Use & Care Guide
Wave-Touch™ Front-Load Gas & Electric Dryer
Guia de Uso y Cuidado
Secadora eléctrica y a gas de carga frontal Wave-Touch
MC
Guide d’utilisation et d’entretien
Sécheuse à gaz et à l’électricité à chargement frontal Wave-Touch
MC
137018100 A (0801)

2
Finding Information
©2008 Electrolux Major Appliances
All rights reserved.
Finding information ......................................................... 2
SAFETY ....... .............................................................. 3-5
Features .......................................................................... 6
Operating Instructions ............................................... 7-29
• GettingStarted ........................................................... 7
• NormalOperatingSounds .......................................... 7
• OperatingYourDryer .............................................8-10
• CycleSelection ....................................................11-16
• DryingTemperature .................................................. 17
• DrynessLevel ........................................................... 18
• DryingTime............................................................... 18
• Options ................................................................19-21
• UserInterfaceFeatures ............................................ 22
• SavingFavorites ..................................................23-24
• SettingPreferences .............................................25-28
• OtherFeatures .......................................................... 29
CycleChart(non-steammodel) ................................... 30
CycleChart(steammodel) ........................................... 31
Care&Cleaning ............................................................ 32
SolutionstoCommonProblems .............................33-34
• CommonDryingProblems ....................................... 33
• ServicePreventionChecklist ...............................34-35
WarrantyInformation .................................................... 36
Please read and save this guide
ThankyouforchoosingElectrolux,thenewpremiumbrandinhomeappliances.ThisUse & Care Guide
ispartofourcommitmenttocustomersatisfactionandproductqualitythroughouttheservicelifeofyour
new appliance.
Weviewyourpurchaseasthebeginningofarelationship.Toensureourabilitytocontinueservingyou,
please use this page to record important product information.
Questions?
Fortoll-freetelephonesupportintheU.S.andCanada:1-877-4ELECTROLUX (1-877-435-3287)
For online support and product information visit http://www.electroluxappliances.com
Table of contents
Purchasedate
Electroluxmodelnumber
Electroluxserialnumber
Keep a record for quick reference
NOTE
RegisteringyourproductwithElectroluxenhances
ourabilitytoserveyou.Youcanregisteronlineat
www.electroluxappliances.comorbydropping
yourProductRegistrationCardinthemail.
3
Safety
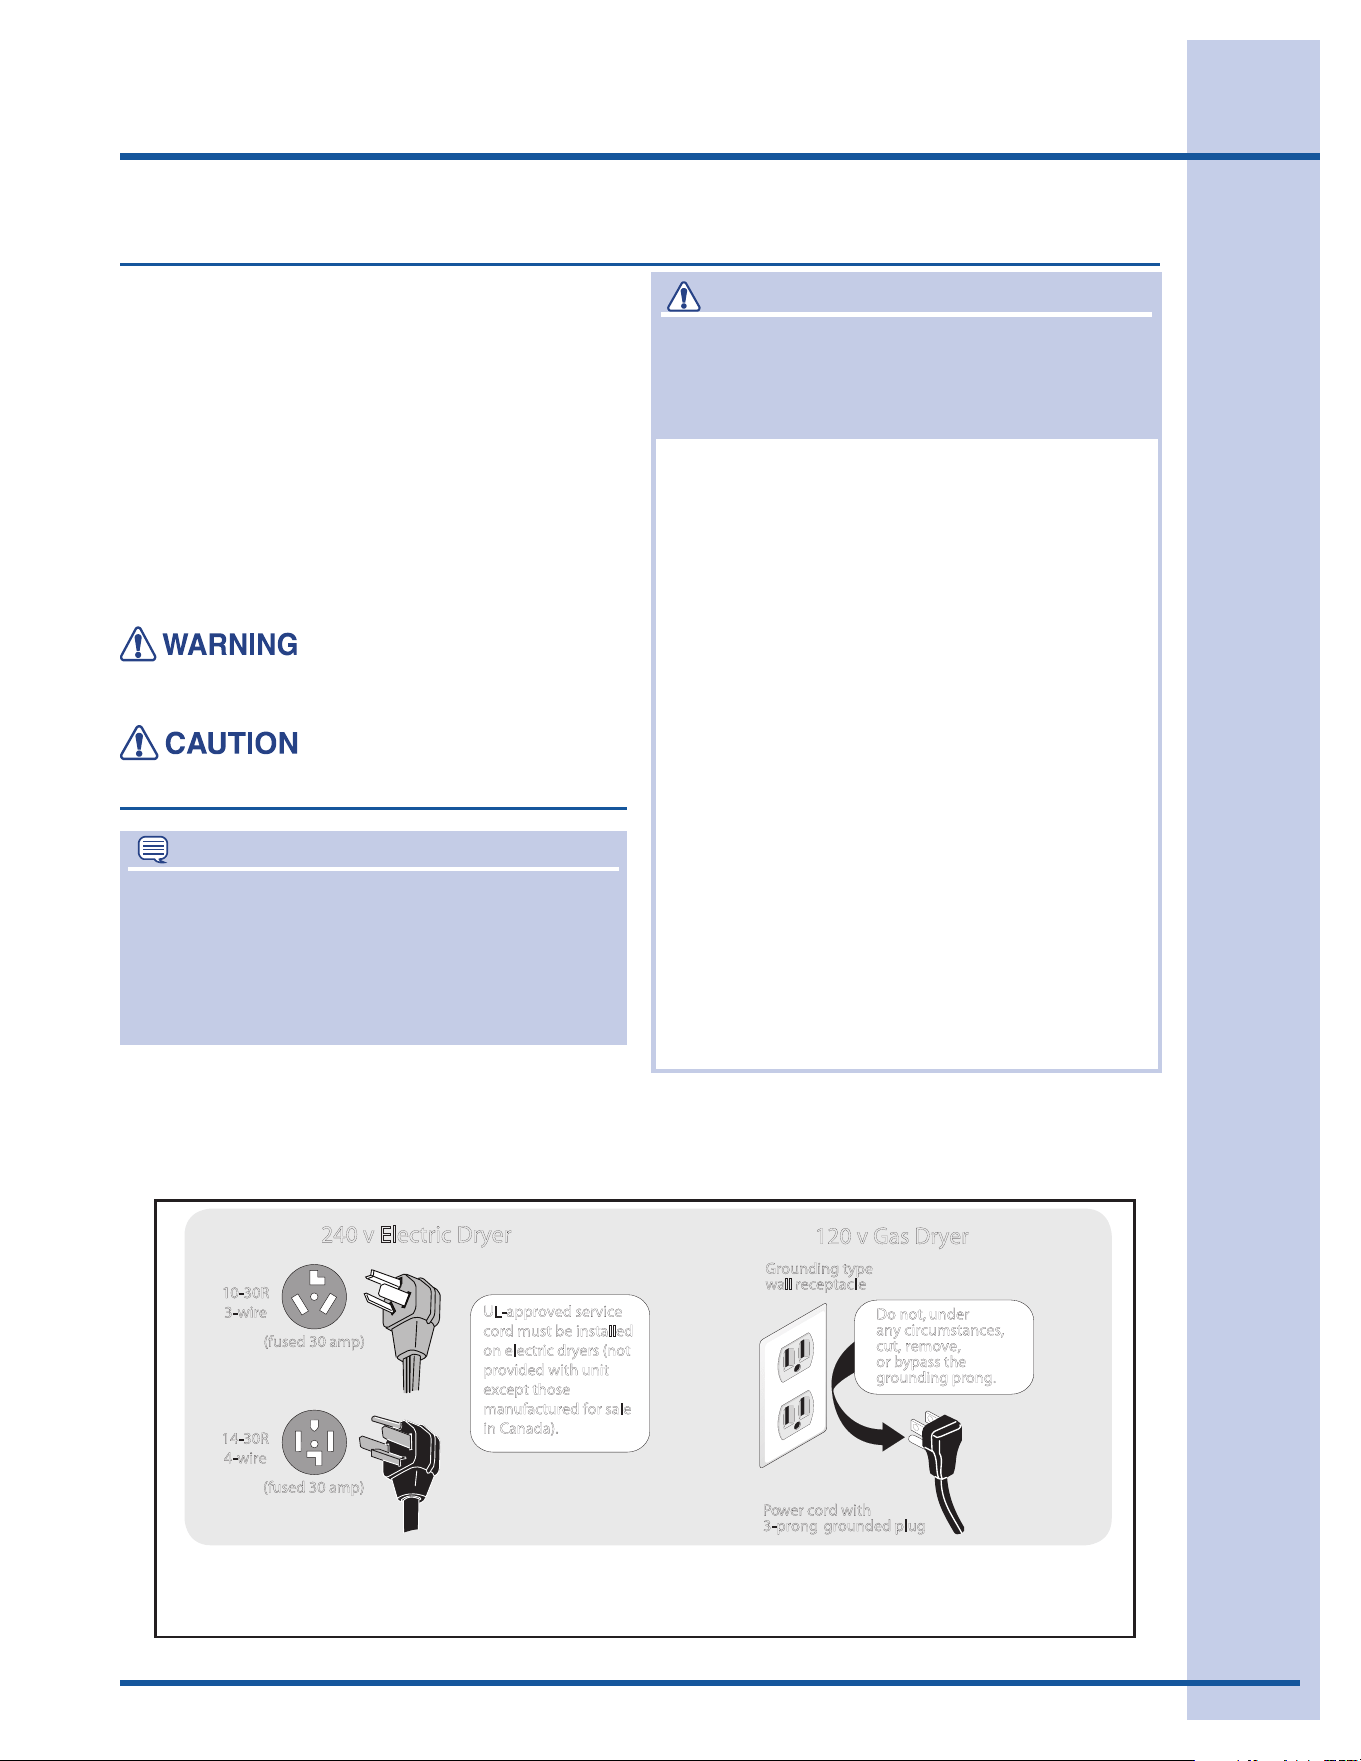
Avoidrehazardorelectricalshock.Donotuseanadaptorplugorextensioncord
or remove grounding prong from electrical power cord. Failure to follow this warning
cancauseseriousinjury,reordeath.
Grounding type
10-30R
3-wire
240 v Electric Dryer
120 v Gas Dryer
14-30R
4-wire
(fused 30 amp)
(fused 30 amp)
wall receptacle
P o wer cord with
3-prong grounded plug
Do not, under
any circumstances,
cut, remove,
or bypass th
UL-approved service
cord must be installed
on electric dryers (not
provided with unit
except those
manufactured for sale
in Canada).
e
grounding prong.
Save these instructions for future reference.
Important Safety Instructions
NOTE
The instructions appearing in this Use and
Care Guidearenotmeanttocoverevery
possibleconditionandsituationthatmayoccur.
Commonsenseandcautionmustbepracticed
wheninstalling,operatingandmaintainingany
appliance.
Recognize safety symbols, words and
labels
Your safety and the safety of others is very
important.
Wehaveprovidedmanyimportantsafety
messages in the Use and Care Guide, Installation
Instructionsandonyourappliance.Alwaysread
andobeyallsafetymessages.
Safetyitemsthroughoutthismanualarelabeled
with a WARNING or CAUTIONbasedontherisk
typeasdescribedbelow:
Thissymbolalertsyoutositua-
tionsthatmaycauseseriousbody
harm,deathorpropertydamage.
Thissymbolalertsyoutositua-
tionsthatmaycausebodilyinjury
orpropertydamage.
WARNING
Foryoursafetythefollowinginformationinthis
manualmustbefollowedtominimizetheriskof
reorexplosionortopreventpropertydamage,
personalinjuryordeath.
Donotstoreorusegasolineorother
ammablevaporsandliquidsinthe
vicinityofthisoranyotherappliance.
WHATTODOIFYOUSMELLGAS:
Donottrytolightanyappliance.•
Donottouchanyelectricalswitch;do•
notuseanyphoneinyourbuilding.
Cleartheroom,buildingorareaofall•
occupants.
Immediatelycallyourgassupplierfrom•
aneighbor’sphone.Followthegas
supplier’sinstructions.
Ifyoucannotreachyourgassupplier,•
call the fire department.
Installationandservicemustbe
performedbyaqualiedinstaller,
serviceagencyorthegassupplier.

4
Safety
PREVENT FIRE
Donotdryitemsthathavebeenpreviously•
cleanedin,soakedin,orspottedwithgasoline,
cleaningsolvents,kerosene,waxes,etc.Donot
storetheseitemsonornearthedryer.These
substancesgiveoffvaporsthatcouldigniteor
explode.
Donotplaceitemsexposedtocookingoilsin•
yourdryer.Itemscontaminatedwithcookingoils
maycontributetoachemicalreactionthatcould
cause a load to catch fire.
Donotdryarticlescontainingrubber,plastic•
orsimilarmaterialssuchasbras,galoshes,
bathmats,rugs,bibs,babypants,plasticbags
andpillowsthatmaymeltorburn.Somerub-
bermaterials,whenheated,canundercertain
circumstancesproducerebyspontaneous
combustion.
Cleanthelintscreenbeforeoraftereachload.•
Theinteriorofthedryer,lintscreenhousingand
exhaustductshouldbecleanedapproximately
every18monthsbyqualiedservicepersonnel.
Anexcessiveamountoflintbuild-upinthesear-
eascouldresultininefcientdryingandpossible
re.SeeCareandCleaning.
Donotobstructtheowofventilatingair.Donot•
stackorplacelaundryorthrowrugsagainstthe
frontorbackofthedryer.
Donotsprayanytypeofaerosolinto,onornear•
dryeratanytime.
Donotusefabricsoftenersorproductstoelimi-•
natestaticunlessrecommendedbythemanu-
facturerofthefabricsoftenerorproduct.
Failuretocomplywiththesewarningscould•
resultinre,explosion,seriousbodilyinjuryand/
ordamagetotherubberorplasticpartsofthe
dryer.
PROTECT CHILDREN
Donotallowchildrentoplayonorinthedryer.•
Closesupervisionofchildrenisnecessarywhen
thedryerisusednearchildren.Aschildrengrow,
teach them the proper, safe use of all appliances.
Destroythecarton,plasticbagandotherpack-•
ingmaterialsafterthedryerisunpacked.Chil-
drenmightusethemforplay.Cartonscovered
withrugs,bedspreadsorplasticsheetscan
becomeairtightchambers.
Keeplaundryproductsoutofchildren’sreach.•
Topreventpersonalinjury,observeallwarnings
onproductlabels.
Beforethedryerisremovedfromserviceor•
discarded,removethedryerdoortopreventac-
cidental entrapment.
Failuretocomplywiththesewarningscould•
result in serious personal injuries.
WARNING
FIREHAZARD
Aclothesdryerproducescombustiblelint.
Thedryermustbeconnectedtoanoutdoors
exhaust.Regularlyinspecttheoutdoorexhaust
openingandremoveanyaccumulationoflint
around the opening and in the surrounding area.
WARNING
Toreducetheriskofre,electricalshock,orinjurytopersonswhenusingthisdryer,comply
withthebasicwarningslistedbelow.Failuretocomplywiththesewarningscouldresultin
serious personal injuries.
Youcanbekilledorseriouslyinjuredifyoudon’tfollowtheseImportantSafetyInstructions:
Donotoperatethedryerifthelintscreenis•
blocked,damagedormissing.Firehazard,over-
heatinganddamagetofabricscanoccur.

5
Safety
PREVENT INJURY
Topreventshockhazardandassurestability•
duringoperation,thedryermustbeinstalled
andelectricallygroundedbyaqualiedservice
person in accordance with local codes. Installa-
tioninstructionsarepackedinthedryerforthe
installer’sreference.RefertoINSTALLATION
INSTRUCTIONS for detailed grounding proce-
dures.Ifthedryerismovedtoanewlocation,
haveitcheckedandreinstalledbyaqualied
service person.
Topreventpersonalinjuryordamagetothe•
dryer,theelectricalpowercordofagasdryer
mustbepluggedintoaproperlygroundedand
polarized 3-prong outlet. The third grounding
prongmustneverberemoved.Neverground
thedryertoagaspipe.Donotuseanextension
cord or an adaptor plug.
ALWAYSdisconnectthedryerfromtheelectrical•
supplybeforeattemptinganyserviceorclean-
ing.Failuretodosocanresultinelectricalshock
orinjury.
Donotuseanytypespraycleanserwhenclean-•
ingdryerinterior.Hazardousfumesorelectrical
shockcouldoccur.
Topreventinjury,donotreachintothedryer•
ifthedrumismoving.Waituntilthedryerhas
stoppedcompletelybeforereachingintothe
drum.
PREVENT INJURY AND DAMAGE TO THE
DRYER
Allrepairsandservicingmustbeperformedby•
anauthorizedservicerunlessspecicallyrec-
ommended in this Use & Care Guide.Useonly
authorizedfactoryparts.
Donottamperwithcontrols.•
Donotinstallorstorethedryerwhereitwillbe•
exposed to the weather.
Athermallimiterswitchautomaticallyturnsoff•
themotorintheunlikelyeventofanoverheated
situation(electricdryersonly).Aservicetechni-
cian must replace the thermal limiter switch after
correcting the fault.
Failuretocomplywiththesewarningscould•
result in serious personal injuries.
Important Safety Instructions, con’t
6
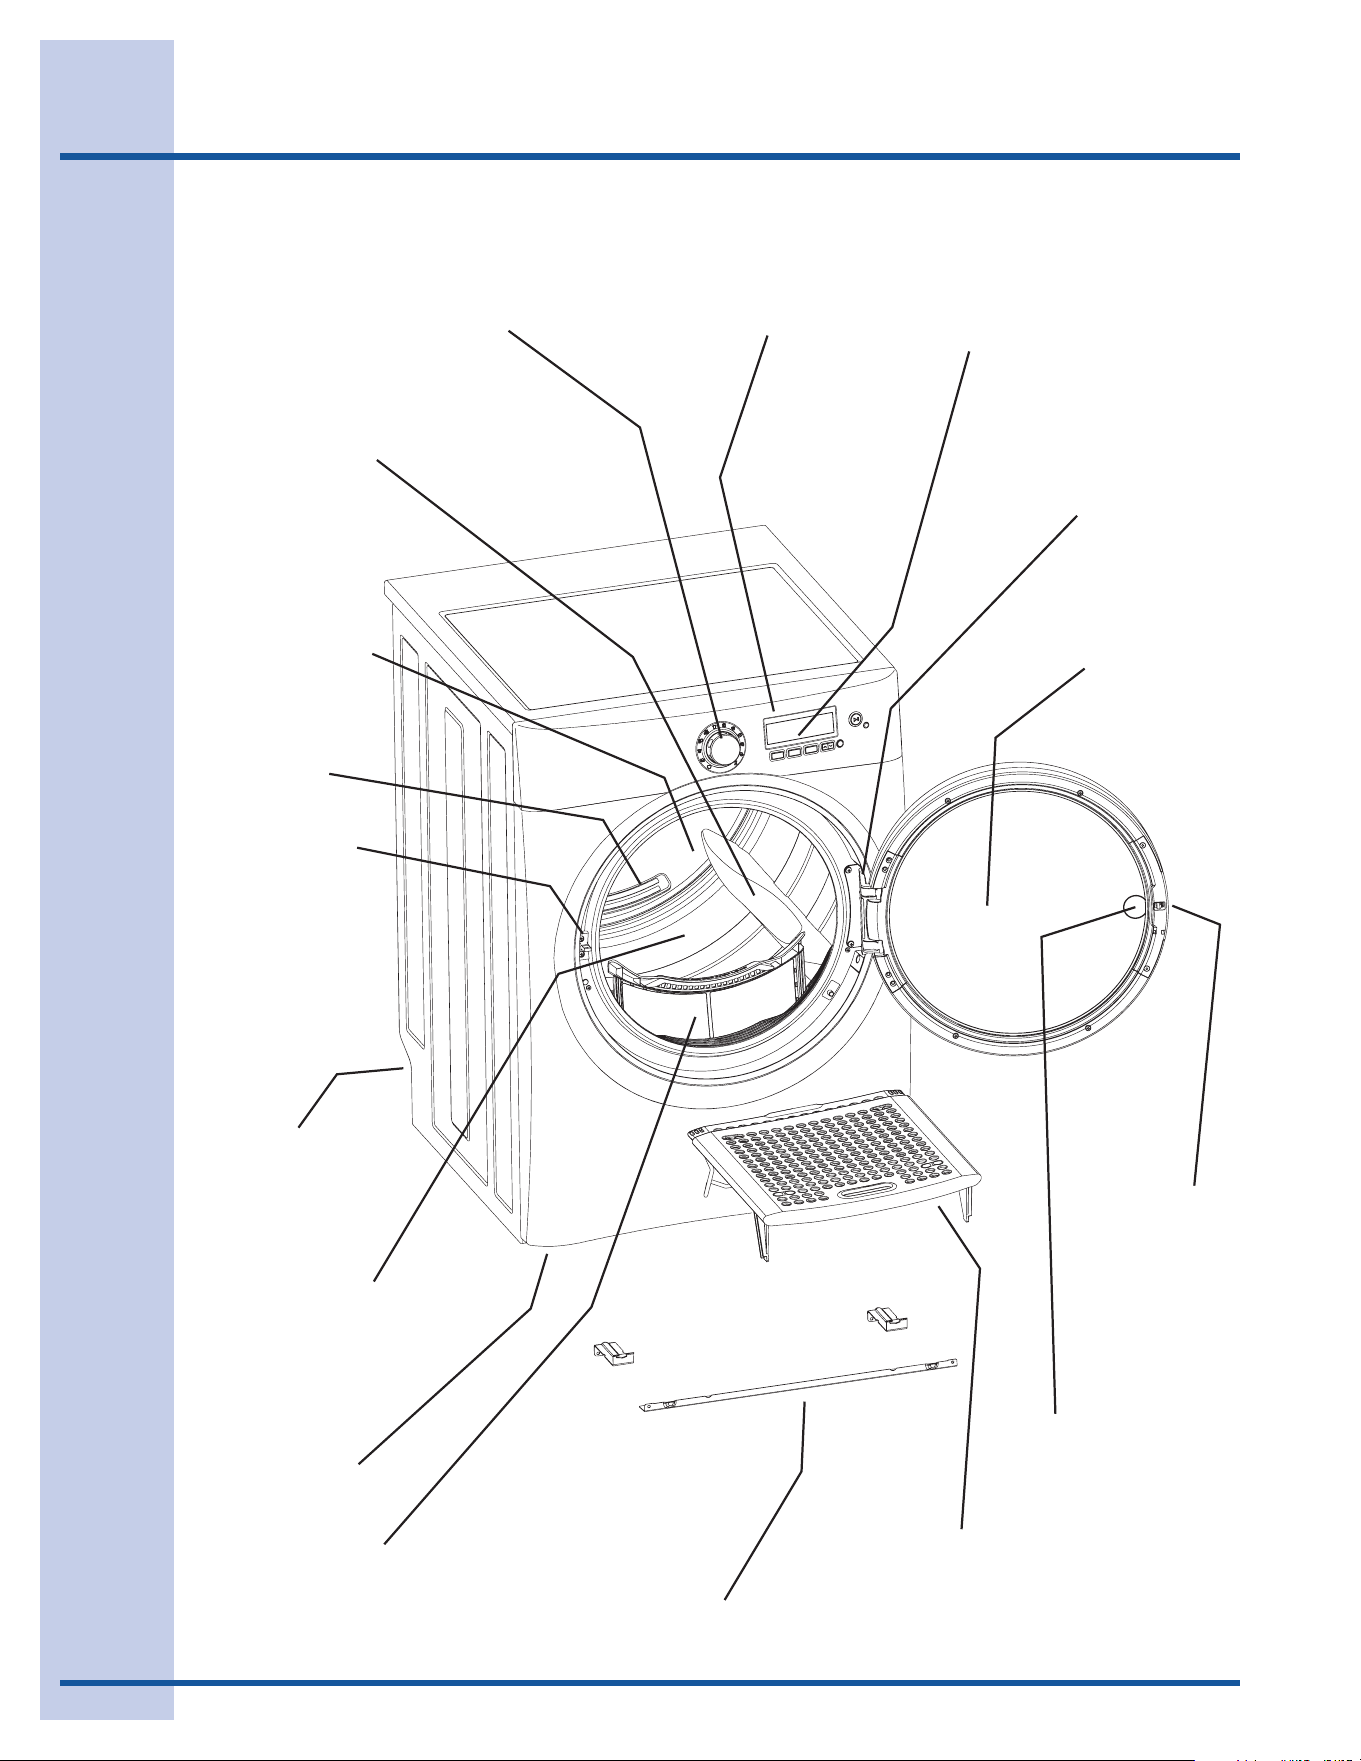
Features
Multi-language
LCD Interface
Control Lock
Theater-Style,
Luxury-Lighting™
System
Exhaust Channel
Outlet
Collapsible
Drying Rack
Reversible,
Touch-2-Open™
Door System
Touch-2-Open™
Door Latch
Touch-2-Open™
Latch Indicator
Touch-2-Open™
Cycle Selector
Door Strike
3 Drum Vanes
(2 tumbling)
(1 mixing)
Lint Filter
Large Surface
Moisture Sensor
Adjustable
Leveling Legs
Stacking Kit for Mounting
on Matching Washer
Dual Stage,
Wide-Angle
Door Hinge
Reversing-Action,
Perfect Tumble™
Drying System
7
Operating Instructions
Getting Started
Normal Operating Sounds
Checkandcleanthelintlter.(Seepage8.)1.
Loadthedryer.(Seepage8.)2.
Selectthedesiredcycle.(Seepage9,pages3.
11-14andpage29.)
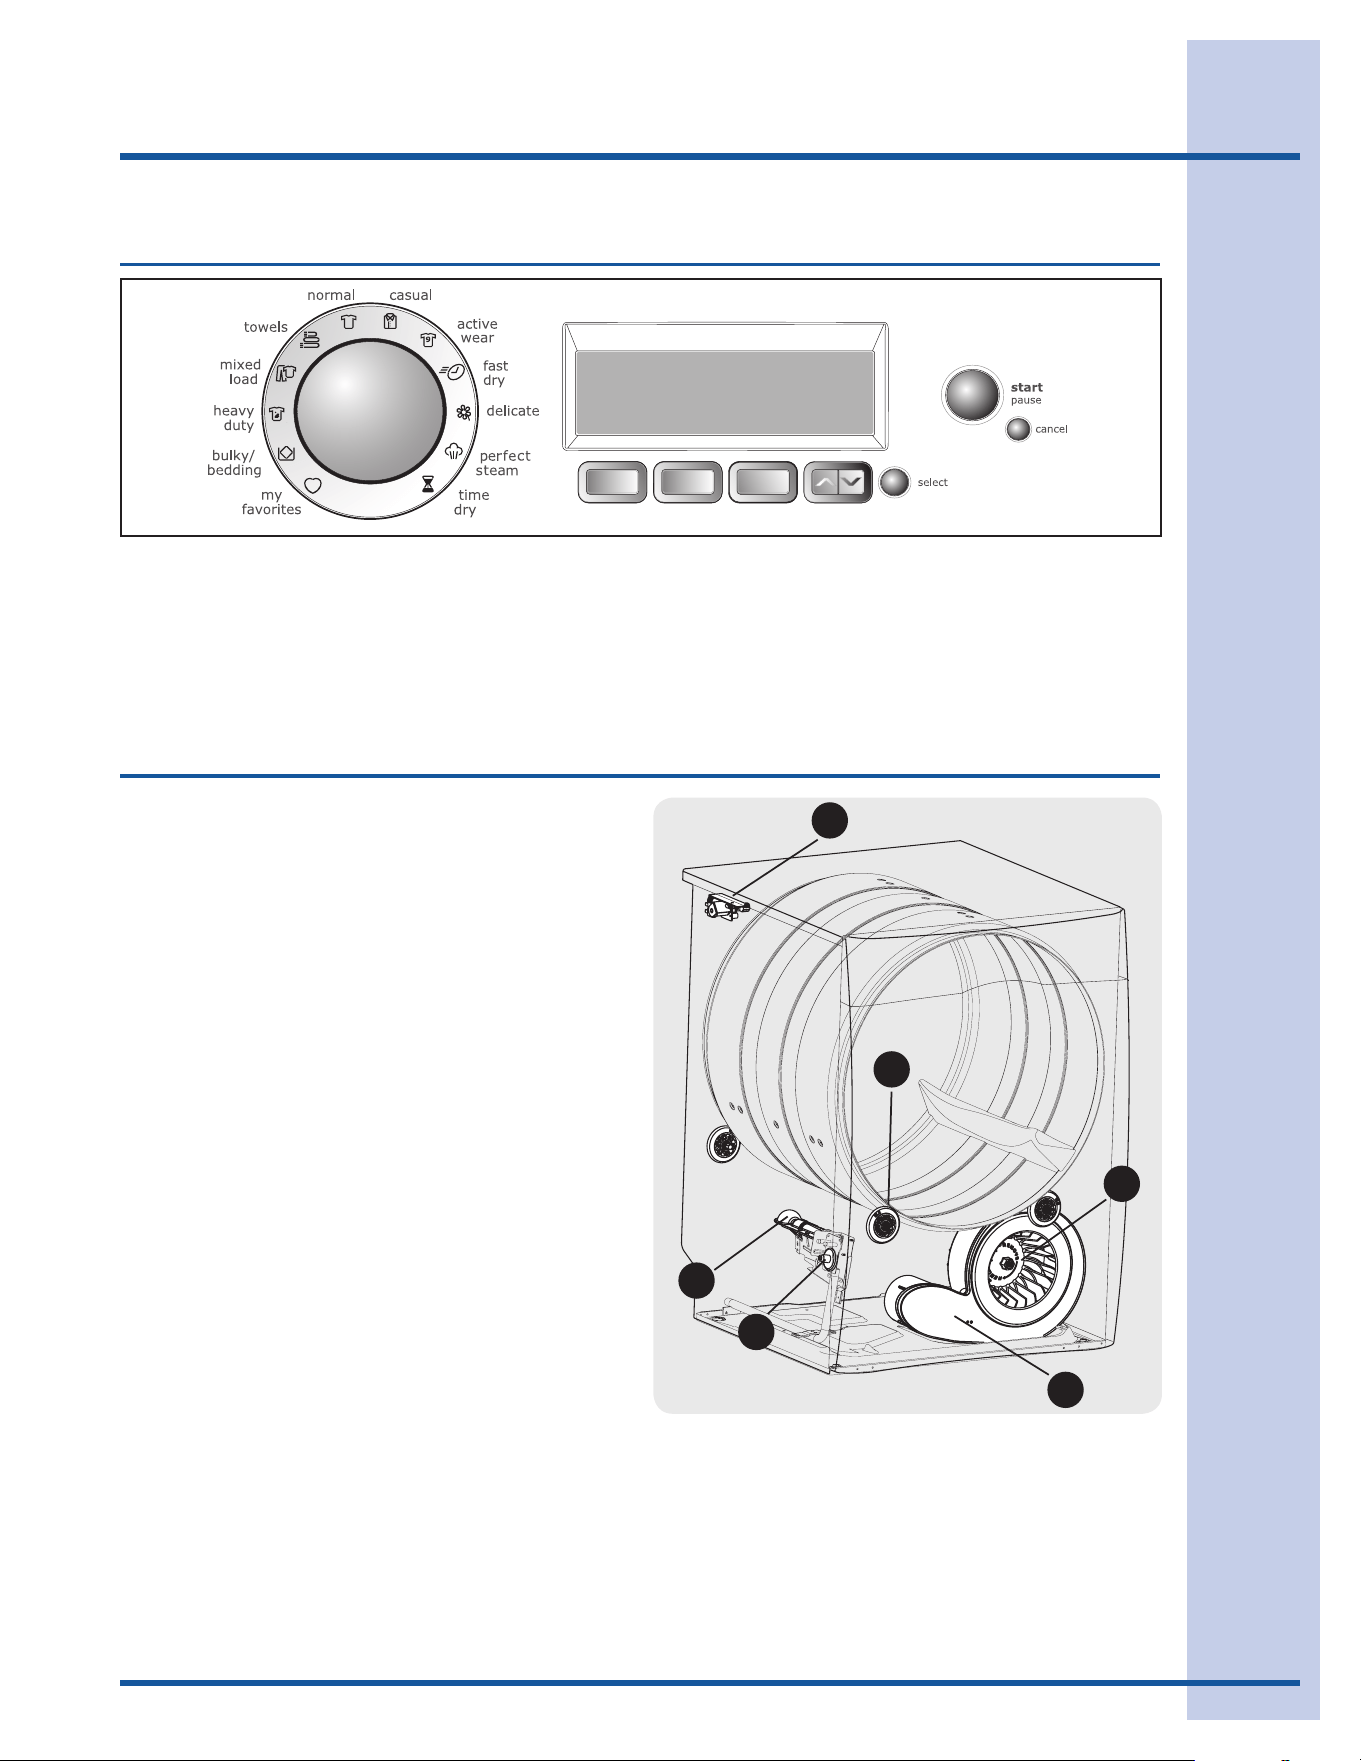
To operate your dryer, follow these basic steps:
B
C
D
F
E
A
Selectdesiredsettingsandoptions.(Seepage4.
9,page17,page18,andpages19-20.)
Startthedryer.(Seepage10.)5.
Youmayormaynothearthefollowingsounds
fromyournewdryer:
A. WATER VALVE(Steammodelsonly.)Theowof
wateriscontrolledbyelectricsolenoids.During
operationtheremaybeaclickingsoundasthe
valve opens and closes to control the water flow.
B. SUSPENSION ROLLERSThedryerdrum
issupportedbyasetofsuspensionrollers.
Attimestheremaybeathumpingorrolling
soundwhenthedryerstarts.Thismayhappen
ifthedryerhasnotbeeninuseforaperiodof
time,orafteraheavyloadhasremainedinthe
dryerdrumforanextendedperiod,creating
atemporaryatspotontheedgeofthe
roller.Thenoiseshoulddissipateasthedryer
operates and the flat spots smooth out.
C.PERFECT TUMBLE™ When the reversing-
action option of perfect tumble™ is selected,
youwillheartheintermittentsoundofthedryer
stopping,momentarilypausing,thenrestartingin
the opposite direction.
D.AIR FLOW SYSTEMYourdryerisequipped
withahighvolumeairhandlingsystem.In
someinstallationstheremaybesomesounds
associated with air movement throughout
thedryer,includingtheairduct,blower,and
exhaustsystem.Thisisnormalandcanvary
withloadsizeandtype.
E. GAS VALVE(Gasmodelsonly.)Theowofgasis
controlledbyelectricsolenoids.Duringoperation
theremaybeaclickingsoundasthevalveopens
and closes to control the gas flow.
F. GAS BURNER(Gasmodelsonly.)Whenthe
burnerisoperating,theremaybesounds
generated as the air flow mixes with the gas
ame.Thisnoiseisnormalandwillonlyoccur
whenthegasisignitedinthecombustiontube.
8
Operating Instructions
BEFORE USING YOUR DRYER
Read the important instructions in this section of the
Use and Care Guidebeforeoperatingyourdryer.
OPERATING YOUR DRYER
Prepare load for drying.1.
Dryitemsofsimilarfabric,weightandcon-
struction in the same load.
Separatedarkitemsfromlight-coloreditems.
Separate items that shed lint from those that
attract lint.
Checkforstainswhichmaynothavebeen
removed in washing. Repeat stain removal
processandwashagainbeforedrying.Dryer
heatmaypermanentlysetsomestains.
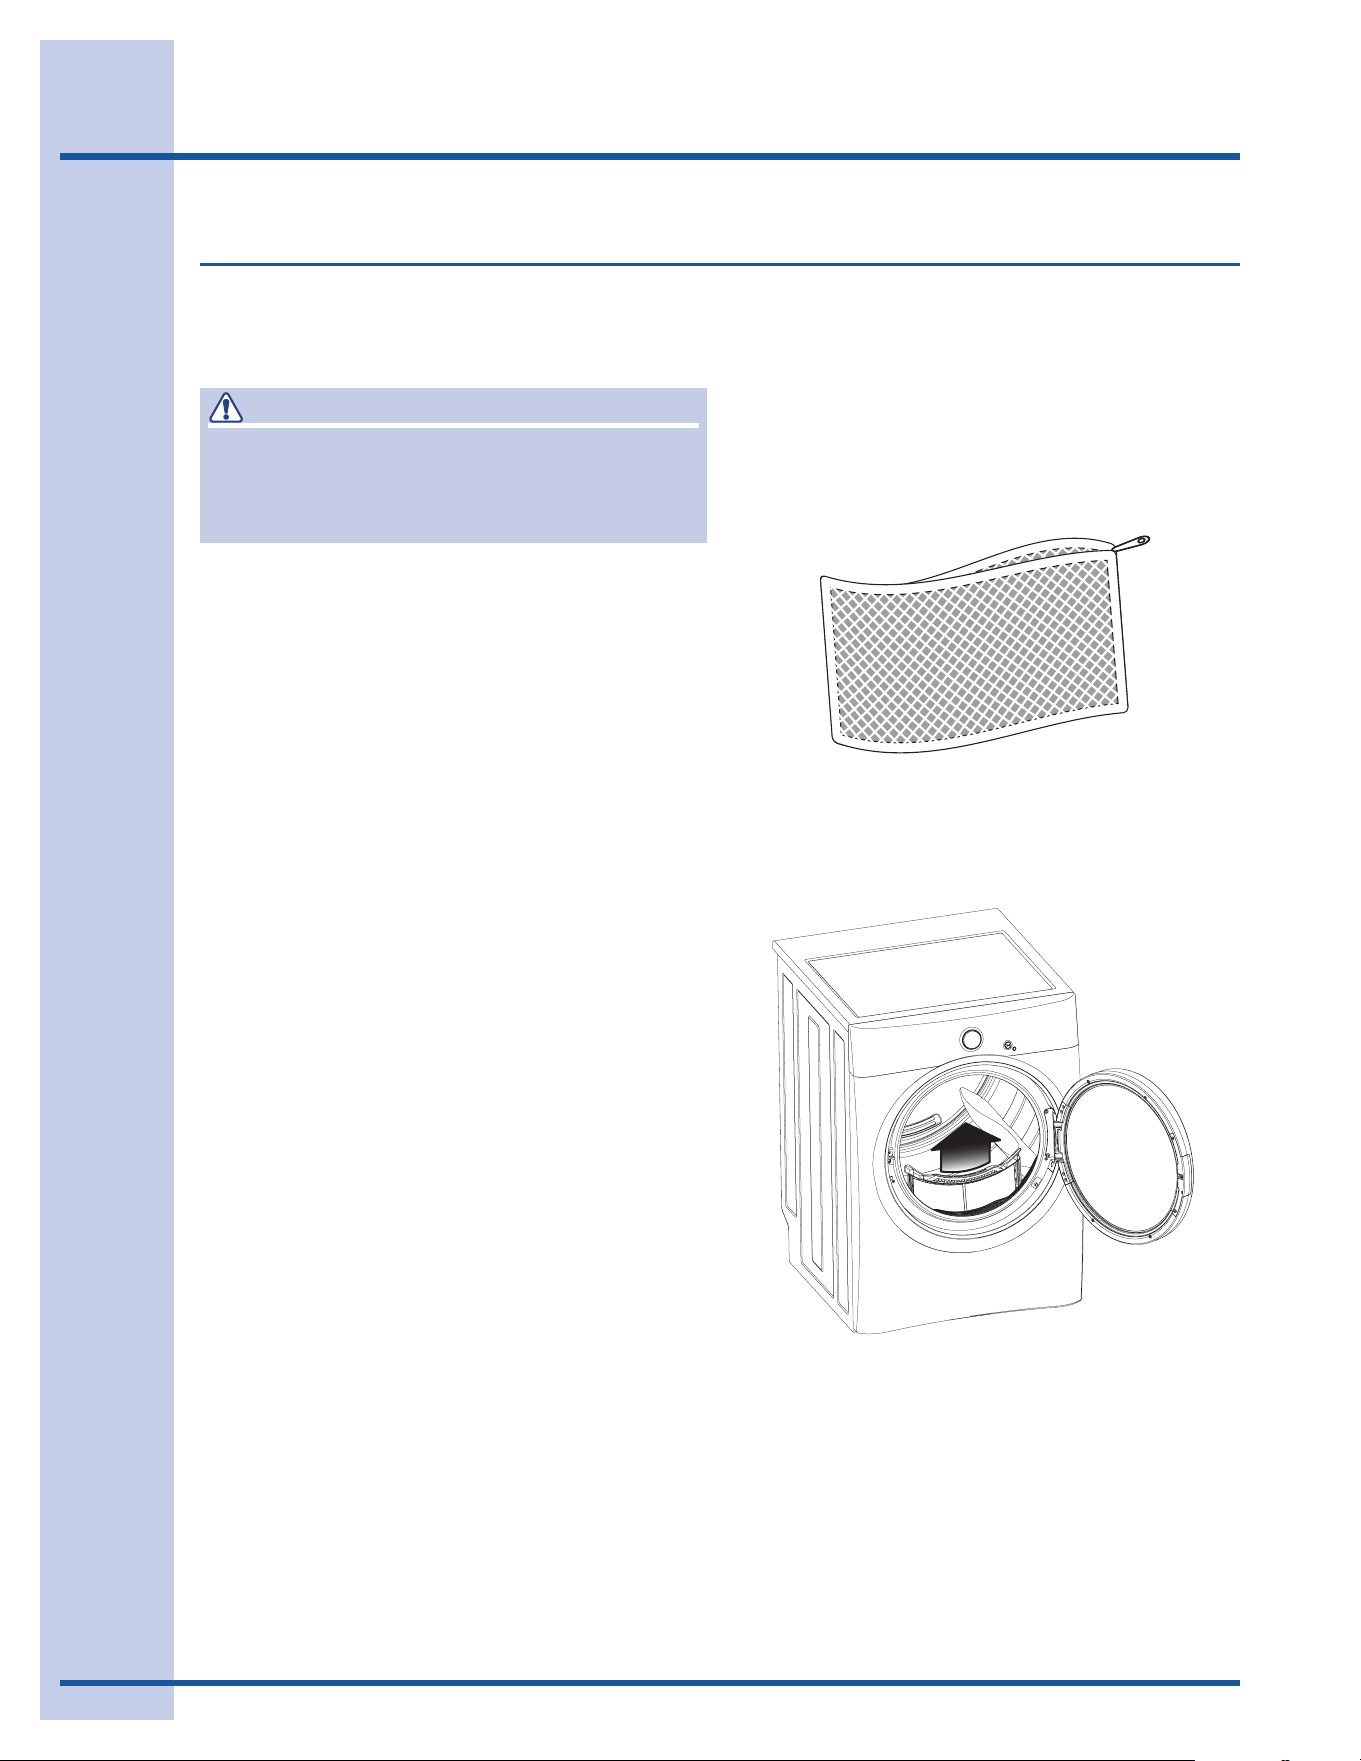
Placedelicateorsmallitemsinameshbag.
Besurebuckles,buttonsandtrimareheat-
proofandwon’tdamagethedrumnish.Close
zippers;fastenhooksandVelcro
®
-likefasten-
ers. Tie strings and sashes to prevent snag-
ging and tangling.
2. Check that the lint filter is clean and
in place.
Acleanlintlterallowsthedryertooperate
moreefciently.
3. Load the dryer and close the door.
Loaditemsloosely.Theaveragewetloadwill
llthedrum1/3to1/2full.Itemsneedroomto
tumblefreelyforevendryingandlesswrinkling.
Ifdesired,placeadryerfabricsoftenersheet
ontopoftheloadatthebeginningofthe
cycle.
Tosaveenergyandtimeandavoiduneven
dryingandwrinkling,donotoverloadthedryer.
Whendryinglargeitems,dryonlytwoorthree
items at a time. Fill out the load with small and
medium sized items.
Fordelicateorverysmallloads,addtwoor
threesimilaritemstoimprovetumblingaction.
Operating Your Dryer
WARNING
Toreducetheriskofre,electricshockorinjury
topersons,readtheIMPORTANTSAFETY
INSTRUCTIONSinthisUseandCareGuide
beforeoperatingyourdryer.
(Meshbagnotincluded.)
9
TEMPERATURE
EXTENDEDTUMBLE
OPTIONSSCROLL&SELECT
DRYINGTIMEor
DRYNESSLEVEL
Operating Instructions
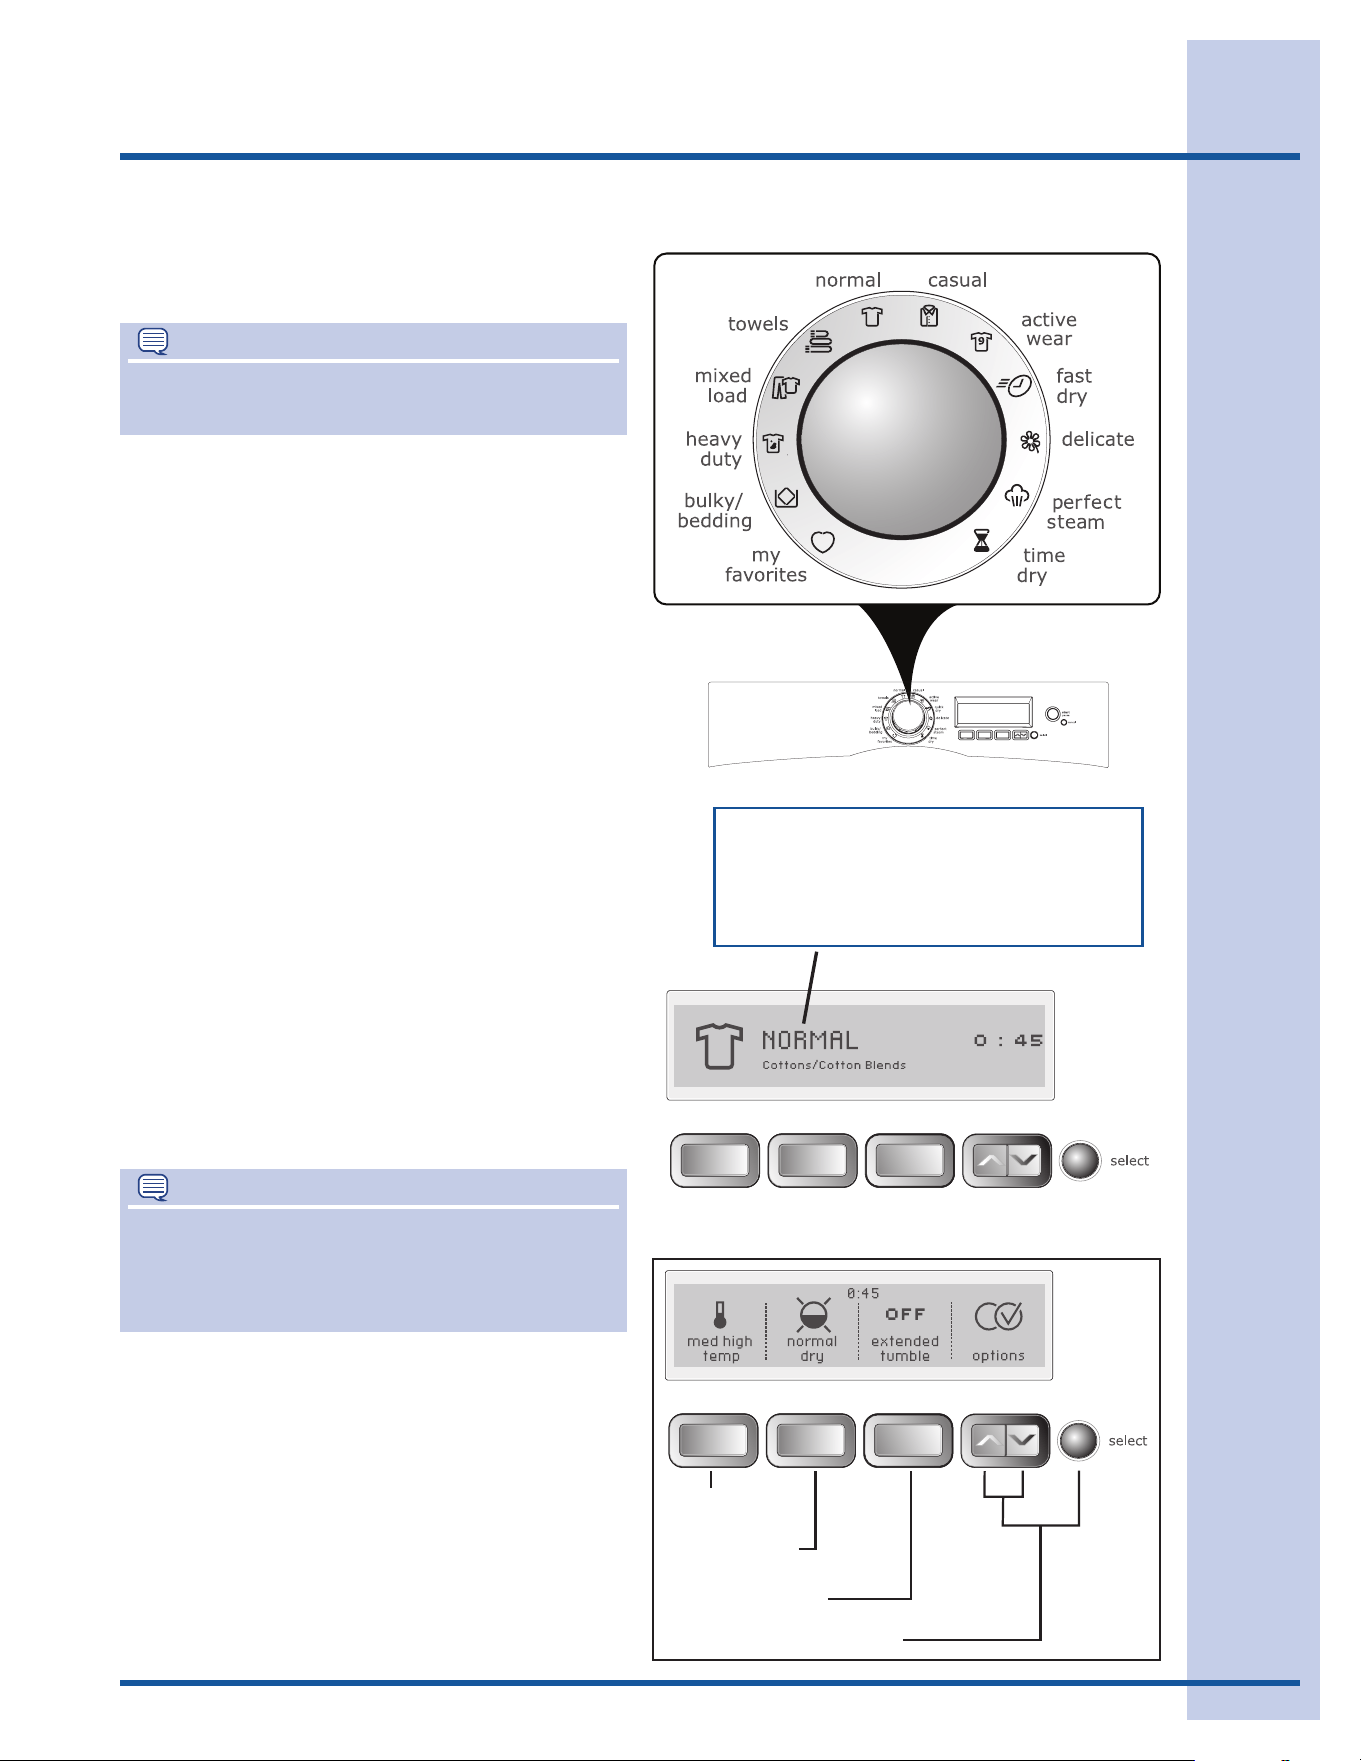
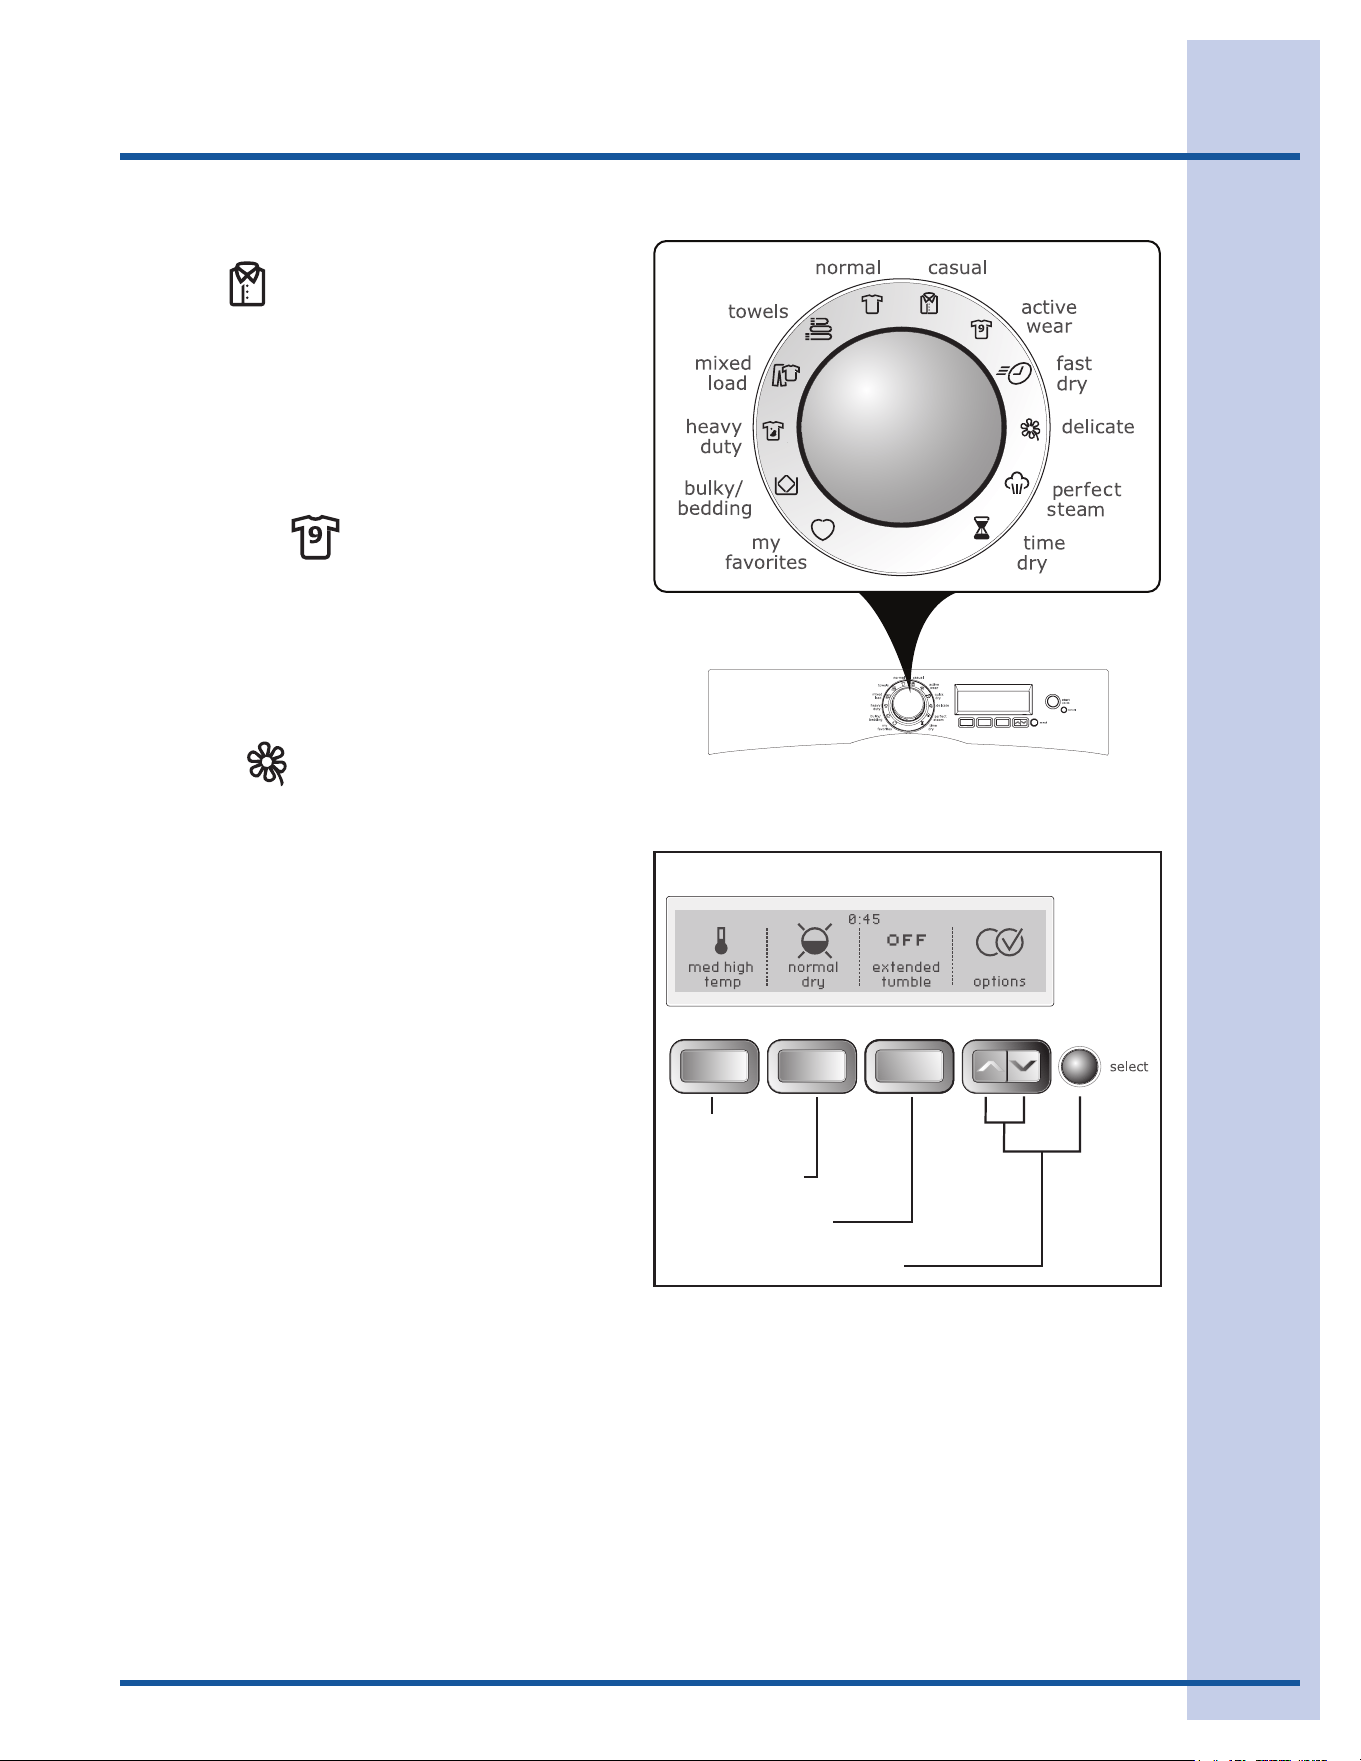
4. Select the appropriate cycle and
settings for each load.
Turnthecycleselectorknobineitherdirec-
tiontoselectthecycledesired.Theiconfor
thatcyclewillbeilluminatedandifthecycle
descriptionfeatureisturnedon,thecycleand
estimatedcycletimearedisplayedontheUser
Interfacescreenfor5seconds.Pressanykey
toadvancetheUserInterfacetoselectset-
tingsandoptions.Seethe“CycleSelection”
section in this guide for descriptions of each
cycle.
Ifnobuttonsarepressed,theUserInterface
screenwillautomaticallyadvanceafter 5 sec-
ondsanddisplaythepresetdryingtempera-
ture,drynesslevel(AutoDry)ordryingtime
(TimeDry),extendedtumbletime,andoptions
forthecycleselectedwillbedisplayed.See
the“CycleSettingsChart”inthisguideforset-
tingsavailableforeachcycle.
To change the settings, press the temp, dry-
ness level(AutoDry)ordrying time(TimeDry)
and extended tumblebuttonstoscrolltothe
desiredsettings.Pressthescrolluporscroll
downbuttonsunderoptions to scroll through
the optionsmenu.Presstheselectbuttonto
add or delete options.Theestimatedcycle
timewillbedisplayedatthetopofthescreens.
NOTE
Overdryingcancausewrinkles,shrinkage,lint,
harshnessandabuildupofstaticelectricity.
Adjustmentsmadetoacyclewillberemem-
beredandrecalledeachtimethatcycleis
selected in the future.
Toreturntothefactorydefaultsettings,select
RESET in set prefs under the options scroll
buttons.
Tocustomizeandsaveupto3cyclesinnon-
custommodeplus9morecyclesforcustom
users, see save as favorite and CUSTOM
MODEintheUserInterfacesectionsofthis
guide.
OPERATING YOUR DRYER, con’t
NOTE
Toprovidethebestcareofyourlaundry,not
everysettingoroptionisavailablewithevery
cycle.Ifasettingisnotavailableforthecycle
selected,itwillnotbedisplayed.
AstheCycleSelectorknobisturned,the
cycleandestimatedcycletimearedisplayed
ontheUserInterfacescreenfor5seconds.
PressanykeytoadvancetheUserInterface
and select settings and options.
10
Operating Instructions
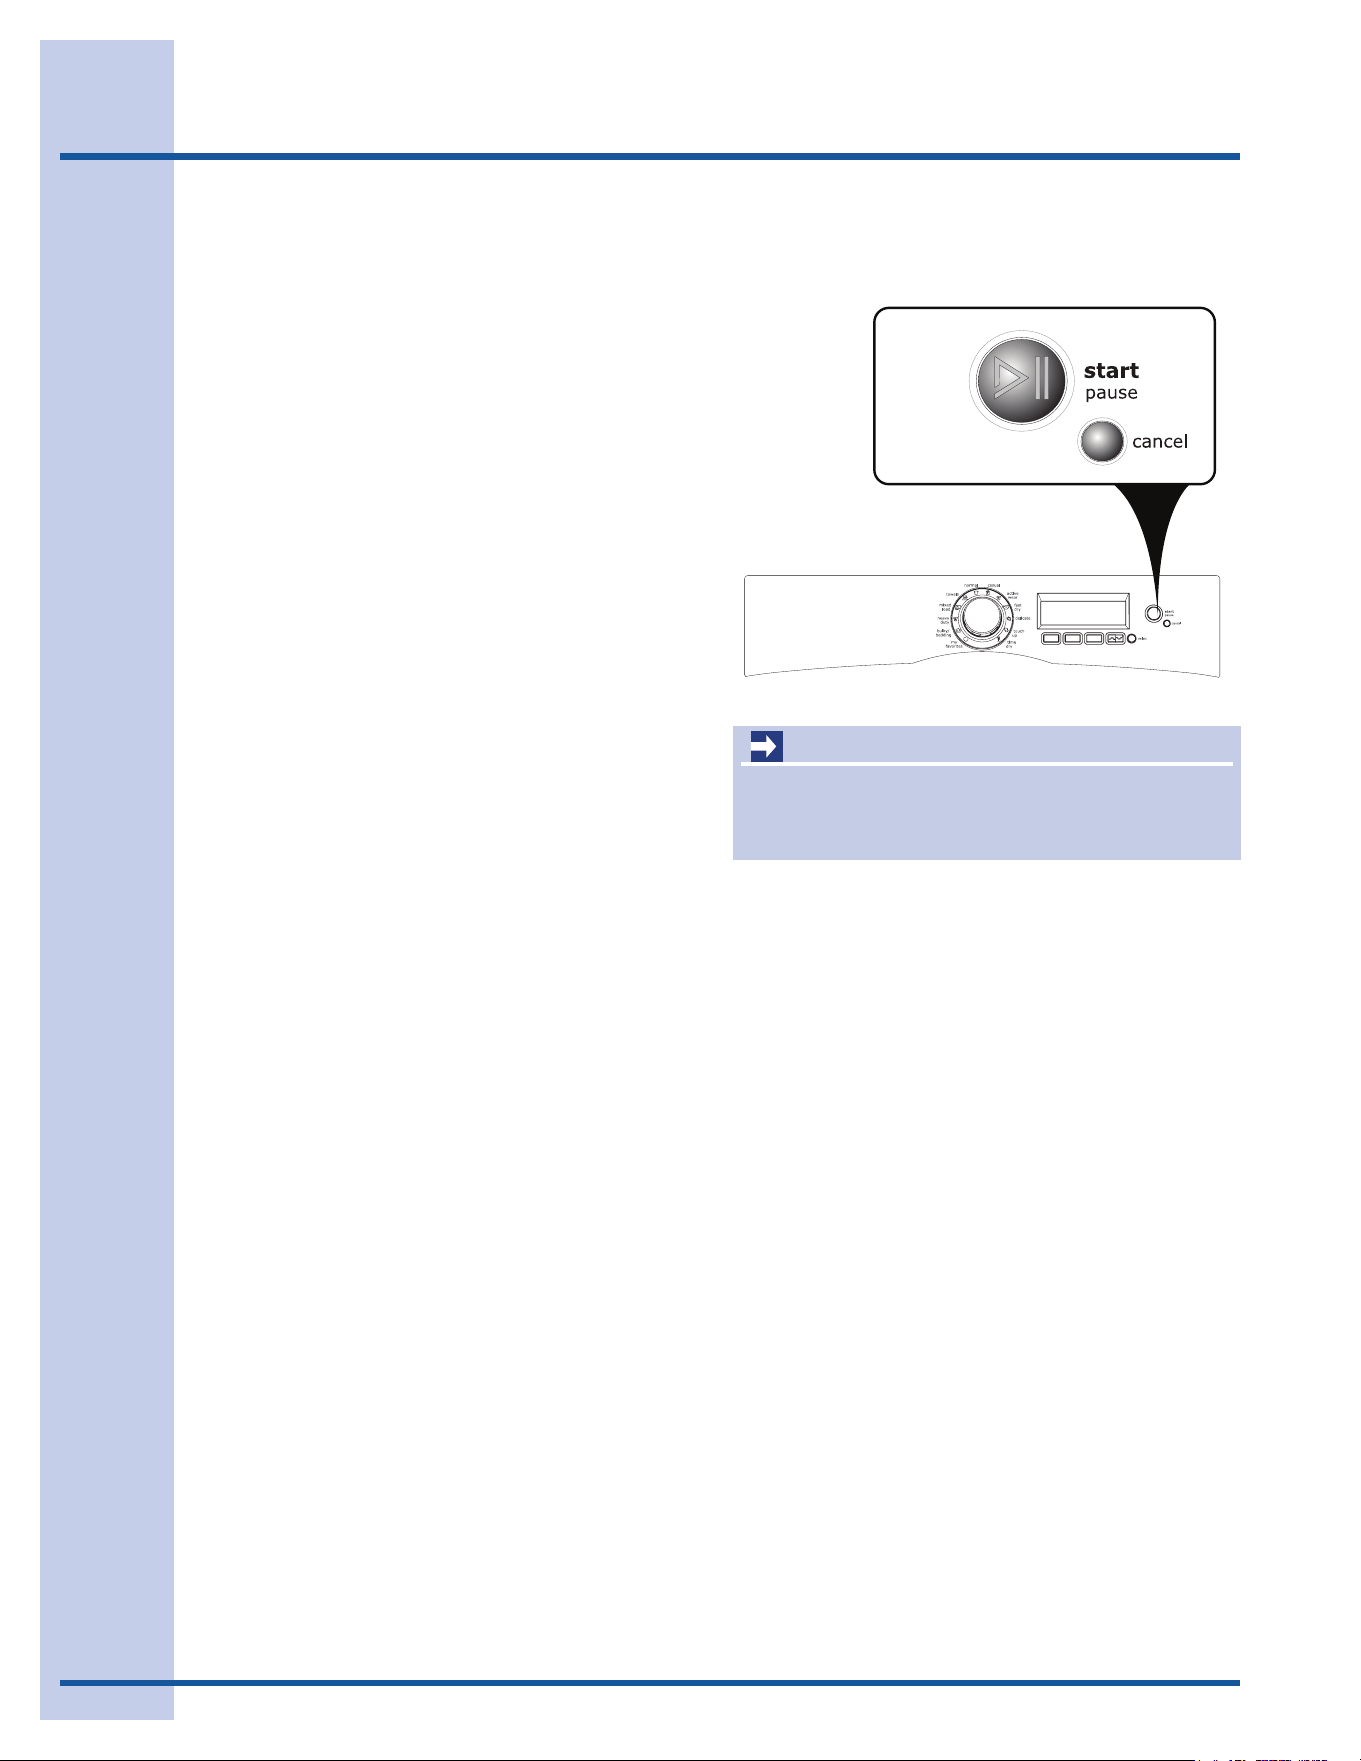
5. Start the cycle.
Closethedoorandpressstarttobeginthe
cycle.Thedryerwillnotoperatewiththedoor
open.Tointerruptthecycle,presspause or
simplyopenthedoor.Pressstart again to re-
sumethecycle.Presscanceltostopthecycle.
Tochangethecycleoncethecyclehasbegun,
press cancel,selectanewcycle,andrestart
thedryer
To change the temperature, dryness level or
drying time, extended tumble time or options
oncethecyclehasbegun,presspause,make
thenewselectionsandrestartdryer.
Asignalwillsoundattheendofthecycle,
periodicallyduringextended tumble and
wrinkle release, when the damp alert option
isselectedandtonotifyyouthattheloadhas
finished.
Whenthecycleends,COMPLETEwillbe
displayedandthedrumlightwillcomeon.
Removetheitemspromptlyandhangorfold.
OPERATING YOUR DRYER, con’t
IMPORTANT
Cleanthelintlteraftereveryload.CLEAN
FILTER
willbedisplayedattheendofthecycle
toremindyoutoremovelintfromthelter.
11
Operating Instructions
Cycle Selection
Turnthecycleselectorineitherdirectiontothe
cycledesired.Theiconforthatcyclewillbeillumi-
nated.Pressonthecycleselectorknobtoextend
it or return it flush to the console.
Tochangethecycleonceithasbegun,pressthe
cancelbuttonbeforeselectinganewcycle.Just
turningthecycleselectorknobtoanotherselec-
tionwillnotchangethecycle.
AUTO DRY CYCLES
AutoDrycyclestaketheguessworkoutofselect-
ingthecorrectdryingtimeforeachload.Moisture
sensingbarsatthebackofthedryerdrumsense
themoistureleveloftheloadasittumblesthrough
theheatedair.WithAutoDrycycles,theloadwill
automaticallybedriedattheselectedtemperature
tothedesireddrynesslevel.
AutoDrycyclessavetimeandenergyandprotect
fabrics.Whentheloadhasreachedtheselected
drynesslevel,itwillcontinuetotumble,unheated,
during a cool down period. This helps reduce
wrinklingandmakesitemseasiertohandleduring
unloading.
Dryingtimevariesdependingonsizeanddamp-
nessofloadandfabrictype.Iftheloadistoosmall
oralmostdry,themoisturesensingbarsmaynot
detectenoughmoisturetocontinuethecycleand
thecyclemayendafterafewminutes.Ifthisoc-
curs, then select the time drycycletodrysuch
loads.
Roomtemperatureandhumidity,typeofinstalla-
tion and electrical voltage or gas pressure can also
affectdryingtime.
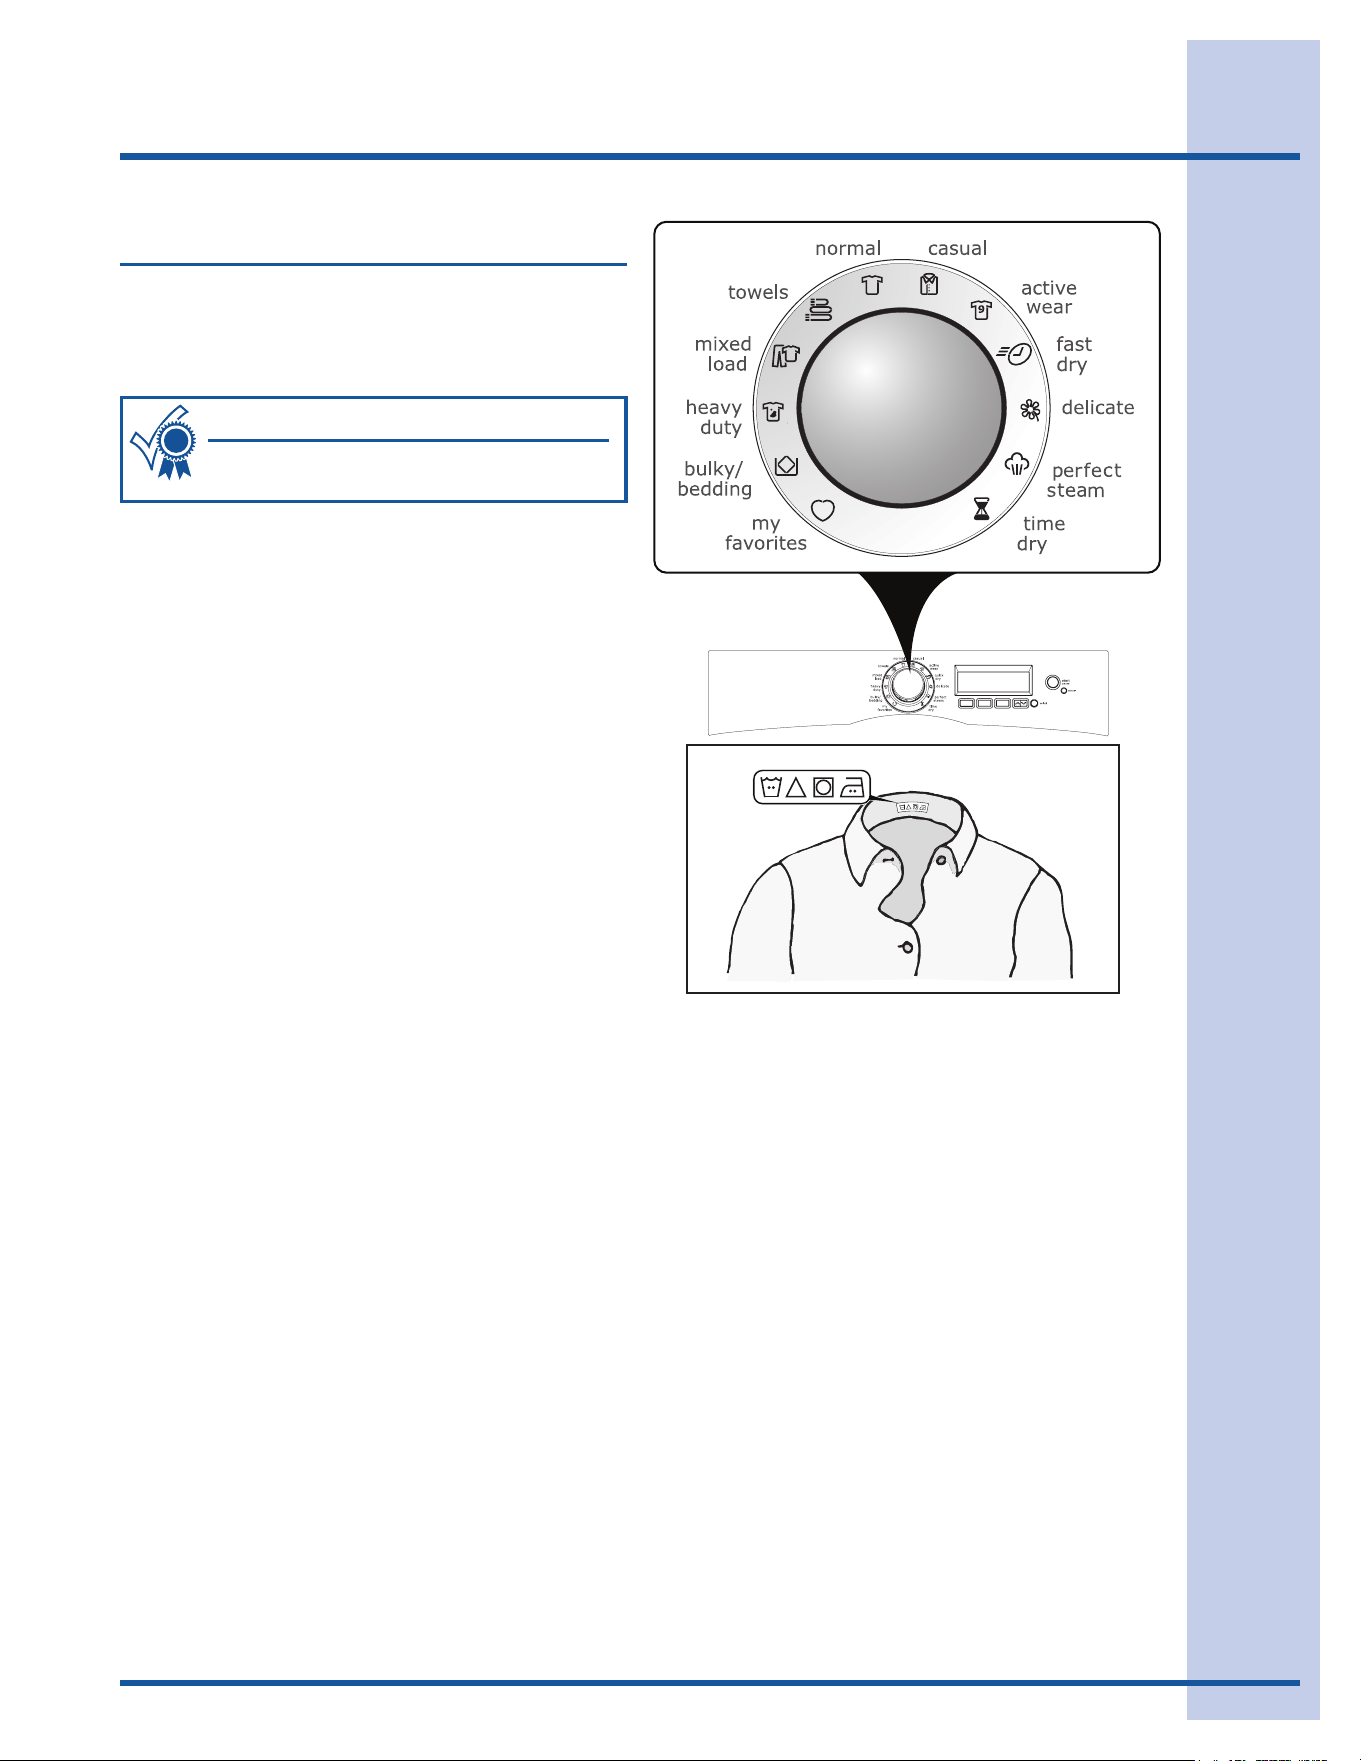
Followthefabriccarelabelinstructions
onitemstobedried.
For best results
12
Operating Instructions
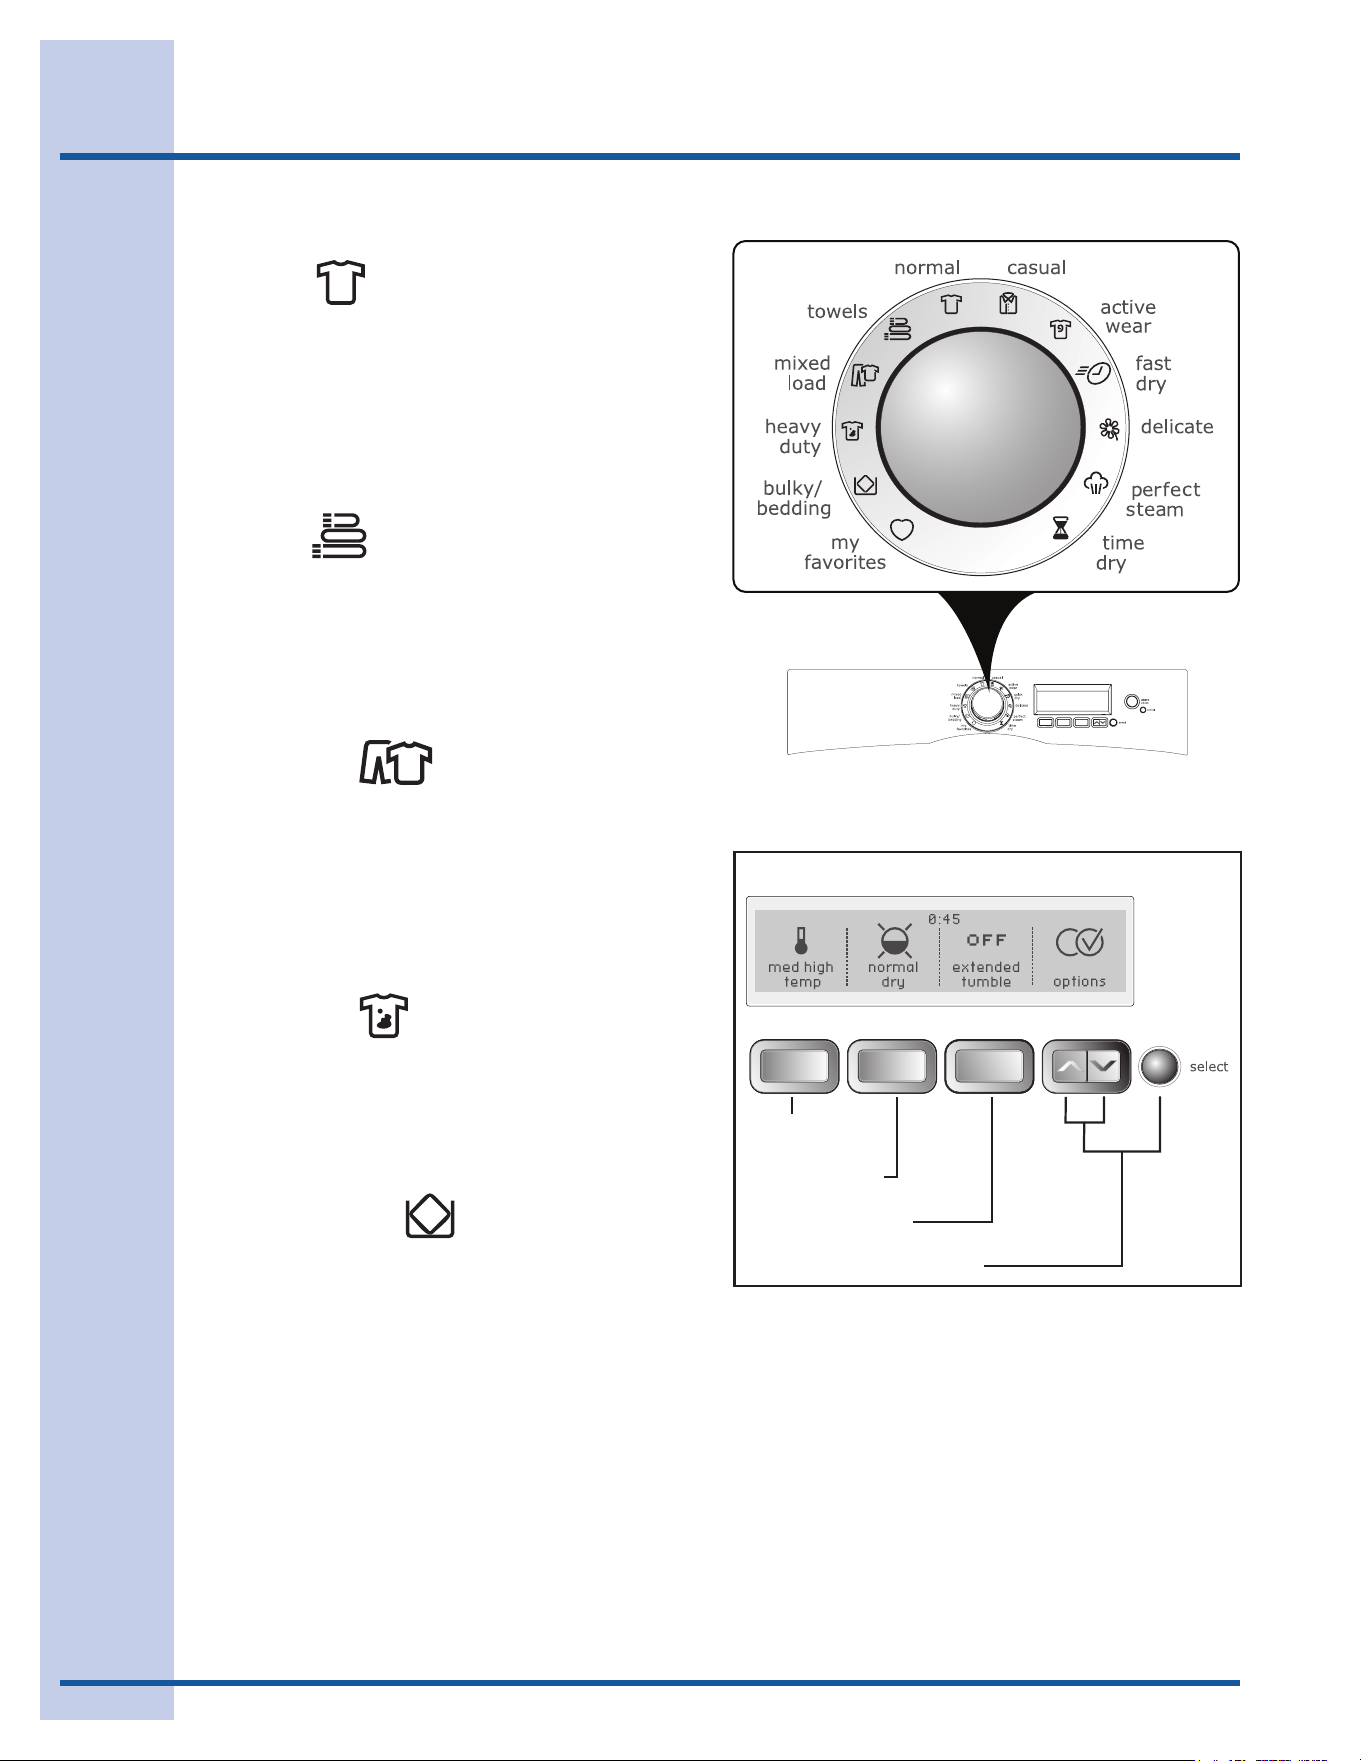
NORMAL
Selectthiscycletodryeverydayfabricsincluding
cottons and sheets with high temp, med high
temp or medium tempheat.Alldrynesslevels
except maximum dry and all options including
sanitizeareavailablewiththisAutoDrycycle.If
equipped with Perfect Steam™, the add steam
optionisalsoavailablewiththiscycle.
TOWELS
Selectthiscycletodryheavyloadssuchastowels
andbathmatswithmaximum temp, high temp
or med high temp heat. The maximum dry, more
dry and normal drydrynesslevelsandtheperfect
tumble and sanitize optionsareavailablewith
thisAutoDrycycle.
MIXED LOAD
Selectthiscycletodryloadscontainingamixof
fabricswithmed high temp, medium temp, or
med low tempheat.Alldrynesslevelsexcept
maximum dry and all options except sanitize are
availablewiththisAutoDrycycle.Ifequippedwith
Perfect Steam™, the add steam option is also
availablewiththiscycle.
HEAVY DUTY
Selectthiscycletodrydurablefabricssuchas
jeans and overalls with maximum temp, high
temp, or med high tempheat.Alldrynesslevels
except damp dry and all options including
sanitizeareavailablewiththisAutoDrycycle.
BULKY/BEDDING
Selectthiscycletodrybeddingandbulkyitems
suchascomforters,blankets,sleepingbagsand
parkaswithmed high temp, medium temp, or
med low temp heat. Normal dry and less dry
drynesslevelsandalloptions except sanitize are
availablewiththisAutoDrycycle.
TEMPERATURE
EXTENDEDTUMBLE
OPTIONSSCROLL&SELECT
AUTO DRY CYCLES
DRYNESSLEVEL
AUTO DRY CYCLES, con’t
13
Operating Instructions
TEMPERATURE
EXTENDEDTUMBLE
OPTIONSSCROLL&SELECT
AUTO DRY CYCLES
DRYNESSLEVEL
CASUAL
Selectthiscycletodrycottonsandblendswith
a no-iron finish using med high temp, medium
temp, or med low temp heat. Normal dry, less
dry, and damp drydrynesslevelsandalloptions
except sanitizeareavailablewiththisAutoDry
cycle.IfequippedwithPerfect Steam™, the add
steam optionisalsoavailablewiththiscycle.
ACTIVE WEAR
Selectthiscycletodrylightweightsyntheticath-
leticapparelincludingstretchfabricswithmedium
temp, med low temp or low temp heat. Normal
dry, less dry, and damp drydrynesslevelsand
all options except sanitizeareavailablewiththis
AutoDrycycle.
DELICATE
Selectthiscycletodryknitsanddelicateswith
med low temp or low temp heat. Normal dry,
less dry, and damp drydrynesslevelsandall
options except sanitizeareavailablewiththis
AutoDrycycle.
AUTO DRY CYCLES, con’t
14
Operating Instructions
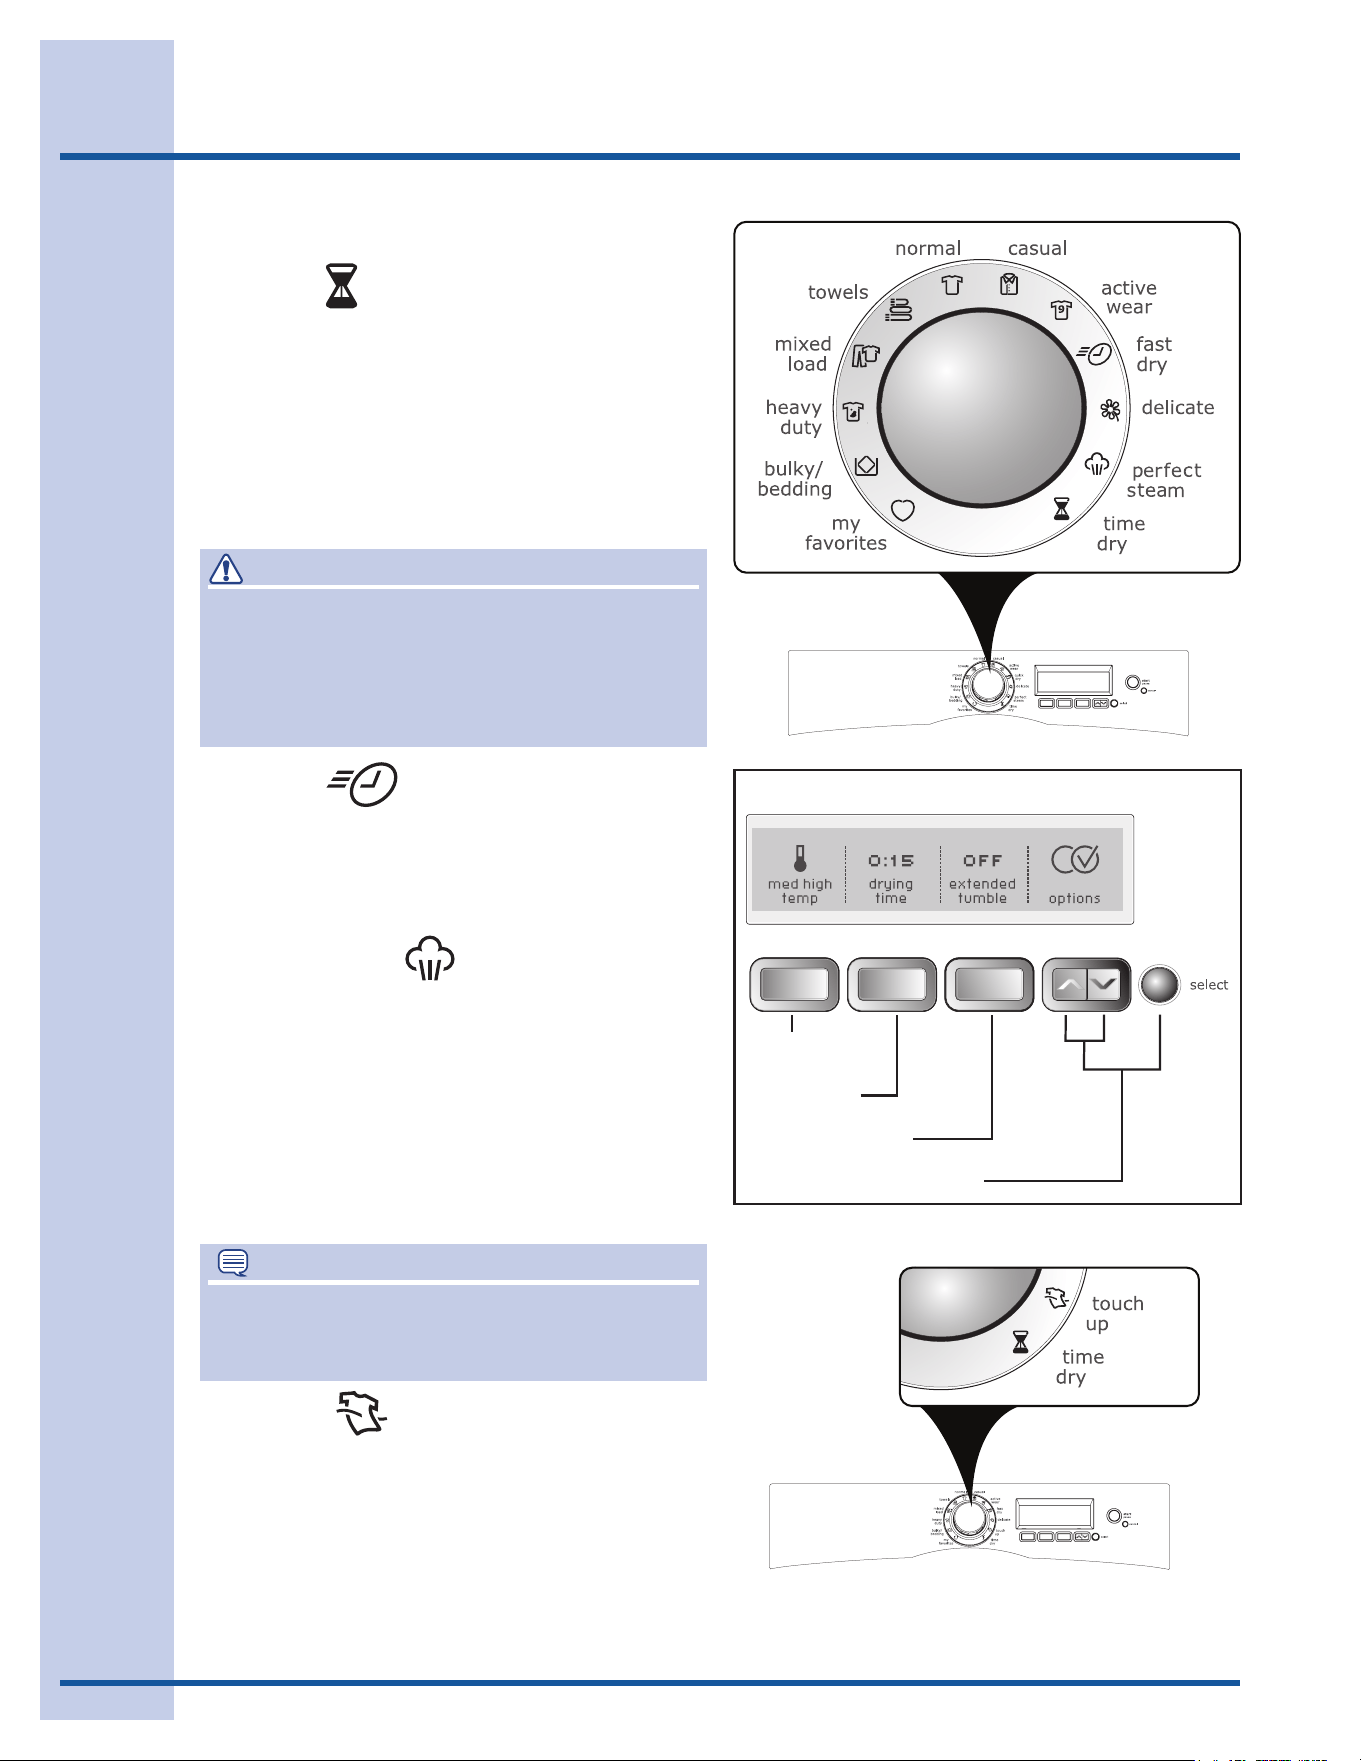
TIME DRY CYCLES
TIME DRY
Tomanuallyselectthedryingtimeforanyload,
turnthecycleselectorknobtotime dry and press
the drying timebuttontoselectupto90minutes
ofdryingtimein15-minuteincrements.Selectany
dryingtemperature.Drynesslevelsarenotselect-
ablewithTimeDrycycles.Theextended tumble,
wrinkle release, delicate heat and shrink guard
optionsareavailablewiththetime drycycle.
FAST DRY
Selectthiscycletoquicklydrysmallloadsin18
minutes with maximum temp, high temp, or med
high tempheat.Nooptionsareavailablewiththis
TimeDrycycle.
PERFECT STEAM
(steammodelsonly)
Selectthiscycletorefreshfabrics,removeodors
andreducestaticbyinjectingtheperfectamount
ofsteamintoclothingthathasbeenleftinthe
dryer,storedincrowdedclosets,drawers,or
unpackedluggage.Theloadwilltumblefor15
minutes on low temp heat while steam is injected
into the drum. The perfect tumble option is avail-
ablewiththisTimeDrycycle.
WARNING
FIREHAZARD
Toavoidrehazard,donotuseheattodryitems
containingfeathersordown,foamrubber,plastics
similarlytextured,rubber-likematerials.Usethe
timedrycycleandtheair(noheat)setting.
TIME DRY CYCLES
TEMPERATURE
EXTENDEDTUMBLE
OPTIONSSCROLL&SELECT
DRYINGTIME
NOTE
Itisnotrecommendedtousefabricsoftener
sheetswithSteamCyclesorOptionsasitmay
cause staining on clothes.
TOUCH UP
(non-steammodelsonly)
Selectthiscycletoremovewrinklesfromclean,
dryitemsthatmayhavebeenleftinthedryer,
storedincrowdedclosetsordrawersorunpacked
fromluggage.Theloadwilltumblefor15minutes
on low temp heat. The perfect tumble option is
availablewiththisTimeDrycycle.

15
Operating Instructions
Cycle Selection, con’t
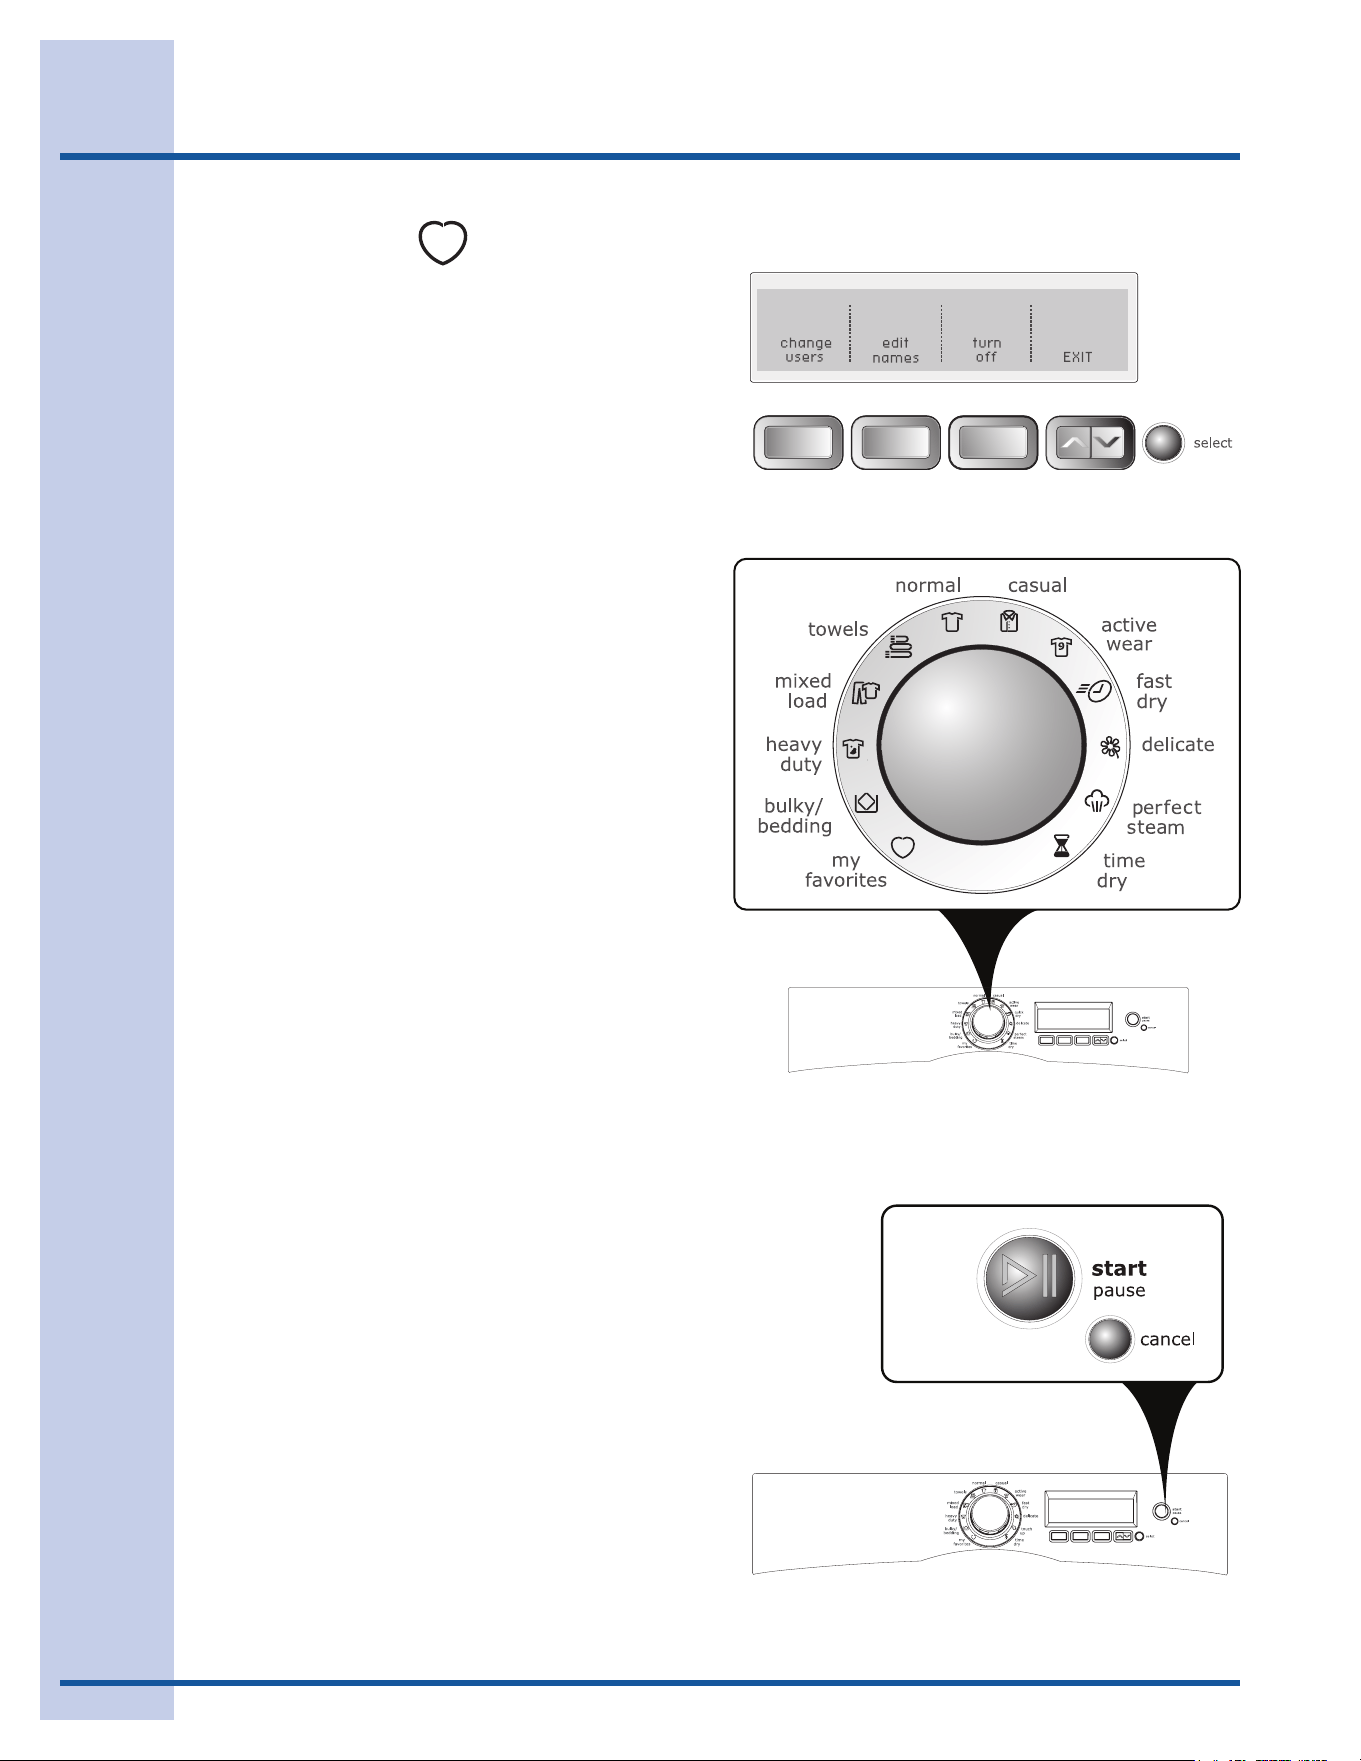
MY FAVORITES
Toselectoneofyour3favoritecycles:
Turnthecycleselectorknobto• my favorites.
Pressthebuttoncorrespondingtothefavorite•
cycledesired.Thecustomcycle,settings,and
optionsyousavedwillautomaticallybedis-
played.
Pressthe• startbuttontobeginthecycle.
Forexample,toselectyourmy shirtscycle,turn
thecycleselectorknobtomy favorites.Pressthe
buttoncorrespondingtomy shirts, and then press
start.
(Seesave as favoriteinthe“OperatingUserInter-
facePreferences”sectionofthisguideforinstruc-
tionsoncustomizingupto3cycles.)
16
Ifmorethanoneuserhasbeenenteredin
CUSTOM MODE:
Thecurrentuser’snamewillbedisplayedwhen•
thedryeristurnedonifCUSTOM MODE is on.
Pressthebuttonunder• OK to continue using
thatuser’sfavoritecycles.
Theiconforthelastcyclerunwilllightup.•
Turnthecycleselectorknobto• my favorites.
Selectoneofthe3customizedcyclesbypress-•
ingthecorrespondingbutton.
Pressthe• startbutton.
Tochangeusers:
Pressthe• selectbuttonwhenthedryerturnson
andshowsthecurrentuser’sname.
Pressthebuttonunder• change users.
Selectanotheruser’sname.•
Press• EXIT.
Theiconforthelastcyclerunwilllightup.•
Turnthecycleselectorknobto• my favorites.
Selectoneofthe3customizedcyclesbypress-•
ingthecorrespondingbutton.
Pressthe• startbutton.
Toselectauserifauser’snameisnotdisplayed
whenthedryeristurnedon:
Pressthe• optionsbuttonstoscrolltoset prefs
and then press the selectbutton.
Ifnecessary,pressthe• optionsbuttonstoscroll
to CUSTOM MODE and then press the select
button.
Pressthebuttoncorrespondingtotheuser’s•
name.
Theiconforthelastcyclerunwilllightup.•
Turnthecycleselectorknobto• my favorites.
Selectoneofthe3customizedcyclesbypress-•
ingthecorrespondingbutton.
Pressthe• startbutton.
(SeeCUSTOM MODEin“OperatingUserInterface
Preferences”inthisguideforinstructionsentering
newusersandnamingfavoritecycles.)
MY FAVORITES , con’t
Operating Instructions
17
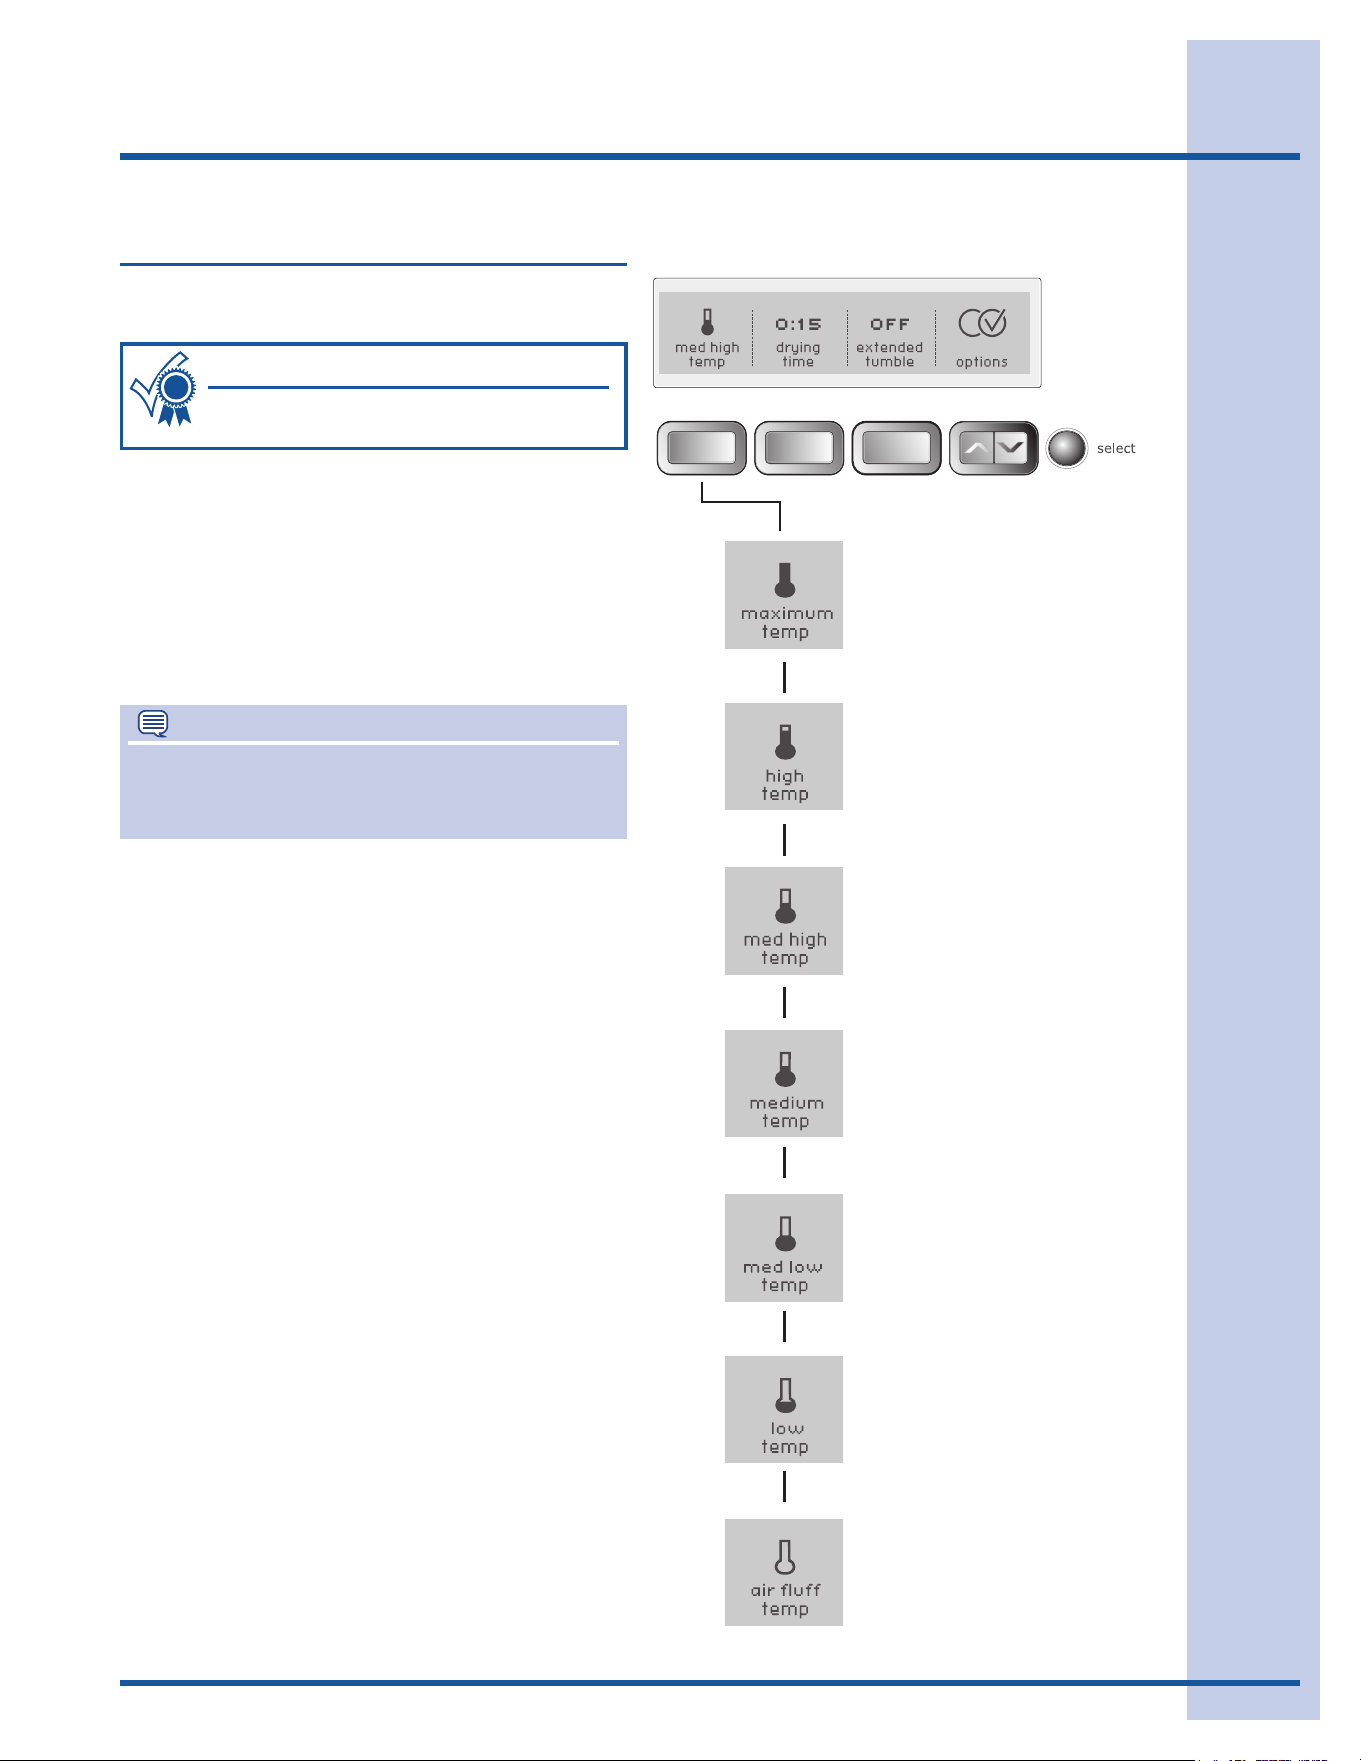
The appropriate drying temperature will auto-
matically be indicated for the cycle selected.
Drying Temperature
NOTE
Tochangethetemperatureoncethecyclehas
begun,pressthepausebutton,makethenew
selection and press start again.
To change the preset temperature, press the tem-
peraturebuttontoscrolltothedesiredsetting.
Toprotectyourfabrics,notalltemperaturesare
availablewitheverycycle.Ifatemperatureisnotap-
propriateforthecycle,itwillnotbedisplayed.
Thetemperatureselectedforthecyclewillbe
rememberedeachtimethatcycleisselectedinthe
future.
Followthefabriccarelabelinstructions
onitemstobedried.
For best results
MAXIMUM TEMP
Recommended to use with the sanitize option for
towelsandheavydutyloads.
HIGH TEMP
Recommendedfordurablefabrics.
MED HIGH TEMP
Recommendedformostcottonfabrics.
MEDIUM TEMP
Recommendedforwrinklefree,easycarelight-
weightfabricsandbulkyloads.
MED LOW TEMP
Recommendedforknits.
LOW TEMP
Recommendedfordelicatefabrics.
AIR FLUFF TEMP
Thissetting(noheat)shouldonlybeusedwitha
timedrycycletodryitemscontainingfeathers,
down,foamrubber,plasticsorrubber-likemateri-
als;torefreshclothing,stuffedanimals,pillowsor
blankets;andtodustdraperies.
Operating Instructions

18
Operating Instructions
The appropriate dryness level will automatically
be indicated when the cycle is selected.
Tochangethepresetlevel,pressthedrynesslevel
buttontoscrolltothedegreeofdrynessdesired.
Toprotectyourfabrics,notalldrynesslevelsare
availablewitheverycycle.Ifadrynesslevelisnot
recommendedforthecycle,itwillnotbedisplayed.
Thedrynesslevelselectedforthecyclewillbe
rememberedandrecalledeachtimethatcycleis
selected in the future.
Dryness Level (Auto Dry)
NOTE
Tochangethedrynessleveloncethecyclehas
begun,pressthepausebutton,makethenew
selection and press start again.
Select the normaldrynesslevelformostAutoDry
cycles.
Occasionallyaloadmayseemtoodamporover-
driedattheendofthecycle.Toincreasethedrying
timeforsimilarloadsinthefuture,pressthedryness
buttontoselectmore dry or maximum dry. For
loadsrequiringlessdryingtime,selectless dry.
Select damp dryforitemsyouwishtopartiallydry
beforehangingorironing.
Drying Time (Time Dry)
Pressthedryingtimebuttontoselectupto90
minutesofdryingtimein15-minuteincrements.This
settingisonlyavailablewiththetime drycycle.
19
Operating Instructions
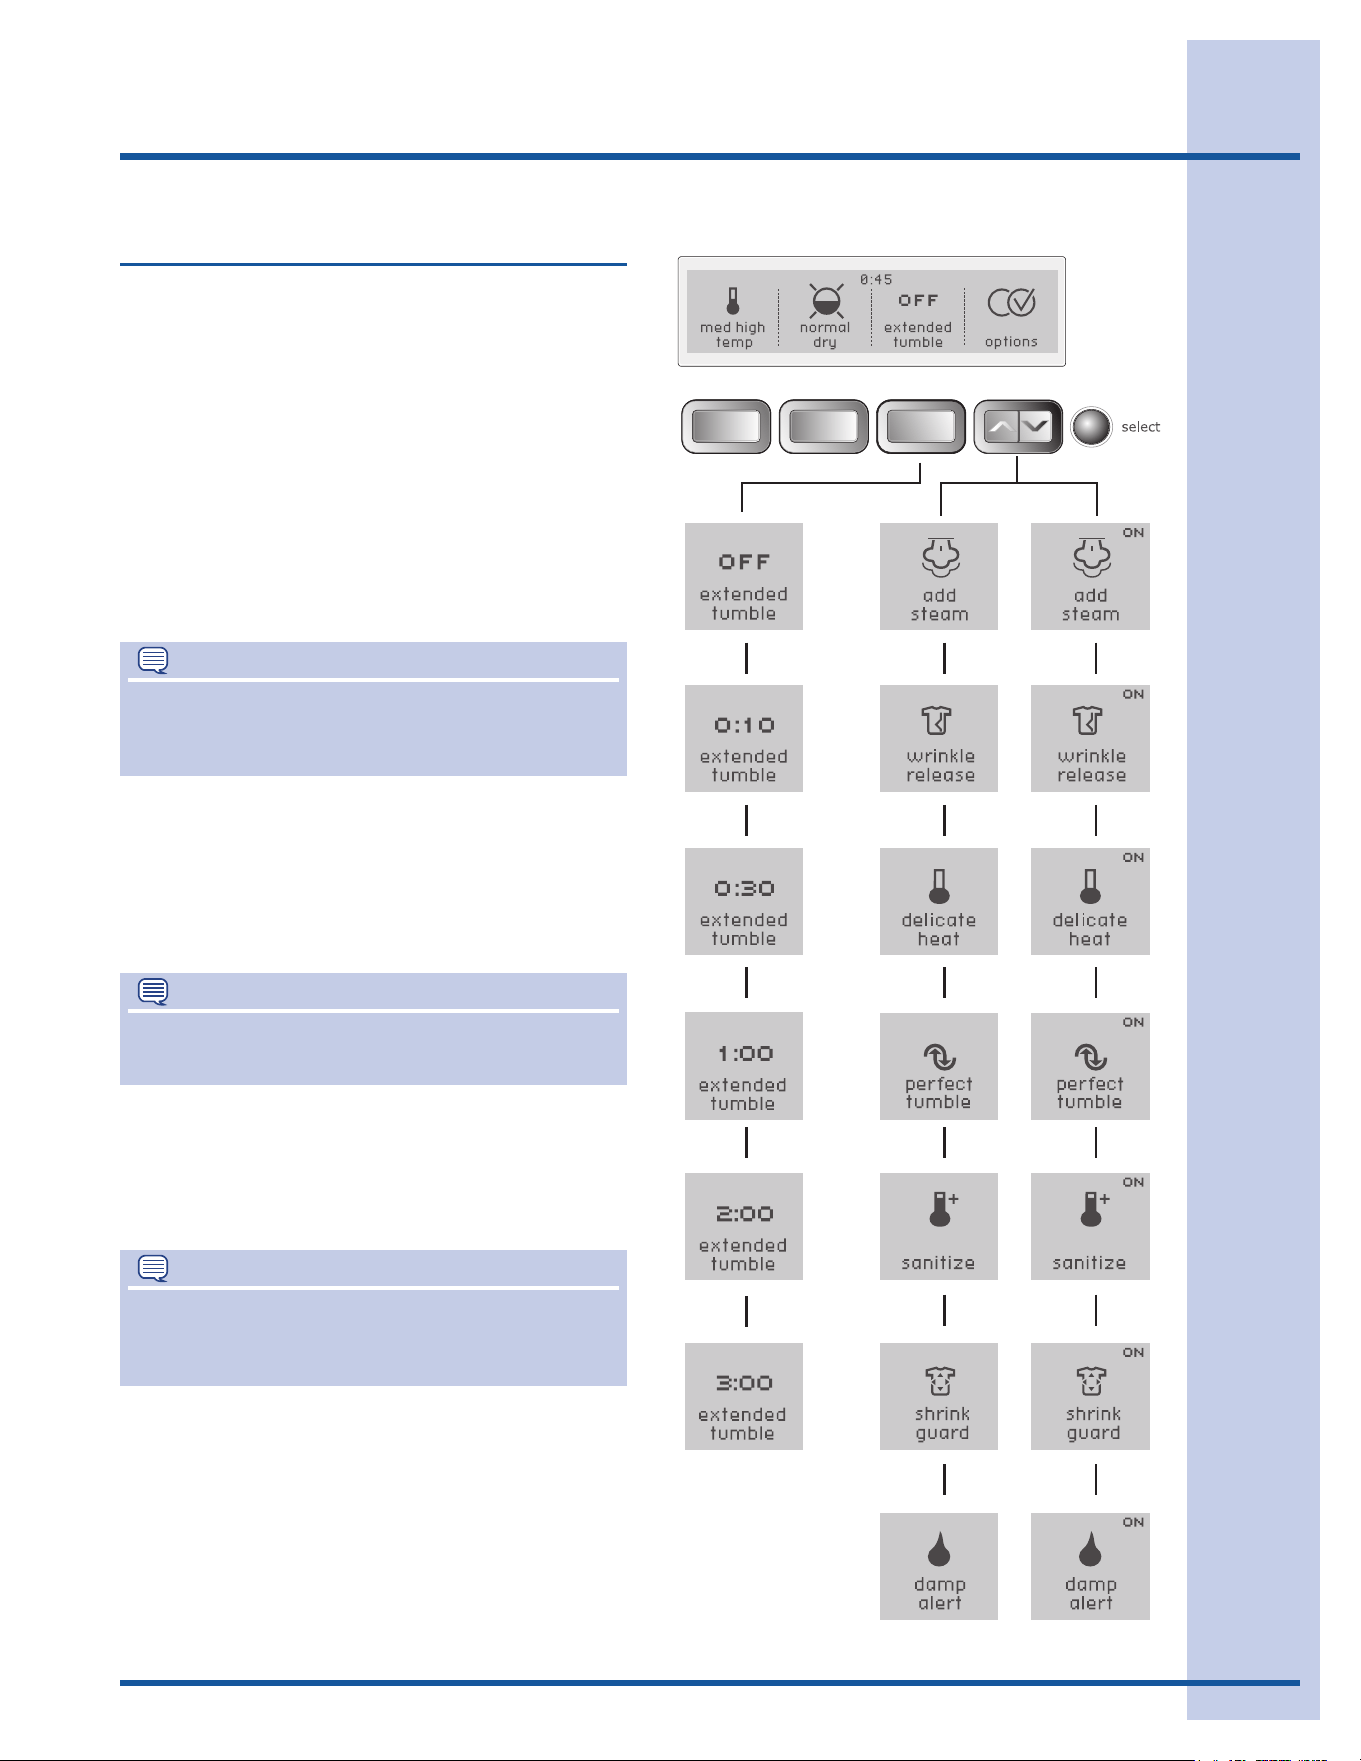
Suitable options will automatically be indicated
when the cycle is selected.
To select or clear the wrinkle release, extended
tumble, delicate heat, perfect tumble, sanitize,
shrink guard and damp alert options, press the
optionsbuttonsuntilthedesiredoption is dis-
played.Pressselect and ONwillbedisplayedinthe
upper right corner. To clear the option, press select
again and ON will disappear.
Toprotectyourfabrics,notalloptionsareavailable
witheverycycle.Ifanoption is not appropriate for
thecycle,itwillnotbedisplayed.
Options
NOTE
To change the optionsoncethecyclehas
begun,pressthepausebutton,makethenew
selections and press start again.
All optionsselectedforthecycle,exceptsanitize,
willberememberedeachtimethatcycleisselected
in the future. To prevent unintentional and accidental
exposure of delicate material to sanitize heat, the
sanitize optionwillnotberememberedandmust
bereselectedeachtime.
* *
*
AddsteamoptionavailableonSteamModelonly.
ADD STEAM
(steammodelsonly)
The add steam option injects steam into the cloth-
ingpriortocooldowntoreducewrinkling,ironing
and static cling.
NOTE
The sanitize optionwillberetainedandrecalledif
it is selected and saved in the my favorite cycle.
NOTE
Itisnotrecommendedtousefabricsoftener
sheetswithSteamCyclesorOptionsasitmay
cause staining on clothes.
20
Operating Instructions
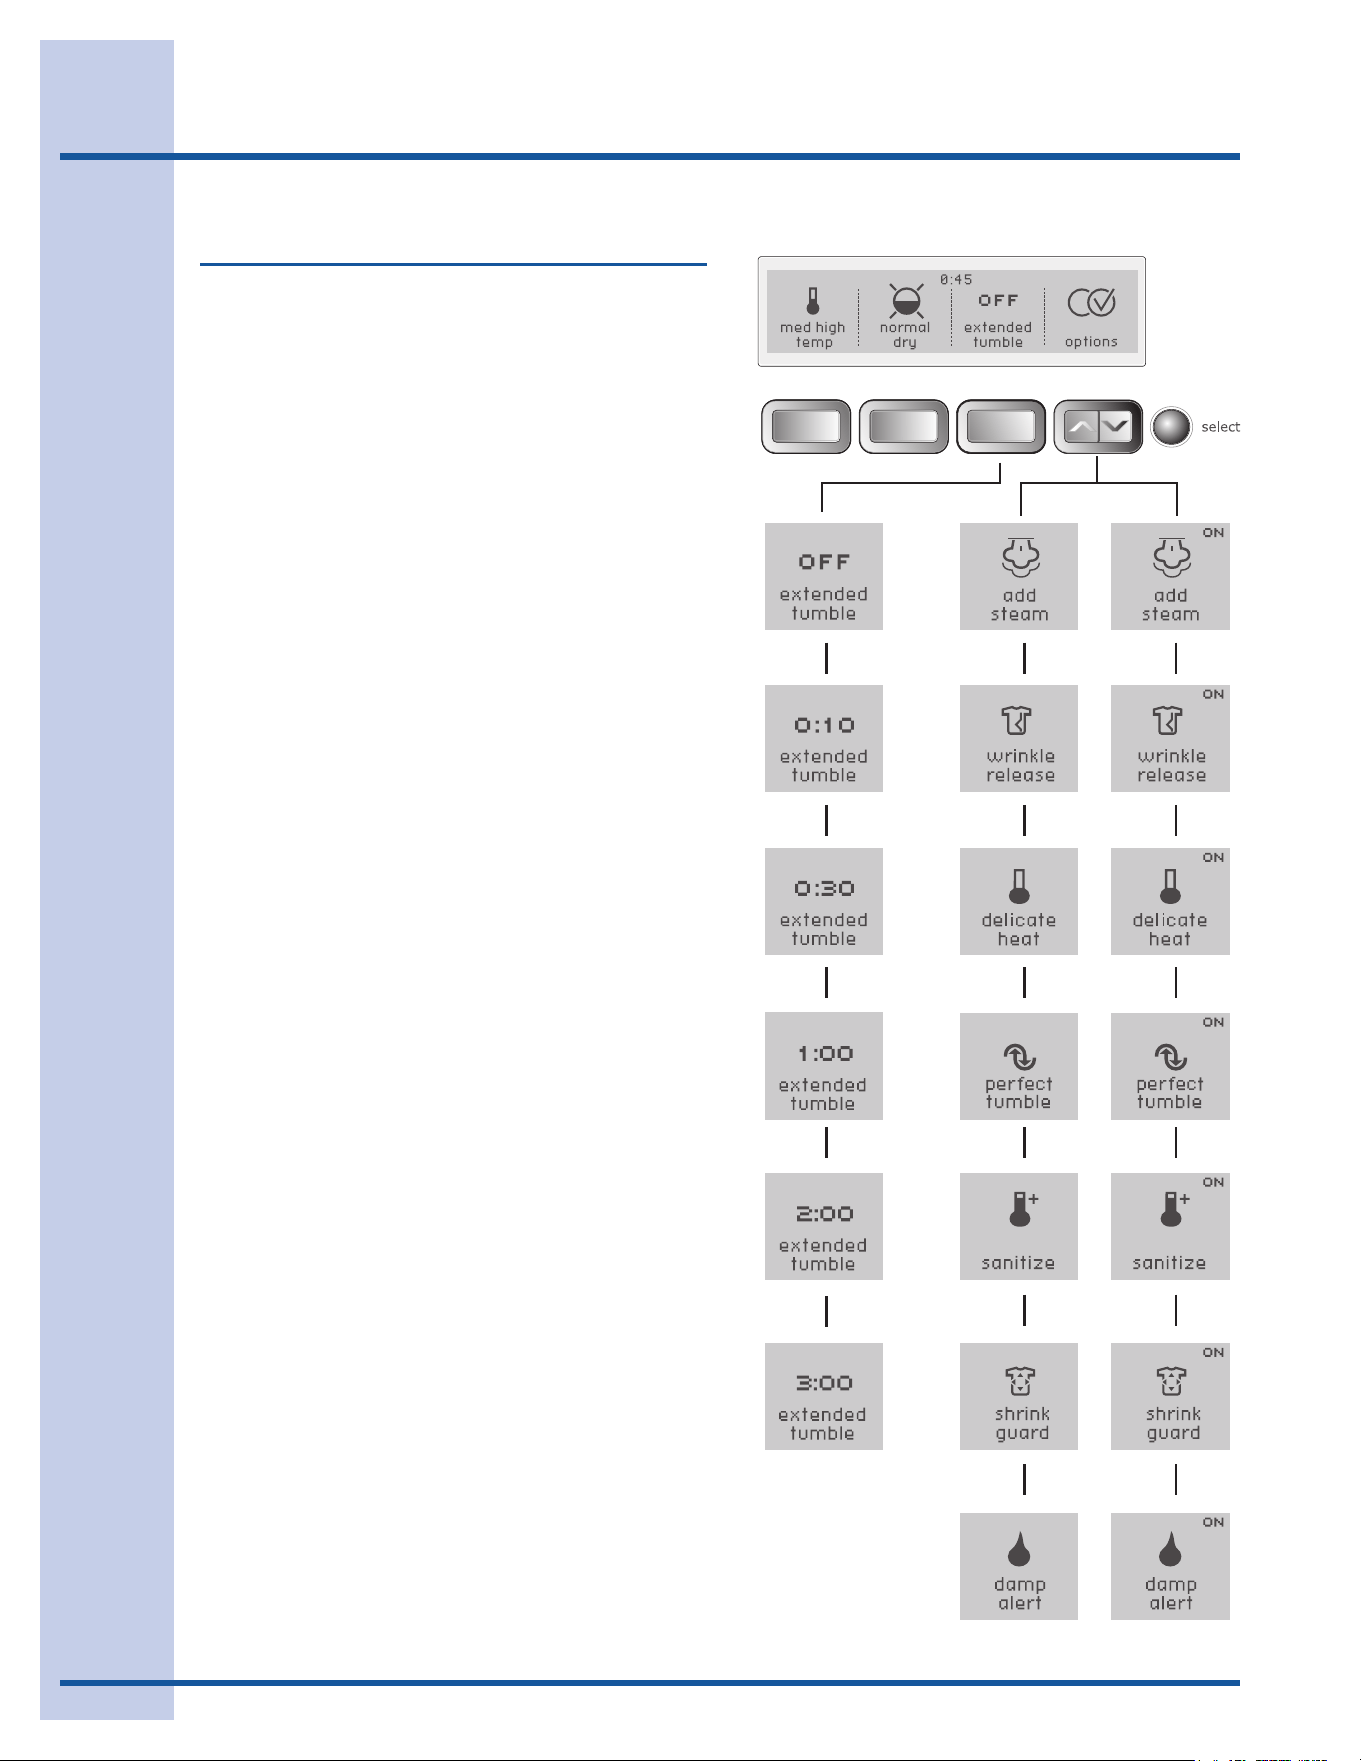
Options, con’t
WRINKLE RELEASE
The wrinkle releaseoptionhelpspreventwrinkles
andtanglingbyalternatelytumblingtheloadwith-
outheatfor5minutesinaclockwisedirection,then
5minutesinacounterclockwisedirection,foratotal
of45minutes.Asignalwillsoundevery5minutes
toremindyoutoremovethedryloadatanytime.
The extended tumbleoptioncanbeselectedwith
wrinkle release to increase the amount of time the
loadwilltumblewithoutheat.Usethiscombination
ifyouknowitcouldbeupto3hoursbeforeyou
can remove the load.
DELICATE HEAT
Select the delicate heat option to protect a load
fromexcessiveheatwhichcanleadtoshrinking
andover-drying.Thedryingtemperaturewillbe
graduallyreducedastheloaddries.
EXTENDED TUMBLE
Select the extended tumble option if the dried
loadmightnotberemovedpromptlyattheendof
thecycle.Thedryloadwilltumblewithoutheatin
aclockwisedirectiononlyfortheselectedtimeto
helpreducewrinkling.Presstheextended tumble
buttontoselect10or30minutesor1,2or3hours
tumbling.Asignalwillsoundperiodicallytoremind
youtoremovethedryloadatanytime.
The wrinkle releaseoptioncanbeselectedwith
extended tumble option to increase the amount
oftimetheloadwilltumblewithoutheat.Usethis
combinationifyouknowitcouldbeupto3hours
beforeyoucanremovetheload.
PERFECT TUMBLE
The perfect tumbleoptionusesreversetumble
action during cool down to reduce tangling and
wrinkling.
* *
*
AddsteamoptionavailableonSteamModelonly.
21
Operating Instructions
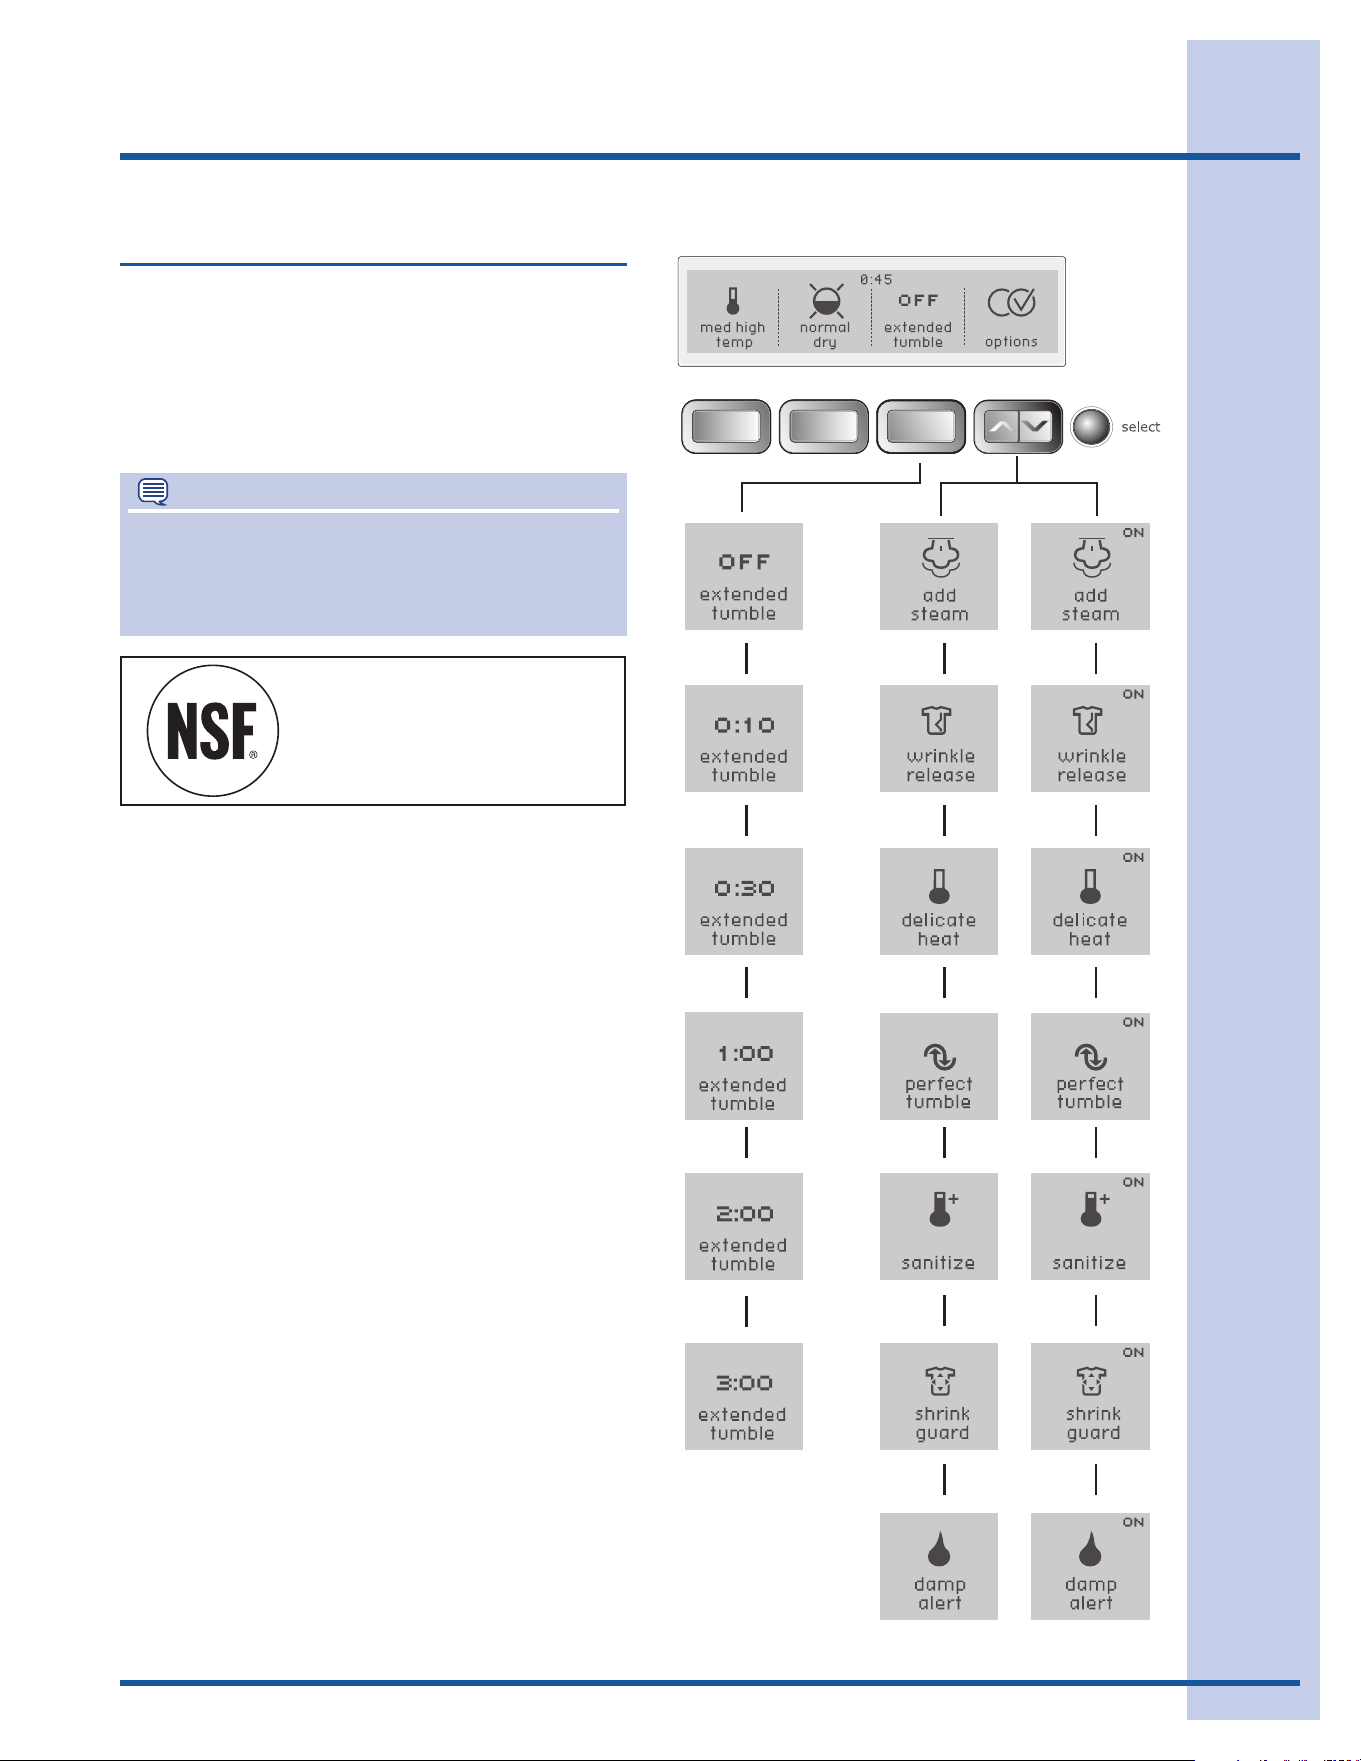
NOTE
ThisoptionhasbeencertiedbyNSF
International®,anindependent,third-partytesting
andcerticationorganizationdedicatedtopublic
health,safetyandenvironmentalprotection.
Options, con’t
SANITIZE
Select the sanitizeoptionforloadsthatmaycon-
tainharmfulbacteria.Anextendeddryingtimeat
highheatwillkill99.9%ofbacteriawithnocarry-
overofbacteriabetweenloads.Checkfabriccare
labelstopreventdamagecausedbyhighheat.
NSF Protolcol P154
Sanitization Performance of
Residential Clothes Dryers
* *
*
AddsteamoptionavailableonSteamModelonly.
SHRINK GUARD
The shrink guardoptionreducestheinitialdrying
temperatureandgraduallylowersthedryingtem-
peratureduringthecycletoprotectfabricsfrom
shrinking.
DAMP ALERT
Forloadsthatcontainsomeitemsyouplantohang
dry,atdryoriron,addthedamp alert option to
anyAutoDrycycle.IftheVOLUME is turned up in
yourpreferences(see“SettingPreferences”onthe
nextpage),achimewillsoundwhentheloadhas
reached the damp drydrynessleveltoremindyou
toremovethoseitemstohangdry,dryatoriron
dry.Openthedoor,removethoseitems,closethe
door and press the startbuttontocontinuedrying
the remaining items.
22
Operating User Interface Features
CONTROLLOCKON
CONTROLLOCKOFF
CUSTOMMODE
INSTALLCYCLE
RESET
CONTRAST
BRIGHTNESS
VOLUME
LANGUAGE
CYCLEDESCON
LISTOFSAVEDFAVORITES
CYCLESGUIDE
SETTINGSGUIDE
OPTIONSGUIDE
SETPREFSGUIDE
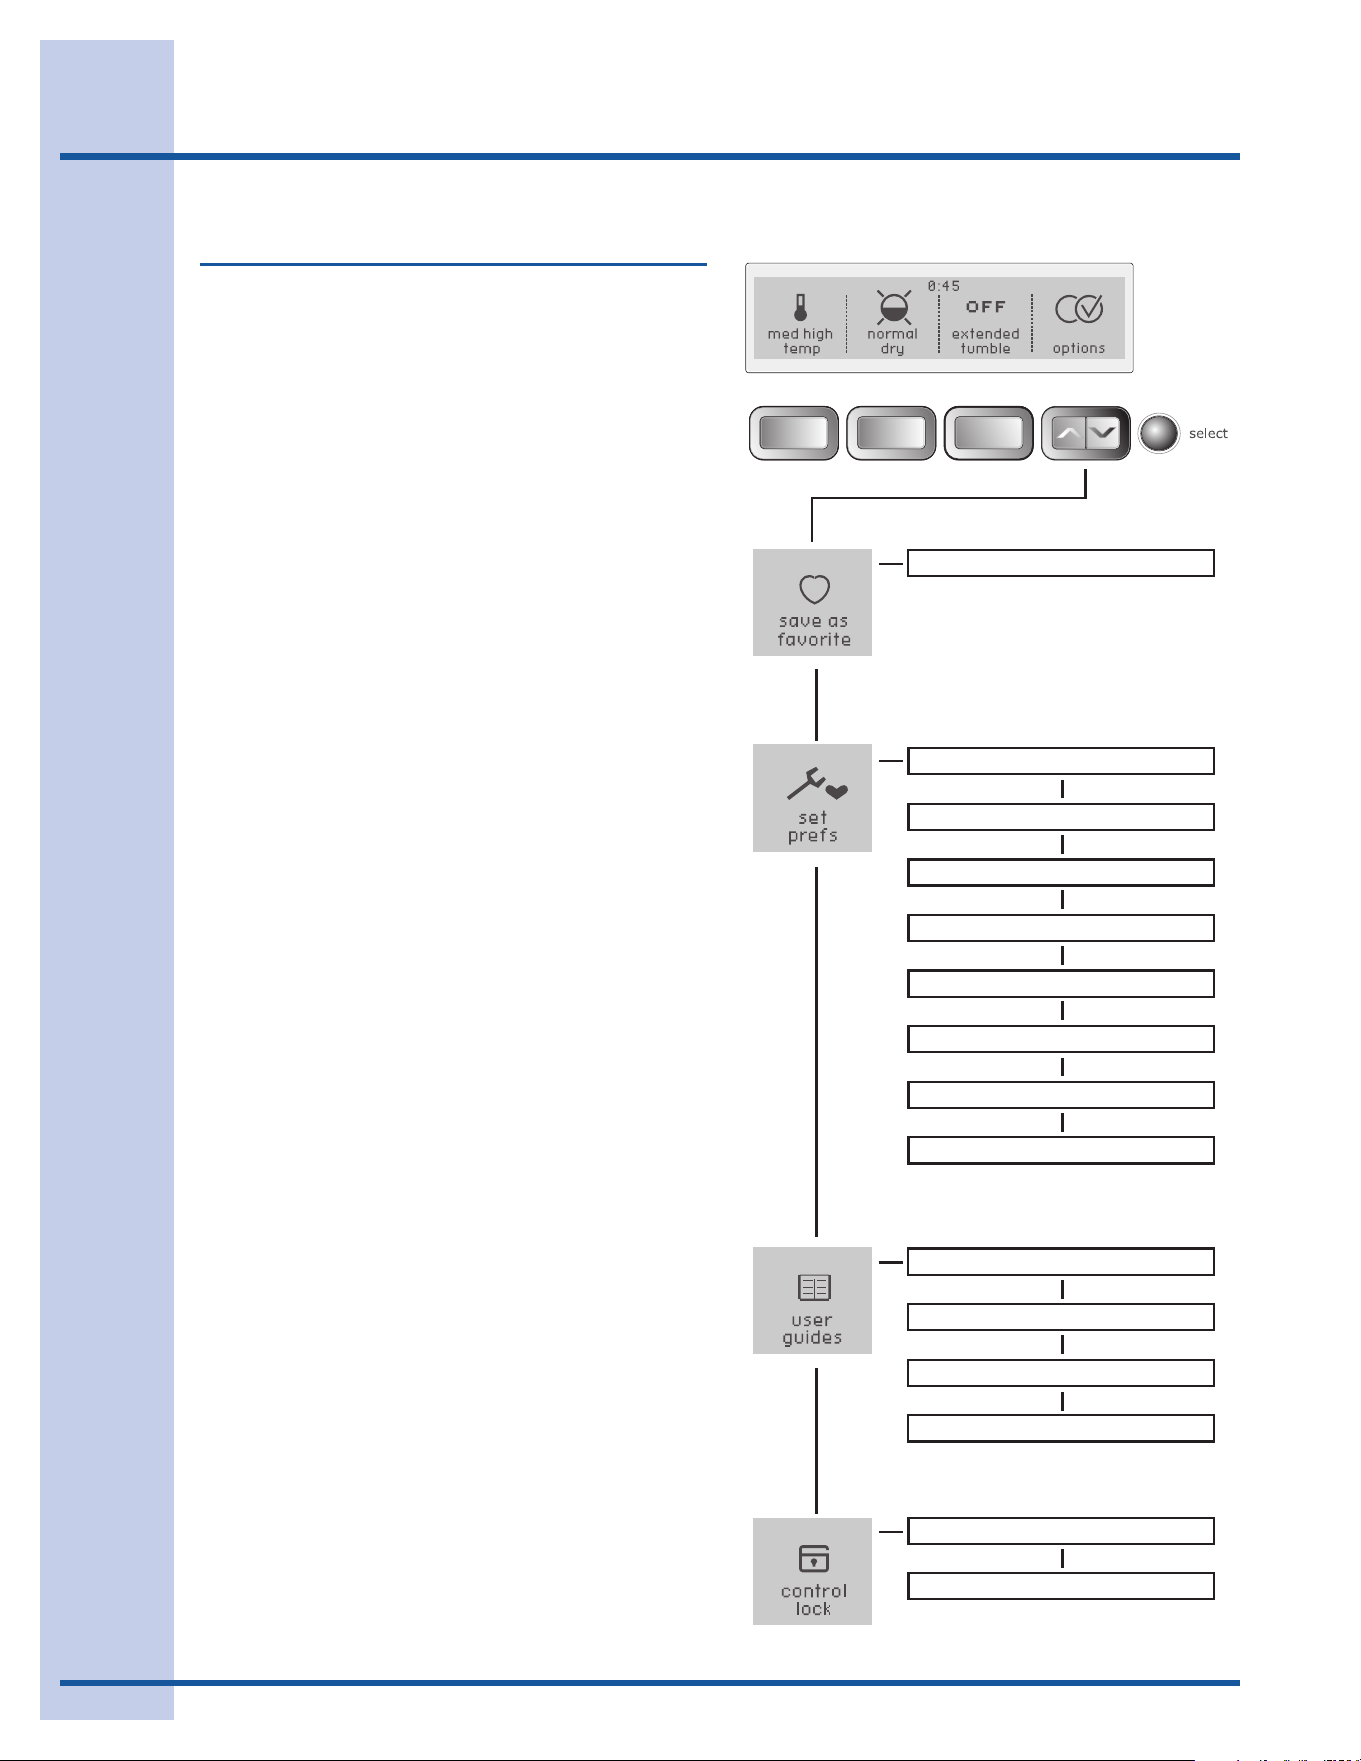
User Interface Features
SAVE AS FAVORITE
The save as favoritefeatureallowsyoutoperson-
alizeupto3customcyclesforeachsaveduser.
See save as favoritein“OperatingUserInterface
Preferences”formoredetails.
SET PREFS
The set prefsfeatureallowsyoutopersonalize
cycles,hidecycledescriptions,selectlanguage,
volume,brightnessandcontrastofthedisplay,
resetsettingsandruntheinstallationcycle.See
SET PREFSin“OperatingUserInterfaceFeatures”
for more details.
USER GUIDES
Scroll through this option for the CYCLES GUIDE,
SETTINGS GUIDE, OPTIONS GUIDE, and SET
PREFS GUIDEfordescriptionsofthecycles,dry-
ingtemperatures,drynesslevels,cycleoptions
and features for user preferences.
CONTROL LOCK
Tolockthecontrolsbetweencycles,scrolltothe
controllockfeaturepressselect and CONTROL
LOCK OFF - press SELECT to lock the control
panel
willbedisplayed.Presstheselectbuttonto
lockthecontrols.Tounlockthecontrols,pressand
hold selectagainfor3seconds.Usethisfeature
toreducethelikelihoodofaccidentaloperationby
children.
23
Operating User Interface Features
Saving Favorites
Usethesave as favorite feature to name and save
acustomcycletomemorywithalloptionsand
settingspreferred.Upto3favoritesmaybesaved
foreachcustomuser.Followthesesteps:
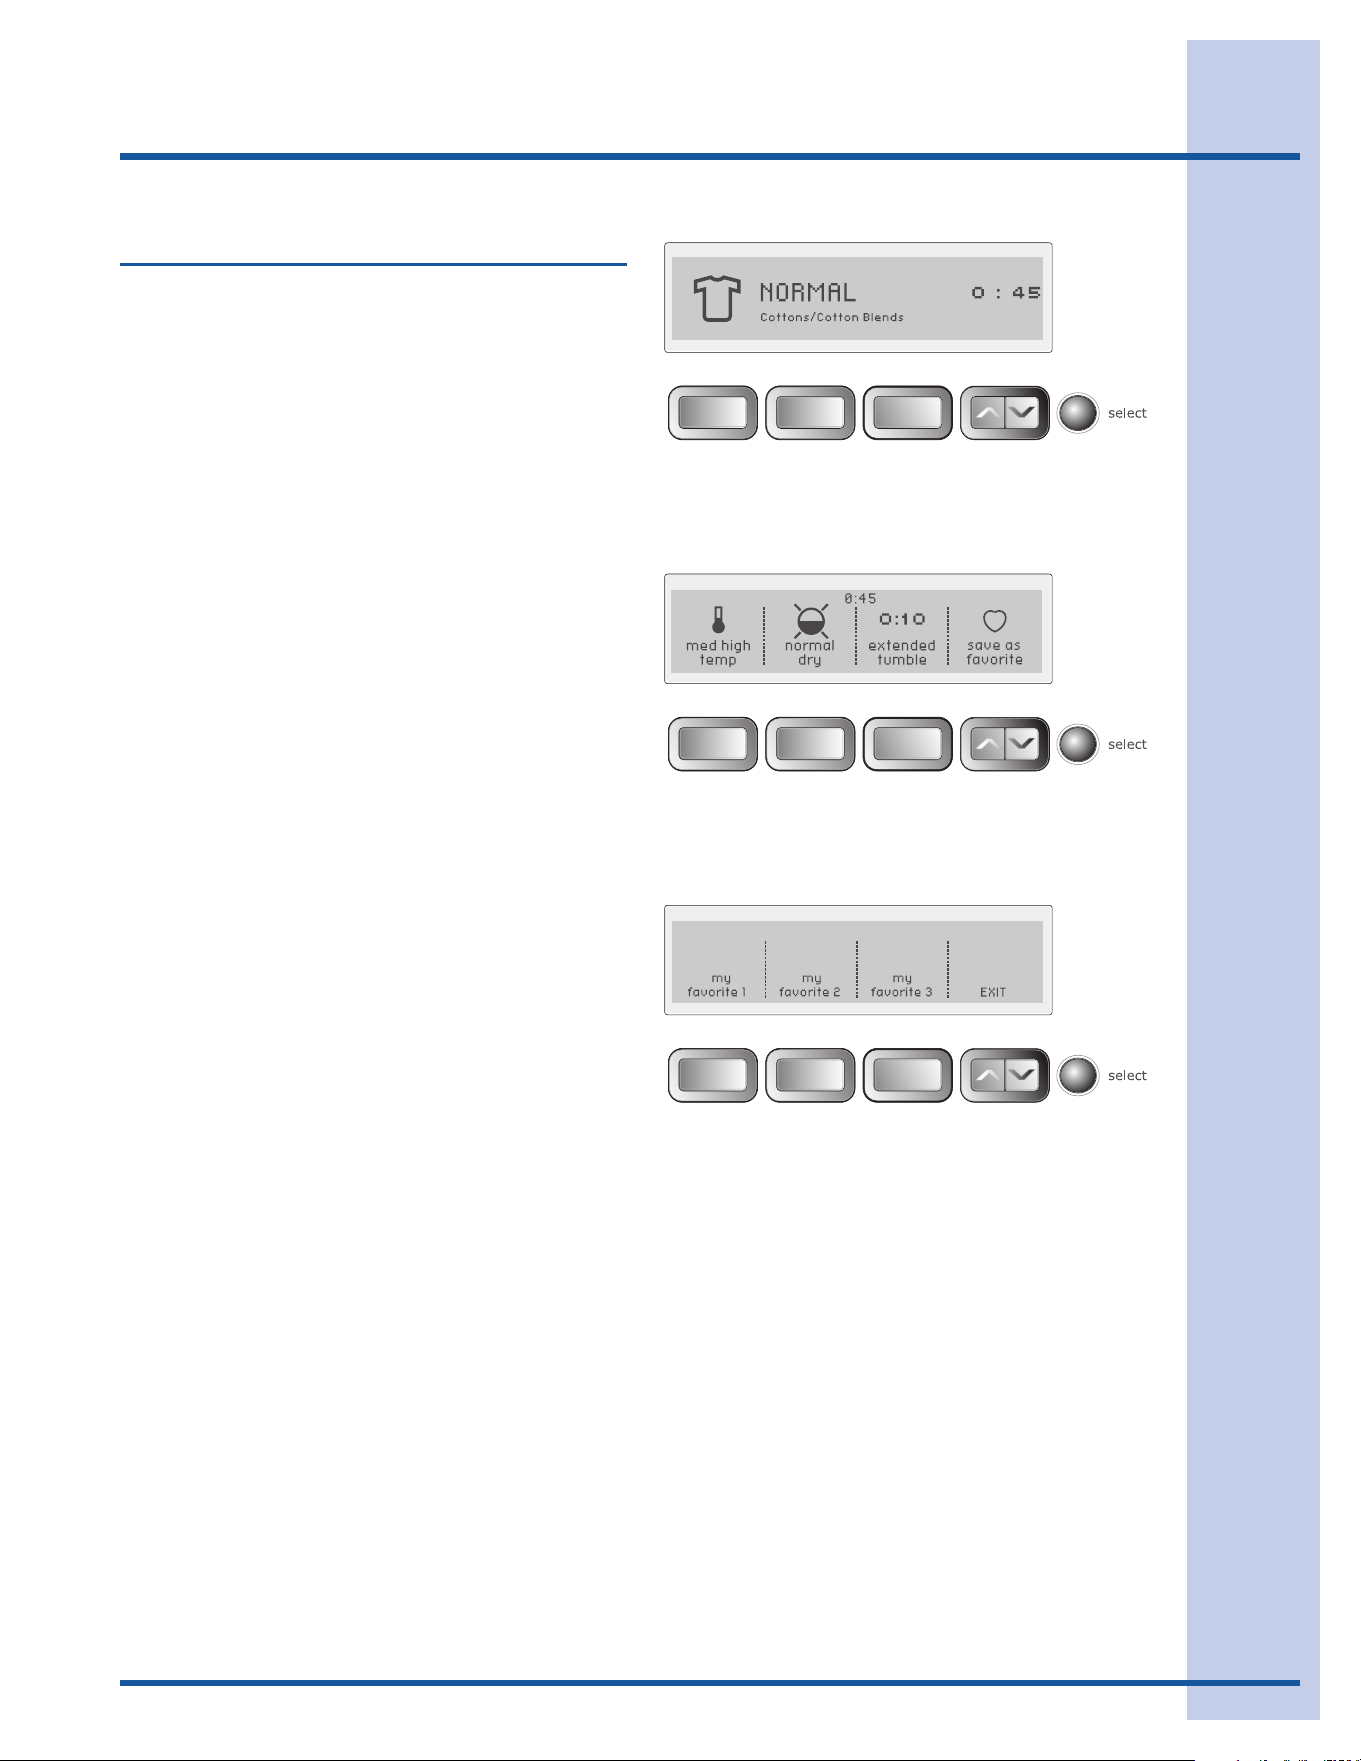
Selectacycle,dryingtemperature,drynesslevel•
(AutoDry)ordryingtime(TimeDry),extended
tumbletimeandotheroptionsdesired.
Usethescrolluporscrolldownbuttonuntilyou•
reach save as favorite.
Pressthe• selectbuttontoenterthefavorite
cyclechoicescreen.
Choose1ofthe3buttonsfornamingthecycle.•
Seethenextpagefornamingyourfavoritecycle.•
For example, to customize the normalcyclefor
yourshirtloadsusingmed highdryingtempera-
ture, normal drydrynessleveland10minutesof
extended tumble:
Turnthecycleselectorknobto• normal.
Pressthe• tempbuttontoselectmed high temp.
Pressthe• dryness levelbuttontoselectnormal
dryness.
Pressthe• extended tumblebuttontoselect10
minutes.
Pressthescrolluporscrolldownbuttonuntil•
youreachsave as favorite.
Pressthe• selectbuttontoenterthefavorite
cyclechoicescreen.
Pressthebuttonunder• my favorite 1.
Seethenextpagefornamingyourfavoritecycle.•
24
Operating User Interface Features
Saving Favorites, con’t
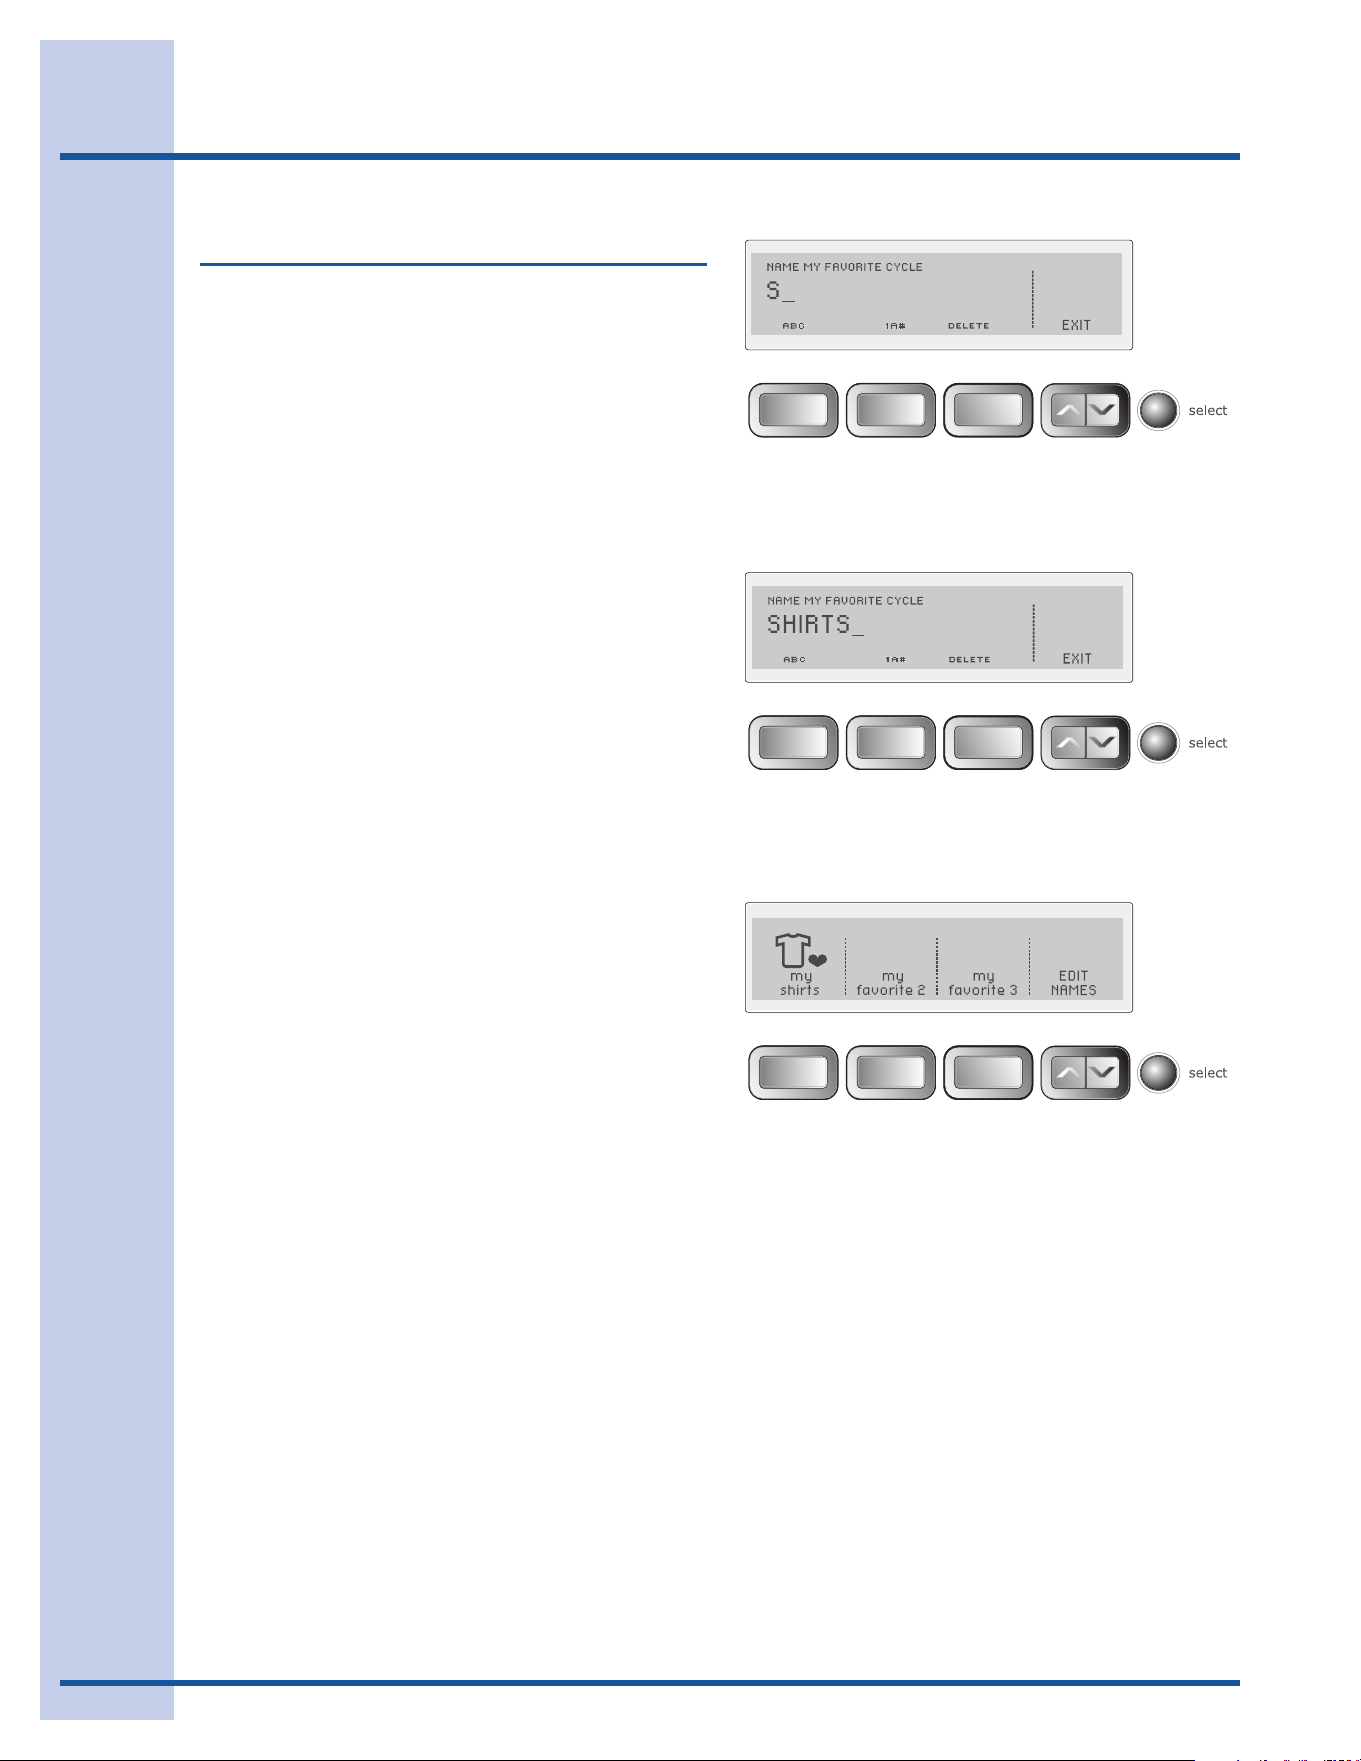
Tonamethecustomizedcycleforshirts,pressmy
favorite 1.
PressthebuttonunderABC to name the favorite
cyclealphabetically.Usethebuttonunder1A#
toaddnumbers,foreignlanguagecharactersor
symbolstothename.
Rotatethecycleselectorknobineitherdirection
to select the letters S-H-I-R-T-S, pausing after
eachcharactertoletthecursoradvance.Pressthe
buttonunderDELETE to erase incorrect entries.
ThereisablankcharacterbetweenZ and A for
insertingspacesinyourcustomname.Pausemo-
mentarilyonthischaracterasyouwouldtoinsert
anyothercharacter,thencontinue.
Pressselecttosavethefavoritecyclename.
Repeatthestepstocustomize2othercycles
as my favorite 2 and my favorite 3.Anyofthe
favoritecyclenamescanbechangedinthefuture
byturningthecycleselectorknobtomy favorites
andpressingthebuttonunderEDIT NAMES.
See my favoritesinthe“CycleSelection”section
ofthisguideforinstructionsonusingyourcustom-
izedcycles.
25
Operating User Interface Features
Setting Preferences
CUSTOM MODE
CUSTOM MODE allows up to 3 household mem-
berstopersonalizeupto3favoritecycleseach.
To enter custom users and personalize favorite
cycles:
Usethescrolluporscrolldownbuttonsuntilyou•
reach set prefs.Presstheselectbuttontoenter
the preference menu.
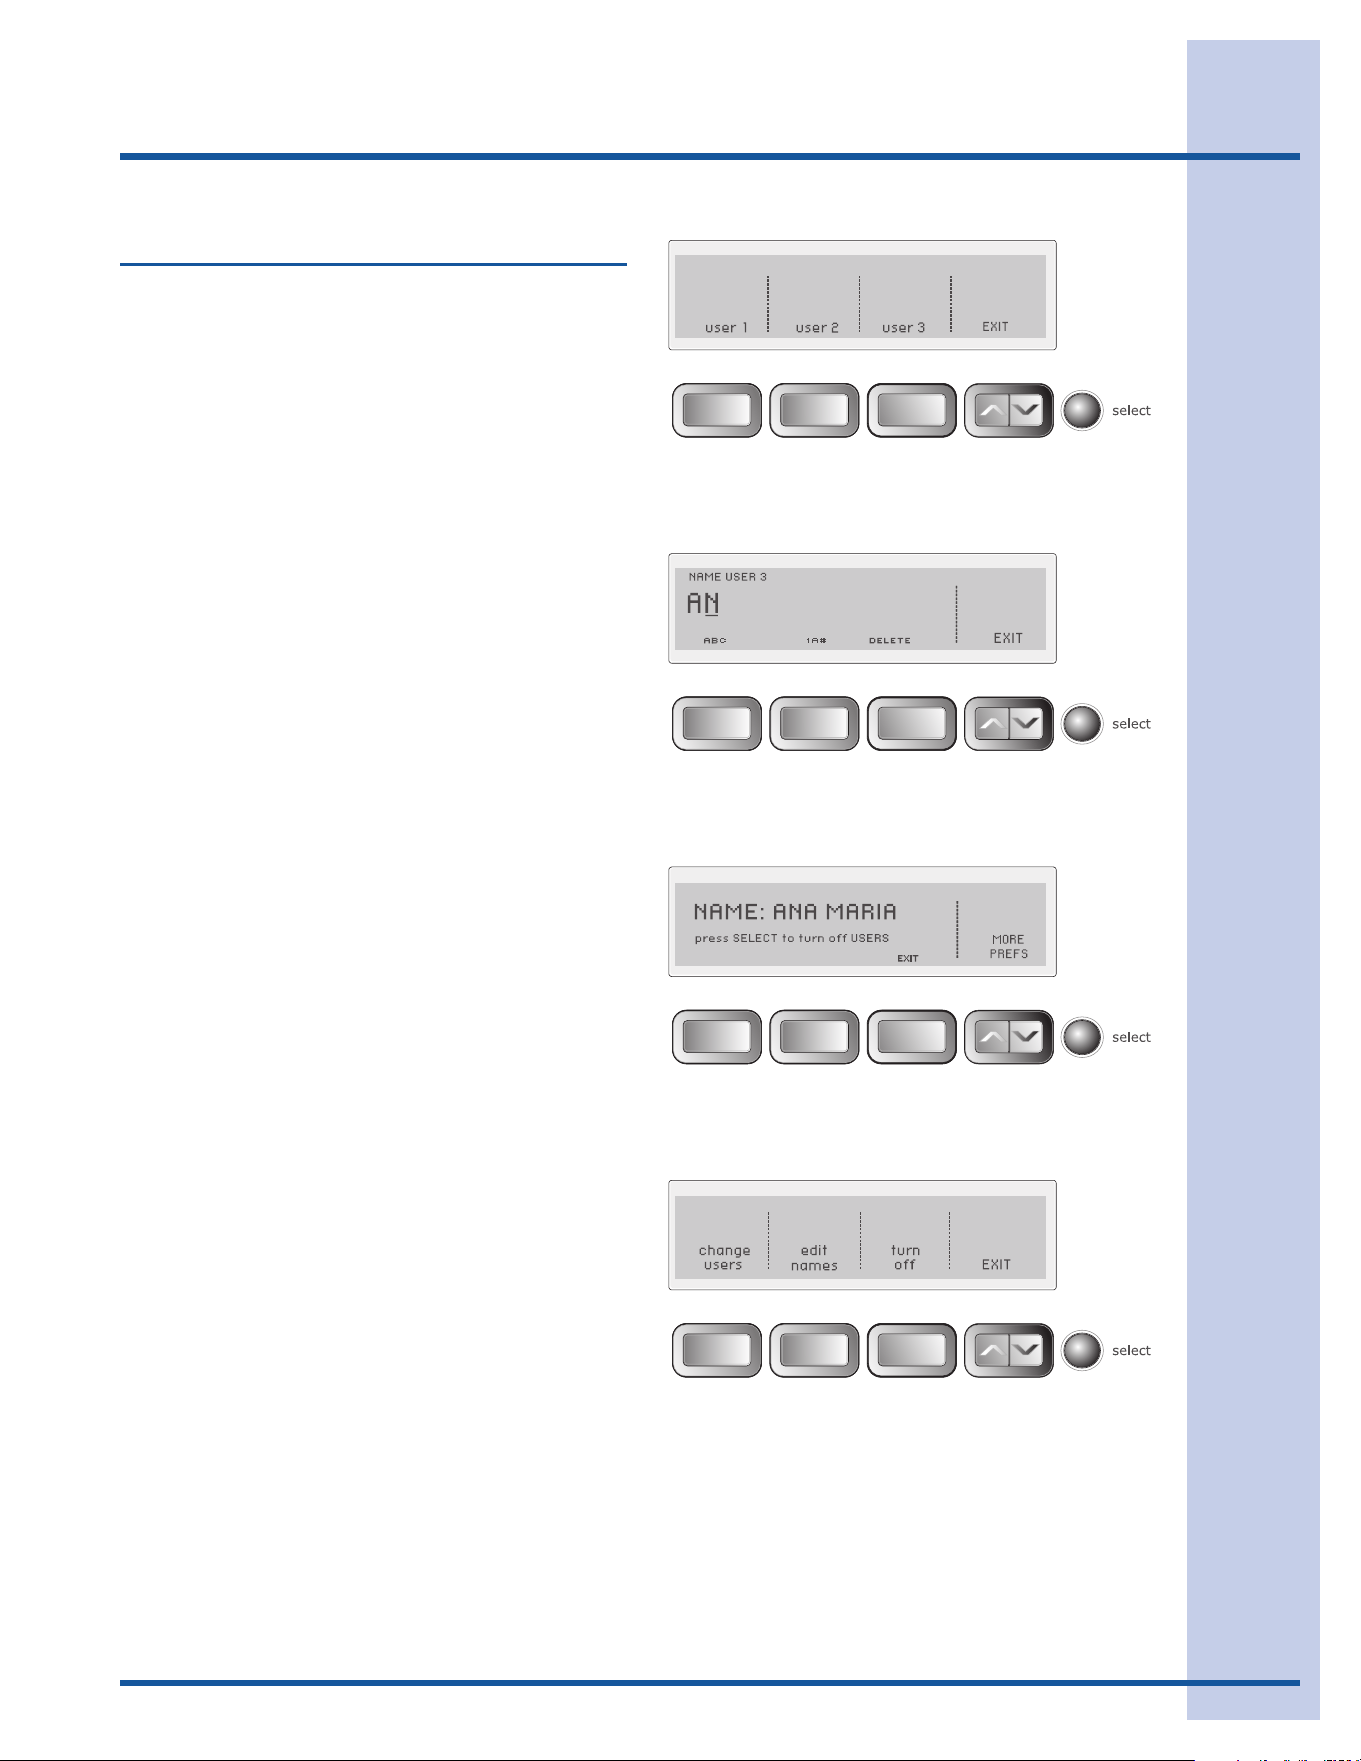
Press• select again to enter CUSTOM MODE.
Pressthebuttonfor• user 1, user 2 or user 3.
Press• select.
PressthebuttonunderABC to name the favorite
cyclealphabetically.Usethebuttonunder1A#
toaddnumbers,foreignlanguagecharactersor
symbolstothename.
Rotatethecycleselectorknobineitherdirection
to select the characters in the name, pausing after
eachcharactertoletthecursoradvance.Pressthe
buttonunderDELETE to erase incorrect entries.
ThereisablankcharacterbetweenZ and A for
insertingspacesinyourcustomname.Pausemo-
mentarilyonthischaracterasyouwouldtoinsert
anyothercharacter,thencontinue.
Whenthenamehasbeenentered,pressselect to
save the name.
To edit names while in CUSTOM MODE, turn
thedryeroffbypressingcancel.Pressanyother
buttontowakethedryerup.Screenwilldisplay
to change or turn off USERS press SELECT.
You must press selectwithin5secondsordryer
will return to normal operation with previous user
selected.Afterpressingselectyouhavethechoice
of change users, edit names, turn off or EXIT.
Makeyourselectionandfollowthedirections
displayed.
Eachcustomusermayselectupto3favorite
cycles.Thedryerwillremembercyclesettings,
options, preferences, etc. for each user. This al-
lows each user to customize without the hassle of
selecting all items each time.

26
Operating User Interface Features
Setting Preferences, con’t
INSTALL CYCLE
Run the INSTALL CYCLEbeforeoperatingthe
dryerthersttime.Removeallitemsfromthe
dryerdrumandpressstart. For more information
onperformingthedryerINSTALL CYCLE, refer to
the Installation Instructionsaccompanyingthis
dryer.
IfthedryerhasbeeninstalledaccordingtoIn-
stallation Instructions, INSTALL PASS!willbe
displayedandthedryerisreadytouse.
Ifthedryerwasnotinstalledproperly,SERVICE
CORD
, NO GAS or CALL SERVICE 877 435
3287
willbedisplayedtoindicatetheinstallation
error.
Theerrorsmayresultfromthefollowingcondi-
tions:
SERVICE CORD• (electricdryer)—Thepower
supplycordhasbeeninstalledimproperlyorthe
house wiring to the receptacle is incorrect.
NO GAS• (gasdryer)—Thereisnoconnection
betweenthedryerandthegaslineorthevalve
is closed.
CALL SERVICE• —
Errorcanonlybecorrectedby
callingaqualiedtechnician(1-877-435-3287).
Repeat the INSTALL CYCLE when corrections are
completed.
NOTE
The INSTALL CYCLEispromptedautomatically
onlyoncewhenthedryeristurnedontherst
timeattheendofinstallation.Afterthat,ifyou
wishtorunasubsequentINSTALL CYCLE when
movingthedryerormodifyingyourinstallation,
youmayperformyourownINSTALL CYCLE
byselectingitintheset prefs feature and then
following the screen prompts.
27
Operating User Interface Features
Setting Preferences, con’t
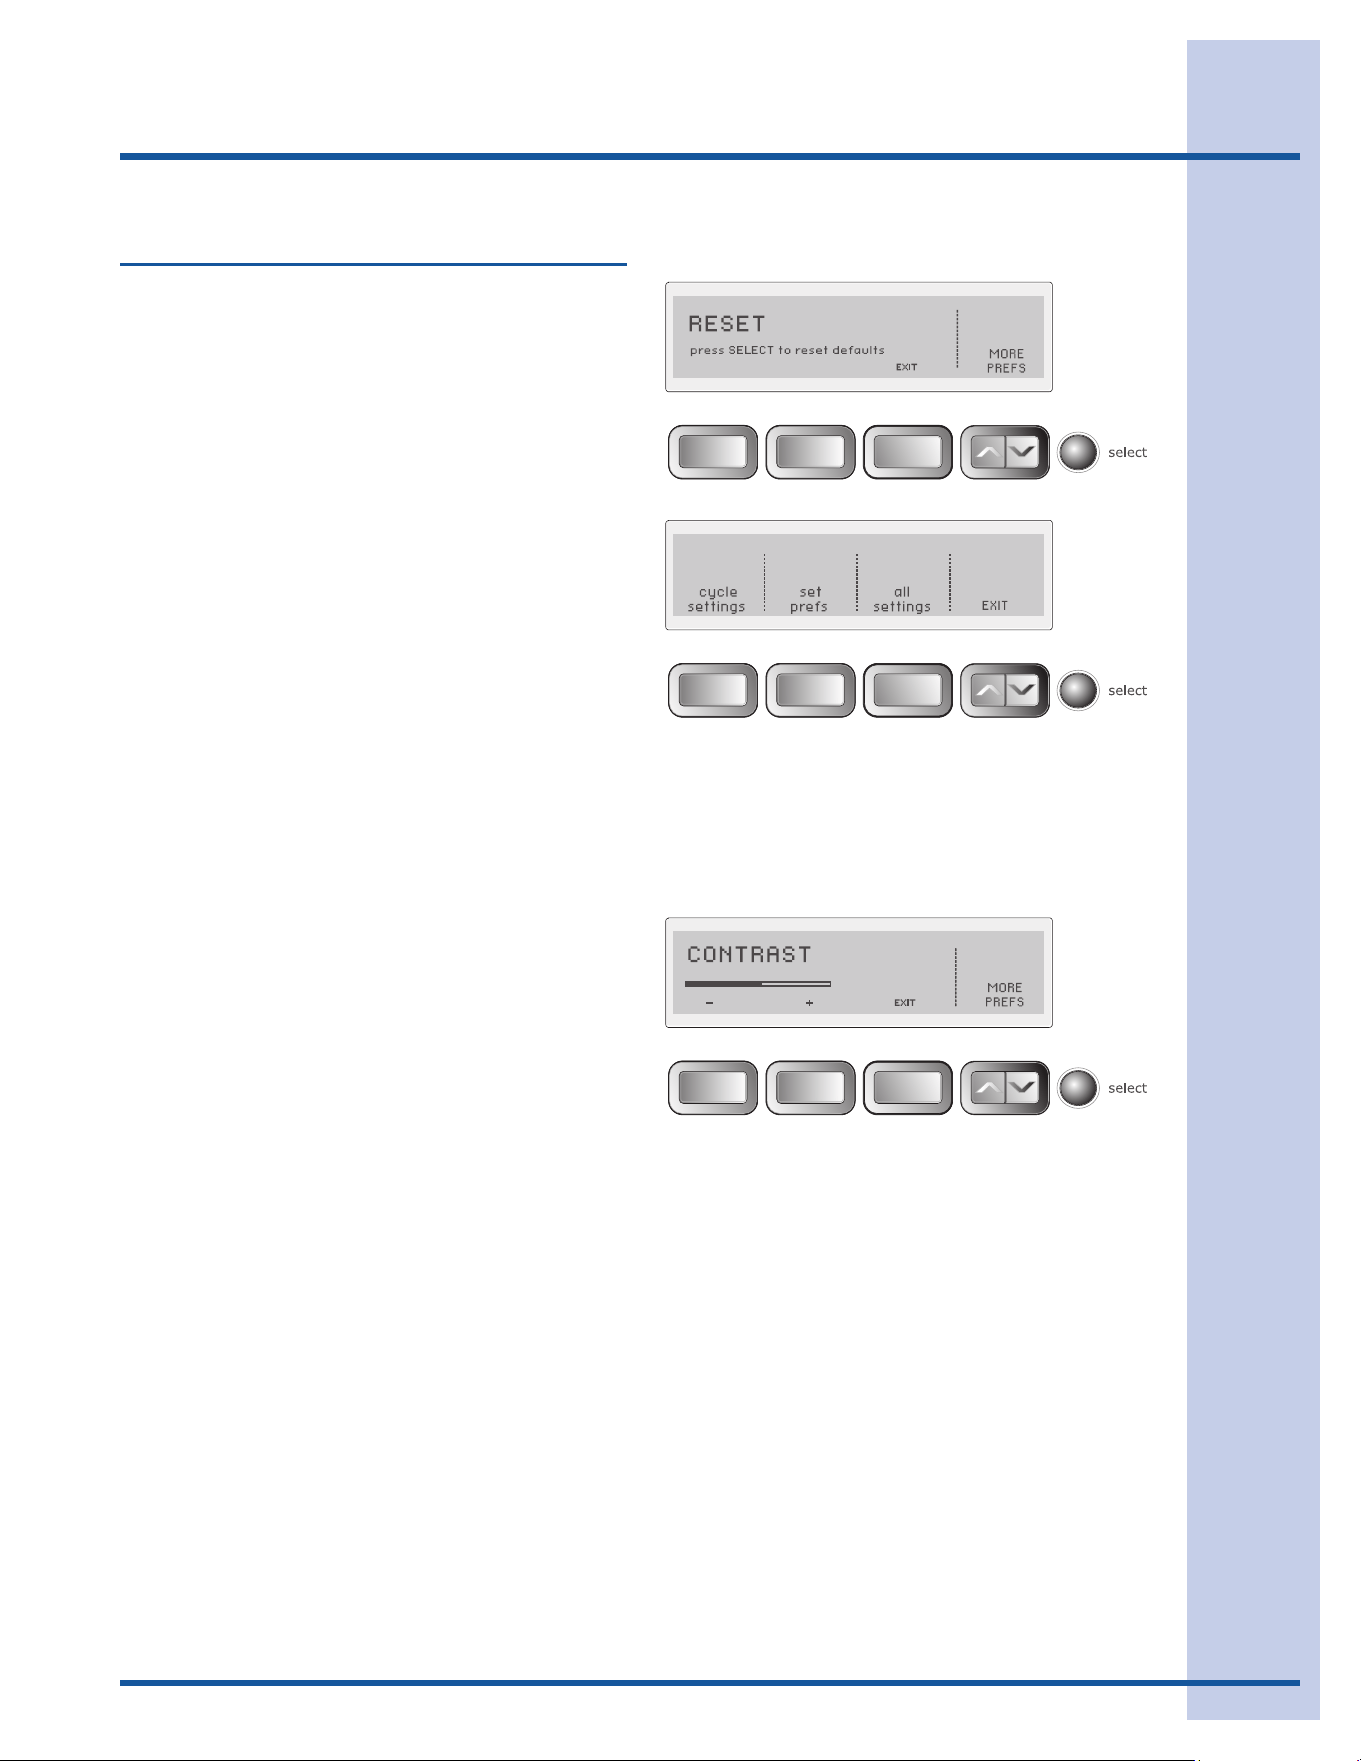
RESET
Pressthebuttonsindicatedtorestoreonlycycle
settings,resetonlyfactorypreferences(users,
language,brightness,volume,etc.)orrestore
allfactorydefaults(bothcyclesettingsandfac-
torypreferences).PressthebuttonunderEXIT
to return to normal operation or press the cancel
buttontoturnthedryeroffwithoutmakingany
changes.Ifyoudonotmakeaselectionwithin
30secondsthedryerwillreturntonormalopera-
tionwithoutanychanges.Ifyouresetallsettings,
INSTALL CYCLEwillbedisplayedasthoughthe
dryerwerejustturnedonforthersttime.You
maypressthebuttonunderCANCELifyoudonot
wish to rerun the INSTALL CYCLE.
CONTRAST
Pressthebuttonbeneathplus(+)orminus(-)
symbolstoincreaseordecreasethecontrastof
thedisplay.Pressselect to accept the change or
pressthebuttonunderEXIT to return to normal
operationwithoutanychanges.
28
Operating User Interface Features
Setting Preferences, con’t
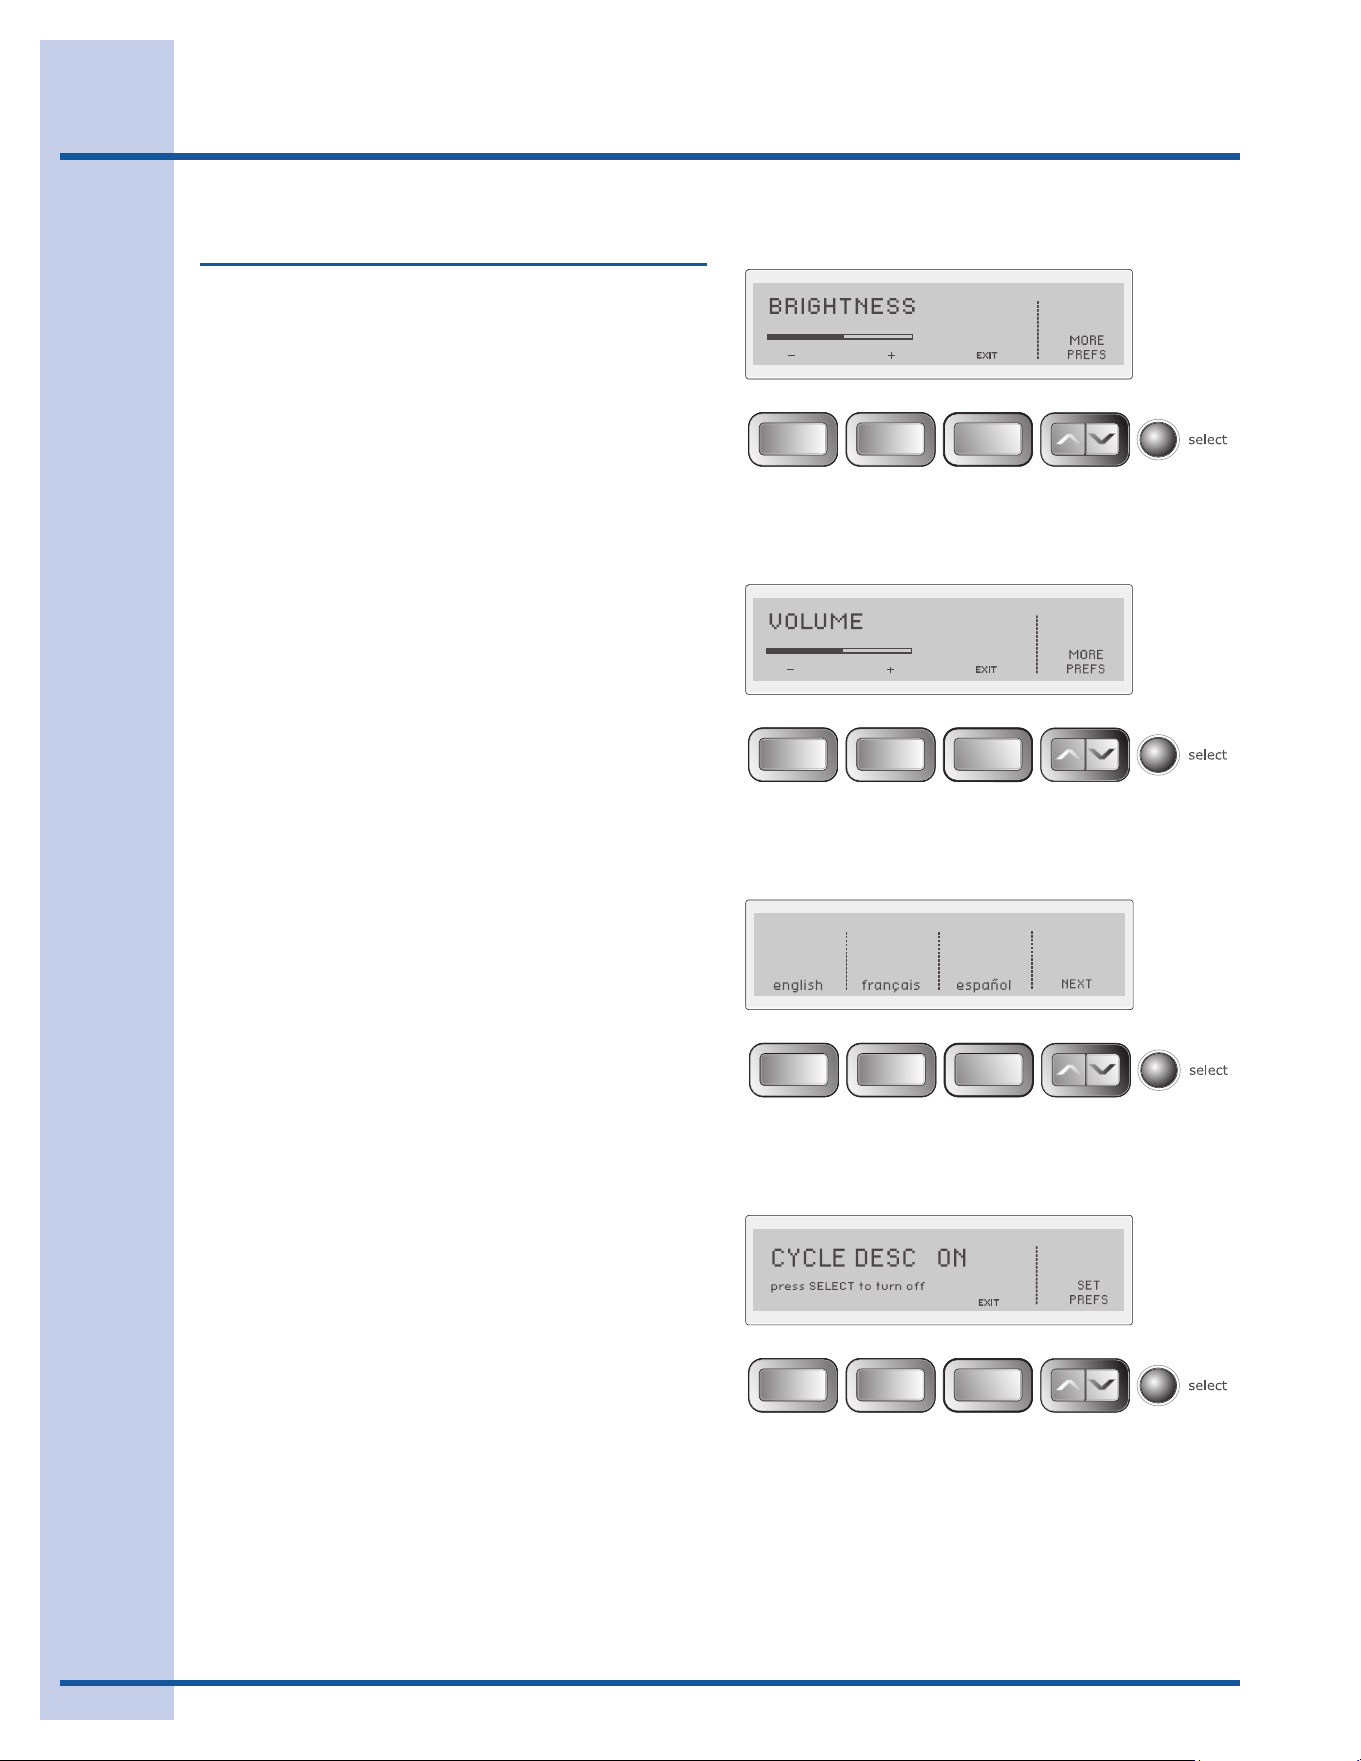
BRIGHTNESS
Pressthebuttonbeneaththeplus(+)orminus(-)
symbolstoincreaseordecreasethebrightnessof
thedisplay.Pressselect to accept the change or
pressthebuttonunderEXIT to return to normal
operationwithoutanychanges.
VOLUME
Pressthebuttonbeneaththeplus(+)orminus(-)
symbolstoincreaseordecreasethevolumeofthe
chime.Pressselect to accept the change or press
thebuttonunderEXIT to return to normal opera-
tionwithoutanychanges.
LANGUAGE
SelectEnglish,FrenchorSpanishforthedisplay
language.
CYCLE DESCRIPTION
Thename,aniconandabriefdescriptionaredis-
playedforeachcycle.Todeletethedisplay,press
select.Torestorethedisplay,pressselect and
CYCLE DESC ON - press SELECT to turn OFF
willappearintheLCDUserInterface.
29
Operating Other Features
NOTE
Forstep-by-stepinstructionsonDOOR
REVERSAL,refertothe Installation Instructions
suppliedwiththisdryer.
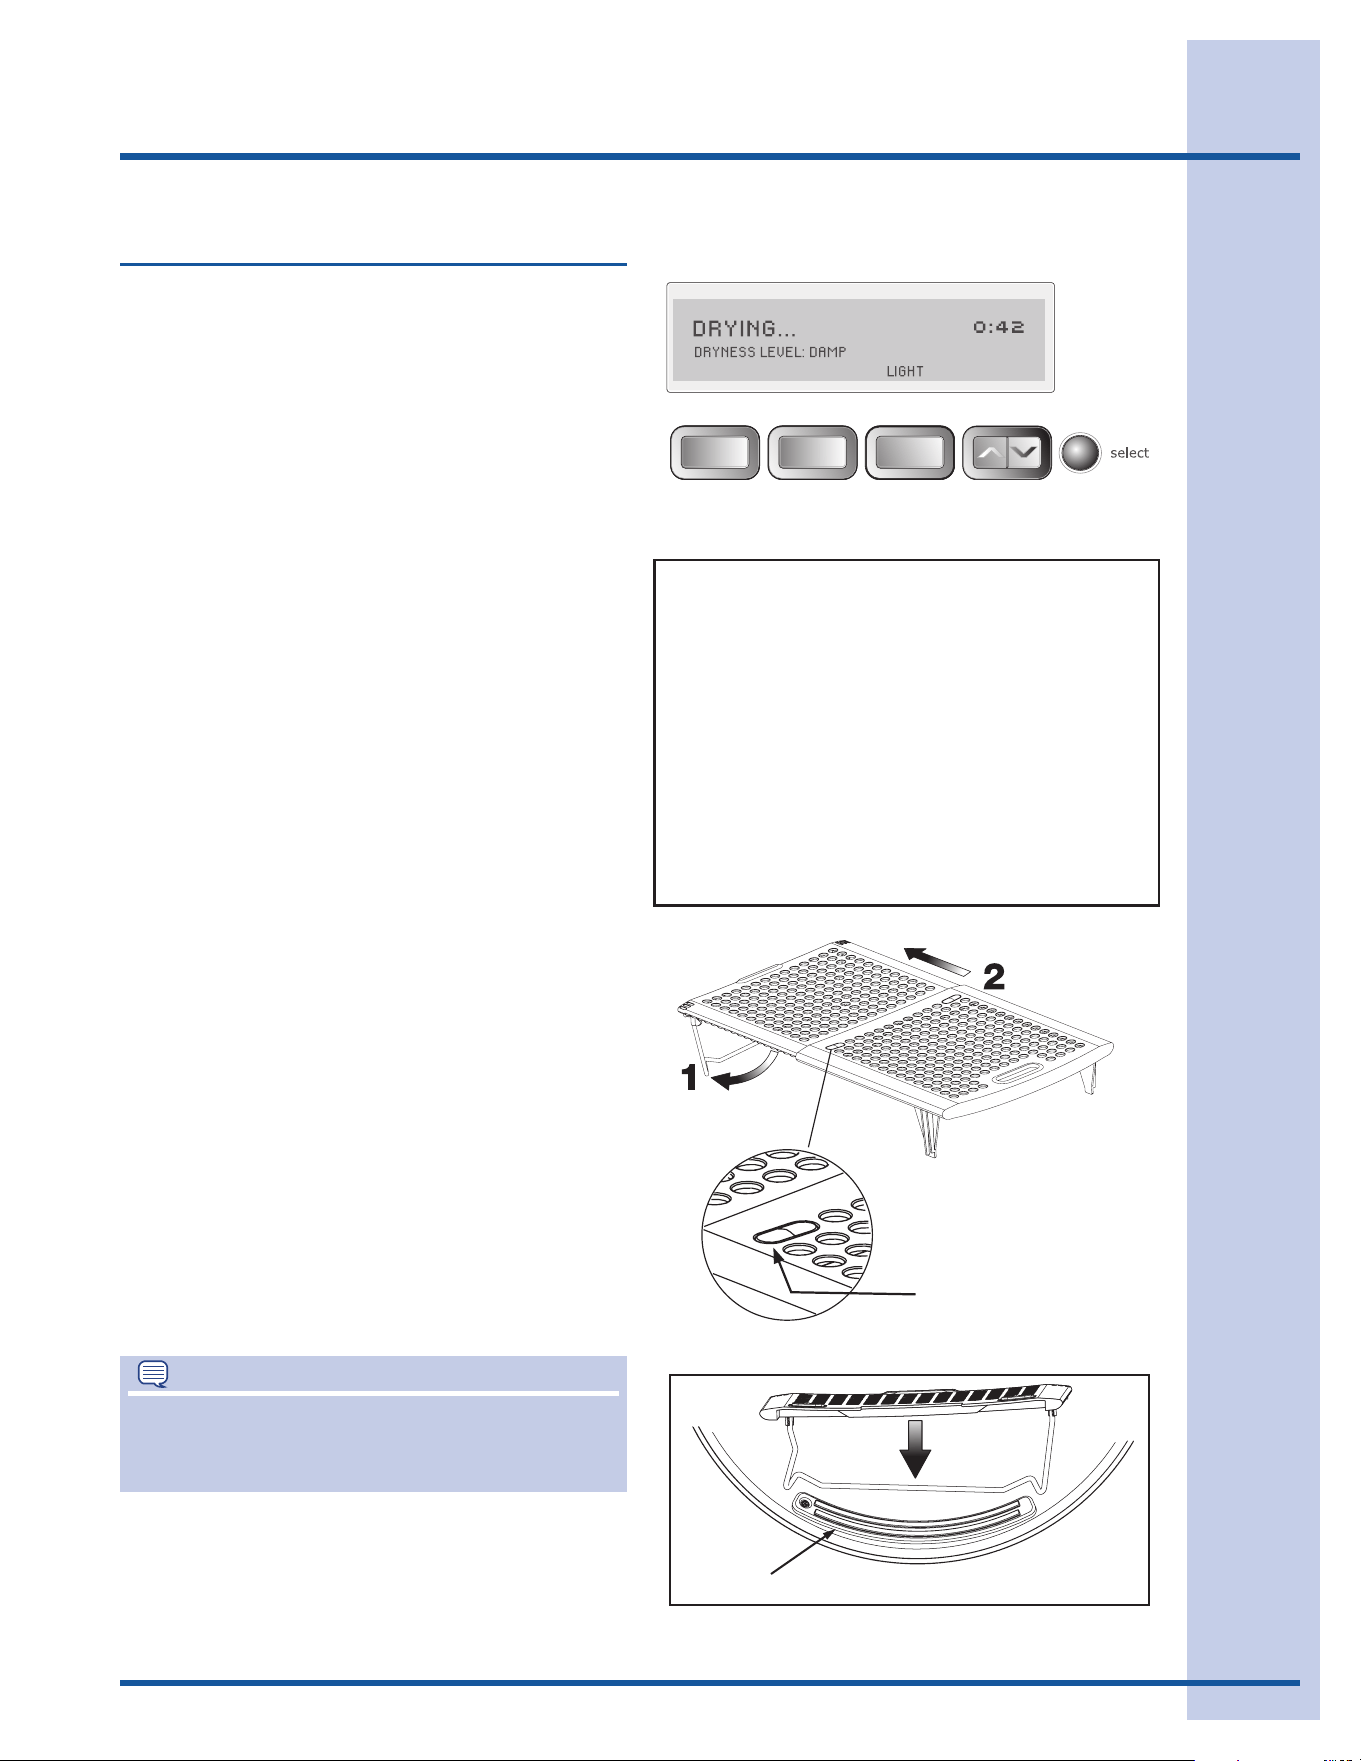
STATUS DISPLAY
Theestimatedtotalcycletimewillbedisplayed
whenthecycleisselected.Theestimatedremain-
ingcycletimeisdisplayedduringthecycle.
DRUM LIGHT
The drum light will come on whenever the door is
opened to illuminate the drum during loading and
unloading.Closingthedoorturnsoffthelight.The
drumlightwillautomaticallyturnoffifthedooris
left open more than 3 minutes.
Toactivatethedrumlightduringacycle,pressthe
buttonunderLIGHT.Thelightwillstayonduring
thecyclefor3minutes.Toturnitoff,pressthe
buttonunderLIGHT again.
DRYING RACK
Usethedryingracktodryitemswhichshouldnot
betumbledried.Folddownthemetalsupporton
thebackoftherackandslowlyextendtherack
untilthelocktabsclickintoplace.Inserttherack
intothedryerdrum,restingthebacksupporton
themoisturesensorbarsandthefrontlegsonthe
air grill.
Placeitemstobedriedontopoftherack,leav-
ingspacebetweenitemsandnotallowingthem
to hang over the sides or through the holes. The
weightshouldnotexceed10lbs(4.5kg).Select
the air(noheat)settingforitemscontainingplas-
tic,foamrubber,rubber-likematerials,feathersor
down.
Whenitemsaredry,removetherack,pushthetwo
centertabstocollapsetherackandfoldupthe
backsupport.Storethedryingrackinaconve-
nient location.
REVERSIBLE DOOR
Yourdryerisequippedwithareversibledoor.The
doorcanbehingedontherightorleftside.
Other Features
moisture sensing bars
Extendrackuntiltabs
click.Presstabsdown
tocollapserack.
DRYING...
PERFECT STEAM (onSteamModelonly)
DAMP ALERT - DRYING WILL CONTINUE...
COOLING...
SANITIZING...
ADDING STEAM... (onSteamModelonly)
COMPLETE - WRINKLE RELEASE IS ON
COMPLETE - EXT. TUMBLE WILL CONTINUE
COMPLETE
CLEAN FILTER
STATUS DISPLAY
The following will also be displayed at the
appropriate times during the cycle:
30
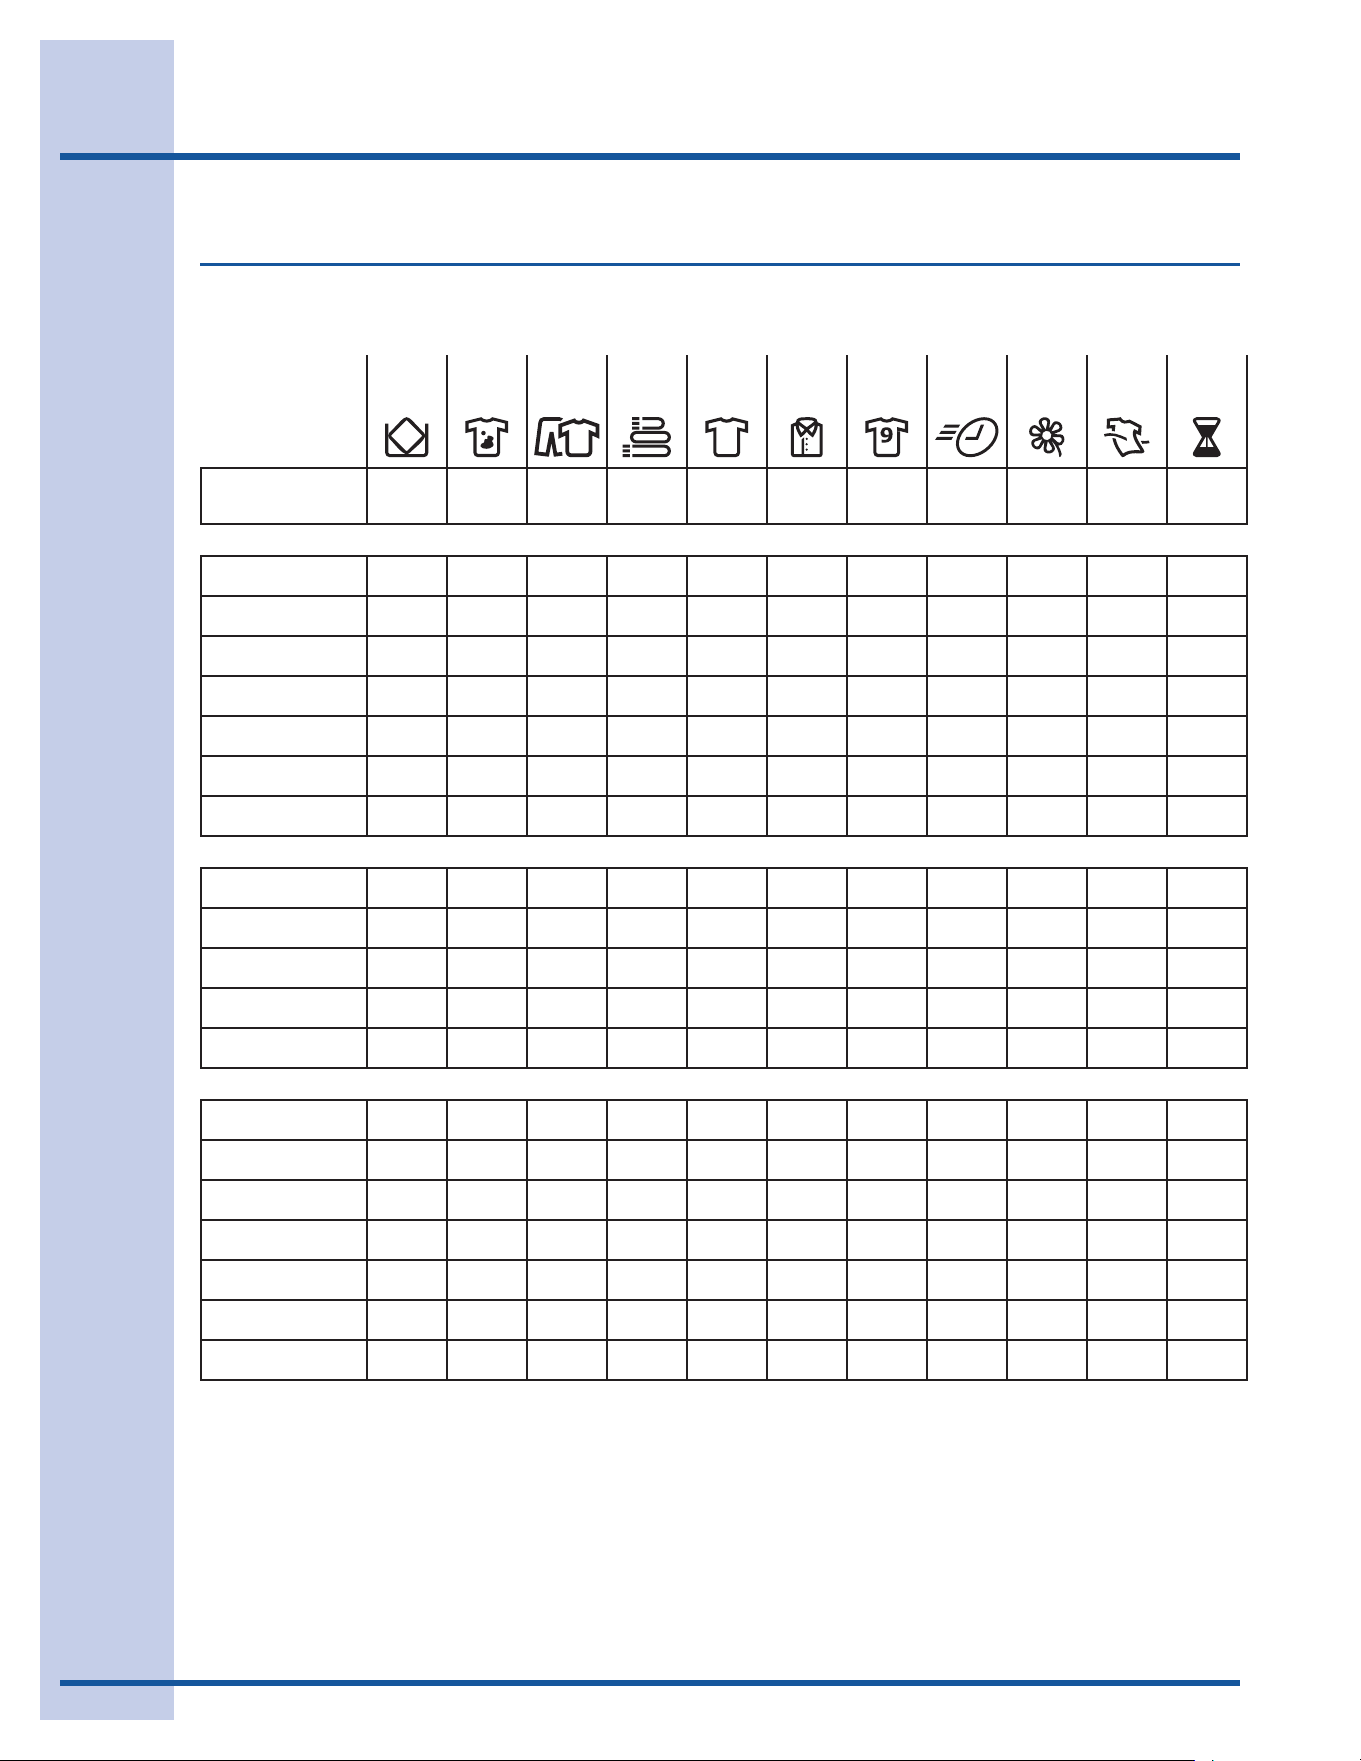
Cycle Chart
These Temperature, Dryness levels and Optionsareavailablewiththefollowingcycles:
bulky/
bedding
heavy
duty
mixed
load
towels normal casual active
wear
fast
dry
delicate touch
up
time
dry
EstimatedCycle
Duration**
60 min 70 min 55 min 50 min 45 min 35 min 30 min 18 min 25 min 15 min 15-90
min
Temperature
maximum temp
high temp * * *
med high temp * *
medium temp * * *
med low temp *
low temp * *
air fluff temp
Dryness
maximum dry
more dry *
normal dry * * * * *
less dry * *
damp dry
Options
damp alert
extended tumble *
wrinkle release
delicate heat * * *
shrink guard *
sanitize
perfect tumble™ * * *
*Factorypresets
Availableselections
**Estimatedcycledurationisbasedondefaultdrynesslevelandfactorysettingsofelectricdryers.Displayedcycledurationmay
differslightlyongasmodels.
Dryer Setting Chart (non-Steam Model)
31
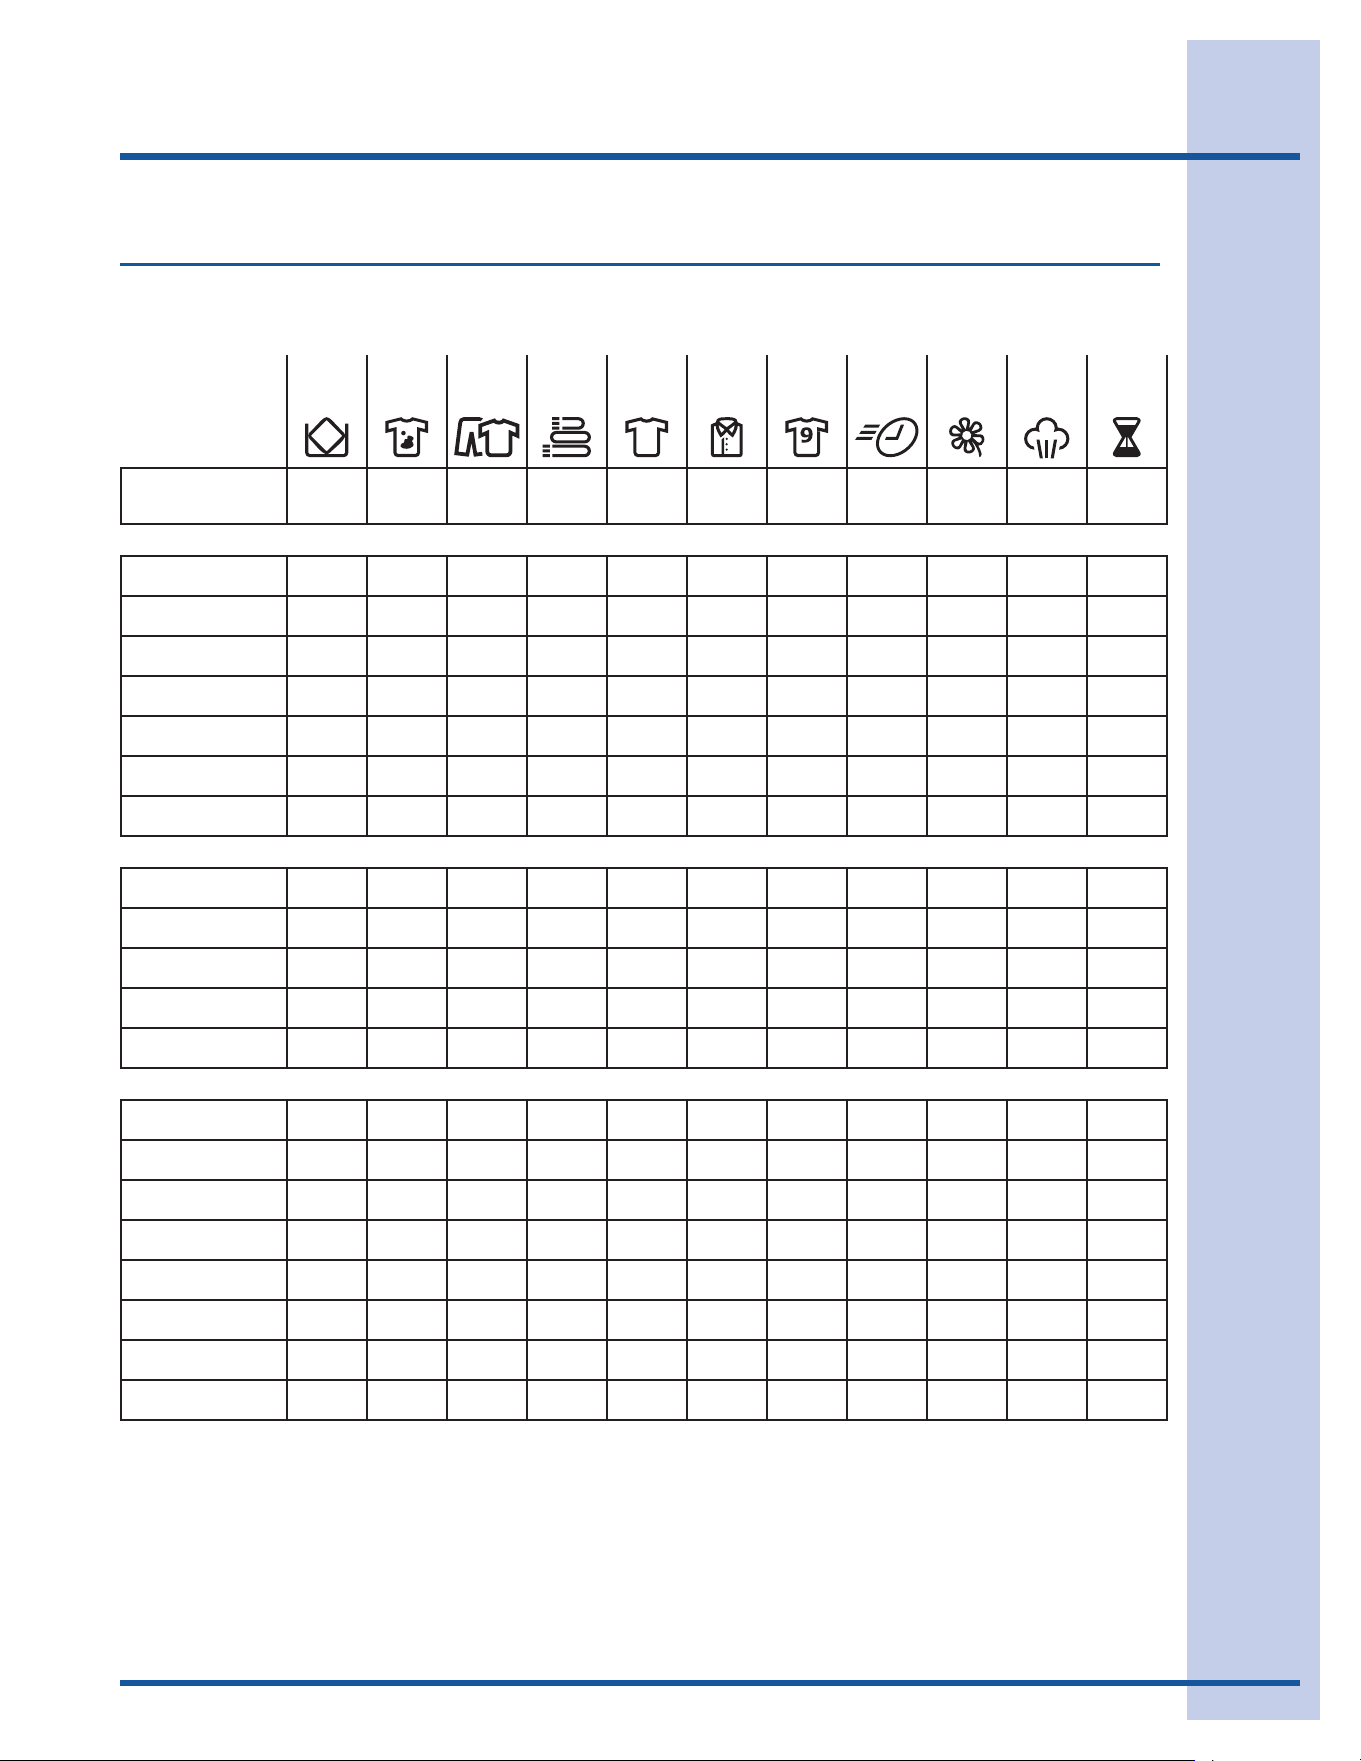
Cycle Chart
These Temperature, Dryness levels and Optionsareavailablewiththefollowingcycles:
bulky/
bedding
heavy
duty
mixed
load
towels normal casual active
wear
fast
dry
delicate perfect
steam™
time
dry
EstimatedCycle
Duration**
E 60 min 70 min 55 min 50 min 45 min 35 min 30 min 18 min 25 min 15 min 15-90
min
Temperature
maximum temp
high temp * * *
med high temp * *
medium temp * * *
med low temp *
low temp * *
air fluff temp
Dryness
maximum dry
more dry *
normal dry * * * * *
less dry * *
damp dry
Options
damp alert
extended tumble *
wrinkle release
delicate heat * * *
shrink guard *
sanitize
add steam ¹
perfect tumble™ * * *
*Factorypresets
Availableselections
**Estimatedcycledurationisbasedondefaultdrynesslevelandfactorysettingsofelectricdryers.Displayedcycledurationmay
differslightlyongasmodels.
¹Thisoptioniscannotbedeselected.
Dryer Setting Chart (Steam Model)
32
Care & Cleaning
WARNING
FIREHAZARD
Aclothesdryerproducescombustiblelint.
Thedryermustbeconnectedtoanoutdoors
exhaust.Regularlyinspecttheoutdoorexhaust
openingandremoveanyaccumulationoflint
around the opening and in the surrounding area.
WARNING
Toreduceriskofreorseriousinjurytopersons
orproperty,complywiththebasicwarningslisted
intheImportantSafetyInstructionsandthose
listedbelow.
Beforecleaningthedryerinterior,unplugthe•
electricalpowercordtoavoidelectricalshock
hazards.
Donotuseanytypespraycleanserwhenclean-•
ingthedryerinterior.Hazardousfumesorelectri-
calshockcouldoccur.
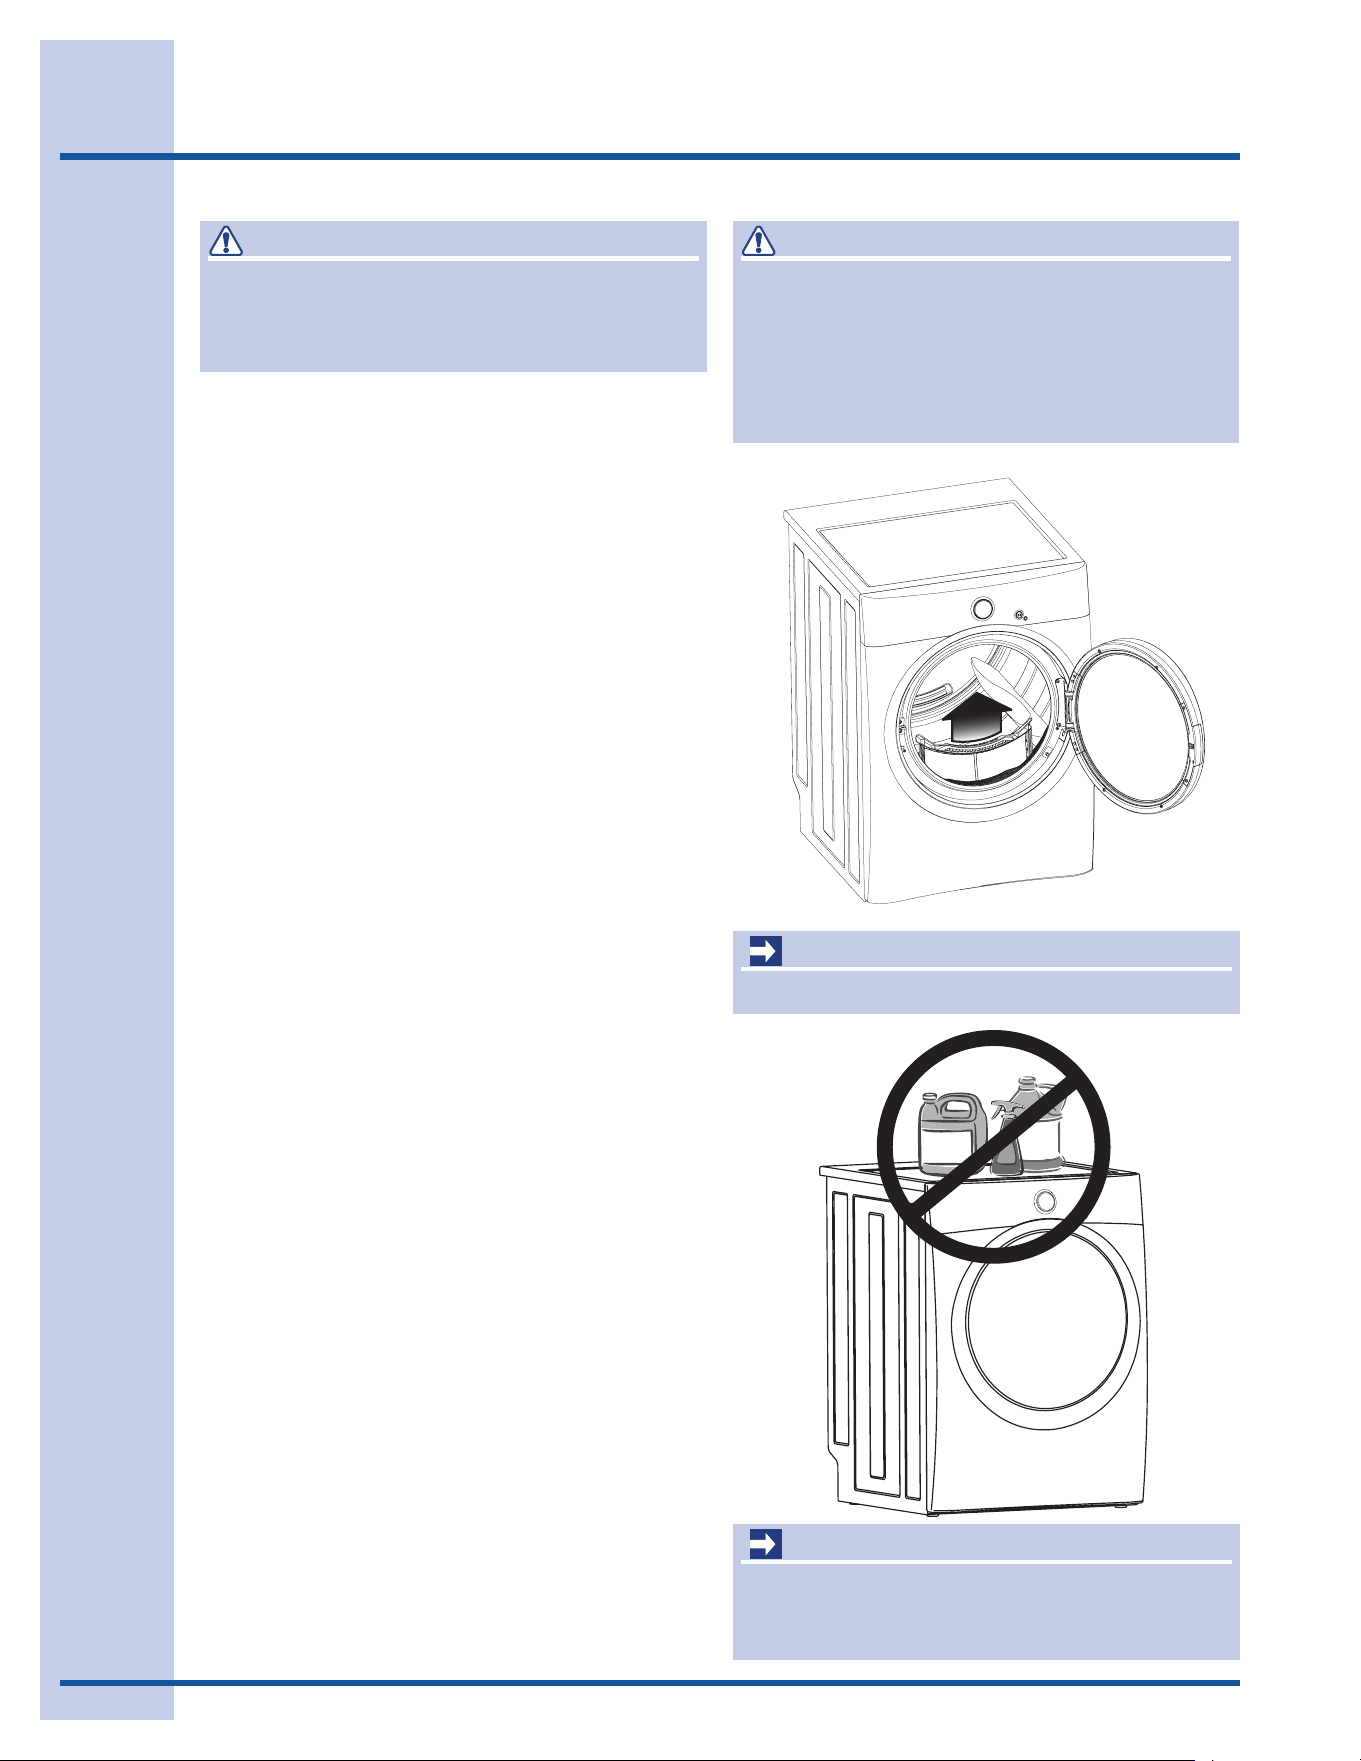
INSIDE
Cleanthelintlteraftereveryload.Lintbuild-•
up on the filter restricts air flow, which causes
longerdryingtimes.Thelterislocatedatthe
bottomofthedooropening.Removebypulling
straight up. Remove the lint and replace the filter.
Occasionallyawaxybuild-upmayformonthe•
lintlterand/ormoisturesensingbarsfrom
usingdryer-addedfabricsoftenersheets.To
removethisbuild-up,washthemwithwarm,
soapywater.Drythelterthoroughlyandre-
place.Donotoperatethedryerwithoutthelint
filter in place.
Ifthedryerdrumbecomesstainedfromnoncol-•
orfastfabrics,cleanthedrumwithadampcloth
and a mild liquid household cleanser. Remove
cleanserresiduebeforedryingthenextload.
Every18monthsanauthorizedservicershould•
cleanthedryercabinetinteriorandexhaust
duct. These areas can collect lint and dust
overtime.Anexcessiveamountoflintbuild-up
couldresultininefcientdryingandpossible
fire hazard.
OUTSIDE
Cleanthecabinetwithmildsoapandwater.•
Neveruseharsh,grittyorabrasivecleansers.
Ifthecabinetbecomesstained,cleanwith•
dilutedchlorinebleach(1partbleachto8parts
water).Rinseseveraltimeswithclearwater.
Removeglueresiduefromtapeorlabelswitha•
mixture of warm water and mild detergent. Or,
touchresiduewiththestickysideofthetapeor
label.
When cleaning chrome parts use a window •
cleaner with ammonia or mild soap and water.
Beforemovingthedryer,placeastripofcard-•
boardorthinberboardunderthefrontleveling
legs to prevent damage to the floor.
IMPORTANT
Donotstoreorplacelaundryproductsontopof
dryeratanytime.Theycandamagethenishor
controls.
IMPORTANT
Cleanlintscreenaftereveryload.

33
Solutions to Common Problems
Common Drying Problems
Manydryingproblemsinvolvepoorcleaningresults,poorsoilandstainremoval,residuesoflintand
scum,andfabricdamage.Forsatisfactorydryingresults,followthesesuggestionsprovidedbyThe
SoapandDetergentAssociation.
PROBLEM POSSIBLECAUSES SOLUTIONS PREVENTIVEMEASURES
Greasy,oily
stains
Fabricsoftenersheet.• Rubfabricsoftenerstains•
withbarsoap.Rinseand
rewash.
Addafewbathtowels•
to small loads for proper
tumbling.
Some“silk-like”fabrics•
shouldbeairdried.
Useproperdryingtempera-•
ture.
Placefabricsoftenersheet•
ontopofloadbeforestart-
ingthedryer.
Lint Overloading.•
Overdryingcausesstatic•
electricity.
Lintscreennotcleanwhen•
cyclebegan.
Lintisattachedto“pills.”•
Reduce load size and •
rewashusingliquidfabric
softener in the final rinse.
Or,addafabricsoftener•
sheetandtumblewithout
heat.
Uselintbrushorrollerto•
remove lint.
Donotoverloaddryer.•
Usefabricsoftenerin•
washerordryertoreduce
staticelectricity.
Removeitemswhenthey•
areslightlydamptoavoid
overdrying.
Checkthatlintlterisclean•
and in place.
Pilling
(Fibersballup
and cling to
fabric.)
Overdrying.• Usealintbrushorshaverto•
remove pills.
Usefabricsoftenertolubri-•
catebers.
Whenironing,usespray•
starchorfabricnishon
collars and cuffs.
Turn items inside out to •
reduceabrasion.
Shrinking Temperature too high.•
Overdrying.•
Irreversiblecondition.• Followfabriccarelabel•
directions.
Ifshrinkingisaconcern,•
checkloadoften.
Removeitemswhileslightly•
dampandhangorlayatto
completedrying.
Blockknitsintoshape.•
Wrinkling Overloading.•
Leavingitemsindryerafter•
cycleends.
Reduce load size and •
tumbleatmediumorlow
heat for 5-10 minutes.
Removeitemsimmediately.•
Hang or fold.
Donotoverloaddryer.•
Remove items as soon as •
cycleends.

34
Solutions to Common Problems
Service Prevention Checklist
Beforecallingforservice,reviewthislist.Itmaysavebothtimeandexpense.Thelistincludescommon
occurrencesthatarenottheresultofdefectiveworkmanshipormaterialsinthisdryer.
OCCURRENCE POSSIBLECAUSE SOLUTION
Dryerdoesnotstart. Electricalpowercordisnotsecurelyplugged
inorplugmaybeloose.
Makesuretheplugtstightlyinwalloutlet.
Housefuseblownorcircuitbreakertripped. Resetcircuitbreakerorreplacefuse.
Makesureelectricallineisnotoverloadedandthe
dryerisonaseparatecircuit.
Thermal limiter tripped. Callauthorizedservicepersonforreplacement.
LCDdisplays
DEMO MODE.
Dryerhasbeenprogrammedtotemporarily
performarepeatingdemocycle.
Toreturntothefactorydefaultsettings,selectRESET
in set prefs under the optionsscrollbuttons.
Dryerrunsbutwon’t
heat.
Thereare2housefusesinthedryercircuit.If1
ofthe2fusesisblown,thedrummayturnbut
theheaterwillnotoperate.(electricmodels)
Replace fuse.
Gassupplyvalveisnotopen(gasmodels). Checktomakesuresupplyvalveisopen.SeeINSTAL-
LATIONINSTRUCTIONSforprocedure.
Dryerdoesnothaveenoughairsupplyto
supporttheburnerame(gasmodels).
SeeINSTALLATIONINSTRUCTIONS.
LPgassupplytankisemptyortherehas
beenautilityinterruptionofnaturalgas(gas
models).
Rellorreplacetank.
Dryershouldheatwhenutilityserviceisrestored.
Dryingcycletakestoo
long, outside of the
dryerfeelstoohotor
smells hot.
Lintlteriscloggedwithlint. Makesurealllinthasbeenremovedfromthedryerlint
lterbeforestartingeachcycle.
Exhaustductrequirementshavenotbeen
met.
Exhaustductmustbeatleast4inchesindiameterand
made of rigid or semi-rigid metal.
When in place, the duct must have no more than
two90°bendsandmustnotexceedlengthlistedin
INSTALLATIONINSTRUCTIONS.
Electricdryerisconnectedtoa208volt
circuit.
Dryingtimewillbe20%longerthandryingona240
volt circuit.
Dryingprocedureshavenotbeenfollowed. See“OperatingInstructions.”
Outsideexhausthoodorexhaustductmay
becloggedorrestricted.
Cleanoutanyobstruction.
Highhumidity. Useadehumidiernearthedryer.

35
Solutions to Common Problems
Service Prevention Checklist, con’t
OCCURRENCE POSSIBLECAUSE SOLUTION
Excessivewrinkling. Dryerisoverloaded. Donotoverload.See“OperatingInstructions.”
Itemsleftindryertoolong. Removeitemsassoonascycleends.
Insufficient sorting of items. See“OperatingInstructions.”
Dryingtemperaturetoohigh. Followfabriccarelabelinstructions.
Scratching or chipping
of the drum finish.
Foreignobjectssuchascoins,pins,clipsor
buttonsareinsidethedryer.*
Alwaysremoveforeignobjectsfrompocketsbefore
laundering.Removeobjectsfromdrumandrestart
dryer.
Permanentlyattacheditemssuchasbelt
buckles,zippersandfastenersmaybehitting
the inside of the drum.*
Itmaybenecessarytosewascrapofmaterial
securelyaroundornamentsbeforedryingtoprevent
scratchinganddamagetothedryer.
*Drumdamagecausedbyforeignobjectsorpermanentlyattacheditemsisnotcoveredbythewarranty.

36
Warranty Information
Yourapplianceiscoveredbyaoneyearlimitedwarranty.Foroneyearfromyouroriginaldateofpurchase,Electroluxwill
repairorreplaceanypartsofthisappliancethatprovetobedefectiveinmaterialsorworkmanshipwhensuchapplianceis
installed,used,andmaintainedinaccordancewiththeprovidedinstructions.Inaddition,yourapplianceiscoveredbyan
additionaloneyear,partsonly,limitedwarranty.Duringthe2ndyearfromyouroriginaldateofpurchase,Electroluxwillpay
forpartsneededforthisappliancethathaveproventobedefectiveinmaterialsorworkmanshipwhenyourapplianceis
installed, used, and maintained in accordance with the provided instructions.
Exclusions
Thiswarrantydoesnotcoverthefollowing:
Productswithoriginalserialnumbersthathavebeenremoved,alteredorcannotbereadilydetermined.1.
ProductthathasbeentransferredfromitsoriginalownertoanotherpartyorremovedoutsidetheUSAorCanada.2.
Rust on the interior or exterior of the unit.3.
Productspurchased“as-is”arenotcoveredbythiswarranty.4.
Productsusedinacommercialsetting.5.
Servicecallswhichdonotinvolvemalfunctionordefectsinmaterialsorworkmanship,orforappliancesnotinordinary6.
household use or used other than in accordance with the provided instructions.
Servicecallstocorrecttheinstallationofyourapplianceortoinstructyouhowtouseyourappliance.7.
Expensesformakingtheapplianceaccessibleforservicing,suchasremovaloftrim,cupboards,shelves,etc.,which8.
arenotapartoftheappliancewhenitisshippedfromthefactory.
Servicecallstorepairorreplaceappliancelightbulbs,airlters,waterlters,otherconsumables,orknobs,handles,9.
or other cosmetic parts.
Pickupanddeliverycosts;yourapplianceisdesignedtoberepairedinthehome.10.
Surchargesincluding,butnotlimitedto,anyafterhour,weekend,orholidayservicecalls,tolls,ferrytripcharges,or11.
mileageexpenseforservicecallstoremoteareas,includingthestateofAlaska.
Damagestothenishofapplianceorhomeincurredduringtransportationorinstallation,includingbutnotlimitedto12.
oors,cabinets,walls,etc.
Damagescausedby:servicesperformedbyunauthorizedservicecompanies;useofpartsotherthangenuineElec-13.
troluxpartsorpartsobtainedfrompersonsotherthanauthorizedservicecompanies;orexternalcausessuchas
abuse,misuse,inadequatepowersupply,accidents,res,oractsofGod.
DISCLAIMER OF IMPLIED WARRANTIES; LIMITATION OF REMEDIES
CUSTOMER’SSOLEANDEXCLUSIVEREMEDYUNDERTHISLIMITEDWARRANTYSHALLBEREPAIRORREPLACE-
MENTASPROVIDEDHEREIN.CLAIMS BASED ON IMPLIED WARRANTIES, INCLUDING WARRANTIES OF MER-
CHANTABILITY OR FITNESS FOR A PARTICULAR PURPOSE, ARE LIMITED TO ONE YEAR OR THE SHORTEST
PERIOD ALLOWED BY LAW, BUT NOT LESS THAN ONE YEAR.ELECTROLUXSHALLNOTBELIABLEFORCONSE-
QUENTIALORINCIDENTALDAMAGESSUCHASPROPERTYDAMAGEANDINCIDENTALEXPENSESRESULTINGFROM
ANYBREACHOFTHISWRITTENLIMITEDWARRANTYORANYIMPLIEDWARRANTY.SOMESTATESANDPROVINCES
DONOTALLOWTHEEXCLUSIONORLIMITATIONOFINCIDENTALORCONSEQUENTIALDAMAGES,ORLIMITATIONS
ONTHEDURATIONOFIMPLIEDWARRANTIES,SOTHESELIMITATIONSOREXCLUSIONSMAYNOTAPPLYTOYOU.
THISWRITTENWARRANTYGIVESYOUSPECIFICLEGALRIGHTS.YOUMAYALSOHAVEOTHERRIGHTSTHATVARY
FROM STATE TO STATE.
If You Need Service
Keepyourreceipt,deliveryslip,orsomeotherappropriatepaymentrecordtoestablishthewarrantyperiodshouldservice
berequired.Ifserviceisperformed,itisinyourbestinteresttoobtainandkeepallreceipts.Serviceunderthiswarranty
mustbeobtainedbycontactingElectroluxattheaddressesorphonenumbersbelow.
ThiswarrantyonlyappliesintheUSA,PuertoRicoandCanada.IntheUSAandPuertoRico,yourapplianceiswarranted
byElectroluxMajorAppliancesNorthAmerica,adivisionofElectroluxHomeProducts,Inc.InCanada,yourappliance
iswarrantedbyElectroluxCanadaCorp.Electroluxauthorizesnopersontochangeoraddtoanyobligationsunderthis
warranty.ObligationsforserviceandpartsunderthiswarrantymustbeperformedbyElectroluxoranauthorizedservice
company.Productfeaturesorspecicationsasdescribedorillustratedaresubjecttochangewithoutnotice.
USA
1-877-435-3287
ElectroluxMajorAppliancesNorthAmerica
NorthAmerica
P.O.Box212378
Augusta,GA30907
Canada
1-800-265-8352
ElectroluxCanadaCorp.
5855TerryFoxWay
Mississauga,Ontario,Canada
L5V3E4