English
Congratulations on your Celestron Labs
microscope purchase. Your new Celestron
Labs microscope is a precision optical
instrument, made of the highest quality
materials to ensure durability and long
life. It is designed to give you a lifetime of
enjoyment with minimal maintenance.
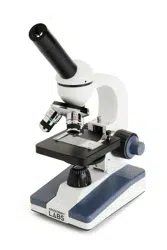
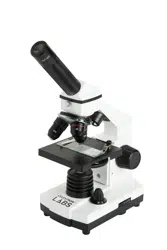
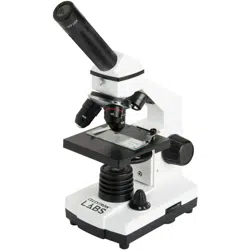
This CL-CM800 microscope provides powers
from 40x up to 800x. It is ideally suited for
examining specimen slides of yeasts and
molds, cultures, plant and animal parts,
fibers, bacteria, and more.
Before attempting to use your Celestron
Labs microscope, please read these
instructions to familiarize yourself with
the parts and functions of the microscope.
Refer to the microscope diagrams to locate
the parts discussed in the manual. The final
section of the manual provides simple care
and maintenance tips.
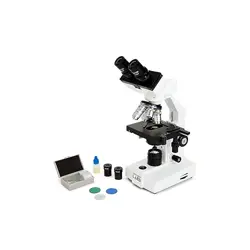
IN THE BOX
- Microscope CL-CM800
- 2 wide field eyepieces: 10x, 20x
- AC adapter
- 10 prepared slides
- 3 AA batteries
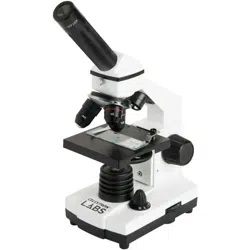
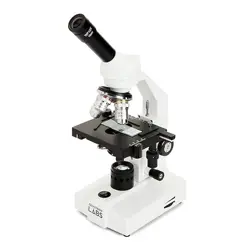
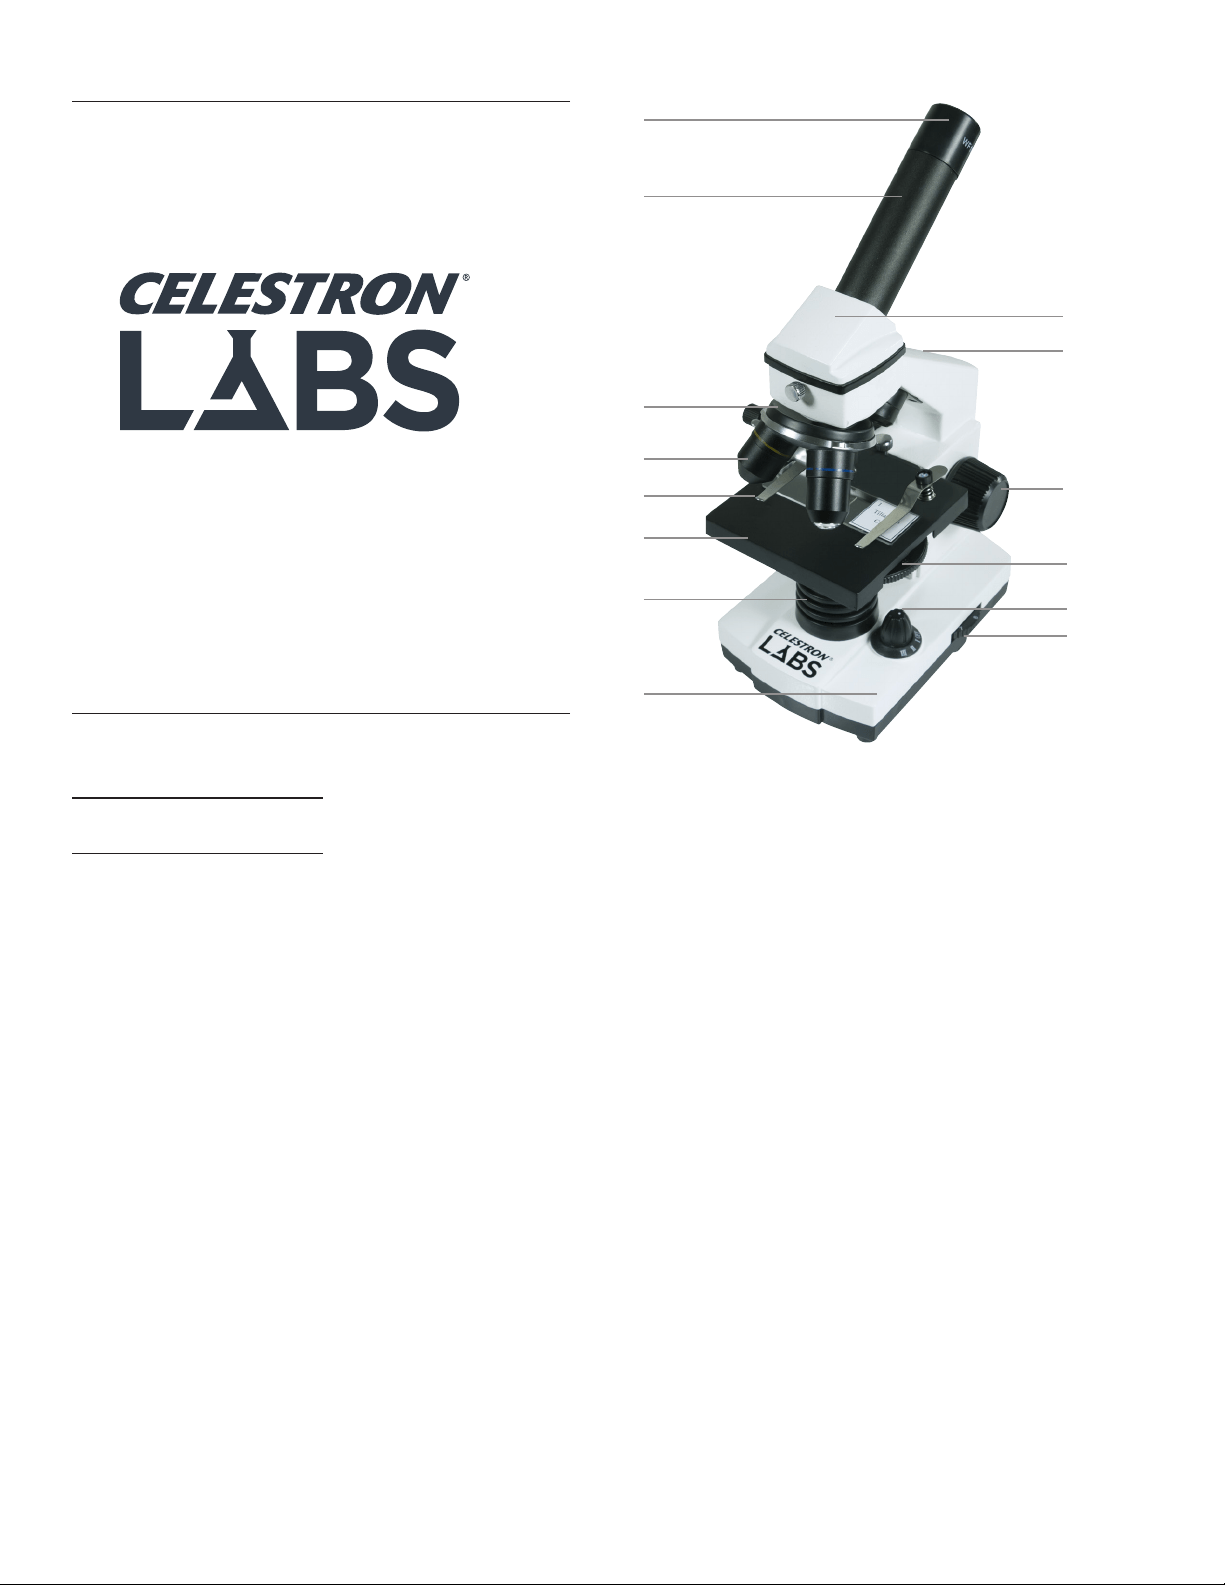
PARTS
1. Eyepiece
2. Eyepiece Tube
3. Nosepiece
4. Objective Lens
5. Stage Clip
6. Stage
7. Illuminator
8. Base
9. Head
10. Arm
11. Focus Knob
12. Disc Diaphragm
13. Power Switch
14. Illuminator Adjustment
SPECIFICATIONS
STAGE: Plain Stage with clips –
3.5 in x 3.5 in (88 mm x 88 mm)
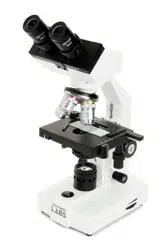
HEAD: Monocular with 45° incline
MAGNIFICATION RANGE: 40x to 800x
FOCUSER: Coarse focus
OBJECTIVES: 4x, 10x, 40x
EYEPIECES: WF 10x, WF 20x
NOSEPIECE: Triple with click stop
ILLUMINATOR: LED, adjustable
CONDENSER: N.A. 0.65
DIAPHRAGM: Disc diaphragm with 6
aperture sizes
DIMENS IONS: 5.0 in x 6.0 in x 11.0 in
(127 mm x 152 mm x 279 mm)
WEIGHT: 2.7 lbs (1.108 kg)
MAGNIFICATION TABLE
Use the following table to determine
magnification using your microscope’s
different eyepiece/objective lens
combinations.
OBJECTIVE LENS: 4x 10x 40x
WF 10X EYEPIECE: 40x 100x 400x
WF 20X EYEPIECE: 80x 200x 800x
SETTING UP YOUR
MICROSCOPE
1. Remove the Styrofoam container from
the carton.
2. Carefully remove the microscope and
accessories from container and set them
on a table, desk, or other flat surface.
3. Remove bag covering from microscope.
4. Remove cap from eyepiece tube (2).
5. Remove the eyepieces from plastic bags.
6. Insert the WF 10x eyepiece into the
eyepiece tube (2)
7. Plug the AC adapter into the socket on
the back of the base (8).
8. Insert the plug end of the AC adapter into
the proper power source.
Additionally the microscope can be powered
with three AA batteries.
- Open the battery compartment on the
base (8) of the microscope.
- Install the three AA batteries (supplied)
and close the battery compartment.
MICROSCOPE OPERATION
Before viewing specimens, please read
these sections thoroughly regarding
focusing, changing power (magnification),
using the stage and adjusting illumination.
VIEWING A SPECIMEN
Carefully place a specimen slide under the
stage clips (5) and center the specimen.
Images will be observed upside down and
reversed right to left. Prepared slides are
included with your microscope to help you
get started.
You are now ready to focus and view a
specimen. Be careful not to damage the
specimen slide.. When using higher powers
while focusing, make sure the objective lens
(4) does not hit the slide or object being
viewed.
FOCUSING AND CHANGING
POWER (MAGNIFICATION)
1. Always start with lowest power (4x
objective lens and WF 10x eyepiece). This
combination yields the lowest power.
2. Place a specimen slide (or object) on
the stage (6) directly under the objective
lens (4). Gradually turn the focus knob
(11) until the specimen is in focus.
CM800
Model # 44128
9
11
8
13
14
12
10
3
4
2
1
6
7
5

3. For higher powers, rotate the nosepiece
(3) to change the objective lens (4)
to 10x or 40x. This will yield a greater
magnification. Gradually turn the focus
knob (11) to refocus on the specimen.
NOTE: You should first turn the focus knob
to lower the stage, before turning the
objective carriage.
4. You can replace the WF 10x eyepiece
with the WF 20x eyepiece to obtain three
additional high power magnifications,
including (800x) the highest power
possible.
ADJUSTING THE
ILLUMINATION
Specimens of different sizes, thickness
and color variations will require different
levels of illumination. In order to adjust
illumination, turn the illuminator adjustment
wheel (14) to either increase or decrease
the illumination. The illuminator adjustment
wheel (14) has three illumination settings
(I being the lowest and III the highest).
Optimal lighting is found by making
adjustments and experimenting.
DIAPHRAGM
The disc diaphragm (12) has six diameter
openings. These openings allow you to
adjust the amount of light passing through
the specimen. Adjusting the light can help
you maximize brightness, contrast, etc.
CARE, MAINTENANCE AND
WARRANTY
Your Celestron Labs microscope is a
precision optical instrument and should be
treated with care at all times. Follow these
care and maintenance suggestions and your
microscope will need very little maintenance
throughout its lifetime.
• When you are done using your
microscope, remove any specimens left
on the stage.
• Turn off the power and unplug the power
cord (if applicable).
• Always place the plastic bag or dust cover
over the microscope when not in use to
help keep it clean.
• Store the microscope in a dry, clean place.
• Be very careful if using your microscope
in direct sunlight to prevent damage to
the microscope or your eyes.
• To carry your microscope, place one hand
on the “arm” of the microscope and the
other hand under the base for support. Do
not grasp your microscope by the focuser
knob or head.
• Clean the outside surfaces (metal and
plastic) with a moist cloth.
• Always unplug any cords before cleaning.
• Never clean optical surfaces with cloth or
paper towels as they can scratch optical
surfaces easily. Instead, use an air blower
or camel hair brush.
• To clean fingerprints off of optical
surfaces, use a lens cleaning agent
and lens tissue available at most photo
supply stores. When cleaning, do not rub
in circles as this may cause streaks or
scratches.
• Never disassemble your microscope or
clean internal optical surfaces. Only
qualified technicians at the factory or an
authorized repair facility should attempt
these repairs.
• When handling glass specimen slides, use
care, as the edges can be sharp.
YOUR MICROSCOPE HAS A
TWO YEAR LIMITED WARRANTY.
FOR MORE DETAILED INFORMATION,
PLEASE VISIT
www.CelestronLabs.com
Torrance, CA 90503
TEL (800) 421-9649
www.CelestronLabs.com
Copyright 2014 Celestron
All rights reserved.
(Products or instructions may change
without notice or obligation.Designed and
intended for those 14 years of age and
older.

Français
Félicitations pour l’acquisition de votre
microscope Celestron Labs. Votre
microscope est un instrument optique de
précision, fabriqué avec des matériaux de
la plus grande qualité afin d’assurer sa
durabilité et sa longue durée d’utilisation.
Il est conçu pour vous offrir une vie entière
de découvertes avec un niveau d’entretien
minimal.
Le microscope CL-CM800 offre des
puissances d’agrandissement de 40x à 800x.
Il convient parfaitement à l’observation
d’échantillons de levures et de moisissures,
de cultures, d’éléments végétaux et
animaux, de fibres, de bactéries et autres.
Avant de commencer à utiliser votre
microscope Celestron Labs, lisez ces
instructions pour vous familiariser avec les
composants et les fonctions du microscope.
Référez-vous au schémas du microscope
pour repérer les pièces mentionnées dans
le présent manuel. La dernière section
du mode d’emploi donne des conseils
d’entretien et de maintenance faciles à
appliquer.
DANS LA BOÎTE
- Microscope CL-CM800
- 2 oculaires à angle large: 10x, 20x
- Adaptateur CA
- 10 lamelles préparées
- 3 piles AA
COMPOSANTS
1. Oculaire
2. Tube d’oculaire
3. Tourelle
4. Lentille de l’objectif
5. Pinces de platine porte-échantillons
6. Platine porte-échantillons
7. Éclairage
8. Base
9. Tête
10. Bras
11. Bouton de mise au point
12. Disque diaphragme
13. Interrupteur marche/arrêt
14. Molette de réglage de l’illuminateur
FICHE TECHNIQUE
PLATINE PORTE-ÉCHANTILLONS:
Platine porte-échantillons simple avec valets
– 88 mm x 88 mm (3,5 po x 3,5 po)
TÊTE: monoculaire inclinable à 45°
PLAGE DE GROSSISSEMENT:
0x à 800x
TUBE DE MISE AU POINT:
mise au point grossière
OBJECTIFS: 4x, 10x, 40x
OCULAIRES: WF 10x, WF 20x
TOURELLE: triple avec butée à déclic.
ILLUMINATEUR: DEL réglable
CONDENSEUR: N/D 0,65
DIAPHRAGME: disque diaphragme avec 6
dimensions d’ouverture
DIMENSIONS: 127 mm x 152 mm x 279
mm (5 po x 6 po x 11 po)
POIDS: 1,108 kg (2,7 lbs )
TABLEAU DE
GROSSISSEMENT
Utilisez le tableau suivant pour déterminer
le grossissement offert par les différentes
combinaisons d’oculaires et de lentilles.
LENTILLE DE L’OBJECTIF:
4x 10x 40x
OCULAIRE WF 10X:
40x 100x 400x
OCULAIRE WF 20X:
80x 200x 800x
INSTALLATION DE VOTRE
MICROSCOPE
1. Retirez l’emballage de polystyrène du
carton.
2. Retirez le microscope et ses accessoires
avec soin de l’emballage et déposez-les
sur une table, bureau ou autre surface
plate.
3. Sortez le microscope de son sachet.
4. Retirez le capuchon du tube de l’oculaire (2).
5. Retirez les oculaires de leurs sachets.
6. Insérez l’oculaire WF 10x dans le barillet
d’oculaire (2).
7. Branchez l’adaptateur secteur dans
la prise située à l’arrière de la base
(8).
8. Insérez la prise du cordon d’alimentation
dans une source d’alimentation
compatible.
Le microscope peut également fonctionner
avec trois piles AA.
- Ouvrez le compartiment des piles situé à
la base (8) du produit.
- Installez les trois piles AA (fournies) et
fermez le compartiment.
FONCTIONNEMENT DU
MICROSCOPE
Avant de commencer l’observation, veuillez
lire ces sections avec attention pour
comprendre comment effectuer la mise au
point, changer la puissance (grossissement),
utiliser la platine porte-échantillons et
ajuster la luminosité.
OBSERVER UN ÉCHANTILLON
Placez l’échantillon sous les pinces de la
platine (5) et centrez-le. Les images seront
observées à l’envers et inversées sur le plan
horizontal. Votre microscope est livré avec
des lamelles préparées pour vous aider à
bien commencer.
Vous êtes maintenant prêt à faire la
mise au point et observer un spécimen.
Faites attention de ne pas endommager
l’échantillon observé. Lorsque vous passez
sur des puissances plus élevées pour faire
la mise au point, veillez à ne pas toucher la
lamelle ni l’échantillon avec les objectifs (4).
MISE AU POINT
ET CHANGEMENT
DE PUISSANCE
(GROSSISSEMENT)
1. Commencez toujours par la plus petite
puissance (lentille 4x et oculaire WF 10x).
Cette combinaison offre la plus faible
puissance de grossissement.
2. Placez une lamelle (ou un objet) sur la
platine (6) directement sous la lentille
de l’objectif (4). Faites tourner la molette
de mise au point (11) jusqu’à la mise au
point sur l’échantillon.
3. Pour obtenir un grossissement plus élevé,
faite pivoter la tourelle (3) pour changer
la lentille d’objectif utilisée (4) sur 10x,
40x. Cela vous offrira une puissance
de grossissement plus élevée. Faites
doucement tourner la molette de mise au
point (11) pour effectuer la mise au point
de nouveau.
REMARQUE: Par sécurité pour le matériel,
nous vous conseillons de
d’abaisser la platine avant de
faire pivoter la tourelle.
4. Vous pouvez remplacer l’oculaire
WF 10x avec l’oculaire WF 20x pour
obtenir deux niveaux de grossissement
supplémentaires, incluant la plus grande
puissance possible (800x).
RÉGLER L’ILLUMINATION
Les spécimens de différentes tailles,
épaisseur ou couleur nécessiteront autant
de niveaux de luminosité différents. Pour
régler l’intensité d’illumination, faites
tourner la molette de réglage (14) pour
soit augmenter, soit réduire l’intensité.
La molette de réglage (14) comporte 3
positions (I étant la plus faible intensité
et III la plus forte). L’illumination adaptée
est obtenue grâce aux expérimentations et
réglages.
DIAPHRAGME
Le disque diaphragme (12) comporte 6
diamètres d’ouverture. Ces ouvertures
permettent également de régler la quantité
de lumière qui passe dans l’échantillon.
Régler l’illumination peut aider à améliorer
la luminosité et le contraste.
ENTRETIEN,
MAINTENANCE
ET GARANTIE
Votre accessoire Celestron Labs est un
instrument optique de précision et doit être
traité avec soin, en tout temps. Suivez ces
soins et suggestions d’entretien et votre
microscope n’aura besoin que de très peu
d’entretien tout au long de sa vie.
• Lorsque vous avez terminé d’utiliser votre
microscope, enlever tout spécimen de la
platine.
• Fermer les interrupteurs des illuminateurs.
• Éteindre le moniteur LCD — appuyer sur le
bouton on/off jusqu’à ce que vous voyez
apparaitre «Shutting Power Off».
• Débrancher le cordon d’alimentation.
• Toujours placer la housse de plastique ou
housse de protection sur le microscope
lorsque vous ne l’utilisez pas ou lorsqu’il
est entreposé afin de le conserver propre.
• Entreposer le microscope dans un endroit
propre et sec.
• Faire attention si vous utilisez votre
microscope en plein soleil pour éviter
d’endommager le microscope ou vos yeux.
• Lorsque vous déplacez le microscope, le
prendre par le «bras» avec une main et
non pas par le bouton de mise au point, le
moniteur LCD, etc. Ensuite, placer votre
autre main sous la base de soutien.
• Nettoyer les surfaces extérieures (métal et
plastiques) avec un chiffon humide.
• Toujours débrancher tous les cordons
avant de le nettoyer.
• Pour nettoyer les surfaces optiques,
utilisez un séchoir à cheveux ou un
pinceau de poils de chameau.
• Soufflez la poussière des surfaces
optiques avec une brosse en poil de
chameau ou un souffleur d’air.
• Pour nettoyer les empreintes digitales des
surfaces optiques, utiliser un agent de
nettoyage de lentilles et un tissu optique
disponible dans la plupart des magasins
de photo et lors du nettoyage ne pas
frotter dans les cercles car cela pourrait
provoquer des fissures ou des rayures.
• Ne jamais démonter ou nettoyer les
surfaces optiques internes. Cela devrait
être effectué par des techniciens qualifiés
à l’usine ou d’autres centres de réparation
agréés.
• Faire attention lors de la manipulation de
lamelles
VOTRE MICROSCOPE A UNE GARANTIE
LIMITÉE DE DEUX ANS.
VEUILLEZ CONSULTER LE SITE WEB DE
CELESTRON POUR PLUS DE DÉTAILS À
www.CelestronLabs.com
4
Torrance, CA 90503
TEL (800) 421-9649
www.CelestronLabs.com
Tous droits réservés. • Imprimé en Chine
La conception des produits et les
spécifications sont sujettes à modification
sans notification préalable.
Ce produit est conçu et destiné pour les
personnes de 14 ans et plus.

Deutsch
Herzlichen Glückwunsch zum Kauf Ihres
Mikroskops von Celestron Labs. Bei Ihrem
Mikroskop von Celestron Labs handelt es sich
um ein präzises optisches Instrument, das
aus Materialien höchster Qualität gefertigt
wurde, um Haltbarkeit und Langlebigkeit zu
gewährleisten. Es wird Ihnen während seiner
Lebensdauer viel Freude bei minimalem
Wartungsaufwand bereiten.
Das Mikroskop CL-CM800 bietet 40- bis
800-fache Vergrößerungen. Es ist ideal zum
Untersuchen von Objektträgern mit Hefen
oder Schimmelpilzen, Kulturen, pflanzlichen
und tierischen Bestandteilen, Fasern,
Bakterien und vielem mehr.
Bitte lesen Sie diese Anleitung vor Gebrauch
Ihres Mikroskops von Celestron Labs durch
und machen Sie sich mit den Teilen und
Funktionen des Mikroskops vertraut. Sehen
Sie sich die Schaubilder zum Mikroskop
an, um die in der Anleitung beschriebenen
Bauteile zu identifizieren. Im abschließenden
Abschnitt der Anleitung werden Pflege- und
Instandhaltungshinweise aufgeführt.
PACKUNGSINHALT
- Mikroskop CL-CM800
- 2 Weitwinkelokulare: 10x, 20x
- Netzteil
- 10 vorbereitete Objektträger
- 3 AA-Batterien
TEILE
1. Okular
2. Okulartubus
3. Objektivrevolver
4. Objektiv
5. Tischklammern
6. Objekttisch
7. Licht
8. Instrumentenbasis
9. Kopf
10. Arm
11. Fokussierknopf
12. Scheibenmembran
13. Netzschalter
14. Beleuchtungsregler
TECHNISCHE DATEN
OBJEKTTISCH: Tisch mit Klammern –
3,5 Zoll x 3,5 Zoll (88 mm x 88 mm)
KOPF: Monokular mit 45°-Neigung
VERGRÖSSERUNGSBEREICH: 40x bis 800x
FOKUSSIERER: Grobfokus
OBJEKTIVE: 4x, 10x, 40x
OKULARE: WF 10x, WF 20x
OBJEKTIVREVOLVER: Objektivrevolver mit
Klick-Stopp
LICHT: LED, regelbar
KONDENSOR: N.A. 0,65
MEMBRAN: Scheibenmembran mit 6
Aperturen
ABMESSUNGEN: 127 mm x 152 mm x
279 mm
GEWICHT: 2,7 lbs (1,108 kg)
VERGRÖSSERUNGSTABELLE
Verwenden Sie die folgende Tabelle, um die
Vergrößerung bei Verwendung verschiedener
Okular-/Objektiv-Linsenkombinationen Ihres
Mikroskops zu bestimmen.
OBJEKTIVE:
4x 10x 40x
OKULAR WF: 10X:
40x 100x 400x
OKULAR WF: 20X:
80x 200x 800x
MIKROSKOPAUFBAU
1. Nehmen Sie den Styroporbehälter aus dem
Karton.
2. Nehmen Sie vorsichtig Mikroskop und
Zubehör aus dem Karton und stellen Sie
alles auf einen Tisch, Schreibtisch oder
eine andere ebene Fläche.
3. Entfernen Sie den Beutel, in den das
Mikroskop eingepackt ist.
4. Nehmen Sie die Kappe vom Okulartubus (2).
5. Nehmen sie die Okulare aus den
Plastikbeuteln.
6. Setzen Sie das 10x-WF-Okular in den
Okulartubus ein (2).
7. Schließen Sie das Netzteil an die Buchse
auf der Instrumentenrückseite (8) an.
8. Schließen Sie das Steckerende des
Netzteils an eine geeignete Stromquelle an.
Alternativ kann das Mikroskop auch über drei
AA-Batterien betrieben werden.
- Öffnen Sie das Batteriefach an der
Mikroskopbasis (8).
- Legen Sie drei AA-Batterien (enthalten) ein
und schließen Sie das Batteriefach.
MIKROSKOP-BETRIEB
Bevor Sie Proben untersuchen, lesen Sie
bitte die Abschnitte bzgl. des Fokussierens,
der Leistungsänderung (Vergrößerung),
Verwendung des Objekttisches und Einstellen
der Beleuchtung gründlich durch.
BETRACHTEN EINER PROBE
Schieben Sie vorsichtig einen Objektträger
unter die Halteklammern (5) und zentrieren
Sie die Probe. Die Bilder werden auf dem
Kopf stehend und seitenverkehrt betrachtet.
Als Starthilfe sind im Lieferumfang Ihres
Mikroskops vorbereitete Objektträger
enthalten.
Nun sind Sie zum Fokussieren und
Untersuchen einer Probe bereit. Achten
Sie darauf, den Objektträger nicht zu
beschädigen. Wenn Sie beim Fokussieren eine
höhere Vergrößerung verwenden, achten Sie
bitte darauf, dass die Objektivlinse (4) nicht
den Objektträger oder das betrachtete Objekt
berührt.
FOKUSSIEREN UND
ÄNDERN DER LEISTUNG
(VERGRÖSSERUNG)
1. Beginnen Sie stets mit der niedrigsten
Vergrößerung (4x Objektivlinse und
10x-WF-Okular). Mit dieser Kombination
erreichen Sie die geringste Vergrößerung.
2. Legen Sie einen Objektträger (oder ein
Objekt) auf den Objekttisch (6) direkt
unter die Objektivlinse (4). Drehen Sie den
Fokusknopf (11) schrittweise so weit, bis
die Probe scharfgestellt ist.
3. Drehen Sie für höhere Vergrößerungen am
Objektivrevolver (3), um die Objektivlinse
(4) auf 10x oder 40x zu wechseln. Dadurch
erreichen Sie eine höhere Vergrößerung.
Drehen Sie den Fokusknopf (11)
schrittweise so weit, bis die Probe erneut
scharfgestellt ist.
HINWEIS: Bevor Sie die Objektivhalterung drehen,
sollten Sie zuerst am Fokusknopf
drehen, um den Objekttisch abzusenken.
4. Sie können das 10x-WF-Okular für drei
zusätzliche Vergrößerungen durch das
20x-WF-Okular ersetzen, einschließlich der
höchstmöglichen Vergrößerung (800 x).
BELEUCHTUNGSREGELUNG
Proben mit unterschiedlicher
Größe, Dicke und unterschiedlichen
Farbvariationen benötigen unterschiedliche
Beleuchtungspegel. Drehen Sie zur
Beleuchtungsregelung am Einstellrad (14),
um die Lichtmenge entweder zu erhöhen
oder zu verringern. Das Einstellrad (14)
verfügt über drei Einstellmöglichkeiten
(I stellt die niedrigste und III die höchste
dar). Die optimale Beleuchtung wird durch
Anpassungen und Experimentieren gefunden.
MEMBRAN
Die Scheibenmembran (10) weist
sechs Öffnungen mit unterschiedlichem
Durchmesser auf. Diese Öffnungen
ermöglichen es Ihnen, die durch die Probe
dringende Lichtmenge anzupassen. Die
Anpassung der Lichtmenge kann dazu
beitragen, Helligkeit, Kontrast usw. zu
optimieren.
PFLEGE, WARTUNG UND
GEWÄHRLEISTUNG
Ihr Celestron-Zubehör ist ein optisches
Präzisionswerkzeug und sollte zu jeder Zeit
mit Vorsicht behandelt werden. Befolgen
Sie diese Pflege- und Wartungsvorschläge,
und ihr Mikroskop wird während seiner
Lebensdauer nur sehr wenig Wartung
benötigen.
• Entfernen Sie sämtliche auf dem Tisch
befindlichen Proben, wenn Sie mit der
Verwendung Ihres Mikroskops abschließen.
• Schalten Sie alle Beleuchtungselemente aus.
• Schalten Sie den LCD-Monitor — aus, indem
Sie auf die An-/Aus-Taste drücken, bis
“Herunterfahren” angezeigt wird.
• Ziehen Sie das Netzkabel.
• Stülpen Sie grundsätzlich die
Plastikabdeckung oder den Staubschutz
über das Mikroskop, wenn es nicht
verwendet oder gelagert wird, um es
sauber zu halten.
• Lagern Sie das Mikroskop an einem
trockenen und sauberen Ort.
• Seien Sie äußerst vorsichtig, wenn Sie
Ihr Mikroskop im direkten Sonnenlicht
verwenden, um Schäden am Mikroskop und
ihren Augen zu vermeiden.
• Wenn Sie Ihr Mikroskop bewegen, heben
Sie es mit einer Hand am “Arm“ und nicht
am Fokussiererknopf, LCD-Monitor etc. an.
Legen Sie anschließend die andere Hand
zur Unterstützung unter den Fuß.
• Reinigen Sie die äußeren Oberflächen (Metall
und Plastik) mit einem feuchten Tuch.
• Ziehen Sie alle Kabel, bevor Sie mit der
Reinigung beginnen.
• Reinigen Sie optische Oberflächen niemals
mit einem Stoff- oder Papiertuch, da
dies leicht zu Kratzern auf den optischen
Oberflächen führen kann.
• Reinigen Sie optischer Flächen mit
Druckluft oder einer Kamelhaarbürste.
• Um Fingerabdrücke von optischen
Oberflächen zu entfernen, benutzen Sie
bitte Objektiv-Reinigungsmittel und Linsen-
Tuch, wie sie in Fotobedarfs-Verkaufsstellen
erhältlich sind, und reiben Sie nicht in
Kreisen, da dies zu Schrammen oder
Kratzer führen kann.
• Demontieren oder reinigen Sie niemals die
internen optischen Oberflächen. Dies darf nur
von qualifizierten Technikern im Werk oder
anderen autorisierten Reparatureinrichtungen
durchgeführt werden.
• Wenn Sie mit Objektträgern aus Glas
arbeiten, handhaben Sie sie mit Vorsicht, da
die Ränder scharfkantig sein können.
IHR MIKROSKOP HAT EINE
ZWEI-JÄHRIGE, BESCHRÄNKTE
GEWÄHRLEISTUNGSFRIST.
AUF FOLGENDER CELSTRON-WEBSEITE
FINDEN SIE DAZU DETAILIERTE
INFORMATIONEN:
www.CelestronLabs.com
Torrance, CA 90503
TEL (800) 421-9649
www.CelestronLabs.com
Alle Rechte vorbehalten. • Gedruckt in
China • 04-14 Das Produktdesign sowie
Spezifikationen können ohne vorherige
Ankündigung geändert werden. Dieses Gerät
wurde für den Gebrauch von 14 Jahren und
länger konzipiert.

Español
Felicidades por su adquisición de un
microscopio Celestron Labs. Su microscopio
Celestron Labs es un instrumento óptico de
precisión, fabricado con materiales de la
mejor calidad para garantizar su resistencia
y larga vida útil. Está diseñado para
ofrecerle toda una vida de satisfacción con
un mantenimiento mínimo.
Este microscopio CL-CM800 le ofrece
aumentos entre 40x y 800x. Es perfecto
para examinar portamuestras con
especímenes de levaduras y modo, cultivos,
partes de plantas y animales, fibras,
bacterias, y mucho más.
Antes de intentar usar su microscopio
Celestron Labs, lea estas instrucciones para
familiarizarse con las piezas y funciones
del microscopio. Consulte el diagrama
del microscopio para encontrar las piezas
que se tratan en este manual. La última
sección del manual ofrece recomendaciones
sencillas de cuidados y mantenimiento.
CONTENIDO DEL EMBALAJE
- Microscopio CL-CM800
- 2 oculares de gran angular: 10x, 20x
- Adaptador CA
- 10 portamuestras preparados
- 3 baterías AA
PIEZAS
1. Ocular
2. Tubo de ocular
3. Portaobjetivos
4. Lente de objetivo
5. Clips del soporte
6. Soporte
7. Iluminador
8. Base
9. Cabezal
10.Brazo
11. Mando de enfoque
12. Diafragma de disco
13. Interruptor de alimentación
14. Ajuste del iluminador
ESPECIFICACIONES
SOPORTE: Soporte plano con clips – 3,5 in
x 3,5 in (88 mm x 88 mm)
CABEZAL: Monóculo con inclinación de 45º
GAMA DE AUMENTO: 40x a 800x
ENFOQUE: Enfoque aproximado
OBJETIVOS: 4x, 10x, 40x
OCULARES: WF 10x, WF 20x
PORTAOBJETIVOS: Triple con detención
ILUMINADOR: LED, ajustable
CONDENSADOR: N.A. 0,65
DIAFRAGMA: Diafragma de disco con 6
tamaños de apertura
DIMENSIONES: 5,0 in x 6,0 in x 11,0 in
(127 mm x 152 mm x
279 mm)
PESO: 2,7 lbs (1,108 kg)
TABLA DE AUMENTO
Use la tabla siguiente para determinar el
aumento usando las distintas combinaciones
de lentes de ocular/objetivo del microscopio.
LENTE DE OBJETIVO:
4x 10x 40x
OCULAR WF 10X:
40x 100x 400x
OCULAR WF 20X:
80x 200x 800x
PREPARACIÓN DEL
MICROSCOPIO
1. Saque el embalaje de espuma de la caja.
2. Saque cuidadosamente el microscopio y
los accesorios del embalaje y colóquelos
sobre una mesa, escritorio u otra
superficie plana.
3. Saque la bolsa que cubre el microscopio.
4. Saque la tapa del tubo del ocular (2).
5. Saque los oculares de las bolsas de
plástico.
6. Introduzca el ocular WF 10x en el tubo
del ocular (2).
7. Conecte el adaptador CA en la toma de la
parte posterior de la base (8).
8. Introduzca el enchufe del adaptador CA
en una toma de corriente adecuada.
El microscopio puede alimentarse también
con tres baterías AA.
- Abra el compartimiento de baterías de la
base (8) del microscopio.
- Instale las tres baterías AA (incluidas) y
cierre el compartimiento.
USO DEL MICROSCOPIO
Antes de observar especímenes, lea por
completo las secciones sobre enfoque,
cambio de potencia (aumento), uso del
soporte y ajuste de iluminación.
OBSERVAR UN ESPÉCIMEN
Coloque cuidadosamente un portamuestras
con espécimen bajo los clips del soporte
(5) y céntrelo. Las imágenes se verán
boca abajo e invertidas horizontalmente.
Su microscopio incluye portamuestras
preparados para ayudarle a comenzar.
Ahora está listo para enfocar y observar
un espécimen. Tenga cuidado en no dañar
el portamuestras. Cuando use potencias
elevadas, al enfocar, asgúrese de que
la lente del objetivo (4) no golpee el
portamuestras ni el objeto observado.
ENFOQUE Y CAMBIO DE
POTENCIA (AUMENTO)
1. Comience siempre con la potencia inferior
(lente de objetivo 4x y ocular WF 10x).
Esta combinación ofrece la potencia más
baja.
2. Coloque un portamuestras con espécimen
(o un objeto) sobre el soporte (6),
directamente bajo la lente del objetivo
(4). Gire gradualmente el mando de
enfoque (11) hasta que el espécimen esté
enfocado.
3. Para potencias superiores, gire el
portaobjetivos (3) para cambiar la lente
de objetivo (4) a 10x o 40x. Obtendrá
un aumento superior. Gire gradualmente
el mando de enfoque (11) para volver a
enfocar el objeto.
NOTA: Debería girar primero el mando de enfoque
para bajar el soporte antes de girar el
transporte de objetivos.
4. Puede cambiar el ocular WF 10x
por el ocular WF 20x para obtener
tres aumentos elevados adicionales,
incluyendo (800x), el aumento más alto
disponible.
AJUSTE DE ILUMINACIÓN
Los especímenes de dsitntos tamaños,
grosores y variaciones de color precisarán
distintos niveles de iluminación. Para ajustar
la iluminación, gire la rueda de ajuste del
iluminador (14) para aumentar o reducir
el brillo. La rueda de ajuste de iluminación
(14) tiene tres posiciones de iluminación
(siendo I la más baja y III la más alta). La
iluminación óptima se obtiene realizando
ajustes y experimentando,
DIAFRAGMA
El diafragma de disco (12) tiene seis
diámetros de apertura. Estas aperturas le
permiten ajustar la cantidad de luz que
pasa por el espécimen. Ajustar la luz puede
ayudar a maximizar el brillo, contraste, etc.
CUIDADOS, MANTENIMIENTO
Y GARANTÍA
Su accesorio Celestron Labs es un
instrumento óptico de precisión y debe
tratarse con cuidado en todo momento.
Siga estas recomendaciones de cuidados y
mantenimiento y su microscopio necesitará
muy poco mantenimiento a lo largo de su
vida útil.
• Cuando termine de usar el microscopio,
saque cualquier espécimen que quede en
el soporte.
• Apague los interruptores de los
iluminadores.
• Apague el monitor LCD – pulse el botón
de encendido/apagado hasta que vea
“Apagando”.
• Desconecte el cable de alimentación.
• Coloque siempre la bolsa de plástico o la
cubierta para polvo sobre el microscopio
cuando no lo use o cuando se guarde para
mantenerlo limpio.
• Guarde el microscopio en un lugar seco
y limpio.
• Tenga mucho cuidado si usa el
microscopio a la luz del sol directa para
evitar dañar el microscopio o sus ojos.
• Cuando mueva el microscopio, llévelo
por el “brazo” con una mano y no por el
mando de enfoque, monitor LCD, etc. A
continuación, ponga la otra mano bajo la
base para apoyarlo.
• Limpie las superficies externas
(metálicas y de plástico) con una gamuza
humedecida.
• Desconecte siempre cualquier cable antes
de limpiar.
• No limpie nunca las superficies ópticas
con gamuzas o papel de cocina, pueden
rayar las superficies ópticas con facilidad.
• Para limpiar las superficies ópticas, use
una perilla o un pincel de pelo de camello
• Para limpiar las huellas dactilares de
las superficies ópticas, use un agente
limpiador de lentes y gamuza para
lentes disponibles en la mayoría de
tiendas de fotografía. Al limpiar, no frote
circularmente, podría causar rayadas.
• No desmonte ni limpie nunca superficies
ópticas internas. Esta acción debe ser
realizada por técnicos cualificados en la
fábrica u otra instalación de reparación
autorizada.
• Al manipular muestras de espécimen de
cristal, tenga cuidado, los bordes pueden
estar afilados.
SU MICROSCOPIO TIENE UNA
GARANTÍA LIMITADA DE DOS AÑOS.
CONSULTE EL SITIO WEB DE CELESTRON
PARA MÁS INFORMACIÓN DETALLADA EN
www.CelestronLabs.com
Torrance, CA 90503
TEL (800) 421-9649
www.CelestronLabs.com
Todos los derechos reservados. • Impreso en
China • 04-14
El diseño y las especificaciones del producto
están sujetos a cambios sin previo aviso.
Este producto está diseñado y pretendido
para personas de 14 o más años de edad.

Italiano
Congratulazioni per l’acquisto del
microscopio Celestron Labs. Il microscopio
Celestron Labs è uno strumento ottico
di precisione, realizzato con materiali di
ottima qualità per garantire resistenza
e lunga durata. È ideato per fornire un
intrattenimento duraturo con una minima
manutenzione.
Il microscopio CL-CM800 fornisce un
ingrandimento da 40x fino a 800x. È
ideale per esaminare vetrini con campioni
di lievito, muffa, culture, parti vegetali e
animali, fibre, batteri e altro ancora.
Prima di utilizzare il microscopio Celestron
Labs, leggere le presenti istruzioni per
familiarizzare con i componenti e le funzioni
del microscopio. Fare riferimento ai disegni
per identificare i componenti descritti nel
manuale. La sezione finale del manuale
fornisce semplici suggerimenti di cura e
manutenzione.
NELLA CONFEZIONE
- Microscopio CL-CM800
- 2 oculari grandangolari: 10x, 20x
- Adattatore CA
- 10 vetrini già pronti
- 3 batterie AA
COMPONENTI
1. Oculare
2. Tubo oculare
3. Portaobiettivi
4. Obiettivo
5. Mollette fermavetrino
6. Tavolino
7. Illuminatore
8. Base
9. Testata
10.Braccio
11. Manopola di messa a fuoco
12. Diaframma
13. Interruttore di alimentazione
14. Regolazione illuminatore
SPECIFICHE
TAVOLINO: Tavolino semplice con mollette
– 3,5” x 3,5” (88 mm x 88 mm)
TESTATA: Monoculare con inclinazione di 45°
INTERVALLO DI INGRANDIMENTO: da
40x a 800x
MESSA A FUOCO: Macrometrica
OBIETTIVI: 4x, 10x, 40x
OCULARI: WF 10x, WF 20x
PORTAOBIETTIVI: Triplo con arresto a clic
ILLUMINATORE: Regolabile a LED
CONDENSATORE: N.A. 0,65
DIAFRAMMA: Diaframma con 6 misure di
apertura
DIMENSIONI: 5,0” x 6,0” x 11,0” (127 mm
x 152 mm x 279 mm)
PESO: 2,7 lb (1,108 kg)
TABELLA INGRANDIMENTI
Utilizzare la tabella seguente per
determinare l’ingrandimento a seconda delle
diverse combinazioni oculari/obiettivi del
microscopio.
OBIETTIVO: 4x 10x
40x
OCULARE WF 10X:
40x
100x 400x
OCULARE WF 20X:
80x
200x 800x
PREPARAZIONE DEL
MICROSCOPIO
1. Rimuovere la confezione in styrofoam dal
cartone.
2. Rimuovere con cautela il microscopio e
gli accessori dalla confezione e sistemarli
su un tavolo, una scrivania o
su un’altra superficie piana.
3. Rimuovere la busta che ricopre il
microscopio.
4. Rimuovere il coperchio dal tubo
dell’oculare (2).
5. Rimuovere gli oculari dalle buste in
plastica.
6. Inserire l’oculare WF 10x nell’apposito
tubo (2).
7. Collegare l’adattatore CA alla presa posta
sul retro della base (8).
8. Inserire la spina dell’adattatore CA in
un’adeguata presa di corrente.
In alternativa il microscopio può essere
alimentato da tre batterie AA.
- Aprire il vano batterie nella base (8) del
microscopio.
- Installare le tre batterie AA (in dotazione)
e chiudere il vano batterie.
FUNZIONAMENTO DEL
MICROSCOPIO
Prima di procedere a osservare i campioni,
leggere attentamente le presenti sezioni che
riguardano la messa a fuoco, la modifica
dell’ingrandimento, l’utilizzo del tavolino e la
regolazione dell’illuminazione.
OSSERVAZIONE DI UN
CAMPIONE
Sistemare con attenzione il vetrino del
campione sotto le mollette del tavolino (5) e
centrare il campione. Le immagini sono visibili
capovolte e invertite da destra a sinistra. I
vetrini già pronti sono forniti in dotazione per
facilitare il primo utilizzo.
Ora è possibile mettere a fuoco e
visualizzare il campione. Fare attenzione a
non danneggiare il vetrino del campione.
Quando si utilizzano gli obiettivi più grandi
durante la messa a fuoco, fare attenzione
a non colpire con l’obiettivo (4) il vetrino o
l’oggetto visualizzato.
MESSA A FUOCO E
SCELTA DEGLI OBIETTIVI
(INGRANDIMENTO)
1. Iniziare sempre con le misure più piccole
(obiettivo 4x e oculare WF 10x). Questa
combinazione rappresenta l’ingrandimento
minimo.
2. Sistemare un vetrino di campione
(o un oggetto) sul tavolino (6)
direttamente sotto l’obiettivo (4). Ruotare
gradualmente la manopola di messa a
fuoco (11) fino a quando il campione è
messo a fuoco.
3. Per un maggiore ingrandimento, ruotare il
portaobiettivi (3) per cambiare l’obiettivo
(4) a 10x oppure 40x. Questo fornisce
un ingrandimento maggiore. Ruotare
gradualmente la manopola di messa a
fuoco (11) per mettere nuovamente a
fuoco il campione.
NOTA: Ruotare prima la manopola di messa a
fuoco per abbassare il tavolino, prima di
ruotare il portaobiettivi.
4. È possibile sostituire l’oculare WF 10x
con l’oculare WF 20x per ottenere altri
tre ingrandimenti, compreso quello
massimo (800x).
REGOLAZIONE
DELL’ILLUMINAZIONE
Campioni di diverse misure, diverso
spessore e variazione di colore richiedono
diversi gradi di illuminazione. Per regolare
l’illuminazione, ruotare la rotella di
regolazione dell’illuminatore (14) per
aumentare o diminuire l’illuminazione. La
rotella di regolazione dell’illuminatore (14)
è dotata di tre diverse impostazioni di
illuminazione (I è la più bassa mentre III
è la più alta). L’illuminazione ottimale può
essere ottenuta effettuando le regolazioni
attraverso varie prove.
DIAFRAMMA
Il diaframma (12) ha sei aperture di
diametro. Tali aperture consentono di
regolare la quantità di luce che attraversa il
campione. Regolare la quantità di luce aiuta
a ottimizzare luminosità, contrasto, ecc.
CURA,
MANUTENZIONE
E
GARANZIA
Il microscopio Celestron Labs è uno
strumento ottico di precisione e deve essere
sempre trattato con cura. Seguire i presenti
suggerimenti di cura e manutenzione
e il microscopio avrà bisogno di poca
manutenzione per tutta la sua durata.
• Una volta completato l’utilizzo del
microscopio, rimuovere eventuali campioni
rimasti sul tavolino portaoggetti.
• Spegnere gli interruttori dell’illuminatore.
• Spegnere il monitor LCD: spingere il
tasto di accensione/spegnimento fino alla
comparsa del messaggio “Spegnimento
in corso”.
• Scollegare il cavo di alimentazione.
• Posizionare sempre la borsa di plastic o il
copri-polvere sul microscopio quando lo
stesso non è in uso oppure durante la sua
conservazione per mantenerlo pulito.
• Conservare il microscopio in un luogo
asciutto e pulito.
• Prestare molta attenzione in caso di
utilizzo del microscopio alla luce diretta
del sole per evitare danni al microscopio
o agli occhi.
• Durante lo spostamento del microscopio,
trasportarlo per il “braccio” con una mano
e non per la manopola del focheggiatore,
per il monitor LCD, ecc. Quindi, mettere
l’altra mano sotto alla base per il supporto.
• Pulire le superfici esterne (metalliche e di
plastica) con un panno umido.
• Scollegare sempre qualsiasi cavo prima
della pulizia.
• Mai pulire le superfici ottiche con
asciugamani di stoffa o carta in quando
potrebbero graffiare con facilità le
superfici ottiche.
• Per pulire le superfici ottiche usare un
phon o un pennello in setole di cammello.
• Per pulire le impronte digitali dalle
superfici ottiche, utilizzare un detergente
per lenti e il panno per lenti disponibile
nella maggior parte di negozi che vendono
articoli fotografici e, durante la pulizia,
non strofinare in senso circolare, in quanto
ciò potrebbe provocare riflessi o graffi.
• Mai smontare o pulire le superfici ottiche
interne. Ciò deve essere effettuato da
tecnici qualificati presso la fabbrica o
strutture di assistenza autorizzate.
• Prestare la massima cura durante la
manipolazione dei vetrini, in quanto i bordi
possono essere taglienti.
IL MICROSCOPIO È COPERTO DA UNA
GARANZIA LIMITATA DI DUE ANNI.
CONSULTARE IL SITO CELETRON
PER INFORMAZIONI DETTAGLIATE
ALL’INDIRIZZO
www.CelestronLabs.com
Torrance, CA 90503
TEL (800) 421-9649
www.CelestronLabs.com
Tutti i diritti riservati. • Stampato in Cina
• 04-14
Il design del prodotto e le specifiche sono
soggette a modifiche senza previa notifica.
Il presente prodotto è progettato e destinato
all’uso di persone di età pari o superiore ai
14 anni.