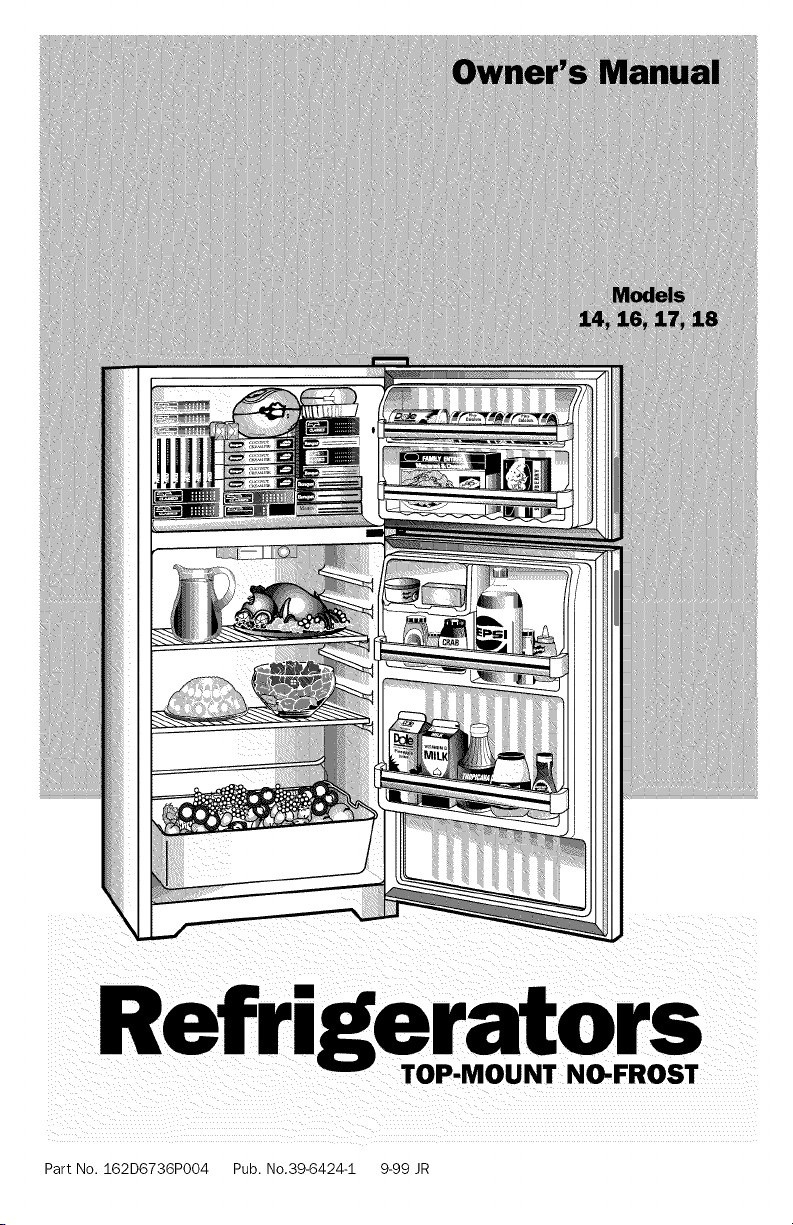
TOP-MOUNT NO-FROST
Part No. i62D6736PO04 Pub. No.39-6424-i 9-99 JR
Congratulations!
Welcoule lo our fhlnil}-. We're proud of our
qualily producls and we are couunitled lo
prmiding dependable selxice. You'll see il in
lifts easy-lo-use ()_mer's Manual and you'll
hear il in lhe fliendly voices of{mr cuslolner
sel_ice deparmlenl.
Best of all, you'll experience these values
each filne you use your refligeralor. Thal's
imporlanl, because your new refligerau)r xdll
be part of your fmnily for many }'ears. And we
hope you _dll be parl of ours for a long filne
ID COllie.
We appreciale your purchase, and hope you
_dll continue 1o rely on us whenever you
need qualily appliances for your home.
Important!
Fill oul and lemm lhe Consumer Producl
Regisl]afion Card lhal is packed x_lh lhis
producl. If you cannol find it, please send
in lhe duplicale card prinled in lhe back of
Ibis manual.
Write the model and serial
numbershere.
#
#
Youcan find them on a label on the
upper left side of the fresh food
compartment.
Staple sales slip or cancelled
check here.
Proof of the original purchase date
is needed to obtain service under
the warranty.
2

A Service Partnership.
We stand behind our products with
unmatched quality service. However, did
you know that most questions result from
simple problems that you can easily
fix yourself in just a few minutes ? This
Owner's Manual can tell you how
Readthis Manual
Inside )sin xdll find many
helpful hints on how lo use and
mainlain your refligeralor
properly..lust a liule preventive
cm-e on your pmt can save )xm a
gTeat deal of time and money
over the life of your refligerator.
Reviewthe Sectionon
Troubleshootingtips
You'll find many answers to
common problems here.
lf)xm review our chin1 of
Troubleshooting Tips firsl,
yOUIn W nol need to call fbr
sel_ice al all.
If YouNeedService
lf)_m do need sel_-ice, )_m can
relax knoxdng help is only a
phone call aw W. A list of loll-flee
cusR)Iney se_ice numbers is
included in the back section.
()r >m can alwws call the
GE Answer Center ® at
800.626.2000, 24 hours a d W,
7 dws a week.
Safety Information
Safety Precautions .......... 4
ProperDisposal............. 5
How to ConnectElectricity .... 6
Useof Adapter Plugs ...... 6, 7
Useof ExtensionCords ...... 7
Operating Instructions
TemperatureControlDial ..... 8
Shelves ............... 9, 10
StorageDrawers........ 11. 12
Automatic Icemaker........ 13
Careand Cleaning ...... 14-16
Installation Instructions
Preparingto
Install the Refrigerator ... 17, 18
WaterLine Installation... 19-23
Reversingthe
Door Swing ........... 24-29
Troubleshootingtips
NormalOperatingSounds ...30
Before You
Call ForService......... 31-33
CustomerService
ProductRegistration....... 37
Warranty ................ 39
ServiceTelephone
Numbers .......... BackCover
3
IMPORTANTSAFETYINFORMATION.
READALLINSTRUCTIONSBEFOREUSING
A WARNING!
Use this appliance only for its intended purpose as
described in this Owner's Manual
4
SAFETYPRECAUTIONS
When using electrical appliances, basic safety precautions
should be followed, including the following:
This refligeralor must be
properly inslalled and
localed in accordance _dfl_
the Installation lnstnlcfions
befin-e il is used.
iiiiiiiiiiiii_iil
iiiiiiiiiiiii_iil
iiiiiiiiiiiii_iil
Do nol allow children lo
climb, sland or hang on dm
shelves in llle refligeralor.
They could damage llle
refligeralor and seriously
injure lhemselves.
Do not louch tim cold
surfaces in tim fieezer
comparlment, particularly
when bands are damp or wel.
Skin m W slick lo lhese
exu-emely cold sm-thces.
Do not slore or use gasoline
or olher flmnmable vapors
and liquids in tile vicinily of
tiffs or any olher appliance.
In refiigeralors xdfll
mm)malic icemakers, avoid
conlact xdfll tile moving pans
of the ejeclor mechanism, or
_dth lhe beating element lhal
releases lhe cubes. Do not
place fingers or bands on lhe
mlu)mafic icemaking
mechanism while lbe
refligeralor is plugged in.
iiiiiiiiiiiii_iil
iiiiiiiiiiiii_iil
Keep fingers out of tim
"pinch point" areas;
clearances belween lbe
doors and bel_veen lbe doors
and cabinet are necessarily
small. Be careful closing
doors when children are in
tile area.
I Jnplug tim refiigeFalor
befine cleaning and making
repairs.
NOTE."We strong&recommend
thatanyservicingbe performed
bya qualifiedindividual.
Turning tim control to lhe
OFFposition does not remove
power lo lhe light circuit.
Do not refleeze frozen fi)ods
which have lhmved
complelely.
It
T
OF B
PROPERDISPOSALOFTHEREFRIGERATOR
Child enuapment and suffocation are not problems of
lhe past.Junked or abandoned refligerators are still
dangerous...even it lhey _dll sit for ".just a few days."
If>m are gelling rid of your old refiigerator, please
fbllow the instnlclions below to help prevent accidents.
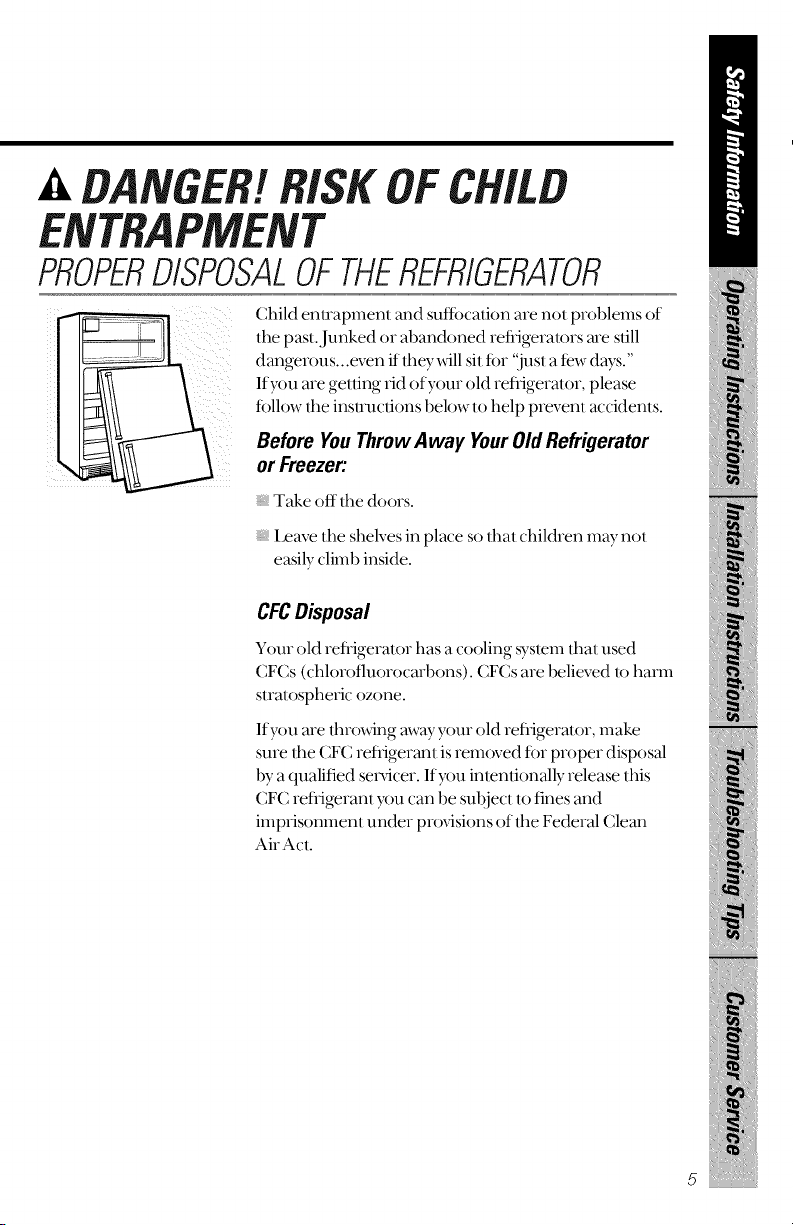
Before YouThrowAway YourOldRefrigerator
or Freezer:
Take off the doors.
Leave the shelves in place so that children may not
easily climb inside.
CFCDisposal
Your old refiigeralor has a cooling system that used
CFCs (chlorofluorocarbons). CFCs are believed to harm
stratospheric ozone.
If)sin are throating mvay your old refiigeralor, make
sure the CFC refiigerant is removed fbr proper disposal
by a qualified sel_icer. If)xm intenlionally release tiffs
CFC refiigerant >m can be subject to fines and
imprisonment under provisions of the Federal Clean
AirAct.
5
6
IMPORTANTSAFETYINFORMATION.
READALLINSTRUCTIONSBEFOREUSING
[, WARNING!
HOWTOCONNECTELECTRICITY
Do not, under any circumstances, cut or remove the third
(ground) prong from the power cord. For personal safety,
this appliance must be properly grounded.
The power cord of d_is appliance is equipped _dth a 3-prong
(grounding) plug which mates _dth a standard 3-prong
(grounding) wall oullel R) minimize lhe possibility of elecuic
shock hazard fiom this appliance.
Have tile wall outlet and circuit checked by a qualified elecuJcian
lo make sure the oullel is properly grounded.
Where a standard 2-prong wall outlet is encountered, it is your
personal responsibility and obligation to have it replaced u_th a
properly grounded 3-prong wall outlet.
Tile refligerator should always be plugged into its o_I1 indMdual
elecuical oullel which has a vohage rating lhal matches the rating
plate.
This provides tile best pertormance and also prevents overloading
house xdring circuits which could cause a fire hazard flom
overheated _dres.
Never unplug yore- refligerator by pulling on the power cord.
Ahvays grip plug firmly and pull suaight OUt fl-om the oullel.
Repair or replace immediately all power cords that have become
fiayed or other_dse damaged. Do not use a cord that shows cracks or
abrasion damage along ils lenglll or al either end.
When moving the reflJgerator mvavflom the wall be careflll not to
roll over or damage the p(mer cord.
USEOFADAPTERPLUGS
Because of potential safety hazards under certain
conditions, we strongly recommend against the use of an
adapter plug.
However, if you must use an adaptor, where local codes pennil, a
temporary connection may be made to a properly grounded 2-prong
wall outlet by use of a I JL-lisled adapter availal)le at most local
hardwm-e stores.
Thelingerslotintheadap/ermustbealigned_dthdmlar,g_rslotin
d_ewalloutletto provide proper polan b, in the connecuon of the
power cord.
When disconnecting d_e power cord fiom tim adapter, always hold
dm adapter in place xdtb one hand while pulling the power cord
plug xdd_ the odmr band. If this is not done, the adapter ,ground
temdnal is veU likely to break _dd_ repeamd use.
If tim adapter ground terminal breaks, O0 NOT USEd_e refligerator
until a proper ,wound has been established.
Attachingthe adaptergroundterminalto a wall outletcoverscrewdoesnot
groundtheapplianceunlessthe coverscrew/} metal,andnotlesuleted,andthe
walloutlet/} groundedthroughthe housewiring.Youshouldhavethecircuit
checkedbya qualifiedelectricianto makesurethe outletis properlygrounded.
USEOFEXTENSIONCORDS
Because of potential safety hazards under certain
conditions, we strongly recommend against the use of an
extension cord.
However, if you must use an exmnsion coM, it is absolu/ely
necessmy lbat it be a UL-lismd, 3-_dre grounding t}i)e appliance
extension cord having a grounding 1}i)e plug and outlet and that
the electrical radng of the cord be 15 amperes (minimum) and
1 21)vohs.
REMEMBER...
Your continued health and safety are important to us.
Please read and follow this Safety Information carefully.
We want you to remain a happy and healthy part of our
family.
SAVETHESEINSTRUCTIONS
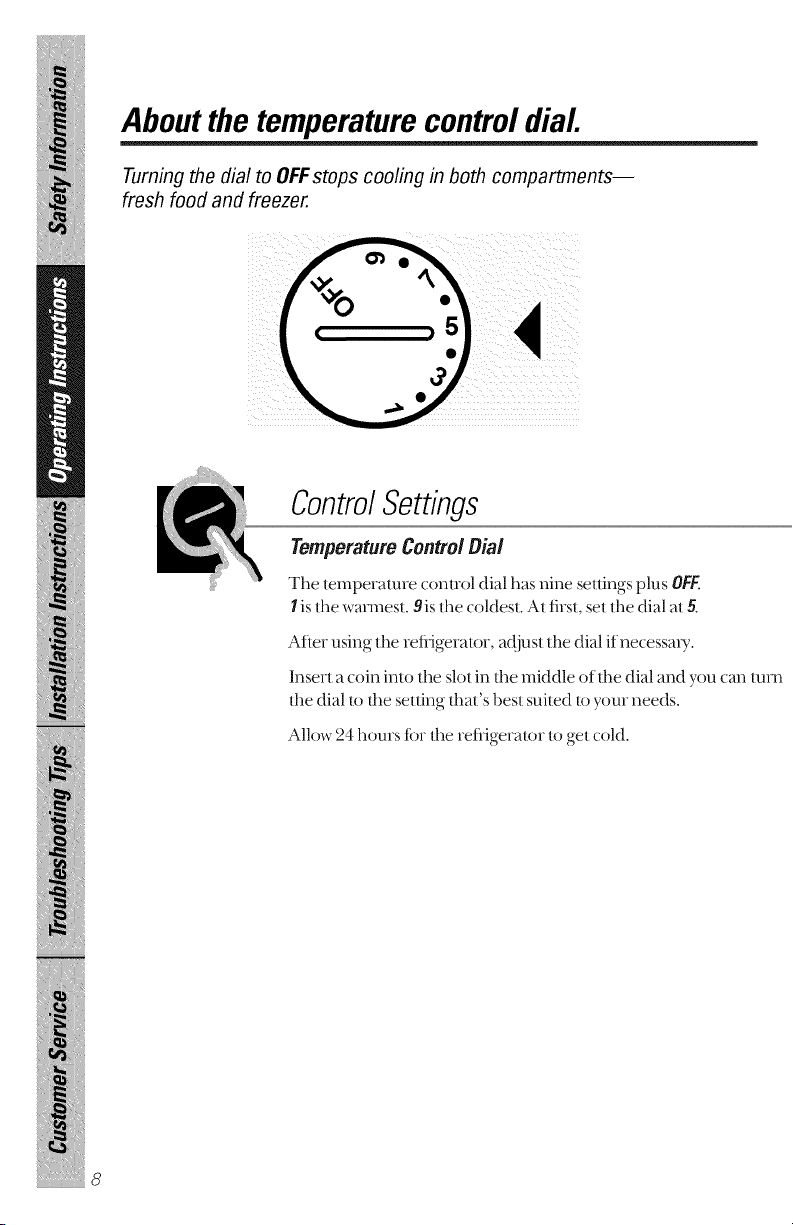
About the temperature control diaL
Turning the dial to OFFstops cooling in both compartments--
fresh food and freezer.
8
ControlSettings
Temperature Control Dial
The temperatme control dial has nine settings plus OFF.
I is the wmmest. 9is the (oldest. At first, set the dial at 5.
After using the reflJgeramr, a(!just the dial if necessm)_.
Insert a coin into the slot in tim middle of the dial and you can turn
the dial to fl_e setting flint's best suited to your needs.
Allow 24 hours for tl_e reflig_ramr to g_t cold.

Aboutthe freshfoodcompartmentshelves.
Shelf supports at various levels allow you to custom-space your shelves.
Not aft features are on aftmodels.
[_Tilt uu
Half-Width Shelves
One end of lhe shelf rests on a molded side-wall
support; a bracket on the other end hooks into a track
on the rear cabinet wall.
Toremove,litl the shelf up al ft-onl, then offthe supporl
and Out of the u-ack.
Toreplace,select desired shelfheighl. With shelf flont
raised slightly hook the brackel's top lug inlo lhe lrack,
then lower the shelf ()nit) the support.
NOTE."The shelf lo the zight of the u-ack is desig3md It)
hook into the right-hand sit)l; the shelf lo the left is
designed 1o hook inlo lhe left-hand slol.
L t ¸(¸¸7
I
Full-Width Shelves
Some models have a smel _dre sliding shelf, a sladonm T
lempered glass shelf or two smel _dre sladonm T sheNes.
These shelves can be moved lo anolher place in lhe
ftesh food comparlment.
The full-xddfl_ sliding shelf has stop-locks. X#3mn placed
coneclly on the shelf supporls, the shelf will slop beft)re
coming complemly out of the reftigeralor and x_ll not
lilt when you place food on it or remove food ftom it.
Toremovethefull-widthshelves,lift lhe rear of lhe shelf
and pull forward.
Toremovea full-widthshelf whenthe freshfood
compartmentdoorcannotbe openedfully,lift:lhe rear of
the shel£ pull fbrward and do_m, lilt the shelf and lake it
oul.
9
iiiii! lIi!iHi
iiiii! iiiiii! i!ii
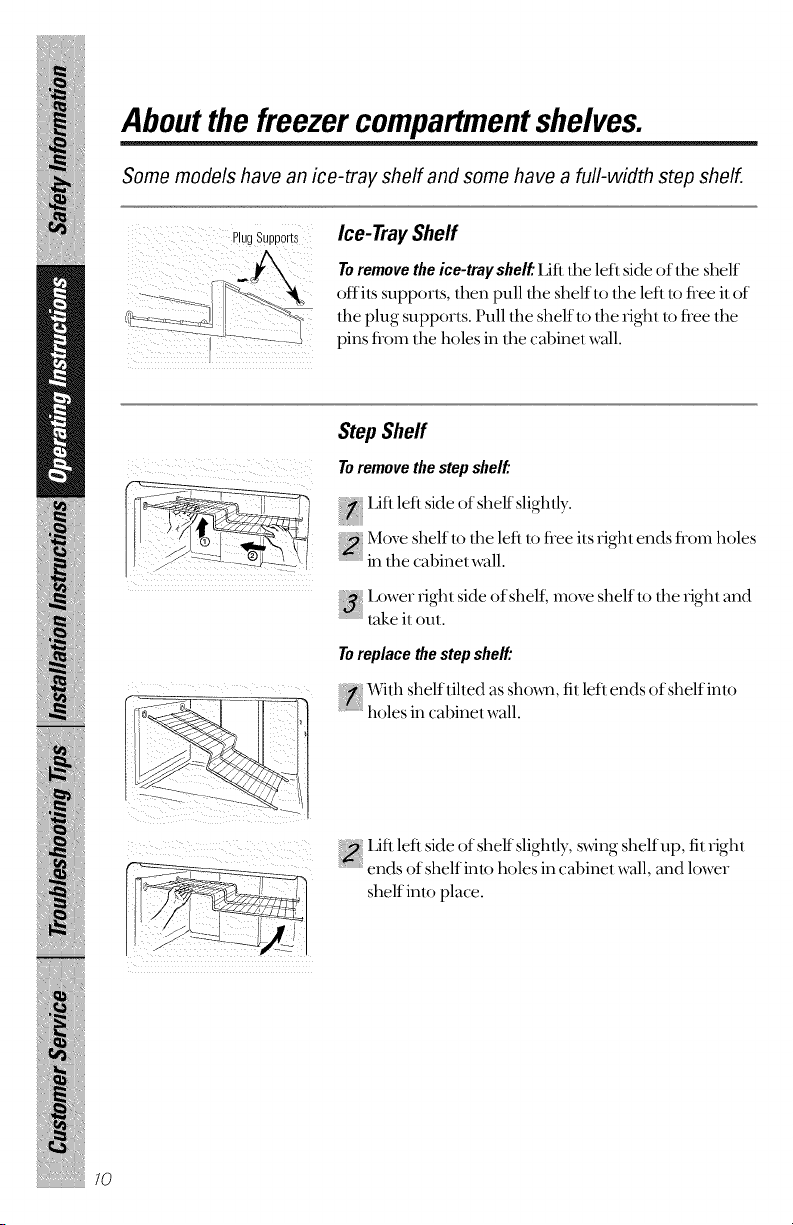
About the freezer compartmentshelves.
Some models have an ice-tray shelf and some have a full-width step shelf.
PlugSupports Ice-TraySheff
Toremove the ice-tray shelf."Lift I}_e left side of the shelf
off its supporLs, then pull I[_e shelf to I[_e left to f-ee it of
the plug supports. Pull the shelf to the light to Dee the
pins ft-om the holes in the cabinet wall.
70
Step Shelf
Toremove the step shelf."
Lif lef side of shelf slighllv.,.
Move shelf to the left to Dee its nghI ends flom holes
in lhe cabinet wall.
Lower lighl side of shell )hove shelf It) lhe lighl and
take it Otll.
Toreplace the step shelf."
With shelf tilled as sho_m, fit left ends of shelf into
holes in cal)inel wall.
_ Lift left side of sheff slightly, s_dng shelf up, fit: dghI
ends of shelf into holes in c abinel wall, and lower
shelf inlo place.
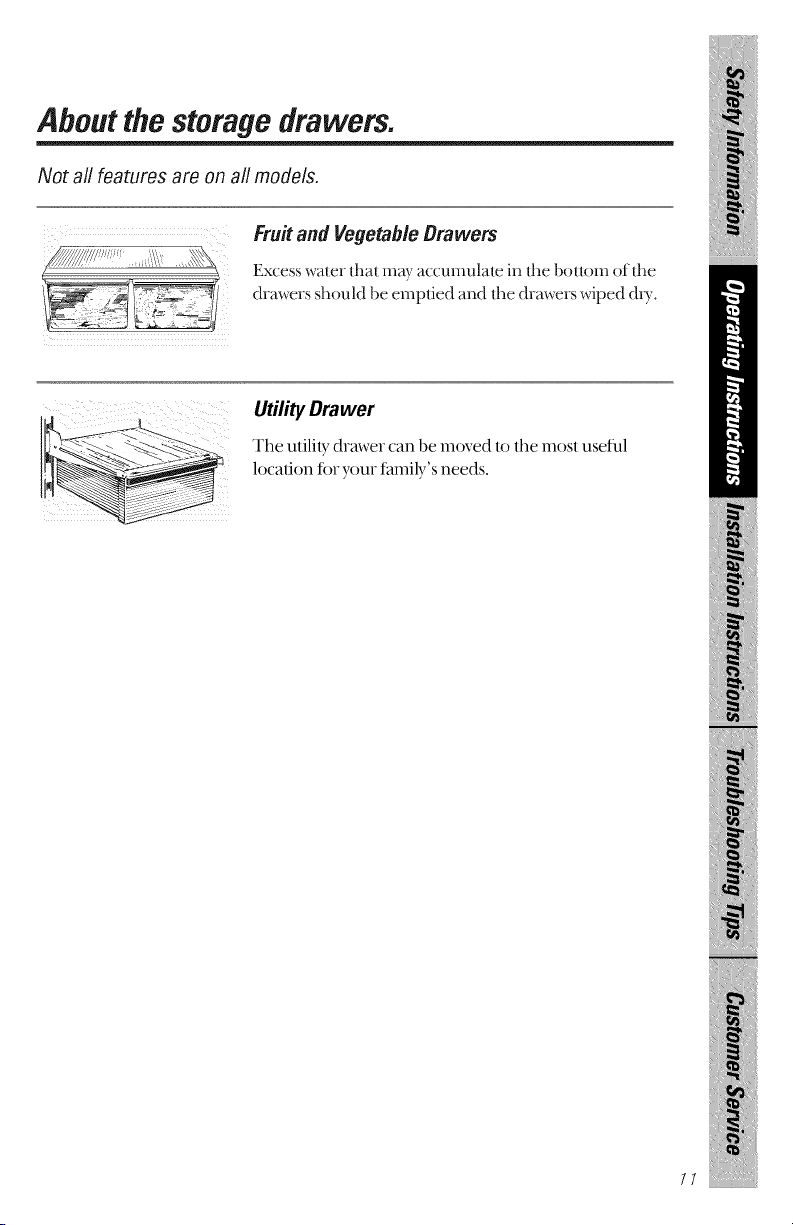
Aboutthestorage drawers.
Not all features are on all models.
Fru# and Vegetable Drawers
Excess water thai may accumulate in the bottom of the
drawers should be empded and the drawers wiped d U.
Utility Drawer
The utility drmver can be moved to the most useful
locadon for your family's needs.
11
About storage drawer and cover removal.
Not all features are on all models.
Drawer and CoverRemoval
Drawers _dll stop before coming all the way out of the refligeralor to
help prevent contents ftom spilling onto the floor. These drm_vrs
can be removed easily by grasping the sides and lifting up slightly
while pulling drawers past the stop location.
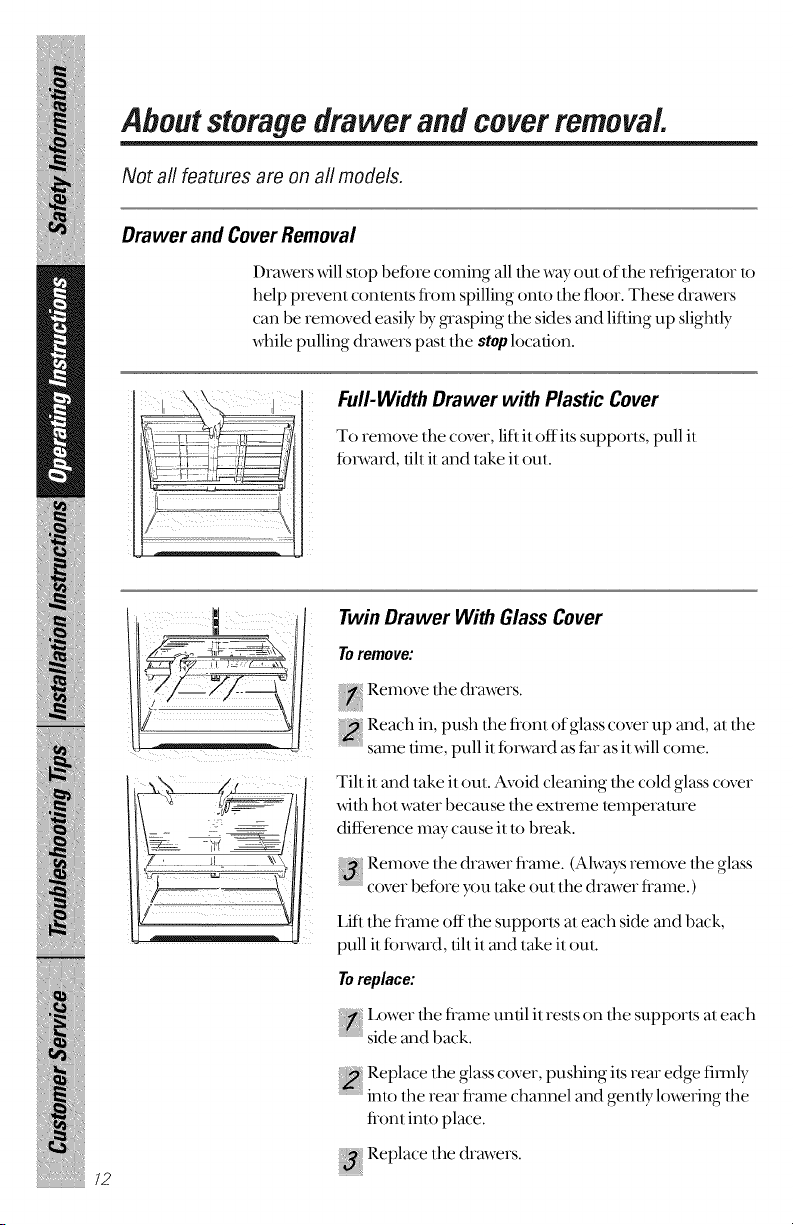
Full-Width Drawer with Plastic Cover
To remove the cover, lift it off its supports, pull it
fbrward, tilt it and take it oul.
72
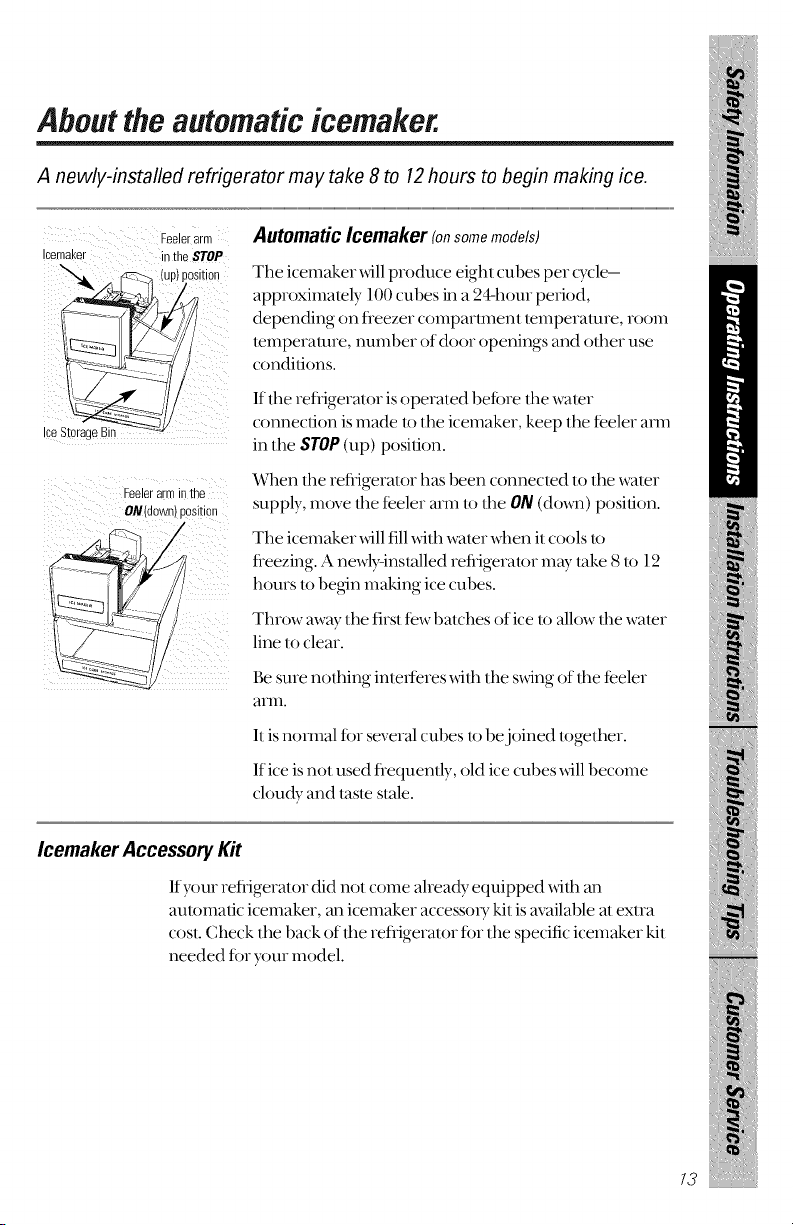
Twin Drawer With Glass Cover
Toremove:
Reach....in push the front ofglass_cover up and, at the
same time, pull it ft)rward as tar as it _dll come.
Tilt it and take it out. Avoid cleaning the cold glass cover
_th hot water becmlse the extreme temperature
difference m W cruise it to break.
{_{ Remove the drinker flame. (Ahvays remove the glass
cover 1)etore VOtltake out the drmver ftame.)
Lift the flmne off tim supports at each side and back,
pull it ftn-ward, tilt it and take it ()tit.
Toreplace:
Ix)wer the ft-ame until it rests on the supports at each
side and back.
Replace the glass cover, pushing its rear edge firefly
-' into the rear flame channel and gently l(mering the
ftont into place.
Replace the drmvers.
About the automatic icemaker.
A newly-installed refrigerator may take 8 to 12hours to begin making ice.
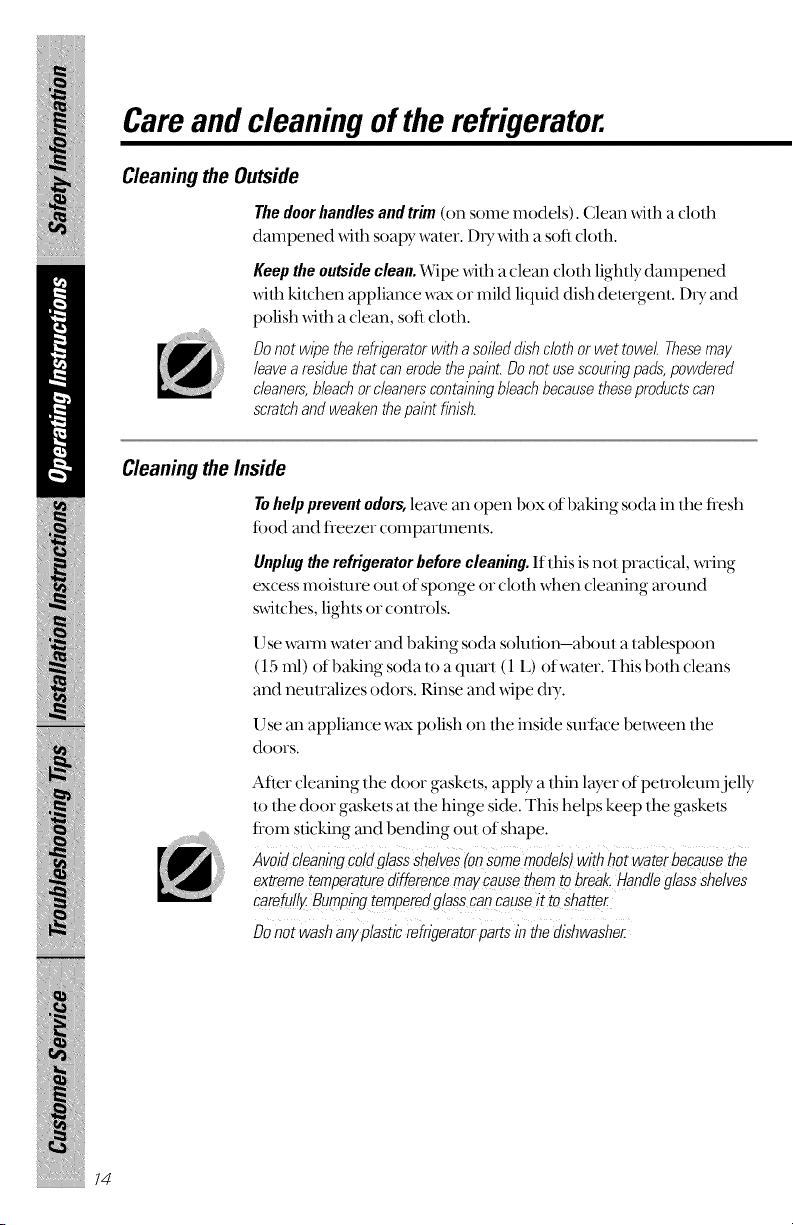
Feelerarm
!cemaker in the STOP
Automatic Icemaker (onsomemodels)
The icemaker xdll produce eight cubes per cycle-
approximamly 100 cubes in a 24-hour period,
depending on fleezer compartment temperature, room
mmperamre, number of door openings and other use
conditions.
If the refrigerator is operated betore the water
connection is made t,) the icemaker, keep the teeler arm
in the STOP (up) position.
Feelera - :" me
ON(downl positlor
When tim refiigerator has been connected to tim water
supply, move the feeler arm to the 011/(do_m) position.
The icemaker xdll fill xdth water when it cools to
freezing. A newly-installed refrigerator may take 8 to 12
hours to begin making ice cubes.
Throw away the first few 1)arches of ice to allow the water
line to clear.
Be sure nothing intederes _dth the s_dng of the feeler
arln.
It is normal for several cubes to be,joined together.
If ice is not used flequently, old ice cubes _dll become
cloudy and taste stale.
Icemaker Accessory Kit
If your refiigerator did not come aheady equipped _dfl_ an
automatic icemaker, an icemaker accesso U kit is available at extra
cost. Check the back of tim refligerator for the specific icemaker kit
needed for your model.
13
Care and cleaning of the refrigerator.
Cleaning the Outside
The door handles and trim (on some models). Clean _dd_ a cloth
dampened _dlh soapy waler. DD-_dlh a soft cloth.
Keep the outside clean. Wipe _dlh a clean clolh lightly dampened
_dlh kilchen appliance wax or mild liquid dish delergenl. DU and
polish xdlh a clean, soft clolh.
Donot wipethe refrigeratorwitha soi/ld dishc/lth or wettowel. Thesemay
/lave aresiduethatcanerodethepaint.Donotusescouringpads,powdered
c/laners,b/lachor c/lanerscontainingb/lachbecausetheseproductscan
scratchandweakenthepaint finish.
Cleaning the Inside
Tohelp prevent odors, leave an ()pen box of baking soda in tim flesh
fi_od and fteezer comparlmenls.
Unplugtherefrigeratorbeforecleaning.If fl_isis not praclical, x_ling
excess moislure out of sponge or clolh when cleaning around
swilches, lighls or conlrols.
I Jse warm wamr and baking soda solulion-aboul a tablespoon
(15 ml) of baking soda lo a quart (1 L) ofwaler. This bolh cleans
and neulralizes odors. Rinse and _dpe d U.
I Jse an appliance wax polish on lhe inside sin-lace bel_veen the
doors.
After cleaning the door gaskels, apply a fl_in layer of pelroleumjelly
Iv)lhe door gaskets at lhe hinge side. This helps keep the gaskels
flom slicking and bending out of shape.
AvoidCleaningco!dglassShelves(onsomemodels)withhotwate_becausethe
extremetemperaturedifferencemaycausethemto break.Handleglassshelves
carefully.Bumpingtempered glasscancause_ttoshatter
Donot washan/plastic refrigeratorpartsin the dishwasher
14
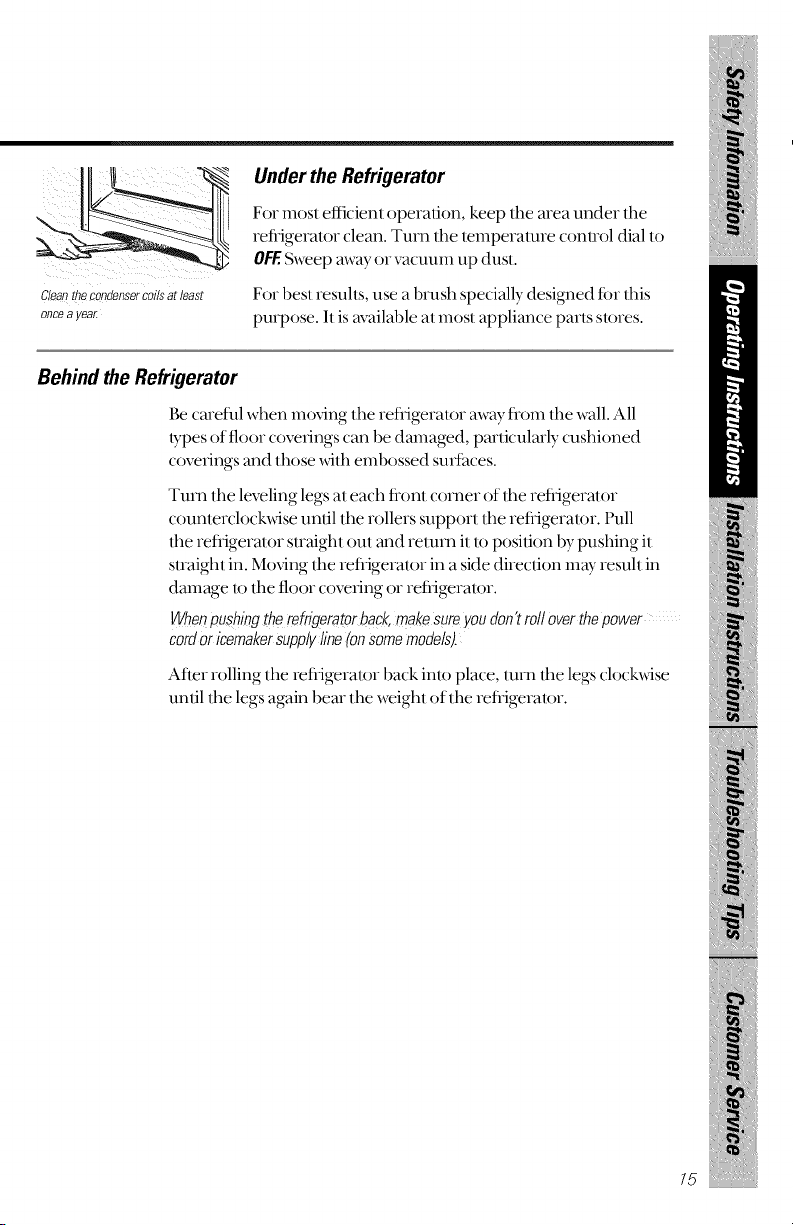
Clean the condenser coils at least
once a yeaL
Under the Refrigerator
For most efficient operation, keep the area under the
refligerator clean. Turn the temperature control dial to
OFF.S_eep mvayor vacuum up dust.
For best results, use a bn_sh specially desig_mdtor this
pm])ose. It is available at most appliance parts stores.
Behind the Refrigerator
Be carefl_l when moving the reflJgerator away fl-om the wall. All
types of floor coverings can be damaged, particularly cushioned
coverings and those with embossed surIaces.
Turn the leveling legs at each fiont comer of the refiigerator
counterclockwise until the rollers support the refiigerator. Pull
the refligerator straight out and return it to position by pushing it
suaight in. Moving lhe refiigerator in a side direction m W result in
damage lo lhe floor covedng or refiigeralor.
Whenpushingthe refrigeratorback,makesureyoudon'troll overthepower
cordor icemakersupplyline(onsomemodels).
After rolling the refiigerator back into place, turn the legs clock_dse
until the legs again bear the weight of the refligerator.
15
Care and cleaning of the refrigerator.
Light Bulb Replacement
To replace a burned out bulb, unplug tim refiigeralor fiom ils
eleclncal oullel, unscrew lhe bulb when cool and replace it wilh an
appliance bull) of lhe same or l()wer wallage.
Turningthecontrolto the OFFpositiondoesnot removepowerto the lightcircuit.
Preparing for Vacation
For long vacauons or absences, remove fi)od and unplug lhe
refligerator. Turn lhe lemperamre conlrol dial Io/he OFFposifion,
and clean/he inlerior xdth a baking soda solution of one lablespoon
(15 ml) of baking soda lo one quarl (1 I,) ofwaler. Leave lhe
doo_ ()pen.
Move the icemaker feeler ann lo STOP(tip) posidon and shul
offlhe waler supply lo lhe refiigeralor.
If rim lemperamre can drop below fleezing, have a qualified
sel_icer drain lhe waler supply syslem (on some models) lo preven!
serious properly damage due lo flooding.
Preparing to Move
Secure all loose items such as grille, shelves and drmvers 1)ytaping
lhem securely in place U)prevenl damage.
Besuretherefrigeratorstays/nanuprightpositionduringmoving.
76
Preparingto install the refrigerator.
Read these instructions completely and carefully.
WaterSupplyto the/cemakerio.some models)
If the refligerator has an icemaker or if you plan to add an
icemaker later, it _dll have to be connected to a cold water line.
A water supply kit (containing copper tubing shuloffvah_e fittings
and instl-ucdons) is available at exlra cost fiom your dealer or fiom
Paris and Accessories, 800-626-2002.
RefrigeratorLocation
Do not inslal] the vefiigerator where the temperature _l] go below
60 °F. (16°C.) because il _dll nol nm often enough to mainlnin
proper temperatures.
Install it on a floor strong enough to support it flflly loaded.
Clearances
Allow the fi_llo_dng clearances fin ease of installation, proper air
circulation and plumbing and elecwical connections:
Sides 3/4" ( 19 ram)
Top 1" (25 ram)
Back 1" (25 ram)
/7
Preparingto install the refrigerato
Read these instructions completely and carefully.
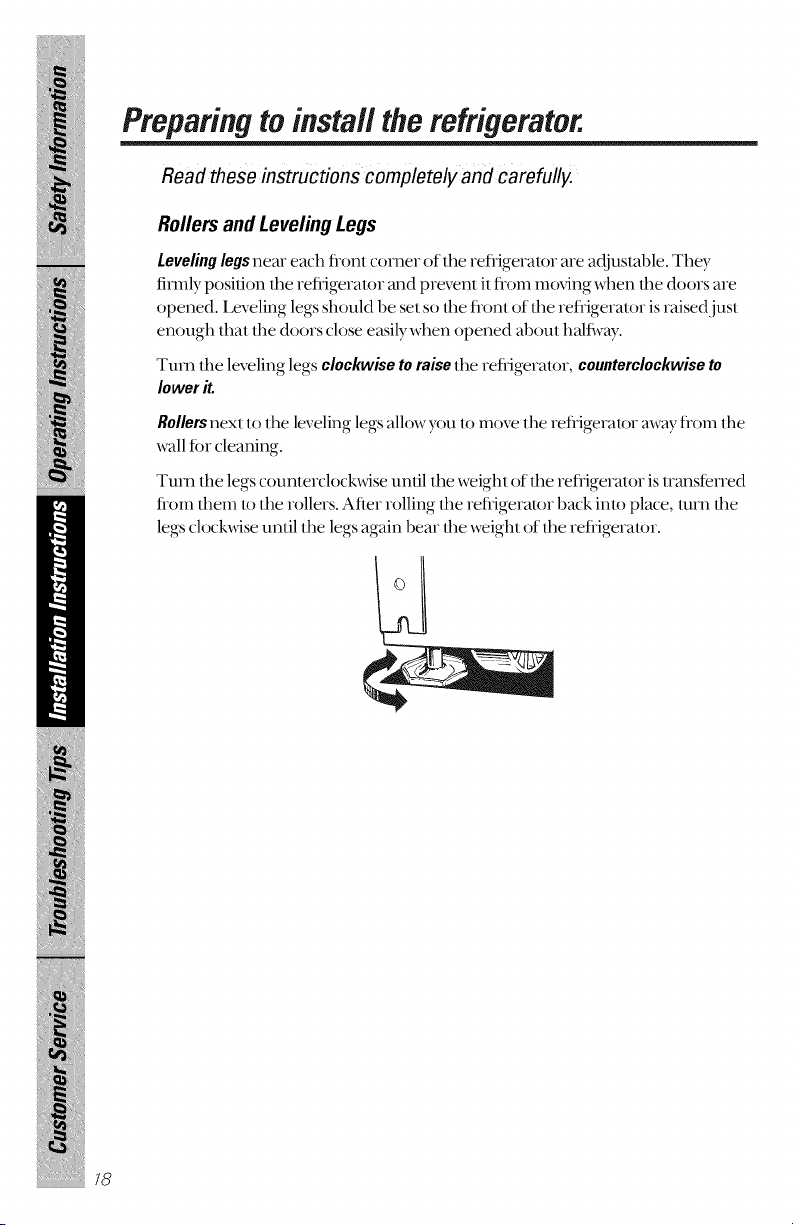
Rollers and Leveling Legs
Leveling legs near each flont comer of tile refligeralor are ad)ustable. They
firmly position file refiigerator and prevent it flom moving when tile doors are
opened. Leveling legs should be set st) file flont of the refligerator is raised just
enough that the doors close easily when opened about halfivay.
Turn the leveling legs clockwise toraisethe refrigerator, counterclockwiseto
lower it.
Rollers next to tile leveling legs allow you to move the refligerator away from the
wall for cleaning.
Turn tile legs counterclock_se until tile weight of tile refligerator is transfen-ed
from them It) the rollers. After rolling tile refrigerator back into place, turn the
legs clock_se until the legs again 1)ear the weight of the refligerator.
Installing the water line.
Read these instructions completely and carefully.
Before YouBegin
This water line installation is not warranted by the
refrigerator or icemaker manufacturer. Follow these
instructions carefully to minimize the risk of expensive
water damage.
Water hammer (water banging in the pipes) in house
plumbing can cause damage to refrigerator parts and lead
to water leakage or flooding. Call a qualified plumber to
correct water hammer before installing the water supply
line to the refrigerator.
Toprevent bums and product damage, do not hook up the
water line to the hot water line.
If you use your refrigerator before connecting the water
line, make sure the icemaker feeler arm is kept in the STOP
(up)position.
Do not install the icemaker tubing in areas where
temperatures fall below freezing.
When using any electrical device (such as a power drill)
during instaflation, be sure the device is insulated or wired
in a manner to prevent the hazard of electric shock.
All installations must be in accordance with local plumbing
code requirements.
I9
Installing the water line.
Read these instructions completely and carefully.
20
What YouWill Need
Todetermine how much coppe_ tubing you need:
Measure the distance fi_m d,e water valve On the back of'the
refligel-ator to dm water supply pipe:Then add 8 feet (244 cm),
Be sure there is sutticient exu'a tubing[about 8 feet (244 cm)
coiled into 3 turns ofab0ut 10 inche s (25 cm) diameter] m allow
file refligerator to move out from file wall after installation.
A water supply kit (containing copper ml)ing, shutoff valve and
fittings listed 1)elow) is available at extra cost fiom your dealer
or fiom Parts and Accessories, 800-626-2002.
Coldwatersupply.The water pressure must be l)etween
20 and 120p.s.i.
Power&ilL
Coppertubing,l/4" outer diameler lo connect the refiigerator lo
the water supply. Be sure both ends of the robing are cut square.
0o notuseplastictubingorplastlcfittingsbecausethe watersupplylineis
underpressureat all times.Certaintypesof plastictubingmaybecomebrittle
withageandcrack,resultingin waterleakage.
iiiiiiiiiiiii_iil
iiiiiiiiiiiii_iil
Two 1/4" outer diameter compression nuts and 2 ferrules (sleeves)-
t() connect the copper ml)ing to the shutoffvalve and the
reflJgeralor water valve.
If your existing water line has a flared fitting at; the end, you xdll
need an adapter (available at plumbing supply stores) to connect
the waler line to the refiigerator ORyou can cut off the flared
filling _dth a tube cutter and then use a compression fiuing.
Shutoffvalve t() connect; to the cold water line. The shu/offvalve
should have a water inlet _dlh a minimum inside dimnemr of
5/32" at lhe point of connection to the COLDWATERLINE.Saddle-
t}])e shuloffvalves are included in many wamr supply kils. Betore
purchasing, make sure a saddle-bi)e valve complies x_lh your
local plumbing codes.
Shut Off theMain WaterSupply
Turn on the nearest faucet long enough to clear the line of water.
Install the Shutoff Valve
: lnst all the shuloffvalve on the nearest fl-equently used drinking water line.
Choose a location fbr the valve thai is easily accessible. It is best I() connect
into the side of a vertical water pipe. When it is necessary to connect into a
horizontal water pipe, make the connection to the top or side, rather than at
the l)otton], to avoid drawing offany sediment flom the water pipe.
DHll a 1/4" hole in the water pipe, using a sha, 1) bit. Remove any buns
' resulting fl-om drilling the hole in the pipe.
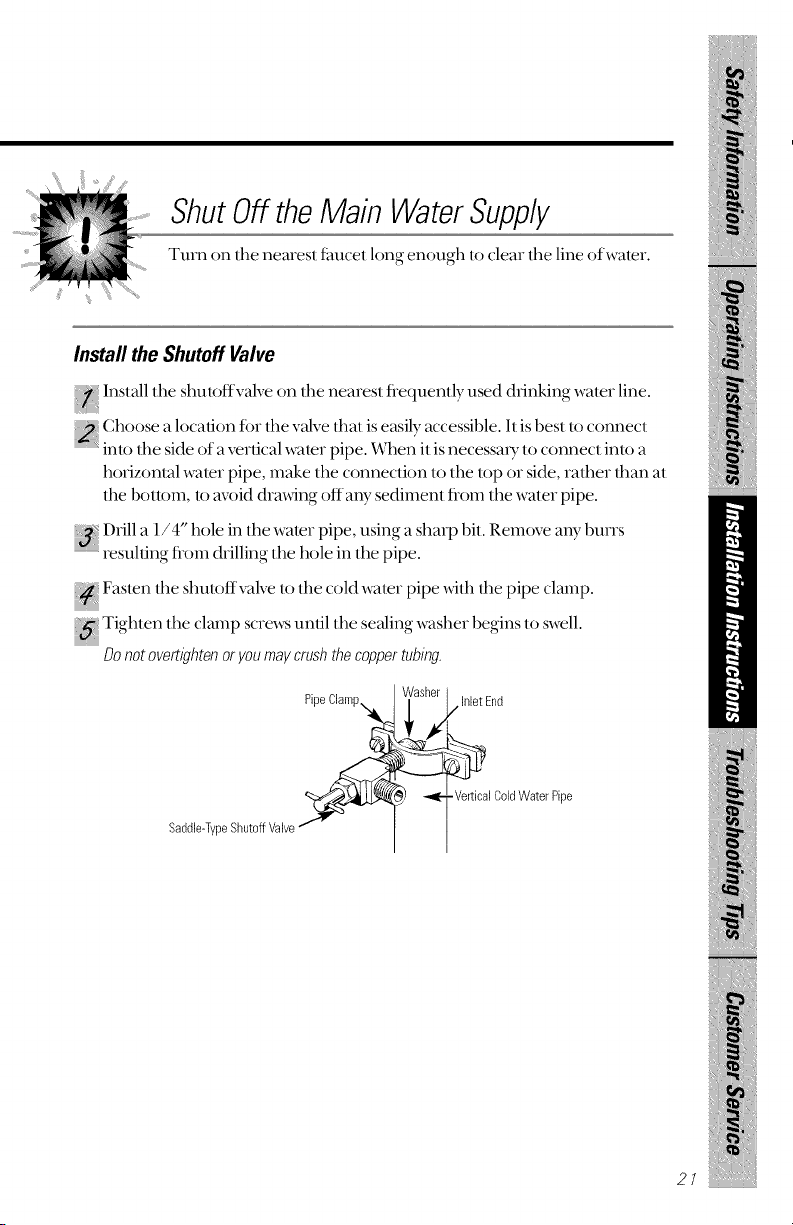
Fasten the shutoffvalve to the cold water pipe _dth the pipe clamp.
{{{_Tighten, the......clamp screws until the sealing, washer begins, to swell.
Donot overtlghtenoryoumaycrushthecoppertubing
PipeClamp_i_
Saddle-TypeShutoffValve
/ InletEnd
-Vertical(:oldWater Pipe
21

Installing the water line.
Read these instructions completely and carefully.
Route the Copper Tubing and Connect It to the Shutoff Valve
Route the copper tubing between the cold water line and the refligeralor.
Route dm robing through a hole drilled in the wall or floor (behind tim
refiigeralor or adjacent base cabinet) as close lo the wall as possible.
Be sure there is sufficient extra tubing [about 8 feet (244 cm) coi/ed into 3 turns of about
10" (25 cm) diameter] to a//ow the refrigerator to move out from the waft after ibsta//ation.
Place dm compression nut and fen-ule (sleeve) onto the end of the robing and
connect it to the shutoffvalve.
Make sure the tubing is flflly inserted into the valve. Tighten the compression nut
secllrely.
Saddle-TypeShutoffValve_._ CompressionNut
Nut I \
OutletValve Ferrule(sleeve)
TurnOn the Water and FlushOut the Tubing
Turn the main ,,'ate,- supply on and flush out the tubing until the ,,'ate,
is (lear.
Shut the water off at the water valve ailer about one quart ( l L) of water has
been flushed through the tubing.
Connectthe Tubingto the Refrigerator
Before making the connection to the refrigerator, be sure the
refrigerator power cord is not plugged into the wall outlet.
We recommend installing a water fiher if your water supply has sand or particles
thai could clog the screen of the refligerator's water valve. Install it in the water
line near the refligerator.
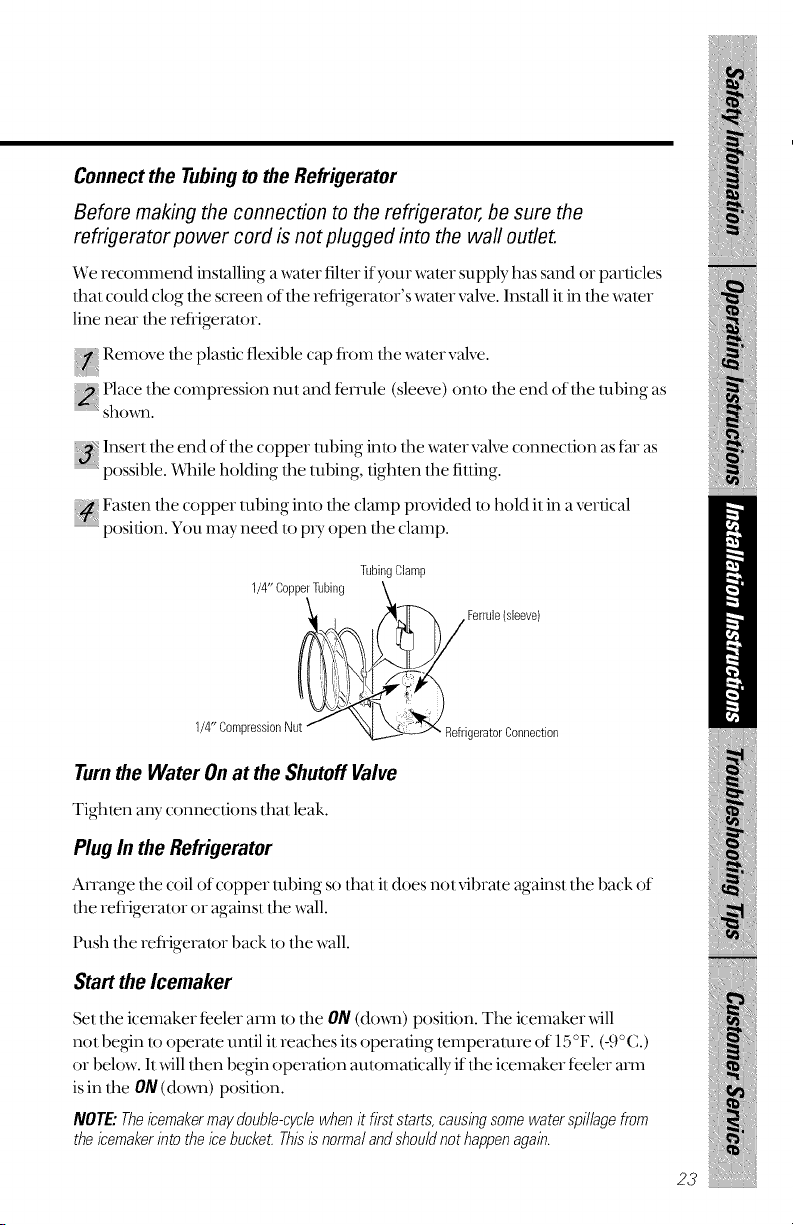
} Remove the plastic flexible cap flom the water valve.
Place the compression nut and femfle (sleeve) onto the end of the ml)ing as
Insert.... the end of the copper tubing into the watervalve, connection as far as
......................possible. _#l_lle holding the tubing, tighten the fitting.
Fasten the copper tubing into tl,e clamp provided to hold it in a vertical
position. You may need to pD_open the clamp.
Tubing(;lamp
1/4" CopperTubing
_ _.__r Ferrule(sleeve)
1/4" CompressionNu_ .
igeratorConnection
Turnthe Water Onat the Shutoff Valve
Tighten any connections thai leak.
Plug In the Refrigerator
Arrange the coil of copper tubing so that it does not vii)rate against the back of
the retiigeralor or against the wall.
Push the retiigeralor back to the wall.
Start the Icemaker
Set the icemaker teeler arm to the ON (do_m) position. The icemaker _dll
not begin to operate until it reaches ils operating temperature of 15°F. (41°C.)
or below. It xdll then begin operauon aulomaucally if the icemaker reeler man
is in the ON (do_) position.
NOTE."Theicemakermaydouble-cyclewhenit firststarts,causingsomewaterspillagefrom
theicemakerinto the icebucket Thisis normalandshouldnothappenagain.
23
Reversingthedoorswing.
Read these instructions completely and carefully.
ImportantNotes
When reversingthe doorswing :
Read the instnulions all the way through betbre starting.
} Handle paris careflllly 1o avoid scralching paint.
} Set screws doxm by their related paris to avoid using them in the
wrong places.
} Proxdde a non-scratching work surface for the doors.
IMPORTAN7_Once you begin, do not move the cabinet until
door-swing reversal is completed.
These instructions are for changing the hinges from the
right side to the left side--if you ever want to change the
hinges back to the right side, follow these same instructions
and reverse all references to left and right.
ToolsRequired
5/16" hex-head sockel screwdriver
Masking lape
T20 or T25 Torxdnver, whichever your model requires
Pully knife or lhin-blade screwdriver
5/16" open-end _lench
Phillips screwdriver
Removingthe doors.
Before Removing the Doors
Unplug the retiigerator ti-om its electrical outlet.
Empt_ all door shelves, including the dail T compartment.
CAUTION:Oo not let either door drop to the floor. Todo so could
damage the door stop.
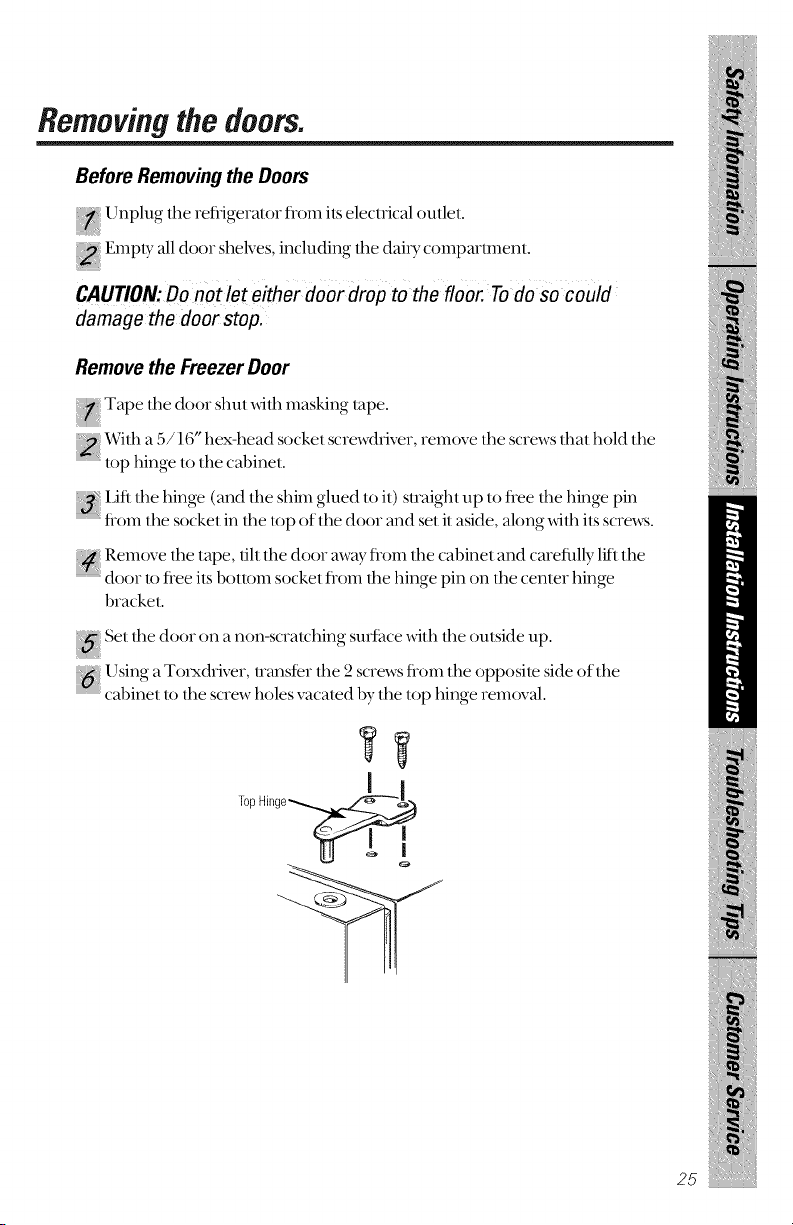
Remove the FreezerDoor
Tape the door shut xdth masking tape.
_ _'lth a,_/16 hex-head socket screwdriver, remove the screws that hold t he
top hinge to the cabinet.
Lift the hinge (and the shim glued to it) suaight tip to fiee the hinge pin
..... flom the socket in the top of the door and set it aside, along with its screws.
Remove the tape, tilt the door away flom the cabinet and careflllly litl the
door to flee its bottoln socket floln the hinge pin on the center hinge
bracket.
N Set the door on a non-scratching surtace with the outside tip.
!!
l Jsing a To_xdriver, u-anst(r the 2 screws fi-om the opposite side of the
cabinet to the screw holes vacated 1)vthe lop hinge removal.
25
Removingthe doors/Reversingthe hardware.
Read these instructions completely and carefully.
Remove the FreshFoodDoor
Tape tile..... door shut with masking, tape.
Using" a ,)/16 hex-head socket screwdnver and a a/16 open-end wrench,
....- remove tile two screws holding tile center hinge (and the shim glued lo it) lo
tile cabinet. IJitl the center hinge It) flee its pin flom tile socket in tile lop of
tile door, and set hinge and screws aside•
Remove tile tape and tilt tile door away fi-om tile cabinet. Lift tile door fi-om
..... tile pin in tile bottom hinge bracket. (If the plastic washer sticks to the door
botlonl, pul it back on tile hinge.)
,Settile door outside-up on a non-scratching, surface.
{_{ Using a To_xdriver, transfer tile Ix*,,)screws fl-om tile opposite side of tile
{_ cal)i('let to tile screw holes vacated by tile center hinge removal.
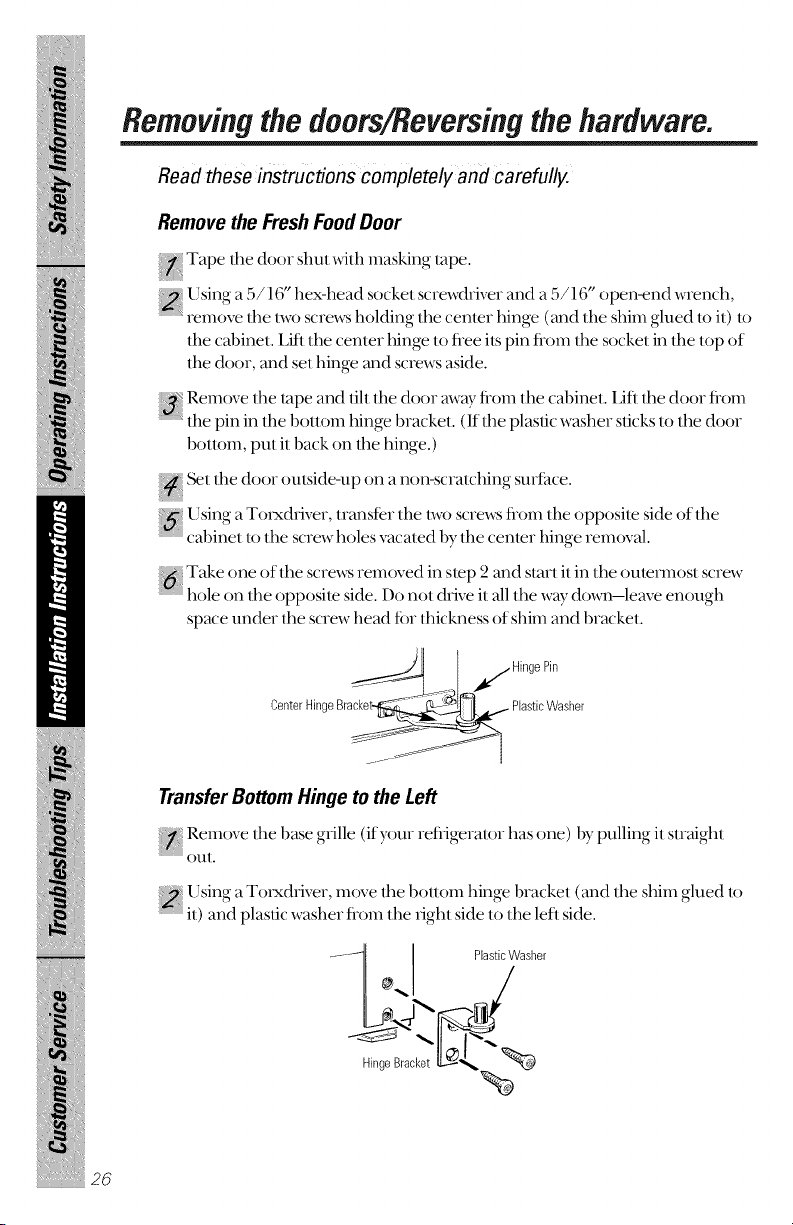
Take one of the screws removed in step 2 and start it in tile outermost screw
hole on tile opposite side. Do not drive it all tile way do_l--leave enough
space under tile screw head for thickness of shim and bracket.
j HingePin
(:enterHingeBra_ PlasticWasher
Transfer Bottom Hinge to the Left
Remove tile base g_ille (if your refiigerator has one) 1)ypulling it straight
out.
? [,_Tsing',a Torxdnver, illove, tile l)olIOlll hinge bracket. (and tile shilll glued to
lI) and plastic washer fl-om tile nghl side lO tile left side.
-""_I I PlasticWasher
/°. /
HingeBracket _-<
%
26
Reversingthe door handles.
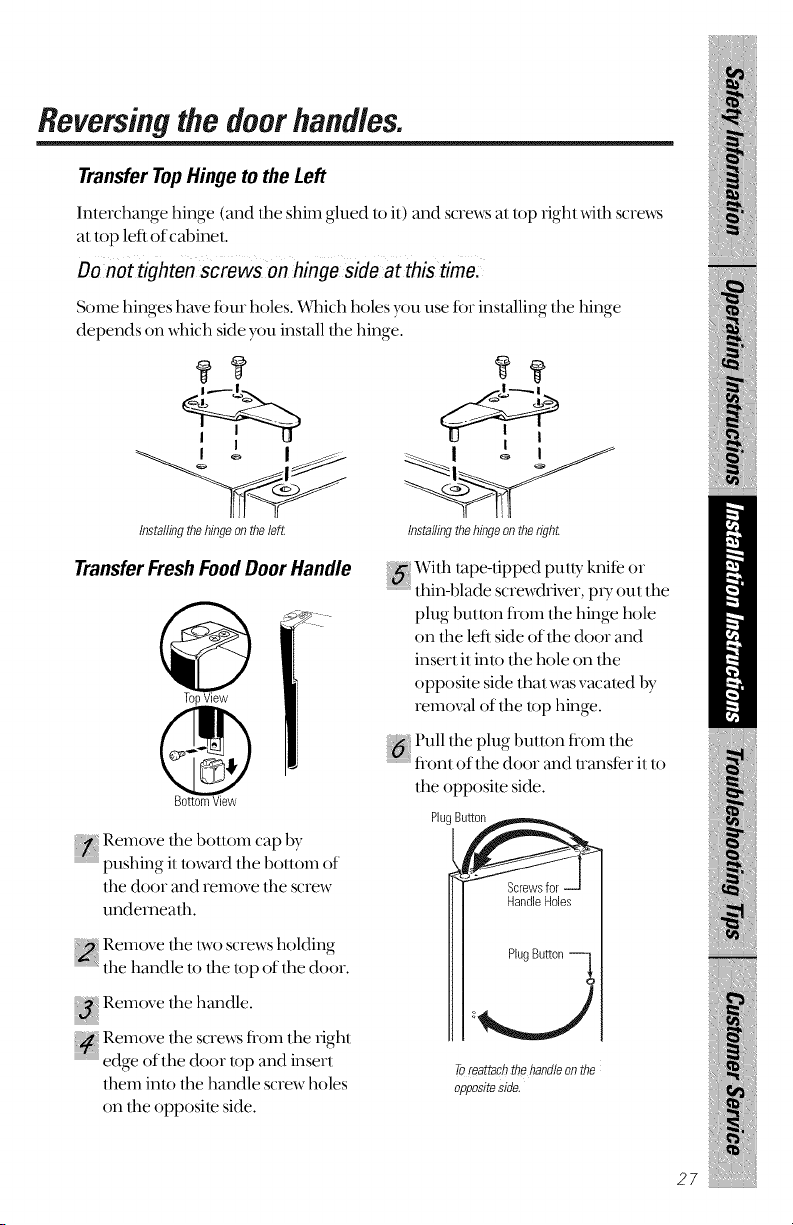
TransferTopHinge to the Left
lnlerchange hinge (and lhe shim glued lo it) and screwsal lop fighl _dd_scre,.vs
at mp left of cabinet.
Do not tighten screws on hinge side at this
Some hinges have four holes. _k_ich holes you use for installing the hinge
depends on which side you inslall lhe hinge.
?{?
I ,..----/_, --I-----. I
InstallingNo hingeonNo left InstallingNo hingeonNo right
TransferFresh FoodDoorHandle
TopView
Remove the bottom cap by
'" pushing it toward the l)ottom of
the door and remove the s(Tew
undemealh.
Remove lhe l_vo screws holding
....- ' the handle to the top of lhe door.
Remove lhe handle.
!!i{
{_ Remove lhe screws fl-om lhe righl
edge of the door lop and inserl
lhem into the handle screw holes
on lhe opposile side.
With rope-tipped puUy knite or
thin-1)lade screw(hiver, pw oul the
plug butlon tiom ll_e hinge hole
on lhe left side of the door and
insert it inu) lhe hole on lhe
opposite side that was vacated 1)y
removal of the lop hinge.
Pull the plug buuon flom the
flont of the door and uanster it to
the opposile side.
PlugButt_
HandleHoles
PlugButton
Toreattachthe handleonthe
oppositeside,
27
28
Rehangingthedoors.
Read these instructions completely and carefully.
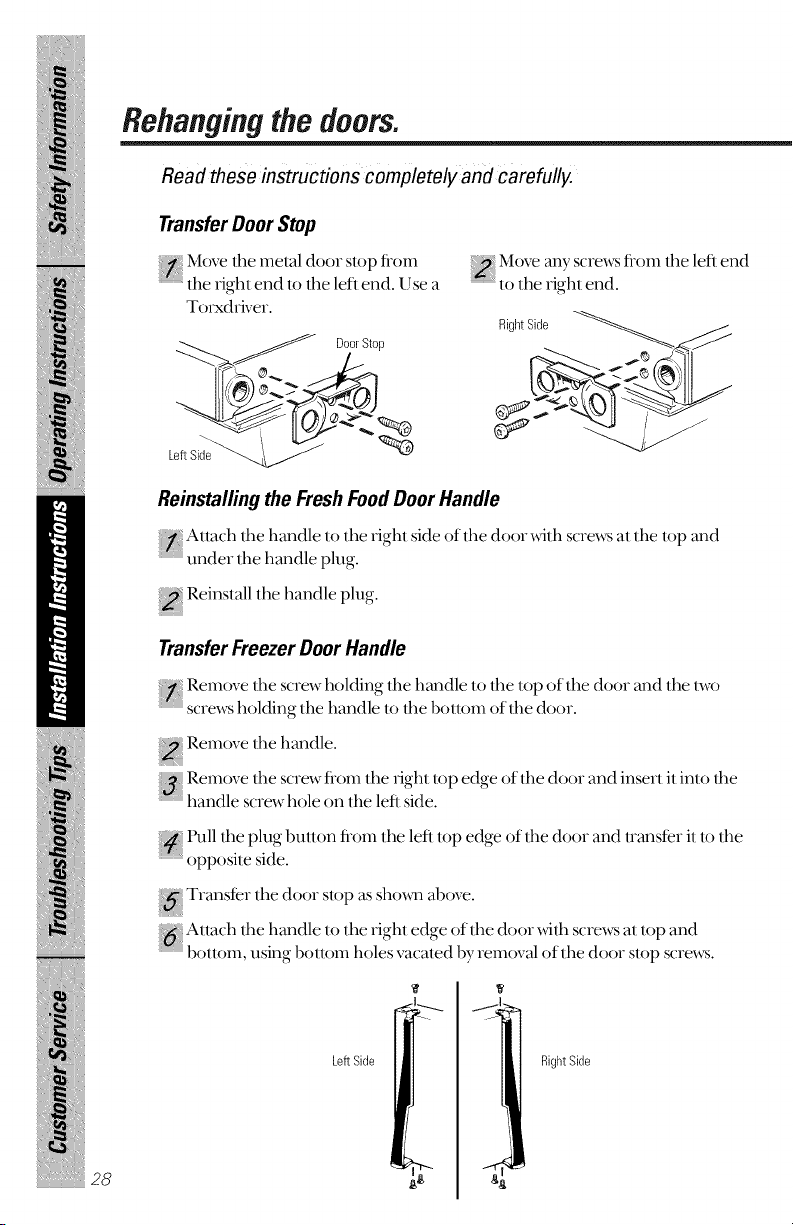
Transfer Door Stop
Move,hemet. doo,stopf,om
"_the fight end to the left end. I Jse a
To_xdfiver.
_....>_ _ DoorStop
Move any screws from the left end
to the fight end.
RightSide _,_
Reinstalling the Fresh Food Door Handle
Attach the hmld]e to the right side of the door _dth screwsat the top mid
under the [mnd]e plug.
Reinslall lhe handle plug.
Transfer Freezer Door Handle
Remove tile _screwholding tile handle to......the. top of the door and the two
screws holding tile handle 1o lhe bollolll of lhe door.
Remove the handle.
{{_ Remove tile screw from tile _ight top edge of the door and insert it into the
handle screw hole on tile left side.
Pull tile plug button from tile left top edge of tile door and transter it to tile
opposite side.
Transter tile door slop as shouI1 above.
{.
Attach tile handle to the right edge of the door with screws at top and
.............................bollOlll using bollOlll holes vacaled by removal oflhe door slop screws.
LeftSide RightSide
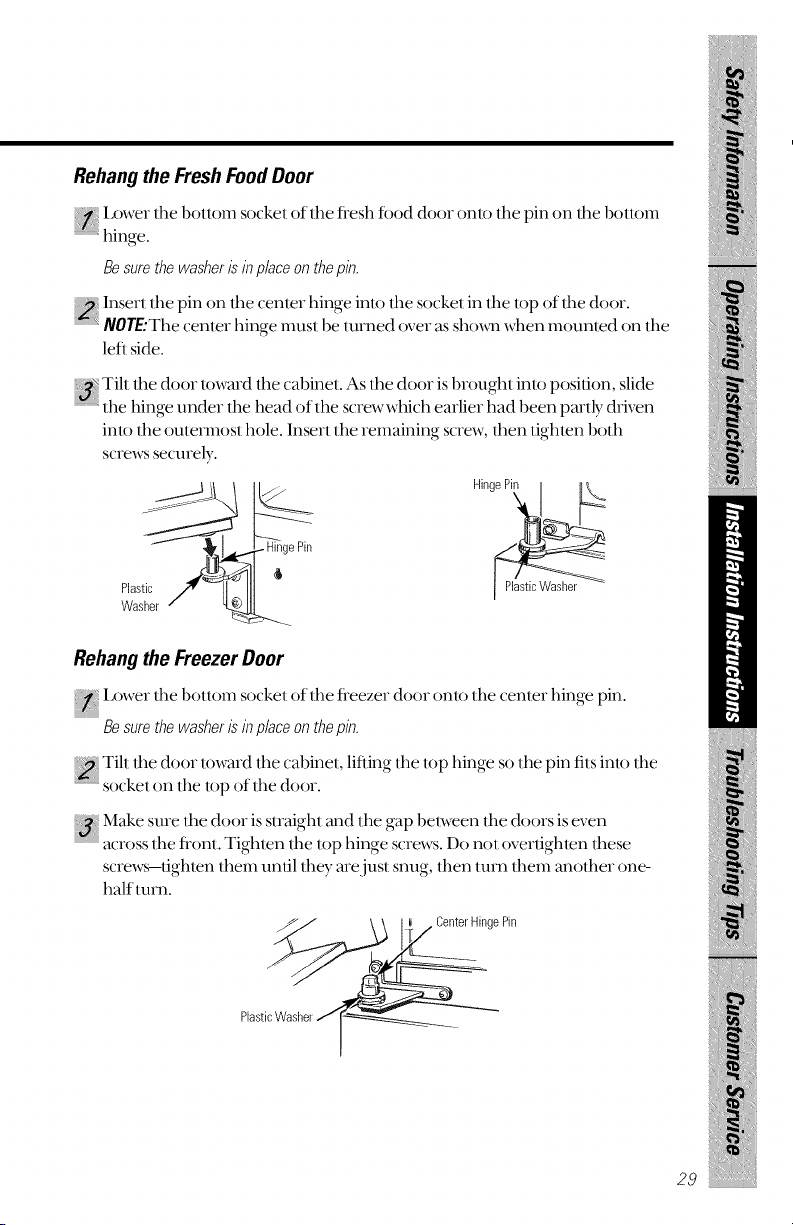
Rehang the FreshFoodDoor
Lower lhe bottom sockel of lhe flesh fbod door onlo lhe pin on lhe bottom
"_hinge.
Besurethe washeris inplaceon thepin.
Insert the pin on the center hinge into the socket in the top of the door.
NOTE.'The cenler hinge musl be mined over as shou_n when mounled on the
left side.
Tilt .........tile door toward the cabinel. As lhe door is l)rou ght into position_ , •slide
.......................tim h)nge under tile head of tile screw wh)ch earher had been part b, driven
into lhe oulerIllOSl hole. Inserl lhe remaining screw, lhen fighlen 1)olh
screws securely.
Rehang the Freezer Door
Ixm'er tile bollom sockel of the freezer door onto the center hinge, pin.
Besurethe washerik inplaceonthepin.
Till the door loward the cabinet, lifting tile top hinge st) tile pin fits into tile
::::F,sockel on the lop of the door.
{{{_Make sure tile door is straight and file gap bemeen tile doors is even
across lhe front. Tighlen tile lop hinge screws. Do not overfighten these
screws--tighlen flmm until lhey arejusl snug, lhen lurn lhem anolher one-
half lurn.
29

i
Normal operating sounds.
Depending on the placement of the refrigerator in your kfchen,
you may want to place a piece of rubber backed carpet under
the refrigerator to reduce noise.
tan circulating air inside lhe freezer which
keeps the temperatures even.
g water or a gurgling noise. The flow of
refligerant through the freezer cooling coils.
hissing or popping sound. Water
dropping on lhe deflosl healer during lhe
defrost cycle.
_gor popping sound. Cooling coils
expanding and conuacfing during 1he
defrosting cycle.
_¥aler dripping as il tachs fiom 1he evaporalor
and flows 1(71hedrain pan during 1he delTaS1
cycle.
(on some models)
Icemaker
The icemaker waler valve xdll buzz when 1he
icemaker fills wilh waler. If 1he teeler arm is in
the 0N (doxm) position it xdll buzz even if it has
no1 yel been hooked up to waler. Keeping 1he
teeler arm in lira 011/(d(mI_) position betore il is
hooked up 1o waler can damage 1he icemaker.
To prevenl this, raise 1he teeler m-m lo lhe STOP
Thesesoundsarenormal (up) position. This _dll slop 1he buzzing.
and are duomos& tohighly The sound of cul)es dropping inlo am bin and
efficient operation, waler nmning in pipes as icemaker refills.
3O

Before you call for service...
Troubleshooting -tips
Save time and money! Review the charts on the following pages first and
you may not need to call for service.
Refrigeratordoesnot
operate
Possible Causes
Refrigerator in
defrost cycle.
What ToDo
The fuse is blown/
circuit breaker is
tripped.
Wait about 30 minules for
deflost cycle to end.
Temperature control Move the temperature
dial in OFFposifion. conu-ol dial to a
telllpelature setting.
Refrigerator is Push tim plug completely
unplugged, into the oullet.
Replace fllse or reset the
breaker.
Motor operates for long
periods or cycles on and
off frequently. (Modern
refrigerators with more
storage space and a larger
freezer require more
operating time. They start
and stop often to maintain
even temperatures.)
Normal when
refrigerator is fwst
plugged in.
Wait 24 hours tor the
reiiigeralor to completely
cool do_m.
Often occurs when large This is normal.
amounts of food are
placed in refrigerator.
Door left open. Check to see if package is
holding door ()pen.
Hot weather or frequent This is normal.
door openings.
Temperature control dial See About the temperature
set at the coldest setting, control dial.
Grille and condenser See Care and cleaning.
need cleaning.
Vibration or rattling Front roller screws or
(slight vibration is normal) front leveling legs need
adjusting.
See Rollers and leveling legs.
31
i
Before you carl for service...
Troubleshooting -tips
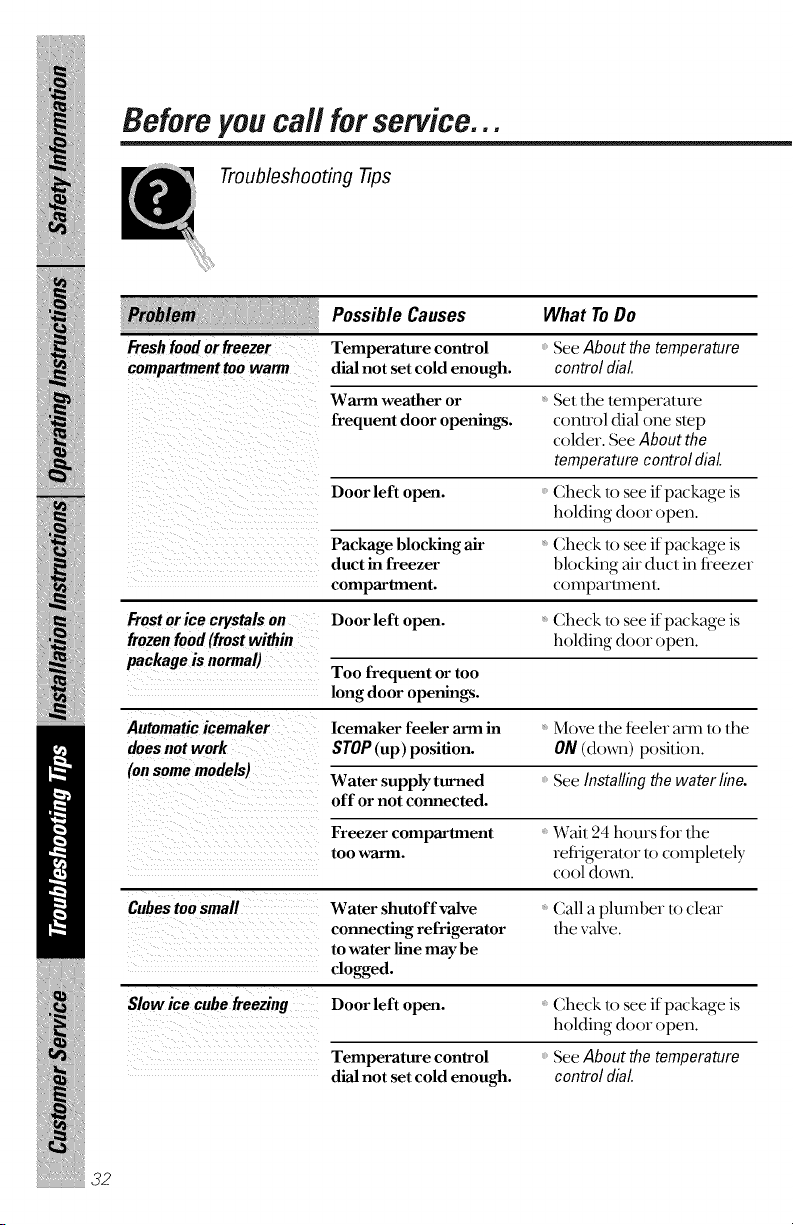
Freshfoodorfreezer
compartmenttoowarm
Frost or ice crystals on
frozen food (frost within
package is normal)
Automatic icemaker
does not work
(on some models)
Possible Causes
Temperature control
dial not set cold enough.
Warm weather or
frequent door openings.
What To Do
SeeAbout the temperature
control dial
Set the lemperature
control dial one step
colder. See About the
temperature control dial
Door left open. Check to see if package is
holding door ()pen.
Package blocking air
duct in freezer
compartment.
Doorlefl open.
Toofrequentortoo
longdooropenings.
Icemaker feeler arm in
STOP (up) position.
Water supply turned
off or not connected.
Check to see if package is
blocking air duct in fleezer
compartment.
Check to see if package is
holding door ()pen.
Move the reeler ann to the
ON (doxm) position.
See &stalling the water line.
Freezer compartment
too warm.
Wait 24 hours tor the
refligeramr to completely
cool doom.
Cubestoosmall Water shutoff valve
connecting refrigerator
to water line may be
dogged.
Slow ice cube freezing Door left open.
Temperature control
dial not set cold enough.
Call a plumber to clem
the valve.
Check to see if package is
holding door ()pen.
See About the temperature
control dial
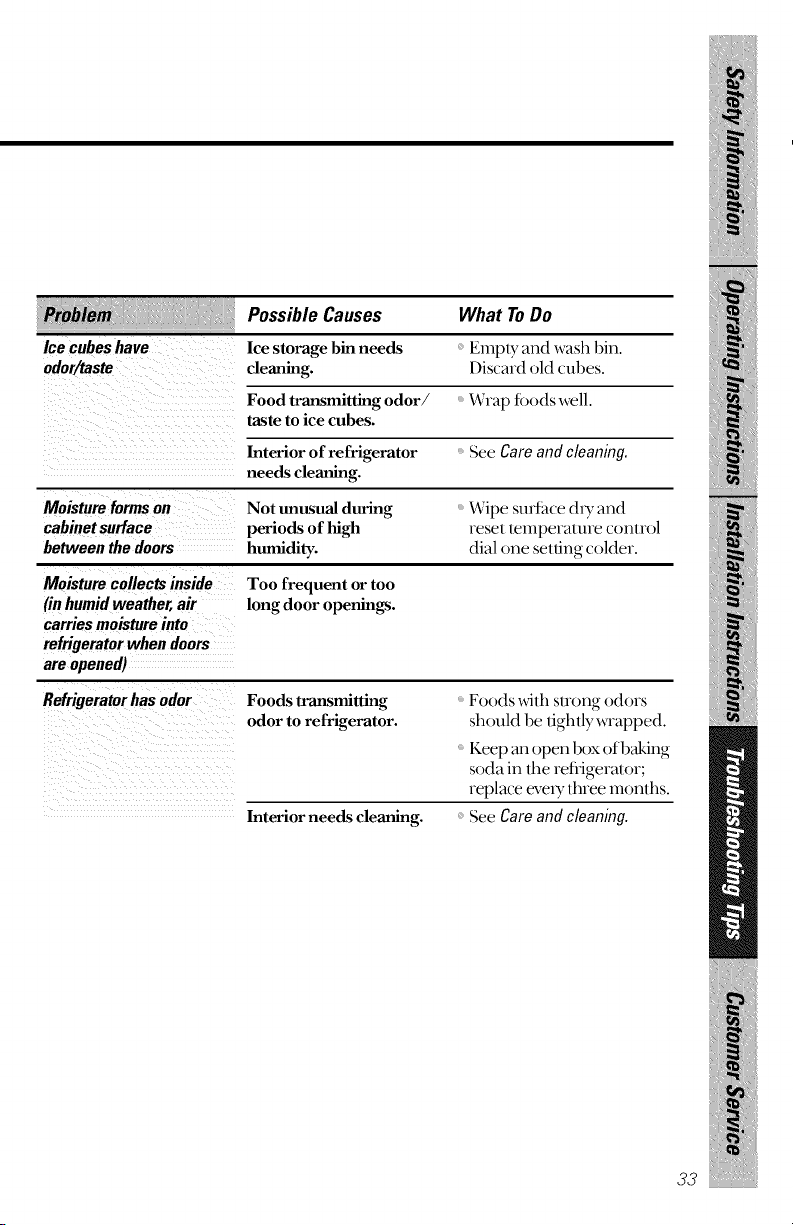
Ice cubeshave
odor/taste
Possible Causes What ToDo
Ice storage bin needs
deaning.
Emply and wash bin.
Discard old cubes.
Food transmitting odor/ Wrap tbods well.
taste to ice cubes.
Interior of refrigerator See Care and cleaning.
needs cleaning.
Moisture forms on Not unusual during Wipe sm race d D- and
cabinet surlace periods of high leSel lemperaUne conlrol
between the doors humidity, dial one selling colder.
Moisture collects inside
(in humid weather, air
carries moisture into
refrigerator when doors
are opened)
Too frequent or too
long door openings.
Refrigeratorhasodor
Foods transmitting
odor to refrigerator.
Interior needs cleaning.
Foods xdlh su-ong odors
should be lighlly wrapped.
Keep an open box of baking
soda in rim retiigeralor;
replace eve U three months.
See Careandcleaning.
33
iNotes
35
iNotes
GE Service Protection Plus TM
GE, a name recognized worl&dde fin quality and dependability
otters you Service Protection PlusrV-comprehensive protection on
all your appliances--No Matter What Brand!
Benefits Include:
• Backed by GE
• All brands covered
• Unlimited service calls
• All parts and labor costs included
• No out-of-pocket expenses
• No hidden deductibles
• One 800 number to call
We'll Cover Any Appliance.
Anywhere. Anytime.*
You will be completely satisfied _dth our service protection or you may request your
money back on the remaining value of your contract. No ques{ions asked. It's thai simple.
Protect your refligerator, dishwasher, washer and dryer, range, TV, VCR and much
more-any brand! Plus there's no extra charge for emergency service and low monthly
financing is available. Even icemaker coverage and food spoilage protection is offered.
You can rest easy, knoxdng that all your valuable household products are protected
against expensive repairs.
Place your confidence in (;E and call us in tl_e U.S. toll-flee at 800-626-2224
fin more infi)rmation.
*All brands cox(wed, up to 20 }ears old, in the continental ['.S.
........................................ _. (.hdl t2ere
Please place in envelope and mail to:
General Electric Company
Warranty Registration Department
P.O. Box 34070
Louisville, KY 40232-4070
37
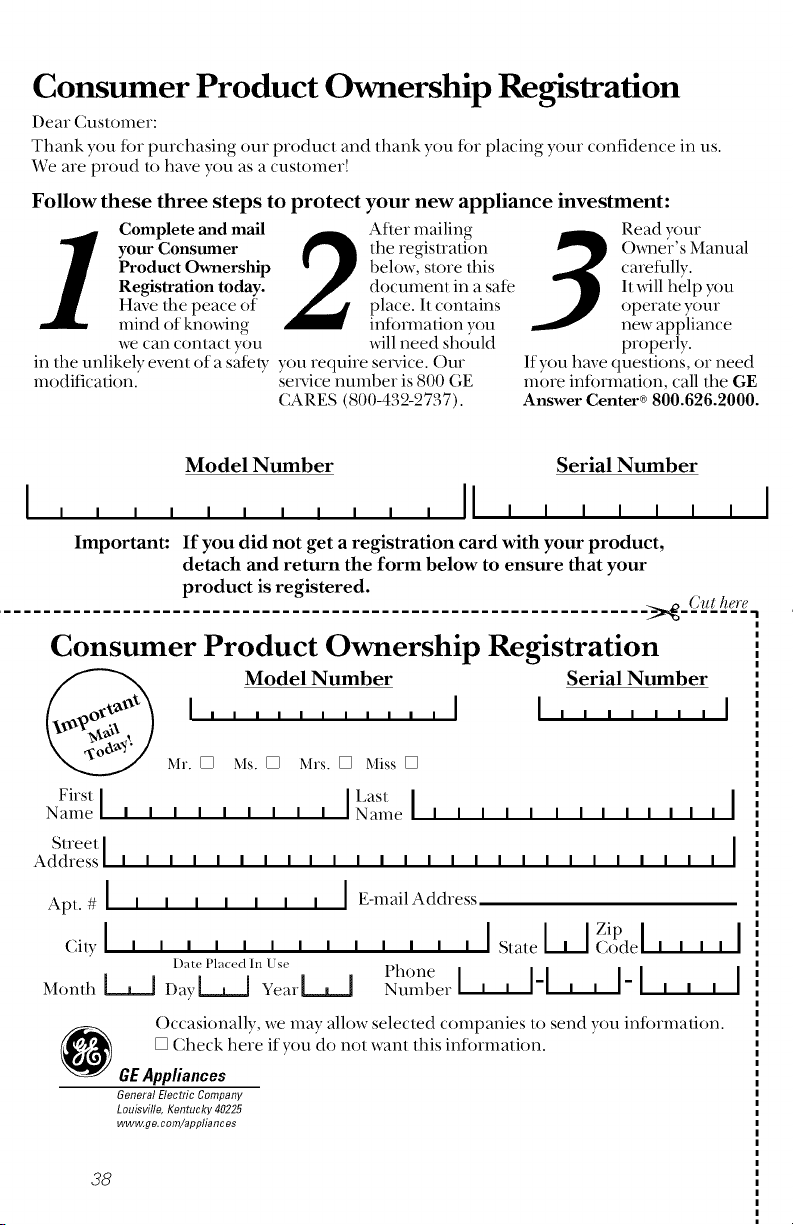
Consumer Product Ownership Registration
Dear Customer:
Thank you fbr purchasing our product and thank you fbr placing your confidence in us.
We are proud to have you as a cuslolneY!
Follow these three steps to protect your new appliance investment:
Complete and mail After mailing
J
Product Ownership 1)elow, store this
Registration today, document in a sate
Have the peace of place. It contains
mind ofknowing intbnnation you
we can contact you will need sho'uld
in the unlikely event of a safety you require service. ()ur
modification, service number is 800 GE
o( ( o
CARES (800-4o2-27o7).
Read your
()xmer's Manual
carefully.
It will help you
operme your
new appliance
properly.
If you have questions, or need
more infbrmation, call the GE
Answer Center® 800.626.2000.
Model Number Serial Number
i I m
I , , , , , , , , , , , II i i i i i i
Important: If you did not get a registration card with your product,
detach and return the form below to ensure that your
product is registered.
......... _,_.(-hdL t_eJ£.
Consumer Product Ownership Registration
Model Number Serial Number
I .... , ...... I I,, ,,,, ,I
Mr. [] Ms. [] Mrs. [] Miss []
Fi"stI I'JastI I
Name I I I I I I I I I Name I I I I I I I I I I I I I
Streetl I
AddYess I I I I I I I I I I I I I I I I I I I I I I I I I I
Apt.#1 I I I I I I I I E-mail Address
I I U Zip I I
City i i i i i i i i i i i i i Stale Codel I I I I
I)ate l'lac,__d In [se Phone
MonthL_J Dar_ vea,-L.J _,.nl,e,-I, , I-I , , I-I , , , I
()ccasionally, we may allow selected companies to send you infbrmation.
[] Check here if you do not want this infbrmation.
GEAppliances
General Electric Company
Louisville, Kentucky 40225
www, ge, com/eppliancee
I
38
Refrigerator Warranty (Forcustomers in the United States)
All warranty service provided by our Factory Service Centers,
or an authorized Customer Care® technician. For service,
carl 800-GE-CARES.
One Year
From the date of the
original purchase
We Will Replace, At No Charge To You:
Anypartof the refligeralor which fails due lo a detecl
in malerials or workmanship. During this full one-year
warranty,we _dll also provide, free of charge, all labor
and in-home service lo replace lhe deteclive pan.
Rye Years Any part of the sealed refrigeratingsystem
From the date of the (the compressor, condenser, evaporator and all
original purchase connecting robing) which fails due lo a defect in
malerials or _rkmanship. During lhis additional
four-year warranty,we will also provide, free of charge,
all labor and in-home service 1o replace lhe
defective pan.
Service trips to your home to teach you
how to use the product.
Improper installation.
Failure of the product if it is
abused, misused, or used for other
than the intended purpose or used
commercially.
Replacement of house fuses or
resetting of circuit breakers.
Damage to the product caused by
accident, fire, floods or acts of God.
Incidental or consequential damage to
personal property caused by possible
defects with this appliance.
Loss of food due to spoilage.
Thiswarrantyis extendedto theorigina/purchaserandanysucceedingownerforproductspurchased
forhomeusewithinthe USA.InAlaska,thewarrantyexcludesthecostof shippingor servicecallsto
yourhome.
Somestatesdonotallowthe exc/uslanorlimitationof incidentalor consequentialdamages.This
warrantygivesyouspecificlegalrights,andyoumayalsohaveotherrightswhichvaryfromstateto
state.Toknowwhat yourlegalrightsare,consultyourlocalor stateconsumeraffairsofficeoryour
state'sAttorneyGeneral.
Warrantor:GeneralElectricCompany.Louisville,KY40225
39
i
Service TelephoneNumbers.
GEAnswer Center_ 800.626.2000
The GE Answer Cenler ® is open 24 hours a day 7 days a week.
In-HomeRepairService800-GE-CARES(800-432-2737)
Expert GE repair service is only a phone (all away.
SpecialNeedsService800.626.2000
TDD 800-TDD-GEAC(800-833-4322)
GE offers, fl-ee of charge, a brochure to assist in planning a banie>
flee kilchen fbr persons wilh limiled mol)ilily.
ServiceContracts800-626-2224
Purchase a GE service contract while your wan-anty is still in eflecl
and you'll receive a subslantial discounl. GE Consumer Service will
still be flmre ',tiler your wananly expires.
Discover cards are accepted).
Instructions contained in this manual cover procedures to be performed
by any user. Other servicing generally should be referred to qualified
service personnel. Caution must be exercised, since improper servicing
may cause unsafe operation.
ServiceSatisfaction
If you are nol satisfied wilh the se_Yiceyou receive flom GE, fi_llow
lhese stops. First,contac! the people who serviced your appliance.
Next, if you are still nol pleamd, x_-im all tim delails-including your
phone number--lo: Manager, Consumer Relations, GE Appliances,
Appliance Park, Ixmisville, KY 4{)225.