
- 2 -
TABLE OF CONTENTS
INTRODUCTION ....................................................................................................................................................... - 3 -
WHAT’S IN THE KIT ................................................................................................................................................. - 4 -
KEYPAD FUNCTIONS ............................................................................................................................................... - 4 -
BATTERY REPLACEMENT ........................................................................................................................................ - 5 -
PREPARATION BEFORE USE .................................................................................................................................. - 5 -
PH CALIBRATION ..................................................................................................................................................... - 5 -
PH MEASUREMENT ................................................................................................................................................. - 7 -
ORP MEASUREMENT ............................................................................................................................................... - 8 -
PROBE CLEANING .................................................................................................................................................... - 8 -
PROBE STORAGE .................................................................................................................................................. - 8 -
PARAMETER SETTING ......................................................................................................................................... - 9 -
TECHNICAL SPECIFICATIONS ......................................................................................................................... - 10 -
ICONS AND FUNCTIONS ................................................................................................................................. - 10 -
TROUBLESHOOTING GUIDE............................................................................................................................ - 11 -
PROBE REPLACEMENT...................................................................................................................................... - 12 -
WARRANTY ......................................................................................................................................................... - 12 -
ATTENTION
• Never use the product when it’s freezing cold. Let it warm to room temperature before using.
- 3 -
Introdu ction
Dear Customer,
Thank you for choosing Apera Instruments PH60S-Z Smart pH Tester. Please carefully read this manual in
order to properly use and maintain the product.
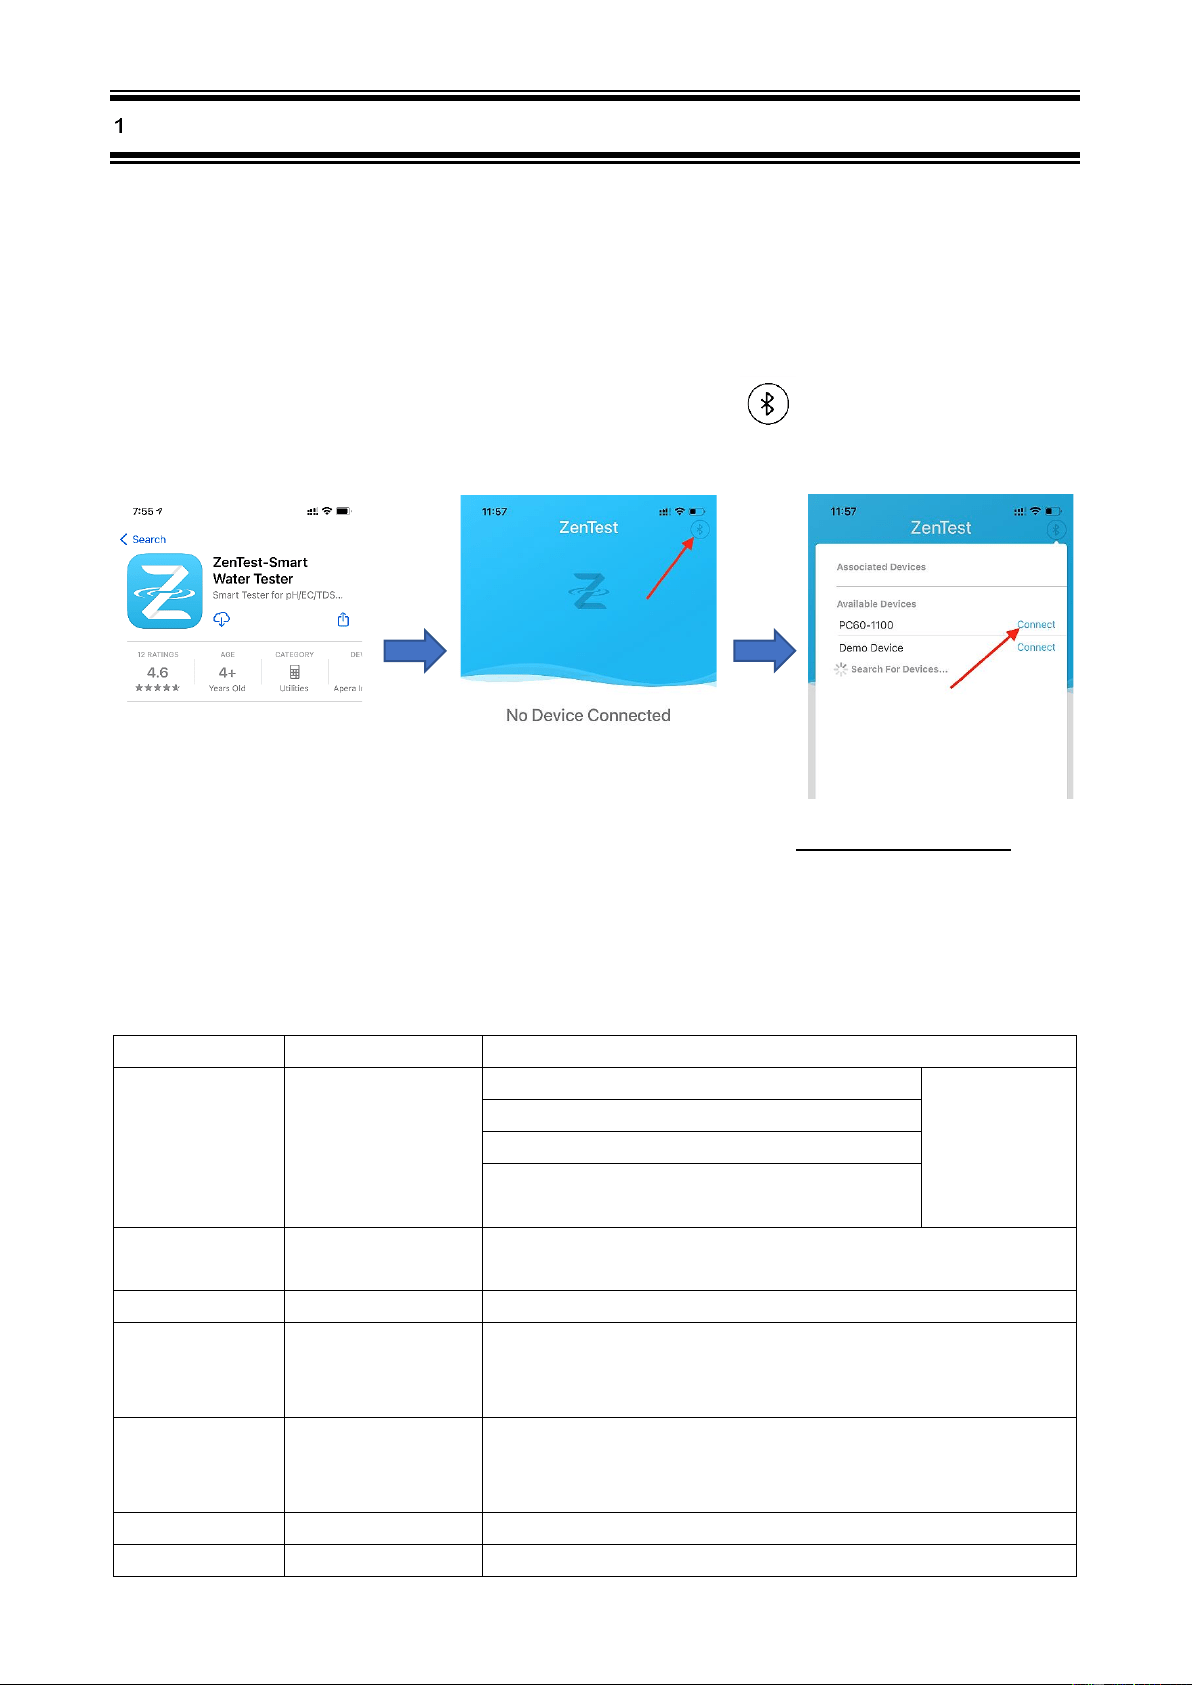
1.1 Search “zentest smart” in Apple App Store or Google Play App Store to download the latest App for your
tester. Turn on the Bluetooth of your phone, go to ZenTest™ App, tap on the upper right corner, then
select your tester to connect.
1.3 For video tutorials on how to get the most out of ZenTest™, please go to support.aperainst.com
1.4 This product is designed with a two-way control on both the tester and ZenTest™ App. Please refer to the
functions available on each platform in the following table. This manual shows you how to operate the tester
without connecting to a smartphone.
Table 1: Funtions on 60-Z Tester and ZenTest
®
Mobile App
Functions
60-Z Tester
ZenTest Mobile App
Display
LED display
1. Basic Mode: digital display+calibration info
Swipe to switch
among various
modes
2. Dial Mode: digital display+dial display
3. Graph Mode: digital display+graph display
4. Table Mode: digital display+real time
measurement and history display
Calibration
Press buttons to
operate
Operate on smartphone following graphic guides
Self-Diagnosis
Er1 – Er6 icons
Detailed problem analysis and solutions
Parameter Setup
Press buttons to set
up (except for P7 and
P11)
All parameters can be set up in Settings.
Alarm
The screen turns red
when alarm triggered;
cannot be setup
Alarm display and alarm values can be preset for each parameter
Data Management
N/A
Manual or Auto. Datalogger; notes can be added to saved data
Data Output
N/A
Share data via Email
- 4 -
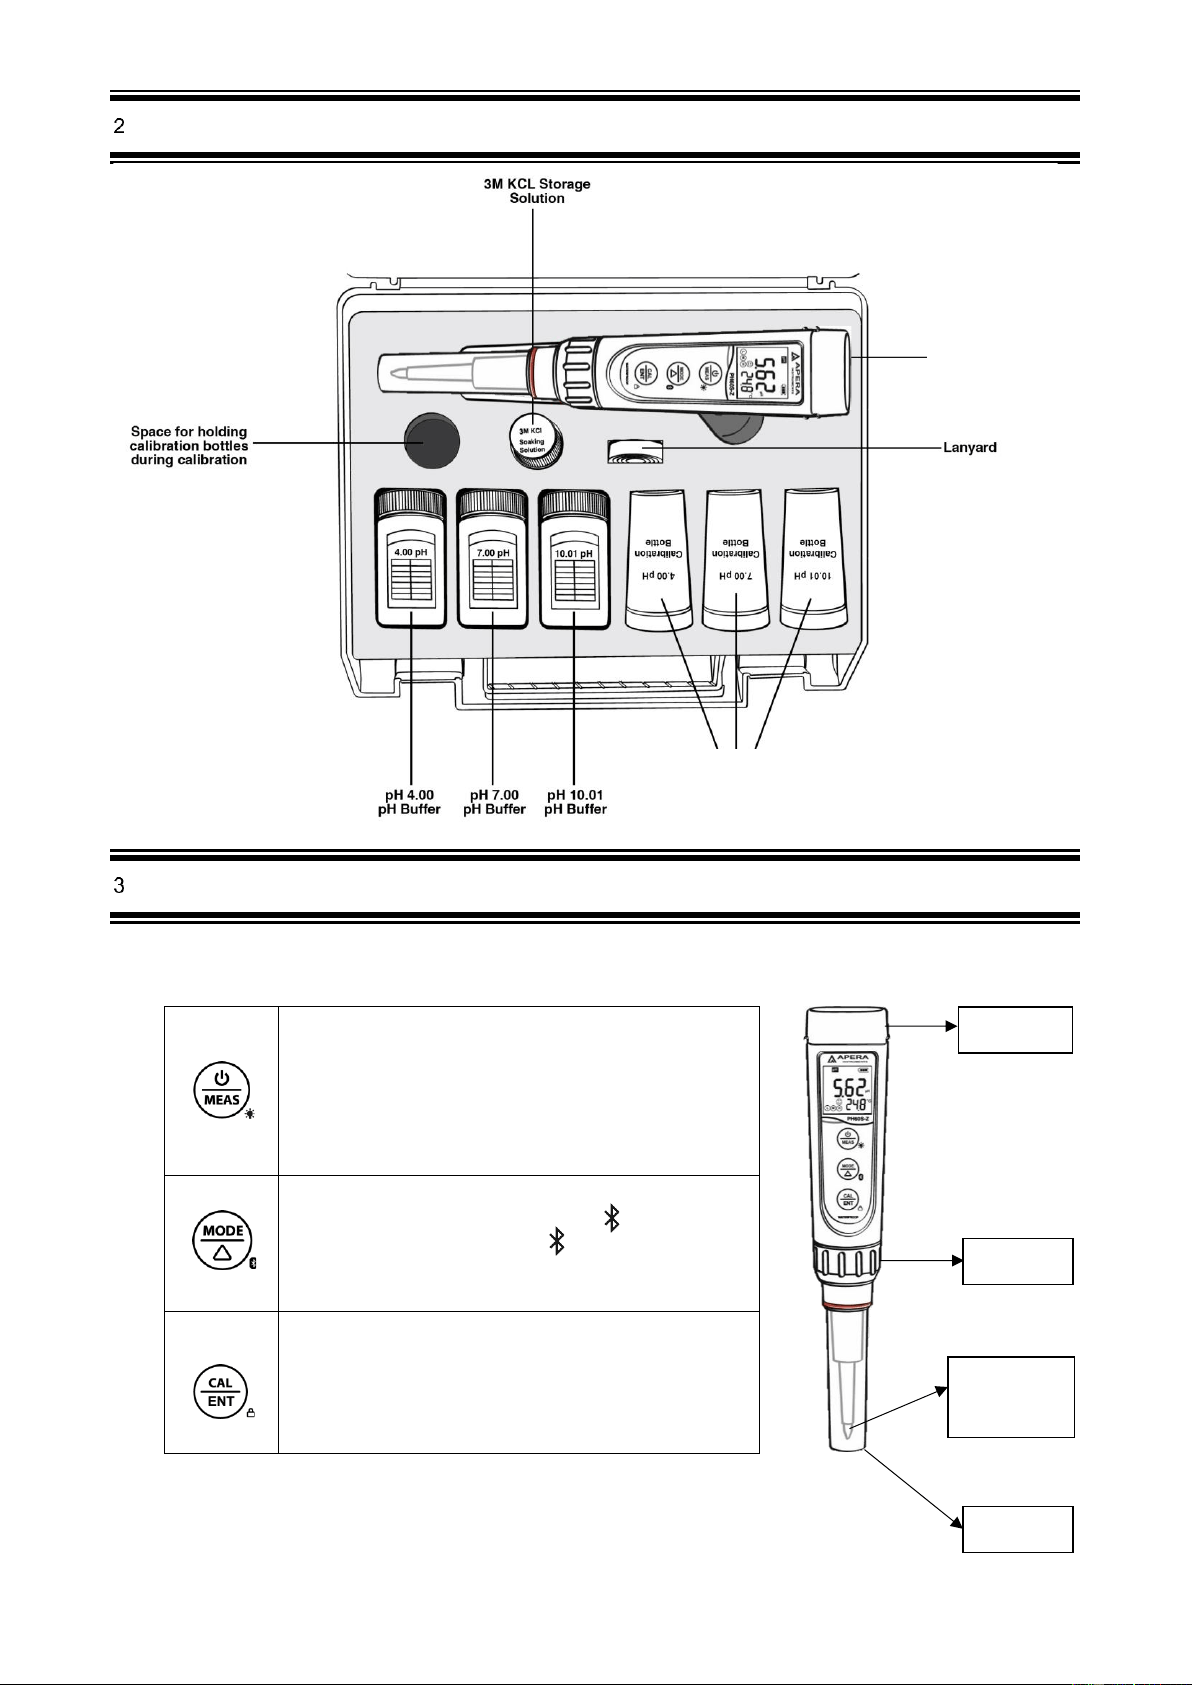
Wh at ’s in t h e Kit
Keyp ad F un ct ion s
■ Short press------ < 2 seconds, Long press------- > 2 seconds
1. When turned off, short press to turn on the tester; long
press to enter parameter setting.
2. In calibration mode or parameter setting, short press to
return to measurement mode.
3. In measurement mode, long press to turn off the tester,
short press to turn on/off backlight.
1.In measurement mode, long press to turn on/off
Bluetooth
®
receiver. When turned on, will be flashing;
when connected to smartphone, will stay on.
3.In parameter setting, short press to change parameter
(Uni-directional).
1. Long press to enter calibration mode.
2. In calibration mode, short press to confirm calibration.
3. In measurement mode, when automatic lock is turned
off, short press to manually lock or unlock readings.
Calibration Vials
PH60S-Z Tester
Probe cap
Swiss spear
pH probe
Probe ring
Battery cap
- 5 -
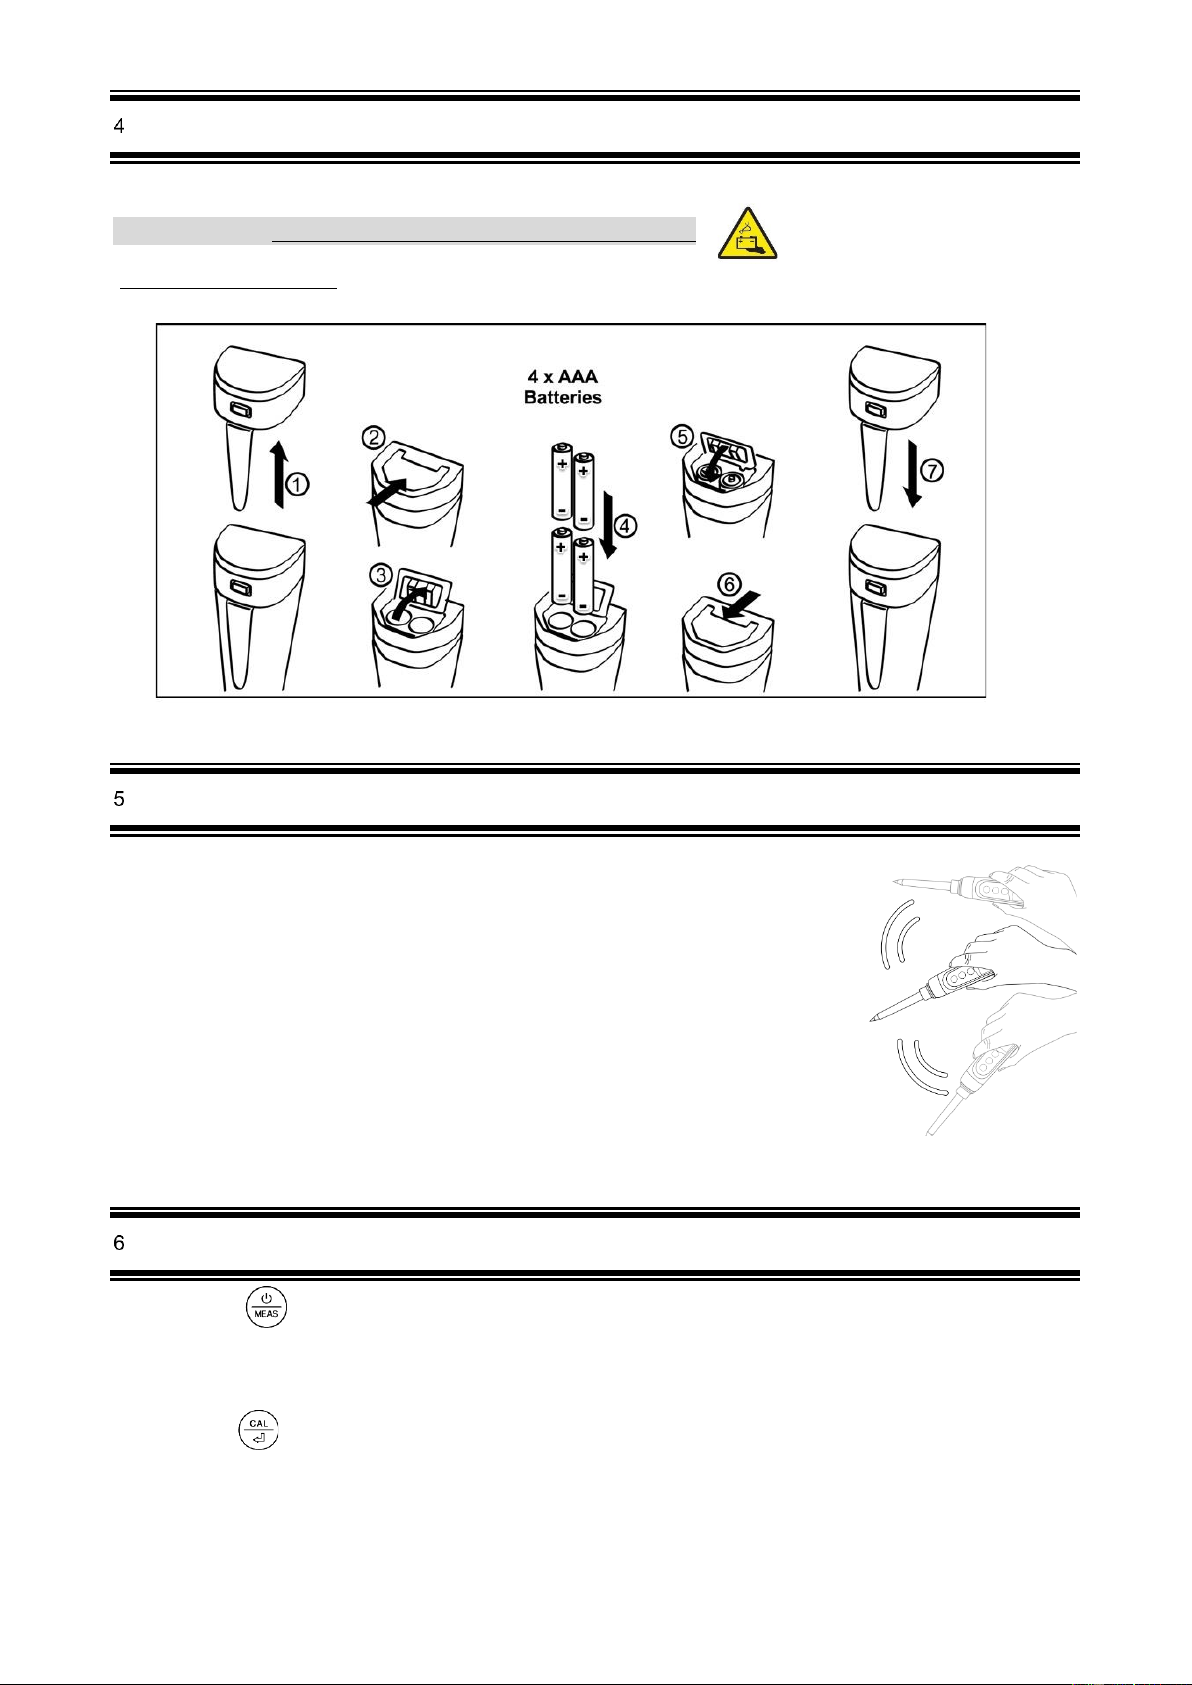
Batt er y R epl acem en t
Please install batteries according to the following steps. *Please note the correct direction of battery installation:
The Positive Side (“+”) OF EVERY SINGLE Battery MUST FACE UP.
(WRONG INSTALLATION OF BATTERIES WILL CAUSE DAMAGE TO THE TESTER AND POTENTIAL HAZARDS!)
Prepa rat io n bef or e Use
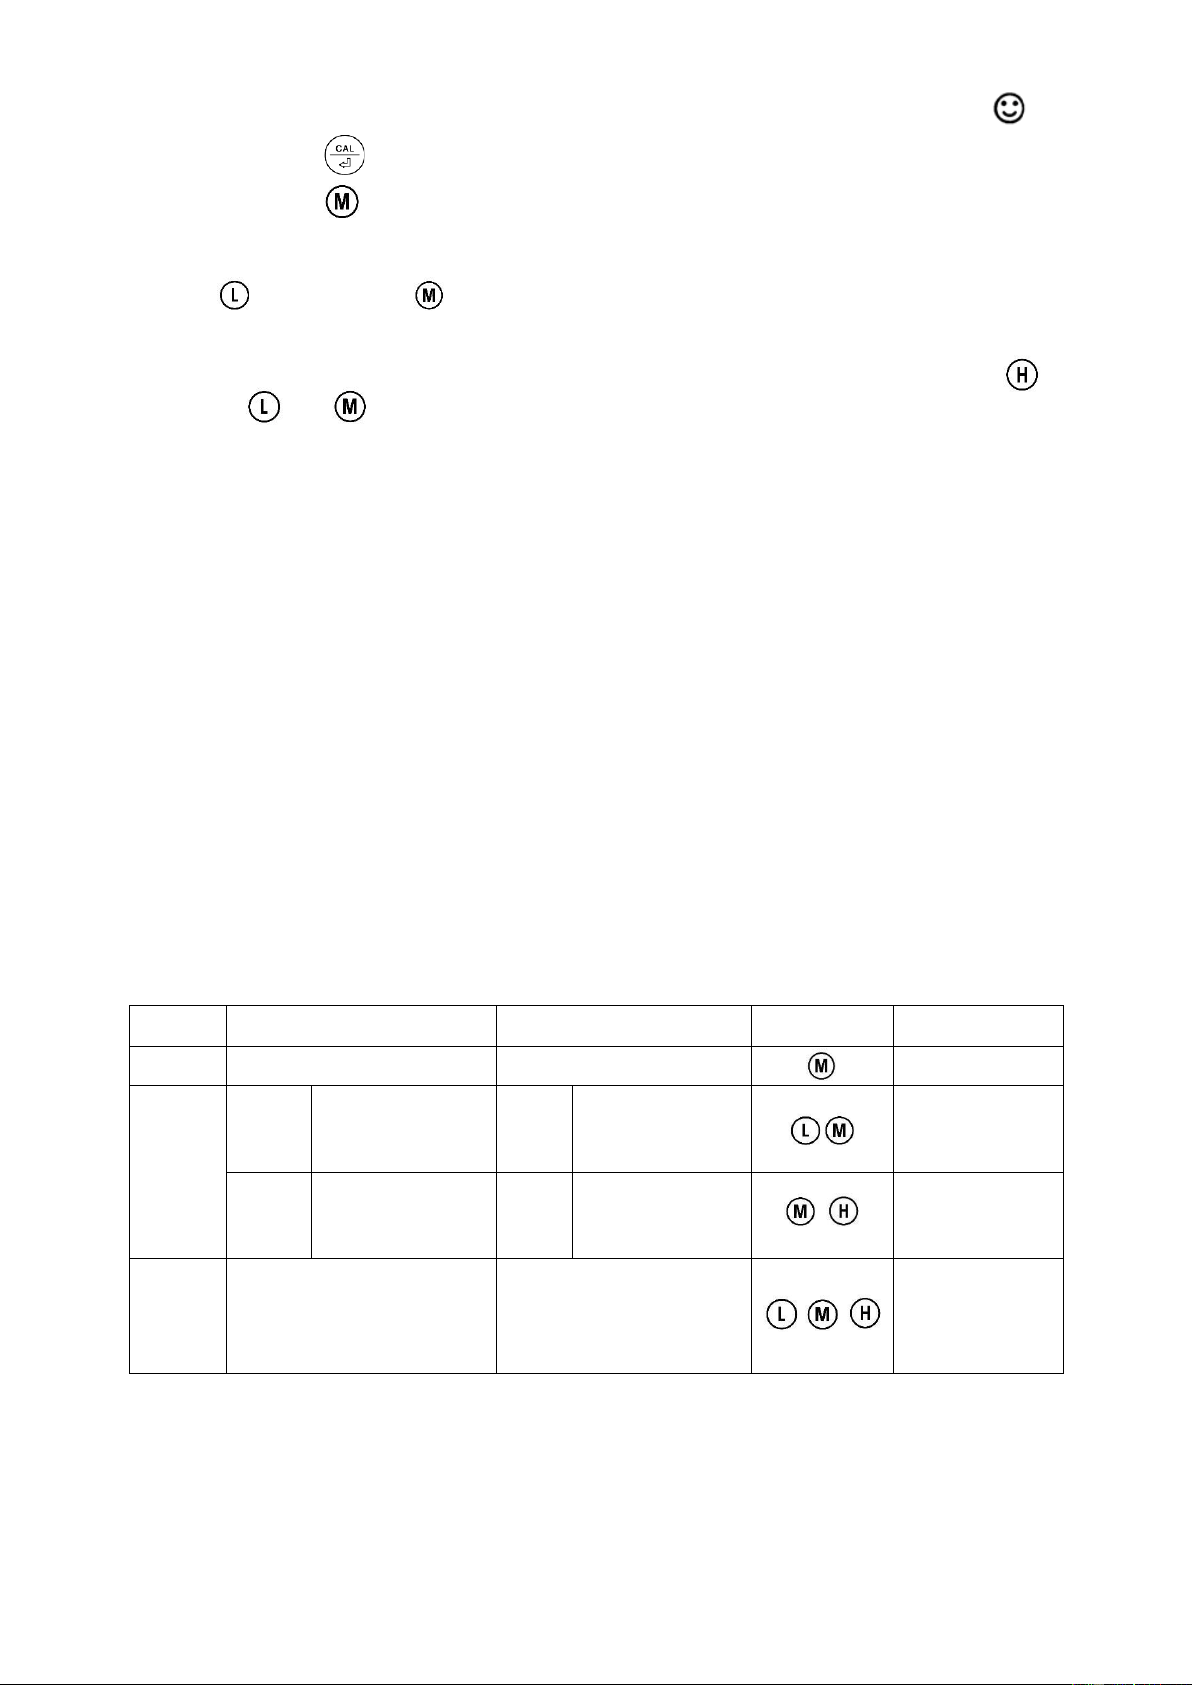
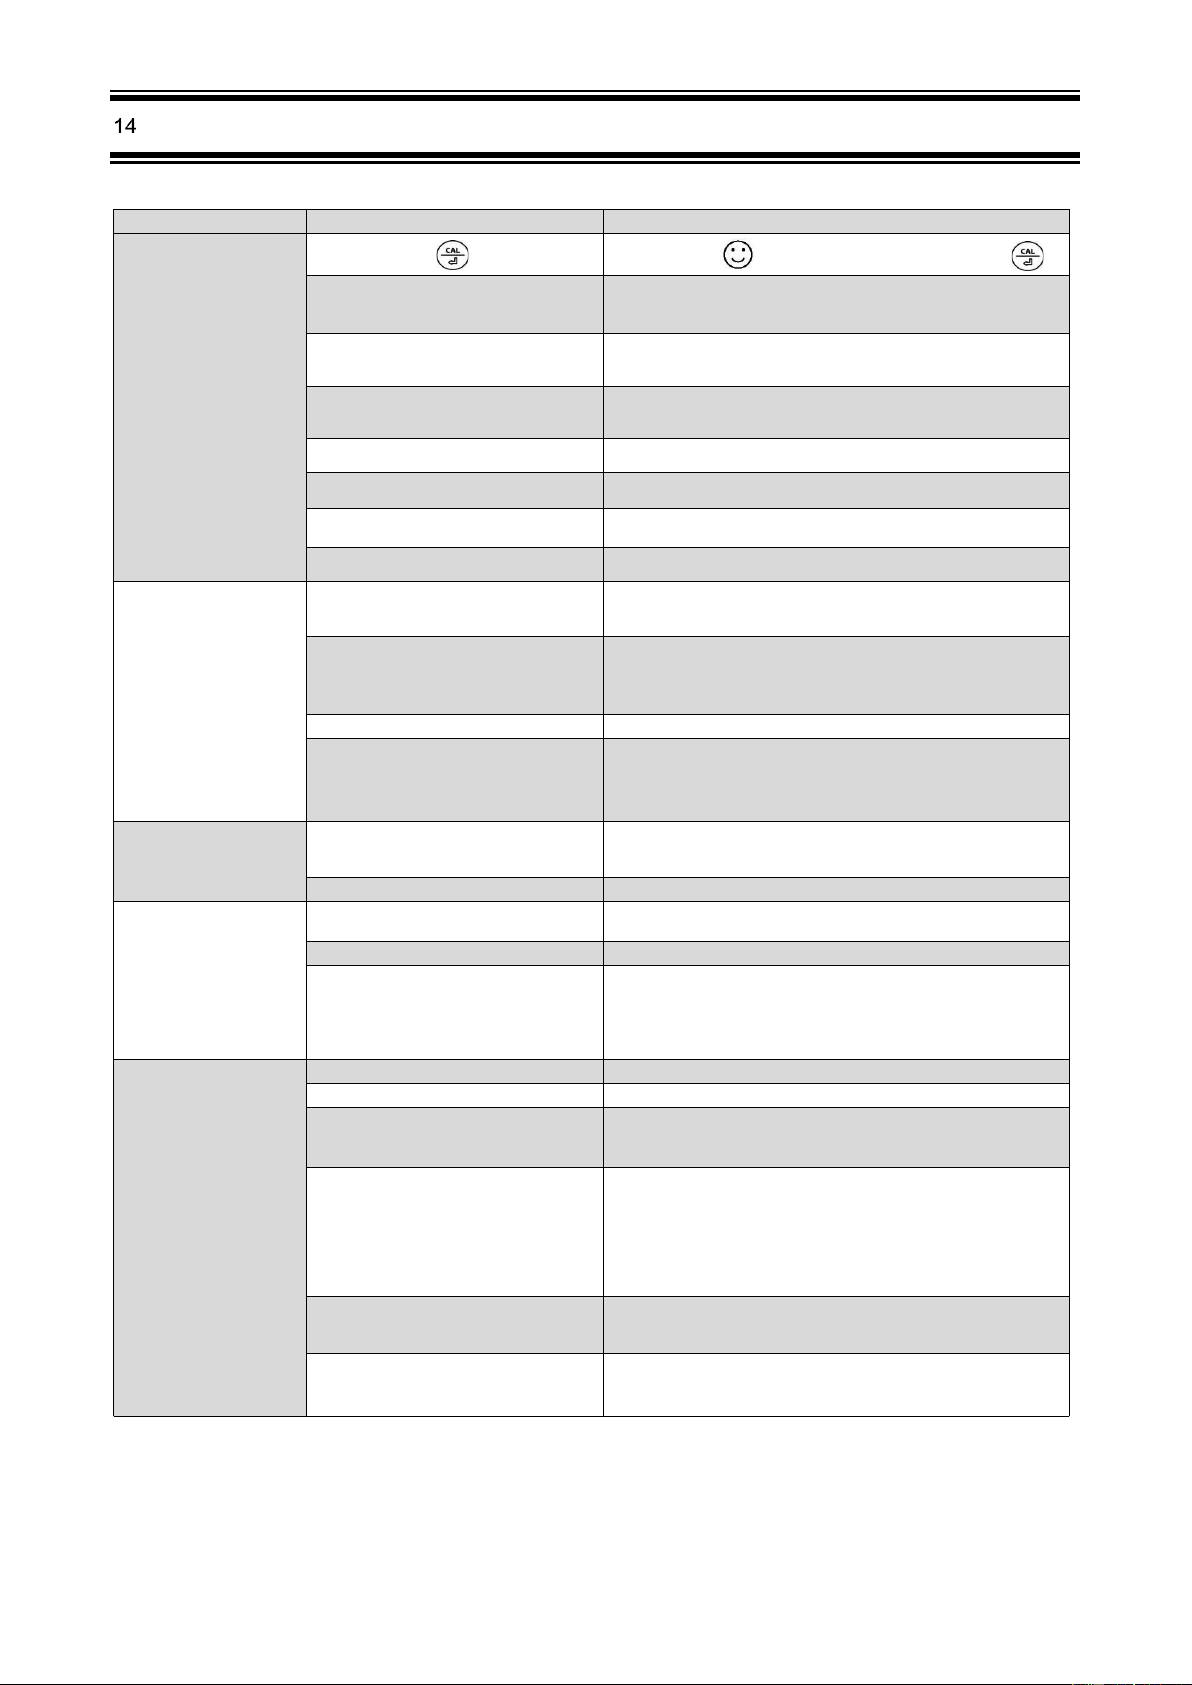
5.1 Pull out the battery insulation slip, and take off the probe cap.
5.2 Rinse off the probe in pure water (preferably distilled or deionized water. RO water
or tap water is the alternative) , then shake off excess water (see graph on the right).
5.3 Perform at least a 2-point calibration. For pH calibration tutorial, refer to
Section 6.
5.4 When you are not using the tester, always store the spear probe in the
3M KCL soaking solution. Never let it dry out. Replace the soaking solution if it gets contaminated.
pH Ca lib rat io n
6.1 Short press to power on the meter; rinse the probe in pure water. Shake off excess water.
6.2 Pour pH 7.00 and pH 4.00 buffer solution in the corresponding calibration vials (to about half volume of the vials).
6.3 Long press to enter calibration mode (screen turns green);
- 6 -
6.4 Insert the probe into pH 7.00 buffer solution, make a quick stir, and hold still. When the reading is stabilized ( stays
on screen), short press to start 1
st
point calibration. After calibration is completed, the tester will return to
measurement mode. Icon will appear at the bottom left of the screen, indicating a successful 1
st
point pH calibration.
6.5 To calibrate 2nd point, use 4.00 pH buffer and repeat Step 6.3 to 6.4 (Do NOT turn off the tester after you finish pH 7
calibration). will display next to , indicating a successful 2-point pH calibration (low and middle points).
6.6 If necessary (target pH>8.00), calibrate 3rd point using 10.01 standard pH buffer and repeat Step 6.3 to 6.4, will
show up next to and , indicating a successful 3-point calibration (high, low, and middle points).
6.7 Notes about Calibration
1) The 1st point calibration must be 7.00 pH. Perform the 2nd and 3rd point calibrations (4.00, 10.01, 1.68, or 12.45)
immediately after the 1st point calibration is finished. Do NOT turn off the meter before you calibrate 2nd or 3rd
point. Otherwise, you will need to restart the calibration process with 7.00 pH first.
2) The pH 4.00 and 7.00 buffer solutions poured into the calibration vials can be used for up to 10 times as long as
they are not contaminated and the bottles are capped when not in use. pH 10.01 can only be used for up to 5
times as it will lose its accuracy much faster. After that, replace the buffer solutions in the calibration vials with
new ones to keep the accuracy. Keeping the freshness and cleanliness of calibration buffers is essential for
accurate pH measurement.
3) The tester can perform 1 to 3 points of automatic calibration and can recognize 5 types of pH standard solutions.
For details, please refer to the following table:
Calibration
USA Series
NIST Series
Indication icon
Recommended
1-pt
7.00 pH
6.86 pH
Accuracy ≥ 0.1 pH
2-pt
Option A
1st pt: 7.00 pH
2nd pt: 4.00 or 1.68 pH
Option A
1st pt: 6.86 pH
2nd pt: 4.01 or 1.68 pH
Range < 7.00 pH
Option B
1st pt: 7.00 pH
2nd pt: 10.01 or 12.45 pH
Option B
1st pt: 6.86 pH
2nd pt: 9.18 or 12.45 pH
Range >7.00 pH
3-pt
1st pt: 7.00 pH
2nd pt: 4.00 or 1.68 pH
3rd pt: 10.01 or 12.45 pH
1st pt: 6.86 pH
2nd pt: 4.01 or 1.68 pH
3rd pt: 9.18 pH or 12.45 pH
Range: 0 to 14.00 pH
- 7 -
6.8 For the self-diagnosis information, please refer to the table below:
Symbol
Self-Diagnosis information
Potential problems and how to fix
The pH calibration solution cannot be
recognized by the meter.
1. Make sure the probe is fully immersed in the calibration
solution.
2. Check if calibration solution is expired or polluted.
3. 1st point of pH calibration must be pH 7.00 or 6.86. See 6.6.
4. Please check whether pH probe is damaged or broken. If
so, please replace with a new one.
5. The glass bulb or junction is severely contaminated. Please
use a soft brush with soap water to clean it thoroughly. Then
soak it in 3M KCL 3-5 hours before performing calibration
again.
is pressed before measurement
is fully stabilized.
Wait for to stay on screen before pressing
During calibration, readings being unstable for
over 3 minutes.
1. Please check whether pH probe is damaged or broken. If so,
please replace with a new one.
2. The glass bulb or junction is severely contaminated. Please
use a soft brush with soap water to clean it thoroughly. Then
soak it in 3M KCL overnight before performing calibration
again.
3. The probe is aged (used for over a year and has a much
slower response). A replacement is needed.
pH probe zero electric potential out of range
(<-60mV or >60mV)
1. Check whether pH buffer solutions comply with the USA or
NIST standard.
2. Check whether pH buffers are expired or contaminated.
3. Please check whether pH probe is damaged or broken. If so,
please replace with a new one.
4. The probe is aged (used for over a year and has a much
slower response). A replacement is needed.
5. The probe is invalidated (Er4/Er5 repetitively appears, and
problems 1, 2, 3 are excluded). Probe replacement is
needed.
pH probe slope out of range
(<85% or >110%)
The calibration reminder is triggered. It’s time to
perform a new pH calibration.
Perform pH calibration or cancel calibration reminder in ZenTest App
settings.
pH M easu rement
7.1 PH60S-Z Spear pH tester is designed for direct spear test of solid samplings such as cheese, fruit, sushi rice, meat,
dough. It also works well in general water solutions.
7.2 When performing spear tests in solid samples, pay attention to insert probe evenly, and be careful to prevent probe
from damage. If the medium is too hard, please bore a small hole with a clean knife before inserting the spear probe.
• For food pH measurement (e.g. sushi, cheese, meat, fruit, etc.), it should always be a sampling test. That means
test samples should no longer be edible.
- 8 -
7.3 How to take pH measurements
Short press to power on the tester. Rinse the probe in pure water, shake off excess water. Insert the probe in your
sample solution or solid sample, and hold still. Record the reading when it is stabilized( stays on screen).
7.4 Pure Water pH Measurement
When testing pure water like tap water, drinking water, RO water and distilled water, it will take longer for the readings to
get fully stabilized (typically 1-5 minutes). Please be patient. If still not working, add Apera 3M KCL (AI1107) to your pure
water at the ratio of 1:1000 (e.g. 1 ml KCL to 1000 ml water) to accelerate stabilization while minimizing pH change. If the
accuracy is not meeting your requirement, please contact us at [email protected] to find the specialized meter designed
for pure water pH test.
ORP Meas ur ement
1) ORP stands for Oxidation-Reduction Potential, measured in mV. It’s also called redox. ORP is a measure of the
cleanliness of water & its ability to break down contaminants. A separate ORP probe (ORP60-DA) needs to be
installed to be able to measure ORP.
2) Power on the tester, unscrew the original probe, and install the ORP60-DA probe, then the tester will automatically
switch to ORP measurement mode (Refer to Section 15 for how to replace a probe).
3) Rinse the probe in distilled water and dry it. Dip the probe in sample solution, shake for a few seconds, and hold still.
Record the ORP reading after appears and stays on screen.
Probe Cl eaning
1) The tester is only as accurate as the probe is clean. Always thoroughly rinse off the probe before and after each
measurement with pure water in a container or with a wash bottle.
2) For tough contaminants, detach the sensor shield, soak the probe in Apera probe cleaning solution (AI1166) or
detergent water for 30 minutes. Then use a soft brush to remove the contaminants. Afterwards, soak the probe in
3M KCL soaking solution for at least 1 hour. Rinse it off, then re-calibrate the tester before using again.
P rob e St or ag e
1) Always store the spear probe in the 3M KCL soaking solution when not in use. Never let it dry out.
Replace the soaking solution if it gets contaminated.
2) NEVER store the probe in pure water like tap, RO, distilled, or deionized water as they could damage the pH probe.
If this happens, immediately soak the pH probe Apera 3M KCL soaking solution overnight, then re-calibrate it before
using. Pure water is only for rinsing the probe.

- 9 -
P ar am et er Set ti ng
Table of Settings
Parameter Setting
1) When the meter is turned off, long press to enter parameter setting →short press to switch P01-P02…
→P8. Short Press , parameter flashes → short press to adjust parameter → short press to confirm
→Short press to exit parameter setting and go back to measurement mode.
2) Auto. Lock (P02) – Users can set the auto lock time from 5 to 20 seconds. For example, if 10 seconds is set, when
the measured value is stable for more than 10 seconds, the measured value will be automatically locked, and the
HOLD icon will be displayed. Short press to release the lock. When the setting is "Off" , the Auto. lock function
is turned off, that is, the measured value can only be manually locked. Short press to lock or unlock the
measured value. The HOLD icon will be displayed when reading is locked.
3) Auto. Backlight (P03) ─ Users can set the automatic backlight time for 1 to 8 minutes. For example, if 3 minutes
is set, the backlight will turn off automatically after 3 minutes; when the “Off” is set, the auto. backlight function will
be turned off, and short press to manually turn the backlight on or off.
4) Auto. Power off (P04) ─ The auto. power off time can be set to 10 to 20 minutes. For example, if 15 minutes is
set, the meter will automatically shut down after 15 minutes if no operation; when “Off” is set, the auto. power off
function will be turned off. Long press to manually shut down the meter.
5) pH Calibration Reminder (P07) – set X hours (H) Or X days (D) in ZenTest mobile app – settings – Parameter –
pH – Calibration Reminder. On the meter, you can only check the values that’s been set up on ZenTest App. For
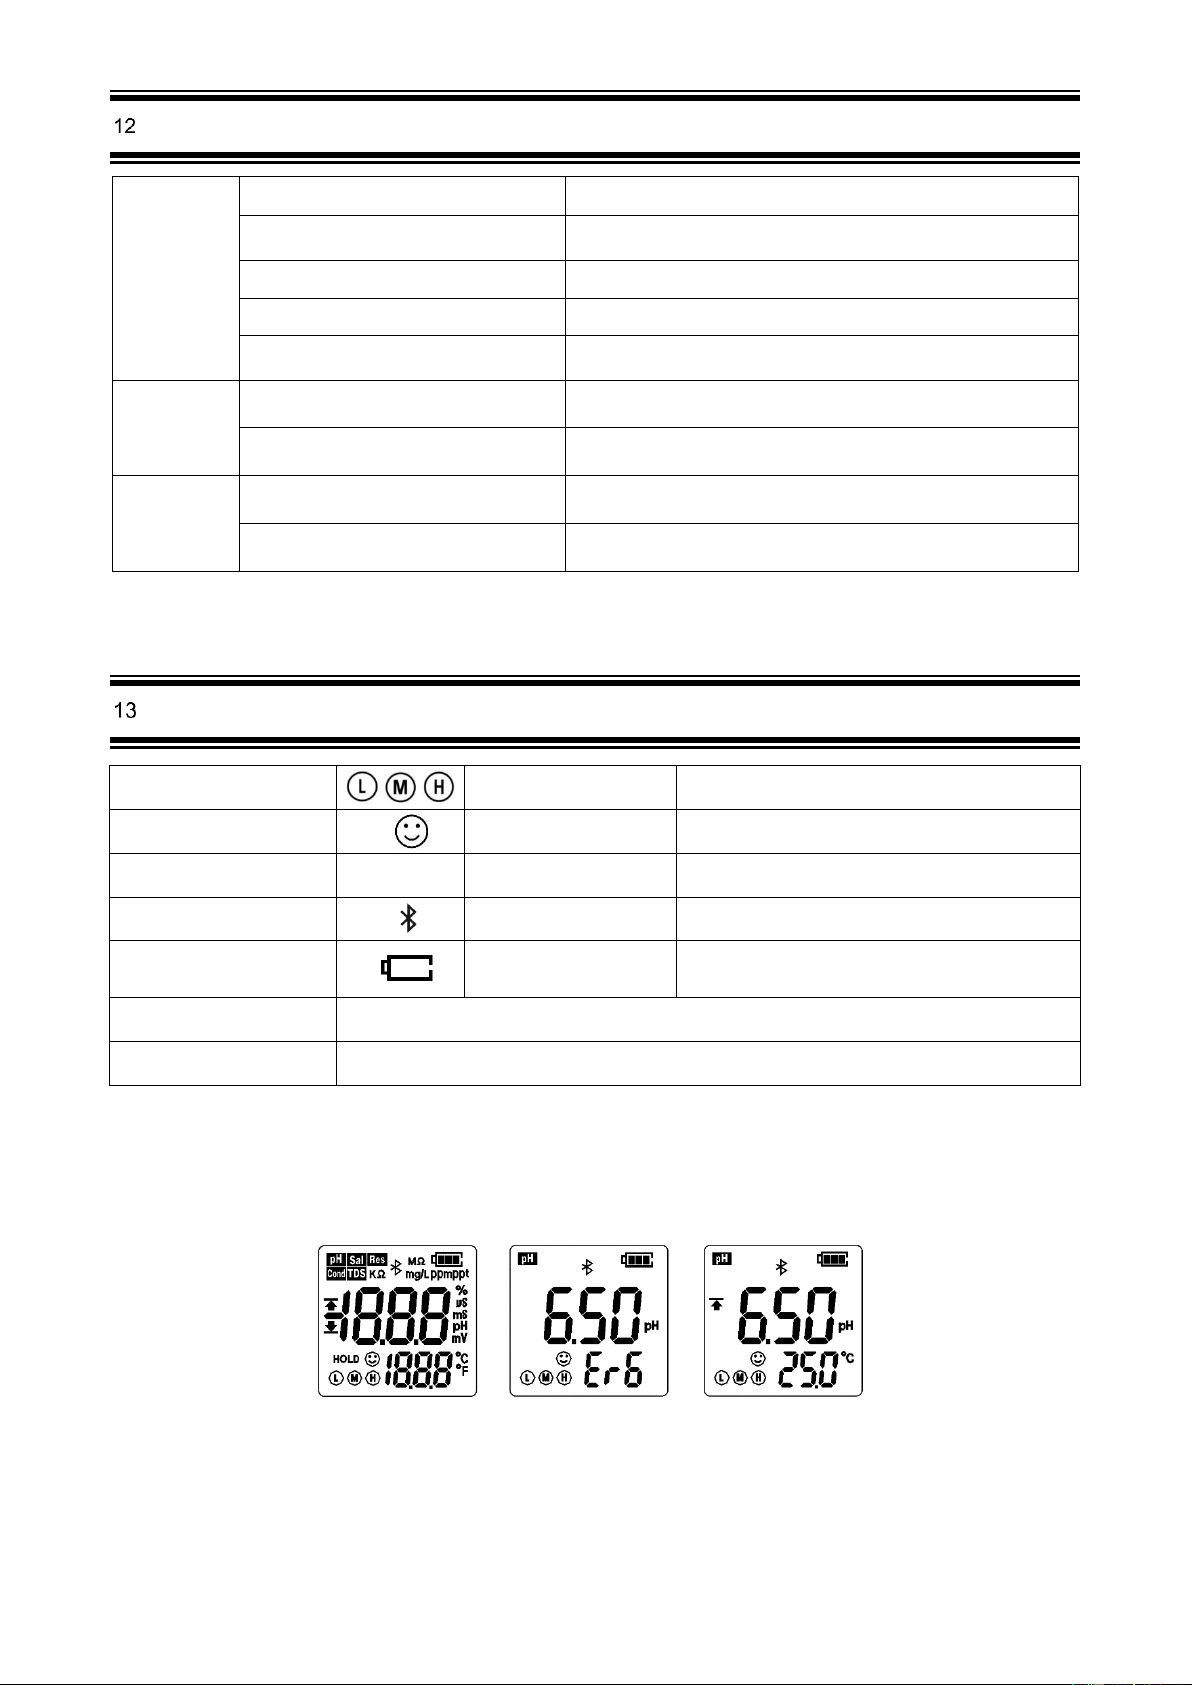
example, if 3 days is set up, the Er6 icon (see Figure-4) will appear in the lower right corner of the LCD screen in 3
days to remind you to perform calibration, also in the ZenTest App there will be a pop-up reminder. After calibration
is finished or the reminder setting is cancelled in the ZenTest App, the Er6 icon will disappear.
6) pH Back to Factory Default (P08) – Select “Yes” to recover instrument calibration to theoretical value. This
function can be used when instrument does not work well in calibration or measurement. Calibrate and measure
again after setting the instrument back to factory default.
Symbol
Parameter Setting Contents
Content
Factory Default
P1
Temperature Unit
˚C – ˚F
˚F
P2
Select automatic lock
5-20 seconds – Off
Off
P3
Automatic Backlight Off
1-8 minutes – Off
1
P4
Automatic Power Off
10-20 minutes – Off
10
P5
pH Buffer Series Selection
USA – NIST
USA
P6
pH Resolution
0.1 – 0.01
0.01
P7
pH Calibration Reminder
H-hours D-Days (set up in ZenTest App)
/
P8
pH back to factory default
No – Yes
No
- 10 -
Tec hni cal Sp ec ifi cat ions
pH
Range
-2.00 to 16.00 pH
Resolution
0.01 pH
Accuracy
±0.01 pH ±1 digit
Calibration Points
1 to 3 points
Auto. Temperature Compensation
0 – 50˚C (32 – 122˚F)
ORP (mV)
Range
-1000 mV to 1000 mV
Accuracy
±0.2% F.S
Temperature
Range
0 to 50˚C (32-122˚F)
Accuracy
±0.5˚C
Ico ns an d Fun ct io ns
Calibrated points
Self-Diagnosis Symbol
Er1, Er2, Er3, Er4,Er5, Er6
Stable reading indicator
Waterproof Rating
IP67, floats on water
Reading Lock
HOLD
Power
DC3V, AAA batteries*4
Bluetooth Signal
Battery Life
>200 Hours
Low power reminder
Backlight
White: Measurement;Green: Calibration;
Red: Alarm
Auto. Power Off
Automatically power off if no operation for 10 minutes
Dimension/Weight
Instrument:40×40×178mm/133g; case:255×210×50mm/680g;
LCD Display
pH calibration reminder
pH alarm triggered
- 11 -
Trouble sho oting G ui de
Trouble Reason How to fix
Pressing too soon Wait for to stay on the screen before pressing
Incorrect standard solutions
Reboot tester, calibrate pH 7 first, then pH 4. For details refer to
Section 5.2 (a)
Poor quality standard solutions
Replace with fresh and clean standard calibration solutions made
by legitimate scientific instrument manufacturers.
Contaminated probe
Use a soft brush to clean the probe with Apera probe cleaning
solution or detergent water.
Aged probe Replace the probe.
Dried-out probe Soak in Apera 3M KCL soaking solution for at least 30 minutes.
Probe is not fully submerged Make sure the probe is immersed in the solution at least 1 inch.
Air bubbles around the sensor shield Make a quick stir in the solution to remove air bubbles.
Contaminated probe
Use a soft brush to clean the probe with Apera probe cleaning
solution or detergent water.
Clogged junction
Use a soft brush to clean the probe with Apera probe cleaning
solution or detergent water, then soak it in Apera 3M KCL soaking
solution overnight.
Aged probe Replace the probe.
Testing pure water like
tap/drinking/RO/distilled water
Be patient, wait for 1-5 minutes to reach a fully stabilized reading.
If still not stabilizing, add Apera 3M KCL solution to test water at
1:1000 ratio.
Broken probe
If you don’t find any visible damage of the probe, contact us for
warranty fulfillment; If there is visible damage, replace the probe.
Instrument defect Contact us for warranty fulfillment
Probe is not fully submerged in the
solution
Make sure the probe is immersed into solution at least 1 inch.
Air bubbles around the sensor shield Make a quick stir in the solution to remove air bubbles.
Probe is not properly connected or the
connector is broken.
Check the probe’s connector, make sure it’s not broken and is
correctly connected. Align the probe and instrument correctly
before plugging in. Never force it. Ensure that the probe
connector is not exposed to the air too long.
Aged probe Replace the probe.
Air bubbles around the sensor shield Make a quick stir in the solution to remove air bubbles.
Clogged junction
Clean the probe with cleaning solution, then soak it in 3M KCL
storage solution overnight
Comparison with other testers, test strips,
or drop tests
To compare accuracy with other testers, make sure to perform
calibration for all testers in the same standard, then test another
standard. Whichever gives more accurate reading is the more
accurate one. Test strips or drop tests’ accuracy is not comparable
to pH meters’.
Poor quality standard solutions
Replace with fresh and clean standard calibration solutions made
by legitimate scientific instrument manufacturers.
The probe is not suitable for your
appliacation.
Contact us to find the most appropriate product for your specific
application.
Cannot calibrate
Reading is always slowly
changing, won’t stabilize.
Display similar readings in
any solutions or always
display 7.0 pH
Reading keeps jumping
Calibration is successful,
but reading is not accurate
- 12 -
P rob e Repla cem en t
pH probes don’t last forever. Every probe will eventually age and fail even if you don't use it that often. The typical service
life of Apera probes is 12-24 months depending on the frequency of usage and how well you keep it clean and properly
stored. We recommend replacing your probe every 1 to 2 years to ensure the best performance.
To replace the probe: 1) take off the probe cap; 2) screw off the probe ring 3) unplug the
probe; 4) plug in the new replacement probe (pay attention to the probe’s position); 5) screw
on the probe ring tightly. Soak the probe in 3M KCL for 5-15 minutes. Then perform
calibration before testing.
The replacement probes that are compatible with PH60S-Z:
• PH60S-DE (Spear pH probe for solids/semi-solids pH testing), PH60-DE (Regular
pH glass bulb probe), PH60F-DE (Flat pH probe for surface pH testing), ORP60-DA (ORP Probe).
War ran ty
We warrant this instrument to be free from defects in material and workmanship and agree to repair or replace free of
charge, at option of APERA INSTRUMENTS, LLC, any malfunctioned or damaged product attributable to responsibility of
APERA INSTRUMENTS, LLC for a period of TWO YEARS (SIX MONTHS for the probe) from the delivery.
This limited warranty does NOT cover any damages due to:
Accidental damage, transportation, storage, improper use, failure to follow the product instructions or to perform any
preventive maintenance, unauthorized repair or modifications, normal wear and tear, or other external causes or actions
beyond our reasonable control.
To get the fastest warranty fulfillment, go to support.aperainst.com and click “New Support Ticket” on the upper right
corner. Type your email in the requester field, “Warranty” in the Subject field, and then input the following information in
the description field:
• Your full name
• Product model that needs warranty fulfillment
• Serial number of the product (can be found on the back sticker of the tester body)
• What problem or issue you had experienced with the product
• Attach a photo of your proof of purchase
• Attach a photo of the problematic product
Then click Submit. One of our customer care specialists will help you fulfill the warranty within one business day.
APERA INSTRUMENTS, LLC
Address: 6656 Busch Blvd, Columbus Ohio 43229;Tel: 1-614-285-3080
Website: www.aperainst.com
