ID5E92KMW/UKID5E92KMW/UKID5E92KMW/UK

EN
ENGLISH
3
Safety Instructions
2
17
Daily Reference Guide
Instalation Guide
5
EN
SAFETYINSTRUCTIONS
IMPORTANTTOBEREADANDOBSERVED
Beforeusingtheappliance,readthesesafety
instructions.Keepthemnearbyforfuture
reference.
Theseinstructionsandtheapplianceitselfprovide
importantsafetywarnings,tobeobservedatall
times.Themanufacturerdeclinesanyliabilityfor
failuretoobservethesesafetyinstructions,for
inappropriateuseoftheapplianceorincorrect
settingof controls.
WARNING:Theapplianceanditsaccessible
partsbecomehotduringuse. Careshoulbetaken
to avoid touching heating elements. Children less
than8yearsofagemustbekeptawayunless
continuouslysupervised.
WARNING:Ifthehobsurfaceiscracked,donot
usetheappliance– riskofelectricshock.
WARNING : Danger of fire :Do not store items
onthecookingsurfaces.
CAUTION:Thecookingprocesshastobe
supervised.Ashortcookingprocesshastobe
supervisedcontinuously.
WARNING:Leaving thehob unattended when
cooking withfatoroilcanbedangerous – riskof
fire.NEVER try to extinguish a fire with water,but
switchofftheapplianceandthencovertheflames
e.g.witha lidorafireblanket.
Donotusethehobasaworksurfaceorsupport.
Keepclothesorotherflammablematerialsaway
fromtheappliance,unitl allthecomponentshave
cooleddowncompletely– riskoffire.
Veryyoungchildren(0-3years)shouldbekept
awayfromtheappliance.Youngchildren(3-8
years)shouldbekeptawayfromtheappliance
unlesscontinuouslysupervised.Childrenfrom8
yearsoldandaboveandpersonswithreduced
physical,sensoryormentalcapabilitiesorlackof
experienceandknowledgecanuse this appliance
onlyiftheyaresupervisedorhavebeengiven
instructionsonsafeuseandunderstandthe
hazardsinvolved. Childrenmustnot play with the
appliance.Cleaningandusermaintenancemust
notbecarriedoutbychildrenwithoutsupervision.
WARNING:Theapplianceanditsaccessible
partsbecomehotduringuse.Careshouldbetaken
to avoid touching heating elements. Children less
than8yearsofagemustbekeptawayunless
continuouslysupervised
Never leavethe applianceunattended during
fooddrying.Iftheapplianceissuitablefor
probeusage,onlyuseatemperatureprobe
recommendedforthis oven-riskoffire.
Keepclothesorotherflammablematerials
awayfromtheappliance,untilallthecomponents
havecooleddowncompletely-riskoffire.Always
bevigilantwhencookingfoodsrichinfat,oilor
whenaddingalcoholicbeverages-riskoffire.Use
ovenglovestoremovepansandaccessories.At
theendofcooking,openthedoorwithcaution,
allowinghotairorsteamtoescapegradually
before accessing the cavity - risk of burns.Do not
obstructhotairventsatthefrontoftheoven-risk
offire.
Exercise caution when theoven door isinthe
openor downposition,to avoidhittingthedoor.
PERMITTEDUSE
CAUTION:Theapplianceisnotintendedto
beoperatedbymeansofanexternalswitching
device,suchasatimer,orseparateremote
controlledsystem.
Thisapplianceisintendedtobeusedin
householdandsimilarapplicationssuchas:staff
kitchenareasinshops,officesandotherworking
environments;farmhouses;byclientsinhotels,
motels,bed&breakfastandotherresidential
environments.
Nootheruseispermitted(e.g.heatingrooms).
Thisapplianceisnotforprofessionaluse.Do
notusethe applianceoutdoors.
Donotstoreexplosiveorflammable
substances(e.g.gasolineoraerosolcans)insideor
nearthe appliance- riskoffire.
INSTALLATION
Theappliancemustbehandledandinstalled
bytwoormorepersons-riskofinjury.Use
protectiveglovestounpackandinstall-riskof
cuts.
Installation,includingwatersupply(ifany),
electricalconnectionsand repairs must becarried
outbyaqualifiedtechnician.Donotrepairor
replaceanypartoftheapplianceunlessspecifically
statedintheusermanual.Keepchildrenawayfrom
theinstallationsite.Afterunpackingtheappliance,
makesurethatithasnotbeendamagedduring
transport.Intheeventofproblems,contactthe
dealeroryournearestAftersalesService.Once
installed,packagingwaste(plastic,styrofoam
partsetc.)mustbestoredoutofreachof
children-riskofsuffocation.Theappliancemust
bedisconnectedfromthepowersupplybefore
anyinstallationoperation-riskofelectricshock.
During installation, make sure the appliance does
notdamagethepowercable-riskoffireorelectric
shock.Onlyactivatetheappliancewhenthe
installationhasbeencompleted.
Donot removethe appliancefromits polystyrene
foambase untilthetime ofinstallation.
Donotinstalltheappliancebehindadecorative
door- riskoffire.
iftherangeis placedon abase,itmust
beleveledandfixedtothewall bythe
retentionchainprovided,to preventthe
applianceslippingfromthebase.
3
WARNING:In ordertopreventthe
appliancefromtipping,theretentionchain
providedmustbeinstalled.Refertothe
instructionsforinstallation.
ELECTRICALWARNINGS
Theratingplateisonthefrontedgeofthe
oven(visible whenthe doorisopen).
Itmustbepossibletodisconnecttheappliance
fromthepowersupplybyunpluggingitif
plugisaccessible,orbyamulti-poleswitch
installedupstreamofthesocketinaccordance
withthewiringrulesandtheappliancemust
beearthedinconformitywithnationalelectrical
safetystandards.
Donotuseextensionleads,multiplesockets
oradapters.Theelectricalcomponentsmustnot
be accessible to the user after installation.Do not
usetheappliancewhenyouarewetorbarefoot.
Do not operate this appliance if ithas a damaged
powercableorplug,ifitisnotworkingproperly,
orifithasbeendamagedor dropped.
Ifthesupplycordisdamaged,itmust
bereplacedwithanidenticalonebythe
manufacturer,itsserviceagentorsimilarly
qualifiedpersonsinordertoavoidahazard-
riskofelectric shock.
Ifthepowercableneedstobereplaced,
contactan authorizedservicecenter.
WARNING:Ensurethattheapplianceis
switchedoffbeforereplacingthelamptoavoid
thepossibilityofelectricshock.
CLEANINGANDMAINTENANCE
WARNING:Ensurethattheapplianceis
switchedoffanddisconnectedfromthepower
supplybeforeperforminganymaintenance
operation;never usesteam cleaning equipment -
riskofelectric shock.
Donotuseharshabrasivecleanersormetal
scraperstocleanthedoorglasssincetheycan
scratchthesurface,whichmayresultinshattering
oftheglass.
Donotuseabrasiveorcorrosiveproducts,
chlorine-basedcleanersor panscourers.
Makesuretheappliancehascooleddown
beforecleaningor performing maintenance. - risk
ofburns.
WARNING:Switchofftheappliancebefore
replacingthelamp-riskofelectricshock.
DISPOSALOFPACKAGINGMATERIALS
Thepackagingmaterialis100%recyclableandismarkedwiththe
recyclesymbol
.Thevariouspartsofthepackagingmusttherefore
bedisposedofresponsiblyandinfullcompliancewithlocalauthority
regulationsgoverningwaste disposal.
DISPOSALOFHOUSEHOLDAPPLIANCES
Thisapplianceismanufacturedwithrecyclableorreusablematerials.
Disposeofitinaccordancewithlocalwastedisposalregulations.
Forfurtherinformationonthetreatment,recoveryandrecycling
ofhouseholdelectricalappliances,contactyourlocalauthority,the
collectionserviceforhouseholdwasteorthestorewhereyoupurchased
theappliance.ThisapplianceismarkedincompliancewithEuropean
Directive2012/19/EU,WasteElectricalandElectronicEquipment(WEEE).
Byensuringthisproductisdisposedofcorrectly,youwillhelpprevent
negativeconsequencesfortheenvironmentandhumanhealth.The
symbol
ontheproductorontheaccompanyingdocumentation
indicatesthatitshouldnotbetreatedasdomesticwastebutmustbe
takentoanappropriatecollectioncentrefortherecyclingofelectrical
andelectronic equipment.
ENERGYSAVINGTIPS
Onlypreheattheovenifspecifiedinthecookingtableoryourrecipe.Use
darklacquered orenamelledbaking traysas theyabsorbheat better.
DECLARATIONSOFCONFORMITY
4
and with the Waste Electrical and Electronic Equipment regulations
2013 (as amended).
This appliance meets: Ecodesign requirements of European Regulation
66/2014; Energy Labeling Regulation 65/2014; Ecodesign for Energy- Releted
in compliance with the European standard EN 60350-1.
Products and Energy Information (Amendment) (EU Exit) Regulations 2019
This appliance meets: Ecodesign requirements of European Regulation
66/2014; andThe Ecodesign for Energy-Releted Products and Energy
the European standard EN 60350-2.
Information (Amendment) (EU Exit) Regulations 2019 in complience with
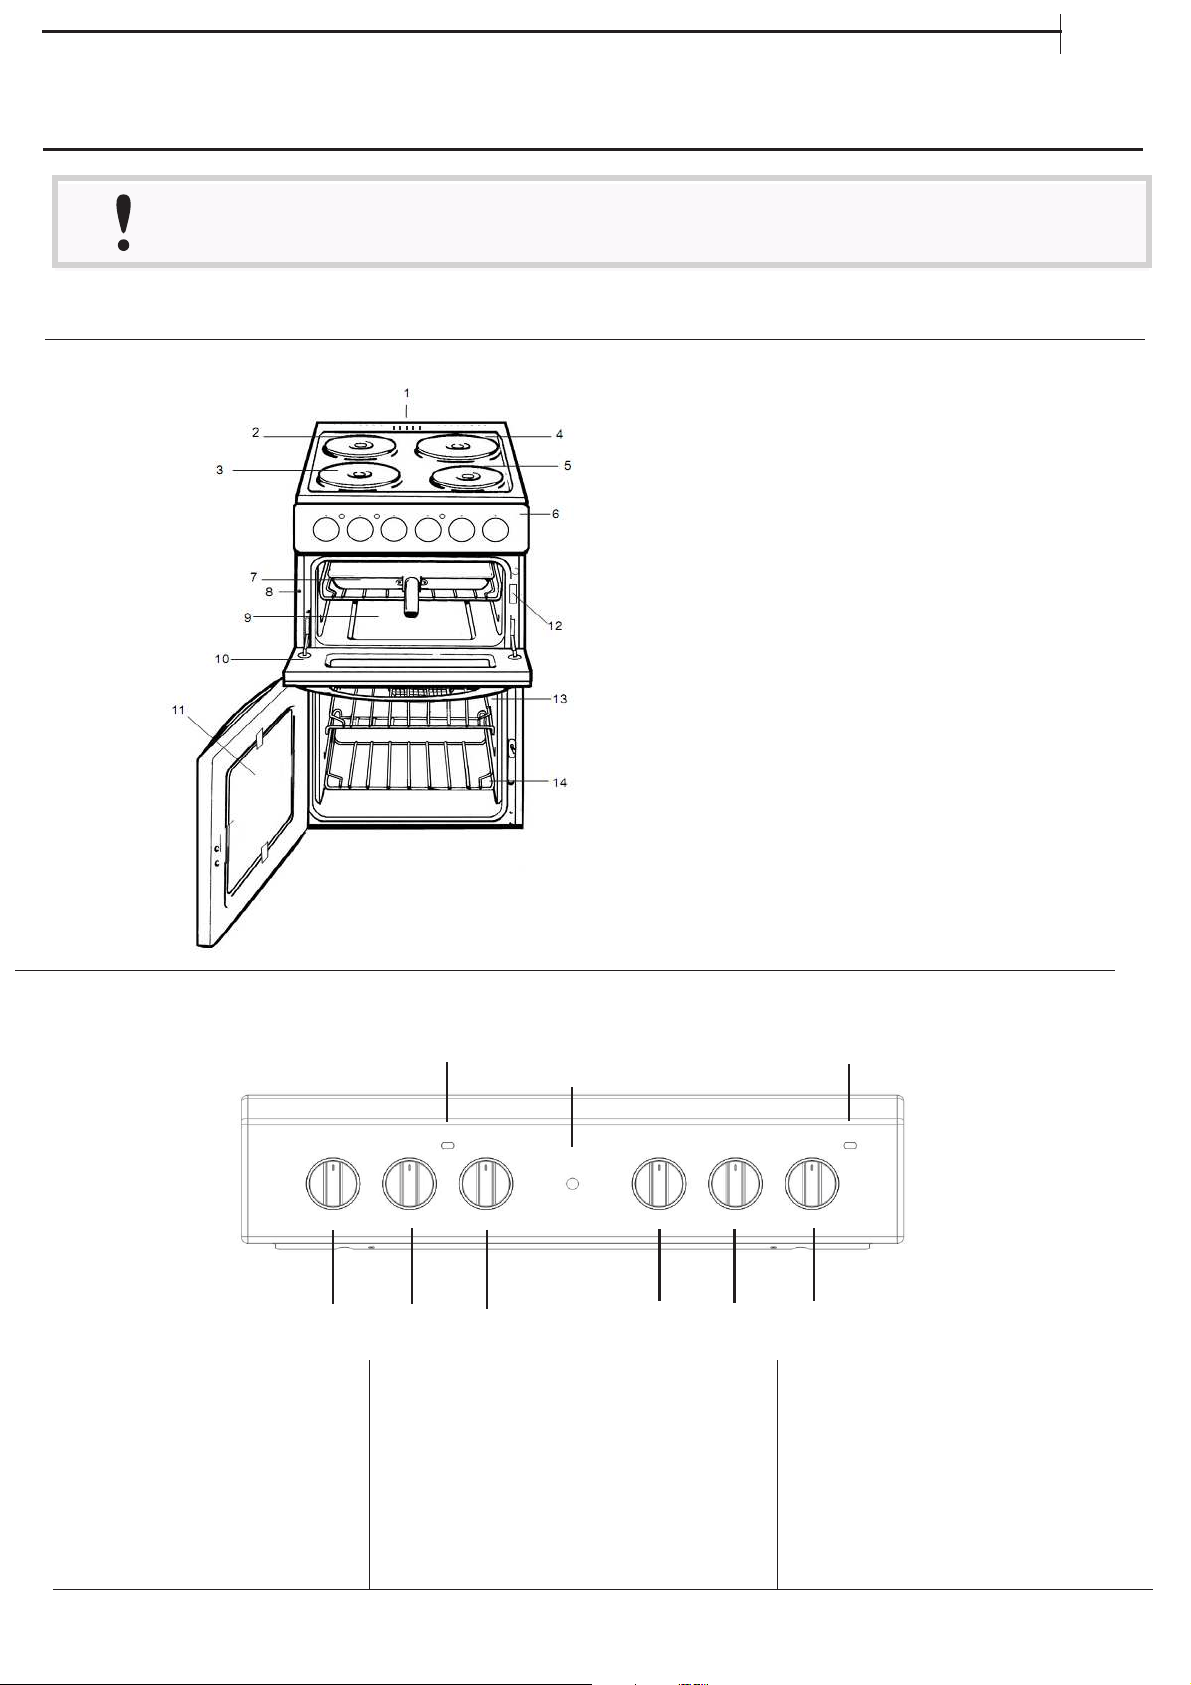
GRILL DOOR
GLASS
DOOR
CONTROL
PANEL
MAIN OVEN
WIREWORK
SHELF
SUPPORTS
OVEN ROD
SHELVES
GRILL
2000W
1500W
1500W
2000W
GRILL DOOR SWITCH
GRILL/MEAT PAN
WITH REMOVABLE
HANDLE AND WIRE
FOOD SUPPORT
MODEL & SERIAL
NUMBER
HOB VENTILATION SLOTS
ENEN
5
1.
2.
3.
4.
5.
6.
7.
8.
9.
10.
11.
12.
13.
14.
ENEN
DAILY REFERENCE
GUIDE
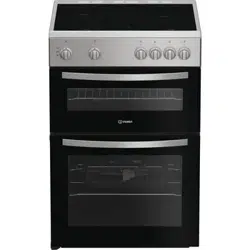
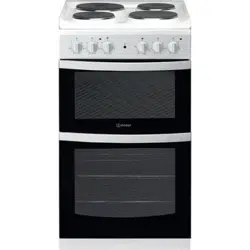
PRODUCT DESCRIPTION
Read the safety instructions carefully before using the product
EN
CONTROL PANEL
MAIN OVEN
INDICATOR
GRILL
INDICATOR
PLATE
INDICATOR
LIGHT
MAIN
OVEN
GRILL
LEFT
FRONT
PLATE
RIGHT
REAR
PLATE
LEFT
REAR
PLATE
RIGHT
FRONT
PLATE
1 2
3
4
5
6
7
8
9
1.
2.
3.
4.
5.
6.
7.
8.
9.

Control Knobs
The knobs for the hotplates can be rotated in either
direction to provide variable heat control, the Main
Oven knob can only be rotated clockwise from the Off
position.
Note: Always ensure that all controls are in the OFF
position, when the appliance is not in use.
Operating the control when the grill is in use
In common with all cookers having controls sited
above the grill compartment, care must be taken when
setting the controls, due to hot air being emitted from
the grill compartment.
Slow cooking ‘S’
The main oven has a ‘S’ setting specially designed to
reduce energy usage. Full details of this can be found
in the Slow cooking section of this book.
6
To help you make the best use of your cooker,
PLEASE READ THIS BOOKLET CAREFULLY.
Your new cooker is guaranteed and will give lasting
service.
The guarantee is only applicable if the cooker has
been installed in accordance with the Installation
Instructions.
The cooker is designed specifically for domestic use
and responsibility will not be accepted for use in any
other installation.
When first using the cooker ensure that the room is
well ventilated (e.g. open a window or use an
extractor fan) and that persons who may be
sensitive to the odour avoid any fumes. It is
suggested that any pets be removed from the room
until the smell has ceased. This odour is due to any
temporary finish and also any moisture absorbed by
the insulation.
When the cooker is first used an odour may be
emitted. This will cease after a period of use.
Our policy is one of continual improvement in design
and development, therefore strict accuracy of
illustrations and descriptions cannot be guaranteed.
* The guarantee is subject to the provisions* The guarantee is subject to the provisions
* The guarantee is subject to the provisions* The guarantee is subject to the provisions
* The guarantee is subject to the provisions
that the appliance:that the appliance:
that the appliance:that the appliance:
that the appliance:
(a) Has been used solely in accordance with the
Users Instruction Book.
(b) Has been properly connected to a suitable
supply voltage as stated on the
rating plate attached to this equipment.
(c) Has not been subjected to misuse or
accident or been modified or repaired by
any person other than the authorised employee or
agent.
(d) Has been correctly installed.
Main Oven
Dimensions (HxWxD): 35,5x39,2x44 cm
Volume: 62 Litres
Max. Oven Power Absorption: 1700 W
Voltage and Frequency
230-240V~ 50-60Hz
Declared energy consumption for Natural convection
Class
heating mode: Fan Oven
HobHobHob
Introduction
The controls
EN
Technical Characteristics
WARNING – THIS APPLIANCE MUST BEWARNING – THIS APPLIANCE MUST BE
WARNING – THIS APPLIANCE MUST BEWARNING – THIS APPLIANCE MUST BE
WARNING – THIS APPLIANCE MUST BE
EARTHED.EARTHED.
EARTHED.EARTHED.
EARTHED.
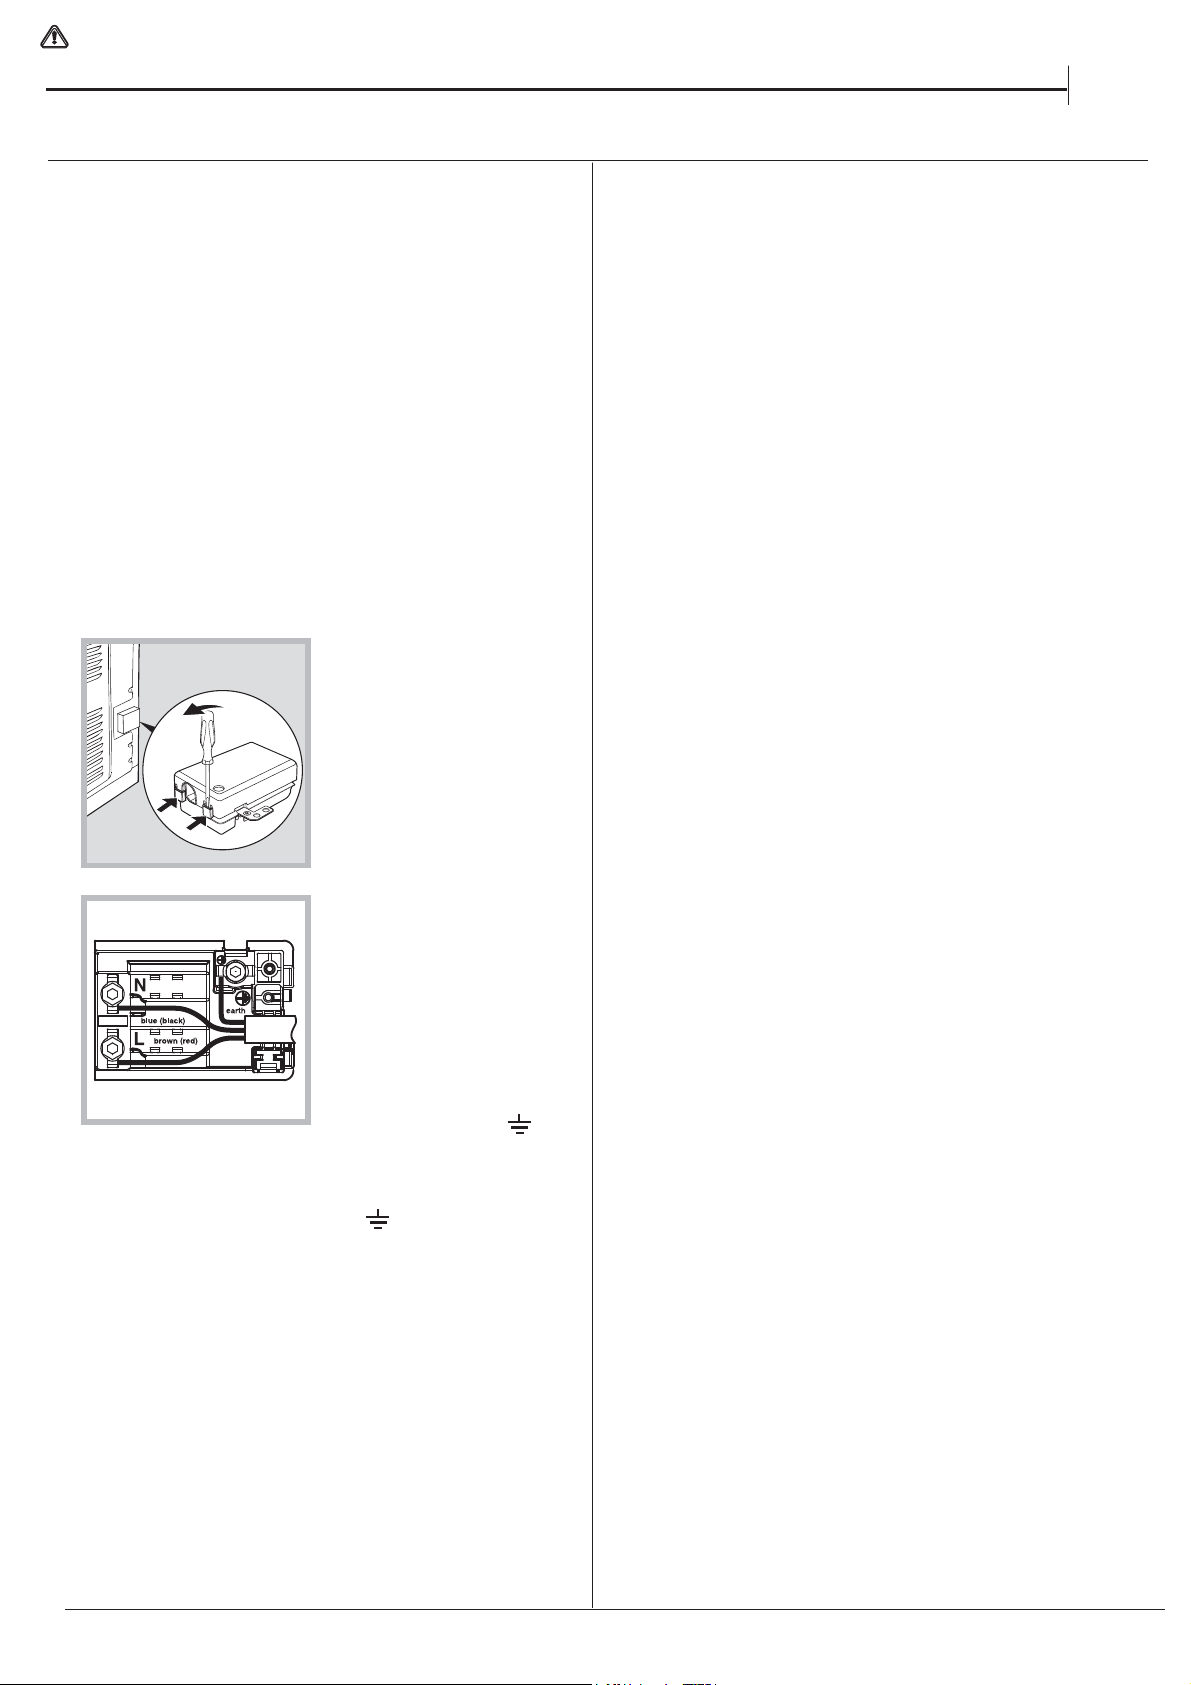
Electrical connection
Electric cookers come without a power supply cable.
The cooker is designed to operate on an electricity
supply which conforms to the electrical data shown
on the Rating Plate. The cooker can be connected to
the mains only after removing the back panel of the
cooker itself with a screwdriver.
The following installation procedure must be
carried out by a qualified electrician. The electrical
installation must comply with the IEE Regulations,
Building & local By-Lays.
For the installation of the feeding cable carry out the
following operations:
1 Open the terminal
board by inserting a
screwdriver into the
side tabs of the cover.
Use the
screwdriver as a
lever by pushing it
down to open the cover
(see diagram).
2 Loosen the cable
clamp screw and
remove it, using a
screwdriver as a lever
(see figure).
3 Remove the wire
contact screws L-N-
,
then fasten the wires
under the screw heads, respecting
the colour code: Black/Blue (N), Red/Brown
(L) and Bare Wire/Yellow-Green (
).
Once the connections have been made, tighten all
the terminal screws fully.
Fasten the supply cable in place with the clamp
and close the cover of the terminal board.
N.B.:N.B.:
N.B.:N.B.:
N.B.: the power supply cable must have these minimum
requirements:
Type: H05RR-F
H05VV-F
Section: 3x4 mm
2
The appliance must not be installed behind
a decorative door in order to avoid overheating
Then install the product into position.
NOTE: This appliance must not be fitted on a
platform.
EN
Installation tips
WARNING:Thisoperationmustbeperfomed
by a qualified technician
7
The height of the
cooker can be
adjusted by means
of adjustable feet
in the plinth
(900mm-915mm).
Adjust the feet by
tilting the cooker
from the side.
Hotplate
Use of Hotplates
Note:
Under no circumstances should the hob be
used with aluminium foil in contact with the
hob surface.
The controls set the hotplates at six pre-set
power levels. Each control can be used to
select one of six temperature settings from a
minimum at position 1 to a maximum at
position 6.
CONTROL SETTINGS GUIDE
This is provided only as a guide – settings also
depend on the type of pan used and the quality of
food.
Knob Position Type of food
1 To melt butter, chocolate, etc.
1 or 2 To heat food gently.
To keep small amounts of water simmering.
To heat sauces, containing egg yolks and butter.
To simmer: stews, meat, fish, vegetables, fruit.
3 To heat solid and liquid foods.
Keep water boiling.
Thaw frozen vegetables.
Make 2-3 egg omelettes.
4 or 5 To cook foods, just above simmering.
To maintain 'rolling' boil for preserve making.
5 or 6 To seal meat and fry fish.
6 Frying potatoes.
Bringing water to the boil.
Deep fat frying.
Dissolve sugar for preserve making.
Safety requirements for deep fat frying
1. Use a deep pan, large enough to completely
cover the appropriate heating area.
2. Never fill the pan more than one-third full of oil.
3. Never leave oil or fat unattended during the
heating or cooking period.
4. Never try to fry too much food at a time,
especially frozen food. This only lowers the
temperature of the oil or fat too much, resulting in
greasy food.
5. Always dry food thoroughly before frying, and
lower it slowly into the hot oil or fat. Frozen foods,
in particular, will cause frothing and spitting, if
added to quickly.
6. Never heat fat, or fry, with a lid on the pan.
7. Keep the outside of the pan clean and free from
streaks of oil or fat.
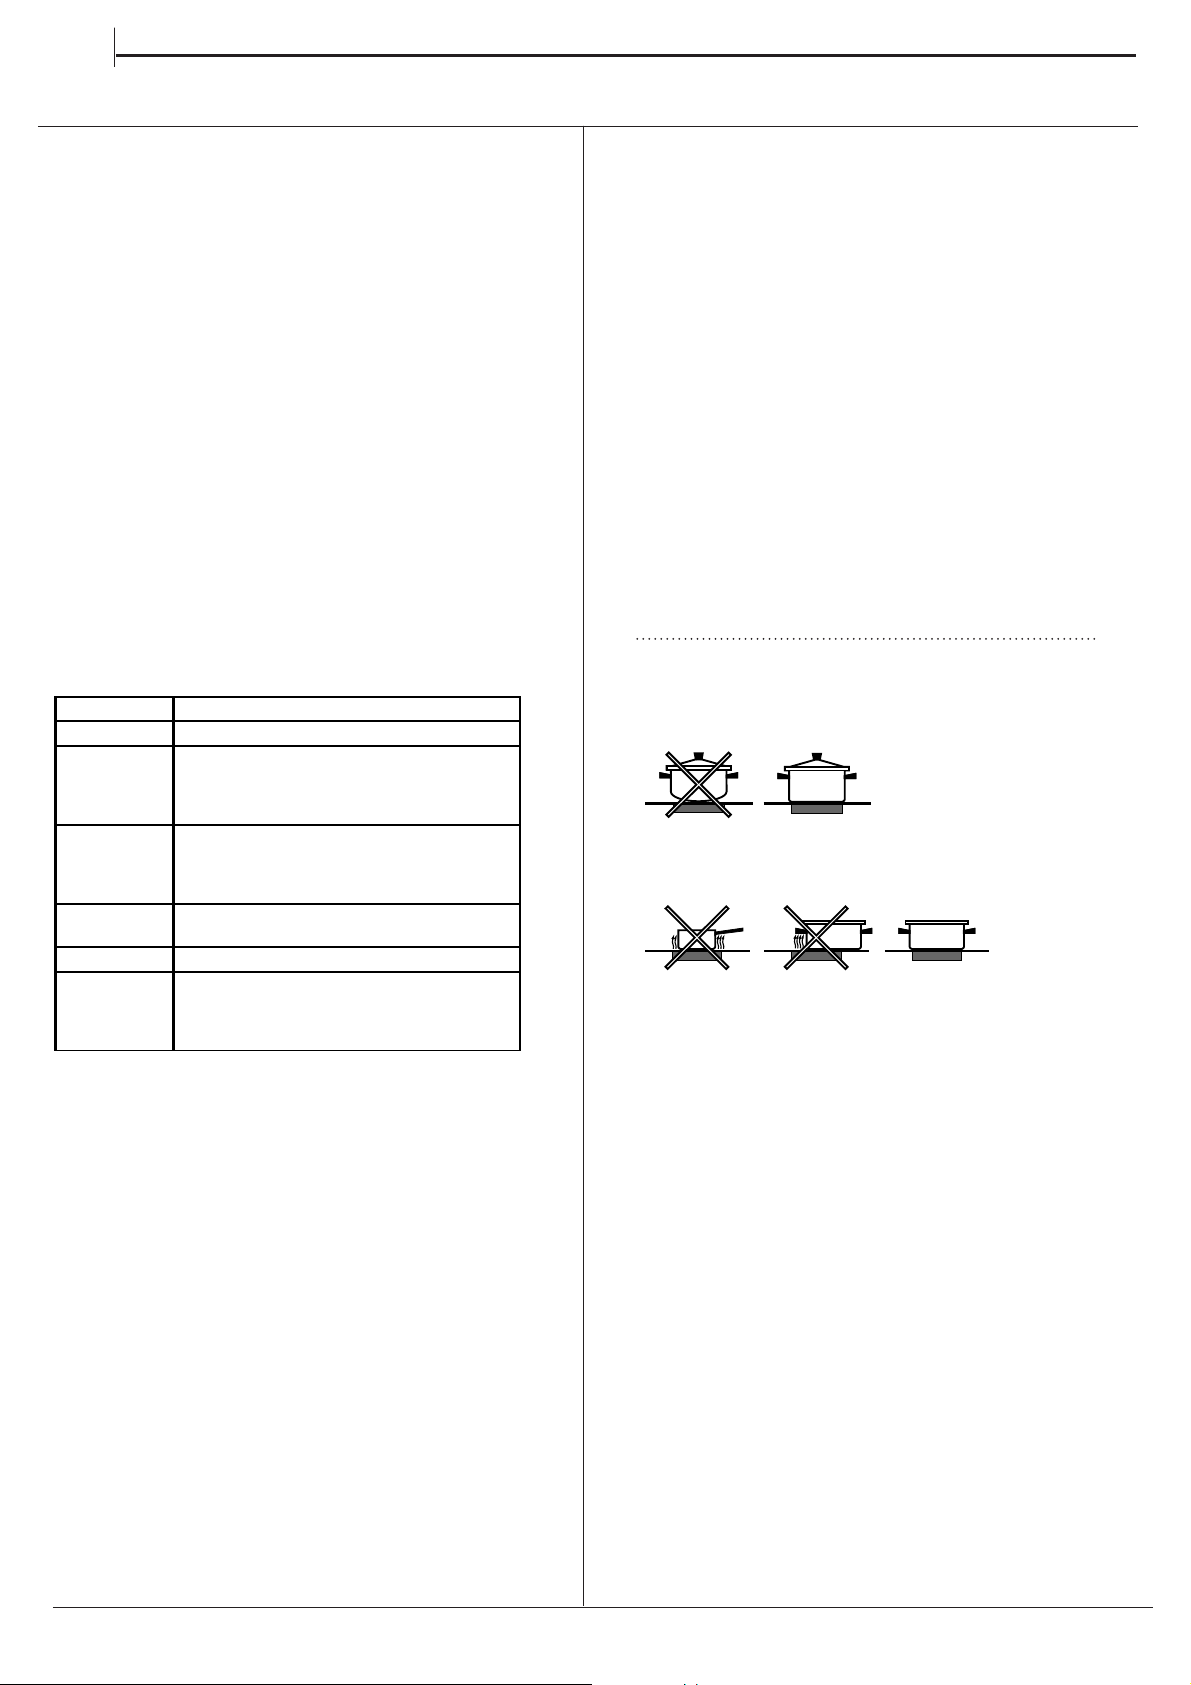
Practical advice on using the hob
• Use pans with a thick, flat base to ensure that
they adhere perfectly to the cooking zone.
• Always use pans with a diameter that is large
enough to cover the hotplate fully, in order to use
all the heat produced.
• Always make sure that the base of the pan is
completely clean and dry: this ensures that the
pans adhere perfectly to the cooking zones and
that both the pans and the hob remain effective
for a longer period of time.
• Avoid using the same cookware that is used on
gas burners: the heat concentration on gas
burners may have warped the base of the pan,
causing it not to adhere to the surface correctly.
• Never leave a cooking zone switched on without a
pan on top of it, as doing so may cause the zone
to become damaged.
EN
8

To operate the grill proceed as follows:To operate the grill proceed as follows:
To operate the grill proceed as follows:To operate the grill proceed as follows:
To operate the grill proceed as follows:
Open the grill door.
Pre-heat the grill on setting 6 for approximately 5
minutes (see chart on guide to grilling).
Fix the grill pan handle securely in position. See
below.
Food which only requires browning should be
placed directly on/in the grill pan in the grill pan
runner, or on the floor of the grill compartment.
(the grill pan grid may be removed.)
Leave the control on setting 6 for toast, sealing
and fast cooking of foods. For thicker foods
requiring longer cooking turn the control to a lower
setting after the initial sealing, on both sides, on
setting 6. The thicker the food the lower the
control should be set.
Warning: Take care as the grill will be hot –Warning: Take care as the grill will be hot –
Warning: Take care as the grill will be hot –Warning: Take care as the grill will be hot –
Warning: Take care as the grill will be hot –
always wear oven gloves. Always ensure thatalways wear oven gloves. Always ensure that
always wear oven gloves. Always ensure thatalways wear oven gloves. Always ensure that
always wear oven gloves. Always ensure that
the grill pan is clean BEFORE use. Excessthe grill pan is clean BEFORE use. Excess
the grill pan is clean BEFORE use. Excessthe grill pan is clean BEFORE use. Excess
the grill pan is clean BEFORE use. Excess
fat build up in the bottom of the pan couldfat build up in the bottom of the pan could
fat build up in the bottom of the pan couldfat build up in the bottom of the pan could
fat build up in the bottom of the pan could
cause a fire hazard. Never line grill pan withcause a fire hazard. Never line grill pan with
cause a fire hazard. Never line grill pan withcause a fire hazard. Never line grill pan with
cause a fire hazard. Never line grill pan with
foil.foil.
foil.foil.
foil.
Fixing the Grill Pan Handle
The grill pan handle is detachable from the pan to
facilitate cleaning and storage. Fix the pan handle
securely before use:
1. Fit the handle to the grill pan so that the external
‘hooks’ embrace the edge of the pan (fig. 1)
2. Make sure that the middle part of the handle fits
exactly the protruding support of the pan (fig .2) and
holds the pan from the bottom.
The food must be placed on the rack in the grill pan.
Position the grill pan on top of the oven rack. The
best results are achieved by placing the oven rack
on the uppermost shelves. Pouring a little water into
the grill pan will make the collection of grease
particles more efficient and prevent the formation of
smoke.
The food to be cooked should be placed on the grill
pan/grill pan food support.
Place the grill pan on the runners and push back to
the stop position when the grill pan is correctly
positioned beneath the grill element.
Plates and dishes placed on the floor of the grill
compartment will be heated when the oven is in use.
Grill Compartment
as a ‘Hotcupboard’
Do not operate the grill control when usingDo not operate the grill control when using
Do not operate the grill control when usingDo not operate the grill control when using
Do not operate the grill control when using
the compartment as a hotcupboard.the compartment as a hotcupboard.
the compartment as a hotcupboard.the compartment as a hotcupboard.
the compartment as a hotcupboard.
Do take care when removing plates, dishes and
utensils from the grill compartment when the oven is
in use as they may become quite hot.
You may need to use oven gloves when removing
warmed items.
1
2
Grilling
GRILLING MUST BE DONE WITH THE GRILL DOOR
OPEN.
CONTROL KNOBS MAY BECOME HOT DURING
GRILLING.
CAUTION: ACCESSIBLE PARTS WILL BECOME
HOT WHEN THE GRILL
IS USED - CHILDREN SHOULD BE KEPT AWAY.
Grilling
EN
9
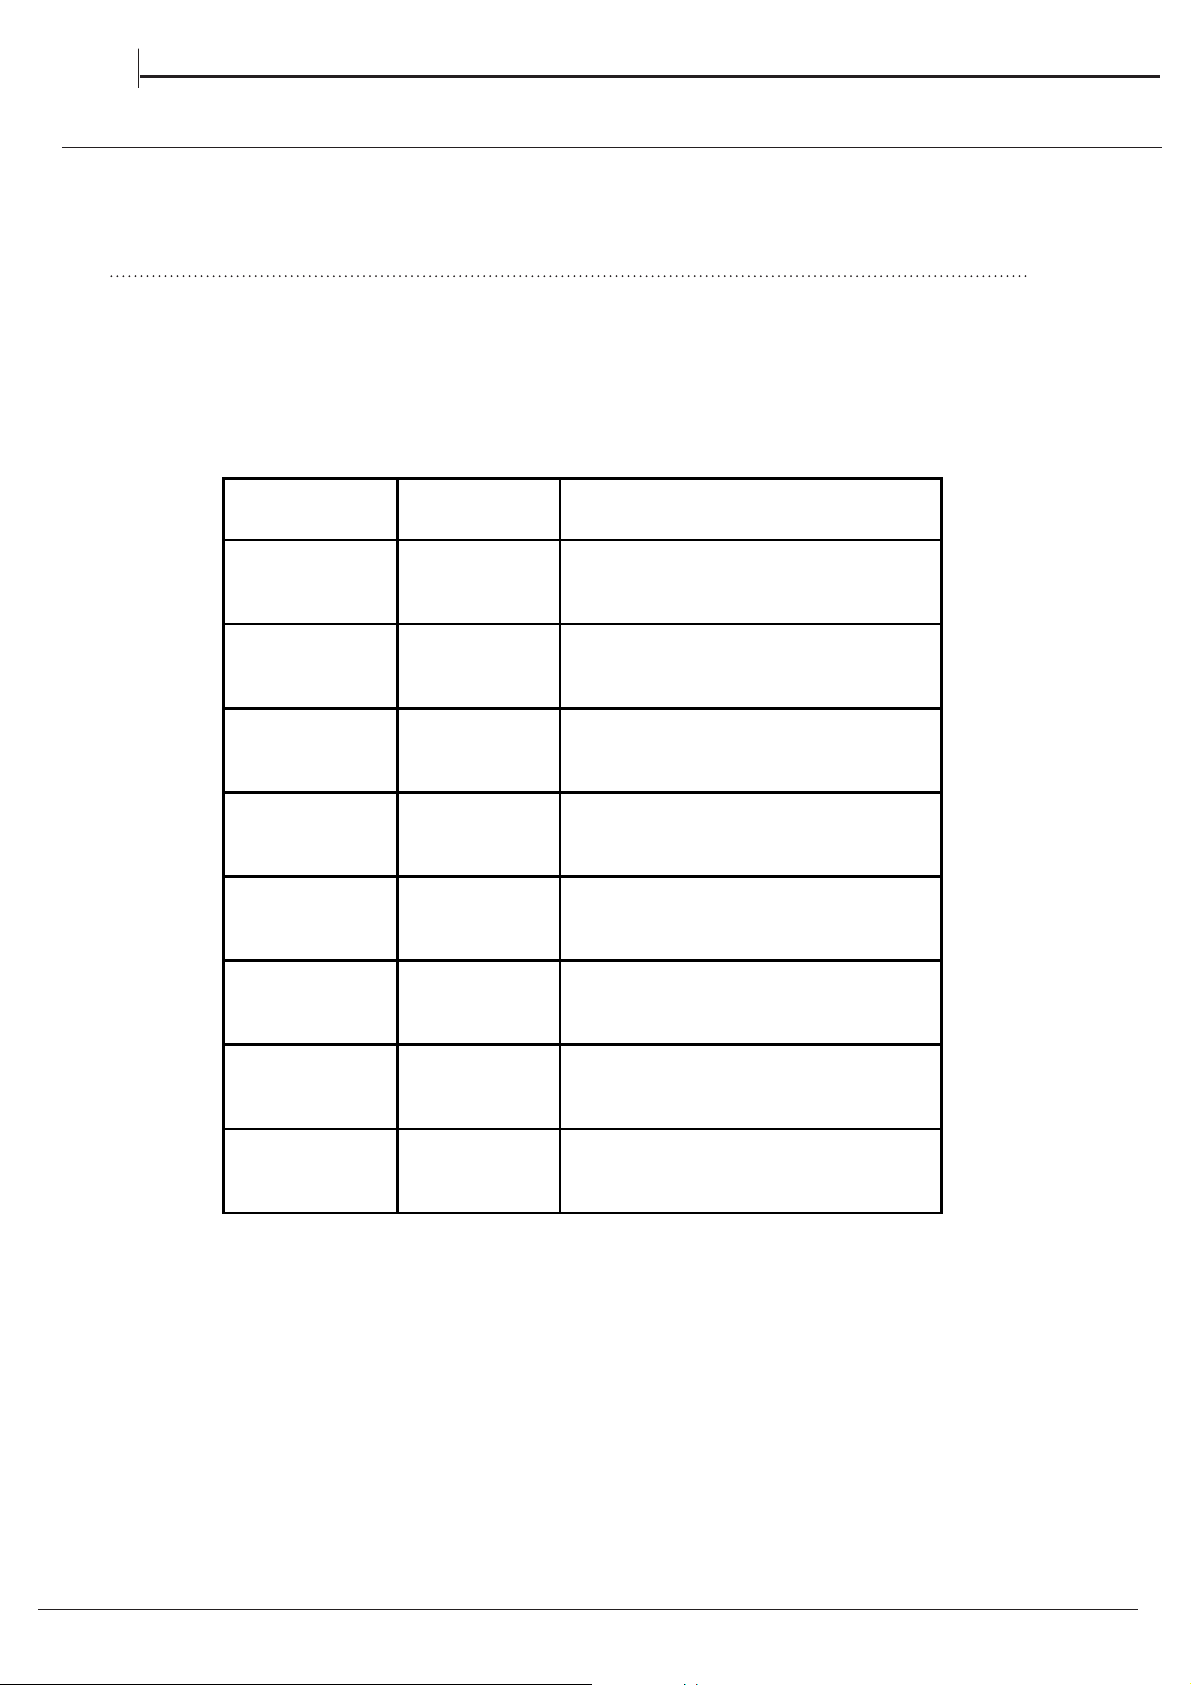
Pre - heat the grill for 5 minutes on maximum control setting before grilling
GRILL CHART
The settings in the above guide have been developed to cook food successfully without excessive fat spitting
and splashing.
Grill Chart
Food Grill Setting Approximate Cooking time
Toasting of Bread
products
63 - 10 mins.
Small cuts of meat,
sausages, bacon, etc.
5-6 15 - 20 mins.
Chops etc. Gammon
steaks Chicken
pieces
5
20 - 25 mins. Wire food support used in
upturned position for chicken.
Fish: fingers Whole
Fillets
5
10 - 20 mins. Whole fish and fillets placed in the
base of the grill pa n.
Fish in breadcrumbs 5 15 - 20 mins.
Pre - Cooked potato
products
5 15 - 20 mins.
Pizzas 5 12 - 15 mins. in the base of the grill p an.
Browning of food 6
8 - 10 mins. Dish placed directly on base of the
grill pan and pan placed on the base of the grill
compartment.
ENEN
EN
10
Main Oven
Oven Control
Heating of the oven is achieved by turning control
clockwise to the required temperature scale on the
control panel, as recommended in the temperature
charts. The indicator light will immediately come on
and will then automatically go off and on during
cooking as the oven thermostat maintains the correct
temperature.
The cooking charts provided in this book are a guide
only, giving approximate cooking temperatures and
times. To suit personal taste and requirements, it may
be necessary to increase or decrease temperatures
by 10°C.
The oven is fitted with two rod shelves. The oven is
heated by two tubular sheathed elements located
under the floor of the oven and on the oven roof, inside
the cavity. It should be noted that at the end of a
cooking period there may be a momentary puff of
steam when the oven door is opened. This will
disperse in a few seconds and is a perfectly normal
characteristic of an oven with a good door seal.
Oven Positions
The correct positioning of food is indicated in the
temperature charts.
To prepare meat and poultry for roasting in your
conventional oven.
(a)Wipe the joint, dry well with a clean cloth, kitchen
tissue etc. and weigh it. Meat which has been
stored in a refrigerator should be allowed to come
to room temperature for approximately 30 minutes
before cook ing, and frozen meat or poultry must
be completely defrosted before placing in the
oven.
(b)The weight of any stuffing used should be added
to the oven ready weight of the meat / poultry
before calculating the cooking time.
(c)Place the joint in the meat pan supplied with your
cooker. Small joints weighing less than 1.75kg
(31/2 lbs) should be roasted in a smaller meat
pan/tin - or they may be ‘pot roasted’ - a small
joint in a large meat pan causes unnecessary
oven splashing and evaporation of meat juices.
(d)Additional fat should not be added, except for
veal, very lean meat or poultry which can either be
‘larded’ with fat bacon or brushed
veryvery
veryvery
very
sparingly sparingly
sparingly sparingly
sparingly with cooking oil or melted fat.
(e)Beef, lamb, mutton and poultry may be dusted
lightly with seasoned flour to give a crisp outer
surface. The skin of duck and goose should be
pricked to release excess fat during cooking, and
the rind of pork should be scored, brushed lightly
with oil, and rubbed with salt, to give crisp
crackling.
(f) Potatoes for roasting only require to be brushed
with cooking oil or melted fat.
(g)It is not necessary to baste when roasting in an
electric oven and stock or liquid should not be
added to the meat pan since this only causes
unnecessary soiling, steam and condensation.
For optimum cooking performance, there must be
clearance between meat pan and oven sides. The meat
pan must be placed lengthways in the oven to allow for
air circulation.
Times and Temperatures for Roasting
The secret of succulent, tender meat, is not to roast it
too quickly, at too high a temperature. Best results
are obtained when roasting is carried out at a low
temperature. When a lower temperature is used, the
joint loses less weight, is more tender (too high a
temperature causes meat to be tough and dry) and
the splashing of fat onto the oven interior is reduced to
a minimum. When a complete meal is being cooked
in the oven, cooking time may need to be increased
and temperature may need to be raised for
approximately the last 30 minutes of the cooking
period (for instance when cooking Yorkshire pudding
to serve with roast beef). The suggested times and
temperatures should be used as a guide, but may
vary according to:-
1. Whether you prefer meat rare, medium or well
done.
2. The size and shape of your joint.
(a)A short thick joint requires a longer cooking
period than a long thin joint.
(b)A small joint under 1.5kg (3 lbs) takes longer per
450g (1 lb) cook in the time given for ‘minutes’ per
450g (1 lb) without the ‘minutes’ over added.
(c)Boned/rolled and stuffed joints take longer to
cook through than those with a bone.
N.B.N.B.
N.B.N.B.
N.B.
Remember to switch off the oven control after cooking
is finished. If the door of the oven is left open for long
periods of time with the control switch ON, then the
grill element will become hot. The correct positioning
of food is indicated in the temperature charts.
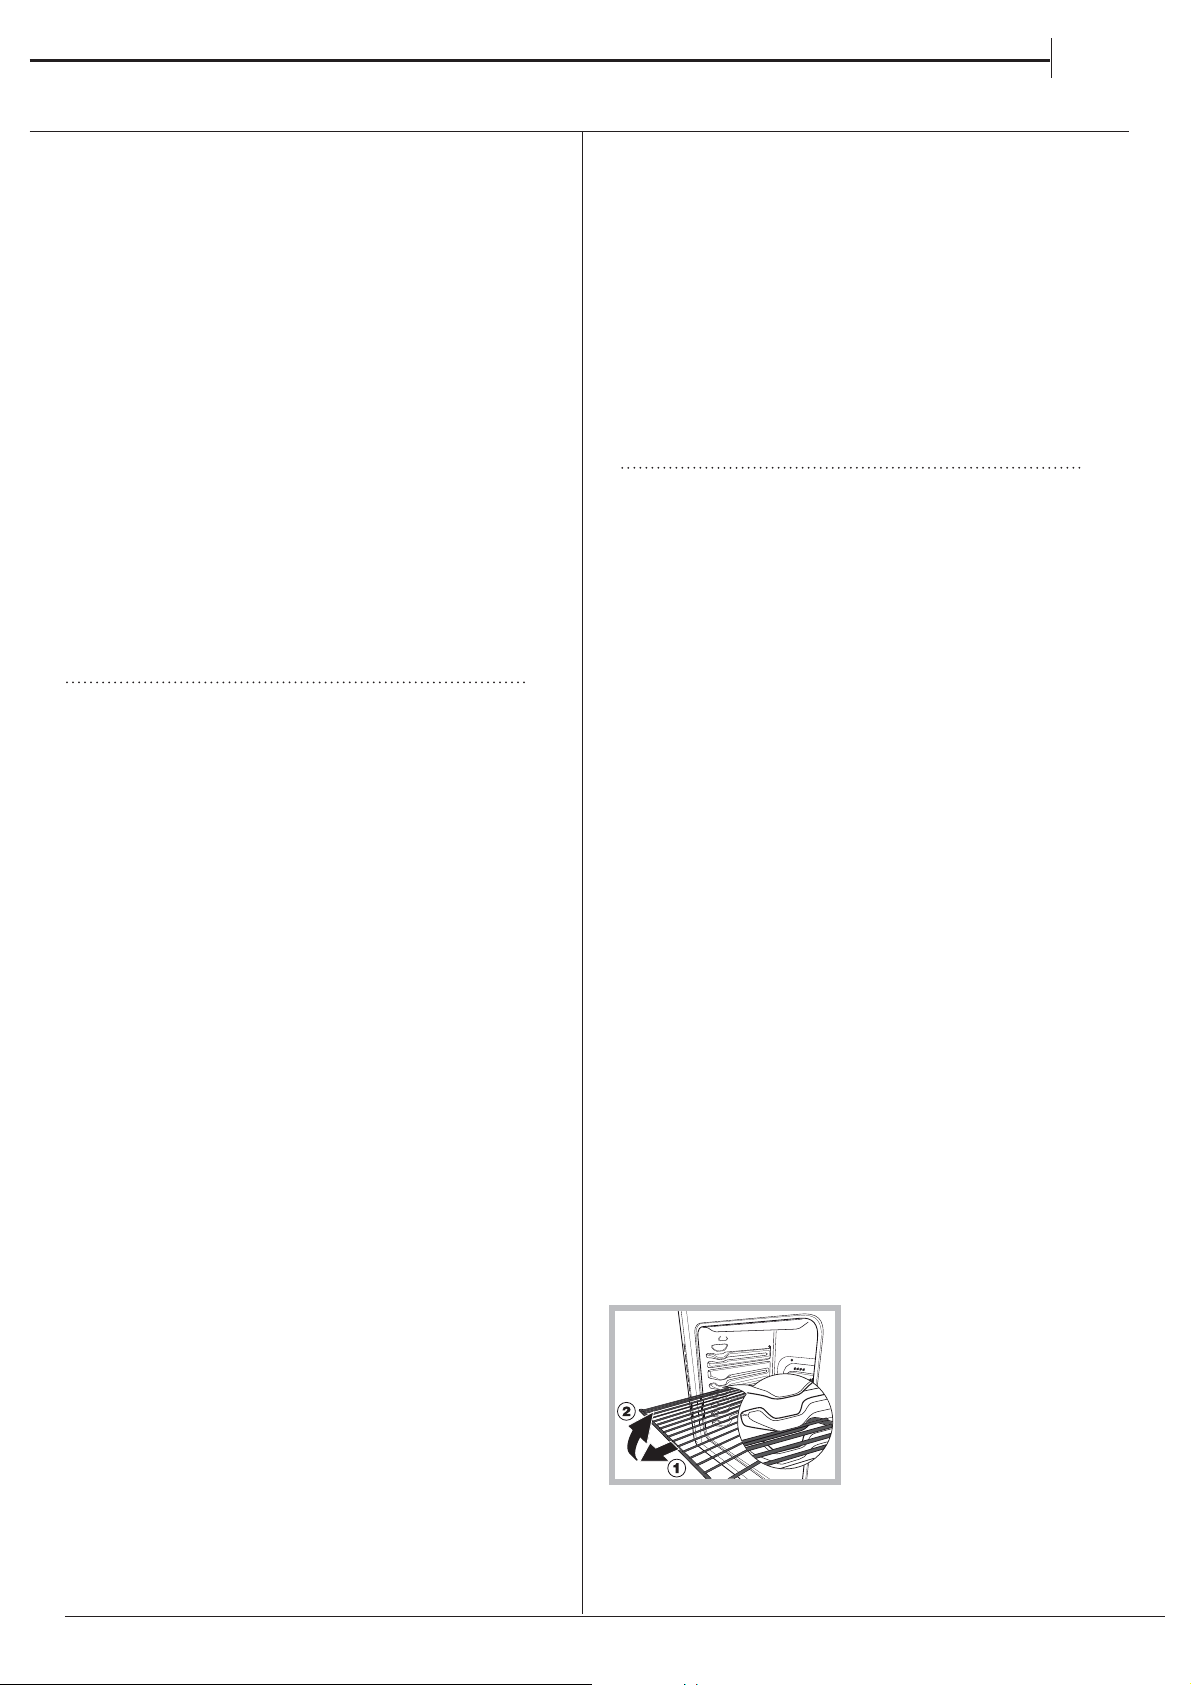
WARNING! The oven is
provided with a stop sys-
tem to extract the racks
and prevent them from
coming out of the oven.(1)
As shown in the drawing,
to extract them comple-
tely, simply lift the racks,
holding them on the front
part, and pull (2).
11
EN
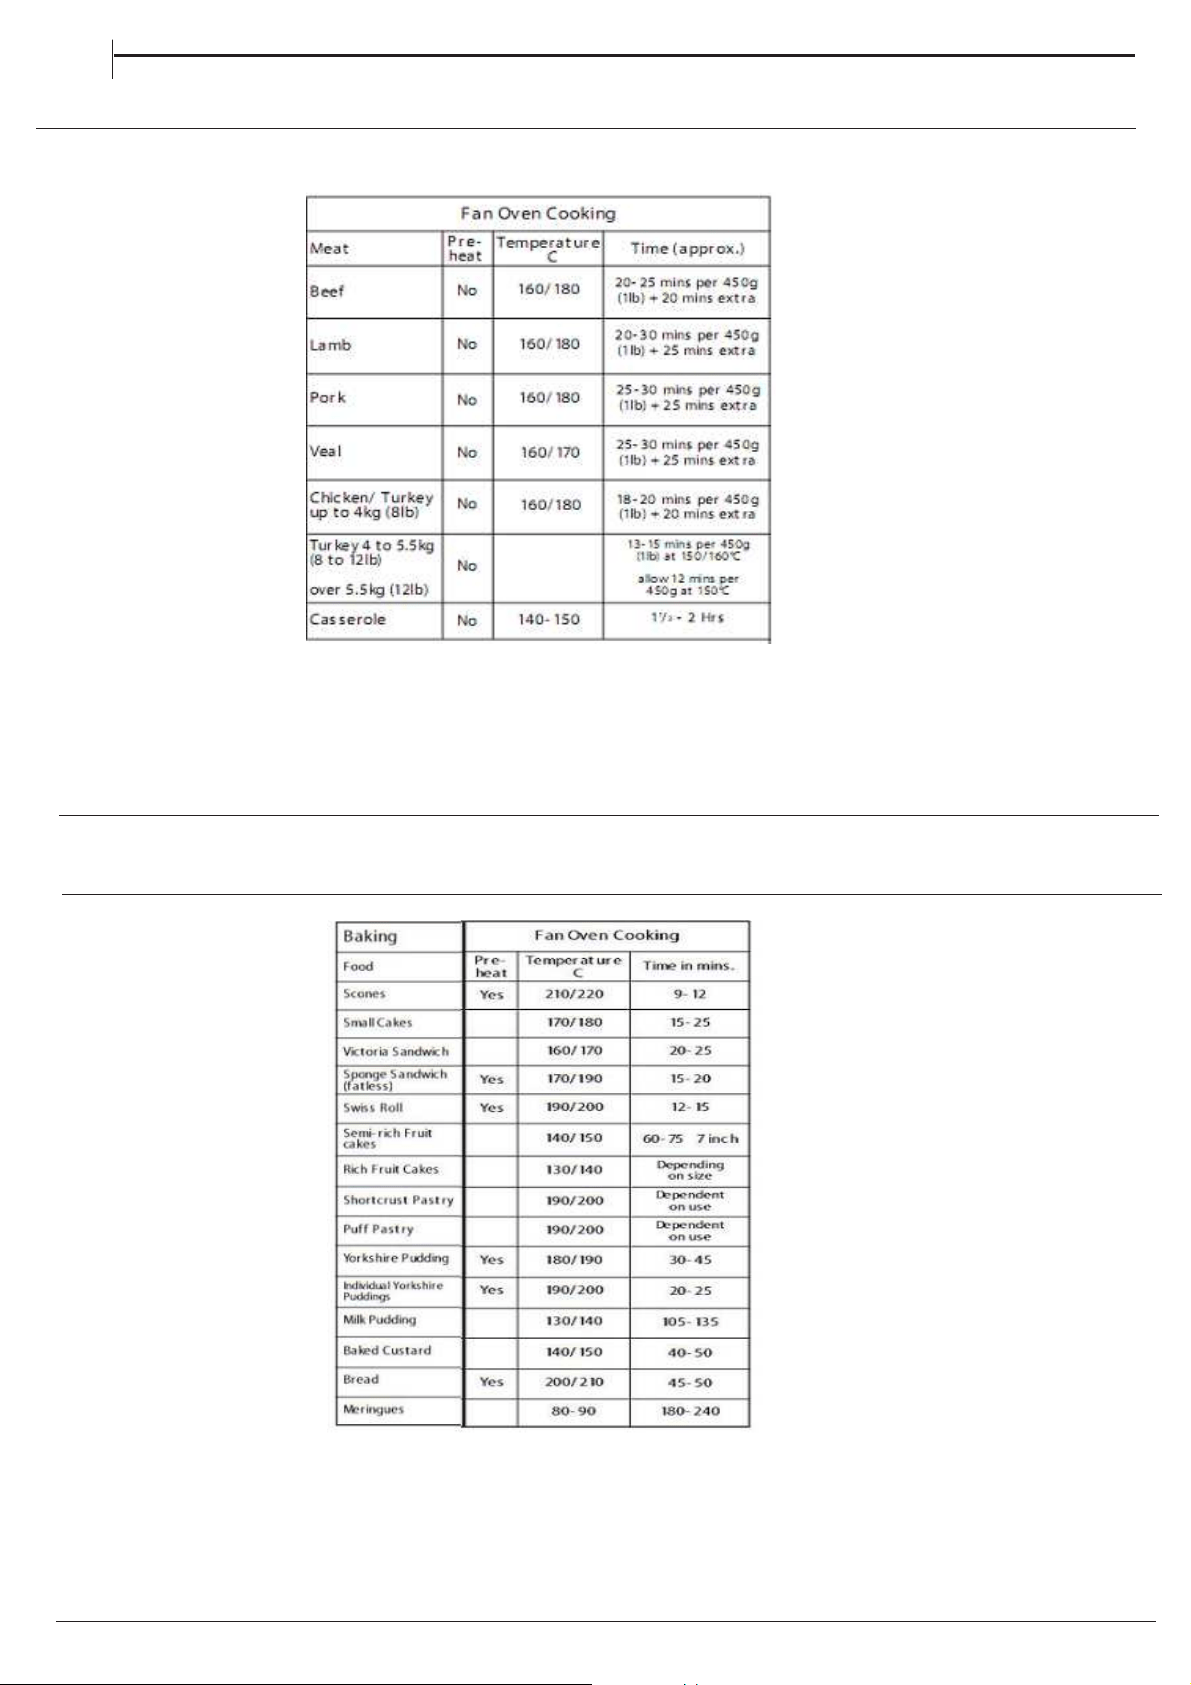
Conventional Oven - Cooking
Chart MEAT
Note: Where times are stated, they are approximate only.
The most accurate method of testing the readiness of joints of meat or whole poultry is to insert a meat thermometer into
the thickest part of a joint, or the thickest part of poultry thighs, during the cooking period. The meat thermometer will
indicate when the required internal temp has been reached.
Beef: Rare: 60°C Lamb: 80°C Poultry: 90°C
Medium: 70°C Pork: 90°C
Well Done: 75°C Veal: 75°C
ENEN
Note:
If soft margarine is used for cake making, temperatures recommended by the manufacturers should be followed.
Temperatures recommended in this chart refer to cakes made with block margarine or butter only.
EN
Cooking Chart- Baking
12

Using the Main Oven
for Other Functions
‘S’ SLOW Setting
This is used for slow cooking, keeping food warm and
warming plates for short periods. Extra care should be
taken when warming bone china, as it may be
damaged in a hot oven.
Advantages of “SLOW” cooking are:
The oven stays cleaner because there is less
splashing.
Timing of food is not as critical, so there is less fear of
overcooking.
Inexpensive joints of meat are tenderised.
Fully loading the oven can be economical.
Cooking times can be extended in some cases by up
to 2 hours.
Operation:
1. Place the prepared food in the main oven and
ensure the door is fully closed.
2. Select ‘S’ (Slow Cooking Temperature) by turning
the Main Oven Control clockwise ensuring the oven
door is fully closed.
Storage and re-heating of food:
1. If food is to be frozen or not used immediately,
place it in a clean container and cool as soon as
possible.
2. Always thaw frozen food completely in the
refrigerator before re-heating.
3. Always reheat food thoroughly and ensure it is
piping hot before serving.
4. Only re-heat food once.
1. Make sure that the dishes to be used will fit into
the oven ensuring enough room for air to circulate.
2. All dishes cooked on the slow setting will require a
minimum of 6 hours, however, if they are cooked for 1
-2 hours longer then deterioration in their appearance
may be noticed.
3. Never cook joints of meat over 2.7kg (6 Ib) or
poultry over 2.0kg (4lb 8oz).
We do not recommend that joints of meat or poultry
are stuffed before cooking on the slow setting.
4. To seal in the meat juices, always cook meat or
poultry at 170°C for 30 minutes before wrapping in foil
and placing on a rack over a tin (to allow good air
circulation) before turning the control to the slow
setting and cooking immediately.
5. Always ensure that joints of pork and poultry are
thoroughly cooked by checking with a meat
thermometer before serving.
6. Always thaw frozen foods completely before
cooking. We do not recommend placing frozen food in
the oven to cook.
7. Always bring soups, liquids and casseroles to the
boil before placing in the oven.
8. Ensure that casserole dishes have a good seal
(not airtight) and cover to the top with foil to prevent
loss of moisture.
9. Ensure that fruit and vegetables are cut into even
sized small pieces to cook properly.
10. Always adjust seasoning before serving.
11. If using dried red kidney beans it is important that
the beans are soaked and then boiled fora minimum of
10 minutes before using in any dish to destroy any
toxins.
12. When cooking fish or egg dishes it may be
necessary to check during cooking to avoid
overcooking.
13
EN
Something Wrong
with your Cooker
Before contacting your nearest Service Centre/Installer, check the problem guide below; there may be
nothing wrong with your cooker.
Problem
Slight odour or small amount of
smoke when using the cooker
for the first time.
This is normal and should cease after a short period.
Nothing Works Is the main cooker wall switch turned on?
There may be no electricity supply.
Oven temperature seems too
high or too low.
Check that the temperature has been set in accordance with the temperature
charts. It may be necessary to increase or decrease the recommended
temperature by up to 10°C to suit your taste.
Oven does not cook evenly. Check that the temperature and shelf position are as recommended in the
temperature charts.
Check that the containers being used in the oven allow sufficient air flow
around them.
Check that the cooker is level.
Hotplates are slow to boil or
will not simmer
Check that your pans conform to the recommendations in these instructions.
Marks appearing on hotplates.
Can not clean hob / hotplates.
The hob surround can be cleaned with warm soapy water and a cream
cleaner, such as Cif. The sealed hotplates should be cleaned regularly,
(please refer to the Care and Cleaning section for further information. Please
note that replacement hob cleaning kits are available from our parts
department, see Key Contacts, back page.
Grill not working. The grill door MUST be open.
Grill keeps turning on and off. When the grill control is operated at a setting less than maximum, this is
normal regulator operation, not a fault.
Condensation on the wall at
the rear of the cooker.
Steam and/or condensation may appear from the vent at the rear of the
appliance when using an oven particularly for foods with a high water content
e.g. frozen chips, roast chicken etc. This is normal and any excess should be
wiped off.
Steam / Condensation in the
oven after use.
Steam is a by-product of cooking any food with a high water content. To help
minimise always:
a) Try to avoid leaving food in the oven to cool after being cooked.
b) Use a covered container, wherever possible
Cooking Results
Not Satisfactory?
14
EN
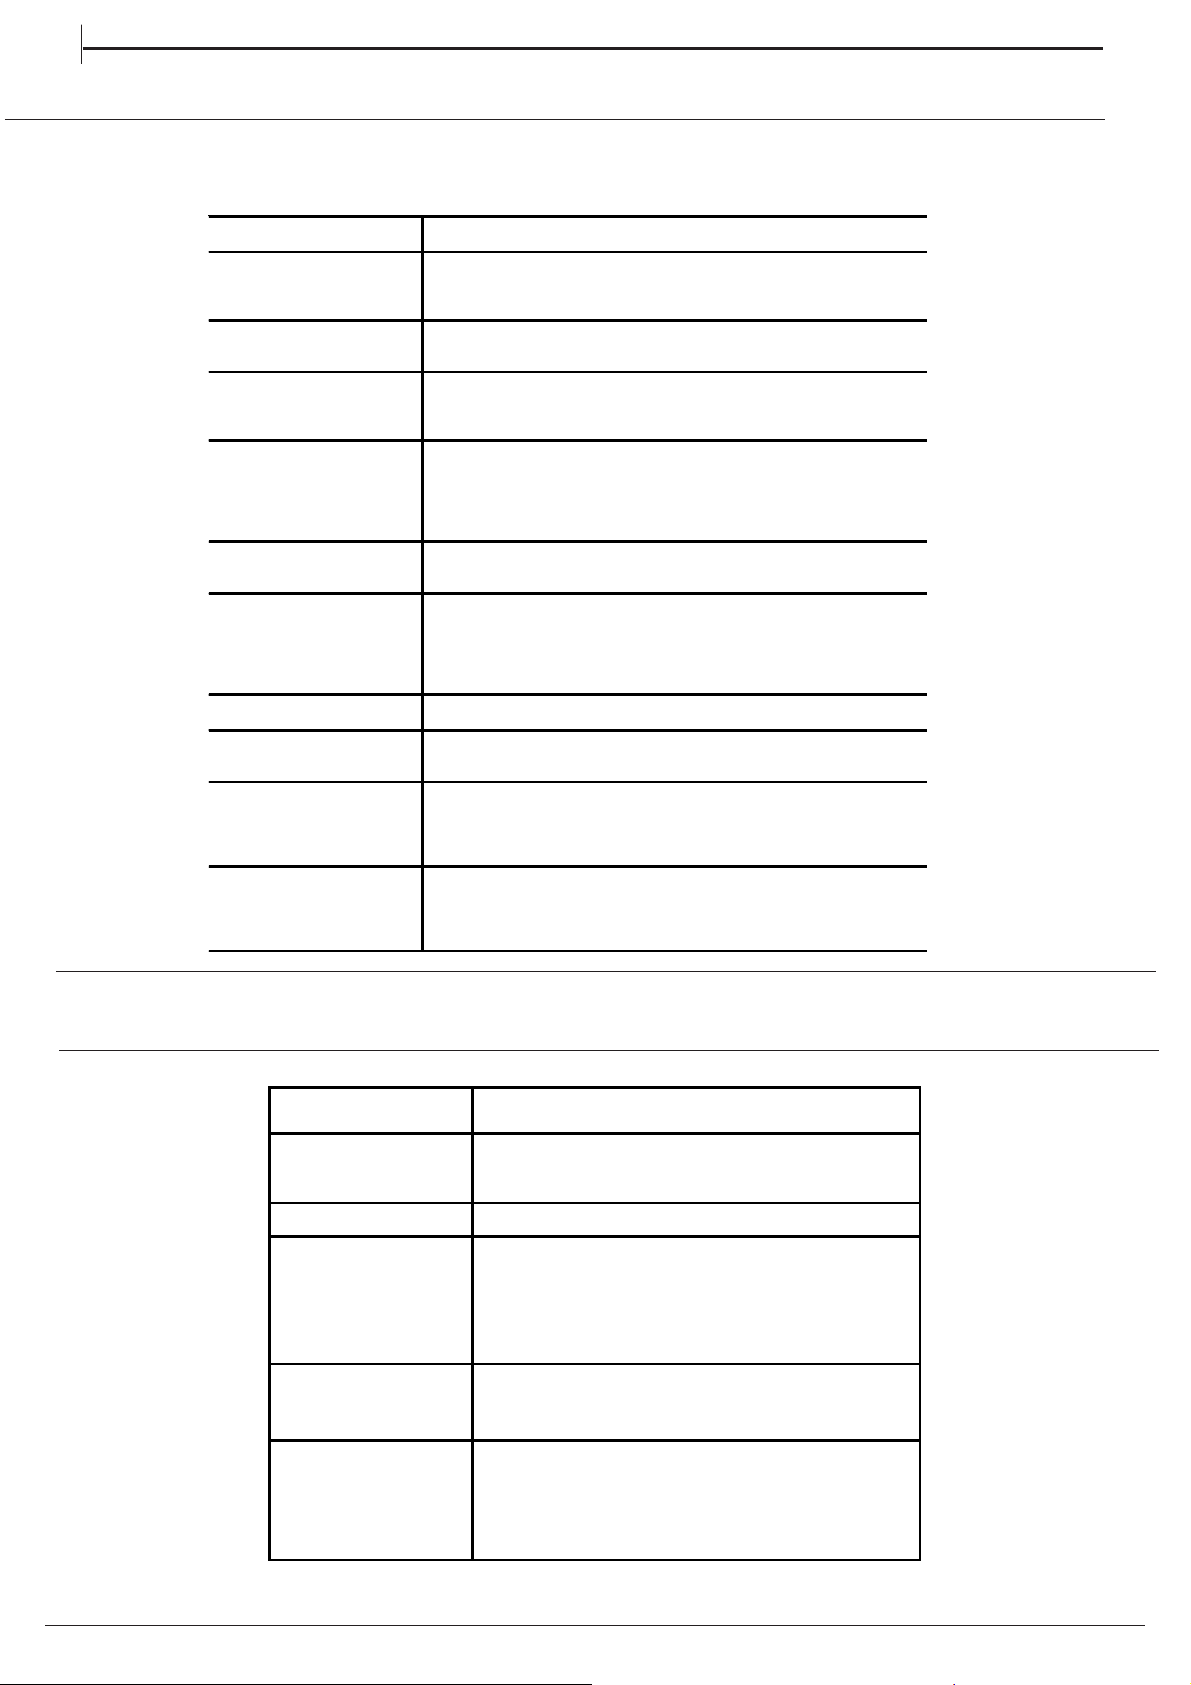
Problem Check
Grilling
Uneven cooking front
to back
Ensure that the grill pan is positioned centrally below
the grill element.
Fat splattering Ensure that the grill is not set to too high
temperature.
Oven Baking
Uneven rising of cake
Ensure that the oven shelves are level by using a
spirit level on the rod shelf and adjusting, using
suitable packing e.g. wood, under the feet of the
appliance. This should be checked both left to right
and front to back. Ensure that the food is positioned
centrally in the oven.
Sinking of cakes The following may cause cakes to sink:
1. Cooking at too high a temperature.
2. Using normal creaming method with soft margarine.
Over/Under cooking
Fast/Slow cooking
Refer to the cooking times and temperatures given in
the oven temperature charts, however, it may be
necessary to increase or decrease temperatures by
10°C to suit personal taste.
Do not use utensils greater than 2Ľ ins in height.

TURN OFF THE MAIN SWITCH AND ENSURE
THE COOKER IS COLD BEFORE CLEANING.
BEFORE SWITCHING ON AGAIN, ENSURE THAT
ALL CONTROLS ARE IN THE OFF POSITION.
ENEN
Do not use steam cleaning
equipment.
Use protective gloves during all
operations.
Carry out the required
operations when the oven is cold.
Disconnect the appliance from
the power supply.
Do not use wire wool, abrasive
scourers or abrasive/corrosive
cleaning agents, as these could
damage the surfaces of the
appliance.
EXTERIOR SURFACES
• Clean the surfaces with a damp microfibre cloth.
If they are very dirty, add a few drops of pH-neutral
detergent. Dry them with a dry cloth.
• Do not use corrosive or abrasive detergents. If any of
these products inadvertently comes into contact with
the surfaces of the appliance, clean immediately with
a damp microfibre cloth.
INTERIOR SURFACES
• After every use, leave the oven to cool and then
clean it, preferably while it is still warm, to remove any
deposits or stains caused by food residues To dry any
condensation that has formed as a result of cooking
foods with a high water content, let the oven to cool
completely and then wipe it with a cloth or sponge.
• Clean the glass in the door with a suitable liquid
detergent.
CATALYTIC PANELS
(SOME MODELS ONLY)
Special catalytic panels facilitate the cleaning of the
cooking compartment thanks to their special self-
cleaning coating, which is highly porous and able to
absorb grease and grime.
Please note: Using corrosive or abrasive cleaning agents,
sti brushes, pan scourers or oven sprays could damage the
catalytic surface and compromise its self-cleaning properties.
Please contact our After-sales Service if you require
replacement panels.
ACCESSORIES
Soak the accessories in a washing-up liquid solution
after use, handling them with oven gloves if they
are still hot. Food residues can be removed using a
washing-up brush or a sponge.
REPLACING THE LIGHT
1.
Disconnect the oven from the power supply.
2. Unscrew the cover from the light, replace the bulb
and screw the cover back on the light.
3. Reconnect the oven to the power supply.
Note: Use 25 W/230 V type E14
The bulb used in the product is specically designed for
domestic appliances and is not suitable for general room
lighting within the home (EC Regulation 244/2009).
Light bulbs are available from our After-sales Service.
- Do not handle bulbs with your bare hands as your
ngerprints could damage them. Do not use the oven until
the light cover has been retted.
Check the door seals around the oven periodically. If
the seals are damaged, please contact your nearest
Authorised After-sales Service Centre. We recommend
that the oven is not used until the seals have been
replaced.
INSPECTING THE OVEN SEALS
CERAMIC HOB
To reduce the amount of cleaning always ensure that
the hob and cooking utensils are clean and dry
before use. Regular use of cleaner conditioner is
recommended for proper care and protection of the
hob surface. Apply conditioner before using the hob
for the first time. It contains a mild cleaning agent,
so that subsequent applications may clean off soil
and apply a protective film at the same time. For
stubborn stains or heavy soiling use the materials,
which are specially prepared for this activity.
MAINTENANCE AND
CLEANING
EN
15
This product contains a light source of
energy eciency class E.
Assistance
Please have the following information handy:
• The appliance model (Mod.).
• The serial number (S/N).
This information can be found on the data plate located
on the appliance and/or on the packaging.
• Cook your food in closed pots or pans with well-fitting
lids and use as little water as possible. Cooking with
the lid off will greatly increase energy consumption
• Use purely flat pots and pans
• If you are cooking something that takes a long time,
it's worth using a pressure cooker, which is twice as
fast and saves a third of the energy.
Respecting and conserving the environment
• Whenever possible, avoid pre-heating the oven
and always try to fill it. Open the oven door as little
as possible because heat is lost every time it is
opened. To save a substantial amount of energy,
simply switch off the oven 5 to 10 minutes before the
end of your planned cooking time and use the heat
the oven continues to generate.
• Keep gaskets clean and tidy to prevent any door
energy losses
• If you have a timed tariff electricity contract, the “delay
cooking” option will make it easier to save money by
moving operation to cheaper time periods.
• The base of your pot or pan should cover the hot plate.
If it is smaller, precious energy will be wasted and
pots that boil over leave encrusted remains that can
be difficult to remove.
AFTER-SALES SERVICE
To receive assistance, call the number given on the
warranty leaflet enclosed with the product or follow
the instructions on our website. Be prepared to
provide:
•
a brief description of the problem;
•
the exact model type of your product;
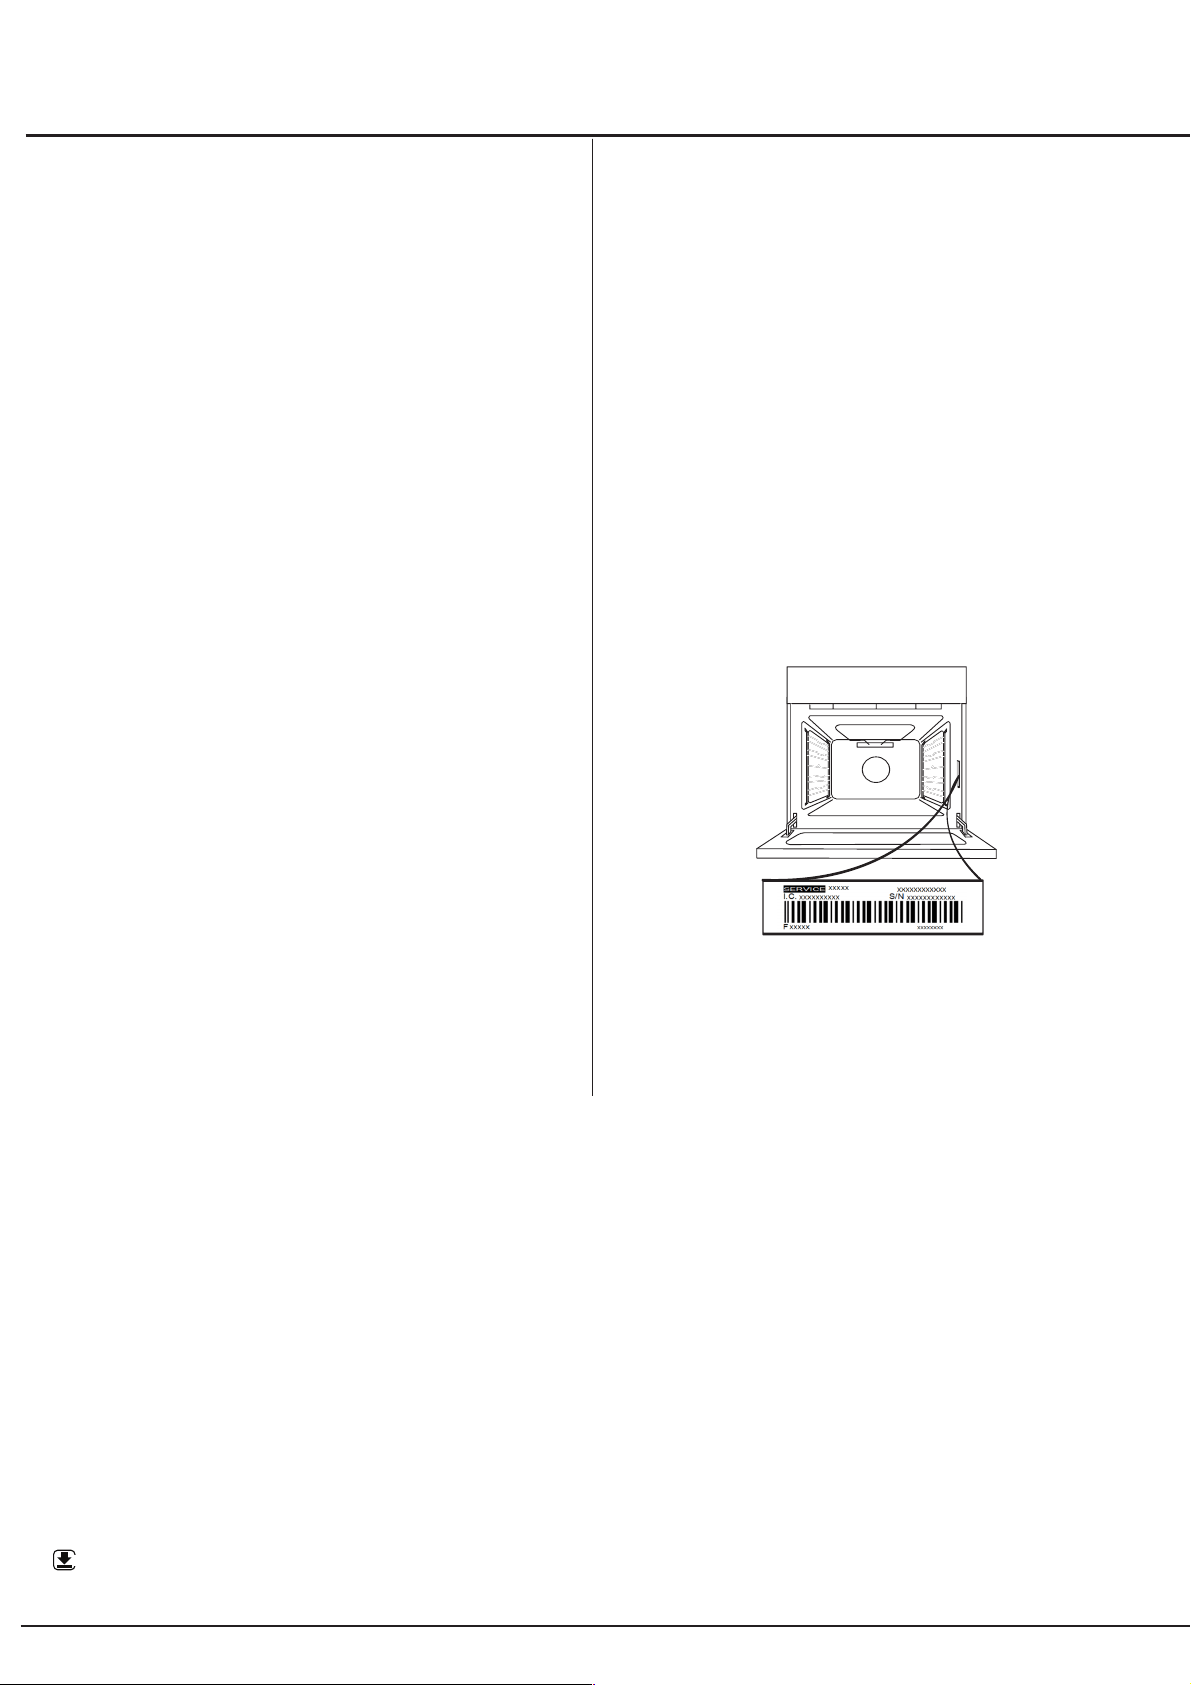
•
the assistance code (the number following the word
SERVICE on the identification plate attached to the
product, which can be seen on the inside edge when
the oven door is open);
•
your full address;
•
a contact telephone number.
Please note: If repairs are required, contact an
authorised service centre that is guaranteed to use
original spare parts and perform repairs correctly.
Please refer to the enclosed warranty leaflet for more
information on the warranty.
WWW
A complete product specification, including the energy efficiency ratings for this oven, can be read and
downloaded from our website
www.hotpoint.co.uk
16
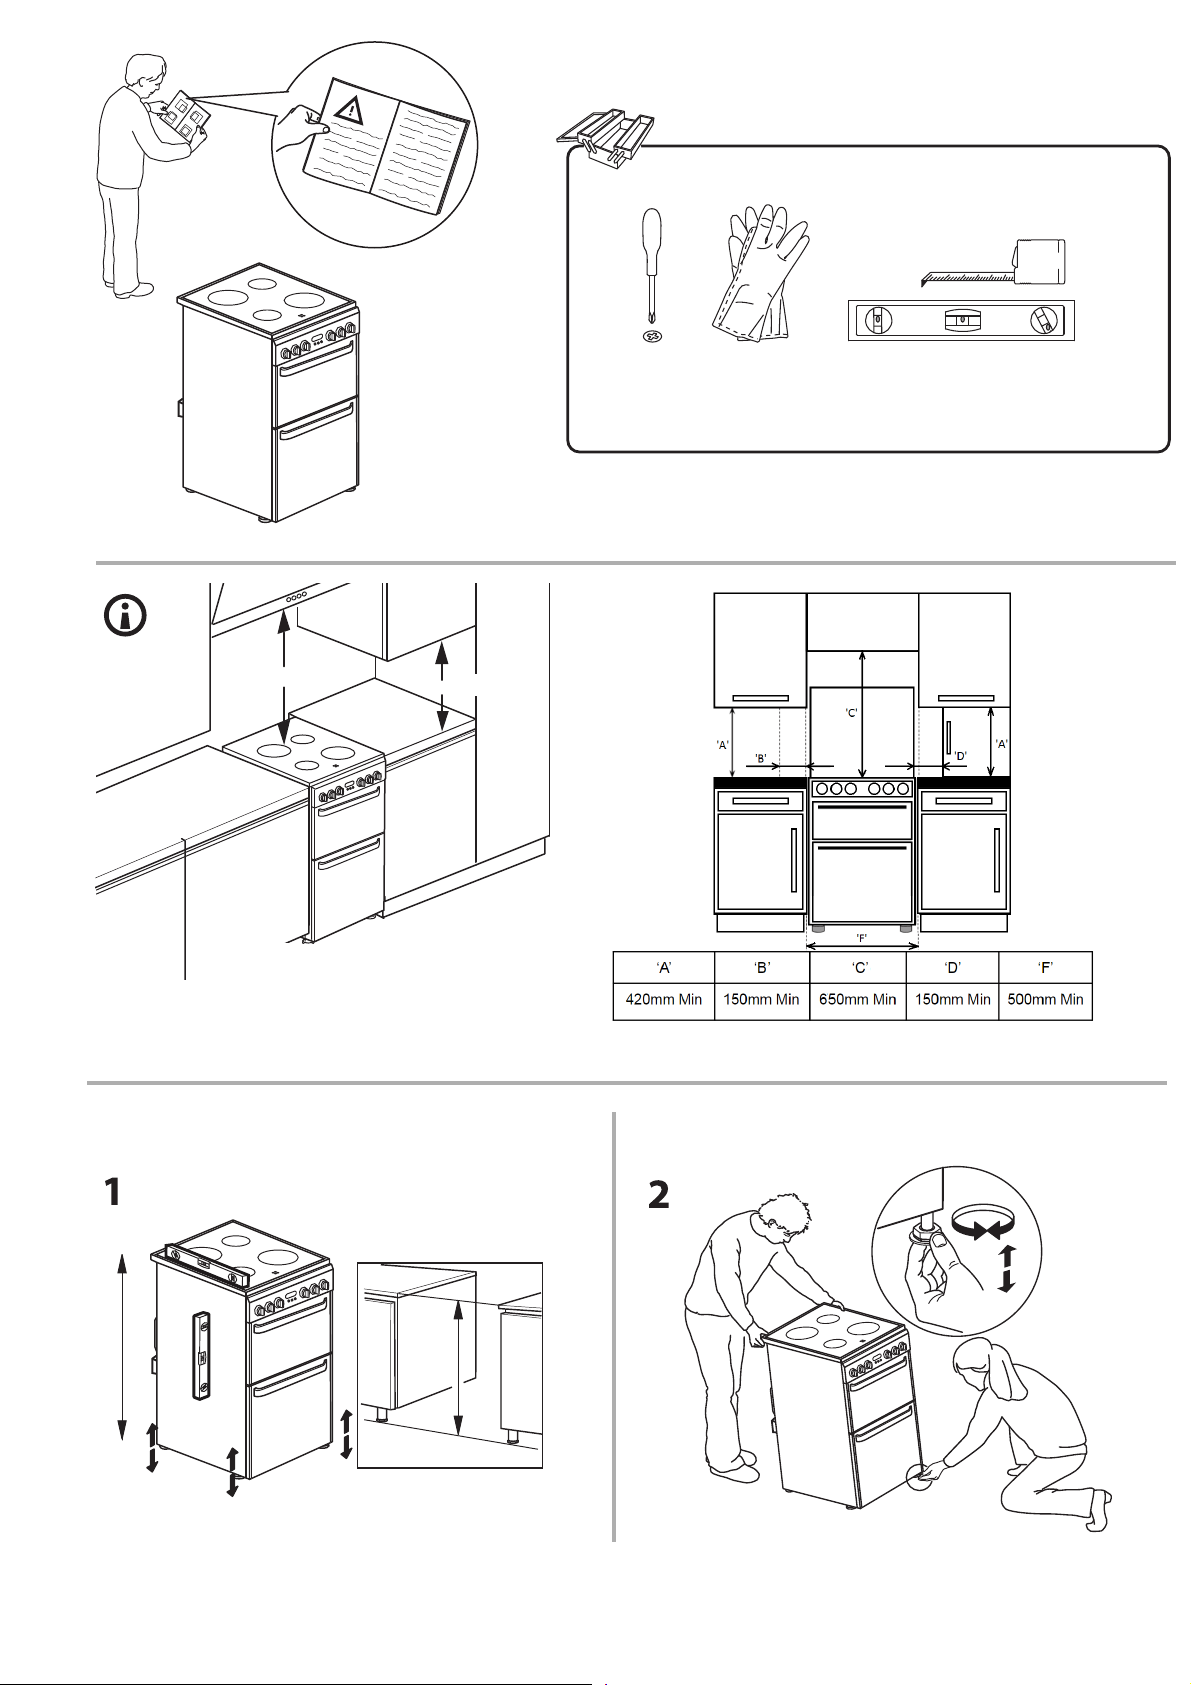
max. 15 mm
Min. 650 mm
Min. 420 mm
17

18
EN
After installing the power cable, screw the metal cover with three screws.

19

XEROX FABRIANO
www.indesit.com
04/2022 - W11293666
20