
1
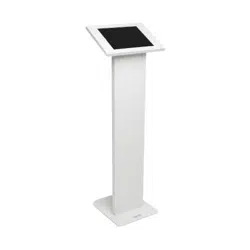
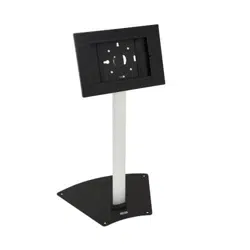
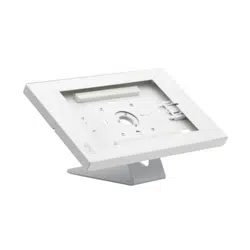
Tablet Mount
for 9.7 to 11"
tablets
Model: DMTB911
1111 W. 35th Street, Chicago, IL 60609 USA • tripplite.com/support
Copyright © 2022 Tripp Lite. All rights reserved.
Installation Instructions
WARRANTY REGISTRATION
Register your product today and be
automatically entered to win an ISOBAR
®
surge protector in our monthly drawing!
tripplite.com/warranty
Español 9 • Français 17 • Русский 25 • Deutsch 33

2
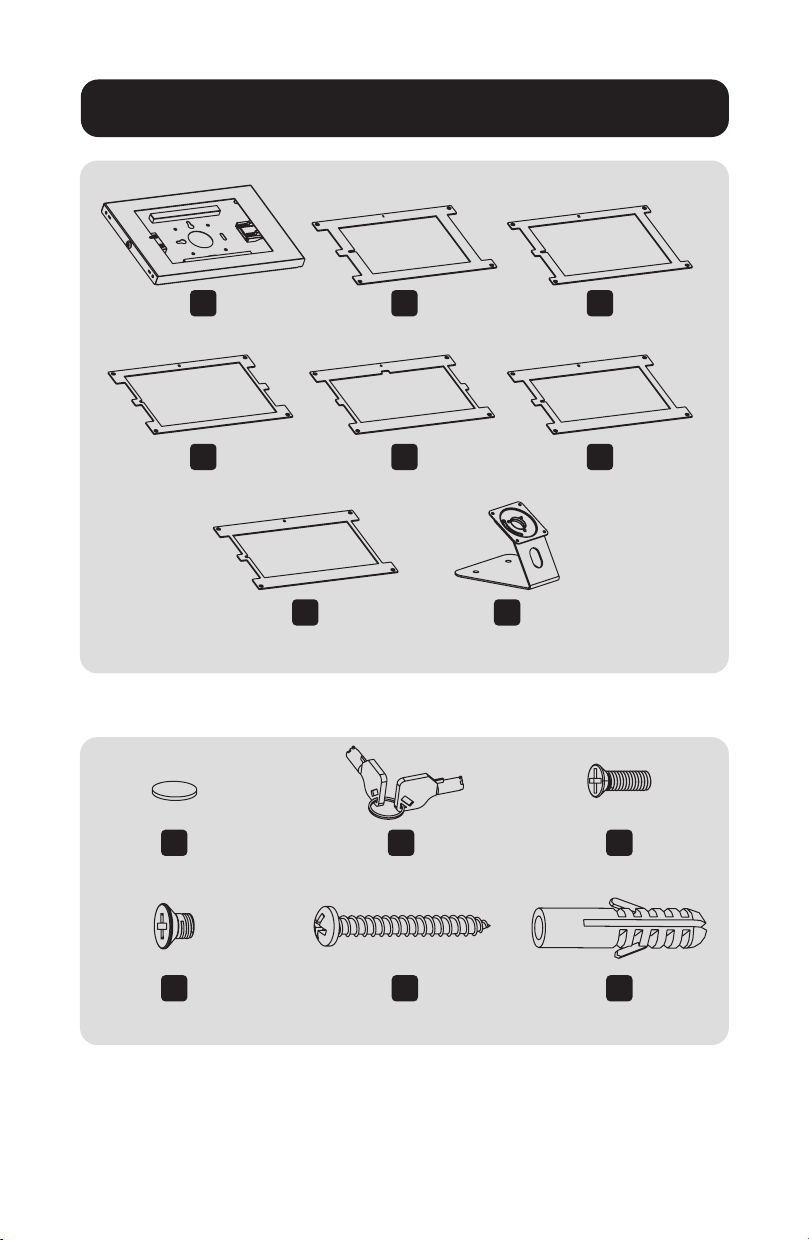
Package P
Component Checklist
A
x1
D
x1
I
x4
L
x4
J
x1
M
x2
K
x4
N
x2
B
x1
E
x1
G
x1
H
x1
C
x1
F
x1

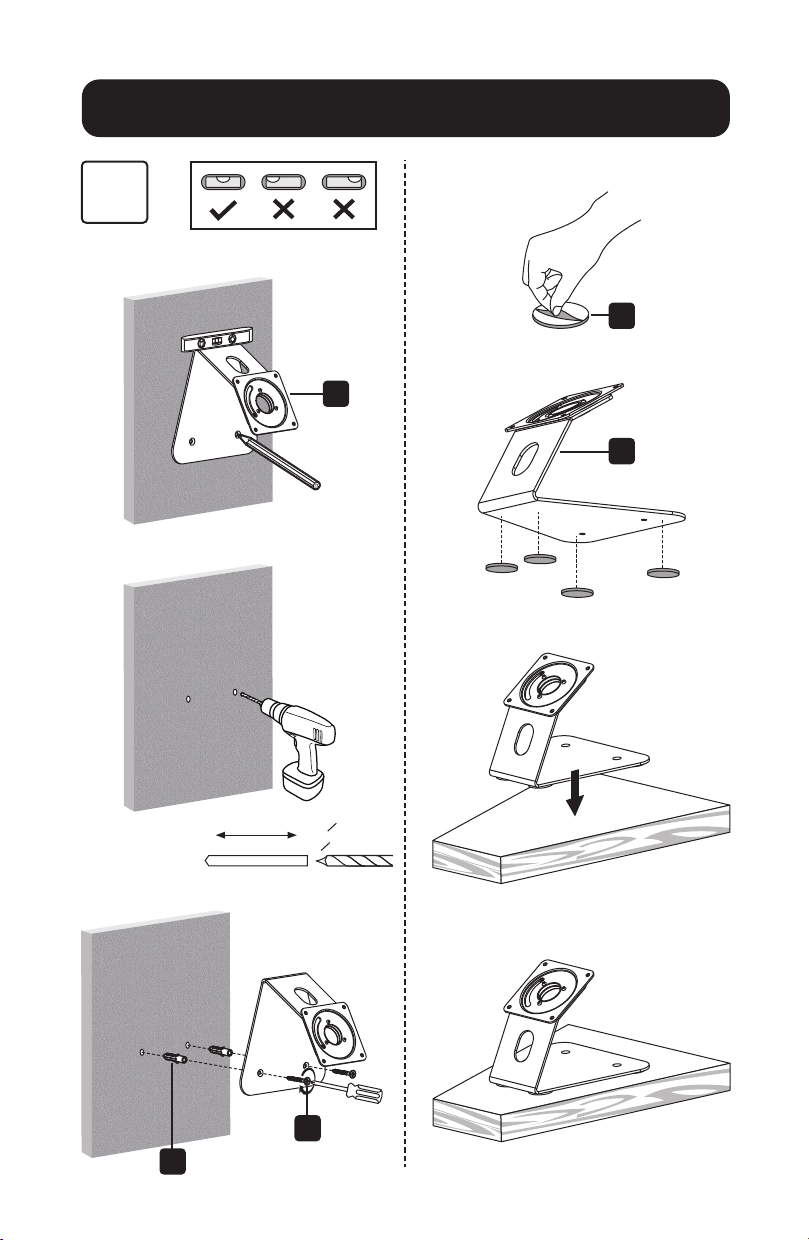
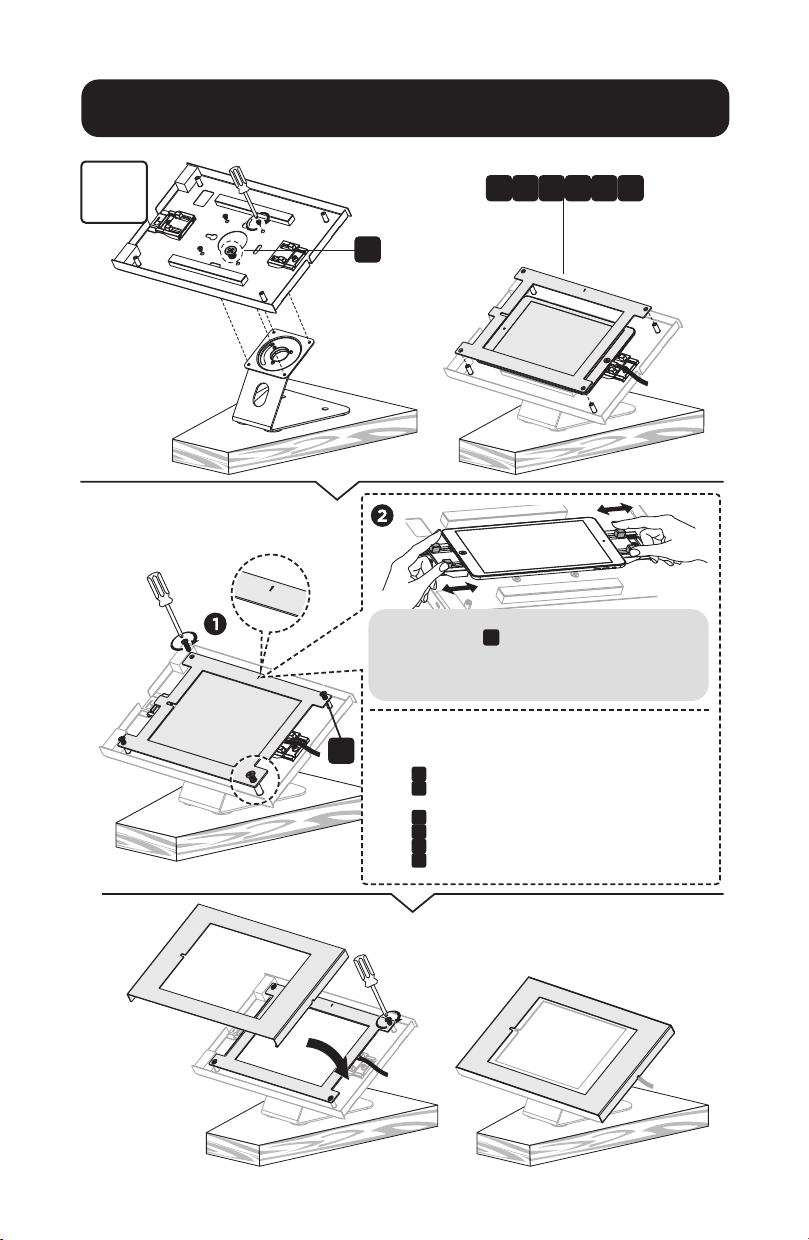
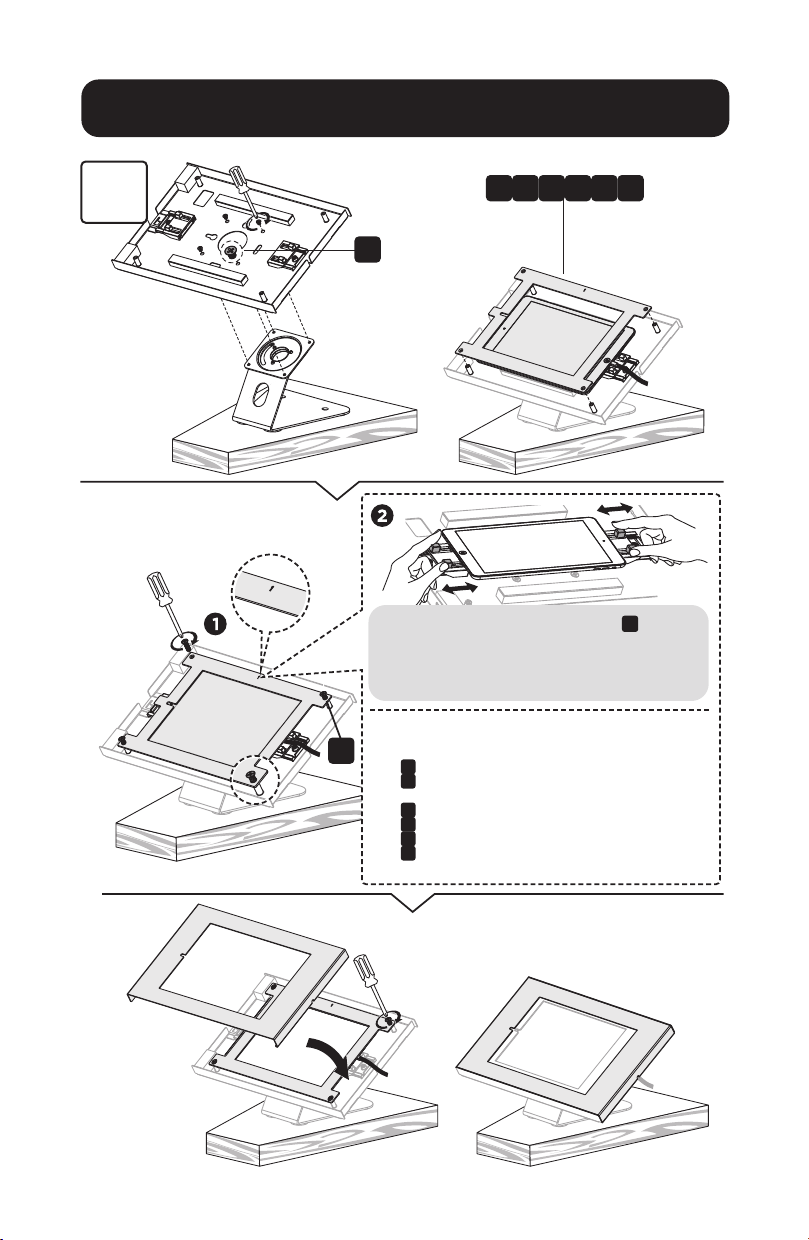
3
Installation
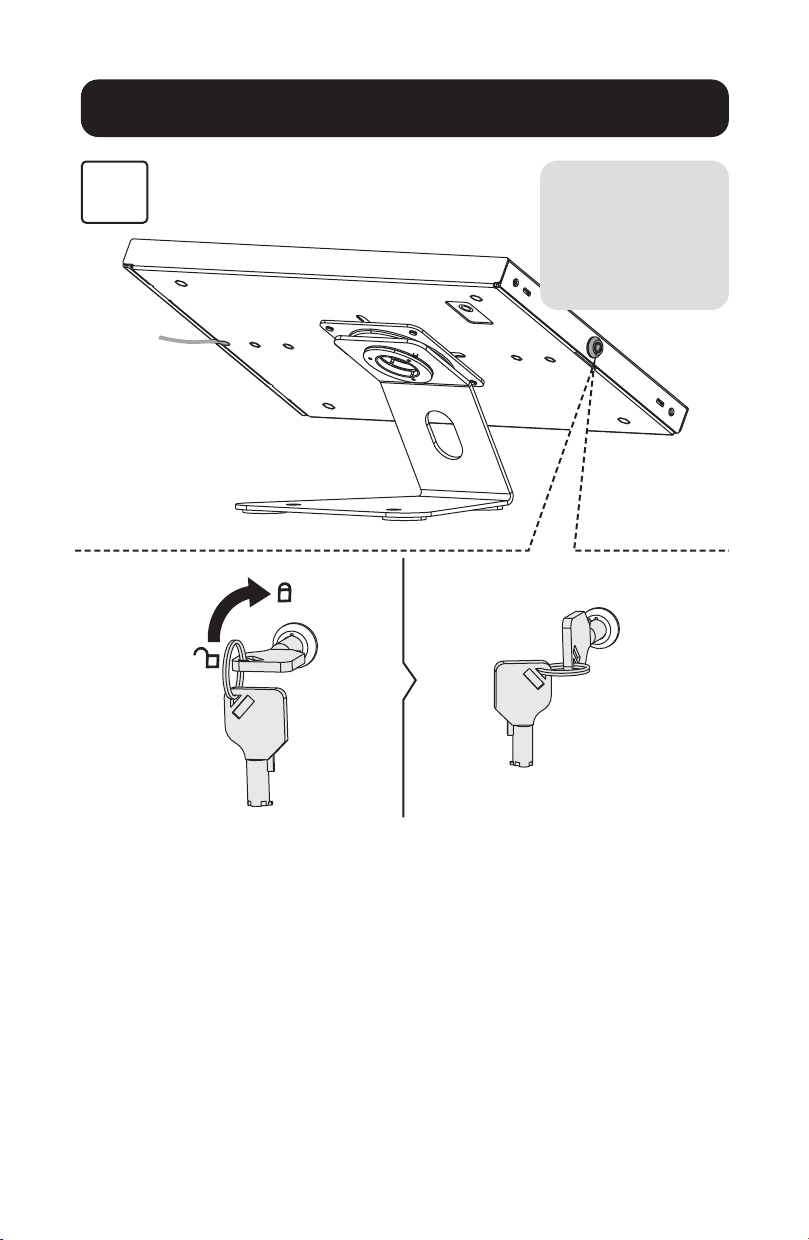
1
A
J
Note: Remove
pearl cotton
foam before
installation.

4
Installation
2
H
H
N
M
I
45mm
(1.8")
o 8mm
(o 5/16")

5
Installation
3
L
K
Attach the panel to the enclosure using four screws
K
. Before completely tightening the screws, adjust
the two claws to hold the tablet and to ensure the
screen is aligned and visible through the front panel.
Choose the corresponding panel according to the tablet.
Panel
B
: For 9.7" iPad 5/6, iPad Air 1/2 & iPad Pro (Gen 1)
Panel
C
: For 10.2" iPad 7 /8/9 & 10.5" iPad Air 3, iPad Pro (Gen 2)
Panel
D
: For 11" iPad Pro (Gen 3/4/5) & 10.9" iPad Air 4
Panel
E
: For 10.4" Samsung Galaxy Tab A7
Panel
F
: For 10.1" Samsung Galaxy Tab A
Panel
G
: For 10.4" Samsung Galaxy Tab S6
B D FC E G

6
Installation
3
L
K
Attach the panel to the enclosure using four screws
K
. Before completely tightening the screws, adjust
the two claws to hold the tablet and to ensure the
screen is aligned and visible through the front panel.
Choose the corresponding panel according to the tablet.
Panel
B
: For 9.7" iPad 5/6, iPad Air 1/2 & iPad Pro (Gen 1)
Panel
C
: For 10.2" iPad 7 /8/9 & 10.5" iPad Air 3, iPad Pro (Gen 2)
Panel
D
: For 11" iPad Pro (Gen 3/4/5) & 10.9" iPad Air 4
Panel
E
: For 10.4" Samsung Galaxy Tab A7
Panel
F
: For 10.1" Samsung Galaxy Tab A
Panel
G
: For 10.4" Samsung Galaxy Tab S6
B D FC E G

7
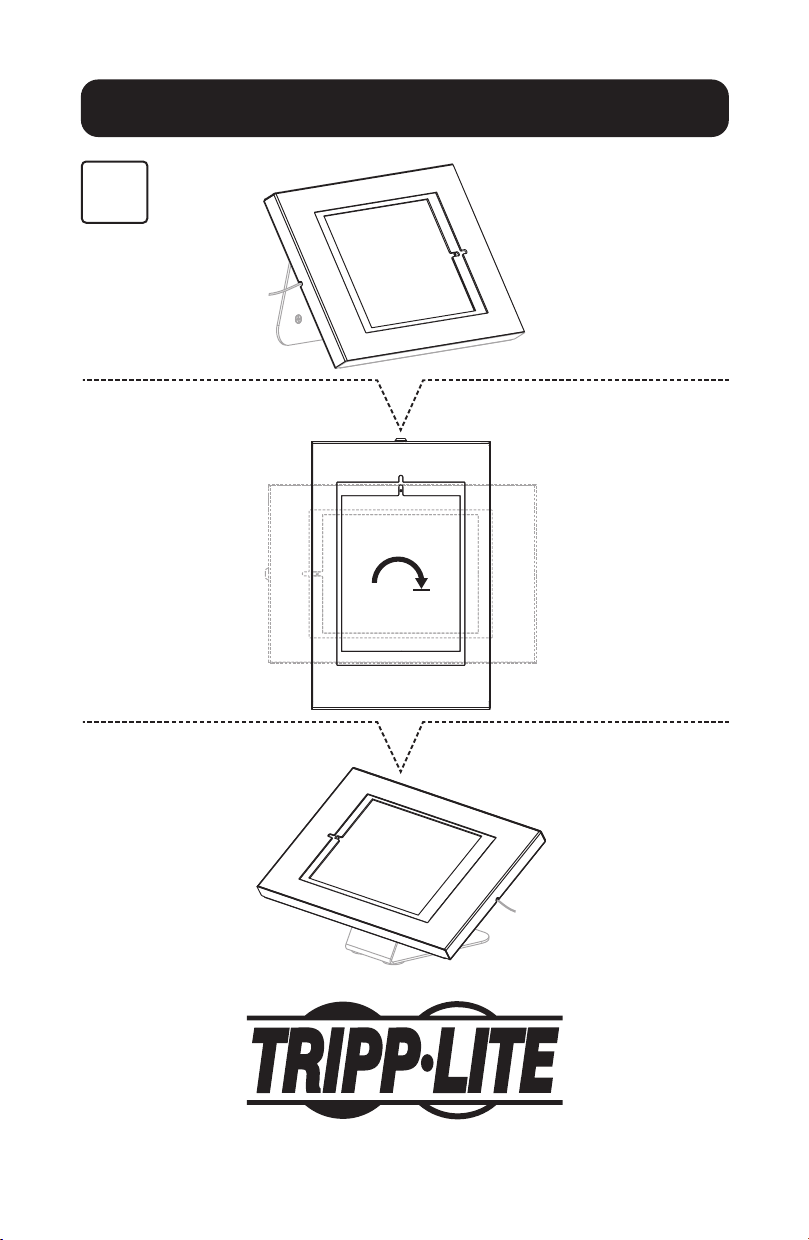
Installation
4
Before locking the
enclosure, conrm
the camera is
visible through the
slot, as shown.

8
1111 W. 35th Street, Chicago, IL 60609 USA • tripplite.com/support
22-04-264 9341DE_RevA
Installation
5
9
Soporte para
Tabletas de
9.7" a 11"
Modelo: DMTB911
1111 W. 35th Street, Chicago, IL 60609 EE UU • tripplite.com/support
Copyright © 2022 Tripp Lite. Todos los derechos reservados.
Instrucciones de Instalación
English 1 • Français 17 • Русский 25 • Deutsch 33

10
Paquete P
Lista de Comprobación de Componentes
A
x1
D
x1
I
x4
L
x4
J
x1
M
x2
K
x4
N
x2
B
x1
E
x1
G
x1
H
x1
C
x1
F
x1

11
Instalación
1
A
J
Nota: Retire la
espuma de algodón
perlado antes de la
instalación.

12
Instalación
2
H
H
N
M
I
45 mm
(1.8")
o 8 mm
[o 5/16"]

13
Instalación
3
L
K
Fije el panel al gabinete usando cuatro tornillos
K
. Antes de apretar completamente los tornillos, ajuste
las dos uñas para sujetar la tableta y para asegurar que la
pantalla esté alineada y visible a través del panel frontal.
Elija el panel correspondiente de acuerdo con la tableta.
Panel
B
: Para iPad 5/6, iPad Air 1/2 y iPad Pro (Gen 1) de 9.7"
Panel
C
: Para iPad 7/8/9 de 10.2" y iPad Air 3, iPad Pro (Gen 2)
de 10.5"
Panel
D
: Para iPad Pro (Gen 3/4/5) de 11" y iPad Air 4 de 10.9"
Panel
E
: Para Samsung Galaxy Tab A7 de 10.4"
Panel
F
: Para Samsung Galaxy Tab A de 10.1"
Panel
G
: Para Samsung Galaxy Tab S6 de 10.4"
B D FC E G

14
Instalación
3
L
K
Fije el panel al gabinete usando cuatro tornillos
K
.
Antes de apretar completamente los tornillos, ajuste las
dos uñas para sujetar la tableta y para asegurar que la
pantalla esté alineada y visible a través del panel frontal.
Elija el panel correspondiente de acuerdo con la tableta.
Panel
B
: Para iPad 5/6, iPad Air 1/2 y iPad Pro (Gen 1) de 9.7"
Panel
C
: Para iPad 7/8/9 de 10.2" y iPad Air 3, iPad Pro (Gen 2)
de 10.5"
Panel
D
: Para iPad Pro (Gen 3/4/5) de 11" y iPad Air 4 de 10.9"
Panel
E
: Para Samsung Galaxy Tab A7 de 10.4"
Panel
F
: Para Samsung Galaxy Tab A de 10.1"
Panel
G
: Para Samsung Galaxy Tab S6 de 10.4"
B D FC E G
15
Instalación
4
Antes de cerrar el
gabinete, conrme que
la cámara esté visible
a través de la ranura,
como se muestra.

16
1111 W. 35th Street, Chicago, IL 60609, EE UU • tripplite.com/support
22-04-264 9341DE_RevA
Instalación
5

17
Montage pour
tablettes
de 24,64 à
27,94 cm
(9,7 à 11 po)
Modèle : DMTB911
1111 W. 35th Street, Chicago, IL 60609 USA • tripplite.com/support
Droits d'auteur © 2022 Tripp Lite. Tous droits réservés.
Instructions d'installation
English 1 • Español 9 • Русский 25 • Deutsch 33
18
Emballage P
Liste de vérication des composants
A
x 1
D
x 1
I
x 4
L
x 4
J
x 1
M
x 2
K
x 4
N
x 2
B
x 1
E
x 1
G
x 1
H
x 1
C
x 1
F
x 1

19
Installation
1
A
J
Remarque : Retirer
la mousse de
coton perlé avant
l'installation.
20
Installation
2
H
H
N
M
I
45 mm
(1,8 po)
o 8 mm
(o 5/16 po)

21
Installation
3
L
K
Fixer le panneau au boîtier en utilisant quatre vis
K
.
Avant de serrer complètement les vis, ajuster les deux
pinces pour maintenir la tablette et s'assurer que l'écran
est aligné et visible à travers le panneau avant.
Choisir le panneau correspondant en fonction de la tablette.
Panneau
B
: pour iPad 5/6 de 9,7 po, iPad Air 1/2 et iPad Pro
(Gen 1)
Panneau
C
: pour iPad 7/8/9 de 10,2 po et iPad Air 3 de 10,2 po,
iPad Pro (Gen 2)
Panneau
D
: pour iPad Pro de 11 po (Gen 3/4/5) et iPad Air 4 de
10,9 pouces
Panneau
E
: pour Samsung Galaxy Tab A7 de 10,4 po
Panneau
F
: pour Samsung Galaxy Tab A de 10,1 po
Panneau
G
: pour Samsung Galaxy Tab S6 de 10,4 po
B D FC E G
22
Installation
3
L
K
Fixer le panneau au boîtier en utilisant quatre vis
K
.
Avant de serrer complètement les vis, ajuster les deux
pinces pour maintenir la tablette et s'assurer que l'écran
est aligné et visible à travers le panneau avant.
Choisir le panneau correspondant en fonction de la tablette.
Panneau
B
: pour iPad 5/6 de 9,7 po, iPad Air 1/2 et iPad Pro
(Gen 1)
Panneau
C
: pour iPad 7/8/9 de 10,2 po et iPad Air 3 de 10,2 po,
iPad Pro (Gen 2)
Panneau
D
: pour iPad Pro de 11 po (Gen 3/4/5) et iPad Air 4 de
10,9 pouces
Panneau
E
: pour Samsung Galaxy Tab A7 de 10,4 po
Panneau
F
: pour Samsung Galaxy Tab A de 10,1 po
Panneau
G
: pour Samsung Galaxy Tab S6 de 10,4 po
B D FC E G

23
Installation
4
Avant de verrouiller
le boîtier, vérier
que la caméra est
visible via la fente,
comme illustré.

24
1111 W. 35th Street, Chicago, IL 60609 USA • tripplite.com/support
22-04-264 9341DE_RevA
Installation
5
25
Кронштейн
для крепления
планшетов
размером
9,7-11"
Модель: DMTB911
1111 W. 35th Street, Chicago, IL 60609 USA • tripplite.com/support
Copyright © 2022 Tripp Lite. Перепечатка запрещается.
Руководство по
монтажу
English 1 • Español 9 • Français 17 • Deutsch 33

26
Упаковочный комплект P
Перечень комплектации
A
1 шт.
D
1 шт.
I
4 шт.
L
4 шт.
J
1 шт.
M
2 шт.
K
4 шт.
N
2 шт.
B
1 шт.
E
1 шт.
G
1 шт.
H
1 шт.
C
1 шт.
F
1 шт.

27
Установка
1
A
J
Примечание.
Перед установкой
уберите поролон.

28
Установка
2-
H
H
N
M
I
45 мм
(1,8")
o 8 мм
(o 5/16")
29
Установка
3
L
K
Прикрепите панель к корпусу с помощью
четырех винтов
K
. Перед полным затягиванием
винтов отрегулируйте два зажима для крепления
планшета и обеспечения выравнивания экрана и
его видимости через переднюю панель.
Выберите соответствующую панель в зависимости от
планшета.
Панель
B
: для iPad 5/6 9,7", iPad Air 1/2 и iPad Pro (Gen 1)
Панель
C
: для iPad 7/8/9 10,2", iPad Air 3 10,5" и iPad Pro (Gen
2)
Панель
D
: для iPad Pro 11" (Gen 3/4/5) и iPad Air 4 10,9"
Панель
E
: для Samsung Galaxy Tab A7 10,4"
Панель
F
: для Samsung Galaxy Tab A 10,1"
Панель
G
: для Samsung Galaxy Tab S6 10,4"
B D FC E G
30
Установка
3
L
K
Прикрепите панель к корпусу с помощью
четырех винтов
K
. Перед полным затягиванием
винтов отрегулируйте два зажима для крепления
планшета и обеспечения выравнивания экрана и
его видимости через переднюю панель.
Выберите соответствующую панель в зависимости от
планшета.
Панель
B
: для iPad 5/6 9,7", iPad Air 1/2 и iPad Pro (Gen 1)
Панель
C
: для iPad 7/8/9 10,2", iPad Air 3 10,5" и iPad Pro
(Gen 2)
Панель
D
: для iPad Pro 11" (Gen 3/4/5) и iPad Air 4 10,9"
Панель
E
: для Samsung Galaxy Tab A7 10,4"
Панель
F
: для Samsung Galaxy Tab A 10,1"
Панель
G
: для Samsung Galaxy Tab S6 10,4"
B D FC E G

31
Установка
4
Перед блокировкой
корпуса убедитесь
в том, что камера
видна через
отверстие, как
показано на рисунке.
32
1111 W. 35th Street, Chicago, IL 60609 USA • tripplite.com/support
22-04-264 9341DE_RevA
Установка
5

33
Tablet-Halterung
für 9,7 bis 11 Zoll
Tablets
Modell: DMTB911
1111 W. 35th Street, Chicago, IL 60609 USA • tripplite.com/support
Copyright © 2022 Tripp Lite. Alle Rechte vorbehalten.
Installationsanleitung
English 1 • Español 9 • Français 17 • Русский 25

34
Paket P
Komponentenliste
A
x 1
D
x 1
I
x 4
L
x 4
J
x 1
M
x 2
K
x 4
N
x 2
B
x 1
E
x 1
G
x 1
H
x 1
C
x 1
F
x 1

35
Installation
1
A
J
Hinweis:
Entfernen Sie das
Baumwollperlgarn
vor der Installation.

36
Installation
2
H
H
N
M
I
45mm
(1.8")
o 8 mm
(o 5/16 Zoll)

37
Installation
3
L
K
Befestigen Sie das Panel mit vier Schrauben
K
am
Gehäuse. Bevor Sie die Schrauben vollständig anziehen,
passen Sie die beiden Klemmen an, um das Tablet zu
halten und sicherzustellen, dass der Bildschirm durch die
Frontblende ausgerichtet und sichtbar ist.
Wählen Sie das passende Panel für das Tablet.
Panel
B
: Für 9,7 Zoll iPad 5/6, iPad Air 1/2 und iPad Pro (Gen 1)
Panel
C
: Für 10,2 Zoll iPad 7/8/9 und 10,5 Zoll iPad Air 3,
iPad Pro (Gen 2)
Panel
D
:
Für 11 Zoll iPad Pro (Gen 3/4/5) und 10,9 Zoll iPad Air 4
Panel
E
: Für 10,4 Zoll Samsung Galaxy Tab A7
Panel
F
: Für 10,1 Zoll Samsung Galaxy Tab A
Panel
G
: Für 10,4 Zoll Samsung Galaxy Tab S6
B D FC E G
38
Installation
3
L
K
Befestigen Sie das Panel mit vier Schrauben
K
am
Gehäuse. Bevor Sie die Schrauben vollständig anziehen,
passen Sie die beiden Klemmen an, um das Tablet zu
halten und sicherzustellen, dass der Bildschirm durch die
Frontblende ausgerichtet und sichtbar ist.
Wählen Sie das passende Panel für das Tablet.
Panel
B
: Für 9,7 Zoll iPad 5/6, iPad Air 1/2 und iPad Pro (Gen 1)
Panel
C
: Für 10,2 Zoll iPad 7/8/9 und 10,5 Zoll iPad Air 3,
iPad Pro (Gen 2)
Panel
D
:
Für 11 Zoll iPad Pro (Gen 3/4/5) und 10,9 Zoll iPad Air 4
Panel
E
: Für 10,4 Zoll Samsung Galaxy Tab A7
Panel
F
: Für 10,1 Zoll Samsung Galaxy Tab A
Panel
G
: Für 10,4 Zoll Samsung Galaxy Tab S6
B D FC E G

39
Installation
4
Bevor Sie das
Gehäuse verriegeln,
stellen Sie sicher, dass
die Kamera durch den
Steckplatz sichtbar ist,
wie gezeigt.

40
1111 W. 35th Street, Chicago, IL 60609 USA • tripplite.com/support
22-04-264 9341DE_RevA
Installation
5