OWNER'S MANUAL
AUTO EMPTY
CHARGING STATION
Read this owner's manual thoroughly before operating the
appliance and keep it handy for reference at all times.
ENGLISH
VDS-ST1****
MFL71780907
Rev.00_060321
www.lg.com
Copyright © 2021 LG Electronics Inc. All Rights Reserved.

TABLE OF CONTENTS
2
3 IMPORTANT SAFETY
INSTRUCTIONS
3 READ ALL INSTRUCTIONS BEFORE USE
3 WARNING STATEMENTS
7 CAUTION STATEMENTS
8 INSTALLATION
8 Product Overview
10 Installing the Charging Station
11 Storing the Accessories
13 OPERATION
13 Charging the Battery
14 Getting Started
17 MAINTENANCE
17 Cleaning the Appliance
20 TROUBLESHOOTING
20 Before Calling for Service
22 LIMITED WARRANTY
22 USA

3IMPORTANT SAFETY INSTRUCTIONS
ENGLISH
IMPORTANT SAFETY INSTRUCTIONS
READ ALL INSTRUCTIONS BEFORE USE
Safety Messages
Your safety and the safety of others are very important.
We have provided many important safety messages in this manual and on your appliance. Always read and
follow all safety messages.
All safety messages will tell you what the potential hazard is, tell you how to reduce the chance of injury,
and tell you what may happen if the instructions are not followed.
WARNING STATEMENTS
WARNING
• To reduce the risk of explosion, fire, death, electric shock, injury or scalding to persons when using this
product, follow basic precautions, including the following:
Technical Safety
• This appliance is not intended for use by persons (including children) with reduced physical, sensory or
mental capabilities, or lack of experience and knowledge, unless they have been given supervision or
instruction concerning use of the appliance by a person responsible for their safety.
• Do not allow the appliance to be used as a toy. Close attention is necessary when used by or near
children.
• Do not allow children to play with or hang on the appliance.
• Do not use the appliance with a damaged power cord or plug. The cord must be replaced. If the
appliance is not working as it should, has been dropped, damaged, left outdoors, or dropped into water,
return it to an LG Electronics service center.
• Do not pull or carry by the cord, use the cord as a handle, close a door on the cord, or pull the cord
around sharp edges or corners. Do not run the appliance over the cord. Keep the cord away from heated
surfaces.
• Do not unplug by pulling on the cord. To unplug, grasp the plug, not the cord.
• Place the cords from other appliances out of the area to be cleaned.
• Have servicing performed by a qualified repair person using only identical replacement parts. This will
ensure that the safety of the product is maintained.
This is the safety alert symbol.
This symbol alerts you to potential hazards that can kill or injure you and others. All safety messages
will follow the safety alert symbol and either the word WARNING or CAUTION.
These words mean:
WARNING
You may be killed or seriously injured if you do not follow instructions.
CAUTION
You may be injured or cause damage to the product if you do not follow instructions.

4 IMPORTANT SAFETY INSTRUCTIONS
Battery
• Never use the battery and the charging station from other appliances with this appliance. Use only the
battery and the charging station provided by LG Electronics.
• Use appliances only with specifically designated battery packs. Use of any other battery packs may
create a risk of injury and fire.
• Recharge only with the charger specified by the manufacturer. A charger that is suitable for one type of
battery pack may create a risk of fire when used with another battery pack.
• Never use the battery and the charging station from this appliance with other appliances.
• Unplug the power cord from the outlet and remove the battery if the appliance will not be used for an
extended period of time.
• Do not use modified or damaged batteries.
• When disposing of the battery or the appliance, remove the battery from the appliance and safely
dispose of it.
• Do not use a battery pack or appliance that is damaged or modified. Damaged or modified batteries may
exhibit unpredictable behavior resulting in fire, explosion or risk of injury.
• Do not disassemble, remove or short-circuit the battery.
• Have the battery replaced when it is no longer able to hold a charge.
• Refer to the Charging the Battery section instructions for the method of replacing the battery.
• When disposing of this appliance, follow regulations for disposal of rechargeable lithium-ion batteries.
• Follow all local ordinances and regulations when handling or disposing of the battery.
• Disconnect the battery pack before cleaning or servicing.
• Prevent unintentional starting. Ensure the switch is in the off position before connecting to the battery
pack, picking up or carrying the appliance. Carrying the appliance with your finger on the switch or
energizing an appliance that has the switch on invites accidents.
• When the battery pack is not in use, keep it away from other metal objects, like paper clips, coins, keys,
nails, screws or other small metal objects, that can make a connection from one terminal to another.
Shorting the battery terminals together may cause burns or a fire.
• Under abusive conditions, liquid may be ejected from the battery. If this happens, avoid contact. If
contact accidentally occurs, flush with water. If liquid contacts eyes, additionally seek medical help.
Liquid ejected from the battery may cause irritation or burns.
• Do not modify or attempt to repair the appliance or the battery pack (as applicable) except as indicated
in the instructions for use and care.
Installation
• To avoid an electrical shock or fire, do not install, charge or store the appliance where it may be exposed
to water, rainfall or high humidity.
• Install, charge and store the appliance in a well-ventilated place.
• Avoid operating the appliance in areas where there is a risk of leakage of flammable gas, industrial oil or
metallic dust.
• Do not store or install the appliance, power cord or plug near heating devices or open flames.
• Install the charging station on a firm, level surface.
• Install the device so that it does not tip over.
• To prevent tipping, self-standing mode installations should be anchored to the wall using the provided
anchoring kit.
• Use the anchoring screws only when attaching to concrete or similar solid surfaces.
• Never drill into a wall without first checking that the area behind it is free from power conduits,
plumbing, vents, or cables.
• Do not use or store the appliance at temperatures below 41 °F (5°C) or above 100 °F (38°C).
5IMPORTANT SAFETY INSTRUCTIONS
ENGLISH
• Do not store or install the appliance where it is exposed to temperatures below freezing or exposed to
outdoor weather conditions.
• When installing or moving the appliance, be careful not to pinch, crush, or damage the power cord or
plug.
Operation
• This appliance is exclusively for use with the LG Electronics CordZero A9 Vacuum Cleaner. Do not use it
for other appliances or other purposes.
• Use only as described in this manual. Use only manufacturer’s recommended attachment.
• This appliance is designed for normal indoor domestic use only. It is not to be used for any non-
residential, commercial, or industrial application.
• Do not use or store the appliance in any outdoor location, garage environment or on wet surfaces.
• This product should only be used with a 120 V~ 60 Hz outlet. Make sure to check the power specifications
of the place where you intend to use the appliance.
• Do not handle the power cord, plug, or appliance controls with wet hands.
• Wipe any moisture or dirt off the cord or plug with a dry cloth.
• Unplug the power cord using the plug, not the cord. Pulling on the cord can damage it and result in
electric shock or fire.
• Never attempt to operate this appliance if it is damaged, malfunctioning, partially disassembled, or has
missing or broken parts, including a damaged cord or plug. Take it to an authorized LG Electronics
service center or dealer for assistance.
• Do not apply excessive force to the power cord to bend it, or place it under a heavy object as this will
damage it.
• Do not use multiple-outlet adapters with this appliance. Make sure to use a power socket with a capacity
of 10 A.
• Do not plug the appliance into a damaged or loose outlet.
• Make sure to unplug the power cord from the outlet when the appliance is not to be used for an
extended period of time.
• Do not damage, alter, excessively bend, twist, pull, pinch or heat the power cord.
• Before using the appliance, remove any wire or string on the floor.
• Avoid touching the prongs of the power plug with your finger(s) when unplugging the power cord.
• Do not cover the power cord with a rug or carpeting.
• Push the power plug firmly into the wall outlet so that it is not loose.
• If the product has been submerged, contact an LG Electronics service center or dealer for instructions
before resuming use.
• If the product makes a strange noise or emits an odor or smoke, discontinue use and contact an LG
Electronics customer information center.
• Only qualified technicians or service personnel from LG Electronics may disassemble, repair or modify
the appliance.
• Never insert a sharp metal object such as a pin, nail or knife in a hole or gap in the appliance or the
charging station.
• Make sure that no water, beverage or detergent gets inside the appliance or the charging station.
• Do not allow children to use the appliance.
• Do not let children or pets get close to the appliance when using, charging or storing.
• Keep clothing and hair, fingers, or other parts of the body away from openings and moving parts.
• Do not use in an enclosed space where vapors are present from paint thinner, mothproofing substances,
flammable dust or other explosive or toxic materials.
6 IMPORTANT SAFETY INSTRUCTIONS
• Make sure that the filter is installed before use.
• Do not touch the charging terminals on the appliance or the charging station, or insert an electrified
object inside the appliance or the station.
• Do not lean the appliance on walls, chairs or tables.
• If the earth leakage breaker is tripped when the product is put on the charging station, immediately
remove the appliance from the charging station. Contact an LG Electronics customer service center.
• Do not use or store a heating device or flammable substance (ether, benzene, alcohol, chemicals,
combustible sprays, insecticide, air freshener or cosmetics) in close proximity to the appliance.
• Do not attempt to clean up a liquid substance (water, beverage), odorous substances (candy, chocolate,
pet excrement), metal objects (blades, pins), flammable substances, surfactants, or glass shards with this
appliance.
• In the event of a gas leak (natural gas, propane gas, etc.) do not operate this or any other appliance.
Open a window or door to ventilate the area immediately.
• Do not hold the charging station upside down with the battery in the charging station.
• Do not expose the appliance, and the battery in particular, to heat, a heating device or direct sunlight.
• Do not keep the appliance or its battery inside a vehicle which is exposed to direct sunlight.
• Never allow any water, beverage or detergent to get inside the battery.
• Do not apply physical impacts to the battery.
• Do not use the appliance without the dust bag and filters in place.
• Do not suck up anything that is burning or smoking, such as cigarettes, matches, or hot ashes.
• Do not use to suck up flammable or combustible liquids, such as gasoline, or use in areas
Maintenance
• Make sure to unplug the power cord from the outlet when cleaning or maintaining the charging station.
• Do not spray or use water, inflammable materials such as gasoline or thinners, or surfactants such as
detergent or bath soap near the appliance.
Disposal
• Keep packing materials out of the reach of children. Packaging materials can pose a suffocation risk for
children.
• Destroy the carton, plastic bag, and other packing materials after the appliance is unpacked. Children
might use them for play. Cartons covered with rugs, bedspreads, or plastic sheets can become airtight
chambers.
• Dispose of this appliance according to local, state, and regional laws and regulations.
• Contact your local city council or the related government authority before disposing of this appliance.
• In case a rechargeable battery is included in this product, the entire device should be recycled in
compliance with rechargeable battery recycling standards because of the internal battery. To dispose of
properly, call (800) 822-8837 or visit www.call2recycle.org.

7IMPORTANT SAFETY INSTRUCTIONS
ENGLISH
SAVE THESE INSTRUCTIONS
CAUTION STATEMENTS
CAUTION
• To reduce the risk of injury to persons, malfunction, or damage to the product or property when using
the appliance, follow basic safety precautions, including the following:
Operation
• Do not open the door of the product using excessive force.
• Do not carry the product with the vacuum cleaner, nozzles, or accessories inside; it may cause injury or
product damage.
• When opening and closing the product door or control panel, be careful not to get your fingers caught.
• Remove all the protective plastic from the Vacuum Cleaner before use. Otherwise, it may cause
abnormal noise during the dust emptying operation.
• Keep the area around the charging station clean. A strong airstream can be emitted from the exhaust on
the back of the product, causing dust to accumulate on the floor.
• This appliance has a built-in safety device to prevent damage from overheating. If the appliance
becomes overheated after extended use, it may automatically turn off. If this occurs, leave the appliance
in a cool, well-ventilated area for about an hour before turning on the power again.
• Do not subject the product to shocks or drop it.
• Do not install wet or damp filters.
• Do not clean the product with a volatile or organic solvent (thinner or acetone).
• Always use a soft cloth to clean the appliance.
• Remain aware of your surroundings while using the appliance to avoid colliding with people or animals.
• Do not kick or apply force to the appliance.
• Do not put any object other than the appliance, especially a metallic or magnetic object, on the charging
station.
• Keep fingers away from pinch points when assembling the appliance or the charging station.
• Do not let a child or a pet hang onto the charging station.
• Follow all applicable state and local codes and regulations when installing the mounting station.
• Do not use the double-sided tape to anchor the charging station on wallpaper. Use the provided screws
to anchor the charging station. The weight of the charging station and the appliance could damage the
paper.
• Do not remove the battery during operation.
8 INSTALLATION
INSTALLATION
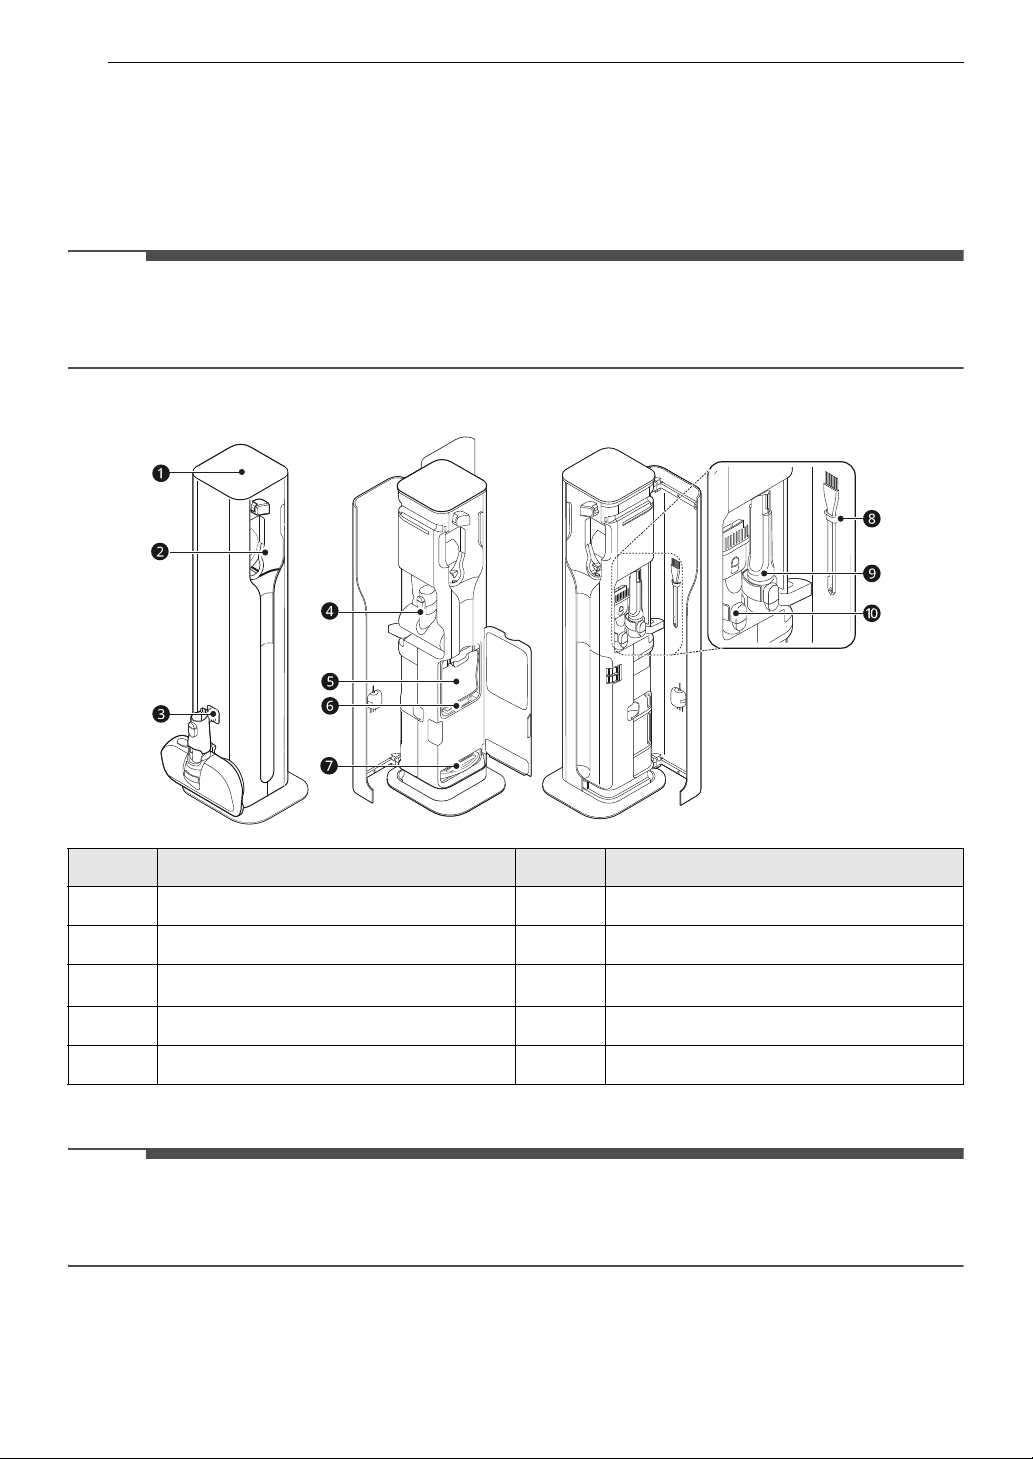
Product Overview
The images in this guide may be different from the actual components and accessories, which are subject
to change by the manufacturer without prior notice for product improvement purposes.
NOTE
• For your safety and for extended product life, use only authorized components. The manufacturer is not
responsible for product malfunction, property damage or bodily injury caused by the use of separately
purchased unauthorized components, parts, or non-LG products.
Front View
† There is also a nozzle hook on the right.
NOTE
• Use the charging station only with the provided vacuum cleaner. Using a vacuum cleaner other than the
one designed to be used with the charging station may result in improper sealing of the product and
failure to empty dust from the vacuum cleaner.
List Part Name List Part Name
a
Control Panel
f
Motor Protection Filter (Expendable)
b
Vacuum Cleaner Mounting Unit
g
Exhaust Filter (Expendable)
c
Nozzle Hook
†
h
Cleaning Brush
d
Bedding Nozzle or Pet Nozzle
i
Crevice Tool
e
Dust Bag (Expendable)
j
Combination Tool
9INSTALLATION
ENGLISH
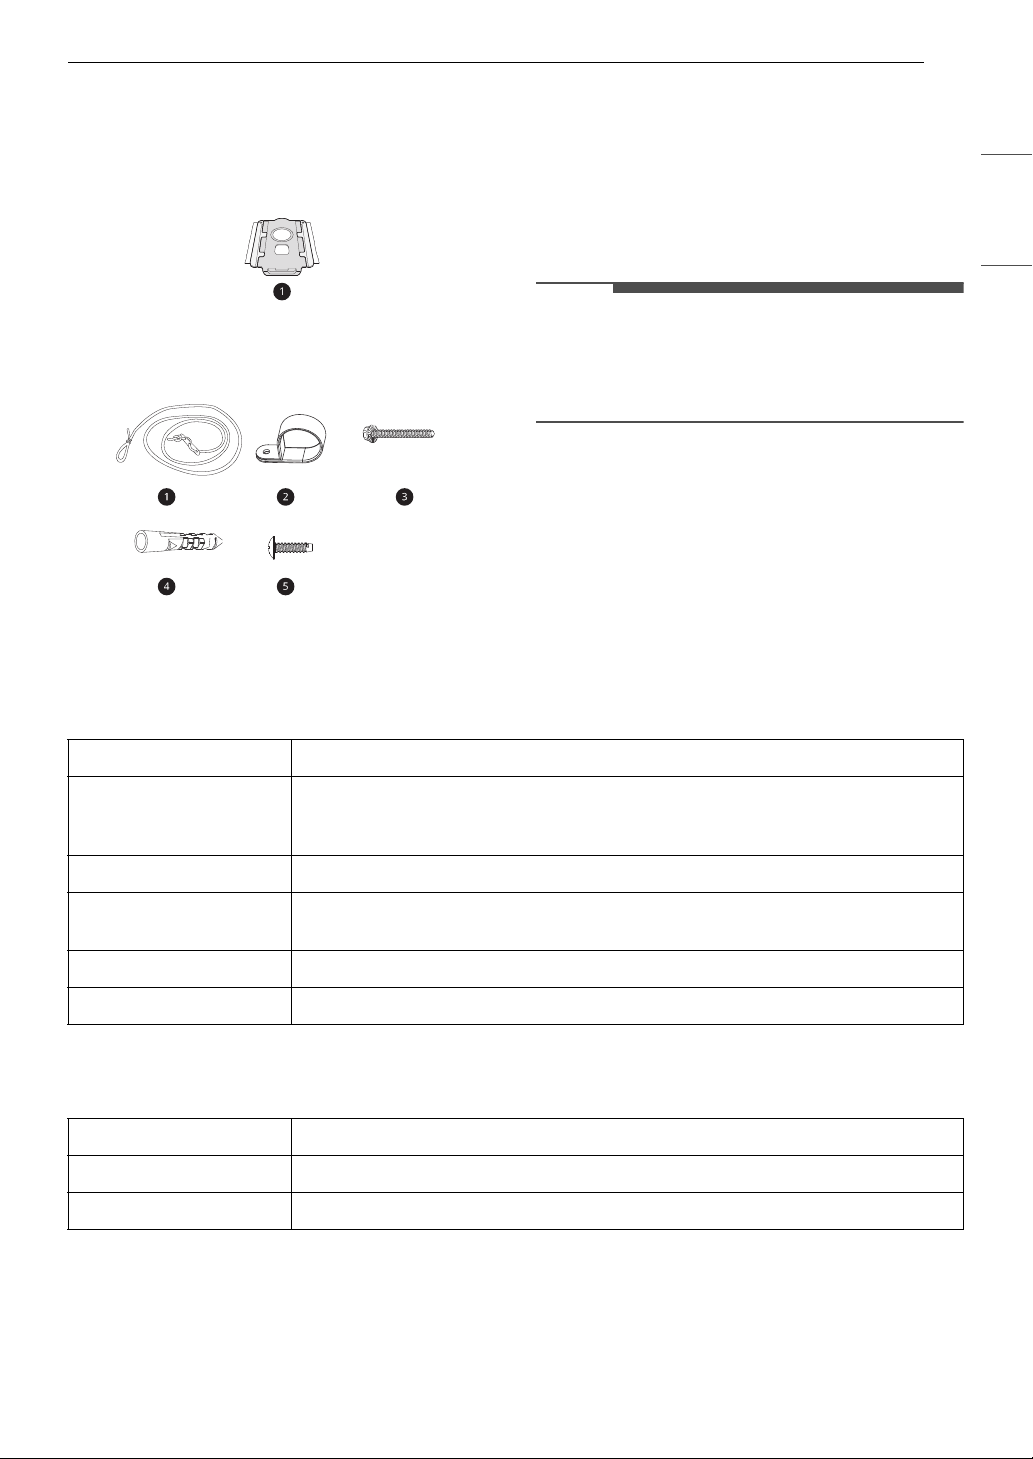
Accessories
† This accessory is only available on some models.
Included Accessories
a Dust Bag (Expendable)
Installation Kit
a Cord (includes slide and loop)
b Mounting bands (2EA)
c Wall Mounting Screw
d Wall Mounting Anchor
e Product Mounting Screw
NOTE
• The dust bag exhaust filter and the motor
protection filter will eventually need to be
replaced. Contact an LG Electronics customer
service center.
Specifications
Appliance
Battery
One or two batteries are provided. The number of batteries varies depending on the model purchased.
Model VDS-ST1****
Dimensions
(Width X Depth X
Height)
10.0 in X 11.7 in X 39.7 in
255 mm X 297 mm x 1009 mm
Weight Approximately 22.3 lb (10.1 kg)
Power Consumption 9 A (Cleaning)
0.6 A (Charging)
Input 120 V~ 60 Hz
Output DC 28.3 V / 1.15 A
Model EAC63382204 or 08
Voltage DC 25.2 V
Capacity 2400 mA
10 INSTALLATION
Installing the Charging
Station
CAUTION
• Do not allow children or pets to hang onto the
charging station. They could be injured or cause
damage to the appliance.
• Take care not to drop the product parts while
unpacking them to avoid appliance damage or
personal injury.
NOTE
• The cost of a service call to install or reinstall the
charging station is not covered under the
warranty.
Installation
Follow the steps below to install the charging
station on a hard and level floor.
CAUTION
• Do not install on carpeted floors or rugs. The
product may fall, causing injury or damage.
1 Place the product on a flat, hard surface.
• Install with 2" (5cm) clearance in the rear
and 8" (20cm) radius in the front to be able
to open both doors of the product.
• When storing with the mop nozzle, install
the product further away from the wall.
2 Using the anti-tip kit, fix the product firmly to
the wall.
3 Plug the power plug into the outlet.
• When the power plug is connected
correctly, the status display flashes, and the
product setting is initialized. Once
initialization is completed, the status display
turns off.
• Use a velcro tie to bind and tidy the excess
cable.
Anti-tip Kit Installation
The anti-tip kit is designed to secure the product to
the wall in order to prevent it from tipping over
and causing personal injury or damage to itself or
the floor.
WARNING
• Carefully read and follow the guidelines in order
to prevent property damage or personal injury.
• Do not lean against the product or place a heavy
object on top of it.
• Manage and supervise children or pets to
prevent them from knocking into or climbing on
the product.
• If you prefer not to install this kit immediately,
ensure that you keep it out of the reach of
children.
• Do not use this kit for purposes other than the
installation of the charging station.
• Wear gloves and protective clothing in order to
prevent personal injury.
• When drilling a hole in concrete, take caution
and wear protective goggles.
5 cm
20 cm
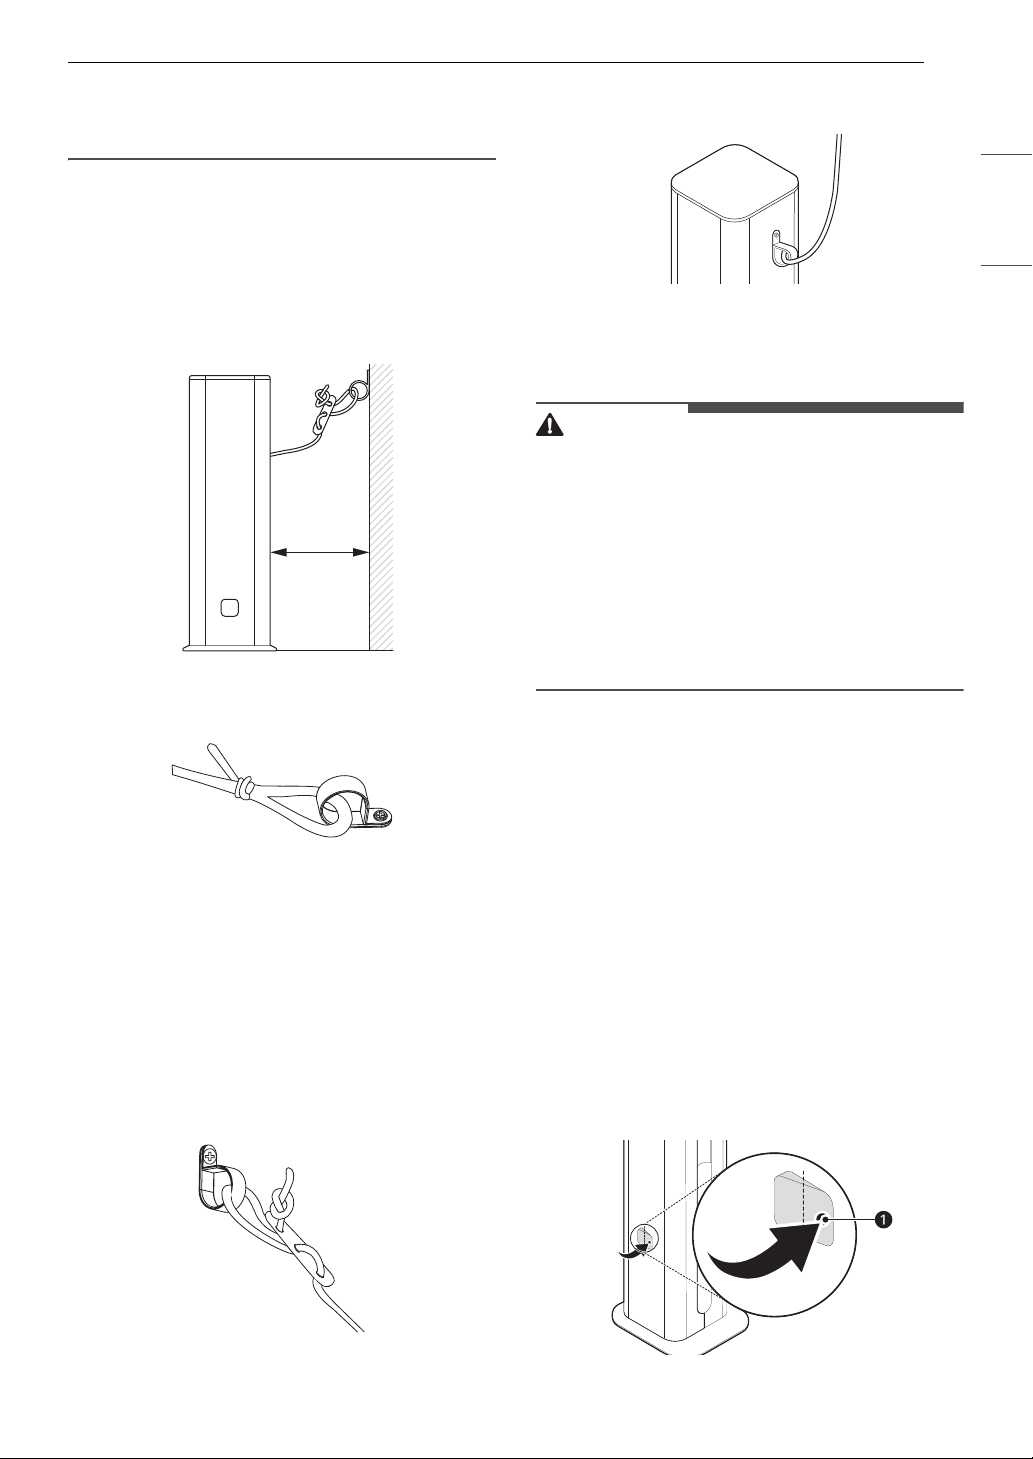
11INSTALLATION
ENGLISH
• Before drilling into a wall, make sure that there
are no vents, gas or water pipes, or electrical
cables behind the wall.
1 Before moving the product to its final
position, mark the location on the wall where
you will attach the anti-tip cord. If you are not
drilling into a wall stud, you will need to use
the wall mounting anchor.
• Install the wall mounting anchor and the
mounting band directly behind the product.
2 Attach one of the mounting bands to the loop
at one end of the cord.
3 If drilling into drywall, use a 4 mm bit to drill a
hole 1 3/4" (44.5 mm) deep at the marked
location and insert the wall mounting anchor
first. Then screw the mounting band into the
anchor with the wall mounting screw. When
screwing into a wall stud or concrete, use the
wall mounting screw without the anchor.
4 Thread the other end of the cord through the
slide as shown to form a loop. Attach the
second mounting band to this loop.
5 Use the product mounting screw to attach the
mounting band to the back of the product.
6 Place the product in its final location and use
the slider to adjust the length of the cord until
there is about 1 inch of play in the cord.
CAUTION
• Do not tighten the wall mounting screw
excessively. Doing so may cause the wall
mounting to come loose and the product to fall,
resulting in personal injury or product damage.
• For best results, attach the mounting band to a
wall stud or a solid wall. If the screw pulls out of
the wall and the product falls, personal injury or
product damage may result.
• If the distance between the wall and the product
is too great, the product may fall.
Storing the Accessories
Storing the Tools
Use the product to store the inlet and components
provided with the vacuum cleaner.
The components may differ depending on the
vacuum cleaner model.
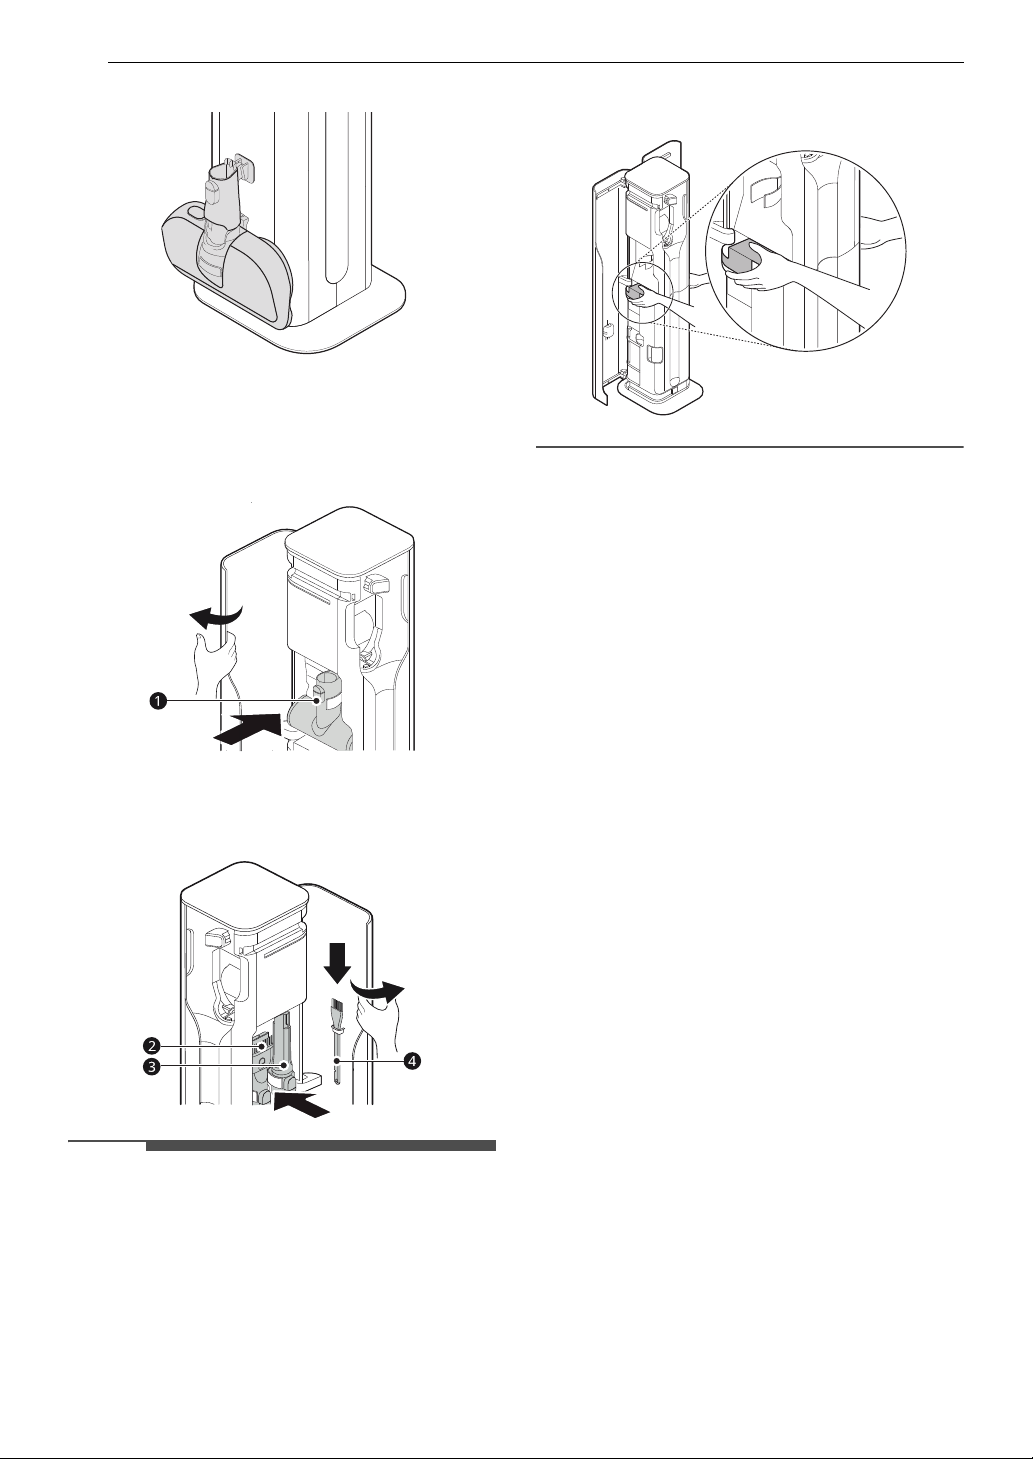
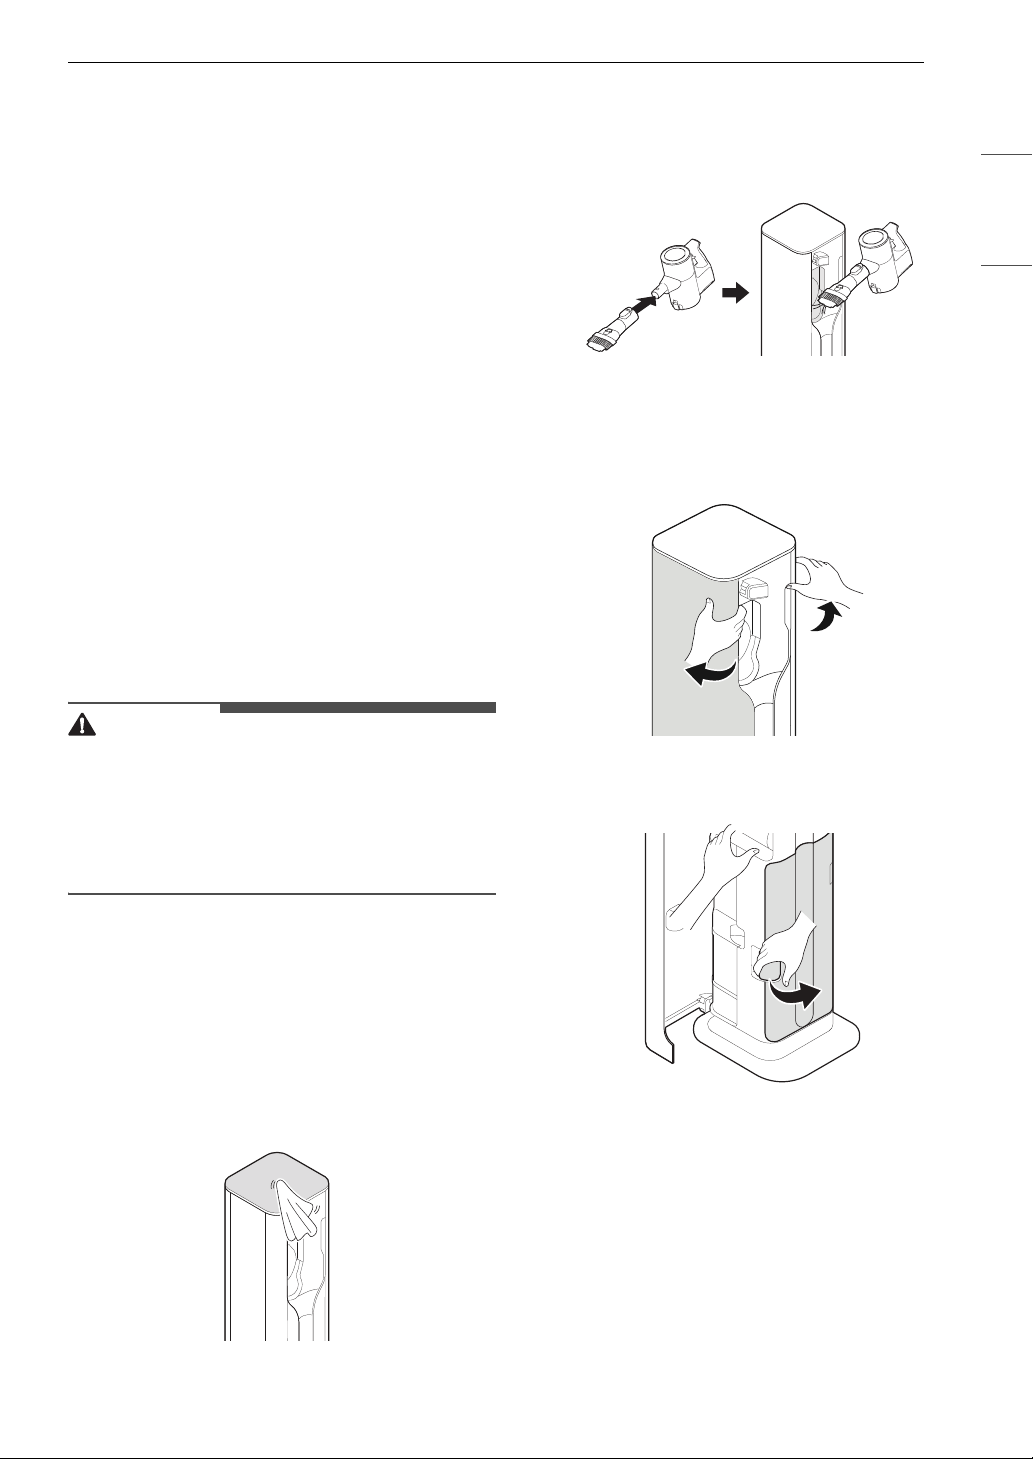
Using the Nozzle Hooks
1 Open the nozzle hook a on both sides of the
product.
• To open the nozzle hooks, press on the right
side. Be careful not to pinch fingers when
opening.
2"(5 cm)
12 INSTALLATION
2 Hang the nozzle on the nozzle hook.
Storage Inside
1 Open the left door of the product and insert
the bedding nozzle or the pet nozzle a for
storage.
2 Open the right door and insert the
combination tool b, the crevice tool c and
the cleaning brush
d for storage.
NOTE
• Before moving the product, unplug it and
remove the vacuum cleaner, nozzles, and
accessories.
• To carry the product, open both doors and hold
the areas shown.
13OPERATION
ENGLISH
OPERATION
Charging the Battery
Before Charging the Battery
• Make sure that the adapter is connected to both
the charging station and the power outlet.
• Fully charging a single battery usually takes
about 4 hours. It will take twice as long to charge
both the main and auxiliary batteries.
• The battery will not be charged if the indoor
temperature is below 41 °F (5°C). Only charge
the battery when indoor temperatures are
between 41 °F (5°C) and 100 °F (38 °C).
• The battery will eventually need to be replaced.
Due to the battery characteristics, runtime is
shortened after using the appliance repeatedly
for an extended period.
• The last bar on the battery indicator begins to
blink when the battery needs to be recharged.
Use the appliance with a fully charged battery.
• If the main battery is charging on the charging
station, the auxiliary battery will only start
charging once the main battery is fully charged.
• To maintain battery life on dual-battery models,
swap the positions of the two batteries
periodically, between the main body and the
auxiliary charging station.
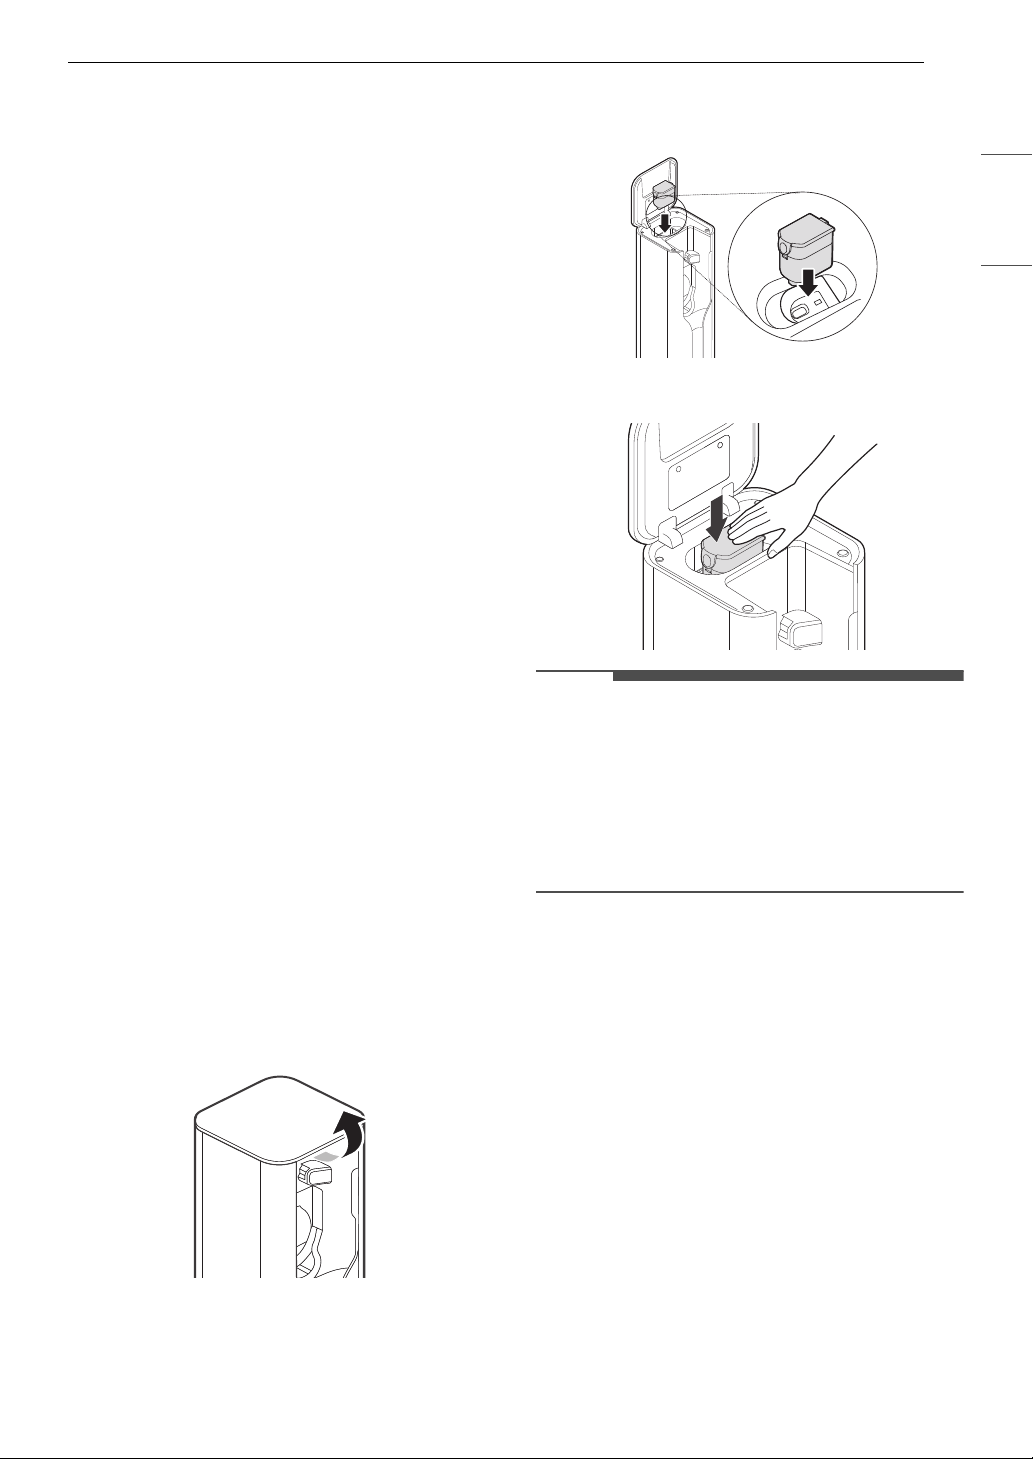
Charging the Auxiliary Battery
After the vacuum cleaner has finished charging,
the auxiliary battery will start charging.
One or two batteries are provided. The number of
batteries varies depending on the model
purchased.
1 Lift the front of the control panel located at
the top of the charging station.
2 To insert, align the battery with the outline of
the battery charger.
3 Press the battery down into the compartment.
NOTE
• The auxiliary battery icon (*) in the status
display flashes during charging and then lights
up briefly and turns off to save energy when
charging is complete.
• Insert the auxiliary battery completely. If the
auxiliary battery is inserted correctly, the
auxiliary battery icon (*) flashes.
14 OPERATION
Getting Started
Control Panel Features
Control Panel
List Descriptions
a
Status Display The display shows the dust emptying operation status or when to replace the
dust bag, charging status of the auxiliary battery, and dust emptying mode.
b
Start Press the Start/Stop button once to start the dust emptying operation.
•When the Start/Stop button is selected, a melody plays. Mount the
vacuum cleaner. The dust bin cover opens automatically, and dust
emptying operation begins.
• When you purchase the product, the manual dust emptying mode is set
by default.
Stop Press the Start/Stop button once to cancel or pause the dust emptying
operation.
• Dust emptying operates in 3 stages, and its function is different for
each stage (preparation ~ dust emptying ~ finishing).
- Pressing the Start/Stop button in the Preparation Stage (mounting
the body of the vacuum cleaner): The dust emptying operation is
canceled and the product returns to the charging status.
- Pressing the Start/Stop button in the Dust Emptying Stage (the dust
bin cover opens automatically, and the dust emptying operation
begins): The dust emptying (replace bag) indicator flashes white
along with emitting a beeping sound, and the dust emptying
operation is paused.
Repress the Start/Stop button to start additional dust emptying
operation.
- Pressing the Start/Stop button in the Finishing Stage (the dust bin
cover closes automatically, the body of the vacuum cleaner is
released): Pressing the Start/Stop button does not work
Change Dust
Emptying Mode
Press and hold the Start/Stop button for at least 3 seconds to switch between
automatic or manual dust emptying mode.
(PSW\'XVW
67$57
6723
$XWR0RGH2Q2II
+ROGVHF

15OPERATION
ENGLISH
Status Display
NOTE
• Remove all the protective plastic from the vacuum cleaner before use. Otherwise, it may cause abnormal
noise during the dust emptying operation.
Using the Product
Using the Manual Mode
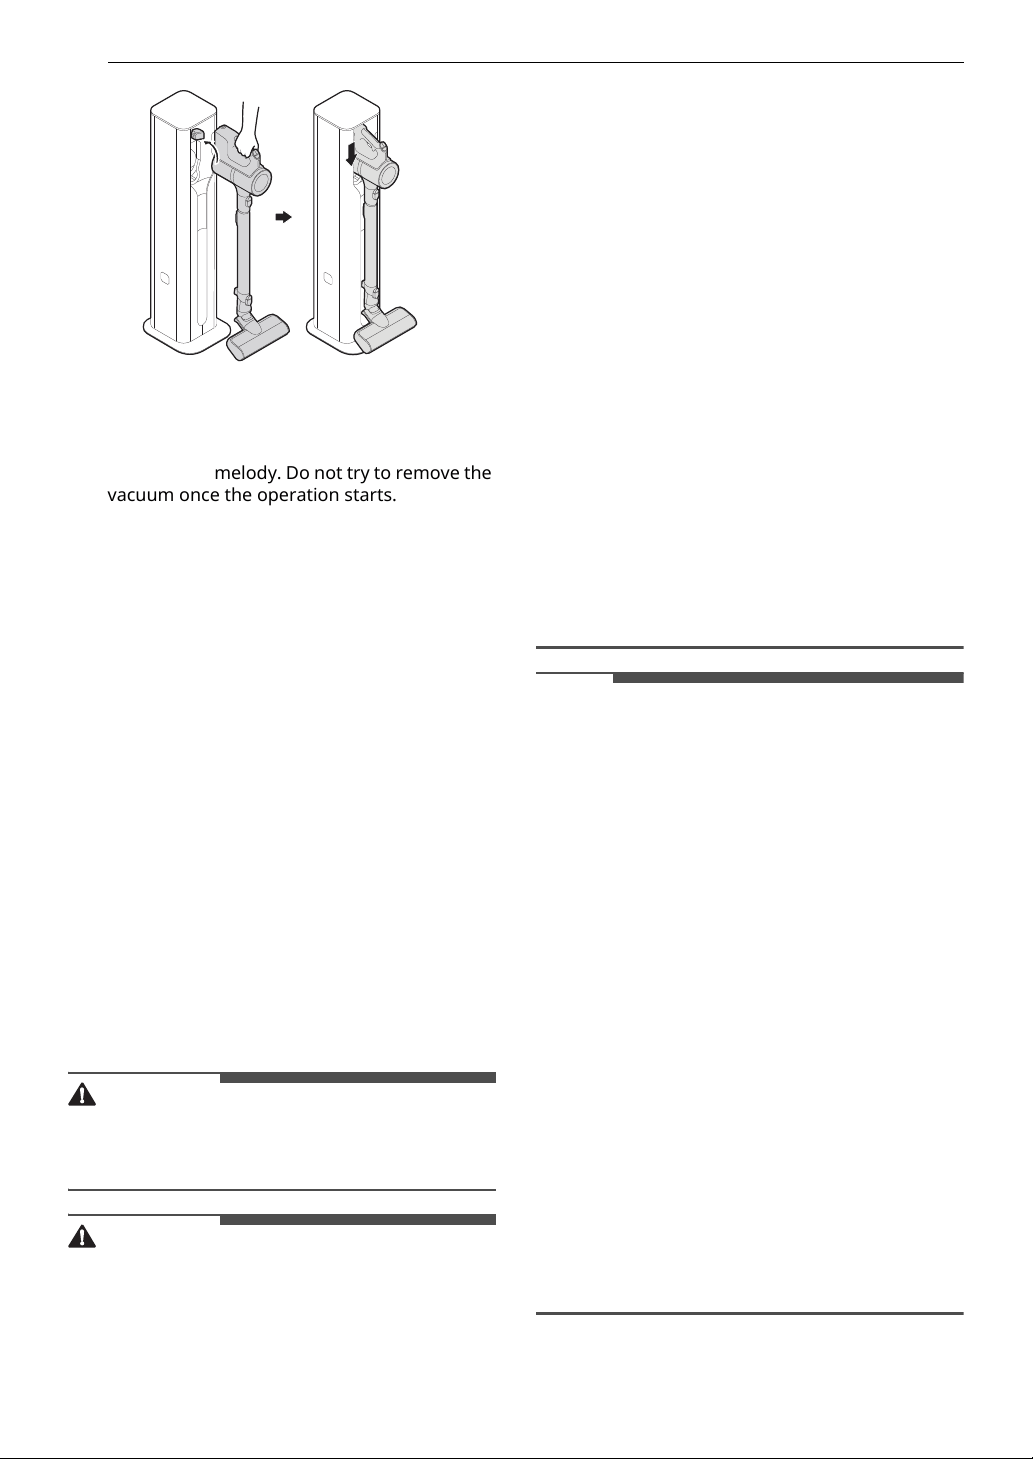
1 Insert the vacuum cleaner into the product.
• After adjusting the length adjustment pipe
of the vacuum cleaner to the shortest
length, attach it to the product.
• If the vacuum cleaner pipe is connected to a
combination tool or a crevice tool, the
vacuum cleaner doesn't fit inside the
product. Use it without the combination
tool or the crevice tool.
• If the vacuum cleaner fits properly inside
the product, the alarm will sound. If the
alarm does not sound, reinsert the vacuum
cleaner, making sure that the nozzle sits flat
on the floor.
• Before starting the dust emptying
operation, pull the easy dust emptying lever
on the vacuum cleaner down 2 or 3 times to
sweep away the dust to make the operation
easier.
List Descriptions
a
Dust Emptying
(Replace Bag)
Indicator
• Indicates the dust emptying operation status or when to replace the
dust bag.
- White: Product is emptying dust.
- Flashing red: If the indicator flashes red while emptying dust, replace
the dust bag at the end of the dust emptying operation.
- Flashing red, beeping: If the dust emptying operation is complete and
the dust bag is full, the indicator will flash red, beep 10 times and
then turn off.
- If the indicator flashes red, replace the dust bag to maintain product
performance.
b
Auxiliary Battery
Indicator
• Indicates the charging status of the auxiliary battery.
- Flashes: When the auxiliary battery is mounted in the charger.
- Lights up briefly and then turns off: Auxiliary battery charging is
complete.
- The auxiliary battery will not charge until the battery mounted in the
vacuum cleaner is fully charged. Check the battery level on the handle
of the vacuum cleaner to check whether charging is complete.
c
Auto Emptying
Indicator
• Lights to indicate that the automatic dust emptying mode is on.
- Automatic dust emptying mode automatically starts to operate every
time the vacuum cleaner is mounted correctly onto the product.
- If you remove the vacuum cleaner and mount it immediately, dust
emptying operation may not start automatically, depending on the
circumstance. If it doesn't start automatically, select the Start/Stop
button to start.
AUTO
16 OPERATION
2 Press the Start/Stop button. The dust
emptying (replace bag) icon flashes white,
and the dust emptying operation begins
along with a melody. Do not try to remove the
vacuum once the operation starts.
3 When the dust emptying operation is
complete, a melody sounds, the dust
emptying (replace bag) icon turns off, and the
vacuum cleaner starts charging.
Using the Auto Mode
When the automatic dust emptying mode is set,
the dust emptying operation starts automatically
whenever the vacuum cleaner is properly inserted
into the product.
1 Press and hold Start/Stop for 3 seconds to
change from the Manual mode to the Auto
mode.
2 Insert the vacuum cleaner into the product.
3 When the dust emptying operation is
complete, a melody sounds, the dust
emptying (replace bag) icon turns off, and the
vacuum cleaner starts charging.
WARNING
• Do not wash the vacuum cleaner body or the
inlet with water. If water enters the built-in
motor, it can cause electric shock or fire.
CAUTION
• Do not forcibly remove the vacuum cleaner
during the dust emptying operation or when it is
paused. Since the vacuum cleaner is mounted,
the product may break or fall, causing injury or
product damage.
- Remove the vacuum cleaner after the dust
emptying (replace bag) icon in the status
display is turned off completely.
• Do not put foreign objects such as hands,
garbage, or toys in the dust suction area of the
product without a vacuum cleaner mounted.
• Do not push, pull, or lean on the product; it may
fall, causing injury or damage.
• Do not put objects like smartphones on the
product's control panel. The product may
malfunction due to vibration, or the object may
fall to the floor, causing injury or damage.
• If the power suddenly turns off during the dust
emptying operation, the vacuum cleaner is
mounted and cannot be removed. Causes for
power loss include a power outage, a turned off
power strip, an unplugged power cord, and a
tripped circuit breaker.
• After the power comes back on, remove the
vacuum cleaner when the settings on the
vacuum cleaner mounting unit are reset.
NOTE
• The sound of the high-performance motor may
be louder than the existing wireless vacuum
cleaner. It is normal to hear sounds such as the
vacuum cleaner, dust bin cover opening, product
operating unit, and suction.
• The vacuum cleaner mounting unit of the
charging station is cleaned with a stronger
suction force just before the dust emptying
operation is over. The sound may increase, but
this is normal and not a fault.
• During the dust emptying operation, the product
and auxiliary battery are not charged for safety
reasons.
• Replace the dust bag every 3 months to maintain
the dust emptying performance. The
replacement cycle may vary depending on the
environment.
• The dust bin may not be emptied completely
under certain conditions (very full, contains long
hairs, etc.). If this happens, press Start/Stop to
repeat the emptying process.
• Clean the dust bin's inside, the easy dust
emptying lever and the large dust separator to
remove remaining dust. For more information,
see the vacuum cleaner owner's manual.
17MAINTENANCE
ENGLISH
MAINTENANCE
Cleaning the Appliance
Before Cleaning the Appliance
• Replace the dust bag when the dust emptying
(replace bag) icon flashes red.
• Replace the dust bag at least once every 3
months to maintain product performance.
• Clean the motor protection filter and the
exhaust filter every 3 months or if the dust
emptying function seems weaker.
• Disconnect the power plug from the outlet
before cleaning the product.
• If the product smells, replace the dust bag and
clean the filter.
• The frequency of cleaning varies depending on
the usage environment and usage time. In a
dusty environment, clean frequently.
• Fine dust may remain on the dust bin cover due
to static electricity generated during the dust
emptying operation; periodically clean the dust
bin cover.
WARNING
• Never wash the product body with water. Water
could reach the motor and cause electric shock
or fire.
• Do not allow foreign objects to enter the motor.
Doing so may cause electric shock, fire or
product damage.
Cleaning the Product Body
1 Disconnect the power plug from the outlet.
2 Wipe the control panel using a soft cloth.
• Product may malfunction if there is dust on
the control panel.
3 Clean the dust around the dust suction area
using a vacuum cleaner.
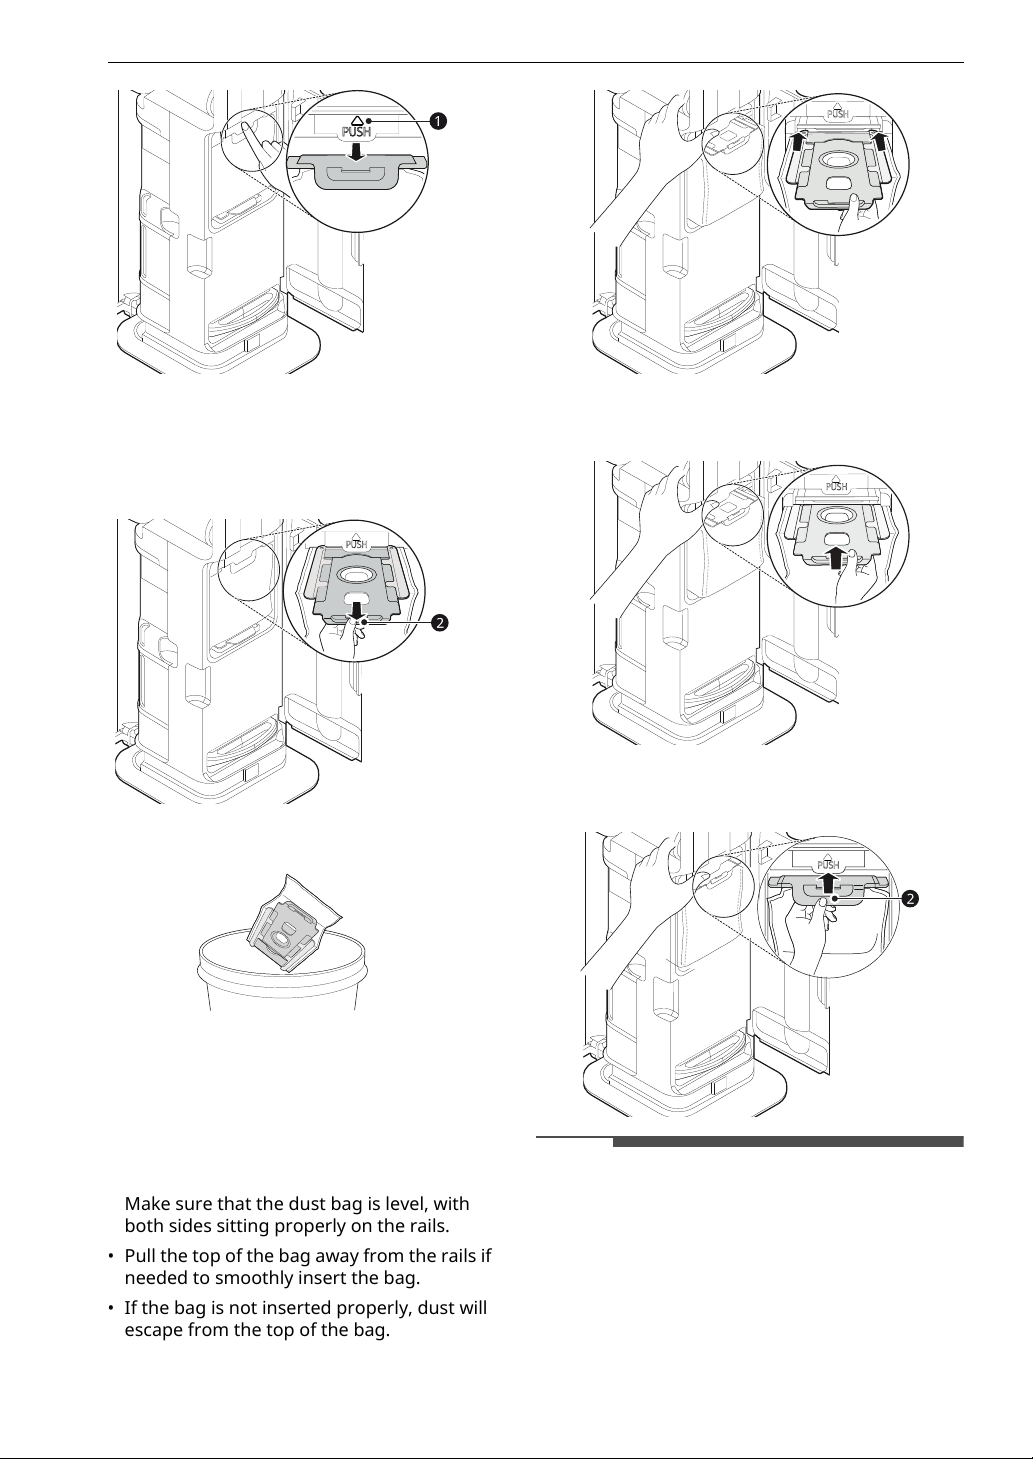
Changing the Dust Bag
1 Open the left and right doors of the
component storage.
2 Hold the product with one hand and open the
dust bag door with the other hand.
3 Press n button a above the PUSH label with
one hand. The dust bag is released.
18 MAINTENANCE
4 Pull out the dust bag lever b to remove the
dust bag.
• As the dust bag is pulled out, the top
opening is closed.
5 Throw away the dust bag.
6 Prepare a new dust bag.
• To avoid odors, do not reuse the dust bags.
7 Place the end of the dust bag on the rail inside
the product.
• Make sure that the dust bag is level, with
both sides sitting properly on the rails.
• Pull the top of the bag away from the rails if
needed to smoothly insert the bag.
• If the bag is not inserted properly, dust will
escape from the top of the bag.
8 Slide the dust bag in along the rails of the
product until it is completely inserted.
9 Grab the dust bag lever b and push it up until
you hear a "click" sound.
NOTE
• The dust bag door will not close without a dust
bag. Discard the dust bag and be sure to put a
new dust bag in place.
• Replace the dust bag once every 3 months. The
replacement cycle may vary depending on the
environment.
• Replace the dust bag if it smells, even if it is not
full.
19MAINTENANCE
ENGLISH
• The motor protection filter will eventually need
to be replaced. Contact an LG Electronics
customer service center.
Cleaning the Filters
Clean the motor protection filter and the exhaust
filter every 3 months or sooner if the dust
emptying function seems weaker.
• Clean the filters more frequently if the appliance
is used regularly or in areas with a lot of dust.
CAUTION
• Do not use the appliance without the exhaust
filter and the motor protection filter installed.
Doing so could result in product damage.
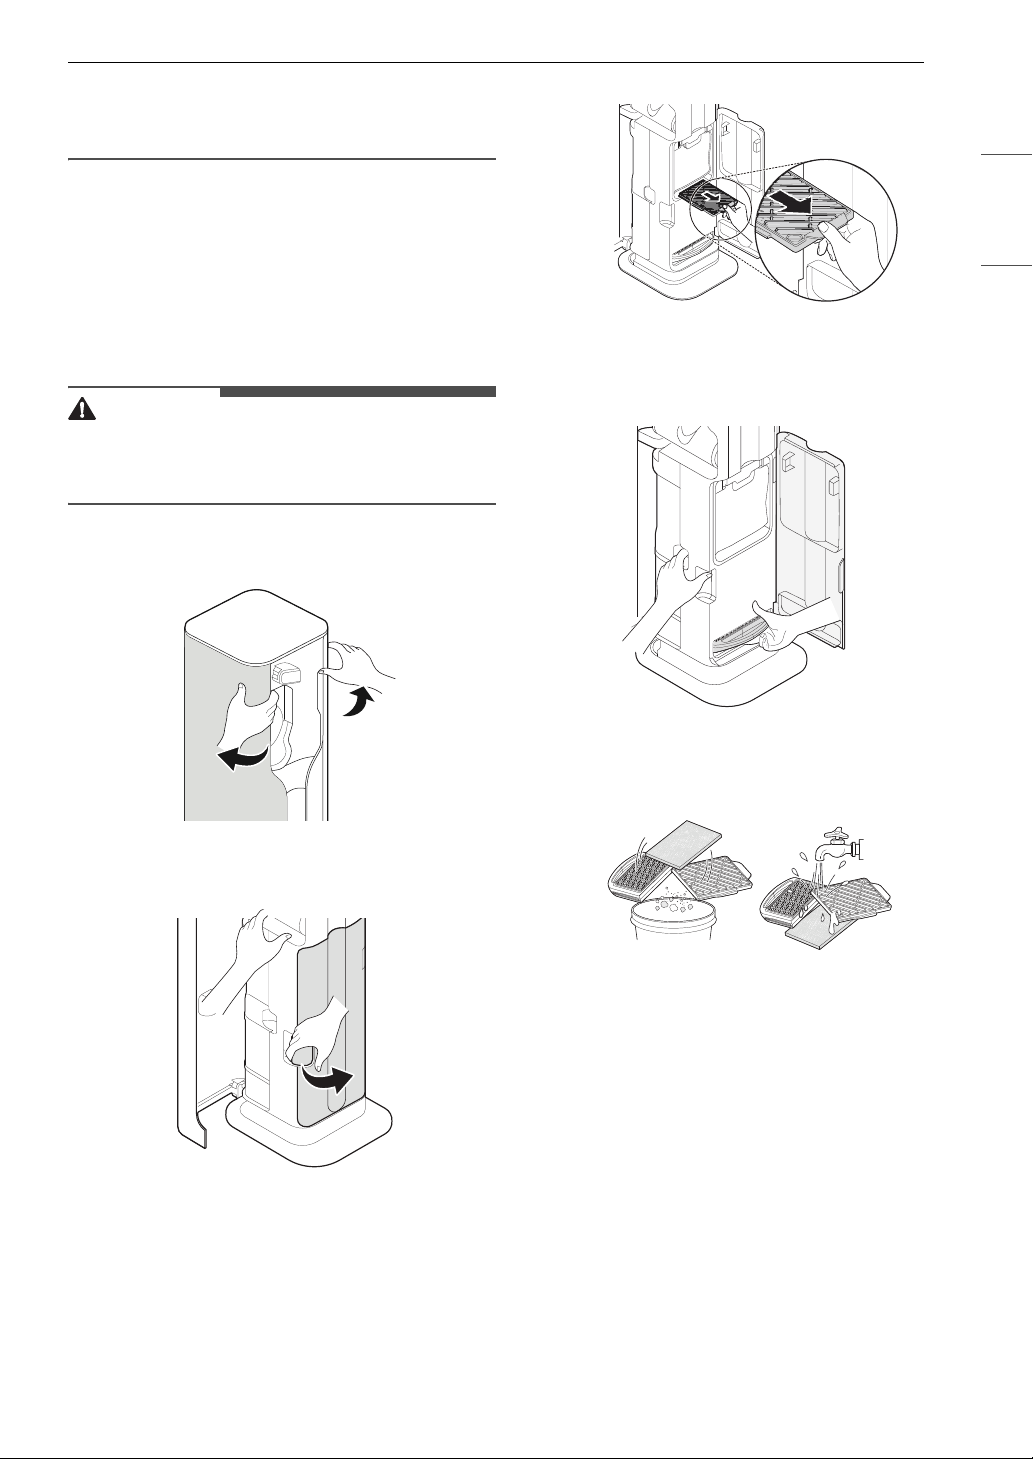
1 Open the left and right component storage
doors.
2 Hold the product with one hand and open the
dust bag door with the other hand.
3 Hold the product with one hand and take out
the motor protection filter with the other
hand.
4 To remove the exhaust filter, hold the bottom
of the product and pull the handle end of the
filter.
5 Remove dust from the motor protection filter
and exhaust filter once every 3 months and
wash it using room temperature water.
• To avoid odor and the malfunction of the
motor, allow the motor protection filter and
the exhaust filter to dry completely in a well-
ventilated area out of direct sunlight for at
least 24 hours before reassembling.
6 Push the motor protection filter and exhaust
filter back into their original positions.
• Make sure that the filters are in place before
using the product.
20 TROUBLESHOOTING
TROUBLESHOOTING
Before Calling for Service
Operation
Problem Possible Cause & Solution
Dust emptying
doesn't work.
The power plug is not connected.
• Connect the power plug to an outlet.
The Vacuum Cleaner is not properly inserted into the product.
• Remove the Vacuum Cleaner and reinsert it. If it is installed properly, a beep will sound.
Dust emptying operation is stopped.
• When the Dust Emptying Start/Stop button is pressed, the dust emptying operation starts
from the beginning.
It is set to automatic or manual dust emptying mode.
• When you purchase the product, the manual dust emptying mode is set by default. After
inserting the Vacuum Cleaner into the product, pressing the Dust Emptying Start/Stop
button starts the dust emptying operation.
• When it is in automatic dust emptying mode, the dust emptying operation starts
automatically whenever the vacuum cleaner is properly inserted into the product.
Product setting
initialization doesn't
work even after the
power plug is
plugged in again.
The internal motor of the product is not operating properly .
• Disconnect the power plug from the outlet and contact an LG Electronics Service Center.
The power supply
has been cut off.
The power supply has been cut off.
• Check whether the power plug is connected correctly to the outlet.
• If using a multi-outlet strip, make sure the strip is turned on.
• Check if the breaker is tripped or there is a power outage.
It won't charge. It is not plugged in.
• Plug it into an outlet.
There is a foreign object on the charging terminals.
• After unplugging from the outlet, wipe off any foreign matter from the charging terminal
with a dry cloth.
The room temperature was 41 °F (5 °C) or less during charging.
• Charging may not work if the temperature where you are charging is 41 °F (5 °C) or less.
Before use, fully charge the vacuum cleaner at a temperature above 41 °F (5 °C).
The vacuum cleaner is not properly inserted into the product.
• When the vacuum cleaner is properly inserted into the product, a beep sounds. If the beep
does not sound, reinsert the vacuum cleaner.
The auxiliary battery is not properly inserted into the product.
• Push in the auxiliary battery all the way. When the auxiliary battery is properly inserted,
the auxiliary battery icon flashes.
21TROUBLESHOOTING
ENGLISH
The product has a
strange smell.
The product is purchased within 3 months.
• The odors from manufacturing the product should be gone within 3 months.
The Vacuum Cleaner smells.
• After cleaning with the mop nozzle, the wet dust may emit an odor. After finishing
cleaning, remove the damp dust from the mop nozzle before storing the vacuum.
• The pre-filter, exhaust filter, or large dust separator may smell after washing if it isn’t dried
completely. After washing with water, dry them thoroughly in well-ventilated shade for at
least 24 hours before using them again.
The dust bag smells.
• If you clean foreign matter that smells (such as pet excrement) with the vacuum cleaner,
the vacuum may smell even if you do not have a full dust bag. Replace the new dust bag
even if it isn't full.
• If you have not replaced the dust bag for a long time, it may smell. Replace it with a new
dust bag even if it isn't full.
Two icons [dust
emptying (replace
bag) and auxiliary
battery] flash
simultaneously.
The motor that holds the Vacuum Cleaner isn't working properly.
• Disconnect the power plug from the outlet and contact an LG Electronics Service Center.
The motor that opens and closes the Vacuum Cleaner dust bin cover isn't working
properly.
• Disconnect the power plug from the outlet and contact an LG Electronics Service Center.
Two icons (auxiliary
battery and auto
emptying) flash
simultaneously.
The motor that presses the Vacuum Cleaner dust bin cover separation button isn't
working properly.
• Disconnect the power plug from the outlet and contact an LG Electronics Service Center.
During the dust
emptying operation,
the dust emptying
notification flashes
red.
The dust bag is full.
• Throw away the used dust bag and replace it with a new dust bag.
The dust emptying
notification flashes
red for about 10
seconds, and a beep
sounds.
The dust bag is full.
• Throw away the used dust bag and replace it with a new dust bag.
Problem Possible Cause & Solution
22 LIMITED WARRANTY
LIMITED WARRANTY
USA
TERMS AND CONDITIONS
ARBITRATION NOTICE: THIS LIMITED WARRANTY CONTAINS AN ARBITRATION PROVISION THAT
REQUIRES YOU AND LG ELECTRONICS (“LG”) TO RESOLVE DISPUTES BY BINDING ARBITRATION
INSTEAD OF IN COURT, UNLESS YOU CHOOSE TO OPT OUT. IN ARBITRATION, CLASS ACTIONS AND
JURY TRIALS ARE NOT PERMITTED. PLEASE SEE THE SECTION TITLED “PROCEDURE FOR RESOLVING
DISPUTES” BELOW.
Should your LG Vacuum Cleaner Charging Station (“Product”) fail due to a defect in materials or
workmanship under normal and proper use, during the warranty period set forth below, LG will, at its
option, repair or replace the Product. This limited warranty is valid only to the original retail purchaser of
the Product (“You”) and applies only when purchased lawfully and used within the United States including
U.S. Territories.
• Replacement Products and parts are warranted for the remaining portion of the original warranty period
or ninety (90) days, whichever is greater.
• Replacement Products and parts may be new, reconditioned, refurbished, or otherwise factory
remanufactured.
• Replaced Product or part(s) will be the property of LG.
• Proof of original retail purchase specifying the Product model and date of purchase is required to obtain
warranty service under this limited warranty.
• Warranty start date will be ninety (90) days from manufacture date absent valid proof of purchase.
EXCEPT TO THE EXTENT PROHIBITED BY APPLICABLE LAW, ANY IMPLIED WARRANTY OF
MERCHANTABILITY OR FITNESS FOR A PARTICULAR PURPOSE ON THE PRODUCT IS LIMITED IN
DURATION TO THE DURATION OF THE ABOVE LIMITED WARRANTY. UNDER NO CIRCUMSTANCES
SHALL LG OR ITS U.S. DISTRIBUTORS/DEALERS BE LIABLE FOR ANY INDIRECT, INCIDENTAL,
CONSEQUENTIAL, SPECIAL, OR PUNITIVE DAMAGES, INCLUDING, WITHOUT LIMITATION, LOST
GOODWILL, LOST REVENUES OR PROFITS, WORK STOPPAGE, IMPAIRMENT OF OTHER GOODS, COST OF
REMOVAL AND REINSTALLATION OF THE PRODUCT, LOSS OF USE, OR ANY OTHER DAMAGES WHETHER
BASED IN CONTRACT, TORT, OR OTHERWISE. LG’S TOTAL LIABILITY, IF ANY, SHALL NOT EXCEED THE
PURCHASE PRICE PAID BY YOU FOR THE PRODUCT.
SOME STATES DO NOT ALLOW THE EXCLUSION OR LIMITATION OF INCIDENTAL OR CONSEQUENTIAL
DAMAGES OR LIMITATIONS ON HOW LONG AN IMPLIED WARRANTY LASTS, SO THE ABOVE
EXCLUSIONS OR LIMITATIONS MAY NOT APPLY TO YOU. THIS LIMITED WARRANTY GIVES YOU
SPECIFIC LEGAL RIGHTS AND YOU MAY ALSO HAVE OTHER RIGHTS THAT VARY FROM STATE TO STATE.
THIS LIMITED WARRANTY DOES NOT COVER:
• Service trips to deliver, pick up, install, or clean, or to correct wiring or unauthorized repairs.
• Service trips to educate how to assemble, operate, or maintain the Product.
• Damage or failure of the Product to perform during power failures and interrupted or inadequate
electrical service.
WARRANTY PERIOD
Vacuum Cleaner Charging Station Smart Inverter Motor (Suction Motor)
One (1) year from the date of original retail purchase Ten (10) years from the date of original retail
purchase
Parts and Labor (internal/functional parts only) Parts only (You will be charged for labor)

23LIMITED WARRANTY
ENGLISH
• Damage or failure of the Product resulting from operating the Product in a corrosive atmosphere or
contrary to the Product owner’s manual.
• Damage or failure of the Product caused by accidents, pests and vermin, lightning, wind, fire, floods, acts
of nature, or any other causes beyond the control of LG.
• Damage or failure of the Product caused by unauthorized modification or alteration, or if the Product is
used for other than the intended purpose.
• Damage or failure of the Product caused by incorrect electrical current or voltage.
• Damage or failure of the Product caused by transportation, storage, and/or handling, including
scratches, dents, chips, and/or other damage to the finish of the Product, unless such damage is
reported within one (1) week of delivery.
• Damage or missing items to any display, open box, or discounted Product.
• Refurbished Product or any Product sold “As Is”, “Where Is”, “With all Faults”, or similar disclaimer.
• Products with original serial numbers that have been removed, altered, or cannot be readily determined.
• Increases in utility costs and additional utility expenses.
• Any noises associated with normal operation.
• Products used for other than normal and proper household use (e.g., commercial or industrial use,
offices, and recreational facilities or vehicles) or contrary to the Product owner’s manual.
• Costs associated with removal and reinstallation of the Product for repairs.
• Replacement of batteries, filters, or any consumable parts.
• The removal and reinstallation of the Product if it is installed in an inaccessible location or is not installed
in accordance with the Product owner’s manual.
• Damage or failure of the Product resulting from misuse, abuse, improper installation, repair, or
maintenance. Improper repair includes the use of parts not authorized by LG. Improper installation or
maintenance includes installation or maintenance contrary to the Product owner’s manual.
• Damage or failure of the Product caused by the use of parts, components, accessories, consumable
cleaning products, detergents, chemicals, or any other products or services that are not authorized by
LG.
The cost of repair or replacement under these excluded circumstances shall be borne by You.
TO OBTAIN WARRANTY SERVICE AND ADDITIONAL INFORMATION
Call 1-800-243-0000 and select the appropriate option from the menu.
Or visit our website at http://www.lg.com
Or by mail: LG Electronics Customer Service P.O. Box 240007 Huntsville, AL 35813 ATTN: CIC

24 LIMITED WARRANTY
PROCEDURE FOR RESOLVING DISPUTES:
ALL DISPUTES BETWEEN YOU AND LG ARISING OUT OF OR RELATING IN ANY WAY TO THIS LIMITED
WARRANTY OR THE PRODUCT SHALL BE RESOLVED EXCLUSIVELY THROUGH BINDING ARBITRATION, AND
NOT IN A COURT OF GENERAL JURISDICTION. BINDING ARBITRATION MEANS THAT YOU AND LG ARE EACH
WAIVING THE RIGHT TO A JURY TRIAL AND TO BRING OR PARTICIPATE IN A CLASS ACTION.
Definitions. For the purposes of this section, references to “LG” mean LG Electronics U.S.A., Inc., its
parents, subsidiaries and affiliates, and each of their officers, directors, employees, agents, beneficiaries,
predecessors in interest, successors, assigns and suppliers; references to “dispute” or “claim” shall include
any dispute, claim or controversy of any kind whatsoever (whether based in contract, tort, statute,
regulation, ordinance, fraud, misrepresentation or any other legal or equitable theory) arising out of or
relating in any way to the sale, condition or performance of the product or this Limited Warranty.
Notice of Dispute. In the event you intend to commence an arbitration proceeding, you must first notify
LG in writing at least 30 days in advance of initiating the arbitration by sending a letter to LG at LG
Electronics, USA, Inc. Attn: Legal Department- Arbitration 111 Sylvan Avenue, Englewood Cliffs, NJ 07632.
You and LG agree to engage in good faith discussions in an attempt to amicably resolve your claim. The
notice must provide your name, address, and telephone number; identify the product that is the subject of
the claim; and describe the nature of the claim and the relief being sought. If you and LG are unable to
resolve the dispute within 30 days, either party may proceed to file a claim for arbitration.
Agreement to Binding Arbitration and Class Action Waiver. Upon failure to resolve the dispute during
the 30 day period after sending written notice to LG, you and LG agree to resolve any claims between us
only by binding arbitration on an individual basis, unless you opt out as provided below. Any dispute
between you and LG shall not be combined or consolidated with a dispute involving any other person’s or
entity’s product or claim. More specifically, without limitation of the foregoing, any dispute between you
and LG shall not under any circumstances proceed as part of a class or representative action. Instead of
arbitration, either party may bring an individual action in small claims court, but that small claims court
action may not be brought on a class or representative basis.
Arbitration Rules and Procedures. To begin arbitration of a claim, either you or LG must make a written
demand for arbitration. The arbitration will be administered by the American Arbitration Association
(“AAA”) and will be conducted before a single arbitrator under the AAA’s Consumer Arbitration Rules that
are in effect at the time the arbitration is initiated (referred to as the “AAA Rules”) and under the
procedures set forth in this section. The AAA Rules are available online at www.adr.org/consumer. Send a
copy of your written demand for arbitration, as well as a copy of this provision, to the AAA in the manner
described in the AAA Rules. You must also send a copy of your written demand to LG at LG Electronics,
USA, Inc. Attn: Legal Department- Arbitration 111 Sylvan Avenue Englewood Cliffs, NJ 07632. If there is a
conflict between the AAA Rules and the rules set forth in this section, the rules set forth in this section will
govern. This arbitration provision is governed by the Federal Arbitration Act. Judgment may be entered on
the arbitrator’s award in any court of competent jurisdiction. All issues are for the arbitrator to decide,
except that issues relating to the scope and enforceability of the arbitration provision and to the
arbitrability of the dispute are for the court to decide. The arbitrator is bound by the terms of this
provision.
Governing Law. The law of the state of your residence shall govern this Limited Warranty and any
disputes between us except to the extent that such law is preempted by or inconsistent with applicable
federal law.
Fees/Costs. You do not need to pay any fee to begin an arbitration. Upon receipt of your written demand
for arbitration, LG will promptly pay all arbitration filing fees to the AAA unless you seek more than $25,000
in damages, in which case the payment of these fees will be governed by the AAA Rules. Except as
otherwise provided for herein, LG will pay all AAA filing, administration and arbitrator fees for any
arbitration initiated in accordance with the AAA Rules and this arbitration provision. If you prevail in the
arbitration, LG will pay your attorneys’ fees and expenses as long as they are reasonable, by considering
factors including, but not limited to, the purchase amount and claim amount. Notwithstanding the
foregoing, if applicable law allows for an award of reasonable attorneys’ fees and expenses, an arbitrator
can award them to the same extent that a court would. If the arbitrator finds either the substance of your
claim or the relief sought in the demand is frivolous or brought for an improper purpose (as measured by
the standards set forth in Federal Rule of Civil Procedure 11(b)), then the payment of all arbitration fees will
be governed by the AAA Rules. In such a situation, you agree to reimburse LG for all monies previously
disbursed by it that are otherwise your obligation to pay under the AAA Rules. Except as otherwise

25LIMITED WARRANTY
ENGLISH
provided for, LG waives any rights it may have to seek attorneys’ fees and expenses from you if LG prevails
in the arbitration.
Hearings and Location. If your claim is for $25,000 or less, you may choose to have the arbitration
conducted solely on the basis of (1) documents submitted to the arbitrator, (2) through a telephonic
hearing, or (3) by an in-person hearing as established by the AAA Rules. If your claim exceeds $25,000, the
right to a hearing will be determined by the AAA Rules. Any in-person arbitration hearings will be held at a
location within the federal judicial district in which you reside unless we both agree to another location or
we agree to a telephonic arbitration.
Opt Out. You may opt out of this dispute resolution procedure. If you opt out, neither you nor LG can
require the other to participate in an arbitration proceeding. To opt out, you must send notice to LG no
later than 30 calendar days from the date of the first consumer purchaser’s purchase of the product by
either: (i) sending an e-mail to opto[email protected], with the subject line: “Arbitration Opt Out” or (ii) calling 1-
800-980-2973. You must include in the opt out e-mail or provide by telephone: (a) your name and address;
(b) the date on which the product was purchased; (c) the product model name or model number; and (d)
the serial number (the serial number can be found (i) on the product; or (ii) online by accessing https://
www.lg.com/us/support/repair-service/schedule-repair-continued and clicking on “Find My Model & Serial
Number”).
You may only opt out of the dispute resolution procedure in the manner described above (that is, by e-mail
or telephone); no other form of notice will be effective to opt out of this dispute resolution procedure.
Opting out of this dispute resolution procedure will not affect the coverage of the Limited Warranty in any
way, and you will continue to enjoy the full benefits of the Limited Warranty. If you keep this product and
do not opt out, then you accept all terms and conditions of the arbitration provision described above.

26 Memo

27Memo
LG Customer Information Center
Register your product Online!
www.lg.com
For inquiries or comments,
visit www.lg.com or call:
1-800-243-0000
U.S.A.
1-888-542-2623
CANADA