USA
EN Instructions for use
FIUS1901I235
WARNING:
Weight limits:
40 – 120 lbs
(18 – 54 kg)
Height limits:
39 - 63 inches
(99 – 160 cm)
• Do not install or use this
booster seat until you read
and understand all the
instructions in this manual
and the labels. To avoid
serious injuries to your
child, follow the instructions
carefully. Keep the instruction
manual in the dedicated
pocket for future reference.

2
Table of Contents
Introduction .....................................................................3
Warning .....................................................................5
Safety information .........................................................7
Registration form ........................................................8
Your booster seat ..........................................................9
Rigid Latch....................................................................10
Product components................................................11
Opening the product before use.........................12
Product features .......................................................13
Vehicle seatbelts design and compatibility .......16
Vehicle seat design and compatibility ...............20
Installing the booster seat in the vehicle .............21
Securing your child in the booster seat ................26
How to fold and carry the car seat .......................31
Cleaning and maintenance ....................................33
Accessories....................................................................44
Replacement Parts ....................................................45
© 2016 Peg-Perego. All rights reserved.

3
Introduction
Thank you for choosing the Peg-Perego Viaggio Flex
120 booster seat. As with all Peg-Perego products,
your Viaggio Flex 120 has been designed and certied
by a dedicated team of engineers inside Peg-Perego's
research and development department. lt has been
manufactured and assembled in a Peg-Perego plant
under certied quality procedures and using high
quality materials from certied suppliers. As with all
booster seats, the Viaggio Flex 120 is designed to be
used with a child inside a vehicle.
We encourage you to use the Viaggio Flex 120 with
the utmost concern by driving carefully when a child
is on board and by taking your time to explore the
product to get to know all of the features, dierent
possible uses and the best and proper installations.
Please read through the manual in its entirety with
the product in sight. This will allow for checking every
point on the product and thoroughly understanding
it. lnstall the Viaggio Flex 120 in your vehicle by taking
the necessary time and making tting trials before
using it with your chiId. Once the manual has been
read, store it in the base of the Viaggio Flex 120 to

4
Introduction
ensure that anyone else using the seat will be able to
access it for help.
Should you see any malfunctioning feature or broken
parts, please do not hesitate to call Peg-Perego
Customer Service @ 1-800-671-1701 for help. Now
that you are familiar with your new Viaggio Flex 120,
you are ready to enjoy safe and happy journeys with
your family.

5
Warning
• Do not install or use this booster seat until you read
and understand all the instructions in this manual and
the labels on the product. To avoid serious injuries to
your child, follow the instructions carefully. Keep the
instruction manual in the backrest for future reference.
• Your child could be seriously injured if you do not
follow instructions and warning labels correctly.
• Use only the vehicle's lap and shoulder belt system
when restraining the child in this booster seat. Snugly
adjust the belt around child's body making sure that
the belt lies at with no slack.
• This booster seat meets or exceeds all applicable
Federal Motor Vehicle Safety Standard 213
requirements for use in motor vehicles. This restraint
is NOT certied for aircraft use since aircraft seats are
normally equipped with lap belt only.
• Not all available models of seatbelts are approved for
use with this product. Refer to the dedicated section in
this manual for further details.
• Viaggio Flex 120 can be secured to your vehicle by
means of lower universal anchorage system (LATCH)
for added stability. Refer to the dedicated section in
this manual for installation details and check your
vehicle owner’s manual for further details.
• This booster seat is designed to be installed on front

6
facing vehicle seats only. Never use on seats looking
sideways or rearward facing. Do not use in cars with door-
mounted or motorized shoulder belts. Read your vehicle
owner’s manual for additional information.
• According to accident statistics, children are safer when
properly restrained in the rear seating positions than in
the front seating positions.
• Complete and send in the registration form provided
with this product right away. In case of an accident: if this
car seat is involved in a car accident, it may be no longer
safe for use. You may need to get a new unit. Call Peg-
Perego Customer Service at 1-800-671-1701 (toll free) for
information about repairs or spare parts.
• Seat covers and pads provided in this product are part of
the product and the certication program. The use of non
approved covers or other accessories are not recommended.
• EPS components (white soft foam located below the
upholstered covers) are integrated in the product as safety
related parts and should never be removed or damaged.
• Firmly secure this booster seat in the car even when not
occupied. This car seat is a heavy object that could cause
severe damage to other occupants in case of an accident.
Secure the seat using rigid latch (folded or unfolded). If latch
is not in use, secure the seat using the vehicle belt.
• Keep ngers away from moving parts.
Warning

7
Safety Information
• Use Viaggio Flex 120 in forward facing mode with children
weighing in the range 40 – 120 lbs (18 – 54 kg) and whose
height is between 39 and 63 inches (99 – 160 cm).
• When placing your child in the seat, make sure that bulky jackets
are removed.
This will make the use of seatbelts safer as bulky
jackets can negatively aect the snugness of the belts in a crash.
• Do not leave your child unattended in the vehicle, even for
a short period. He/she could get tangled in the straps and be
seriously injured or could move or tip the seat.
• Do not leave the booster seat under direct sunlight for a
prolonged time. The seat may become very hot and burn
your child’s skin.
In this eventuality, make sure that the
booster backrest is folded (page 31).
• When not in use, store the product in a proper place, away
from light, moisture, excessive heat or cold.
• Do not place this car seat on countertops, tables or soft surfaces.
• Do not try to remove or add parts unless where explained
in this manual; do not try to repair this product. In case of
damaged or defective components, call customer service @
1-800-671-1701 for help.
• Do not leave loose objects, bags or luggage in the vehicle
interior. In case of an accident they could suddenly move
causing the occupants to be injured.
• Do not use this unit after twelve (12) years from the date of
production labelled on the seat.

8
Registration Form
Important! Child restraints could be recalled for safety
reasons. You must register this restraint to be reached
in a recall. Send your name, address and the restraint's
model number and manufacturing date to:
Peg-Perego U.S.A., Inc. 3625 Independence Drive
Fort Wayne, IN 46808 Or call 1-800-671-1701 (toll free)
Or register online at
www.carseat-registration.pegperego.com
For recall information, call the U.S. Government’s
Vehicle Safety Hotline at 1-888-327-4236
(TTY: 1-800-424-9153) Or go to http://www.NHTSA.gov
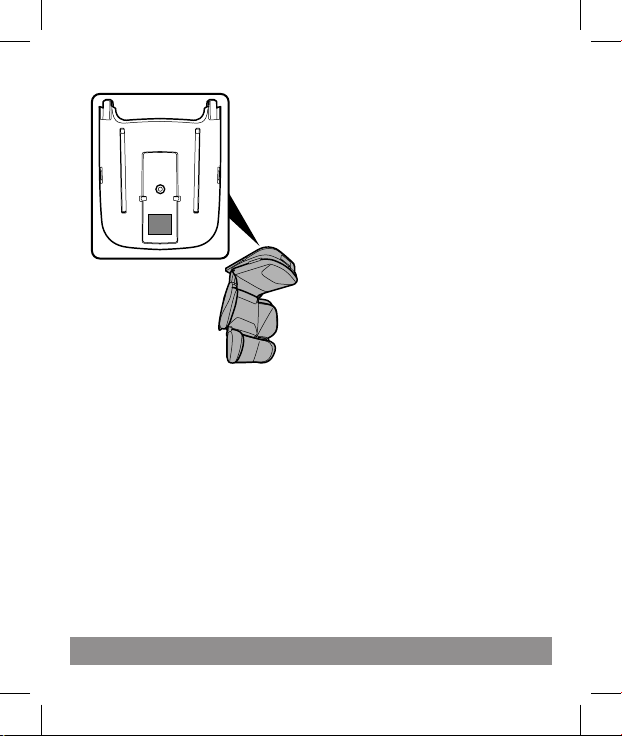
Model number, model name,
date of manufacturing, etc.
are indelibly printed on a label
located under the seat base (as
shown here). Registration form
is attached to the product
cover. Detach the form, ll in
and mail to Peg-Perego. No
stamp is needed. We have
already paid for it. Should
the registration form be
missing, please call Customer
Service @ 1-800-671-1701 for a
replacement form.
9
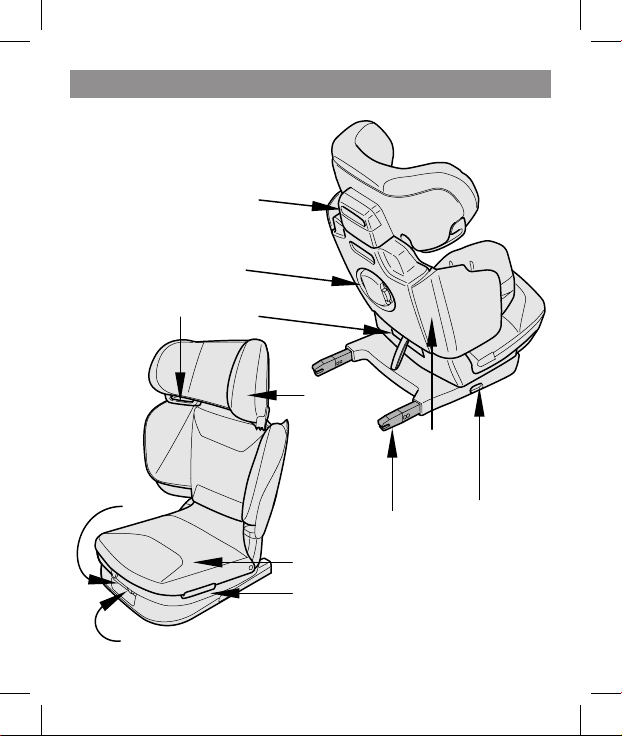
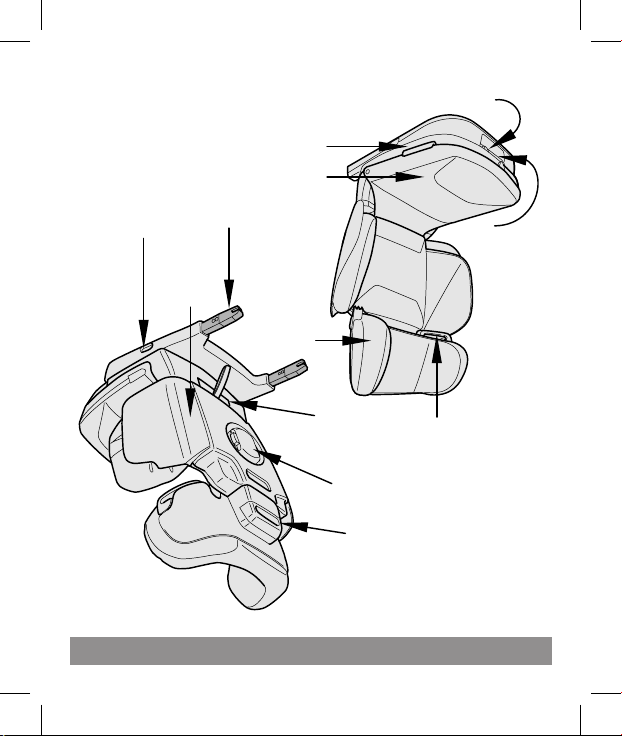
Your booster seat
Backrest
wings adjustable
knob
Rigid latch
connectors
Cup holder
Rigid latch handle
Seat
Backrest
Headrest
Shoulder
belt router
Headrest
adjustable
handle
Recline
handle
Rigid latch
release button
Instruction
manual
10
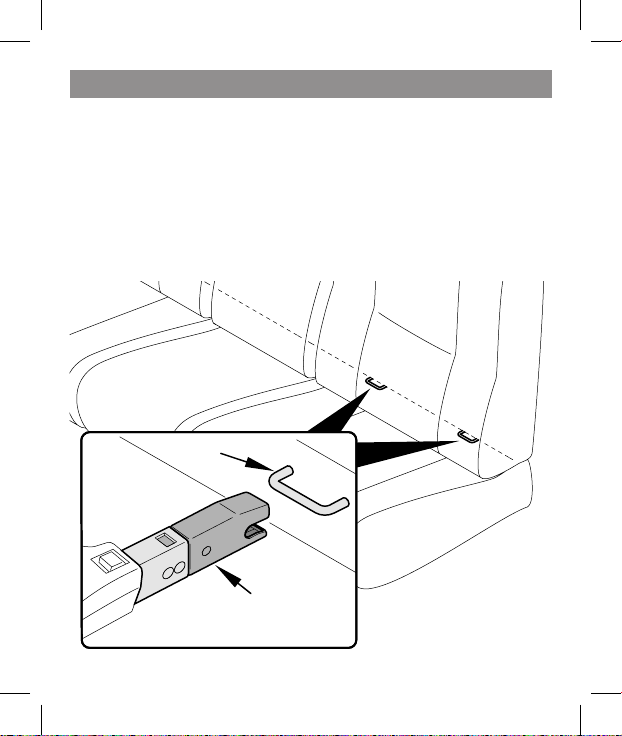
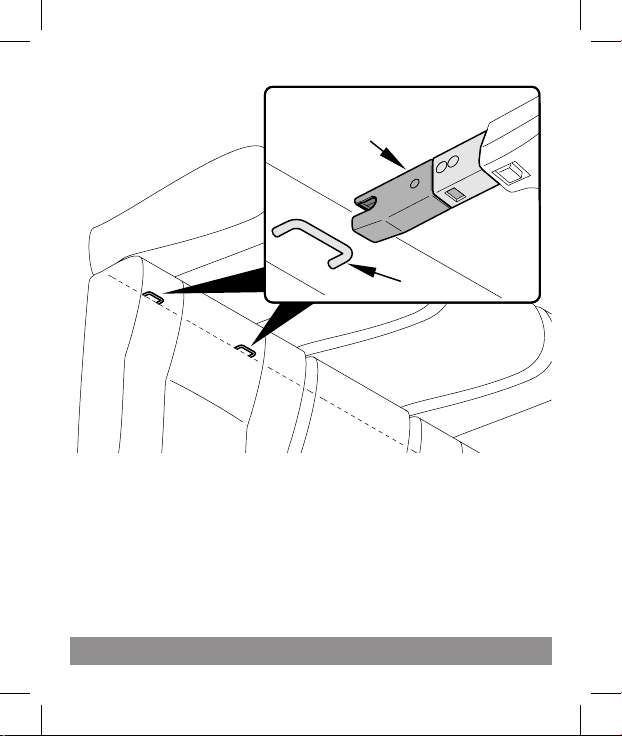
Rigid Latch
Viaggio Flex 120 is equipped with rigid latch.
The rigid latch interface is composed of two connectors,
located in the integrated base of the child restraint and
two anchors located at the joint line between the seat
and backrest of the vehicle.
The spacing between connectors corresponds to the
spacing between the anchors in the vehicle.
Connector
(Rigid latch)
Anchors
11
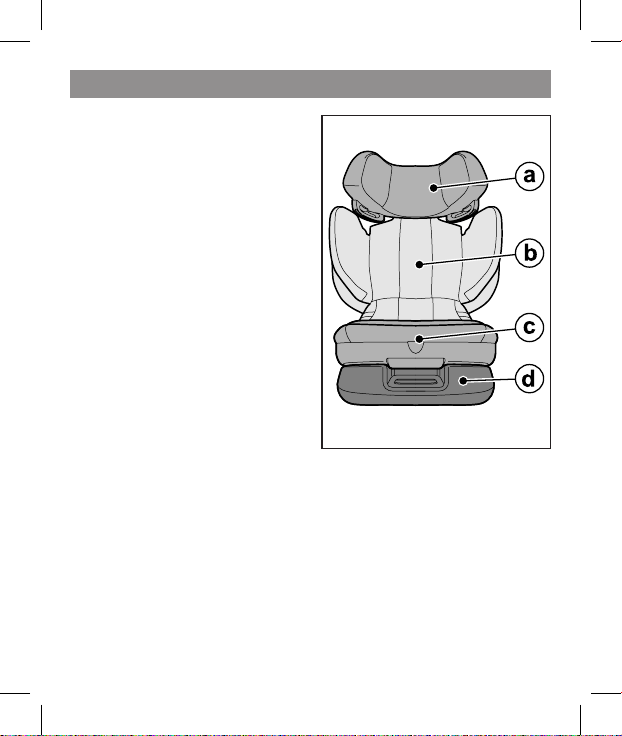
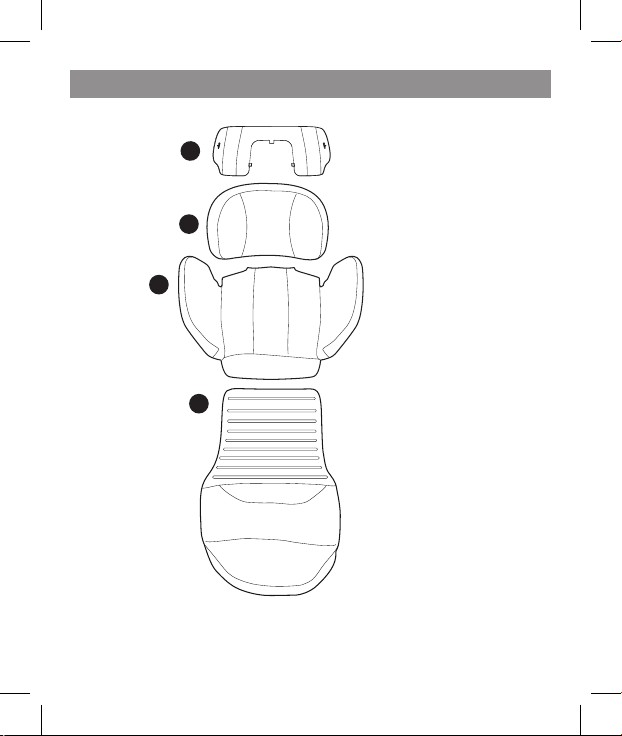
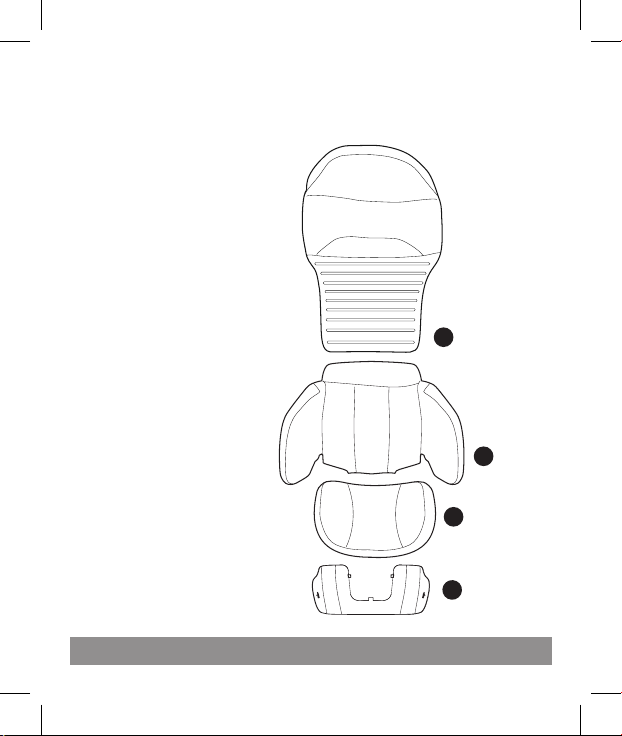
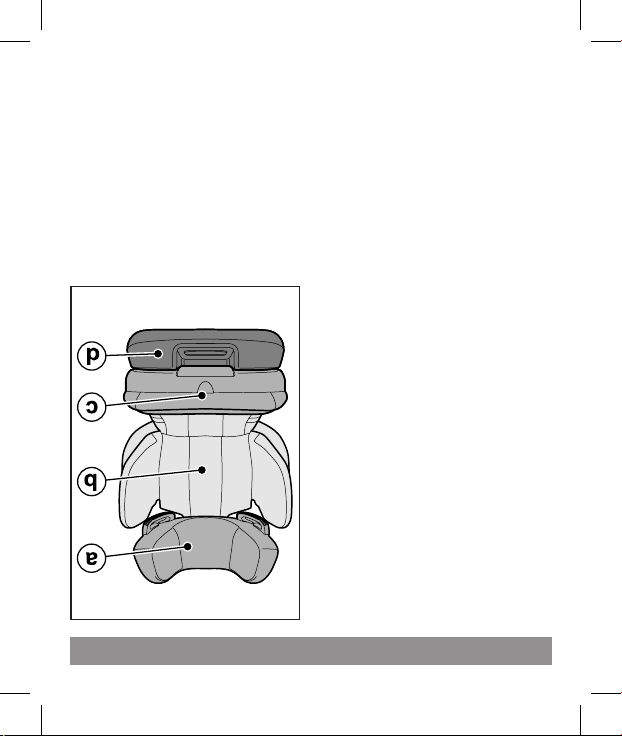
Product components
1. Always check the
product prior to use. The
product is composed of:
headrest (a), backrest (b),
seat (c), Rigid Latch Base
integrated into the seat
(d).
The car seat is ready
for use: no assembly
operation is required.
In case of missing or
malfunctioning parts,
please contact our
Customer Service @
1-800-671-1701 for help.
12
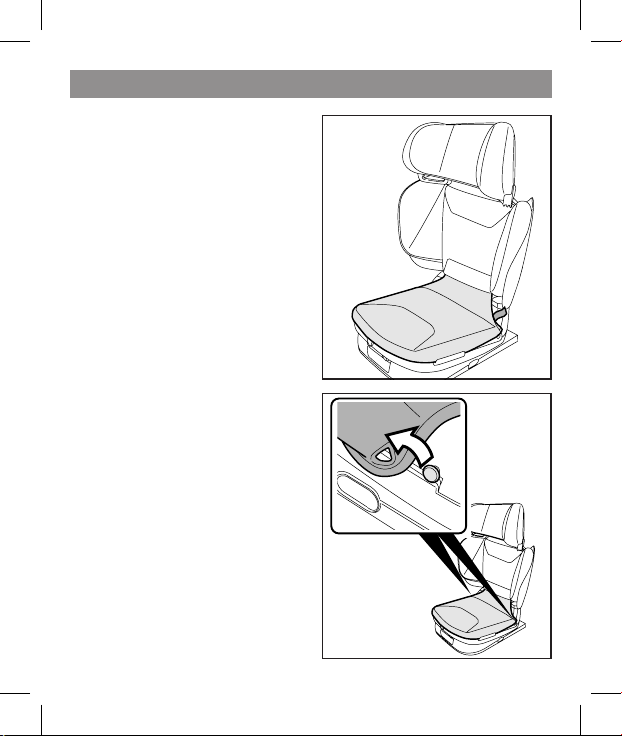
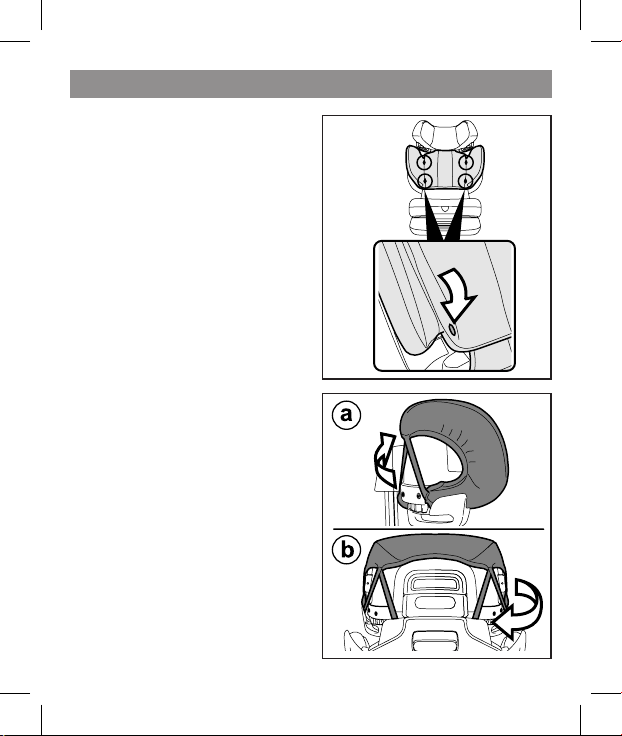
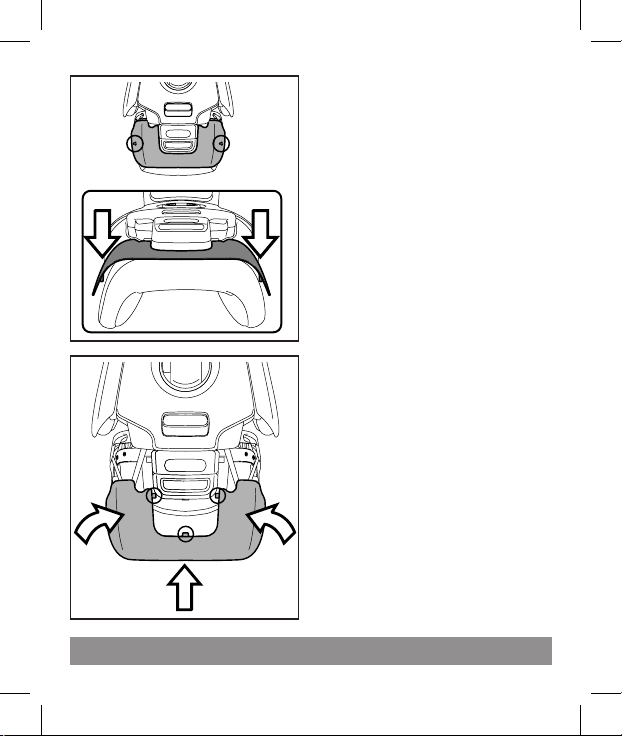
Opening the product before use
1. Raise the car seat
backrest until it clicks; the
product should remain
upright on its own. The
backrest oscillates by a
few degrees to better
fit the different types of
vehicle seats.
click
13
Product features
Viaggio Flex 120 adjusts
to grow with your child.
Each adjustment is
independent to ensure
maximum exibility of use.
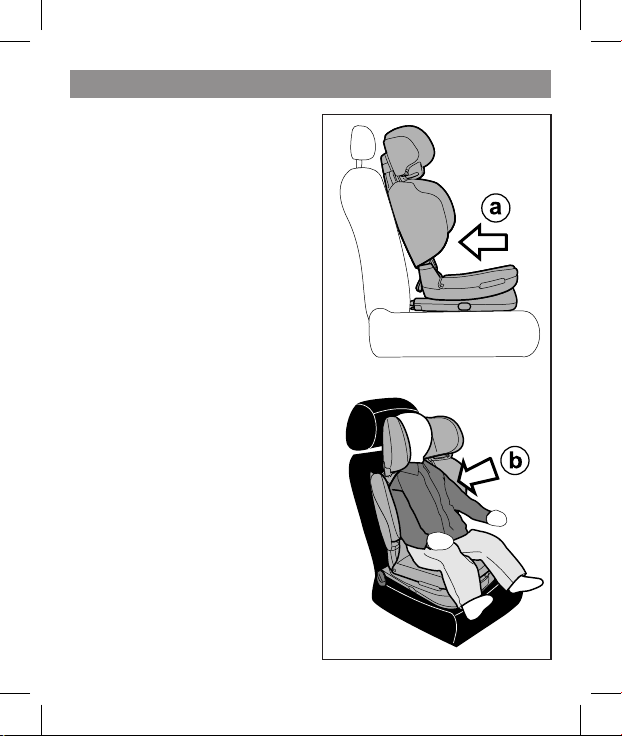
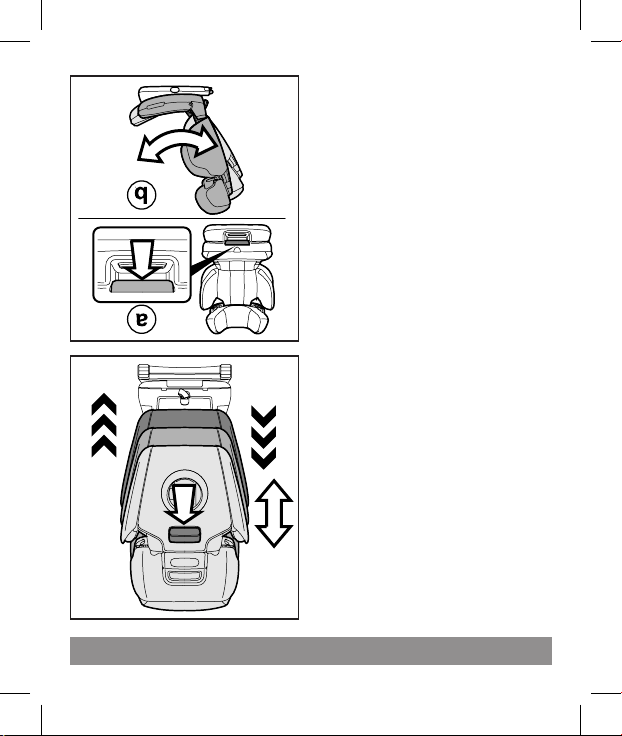
1. The headrest can be
adjusted in 5 positions. Lift
the handle (g_a) on the
back of the headrest and
simultaneously raise the
headrest (g_b), placing it
at the desired height.
IMPORTANT: as the
child grows, it is necessary
to adjust the height of the
headrest according to
that of the child.
IMPORTANT:
after completing the
operation, try to move
the headrest to ensure
it is correctly tted in
place.
1
2
3
4
5
1
2
3
4
5
14
Product features
1
2
3
1
2
3
1
2
1
2 3
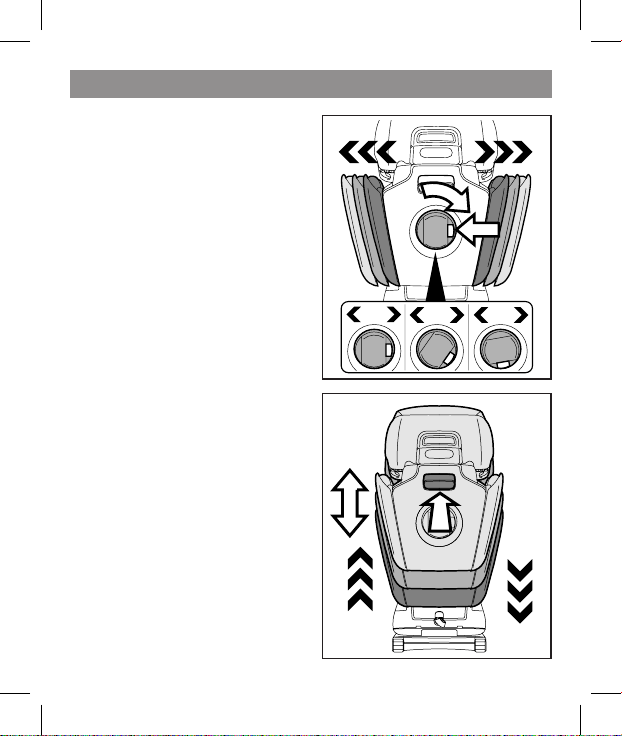
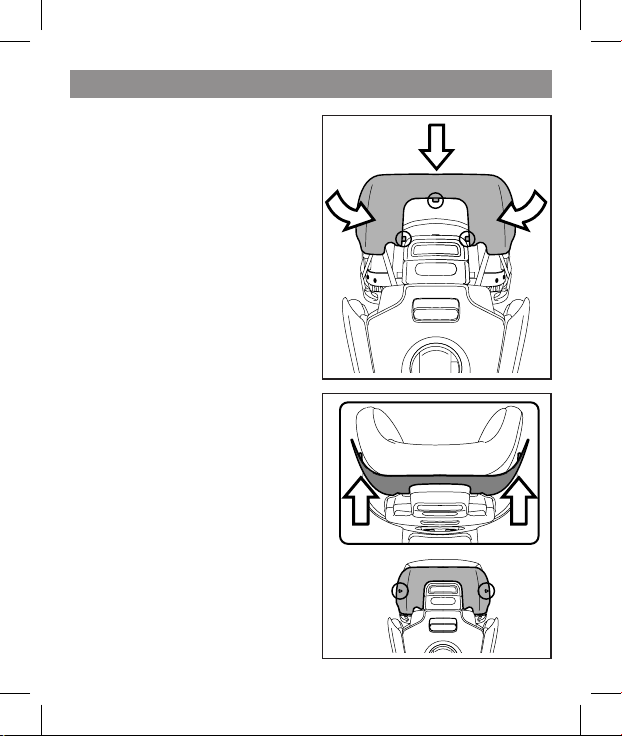
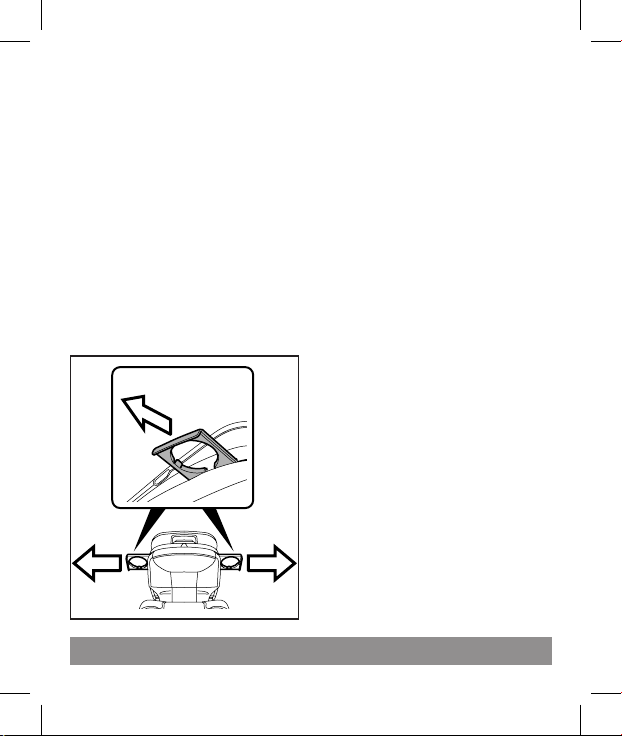
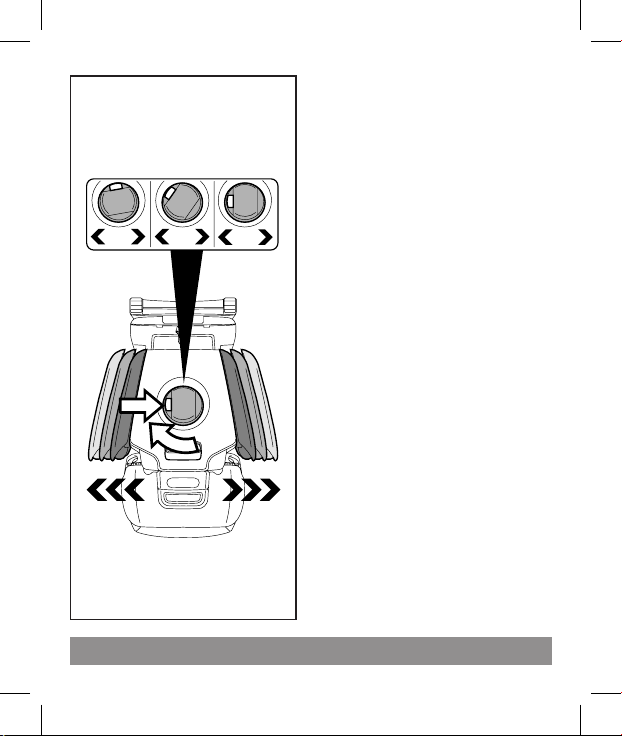
2.
The width of the backrest
may be adjusted in three
positions (closed, mid,
opened). Push the button
om the side of the knob
(1) and rotate the knob
(2) clockwise to open the
wings. This operation is
required as your child grows.
To close the wings, push the
side button and turn the
knob anti-clockwise.
3. The height of the
backrest may be adjusted
in 3 positions: push the
handle on the rear of the
backrest upwards (1) and
lift at the same time the
entire backrest (2) to the
desired position. To lower the
backrest, pull the handle (1)
and push at the same time
the backrest downwards (2).
This operation is required as
your child grows.
2
1
2
3
1
2
3
1
15
Product features
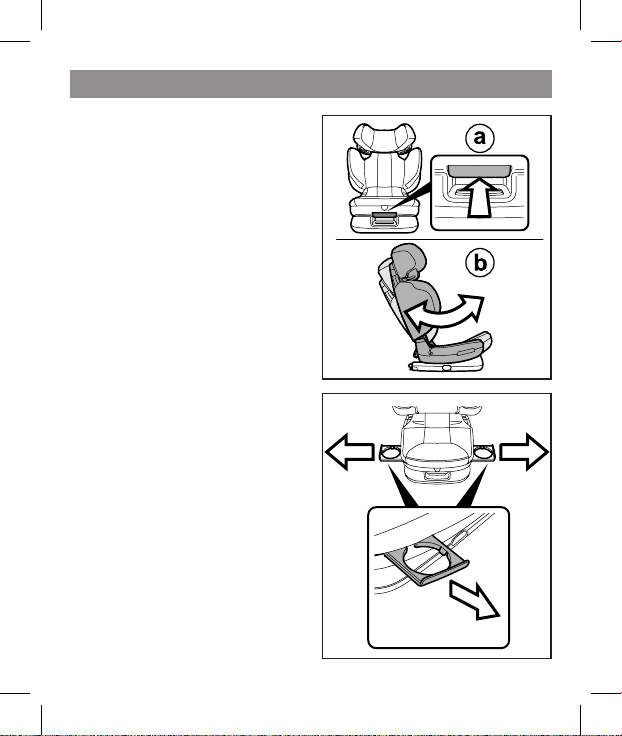
4. Viaggio Flex 120 is
tted with a reclining
system that guarantees
maximum comfort. To
recline the seat, pull the
handle (g_a) on the
front and simultaneously
recline the product
(g_b).
5. Viaggio Flex 120 is
tted with two side cup
holders.

16
Vehicle seatbelts design and compatibility
Viaggio Flex 120 is designed to be installed with lap
and shoulder vehicle belts commonly fitted on most
of the available cars. However, in the market there are
several different types of vehicles manufactured in
different periods.
As a result, there are many different vehicle belt
designs. Unfortunately, some may be unsuitable for
a safe installation of Viaggio Flex 120. Please read
carefully the list below and in case of problems or
doubts, double check your vehicle owner’s manual or
call Peg-Perego Customer Service @ 1-800-671-1701
for additional help.
17
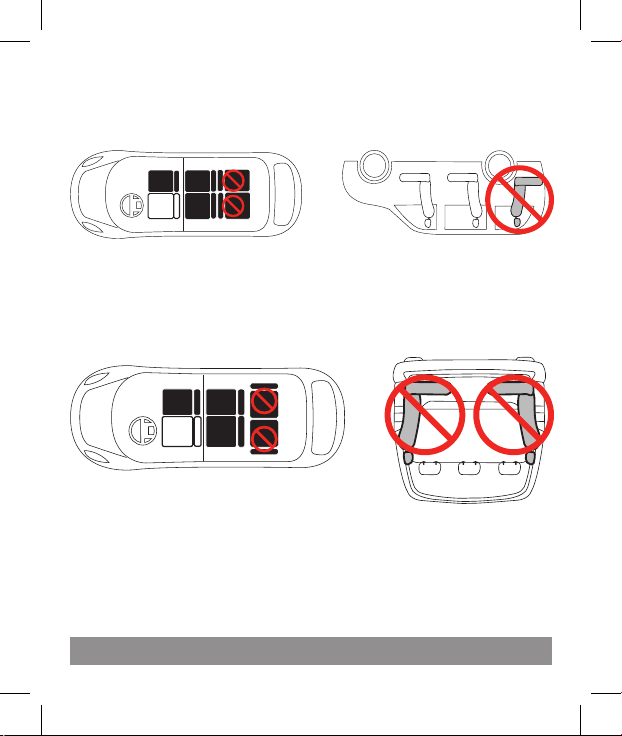
1. Lap/motorized
shoulder belts. Belts
mounted on the door
2. Lap belt only of any
kind.
Vehicle seatbelts design and compatibility
NON COMPATIBLE VEHICLE BELT DESIGNS
WARNING: do not use Viaggio Flex 120 with the
following vehicle belt design:

18
Vehicle seatbelts design and compatibility
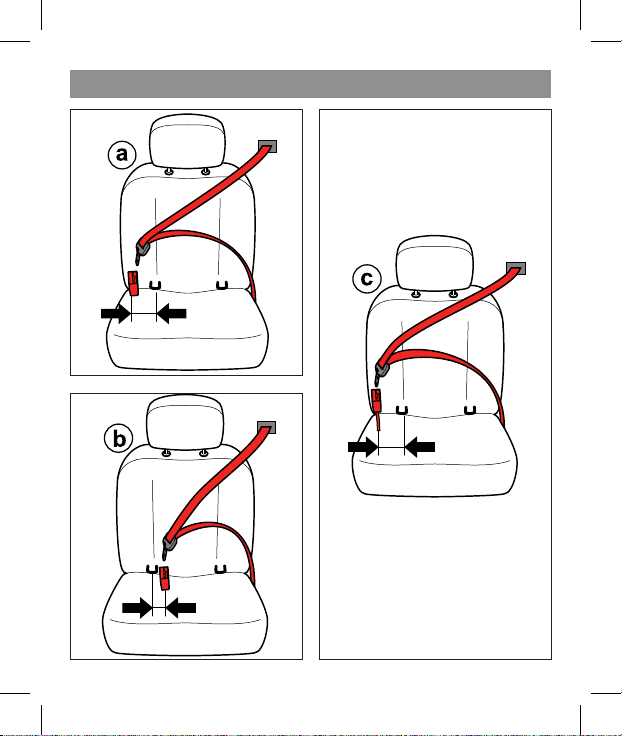
Viaggio Flex 120 is a booster seat equipped with
rigid latch. Although the rigid latch is used for
added stability only, its use is recommended.
When installing the seat, make sure that there is
enough space between the attached seat and the
vehicle belt buckle (a). On certain vehicles, the
buckle and the latch anchors may be close one to
the other.
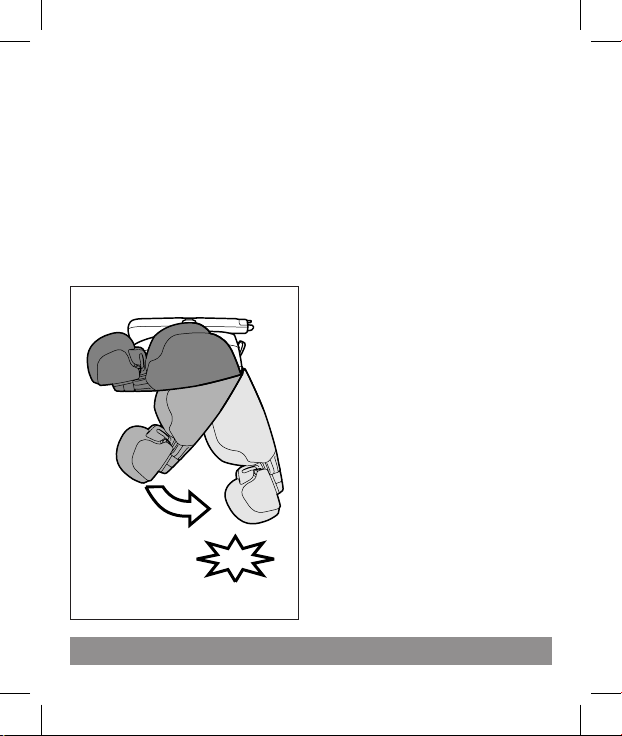
In the unlucky eventuality that they are too
close (b), or even overlapped, the contemporary
use of vehicle seatbelts and rigid latch may be
not possible; please refer to the vehicle owner's
manual for a suitable installation position or
contact Peg-Perego Customer Service @ 1-800-
671-1701 for additional help.
In case your vehicle is equipped with flexible
buckles, make sure that the buckle position allows
for trouble free attachment of the vehicle seatbelt
plate (c).
19
Vehicle seatbelts design and compatibility
20
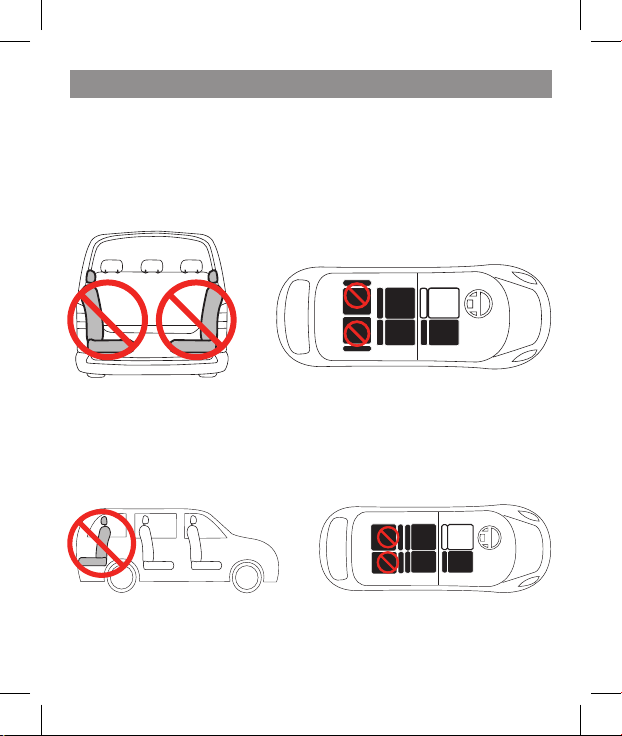
WARNING: do not use Viaggio Flex 120 with the
following vehicle seat design:
1. Side facing seats
2. Rear facing seats or seats that rotate in dierent
positions
For your child’s safety, always read your vehicle
owner’s manual for further informations.
NO
NO
NO
NO
Vehicle seat design and compatibility
Installing the booster seat in the vehicle

21
Vehicle seat design and compatibility
Installing the booster seat in the vehicle
How to attach the car seat on vehicle seats equipped
with latch anchors.
If your car is not fitted with latch positions, go to
the next section. For further information on the
availability of the anchors and their location, refer to
the vehicle's instruction manual.
IMPORTANT NOTE: use of LATCH connectors are
recommended by Peg-Perego to achieve the best
stability of the product in case of sudden or steep
turns. Also, using the LATCH will give guarantee
that the product is located in the correct position
with respect to the vehicle belt attachment points.
Use of latch does NOT replace the use of vehicle's
seatbelt to restraint your child.
22
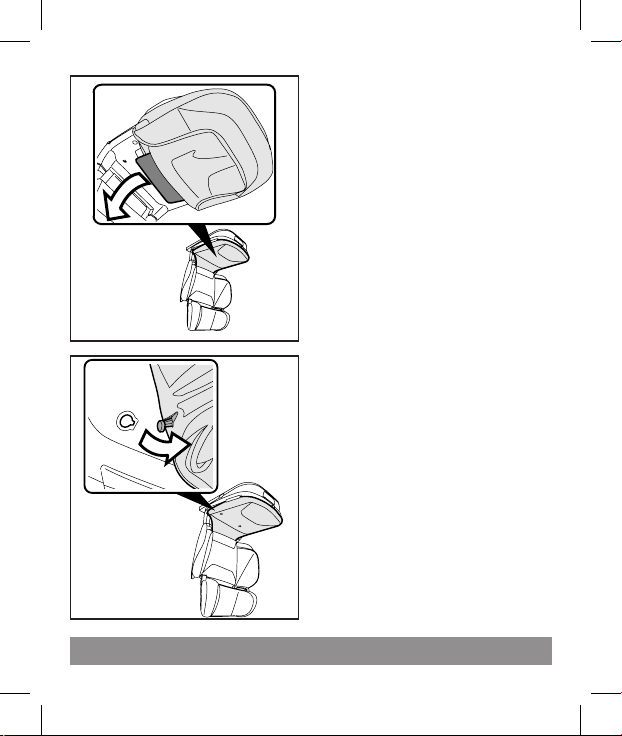
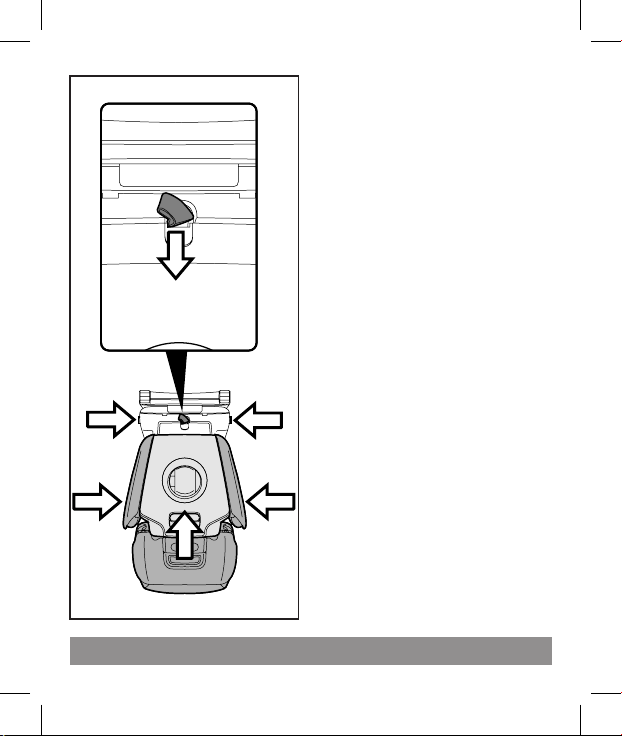
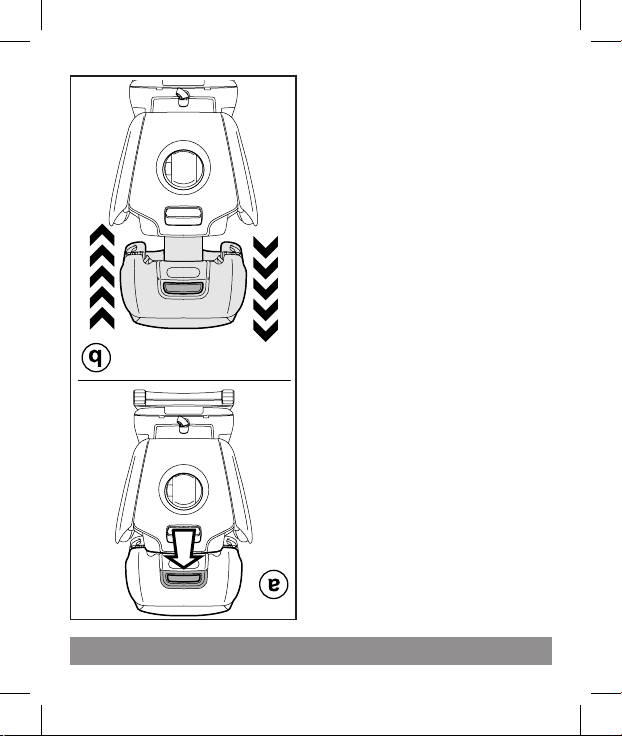
Installing the booster seat in the vehicle
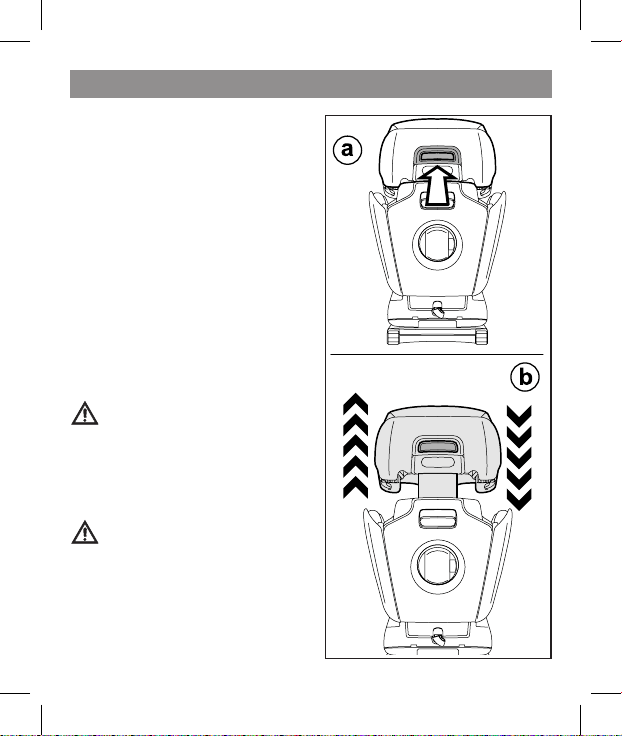
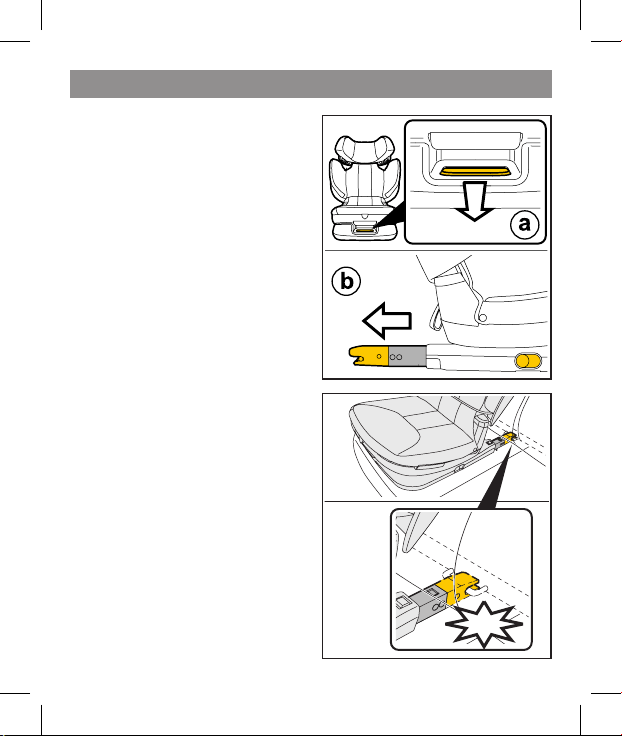
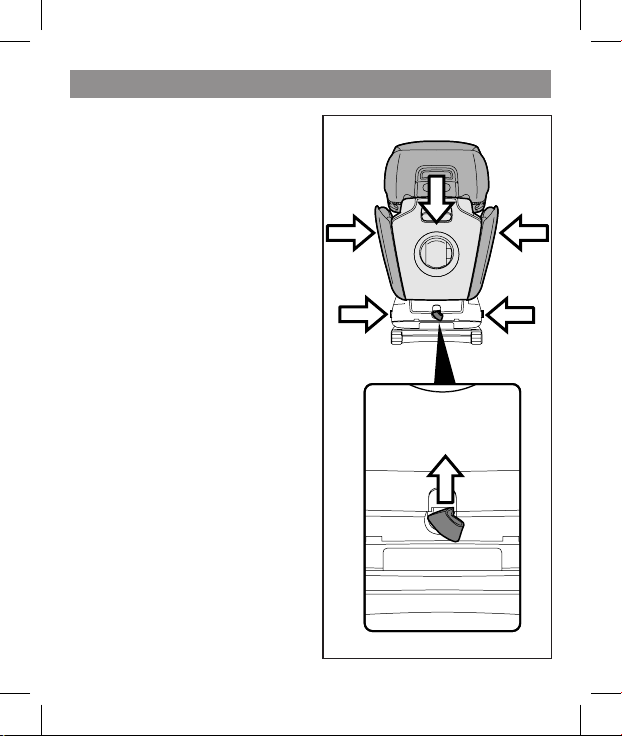
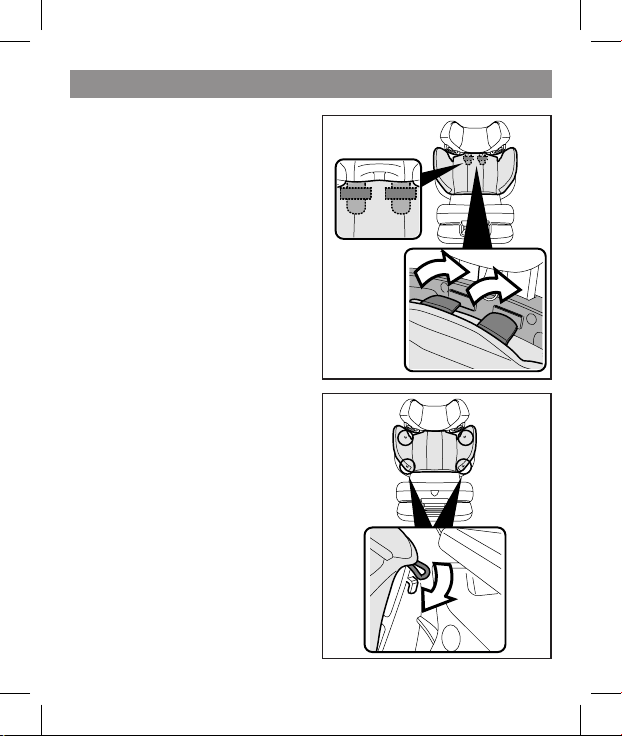
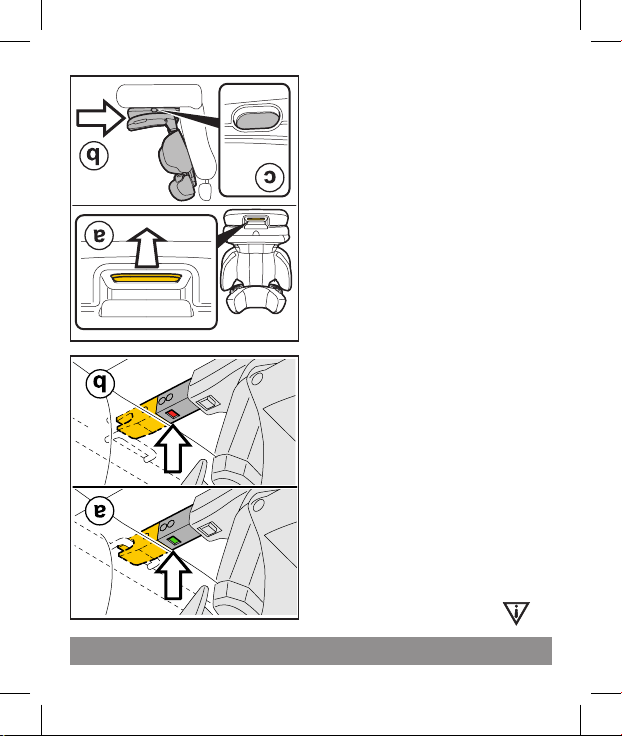
2. Attach the connectors
to the vehicle seat
anchors, ensuring they
“click” into place.
click
1. To expose the
connectors located
inside the base, pull the
handle on the bottom
front part of the seat
(fig_a). The connectors
will be ejected (fig_b).
Repeat to make sure they
have been ejected fully
and simultaneously.
Installing the booster seat in the vehicle

23
Installing the booster seat in the vehicle
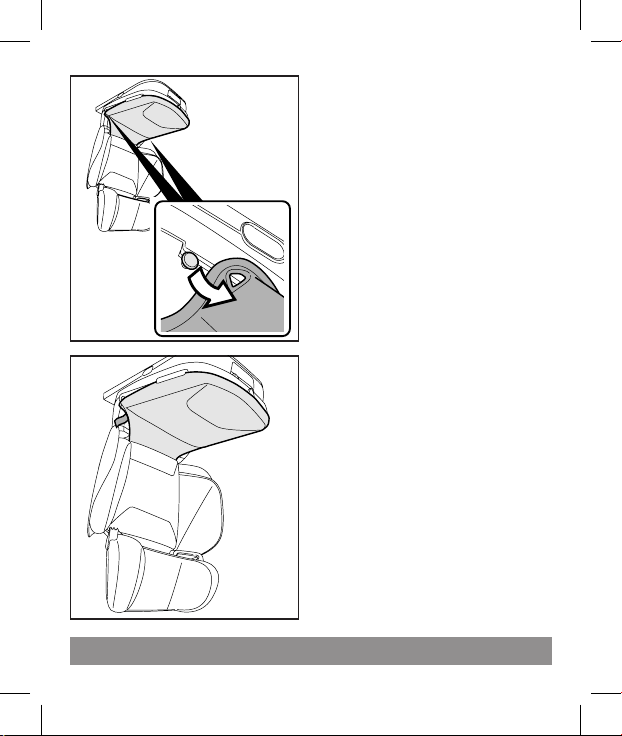
Installing the booster seat in the vehicle
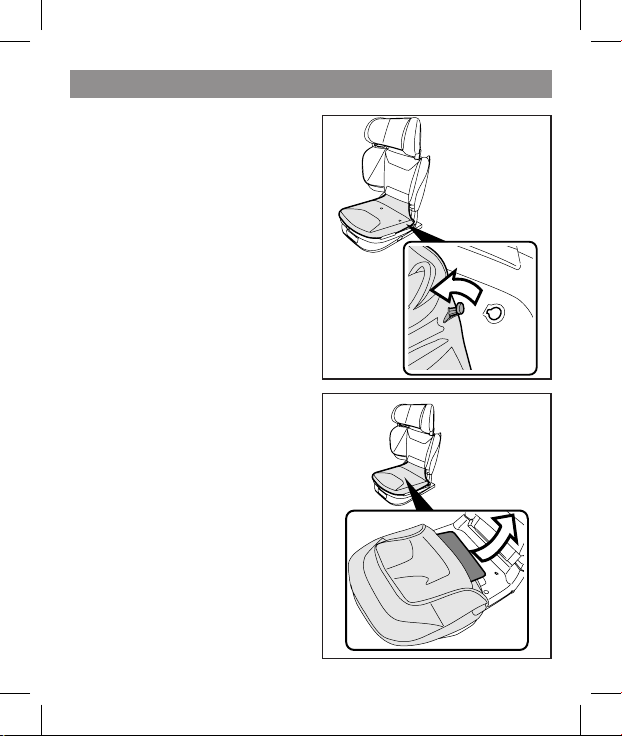
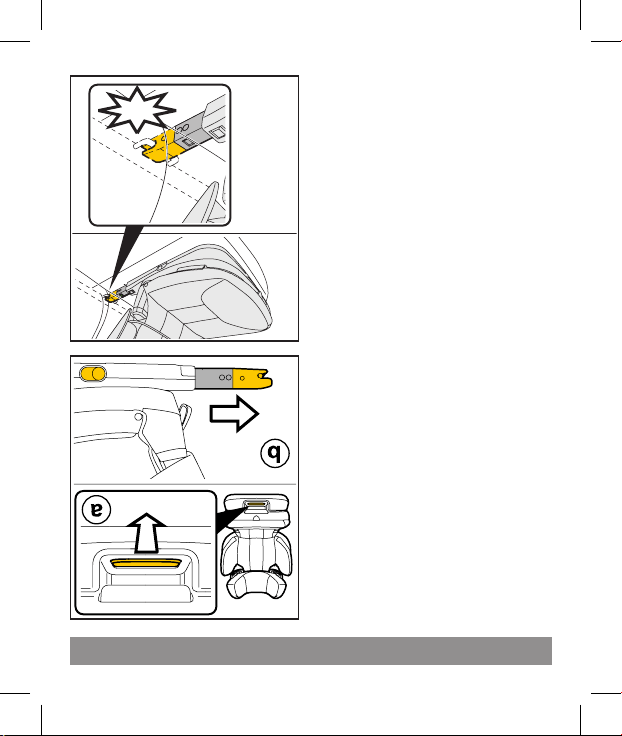
4. After attaching the seat,
pull the front handle again
(fig_a) and, at the same
time, push the car seat
towards the vehicle’s seat
(fig_b), then release the
handle.
By doing this the release
buttons on the side of
the base will disappear
(fig_c), thus preventing
inadvertent release.
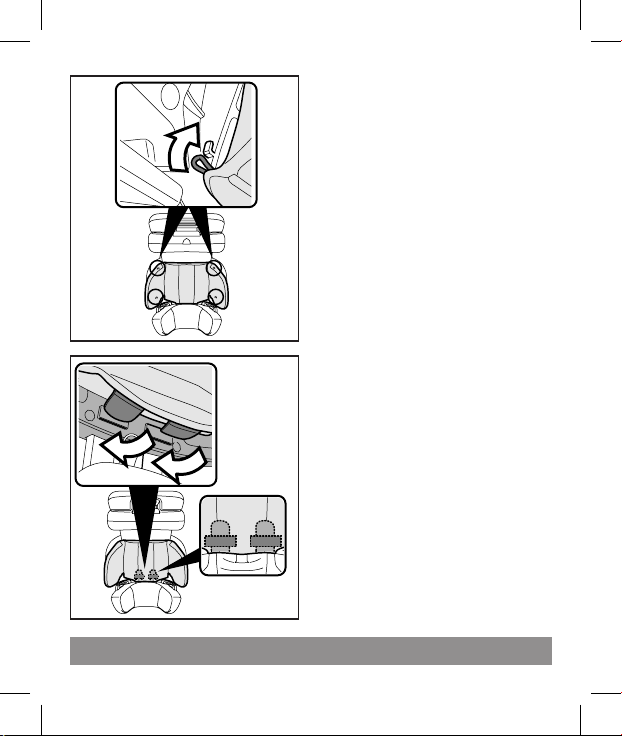
3. IMPORTANT:
The vehicle anchors and
the car seat connectors
are correctly coupled
when a green signal
appears above the
connectors (fig_a). A red
signal indicates that the
attachments have NOT
been coupled correctly
(fig_b) .
24
1
2
2
1
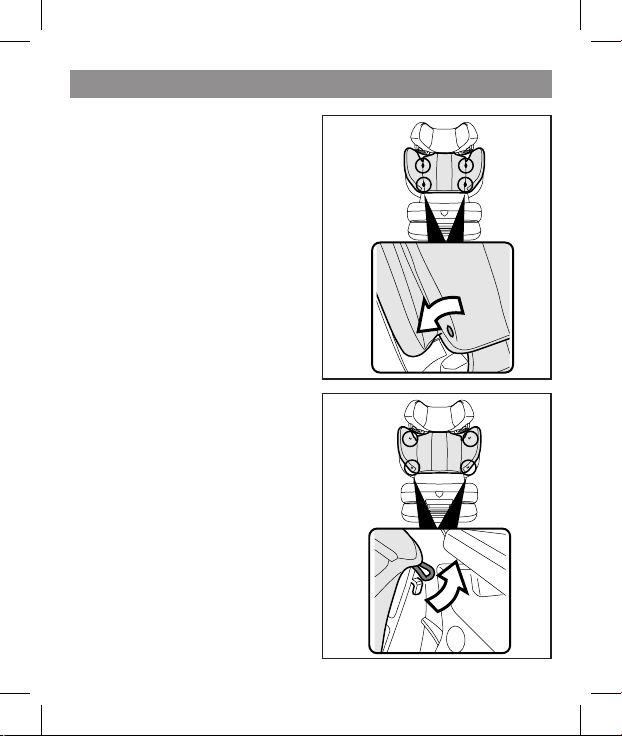
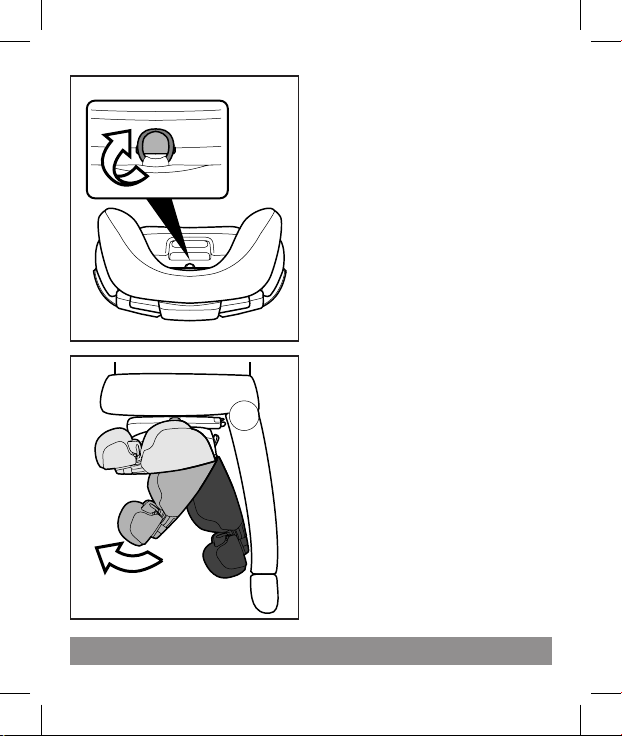
Installing the booster seat in the vehicle
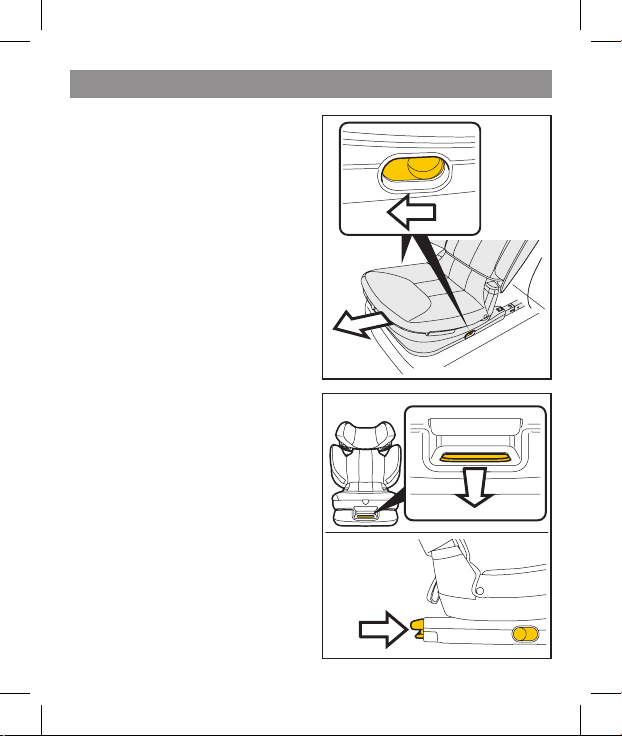
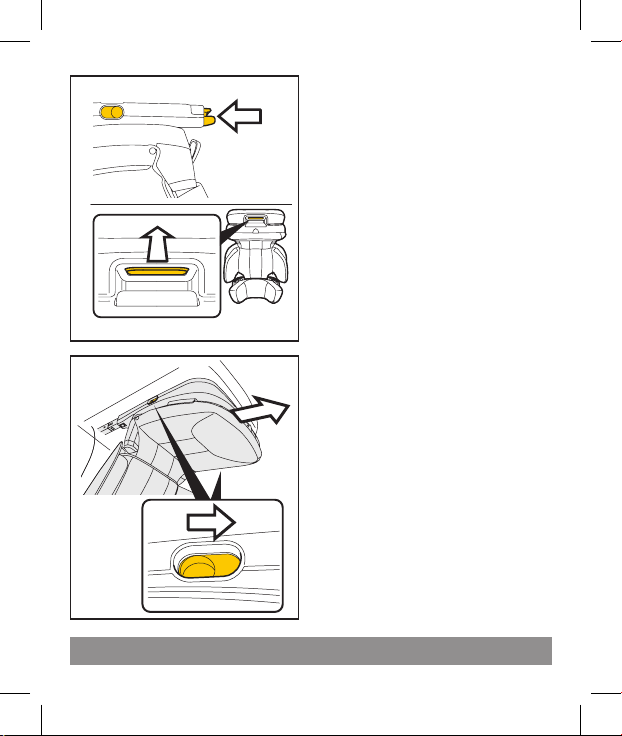
5. To release Viaggio Flex
120 from the vehicle seat,
pull the handle (1) and
the seat until the release
buttons on the side of the
base are fully revealed. In
so doing, the yellow release
buttons will be visible on
the sides of the base; pull
the two buttons (2) until
you hear the attachments
click open. At this point
you can remove the car
seat.
6. To reposition the
connectors inside the base
(when not in use), pull the
lever once more (1) and
simultaneously push one
of the two connectors in (2)
until they disappear.
Installing the booster seat in the vehicle
25
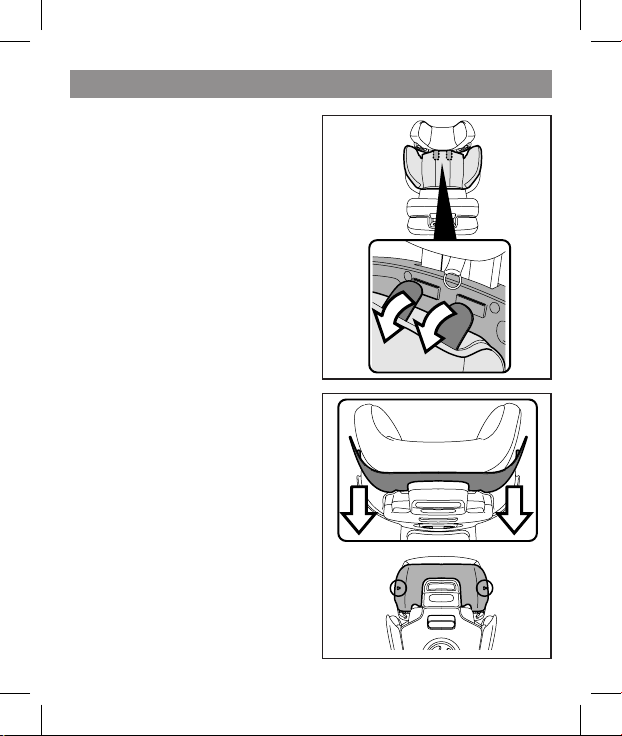
Installing the booster seat in the vehicle
Installing the booster seat in the vehicle
How to attach the car
seat on vehicle seats
not equipped with latch
anchor positions.
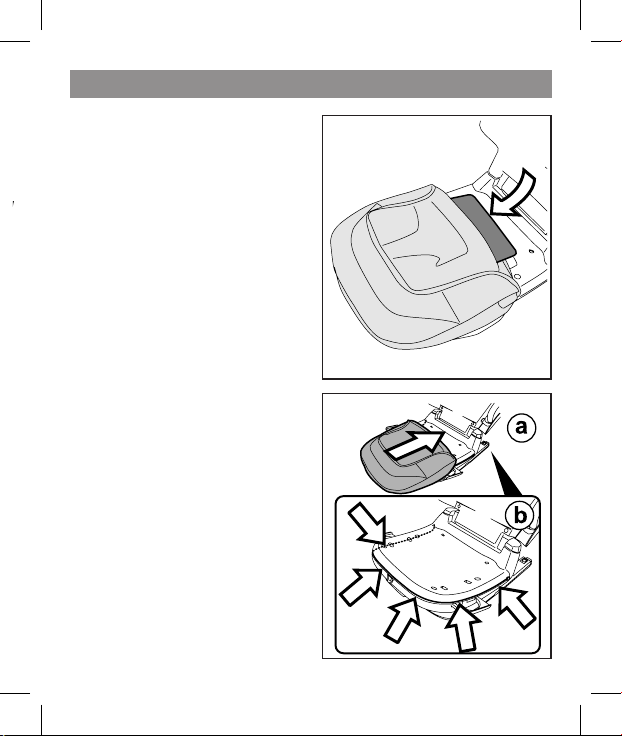
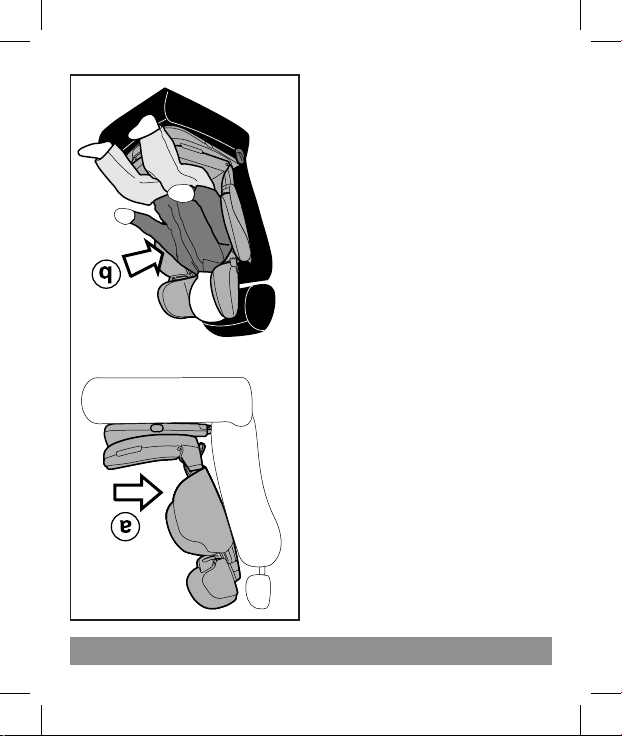
7. Place the Viaggio Flex
120 car seat on the vehicle
seat in the direction
of travel, leaving the
connectors inside the
base (fig_a) and position
the child in the seat as
shown in the picture
(fig_b), ensuring the
car seat does not move
during this operation.
26
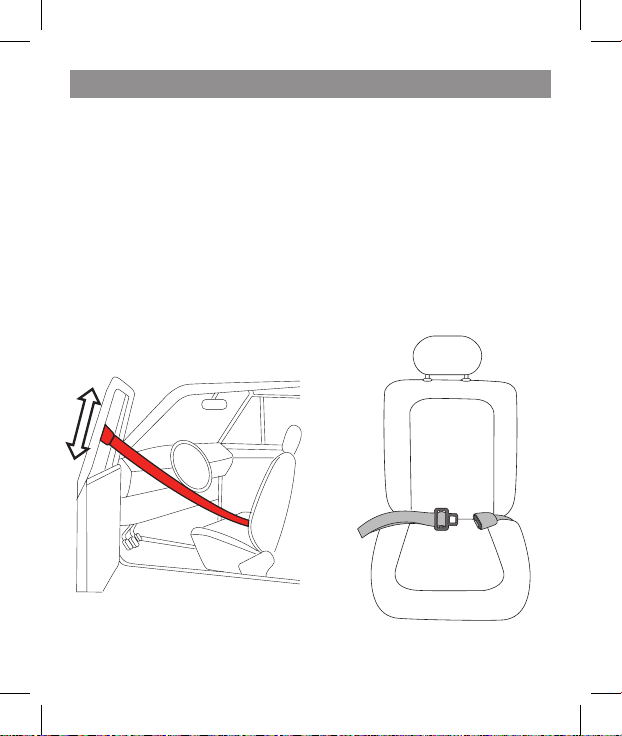
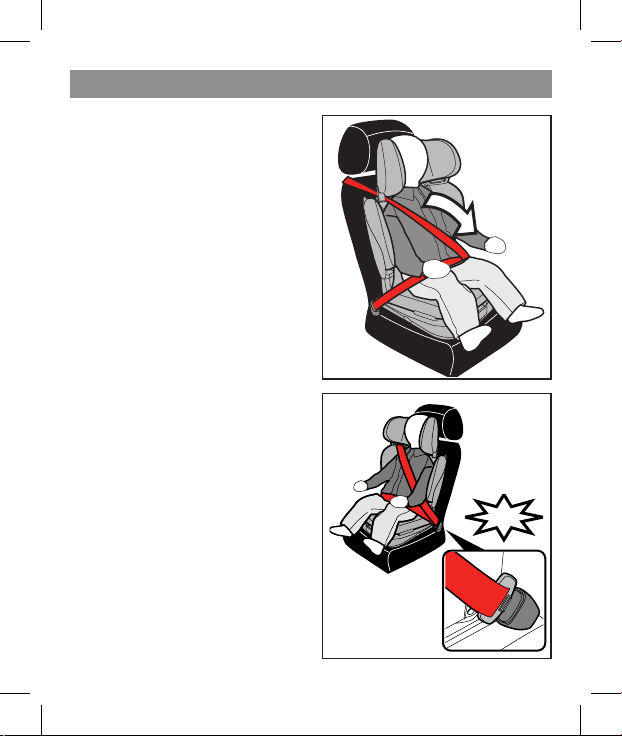
1. Secure your child with
the vehicle seat belt as
shown in the picture.
click
Securing your child in the booster seat
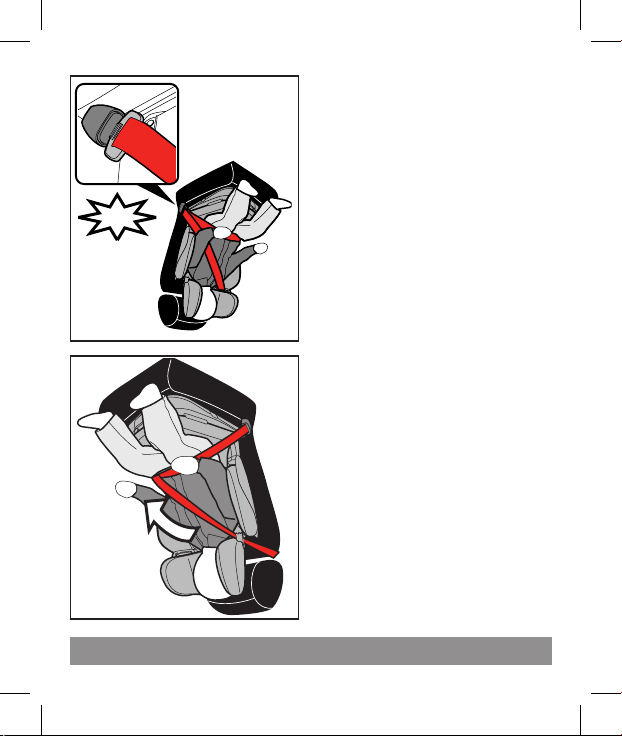
2. Fasten the vehicle
seat belt, ensuring that
it clicks in place. Position
the two sections of the
belt as shown in the
picture.
Securing your child in the booster seat
27
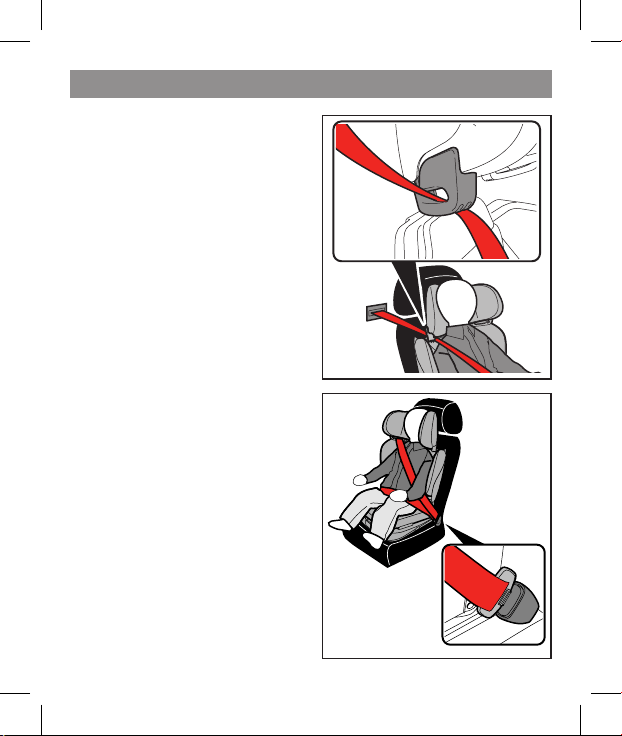
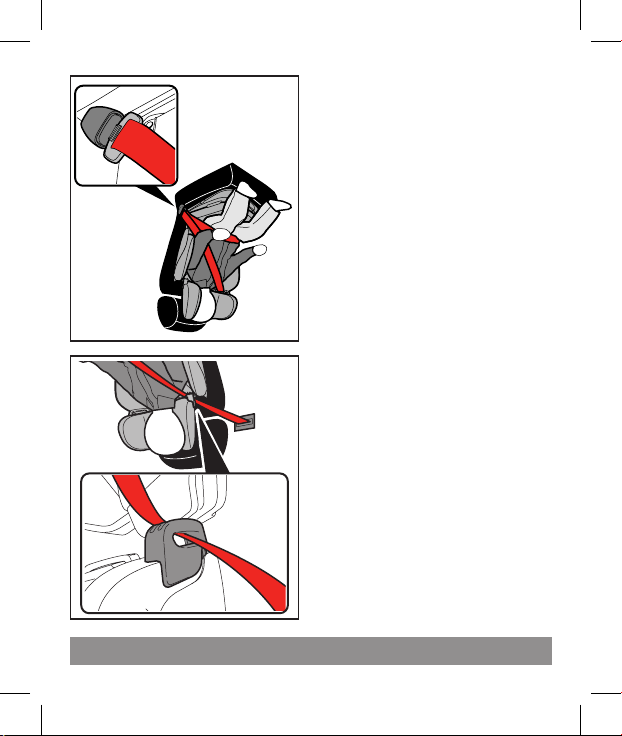
Securing your child in the booster seat
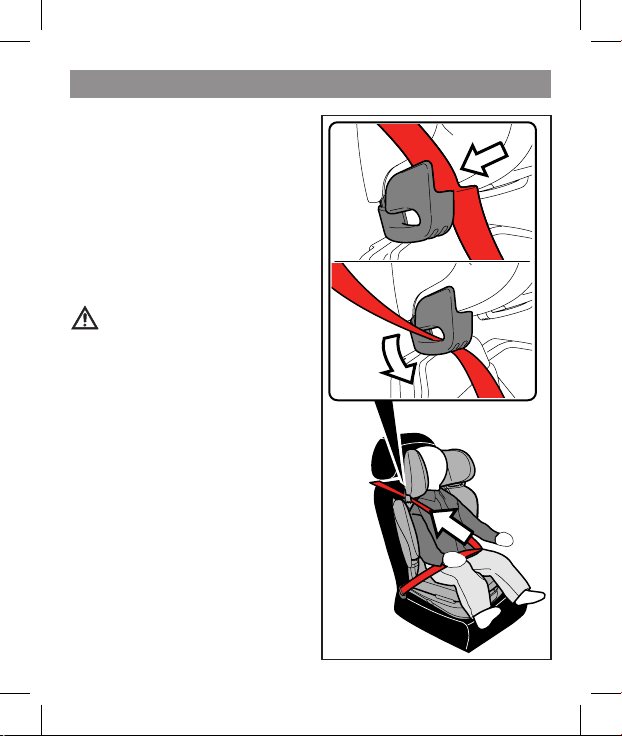
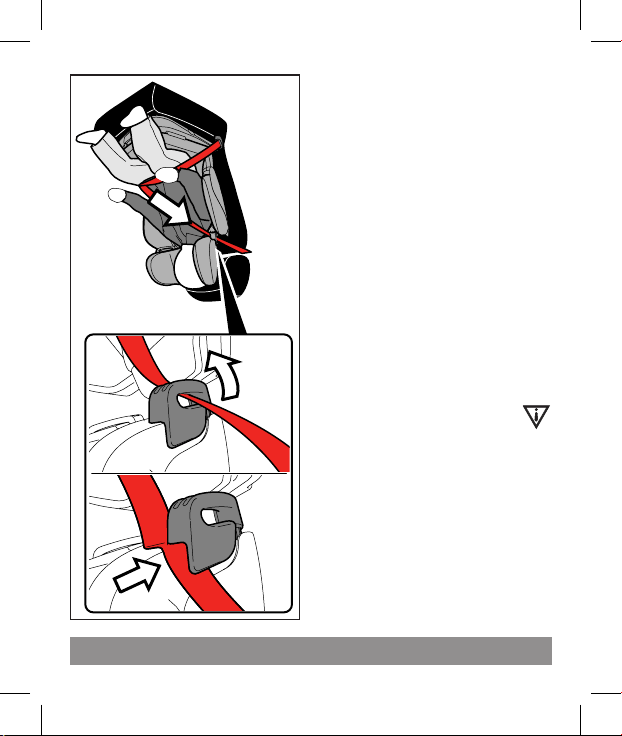
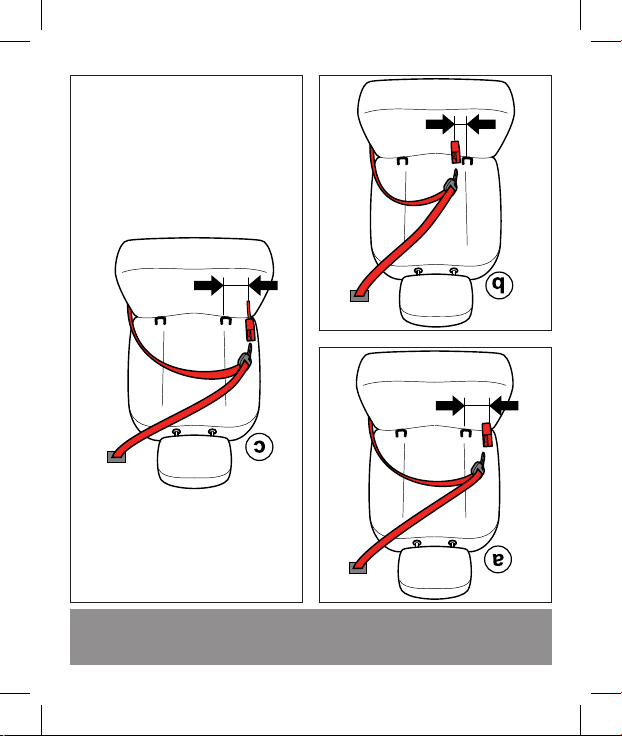
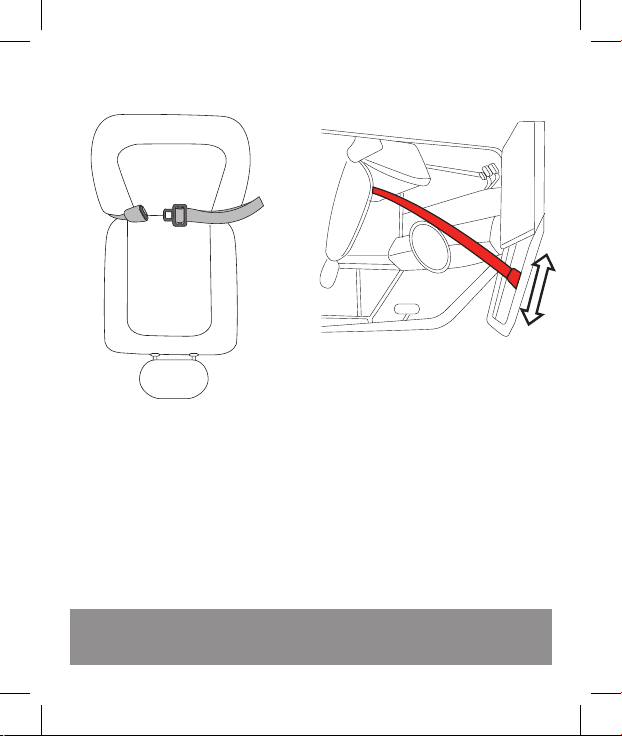
3. Thread the belt
through the router
placed on the headrest:
thread the belt between
the router and the
headrest (1) until it slides
completely into the
router slot (2).
IMPORTANT: If the
belt is loose, pull it
tight above the loop
(3). Ensure the belt is
always tensioned and
not twisted.
Securing your child in the booster seat
2
1
3
28
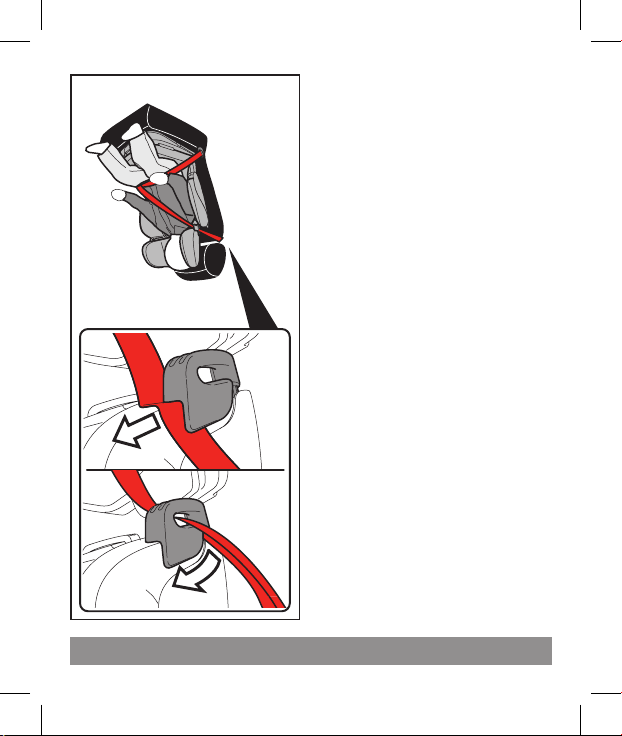
Securing your child in the booster seat
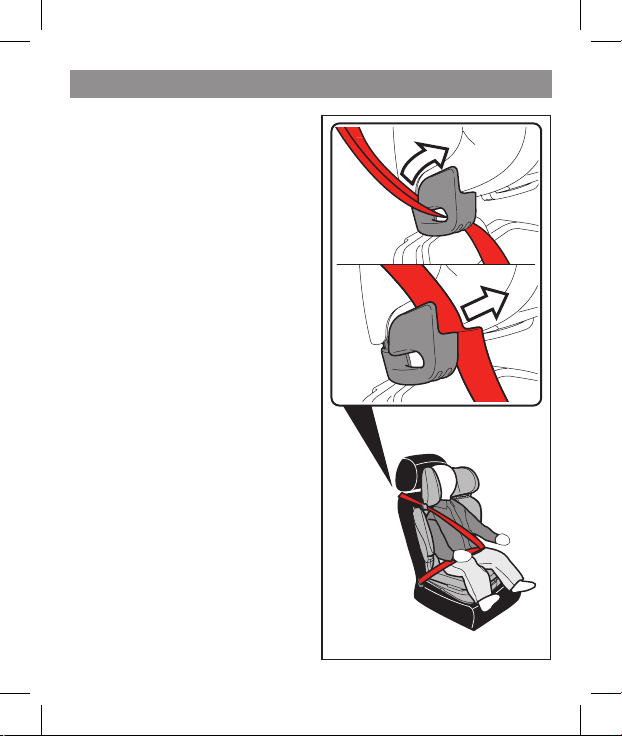
4. To remove the belt,
slide it out of the
router slot (1) and then
between the router and
the headrest (2) until it is
completely removed.
1
2
Securing your child in the booster seat
29
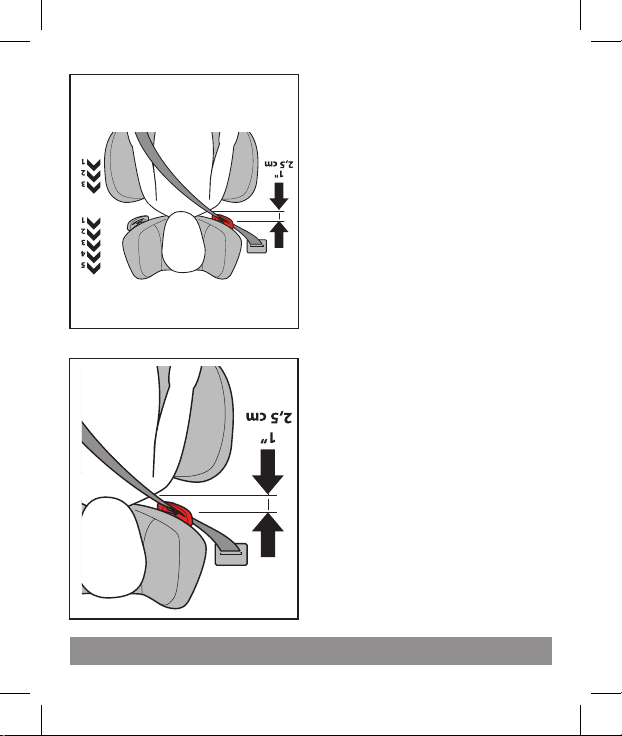
Securing your child in the booster seat
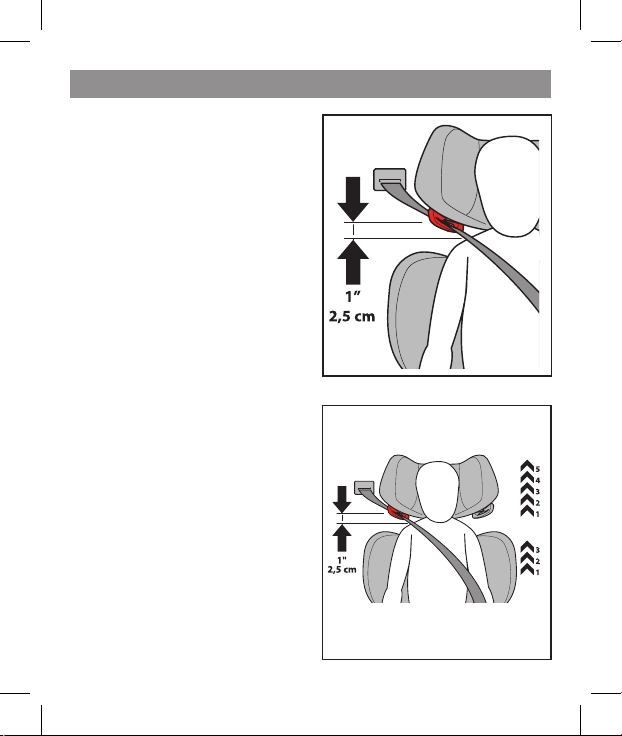
Securing your child in the booster seat
With the child in the booster
seat, adjust headrest and
backrest height using the
levers located behind the
seat (refer to pages 13-14).
The headrest is properly
set when the shoulder belt
router is located at no more
than 1" (2.5 cm) above
shoulder level and the
shoulder lies at the center
of child's chest.
Adjust the headrest and
backrest so that the red
shoulder belt guide is
always within 1" (2.5 cm) of
your child's shoulder and
never below.
The seat must be
discontinued when the
child's shoulder touches
the belt red guide even
when the seat is adjusted
at the maximum height.
30
Securing your child in the booster seat
Picture shows the correct
belt pattern around the
child in your Viaggio Flex
120.
31
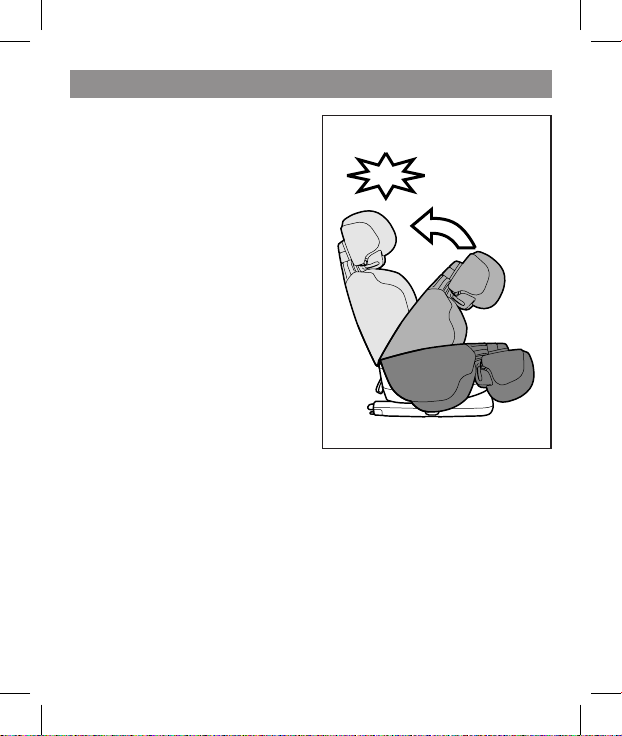
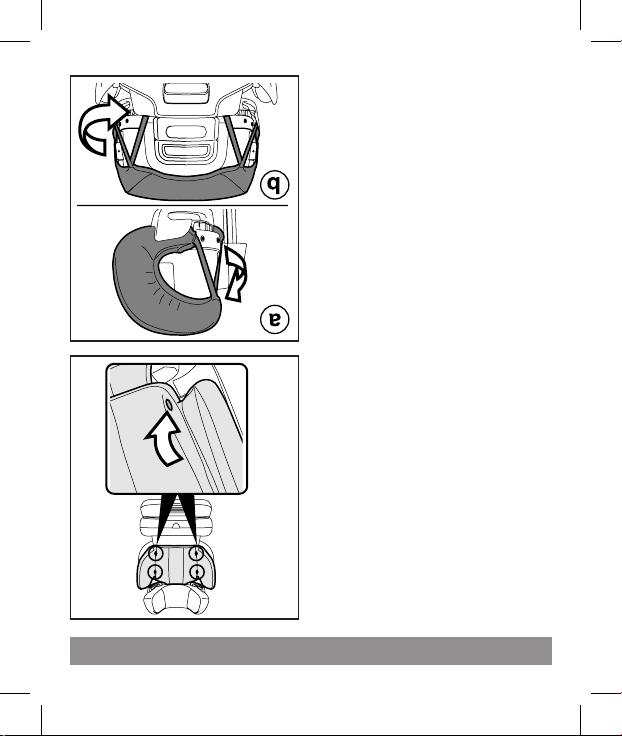
Securing your child in the booster seat
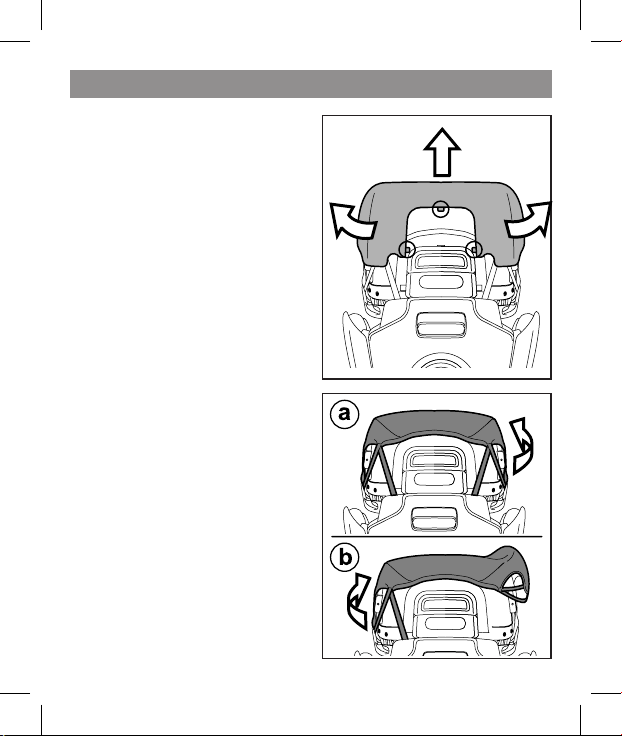
Viaggio Flex 120 is
designed with a foldable
backrest. Fold it to store
the product or carry it. In
case the seat is attached
with rigid latch and is
not in use, you can rotate
the backrest for better
rearward visibility.
1. To fold the product
lower the headrest and
the backrest (1), tighten
the side restraining
wings (2) and, if
necessary, push in the
cup holders (3). Pull the
ribbon upwards (4).
3
2
3
2
4
1
How to fold and carry the car seat

32
5
2. At the same time rotate
the backrest down (5).
IMPORTANT NOTE: if
the Viaggio Flex 120 is
not attached with latch
and not in use remove
it from the vehicle
cockpit. In case of a
sudden stop or a crash
it could be extremely
dangerous.
3. Attach the ring that
fastens the backrest
to the seat when the
product is closed.
How to fold and carry the car seat
33
Cleaning and maintenance
Your booster seat requires a minimum of cleaning
and maintenance. Do not clean with harsh products
or solvents. Keep moving parts clean. In case, clean
plastic parts with a damp cloth. Do not use water
with harness and latching mechanisms. Protect the
booster seat from extreme cold, water, rain and sun
exposure. Prolonged exposures to these elements
can change the colors in the material but also change
their mechanical properties. Store the booster seat in
a dry area if not used for long periods.
The upholstery is likely to be removed and cleaned
frequently. Follow the procedure below to remove
the fabric and reassemble it properly. Check the
booster seat features before disassembly and make
sure that the same features are still working once
the booster seat is set up for use again. Extra care is
required when removing padding to avoid breaking
the white EPS panels on the booster seat.
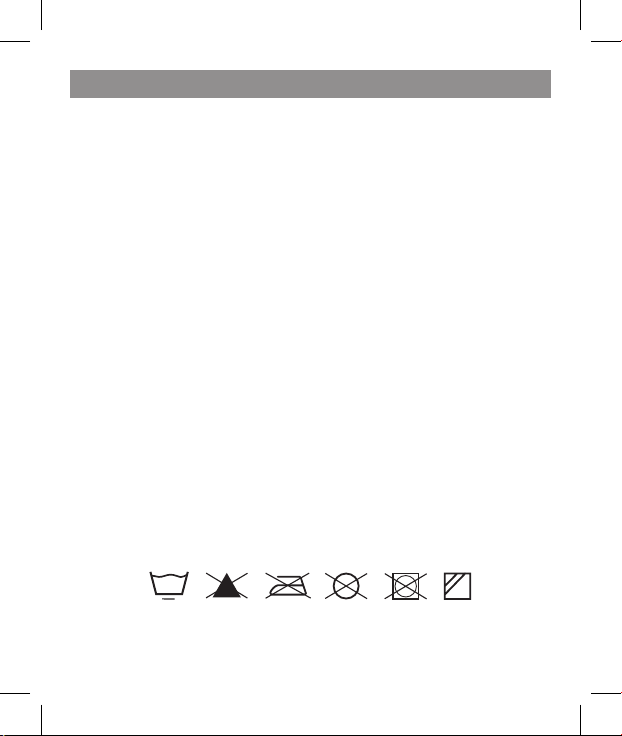
All the upholstered covers (seat, backrest and
headrest) can be machine washed at 87° F (30° C).
30
°
34
Cleaning and maintenance
The upholstery of Viaggio
Flex 120 may be removed
for cleaning.
1. Follow the washing
instructions on the seat
lining.
Removing the upholstery
from the seat:
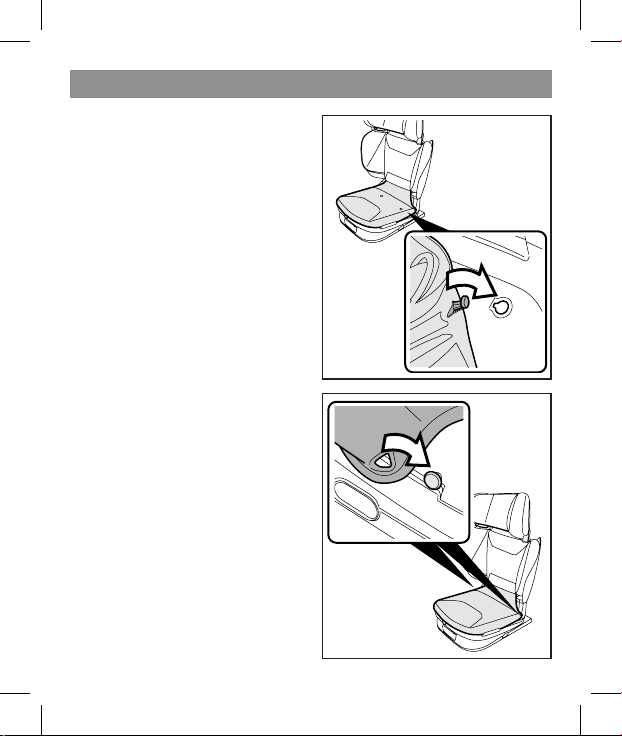
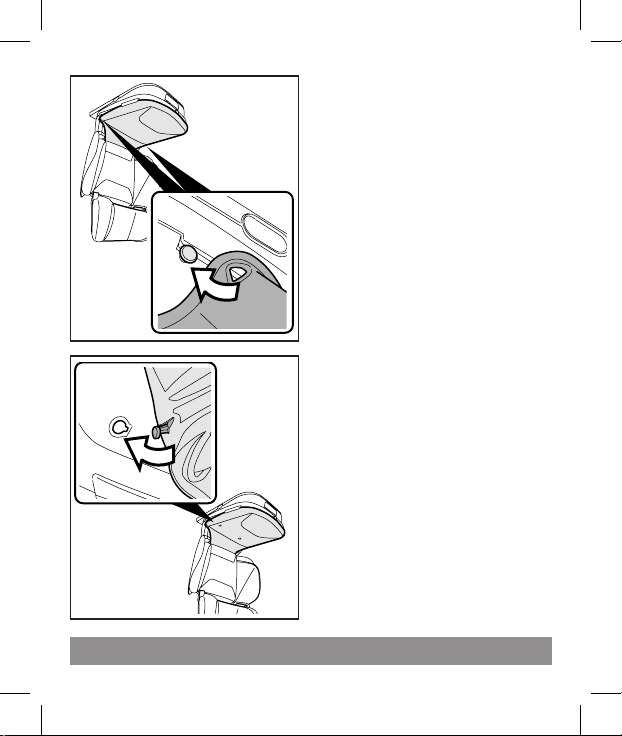
2. Unhook the two
eyelets from the buttons
on the sides of the car
seat base.
Cleaning and maintenance
35
Cleaning and maintenance
Cleaning and maintenance
3. Release the plastic
hooks from the seat base.
4. Remove the upholstery
and slide out the plastic
panel placed inside
the pocket as shown.
Remember to put it in
place once the lining has
been washed and dried.
36
Removing the upholstery
from the backrest
:
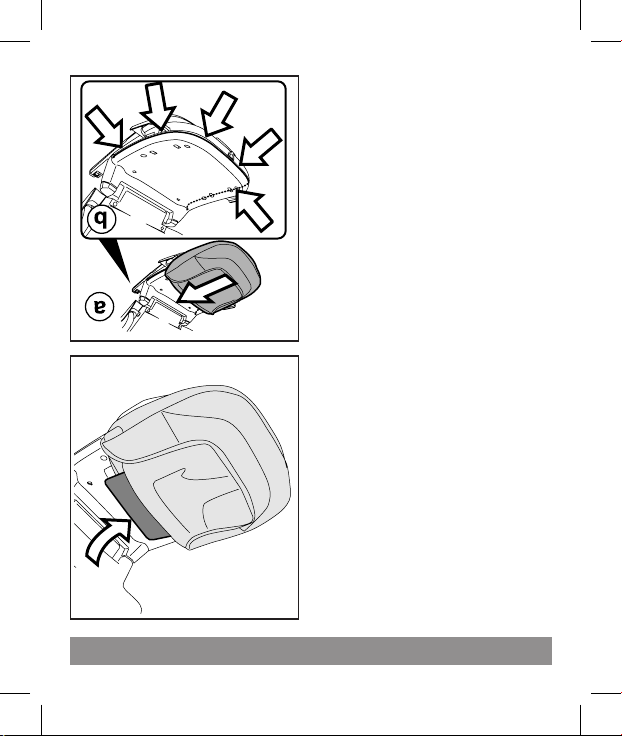
5. Remove the four
eyelets from the plastic
buttons on the sides of
the backrest. To facilitate
this operation, widen the
side wings
6. Release the two upper
elastic bands and the
two lower ones located
on each side.
Cleaning and maintenance
Cleaning and maintenance
37
Cleaning and maintenance
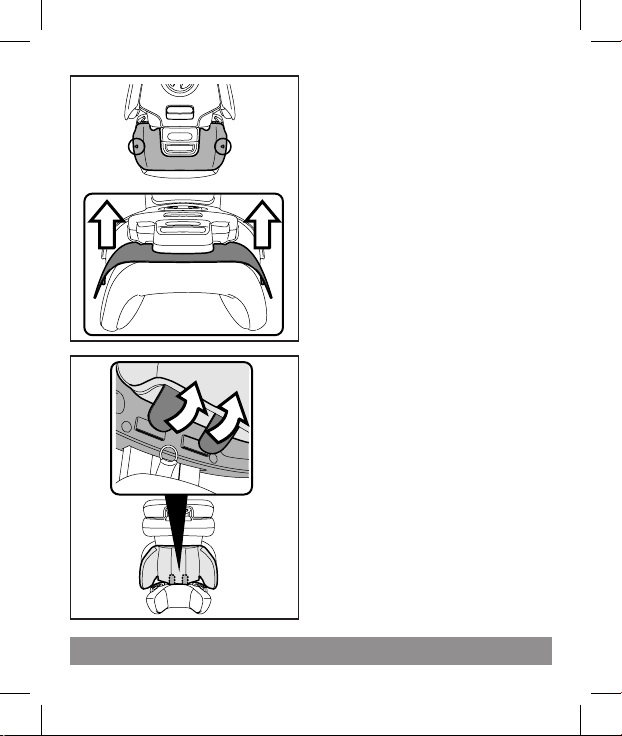
7. Remove the two
flaps from their slots on
the upper part of the
backrest. To help with
this operation, raise the
headrest. At this point
you can remove the
lining from the car seat
upholstery backrest.
Cleaning and maintenance
Removing the upholstery
from the headrest
:
8. To remove the plastic
cover on the back of the
headrest, unfasten the
two side hooks.
38
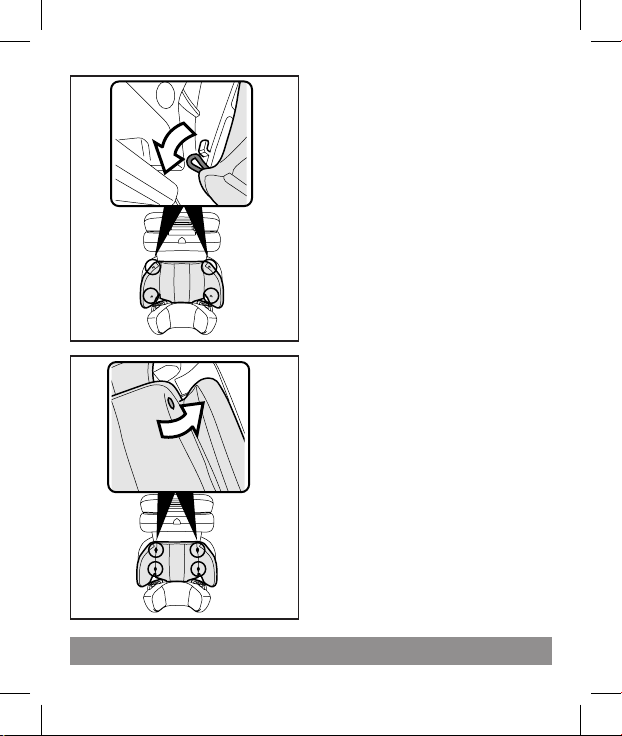
Cleaning and maintenance
9. Release the bottom
(1) and top tabs (2) as
shown.
1
1
2
10. To remove the
headrest upholstery,
slightly raise the headrest
and release the two
elastic bands on one side
(fig_a) and then on the
other (fig_b). Remove
the upholstery.
39
Cleaning and maintenance
1
1
2
Cleaning and maintenance
Cleaning and maintenance
Relining the seat:
1. Insert the plastic panel
in the pocket of the seat.
2. Slip the seat lining on
from the front (fig_a),
inserting the profile in
the appropriate slot
(fig_b).
40
Cleaning and maintenance
3. Insert the two hooks
on the base of the seat
near the bottom of the
backrest.
4. Finally, attach the
two side eyelets to the
buttons on the sides of
the seat.
41
Cleaning and maintenance
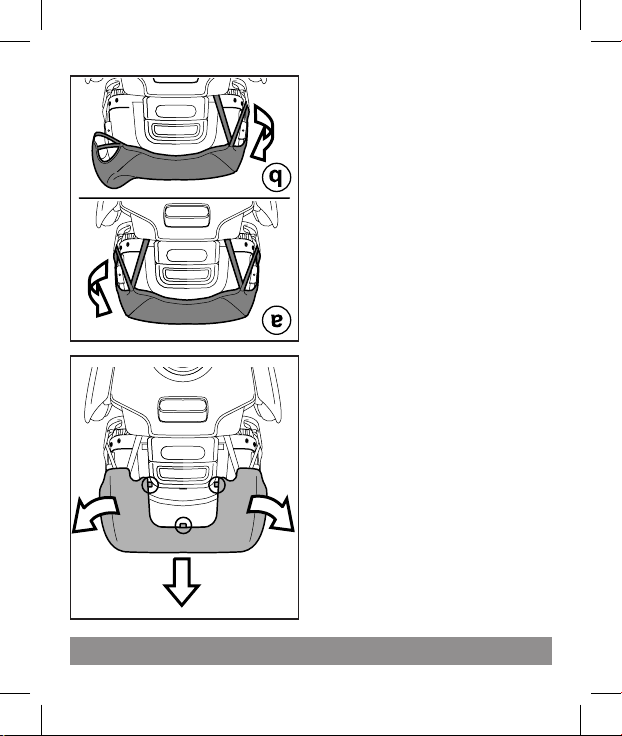
Relining the backrest:
5. Slightly widen the side
wings of the car seat
and insert the plastic
flaps into their slots in
the backrest, ensuring
they come out below as
shown in figure.
6. Slip on the side lining
and fasten the two upper
elastic bands; repeat for
the lower elastic bands.
42
Cleaning and maintenance
7. Fasten the four side
eyelets to the appropriate
buttons.
Relining the headrest:
8. Slightly raise the
headrest and put the
lining back in place,
fastening the two elastics
as shown, first on one
side (fig_a) and then on
the other (fig_b), and
paying attention to the
white polystyrene.
43
9. Fasten the back
cover along the three
central points above
the adjustment handle,
following the sequence
shown in the figure.
2
2
1
Cleaning and maintenance
10. Finally, fasten the two
sides to the headrest.
44
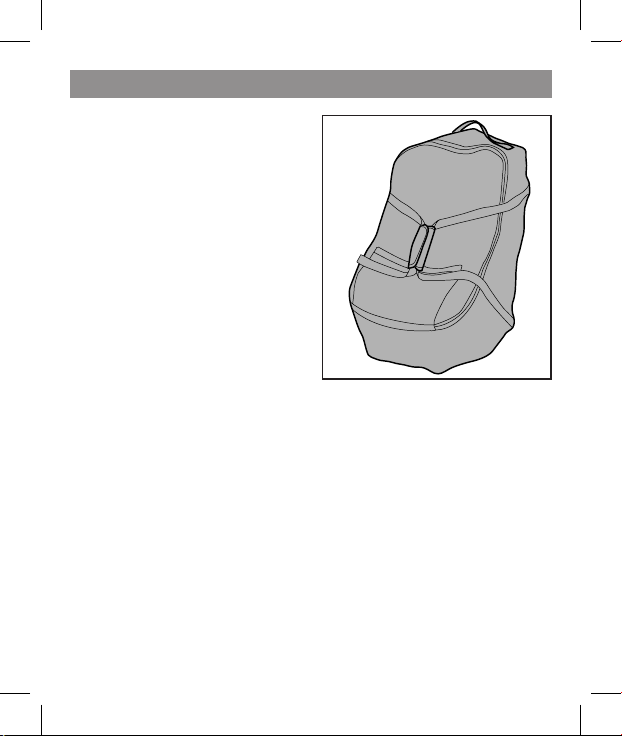
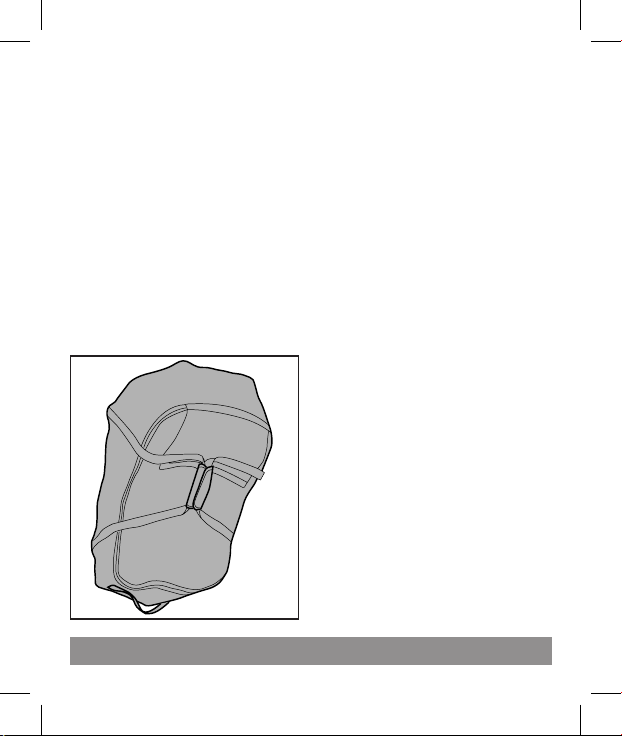
Accessories
Travel Bag Car Seat:
practical travel bag that
keeps the car seat clean
and protected.
45
2
1
3
4
Replacement Parts
NOTE: Spare parts available in different
colors* to be specified when ordering.
1) SPST7731NF
2) BRIVFL00*
3) BSCVFL00*
4) BSAVFL00*
VIAGGIO FLEX 120 VIAGGIO FLEX 120
IMVF00US35*
IMVF00US35*
Peg-Perego S.p.A. declares under
its sole responsibility that the
article to which this declaration
relates has undergone internal
testing and has been approved,
in accordance with regulations in
force, by external, independent
testing laboratories
Arcore, 26 Maggio 2016
Peg-Perego S.p.A.
Via De Gasperi, 50
20862 Arcore (MB), ITALY
Peg-Perego S.p.A.
Via De Gasperi, 50
20862 Arcore (MB), ITALIA
Arcore, 26 de Mayo 2016
Peg-Perego S.p.A. declara bajo su
propria responsabilidad que el
artículo considerado ha sido
sometido a ensayos propios y ha
sido certicado por laboratorios
externos e independientes de
conformidad con la normas
vigentes.
49
Piezas de repuesto
NOTA: Las piezas de repuesto disponibles en colores
diferentes*, deben especificarse cuando se pidan.
1) SPST7731NF
2) BRIVFL00*
3) BSCVFL00*
4) BSAVFL00*
2
1
3
4
48
Accesorios
Travel Bag Car Seat:
práctica bolsa de
transporte, la silla se
mantiene protegida y
limpia.
47
9. Colocar otra vez la tapa
trasera, enganchando
los tres puntos centrales
sobre la manilla de ajuste,
respetando la secuencia
ilustrada en la figura.
.
2
2
1
Limpieza y mantenimiento
10. Por último, enganchar
las dos fijaciones laterales
en el reposacabezas.
46
Limpieza y mantenimiento
7. Enganche los cuatro
ojales laterales en los
botones respectivos.
Colocación del revestimiento
del reposacabezas:
8. Alzar ligeramente el
reposacabezas y calzar el
revestimiento; primero de
un lado, colocando los dos
elásticos como se ve en la
figura (fig_a). Completar
el recubrimiento calzando
el otro lado de la misma
forma (fig_b), prestando
atención a la parte blanca
en poliestireno.
45
Limpieza y mantenimiento
Colocación del
revestimiento del
respaldo:
5. Ensanche ligeramente
los laterales de la silla e
introduzca las lengüetas de
plástico en los pasadores
del respaldo, comprobando
que sobresalgan por la
parte inferior, como se ve
en la figura.
6. Calce el revestimiento
lateral y enganche los
dos elásticos superiores;
repita la operación con
los elásticos inferiores.
44
Limpieza y mantenimiento
3. Introduzca los dos
ganchos del asiento
en los alojamientos
correspondientes, cerca
de la parte inferior del
respaldo.
4. Por último, enganche
los dos ojales en los
botones presentes en los
laterales.
43
Limpieza y mantenimiento
Limpieza y mantenimiento
Cleaning and maintenance
Colocación del
revestimiento del asiento:
1. Introduzca el panel
de plástico en el forro
de la parte superior del
asiento.
2. Calce el revestimiento
desde la parte delantera
de la silla (fig_a),
introduciendo el perfil
en el alojamiento
correspondiente (fig_b).
42
Limpieza y mantenimiento
9. Suelte las lengüetas
inferiores (1) y superiores
(2) como se muestra en la
imagen.
1
1
2
10. Para retirar el tapizado
del reposacabezas,
alce ligeramente el
reposacabezas y extraiga
las dos bandas elásticas de
un lado (fig_a), y luego, las
dos del otro lado (fig_b).
Retire el tapizado.
41
Limpieza y mantenimiento
7. Extraiga las dos solapas
de los alojamientos
correspondientes,
presentes en la parte
superior del respaldo. Para
facilitar esta operación,
alce el reposacabezas.
Ahora es posible retirar
el revestimiento del
respaldo de la silla.
Limpieza y mantenimiento
Extracción del tapizado
del reposacabezas:
8. Para retirar la cubierta
de plástico posterior del
reposacabezas, suelte los
dos ganchos laterales.
40
Extracción del tapizado
del respaldo:
5. Desabroche los
botones de plástico
presentes en los laterales
del respaldo. Para facilitar
esta operación, ensanche
los laterales.
6. Desenganche las dos
bandas elásticas de la
parte superior y las dos
inferiores ubicadas en los
laterales.
Limpieza y mantenimiento
Limpieza y mantenimiento
39
Limpieza y mantenimiento
Limpieza y mantenimiento
3. Desenganche los dos
ganchos de plástico de la
base de la silla.
4. Retire el tapizado
y extraiga el panel de
plástico presente en
el interior del bolsillo,
como se muestra a
continuación. Recuerde
que debe volver a
colocarlo después
de lavar y secar el
revestimiento.
38
Limpieza y mantenimiento
Se puede extraer el
tapizado de Viaggio Flex
120 para su limpieza.
1. Siga las instrucciones
de lavado indicadas
en el revestimiento del
asiento.
Cómo quitar el tapizado
de la silla:
2. Desabroche los
botones presentes en los
laterales de la base de la
silla de auto.
Limpieza y mantenimiento
37
Limpieza y mantenimiento
Este producto requiere un mínimo de limpieza y
mantenimiento. No limpie la silla con productos
irritantes o disolventes. Mantenga limpia las piezas
móviles. Si es necesario, limpie las piezas de plástico
con un paño húmedo. No utilice agua en el arnés y
mecanismos de enganche. Proteja el producto del frío
extremo, agua, lluvia y exposición solar. La exposición
prolongada a estos elementos puede cambiar los
colores en el material y cambiar sus propiedades
mecánicas. Guarde el producto en una zona seca si no
lo usa durante largos periodos.
La tapicería puede extraerse y limpiarse frecuentemente.
Siga el siguiente procedimiento para extraer la tapicería
y volver a colocarla. Compruebe las características del
producto antes de desmontarlo y asegúrese de que las
mismas siguen funcionando una vez que el producto
está instalado de nuevo. Debe tener especial cuidado
cuando extraiga los acolchados para evitar romper los
paneles blancos EPS del producto.
Todas las cubiertas tapizadas (asiento, respaldo y reposa
cabezas) pueden lavarse a máquina a 87º F (30 º C).
30
°
36
5
2. Al mismo tiempo, gire
el respaldo hacia abajo (5).
NOTA IMPORTANTE: si el
Viaggio Flex 120 no está
sujeto con el sistema
Latch rígido y no está en
uso, sáquelo de la cabina
del vehículo. En caso de
una parada repentina
o de accidente, podría
ser extremadamente
peligroso.
3. Enganche el anillo que
une el respaldo al asiento
cuando el producto está
cerrado.
Como plegar y transportar la silla de auto
35
Asegurar al niño en la silla elevadora
Viaggio 120 Flex ha
sido diseñada con un
respaldo plegable.
Pliéguelo para guardar o
transportar el producto.
En caso de que la silla
esté sujeta con el sistema
Latch rígido y no esté
en uso, puede plegar
el respaldo para tener
una mejor visibilidad
posterior.
Para plegar el producto
baje el reposacabezas
y el respaldo (1),
estreche los laterales
de contención (2) y, si
es necesario, cierre los
portabebidas (3). Tire
hacia arriba la cinta (4).
3
2
3
2
4
1
Como plegar y transportar la silla de auto
34
Asegurar al niño en la silla elevadora
La imagen muestra la
posición correcta del
cinturón alrededor del
niño en su Viaggio Flex
120.
Si el asiento se ajusta
a la altura máxima y el
hombro toca dicha guía
roja, el asiento debe
dejar de utilizarse.
33
Asegurar al niño en la silla elevadora
Asegurar al niño en la silla elevadora
Con el niño en el asiento
elevador, ajuste la altura
del reposacabezas y
el respaldo usando las
palancas situadas detrás
del asiento (consulte
las páginas 13-14). El
reposacabezas está
correctamente ajustado
cuando el paso del
cinturón a la altura del
hombro se encuentra
a no más de 1" (2.5 cm)
por encima del nivel del
hombro y el hombro se
encuentra en el centro del
pecho del niño.
Ajuste el reposacabezas y
el respaldo de manera que
la guía roja para el cinturón
de hombro quede siempre
a 1" (2.5 cm) de los
hombros del niño y nunca
por debajo.
32
Asegurar al niño en la silla elevadora
4. Para retirar el cinturón,
hacerlo pasar por el
ojal del paso superior
(1) y deslizarlo entre el
paso y el reposacabezas
(2) hasta extraerlo por
completo.
1
2
Asegurar al niño en la silla elevadora
31
Asegurar al niño en la silla elevadora
3. Haga pasar el cinturón
por el paso colocado en
el reposacabezas: haga
pasar el cinturón entre el
paso y el reposacabezas
(1) hasta que se deslice
cómodamente por el ojal
del paso (2).
IMPORTANTE: si el
cinturón queda flojo,
ténselo por encima
del pasador (3).
Compruebe que quede
siempre tenso y no
retorcido.
Asegurar al niño en la silla elevadora
2
1
3
30
1. Haga pasar el cinturón
de seguridad del
automóvil como se ve en
la figura.
click
Asegurar al niño en la silla elevadora
2. Enganche el cinturón
de seguridad del
automóvil, hasta oír un
"clic". Coloque los dos
lazos del cinturón como
se ilustra en la figura.
Asegurar al niño en la silla elevadora
29
Instalación de la silla elevadora en el vehículo
Instalación de la silla elevadora en el vehículo
Cómo enganchar
la silla en asientos
de automóvil sin
acoplamientos Latch.
7. Coloque la silla de
auto Viaggio Flex 120 en
el asiento del vehículo,
en el sentido de marcha
del mismo, dejando los
conectores dentro de la
base (fig_a) y acomode
al niño como se ilustra
en la imagen (fig_b),
prestando atención a
que la silla de auto no
se desplace durante la
operación.
28
1
2
Instalación de la silla elevadora en el vehículo
5. Para desenganchar
Viaggio Flex 120 del asiento
del automóvil, tire de la
manilla (1) y de la silla hasta
que los botones de liberación
del lateral de la base queden
completamente expuestos.
Con esta operación, los
botones amarillos de
liberación quedarán visibles
a los lados de la base. Tire de
los dos botones (2) hasta oír
el "clic" de apertura de los
conectores. Ahora es posible
retirar la silla de auto.
6. Para colocar los conectores
otra vez dentro de la base
(cuando no se usan), tire
nuevamente de la palanca
(1) y, simultáneamente,
empuje uno de los dos
conectores hacia dentro (2)
hasta que desaparezcan por
completo.
2
1
Instalación de la silla elevadora en el vehículo
27
Instalación de la silla elevadora en el vehículo
Instalación de la silla elevadora en el vehículo
4. Después de fijar la
silla, accione otra vez la
manilla delantera (fig_a) y,
simultáneamente, empuje
la silla contra el asiento
(fig_b) y suelte la manilla.
Al hacer esto, los botones
de liberación del lateral
de la base desaparecerán
(fig_c), evitando de este
modo una liberación
inadvertida.
3. IMPORTANTE:
El correcto enganche
de los acoplamientos
del automóvil y de los
conectores de la silla de auto
se verifica cuando aparece
un testigo de color verde
encima de los conectores
(fig_a). La presencia del
testigo de color rojo indica
un enganche INCORRECTO
(fig_b).
26
Instalación de la silla elevadora en el vehículo
2. Enganche los
conectores a los
acoplamientos del
asiento del automóvil
hasta oír un "clic".
click
1.
Para extraer los
conectores situados dentro
de la base, tire de la manilla
presente en la parte
delantera inferior de la
silla (fig_a). Los conectores
saldrán automáticamente
(fig_b). Repita la operación
para comprobar que
los conectores hayan
salido completa y
simultáneamente.
Instalación de la silla elevadora en el vehículo

25
Diseño y compatibilidad de la silla de auto
Instalación de la silla elevadora en el vehículo
Cómo enganchar la silla en asientos de automóvil con
acoplamientos Latch.
Si su automóvil no los tiene instalados, pase a la siguiente
sección. Para obtener más información sobre la presencia
y posición de los acoplamientos, consulte el manual de
uso del automóvil.
NOTA IMPORTANTE: Peg-Perego recomienda el uso
de conectores LATCH para lograr la mejor estabilidad
del producto en caso de giros bruscos o abruptos.
Además, el uso de conectores LATCH le garantizará
que el producto se encuentra en la posición correcta
con respecto a los puntos de fijación del cinturón del
vehículo.
El uso de conectores Latch NO sustituye al uso del
cinturón de seguridad para asegurar a su hijo.
24
ADVERTENCIA: No utilice Viaggio Flex 120 con los
siguientes tipos de asiento de auto:
1. Asientos orientados hacia el lateral
2. Asientos orientados hacia atrás o asientos que
giran en posiciones diferentes
NO
NO
NO
NO
Diseño y compatibilidad de la silla de auto
Para la seguridad de su hijo, siempre lea el manual
de su auto para obtener más información.
Instalación de la silla elevadora en el vehículo
23
Vehicle seatbelts design and compatibility
Diseño y compatibilidad de los cinturones de
seguridad del automóvil

22
Viaggio Flex 120 es una silla elevadora equipada
con el sistema Latch rígido. A pesar de que el
sistema Latch rígido se utiliza solo para ofrecer
una mayor estabilidad, su uso es recomendado.
Al instalar la silla, asegúrese de que hay suficiente
espacio entre la silla adjunta y la hebilla del
cinturón del vehículo (fig_a). En algunos vehículos,
la hebilla y los acoplamientos Latch pueden estar
cerca los unos de la otra.
En caso de que se encuentren demasiado
cerca (fig_b), o incluso solapados, el uso
contemporáneo de los cinturones de seguridad
del vehículo y del sistema Latch rígido puede no
ser posible. Consulte el manual del propietario del
vehículo para una posición de montaje adecuada
o póngase en contacto con Servicio de Atención
al Cliente de Peg-Perego al 1-800-671-1701 para
obtener ayuda adicional.
En caso de que su vehículo esté equipado con
hebillas flexibles, asegúrese de que la posición de
la hebilla permita una fijación sencilla de la placa
del cinturón de seguridad del vehículo (fig_c).
Diseño y compatibilidad de los cinturones de
seguridad del automóvil
Diseño y compatibilidad de los cinturones de
seguridad del automóvil
21
1. Cinturones de
seguridad de cadera/
motorizados. Cinturones
de seguridad instalados
en la puerta.
2. Sólo cinturón de
cadera de cualquier tipo
DISEÑOS DE CINTURONES DE SEGURIDAD NO
COMPATIBLES
ADVERTENCIA: no utilice Viaggio Flex 120 con los
siguientes tipos de cinturones de seguridad:
Diseño y compatibilidad de los cinturones
de seguridad del vehículo

20
El Viaggio Flex 120 está diseñado para ser instalado
con cinturones de seguridad del vehículo de cadera
y hombro, como los instalados en la mayoría de
los vehículos. Sin embargo, en el mercado, existen
varios tipos de vehículos fabricados en diferentes
momentos.
Como resultado, existen muchos tipos de cinturones
de seguridad. Desafortunadamente, algunos no
serán adecuados para la instalación segura del
Viaggio Flex 120. Lea cuidadosamente la siguiente
lista y en caso de problemas o dudas, consulte el
manual de su vehículo o llame al Servicio de atención
al cliente de Peg-Perego en el 1-800-671-1701 para
obtener ayuda.
Diseño y compatibilidad de los cinturones
de seguridad del vehículo
19
Características del producto
5. Viaggio Flex 120
está equipada con dos
portabebidas laterales.
18
3. La altura del respaldo
se puede ajustar en tres
posiciones: tire de la
manilla de la parte trasera
del respaldo hacia arriba
(1) y, simultáneamente,
alce completamente
el respaldo (2) hasta la
posición deseada. Para
bajar el respaldo, tire de
la misma manilla (1) y,
simultáneamente, empuje
el respaldo hacia abajo (2).
Es necesario realizar este
ajuste para acompañar el
crecimiento del niño.
4. Viaggio Flex 120 está
equipada con un sistema de
reclinación para garantizar
un mayor confort. Para
reclinar la silla, tire de la
manilla (g_a) de la parte
frontal y, simultáneamente,
recline el producto (g_b).
Características del producto
2
1
2
3
1
2
3
1
17
Características del producto
1
2
3
1
2
3
1
2
1
2 3
2. La anchura del
respaldo se puede
ajustar en tres posiciones
(cerrado, medio, abierto).
Pulse el botón al lado
de la perilla (1) y gire
la perilla (2) hacia la
derecha para abrir los
laterales.
Esta operación es
necesaria a medida que
el niño crece.
Para cerrar los laterales,
pulse el botón y gire la
perilla hacia la izquierda.
16
IMPORTANTE: para seguir el crecimiento
del niño, es necesario ajustar la altura del
reposacabezas adecuándolo a su talla.
IMPORTANTE: al nalizar la operación, intente
mover el reposacabezas para comprobar que esté
correctamente encajado.
Características del producto
15
Características del producto
Viaggio Flex 120 se
adapta al crecimiento
del niño mediante
distintos tipos de
ajustes. Los ajustes son
independientes entre
sí, para garantizar una
máxima exibilidad de
uso.
1. El reposacabezas
se puede ajustar en
5 posiciones. Alce la
manilla (g_a) presente
en la parte trasera del
reposacabezas y alce
simultáneamente el
reposacabezas (g_b)
ubicándolo a la altura
deseada
1
2
3
4
5
1
2
3
4
5
14
Apertura del producto antes del uso
1. Alce el respaldo de la
silla de auto hasta que
oiga un "clic". Cuando se
completa la operación, el
producto queda erguido.
El respaldo oscila con
algunos grados de
libertad, para adaptarse
mejor a los distintos tipos
de asiento de automóvil.
click
13
Componentes del producto
1. Compruebe siempre
el producto antes de su
uso. El producto está
compuesto por:
reposacabezas (a),
respaldo (b), asiento
(c), base Latch rígida
integrada en el asiento
(d).
La silla de auto está
preparada para el uso:
no se requiere ninguna
operación de montaje
Incorrectamente, o que
falten, contacte con
nuestro Servicio de
atención al cliente en el
@ 1-800-671-1701.
12
Latch rígido
Viaggio Flex 120 está equipada con un sistema Latch
rígido. La interfaz Latch rígida se compone de dos
conectores, que se encuentran en la base integrada de la
silla de auto, y de dos acoplamientos situados en la línea
de unión entre el asiento y el respaldo del vehículo.
El espacio entre los conectores corresponde a la
separación entre los acoplamientos del vehículo.
Conectores
(Latch rígido)
Acoplamientos
11
Silla de auto
Perilla de ajuste
anchura del respaldo
Conectores
Latch
Soporte para bebidas
Manilla del Latch rígido
Asiento
Respaldo
Reposa
cabezas
Encaminador
del cinturón
del respaldo
Manija del
reposa cabezas
ajustable
Manija
de ajuste
de reclinación
Botones de
desenganche
conectores latch
manual de
instrucciones
10
Formulario de registro
Para obtener información sobre retiradas, llame a
la línea de seguridad en vehículos gubernamental
al 1-888-327-4236 (TTY: 1-800-424-9153) o vaya a
http://www.NHTSA.gov
El número de modelo, el nombre del modelo, la
fecha de fabricación, etc., están indeleblemente
impresos en una etiqueta situada debajo de la base
de la silla (como se muestra a continuación). Se
adjunta un formulario de registro en la cubierta del
producto. Extraiga el
formulario, complételo
y envíelo a Peg-Perego.
No necesita sello. Ya lo
hemos abonado. Si no
estuviera el formulario
de registro, llame al
Servicio de atención al
cliente al 1-800-671-
1701 para obtener otro
formulario.

9
Información de seguridad
este producto. En caso de daño o componentes
defectuosos, llame al servicio al cliente en el 1-800-
671-1701 para obtener ayuda.
• No deje objetos sueltos, bolsos o equipaje en el
interior del vehículo. En caso de accidente, podrían
moverse causando daños a sus ocupantes.
• No utilice este dispositivo tras doce (12) años desde
la fecha de producción marcada en la silla.
Formulario de registro
¡Importante! Los dispositivos de retención de niños
pueden ser reclamados por motivos de seguridad.
Debe registrar este dispositivo para permitir que le
llamen. Envíe su nombre, dirección y el número de
modelo del dispositivo y la fecha de fabricación a:
Peg-Perego U.S.A., Inc. 3625 Independence Drive
Fort Wayne, IN 46808 Or call 1-800-671-1701
(gratuito).
O regístrate online en
www.carseat-registration.pegperego.com

8
Información de seguridad
• Utilice el Viaggio Flex 120 en modo de orientación
hacia adelante con niños que pesen entre 40 y 120
libras (18 a 54 kg) y cuya altura esté entre las 39 y 63
pulgadas (99 a 160 cm).
• Cuando siente a su hijo en el asiento, asegúrese de
que no lleve chaquetas pesadas. Esto hará que el
uso de los cinturones de seguridad sea más seguro,
ya que las chaquetas abultadas pueden afectar
negativamente al ajuste de los cinturones en caso de
accidente.
• No deje nunca a su hijo solo en el automóvil, ni
siquiera por un momento. Podría enredarse con las
correas y causarse daños graves o podría mover o
tumbar el asiento.
• No deje el asiento bajo la luz solar directa durante
un periodo de tiempo prolongado. En este caso,
asegúrese de que el respaldo del elevador esté
plegado (página 35).
• Cuando no lo use, almacene el producto en un lugar
adecuado, lejos de la luz, la humedad, y el calor o frío
excesivos.
• No coloque este asiento de auto en encimeras,
mesas o supercies blandas.
• No intente extraer o añadir piezas a menos que
se indique en este manual; no intente reparar

7
proporcionado con este producto son parte del
producto y del programa de certicación. No se
recomienda el uso de cubiertas no aprobadas u otros
accesorios .
• Los componentes EPS (espuma suave y blanca
ubicada bajo las cubiertas tapizadas) están integradas
en el producto como piezas relacionadas con la
seguridad y no deben ser extraídas o gravemente
dañadas.
• Asegure rmemente este asiento en el automóvil
incluso si no está ocupada. Esta silla de auto es un
objeto pesado que podría causar daños graves a
otros ocupantes en caso de accidente. Asegure el
asiento mediante un enganche rígido (plegado o
desplegado). Si no se está utilizando el enganche,
asegure el asiento con el cinturón del vehículo.
• Mantenga los dedos alejados de las piezas móviles.
Advertencia

6
• El Viaggio Flex 120 puede jarse a su vehículo
mediante un sistema de anclaje inferior universal
(LATCH) para mayor estabilidad. Consulte la sección
dedicada de este manual para ver los detalles de
instalación y comprobar el manual de su vehículo.
• Esta silla elevadora ha sido diseñada exclusivamente
para instalarse en asientos de automóvil orientados
hacia el frente. Nunca la utilice en asientos orientados
hacia los lados o hacia atrás. No lo utilice en coches
con cinturones de seguridad instalados en las puertas
o motorizados. Lea el manual de su vehículo para
obtener información adicional.
• De acuerdo con las estadísticas sobre accidentes,
los niños están más seguros cuando están
adecuadamente sujetos en posiciones orientadas
hacia atrás que hacia delante.
• Complete y envíe el formulario de registro
proporcionado con el producto de inmediato. En
caso de accidente: si la silla de auto está involucrada
en un accidente de auto, no será segura para usar de
nuevo. Deberá adquirir una nueva. Llame al Servicio
de atención al cliente de Peg-Perego en el 1-800-671-
1701 (gratuito) para obtener más información sobre
reparaciones y piezas de repuesto.
• Las cubiertas del asiento y el acolchado
Advertencia
Advertencia
5
Advertencia
• No instale o utilice este asiento elevador hasta que
haya leído y comprendido todas las instrucciones
de este manual y en las etiquetas del producto. Para
evitar daños serios a su hijo, siga cuidadosamente las
instrucciones. Guarde el manual de instrucciones en
respaldo para futuras referencias.
• Su hijo podría resultar seriamente dañado si no
sigue las instrucciones y las etiquetas de aviso
correctamente.
• Utilice solamente el sistema de cinturones de
seguridad de cadera y hombro del vehículo cuando
sujete al niño en este asiento elevador. Ajuste el
cinturón, cómodamente, alrededor del cuerpo del
niño, asegurándose de que el cinturón está plano, sin
holguras.
• Este asiento elevador cumple o supera todos los
213 requisitos de la Norma Federal de Seguridad
de Vehículos a Motor para su uso en vehículos. Este
dispositivo de sujeción NO está certicado para su
uso en aeronaves, ya que los asientos de una aeronave
sólo están equipados con cinturones de cadera.
• No todos los modelos disponibles de cinturones
de seguridad están aprobados para su uso con este
producto. Consulte la sección dedicada en este
manual para obtener más detalles..

4
Introducción
vehículo y realice pruebas de ajuste antes de utilizarla
con niños. Cuando haya leído el manual, guárdelo en
la base de Viaggio Flex 120 para que cualquiera que
use el producto pueda consultarlo en caso de duda.
Si detecta cualquier mal funcionamiento o piezas
rotas, por favor no dude en llamar al Servicio de
Atención al Cliente de Peg-Perego al 1-800-671-1701
para obtener ayuda. Ahora que está familiarizado con
su nueva Viaggio Flex 120, ya está listo para disfrutar
de viajes seguros y felices con su familia.

3
Introducción
Gracias por elegir la silla elevadora Peg-Perego
Viaggio Flex 120. Como todos los productos de
Peg-Perego, su Viaggio Flex 120 ha sido diseñada
y certicada por un equipo especializado de
ingenieros del departamento de investigación y
desarrollo de Peg-Perego. La silla ha sido fabricada y
montada en una fábrica Peg-Perego siguiendo unos
procedimientos de calidad certicados y mediante
el uso de materiales de alta calidad de proveedores
certicados. Al igual que ocurre con todas las sillas
elevadoras, Viaggio Flex 120 ha sido diseñada para
ser utilizada cuando un niño viaje dentro del vehículo.
Le recomendamos utilizar Viaggio Flex 120
conduciendo con la mayor precaución cuando
viaje con un niño y tomándose su tiempo para
familiarizarse con el producto hasta llegar a conocer
todas sus características, sus diferentes usos posibles
y la instalación más adecuada. Por favor, lea el manual
en su totalidad y con el producto a la vista. Esto le
permitirá comprobar todas las partes e indicaciones
sobre el producto y comprenderlo mejor. Tómese el
tiempo necesario para instalar Viaggio Flex 120 en su
2
Tablade contenidos
Introducción................................................................3
Advertencia.............................................................5
Información de seguridad.........................................8
Formulario de registro.................................................9
Silla de auto...................................................................11
Latch rígido....................................................................12
Componentes del producto.....................................13
Apertura del producto antes del uso...................14
Características del producto....................................15
Diseño y compatibilidad de los cinturones
de seguridad del vehículo........................................20
Diseño y compatibilidad de la silla de auto.........24
Instalación de la silla elevadora en el vehículo ......25
Asegurar al niño en la silla elevadora ..................30
Cómo plegar y transportar la silla de auto .................35
Limpieza y mantenimiento ....................................37
Accesorios....................................................................48
Piezas de repuesto .....................................................49
© 2016 Peg-Perego. All rights reserved.
USA
ES Instrucciones de uso
FIUS1901I235
ADVERTENCIA:
Límites de peso:
40 – 120 libras
(18 – 54 kg)
Límites de altura:
39 - 63 pulgadas
(99 – 160 cm)
• No instale o utilice este
elevador hasta que haya leído
y comprendido todas las
instrucciones de este manual
y las etiquetas. Para evitar
daños serios a su hijo
siga las instrucciones
detenidamente. Conserve
el manual de instrucciones
en el bolsillo dedicado a tal
n para futuras consultas.