ReaD aND Save TheSe INSTRuCTIONS
Use&Care Manual
Refrigerator
Top Mount
P/N 241997501 (October 2008)
Important Safety Instructions.............. 2
Installation ............................................. 3
Connecting Water Supply .................... 4
Door Removal Instructions .................. 5
Temperature Controls .......................... 7
Ice Service ............................................. 8
Normal Operating Sounds & Sights ... 9
Care and Cleaning ................................ 10
Warranty ................................................ 11
Before you Call ..................................... 12
ReaD aND Save TheSe INSTRuCTIONS
2
ImPORTaNT SafeTy INSTRuCTIONS
fOR yOuR SafeTy
• Donotstoreorusegasoline,orotherammableliquids
inthevicinityofthisoranyotherappliance.Readproduct
labelsforwarningsregardingammabilityandother
hazards.
• Donotoperatetherefrigeratorinthepresenseofexplosive
fumes.
• Avoidcontactwithanymovingpartsofautomaticice
maker.
• Removeallstaplesfromthecarton.Staplescancause
severecuts,andalsodestroynishesiftheycomein
contactwithotherappliancesorfurniture.
PROPeR DISPOSal Of yOuR RefRIgeRaTOR OR
fReezeR
Risk of child entrapment
Childentrapmentandsuffocation
arenotproblemsofthe
past.Junkedorabondoned
refrigeratorsorfreezersarestill
dangerous–eveniftheywillsit
for“justafewdays.”Ifyouare
gettingridofyouroldrefrigerator
orfreezer,pleasefollowthe
instructionsbelowtohelpprevent
accidents.
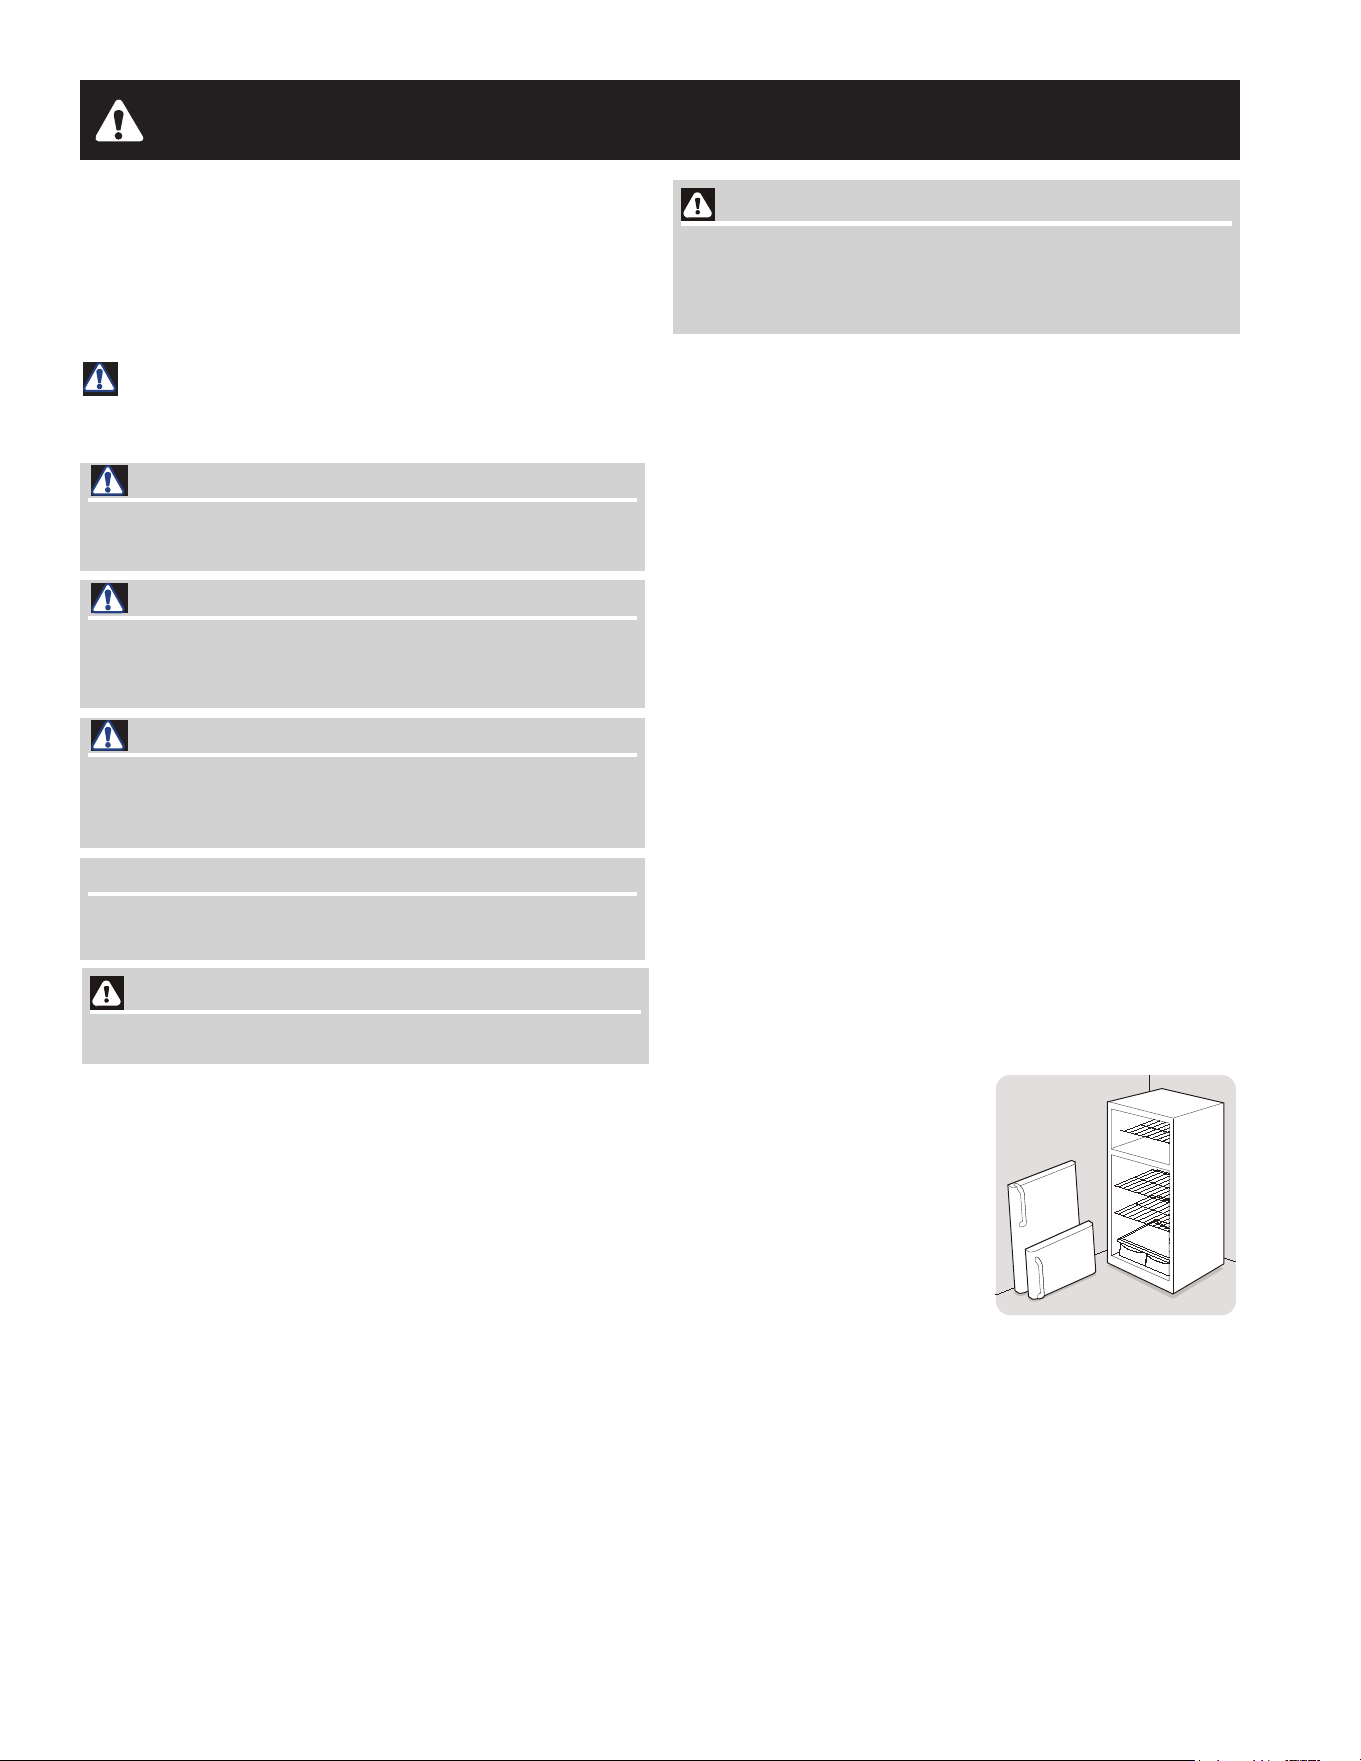
Before you throw away your old refrigerator/ freezer:
• Removedoors.
• Leaveshelvesinplacesochildrenmaynoteasilyclimb
inside.
• Haverefrigerantremovedbyaqualiedservice
technician.
WaRNINg
Please read all instructions before using this refrigerator.
Warning
These guidelines must Be followed To ensure That
Safety mechanisms In This Refrigerator Will Operate
Properly.
ImPORTaNT SafeTy INSTRuCTIONS
Safety Precautions
Donotattempttoinstalloroperateyourunituntilyouhaveread
thesafetyprecautionsinthismanual.Safetyitemsthroughout
thismanualarelabeledwithaDanger,WarningorCaution
basedontherisktype.
Definitions
This is the safety alert symbol. It is used to alert you to
potential personal injury hazards. Obey all safety messages that
follow this symbol to avoid possible injury or d
eath.
DaNgeR
DaNgeR indicates an imminently hazardous situation
which, if not avoided, will result in death or serious injury.
WaRNINg
WaRNINg indicates a potentially hazardous situation
which, if not avoided, could result in death or serious
injury.
CauTION
CauTION indicates a potentially hazardous situation
which, if not avoided, may result in minor or moderate
injury.
ImPORTaNT
Indicatedinstallation,operationormaintenanceinformation
whichisimportantbutnothazard-related.
ChIlD SafeTy
Destroyorrecyclethecarton,plasticbags,andanyexterior
wrappingmaterialimmediatelyaftertherefrigeratoris
unpacked.ChildrenshouldNeveR usetheseitemstoplay.
Cartonscoveredwithrugs,bedspreads,plasticsheetsor
stretchwrapmaybecomeairtightchambers,andcanquickly
causesuffocation.
eleCTRICal INfORmaTION
• Therefrigeratormustbepluggedintoitsown
dedicated115Volt,60Hz.,15Amp,AConlyelectrical
outlet.Thepowercordoftheapplianceisequippedwith
athree-pronggroundingplugforyourprotectionagainst
electricalshockhazards.Itmustbepluggeddirectlyintoa
properlygroundedthreeprongreceptacle.Thereceptacle
mustbeinstalledinaccordancewithlocalcodesand
ordinances.Consultaqualiedelectrician.Avoid
connectingrefrigeratortoaGroundFaultInterruptor(GFI)
circuit.Donotuseanextensioncordoradapterplug.
• Ifthepowercordisdamaged,itshouldbereplacedbyan
authorizedservicetechniciantopreventanyrisk.
• Neverunplugtherefrigeratorbypullingonthepower
cord.Alwaysgriptheplugrmly,andpullstraightout
fromthereceptacletopreventdamagingthepowercord.
• Unplugtherefrigeratorbeforecleaningandbefore
replacingalightbulbtoavoidelectricalshock.
• Performancemaybeaffectedifthevoltagevariesby
10%ormore.Operatingtherefrigeratorwithinsufcient
powercandamagethecompressor.Suchdamageis
notcoveredunderyourwarranty.
• Donotplugtheunitintoanelectricaloutletcontrolledbya
wallswitchorpullcordtopreventtherefrigeratorfrom
beingturnedoffaccidentally.
3
INSTallaTION
ThisUse&CareManualprovidesspecicoperatinginstructions
foryourmodel.Usetherefrigeratoronlyasinstructedinthis
Use&CareManual.Before starting the refrigerator, follow
these important first steps.
lOCaTION
• Chooseaplacethatisnearagroundedelectricaloutlet.
Do Notuseanextensioncordoranadapterplug.
• Ifpossible,placetherefrigeratoroutofdirectsunlight
andawayfromtherange,dishwasherorotherheat
sources.
• Therefrigeratormustbeinstalledonaoorthatislevel
andstrongenoughtosupportafullyloadedrefrigerator.
• Considerwatersupplyavailabilityformodelsequipped
withanautomaticicemaker.
INSTallaTION
caution
Do Not install the refrigerator where the temperature
will drop below 55°f (13°C) or rise above 110°f (43°C).
The compressor will not be able to maintain proper
temperatures inside the refrigerator.
Do Not block the toe grille on the lower front of your
refrigerator. Sufficient air circulation is essential for the
proper operation of your refrigerator.
Installation Clearances
• Allowthefollowingclearancesforeaseofinstallation,
properaircirculation,andplumbingandelectrical
connections:
Sides&Top 3/8”
Back 1”
note
Ifyouseeblackcoils/tubingonthebackofyourrefrigerator
(air-cooledcondenser)leave3”clearanceattopofrefrigerator.
DOOR OPeNINg
Yourrefrigeratorshouldbepositionedtoalloweasyaccess
toacounterwhenremovingfood.Tomakethispossible,the
directioninwhichthedoorsopencanbereversed.SeeDoor
Removal & Reversal Instructions.
note
Ifyourrefrigeratorisplacedwiththedoorhingesideagainsta
wall,youmayhavetoallowadditionalspacesothedoorcan
beopenedwider.
ImPORTaNT
Ifyouinstallyourrefrigeratorinagarageorotherunheated
area,youmayexperiencefreezertemperatureproblems
duringthewintermonthswhentemperaturesdipbelow55°F.
UpgradingyourrefrigeratorwithaGarageKitwilllowerthe
minimumoperatingtemperatureofyourunitto34°F.Thiskit
canbeorderedthroughtheElectrolux Solutions Hotline(see
backcover).
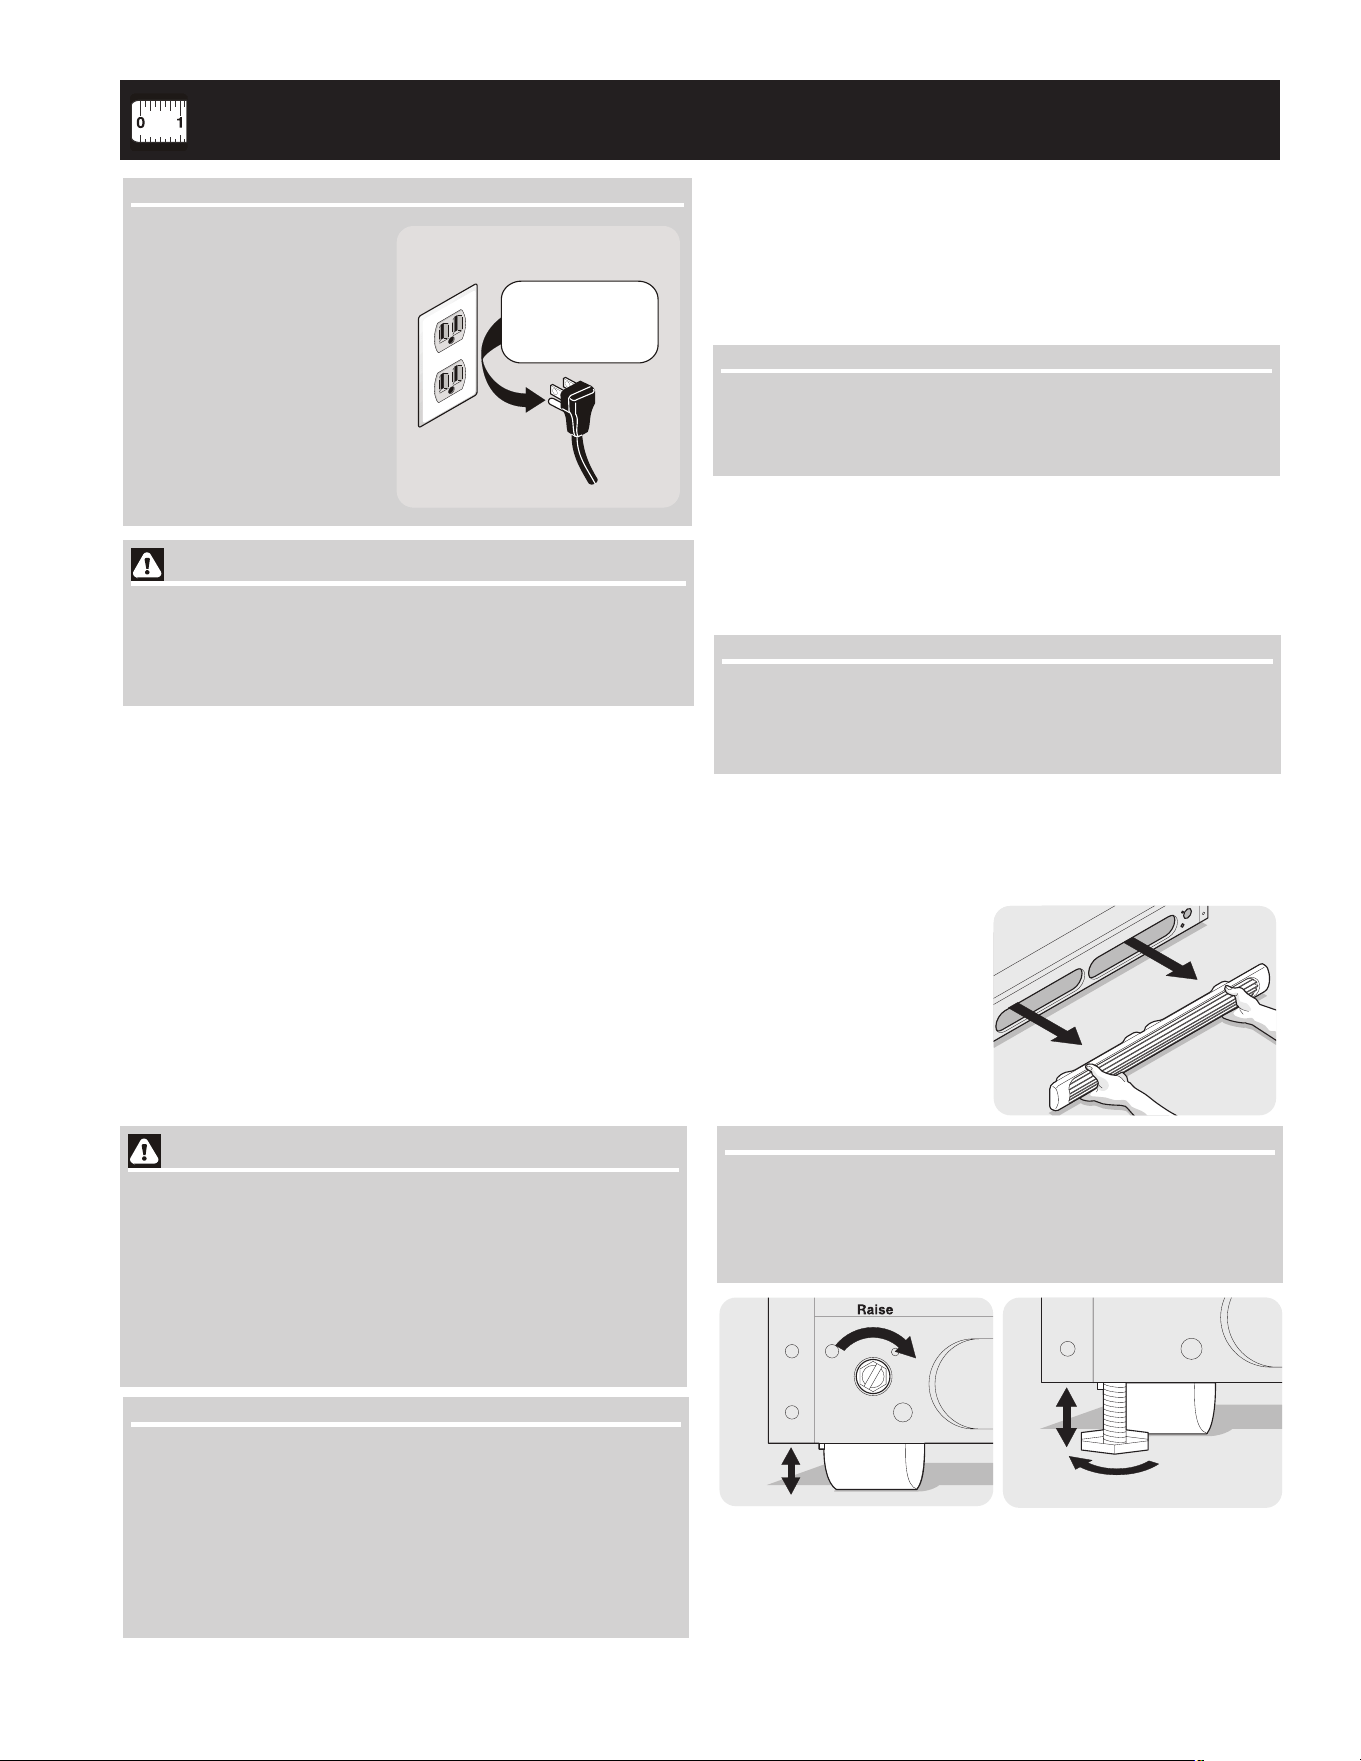
levelINg
Allfourcornersofyourrefrigeratormustrestrmlyonasolid
oor.Yourrefrigeratorisequippedwithadjustablefrontrollersor
frontlevelingscrewstohelplevelyourunit.
2. Useat-bladescrewdriver
or3/8”socketwrenchto
adjustfrontrollers.Use
adjustablewrenchto
adjustlevelingscrews.
Raise
AdjustableFrontRoller
(somemodels)
StationaryFrontRoller
withLevelingScrew
(somemodels)
note
Raisethefrontoftherefrigeratorenoughsothedoorsclose
freelywhenopenedhalfway.Therefrigeratorshouldslope¼”
to½”fromfronttoback.Thenleveltherefrigeratorfromside
toside.
To level your Refrigerator:
1. Removetoegrille.
ImPORTaNT
TurningtheFreezerand
FreshFoodControlsto“0”
turnsoffthecompressor
andpreventsyour
refrigeratorfromcooling,
butdoesnotdisconnectthe
powertothelightbulband
otherelectricalcomponents.
Toturnoffpowertoyour
refrigeratoryoumustunplug
thepowercordfromthewall
outlet.
Groundingtype
wallreceptacle
Powercordwith
3-pronggroundedplug
Do not, under
any circumstances,
cut, remove,
or bypass the
grounding prong.
caution
To avoid personal injury or property damage, handle
tempered glass shelves carefully. Shelves may break
suddenly if nicked, scratched, or exposed to sudden
temperature change.
4
CONNeCTINg hOuSehOlD WaTeR SuPPly TO RefRIgeRaTOR
Before Installing The Water Supply line, you Will Need
• Basic Tools: adjustablewrench,at-bladescrewdriver,
andPhillips
TM
screwdriver
• Accesstoahouseholdcoldwaterlinewithwaterpressure
between30and100psi.(coldwateronly)
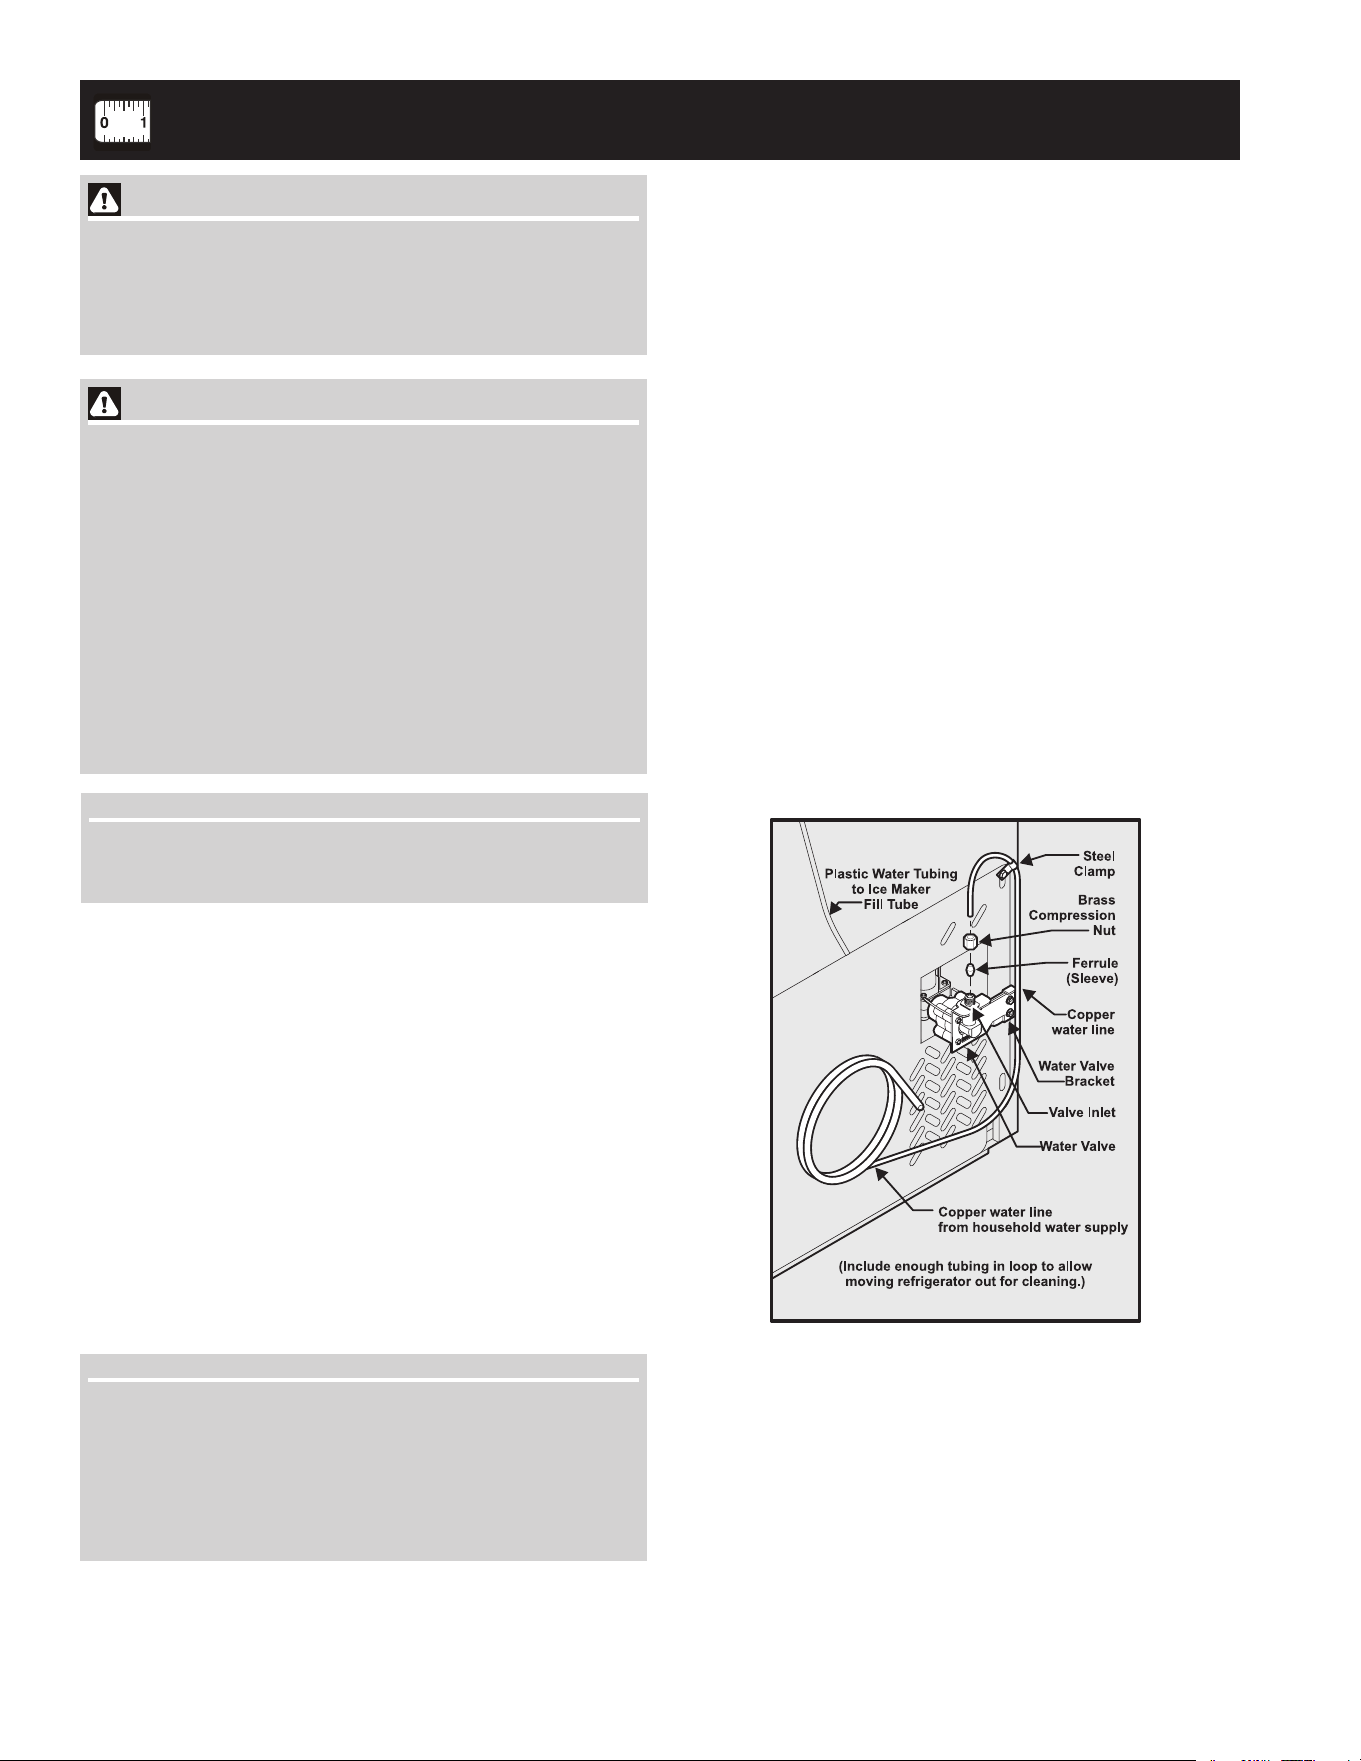
• Awatersupplylinemadeof¼inch(6.4mm)OD,copper
tubing.Todeterminethelengthofcoppertubingneeded,
youwillneedtomeasurethedistancefromtheicemaker
inletvalveatthebackoftherefrigeratortoyourcoldwater
pipe.Thenaddapproximately7feet(2.1meters),sothe
refrigeratorcanbemovedoutforcleaning(asshown).
• Ashutoffvalvetoconnectthewatersupplylinetoyour
householdwatersystem.DO NOTuseaself-piercingtype
shutoffvalve.
• Acompressionnutandferrule(sleeve)forconnectingthe
watersupplylinetotheicemakerinletvalve.
To Connect Water Supply line To Ice maker Inlet
valve
1. Disconnectrefrigeratorfromelectricpowersource.
2. Placeendofwatersupplylineintosinkorbucket.TurnON
watersupplyandushsupplylineuntilwaterisclear.Turn
OFFwatersupplyatshutoffvalve.
3. Unscrewplasticcapfromwatervalveinletanddiscard
cap.
4. Slidebrasscompressionnut,thenferrule(sleeve)onto
watersupplyline,asshown.
5. Pushwatersupplylineintowatervalveinletasfarasit
willgo(¼inch).Slideferrule(sleeve)intovalveinletand
ngertightencompressionnutontovalve.Tightenanother
halfturnwithawrench;DO NOT overtighten.
6. Withsteelclampandscrew,securewatersupplylineto
rearpanelofrefrigeratorasshown.
7. Coilexcesswatersupplyline(about2½turns)behind
refrigeratorasshownandarrangecoilssotheydonot
vibrateorwearagainstanyothersurface.
8. TurnONwatersupplyatshutoffvalveandtightenany
connectionsthatleak.
9. Reconnectrefrigeratortoelectricalpowersource.
10. Toturnicemakeron,lowerwiresignalarm(seeice
makerfrontcoverforON/OFFpositionofarm).
ImPORTaNT
Ensurethatyourwatersupplylineconnectionscomplywithall
stateandlocallawsandregulations.
note
Waterlinekitnumber5303917950,availablefromyour
appliancedealeratadditionalcost,contains25feet(7.6
meters)of¼inchODcoppertubing,asaddletypeshutoff
valve(nonpiercing),(2)¼inchbrasscompressionnuts,(2)
ferrules/sleeves,andinstructionsforinstallingawatersupply
line.
Warning
To avoid electric shock, which can cause death or severe
personal injury, disconnect the refrigerator from electrical
power before connecting a water supply line to the
refrigerator.
caution
To avoid Property Damage:
• Copper tubing is recommended for the water supply
line. Water supply tubing made of ¼” plastic is not
recommended since it greatly increases the potential
for water leaks. manufacturer will not be responsible
for any damage if plastic tubing is used for supply
line.
• DONOTinstallwatersupplytubinginareaswhere
temperatures fall below freezing.
• Chemicals from a malfunctioning softener can
damage the ice maker. If the ice maker is connected
to soft water, ensure that the softener is maintained
and working properly.
5
DOOR RemOval / ReveRSal INSTRuCTIONS
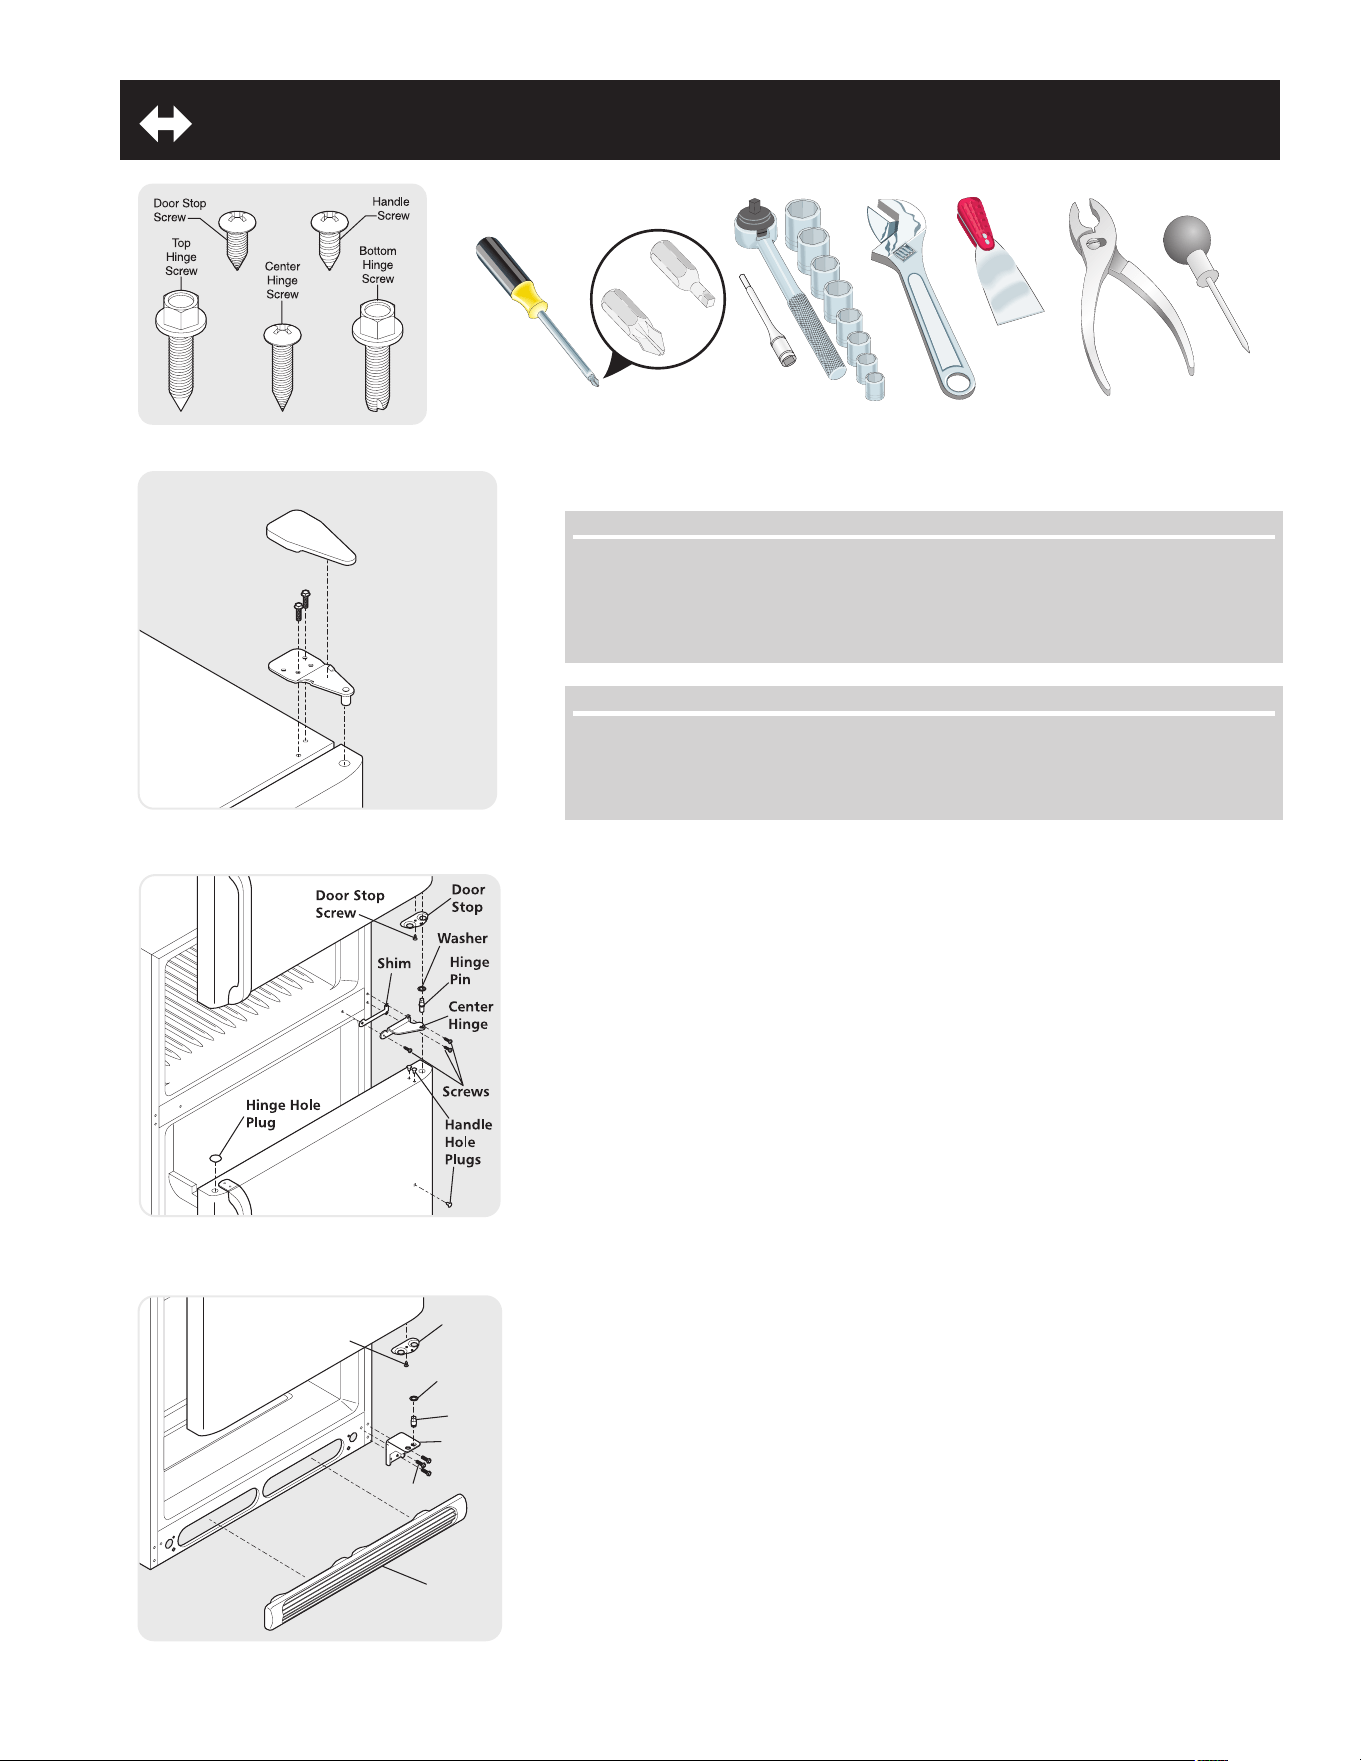
1. Removetoegrille.
2. Removetophingecover.Tracearoundthehingewithasoftleadpencil.
Thismakesreinstallationeasier.Removetophingeandliftdooroffcenter
hingepin.Setdooraside.
3. Unscrewcenterhingepinusingadjustablewrenchandsavefor
reassembly.Ensureplasticwasherstaysonhingepin.
4. Liftrefrigeratordooroffofbottomhingeandsetaside.
5. Removecenterhingeandshimbyremovinginsidescrewand
looseningtwooutsidescrewsenoughtoallowhingeandshimtoslideout.
Tightenscrews.
6. Loosentwooutsidescrewsonoppositesideofrefrigerator,removeinside
screwandinstallcenterhinge.
7. Removetwoscrewsonbottomhingewith3/8”socketwrench.
8. Installbottomhingeonoppositesidewiththetwoscrewsremoved from
step7.
9. Unscrewbottomhingepinusingadjustablewrench.Movehingepinto
otherholeinhingeandtightenwithadjustablewrench.
10. Reversedoorhandles(seeinstructionsonnextpage).
11. Movefreezerandrefrigeratordoorstopstooppositeside.Beforestarting
screws,useanawltopuncturethefoam.
12. Positionrefrigeratordoorontobottomhingepinandscrewcenterhingepin
throughcenterhingeintotopofdoor.Closerefrigeratordoortohelpalign
hingehole.
13. Tightencenterhingepinwithadjustablewrench.
14. Removecabinetandhingeholeplugsandmovetooppositeside.
15. Lowerfreezerdoorontocenterhingepin.
16. Closefreezerdoor.Haveanassistantliftuponoppositesideofdoorwhile
tighteningscrewstoinstalltophinge.
17. Fliptoegrilleandreinstall.
18. Pluginelectricalpowercordandturnrefrigeratortemperaturecontrolto
centerposition.Adjustsettingasnecessary.
DOOR RemOval aND ReveRSal INSTRuCTIONS:
Plastic
Putty
Knife
Adjustable
Wrench
Socket
Wrench Set
OR
Phillips head
or
Quadrex head
screwdriver
™
™
Tools Necessary:
Pliers
Awl
(OR)
Door
Stop
Door Stop
Screw
Hinge
Pin
Screws
Bottom
Hinge
Toe Grille
Washer
note
Thedirectioninwhichyourrefrigeratordoorsopen(doorswing)canbe
reversed,fromlefttorightorrighttoleft,bymovingthedoorhingesfromone
sidetotheother.Reversingthedoorswingshouldbeperformedbyaqualied
person.
ImPORTaNT
Beforeyoubegin,turntherefrigeratortemperaturecontrolto“0”andremove
theelectricalpowercordfromthewalloutlet.Removeanyfoodfromdoor
shelves.
TopHinge
Cover
TopHinge
6
Handle
Dovetail
Button
Screw
Screw
Lock Handle
over
Dovetail
Button
DOOR RemOval / ReveRSal INSTRuCTIONS
Handle
Screw
Screw
Dovetail
Button
Lock Handle
over
Dovetail Button
Self Adhesive
Nameplate
(some models)
Nameplate
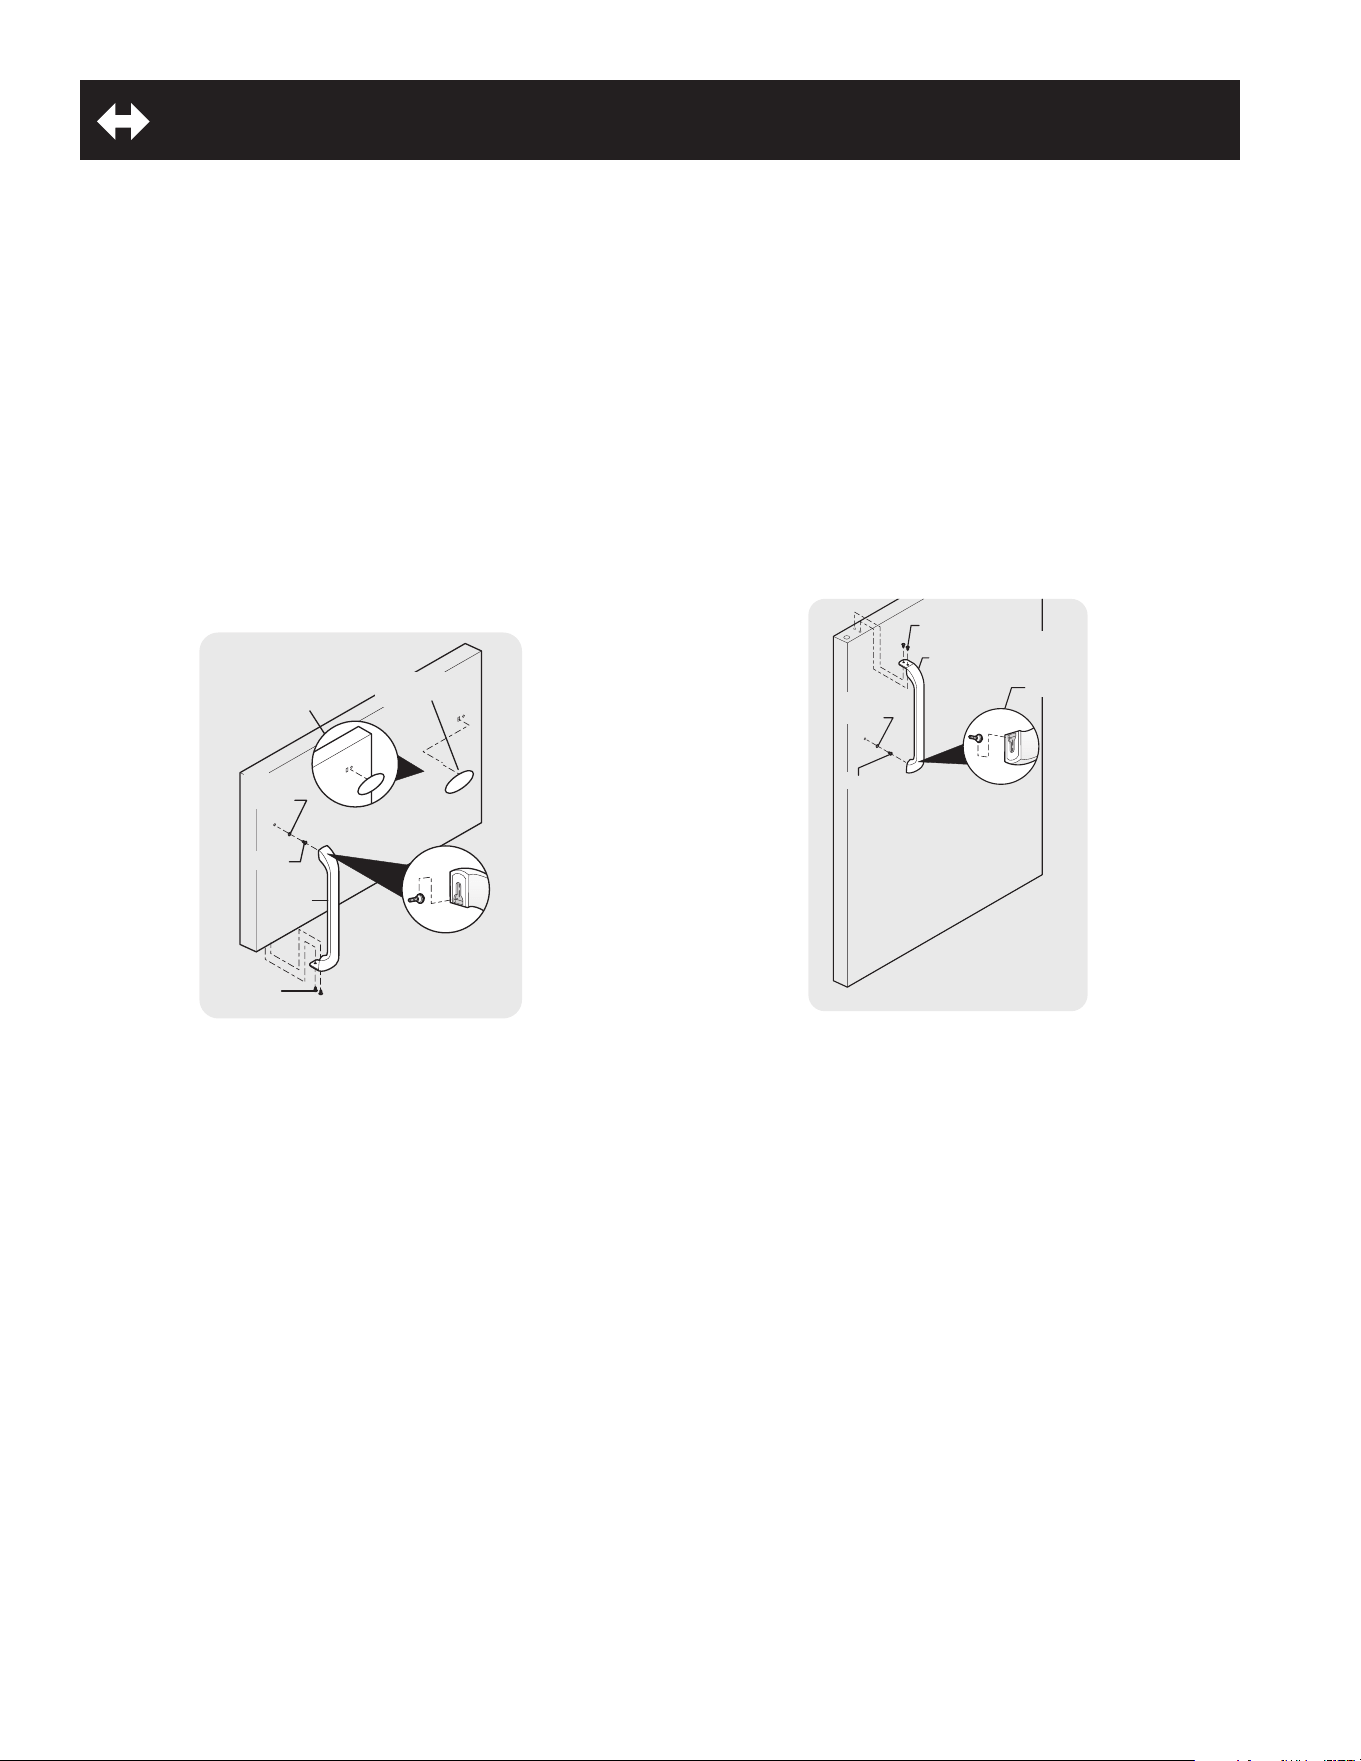
TO RemOve fReezeR haNDle:
(Handlesmaybeeasiertoreversewhiledoorsareoff.)
1. Removetwoscrewsattachinghandletobottomoffreezer
door.
2. Swingbottomofhandleawayfromthedoorandslide
handlestraightupandoffofdovetailbutton.
3. Removescrewanddovetailbuttonandinstallonother
side,usingthesameholesasnameplate.
4. Self-adhesive Nameplate models: Useputtyknifeto
gentlypeeloffnameplatefromdoorandreapplyoverold
handleholes.
TO aTTaCh fReezeR haNDle:
1. Startwithhandleoffsetawayfromdoor.Placetopofhandle
overdovetailbutton,swinghandleintoanuprightposition
andpulldownward,lockingitintoplace.
2. Securebottomofhandlewithtwoscrewsremovedearlier.
TO RemOve RefRIgeRaTOR haNDle:
(Handlesmaybeeasiertoreversewhiledoorsareoff.)
1. Removetwoscrewsattachinghandletotopofrefrigerator
door.
2. Swingtopofhandleawayfromdoorandslidehandle
downandoffofdovetailbutton.
3. Removescrewanddovetailbuttonandinstallonotherside,
movingholeplugsfromcorrespondingholestoopposite
side.
TOATTACHREFRIGERATORHANDLE:
1. Startwithhandleoffsetawayfromdoor.Placebottomof
handleoverdovetailbutton,swinghandleintoanupright
positionandpullupward,lockingitintoplace.
2. Securetopofhandlewithscrews.

7
FreezerControl(somemodels)
RefrigeratorControl
(somemodels)
* ImPORTaNT
Turningtherefrigeratortemperaturecontrolto“0”turnsoff
thecompressorandpreventstherefrigeratorfromcooling,
butdoesnotdisconnectthepowertothelightbulbandother
electricalcomponents.Toturnoffpowertoyourrefrigerator,
youmustunplugthepowercordfromthewalloutlet.
COOl DOWN PeRIOD
Toensuresafefoodstorage,allowtherefrigeratortooperate
withthedoorsclosedforatleast8to12hoursbeforeloadingit
withfood.
RefRIgeRaTOR & fReezeR CONTROlS
• adjust temperature gradually: move the knob in small
increments, allowing the temperature to stabilize.
• Forcoldertemperatures,turntheknobtowardsColder.
• Forwarmertemperatures,turntheknobtowardsCold.
Turningtherefrigeratorcontrolwillchangetemperaturesinboth
compartments.Forexample,iftherefrigeratorcontrolisturned
toacoldersetting,thefreezercontrolmayhavetobeadjusted
toawarmersetting.Turningthefreezercontrolwillchangeonly
thefreezertemperature.
Tomaintaintemperatures,afancirculatesairintherefrigerator
andfreezercompartments.Forgoodcirculation,donotblock
coldairventswithfooditems.
note
Whenmakingchangestothetemperaturecontrols,wait24
hoursforthetemperaturetostabilizebeforemakingadditional
changes.
TemPeRaTuRe aDjuSTmeNT
note
Whenrstturningrefrigeratoron,moverefrigeratorand
freezercontrolstoNormal.Thisistherecommendedinitial
setting.After24hours,adjustthecontrolsasneeded.
Refrigerator&FreezerControl(somemodels)
OR
OR
OR
TemPeRaTuRe CONTROlS
TemPeRaTuRe aDjuSTmeNT guIDe
If Refrigerator compartment Is Too Warm
TurnRefrigeratorControlSlightlyTowardsColder.
If Refrigerator compartment Is Too Cold
TurnRefrigeratorControlSlightlyTowards Cold.
If freezer compartment Is Too Warm
TurnFreezerControlSlightlyTowardsColder.
If freezer compartment Is Too Cold
TurnFreezerControlSlightlyTowardsCold.
* To Turn Refrigerator Off
TurnRefrigeratorControlTo 0.
8
ICe SeRvICe
caution
DO NOT place the ice container in your dishwasher.
caution
Chemicals from a malfunctioning softener can damage
the ice maker. If the ice maker is connected to soft water,
ensure that the softener is maintained and working
properly.
important
Youricemakerisshippedfromthefactorywiththewiresignal
armintheONposition.Toensureproperfunctionofyourice
maker,hookupwatersupplyimmediatelyorturnicemaker
OFFbyliftingthewiresignalarmuntilitclicksandlocksin
theUPposition. If the ice maker is not turned off and the
water supply is not connected, the water valve will make
a loud chattering noise.
ICe PRODuCTION: WhaT TO eXPeCT
Theicemakerwillproduce2.5to3poundsoficeevery24
hoursdependingonusageconditions.Iceisproducedatarate
of8cubesevery80to160minutes.
Ifyourrefrigeratorhasanautomaticicemaker,itwillprovidea
sufcientsupplyoficefornormaluse.Duringtheinitialstartup
ofyourrefrigerator,noicewillbeproducedduringtherst24
hoursofoperation.Airinnewplumbinglinesmaycausetheice
makertocycletwoorthreetimesbeforemakingafulltrayof
ice.Withnousage,itwilltakeapproximatelyonetotwodaysto
lltheicecontainer.
Newplumbingconnectionsmaycausetherstproductionofice
cubestobediscoloredorhaveanoddavor.Discardicemade
duringtherst24hours.
note
NOTe:Automaticicemakersarealsooptionalaccessories
thatmaybeinstalledinmostmodelsatanytime.Callyour
localdealerforinformation.
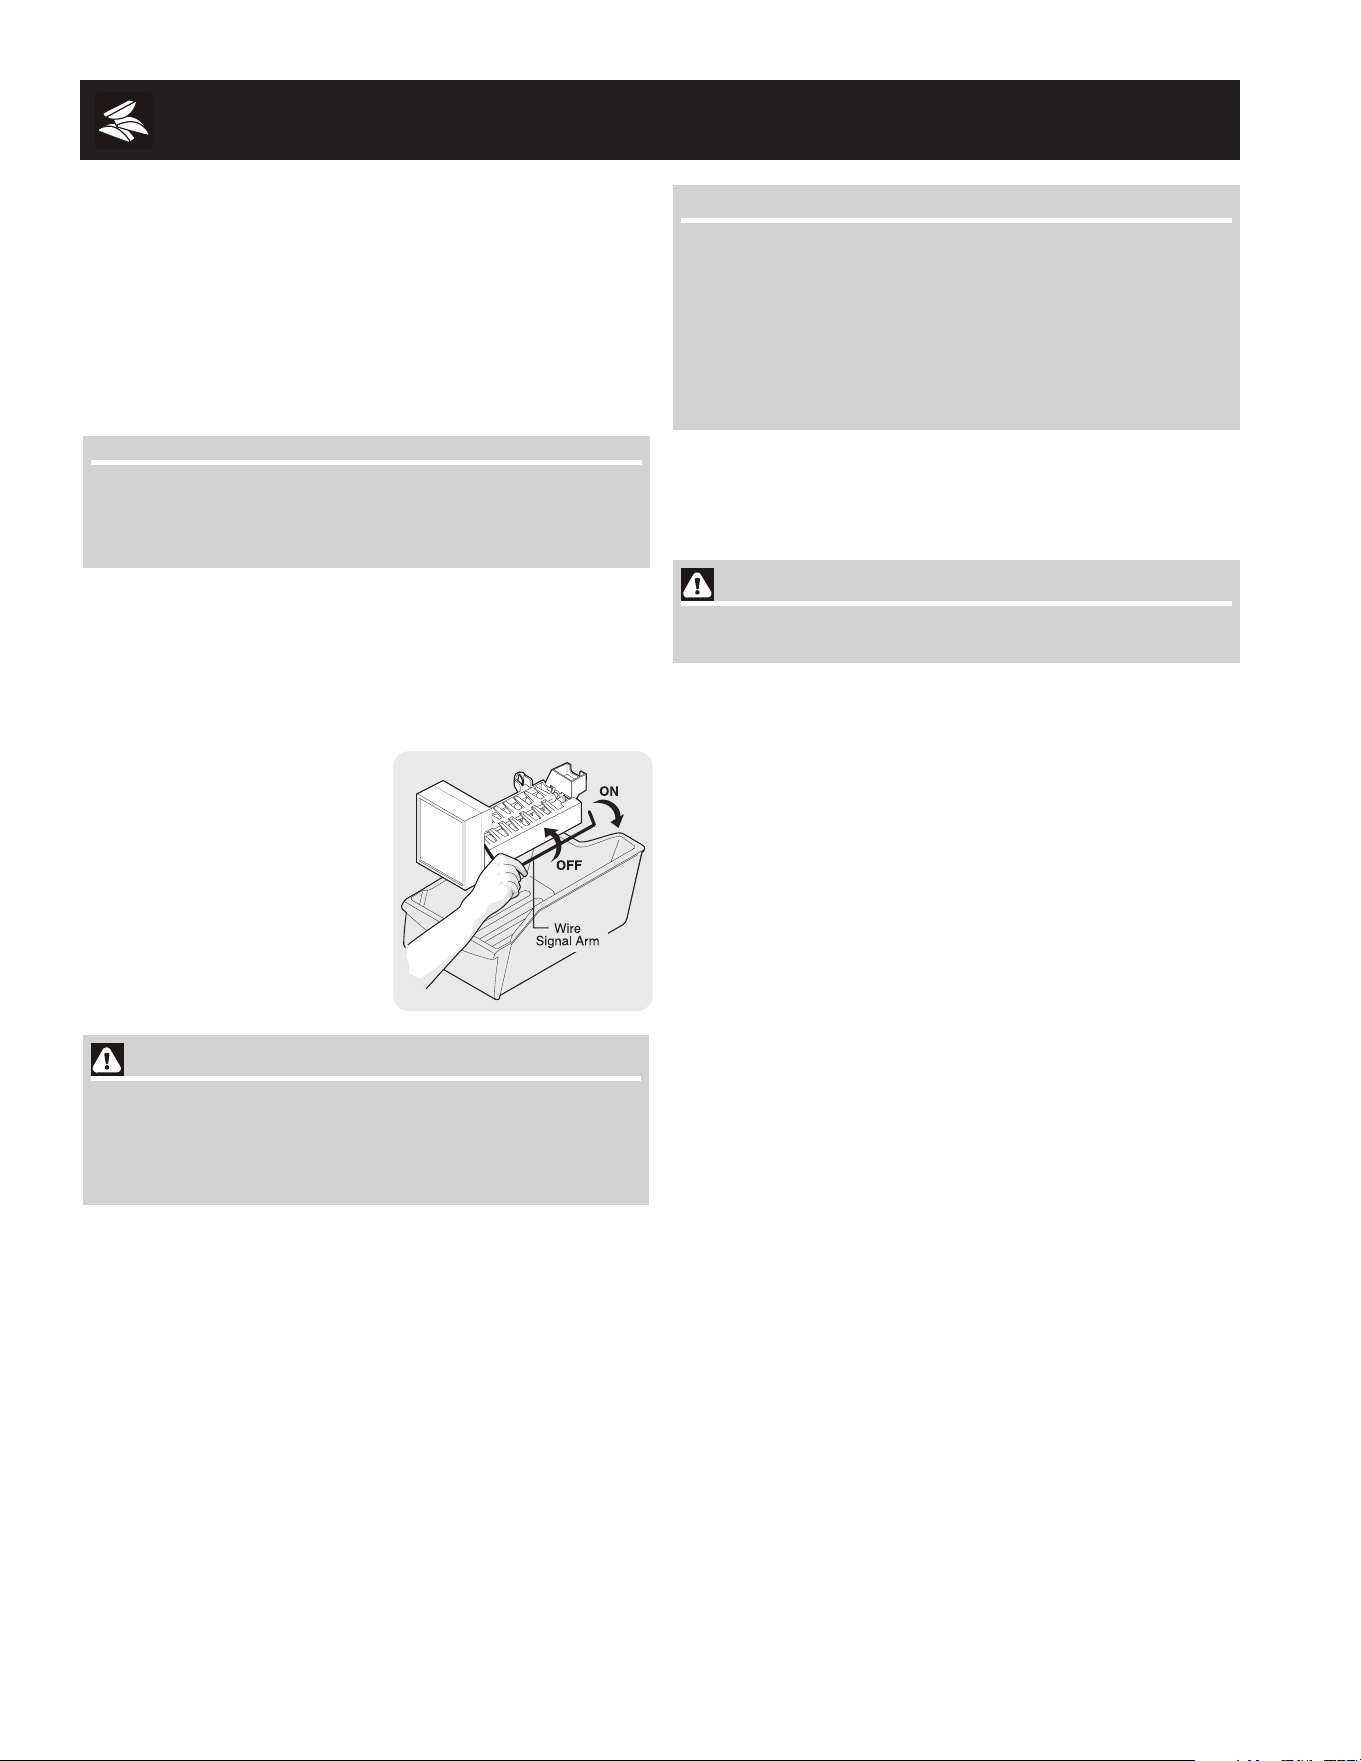
TuRNINg yOuR ICe maKeR ON
Aftertheplumbingconnectionshavebeencompleted,thewater
supplyvalvemustbeopened.Placetheicecontainerunderthe
icemaker,pushingitasfarbackaspossible.Lowerthewire
signalarmtoits“down”orONposition.
TuRNINg yOuR ICe maKeR Off
Tostoptheicemaker,liftthe
wiresignalarmuntilitclicks
andlocksinthe“up”orOFF
position.Theicemakeralso
turnsoffautomaticallywhen
theicecontainerisfull.Ifyour
modelhasanadjustablefreezer
shelf,placetheshelfinthelower
position,sothatthewiresignal
armwillhittheicewhenthe
containerisfull.
9
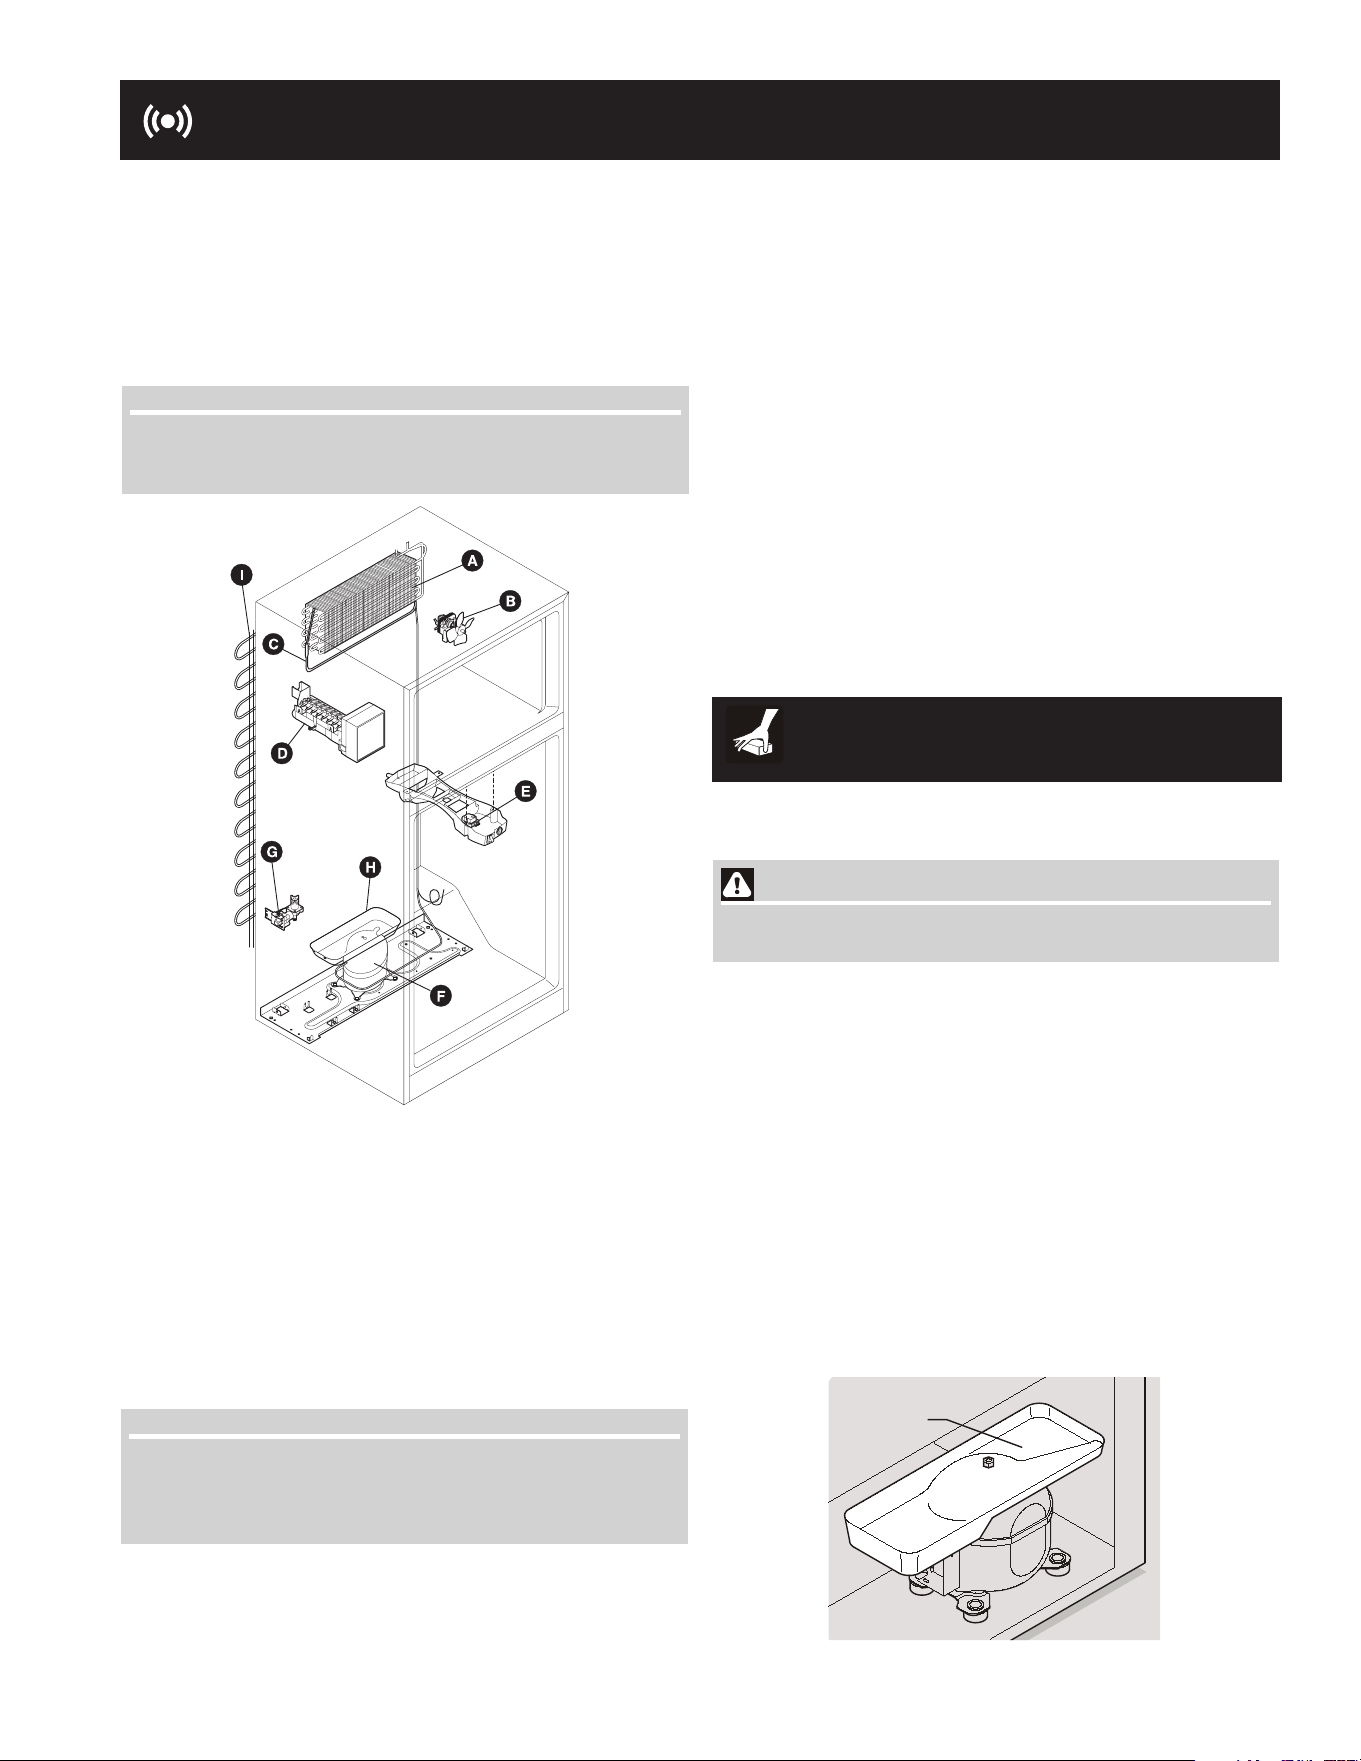
NORmal OPeRaTINg SOuNDS & SIghTS
uNDeRSTaNDINg The SOuNDS yOu may heaR
Yournewhigh-efciencyrefrigeratormaymakeunfamiliar
sounds.Theseareallnormalsoundsandsoonwillbecome
familiartoyou.Theyalsoindicateyourrefrigeratorisoperating
asdesigned.Hardsurfaces,suchasvinylorwoodoors,walls,
andkitchencabinetsmaymakesoundsmorenoticeable.Listed
belowaredescriptionsofsomeofthemostcommonsounds
youmayhear,andwhatiscausingthem.
a. evaporator
Theowofrefrigerantthroughtheevaporatormay
createaboilingorgurglingsound.
B. Evaporator Fan
Youmayhearairbeingforcedthroughtherefrigerator
bytheevaporatorfan.
C. Defrost Heater
Duringdefrostcycles,waterdrippingontothedefrost
heatermaycauseahissingorsizzlingsound.After
defrosting,apoppingsoundmayoccur.
D. Automatic Ice Maker
Ifyourrefrigeratorisequippedwithanautomaticice
maker,youwillhearicecubesfallingintotheicebin.
note
Rigidfoaminsulationisveryenergyefcient,butisnota
soundinsulator.
ImPORTaNT
Duringtheautomaticdefrostcycle,youmaynoticearedglow
intheventsonthebackwallofyourfreezercompartment.
Thisisnormalduringthedefrostcycle.
RePlaCINg The fReezeR lIghT BulB (SOme
mODelS)
caution
avoid cuts when replacing light bulbs, wear gloves.
1. Unplugrefrigerator.
2. Wearglovesasprotectionagainstpossiblebrokenglass.
3. Unsnaplightshieldasshown.
4. Unscrewandreplaceoldbulbwithanappliancebulbof
thesamewattage.
5. Replacelightshield.
6. Remembertoplugtherefrigeratorbackin.
E. Cold Control/Defrost Timer or Auto Defrost Control
Thesepartscanproduceasnappingorclickingsound
whenturningtherefrigeratoronandoff.Thetimeralso
producessoundssimilartoanelectricclock.
F. Compressor
Modern,high-efciencycompressorsoperatemuch
fasterthanoldermodels.Thecompressormayhavea
high-pitchedhumorpulsatingsound.
G. Water Valve
Ifyourrefrigeratorisequippedwithanautomaticice
maker,youwillhearabuzzingsoundasthewatervalve
openstolltheicemakerduringeachcycle.
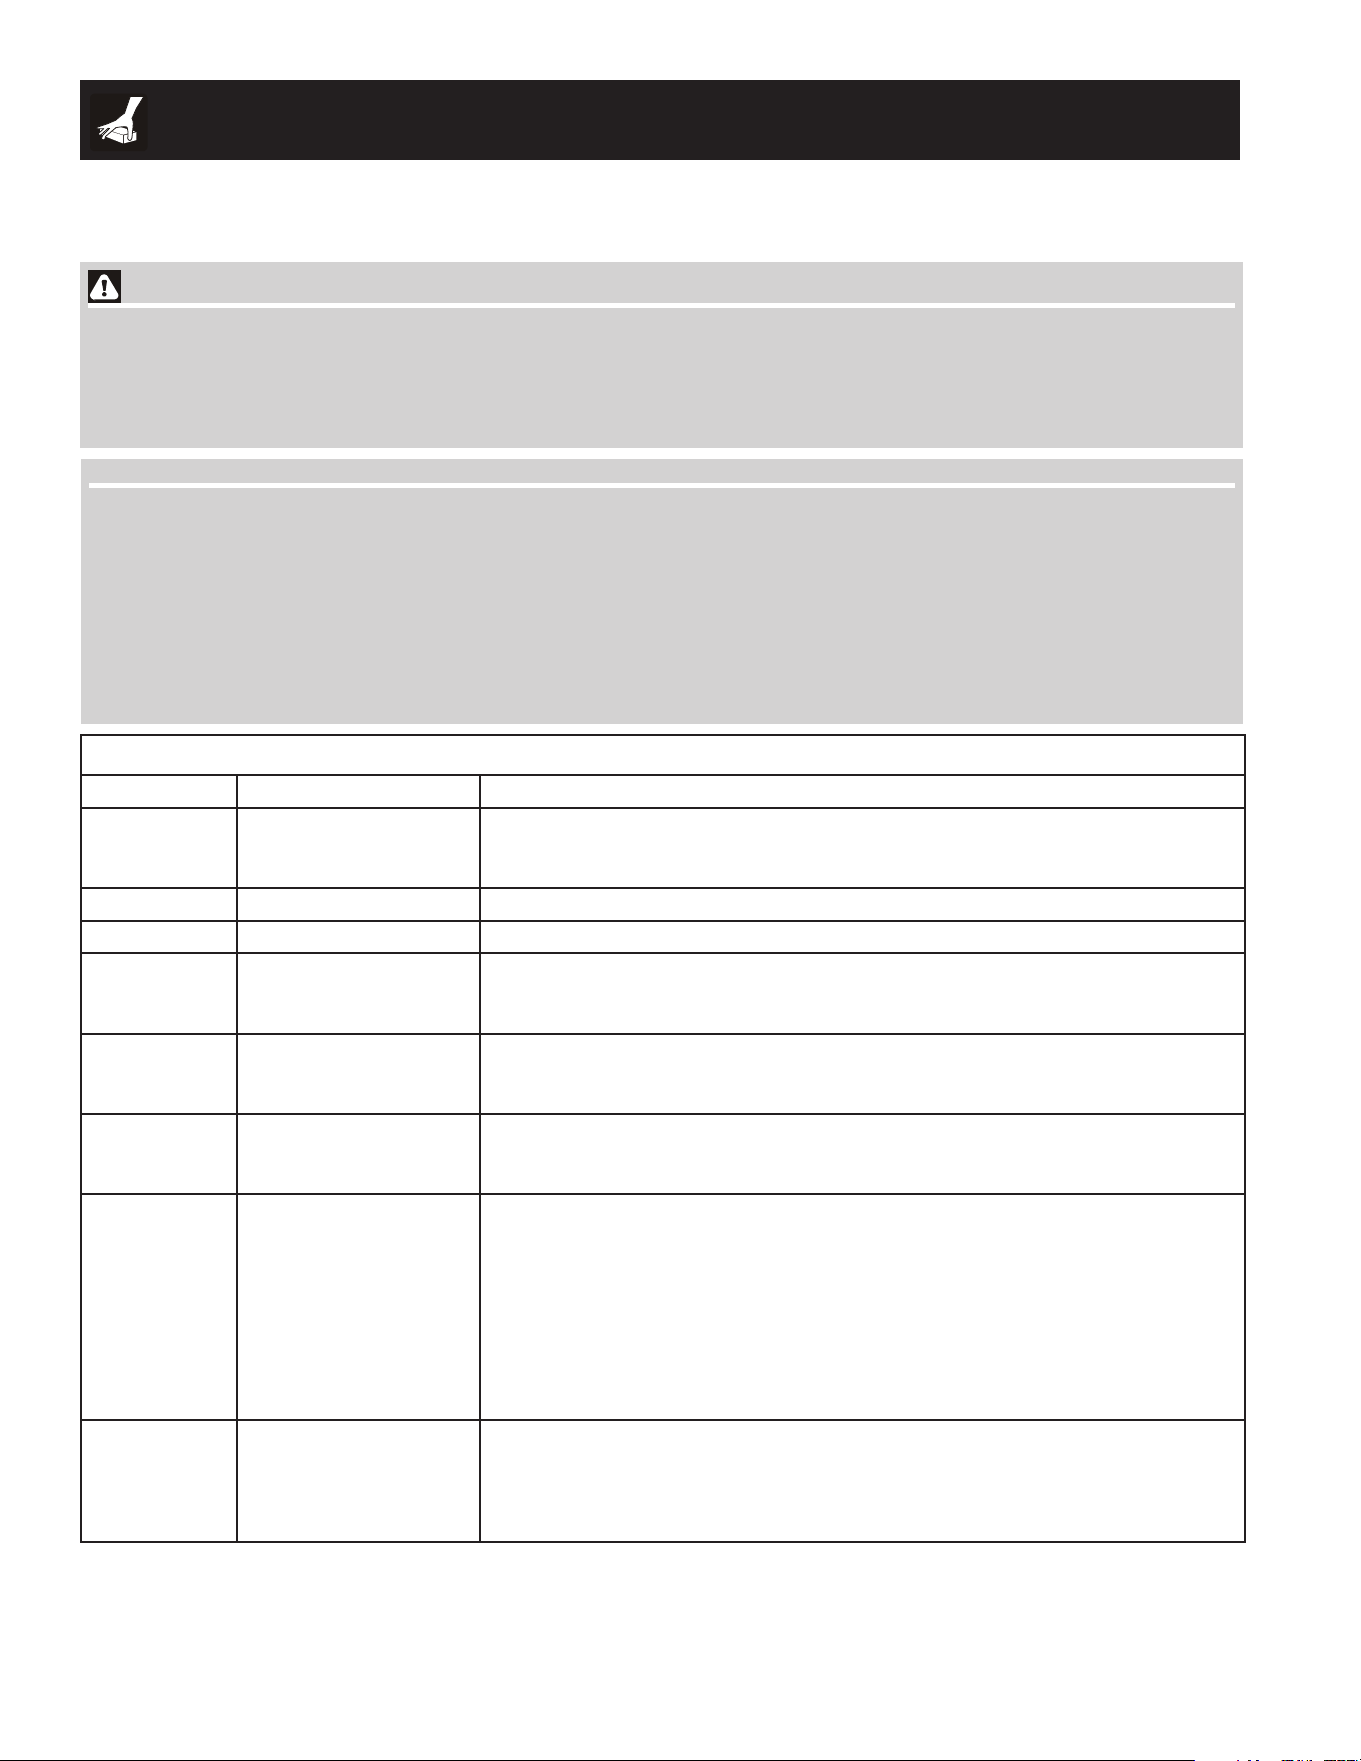
H. Drain Pan (Nonremovable)
Youmayhearwaterrunningintothedrainpanduring
thedefrostcycle.Thedrainpanwillbelocatedontop
ofthecompressorforair-cooledcondensers(blackcoils
onbackofrefrigerator).
I. Condenser Coils
CaRe & CleaNINg
NeveR CleaN CONDeNSeR (SOme mODelS)
IfyourrefrigeratorisequippedwithaNeverCleancondenser,
there’snoneedtocleanthecondenserundernormaloperating
conditions.Iftherefrigeratorisoperatedunderparticularly
dustyorgreasyconditions,orifthereissignicantpettrafc
inyourhome,itmaybenecessarytoperiodicallycleanthe
condenserformaximumefciency.
Defrost
WaterPan
10
CaRe & CleaNINg
Keepyourrefrigeratorandfreezercleantopreventodorbuild-up.Wipeupanyspillsimmediatelyandcleanbothsectionsatleast
twiceayear.Never useanytypeofscouringpads,brushes,abrasivecleanersorstrongalkalinesolutionsonanysurface.Do not
washanyremovablepartsinadishwasher.Always unplug the electrical power cord from the wall outlet before cleaning.
caution
• Whenmovingtherefrigerator,pullstraightout.Donotshifttherefrigeratorfromsidetosideasthismaytearor
gouge the floor covering. If the refrigerator has an automatic ice maker, be careful not to move the refrigerator
beyond the plumbing connections.
• Dampobjectssticktocoldmetalsurfaces.Donottouchrefrigeratedsurfaceswithwetordamphands.
• NeveruseCHLORIDEtocleanstainlesssteel.
note
• Donotuseabrasivecleanerssuchaswindowsprays,scouringcleansers,ammableliquids,cleaningwaxes,concentratred
detergents,bleachesorcleanserscontainingpetroleumproductsorplasticparts,interiordoors,gasketsorcabinetliners,Do
notusepapertowels,scouringpads,orotherabrasivecleaningmaterials.
• Turningtherefrigeratortemperaturecontrolto“0”turnsoffthecompressor,butdoesnotdisconnectelectricalpowertothe
lightbulborotherelectricalcomponents.Toturnoffpowertoyourrefrigerator,youmustunplugthepowercordfromthe
walloutlet.
• Donotuserazorbladesorothersharpinstrumentswhichcanscratchtheappliancesurfacewhenremovingadhesive
labels.Anyglueleftfromtapeorlabelscanberemovedwithamixtureofwarmwaterandmilddetergent,or,touchtheglue
residuewiththestickysideoftapeyouhavealreadyremoved.Do not remove the serial plate.
Care & Cleaning Chart
Part What To use Tips and Precautions
Interior/Door
liner
Soapandwater•
Bakingsodaand•
water
Use2tablespoonsofbakingsodain1quartofwarmwater.Be sure to wring ex-
cess water out of sponge or cloth before cleaning around controls, light bulb
or any electrical part.
Door gaskets
Soapandwater• Wipegasketswithacleansoftcloth.
Drawers/Bins
Soapandwater• Donotwashanyremovableitems(bins,drawers,etc.)indishwasher.
glass Shelves
Soapandwater•
Glasscleaner•
Mildliquidsprays•
Allowglasstowarmtoroomtemperaturebeforeimmersinginwarmwater.
Toe grille
Soapandwater•
Mildliquidsprays•
Vacuumattachment•
Vacuumdustfromfrontoftoegrille.Vacuumbacksideandwipewithsudsyclothor
sponge.Rinseanddry.
exterior and
handles
Soapandwater•
NonAbrasiveGlass•
Cleaner
Donotusecommercialhouseholdcleaners,ammonia,oralcoholtocleanhandles.
Useasoftclothtocleansmoothhandles.DO NOT use a dry cloth to clean
smooth doors.
exterior and
handles
(Stainless
Steel models
Only)
Soapandwater•
StainlessSteel•
Cleaners
CauTION: Never use ChlORIDe to clean stainless steel.
Cleanstainlesssteelfrontandhandleswithsoapywaterandadishcloth.Rinse
withcleanwaterandasoftcloth.Useanon-abrasivestainlesssteelcleaner.These
cleanerscanbepurchasedatmosthomeimprovementormajordepartmentstores.
Alwaysfollowmanufacturer’sinstructions.
NOTe: always clean, wipe and dry with the grain to prevent cross-grain
scratching.Washtherestofthecabinetwithwarmwaterandmildliquiddetergent.
Rinsewell,andwipedrywithacleansoftcloth.
exterior
(Easy Care
Stainless
Steel models)
Soapandwater•
Mildliquidsprays•
CauTION: DO NOT use abrasive or stainless steel cleaners on Easy Care
Stainless Steel models. It will remove the protective finish.
UsewarmsoapywatertocleanEasy Caresurfaces.Mildliquidspraysmaybeused
onstubbornspots.

11
WhITe WeSTINghOuSe aPPlIaNCe WaRRaNTy INfORmaTION
Your appliance is covered by a 90 day limited warranty. For 90 days from your original date of purchase, Electrolux will pay
costs, except as set forth below, associated with replacing any parts of this appliance that prove to be defective in materials or
workmanship when such appliance is installed, used, and maintained in accordance with the provided instructions.
DISCLAIMER OF IMPLIED WARRANTIES; LIMITATION OF REMEDIES
CUSTOMER’S SOLE AND EXCLUSIVE REMEDY UNDER THIS LIMITED WARRANTY SHALL BE PRODUCT REPAIR AS
PROVIDED HEREIN. CLAIMS BASED ON IMPLIED WARRANTIES, INCLUDING WARRANTIES OF MERCHANTABILITY OR
FITNESS FOR A PARTICULAR PURPOSE, ARE LIMITED TO THE DURATION OF THE EXPRESS LIMITED WARRANTY
STATED ABOVE. ELECTROLUX SHALL NOT BE LIABLE FOR CONSEQUENTIAL OR INCIDENTAL DAMAGES SUCH AS
PROPERTY DAMAGE AND INCIDENTAL EXPENSES RESULTING FROM ANY BREACH OF THIS WRITTEN LIMITED
WARRANTY OR ANY IMPLIED WARRANTY. SOME STATES AND PROVINCES DO NOT ALLOW THE EXCLUSION OR
LIMITATION OF INCIDENTAL OR CONSEQUENTIAL DAMAGES, OR LIMITATIONS ON THE DURATION OF IMPLIED
WARRANTIES, SO THESE LIMITATIONS OR EXCLUSIONS MAY NOT APPLY TO YOU. THIS WRITTEN WARRANTY GIVES
YOU SPECIFIC LEGAL RIGHTS. YOU MAY ALSO HAVE OTHER RIGHTS THAT VARY FROM STATE TO STATE.
Exclusions
If You Need
Service
USA
1.866.312.2117
Electrolux Major Appliances
North America
P.O. Box 212378
Augusta, GA 30907
Canada
1.800.668.4606
Electrolux Canada Corp.
5855 Terry Fox Way
Mississauga, Ontario, Canada
L5V 3E4
White Westinghouse Appliance Warranty Information
This warranty does not cover the following:
Keep your receipt, delivery slip, or some other appropriate payment record to establish the warranty period
should service be required. If service is performed, it is in your best interest to obtain and keep all receipts.
Service under this warranty must be obtained by contacting Electrolux at the addresses or phone
numbers below.
This warranty only applies in the USA and Canada. In the USA, your appliance is warranted by Electrolux Major Appliances
North America, a division of Electrolux Home Products, Inc. In Canada, your appliance is warranted by Electrolux Canada Corp.
Electrolux authorizes no person to change or add to any obligations under this warranty. Obligations for service and parts under
this warranty must be performed by Electrolux or an authorized service company. Product features or specifications as described
or illustrated are subject to change without notice.
1. Products with original serial numbers that have been removed, altered or cannot be readily determined.
2. Product that has been transferred from its original owner to another party or removed outside the USA or Canada.
3. Rust on the interior or exterior of the unit.
4. Products purchased “as-is” are not covered by this warranty.
5. Food loss due to any refrigerator or freezer failures.
6. Products used in a commercial setting.
7. Service calls which do not involve malfunction or defects in materials or workmanship, or for appliances not in ordinary
household use or used other than in accordance with the provided instructions.
8. Service calls to correct the installation of your appliance or to instruct you how to use your appliance.
9. Expenses for making the appliance accessible for servicing, such as removal of trim, cupboards, shelves,etc.,which are
not a part of the appliance when it is shipped from the factory.
10. Service calls to repair or replace appliance light bulbs, air filters, water filters, other consumables, or knobs, handles, or
other cosmetic parts.
11. Surcharges including, but not limited to, any after hour, weekend, or holiday service calls, tolls, ferry trip charges, or
mileage expense for service calls to remote areas, including the state of Alaska.
12. Damages to the finish of appliance or home incurred during installation, including but not limited to floors, cabinets, walls,
etc.
13. Damages caused by: services performed by unauthorized service companies; use of parts other than genuine Electrolux
parts or parts obtained from persons other than authorized service companies; or external causes such as abuse, misuse,
inadequate power supply, accidents, fires, or acts of God.

12
BefORe yOu Call
Visitourwebsiteat
www.frigidaire.com.
1-800-944-9044 (UnitedStates)
1-800-668-4606 (Canada)
Common
Occurrences
Before calling for service, review this list. It may save you time and
expense. This list includes common occurrences that are not the result of
defective workmanship or materials in this appliance.
Refrigerator does not run.
x Ensure plug is tightly pushed into electrical outlet.
x Check/replace fuse with a 15 amp time-delay fuse. Reset circuit
breaker.
x The temperature control is turned to "O".
x Refrigerator may be in defrost cycle. Wait 20 minutes and check again.
Freezer temperature too cold.
Refrigerator temperature is
satisfactory.
x Set freezer control to a warmer setting until freezer temperature is
satisfactory. Allow 24 hours for the temperature to stabilize.
Refrigerator temperature too cold.
Freezer temperature is
satisfactory.
x Set refrigerator control to a warmer setting. Allow 24 hours for
temperature to stabilize. Then check freezer temperatures and adjust
as needed.
* Refrigerator is noisy or vibrates.
x The cabinet is not level.
x Floor is weak.
Odors in refrigerator.
x Interior needs to be cleaned.
x Foods that produce odors should be covered or wrapped.
Cabinet light not working.
x Replace light bulb.
x Ensure plug is tightly pushed into electrical outlet.
x Light switch may be stuck. Push in light switch, located on the
refrigerator control box, to release.
Automatic ice maker not working.
(some models)
x Ensure the Wire Signal Arm is not in UP position.
x Ice maker should produce 4 to 5 pounds of ice in a 24 hour period.
x Water supply is turned off.
x Water pressure is too low.
x The freezer is not cold enough.