
4
1. Getting Started
kk
kk
k CASIO Program-Link Package
The CASIO Program-Link package includes the following items:
• Macintosh Program Disk
• PC Program Disk
• Communication cable (with Macintosh connector)
• CASIO Program-Link User’s Guide
kk
kk
k Manual Conventions
• The terms “Program-Link” and “this software” as used in this manual refer to the
Program-Link software that comes with the FA-123 Package.
• The term “calculator” as used in this manual refers to your CASIO Graphic Scientific
Calculator.
• This manual explains only the procedures required to operate the Program-Link
application software. It assumes that you are already familiar with the following
computer operations.
•Pull-down menu operations, clicking, double-clicking, and dragging with the
mouse
• Text input using the keyboard
• Icon and window operations.
See the documentation that comes with your computer for full details on these
operations.
• All of the operations in this manual are explained using the Windows operating
system. What actually appears on the display of your computer may differ some-
what if you are using a different operating system.
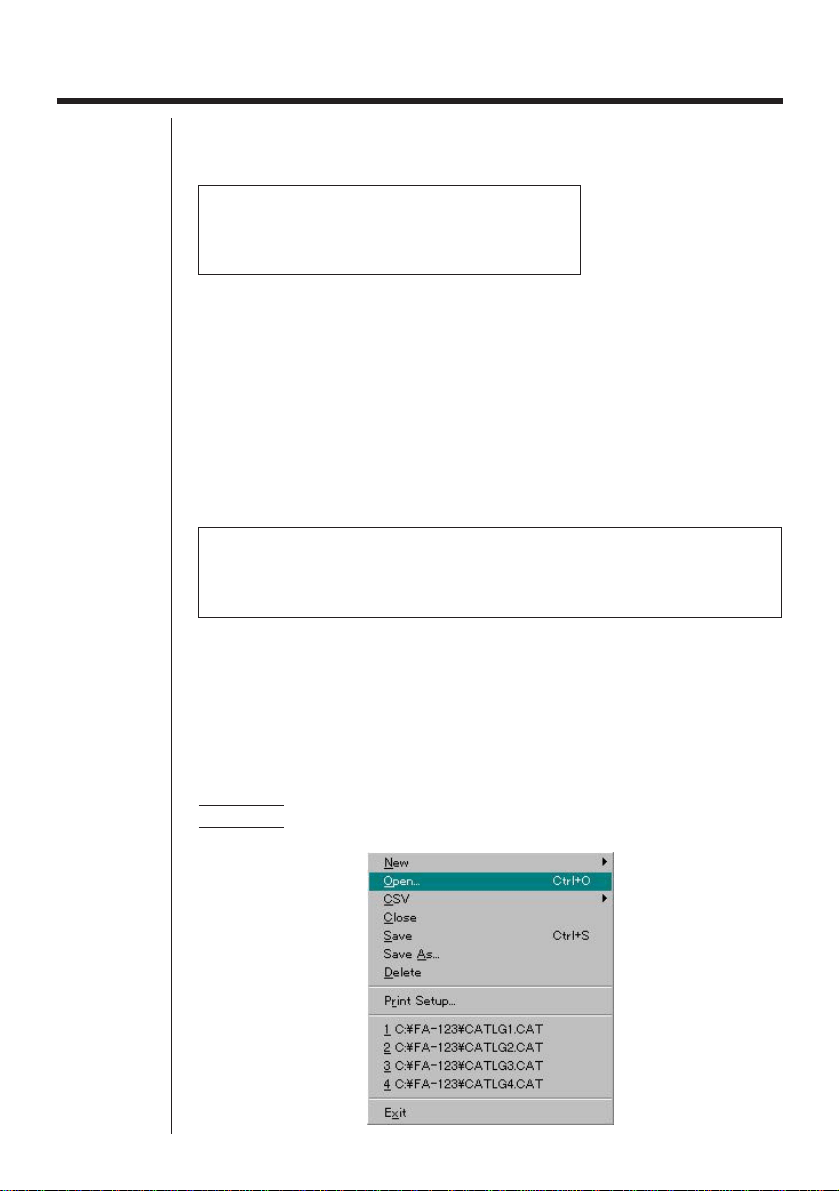
• Menu operations are notated within the text of this manual as hyphenated com-
mands with the menu hierarchy progressing from left to right.
Example Selecting the Open command from the File menu would be
described as: “Select
File-Open
.”
Menu (Windows)

5
• Any operation in this manual that is specifically identified as neither a computer nor
calculator operation should be assumed to be a computer operation. All calculator
operations are specifically identified as such.
kk
kk
k System Requirements
FA-123 Program-Link requires either of the following minimum systems.
Windows Macintosh
Computer IBM PC/AT or compatible Macintosh
(68030 CPU or newer)
Operating System Windows 3.1 System 7 or higher
Windows 95 / Windows 98
Monitor Color (256 colors or more) Color or B&W
Minimum free space 1MB on user specified drive 2.0MB
on hard drive 200KB on system drive 2.0MB
RAM 1MB free 2.5MB free
Floppy Disk Drive 3.5" 2HD 3.5" 2HD
Serial Port 1 port free 1 port free
kk
kk
k CASIO Graphic Scientific Models
This software is designed for use with the following CASIO Graphic Scientific Mod-
els.
u ALGEBRA FX Series
ALGEBRA FX 2.0
u CFX-9850 Series
CFX-9850G CFX-9950G
fx-9750G CFX-9970G
CFX-9850G PLUS
CFX-9850Ga PLUS
CFX-9850GB PLUS CFX-9950GB PLUS
u fx-7400 Series
fx-7450G
fx-7400G PLUS
In addition, the following CASIO Graphic Scientific models can exchange data with
the above models.
fx-7700GB CFX-9800G
fx-8700GB
fx-7700GE
fx-7700GH
fx-9700GE
fx-9700GH
kk
kk
k File Configuration
Program-Link files are called “catalog files,” which can be one of three different types.
Catalog Files Text files
Back-up file
Image files
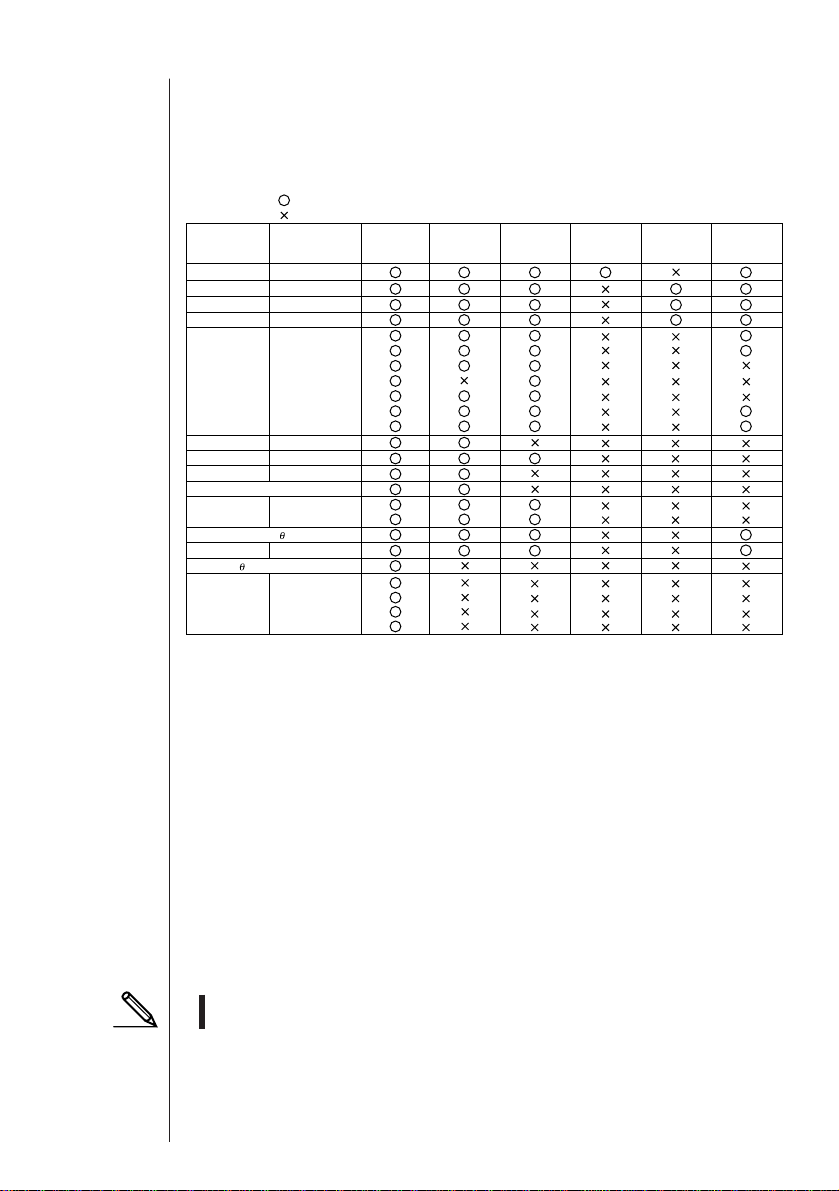
Group Item Display Editing
CSV
Conversion
(A)-(B)
Conversion
CFX-9850/fx-7400
Series *(B)
Program
Matrix
List
List File
Y=Data
Graph Memory
V-Window Mem
Picture
DynaMem
Equation
Alpha Memory(A~Z,r, )
F-Mem n
CAS(A~Z,r, )
Algebra
Data from an older model CASIO Graphic Scientific Calculator is converted to CFX-9850/fx-7400 Series format data.
Program name
MatA~MatZ
List1~List20
File1~File6
Graph Function
Recursion Function
V-Window
RightV-Window
Graph Factor
Table Range
Recursion Range
G-Mem1~G-Mem20
V-Win1~V-Win6
Pict1~Pict20
Simul Equation
Poly Equation
f1~f20
ANS
InputReplay
OutputReplay
Equation
ALGEBRA FX
Series *(A)
YES
NO
(1-6)
(1-6)
(1-6)
(1-6)
…
…
6
u Text files
This type of file consists of two parts: a group and the multiple items stored under it.
Except for graphic data, all items can be displayed on a computer screen, and pro-
grams can be edited on the computer.
Text Files
u Back-up file
This file contains the data produced when you back up all of the data in calculator
memory.
u Graphic files
This type of file contains the data produced when you use the screen capture func-
tion to create a bit pattern of the screen and save the bit pattern to your computer.
Graphic data is saved using one of the two following file formats.
• Windows: Bitmap
• Macintosh: PICT
Graphic data can also be converted to one of the following file formats.
• Windows: TIFF, PCX
• Macintosh: TIFF
• Graphic files saved as one of the above file formats cannot be opened using
Program-Link.

7
2. Installation: Windows
kk
kk
k Installing CASIO Program-Link
1. Insert the Windows installation disk into your computer’s floppy disk drive.
2. Double click on
setup.exe
to install Program-Link.
• On the dialog box that appears, specify the installation path and then click
OK
.
3. A confirmation dialog box appears after installation is complete. Click
OK
.
If the procedure described above does not install Program-Link for you, do the
following.
1. Change the names of the files on the installation disk as shown below and
copy them to the directory where you want to install Program-Link.
From: FA123.EX_ To: FA123.EXE
FA123.HL_ FA123.HLP
FA123GRF.TT_ FA123GRF.TTF
FA123ALG.TT_ FA123ALG.TTF
2. Use the control panel to install the fonts.
kk
kk
k Cable Connection
Connect the communication cable to your computer’s COM1 or COM2 port.
kk
kk
k Starting Program-Link
Double click the
FA-123.EXE
file to start Program-Link.
8
3. Installation: Macintosh
kk
kk
k Installing CASIO Program-Link
1. Insert the Macintosh installation disk into your computer’s floppy disk drive.
2. Double-click the FA123 icon.
• This starts a process that uncompresses the program file.
3. In accordance with the instructions that appear on the display, specify the name
of the folder where you want the uncompressed program file to be stored. Click
Save
.
4. Some of the other files on the installation disk have to be copied to the folders
described below.
4-1. Drag
Serial Tool
to your
System Folder
.
• A dialog box appears asking whether
Serial Tool
should be placed in the
Ex-
tensions
folder. Click
OK
.
4-2. Drag the
FA123GRF
font and
FA123ALG
font to your
System Folder
.
• A dialog box appears asking whether
FA123GRF
font and
FA123ALG
font
should be placed in the
Font
folder. Click
OK
.
kk
kk
k Cable Connection
Connect the communication cable to your computer’s modem port.
If the modem port is already being used, connect to the printer port.
• If you connect to the printer port, be sure to turn Apple Talk off.
kk
kk
k Starting Program-Link
Double click the Program-Link
FA123
icon to start Program-Link.
9
4. File Transfer
The procedures described here can be used to upload calculator data to your com-
puter, and to download programs and data from your computer to your calculator.
• For details on how to operate your calculator during file transfers, see the section
of the calculator’s User’s Guide titled “Data Communications.”
k Types of Transfers
There are tow ways to transfer items.
• Transfer of a single data item. Transferred data items can be individually opened
and manipulated in the catalog window, and programs can be edited on the com-
puter.
• Transfer of all data to back up computer memory contents. Backed up data con-
tents cannot be viewed or edited on the computer.
kk
kk
k Before Transferring Data
uu
uu
uSetting computer communication parameters
1. Select
Link-Communications
.
2. Specify the communication port.
3. If you are using a Macintosh computer, set the following communication param-
eters.
BPS 9600
Parity None
Data Bits 8
Stop Bits 1
Hand shake None
uu
uu
uSpecifying the calculator type
Select the type of calculator you are connecting from
Tool-Model Type
(
Link-Model
Type
on the Macintosh) .
uu
uu
uSetting calculator communication parameters
Use the communication parameter setting procedure described in the User’s Guide
of your calculator to set its parameters to the following.
BPS 9600
Parity None
• ALGEBRA FX, CFX-9850, and fx-7400 Series communication parameters are
set automatically.
kk
kk
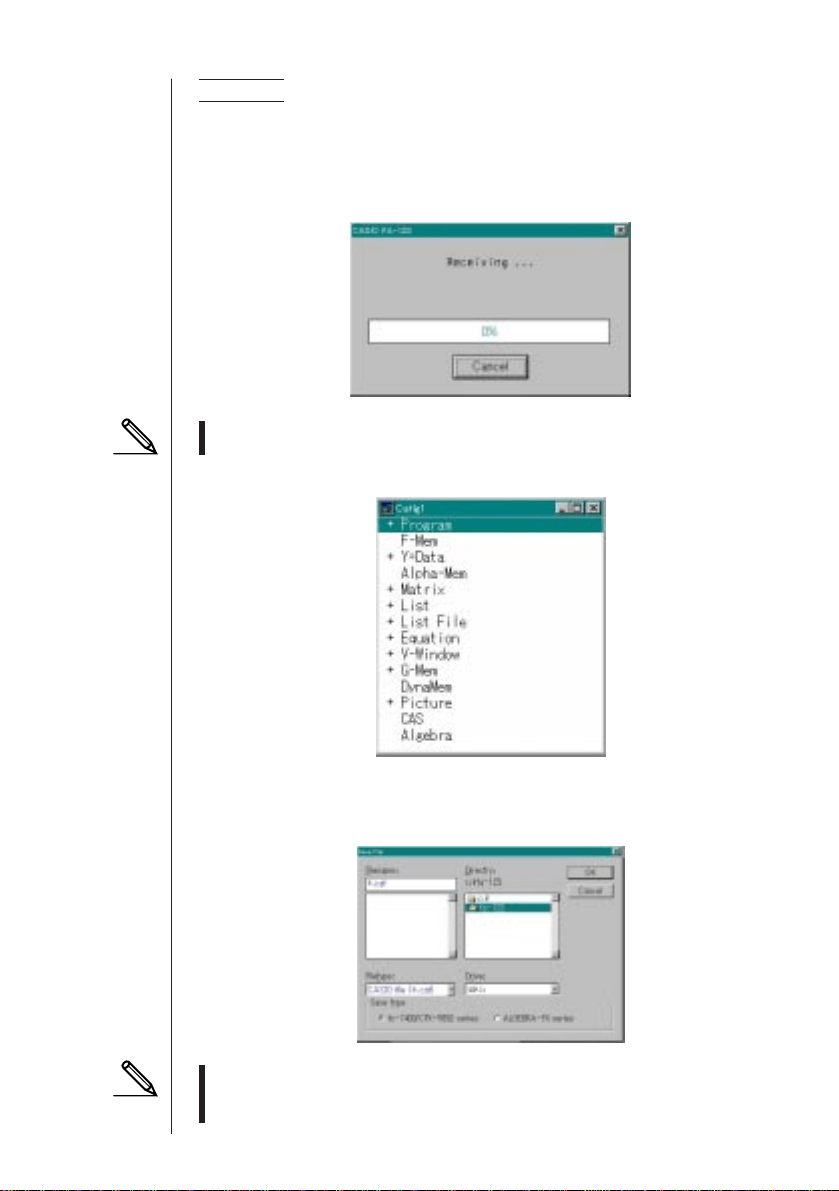
kTransferring Files from Your Calculator to Your Computer
1. Select
Link-Receive
on the computer screen.
2. Select the calculator data you want and then send it.
P5
10
Example Use the following procedure to send data from the ALGEBRA FX.
Select
Transmit
in the
LINK
mode.
Select
Select
and then select the data item you want to sent.
Select
Tran
and then select
YES
.
Data transfer starts at this time, with its progress indicated by a dialog box on the
computer screen.
The message “Transmit ERROR!” appears if the computer is not set up to re-
ceive data.
3. When data transfer is complete, a new catalog window appears on the screen.
4. Save the data as a file.
Select
File-Save
.
Specify a file name and click
OK
(
Save
in the case of a Macintosh) to save it as
a catalog file.
• Selecting
File-Save
displays a dialog box you can use to specify the file
name, drive, and directory (folder on the Macintosh). You can also use the “Save
type” box to specify the file format.
Sample screen
Sample screen

11
• Double check the following items whenever data transfer is not performed cor-
rectly.
• Check for proper connection of the communication cable.
• Check that the port was correctly selected using
Link-Communications
.
•Make sure the correct Tool-Model Type (Link-Model Type on the Macintosh) is
selected.
kk
kk
k Transferring Files from Your Computer to Your Calculator
1. Select
File-Open
and open the catalog file that you want to use for the transfer.
• Selecting
File-Open
causes a dialog box to appear. This dialog box can be used
to specify a file name and also to specify a drive and directory (a folder in the
case of a Macintosh).
2. Click on a group and item to select it for transfer.
• To select all the contents of the catalog file, select
Edit-Select All
.
• To select all the items in a group, double-click on the group (click on the arrow
mark to the left of the group name in the case of a Macintosh).
• To select multiple groups and items, hold down
control
(
command
in the
case of a Macintosh) and click. Hold down
shift
while clicking on groups or
items to select them.
3. Set up the calculator to receive data.
Example Use the following procedure to receive data with the ALGEBRA FX.
Select
Receive
in the
LINK
mode.
4. Select
Link-Transmit
.
Double check to make sure that both units are set up correctly for data transfer and
then click
OK
.
Data transfer starts at this time, with its progress indicated by a dialog box on the
computer screen.
5. If a received file has a name of a file already stored in calculator memory, a dialog
box appears asking if you want to overwrite the existing file. Select
Yes
or
No
in
response to the dialog message.
The message “Transmit error” appears if the calculator is not set up to receive
data.
6. When data transfer is complete, the dialog box closes.
• Double check the following items whenever data transfer is not performed cor-
rectly.
• Check for proper connection of the communication cable.
• Check that the port was correctly selected using
Link-Communications
.
• Make sure the correct Tool-Model Type (Link-Model Type on the Macintosh) is
selected.

12
kk
kk
k Back-up Data Transfer
uu
uu
uTo back up calculator data
1. Select
Link-Receive
on the computer screen.
2. Select
Backup
in the calculator’s
LINK
mode.
Example Use the following procedure to back up data from the ALGEBRA FX.
Select
Transmit
in the
LINK
mode.
Select
Backup
and then select
Tran
.
3. Now proceed with step 3 under “Transferring Files from Your Calculator to Your
Computer”.
uu
uu
uTo transfer backed up data to the calculator
1. Select
File-Open
and then select the back-up data file.
2. Now proceed with step 3 under “Transferring Files from Your Computer to Your
Calculator”.
• In the case of back-up data, no confirmation message appears to ask if you want
to replace previously backed up data with new data if you assign a file name that
is already assigned to back up data in memory.

13
Sample screen
5. Data Editing
kk
kk
k Creating a New Catalog File
1. Select
File-New-Model Type
, and then on the sending unit select
Model Type
.
2. Input data to create a new program or copy (or move) data from another catalog
window.
• For details on creating a program, see “Creating a New Item (Program)”.
• For details on copying or moving data, see “Deleting, Copying, and Moving
Groups and Items”.
3. Select
File-Save As
to save the data.
kk
kk
k Creating a New Item (Program)
• A program is the only type of item that can be newly created.
1. While a catalog file is open, select
Item-New
.
• Input the item name (program name) in the dialog box that appears on the
screen.
• The following are the characters you can use in a file name:
A through Z, r,
θ
, spaces, [, ], {, }, ’, ”, ~, 0 through 9, ., +, –, ×, ÷
• The above operation creates a program group and creates the item inside the
program group.
• If a program group already exists, the item is created inside the existing program
group.
2. Double-click on the item to launch the program editor.
• In the case of a Macintosh, the program editor is launched automatically.
3. Input the contents of the program.
• See “Program Editor” for details on inputting program contents.
4. Select
File-Close
to quit the program editor.
5. Select
File-Save
to save the catalog file.

14
• Program passwords are ignored by this software.
• When a program with password is transferred from the calculator to the compu-
ter, the password is ignored.
• You cannot edit a BASE program.
kk
kk
k Displaying, Editing, and Printing Items
uu
uu
uDisplaying and Editing an Item
1. While an item is selected, select
Item-Open
to display the contents of the item.
• In addition to using
Item-Open
, you can also double click on an item to display
its contents.
• If the item is a program, you can use the program editor to edit its contents.
• You cannot display the contents of G-Mem, Picture, or Dyna-Mem items.
• You can only edit RUN programs. You cannot edit BASE programs. Program
passwords are ignored by the software.
uu
uu
uPrinting
1. While an item is displayed, select
File-Print
.
2. Specify the printer, print options, number of copies, and enlargement factors, and
then start the printing.
• You can use the preview function (not available in the case of a Macintosh) to
display an image of the printout on the screen.
• You can print approximately 70 characters on an A4 size sheet of paper when the
font size is 10. To print more data, reduce the size of the printout.
kk
kk
k Deleting, Copying, and Moving Groups and Items
uu
uu
uDeleting a Group and Item
Select the group and item to be deleted and then select
Edit-Delete
(
Edit-Clear
in
the case of a Macintosh), or press the
del
key (
delete
key in the case of a Macin-
tosh).
uu
uu
uCopying a Group and Item to Another Catalog File
1. Select the group and item to be copied and then select
Edit-Copy
.
2. Open the destination catalog file and then select
Edit-Paste
.
• You could also drag the group and item to the designation window (while holding
down the
command
key in the case of a Macintosh).
• Copying data between two catalog files that are different formats can cause some
of the data to be lost.
• Available formats depend on graphic scientific calculator model.

15
uu
uu
uMoving a Group and Item to Another Catalog File
1. Select the group and item to be copied and then select
Edit-Cut
.
2. Open the destination catalog file and then select
Edit-Paste
.
• You could also drag the group and item to the destination window while holding
down the
control
key (simply drag the group and item without holding down any
key in the case of a Macintosh).
16
6. CSV Format Data File Conversion
You can convert List, File, and Matrix data to CSV format, which can then be imported
into a spreadsheet. You can also convert CSV format data to List, File, and Matrix
data.
kk
kk
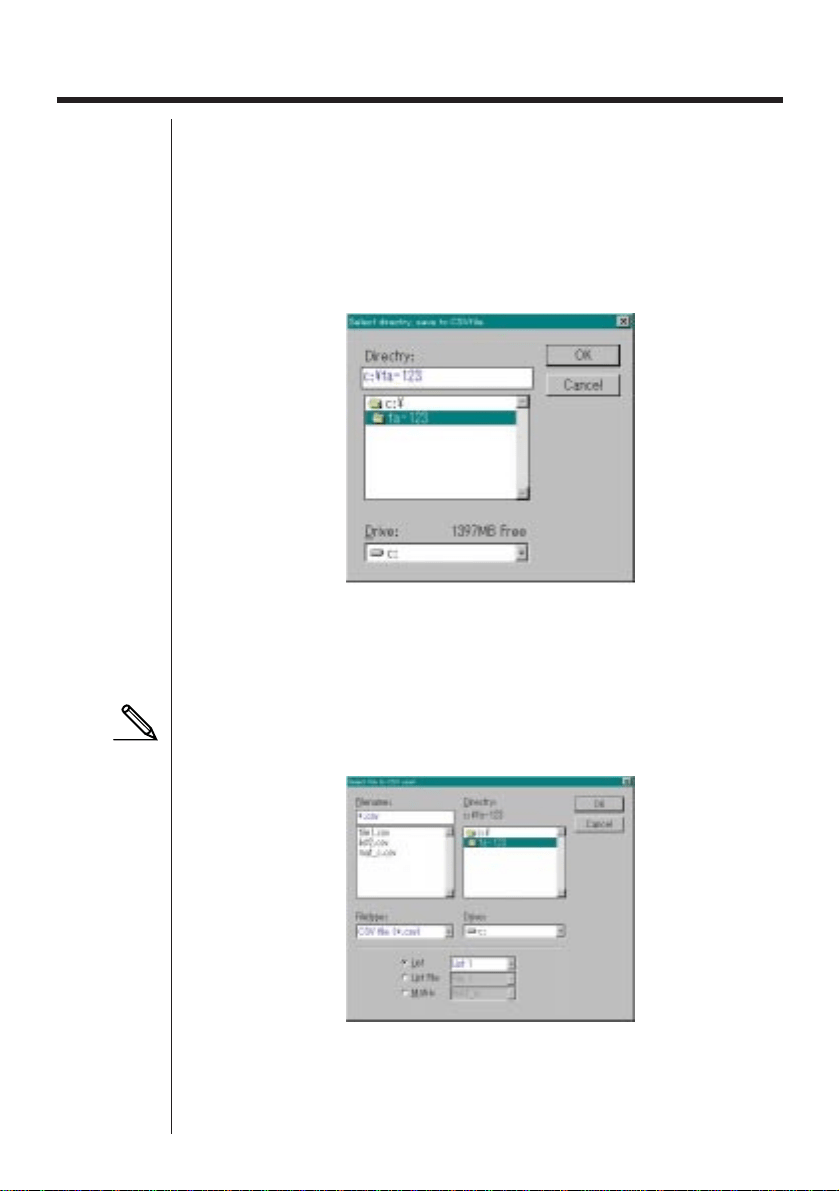
k Converting List, File, or Matrix Data to CSV Format
1. Select the catalog file list, file, or matrix data you want to convert, and then select
File-CSV-Save as CSV
.
2. On the dialog box that appears, select the destination directory.
3. Click
OK
to convert the data to CSV format.
• List, File, or Matrix data that contains complex numbers cannot be converted.
kk
kk
k Converting CSV Format Data to List, File, or Matrix Data
1. Select
File-CSV-Load from CSV
.
2. Specify List, File, or Matrix and the type of data to which you want to convert.
3. After the data is converted, the catalog file for the data type you select (List, File,
Matrix) appears on the screen.
• Conversion is not performed if the file type you select is not compatible with
CSV data.
Sample screen
7. Screen Capture
The screen image of the calculator can be captured as a bit pattern and transferred
to your computer.
• For details on how to operate your calculator for screen capture, see the section
of the calculator’s User’s Guide titled “Data Communications.”
kk
kk
k Capturing a Screen to Your Computer
uu
uu
uALGEBRA FX Series
1. Set up the calculator to send a screen shot to a computer.
• Use the calculator’s LINK Mode set up (u3(SET UP)) to specify Direct
(direct send) for the H-Copy item.
2. On the calculator, display the screen you want to send to the computer.
3. On the FA-123 menu bar, select
Link-Screen Capture
.
4. On the calculator, press u6 (H-COPY) to send the screen shot.
uu
uu
uCFX-9850/fx-7400 Series
1. Set up the calculator to send a screen shot to a computer.
• On the calculator’s LINK Mode, press 6 (IMGE) and then turn on the Image
Set Mode. In the case of a color calculator, you can select either MONO or COLR
for the Image Set Mode.
2. On the calculator, display the screen you want to send to the computer.
3. On the FA-123 menu bar, select
Link-Screen Capture
.
4. On the calculator, press M to send the screen shot.
• The screen shot is shown on the display of your computer after the transfer
operation is complete.
5. Save the data in a file.
Select
File-Save As
.
Specify a file name and save the file.
To change the format of the image file, specify the file type and then save the file.
• Selecting
File-Save As
causes a dialog box to appear. This dialog box can be
used to specify a file name and also to specify a drive and directory (a folder in
the case of a Macintosh).
17

kk
kk
k Displaying and Printing a Captured Screen Image
uu
uu
uDisplaying a Captured Screen Image
Select
File-Open
and open the image file to display the image.
uu
uu
uPrinting a Captured Screen Image
1. While the image is on the display, select
File-Print
.
2. Specify the printer, print options, number of copies, and enlargement factors, and
then start the printing.
• You can use the preview function (not available in the case of a Macintosh) to
display an image of the printout on the screen.
18

19
8. Program Editor
The program editor lets you edit the contents of programs.
kk
kk
k Launching the Program Editor
Create a new program or select an existing program to launch the program editor.
uu
uu
uCommand Input
You can input commands using any one of the three following methods.
• Selecting command from one of the following menus: MENU, PRGM, VARS, OPTN,
KEY, SET UP, CATALOG
• Inputting commands from the keyboard.
• Displaying the calculator window and using the mouse to click on its keys.
• To display the calculator window, select
View-Calculator
. Select
View-Calculator
again to clear the calculator from the display.
• The calculator independent font (i.e.
3
) is included in the FA123GRF font and
FA123ALG font, and cannot be input from the keyboard.
• Special characters will not appear normally on the display if the FA123GRF font
and FA123ALG font is not installed correctly.
• The calculation window’s
SHIFT
key and
ALPHA
key are disabled in the case of
a Macintosh.
kk
kk
k Saving Programs
Use the following procedure to save a program after inputting or editing it.
1. Select
File-Close
to quit the program editor.
2. Select
File-Save
to save the catalog file.
kk
kk
k Changing Fonts (Macintosh Only)
You can use another font with the program editor besides the FA123GRF font and
FA123ALG font.
• Special characters will not appear normally on the screen whenever you use a
font other than FA123GRF and FA123ALG.
Select
Edit-Font-font name
to change the font.
20
9. Data Transfer with an Old Model Calculator
Using this software to transfer data to the computer from an older model calculator
automatically converts the data to the format used by CFX-9850 / fx-7400 Series
and then stores it on disk.
The following table shows how data is converted.
Statistics SD
X-data R LIST1
f-data R LIST2
Statistics REG
X-data R LIST3
Y-data R LIST4
f-data R LIST5
Variable Mem
Defm R disappear
Range R View Window Mem1
Factor R Y=DATA
Table Function R Y=DATA , Graph Function , Table Range
Table Recursion R Y=DATA , Recursion Function , Recursion Range
Graph Function R Y=DATA , Graph Function
Dynamic Graph R Y=DATA , Graph Function
Editor R Program
20