Loading ...
Loading ...
Loading ...
1. Remove the 4 sets of nuts and bolts on the middle steel
plate.
2. Remove the 4 sets of nuts and bolts on each side.
3. Remove the impellers (10).
4. Install the new impellers (10).
5. Tigthen the 8 sets of nuts and bolts that you removed.
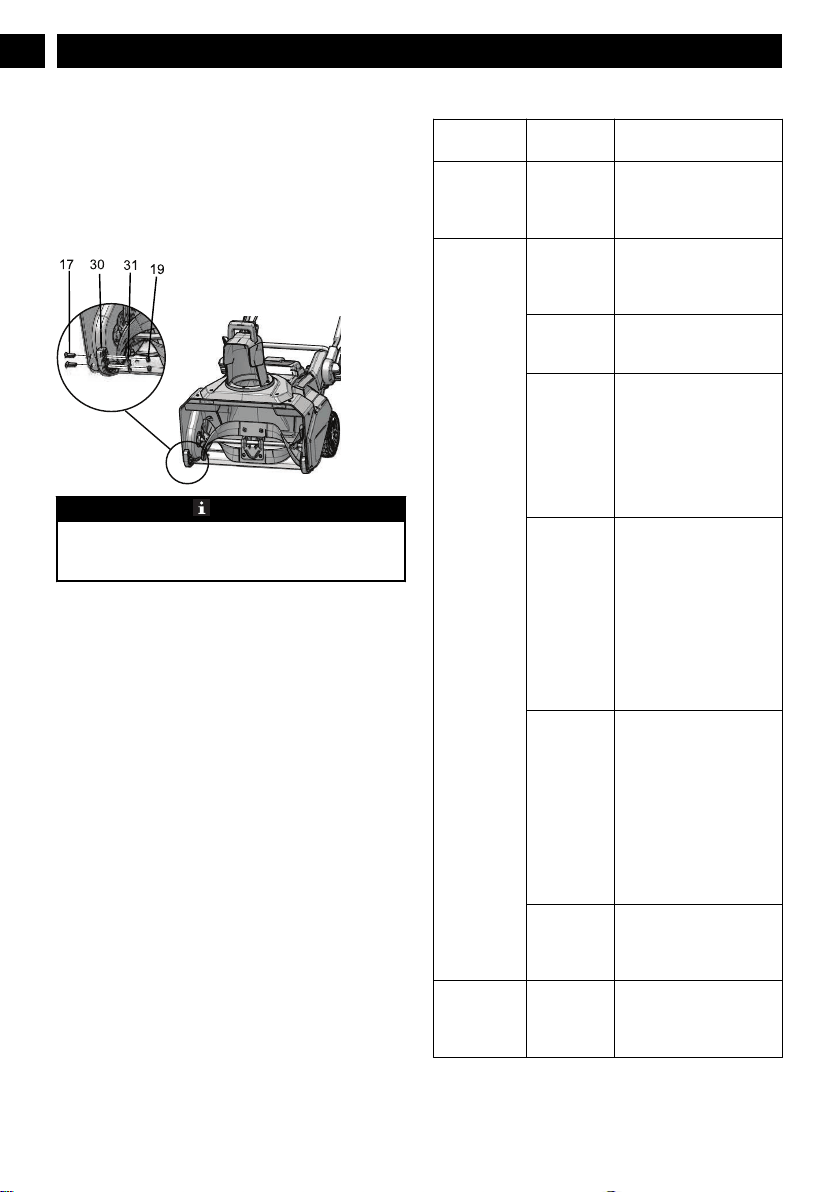
9.5 REPLACE THE SKID PLATES
NOTE
The range of adjustable height for skid plates is 1.5mm,
when putting the bolts through the U-hole on the skid
plates.
1. Loosen the 2 sets of bolts (17), spacers (31) and nuts (19)
that attach the skid plates (30) to the snow thrower
housing.
2. Remove the skid plates (30).
3. Install the new skid plates (30).
4. Do the same operation on the other side.
9.6 STORE THE MACHINE
• Clean the machine before storage.
• Make sure the motor is not hot when you store the
machine.
• Make sure that the machine does not have loose or
damaged parts. If it is necessary, do these steps/
instructions:
• Replace the damaged parts.
• Tighten the bolts.
• Speak to a person at an approved service center.
• Store the machine in a dry area.
• Make sure that children cannot come near the machine.
10 TROUBLESHOOTING
Problem Possible
cause
Solution
The handle is
not in posi-
tion.
The bolts are
not engaged
correctly.
Adjust the height of the
handle and make sure that
the knobs and bolts are
aligned correctly.
The machine
does not start.
The battery is
not charged.
Charge the battery by fol-
lowing the procedures in
the battery and charger
manual.
The switch is
defective.
Have the switch replaced by
an authorized service cen-
ter.
Battery is too
cold.
Remove battery from snow
thrower. Place battery on
charger and allow to charge
for 10 minutes or until the
changing light turns green.
Remove from charger and
install in snow thrower for
use.
Blue LED
light is Flash-
ing - Battery
is in Low
Voltage Pro-
tection.
Bring the Battery and
Charger in to a warm area.
Place the Battery in the
charger and allow for the
battery to reach room tem-
perature or when the light
on the charger is flashing
Green. Once charger is
flashing green, take the bat-
tery and place it in the unit
to begin work.
Blue LED
light is al-
ways on -
Battery Tem-
perature is
Low.
Bring the Battery and
Charger in to a warm area.
Place the Battery in the
charger and allow for the
battery to reach room tem-
perature or when the light
on the charger is flashing
Green. Once charger is
flashing green, take the bat-
tery and place it in the unit
to begin work.
Battery may
require serv-
ice or re-
placement.
Call toll free helpline, at
1-855-345-3934 or replace
battery.
The engine is
on, but the im-
peller does not
turn.
The belt is
damaged.
Replace the belt.
12
English
EN
Loading ...
Loading ...
Loading ...