1
MODEL: T547000
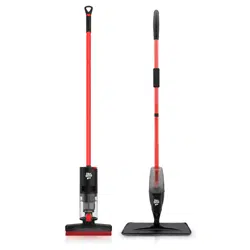
TOWER HYGENESIS SPRAY MOP
USER MANUAL

2
THIS BOX CONTAINS 3
SPECIFICATIONS
3
IMPORTANT SAFETY INFORMATION
4
• General safety 4
STRUCTURE OF YOUR APPLIANCE 6
• Features & functions 6
BEFORE FIRST USE
7
• Setting up 7
• Preparing the cleaning solution 7
• Cleaning solution table 8
USING YOUR APPLIANCE
9
• Using the bottle as a spray bottle 9
CLEANING AND CARE 9
TROUBLESHOOTING
10
DISPOSAL OF THE UNIT 11
CUSTOMER SUPPORT 11
TABLE OF CONTENTS
3
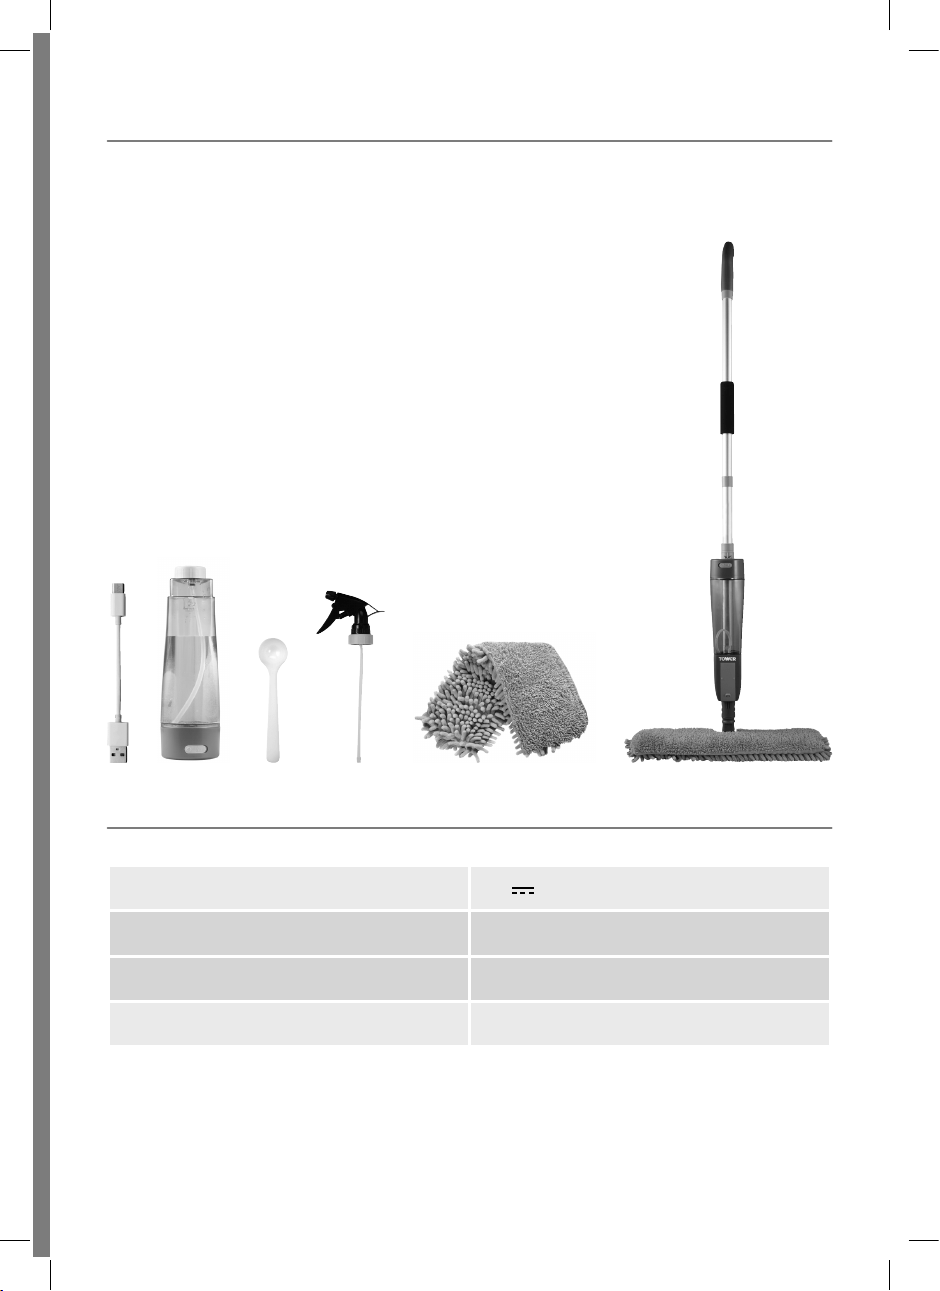
THIS BOX CONTAINS
SPECIFICATIONS
RATED VOLTAGE 5V 1.0A
IONISING TIME Up to 9 minutes
DIMENSIONS (MM) H: 1200 x W: 420 x D: 145mm
WEIGHT 1.0Kg
Instruction manual
Anti-Bacterial Spray Mop
Bottle
Microber Cloth
Bottle Spray Nozzle
USB Charging Cable
Measuring Spoon

4
Please read these safety NOTES carefully
BEFORE using your Tower appliance.
These warnings have been provided in the
interest of safety. Basic safety precautions
should always be followed including the
following:
GENERAL SAFETY
• If the supply cord or appliance is
damaged, stop using the appliance
immediately and seek advice from the
manufacturer or its service agent or a
similarly qualied person.
• This product contains no serviceable
parts. DO NOT try to repair it yourself. Any
servicing that requires disassembly other
than cleaning must be performed by a
qualied appliance repair technician.
• The use of accessory attachments is
not recommended by the appliance
manufacturer apart from those supplied
with this product.
• Please ensure that the appliance is used
on a stable, level, and heat resistant
surface.
• Please ensure that the appliance is used
on a stable, level, and heat resistant
surface.
• This appliance can be used by children
aged from 8 years and above and persons
with reduced physical, sensory or mental
capabilities or lack of experience and
knowledge if they have been given
supervision or instruction concerning
use of the appliance in a safe way and
understand the hazards involved.
• Children should not play with the
appliance.
• Cleaning and user maintenance shall not
be made by children without supervision.
• DO NOT use this product for anything
other than its intended use.
• This appliance is for household use only.
• DO NOT use the appliance outdoors.
• DO NOT use the appliance in
temperatures above 30 degrees
Centigrade, or in locations with excessive
humidity or where frost has formed.
• DO NOT use the mop head without the
micro bre cleaning cloth correctly
installed or without water in the water
bottle.
• DO NOT drink the cleaning solution.
• DO NOT use hot or boiling water in the
cleaning solution.
• DO NOT heat up boil the prepared
cleaning solution.
• DO NOT use distilled water in the
cleaning solution.
• DO NOT add more salt or vinegar than
recommended in the instructions, as
this could cause excessive fumes and
lead to breathing difficulties. Always
use regular table salt and white vinegar
when making the cleaning solution.
It is important that this instruction
manual is retained for future reference.
If the appliance is given to someone
else, it should always be accompanied
by these operating instructions, as they
form an integral part of the appliance.
IMPORTANT SAFETY INFORMATION

5
• DO NOT add any ingredients to the
cleaning solution, other than the ones
detailed in this instruction manual.
The use of fragrances or scented oils
will reduce the effectiveness and
disinfectant properties of the cleaning
solution.
• NEVER mix the cleaning solution with
ammonia products, acidic toilet cleaners,
or any other cleaning solutions, as
this could result in toxic fumes being
generated which can cause breathing
difculties.
• DO NOT ionize cleaners, sanitisers, or
any other ammable, explosive or toxic
solutions. This process should only
be applied to water, salt or vinegar, as
detailed in this instruction manual.
• The unit may give off a slight smell
during use. This is a result of the
ionization process, and does not indicate
malfunction or misuse of the unit.
• The cleaning solution could cause
unprotected metals to corrode. Clean off
the cleaning solution from unprotected
metal surfaces after every use.
• DO NOT use on leather or waxed polished
furniture or ooring, synthetic fabrics,
velvet or other delicate steam sensitive
materials.
• DO NOT use on any unsealed hard floor
surfaces. Additionally, on surfaces
that have been treated with wax or
some no-wax floors, the sheen may
be removed by the spraying action.
It is always recommended to test
an isolated area of the surface to be
cleaned before proceeding. We also
recommend that you check the use
and care instructions from the floor
manufacturer.
6
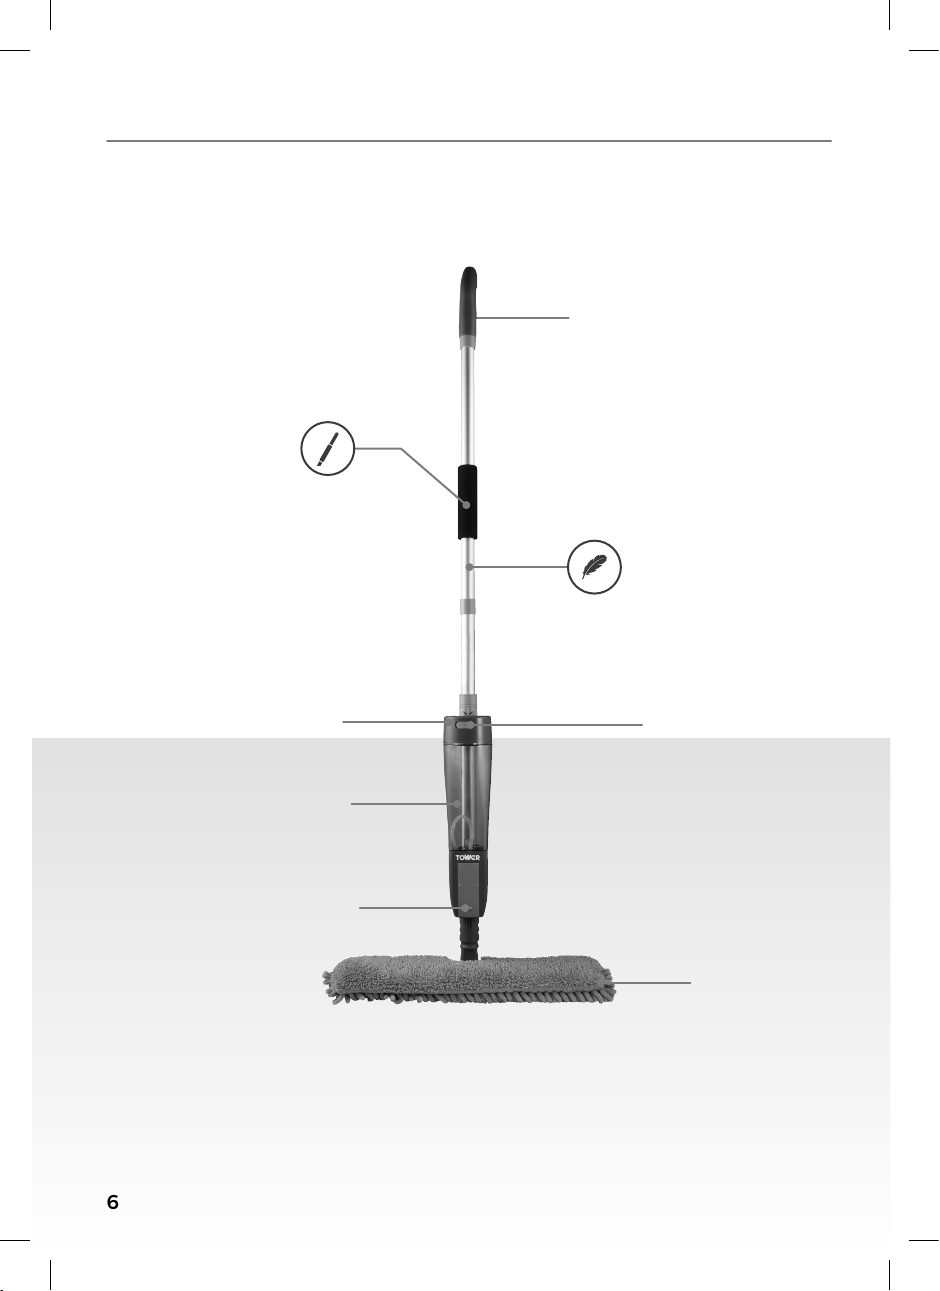
STRUCTURE OF YOUR APPLIANCE
Easy Trigger
Water Spout
Reversable
Mop Head
Lightweight
Tube
Ionising
Charging Port
Power Button
Detachable
Water Bottle
Ergonomic
Grip Handle

7
SETTING UP
1. Remove your appliance from the
packaging.
2. Check that there is no visible damage to
the body.
3. Check that all listed parts are present.
4. Remove any stickers or labels from
the appliance. DO NOT remove any
warnings.
5. Dispose of the packaging in a
responsible manner.
6. Charge the rechargeable battery.
PREPARING THE
CLEANING SOLUTION
NOTE: Once prepared, the cleaning
solution will keep for about two weeks;
after this period, we recommend disposing
of any unused cleaning solution, and
making a fresh batch.
To prepare the cleaning solution, carry out
the following steps:
1. Remove the water bottle from its holder
on the main body of the appliance.
2. Once the water bottle has been pulled
out, ll it with water up to the MAX
marking (approximately 450ml.) When
the bottle has been lled, use the
provided measuring spoon to measure
out two spoonfuls of salt, and add these
to the water.
NOTE: Use only cold tap or bottled water
and table salt. DO NOT use hot or boiling
water, and do not add any oils or fragrances
to the solution, as this will reduce its
effectiveness.
3. When the ingredients have been
added into the bottle, plug the micro-
USB end of the included USB cable to
the corresponding slot on the base
of the bottle, and the other end to
a compatible USB socket or mains
adaptor (not included.)
4. When the water bottle is plugged into
the mains, press the Power On/Off
button on the base the required number
of times to start the corresponding
ionisation process, as follows:
Press this button once to launch a
90-second ionisation process. The unit
will automatically start the process, and
the LED indicator on the base of the
bottle will light up blue to indicate this
length has been selected.
Press this button twice to launch a
3-minute ionisation process. The unit
will automatically start the process,
and the LED indicator on the base of
the bottle will light up blue and red to
indicate this length has been selected.
Long-press this button to launch a
9-minute ionisation process. The unit
will automatically start the process, and
the LED indicator on the base of the
bottle will light up red to indicate this
length has been selected.
5. If required, after the ionisation process
has concluded and the solution has
been created, measure out a spoonful of
white vinegar and add it to the cleaning
solution. DO NOT add vinegar to the
cleaning solution before it is ready
or while the ionisation process is in
progress.
NOTE: Use ONLY white vinegar for this
purpose. NEVER use another type of
vinegar or oil.
Refer to the table on the next page for
guidance on the recommened length
for the ionisation process for a variety of
common usages.
BEFORE FIRST USE

8
PREPARING THE CLEANING SOLUTION
USAGE
SALT
ADDED
ELECTROLYSIS
TIME
1. Towel disinfection.
3g
(One spoon)
1.5 minutes
2. Routine disinfection of houseold items.
3. Toutine cleaning and disinfection of oors.
4. Added disinfection when washing clothes.
5. Outdoor furniture abd other items.
1. Disinfecting fruits and vegatables.
3g
(One spoon)
3 minutes
2. Disinfecting and cleaning drinking fountains,
coffee machines and lters.
1. Sterilizing tableware and kitchenware.
6g
(One spoon)
3 minutes
2. Disinfection of children’s toys.
3. Cleaning and disinfection of xed facilities
in toilets.
4. Disinfection of shoes.
5. Disinfection cleaning inside and outside of
washing machine.
6. Sewer cleaning and disinfection.
7. Disinfection for pet supplies.
8. Cleaning and disinfection of sports equipment.
9. Cleaning dust container and vacuum duct of the
vacuum cleaner.
1. Indoor air disinnfection.
6g
(One spoon)
9 minutes
2. Disninfection of xed kitchen.
3. Regerator, dishwasher disinfection and oder
removal.
4. Disinfect the radiator inside the air conditioner.

9
USING YOUR APPLIANCE/ CLEANING & CARE
USING YOUR APPLIANCE
1. Once the cleaning solution has been
prepared, as detailed above, unplug the
water bottle from the USB power source
and return it to its holder, ensuring
it goes in in the correct position. The
water bottle is in the correct position
when the cap is facing downwards and
aligned with the corresponding notch
on the main body of the appliance.
NOTE: Ensure the water bottle is rmly
secured into place before attempting to
use the unit.
2. Once the water bottle is correctly tted
into place, turn the bottle lock to secure
it into place.
3. With the water bottle securely in place,
t the microber cloth onto the mop
head, ensuring it is correctly afxed
into place.
NOTE: DO NOT use the unit without the
microber cloth attached.
4. When the microber cloth has been
correctly attached, press the spray
trigger on the handle of the appliance to
spray the home-made cleaning solution
onto the surface to be cleaned. Repeat
this action as many times as necessary
until the surface has been fully cleaned.
USING THE BOTTLE
AS A SPRAY BOTTLE
Ensure the water bottle is rmly secured
into place before attempting to use the
unit.
1. In addition to acting as a water tank, the
included water bottle can also be used
as a manual sprayer, to clean harder-to-
reach areas.
2. Once the spray nozzle is rmly attached
into place, press the spray trigger to
manually spray the home-made solution
inside the bottle onto the surface to be
cleaned. Repeat this action as many
times as necessary until the surface has
been fully cleaned.
CLEANING THE APPLIANCE
1. Wipe the main body of the unit and
holder/ handle with a damp cloth. DO
NOT use any abrasive, chemical or harsh
cleaners.
2. The water bottle can be cleaned by
mixing approximately 50ml of white
vinegar and 200ml of water inside the
bottle, shaking it to mix the ingredients,
and leaving it to sit for approximately
30 minutes. When this time elapses,
drain the contents inside the bottle and
rinse it with fresh water from a bottle
or tap. If necessary, repeat this process
until the bottle is thoroughly clean.
3. When cleaning the water bottle after
creating multiple batches of cleaning
solution in quick succession, carry out
the process detailed above, but leave
it to soak for 3 minutes. Once this
time elapses, rinse the bottle under
fresh running water and leave it to dry
thoroughly before attempting to use
it again.
NOTE: Use fresh water when making a new
batch of cleaning solution after cleaning
the bottle. DO NOT use the rinsing water,
or the water and vinegar mixture used
to clean the bottle, as the basis for the
cleaning solution.
4. The microber cloth pad can be washed
in the washing machine, or rinsed under
warm water and cleaned with soap or a
mild detergent. Ensure the microber
cloth pad is thoroughly dry before
attempting to afx it to the unit.
STORING THE APPLIANCE
1. Store the appliance in a cool, dry place,
preferably inside its original packaging,
and out of the reach of children.

10
PROBLEM POSSIBLE CAUSE POSSIBLE SOLUTION
Reduced spray or no
spray.
The water bottle may
be empty.
Add water and salt to the water
bottle to create the home-made
cleaning solution, as detailed in
the corresponding section of this
instruction manual.
The water bottle
may be incorrectly
attached to the unit,
or the manual spray
nozzle incorrectly
attached to the unit.
Ensure the water bottle is rmly
attached into place, and in the
correct position. The water bottle
is in the correct position when
the cap is facing downwards and
aligned with the corresponding
notch on the main body of the
appliance.
The spray trigger has
not been pressed.
Press the spray trigger on the
handle of the appliance or on the
manual spray nozzle.
Weak cleaning solution.
The solution has not
been sufciently
ionized.
Observe the correct ionization
time for the desired purpose.
Refer to the table contained in
the corresponding section of this
instruction manual for guidance
on appropriate ionization times
for a variety of common cleaning
tasks.
The ionization process
does not start when the
Power On/Off button on
the bottle is pressed.
The bottle is not
plugged into USB.
Ensure the bottle is plugged
into a compatible USB socket or
mains adaptor (not included.)
The ionization process
is too short.
The wrong ionization
cycle may have been
selected.
Press the Power On/Off
button on the water bottle the
corresponding amount of times
to launch the required ionization
cycle Refer to the Preparing the
Cleaning Solution section of this
instruction manual for guidance
on how to activate each different
ionization cycle.
Alternatively, run more than one
ionization cycle consecutively,
until the desired length or
ionization levels are reached.
TROUBLESHOOTING
11
Appliances bearing the symbol shown
here may not be disposed of in domestic
rubbish. You are required to dispose of old
electrical and electronic appliances like
this separately.
Please visit www.recycle-more.co.uk
or www.recyclenow.co.uk for access
to information about the recycling of
electrical items.
Please visit www.weeeireland.ie for access
to information about the recycling of
electrical items purchased in Ireland.
The WEEE directive, introduced in August
2006, states that all electrical items must
be recycled, rather than taken to landll.
Please arrange to take this appliance to
your local Civic Amenity site for recycling,
once it has reached the end of its life.
DISPOSAL OF THE UNIT
If you have any questions or concerns about your new product,
please contact our helpful Customer Support Team:
Spare part replacements and accessories are available to purchase via:
+44 (0) 333 220 6066
www.towerhousewares.co.uk
Please have your Model No. available. This can be found on the front
cover of this instruction manual and on the appliance’s rating label.
SPARE PARTS / CUSTOMER SUPPORT
12
We hope you enjoy your appliance for many years...
This product is guaranteed for 12 months
from the date of original purchase.
If any defect arises due to faulty
materials of workmanship, the faulty
products must be returned to the place
of purchase.
Refund or replacement is at the
discretion of the retailer.
THE FOLLOWING CONDITIONS APPLY:
The product must be returned to the
retailer with proof of purchase or a
receipt.
The product must be installed and used
in accordance with the instructions
contained in this instruction guide.
It must be used only for domestic
purposes.
It does not cover wear and tear, damage,
misuse or consumable parts.
Tower has limited liability for incidental
or consequential loss or damage.
This guarantee is valid in the UK and
Eire only.
The standard one year guarantee is only
extended to the maximum available
for each particular product upon
registration of the product within
28 days of purchase. If you do not register
the product with us within the 28 day
period, your product is guaranteed for
1 year only.
To validate your extended warranty,
please visit www.towerhousewares.
co.uk and register with us online.
Please note that length of extended
warranty offered is dependent on
product type and that each qualifying
product needs to be registered
individually in order to extend its
warranty past the standard 1 year.
Extended warranty is only valid with
proof of purchase or receipt.
Your warranty becomes void should you
decide to use non Tower spare parts.
Spare parts can be purchased from
www.towerhousewares.co.uk
Or call our Customer Support Team on:
+44 (0) 333 220 6066
YEAR
GUARANTEE
3