Loading ...
Loading ...
Loading ...
First Steps
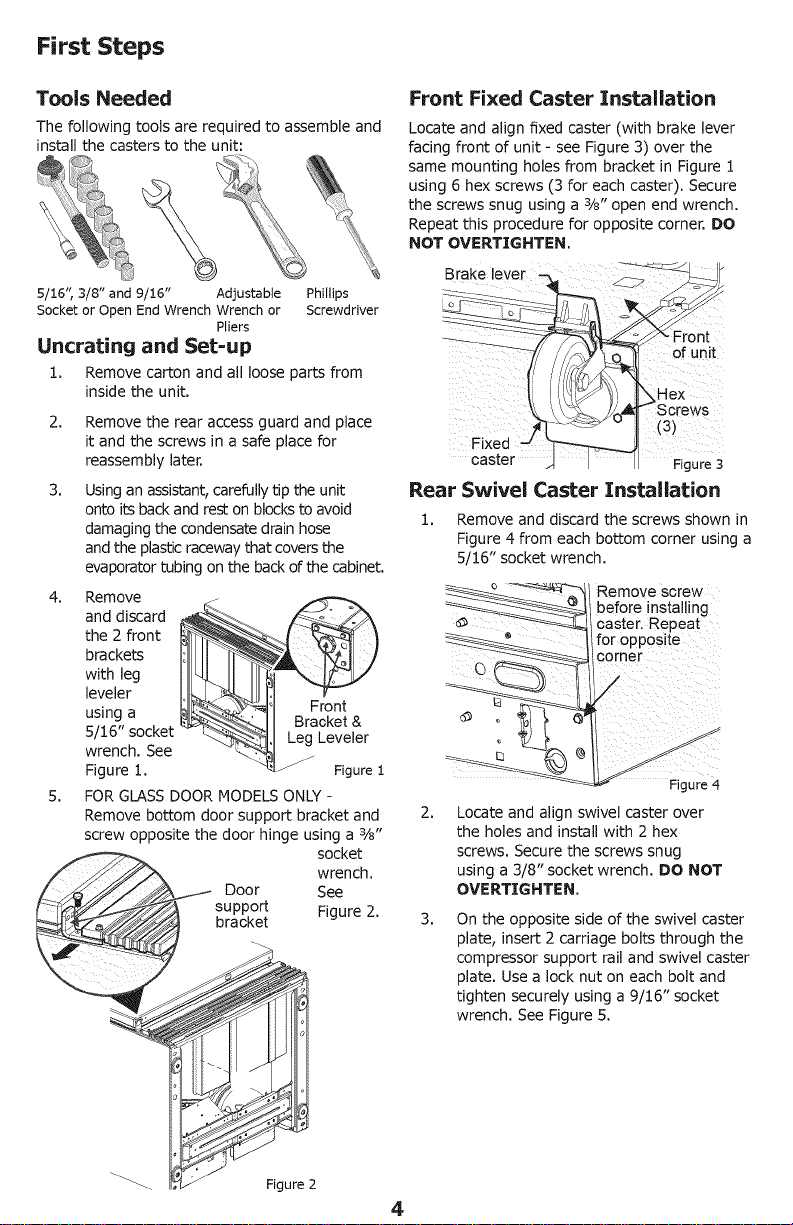
Tools Needed
The following tools are required to assemble and
install the casters to the unit:
5/16", 3/8" and 9/16" Adjustable Phillips
Socket or Open EndWrench Wrenchor Screwdriver
Pliers
Uncrating and Set=up
1. Remove carton and all loose parts from
inside the unit.
2. Remove the rear access guard and place
it and the screws in a safe place for
reassembly later.
3. Using an assistant, carefully tip the unit
onto its back and rest on blocks to avoid
damaging the condensate drain hose
and the plastic raceway that covers the
evaporator tubing on the back of the cabinet.
4. Remove
andrd
the 2 front [_---_._.
brackets I: II
with leg _1
leveler i_<_1. I P-4c
using a _
5/16" socket _ _er
wrench. See
Figure 1. Figure1
5. FOR GLASS DOOR MODELS ONLY -
Remove bottom door support bracket and
screw opposite the door hinge using a 3/8"
socket
wrench.
Door See
support Figure 2.
bracket
Front Fixed Caster Installation
Locate and align fixed caster (with brake lever
facing front of unit - see Figure 3) over the
same mounting holes from bracket in Figure 1
using 6 hex screws (3 for each caster). Secure
the screws snug using a 3/8"open end wrench.
Repeat this procedure for opposite corner. DO
NOT OVERTIGHTEN,
Brake lever _T:2
- Front
unit
Hex
i
caster Figure3
Rear Swivel Caster Installation
1. Remove and discard the screws shown in
Figure 4 from each bottom corner using a
5/16" socket wrench,
Remove screw
_efore installing
caster Repeat
for opposite
corner
2.
3.
Figure4
Locate and align swivel caster over
the holes and install with 2 hex
screws. Secure the screws snug
using a 3/8" socket wrench. DO NOT
OVERTIGHTEN.
On the opposite side of the swivel caster
plate, insert 2 carriage bolts through the
compressor support rail and swivel caster
plate. Use a lock nut on each bolt and
tighten securely using a 9/16" socket
wrench. See Figure 5.
Figure 2
4
Loading ...
Loading ...
Loading ...