
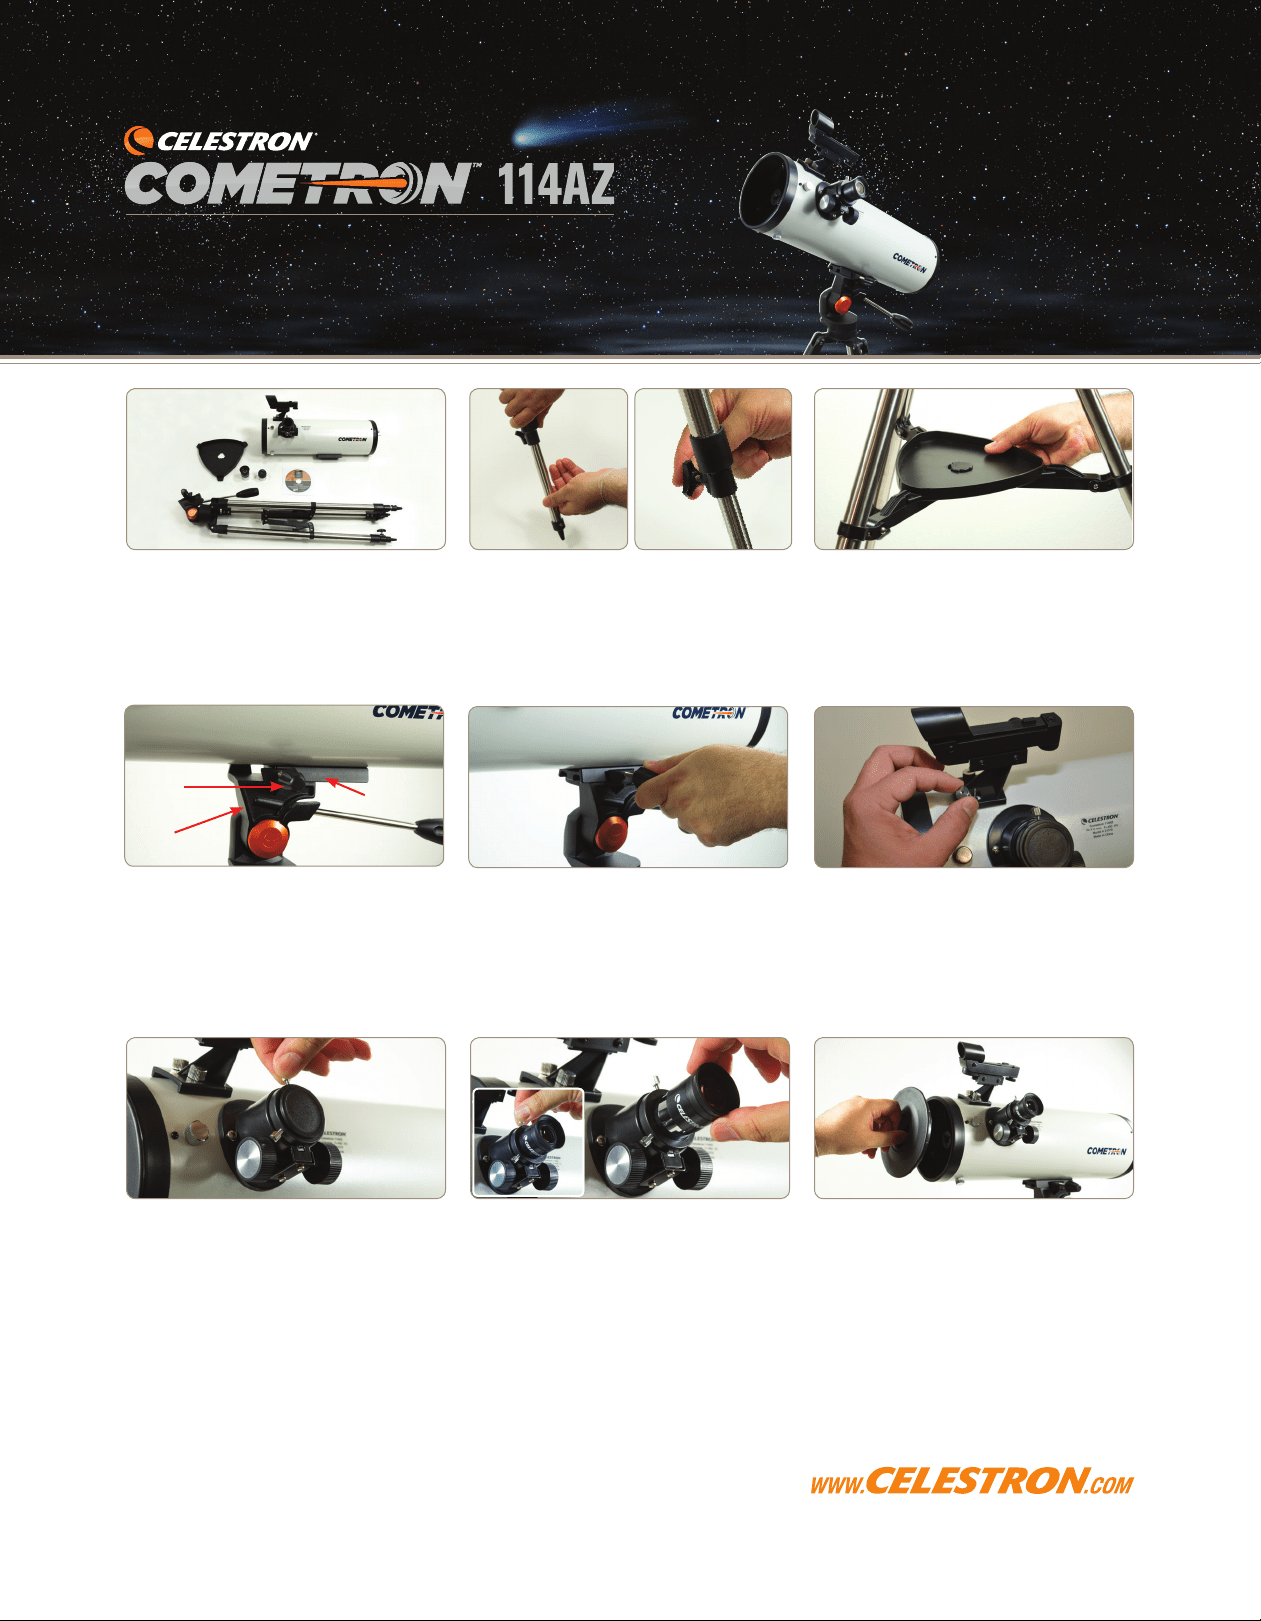
1. Your Cometron 114AZ includes an optical
tube, tripod with altazimuth mount, accessory
tray, red-dot finderscope, and TheSkyX
DVD-ROM astronomy software.
2. To setup tripod spread the legs outward
until they are fully extended. Loosen the
knobs at the end of the legs to extend the
tripod to the desired height. Tighten the
knobs to lock the legs.
3. To attach the accessory tray, line up the
notches and turn the tray clockwise until
the tray tabs lock in place with the tripod
brackets.
4. Now slide the dovetail bar on the bottom of
the optical tube into the clamp assembly on
the top of the mount. Be sure to back out the
fastening screw to allow enough clearance
for the dovetail bar.
5. Center the dovetail in the mount and tighten
the fastening screw.
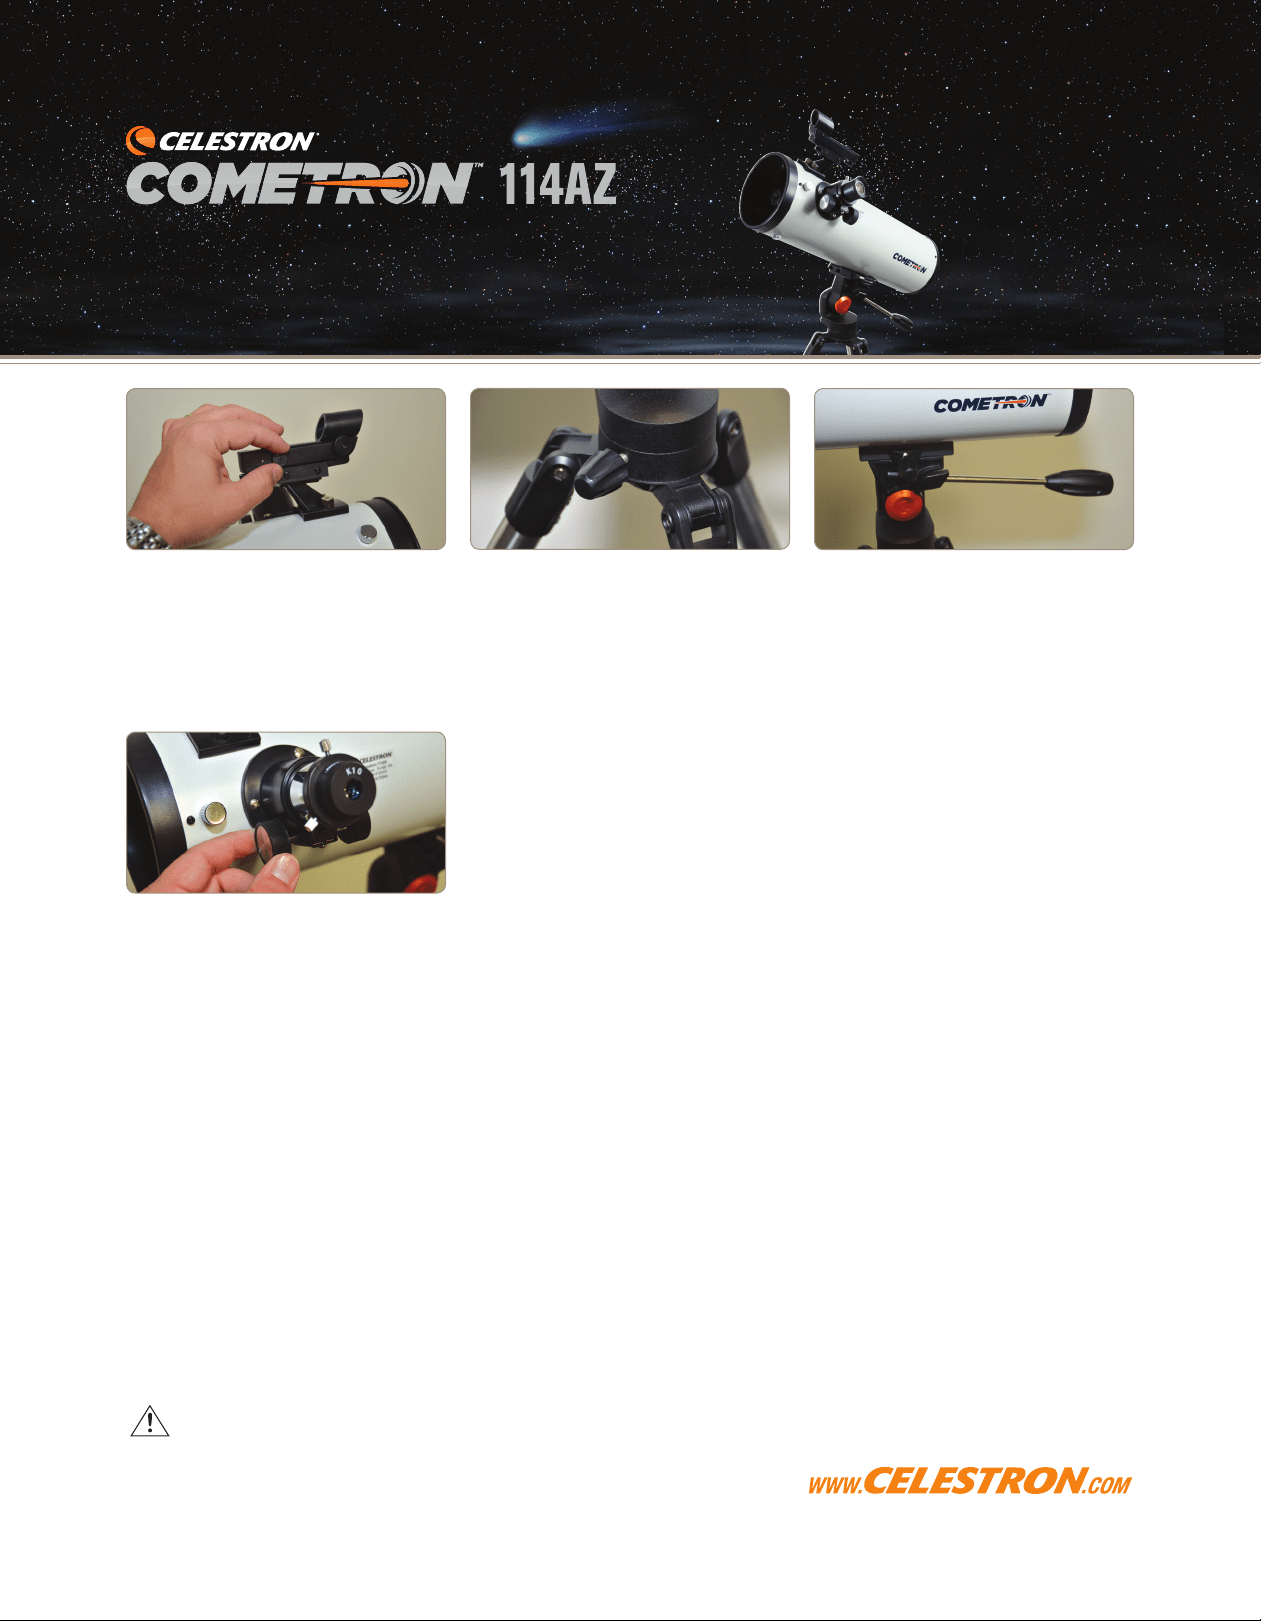
6. To install finderscope, remove nuts on side
of tube, place bracket over threaded posts
and replace the nuts.
7. Loosen the thumbscrews on the focuser
and remove focuser cap.
8. Insert the chrome barrel of the eyepiece into
the focuser and secure with set screws.
9. Remove main telescope lens cap.
INSTRUCTION SHEET
Dovetail
Mount
Fastening
screws
English

10. Turn on the red-dot finderscope. To
conserve battery life, be sure to turn it
off when not in use.
11. Loosen the clutch knob to free up the
azimuth (left & right) axis.
12. Turn the panning handle of the mount
counterclockwise to loosen the altitude
(up & down) clutch. Use the pan handle
to move the telescope until your target
appears in the finderscope. When you
have your target in the field of view of the
telescope eyepiece, tighten the altitude
lock nut.
13. Focus your telescope by turning the two
knobs under the eyepiece until you have
a sharp image.
INSTRUCTION SHEET CONT...
For general usage information, please visit www.celestron.com.
If you have questions or problems with setup, please contact
Celestron Technical Support: 310.803.5955
This product is designed and intended for use by those 14 years of age and older.
Product design and specifications are subject to change without prior notification.
©2013 Celestron
Celestron and Symbol are trademarks of Celestron, LLC. All rights reserved.
2835 Columbia Street • Torrance, CA 90503 U.S.A
Solar WarNING: Never attempt to view the sun through
any telescope without a proper solar filter.

1. Votre Cometron 114AZ comprend un tube
optique, un trépied avec monture azimutale,
un plateau à accessoires, un chercheur à
points rouges et un DVD-ROM du logiciel
d’astronomie TheSkyX.
2. Pour l’installation du trépied, écartez les
pattes vers l’extérieur jusqu’à ce qu’elles
soient complètement étendues. Desserrez les
molettes à l’extrémité des pattes pour étendre
le trépied à la hauteur souhaitée. Serrez les
molettes de verrouillage des pattes.
3. Pour fixer le plateau à accessoires, alignez les
encoches et tournez le plateau dans le sens
horaire jusqu’à ce que les languettes du pla-
teau se verrouillent aux supports du trépied.
4. Faites maintenant glisser la barre queue
d’aronde sur le dessous du tube optique
dans les colliers sur le dessus de la monture.
Assurez-vous de dévisser la vis de fixation de
manière à laisser suffisamment de dégage-
ment pour la barre queue d’aronde.
5. Centrez la queue d’aronde sur la monture et
serrez la vis de fixation.
6. Pour installer le chercheur, retirez les écrous
situés sur le côté du tube, placez le support
sur les poteaux filetés et remettez en place
les écrous.
7. Desserrez les vis à serrage à main situées
sur le porte-oculaire et retirez le capuchon du
porte-oculaire.
8. Insérez le barillet chromé de l’oculaire dans
le porte-oculaire et fixez-le avec les vis de
réglage.
9. Retirez le capuchon de l’objectif principal
du télescope..
MODE D’EMPLOI
Queue
d’aronde
Monture
Vis de
blocage
Français
10. Mettez sous tension le chercheur à points
rouges. Pour préserver la durée de vie de la
pile, assurez-vous de le mettre hors tension
lorsque vous ne l’utilisez pas.
11. Desserrez la molette de verrouillage pour
libérer l’axe azimutal (gauche & droite).
12. Tournez la poignée de pivotement de la mon-
ture dans le sens antihoraire pour desserrer
le verrouillage d’altitude (haut & bas). Utilisez
la poignée de pivotement pour déplacer le
télescope jusqu’à ce que votre cible appara-
isse dans le chercheur. Lorsque votre cible
apparait dans l’oculaire du télescope, serrez
l’écrou de verrouillage de l’altitude.
13. Faites la mise au point de votre télescope
en faisant tourner les deux molettes situées
sous l’oculaire jusqu’à ce que vous obteniez
une image nette.
MODE D’EMPLOI SUITE
Pour des informations générales concernant l’utilisation, veuillez
visiter le www.celestron.com.
Si vous avez des questions ou des problèmes concernant
l’installation, veuillez contacter le soutien technique Celestron :
310.803.5955
Ce produit a été conçu à l’intention des utilisateurs âgés de 14 ans et plus.
La conception et la spécification du produit peuvent être modifiées sans préavis.
©2013 Celestron
Celestron et le symbole sont des marques de commerce de Celestron, LLC. Tous
droits réservés.
2835 Columbia Street • Torrance, CA 90503 É.-U.
aVErTISSEMENT au sujet du soleil :
N’essayez jamais d’observer le soleil à l’aide d’un
télescope sans utiliser un filtre solaire adéquat.
1. Su Cometron 114AZ incluye un tubo óptico,
un trípode con soporte altazimut, bandeja
de accesorios, localizador de punto rojo y
el DVD-ROM de software de astronomía
TheSkyX.
2. Para instalar el trípode, separe las patas
hacia fuera hasta que estén totalmente
desplegadas. Afloje los mandos del extremo
de las patas para extender el trípode hasta
la altura deseada. Apriete los mandos para
bloquear las patas.
3. Para colocar la bandeja de accesorios,
alinee las ranuras y gire la bandeja en el
sentido de las agujas del reloj hasta que
encaje en posición con los soportes del
trípode.
4. Deslice la barra con el tornillo en mariposa de
la parte inferior del tubo óptico en la estructura
de enganche de la parte superior del soporte.
Asegúrese de hacer retroceder el tornillo de
fijación para dejar un espacio suficiente para
la barra con el tornillo en mariposa.
5. Centre el tornillo de mariposa en el soporte
y apriete el tornillo de fijación.
6. Para instalar el localizador, saque las roscas
del lateral del tubo, coloque el soporte
sobre los postes estriados y vuelva a
colocar las roscas.
7. Afloje los tornillos del enfoque y saque
la tapa.
8. Introduzca el cañón cromado del ocular en
el enfoque y fíjelo con los tornillos.
9. Saque la tapa de la lente principal del
telescopio.
FOLLETO DE INSTRUCCIONES
ensambladura
a cola de
milano
Montaje
Tornillo de
sujeción
Español

10. Encienda el localizador de punto rojo.
Para conservar batería, asegúrese de
apagarlo cuando no lo use.
11. Afloje el mando para liberar el eje de azimut
(izquierda y derecha).
12. Gire el mango de desplazamiento del
soporte en el sentido contrario a las agujas
del reloj para aflojar el eje de altitud (arriba
y abajo). Use el mango de desplazamiento
para mover el telescopio hasta que apa-
rezca su objetivo en el localizador. Cuando
tenga su objetivo en el campo de visión del
ocular del telescopio, apriete la rosca de
bloqueo de altitud.
13. Enfoque su telescopio girando los dos
mandos bajo el ocular hasta obtener una
imagen definida.
FOLLETO DE INSTRUCCIONES CONTINUACIÓN
Para obtener información general de uso, visite www.celestron.
com. Si tiene consultas o problemas de instalación, contacte con
el soporte técnico de Celestron: 310.803.5955
Este producto ha sido diseñado y está pensado para ser usado por personas de 14
años o más de edad.
El diseño y las especificaciones del producto están sujetos a cambios sin
notificación previa.
©2013 Celestron
Celestron y su símbolo son marcas comerciales de Celestron, LLC. Todos los
derechos reservados.
2835 Columbia Street • Torrance, CA 90503 EE.UU.
aVISo Solar: No intente nunca observar
el sol por un telescopio sin un filtro solar adecuado.

1. Ihr Cometron 114AZ umfasst einen op-
tischen Tubus, ein Stativ mit Azimutmontier-
ung, eine Zubehörablage, einen Sucher mit
rotem Punkt sowie die Astronomiesoftware
TheSkyX auf DVD-ROM.
2. Das Stativ wird aufgestellt, indem die Beine
vollständig nach außen gespreizt werden.
Zum Einstellen der gewünschten Höhe
werden die Knöpfe an den Beinenden
gelöst. Zum Feststellen der Beine werden
die Knöpfe angezogen.
3. Zum Anbringen der Zubehörablage werden
die Kerben aneinander ausgerichtet, und die
Ablage wird solange im Uhrzeigersinn
gedreht, bis die Steckverbindungen der
Ablage in den Stativhalterungen einrasten.
4. Nun wird die Schwalbenschwanzführung
unten am optischen Tubus in die Klem-
menbaugruppe oben an der Montierung
geschoben. Die Befestigungsschraube
muss weit genug herausgedreht werden,
um ausreichend Platz für die Schwalben-
schwanzführung zu ermöglichen..
5. Die Schwalbenschwanzführung wird in der
Montierung zentriert, und die Schraube wird
angezogen.
6. Zum Anbringen des Suchers werden die
Muttern seitlich am Tubus entfernt, die
Halterung wird über den Gewinden platziert
und die Muttern werden wieder angebracht.
7. Die Flügelschrauben am Fokussierer lösen
und die Fokussiererkappe abnehmen.
8. Den Chromzylinder des Okulars in
den Fokussierer einführen und mit den
Stellschrauben sichern..
9. Die Objektivkappe des Hauptteleskops
abnehmen.
ANWEISUNGSBLATT
Schwalbenschwanz
Montierung
Befestigungss-
chrauben
Deutsch

10. Den Sucher mit rotem Punkt einschalten.
Die Batterie wird geschont, wenn es bei
Nichtverwendung ausgeschaltet wird.
11. Der Azimut (die Links-/Rechtsachse) ist
frei beweglich, wenn der Kupplungsknopf
gelöst wird.
12. Drehen Sie den Schwenkgriff der Mon-
tierung gegen den Uhrzeigersinn, um die
Höhe (auf und ab) zu entkuppeln. Richten
Sie das Teleskop mithilfe des Schwen-
kgriffs so aus, dass Ihr Ziel im Sucher
erscheint. Wenn sich Ihr Ziel im Sichtfeld
des Teleskopokulars befindet, wird die Ver-
riegelungsmutter für die Höheneinstellung
angezogen.
13. Drehen Sie die zwei Knöpfe unter dem
Okular, bis Sie ein scharfes Bild erhalten.
ANWEISUNGSBLATT FORTSETZUNG
Allgemeine Nutzungshinweise finden Sie auf www.celestron.com.
Bei Fragen oder Problemen beim Aufbau wenden Sie sich bitte an
den technischen Support von Celestron: 310.803.5955
Dieses Instrument wurde für Personen ab 14 Jahren konzipiert und vorgesehen.
Produktdesign und technische Daten können ohne vorherige Ankündigung geändert
werden.
©2013 Celestron
Celestron und Symbol sind Warenzeichen von Celestron, LLC. Alle Rechte
vorbehalten.
2835 Columbia Street • Torrance, CA 90503 USA
SoNNENSTraHlEN-WarNHINWEIS:
Ohne geeigneten Sonnenfilter darf keinesfalls durch ein Teleskop
in die Sonne geblickt werden.

1. Il Cometron 114AZ è dotato di un tubo
ottico, di un treppiede con montatura altazi-
mutale, di un vassoio porta accessori, di un
cercatore di stelle con puntino rosso e di un
software astronomico TheSkyX DVD-ROM.
2. Per configurare il treppiede, allargare le
gambe verso l’esterno fino a quando non
saranno completamente estese. Allentare
le manopole all’estremità delle gambe per
estendere il treppiede all’altezza desiderata.
Serrare le manopole per bloccare le gambe.
3. Per allegare il vassoio porta accessori,
allineare le tacche e ruotare il vassoio in
senso orario fino a quando i dispositivi di
bloccaggio del vassoio non scatteranno in
posizione con le staffe del treppiede.
4. Ora, far scorrere la barra di montaggio a
coda di rondine sulla parte inferiore del tubo
ottico sul gruppo del morsetto sulla parte
superiore della montatura. Assicurarsi di al-
lentare le viti di fissaggio per lasciare spazio
sufficiente per la barra a coda di rondine.
5. Centrare la coda di rondine nella montatura
e serrare le viti di fissaggio.
6. Per installare il cercatore di stelle, rimuovere
i dadi sul lato del tubo, posizionare la staffa
sui perni filettati e posizionare nuovamente
i dadi.
7. Allentare le viti a testa piatta sul focheggiatore
e rimuovere il relativo tappo.
8. Inserire il barilotto cromato dell’oculare nel
focheggiatore e serrare le viti.
9. Rimuovere il tappo delle lenti del telescopio
principale.
FOGLIO DI ISTRUZIONI
Coda di
rondine
Montatura
Viti di
fissaggio
Italiano

10. Accendere il cercatore di stelle con
puntino rosso. Per una maggiore durata
della batteria, assicurarsi di spegnere il
cercatore se non in uso.
11. Allentare la manopola della frizione per
liberare l’asse dell’azimut (sinistra e
destra).
12. Ruotare la manopola panoramica della
montatura in senso antiorario per allentare
la frizione dell’altitudine (su e giù). Utiliz-
zare la manopola panoramica per spostare
il telescopio fino a quando l’obiettivo
apparirà nel cercatore di stelle. Una
volta centrato l’obiettivo nel campo visivo
dell’oculare del telescopio, serrare il dado
di blocco dell’altitudine.
13. Mettere a fuoco il telescopio ruotando le
due manopole sotto all’oculare fino a ot-
tenere un’immagine nitida.
FOGLIO DI ISTRUZIONI CONTINUA
Per informazioni generali sull’uso, visitare il sito www.celestron.com.
In caso di domande o problemi con la configurazione, contattare il
Servizio di assistenza tecnica Celestron al numero: 310.803.5955
Il presente prodotto è progettato e destinato all’uso di persone di età pari o
superiore ai 14 anni.
Il design del prodotto e le specifiche sono soggette a modifiche senza previa
notifica.
©2013 Celestron
Celestron e Symbol sono marchi di Celestron, LLC. Tutti i diritti riservati.
2835 Columbia Street • Torrance, CA 90503 U.S.A
aVVErTENZa SolarE:
Non tentare mai di osservare il sole attraverso qualsiasi
telescopio senza adottare un filtro solare adeguato!