Record Your Mooel t_ )erlaJ ivun]_er_ .......................................... Cover
important Safety Instructions .......... ;..... ;...................... ;.................... 2-4
¢
Grouod!dg;;IristrdctiSns
(electric ignition models only) .............................................................. 4
getting Surface Controls ........................................................ ................ 7
Before setting Oven and Warm & Ready Drawer Contr.ols • 8
Setting Oven Controls .......................................................................... 9-11
Setting Warm & Ready Drawer Controls (some models) .................. 12
Oven Cleaning ..................................................................................... 13-14
Read and Save These gns_ruct_o_s
Read air instructions before using
tills appliance, This book contains
valuable information about;
Operation
o Care
o Service
Keep it in a safe place.
Record Your Model and Serial Numbers
The model and serial numbers of your range are found on the right
side of the oven front frame in the storage compartment or on the
oven floor' shield Record and retain these numbers,
Model Number_
e- ?
._enat Number:
Date of Purchase:
$÷ars, Roeu, uck and Coo, 14on'man Esta,:es, fL 50# 79 U.S.A.
PIN 3 16000930 (9805)
............HVIPORTANT-SAFE {-JN-STRUC-TIO NS
Read all instructions before usingthis
appliance. Save these instructions for future
reference,
This guide contains important safety symbols and
instructions. Please pay special attention to these symbols
and follow all instructions given Here is a brief explanation
of the use of these symbots.
_This symbol will help alert you to situations
that may cause serious bodily harm, death or property
damage_
_This symbol will help alert you to situations
that'maycatJse bodily injury or property damage.
If the information in this
manual is not followed exactly, a_fire_6r _
explosion may result causing property
damage, personal injury or u=a_h.
FoR YOUR SAFETY:
Do not store or use gasoline or other
flammable vapors and liquids in the
vicinity of this or any other appliance.
WHAT TO DO IF YOU SMELL GAS:
- Do not try to light any appliance.
° Do not touch any electrical switch; do
not use any phone in your building.
immediately call your gas supplier from
a neighbor's phone. Follow the gas
supptier's instructions.
If you cannot reach your gas supplier,
call the fire department.
installation and service must be
performed by a qualified installer,
servicer or the gas supplier.
o Remove all tape and packaging wrap before using
the range, Destroy the carton, and plastic bags after
unpacking the range. Ne'v.eralloYS'children to play with
the packaging mat_dal,, :_
• Proper Instatlation'Z-Be sure yourappl!ance is
prooerly installei_ and grounded .by a _ualified
technician in acc_ra_'i4c_#'{bitf{' tee =National Gas Code
ANSl Z223.1--1a;c:_.;_"edition, and tl:ie'._1:_ol.naJ.
Electrical Code ANSlINFPA No. 70--1atest edition,
and local code reqbire_nts, Instali or_l'_/per, installation
instructions provided n tl_'e li_e_atur_ package for {his:
range.
Ask your dealer tcLreC6mmend a.qdatifiecjLte'dhnidan and._
an authorized repair S'ervice'.Know hovv to discc_nneci the
electrical power to the range.at the circuit breaker of fuse
box in case of an emer'gency, ,-
, ÷., • ,
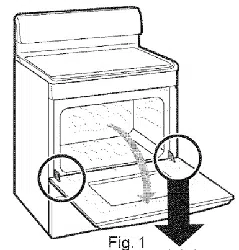
o All_r.anges can.t_p,_. : -
, Injury to pc(sons could resul ,
• Install ai_iLtip _Jevice packed with
range, _ __L.z:Z.T,:.:.I,..'_"..
..... i ...............
_To reduce the risk of tipping of the
range, the range must be secured by properly
installed anti-tip bracket(s)provided with the
range. To check if the bracket(s) is installed.
properly, remove the'_io-w_e-_a-n-ei_?o-r"stor:ag e
drawer and verify that the anti-tip bracket(s) is
engaged. Refer to the Installation lnstru_.tions for
proper anti-tip bracket(s) installation.
*Note: On Warm & Ready Drawer models, a metal
plate at the base of the drawer pr#vents you from
seeing if the brackets are engaged. On these
models, pull for€card on center back of appliance to
ensure bracket(s) are engaged,
_Stepping, leaning or sitting on the doors
or drawers ofthis range can result in serious injurie s
and may also cause damage to the range, Do not allow
children to dimb or play around the range The weight of a
child on an open door may cause the range to tip, resulting
_nserious burns or other injury
_Do not store items of interest to children
in the cabinets above or' on the backguard of a range.
Children ciimbing on the range to reach items could be
seriously injured
MP©RTANT SAFETY-iNSTRUCT ON$
DO not use the oven or Warm & Ready
Drawer for storage,
Storage in or on Appliance---Flammable materials
should not be stored in the oven, near surface
burners, in the storage drawer (if equipped) or in the
Warm & Ready Drawer (if equipped), This includes
paper, pla_,ticand cloth items, such as cookbooks,.-
plasticware and towels, as well as flammable liquids, Do
not store explosives, such as aerosol cans on or near the
range. Flammable materials may explode and result in fire
or property damage,
• Do not leave children alone, children should not be .
le_ alone or unattended in the area where an
appliance is in use. They should never be allowed to sit
or stand on any part of the appliance,
, Do not touch surface burners, areas near these
burners, oven burner, interior surfaces of the oven
or Warm & Ready Drawer, Areas near s.urface burners
may become hot enough to cause burns. During and after
use, do not touch, or let clothing or other flammable
materiats touch these areas until they have had sufficient
time to cool, Among these areas are the cook-top,
surfaces facing the cooktop, the oven vent openings and
surfaces near these openings, oven door, warm & Ready
Drawer and window.
, Wear Proper Apparel_Loose-fi_ing or hanging
garments should never be worn while using the
appliance, Do not let clothing or other flammable
materials contact hot surfaces.
_Never use your appliance for warming or
_eat]ng the room.
Do Not Use Water or Flour on Grease Fires_Smother
the fire'with a pan iid, or use baking soda, a dry
chemical or foam-type extinguisher°
When heating fat or grease, watch it closely. Fat Or
grease may catch fire if allowed to become too hot
Use Only Dry Potholders_Moist or damp potholders
on hot surfaces may result in burns from steam. Do
not let the potholders touch the flame or burners Do not
use a toweJ or other bulky cloth instead of a potholder.
Do Not Heat Unopened Food Containers_Build-up
of pressure may cause the container to burst and
result in injury.
Remove the oven door from any unused range if it is
to be stored or discarded_
Cold temperatures can damage the
electronic control. When using the appliance for the first
time, or when the appliance has not been used for an
extended period of time, be certain the unit has been in
temperatures above 32°F for at least 3 hours before turning
on the power to the apptiance_
. IMPORTANT_Do not attempt to operate the oven
during a power failure. If the p0werfails, always
turn the oven controls to off. Once the power resumes,
reset the clock and oven functions.
Important instructions for Using Your
Cooktop
• Know which knob controls each surface heating
unit,
• Us_e.,_rol?erFlame Size--Adjust flame size so it does not
extend be)ohd the edge of the utensil. The bs_rof_hder-
sized utensils will expose a portion of the burner flame to
direct contad and may result in ignition of clothing,
Proper relationship of utensil to flame will also improve
efficienq/
. U{ensil Handles Should Be Turned inward and
Should Not Extend Over Adjacent Surface Burners_
To reduce the risk of burns, ignition of flarfimable
materials, and spillage due to unintentional contact with
the utensil, the handle of the utensil should be positioned
so that it is turi_ed inward, and does not extend over
adjacent surface burners.
o Never Leave Surface Burners Unattended at High
Settings_Boilovers cause smoking and greasy spillovers
that may ignite, or a pan that has boiled dry may melt
• Protective Liners_Do not usealuminum foil to line
surface BLirner pans, the 0v_h 5"6t_omor any other
part of the range Only use aluminum foil as
recommended for baking if used as a cover placed on the
food Any otl_er use of protective liners or aluminum foil
may interfere with heat and air distribution, and
combustion Damage to the range or personal injury may
result
° Glazed Cooking Utensils_Only certain types of glass,
glass!ceramic, ceramic, eartlienware, or other' glazed
utensils are suitabfe for rangetop service without breaking
due to the sudden change in temperature Check the
manufacturer's recommendations for rar_getop use
• Do Not Usa Decorative Surface Burner Covers If a
burner is accidentally turned on, the decorative cover will
become hot and possibly melt You will not be able to see
that the burner is on Burns will occur if the hot covers are
touched. Damage may also be done to the cooktop or
burners because tt_e covers may cause overheating. Air
wil! be blocked from the burner and cause combustion
problems

iMPORTANT SAFETY-- STRUCTtONS
Important instructions for Using ",-'our Oven/
Warm & Ready Drawer
• Use Care When Opening the Oven Door or Warm &
Ready Drawer_Stand to the side of the range When
opening the door of a hot ovenfvVarm & Ready Drawer,
Let hot ak Or steam escape before you remove or' replace
food in the oven/Warm & Ready Drawer,
Keep Oven Vent Ducts Unobstructed. The oven is
vented below the backguard, Touching the surfaces in
this area when the oven is operating may cause severe
burns. Also, do not place plastic or heat-sensitive items
on or near the oven vent° These items could melt or
ignite. ".............
= r,=C=m=n_ of Oven/Warm & Ready Drawer Racier.
Always place racks in desired location while overFWarm
& Ready Drawer is cool. If rack must be moved while oven
is hot_ use¢_tr, emetcaution. Use pbtboiders a_d grasp the
rack with both hands to reposition Do not let potholders
contact the oven burner flame or interior' of the oven/
Warm & Ready Drawer, Remove all utensils from the rack
before removing rack.
• Do not use the broiler' pan without its insert. The
broiler pan and grid allow dripping fat to drain and be
kept away from the high heat of the broiler.
o Do not cover,the broiler grid or Warm & Ready
Drawer with aluminum foil. Exposed fat and grease
could ignite,
° Do not touch a hot light bulb (some models) with a
damp cloth. Doing so could cause the bulb to break.
Disconnect the range or turn off the power' to the range
before removing and replacing the light bulb..
Important Instructions for Cleaning Your
Range
• Clean the range regularly to keep all parts free of
grease that could catch fire, Pay particular attention to
the area underneath each surface burner, Exhaust fan
ventilation hoods and grease filtebs should be kept clean
Do not alIow grease to accumulate, Greasy deposits in the
far_could catch fire. Refer to the hood manufacturer's
instructions for cleaning.
° Kitchen deanerstaerosols--Always follow the
manufacturer's recommended directions for use, Be aware
that excessresidue from cleaners and aerosols may ignite -
causing damage and/or injury:
Self-Cleaning Ovens:
• Clean in the self-cleaning cycle only the parts of the
oven listed in this owner's guide. Before self-cleaning
the oven, remove the broiler pan and any utensils stored
in the oven_
• Do not clean the oven door gasket, The door gasket is
essential for a good seal Care should be taken not to rub,
damage or move the gasket
• Do not use oven cleaners, No oven cleaner or oven liner
protective coating of any kind shoutd be used in or
around any part of the oven.
_ _ _ e =
nS rUCi3OrIS
(electric ignition models only)
_Avold fire hazard or
electrical shock. Do not use an adaptor
3tug, an extension cord, or remove
grounding prong from electrical power
cord Failure to follow this warning can
cause serious injury, fire or death.
Grounding b/pc,
wail receptacle
__ /_Do .o_ under "-",
__1;It I any ctrcumstance_, t
_1 J cut, remove, /
_:_,L_ or bypass I
,r_!t!i_ '_} the grounding prong !
Power supply
cord with 3-prong
grounding plug
,. - ,_'r. READ .,_r',K_._FTHESE,,_,,,.,.... .......
This appliance is equipped with a 3 prong ground!ng plug for
your protection against shock hazard and should be plugged directly into a
properly grounded receptacle DO NOT cut of' remove the grounding prong
from this plug.
Fo_personal safety, the oven must be properly grounded For maximum safety,
the power cord must be plugged into a 120V--60 Hz. outlet that is c_orrectty
polarized and properly grounded If a 2-prong wa!t receptacle is the only
available outlet, it is the personal responsibiti_ of the consumer to have it
replaced with a properly grounded 3-prong wall receptacle installed by a
qualified electrician
Do not under any circumstances cut or' remove the third round
grounding prong from the power cord plug, See the Installation
Instructions packaged with this oven for complete installation and
grounding instructions. Do not operate the over] using a 2-prong
adapter or an extension cord,
4
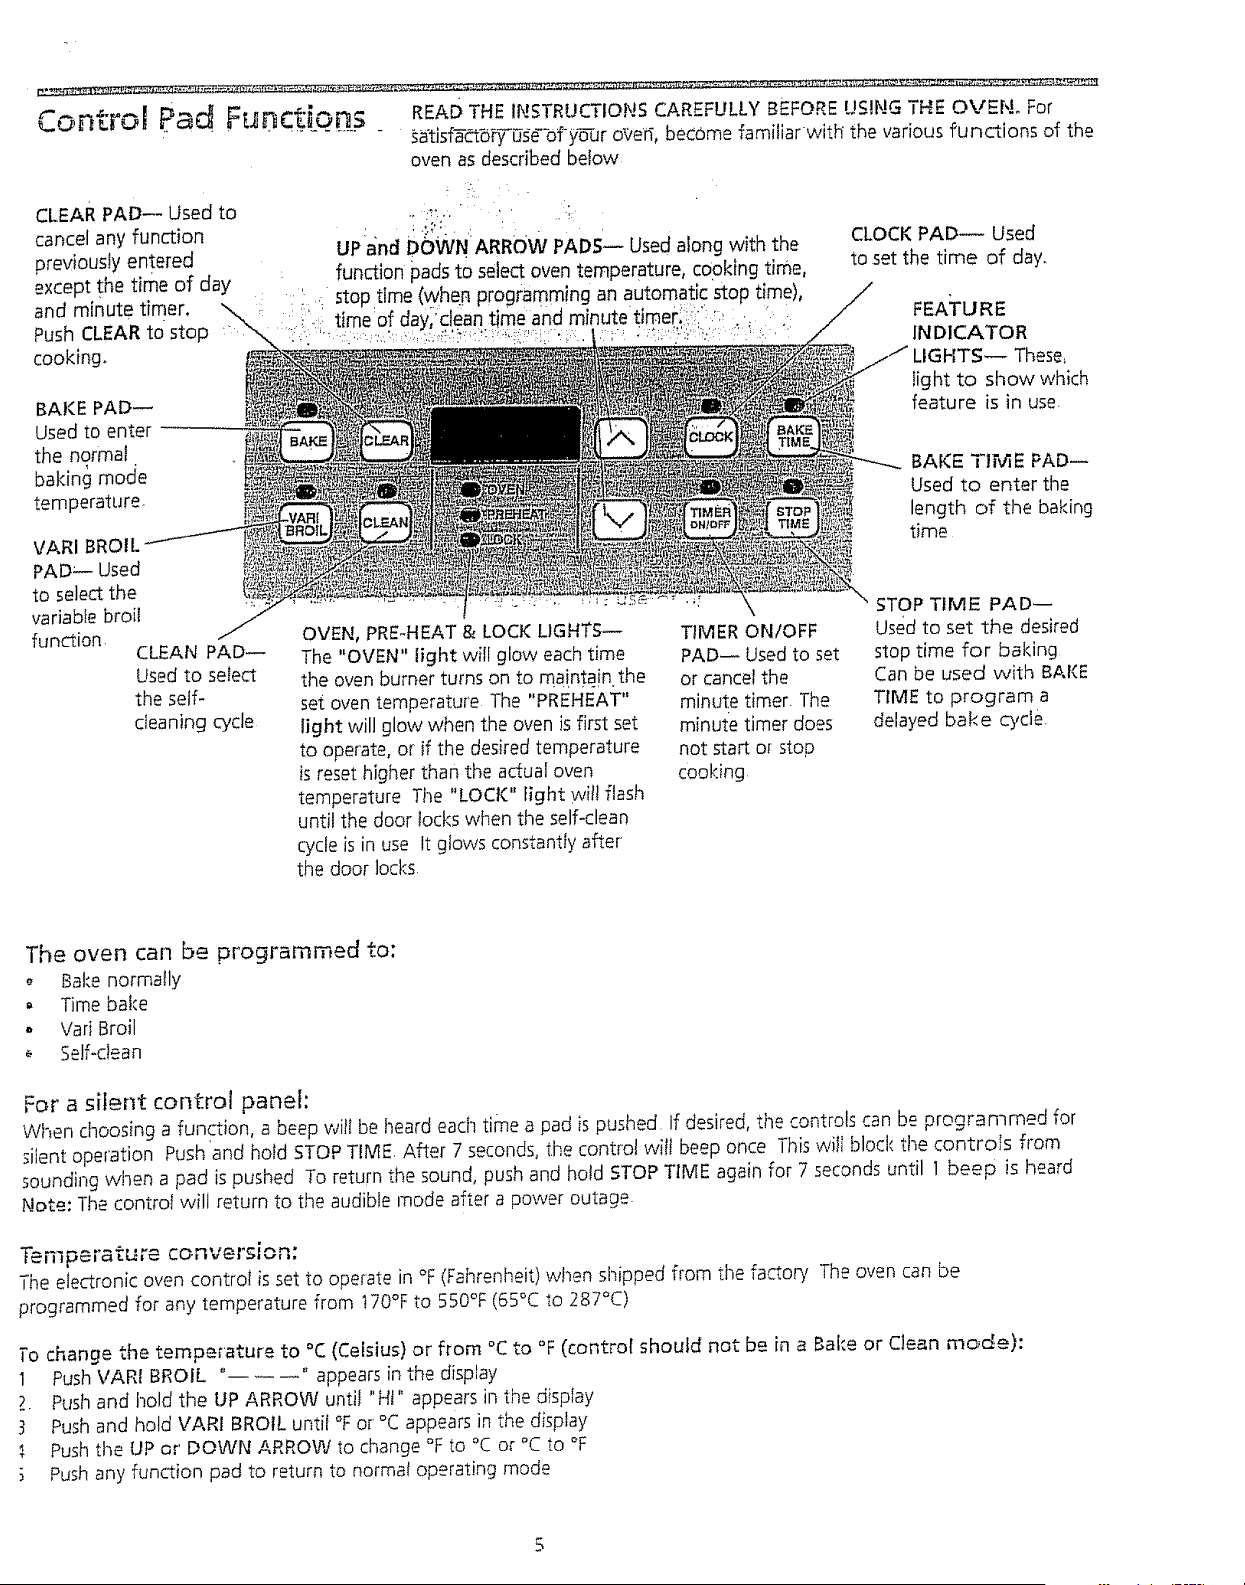
Control Pad Functions READTHE INSTRUCTIONS CAREFULLY BEFORE USING THE OVEN_ For
.............. _atisf_<Ebf_b--Qr o_/erf, become familiarwith the various functions of the
oven as described below
CLEAR PAD-- Used to
cancel any function
previously entered
except the time of day
and minute timer.
Push CLEAR to stop
cooking,
BAKE PAD--
Used to enter
the normal
baktng mocJe
temperature
VARI BROIL
PAD _-- Used
to select the
variable broil
function
CLEAN PAD_
Used to select
the self-
cleaning cycle
UPand bO'_JN'ARROW PADS" Used along with the
function pads to select oven temperature, cooking time,
, stop time ('when programming an automatic stop time),
: _ time of day,'dean time and minutetimer_!i::':, : ,.
OVEN, PRE,.HEAT & LOCK LIGHTS_
The "OVEN" light vvili glow each time
the oven burner turns on to ma!nta!n the
set oven temperature The "PREHEAT"
light will glow when the oven is first set
to operate, or if the desired temperature
is reset higher than the actual oven
temperature The "LOCI(" light wilt flash
until the door Iocks when the self<lean
cycle is in use It glows constantly after
the door locks.
TIMER ON/OFF
PAD_ Used to set
or cancel the
minute timer The
minute timer does
not start o_ stop
cooking
CLOCK PAD_ Used
to set the time of day.
FEA:TLIRE
INDICATOR
LIGHTS_ These,
light to show which
feature is in use.
BAKE TIME PAD--
Used to enter the
length of the baking
time
STOP TIME PAD_
Used to set the desired
stop time for baking
Can be used with BAKE
TIME to program a
delayed bake cycle,
The oven can be programmed to:
Bake normatly
, Time bake
o Vari Broil
Self-clean
For a silent control panel:
When choosing a function, a beep will be heard each time a pad is pushed if desired, the controls can be programmed for
silent operation Push and hold STOP TIME. After 7 seconds, tile control witt beep once This wiI[ block the controls from
sounding when a pad is pushed To return the sound, push and hold STOP TIME again for 7 seconds until 1 beep is heard
Note: The control wilt return to the audible mode after a power outage.
Temperature conversion:
The electronic oven control isset to operate in °F (fahrenheit) when shipped from the factory The oven can be
programmed for any temperature from t70% to 550°F (65°C to 287°C)
To change the temperature to °C (Ce!sius) or from °C to °F (cantro[ should not be in a Sake or Clean mode):
1 PushVARI BROIL .... appears in the display
2. Push and hold the UP ARROW until "Hi ° appears in the display
3 Push and hold VARI BROIL until °For °C appears in the display
Push the UP or DOWN ARROW to change °F to °C or °C to °F
Push any function pad to return to normal operating mode
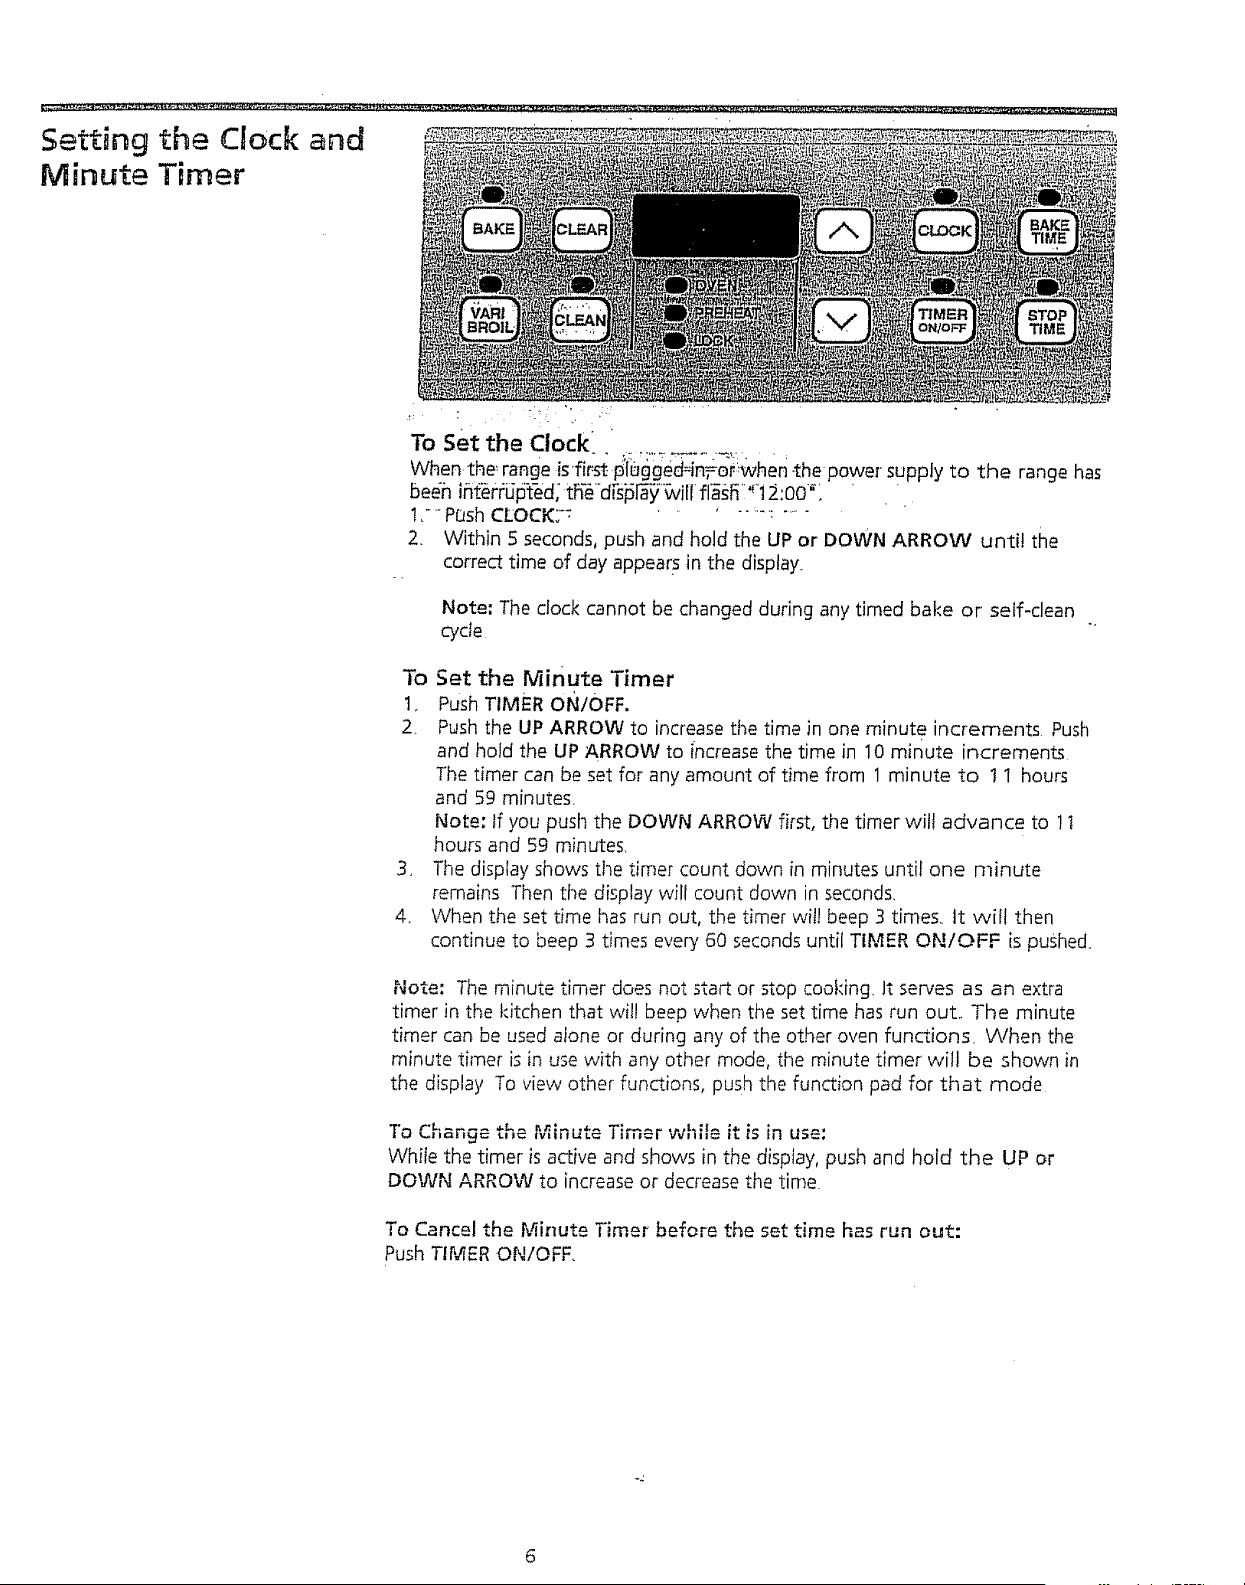
Setting the C ock and
Minute Timer
_: : _i_:I "i•. ;".......
To set the Clock
When the_range isfi__ pi:b_'ge'd:in,o_:when _thePower supply to the range has
been Interrupted, tee dlspa_ywl f as_ 12,00'_".
t _- Pesh CLOCK;-: ...............
2. Within 5 seconds, push and hold the UP or DOWN ARROW until the
correct time of day appears in the display.
Note; The clock cannot be changed during any timed bake or self-clean
_cte "
To Set the Minute Timer
1. Push TIMER oN/oFF.
2 Push the UP ARROW to increase the time in one minute increments Push
and hold the UP ARROW to increase the time in 10 minute increments
The timer can be set for any amount of time from 1 minute to 1 1 hours
and 59 minutes.
Note: If you push the DOWN ARROW first, the timer wilt advance to 11
hours and 59 minutes
3. The display shows the timer count down in minutes until one minute
remains Then the display will count down in seconds,
4. When the set time has run out, the timer wit] beep 3 times. It will then
continue to beep 3 times every 60 seconds until TIMER ON/OFF is pushed.
Note: The minute timer does not star or stop cooking. It serves as an extra
timer in the kitchen that will beep when the set time has run out.. The minute
timer can be used alone or during any of the other oven functions. When the
minute timer is in use with any other mode, the minute timer will be shown in
the display To view other functions, push the function pad for that mode
To '_".... "_'_ _"'_ "^
_.,,=n_= u,= _,i,_u_= Timer while it is in use:
While the timer is active and shows in the display, push and hold the UP or
DOWN ARROW to increase or decrease the time
To Cancel the Minute Timer before the set time has run out:
Push TIMER ON/OFR
6
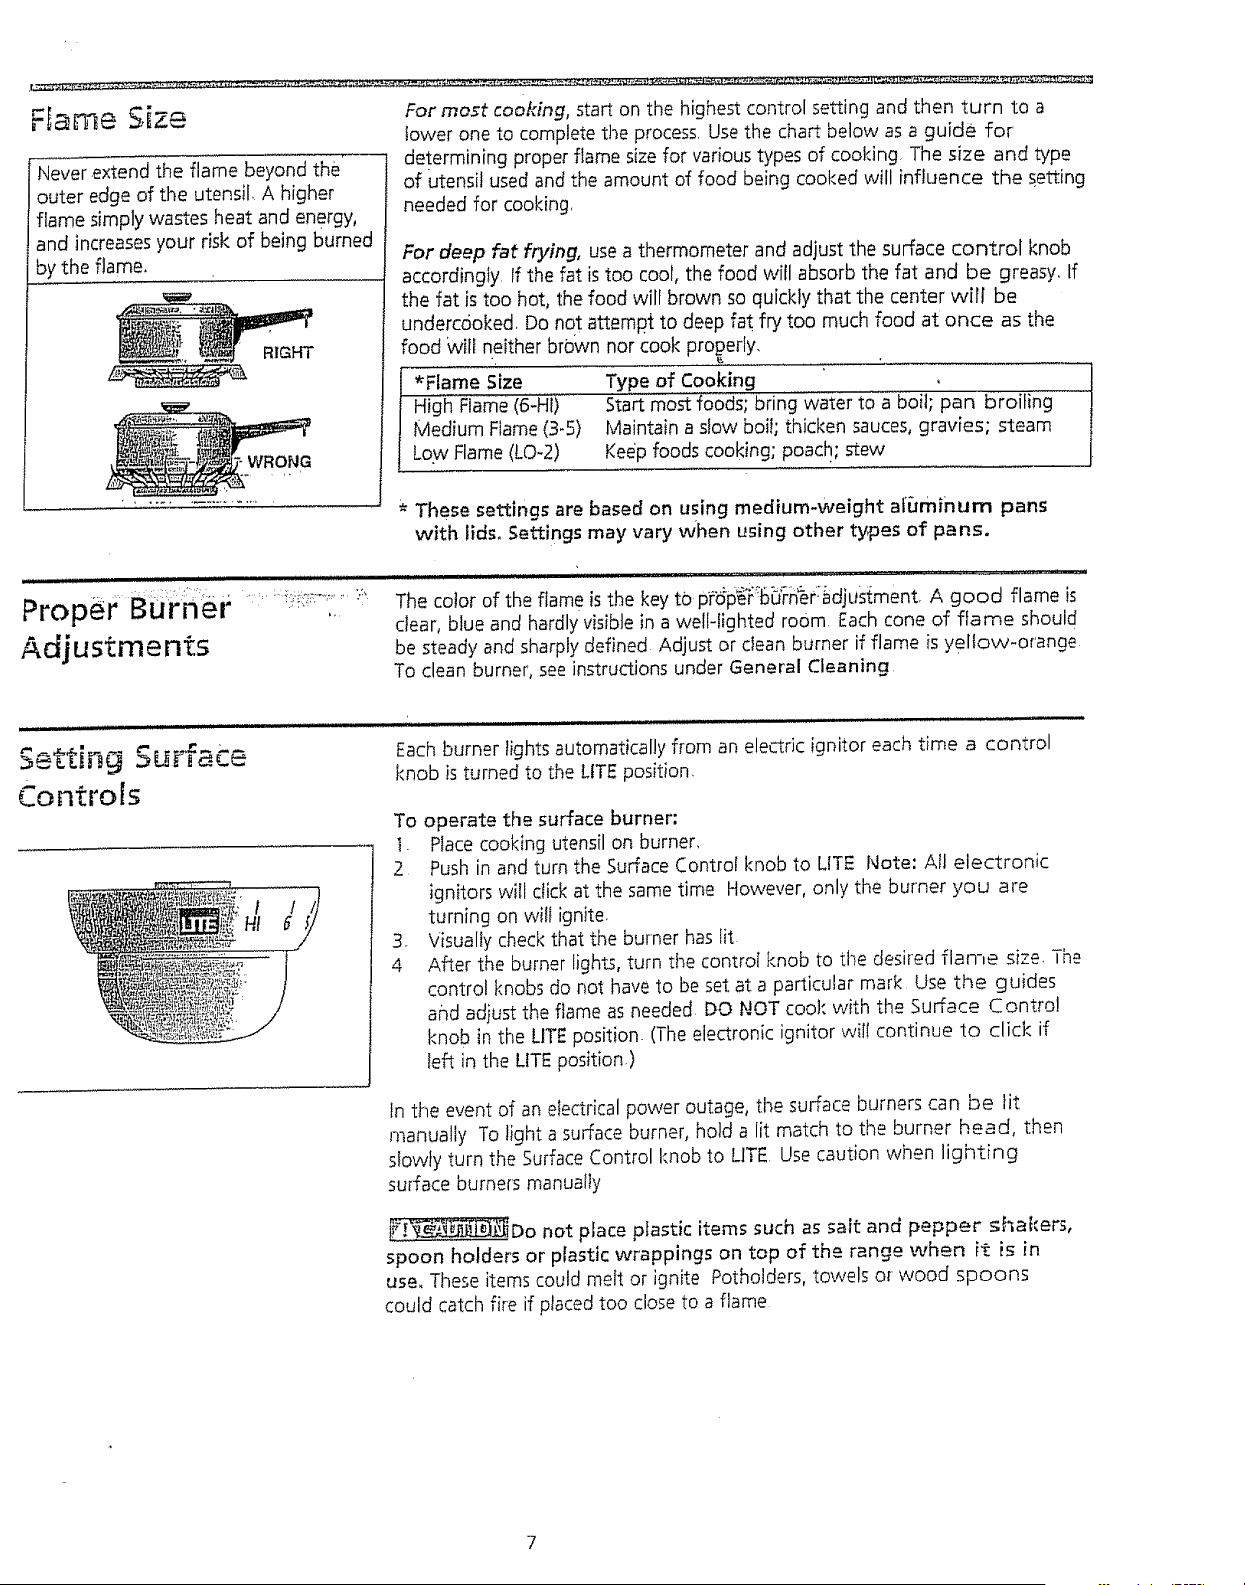
FEame S,ize
Never .extend the flame beyond the
outer edge of the utensil, A higher
flame simply wastes heat and energy,
and increases your risk of being burned
by the flame.
For most cooking, start on the highest control setting and then turn to a
lower one to complete the process. Use the chart below as a guide for
determining proper flame size for various types of cooking. The size and type
of utensil used and the amount of food being cooked will influence the setting
needed for cooking,
For deep fat frying, use a thermometer and adjust the surface control knob
accordingly tf the fat is too coot, the food will absorb the fat and be greasy. If
the fat is too hot, the food will brown so quickly that the center well be
undercdoked Do not attempt to deep fat fry too much food at once as the
food WiII neither brown nor cook properly.
*Flame Size Type of Cooking
High Flame (6-Hf) Start most foods; bring water to a boil; pan broiling
Medium Flame (3-5) Maintain a s!ow boil; thicken sauces, gravies; steam
Low Flame (LO-2) Keep foods cooking; poach; stew
These settings are based on using medium-weight a[[Jminurn pans
with lids, Settings may vary When using other ty,pes of pans.
Proper BOrner
Adjustments
':: T•':' '
The color of the flame is the key t0 pfSp_%_n%r:i_djust_ment_ A good flame is
clear, blue and hardly visible in a well-lighted room Each cone of flame should
be steady and sharply defined Adjust or clean burner if flame is yellow-orange
To clean burner, see instructions under General Cleaning
Setting Surface
Controls
/
Each burner lights automatically from an electric ignitor each time a control
knob is turned to the LtTE position.
To operate the surface burner:
t. Place cooking utensil on burner,
2 Push in and turn the Surface Control knob to LITE Note: All electronic
ignitors will click at the same time However, only the burner you are
turning on will ignite.
3. Visually check that the burner has lit
4 After the burner lights, turn _he control knob to the desired flame size. The
control knobs do not have to be set at a particular mark Use the guides
and adiust the flame as needed. DO NOT coo!: with the Surface Control
knob in the LITE position. (The electronic ignitor will continue to click if
left in the LfTE position.)
tn the event of an electrical power outage, the surface burners can be tit
manually To light a surface burner, hold a lit match to the burner head, then
slowly turn the Surface Control knob to LITE Use caution when lighting
su[face burners manually
_['__Do not place plastic items such as salt and pepper shakers,
spoon holders or plastic wrappings on top of the range when it is in
use, These items could melt or ignite Potholders, towels or wood spoons
could catch fire if placed too close to a flame
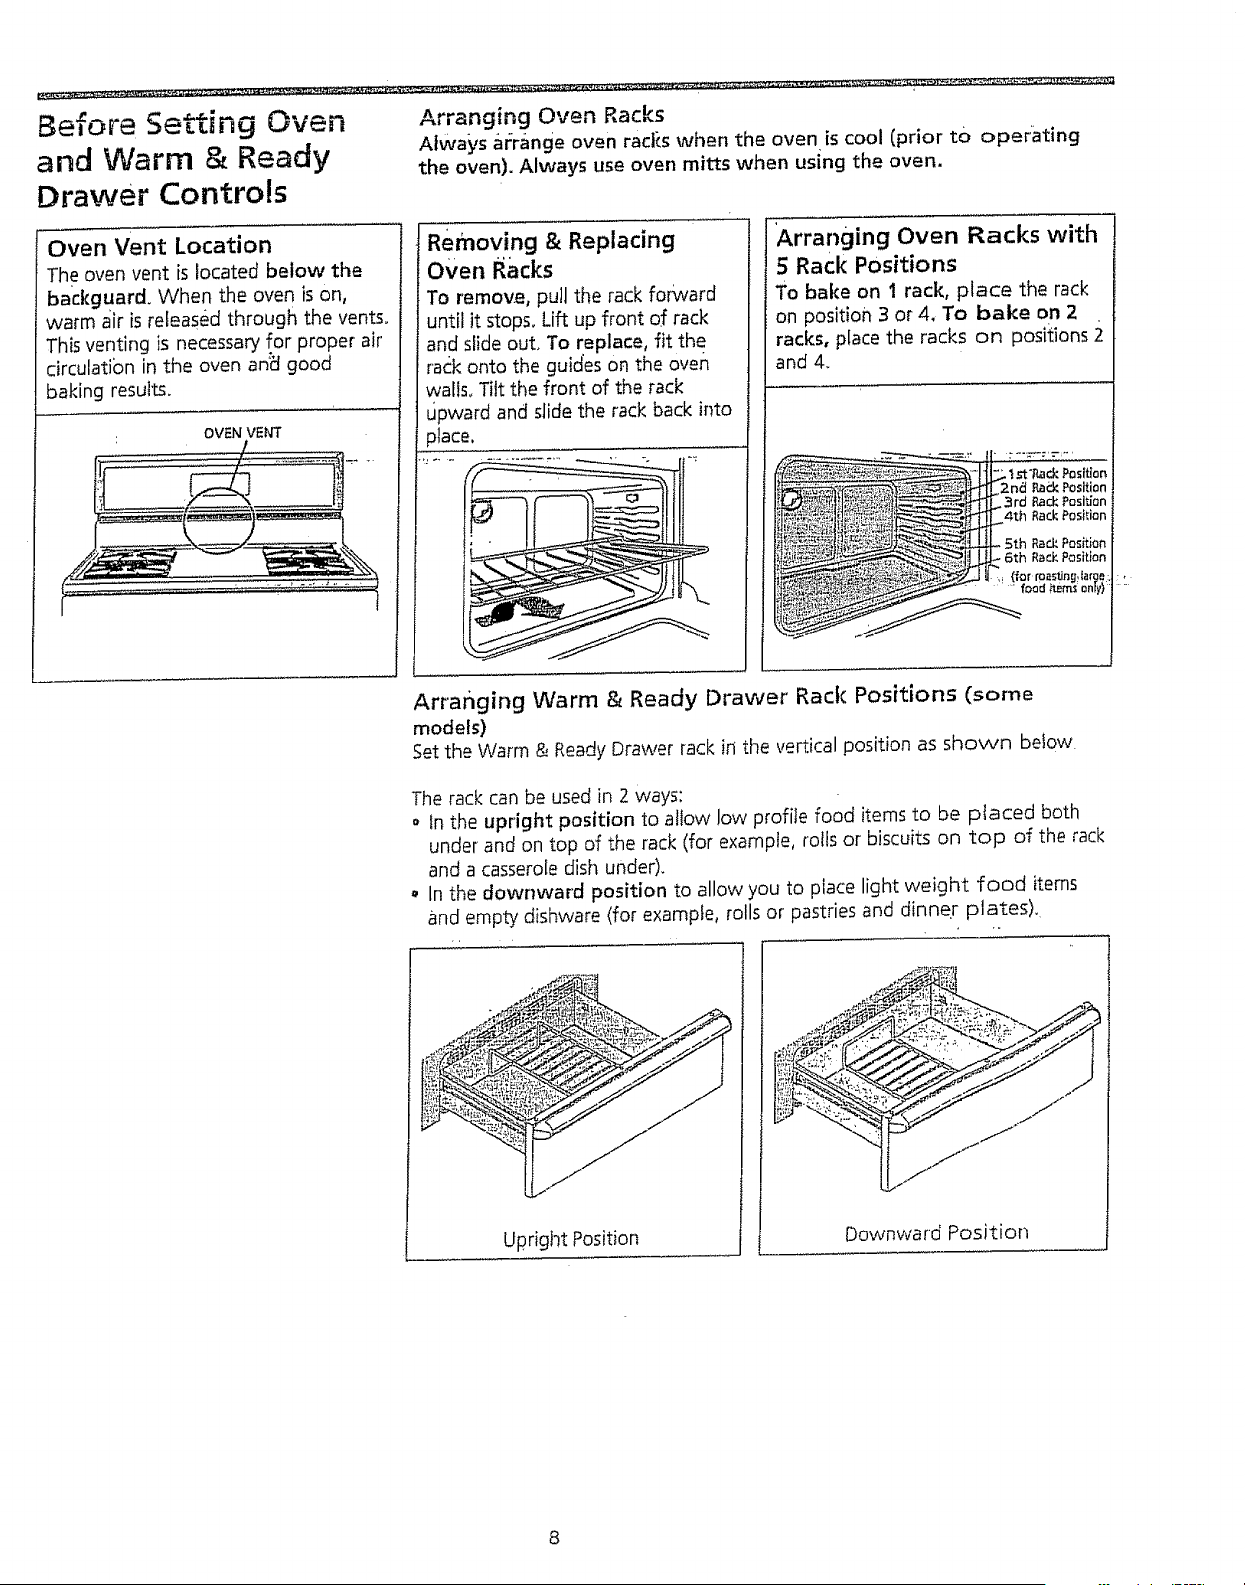
Before Setting Oven Arranging Oven Racks
and Warm & Ready AIwa_,s ,_t=rangeoven rac|_:swhen the oven is cool (prior tO operating
the oven). Always use oven mitts when using the oven.
Drawer Controls
Oven Vent Location
The oven vent is located below the
backguard. When the oven is on,
warm air is released through the vents.
This venting is necessary for proper air'
circulatibn in the oven an_ good
baking results.
: OVEN VENT
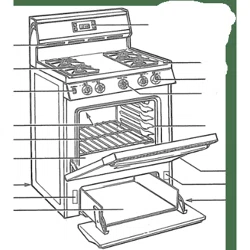
Removing & Replacing
Oven l_acks
To remove, pull the rack forward
until it stops. Lift up front of rack
and slide out. To replace, fit the
rack onto the guides on the oven
walls_ Tilt the front of the rack
LJpwardand slide the rack back into
3lace.
Arranging Oven Racks with
5; Rack Positions
To bake on 1 rack, place the rack
on position 3 or 4. To bake on 2
racks, place the racks on positions
and 4.
[_ 1_:#_ Position
]_2n_i _ek Position
L.3rd Rack PQsition
4th Rack Position
_, 5th Rack Position
_6th Ra_ Position
. {for roasting4arg_.:
x.._jff __f°°d _tems an|y}
Arranging Warm & Ready Drawer Rack Positions (some
models)
Set the Warm & Ready Drawer rack in the vertical position as shown befow
The rack can be used in 2 ways:
o In the upright position to allow low profiIe food items to be pieced both
under' and on top of the rack (for example, rolls or biscuits on top of the rack
and a casserole dish under).
o In the downward position to allow you to place light weight food items
and empty dishware (for example, rolls or pastries and dinner plates).
Upright Position
Downward Position
8
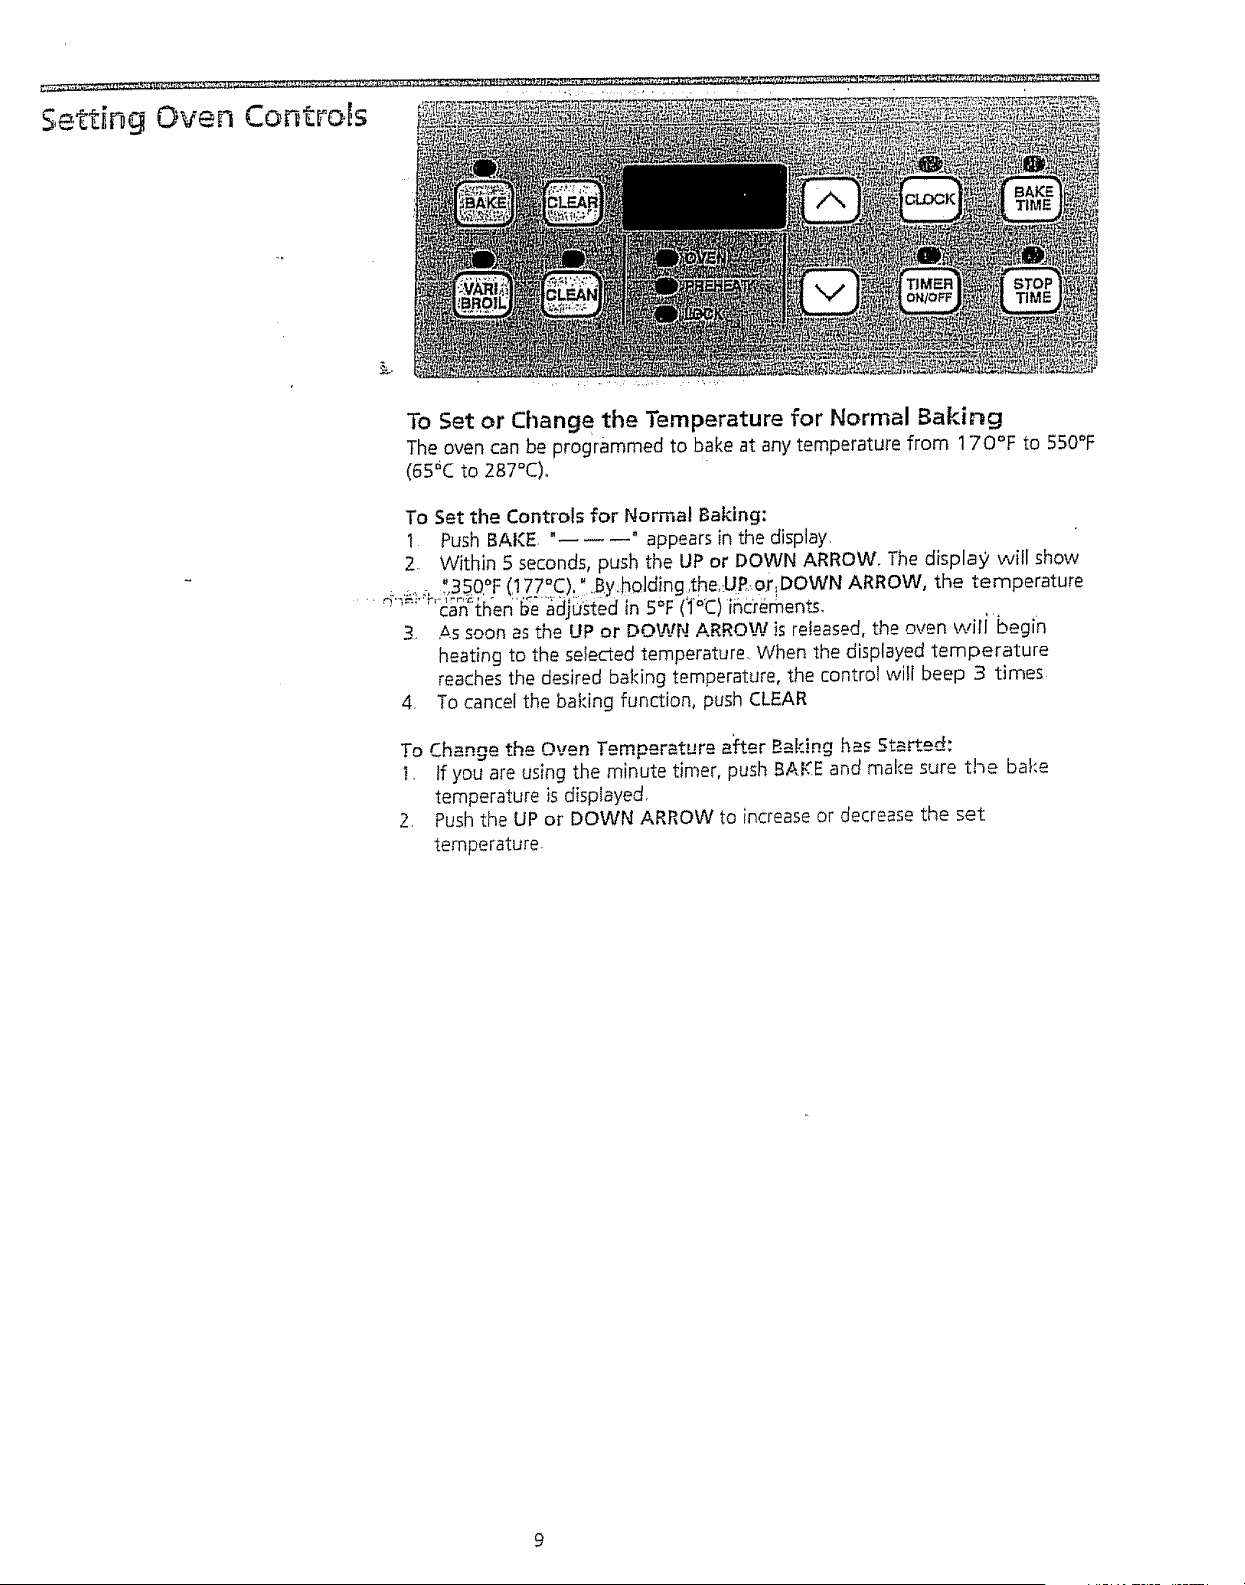
Settir # Oven Controls
To Set or Ct_ange the Temperature for Normal Baking
The oven can be programmed to bake at any temperature from 1 70°F to 550°F
(65_C to 287°C).
To Set the Controls for Normal Baking:
1 Push BAKE, "------" appears {nthe display,
2. Within 5 seconds,push the UP or DOWN ARROW. The display2 will show
" 0° ° " ' ' N
........... 35 F(t77 C).... By holdtngtheURor DOW ARROW the temperature
' can then be adjusted _n5°F (1°C) increments.
3, 4-s soon as the UP or DOWN ARROW is refeased, the oven wi[i begin
heating to the selected temperature When the displayed temperature
reaches the desired baking temperature the control will beep 3 times
4 To cancel the baking function push CLEAR
To Change the Oven Temperature a_er Baking has Started:
1 If you are using the minute timer push BAKE and make sure the bake
temperature ;s displayed_
2 Push the UP or DOWN ARROW to increase or decrease the set
temperature.
• • • ! % .
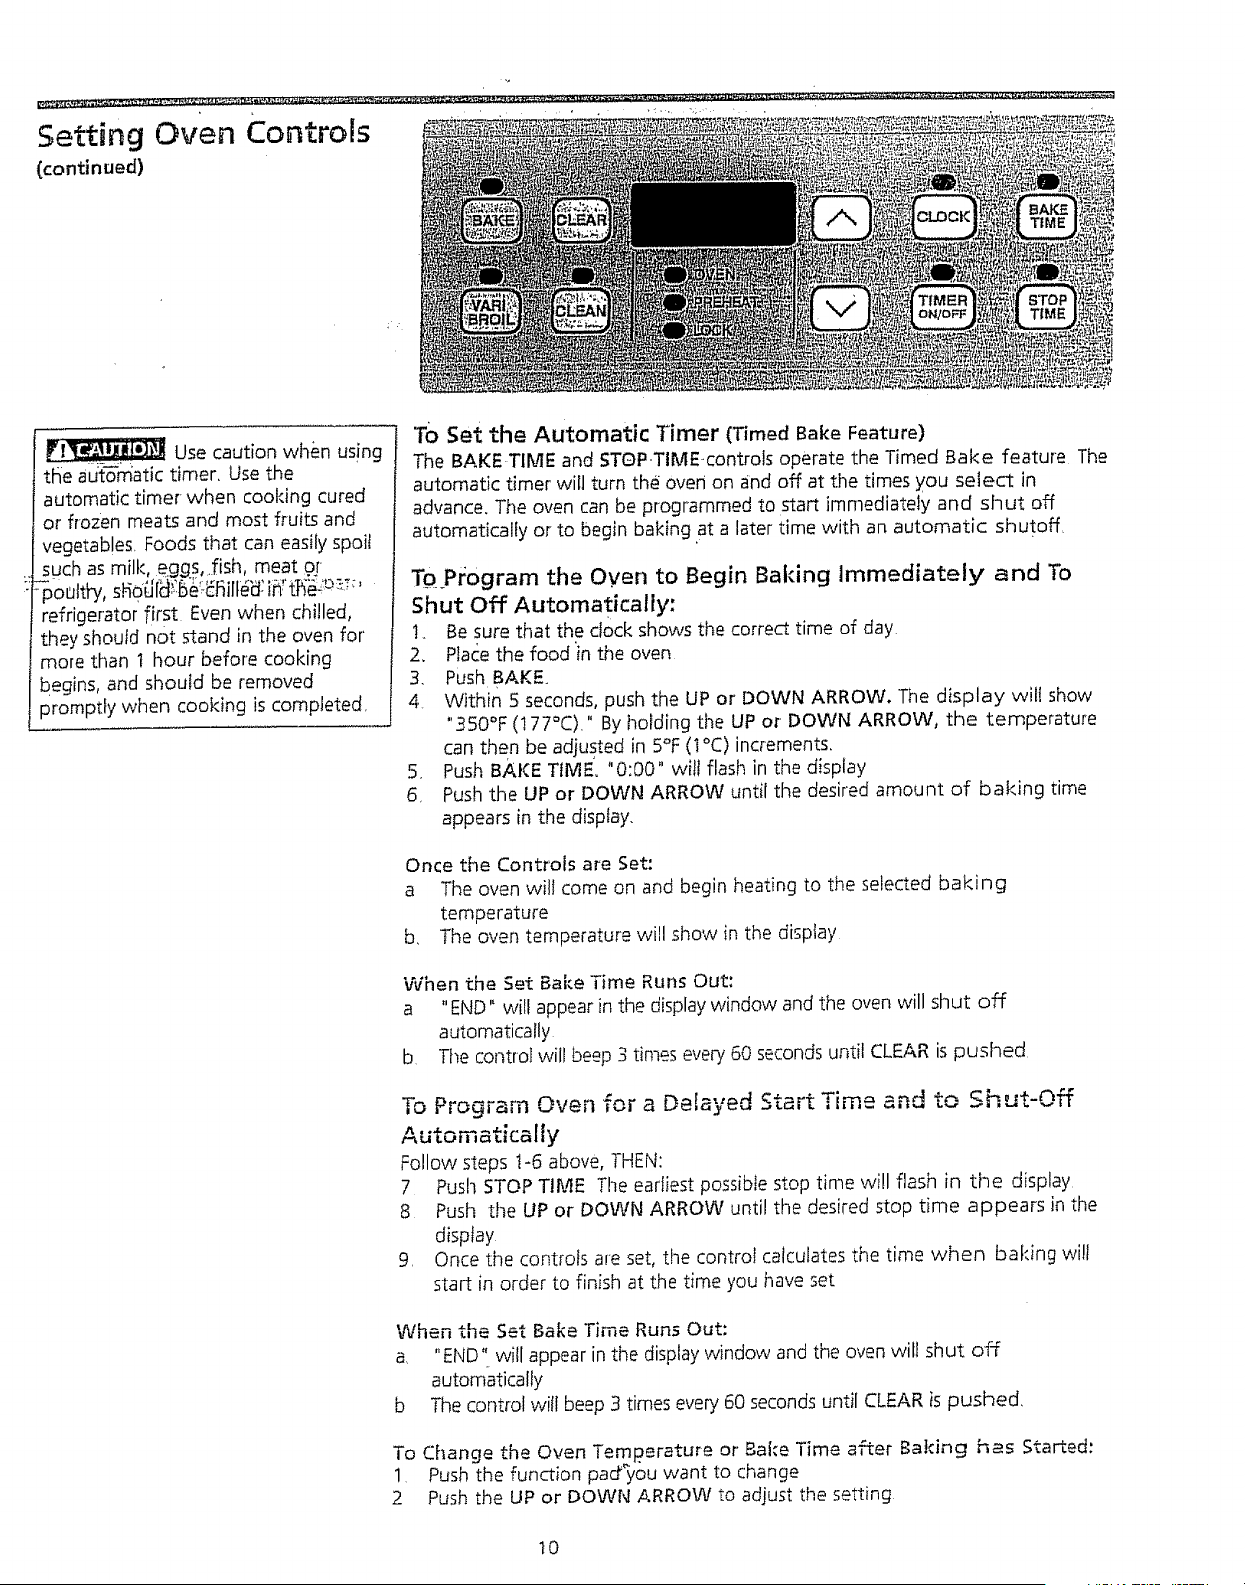
Setting Oven ControJs
(continued)
• G
Use caution when us!ng
tfie aut_matic timer, use the
automatic timer- when cooking cured
or flozen meats and most fruits and
vegetables, Foods that can easily spoil
such as milk, eggs,..fish, meat of-
poultb7 s!4o_J[_:5_Eliifl_J: it1"tf___:__:'
refrigerator first Even when chilled,
they should not _and in the oven for'
more than t hour before cooking
begins, and should be removed
promptly when cooking is completed,
TO Set the Automatic Timer (Timed Bake Feature)
The BAKE TIME and STOP TIME.controls operate the Timed Bake feature The
automatic timer will turn the oven on and off at the times you select in
advance. The oven can be programmed to start immediately and shut off
automatically or to begin baking at a later time with an automatic shutoff,
TO_Program the Oyen to Begin Baking Immediately and To
Shut Off Automaticafly:
1. Be sure that the clock shows the correct time of day
2. Place the food in the oven
3. Push BAKE.
4. Within 5 seconds, push the UP or DOWN ARROW. The display wilt show
"350°F (!77°C)." By holding the UP or DOWN ARROW, the temperature
can then be adjusted in 5°F (1°C) increments
5. Push BAKE TIME. "0:00" will flash in the display
5. Push the UP or DOWN ARROW until the desired amount of baking time
appears in the display.
Once the Controls are Set:
a The oven will come on and begin heating to the selected baking
temperature
b, The oven temperature will show in the display
When the Set Bake Time Runs Out:
a "END" wi!t appear in the display window and the oven will shut off
automatically
b The control will beep 3 times every 60 seconds until CLEAR is pushed
To Program Oven for a Delayed Start Time and to Shut-Off
Automatically
Follow steps t-6 above, ]-HEN:
7 Push STOP TIME The earliest possible stop time will flash in the display
8 Push the UP or DOWN ARROW until the desired stop time appears in the
display
9, Once the controls are set, the control calculates the time when baking will
start in order to finish at the time you have set
When the Set Bake Time Runs Out:
a "END" will appear in the display window and the oven will shut off
automatically
b The control will beep 3 times every 60 seconds until CLEAR is pushed,
To Change the Oven Temperature or Bake Time after Baking has Started:
1 Push the function pad'_you ,want to change
2 Push the UP or DOWN ARROW to adjust the setting
tO
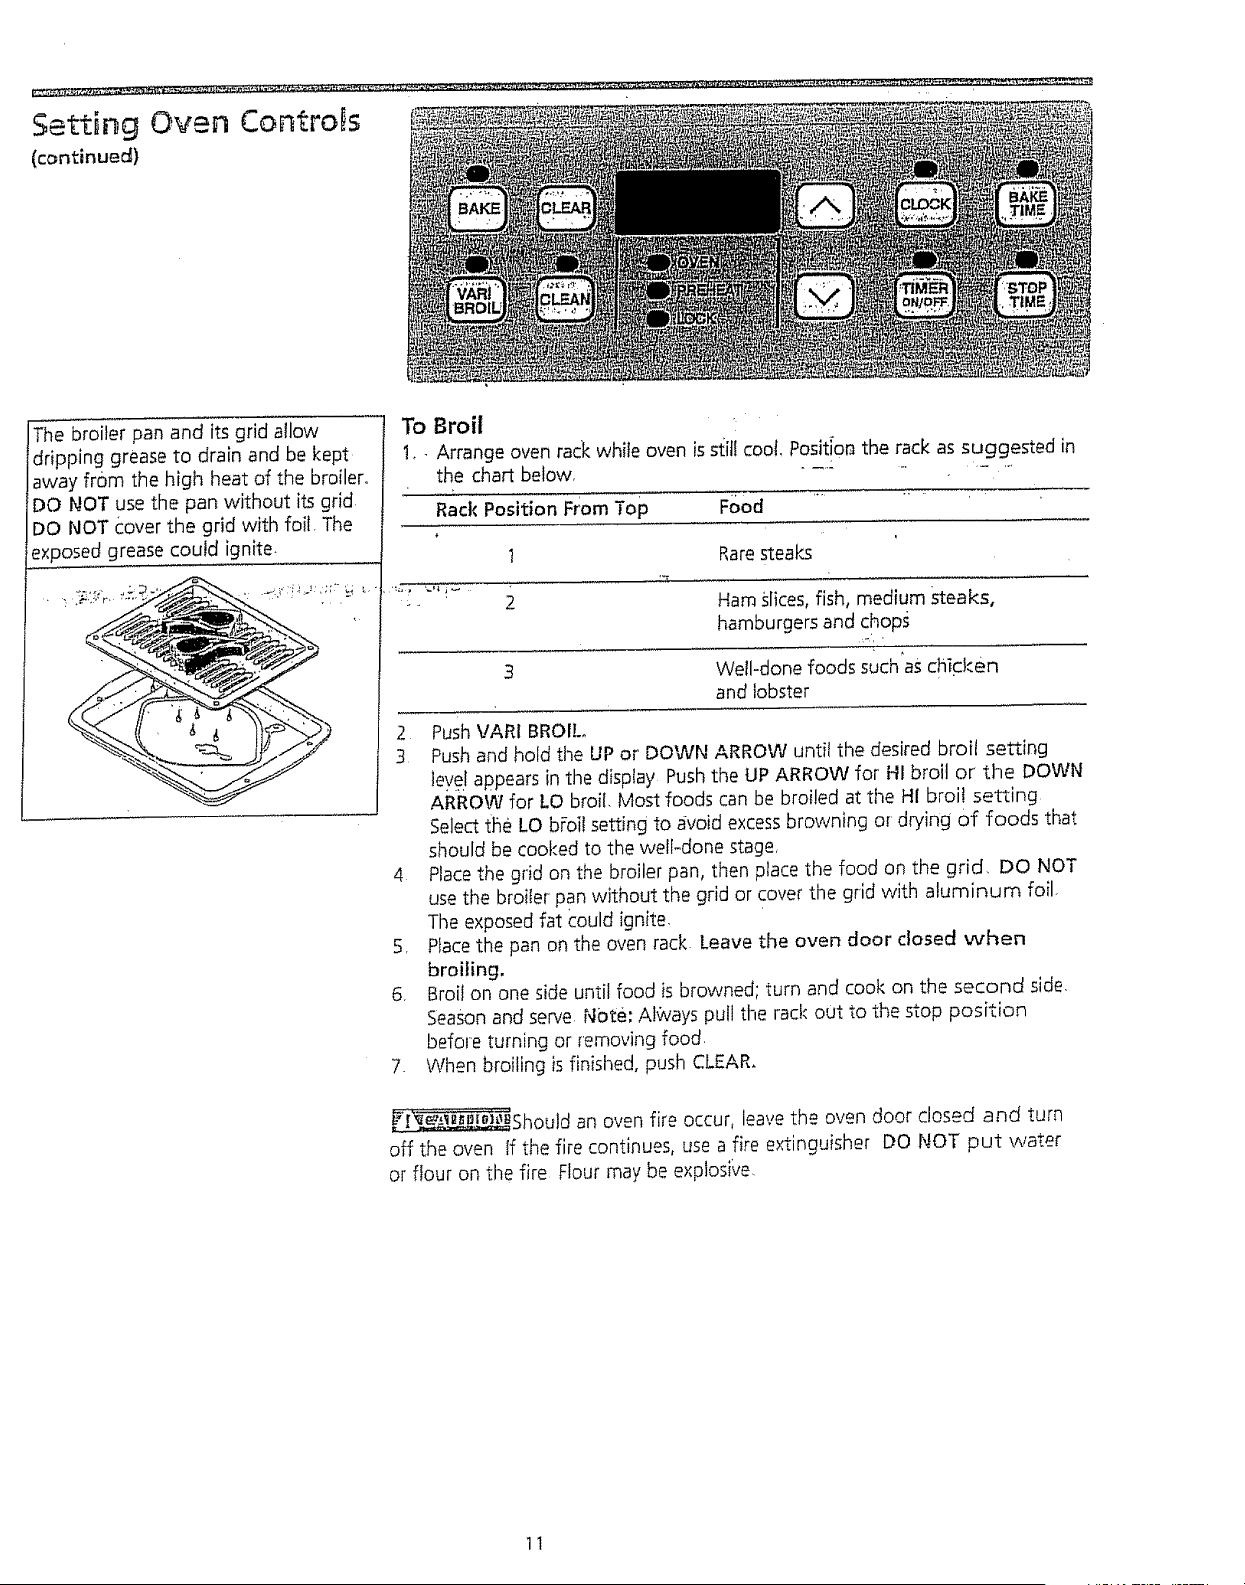
Setting Oven Controls
(c_ntinued)
The broiler pan and its grid allow
dripping grease to drain and be kept
away from the high heat of the broiler°
DO NOT use the pan without its grid
DO NOT c:over the grid with foil The
exposed grease could ignite.
To Broil
1o- Arrange oven rack white oven is sl_ilIcoot_Positior_the rack as suggested in
the chart below, ".............
Food ........
Rack Position From Top
t Rare steaks
Ham slices, fish, medium Steaks,
hamburgers and chop_,
Well-done foods such as chidCen
and lobster
2 Push VARI BROIL,
3 Push and hold the UP or DOWN ARROW until the desired broil setting
ley.elappears in the display Push the UP ARROW for' HI broil or the DOWN
ARROW for LO broil. Most foods can be broiled at the HI broil setting
Select the LO b[oif setting to avoid excess browning or drying of foods that
should be cooked to the well-done stage,
4 Place the grid on the broiler pan, then place the food on the grid. DO NOT
use the broiler pan without the grid or cover the grid with aluminum foil.
The exposed fat could ignite.
5. Place the pan on the oven rack Leave the oven door closed when
broiling.
6, Broil on one side until food is brownedl turn and cook on the second side,
Season and serve tgbte: A!ways pull the rack out to the stop position
before turning or removing food.
7 When broiling is finished, push CLEAR_
[i___Should an oven fire occur, leave the oven door closed and turn
off the oven If the fire continues, use a fire extinguisher DO NOT put water
or flour on the fire Flour may be explos;ve.
11
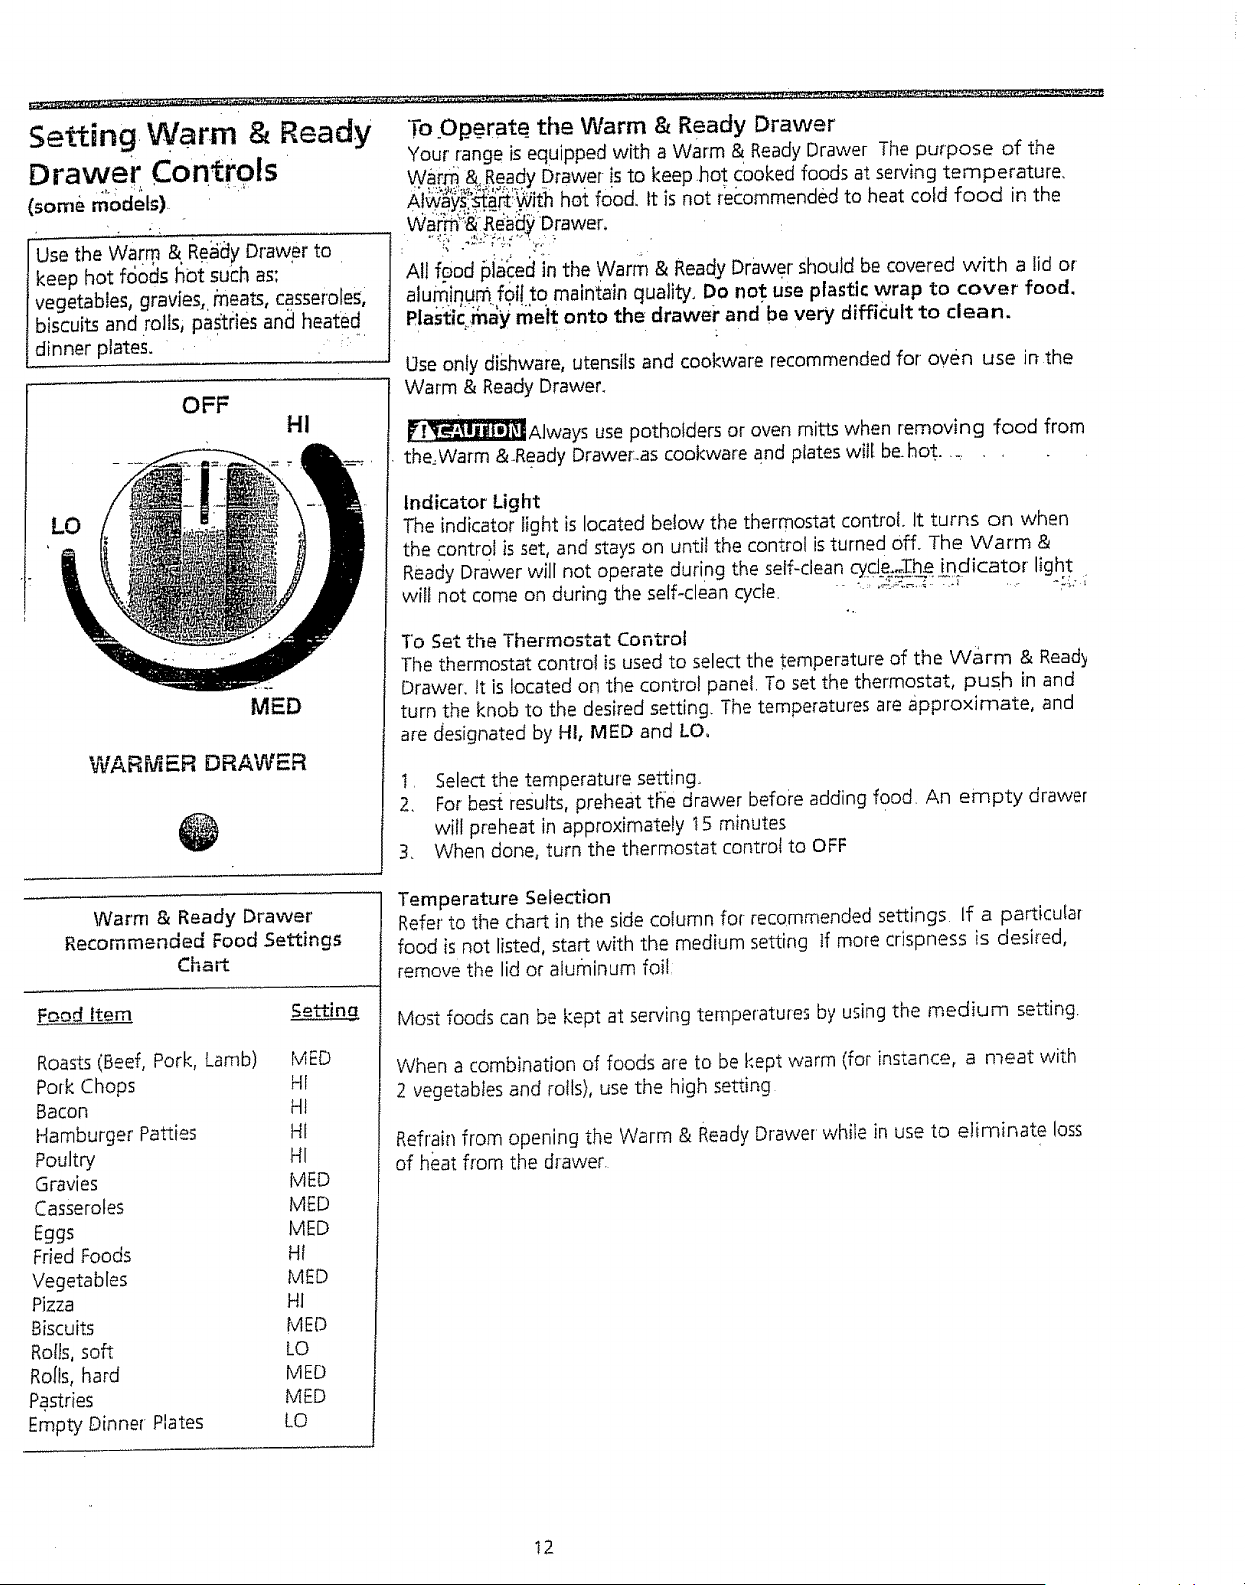
Setting+ Warm & Ready
Drawer ContrOlSr+'
(sore+ models)
OFF
HI
MED
WARMER DRAWER
To Operate+ the Warm & Ready Drawer
Your' range is equipped with a Warm & Ready Drawer The purpose of the
, t% 2;3u+?2wp;o+++.,n °wo +o+oow+oo ° o°+ th%%o
Use only di._hware, utensils and cookware recommended for oven use in the
Warm & Ready Drawer+
_Always use potholders or oven mitts when removing food from
the=Warm &.Ready Drawer.as cookware and plates will be+hot. ._
Indicator Light
The indicator light is located below the thermostat control. It turns on when
the control is set, and stays on until the control is turned off. The Warm &
wiltReadYnotDrawercomeonWillduringnOtoperatethe self.cleandUringthecycleSelf-clean,c_he indicator light+,+,.+?
+
To Set the Thermostat Control
The thermostat controt is used to select the temperature of the Warm & Ready
Drawer. tt is located on the control panel. To set the thermostat, push in and
turn the knob to the desired setting. The temperatures are approximate, and
are designated by HI, MED and LO°
t. Select the temperature setting+
2. For bed reJutts, preheat t_e drawer before adding food. An empty drawer
will preheat in approximately t5 minutes
3. When done, turn the thermostat control to OFF
Warm & Ready Drawer
Recommended Food Settings
Chart
Food item Se_ina
Roasts (Beef, Pork, Lamb) MED
Pork Chops HI
Bacon HI
Hamburger Patties HI
Poultry HI
Gravies MED
Casseroles MED
Eggs MED
Fried Foods HI
Vegetables MED
Pizza HI
Biscuits MED
Rolls, soft LO
Rolls, hard MED
Pastries MED
Empty Dinner Plates LO
Temperature Selection
Refer to the chart in the side column for recommended settings If a particular
food is not listed, start with the medium setting tf more crispness is desired,
remove the lid or aluminum foi!:
Most foods can be kept at serving temperatures by using the medium se_ing.
When a combination of foods are to be kept warm (for instance, a meat with
2 vegetables and rolls), use the high setting
Refrain from opening the Warm & Ready Drawer while in use to eliminate loss
of heat from the drawer.
12
Oven Cleaning
[ ]_]_[_During the self-cleaning
cycle, t_ie outside of the range can
become very hot to the touch DO
NOT leave small children unattended
near the appliance
_DO NOT line the o_en
watlsT racks, bottom or any other
part of the rang e with aluminum
foil, Doing so will destroy heat
distribution, produce poor baMng
"esults and cause permanent
damage to the oven interior
(aluminum foil will melt to the
interior surface of the oven).
HAND
CLEAN FRAME
Self-Cleaning Oven
A self-deaning oven cleans itself with high temperatures (well above cooMng
temperatures) which eliminate soil completely or reduce it to a fine powdered
ash you can wipe away with a damp cloth.
_ Adhere to the follov_ing clean}rig precautions:
• Allow the oven to cool before precteaning
, Wear rubber gloves when predeaning and while wiping up the ,residue,
after the self-clean cycle.
- DO NOT use oven cleaners or oven protective coatings in or around any
part of the self-cleaning oven,
• DO NOT clean the oven door gasket The woven material of the oven
door gasket is essential for a good seal Care should be taken not to rub,
damage or remove the gasket
. DO NOT use any cleaning materials on tile oven door gasket_ Doing so
could causedamage,
2_ Remove the broiler pan, its insert, and all utensils and any aiuminum
foil. These items cannot withstand high cleaning temperatures,
3 Oven racks may be left in the oven or may be removed If they go through
the clean cycle their color will turn slightly blue and the finish will be dull.
After the cycle is complete and the oven has cooled, rub the sides of the
racks with wax pape[ or a cloth containing a small amount of baby oi! or
salad oit (this will make the racks glide easier into the rack position).
4 Remove any excessspiliovers in the oven cavity before starting the self-
cleaning cycle, To clean, use hot, soapy water and a cloth Large spi!lovers
can cause heavy smoke or fire when subjected to high temperatures DO
_,lr$
,.,,._Tallow food spills with a high sugar or acid content (such as milk,
tomatoes, sauerkraut, fru)t juices or pie fiIling) to remain on the surface as
they may cause a dull spot even after cleaning
5 Clean any soil from the oven frame, the door liner outside the oven door
gasket and the small a_ea at the flont center of the oven bottom_ These
areas heat sufficiently to burn soil on Clean with soap and water
Stopping or Interrupting a Self-Cleaning Cycle
If it becomes necessaryto stop or interrupt a self<leaning cycle due to excessive
smoke or fire:
I Push CLEAR.
2 Once the oven has cooled down for about t HOUR and the "LOCI(" light
has gone out, the oven door can be opened
3 Correct the condition which caused the smoking
4 Restart the self-clean cycle once al! conditions have been corrected
_DO NOT force the oven door open. This can damage the
automatic door locking system Use caution when opening the door after the
self-cleaning cycle is compL..ed The oven may still be VERY HOT
13
Oven Cleaning ......
(continued)
i ¸, • •.••
_Use care when opening
the oven door after the self-cleaning
cycle. Stand to the side of the oven
when opening the door' to allow hot
air or steam to escape, .
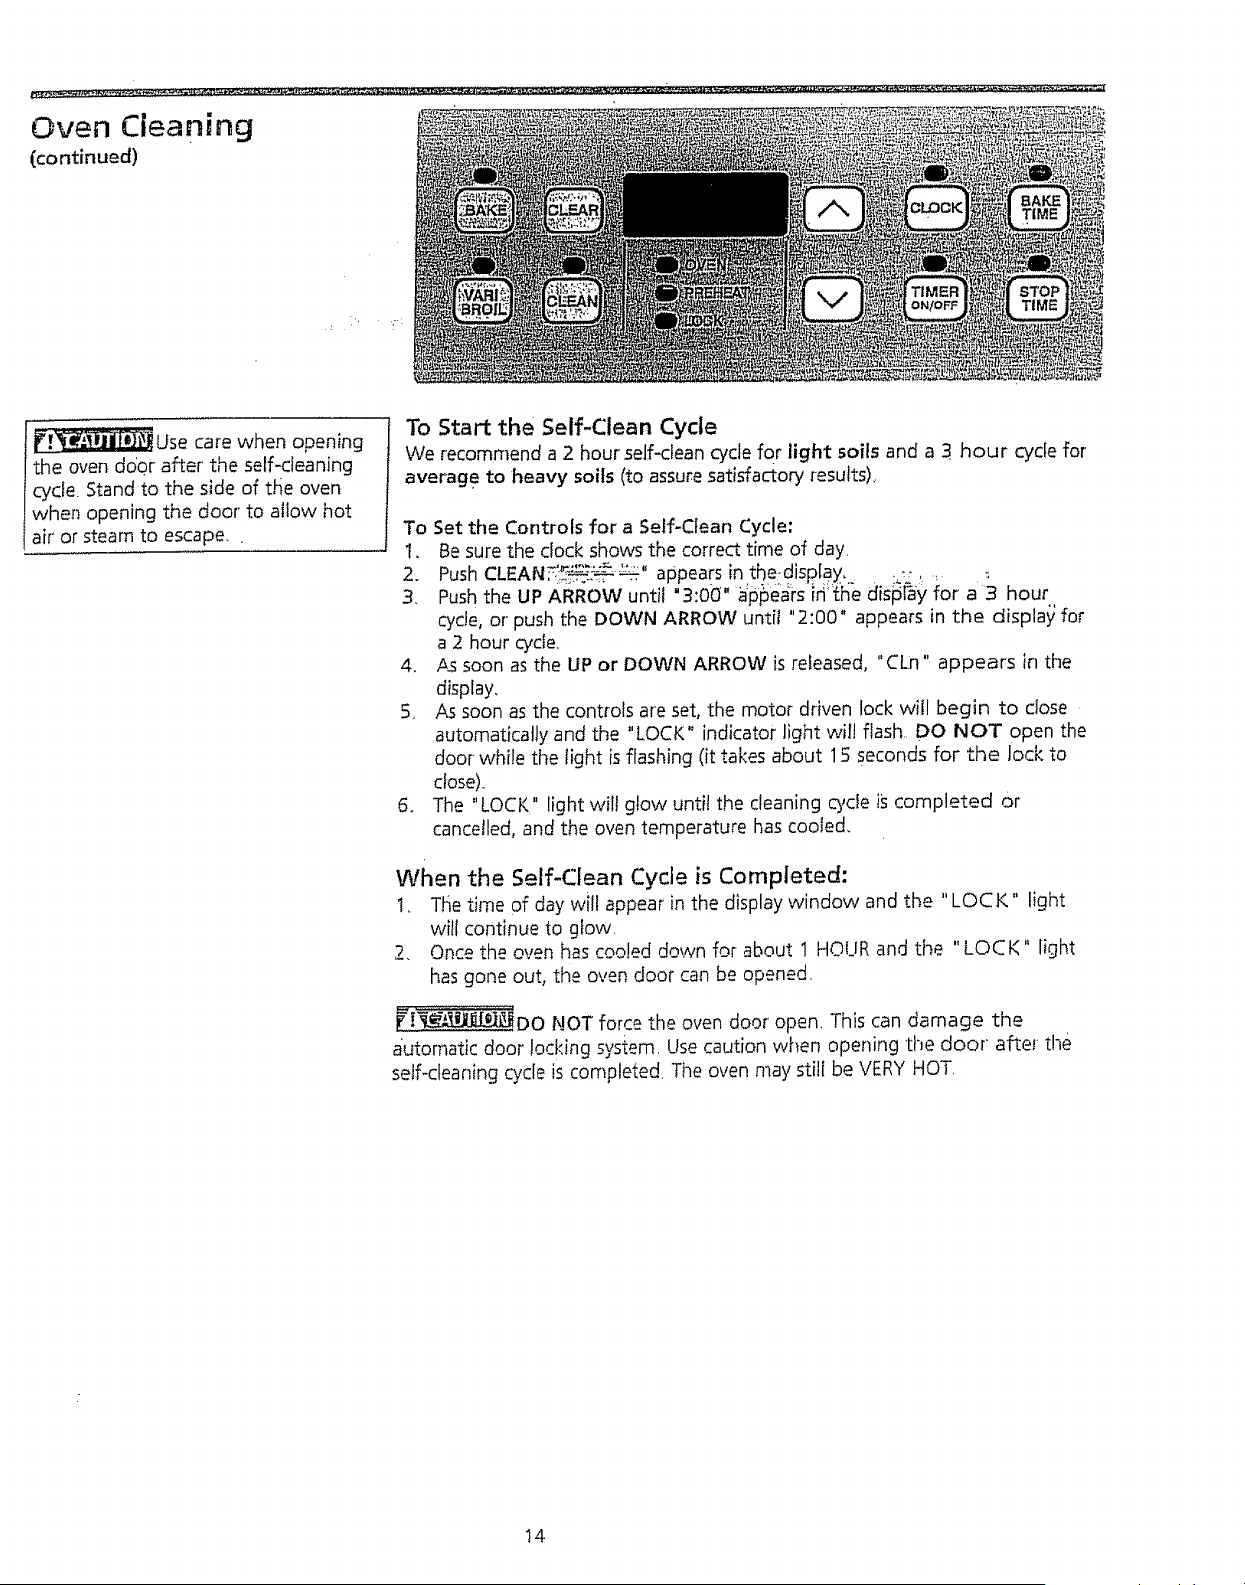
To Start the Self-Clean Cycle
We recommend a 2 hour' self-clean cycle for light soils and a 3 hour cycle for'
average to heavy soils (to assure satisfactory resutts)_
To Set the Controls for a Self-Clean Cycle:
1, Be sure the clock shows the correct time of day,
2, Push CLEAN_I_-_:"_"-_:_' appears in the-display, _-, _
3. Push the UP ARROW until "3:00'" #p_ears idlhe dis_l'_y for a 3 hour
cycle, or push the DOWN ARROW until "2:00 _ appears in the display for
a 2 hour cycle.
4. #3 soon as the UP or DOWN ARROW is released, "CLn" appears in the
display.
5. As soon as the controls are set, the motor driven lock will begin to close
automatically and the "LOCK" indicator light will flash DO NOT open the
door while the light is flashing (it takes about 15 seconds for the Jock to
close).
5. The "LOCK" light will glow until the cleaning cycle is completed or
cancelled, and the oven temperature has cooled.
When the Self-Clean Cycle is Completed:
t_ T!_etime of day will appear in the display window and the "LOCK" light
will continue to glow.
2, Once the oven has cooled down for about 1 HOUR and the "LOCK" light
has gone out, the oven door can be opened.
f'[_-__DO NOT force the oven door open This can damage the
automatic door locking system. Use caution when opening the door' after the
self-cleaning cycle is completed The oven may still be VERY HOT
14
_C-F_eFal CL_Bi_g_ Cleaning t_rious Parts of Your Range
Before cleaning any part of the range, be sure all controls are turned off and
the range is cool. Remove spi/Iovers and heavy soiling as soon as possible,
Regular cleanings will reduce the number of major cleanings later.
Surfaces
Aluminum (Trim' Pieces) &
Vinyl
How to Clean
Use hot, soapy water and a cloth, Dry with a clean cloth.
Glass, Painted and Plastic
Control t(':nobs Body Parts. and
Decorative Trim Pierces
For generaf cleaning, use hot, soapy water and a cloth. For mole difficult soils and built-
up grease, apply a liquid detergent directly onto the soil. Leave on soil for 30 to 60
minutes. Rinsewith a damp cloth and dry. DO NOT use abrasive cleaners on any of
these materials; they can scratch,
Porcelain Enamel
Burner Grates, Cooktop,
BroiIer Pan and Insert, Door
Liner, Warm & Ready Drawer
(some models)
Before cleaning the controlpanel, turn all controls to OFF and remove the control
knobs, To remove, pul! each knob straight off the shaft. Clean using hot, soapy water
and a cloth. Besure to squeeze excess water from the cloth before wiping the panel
(especially when wiping around the controls) Excesswater in or around the controls
may cause damage to the appliance_ To replace knobs after cleaning, line up the fiat
sides of both the knob and the shaft; then push the knob into place.
Clean in the dishwasher and dry upon removal, tf soils are not removed,
cooktop cleaning instructions below
Gentle scouring with a soapy scoudng pad wilt remove most spots. Rinsewith a t: 1
solution of clean water and ammonia, lfnecessaot, cover difficult spots with an
ammonia-soaked paper towel for 30 lo 40 minutesRinse with clean water and a damp
cloth, and then scrub with a soap-filled scouring pad. Rinse and wipe dry with a clean
cloth, Remove all cleaners or the porcelain may become damaged during future
heating DO NOT use spray oven cleaners on the rangetop
Stainless Steel, Chrome
Decorative Trim, Drip Pans
I
Oven Racks
' Sealed Burner Units
Burner Cap, Trim Ring (some
models), Burner Pans (some
rnodeIs), and Burner Base
Oven Door
Clean with hot, soapy water and a dishcloth Rinsewith clean water and a cloth. Cover
stubborn spots with an ammonia-soaked paper towel for 30 to 40 minutes. Rinse
Cleaners made especially for stainless steel are recommended. Be sure to rinse the
cleaners as bluish stains may occur during heating and cannot be removed
Oven racks may be removed or left in the oven during the self-cleancycle for cfearfing
See "Removing and Replacing Oven Racks" under Before Se_ing Oven Controls. If
removed, clean by using a mild, abrasive cleaner, folIowing manufacturer's instructions
Rinsewith clean water and dry.
If the racks are cleaned in the seIf4:tean cycle, their color will turn slightly blue and the
finish will be dull After the self-dean cycle iScomplete, and the oven has cooled, rub
the sides of the racks with wax paper or a cloth containing a small amount of baby oil
or salad oil (this will make the racks glide easier into the rack positions)
The holes in the burners of your range must be kept clean at all times for proper
ignition and a complete, even flame Clean the burner holes routinely with a small
gauge wile or needle and especially after bad spillovers which could clog these holes
To remove, clean and replace sealed burner units, follow the instructions under
Genera_ C_eaning DO NOT put burner units Jnthe dishwasher
To dean oven door, wash with hot, soapy water and a clean cloth DO NOT immerse
the door in water,
DO NOT clean tlqe oven door gasket The oven gasket is made of a woven material
which is essential for a good seal Care shoutd be taken not to rub, damage or remove
the gasl-et
t5
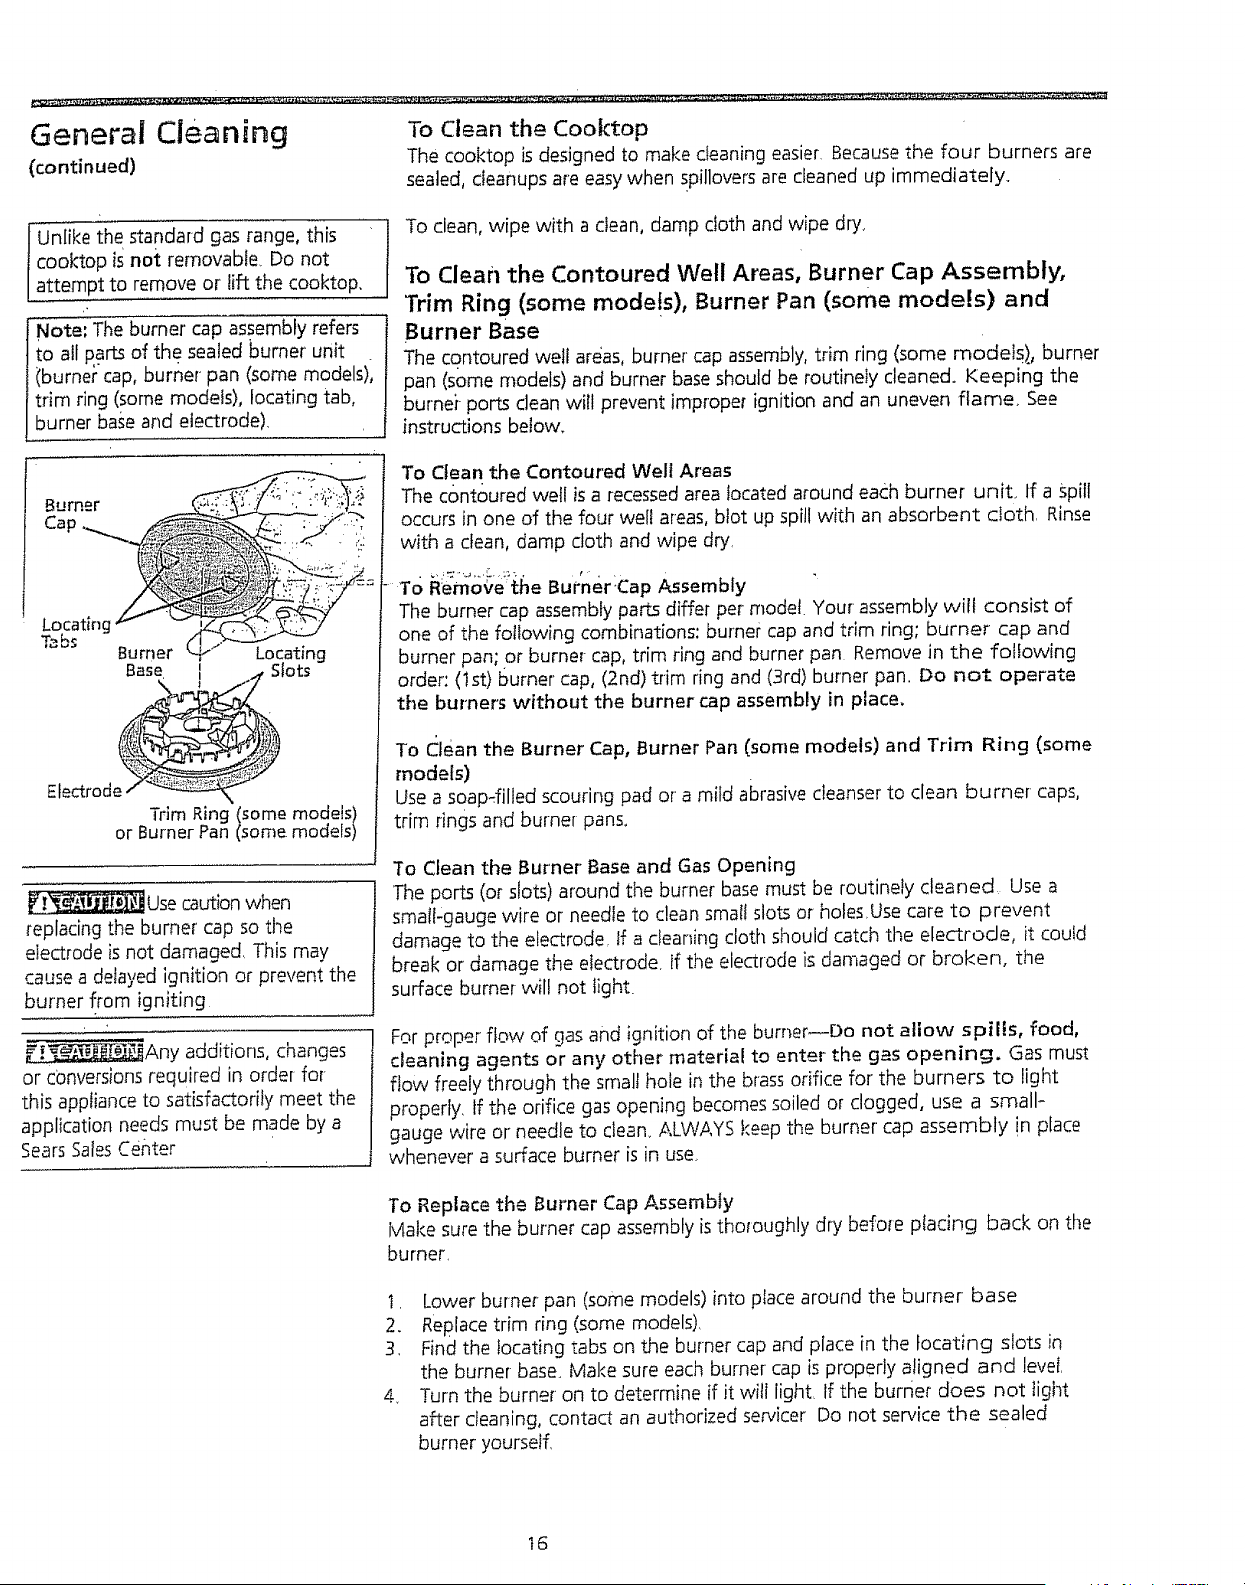
Unlike the standard gas range, this
cooktop is not removable Do not
attempt to remove or lift the cooktop.
Note: The burner' cap assembly refers
to all parts of the sealed burner' unit
(burner cap, burner pan (some models)i
trim ring (some models), locating tab,
burner base and electrode).
To clean, wipe with a clean, damp cloth and wipe dry,
To Clean the Contoured Well Areas, Burner Cap Assembly,
Trim Ring (some models), Burner Pan (some models) and
Burner Base
The contoured welt areas, burner' cap assembly, trim ring (some models)., burner
pan (some models) and burner base should be routinely cleaned. Keeping the
burnei-ports clean will prevent imprope_ ignition and an uneven flame. See
instructions below.
Burner
Cap
Locating
Tabs
Burner Locating
,_tots
Electrod__
Trim Ring Isome models)
or Burner Pan [some models)
Usecaution when
replacing the burner cap so the
electrode is not damaged, This may
cause a delayed ignition or prevent the
burner from igniting
_Any additions, changes
or conversions required in order for
this appliance to satisfactorily meet the
application needs must be made by a
Sears Salescenter
To Clean the Contoured Well Areas
The contoured well is a recessed area located around each burner unit_ If a spitl
occurs in one of the four welt areas, blot up spill with an absorbent cloth, Rinse
with a clean, damp cloth and wipe dry,
To Remove the Burner'Cap Assembly
The burner cap assembly parts differ per model. Your assembly wilt consist of
one of the following combinations: burner cap and trim ring; burner cap and
burner pan; or burner cap, trim ring and burner pan Remove in the following
order: (1st) burner' cap, (2nd)trim ring and (3rd) burner pan. Do not operate
the burners without the burner cap assembly in place.
To C_leanthe Burner Cap, Burner Pan (some models) and Trim Ring (some
models)
Use a s0aP_filled scouring pad or a mild abrasive cleanser to clean burner caps.
trim rings and burner pans.
To Clean the Burner Base and Gas Opening
The ports (or slots) around the burner base must be routinely cleaned, Use a
smalFgauge wire or needle to clean small slots or holes,Use care to prevent
damage to the electrode, If a cleaning cloth should catch the electrode, it could
break or damage the electrode. If the electrode is damaged or broken, tlqe
surface burner wilt not light.
For proper flow of gas and ignition of the burner_Do not allow spills, food,
cleaning agents or any other material to enter the gas opening. Gas must
flow freely through the small hole in the brass orifice for the burners to light
properly, tf the orifice gas opening becomes soiled or clogged, use a small-
gauge wire or needle to ctean. ALWAYS keep the burner cap assembly !n place
whenever a surface burner is in use.
To Replace the Burner Cap Assembly
Make sure the burner cap assembly is thoroughly dry before placing back on the
burner,
t, Lower burner pan (some models) into place around the burner base
2. Replace trim ring (some models),
3. Find the locating tabs on the burner cap and place in the locating slots in
the burner base. Make sure each burner cap is properly aligned and level,
4. Turn the burner on to determine if it will light, If the burner does not light
after cleaning, contact an authorized servicer Do not service the sealed
burner yourself,
t5
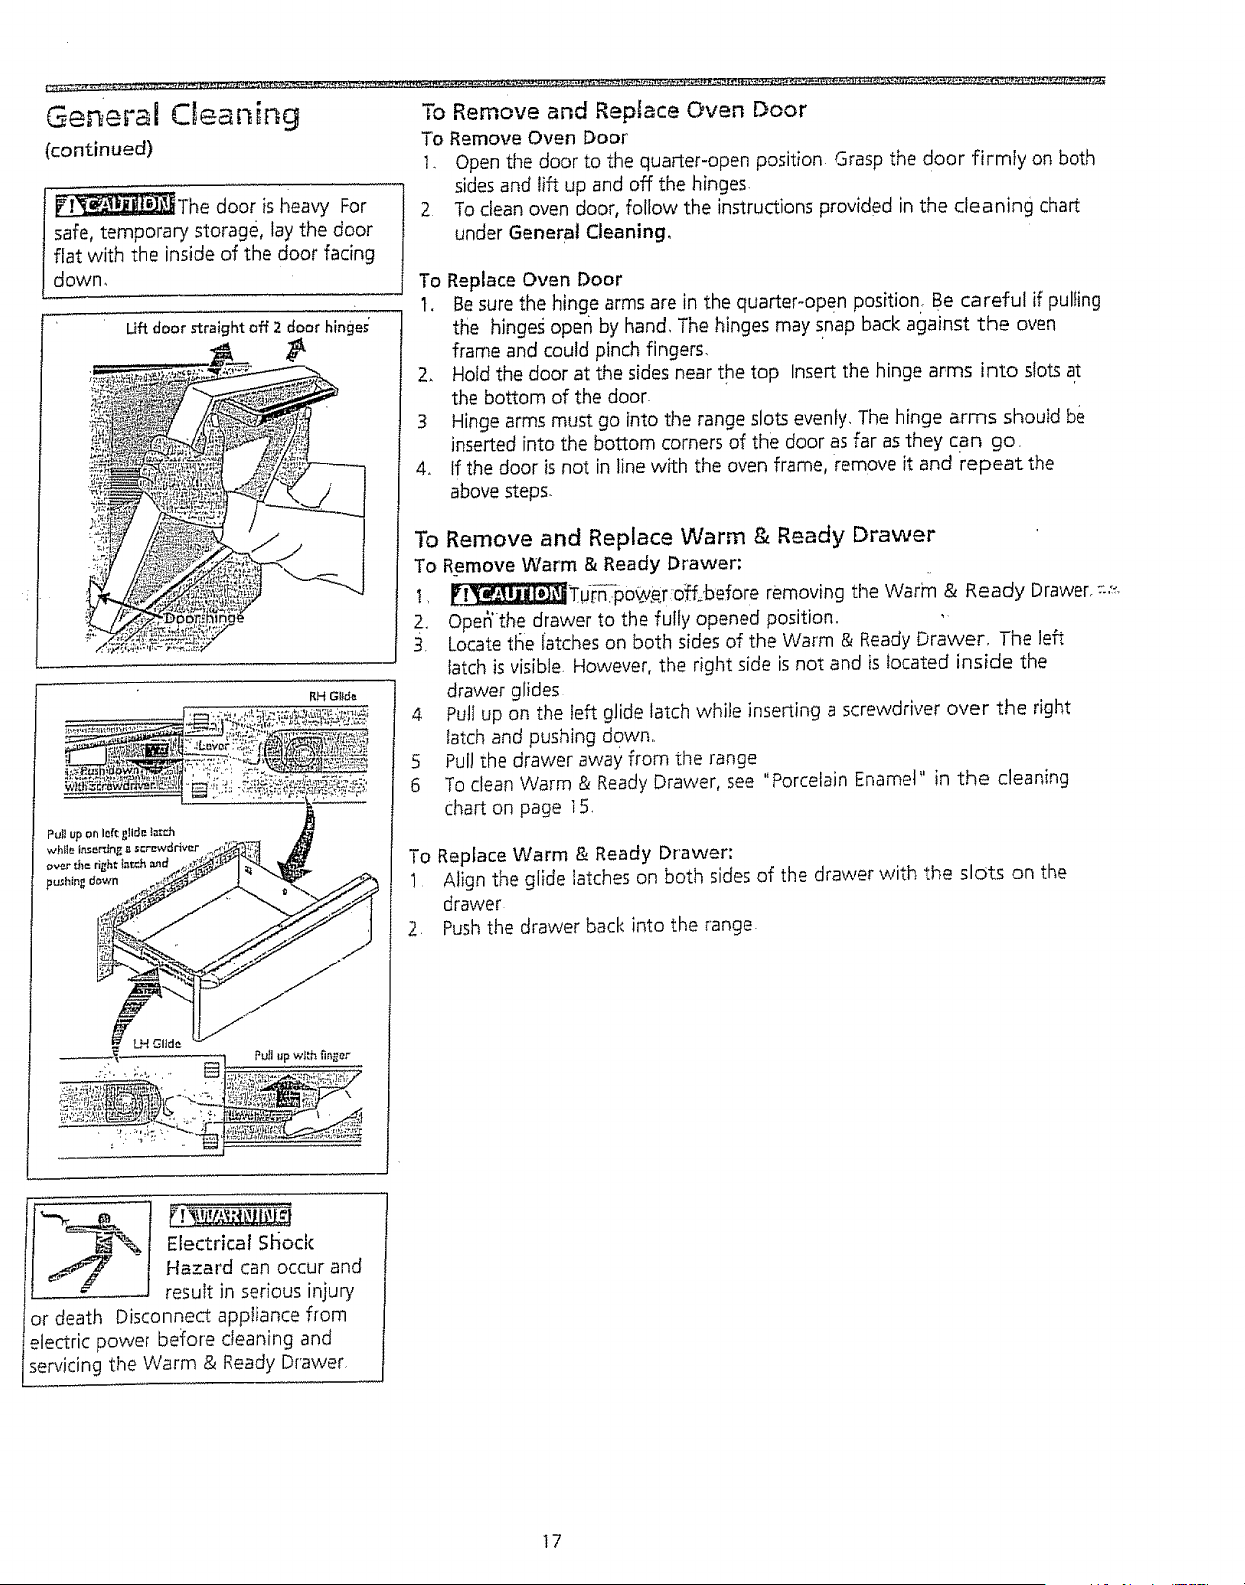
GeF_eFal CIea[_ing To Remove and Replace Oven Door
(continued)
_The door is heavy For
safe, temporary storage, lay the door
flat with the inside of the door facing
down,
Lg_door ¢traight off 2 door hinge_
t
RH GI_de
To Remove Oven Door
1. Open the cloor to the qua_er-open position Grasp the door firmly on both
sidesand lift up and off the hinges.
2 To clean oven door, follow the instructions provided in the cleaning chart
under General Cleaning,
To Replace Oven Door
t. Besure the hinge arms are in the quarter-open position: Be careful if pulling
the hinge# oper_ by hand, The hinges may snap back against the oven
frame and could pinch fingers,
2. Hoid the door at the sides near the top Insert the hinge arms into slots at
the bottom of the door.
3 Hinge arms must go into the range slots evenly, The hinge arms should be
inserted into the bottom corners of the door as far as they can go.
4, If the door is not in line with the oven frame, remove it and repeat the
above steps.
To Remove and Replace Warm & Ready Drawer
To Remove Warm & Ready Drawer;
t, __d_-n_T:pow_r df'f;before removing the Warm & Ready Drawer_ =,_,
2., Ope_"the drawer to the fully opened position. ,,
3. Locate ti_e latches on both sides of the Warm & Ready Drawer, The left
latch is visible. However, the right side is not and is located inside the
drawer glides
4 Pull up on the left glide latch while inserting a screwdriver over the right
latch and pushing down,,
_5 Pull the drawer away from the range
6 To clean Warm & Ready Drawer, see "Porcelain Enamel" in the cleaning
chart on page t 5,
To Replace Warm & Ready Drawer:
! Align the glide latches on both sides of the drawer with the slots on the
drawer
2. Push the drawer back into the range.
Electrical Sl4ock
Hazard can occur and
result in serious injury
or death Disconnect appliance from
electric power before cleaning and
servicing the Warm & Ready Dr'awer_
17
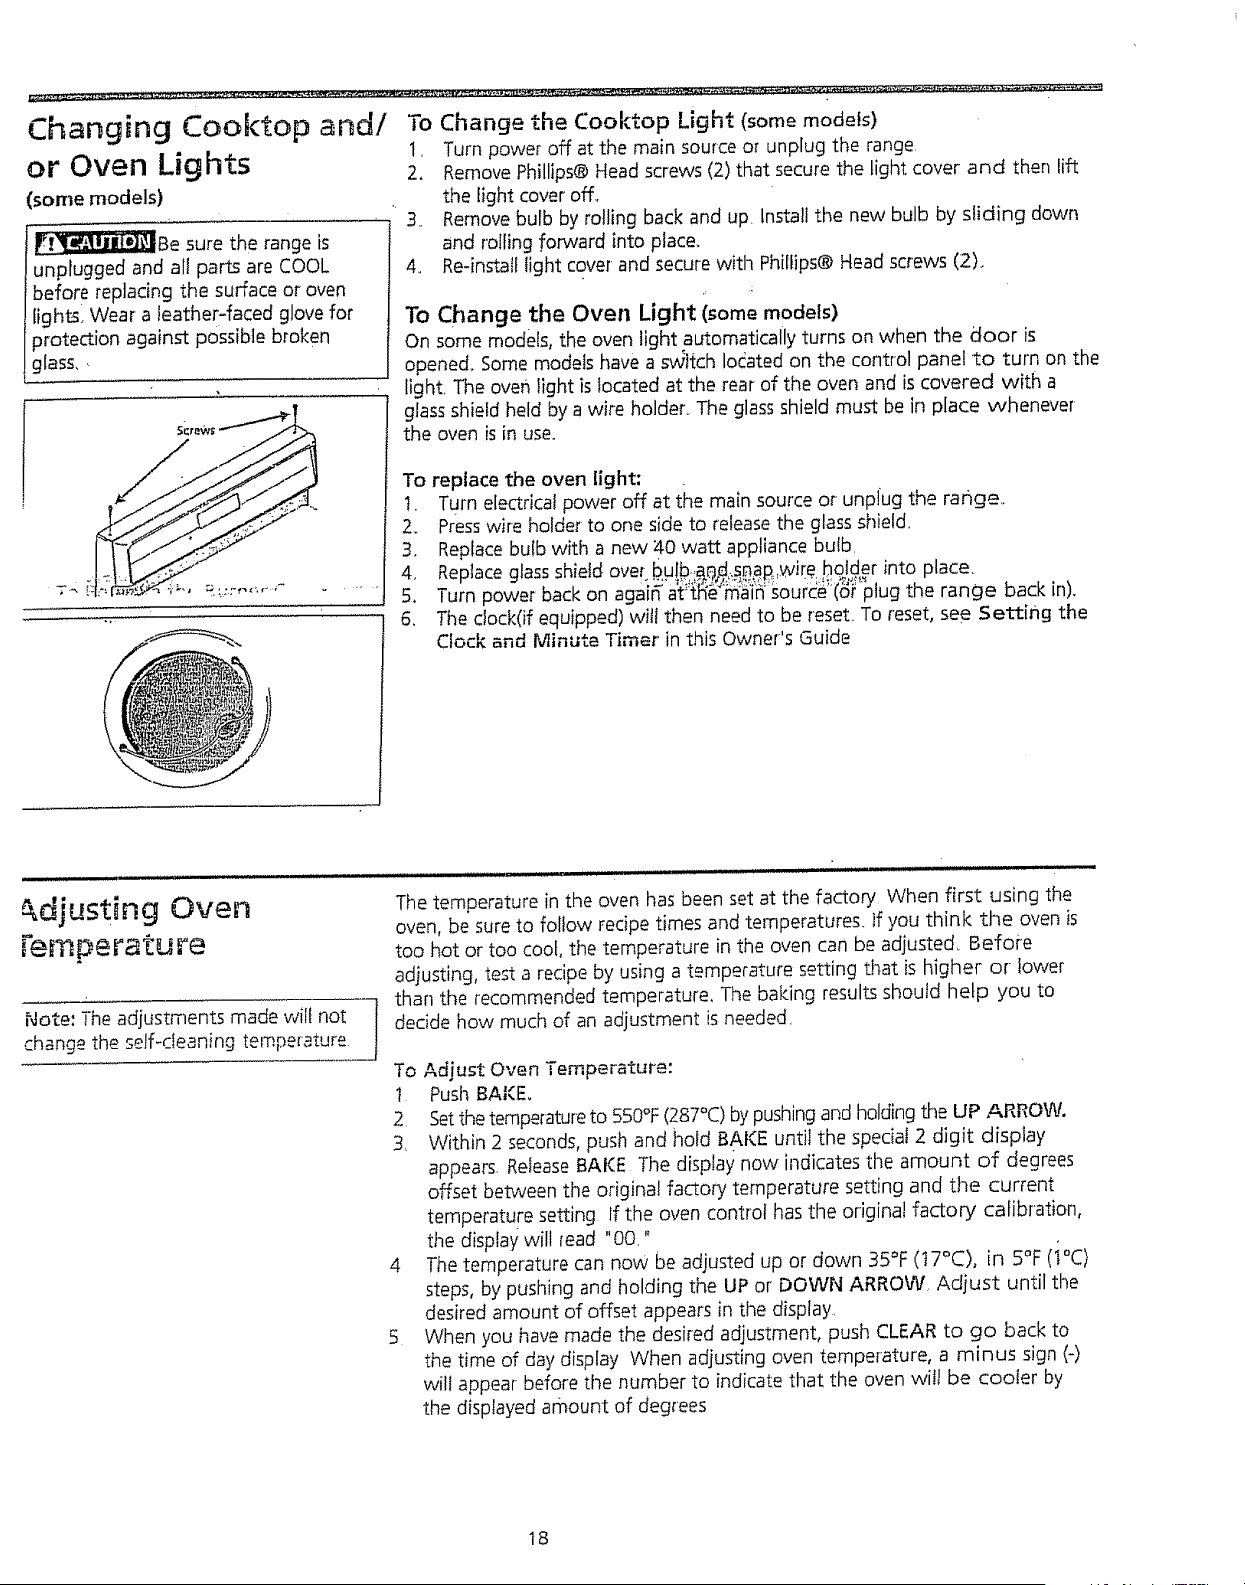
Changing Cooktop and/
or Oven Lights
(some models)
_Be sure the range is
unplugged and al! parts are COOL
before replacing the surface or oven
lighSl Wear a leather-faced glove for
protection against possible broken
glass,,
r
To Change the Cooktop Light (some models)
1, Turn power off at the main source or unplug the range.
2, Remove Phillips@ Head screws (2) that secure the light cover and then lift
the light cover off,
3_ Remove bulb by rolling back and up. install the new bulb by sliding down
and rolling forward into place,
4. Re-install light cover and secure with Phillips@ Head screws (2)°
To Change the Oven Light (some models)
On some models, the oven light automatically turns on when the door is
opened_Some models have a s_ttch located on the control panel to turn on the
light. The oven light is located at the rear of the oven and is covered witl_ a
glass shield held by a wire holder. The glass shield must be in place ,whenever
the oven is in use.
To replace the oven light:
t. Turn electrical power off at the main source or unp!ug the rar_ge..
2. Presswire holder to one side to release the glass shield
3. Replace bulb with a new :40 watt appliance bulb.
4. Replace glass shield, ove_ bulb,a_d.sBap,_wire holder into place.
5. Turn power back on aga n at"tRe ma "fi source (oi_ plug t_e range back in).
6, The clock(if equipped) will then need to be reset, To reset, see Setting the
Clock and Minute Timer in this Owner's Guide
Cdjusting Oven
Note: The adjustments made will not
change the self-cleaning temperature
The temperature in the oven has been set at the factory When first using the
oven, be sure to follow recipe times and temperatures, if you think the oven is
too hot or too cool, the temperature in the oven can be adjusted, Before
adjusting, test a recipe by using a temperature setting that is higher or lower
than the recommended temperature, The baking results should help you to
decide how much of an adjustment is needed,
To Adjust Oven Temperature:
1 Push BAKE,
2 Setthe temperature to 550°F (287°C) by pushing and holding the UP ARROW.
3, Within 2 seconds, push and hold _AKE until the special 2 digit display
appears. ReleaseBAKE The display now indicates the amount of degrees
offset between the original factory temperature setting and the current
temperatu/'e setting If the oven control has the original factory calibration,
the display will _ead "00"
4 The temperature can now be adjusted up or down 35°F (t 7°C), in 5°F (i °C)
steps, by pushing and holding the UP or DOWN ARROW_ Adjust until the
desired amount of offset appears in the display.
5 When you have made the desired adjustment, push CLEAR to go back to
the time of day display When adjusting oven temperature, a minus sign (-)
will appear before the number to indicate that the oven will be cooler by
the displayed amount of degrees
t8
Avoid Service Checklist Beforeyou call for service, review this list It may save you time and expense
The list includes common occurrences that are not the result of defective
workmanship or materials in this appliance
This oven is equipped with a state of the art electronic oven controller, Among
its many features iSa full time oven circuit diagnostics system. The controlle_
constantly monitors its internal circuitry as well as several crucial oven circuits to
insure they are all oPerating correctly. If at any time one of these systems fails,
the Controller will immediately stop operation, beeping and flashing an error
(:ode of F! or F3 in the display window.
OCCURRENCE POSSIBLE CAUSE/SOLUTION
Range is not level.
Poor installation Placeoven rack in center of oven Place a level on the oven
rack Adjust leveling legs at base of range until the rack is level When range is
level, cooktop may appear out of alignment if countertop is not levelo
Weak, unstable floor Be Sure floor is level and can adequately support rahge,
Contact a carpenter to correct sagging or sIoping floor°
Cannot move appliance easily,
Appliance must be accessible for
service.
Kitchen cabinet misalignment may make range appear to be unlevel. Be sure
cabinets are square and have sufficient roo_ f0,,_a_ge c!earance, .., •:i i :.!,:_1:_:
Cabinets not square or are built in too tight, Contact a cabinet maker to
correct the problem.
Contact builder or installer to make appliance accessible,
Carpeting interferes with range, Provide sufficient space so range can be lifted
over carpet,
Gas line is hard-plumbed Have a flexible AGA approved metal appliance
connector installed
Oven control beeps and displays
F1 or F3.
Electronic control has detected a fault condition Push CLEAR to clear the
display and stop beeping Reprogram oven, If fault recurs, record fault number,
Push CLEAR and contact an authorized servicer',
5urface burners do not light.
Surface Control knob has not been completely turned to LITE, Push in and turn
the Surface Control knob to LtTE until burner ignites and then turn control
t-nob to desired flame size
Burner ports are clogged, Clean burners, See "To Clean the Contoured Well
Areas, Burner Cap Assembly, Trim Ring (some models), Burner Pan (some
models) and Burner Base" under General Cleaning. With the burner off,
clean ports witl_ a small-gauge wire or needle,
Range p0we[ cord is disconnected from outlet (electric ignition models only),
Be sure cord is securely plugged into the outlet,
Electrical power outage (electric ignition models only) Burners can be fit
manually See Setting Surface Contro!s in this Owner's Guide,
Surface burner flame burns half way Bu_'nerports are clogged With the burner off, clean ports by using a small-
around, gauge wire or needle.
Moisture is present after cleaning Lightly fan the flame and allow burner to
operate until flame is full, Dry the burners thoroughly following instructions in
the General Cleaning section.
Surface burner flame is orange.
Dust particles in main line Allow the burner to operate a few minutes until
flame turns blue
in coastal areas, a slightly orange flame is unavoidable due to salt air,
t9
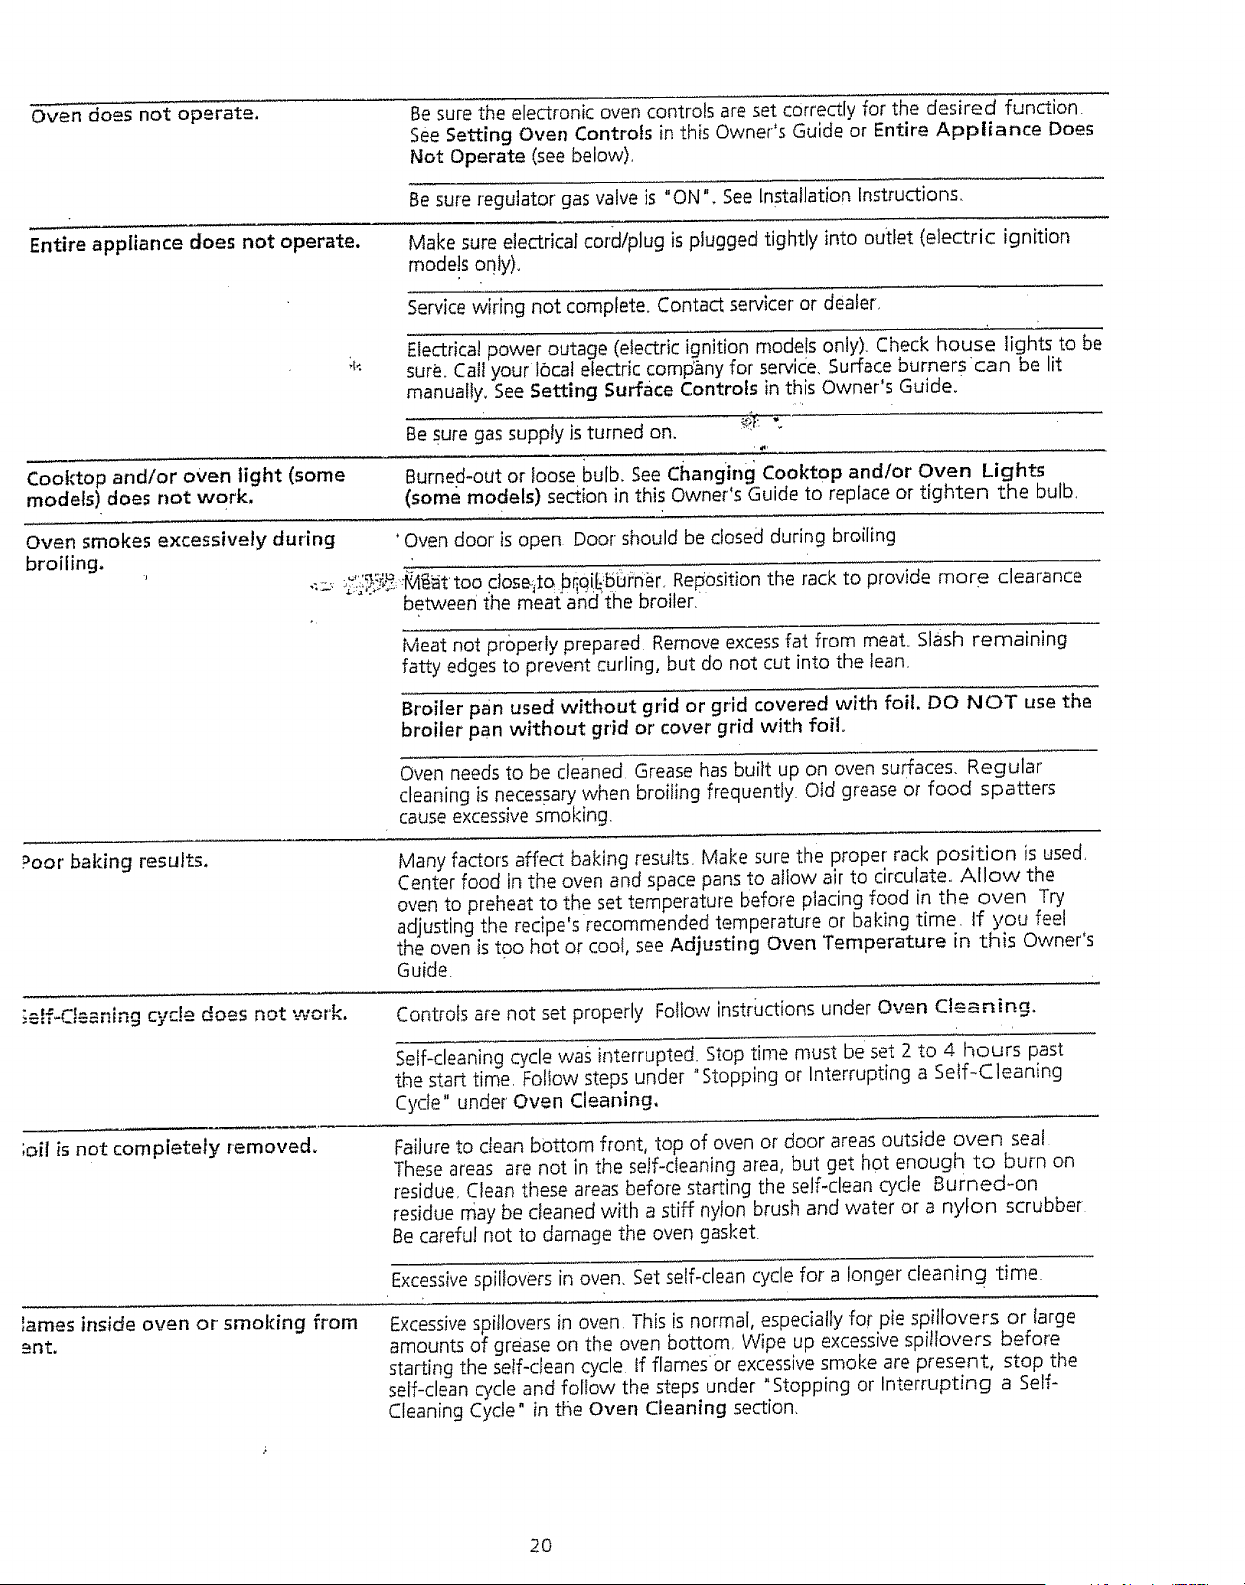
Oven does not operate.
Be sure the electronic oven controls are set correctly for the desired function.
See Setting Oven Controls in this Owner's Guide or Entire Appliance Does
Not Operate (see below).
Entire appliance does not operate,
Be sure regulator gas valve is "ON". See Installation Instructions.
Make sure electrical cord/plug is plugged tightly into outlet (electric ignition
models only).
Service wiring not complete. Contact servicer or dealer_
Cool:top and/or oven light (some
models) does not work,
;P,
Electrical power outage (electric ignition models only). Check house lights to be
sure. Ca_lyour J6calelectric comp'any for service. Surface burners can be lit
manually, See Setting Surface Controls in this Owner's Guide.
Be sure gas supply is turned on.
Burned-out or loose bulb. See Changing Cooktop and/or Oven Lights
(some models) section in this Owner's Guide to replace or tighten the bulb.
Oven smokes excessively during ' Oven door is open Door should be closed during broiling
broiling.
,::_, t;O_:_,:.:-B4_attoo c!ose_to blio_burner. Reposltion the rack to provide more clearance
" between {he mea{ahcf'the broiler.
Meat not pr0pe_ly prepared Remove excess fat from meat. Slash remaining
fatty edges to prevent curling, but do not cut into the lean.
Broiler pan used without grid or grid covered with foil, DO NOT use the
broiler pan without grid or cover grid with foil.
Oven needs to be cleaned Grease has built up on oven surfaces. Regular
cleaning isnecessary when broiling frequently. Otd grease or food spatters
cause excessive smoking.
Poor' baking results.
Many factors affect baking results. Make sure the proper rack position is used.
Center food in the oven and space pans to allow air to circulate.. Allow the
oven to preheat to the set temperature before placing food in the oven Try
adjusting the recipe'srecommended temperature or' baking time. tf you feel
the oven is too hot or cool, see Adjusting Oven Temperature in this Owner's
Guide.
:-f_ rt ....:--n cycle does not work.
-'=----,==-,,,= Controfs are not set properly Follow instrbctions under Oven Cleaning.
Self-cleaning cycle wa__interrupted. Stop time must be set 2 to 4 hours past
the start time. Follow steps under "Stopping or Interrupting a Self-Cleaning
Cycle" under Oven Cleaning,
;oil is not completely removed.
Failure to clean bottom front, top of oven or door areas outside oven sea!
These areas are not in the self-cleaning area, but get hot enough to burn on
residue, Clean ti_ese areas before starting the self-dean cycle Burned-on
residue may be cleaned with a stiff nylon brush and water or a nylon scrubber
Be careful not to damage the oven gasket
Excessivespilbvers in oven. Set self-clean cycle for a longer cleaning time.
lames inside oven or smoking from
ent,
Excessivesp/tlovers in oven. This is normal, especially for pie spiifovers or large
amounts of grease on the oven bottom, Wipe up excessive spitiovers before
starting the self-dean cycle If flames0r excessive smoke are present, stop the
self-dean cycle and follow the steps under "Stopping or Interrupting a Self-
Cleaning Cycle" in the Oven Cleaning section,
2O
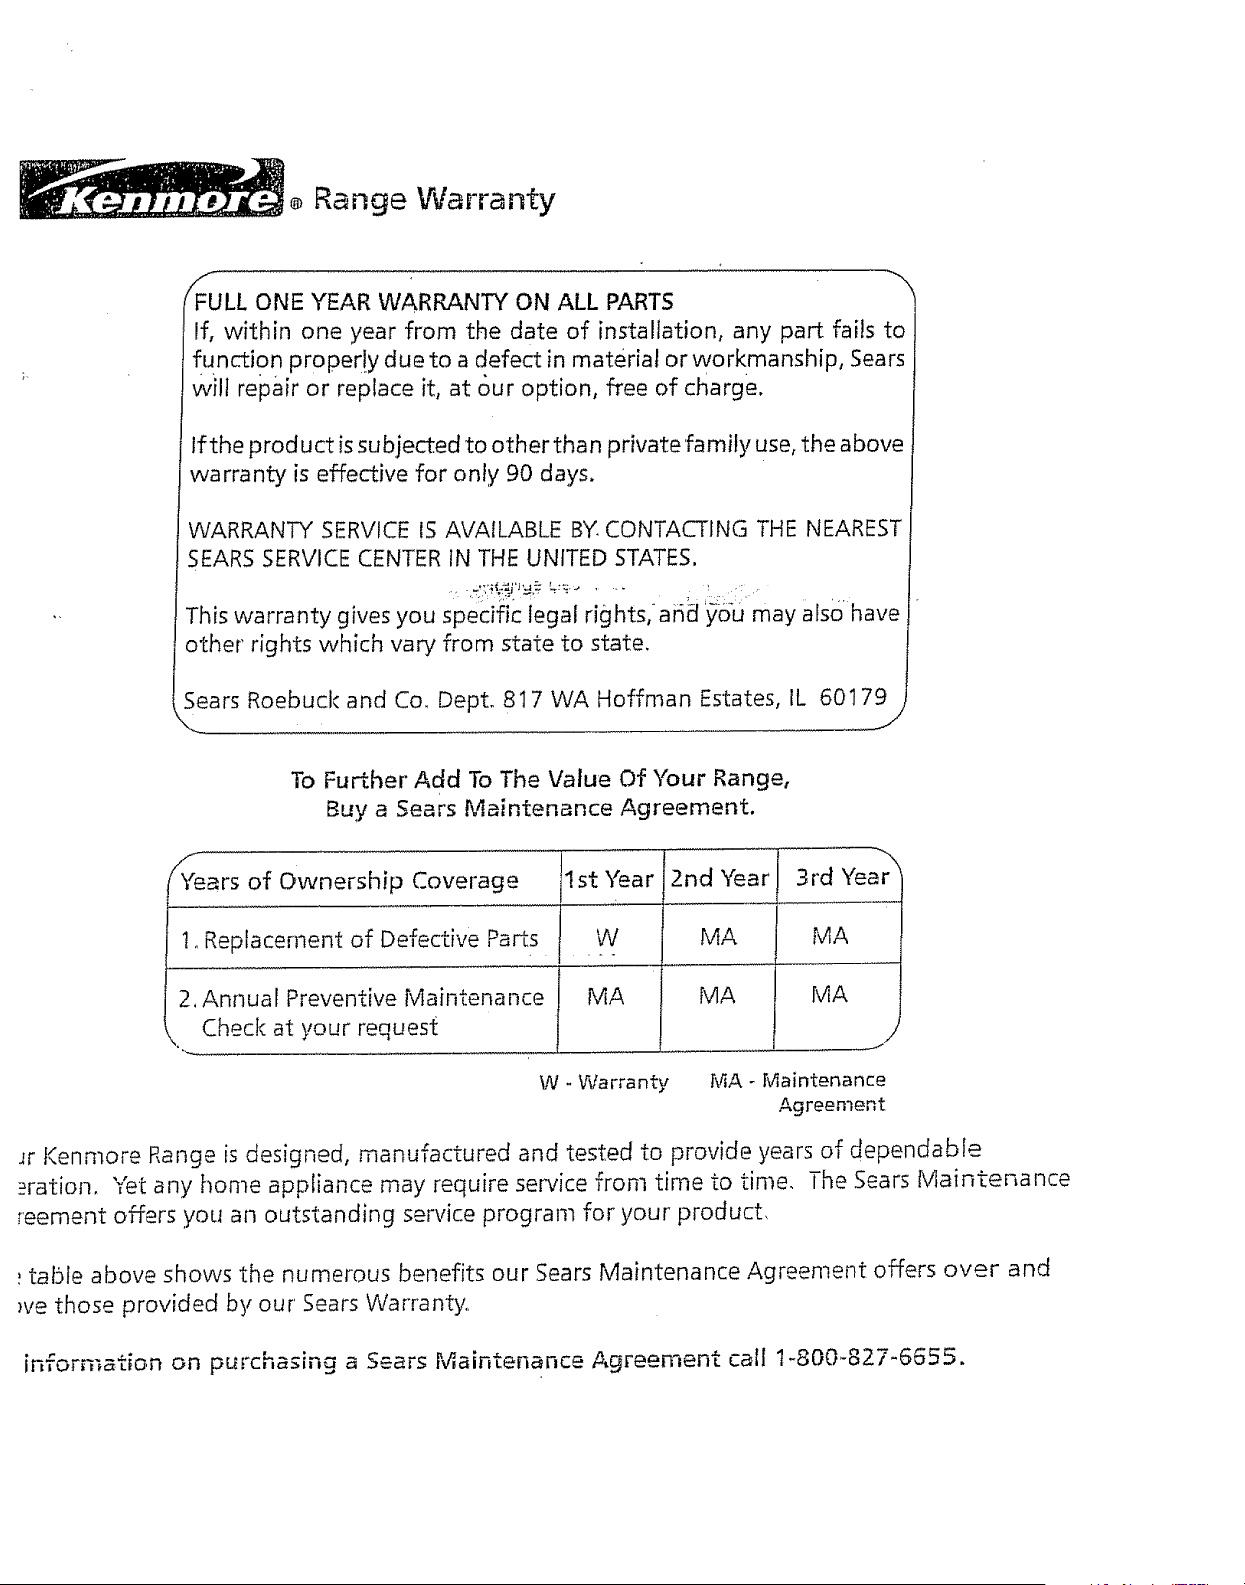
® Range Warranty
_FULL ONE YEAR WARRANTY ON ALL PARTS
If, within one year from the date of installation, any part fails to
function proper!y due to a defect in material or workmanshi p, Sears
wilt repair or replace it, at our option, free of charge.
if the product is subjected to other than privatefamily use, the above
warranty is effective for only 90 days.
WARRANTY SERVICE IS AVAILABLE BY. CONTACTING THE NEAREST
SEARS SERVICE CENTER IN THE UNITED STATES.
This warranty gives you specific legal rights,aii_ 'you may also have
other rights which vary from state to state.
Sears Roebuck and Co. Dept° 817 WA Hoffman Estates, IL 60179
To Further Add To The Value Of Your Range,
Buy a Sears Maintenance Agreement.
Years of Ownership Coverage st _ar
i
1. Replacement of Defective Parts ! W
2. Annual Preventive Maintenance
Check at your request
MA
MA
W - Warranty
2nd Year 3rd Yea>
MA MA
MA
WiA- Maintenance
Agreement
_r Kenmore Range is designed, manufactured and tested to provide years of dependable
__ration, Yet any home appliance may require service from time to time, The Sears Maintenance
reement offers you an outstanding service program for your product,
table above shows the numerous benefits our Sears Maintenance Agreement offers over and
we those provided by our' Sears Warranty,,
inTorma,_on on pu_'chasMg a Sears Maintenance Agreement call 1-800-827-6555.
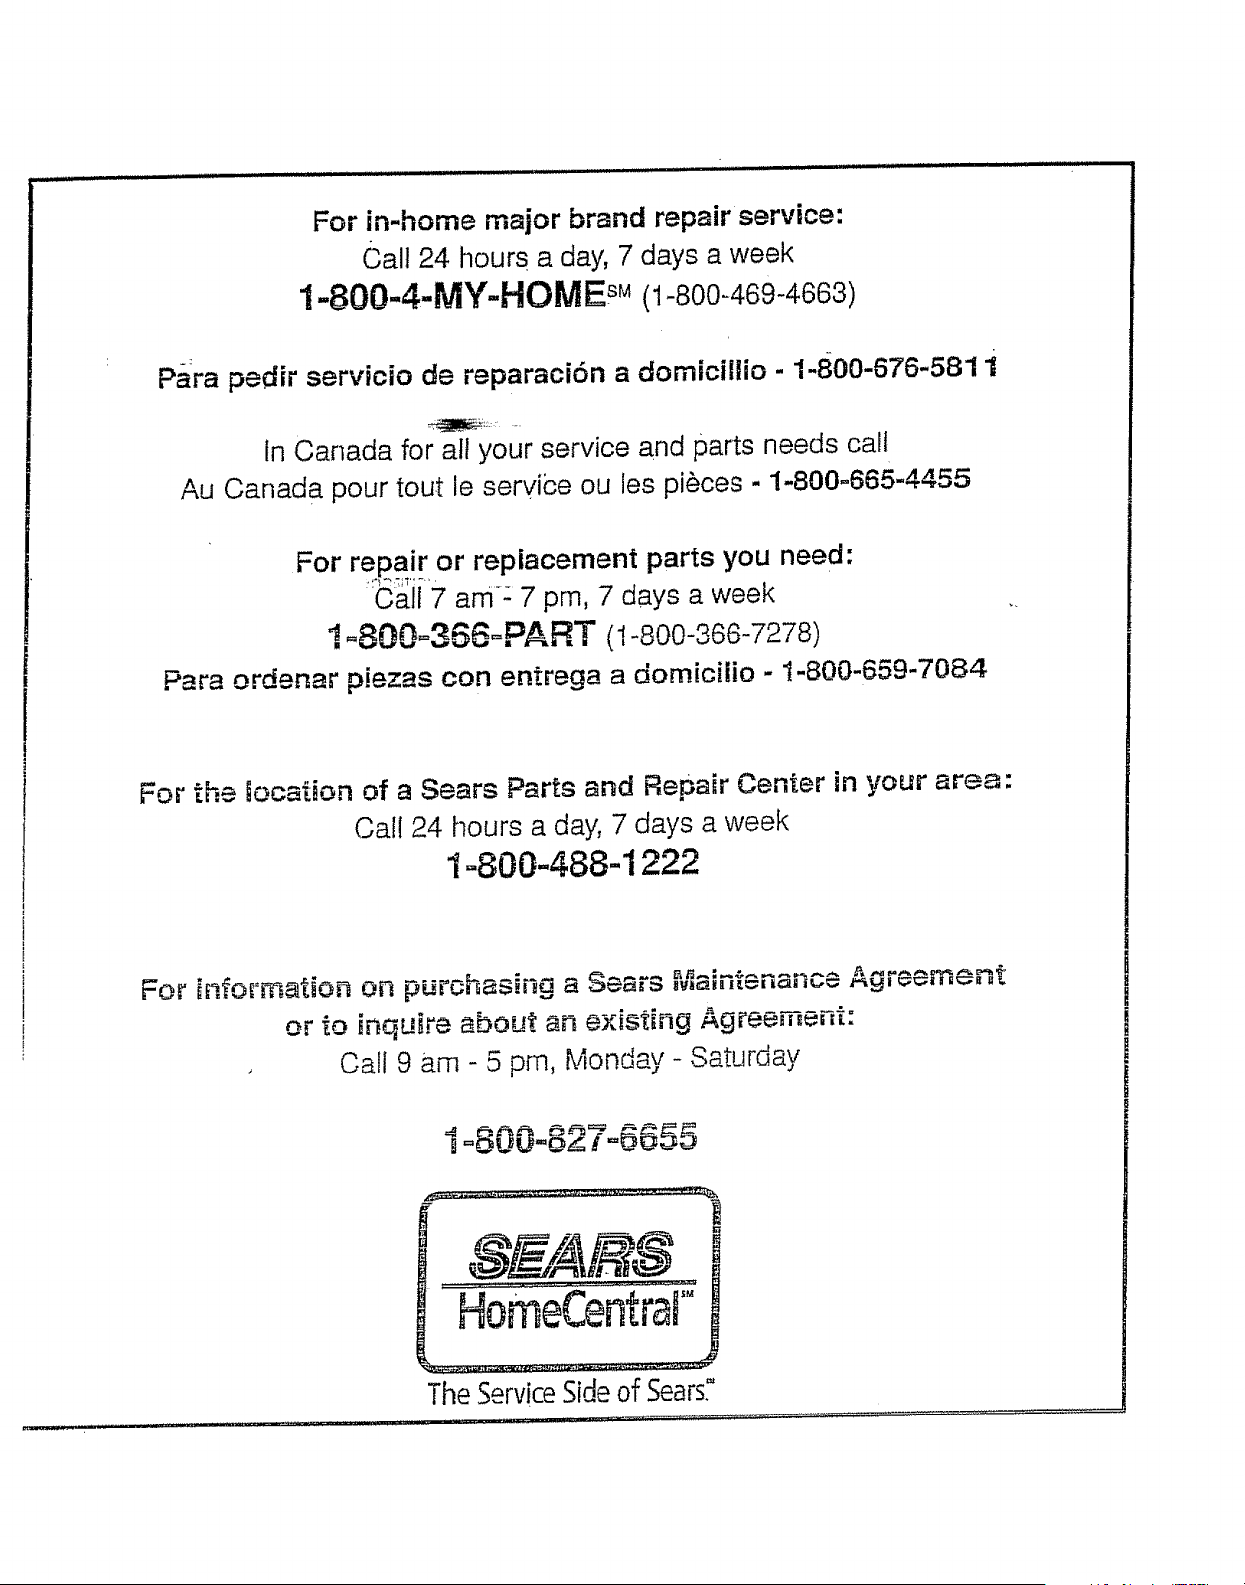
For in-home major brand repair service:
Call 24 hours a day, 7 days a week
1-800-4-MY-HOMEs M (1-800_469-4663)
Para pedir servicio de reparaci6n a domiciBio - 1-800-676-581 i
In Canada for all your service and parts needs call
Au Canada pour tout le servibe ou les pi_ces - !-800-665-4455
For re_air or replacement parts you need:
_C_ii 7 am-7 pro, 7 days a week
!oSO0o366oPART (i-800-366-7278)
Rata ordenar piezas con entrega a domiciiio - t-800-659-7084
For the location of a Sears Parts and Repair Center in your area"
CaR124 hours a day, 7 days a week
1=800-488-1222
For info_mat_on on purch_==_ny a Sears _w,_,,_'_":-',,=,......,,=,,,.= Agreement
or to inquHre about an existing Agreement:
. Call 9 am - 5 pm, Monday - Saturday
The Service Side of Sears."
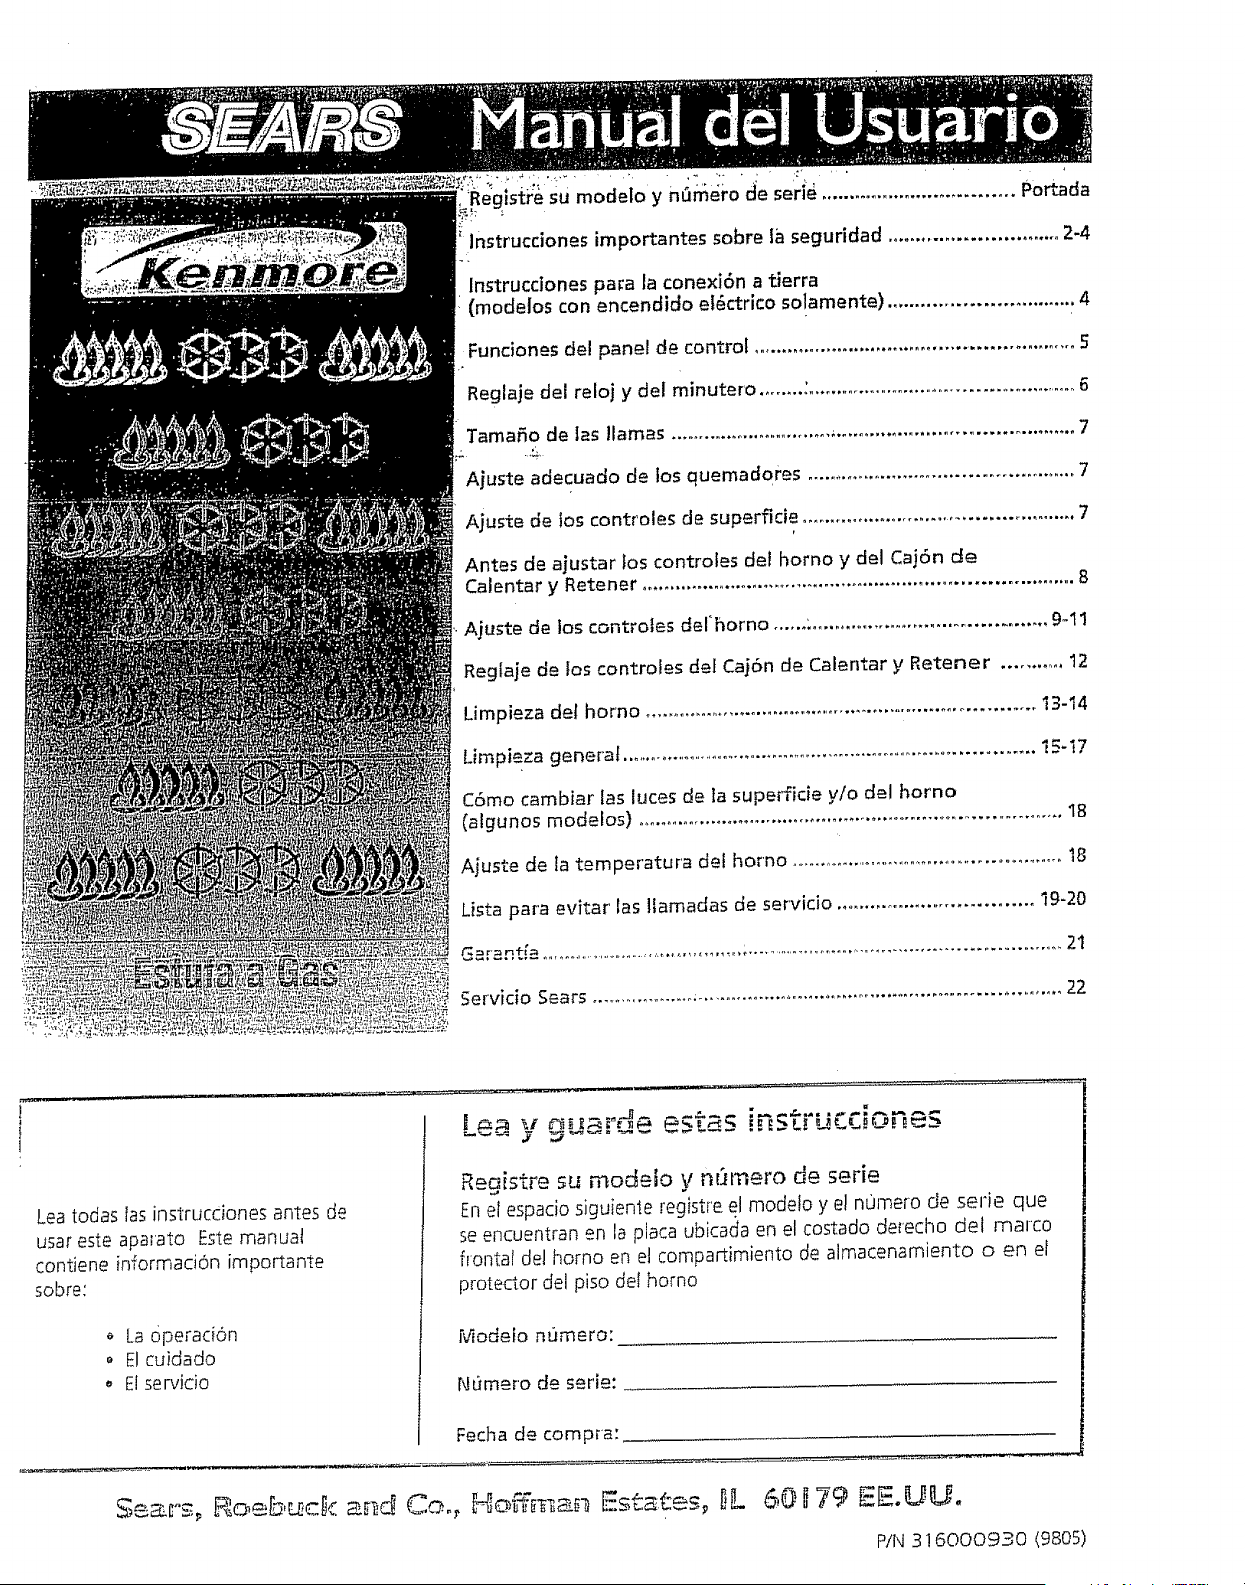
isti_ sU modelo y non_iro de serie ................................. Portada
Instrucctones importantes sobre ta seguridad ............................. 2-4
lnstrucciones papa la conexi6n a tierra
(modelos con encendido et6ctrico solamente) ................................ 4
Funciones det panet de contro( ......................................................... 5
Reglaje del reloj y del minutero ........ :.................................................. 6
Tamafio de las llamas .............................. _......................................... 7
Ajuste adecuado de los quemadores .............................................. 7
Ajuste de los controles de superficie ................................................ 7
Antes de ajustar tos controles de_ homo y del Caj6n de
Calentar y Retener ............................................................................ 8
Ajuste de los controles deFhomo ...... '............................................ 9+11
Reglaje de tos controles del Ca_6n de Calentar y Retener ........... 12
Limpieza del homo ........................................................................ 13-14
L/mpieza genera+ ................................................................................... +5-17
C6mo cambiar las luces de la superficie y/o del homo
(algunos modelos) ............................................................................. 18
Ajuste de +atemperatura de+ homo ............................................................18
Lista para evitar las llamadas de servicio ................................... 19-20
G_rantfa ' 21
5ervicio Sears ................... _................................................................ 22
i
Lea todas las instrucciones antes de
user este aparato Este manual
contiene informaci6n importante
sobre:
La 6peracibn
o E! cuidado
_, E!servicio
Registre su modelo y nt:nT_ero de serie
En el espacio siguiente registre el mode!o y el nomero de serie que
se encuentran en la place ubicada en el costado deiecho det marco
flontal del homo en et compartimiento de aimacenamiento o en el
protector del piso de[ homo
Modefo numero:
NL+mero de serie:
Fecha de compra:
Ss .rs, Roebuck Co+, F o %Y an Estates, +L -'50#79 EE.UU.
P/N375000930 <9s09
INSTRUCCIONES IMPORTANTES SABRE LA SEGURIDAD
Lea todas las instrucciones antes de Usar este
aparato. Guarde estas instrucciones para
consulta futura,
Esta gufa contiene sfmbolos e instrucciones importantes sabre
la seguridad. Enseguida, seda una breve explicaci6.n sabre el
usa de estos dmbolos Par favor presto especial atenci6n a
estos slmbolos y siga todas las instrucciones EsCaes una
explicacibn breve del usa de esto.s dmbolos.
_Este dmbolo alerta acerca de situaciones
que pueden provocar serios da_os corporales, muerte o
daSos matedales.
Este sImboto alerta acerca de situaciones
que puedenprovocar da_os corporaIes o materiales.
__ 5i no se sigue exactamente la
informaci6n que aparece en este manual,
puede provocarse un incendio o una
explosi6n, con 10 que resultar_an dafios a la
propiedad, tesiones personales o muerte,
PARA SU SEGURIDAD:
No aimacene o use gasotina ni otros
vapores o lfquidos inflamabtes junto a este
aparato electrodom_stico ni cualquier otto,
QUE HACER Sl HUELE GAS:
o Noencienda ning_n aparato
' " ._nte,, up,or et#.ctrico; no
Notoque n:ngun" ---
use ning_in tel_fono en su edificio.
o Llame de inmediato a su proveedor de gas
desde la casa de alg6n vedno. Siga [as
instrucciones que le d6 el proveedor de gas.
o 5i usted no puede ponerse en cantata con
su proveedor de gas, ltame al
depa_amento de bomberos.
-- Tanto ia instalaci6n coma el servicio deben
quedar a cargo de un instalador
pr.ofesional, un t_-cnico o el proveedor de
gas.
, Quite todas tascintas.Ytgd, o e! embalaje antes deusa.r la
estufa, Despues'de._al_erfa{_esempaca_o,destruya.tbdo
carton de emb_ilaje y las balsas plast_cas. Nunca permita que
asn 5osjuebuei_?_!)el ma"l;er!alde embalaje,
• Serviciopor partedel usuario--No repare ni reemplace
nmguna parte del ap,arato a menos,:que lOS_manuales:asilo
recomienden, SolamenSeun t_cntcncaliflcaao pue_e ocuparse
detodos los demosservtclos;asfs'e.,nIuc¢_el nesgo delesiones
personaesy dedaSosa,!,_,e_ufa,'_ :
@
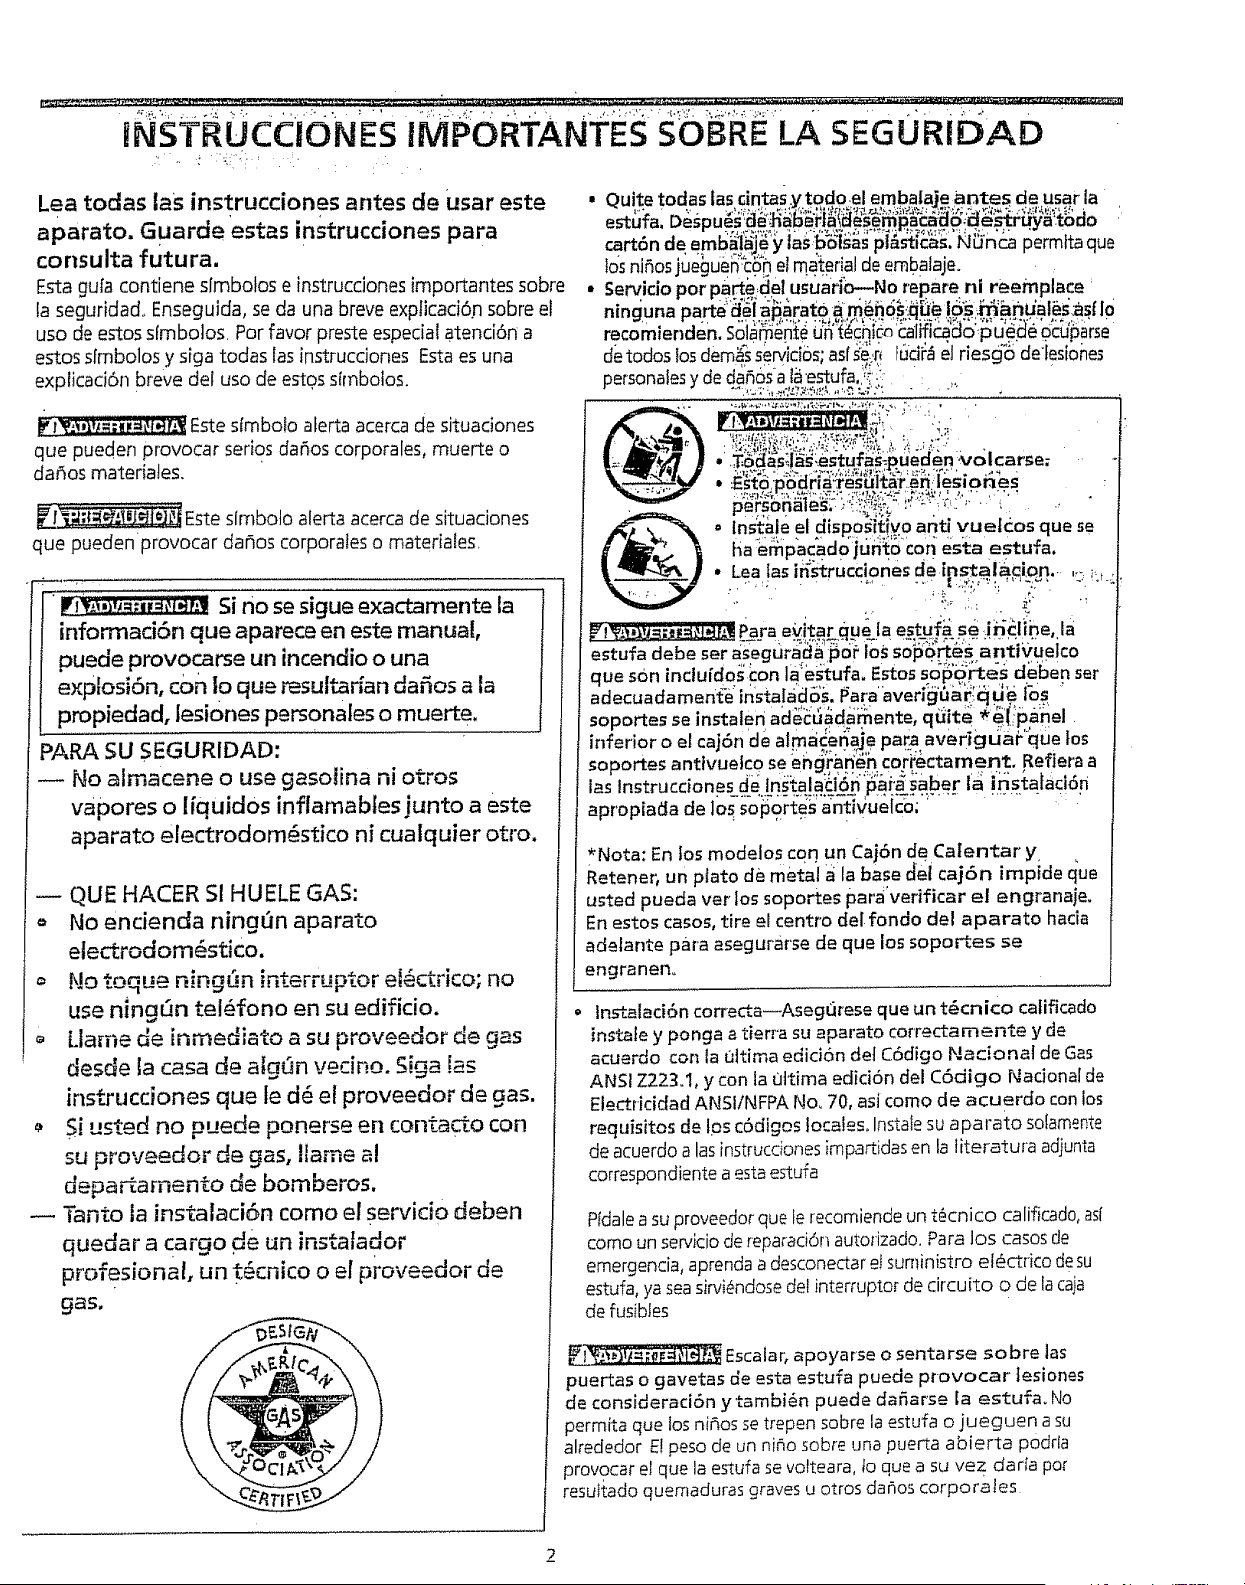
o nstgle el dispositiyo anti vuefcos que se
ha:e_p'ac_ado_j6_{o"€oil es:ta estufa.
• Lea las i6_truc¢iones dein_alafiion,. ,.. b_
*Nora: En los modelos con un Caj6n de Calentar y,
Retener; un plato de metal ala base dei caj6n impide que
usted pueda ver los soportes para verificar el engranaje.
En estos casos, tire el centro del fondo del aparato hacia
adetante para asegurarse de que los soportes se
engraneno
Instalaci6n corre_a_Asegcirese que un t_cnico catificado
instale y ponga a tierra su aparato correctamente y de
acuerdo con la ultima edici6n de! C6digo National de Gas
ANSI Z223°1, y con la 01tima edici6n del C6digo Nadona[ de
Electricidad ANSIiNFPA Noo 70, asi coma de acuerdo con los
requisitos de los c6diges ]ecales_ Instale su aparato solamente
de acuerdo alas instrucciones impartidas en la literatura adjunta
correspondiente a esta estufa
PIdaleasu proveedor que le recomiende un t_cnico calificad00asf
coma un serviciode repa_aci_nautorizado. Para los casos de
emergencia, aprendaa desconectaret suministro el_rico de su
estufa,ya seasinai_ndosedot interruptor de circuito o de lacaja
de fusibles
__}]_ Escalar, apoyarse o sentarse sabre las
puertas o gavetas de esta estufa puede provocar tesiones
de consideraci6n ytambi_n puede daffarse la estufa. No
que los ni_os se trepen sabre la estufa o jueguen a su
alrededor £! peso de un nirio sabre una puerta abierta podrla
provocar el que la estufa se votteara, lo que a su vez daria par
quemaduras graves u otros da_os corporaies
NSTRUCCIONES IMPORTANTES SOBRE LA SEGURIDAD
_No almacene articulos de interns pare los
niSos dentro de t0s armarios situados per encima de la
estufa o en su parte posterior. Los ni5os que se subieran sobre
ia estufa pare atcanzar objetos podrlan resultar gravement_e
lesianados,
No se use el homo pare almacenamiento
de objetos.
• Almacenamiento dentro o sobre el aparato--No deben
almacenarse materiales inflamabtes en el homo de la
estufa, cerca de los quemadores, ni en su gaveta (st hay)
o en el Ca_6n de CatentaryRetener(si hay), Esto indwe
art!cu!osde papet, pI_stico y de tela, tales como libros de
cocina, utensilios de pl_stico y toallas, as[ como tlqdidos
inflamabtes No almacene exptosivos, tales como latas de
aerosol, cerca o encima de la estufa Los materiales inflamables
pueden explorer y causar incendios o da_os a [a propiedad No
...... :_!i_U.ti!iCe:el:horno:nidCaj6n de Calentar y Retener (si hay) para
• No deje a los ni6os solos. Nunca hay que de_ar a los niSos
solos o desatendidos en el sitio en el que se est_ usando
un aparato, Nunca les permita sentarse o parers e en ninguna
porte de un aparato.
• No toque los quemadores de superficie, las areas
cercanas a esos quemadores, el quemador del horno, Ias
superficies interiores de] homo, o el Caj6n de Calentar y
Retener, Las _reas cercar_as a los quemadores de superficie
pueden catentarse Io suficiente como pare causar quemaduras
Durante y despu_s de su uso, no toque, ni permita que ningOn
tipo de tela o material inflamable toquen estas &reas hasta que
hayan tenido el tiempo necesario de enfriarse Entre elias se
cuentan la cubierta de la estufa, los superficies que se
encuentran mirando ala cubierta, los aberturas de los
respiraderos del homo y tas superficies cercanas a los
respiraderos, la puerto det homo, la ventana del homo o el
Caj6n de Calentar y Retene_
P6ngase rope adecuada_Nunca lleve puesta ropa _<uetta
o prendas que cuelguen mientras est_ usando la estufa_
No deje que su ropa ni otros materiales inflamables entren en
contacto con superficies calientes
_Nunca use su _u_ p_,_ m_n L=n=r un
cuarto caliente n_ para ca_entarlo_
,, No vierta agua ni harina sobre et fuego provocado por
grasa_ Ahogue los llamas con la tapa de una olla, o con
bicarbonato de sosa, un producto quimico seco o un
extinguidor a base de espuma.
Cuando caiiente manteca o grasa, obs_r'vela de cercao La
manteca o la grasa pueden incendiarse si se catientan
demasiado.
o Use solamente manoptas o agarraderas secas_Cuando
se los pone sobre superficies calientes, los manoplas, o las
agarraderas hL)medas d mo_adas, pueden causer
quemadura_,¢est_tantes del vagor_ No deje que dichos
protectores toquen losquemadores calientes ni ]as resistencias
interiores de/horno At asir utensilios calientes, no use toaltas ni
articulos de tela gruesos en lugar de una manopla o una
agarradera
• No caliente envases de comida sin antes abrirlos--La
presi6n resultante podr_a causer el estalitdo del envase y
provocar lesiones.
. Desmonte la puerto del homo de cualquier estufa que no
se use porque se va a almacenar o desechan
_Las temperatures altas puede'n daSar el
control etectr6nicm Cuando se use el aparato por primera
vez, o cuarido et aparato no ha sido usado p,or un periodo
de tiempo largo, aseg0rese de que'la unidad ha estado en
temperatures por encima de 32_F por 1o menos 3 horas
antes de conectar la electricidad al aparato°
o tmportante--No trate de hacer funcionar ta estufa durante
un pedodo de corte de energia el_ctrica, Si falla ia energfa,
apaq'ue los controles de la estufa (OFF).Una vez que la energla
elc_ctricase reinida, hay que hacer los ajustes del reloj y del homo
de nuevo,
Instrucciones importantes pare el uso de"l_ "'':;_:¢_'_-'_
cubie_a de su estufa
• Famil_arfcese con los peritlas que controlan carla quemador
de superficieo
• Use e! tama6o adecuado de IIama_Ajuste el tama_o dela
llama pare que no se extienda pot fuei-a del borde de los
utensitios. Los utensilios con 1_amar_omenor que el requerido
har_in que quede expuesta una pane de! quemactor Io que
puede provocar que se queme la rope. Una relaci6n adecuada
entre los quemadores y los utensitios de codna mejorar_i la
eficiencia.
. Los mangos de los utensilios deben quedar hacia adentro
y no tienen que estar extendidos encima de los
quemadores adyacentes--Para reducir el riesgo de
quemaduras, ignid6n de materiales inflamables y derrames
debido al contacto no intentional con el utensilio, hay que
cofocar su mango de tel manera que quede votteado hacia
adentro y no sobre los quemadores adyacentes
• Nunca deje desatendidos los quemadores cuando est_n
funcionando a alto temperatura--Lo que al hervir cause
humo o desbordamientos de grasa puede PrOvocar [a ignition
Asimismo, una cacerola que se ha dejado hervir iqasta secarse
puede derretirse
o Revestimientos de protecci6n--No use hojas de aluminio
para proteger las bandejas de los quemadores de superficie, el
fondo del homo o en cualquier otra paste de! aparato
Solamente use laminilla de aluminio como se recomienda para
cooer, para cubrir el atimento sienclo cocido, El uso de cualqubr
otto revestimiento protector u hojas de aluminio, puede
per)udicar ta distribud6n de aire y de ca!or, ad como ia
combusti6n Pueden ocurrir dafios personales o darhos a la
estufa
o Utensitios de cocina vidriados--Solamente ciertos tipos de
vidrio, vitrocer_mica, cer_fmica, barro y otros utensilios vidriados
se pueden utilizer sobre la cubierta de la e_tufa sin romperse a
cause de cambios de temperatura sObitos, vea tas
recomendaciones del fabricante acerca de su uso sobre la
cubierta de la estufa,
NO use cubiertas decorativas para los quemadores de
super'ficie. Size enciende un quemador accidentalmente, la
cubierta decorative se calentar_i y puede derretirse. Usted no
podrb ver que el quemador esta:encendido Se quemar_ si toca
los cubiertas calientes
NSTRUCC ONES MPORTANTES SOBRE LA SEGUR DAD
hstrucciones imP0rtantes para user su horno/ instrucciones imPortantes para la Hmpieza
Caj6n de Calentar y Retener (si hay) de su estufa
, Tenga cuidado cuando abra la puerta del homo o el Caj6n • Limpie la estufa regularmente para mantener todas
de Calentar y Retener--Mant_ngase a 0n lade de la estufa sus partes libres de grasa y evitar qua se enciendan,
cuando abra la puerta de un homo caliente/Caj6n de Calentar Presteatenci6n especialal =_readebajo de cada q uemador
y'Retener. Deje que el ake caliente o elvapor escapenantes de r: de superficie. Hay que mantener limpias las campanas de
_:etirarcomida del horno/Caj6n de Caientar y Retenero al aireaci6n del ventilador y losfittros de grasa. No permita que
volver a mete'Fla.
• Mantenga4os ductos de aireaci6n del homo sin
obstrucdones. El borne se ventiia debajo del tabtero posterio_
Toter lassuperficies de ese_rea cuando el homo est=_
funcionando puede provocar quemaduras graves. Tampoco
cotoque art[culos de pI,_stico,6 sensibles at cafor,sobre el _
zespiraderodel homo o cerca de _1,ya que pueden derretirse o
encenderse_
- Colocaci6nde las parrittas del horno o el Caj6n de
Calentar y Retener. Co!oque siempre las parrillas deI homo
en e! sitio deseado, cuando est_ frfo Si hay que mover ias
parrillascuando eI borne est,1catiente, h_galo con extreme
precaud6n. Use manoplas o agarraderas, y tome ta parri!ta con
ambasmanes para co!ocarIa donde desee. No deje que Ins
agarraderashagen contacto con la Ifamadel quemador del
homo catiente o el interior de! homo o el Caj6n de Calentar de
Retener:Saquetodos los utensilios de Ia par_illaantes de
retirada.
o No use el asador sin su complemento. Elasador y su therein
ranurada permiten que escurra la grasa, y lamantienen alejada
del intense cater del asado_:
. No cubra la charola ranurada del asador o el Caj6n de
Calentar de Retener con hojas de aluminio. Lamanteca y !a
grasa pueden encenderse.
° No toque la bombilla de tuz (algunos modelos) con un
patio h0medo cuando est_ caliente. Hacerlo podria causar
el estatlido de la bombilla Antes de quitar o reempfazar la
bombiila, desconecte la estufa o ap_guela Pareque no le
Ilegue corriente
GUARDE ESTAS
nstmcciones pare
conexi6n a tierra (mddelos
con encendido el_ctrico Solamente)
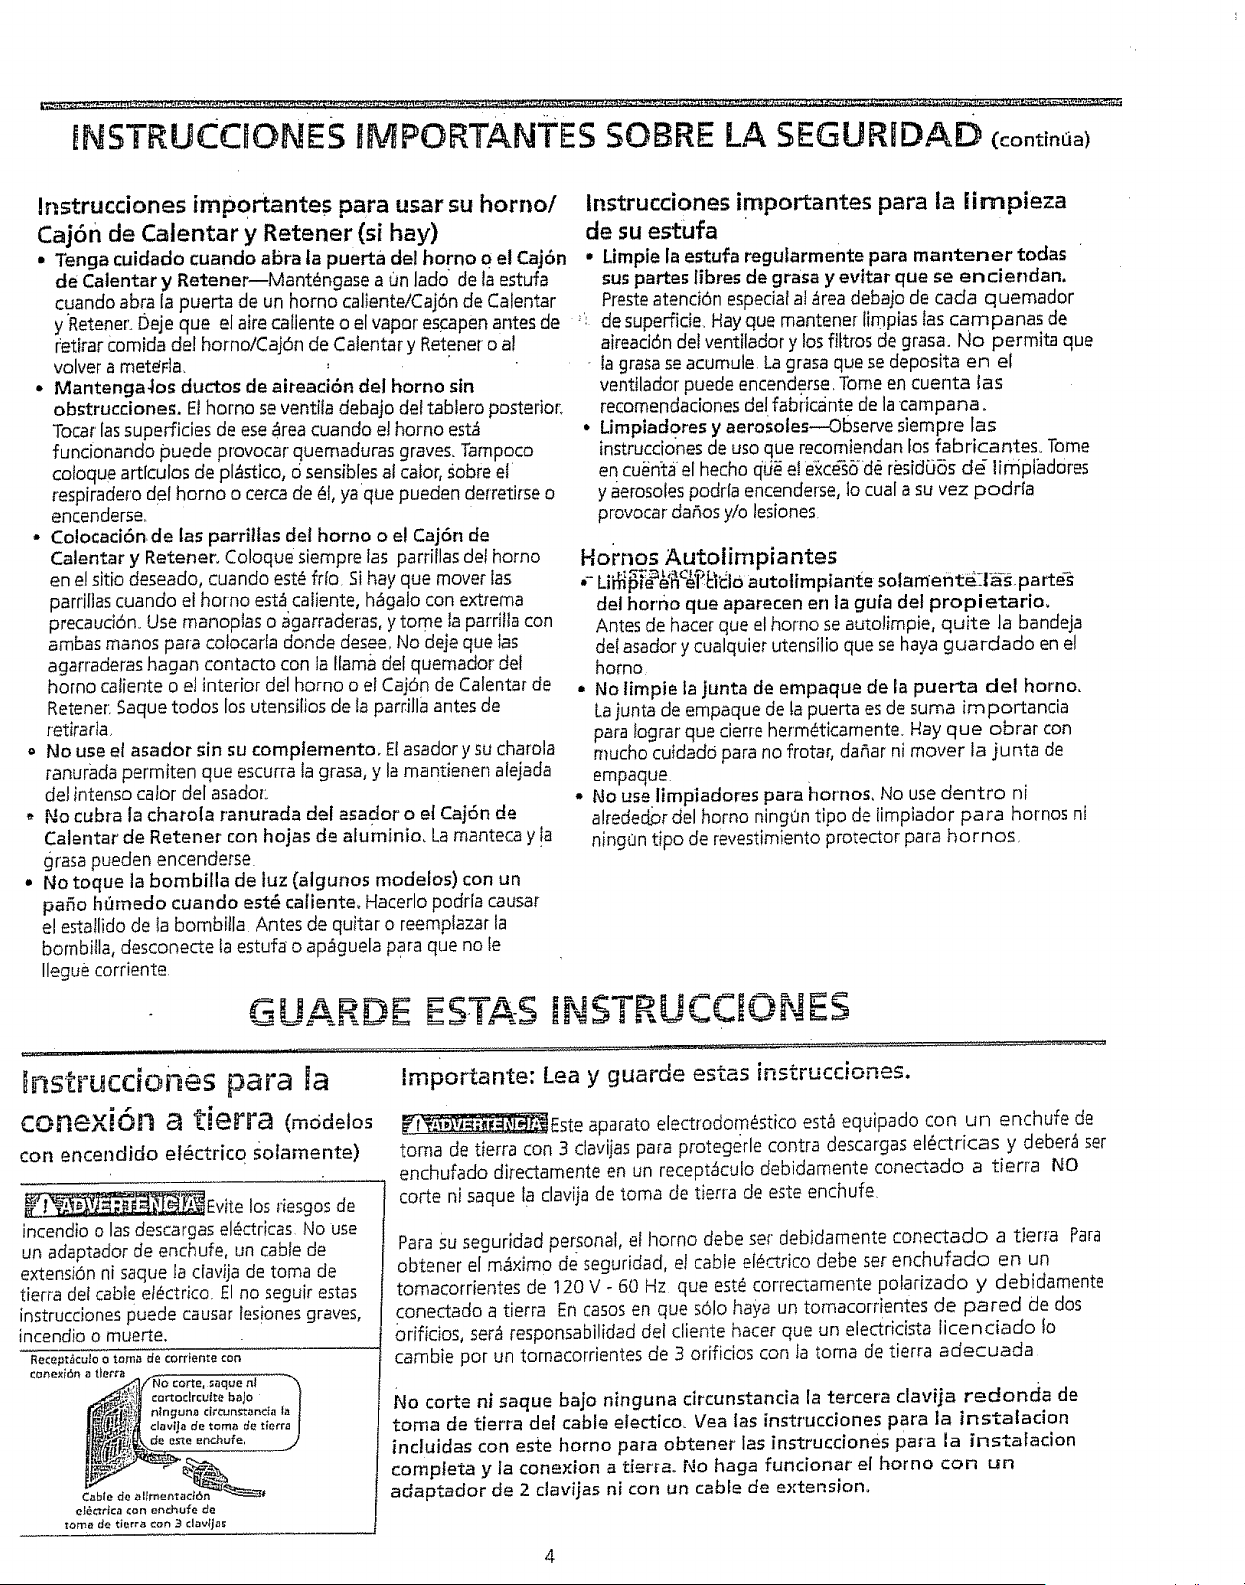
__Evite los riesgosde
incendio o Insdescargas el_ctricas No use
un adaptador de enchufe, un cable de
extensi6n ni saque la clavija de toma de
tierra det cable et_ctrico. Elno seguir estas
instruccionespuede causar lesionesgraves,
incendio o muerte.
Recept_cu_e o reran de corrien_e con
conexi6n a tierra
.,_!/NO torte, saque nl _'_
l'_d_:il ninguna drcun_anda la 1
Cable de allmentad6n _t
el_ctt_¢a t:on eot.hu(e de
Itoma de tlerra con _ ¢lav_ja_
' la grasaseacumule Lagrasa que se deposita en el
ventilador puede encenderse.Tomeen cuenta Ins
recomendacionesdel fabiicante de lacampana.
° Limpiadpres y aerosoles_Observe siempre Ins
instrucciones de use que recomiendan fos fabricantes. Tome
en cu_n:ta el hecho qd_ el e_c_5d_ residOSs dd lirnpiadores
y aerosoles podrla encenderse, 1ocual a su vez podr[a
provocar da,5os y/o lesiones.
Hornos Autolirnpiantes
•- Lii_[_'_c$'[_l_lo autotimpiante solament_:l&_.parte-s
del horno que aparecen en la gufa del propietario.
Antes de hacer que el homo se autolimpie, quite la bandeja
del asador y cualquier utensilio que se haya guardado en el
homo,
• No limpie la junta de empaque de la puerta del homo.
Lajunta de empaque de la puerta esde suma importancia
pare !ograr que cierre herm@camente_ Hay que obrar con
touche cuidadd para no frotar, dafiar ni mover la junta de
empaque.
° No use limpiadores para hornos, No use dentro ni
alredec_r del homo ning0n tipo de timpiador pare hornos ni
ning0n tipo de revestimiento protector para berries
[NSTRUCC ONES
Importante: Lea y guarde estas instrucciones.
_Este aparato electrodom¢stico est,1equipado con un enchufe de
toma de tierra con 3 clavijas para protegerle centre descargas el_ctricas y deber_ ser
enchufado directamente en un recept_tculodebidamente conectado a tierra NO
corte ni saquela clavija de tome de tierra de este enchufe.
Parasu seguridad personal, el horno debe set debidamente conectado a tierra Pare
obtener el m_iximo de seguridad, el cable el_ctrico debe set enchufado en un
tomacorrientes de 120 V - 60 Hz que est_ correctamente polarizado y debidamente
conectado a tierra En casesen que s61ohaya un tomacorrientes de pared de dos
0rificios, ser_ responsabilidad del cliente hater que un electdcista iicenciado fo
cambie per un tomacorrientes de 3 orificios con la toma de tierra adecuada
No torte ni saque bajo ninguna circunstancia la tercera clavfja redonda de
toma de tierra del cable electico, Vea las instrucciones Para la instalacion
inc|uidas con este homo para obtener las instrucclones para la instatacion
completa y la coney.ion a tierrao No haga funcionar e[ borne con un
adaptador de 2 clavijas ni con un cable de extension.
4
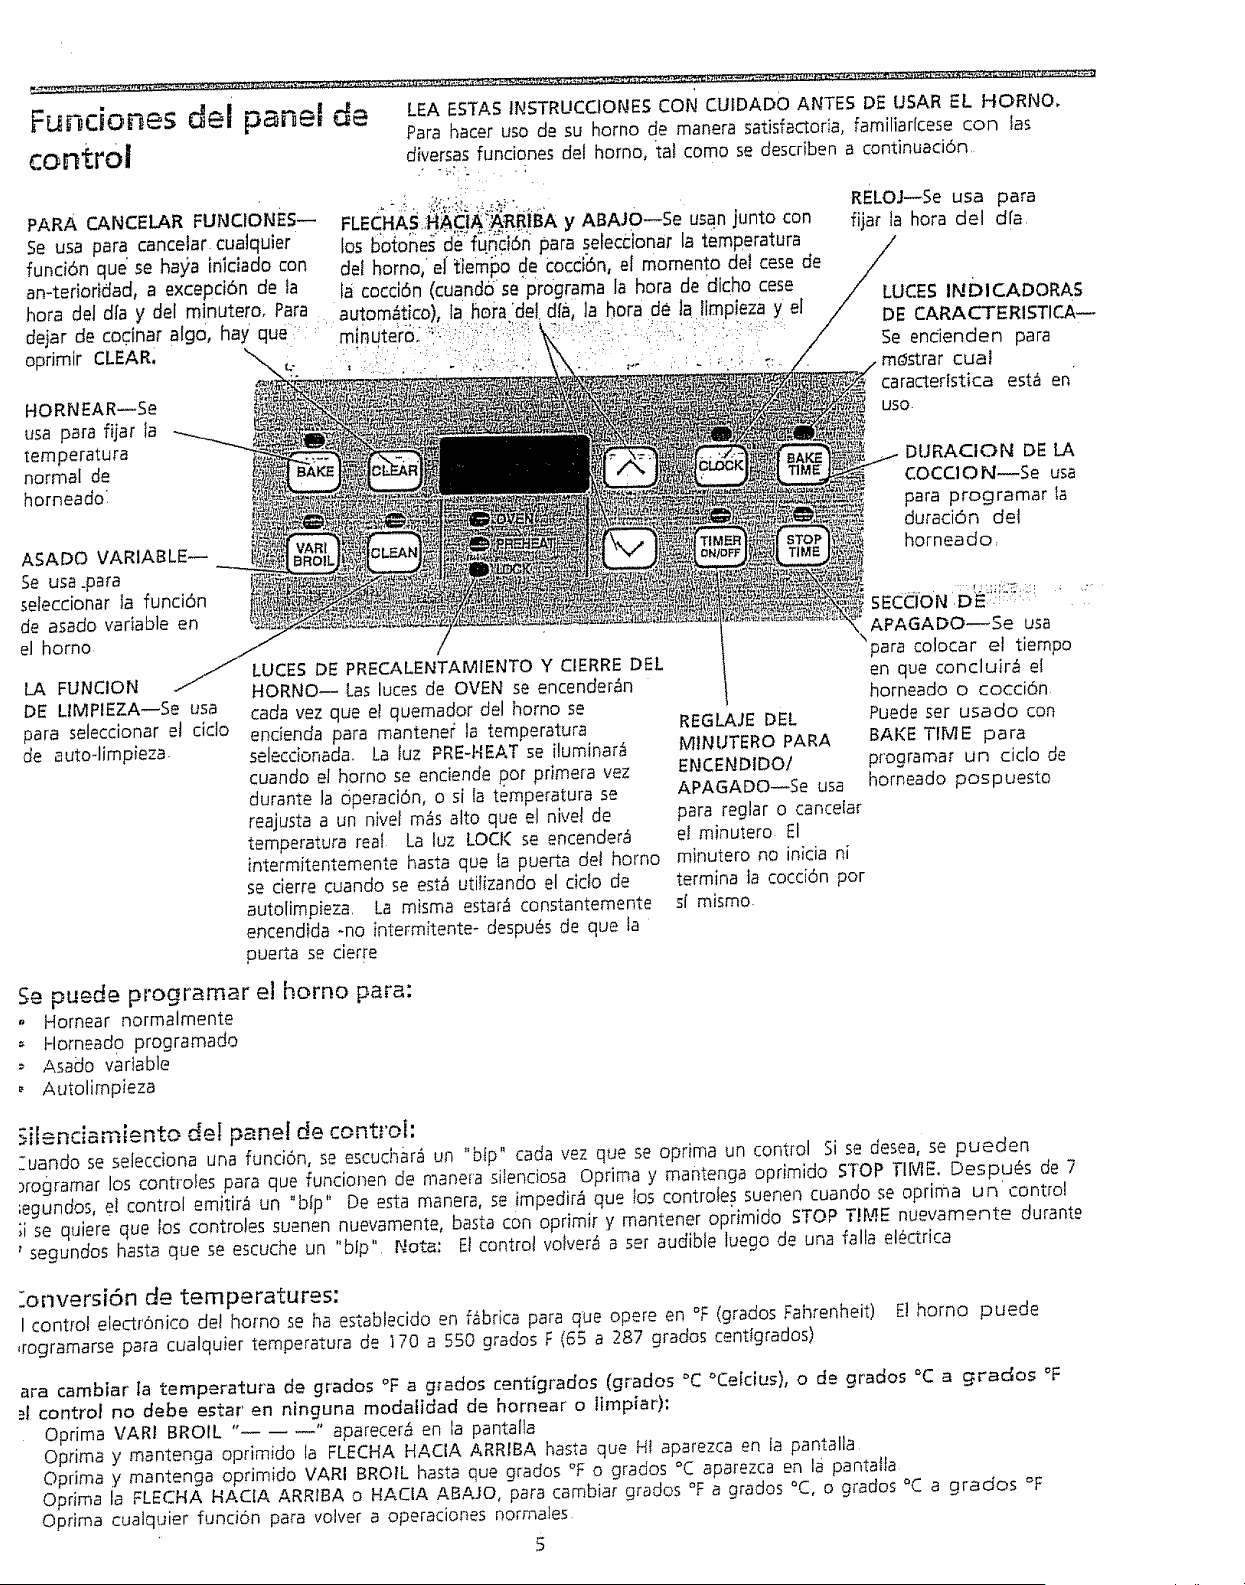
F_J_CiO_e_ _el p_el (:_ LEA ESTAS INSTRUCCIONES CON CUIDADO ANTES DE USAR EL HORNO,
Para hater usa de su homo de manera satisfactoria, familiarfcese con las
control d_,,_r_osfuncianes delhomo, tal coma se describen a continuaci6n.
PARA CANCELAR FUNCIONES--
5e usa para cancetar cualquier
funci6n que se haya in;dado con
an-terioridad, a excepd6n de ta
hera det dfa y del minutero° Para
de]or de coqinar alg0, hay que]" ::'
oprimir CLEAR.
HORNEAR_Se
usa para fijar Ia
temperatura
normal de
horneadd
ASADO VARIABLE--
Se usa .para
seteccbnar ta funci6n
de asada variable en
el homo
LA FUNCION
DE LIMPIEZA--Se usa
para seleccionar el cicio
de autoqimpieza.
FLECHAS::_:__iA!_R_:il_* y ABAJO--Se usan junto con
los 5obne_ _d__f[J_ciSn para selecdonar Ia temperatura
dot homo, el"tiem#o de cocci6n, ef momenta del cese de
la cocci6n (cuandd se programa ia hera de cliche cese
autom_tico), la hera "del hera de ]a !impieza y el
mlnutero_ ..... .:. :::: ....
RELOJ_Se usa para
fijar la hera del dfa
LUCES INDICADORAS
DE CARACTERI_TICA--
5e endenden para
mOstrar cual
caracteristica est_ en
USO.
DURACION DE LA
COCCtON_Se usa
para programar fa
duraci6n det
horneado,
HORNO-- Las luces de OVEN se encender_n
cada vez queet quemador del homo se
endenda para mantene_ la temperatura
seleccionad& La Iuz PRE44EATse i!uminar_
cuando el homo se enciende .par primera vez
durante la 6peraci6n, o sila temperatura se
reajusta a un nivd m_fsalto que el nivet de
temperatura real La luz LOCI( se encenderb
intermitentemente hasta que la puerto dot homo
se cierre cuando se est,1 utilizando el cido de
autolimpieza, La misma estar_ constantemente
encendida -no intermitente- despu_s de que ta
puerta se cierre
REGLAJE DEL
M1NUTERO PARA
ENCENDIDOI
APAGADO_Se usa
para reglar o cancetar
et minutero El
minutero no inicia ni
termina ta cocci6n per
sl mismo.
APAGADO--Se usa
\
para co!ocar el tiempo
en que concluiM el
horneado o cocci6n
Puede ser usado con
BAKE TIME para
programar un title de
horneado pospuesto
£e puede programar el homo para:
. Hornear normalmente
Horneado programado
Asado variable
, Au_alJmpbza
_ilenciamiento del panel de control:
:uando se selecciona una funci6n, se escuch&r=iun "bfp" cada vez que se oprima un control Si se desea, se pueden
)rogramar los controles para que funcionen de manera silenciosa Optima y mantenga oprimido STOP TIME. DesPu_s de 7
;egundos, el control emitinl un "bb" De esta manera, se impedir_i que los controies suenen cuando se optima un control
;i se quiere que los controles suenen nuevamente, basta con oprimir y mantener oprimido STOP TIME nuevamente durante
' segundos hasta que se escuche un "b/p" Nora: El control volver_ a set audible luego de una falla el_ctrica
ionversi6n de temperatures:
I control electr6nico del homo se ha estabtecido en f&brica para que opere en °F (grades Fal_renheit) E! homo puede
,rogramarse para cualquier temperatura de I70 a 550 grades F (65 a 287 grades centigrades)
ara cambiar ta temperatura de grades °F a g_ades centigrades (grades °C °Cetcius), o de grades °C a grades °F
.q control no debe estar en ninguna modalidad de hornear o timpiar):
Oprima VARI BROIL .... aparecer_ en la pantafla
Optima y mantenga oprimido la FLECHA HACIA ARRIBA hasta que Ht aparezca en la pantalla
Oprima y mantenga oprimido VARI BROIL hasta que grades _F o grades °C aparezca en la pantaita
Oprima la FLECHA HACIA ARRIBA o HACIA ABAJO, para cambiar grades °F a grades °C, o grades °C a grades °F
Oprima cuatquier funci6n para volver a operaciones normales
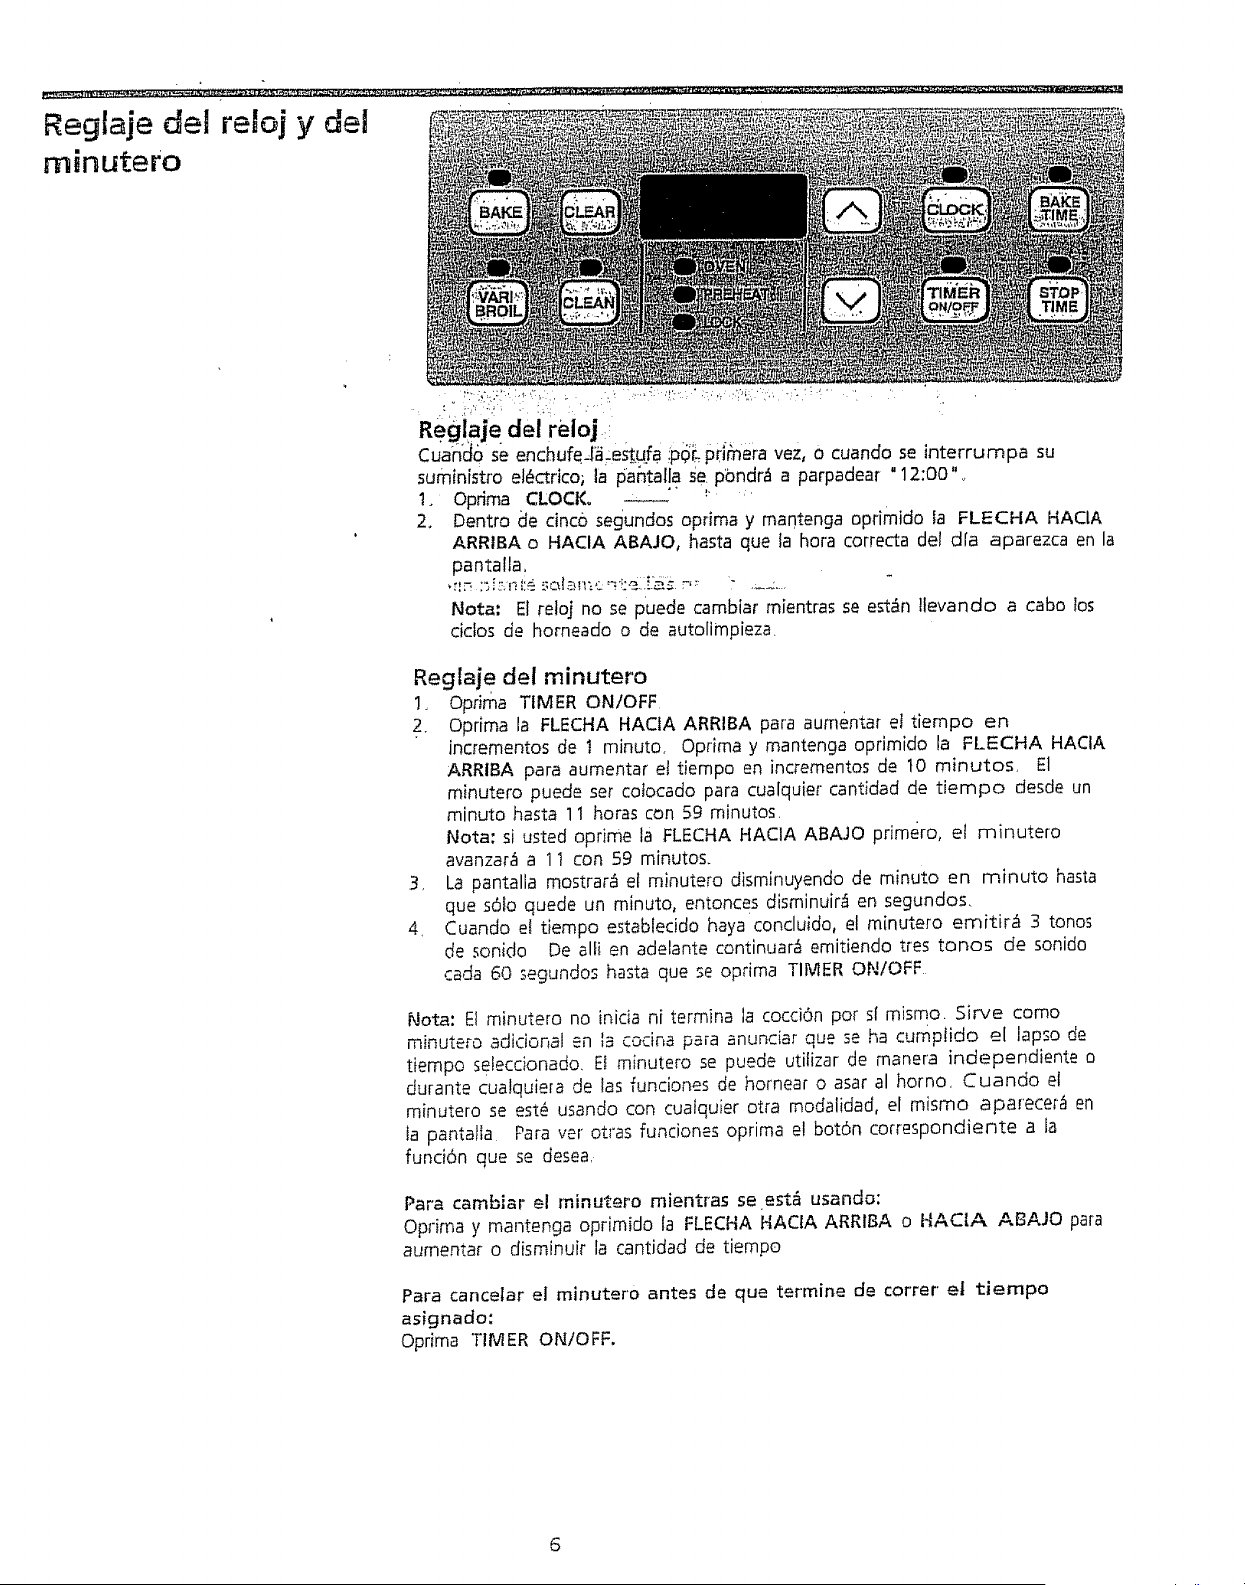
Reglajedelre ojy del
minutero
_'_'_,':<':,_': • :-,'_'-- ''+?i_,'TL ¸, -:i_:_I" ' ?
R gl jed ireioj,
cuan_6 se enchufeJ_estufa :p_i_:pdmera vez, o cuando se interrumpa su
suministro el_ctrico; la pantalia -_ep'ondr_ a parpadear 12:00"o
t. Optima CLOCK. " "" _ "
2. Dentro de cinc6 segundos optima y mantenga oprimido Ia FLECHA HACIA
ARRIBA o HACIA ABAJO, hasta que la hora correcta del d[a aparezca en la
pantalla,
Nora: EI re_oj no se puede camblar mientras se est_n Ilevando a cabo tos
ciclos de horneado o de autolimpieza.
Reglaje del minutero
1. Oprima TIMER ONIOFF.
2. Oprima la FLECHA HACfA ARRIBA para aurnentar et tiempo en
incrementos de t minuto, Optima y mantenga oprimido la FLECHA HACIA
ARRIBA para aumentar el tiempo en incrementos de t0 minutos, E1
minutero puede set co_ocado para cualquier cantidad de tiempo desde un
minuto hasta 11 horas con 59 minutos,
Nota: si usted oprime la FLECHA HACIA ABAJO primero, el minutero
avanzar_ a 11 con 59 minutos.
3, La pantalla mostrar_ el minutero disminuyendo de minuto en minuto hasta
que s6Io quede un minuto, entonces disminuir,1 en segundos.
4 Cuando el tiempo establecido haya concluido, el minutero emitir_t 3 tonos
de sonido De alfi en adelante continuar_ emitiendo tres tonos de sonido
cada 60 segundo_ hasta que se optima TIMER ON/OFF
Nora: El minutero no }nicia ni terrnina la cocciSn pot sl mismo, Sirve como
minutero adicional en la cocina para anunc[ar que se ha cumplido el iapso de
tiempo seleccionado, Et minutero se puede utilizar de manera independiente o
durante cualquiera de las funciones de hornear o asar al homo, Cuando el
minutero se est@ usando con cuaiquier otra modalidad, el mismo aparecer_ en
Ia pantalia Para vet otras funciones optima e! bot6n correspondiente a la
funci6n que se desea
Para cambiar el minutero mientras se est& usando:
Optima y mantenga oprimido la FLECHA HACtA ARRIgA o HAC_A ABAJO para
aumentar o disminuJr la cantidad de tiempo
Para cancelar el minutero antes de que termine de correr et tiempo
asignado:
Oprima TIMER ON/OFF.

. ._ ...... ,_,_.,,= ; ;:;;_ .=_;:° _ ...... ._':,_,_T_,_z_,._,_,_ _-_, ._,_ _l_'_/_¸4'`"_4H`¸_,_¸_.`_;'_:_;_"_'_44_;._-_`_¸_#¸_v_¸_:=¸_;_4¸_:_`_._*_ _' ""_'_'_"_:': ';;;:_ _.:._,.h;,_ .... • ,•_.. - ._
Tc_r_a_o _e i_._ Iic3_c_s Para cacinarla mayoria dela_afimento_', comlence codnando en et punto m_s
alto y luego ponga el contro! en un punto m_s bajo para comptetar el proceso, 5irvase
de la tabta siguiente coma gula paradeterminar e! tama_o adecuado de la llama para
diferentes tipos de cocciOnEttomato y el tipo de utensi[io que se use y la cant!dad de
cam!do que sevayaa codnar determinar_tneltipo de llama qua se necesite,
Nunca permita que la llama se extienda
m=fsall_ de laorilla externa de los
utensitios, Una llama demos!ado grande
simplemente es un desperdicio de color y
de energfa y adam,s con eso aumenta el
riesgo de qua usted pueda quemarse con
]allama,
Para freirpor inmersi6n en ace!to, slrvasede un term6metro y ajuste ]a perilla de
control consecuentemente. Siel aceite est=1demasiado fr!o entonces la comida Io
absorber=fy quedar_tgrasosa,Siel aceite est,f demos!adocaliente la comida se dorar_
tan r_pidamente qua queSar=frealcocida en el centro, l',Jointente frdr par inmersi6n
en aceite demasiadacomida a! raisin0 tiempo ya que ni sedorar_ ni se cocinar=1
CORRECTO
INCORRECTO
Ajuste adecuado de los
quemadores
adecuadamente_ -, _,
*Tama_o de 1,1llama
Llama atta (6-Ht)
Tipo de cocci6n
Empezara cocinar la mayorfa de Iosal[mentos; poner
agua a herr!r; fretr en una sartcM
Llama media (3-5) Mantener alga a hervor lento; espesar salsas, salsas
de came; cocinar at vapor
Llamabaja (LO-2) Mantener losalimentos cocin_ndose; escalfar; hacer
pucheros- "
* Estos ajustes se basan en la utilizaci6n de cacerofas de aluminio de peso
media y con la tapa puesta, Cuando se Usen otros tipos de cacerot;_s,
deborah aiustarse los llamas consecuentemente,.
El co!or de la llama es ta clave del ajuste adecuado de! quemador. Una buena llama es
transparente, azul y casi invisible en un cuarto bien iluminado, Cada cono de la llama
deber_t set firme y astor bien defJnido. Ha}) qua ajustar o limpiar el quemador si ta llama
es de color amarillo naranja Para timpiar un quemador, yea los instruct!ones qua se
dan en Limpieza general.
Ajuste de los contro!es
de superficie
.... i ,i
Cada quemador se enciendeautom_ticamen_e apartir de un encendedor ei6ctrico
cada vez qua sete da la vueltaa la perilta de control a la posici6n LITE (encendido)
C6mo hacer funcionar et quemador de superficie:
t.. Coloque el utensilio de cocinasabre el quemador
2 Empuje la perilla de control y d#.levuetta hasta itegar a LfTE f'_ota: Todos los
encendedoresetecJ:r6nicoshar_n "clic" al mismo tiempo Sin embargo,
solamente el quemador qua est,1girando ser_ el qua se encienda
3, Compruebe visualmente que el quemador se haencendido,
4 Despu_sde que se haya encendido el quemador, d_ie vuelta a la peritla hasta qua
Iogre et tamaSb de llama deseado.Ito es necesario ajustar los perillas de control a
ninguna marcaen particular Use losgufas y ajuste la llama segun se necesite NO
cocine con la periilade control en la posid6n LITE (E!encendedor electrOn!co
continuar_ hacienda "dic" si se dejaen la posici6n LITE)
Siocurre una DID el6ctrica (apag6n), los quemadores de supefficie pueden
encenderse manualmente Para encender un quemador de superficie acerque un
f6sforo prendido a ia cabeza del quemador y d@levuelta lentamente a la perflla de
control hasta Itegar a LITE Tonga cuidado al encende_ los quemadores de superficie
manualmente
__No coloque encima de una estufa encendida articutos de
pl_stico tales coma saleros y pimenteros, suieta-cucharas o envolturas de
pl_,stico. Estos artlculos pueden derretirse o encenderse Los agarraderas, las toa!las o
los cucharas de madera pueden encenderse si se los coloca demasiado cerca de [as
llamas.
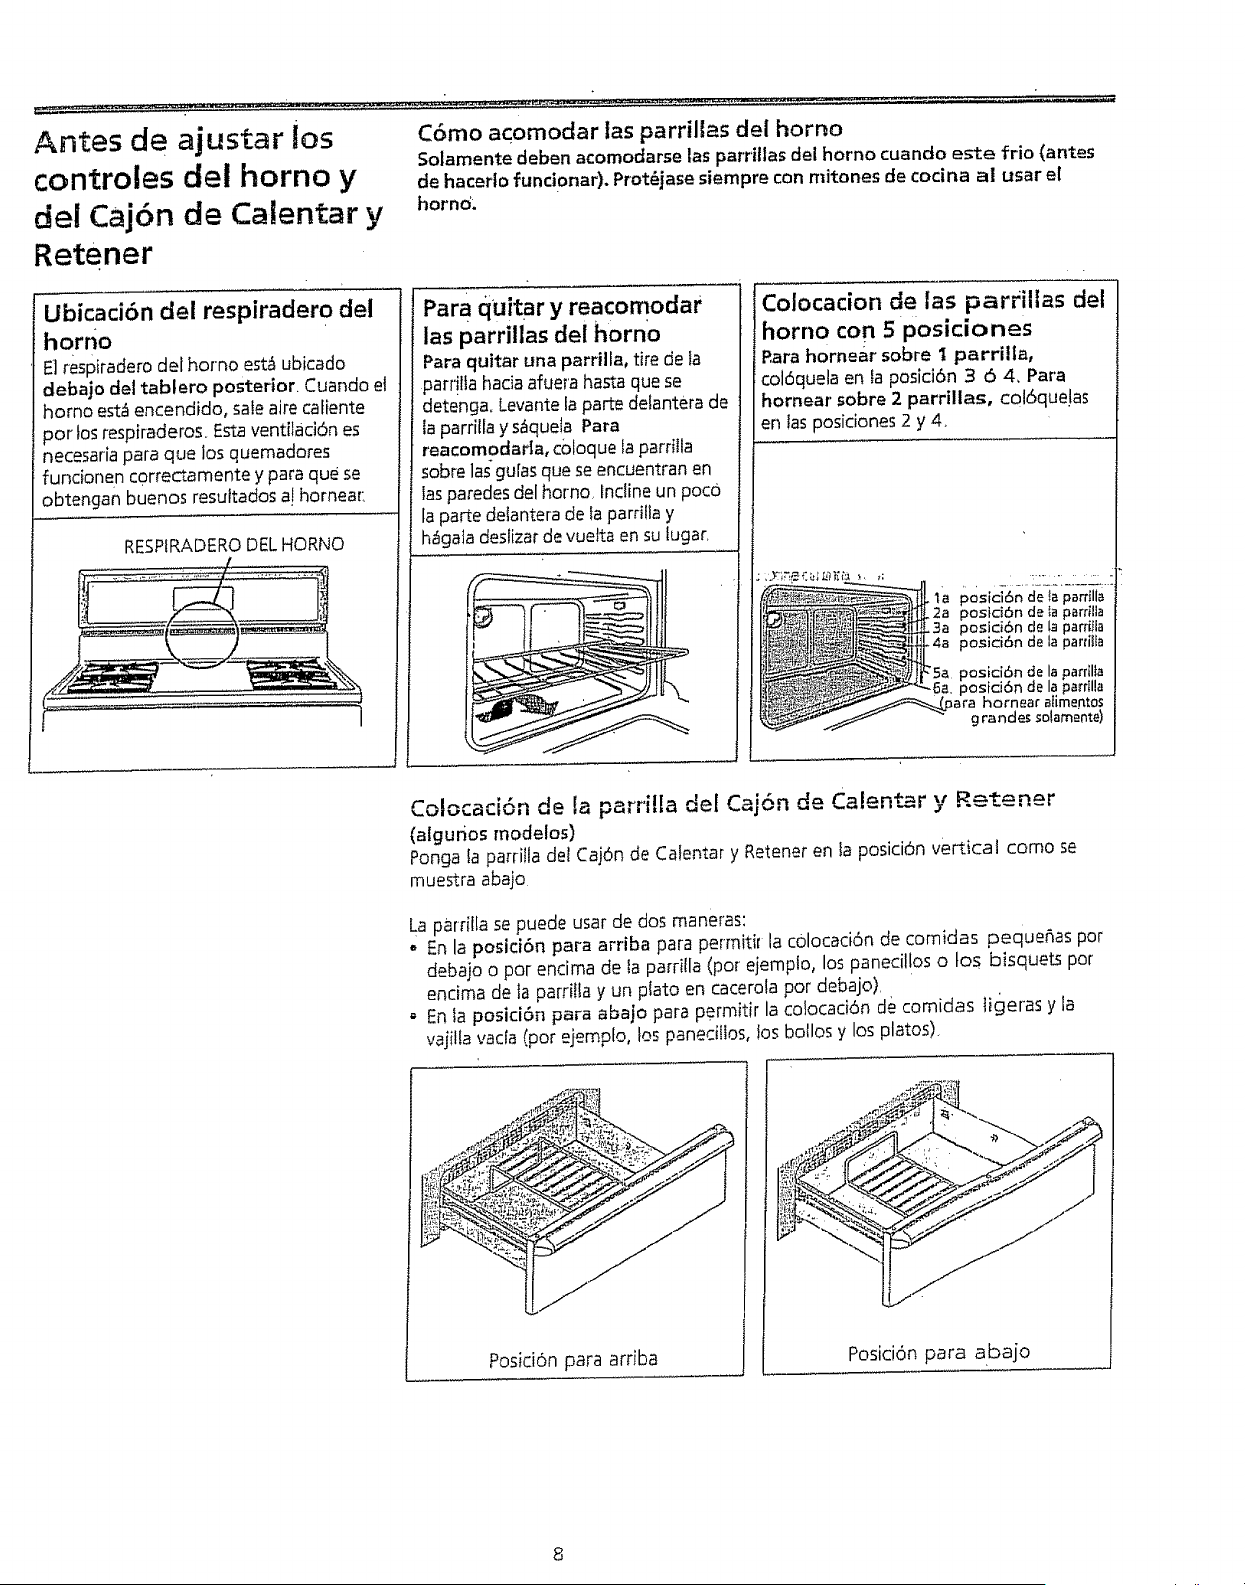
Antes de ajustar Jos
controles del homo y
del Cajbn de CaJentar y
Retener
C6mo acomodar las parrilJas del homo
Solamente deben acomodarse las parriJ|as del homo cuando este frio (antes
de hacerlo fundonar). Prot_jase siempre con mitones de cocina al usar et
homo:
Ubicad6n dei respiradero del
homo
E] respiradero del horno est.1ubicado
deba_o de] tablero posterior. Cuando et
homo est_encendido, sate airecafiente
pot los respkaderos. Estaventitacibn es
necesariapara que los quemadores
funcionen c0rrectamente y para que se
obtengan buenos resu{tados a! hornear:
RESPtRADERO DEL HORNO
Para quitar y reacomodar
las parrillas del homo
Para quitar una parrilla, tire de {a
parr!lfa hada afueta hastaque se
deteng& Levante la parte delantera de
ia parrilla y s_queta Para
reacompdarla, coloque laparrilla
sobre las gu[asque se encuentran en
lasparedes del homo, Incline un poco
ia parte de{anterade Iapard!la y
h_gaiadeslizar de vuetta en su tugar.
Coiocadon de las parrillas del
homo con 5 posiciones
P,ara hornear sobre I parri!|a,
col6quela en la posld6n 3 6 4_ Para
hornear sobre 2 parrillas, col6que!as
en tas posiciones 2 y 4.
............ :_LZ_::.__ ....
. la pos_ci6n de ta parfilla
.2a posici6n de Ia parrilla
.3a posici6n de [a parrifla
_4a posJ_i6n de la partilla
de la parrilla
3osici6n de la parrIIla
a hornear atimentos
g rande._ solamente)
Colocad6n de la parrilla del Caj6n de Calentar y Retener
(algurios modelos)
Ponga {aparritla det Caj6n de Cafentar y Retener en {a posici6n vertical como se
muestra aba]o
La parfilla se puede usar de dos maneras:
En la posid6n para arriba para permitir la cOIocaci6n de comidas pequeSas pot
debajo o pot encima de ta parrilla (pot ejernplo, los panecil!os o los bisques pot
endma de ia parr{tla y un p{ato en cacerola por debajo),
- EnIa posid6n para abajo para permitir la colocaci6n de comidas tigeras y la
vajilla vada (por ejemplo, los panecillos, !os bollos y los platos).
Posici6n para arriba
Posici6n para abajo
i
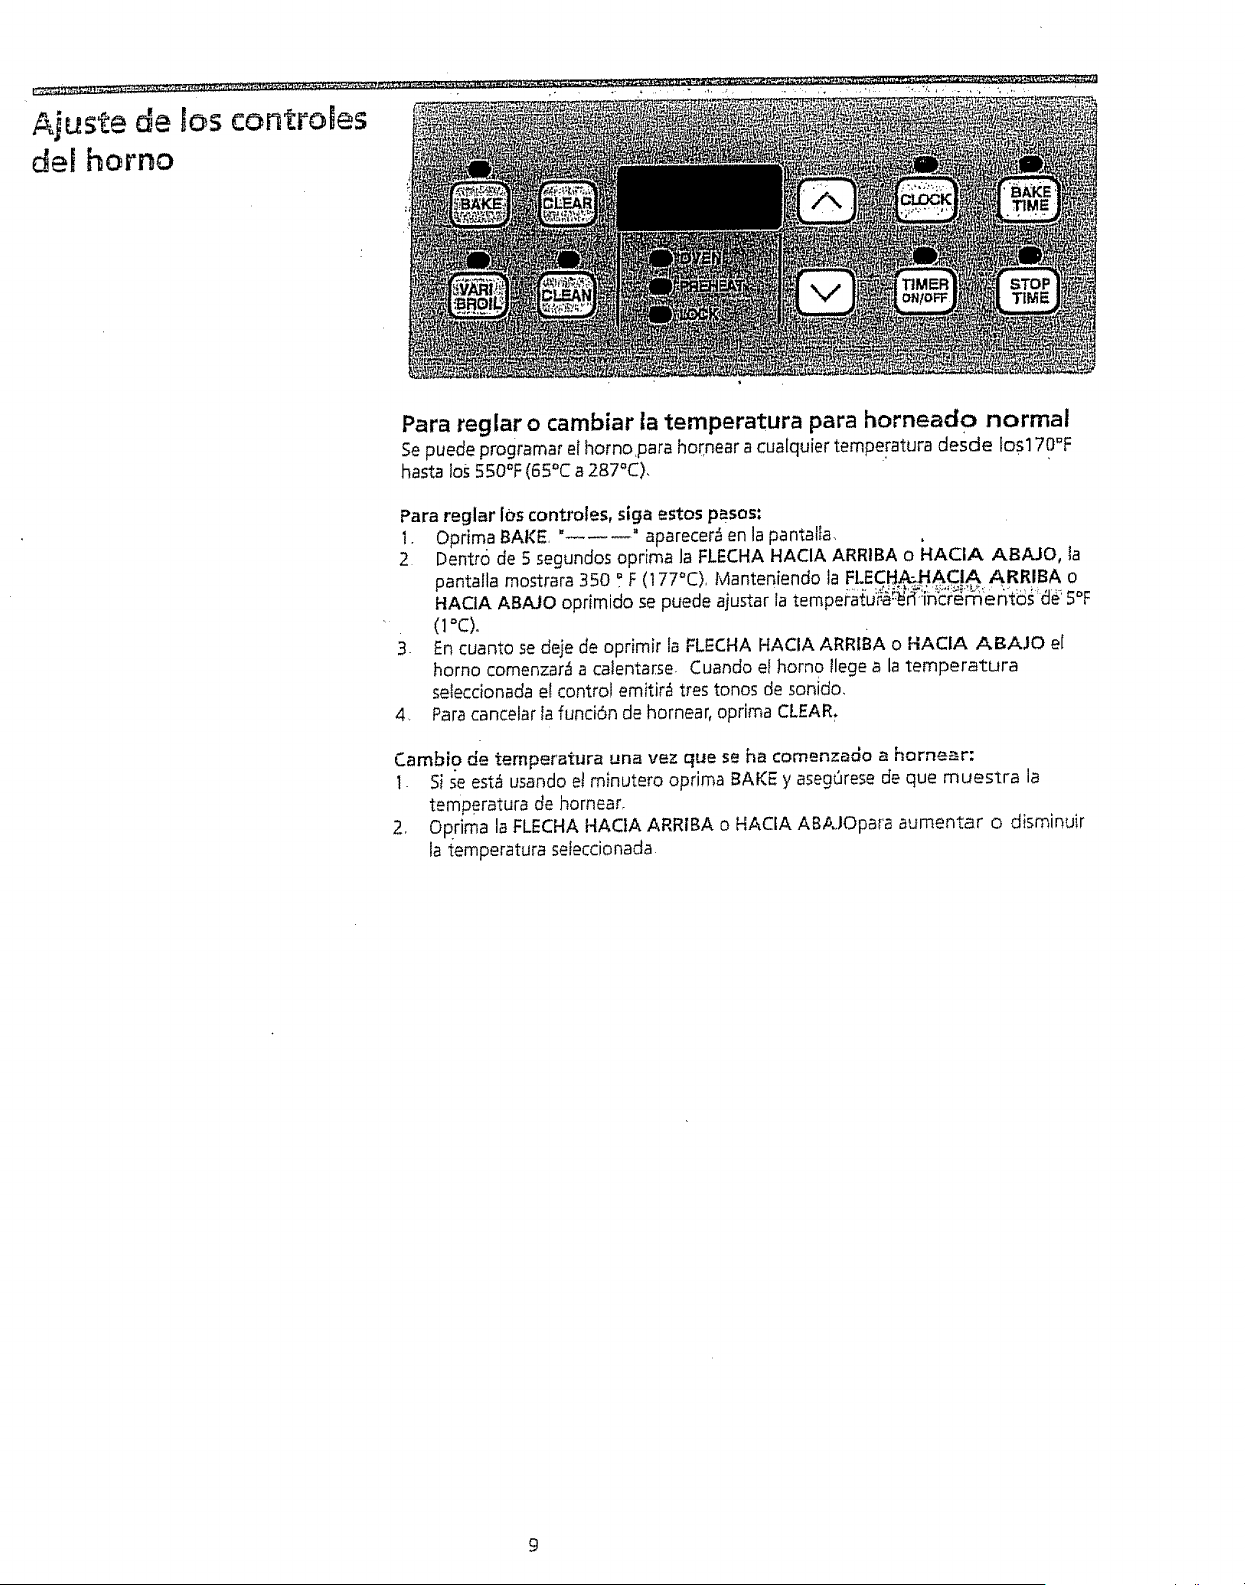
Ajuste de controBes
de[ herno
Para reglar o cambiar ta temperatura para horneado normal
5e puede programar el hornopara homear a cualquier temPeratura desde los170_F
hasta los 550°F (65°C a 287_C).
Para reglar los controtes, siga estos pasos:
1. Oprima BAKE, " " aparecer_ en la pantalIa,
2 Dentro de 5 segundos oprima la FLECHA HACIA ARR1BA o _IACIA AlaAJO, ta
pantalla mostrara 350 _ F (177°C), Manteniendo ia FLECH_HACI_ ARRIBA o
HACIA ABAJO oprimido se puede ajustar la tempel:atu:_r_!incr__'en_tos d:e_5°F
' (1 °C).
3. £n cuanto se deje de oprimir la FLECHA HACIA ARRIBA o HACIA ABAJO el
homo comenzar_ a calentarse- Cuando e[ homo tlege a la temperatura
se]eccionada el control emitir_ tres tonos de sonido,
4 Para cancelar Ia funci6n de hornear, optima CLEAR.
Cambio de temperatura una vez que se ha comenzado a hornear:
1. Sise est_ usando et minutero optima BAKE y asegOresede que muestra ia
temperatura de hornear_
2, Optima la FLECHAHACIA ARRIBA o HACIA AB_JOpara aumentar o disminuir
la temperatura sefeccionada

_Obre con
precauci6na[[_acei'usodelminutero
autom_tico.Useloparacocinarcarnes
curadasoc0ngeladasycontamayodade
lasfrutasyInsverduras Hayque enfria_
primero en el refrigerador alimentos que
se pueden echar a perder f_citmente, tales
como feche, huevos, pescado, carneo
ayes lnduso cuando se les ha enfriado de
tal manera, no hay que dejar dichos
alimentos en el homo durante m,fs de 1
horn antes de empezar a cocinarlos y
tuego hay que sacarlos del homo
prontamente cuando sehaya completado
la cocci6n
C6mo #eglar el minutero autom_tico (sincronizaci6n del tiempo de
horneado) .....
BAKE TIME y 5TOP TIME controlan lasincronizaci6n del tiempo de horneado El
minutero automStico encender_y apagar_telhorno a tashorns que usted selec_ione
de antemano. Sepuede programar el homo para que seencienda inmediatamente y
se apague autom_hticamente;o para que se endenda a una hora preseleccionada y se
apague autgm_tticamente. ......
C6mo programar el homo para que se encienda
inmediatamente y se apague autom_ticarnente:
t. AsegOresede que et reloi de/homo marque ia horn correcta del dfa..
2, Coloque los alimentos en el homo.
3, Optima BAKE.
4 Dentro de 5 segundos optima la FLECHAHACIA ARRIBA o HACtA ABAJ0, la
pantalla mostrar_ 350 ° F(177°C) 5i continua oprimiendo la FLECHA HACIA
ARR/BA o HAaA ABA_O se puede aiustar la temperatura en incrementos de 5
° F (1°C),
5. Optima BAKE TIME y la pa'ntalla mostrar_ "0:00" en forma intermitente
6 Optima la FLECHA HACIA ARRIBA o HACIA ABAJO hasta que el tiempo
deseado para hornear aparezca en la pantalta.
Una vez que se han reglado los controtes:
a Elhomo se encender_ y calentar=tta comida hasta alcanzar Ia temperatura
deseada
b La temperatura det horno aparecer=fen la pantalla.
Cuando el tiempo seleccionado de hornear se ha vencido:
a END aparecer_1 en la pantalla y el homo se apagar=f automaticamente
b E! controt emitiM tres tonos de sonido cada 60 segundos basra que se oprima
CLEAR,
C6mo programar el homo para que se encienda a una horn
t'_ • I
prese!,.coonaua y se apague automb, tJcamente
Signlos pasos 1 a 6 descritosarribaoy LUEGO:
7 Optima STOP TIME y Ia hora m_1stemprana de terminar el horneado aparecer_
en e! p_ine!_
8 Oprima la FLECHAHACIA ARRIBA o HACIA ABAJO hasta que la hora a la
cual se desea que se apage el homo aparezca en el p_tne{
9, Ona vez que se han seleccionado los controles, el control catcula la hora en que
debe de comenzar a hornear para terminar a la hora que se ha establecido
Cuando termine el periodo de hornear:
a ENDaparecer_ en ta pantalla y el homo se apagar_fautomaticamente
b. El control emitir=i 3 tonos de sonido cada 60 segundos hasta que se optima
CLEAR_
Para cambial la temperatur'a det homo o [a duraci6n de horneado una vez
que el homo se ha encendido:
1 Optima en el tablero la funci6n que desea cambiar,
2, Oprima ta FLECHA HACIA ARRIBA o HACIA ABAJO para ajustar su selecd6n
I0
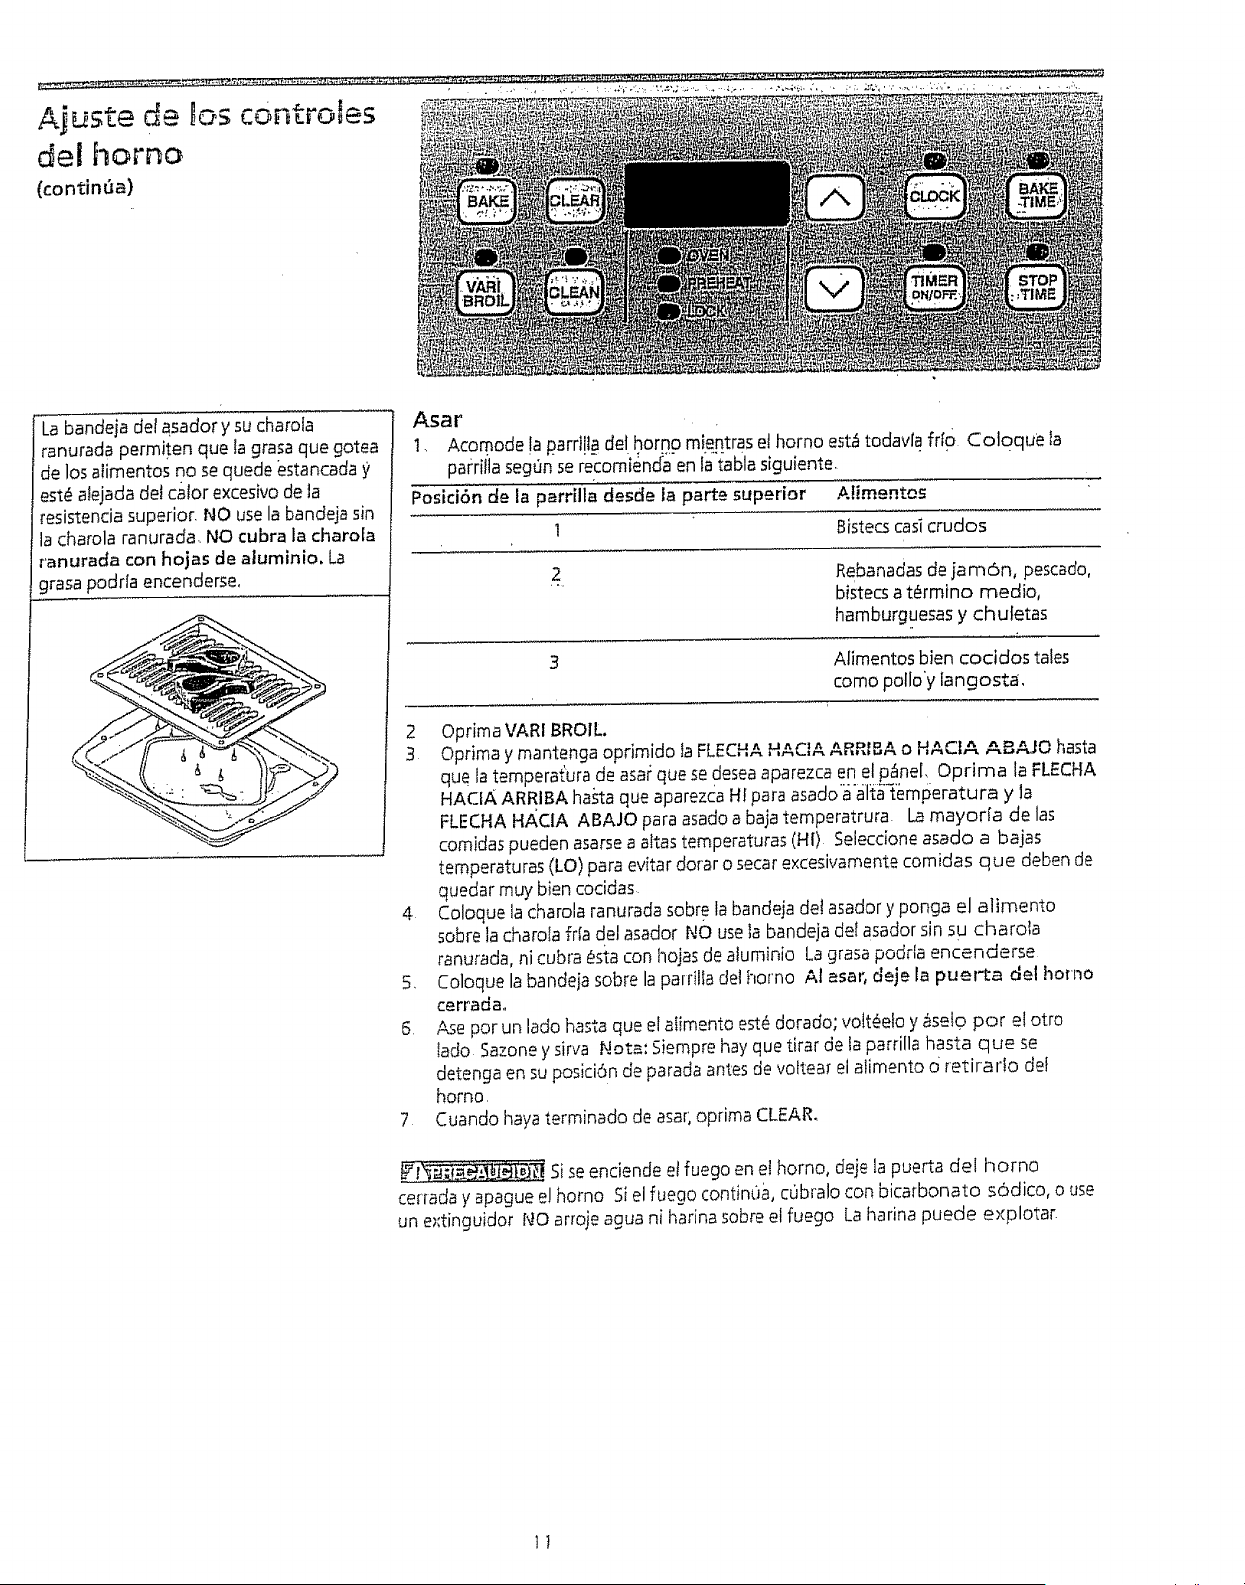
_continSa)
Labandeja det asador y su charola
ranurada permiten que Iagrasa que gotea
de los alimentos no sequede estancada £
est6 atejadadet calor excesivode ta
resistenciasuperior. NO usela bandeja sin
la charola ranurada, NO cubra la charo[a
ranurada con hojas de aluminio. La
grasa podr[a encenderse,
Asar
1, Acomode !a #arri!l# def homo mientras eJhomo est=1todavfa frto Coloque la
pa#riflasegQnse recomiendaen la"tablaslguiente.
Posici6n de la parrilla desde la parte superior Affmentos
1 Bistecscas]crudos
2. Rebanadasdejam6n, pescado,
bistecsa t_rmino rnedio,
hamburguesas y chutetas
3 Alimentos bien cocidos tales
como pollo'y langosta,
2 Optima VARI BROIL.
3 Optima y mantenga opdmido la FLECHAHACIA ARRtBA o HACIA ABAJO hasta
que la temperatura de asa_que se deseaaparezcaen el p_fne[, Optima la FLECHA
HACIA ARRIBA ha._taque aparezcaI4Ipara asadoaaffa"{emperatura y la
FLECHAHACIA ABAJO paraasado a baja temperatrura. Lamayor_a de las
comidas pueden asarsea attastemperaturas (HI) Seleccioneasado a bajas
temperaturas(LO) para evitar dofar o secarexce_ivamentecomidas que deben de
quedar muy bien cocidas
4 Coloque ta charola ranurada sobre la bandeja de! asador y ponga el alimento
sobre lacharola fffa del asador NO usela bandeja del asador sin su charola
ranurada, ni cubra _stacon i_ojasde atuminio Lagrasa podr[a encenderse
5, Coloque la bandeia sobre la pardlta del homo At asar, deje la puerta del homo
cerrada°
5 Ase por un lado hastaque el aiimento est_dorado; voltCe!oy &se!Opor e! otro
Iado 5azone y brva Nots: 5iempre hay que tirar de ta parrilla hasta que se
detenga en su posici6n de parada antesde vottear el alimento d retirarlo def
homo.
7 Cuando hayaterminado de asar;optima CLEAR,
___ Sise enciende etfuego en e_homo, deje la puerta de[ horno
cerrada y apague e!homo 5i el fuego contin0a, cubra!o con bicarbonato s6dico, o use
un extinguidor NO arroje agua ni harina sobreel fuego La harina puede explotar.
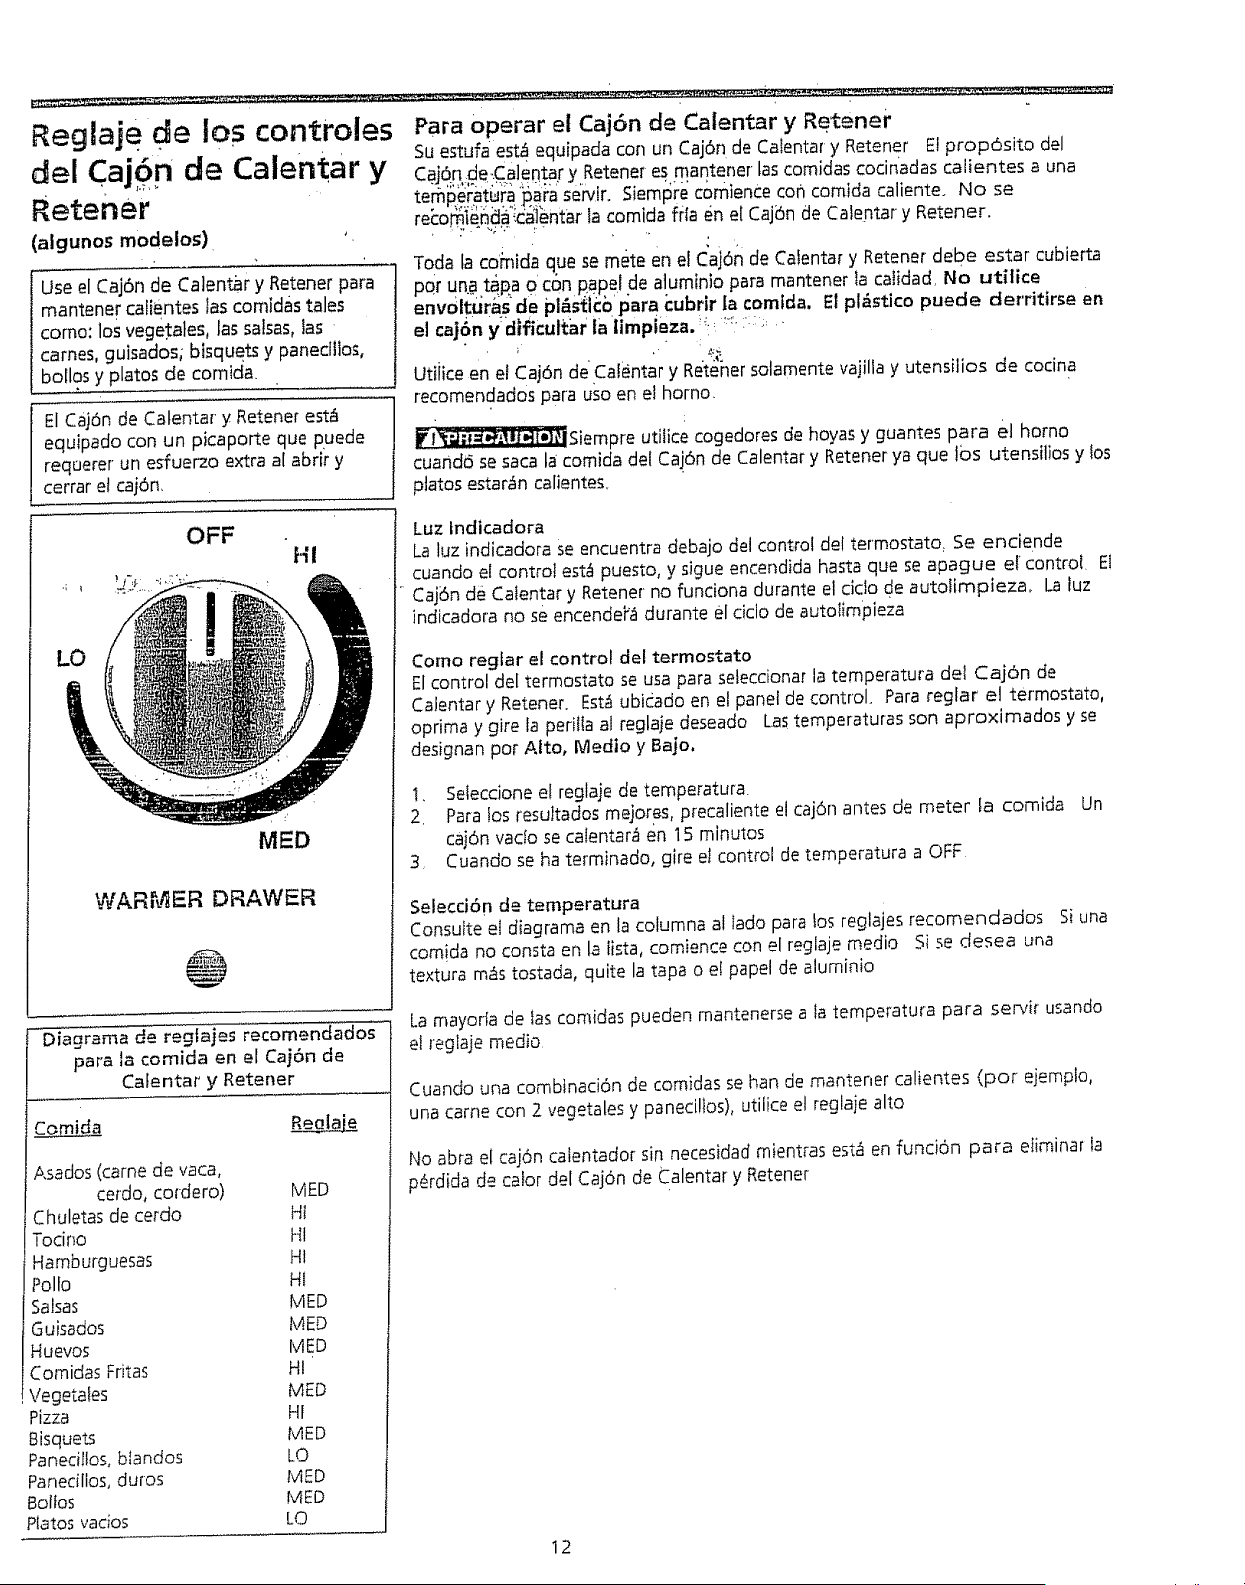
Reglaje de los controles
del Caj6n de Calentar y
Retener
(algunos modelos) '.
Use el Caj6n de Catentbr y Retener para
mantener cafientes ias comfdas tales
como: los vegetates, fas satsas,Jas
carnes, guisados; blsquets y panedllos,
botlos y platos de comida
El caj6n de Catentary Retenet est8
equipado con un picaporte que puede
requerer un esfuerzo extra al abrir y
cerrar el caj6n,
Para operar el Cajbn de Calentar y Retener
Su estufa est_ equipada con un Caj6n de Calentar y Retener Et prop6sito del
Caj6n ,cl.e,Calentar y Retener es mantener las comidas cocinadas calientes a una
temperatura para servfr. Siempre comience con comida caliente. No se
re_:o_i_il_ta'i_di_ntar la comida fda en e[ Cajbn de Calentar y Retener.
Toda ta co_nida que se mete en el C'aj6nde Calentar y Retener debe estar cubierta
por un.atap a 0 con p.apelde aluminio para mantener ta calidad, NO utilice
envOIt_Jrasde pi_s{l_6para _:ubrir la comtda. El pl_stico puede derrit_rse en
el calan y'ctfficuttar ta iimpieza, _:: '< :: ' ....
• t_:
Utiiice en el Caj6n de Calentar y Retener so amente vajilla y utensilios de cocina
recomendados para uso en el homo.
_Siempre utilice cogedores de hoyas y guantes para el homo
cuandc_se saca la comida del Ca!6n de Calentar y Retenerya que !Os utensilios y tos
ptatos estar_tncalientes_
OFF
HI
3
MED
WARMER DRAWER
Luz tndicadora
La luz indicadora se encuentra debajo del control de! termostato: Se enciende
cuando el control est_ puesto, y sigue encendida hasta que se apague el control. El
' Cajbn de Calentar y Retener no funciona durante el cido de autofimpieza, La _uz
indicadora no se encendeY_1 durante el ciclo de autolimpieza
Como regfar el control del termostato
El control del termostato se usa para seleccionar la temperatura del Caj6n de
Calentar y Retorter. Est=fubicado en el panel de control. Para reglar el termostato,
optima y gire fa perilla al reglaje deseado Los temperaturas son aproximados y se
designan pot Alto, Medio y Bajo.
t. Seleccione el reglaje de temperatura
2. Paralos resultados mejores, precaliente el caj6n antes de meter la comida
caj6n vado se calentaM en 15 minutos
3, Cuando se ha terminado, gire el control de temperatura a OFF
Un
Selecd6 n de temperatura
Consulte el diagrama en la columna al Iado para los reglajes recomendados
comida no consta en la tista, comience con el reglaje medio Si se desea una
textura m_fstostada, quite la tapa o e! papel de aluminio
Si una
Diagrama de r,=fal_s recomendados
para la comida en el Cai6n de
Calentar y Retener
Comida
Asados (came de rata,
cerdo, cotdero) MED
Chuletas de cerdo H1
Tocino HI
Hamburguesas HI
Polio HI
Salsas MED
Guisados MED
Hu evos lvt ED
Comidas Fritas HI
Vegetafes MED
Pizza HI
Bisques MED
Panedllos, blandos LO
Panedlios, duros MED
golfos MED
Ptatos ratios LO
La mayorla de Ias comidas pueden mantenerse a ta temperatura para sen4r usando
el reglaje medio
Cuando una combinad6n de comidas se han de mantener ca!ientes (pot ejemp!o,
una came con 2 vegetales y panecl!los)0utilice el reglaje alto
No abra el caj6n catentador sin necesidad mientras est,f en funci6n para etiminar la
p_rdida de color del Caj6n de Calentar y Retener
12
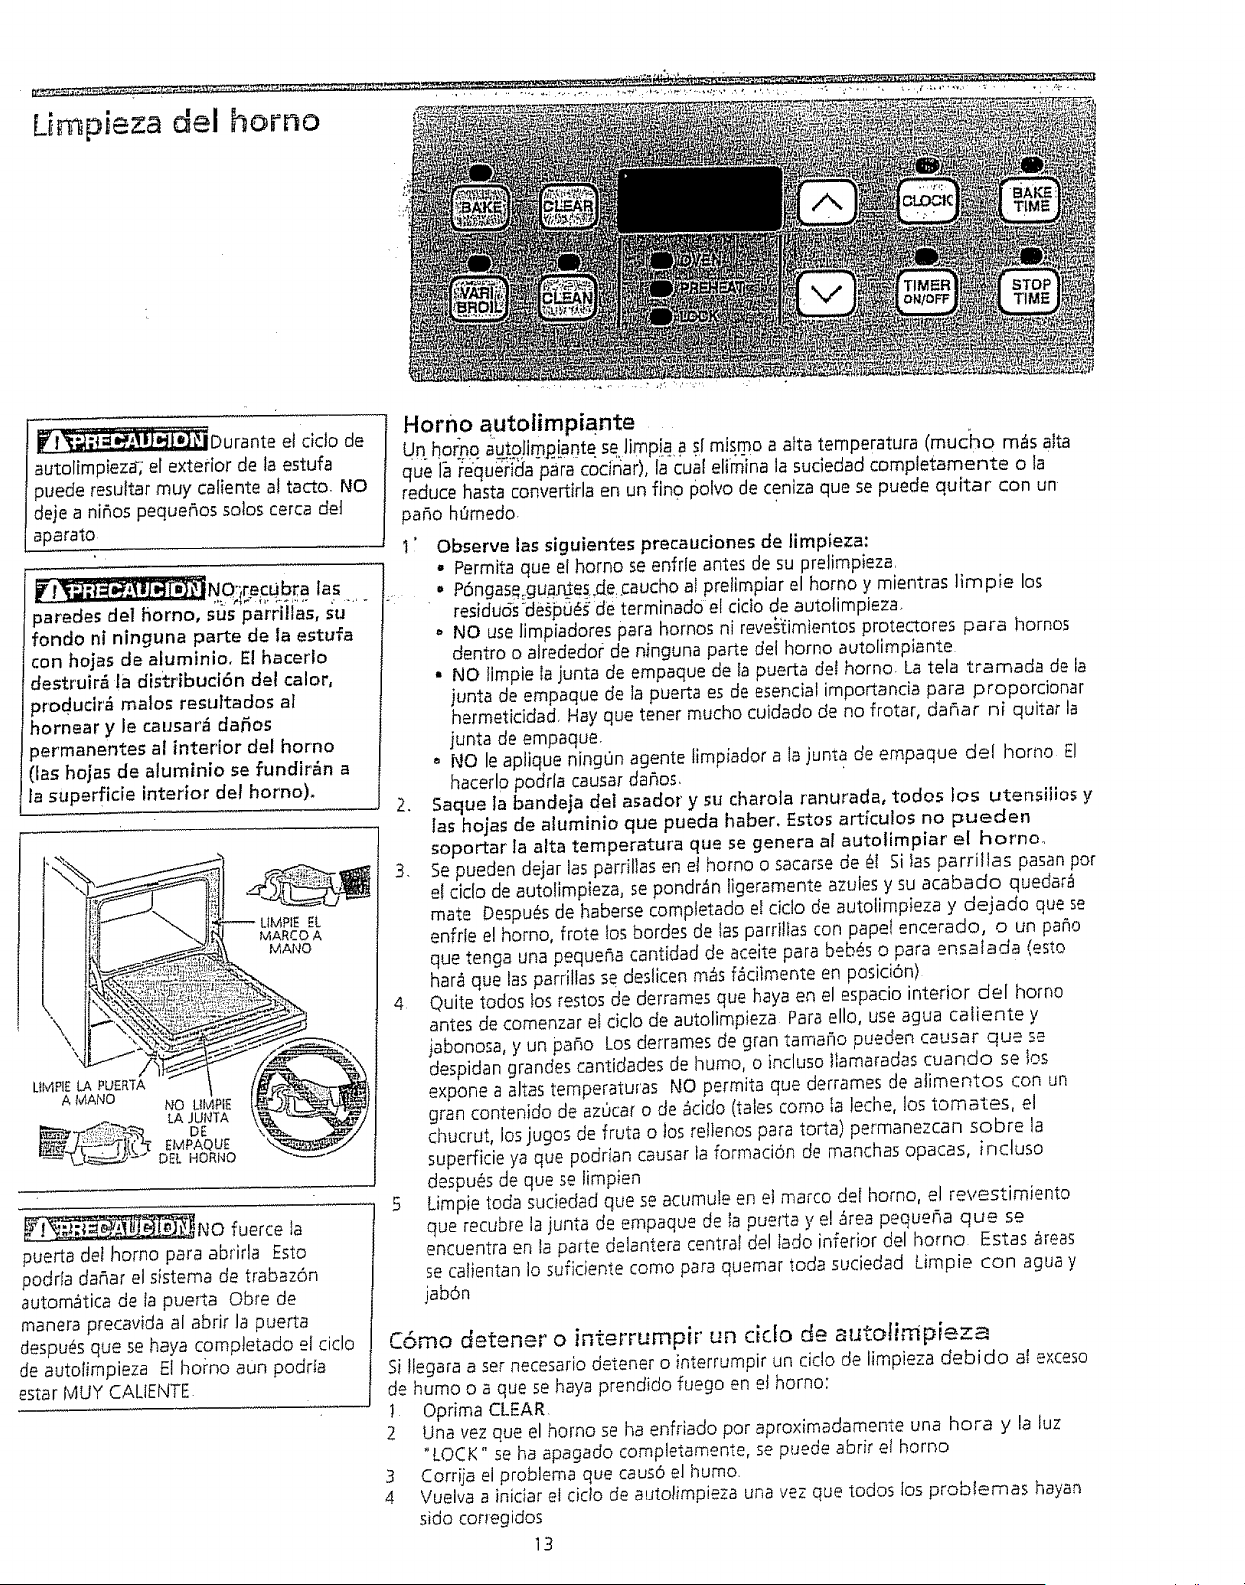
f Duranteeldclode
autoiimpieza_;' el exterior de la estufa
puede resultar muy cafiente a! tacto. NO
deje a nihos pequeP_ossolos cerca del
aparato
_NQ:irecUbr, a las
. .+ .+: _ _+. +.+,.,,+ ,......
paredes de| homo, sus parrillas, su
rondo ni ninguna parte de la estufa
con hojas de alumJnJo, El hacerlo
destruir_ la distribud6n del calor,
produdr_ malos resuttados at
hornear y Jecausar_ da6os
9ermanentes aJ interior deJ homo
(las hojas de aluminio se fundir_n a
la superftcie interior del homo)+
_NO fuerce la
puerto de! homo para abrirla Esto
podrIa daSar el sistema de trabaz6n
autom_itica de la puerto Obre de
manera precavida al abrir la puerta
despu_sque sehaya completado el cic!o
de autotimpieza El homo aun podrfa
estar MUY CALIENTE
+ - .... ++ , . :, +,,1 ",, _-,
Horno autolimpiante
Un ho_nqautoJlmp.[antese ]impJaa s! mismo a atta temperatura ,(mucho m_tsalta
que la requeri'cJaparacodnar), la+cualelim-inala suciedad completamente o la
reduce hasta convertirla en un fin0 polvo de ceniza que se puede quitar con un
paho hOmedo.
1' Observe los siguientes precauciones de limpieza:
- Permitaque el homo se enfrle antes de su prelimpieza.
• , P6ngas_=gu#_es.de.cauchoal prefimpiar el homo y mientras limpie los
residudsde_htJ_sde terminado el cicto de autolimpieza+
NO use limpiadores para hornos ni reve_imientos protectores para hornos
dentro o alrededor de n_nguna porte de( homo autolimpiante
• NO limpie ia junta de empaque de la puerta det homo. Latela tramada de ia
junta de empaque de la puerta es de esencial importancia pare proporcionar
hermeticidad, Hay que tener mucho cuidado de no frotar, dar_ar ni quitar la
junta de empaque.
NO le aptique ningOn agente timpiador a la junta de empaque del horno El
hacerlo podrla causar dahos,
2. Saque ta bandeja del asador y su charota ranurada, todos los utensiiios y
Ias hojas de aluminio que pueda haber, Estos articulos no pueden
soportar la alta temperatura que se genera a! autolimpiar el hornoo
3. Sepueden dejar las parrilias en et homo o sacarse de _I Si Ias parrillas pasan por
el ciclo de autolimpieza, se pondr_tn iigeramente azules y su acabado quedar_i
mate Despu_sde haberse completado et ciclo de autolimpieza y dejado que se
enfrle el homo, frote los bordes de tas parritlas con pape+encerado, o un pa_o
que tenga una pequer_acantidad de aceite para beb_s o para ensatada (esto
har_fque las parrillas se deslicen masfacilmente en posiciOn)
4 Quite todos los restos de derrames que haya en el espacio interior del homo
antes de comenzar el ciclo de autolimpieza Para ello, use agua caliente y
jabonosa, y un paso Los derrames de gran tama_o pueden causar que se
despidan grandes cantidades de humo, o incluso llamaradas cuando se fos
expone a altas temperaturas NO permita que derrames de alimentos con un
gran contenido de azucar o de _icido (tales como ta ieche, los tomates, el
chucrut, los jugos de fruta o tos rellenos para torta) permanezcan sobre la
superficie ya que podr+ancausar la formad6n de manchas opacas, incluso
despu_s de que se limp+en
5 Limpie toda suciedad que se acumule en el marco del homo, el revestimiento
que recubre la junta de empaque de la pue_ta y el _rea pequeha que se
encuentra en la pare delantera central del lado inferior del homo Estas _ireas
se calientan Io suficiente como para quemar toda suciedad Limpie con agua y
jab6n
C6mo detener o interrumpir un cicfo de autofimpieza
SJ!legara a set necesario detener o interrumpir un ciclo de limpieza debido al exceso
de humo o a que se haya prendido fuego en et homo:
I Oprima CLEAR,
2 Una vez que el homo se ha enfriado por aproximadamente una hora y la luz
"LOCK" se ha apagado completamente, se puede abrir el homo
3 Corrija el problema que caus6 el humo.
4 Vuelva a inidar el cido de autolimpieza una vez que todos los problemas hayan
sido conegidos
13
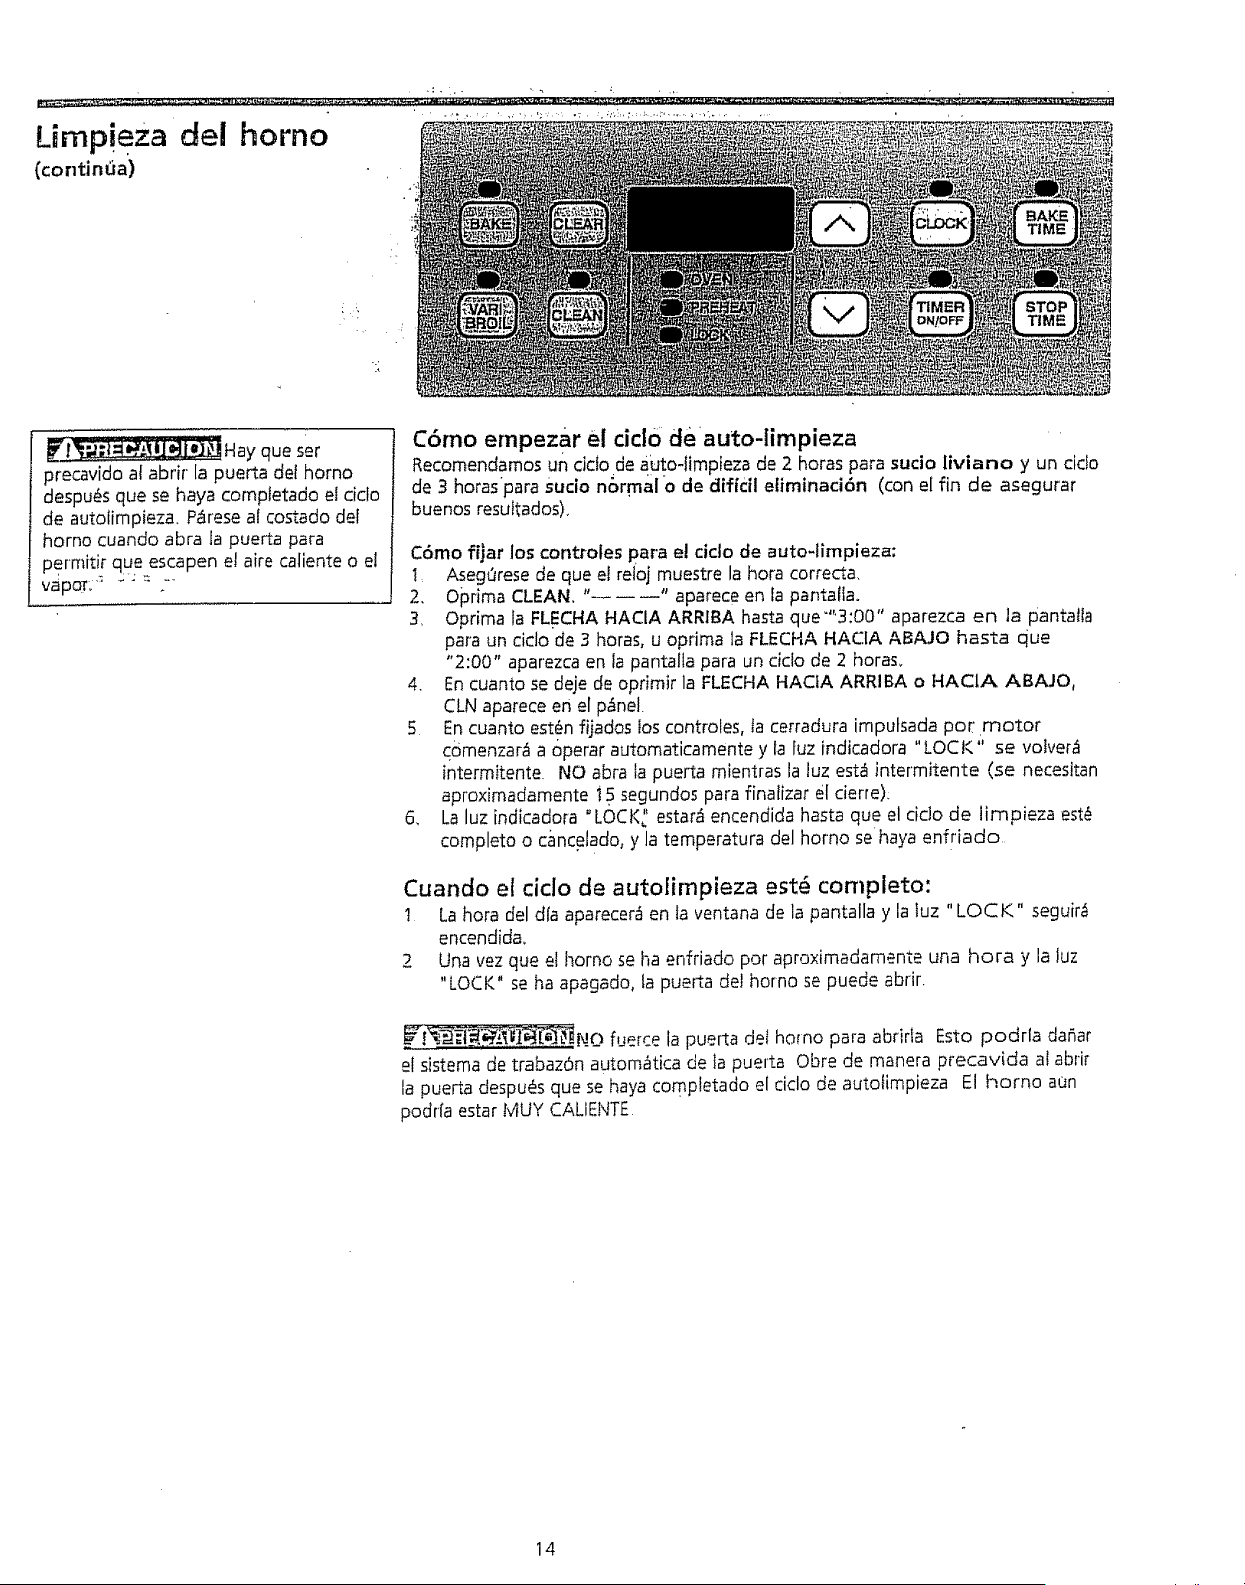
LimP!eza del horno
(contin(ia)
_Hay que set
precavido af abrir la puerta det homo
despu_s que se haya comptetado et ciclo
de autotimpieza. Parese al costado del
homo cuando abra la puerta para
PermitLr que escapen el aire caliente o el
vapar_ ........ :
C6mo empezar el cici0 deauto-limpieza
Recomendamos un ddo de a_uto-limpteza de 2 horas para sucio liviano y un cido
de 3 horaspara Sucio normalo de diffdl etiminaci6n (con el fin de asegurar
buenos resultgdos).
C6mo fijar los controles para e! ciclo cte auto-timpieza:
t_ AsegQrese de que e! retoi muestre la hora correct&
2. Optima CLEAN, " " aparece en fa pantaIla.
3, Oprima la FLECHA HACIA ARRIBA hasta que''3:00" aparezca en la pantalla
para un ddo de 3 horas, u optima la FLECHA HACIA ABAJO hasta que
"2:00" aparezca en la pantalla para un ciclo de 2 horaso
4. En ¢uanto se deje de oprimir la FLECHA HAOA ARRIBA o HACILA ABAJO,
CLN aparece en el p_nel.
5 En cuanto estc_nfijados Ios controles, ta cerradura imputsada pot motor
c6menzar_ a operar automaticamente y la fuz indicadora "LOCK" se votver_
intermitente. NO abra la puerta mientras la luz esta intermitente (se necesitan
aproximadamente i5 segundos para finatizar el cierre):
6, La luz indicadora °LOCK_" estar_ encendida hasta que el ddo de iimpieza est_
completo o canc elado, y la temperatura del horno se haya enfriado
Cuando el ciclo de autofimpieza est6 completo:
t La hora del dfa aparecer_ en la ventana de la pantalla y la iuz "LOC K" seguir_
encendid&
2 Una vez que el homo se ha enfriado pot aproximadamente una hora y la luz
"LOCK" se ha apagado, la pue[ta del horno se puede abHr.
_NO fuerce la puerta del homo para abrida Esto podrla daSar
el sistema de trabaz6n autom_tica de Ia puerta Obre de manera precavida al abrir
la puerta despu_s que se haya comPletado el dclo de autoiimpieza El homo aon
podrfa estar MUY CALIENTE
14
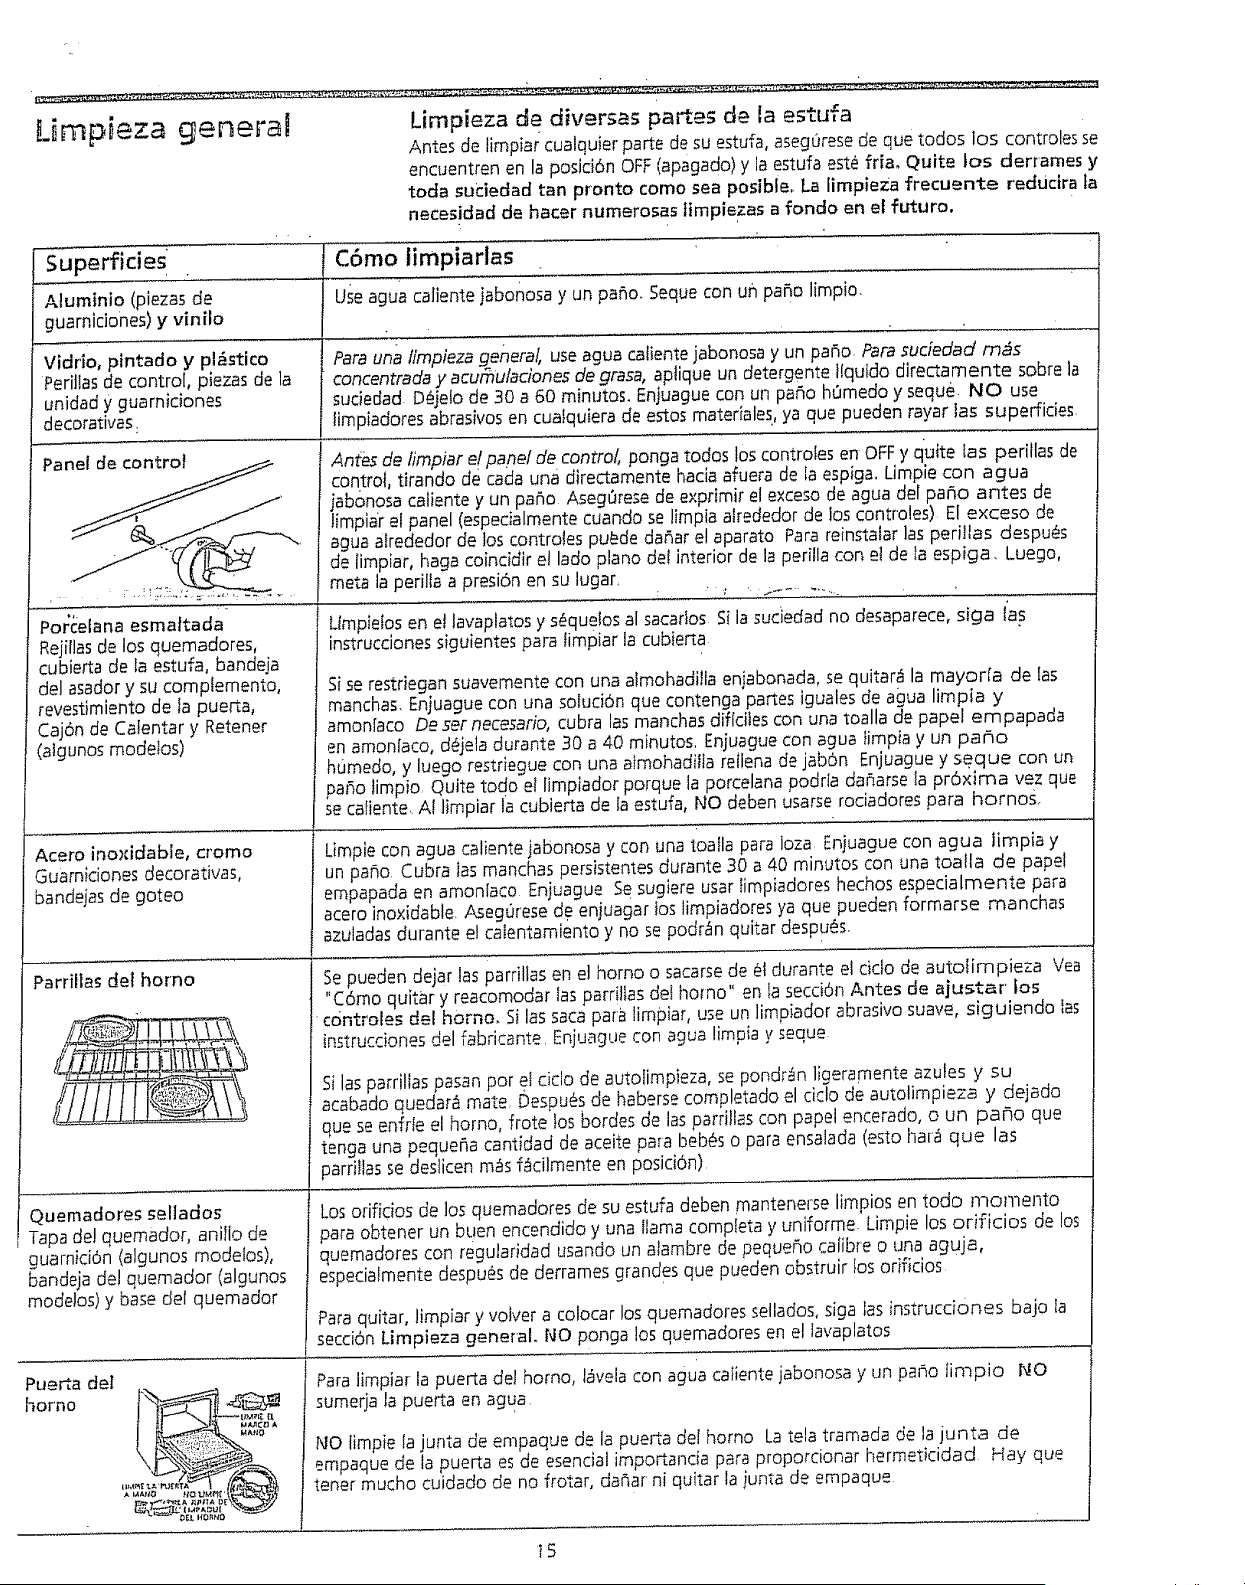
Limpieza general
Limpieza de diversas pares de la estufa
Antes de timpiar cualquier parte de su estufa, aseg0resede que todos los controles se
encuentren en la posici6n OFF(apagado)y ia estufa est_ fria, quit_ los den'ames y
toda sudedad tan pronto come sea posible. La limpieza frecuente reducira ta
necesidad de hater numerosas timpiezas a rondo en et future.
Superficies C6mo limpiartes
Atuminio (piezasde LJseague caliente jabonosa y un patio. Seque con un pa_o limpio.
guarniciones) y vinilo
pintado y plb.stico Pare una timpieza genera!, use ague catientejabonosa y un patio. Paresucieded rnbs
Perittasde control, piezas de la concentrada y acufnulaciones de grasa, aptique un detergente ilqutdo directamente sabre la
unidad y guarniciones sudedad. D_jefo de 30 a 60 minutes. Enjuaguecon un pa_o h0medo y seque. NO use
decorativas: limpiadores abrasives en cuatquiera de estos materiales,ya qua pueden rayar las superficies.
Porcelana esmattada
Rejillasde los quemadores,
cubierta de fa estufa, bandeja
del asadory su complemento,
revestimiento de la puerta,
Caj6n de Calentar y Retener
(atgunosmodetos)
Anfes de limpiar elpane/de control, ponga todos los controfes en OFFy quite fas perillas de
corttrot, tirando de cads una directamente hacia afuera de ta espiga. Limpie con ague
jabonosa catiente y un pa_o Aseg0rese de exprimir el excesode agua deI paso antes de
limpiar el panel (especialmente cuando se limpia akededor de los con_roles) El exceso de
ague akededor de los controles pu_de daRarel aparato Pare reinstalar las perillas despu_s
de iimpiar, haga coincidir et lade plane det interior de la perilla con el de ta espiga, Luego,
mete la perilta a presi6n en su lugar,
Umptefosen et lavaptatos y s_quefosal sacarlos Si ia suciedadno desaparece,siga l'as
instruccionessiguientes para timpiar ia cubier[a
Sise restriegan suavemente con una almohadiIla eniabonada, se quitar_f la mayoHa de las
manchas.Enjuague con una solucibn qua contenga partes iguales de ague limpia y
amen[ace De ser necesario, cubra lasmanchas diflciles con una toalla de papal empapada
en amonlaco, d_jeta durante 30 a 40 minutes. Enjuague con ague limpia y un parho
humedo, y luego restriegue con una afmohadilia reliena de jab6n Enjuague y seque con un
paso timpio, Quite todo el limpiador porque la porcelana podr[a dar_arseia pr6xima vez qua
se caliente, At limpiar la cubierta de la estufa, NO deben usarserociadores pare hornoso
Acero inoxidable, creme
Guarnicionesdecorativas,
bandejasde goteo
Limpie con ague caliente jabonosa y con una toatla pare loza En]uague con agua limpia y
un pa5o Cubra Ias manchas persistentes durante 30 a 40 minutes con una toalla de papel
empapada en amonlaco Enjuague Sesugiere user Iimpiadores hechos especialmente pare
acero inoxidable A.segOresede.enjuagar )os limpiadores ya qua pueden formarse manchas
azuladasdurante el calentamiento y no se podr_1nquitar despuCs.
Quemadores sellados
Tapa de! quemador, anillo de
guarnid6n (algunos modetos),
bandeja del quemador (algunos
modelos) y base del quemador
Pue_a del
horno
Sepueden dejar las parriltas en e! homo o sacarsede et durante el dcto de autolimpieza Yea
"C6mo quitar y reacomodar fasparrillas de! homo" en la secci6n Antes de ajustar fos
' c6ntrales del homo. Si las sacapare limpiar, use un limpiador abrasive suave, siguiendo Ias
instrucciones del fabricante. Enjuaguecon ague limpia y seque.
Silas parrillas pasan per ?I tide de autolimpieza, se pondr_n ligeramente azules y su
acabado quedar& mate, DespuCsde haberse completado el cic!o de auiolimpieza y dejado
qua se enfrle el homo, frote los bordes de lasparriltas con papel encerado, o un paBo que
tenga una pequeBa cantidad de aceite pare beb_s o pare ensaiada (esto har_1qua las
parritlas se deslicen m_fsf_fcilmente en posici6n)
Losorifidos de los quemadores de su estufa deben mantenerse limpios en todo memento
run buen encendido y una llama complete y uniforme. Limpie los orificios de los
quemadores con regularidad usando un alambre de pequeSo calibre o una aguja,
especMmente despu_s de derrames grandes qua pueden obstruir Iosorificios
Parequitar, limpiar y velvet a colocar los quemadores sellados,siga las instrucci0nes bajo la
secci6n Limpieza general. NO ponga los quemadores en el lavaplatos
Pare limpiar la puerta del homo, IMela con agua catiente jabonosa y un par_o [in7pio NO
sumerja Ia puerta en ague
NO limpie Ia junta de empaque de ia puerta del homo La teta tramada de lajunta de
empaque de la puerta es de esencialimportancia pare proporcionar hermeticidad Hay que
tener touche cuidado de no frotar, da_ar' ni quitar la junta de empaque
_5
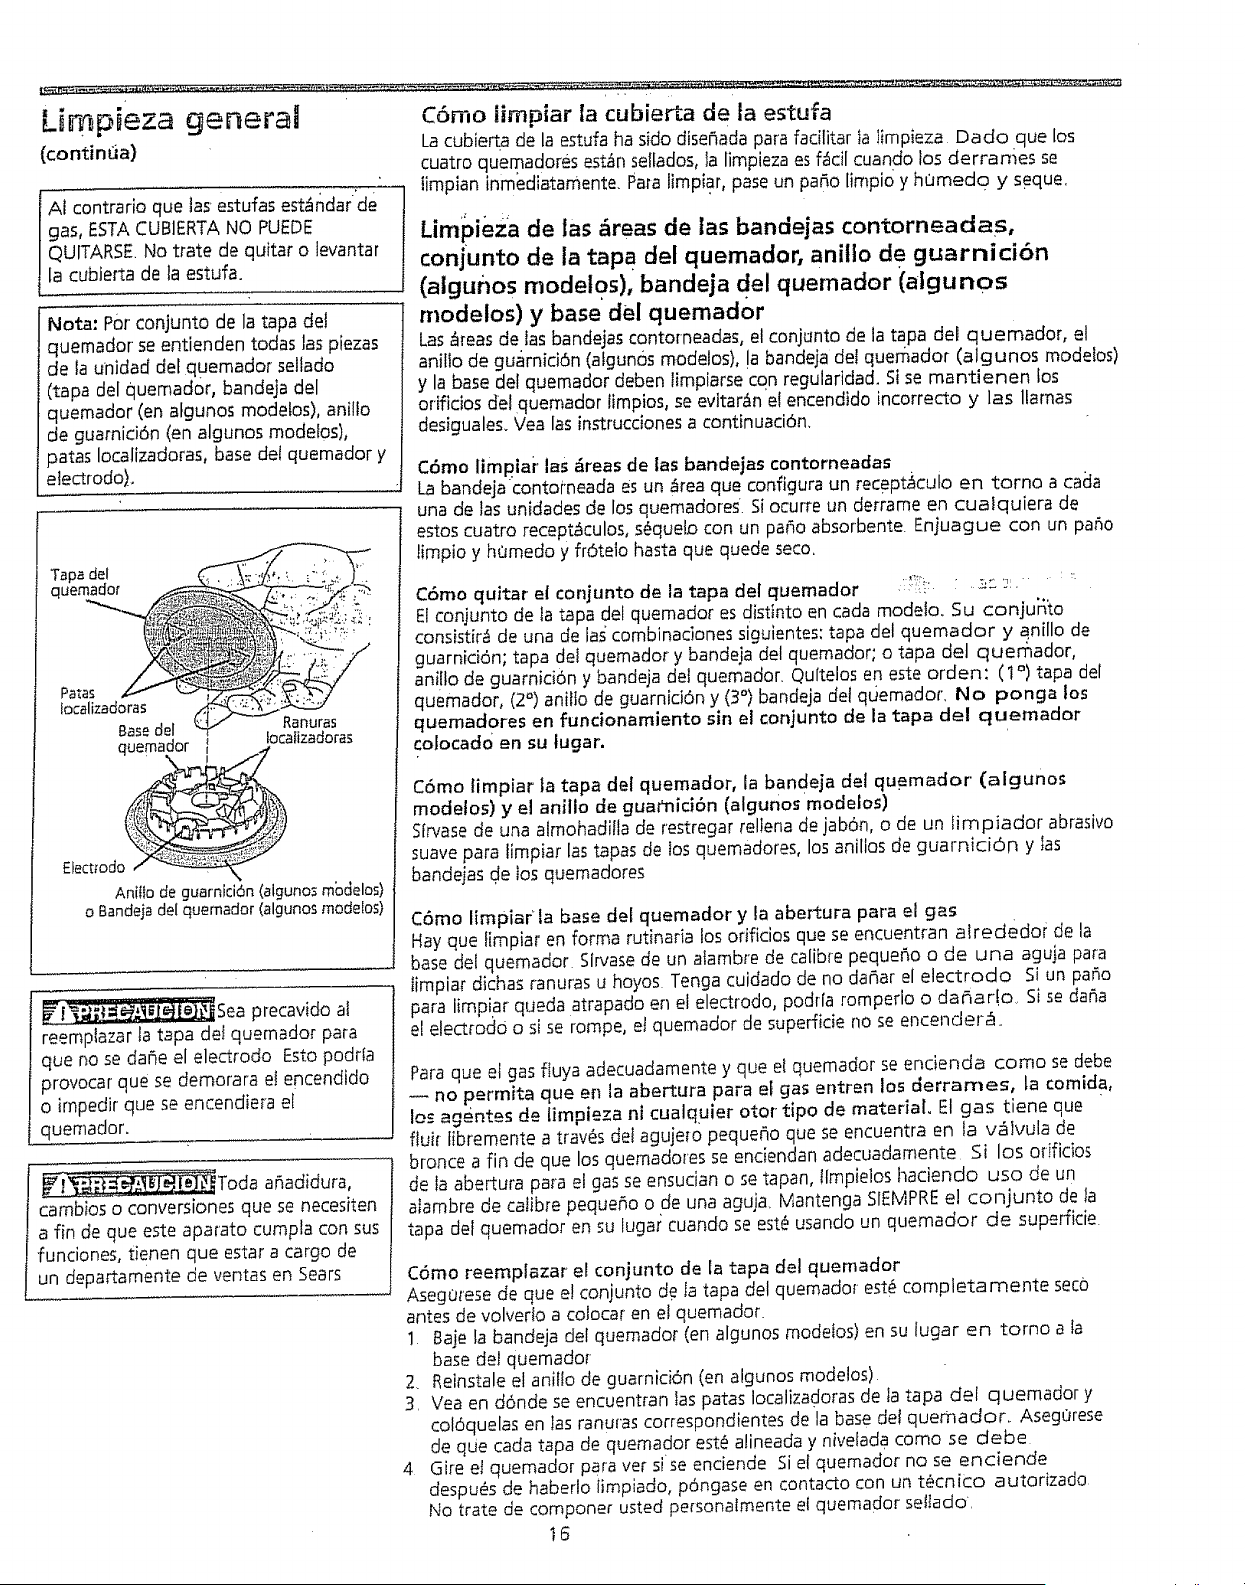
(continua)
AI contrarioquetasestufasestarldar"de
gas,ESTACUBIERTANOPUEDE
QUITARSENotratedequitaro levantar
lacubiertadelaestufa.
Limpieza general C6moiirnpiar [a cubierta de la estufa
Lacubierta de la estufa ha sido diseBadapara fadlitar la limpieza Dado que los
cuatro quemadores est=InseIlados,la limpieza es f_Icilcuando los derrames se
limpian inmediatamente. Patelimp#ar, pase un patio limpic_y hcJmedo y seque.
....l
Limpieza de las greas de las bandejas contorneadas,
conjunto de la tapa del quemador, aniilo de guarnici6n
(aigunos rnodelos), bandeja del quemador (aigunos
Nora: Pot conjunto de la tape dei
quemador se entienden todas las piezas
de la unidad def quemador sellado
(tapa del quemador, bandeja del
quemador Ien a}gunos modetos), aniIfo
de guarnici6n (en algunos modeIos),
paras Iocalizadoras, base det quemador y
etectrodo). .j
Tape del
quemador
Pates
iocalizadoras
Base deI Ranuras
fquemador focatizadoras
Ebcttodo "_
AniIlo de guarnici6n (alguno_ modelos)
o 8andeja deI quemador (algunos modetos)
f
! _Sea precavido al
reemplazar ta tapa def quemador pare
que no se da_e el electrodo Esto podda
provocar que se demorara et encendido
o irnpedir que se encendiera el
quemador.
Toda a_adidura,
cambios o conversiones que se necesiten
a fin de que este aparato cumpta con sus
funciones, tienen que ester a cargo de
un departamente de ventas en Sears
modetos) y base del quemador
Las=fireasde las bandejas contorneadas, el conjunto de la tapa del quemador, el
anillo de guarnici6n (atgunos modelos), !a bandeja del quemador (algunos modelos)
y la base del quemador deben limpiarse con regularidad. Sise mantienen los
odficios del quemador limpios, se evitar_n e! encendido incorrecto y ]as llamas
desiguales. Vea las instrucciones a continuaciOn.
C6mo limpiai' las _reas de tas bandejas contorneadas
Labandeja ¢ontorneada es un _1reaque configure un recept=icuio en torno a cacla
una de tas unidades de los quemadores. Si ocurre un derrame en cualquiera de
estos cuatro recept_culos, s_quelo con un paso absorbente Eniuague con un paso
limpio y hOmedo y fr6teto hasta que quede seco.
C6mo quitar el conjunto de la tape del quemador , ":::i_,;. , _: _:, '
El conjunto de ia tapa del quemador es distinto en cada modeto. Su conju_o
consistir=f de una de ias' combinaciones siguientes: tapa del quemador y anil o de
guarnici6n; tape del quemador y bandeja del quemador; o tape del quernador,
anilto de guarnici6n y bandeja del quemador. Qultelos en este orden: (I °) tapa del
quemador, (2°) anitto de guarnici6n y (3 °) bandeja det qdemador, No ponga los
quemadores en funcionamiento sin el conjunto de la tapa del quemador
colocado en su lugar.
C6mo timpiar la tape del quemador, la bandeja del qu.emador (algunos
modelos) y el anillo de guaimici6n (algunos modelos)
Sfrvasede una almohaditla de restregar relIena de jab6n, o de un Iimpiador abrasivo
suavepara fimpiar las tapes de los quemadores, los anilios de guarnici6n y Ias
bandejas de los quemadores
C6mo limpiar la base del quemador y la abe[tura pare el gas
Hayque _impiar en forma rutinada los orificios que se encuentran alrededot de la
base del quemador Slrvasede un atambre de calibre pequer_oo de una aguja pare
limpiar dichas ranuras u hoyos. Tenga cuidado de no daSar el electrodo Si un pa5o
para iimpiar queda atrapado en el electrodo, podHa romperio o darhar!o. Si se derma
el electrod0 o si se rompe, et quemador de supefficie no se encender=fl..
Paraqueet gas fluya adecuadamente y que e! quemador se encienda como se debe
no permita que ell la abertura para et gas entren los derrames, la comida,
los agentes de limpieza ni cualquier otor tipo de material. El gas tiene que
fluir libremente a tray,s del agujelo peque_o que se encuentra en la v=ilvula de
bronce a fin de que los quemadores se enciendan adecuadarnente Si los odficios
de Ia abertura pare el gas se ensucian o se tapan, tlmpielos haciendo uso de un
alambre de calibre pequer_oo de una agu)a. Mantenga SIEMPREel conjunto de la
tapa del quemador en su lugar cuando se est_ usando un quemador de superficie
C6mo reemplazar el conjunto de la tapa del quemador
Aseg0rese de que e! conjunto de Ia tapa del quemadof est_ completamente seco
antes de volverto a coJocaren el quemador.
1 Baje la bandeja del quemador (en algunos modetos) en su lugar en torno a la
base del quemador
2. Reinstale el anifio de guarnici6n (en algunos modelos)
3. Vea en d6nde se encuentran tas pates Iocalizadorasde ta tape del quemador y
col6quelas en ias ranuras correspondientes de la base de! quemador. Aseg0rese
de que cada tapa de quemador est_ alineada y nivelada como se debe
4. Gire et quemador para ver si se enciende Si el quemador no se enc:iende
despues de haberlo limpiado, p6ngase en contacto con un t_cnic:o autorizado
No trate de componer usted pe_sonatmente el quemador setlado.
t6
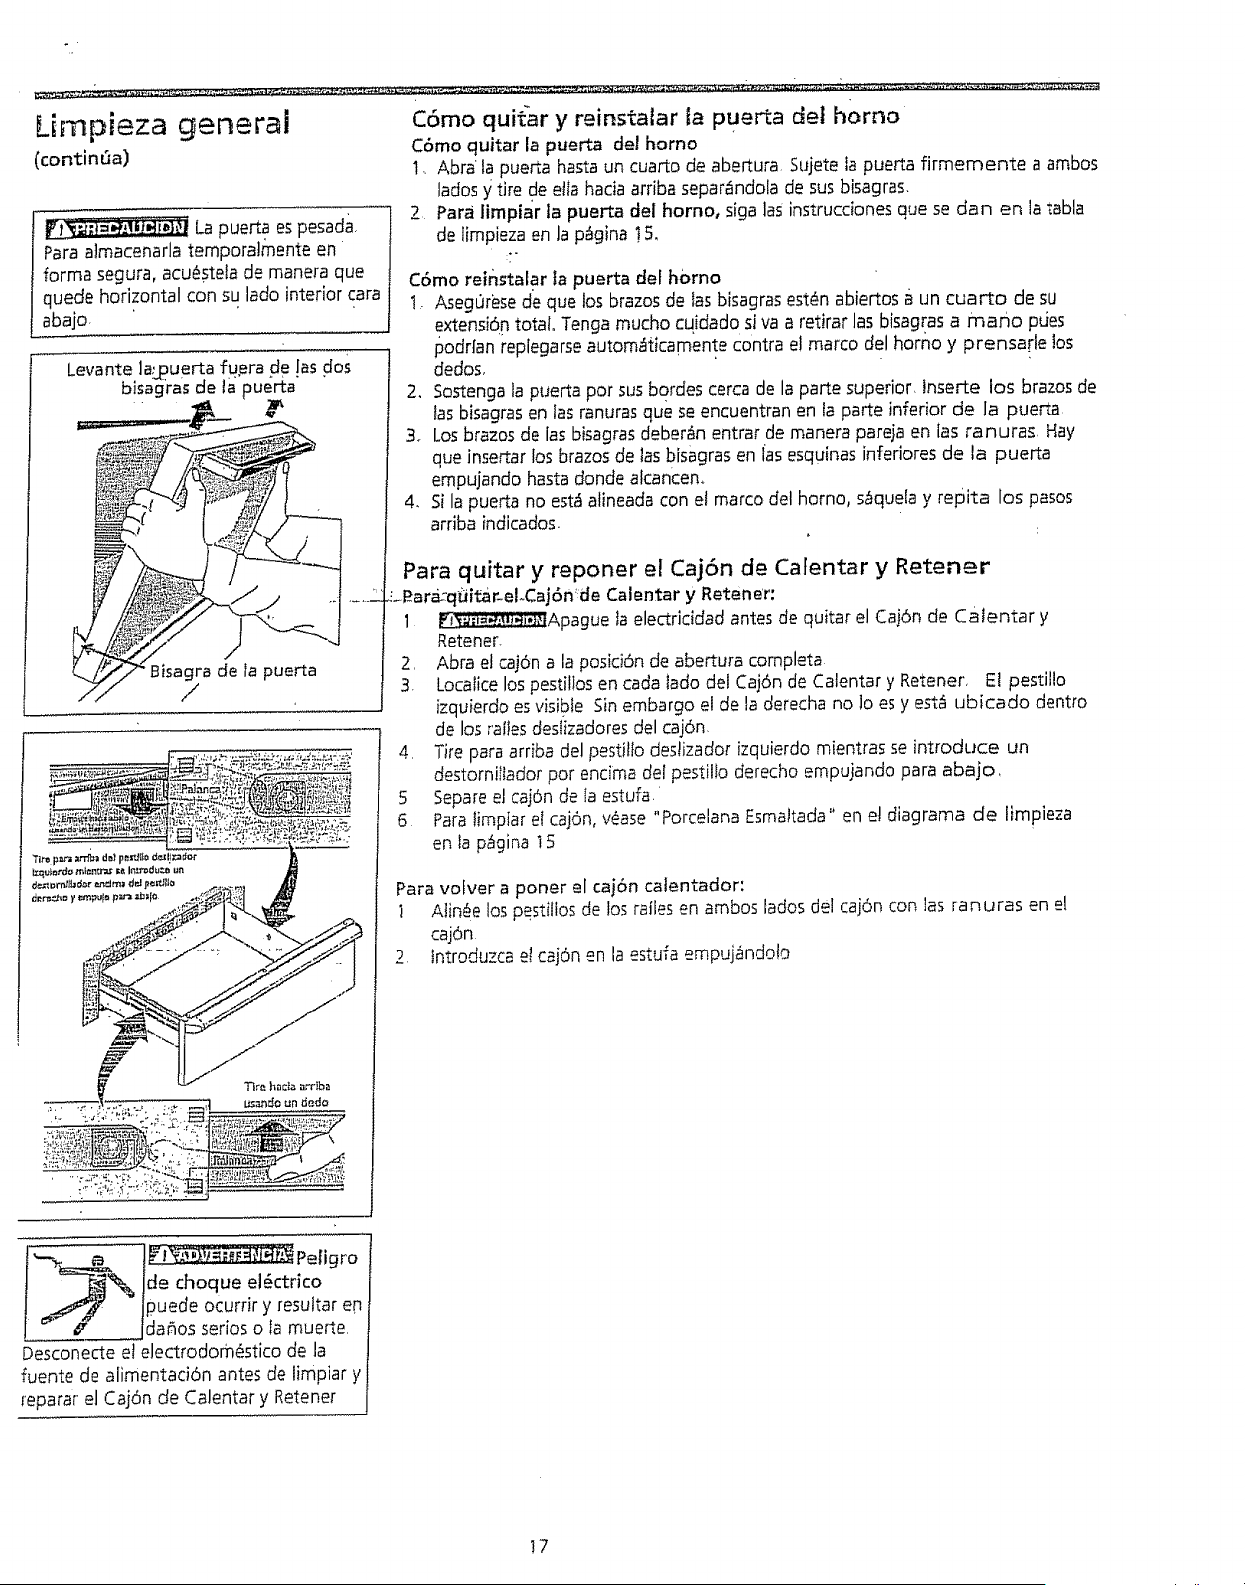
L[mpieza general
(continUa)
La puer[a espesada
Paraa]macenarla temporalmente en
forma segura, acu_stela de manera que
quede horizontal con su lado interior tara
abajo,
Levante a,_.ue_a fu,era de las dos
bisagras de ta puerta"
i
[_. _/Bisagra de ia puerta
// /
C6mo quit'ar y reinstalar Ia Puerta del homo
C6mo quitar la puerta del homo
1, Abra la puerta hasta un cuarto de abertura 5ujete ia puerta firmernente a ambos
lados y tire de etla hacia arriba separandola de sus bisagras.
2 Para limpiar la puerta del homo, siga las instrucciones que se dan en la _abla
de limpieza en la p_gina !5,
C6mo reinstalar la puerta del homo
1, AsegOresede que los brazos de las bisagrasest_n abiertos a un cuarto de su
extensi6n total° Tenga mucho cqidado si va a retirar las bisagrasa mano pues
l_oddan replegarseautom_ticamente contra e! marco del homo y prensarle los
dedos,
2. Sostengala puerta por sus bordes cerca de la parte superior, lnse_e los brazosde
tasbisagras en fas ranuras que se encuentran en la parte inferior de la puerta
3+ Losbrazos de las bisagrasdeber_n entrar de manera pareja en [as ranuras, Hay
que inser_arlos brazosde las bisagras en [asesquinas inferiores de la puerta
empujando hasta don@ alcancen+
4+ Si la puerta no est_ alineada con e! marco del homo, s_quela y repita los pasos
arriba indicados.
Para quitar y reponer el Caj6n de Cafentar y Retener
_P_ara--qLiitar-el+Caj6nde Calentar y Retener:
1 _'#:i=_:._,_i,J_lApagueta electriddad antes de qu+tarel Caj6n de catentar y
Retener-
2, Abra el caj6n a la posici6n de abertura completa
3. Locaiicelospestillos en cada lado del Cajdn de Calentar y Retener, El pestillo
izquierdo esvisible Sin embargo el de [a clerechano !o es y est.1ubicado dentro
de los ralbs deslizadoresdel cajdn.
4, Tire para arriba del pestilfo destizador izquierdo mientras se introduce un
destornitlador pot endma del pestilfo derecho empujando para abajo,
5 Separeel caj6n de [a estufa.
6 Para limpiar el caj6n,v_-ase"Porcelana Esmaltada" en e! diagrama de iimpieza
en ta p_gina 15
Para volver a poner el caj6n calentador:
1 Aiinc_elos pestillos de los rafles en ambos lados dei caj6n con las ranuras en el
cajdn
2 lntroduzca et caj6n en la estufa empujandoto
---_._ _ jde choque el_ctrico
_f_ Ipuede ocurrir y resultar en
lclar_osserios o ia mue_e,
Desconecte et electrodom_stico de la
fuente de alimentad6n antes de limpiar y
reparar el Caj6n de Calentar y Retener
17
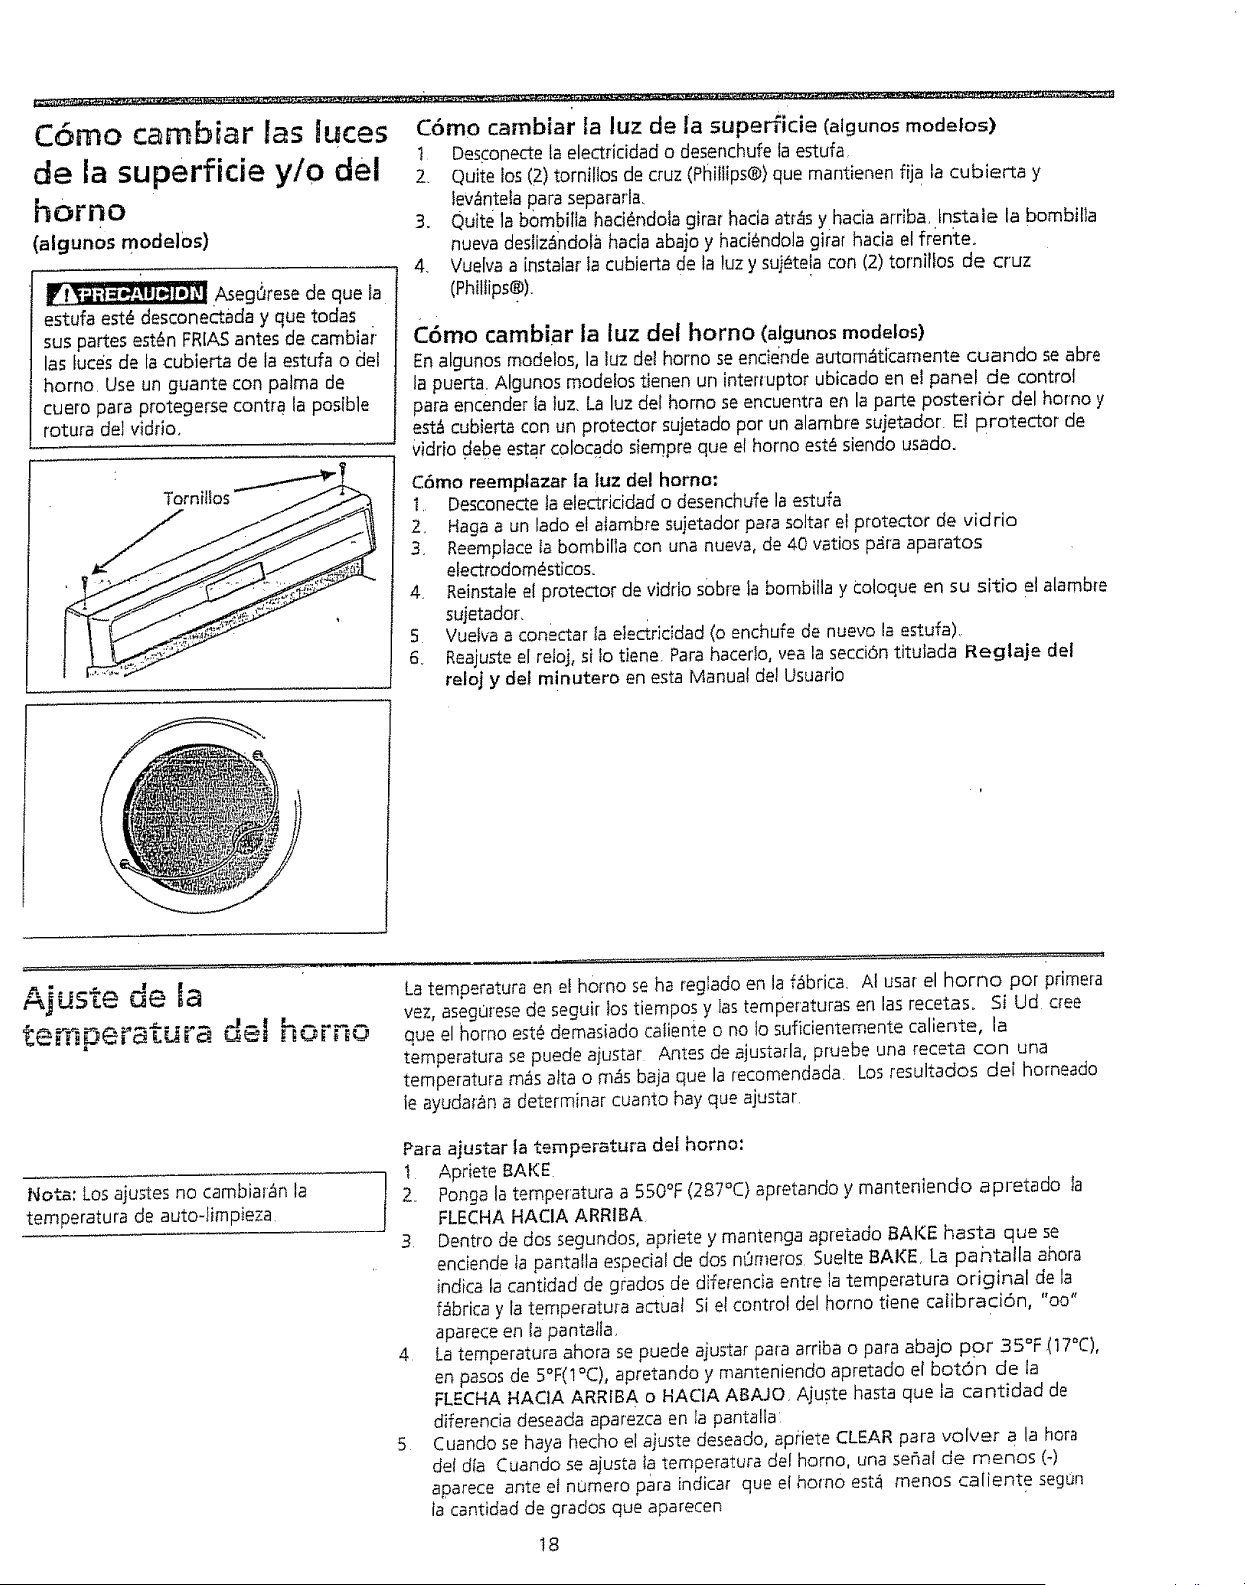
C6mo carnbiar Nas luces
de la superfide y/o del
homo
(algunOs modelos)
_i_;1:_._1_ll_le.l_iAsegOresede que la
estufa est_ desconectada y que todas
sus partes est_n FRIASantes de carnbiai
las fuce's de la cubierta de la estufa o _el
horno, Use un guante con palma de
cuero papaprotegerse contra la posible
rotura del vidrio.
Tornillos"
C6mo cambiar ia luz de la superficie Calgunos" modelos)
I Des_:onectela electricidad o desenchufe la estufa
2, Quite los (2) tornilios de cruz (Plnillips®}que mantienen fija la cubierta y
leV_ntetapapasepararla,
3. Quite la bombi[la had_ndola girar hacia atr=Isy hada arrlba Instale la bombilla
nueva desliza'ndolahada abajo y haci_ndola girar hacia el frente.
4. Vuelva a instalar la cubierta de la luz y su_te!a con (2) total!los de cruz
(Phillips®).
C6mo cambiar ia luz del homo (algunos modelos)
Enalgunos modelos, la luz del horno se encie_ndeautom_fticamente cuando se abre
la puerta Atgunos mode!os tienen un interruptor ubicado en el panel de control
papaencender ta luz. La luz del homo se encuentra en la pa_e posterior del homo y
esta cubierta con un protector sujetado por un alambre sujetador. El protector de
_idpiodebe esta.rcolocado siempre que el homo est_siendo usado.
C6mo reemptazar la tuz de! homo:
i, Desconectela electricidad o desenchufe la estufa
Z Haga a un lado el atambre sujetador papasoltar el protector de vidrio
3. ReemplaceIa bombilla con una nueva, de 40 vatios papa aparatos
etectrodomesticos.
4. Reinstaleel protector de vidpio sobre la bombilla y coloque en su sitio el alamb_e
sujetador.
5 Vuetva a conectar la electricidad (o enchufe de nuevo la estufa),
6. Reajusteel reloj, si fo tiene Papahacerlo, yea la secci6n titulada Reglaje del
reloj y del minutero en esta Manual del Usuapio
jUSZe '-
te,npera ura del homo
Nora: Losajustes no cambiar_n ta
temperatura de autoqimpieza
Latemperatura en et h0rno se ha reglado en la f_brica. AI usar el horno pop primera
vez, aseguresede seguir los tiempos y las temperaturas en las recetas. Si Ud cree
que el homo est_ demasiado cafiente o no Io suficientemente caliente, la
temperatura se puede aiustar Antes de ajustarla, pruebe una receta con una
temperatura m_s alta o rn_s baja que la recomendada Losresultados del hornead0
le ayudar_n a determinar cuanto hay que ajustar
t
Papa ajustar la ternperatura det homo:
l Apriete BAKE
2. Ponga la temperatura a 550°F (287°C) apretando y manteniendo apretado Ia
FLECHA HACIA ARRIBA,
3 Dentro de dos segundos, apriete y manten_a apretado BAKE hasta que se
endende ta pantalla especial de dos n0meros Suelte BAKE, La pantalla ahora
indica ta cantidad de grados de diferencia entre la temperatura original de la
f_brica y [a temperatura actual Si el contro! del homo tiene catibraci6n, "oo"
aparece en la pantatla
4 La temperatura ahora se puede ajustar papa ardba o papa abajo por 3 5°F ,(17°C),
en pasos de 5°F(1°C), apretando y manteniendo apretado el bot6n de ta
FLECHA HACIA ARRIBA o HACIA ABAJO, Ajuste hasta que la cantidad de
diferencia deseada apapezca en Ia pantalla
5 Cuando se haya hecho el ajuste deseado, apdete CLEAR para volver a la hora
del dla Cuando se ajusta ta temperatura del homo, una sepal de menos (-)
aparece ante el numero para indica_ que e! homo esta menos caliente segun
la cantidad de grados que aparecen
18
[[arnadas de servido
Lista para ev[tar [as Antes de llamaratservido, examine esta lista Puede ehorrarle tiempo y dinero En la
tista se induyen incidentes comunes clue no son el resuttado de fabricaci6n o mater;ales
defectuosos en e! aparato etectrodom_stico
Este homo est_fequipad 0 con un controlador etectr6nico de 0ttima moda, Entre sus
caracteristicas se cuenta con un sistema que diagnostica constantemente los circuitos
del homo. Este controlador verifica constantemente los circuitos internos, asf como
varios circuitos del homo de gran importanda, pare asegurarse de que todos est6n
funcionando correctamente 51,en cualquier momento, alguno de estos sistemas
llegara a failer, el controtador terminada la funci6n afectada, emitir[a una serie de
"bips" yen la pantalla parpadearian c6digos de error del F1 o F3
tNCIDENTE
La estufa no est_ nivetada,
POSIBLE CAUSAISOLUCION
Mala insta[aci6n. Coloque la parrilIa en el centro del homo Coloque un nivel s6bre.la
parrilla. Ajuste las pates niveladoras en la base de la estufa hasta que la parrilla se
nivele, Cuando ta estufa est_ nivelada, la superfide puede parecer desafineada si la
cubierta no est_ nivetada.
Piso d_bit e inestabie. Aseg0rese de qua et piso est_ nivetado y qua puede soportar
adecuadamente la estufa. Llame a un carpintero para corregir el hundimiento o el
desnivel de! piso.
Los armarios de cocina mai alineados podrfan dar ia impresi6n que la estufa est=t
desniveiada Aseg_rese de qua tos armarios est6n bien a escuadra y que haya suficiente
ZL:L t_a:a r, "ar.e-l.GT._, _'.'d,_: f' ::d,:÷T_,S._:.."_,.'-:t.--_esPaci° libra pare la estufa
No se puede mover el aparato
f_citmenteo Debe tenerse acceso ala
estufa para darle servicto.
Los armarios no _st_tn bien a escuadra o quedaron muy apretados Llamar a un ebanista
para corregir :el problema.
Llamar a[ constructor o a! instalador pare qua se proporcione acceso al aparato
La alfombra interfiere con fa estufa. Proporci0nar suficiente espacio pera que pueda
levantarse la estufa pDr endma de ta alfombra.
La tlnea de gas tiene ci)nexiones duras. Haga instatar un conector flexible de metal
aprobado p,or AG A/C G A pare aparatos electrodom_sticos
El control del homo emite un "bip" y
aparecen an ia panta|la los cbdigos
F1 o F3,
El control elect:r6nico ha detectado una falla Oprima CLEAR para que se despeje la
pantatla y cesen los "hips". Vuek_aa programar el homo 5i ;a falla contin0a, apunte el
c6digo correspondiente ala falia, optima CLEAR, y p6ngase en contacto con un t6cnico
de servicio autorizado,
Los queme, dores de supeffide no se
encienden.
La peritla de control de superficie no ha sido girada completamente a LITE Aprieie y
gire la perilla de control de superficie a LITEhaste que el quemador se encienaa y iuego
gire la peri!la de control at tamaffo de llama qua desee
Los orificios de[ quemador estgn taponados. Limpie los quemadores Yea "Limpieza de
las _reas de las bandejas contorneadas, conjunto de la tape de[ quemador, an[llo de
guamici6n (atgunos modelas), bandeja del quemador _aigunos modelos) y base del
quemador _ baio la secci6n Limpieza general. Con el quemador apagado, limpie los
orificios con un alambre de pequot0 calibre o con una aguja
El cord6n el_ctrico de ta estufa est_i desconectado de ta toma de corriente (modelos con
encendido el6ctrico solamente) AsegOrese de que el ¢ord6n est_ bien enchufado en ia
toma de corriente
Fe!la de corriente (apacj6n) (modelos con encendido d_ctrico solamente), Los
querhadores pueden encenderse manuatmente. Vea ta secci6n A_uste de los controtes
de superficie en este Manual del Usuario.
La llama de[ quemador de superficie s61o Los orificiosdel quemador estantaponados Con el quemador apagado, lirnpie los
se quema ala mitad del c[rculo, orificios con un alambre de pequeBocalibre o con una aguje
Hay humedad despu6s de la timpieza. Ventee tigeramente la IIama y deje que el
quemador funcione haste qua la llama sea completa. Seque los quemadores a fondo
siguiendo las instrucciones de ia secci6n Limpieza general
La llama del quemador de _;uperfici_ es
3naranJada.
Particulas de polvo en la linea principal Deje que el quemadoi funcione durante unos
minutos hasta que la llama sea azul
En tas _reas cost:eras es inevitable qua Jatlama sea iigeramente anaranjada debido a_
contenido de sat en el aire
19

Et horno no funciona.
Aseg0rese de que los controtes electr6nicos det homo est_n correctamente ajustados
para la funcibn deseada Vea la secci6n Ajuste de los controtes dei homo en este
Manua! de{ Usuario o El aparato no fundona en absoluto (a continuaci6n)
Asegt)cese de que la v_lvula regutadora de gas este en "ON', Vea !as Instrucdones para
ta Instalad6n.
E! aparato no funciona en absoluto=
Aseg_resede queef cord6n eI_dco/enchufe estc_enchufado correctamente en su
toma de cordente (modela5can'encendido ebctrico solamente)
La instalaci6n elicit!ca no est_ completa L[ame a 5u representante o agente de servido
autodzado_
Falla de corfiente (apag6n) (modetos con encendido el_ctrico 5olamente). Verifique si se
pueden encender _asfuces de la casa, Llame a la compafWade ser¢icio electrico local
Los quemadores pueden encenderse manuaknente. Vea la secci6n Ajuste de los
controles de superficie en este Manual de/Usuario
A-seg0rese de queef suministro de gas est_ encendido.
Las tuces del homo y!o de la cubierta de Bombilla fundida o fioja Vea la secci6n C6mo cambiar las lutes de la superficie ylo
la estufa no funcionan, del homo en este Manual det Usuario para reemplazar o apretar )a bombilla
E1homo humea excesivamente cuande se La puetta del homo est_ abierta La puerta deber_ estar cerrada cuando se axe usando
asa usando la resistencia superior, Ia resistencia superior. :...... _ ................/,,_, _
La came est_ demasiade cercana a ta resistencia superior Reacomode la parritla para
qua haya suficiente espacio fibre entre la came y la resistencia.
No se prepar6 la carne adecuadamente Qultele el exceso de grasa a la came Corte los
hordes grasosos sobrantes en _nguto recto para evitar el pandeamiento de ta came,
pero no corte basra Ia parte magra.
La charola ranurada del asador ha side usada sin la rejilla o se ha ¢ubierto ta
re]ilta con aluminio, NO use ta charola ranurada del asador sin la r'eji_la nt cubra
la re]ilia con aluminio,
E! homo necesita set limp!ado Se ha acumutado la grasa en lax paredes del homo,
Cuando se usa e! asador con frecuenda, hay que limpiar el homo en forma regula_ La
grasa acumulada o lax satpicaduras cle comida causan humo en exceso.
Vlaios resultados al hornear,
Muchox factores influyen en los resultados al hornear Aseg0rese de ubicar las parriltas
del homo adecuadamente Ponga la5 cacerolas en el centro del homo y posid6nela5
para que el aire pueda circular adecuadamente Permite que el homo se precaliente
ante de homear Es posible necesitar ajustar la duraci6n del tiempo de hornear o Ia
temperatura recomendados por la receta Si usted piensa que el homo no este bastante
caliente o que est@demasiado caliente, consulte ta secci6n Ajuste de la ternperatura
de} homo en este Manua! de! Usuado
_i criciode autolimpieza no funciona.
Los controfes no est_n debidamente ajustados Siga las instrucciones de Limpi_za del
horno_
FJcicto de autolimpieza fue interrumpicfo El tiempo para la detenci6n debeser reglado
para 2 a 4 horas despu_s del inicio, Siga tos pasos que se danen Ia parse intitulada
"C6mo detener o interrumpir un ciclo de autolimpieza", de ta secci6n denominada
Limpieza del horno.
._ose ha eliminado la suciedad
ompfetamenteo
No se limpi6 correctamente la parte inferior del frente, Ia parte superior del homo o tas
areas de [a puerta fuera de la junta de empaque det homo Estas partes no est&n en el
_rea de autolimpieza, pero se calientan Io suficiente como para quemar cesiduos Limpie
estas _reas antes de iniciar el cido de autolimpieza. Los residuos que se hayan quemado
sobre las 'superficies se pueden limpiar con un cepitto de nil6n duro y agua, o con un
restregador de nii6n Tenga cuidado de no dar_ar {ajunta de empaque del homo
Derrames demasiado grandes dentro det homo Haga durar el dcIo de autolimpieza
durante m_s tiempo.
ay llamas dentr 0 del homo o sale humo
el respiradero_
Derrames demasiado grandex dentro del homo Esto es normal, especialmente si se
h0rnean tartas o cuando se acumula una gran cantk_ad de grasa en el rondo L!mpie
dichos derrames antes de iniciar el ciclo de autolimpieza Si surg6n llamas o hay
demasiado humo, detenga el ciclo de autolimpieza y siga los pasos que se dan en la
parte intil:ulada "Chino detene? o interrumpir un cicio deautolimpieza" cle la secci6n
denominada Limpieza del homo,
-20 •
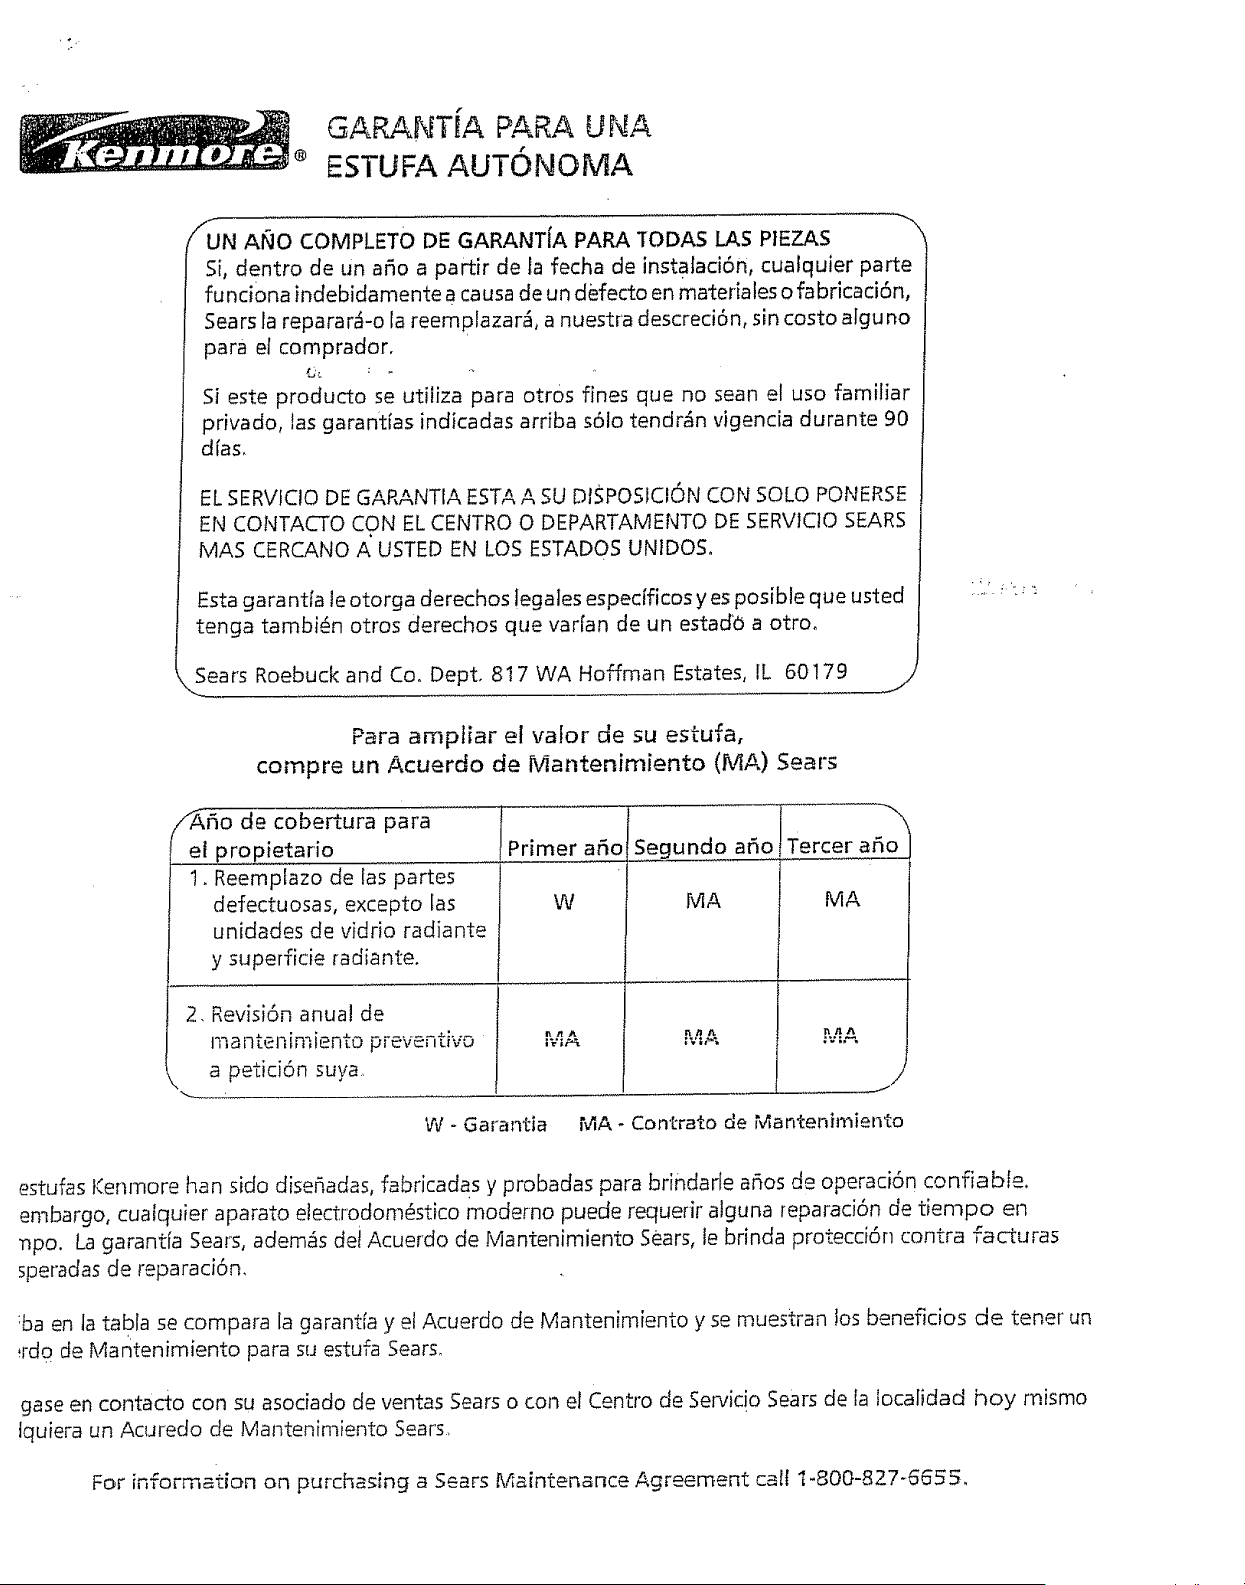
'.t-
®
GAP,ANTiA PARA UNA
ESTUFA AUTONOMA
fUN AI_JO COMPLETO DE GARANTiA PAPA TODAS I.AS PIEZAS
Si, dentro de un aSo a partir de la fecha de instataci6n, cualquier parte
funciona indebidamente a causa de un defecto en materiales o fabricaci6n,
Sears la reparar_-o la reemplazar_, a nuestra descreci6n, sin costo alguno
para el comprador.
Si este producto se utiliza para otr0s fines que no sean el uso familiar
privado, las garantfas indicadas arriba s6Io tendr_n vigencia durante 90
dfas.
EL SERVICIO DE GARANTIA ESTA A SU DISPOSICI6N CON SOLO PONERSE
EN CONTACTO CON EL CENTRO O DEPARTAMENTO DE SERVlCIO SEARS
MAS CERCANO A USTED EN LOS ESTADOS UNIDOS_
Esta garantfa le otorga derechos legales espec[ficos y es posible que usted
tenga tambi6n otros derechos que var[an de un estad6 a otroo
Sears Roebuck and Co,, Dept, 817 WA Hoffman Estates, IL 60179
Para amptiar el valor de su estufa,
compre un Acuerdo de Mantenimiento (MA) Sears
/_50 de cobertura para
el propietario
1. Reempfazo de las partes
defectuosas, excepto las
unidades de vidrio radiante
y superficie radiante.
2, Revisi6n anua! de
m an ten imiento p__v_,....... ,uvu:"-
a petici6n suya
W - Garantia
W MA
AlIA rltt_
I&,'IP_.
Primer a5o Segundo a6o Tercer a6o
MA
MA
I./
MA- Contrato de Mantenimiento
estufas Kenmore ban sido diseSadas, fabricadas y probadas para brindarle aries de operaci6n confiable.
embargo, cualquier aparato electrodom6stico moderno puede requerir atguna reparaci6n de tiempo en
_po. La garant[a Sears, adem_s dei Acuerdo de Mantenimiento Sears, le brinda protecci6n contra facturas
speradas de reparaci6n.
:ba en la tabta se compara la garant[a y el Acuerdo de Mantenimiento y se muestran los beneficios de tener un
_rdo de Mantenimiento para su estufa Sears.
gase en contacto con su asociado de ventas Sears o con el Centro de Servicio Sears de la localidad hoy mismo
tquiera un Acuredo de Mantenimiento Sears.
For information on purchasing a Sears Maintenance Agreement ca!f t-800-827-5655.
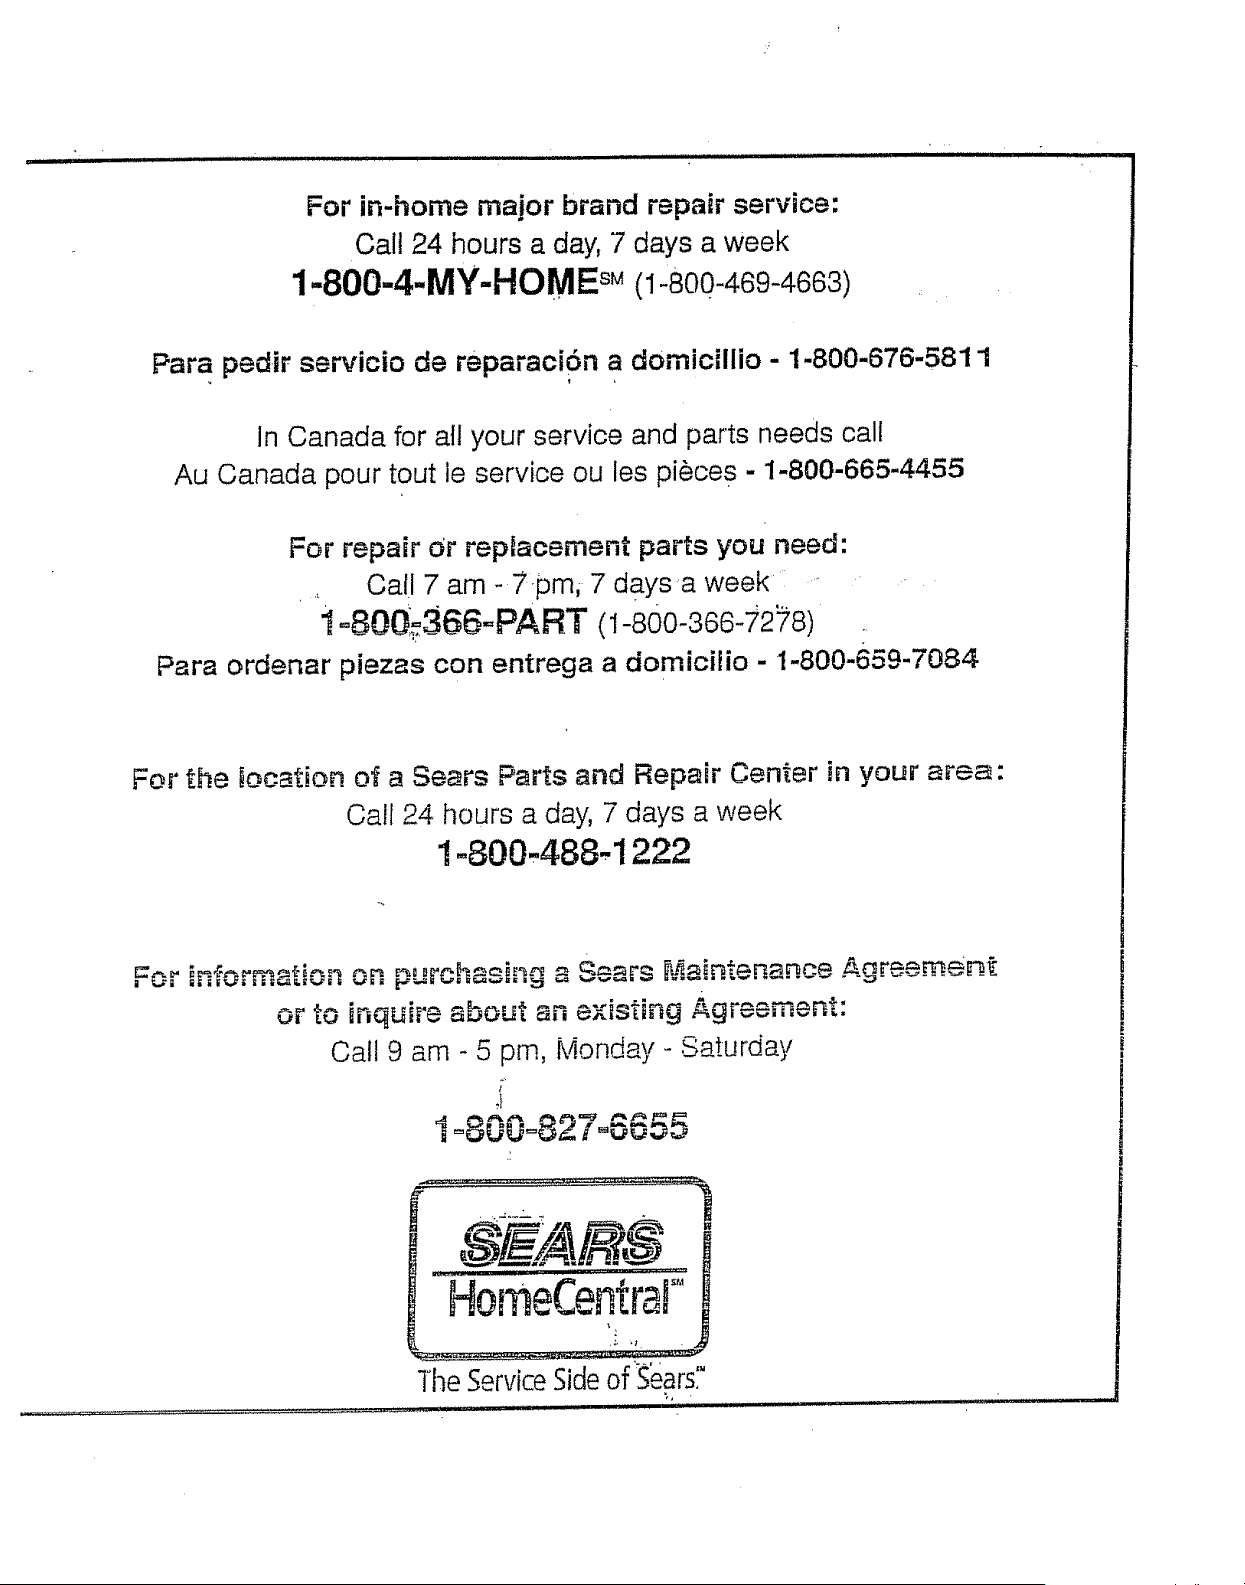
,, ,, Jll/ll¸ II iJlln,i
For in-home major brand repair service:
Call 24 hours a day, 7 days a week
1-800-4-MY-HOME sM(1-800-469-4663)
Para pedir ser_,icio de reparaci6n a domicillio - 1-800-676-581 1
In Canada for all your service and parts needs call
Au Canada pour tout ie service ou les pi_ces - 1-800-665-4455
For repair or repJacernent parts you need:
Call 7 am -7,pmi 7 daYsa week
I =800_366=PART (1-800-366-7278)
Para ordenar piezas con entrega a domiciiio - !-800-659-7084
For the iocation of a Sears Parts and Repair Center in your area:
Call 24 hours a day, 7 days a week
1-800,488-1222
.... Agr==r_,.,n,..
or to mqu_re about an e×_st_ng "" _ _"
Call 9 am - 5 pro, Monday- Saturday
,t
The ServiceSideof 'Sears?