
M90a Gen 3 and M90a Pro Gen3
User Guide

Read this first
Before using this documentation and the product it supports, ensure that you read and understand the
following:
• Safety and Warranty Guide
• Generic Safety and Compliance Notices
• Setup Guide
First Edition (April 2022)
© Copyright Lenovo 2022.
LIMITED AND RESTRICTED RIGHTS NOTICE: If data or software is delivered pursuant to a General Services
Administration “GSA” contract, use, reproduction, or disclosure is subject to restrictions set forth in Contract No. GS-
35F-05925.

Contents
Discover your Lenovo computer . . . . iii
Chapter 1. Meet your computer. . . . . 1
Front . . . . . . . . . . . . . . . . . . . . 1
Rear . . . . . . . . . . . . . . . . . . . . 3
Features and specifications . . . . . . . . . . . 4
USB specifications . . . . . . . . . . . . . . 5
Chapter 2. Get started with your
computer . . . . . . . . . . . . . . . . . 7
Adjust the computer stand (for selected models) . . . 7
Rotate the monitor (for selected models) . . . . . . 8
Adjust the tiltable camera (for selected models) . . . 8
Access networks . . . . . . . . . . . . . . . 9
Connect to the wired Ethernet . . . . . . . . 9
Connect to Wi-Fi networks (for selected
models) . . . . . . . . . . . . . . . . . 9
Use the touch screen (for selected models) . . . . . 9
Connect an external display . . . . . . . . . . 11
Detect human presence (for selected models) . . . 11
Chapter 3. Explore your computer . . 13
The Vantage app . . . . . . . . . . . . . . 13
Night light (Software solution) . . . . . . . . . 13
Set the power plan . . . . . . . . . . . . . 13
Transfer data . . . . . . . . . . . . . . . . 14
Connect to a Bluetooth-enabled device (for
selected models) . . . . . . . . . . . . 14
Use the optical drive (for selected models) . . 14
Use a media card (for selected models) . . . . 15
Purchase accessories . . . . . . . . . . . . 15
Chapter 4. Secure your computer
and information . . . . . . . . . . . . 17
Lock the computer . . . . . . . . . . . . . 17
Log in to your computer securely . . . . . . . . 17
UEFI BIOS passwords . . . . . . . . . . 17
Certificate based BIOS management. . . . . 18
Face authentication (for selected models) . . . 19
Use software security solutions. . . . . . . . . 19
Windows firewalls . . . . . . . . . . . . 19
Antivirus programs . . . . . . . . . . . . 19
Computrace Agent software embedded in
firmware (for selected models) . . . . . . . 20
Use BIOS security solutions . . . . . . . . . . 20
Wipe the storage drive data . . . . . . . . 20
Cover presence switch . . . . . . . . . . 20
Intel BIOS guard. . . . . . . . . . . . . 21
Smart USB Protection . . . . . . . . . . 21
Chapter 5. UEFI BIOS . . . . . . . . . 23
What is UEFI BIOS. . . . . . . . . . . . . . 23
Enter the BIOS menu. . . . . . . . . . . . . 23
Navigate in the BIOS interface . . . . . . . . . 23
Change the display language of UEFI BIOS
. . . . 23
Change the display mode of UEFI BIOS (for
selected models) . . . . . . . . . . . . . . 24
Set the system date and time . . . . . . . . . 24
Change the boot priority order . . . . . . . . . 24
Enable or disable the configuration change
detection feature . . . . . . . . . . . . . . 25
Enable or disable the automatic power-on
feature . . . . . . . . . . . . . . . . . . 25
Enable or disable the smart power-on feature (for
selected models) . . . . . . . . . . . . . . 25
Enable or disable the ErP LPS compliance mode . . 25
Change the ITS performance mode . . . . . . . 26
Change BIOS settings before installing a new
operating system . . . . . . . . . . . . . . 26
Update UEFI BIOS. . . . . . . . . . . . . . 27
Recover from a BIOS update failure . . . . . . . 27
Clear CMOS . . . . . . . . . . . . . . . . 28
Chapter 6. Diagnostics . . . . . . . . 29
Lenovo diagnostic tools . . . . . . . . . . . 29
The Vantage app . . . . . . . . . . . . . . 29
Chapter 7. CRU replacement . . . . . 31
CRU list . . . . . . . . . . . . . . . . . . 31
Remove or replace a CRU . . . . . . . . . . . 31
Computer stand . . . . . . . . . . . . . 31
Chapter 8. Help and support . . . . . 37
Self-help resources . . . . . . . . . . . . . 37
Call Lenovo . . . . . . . . . . . . . . . . 39
Before you contact Lenovo . . . . . . . . 39
Lenovo Customer Support Center . . . . . . 39
Purchase additional services. . . . . . . . . . 40
Appendix A. Compliance
information . . . . . . . . . . . . . . . 41
Appendix B. Notices and
trademarks . . . . . . . . . . . . . . . 43
© Copyright Lenovo 2022 i

ii M90a Gen 3 and M90a Pro Gen3 User Guide

Discover your Lenovo computer
Thank you for choosing a Lenovo
®
computer! We are dedicated to delivering the best solution to you.
Before starting your tour, please read the following information:
• Illustrations in this documentation might look different from your product.
• Depending on the model, some optional accessories, features, software programs, and user interface
instructions might not be applicable to your computer.
• Documentation content is subject to change without notice. To get the latest documentation, go to
https://
pcsupport.lenovo.com
.
© Copyright Lenovo 2022 iii

iv M90a Gen 3 and M90a Pro Gen3 User Guide
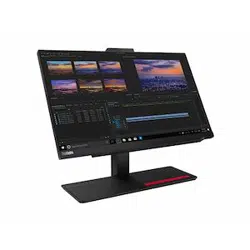
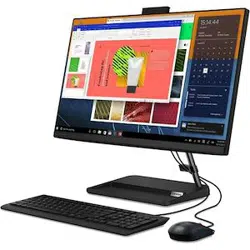
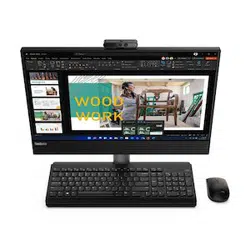
Chapter 1. Meet your computer
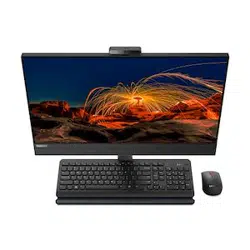
Front
1. Microphones* 2. Integrated camera or Infrared (IR) camera*
3. Integrated camera or Infrared (IR) camera shield* 4. IR camera activity indicator*
5. Multi-touch screen*
6. Microphone mute/unmute indicator*
7. System status indicator 8. Microphone mute/unmute control
9. Monitor / computer mode switch
10. USB 3.2 connector Gen 2
© Copyright Lenovo 2022 1

11. Headset connector 12. SD-card slot*
13. Power button
14. Optical drive activity indicator*
15. Optical drive eject button*
* for selected models
System status indicator
Show the system status of your computer.
• Blinking for three times: The computer is initially connected to power.
• On: The computer is starting up or working.
• Off: The computer is off or in hibernation mode.
• Blinking rapidly: The computer is entering sleep or hibernation mode.
• Blinking slowly: The computer is in sleep mode.
Related topics
• “Use the optical drive (for selected models)” on page 14.
• “Use a media card (for selected models)” on page 15.
• “Lenovo diagnostic tools” on page 8.
• “USB specifications” on page 5.
2
M90a Gen 3 and M90a Pro Gen3 User Guide
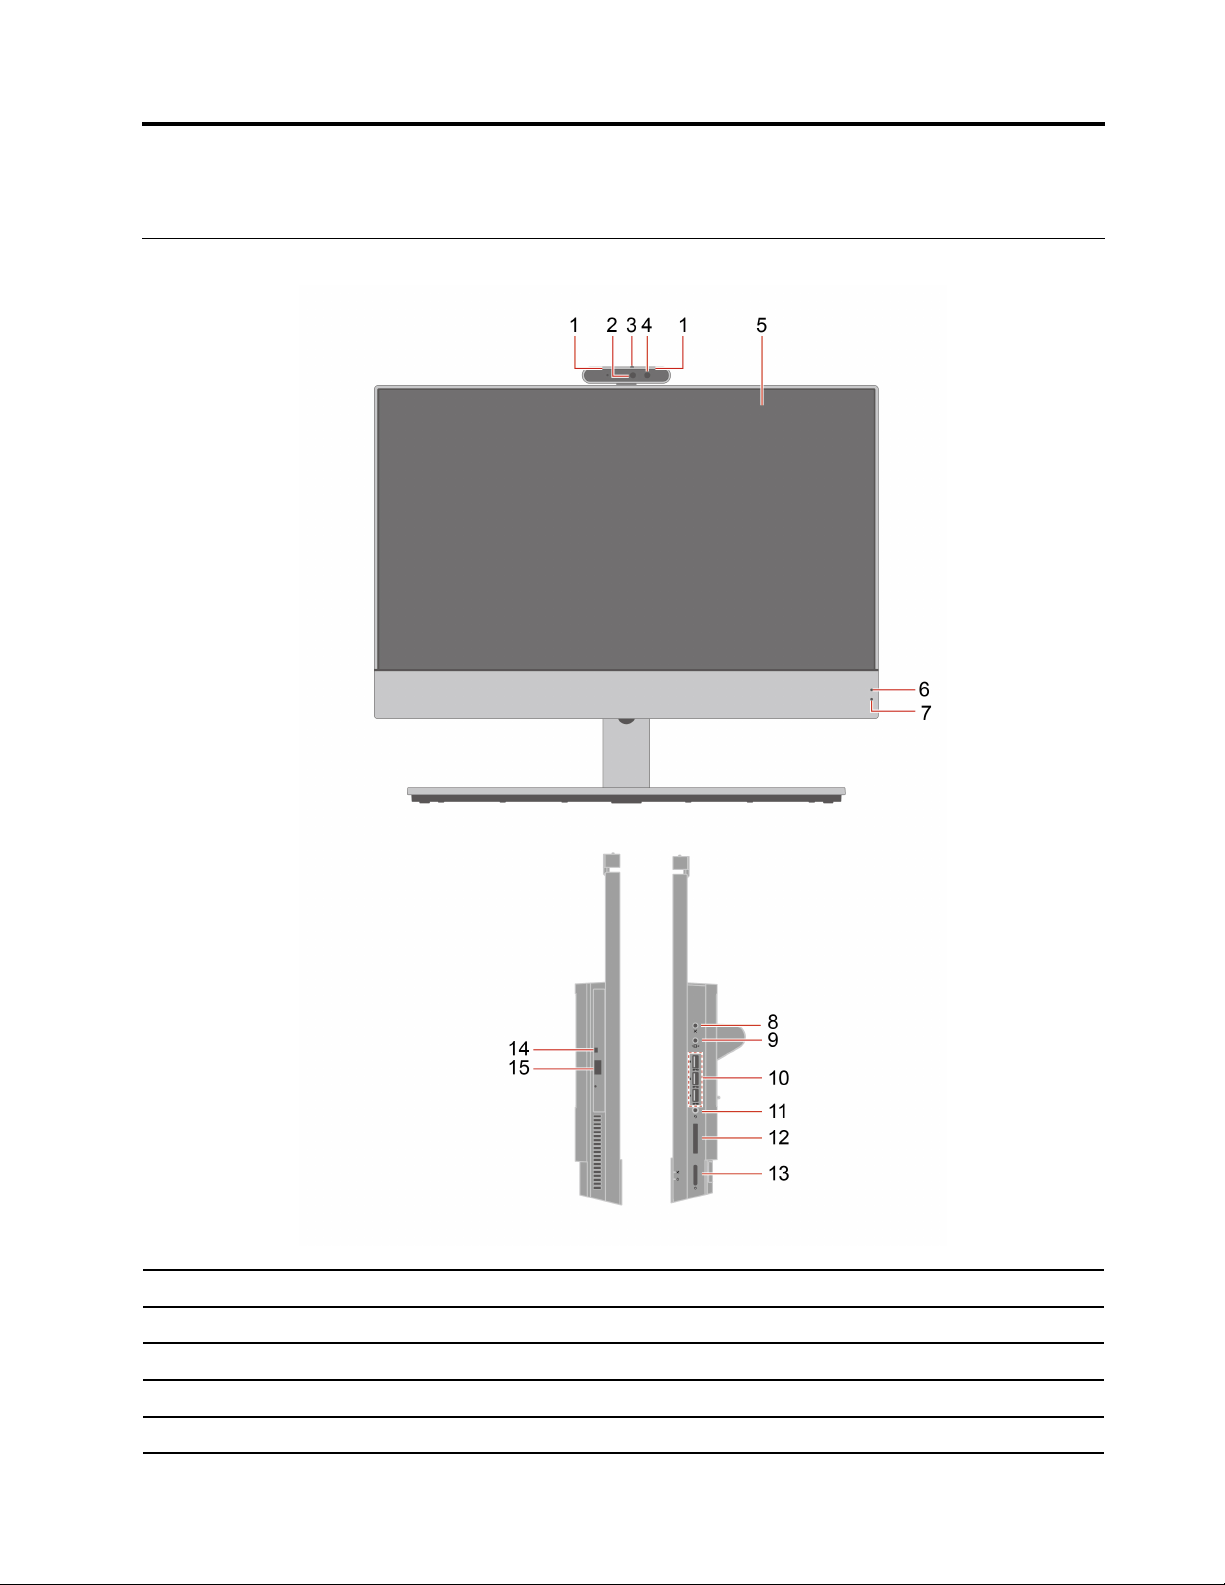
Rear
1. Serial connector*
2. DisplayPort
™
out connector
4. Ethernet connector
5. USB-C
®
(3.2 Gen 2) connector
6. USB 3.2 connector Gen 1 (with smart power-on
feature)
7. USB 3.2 connectors Gen 1
8. Security-lock slot
9. Power cord connector
10. VESA
®
threaded holes (screws: M4 x 8 mm, 4 pcs)
* for selected models
Serial connector
Connect an external modem, a serial printer, or other devices that use a serial connector.
Related topics
• “Lock the computer” on page 17.
• “Connect an external display” on page 11.
• “USB specifications” on page 5.
• “Enable or disable the smart power-on feature (for selected models)” on page 25.
Chapter 1. Meet your computer 3
3. HDMI
™
in1.4/Out2.1connector

Features and specifications
For detailed specifications of your computer, go to
https://psref.lenovo.com.
Dimensions (without any
computer stand)
• Width: 539.6 mm(21.2 inches)
• Height: 352 mm (13.9 inches)
• Depth: 49.3 mm (1.9 inches)
Weight (without packaging) Maximum configuration as shipped: 8.5 kg (18.7 lb)
Hardware configuration
Type Device Manager in the Windows search box and then press Enter. Type the
administrator password or provide confirmation, if prompted.
Power supply
• 180-watt automatic voltage-sensing power supply
• 230-watt automatic voltage-sensing power supply
Electrical input
• Input voltage: From 100 V ac to 240 V ac
• Input frequency: 50/60 Hz
Microprocessor
Type System in the Windows search box and then press Enter. View the system
information as you need.
Memory
• M90a Gen 3: Double data rate 4 (DDR4) small outline dual in-line memory
module (SODIMM)
• M90a Pro Gen3: Double data rate 5 (DDR5) small outline dual in-line memory
module (SODIMM)
Maximum memory capacity: 64 GB
Storage device
• 2.5-inch hard disk drive*
• M.2 solid-state drive*
To view the storage drive capacity of your computer, type Disk Management in the
Windows search box and then press Enter.
Note: The storage drive capacity indicated by the system is less than the nominal
capacity.
Video features
• Color display with White Light Emitting Diode (WLED) technology
• Color display with Full High Definition (FHD) technology
• Display size: 604.5 mm (23.8 inches)
• Display resolution:
– M90a Gen 3: 1920 x 1080 pixels
– M90a Pro Gen3: 2560 x 1440 pixels
• Multi-touch technology*
• The integrated graphics card supports the following:
– DisplayPort out connector
– HDMI in and out connector
• The optional discrete graphics card provides an enhanced video experience
and extended capabilities.
4 M90a Gen 3 and M90a Pro Gen3 User Guide
Expansion
• Card reader*
• Memory slots
• M.2 solid-state drive slot
• Optical drive*
• Storage drive bay
Network features
• Bluetooth*
• Ethernet LAN
• Wireless LAN*
* for selected models
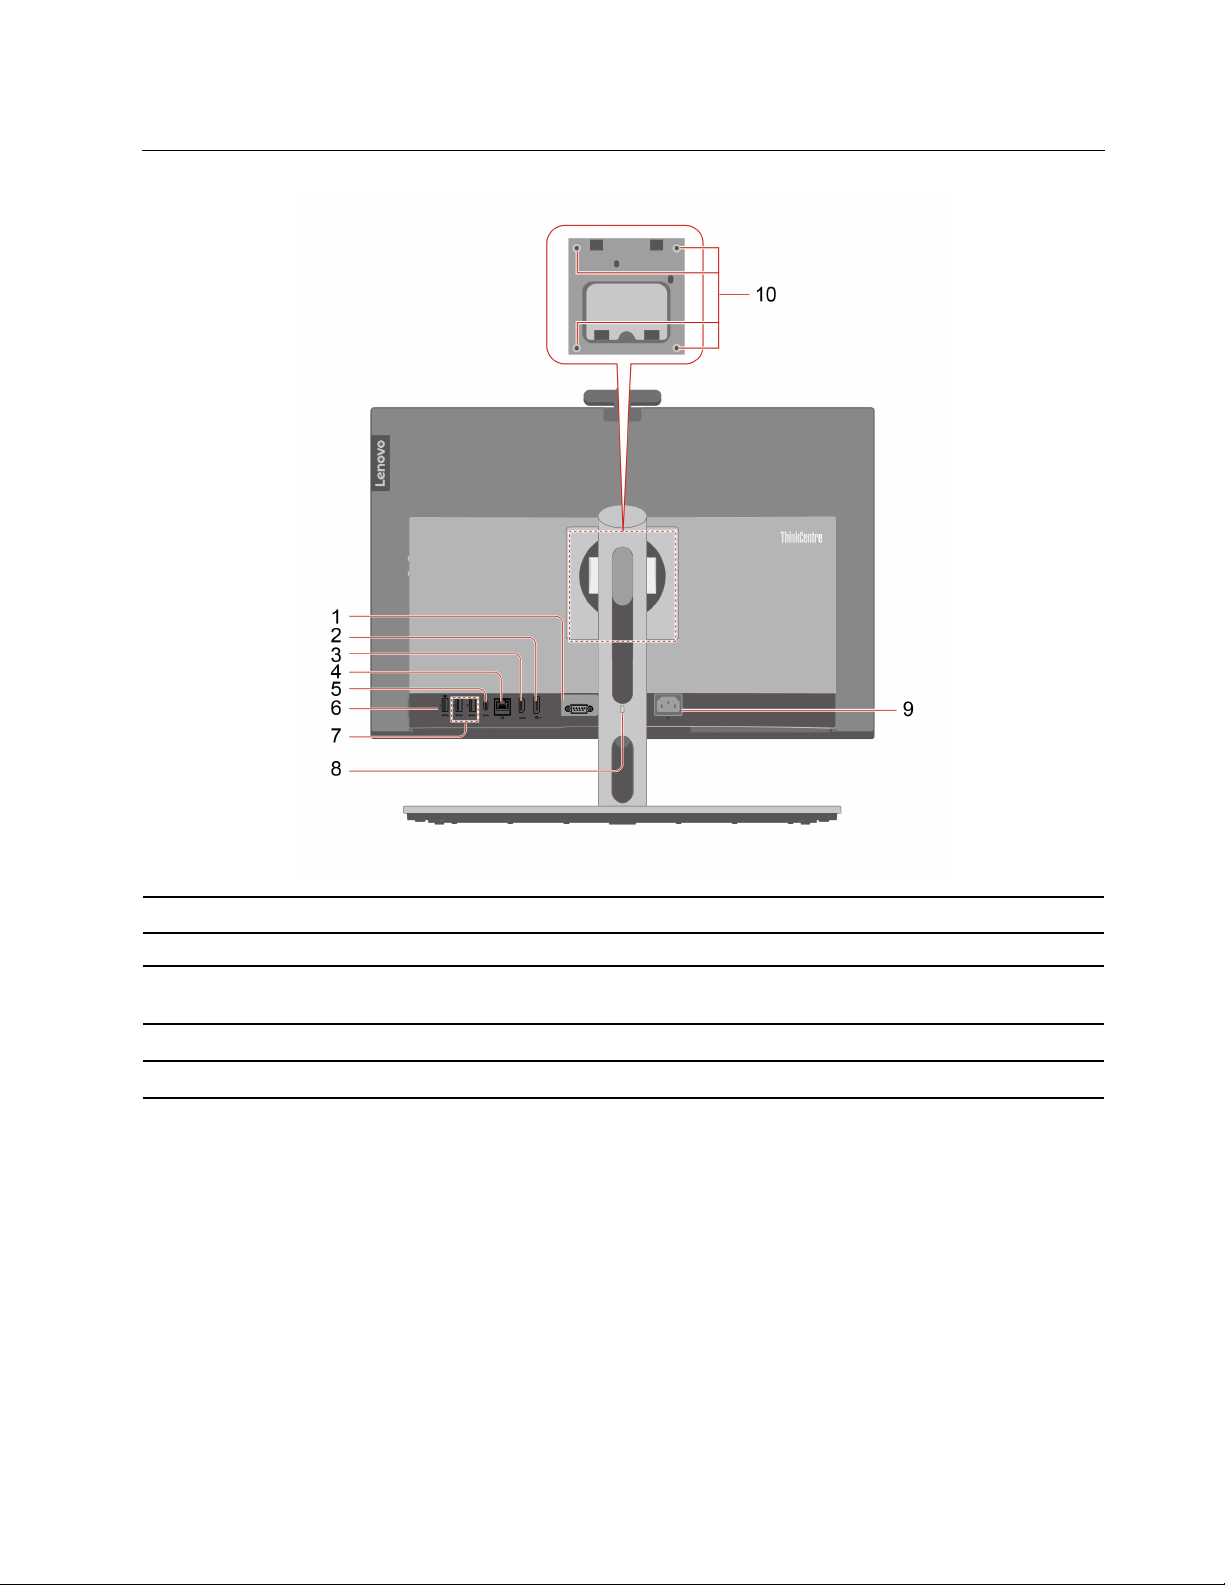
USB specifications
Note: Depending on the model, some USB connectors might not be available on your computer.
Connector name
Description
• USB 2.0 connector
•
USB 3.2 connector Gen 1
•
USB 3.2 connector Gen 2
Connect USB-compatible devices, such as a USB
keyboard, USB mouse, USB storage device, or USB
printer.
• USB-C (3.2 Gen 1) connector
•
USB-C (3.2 Gen 2) connector
•
USB-C (Thunderbolt 3) connector
•
USB-C (Thunderbolt 4) connector
• Charge USB-C compatible devices with the output
voltage and current of 5 V and 3 A.
• Connect to USB-C accessories to help expand your
computer functionality. To purchase USB-C
accessories, go to
https://www.lenovo.com/accessories.
Chapter 1. Meet your computer 5

Statement on USB transfer rate
Depending on many factors such as the processing capability of the host and peripheral devices, file
attributes, and other factors related to system configuration and operating environments, the actual transfer
rate using the various USB connectors on this device will vary and will be slower than the data rate listed
below for each corresponding device.
USB device Data rate (Gbit/s)
3.2 Gen 1
5
3.2 Gen 2
10
3.2 Gen 2 × 2
20
Thunderbolt 3 40
Thunderbolt 4 40
6 M90a Gen 3 and M90a Pro Gen3 User Guide
Chapter 2. Get started with your computer
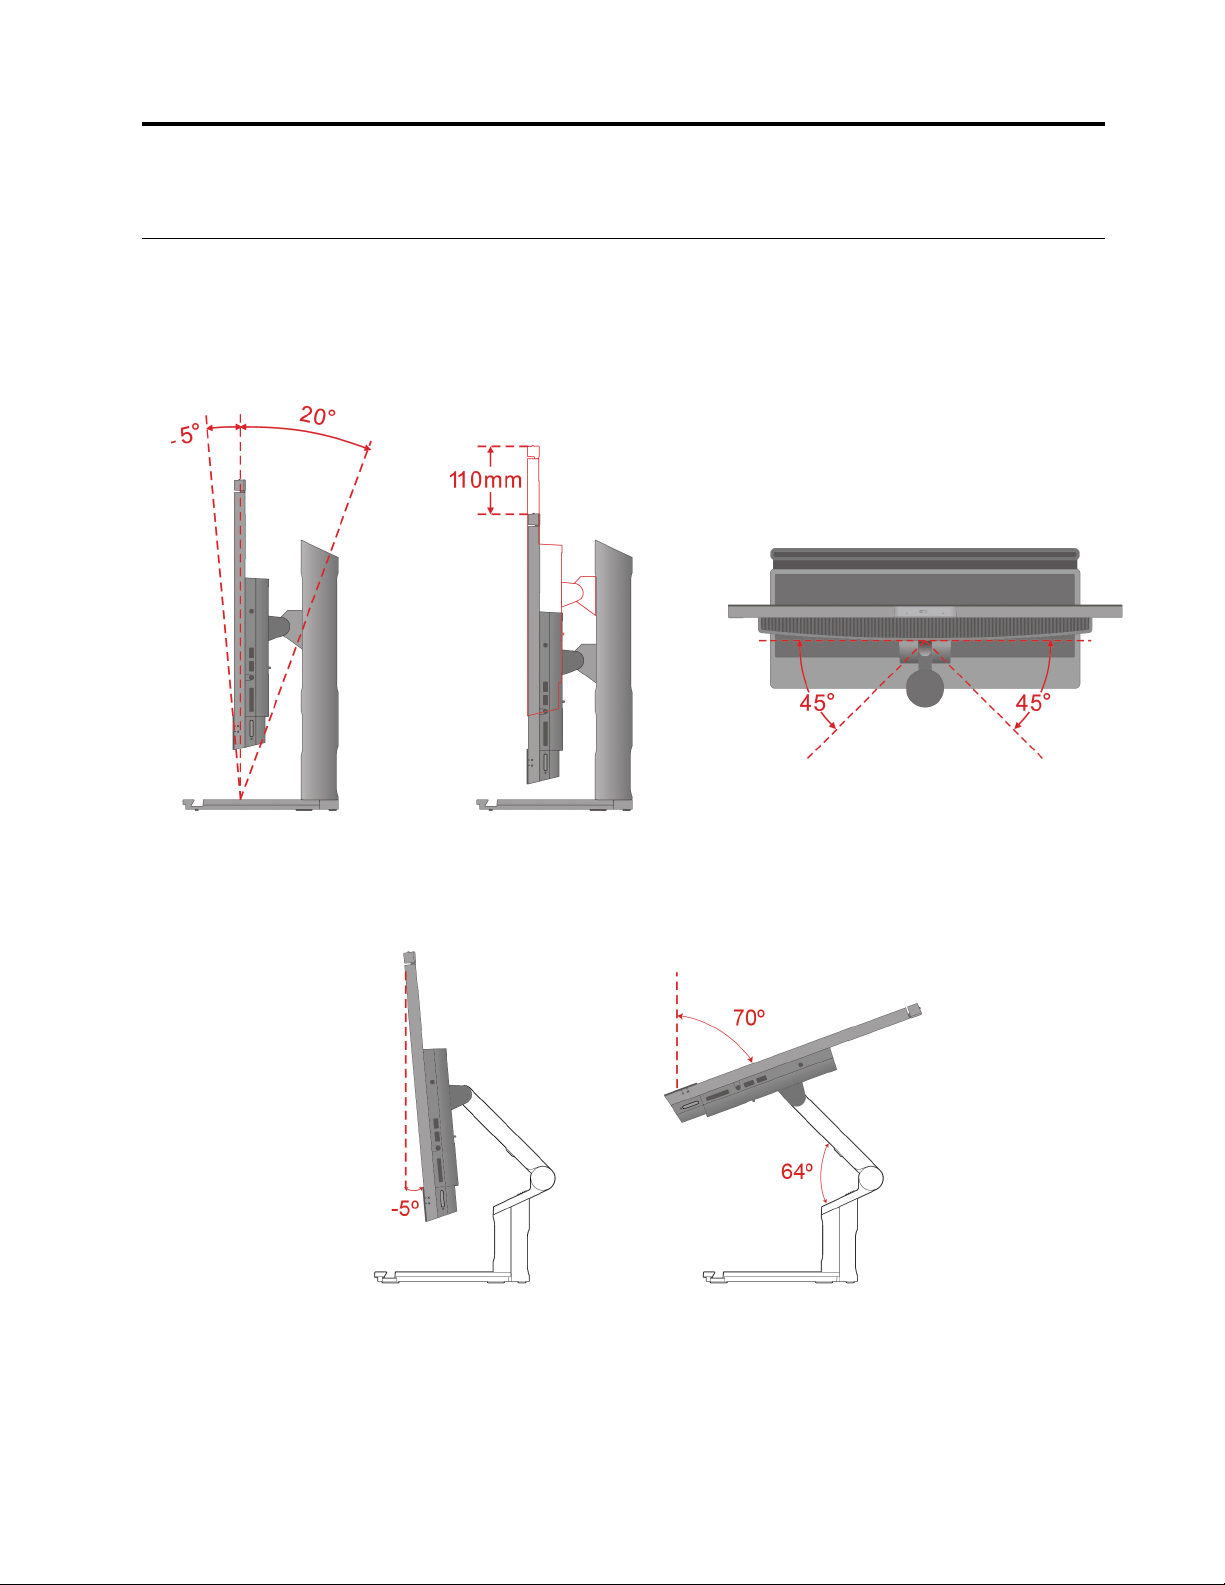
Adjust the computer stand (for selected models)
For full-function monitor stand
For UltraFlex V Stand
© Copyright Lenovo 2022 7
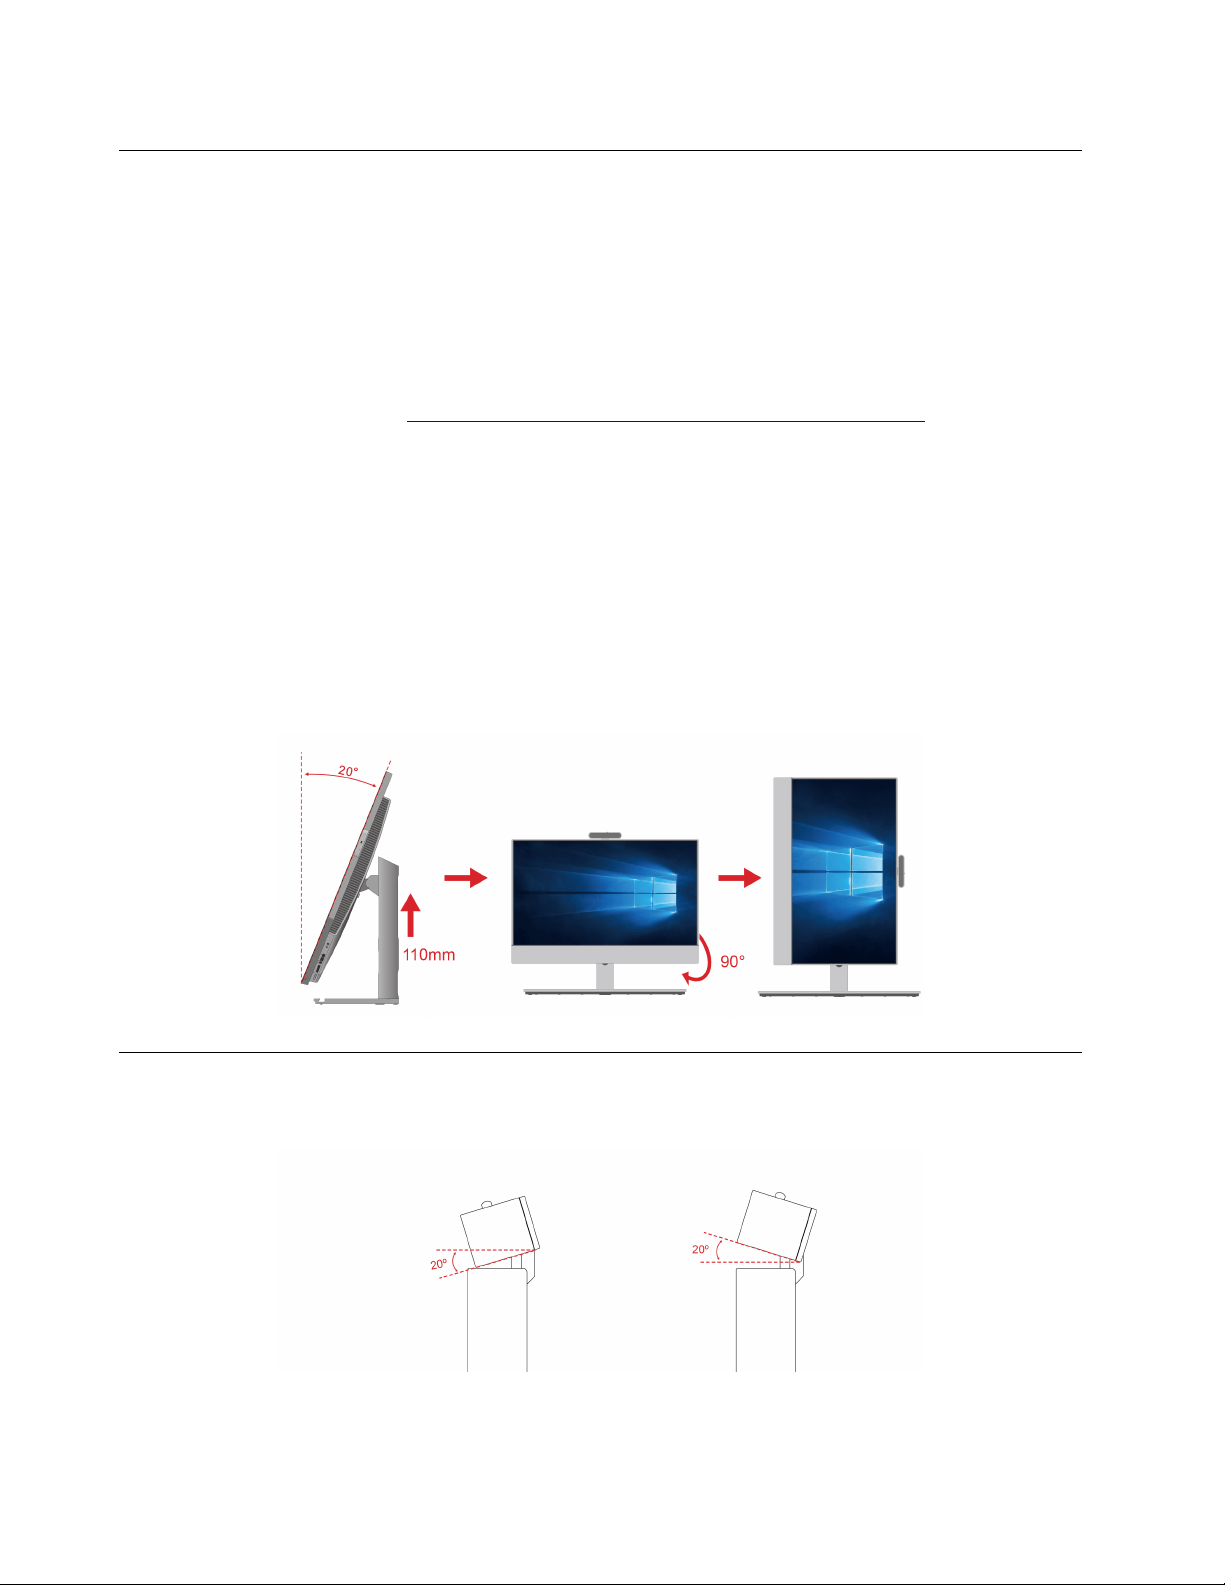
Rotate the monitor (for selected models)
The full function stand supports rotating the computer monitor from horizontal to vertical in certain usage
scenario. Before rotating, you must adjust the monitor to the highest point (110 mm) and the tilt angle to
maximum (backward 20 degrees).
Adjust the desktop settings
Before rotating the computer monitor direction, you might need to adjust the desktop direction accordingly
for better use experience. The preinstalled Intel Graphics Command Center app (IGCC) helps you enable and
customize system hotkeys so that you can use shortcuts to personalize your desktop settings. To download
the latest version of IGCC, go to
https://www.microsoft.com/store/productId/9PLFNLNT3G5G.
1. To access the IGCC app, type Intel Graphics Command Center in the Windows search box.
2. Accept the license of IGCC.
3. Turn on the Enable System Hotkeys switch. Customize the landscape and Portrait hotkeys according
to your preference.
4. Press Ctrl + Alt + Left ( by default) to change the desktop from horizontal to vertical.
5. Press Ctrl + Alt + Up (by default) to change the desktop from vertical to horizontal.
Rotate the monitor
Rotate the computer monitor clockwise from horizontal to vertical. You also can rotate the monitor
counterclockwise from vertical to horizontal when needed.
Adjust the tiltable camera (for selected models)
You can adjust the camera angle by tilting the camera forward or backward for better usage experience.
8 M90a Gen 3 and M90a Pro Gen3 User Guide
Access networks
This section helps you access networks through connecting to a wired or wireless network.
Connect to the wired Ethernet
Connect your computer to a local network through the Ethernet connector on your computer with an
Ethernet cable.
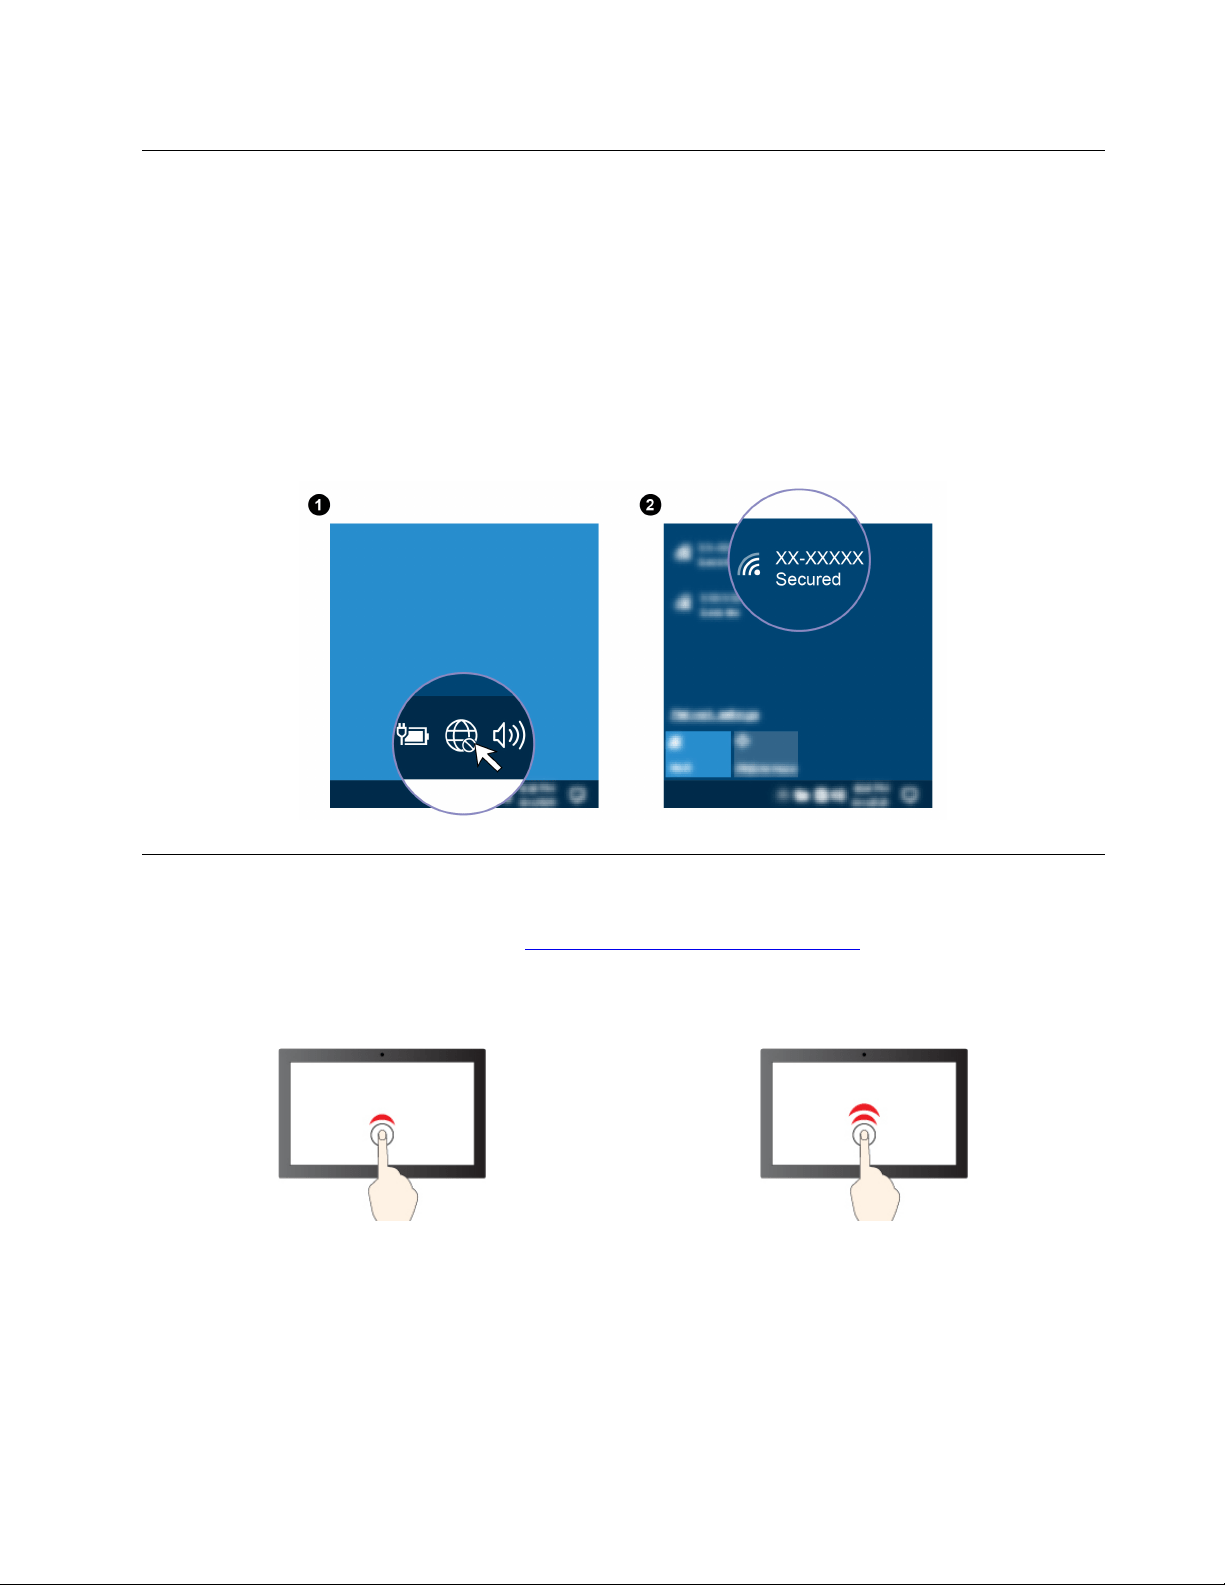
Connect to Wi-Fi networks (for selected models)
Click the network icon in the Windows
®
notification area, and then select a network for connection. Provide
required information, if needed.
Use the touch screen (for selected models)
If your computer display supports the multi-touch function, you can navigate the screen with simple touch
gestures. For more touch gestures, refer to
https://support.microsoft.com/windows.
Note: Some gestures might not be applicable when you use certain apps.
Tap once to single click Tap twice quickly to double-click
Chapter 2. Get started with your computer 9
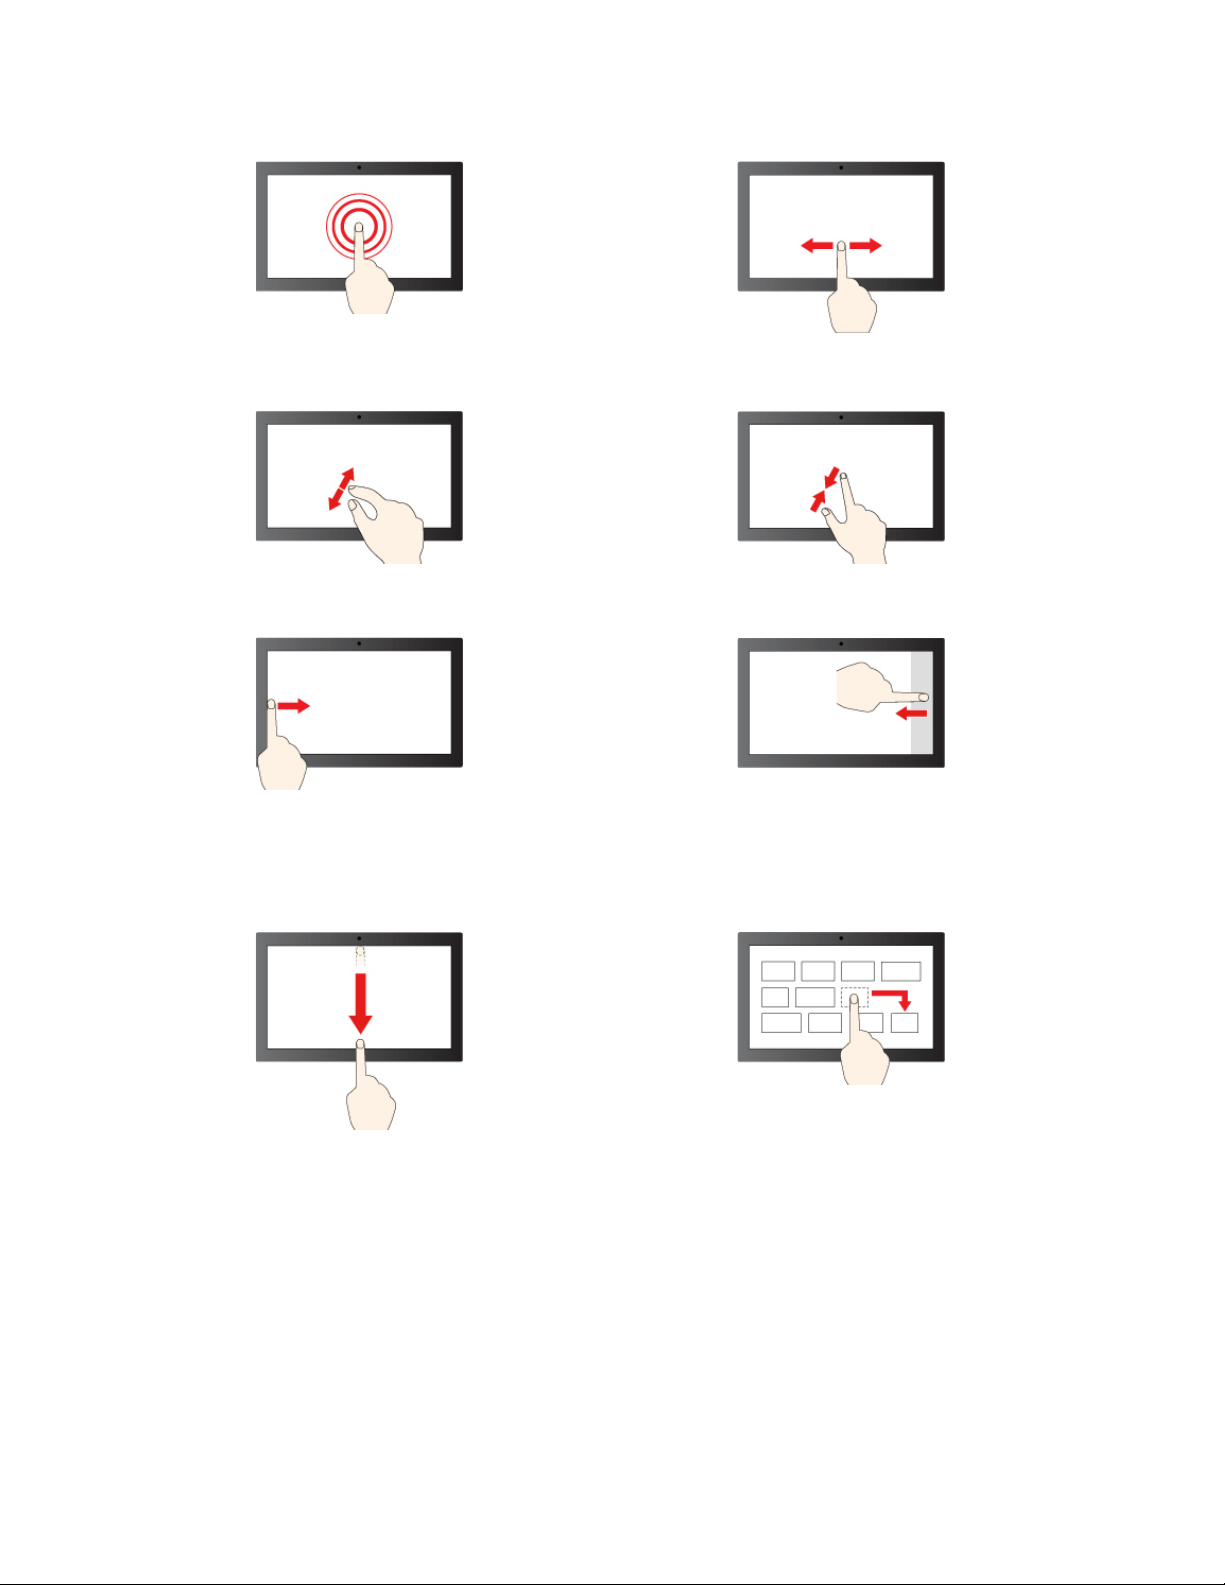
Tap and hold to right-click
Slide to scroll through items
Zoom in Zoom out
Swipe from the left: view all open windows (Windows 10)
Swipe from the left: open widget panel (Windows 11)
Swipe from the right: open action center (Windows 10)
Swipe from the right: open notification center (Windows
11)
Swipe downwards shortly: show title bar
Swipe downwards: close the current app
Drag
Maintenance tips
• Turn off the computer before cleaning the touch screen.
• Use a dry, soft, and lint-free cloth or a piece of absorbent cotton to remove fingerprints or dust from the
touch screen. Do not apply solvents to the cloth.
• The touch screen is a glass panel covered with a plastic film. Do not apply pressure or place any metallic
object on the screen, which might damage the touch panel or cause it to malfunction.
• Do not use fingernails, gloved fingers, or inanimate objects for input on the screen.
10
M90a Gen 3 and M90a Pro Gen3 User Guide
• Regularly calibrate the accuracy of the finger input to avoid a discrepancy.
Connect an external display
Connect a projector or a monitor to your computer to give presentations or expand your workspace.
Connect a wireless display
Ensure that both your computer and the wireless display support Miracast
®
.
Press Windows logo key + K and then select a wireless display to connect.
Change display settings
1. Right-click a blank area on the desktop and select display settings.
2. Select the display that you want to configure and change display settings of your preference.
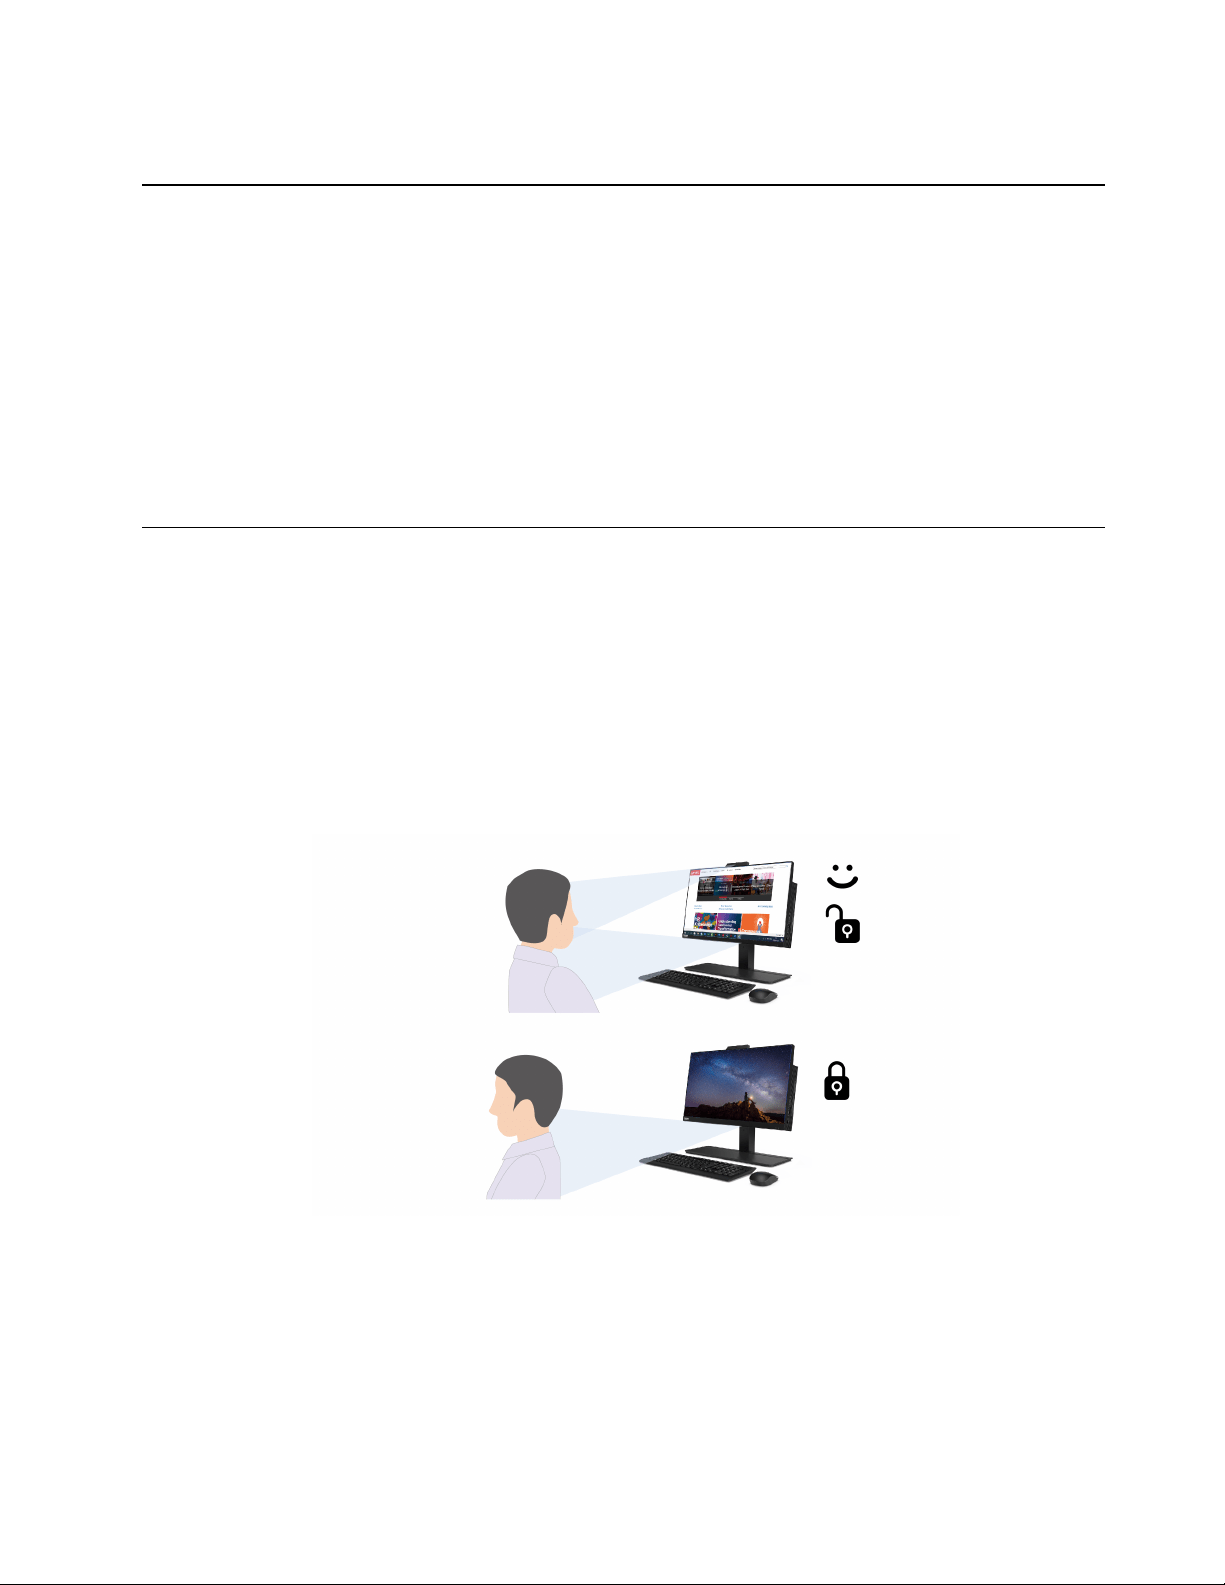
Detect human presence (for selected models)
Your computer supports the human presence detection function.
• Wake up the computer at most 1.5 meters (4.9 feet) from it when you are approaching. With a face ID
created, your computer can recognize your face and log in to the system automatically. You need to face
the camera and be at most 0.5 meters (1.6 feet) from the computer. The function does not work when your
computer is in hibernation mode or has been turned off.
Note: The zero touch login function is only available on computer models that support Modern Standby.
• Dim the display or lock the computer (depending on your settings on the Vantage app) when you are
leaving. The function does not work if you set the power options to never turn off the display.
The human presence sensor is enabled by default. To change the settings:
Open the Vantage app, and then click Device ➙ Smart Assist to customize the Zero Touch Login and Zero
Touch Lock settings according to your preference.
Notes:
• Your computer uses a human presence sensor to detect your presence and the IR camera to recognize
your face. Lenovo does not collect any personal data.
Chapter 2. Get started with your computer 11

• For some countries or regions, the human presence sensor is disabled according to local regulations.
12
M90a Gen 3 and M90a Pro Gen3 User Guide

Chapter 3. Explore your computer
The Vantage app
The preinstalled Vantage app is a customized one-stop solution to help you maintain your computer with
automated updates and fixes, configure hardware settings, and get personalized support.
To access the Vantage app, type Vantage in the Windows search box.
Key features
The Vantage app enables you to:
• Know the device status easily and customize device settings.
• Download and install UEFI BIOS, firmware and driver updates to keep your computer up-to-date.
• Monitor your computer health, and secure your computer against outside threats.
• Scan your computer hardware and diagnose hardware problems.
• Look up warranty status (online).
• Access User Guide and helpful articles.
Notes:
• The available features vary depending on the computer model.
• The Vantage app makes periodic updates of the features to keep improving your experience with your
computer. The description of features might be different from that on your actual user interface.
Night light (Software solution)
Blue light is the high-energy visible light in the light spectrum. Excessive exposure to blue light might damage
your vision. Night light is a feature that reduces the blue light emitted by computer displays. When the night
light is on, your computer display shows warmer colors that help you reduce eye strain.
To turn on or turn off the night light, type Night light in the Windows search box and then press Enter. Then,
follow the on-screen instructions.
Note: Selected Lenovo computers are low blue-light certified. These computers are tested with night light
turned on and color temperature set to the default value of 48.
Set the power plan
For ENERGY STAR
®
compliant computers, the following power plan takes effect when your computers have
been idle for a specified duration:
• turn off the display: After 10 minutes
• put the computer to sleep: After 25 minutes
To awaken the computer from Sleep mode, press any key on your keyboard.
To reset the power plan:
1. Right-click the battery status icon and select Power Options.
2. Choose or customize a power plan of your preference.
© Copyright Lenovo 2022 13
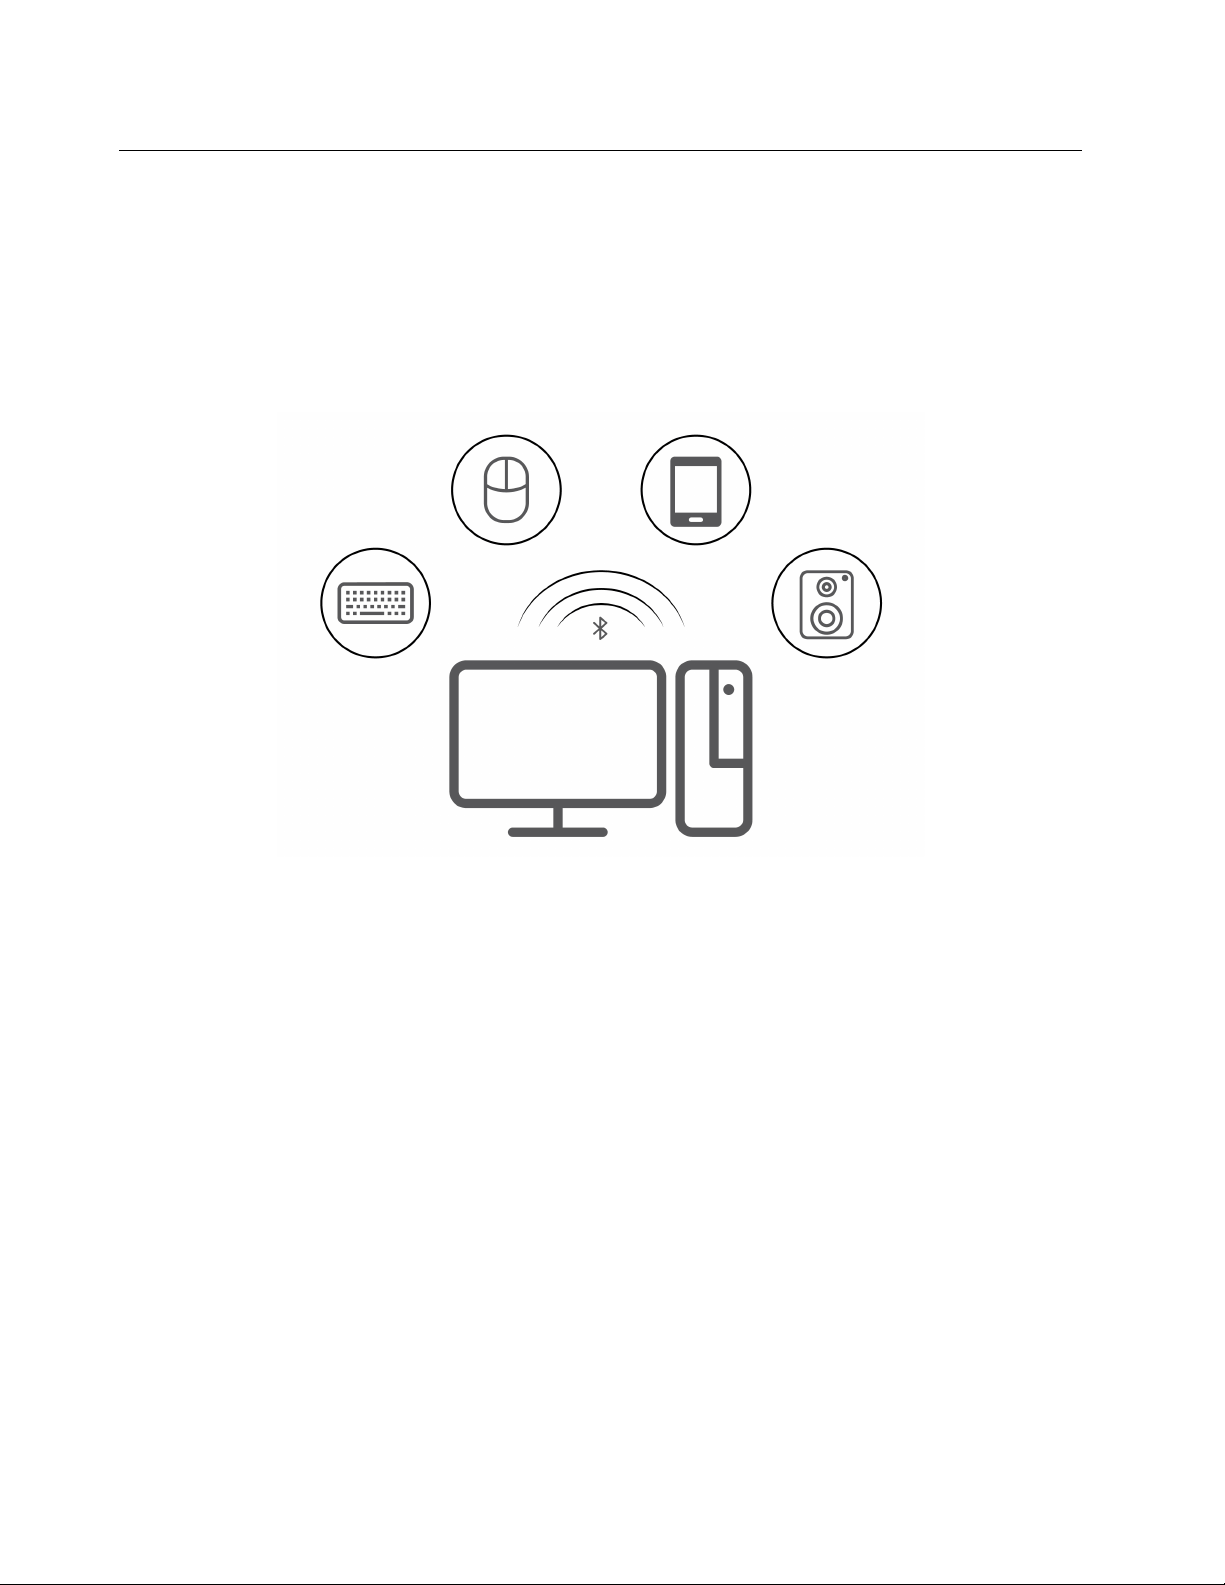
Transfer data
Quickly share your files using the built-in Bluetooth technology among devices with the same features. You
also can install a disc or media card to transfer data.
Connect to a Bluetooth-enabled device (for selected models)
You can connect all types of Bluetooth-enabled devices to your computer, such as a keyboard, a mouse, a
smartphone, or speakers. Place the device that you are attempting to connect to less than 10 meters (33
feet) from the computer.
1. Type Bluetooth in the Windows search box and then press Enter.
2. Turn on Bluetooth, if it is off.
3. Select a Bluetooth device, and then follow the on-screen instructions.
Use the optical drive (for selected models)
If your computer has an optical drive, read the following information.
Know the type of your optical drive
1. Type Device Manager in the Windows search box and then press Enter. Type the administrator password
or provide confirmation, if prompted.
2. Select an optical drive, and then follow the on-screen instructions.
Install or remove a disc
1. With the computer on, press the eject button on the optical drive. The tray slides out of the drive.
2. Insert a disc into the tray or remove a disc from the tray, and then push the tray back into the drive.
Note: If the tray does not slide out of the drive when you press the eject button, turn off the computer. Then,
insert a straightened paper clip into the emergency-eject hole adjacent to the eject button. Use the
emergency eject only in an emergency.
14
M90a Gen 3 and M90a Pro Gen3 User Guide

Record a disc
1. Insert a recordable disc into the optical drive that supports recording.
2. Do one of the following:
• Type AutoPlay in the Windows search box and then press Enter. Turn on Use AutoPlay for all media
and devices.
• Open Windows Media Player.
• Double-click the ISO file.
3. Follow the on-screen instructions.
Use a media card (for selected models)
If your computer has a SD-card slot, read the following information.
Install a media card
1. Locate the SD-card slot.
2. Ensure that the metal contacts on the card are facing the ones in the SD-card slot. Insert the card firmly
into the SD-card slot until it is secured in place.
Remove a media card
Attention: Before removing the card:
1. Click the triangular icon in the Windows notification area to show hidden icons. Right-click the icon
prompting you to safely remove hardware and eject media.
2. Select the corresponding item to eject the card from the Windows operating system.
3. Press the card and remove it from your computer. Store the card safely for future use.
Purchase accessories
Lenovo has a number of hardware accessories and upgrades to help expand the capabilities of your
computer. Options include memory modules, storage devices, network cards, power adapters, keyboards,
mice, and more.
To shop at Lenovo, go to
https://www.lenovo.com/accessories.
Chapter 3. Explore your computer 15

16 M90a Gen 3 and M90a Pro Gen3 User Guide

Chapter 4. Secure your computer and information
Lock the computer
Note: Lenovo makes no comments, judgments, or warranties about the function, quality, or performance of
the locking device and security feature. You can purchase computer locks from Lenovo.
Kensington-style cable lock
Lock your computer to a desk, table, or other fixtures through a Kensington-style cable lock.
Log in to your computer securely
This section provides secure ways to log in to your computer.
UEFI BIOS passwords
You can set passwords in UEFI (Unified Extensible Firmware Interface) BIOS (Basic Input/Output System) to
strengthen the security of your computer.
Password types
You can set a power-on password, supervisor password, system management password, or hard disk
password in UEFI BIOS to prevent unauthorized access to your computer. However, you are not prompted to
enter any UEFI BIOS password when your computer resumes from sleep mode.
• Power-on password
When a power-on password is set, you are prompted to enter a valid password each time the computer is
turned on.
• Supervisor password
Setting a supervisor password deters unauthorized users from changing configuration settings. If you are
responsible for maintaining the configuration settings of several computers, you might want to set a
supervisor password.
© Copyright Lenovo 2022 17

When a supervisor password is set, you are prompted to enter a valid password each time you try to enter
the BIOS menu.
If both the power-on password and supervisor password are set, you can enter either password.
However, you must use your supervisor password to change any configuration settings.
• Hard disk password
Setting a hard disk password prevents unauthorized access to the data on the storage drive. When a hard
disk password is set, you are prompted to enter a valid password each time you try to access the storage
drive.
Note: After you set a hard disk password, your data on the storage drive is protected even if the storage
drive is removed from one computer and installed in another.
• System management password (for selected models)
You can enable the system management password to have the same authority as the supervisor
password to control security related features. To customize the authority of the system management
password through the UEFI BIOS menu:
1. Restart the computer. When the logo screen is displayed, press F1 or Fn+F1.
2. Select Security ➙ System Management Password Access Control.
3. Follow the on-screen instructions.
If you have set both the supervisor password and the system management password, the supervisor
password overrides the system management password.
Set, change, and remove a password
Before you start, print these instructions.
1. Restart the computer. When the logo screen is displayed, press F1 or Fn+F1.
2. Select Security.
3. Depending on the password type, select Set Supervisor Password, Set Power-On Password, Set
System Management Password, or Hard Disk Password and press Enter.
4. Follow the on-screen instructions to set, change, or remove a password.
5. Press F10 or Fn+F10 to save the changes and exit.
You should record your passwords and store them in a safe place. If you forget the passwords, contact a
Lenovo-authorized service provider to have the passwords removed.
Note: If the hard disk password is forgotten, Lenovo cannot remove the password or recover data from the
storage drive.
Certificate based BIOS management
Certificate-based BIOS authentication (also called the password-less management mode) provides more
secure UEFI BIOS management with password-free solution. It is used to replace the supervisor password /
system management password for authentication if you have set one.
Note: Supervisor password / system management password are disabled automatically when certificate
mode is enabled. But the power-on password / hard disk password still can be used normally in certificate
mode if you have set one.
For certificate enrollment, see Certificate Enrollment Guide at:
https://support.lenovo.com/docs/certificate_
enrollment_guide
18 M90a Gen 3 and M90a Pro Gen3 User Guide

Enter the BIOS menu with certificate
Once you have enrolled the certificate, you can enter the BIOS menu with the certificate.
1. Restart the computer. When the logo screen is displayed, press F1 or Fn+F1 to enter the BIOS menu.
2. The request data is displayed. Click Save to File to save the request data in a USB key and send the
request data to IT admin by e-mail or phone.
3. Enter the unlock code provided by IT admin and click OK.
Notes:
• The unlock encode is a one-time password and is valid only during logon prompt (in one power-on cycle)
for up to two hours.
• If you click Skip, you can enter the BIOS setup menu without BIOS management authority. But certificate
reset is allowed.
Reset certificate
The enrolled certificate cannot be disabled. You can reset or remove it:
1. Restart the computer. When the logo screen is displayed, press F1 or Fn+F1.
2. Enter the BIOS menu with the certificate or skip the certification authentication process.
3. Select Security ➙ Reset Certificate.
4. Follow the on-screen instructions to enter the reset code provided by IT admin.
Face authentication (for selected models)
Create your face ID and unlock your computer by scanning your face:
1. Type Sign-in options in the Windows search box and then press Enter.
2. Select the face ID setting and then follow the on-screen instruction to create your face ID.
Use software security solutions
This section provides software solutions to secure your computer and information.
Windows firewalls
A firewall can be hardware, software, or a combination of both depending on the level of security required.
Firewalls work on a set of rules to determine which inbound and outbound connections are authorized. If the
computer is preinstalled with a firewall program, it helps protect against computer Internet security threats,
unauthorized access, intrusions, and Internet attacks. It also protects your privacy. For more information
about how to use the firewall program, refer to the help system of your firewall program.
To use Windows firewalls:
1. Type Control Panel in the Windows search box and then press Enter. View by large icons or small icons.
2. Click Windows Defender Firewall, and then follow the on-screen instructions.
Antivirus programs
The computer is preinstalled with an antivirus program to help you guard against, detect, and eliminate
viruses.
Lenovo provides a full version of antivirus software on the computer with a free 30-day subscription. After 30
days, you must renew the license to continue receiving the antivirus software updates.
Chapter 4. Secure your computer and information 19

Note: Virus definition files must be kept up-to-date to guard against new viruses.
For more information about how to use your antivirus software, refer to the help system of your antivirus
software.
Computrace Agent software embedded in firmware (for selected
models)
The Computrace Agent software is an IT asset management and computer theft recovery solution. The
software detects if changes have been made on the computer, such as hardware, software, or the computer
call-in location. You might have to purchase a subscription to activate the Computrace Agent software.
Use BIOS security solutions
This section provides BIOS solutions to secure your computer and information.
Wipe the storage drive data
It is recommended that you wipe the storage drive data before recycling the storage drive or the computer.
To wipe the storage drive data:
1. Restart the computer. When the logo screen is displayed, press F1 or Fn+F1.
2. Select Security ➙ secure wipe ➙ Enabled.
3. Press F10 or Fn+F10 to save the changes and exit.
4. Restart the computer. When the logo screen is displayed, press F12 or Fn+F12.
5. Select App Menu ➙ secure wipe and press Enter.
6. Select the storage drive you will wipe and click NEXT.
7. Select the entire storage drive or partition to wipe as desired.
8. Select the method as desired and click NEXT.
9. Click Yes to confirm your option when the prompting window is displayed.
10. If you have set a hard disk password for the storage drive, enter the password. Otherwise, set a
temporary password following the on-screen instructions. Then, click NEXT. The wiping process begins.
Note: Duration of the wiping process varies depending on the storage drive capacity.
11. Click Reboot when you are prompted to reset the system, and then one of the following will happen:
• If the system storage drive data is wiped, you will be prompted that no operating system is found.
• If the non-system storage drive data is wiped, the computer restarts automatically.
Cover presence switch
The cover presence switch prevents the computer from logging in to the operating system when the
computer cover is not properly installed or closed.
To enable the cover presence switch connector on the system board:
1. Restart the computer. When the logo screen is displayed, press F1 or Fn+F1.
2. Select Security ➙ Cover Tamper Detected and press Enter.
3. Select Enabled and press Enter.
4. Press F10 or Fn+F10 to save the changes and exit.
20
M90a Gen 3 and M90a Pro Gen3 User Guide

If the cover presence switch is enabled and the computer cover is not correctly installed or closed, an error
message will be displayed when you turn on the computer. To bypass the error message and log in to the
operating system:
1. Properly install or close the computer cover.
2. Enter the BIOS menu, save and then exit.
Intel BIOS guard
The Intel
®
BIOS Guard module cryptographically verifies all BIOS updates. This hardware-based security
helps prevent software and malware attacks on the computers BIOS.
Smart USB Protection
The Smart USB Protection function is a security function that helps prevent data from being copied from the
computer to USB storage devices connected to the computer. You can set the Smart USB Protection
function to one of the following modes:
• Disabled (default setting): You can use the USB storage devices without limitation.
• Read Only: You cannot copy data from the computer to the USB storage devices. However, you can
access or modify data on the USB storage devices.
• No Access: You cannot access the USB storage devices from the computer.
To configure the Smart USB Protection function:
1. Restart the computer. When the logo screen is displayed, press F1 or Fn+F1.
2. Select Security ➙ Smart USB Protection and press Enter.
3. Select the desired setting and press Enter.
4. Press F10 or Fn+F10 to save the changes and exit.
Chapter 4. Secure your computer and information 21

22 M90a Gen 3 and M90a Pro Gen3 User Guide

Chapter 5. UEFI BIOS
This chapter provides information about configuring and updating UEFI BIOS, and clearing CMOS.
What is UEFI BIOS
Note: The operating system settings might override any similar settings in UEFI BIOS.
UEFI BIOS is the first program that the computer runs when the computer is turned on. UEFI BIOS initializes
the hardware components and loads the operating system and other programs. Your computer comes with a
setup program with which you can change UEFI BIOS settings.
Enter the BIOS menu
Restart the computer. When the logo screen is displayed, press F1 or Fn+F1 to enter the BIOS menu.
Note: If you have set BIOS passwords, enter the correct passwords when prompted. You also can select No
or press Esc to skip the password prompt and enter the BIOS menu. However, you cannot change the
system configurations that are protected by passwords.
Navigate in the BIOS interface
Attention: The default configurations are already optimized for you in boldface. Improper change of the
configurations might cause unexpected results.
Depending on your keyboard, you can navigate in the BIOS interface by pressing the following keys, or
combinations of Fn and the following keys:
Key Function
F1 or Fn+F1 General Help
Esc or Fn+Esc Exit the submenu
↑↓ or Fn+↑↓ Locate an item
← → or Fn+← → Move keyboard focus
+/– or Fn++/– Change value
Enter Enter the submenu
F9 or Fn+F9
Setup Defaults
F10 or Fn+F10 Save and exit
Change the display language of UEFI BIOS
UEFI BIOS supports three or four display languages: English, French, simplified Chinese, and Russian (for
selected models).
To change the display language of UEFI BIOS:
1. Select Main ➙ Language and press Enter.
2. Set the display language as desired.
© Copyright Lenovo 2022 23

Change the display mode of UEFI BIOS (for selected models)
You can use UEFI BIOS in the graphic mode or the text mode according to your needs.
The keys on the keyboard used to perform various tasks are displayed at the bottom of the screen. In
addition to the keyboard, you also can use the mouse to make selections.
To change the display mode of UEFI BIOS:
1. Restart the computer. When the logo screen is displayed, press F1 or Fn+F1.
2. Select Main ➙ Setup Mode Select and press Enter.
3. Set the display mode as desired.
Set the system date and time
1. Restart the computer. When the logo screen is displayed, press F1 or Fn+F1.
2. Select Main ➙ System Time & Date and press Enter.
3. Set the system date and time as desired.
4. Press F10 or Fn+F10 to save the changes and exit.
Change the boot priority order
If the computer does not boot from a device as expected, you can change the boot priority order
permanently or select a temporary boot device.
Change the boot priority order permanently
1. Depending on the type of the storage device, do one of the following:
• If the storage device is internal, go to step 2.
• If the storage device is a disc, ensure that the computer is on or turn on the computer. Then, insert
the disc into the optical drive.
• If the storage device is an external device other than a disc, connect the storage device to the
computer.
2. Restart the computer. When the logo screen is displayed, press F1 or Fn+F1.
3. Select Startup ➙ Boot Priority Order, and then follow the on-screen instructions to change the boot
priority order.
4. You can also select the first priority device group by selecting Startup ➙ First Boot Device, and then
follow the on-screen instructions to select the first boot device within this group. Your computer will
boot from the first boot device before trying the boot priority order you set in the previous step.
5. Press F10 or Fn+F10 to save the changes and exit.
Select a temporary boot device
Note: Not all discs and storage drives are bootable.
1. Depending on the type of the storage device, do one of the following:
• If the storage device is internal, go to step 2.
• If the storage device is a disc, ensure that the computer is on or turn on the computer. Then, insert
the disc into the optical drive.
• If the storage device is an external device other than a disc, connect the storage device to the
computer.
24
M90a Gen 3 and M90a Pro Gen3 User Guide

2. Restart the computer. When the logo screen is displayed, press F12 or Fn+F12.
3. Select the storage device as desired and press Enter.
If you want to change the boot priority order permanently, select Enter Setup on Startup Device Menu and
press Enter to enter the BIOS menu.
Enable or disable the configuration change detection feature
If you enable configuration change detection, when the POST detects configuration changes of some
hardware devices (such as storage drives or memory modules), an error message will be displayed when you
turn on the computer.
To enable or disable the configuration change detection feature:
1. Restart the computer. When the logo screen is displayed, press F1 or Fn+F1.
2. Select Security ➙ Configuration Change Detection and press Enter.
3. Enable or disable the feature as desired.
4. Press F10 or Fn+F10 to save the changes and exit.
To bypass the error message and log in to the operating system, press F2 or Fn+F2. To clear the error
message, enter the BIOS menu, save and then exit.
Enable or disable the automatic power-on feature
The Automatic Power On item in UEFI BIOS provides various options for you to make your computer start up
automatically.
To enable or disable the automatic power-on feature:
1. Restart the computer. When the logo screen is displayed, press F1 or Fn+F1.
2. Select Power ➙ Automatic Power On and press Enter.
3. Select the feature as desired and press Enter.
4. Enable or disable the feature as desired.
5. Press F10 or Fn+F10 to save the changes and exit.
Enable or disable the smart power-on feature (for selected models)
Ensure that the keyboard is connected to a USB connector supporting the smart power-on feature. With the
smart power-on feature enabled, you can start up or wake up the computer from the hibernation mode by
pressing Alt+P.
To enable or disable the smart power-on feature:
1. Restart the computer. When the logo screen is displayed, press F1 or Fn+F1.
2. Select Power ➙ Smart Power On and press Enter.
3. Enable or disable the feature as desired.
4. Press F10 or Fn+F10 to save the changes and exit.
Enable or disable the ErP LPS compliance mode
Lenovo computers meet the eco-design requirements of the ErP Lot 3 regulation. For more information, go
to:
https://www.lenovo.com/us/en/compliance/eco-declaration
Chapter 5. UEFI BIOS 25

You can enable the ErP LPS compliance mode to reduce the consumption of electricity when the computer
is off or in sleep mode.
To enable or disable the ErP LPS compliance mode:
1. Restart the computer. When the logo screen is displayed, press F1 or Fn+F1.
2. Select Power ➙ Enhanced Power Saving Mode and press Enter.
3. Depending on whether you select Enabled or Disabled, do one of the following:
• If you select Enabled, press Enter. Then, select Power ➙ Automatic Power On and press Enter.
Check whether the Wake on LAN feature is disabled automatically. If no, disable it.
• If you select Disabled, press Enter. Then, go to the next step.
4. Press F10 or Fn+F10 to save the changes and exit.
When the ErP LPS compliance mode is enabled, you can wake up the computer by doing one of the
following:
• Press the power button.
• Enable the Wake Up on Alarm feature to make the computer wake up at a set time.
To meet the off mode requirement of ErP compliance, you need to disable the Fast Startup function.
1. Go to Control Panel and view by large icons or small icons.
2. Click Power Options ➙ Choose what the power buttons do ➙ Change settings that are currently
unavailable.
3. Clear the Turn on fast startup (recommended) option from the Shutdown settings list.
Change the ITS performance mode
You can adjust the acoustic and thermal performance of your computer by changing the ITS performance
mode. Three options are available:
• Balance mode: The computer works at the balance mode with balanced noise and better performance.
• Performance mode (default setting): The computer works at the best performance with normal acoustic
level.
Note: The term “best” only refers to the best effect among different settings of the product itself.
• Full Speed: All fans in the computer will run at full speed.
To change the ITS performance mode:
1. Restart the computer. When the logo screen is displayed, press F1 or Fn+F1.
2. Select Power ➙ Intelligent Cooling and press Enter.
3. Select Performance Mode and press Enter.
4. Set the performance mode as desired.
5. Press F10 or Fn+F10 to save the changes and exit.
Change BIOS settings before installing a new operating system
BIOS settings vary by operating system. Change the BIOS settings before installing a new operating system.
Microsoft constantly makes updates to the Windows operating system. Before installing a particular
Windows version, check the compatibility list for the Windows version. For details, go to:
https://support.lenovo.com/us/en/solutions/windows-support
26 M90a Gen 3 and M90a Pro Gen3 User Guide

To change the BIOS settings:
1. Restart the computer. When the logo screen is displayed, press F1 or Fn+F1.
2. From the main interface, select Security ➙ Secure Boot and press Enter.
3. Depending on the operating system to be installed, do one of the following:
• To install a Windows operating system that supports secure boot, select Enabled for Secure Boot.
• To install an operating system that does not support secure boot, such as some Linux operating
systems, select Disabled for Secure Boot.
4. Press F10 or Fn+F10 to save the changes and exit.
Update UEFI BIOS
When you install a new program, device driver, or hardware component, you might need to update UEFI
BIOS. You can update the BIOS from your operating system or a flash update disc (supported only on
selected models).
Download and install the latest UEFI BIOS update package by one of the following methods:
• From the Vantage app:
Open the Vantage app to check the available update packages. If the latest UEFI BIOS update package is
available, follow the on-screen instructions to download and install the package.
• From the Lenovo Support Web site:
1. Go to
https://pcsupport.lenovo.com.
2. Download the flash BIOS update driver for the operating system version or the ISO image version
(used to create a flash update disc). Then, download the installation instructions for the flash BIOS
update driver you have downloaded.
3. Print the installation instructions and follow the instructions to update the BIOS.
Recover from a BIOS update failure
1. Remove all media from the drives and turn off all connected devices.
2. Insert the BIOS update disc into the optical drive, and then turn off the computer.
3. Disconnect all power cords from electrical outlets. Then, remove any parts that impede access to the
Clear CMOS/Recovery jumper.
4. Move the jumper from the standard position to the maintenance position.
5. Reconnect the power cords for the computer and the monitor to electrical outlets.
6. Turn on the computer and the monitor. When the computer beeps, the recovery process begins.
7. After the recovery process is completed, the computer will be turned off automatically.
Note: Depending on the computer model, the recovery process will take two to three minutes.
8. Disconnect all power cords from electrical outlets.
9. Move the jumper back to the standard position.
10. Reinstall all the parts that have been removed. Then, reconnect the power cords for the computer and
the monitor to electrical outlets.
11. Turn on the computer and the monitor. When the logo screen is displayed, press F1 or Fn+F1.
12. To prevent data loss, ensure that BIOS settings are restored to an earlier point.
Chapter 5. UEFI BIOS 27

Clear CMOS
1. Remove all media from the drives and turn off all connected devices and the computer.
2. Disconnect all power cords from electrical outlets. Then, remove any parts that impede access to the
Clear CMOS/Recovery jumper.
3. Move the jumper from the standard position to the maintenance position.
4. Reconnect the power cords for the computer and the monitor to electrical outlets.
5. Turn on the computer and the monitor. When the computer beeps, wait for approximately 10 seconds.
6. Turn off the computer by holding the power button for approximately four seconds.
7. Disconnect all power cords from electrical outlets.
8. Move the jumper back to the standard position.
9. Reinstall all the parts that have been removed. Then, reconnect the power cords for the computer and
the monitor to electrical outlets.
10. Turn on the computer and the monitor. When the logo screen is displayed, press F1 or Fn+F1.
11. To prevent data loss, ensure that BIOS settings are restored to an earlier point.
28
M90a Gen 3 and M90a Pro Gen3 User Guide

Chapter 6. Diagnostics
Use diagnostic solutions to test hardware components and report operating-system-controlled settings that
interfere with the correct operation of your computer.
Lenovo diagnostic tools
For information about Lenovo diagnostic tools, go to:
https://pcsupport.lenovo.com/lenovodiagnosticsolutions
The Vantage app
The Vantage app is preinstalled on your computer. To diagnose problems with the Vantage app:
1. Type Vantage in the Windows search box and press Enter.
2. Follow the on-screen instructions and run a hardware scan.
If you are unable to isolate and resolve the problem after running the Vantage app, save and print the log files
created by the program. You might need the log files when you speak to a Lenovo technical support
representative.
© Copyright Lenovo 2022 29

30 M90a Gen 3 and M90a Pro Gen3 User Guide

Chapter 7. CRU replacement
Customer Replaceable Units (CRUs) are parts that can be upgraded or replaced by the customer. Lenovo
computers contain the following types of CRUs:
• Self-service CRUs: Refer to parts that can be installed or replaced easily by customer themselves or by
trained service technicians at an additional cost.
• Optional-service CRUs: Refer to parts that can be installed or replaced by customers with a greater skill
level. Trained service technicians can also provide service to install or replace the parts under the type of
warranty designated for the customer’s machine.
If you intend on installing the CRU, Lenovo will ship the CRU to you. CRU information and replacement
instructions are shipped with your product and are available from Lenovo at any time upon request. You
might be required to return the defective part that is replaced by the CRU. When return is required: (1) return
instructions, a prepaid shipping label, and a container will be included with the replacement CRU; and (2) you
might be charged for the replacement CRU if Lenovo does not receive the defective CRU within thirty (30)
days of your receipt of the replacement CRU. For full details, see the Lenovo Limited Warranty
documentation at:
https://www.lenovo.com/warranty/llw_02
CRU list
The following is the CRU list of your computer.
Self-service CRUs
• Computer stand*
• Keyboard*
• Mouse*
• Power cord
* for selected models
Remove or replace a CRU
This section provides instructions on how to remove or replace a CRU.
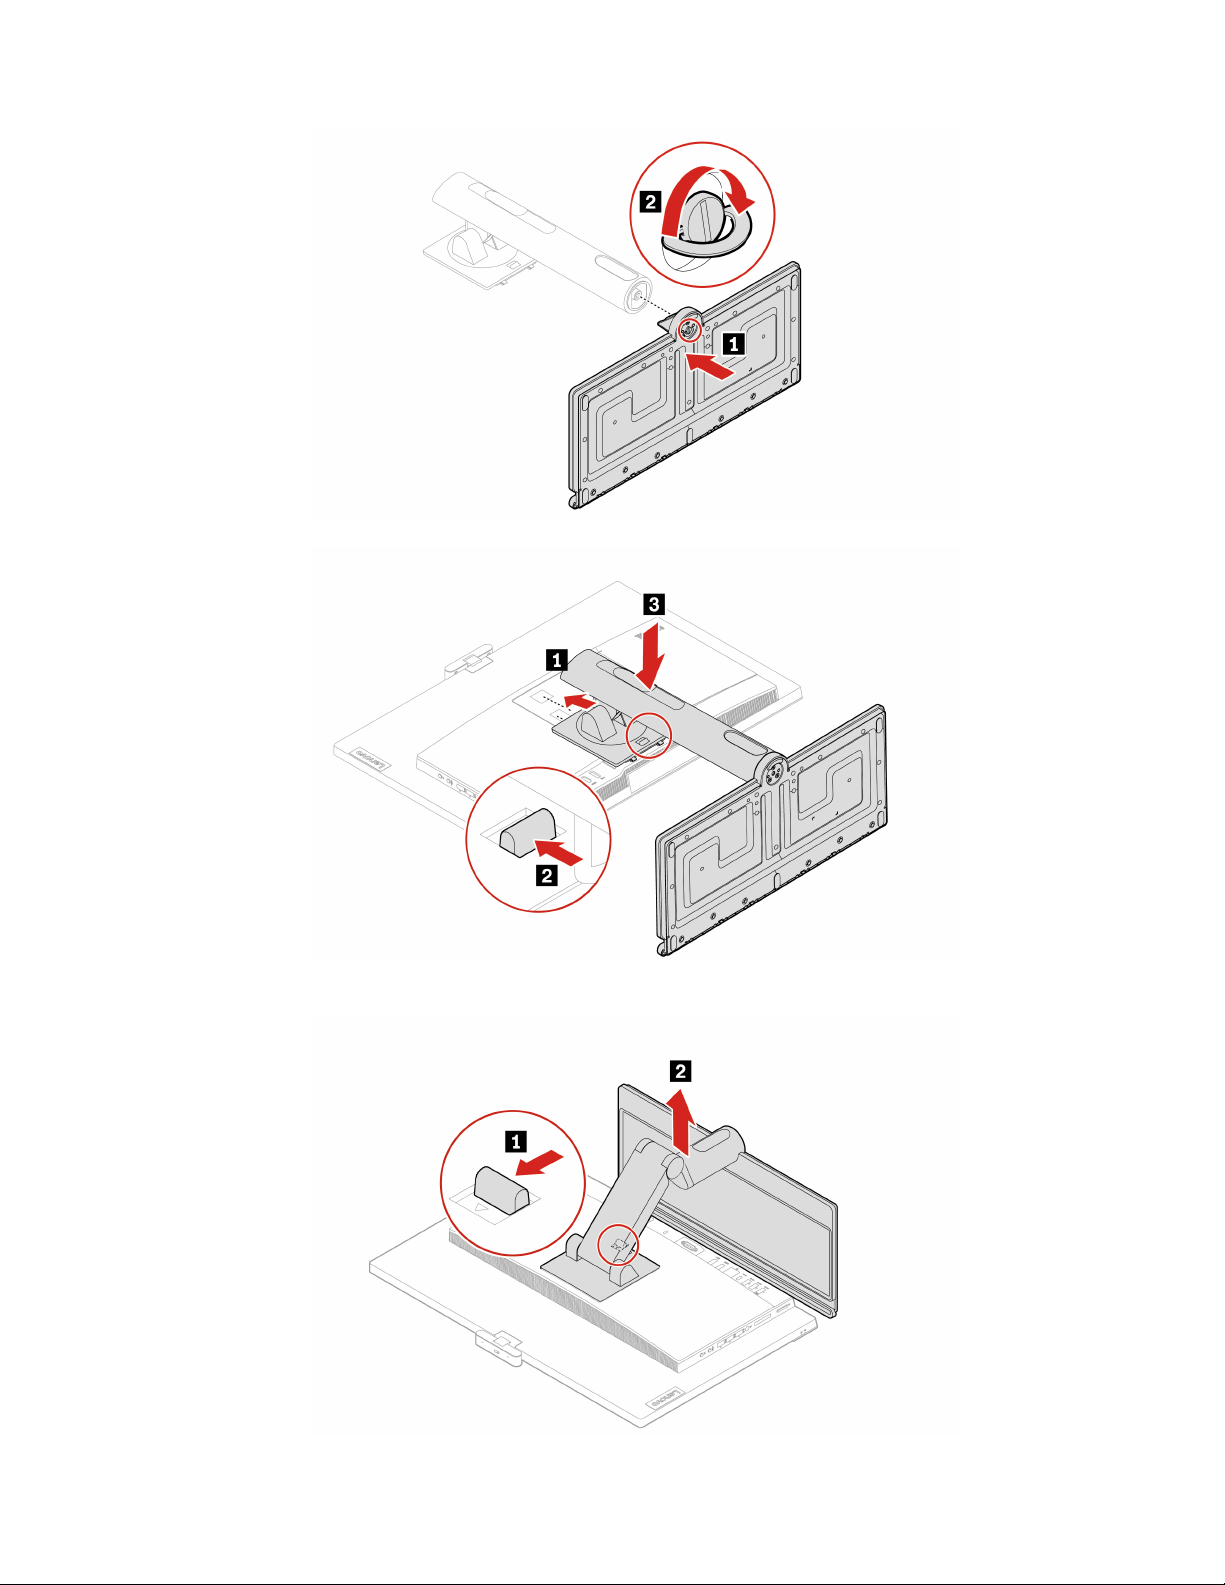
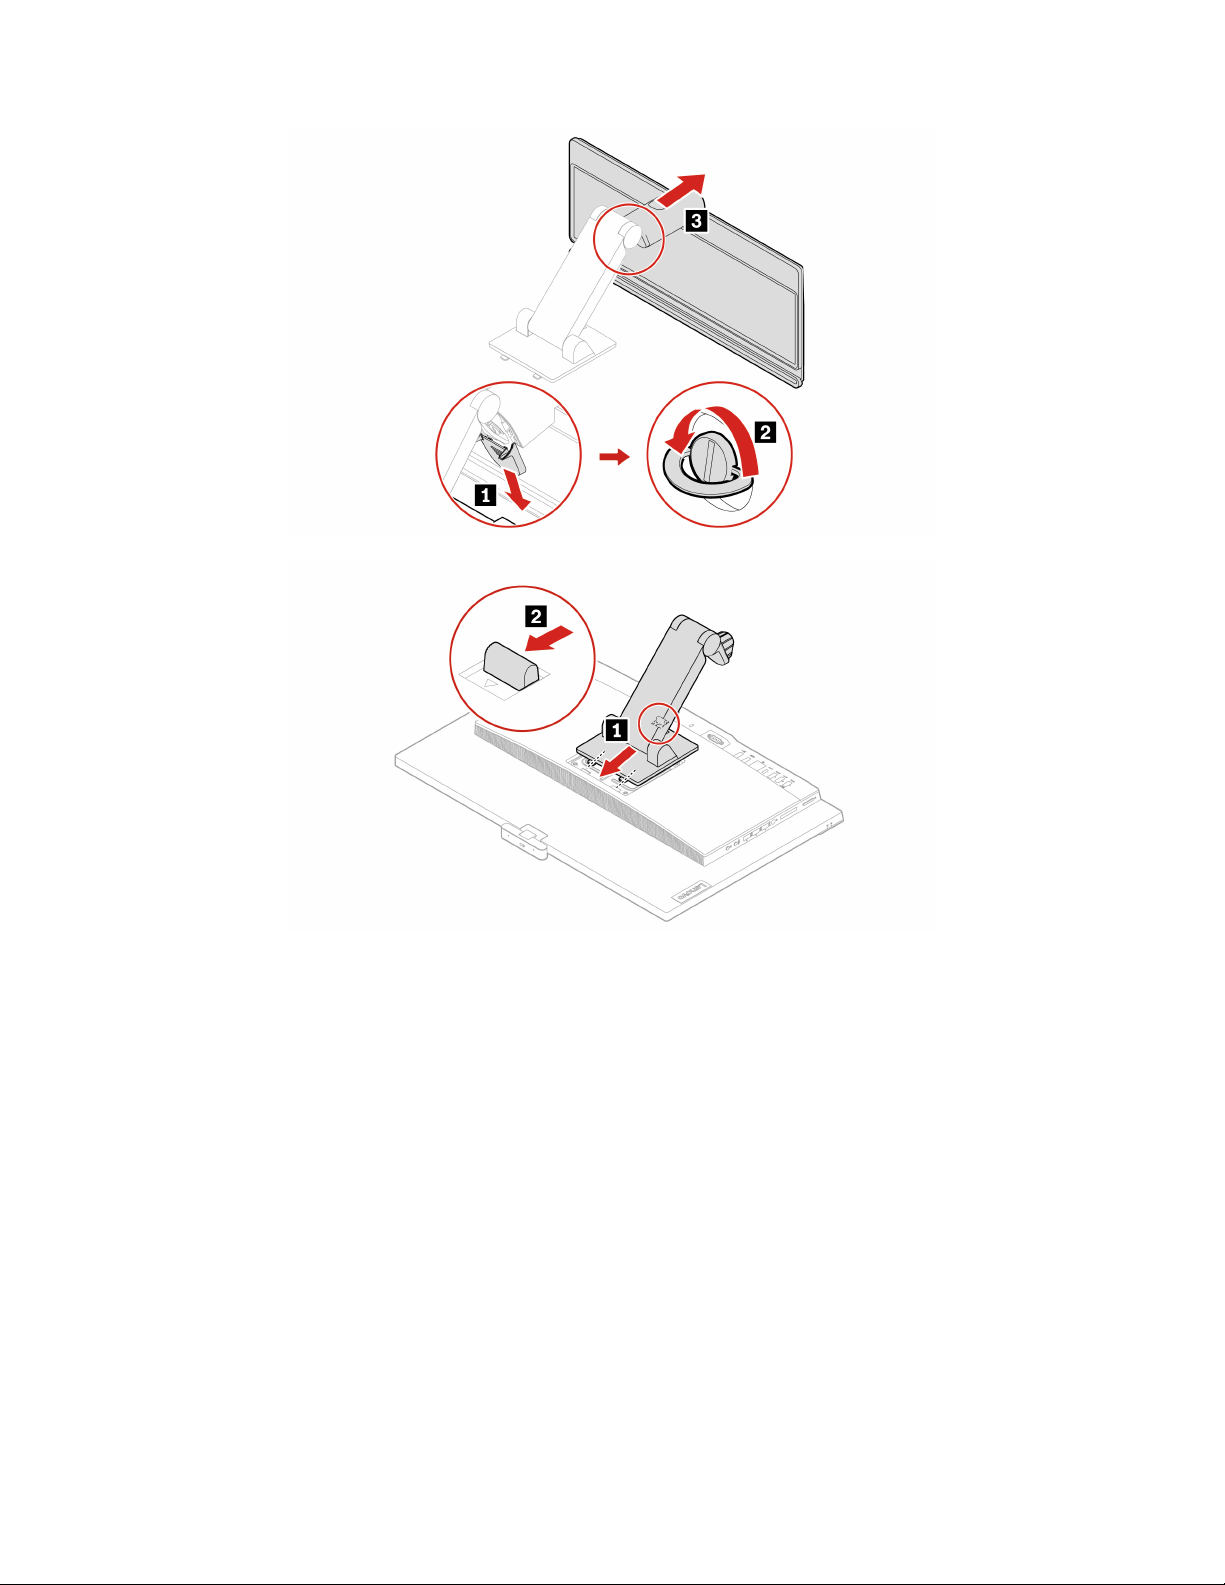
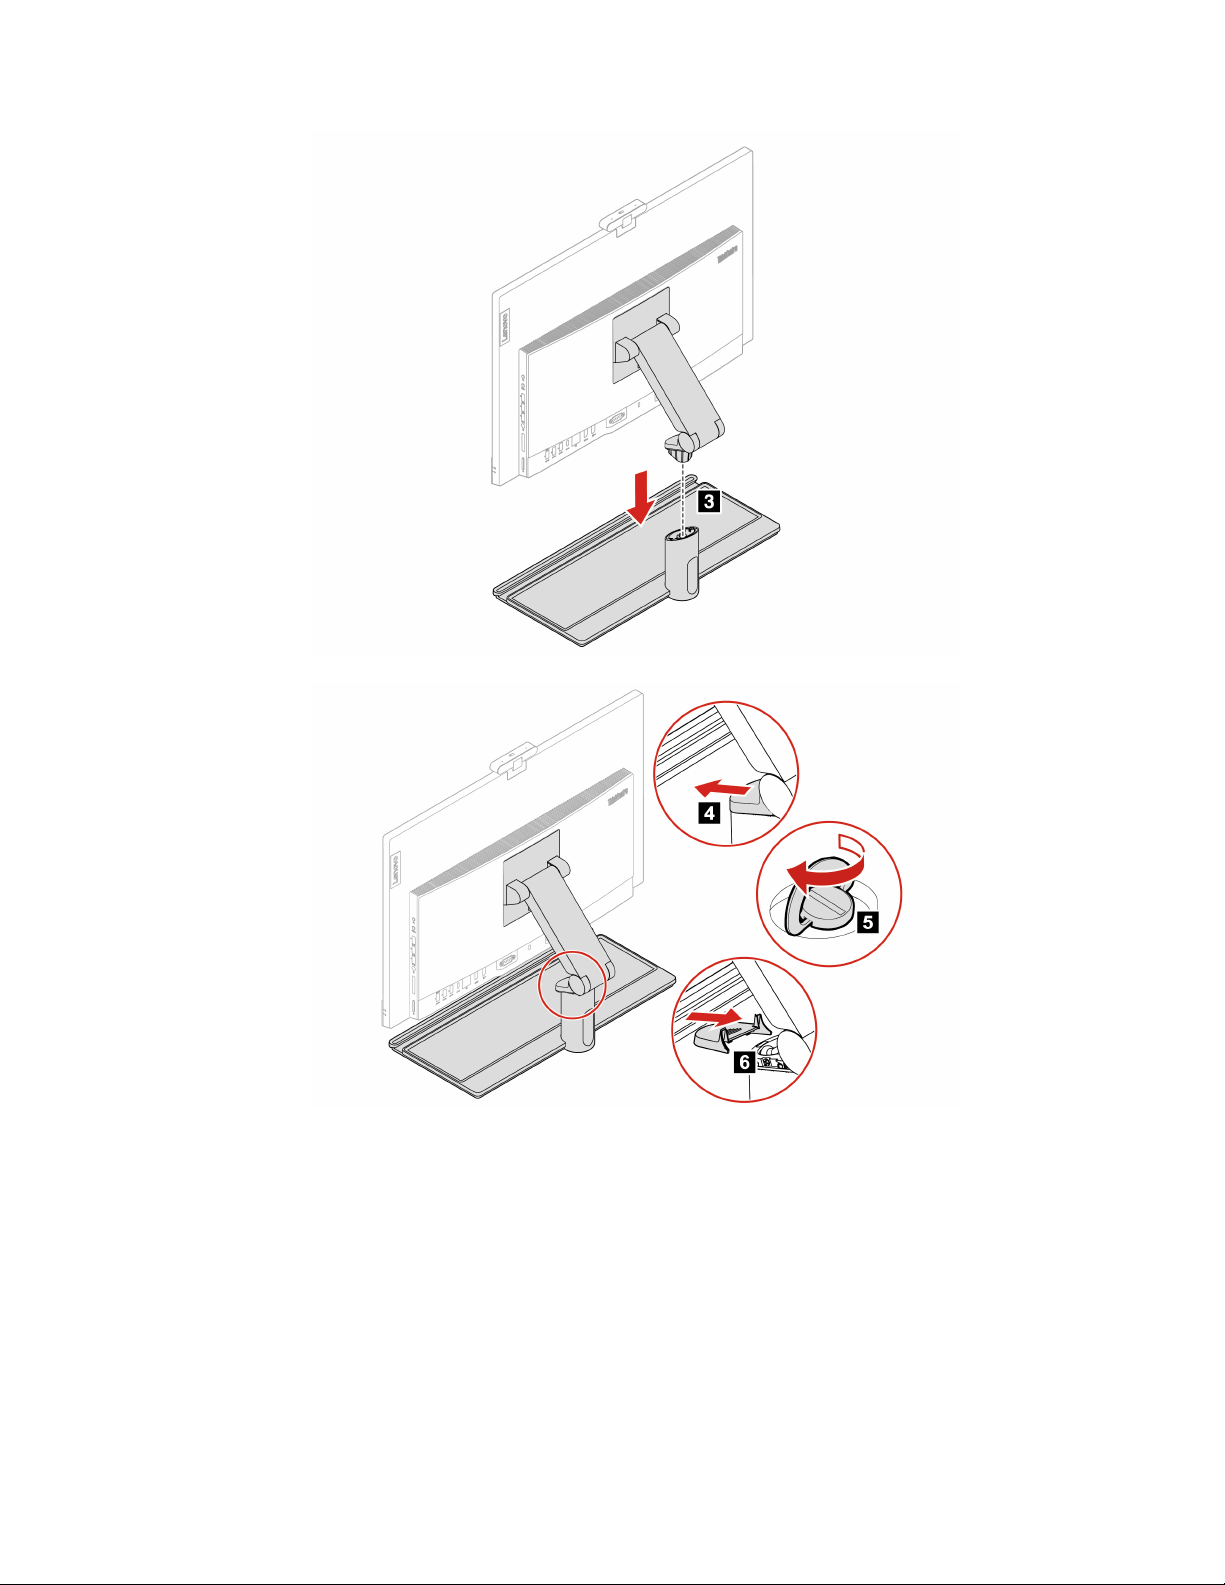
Computer stand
Prerequisite
Before you start, read Generic Safety and Compliance Notices, and print the following instructions.
For access, do the following:
1. Turn off the computer and remove all connected devices and cables.
2. Disconnect the computer from ac power and all connected cables.
3. Place a soft, clean towel or cloth on the desk or surface. Hold the sides of your computer and gently lay
it down so that the screen is against the surface and the computer cover is facing up.
© Copyright Lenovo 2022 31
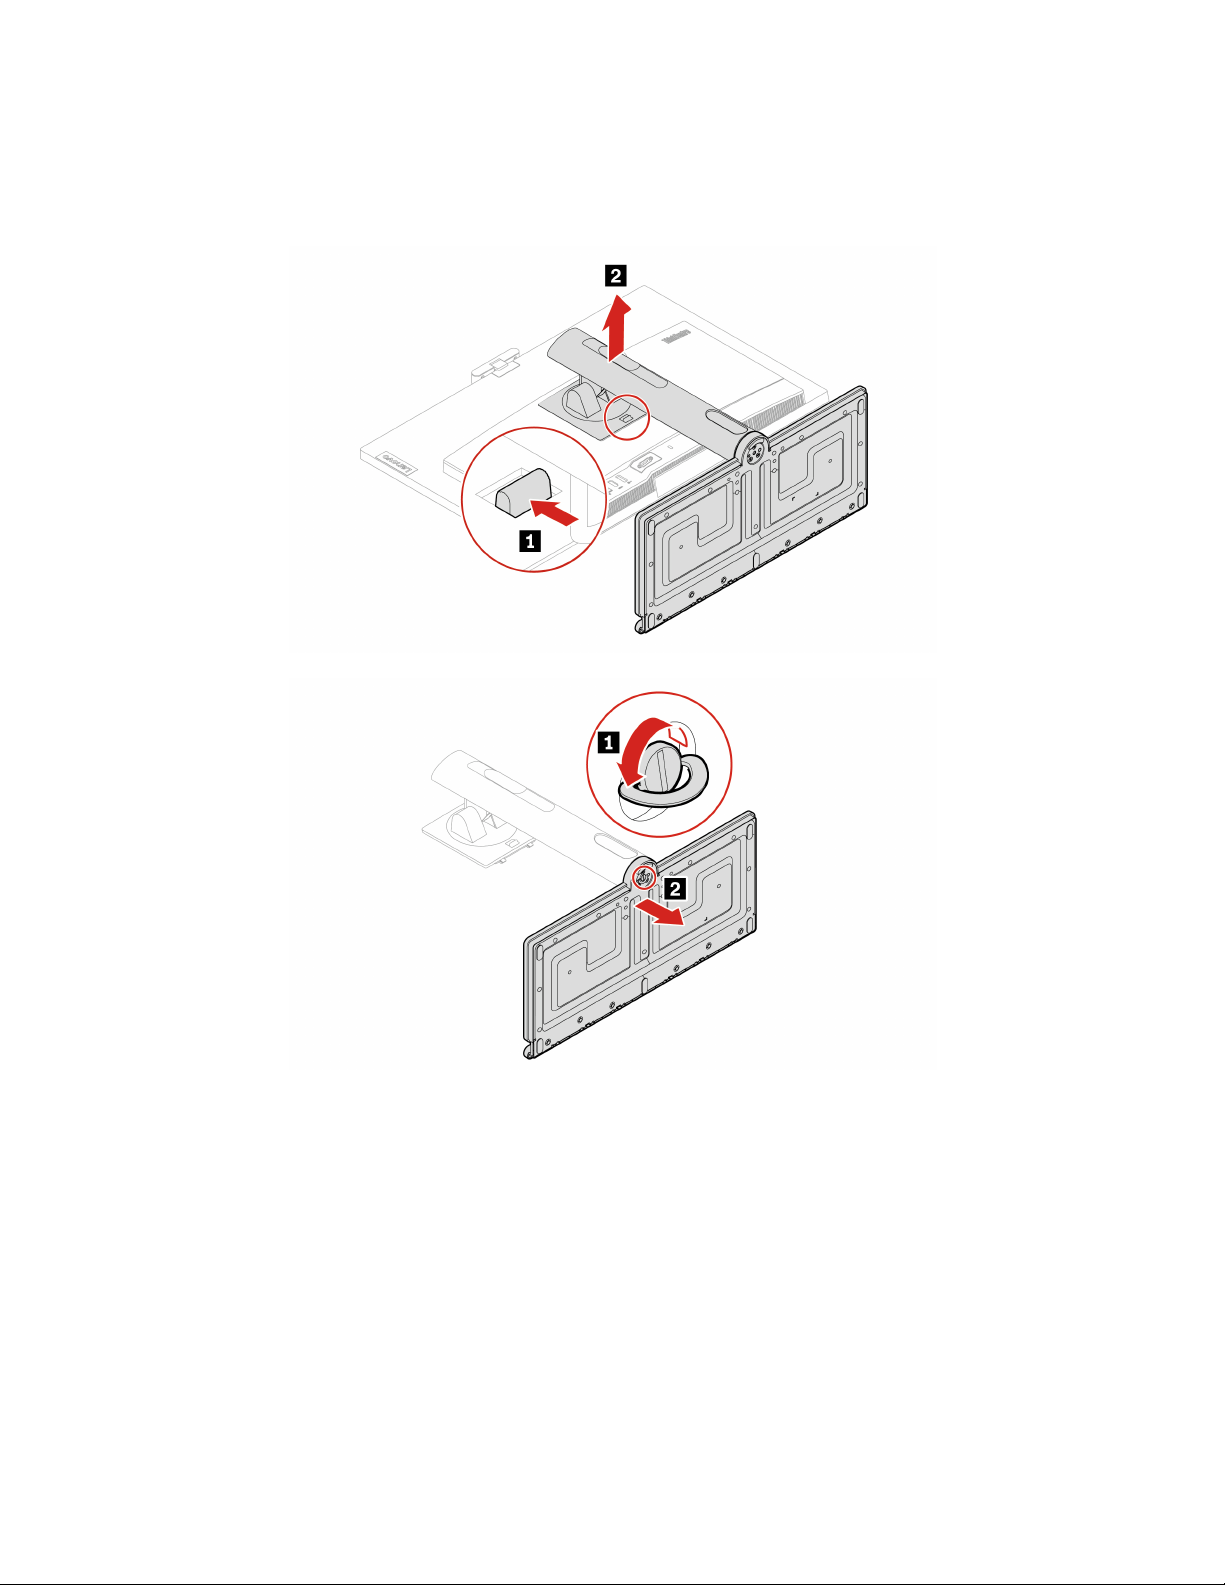
Replacement procedure
Depending on your computer stand, refer to one of the following to replace the computer stand.
• Full-function monitor stand
32 M90a Gen 3 and M90a Pro Gen3 User Guide
34 M90a Gen 3 and M90a Pro Gen3 User Guide

36 M90a Gen 3 and M90a Pro Gen3 User Guide

Chapter 8. Help and support
Self-help resources
Use the following self-help resources to learn more about the computer and troubleshoot problems.
Resources How to access?
Troubleshooting and frequently asked questions
•
https://www.lenovo.com/tips
• https://forums.lenovo.com
Accessibility information
https://www.lenovo.com/accessibility
Reset or restore Windows
• Use Lenovo recovery options.
1. Go to
https://support.lenovo.com/
HowToCreateLenovoRecovery
.
2. Follow the on-screen instructions.
• Use Windows recovery options.
1. Go to
https://pcsupport.lenovo.com.
2. Detect your computer or manually select your
computer model.
3. Click Diagnostics ➙ Operating System
Diagnostics and then follow the on-screen
instructions.
Use the Vantage app to:
• Configure device settings.
• Download and install UEFI BIOS, drivers and firmware
updates.
• Secure you computer from outside threats.
• Diagnose hardware problems.
• Check the computer warranty status.
• Access User Guide and helpful articles.
Note: The available features vary depending on the
computer model.
Type Vantage in the Windows search box.
Product documentation:
• Safety and Warranty Guide
• Generic Safety and Compliance Notices
• Setup Guide
• This User Guide
• Regulatory Notice
Go to
https://pcsupport.lenovo.com. Then, follow the on-
screen instructions to filter out the documentation you
want.
© Copyright Lenovo 2022 37

Resources How to access?
Lenovo Support Web site with the latest support
information of the following:
• Drivers and software
• Diagnostic solutions
• Product and service warranty
• Product and parts details
• Knowledge base and frequently asked questions
https://pcsupport.lenovo.com
Windows help information
• Open the Start menu and click Get Help or Tips.
• Use Windows Search or the Cortana
®
personal
assistant.
• Microsoft support Web site:
https://support.microsoft.com
38 M90a Gen 3 and M90a Pro Gen3 User Guide

Call Lenovo
If you have tried to correct the problem yourself and still need help, you can call Lenovo Customer Support
Center.
Before you contact Lenovo
Prepare the following before you contact Lenovo:
1. Record the problem symptoms and details:
• What is the problem? Is it continuous or intermittent?
• Any error message or error code?
• What operating system are you using? Which version?
• Which software applications were running at the time of the problem?
• Can the problem be reproduced? If so, how?
2. Record the system information:
• Product name
• Machine type and serial number
The following illustration shows where to find the machine type and serial number of your computer.
Lenovo Customer Support Center
During the warranty period, you can call Lenovo Customer Support Center for help.
Telephone numbers
For a list of the Lenovo Support phone numbers for your country or region, go to:
https://pcsupport.lenovo.com/supportphonelist
Note: Phone numbers are subject to change without notice. If the number for your country or region is not
provided, contact your Lenovo reseller or Lenovo marketing representative.
Chapter 8. Help and support 39

Services available during the warranty period
• Problem determination - Trained personnel are available to assist you with determining if you have a
hardware problem and deciding what action is necessary to fix the problem.
• Lenovo hardware repair - If the problem is determined to be caused by Lenovo hardware under warranty,
trained service personnel are available to provide the applicable level of service.
• Engineering change management - Occasionally, there might be changes that are required after a product
has been sold. Lenovo or your reseller, if authorized by Lenovo, will make selected Engineering Changes
(ECs) that apply to your hardware available.
Services not covered
• Replacement or use of parts not manufactured for or by Lenovo or nonwarranted parts
• Identification of software problem sources
• Configuration of UEFI BIOS as part of an installation or upgrade
• Changes, modifications, or upgrades to device drivers
• Installation and maintenance of network operating systems (NOS)
• Installation and maintenance of programs
For the terms and conditions of the Lenovo Limited Warranty that apply to your Lenovo hardware product,
see Safety and Warranty Guide that comes with your computer.
Purchase additional services
During and after the warranty period, you can purchase additional services from Lenovo at:
https://pcsupport.lenovo.com/warrantyupgrade
Service availability and service name might vary by country or region.
40
M90a Gen 3 and M90a Pro Gen3 User Guide

Appendix A. Compliance information
For more compliance information, refer to Regulatory Notice at
https://pcsupport.lenovo.com and Generic
Safety and Compliance Notices at
https://pcsupport.lenovo.com/docs/generic_notices.
Certification-related information
Product name Machine types
ThinkCentre M90a Gen 3 11VA, 11VB, 11VC, 11VD, and 11VE
ThinkCentre M90a Pro Gen3 11VF, 11VG, 11VH, 11VJ, and 11VK
Further compliance information related to your product is available at
https://www.lenovo.com/compliance.
Operating environment
Maximum altitude (without pressurization)
• Operating: From 0 m (0 ft) to 3048 m (10 000 ft)
• Storage: From 0 m (0 ft) to 12192 m (40 000 ft)
Temperature
• Operating: From 5°C (41°F) to 35°C (95°F)
• Storage:
– For common desktop computers: From -40°C (-40°F) to 60°C (140°F)
– For all-in-one desktop computers: From -20°C (-4°F) to 60°C (140°F)
Relative humidity
• Operating: 20%-80% (non-condensing)
• Storage: 10%–90% (non-condensing)
© Copyright Lenovo 2022 41

42 M90a Gen 3 and M90a Pro Gen3 User Guide

Appendix B. Notices and trademarks
Notices
Lenovo may not offer the products, services, or features discussed in this document in all countries. Consult
your local Lenovo representative for information on the products and services currently available in your
area. Any reference to a Lenovo product, program, or service is not intended to state or imply that only that
Lenovo product, program, or service may be used. Any functionally equivalent product, program, or service
that does not infringe any Lenovo intellectual property right may be used instead. However, it is the user's
responsibility to evaluate and verify the operation of any other product, program, or service.
Lenovo may have patents or pending patent programs covering subject matter described in this document.
The furnishing of this document does not give you any license to these patents. You can send license
inquiries, in writing, to:
Lenovo (United States), Inc.
8001 Development Drive
Morrisville, NC 27560
U.S.A.
Attention: Lenovo Director of Licensing
LENOVO PROVIDES THIS PUBLICATION "AS IS" WITHOUT WARRANTY OF ANY KIND, EITHER EXPRESS
OR IMPLIED, INCLUDING, BUT NOT LIMITED TO, THE IMPLIED WARRANTIES OF NON-INFRINGEMENT,
MERCHANTABILITY OR FITNESS FOR A PARTICULAR PURPOSE. Some jurisdictions do not allow
disclaimer of express or implied warranties in certain transactions, therefore, this statement may not apply to
you.
Changes are made periodically to the information herein; these changes will be incorporated in new editions
of the publication. To provide better service, Lenovo reserves the right to improve and/or modify the
products and software programs described in the manuals included with your computer, and the content of
the manual, at any time without additional notice.
The software interface and function and hardware configuration described in the manuals included with your
computer might not match exactly the actual configuration of the computer that you purchase. For the
configuration of the product, refer to the related contract (if any) or product packing list, or consult the
distributor for the product sales. Lenovo may use or distribute any of the information you supply in any way it
believes appropriate without incurring any obligation to you.
The products described in this document are not intended for use in implantation or other life support
applications where malfunction may result in injury or death to persons. The information contained in this
document does not affect or change Lenovo product specifications or warranties. Nothing in this document
shall operate as an express or implied license or indemnity under the intellectual property rights of Lenovo or
third parties. All information contained in this document was obtained in specific environments and is
presented as an illustration. The result obtained in other operating environments may vary.
Lenovo may use or distribute any of the information you supply in any way it believes appropriate without
incurring any obligation to you.
Any references in this publication to non-Lenovo Web sites are provided for convenience only and do not in
any manner serve as an endorsement of those Web sites. The materials at those Web sites are not part of the
materials for this Lenovo product, and use of those Web sites is at your own risk.
© Copyright Lenovo 2022 43

Any performance data contained herein was determined in a controlled environment. Therefore, the result
obtained in other operating environments may vary significantly. Some measurements may have been made
on development-level systems and there is no guarantee that these measurements will be the same on
generally available systems. Furthermore, some measurements may have been estimated through
extrapolation. Actual results may vary. Users of this document should verify the applicable data for their
specific environment.
This document is copyrighted by Lenovo and is not covered by any open source license, including any Linux
agreement(s) which may accompany software included with this product. Lenovo may update this document
at any time without notice.
For the latest information or any questions or comments, contact or visit the Lenovo Web site:
https://pcsupport.lenovo.com
Trademarks
LENOVO, LENOVO logo, THINKCENTRE, and THINKCENTRE logo are trademarks of Lenovo. Intel and
Thunderbolt are trademarks of Intel Corporation or its subsidiaries in the U.S. and/or other countries.
Microsoft, Windows, and Cortana are trademarks of the Microsoft group of companies. DisplayPort, and
VESA are trademarks of the Video Electronics Standards Association. The terms HDMI and HDMI High-
Definition Multimedia Interface are trademarks or registered trademarks of HDMI Licensing LLC in the United
States and other countries. Wi-Fi, Wi-Fi Alliance, and Miracast are registered trademarks of Wi-Fi Alliance.
USB-C is a registered trademark of USB Implementers Forum. All other trademarks are the property of their
respective owners.
44
M90a Gen 3 and M90a Pro Gen3 User Guide