Loading ...
Loading ...
Loading ...
ENGLISH
7
• To select reverse rotation, push the forward/reverse
slider2 to the right (when viewed from the chuck end).
NOTE: The center position of the control button locks the
tool in the OFF position. When changing the position of the
control button, be sure the trigger is released.
Fig. B
2
1
ASSEMBLY AND ADJUSTMENTS
WARNING: To reduce the risk of serious personal
injury, turn unit off and remove the battery pack
before making any adjustments or removing/
installing attachments or accessories. An
accidental start-up can causeinjury.
Keyless Chuck (Fig. C)
WARNING: Make certain the lock-off button is
engaged to prevent switch actuation before
installing or removing accessories.
WARNING: Do not attempt to tighten drill bits (or
any other accessory) by gripping the front part
of the chuck and turning the tool on. Damage to
the chuck and personal injury may occur when
changing accessories.
To insert a drill bit or other accessory:
1. Grasp the rear half of the chuck 3 with one hand
and use your other hand to rotate the front half 3 in
the counterclockwise direction, as viewed from the
chuckend.
2. Insert the bit or other accessory fully into the chuck, and
tighten securely by holding the rear half of the chuck
and rotating the front portion in the clockwise direction
as viewed from the chuck end.
Fig. C
3
3
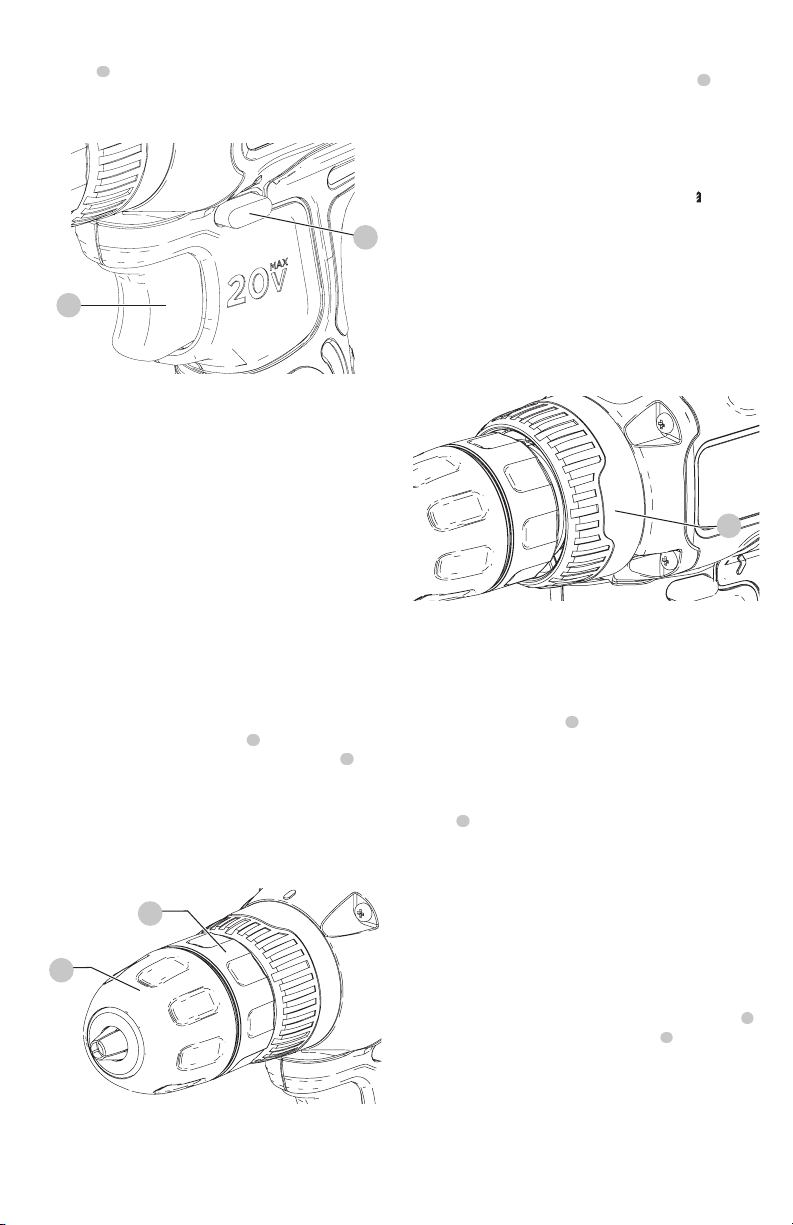
Torque Control (Fig. D)
This tool is fitted with a torque adjustment collar 4 to select
the operating mode and to set the torque for tightening
screws. Large screws and hard workpiece materials require a
higher torque setting than small screws and soft workpiece
materials.
For drilling in wood, metal and plastics:
1. Set the collar to the drilling position symbol
For screwdriving, set the collar to the desired setting.
If you do not yet know the appropriate setting,
proceed as follows:
2. Set the collar to the lowest torque setting.
3. Tighten the first screw.
4. If the clutch ratchets before the desired result is
achieved, increase the collar setting and continue
tightening the screw. Repeat until you reach the correct
setting. Use this setting for the remaining screws.
Fig. D
4
Installing and Removing the
Battery Pack (Fig. A)
NOTE: For best results, make sure your battery pack is
fullycharged.
To install the battery pack 7 into the tool handle, align the
battery pack with the rails inside the tool’s handle and slide
it into the handle until the battery pack is firmly seated in
the tool and ensure that it does notdisengage.
To remove the battery pack from the tool, press the release
button 8 and firmly pull the battery pack out of the tool
handle. Insert it into the charger as described in the charger
section of thismanual.
Proper Hand Position (Fig. D)
WARNING: To reduce the risk of serious personal injury,
ALWAYS use proper hand position as shown.
WARNING: To reduce the risk of serious personal
injury, ALWAYS hold securely in anticipation of a
suddenreaction.
Proper hand position requires one hand on the main handle 5
and the other hand holding the battery pack 7 .
Loading ...
Loading ...
Loading ...