DRC200
GB Robotic Cleaner INSTRUCTION MANUAL 7
CS 智能扫地机器人吸尘器 使用说明书(保留备用。) 18
CT 自動掃地機器人 使用說明書 32
KR 로봇 청소기 사용 설명서 41
ID Robot Pembersih PANDUAN PENGGUNA 52
VI Máy Hút Bụi Tự Động HƯỚNG DẪN SỬ DỤNG 63
TH 74

Fig. A
Fig. B
1
2
3
Fig. C
1
Fig. D
Fig. E
2
1 2 3 4
5
6
12
710
11
9
8
Fig. F
1
2
3
4
6
7
5
Fig. G
1 2
ab
c
d
Fig. H
1
2
Fig. I
3
4
1
Fig. J
1
3
2
4
5
6
Fig. K
1
2
Fig. L
4
5
4
2
3
1
Fig. M
13
4
2
8
7
5
6
Fig. N
5
6
2
1
Fig. O
2
3
4
5
4
1
Fig. Q
1
2
Fig. R
1
2
Fig. P

7ENGLISH
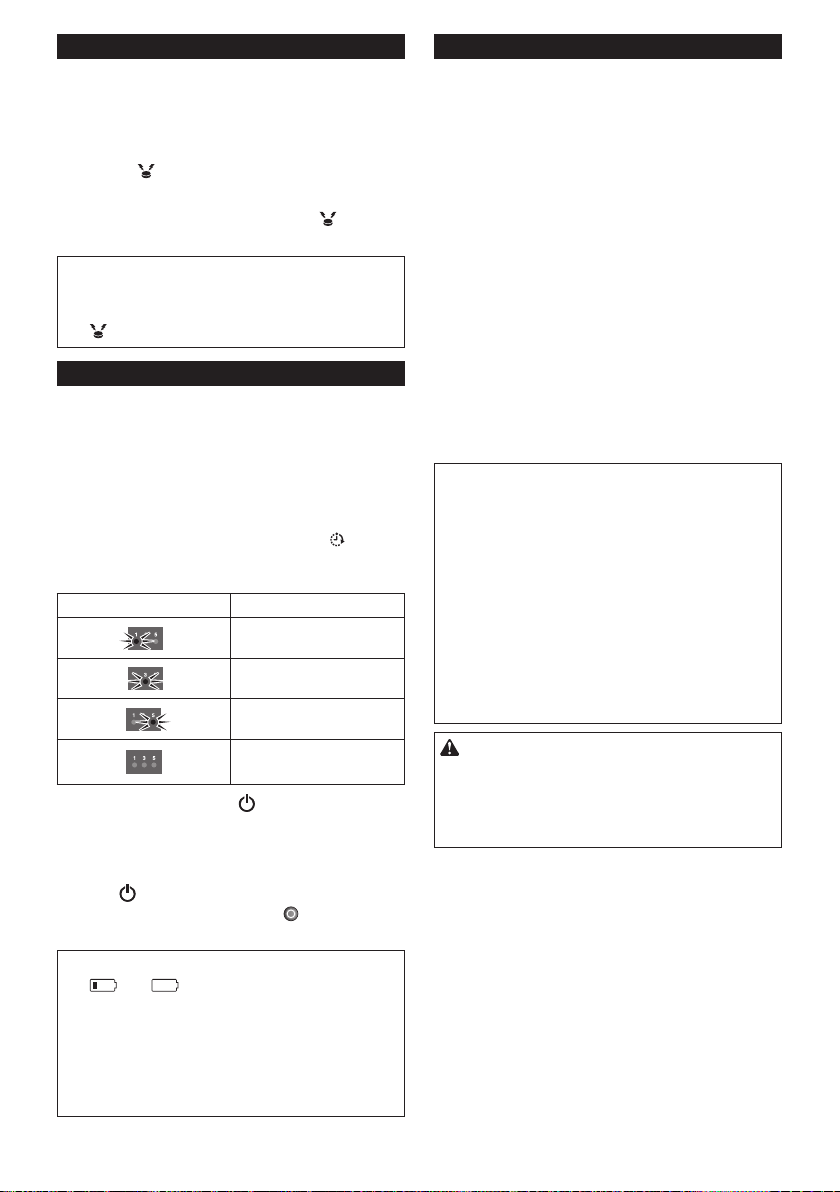
SPECIFICATIONS
Standard battery
cartridge
BL1815N, BL1820B, BL1830B,
BL1840B, BL1850B, BL1860B
Battery life
(using optional lithium
ion batteries)
Approx. 120 min. using two BL1830s
(18 V, 3 Ah ea.)
Approx. 200 min. using two BL1850s
(18 V, 5 Ah ea.)
Bin capacity 2.5 L
Dimensions (w/l/h)
(incl. BL1830 batteries) Approx. 460 x 460 x 180 mm
Weight (incl. two
BL1830 batteries) Approx. 7.8 kg
• Thespecicationsherearesubjecttochange
without notice, due to our continuing program of
research and development.
• Specicationsmaydifferfromcountrytocountry.
Symbols
Read instruction manual.
DonotsteporputobjectsontheRobotic
Cleaner.
Do not use the Robotic Cleaner near an
openameorammableand/ordangerous
materials.
Clean the cliff sensors on the bottom face if
they are dirty or wet.
Intended use
This is the Robotic Cleaner intended for cleaning indoor
oors.TheremotecontrollerconnectstotheRobotic
Cleaner by wireless (2.4 GHz ZigBee).
ENGLISH (Original instructions)
WARNING: This machine is not intended for use by persons (including
children) with reduced physical, sensory or mental capabilities, or lack
of experience and knowledge. Children should be supervised to ensure
that they do not play with the appliance.
SAFETY PRECAUTIONS
WARNING
Do not use the Robotic Cleaner near or vacuum up
inammable substances.
Thismayresultinexplosionorre.
• Kerosene, gasoline, incense, candles
• Benzine, thinner
• Cigarette butts
• Toner or other combustible substances
• Carpet cleaner or other foamy substances
Do not use the Robotic Cleaner in wet locations,
locations that may become wet, or locations with
high temperatures and humidity. Also, do not
vacuum up water.
Thismayresultinelectricshock,short-circuit,re,
deformation or malfunction.
• Kitchens and other areas where water is used
• Bathrooms
• Shower rooms
• Attics, etc.
Do not touch the Robotic Cleaner with wet hands.
This may result in electric shock.
Do not use the Robotic Cleaner around stoves or
other heating equipment.
Thismayresultinelectricshock,short-circuit,re,
deformation or malfunction.
Do not use the Robotic Cleaner in the following
types of locations.
Thismayresultinelectricshockorinjury.
• Near infants or persons with reduced physical,
sensory or mental capabilities, or lacking in the
necessary experience and knowledge
• Near animals
• Nearlargenumbersofpeopleorhighlytrafcked
areas
Do not allow unsupervised children or persons
who are unable to express their will or operate the
Robotic Cleaner by themselves to use the Robotic
Cleaner.
Thismayresultinelectricshockorinjury.
Discontinue operation immediately in the event
of an abnormality or malfunction such as the
following.
Failure to observe this instruction may result in smoke,
reorelectricshock.
• The Robotic Cleaner will not operate even though it
is turned ON.
• The Robotic Cleaner is deformed or abnormally hot.
• The Robotic Cleaner stops sometimes during
operation.

8ENGLISH
• The Robotic Cleaner makes abnormal noises during
operation.
• The Robotic Cleaner gives off a burnt smell.
Turn OFF the Robotic Cleaner in locations where
use is prohibited.
Failure to observe this instruction may cause medical
equipment to operate improperly.
Be sure to follow the instructions of each medical
institution when using equipment that emits radio waves
inside medical institutions.
Do not use the Robotic Cleaner in narrow and
unenclosed high locations.
This may cause the Robotic Cleaner to fall from the
area,resultingininjuryormalfunction.
• Stairs
• On top of a table, shelf, dresser, refrigerator, etc.
• Mezzanines,lofts,oorswithadirectdroponto
stairwells or entranceways, etc.
• Locations with an incline of 10° or more
Do not expose the Robotic Cleaner to direct
sunlight or infrared rays.
Improper operation due to a sensor error may cause the
RoboticCleanertofall,resultingininjuryormalfunction.
• Halogen heaters
• Remote controls or sensors, etc.
• Sun rays entering through frosted glass
Move any objects that may cause an accident in the
event of contact with the Robotic Cleaner.
Failuretoobservethisinstructionmayresultininjury
duetoobjectstippingoverorfalling.
• Lit candles, vases, etc.
• Electronics with controls located around the same
height as the Robotic Cleaner.
Do not cover the Robotic Cleaner.
Thismayresultinreduetooverheating.
Do not ride or place heavy objects on the Robotic
Cleaner. Do not apply strong physical shocks.
Thismayresultininjury,damageormalfunction.
In particular, pay close attention to children around the
Robotic Cleaner.
Never modify the Robotic Cleaner.
Thismayresultinre,electricshockorinjury.
Consult the dealer where you purchased the Robotic
Cleaner for repairs.
Do not block or insert metallic or easily combustible
foreign object into the suction or exhaust openings.
Also, do not use the Robotic Cleaner around
objects that may block the suction opening.
Thismayresultinelectricshock,reormalfunction.
Do not heat or expose the Robotic Cleaner to re or
leave it in a hot location such as near a re or stove,
exposed to direct sunlight, or inside a vehicle under
the blazing sun.
Thismayresultinshort-circuit,re,orcausethebattery
toleakuidorburst.
Do not wash or expose the Robotic Cleaner* to
water or detergents.
Thismayresultinelectricshock,short-circuitorre.
* Excluding the main brush, bottom plate, side
brushes,dustboxandlter
Do not touch the drive wheels or insert hands or
feet under the Robotic Cleaner during operation.
Thismayresultininjury.
In particular, pay close attention to children around the
Robotic Cleaner.
Do not block or insert foreign matter into the
Robotic Cleaner’s sensors.
Thismayresultinoperationalfailure,injurydueto
the Robotic Cleaner falling as a result of improper
operation, or malfunction.
Do not attach tape to the sensors or wheels. Do
not alter the bumper or wheel shapes or press the
bumper with excessive force.
Thismayresultinoperationalfailure,injurydueto
the Robotic Cleaner falling as a result of improper
operation, or malfunction.
Periodically clean each sensor.
Failure to observe this instruction may result in
operationalfailure,injuryduetotheRoboticCleaner
falling as a result of improper operation, or malfunction.
Do not use boundary tape (sold separately) that is
dirty, peeling or torn.
ThismayresultininjuryduetotheRoboticCleaner
falling as a result of operational failure.
CAUTION
Do not use the Robotic Cleaner in the following
locations.
This may cause other equipment to operate improperly.
• Inside a hospital or around medical equipment
• Inside an airplane
• Around electronic equipment that requires precision
control or uses weak signals.
Be sure to keep the Robotic Cleaner and the remote
control more than 15 cm away from implantable
cardiac pacemakers and debrillators.
Failure to observe this instruction may result in
malfunction of the medical devices.
Do not insert foreign matter into the gaps and
openings.
Thismayresultinelectricshockorinjury.
Be careful not to get your ngers caught when
cleaning the Robotic Cleaner.
Thismayresultininjury.
Be sure to read this INSTRUCTION MANUAL
thoroughly before using the Robotic Cleaner.
Failuretoobservethisinstructionmayresultininjuryor
malfunction.
NOTICE
Immediately discontinue use of the battery
cartridge if an unpleasant odor, battery leakage,
abnormal heating, deformation, or discoloration is
observed.
Failure to observe this instruction may result in
malfunction.
Do not use the Robotic Cleaner outdoors or in
locations where it may wander outdoors.
This may result in malfunction.
9ENGLISH
Do not use the Robotic Cleaner in the following
locations.
This may result in malfunction.
• Locations where cooking oil particles or other oil
components are suspended in the air
• Locations where aerosol sprays or chemical
products are used, such as barber shops, beauty
salons, and dry cleaning shops
• Dusty locations
Do not use the Robotic Cleaner in the following
locations.
Thismaydamageoorcoveringsorscratchoor
surfaces.
• Locationswitheasilydamagedoorcoverings
(sheepskin, felt materials, etc.)
• Unnishedwoodormarbleoors
• Freshlywaxedoors
Do not use the Robotic Cleaner on oor coverings
with a long pile length (7 mm or more).
Thismayresultindamagetotheoorcoveringsor
cause the Robotic Cleaner to malfunction.
Do not use the Robotic Cleaner on hard, uneven
oor surfaces such as concrete oors, etc.
This may result in increased brush and wheel wear.
Do not use the Robotic Cleaner if the brushes or
wheels are worn.
Thismayresultinscratchedoorsurfaces.
Discontinue operation and consult the dealer where you
purchased the Robotic Cleaner.
Remove any sandy dirt adhering to the main brush,
side brushes and wheels.
Failure to observe this instruction may result in
scratchedoorsurfaces.
Do not vacuum up the following items.
This may scratch or clog the inside of the Robotic
Cleaner or result in malfunction.
• Liquids or wet garbage
• Chemicals or oils
• Pet excrement
• Large amounts of sand or powder
• Sharpobjects(glass,blades,pins,etc.)
• Large paper or vinyl garbage
• Cord or string
Clean the lter after vacuuming up ne powder
(plaster, cement, chalk, etc.).
Failure to observe this instruction may result in
malfunction.
Do not use the Robotic Cleaner if the lter is
clogged or the sensors are soiled.
This may result in malfunction.
Do not oil the rotating brush or other moving parts.
This may result in plastic cracking.
SAVE THESE INSTRUCTIONS.
Battery tool use and care
1. Recharge only with the charger specied by the
manufacturer. A charger that is suitable for one
type of battery pack may create the risk of re
when used with another battery pack.
2. Use power tools only with specically
designated battery packs. Use of any other
battery pack may create the risk of injury or re.
3. When (the) battery pack is not in use, keep it
away from paper clips, coins, keys, nails, screws
and other small metal objects that can make a
connection from one terminal to another.
4. Under extreme conditions, liquid may be ejected
from the battery; avoid contact. If accidental
contact occurs, ush with water.
Important safety instructions for the
battery cartridge
1. Before using the battery cartridge, read all
instructions and precautionary markings on
(1) the battery charger, (2) the battery, and (3)
product using the battery.
2. Do not disassemble the battery cartridge.
3. If operating time has become signicantly
shorter than usual, stop operating immediately.
It may result in a risk of overheating, possible
burns and even an explosion.
4. If electrolyte gets into your eyes, rinse them out
with clear water and seek medical attention right
away. It may result in loss of your eyesight.
5. Do not short-circuit the battery cartridge:
(1) Do not touch the terminals with any
conductive material.
(2) Avoid storing the battery cartridge in a
container with other metal objects such as
nails, coins, etc.
(3) Do not expose the battery cartridge to water
or rain.
A battery short-circuit can cause a large current
ow, overheating, possible burns and even a
breakdown.
6. Do not store the Robotic Cleaner and battery
cartridge in any location where the temperature
may reach or exceed 50°C (122°F).
7. Do not incinerate the battery cartridge even if it
is severely damaged or is completely worn out.
The battery cartridge can explode in a re.
8. Be careful not to drop or strike the battery
cartridge.
9. Do not use a damaged battery cartridge.
10. Follow your local regulations relating to the
disposal of battery cartridges.
SAVE THESE INSTRUCTIONS.
CAUTION: Only use genuine Makita batteries.
Using non-genuine Makita batteries, or batteries that
have been altered, may result in the battery bursting
causingres,personalinjuryanddamage.Itwill
also void the Makita warranty for the Makita tool and
charger.

10 ENGLISH
Tips for maintaining maximum
battery life
1. Charge the battery cartridge before it becomes
completely discharged. Always stop operation
and charge the battery cartridge when you
notice less tool power.
2. Never recharge a fully charged battery cartridge.
Overcharging shortens the battery service life.
3. Charge the battery cartridge within a room
temperature range of 10°C - 40°C (50°F - 104°F).
Let a hot battery cartridge cool down before
charging it.
4. It is recommended that you charge the battery
cartridge before storing it for a long period
(more than six months).
Tool/battery cartridge protection
system
The Robotic Cleaner is equipped with a tool/battery
cartridge protection system that automatically cuts
OFF the power to the motor to extend the life cycle of
the Robotic Cleaner and the battery cartridges. The
Robotic Cleaner automatically stops under the following
conditions.
Overload
When the Robotic Cleaner is overloaded and an
abnormally high current is drawn, the Robotic Cleaner
automatically stops without any indication.
To restart the Robotic Cleaner, turn the power OFF,
eliminate the cause of the overload, and then turn the
power back ON.
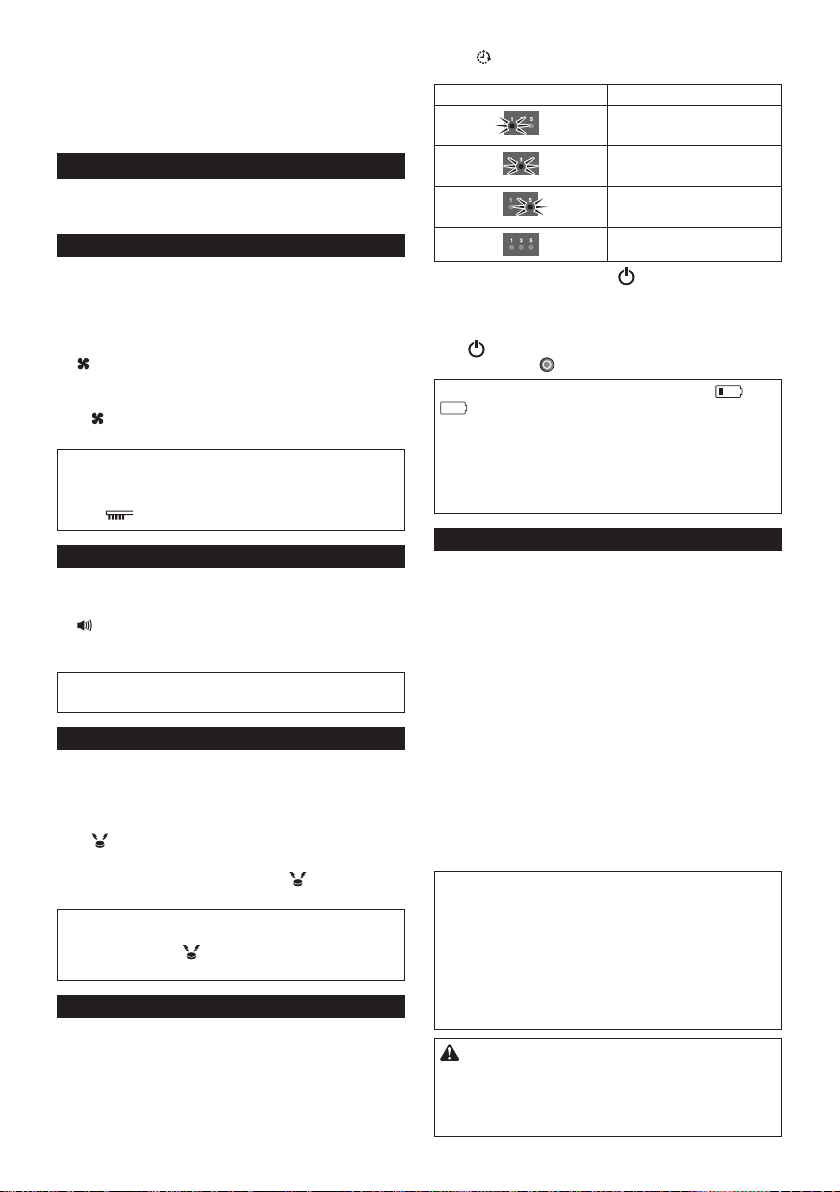
Overheating
When the Robotic Cleaner overheats, the lamp
ashes5or7timesforeachsequenceandtheRobotic
Cleaner automatically stops.
In this case, leave the Robotic Cleaner to cool down
before turning the power back ON.
Overdischarge
When the remaining battery level becomes low, the
Robotic Cleaner automatically stops and does not
respond to any switch operations.
In this case, remove and recharge the battery
cartridges.
BUTTONS AND
INDICATORS
Youcannddetailsofthepartsbysearchingfor
thegurenumbercorrespondingtoeachpartinthis
document (e.g. search for “Fig. F-8” for the POWER
button).
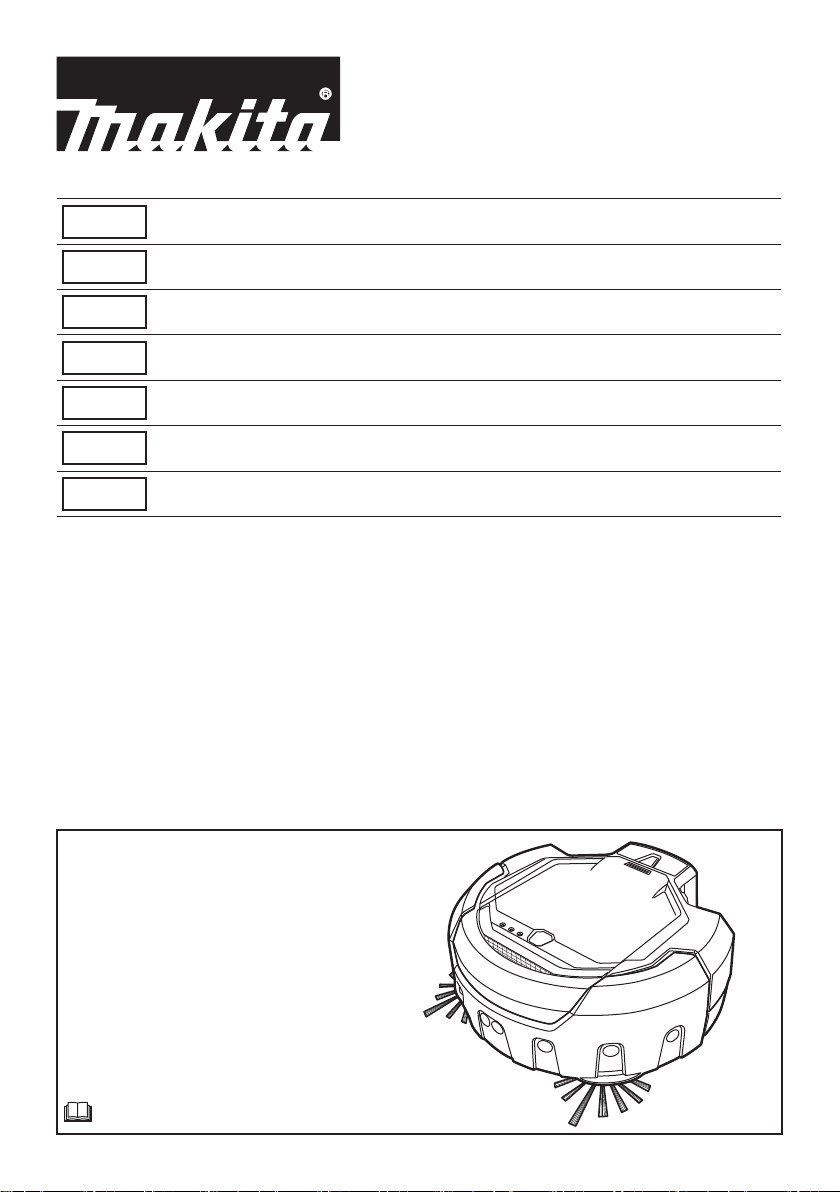
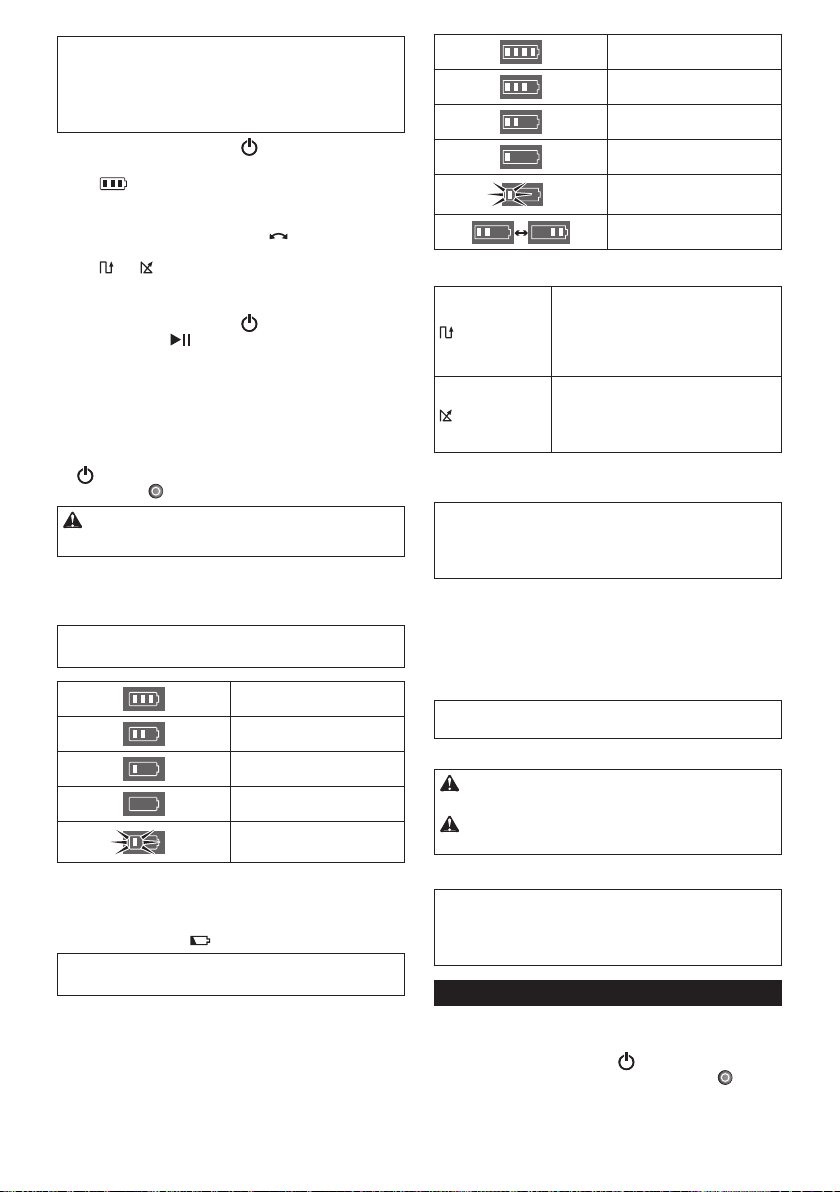
Robotic Cleaner (Fig. F)
1. Pilot lamp
2. Troubleshooting lamp
3. Filter maintenance lamp
4. Brush maintenance lamp
5. Battery indicators (for the right-hand and left-
hand battery cartridges)
6. Timer button and lamps
7. Cruise mode button and lamps
: Pattern mode
: Random mode
8. POWER (start/stop) button
9. Buzzer button and lamp
10. Vacuum button and lamp
11. Boundary sensor button and lamp
Remote control (Fig. G)
1. POWER OFF button
2. Start/Stop button
3. Location beacon button
4. / Cruise mode buttons
5. Timer button
6. Buzzer button
7. Vacuum button
PRIOR TO USE
Assembly and battery installation
CAUTION: Always be sure to turn OFF the Robotic
Cleaner before carrying out any work on the Robotic
Cleaner.
Supplied accessories
Check that the items in the following list are included in
the package.
• Size AAA (LR03) batteries (x2)
• Side brushes (x4, incl. two spare brushes)
• Screws for side brush installation (x4)
• Boundary tape (15 m x1)
• Instruction Manual (x1)
• Quick start guide (x1)
• Notes on use (x1)
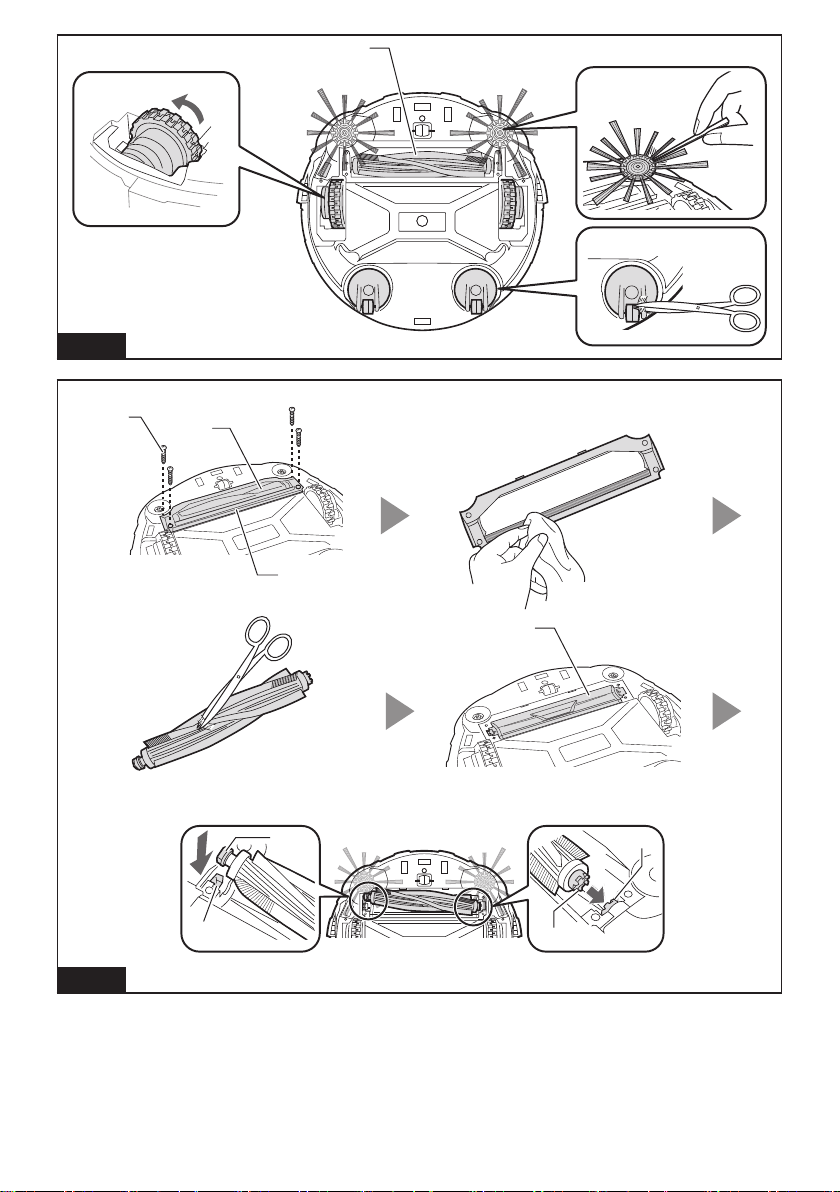
Installing the side brushes (Fig. A)
Install the side brushes on both sides of the bottom front
of the Robotic Cleaner.
NOTICE: Before work, be sure to spread a rug or
othercushioningmaterialontheoortoprevent
damagetotheoorandRoboticCleaner(Fig.B).
1. Place the side brush on the rotating shaft head on
the Robotic Cleaner with the groove of the brush
ttedtotheshafthead.
2. Secure the side brush using the supplied screw.
NOTICE: Make sure that the Robotic Cleaner is
operated with the side brushes installed.
Installing the battery cartridges
Align the groove (Fig. C-2) on the battery cartridge with
the tongue (Fig. C-3) on the battery dock and slip it into
place. Insert it all the way until it locks in place with a
small click.
If you can see the red indicator (Fig. C-1) on the upper
side of the release button, the battery cartridge is not
completely locked.
CAUTION: Care must be taken in installing the
batterycartridgessothatngersarenotcaught
between the dock and the battery cartridge.
11 ENGLISH
The Robotic Cleaner operates with only one battery
cartridge installed on either of the battery dock.
To remove the battery cartridge, slide it from the battery
dock while pressing the release button (Fig. D-1) on the
cartridge.
Installing batteries in the remote control (Fig. E)
Slide off the battery compartment lid, and insert two
AAA size (LR03) batteries, taking care to align correctly
the polarity (+/–).
NOTICE: Do not use new and old batteries together,
nor use different types of battery together.
NOTICE: Remove the batteries, if the remote control
is not going to be used for a long time.
CAUTION: If the skin or eyes come into
contact with electrolyte leaking from the batteries,
immediatelyushwithwater.
Pairing the Robotic Cleaner and the remote control
The Robotic Cleaner comes already paired with the
remote control. However, the pairing process must be
performed again if you replace the remote control.
1. Press and hold the Timer (Fig. F-6)
and Cruise mode (Fig. F-7) buttons
simultaneously on the Robotic Cleaner until the
buzzer beeps twice.
2. Press and hold the Timer (Fig. G-5)
and Location beacon (Fig. G-3) buttons
simultaneously on the remote control until the
buzzer beeps once.
If pairing fails and the buzzer beeps 5 times, retry
pairing again.
Organizing rooms
To ensure smooth cruising
• Shut the doors to the room. If the difference in the
level of the door threshold is small enough that the
Robotic Cleaner can pass over it without problem,
the door can also be left open so that the Robotic
Cleanercontinuesandcleanstheadjoiningroom.
• Place obstacles in front of easily damaged furniture,
etc.
• Place obstacles to prevent the Robotic Cleaner from
entering locations where it may become stuck, such
as under low shelves.
• Movetall,thinandunstableobjectsandothereasily
tippedoverobjectstoanotherroom.
• Lockthewheelsofcartsorotherobjects,ormove
them to another room.
• Arrange electrical cords along the walls.
• Movecushions,booksorotherobjectsthatmay
impede the Robotic Cleaner from cruising to another
room.
• Raisethepartsofcurtainsorotherobjectsthat
droopontotheoor.
• Moveanyoorcoveringswitheasilypulled-out
strandsordifferencesinlevelandoorcoverings
that are thin and slide easily to another room.
• Foldanyoorcoveringtasselsbeneaththeoor
coverings.
• Putawayanysmallorexpensiveobjectsthatmay
be easily vacuumed up.
• Put away any cords, belts, strings, thin papers, or
plasticbags,lyingontheoor.
• Retractanyretractableoorpowersockets.
• Coveranygratingsdividingoorsectionswith
boards, etc. as the Robotic Cleaner may detect
them as boundaries and fail to move across them.
Preventing the Robotic Cleaner from falling
• Ifthecleaningareacontainsaightofstairsorother
section where the Robotic Cleaner may fall down, in
order to keep the Robotic Cleaner out of the section,
placeobjectswithaheightof15cmortallerand
that are heavy enough to withstand the impact of the
Robotic Cleaner in front of the section.
• Block sunlight and infrared rays with curtains. (The
Robotic Cleaner may fall to a lower level when
backing up to avoid sunlight or infrared rays.)
• Close aluminum sash doors. (The Robotic Cleaner
may not detect the difference in level between the
aluminumsashrailandtheoorandmayfalloutof
the door.)
• Moveanyoorcoveringsneardifferencesinlevelto
another room. (The Robotic Cleaner may not detect
the difference and may fall.)
NOTE
• Do not use the Robotic Cleaner near or to vacuum
upammablesubstances.(Itmayresultinexplosion
orre.)
• Do not use the Robotic Cleaner in wet locations,
locations that may become wet, or locations with
high temperature and humidity. Also, do not vacuum
up water. (This may result in electric shock, short-
circuit,re,deformationormalfunction.)
• Do not use the Robotic Cleaner in locations where
the distance from the wall to a difference in level
is approx. 1 m or less. (In rare cases the Robotic
Cleaner may fall while backing up.)
• Do not use the Robotic Cleaner in areas where
barriers that the Robotic Cleaner cannot climb over
are located in the vicinities of walls or obstacles.
The Robotic Cleaner may get stuck on the barrier
while moving backward to avoid the wall or the
obstacle.
• Deactivate any home security systems, etc. (The
Robotic Cleaner may be mistakenly detected as an
intruder.)
• The Robotic Cleaner may not avoid differences in
level of 5.5 cm or less.
• Noise may appear on TV screens during operation.
(This is not a malfunction of the television.)
• Do not leave the Robotic Cleaner for long periods
with the battery cartridge installed. (The battery
electrolyte may leak.)
• Do not turn the Robotic Cleaner upside down with
the battery cartridge installed. (A button may be
pressed, resulting in unintended operation.)

12 ENGLISH
OPERATION
TheRoboticCleanercruisesaroundontheoor
according to the preset cruising mode, avoiding
obstacles using ultrasonic sensors (Fig. P-1), and
captures dust and dirt and other debris on the route
using the side brushes, main brush, and vacuum fan.
However, the sensors may not detect an obstacle
in some situations. If your Robotic Cleaner hits an
obstacle, the Robotic Cleaner’s bumper (Fig. P-2)
absorbs impact and changes the direction of travel.
NOTE: There may be cases where the Robotic
Cleaner could not pass over the barriers at the height
of up to 1.5 cm, even though the Robotic Cleaner is
designed to pass over such barriers.
NOTE: The Robotic Cleaner may avoid an area
where is colored in black, having black wood-grain
patterns, or an area made of glass.
NOTE: After a cleaning cycle is completed, some dust
and dirt may remain under certain conditions.
NOTE: Wireless communication may be interrupted
or blocked under the following conditions:
• Inside structures built with reinforced concrete or
metallic building materials
• When the Robotic Cleaner is behind an obstacle
• Near radio communication equipment that uses
the same frequency band
• Neardevicesthatgenerateelectromagneticelds
(microwave ovens, etc.) or static electricity, or that
cause radio wave interference
Basic operations
CAUTION: Always make sure that the Robotic
CleaneristurnedOFFbeforeadjustingorchecking
any function on the Robotic Cleaner.
NOTICE: If dew condensation has occurred, turn
OFF the Robotic Cleaner and wait until the Robotic
Cleaner dries up, before restarting operation.
NOTICE: All settings are not cleared when the
RoboticCleaneristurnedOFF.Besuretoconrm
that the settings are right by the lamps (Figs. F-6, 7,
9, 11) on the Robotic Cleaner to prevent unexpected
operation.
1. Press the POWER button (Fig. F-8) on the
Robotic Cleaner.
The Robotic Cleaner enters standby mode and
the Battery indicator (Fig. F-5) lights up.
(For details, see “Battery indicator on the Robotic
Cleaner” below.)
2. Press the Cruise mode button (Fig. F-7) on the
Robotic Cleaner repeatedly to select mode, or press
the or Cruise mode button (Fig. G-4) on the
remote control.
The selected mode lamp lights up. (For details, see
“Cruise mode” below.)
3. Press the POWER button (Fig. F-8) on the
Robotic Cleaner or the Start/Stop button (Fig.
G-2) on the remote control to start cleaning.
Thepilotlamp(Fig.F-1)ashesandthebuzzer
beeps while cleaning.
To pause the cleaning operation, perform step 3 again.
To resume the cleaning operation, perform step 3 again.
To turn OFF the Robotic Cleaner, press and hold
the POWER button (Fig. F-8) on the Robotic Cleaner
until all indicators turn OFF, or press the POWER
OFF button (Fig. G-1) on the remote control.
CAUTION: Do not get a close look at the pilot lamp
light, or avoid the light getting in your eyes. Doing so
may harm your eyes.
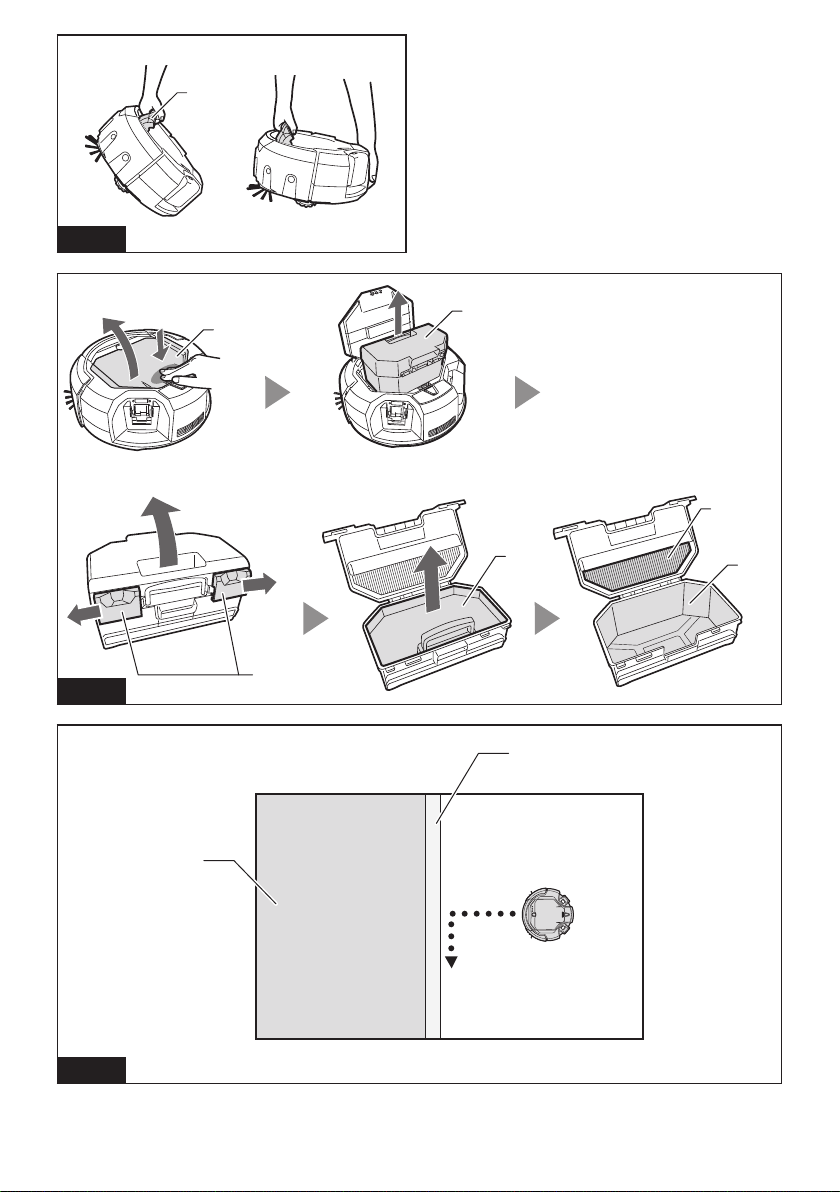
Battery indicator on the Robotic Cleaner
The battery indicator located on the corresponding
battery cartridge side lights up and indicates the
remaining power of the battery cartridge.
NOTICE: The table below provides a rough indication
of the remaining battery power. The remaining
amount may vary depending on the conditions of use
and the room temperature.
50% or more
Between 20% and 50%
20% or lower
Empty/No battery cartridge
installed
Battery error
Battery indicator on the battery cartridge
The remaining power can also be checked using the
battery indicator (Fig. I-1) on battery cartridges with
model numbers ending in the letter “B.”
Remove the battery cartridge and press the button
(Fig. I-2).
NOTICE: The table below provides a rough indication
of the remaining battery power. The remaining
amount may vary depending on the conditions of use
and the room temperature.
75% or more
Between 50% and 75% (incl.
50%)
Between 25% and 50%
25% or lower
Empty
Battery error
13 ENGLISH
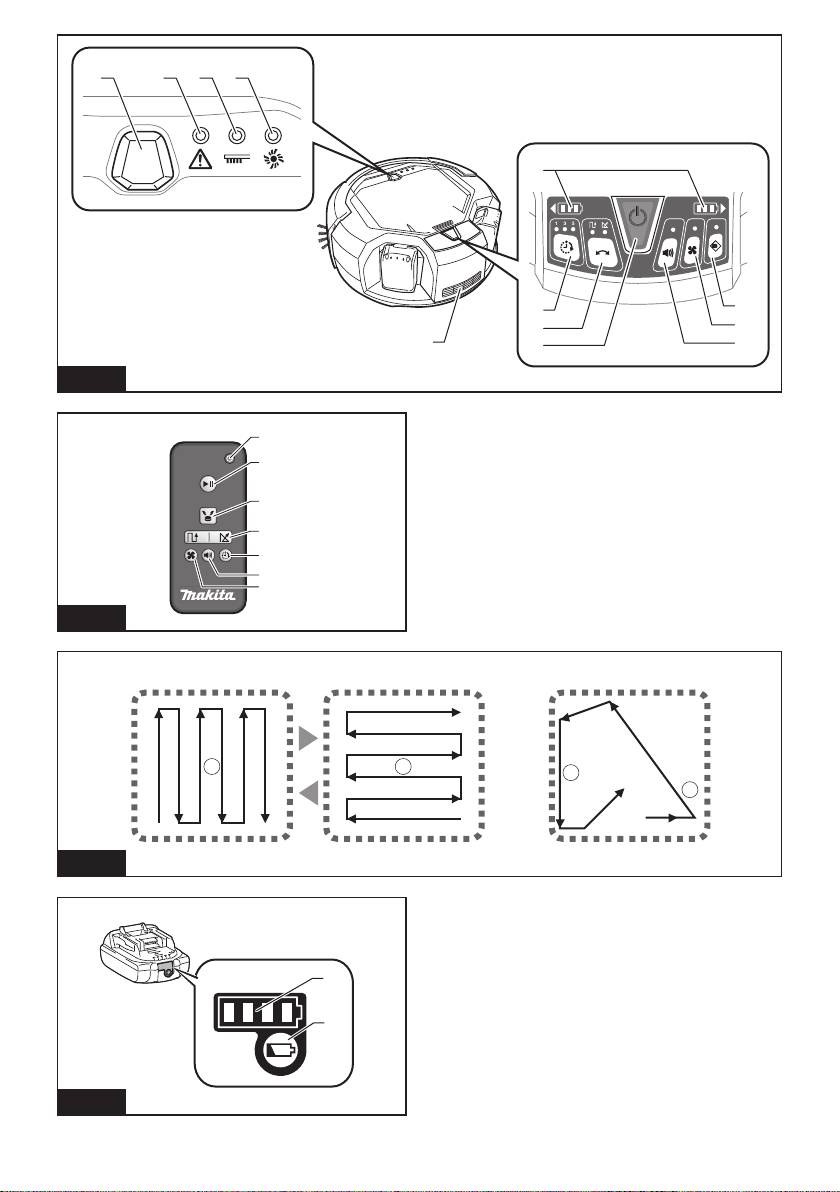
Cruise mode
Pattern mode
Application:
Largeoorswithlessobstaclessuch
as in a well-organized warehouse and
long gallery.
Description (Fig. H-1):
The Robotic Cleaner repeats a cycle of
vertical (a) and horizontal (b) travels.*
Random mode
Application:
Floors with many obstacles such as in
anofce.
Description (Fig. H-2):
The Robotic Cleaner repeats a cycle of
bouncing off (c) and along-the-wall (d)
travels.
* Depending on the conditions encountered, the
actual trail of the Robotic Cleaner may differ from
this chart.
NOTE: The Robotic Cleaner could not clean a narrow
area where the Robotic Cleaner could not travel or
where is out of the reach of the side brush.
NOTE: After a cleaning cycle is over, some dust may
remainontheoorinsomeconditions.
Sleep mode
If the Robotic Cleaner is left as it is for approx. 5
minutes in standby mode, the Robotic Cleaner
automatically enters sleep mode to save the batteries,
andthepilotlamp(Fig.F-1)slowlyashes.TheRobotic
Cleaner also enters sleep mode when the auto-on timer
has been activated.
To return to standby mode, perform step 3 in “Basic
operations.”
NOTICE: Changes of settings and starting of cleaning
operations are not possible in this mode.
Carrying the Robotic Cleaner
CAUTION: Before carrying the Robotic Cleaner,
be sure to turn OFF the Robotic Cleaner.
CAUTION: Care must be taken that your hand
never be caught between the handle and the Robotic
Cleaner’s body.
Grip the handle (Fig. J-1).
NOTICE: If you support the rear bottom of the Robotic
Cleaner with another hand, care must be taken so as
not to lift that side too much as the dust and dirt in the
Robotic Cleaner drop out of the main brush opening.
NOTICE: Do not haul the Robotic Cleaner.
Emptying the bin
Empty the bin after every use to keep the Robotic
Cleaner operating at peak performance.
1. Press and hold the POWER button (Fig. F-8) on
the Robotic Cleaner until all indicators turn OFF, or
press the POWER OFF button (Fig. G-1) on the
remote control to turn OFF the Robotic Cleaner.
2. Press and release the top lid (Fig. K-1) to unlock it,
and then fully open the lid.
3. Take out the dust box (Fig. K-2).
4. Undo both locks (Fig. K-3), and open the dust box
lid.
5. Take out and empty the upper bin (Fig. K-4).
6. Removesmallclumpsofdustfromthelter(Fig.
K-5) and empty the lower bin (Fig. K-6).
7. Replace the dust box in the Robotic Cleaner in the
reverse sequence.
Advanced operations
The following features can be set only when the Robotic
Cleaner is in standby mode (see step 1 in “Basic
operations”).
Saving power
The Robotic Cleaner can capture most visible dust
withoutusingthevacuumfan.Ifnedustdoesnotneed
to be removed, turning OFF the vacuum fan saves
the battery power to prolong the operating time of the
Robotic Cleaner.
In standby mode, press the Vacuum button on the
Robotic Cleaner (Fig. F-10) or on the remote control
(Fig. G-7) to turn OFF the Vacuum lamp (Fig. F-10).
To turn ON the vacuum fan, press the Vacuum button
on the Robotic Cleaner (Fig. F-10) or on the remote
control (Fig. G-7). The lamp lights up again.
NOTICE: This setting is not possible in sleep mode
with the auto-on timer activated.
NOTICE: In cases where the vacuum fan is turned
OFF, the Filter maintenance lamp (Fig. F-3) does
notlightevenifthelterisfullofdirt.
Adjusting the buzzer volume
Three levels of buzzer volume including mute can be
selected.
In standby mode, repeatedly press the Buzzer button
on the Robotic Cleaner (Fig. F-9) or on the remote
control (Fig. G-6). Each time you press the button, the
buzzer beeps in the following order: at high volume (the
lamp lights up), at low volume (the lamp lights up), and
then no sound (the lamp goes off).
NOTICE: This setting is not possible in sleep mode
with the auto-on timer activated.

14 ENGLISH
Locating the Robotic Cleaner
This feature is useful for locating the Robotic Cleaner
whichmaybeoutofsightonalargeoorwithdesks,
cabinets,andotherxtures.
Press the Location beacon button on the remote
control (Fig. G-3) while the Robotic Cleaner is in
standby or sleep mode. The buzzer beeps for approx.
10secondsandthepilotlampashes.
Tostopthebuzzerandashing,pressthe Location
beacon button again.
NOTE: There may be cases where the Robotic
Cleaner does not respond because the Robotic
Cleaner is out of range of the remote control. The
problem can be resolved by pressing the Location
beaconbuttonwhileyouaremovingaroundtheoor.
Using the auto-on timer
This feature enables the Robotic Cleaner to start
cleaningautomaticallyafterthespeciedtime.
As the setting is cleared once the auto-timed cleaning
is completed, perform the following procedure to
reactivate the auto-on timer.
1. In standby mode, repeatedly press the Timer
button on the Robotic Cleaner (Fig. F-6) or on the
remote control (Fig. G-5). Each time you press the
button, the setting changes in the following order:
Lamp status Cleaning starts
after 1 hour.
after 3 hours.
after 5 hours.
Auto-on timer is disengaged.
2. Press the POWER button (Fig. F-8) on the
Robotic Cleaner to activate the auto-on timer. The
Robotic Cleaner enters sleep mode.
To clear the timer in standby mode, press and hold
the POWER button (Fig. F-8) on the Robotic Cleaner
until all indicators go off, or press the POWER OFF
button (Fig. G-1) on the remote control.
NOTICE: If the status of both right and left battery
indicators is or , the auto-on timer may not
activate and cleaning may not start automatically.
NOTICE: Changes of settings or starting of cleaning
operations are not possible in this mode.
NOTICE: The auto-on timer setting is cleared if the
batteries are completely discharged.
Conning the Robotic Cleaner to a particular
area
Boundary tape (Fig. L-1) and the boundary-sensing
feature that employs infrared sensors, enable the
Robotic Cleaner to avoid the following areas (Fig. L-2):
• An area that is divided into sections because the
entireoorissolargethattheRoboticCleaner
cannotcleantheooratatime
• An area where fragile articles are present that the
Robotic Cleaner could damage
• Anareafullofgoodsandxtures,barriers,orof
an intricate shape, resulting in the Robotic Cleaner
getting stuck
• An area in the vicinity of a staircase
• An area with a low barrier that the Robotic Cleaner
canclimboverandfalldowntoaloweroor,orthat
the Robotic Cleaner will get stuck on
Preparations
1. Selectanevenandsmoothsurfaceontheoor
where you plan to place the boundary tape, and
then clean the surface.
2. Place the boundary tape so that the side with the
shortbarsisadjacenttothecleaningareaandthere
arenoairbubblesbetweenthetapeandtheoor.
NOTICE: Be sure to use only genuine boundary tape.
Using a tape other than the genuine article might risk
malfunctioning of the boundary-sensing feature.
NOTICE: Do not place the boundary tape on uneven
surfaces that may cause erroneous detection or
on surfaces where the tape may become soiled or
damaged.
NOTICE: Be aware that some adhesive agent may
remainonoors,ortheoormaybedamagedwhen
you remove the boundary tape.
NOTICE: Keep the boundary tapes clean and check
if any positions torn or ripped. If the tape is damaged,
replace it.
WARNING: Do not place the boundary tape in
any area where an accident occurs resulting from
the Robotic Cleaner entering the area or the Robotic
Cleaner falling down from the area. In such a case,
placeobjectswhoseheightis15cmorhigherand
that are heavy enough to withstand the impact of the
Robotic Cleaner, in place of the boundary tapes.
Operations
In standby mode, press the Boundary sensor button
(Fig. F-11) on the Robotic Cleaner to activate the
boundary sensor (Fig. O-2).
The lamp (Fig. F-11) lights up.
To deactivate the boundary sensor, press
the Boundary sensor button again.
NOTICE: This setting is not possible in sleep mode
with the auto-on timer activated.

15 ENGLISH
MAINTENANCE
CAUTION: Always make sure that both battery
cartridges are removed before attempting to perform
inspection or maintenance.
NOTICE: Be sure to take out the dust box before
turning over the Robotic Cleaner to prevent dust and
dirt from dropping out of the main brush opening.
NOTICE: Be sure to spread a rug or other cushioning
materialontheoortopreventdamagetotheoor
and the Robotic Cleaner (Fig. B).
NOTICE: Never use hot water (higher than 40°C
(104°F)), gasoline, benzine, thinner, alcohol or the
like. Discoloration, deformation, or cracks may result.
To maintain product SAFETY and RELIABILITY,
repairs,anyothermaintenance,oradjustmentshould
be performed by Makita Authorized or Factory Service
Centers, always using Makita replacement parts.
Cleaning the side brushes
(Figs. A, M-1)
• Threads and hairs tangled in the bristles of the
side brushes may cause the brush to stop rotating.
Remove them using tweezers or similar tools.
• If the bristles are deformed or missing, replace with
the spare brush (see “Installing the side brushes” for
details).
Cleaning the wheels
• Remove threads and hairs from the drive wheels
(Fig. M-2) using tools such as tweezers and
scissors. Turning the wheel facilitates the cleaning.
• Remove threads and hairs from the swivel wheels
(Fig. M-3) using tweezers, scissors, or similar tools.
NOTICE:Caremustbetakensothatngersarenot
caught between the wheels and the Robotic Cleaner
body.
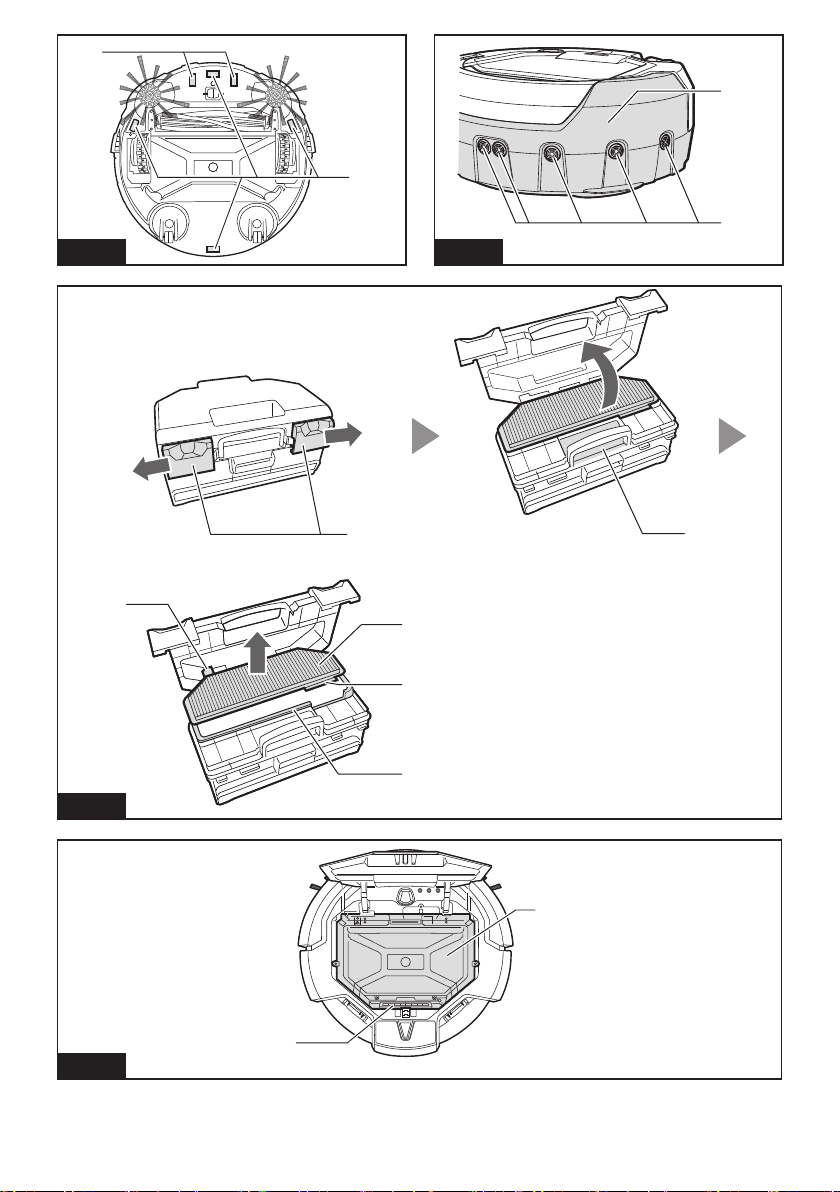
Cleaning the main brush
Removing the side brushes (see “Installing the side
brushes” for details) facilitates the following work.
1. Remove four screws (Fig. N-1), and then the bottom
plate (Fig. N-2) and main brush (Fig. N-3).
2. Wipe the bottom plate (Fig. N-2) with a cloth slightly
moistened with mild detergent or wash the plate in
water if necessary.
3. Remove threads and hairs from the main brush (Fig.
N-3) using scissors and wash the main brush in
water if necessary.
4. Wipe the inside of the vacuum vent (Fig. N-4) with a
cloth slightly moistened with mild detergent.
5. To replace the main brush, align the protruding
portion (Fig. N-5) on the right end of the main brush
with the indentation on the right shaft bush (Fig.
N-6),andtheninsertthemainbrushtojointhem
together.
6. Insert the left square end of the main brush (Fig.
N-7) into the left square shaft bush (Fig. N-8).
7. Replace the bottom plate in the reverse sequence.
NOTE: When the side brushes remain attached to
the body of the Robotic Cleaner, manually rotating
the side brush facilitates attachment of the bottom
plate without pinching the bristles of the side brushes
between the plate and body of the Robotic Cleaner.
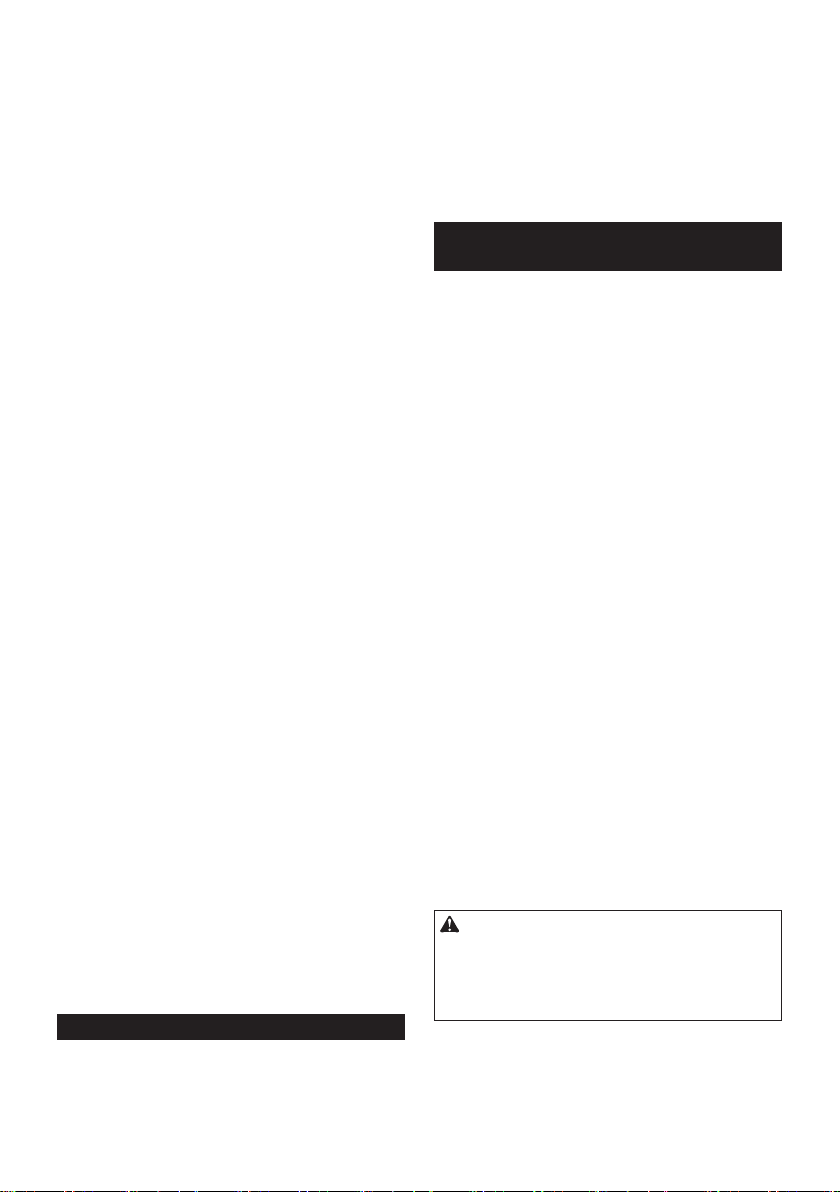
Cleaning the sensors
• Clean the cliff sensors (Fig. O-1) and boundary
sensors (Fig. O-2) using a clean, dry cotton
applicator.
• Clean the ultrasonic sensors (Fig. P-1) using
another vacuum cleaner set in gentle suction mode.
A total of 8 sensors are located on the front and both
sides of the bumper (Fig. P-2).
Cleaning the lter and dust box
NOTICE: To avoid damaging the upper dust box lid,
do not open or close it forcibly.
1. Undo both locks (Fig. Q-1) and lift the upper dust
box lid while holding the Filter maintenance
mark(Fig.Q-2)toopentheltercompartment.
2. Takeoutthelter(Fig.Q-3)andtapitagainstthe
garbage bag or on a waste sheet spread on an even
surface to shake off the dust and dirt.
NOTICE:Donotscruborsquashthelter,norusea
pointedobjecttocleanthelter.
3. WashthelterifthesuctionpoweroftheRobotic
Cleaner becomes weak.
NOTICE:Iftheltersmells,soakthelterina
diluted solution of household bleach (10 milliliters of
bleach per 1 liter of water) for approx. 3 hours before
washingthelterinrunningwater.
4. Wash the dust box.
5. Drythelter(ifyouhavewashedit)andthedust
box for 1 day in a well-ventilated place to prevent
unpleasant odor or malfunctions.
NOTICE:Donotdrythewetlterusingahairdryeror
other heat source.
6. Replacethelterinthedustboxinthereverse
sequence.
NOTICE:Whenyoureplacethelterinthe
compartment, make sure that the tabs (Fig. Q-4) on
thelterarettedtothecutintheedgeofthelter
holder (Fig. Q-5).
16 ENGLISH
Cleaning the body
1. Wipe the Robotic Cleaner’s exterior with a cloth
slightly moistened with mild detergent.
2. Press and release the top lid (Fig. K-1) to unlock,
and then fully open the lid.
3. Take out the dust box (Fig. K-2).
4. Wipe the Robotic Cleaner’s interior (Fig. R-1)
including the vent grill (Fig. R-2) with a cloth slightly
moistened with mild detergent.
RESTORING THE
ROBOTIC CLEANER
When the Robotic Cleaner cannot continue to operate
under such conditions as drive wheel hanging down or
running out of battery power, the Robotic Cleaner will
stop cleaning and tell you something is wrong by the
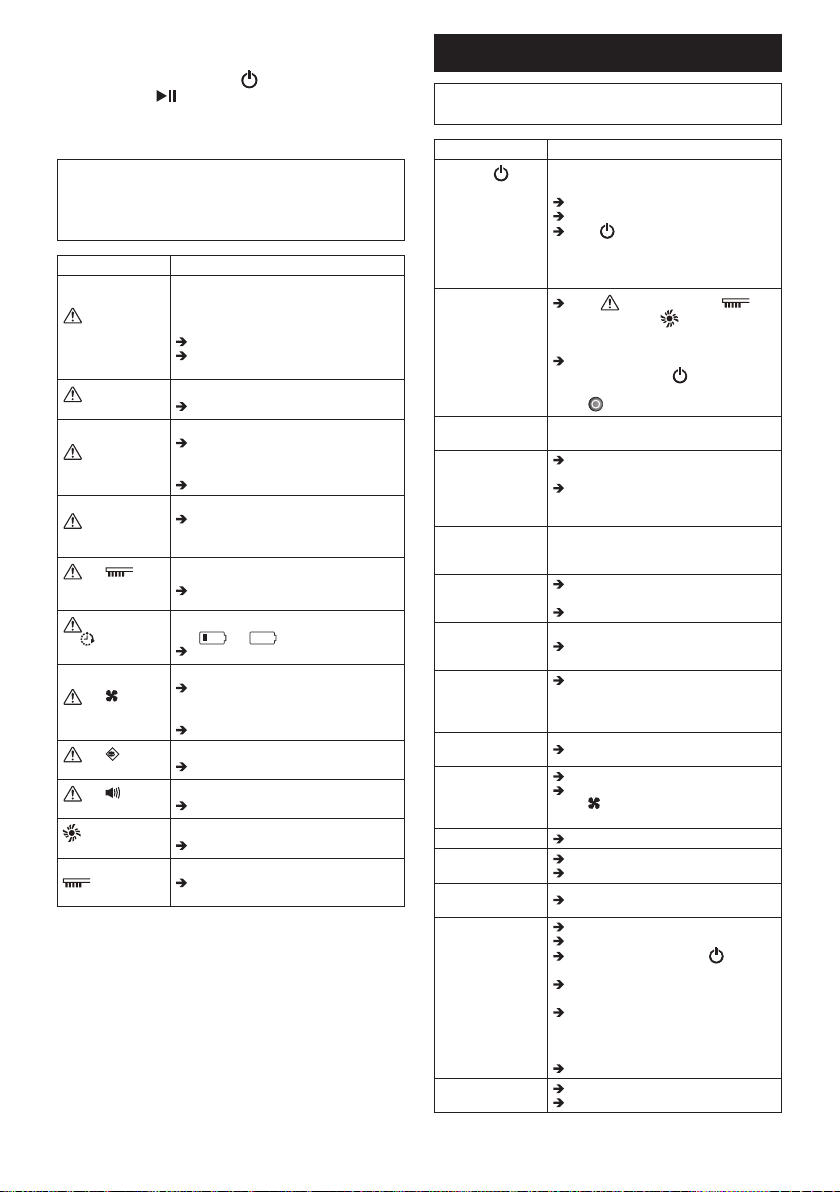
following lamps and buzzers.
• Troubleshooting lamp (Fig. F-2)
• Filter maintenance lamp (Fig. F-3)
• Brush maintenance lamp (Fig. F-4)
• Timer lamps (Fig. F-6)
• Buzzer lamp (Fig. F-9)
• Vacuum lamp (Fig. F-10)
• Boundary sensor lamp (Fig. F-11)
1. Identify the problem using the following table.
2. Resolve the problem.
3. Press the POWER button (Fig. F-8) on the
Robotic Cleaner or the Start/Stop button (Fig.
G-2) on the remote control to enter standby mode.
The error indication stops and the Robotic Cleaner
is ready for cleaning.
NOTICE: If the error occurs again, turn OFF and ON
the Robotic Cleaner.
NOTICE: If the problem persists after the remedial
action is complete, consult your nearest Makita
Service Center.
Indication Cause/Remedy
lampashes
once, twice, or
6 times for each
sequence
• The drive wheel is hanging down.
• The Robotic Cleaner has gotten stuck
on a barrier.
• The Robotic Cleaner has been
exposed to direct sunlight.
• The Robotic Cleaner has stopped on a
blackoor.
Move the Robotic Cleaner away from
the area.
If the error occurs again, clean the cliff
sensors (Fig. O-1).
lampashes
3 times for each
sequence
• A bumper sensor error has occurred.
Push the bumper (Fig. P-2) 10 times.
lampashes
4 times for each
sequence
• Threads and hairs are tangled with the
drive wheels.
Remove them from the drive wheels
(Fig. M-2).
• The Robotic Cleaner passed through
aconnedareawhereitstopsurface
was pushed down.
This is not a malfunction.
lampashes5
or 7 times for each
sequence
• The Robotic Cleaner has overheated.
Turn the Robotic Cleaner OFF,
remove the battery cartridge(s), and
wait for an hour. Use the Robotic
Cleaner only at room temperatures
not exceeding 40°C (104°F).
and
lampsashonce
for each sequence
• Thedustboxorthelterhasnotbeen
installed.
Installthedustboxorthelter.
and
all lampsash
once for each
sequence
• The remaining battery charge was
not enough ( or ) to start
cleaning.
Fully charge the battery cartridges.
and lamps
light up
• Threads and hairs are tangled in the
drive wheels.
Remove them from the drive wheels
(Fig. M-2).
• The Robotic Cleaner passed through
aconnedareawhereitstopsurface
was pushed down.
This is not a malfunction.
and lamps
light up
• A sensor error has occurred.
Turn the Robotic Cleaner OFF and
then ON.
and lamps
light up
• An error has occurred in the Robotic
Cleaner.
Turn the Robotic Cleaner OFF and
then ON.
lampashes
once for each
sequence
• Threads and hairs are tangled in the
side brushes and main brush.
Remove them from the brushes (Figs.
A, N-3).
lamp
lights up
• The dust box is full of dust and dirt or
thelterisclogged.
Empty the dust box (Fig. K-2) and
cleanthelter(Fig.K-5).
17 ENGLISH
TROUBLESHOOTING
NOTE: If the problem persists after the remedial
action is taken, consult your nearest Makita Service
Center.
Symptom Cause/Remedy
The lamps do
not light up
when you press
the button.
The Robotic
Cleaner does not
operate when you
press the button
on the Robotic
Cleaner or the
remote control.
Install the battery cartridges correctly.
Fully charge the battery cartridges.
Press the button to turn the
Robotic Cleaner ON.
The Robotic
Cleaner does not
operate.
If the Troubleshooting
lamp, Filter maintenance lamp,
or Brush maintenance lamp lights
uporashes,see“RESTORINGTHE
ROBOTIC CLEANER” to resolve the
problem.
Ifthepilotlampashesslowly,press
and hold the POWER button on
the Robotic Cleaner until all indicators
go off, or press the POWER OFF
button on the remote control to clear
the timer.
The Robotic
Cleaner starts
operation
automatically.
• The auto-on timer has been activated.
The Robotic
Cleaner stops
operation during
cleaning.
Turn the Robotic Cleaner OFF, and
then remove any cords, strings, etc.
from the drive wheels.
If the Robotic Cleaner has gotten
stuck on a barrier or other obstacle,
move the Robotic Cleaner to a
different location.
The cruising speed
is not constant.
• If an obstacle is detected, the Robotic
Cleaner will slow down as it takes time
to calculate a traveling direction. This
is not a malfunction of the Robotic
Cleaner.
The Robotic
Cleaner does not
travel straight
forward.
Turn the Robotic Cleaner OFF, and
thenremoveanyforeignobjects
tangled in the drive wheels.
Clean the ultrasonic sensors.
The Robotic
Cleaner is hitting
obstacles more
frequently than
before.
Clean the ultrasonic sensors.
The Robotic
Cleaner falls down
stairs or to a lower
oor.
Clean the cliff sensors.
• The Robotic Cleaner may not avoid
differences in level of 5.5 cm or
less. This is not a malfunction of the
Robotic Cleaner.
The operating
sound is louder
than usual.
Empty the dust box and clean the
lter,thesidebrushes,andthemain
brush.
The suction power
is not strong
enough to capture
dust and dirt.
Empty the dust box and clean the
lter.
Press the Vacuum button on the
Robotic Cleaner or on the remote
control to turn ON the vacuum fan.
The side brushes
fall off.
Install the side brushes correctly
(Fig. A).
The side brushes
do not rotate
or rotate with
difculty.
Clean the side brushes and the main
brush.
Install the main brush and the plate
correctly (Fig. N).
The exhaust air
smells.
Empty the dust box and clean the
lter.
The remote control
does not work.
Install the remote control batteries
correctly (Fig. E).
Replace the batteries with new ones.
Press the POWER button on the
Robotic Cleaner to turn it ON.
Move closer to the Robotic Cleaner
or remove obstacles between the
Robotic Cleaner and the remote
control.
Stop using the Robotic Cleaner near
or move it away from equipment that
uses radio frequencies in the 2.4 GHz
band (kitchen microwaves, Bluetooth
devices, Wi-Fi devices, etc.).
Turn the Robotic Cleaner OFF and
then ON.
The auto-on timer
does not work.
Use fully charged battery cartridges.
Reactivate the auto-on timer.
OPTIONAL
ACCESSORIES
CAUTION: These accessories or attachments are
recommendedforusewithyourMakitatoolspecied
in this manual. The use of any other accessories or
attachmentsmightpresentariskofinjurytopersons.
Only use the accessory or attachment for its stated
purpose.
• Boundary tape
• Side brush
• Main brush
• Bottom plate
• Filter
• Makita genuine battery and charger
NOTE: Some items in the list may be included in the
tool package as standard accessories. They may
differ from country to country.
REFERENCE
INFORMATION
MakitaCorporationanditssubsidiaries,afliates,and
distributors may use Usage Information for the purpose
of after-sales services such as maintenance and repair.
Usage Information consists of number of operations,
distribution load, error information, operational status,
and/or maintenance record of the power tool.
Complies with
IDA Standards
DA107248

18 简体中文
目次
规格
•
•
简体中文(原版说明书)
警告:
符号
用途

19 简体中文
安全警告
警 告
不要在易燃物附近使用扫地机器人或吸掉易
燃物。
•
•
•
•
•
不要在湿的地方、可能会变湿的地方或高
温高湿的地方使用扫地机器人。另外,不要
吸水。
•
•
•
•
不要用湿手接触扫地机器人。
不要在炉子或其他加热设备周围使用扫地机
器人。
不要在以下类型的地方使用扫地机器人。
•
•
•
不要让没有监管的小孩或不能表达其意志的
人或自己不能操作扫地机器人的人使用扫地
机器人。
在下列异常或故障的情况下请立即停止
操作。
•
•
•
•
•
在禁止使用的地方请关闭扫地机器人。
不要在狭窄且没有包围的高处使用扫地机
器人。
•
•
•
•
不要将扫地机器人暴露在直射阳光或红外
线下。
•
•
•
移动任何如果与扫地机器人接触可能导致事
故的物体。
•
•
不要盖住扫地机器人。
不要骑坐或放置重物在扫地机器人上面。不
要施加强烈的物理冲击。
切勿修改扫地机器人。
不要阻塞或插入金属或易燃异物到吸入或排
出口。另外,不要在可能阻挡吸入口的物体
周围使用扫地机器人。
不要加热或让扫地机器人暴露到火或让其留
在热的地方,例如火或炉子附近、暴露在直
射阳光下或留在骄阳下的车子中。
20 简体中文
不要水洗或让扫地机器人暴露到水或洗
涤液。
运作中不要接触驱动轮或将手或脚插到扫地
机器人下面。
不要阻挡或将异物插入扫地机器人的传感
器中。
不要粘胶带到传感器或轮子。不要改变缓冲
器或轮子形状或用力按压缓冲器。
定期清洁各传感器。
不要使用脏、撕裂或破损的边界带(另
售)。
注 意
不要在以下地方使用扫地机器人。
•
•
•
确保使扫地机器人和遥控器距离可植入心脏
起搏器和除细动器15厘米以上。
不要将异物插入空隙和开口中。
在清洁扫地机器人时,小心不要夹到手指。
在使用扫地机器人之前,务必读完此使用说
明书。
注意
如果察觉有异味、电池泄漏、异常发热、变
形或变色,立即停止使用电池。
不要在室外或在可能转到室外的地方使用扫
地机器人。
不要在以下地方使用扫地机器人。
•
•
•
不要在以下地方使用扫地机器人。
•
•
•
不要在长绒(7毫米以上)地板覆盖物上使
用扫地机器人。
不要在混凝土地板等硬而不平整的表面上使
用扫地机器人。
不要使用刷子或轮子破损的扫地机器人。
去除沾在主刷、侧刷和轮子上的任何砂土。
不要吸以下东西。
•
•
•
•
•
•
•

21 简体中文
在吸完细粉末(灰泥、水泥、粉笔末等)之
后清洁过滤器。
不要使用过滤器堵塞或传感器脏的扫地机
器人。
不要给旋转的刷子或其他移动部件上油。
保管使用说明书。
电池工具的使用和保养
仅用制造商指定的充电器充电。适合一
种类型电池的充电器被用于另一种电池
时,可能构成火灾危险。
仅用特别指定的电池使用电动工具。
使用任何其他电池可能构成伤害或火灾
危险。
不使用电池时,不要与会接通一个端子
到另一个端子的回形针、硬币、钥匙、
铁钉、螺丝或其他金属物放在一起。
在极端情况下,电池可能会冒出液体;
请避免接触。如果意外发生接触,请用
水冲洗。
电池重要安全指南
在使用电池之前,请阅读(1)电池充电
器、(2)电池和(3)使用电池的产品上面
的所有指南和注意标记。
不要拆解电池。
如果操作时间变得比平时明显短,请立
即停止操作。否则可能导致过热、燃烧
甚至爆炸的危险。
如果电解液进入眼睛,请立即用清水冲
洗掉并就医。否则可能导致失明。
不要使电池短路:
不要用任何导电材料接触端子。
避免将电池与铁钉、硬币等其他金
属物存放在一个容器中。
不要使电池暴露于雨水中。
电池短路会导致大电流、过热、燃烧甚
至分解。
不要将扫地机器人和电池存放在温度可
能会达到或超过50°C的任何地方。
不要焚烧电池,即使它严重损坏或完全
破损。电池在火中会爆炸。
小心不要掉落或击打电池。
不要使用损坏的电池。
请遵循与电池废弃相关的本地规定。
保管使用说明书。
注意:只使用正宗牧田电池。使用非正
宗牧田电池或更改过的电池可能造成电池
爆裂而导致火灾、人身伤害和损失。它还
将使牧田工具和充电器的牧田保修失效。
保持最长电池寿命的提示
在电池放完电之前给电池充电。当您注
意到工具动力不足时,务必停止操作并
给电池充电。
切勿给完满电的电池再充电。过度充电
会缩短电池使用寿命。
请在10°C - 40°C的室温范围内给电
池充电。在给热的电池充电之前先让其
冷却。
在长期(超过六个月)存放之前,建议
您给电池充电。
工具/电池保护系统
过负荷
过热
过放电
按钮和指示灯

22 简体中文
扫地机器人(图F)
遥控器(图G)
使用之前
装配和电池安装
注意:在扫地机器人上进行任何作业之
前,务必确保关闭扫地机器人。
附带的配件
•
•
•
•
•
•
•
安装侧刷(图A)
注意:作业之前,确保在地板上铺一块厚
毯或其他垫子以防损坏地板和扫地机器人
(图B)。
注意:确保扫地机器人装上侧刷工作。
安装电池
注意:安装电池时需小心,不要让手夹
到坞和电池之间。
在遥控器中安装电池(图E)
注意:不要混用新旧电池,或混用不同类
型的电池。
注意:如果长时间不使用遥控器,请取出
电池。
注意:如果皮肤或眼睛接触电池漏出的
电解液,请立即用水冲洗。
配对扫地机器人和遥控器

23 简体中文
整理房间
为确保顺畅巡航
•
•
•
•
•
•
•
•
•
•
•
•
•
•
防止扫地机器人掉落
•
•
•
•
注解
•
•
•
•
•
•
•
•
•
操作

24 简体中文
注解:虽然扫地机器人设计为能够越过
1.5厘米高度的屏障,有些情况下也可能
过不去。
注解:扫地机器人可能会避开黑色、有黑
色木纹图案的区域或玻璃制作的区域。
注解:在完成一个打扫周期之后,在某些
情况下可能会留下一些灰尘和脏物。
注解:在下列情况下,无线通讯可能被打
断或阻挡。
• 在用钢筋混凝土或金属建筑材料构建
的建筑物内
• 当扫地机器人在障碍物后面时
• 在使用相同频段的无线电通讯设
备附近
• 在产生电磁场(微波炉等)或静电的
设备或造成无线电波干扰的设备附近
基本操作
注意:在调整或检查扫地机器人上的任
何功能之前,务必确保扫地机器人关闭。
注意:如果发生结露,关闭扫地机器人并
等到扫地机器人变干再重新开始工作。
注意:当扫地机器人关闭时,所有设定都
不会清除。务必通过扫地机器人上的灯
(图F-6、7、9、11)来确认设定正确,
以防意外操作。
注意:不要凑近看信号灯光,或避免让
灯光进入您的眼睛。这样做可能会损害您
的眼睛。
扫地机器人上的电池指示灯
注意:下表提供了剩余电池电量的粗略指
示。剩余电量可能根据使用情况和室温
而异。
电池上的电池指示灯
注意:下表提供了剩余电池电量的粗略指
示。剩余电量可能根据使用情况和室温
而异。

25 简体中文
巡航模式
注解:扫地机器人不能打扫它不能通行或
侧刷不能达到的狭窄区域。
注解:在打扫周期结束之后,在某些情况
下地板上可能留下一些灰尘。
睡眠模式
注意:在此模式下不可以改变设定和开始
打扫操作。
携带扫地机器人
注意:在携带扫地机器人之前,确保关
闭扫地机器人。
注意:小心不要让手夹在把手和扫地机
器人机身之间。
注意:如果您用另一只手支撑扫地机器人
的后底部,小心不要抬起该侧太多,否则
扫地机器人中的灰尘和脏物会掉出主刷
开口。
注意:不要拖扫地机器人。
倒空尘盒
高级操作
省电
注意:在启用自动开启定时器的睡眠模式
中不能进行此设定。
注意:如果吸尘风扇关闭,则即使过滤器
装满了脏物, 过滤器维护灯
(图F-3)也不会亮起。
调节蜂鸣器音量
注意:在启用自动开启定时器的睡眠模式
中不能进行此设定。
26 简体中文
找出扫地机器人
注解:如果扫地机器人不在遥控的范围
之内,有时扫地机器人可能不会响应。
此问题可通过在您在地板上移动的同时
按 位置灯标按钮来解决。
使用自动开启定时器
灯状态 开始打扫
注意:如果左右电池指示灯的状态都
是 或 ,则自动开启定时器可能不
会启动,可能不会自动开始打扫。
注意:在此模式下不能改变设定或开始打
扫操作。
注意:如果电池完全没电,则自动开启定
时器设定将被清除。
局限扫地机器人在特定区域
•
•
•
•
•
准备
注意:务必只使用正宗的边界带。使用非
正宗的胶带可能有边界传感器功能失灵的
危险。
注意:不要将边界带置于可能导致错误侦
侧的不平整表面或胶带可能弄脏或损坏的
表面上。
注意:注意在您取下边界带时,有些粘剂
可能留在地板上,或地板可能损坏。
注意:保持边界带干净,检查任何位置是
否有破损或撕裂。如果胶带损坏,请更
换它。
警告:不要在因扫地机器人进入而导致
事故发生的区域或扫地机器人掉落过的区
域放置边界带。在这种情况下,放置重量
足以承受扫地机器人冲击的15厘米或更高
的物体取代边界带。
27 简体中文
操作
注意:在启用自动开启定时器的睡眠模式
中不能进行此设定。
维护
注意:在进行检查或维护之前,始终确
保两块电池都已卸下。
注意:在倒置扫地机器人之前,确保取出
尘盒,以免灰尘和脏物掉出主刷开口。
注意:确保在地板上铺一块厚毯或其他垫
子以防损坏地板和扫地机器人(图B)。
注意:切勿使用热水(高于40°C)、汽
油、挥发油、稀释剂、酒精等。可能发生
掉色、变形或裂开。
清洁侧刷(图A、M-1)
•
•
清洁轮子
•
•
注意:小心不要让手夹在轮子和扫地机器
人机身之间。
清洁主刷
注解:当侧刷留在扫地机器人机身时,手
动转动侧刷有助于安装底盘而不会使侧刷
的刷毛夹在底盘和扫地机器人机身之间。
清洁传感器
•
•
清洁过滤器和尘盒
注意:为避免损坏上尘盒盖子,不要强制
打开或关闭它。
注意:不要刮或挤过滤器,或使用尖头物
体清洁过滤器。
注意:如果过滤器有异味,将过滤器浸泡
在家用漂白剂稀释溶液(每1升水兑10毫
升漂白剂)中约3小时,再用水冲洗。
28 简体中文
注意:不要使用头发吹风机或其他热源吹
干湿的过滤器。
注意:当您更换舱中的过滤器时,确保过
滤器上的弹片(图Q-4)嵌到过滤器托
(图Q-5)边缘的割口。
清洁机身
恢复扫地机器人
•
•
•
•
•
•
•
注意:如果再次发生错误,请关闭并开启
扫地机器人。
注意:如果完成纠正操作之后问题还是存
在,请就近咨询牧田维修中心。
指示 原因/消除方法
•
•
•
•
•
•
•
•
•
•
•
•
•

29 简体中文
•
•
•
故障排除
注解:如果采取纠正操作之后问题还是存
在,请就近咨询牧田维修中心。
症状 原因/消除方法
•
•
•
30 简体中文
选购附件
注意:这些配件或附件推荐用于本说明
书中指定的牧田工具。使用任何其他配件
或附件可能构成人身伤害的危险。仅将配
件或附件用于其说明的用途。
•
•
•
•
•
•
注解:清单中的某些物品可能作为标准
配件包含在工具包中。它们可能因国家
而异。
参考信息
Complies with
IDA Standards
DA107248
31 简体中文
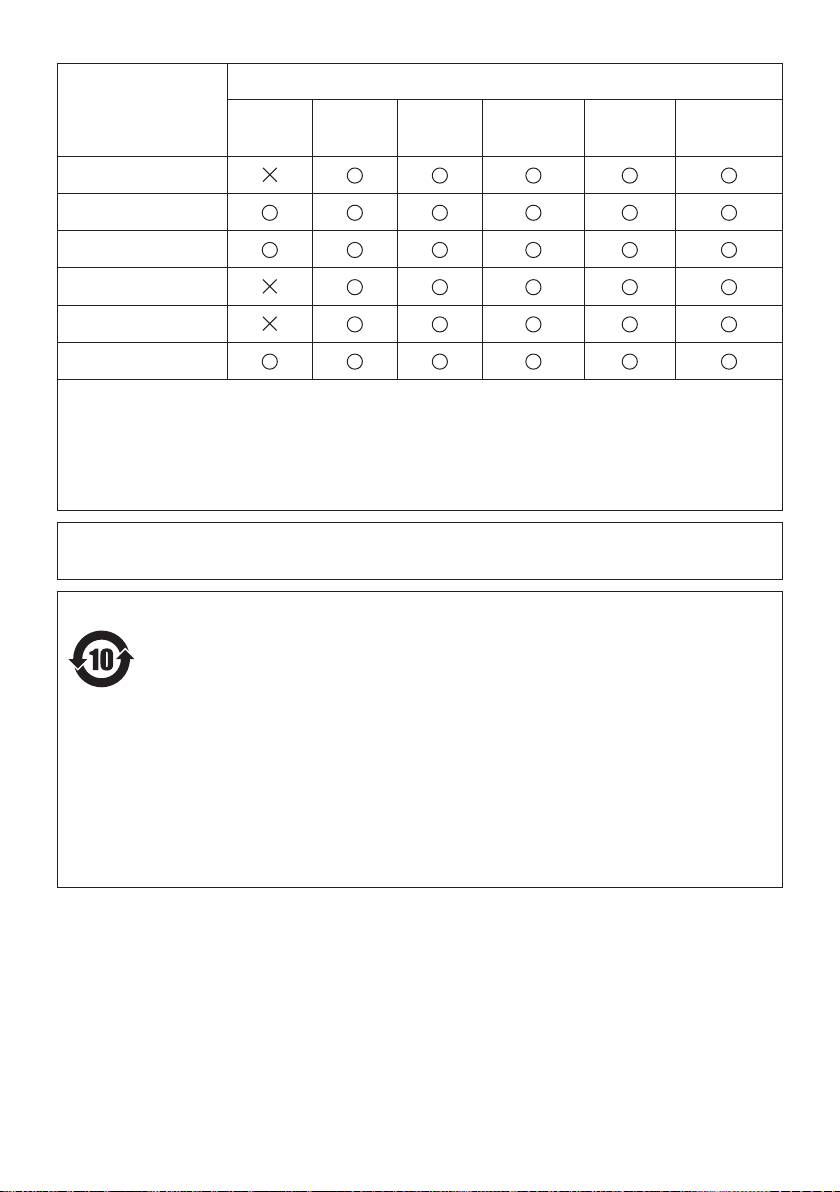
产品中有害物质的名称及含量
32 繁體中文
規格
•
•
符號
用途
安全注意事項
警告
使用自動掃地機器人時切勿靠近或吸到易燃物質,
•
•
•
•
•
切勿在潮濕場所、可能變濕的場所,或溫度與濕度高的
場所使用自動掃地機器人。此外,也不可吸水,
繁體中文 (原始使用說明)
警告:
•
•
•
•
切勿以潮濕的手碰觸自動掃地機器人,
切勿在火爐或其他發熱設備附近使用自動掃地機器人,
切勿在以下各種場所使用自動掃地機器人,
•
•
•
切勿讓無人看管的兒童或無法清楚陳述意圖或自行操作
自動掃地機器人的人使用自動掃地機器人,
發生類似下列的異常或故障情況時,請立即停止操作。
•
•
•
•
•
在禁止使用自動掃地機器人的場所中關閉自動掃地機
器人。
切勿在狹窄與開放的高處使用自動掃地機器人。
•
•
•
•
切勿使自動掃地機器人直接暴露在陽光或紅外線下。
•
•
•
移除接觸到自動掃地機器人時可能導致事故發生的任何
物品。
•
•
切勿覆蓋自動掃地機器人,
切勿騎乘或在自動掃地機器人上放置重物。切勿予以機
體強烈震動,
33 繁體中文
切勿修改自動掃地機器人,
切勿阻塞或將金屬或易燃異物放進吸氣或排氣口。此
外,也不要在可能阻塞吸氣口的物品四周使用自動掃地
機器人,
切勿加熱或使自動掃地機器人暴露在火中,或將它留在
高溫場所,例如靠近火或火爐、直接曝曬在太陽光下,
或放在烈日下的車輛內,
切勿清洗自動掃地機器人 或放在水或清潔劑中,
運作過程中,切勿觸碰驅動輪或將手腳放進自動掃地機
器人底下,
切勿阻塞或將異物放進自動掃地機器人的感應器,
切勿在感應器或輪子上貼膠帶。切勿修改緩衝器或輪
形,或過度用力強壓緩衝器,
每一個感應器皆應定期清潔。
切勿使用髒污、剝落或撕裂的阻隔帶 (另售),
注意
切勿在以下場所使用自動掃地機器人,
•
•
•
務必使自動掃地機器人和遙控器遠離植入式心律調整器
和除顫器 15 公分以上。
切勿將異物放進接縫與開口,
清潔自動掃地機器人時,小心不要夾到手指,
使用自動掃地機器人之前,請仔細完整閱讀本使用說
明書。
注意
如果發現異味、電池漏液,異常高溫,變形,或變色,
請立即停止使用電池匣。
切勿在戶外或可能移動到戶外的場所使用自動掃地機
器人,
切勿在以下場所使用自動掃地機器人,
•
•
•
切勿在以下場所使用自動掃地機器人,
•
•
•
切勿在地板鋪墊上有長毛的範圍(7公釐或以上)內自動
掃地機器人,
切勿在堅硬、凹凸不平的地面 (例如水泥地板等) 上使
用自動掃地機器人,
如果刷子或輪子已磨損,請勿使用自動掃地機器人,
移除所有黏在主刷、邊刷和輪子上的沙塵。
切勿吸入以下東西,
•
•
•
•
•
•
•
吸入細微粉末 (石膏、水泥、粉筆等) 後,請清潔
濾網。
如果濾網堵塞或感應器髒污,請勿使用自動掃地機
器人,
切勿為旋轉刷子或其他活動零件上油,
請妥善保存這些說明。
電池工具使用與保養
請僅使用製造商指定的充電器充電。適合某種類型電
池組的充電器,如果用於其他電池組,可能會發生起
火危險。
僅限與明確指定的電池組搭配使用電力工具。使用其
他任何電池組可能造成傷害或起火危險。
當電池組未使用時,請遠離迴紋針、硬幣、鑰匙、鐵
釘、螺絲及其他小型金屬物,因為這些物品可能會使
電池電極彼此相連。
在極端狀況下,可能會有液體從電池中噴出;請避免
碰觸。萬一意外碰到,請用水沖洗。
電池匣的重要安全說明
使用電池匣之前,請先閱讀 (1) 電池充電器、(2)
電池及 (3) 使用電池的產品上的所有說明和警示
標誌。
切勿拆卸電池匣。
如果操作時間明顯異常地變短,請立即停止操作,否
則可能導致過熱危險,也可能造成燃燒,甚至爆炸。
34 繁體中文
如果電解液進入眼睛,請用清水沖洗出來,並立即就
醫,否則可能導致視力喪失。
切勿使電池匣短路:
切勿以任何導電物品碰觸電極。
避免將電池匣放在裝有其他金屬物品 (例如鐵
釘、硬幣等) 的容器內。
切勿將電池匣暴露在水或雨中。
電池短路會造成龐大電流、過熱,可能會燃燒,甚至
故障。
切勿將自動掃地機器人和電池匣放在溫度可能達到或
超過 50°C 的任何場所。
切勿燃燒電池匣,即使已經嚴重損壞或完全不堪使用
也一樣。電池匣在火中可能會爆炸。
小心切勿掉落或撞擊電池匣。
切勿使用損壞的電池匣。
請遵守丟棄電池匣的相關當地法規。
請妥善保存這些說明。
維持最長電池續航時間的技巧
在電池匣完全沒電之前就先充電。一律在發現電量較
少時就停止運作並為電池匣充電。
已完全充電的電池匣切勿充電。過度充電會縮短電池
壽命。
請在室溫 10°C - 40°C 的環境下為電池匣充電。
請先冷卻發熱的電池匣再充電。
建議您在長時間收藏電池匣 (超過 6 個月) 之前,
先為電池匣充電。
工具/電池匣保護系統
過載
過熱
過度放電
按鈕與指示燈
自動掃地機器人 (圖 F)
遙控器 (圖 G)
使用前
組裝與電池安裝
隨附配件
•
•
•
•
•
•
•
安裝邊刷 (圖 A)
安裝電池匣

35 繁體中文
安裝遙控器的電池 (圖 E)
配對自動掃地機器人與遙控器
整理房間
確保巡航順暢
•
•
•
•
•
•
•
•
•
•
•
•
•
•
防止自動掃地機器人掉落
•
•
•
•
注意
•
•
•
•
•
•
•
•
•
操作
•
•
•
•
基本操作
36 繁體中文
自動掃地機器人上的電池指示燈
電池匣上的電池指示燈
巡航模式
睡眠模式
搬運自動掃地機器人
清空集塵盒
37 繁體中文
進階操作
省電
調整蜂鳴器音量
尋找自動掃地機器人
使用自動啟動計時器
指示燈狀態 清掃開始
將自動掃地機器人設定在特定區域
•
•
•
•
•
準備工作
38 繁體中文
操作
保養
清潔邊刷 (圖A、M-1)
•
•
清潔輪子
•
•
清潔主刷
清潔感應器
•
•
清潔濾網和集塵盒
清潔機身
修復自動掃地機器人
•
•
•
•
•
•
•
39 繁體中文
指示 原因/解決方法
•
•
•
•
•
•
•
•
•
•
•
•
•
•
•
•
疑難排解
徵兆 原因/解決方法
•
•
•

40 繁體中文
選購配件
•
•
•
•
•
•
參考資訊
41
한국어
사양
표준 배터리 카트리지 BL1815N, BL1820B, BL1830B,
BL1840B, BL1850B, BL1860B
배터리 수명
(별매 리튬 이온
배터리 사용 시)
BL1830 두 개(각 18V, 3Ah) 사용 시
약 120분
BL1850 두 개(각 18V, 5Ah) 사용 시
약 200분
먼지통 용량 2.5L
크기(w/l/h)
(BL1830 배터리 포함) 약 460 x 460 x 180mm
무게(BL1830 배터리
2개 포함) 약 7.8kg
• 지속적인 연구 개발 프로그램으로 인해 본 사양은
예고 없이 변경될 수 있습니다.
• 사양은 국가별로 상이할 수 있습니다.
기호
사용 설명서를 참조하십시오.
로봇 청소기를 밟거나 물건을 올리지
마십시오.
불꽃, 가연성 및/또는 위험 물질 근처에서
로봇 청소기를 사용하지 마십시오.
바닥면의 낙차 센서가 더럽거나 젖은 경우
청소하십시오.
용도
본 로봇 청소기는 실내 바닥 청소용입니다. 리모컨은
로봇 청소기에 무선(2.4GHz ZigBee)으로 연결됩니다.
한국어(사용 설명서)
경고: 어린이를 포함해서 체력이 약하거나 정신적으로 문제가 있거나
지식과 경험이 없는 사람은 본 공구를 사용하지 마십시오. 어린이가 본
기기를 가지고 놀지 못하도록 주의하여 주십시오.
안전 지침
경고
로봇 청소기로 가연성 물질을 빨아들이거나 가연성
물질 근처에서 사용하지 마십시오.
폭발이나 화재가 발생할 수 있습니다.
• 등유, 휘발유, 향, 촛불
• 벤진, 신너
• 담배 꽁초
• 토너 또는 기타 연소성 물질
• 카펫 클리너 또는 기타 거품 물질
젖은 장소, 젖을 수 있는 장소 또는 온도와 습도가 높은
장소에서 로봇 청소기를 사용하지 마십시오. 또한 물을
빨아들이지 마십시오.
이 경우 감전, 단락, 화재, 변형 또는 고장이 발생할 수
있습니다.
• 물을 사용하는 부엌 및 기타 장소
• 욕실
• 샤워실
• 다락 등
로봇 청소기를 젖은 손으로 만지지 마십시오.
감전될 수 있습니다.
스토브 또는 기타 전열 기구 근처에서 로봇 청소기를
사용하지 마십시오.
이 경우 감전, 단락, 화재, 변형 또는 고장이 발생할 수
있습니다.
다음과 같은 장소에서는 로봇 청소기를 사용하지
마십시오.
감전 또는 부상이 발생할 수 있습니다.
• 신체, 지각 또는 정신적 능력이 떨어지거나 경험 및
지식이 부족한 사람 또는 유아 근처
• 동물 근처
• 사람이 많은 곳이나 왕래가 잦은 곳
보호자 없는 어린이 또는 의사를 표현할 수 없거나 로봇
청소기를 스스로 조작할 수 없는 사람이 로봇 청소기를
사용하지 못하도록 하십시오.
감전 또는 부상이 발생할 수 있습니다.
다음과 같은 이상 현상 또는 오작동이 발생하는 경우
즉시 작동을 중지하십시오.
이 지침을 따르지 않을 경우 연기, 화재 또는 감전이
발생할 수 있습니다.
• 로봇 청소기의 전원을 켜도 작동하지 않는 경우
• 로봇 청소기가 변형되었거나 비정상적으로
뜨거운 경우
• 로봇 청소기가 작동 중 가끔 멈추는 경우
• 로봇 청소기 작동 중 비정상적 소음이 발생하는 경우
• 로봇 청소기에서 타는 냄새가 나는 경우
42
한국어
사용이 금지된 장소에서는 로봇 청소기를 끄십시오.
이 지침을 따르지 않을 경우 의료 장비의 오작동을
초래할 수 있습니다.
의료 시설 내에서 무선파를 방출하는 장비를 사용할
때는 각 의료 기관의 지침을 준수하십시오.
좁고 테두리가 없는 곳에서는 로봇 청소기를 사용하지
마십시오.
로봇 청소기가 낙하하여 부상 또는 고장이 발생할 수
있습니다.
• 계단
• 탁자, 선반, 화장대, 냉장고 등의 위
• 중이층, 로프트, 계단통이나 입구로 바로 떨어지는
바닥 등
• 경사가 10도 이상인 곳
로봇 청소기를 직사 광선이나 적외선에 노출시키지
마십시오.
센서 오류로 부적절한 작동이 수행되어 로봇 청소기
낙하로 인한 부상이나 고장이 발생할 수 있습니다.
• 할로겐 히터
• 리모컨 또는 센서 등
• 서리로 덮인 유리창을 통해 들어오는 태양광
로봇 청소기와 접촉 시 사고가 발생할 수 있는 다른
물건을 치우십시오.
이 지침을 따르지 않을 경우 물건이 넘어지거나
낙하하여 부상이 발생할 수 있습니다.
• 불이 켜진 촛불, 꽃병 등
• 로봇 청소기와 같은 높이에 조작 버튼이 있는
전자 제품
로봇 청소기를 덮지 마십시오.
과열로 인해 화재가 발생할 수 있습니다.
로봇 청소기 위에 올라타거나 무거운 물체를 올리지
마십시오. 강한 물리적 충격을 가하지 마십시오.
부상, 손상 또는 오작동이 발생할 수 있습니다.
로봇 청소기 근처의 어린이에 특히 주의를
기울이십시오.
로봇 청소기를 절대 개조하지 마십시오.
화재, 감전 또는 부상이 발생할 수 있습니다.
수리가 필요한 경우 로봇 청소기를 구매한 대리점에
문의하십시오.
흡기 또는 배기 구멍을 막거나 금속성 또는 연소성
물질을 넣지 마십시오. 또한 흡기구를 막을 수 있는
물체 근처에서 로봇 청소기를 사용하지 마십시오.
감전, 화재 또는 오작동이 발생할 수 있습니다.
로봇 청소기를 가열하거나 불꽃에 노출시키지 말아야
하며 불꽃이나 난로 근처, 직사 광선에 노출되는 곳,
더운 날씨의 차량 내부 등과 같은 뜨거운 장소에 두지
마십시오.
이 경우 단락 또는 화재가 발생하거나 배터리가
누출되거나 폭발할 수 있습니다.
로봇 청소기를 물이나 세제로 세척하거나 물이나
세제에 노출시키지 마십시오.*
감전, 단락 또는 화재가 발생할 수 있습니다.
* 메인 브러시, 바닥판, 측면 브러시, 먼지통 및
필터 제외
작동 중 로봇 청소기 아래에 손이나 발을 넣거나 구동
휠을 만지지 마십시오.
부상을 입을 수 있습니다.
로봇 청소기 근처의 어린이에 특별히 주의를
기울이십시오.
로봇 청소기의 센서를 막거나 이물질을 넣지 마십시오.
오작동이나 기능 이상으로 인해 로봇 청소기가
낙하하여 다치거나 고장이 발생할 수 있습니다.
센서나 휠에 테이프를 부착하지 마십시오. 범퍼 또는
휠 모양을 개조하거나 범퍼를 강한 힘으로 누르지
마십시오.
오작동이나 기능 이상으로 인해 로봇 청소기가
낙하하여 부상 또는 고장이 발생할 수 있습니다.
각 센서를 주기적으로 청소하십시오.
이 지침을 따르지 않을 경우 오작동이나 기능 이상으로
인해 로봇 청소기가 낙하하여 다치거나 고장이 발생할
수 있습니다.
오염되거나 벗겨지거나 찢어진 경계 테이프(별매)를
사용하지 마십시오.
작동 장애로 로봇 청소기가 낙하하여 부상을 입을 수
있습니다.
주의
다음 장소에서는 로봇 청소기를 사용하지 마십시오.
다른 장비가 정상적으로 작동하지 않을 수 있습니다.
• 병원 내부 또는 의료 장비 근처
• 항공기 내부
• 정밀한 제어 또는 약한 신호를 사용하는 전자
장비 근처
로봇 청소기와 리모컨은 이식형 인공심장 박동기 및
자동제세동기에서 15cm 이상 떨어뜨리십시오.
이 지침을 따르지 않을 경우 의료 장치의 오작동이
발생할 수 있습니다.
틈이나 구멍에 이물질을 넣지 마십시오.
감전 또는 부상이 발생할 수 있습니다.
로봇 청소기를 청소할 때 손가락이 끼지 않도록
주의하여 주십시오.
부상을 입을 수 있습니다.
로봇 청소기를 사용하기 전에 본 사용 설명서를 잘
읽으시기 바랍니다.
이 지침을 따르지 않을 경우 부상 또는 오작동이 발생할
수 있습니다.
유의사항
배터리 카트리지에서 좋지 않은 냄새, 배터리 누출,
비정상적인 열, 변형 또는 변색이 발견된 경우 즉시
사용을 중단하십시오.
이 지침을 따르지 않을 경우 오작동이 발생할 수
있습니다.
로봇 청소기를 실외 또는 실외로 나갈 수 있는 장소에서
사용하지 마십시오.
오작동이 발생할 수 있습니다.
43
한국어
다음 장소에서는 로봇 청소기를 사용하지 마십시오.
오작동이 발생할 수 있습니다.
• 식용유 입자나 기타 오일 성분이 공기 중에 부유하고
있는 장소
• 이발소, 미장원 및 드라이 클리닝 세탁소처럼
분무제나 화학 제품이 사용되는 장소
• 먼지가 많은 장소
다음 장소에서는 로봇 청소기를 사용하지 마십시오.
이 경우 바닥 덮개가 손상되거나 바닥이 긁힐 수
있습니다.
• 손상되기 쉬운 바닥 덮개(양피, 펠트 재질 등)가
깔려 있는 장소
• 마감되지 않은 목재 또는 대리석 바닥
• 새로 왁스칠한 바닥
긴 털(7mm 이상)의 바닥 덮개가 깔린 곳에는 로봇
청소기를 사용하지 마십시오.
바닥 덮개가 손상되거나 로봇 청소기가 고장날 수
있습니다.
콘크리트 바닥처럼 단단하고 편평하지 않은 바닥면에
로봇 청소기를 사용하지 마십시오.
브러시 및 휠 마모가 심해질 수 있습니다.
브러시 또는 휠이 마모된 경우에는 로봇 청소기를
사용하지 마십시오.
바닥 표면이 긁힐 수 있습니다.
이 경우 로봇 청소기의 작동을 중단하고 구입한
대리점에 문의하십시오.
메인 브러시, 측면 브러시 및 휠에 부착된 꺼칠꺼칠한
먼지를 모두 제거하십시오.
이 지침을 따르지 않을 경우 바닥 표면이 손상될 수
있습니다.
다음과 같은 물질을 빨아들이지 마십시오.
이 경우 로봇 청소기 내부가 막히거나 긁힐 수 있으며
고장이 발생할 수도 있습니다.
• 액체 또는 젖은 쓰레기
• 화학 물질 또는 기름
• 애완 동물 배설물
• 많은 양의 모래나 분말
• 날카로운 물체(유리, 칼날, 핀 등)
• 많은 종이 또는 비닐 쓰레기
• 실이나 끈
미세한 분말(분말 석고, 시멘트, 분필 등)을 빨아들인
후에는 필터를 청소하십시오.
이 지침을 따르지 않을 경우 오작동이 발생할 수
있습니다.
필터가 막혔거나 센서가 오염된 경우 로봇 청소기를
사용하지 마십시오.
오작동이 발생할 수 있습니다.
회전 브러시 또는 기타 움직이는 부품에 오일을 바르지
마십시오.
플라스틱이 파손될 수 있습니다.
위의 지시 사항을 준수하여
주십시오.
배터리 공구의 사용 및 관리
1. 제조사에서 지정한 충전기만 사용하여
충전하십시오. 특정 형태의 배터리 팩에 사용하는
충전기를 다른 배터리 팩에 사용할 경우 화재의
위험이 있을 수 있습니다.
2. 전동 공구에는 지정된 전용 배터리 팩만
사용하십시오. 다른 배터리 팩을 사용하면 부상이나
화재의 위험이 있습니다.
3. 배터리 팩을 사용하지 않을 때는 종이 클립, 동전,
열쇠, 못, 나사 및 단자 간 접촉을 초래할 수 있는
기타 작은 금속 물체가 없는 곳에 보관하십시오.
4. 가혹 조건에서 사용할 경우 배터리에서 액이 누출될
수 있으므로 몸에 닿지 않도록 주의하십시오.
실수로 접촉한 경우에는 물로 씻어 주십시오.
배터리 카트리지에 대한 중요한
안전 지침
1. 배터리 카트리지를 사용하기 전에 (1) 배터리
충전기 (2) 배터리 (3) 배터리를 사용하는 제품의
모든 지침 및 주의 표시를 숙지하여 주십시오.
2. 배터리 카트리지를 분해하지 마십시오.
3. 작동 시간이 평소보다 많이 짧아진 경우에는 작동을
즉시 멈추십시오. 과열이나 화상 혹은 폭발의
위험이 있습니다.
4. 전해질이 눈에 들어간 경우에는 깨끗한 물로 씻어낸
다음 즉시 치료를 받으십시오. 시력을 잃을 수
있습니다.
5. 배터리 카트리지를 단락시키지 마십시오.
(1) 전도성 물질로 단자를 접촉하지 마십시오.
(2) 못, 동전 등과 같은 금속 물질이 들어 있는
용기에 배터리 카트리지를 보관하지 마십시오.
(3) 배터리 카트리지를 물이나 비에 노출시키지
마십시오.
배터리가 단락되어 과전류, 과열, 화상 및 고장이
일어날 수 있습니다.
6. 온도가 50℃ 이상으로 올라갈 수 있는 곳에 로봇
청소기와 배터리 카트리지를 보관하지 마십시오.
7. 심하게 손상되었거나 완전히 소진된 경우라도
배터리 카트리지를 소각하지 마십시오. 배터리
카트리지가 폭발할 수 있습니다.
8. 배터리 카트리지를 떨어뜨리거나 충격을 가하지
마십시오.
9. 손상된 배터리 카트리지를 사용하지 마십시오.
10. 배터리 카트리지의 폐기에 관해서는 지역 규정에
따르십시오.
위의 지시 사항을 준수하여
주십시오.
주의: 정품 Makita 배터리만 사용하십시오.
비순정품 Makita 배터리 또는 개조된 배터리를
사용하면 배터리 폭발이 발생하여 화재, 개인 부상 및
손상의 원인이 될 수 있습니다. 또한, Makita 공구 및
충전기에 대한 Makita 보증이 무효가 됩니다.

44
한국어
배터리 수명을 최대로
유지하는 방법
1. 배터리 카트리지가 완전히 방전되기 전에
충전하십시오. 공구의 힘이 약해진 것을
감지하면 항상 작동을 멈추고 배터리 카트리지를
충전하십시오.
2. 완전히 충전된 배터리 카트리지를 재충전하지
마십시오. 과충전은 배터리의 수명을 단축시킵니다.
3. 실내 온도 10℃~40℃에서 배터리 카트리지를
충전하십시오. 배터리 카트리지는 충분히 식은 후
충전하십시오.
4. 배터리 카트리지를 장시간 (6개월 이상) 보관할
때는 충전 후 보관할 것을 권장합니다.
공구/배터리 카트리지 보호 시스템
로봇 청소기에는 로봇 청소기와 배터리 카트리지의
수명을 늘리기 위해 모터 전원을 자동으로 차단하는
공구/배터리 카트리지 보호 시스템이 장착되어
있습니다. 다음 조건에서는 로봇 청소기가 자동으로
중지됩니다.
과부하
로봇 청소기가 과부하되어 비정상적으로 높은 전류가
유입되면 별도 표시 없이 로봇 청소기가 자동으로
멈춥니다.
로봇 청소기를 다시 시작하려면 전원을 끄고 과부하의
원인을 제거한 다음 다시 전원을 켜십시오.
과열
로봇 청소기가 과열되면 가 5번 또는 7번 깜박이고
로봇 청소기가 자동으로 멈춥니다.
이 경우 로봇 청소기가 식을 때까지 기다린 후 다시
전원을 켜십시오.
과방전
배터리 잔량이 낮으면 로봇 청소기가 자동으로 멈추고
어떠한 스위치 조작에도 반응하지 않습니다.
이 경우 배터리 카트리지를 분리하여 충전하십시오.
버튼 및 표시등
각 부품에 대한 자세한 내용은 본 설명서에서 해당
부품에 해당하는 그림 번호를 찾아서 확인할 수
있습니다(예: 전원 버튼의 경우 “그림 F-8” 검색).
로봇 청소기(그림 F)
1. 파일럿 램프
2. 문제 해결 램프
3. 필터 관리 램프
4. 브러시 관리 램프
5. 배터리 표시등(우측 및 좌측 배터리
카트리지용)
6. 타이머 버튼 및 램프
7. 크루즈 모드 버튼 및 램프
: 패턴 모드
: 랜덤 모드
8. 전원(시작/중지) 버튼
9. 부저 버튼 및 램프
10. 진공 버튼 및 램프
11. 경계 센서 버튼 및 램프
리모컨(그림 G)
1. 전원 끄기 버튼
2. 시작/중지 버튼
3. 위치 알림 버튼
4. / 크루즈 모드 버튼
5. 타이머 버튼
6. 부저 버튼
7. 진공 버튼
사용하기 전에
조립 및 배터리 설치
주의: 로봇 청소기에 어떤 작업을 수행할 때는
먼저 로봇 청소기 전원을 끄십시오.
동봉 부속품
다음 목록의 품목이 패키지에 포함되어 있는지
확인하십시오.
• AAA(LR03) 배터리(2개)
• 측면 브러시(4개, 여분 브러시 2개 포함)
• 측면 브러시 설치용 나사(4개)
• 경계 테이프(15m, 1개)
• 사용 설명서(1개)
• 빠른 시작 안내서(1개)
• 사용 주의 사항(1개)
측면 브러시 설치(그림 A)
로봇 청소기 전방 아래의 양 측면에 측면 브러시를
설치합니다.
유의사항: 작업 전에 바닥과 로봇 청소기의 손상을
방지하기 위해 러그나 기타 완충재를 바닥에 까십시오
(그림 B).
1. 측면 브러시를 브러시 훔이 샤프트 헤드에 맞도록
로봇 청소기의 회전 샤프트 헤드에 위치시킵니다.
2. 제공된 나사를 사용하여 측면 브러시를 고정합니다.
유의사항: 측면 브러시를 설치한 상태에서 로봇
청소기를 작동하십시오.
배터리 카트리지 설치
배터리 카트리지의 홈(그림 C-2)을 배터리 도크의
돌출부(그림 C-3)에 맞춰서 밉니다. 딸깍 소리가
나면서 제자리에 고정될 때까지 밀어 넣습니다.
해제 버튼 위쪽에 빨간색 표시등(그림 C-1)이 보이면
배터리 카트리지가 완전히 잠기지 않은 것입니다.
주의: 배터리 카트리지 설치 시 도크와 배터리
카트리지 사이에 손가락이 끼지 않도록 주의해야
합니다.
로봇 청소기는 두 배터리 도크 중 하나에, 하나의
배터리 카트리지가 설치된 경우에만 작동합니다.
배터리 카트리지를 분리하려면 카트리지의 해제 버튼
(그림 D-1)을 누른 채 배터리 도크에서 밀어 꺼냅니다.
45
한국어
리모컨에 배터리 설치(그림 E)
배터리 격실 뚜껑을 밀어서 열고 두 개의 AAA(LR03)
크기 배터리를 극성(+/-)에 맞게 삽입합니다.
유의사항: 오래된 배터리와 새 배터리를 함께
사용하거나 다른 종류의 배터리를 함께 사용하지
않아야 합니다.
유의사항: 리모컨을 장시간 사용하지 않을 때는
배터리를 분리해 두십시오.
주의: 배터리에서 누출된 전해액이 피부나 눈에
닿은 경우에는 즉시 물로 씻으십시오.
로봇 청소기와 리모컨 페어링
로봇 청소기는 리모컨과 페어링되어 출하됩니다.
하지만 리모컨을 교체한 경우에는 페어링을 다시
수행해야 합니다.
1. 부저음이 두 번 울릴 때까지 로봇
청소기의 타이머(그림 F-6) 및 크루즈 모드
(그림 F-7) 버튼을 동시에 길게 누릅니다.
2. 부저음이 한 번 울릴 때까지 리모컨의 타이머
(그림 G-5) 및 위치 알림 버튼(그림 G-3)을
동시에 길게 누릅니다.
페어링이 실패하고 부저음이 5번 울리면 페어링을 다시
시도하십시오.
방 정리
원활한 이동을 위해
• 방문을 닫습니다. 방의 문턱 높이가 낮아서 로봇
청소기가 문제 없이 넘어갈 수 있는 경우에는, 로봇
청소기가 방으로 이동하여 계속 청소할 수 있도록
문을 열어두어도 됩니다.
• 손상되기 쉬운 가구 등이 있는 경우 그 앞에
장애물을 두십시오.
• 낮은 선반의 하단부처럼 로봇 청소기가 걸릴 수 있는
위치에는 들어가지 못하도록 장애물을 두십시오.
• 가늘고 높으며 불안정한 물건과 기타 넘어지기 쉬운
물건은 다른 방으로 옮깁니다.
• 카트 등의 물건은 바퀴를 잠그거나 다른 방으로
옮깁니다.
• 전기 코드는 벽을 따라 정돈합니다.
• 로봇 청소기가 다른 방으로 이동하는 데 방해가
될 수 있는 쿠션, 책 등의 물건을 다른 방으로
옮깁니다.
• 바닥에 늘어뜨려진 커튼 등의 물건을 올려둡니다.
• 높이 차이가 있거나 가닥이 빨려 들어갈 수 있는
바닥 덮개와 얇아서 미끄러지기 쉬운 바닥 덮개는
모두 다른 방으로 옮깁니다.
• 바닥 덮개의 장식용 술은 모두 바닥 덮개 아래로
접어 넣습니다.
• 빨려 들어가기 쉬운 작은 물체 또는 귀중품을
치웁니다.
• 바닥에 놓인 줄, 벨트, 끈, 얇은 종이 또는 비닐 봉투
등을 모두 치웁니다.
• 집어넣을 수 있는 전원 소켓은 집어넣습니다.
• 바닥 구획을 나누는 격자 등은 로봇 청소기가 이를
경계로 감지하여 건너가지 않을 수 있으므로 보드
등으로 덮습니다.
로봇 청소기 낙하 방지
• 청소할 구역에 로봇 청소기가 낙하할 수 있는 계단
등이 있는 경우에는 로봇 청소기가 해당 구역에 가지
않도록 하기 위해, 그 앞에 높이가 15cm 이상이며
로봇 청소기가 부딪쳐도 넘어지지 않을 정도로
무거운 물체를 두십시오.
• 태양광 및 적외선을 커튼으로 차단하십시오. (로봇
청소기가 직사 광선이나 적외선을 피하기 위해
물러날 때 낮은 면으로 낙하할 수 있습니다.)
• 알루미늄 섀시 문을 닫습니다. (로봇 청소기가
알루미늄 섀시 레일과 바닥 간의 높이 차이를
감지하지 못하여 문 밖으로 떨어질 수 있습니다.)
• 높이 차가 있는 곳 근처의 바닥 덮개를 다른 방으로
옮깁니다. (로봇 청소기가 차이를 감지하지 못하여
낙하할 수 있습니다.)
주석
• 로봇 청소기로 가연성 물질을 빨아들이거나 가연성
물질 근처에서 사용하지 마십시오. (폭발이나
화재가 발생할 수 있습니다.)
• 젖은 장소, 젖을 수 있는 장소 또는 온도와 습도가
높은 장소에서 로봇 청소기를 사용하지 마십시오.
또한 물을 빨아들이지 마십시오. (이 경우 감전,
단락, 화재, 변형 또는 고장이 발생할 수 있습니다.)
• 높이 차이가 있는 곳에서 벽까지의 거리가 1m
이하인 곳에서는 로봇 청소기를 사용하지 마십시오.
(드문 경우 로봇 청소기가 물러나면서 떨어질 수
있습니다.)
• 벽이나 장애물 근처에 로봇 청소기가 올라갈 수 없는
물체가 있는 장소에서는 로봇 청소기를 사용하지
마십시오. 로봇 청소기가 벽이나 장애물을 피하기
위해 뒤로 움직일 때 물체에 걸릴 수 있습니다.
• 홈 보안 시스템 등은 모두 해제하십시오(로봇
청소기가 침입자로 잘못 감지될 수 있습니다).
• 로봇 청소기는 5.5cm 이하의 높이 차이는 피하지
못할 수 있습니다.
• 작동 중 TV 화면에 노이즈가 나타날 수 있습니다.
(이는 텔레비전의 오작동이 아닙니다.)
• 로봇 청소기에 배터리 카트리지를 설치한 채
장시간 두지 마십시오. (배터리 전해액이 누출될 수
있습니다.)
• 배터리 카트리지가 설치된 로봇 청소기를 위아래로
뒤집지 마십시오. (버튼이 눌려져서 의도치 않은
작동이 수행될 수 있습니다.)
46
한국어
작동
로봇 청소기는 초음파 센서(그림 P-1)를 사용해
장애물을 피해가며 사전 설정된 크루징 모드에 따라
바닥을 이동하면서, 측면 브러시, 메인 브러시 및 진공
팬으로 경로상의 먼지 및 기타 이물질을 빨아 들입니다.
하지만 특정 상황에서는 센서가 장애물을 감지하지
못할 수 있습니다. 로봇 청소기가 장애물에 부딪치면
로봇 청소기의 범퍼(그림 P-2)가 충격을 흡수하고 이동
방향을 바꿉니다.
주석: 로봇 청소기는 최대 높이 1.5cm의 턱을
넘어가도록 설계되었지만 경우에 따라 이러한 턱을
넘지 못할 수 있습니다.
주석: 로봇 청소기는 검은색이나 검은색 우드그레인
패턴이 있는 곳 또는 유리 재질로 만들어진 곳을 피할
수 있습니다.
주석: 특정 조건에서는 청소 주기가 끝나도 먼지가
남아 있을 수 있습니다.
주석: 다음 조건에서는 무선 통신이 방해되거나
차단될 수 있습니다.
• 강화 콘크리트 또는 금속성 건축 자재로 만들어진
구조물 내부
• 로봇 청소기가 장애물 뒤에 있을 때
• 동일한 주파수 대역을 사용하는 무선 통신
장비 근처
• 전자기장(전자렌지 등) 또는 정전기를 발생하거나
무선 전파 간섭을 초래하는 장치의 근처
기본 작동
주의: 로봇 청소기의 기능을 조정 또는 점검할
때는 항상 로봇 청소기의 전원을 끄십시오.
유의사항: 이슬이 맺힌 경우에는 로봇 청소기 전원을
끄고 로봇 청소기가 마를 때까지 기다린 후 작동을
다시 시작하십시오.
유의사항: 로봇 청소기를 끄더라도 모든 설정이
지워지지는 않습니다. 예기치 않은 동작을 방지하기
위해 각 램프(그림 F-6, 7, 9, 11)를 통해 설정이
올바른지 확인하십시오.
1. 로봇 청소기의 전원 버튼(그림 F-8)을
누릅니다.
로봇 청소기가 대기 모드에 들어가고 배터리
표시등(그림 F-5)이 켜집니다. (자세한 내용은
아래의 “로봇 청소기의 배터리 표시등”을
참조하십시오.)
2. 로봇 청소기의 크루즈 모드 버튼
(그림 F-7)을 여러 번 눌러 모드를 선택하거나
리모컨의 또는 크루즈 모드 버튼(그림 G-4)을
누릅니다.
선택된 모드 램프가 켜집니다. (자세한 내용은
아래의 “크루즈 모드”를 참조하십시오.)
3. 로봇 청소기의 전원 버튼(그림 F-8) 또는
리모컨의 시작/중지 버튼(그림 G-2)을 눌러
청소를 시작합니다.
청소 도중 파일럿 램프(그림 F-1)가 깜박이고
부저음이 울립니다.
청소를 일시 중지하려면 3단계를 다시 수행합니다.
청소를 다시 시작하려면 3단계를 다시 수행합니다.
로봇 청소기를 끄려면 로봇 청소기의 전원 버튼
(그림 F-8)을 표시등이 꺼질 때까지 길게 누르거나,
리모컨의 전원 끄기 버튼(그림 G-1)을 누릅니다.
주의: 파일럿 램프 불빛을 직접 바라보거나 빛이
눈에 들어오지 않도록 주의하십시오. 눈에 해로울 수
있습니다.
로봇 청소기의 배터리 표시등
해당 배터리 카트리지 측에 있는 배터리 표시등이
배터리 카트리지의 잔량을 표시합니다.
유의사항: 아래 표는 배터리 잔량에 대한 대략적인
표시입니다. 잔량은 사용 조건 및 실내 온도에 따라
달라질 수 있습니다.
50% 이상
20% ~ 50% 사이
20% 이하
비어 있음/배터리 카트리지
설치되지 않음
배터리 오류
배터리 카트리지의 배터리 표시등
모델 번호가 “B”로 끝나는 배터리 카트리지의 경우
배터리 카트리지의 배터리 표시등(그림 I-1)을
사용하여 잔량을 확인할 수도 있습니다.
배터리 카트리지를 분리하고 버튼(그림 I-2)을
누릅니다.
유의사항: 아래 표는 배터리 잔량에 대한 대략적인
표시입니다. 잔량은 사용 조건 및 실내 온도에 따라
달라질 수 있습니다.
75% 이상
50% ~ 75% 사이(50% 포함)
25% ~ 50% 사이
25% 이하
비어 있음
배터리 오류
47
한국어
크루즈 모드
패턴 모드
적용:
잘 정리된 창고나 긴 갤러리처럼
장애물이 별로 없는 넓은 바닥.
설명(그림 H-1):
로봇 청소기가 세로(a) 및 가로(b)
이동의 주기를 반복합니다.*
랜덤 모드
적용:
사무실처럼 장애물이 많은 바닥.
설명(그림 H-2):
로봇 청소기가 임의 이동(c)하고 벽을 따라
이동(d)하는 주기를 반복합니다.
* 로봇 청소기의 실제 이동 경로는 조건에 따라 이
차트와 달라질 수 있습니다.
주석: 로봇 청소기는 로봇 청소기가 이동할 수
없거나 측면 브러시가 닿지 않는 좁은 곳은 청소할 수
없습니다.
주석: 청소 주기가 끝난 후 일부 조건에서는 바닥에
먼지가 남아 있을 수 있습니다.
슬립 모드
로봇 청소기의 대기 모드가 약 5분 이상 지속되면
로봇 청소기는 배터리 절약을 위해 자동으로 슬립
모드에 들어가며 파일럿 램프(그림 F-1)가 천천히
깜박입니다. 자동 켜짐 타이머가 작동할 때도 슬립
모드에 들어갑니다.
대기 모드로 돌아가려면 “기본 작동”의 3단계를
수행하십시오.
유의사항: 이 모드에서는 청소 동작의 시작 및 설정
변경을 수행할 수 없습니다.
로봇 청소기 운반
주의: 로봇 청소기를 운반할 때는 먼저 로봇
청소기 전원을 끄십시오.
주의: 핸들과 로봇 청소기 본체 사이에 손이 끼지
않도록 주의하십시오.
핸들(그림 J-1)을 잡습니다.
유의사항: 다른 손으로 로봇 청소기 뒤쪽 바닥을 받칠
때는, 로봇 청소기 내의 먼지가 메인 브러시 구멍을
통해 쏟아질 수 있으므로 뒤쪽을 너무 많이 올리지
않도록 주의하십시오.
유의사항: 로봇 청소기를 억지로 잡아당기지
마십시오.
먼지통 비우기
로봇 청소기의 최고 성능을 유지하려면 사용할 때마다
먼지통을 비우십시오.
1. 로봇 청소기의 전원 버튼(그림 F-8)을 표시등이
꺼질 때까지 길게 누르거나, 리모컨의 전원 끄기
버튼(그림 G-1)을 눌러서 로봇 청소기를 끕니다.
2. 상단 뚜껑(그림 K-1)을 눌렀다 떼어서 잠금을
해제한 다음 완전히 개방합니다.
3. 먼지통 상자(그림 K-2)를 꺼냅니다.
4. 두 잠금 장치(그림 K-3)를 풀고 먼지통 상자 뚜껑을
엽니다.
5. 상단 먼지통(그림 K-4)을 꺼내서 비웁니다.
6. 필터(그림 K-5)에 묻은 작은 먼지 덩어리를
제거하고 하단 먼지통(그림 K-6)을 비웁니다.
7. 먼지통 상자를 로봇 청소기에 역순으로 장착합니다.
고급 작동
다음 기능은 로봇 청소기가 대기 모드에 있을 때만
설정할 수 있습니다(“기본 작동”의 1단계 참조).
절전
로봇 청소기는 진공 팬을 사용하지 않고도 눈에 보이는
먼지 대부분을 청소할 수 있습니다. 미세한 먼지를
제거할 필요가 없을 때는 진공 팬을 꺼서 배터리 전력을
절약하고 로봇 청소기의 작동 시간을 늘릴 수 있습니다.
대기 모드에서 로봇 청소기(그림 F-10) 또는 리모컨
(그림 G-7)의 진공 버튼을 눌러 진공 램프(그림
F-10)를 끕니다.
진공 팬을 켜려면 로봇 청소기(그림 F-10) 또는 리모컨
(그림 G-7)의 진공 버튼을 누릅니다. 램프가 다시
켜집니다.
유의사항: 자동 켜짐 타이머가 켜져 있는 슬립
모드에서는 이 설정이 불가능합니다.
유의사항: 진공 팬이 꺼진 경우에는 필터가 먼지로
가득차더라도 필터 관리 램프(그림 F-3)가
켜지지 않습니다.
부저음 볼륨 조정
음 소거를 포함하여 세 가지 부저음 볼륨 중에서 선택할
수 있습니다.
대기 모드에서 로봇 청소기(그림 F-9) 또는 리모컨
(그림 G-6)의 부저 버튼을 반복적으로 누릅니다.
버튼을 누를 때마다 부저음이 높은 볼륨(램프 켜짐),
낮은 볼륨(램프 켜짐), 부저 울리지 않음(램프 꺼짐)의
순으로 울립니다.
유의사항: 자동 켜짐 타이머가 켜져 있는 슬립
모드에서는 이 설정이 불가능합니다.
48
한국어
로봇 청소기 찾기
이 기능은 책상, 캐비닛 및 기타 가구들이 놓인
넓은 곳에서 시야를 벗어난 로봇 청소기를 찾을 때
유용합니다.
로봇 청소기가 대기 모드 또는 슬립 모드에 있을 때
리모컨의 위치 알림 버튼(그림 G-3)을 누릅니다.
그러면 부저음이 약 10초 동안 울리고 파일럿 램프가
깜박입니다.
부저음과 깜박임을 중지하려면 위치 알림 버튼을
다시 누릅니다.
주석: 로봇 청소기가 리모컨 범위를 벗어났기 때문에
로봇 청소기가 반응을 하지 않는 경우가 있습니다. 이
문제는 해당 구역을 이동하면서 위치 알림 버튼을
눌러서 해결할 수 있습니다.
자동 켜짐 타이머 사용
지정된 시간이 지나면 로봇 청소기가 자동으로 청소를
시작하는 기능입니다.
자동 시간 지정 청소가 끝나면 설정이 지워지므로
자동 켜짐 타이머를 다시 작동하려면 다음 절차를
수행하십시오.
1. 대기 모드에서 로봇 청소기(그림 F-6) 또는 리모컨
(그림 G-5)의 타이머 버튼을 반복적으로
누릅니다. 버튼을 누를 때마다 설정이 다음 순서로
바뀝니다.
램프 상태 청소 시작
1시간 후
3시간 후
5시간 후
자동 켜짐 타이머가
해제되었습니다.
2. 로봇 청소기의 전원 버튼(그림 F-8)을 누르면
자동 켜짐 타이머가 작동합니다. 로봇 청소기가
슬립 모드에 들어갑니다.
대기 모드에서 타이머를 지우려면 로봇
청소기의 전원 버튼(그림 F-8)을 표시등이 꺼질
때까지 길게 누르거나, 리모컨의 전원 끄기 버튼
(그림 G-1)을 누릅니다.
유의사항: 우측 및 좌측 배터리 표시등의 상태가
모두 또는 인 경우는 자동 켜짐 타이머가
작동하지 않고 청소가 자동으로 시작되지 않을 수
있습니다.
유의사항: 이 모드에서는 청소 동작의 시작 또는 설정
변경을 수행할 수 없습니다.
유의사항: 배터리가 완전히 방전되면 자동 켜짐
타이머 설정이 지워집니다.
로봇 청소기를 특정 구역으로 제한하기
적외선 센서를 사용하는 경계 인식 기능과 경계 테이프
(그림 L-1)를 사용하면, 로봇 청소기가 다음과 같은
구역을 피하도록 할 수 있습니다(그림 L-2).
• 바닥이 너무 넓어서 로봇 청소기가 한 번에 청소할
수 없기 때문에 구획으로 나눈 곳
• 로봇 청소기가 손상될 수 있는 파편들이 있는 곳
• 물건이나 가구, 장애물이 많거나 모양이 복잡하여
로봇 청소기가 걸릴 수 있는 곳
• 계단 근처
• 로봇 청소기가 올라가서 아래로 떨어지거나 로봇
청소기가 걸릴 수 있는 낮은 벽이 있는 곳
준비
1. 경계 테이프를 부착할 편평한 바닥면을 선택한 후
청소합니다.
2. 짧은 막대가 있는 쪽이 청소할 부분을 향하도록 하고
테이프와 바닥 사이에 공기 방울이 없도록 주의하며
경계 테이프를 부착합니다.
유의사항: 순정품 경계 테이프만 사용하십시오.
순정품이 아닌 테이프를 사용하면 경계 감지 기능이
오작동할 수 있습니다.
유의사항: 잘못된 감지를 유발할 수 있는 편평하지
않은 면 또는 테이프가 오염되거나 손상될 수 있는
면에는 경계 테이프를 부착하지 마십시오.
유의사항: 경계 테이프를 제거할 때 바닥이
손상되거나 소량의 접착 성분이 바닥에 남을 수
있습니다.
유의사항: 경계 테이프를 항상 깨끗하게 유지하고,
찢어지거나 말린 부분이 없는지 확인하십시오.
테이프가 손상된 경우 교체하십시오.
경고: 로봇 청소기가 진입하면 사고가 발생하거나
로봇 청소기가 낙하할 수 있는 곳에는 경계 테이프를
부착하지 마십시오. 이러한 경우에는 경계 테이프
대신, 높이가 15cm 이상이며 로봇 청소기가
부딪쳐도 넘어지지 않을 정도로 무거운 물체를
두십시오.
작동
대기 모드에서 로봇 청소기의 경계 센서 버튼(그림
F-11)을 눌러 경계 센서를 켭니다(그림 O-2).
램프(그림 F-11)가 켜집니다.
경계 센서를 해제하려면 경계 센서 버튼을 다시
누릅니다.
유의사항: 자동 켜짐 타이머가 켜져 있는 슬립
모드에서는 이 설정이 불가능합니다.

49
한국어
유지 보수
주의: 점검 또는 유지 보수 작업을 하기 전에는
항상 두 배터리 카트리지를 모두 제거했는지
확인하십시오.
유의사항: 메인 브러시 구멍에서 먼지가 떨어지는
것을 방지하기 위해, 로봇 청소기를 뒤집을 때는 먼저
먼지통 상자를 꺼내십시오.
유의사항: 바닥과 로봇 청소기의 손상을 방지하기
위해 러그나 기타 완충재를 바닥에 까십시오(그림 B).
유의사항: 뜨거운 물(40℃ 이상), 휘발유, 벤진,
신너, 알코올 등을 사용하지 마십시오. 변색 또는
변형되거나 금이 갈 수 있습니다.
제품의 안전과 신뢰성을 유지하기 위해, 수리 및 기타
유지 보수 또는 조정 시에는 항상 Makita 순정 부품을
사용하는 Makita 공인 서비스 센터나 공장 서비스
센터를 이용하여 주십시오.
측면 브러시(그림 A, M-1) 청소
• 측면 브러시의 털에 머리카락이나 실이 낀 경우
브러시 회전이 멈출 수 있습니다. 핀셋 등으로 이를
제거하십시오.
• 브러시 털이 손상되었거나 빠진 경우에는 여분
브러시로 교체하십시오(자세한 내용은 “측면 브러시
설치” 참조).
휠 청소
• 핀셋과 가위 등의 도구를 이용하여 구동 휠(그림
M-2)의 실이나 머리카락 등을 제거합니다. 이 휠이
회전해야 효과적으로 청소됩니다.
• 핀셋, 가위 또는 비슷한 도구를 사용하여 회전 휠
(그림 M-3)에서 실이나 머리카락 등을 제거합니다.
유의사항: 휠과 로봇 청소기 본체 사이에 손가락이
끼지 않도록 주의하십시오.
메인 브러시 청소
측면 브러시를 제거하면(자세한 내용은 “측면 브러시
설치” 참조) 다음 작업이 용이합니다.
1. 네 개의 나사(그림 N-1)를 제거한 다음 바닥판
(그림 N-2)과 메인 브러시(그림 N-3)를
제거합니다.
2. 중성 세제를 조금 적신 천으로 바닥판(그림 N-2)을
닦아내고 필요한 경우 판을 물로 세척합니다.
3. 가위를 사용하여 메인 브러시(그림 N-3)의 실이나
머리카락을 제거하고 필요한 경우 메인 브러시를
물로 세척합니다.
4. 중성 세제를 살짝 적신 천으로 진공 구멍(그림 N-4)
안쪽을 닦아냅니다.
5. 메인 브러시를 다시 장착하려면 메인 브러시 우측의
돌출부(그림 N-5)를 우측 샤프트 부시의 톱니
모양으로 들어간 부분(그림 N-6)에 맞춘 다음 메인
브러시를 삽입하여 함께 결합합니다.
6. 메인 브러시의 좌측 사각 끝부분(그림 N-7)을 좌측
사각 샤프트 부시(그림 N-8)에 삽입합니다.
7. 바닥판을 역순으로 다시 장착합니다.
주석: 측면 브러시가 로봇 청소기 본체에 부착되어
있을 때는, 판과 로봇 청소기 본체 사이 측면 브러시의
털을 잡아당기지 않고 측면 브러시를 수동으로 돌리면
바닥판 부착이 용이합니다.
센서 청소
• 낙차 센서(그림 O-1) 및 경계 센서(그림 O-2)를
깨끗한 마른 면봉으로 청소합니다.
• 초음파 센서(그림 P-1)를 다른 진공 청소기의 약한
흡입 모드를 사용하여 청소합니다. 범퍼의 양쪽과
전면에 총 8개의 센서가 있습니다(그림 P-2).
필터 및 먼지통 상자 청소
유의사항: 상단 먼지함 상자 뚜껑의 손상을 막기 위해
강제로 열거나 닫지 마십시오.
1. 두 잠금 장치를 풀고(그림 Q-1) 필터 관리
표시(그림 Q-2)를 잡은 채 상단 먼지통 상자
뚜껑을 들어올려 필터 격실을 엽니다.
2. 필터를 꺼낸 다음(그림 Q-3) 쓰레기 봉투에
대고 털거나 바닥에 종이를 깔고 털어서 먼지를
제거합니다.
유의사항: 필터를 비비거나 비틀어 짜지 말고
날카로운 물체로 청소하지 마십시오.
3. 로봇 청소기의 흡입력이 약해진 경우에는 필터를
세척합니다.
유의사항: 필터에서 냄새가 나는 경우 가정용
포백제를 희석한 용액(물 1리터에 표백제 10밀리리터)
에 필터를 3시간 정도 담가두었다가 흐르는 물로
씻으십시오.
4. 먼지통 상자를 세척합니다.
5. 불쾌한 냄새 또는 오작동을 방지하기 위해, 필터
및 먼지통 상자를 환기가 잘 되는 곳에서 하루 동안
말립니다(물로 세척한 경우).
유의사항: 젖은 필터를 헤어 드라이어나 기타 전열
기구로 말리지 마십시오.
6. 필터를 먼지통 상자에 역순으로 조립합니다.
유의사항: 격실의 필터를 교환할 때는 필터의 탭(그림
Q-4)을 필터 홀더(그림 Q-5) 가장자리의 절단면에
맞추십시오.
50
한국어
본체 청소
1. 중성 세제를 살짝 적신 천으로 로봇 청소기의 외장을
닦아냅니다.
2. 상단 뚜껑(그림 K-1)을 눌렀다 떼어서 잠금을
해제한 다음 완전히 개방합니다.
3. 먼지통 상자(그림 K-2)를 꺼냅니다.
4. 중성 세제를 살짝 적신 천으로 구멍 망(그림 R-2)
를 포함하여 로봇 청소기의 내장(그림 R-1)을
아냅니다.
로봇 청소기 복구
구동 휠이 내려가거나 배터리 전력이 소진되는 등의
상황에서 로봇 청소기가 계속 작동할 수 없는 경우,
로봇 청소기는 청소를 멈추고 다음의 램프 및 부저음을
통해 문제를 알립니다.
• 문제 해결 램프(그림 F-2)
• 필터 관리 램프(그림 F-3)
• 브러시 관리 램프(그림 F-4)
• 타이머 램프(그림 F-6)
• 부저 램프(그림 F-9)
• 진공 램프(그림 F-10)
• 경계 센서 램프(그림 F-11)
1. 다음 표를 사용하여 문제를 확인합니다.
2. 문제를 해결합니다.
3. 로봇 청소기의 전원 버튼(그림 F-8) 또는
리모컨의 시작/중지 버튼(그림 G-2)을 눌러
대기 모드에 들어갑니다.
오류 표시가 멈추고 로봇 청소기가 청소를 시작할
준비가 됩니다.
유의사항: 오류가 다시 발생하면 로봇 청소기 전원을
껐다 켜십시오.
유의사항: 교정 조치 후에도 문제가 지속되면 Makita
서비스 센터에 문의하십시오.
표시 원인/해결 방법
램프가 1번,
2번 또는 6번씩
깜박임
• 구동 휠이 내려갔습니다.
• 로봇 청소기가 벽에 걸렸습니다.
• 로봇 청소기가 직사 광선에
노출되었습니다.
• 로봇 청소기가 검은색 바닥에서
멈췄습니다.
로봇 청소기를 다른 곳으로 옮깁니다.
오류가 다시 발생하면 낙차 센서(그림
O-1)를 청소합니다.
램프가 3번씩
깜박임
• 범퍼 센서 오류가 발생했습니다.
범퍼(그림 P-2)를 10번 누릅니다.
램프가 4번씩
깜박임
• 구동 휠에 실이나 머리카락이
끼었습니다.
구동 휠(그림 M-2)에서 이를
제거합니다.
• 로봇 청소기가 상단면이 아래로
눌리는 좁은 영역을 통과했습니다.
이는 고장이 아닙니다.
램프가 5번
또는 7번씩 깜박임
• 로봇 청소기가 과열되었습니다.
로봇 청소기를 끄고 배터리
카트리지를 분리한 후 1시간 동안
기다립니다. 실내 온도가 40℃
를 넘지 않을 때만 로봇 청소기를
사용하십시오.
및
램프가 한 번씩
깜박임
• 먼지통 상자나 필터가 설치되지
않았습니다.
먼지통이나 필터를 설치합니다.
및
모든 램프가 한
번씩 깜박임
• 배터리 충전량이 낮아서
( 또는 ) 청소를 시작할 수
없습니다.
배터리 카트리지를 완전히
충전하십시오.
및 램프가 켜짐
• 구동 휠에 실이나 머리카락이
끼었습니다.
구동 휠(그림 M-2)에서 이를
제거합니다.
• 로봇 청소기가 상단면이 아래로
눌리는 좁은 영역을 통과했습니다.
이는 고장이 아닙니다.
및 램프가 켜짐
• 센서 오류가 발생했습니다.
로봇 청소기를 껐다 켭니다.
및 램프가 켜짐
• 로봇 청소기에서 오류가
발생했습니다.
로봇 청소기를 껐다 켭니다.
램프가 한 번씩
깜박임
• 측면 브러시 및 메인 브러시에 실이나
머리카락이 끼었습니다.
브러시(그림 A, N-3)에서 이를
제거합니다.
램프가 켜짐
• 먼지통 상자가 먼지로 가득찼거나
필터가 막혔습니다.
먼지통 상자(그림 K-2)를 비우고
필터(그림 K-5)를 청소합니다.
51
한국어
문제 해결
주석: 교정 조치 후에도 문제가 지속되면 Makita
서비스 센터에 문의하십시오.
증상 원인/해결 방법
버튼을 눌러도
램프가 켜지지
않습니다.
로봇 청소기 또는
리모컨의 버튼을
눌러도 로봇
청소기가 작동하지
않습니다.
배터리 카트리지를 올바르게
설치하십시오.
배터리 카트리지를 완전히
충전하십시오.
버튼을 눌러 로봇 청소기 전원을
켜십시오.
로봇 청소기가
작동하지
않습니다.
문제 해결 램프, 필터 관리
램프 또는 브러시 관리 램프가
켜지거나 깜박이는 경우에는 “로봇
청소기 복구”를 참조하여 문제를
해결하십시오.
파일럿 램프가 천천히 깜박이는
경우에는 모든 표시등이 꺼질 때까지
로봇 청소기의 전원 버튼을 길게
누르거나 리모컨의 전원 끄기
버튼을 눌러 타이머를 지우십시오.
로봇 청소기가
자동으로 작동을
시작합니다.
• 자동 켜짐 타이머가 켜졌습니다.
청소 도중 로봇
청소기가 작동을
멈춥니다.
로봇 청소기를 끄고 구동 휠에 붙은
줄, 끈 등을 모두 제거합니다.
로봇 청소기가 벽이나 다른 장애물에
걸린 경우 로봇 청소기를 다른 곳으로
옮깁니다.
이동 속도가
일정하지
않습니다.
• 로봇 청소기는 장애물이 감지되면
이동 거리를 계산하기 위해 속도를
늦춥니다. 이는 로봇 청소기의
오작동이 아닙니다.
로봇 청소기가
앞으로 똑바로
이동하지
않습니다.
로봇 청소기를 끄고 구동 휠에 엉킨
이물질을 모두 제거합니다.
초음파 센서를 청소합니다.
로봇 청소기가
전보다 자주
장애물에
부딪칩니다.
초음파 센서를 청소합니다.
로봇 청소기가
계단이나
아래 바닥으로
떨어집니다.
낙차 센서를 청소합니다.
• 로봇 청소기는 5.5cm 이하의 높이
차이는 피하지 못할 수 있습니다. 이는
로봇 청소기의 오작동이 아닙니다.
작동 소리가
평소보다 큽니다.
먼지통 상자를 비우고 필터, 측면
브러시 및 메인 브러시를 청소합니다.
흡입력이 약해서
먼지를 빨아들이지
못합니다.
먼지통 상자를 비우고 필터를
청소합니다.
로봇 청소기나 리모컨의 진공
버튼을 눌러 진공 팬을 켭니다.
측면 브러시가
떨어집니다.
측면 브러시를 올바르게 설치합니다
(그림 A).
측면 브러시가
회전하지 않거나
제대로 회전하지
않습니다.
측면 브러시와 메인 브러시를
청소합니다.
메인 브러시와 판을 올바르게
설치합니다(그림 N).
배출되는 공기에서
냄새가 납니다.
먼지통 상자를 비우고 필터를
청소합니다.
리모컨이 작동하지
않습니다.
리모컨 배터리를 올바르게 설치합니다
(그림 E).
배터리를 새 것으로 교환합니다.
로봇 청소기의 전원 버튼을 눌러서
켭니다.
로봇 청소기에 더 가깝게 가거나 로봇
청소기와 리모컨 사이의 장애물을
제거합니다.
2.4GHz 대역의 무선 주파수를
사용하는 장비(전자렌지, Bluetooth
장치, Wi-Fi 장치 등) 근처에서 로봇
청소기 사용을 중지하거나 멀리
떨어뜨립니다.
로봇 청소기를 껐다 켭니다.
자동 켜짐
타이머가 작동하지
않습니다.
완전히 충전된 배터리 카트리지를
사용합니다.
자동 켜짐 타이머를 다시 켭니다.
별매 부속품
주의: 본 설명서에 명시된 Makita 공구에
사용하도록 권장하는 부속품 또는 장착품입니다.
다른 부속품 또는 장착품을 사용하면 부상이 발생할
수 있습니다. 부속품 또는 장착품은 지정된 용도로만
사용하여 주십시오.
• 경계 테이프
• 측면 브러시
• 메인 브러시
• 바닥판
• 필터
• Makita 정품 배터리 및 충전기
주석: 목록의 몇 가지 품목은 표준 부속품으로 공구
포장에 포함되어 있습니다. 포함된 품목은 국가별로
상이할 수 있습니다.
참조 정보
Makita Corporation 및 자회사, 계열사 및 유통사는
유지 보수 및 수리와 같은 AS 서비스의 목적으로 사용
정보를 이용할 수 있습니다. 사용 정보는 작동 횟수,
부하 배분, 오류 정보, 작동 상태 및/또는 전동 공구의
유지 보수 기록으로 구성됩니다.
A급 기기 (업무용 방송통신기자재)
이 기기는 업무용(A급) 전자파적합기기로 서 판매자
또는 사용자는 이 점을 주의하시 기 바라며, 가정외의
지역에서 사용하는 것 을 목적으로 합니다.
- 해당 무선설비는 운용 중 전파혼신 가능성이 있음
- 해당 무선설비는 전파혼신 가능성이 있으므로
인명안전과 관련된 서비스는 할 수 없습니다
52 BAHASA INDONESIA
SPESIFIKASI
Kartrid baterai
standar
BL1815N, BL1820B, BL1830B, BL1840B,
BL1850B, BL1860B
Masa pakai baterai
(menggunakan
baterai lithium ion
opsional)
Sekitar 120 menit menggunakan dua
BL1830 (masing-masing 18 V, 3 Ah)
Sekitar 200 menit menggunakan dua
BL1850 (masing-masing 18 V, 5 Ah)
Kapasitas wadah 2,5 L
Dimensi (p/l/t)
(termasuk baterai
BL1830)
Sekitar 460 x 460 x 180 mm
Berat (termasuk
dua baterai
BL1830)
Sekitar 7,8 kg
• Spesikasiinidapatberubahtanpapemberitahuan
sebelumnyakarenakamimasihterusmenjalankan
program riset dan pengembangan.
• Spesikasidapatberbedadisetiapnegara.
Simbol
Bacabukupetunjuk.
Janganinjakdanjanganletakkanbendadi
atas Robot Pembersih.
Jangan gunakan Robot Pembersih di dekat
api maupun material yang mudah terbakar
dan/atau berbahaya.
Bersihkan sensor tepi di bagian depan
bawahjikakotorataubasah.
Penggunaan yang dimaksudkan
Robot Pembersih ini dimaksudkan untuk membersihkan
lantai dalam ruangan. Remote control tersambung ke
Robot Pembersih secara nirkabel (ZigBee 2,4 GHz).
PETUNJUK KESELAMATAN
PERINGATAN
Jangan gunakan Robot Pembersih di dekat zat yang
mudah terbakar atau memvakum zat yang mudah
terbakar.
Hal ini dapat menimbulkan ledakan atau kebakaran.
BAHASA INDONESIA (Petunjuk awal)
PERINGATAN: Mesininitidakditujukanuntukdigunakanolehorang
(termasukanak)yangmemilikikekurangansik,pancaindra,atau
mental, atau kurang memiliki pengalaman dan pengetahuan. Anak-
anak harus diawasi untuk memastikan mereka tidak bermain dengan
alat ini.
• Minyak tanah, minyak gas, dupa, lilin
• Bensin, tiner
• Puntung rokok
• Toner atau zat yang mudah terbakar
• Pembersih karpet atau zat berbusa lainnya
Jangan gunakan Robot Pembersih di lokasi yang
basah, lokasi yang dapat menjadi basah, atau lokasi
dengan suhu dan kelembapan tinggi. Selain itu,
jangan vakum air.
Hal ini dapat menimbulkan sengatan listrik, hubungan
arus pendek, api, perubahan bentuk, atau kegagalan
fungsi.
• Dapur atau area lainnya yang menggunakan air
• Kamar mandi
• Ruang pancuran
• Loteng, dll.
Jangan sentuh Robot Pembersih dengan tangan
yang basah.
Hal ini dapat mengakibatkan sengatan listrik.
Jangan gunakan Robot Pembersih di sekitar
kompor atau alat pemanas lainnya.
Hal ini dapat menimbulkan sengatan listrik, hubungan
arus pendek, api, perubahan bentuk, atau kegagalan
fungsi.
Jangan gunakan Robot Pembersih di lokasi berikut.
Hal ini dapat mengakibatkan sengatan listrik atau
cedera.
• Di dekat bayi atau orang yang memiliki kekurangan
sik,pancaindra,ataumental,ataukurangmemiliki
pengalaman dan pengetahuan
• Di dekat hewan
• Di dekat orang banyak atau area yang ramai
Jangan biarkan anak-anak atau orang yang tidak
dapat mengekspresikan keinginannya tidak diawasi
atau mengoperasikan Robot Pembersih sendiri
untuk menggunakan Robot Pembersih.
Hal ini dapat mengakibatkan sengatan listrik atau
cedera.
Segera hentikan pengoperasian jika terjadi kelainan
atau gangguan fungsi seperti berikut.
Tidakmengikutipetunjukinidapatmenimbulkanasap,
kebakaran, atau sengatan listrik.
• Robot Pembersih tidak beroperasi meskipun telah
dihidupkan.
• Robot Pembersih berubah bentuk atau panas
secara abnormal.
• Robot Pembersih kadang terhenti selama
pengoperasian.
• Robot Pembersih mengeluarkan bunyi abnormal
selama pengoperasian.
• Robot Pembersih mengeluarkan bau terbakar.
53 BAHASA INDONESIA
Matikan Robot Pembersih di lokasi yang melarang
penggunaannya.
Tidakmengikutipetunjukinidapatmenyebabkan
peralatan medis tidak beroperasi sebagaimana
mestinya.
Pastikanuntukmengikutipetunjukdarimasing-masing
lembaga medis saat menggunakan peralatan yang
memancarkan gelombang radio di dalam lembaga
medis.
Jangan gunakan Pembersih Robotik di dekat atau
berbatasan langsung dengan ketinggian.
HalinidapatmenyebabkanRobotPembersihjatuhdari
area, sehingga mengakibatkan cedera atau kerusakan.
• Tangga
• Diatasmeja,rak,lemaripakaian,lemaries,dll.
• Mezzanine, loteng, lantai dengan sambungan
langsungkeanaktanggaataujalanmasuk,dll.
• Lokasi dengan kemiringan 10° atau lebih
Jangan biarkan Robot Pembersih terkena sinar
matahari langsung atau sinar inframerah.
Pengoperasian yang tidak benar karena kesalahan
sensordapatmenyebabkanRobotPembersihterjatuh,
sehingga mengakibatkan cedera atau kerusakan.
• Pemanas halogen
• Remote control atau sensor, dll.
• Sinar matahari yang menembus kaca buram
Pindahkan benda yang dapat menyebabkan
kecelakaan jika terjadi kontak dengan Robot
Pembersih.
Tidakmengikutipetunjukinidapatmenimbulkancedera
akibatbendatersandungatauterjatuh.
• Lilin menyala, vas, dll.
• Elektronik dengan kontrol yang terletak dengan
ketinggian yang sama dengan Robot Pembersih.
Jangan tutupi Robot Pembersih.
Hal ini dapat menimbulkan kebakaran akibat panas
berlebih.
Jangan naiki atau letakkan benda berat pada Robot
Pembersih. Jangan sampai terkena benturan keras.
Hal ini dapat mengakibatkan cedera, kerusakan, atau
gangguan fungsi.
Secara khusus, perhatikan anak-anak di sekitar Robot
Pembersih.
Jangan modikasi Robot Pembersih.
Hal ini dapat mengakibatkan kebakaran, sengatan
listrik, atau cedera.
Hubungi dealer tempat Anda membeli Robot Pembersih
untuk diperbaiki.
Jangan halangi atau jangan masukkan benda
logam atau benda asing yang mudah terbakar ke
dalam lubang isap atau saluran buang. Jangan juga
gunakan Robot Pembersih di sekitar benda yang
dapat menghalangi lubang isap.
Hal ini dapat menimbulkan sengatan listrik, kebakaran,
atau gangguan fungsi.
Jangan panaskan atau biarkan Robot Pembersih
terkena api atau diletakkan di tempat yang panas,
misalnya di dekat nyala api atau kompor, terkena
sinar matahari langsung, atau di dalam kendaraan
di bawah terik matahari.
Hal ini dapat menyebabkan hubungan arus pendek,
kebakaran, atau bocornya cairan atau meledaknya
baterai.
Jangan cuci atau jangan biarkan Robot Pembersih*
terkena air atau deterjen.
Hal ini dapat mengakibatkan sengatan listrik, hubungan
arus pendek, atau kebakaran.
* Tidak termasuk sikat utama, pelat bawah, sikat sisi,
kotakdebu,danlter
Jangan sentuh roda penggerak atau masukkan
tangan maupun kaki ke bagian bawah Robot
Pembersih selama pengoperasian.
Hal tersebut dapat mengakibatkan cedera.
Secara khusus, perhatikan anak-anak di sekitar Robot
Pembersih.
Jangan halangi atau masukkan benda asing ke
dalam sensor Robot Pembersih.
Hal ini dapat menyebabkan kegagalan pengoperasian,
cederakarenaRobotPembersihjatuhsebagaiakibat
pengoperasian yang tidak benar, atau gangguan fungsi.
Jangan pasang selotip pada sensor atau roda.
Jangan ubah bumper atau bentuk roda atau jangan
tekan bumper dengan kuat.
Hal ini dapat menyebabkan kegagalan pengoperasian,
cederakarenaRobotPembersihjatuhsebagaiakibat
pengoperasian yang tidak benar, atau gangguan fungsi.
Bersihkan setiap sensor secara berkala.
Tidakmengikutipetunjukinidapatmenyebabkan
kegagalan pengoperasian, cedera karena Robot
Pembersihjatuhsebagaiakibatpengoperasianyang
tidak benar, atau gangguan fungsi.
Jangan gunakan pita pembatas (dijual terpisah)
yang kotor, terkelupas, atau robek.
Hal ini dapat menyebabkan cedera karena
RobotPembersihjatuhsebagaiakibatgagalnya
pengoperasian.
PERHATIAN
Jangan gunakan Robot Pembersih di lokasi berikut.
Hal ini dapat menyebabkan peralatan lain tidak
beroperasi sebagaimana mestinya.
• Di dalam rumah sakit atau di sekitar peralatan
medis
• Di dalam pesawat
• Di sekitar peralatan elektronik yang memerlukan
kontrol presisi atau menggunakan sinyal yang
lemah.
Pastikan Robot Pembersih dan remote control
berjarak lebih dari 15 cm dari alat pacu jantung
implan dan debrilator.
Tidakmengikutipetunjukinidapatmenimbulkan
gangguan fungsi pada peralatan medis.
Jangan masukkan benda asing ke dalam celah dan
lubang.
Hal ini dapat mengakibatkan sengatan listrik atau
cedera.
Hati-hati, jangan sampai jari Anda tersangkut saat
membersihkan Robot Pembersih.
Hal tersebut dapat mengakibatkan cedera.
Pastikan untuk membaca PANDUAN PENGGUNA
ini dengan cermat sebelum menggunakan Robot
Pembersih.
Tidakmengikutipetunjukinidapatmenyebabkan
cedera atau kegagalan fungsi.
54 BAHASA INDONESIA
PEMBERITAHUAN
Segera hentikan penggunaan kartrid baterai jika ada
bau tidak enak, kebocoran baterai, panas abnormal,
perubahan bentuk, atau perubahan warna.
Tidakmengikutipetunjukinidapatmengakibatkan
kegagalan fungsi.
Jangan gunakan Robot Pembersih di luar ruangan
atau di lokasi yang memungkinkannya keluar dari
ruangan.
Hal ini dapat mengakibatkan gangguan fungsi.
Jangan gunakan Robot Pembersih di lokasi berikut.
Hal ini dapat mengakibatkan gangguan fungsi.
• Lokasi yang menahan partikel minyak goreng atau
komponen minyak lainnya di udara
• Lokasi yang terdapat penggunaan semprotan
aerosol atau produk kimia, seperti tempat cukur
rambut, salon kecantikan, dan toko dry cleaning
• Lokasi berdebu
Jangan gunakan Robot Pembersih di lokasi berikut.
Hal ini dapat merusak lapisan lantai atau menggores
permukaan lantai.
• Lokasi dengan lapisan lantai mudah rusak (kulit
domba, bahan bulu, dll.)
• Lantai kayu atau marmer yang belum selesai
• Lantai yang baru dililin
Jangan gunakan Robot Pembersih pada lapisan
lantai dengan tumpukan panjang (7 mm atau lebih).
Hal ini dapat menyebabkan kerusakan pada lapisan
lantai atau menyebabkan gangguan fungsi Robot
Pembersih.
Jangan gunakan Robot Pembersih pada permukaan
lantai yang keras dan tidak rata, seperti lantai
beton, dll.
Hal ini dapat menyebabkan meningkatnya sikat dan
roda yang aus.
Jangan gunakan Robot Pembersih jika sikat atau
roda mengalami keausan.
Hal ini dapat menyebabkan tergoresnya permukaan
lantai.
Hentikan pengoperasian dan hubungi dealer tempat
Anda membeli Robot Pembersih.
Bersihkan kotoran pasir yang menempel pada sikat
utama, sikat sisi, dan roda.
Tidakmengikutipetunjukinidapatmengakibatkan
tergoresnya permukaan lantai.
Jangan vakum item berikut.
Hal ini dapat menggores atau menyumbat bagian
dalam Robot Pembersih atau mengakibatkan gangguan
fungsi.
• Cairan atau sampah basah
• Bahan kimia atau minyak
• Kotoran hewan
• Pasiratauserbukdalamjumlahbanyak
• Bendatajam(kaca,pisau,pakupayung,dll.)
• Kertas besar atau sampah vinyl
• Kabel atau tali
Bersihkan lter setelah memvakum serbuk halus
(plester, semen, kapur, dll.).
Tidakmengikutipetunjukinidapatmengakibatkan
kegagalan fungsi.
Jangan gunakan Robot Pembersih jika lter
tersumbat atau sensor kotor.
Hal ini dapat mengakibatkan gangguan fungsi.
Jangan minyaki sikat putar atau komponen
bergerak lainnya.
Hal ini dapat menyebabkan retakan plastik.
SIMPAN PETUNJUK INI.
Penggunaan dan pemeliharaan alat
baterai
1. Isi daya hanya dengan pengisi daya yang
ditentukan oleh produsen. Pengisi daya yang
sesuai untuk satu jenis unit baterai dapat
menimbulkan risiko kebakaran bila digunakan
dengan unit baterai lain.
2. Gunakan perkakas listrik hanya dengan unit
baterai yang ditetapkan khusus. Penggunaan
unit baterai lainnya dapat menimbulkan risiko
cedera atau kebakaran.
3. Bila unit baterai tidak digunakan, jauhkan dari
klip kertas, koin, kunci, paku, sekrup, dan
benda logam kecil lainnya yang dapat membuat
sambungan dari satu terminal ke terminal lain.
4. Jika mengalami gangguan parah, cairan dapat
keluar dari baterai; hindari kontak. Jika tidak
sengaja terjadi kontak, bilas dengan air.
Petunjuk keselamatan penting untuk
kartrid baterai
1. Sebelum menggunakan kartrid baterai, baca
semua petunjuk dan tanda tindakan pencegahan
pada (1) pengisi daya baterai, (2) baterai, dan (3)
produk yang menggunakan baterai.
2. Jangan bongkar kartrid baterai.
3. Jika waktu operasi menjadi lebih singkat secara
signikan daripada biasanya, segera hentikan
pengoperasian. Hal ini dapat mengakibatkan
risiko panas berlebih, kemungkinan luka bakar,
dan bahkan ledakan.
4. Jika elektrolit masuk ke mata Anda, bilas dengan
air bersih dan segera minta pertolongan medis.
Hal ini dapat mengakibatkan kebutaan.
5. Jangan buat hubungan arus pendek pada kartrid
baterai:
(1) Jangan sentuh terminal dengan materi
penghantar apa pun.
(2) Jangan simpan kartrid baterai dalam wadah
bersama benda logam lain, misalnya paku,
koin, dll.
(3) Pastikan kartrid baterai tidak terkena air
atau hujan.
Arus pendek pada baterai dapat menyebabkan
aliran arus besar, panas berlebih, kemungkinan
luka bakar, dan bahkan kerusakan.
6. Jangan simpan Robot Pembersih dan kartrid
baterai di lokasi dengan suhu yang dapat
mencapai atau melebihi 50°C.
7. Jangan bakar kartrid baterai meskipun telah
rusak atau benar-benar usang. Kartrid baterai
dapat meledak dalam api.
55 BAHASA INDONESIA
8. Hati-hati jangan sampai kartrid baterai jatuh atau
terbentur.
9. Jangan gunakan kartrid baterai rusak.
10. Ikuti peraturan setempat mengenai pembuangan
kartrid baterai.
SIMPAN PETUNJUK INI.
PERHATIAN: Gunakan hanya baterai asli
Makita. Penggunaan baterai Makita palsu, atau
baterai yang telah diganti, dapat menyebabkan
baterai meledak dan mengakibatkan kebakaran,
cedera,dankerusakan.Tindakantersebutjugaakan
membatalkanjaminanMakitaatasalatdanpengisi
daya Makita.
Tips untuk mempertahankan
masa pakai baterai maksimum
1. Isi daya kartrid baterai sebelum benar-benar
habis. Selalu hentikan pengoperasian dan isi
daya kartrid baterai bila daya alat berkurang.
2. Jangan isi ulang daya kartrid baterai yang
terisi penuh. Mengisi daya berlebihan akan
mempersingkat usia baterai.
3. Isi daya kartrid baterai dalam suhu ruang sekitar
10°C - 40°C. Biarkan kartrid baterai panas
mendingin sebelum diisi daya.
4. Sebaiknya isi daya kartrid baterai sebelum
menyimpannya dalam waktu lama (lebih dari
enam bulan).
Sistem perlindungan alat/kartrid
baterai
Robot Pembersih dilengkapi sistem perlindungan alat/
kartrid baterai yang secara otomatis akan memutus
alirandayakemotoruntukmemperpanjangmasapakai
Robot Pembersih dan kartrid baterai. Robot Pembersih
akan secara otomatis berhenti dalam kondisi berikut.
Kelebihan beban
Bila Robot Pembersih kelebihan beban dan menarik
arus daya yang tinggi, Robot Pembersih akan secara
otomatis berhenti tanpa indikasi apa pun.
Untuk menghidupkan ulang Robot Pembersih, matikan
daya, kurangi penyebab kelebihan beban, lalu hidupkan
kembali daya.
Panas berlebih
Bila Robot Pembersih terlalu panas, lampu akan
berkedip 5 atau 7 kali untuk setiap urutan dan Robot
Pembersih akan secara otomatis berhenti.
Dalam kasus ini, biarkan Robot Pembersih mendingin
sebelum dihidupkan kembali.
Daya benar-benar habis
Bila daya baterai yang tersisa akan habis, Robot
Pembersih akan secara otomatis berhenti dan tidak
akan merespons pengoperasian tombol apa pun.
Dalam kasus ini, keluarkan dan isi ulang daya kartrid
baterai.
TOMBOL DAN
INDIKATOR
Anda dapat menemukan rincian komponen dengan
mencari nomor gambar yang sesuai untuk setiap
komponen dalam dokumen ini (misalnya, cari “Gambar
F-8” untuk tombol DAYA ).
Robot Pembersih (Gambar F)
1. Lampu pilot
2. Lampu Pemecahan masalah
3. LampuPemeliharaanlter
4. Lampu Pemeliharaan sikat
5. Indikator baterai (untuk kartrid baterai kanan
dan kiri)
6. Tombol dan lampu Timer
7. TomboldanlampumodeJelajah
: Mode Pola
: Mode Acak
8. Tombol DAYA (mulai/berhenti)
9. Tombol dan lampu Buzzer
10. Tombol dan lampu Vakum
11. Tombol dan lampu Sensor pembatas
Remote control (Gambar G)
1. Tombol DAYA MATI
2. Tombol Mulai/Berhenti
3. Tombol Penentu lokasi
4. TombolmodeJelajah /
5. Tombol Timer
6. Tombol Buzzer
7. Tombol Vakum
SEBELUM PENGGUNAAN
Perakitan dan pemasangan baterai
PERHATIAN: Pastikan untuk selalu mematikan
Robot Pembersih sebelum melakukan apa pun pada
Robot Pembersih.
Aksesori yang tersedia
Pastikan item dalam daftar berikut ada dalam kemasan.
• Baterai AAA (LR03) (x2)
• Sikat sisi (x4, termasuk dua sikat cadangan)
• Sekrup untuk pemasangan sikat sisi (x4)
• Pita pembatas (15 m x1)
• Panduan Pengguna (x1)
• Panduan ringkas (x1)
• Catatan tentang penggunaan (x1)
Memasang sikat sisi (Gambar A)
Pasang sikat sisi pada kedua sisi bagian depan bawah
Robot Pembersih.
PEMBERITAHUAN: Sebelum melakukan sesuatu,
pastikan untuk membentangkan karpet atau bantalan
lainnya guna mencegah kerusakan pada lantai dan
Robot Pembersih (Gambar B).
56 BAHASA INDONESIA
1. Letakkan sikat sisi pada kepala poros putar pada
Robot Pembersih dengan alur sikat sesuai dengan
kepala poros.
2. Kencangkan sikat sisi menggunakan sekrup yang
tersedia.
PEMBERITAHUAN:PastikanjikaRobotPembersih
dioperasikan dengan sikat sisi terpasang.
Memasang kartrid baterai
Sejajarkanalur(GambarC-2)padakartridbaterai
dengan lidah (Gambar C-3) pada dok baterai dan
masukkan pada tempatnya. Masukkan sepenuhnya
hingga terkunci pada tempatnya dengan sedikit klik.
Jika Anda dapat melihat indikator merah (Gambar C-1)
di bagian atas tombol pelepas, berarti kartrid baterai
belum benar-benar terkunci.
PERHATIAN: Hati-hati saat memasang kartrid
baterai,jangansampaijariterjepitantaradokdan
kartrid baterai.
Robot Pembersih dapat beroperasi hanya dengan satu
kartrid baterai terpasang di salah satu dok baterai.
Untuk melepaskan kartrid baterai, geser dari dok sambil
menekan tombol pelepas (Gambar D-1) pada kartrid.
Memasang baterai remote control (Gambar E)
Geser tutup tempat baterai hingga terlepas, lalu
masukkan dua baterai ukuran AAA (LR03), perhatikan
dansejajarkanpolaritas(+/–)denganbenar.
PEMBERITAHUAN: Jangan gunakan baterai baru
danlamasecarabersamaan,ataujangangunakan
jenisbateraiyangberbedasecarabersamaan.
PEMBERITAHUAN:Lepasbateraijikaremotecontrol
tidakakandigunakanuntukjangkawaktulama.
PERHATIAN: Jika kulit atau mata terkena
elektrolit yang bocor dari baterai, segera bilas dengan
air.
Memasangkan Robot Pembersih dengan remote
control
Robot Pembersih telah dipasangkan dengan remote
control. Namun, proses pembuatan pasangan harus
dilakukanlagijikaAndamenggantiremotecontrol.
1. Tekan terus tombol Timer (Gambar F-6) dan
modeJelajah (Gambar F-7) secara bersamaan
pada Robot Pembersih hingga buzzer berbunyi bip
dua kali.
2. Tekan terus tombol Timer (Gambar G-5) dan
Penentu lokasi (Gambar G-3) secara bersamaan
pada remote control hingga buzzer berbunyi bip
satu kali.
Jika pembuatan pasangan gagal dan buzzer berbunyi
bip 5 kali, coba lagi pembuatan pasangan.
Mengatur ruang
Untuk memastikan penjelajahan lancar
• Tutup pintu ke ruangan. Jika undakan batas
pintu tidak terlalu besar dan dapat dilalui Robot
Pembersihtanpamasalah,pintutersebutjugadapat
dibiarkan terbuka agar Robot Pembersih dapat
lanjutmembersihkanruangyangbersebelahan.
• Letakkan penghalang di depan furnitur yang mudah
rusak, dll.
• Letakkan penghalang untuk mencegah Robot
Pembersih masuk ke lokasi yang dapat
membuatnya tertahan, seperti kolong rak rendah.
• Pindahkan benda yang tinggi, tipis, dan tidak stabil
sertabendalainyangmudahterjatuhkeruangan
lain.
• Kuncirodamejadorongataubendalain,atau
pindahkan ke ruangan lain.
• Atur kabel listrik di dinding.
• Pindahkan bantal, buku, atau benda lain yang
dapatmenghalangiRobotPembersihmenjelajahke
ruangan lain.
• Angkatbagiantiraiataubendalainyangmenjuntai
ke lantai.
• Pindahkan lapisan lantai dengan tali yang mudah
ditarik atau berundak dan lapisan lantai yang tipis
dan mudah bergeser ke ruangan lain.
• Lipat semua rumbai lapisan lantai ke bawah lapisan
lantai.
• Singkirkan semua benda kecil atau mahal yang
dapat tervakum dengan mudah.
• Singkirkan semua kabel, sabuk, tali, kertas tipis,
atau kantong plastik yang berserakan di lantai.
• Tarik setiap soket daya lantai yang dapat
memendek sendiri.
• Tutup semua kisi pembatas bagian lantai dengan
papan, dll. karena Robot Pembersih dapat
mendeteksinya sebagai batas dan tidak dapat
melintasinya.
Mencegah Robot Pembersih terjatuh
• Jika area yang dibersihkan memiliki anak tangga
atau bagian lain yang dapat mengakibatkan Robot
Pembersihterjatuh,letakkanbendadengantinggi
15 cm atau lebih dan yang cukup berat untuk
menahan Robot Pembersih di depan bagian
tersebut agar Robot Pembersih tidak masuk.
• Halangi sinar matahari dan sinar inframerah dengan
tirai.(RobotPembersihdapatterjatuhketingkat
yang lebih rendah bila mundur untuk menghindari
sinar matahari atau sinar inframerah.)
• Tutup pintu aluminium. (Robot Pembersih mungkin
tidak dapat mendeteksi undakan antara rel
aluminiumdanlantai,dandapatterjatuhdaripintu.)
• Pindahkan lapisan lantai di dekat undakan ke
ruangan lain. (Robot Pembersih mungkin tidak
dapatmendeteksiundakandandapatterjatuh.)
CATATAN
• Jangan gunakan Robot Pembersih di dekat zat yang
mudah terbakar atau memvakum zat yang mudah
terbakar. (Hal ini dapat menimbulkan ledakan atau
kebakaran.)
• Jangan gunakan Robot Pembersih di lokasi yang
basah,lokasiyangdapatmenjadibasah,atau
lokasi dengan suhu dan kelembapan tinggi. Selain
itu,janganvakumair.(Halinidapatmenimbulkan
sengatan listrik, hubungan arus pendek, api,
perubahan bentuk, atau kegagalan fungsi.)
• Jangan gunakan Robot Pembersih di lokasi yang
berjaraksekitar1mataukurangdaridindingke
undakan.(Dalamkasusyangjarangterjadi,Robot
Pembersihdapatterjatuhsaatmundur.)
57 BAHASA INDONESIA
• Jangan gunakan Robot Pembersih di area
berpembatas yang tidak dapat dilintasi Robot
Pembersih di sekitar dinding atau penghalang.
Robot Pembersih dapat tersangkut pada pembatas
saat bergerak mundur untuk menghindari dinding
atau penghalang.
• Nonaktifkan sistem keamanan rumah, dll. (Robot
Pembersih dapat salah terdeteksi sebagai
penyusup.)
• Robot Pembersih mungkin tidak dapat menghindari
undakan dengan tinggi 5,5 cm atau kurang.
• Noise mungkin akan muncul di layar TV selama
pengoperasian. (Ini bukan gangguan fungsi
televisi.)
• JangansimpanRobotPembersihuntukjangka
waktu lama dengan kartrid baterai terpasang.
(Elektrolit baterai dapat bocor.)
• Jangan balik Robot Pembersih dengan kartrid
baterai terpasang. (Tombol dapat tertekan dan robot
beroperasisecaratidakdisengaja.)
PENGOPERASIAN
RobotPembersihakanmenjelajahilantaiberdasarkan
modejelajahstandar,menghindaripenghalang
menggunakan sensor ultrasonik (Gambar P-1), serta
mengisapdebudankotorandansisalainnyadijalur
lintasan menggunakan sikat sisi, sikat utama, dan kipas
vakum. Namun, sensor mungkin tidak mendeteksi
penghalang dalam situasi tertentu. Jika Robot
Pembersih mengenai penghalang, bumper Robot
Pembersih (Gambar P-2) akan menahan benturan dan
mengubaharahjalan.
CATATAN: Robot Pembersih mungkin sesekali tidak
dapat melewati pembatas dengan tinggi maksimum
1,5 cm, meskipun Robot Pembersih didesain untuk
dapat melewati pembatas tersebut.
CATATAN: Robot Pembersih mungkin akan
menghindari area berwarna hitam, memiliki pola kayu
hitam, atau area yang terbuat dari kaca.
CATATAN: Setelah siklus pembersihan selesai, debu
dan kotoran tertentu dapat menempel dalam kondisi
tertentu.
CATATAN: Komunikasi nirkabel dapat terganggu atau
terblokir dalam kondisi berikut:
• Di dalam bangunan berbahan beton kuat dan
logam
• Bila Robot Pembersih di belakang penghalang
• Di dekat peralatan komunikasi radio yang
menggunakan pita frekuensi yang sama
• Di dekat perangkat yang menghasilkan medan
elektromagnet (oven microwave, dll.) atau listrik
statis, atau yang menyebabkan interferensi
gelombang radio
Pengoperasian dasar
PERHATIAN: Pastikan selalu Robot Pembersih
dimatikan sebelum menyesuaikan atau memeriksa
fungsi pada Robot Pembersih.
PEMBERITAHUAN:Jikaterjadikondensasi,
matikan Robot Pembersih dan tunggu hingga
Robot Pembersih kering, sebelum memulai kembali
pengoperasian.
PEMBERITAHUAN: Semua pengaturan tidak akan
dihapus bila Robot Pembersih dimatikan. Pastikan
untukmengkonrmasibahwapengaturansudah
benar melalui lampu (Gambar F-6, 7, 9, 11) pada
Robot Pembersih untuk mencegah pengoperasian
tidak terduga.
1. Tekan tombol DAYA (Gambar F-8) pada Robot
Pembersih.
Robot Pembersih akan beralih ke mode siaga
dan indikator Baterai (Gambar F-5) menyala.
(Untuk informasi rinci, lihat “Indikator Baterai pada
Robot Pembersih” di bawah ini.)
2. TekantombolmodeJelajah (Gambar F-7) pada
Robot Pembersih berulang kali untuk memilih mode,
atautekantombolmodeJelajah atau (Gambar
G-4) pada remote control.
Lampu mode yang dipilih akan menyala. (Untuk
informasirinci,lihat“ModeJelajah”dibawahini.)
3. Tekan tombol DAYA (Gambar F-8) pada Robot
Pembersih atau tombol Mulai/Berhenti (Gambar
G-2) pada remote control untuk memulai
pembersihan.
Lampu pilot (Gambar F-1) akan menyala dan buzzer
berbunyi sewaktu pembersihan.
Untukmenjedaoperasipembersihan,ulangilangkah3.
Untukmelanjutkanoperasipembersihan,ulangi
langkah 3.
Untuk mematikan Robot Pembersih, tekan terus
tombol DAYA (Gambar F-8) pada Robot Pembersih
hingga semua indikator MATI, atau tekan tombol DAYA
MATI (Gambar G-1) pada remote control.
PERHATIAN: Jangan terlalu dekat melihat cahaya
lampu pilot, atau hindari cahaya terkena mata. Hal
tersebut akan membahayakan mata.
Indikator baterai pada Robot Pembersih
Indikator baterai yang terletak pada sisi kartrid baterai
yangsesuaiakanmenyaladanmenunjukkandaya
kartrid baterai yang tersisa.
PEMBERITAHUAN: Tabel berikut berisi indikasi
kasar daya baterai yang tersisa. Jumlah tersisa dapat
beragam, tergantung pada kondisi penggunaan dan
suhu ruangan.
50% atau lebih
Antara 20% hingga 50%
20% atau kurang
Kosong/Kartrid baterai tidak
dipasang
Kesalahan pada baterai
58 BAHASA INDONESIA
Indikator baterai pada kartrid baterai
Dayayangtersisajugadapatdiperiksamenggunakan
indikator baterai (Gambar I-1) pada kartrid baterai
dengan nomor model yang berakhiran “B”.
Lepas kartrid baterai, lalu tekan tombol (Gambar I-2).
PEMBERITAHUAN: Tabel berikut berisi indikasi
kasar daya baterai yang tersisa. Jumlah tersisa dapat
beragam, tergantung pada kondisi penggunaan dan
suhu ruangan.
75% atau lebih
Antara 50% hingga 75%
(termasuk 50%)
Antara 25% hingga 50%
25% atau kurang
Kosong
Kesalahan pada baterai
Mode Jelajah
Mode Pola
Aplikasi:
Lantai luas dengan sedikit penghalang
seperti dalam gudang yang tertata rapi
dangaleripanjang.
Deskripsi (Gambar H-1):
Robot Pembersih akan mengulang siklus
jalanvertikal(a)danhorizontal(b).*
Mode Acak
Aplikasi:
Lantai dengan banyak penghalang,
misalnya kantor.
Deskripsi (Gambar H-2):
Robot Pembersih akan mengulang
siklusjalanbenturan(c)dan sepanjang
dinding (d).
* Berdasarkankondisiyangdialami,jejaksebenarnya
Robot Pembersih dapat berbeda dari tabel ini.
CATATAN: Robot Pembersih tidak dapat
membersihkan ruangan sempit yang tidak
memungkinkanRobotPembersihberjalanatautidak
dapatdijangkausikatsisi.
CATATAN: Setelah siklus pembersihan selesai, debu
tertentu dapat menempel di lantai dalam kondisi
tertentu.
Mode Tidur
Jika dibiarkan sekitar 5 menit dalam mode siaga, Robot
Pembersih akan secara otomatis beralih ke mode tidur
untuk menghemat baterai, dan lampu pilot (Gambar
F-1)berkedippelan.RobotPembersihjugaakanberalih
ke mode tidur bila timer hidup otomatis diaktifkan.
Untuk kembali ke mode siaga, lakukan langkah 3 dalam
“Pengoperasian dasar”.
PEMBERITAHUAN: Perubahan pengaturan dan
dimulainya operasi pembersihan tidak dapat
dilakukan dalam mode ini.
Membawa Robot Pembersih
PERHATIAN: Sebelum membawa Robot
Pembersih, pastikan untuk mematikan Robot
Pembersih.
PERHATIAN:Hati-hati,jangansampaitangan
AndaterjepitdiantaragagangdanbodiRobot
Pembersih.
Pegang gagang (Gambar J-1).
PEMBERITAHUAN: Jika Anda menyangga bagian
bawah belakang Robot Pembersih dengan tangan
lainnya, pastikan untuk tidak mengangkat bagian
tersebut terlalu tinggi karena debu dan kotoran di
Robot Pembersih dapat keluar melalui celah sikat
utama.
PEMBERITAHUAN: Jangan tarik Robot Pembersih.
Mengosongkan wadah
Kosongkan wadah setiap kali selesai digunakan agar
Robot Pembersih tetap memiliki performa optimal.
1. Tekan terus tombol DAYA (Gambar F-8) pada
Robot Pembersih hingga semua indikator MATI,
atau tekan tombol DAYA MATI (Gambar G-1)
pada remote control untuk mematikan Robot
Pembersih.
2. Tekan, lalu lepas tutup atas (Gambar K-1) untuk
membuka kunci, lalu buka tutup sepenuhnya.
3. Keluarkan kotak debu (Gambar K-2).
4. Buka kunci keduanya (Gambar K-3), lalu buka tutup
kotak debu.
5. Keluarkan, lalu kosongkan wadah atas (Gambar
K-4).
6. Bersihkangumpalankecildebudarilter(Gambar
K-5), lalu kosongkan wadah bawah (Gambar K-6).
7. Ganti kotak debu dalam Robot Pembersih dengan
urutan terbalik.
Operasi lanjutan
Fitur berikut hanya dapat ditetapkan bila Robot
Pembersih dalam mode siaga (lihat langkah 1 dalam
“Pengoperasian dasar”).
Menghemat daya
RobotPembersihdapatmengisapdebuyangjelas
terlihat tanpa menggunakan kipas vakum. Jika
tidak perlu membersihkan debu halus, mematikan
kipas vakum akan menghemat daya baterai untuk
memperpanjangwaktupengoperasianRobot
Pembersih.
Dalam mode siaga, tekan tombol Vakum pada
Robot Pembersih (Gambar F-10) atau pada remote
control (Gambar G-7) untuk mematikan lampu Vakum
(Gambar F-10).
Untuk menghidupkan kipas vakum, tekan tombol
Vakum pada Robot Pembersih (Gambar F-10)
atau pada remote control (Gambar G-7). Lampu akan
menyala kembali.

59 BAHASA INDONESIA
PEMBERITAHUAN: Pengaturan ini tidak dapat
dilakukan dalam mode tidur dengan timer hidup
otomatis diaktifkan.
PEMBERITAHUAN: Pada saat kipas pengisap debu
TIDAK AKTIF, lampu pemeliharaan Filter (Gbr.
F-3)tidakmenyalameskipunlterdipenuhikotoran.
Mengatur volume suara buzzer
Tiga tingkat volume suara buzzer termasuk senyap
dapat dipilih.
Dalam mode siaga, tekan tombol Buzzer berulang
kali pada Robot Pembersih (Gambar F-9) atau pada
remote control (Gambar G-6). Setiap kali Anda
menekan tombol, buzzer akan berbunyi dalam urutan
berikut: volume tinggi (lampu menyala), volume rendah
(lampu menyala), lalu tanpa suara (lampu mati).
PEMBERITAHUAN: Pengaturan ini tidak dapat
dilakukan dalam mode tidur dengan timer hidup
otomatis diaktifkan.
Mencari Robot Pembersih
Fitur ini berguna untuk menemukan Robot Pembersih
yang mungkin tidak terlihat di lantai luas yang dipenuhi
meja,kabinet,atauperlengkapanlainnya.
Tekan tombol Penentu lokasi pada remote control
(Gambar G-3) sewaktu Robot Pembersih dalam mode
siaga atau tidur. Buzzer akan berbunyi sekitar 10 detik
dan lampu pilot akan berkedip.
Untuk menghentikan buzzer dan mematikan lampu,
tekan kembali tombol Penentu lokasi .
CATATAN: Robot Pembersih mungkin sesekali tidak
meresponskarenaberadadiluarjangkauanremote
control. Masalah dapat diatasi dengan menekan
tombol Penentu lokasi sambil Anda bergerak.
Menggunakan timer hidup otomatis
Fitur ini memungkinkan Robot Pembersih memulai
pembersihan secara otomatis setelah waktu yang
ditentukan.
Karena pengaturan akan dihapus setelah pembersihan
waktu otomatis selesai, maka lakukan prosedur berikut
untuk mengaktifkan kembali timer hidup otomatis.
1. Dalam mode siaga, tekan tombol Timer berulang
kali pada Robot Pembersih (Gambar F-6) atau pada
remote control (Gambar G-5). Setiap kali Anda
menekan tombol, pengaturan akan berubah dalam
urutan berikut:
Status lampu Pembersihan dimulai
setelah1jam.
setelah3jam.
setelah5jam.
Timer hidup otomatis
dinonaktifkan.
2. Tekan tombol DAYA (Gambar F-8) pada Robot
Pembersih untuk mengaktifkan timer hidup
otomatis. Robot Pembersih akan beralih ke mode
tidur.
Untuk menghapus timer dalam mode siaga, tekan terus
tombol DAYA (Gambar F-8) pada Robot Pembersih
hingga semua indikator mati, atau tekan tombol DAYA
MATI (Gambar G-1) pada remote control.
PEMBERITAHUAN: Jika status baterai kiri dan
kanan atau , timer otomatis aktif tidak dapat
diaktifkan dan pembersihan tidak dapat dimulai
otomatis.
PEMBERITAHUAN: Perubahan pengaturan dan
dimulainya operasi pembersihan tidak dapat
dilakukan dalam mode ini.
PEMBERITAHUAN: Pengaturan timer hidup otomatis
akandihapusjikadayabateraibenar-benarhabis.
Membatasi Robot Pembersih pada area
tertentu
Pitapembatas(GambarL-1)danturdeteksipembatas
yang menggunakan sensor inframerah memungkinkan
Robot Pembersih menghindari area berikut
(Gambar L-2):
• Area yang terbagi dalam beberapa bagian karena
keseluruhan lantai terlalu luas sehingga Robot
Pembersih tidak dapat membersihkan lantai dalam
sekali pengoperasian
• Area yang terdapat benda rapuh dan dapat rusak
karena Robot Pembersih
• Area yang penuh dengan barang dan perlengkapan,
pembatas, atau berbentuk rumit, sehingga Robot
Pembersih dapat terhalang
• Area di sekitar tangga
• Area berpembatas rendah yang dapat dilewati
RobotPembersihdanjatuhkelantaiyanglebih
rendah, atau yang akan membuat Robot Pembersih
terhalang
Persiapan
1. Pilih permukaan yang rata dan halus pada lantai
yang akan dipasangi pita pembatas, lalu bersihkan
permukaan.
2. Pasang pita pembatas sehingga bagian dengan
palangpendeksejajardenganareapembersihan
dan tidak ada gelembung udara di antara pita dan
lantai.
PEMBERITAHUAN: Pastikan untuk hanya
menggunakan pita pembatas asli. Menggunakan pita
selain yang asli dapat berisiko kegagalan fungsi pada
turdeteksipembatas.
PEMBERITAHUAN: Jangan pasang pita
pembatas pada permukaan tidak rata yang dapat
mengakibatkan kesalahan deteksi atau permukaan
yang dapat mengotori atau merusak pita.
PEMBERITAHUAN: Perhatikan bahwa bahan perekat
tertentu dapat menempel di lantai, atau lantai dapat
rusak saat pita pembatas dilepas.
PEMBERITAHUAN: Pastikan pita pembatas tetap
bersih dan periksa apakah ada bagian yang rusak
ataurobek.Gantipitajikarusak.
60 BAHASA INDONESIA
PERINGATAN: Jangan pasang pita pembatas di
area yang dapat mengakibatkan kecelakaan karena
Robot Pembersih memasuki area tersebut atau Robot
Pembersihjatuhdariareatersebut.Dalamkasus
tersebut, letakkan benda dengan tinggi 15 cm atau
lebih dan yang cukup berat untuk menahan benturan
Robot Pembersih, sebagai pengganti pita pembatas.
Pengoperasian
Dalam mode siaga, tekan tombol Sensor
pembatas (Gambar F-11) pada Robot Pembersih
untuk mengaktifkan sensor pembatas (Gambar O-2).
Lampu (Gambar F-11) akan menyala.
Untuk menonaktifkan sensor pembatas, tekan kembali
tombol Sensor pembatas .
PEMBERITAHUAN: Pengaturan ini tidak dapat
dilakukan dalam mode tidur dengan timer hidup
otomatis diaktifkan.
PEMELIHARAAN
PERHATIAN: Pastikan selalu kedua kartrid
baterai dilepas sebelum melakukan pemeriksaan
atau pemeliharaan.
PEMBERITAHUAN: Pastikan untuk mengeluarkan
kotak debu sebelum membalik Robot Pembersih agar
debu atau kotoran tidak keluar melalui celah sikat
utama.
PEMBERITAHUAN: Pastikan untuk membentangkan
karpet atau bantalan lainnya guna mencegah
kerusakan pada lantai dan Robot Pembersih
(Gambar B).
PEMBERITAHUAN: Jangan gunakan air panas
(lebih dari 40°C), minyak gas, bensin, tiner, alkohol,
atau semacamnya. Semua dapat mengakibatkan
perubahan warna, perubahan bentuk, atau keretakan.
Untuk mempertahankan KEAMANAN dan
KEANDALAN produk, perbaikan, pemeliharaan, atau
penyesuaian lainnya harus dilakukan di Pusat Servis
Resmi atau Pabrik Makita yang selalu menggunakan
komponen pengganti Makita.
Membersihkan sikat sisi
(Gambar A, M-1)
• Benang dan rambut yang tersangkut di bulu sikat
sisi dapat mengakibatkan sikat berhenti berputar.
Bersihkankotorantersebutmenggunakanpenjepit
atau alat bantu serupa.
• Jika bulu sikat rusak atau terlepas, ganti dengan
sikat cadangan (lihat “Memasang sikat sisi” untuk
informasi rinci).
Membersihkan roda
• Bersihkan benang dan rambut dari roda penggerak
(Gambar M-2) menggunakan alat bantu seperti
penjepitdangunting.Memutarrodaakan
memudahkan pembersihan.
• Bersihkan benang dan rambut dari roda putar
(GambarM-3)menggunakanpenjepit,gunting,atau
alat bantu serupa.
PEMBERITAHUAN:Hati-hati,jangansampaijari
terjepitdiantararodadanbodiRobotPembersih.
Membersihkan sikat utama
Melepas sikat sisi (lihat “Memasang sikat sisi” untuk
informasi rinci) akan memudahkan tugas berikut.
1. Lepas empat sekrup (Gambar N-1), lalu
pelat bawah (Gambar N-2) dan sikat utama
(Gambar N-3).
2. Seka pelat bawah (Gambar N-2) dengan kain yang
sedikitdibasahidengansedikitdeterjenataucuci
pelatdenganairjikaperlu.
3. Bersihkan benang dan rambut dari sikat utama
(Gambar N-3) menggunakan gunting, lalu cuci sikat
utamadenganairjikaperlu.
4. Seka bagian dalam ventilasi vakum (Gambar N-4)
dengankainyangsedikitdibasahidengandeterjen
lembut.
5. Untukmenggantisikatutama,sejajarkanbagian
yangmenonjol(GambarN-5)padaujungkanan
sikat utama dengan lekukan pada bush poros kanan
(Gambar N-6), lalu masukkan sikat utama untuk
memasangnya.
6. Masukkanujungpersegikirisikatutama(Gambar
N-7) ke bush poros persegi kiri (Gambar N-8).
7. Ganti pelat bawah dengan urutan terbalik.
CATATAN: Bila sikat sisi tetap terpasang di bodi
Robot Pembersih, memutar sikat sisi secara manual
akan memudahkan pemasangan pelat bawah tanpa
menjepitbulusikatsisiantarapelatdanbodiRobot
Pembersih.
Membersihkan sensor
• Bersihkansensorjurang(GambarO-1)dansensor
pembatas (Gambar O-2) menggunakan kuas kapas
bersih dan kering.
• Bersihkan sensor ultrasonik (Gambar P-1)
menggunakan set pembersih vakum lain dalam
mode isap halus. Secara keseluruhan terdapat 8
sensor pada bagian depan dan kedua sisi bumper
(Gambar P-2).
Membersihkan lter dan kotak debu
PEMBERITAHUAN: Untuk menghindari kerusakan
padatutupkotakdebuatas,janganbukaataututup
dengan paksa.
1. Buka kedua kunci (Gambar Q-1), lalu angkat tutup
kotak debu bagian atas sambil menahan tanda
Pemeliharaanlter (Gambar Q-2) untuk
membukakompartemenlter.
2. Lepaslter(GambarQ-3),laluketukkekantong
sampah atau kain penampung kotoran pada
permukaan rata untuk menghilangkan debu dan
kotoran.
PEMBERITAHUAN: Jangan gosok atau tekan
lter,ataujangangunakanbendatajamuntuk
membersihkanlter.

61 BAHASA INDONESIA
3. CucilterjikadayaisapRobotPembersih
berkurang.
PEMBERITAHUAN:Jikalterbau,rendamlter
dalam larutan pemutih encer (10 mililiter pemutih
per1literair)kuranglebihselama3jamsebelum
mencucilterdiairmengalir.
4. Cuci kotak debu.
5. Keringkanlter(jikadicuci)dankotakdebuselama
1 hari di ruangan berventilasi baik untuk mencegah
bau tidak enak atau kegagalan fungsi.
PEMBERITAHUAN:Jangankeringkanlteryang
basah menggunakan pengering rambut atau sumber
panas lainnya.
6. Gantilterdikotakdebudenganurutanterbalik.
PEMBERITAHUAN:BilaAndamenggantilterdalam
kompartemen,pastikantab(GambarQ-4)padalter
sesuaidenganlekukanpadatepipenyanggalter
(Gambar Q-5).
Membersihkan bodi
1. Seka bagian luar Robot Pembersih dengan kain
yangsedikitdibasahidengandeterjenlembut.
2. Tekan, lalu lepas tutup atas (Gambar K-1) untuk
membuka kunci, lalu buka tutup sepenuhnya.
3. Keluarkan kotak debu (Gambar K-2).
4. Seka bagian dalam Robot Pembersih (Gambar R-1)
termasuk kisi ventilasi (Gambar R-2) dengan kain
yangsedikitdibasahidengandeterjenlembut.
MENYIMPAN ROBOT
PEMBERSIH
Bila Robot Pembersih tidak dapat beroperasi dalam
kondisi tertentu seperti roda penggerak menggantung
atau kehabisan daya baterai, Robot Pembersih akan
berhentimembersihkandanmenunjukkankesalahan
dengan lampu dan buzzer berikut.
• Lampu Pemecahan masalah (Gambar F-2)
• LampuPemeliharaanlter(GambarF-3)
• Lampu Pemeliharaan sikat (Gambar F-4)
• Lampu Timer (Gambar F-6)
• Lampu Buzzer (Gambar F-9)
• Lampu Vakum (Gambar F-10)
• Lampu Sensor pembatas (Gambar F-11)
1. Identikasikanmasalahmenggunakantabelberikut.
2. Atasi masalah.
3. Tekan tombol DAYA (Gambar F-8) pada Robot
Pembersih atau tombol Mulai/Berhenti (Gambar
G-2) pada remote control untuk beralih ke mode
siaga.
Indikasi kesalahan akan berhenti dan Robot
Pembersih siap membersihkan.
PEMBERITAHUAN:Jikakesalahanterjadilagi,
matikan, lalu hidupkan Robot Pembersih.
PEMBERITAHUAN:Jikamasalahberlanjutsetelah
melakukan tindakan perbaikan, hubungi Pusat Servis
Makita terdekat.
Indikasi Penyebab/Solusi
Lampu
berkedip sekali,
dua kali, atau 6
kali untuk setiap
urutan
• Roda penggerak menggantung.
• Robot Pembersih terhalang
pembatas.
• Robot Pembersih terkena sinar
matahari langsung.
• Robot Pembersih terhenti di lantai
hitam.
Pindahkan Robot Pembersih dari area
tersebut.
Jikakesalahanberlanjut,bersihkan
sensorjurang(GambarO-1).
Lampu
berkedip 3 kali
untuk setiap
urutan
• Terjadikesalahanpadasensor
bumper.
Tekan bumper (Gambar P-2) 10 kali.
Lampu
berkedip 4 kali
untuk setiap
urutan
• Benang dan rambut tersangkut pada
roda penggerak.
Bersihkan dari roda penggerak
(Gambar M-2).
• Robot Pembersih melewati area
berpembatas dengan permukaan
bagian atasnya terdorong.
Hal ini bukan kegagalan fungsi.
Lampu
berkedip 5 atau 7
kali untuk setiap
urutan
• Robot Pembersih terlalu panas.
Matikan Robot Pembersih, lepas
katrid baterai, lalu tunggu selama
sejam.GunakanRobotPembersih
hanya pada suhu ruang tidak lebih
dari 40°C.
Lampu dan
berkedip sekali
untuk setiap
urutan
• Kotakdebuataulterbelumdipasang.
Pasangkotakdebuataulter.
Lampu
dan semua
berkedip sekali
untuk setiap
urutan
• Daya baterai yang tersisa tidak cukup
( atau ) untuk memulai
pembersihan.
Isi penuh daya kartrid baterai.
Lampu dan
menyala
• Benang dan rambut tersangkut di roda
penggerak.
Bersihkan dari roda penggerak
(Gambar M-2).
• Robot Pembersih melewati area
berpembatas dengan permukaan
bagian atasnya terdorong.
Hal ini bukan kegagalan fungsi.
Lampu dan
menyala
• Terjadikesalahanpadasensor.
Matikan, lalu hidupkan Robot
Pembersih.
Lampu dan
menyala
• TerjadikesalahanpadaRobot
Pembersih.
Matikan, lalu hidupkan Robot
Pembersih.
Lampu
berkedip sekali
untuk setiap
urutan
• Benang dan rambut tersangkut di sikat
sisi dan sikat utama.
Bersihkan dari sikat (Gambar A, N-3).
Lampu
menyala
• Kotak debu penuh debu dan kotoran
ataultertersumbat.
Bersihkan kotak debu (Gambar K-2)
danlter(GambarK-5).
62 BAHASA INDONESIA
MEMECAHKAN
MASALAH
CATATAN:Jikamasalahberlanjutsetelahmelakukan
tindakan perbaikan, hubungi Pusat Servis Makita
terdekat.
Gejala Penyebab/Solusi
Lampu tidak
menyala saat
tombol ditekan.
Robot Pembersih
tidak beroperasi
saat tombol pada
Robot Pembersih
atau remote
control ditekan.
Pasang kartrid baterai dengan benar.
Isi penuh daya kartrid baterai.
Tekan tombol untuk menghidupkan
Robot Pembersih.
Robot Pembersih
tidak beroperasi.
Jika lampu Pemecahan
masalah , Pemeliharaan
lter , atau Pemeliharaan
sikat menyala atau berkedip, lihat
“MENYIMPAN ROBOT PEMBERSIH”
untuk mengatasi masalah.
Jika lampu pilot berkedip pelan, tekan
terus tombol DAYA pada Robot
Pembersih hingga semua indikator
mati, atau tekan tombol DAYA
MATI pada remote control untuk
menghapus timer.
Robot Pembersih
memulai operasi
secara otomatis.
• Timer hidup otomatis telah diaktifkan.
Robot Pembersih
berhenti
beroperasi selama
pembersihan.
Matikan Robot Pembersih, lalu
bersihkan kawat, tali, dll. dari roda
penggerak.
Jika Robot Pembersih terhalang
pembatas atau benda lainnya,
pindahkan Robot Pembersih ke lokasi
lain.
Kecepatanjelajah
tidak konstan.
• Jika penghalang terdeteksi, Robot
Pembersih akan melambat karena
memerlukan waktu untuk menghitung
arahjalan.Inibukankegagalanfungsi
Robot Pembersih.
Robot Pembersih
tidakberjalan
lurus.
Matikan Robot Pembersih, bersihkan
semua benda asing yang tersangkut
di roda penggerak.
Bersihkan sensor ultrasonik.
Robot Pembersih
lebih sering
menabrak
penghalang
dibanding
sebelumnya.
Bersihkan sensor ultrasonik.
Robot Pembersih
jatuhdaritangga
atau ke lantai yang
lebih rendah.
Bersihkansensorjurang.
• Robot Pembersih mungkin tidak
dapat menghindari undakan dengan
tinggi 5,5 cm atau kurang. Ini bukan
kegagalan fungsi Robot Pembersih.
Suara
pengoperasian
lebih kencang dari
biasanya.
Kosongkan kotak debu dan bersihkan
lter,sikatsisi,sertasikatutama.
Daya isap tidak
cukup kuat untuk
mengisap debu
dan kotoran.
Kosongkan kotak debu dan bersihkan
lter.
Tekan tombol Vakum pada Robot
Pembersih atau pada remote control
untuk menghidupkan kipas vakum.
Sikat sisi terlepas. Pasang sikat sisi dengan benar
(Gambar A).
Sikat sisi tidak
berputar atau sulit
berputar.
Bersihkan sikat sisi dan sikat utama.
Pasang sikat utama dan pelat dengan
benar (Gambar N).
Udara
pembuangan
berbau.
Kosongkan kotak debu dan bersihkan
lter.
Remote control
tidak berfungsi.
Pasang baterai remote control dengan
benar (Gambar E).
Ganti baterai dengan yang baru.
Tekan tombol DAYA pada Robot
Pembersih untuk menghidupkannya.
Geser lebih dekat dengan Robot
Pembersih atau singkirkan
penghalang antara Robot Pembersih
dan remote control.
Hentikan penggunaan Robot
Pembersihdidekatataujauhkan
dari peralatan yang menggunakan
frekuensi radio pada gelombang
2,4 GHz (micowave dapur, perangkat
Bluetooth, perangkat Wi-Fi, dsb.).
Matikan, lalu hidupkan Robot
Pembersih.
Timer hidup
otomatis tidak
berfungsi.
Gunakan kartrid baterai yang terisi
penuh.
Aktifkan ulang timer hidup otomatis.
AKSESORI OPSIONAL
PERHATIAN: Aksesori atau perangkat tambahan
tersebut disarankan untuk digunakan dengan
alatMakitayangdijelaskandalampanduanini.
Penggunaan aksesori atau perangkat tambahan
lainnya dapat menimbulkan risiko cedera. Gunakan
hanya aksesori atau perangkat tambahan untuk
tujuanyangtelahdijelaskan.
• Pita pembatas
• Sikat sisi
• Sikat utama
• Pelat bawah
• Filter
• Baterai dan pengisi daya asli Makita
CATATAN: Beberapa item dalam daftar mungkin
tersedia dalam kemasan alat sebagai aksesori
standar. Item tersebut dapat berbeda di setiap
negara.
INFORMASI REFERENSI
MakitaCorporationdananakperusahaan,aliasi,
dan distributornya dapat menggunakan Informasi
Penggunaanuntukkeperluanlayananpurnajualseperti
pemeliharaan dan perbaikan. Informasi Penggunaan
berisijumlahoperasi,bebandistribusi,informasi
kesalahan, status pengoperasian, dan/atau catatan
pemeliharaan perkakas listrik.
63 TIẾNG VIỆT
CÁC ĐẶC ĐIỂM KỸ
THUẬT
Hộppintiêuchuẩn BL1815N, BL1820B, BL1830B, BL1840B,
BL1850B, BL1860B
Tuổithọpin
(khisửdụngpin
lithium ion tùy
chọn)
Khoảng120phútsửdụnghaipinBL1830
(18V,3Ahmỗipin)
Khoảng200phútsửdụnghaipinBL1850
(18V,5Ahmỗipin)
Dungtíchhộc 2,5 L
Kíchthước(rộng/
dài/cao)
(baogồmcácpin
BL1830)
Khoảng460x460x180mm
Trọnglượng
(baogồmhaipin
BL1830)
Khoảng7,8kg
• Dochươngtrìnhnghiêncứuvàpháttriểnliêntục
củachúngtôinêncácđặcđiểmkỹthuậttrongđây
cóthểđượcthayđổimàkhôngcầnthôngbáo
trước.
• Cácđặcđiểmkỹthuậtcóthểkhácnhautùytheo
từngquốcgia.
Các biểu tượng
Đọchướngdẫnsửdụng.
KhôngbướclênhoặcđặtcácvậtlênMáy
HútBụiTựĐộng.
KhôngsửdụngMáyHútBụiTựĐộnggần
ngọnlửatrựctiếphoặccácvậtliệudễcháy
và/hoặcnguyhiểm.
Lauchùicáccảmbiếnđứngởmặtdướinếu
chúngbịbẩnhoặcẩmướt.
Mục đích sử dụng
ĐâylàMáyHútBụiTựĐộngdùngđểlàmsạchsàn
trongnhà.Bộđiềukhiểntừxakếtnốikhôngdây
(2,4GHzZigBee)vớiMáyHútBụiTựĐộng.
TIẾNG VIỆT (Những hướng dẫn ban đầu)
CẢNH BÁO: Máynàykhôngdànhchonhữngngười(baogồmcảtrẻ
em)suygiảmthểchất,giácquanhoặckhảnăngtríóc,hoặcthiếukinh
nghiệmvàkiếnthứcsửdụng.Trẻemcầnđượcgiámsátđểđảmbảo
rằngchúngsẽkhôngnghịchthiếtbị.
CÁC BIỆN PHÁP PHÒNG NGỪA AN
TOÀN
CẢNH BÁO
Không sử dụng Máy Hút Bụi Tự Động gần hoặc hút
các chất dễ cháy.
Điềunàycóthểgâynổhoặccháy.
• Dầulửa,xăng,nhang,nến
• Étxăng,dungmôi
• Tànthuốclá
• Mựctonehoặccácchấtdễbắtlửakhác
• Chấttẩythảmhoặccácchấttạobọtkhác
Không sử dụng Máy Hút Bụi Tự Động ở những nơi
ẩm ướt, những nơi có thể bị ẩm ướt, hoặc những
nơi có nhiệt độ và độ ẩm cao. Đồng thời, cũng
không thực hiện hút nước.
Điềunàycóthểgâyđiệngiật,đoảnmạch,cháy,biến
dạnghoặchỏnghóc.
• Nhàbếpvànhữngnơikháccósửdụngnước
• Nhàtắm
• Buồngtắmvòisen
• Ápmái,v.v...
Không chạm vào Máy Hút Bụi Tự Động bằng tay
ướt.
Điềunàycóthểgâyđiệngiật.
Không sử dụng Máy Hút Bụi Tự Động quanh bếp lò
hoặc thiết bị nhiệt khác.
Điềunàycóthểgâyđiệngiật,đoảnmạch,cháy,biến
dạnghoặchỏnghóc.
Không sử dụng Máy Hút Bụi Tự Động ở các loại địa
điểm sau đây.
Điềunàycóthểgâyđiệngiậthoặcthươngtích.
• Gầntrẻsơsinhhoặcnhữngngườisuygiảmthể
chất,giácquanhoặckhảnăngtríóc,hoặcthiếu
kinhnghiệmvàkiếnthứcsửdụng
• Gầnđộngvật
• Gầnkhuvựcđôngngườihoặcmuabántấpnập
Không cho phép trẻ em ngoài tầm giám sát hoặc
những người không thể hiện được sự sẵn sàng
hoặc không có khả năng tự vận hành Máy Hút Bụi
Tự Động để sử dụng Máy Hút Bụi Tự Động.
Điềunàycóthểgâyđiệngiậthoặcthươngtích.
Dừng tiếp tục vận hành ngay lập tức trong trường
hợp có bất thường hoặc hỏng hóc như sau.
Việckhôngtuântheohướngdẫnnàycóthểgâyrakhói,
cháyhoặcđiệngiật.
• MáyHútBụiTựĐộngkhônghoạtđộngngaycảkhi
nóđãđượcBẬT.
• MáyHútBụiTựĐộngbịbiếndạnghoặcnóngbất
thường.

64 TIẾNG VIỆT
• MáyHútBụiTựĐộngthỉnhthoảngdừnglạitrong
khivậnhành.
• MáyHútBụiTựĐộngtạoratiếngồnbấtthường
trongkhivậnhành.
• MáyHútBụiTựĐộngphátramùikhét.
TẮT Máy Hút Bụi Tự Động ở những địa điểm bị cấm
sử dụng.
Việckhôngtuântheohướngdẫnnàycóthểlàmcho
thiếtbịytếhoạtđộngkhôngchínhxác.
Đảmbảotuântheocáchướngdẫncủatừngcơquany
tếkhisửdụngthiếtbịphátrasóngvôtuyếnbêntrong
cáccơquanytế.
Không sử dụng Máy hút bụi Tự động ở các vị trí
hẹp và trên cao mà không che chắn.
ĐiềunàycóthểlàmchoMáyHútBụiTựĐộngrơikhỏi
khuvực,gâyrathươngtíchhoặchỏnghóc.
• Cầuthang
• Đầubàn,kệ,tủquầnáo,tủlạnh,v.v...
• Gáclửng,gácxép,chiếunghỉcầuthanghoặclốiđi
vào, v.v...
• Cácđịađiểmcódốcnghiêngtừ10°trởlên
Không để Máy Hút Bụi Tự Động tiếp xúc với ánh
nắng mặt trời trực tiếp hoặc các tia hồng ngoại.
Hoạtđộngkhôngchínhxácdolỗicảmbiếncóthểlàm
choMáyHútBụiTựĐộngrơingã,gâyrathươngtích
hoặchỏnghóc.
• Bộcấpnhiệthalogen
• Điềukhiểntừxahoặccảmbiến,v.v...
• Cáctianắngxuyênquakínhmờ
Hãy di chuyển bất kỳ vật nào có thể gây ra tai nạn
trong trường hợp tiếp xúc với Máy Hút Bụi Tự
Động.
Việckhôngtuântheohướngdẫnnàycóthểgâyra
thươngtíchdovậtbịlậtnghiênghoặcrơingã.
• Nếnđãthắp,lọhoa,v.v...
• Thiếtbịđiệntửcóđiềukhiểnđượcđặtcùngchiều
caovớiMáyHútBụiTựĐộng.
Không che chắn Máy Hút Bụi Tự Động.
Điềunàycóthểgâyracháydoquánhiệt.
Không cưỡi hoặc đặt các vật nặng lên Máy Hút Bụi
Tự Động. Không tác dụng lực sốc vật lý mạnh.
Điềunàycóthểgâyrathươngtích,hưhỏnghoặchỏng
hóc.
Đặcbiệt,hãychúýcẩnthậnkhitrẻemởquanhMáy
HútBụiTựĐộng.
Không được cải tạo Máy Hút Bụi Tự Động.
Điềunàycóthểgâycháy,điệngiậthoặcthươngtích.
LiênhệvớiđạilýbạnđãmuaMáyHútBụiTựĐộngđể
sửachữa.
Không được chặn hoặc chèn ngoại vật kim loại
hoặc dễ cháy vào các lỗ hút hoặc xả. Đồng thời,
không được sử dụng Máy Hút Bụi Tự Động quanh
những vật có thể chặn lỗ hút.
Điềunàycóthểgâyđiệngiật,cháyhoặchỏnghóc.
Không đốt nóng hoặc để Máy Hút Bụi Tự Động tiếp
xúc với lửa hoặc đặt nó ở một nơi nóng như ở gần
lửa hoặc bếp lò, tiếp xúc với ánh sáng mặt trời trực
tiếp, hoặc đặt bên trong một chiếc xe dưới nắng
gắt.
Điềunàycóthểgâyrađoảnmạch,cháy,hoặclàmcho
pinròrỉchấtlỏnghoặcnổ.
Không được rửa hoặc để Máy Hút Bụi Tự Động*
tiếp xúc với nước hoặc chất tẩy rửa.
Điềunàycóthểgâyđiệngiật,đoảnmạchhoặccháy.
* Khôngbaogồmbànchảichính,đĩađáy,bànchải
cạnh,hộpchứabụivàbộlọc
Không chạm vào bánh xe dẫn động hoặc đưa tay
hoặc chân vào bên dưới Máy Hút Bụi Tự Động trong
khi vận hành.
Điềunàycóthêgâyrathươngtích.
Đặcbiệt,hãychúýcẩnthậnkhitrẻemởquanhMáy
HútBụiTựĐộng.
Không được chặn hoặc chèn ngoại vật vào cảm
biến của Máy Hút Bụi Tự Động.
Điềunàycóthểgâyralỗivậnhành,thươngtíchdoMáy
HútBụiTựĐộngrơingãvìhoạtđộngkhôngchínhxác
hoặchỏnghóc.
Không được dán băng dính vào cảm biến hoặc
bánh xe. Không làm thay đổi Hình dạng bộ giảm
xung hoặc bánh xe hoặc nhấn bộ giảm xung với lực
quá mạnh.
Điềunàycóthểgâyralỗivậnhành,thươngtíchdoMáy
HútBụiTựĐộngrơingãvìhoạtđộngkhôngchínhxác
hoặchỏnghóc.
Vệ sinh định kỳ từng cảm biến.
Việckhôngtuântheohướngdẫnnàycóthểgâyralỗi
vậnhành,thươngtíchdoMáyHútBụiTựĐộngrơingã
vìhoạtđộngkhôngchínhxáchoặchỏnghóc.
Không sử dụng băng chắn ranh giới (được bán
riêng) đã bị bẩn, bong tróc hoặc rách.
ĐiềunàycóthểgâyrathươngtíchdoMáyHútBụiTự
Độngrơingãvìhoạtđộngkhôngchínhxác.
CHÚ Ý
Không sử dụng Máy Hút Bụi Tự Động ở các địa
điểm sau đây.
Điềunàycóthểkhiếnchocácthiếtbịkháchoạtđộng
khôngchínhxác.
• Bêntrongmộtbệnhviệnhoặcxungquanhthiếtbị
ytế
• Bêntrongmáybay
• Xungquanhthiếtbịđiệntửđòihỏiphảikiểmsoát
chínhxáchoặcsửdụngtínhiệuyếu.
Hãy đảm bảo giữ Máy Hút Bụi Tự Động và điều
khiển từ xa cách máy điều hòa nhịp tim và máy khử
rung tim cấy dưới da trên 15 cm.
Việckhôngtuântheohướngdẫnnàycóthểgâyra
hỏnghócthiếtbịytế.
Không được chèn ngoại vật vào các khe hở và lỗ.
Điềunàycóthểgâyđiệngiậthoặcthươngtích.
Cẩn thận không để các ngón tay của bạn bị kẹt vào
khi vệ sinh Máy Hút Bụi Tự Động.
Điềunàycóthêgâyrathươngtích.
Đảm bảo đọc kỹ HƯỚNG DẪN SỬ DỤNG trước khi
sử dụng Máy Hút Bụi Tự Động.
Việckhôngtuântheohướngdẫnnàycóthểgâyra
thươngtíchhoặchỏnghóc.
65 TIẾNG VIỆT
THÔNG BÁO
Dừng tiếp tục sử dụng hộp pin ngay lập tức nếu
nhận thấy có mùi khó chịu, rò rỉ pin, nóng bất
thường, biến dạng, hoặc đổi màu.
Việckhôngtuântheohướngdẫnnàycóthểgâyra
hỏnghóc.
Không sử dụng Máy Hút Bụi Tự Động ở ngoài trời
hoặc ở những nơi mà máy có thể dịch chuyển ra
ngoài trời.
Điềunàycóthểgâyrahỏnghóc.
Không sử dụng Máy Hút Bụi Tự Động ở các địa
điểm sau đây.
Điềunàycóthểgâyrahỏnghóc.
• Nhữngđịađiểmmàcácphântửdầuănhoặccác
thànhphầndầukhácđanglơlửngtrongkhôngkhí
• Nhữngđịađiểmmàbìnhxịtaerosolhoặccácsản
phẩmhóachấtđượcsửdụng,chẳnghạnnhưcác
cửahàngcắttóc,thẩmmỹviện,vàcáccửahàng
giặtkhô
• Nhữngđịađiểmđầybụi
Không sử dụng Máy Hút Bụi Tự Động ở các địa
điểm sau đây.
Điềunàycóthểlàmhỏnglớptrảisànhoặclàmtrầybề
mặtsàn.
• Nhữngđịađiểmcólớptrảisàndễbịhưhỏng(da
cừu,vảidạ,v.v...)
• Sànbằnggỗbánthànhphẩmhoặcđácẩmthạch
• Sànmớiđượcbôisáp
Không sử dụng Máy Hút Bụi Tự Động trên lớp trải
sàn có chiều dài cọc dài (từ 7 mm trở lên).
Điềunàycóthểgâyhưhỏngcholớptrảisànhoặclàm
choMáyHútBụiTựĐộngbịhỏnghóc.
Không sử dụng Máy Hút Bụi Tự Động trên mặt sàn
cứng, không bằng phẳng như sàn bê tông, v.v...
Điềunàycóthểlàmbànchảivàbánhxemaumòn
nhanh.
Không sử dụng Máy Hút Bụi Tự Động nếu bàn chải
và bánh xe bị mòn.
Điềunàycóthểgâytrầyxướcbềmặtsàn.
Dừngtiếptụcviệcvậnhànhvàliênhệvớiđạilýnơibạn
đãmuaMáyHútBụiTựĐộng.
Loại bỏ bất kỳ bụi bẩn đất cát bám vào bàn chải
chính, bàn chải cạnh và bánh xe.
Việckhôngtuântheohướngdẫnnàycóthểlàmchobề
mặtsànbịtrầyxước.
Không hút các món đồ sau đây.
Điềunàycóthểlàmtrầyxướchoặclàmtắcnghẽnbên
trongMáyHútBụiTựĐộnghoặcgâyhỏnghóc.
• Chấtlỏnghoặcrácướt
• Hóachấthoặcdầu
• Phânthúcưng
• Mộtkhốilượnglớncáthoặcbột
• Vậtsắcnhọn(thủytinh,lưỡidao,đinhghim,v.v...)
• Giấylớnhoặcrácnhựavinyl
• Dâycáphoặcdây
Vệ sinh bộ lọc sau khi hút bột mịn (thạch cao, xi
măng, phấn, v.v...).
Việckhôngtuântheohướngdẫnnàycóthểgâyra
hỏnghóc.
Không sử dụng Máy Hút Bụi Tự Động nếu bộ lọc bị
tắc hoặc các cảm biến bị bẩn.
Điềunàycóthêgâyrahỏnghóc.
Không được tra dầu bàn chải xoay hoặc các bộ
phận chuyển động khác.
Điềunàycóthểlàmnứtnhựa.
GIỮ GÌN CÁC HƯỚNG DẪN NÀY
Sử dụng và bảo quản dụng cụ
dùng pin
1. Chỉ sạc pin lại với bộ sạc do nhà sản xuất quy
định. Bộ sạc phù hợp với một loại bộ pin này có
thể gây ra nguy cơ hỏa hoạn khi được dùng cho
một bộ pin khác.
2. Chỉ sử dụng các dụng cụ máy với các bộ pin
được quy định cụ thể. Việc sử dụng bất cứ bộ
pin nào khác có thể gây ra thương tích và hỏa
hoạn.
3. Khi không sử dụng bộ pin, hãy giữ nó tránh xa
kẹp giấy, tiền xu, chìa khóa, đinh, ốc vít hoặc các
vật nhỏ bằng kim loại khác mà có thể làm nối tắt
các đầu cực pin.
4. Trong điều kiện sử dụng quá mức, pin có thể bị
chảy nước; hãy tránh tiếp xúc. Nếu lỡ tiếp xúc,
hãy rửa sạch bằng nước.
Các hướng dẫn an toàn quan trọng
cho hộp pin
1. Trước khi sử dụng hộp pin, hãy đọc tất cả các
hướng dẫn và dấu hiệu phòng ngừa trên (1) bộ
sạc pin, (2) pin, và (3) sản phẩm sử dụng pin.
2. Không được tháo rời hộp pin.
3. Nếu thời gian vận hành trở nên ngắn hơn bình
thường một cách đáng kể, hãy dừng vận hành
ngay lập tức. Điều này có thể gây ra nguy cơ quá
nhiệt, có thể gây cháy và thậm chí có thể gây nổ.
4. Nếu chất điện phân dính vào mắt, hãy rửa mắt
với nước sạch và tìm đến chăm sóc y tế ngay.
Điều này có thể gây mất thị lực.
5. Không được làm đoản mạch hộp pin:
(1) Không chạm vào các đầu cực pin với vật
liệu dẫn điện bất kỳ.
(2) Tránh cất giữ hộp pin trong một thùng chứa
có các vật kim loại khác như đinh, tiền xu,
v.v...
(3) Không để hộp pin tiếp xúc với nước hoặc
mưa.
Đoản mạch pin có thể gây ra một dòng điện lớn,
quá nhiệt, có thể gây cháy và thậm chí là hỏng
vỡ máy.
6. Không cất giữ Máy Hút Bụi Tự Động và hộp pin
ở bất kỳ nơi nào có nhiệt độ có thể lên tới hoặc
vượt quá 50°C.
7. Không được đốt hộp pin ngay cả khi nó bị hư
hỏng nghiêm trọng hoặc đã cạn hoàn toàn. Hộp
pin có thể phát nổ khi gặp lửa.
8. Cẩn thận không được làm rơi hoặc va đập hộp
pin.
9. Không được sử dụng hộp pin đã bị hư hỏng.
66 TIẾNG VIỆT
10. Tuân thủ các quy định tại địa phương bạn liên
quan đến việc thải bỏ các hộp pin.
GIỮ GÌN CÁC HƯỚNG DẪN NÀY
CHÚÝ:ChỉsửdụngpinchínhhãngMakita.Sử
dụngpinMakitakhôngchínhhãng,hoặcpinđãđược
thayđổi,cóthểdẫnđếnpinnổgâycháy,bịthương
vàthiệthại.SẽlàmmấthiệulựcbảohànhMakitađối
vớidụngcụvàbộsạcMakita.
Mẹo kéo dài tuổi thọ pin tối đa
1. Sạc pin hộp pin trước khi nó được xả hoàn toàn.
Luôn dừng vận hành và sạc hộp pin khi bạn
nhận thấy nguồn điện của dụng cụ còn ít.
2. Không bao giờ sạc lại hộp pin đã sạc đầy. Sạc
điện quá mức sẽ rút ngắn tuổi thọ pin.
3. Sạc hộp pin trong phạm vi nhiệt độ phòng từ
10°C - 40°C. Hãy để một hộp pin nóng nguội
xuống trước khi sạc nó.
4. Sạc hộp pin trước khi cất giữ máy trong thời
gian dài (hơn sáu tháng).
Hệ thống bảo vệ dụng cụ/hộp pin
MáyHútBụiTựĐộngđượctrangbịmộthệthốngbảo
vệdụngcụ/hộppingiúptựđộngTẮTnguồnđiệndẫn
đếnđộngcơđểkéodàituổithọcủaMáyHútBụiTự
Độngvàcáchộppin.MáyHútBụiTựĐộngtựđộng
dừngdướinhữngđiềukiệnsau.
Quá tải
KhiMáyHútBụiTựĐộngbịquátảivàdòngđiệncao
bấtthườngđượcphóngra,MáyHútBụiTựĐộngsẽtự
độngdừnglạimàkhôngcầnbấtkỳchỉthịnào.
ĐểkhởiđộnglạiMáyHútBụiTựĐộng,hãyTẮTnguồn,
loạibỏcácnguyênnhângâyratìnhtrạngquátải,và
sauđóBẬTnguồntrởlại.
Quá nhiệt
KhiMáyHútBụiTựĐộngbịquánhiệt,đèn sẽnhấp
nháy5hoặc7lầnliêntụcvàtựđộngdừngMáyHútBụi
TựĐộng.
Trongtrườnghợpnày,hãyđểMáyHútBụiTựĐộng
nguộitrướckhiBẬTnguồntrởlại.
Xả quá mức
Khimứcpincònlạithấp,MáyHútBụiTựĐộngsẽtự
độngdừngvàkhônghồiđápbấtkỳhoạtđộngchuyển
đổinào.
Trongtrườnghợpnày,hãytháovàsạclạihộppin.
CÁC NÚT VÀ ĐÈN
CHỈ BÁO
Bạncóthểtìmthấychitiếtcủacácbộphậnbằngcách
tìmsốthứtựhìnhtươngứngvớitừngbộphậntrongtài
liệunày(vídụ:tìm“HìnhF-8”chonút NGUỒN).
Máy Hút Bụi Tự Động (Hình F)
1. Đènbáo
2. Đènxửlýsựcố
3. Đènbảodưỡngbộlọc
4. Đènbảodưỡngbànchải
5. Đènchỉbáopin(đốivớicáchộppinbênphải
vàbêntrái)
6. Núthẹngiờvàđèn
7. Nútchếđộhànhtrìnhvàđèn
:Chếđộkiểumẫu
:Chếđộngẫunhiên
8. NútNGUỒN(khởiđộng/dừng)
9. Nútcòivàđèn
10. Núthútvàđèn
11. Nútvàđèncảmbiếnranhgiới
Điều kiển từ xa (Hình G)
1. NútTẮTNGUỒN
2. Nútkhởiđộng/dừng
3. Nútđènhiệuvịtrí
4. / Nútchếđộhànhtrình
5. Núthẹngiờ
6. Nútcòi
7. Núthút
TRƯỚC KHI SỬ DỤNG
Lắp ráp và lắp pin
CHÚÝ:LuônđảmbảoTẮTMáyHútBụiTựĐộng
trướckhithựchiệnbấtkỳcôngviệcnàotrênMáyHút
BụiTựĐộng.
Phụ kiện được cung cấp
Kiểmtraxemcácmónđồtrongdanhsáchsauđâycó
baogồmtronggóihaykhông.
• PincỡAAA(LR03)(x2)
• Bànchảicạnh(x4,baogồmhaibànchảidựphòng)
• Ốcvítđểlắpbànchảicạnh(x4)
• Băngchắnranhgiới(15mx1)
• Sáchhướngdẫnsửdụng(x1)
• Hướngdẫnkhởiđộngnhanh(x1)
• Lưuýkhisửdụng(x1)
Lắp bàn chải cạnh (Hình A)
Lắpbànchảicạnhởcảhaimặtcủamặttrướcvàmặt
đáycủaMáyHútBụiTựĐộng.
THÔNGBÁO:Trướckhilàmviệc,hãyđảmbảotrải
tấmthảmhoặcvậtliệuđệmkháctrênsànnhàđể
tránhhưhỏngsànnhàvàMáyHútBụiTựĐộng
(HìnhB).
1. ĐặtbànchảicạnhlênđầutrụcxoaytrênMáyHút
BụiTựĐộngcócácrãnhcủabànchảikhớpvớiđầu
trục.
2. Cốđịnhbànchảicạnhbằngcáchsửdụngốcvít
đượccungcấp.
THÔNGBÁO:ĐảmbảorằngMáyHútBụiTựĐộng
nàyđượcvậnhànhvớibànchảicạnhđãđượclắpđặt.
Lắp các hộp pin
Cănchỉnhrãnh(HìnhC-2)trênhộppinvớichốt(Hình
C-3)trênhộpđựngpinvàtrượtnóvàovịtrí.Đẩyhộp
pinbằngmọicáchchođếnkhinókhóachặtvàovịtrí
vớimộttiếngcáchnhỏ.
Nếubạncóthểthấyđènchỉbáomàuđỏ(HìnhC-1)
ởphíatrêncủanútnhả,hộppinvẫnchưađượckhóa
hoàn toàn.
67 TIẾNG VIỆT
CHÚÝ:Cầnphảicẩnthậntrongviệclắpđặthộp
pinđểngóntaykhôngbịkẹtgiữalỗsạcvàhộppin.
MáyHútBụiTựĐộnghoạtđộngvớichỉmộthộppin
đượclắptrênmộttronghaihộpđựngpin.
Đểtháohộppin,trượthộppintừhộpđựngpintrongkhi
nhấnnútnhả(HìnhD-1)trênhộp.
Lắp pin vào điều khiển từ xa (Hình E)
TrượtnắpngănchứapinvàgắnhaipincỡAAA(LR03),
chúýcẩnthậnđểcănchỉnhcáccực(+/–)chínhxác.
THÔNGBÁO:Khôngsửdụngpinmớivàcũchung
vớinhau,cũngkhôngsửdụngcácloạipinkhácnhau
chungvớinhau.
THÔNGBÁO:Tháopinra,nếukhôngsửdụngđiều
khiểntừxatrongmộtthờigiandài.
CHÚÝ:Nếudahoặcmắttiếpxúcvớichấtđiện
phânròrỉtừpin,hãylậptứcrửasạchbằngnước.
Ghép nối Máy Hút Bụi Tự Động và điều khiển từ xa
MáyHútBụiTựĐộngđãđượcghépnốivớiđiềukhiển
từxa.Tuynhiên,phảithựchiệnmộtlầnnữaquátrình
ghépnốinếubạnthayđiềukhiểntừxa.
1. Nhấnvàgiữcácnút Hẹngiờ(HìnhF-6)
và Chếđộhànhtrình(HìnhF-7)cùnglúctrên
MáyHútBụiTựĐộngchođếnkhinghecòikêubíp
hailần.
2. Nhấnvàgiữcácnút Hẹngiờ(HìnhG-5)
và Đènhiệuvịtrí(HìnhG-3)cùnglúctrênđiều
khiểntừxachođếnkhinghecòikêubíphailần.
Nếughépnốikhôngthànhcôngvàcòikêubíp5lần,vui
lòngthửghépnốilạilầnnữa.
Tổ chức bố trí các phòng
Để đảm bảo hành trình suôn sẻ
• Đóngcáccánhcửadẫnvàophòng.Nếusựkhác
biệtvềmứcđộcủangưỡngcửanhỏđủđểMáyHút
BụiTựĐộngcóthểvượtquamàkhôngcóvấnđề,
cóthểđểcửamởđểMáyHútBụiTựĐộngtiếptục
vàdọndẹpcácphòngliềnkề.
• Đặtchướngngạivậttrướcnhữngđồnộithấtdễbị
hưhỏng,v.v...
• ĐặtchướngngạivậtđểngănMáyHútBụiTựĐộng
vàonơimàmáycóthểbịkẹt,chẳnghạnnhưdưới
nhữnggiákệthấp.
• Dichuyểnnhữngvậtthểcao,mảnhvàkhôngổn
địnhvànhữngvậtthểdễbịlậtnghiêngsangmột
phòngkhác.
• Khóabánhxecủaxeđẩyhoặccácvậtthểkhác,
hoặcdichuyểnchúngsangmộtphòngkhác.
• Sắpxếpcácdâyđiệndọctheocácbứctường.
• Dichuyểnđệm,sáchhoặccácvậtthểkháccóthể
ngănMáyHútBụiTựĐộngthựchiệnhànhtrình
sangmộtphòngkhác.
• Nângcácbộphậncủarèmcửahoặccácvậtkhác
rủxuốngsànnhà.
• Dichuyểnlớptrảisànbấtkỳcósợidễbịkéođi
hoặccósựkhácbiệtvềmứcđộvànhữnglớptrải
sànquámỏngvàdễtrượtsangmộtphòngkhác.
• Gấpphầntuaruabấtkỳcủalớptrảisànxuốngbên
dướilớptrảisàn.
• Cấtbấtkỳvậtthểnhỏhayđắttiềnnàomàcóthểdễ
dàngbịhútlên.
• Cấtbấtkỳdâycáp,thắtlưng,dây,giấymỏng,hoặc
túinhựanàonằmtrênsànnhà.
• Thulạibấtkỳổcắmđiệntrênsànnàocóthểthu
vào.
• Phủbấtkỳphầnlướinàođangchiacácphầnsàn
rabằngnhữngtấmbảng,v.v...vìMáyHútBụiTự
Độngcóthểpháthiệnđólàranhgiớivàkhôngdi
chuyểnquachúng.
Ngăn Máy Hút Bụi Tự Động rơi
• Nếukhuvựclàmsạchcóđợtcầuthanghoặcphần
khácmàMáyHútBụiTựĐộngcóthểrơixuống,thì
đểMáyHútBụiTựĐộngnằmngoàiphầnnày,phải
đặtvậtthểcóchiềucaotừ15cmtrởlênvàđủnặng
đểchịuđượctácđộngcủaMáyHútBụiTựĐộngở
phíatrướcphầnnày.
• Ngănánhsángmặttrờivàcáctiahồngngoạibằng
rèmcửa.(MáyHútBụiTựĐộngcóthểgiảmxuống
mộtmứcthấphơnkhilùilạitránhánhsángmặttrời
hoặctiahồngngoại.)
• Đóngcửacókhungnhôm.(MáyHútBụiTựĐộng
cóthểkhôngpháthiệnsựkhácbiệtvềmứcđộgiữa
thanhngangkhungcửanhômvàsànvàcóthểrơi
rakhỏicửa.)
• Dichuyểnbấtkỳlớpphủsàngầnnhưkhácbiệt
vềmứcđộsangmộtphòngkhác.(MáyHútBụiTự
Độngcóthểkhôngpháthiệnđượcsựkhácbiệtvà
cóthểngã.)
LƯU Ý
• KhôngsửdụngMáyHútBụiTựĐộnggầnhoặchút
chấtdễcháy.(Điềunàycóthểgâynổhoặccháy.)
• KhôngsửdụngMáyHútBụiTựĐộngởnhữngnơi
ẩmướt,nhữngnơicóthểbịẩmướt,hoặcnhững
nơicónhiệtđộvàđộẩmcao.Đồngthời,cũng
khôngthựchiệnhútnước.(Điềunàycóthểgây
điệngiật,đoảnmạch,cháy,biếndạnghoặchỏng
hóc.)
• KhôngsửdụngMáyHútBụiTựĐộngtạicácđịa
điểmmàkhoảngcáchtínhtừtườngđếnchỗkhác
biệtvềmứcđộkhoảngtừ1mtrởxuống.(Vìchẳng
maycókhiMáyHútBụiTựĐộngcóthểrơitrongkhi
lùilại.)
• KhôngsửdụngMáyHútBụiTựĐộngtrongcáckhu
vựccóvậtchắnmàMáyHútBụiTựĐộngkhông
thểleolênđượcđặtxungquanhtườnghoặccác
chướngngạivật.MáyHútBụiTựĐộngcóthểbịkẹt
vàovậtchắntrongkhidichuyểnngượclạiđểtránh
nhữngbứctườnghoặccácchướngngạivật.
• Ngắtkíchhoạttấtcảcáchệthốnganninhtạitrong
nhà,v.v...(MáyHútBụiTựĐộngcóthểbịpháthiện
nhầmlàmộtkẻxâmnhập.)
• MáyHútBụiTựĐộngkhôngthểtránhđượcnhững
chỗkhácbiệtvềmứcđộtừ5,5cmtrởxuống.
• NhiễusóngcóthểxuấthiệntrênmànHìnhTVtrong
khiđangvậnhành.(Đâykhôngphảidotivihỏng
hóc.)
• KhôngđểMáyHútBụiTựĐộngtrongthờigiandài
vớihộppinđãlắp.(Chấtđiệnphâncủapincóthểbị
ròrỉ.)
• KhôngđượcđểMáyHútBụiTựĐộnglộnngược
vớicáchộppinđượclắp.(Nútcóthểbịnhấn,dẫn
đếnvậnhànhkhônglườngtrướcđược.)
68 TIẾNG VIỆT
QUÁ TRÌNH VẬN HÀNH
MáyHútBụiTựĐộngchạyxungquanhsàntheochế
độhànhtrìnhđịnhsẵn,tránhchướngngạivậtbằng
cáchsửdụngcảmbiếnsiêuâm(HìnhP-1),vàbắtbụi,
bẩnvàcácmảnhvỡtrênđườngđibằngcáchsửdụng
bànchảicạnh,bànchảichính,vàquạthút.Tuynhiên,
cáccảmbiếncóthểkhôngpháthiệnrachướngngại
vậttrongmộtsốtìnhhuống.NếuMáyHútBụiTựĐộng
củabạnvaphảimộtchướngngạivật,thìđệmcủaMáy
HútBụiTựĐộng(HìnhP-2)sẽhấpthụtácđộngvàthay
đổihướngđi.
LƯUÝ:CóthểcótrườnghợpMáyHútBụiTựĐộng
khôngthểđiquanhữngràochắnởđộcaolênđến
1,5cm,mặcdùMáyHútBụiTựĐộngđượcthiếtkế
đểvượtquaràochắnnày.
LƯUÝ:MáyHútBụiTựĐộngcóthểtránhkhuvực
màcómàuđen,sànkiểuvângỗmàuđen,hoặckhu
vựclàmbằngthủytinh.
LƯUÝ:Saumộtchukỳlàmsạchđượchoànthành,
mộtsốbụivàchấtbẩncóthểvẫncòntrongđiềukiện
nhấtđịnh.
LƯUÝ:Giaotiếpkhôngdâycóthểbịgiánđoạnhoặc
bịnghẽntheocácđiềukiệnsauđây:
• Cấutrúcbêntrongđượcxâydựngbằngbêtông
cốtthéphoặcvậtliệuxâydựngbằngkimloại
• KhiMáyHútBụiTựĐộngởphíasauvậtcản
• Thiếtbịthôngtinvôtuyếngầnđósửdụngcùng
băngtầnsố
• Cácthiếtbịgầnđóphátrađiệntừtrường(lòvi
sóng,v.v...)hoặctĩnhđiện,hoặcdonhiễusóngvô
tuyếngâyra
Quá trình vận hành cơ bản
CHÚÝ:LuônđảmbảorằngMáyHútBụiTựĐộng
đãđượcTẮTtrướckhiđiềuchỉnhhoặckiểmtrabất
kỳchứcnăngtrênMáyHútBụiTựĐộng.
THÔNGBÁO:Nếuxảyrangưngtụsương,TẮTMáy
HútBụiTựĐộngvàchờđợichođếnkhiMáyHútBụi
TựĐộngkhô,trướckhivậnhànhkhởiđộnglại.
THÔNGBÁO:Tấtcảcácthiếtlậpkhôngđượcxóa
khiMáyHútBụiTựĐộngđượcTẮT.Hãyđảmbảo
xácnhậnrằngcácthiếtlậplàđúngbằngcácbóng
đèn(HìnhF-6,7,9,11)trênMáyHútBụiTựĐộngđể
ngănchặnvậnhànhkhôngmongmuốn.
1. Nhấnnút NGUỒN(HìnhF-8)trênMáyHútBụi
TựĐộng.
MáyHútBụiTựĐộngvàochếđộdựphòngvàđèn
chỉbáopin (HìnhF-5)sánglên.(Đểbiếtthêm
chitiết,vuilòngxem“ĐènchỉbáopintrênMáyHút
BụiTựĐộng”bêndưới.)
2. NhấnnútChếđộhànhtrình (HìnhF-7)trênMáy
HútBụiTựĐộnglặpđilặplạinhiềulầnđểchọn
chếđộ,hoặcnhấnnút hoặcnútChếđộhành
trình (HìnhG-4)trênđiềukhiểntừxa.
Đènởchếđộlựachọnsánglên.(Đểbiếtthêmchi
tiết,vuilòngxem“Chếđộhànhtrình”dướiđây.)
3. Nhấnnút NGUỒN(HìnhF-8)trênMáyHútBụi
TựĐộnghoặcnútKhởiđộng/Dừng (HìnhG-2)
trênđiềukhiểntừxađểbắtđầulàmsạch.
Đènbáo(HìnhF-1)nhấpnháyvàcòikêubípkhi
làmsạch.
Đểtạmdừngcáchoạtđộnglàmsạch,thựchiệnlại
bước3.
Đểtiếptụccáchoạtđộnglàmsạch,thựchiệnlại
bước3.
ĐểTẮTMáyHútBụiTựĐộng,nhấnvàgiữ
nút NGUỒN(HìnhF-8)trênMáyHútBụiTựĐộng
chođếnkhitấtcảcácđènchỉbáoTẮT,hoặcnhấn
nút TẮTNGUỒN(HìnhG-1)trênđiềukhiểntừxa.
CHÚÝ:Khôngnhìnsátgầnvàoánhsángđèn
báo,hoặctránhánhsángxavớimắtcủabạn.Làm
nhưvậycóthểgâyhạichomắtcủabạn.
Đèn chỉ báo pin trên Máy Hút Bụi Tự Động
Đènchỉbáopinnằmbênhộppintươngứngsánglên
vàchỉbáonguồnđiệncònlạicủahộppin.
THÔNGBÁO:Bảngdướiđâycungcấpchỉbáocủa
lượngpincònlại.Lượngpincònlạicóthểkhácnhau
tùythuộcvàođiềukiệnsửdụngvànhiệtđộphòng.
Từ50%trởlên
Từ20%đến50%
Từ20%trởxuống
Hếtpin/Khôngcóhộppinnào
đượclắp
Lỗipin
Đèn chỉ báo pin trên hộp pin
Cóthểkiểmtranguồnđiệncònlạicũngbằngcáchsử
dụngđènchỉbáopin(HìnhI-1)trênhộppinvớisốkiểu
kếtthúcbằngchữ“B.”
Tháohộppinvànhấnnút (HìnhI-2).
THÔNGBÁO:Bảngdướiđâycungcấpchỉbáocủa
lượngpincònlại.Lượngpincònlạicóthểkhácnhau
tùythuộcvàođiềukiệnsửdụngvànhiệtđộphòng.
Từ75%trởlên
Từ 50% đến 75% (bao gồm
cả50%)
Từ25%đến50%
Từ25%trởxuống
Hếtpin
Lỗipin
69 TIẾNG VIỆT
Chế độ hành trình
Chếđộkiểu
mẫu
Ứngdụng:
Sànlớncóítchướngngạivậtchẳnghạn
nhưmộtnhàkhođượcsắpxếpgọnvà
hành lang dài.
Môtả(HìnhH-1):
MáyHútBụiTựĐộnglặpđilặplạihành
trìnhtheochiềudọc(a)vàchiềungang
(b).*
Chếđộngẫu
nhiên
Ứngdụng:
Sàn với nhiều chướng ngại vật như ở
vănphòng.
Môtả(HìnhH-2):
MáyHútBụiTựĐộnglặpđilặplạimột
chukỳnảylên(c)vàcáchànhtrìnhdọc
theotường(d).
* Tùythuộcvàođiềukiệngặpphải,đườngđithựctế
củaMáyHútBụiTựĐộngcóthểkhácnhausovới
biểuđồnày.
LƯUÝ:MáyHútBụiTựĐộngkhôngthểlàmsạch
khuvựchẹpnơiMáyHútBụiTựĐộngkhôngthểdi
chuyểnhoặcnơinằmngoàiphạmvitầmvớicủabàn
chảicạnh.
LƯUÝ:Saukhichutrìnhlàmsạchkếtthúc,mộtsố
bụicóthểvẫncòntrênsànnhàtrongmộtsốđiều
kiện.
Chế độ nghỉ
NếuMáyHútBụiTựĐộngđượcđểởchếđộchờ5
phút,thìMáyHútBụiTựĐộngsẽtựđộngvàochếđộ
nghỉđểtiếtkiệmpin,vàđènbáo(HìnhF-1)nhấpnháy
chậm.MáyHútBụiTựĐộngcũngđivàochếđộnghỉ
khibộhẹngiờtựbậtđãđượckíchhoạt.
Đểtrởvềchếđộchờ,thựchiệnbước3trong“Quá
trìnhvậnhànhcơbản.”
THÔNGBÁO:Cácthayđổivềcáccàiđặtvàkhởi
độngvậnhànhlàmsạchkhôngkhảthitrongchếđộ
này.
Mang Máy Hút Bụi Tự Động
CHÚÝ:TrướckhivậnchuyểnMáyHútBụiTự
Động,hãyđảmbảoTẮTMáyHútBụiTựĐộng.
CHÚÝ:Cầnphảicẩnthậnđểtaycủabạnkhôngbị
kẹtgiữataycầmvàthâncủaMáyHútBụiTựĐộng.
Nắmchặttaycầm(HìnhJ-1).
THÔNGBÁO:NếubạnđỡphíasaucủaMáyHútBụi
TựĐộngbằngtaykhác,bạnphảicẩnthậnđểkhông
nângphíabênđóquánhiềulàmbụivàchấtbẩntrong
MáyHútBụiTựĐộngrơivàobànchảichínhđang
mở.
THÔNGBÁO:KhôngkéomạnhMáyHútBụiTự
Động.
Dọn sạch thùng
DọnsạchthùngsaumỗilầnsửdụngđểgiữchoMáy
HútBụiTựĐộngvậnhànhvớihiệusuấtcaonhất.
1. Bấmvàgiữnút NGUỒN(HìnhF-8)trênMáyHút
BụiTựĐộngchođếnkhitấtcảcácđènchỉbáolần
lượtTẮT,hoặcbấmnút TẮTNGUỒN(HìnhG-1)
trênđiềukhiểntừxađểTẮTMáyHútBụiTựĐộng.
2. Nhấnvàtháonắpphíatrên(HìnhK-1)đểmởkhóa,
vàsauđómởnắphoàntoàn.
3. Lấyhộpchứabụira(HìnhK-2).
4. Khôiphụccảhaiổkhóa(HìnhK-3),vàmởnắphộp
chứabụi.
5. Lấyhộpchứabụiravàdọnsạchthùngphíatrên
(HìnhK-4).
6. Dọnnhữngtảngbụinhỏkhỏibộlọc(HìnhK-5)và
dọnsạchthùngphíadưới(HìnhK-6).
7. ThaythếhộpchứabụitrongMáyHútBụiTựĐộng
theotrìnhtựđảongược.
Quá trình vận hành nâng cao
ChỉcóthểthiếtlậpcáctínhnăngsauđâykhiMáyHút
BụiTựĐộngđangởchếđộchờ(vuilòngxembước1
trong“Quátrìnhvậnhànhcơbản”).
Tiết kiệm điện
MáyHútBụiTựĐộngcóthểlấyđihầuhếtbụidễthấy
bằngmắtmàkhôngsửdụngquạthút.Nếukhôngcần
loạibỏbụimịn,TẮTquạthútsẽtiếtkiệmđiệnđểkéo
dàithờigianvậnhànhcủaMáyHútBụiTựĐộng.
Trongchếđộchờ,nhấnnút HúttrênMáyHútBụiTự
Động(HìnhF-10)hoặctrênđiềukhiểntừxa(HìnhG-7)
đểTẮTđènHút(HìnhF-10).
ĐểBẬTquạthút,nhấnnút HúttrênMáyHútBụiTự
Động(HìnhF-10)hoặctrênđiềukhiểntừxa(HìnhG-7).
Đènsánglênmộtlầnnữa.
THÔNGBÁO:Thiếtlậpnàylàkhôngthểtrongchế
độtạmnghỉvớiđồnghồbấmgiờtựđộngđượckích
hoạt.
THÔNGBÁO:Trongtrườnghợpquạthútđược
TẮT, đènbảodưỡngbộlọc(HìnhF-3)không
sángngaycảkhibộlọcđầybụibẩn.
Điều chỉnh âm lượng còi
Cóthểlựachọnbamứcâmlượngcòibaogồmchếđộ
câm.
Trongchếđộchờ,nhấnlặpđilặplạinút Còitrên
MáyHútBụiTựĐộng(HìnhF-9)hoặctrênđiềukhiển
từxa(HìnhG-6).Mỗilầnbạnnhấnnút,còisẽkêubíp
theotrìnhtựsau:ởâmlượngcao(đènsánglên),ởâm
lượngthấp(đènsánglên),vàkhôngcóâmthanh(đèn
sẽtắt).
THÔNGBÁO:Thiếtlậpnàylàkhôngthểtrongchế
độtạmnghỉvớiđồnghồbấmgiờtựđộngđượckích
hoạt.
Định vị Máy Hút Bụi Tự Động
TínhnăngnàyrấthữuíchchoviệcđịnhvịMáyHútBụi
TựĐộngmàcóthểkhuấttầmnhìntrênmộtsànlớnvới
bàn,tủ,vànhữngthiếtbịkhác.
Nhấnnút Đènhiệuvịtrítrênđiềukhiểntừxa(Hình
G-3)trongkhiMáyHútBụiTựĐộngđangởchếđộchờ
hoặcchếđộnghỉ.Còikêubíptrongkhoảng10giâyvà
đènbáonhấpnháy.
Đểngăncòivànhấpnháy,nhấnnút Đènhiệuvịtrí
mộtlầnnữa.
70 TIẾNG VIỆT
LƯUÝ:CóthểcótrườnghợpkhiMáyHútBụiTự
ĐộngkhôngphảnhồivìMáyHútBụiTựĐộngnằm
ngoàiphạmviđiềukhiểntừxa.Vấnđềcóthểđược
giảiquyếtbằngcáchnhấnnút Đènhiệuvịtrítrong
khibạnđangdichuyểnxungquanhsànnhà.
Sử dụng các bộ hẹn giờ tự bật
TínhnăngnàychophépMáyHútBụiTựĐộngbắtđầu
làmsạchtựđộngsauthờigianquyđịnh.
Saukhixóathiếtlậpmộtkhiviệclàmsạchhẹngiờtự
độngđượchoànthành,thìthựchiệncácthủtụcsau
đâyđểkíchhoạtlạibộhẹngiờtựđộng.
1. Trongchếđộchờ,nhấnlặpđilặplạinút Hẹngiờ
trênMáyHútBụiTựĐộng(HìnhF-6)hoặctrênđiều
khiểntừxa(HìnhG-5).Mỗilầnbạnnhấnnút,thiết
lậpsẽthayđổitheotrìnhtựsau:
Tình trạng đèn Bắt đầu làm sạch
sau1giờ.
sau3giờ.
sau5giờ.
Hẹngiờtựbậtđượcgỡbỏ.
2. Nhấnnút NGUỒN(HìnhF-8)trênMáyHútBụi
TựĐộngđểkíchhoạtbộhẹngiờtựbật.MáyHút
BụiTựĐộngvàochếđộnghỉ.
Đểxóabộđếmthờigianởchếđộchờ,nhấnvà
giữnút NGUỒN(HìnhF-8)trênMáyHútBụiTự
Độngchođếnkhitấtcảđènchỉbáotắt,hoặcnhấn
nút TẮTNGUỒN(HìnhG-1)trênđiềukhiểntừxa.
THÔNGBÁO:Nếutrạngtháicủacảhaichỉbáopin
bênphảivàbêntráilà hoặc ,đồnghồbấm
giờtựđộngcóthểkhôngđượckíchhoạtvàlàmsạch
cóthểkhôngtựđộngkhởiđộng.
THÔNGBÁO:Cácthayđổivềcáccàiđặtvàkhởi
độngvậnhànhlàmsạchkhôngkhảthitrongchếđộ
này
THÔNGBÁO:Càiđặtbộđếmgiờtựđộngsẽbịxóa
nếupinhếthoàntoàn.
Hạn chế Máy Hút Bụi Tự Động vào một khu
vực riêng
Băngchắnranhgiới(HìnhL-1)vàtínhnăngcảmbiến
ranhgiớisửdụngbộcảmbiếnhồngngoại,chophép
MáyHútBụiTựĐộngtránhcáckhuvựcsauđây(Hình
L-2):
• Mộtkhuvựcđượcchiathànhnhiềuphầnbởivìtoàn
bộsànlàquálớnđếnnỗiMáyHútBụiTựĐộng
khôngthểlàmsạchsàntạimộtthờiđiểm
• Mộtkhuvựcmànhữngđồdễvỡxuấthiệnlànơimà
MáyHútBụiTựĐộngcóthểlàmhỏng
• Khuvựccónhiềuhànghóavàđồđạc,ràochắn
hoặcvậtcóHìnhdạngphứctạpsẽlàmMáyHútBụi
TựĐộngbịkẹt
• Khuvựclâncậngầncầuthang
• KhuvựccóràochắnthấpmàMáyHútBụiTựĐộng
cóthểđiquavàrơixuốngtầngthấphơn,hoặcMáy
HútBụiTựĐộngsẽbịmắckẹt
Chuẩn bị
1. Chọnbềmặtphẳng,nhẵn,trênsànnhà,nơibạn
sẽđặtbăngchắnranhgiới,vàsauđólàmsạchbề
mặt.
2. Đặtbăngchắnranhgiớisaochophíabênthanh
ngắnlàtiếpxúcvớikhuvựclàmsạchvàkhôngcó
bọtkhôngkhígiữabăngchắnvàsànnhà.
THÔNGBÁO:Hãyđảmbảochỉsửdụngbăngchắn
ranhgiớichínhhãng.Sửdụngbăngchắnkhácngoài
hàngchínhhãngcóthểcónguycơlàmhưhỏngtính
năngcảmbiếnranhgiới.
THÔNGBÁO:Khôngđặtbăngchắnranhgiớitrên
cácbềmặtkhôngbằngphẳngvìcóthểgâyraphát
hiệncósaisóthoặctrênbềmặtnơibăngchắncóthể
bịbẩnhoặcbịhưhỏng.
THÔNGBÁO:Nênbiếtrằngmộtsốchấtdínhcóthể
vẫncòntrênsànnhà,hoặcsànnhàcóthểbịhỏng
khibạntháobăngchắnranhgiới.
THÔNGBÁO:Giữcácbăngchắnranhgiớisạchsẽ
vàkiểmtranếucóbấtkỳvịtrínàobịxéhoặcbịrách.
Nếubăngchắnbịhỏng,thaythếnó.
CẢNHBÁO:Khôngđặtbăngchắnranhgiớitrong
khuvựcnơixảyratainạndoMáyHútBụiTựĐộngdi
chuyểnvàokhuvựcnàyhoặcMáyHútBụiTựĐộng
rơixuốngtừkhuvựcnày.Trongtrườnghợpnhư
vậy,đặtcácđồvậtcóchiềucaolà15cmtrởlênvà
đủnặngđểchịuđượctácđộngcủaMáyHútBụiTự
Độngởvịtrícủacácbăngchắnranhgiới.
Vận hành
Khiởchếđộchờ,nhấnnút Cảmbiếnranhgiới(Hình
F-11)trênMáyHútBụiTựĐộngđểkíchhoạtcảmbiến
ranhgiới(HìnhO-2).
Đèn(HìnhF-11)sánglên.
Đểtắtcảmbiếnranhgiới,nhấnnút Cảmbiếnranh
giớimộtlầnnữa.
THÔNGBÁO:Thiếtlậpnàylàkhôngthểtrongchế
độtạmnghỉvớiđồnghồbấmgiờtựđộngđượckích
hoạt.
BẢO TRÌ
CHÚÝ:Luônđảmbảorằngcảhaihộppinđược
tháoratrướckhithựchiệnkiểmtrahoặcbảodưỡng.
THÔNGBÁO:Hãyđảmbảolấyhộpchứabụira
trướckhiquayMáyHútBụiTựĐộngđểngănchặn
bụivàchấtbẩnrơirakhỏibànchảichính.
THÔNGBÁO:Hãyđảmbảotrảitấmthảmhoặcvật
liệuđệmkháctrênsànnhàđểtránhhưhỏngsànnhà
vàMáyHútBụiTựĐộng(HìnhB).
THÔNGBÁO:Khôngsửdụngnướcnóng(caohơn
40°C),xăng,étxăng,dungmôi,rượuhoặccácloại
tươngtự.Cóthểdẫnđếnđổimàu,biếndạng,hoặc
cácvếtnứt.
ĐểbảodưỡngsảnphẩmANTOÀNvàĐÁNGTINCẬY,
việcsửachữa,bảodưỡngbấtkỳkhác,hoặcđiềuchỉnh
phảiđượcthựchiệnbởiMakitaỦyquyềnhoặcTrung
tâmDịchvụNhàmáy,luônluônsửdụngcácbộphận
thaythếcủaMakita.
71 TIẾNG VIỆT
Làm sạch bàn chải mặt bên
(Hình A, M-1)
• Sợichỉvàsợitócvướngvàolôngbànchảicạnh
cóthểlàmbànchảidừngquay.Gỡbỏchúngbằng
cáchsửdụngnhíphoặccácdụngcụtươngtự.
• Nếulôngbànchảibịbiếndạnghoặcmất,thaythế
bằngbànchảidựphòng(xem“Lắpbànchảicạnh”
đểbiếtchitiết).
Làm sạch các bánh xe
• Gỡbỏsợichỉvàsợitócrakhỏibánhxedẫnđộng
(HìnhM-2)bằngcáchsửdụngcácdụngcụnhư
nhípvàkéo.Quaybánhxeđểdễdànglàmsạch.
• Gỡbỏsợichỉvàsợitócrakhỏibánhxexoay(Hình
M-3)bằngcáchsửdụngnhíp,kéohoặccácdụng
cụtươngtự.
THÔNGBÁO:Cầnphảicẩnthậnđểtaycủabạn
khôngbịkẹtgiữacácbánhxevàthâncủaMáyHút
BụiTựĐộng.
Làm sạch bàn chải chính
Tháobànchảicạnh(xem“Lắpbànchảicạnh”đểbiết
chitiết)đểthựchiệncôngviệcsau.
1. Tháobốnốcvít(HìnhN-1),vàsauđótháotấmđáy
(HìnhN-2)vàbànchảichính(HìnhN-3).
2. Lausạchtấmđáy(HìnhN-2)bằngmộtmiếngvải
ẩmvớichấttẩyrửanhẹhoặcrửatấmđáytrong
nướcnếucầnthiết.
3. Gỡbỏsợichỉvàsợitócrakhỏibanchảichính
(HìnhN-3)bằngnhípvàrửabànchảichínhtrong
nướcnếucầnthiết.
4. Lausạchbêntronglỗthônggióchânkhông(Hình
N-4)bằngmộtmiếngvảiẩmvớichấttẩyrửanhẹ.
5. Đểthaythếbànchảichính,cănchỉnhphầnnhôra
(HìnhN-5)trênđầubênphảicủabànchảichính
khớpvớiphầnlõmvàotrênbànchảidẹpbênphải
(HìnhN-6),vàsauđógắnbànchảichínhvàocùng
vớinhau.
6. Gắnđầuvuôngbêntráicủabànchảichính(Hình
N-7)bànchảidẹpvuôngbêntrái(HìnhN-8).
7. Thaythếtấmđáytheotrìnhtựđảongược.
LƯUÝ:KhibànchảicạnhvẫngắnvớithâncủaMáy
HútBụiTựĐộng,dùngtayxoaybànchảicạnhđể
dễdànggắntấmđáymàkhôngđèlênlôngbànchải
cạnhgiữacáctấmvàthâncủaMáyHútBụiTựĐộng.
Làm sạch cảm biến
• Làmsạchcảmbiếnmặtdựng(HìnhO-1)vàcác
cảmbiếnranhgiới(HìnhO-2)bằngmiếngbông
khô.
• Làmsạchcảmbiếnsiêuâm(HìnhP-1)bằngcách
sửdụngmáyhútbụithiếtlậpởchếđộhútnhẹ.
Tổngcộngcó8cảmbiếnđượcđặtởmặttrướcvà
haibêncủabộgiảmchấn(HìnhP-2).
Làm sạch bộ lọc và hộp chứa bụi
THÔNGBÁO:Đểtránhlàmhưhỏngnắphộpchứa
bụiphíatrên,khôngmởhoặcđóngbằnglựcmạnh.
1. Mờhaikhóa(HìnhQ-1)vànhấchộpchứabụiphía
trênkhinắm taycầmbảodưỡngbộlọc(Hình
Q-2)đểmởngănbộlọc.
2. Lấybộlọc(HìnhQ-3)ravàđậpnhẹvàotúiráchoặc
trênmộttờgiấybỏđiđểphủibụivàchấtbẩn.
THÔNGBÁO:Khôngđượclauchùihoặccọrửabộ
lọc,cũngkhôngsửdụngvậtnhọnđểlàmsạchbộlọc.
3. RửabộlọcnếucôngsuấthútcủaMáyHútBụiTự
Độngtrởnênyếu.
THÔNGBÁO:Nếubộlọccómùi,ngâmbộlọctrong
thuốctẩygiadụngphaloãng(10mlthuốctẩycho
mỗi1lítnước)khoảng3giờtrướckhirửabộlọc
dướidòngnướcchảy.
4. Rửahộpchứabụi.
5. Phơikhôbộlọc(nếubạnđãrửasạch)vàhộpchứa
bụi1ngàyởnơithôngthoángđểtránhmùikhóchịu
hoặctrụctrặc.
THÔNGBÁO:Khônglàmkhôbộlọcướtbằngcách
sửdụngmáysấytóchoặccácnguồnnhiệtkhác.
6. Thaythếbộlọctronghộpchứabụitheotrìnhtựđảo
ngược.
THÔNGBÁO:Khibạnthaythếcácbộlọctrongngăn,
hãyđảmbảorằngcácmấu(HìnhQ-4)trênbộlọc
đượclắpvàođểchặncạnhcủagiábộlọc(HìnhQ-5).
Làm sạch thân máy
1. LausạchbênngoàiMáyHútBụiTựĐộngbằngmột
miếngvảihơiẩmvớichấttẩyrửanhẹ.
2. Nhấnvàthảnắpđầu(HìnhK-1),sauđómởnắp
hoàn toàn.
3. Lấyhộpchứabụira(HìnhK-2).
4. LausạchbêntrongMáyHútBụiTựĐộng(Hình
R-1)baogồmlỗthônghơi(HìnhR-2)bằngmột
miếngvảiẩmvớichấttẩyrửanhẹ.
KHÔI PHỤC MÁY HÚT BỤI
TỰ ĐỘNG
KhiMáyHútBụiTựĐộngkhôngthểtiếptụcvậnhành
trongđiềukiệnnhưbánhxedẫnđộngbịrơirahoặc
nguồnpinbịthoátrangoài,MáyHútBụiTựĐộngsẽ
dừnglàmsạchvàchỉbáochobạnbiếtcótrụctrặcbằng
đènvàcòisauđây.
• Đènxửlýsựcố(HìnhF-2)
• Đènbảodưỡngbộlọc(HìnhF-3)
• Đènbảodưỡngbànchải(HìnhF-4)
• Đènhẹngiờ(HìnhF-6)
• Đèncòibáo(HìnhF-9)
• Đènchânkhông(HìnhF-10)
• Đèncảmbiếnranhgiới(HìnhF-11)
1. Nhậnbiếtvấnđềbằngcáchsửdụngbảngsauđây.
2. Giảiquyếtvấnđề.
3. Nhấnnút NGUỒN(HìnhF-8)trênMáyHútBụi
TựĐộnghoặc nútKhởiđộng/Dừng(HìnhG-2)
trênđiềukhiểntừxađểchuyểnsangchếđộchờdự
phòng.
DấuhiệubáolỗidừngvàMáyHútBụiTựĐộngsẵn
sànglàmsạch.

72 TIẾNG VIỆT
THÔNGBÁO:Nếuxảyralỗimộtlầnnữa,hãyTẮTvà
BẬTMáyHútBụiTựĐộng.
THÔNGBÁO:Nếuvấnđềvẫncònsaukhiđãhoàn
thànhhoạtđộngsửachữa,hãyliênhệTrungtâm
DịchvụMakitagầnnhất.
Chỉ thị Nguyên nhân/Cách khắc phục
Đèn nhấp
nháymộtlần,hai
lần,hoặc6lầncho
mỗitrìnhtự
• Bánhtruyềnđộngrơixuống.
• MáyHútBụiTựĐộngbịkẹtvàorào
chắn.
• MáyHútBụiTựĐộngtiếpxúcvớiánh
sángmặttrờitrựctiếp.
• MáyHútBụiTựĐộngđãdừnglạitrên
mộtsànmàuđen.
DichuyểnMáyHútBụiTựĐộngra
khỏikhuvực.
Nếuxảyralỗimộtlầnnữa,làmsạch
cảmbiếnmặtdựng(HìnhO-1).
Đèn nhấp
nháy3lầnchomỗi
trìnhtự
• Đãpháthiệnlỗitrongcảmbiếnbộ
giảmchấn.
Đẩybộgiảmchấn(HìnhP-2)10lần.
Đèn nhấp
nháy4lầnchomỗi
trìnhtự
• Sợichỉvàsợitócbịvướngvàobánh
xedẫnđộng.
Gỡbỏchúngrakhỏibánhxedẫn
động(HìnhM-2).
• MáyHútBụiTựĐộngđiquakhuvực
giớihạnnơimặttrêncủamáybịđẩy
xuống.
Đâykhôngphảibịtrụctrặc.
Đèn nhấp
nháy5hoặc7lần
chomỗitrìnhtự
• MáyHútBụiTựĐộngbịquánhiệt.
TẮTMáyHútBụiTựĐộng,tháo(các)
hộppin,vàchờmộtgiờ.SửdụngMáy
HútBụiTựĐộngchỉởnhiệtđộphòng
khôngquá40°C.
Đèn và
nhấpnháymộtlần
chomỗitrìnhtự
• Hộpchứabụihoặcbộlọcchưađược
lắpđặt.
Lắpđặthộpchứabụivàbộlọc.
Đèn vàtất
cả nhấpnháy
mộtlầnchomỗi
trìnhtự
• Pinsạccònlạikhôngđủ
(hoặc )đểkhởiđộnglàm
sạch.
Sạcđầyhộppin.
Đèn và sáng
lên
• Sợichỉvàsợitócbịvướngtrongbánh
xedẫnđộng.
Gỡbỏchúngrakhỏibánhxedẫn
động(HìnhM-2).
• MáyHútBụiTựĐộngđiquakhuvực
giớihạnnơimặttrêncủamáybịđẩy
xuống.
Đâykhôngphảibịtrụctrặc.
Đèn và sáng
lên
• Đãpháthiệnlỗitrongcảmbiến.
TẮTvàsauđóBẬTMáyHútBụiTự
Động.
Đèn và sáng
lên
• PháthiệnlỗitrongMáyHútBụiTự
Động.
TẮTvàsauđóBẬTMáyHútBụiTự
Động.
Đèn nhấp
nháymộtlầncho
mỗitrìnhtự
• Sợichỉvàsợitócvướngvàobànchải
cạnhvàbànchảichính.
Gỡbỏchúngrakhỏicácbànchải
(HìnhA,N-3).
Đèn sánglên
• Hộpchứabụiđầybụivàchấtbẩn
hoặcbộlọcbịtắc.
Đổhếthộpchứbụi(HìnhK-2)vàlàm
sạchbộlọc(HìnhK-5).
XỬ LÝ SỰ CỐ
LƯUÝ:Nếuvấnđềvẫncònsaukhithựchiệnhoạt
độngsửachữa,hãyliênhệTrungtâmDịchvụMakita
gầnnhất.
Dấu hiệu Nguyên nhân/Cách khắc phục
Cácđènkhông
sánglênkhibạn
nhấnnút .
MáyHútBụiTự
Độngkhônghoạt
độngkhibạnnhấn
núttrênMáyHút
BụiTựĐộnghoặc
điềukhiểntừxa.
Lắpđặthộppinđúngcách.
Sạcđầyhộppin.
Nhấnnút đểBẬTMáyHútBụiTự
Động.
MáyHútBụiTự
Độngkhônghoạt
động.
Nếu đènxửlýsựcố, đèn
bảodưỡngbộlọc,hoặc đènbảo
dưỡngbànchảisánglênhoặcnhấp
nháy,xem“KHÔIPHỤCMÁYHÚT
BỤITỰĐỘNG”đểgiảiquyếtvấnđề.
Nếuđènbáonhấpnháychậm,nhấn
vàgiữnút NGUỒNtrênMáyHút
BụiTựĐộngchođếnkhitấtcảcácchỉ
báođềutắt,hoặcnhấnnút TẮT
NGUỒNtrênđiềukhiểntừxađểxóa
bộđếmthờigian.
MáyHútBụiTự
Độngbắtđầuvận
hànhtựđộng.
• Đồnghồhẹngiờbậttựđộngđược
kíchhoạt.
MáyHútBụiTự
Độngngưngvận
hành trong khi
đanglàmviệc.
TẮTMáyHútBụiTựĐộng,vàsauđó
tháocácsợidây,dâybện,v.v...rakhỏi
bánhxedẫnđộng.
NếuMáyHútBụiTựĐộngbịkẹtvào
ràochắnhoặcvậtcảnkhác,dichuyển
MáyHútBụiTựĐộngđếnvịtríkhác.
Tốcđộhànhtrình
khôngổnđịnh.
• Nếupháthiệncóvậtcản,MáyHútBụi
TựĐộngsẽchậmlạikhicầnthờigian
đểtínhtoánhướngdichuyển.Đây
khôngphảisựcốcủaMáyHútBụiTự
Động.
MáyHútBụiTự
Độngkhôngđi
thẳngvềphía
trước.
TẮTMáyHútBụiTựĐộng,vàsauđó
tháocácvậtthểlạbấtkỳrakhỏibánh
xedẫnđộng.
Làmsạchcảmbiếnsiêuâm.
MáyHútBụiTự
Độngvachạmvào
vậtcảnthường
xuyênhơnsovới
trướcđây.
Làmsạchcảmbiếnsiêuâm.
MáyHútBụiTự
Độngrơixuống
cầuthanghoặc
xuốngtầngthấp
hơn.
Làmsạchcảmbiếnmặtdựng.
• MáyHútBụiTựĐộngkhôngthểtránh
khỏichênhlệchởmứcđộ5,5cm
hoặcíthơn.Đâykhôngphảisựcố
củaMáyHútBụiTựĐộng.
Âmthanhvận
hànhlớnhơnbình
thường.
Đổsạchhộpchứabụivàlàmsạchbộ
lọc,bànchảicạnh,vàbànchảichính.
Côngsuấthút
khôngđủmạnh
đểhútbụivàchất
bẩn.
Đổsạchhộpchứabụivàbộlọc.
Nhấnnút HúttrênMáyHútBụiTự
Độnghoặctrênđiềukhiểntừxađể
BẬTquạthút.
Bànchảicạnhbị
rơira.
Lápđặtbànchảicạnhđúngcách
(HìnhA).
Bànchảicạnh
khôngxoayhoặc
xoay khó.
Làmsạchbànchảicạnhvàbànchải
chính.
Lắpđặtbànchảicạnhvàcáctấm
đúngcách(HìnhN).
Khíxảcómùi. Đổsạchhộpchứabụivàbộlọc.

73 TIẾNG VIỆT
Điềukhiểntừxa
khônghoạtđộng.
Lắpđặtpinđiềukhiểntừxađúng
cách(HìnhE).
Thaythếpinbằngpinmới.
Nhấnnút NGUỒNtrênMáyHút
BụiTựĐộngđểBẬTmáy.
DichuyểngầnvớiMáyHútBụiTự
ĐộnghoặcgỡbỏvậtcảngiữaMáy
HútBụiTựĐộngvàđiềukhiểntừxa.
NgưngsửdụngMáyHútBụiTựĐộng
gầnhoặcdichuyểnmáyrakhỏithiết
bịcósửdụngtầnsốvôtuyếntrong
dảitầnsố2,4GHz(lòvisóng,các
thiếtbịBluetooth,cácthiếtbịWi-Fi,
v.v...).
TẮTvàsauđóBẬTMáyHútBụiTự
Động.
Đồnghồhẹngiờ
tựđộngkhông
hoạtđộng.
Sửdụnghộppinđượcsạcđầy.
Kíchhoạtđồnghồhẹngiờbậttự
động.
CÁC PHỤ KIỆN TÙY
CHỌN
CHÚÝ:Nhữngphụkiệnhoặcphụtùngđược
khuyếnnghịsửdụngvớidụngcụMakitacủabạn
đượcquyđịnhtronghướngdẫnnày.Việcsửdụng
cácphụkiệnhoặcphụtùngkháccóthểdẫnđếnnguy
cơthươngtíchchoconngười.Chỉsửdụngcácphụ
kiệnhoặcphụtùngvớimụcđíchđãđượctrìnhbày.
• Băngchắnranhgiới
• Bànchảicạnh
• Bànchảichính
• Tấmđáy
• Bộlọc
• PinvàbộsạcchínhhãngMakita
LƯUÝ:Mộtsốmặthàngtrongdanhsáchcóthểbao
gồmtronggóidụngcụnhưcácphụkiệntiêuchuẩn.
Chúngcóthểkhácnhauởcácquốcgia.
THÔNG TIN THAM KHẢO
TổngcôngtyMakitavàcáccôngtycon,chinhánh,và
nhàphânphốicóthểsửdụngThôngtinCáchsửdụng
vớimụcđíchdịchvụsaubánhàngdịchvụnhưbảo
dưỡngvàsửachữa.ThôngtinCáchsửdụngbaogồm
sốlượngvậnhành,tảitrọngphânphối,thôngtinlỗi,
tìnhtrạnghoạtđộng,và/hoặchồsơbảodưỡngcủacác
dụngcụđiện.
74 ภาษาไทย
BL1815N, BL1820B, BL1830B,
BL1840B, BL1850B, BL1860B
75 ภาษาไทย
76 ภาษาไทย
1.
2.
3.
4.
1.
2.
3.
4.
5.
6.
8.
9.
10.
1.
2.
3.
4.
77 ภาษาไทย
2.
3.
4.
5.
6.
8.
9.
10.
11.
1.
2.
3.
4.
5.
6.

78 ภาษาไทย

79 ภาษาไทย
80 ภาษาไทย

81 ภาษาไทย
•
•
82 ภาษาไทย
•
•
•
•
•
(
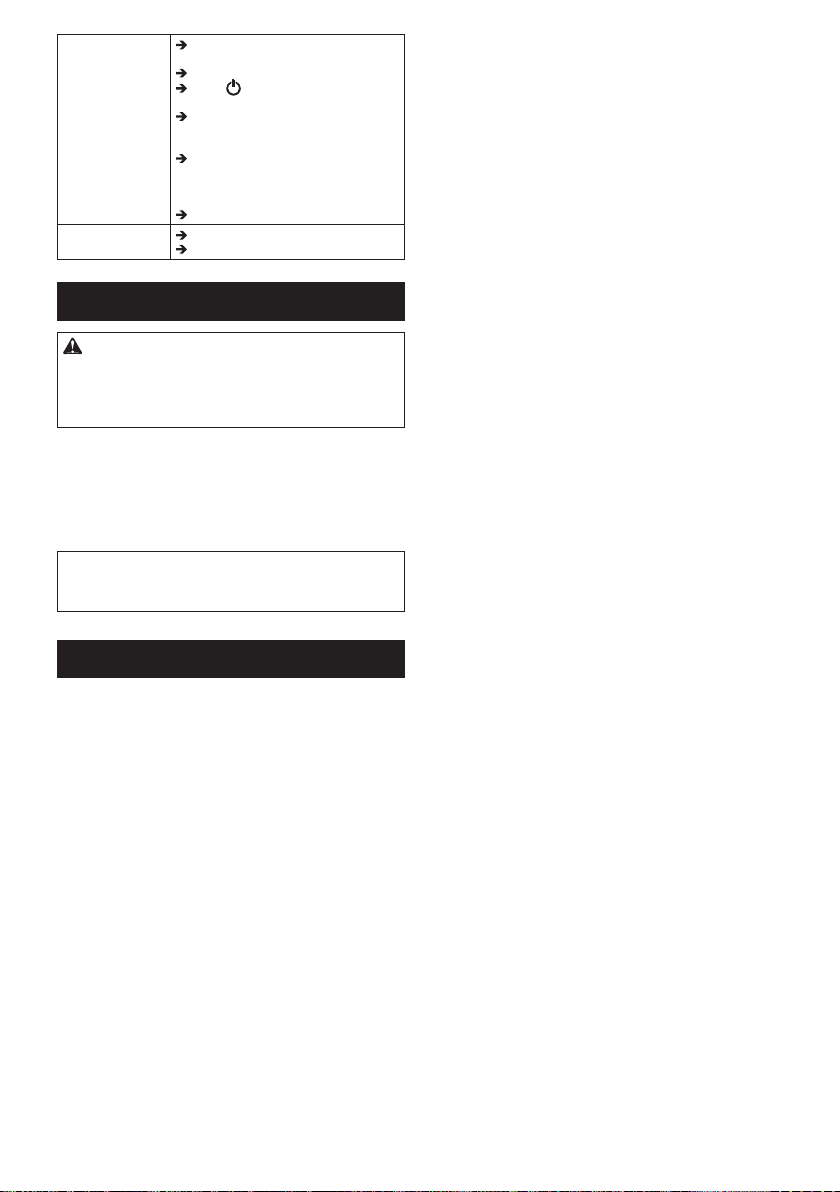
83 ภาษาไทย

DRC200-ASIA7L-1809
Makita Corporation
3-11-8, Sumiyoshi-cho,
Anjo, Aichi 446-8502 Japan
www.makita.com
Printed in Thailand
TINSJA599VBRZ16K− TH 1
IDE