Loading ...
Loading ...
Loading ...
USING THE BORDER EDGER ATTACHMENT
Your MANTIS Tiller has been
designed and built to accept a -,vide
range of MANTIS Tiller Attachments to
increase its usehalness in your lawn and
garden. And, all MANTIS Tiller Attach-
rrtents have been designed/br quick and
easy attachment to the Tiller or Engine.
The Border Edger
(Item #3222)
The most popular attachment, the
Border Edger can be used to create
clean, neat edges along walkways, or
around trees, shrubs, and garden beds.
The Border Edger has two parts: a
Wheel and a hardened steel blade, with
pointed tines.
How to Install the
Border Edger
The foliowing instructions refer to
'right" and ' left" axles. Assume that
you're standing behind your Tillec as
you would for tilling and cultivating.
Some areas of your yard may harbor
roots and other underground
obstructions. In places like this you'll
want to edge your borders shallowly
(1" to 2" deep). Here's how to install
the Border Edger tor shallow edging:
I. First remove your tilling,,'
cultivating tines.
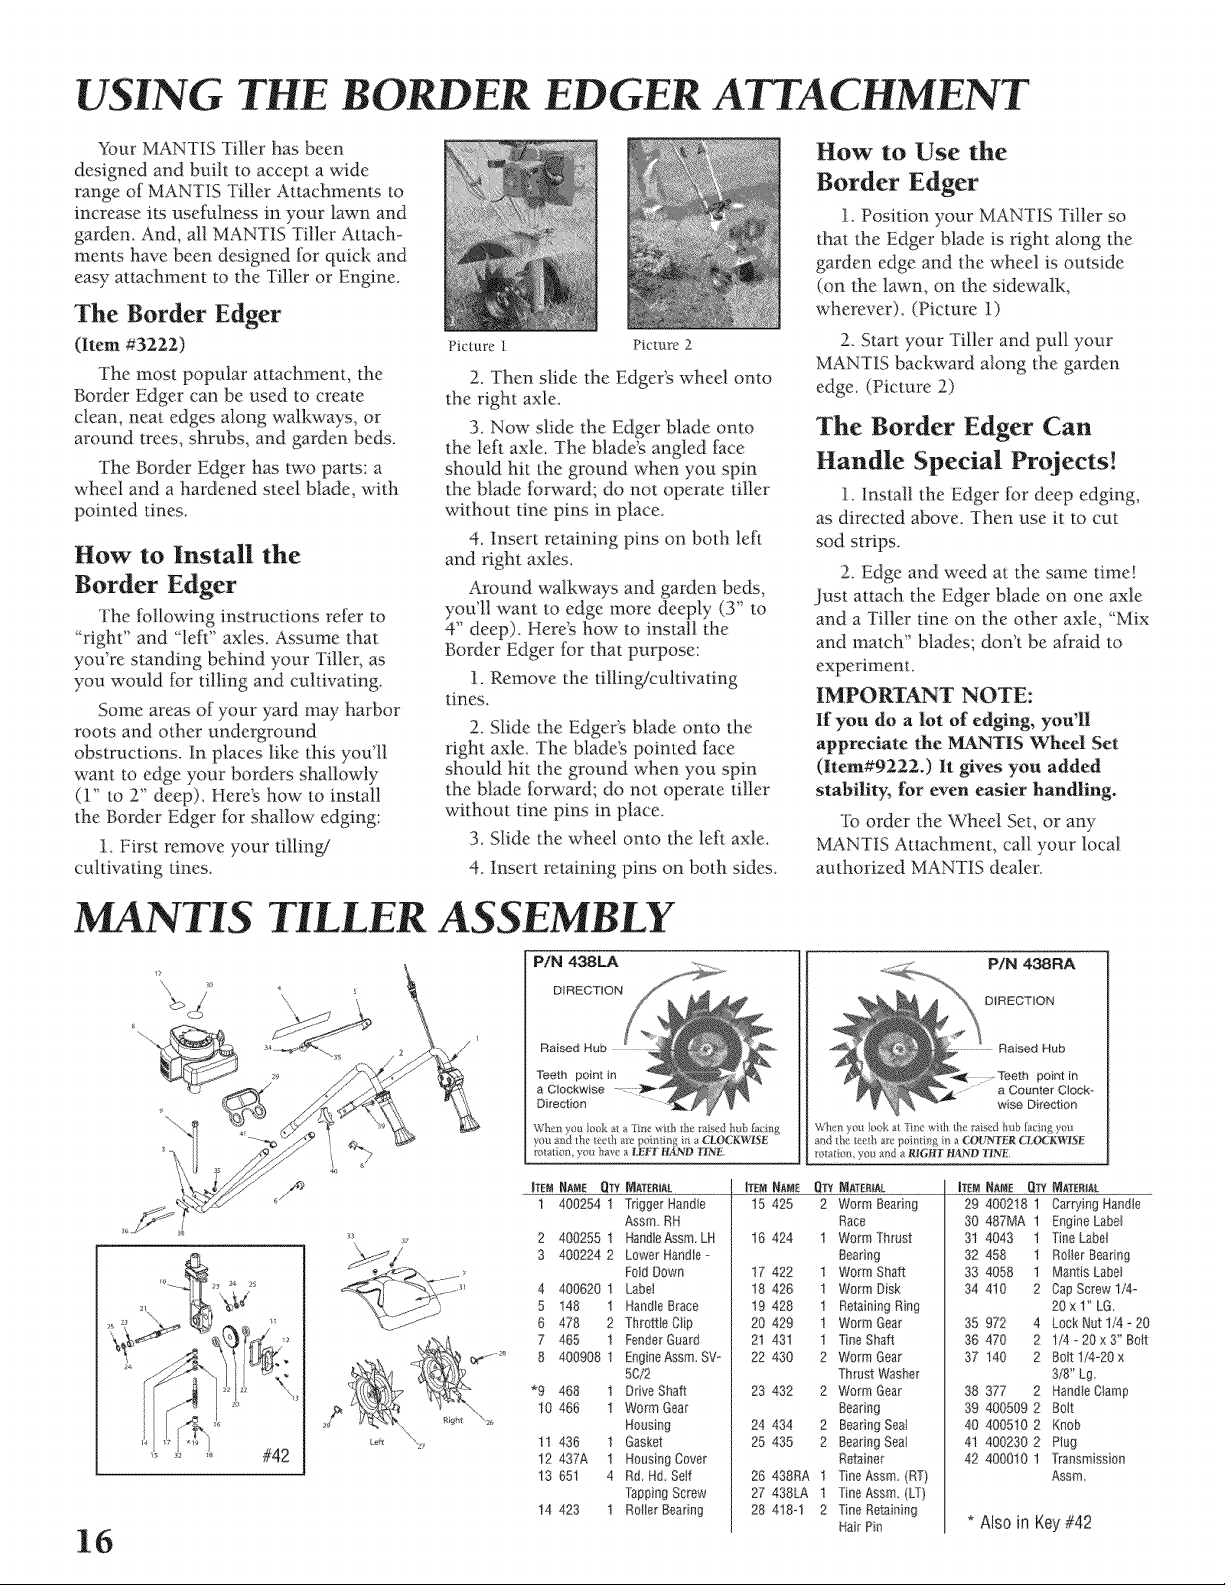
Picture 1 Picture 2
2. Then slide the Edgerg wheel onto
the right axle,
3. Now slide the Edger blade onto
the left axle. The blade's angled face
should bit the ground when you spin
the blade forward; do not operate tiller
without tine pins in place
4. Insert retaining pins on both le[t
and right axles.
Around walkways and garden beds,
you'll want to edge more deeply (3" to
4" deep). Here_ how to install the
Border Edger for that purpose:
1. Remove the tilling/cultivating
tines.
2 Slide the Edger_ blade onto the
right axle The bladeE pointed face
should hit the ground when you spin
the blade forward; do not operate tiller
without tine pins in place
3 Slide the wheel onto the left axle.
4. Insert retaining pins on both sides.
How to Use the
Border E@r
i. Position your MANTIS Tiller so
that the Edger blade is right along (he
garden edge and the wheel is outside
(on the lawn, on the sidewalk,
wherever). (Picture I)
2. Start your Tiller and pull your
MANTIS backward along the garden
edge. (Picture 2)
The Border Edger Can
Handle Special Projects!
1. Install the Edger lor deep edging,
as directed above. Then use it to cut
sod strips.
2. Edge and weed at the same time!
Just attach the Edger blade on one axle
and a Tiller fine on the other axle, "Mix
and match" blades; don't be afraid to
experiment.
IMPORTANT NOTE:
If you do a lot of edging, you'll
appredate the Mk_NTIS Wheel Set
(Ire:m#9222.) It gives you added
stability, for even easier handling.
_lborder the Wheel Set or any
MANTIS Attachment, call your local
authorized MANTIS dealen
MANTIS TILLER ASSEMBLY
16
P/N 438LA
DIRECTION
Raised Hub
Teeth point in
a Clockwise
Direction
When _o_1 look a a [me wiIh the aised tmb [amg
P/N 438RA
D_RECTION
Hub
point in
.... a Counter C!ock_
wee Direction
When yo_ i_ok at "Ine ,vdl de raised hub facing you
a_d the _eeth are poi_Im_g in a (OUNIER Cn)CKW1S[:
_n_adm, ym_ a_ad a RIG[IT ;CIANI}MINE
|TEI_NAME _q.TYNAT_81AL ITIENNAME QTY
1 400254 1 Trigger Handle !5 425 2
Assm, RH
2 400255 I HandleAssm, LH
3 400224 2 Lower Handle -
Foid Down
4 400620 1 Label
5 148 1 Handle Brace
6 478 2 TbrotBe Ciip
7 465 1 Fender Guard
8 400908 ! EngineAssm, SVo
5C/2
*9 468 1 Drive Shaft
10 466 ! Worm Gear
Ho_sing
Gasket
Housing Cover
Rd Hd, Se#
Tapping Screw
Roller Bearing
11 436 1
12 437A 1
13 651 4
14 423 1
16 424
17 422
18 426
19 428
20 429
2! 431
22 430
23 432
MATernAL
Worm Bearing
Race
ITeMNA_E Q_ NATEmA[
29 400218 1 Carrying Handle
30 487MA 1 Engine Label
31 4043 1 Tine Label
32 458 1 Relier Bearing
33 4058 1 Mantis LabeI
34 410 2 Cap Screw 1/4-
20 x 1" LG
35 972 4 Lock Nut 1/4 - 20
36 470 2 1/4 - 20 x 3" Bolt
37 140 2 Bolt 1/4-20 x
3/8" kg.
38 377 2 HandIeCtamp
! Worm Thrust
Bearing
I Worm Shaft
I Worm Disk
1 Retaining Ring
! Worm Gear
1 Tine Shaft
2 Worm Gear
Thrust Washer
2 Worm Gear
24 434
25 435
26 438RA
27 438LA
28 418-1
Bearing
2 Beark/g Seal
2 Bearing Sea!
Retainer
I Ene Assm, (RT)
I Tine Assm (LT)
2 Fine Retaining
Hair Pin
39 400509 2 Bolt
40 400510 2 Knob
41 400230 2 Plug
42 400010 1 Transmission
Assm.
* Also in Key #42
Loading ...
Loading ...
Loading ...