Micro Spotting Scopes
Instruction Manual


ENGLISH ...............................................2
FRANÇAIS ...........................................8
DEUTSCH .............................................15
ITALIANO ..............................................22
ESPAÑOL .............................................29

2 I ENGLISH
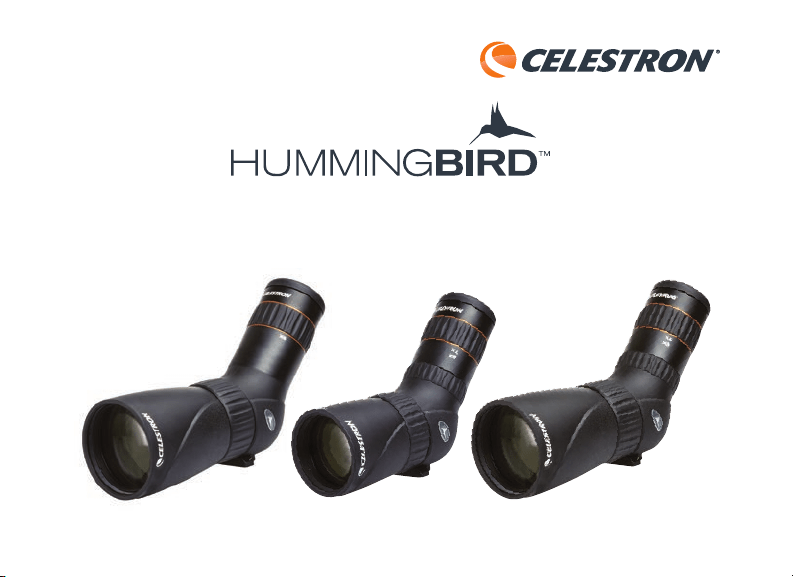
Thank you for purchasing a Celestron Hummingbird
TM
micro spotting scope. Whether you chose
a standard or ED model, we trust that this spotting scope will provide you with years of enjoyment
and faithful service. Please read the instructions carefully before using your spotting scope to
ensure proper use and care.
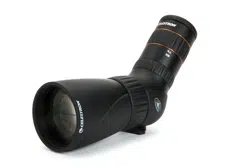
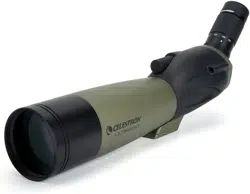
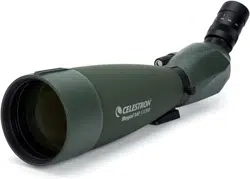
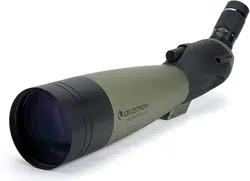
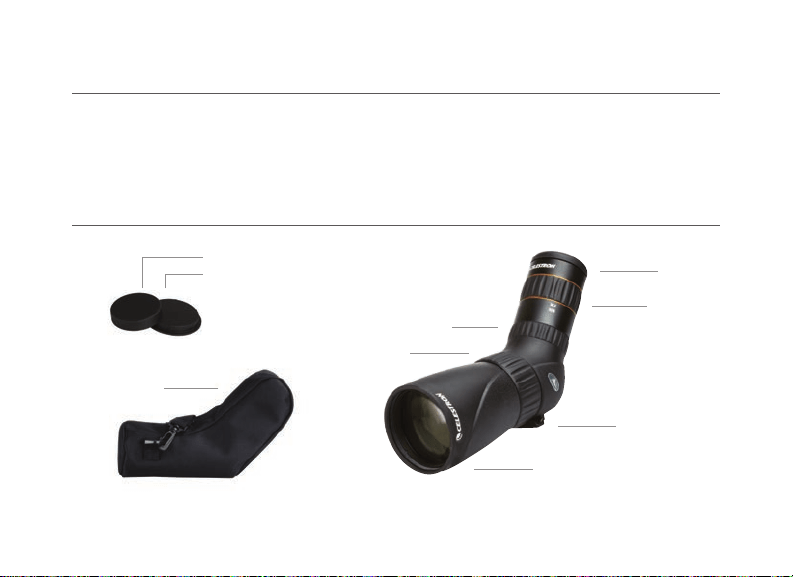
FIG. 1
CELESTRON HUMMINGBIRD
TM
MICRO SPOTTING SCOPES
NOMENCLATURE
Eyepiece
Focus Dial
Eyepiece Locking Dial
(ED models only)
Tripod Mount
Objective Lens
Magnification Dial
Eyepiece Cap
Objective Lens Cap
Case

ENGLISH I 3
The Celestron Hummingbird
TM
micro spotting
scope can be used hand-held, or mounted
on a tripod, monopod, window mount, or
other stabilizing aid.
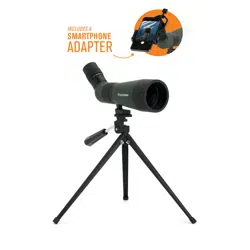
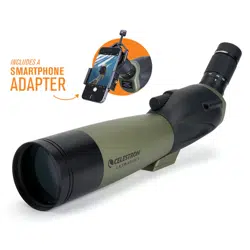
USE
To attach the spotting scope to a stabilizing
aid, simply attach the device’s (or device
mounting plate’s)
1/4-20 thread mounting
bolt to the spotting scope’s
1/4-20 thread
tripod mount.
TRIPOD, MONOPOD, WINDOW
MOUNT, ETC. MOUNTING
WARNING: Never look at the Sun while using your spotting scope. Looking at the Sun can cause permanent eye damage.
The eyepiece included with the Celestron
Hummingbird
TM
micro spotting scope
provides plenty of eye relief for use with or
without eyeglasses. For use while wearing
eyeglasses, leave the twist-up eyecup in the
lowered position. For use while not wearing
eyeglasses, twist the twist-up eyecup into
the extended position.
USE WITH OR WITHOUT EYEGLASSES

4 I ENGLISH
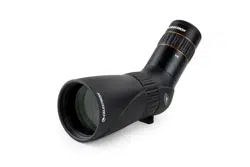
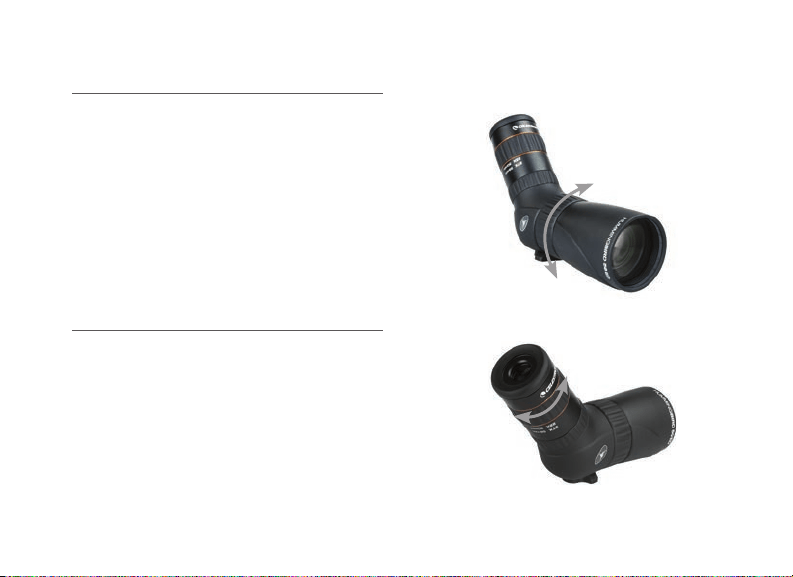
FOCUSING
To ensure a crisp, sharp image, the spotting scope
must be focused. To focus the spotting scope,
slowly rotate the focus dial until the image in
the eyepiece is clear and sharp. If you feel that
the focus dial will not rotate any further, you
have reached the end of its travel and need to
turn the dial in the opposite direction.
CHANGING THE MAGNIFICATION
To change the magnification of the zoom
eyepiece, simply rotate the magnification dial
in the clockwise direction to increase the
magnification and counterclockwise to decrease
the magnification. When changing magnification,
the scope will need to be refocused. The largest
field of view and brightest images will always be
at the lowest magnification.
FIG. 3
FIG. 2

ENGLISH I 5
CARE AND STORAGE
Your Celestron spotting scope will provide you
years of dependable service if it is cared for and
stored properly.
1. Protect the spotting scope from impact and
do not force any of the moving parts beyond
their limits.
2. Protect the optics of your spotting scope by
putting on all lens caps when not in use.
3. Store your spotting scope in a cool, dry place
whenever possible.
4. When storing for an extended period of time,
place the spotting scope in a plastic bag or
airtight container with a desiccant.
5. Do not leave the spotting scope in a car on a
hot/sunny day or near anything that generates
heat as this may cause damage.
6. Clean any dust, dirt or water that may get
on the spotting scope or inside moving
parts as soon as possible to prevent any
unforeseen damage.

6 I ENGLISH
CLEANING
Proper cleaning of the lenses is essential to
maintaining the optical integrity of your spotting
scope. Dirty lenses diminish the amount of light
transmitted through the spotting scope and your
overall viewing experience.
1. Remove any dust on the lenses with a soft lens
brush or can of pressurized air.
2. Remove any fingerprints, stains or smudges
from the lens surface with a soft, clean lens
cloth or lens tissue by rubbing in a circular
motion. Start in the middle of the lens and
work your way to the edges. Breathe lightly on
the lens to provide moisture if needed.
3. For a more thorough cleaning we recommend
the use of a lens/optics cleaning kit available
at most photo or optical shops. Follow the
directions supplied with the cleaning kit for
best results.
SERVICE AND REPAIR
If warranty problems arise or repairs are
necessary,
please visit Celestron’s online
technical support center at
https://www.celestron.com/pages/technical-support
if you live in the United States or Canada.
If you live outside of these countries, please
contact the dealer you purchased your spotting
scope from or the Celestron distributor in your
country. A list of our distributors can be found
on our website.

ENGLISH I 7
WARRANTY
Your spotting scope is covered under the
Celestron Limited Lifetime Warranty. Celestron
warrants the spotting scope to be free from
defects in materials and workmanship for
the spotting scope’s usable lifetime to the
original owner. Celestron will repair or replace
the spotting scope that, upon inspection by
Celestron, is found to be defective in materials
or workmanship and within the definitions of the
limits described below.
This warranty does not cover products that
have been subject to abuse, misuse, physically
damaged, altered, or had unauthorized repairs
or modifications. This warranty does not cover
defects due to normal wear and tear and
other conditions.
This warranty is valid to U.S.A. and Canadian
customers who have purchased their spotting
scope from an authorized Celestron dealer in
the U.S.A. or Canada. For products purchased
outside of the U.S.A. or Canada, please contact
your local Celestron Distributor or authorized
Dealer for applicable warranty information.
Additional warranty information and eligibility
details can be found on the Celestron website.
This product is designed and intended for use by
those 14 years of age and older.
Product design and specifications are subject to
change without prior notification.
For complete specifications and product
information, visit: www.celestron.com
2835 Columbia Street • Torrance, CA 90503 USA
Tel: 1 (800) 421-9649

MICRO LONGUES-VUES
MODE D’EMPLOI
FRANÇAIS

FRANÇAIS I 9
Nous vous remercions d’avoir acheté une micro longues-vues Hummingbird
TM
Celestron. Que
vous choisissiez un modèle standard ou un modèle ED, nous espérons que cette longue-vue
vous donnera des années de satisfaction et de loyaux services. Veuillez lire attentivement les
instructions avant d’utiliser votre longue-vue pour vous garantir la meilleure utilisation et le
meilleur entretien possible.
FIG. 1
MICRO LONGUES-VUES HUMMINGBIRD
TM
CELESTRON
NOMENCLATURE
Oculaire
molette de
mise au point
l’oculaire molette de verrouillage
(Modèles ED uniquement)
Trépied
Lentille de l’objectif
Molette
d’agrandissement
Capuchon de l’oculaire
Capuchon de l’objectif
Étui

10 I FRANÇAIS
La micro longue-vue Hummingbird
TM
Celestron peut être tenue en main, ou
montée sur un trépied, un monopied, une
monture de fenêtre ou tout autre dispositif
de stabilisation.
UTILISATION
Pour attacher la longue vue à un dispositif
de stabilisation, vissez simplement l’écrou
de monture 1/4-20 du dispositif (ou de la
plaque de monture du dispositif) dans le pas
de vis 1/4-20 du trépied.
MONTAGE SUR TRÉPIED,
MONOPIED, MONTURE DE
FENÊTRE, ETC.
AVERTISSEMENT : Ne jamais observer directement le Soleil avec votre longue vue. L’observation du Soleil peut entraîner des lésions
oculaires permanentes.
L’oculaire inclus avec la micro longue vue
Hummingbird
TM
Celestron offre tout le
confort possible pour une utilisation avec
ou sans lunettes de correction. Si vous des
lunettes, laissez les œilletons en caoutchouc
en position abaissée. Si vous ne portez pas
de lunettes, faites pivoter les œilletons en
caoutchouc en position relevée.
UTILISATION AVEC OU SANS DES
LUNETTES DE CORRECTION

FRANÇAIS I 11
MISE AU POINT
Pour vous assurer d’une image nette, la mise au
point de la longue vue doit être effectuée. Pour
la mise au point de la longue vue, faites tourner
lentement la molette de focalisation jusqu’à ce
que l’image dans l’oculaire soit claire et nette. Si
la molette de focalisation ne tourne plus, vous
avez atteint la valeur maximum et devez tourner la
molette dans la direction opposée.
MODIFICATION DU
GROSSISSEMENT
Pour modifier le grossissement de l’oculaire,
faites tourner l’oculaire dans le sens horaire pour
augmenter le grossissement et dans le sens
antihoraire pour diminuer le grossissement. Il sera
nécessaire d’effectuer la mise au point lorsque
vous modifiez le grossissement. Le plus grand
champ de vision et les plus brillantes images
seront toujours atteints avec le grossissement le
plus faible.
FIG. 3
FIG. 2

12 I FRANÇAIS
ENTRETIEN ET ENTREPOSAGE
Votre télescope d’observation Celestron vous
fournira des années de service fiable s’il est bien
entretenu et entreposé correctement.
1. Protégez votre télescope d’observation de
tout impact et ne forcez pas aucune pièce en
mouvement au-delà de sa limite.
2. Protégez l’optique de votre télescope
d’observation en mettant tous les bouchons
d’objectif en place lorsque vous ne l’utilisez pas.
3. Entreposez votre télescope d’observation dans
un endroit frais et sec si possible.
4. Lors de l’entreposage pendant une période
prolongée de temps, placez le télescope
d’observation dans un sac en plastique ou un
récipient hermétique avec déshydratant.
5. Ne pas laisser le télescope d’observation
dans une voiture lors d’une journée chaude et
ensoleillée ou à proximité de tout ce qui génère
de la chaleur car cela pourrait causer des
dommages.
6. Nettoyez toute poussière, saleté ou eau
qui peut s’accumuler sur le télescope
d’observation ou à l’intérieur de pièces en
mouvement dès que possible afin d’éviter
tout dommage imprévu.

FRANÇAIS I 13
NETTOYAGE
Le nettoyage approprié des lentilles est essentiel
au maintien de l’intégrité optique de votre
télescope d’observation. Des lentilles sales
diminuent la quantité de lumière transmise
à travers le télescope d’observation et votre
expérience de visionnement.
1. Enlevez toute poussière des lentilles avec
une brosse à lentilles souples ou aérosol
d’air pressurisé.
2. Retirez les traces de doigt, les salissures et les
saletés de la lentille à l’aide d’un tissu spécialisé
doux en frottant en effectuant des mouvements
circulaires. Commencez au milieu de la lentille en
vous dirigeant lentement vers les bords. Soufflez
légèrement sur l’objectif afin de fournir de
l’humidité si nécessaire.
3. Pour un nettoyage plus en profondeur, nous
recommandons l’utilisation d’une trousse de
nettoyage de lentilles/optique disponible dans
la plupart des boutiques de photos ou des
magasins optiques. Suivez les instructions
fournies avec la trousse de nettoyage pour de
meilleurs résultats.
SERVICE ET RÉPARATIONS
Si des problèmes de garantie survenaient
ou des réparations s’avéraient nécessaires,
visitez le centre d’assistance technique
en ligne de Celestron à l’adresse
https://www.celestron.com/pages/technical-support
si vous résidez aux États-Unis ou au Canada. Si
vous habitez à l’extérieur de ces pays, contactez le
revendeur où vous avez acheté votre longue vue ou
le distributeur Celestron de votre pays Vous trouverez
une liste de nos distributeurs sur notre site Web.

14 I FRANÇAIS
GARANTIE
Votre télescope d’observation est couvert par la
garantie à vie limitée Celestron. Celestron garantit
que la longue vue sera exempt de tout défaut de
matériaux ou de fabrication sur toute la durée
utile du produit, mais n’est pas transmissible.
Celestron réparera ou remplacera le télescope
d’observation qui, après inspection par Celestron,
présente des défauts de matériaux ou de
fabrication et dans les définitions des limites
décrites ci-dessous.
Cette garantie ne couvre pas les produits qui ont
fait l’objet d’abus, de mauvaise utilisation, qui sont
physiquement endommagés, altérés ou n’avaient
pas reçu les autorisations nécessaires pour les
réparations ou les modifications. Cette garantie
ne couvre pas les défauts dus à une usure
normale et d’autres conditions.
Cette garantie est valable pour les clients aux
États-Unis d’Amérique et au Canada qui ont acheté
leur télescope d’observation chez un revendeur
Celestron agréé aux États-Unis ou au Canada. Pour
les produits achetés en dehors des États-Unis ou au
Canada, veuillez contacter votre distributeur local de
Celestron ou revendeur agréé pour toute information de
garantie applicable.
Des informations additionnelles de garantie et de
détails d’admissibilité se trouvent sur le site Web de
Celestron.
Ce produit a été conçu pour être utilisé par les
personnes de 14 ans et plus.
La conception et les caractéristiques du produit sont
indiquées sous réserve de modifications sans préavis.
Pour connaître les spécifications complètes et
informations sur le produit, rendez-vous sur :
www.celstron.com
2835 Columbia Street • Torrance, CA 90503 USA
Tél: 1 (800) 421-9649

MIKRO-SPEKTIVE
BEDIENUNGSANLEITUNG
DEUTSCH

16 I DEUTSCH
Vielen Dank für den Kauf eines Hummingbird
TM
Mikro-Spektivs von Celestron. Ob Sie sich
für ein Standard- oder ED-Modell entscheiden, wir sind davon überzeugt, dass Ihnen dieses
Spektiv jahrelang Freude bereiten und zuverlässige Dienste leisten wird. Bitte lesen Sie die
Bedienungsanleitung vor Gebrauch des Spektivs sorgfältig durch, um eine sichere Handhabung
und Pflege sicherzustellen.
ABB. 1
CELESTRON HUMMINGBIRD
TM
MIKRO-SPEKTIVE
NOMENKLATUR
Okular
Fokussierer
Okular Arretierung
(Nur ED-Modelle)
Stativanschluss
Objektiv
Vergrößerungsrad
Okularkappe
Objektivkappe
Aufbewahrung

DEUTSCH I 17
Das Hummingbird
TM
Mikro-Spektiv von
Celestron kann per Hand, auf einem Stativ,
Einbeinstativ, per Fenstermontage oder einer
anderen Stabilisierungshilfe verwendet werden.
VERWENDUNG
Zum Anbringen des Spektivs an
eine Stabilisierungshilfe, einfach den
Montagebolzen mit 1/4-20-Gewinde des
Instruments an den Stativanschluss des
Spektivs mit 1/4-20-Gewinde anbringen.
STATIV, EINBEINSTATIV,
FENSTERMONTAGE ETC.
WARNUNG : Niemals mit Ihrem Spektiv in die Sonne schauen da dies zu permanenten Sehschäden führen kann.
Das Okular ist im Celestron-Lieferumfang
des Hummingbird
TM
Mikro-Spektivs
enthalten und bietet entspanntes Betrachten
mit und ohne Brille. Wenn Sie eine Brille
tragen, belassen Sie die einstellbaren
Augenmuscheln in der abgesenkten Position.
Wenn Sie keine Brille tragen, drehen Sie
die einstellbaren Augenmuscheln in die
erhöhte Position.
NUTZUNG MIT UND OHNE BRILLE
18 I DEUTSCH
FOKUSSIEREN
Um ein gestochen scharfes Bild zu gewährleisten,
muss das Spektiv fokussiert werden. Drehen
Sie zum Fokussieren des Spektivs langsam am
Fokussierrad, bis das Bild im Okular klar und scharf
ist. Lässt sich das Fokussierrad nicht weiterdrehen,
haben Sie das Ende seiner Beweglichkeit erreicht
und müssen das Rad in die entgegengesetzte
Richtung drehen.
VERGRÖSSERUNG ÄNDERN
Drehen Sie zum Ändern der Vergrößerung des
Zoom-Okulars einfach das Vergrößerungsrad im
Uhrzeigersinn, um die Vergrößerung zu erhöhen
und gegen Uhrzeigersinn, um die Vergrößerung zu
verringern. Nach einer Vergrößerungsanpassung
muss das Spektiv neu fokussiert werden. Das
größte Sichtfeld und hellste Bild wird immer bei
niedrigster Vergrößerung erreicht.
ABB. 3
ABB. 2

DEUTSCH I 19
PLFEGE UND AUFBEWAHRUNG
Ihr Celestron-Spektiv wird Ihnen jahrelang
zuverlässige Dienste leisten, wenn es
ordnungsgemäß gepflegt und aufbewahrt wird.
1. Schützen Sie das Spektiv vor Stößen und
beanspruchen Sie die beweglichen Teile nicht
über deren Grenzen hinaus.
2. Schützen Sie die optischen Teile Ihres
Spektivs, indem Sie bei Nicht-Verwendung
alle Objektiv-Kappen anbringen.
3. Bewahren Sie Ihr Spektiv, wann immer möglich,
an einem kühlen, trockenen Ort auf.
4. Legen Sie das Spektiv für eine Aufbewahrung
über einen längeren Zeitraum zusammen mit
einem Trockenmittel in einen Plastikbeutel oder
einen luftdichten Behälter.
5. Lassen Sie das Spektiv an einem heißen/
sonnigen Tag nicht im Auto liegen und legen
Sie es nicht in die Nähe einer Wärmequelle, da
dies zu Schäden führen könnte.
6. Entfernen Sie Staub, Schmutz oder Wasser
so schnell wie möglich, da diese in das
Spektiv oder die internen beweglichen Teile
eindringen können und unvorhergesehene
Schäden verursachen können.

20 I DEUTSCH
REINIGUNG
Die ordnungsgemäße Reinigung der Objektive ist
für die Aufrechterhaltung der optischen Integrität
Ihres Spektivs unerlässlich. Verschmutzte
Objektive reduzieren die Lichtmenge, die durch
das Spektiv geleitet wird, und somit Ihr gesamtes
Betrachtungserlebnis.
1. Entfernen Sie Staub mithilfe einer weichen
Objektivbürste oder einer Druckluftdose
vom Objektiv.
2. Entfernen Sie von den Objektiv-Oberflächen
Fingerabdrücke, Flecken oder Verschmutzungen
mit einem weichen, sauberen Tuch oder
Linsenreinigungstuch, indem Sie in kreisenden
Bewegungen darüber reiben. Beginnen Sie in
der Mitte des Objektivs und arbeiten Sie sich an
die Ränder vor. Hauchen sie die Objektive leicht
an, um wenn nötig Feuchtigkeit aufzubringen.
3. Für eine gründlichere Reinigung empfehlen
wir die Verwendung eines Reinigungs-Kits
für Linsen/Objektive, das in den meisten
Foto- oder Optik-Geschäften erhältlich ist.
Befolgen Sie für optimale Ergebnisse die
Anleitung, die dem Reinigungs-Kit beiliegt.
WARTUNG UND REPARATUR
Treten Garantiefälle auf oder sind Reparaturen
nötig, wenden Sie sich bitte an die Celestron
Kundendienstabteilung unter
https://www.celestron.com/pages/technical-support
wenn Sie in den Vereinigten Staaten oder in Kanada
leben. Leben Sie außerhalb dieser Länder, wenden
Sie sich bitte an den Händler, bei dem Sie Ihr Spektiv
erworben haben oder an den Celestron Vertrieb in
Ihrem Land. Eine Liste unserer Vertreiber finden Sie
auf unserer Webseite.

DEUTSCH I 21
GARANTIE
Ihr Spektiv ist durch die eingeschränkte,
lebenslange Garantie von Celestron abgedeckt.
Celestron gewährleistet, dass Ihr Spektiv frei
von Material- und Verarbeitungsfehlern ist für
die nutzbare Lebensdauer beim ursprünglichen
Käufer. Celestron wird eine Reparatur oder einen
Austausch des Spektivs, bei dem aufgrund einer
Überprüfung durch Celestron ein Material- oder
Herstellungsfehler gefunden wird, innerhalb der
Definitionen der unten beschriebenen Grenzen
durchführen.
Diese Garantie gilt nicht für Produkte,
die Gegenstand von Missbrauch oder
unsachgemäßer Verwendung waren oder
physikalisch beschädigt bzw. verändert wurden
oder an denen unautorisierte Reparaturen oder
Modifikationen vorgenommen wurden. Diese
Garantie deckt keine Defekte aufgrund von
normalem Verschleiß und anderen Bedingungen ab.
Diese Garantie ist für Kunden in den USA
und Kanada gültig, die ihr Spektiv von einem
autorisierten Celestron-Händler in den USA
oder Kanada gekauft haben. Wenden Sie sich
für geltende Garantieinformationen bezüglich
Produkte, die außerhalb der USA oder Kanada
gekauft wurden, bitte an Ihren Celestron
Vertreiber oder autorisierten Händler vor Ort.
Zusätzliche Garantieinformationen und
Einzelheiten über Ansprüche finden Sie auf der
Celestron-Website.
Dieses Instrument wurde für Personen ab 14
Jahren konzipiert und vorgesehen.
Produktdesign und technische Daten können ohne
vorherige Ankündigung geändert werden.
Für vollständige technische Daten und
Produktinformationen besuchen Sie:
www.celestron.com
2835 Columbia Street • Torrance, CA 90503 USA
Tel: 1 (800) 421-9649

MICRO-CANNOCCHIALI
MANUALE D’ISTRUZIONI
ITALIANO

ITALIANO I 23
Grazie per aver acquistato un micro-cannocchiale Hummingbird
TM
Celestron. Sia che tu
abbia scelto un modello standard o ED, siamo sicuri che questo cannocchiale offrirà anni
di divertimento e servizio affidabile. Leggere attentamente le istruzioni prima di utilizzare il
cannocchiale al fine di garantire l’uso ela cura corretti.
FIG. 1
MICRO-CANNOCCHIALI HUMMINGBIRD
TM
CELESTRON
COMPONENTI
Oculare
Ghiera di messa
a fuoco
Ghiera di blocco obiettivo
(Solo modelli ED)
Montaggio su treppiede
Obiettivo
Ghiera di
ingrandimento
Tappo oculare
Tappo obiettivo
Valigia

24 I ITALIANO
Il micro-cannocchiale Hummingbird
TM
Celestron può essere tenuto in mano
oppure montato su treppiede o monopiede,
montato su una finestra o altro ausilio stabile.
UTILIZZO
Per fissare il cannocchiale a un ausilio
stabile, fissare semplicemente il bullone
di montaggio filettato da 1/4-20 del
dispositivo (o la piastra di montaggio del
dispositivo) all’attacco filettato da 1/4-20
del cannocchiale.
MONTAGGIO SU TREPPIEDE,
MONOPIEDE, FINESTRA, ECC.
AVVERTENZA : Mai guardare in direzione del Sole utilizzando il cannocchiale. Guardare in direzione del Sole può causare danni permanenti
agli occhi.
L’oculare fornito con il micro-cannocchiale
Hummingbird
TM
Celestron fornisce comfort
agli occhi durante l’uso con o senza occhiali
da vista. Per l’uso con occhiali da vista
lasciare il tappo girevole nella posizione
abbassata. Per l’uso senza occhiali da vista
ruotare il tappo girevole nella posizione estesa.
UTILIZZO CON/SENZA OCCHIALI DA
VISTA

ITALIANO I 25
MESSA A FUOCO
Per garantire immaginichiare e nitide, il
cannocchiale deve essere messo a fuoco. Per
la messa a fuoco del cannocchiale, ruotare
lentamente la manopola della messa a fuoco fino
a quando l’immagine nell’oculare risulterà chiara
e nitida. Quandononèpiù possibile ruotare la
manopola significa che si è raggiunto il limite ed è
necessario ruotarla in direzioneopposta.
MODIFICARE L’INGRANDIMENTO
Per modificare l’ingrandimento dell’oculare,
ruotare semplicemente la manopola di
ingrandimentoin senso orario per aumentare
l’ingrandimento e in senso antiorario per
diminuire l’ingrandimento. Quando si modifica
l’ingrandimento il cannocchiale deve essere
messo nuovamente a fuoco. Il campo visivo più
ampio e le immagini più nitide si ottengo no
sempre con il minore ingrandimento.
FIG. 3
FIG. 2

26 I ITALIANO
CURA E CONSERVAZIONE
Il cannocchiale Celestron offrirà anni di servizio
affidabile se curato e conservato correttamente.
1. Proteggere il cannocchiale dagli urti e non
forzare alcuna parte movibile oltre i suoi limiti.
2. Proteggere le parti ottiche del cannocchiale
applicando tutti i tappiper le lenti quando non
in uso.
3. Conservare il cannocchiale in un luogo fresco e
asciutto ogniqualvolta possibile.
4. In caso di conservazione per un periodo
prolungato, sistemare il cannocchiale in un
sacchetto di plastica o un contenitore a
chiusura ermetica con un essiccante.
5. Non lasciare il cannocchiale all’interno dell’auto
in giornate calde/soleggiate o in prossimitàdi
qualsiasi fonte che generi calore in quanto ciò
potrebbe provocare danni.
6. Pulire pulviscolo, sporcizia o acqua che
potrebbe trovarsi sul cannocchiale o
all’interno delle parti movibili non appena
possibile alfine di evitare danni

ITALIANO I 27
PULIZIA
La corretta pulizia delle lenti è essenziale
per mantenere l’integrità dei componenti
ottici del cannocchiale. Le lenti sporche
diminuiscono la quantità di luce trasmessa
attraverso il cannocchiale e l’esperienza di
osservazione complessiva.
1. Rimuovere eventuali pulviscoli sulle lenti con un
pennello soffice per lenti o una bomboletta di
aria compressa.
2. Rimuovere eventuali impronte, macchie o
strisce dalla superficie delle lenti con un
panno morbido e pulito per lenti oppure con
un fazzoletto per lenti sfregando con un
movimento circolare. Iniziare al centro delle lenti
e muoversi verso i bordi. Alitare leggermente
sulle lenti per applicare umidità, se necessario.
3. Per una pulizia più profonda si consiglia di
utilizzare un kit di pulizia per componenti ottici/
lenti disponibile presso i principali negozi di
ottica o fotografia. Per risultati ottimali, seguire
le istruzioni fornite con il kit di pulizia.
ASSISTENZA ERIPARAZIONE
In caso di problemi di garanzia o di necessità
di riparazione, visitare il centro assistenza
tecnica online Celestron all’indirizzo
https://www.celestron.com/pages/technical-support
se si risiede negli Stati Uniti o in Canada. Se si abita
al di fuori di questi Paesi, contattare il rivenditore da
cui si è acquistato il cannocchiale oppure il distributore
Celestrondel proprio Paese. L’elenco dei distributori può
essere consultato sul nostro sito web.

28 I ITALIANO
GARANZIA
Il cannocchiale è coperto dalla garanzia limitata
per la durata utile Celestron. Celestron garantisce
all’acquirente originario che il cannocchiale è
privo di difetti nei materiali e nella fabbricazione
per la durata utile del cannocchiale. Celestron
riparerà o sostituirà i cannocchiali che, a
seguito di controllo da parte di Celestron,
risultino presentare difetti nei materiali onella
fabbricazione e che rientrino nelle definizioni dei
limiti descritti di seguito.
La presente garanzia non copre prodotti che
sono stati soggetti ad abuso, uso improprio, danni
o alterazioni fisiche, o che sono stati sottoposti
a riparazioni o a modifiche non autorizzate. La
presente garanzia non copre i difetti dovuti alla
normale usura e ad altre condizioni.
La presente garanzia è valida per clienti di
Stati Uniti e Canada che hanno acquistato
il cannocchiale da un rivenditore autorizzato
Celestron negli Stati Uniti o in Canada. Per
prodotti acquistati al di fuori di Stati Uniti o Canada,
contattare il distributore locale Celestrono un
rivenditore autorizzato per informazioni relative alla
garanzia applicabile.
Ulteriori informazioni sulla garanzia e i criteri di
idoneità sono disponibili sul nostro sito web.
Questo prodotto è progettato per essere utilizzato
da persone di età uguale o superiore ai 14 anni.
Il design del prodotto e le specifiche sono soggetti
a modifiche senza previa notifica.
Per le specifiche e le informazioni di prodotto
specifiche visitare: www.celestron.com
2835 Columbia Street
Torrance, CA 90503 Stati Uniti
Tel: 1 (800) 421-9649
MICRO CATALEJOS
MANUAL DE INSTRUCCIONES
ESPAÑOL
30 I ESPAÑOL
Gracias por adquirir un micro catalejo Hummingbird™ de Celestron. Ya sea que elija un modelo
estándar o ED, confiamos en que este catalejo le ofrecerá años de servicio y satisfacción. Lea
atentamente las instrucciones antes de usar su catalejo para garantizar un uso y cuidado adecuados.
FIG. 1
MICRO CATALEJOS HUMMINGBIRD
TM
DE CELESTRON
NOMENCLATURA
Ocular
Dial de enfoque
Dial de bloqueo de ocular
(Solo modelos ED)
Soporte de trípode
Lente de objetivo
Dial de aumento
Tapa de ocular
Tapa de lente de objetivo
Estuche

ESPAÑOL I 31
El micro catalejo Hummingbird™ de
Celestron puede usarse de modo manual
o montarse en un trípode, pie, soporte de
ventana u otro apoyo estabilizador.
USO
Para fijar el catalejo a un apoyo estabilizador,
monte el perno de montaje estriado
de 1/4-20 (o la placa de montaje del
dispositivo) en el soporte de trípode
estriado 1/4-20 del catalejo.
MONTAJE EN TRÍPODE, PIE,
SOPORTE DE VENTANA, ETC.
ATENCIÓN: No mire nunca al Sol cuando use el catalejo. Mirar al Sol puede provocar daños oculares permanentes.
El ocular incluido con el micro catalejo
Hummingbird™ de Celestron ofrece un
notable reposo ocular para usarse con o sin
gafas. Para usarlo llevando gafas, deje la
almohadilla del ocular en posición bajada.
Para usarlo sin gafas, levante la almohadilla
del ocular a posición extendida.
USO CON O SIN GAFAS

32 I ESPAÑOL
ENFOQUE
Para garantizar una imagen clara y definida debe
enfocarse el catalejo. Para enfocar el catalejo, gire
lentamente el dial de enfoque hasta que la imagen
del ocular sea clara y definida. Si el dial de enfoque
no puede girar más, habrá llegado al final de su
recorrido y deberá girarlo en dirección opuesta.
CAMBIO DE AUMENTO
Para cambiar el aumento del ocular del zoom,
gire el dial de aumento hacia la derecha para
aumentarlo y a la izquierda para reducirlo. Cuando
cambie el aumento deberá volver a enfocar el
catalejo. El mayor campo de visión y las imágenes
más brillantes siempre se obtendrán con el
aumento más bajo.
FIG. 3
FIG. 2

ESPAÑOL I 33
CUIDADOS Y ALMACENAMIENTO
Su catalejo Celestron le ofrecerá años de servicio
fiable si se cuida y guarda adecuadamente.
1. Proteja el catalejo de impactos y no fuerce
ninguna pieza móvil más allá de sus límites.
2. Proteja la óptica del catalejo poniendo todas
las tapas de lentes cuando no lo use.
3. Guarde su catalejo en un lugar fresco y seco
siempre que sea posible.
4. Cuando lo guarde durante un periodo
prolongado, coloque el catalejo en una bolsa
de plástico o un recipiente hermético con
desecante.
5. No deje el catalejo en un coche en un día
cálido/soleado ni cerca de nada que genere
calor, podría dañarlo.
6. Limpie el polvo, la suciedad o el agua que
pueda estar sobre el catalejo o en las piezas
móviles en cuanto sea posible para evitar
posibles daños.

34 I ESPAÑOL
LIMPIEZA
Es esencial una limpieza adecuada de las lentes
para mantener la integridad óptica de su catalejo.
Las lentes sucias reducen la cantidad de luz que
se transmite por el catalejo y su experiencia de
observación global.
1. Saque el polvo de las lentes con un cepillo
suave para lentes o un bote de aire comprimido.
2. Elimine las huellas dactilares, manchas o
borrones de la superficie de la lente con una
gamuza suave y limpia para lentes o papel
tisú para lentes, frotando de forma circular.
Comience por el centro de la lente y avance hacia
los bordes. Aliente ligeramente sobre la lente para
proporcionar humedad si es necesario.
3. Para una limpieza más completa
recomendamos usar un kit de limpieza
de lente/óptica, disponible en la mayoría
de tiendas de fotografía u óptica. Siga las
instrucciones incluidas en el kit de limpieza
para obtener los mejores resultados.
SERVICIO Y REPARACIÓN
Si se presentan problemas de garantía o
reparaciones, visite el centro de soporte
técnico en línea de Celestron en
https://www.celestron.com/pages/technical-support
si vive en Estados Unidos o Canadá.
Si vive en otro país, contacte con el vendedor
en el que adquirió el catalejo o el distribuidor
Celestron de su país. Puede encontrar una lista
de distribuidores en nuestro sitio web.

ESPAÑOL I 35
GARANTÍA
Su catalejo está cubierto por la garantía limitada
de por vida de Celestron. Celestron garantiza que
el catalejo está libre de defectos de materiales
y mano de obra durante la ida útil del catalejo
para el propietario original. Celestron reparará
o sustituirá el catalejo que, al ser inspeccionado
por Celestron, muestre defectos de materiales o
mano de obra y esté dentro de las definiciones
de los límites descritos a continuación.
Esta garantía no cubre productos que hayan
sido sometidos a abuso, mal uso, daños físicos,
alteraciones, reparaciones o modificaciones no
autorizadas. Esta garantía no cubre defectos por
desgaste normal y otras condiciones.
Esta garantía tiene validez para clientes
de EE.UU. y Canadá que hayan adquirido
sus binoculares en un vendedor autorizado
de Celestron en EE.UU. y Canadá. Para
productos adquiridos fuera de EE.UU. o Canadá,
contacte con su distribuidor local de Celestron
o un vendedor autorizado para obtener la
información de garantía aplicable.
Puede encontrar información adicional de
garantía y eligibilidad en el sitio web de Celestron.
Este producto ha sido diseñado y está pensado
para ser usado por personas de 14 años o más
de edad.
El diseño y las especificaciones del producto están
sujetos a cambios sin notificación previa.
Para obtener las especificaciones completas e
información del producto, visite:
www.celestron.com
2835 Columbia Street • Torrance, CA 90503 EE.UU.
Tel: 1 (800) 421-9649

NOTES


©2019 Celestron. All rights reserved. • 03-19