Model Number: UPC Code: Color:
DL7891TBB
0-65857-17827-2
Mocha
DL7891TBBW
0-65857-18286-6
White
DL7891TBBG 0-65857-19467-8 Grey
DL7891TBBB 0-65857-19902-4 Black
Date of Purchase: _____ / _____ / _____ Lot Number:
(taken from carton)
NOTE: THIS INSTRUCTION BOOKLET CONTAINS IMPORTANT SAFETY INFORMATION. PLEASE
READ AND KEEP FOR FUTURE REFERENCE.
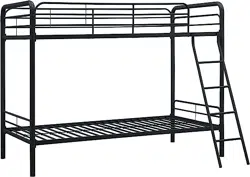
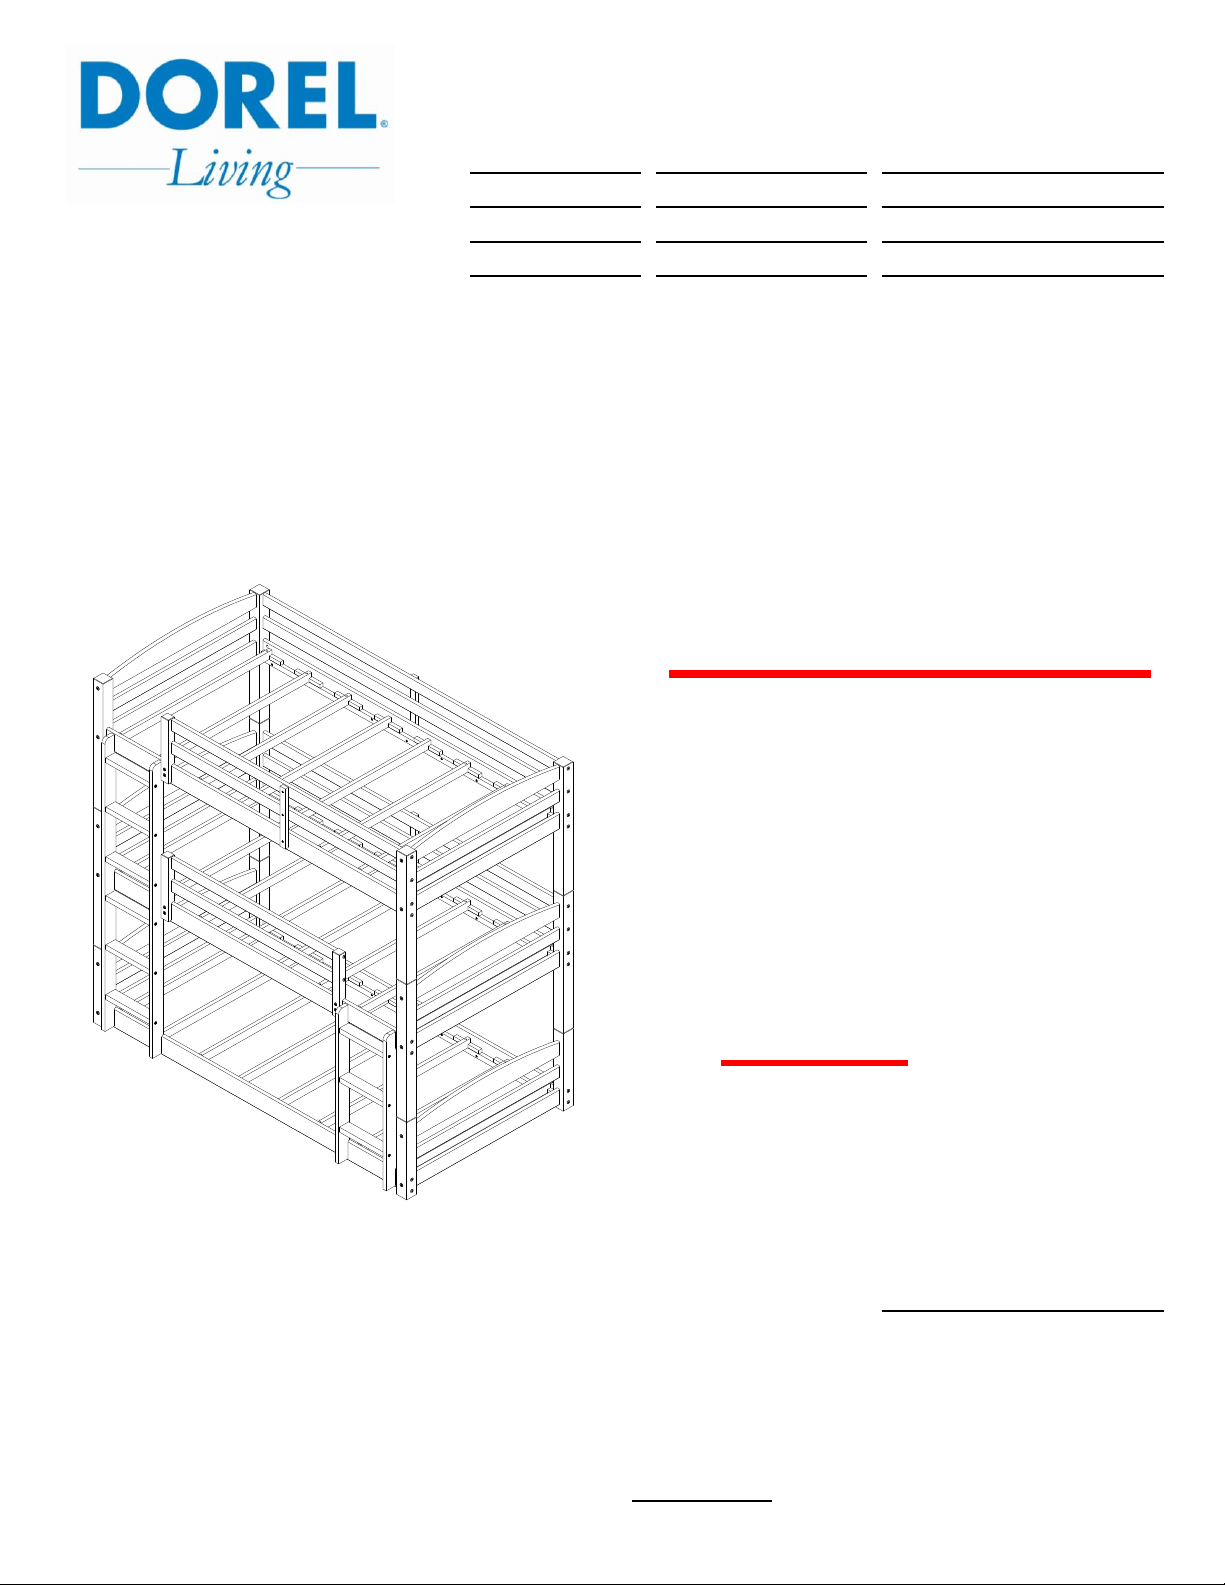
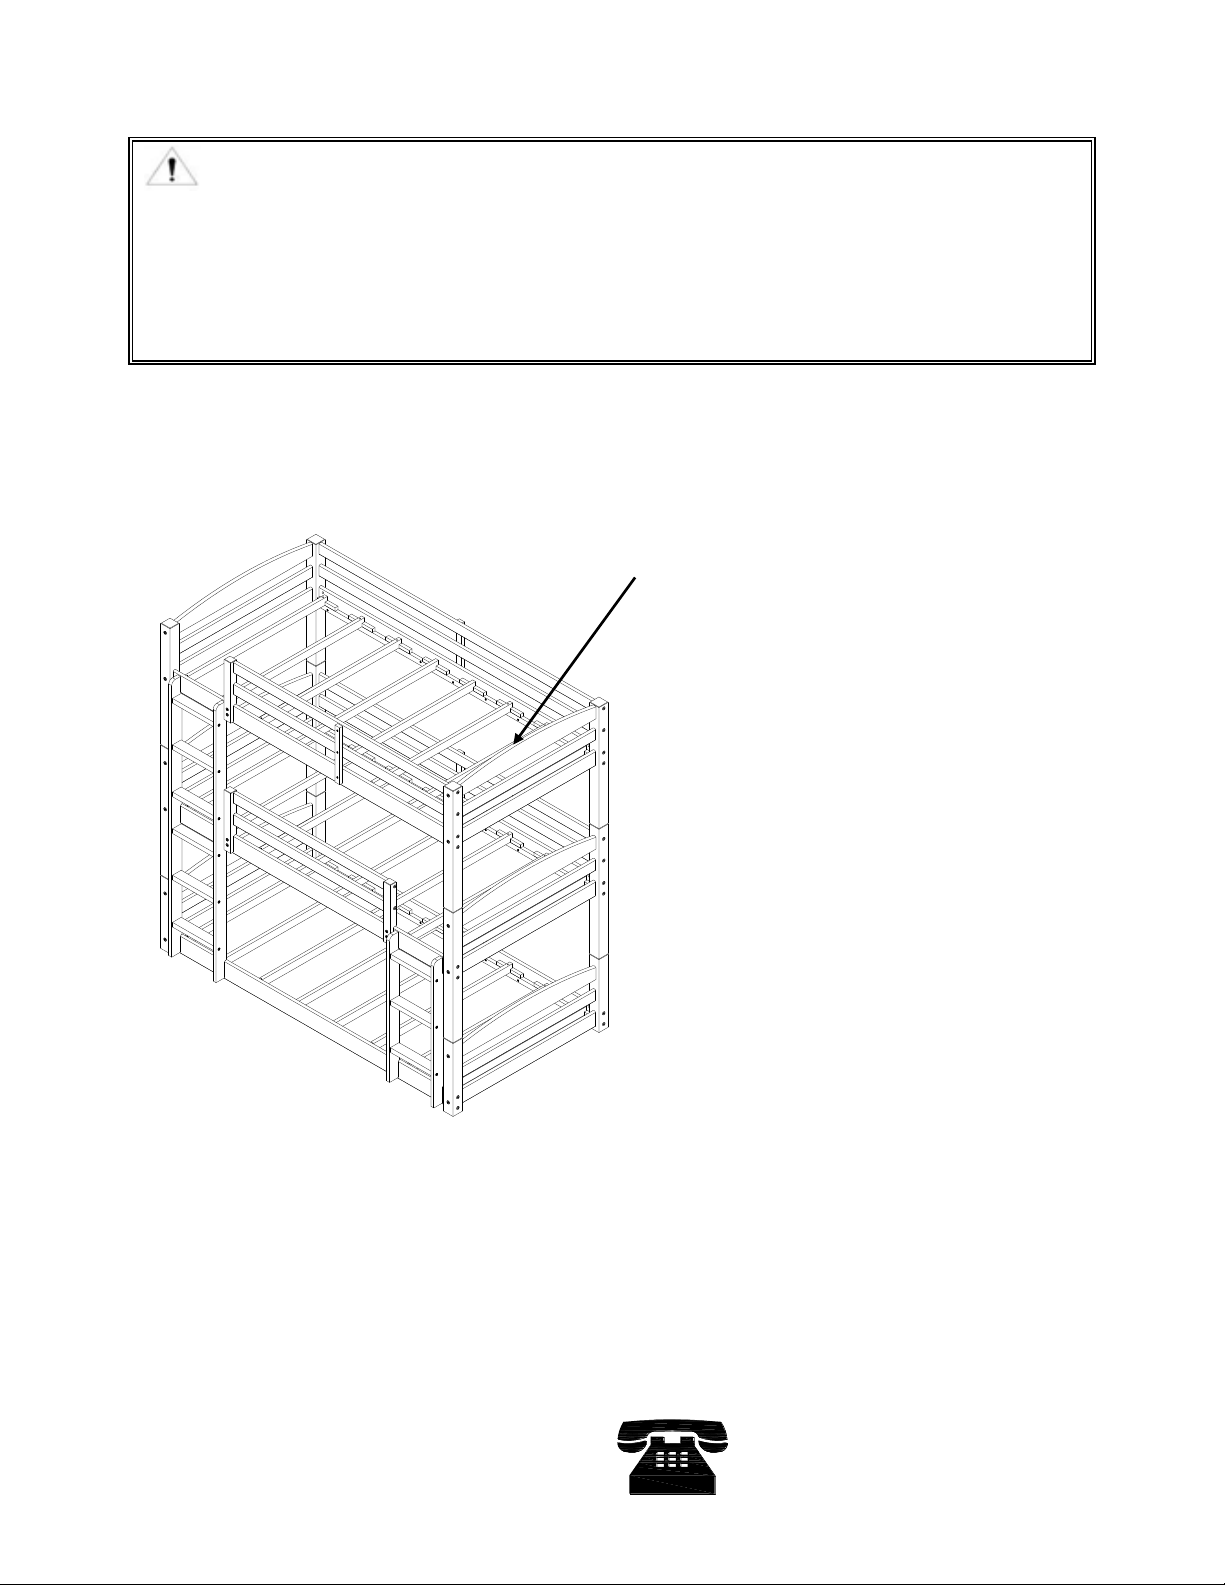
TRIPLE BUNKBED
Customer satisfaction is important to us at Dorel Asia. Our agents are available Monday to
Friday 8am to 5pm (EST) to answer any question you may have. For faster service, always have
the model number ready when calling our toll free number 1-800-295-1980 or emailing us at
For more great furniture ideas, check out our website at www.dorelliving.com
You can also keep up to date on all the latest trends by liking our Facebook page.
ATTENTION
USE THIS
MANUAL TO
ASSEMBLE THE
TRIPLE BUNK
BED
DO NOT RETURN PRODUCT TO THE RETAILER. If a part is missing or damaged, contact our
customer service department. We will replace the part FREE of charge.
*
*
*
*
*
*
*
*
*
*
*
*
*
*
*
*
STRANGULATION HAZARD - NEVER ATTACH OR HANG ITEMS TO ANY PART BUNK BED THAT ARE
NOT DESIGNED FOR USE WITH THE BED; FOR EXAMPLE, BUT NOT LIMITED TO HOOKS, BELTS AND
JUMP ROPES.
FOLLOW THE INFORMATION ON THE WARNINGS APPEARING ON THE UPPER BUNK END
STRUCTURE AND ON THE CARTON. DO NOT REMOVE WARNING LABEL FROM BED.
CUSTOMER SERVICE
If you are missing parts or have any questions about this product, contact our customer service
representative first!
CALL 1-800-295-1980
You can also order parts by writing to the address listed below. Please include the
product model number, color and a detailed description of the part.
Customer Service Department No. 413
12345 Albert-Hudon Boulevard, Suite 100
Montreal, Quebec
Canada, H1G 3L1
E-MAIL: da[email protected]
WARNING
THE USE OF WATER OR SLEEP FLOTATION MATTRESSES IS PROHIBITED.
ALWAYS USE THE LADDER FOR ENTERING AND LEAVING THE UPPER BUNK.
THE MATTRESS PLATFORM IS DESIGNED TO SUPPORT A MATTRESS WITHOUT THE NEED FOR A
POSTURE BOARD OR BOX SPRING.
ALWAYS USE THE RECOMMENDED SIZE MATTRESS OR MATTRESS SUPPORT, OR BOTH, TO HELP
PREVENT THE LIKELIHOOD OF ENTRAPMENT OR FALLS.
USE ONLY COIL SPRING MATTRESSES ON BOTH THE UPPER AND LOWER BUNKS. FAILURE TO DO SO
CAN RESULT IN INJURY.
USE ONLY MATTRESSES WHICH ARE 74"-75" LONG AND 37 1/2" - 38 1/2" WIDE ON UPPER AND ON
LOWER BUNKS. ENSURE THICKNESS OF MATTRESS DOES NOT EXCEED 6". SURFACE OF MATTRESS
MUST BE AT LEAST 5" (127MM) BELOW THE UPPER EDGE OF GUARDRAILS.
DO NOT ALLOW CHILDREN UNDER 6 YEARS OF AGE TO USE THE UPPER BUNK.
ALWAYS USE GUARDRAILS ON BOTH LONG SIDES OF THE UPPER BUNK. IF THE BUNK BEDWILL BE
PLACED NEXT TO THE WALL, THE GUARDRAIL THAT RUNS THE FULL LENGTH OF THE BED SHOULD BE
PLACED AGAINST THE WALL TO PREVENT ENTRAPMENT BETWEEN THE BED AND WALL (APPLICABLE
FOR BUNK BEDS WITH FULL LENGTH GUARDRAILS ON ONE SIDE).
PERIODICALLY CHECK AND ENSURE THAT THE GUARDRAIL, LADDER AND OTHER COMPONENTS
ARE IN THEIR PROPER POSITION, FREE FROM DAMAGE, AND THAT ALL CONNECTORS ARE TIGHT.
DO NOT ALLOW HORSEPLAY ON OR UNDER THE BED AND PROHIBIT JUMPING ON THE BED.
DO NOT USE SUBSTITUTE PARTS. CONTACT CUSTOMER SERVICE FOR REPLACEMENT PARTS.
USE OF A NIGHT LIGHT MAY PROVIDE ADDED SAFETY PRECAUTION FOR A CHILD USING THE
UPPER BUNK.
PROHIBIT MORE THAN ONE PERSON ON UPPER BUNK.
KEEP THESE INSTRUCTIONS FOR FUTURE USE.
*
*
*
*
*
*
*
*
*
CAUTION: ADULT ASSEMBLY REQUIRED
MAKE SURE ALL PARTS ARE INCLUDED. WORK IN SPACIOUS AREA, PREFERABLY ON A SMOOTH
SOFT SURFACE.
NOTES
READ EACH STEP CAREFULLY BEFORE STARTING. IT IS VERY IMPORTANT THAT EACH STEP OF
INSTRUCTION IS PERFORMED IN THE CORRECT ORDER. IF THESE STEPS ARE NOT FOLLOWED IN
SEQUENCE, ASSEMBLY DIFFICULTIES WILL OCCUR AND CAN RESULT IN INJURY.
CAUTION: ADULT ASSEMBLY REQUIRED. ASSEMBLY WILL REQUIRE 2 PEOPLE. ESTIMATED
ASSEMBLY TIME 45 MINUTES.
ASSEMBLY WILL REQUIRE TWO PEOPLE.
MOST BOARD PARTS ARE LABELED OR STAMPED ON THE RAW EDGE.
PHILLIPS SCREWDRIVER (NOT INCLUDED) IS REQUIRED.
A RUBBER MALLET (NOT INCLUDED) IS RECOMMENDED TO FACILITATE ASSEMBLY.
BED IS DESIGNED FOR CHILDREN RANGING FROM 6 YEARS OF AGE TO YOUNG TEENAGERS.
WARNING: Should this product become damaged,
and/or components are broken or missing, DO NOT USE.
CARE AND CLEANING
Dust regularly with a soft, dry cloth. We do not recommend the use of chemical
cleaners or wax on our lacquered furniture as it may damage the finish. Keep
solvents, alcohol, nail polish and polish removers away from your hardwood
furniture surfaces.
MAINTENANCE
Check bolts/screws periodically and tighten them if necessary.
LIMITED WARRANTY
DOREL warrants its product to be free from defects in material and workmanship and
agrees to remedy any such defect. This warranty covers 1 year from the date of
original purchase. This warranty is valid only upon presentation of proof of purchase.
This is solely limited to the repair or replacement of defective furniture components
and no assembly labor is included. This warranty does not apply to any product which
has been improperly assembled, subjected to misuse or abuse or which has been
altered or repaired in any way. This warranty gives you specific legal rights and you
may also have other rights which vary from State to State
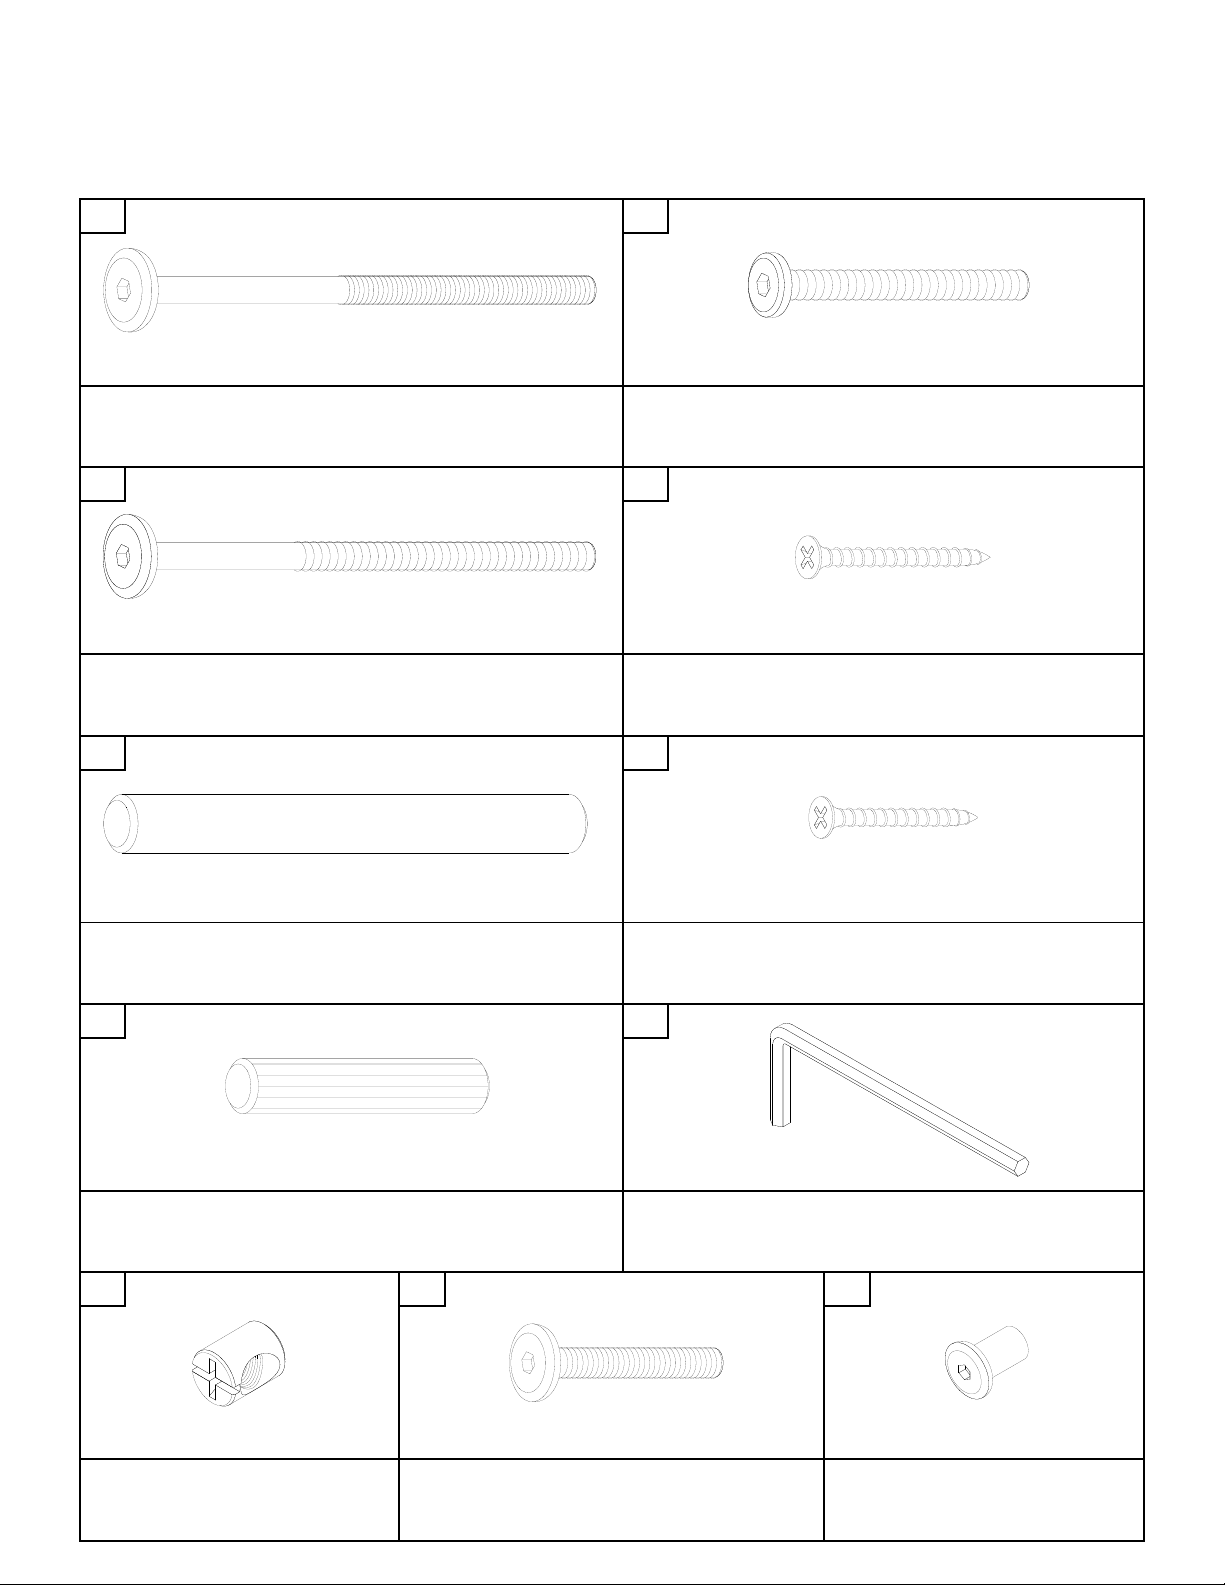
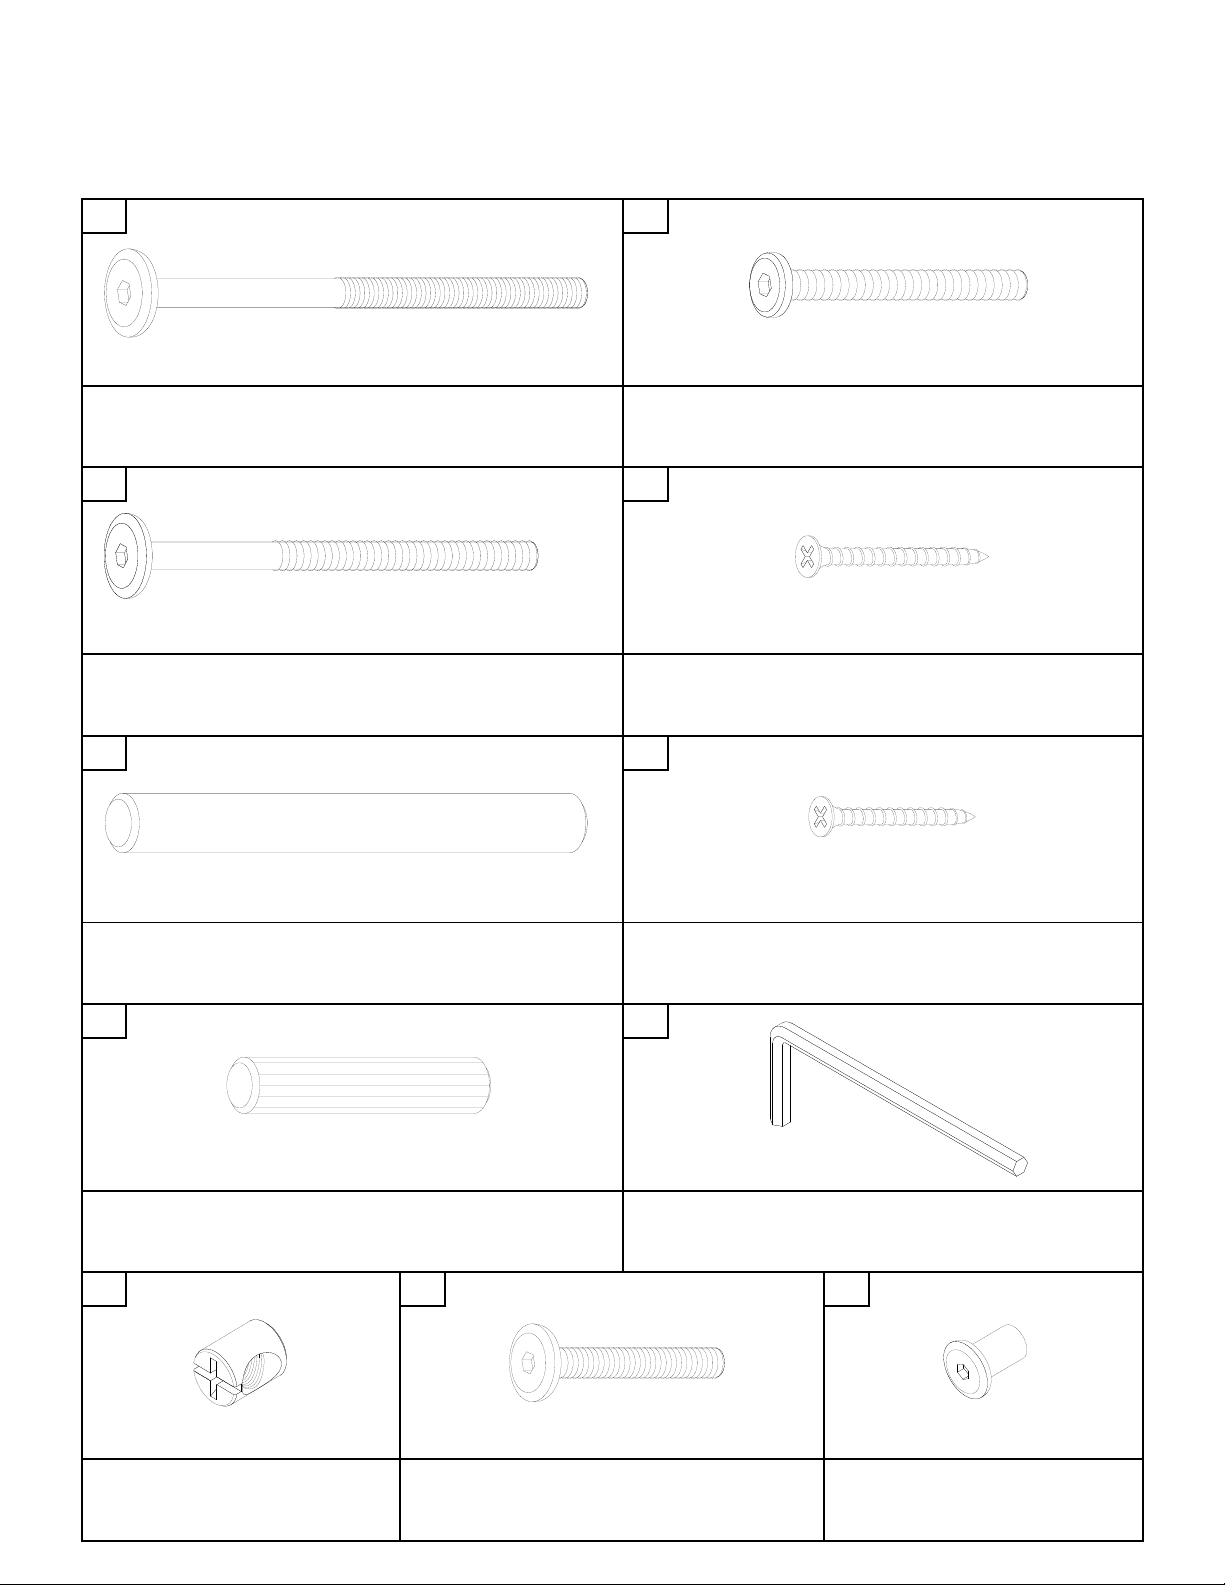
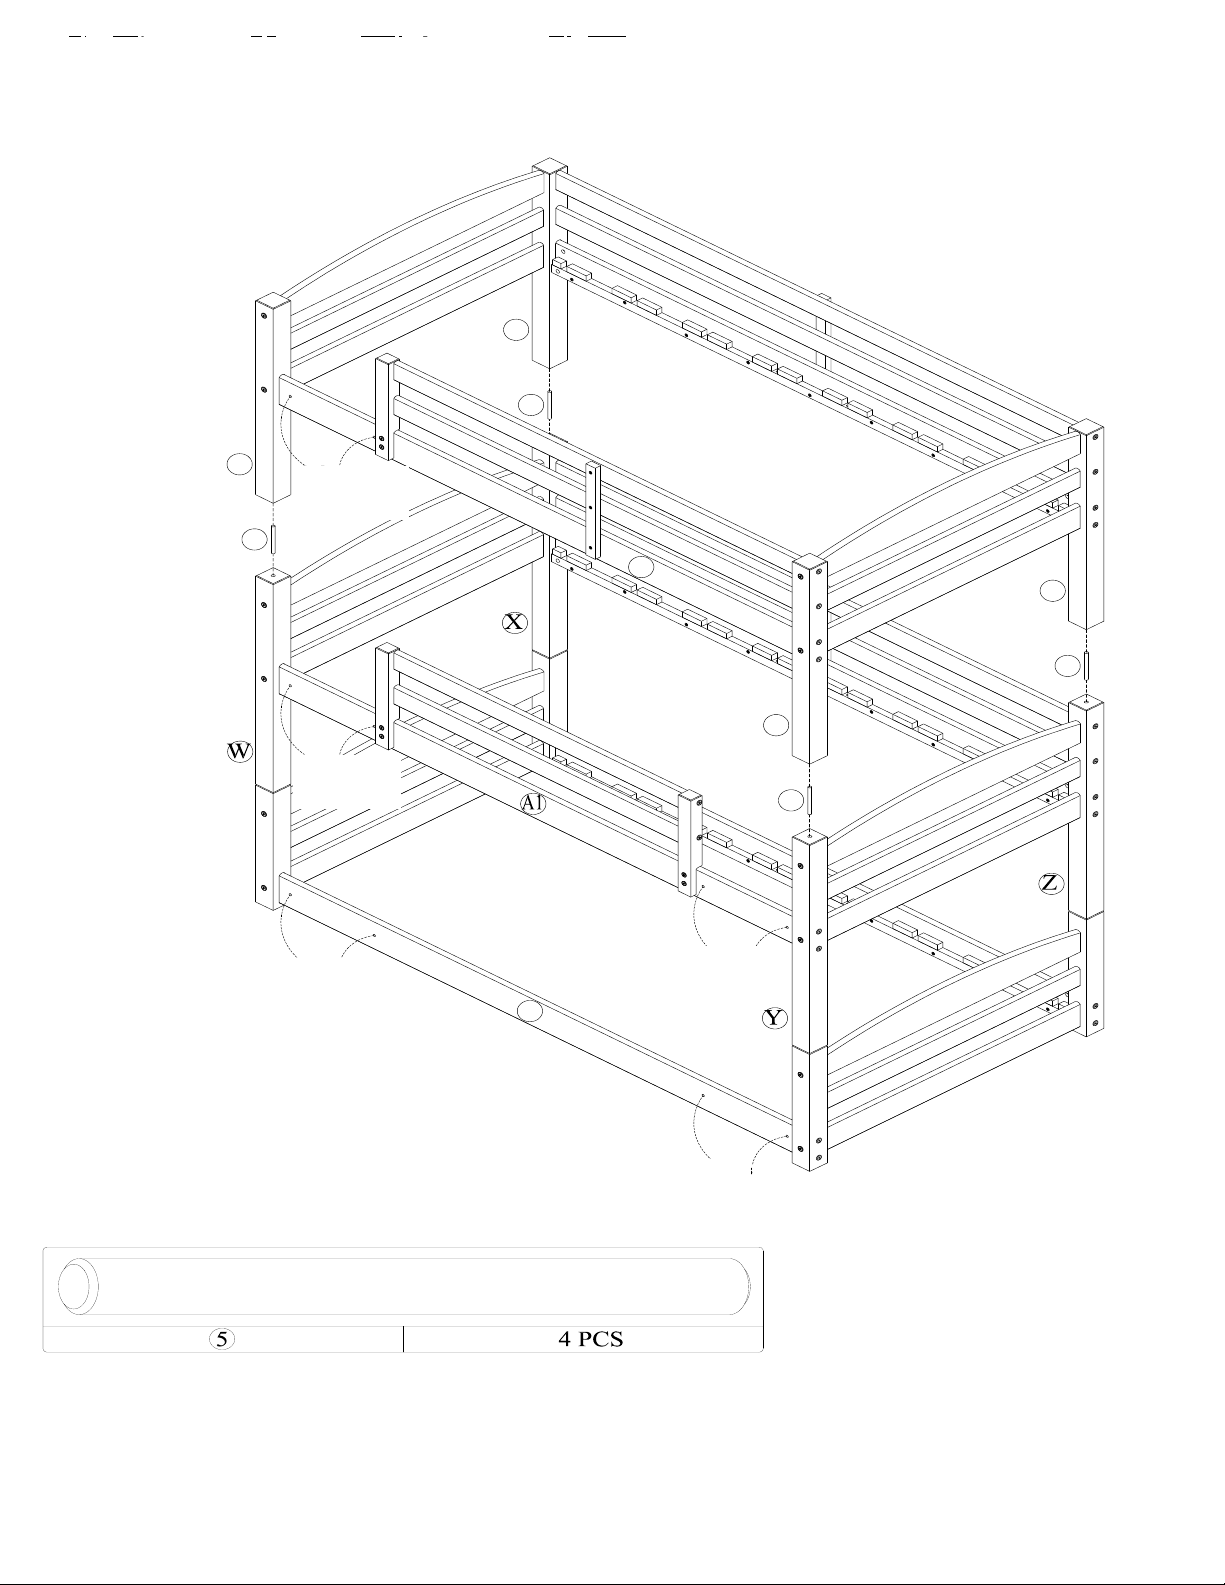
HARDWARE LIST
1 2
3 4
5 6
7 8
9 10 11
24 PCS
6 PCS
6 PCS
106 PCS
1 PC
Φ 11.8mm x 15mm
Φ 1/4" x 32mm
Φ 9mm x 17mm
BARREL NUT
JOINT CONNECTOR (4mm HEX HEAD)
HEX CAP
8 PCS
9 PCS
Φ 10mm x 50mm
WOOD DOWEL
ALLEN KEY
40 PCS
36 PCS
Φ 10mm x 100mm
Φ 4mm x 30mm
METAL DOWEL
FLAT HEAD SCREW
24 PCS
28 PCS
Φ 6.5mm x 100mm
Φ 4mm x 35mm
WOOD JOINT CONNECTOR (4mm HEX HEAD)
FLAT HEAD SCREW
TRIPLE BUNK BED
Φ 1/4" x 100mm
Φ 6.5mm x 48mm
JOINT CONNECTOR (4mm HEX HEAD)
WOOD JOINT CONNECTOR (4mm HEX HEAD)
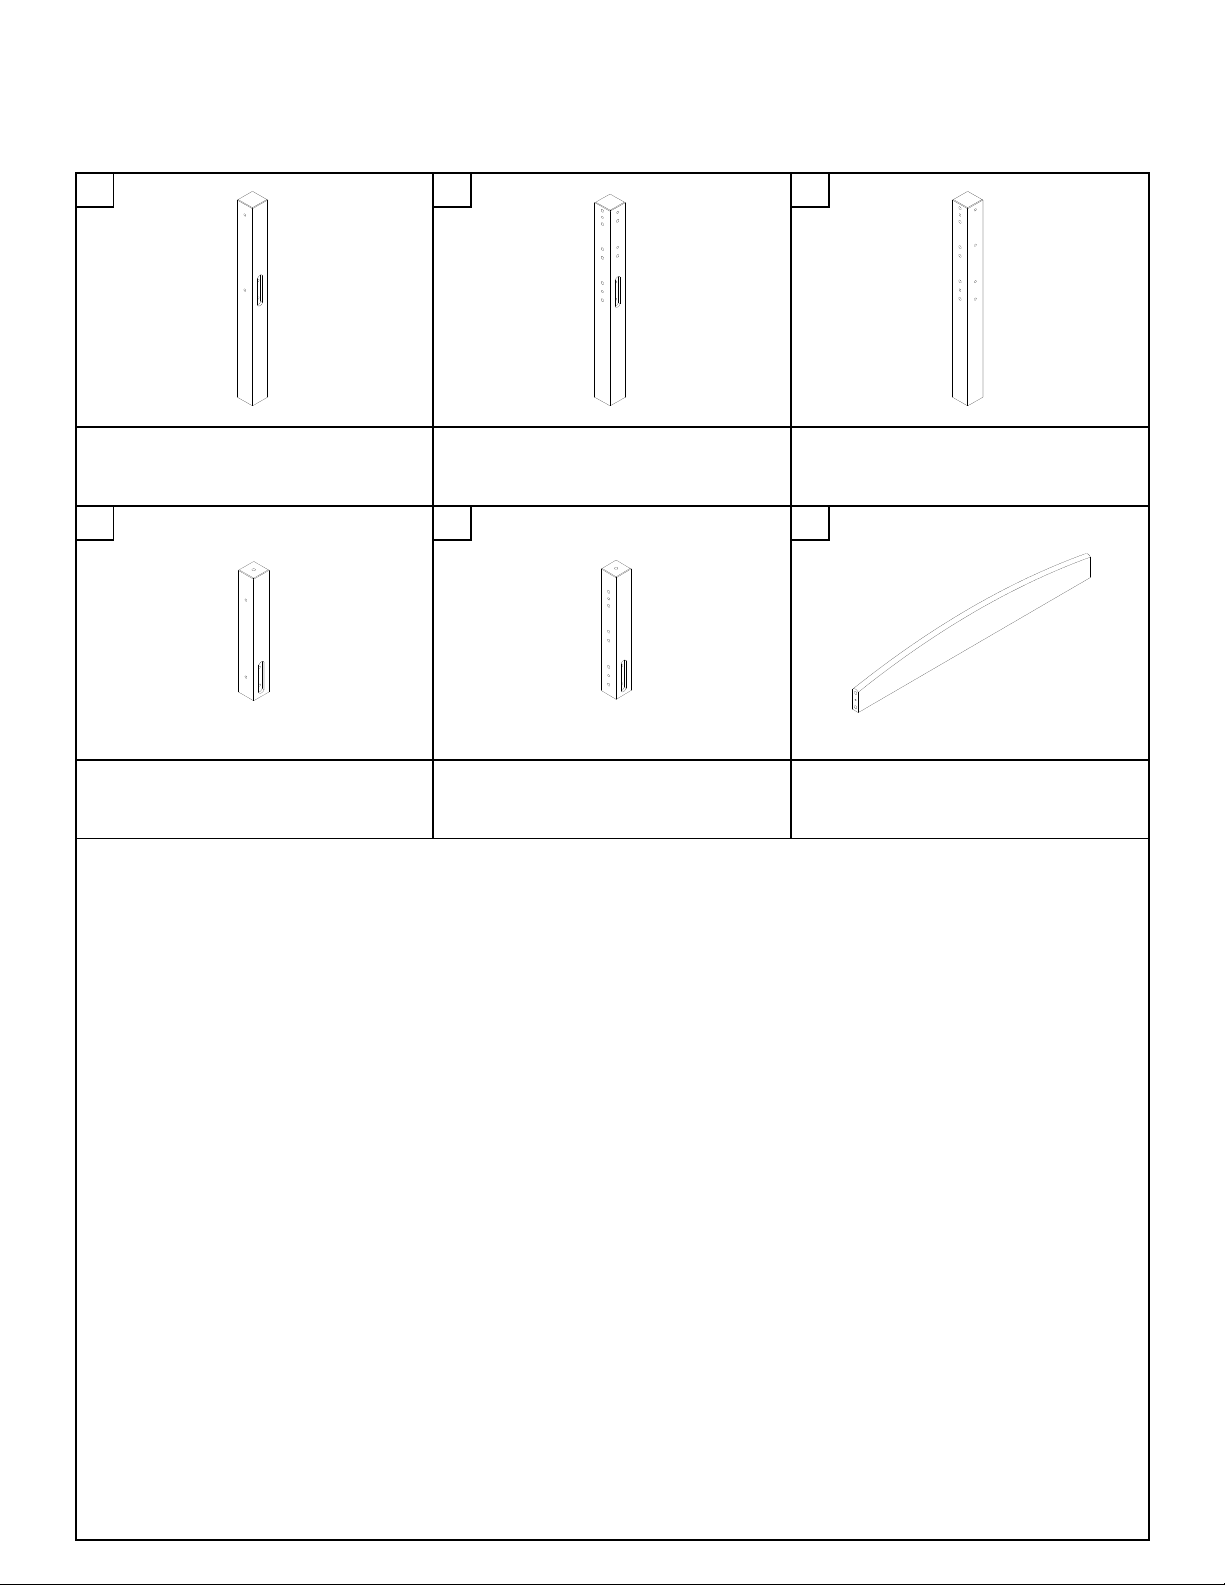
PARTS LIST
A B C
D E F
BOTTOM POST
HEADBOARD TOP CROSS
2 PCS
2 PCS
6 PCS
NOTE- the components needed to
assemble the triple bunk bed are packed
in 2 boxes. Make sure that all parts are
accounted for before beginning
assembly.
BOTTOM POST
TRIPLE BUNK BED
TOP POST
TOP POST
TOP POST
1 PC
2 PCS
1 PC
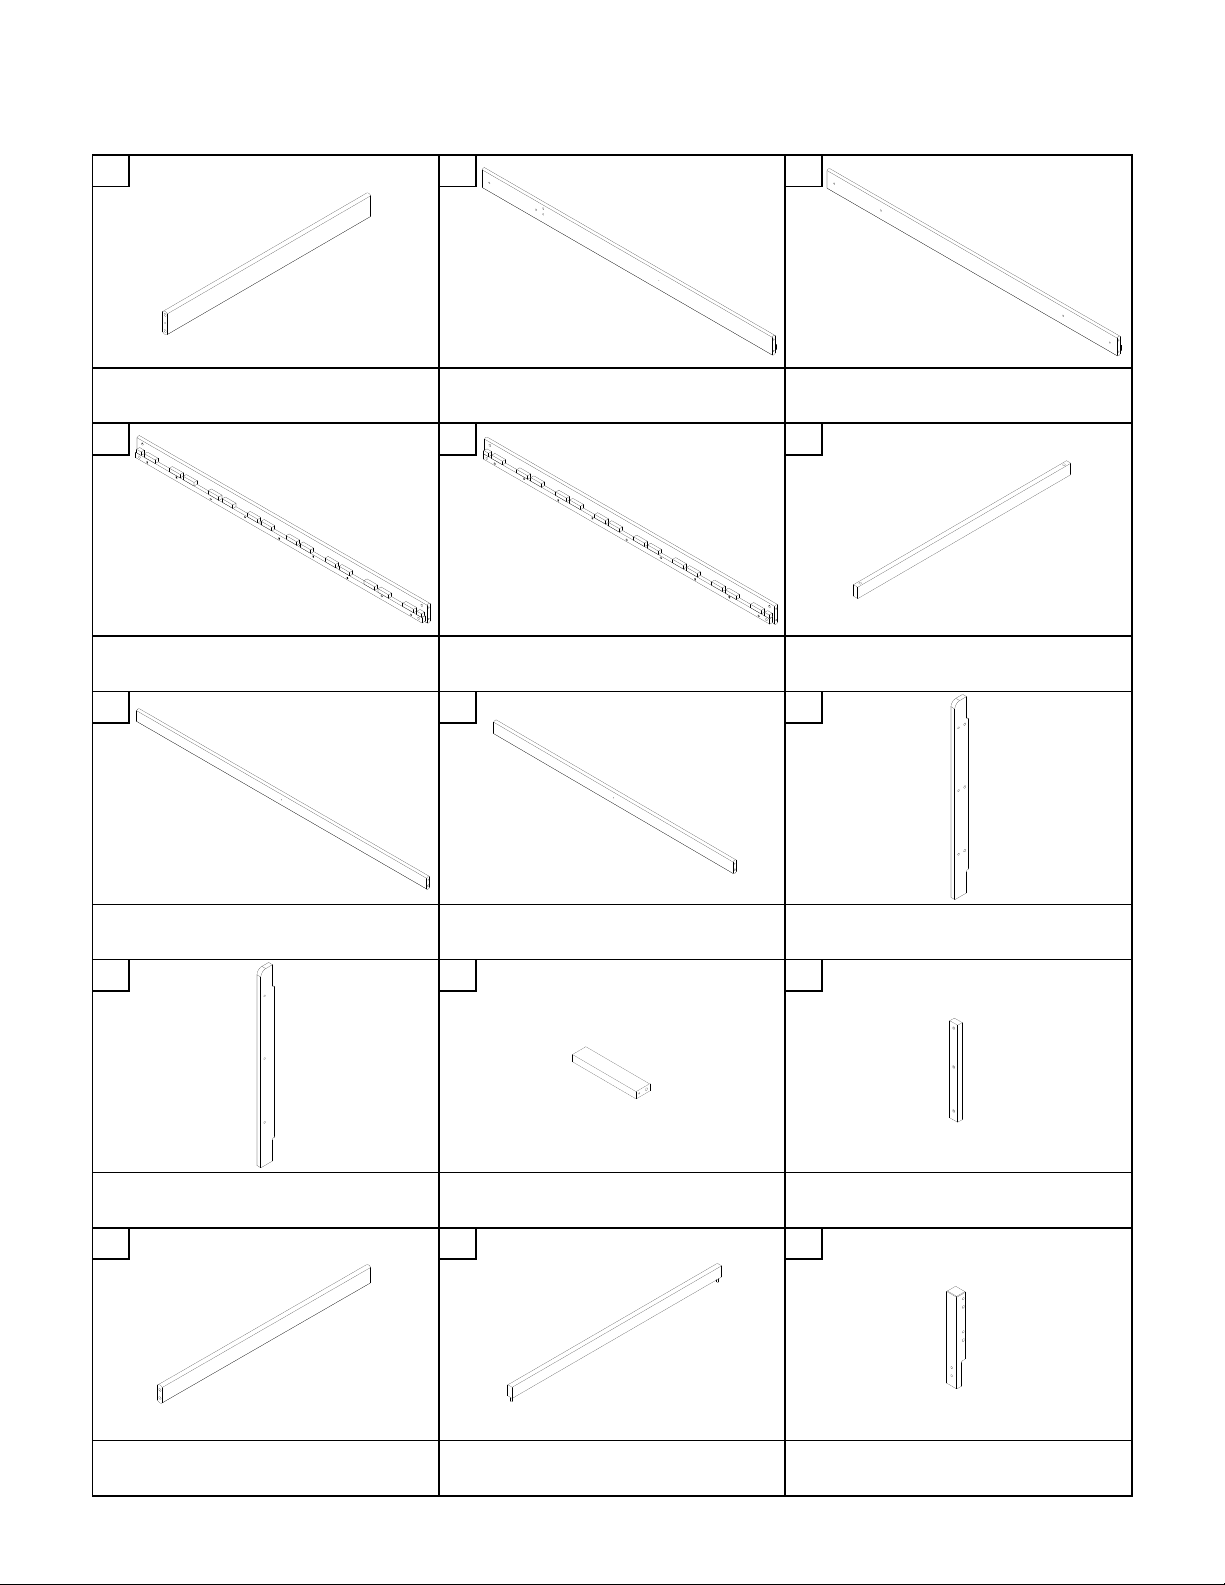
PARTS LIST
G H I
J K L
M N O
P Q R
S T U
HEADBOARD CENTER CROSS
SLAT WITH WOOD DOWEL
GUARDRAIL POST
6 PCS
6 PCS
2 PCS
RIGHT LADDER END
LADDER STEP
GUARDRAIL LEG
1 PC
9 PCS
3 PCS
LONG GUARDRAIL
SHORT GUARDRAIL
LEFT LADDER END
4 PCS
2 PCS
1 PC
BACK SIDE RAIL
BOTTOM BACK SIDE RAIL
SLAT WITHOUT WOOD DOWEL
2 PCS
1 PC
18 PCS
TRIPLE BUNK BED
HEADBOARD BOTTOM CROSS
TOP FRONT SIDE RAIL
BOTTOM FRONT SIDE RAIL
6 PCS
1 PC
1 PC

PARTS LIST
V W X
Y Z A1
B1 C1
D1
1 PC
LONG LADDER RIGHT END
1 PC
1 PC
FRONT SIDE RAIL
LONG LADDER LEFT END
1 PC
CENTER POST
1 PC
SHORT GUARDRAIL
2 PCS
TRIPLE BUNK BED
CENTER POST
CENTER POST
1 PC
1 PC
RIGHT GUARDRAIL POST
CENTER POST
1 PC
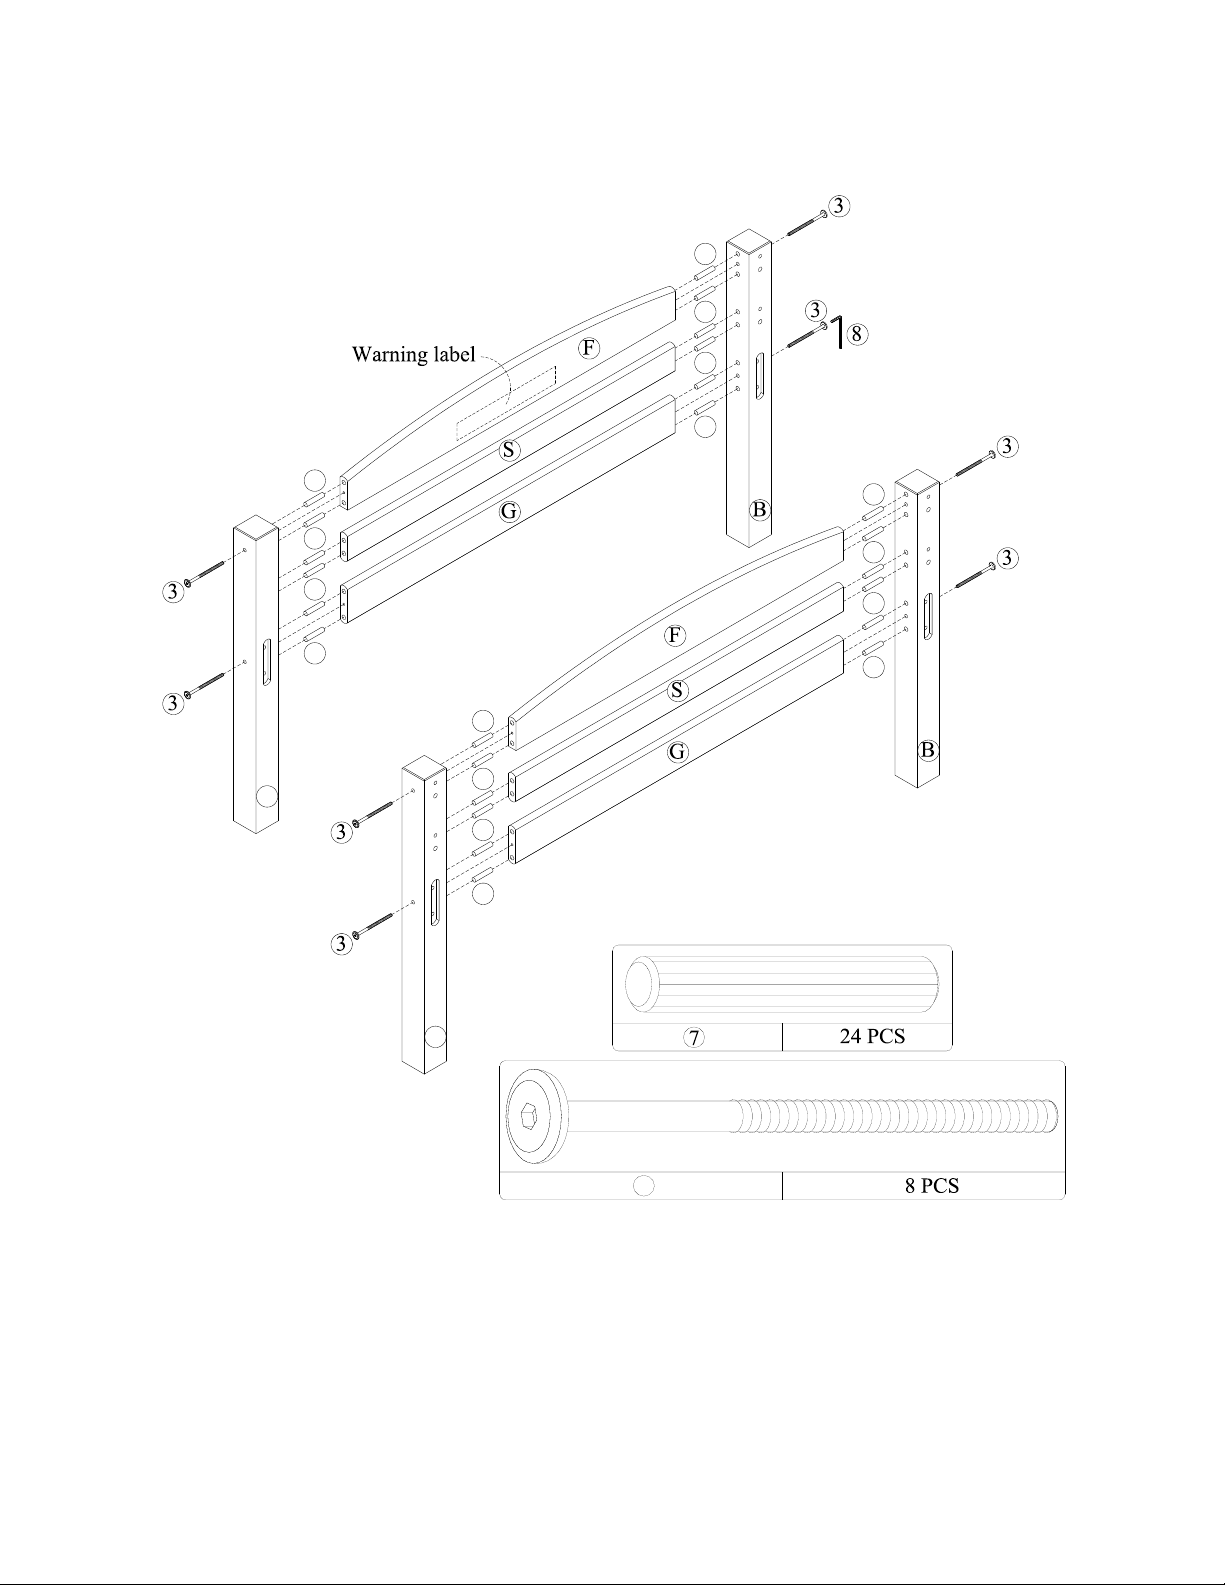
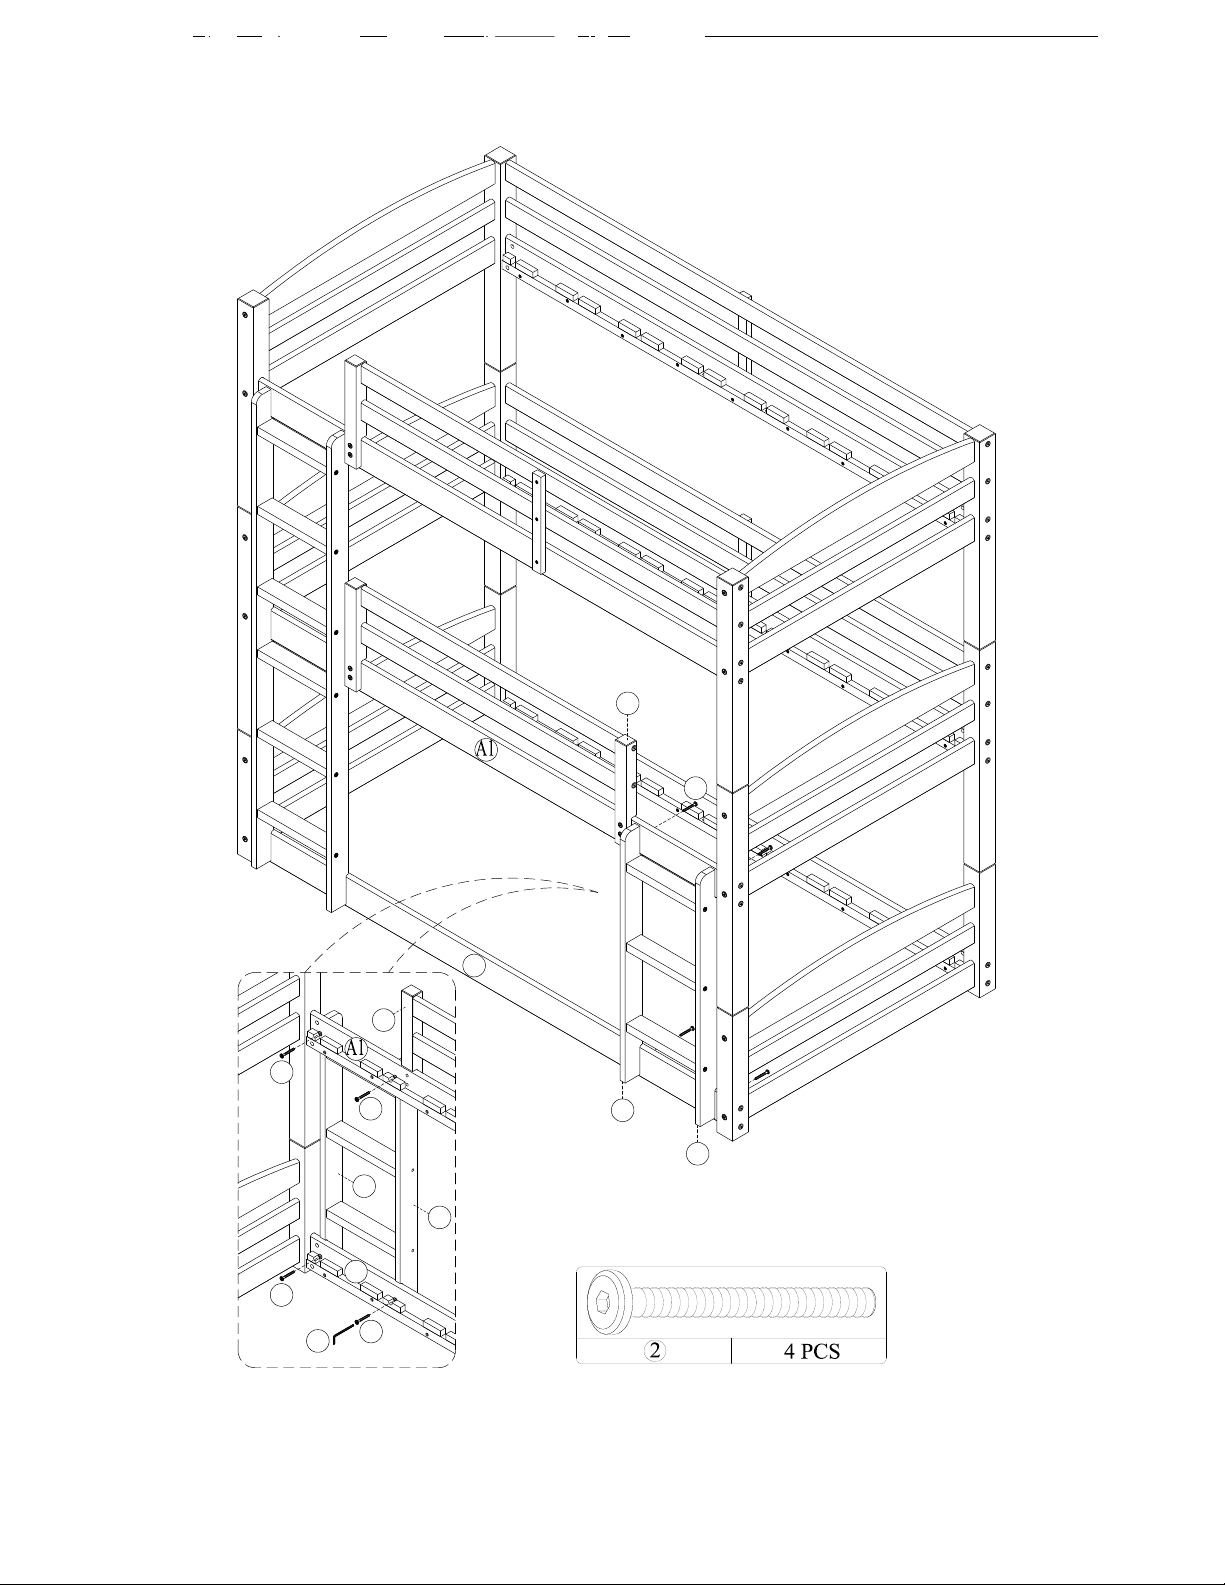
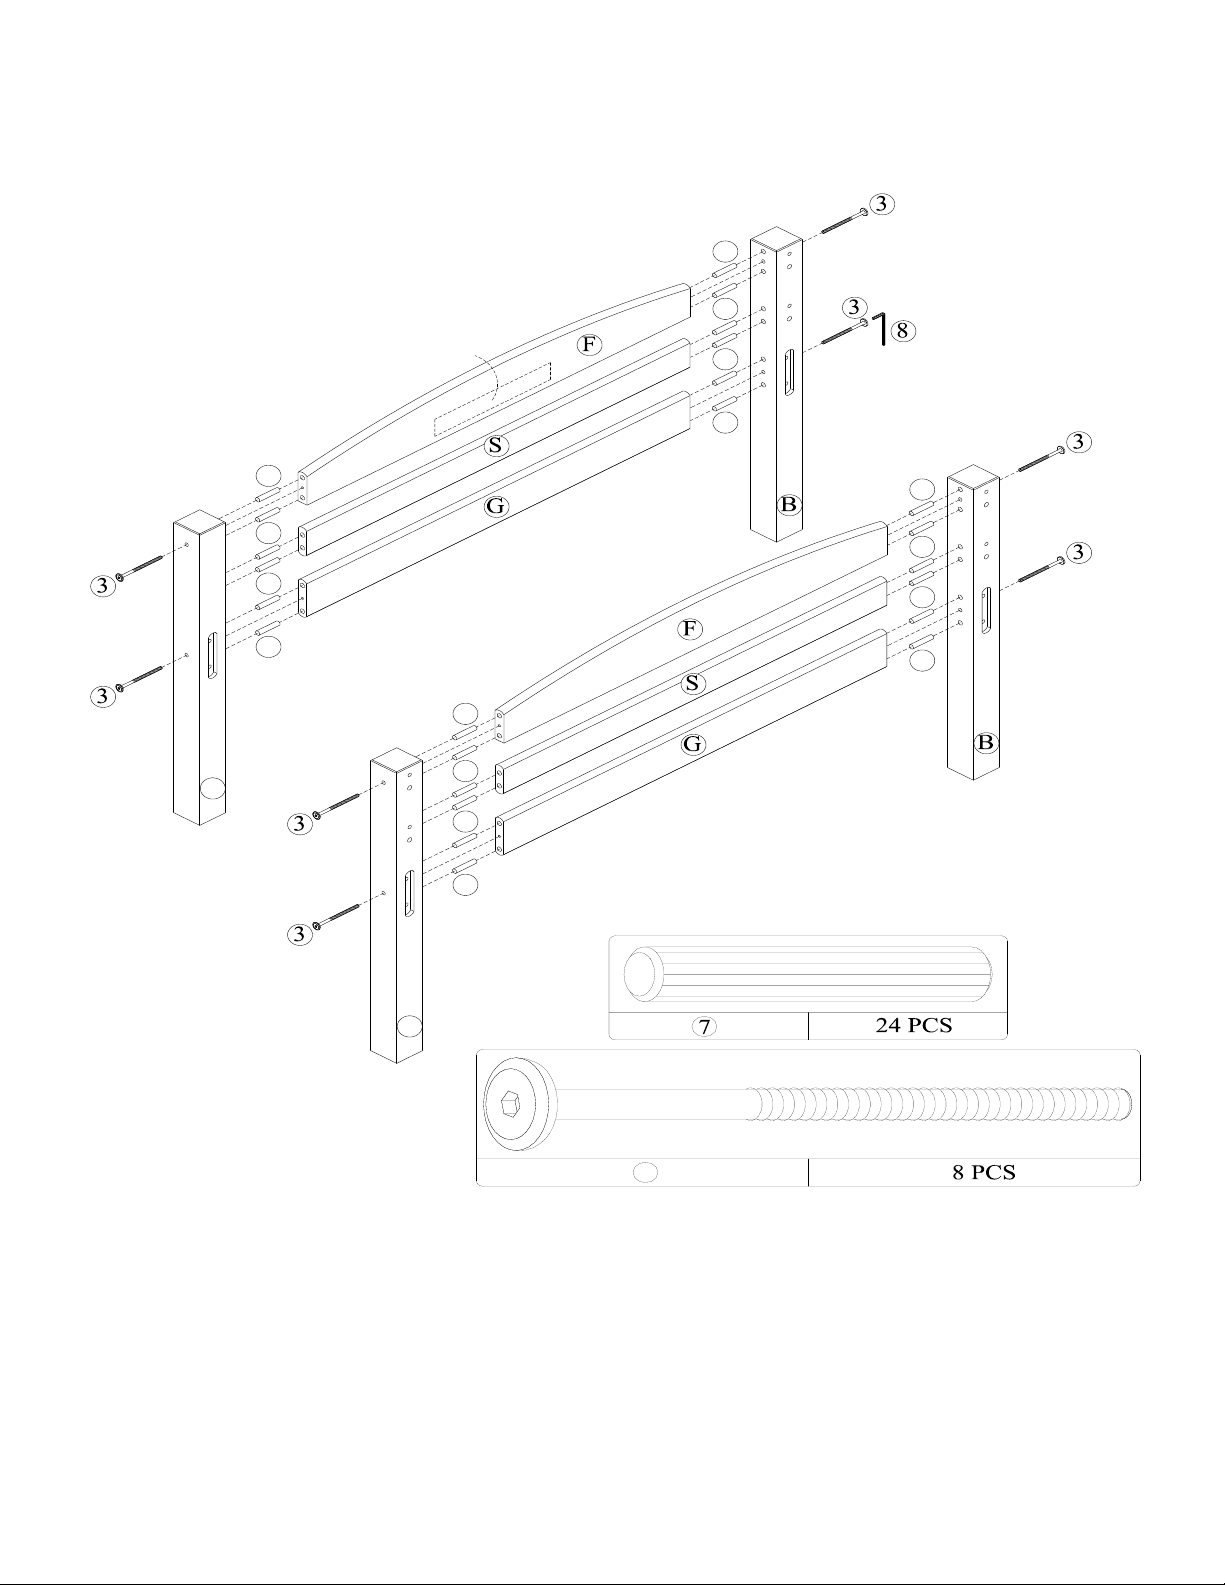
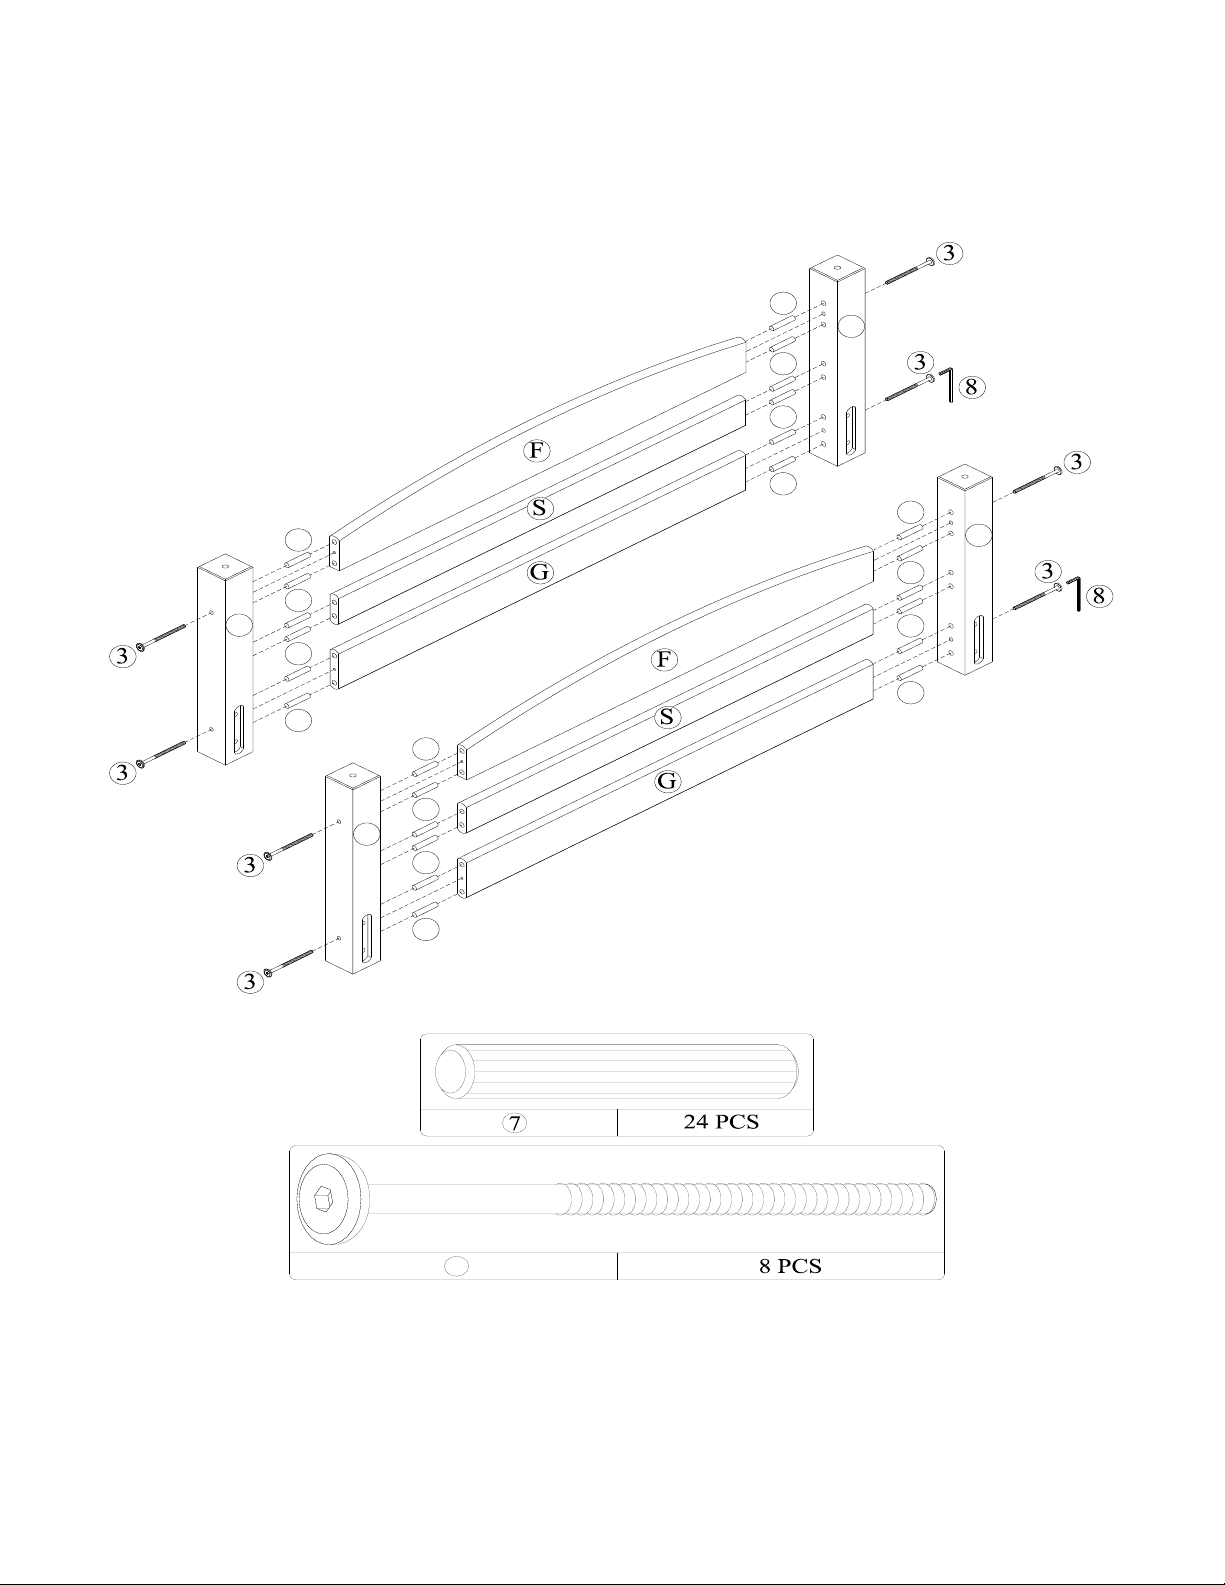
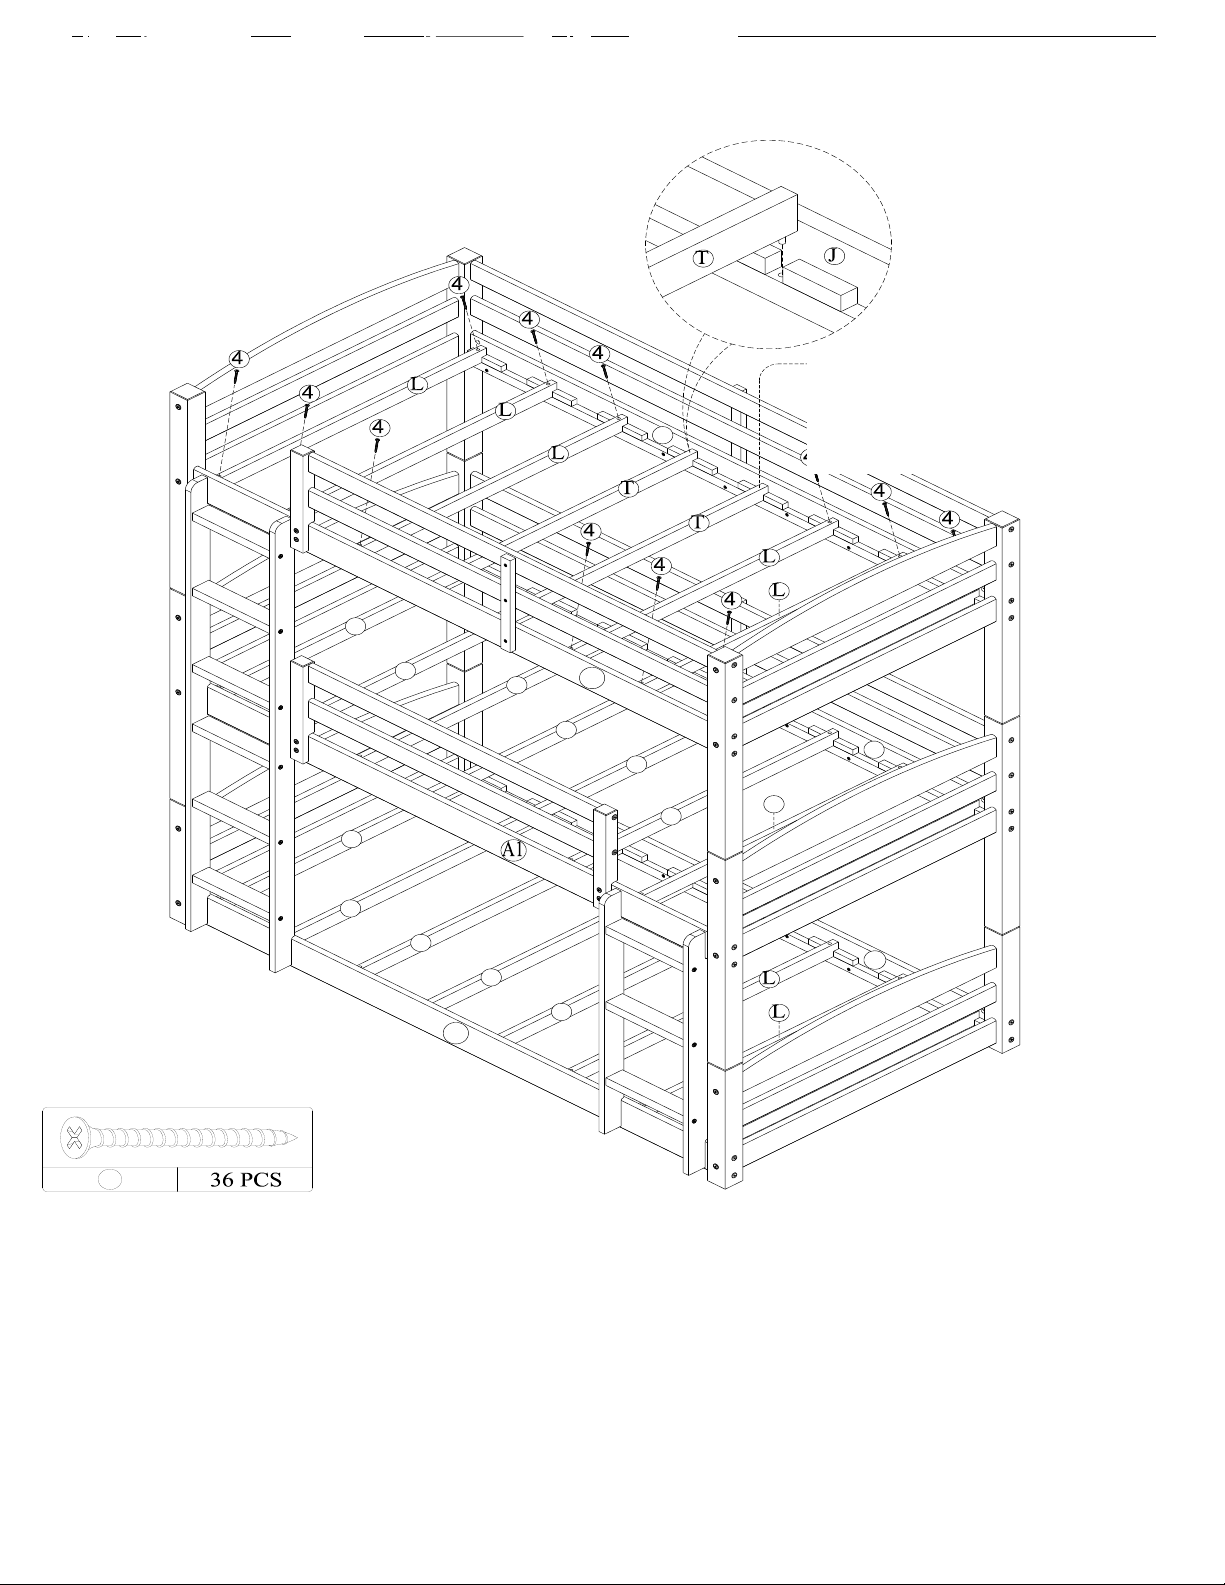
NOTE: Be sure to use headboard top cross (F) with warning label attached to it is between
top posts (A) and (B). See the above illustration for label orientation.
Repeat this previous step to assemble the other headboard using posts (B & C).
TRIPLE BUNK BED
STEP 1
Insert wood dowels (7) into the ends of headboard top cross (F), headboard bottom cross
(G) and headboard center cross (S). Attach them to top posts (A & B) using wood joint
connectors (3) as shown. Tighten the wood joint connectors (3) with the Allen key (8).
NOTES: Headboard top crosses (F, G& S) may require that they be pulled closer together or
further apart in order to allow wood dowels (7) to align with holes in top posts (A & B).
3
A
7
7
7
7
7
7
7
7
C
7
7
7
7
7
7
7
7

TRIPLE BUNK BED
STEP 2
Insert wood dowels (7) into the ends of headboard top cross (F), headboard bottom
cross (G) and headboard center cross (S) and attach them to bottom posts (D) & (E)
using wood joint connectors (3) as shown. Tighten the wood joint connectors (3) with
the Allen key (8).
D
E
7
7
7
7
7
7
7
7
D
E
7
7
7
7
7
7
7
7
3
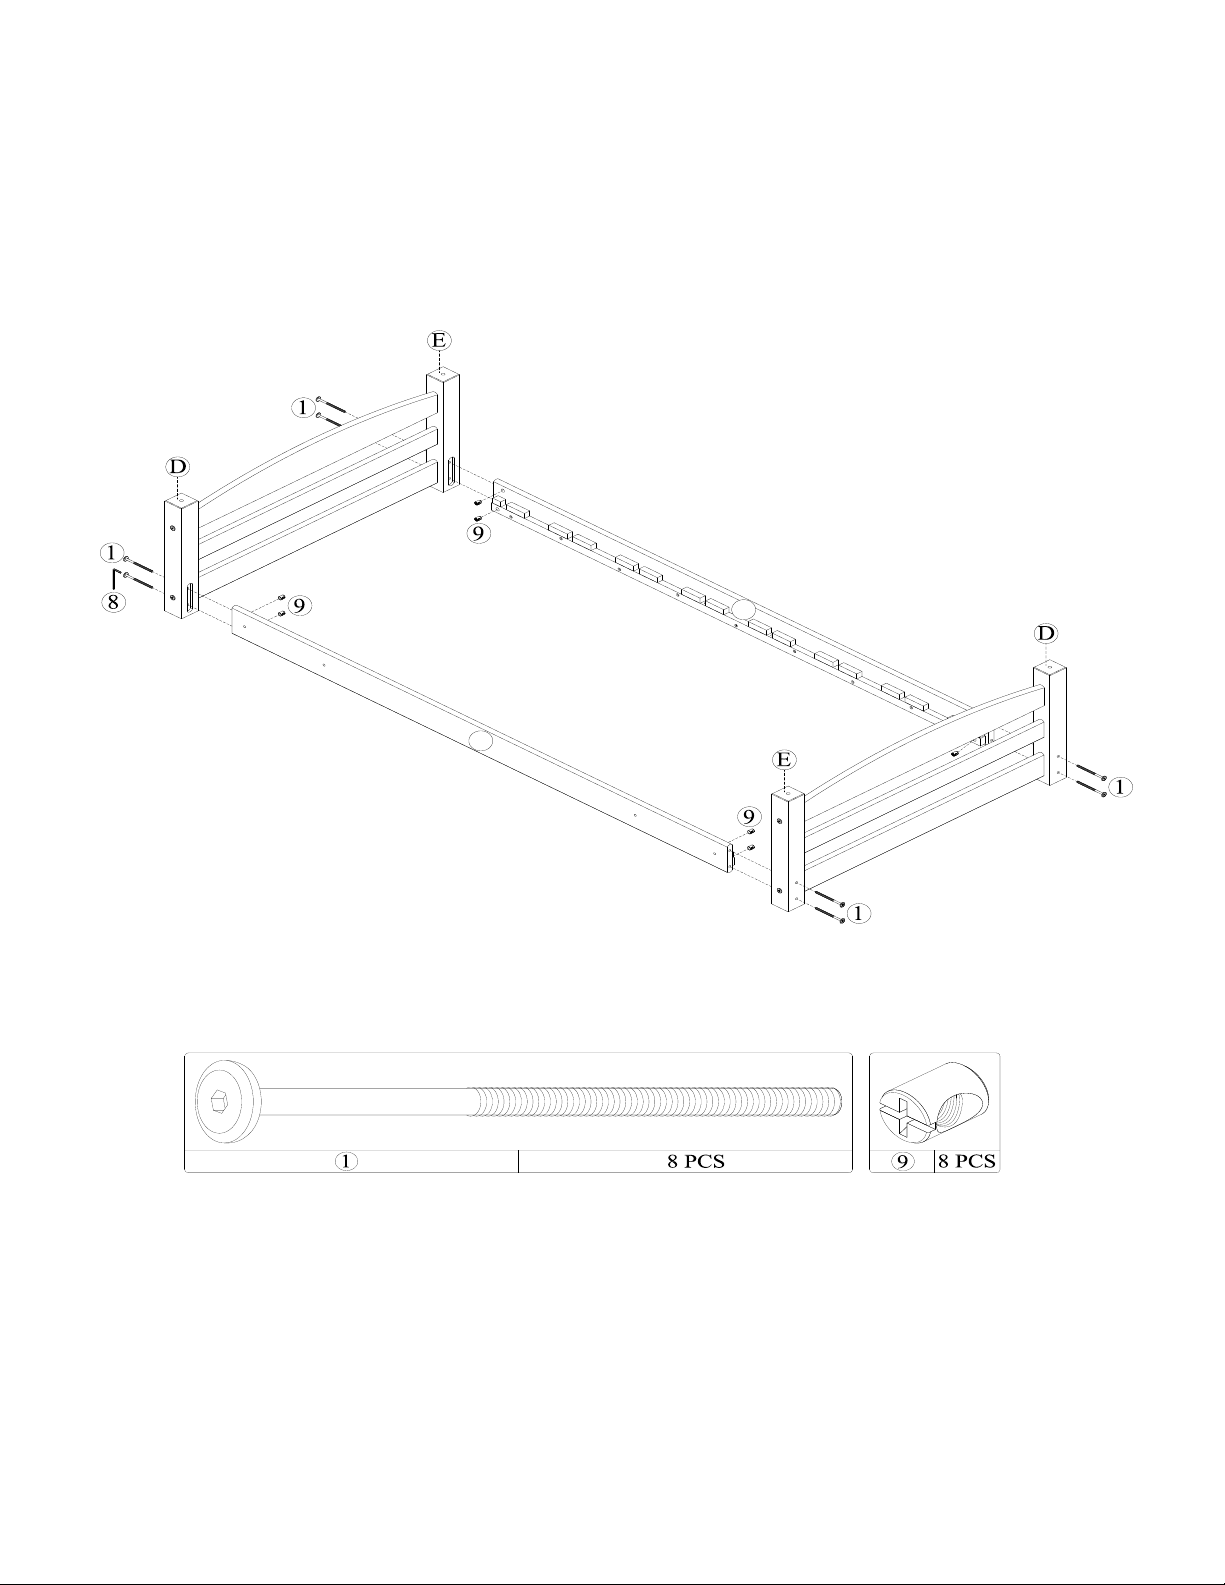
TRIPLE BUNK BED
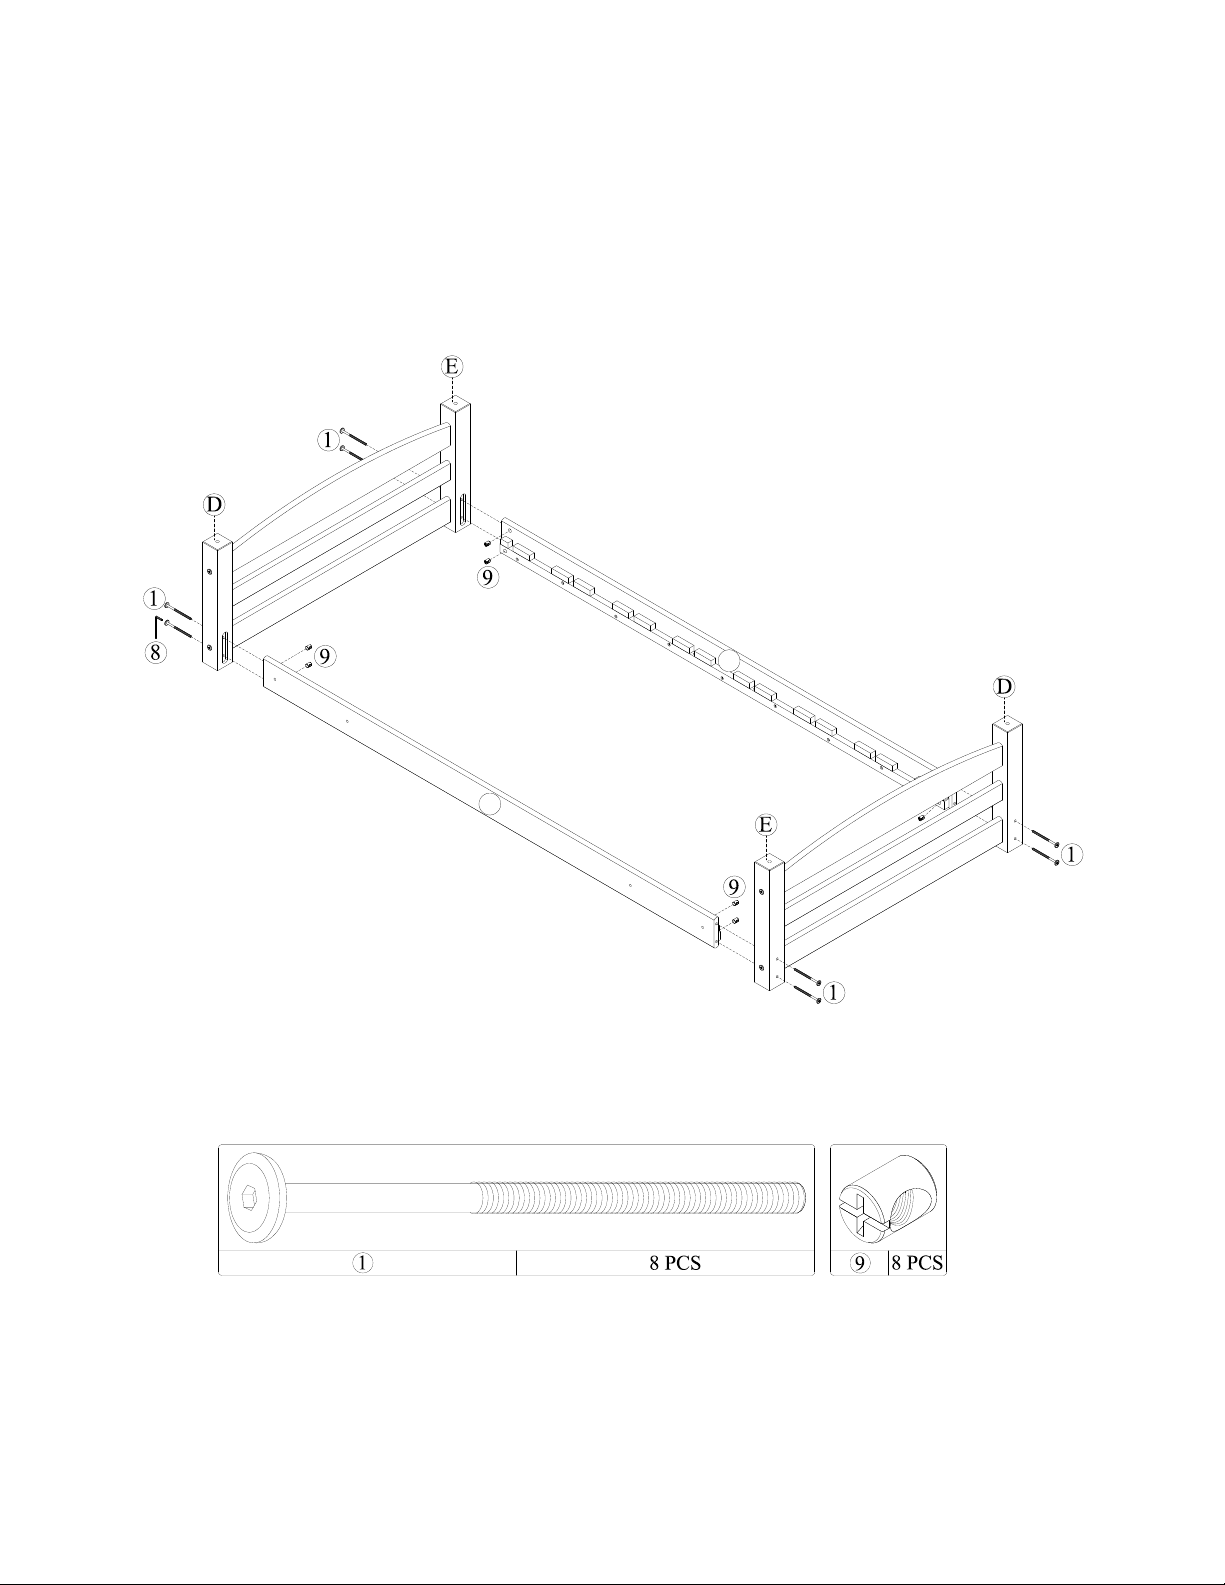
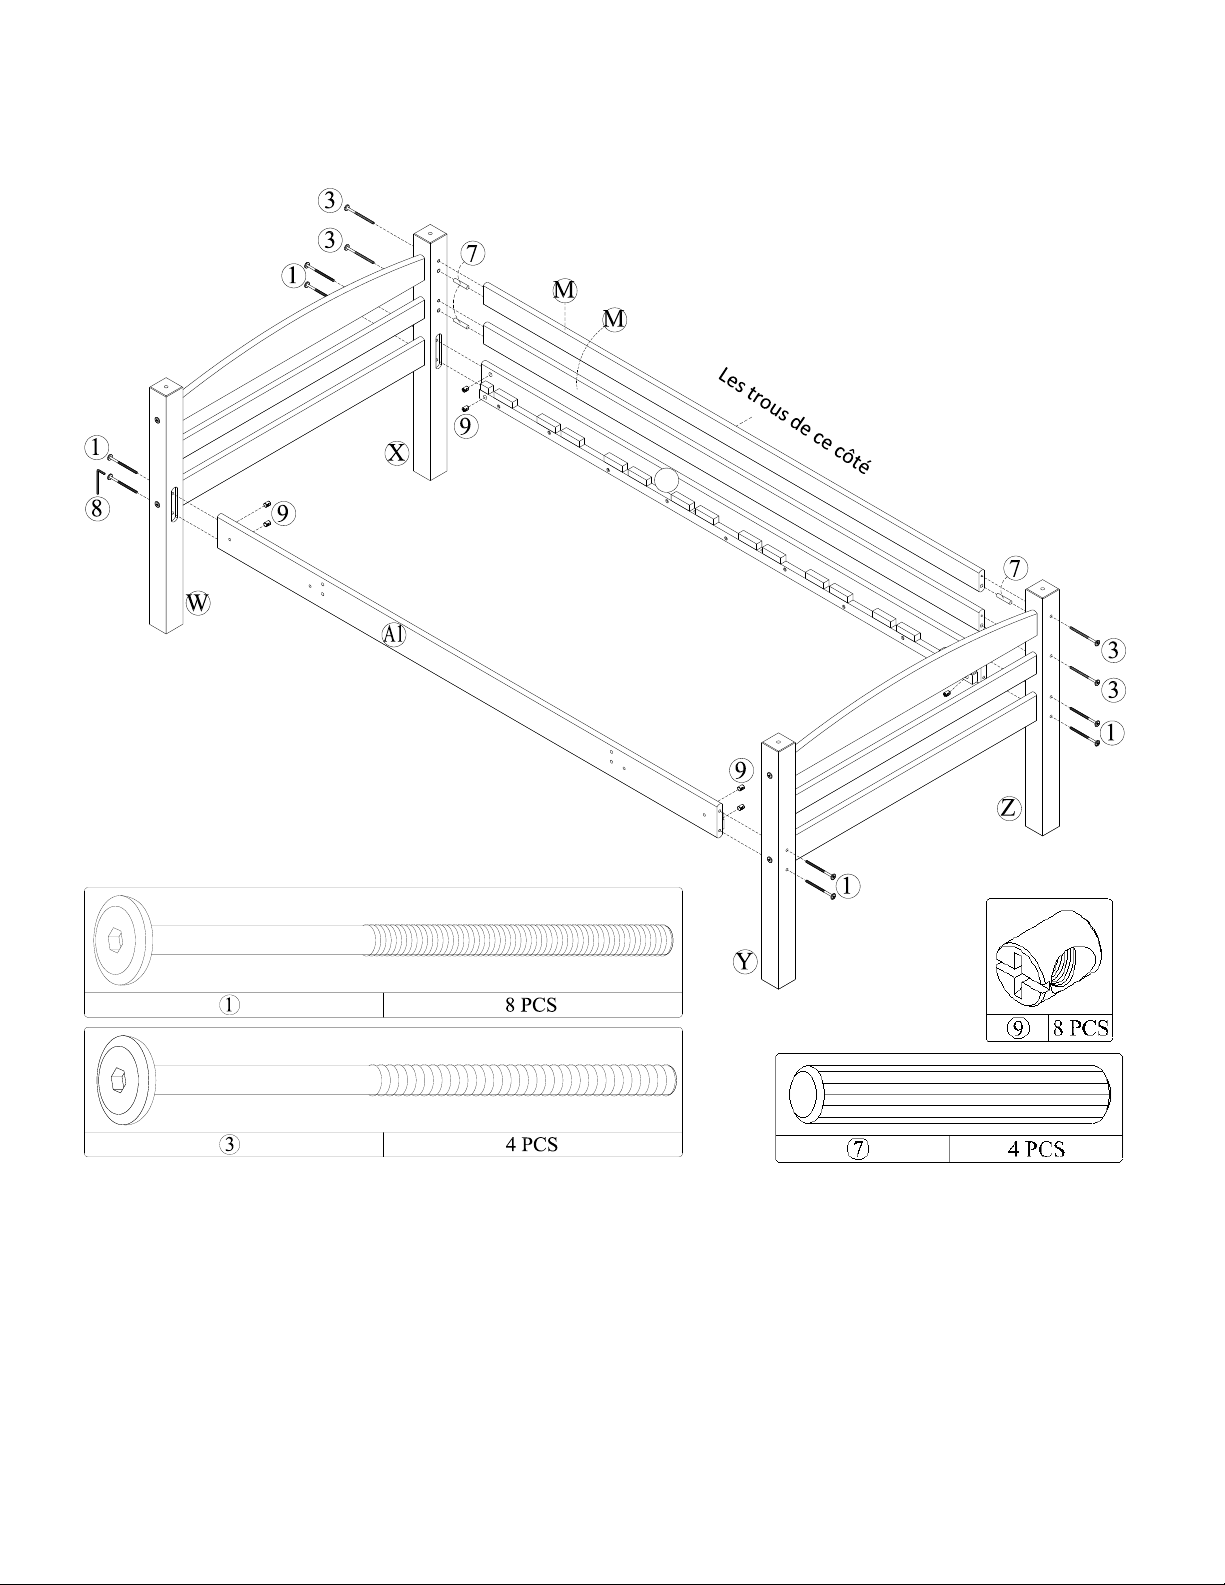
Note: This is the lower bunk.
Attach the two headboards with bottom posts (D & E) to bottom front side rail (I) and
bottom back side rail (K) using joint connectors (1) and barrel nuts (9) as shown.
Tighten the joint connectors (1) with the Allen key (8).
STEP 3
K
I

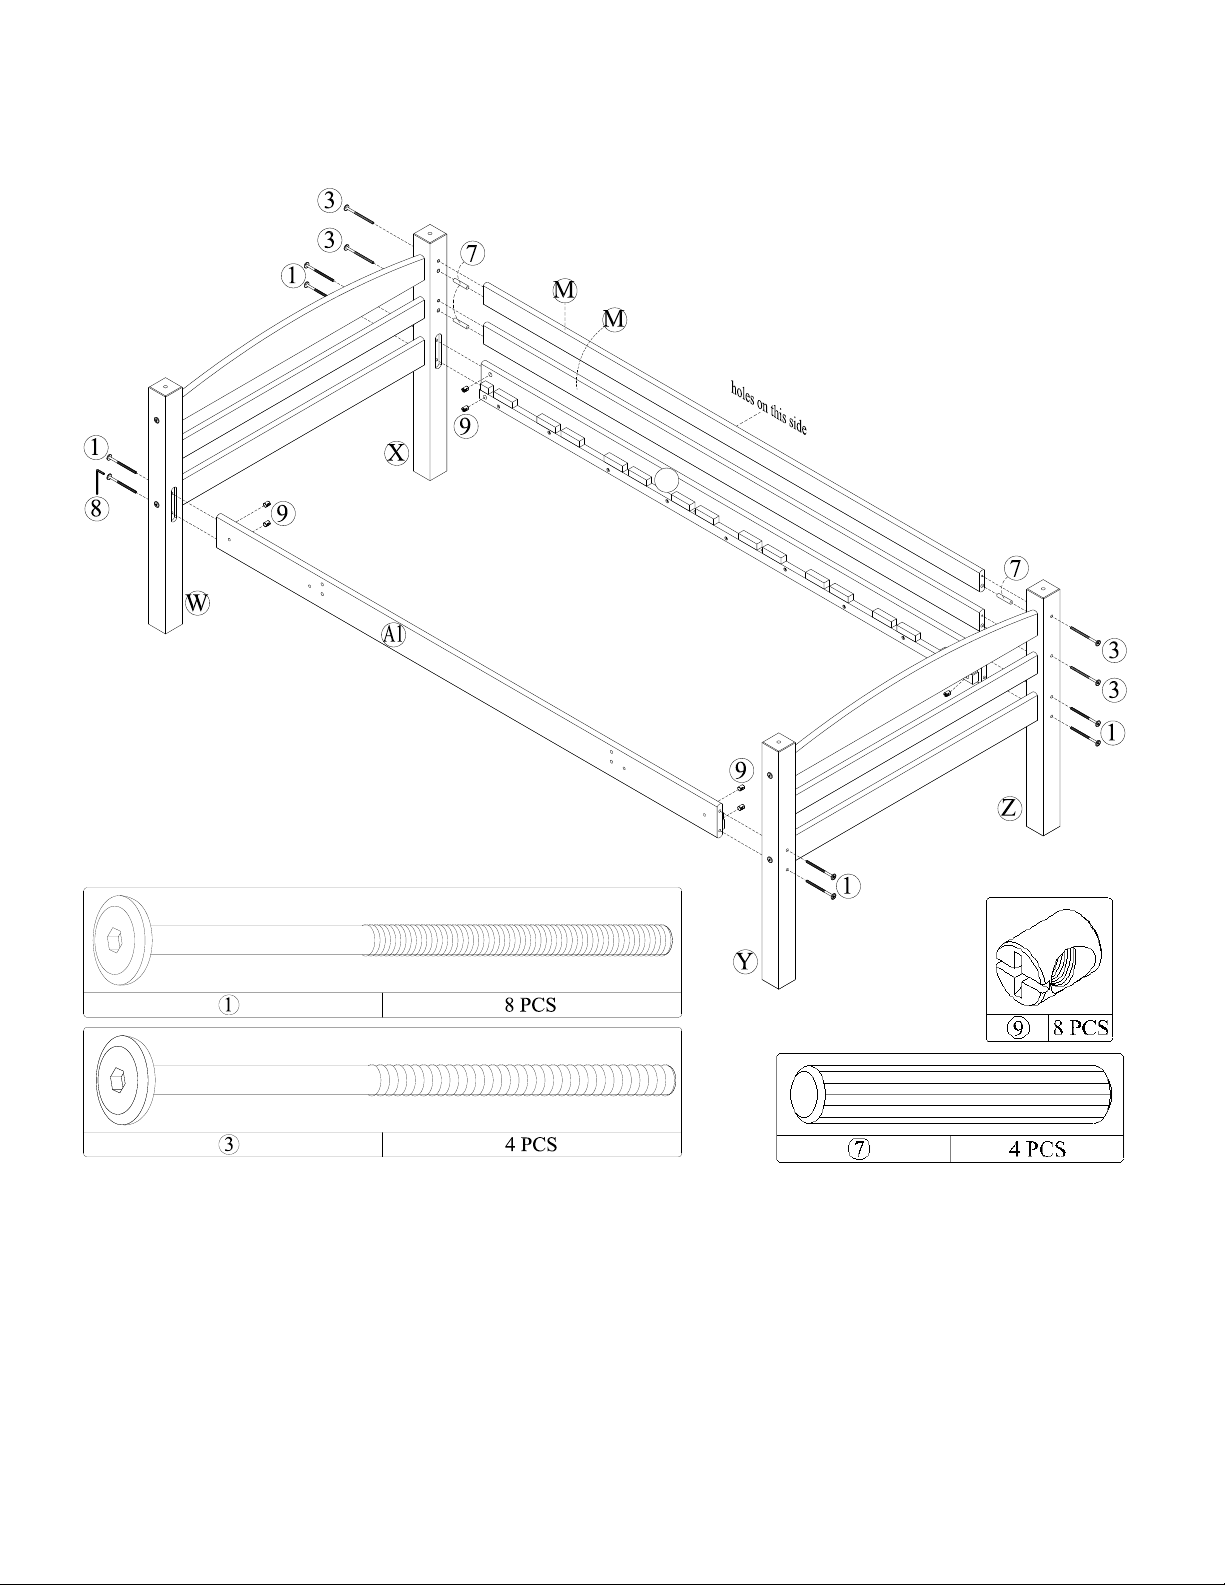
STEP 4
TRIPLE BUNK BED
Insert wood dowels (7) into each end of the long guardrails (M).
Attach two long guardrails (M) and two top side rails (H & J) to top posts (A & B) and (C & B)
as shown.
Fasten top side rails (H & J) with joint connectors (1) and barrel nuts (9). Fasten long
guardrails (M) with wood joint connectors (3).
Tighten the joint connectors (1) and wood joint connectors (3) with the Allen key (8).
Note: This is the top bunk.
J
H

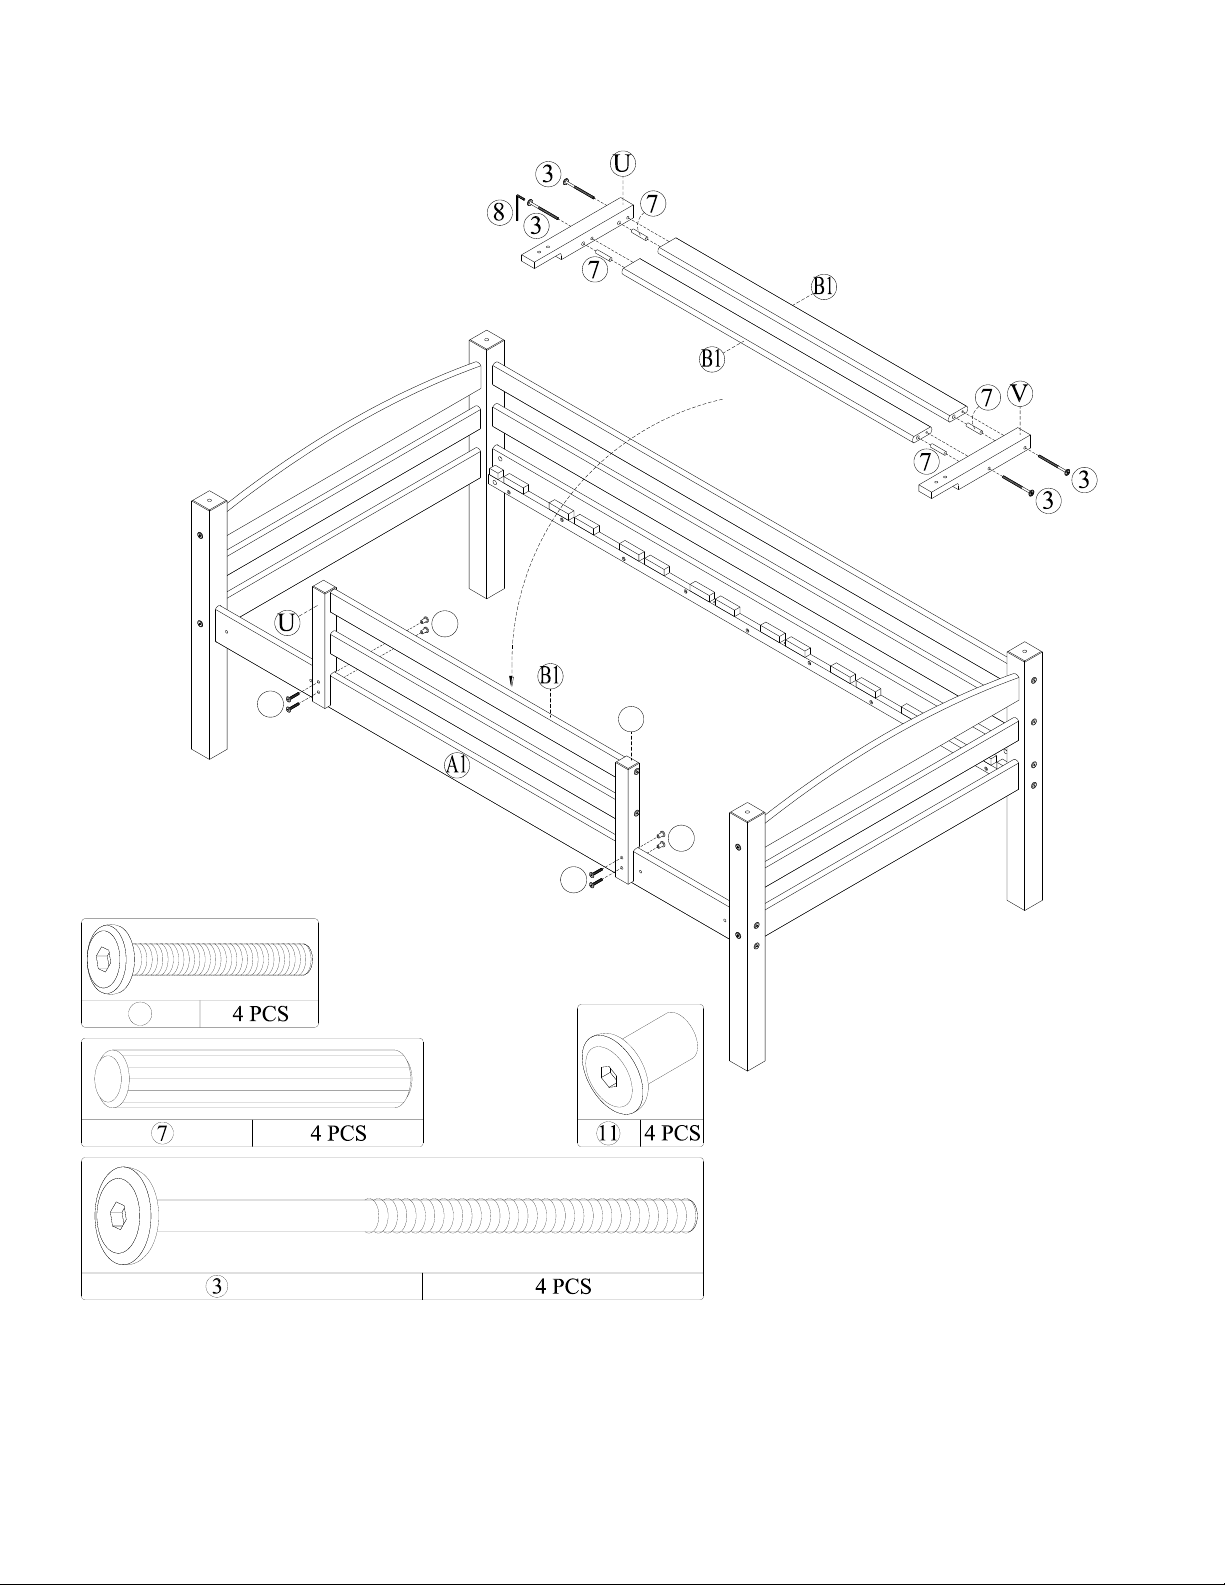
STEP 5
Fasten the short guardrails (N) to top post (B) with wood joint connectors (3). Fasten
the guardrail post (U) to top front side rail (H) with joint connectors (10) and hex cap
(11) as shown.
TRIPLE BUNK BED
Insert wood dowels (7) into short guardrails (N). Attach short guardrails (N) to
guardrail post (U) with wood joint connectors (3) as shown.
7
7
U
8
3
10
11
N
U
H
A
B
10
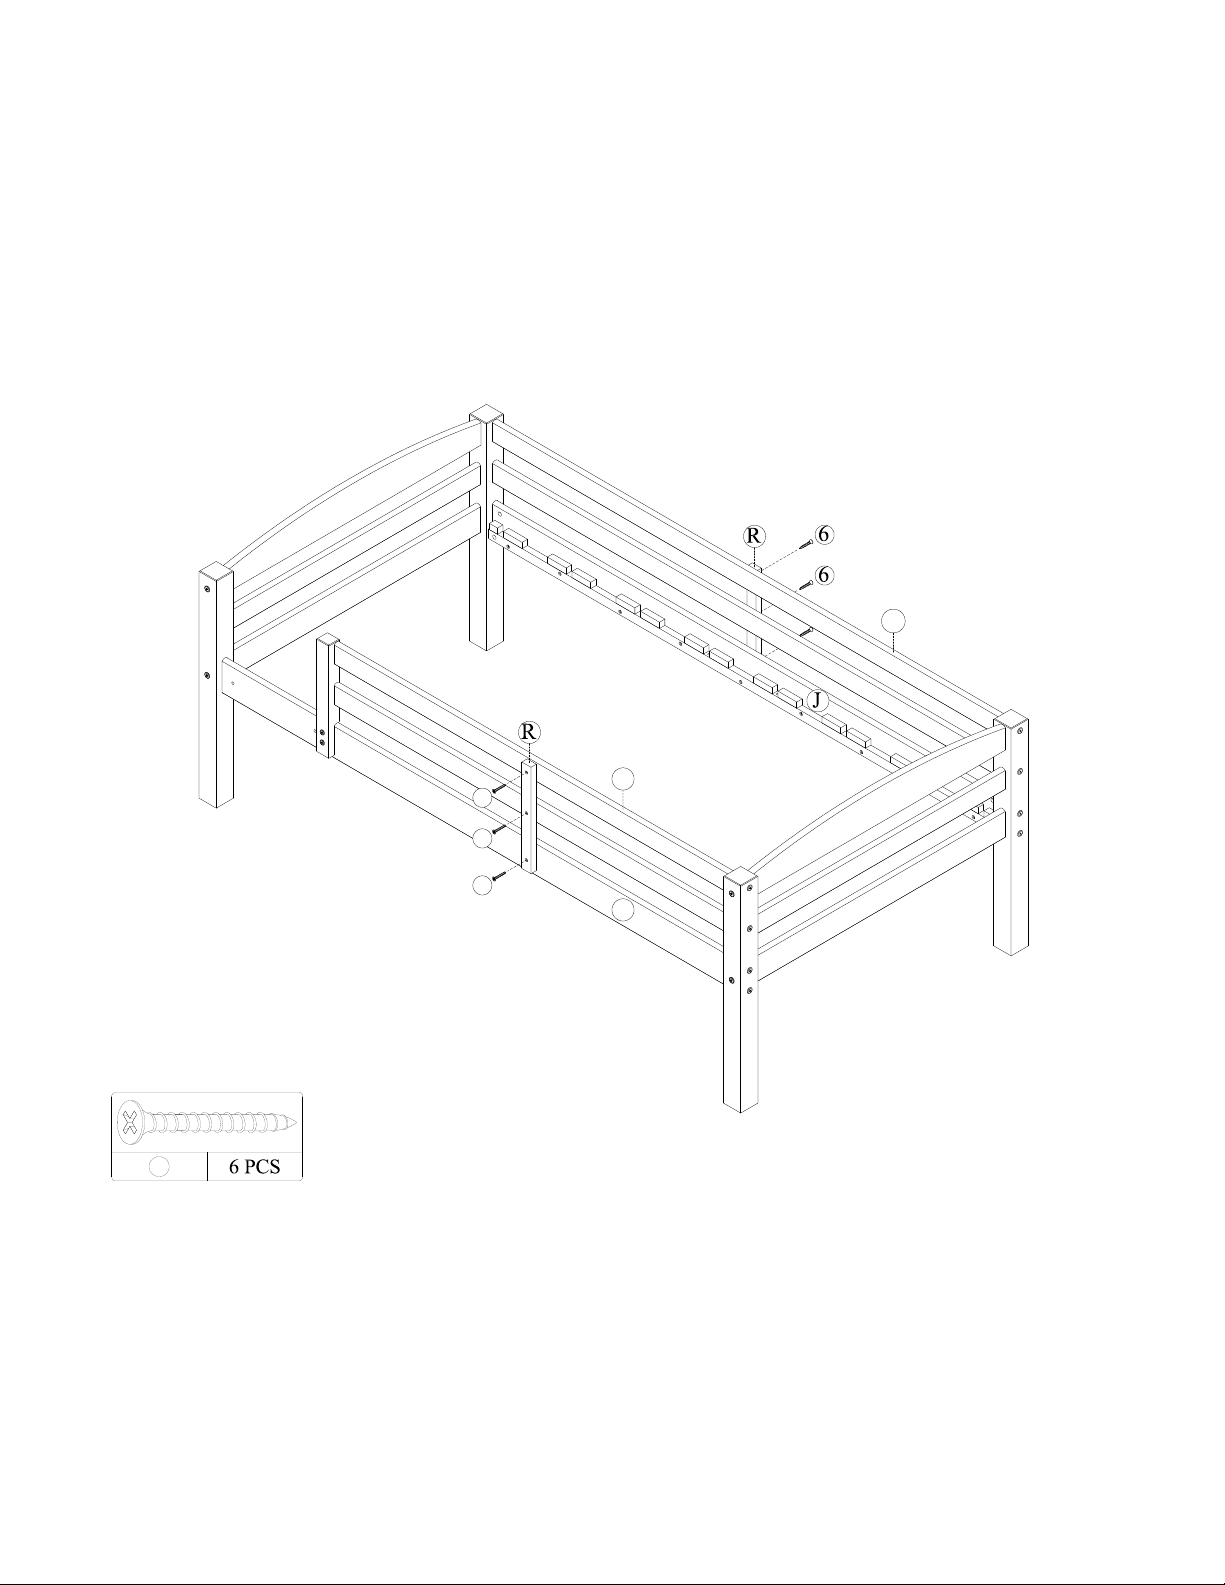
STEP 6
TRIPLE BUNK BED
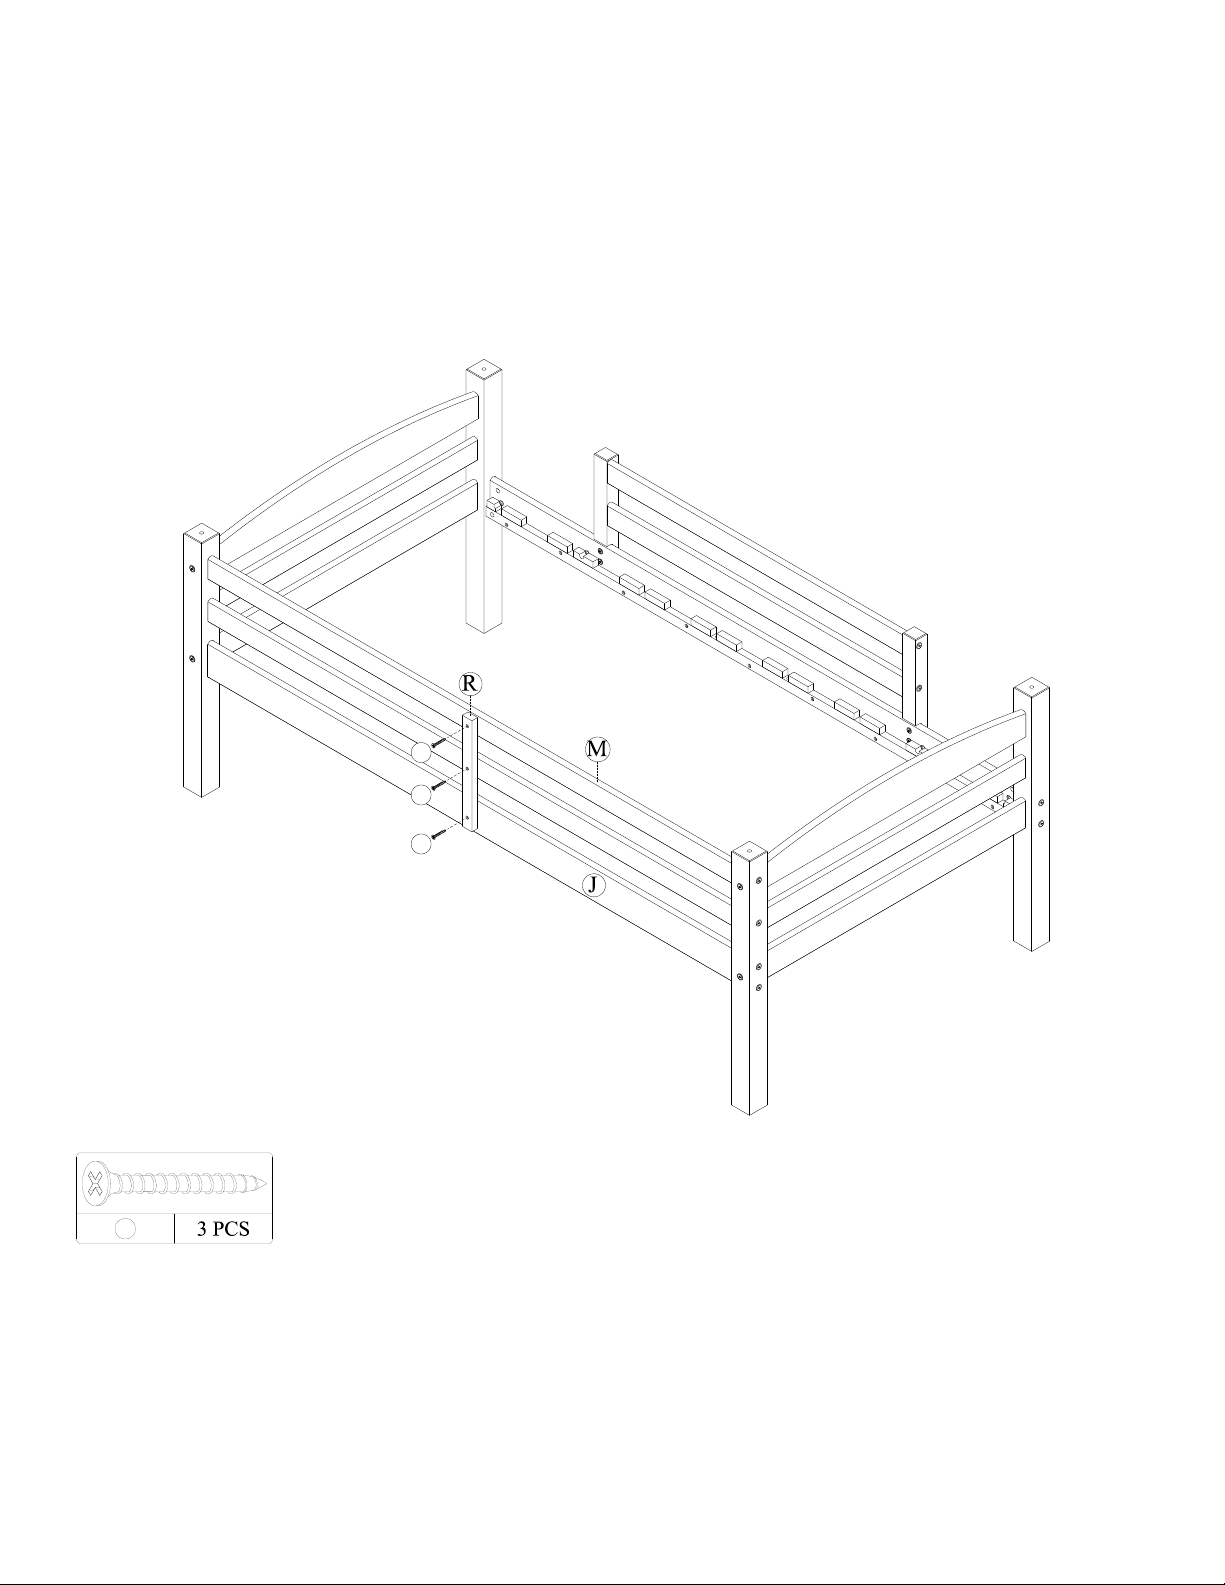
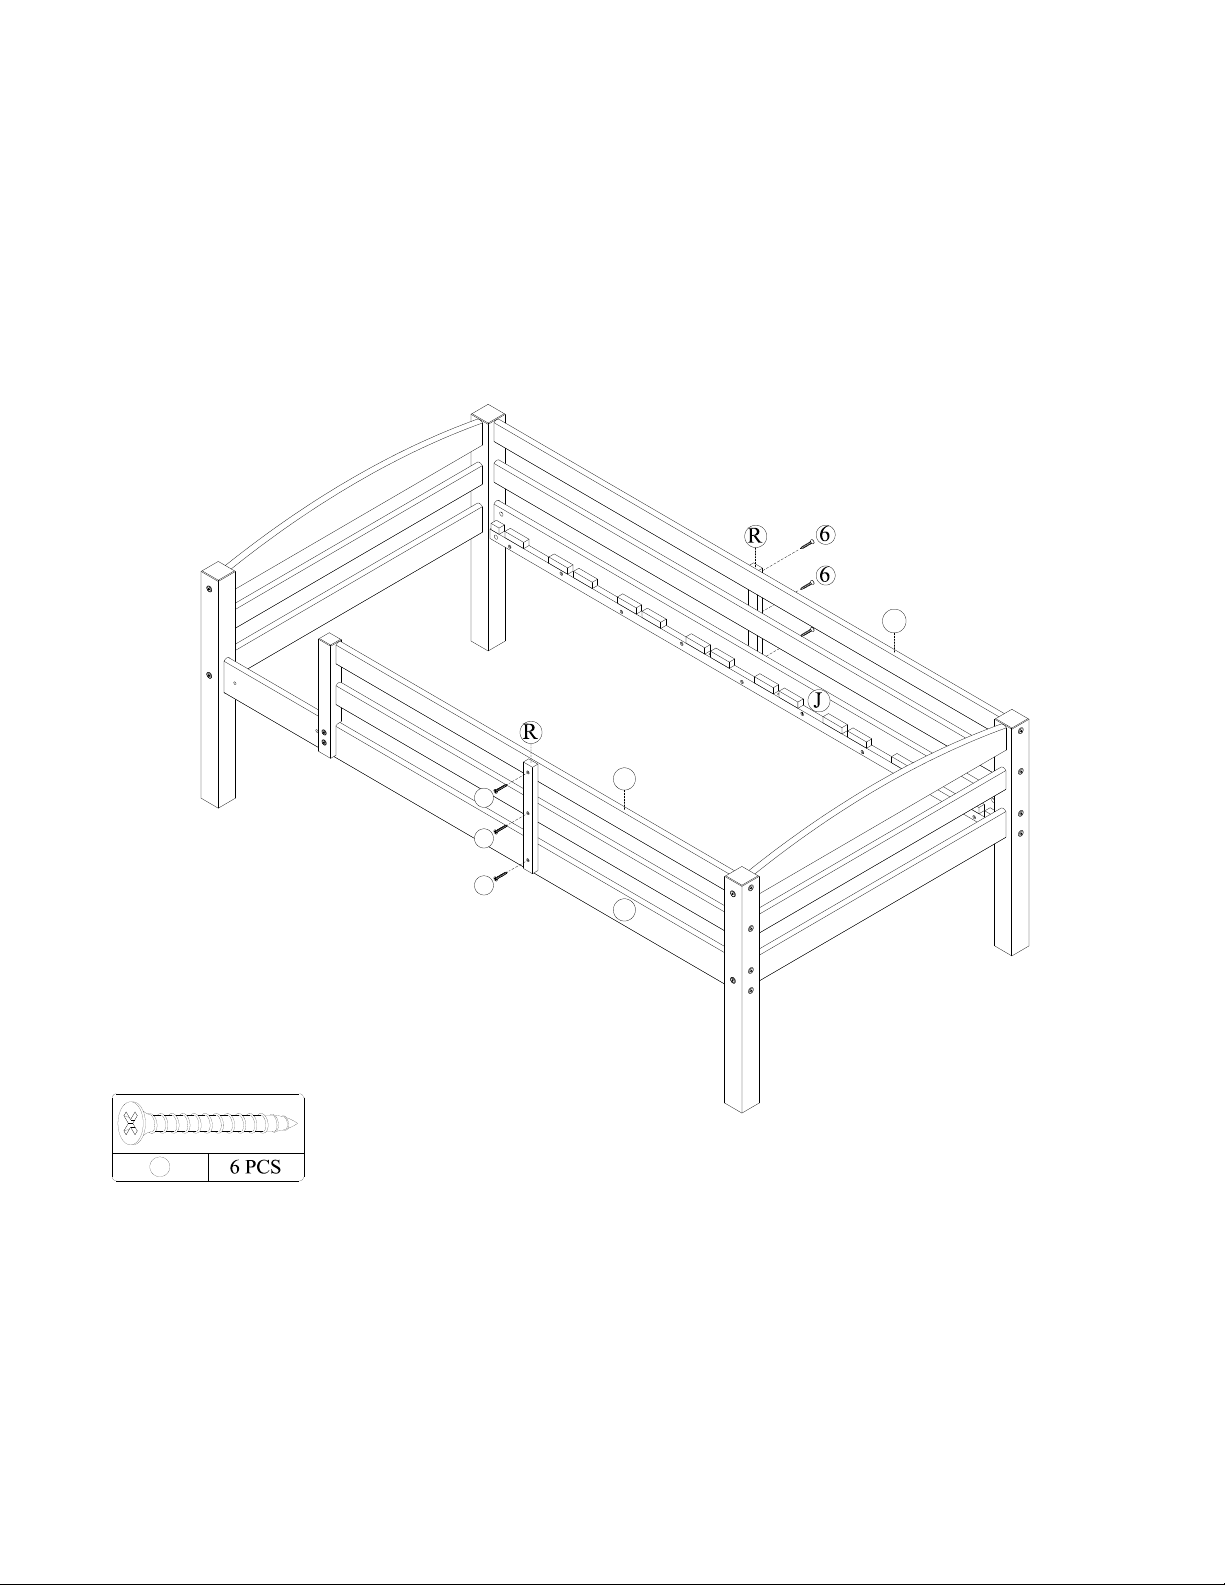
Attach the guardrail leg (R) to the short guardrails (N) and top front side rail (H) with
flat head screws (6). Attach the other guardrail leg (R) (on the other side of the bed)
to long guardrails (M) and top back side rail (J) with flat head screws (6) as shown.
Use a Phillips head screwdriver (not included) to tighten the flat head screws.
6
6
6
N
M
H
6
STEP 7
TRIPLE BUNK BED
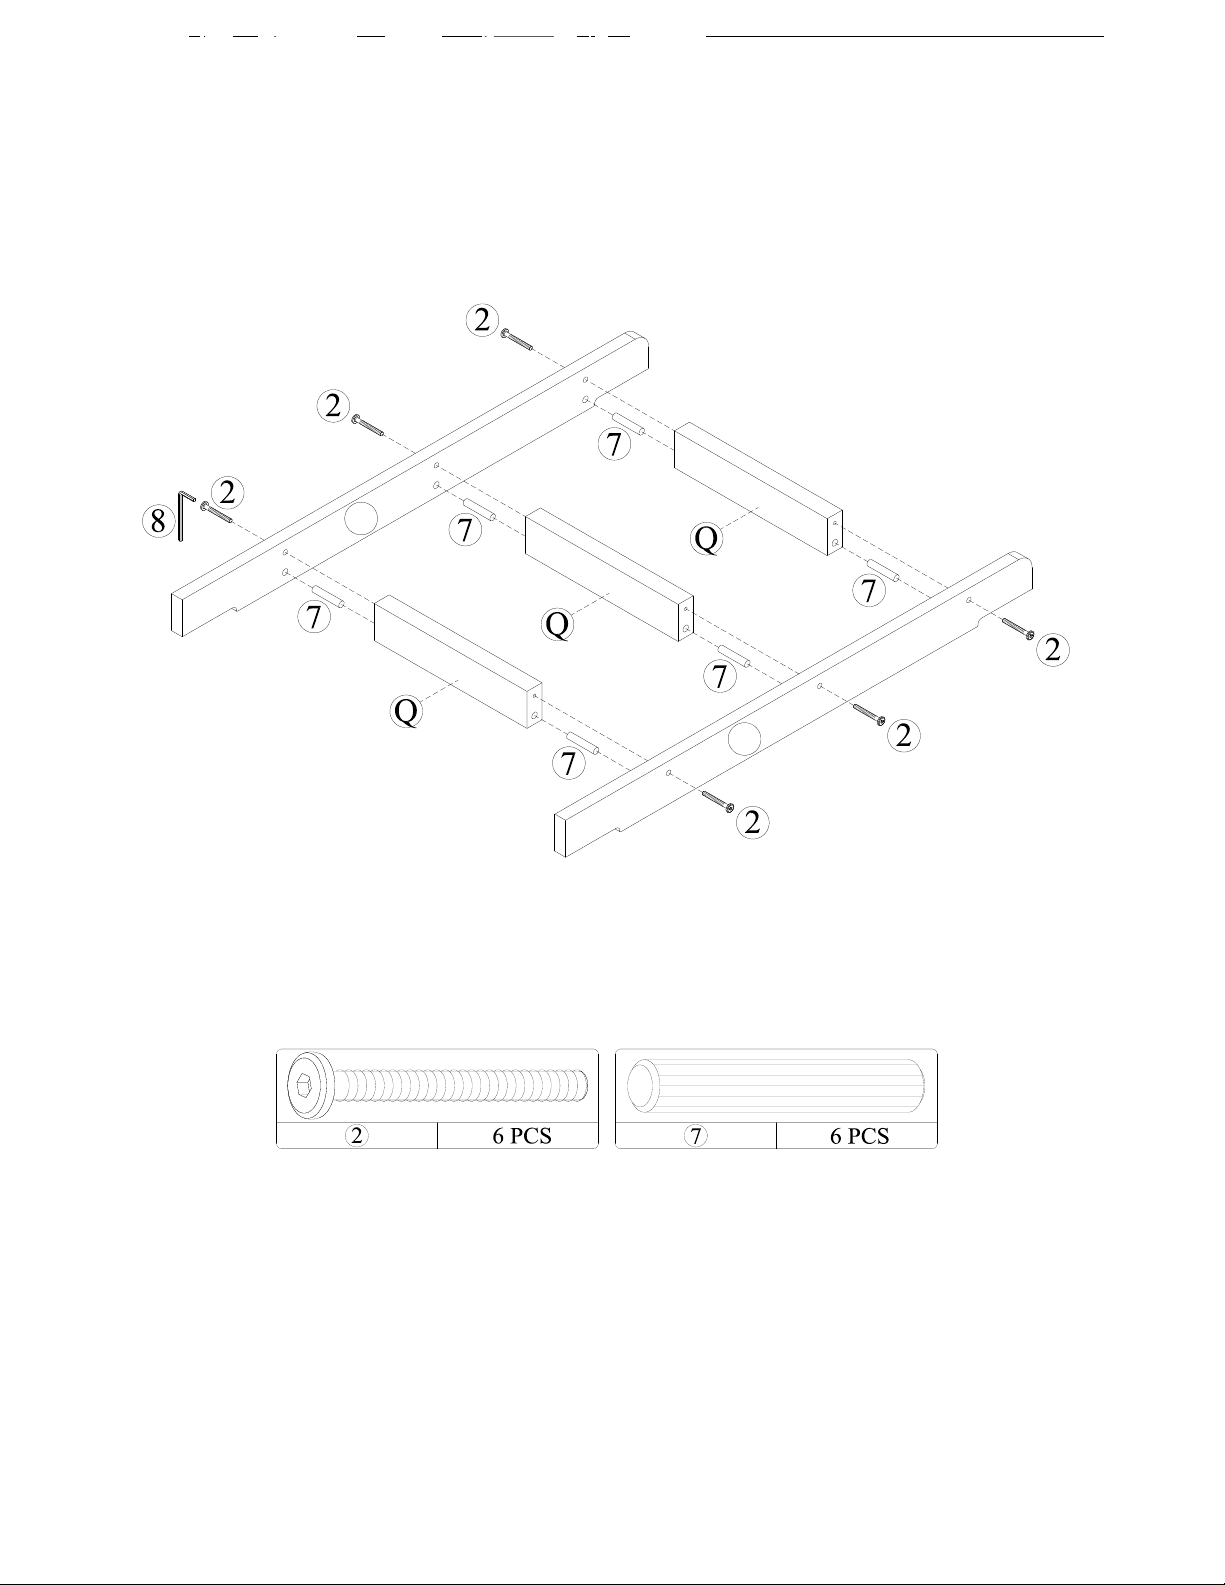
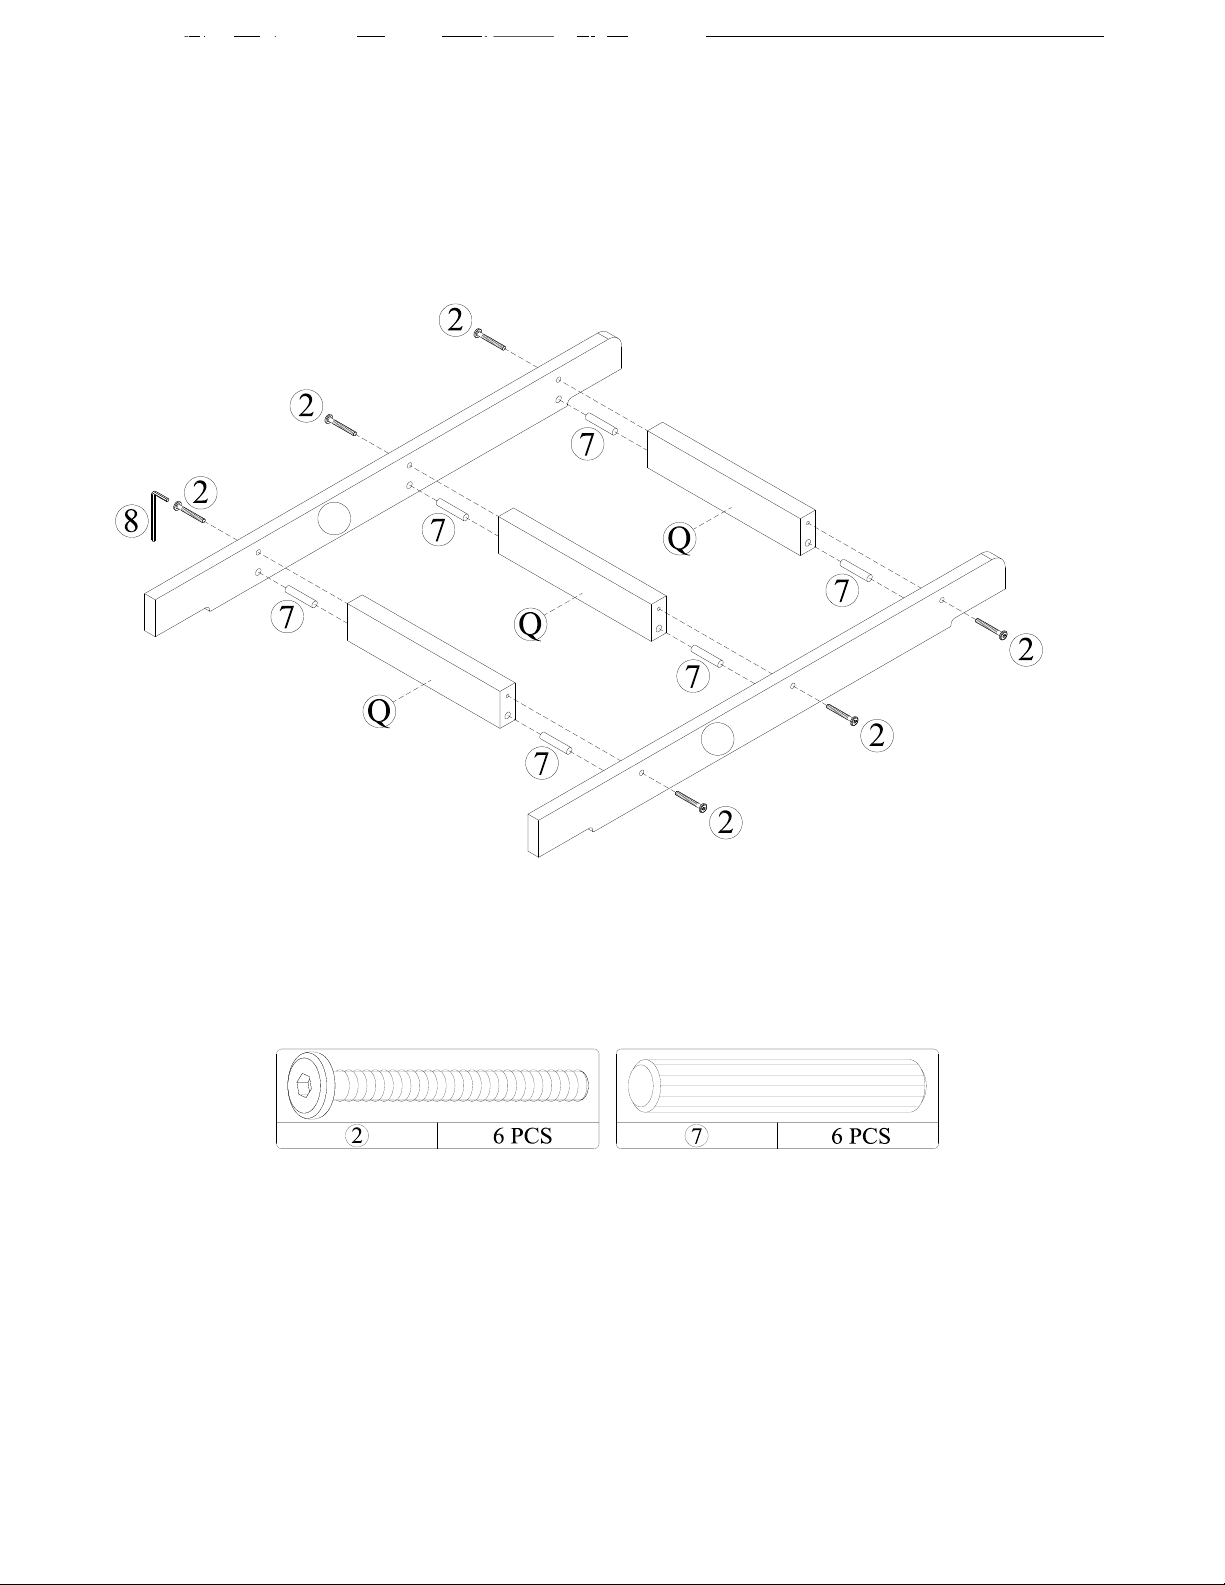
Insert wood dowels (7) into the end of the ladder steps (Q). Attach left ladder end
(O) and right ladder end (P) to ladder steps (Q) with wood joint connectors (2).
Tighten the wood joint connectors (2) with the Allen key (8).
O
P

Repeat this step to assemble the other headboard using center posts (Y & Z).
TRIPLE BUNK BED
STEP 8
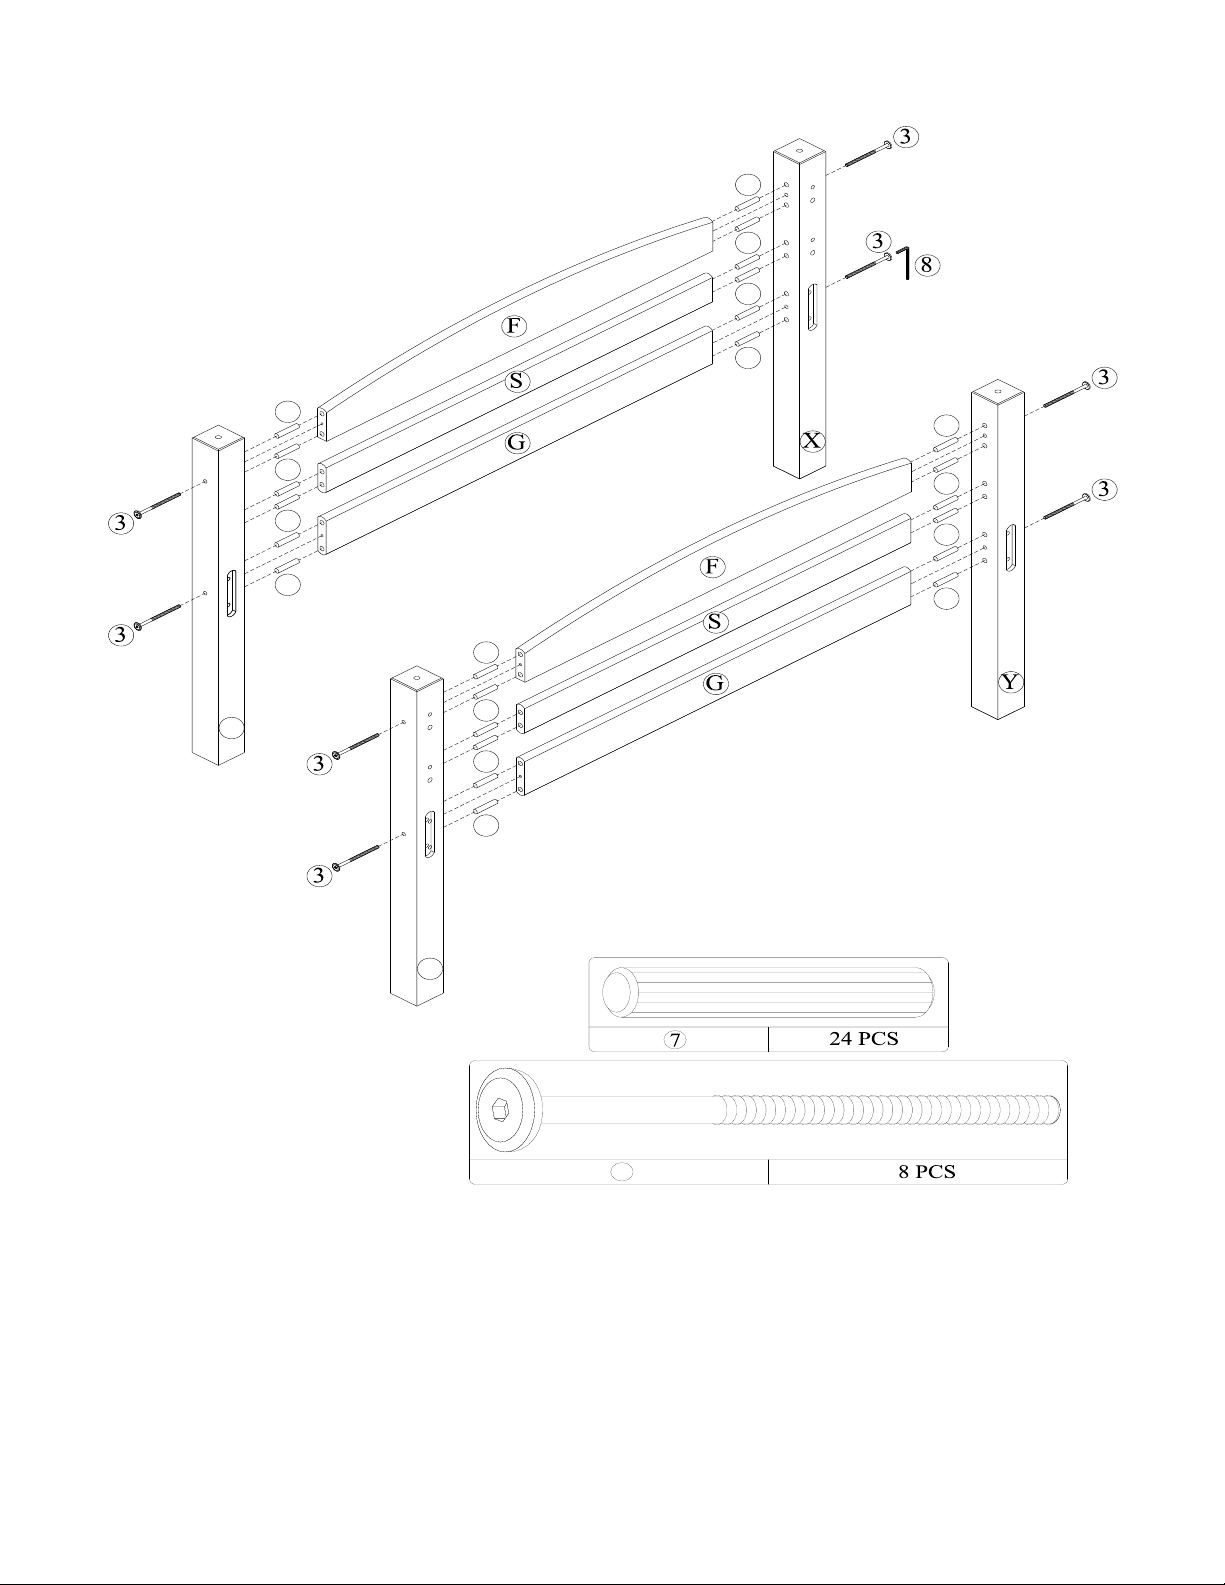
Insert wood dowels (7) into the ends of headboard top cross (F), headboard bottom
cross (G) and headboard center cross (S). Attach the center posts (W & X) using
wood joint connectors (3) and Allen key (8).
NOTES: Headboard top crosses (F, G and S) may require that they be pulled closer
together or further apart in order to allow wood dowels (7) to align with holes in
center posts (W & X).
3
W
7
7
7
7
7
7
7
7
Z
7
7
7
7
7
7
7
7
STEP 9
TRIPLE BUNK BED
Insert wood dowels (7) into each end of the long guardrails (M).
Attach two long guardrails (M) and side rails (A1 and J) to center posts (W & X) and (Y & Z)
as shown.
Fasten side rails (A1 and J) with joint connectors (1) and barrel nuts (9). Fasten long
guardrails (M) with wood joint connectors (3).
Tighten the joint connectors (1) and wood joint connectors (3) with the Allen key (8).
Note: this is the middle bunk.
J

STEP 10
Fasten the guardrail post (U) and right guardrail post (V) to center front side rail (A1)
with joint connectors (10) and hex cap (11) as shown.
TRIPLE BUNK BED
Insert wood dowel (7) into short guardrails (B1). Attach short guardrails (B1) to
guardrail post(U) and right guardrail post (V) with wood joint connectors (3) as shown.
10
V
10
10
11
11
STEP 11
TRIPLE BUNK BED
Attach the guardrail leg (R) to long guardrails (M) and side rail (J) with flat head
screws (6) as shown. Use a Phillips head screwdriver (not included) to tighten the flat
head screws.
6
6
6
6

STEP 12
TRIPLE BUNK BED
To assemble the ladder, insert wood dowels (7) into the end of the ladder steps (Q).
Attach the long ladder ends (C1 & D1) to ladder steps (Q) with wood joint
connectors (2) and Allen key (8).

STEP 13
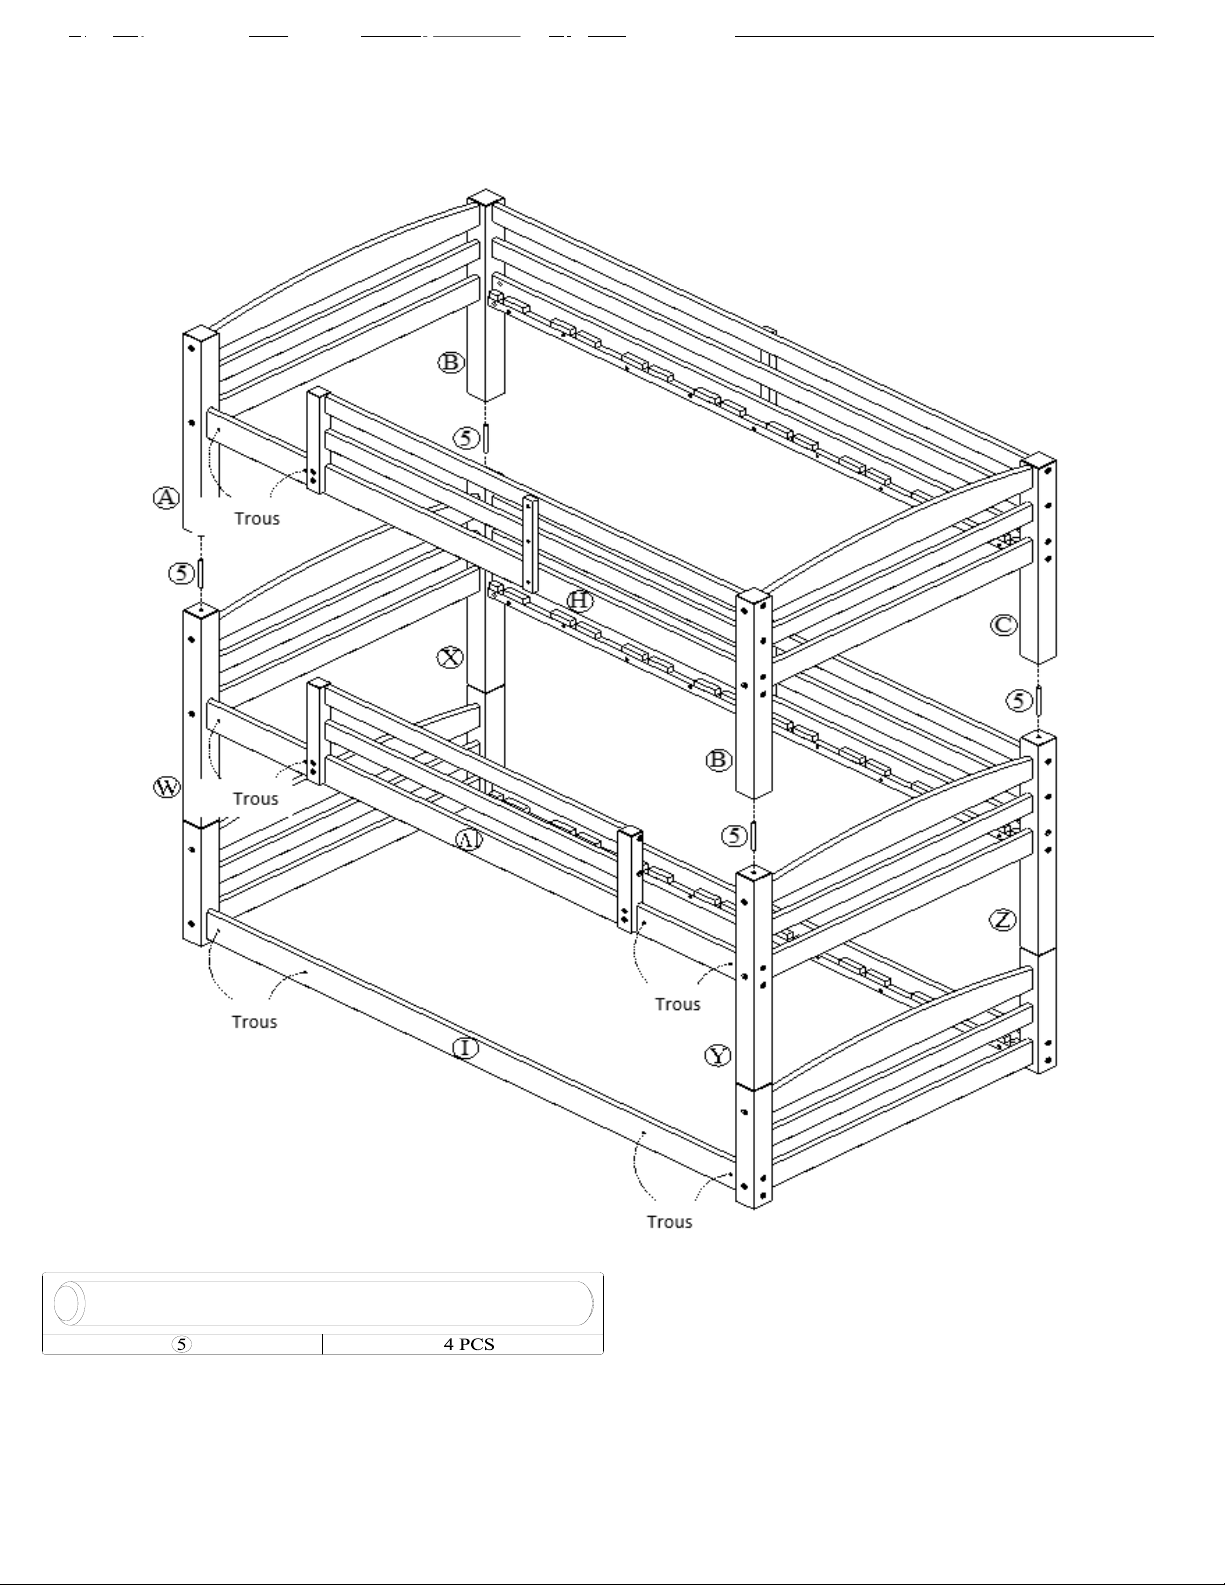
TRIPLE BUNK BED
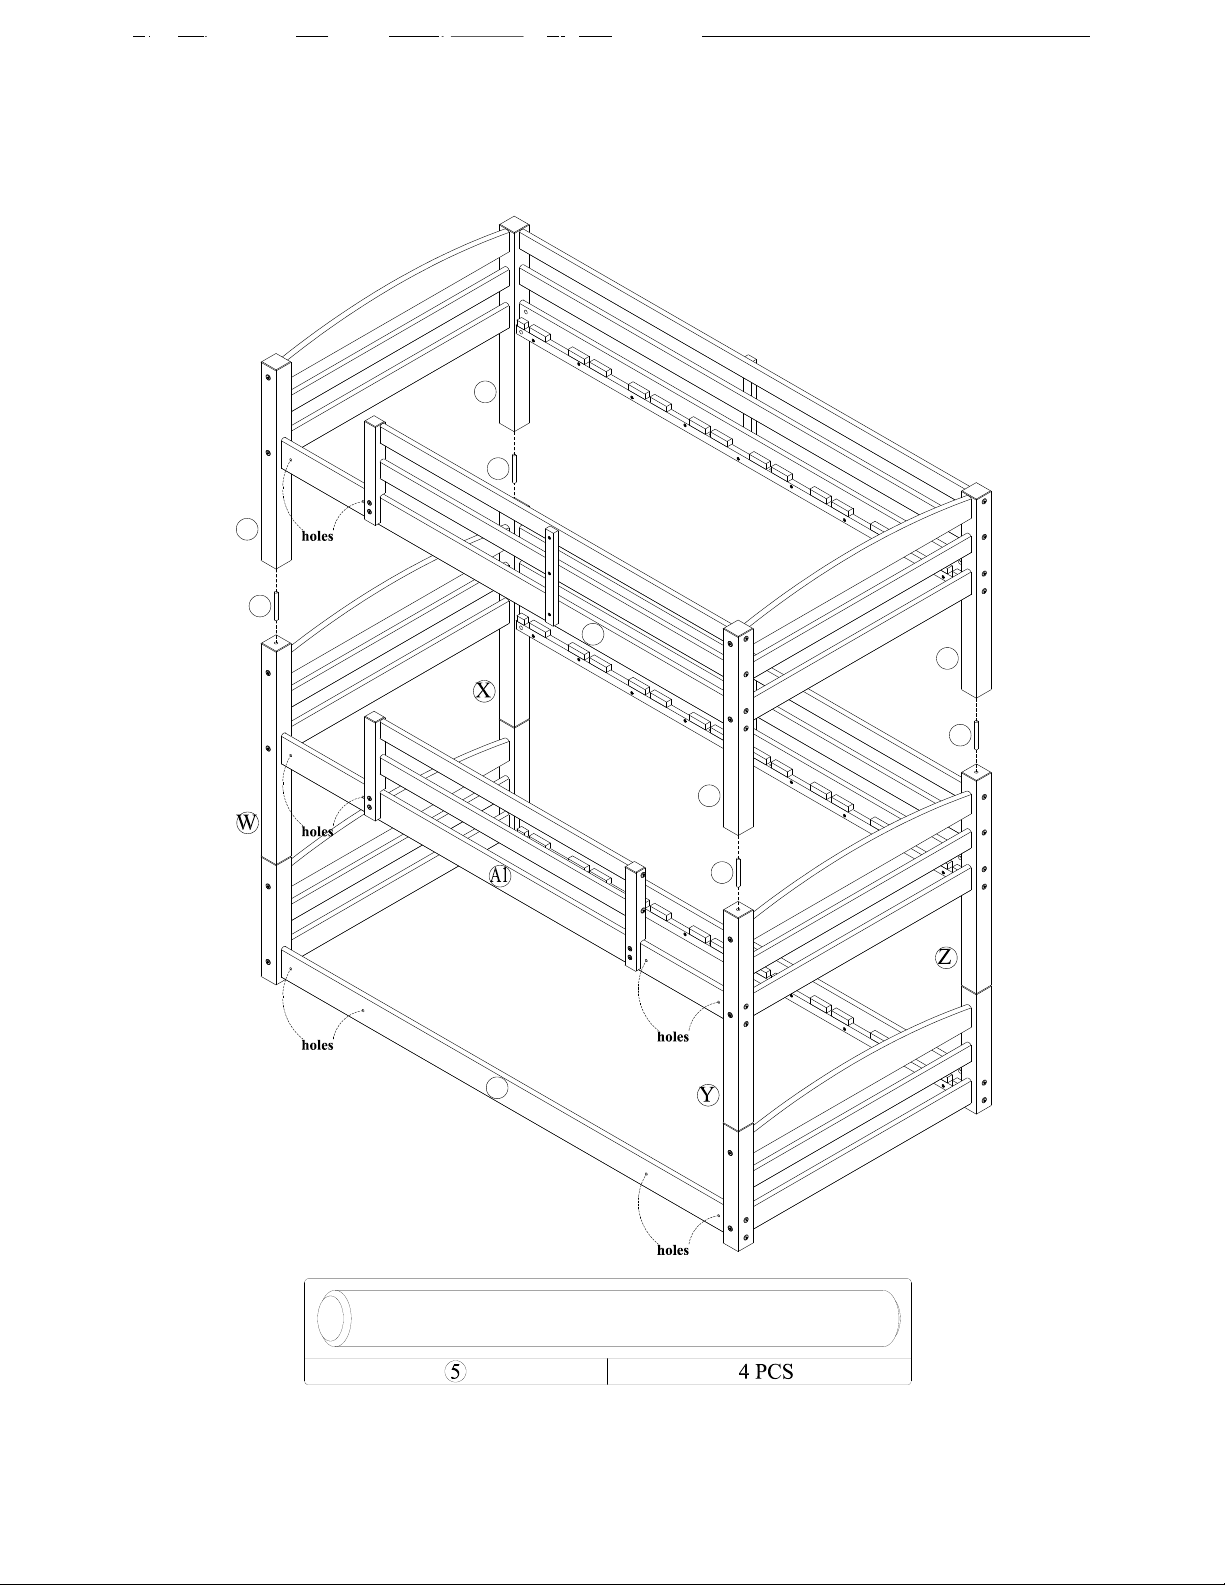
Place four metal dowels (5) into the holes in the bottom posts (D and E). Stack the
middle bunk on the bottom bunk with the help of another person.
5
5
5
5
E
D
D
I
STEP 14
TRIPLE BUNK BED
Place four metal dowels (5) into the holes in the center posts (W, X, Y, Z). Stack the
top bunk on the middle bunk with the help of another person.
5
5
5
5
I
A
B
B
C
H

STEP 15
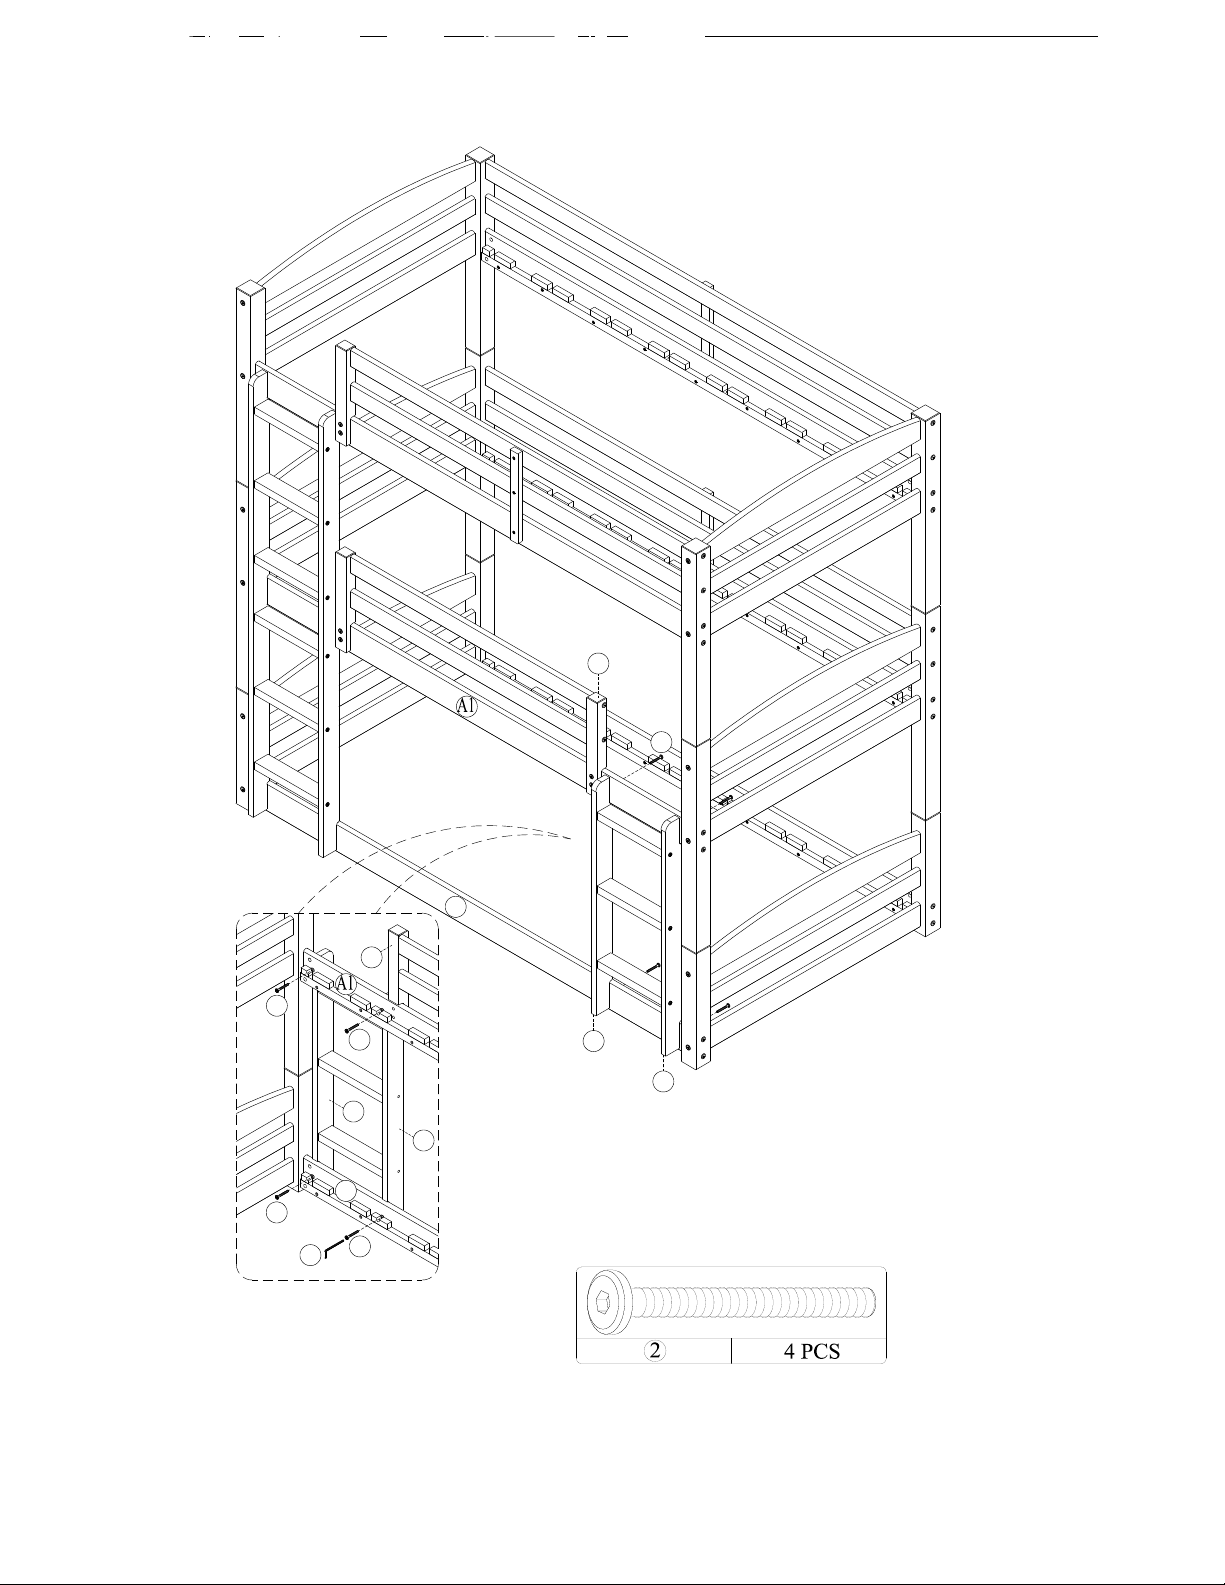
TRIPLE BUNK BED
Attach the long ladder to front side rails (H & A1 & I) with wood joint connectors (2)
as shown. Use Allen key (8) to tighten the joint connectors.
I
U
I
H
U
A
A
2
2
2
2
2
2
8
2
2
back view
H
STEP 16
TRIPLE BUNK BED
Attach the short ladder to the front side rail (A1 & I) with wood joint connectors (2)
as shown. Use Allen key (8) to tighten the joint connectors.
2
I
O
P
V
I
V
P
O
2
2
2
2
8
back view

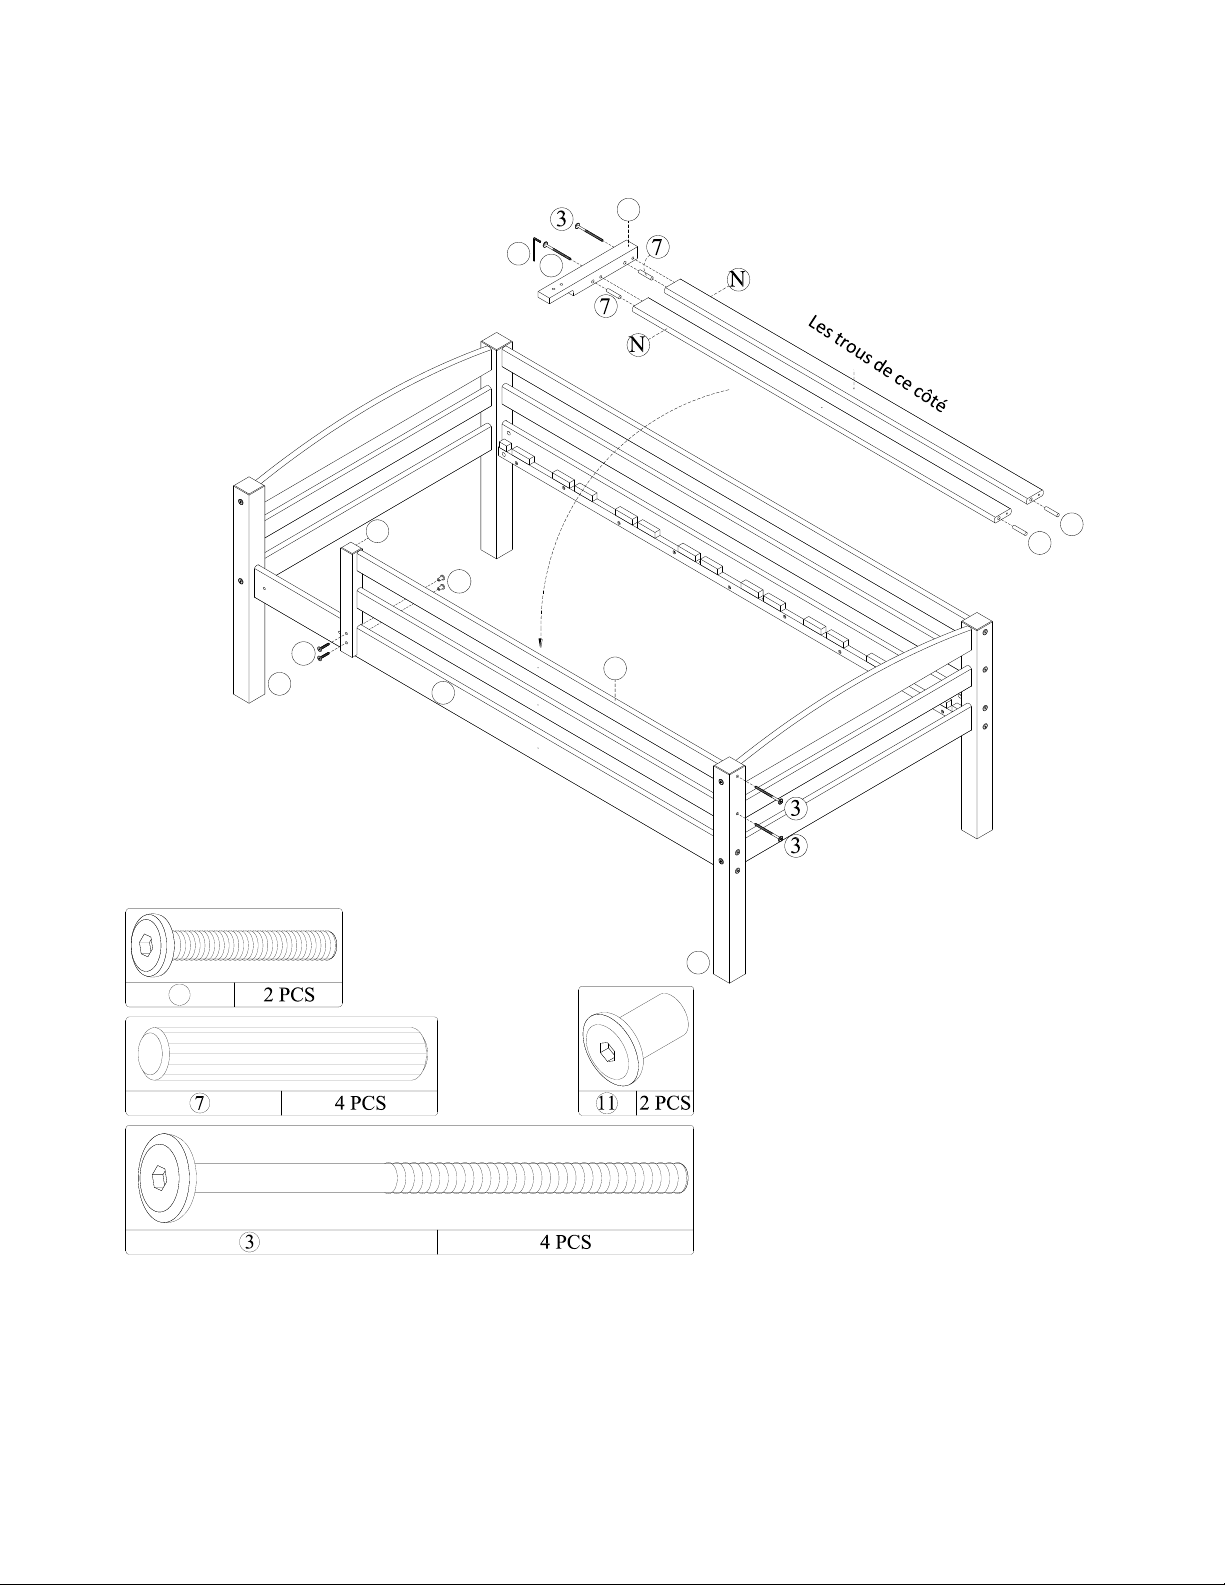
STEP 17
TRIPLE BUNK BED
Repeat this process for the middle and bottom bunk.
Insert two slats with wood dowel (T) into the center slots of the top side rails (H &J)
of the upper bunk as shown.
Attach slats without wood dowel (L) onto top side rails (H &J) of the upper bunk
with flat head screws (4) as shown. Use Phillips screwdriver (not included) to tighten
flat head screws (4).
4
L
L
L
T
T
L
L
L
L
L
T
T
I
H
J
J
K

TRIPLE BUNK BED
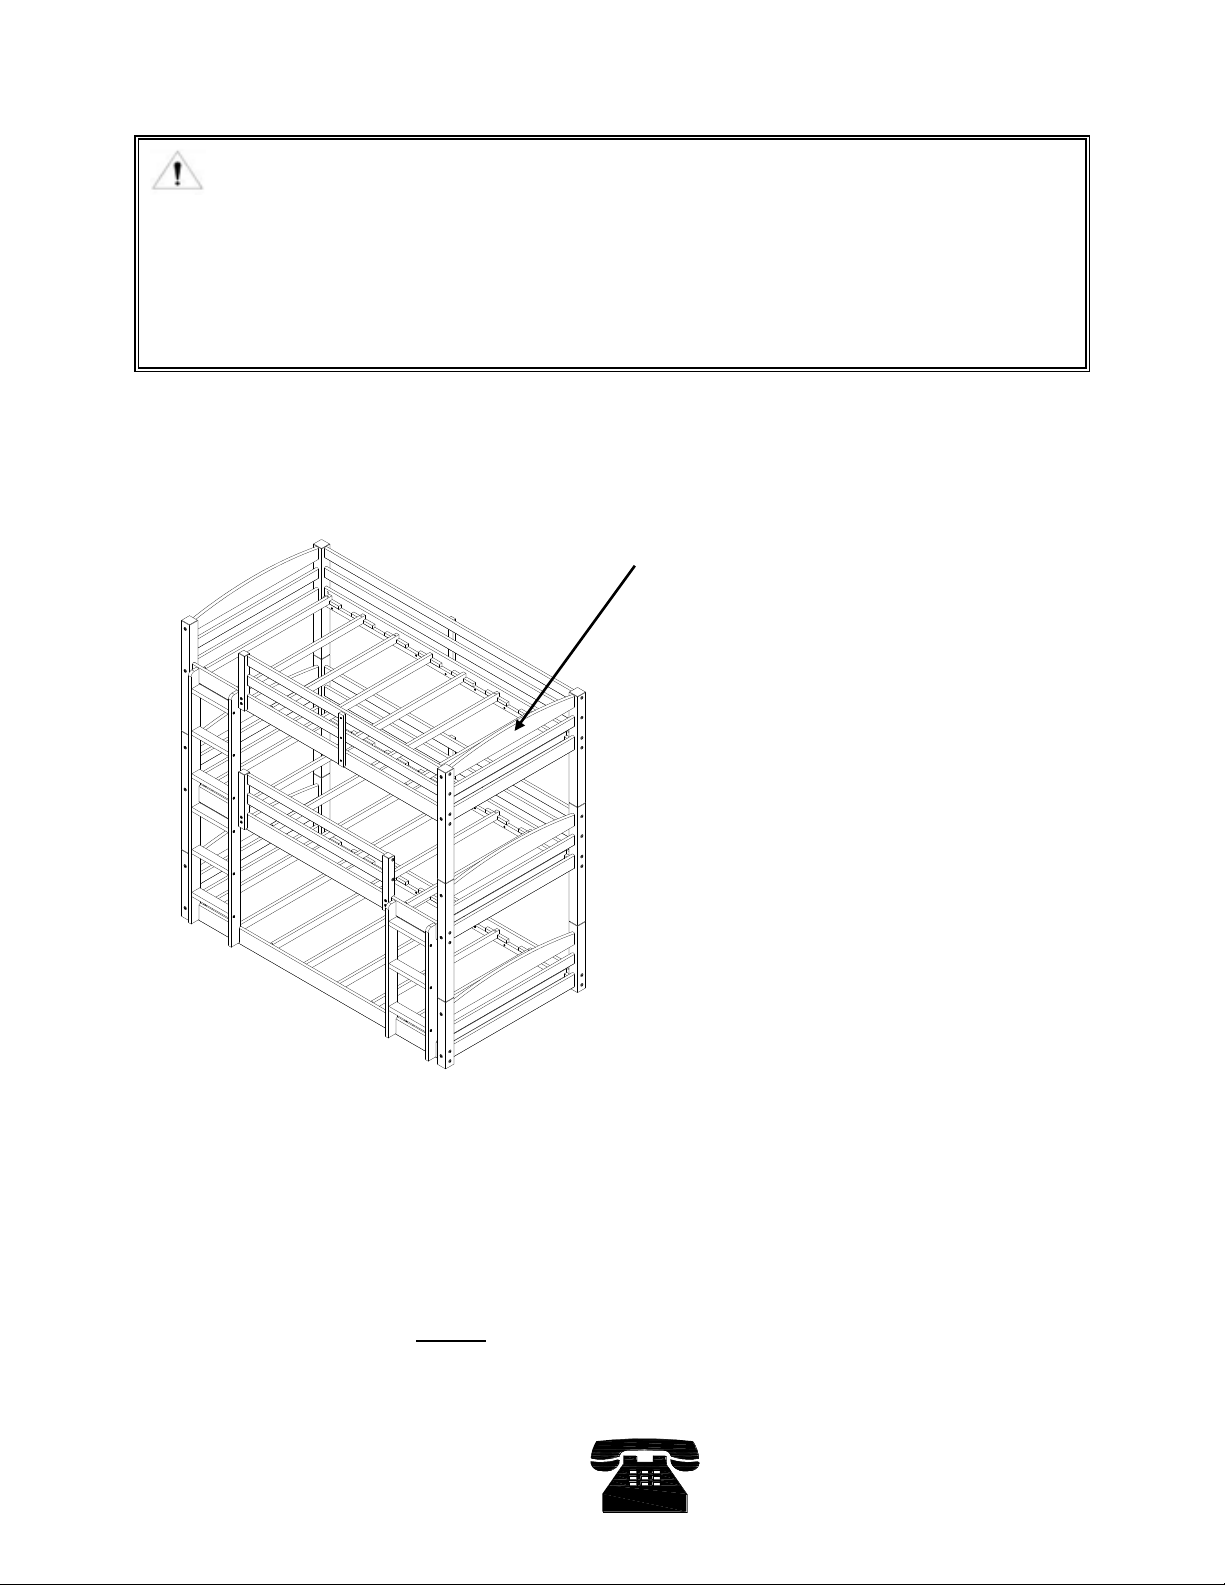
To convert the bunk bed into three different twin bed, remove both ladders and
all the guardrails. With the help of another person, unstack the top bunk and
center bunk from the lower bunk.

That's it! You've finished assembling your triple bunk bed.
TRIPLE BUNK BED
CAUTION: This unit is intended for use only with the
products and/or maximum weights indicated. Use with other
products and/or products heavier than the maximum weights
indicated may result in instability or cause possible injury.
USE ONLY COIL SPRING
MATTRESSES ON BOTH THE UPPER
AND LOWER BUNKS. FAILURE TO
DO SO CAN RESULT IN INJURY.
USE ONLY MATTRESSES WHICH ARE 74"-
75" LONG AND 37 1/2" - 38 1/2" WIDE
ON UPPER AND ON LOWER BUNKS.
ENSURE THICKNESS OF MATTRESS DOES
NOT EXCEED 6".
DO NOT ALLOW CHILDREN UNDER 6 YEARS
OF AGE TO USE THE UPPER BUNK. BED IS
DESIGNED FOR CHILDREN RANGING FROM 6
YEARS OF AGE TO YOUNG TEENAGERS.
DO NOT ALLOW HORSEPLAY
ON OR UNDER THE BED AND
PROHIBIT JUMPING ON THE
BED.
DO NOT RETURN PRODUCT TO THE RETAILER.
If a part is missing or damaged, contact our customer service
department. We will replace the part FREE of charge.
Tel #: 1-800-295-1980
E-Mail: das@dorel.com
Fax #: 514-353-7819
NEED HELP!
CALL US FOR ASSISTANCE
1-800-295-1980
DO NOT RETURN PRODUCT TO STORE
E-MAIL:DAS@DOREL.COM

Modelo No: CODIGO UPC:
Color:
DL7891TBB
0-65857-17827-2
MOCA
DL7891TBBW
0-65857-18286-6
BLANCO
DL7891TBBG 0-65857-19467-8 Gris
DL7891TBBB 0-65857-19902-4 Negro
Fecha de compra: _____ / _____ / _____ Número de lote:
(en la caja)
NOTA: ESTE MANUAL DE INSTRUCCIONES CONTIENE INFORMACIÓN DE SEGURIDAD IMPORTANTE.
POR FAVOR, LÉALO Y CONSÉRVELO PARA CONSULTARLO EN EL FUTURO.
ADVERTENCIA
UTILICE ESTE
MANUAL PARA
ENSAMBLAR LA
CAMAS
CUCHETAS
TRIPLE
CAMAS CUCHETAS TRIPLE
¡Le damos mucha importancia a la satisfacción de nuestros clientes. Nuestros representantes
están disponibles de lunes a viernes de 8 h a 17 h (hora del este) para responder a todas sus
preguntas. Con el fin de acelerar el servicio, por favor tenga a mano el número de modelo
cuando llame a nuestro número sin coste 1-800-295-1980 o por correo electrónico a
Para obtener más ideas de muebles inspirantes, visite nuestro sitio web en www.dorelliving.com
También puede mantenerse informado de todas las últimas tendencias suscribiéndose a nuestra
página en Facebook.
NO DEVUELVA EL PRODUCTO A LA TIENDA. Si falta una pieza o está dañada, contacte nuestro
departamento de servicio a la clientela. Reemplazaremos la pieza SIN cargo.

*
*
*
*
*
*
*
*
*
*
*
*
*
*
*
*
SIEMPRE UTILICE LA ESCALERILLA PARA SUBIR A LA CUCHETA SUPERIOR O BAJAR DE ELLA.
PROHIBA QUE MÁS DE UN NIÑO SUBA A LA CUCHETA SUPERIOR.
SIEMPRE UTILICE LAS BARANDAS EN LOS DOS LADOS DE LA CUCHETA SUPERIOR. SI LA CUCHETA
ESTÁ COLOCADA CERCA DE UNA PARED, LA BARANDA QUE CUBRE EL LADO LARGO DE LA
CUCHETA DEBE SER COLOCADA CONTRA LA PARED PARA EVITAR QUE EL NIÑO QUEDE ATRAPADO
ENTRE LA CAMA Y LA PARED (ESTO SE APLICA A LAS CUCHETAS CON BARANDA LARGA DE UN
SOLO LADO).
VERIFIQUE LA CAMA PERIÓDICAMENTE Y ASEGÚRESE DE QUE EL CUADRO, LA ESCALERILLA Y OTROS
COMPONENTES ESTÉN EN LA POSICIÓN CORRECTA, NO ESTÉN DAÑADOS Y TODAS LAS UNIONES
ESTÉN BIEN AJUSTADAS.
NO PERMITA QUE LOS NIÑOS HAGAN PAYASADAS SOBRE O DEBAJO DE LA CAMA Y PROHIBA QUE
SALTEN SOBRE ELLA.
NO UTILICE PIEZAS DE SUSTITUCIÓN. CONTACTE EL SERVICIO AL CLIENTE PARA OBTENER PIEZAS
PARA REMPLAZAR.
EL USO DE UNA VELADORA SIRVE COMO MEDIDA DE PRECAUCIÓN PARA EL NIÑO QUE UTILIZA LA
CUCHETA SUPERIOR.
SE PROHIBE EL USO DE COLCHONES DE AGUA O COLCHONETAS DE FLOTACIÓN.
LA BASE DEL COLCHÓN ESTÁ DISEÑADA PARA SOPORTAR UN COLCHÓN SIN NECESIDAD DE USAR
UNA TABLA PARA MANTENER LA POSICIÓN O UN SOPORTE CON RESORTES.
SIEMPRE UTILICE EL TAMAÑO DE COLCHÓN O DE SOPORTE DE COLCHÓN RECOMENDADO, O LOS
DOS, PARA EVITAR LA POSIBILIDAD DE CAÍDAS O QUE EL NIÑO QUEDE ATRAPADO.
UTILICE SOLAMENTE COLCHONES CON RESORTES EN ESPIRAL EN LAS DOS CUCHETAS. EL NO RESPETAR
ESTO PUEDE CAUSAR LESIONES.
UTILIZAR ÚNICAMENTE COLCHONES DE 74"-75" DE LARGO Y DE 37 1/2" - 38 1/2" DE ANCHO EN LA
LITERA SUPERIOR Y EN LA LITERA INFERIOR. ASEGÚRESE DE QUE EL ESPESOR DE LOS COLCHONES NO
SUPERE 6". LA SUPERFICIE DEL COLCHÓN DEBE QUEDAR POR LO MENOS 5" (127MM) POR DEBAJO
DEL BORDE SUPERIOR DEL MARCO DE LAS CUCHETAS.
NO PERMITA QUE NIÑOS MENORES DE 6 AÑOS DUERMAN EN LA CUCHETA SUPERIOR.
PESO MÁXIMO: 165 LBS (75 KGS) POR NIVEL.
Montreal, Quebec
Canada, H1G 3L1
CORREO ELECTRÓNICO: [email protected]
ADVERTENCIAS
PELIGRO DE ESTRANGULAMIENTO - NUNCA CUELGUE O ATE EN LA CAMA ARTÍCULOS QUE NO ESTÉN
DISEÑADOS PARA USARLOS CON LA CAMA; POR EJEMPLO, PERO NO LIMITADO A ESTO, GANCHOS,
CINTURONES Y CUERDAS DE SALTAR.
SIGA LA INFORMACIÓN DE LAS ADVERTENCIAS INSCRITAS EN LA ESTRUCTURA DE LA CUCHETA
SUPERIOR Y EN EL CARTÓN. NO RETIRE LA ETIQUETA DE ADVERTENCIAS DE LA CAMA.
SERVICIO AL CLIENTE
Si faltan piezas o si tiene alguna pregunta sobre este producto, ¡comuníquese con nuestro representante de
servicio!
LLAME AL 1-800-295-1980
También puede pedir piezas escribiendo a la siguiente dirección. Por favor incluya el número de
modelo, color y una descripción detallada de la pieza.
Departamento de Servicio al Cliente No. 413
12345 Albert-Hudon Boulevard, Suite 100
*
*
*
DEBE SER ARMADA POR UN ADULTO.
*
*
*
*
*
*
Verifique los pernos y tornillos periódicamente y ajústelos si es necesario.
Limpie el polvo regularmente con un paño suave y seco. Se recomienda no usar productos
químicos o cera en nuestros muebles laqueados, ya que se puede dañar el pulido. Mantenga
solventes, alcohol, esmalte de uñas y quita-esmaltes lejos de toda superficie de madera de los
muebles.
MANTENIMIENTO
GARANTÍA LIMITADA
Dorel garantiza que el producto está libre de defectos de material y mano de obra y se
compromete a remediar cualquier defecto de este tipo. Esta garantía cubre 1 año a partir de la
fecha de compra original. Esta garantía es válida solamente con presentación de una prueba de
compra. Esto se limita a la reparación o reemplazo de componentes defectuosos del mueble y
no se incluye ningún trabajo de ensamblaje. Esta garantía no se aplica a ningún producto que
haya sido mal armado, sujeto a mal uso o abuso, o que haya sido alterado o reparado de
cualquier manera. Esta garantía le da las derechas legales específicas y usted puede también
tener otras derechas que varíen de estado al estado.
ADVERTENCIA: Si este producto está
dañado y/o ciertas piezas faltan o están rotas,
NO LO USE.
SE NECESITARÁN DOS PERSONAS PARA ARMARLA.
LA MAYORÍA DE LAS PIEZAS DE MADERA ESTÁN ETIQUETADAS O MARCADAS DEL LADO RÚSTICO.
SE NECESITA UN DESTORNILLADOR EN CRUZ (NO INCLUIDO).
SE RECOMIENDA EL USO DE UNA MAZA DE CAUCHO (NO INCLUIDA) PARA FACILITAR EL TRABAJO.
LA CAMA ESTÁ DISEÑADA PARA NIÑOS DESDE 6 AÑOS HASTA LA ADOLESCENCIA TEMPRANA.
CUIDADO Y LIMPIEZA
CONSERVE ESTAS INSTRUCCIONES PARA REFERENCIA FUTURA.
NOTAS
LEA ATENTAMENTE CADA ETAPA ANTES DE COMENZAR. ES MUY IMPORTANTE QUE CADA ETAPA SE
LLEVE A CABO EN EL ORDEN CORRECTO. SI ESTAS ETAPAS NO SE SIGUEN EN ORDEN, PUEDEN
SURGIR DIFICULTADES PARA ARMAR LA CAMA Y CAUSAR LESIONES A LOS NIÑOS QUE LA USAN.
ASEGÚRESE DE TENER TODAS LAS PIEZAS. TRABAJE EN UN LUGAR ESPACIOSO, DE PREFERENCIA
SOBRE UN TAPIZ.
LISTA DE ACCESORIOS
1 2
3 4
5 6
7 8
9 10 11
CAMA CUCHETA TRIPLE
Φ 1/4" x 100mm
Φ 6.5mm x 48mm
PERNO CONECTOR (4MM CABEZA HEXAGONAL)
PERNO CONECTOR MADERA (4MM CABEZA
24 PCS
HEXAGONAL) 28 PCS
Φ 6.5mm x 100mm
Φ 4mm x 35mm
PERNO CONECTOR MADERA (4MM CABEZA
TORNILLO CABEZA PLANA
HEXAGONAL) 40 PCS
36 PCS
Φ 10mm x 100mm
Φ 4mm x 30mm
CLAVIJA DE METAL
TORNILLO CABEZA PLANA
PERNO DE BRIDA HEXAGONAL
8 PCS
9 PCS
Φ 10mm x 50mm
CLAVIJA DE MADERA
LLAVE ALLEN
24 PCS
HEXAGONAL) 6 PCS
6 PCS
106 PCS
1 PC
Φ 11.8mm x 15mm
Φ 1/4" x 32mm
Φ 9mm x 17mm
TUERCA BARRILETE
PERNO CONECTOR (4MM CABEZA

LISTA DE PIEZAS
A B C
D E F
CAMA CUCHETA TRIPLE
PATA SUPERIOR
PATA SUPERIOR
PATA SUPERIOR
1 PC
2 PCS
1 PC
PATA INFERIOR
TRAVESAÑO SUPERIOR CABECERA
2 PCS
2 PCS
6 PCS
NOTA – Las piezas necesarias para
ensamblar la cama cucheta triple están
embaladas en 2 cajas. Asegúrese de
tener todas las piezas antes de
comenzar a ensamblar el mueble.
PATA INFERIOR
LISTA DE PIEZAS
G H I
J K L
M N O
P Q R
S T U
CAMA CUCHETA TRIPLE
TRAVESAÑO INFERIOR CABECERA
LARGUERO LATERAL SUPERIOR
LARGUERO LATERAL INFERIOR
6 PCS
ANTERIOR 1 PC
ANTERIOR 1 PC
LARGUERO LATERAL POSTERIOR
LARGUERO LATERAL INFERIOR
LISTÓN SIN CLAVIJA DE MADERA
2 PCS
POSTERIOR 1 PC
18 PCS
BARANDA LARGA
BARANDA CORTA
LADO IZQUIERDO ESCALERA
4 PCS
2 PCS
1 PC
LADO DERECHO ESCALERA
ESCALÓN
SOPORTE DE BARANDA
1 PC
9 PCS
3 PCS
TRAVESAÑO CENTRAL CABECERA
LISTÓN CON CLAVIJA DE MADERA
SOPORTE DE BARANDA
6 PCS
6 PCS
2 PCS

LISTA DE PIEZAS
V W X
Y Z A1
B1 C1
D1
2 PCS
CAMA CUCHETA TRIPLE
PIE CENTRAL
PIE CENTRAL
1 PC
1 PC
SOPORTE DE BARANDA DERECHO
PIE CENTRAL
1 PC
LARGUERO LATERAL ANTERIOR
LADO IZQUIERDO ESCALERA LARGA
1 PC
PIE CENTRAL
1 PC
BARANDA CORTA
1 PC
LADO DERECHO ESCALERA LARGA
1 PC
1 PC
NOTA: Asegúrese de que el travesaño superior de cabecera (F) que tiene una etiqueta de advertencia quede entre
las patas superiores (A) y (B). Observe la ilustración más arriba para ver la orientación de la etiqueta.
Repita la etapa anterior para ensamblar la otra cabecera con las patas (B y C).
CAMA CUCHETA TRIPLE
ETAPA 1
Inserte clavijas de madera (7) en los extremos del travesaño superior de la cabecera (F), del travesaño inferior de la
cabecera (G) y del travesaño central de la cabecera (S). Únalos con las patas superiores (A y B) con pernos
conectores para madera (3) como ilustrado. Ajuste los pernos conectores para madera (3) con la llave Allen (8).
NOTA: Puede pasar que los travesaños de la cabecera superior (F, G y S) requieran ser acercados o
alejados entre sí para permitir que las clavijas de madera (7) queden alineadas con los agujeros de las
patas superiores to (A y B).
3
A
7
7
7
7
7
7
7
7
C
7
7
7
7
7
7
7
7
Etiqueta de advertencia

CAMA CUCHETA TRIPLE
ETAPA 2
Inserte clavijas de madera (7) en los extremos del travesaño superior de cabecera (F), del travesaño
inferior de cabecera (G) y del travesaño central de cabecera (S) y únalos con las patas inferiores
(D) y (E) con pernos conectores para madera (3) como ilustrado. Ajuste los pernos conectores para
madera (3) con la llave Allen (8).
D
E
7
7
7
7
7
7
7
7
D
E
7
7
7
7
7
7
7
7
3

CAMA CUCHETA TRIPLE
Nota: Ésta es la cama inferior.
Una las dos cabeceras con las patas inferiores (D y E) al larguero lateral inferior anterior (I) y al
larguero lateral inferior posterior (K) con pernos conectores (1) y tuercas barrilete (9) como ilustrado.
Ajuste los pernos conectores (1) con la llave Allen (8).
ETAPA 3
K
I

ETAPA 4
CAMA CUCHETA TRIPLE
Inserte clavijas de madera (7) en los extremos de las barandas largas (M).
Una las dos barandas largas (M) y los dos largueros laterales superiores (H y J) con las patas
superiores (A y B) y (C y B) como ilustrado.
Fije los largueros laterales superiores (H y J) con pernos conectores (1) y tuercas barrilete (9).
Fije las barandas largas (M) con pernos conectores para madera (3).
Ajuste los pernos conectores (1) y los pernos conectores para madera (3) con la llave Allen
(8).
Nota: Ésta es la cama superior.
J
H

ETAPA 5
Fije las barandas cortas (N) a la pata superior (B) con pernos conectores para madera (3). Fije el
soporte de baranda (U) al larguero lateral superior anterior (H) con pernos conectores (10) y pernos
de brida hexagonal (11) como ilustrado.
CAMA CUCHETA TRIPLE
Inserte clavijas de madera (7) en las barandas cortas (N). Una las barandas cortas (N) al soporte de
baranda (U) con pernos conectores para madera (3) como ilustrado.
7
7
U
8
3
10
11
N
U
H
A
B
10

ETAPA 6
CAMA CUCHETA TRIPLE
Una un soporte de baranda (R) a las barandas cortas (N) y al larguero lateral
superior anterior (H) con tornillos de cabeza plana (6). Una el otro soporte de
baranda (R) (del otro lado de la cama) con las barandas largas (M) y el larguero
lateral superior posterior (J) con tornillos de cabeza plana (6) como ilustrado. Utilice
un destornillador Phillips (no incluido) para ajustar los tornillos de cabeza plana.
6
6
6
N
M
H
6

ETAPA 7
CAMA CUCHETA TRIPLE
Inserte clavijas de madera (7) en los extremos de los escalones (Q). Una el lado
izquierdo de la escalera (O) y el lado derecho de la escalera (P) a los escalones
(Q) con pernos conectores para madera (2). Ajuste los pernos conectores para
madera (2) con la llave Allen (8).
O
P
Repita la etapa anterior para ensamblar la otra cabecera con las patas (Y y Z).
CAMA CUCHETA TRIPLE
ETAPA 8
Inserte clavijas de madera (7) en los extremos del travesaño superior de la cabecera (F), del
travesaño inferior de la cabecera (G) y del travesaño central de la cabecera (S). Una los pies
centrales (W y X) con pernos conectores para madera (3) y la llave Allen (8).
NOTA: Puede pasar que los travesaños de la cabecera superior (F, G y S) requieran ser acercados
o alejados entre sí para permitir que las clavijas de madera (7) queden alineadas con los
agujeros de las patas superiores (W y X).
3
W
7
7
7
7
7
7
7
7
Z
7
7
7
7
7
7
7
7

ETAPA 9
CAMA CUCHETA TRIPLE
Inserte clavijas de madera (7) en los extremos de las barandas largas (M).
Una dos barandas largas (M) y los largueros laterales (A1 y J) con las patas centrales (W y X)
e (Y y Z) como ilustrado.
Fije los largueros laterales (A1 y J) con pernos conectores (1) y tuercas barrilete (9). Fije las
barandas largas (M) con pernos conectores para madera (3).
Ajuste los pernos conectores (1) y los pernos conectores para madera (3) con la llave Allen
(8).
Nota: Ésta es la cama del medio.
J

ETAPA 10
Fije el soporte de baranda (U) y el soporte de baranda derecho (V) al larguero lateral central
anterior (A1) con pernos conectores (10) y pernos de brida hexagonal (11) como ilustrado.
CAMA CUCHETA TRIPLE
Inserte clavijas de madera (7) en las barandas cortas (B1). Una las barandas cortas (B1) al soporte de
baranda (U) y al soporte de baranda derecho (V) con pernos conectores para madera (3) como ilustrado.
10
V
10
10
11
11

ETAPA 11
CAMA CUCHETA TRIPLE
Una el soporte de baranda (R) a las barandas largas (M) y al larguero lateral (J) con
tornillos de cabeza plana (6) como ilustrado. Utilice un destornillador Phillips (no
incluido) para ajustar los tornillos de cabeza plana.
6
6
6
6
ETAPA 12
CAMA CUCHETA TRIPLE
Para ensamblar la escalera, inserte clavijas de madera (7) en los extremos de los
escalones (Q). Una los lados de la escalera larga (C1 y D1) con los escalones (Q)
con pernos conectores para madera (2) y la llave Allen (8).
ETAPA 13
CAMA CUCHETA TRIPLE
Coloque cuatro clavijas de metal (5) en los agujeros de las patas inferiores (D y E). Con la
ayuda de otra persona, coloque la cama del medio sobre la cama inferior.
5
5
5
5
E
D
D
I
Agujeros
Agujeros
Agujeros
Agujeros
ETAPA 14
CAMA CUCHETA TRIPLE
Coloque cuatro clavijas de metal (5) en los agujeros de las patas centrales (W, X, Y, Z). Con la
ayuda de otra persona, coloque la cama superior sobre la cama del medio.
5
5
5
5
I
A
B
B
C
H
Agujeros
Agujeros
Agujeros
Agujeros
Agujeros

ETAPA 15
CAMA CUCHETA TRIPLE
Una la escalera larga a los largueros laterales anteriores (H, A1 e I) con pernos
conectores para madera (2) como ilustrado. Utilice la llave Allen (8) para ajustar los
pernos conectores.
I
U
I
H
U
A
A
2
2
2
2
2
2
8
2
2
back view
H
Vista Posterior

ETAPA 16
CAMA CUCHETA TRIPLE
Una la escalera corta a los largueros laterales anteriores (A1 e I) con pernos
conectores para madera (2) como ilustrado. Utilice la llave Allen (8) para ajustar
los pernos conectores.
2
I
O
P
V
I
V
P
O
2
2
2
2
8
back view
Vista Posterior

ETAPA 17
CAMA CUCHETA TRIPLE
Repita este procedimiento para la cama del medio y la cama inferior.
Inserte dos listones con clavija de madera (T) en las ranuras ubicadas en el centro de los largueros
laterales superiores (H y J) de la cama superior como ilustrado.
Fije los listones sin clavija de madera (L) en los largueros laterales superiores (H y J) de la cama superior
con tornillos de cabeza plana (4) como ilustrado. Utilice un destornillador Phillips (no incluido) para
ajustar los tornillos de cabeza plana (4).
4
L
L
L
T
T
L
L
L
L
L
T
T
I
H
J
J
K
Listones:
8 piezas para la cama superior
8 piezas para la cama inferior

CAMA CUCHETA TRIPLE
Para convertir las camas cuchetas en tres camas simples separadas, retire las dos escaleras y
todas las barandas. Con la ayuda de otra persona, retire la cama superior y la cama del
medio de la cama inferior.
La primera cama simple
La segunda cama simple
La tercera cama simple
¡Eso es! Has terminado el montaje de su litera.
CAMAS CUCHETAS TRIPLE
PRECAUCIÓN: Esta unidad está diseñada para ser
utilizada únicamente con los productos y/o pesos máximos
indicados. Su uso con otros productos y/o productos más
pesados que los pesos máximos indicados puede provocar
inestabilidad o causar lesiones.
NO PERMITA QUE LOS NIÑOS
HAGAN PAYASADAS SOBRE O
DEBAJO DE LA CAMA Y PROHIBA
QUE SALTEN SOBRE ELLA.
NO PERMITA QUE NIÑOS MENORES DE 6
AÑOS DUERMAN EN LA CUCHETA
SUPERIOR. LA CAMA ESTÁ DISEÑADA
PARA NIÑOS DESDE 6 AÑOS HASTA LA
ADOLESCENCIA TEMPRANA.
UTILICE SOLAMENTE
COLCHONES CON RESORTES
EN ESPIRAL EN LAS DOS
CUCHETAS. EL NO RESPETAR
ESTO PUEDE CAUSAR
UTILICE ÚNICAMENTE COLCHONES DE 74"-75" DE LARGO Y 37 1/2" - 38 1/2" DE
ANCHO EN LA DOS CUCHETAS. ASEGÚRESE DE QUE EL ESPESOR DEL COLCHÓN NO
EXCEDA 6".
NEED HELP!
CALL US FOR ASSISTANCE
1-800-295-1980
DO NOT RETURN PRODUCT TO STORE
E-MAIL:DAS@DOREL.COM
PESO MÁXIMO: 165
LBS (75 KGS) PARA
CUCHETA
NO DEVUELVA EL PRODUCTO A LA TIENDA.
Si falta una pieza o está dañada, comuníquese con nuestro
Departamento de Servicio al Cliente. Reemplazaremos la
pieza SIN costo alguno.
Tel: 1-800-295-1980
Correo electr.: [email protected]
Fax: 514-353-7819

Modèle No:
Code CUP: Couleur:
DL7891TBB
0-65857-17827-2
MOKA
DL7891TBBW
0-65857-18286-6
BLANC
DL7891TBBG 0-65857-19467-8 GRIS
DL7891TBBB 0-65857-19902-4 NOIR
Date d'achat : _____ / _____ / _____ Numéro de lot :
(sur la boîte)
NOTE: CE MANUEL D'INSTRUCTIONS CONTIENT INFORMATION DE SÉCURITÉ IMPORTANTE. VEUILLEZ LE
LIRE ET LE CONSERVER POUR RÉFÉRENCE ULTÉRIEURE.
ATTENTION
UTILISEZ CE
MANUEL POUR
ASSEMBLER LE LITS
SUPERPOSÉS À
TROIS NIVEAUX
LITS SUPERPOSÉS À TROIS NIVEAUX
La satisfaction de nos clients est important pour nous chez Dorel Asia. Nos représentants sont
disponibles du lundi au vendredi de 8 h à 17 h (heure de l’est) pour répondre à toutes vos
questions. Afin d’accélérer le service, ayez toujours en main le numéro de modèle lorsque vous
contacterez notre numéro sans frais 1-800-295-1980 ou par courriel à das@dorel.com.
Pour trouver d’autres idées inspirantes, veuillez visiter notre site web à www.dorelliving.com.
Vous pouvez aussi souscrire à notre page Facebook pour être à la fine pointe de toutes les
dernières tendances.
NE RETOURNEZ PAS LE PRODUIT AU DETAILLANT. Si une pièce est manquante ou endommagée,
veuillez communiquer avec notre service à la clientèle. Nous la remplacerons GRATUITEMENT.
*
*
*
*
*
*
*
*
CAPACITÉ DE POIDS MAXIMUM: 165 LB (75 KG) PAR NIVEAU.
*
*
*
*
*
*
*
VÉRIFIEZ PÉRIODIQUEMENT ET ASSUREZ-VOUS QUE LA BARRIÈRE, L'ÉCHELLE ET LES AUTRES
COMPOSANTS SONT EN PLACE CORRECTEMENT, SANS DOMMAGES, ET QUE TOUTES LES VIS DE
RACCORDEMENT SONT BIEN SERRÉES.
NE PAS JOUER SUR OU SOUS LE LIT ET INTERDICTION DE SAUTER SUR LE LIT.
NE PAS SUBSTITUER DE PIÈCES. CONTACTEZ LE SERVICE À LA CLIENTÈLE POUR DES PIÈCES DE
REMPLACEMENT.
L'UTILISATION D'UNE VEILLEUSE REPRÉSENTE UNE PRÉCAUTION DE SÉCURITÉ SUPPLÉMENTAIRE POUR
L'ENFANT QUI OCCUPE LE LIT SUPÉRIEUR.
L'UTILISATION D'UN MATELAS D'EAU OU MATELAS GONFLABLE EST INTERDITE.
TOUJOURS UTILISER L'ÉCHELLE POUR MONTER OU DESCENDRE DU LIT SUPÉRIEUR.
LA PLATEFORME DE MATELAS EST CONÇUE POUR SUPPORTER UN MATELAS SANS AVOIR BESOIN
D'UN SUPPORT DE MATELAS OU D'UN SOMMIER.
TOUJOURS UTILISER LE FORMAT DE MATELAS OU DE SUPPORT DE MATELAS RECOMMANDÉ, OU LES
DEUX, POUR AIDER À PRÉVENIR LES RISQUES PROBABLES DE PIÉGAGE OU DE CHUTES.
UTILISEZ UNIQUEMENT DES MATELAS À RESSORTS SUR LES DEUX LITS SUPÉRIEUR ET INFÉRIEUR. SINON
DES BLESSURES PEUVENT EN RÉSULTER.
UTILISEZ SEULEMENT DES MATELAS DE 74"-75" DE LONGUEUR ET DE 37 1/2" - 38 1/2" DE LARGEUR
POUR LA COUCHETTE SUPÉRIEURE ET INFÉRIEURE. ASSUREZ-VOUS QUE L'ÉPAISSEUR DES MATELAS NE
DÉPASSE PAS 6". LA SURFACE DE MATELAS DOIT ÊTRE AU MOINS DE 5 "(127MM) CI-DESSOUS DE LA
BANDE SUPÉRIEURE DE GUARDRAILS.
NE PAS PERMETTRE AUX ENFANTS DE MOINS DE 6 ANS D'UTILISER LE LIT SUPÉRIEUR.
TOUJOURS UTILISER LES BARRIÈRES SUR LES DEUX CÔTÉS LONGS DU LIT SUPÉRIEUR. SI LE LIT
SUPERPOSÉ SERA PLACÉ À CÔTÉ D'UN MUR. LA BARRIÈRE DE LA PLEINE GRANDEUR DU LIT DOIT ÊTRE
PLACÉE CONTRE LE MUR POUR PRÉVENIR LES RISQUES DE PIÉGAGE ENTRE LE LIT ET LE MUR
(APPLICABLE POUR LES LITS SUPERPOSÉS AVEC BARRIÈRES PLEINE LONGUEUR SUR UN CÔTÉ).
Montreal, Quebec
Canada, H1G 3L1
Courriel: [email protected]
MISES EN GARDE:
DANGER D'ÉTRANGLEMENT – NE JAMAIS ATTACHER OU SUSPENDRE D'ARTICLES SUR AUCUNE PARTIE
DU LIT SUPERPOSÉ QUI NE SONT PAS CONÇUS POUR ÊTRE UTILISÉ AVEC LE LIT; PAR EXEMPLE, MAIS
NE SE LIMITANT PAS À DES CROCHETS, CEINTURES ET CORDES À DANSER.
SUIVEZ LES INFORMATIONS SUR LES MISES EN GARDE INSCRITES SUR LA STRUCTURE DU LIT
SUPERPOSÉ SUPÉRIEUR ET SUR LA BOÎTE. NE PAS ENLEVER L'ÉTIQUETTE DE MISE EN GARDE SUR LE LIT.
SERVICE À LA CLIENTÈLE
Si des pièces sont manquantes ou si vous avez des questions concernant ce produit, contactez
un représentant de notre service à la clientèle d'abord!
APPELEZ 1-800-295-1980
Vous pouvez aussi commander des pièces en écrivant à l'adresse indiquée ci-dessous. Veuillez
inclure le numéro de modèle du produit, la couleur et une description détaillée de la pièce.
Service à la clientèle, Département No. 413
12345 boul. Albert-Hudon, Suite 100

*
*
*
*
*
*
*
*
*
*
Vérifiez les boulons/vis périodiquement et serrez-les si nécessaire.
Époussetez régulièrement avec un chiffon doux et sec. Nous ne recommandons pas l'utilisation de
produits nettoyants ou de cire sur notre mobilier laqué car cela pourrait endommager la finition.
Gardez les solvants, alcools, vernis à ongles et décapants loin des surfaces de votre mobilier en bois
franc. Utilisez un service de nettoyage professionnel pour nettoyer le tissu.
ENTRETIEN
GARANTIE LIMITÉE
Dorel garantit que son produit est exempt de vices de matériaux et de fabrication et s'engage à
remédier à un tel défaut. Cette garantie couvre 1 an à partir de la date d'achat originale. Cette
garantie n'est valable que sur présentation d'une preuve d'achat. Elle est uniquement limitée à la
réparation ou au remplacement de composants défectueux du mobilier et aucun travail de montage
n'est inclus. Cette garantie ne s'applique pas à un produit qui a été mal assemblé, soumis à une
mauvaise utilisation ou abus, ou qui a été altéré ou réparé d'une façon quelconque. Cette garantie
vous donne des droits légaux spécifiques et vous pouvez également avoir d'autres droits qui varient
d'une province à l'autre.
MISE EN GARDE: Si ce produit est
endommagé et/ou si des pièces sont
brisées ou manquantes, NE PAS UTILISER.
DEUX PERSONNES SONT REQUISES POUR L'ASSEMBLAGE.
LA PLUPART DES PLANCHES SONT ÉTIQUETÉES OU ESTAMPILLÉES SUR LE CÔTÉ NON-FINI.
UN TOURNEVIS À TÊTE CRUCIFORME (NON INCLUS) EST NÉCESSAIRE.
UN MAILLET EN CAOUTCHOUC (NON INCLUS) EST RECOMMANDÉ POUR FACILITER L'ASSEMBLAGE.
LE LIT EST CONÇU POUR DES ENFANTS DE 6 ANS JUSQU'À JEUNES ADOLESCENTS.
SOIN ET ENTRETIEN
INTERDIRE PLUS D'UNE PERSONNE SUR LE LIT SUPÉRIEUR.
CONSERVEZ CES INSTRUCTIONS POUR RÉFÉRENCE ULTÉRIEURE.
NOTES
LIRE ATTENTIVEMENT CHAQUE ÉTAPE AVANT DE COMMENCER. IL EST TRÈS IMPORTANT QUE
CHAQUE ÉTAPE SOIT EXÉCUTÉE DANS L'ORDRE APPROPRIÉ. SI CES ÉTAPES NE SONT PAS SUIVIES
DANS L'ORDRE, DES DIFFICULTÉS D'ASSEMBLAGE SE PRODUIRONT ET PEUVENT ENTRAÎNER DES
BLESSURES.
ATTENTION: ASSEMBLAGE PAR UN ADULTE REQUIS.
ASSUREZ-VOUS QUE TOUTES LES PIÈCES SONT INCLUSES. TRAVAILLEZ DANS UN ENDROIT SPACIEUX,
PRÉFÉRABLEMENT SUR UNE SURFACE LISSE ET DOUCE.

LISTE DE QUINCAILLERIE
1 2
3 4
5 6
7 8
9 10 11
24 PCS
HEXAGONALE) 6 PCS
CREUSE 6 PCS
106 PCS
1 PC
Φ 11.8mm x 15mm
Φ 1/4" x 32mm
Φ 9mm x 17mm
ÉCROU TRANSVERSAL
BOULON DE RACCORDEMENT (4MM TÊTE
VIS À TÊTE HEXAGONALE
8 PCS
9 PCS
Φ 10mm x 50mm
GOUJON DE BOIS
CLÉ ALLEN
HEXAGONALE) 40 PCS
36 PCS
Φ 10mm x 100mm
Φ 4mm x 30mm
GOUJON DE MÉTAL
VIS À TÊTE PLATE
HEXAGONALE) 24 PCS
HEXAGONALE) 28 PCS
Φ 6.5mm x 100mm
Φ 4mm x 35mm
BOULON DE RACCORDEMENT BOIS (4MM TÊTE
VIS À TÊTE PLATE
LITS SUPERPOSÉS À TROIS NIVEAUX
Φ 1/4" x 100mm
Φ 6.5mm x 48mm
BOULON DE RACCORDEMENT (4MM TÊTE
BOULON DE RACCORDEMENT (4MM TÊTE
LISTE DE PIÈCES
A B C
D E F
PIED INFÉRIEUR
TRAVERSE SUPÉRIEURE TÊTE DE LIT
2 PCS
2 PCS
6 PCS
NOTE – Les pièces requises pour
assembler les lits superposés à trois
niveaux sont emballées dans 2 boîtes.
Assurez-vous d’avoir toutes les pièces
avant de commencer l’assemblage.
PIED INFÉRIEUR
LITS SUPERPOSÉS À TROIS NIVEAUX
PIED SUPÉRIEUR
PIED SUPÉRIEUR
PIED SUPÉRIEUR
1 PC
2 PCS
1 PC

LISTE DE PIÈCES
G H I
J K L
M N O
P Q R
S T U
TRAVERSE CENTRALE TÊTE DE LIT
LATTE AVEC GOUJON DE BOIS
SUPPORT DE BARRIÈRE
6 PCS
6 PCS
2 PCS
CÔTÉ DROIT ÉCHELLE
MARCHE
SUPPORT DE BARRIÈRE
1 PC
9 PCS
3 PCS
BARRIÈRE LONGUE
BARRIÈRE COURTE
CÔTÉ GAUCHE ÉCHELLE
4 PCS
2 PCS
1 PC
BARRE LATÉRALE ARRIÈRE
BARRE LATÉRALE INFÉRIEURE ARRIÈRE
LATTE SANS GOUJON DE BOIS
2 PCS
1 PC
18 PCS
LITS SUPERPOSÉS À TROIS NIVEAUX
TRAVERSE INFÉRIEURE TÊTE DE LIT
BARRE LATÉRALE SUPÉRIEURE AVANT
BARRE LATÉRALE INFÉRIEURE AVANT
6 PCS
1 PC
1 PC

LISTE DE PIÈCES
V W X
Y Z A1
B1 C1
D1
1 PC
CÔTÉ DROIT ÉCHELLE LONGUE
1 PC
1 PC
BARRE LATÉRALE AVANT
CÔTÉ GAUCHE ÉCHELLE LONGUE
1 PC
PIED CENTRAL
1 PC
BARRIÈRE COURTE
2 PCS
LITS SUPERPOSÉS À TROIS NIVEAUX
PIED CENTRAL
PIED CENTRAL
1 PC
1 PC
SUPPORT DE BARRIÈRE DROIT
PIED CENTRAL
1 PC
NOTE : Assurez-vous d’utiliser la traverse supérieure de tête de lit (F) qui porte une étiquette d’avertissement entre les
pieds supérieurs (A) et (B). Référez-vous à l’illustration ci-dessus pour voir l’orientation de l’étiquette.
Répétez l’étape précédente pour assembler l’autre tête de lit avec les pieds (B et C).
LITS SUPERPOSÉS À TROIS NIVEAUX
ÉTAPE 1
Insérez des goujons de bois (7) dans les extrémités de la traverse supérieure de la tête de lit (F), dans la traverse
inférieure de la tête de lit (G) et dans la traverse centrale de la tête de lit (S). Fixez-les aux pieds supérieurs (A et B)
avec des boulons de raccordement pour bois (3) tel qu’illustré. Serrez les boulons de raccordement pour bois (3) à
l’aide de la clé Allen (8).
NOTE : Peut-être que les traverses de la tête de lit supérieure (F, G et S) devront être rapprochées ou
éloignées dans le but de permettre aux goujons de bois (7) de s’aligner avec les trous des pieds supérieurs
(A et B).
3
A
7
7
7
7
7
7
7
7
C
7
7
7
7
7
7
7
7
Etiquette d’avertissement
LITS SUPERPOSÉS À TROIS NIVEAUX
ÉTAPE 2
Insérez des goujons de bois (7) dans les extrémités de la traverse supérieure de tête de lit (F), dans la
traverse inférieure de tête de lit (G) et dans la traverse centrale de tête de lit (S) et fixez-les aux pieds
inférieurs (D) et (E) avec des boulons de raccordement pour bois (3) tel qu’illustré. Serrez les boulons
de raccordement pour bois (3) à l’aide de la clé Allen (8).
D
E
7
7
7
7
7
7
7
7
D
E
7
7
7
7
7
7
7
7
3
LITS SUPERPOSÉS À TROIS NIVEAUX
Note : Ceci est le lit inférieur.
Fixez les deux têtes de lit aux pieds inférieurs (D et E), à la barre latérale inférieure avant (I) et à la
barre latérale inférieure arrière (K) avec des boulons de raccordement (1) et des écrous transversaux
(9) tel qu’illustré. Serrez les boulons de raccordement (1) à l’aide de la clé Allen (8).
ÉTAPE 3
K
I

ÉTAPE 4
LITS SUPERPOSÉS À TROIS NIVEAUX
Insérez des goujons de bois (7) dans les extrémités des barrières longues (M).
Fixez les deux barrières longues (M) et les barres latérales supérieures (H et J) aux pieds supérieurs (A
et B) et (C et B) tel qu’illustré.
Fixez les barres latérales supérieures (H et J) avec des boulons de raccordement (1) et des écrous
transversaux (9). Fixez les barrières longues (M) avec des boulons de raccordement pour bois (3).
Serrez les boulons de raccordement (1) et les boulons de raccordement pour bois (3) à l’aide de la
clé Allen (8).
Note : Ceci est le lit supérieur.
J
H
ÉTAPE 5
Fixez les barrières courtes (N) au pied supérieur (B) avec des boulons de raccordement pour
bois (3). Fixez le support de barrière (U) à la barre latérale supérieure avant (H) avec des
boulons de raccordement (10) et des vis à tête hexagonale creuse (11) tel qu’illustré.
LITS SUPERPOSÉS À TROIS NIVEAUX
Insérez des goujons de bois (7) dans les barrières courtes (N). Fixez les barrières courtes (N) au
support de barrière (U) avec des boulons de raccordement pour bois (3) tel qu’illustré.
7
7
U
8
3
10
11
N
U
H
A
B
10
ÉTAPE 6
LITS SUPERPOSÉS À TROIS NIVEAUX
Fixez un support de barrière (R) aux barrières courtes (N) et à la barre latérale
supérieure avant (H) avec des vis à tête plate (6). Fixez l’autre support de barrière
(R) (de l’autre côté du lit) aux barrières longues (M) et à la barre latérale supérieure
arrière (J) avec des vis à tête plate (6) tel qu’illustré. Servez-vous d’un tournevis
cruciforme (non compris) pour serrer les vis à tête plate.
6
6
6
N
M
H
6
ÉTAPE 7
LITS SUPERPOSÉS À TROIS NIVEAUX
Insérez des goujons de bois (7) dans les extrémités des marches (Q). Fixez le côté
gauche de l’échelle (O) et le côté droit de l’échelle (P) aux marches (Q) avec des
boulons de raccordement pour bois (2). Serrez les boulons de raccordement pour
bois (2) à l’aide de la clé Allen (8).
O
P
Répétez l’étape précédente pour assembler l’autre tête de lit avec les pieds centraux (Y et Z).
LITS SUPERPOSÉS À TROIS NIVEAUX
ÉTAPE 8
Insérez des goujons de bois (7) dans les extrémités de la traverse supérieure de la tête de lit (F), dans la
traverse inférieure de la tête de lit (G) et dans la traverse centrale de la tête de lit (S). Fixez les pieds
centraux (W et X) avec des boulons de raccordement pour bois (3) à l’aide de la clé Allen (8).
NOTE : Peut-être que les traverses de la tête de lit supérieure (F, G et S) devront être rapprochées
ou éloignées dans le but de permettre aux goujons de bois (7) de s’aligner avec les trous des
pieds supérieurs (W et X).
3
W
7
7
7
7
7
7
7
7
Z
7
7
7
7
7
7
7
7
ÉTAPE 9
LITS SUPERPOSÉS À TROIS NIVEAUX
Insérez des goujons de bois (7) dans les extrémités des barrières longues (M).
Fixez deux barrières longues (M) et les barres latérales (A1 et J) aux pieds centraux (W et X)
et (Y et Z) telle qu’illustré.
Fixez les barres latérales (A1 et J) avec des boulons de raccordement (1) et des écrous
transversaux (9). Fixez les barrières longues (M) avec des boulons de raccordement pour
bois (3).
Serrez les boulons de raccordement (1) et les boulons de raccordement pour bois (3) à
l’aide de la clé Allen (8).
Note : Ceci est le lit du milieu.
J
ÉTAPE 10
Fixez le support de barrière (U) et le support de barrière droit (V) à la barre latérale centrale avant
(A1) avec des boulons de raccordement (10) et des vis à tête hexagonale creuse (11) tel qu’illustré.
LITS SUPERPOSÉS À TROIS NIVEAUX
Insérez des goujons de bois (7) dans les barrières courtes (B1). Fixez les barrières courtes (B1) au
support de barrière (U) et au support de barrière droit (V) avec des boulons de raccordement pour
bois (3) tel qu’illustré.
10
V
10
10
11
11
ÉTAPE 11
LITS SUPERPOSÉS À TROIS NIVEAUX
Fixez le support de barrière (R) aux barrières longues (M) et à la barre latérale (J)
avec des vis à tête plate (6) tel qu’illustré. Servez-vous d’un tournevis cruciforme (non
compris) pour serrer les vis à tête plate.
6
6
6
6

ÉTAPE 12
LITS SUPERPOSÉS À TROIS NIVEAUX
Pour assembler l’échelle, insérez des goujons de bois (7) dans les extrémités des
marches (Q). Fixez les côtés de l’échelle longue (C1 et D1) aux marches (Q) avec
des boulons de raccordement pour bois (2) à l’aide de la clé Allen (8).

ÉTAPE 13
LITS SUPERPOSÉS À TROIS NIVEAUX
Placez quatre goujons de métal (5) dans les trous des pieds inférieurs (D et E). Avec l’aide
d’une autre personne, placez le lit du milieu sur le lit inférieur.
5
5
5
5
E
D
D
I
Trous
Trous
Trous
Trous
ÉTAPE 14
LITS SUPERPOSÉS À TROIS NIVEAUX
Placez quatre goujons de métal (5) dans les trous des pieds centraux (W, X, Y, Z). Avec l’aide
d’une autre personne, placez le lit supérieur sur le lit du milieu.

ÉTAPE 15
LITS SUPERPOSÉS À TROIS NIVEAUX
Fixez l’échelle longue aux barres latérales avant (H, A1 et I) avec des boulons de
raccordement pour bois (2) tel qu’illustré. Servez-vous de la clé Allen (8) pour serrer
les boulons de raccordement.
I
U
I
H
U
A
A
2
2
2
2
2
2
8
2
2
back view
H
Vue arrière
ÉTAPE 16
LITS SUPERPOSÉS À TROIS NIVEAUX
Fixez l’échelle courte aux barres latérales (A1 et I) avec des boulons de
raccordement pour bois (2) tel qu’illustré. Servez-vous de la clé Allen (8) pour serrer
les boulons de raccordement.
2
I
O
P
V
I
V
P
O
2
2
2
2
8
back view
Vue arrière
ÉTAPE 17
LITS SUPERPOSÉS À TROIS NIVEAUX
Répétez cette procédure pour le lit du milieu et le lit inférieur.
Insérez deux lattes avec goujons de bois (T) dans les rainures situées au centre des barres
latérales supérieures (H et J) du lit supérieur tel qu’illustré.
Fixez les lattes sans goujons de bois (L) aux barres latérales supérieures (H et J) du lit supérieur
avec des vis à tête plate (4) tel qu’illustré. Servez-vous d’un tournevis cruciforme (non compris)
pour serrer les vis à tête plate (4).
4
L
L
L
T
T
L
L
L
L
L
T
T
I
H
J
J
K
Lattes :
8 pièces pour le lit supérieur
8 pièces pour le lit central
8 pièces pour le lit inférieur

LITS SUPERPOSÉS À TROIS NIVEAUX
Pour convertir les lits superposés en trois lits simples, retirez les deux échelles et toutes les
barrières. Avec l’aide d’une autre personne, séparez le lit supérieur et le lit du milieu du lit
inférieur.
Le premier lit simple
Le deuxieme lit simple Le troisième lit simple
C'est tout! Vous avez terminé le montage de votre lit superposés.
LITS SUPERPOSÉS À TROIS NIVEAUX
ATTENTION: Cette unité est destinée à être utilisé
seulement avec des produits et/ou les poids maximum
indiqués. L'utilisation avec d'autres produits et/ou des
produits plus lourds que les poids maximum indiqués peut
entraîner une instabilité ou causer des blessures.
NE PAS PERMETTRE DE SE
CHAMAILLER SUR OU SOUS LE LIT ET
NE PAS SAUTER SUR LE LIT.
NE PAS PERMETTRE À DES ENFANTS ÂGÉS
DE MOINS DE 6 ANS D'UTILISER LE LIT
SUPÉRIEUR. LE LIT EST CONÇU POUR DES
ENFANTS DONT L'ÂGE SE SITUE À PARTIR DE
6 ANS JUSQU'À JEUNES ADOS.
UTILISEZ SEULEMENT DES
MATELAS À RESSORTS SUR LES
LITS SUPÉRIEUR ET INFÉRIEUR.
À DÉFAUT DE QUOI, DES
BLESSURES PEUVENT SE
PRODUIRE.
UTILISEZ SEULEMENT DES MATELAS DE 188-190 CM (74"-75") DE LONG ET 95-98 CM (37
1/2" - 38 1/2") DE LARGE SUR LE LIT SUPÉRIEUR ET LE LIT INFÉRIEUR. ASSUREZ-VOUS QUE
L'ÉPAISSEUR DU MATELAS N'EXCÈDE PAS 15 CM (6").
NEED HELP!
CALL US FOR ASSISTANCE
1-800-295-1980
DO NOT RETURN PRODUCT TO STORE
E-MAIL:DAS@DOREL.COM
CAPACITÉ DE POIDS
MAXIMUM: 165 LB (75 KG)
PAR NIVEAU.
NE PAS RETOURNER CE PRODUIT AU DETAILLANT. Si une pièce est
manquante ou endommagée, contactez notre Service à la
clientèle. Nous remplacerons la pièce GRATUITEMENT.
TÉL. # : 1-800-295-1980
Courriel : [email protected]
Télécopieur # : 514-353-7819