2820531489_EN/ 23-06-23.(14:07)
WDN064SLDIN
Document Number :
Washer-Dryer
User’s Manual

EN / 2
Table of Contents
1 Safety Instructions........................ 4
1.1 Intended Use.................................. 4
1.2 Safety of Children, Vulnerable
Persons and Pets ..........................
4
1.3 Electrical Safety............................. 5
1.4 Handling Safety ............................. 6
1.5 Installation Safety.......................... 6
1.6 Operational Safety......................... 7
1.7 Drying Safety.................................. 9
1.8 Maintenance and Cleaning Safety 11
2 Important Instructions for Envir-
onment...........................................
11
2.1 Compliance with WEEE Directive . 11
2.2 Package Information..................... 12
3 Technical Specifications.............. 13
4 Installation ..................................... 14
4.1 Appropriate Installation Location. 14
4.2 Assembly of Bottom Panel Cov-
ers...................................................
14
4.3 Removing Transportation Safety
Bolts ...............................................
15
4.4 Connecting to Water Supply ......... 15
4.5 Connecting the Drain Hose to the
Drain ...............................................
16
4.6 Adjusting the Stands..................... 17
4.7 Electrical Connection .................... 17
4.8 Handling the Product .................... 17
5 Preliminary Preparation ............... 18
5.1 Sorting the Laundry ....................... 18
5.2 Preparing Laundry for Washing.... 18
5.3 Tips for Energy and Water Saving 18
5.4 Start Up .......................................... 18
5.5 Loading the Laundry...................... 19
5.6 Correct Load Capacity .................. 19
5.7 Using Detergent and Softener ...... 19
5.8 Tips for Efficient Washing ............ 22
5.9 Tips for Efficient Drying ................ 23
5.10 Displayed Programme Duration ... 23
6 Operating the Product.................. 24
6.1 Control Panel ................................. 24
6.2 Symbols on the Display................. 25
6.3 Preparing the Machine.................. 25
6.4 Selection of Washing Programme 25
6.5 Washing Programmes .................. 26
6.6 Temperature Selection .................. 27
6.7 Spin Speed Selection..................... 28
6.8 Drying Programmes....................... 29
6.9 Washing and Drying Programmes 29
6.10 Programme and Consumption
Table...............................................
30
6.11 Auxiliary Function Selection.......... 32
6.11.1 Auxiliary Functions..................... 33
6.11.2 Functions/Programmes Selec-
ted by Pressing the Function
Keys for 3 Seconds ....................
34
6.12 Drying Steps ................................... 35
6.13 End Time ........................................ 35
6.14 Starting the Programme................ 36
6.15 Loading Door Lock......................... 36
6.16 Changing the Selections After
Programme has Started ................
37
6.17 Cancelling the Programme ........... 38
6.18 End of Programme......................... 38
7 Maintenance and Cleaning........... 38
7.1 Cleaning the Detergent Drawer..... 38
7.2 Cleaning the Loading Door and
the Drum.........................................
39
7.3 Cleaning the Body and Control
Panel...............................................
39
7.4 Cleaning the Water Intake Filters.. 39
7.5 Draining Remaining Water and
Cleaning the Pump Filter ...............
39
8 Troubleshooting ............................ 40

EN / 3
Please read this user manual first!
Dear Customer,
Thank you for choosing Smeg product. We hope that you get the best results from your
product which has been manufactured with high quality and state-of-the-art technology.
Therefore, please read this entire user manual and all other accompanying documents
carefully before using the product.
Follow all warnings and information in the user manual. Thus, you protect yourself and
your product against possible dangers.
Keep the user manual. If you hand over the product to someone else, provide the user
manual as well. Warranty terms, usage and troubleshooting methods of your product are in
user guide.
Symbols and Definitions
The following symbols are used in the user guide:
Danger that could result in death or injury.
Important information or useful hints about usage.
Read the user manual.
Recyclable materials.
Hot surface warning.
WARNING
Danger that may result in property damage to the product or its environment.

EN / 4
1 Safety Instructions
This section includes the safety
instructions necessary to pre-
vent the risk of personal injury or
material damage.
Our company shall not be held
responsible for damages that
may occur if these instructions
are not observed.
• Installation and repair opera-
tions shall always be per-
formed by Authorised Service.
• Use original spare parts and
accessories only.
• Do not repair or replace any
component of the product un-
less it is clearly specified in the
operation manual.
• Do not modify the product.
1.1 Intended Use
• This product has been de-
signed for domestic use. It is
not for commercial purposes
or it should not be used out of
its intended use.
• Use only for washing and dry-
ing textile products that are
marked accordingly.
• The manufacturer assumes no
responsibility for any damage
due to misuse or mishandling.
• This appliance is intended to
be used in household and sim-
ilar applications. For example;
– Personnel kitchens of stores,
offices and other work envir-
onments;
– Ranches,
– By customers of hotels, mo-
tels and other accommoda-
tion facilities
– Bed and breakfasts, hostel-
like environments
– Common areas of apartment
blocks or laundries.
1.2 Safety of Children,
Vulnerable Persons
and Pets
• This product may be used by
children aged 8 years and
older and persons with under-
developed physical, sensory or
mental capabilities or lack of
experience and knowledge if
they have been given supervi-
sion or instruction concerning
use of the appliance in a the
product safe way and the haz-
ards involved.
• Children under the age of 3
should be kept away unless
continuously supervised.
• Electrical products are danger-
ous for children and pets. Chil-
dren or pets should not play

EN / 5
with, climb on top or inside the
product. Check inside the
product before use.
• Use child lock to prevent chil-
dren from intervening with the
product.
• Do not forget to close the load-
ing door when leaving the
room where the product is loc-
ated. Children and pets may
get locked inside and drown.
• Children should not perform
cleaning and user mainten-
ance works without an adult’s
supervision.
• Keep the packaging materials
away from children. Risk of in-
jury and suffocation.
• Keep all detergents and addit-
ives used for the product away
from children’s reach.
• Cut the power cable and break
and deactivate the locking
mechanism of the loading
door before disposing of the
product for children’s safety.
1.3 Electrical Safety
• Product should be unplugged
during installation, mainten-
ance, cleaning and repair pro-
cedures.
• Damaged power cables should
be replaced by the authorised
service in order to prevent pos-
sible danger.
• The product should not be fed
via an external switching
device such as a timer or con-
nected to a circuit that is regu-
larly switched on and off by a
device.
• Do not tuck the power cord un-
der the product or to the rear
of the product. Do not put
heavy items on the power
cord. Do not over bend, crush
and touch the power cable to
sources of heat.
• Do not use an extension cord,
multi-plug or adaptor to oper-
ate your product.
• The plug shall be easily ac-
cessible. If this is not possible,
a mechanism that meets the
electrical legislation and that
disconnects all terminals from
the mains (fuse, switch, main
switch, etc.) shall be available
on the electrical installation.
• Do not touch the plug with wet
hands.
• When unplugging the appli-
ance, don't hold the power
cord, but the plug.
• Make sure the plug is not wet,
dirty or dusty.

EN / 6
1.4 Handling Safety
• Unplug the product before
moving, remove the water out-
let and water main connec-
tions. Drain any water left in-
side the product.
• This product is heavy, do not
handle it by yourself. Do not
hold extruding parts such as
the laundry loading door to lift
and move the product. The up-
per tray should be tightly fixed
for moving.
• Your product is heavy; it
should be carried carefully by
two people if a staircase is in-
volved. It may cause injuries if
your product falls on you. Do
not hit and drop the product
while carrying.
• Carry the product in an upright
position.
• Make sure that the hoses as
well as the power cable are not
folded, pinched or crushed
after the product is fitted into
its place after installation or
cleaning procedures.
1.5 Installation Safety
• Check the information on the
manual and installation in-
structions to prepare the
product for installation and
make sure the electrical mains,
clean water mains and water
outlet are suitable. If not, call a
qualified electrician and
plumber to have them make
the necessary arrangements.
These operations are the re-
sponsibility of the customer.
• Check for any damage on the
product before installing it. Do
not have the product installed
if it is damaged.
• Injuries may occur if hands are
put into uncovered slots. Close
the holes of the transportation
safety bolts with plastic plugs.
• Do not install or leave the
product at locations where it
may be exposed to external en-
vironment conditions.
• Do not install the product at
locations where the temperat-
ure drops below 0 ºC.
• Do not place the product on a
carpet or similar surface. It
would create fire hazard since
it cannot receive air from un-
derneath.
• Place the product on a level
and hard surface and balance
with the adjustable legs.
• Connect the product to a
grounding plug protected by a
fuse suitable to the current val-
ues on the type label. Make
sure the grounding is carried
out by an expert electrician. Do

EN / 7
not use the product without
suitable grounding to local/na-
tional regulations.
• Plug the product in a socket
with voltage and frequency val-
ues suitable to those indicated
on the type label.
• Do not plug the product to
loose, broken, dirty, greasy
sockets or sockets that has
come out their seats or sock-
ets with a risk of water con-
tact.
• Use the new hose set provided
with the product. Do not re-use
old hose sets. Do not make ad-
ditions to the hoses.
• Connect the water inlet hose
directly to the water tap. The
pressure from the tap should
be minimum 0.1 MPa (1 bar)
and maximum 1MPa (10 bars).
10 to 80 litres of water should
be running from the tap in a
minute in order for the product
to function properly. If the wa-
ter pressure is above 1 MPa
(10 Bars), a pressure-reducing
valve should be fitted. The
maximum allowed temperat-
ure is 25°C.
• Fit the end of the water dis-
charge hose to the dirty water
discharge drain, the sink or the
bathtub.
• Place the power cable and
houses in locations without
risk of tripping.
• Do not install the product be-
hind a door, a sliding door or at
another location that will pre-
vent the door from opening
completely.
• If a drier is to be placed on the
product, fix with a suitable con-
nection apparatus obtained
from the authorised service.
• There is a risk of contact with
electrical pieces when the up-
per trays is removed. Do not
dismantle the upper tray of the
product.
• Place the product at least 1 cm
away from the edges of fur-
niture.
• Make sure the room in which
the installation performed is
adequately ventilated, as there
may be a risk of undesirable
gases coming out of the
device igniting other fuels in
the room or interacting with an
open flame.
1.6 Operational Safety
• When you are using the appli-
ances, use only detergents,
softeners and supplements
suitable for washing ma-
chines.

EN / 8
• Do not use chemical solvents
on the product. These materi-
als contain an explosion risk.
• Do not operate defective or
damaged products. Unplug the
product (or turn off the fuse it
is connected to), turn off the
water tap and call an author-
ised service.
• Do not place sources of igni-
tion (burning candle, cigar-
ettes, etc.) or sources of heat
(irons, furnaces, ovens, etc.) on
top of or near the product. Do
not put inflammable/explosive
materials near the product.
• Do not get on the product.
• Unplug the product and turn
off the tap if you will not be us-
ing the product for long peri-
ods.
• Detergent/maintenance mater-
ials may splash out of the de-
tergent drawer if it is opened
while the machine is working
Contact of the detergent with
your skin and eyes is danger-
ous.
• Make sure pets do not climb
inside the product. Check in-
side the product before use.
• Do not force open the locked
loading door. The door will
open once the washing is com-
pleted. If the door does not
open, use the solutions for
“loading door does not open”
error in the Troubleshooting
section.
• Do not wash elements contam-
inated with gasoline, kerosene,
benzene, reducers, alcohol or
other inflammable or explosive
materials and industrial chem-
icals.
• Do not directly use dry clean-
ing detergent and do not wash,
rinse, spin or dry laundry con-
taminated with dry cleaning
detergent.
• Do not place your hands into
the rotating drum. Wait until
the drum no longer rotates.
• Do not place your hand or a
metal object under the wash-
ing machine.
• If washing laundry at high tem-
peratures, the discharged
washing water would burn your
skin if in contact with your
skin, for ex. when the draining
hose is connected to the tap.
Do not touch the discharge wa-
ter.
• Take the following precautions
to prevent formation of biofilm
and malodours:
– Make sure the room where
the washing machine is
placed is well ventilated.

EN / 9
– Wipe the door gasket and
loading door glass with a dry
and clean cloth at the end of
the programme.
• The glass of the loading door
will heat up when washing or
drying at high temperatures.
Therefore, do not allow espe-
cially children to touch the
loading door glass while wash-
ing or drying.
1.7 Drying Safety
• Laundry that has been previ-
ously washed, cleaned, con-
taminated or stained with gas-
oline/gas, dry cleaning
solvents or other inflammable/
explosive materials should not
be dried in the machine be-
cause they give off inflam-
mable or explosive vapours.
Otherwise, fire hazard arises.
• Laundry contaminated with
materials such as vegetable or
mineral oil, acetone, alcohol,
gasoline, gas oil, stain re-
movers, naphtha, turpentine,
paraffin or paraffin removers
should be washed separately
in hot water by adding extra
detergent before being dried in
the washing machine with
dryer. Otherwise, fire hazard
arises.
• Do not dry textile products that
contain predominantly foam,
rubber or rubber-like parts (e.g.
shower caps, waterproof tex-
tile products, rubber products
and clothes) or the ones that
are filled and damaged (e.g.
Pillows or coats). There is a
risk of burns.
• If you use a laundry ball, deter-
gent scale, laundry cage or ball
in your machine, these
products may melt during dry-
ing. If you are going to choose
the drying feature, do not use
these products. Otherwise, fire
hazard arises.
• If you use industrial chemicals
for cleaning, do not use the
drying function. Otherwise, fire
hazard arises.
• The door becomes very hot
after drying process. After dry-
ing is over, open the door of
the device completely. Do not
touch the metal door located
inside of the door glass. There
is a risk of burns due to high
temperatures.
• During Drying programmes, a
cooling step is performed as
the last step to ensure that the
laundry remains at a temperat-
ure where it will not be dam-
aged. You may be exposed to

EN / 10
hot steam if you open the
cover without completing the
cooling step. Risk of seething.
• If the drying programmes are
interrupted (as a result of pro-
gramme cancellation or power
failure), the laundry in the ma-
chine may be hot. Be careful.
• Do not stop the machine be-
fore the drying programme is
completed. If you have to stop
the machine, take out all the
laundry inside of it and place
them in a suitable place and
wait for them to cool.
• Your product is suitable to op-
erate between the temperat-
ures of 0°C and +35°C.
• Ambient temperatures
between 15°C and +25°C are
ideal for your product.
• Do not overload the machine
for drying. Observe the spe-
cified maximum load levels for
drying.
• If the laundry has been washed
with a stain remover, run an
additional rinsing speed before
starting the drying speed.
• Do not dry leather laundry and
laundry containing leather
(such as leather tags on jeans)
in the machine. The colour left
by the leather parts may smear
on other textiles.
• If there is a problem that you
cannot solve using the inform-
ation given in the safety in-
structions section, turn off and
unplug the machine and call an
Authorized Service.
• In your washer-dryer, you can
only wash laundry, only dry
laundry or do both of these
processes. The machine
should not be used for a long
period of time only for drying
wet laundry. While the machine
is only used for drying, it
should be run empty in a short
washing programme every 15
starts.
• Before putting laundry in the
machine, check all of them and
make sure that there is no ob-
ject such as lighter, coin, metal
object and pin, etc. in their
pockets or inside of them.
• Lingerie that has metal parts
should not be dried in the ma-
chine. Metal parts may come
off during drying and cause
damage to the machine. Put
them in a bag or pillow case.
• Do not dry large laundry such
as tulle curtains, curtains,
sheets/beddings, blankets,
rugs in the machine. Laundry
may get damaged.
• Do not dry unwashed laundry
in the machine.

EN / 11
• Do not use softener or anti-
static agent unless recommen-
ded by the manufacturer.
• Products such as softener
should be used in accordance
with the manufacturer's in-
structions.
• Do not dry silk, wool and sim-
ilar delicate clothes in the ma-
chine. Otherwise, wool clothes
can shrink and damage may
be caused in other delicate
clothes.
• Check the symbols on laundry
label before washing and dry-
ing processes.
• The machine automatically
cleans the lint itself that
comes out of the laundry dur-
ing drying. The machine per-
forms automatic water intakes
for cleaning. For this reason,
the water tap of the machine
should also be open during
drying programmes.
• Prevent the lint from accumu-
lating around the product.
1.8 Maintenance and
Cleaning Safety
• Do not wash the product with
pressure washers, by spraying
vapour, water or pouring water.
• Do not use sharp or abrasive
tools to clean the product. Do
not use household cleaners,
soap, detergent, gas, gasoline,
thinner, alcohol, varnish, etc.
while cleaning.
• Cleaning agents containing
solvents might reek poisonous
fumes( for ex. cleaning
solvent. Do not use cleaning
products containing solvents.
• There may be detergent
residues in the detergent
drawer when you open it for
cleaning.
• Do not dismantle the filter of
the discharge pump while the
product is running.
• The temperature in the ma-
chine may rise up to 90ºC.
Clean the filter after the water
in the machine cools down in
order to avoid risk of getting
burnt.
2 Important Instructions for Environment
2.1 Compliance with WEEE Directive
This product complies with EU
WEEE Directive (2012/19/EU).
This product bears a classifica-
tion symbol for waste electrical and elec-
tronic equipment (WEEE).
This product has been manufactured with
high quality parts and materials which can
be reused and are suitable for recycling. Do
not dispose of the waste product with nor-
mal domestic and other wastes at the end
of its service life. Take it to the collection

EN / 12
center for the recycling of electrical and
electronic equipment. Please consult your
local authorities to learn about these collec-
tion centers.
Compliance with RoHS Directive:
The product you have purchased complies
with EU RoHS Directive (2011/65/EU). It
does not contain harmful and prohibited
materials specified in the Directive.
2.2 Package Information
Packaging materials of the product are
manufactured from recyclable materials in
accordance with our National Environment
Regulations. Do not dispose of the pack-
aging materials together with the domestic
or other wastes. Take them to the pack-
aging material collection points designated
by the local authorities.
EN / 13
3 Technical Specifications
Supplier’s name or commercial brand SMEG
Model name
WDN064SLDIN
7178576800
Washing capacity (cotton) (kg) 10
Drying capacity (cotton) (kg) 6
Maximum spin speed (cycle/min) 1400
Built-In No
Height (cm) 84,5
Width (cm) 60
Depth (cm) 60
Single Water inlet / Double Water inlet + / -
Electrical connection (V/Hz) 230 V / 50Hz
Total current (A) 10
Total power (W) 2200
Main model code 1721
The model information as stored in the product database
can be reached by entering following website and search-
ing for your model identifier (*) found on energy label.
https://eprel.ec.europa.eu/
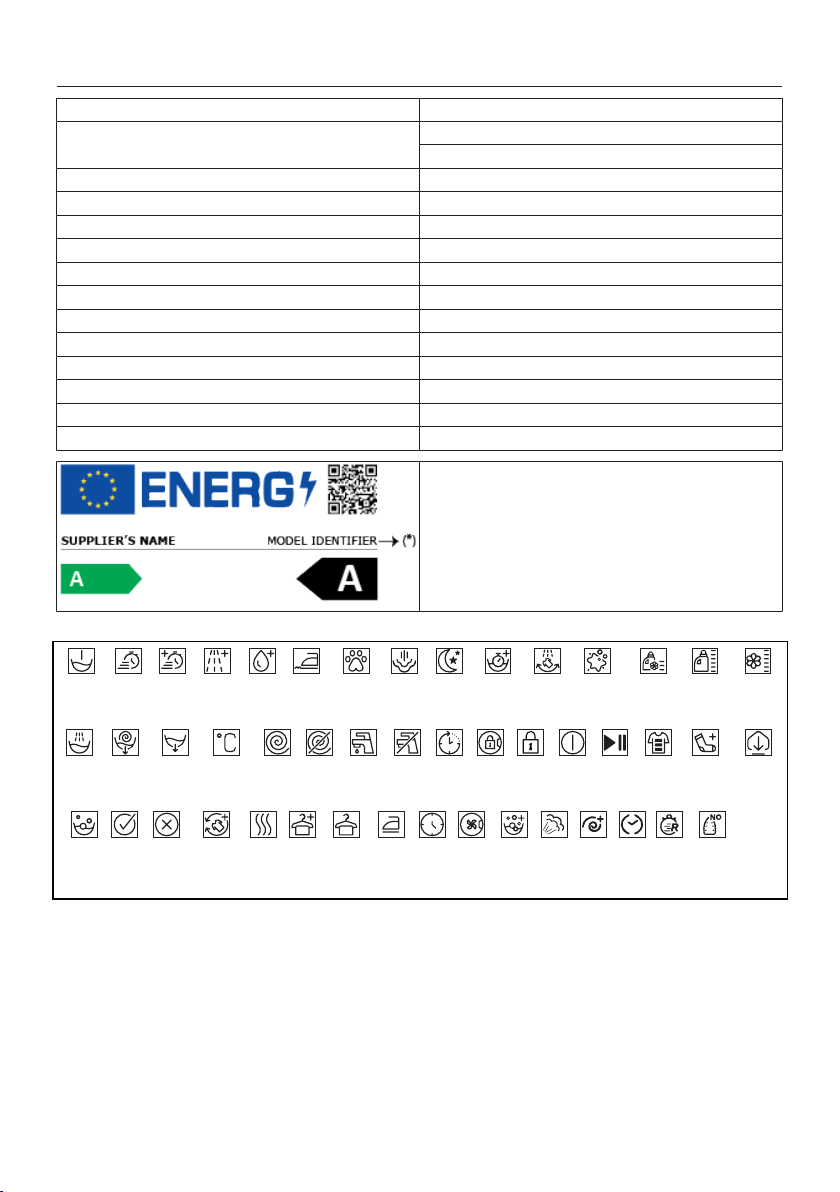
Symbols Table
Prewash Fast Fast+ Extra Extra Anti
Crease
No
Spin
Pet Hair Steam
No
Water
Night
Modu
Time
Delay
Timed
Drying
Soaking
Door
Lock
Clean&
Wear
Rinse
Hold
Child
Lock
Steeping AutoDose Liquid Softener
Selection
Downloaded
Program
Rinse Water Removal Detergent
Selection
Soil Level Add
Garment
Rinse Spin+Drain Drain Temperature Spin Tap
Water
(Cold)
On/Off Start /
Pause
Wash Ok Cancel AntiCrease+ Drying Extra Cupboard Iron
Intensive Steam Spin FastTime
Anti
(End) Dry Dry Dry
Delay
Crease

EN / 14
4 Installation
Please read the “Safety Instruc-
tions” section first!
Your washing machine automatic-
ally detects the amount of laundry
placed inside when selecting a pro-
gram.
While installing the product, before
the first use, calibration should be
done to ensure that the laundry
amount is detected in the most ac-
curate way.
To do this, select the Drum Clean-
ing* program and cancel the spin
function. Start the program without
laundry. Wait for the program to fin-
ish, which will take about 15
minutes.
*The program name may vary de-
pending on the model. For the ap-
propriate program selection, review
the program descriptions section.
• Preparation of the location and electrical,
tap water and waste water installations
at the place of installation is under cus-
tomer's responsibility.
• Make sure that the water inlet and dis-
charge hoses as well as the power cable
are not folded, pinched or crushed while
pushing the product into its place after
installation or cleaning procedures.
• Prior to installation, visually check if the
product has any defects on it. Do not
have the product installed if it is dam-
aged. Damaged products cause risks for
your safety.
4.1 Appropriate Installation Location
• Place the product on a hard and level
floor. Do not place it onto a carpet with
high pile or other similar surfaces. Pla-
cing on an improper floor shall cause
noise and vibration problems.
• Do not place the product on the power
cable.
• Do not install the product at places where
temperature may fall below 0 ºC. Freez-
ing might damage your product.
• Leave a minimum space of 1 cm
between the product and the furniture.
• If you will install the product on a surface
with steps, never place it close to the
edge.
• Do not place the product on any platform.
• There shall not be any locked, sliding or
hinged doors that may prevent the load-
ing door from opening completely in the
installation location of this product.
• Do not place heat sources such as
cooker, irons, ovens, heater etc. on the
appliance and do not use them on the
product.
4.2 Assembly of Bottom Panel Covers
With some models, the base parts
of the products are completely
closed. These products do not have
plugs and covers.
• In order to increase the sound comfort of
the product, attach cover A after remov-
ing the package foam.
Cover A
Tilt the machine back slightly. Rest the tabs
of Cover A against the lower panel. Com-
plete the assembly by rotating the cover.
• Cover B and the Cap are optional. If avail-
able, attach cover B and the Cap.

EN / 15
Cover B
Rest the tabs of Cover B against the lower
panel. Complete the assembly by rotating
the cover.
Cap
Insert the cap by pushing it with your finger.
4.3 Removing Transportation Safety
Bolts
1. Loosen all transportation safety bolts
with an appropriate wrench until they
turn freely.
2. Bend the inner part by pressing it at the
grip areas and pull the part out.
3. Attach the plastic covers supplied in the
User Manual bag into the holes on the
rear panel.
WARNING
Remove the transportation safety
bolts before operating the product.
Otherwise, the product will get
damaged.
WARNING
Keep the transportation safety
bolts in a safe place to reuse when
the product needs to be moved
again in the future.
Install the transportation safety
bolts in reverse order of the disas-
sembly procedure.
Never move the product without the
transportation safety bolts properly
fixed in place.
4.4 Connecting to Water Supply
WARNING
The water pressure required for the
operation of the product is between
1-10 bars (0.1-1 MPa). To ensure a
smooth operation of the machine,
10 - 80 liters of water shall be sup-
plied in a minute from a fully
opened tap. If the water pressure is
higher, install a pressure reducing
valve.
WARNING
Models with a single water inlet
shall not be connected to the hot
water tap. In such a case the laun-
dry will get damaged or the product
will switch to protection mode and
will not operate.
Do not use old or used water inlet
hoses on a new product. It may
cause water leakage from your ma-
chine and stain your laundry.
1. Connect the special hose supplied with
the product to the water inlet on the
product.
EN / 16
WARNING
Make sure that the cold water con-
nection is performed correctly dur-
ing the installation of the product.
Otherwise, your laundry may come
out as hot at the end of the wash-
ing cycle and thus they may be
worn.
2. Tighten all hose nuts by hand. Never use
a tool when tightening the nuts.
3. Open the taps completely after making
the hose connection to check for water
leaks at the connection points. If any
leak occurs, turn off the tap and remove
the nut. Check the gasket and tighten
the nut carefully again. In order to pre-
vent the water leaks and resultant dam-
ages, keep the taps closed when you do
not use the product.
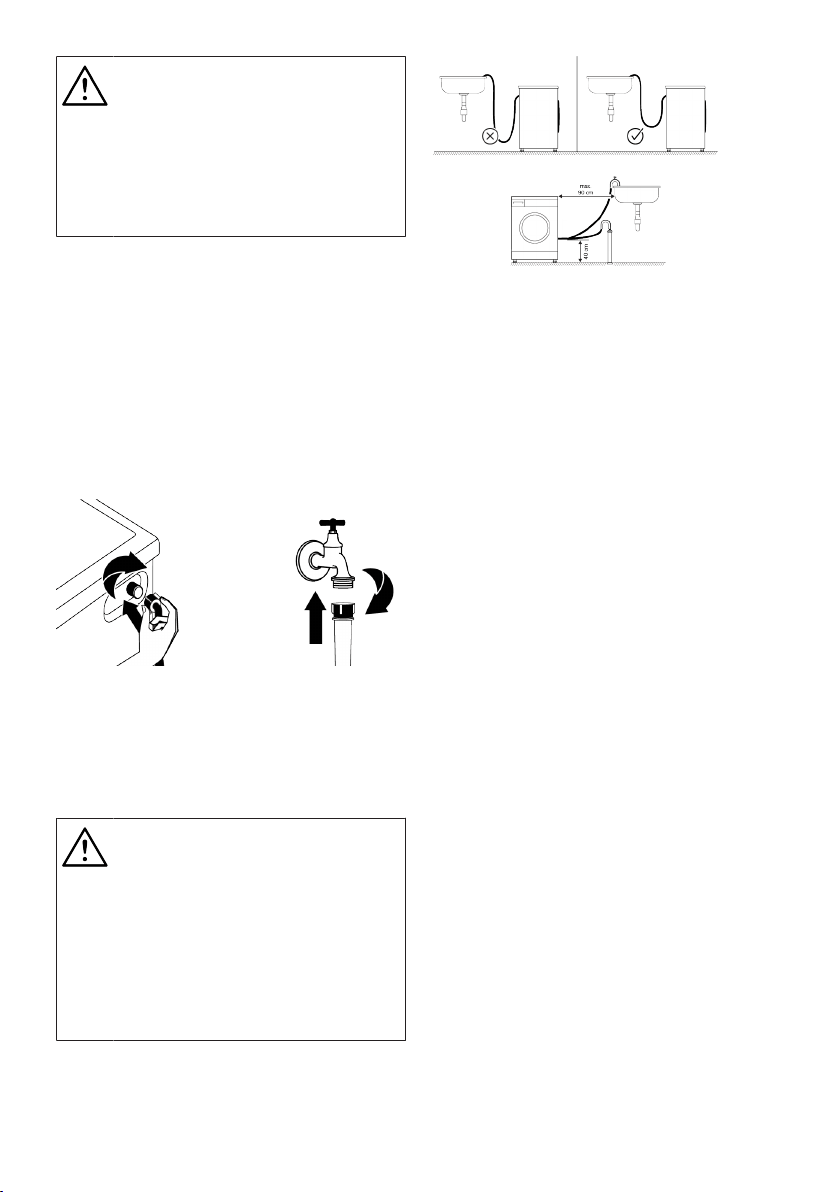
4.5 Connecting the Drain Hose to the
Drain
1. Attach the end of the drain hose directly
to waste water drain, washbasin or
bathtub.
Your house will be flooded if the
water draining hose is dislocated
during water draining. There is also
a risk of burning due to the high
washing temperatures. In order to
prevent such situations and make
sure that the product performs wa-
ter intake and drain processes
without any problem, fix the drain
hose securely.
2. Connect the hose to a minimum height
of 40 cm and a maximum height of 90
cm.
3. If the hose is placed on the floor (or at a
maximum height of 40 cm from the
floor) and then its height is increased,
discharging of water becomes difficult,
and laundry may come out very wet
from the machine. Thus, follow the
heights provided in the figure.
4. To prevent the waste water to go back
into the product again and to ensure
easy drainage, do not immerse the end
of the hose into the waste water or do
not insert it into the drain for more than
15 cm. If it is too long, cut it short.
5. The end of the hose should not be bent,
it should not be stepped on and the
hose must not be pinched between the
drain and the product. Otherwise, water
discharge issues may emerge.
6. If the length of the hose is too short, use
it by adding an original extension hose.
The overall length of the hose shall not
be longer than 3.2 m. To prevent water
leaks, always secure the connection
between the extension hose and the
draining hose of the product with a suit-
able clamp so that it does not come off
and cause leaks.

EN / 17
4.6 Adjusting the Stands
WARNING
In order to ensure that the product
operates more silently and vibra-
tion-free, it must stand level and
balanced on its feet. Ensure that
the product is balanced by adjust-
ing the feet. Otherwise, the product
may move from its place and cause
crushing, noise and vibration prob-
lems.
1. Loosen the nuts on the feet in the direc-
tion of the arrow with the tool in the user
manual bag.
2. Adjust the feet until the product stands
level and balanced. You can move the
feet up by turning them counter-clock-
wise and down by turning them clock-
wise.
3. Re-tighten all lock nuts with the tool in
the direction of the arrow. You can
move the nuts down by turning them
counter-clockwise and up by turning
them clockwise.
4.7 Electrical Connection
Connect the product to a grounded outlet
protected by a 16 A fuse. Our company
shall not be responsible for the damages
that shall be incurred due to using the
product without grounding according to
local regulations.
• Connection must comply with national
regulations.
• The electrical connection cable infra-
structure of the product must be ad-
equate and suitable for product require-
ments. It is recommended to use a
Ground Fault Circuit Breaker (GFCI).
• Power cable plug must be within easy
reach after installation.
• If the current supply to the fuse or
breaker in the house is less than 16
Amps, have a qualified electrician install
a 16 amp supply.
• The voltage specified in the "Technical
specifications" section must be equal to
your mains voltage.
• Do not make connections via extension
cables or multi-plugs. Overheating and
burning may occur due to the connecting
cable.
Damaged power cables should be
replaced by the authorised service
in order to prevent possible danger.
4.8 Handling the Product
1. Unplug the product before handling it.
2. Disconnect the water outlet and water
main connections. 3 Drain all the water
that remains in the product. See Drain-
ing Remaining Water and Cleaning the
Pump Filter
3. Install the shipping bolts in reverse or-
der of the disassembly procedure. See
Removing the Shipping Bolts
Never carry the product without the
shipping bolts properly attached!
Your product is so heavy that it
shall not be carried by one person.
Your product shall be carried by
two people and more care shall be
taken on the stairs as it is a heavy
product. If the product falls on you,
it may cause injury.
The packaging materials are dan-
gerous for children. Keep pack-
aging materials at a safe place
away from the reach of children.

EN / 18
5 Preliminary Preparation
Please read the “Safety Instruc-
tions” section first
5.1 Sorting the Laundry
• Sort laundry according to type of fabric,
colour, and degree of soiling and allow-
able water temperature.
• Always observe the instructions given on
the garment care labels.
5.2 Preparing Laundry for Washing
• Laundry items with metal attachments
such as, underwiring, belt buckles or
metal buttons will damage the product.
Remove the metal pieces or wash such
clothes by putting them in a laundry bag
or pillow case.
• Take out all substances in the pockets
such as coins, pens and paper clips, and
turn pockets inside out and brush. Such
objects may damage the product or
cause noise problem.
• Put small size clothes such as infant’s
socks and nylon stockings in a laundry
bag or pillow case.
• Place curtains in without compressing
them. Remove curtain attachment items.
Curtain attachment items may cause
pulling and tearing on the curtain.
• Fasten zippers, sew loose buttons and
mend rips and tears.
• Wash “Machine washable” or “Hand
washable” labelled products only with an
appropriate programme. Dry these types
of clothes by hanging them or laying
them flat. Do not dry them in the ma-
chine.
• Do not wash colours and whites together.
New, dark coloured cottons release a lot
of dye. Wash them separately.
• Only use paints / colour changing agents
and descalers suitable for use in ma-
chines. Always observe the instructions
on the packaging
• Tough stains must be treated properly
before washing. If you are not sure,
check with a dry cleaner.
• Wash trousers and delicate laundry
turned inside out.
• Laundry that are subjected to materials
such as flour, lime dust, milk powder, etc.
intensely must be shaken off before pla-
cing into the product. Such dusts and
powders on the laundry may build up on
the inner parts of the product in time and
can cause damage.
• Before washing laundry made of angora
wool, keep them in the freezer section of
the refrigerator for few hours. This will re-
duce pilling
5.3 Tips for Energy and Water Saving
Following information will help you use the
product in an ecological and energy/water-
efficient manner.
• Operate the product in the highest load
capacity allowed for the programme you
have selected, but do not overload. See
"Programme and consumption table"
• Observe the temperature instructions on
the detergent packaging.
• Wash slightly soiled laundry at low tem-
peratures.
• Use faster programmes for small quantit-
ies of lightly soiled laundry.
• Do not use prewash and high temperat-
ures for laundry that is not heavily soiled
or stained.
• If you plan to dry your laundry in a dryer,
select the highest spin speed recommen-
ded during washing process.
• Do not use more detergent than the re-
commended on the detergent packaging.
5.4 Start Up
Before starting to use the product make
sure that the preparations described in sec-
tion “Environmental Instructions” and “In-
stallation”. To prepare the product for
washing laundry, perform first operation in

EN / 19
Drum Cleaning programme. If this pro-
gramme is not available in your product, ap-
ply the method which is described in sec-
tion "Cleaning the loading door and the
drum".
Use an anti-limescale product suit-
able for the washing machines
Some water has remained in the
product due to the quality control
processes in the production. It is
not harmful for the product.
5.5 Loading the Laundry
1. Open the loading door.
2. Put the laundry items into the product in
a loose manner.
3. Push the loading door to close until you
hear a locking sound. Ensure that no
items are caught in the door. The load-
ing door is locked while a programme is
running. The door lock will open a few
minutes after the washing programme
has ended. Then you can open the load-
ing door. If the door does not open, ap-
ply the solutions provided for “Loading
door cannot be opened” error in the
Troubleshooting section.
5.6 Correct Load Capacity
The maximum load capacity depends on
the type of laundry, the degree of soiling
and the desired washing programme.
The product automatically adjusts the wa-
ter amount according to the weight of the
laundry put inside it.
Follow the instructions in “Pro-
gramme and consumption table”.
When the appliances is overloaded
product’s washing performance will
drop. Moreover, noise and vibration
problems may occur.
For a successful drying perform-
ance, do not put more laundry in
the machine than specified.
Bathrobe: 1200 g
Bedding: 700 g
Sheet: 500 g
Pillow Case: 200 g
Table Cloth: 250 g
Negligee/Pyjamas: 200 g
Lingerie: 100 g
Shirts: 200 g
Blouse: 100 g
Towel: 200 g
The loading door is locked while a
programme is running. The door
lock will open once the programme
is completed. If the inner part of the
machine is very hot at the end of
the program, the loading door will
not open until the temperature
drops. If the door does not open,
apply the solutions provided for
“Loading Door Cannot Be Opened”
error in the Troubleshooting sec-
tion.
WARNING
If the laundry is placed incorrectly,
noise and vibration problems may
occur in the machine.
5.7 Using Detergent and Softener
WARNING
Read the manufacturer instructions
on the package while using deter-
gents, softeners, starch, bleach and
decolourants, anti-limescale and
follow the dosage information
provided. Use a measuring cup, if
any.

EN / 20
The detergent drawer comprises of three
compartments:
(1) for prewash,
(2) for main washing,
(3) for softener,
( ) a syphon piece in the softener com-
partment,
( ) there is a liquid detergent apparatus
for liquid detergent use in the main wash-
ing compartment.
Detergent, Softener and Other Cleaning
Agents
• Add detergent and softener before start-
ing the washing programme.
• Do not leave the detergent drawer open
when the washing programme is on.
• If you are using a programme without
pre-washing, do not put detergent in the
pre-wash compartment (compartment
no. “1”).
• If you are using a program with prewash,
start the machine after adding powder
detergent to the prewash and main wash
compartments (compartments 1 and 2).
• Do not select a programme with pre-
washing if you are using a detergent pod
or dispensing ball. Place the detergent
pod or the dispensing ball directly among
the laundry in the product.
• If you are using a liquid detergent, follow
the directions under “Liquid detergent
use” and do not forget to bring the liquid
detergent apparatus to the correct posi-
tion.
• Do not add washing chemicals (Liquid
detergent, Softener, etc.) while the ma-
chine is during Drying step.
Choosing the Detergent type
Detergent type to be used depends on the
washing programme, fabric type and col-
our.
• Use different detergents for coloured and
white laundry.
• Wash your delicate clothes only with spe-
cial detergents (liquid detergent, wool
shampoo, etc.) intended solely for delic-
ate clothes and at suggested pro-
grammes.
• When washing dark coloured clothes and
quilts, it is recommended to use liquid
detergent.
• Wash woollens at suggested programme
with special detergent made specifically
for woollens.
• Please review the programme descrip-
tions part for suggested programme for
different textiles.
• All recommendations about detergents
are valid for selectable temperature
range of programmes.
Only detergents, softeners and ad-
ditives suitable for washing ma-
chines should be used.
Do not use soap powder.
Adjusting the Detergent Amount
The amount of detergent depends on the
amount of laundry, how soiled they are and
the water hardness.
• Do not exceed the recommended dosage
values on the detergent packaging in or-
der to eliminate excessive foam and poor
rinsing problems, to save money and pro-
tect the environment.
• Use less amounts of detergent for fewer
or less soiled laundry.
Using Softeners
Put the softener in the softener compart-
ment of the detergent drawer.
• Do not exceed the (>max<) level sign in
the softener compartment.

EN / 21
• If the softener is not fluid, dilute with wa-
ter before placing in the softener com-
partment.
WARNING
Do not use liquid detergents or
other materials with cleaning prop-
erties unless they are intended for
use in washing machines for
softening the laundry.
Using Liquid Detergents
If the Product Has a Liquid Detergent
Apparatus
• Press and rotate the apparatus at where
it is shown when you want to use liquid
detergents. The part falling below will
serve as a barrier for liquid detergent.
• Clean with water at its place or by remov-
ing from its place when it is necessary.
Do not forget to place the apparatus in
the main washing compartment (com-
partment no. “2”) after cleaning.
• The apparatus should be up if you will
use a powder detergent. The fan that you
would see in this position will mix the
powder detergent and help it to dissolve.
Use of Gel and Tablet Detergents
• If the detergent is fluid and there is no li-
quid detergent compartment in your
product, place the gel detergent in the
main washing detergent compartment in
first water intake. If your product has a li-
quid detergent compartment, fill the com-
partment with detergent before starting
the programme.
• If the gel detergent is not fluid or is in a
capsule liquid tablet, place directly inside
the drum before washing.
• Put the tablet detergent in the main
washing compartment (compartment no.
“2”) or directly inside the drum before
washing.
• Tablet detergents may leave residue in
the detergent compartment. If you face
such residues, place the tablet detergent
among the laundry in the next washes in
a way that it will be at the bottom side of
the drum.
• Use tablet or gel detergent without se-
lecting the pre-wash function.
• Do not forget to remove elements such
as plastic detergent compartment from
the drum before drying.
Using Starch
• Put in the liquid starch, powder starch or
fabric dye in the softener compartment.
• Do not use softener and starch in the
same washing programme simultan-
eously.
• Wipe the inside of the product with a
damp and clean cloth after using starch.
Using Anti-Limescale
• When necessary, only use anti-limescale
produced for washing machines.
Using Bleach and Decolourants
• Select a programme with pre-washing
and add bleach at the start of pre-wash-
ing. Do not put detergent in the pre-wash
compartment. As an alternative applica-
tion, select a programme with additional
rinsing and add the bleach while the
product is receiving water to the deter-
gent compartment in the first rinsing
step.
• Do not mix and use bleach and detergent
together.
• As bleach may cause skin irritation use
only small amounts (1/2 tea cups - ap-
proximately 50 ml and rinse the laundry
well.
• Do not pour bleach directly onto the laun-
dry.
• Do not use bleach for coloured clothes.
• Select a programme with low temperat-
ure washing while using oxygen-based
decolourants.
EN / 22
• Oxygen-based decolourants can be used
together with detergents. However, if it
does not have the same viscosity as the
detergent, first place the detergent in
compartment no. “2” in the detergent
drawer and wait for the product to rinse
away the detergent during water intake.
Add the decolourant to the same com-
partment while the machine continues
taking in water.
5.8 Tips for Efficient Washing
Clothes
Light Colours and
Whites
Colours
Black/Dark Col-
ours
Delicates/ Wool-
lens/Silks
(Recommended temperat-
ure range based on soil
level: 40-90 °C)
(Recommended temper-
ature range based on
soil level: cool -40 °C)
(Recommended
temperature range
based on soil level:
cool -40 °C)
(Recommended
temperature
range based on
soil level: cool -30
°C)
Soiling Level
Heavily Soiled
(difficult stains
such as grass,
coffee, fruits
and blood.)
It may be necessary to
pre-treat the stains or per-
form prewash.
Powder and liquid deter-
gents recommended for
whites can be used at
dosages recommended
for heavily soiled clothes.
It is recommended to use
powder detergents to
clean clay and soil stains
and the stains that are
sensitive to bleaches.
Powder and liquid deter-
gents recommended for
colours can be used at
dosages recommended
for heavily soiled
clothes. It is recommen-
ded to use powder de-
tergents to clean clay
and soil stains and the
stains that are sensitive
to bleaches. Detergents
which do not contain de-
colourant should be
used.
Liquid detergents
suitable for colours
and black/dark col-
ours can be used at
doses recommen-
ded for heavily
soiled clothes.
Prefer liquid deter-
gents produced
for delicate
clothes. Woollen
and silk clothes
must be washed
with special wool-
len detergents.
Normally
Soiled
(For example,
stains caused
by body on col-
lars and cuffs)
Powder and liquid deter-
gents recommended for
whites can be used at
dosages recommended
for normally soiled
clothes.
Powder and liquid deter-
gents recommended for
colours can be used at
dosages recommended
for normally soiled
clothes. Detergents
which do not contain de-
colourant should be
used.
Liquid detergents
suitable for colours
and black/dark col-
ours can be used at
doses recommen-
ded for moderately
soiled clothes.
Prefer liquid deter-
gents produced
for delicate
clothes. Woollen
and silk clothes
must be washed
with special wool-
len detergents.
Lightly Soiled
(No visible
stains exist.)
Powder and liquid deter-
gents recommended for
whites can be used at
dosages recommended
for lightly soiled clothes.
Powder and liquid deter-
gents recommended for
colours can be used at
dosages recommended
for lightly soiled clothes.
Detergents which do not
contain decolourant
should be used.
Liquid detergents
suitable for colours
and black/dark col-
ours can be used at
doses recommen-
ded for lightly
soiled clothes.
Prefer liquid deter-
gents produced
for delicate
clothes. Woollen
and silk clothes
must be washed
with special wool-
len detergents.

EN / 23
5.9 Tips for Efficient Drying
Programmes
Cotton Dry Synthetic Dry Babyprotect+
Washing and
Drying
Wash & Wear
Types of Clothing
Durable
Clothes Con-
taining Cotton
Sheets, bed-
dings, baby
clothes, t-
shirts, sweat-
shirts, durable
knitted clothes,
jeans, canvas
pants, shirts,
cotton socks
etc.
Not Recom-
mended!
It washes and
dries consecut-
ively! Sheets,
beddings, baby
clothes, t-
shirts, sweat-
shirts, durable
knitted clothes,
jeans, canvas
pants, shirts,
cotton socks
etc.
It washes and
dries consecut-
ively! Sheets,
beddings, baby
clothes, t-
shirts, sweat-
shirts, durable
knitted clothes,
jeans, canvas
pants, shirts,
cotton socks
etc.
Clothes such
as shirts, t-
shirts, sweat-
shirts etc. that
have been
worn for a
short time and
are unstained
A very small
amount of
laundry should
be loaded.
Synthetic
Clothes (Poly-
ester, nylon
etc.)
Not Recom-
mended!
It is recommen-
ded for clothes
containing
polyester,
nylon, polyacet-
ate, acrylic.
Drying is not re-
commended
for clothes
containing vis-
cose. Attention
should be paid
to the drying in-
structions on
the mainten-
ance label.
It is recommen-
ded for clothes
containing
polyester,
nylon, polyacet-
ate and acrylic
at low temper-
atures, taking
into account
the washing
and drying
warnings indic-
ated on the
maintenance
label.
It is recommen-
ded for clothes
containing
polyester,
nylon, polyacet-
ate and acrylic
at low temper-
atures, taking
into account
the washing
and drying
warnings indic-
ated on the
maintenance
label.
Lightly soiled
and unstained
shirts, t-shirts
and synthetic
laundry. A very
small amount
of laundry
should be
loaded.
Delicate (Con-
taining Silk,
Woolen,
Cashmere, An-
gora wool etc.)
Laundry
Not Recom-
mended!
Not Recom-
mended!
Not Recom-
mended!
Not Recom-
mended!
Not Recom-
mended!
Bulky laundry
such as
blankets, coats,
curtains etc.
Not Recom-
mended! It is
not suitable to
dry bulky laun-
dry in the
washing ma-
chine. Dry
these laundry
by hanging
them or laying
them flat.
Not Recom-
mended! It is
not suitable to
dry bulky laun-
dry in the
washing ma-
chine. Dry
these laundry
by hanging
them or laying
them flat.
Not Recom-
mended! It is
not suitable to
dry bulky laun-
dry in the
washing ma-
chine. Dry
these laundry
by hanging
them or laying
them flat.
Not Recom-
mended! It is
not suitable to
dry bulky laun-
dry in the
washing ma-
chine. Dry
these laundry
by hanging
them or laying
them flat.
Not Recom-
mended! It is
not suitable to
dry bulky laun-
dry in the
washing ma-
chine. Dry
these laundry
by hanging
them or laying
them flat.
5.10 Displayed Programme Duration
You can view the programme duration on
the display of your machine while selecting
a programme. Depending on the amount of
laundry you have loaded into your machine,
foaming, unbalanced load conditions, fluc-
tuations in power supply, water pressure
and programme settings, the programme
duration is automatically adjusted while the
programme is running.
SPECIAL CASE: At programme start of Cot-
tons and Cotton Eco programmes, display
shows the duration of half load. It is the
most common use case. After programme
starts, in 20-25 minutes actual load is de-

EN / 24
tected by the machine. And if the detected
load is higher than half load; washing pro-
gramme will be adjusted accordingly and
programme duration increased automatic-
ally. You can follow this change on the dis-
play.
6 Operating the Product
Please read the “Safety Instruc-
tions” section first!
6.1 Control Panel
1 2 3 4
5
6
7891011121314
1 Programme Selection Button 2 Spin Speed Adjustment Button
3 Temperature Setting Button 4 Display
5 ON/OFF Button 6 Start / Pause Button
7 End Time Setting Button 8 Auxiliary Function Button 5
9 Auxiliary Function Button 4 10 Auxiliary Function Button 3
11 Drying Level Adjustment Button 12 Auxiliary Function Button 2
13 Auxiliary Function Button 1 14 Programme selection LEDs
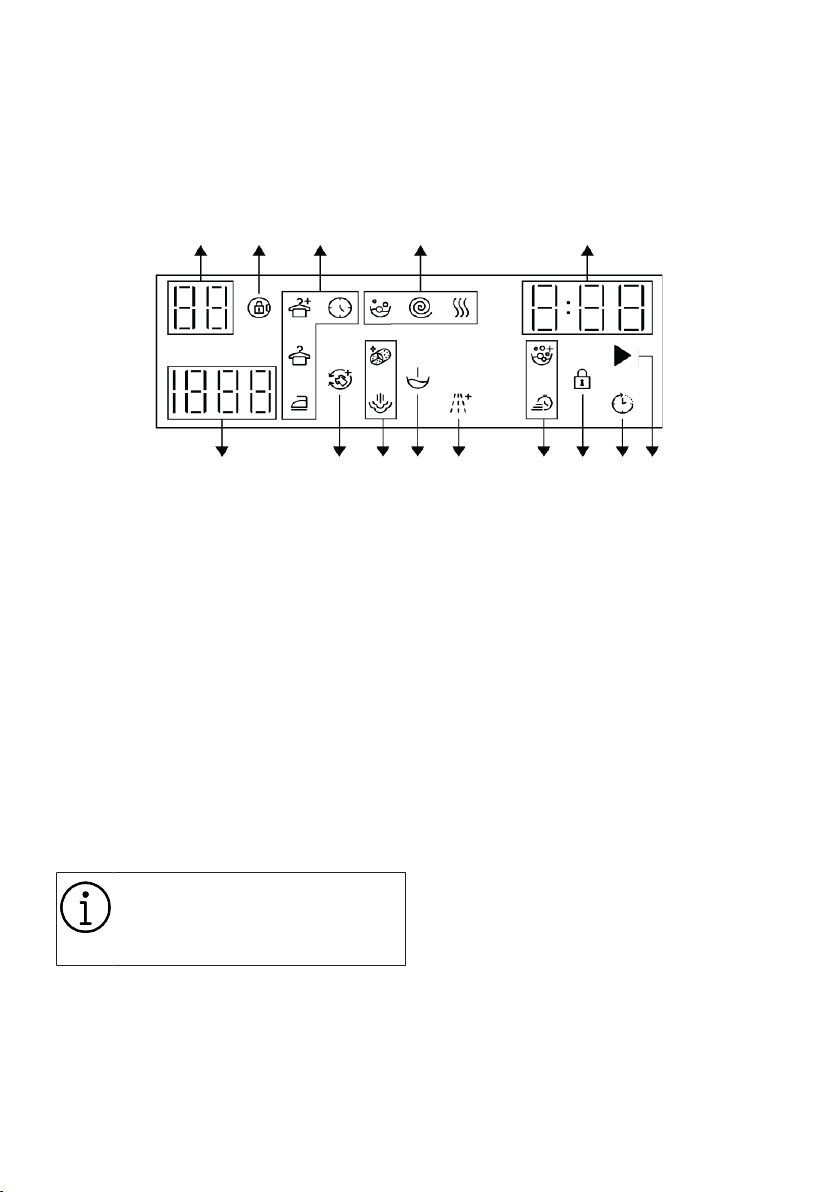
EN / 25
6.2 Symbols on the Display
1 2 3 4 5
67891011121314
1 Temperature Indicator 2 Door Lock Engaged Indicator
3 Drying Level Indicators 4 Programme Tracking Indicators
5 Duration Information 6 Programme Start Indicator
7 Delayed Start Enabled Indicator 8 Child Lock Engaged Indicator
9 Auxiliary Function Indicators 5 10 Auxiliary Function Indicators 4
11 Auxiliary Function Indicator 1 12 Auxiliary Function Indicators 3
13 Auxiliary Function Indicators 2 14 Spin Speed Indicator
The visuals used for machine de-
scription in this section are schem-
atic and may not match exactly
with the features of your machine.
6.3 Preparing the Machine
1. Check if the hoses are connected
tightly.
2. Plug in your machine.
3. Turn on the tap completely.
4. Place the laundry inside the machine.
5. Put detergent and softener.
6.4 Selection of Washing Programme
1. Determine the programme suitable for
the type, quantity and soiling level of the
laundry in accordance with "Programme
and consumption table".
EN / 26
Programmes are limited to the
highest spin speed appropriate for
that particular type of fabric.
When selecting a programme, al-
ways consider the type of fabric,
colour, soiling level and permissible
water temperature.
2. Select the desired programme with the
Programme Selection knob.
6.5 Washing Programmes
Use the following main programmes de-
pending on the type of fabric.
After selecting the appropriate washing
program, by pressing the Drying button be-
fore starting the program, you can set your
machine to switch to the drying step (auto-
matically or timedly) at the end of the
washing program, without any pauses/in-
terruptions. Each time you press the button,
the step in which the drying process will
take place is shown in the row of informa-
tion and the related symbol lights up. You
can see when the programme will finish on
the display of the machine, according to the
drying selections you will add to the wash-
ing programmes. If you want, by keeping
pressing the button you can dry for the
maximum time allowed.
You can take a glance at the programmes
for which you can select the drying function
in the Programme and Consumption tables.
Symbols shown on the display are
schematic and may not match with
the product one-to-one.
If you do not want to perform dry-
ing process after the programme
you have selected, press and hold
the Drying auxiliary function button
until the Drying light turns off.
When washing and drying using the
Drying function of your machine,
load a maximum of 6 kilograms of
laundry into the machine. If you
load more laundry than the capacity
of the machine, your laundry will
not dry and the machine will run
longer and consume more energy.
WARNING
The drying function cannot be se-
lected for the washing programme
for woollen clothes.
• ECO 40-60
In the ECO 40-60 program, you can wash
normally dirty cotton laundry, which is in-
dicated to be washed together at 40°C or
60°C. This programme is the standard test
programme according to EU environment-
ally responsible design and energy labelling
legislation.
Although this program takes longer to
wash than other washing programs, it is
more efficient in terms of energy and water
consumption. The actual water temperat-
ure may differ from the specified wash
temperature. When doing laundry in smaller
quantities (for example, ½ of capacity or
less), the duration of the program stages
may be automatically shortened. In this
case, energy and water consumption are
further reduced.
In order to evaluate compliance with EU en-
vironmentally friendly design and energy la-
belling regulations, the washing and drying
cycle should be run by selecting the cup-
board dry function of eco 40-60 pro-
gramme. The washing and drying cycle can
clean normally soiled laundry declared to

EN / 27
be washable at 40 °C or 60 °C in a single
cycle and dries them so that they can be
put in a cupboard immediately.
• Cotton
Your durable cotton clothes (sheets, linen,
towels, bathrobes, underwear, etc.) you can
wash it in this program. When the quick
wash function button is pressed, the pro-
gram time is significantly shorter, but ef-
fective wash performance is ensured by in-
tensive wash movements. If the quick wash
function is not selected, effective wash and
rinse performance is provided for your very
dirty laundry.
• Synthetics
T-shirt, blouse, synthetic/cotton mixed fab-
rics, etc. you can wash your clothes in this
program. Pressing the quick wash function
button significantly shortens the program
time and provides effective washing per-
formance for your non-dirty laundry. If the
quick wash function is not selected, effect-
ive wash and rinse performance is provided
for your very dirty laundry.
• Wool/Hand
Use this program to wash your wool/delic-
ate clothes. Choose the appropriate tem-
perature for the label of your laundry. Your
clothes are washed with very delicate
movements so that they do not get dam-
aged.
• Spin + Drain
Use this program to remove water from the
garment/inside the machine.
• Rinse
Use when you want to rinse or collage sep-
arately.
• Shirts
Use this program to wash your cotton, syn-
thetic and synthetic shirts. This program al-
lows the laundry to wrinkle less. Steam is
applied at the end of the program to aid the
crease reduction function. The steam and
special tightening profile applied at the end
of the program reduce wrinkles on your
shirts. When the quick wash function is se-
lected, the Pre-treatment algorithm is used.
• Apply the pre-treatment chemical directly
on the laundry or add the detergent to the
machine from the powder detergent com-
partment with the detergent. In this way,
you can achieve the performance you get
in a normal wash in a much shorter time.
Your shirts will last longer. If you are go-
ing to use the time delay function on your
machine, do not use the pre-wash chem-
ical. The pre-wash chemical can flow
over your laundry, causing stains to form
on your laundry.
** It is recommended that you do not wash
your shirts with more than 6 shirts to min-
imize the wrinkle level with this program. at
the end of washing when washing at capa-
cities higher than 6 units; differences in the
level of wrinkle and the amount of moisture
above the shirts can be seen.
• Quickwash 14’
Use this program to wash your cotton
clothes with very little dirt and spotless in a
short time. With the quick wash function
selected, the program time can be reduced
to up to 14 minutes. If the quick wash func-
tion is selected, a maximum of 2 (two) kg
of laundry must be washed.
• Mixed
You can wash your cotton and synthetic
clothes on this program without separating
them.
6.6 Temperature Selection
Whenever a new programme is selected,
the recommended temperature for the pro-
gramme appears on the temperature indic-
ator. It is possible that the recommended
temperature value is not the maximum
temperature that can be selected for the
current programme.

EN / 28
Press the Temperature Adjustment button
to change the temperature. Temperature
decreases gradually.
No change can be made in pro-
grammes where temperature ad-
justment is not allowed.
You can also change the temperature after
the washing starts. This change can be
made if the only washing steps allow it.
If you scroll to cold wash option
and press Temperature Adjustment
button again, the recommended
maximum temperature for the se-
lected programme appears on the
display. Press the Temperature Ad-
justment button again to decrease
the temperature.
6.7 Spin Speed Selection
Whenever a new programme is selected,
the recommended spin speed of the selec-
ted programme is displayed on the Spin
Speed indicator. It is possible that the re-
commended spin speed value is not the
maximum spin speed that can be selected
for the current programme.
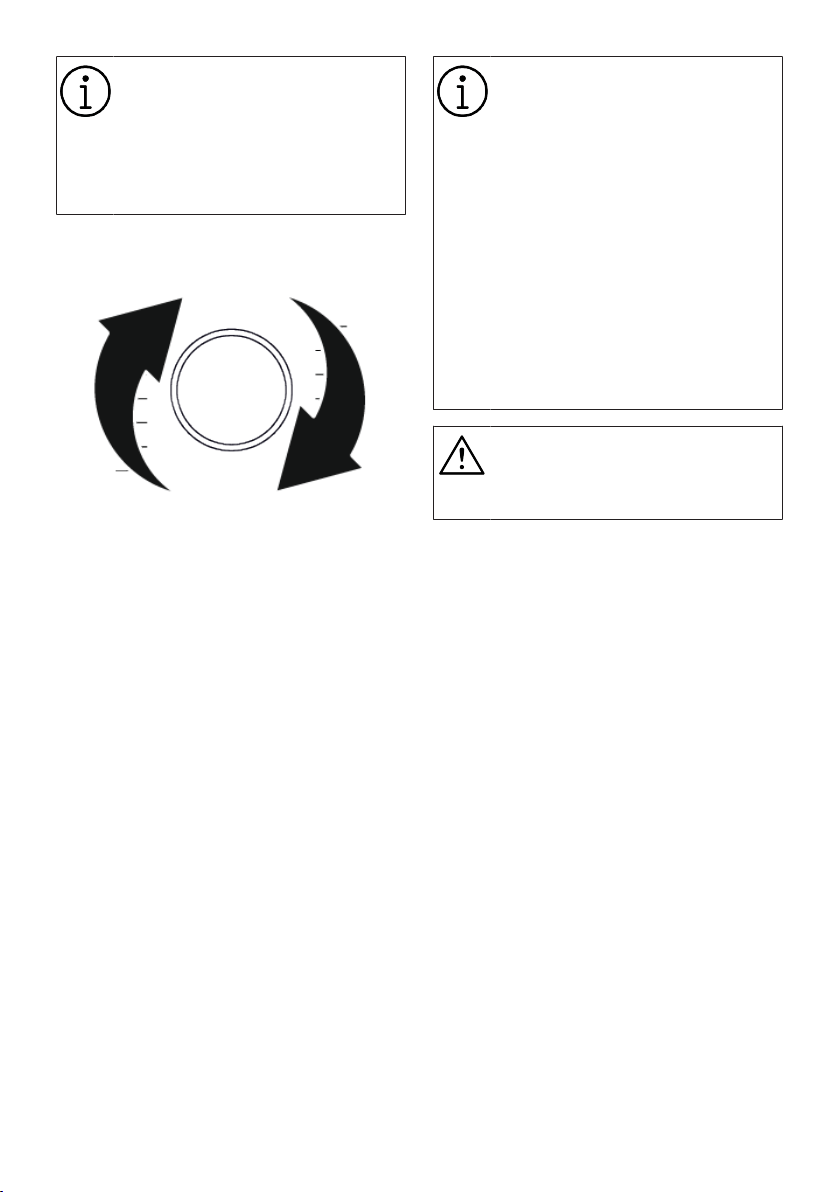
Press the Spin Speed Adjustment button to
change the spin speed. Spin speed de-
creases gradually.
Then, depending on the model of the
product, “Rinse Hold l_l " and "No Spin _"
options appear on the display.
If you are not going to unload your laundry
immediately after the programme com-
pletes, you can use Rinse Hold function in
order to prevent your laundry from getting
wrinkled when there is no water in the ma-
chine.
This function holds the laundry in the final
rinsing water. If you want to spin your laun-
dry after the Rinse Hold function:
1. Adjust the Spin Speed.
2. Press Start/Pause button. The pro-
gramme will resume. Machine drains
the water and spins the laundry.
If you want to drain the water at the end of
the programme without spinning, use No
Spin function.
No change can be made in pro-
grammes where spin speed adjust-
ment is not allowed.
You can change the spin speed after the
washing starts if the washing steps allow it.
Changes cannot be made if the steps do
not allow it.
Auxiliary function selection for drying:
When you select a new washing program,
press the Auxiliary Function Selection but-
ton to set the drying option suitable for this
program.
In programmes where drying set-
ting is not allowed, when the drying
auxiliary function button is pressed,
the drying light doesn’t change and
a warning sound is heard.
For only drying programmes, set
the appropriate drying option by
pressing the Auxiliary Function Se-
lection button.
EN / 29
6.8 Drying Programmes
WARNING
The machine automatically cleans
the lint that from the laundry during
drying programme. The machine
uses water during drying. For this
reason, the water tap of the ma-
chine should also be open during
drying programmes.
When you select a new washing
program, press the Auxiliary Func-
tion Selection button to set the dry-
ing option suitable for this program.
In drying programmes, there is a spinning
step. Your machine performs this process
in order to shorten the drying duration.
When the drying programme is selected,
the spin speed setting is in the range of
Maximum spin speed.
In programmes that do not allow the drying
setting, when the Drying auxiliary function
button is pressed, the drying light will not
change and a warning noise will be heard.
For only drying programmes, set the appro-
priate drying option by pressing the Auxili-
ary Function Selection button.
In case of water outage, washing
and drying cannot be performed.
• Synthetic Dry
Use this programme to dry synthetic laun-
dry with a dry weight of up to 4 kilograms.
You can only dry in this programme.
For the dry weight of the laundry,
see Correct Load Capacity
• Cotton Dry
Use this programme to dry cotton laundry
with a dry weight of up to 6 kilograms. You
can only dry in this programme.
When you will dry laundry consist-
ing of towels and bathrobes only,
load a maximum of 4,5 kilograms
of laundry.
For the dry weight of the laundry,
see Correct Load Capacity
6.9 Washing and Drying Programmes
• Cotton 6kg
Use this programme to dry up to 6 kg of
cotton laundry right after the washing pro-
gramme, without making any other selec-
tions.
External Drying auxiliary function
cannot be selected while this pro-
gramme is selected.
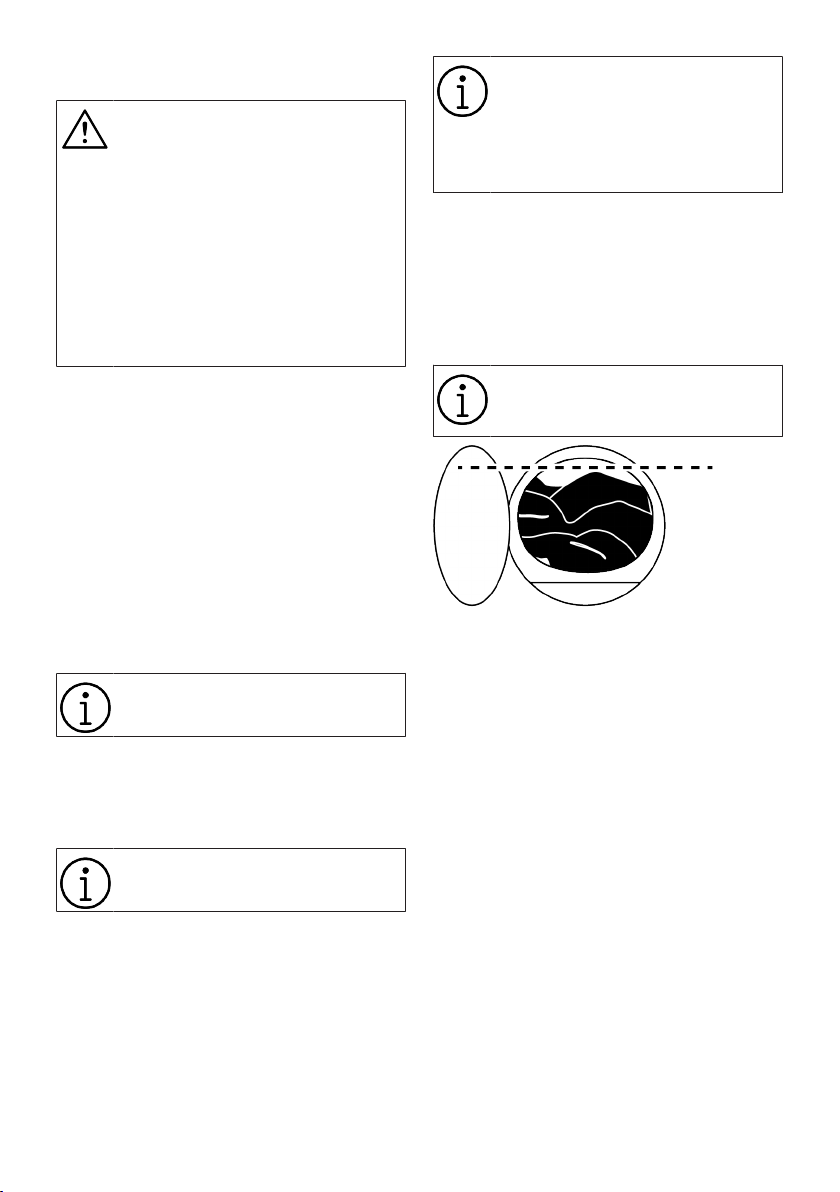
In the 6 kg Washing and 6 kg Drying pro-
gramme, it is recommended to fill the ma-
chine to the level shown in the figure above
for ideal drying conditions (you can see the
level arrow when you open the loading
door).
• Express
Use this programme to wash 0.5 kg of laun-
dry (2 shirts) in 40 minutes or to wash 1 kg
of laundry (5 shirts) in 60 minutes.

EN / 30
Clean and Wear programme is de-
signed to quickly wash and dry
daily clothes that have been worn
for a short time and are not heavily
contaminated. This programme is
suitable for fine-textured and quick-
drying laundry (shirts, t-shirts).
For thick textured laundry that
takes longer to dry, other drying op-
tions or programmes should be
used.
• Anti Allergy
A steam step applied at the beginning of
the program helps to soften the dirt.
Use this programme to wash and quickly
dry laundry weighing up to 2 kilograms, re-
quiring anti-allergic and hygienic washing
(cotton laundry such as baby clothes,
sheets, lingerie).
6.10 Programme and Consumption Table
For washing:
Auxiliary functions
Program
Temperature °C
Maximum load (kg)
Water consumption (lt)
Energy consumption
(kWh)
Max RPM
Steam
Prewash
Extra Rinse
AntiCrease+
Fast/intense
Drying
Temperature °C
Cotton
90 10 98 2,75 1400 • • • • • • Cold - 90
60 10 98 2,00 1400 • • • • • • Cold - 90
40 10 95 1,10 1400 • • • • • • Cold - 90
ECO 40-60
40
***
10 69,5 1,000 1400 • 40-60
40
***
5 56 0,770 1400 • 40-60
40
***
2,5 39 0,410 1400 • 40-60
ECO 40-60 + Cabinet drying
40
***
6 74,5 3,695 1400 • 40-60
40
***
3 46,5 2,095 1400 • 40-60
Synthetics
60 4 76 1,60 1200 • • • • • • Cold - 60
40 4 74 1,10 1200 • • • • • • Cold - 60
Quickwash 14’
90 10 75 2,30 1400 • • • • • Cold - 90
60 10 75 1,30 1400 • • • • • Cold - 90
30 10 75 0,25 1400 • • • • • Cold - 90
Quickwash 14’ + Fast/intense 30 2 45 0,15 1400 • • • • • Cold - 90
Wool/Hand 40 2 60 0,60 1200 • Cold - 40
Shirts 60 4 70 1,4 800 * • • • • • Cold - 60
Mixed 40 4 83 1,10 800 • • • • Cold - 40
Drum Clean + 90 - 80 2,60 600 * * 90
• : Selectable.
* : Automatically selected, cannot be can-
celled.
•

EN / 31
*** : Eco 40-60 programme is a test pro-
gramme according to 40 ° C temperature
selection, EU regulation EU / 2019/2014
and EN 60456: 2016 / A11: 2020 standard.
Selection of 40 °C temperature and cup-
board dry in the Eco 40-60 programme is a
washing and drying cycle test programme
as per EU/2019/2014 EU regulation and EN
62512.
- : See the programme description for max-
imum load.
Please read Installation section of
the user manual before first use.
The auxiliary functions in the table
may vary according to the model of
your machine.
Water and energy consumption
may vary subject to the changes in
water pressure, water hardness and
temperature, ambient temperature,
type and amount of laundry, selec-
tion of auxiliary functions, spin
speed, and changes in electric
voltage.
Selection patterns for auxiliary
functions can be changed by the
manufacturer company. New selec-
tion patterns can be added or the
existing ones can be removed.
The spin speed of your machine
may vary according to the pro-
gramme; this spin speed cannot ex-
ceed the max. spin speed of your
machine.
The amount of noise and humidity
varies according to the spin speed;
when the higher spin speed is se-
lected during the spinning phase,
the laundry contains less moisture
at the end of the programme but
higher noise occurs.
You can see the washing duration
on the display of your machine
while selecting a programme. De-
pending on the amount of laundry
you have loaded into your machine,
there may be a difference of 1-1.5
hours between the duration shown
on the display and the actual dura-
tion of the wash cycle. Duration will
be automatically updated soon
after the washing starts.
Always select the lowest appropri-
ate temperature. The most efficient
programmes in terms of energy
consumption are generally those
that wash at low temperatures for a
long time.

EN / 32
For drying:
Auxiliary functions Drying level
Program °C
Maximum load (kg)
Water consumption
(lt)
Energy consumption
(kWh)
Max RPM
Steam
Prewash
Extra Rinse
Fast/intense
AntiCrease+
Drying
Extra dry
Cabinet drying
Iron drying
Timed drying - minutes
Tem-
perat-
ure Se-
lection
°C
Cotton Dry - 6 50 3,90 1400 • * • • • • -
Synthetic Dry - 4 35 2,50 - • * • • • -
Anti Allergy 60 2 120 3,80 1400 * * • * • • • • 30-90
Cotton 6kg 60 6 115 6,00 1400 • * • • • •
60-
Cold
Express
30 0,5 35 0,60 1200 • • * •
30-
Cold
30 1 44 1,00 1200 • • * •
30-
Cold
Consumption values (TR)
Temperat-
ure Selec-
tion °C
Tightening
Speed
(rpm)
Capacity
(kg)
Program
duration
(h:min)
Energy con-
sumption
(kWh/
cycle)
Water con-
sumption
(litres/
cycle)
Laundry
temperat-
ure (°C)
% Of re-
maining hu-
midity (%)
ECO 40-60
40 1400 10 03:58 1,000 69,5 36 53,9
40 1400 5 02:59 0,770 56 36 53,9
40 1400 2,5 02:59 0,410 39 24 53,9
Cotton
20 1400 10 04:00 0,750 95 20 53,9
60 1400 10 04:00 2,000 98 60 53,9
Synthetics 40 1200 4 02:35 1,100 74 40 40
Quickwash
14’
30 1400 10 00:28 0,250 75 23 62
ECO 40-60
+ Cabinet
drying
40 1400 6 09:30 3,695 74,5 24 53,9
40 1400 3 06:50 2,095 46,5 23 53,9
The consumption values given for programs other than the wash and dry cycle with the Eco 40-60 program are in-
dicative only.
6.11 Auxiliary Function Selection
Select the desired auxiliary functions be-
fore starting the programme. Whenever a
programme is selected, icons of the auxili-
ary function symbol that is selected to-
gether with it illuminate.

EN / 33
When an auxiliary function button
that cannot be selected with the
current programme is pressed, the
washing machine will make a warn-
ing sound.
Some functions cannot be selected
together. If a second auxiliary func-
tion conflicting with the first one is
selected before starting the ma-
chine, the function selected first
will be cancelled and the second
auxiliary function selection will re-
main active. For example, if you
want to select Quick Wash after
you have selected the Additional
Water, Additional Water will be can-
celled and Quick Wash will remain
active.
An auxiliary function that is not
compatible with the programme
cannot be selected. (See "Pro-
gramme and consumption table")
Some programmes have auxiliary
functions that must be operated
simultaneously. Those functions
cannot be cancelled.
If the selected wetness level (Iron
Dry, Cupboard Dry, Cupboard Extra
Dry) cannot be reached at the end
of the drying programme, your ma-
chine automatically extends the
programme duration. The pro-
gramme takes longer.
If Timed Drying is selected, the pro-
gramme finishes at the end of the
drying duration even if the laundry
has not dried.
During the drying programme, if the
selected wetness level (Iron Dry,
Cupboard Dry, Cupboard Extra Dry)
is reached or extra dryness is de-
tected in the timed drying options,
the programme will take a shorter
time. The time shortening is shown
on the display.
6.11.1 Auxiliary Functions
• Prewash
Pre-washing is only necessary for very dirty
laundry. You save energy, water, detergent
and time if you do not use a Pre-wash.
• Fast/intense
With this function, you can shorten or in-
crease the program duration. Depending on
the program selection, there may be differ-
ences in time increases and decreases. In
the event that the fast or HEAVY leash does
not burn, the appropriate program time for
your normal dirty laundry is shown.
Depending on the program selection, the In-
tensive feature may be automatically selec-
ted. In this case, it will be burning heavily on
the board. When washing very dirty clothes,
you can use the intensive choice to get a
better washing performance.
You can reduce the time for your low-soiled
laundry by pressing the fast/intense button
on select programs. Once you press the
button, the led will turn off and you will
reach the appropriate program time for
your normal dirty laundry. When you press
the same button a second time, it will burn
quickly, reducing the time slightly and
showing the minimum program time, suit-
able for your undersoiled laundry. Selecting
this function can shorten the duration of
the respective programs by up to 50%.
Thanks to optimized wash steps, high
mechanical mobility and optimum water
consumption, high wash performance is
achieved despite the shorter duration.
• Extra Rinse
This function allows the machine to per-
form another rinse in addition to the rinsing
after the main wash. Thus, sensitive skin
(baby skin, allergic skin, etc.) you can re-
duce the risk of being affected by the very
small amount of detergent that can stay in
the laundry.

EN / 34
• Steam
This function helps reduce wrinkles, reduce
ironing times and soften and remove dirt
from your cotton, synthetic and mixed laun-
dry.
*Under conditions where the steam func-
tion is applied at the end of the program,
your clothes may be warmer at the end of
the washing. This is expected within the
program operating conditions.
do not use liquid detergents when
you activate the steam function un-
less you have a liquid container or
liquid detergent dosing capability.
There is a risk of stain on the laun-
dry.
• Drying
This function allows the laundry to dry after
washing. Check in the programme table
with which programmes this auxiliary func-
tion can be selected.
6.11.2 Functions/Programmes Selec-
ted by Pressing the Function
Keys for 3 Seconds
• Drum Clean +
Press and hold the corresponding auxiliary
function button for 3 seconds to select the
program. Use regularly (every 1-2 months)
to clean the boiler and ensure proper hy-
giene. Steam is applied prior to the pro-
gram to soften debris from the boiler. Run
the program when the machine is com-
pletely empty. For a more efficient result,
place a suitable powder descaler (boiler
cleaning agent) in washing machines in the
detergent eye “2”. This program includes
the drying step after the boiler cleaning pro-
cess to dry the inside of the machine.
This is not a washing program. This
is a maintenance program.
Do not run this program with any-
thing inside the machine. When you
try to start, the machine automatic-
ally detects that there is a load in-
side, you can end the program or
continue the program depending on
your machine model. Active clean-
ing will not occur if the program
continues.
• AntiCrease+
Pressing and holding the corresponding
auxiliary function button for 3 seconds will
select this function and the program track-
ing light of the corresponding step will illu-
minate. When this function is selected, the
program will ventilate for up to 8 hours to
prevent wrinkles at the end of the cycle.
During this 8-hour period, you can cancel
the program and take off your clothes at
any time. Press the function selection key
or the machine on/off key to cancel the
function. The program tracking light stays
on until the function is cancelled or the step
is complete. If the function is not cancelled,
it remains active during subsequent wash
cycles.
• Child Lock
Using the child Lock feature, you can pre-
vent children from tampering with the ma-
chine. This way, you can prevent changes
to an ongoing program.
With the child Lock engaged, you
can switch the machine on and off
with the on/off button. When you
start the machine again, the pro-
gram resumes where it left off.
If the buttons are pressed while
child Lock is active, the audible
warning sounds. If the buttons are
pressed five times in a row, the
buzzer cancels.

EN / 35
To activate child lock:
Press and hold the corresponding auxiliary
function button for 3 seconds. When the
"3-2-1" countdown on the display has
ended, the child Lock icon appears on the
display. When this warning appears, you
can release auxiliary function button 3.
To deactivate the child lock:
Press and hold the corresponding auxiliary
function button for 3 seconds. The child
Lock icon disappears when the "3-2-1"
countdown on the screen ends.
6.12 Drying Steps
Iron Dry
Drying is performed until the Iron Dry step
is reached at the drying level.
Cupboard Dry
Drying is performed until the Cupboard Dry
step is reached at the drying level.
Extra Dry
Drying is performed until the Cupboard Ex-
tra Dry step is reached at the drying level.
The dryness level may vary depend-
ing on the laundry mixing and ma-
terial type as well as amount and
wetness level.
Clothes containing lace, tulle, stone,
beads, sequins, wires etc. and laun-
dry with high silk content should
not be dried in the machine.
Timed Drying – minute
To achieve the desired dryness level at a
low temperature, you can choose from dry-
ing durations of 30, 90 and 150 minutes.
When drying a small amount of laundry
(maximum 2 items), the timed drying steps
in Cotton or Synthetic dry programmes
should be selected.
If the laundry is not at the desired dryness
level at the end of the drying programme,
timed drying can be selected to finish the
process.
When this function is selected, the machine
performs drying for the set time regardless
of the drying level.
6.13 End Time
Time display
When the end time function is selected, the
remaining time until the programme starts
is shown in hours such as 1h, 2h, and the
remaining time to complete the programme
after your programme starts is shown in
hours and minutes as in the 01:30 example.
Programme duration may differ
from the values in section "Pro-
gramme and consumption table"
depending on the water pressure,
water hardness and temperature,
ambient temperature, amount and
the type of laundry, auxiliary func-
tions selected and the changes at
the mains voltage.
After a certain period of time after
the end time function is activated,
the machine goes into standby
mode and some LEDs on the
screen turn off. If there is any user
input, the LEDs will turn on again.
With the End Time function, the start-up of
the programme may be delayed up to 24
hours. After pressing End Time Setting but-
ton, the programme's estimated ending
time is displayed. If the End Time is set,
End Time Setting indicator is illuminated.

EN / 36
In order for the End Time function to be ac-
tivated and the programme to be com-
pleted at the end of the specified time, you
must press Start/Pause button after adjust-
ing the time.
If you want to cancel the End Time func-
tion, turn off and on the product by press-
ing the On/Off button.
When you have activated the End
Time function, do not add liquid de-
tergent in the powder detergent
compartment no 2. There is the risk
of staining of the clothes
1. Open the loading door, place the laundry
and put detergent, etc.
2. Select the washing programme, temper-
ature, spin speed and, if required, the
auxiliary functions.
3. Set the end time of your choice by
pressing the End Time Setting button.
End Time Setting indicator illuminates.
4. Press Start / Pause. Time countdown
starts.
Additional laundry can be added
into the machine during the End
Time countdown. At the end of the
countdown, End Time indicator
turns off, washing cycle starts and
the time of the selected pro-
gramme appears on the display.
6.14 Starting the Programme
1. Press Start / Pause button to start the
programme.
2. Loading door is locked. The door lock
symbol appears on the display after the
loading door is locked.
3. Programme follow-up indicator lights on
the display will show the current pro-
gramme step.
If no programme is started or no
button is pressed within 10 minutes
during programme selection pro-
cess, the product will automatically
turn off. Display and all indicators
turn off.
If you press On / Off button, the de-
fault selected programme informa-
tion is displayed.
6.15 Loading Door Lock
There is a locking system on the loading
door of the machine that prevents opening
of the loading door in cases when the water
level is unsuitable.
"Door Locked" symbol appears on the dis-
play when the loading door is locked.
Opening the loading door in case of
power failure:
In case of a power failure, you can
use the loading door emergency
handle under the pump filter lid to
manually open the loading door.

EN / 37
Before opening the loading door,
make sure that there is no water in
the machine to avoid flooding.
1. Turn off and unplug the appliance.
2. Open the pump filter lid.
3. Pull down the loading door emergency
handle with a tool and release. Then
open the loading door.
4. If the loading door does not open then
repeat the previous step.
6.16 Changing the Selections After
Programme has Started
Adding laundry after the programme has
started :
If the water level in the machine is suitable
when you press Start/Pause button, the
door lock will be deactivated and the door
will open, allowing you to add garments.
The door lock icon on the display goes off
when the door lock is deactivated. After
adding garments, close the door and press
Start/Pause button once again to resume
the washing cycle.
If the water level in the machine is not suit-
able when you press Start/Pause button,
the door lock cannot be deactivated and
the door lock icon on the display remains
on.
If the temperature of the water in-
side the machine is above 50°C,
you cannot deactivate the door lock
for safety reasons, even if the water
level is suitable.
Switching the machine to pause mode:
Press the Start/Pause button to switch the
machine to pause mode. Pause symbol will
flash on the display.
Changing the programme selection after
programme has started:
Programme cannot be changed when a
programme is running. You need to pause
the operating programme if the Child Lock
is not active and select a new programme.
This action will cancel the current pro-
gramme.
The selected programme starts
anew.
Changing the auxiliary function, speed
and temperature:
Depending on the step the programme has
reached, you can cancel or activate the aux-
iliary functions. See "Auxiliary Function Se-
lection"
You can also change the speed and tem-
perature settings. See "Spin Speed Selec-
tion" and "Temperature Selection".

EN / 38
It gives out an audio warning if
change is not allowed.
The loading door will not open if the
water temperature in the machine
is high or the water level is above
the loading door baseline.
6.17 Cancelling the Programme
When the machine is turn on and off the
programme gets cancelled. Press and hold
On/Off button for 3 seconds.
If you turn the programme selection
button when the Child Lock is en-
abled, the programme will not be
cancelled. You should cancel the
Child Lock first.
If you want to open the loading
door after you have cancelled the
programme but it is not possible to
open the loading door since the wa-
ter level in the machine is above the
loading door baseline, then turn the
Programme Selection knob to
Pump+Spin programme and drain
the water in the machine.
6.18 End of Programme
End warning appears on the display when
the programme is completed.
The product automatically shuts down if no
buttons are pressed for 10 minutes. Display
and all indicators are turned off.
Completed programme steps will be dis-
played if you press the On/Off button.
7 Maintenance and Cleaning
Please read the “Safety Instruc-
tions” section first!
Service life of your product extends and fre-
quently experienced problems will be re-
duced if it is cleaned at regular intervals.
7.1 Cleaning the Detergent Drawer
Clean the detergent drawer at regular inter-
vals (once every 4 to 5 wash) as mentioned
below to prevent accumulation of powder
detergent.
Clean the syphon if excess amounts of wa-
ter and fabric softener mixture remains in
the softener compartment.
1. Press the marked part of the syphon
within the softener compartment and
then pull the drawer towards yourself to
take it out.
2. Lift and remove the syphon from behind
as shown.
3. Rinse drawer and syphon in the sink
with plenty of warm water. Use gloves
or suitable brush to prevent contact of
residues in the drawer with your skin.
4. Firmly fit the syphon and the drawer
back after cleaning.

EN / 39
7.2 Cleaning the Loading Door and the
Drum
For products with drum cleaning pro-
gramme, please see the Operating the
product section.
Repeat Drum Cleaning process in
every 2 months.
NOTICE: Use an anti-limescale
suitable for the washing machines.
After every washing make sure that no for-
eign substance is left in the product.
If the holes on the door gasket shown in the
figure is blocked, open the holes using a
toothpick.
Foreign metal substances will cause rust
stains in the drum. Clean the stains on the
drum surface by using cleaning agents for
stainless steel.
Never use steel wool or wire wool. These
will damage the painted, chrome coated
and plastic surfaces.
We recommend you to wipe the door gas-
ket with a dry and clean cloth at the end of
the programme. This will remove residues
on the door gasket in your machine and
prevent formation of malodours.
7.3 Cleaning the Body and Control
Panel
Wipe the body of the product with soapy
water or non-corrosive mild gel detergents
as necessary, and dry with a soft cloth.
Use only a soft and damp cloth to clean the
control panel. Do not use cleaning products
that contain bleach
7.4 Cleaning the Water Intake Filters
There is a filter at the end of each water in-
take valve at the rear of the product and
also at the end of each water intake hose
where they are connected to the tap. These
filters prevent foreign substances and dirt
in the water to enter the product. Filters
should be cleaned if they are dirty.
1. Close the taps.
2. Remove the nuts of the water intake
hoses to access the filters on the water
intake valves and clean them with an ap-
propriate brush. If the filters are too
dirty, remove them from their places
with a pliers and clean in this way.
3. Take out the filters on the flat ends of
the water intake hoses together with the
gaskets and clean thoroughly under run-
ning water.
4. Replace the gaskets and filters carefully
and tighten their nuts by hand.
7.5 Draining Remaining Water and
Cleaning the Pump Filter
The filter system in your product prevents
solid items such as buttons, coins and fab-
ric fibres clogging the pump impeller during
draining of washing water. Thus, the water
will be drained without any problem and the
service life of the pump will extend.
If the product fails to drain water inside it,
the pump filter is clogged. Filter must be
cleaned whenever it is clogged or in every 3
months. Water must be drained off first to
clean the pump filter.
In addition, prior to transporting the product
(e.g., when moving to another house) water
should be drained completely.

EN / 40
NOTICE:
Foreign substances left in the
pump filter may damage your
product or may cause noise prob-
lem.
In regions where freezing is pos-
sible, the tap must be closed, sys-
tem hose must be removed and the
water inside the product must be
drained when the product is not in
use.
After each use, turn off the tap to
which the mains hose is connected.
In order to clean the dirty filter and drain
the water:
1. Unplug the product to cut off the supply
power.
Temperature of the water inside the
product may rise up to 90 ºC. To
avoid the risk of scalding, clean the
filter after the water inside the
product is cooled down.
2. Open the filter cover.
3. Follow the below procedures in order to
drain water.
If the product does not have an emer-
gency water draining hose, in order to
drain the water:
• Place a large container at the end of the
hose to collect the water from the filter.
• When the pump filter starts leaking water
loosen it by turning (opposite clockwise).
Fill the running water to the container you
placed in front of the filter. Keep a cloth
ready to clean the water that may spill.
• Completely turn and remove the pump fil-
ter when the water in the product leaks
out.
1. Clean any residues inside the filter as
well as fibres, if any, around the pump
impeller region.
2. Replace the filter.
3. If the filter cap is composed of two
pieces, close the filter cap by pressing
on the tab. If it is one piece, seat the
tabs in the lower part into their places
first, and then press the upper part to
close.
8 Troubleshooting
Please read the “Safety Instruc-
tions” section first!
Programmes do not start after the load-
ing door is closed.
• Start / Pause / Cancel button is not
pressed. >>> Press Start / Pause / Cancel
button.
• It may be difficult to close the loading
door in case of excessive loading. >>>
Reduce the amount of laundry and make
sure that the loading door is closed prop-
erly.
Programme cannot be started or selec-
ted.
• The product has switched to self-protec-
tion mode due to a supply problem (line
voltage, water pressure, etc.). >>> De-
pending on the product model, select an-
other program by turning the Program Se-

EN / 41
lection button or pressing and holding
the On/Off button for 3 seconds to can-
cel the program. Previous programme
will be cancelled. See Cancelling the Pro-
gramme
Water inside the product.
• Some water has remained in the product
due to the quality control processes in
the production. >>> This is not a failure;
water is not harmful to the product.
The product does not take water in.
• Tap is turned off. >>> Turn on the taps.
• Water inlet hose is bent. >>> Flatten the
hose.
• Water inlet filter is clogged. >>> Clean the
filter.
• Loading door is not closed. >>> Close the
door.
The product does not drain water.
• Water drain hose is clogged or twisted.
>>> Clean or flatten the hose.
• Pump filter is clogged. >>> Clean the
pump filter.
Product vibrates or makes noise.
• Product is standing unbalanced. >>> Ad-
just the stands to balance the product.
• A hard substance has entered into the
pump filter. >>> Clean the pump filter.
• Transportation safety bolts are not re-
moved. >>> Remove the transportation
safety bolts.
• Laundry quantity in the product is too
little. >>> Add more laundry to the
product.
• Excessive laundry is loaded in the
product. >>> Take out some of the laun-
dry from the product or distribute the
load by hand to balance it homogen-
eously in the product.
• Product is leaning on a rigid item. >>>
Make sure that the product is not leaning
on anything.
There is water leaking from the bottom
of the product.
• Water drain hose is clogged or twisted.
>>> Clean or flatten the hose.
• Pump filter is clogged. >>> Clean the
pump filter.
Product stopped shortly after the pro-
gramme started.
• Machine has stopped temporarily due to
low voltage. >>> Product will resume run-
ning when the voltage restores to the nor-
mal level.
Product directly drains the water it
takes in.
• Draining hose is not at adequate height.
>>> Connect the water draining hose as
described in the user manual.
No water can be seen in the product
during washing.
• Water is inside the invisible part of the
product. >>> This is not a failure.
Loading door cannot be opened.
• Loading door lock is activated because
of the water level in the product. >>>
Drain the water by running the Pump or
Spin programme.
• Product is heating up the water or it is at
the spinning cycle. >>> Wait until the pro-
gramme completes.
• Loading door may be stuck because of
the pressure it is subjected to. >>> Grab
the handle and push and pull the loading
door to release and open it.
• If there is no power, loading door of the
product will not open. >>> To open the
loading door, open the pump filter cap
and pull down the emergency handle po-
sitioned at the rear side of the said cap.
See Loading Door Lock [}36]
Washing takes longer than specified in
the user manual. (*)
• Water pressure is low. >>> Product waits
until taking in adequate amount of water
to prevent poor washing quality due to
the decreased amount of water. There-
fore, the washing time extends.
• Voltage is low. >>> Washing time is pro-
longed to avoid poor washing results
when the supply voltage is low.

EN / 42
• Input temperature of water is low. >>>
Required time to heat up the water ex-
tends in cold seasons. Also, washing
time can be lengthened to avoid poor
washing results.
• Number of rinses and/or amount of rins-
ing water have increased. >>> Product in-
creases the amount of rinsing water
when good rinsing is needed and adds an
extra rinsing step if necessary.
• Excessive foam has occurred and auto-
matic foam absorption system has been
activated due to too much detergent us-
age. >>> Use recommended amount of
detergent.
Programme duration does not count-
down. (On models with display) (*)
• Timer may stop during water intake. >>>
Timer indicator will not countdown until
the product takes in adequate amount of
water. The product will wait until there is
sufficient amount of water to avoid poor
washing results due to lack of water.
Timer indicator will resume countdown
after this.
• Timer may stop during heating step. >>>
Timer indicator will not countdown until
the product reaches the selected temper-
ature.
• Timer may stop during spinning step. >>>
Automatic unbalanced load detection
system is activated due to the unbal-
anced distribution of the laundry in the
product.
Programme duration does not count-
down. (*)
• There is unbalanced load in the product.
>>> Automatic unbalanced load detection
system is activated due to the unbal-
anced distribution of the laundry in the
product.
Product does not switch to spinning
step. (*)
• There is unbalanced load in the product.
>>> Automatic unbalanced load detection
system is activated due to the unbal-
anced distribution of the laundry in the
product.
• The product will not spin if water is not
drained completely. >>> Check the filter
and the draining hose.
• Excessive foam has occurred and auto-
matic foam absorption system has been
activated due to too much detergent us-
age. >>> Use recommended amount of
detergent.
Washing performance is poor: Laundry
turns gray. (**)
• Insufficient amount of detergent has
been used over a long period of time. >>>
Use the recommended amount of deter-
gent appropriate for water hardness and
the laundry.
• Washing has been made at low temperat-
ures for a long time. >>> Select the
proper temperature for the laundry to be
washed.
• Insufficient amount of detergent is used
with hard water. >>> Using insufficient
amount of detergent with hard water
causes the soil to stick on the cloth and
this turns the cloth into gray in time. It is
difficult to eliminate graying once it hap-
pens. Use the recommended amount of
detergent appropriate for water hardness
and the laundry.
• Excessive amount of detergent is used.
>>> Use the recommended amount of de-
tergent appropriate for water hardness
and the laundry.
Washing performance is poor: Stains
persist or the laundry is not whitened.
(**)
• Insufficient amount of detergent is used.
>>> Use the recommended amount of de-
tergent appropriate for water hardness
and the laundry.

EN / 43
• Excessive laundry is loaded in. >>> Do
not load the product in excess. Load with
amounts recommended in the "Pro-
gramme and consumption table".
• Wrong programme and temperature were
selected. >>> Select the proper pro-
gramme and temperature for the laundry
to be washed.
• Wrong type of detergent is used. >>> Use
original detergent appropriate for the
product.
• Detergent was put in the wrong compart-
ment. >>> Put the detergent in the correct
compartment. Do not mix the bleaching
agent and the detergent with each other.
Washing performance is poor: Oily
stains appeared on the laundry. (**)
• Regular drum cleaning is not applied. >>>
Clean the drum regularly. For this proced-
ure, see --- MISSING LINK ---
Washing performance is poor: Clothes
smell unpleasantly. (**)
• Odours and bacteria layers are formed on
the drum as a result of continuous wash-
ing at lower temperatures and/or in short
programmes. >>> Leave the detergent
drawer as well as the loading door of the
product ajar after each washing. Thus, a
humid environment favourable for bac-
teria cannot occur in the machine
Colour of the clothes faded. (**)
• Excessive laundry was loaded in. >>> Do
not load the product in excess.
• Detergent in use is damp. >>> Keep deter-
gents closed in an environment free of
humidity and do not expose them to ex-
cessive temperatures.
• A higher temperature was selected. >>>
Select the proper programme and tem-
perature according to the type and soiling
degree of the laundry.
Washing machine does not rinse well.
• The amount, brand and storage condi-
tions of the detergent used are inappro-
priate. >>> Use a detergent appropriate
for the washing machine and your laun-
dry. Keep detergents closed in an envir-
onment free of humidity and do not ex-
pose them to excessive temperatures.
• Detergent was put in the wrong compart-
ment. >>> If detergent is put in the pre-
wash compartment although prewash
cycle is not selected, the product can
take this detergent during rinsing or
softener step. Put the detergent in the
correct compartment.
• Pump filter is clogged. >>> Check the fil-
ter.
• Draining hose is folded. >>> Check the
drain hose.
Laundry became stiff after washing. (**)
• Insufficient amount of detergent is used.
>>> Using insufficient amount of deter-
gent for the water hardness can cause
the laundry to become stiff in time. Use
appropriate amount of detergent accord-
ing to the water hardness.
• Detergent was put in the wrong compart-
ment. >>> If detergent is put in the pre-
wash compartment although prewash
cycle is not selected, the product can
take this detergent during rinsing or
softener step. Put the detergent in the
correct compartment.
• Detergent was mixed with the softener.
>>> Do not mix the softener with deter-
gent. Wash and clean the drawer with hot
water.
Laundry does not smell like the
softener. (**)
• Detergent was put in the wrong compart-
ment. >>> If detergent is put in the pre-
wash compartment although prewash
cycle is not selected product, the can
take this detergent during rinsing or
softener step. Wash and clean the drawer
with hot water. Put the detergent in the
correct compartment.
• Detergent was mixed with the softener.
>>> Do not mix the softener with deter-
gent. Wash and clean the drawer with hot
water.

EN / 44
Detergent residue in the detergent
drawer. (**)
• Detergent was put in wet drawer. >>> Dry
the detergent drawer before putting in de-
tergent.
• Detergent has gotten damp. >>> Keep de-
tergents closed in an environment free of
humidity and do not expose them to ex-
cessive temperatures.
• Water pressure is low. >>> Check the wa-
ter pressure.
• The detergent in the main wash compart-
ment got wet while taking in the prewash
water. Holes of the detergent compart-
ment are blocked. >>> Check the holes
and clean if they are clogged.
• There is a problem with the detergent
drawer valves. >>> Call the Authorised
Service Agent.
• Detergent was mixed with the softener.
>>> Do not mix the softener with deter-
gent. Wash and clean the drawer with hot
water.
Detergent residue on the clothes.
• The machine might have been over-
loaded. >>> Do not overload the machine.
• Wrong programme and temperature were
selected. >>> Select the proper pro-
gramme and temperature for the laundry
to be washed.
• Wrong type of detergent might have been
used. >>> Select the proper detergent for
the laundry to be washed.
Too much foam forms inside the
product. (**)
• Improper detergents for the washing ma-
chine is used. >>> Use detergents appro-
priate for the washing machine.
• Excessive amount of detergent is used.
>>> Use only sufficient amount of deter-
gent.
• Detergent was stored under improper
conditions. >>> Store detergent in a
closed and dry location. Do not store in
excessively hot places.
• Some meshed laundry such as tulle may
foam too much because of their texture.
>>> Use smaller amounts of detergent for
this type of item.
• Detergent was put in the wrong compart-
ment. >>> Make sure you place the de-
tergent in the appropriate compartment.
• Softener is being taken early by the
product. >>> There may be problem in the
valves or in the detergent drawer. Call the
Authorised Service Agent.
Foam is overflowing from the detergent
drawer.
• Too much detergent is used. >>> Mix 1
tablespoonful softener and ½ l water and
pour into the main wash compartment of
the detergent drawer. >>> Put detergent
into the product suitable for the pro-
grammes and maximum loads indicated
in the “Programme and consumption
table”. When you use additional chemic-
als (stain removers, bleaches and etc.),
reduce the amount of detergent.
Laundry remains wet at the end of the
programme. (*)
• Excessive foam has occurred and auto-
matic foam absorption system has been
activated due to too much detergent us-
age. >>> Use recommended amount of
detergent.
Drying lasts too long.
• The machine might have been over-
loaded. >>> Do not overload the machine.
• Spinning might not be sufficient for laun-
dry. >>> Select a higher spin speed in the
washing step of the Washer-Dryer.
• Tap is turned off. >>> Turn on the taps.
Laundry comes off wet after the drying
step.
• The programme selected might not be
suitable for the type of laundry. >>>
Check the care labels on clothes and se-
lect a programme accordingly, or select
timed programmes additionally.
• The machine might have been over-
loaded. >>> Do not overload the machine.

EN / 45
• Spinning might not be sufficient for laun-
dry. >>> Select a higher spin speed in the
washing step of the Washer-Dryer.
Machine does not start or programme
cannot be started.
• Power cable might be unplugged. >>>
Make sure that the power cable is
plugged in.
• Programme might not be set, or the
Start/Pause/Cancel button might be not
pressed. >>> Make sure the programme
is set and the machine is not in Standby
mode.
• Child lock might be activated. >>> Dis-
able Child Lock.
Laundry shrinks, fades, tarnishes or
gets damaged.
• The programme selected might not be
suitable for the type of laundry. >>>
Check the care labels on clothes and se-
lect a programme accordingly, or select
timed programmes additionally. You
should not dry laundry that is not suitable
for drying.
Machine does not dry.
• Laundry might not be dried or the drying
step might not be enabled. >>> Check if
the drying function is selected after the
selected washing programme.
Loading door cannot be opened.
• The door of your machine might not be
opening due to safety reasons. >>> If the
door locked indicator is still active on the
display after the drying step, the machine
will keep the door locked for your safety
until it cools down.
• If there is no power, loading door of the
product will not open. >>> To open the
loading door, open the pump filter cap
and pull down the emergency handle po-
sitioned at the rear side of the said cap.
See Loading Door Lock [}36]
(*) The product does not switch to spinning
step when the laundry is not evenly distrib-
uted in the drum to prevent any damage to
the product and to its surrounding environ-
ment. Laundry should be rearranged and re-
spun.
(**) Regular drum cleaning is not applied.
Clean the drum regularly. See --- MISSING
LINK ---
If you cannot eliminate the problem
although you follow the instructions
in this section, consult your dealer
or the Authorised Service Agent.
Never try to repair a nonfunctional
product yourself.
See also
2 Cleaning the Loading Door and the
Drum [}39]


CUSTOMER CARE AND SERVICE
Always use original spare parts.
When contacting our Authorised Service Centre, ensure that you have the following
data available: Model, Serial Number and Service Index (SI).
The information can be found on the rating plate. Subject to change without notice.
The original spare parts for some specific components are available for 10 years
from the placing on the market of the last unit of the model.
Visit our website to:
Get usage advice, download user manuals, get service and repair information
www.smeg.com/services/customer-service