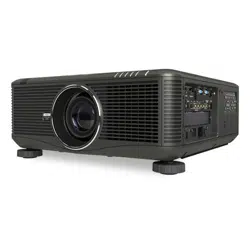
Projector
PX750U2/PX700W2/PX800X2
User’s Manual
Model No.
NP-PX750U, NP-PX750UG, NP-PX700W, NP-PX700WG, NP-PX800X, NP-PX800XG
• EachmodelisreferredtoasPX750U2,PX700W2,andPX800X2respectivelyunlessotherwisespecied.

Ver.27/14
• DLPandBrilliantColoraretrademarksofTexasInstruments.
• Macintosh,MacOSXandPowerBookaretrademarksofAppleInc.registeredintheU.S.andothercountries.
• Microsoft,Windows,WindowsVista,InternetExplorer,.NETFrameworkandPowerPointareeitheraregistered
trademarkortrademarkofMicrosoftCorporationintheUnitedStatesand/orothercountries.
• MicroSaverisaregisteredtrademarkofKensingtonComputerProductsGroup,adivisionofACCOBrands.
• Adobe,AdobePDF,AdobeReader,andAcrobatareeitherregisteredtrademarksortrademarksofAdobeSystems
IncorporatedintheUnitedStatesand/orothercountries.
• VirtualRemoteToolusesWinI2C/DDClibrary,©NicomsoftLtd.
• HDMI,theHDMILogoandHigh-DenitionMultimediaInterfacearetrademarksorregisteredtrademarksofHDMI
LicensingLLC.
• DisplayPortandDisplayPortComplianceLogoaretrademarksownedbytheVideoElectronicsStandardsAssocia-
tion.
• TrademarkPJLinkisatrademarkappliedfortrademarkrightsinJapan,theUnitedStatesofAmericaandother
countriesandareas.
• Wi-Fi
®
,Wi-FiAlliance
®
,andWi-FiProtectedAccess(WPA,WPA2)
®
areregisteredtrademarksoftheWi-FiAlliance.
• Blu-rayisatrademarkofBlu-rayDiscAssociation
• CRESTRONandROOMVIEWareregisteredtrademarksofCrestronElectronics,Inc.intheUnitedStatesandother
countries.
• EthernetiseitheraregisteredtrademarkortrademarkofFujiXeroxCo.,Ltd.
• Otherproductandcompanynamesmentionedinthisuser’smanualmaybethetrademarksorregisteredtrademarks
oftheirrespectiveholders.
NOTES
(1)Thecontentsofthisuser’smanualmaynotbereprintedinpartorwholewithoutpermission.
(2)Thecontentsofthisuser’smanualaresubjecttochangewithoutnotice.
(3)Greatcarehasbeentakeninthepreparationofthisuser’smanual;however,shouldyounoticeanyquestionable
points,errorsoromissions,pleasecontactus.
(4)Notwithstandingarticle(3),NECwillnotberesponsibleforanyclaimsonlossofprotorothermattersdeemed
toresultfromusingtheProjector.
i
Important Information
Safety Cautions
Precautions
PleasereadthismanualcarefullybeforeusingyourNECprojectorandkeepthemanualhandyforfuturereference.
CAUTION
Toturnoffmainpower,besuretoremovetheplugfrompoweroutlet.
Thepoweroutletsocketshouldbeinstalledasneartotheequipmentaspossible,andshouldbeeasily
accessible.
CAUTION
TOPREVENTSHOCK,DONOTOPENTHECABINET.
THEREAREHIGH-VOLTAGECOMPONENTSINSIDE.
REFERSERVICINGTOQUALIFIEDSERVICEPERSONNEL.
Thissymbolwarnstheuserthatuninsulatedvoltagewithintheunitmaybesufcienttocauseelectrical
shock.Therefore,itisdangeroustomakeanykindofcontactwithanypartinsideoftheunit.
Thissymbolalertstheuserthatimportantinformationconcerningtheoperationandmaintenanceofthis
unithasbeenprovided.
Theinformationshouldbereadcarefullytoavoidproblems.
WARNING:TOPREVENTFIREORSHOCK,DONOTEXPOSETHISUNITTORAINORMOISTURE.
DONOTUSETHISUNIT’SPLUGWITHANEXTENSIONCORDORINANOUTLETUNLESSALLTHEPRONGS
CANBEFULLYINSERTED.
DOC Compliance Notice (for Canada only)
ThisClassBdigitalapparatusmeetsallrequirementsoftheCanadianInterference-CausingEquipmentRegulations.
Machine Noise Information Regulation - 3. GPSGV,
Thehighestsoundpressurelevelislessthan70dB(A)inaccordancewithENISO7779.
Disposing of your used product
EU-widelegislationasimplementedineachMemberStaterequiresthatusedelectricalandelectronicprod-
uctscarryingthemark(left)mustbedisposedofseparatelyfromnormalhouseholdwaste.Thisincludes
projectorsandtheirelectricalaccessoriesorlamps.Whenyoudisposeofsuchproducts,pleasefollowthe
guidanceofyourlocalauthorityand/orasktheshopwhereyoupurchasedtheproduct.
Aftercollectingtheusedproducts,theyarereusedandrecycledinaproperway.Thiseffortwillhelpus
reducethewastesaswellasthenegativeimpactsuchasmercurycontainedinalamptothehumanhealth
andtheenvironmentattheminimumlevel.
ThemarkontheelectricalandelectronicproductsonlyappliestothecurrentEuropeanUnionMemberStates.
WARNING
• Whentheprojectorisdamaged,coolinguidsmaycomeoutofinternalpart.
Shouldthishappen,immediatelyturnofftheACsupplytotheprojectorandcontactyourdealer.
DONOTtouchanddrinkthecoolinguid.Whenthecoolinguidsareswallowedorcontactedwithyour
eyes,pleaseconsultmedicalattentionimmediately.Ifyoutouchthecoolinguidwithyourhand,rinse
yourhandswellunderrunningwater.

ii
Important Information
WARNING TO CALIFORNIA RESIDENTS:
Handlingthecablessuppliedwiththisproductwillexposeyoutolead,achemicalknowntotheStateofCalifornia
tocausebirthdefectsorotherreproductiveharm.WASHHANDSAFTERHANDLING.
RF Interference (for USA only)
WARNING
TheFederalCommunicationsCommissiondoesnotallowanymodicationsorchangestotheunitEXCEPTthose
speciedbyNECDisplaySolutionsofAmerica,Inc.inthismanual.Failuretocomplywiththisgovernmentregu-
lationcouldvoidyourrighttooperatethisequipment.Thisequipmenthasbeentestedandfoundtocomplywith
thelimitsforaClassBdigitaldevice,pursuanttoPart15oftheFCCRules.Theselimitsaredesignedtoprovide
reasonableprotectionagainstharmfulinterferenceinaresidentialinstallation.Thisequipmentgenerates,uses,and
canradiateradiofrequencyenergyand,ifnotinstalledandusedinaccordancewiththeinstructions,maycause
harmfulinterferencetoradiocommunications.However,thereisnoguaranteethatinterferencewillnotoccurina
particularinstallation.
Ifthisequipmentdoescauseharmfulinterferencetoradioortelevisionreception,whichcanbedeterminedby
turningtheequipmentoffandon,theuserisencouragedtotrytocorrecttheinterferencebyoneormoreofthe
followingmeasures:
• Reorientorrelocatethereceivingantenna.
• Increasetheseparationbetweentheequipmentandreceiver.
• Connecttheequipmentintoanoutletonacircuitdifferentfromthattowhichthereceiverisconnected.
• Consultthedealeroranexperiencedradio/TVtechnicianforhelp.
ForUKonly:InUK,aBSapprovedpowercordwithmouldedplughasaBlack(veAmps)fuseinstalledforusewith
thisequipment.Ifapowercordisnotsuppliedwiththisequipmentpleasecontactyoursupplier.
Important Safeguards
Thesesafetyinstructionsaretoensurethelonglifeofyourprojectorandtopreventreandshock.Pleasereadthem
carefullyandheedallwarnings.
Installation
• Donotplacetheprojectorinthefollowingconditions:
- onanunstablecart,stand,ortable.
- nearwater,baths,ordamprooms.
- indirectsunlight,nearheaters,orheatradiatingappliances.
- inadusty,smokyorsteamyenvironment.
- onasheetofpaperorcloth,rugsorcarpets.
• Ifyouwishtohavetheprojectorinstalledontheceiling:
- Donotattempttoinstalltheprojectoryourself.
- Theprojectormustbeinstalledbyqualiedtechniciansinordertoensureproperoperationandreducetherisk
ofbodilyinjury.
- Inaddition,theceilingmustbestrongenoughtosupporttheprojectorandtheinstallationmustbeinaccordance
withanylocalbuildingcodes.
- Pleaseconsultyourdealerformoreinformation.
iii
Important Information
WARNING
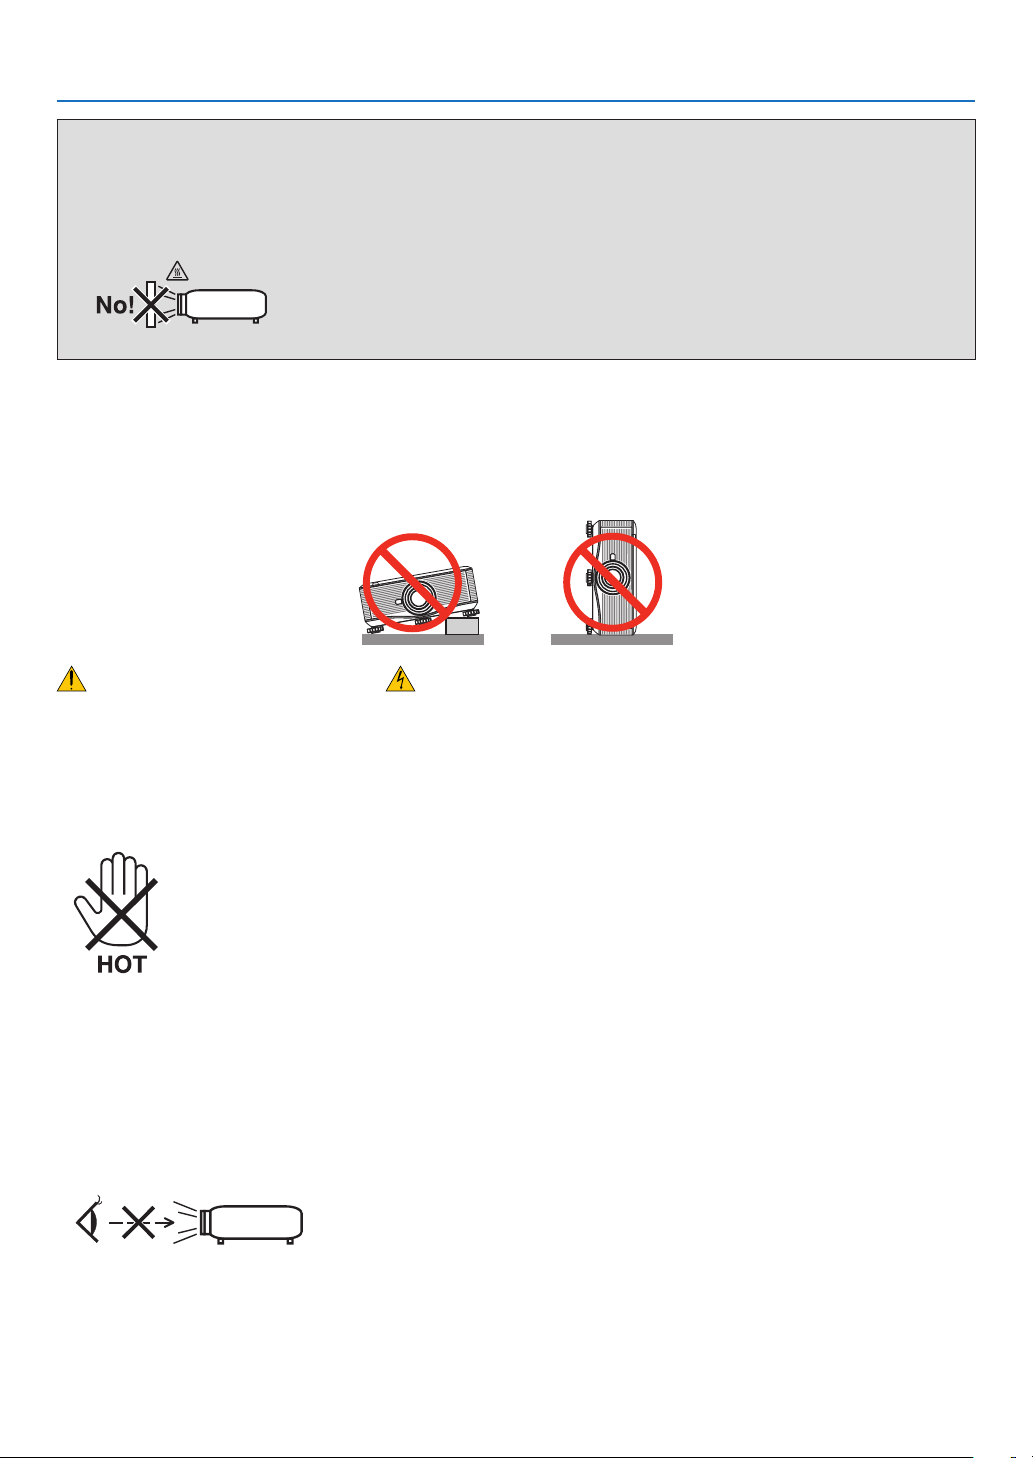
• Donotcoverthelenswiththelenscaporequivalentwhiletheprojectorison.Doingsocanleadtomeltingof
thecapduetotheheatemittedfromthelightoutput.
• Donotplaceanyobjects,whichareeasilyaffectedbyheat,infrontoftheprojectorlens.Doingsocouldlead
totheobjectmeltingfromtheheatthatisemittedfromthelightoutput.
Orientation and Fan Mode
• Donottilttheprojectortotheleftorright.Doingsomayresultinmalfunction.Thereisnolimitonthetiltangle
upwardordownward.Selecttheappropriateoptionfor[FANMODE]accordingtotheinstallationangle.
• Whenchangingtheprojectororientationorinstallationangle,alsochangethe[SETTING]optionof[FANMODE]
accordingly.Failuretodosomaycauseproductmalfunction.(→page122, 123, 128)
Fire and Shock Precautions
• Ensurethatthereissufcientventilationandthatventsareunobstructedtopreventthebuild-upofheatinsideyour
projector.Allowminimumspacesbetweenyourprojectorandawall.(→pagevandvi)
• Donottrytotouchtheventilationoutletontherearsideofthecabinetasitcanbecomeheatedwhiletheprojectoris
turnedonandimmediatelyaftertheprojectoristurnedoff.Partsoftheprojectormaybecometemporarilyheatedif
theprojectoristurnedoffwiththePOWERbuttonoriftheACpowersupplyisdisconnectedduringnormalprojector
operation.
Usecautionwhenpickinguptheprojector.
• Preventforeignobjectssuchaspaperclipsandbitsofpaperfromfallingintoyourprojector.Donotattempttoretrieve
anyobjectsthatmightfallintoyourprojector.Donotinsertanymetalobjectssuchasawireorscrewdriverintoyour
projector.Ifsomethingshouldfallintoyourprojector,disconnectitimmediatelyandhavetheobjectremovedbya
qualiedservicepersonnel.
• Donotplaceanyobjectsontopoftheprojector.
• Donottouchthepowerplugduringathunderstorm.Doingsocancauseelectricalshockorre.
• Theprojectorisdesignedtooperate on a powersupply of 100-240V AC50/60 Hz (PX750U2/PX700W2/
PX800X2)/200-240VAC50/60Hz(PX750UG2/PX700WG2/PX800XG2).Ensurethatyourpowersupplytsthis
requirementbeforeattemptingtouseyourprojector.
• Donotlookintothelenswhiletheprojectorison.Seriousdamagetoyoureyescouldresult.
• Keepanyitems(magnifyingglassetc.)outofthelightpathoftheprojector.Thelightpathbeingprojectedfromthe
lensisextensive,thereforeanykindofabnormalobjectsthatcanredirectlightcomingoutofthelens,cancause
anunpredictableoutcomesuchasareorinjurytotheeyes.
• Donotplaceanyobjects,whichareeasilyaffectedbyheat,infrontofaprojectorexhaustvent.
Doingsocouldleadtotheobjectmeltingorgettingyourhandsburnedfromtheheatthatisemittedfromtheexhaust.
• Handlethepowercordcarefully.Adamagedorfrayedpowercordcancauseelectricshockorre.

iv
Important Information
- Donotuseanypowercordotherthantheonesuppliedwiththeprojector.
- Donotbendortugthepowercordexcessively.
- Donotplacethepowercordundertheprojector,oranyheavyobject.
- Donotcoverthepowercordwithothersoftmaterialssuchasrugs.
- Donotheatthepowercord.
- Donothandlethepowerplugwithwethands.
• Turnofftheprojector,unplugthepowercordandhavetheprojectorservicedbyaqualiedservicepersonnelunder
thefollowingconditions:
- Whenthepowercordorplugisdamagedorfrayed.
- Ifliquidhasbeenspilledintotheprojector,orifithasbeenexposedtorainorwater.
- Iftheprojectordoesnotoperatenormallywhenyoufollowtheinstructionsdescribedinthisuser’smanual.
- Iftheprojectorhasbeendroppedorthecabinethasbeendamaged.
- Iftheprojectorexhibitsadistinctchangeinperformance,indicatinganeedforservice.
• Disconnectthepowercordandanyothercablesbeforecarryingtheprojector.
• Turnofftheprojectorandunplugthepowercordbeforecleaningthecabinetorreplacingthelamp.
• Turnofftheprojectorandunplugthepowercordiftheprojectorisnottobeusedforanextendedperiodoftime.
• WhenusingaLANcable:
Forsafety,donotconnecttotheconnectorforperipheraldevicewiringthatmighthaveexcessivevoltage.
CAUTION
• Aminimumoftwopersonsarerequiredtocarrytheprojector.Otherwisetheprojectormaytumbleordrop,caus-
ingpersonalinjury.
• Keephandsawayfromthelensmountingportionwhilethelensshiftisinoperation.
Failuretodosocouldresultinhandsbeingpinchedbythemovinglens.
• Donotusethetilt-footforpurposesotherthanoriginallyintended.Misusessuchasgrippingthetilt-footorhang-
ingonthewallcancausedamagetotheprojector.
• Donotsendtheprojectorinthesoftcasebyparceldeliveryserviceorcargoshipment.Theprojectorinsidethe
softcasecouldbedamaged.
• Set[LAMPSELECT]and[LAMPINTERVALMODE]ifyoucontinuetousetheprojectorforconsecutivedays.
(Fromthemenu,select[LAMPMODE]→[LAMPSELECT]and[LAMPINTERVALMODE].)
• BeforeusingDirectPowerOff,besuretoallowatleast20minutesimmediatelyafterturningontheprojectorand
startingtodisplayanimage.
• Donotunplugthepowercordfromthewalloutletorprojectorwhentheprojectorispoweredon.Doingsocan
causedamagetotheACINconnectoroftheprojectorand(or)theprongplugofthepowercord.
ToturnofftheACpowersupplywhentheprojectorispoweredon,usetheprojector'smainpowerswitchora
powerstripequippedwithaswitchandabreaker.
• DonotturnofftheACpowerfor60secondsafterthelampisturnedonandwhilethePOWERindicatorisblink-
ingblue.Doingsocouldcauseprematurelampfailure.
• Useofawalloutletwitha20Aormorecircuitbreakerisrecommended.
Performing Lens Calibration After Installation of the Optional Lens
Besuretoperform[CALIBRATION]bypressingandholdingtheORIENTATION/CALIBRATIONbuttonforatleast2
secondsorbyholdingtheCTLbuttonandpressingtheINFO/L-CALIBbuttonontheremotecontrolafterinstallation
orreplacementofthelens.(→page125)Calibrationcorrectstheadjustablezoomandfocusrange.
Thefollowinglensesneedcalibration:
• NP16FL,NP17ZL,NP18ZL,NP19ZL,NP20ZL,NP21ZL,NP31ZL
Caution on Carrying the Projector/Handling the Optional Lens
Whenshippingtheprojectorwiththelens,removethelensbeforeshippingtheprojector.Alwaysattachthedustcap
tothelenswheneveritisnotmountedontheprojector.Thelensandthelensshiftmechanismmayencounterdamage
causedbyimproperhandlingduringtransportation.

v
Important Information
Remote Control Precautions
• Handletheremotecontrolcarefully.
• Iftheremotecontrolgetswet,wipeitdryimmediately.
• Avoidexcessiveheatandhumidity.
• Donotshort,heat,ortakeapartbatteries.
• Donotthrowbatteriesintore.
• Ifyouwillnotbeusingtheremotecontrolforalongtime,removethebatteries.
• Ensurethatyouhavethebatteries’polarity(+/−)alignedcorrectly.
• Donotusenewandoldbatteriestogether,orusedifferenttypesofbatteriestogether.
• Disposeofusedbatteriesaccordingtoyourlocalregulations.
Note for US Residents
Thelampsinthisproductcontainmercury.PleasedisposeaccordingtoLocal,StateorFederalLaws.
Lamp and Color Wheel Replacement
• Usethespeciedlampforsafetyandperformance.
• Toreplacethelampandthecolorwheel,followallinstructionsprovidedonpage182and217respectively.
• Besuretoreplacethelampwhenthemessage[THE LAMP HAS REACHED THE END OF ITS USABLE LIFE.
PLEASE REPLACE THE LAMP 1 (OR 2). USE THE SPECIFIED LAMP FOR SAFETY AND PERFORMANCE.]
appears.Ifyoucontinuetousethelampafterthelamphasreachedtheendofitsusablelife,thelampbulbmay
shatter,andpiecesofglassmaybescatteredinthelampcase.Donottouchthemasthepiecesofglassmaycause
injury.
Ifthishappens,contactyourdealerforlampreplacement.
A Lamp Characteristic
Theprojectorhasadischargelampforspecialpurposesasalightsource.
Alamphasacharacteristicthatitsbrightnessgraduallydecreaseswithage.Alsorepeatedlyturningthelampon
andoffwillincreasethepossibilityofitslowerbrightness.
Theactuallamplifemayvarydependingupontheindividuallamp,theenvironmentalconditionsandusage.
CAUTION:
• DONOTTOUCHTHELAMPorTHECOLORWHEELimmediatelyafterithasbeenused.Itwillbeextremely
hot.Turntheprojectoroffandthendisconnectthepowercord.Allowatleastonehourforthelamptocoolbefore
handling.
• Whenremovingthelampfromaceiling-mountedprojector,makesurethatnooneisundertheprojector.Glass
fragmentscouldfallifthelamphasbeenburnedout.
Clearance for Installing the Projector
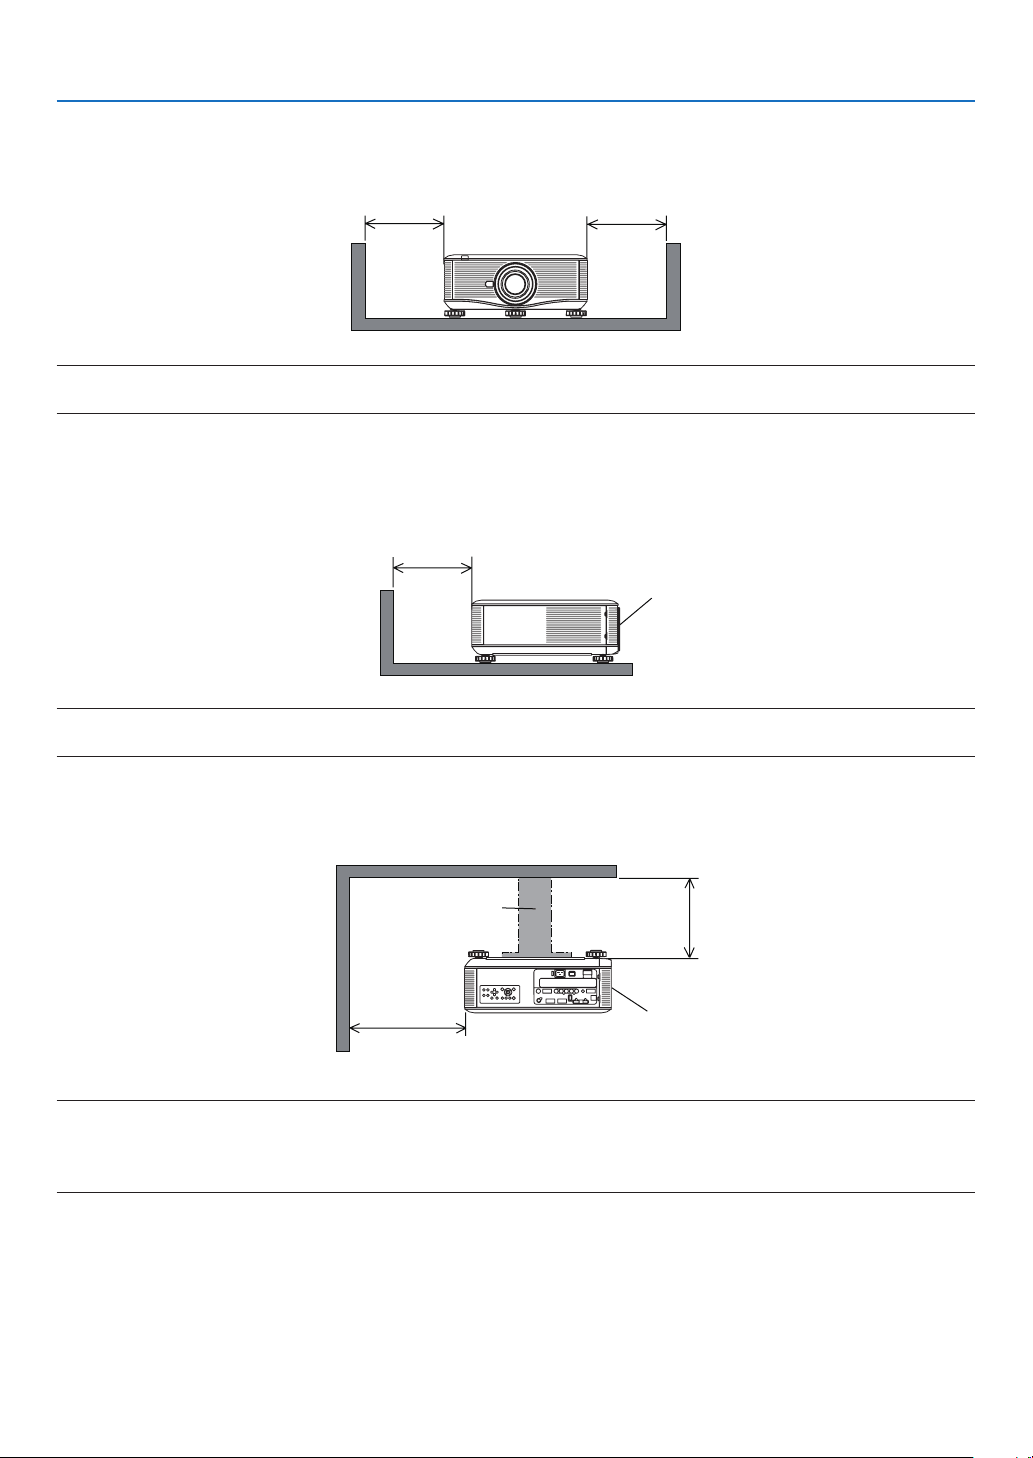
Allowampleclearancebetweentheprojectoranditssurroundingsasshownbelow.
AvoidinstallingtheprojectorinaplacewhereairmovementfromtheHVACisdirectedattheprojector.
HeatedairfromtheHVACcanbetakeninbytheprojector'sintakevent.Ifthishappens,thetemperatureinsidethe
projectorwillrisetoohighcausingtheover-temperatureprotectortoautomaticallyturnofftheprojectorspower.
vi
Important Information
Example 1 – If there are walls on both sides of the projector.
50 cm/19.7" or greater 30 cm/12" or greater
NOTE:
The drawing shows the proper clearance required for the front, back and top of the projector.
Example 2 – If there is a wall behind the projector.
(1) For floor installation:
70 cm/27.6" or greater
Lens
NOTE:
The drawing shows the proper clearance required for the back, sides and top of the projector.
(2) For ceiling mounting:
Ceiling mount unit
30 cm/12" or
greater
70 cm/27.6"
or greater
Lens
NOTE:
1. The drawing shows the proper clearance required for the front, sides, back and bottom of the projector.
2. If suspending the projector 30 cm/12 inches away from the ceiling, allow ample clearance for all four sides and the under the
projector.
(3) Upward or downward projection:
Whenusingtheprojectorinanupwardprojectionangle,allow1m/40inchesorgreaterbetweentheexhaustvent
andthewall.
Whenusingtheprojectorinadownwardprojectionangle,allow70cm/27.6inchesorgreaterbetweentheexhaust
ventandthewall.

vii
Important Information
About High Altitude mode
•
Set[FAN
MODE]to[HIGHALTITUDE]whenusingtheprojectorataltitudesapproximately5500feet/1600meters
orhigher.
Usingtheprojectorataltitudesapproximately5500feet/1600metersorhigherwithoutsettingto[HIGHALTITUDE]
cancausetheprojectortooverheatandtheprotectorcouldshutdown.Ifthishappens,waitacoupleminutesand
turnontheprojector.
• Usingtheprojectorataltitudeslessthanapproximately5500feet/1600metersandsettingto[HIGHALTITUDE]
cancausethelamptoovercool,causingtheimagetoicker.Switch[FANMODE]to[AUTO].
• Usingtheprojectorataltitudesapproximately5500feet/1600metersorhighercanshortenthelifeofinternalparts
suchasthelamp.
About Copyright of original projected pictures:
Pleasenotethatusingthisprojectorforthepurposeofcommercialgainortheattractionofpublicattentioninavenue
suchasacoffeeshoporhotelandemployingcompressionorexpansionofthescreenimagewiththefollowingfunc-
tionsmayraiseconcernabouttheinfringementofcopyrightswhichareprotectedbycopyrightlaw.
[ASPECTRATIO],[3DREFORM],[D-ZOOM]featureandothersimilarfeatures.
Turkish RoHS information relevant for Turkish market
EEE Yönetmeliğine Uygundur.
Thisdeviceisnotintendedforuseinthedirecteldofviewatvisualdisplayworkplaces.Toavoidincommodingreec-
tionsatvisualdisplayworkplacesthisdevicemustnotbeplacedinthedirecteldofview.

viii
Table of Contents
Important Information ............................................................................................i
1. Introduction ...........................................................................................................1
❶What’sintheBox? ..........................................................................................................1
❷IntroductiontotheProjector ...........................................................................................2
CongratulationsonYourPurchaseoftheProjector ..................................................2
Featuresyou’llenjoy: ................................................................................................2
Aboutthisuser’smanual ........................................................................................... 3
❸PartNamesoftheProjector ...........................................................................................4
Front/Top ...................................................................................................................4
Rear ..........................................................................................................................5
ControlPanel/IndicatorSection ................................................................................6
TerminalPanelFeatures ...........................................................................................7
❹PartNamesoftheRemoteControl ................................................................................8
BatteryInstallation ....................................................................................................9
RemoteControlPrecautions ..................................................................................... 9
OperatingRangeforWirelessRemoteControl ......................................................... 9
UsingtheRemoteControlinWiredOperation ........................................................ 10
❺OperatingEnvironmentforSoftwareIncludedonCD-ROM .........................................11
OperatingEnvironment ...........................................................................................12
2. Projecting an Image (Basic Operation) ...............................................13
❶FlowofProjectinganImage .........................................................................................13
❷ConnectingYourComputer/ConnectingthesuppliedPowerCord ...............................14
UsingtheSuppliedPowerCordStopper ................................................................15
❸TurningontheProjector ...............................................................................................17
PerformingLensCalibration ...................................................................................18
NoteonStartupscreen(MenuLanguageSelectscreen) ....................................... 19
Iftheprojectedimageisinvertedorupsidedown ...................................................20
❹SelectingaSource .......................................................................................................21
Selectingthecomputerorvideosource..................................................................21
❺AdjustingthePictureSizeandPosition ........................................................................22
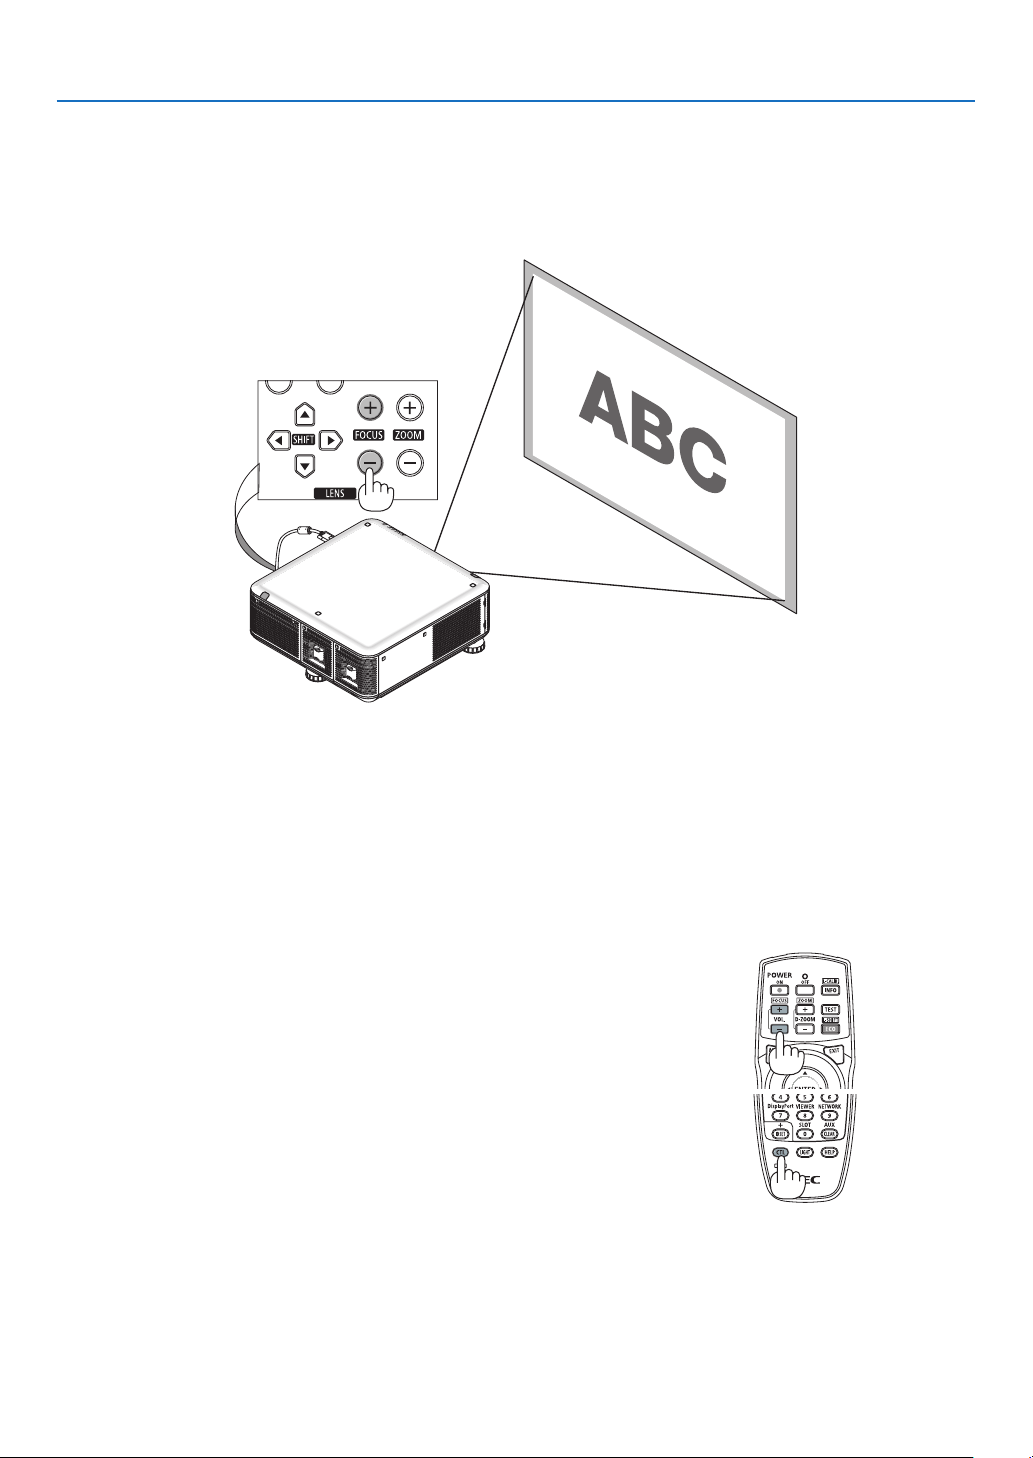
Adjustingtheverticalpositionofaprojectedimage(Lensshift) .............................23
Focus ......................................................................................................................25
Zoom ....................................................................................................................... 28
AdjustingtheTiltFeet .............................................................................................29
❻CorrectingKeystoneDistortion ..................................................................................... 30
❼
OptimizingComputerSignalAutomatically ..................................................................32
AdjustingtheImageUsingAutoAdjust ...................................................................32
❽TurningofftheProjector ...............................................................................................33
❾AfterUse.......................................................................................................................34
3. Convenient Features ......................................................................................35
❶Blockingthelamplight(LENSSHUTTER) ...................................................................35
❷TurningofftheImage ....................................................................................................35
❸TurningOfftheOn-ScreenMenu(On-ScreenMute) ....................................................35
❹FreezingaPicture ........................................................................................................35

ix
Table of Contents
❺EnlargingaPicture .......................................................................................................36
❻ChangingEcoMode/CheckingEnergy-SavingEffectUsingEcoMode[ECOMODE] 37
CheckingEnergy-SavingEffect[CARBONMETER] ..............................................38
❼CorrectingHorizontalandVerticalKeystoneDistortion[CORNERSTONE] .................39
Cornerstone ............................................................................................................39
❽DisplayingTwoPicturesattheSameTime ................................................................... 42
SelectingthePIPorPICTUREBYPICTUREMode[MODE] .................................42
[POSITION] ............................................................................................................. 43
❾PreventingtheUnauthorizedUseoftheProjector[SECURITY] ..................................44
❿StoringChangesforLensShift,Zoom,andFocus[LENSMEMORY] .........................47
UsageExample.......................................................................................................47
Tostoreyouradjustedvaluesin[REF.LENSMEMORY]: .......................................47
Tocallupyouradjustedvaluesfrom[REF.LENSMEMORY]: ................................49
⓫DisplayingaPictureUsing[EDGEBLENDING] ...........................................................51
BeforeexplaininguseoftheEdgeBlendingfunction ..............................................51
BlackLevelAdjustment ...........................................................................................54
9-segmentedportionsforBlackLeveladjustment ..................................................55
⓬ControllingtheProjectorbyUsinganHTTPBrowser ..................................................56
⓭ProjectingYourComputer’sScreenImagefromtheProjectorviaaNetwork
[NETWORKPROJECTOR] ..................................................................................... 63
⓮UsingtheProjectortoOperateYourComputerviaaNetwork[REMOTEDESKTOP] .67
4. Using the Viewer ..............................................................................................73
❶WhatyoucandowiththeViewer .................................................................................. 73
❷Preparingpresentationmaterials .................................................................................76
❸ProjectingimagesstoredinaUSBmemorydevice .....................................................77
StartingtheViewer .................................................................................................. 77
ExitingtheViewer ...................................................................................................80
NamesandfunctionsofViewerscreen ................................................................... 81
Vieweroptionsettings .............................................................................................86
❹Projectingdatafromsharedfolder ...............................................................................89
Connectingtheprojectortothesharedfolder ........................................................89
Disconnectingthesharedfolderfromtheprojector ................................................92
❺Projectingdatafrommediaserver................................................................................93
Settingup“MediaSharing”inWindowsMediaPlayer11 .......................................93
Settingup“MediaSharing”inWindowsMediaPlayer12 .......................................95
Connectingtheprojectortothemediaserver .........................................................96
Disconnectingtheprojectorfromthemediaserver ................................................97
❻Restrictionsondisplayingles .....................................................................................98
SomerestrictionsonPowerPointles ..................................................................... 98
SomerestrictionsonPDFles ...............................................................................98
5. Using On-Screen Menu .................................................................................99
❶UsingtheMenus ...........................................................................................................99
❷MenuElements ...........................................................................................................100
❸ListofMenuItems ......................................................................................................101
❹MenuDescriptions&Functions[SOURCE] ...............................................................104
COMPUTER1,2,and3 .......................................................................................104

x
Table of Contents
HDMI ..................................................................................................................... 104
DisplayPort ............................................................................................................104
VIDEO ................................................................................................................... 104
S-VIDEO ...............................................................................................................104
VIEWER ................................................................................................................ 104
NETWORK ............................................................................................................ 104
SLOT(foroptionalboard) .....................................................................................104
ENTRYLIST .........................................................................................................104
TESTPATTERN .................................................................................................... 104
❺MenuDescriptions&Functions[ADJUST] ................................................................. 108
[PICTURE] ............................................................................................................108
[IMAGEOPTIONS] ...............................................................................................111
[VIDEO] ................................................................................................................. 115
UsingtheLensMemoryFunction[LENSMEMORY] ............................................116
❻MenuDescriptions&Functions[SETUP] ................................................................... 117
[BASIC] .................................................................................................................117
[MENU] .................................................................................................................121
[INSTALLATION(1)] ............................................................................................... 122
[INSTALLATION(2)] ............................................................................................... 126
[OPTIONS(1)] .......................................................................................................128
[OPTIONS(2)] .......................................................................................................130
[EDGEBLENDING] ..............................................................................................132
❼MenuDescriptions&Functions[INFO.] .....................................................................133
[USAGETIME] ......................................................................................................133
[SOURCE(1)] ........................................................................................................134
[SOURCE(2)] ........................................................................................................134
[WIREDLAN] ........................................................................................................134
[WIRELESSLAN(1)] .............................................................................................135
[WIRELESSLAN(2)] .............................................................................................135
[VERSION(1)] .......................................................................................................135
[VERSION(2)] .......................................................................................................136
[OTHERS] .............................................................................................................136
❽MenuDescriptions&Functions[RESET] ................................................................... 137
ReturningtoFactoryDefault[RESET] ..................................................................137
❾ApplicationMenu ........................................................................................................139
IMAGEEXPRESSUTILITY ..................................................................................139
NETWORKPROJECTOR ..................................................................................... 139
REMOTEDESKTOPCONNECTION ...................................................................140
NETWORKSETTINGS ......................................................................................... 141
TOOLS .................................................................................................................. 157
6. Connecting to Other Equipment ...........................................................162
❶Mountingalens(soldseparately) ...............................................................................162
Mountingthelens..................................................................................................162
Removingthelens ................................................................................................163
❷MakingConnections ...................................................................................................164
AnalogRGBsignalconnection .............................................................................164
DigitalRGBsignalconnection ..............................................................................165
ConnectinganExternalMonitor ...........................................................................167
ConnectingYourDVDPlayerorOtherAVEquipment ...........................................168
ConnectingComponentInput ...............................................................................169

xi
Table of Contents
ConnectingHDMIInput.........................................................................................170
ConnectingtoaWiredLAN ..................................................................................171
ConnectingtoaWirelessLAN(soldseparately)...................................................172
MountingawirelessLANunit ...............................................................................172
ToremovethewirelessLANunit...........................................................................174
Stackingprojectors ...............................................................................................176
7. Maintenance .....................................................................................................179
❶CleaningtheFilters.....................................................................................................179
❷CleaningtheLens.......................................................................................................181
❸CleaningtheCabinet ..................................................................................................181
❹ReplacingtheLampandtheFilters ............................................................................ 182
❺ReplacingtheFilters ................................................................................................... 185
8. User Supportware ..........................................................................................187
❶InstallingSoftwareProgram .......................................................................................187
InstallationforWindowssoftware .......................................................................... 187
InstallationforMacintoshsoftware ........................................................................ 190
❷ProjectingImagesorVideosfromtheProjectoroveraLAN(ImageExpressUtility
2.0) ........................................................................................................................ 191
WhatyoucandowithImageExpressUtility2.0 ...................................................191
ConnectingtheprojectortoaLAN ........................................................................ 192
BasicOperationofImageExpressUtility2.0 ........................................................193
❸ControllingtheProjectoroveraLAN(PCControlUtilityPro4) ..................................202
❹ProjectingYourMac’sScreenImagefromtheProjectoroveraLAN(Image
ExpressUtility2forMac) ......................................................................................203
WhatyoucandowithImageExpressUtility2 ......................................................203
Operatingenvironment .........................................................................................203
ConnectingtheprojectortoaLAN ........................................................................ 203
UsingImageExpressUtility2 ...............................................................................204
❺OperatingtheProjectorViatheLAN(VirtualRemoteTool) ........................................207
❻ConvertingPowerPointlestoSlides(ViewerPPTConverter3.0) ............................210
9. Appendix ..............................................................................................................212
❶Throwdistanceandscreensize .................................................................................212
Tablesofscreensizesanddimensions ................................................................212
Lenstypesandthrowdistance .............................................................................213
Lensshiftingrange ................................................................................................216
❷ReplacingtheColorWheel(included) ........................................................................217
StoringUnusedColorWheel: ................................................................................219
❸MountingtheOptionalBoard(soldseparately) ..........................................................220
❹CompatibleInputSignalList .......................................................................................222
❺Specications .............................................................................................................224
Optical ................................................................................................................... 224
Electrical ...............................................................................................................224
Mechanical ............................................................................................................ 225
Optionlens ............................................................................................................ 226
❻CabinetDimensions ...................................................................................................227

xii
Table of Contents
❼PinAssignmentsofD-SubCOMPUTERInputConnector .........................................228
❽Troubleshooting ..........................................................................................................229
IndicatorMessages ............................................................................................... 229
CommonProblems&Solutions ............................................................................231
Ifthereisnopicture,orthepictureisnotdisplayedcorrectly. ............................... 233
❾PCControlCodesandCableConnection ..................................................................234
❿TroubleshootingCheckList ......................................................................................... 235
⓫REGISTERYOURPROJECTOR!(forresidentsintheUnitedStates,Canada,and
Mexico) .................................................................................................................237
1
1. Introduction
❶ What’s in the Box?
Makesureyourboxcontainseverythinglisted.Ifanypiecesaremissing,contactyourdealer.
Pleasesavetheoriginalboxandpackingmaterialsifyoueverneedtoshipyourprojector.
Projector
Dust cap for lens (79TM1061)
* The projector is shipped without
a lens. For the types of lens and
throw distances, see page 213,
214, 215.
Remote control
(7N901041)
AA alkaline batteries
(x2)
Power cord
(US: 79TM1001 for AC 120 V
and 79TM1011 for AC 200 V)
(EU: 79TM1021)
• ImportantInformation(ForNorth
America: 7N8N4841) (For Other
countries than North America:
7N8N4841 and 7N8N4851)
• QuickSetupGuide(ForNorth
America: 7N8N4861) (For Other
countries than North America:
7N8N4861 and 7N8N4871)
NEC Projector CD-ROM
User’s manual (PDF) and the
utility software
(7N952052)
For North America only:
Limited warranty
For customers in Europe:
You will find our current
validGuaranteePolicyon
our Web Site:
www.nec-display-solutions.
com
Lens theft prevention
screw (79TM1071)
This screw makes it
difficult to remove the
lens mounted on the
projector. (→ page
163)
6-segment color wheel
(79TM1081)
Stacking holders (x 3)
(79TM1101)
Power cord stopper
(79TM1111)
Anti-theft cap for LAN unit (for
optional wireless LAN unit)
(79TM1091)
Attaching/Removing the Dust Cap
Toremovethedustcapfromthe
projector,pulltheupperendofthe
dustcapwhileclutchingit.
Toattachthedustcaptotheprojector,locatethecatchonthelowerendof
thedustcapandplaceitintotheopeningoftheprojectorwiththepointofa
trianglemark(▽)facingdownward(①inthegurebelow),andthenpushthe
upperendofthedustcapagainsttheprojectortoplacethecatchesintothe
slotwhileclutchingthehandle(②inthegurebelow).

2
1. Introduction
❷ Introduction to the Projector
Thissectionintroducesyoutoyournewprojectoranddescribesthefeaturesandcontrols.
Congratulations on Your Purchase of the Projector
Thisprojectorisoneoftheverybestprojectorsavailabletoday.Theprojectorenablesyoutoprojectpreciseimages
upto500inches(200or300inchesdependingontheoptionallens)across(measureddiagonally)fromyourPCor
Macintoshcomputer(desktopornotebook),VCR,DVDplayer,ordocumentcamera.
Youcanusetheprojectoronatabletoporcart,youcanusetheprojectortoprojectimagesfrombehindthescreen,
andtheprojectorcanbepermanentlymountedonaceiling*
1
.Theremotecontrolcanbeusedwirelessly.
*
1
Donotattempttomounttheprojectoronaceilingyourself.
Theprojectormustbeinstalledbyqualiedtechniciansinordertoensureproperoperationandreducetherisk
ofbodilyinjury.
Inaddition,theceilingmustbestrongenoughtosupporttheprojectorandtheinstallationmustbeinaccordance
withanylocalbuildingcodes.Pleaseconsultyourdealerformoreinformation.
Features you’ll enjoy:
• DLP
®
projector with high resolution and high brightness
Highresolutiondisplay–PX750U2:WUXGA(1920×1200)nativeresolution(16:10),PX700W2:WXGA(1280×
800)nativeresolution(16:10),PX800X2:XGA(1024×768)nativeresolution(4:3)
• Widerangeofoptionallensesselectableaccordingtotheplaceofinstallation
Thisprojectorsupports7types*ofoptionallenses,providingaselectionoflensesadaptedforavarietyofinstal-
lationrequirements.
Inaddition,thelensescanbemountedandremovedinonetouch.
Notethatnolensismounteduponshipmentfromthefactory.Pleasepurchaseoptionallensesseparately.
* 6typesforPX700W2andPX800X2
• DualLampsystem
Twolampsystemoffersincreasedlamplifeandenergysavingsalongwithredundancy.
• Doublestackableforbuiltinredundancyandhighlightoutputrequirements
Doublestackingprojectorsincreasethebrightnessandvisibility.
• EDGEBLENDINGfunction
TheEDGEBLENDINGfunctionallowsamulti-screenimagewithhighresolutiontobedisplayedonalargescreen.
• PoweredLensShift,Zoom,andFocusofferinstallationexibility
PoweredHorizontalandVerticallensshiftprovidestheabilitytoprojectfromoffcenterscreeninstallations.Powered
zoomandfocusprovidequickandeasyadjustment.
• 360°installationangle(tilt-free)
Theprojectorcanbeinstalledatanyangle(360°).
Note,however,thatthe“fanmode”settingmustbechangedaccordingtotheangleofinstallation.
Also,theprojectorcannotbeinstalledtiltedtotheleftorright.
• Twotypesofcolorwheels(6-segmentwhite)and(6-segmentcolor)interchangeable
Theprojectorisshippedwiththe6-segmentwhitecolorwheelinstalled.Youcanreplaceitwiththeincluded6-seg-
mentcolorwheeltocreateimageswithmorebrilliantcolorstomatchthesource.
• Widerangeofinput/outputconnectors(HDMI,DisplayPort,BNC,etc.)
Theprojectorisequippedwithavarietyofinput/outputconnectors:computer(analog),5BNC,HDMI,DisplayPort,
Video,S-Video,etc.(Thecomputer(analog)andBNCconnectorsalsosupportcomponentinputs.)
Theprojector’sHDMIandDisplayPortinputconnectorssupportHDCP.

3
1. Introduction
• Slotforoptionalboard
Theprojectorhasaslotfortheoptionalboard(SB-01HCorotherNEC’sinterfaceboards).
• Highpicturequalityprocessingcircuit
TheReon-VXvideoprocessorisusedtoprojecthighqualityimages.
• Energy-savingdesignwithastandbypowerconsumptionof0.4Wattsorless
Whentheon-screenmenu’sstandbymodeissetto“PowerSaving”,thepowerconsumptioninthestandbymode
is0.2W(100-130VAC)/0.4W(200-240VAC).
• “Ecomode”forlowpowerconsumptionand“CarbonMeter”display
Theprojector is equipped with an“eco mode”forreducing powerconsumption duringuse. Furthermore, the
power-savingeffectwhentheecomodeissetisconvertedintotheamountofreductionsofCO
2
emissionsand
thisisindicatedontheconrmationmessagedisplayedwhenthepoweristurnedoffandat“Information”onthe
on-screenmenu(CARBONMETER).
• Seamlessswitchfunctionforsmootherscreenchangeswhenswitchingthesignal(forPX750U2only)
Whentheinputconnectorisswitched,theimagedisplayedbeforeswitchingisheldsothatthatprojectorcanwrite
thenewimagewithoutgoingtoblack.
• Simultaneousdisplayof2images(PIP/PICTUREBYPICTURE)
Twoimagescanbeprojectedsimultaneouslywithasingleprojector.
Therearetwotypesoflayoutsforthetwoimages:“picture-in-picture”inwhichasub-pictureisdisplayedonthe
mainpicture,and“picture-by-picture”inwhichthemainandsubpicturesaredisplayednexttoeachother.
• Securityfunctionforpreventingunauthorizeduse
Thisprojectorisequippedwiththefollowingsecurityfunctions:
- Passwordsecurity:Whenapasswordissetintheon-screenmenu,ascreentoinputthepasswordappears
whentheprojector’spoweristurnedon.
- Theftpreventionlock:AsecuritycablecompatiblewithKensingtonlockscanbeconnectedtotheprojector.
• Wired/wirelessLANcompatibility(wirelessLANunitsoldseparately)
TheprojectorisequippedwithaLANport(RJ-45)forconnectiontoawiredLANfortransferringimagesfroma
computertotheprojector,controllingtheprojectorfromacomputer,etc.
Furthermore,theprojectorcanbeusedinawirelessLANbymountingtheseparatelysoldwirelessLANunit
(NP02LM).
• Convenientutilitysoftware(UserSupportware)providedasstandard
Threeutilitysoftwareprograms(ImageExpressUtility2.0,PCControlUtilityPro4,ImageExpressUtility2forMac)
areprovidedontheincludedNECProjectorCD-ROM.Twomoreutilitysoftwareprogramscanbedownloaded
fromourwebsite:VirtualRemoteToolandViewerPPTConverter3.0.
• LAN-compatibleviewerfunction
StillandmovingimagesinsharedfoldersonacomputerconnectedbywiredorwirelessLANcanbeprojected
withtheprojector’sviewer.
- TheviewersupportstheWindowsMediaPlayer11’s“mediasharing”function.
• CRESTRONROOMVIEWcompatibility
TheprojectorsupportsCRESTRONROOMVIEW,allowingmultipledevicesconnectedinthenetworktobeman-
agedandcontrolledfromacomputerorcontroller.
About this user’s manual
Thefastestwaytogetstartedistotakeyourtimeanddoeverythingrightthersttime.Takeafewminutesnowto
reviewtheuser’smanual.Thismaysaveyoutimelateron.Atthebeginningofeachsectionofthemanualyou’llnd
anoverview.Ifthesectiondoesn’tapply,youcanskipit.
4
1. Introduction
❸ Part Names of the Projector
Front/Top
Thelensissoldseparately.ThedescriptionbelowisforwhentheNP18ZLlensismountedonthePX750U2.
Control Panel
(→ page 6)
Lens
Ventilation (inlet)
Filter Cover
Remote Sensor (located on the
front and the rear)
(→ page 9)
Remote Sensor
(→ page 9)
Terminal Panel
(→ page 7)
IndicatorSection
(→ page 6)
Lens Button
(→ page 163)
ACInput
Connect the supplied power cord's
three-pin plug here, and plug the
other end into an active wall outlet.
(→ page 14)
Main Power Switch
USB (LAN) Port (for optional Wire-
less LAN Unit) (→ page 172)
Lens Cap
(The lens cap is attached to the
lens.)
Adjustable Tilt Foot
(→ page 29)
Adjustable Tilt Foot
(→ page 29)
Built-in Security Slot ( )*
Slot for Power Cord Stopper (→
page 15)
* ThissecurityslotsupportstheMicroSaver
®
SecuritySystem.
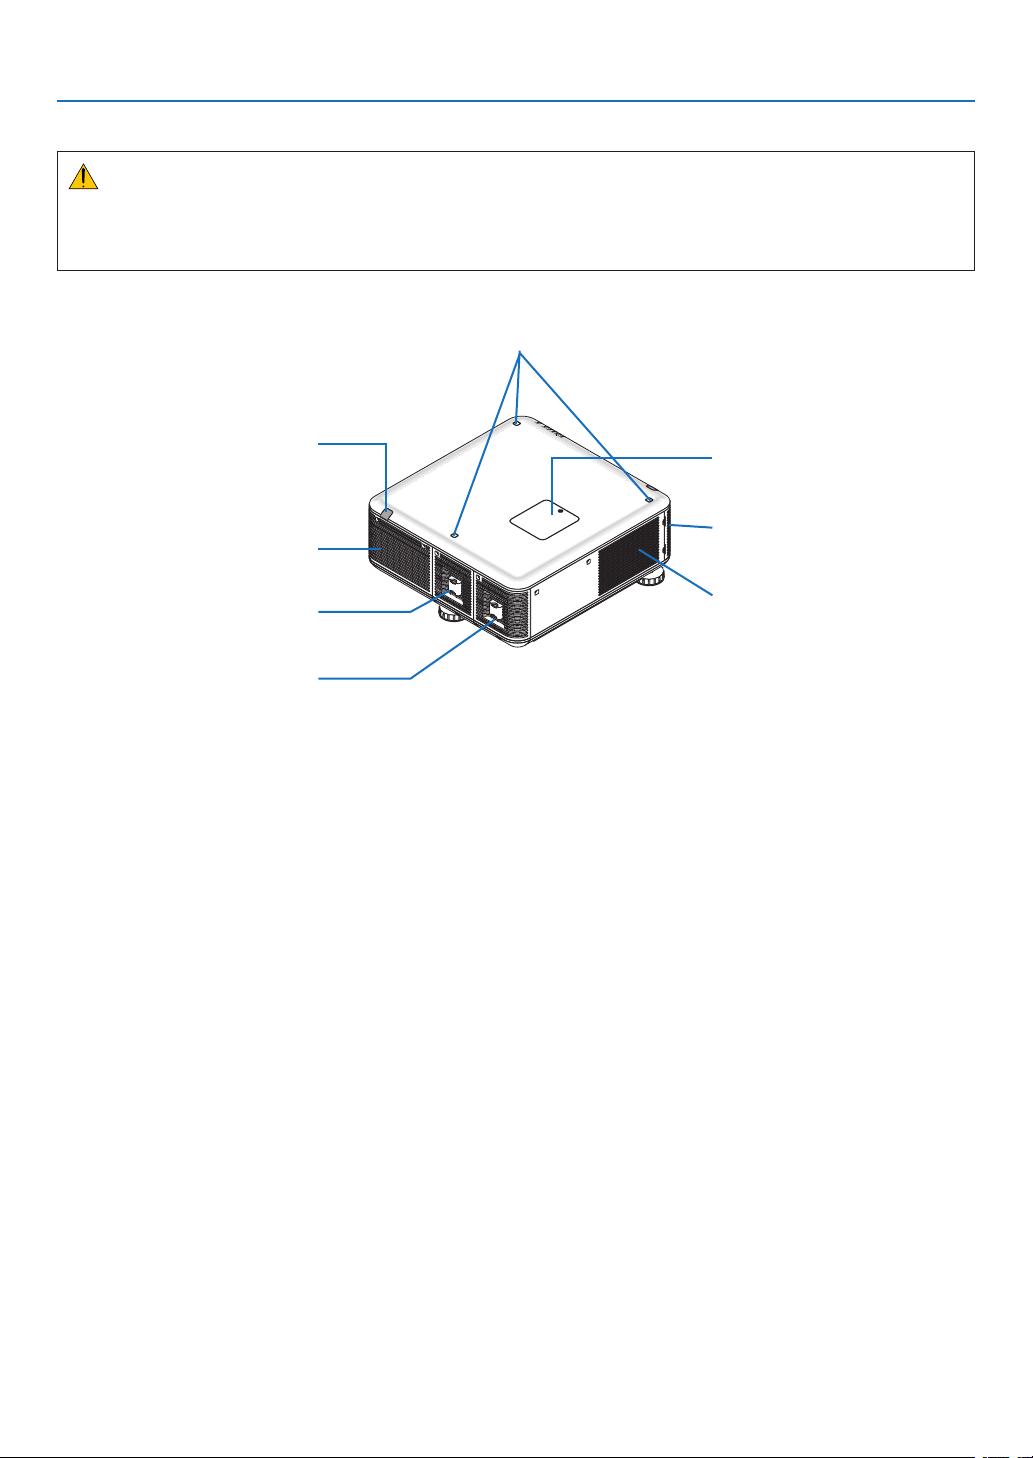
5
1. Introduction
Rear
CAUTION:
PartsoftheprojectormaybecometemporarilyheatediftheprojectoristurnedoffwiththePOWERbuttonorifthe
ACpowersupplyisdisconnectedduringnormalprojectoroperation.
Usecautionwhenpickinguptheprojector.
Remote Sensor (located on the
front and the rear)
(→ page 9)
Color Wheel Cover
(→ page 217)
Ventilation (inlet)
Filter Cover (→ page 179, 185)
Ventilation (outlet)
Heated air is exhausted from here.
Lamp Cover (1)
(→ page 183, 184)
Lamp Cover (2)
(→ page 183, 184)
Stacking Holder
(3 locations)
6
1. Introduction
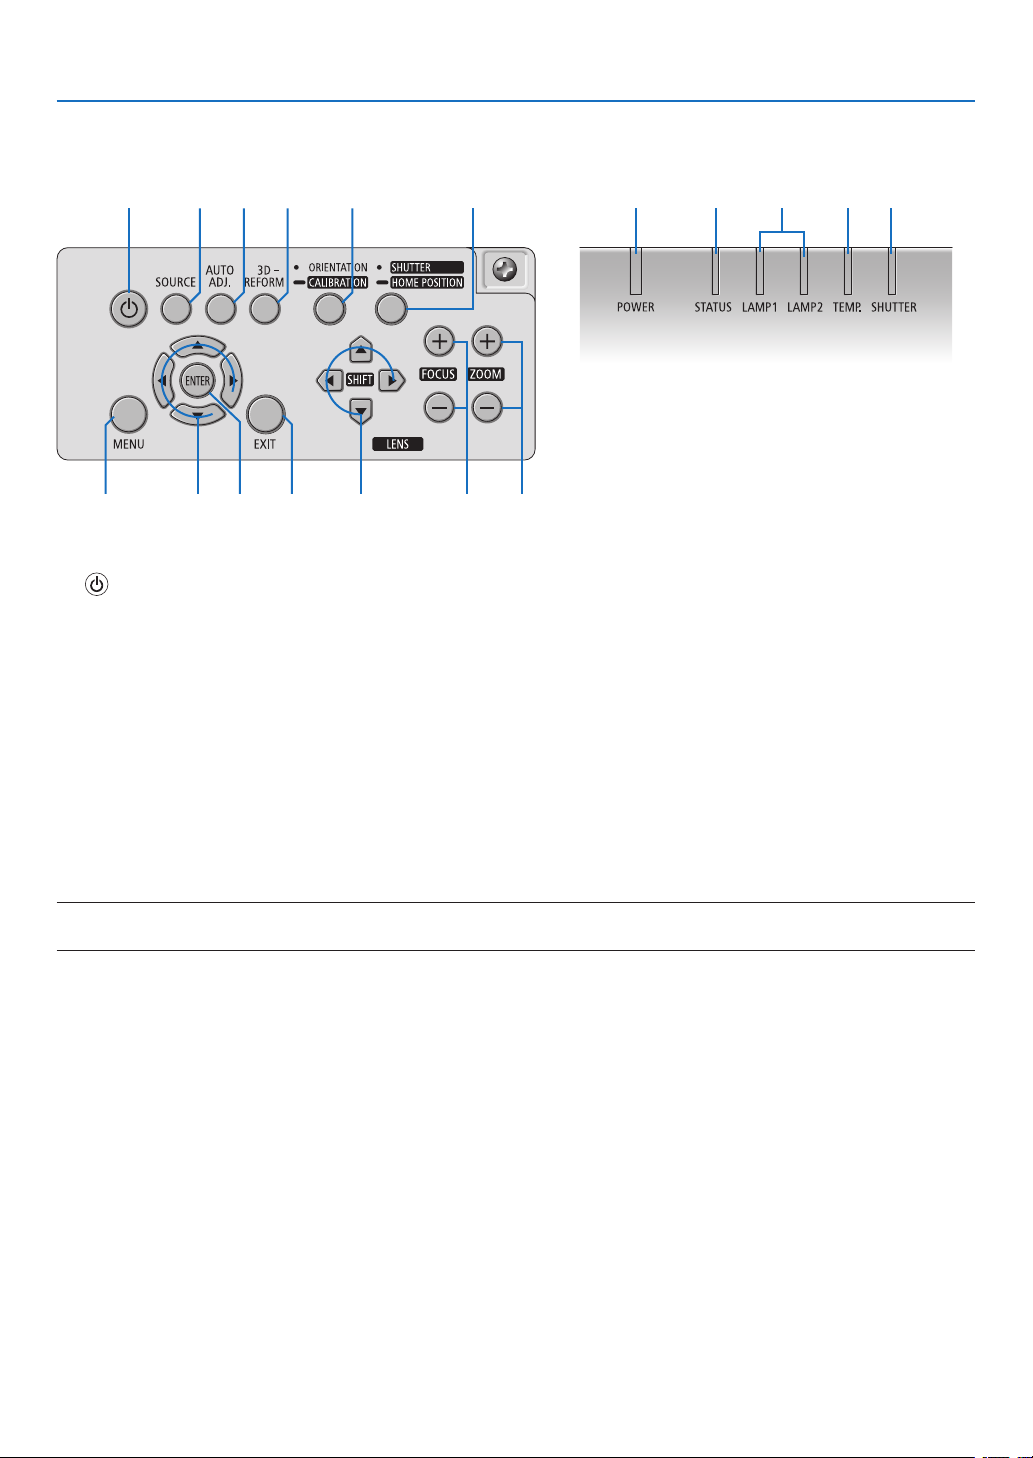
Control Panel/Indicator Section
1. (POWER) Button (→page18, 33)
2. POWER Indicator (→page18, 33, 229)
3. STATUS Indicator (→page229)
4. LAMP1andLAMP2Indicators(→page182, 230)
5. TEMP.Indicator(→page230)
6. SHUTTERIndicator(→page230)
7. SOURCEButton(→page21)
8. AUTO ADJ. Button (→page32)
9. 3D REFORM Button (→page39)
10.ORIENTATION/CALIBRATIONButton(→page18, 20)
11. SHUTTER/HOME POSITION Button (→page23, 35)
NOTE: The “home position” for lens shift position is not the center position of the adjustable lens shift range. The home position
should be used for lens installation.
12. MENU Button (→page99)
13. ▲▼◀▶ Buttons (→page99)
14.ENTERButton(→page99)
15.EXITButton(→page99)
16.LENSSHIFT▲▼◀▶ Buttons (→page23)
17.FOCUS+/−Buttons(→page25)
18.ZOOM+/−Buttons(→page28)
1
12 13 1514 16 17 18
7 8 9 10 11 2 3 4 5 6
7
1. Introduction
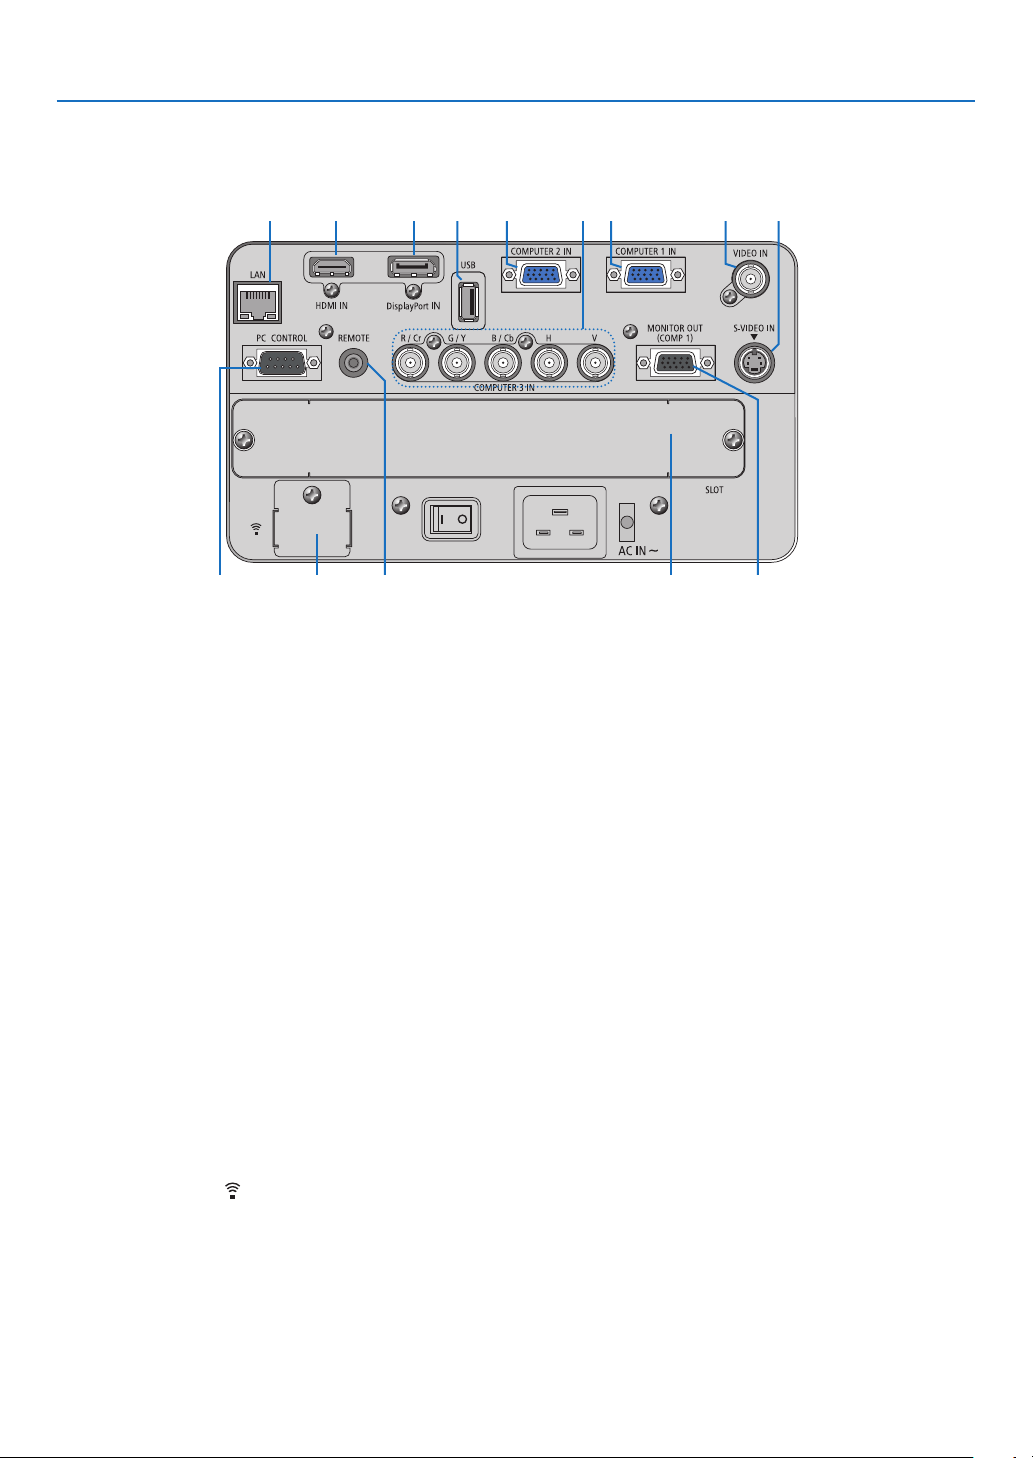
Terminal Panel Features
1. COMPUTER1IN/ComponentInputConnector(MiniD-Sub15Pin)(→ page 14,164,169)
2. COMPUTER2IN/ComponentInputConnector(MiniD-Sub15Pin)(→ page 164,169)
3. COMPUTER3IN/Component(R/Cr,G/Y,B/Cb,H,V)Connectors(BNC×5)(→ page 164,169)
4. HDMIINConnector(TypeA)(→ page 165,166,170)
5. DisplayPortINConnector(DisplayPort20P)(→ page 165)
6. MONITOROUT(COMP1)Connector(MiniD-Sub15Pin)(→ page 167)
7. VIDEOINConnector(BNC)(→ page 168)
8. S-VIDEOINConnector(MiniDIN4Pin)(→ page 168)
9. LANPort(RJ-45)(→ page 171)
10.USBPort(TypeA)(→ page 77)
11.PCCONTROLPort(D-Sub9Pin)(→ page 234)
UsethisporttoconnectaPCorcontrolsystem.Thisenablesyoutocontroltheprojectorusingserialcommunica-
tionprotocol.Ifyouarewritingyourownprogram,typicalPCcontrolcodesareonpage234.
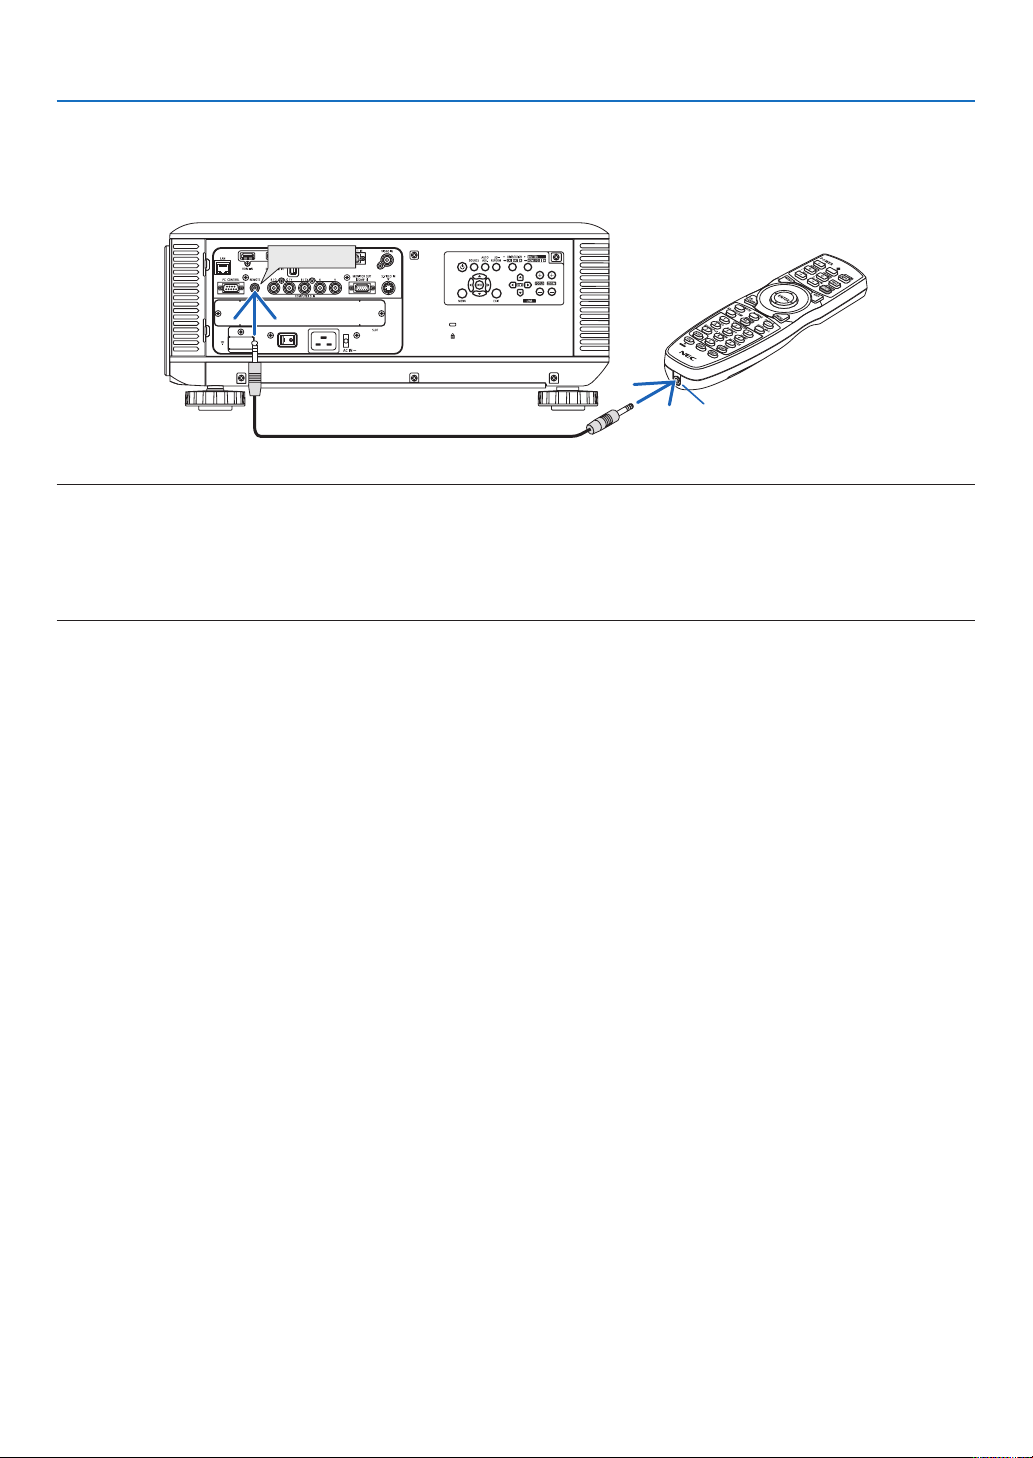
12.REMOTEJack(StereoMini)
Usethisjackforwiredremotecontroloftheprojectorusingacommerciallyavailableremotecablewith⌀3.5stereo
mini-plug(withoutresistance).
Connecttheprojectorandthesuppliedremotecontrolusingacommerciallyavailablewiredremotecontrolcable.
(→page10)
13. USB (LAN) Port
(for optional Wireless LAN Unit) (→ page 172)
14.OptionalSlot(SLOT)(→ page 220)
9 4 5 3 810 2 1 7
1311 12 14 6
8
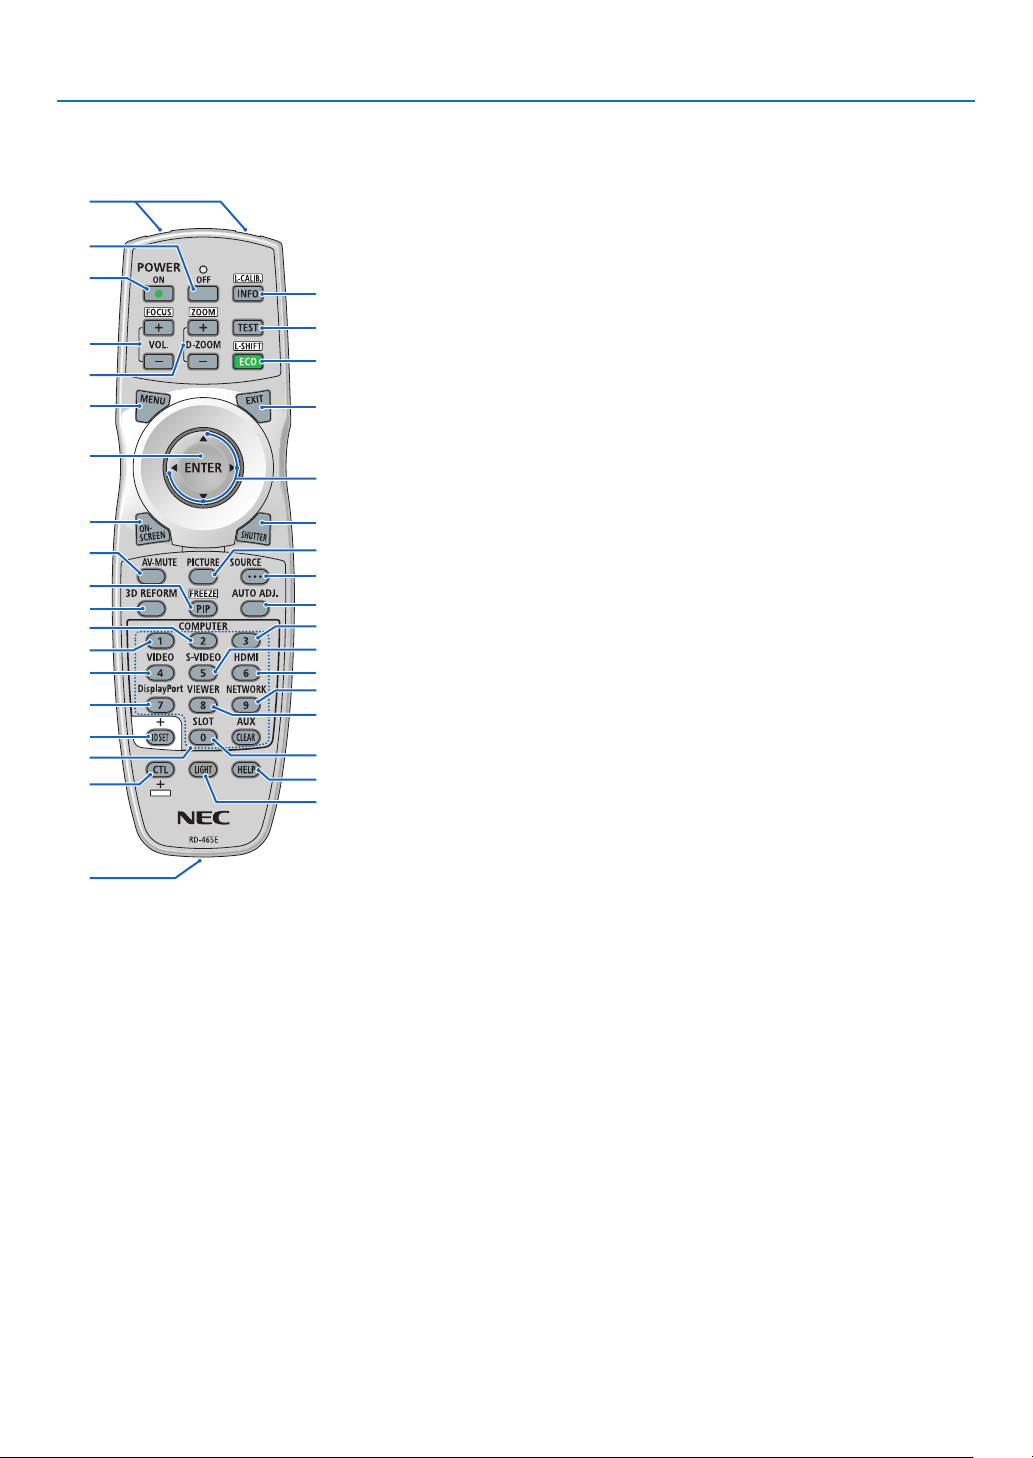
1. Introduction
1. Infrared Transmitter
(→page9)
2. RemoteJack
Connectacommerciallyavailable
remotecablehereforwiredopera-
tion.(→page10)
3. POWER ON Button
(→page18)
4. POWEROFFButton
(→page33)
5. INFO/L-CALIB.Button
(→page18)(Thefunctionofthe
INFObuttonwillnotworkonthis
seriesofprojectors.)
6. VOL./FOCUS+/−Buttons
(→page25)
7. D-ZOOM/ZOOM+/−Buttons
(→page28)
8. TEST Button
(→page22)
9. ECO/L-SHIFTButton
(→page24)
10.MENUButton
(→page99)
11.EXITButton
(→page99)
12. ENTER Button
(→page99)
13. ▲▼◀▶ Button
(→
page99)
14.ON-SCREENButton
(→page35)
15.SHUTTERButton
(→page35)
16.AV-MUTEButton
(→page35)
17.PICTUREButton
(→page108, 110)
18. SOURCE Button
(→page21)
19. 3D REFORM Button
(→page39)
20.PIP/FREEZEButton
(→page35, 42)
❹ Part Names of the Remote Control
1
3
4
6
14
10
12
16
20
7
2
5
8
9
11
15
18
17
13
21
19
25
28
32
23
22
35
24
30
26
29
34
27
31
36
33
21. AUTO ADJ. Button
(→page32)
22,23,24.COMPUTER1/2/3But-
ton
(→
page21)
25.VIDEOButton
(→page21)
26.S-VIDEOButton
(→page21)
27.HDMIButton
(→page21)
28.DisplayPortButton
(→page21)
29.VIEWERButton
(→page21, 73)
30.NETWORKButton
(→page21)
31. SLOT Button
32. ID SET Button
(→page127)
33.Numeric(0to9/CLEAR)But-
tons
(TheAUXbuttonwillnotworkon
thisseriesofprojectors.)
34.CTLButton
Thisbuttonisusedinconjunction
withotherbuttons,similar to a
CTRLkeyonacomputer.
35.LIGHTButton
Thisbuttonisusedtoturnonthe
backlightforthe remote control
buttons.
Thebacklightwill turnoff if no
buttonoperationismade for10
seconds.
36.HELPButton
(→page133)
9
1. Introduction
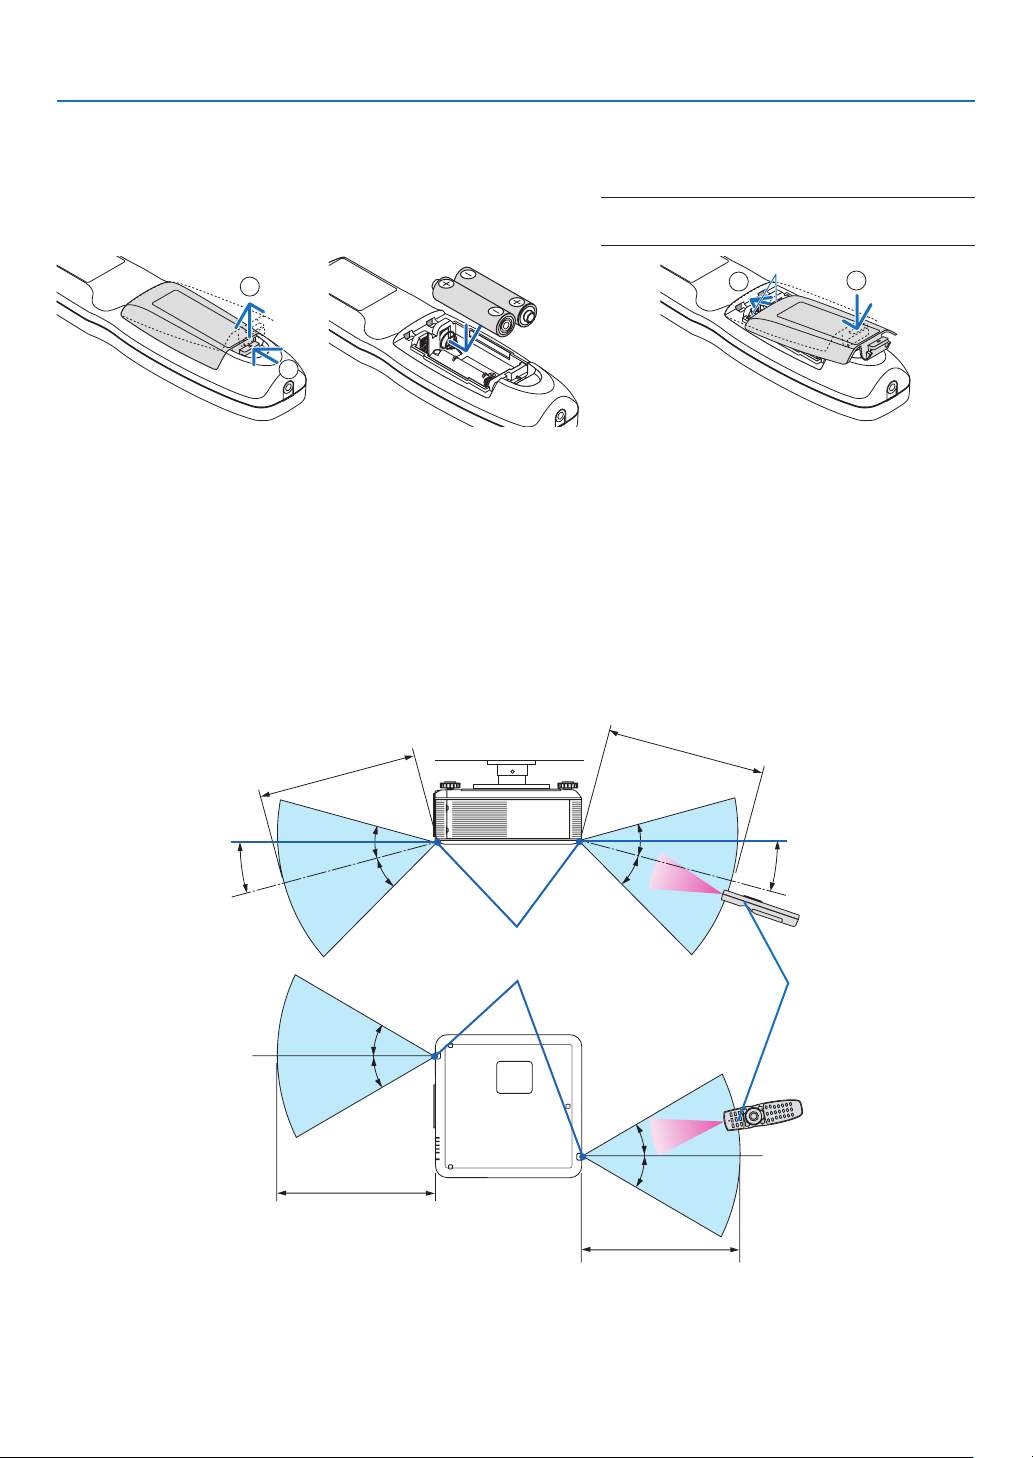
Battery Installation
1. Press the catch and remove
the battery cover.
2. Install new ones (AA). En-
sure that you have the bat-
teries’ polarity (+/−) aligned
correctly.
3. Slip the cover back over the batteries until
it snaps into place.
NOTE: Do not mix different types of batteries or new
and old batteries.
1
2
1
2
Remote Control Precautions
• Handletheremotecontrolcarefully.
• Iftheremotecontrolgetswet,wipeitdryimmediately.
• Avoidexcessiveheatandhumidity.
• Donotshort,heat,ortakeapartbatteries.
• Donotthrowbatteriesintore.
• Ifyouwillnotbeusingtheremotecontrolforalongtime,removethebatteries.
• Ensurethatyouhavethebatteries’polarity(+/−)alignedcorrectly.
• Donotusenewandoldbatteriestogether,orusedifferenttypesofbatteriestogether.
• Disposeofusedbatteriesaccordingtoyourlocalregulations.
Operating Range for Wireless Remote Control
7 m/22 feet
7 m/22 feet
15°
30°
30°
30°
30°
30°
30°
30°
30°
15°
7 m/22 feet
7 m/22 feet
Remote control
Remote sensor on projector cabinet
• Theinfraredsignaloperatesbyline-of-sightuptoadistanceofabout22feet/7mandwithina60-degreeangleof
theremotesensorontheprojectorcabinet.
• Theprojectorwillnotrespondifthereareobjectsbetweentheremotecontrolandthesensor,orifstronglightfalls
onthesensor.Weakbatterieswillalsopreventtheremotecontrolfromproperlyoperatingtheprojector.
10
1. Introduction
Using the Remote Control in Wired Operation
ConnectoneendoftheremotecabletotheREMOTEminijackandtheotherendtotheremotejackontheremote
control.
REMOTE
Remote Jack
NOTE:
• WhenaremotecableisinsertedintotheREMOTEjack,theremotecontroldoesnotworkforinfraredwirelesscommunication.
• WhenaremotecableisinsertedintotheREMOTEjack,the[POWER-SAVING]and[NORMAL2]functionsin[STANDBYMODE]
will not work.
• PowerwillnotbesuppliedtotheremotecontrolfromtheprojectorviatheREMOTEjack.Batteryisneededwhentheremote
control is used in wired operation.

11
1. Introduction
❺ Operating Environment for Software Included on CD-ROM
NamesandFeaturesofBundledSoftwarePrograms
Nameofsoftwareprogram Features
ImageExpressUtility2.0 • Thisisasoftwareprogramusedtosendthescreensofyourpersonalcomput-
erstotheprojectorviawired/wirelessLAN(Meetingmode).
Projectedimagescanbetransferredandsavedtopersonalcomputers.
When“MeetingMode”isused,projectedimagescanbesentandsavedto
thepersonalcomputers.Imagescanbesentfromapersonalcomputerto
notonlyoneprojectorbutalsototwoormoreprojectorsatthesametime.
(→page191)
PCControlUtilityPro4 Thisisasoftwareprogramusedtooperatetheprojectorfromthecomputerwhen
thecomputerandtheprojectorareconnectedwithLAN(wiredorwireless)or
aserialcable.(→page202)
ImageExpressUtilityforMac • ThisisasoftwareprogramusedtosendtheMac’sscreenimagetotheprojec-
toroveranetwork(wiredorwirelessLAN).ForMac’soperatingenvironment,
seepage203.
*AseparatelysoldwirelessLANunitisrequiredtouseawirelessLAN.
NOTE:
• ImageExpressUtilityforMacdoesnotsupport“MeetingMode”whichisprovidedinImageExpressUtility2.0.
Thefollowingsoftwareprogramscanbedownloadedfromourwebsite.
Nameofsoftwareprogram Features
VirtualRemoteTool Whenthecomputerandprojectorareconnectedusinganetwork(wired/wireless
LAN),suchoperationsasturningtheprojector’spoweronandoffandswitching
thesignalcanbeperformed.Itisalsopossibletosendanimagetotheprojector
andregisteritasthebackgroundlogo.Oncetheimageisregistered,itcanbe
lockedtopreventthelogofrombeingoverwritten.(→page207)
ViewerPPTConverter3.0 ThisisasoftwareprogramusedtoconvertlescreatedwithPowerPointinto
JPEGlesthatcanbedisplayedwiththeviewerfunctionoftheprojectorwhen
aUSBmemorydeviceisinsertedintotheprojector.(→page210)
Download service
Fordownloadingorupdatingthesesoftwareprograms,visitourwebsite:
URL:http://www.nec-display.com/dl/en/index.html

12
1. Introduction
Operating Environment
ThefollowingistheoperatingenvironmentforImageExpressUtility2.0.Fortheoperatingenvironmentofothersoft-
wareprogram,refertothehelpfunctionofeachsoftwareprogram.
SupportedOS Windows7HomeBasic
Windows7HomePremium
Windows7Professional
Windows7Ultimate
Windows7Enterprise
WindowsVistaHomeBasic
WindowsVistaHomePremium
WindowsVistaBusiness
WindowsVistaUltimate
WindowsVistaEnterprise
WindowsXPHomeEditionServicePack2orlater
WindowsXPProfessionalServicePack2orlater
WindowsXPTabletPCEdition2005orlater(WindowsXPTabletPCEditionService
Pack2orlater)
• Only32-bitversion
* “EasyConnection”supportstheAdministrativeprivilegesofWindowsXPandWindows7/
WindowsVistaonly
• Windowspower-savingfunctionisnotsupported.
Processor • Windows7/WindowsVista
Pentium4/PentiumM800MHzequivalentorhigherrequired
Dualcore1GHzorhigherrecommended
• WindowsXP
PentiumIII800MHzorhigherrequired
Pentium41.6GHzorhigherrecommended
Memory • Windows7/WindowsVista
512MBormorerequired
1GBormorerecommended
• WindowsXP
128MBormorerequired
192MBormorerecommended
*Morememorymayberequiredtorunadditionalapplicationssimultaneously.
Graphicprocessor • Windows7/WindowsVista
The“Graphics”score3.0ormoreof“WindowsExperienceIndex”recommended.
Networkenvironment TCP/IP-compatiblewiredLANorwirelessLAN
(*UseawirelessLANunitcomplyingwiththeWi-Fistandard.)
Resolution • Windows7/WindowsVista
SVGA(800×600)orhigherrequired
XGA(1024×768)recommended
• WindowsXP
VGA(640×480)orhigherrequired
XGA(1024×768)recommended
ScreenColors HighColor(15bits,16bits)
TrueColor(24bits,32bits)(recommended)
• 256orfewercolorsarenotsupported.

13
Thissectiondescribeshowtoturnontheprojectorandtoprojectapictureontothescreen.
❶ Flow of Projecting an Image
Step 1
• Connectingyourcomputer/Connectingthesuppliedpowercord(→ page 14)
Step 2
• Turningontheprojector(→ page 17)
Step 3
• Selectingasource(→ page 21)
Step 4
• Adjustingthepicturesizeandposition(→ page 22)
• Correctingkeystonedistortion[KEYSTONE](→ page 30)
Step 5
• Adjustingapicture
- Optimizing a computer signal automatically (→ page 32)
Step 6
• Makingapresentation
Step 7
• Turningofftheprojector(→ page 33)
Step 8
• Afteruse(→ page 34)
2. Projecting an Image (Basic Operation)
14
2. Projecting an Image (Basic Operation)
❷ Connecting Your Computer/Connecting the supplied Power
Cord
NOTE:
• Installalensbeforeperformingthefollowingsteps.(→ page 162)
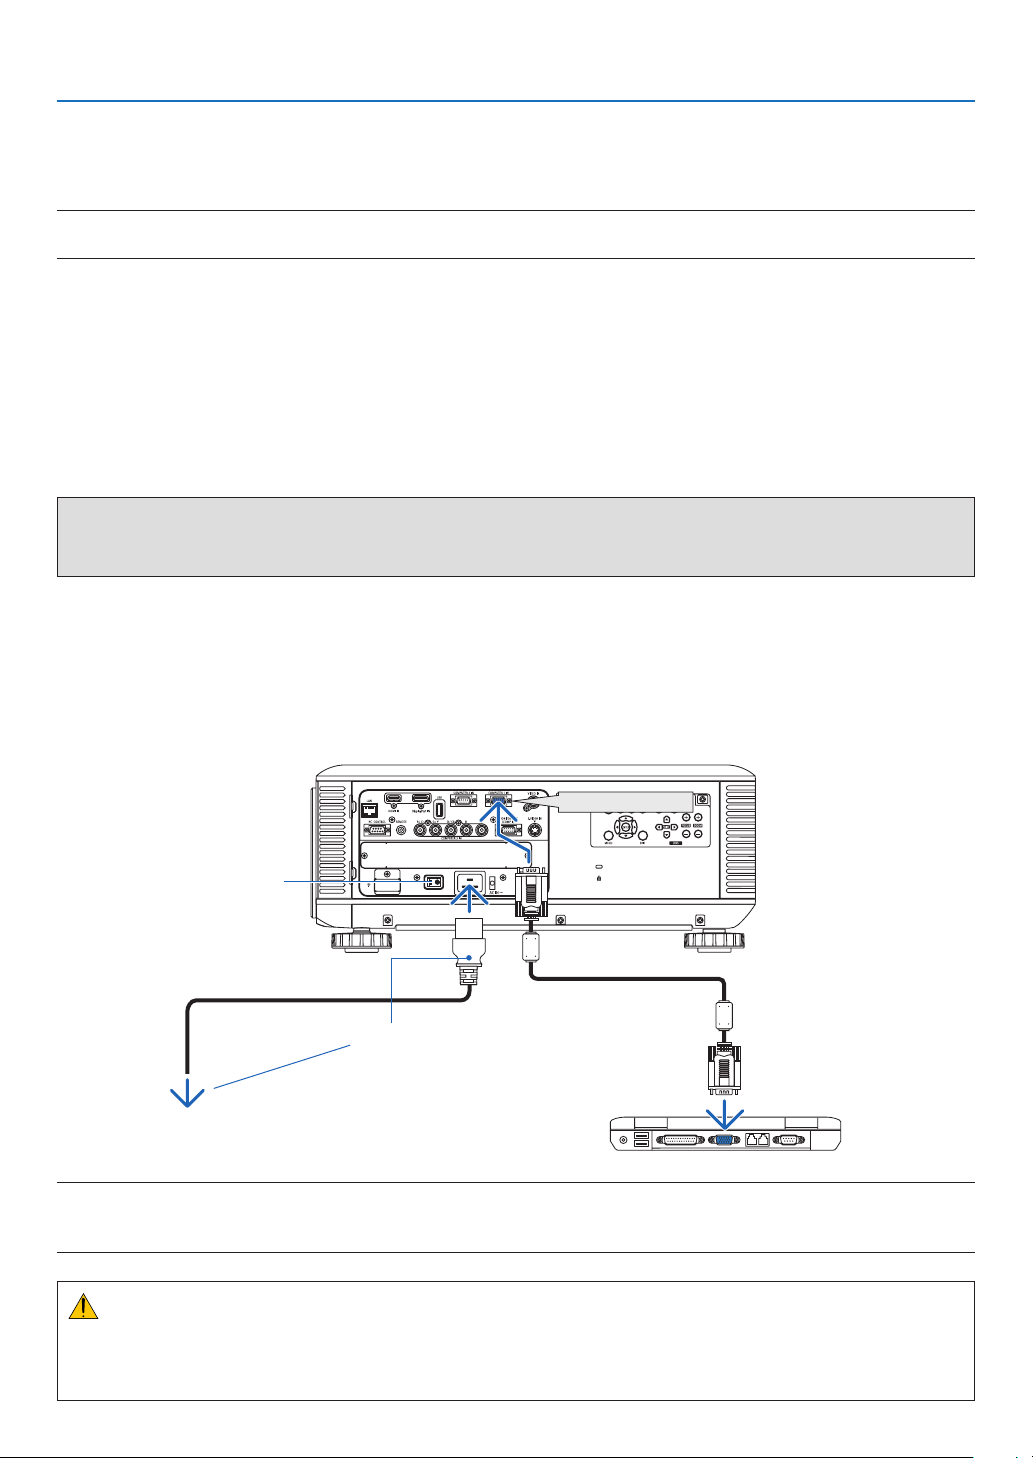
1. Connectyourcomputertotheprojector.
This section will show you a basic connection to a computer. For information about other connections, see “(2)
Making Connections” on page 164.
Connectthecomputercable(VGA)betweentheprojector’sCOMPUTER1INconnectorandthecomputer’sport
(miniD-Sub15Pin).Turntwothumbscrewsofbothconnectorstoxthecomputercable(VGA).
2. Connectthesuppliedpowercordtotheprojector.
WARNING:TOPREVENTFIREORSHOCK,DONOTEXPOSETHISUNITTORAINORMOISTURE.
DONOTUSETHISUNIT’SPLUGWITHANEXTENSIONCORDORINANOUTLETUNLESSALLTHEPRONGS
CANBEFULLYINSERTED.
ImportantInformation:
• Whenplugginginorunpluggingthesuppliedpowercord,makesurethatthemainpowerswitchispushedto
the off [O] position. Failure to do so may cause damage to the projector.
• Donotuseathree-phasepowersupply.Doingsomaycausemalfunction.
Firstconnectthesuppliedpowercord’sthree-pinplugtotheACINoftheprojector,andthenconnecttheother
plug of the supplied power cord in the wall outlet.
COMPUTER 1 IN
Make sure that the prongs are fully inserted into
boththeACINandthewalloutlet.
Main power switch
To wall outlet
NOTE(forNorthAmericaonly)
• ThemodeldistributedinNorthAmericacomeswithtwodifferenttypesofpowercords:onefor120Vandtheotherfor200V.
Usethepowercordsuitableforthevoltagebeingused.
CAUTION:
PartsoftheprojectormaybecometemporarilyheatediftheprojectoristurnedoffwiththePOWERbuttonorifthe
ACpowersupplyisdisconnectedduringnormalprojectoroperation.
Usecautionwhenpickinguptheprojector.
15
2. Projecting an Image (Basic Operation)
Using the Supplied Power Cord Stopper
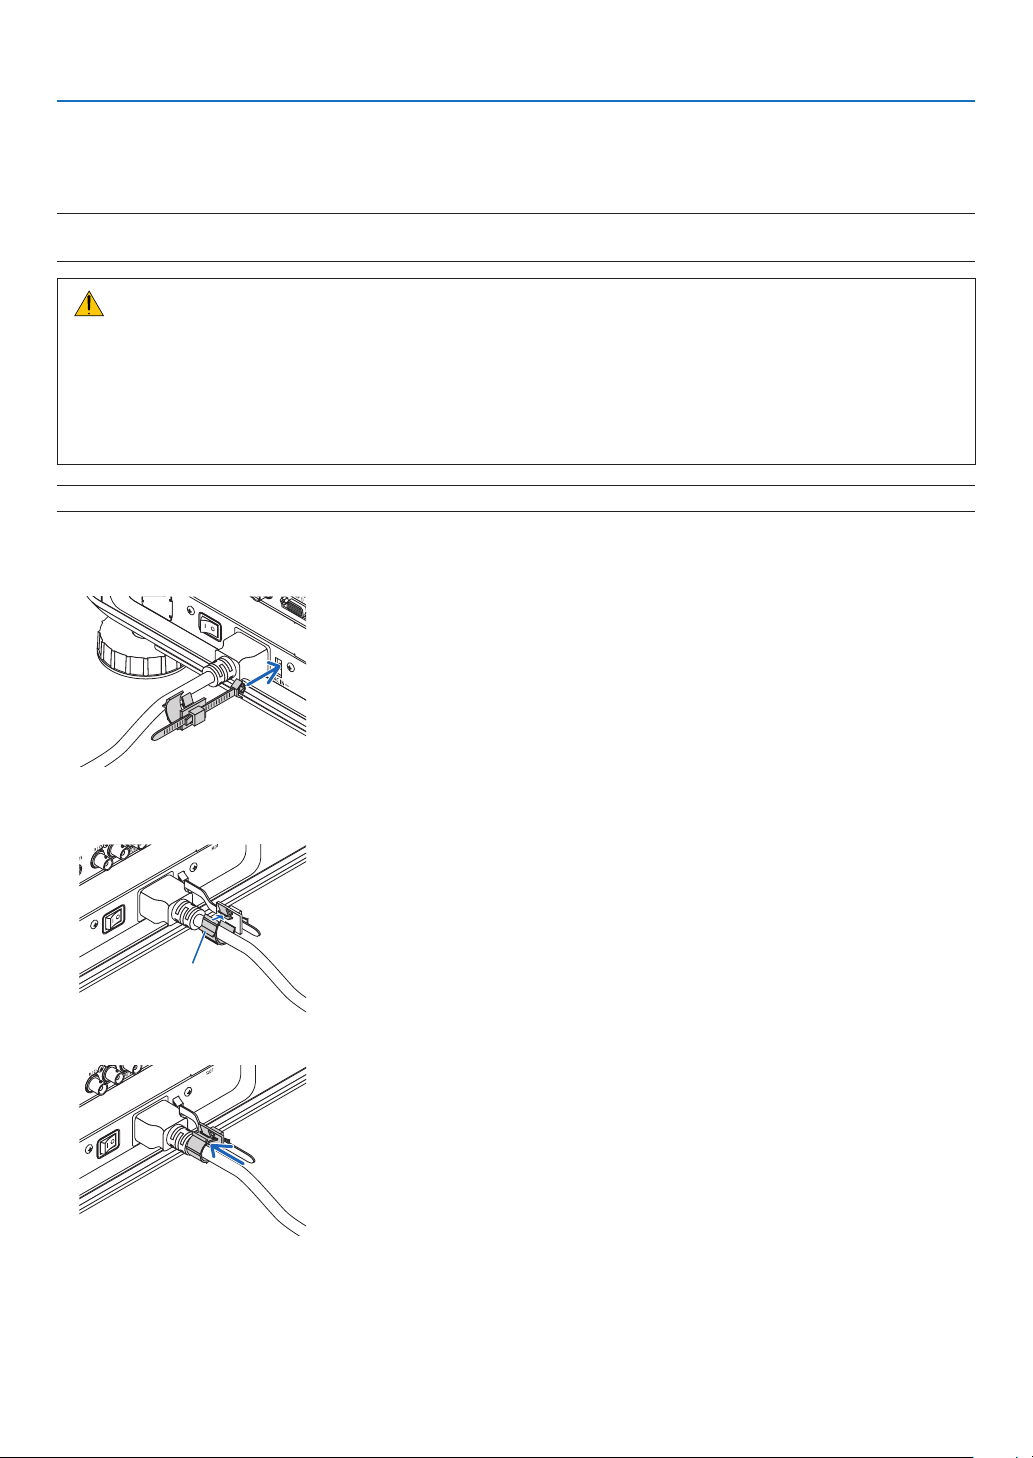
TopreventthepowercordfromaccidentlyremovingfromtheACINoftheprojector,attachthesuppliedpowercord
stoppertoclampthepowercord.
NOTE:
• Donotclampthepowercordwithothercables.Doingsocangeneratenoise,whichcanaffectadverselythesignalcable.
CAUTION
• Topreventthepowercordfromcomingloose,makesurethatalltheprongsofthepowercordarefullyinserted
intotheACINterminaloftheprojectorbeforeusingthepowercordstoppertoxthepowercord.Aloose
contactofthepowercordmaycauseareorelectricshock.
• Donotbundlethepowercord.Doingthiscouldcauseheatorare.
• Donotclamptwopowercordsthatwouldbeusedwhenstackingtwoprojectors.Doingthiscouldcauseare.
NOTE:Becarefulnottoinsertthebandinversely.Oncethebandisattached,itcannotberemovedfromtheslot.
Attaching the power cord stopper
1. InserttheendofbandofthepowercordstopperintotheslotnexttotheACINontheterminalpanel.
2. Use the power cord stopper to clamp the power cord.
Push the clamper to lock it.
Clamper
3. Slidetheclampertothehiltofthepowercord.
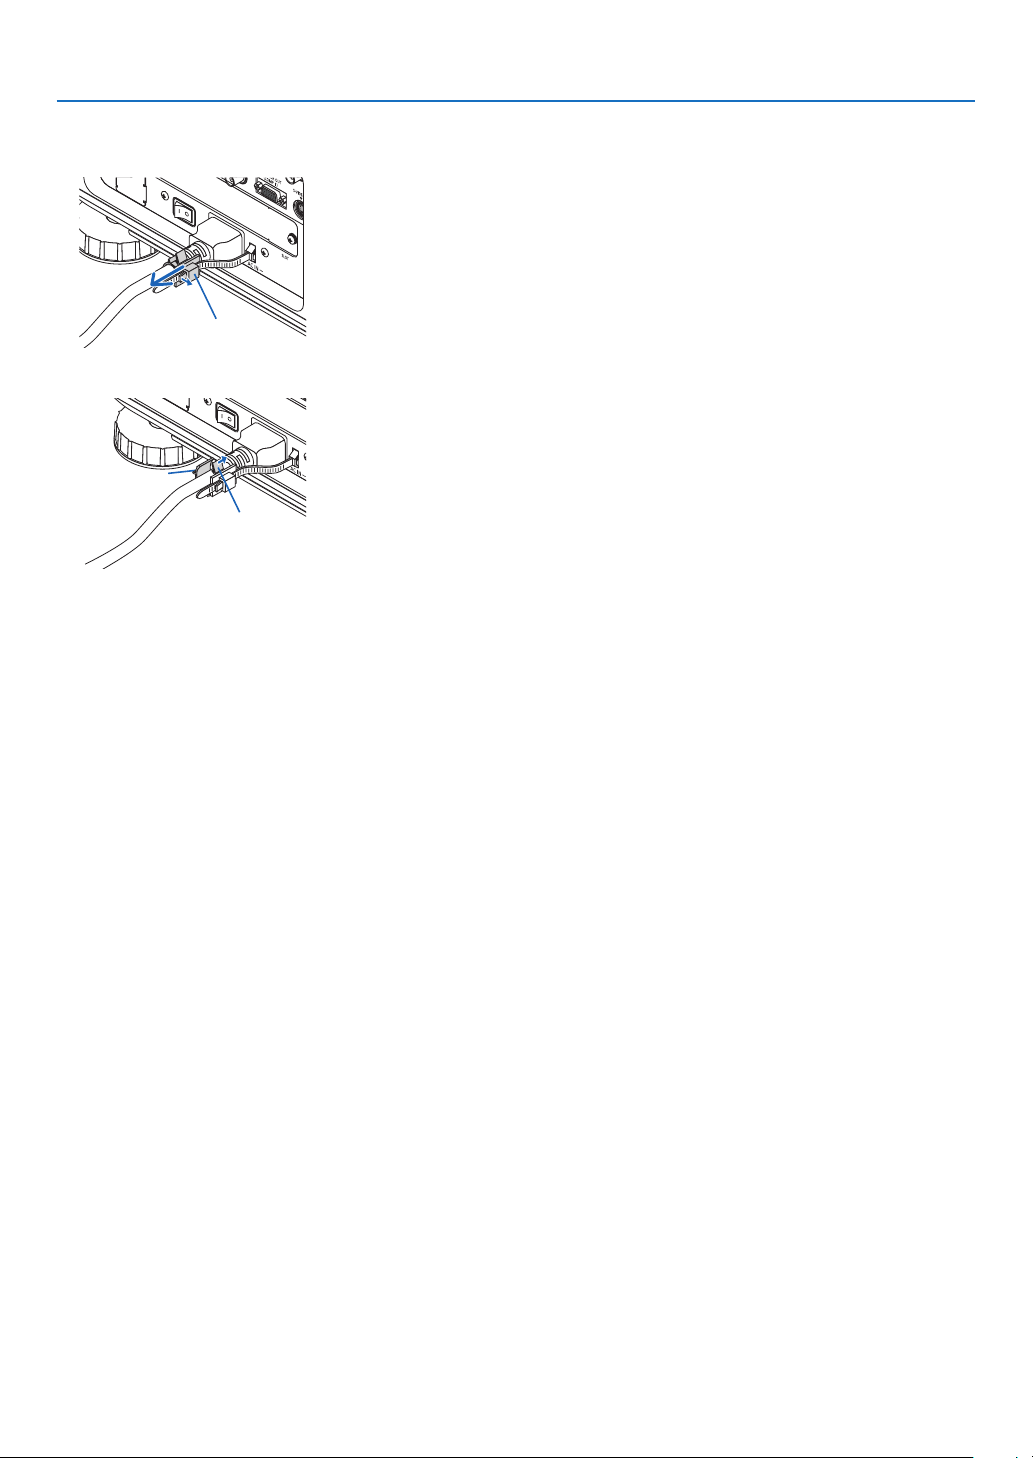
16
2. Projecting an Image (Basic Operation)
Removingthepowercordfromthepowercordstopper
1. Pushtheclamperofthepowercordstoppertounclaspit.
2. Push the power cord clamper to open it wide enough to pull out the power cord.
Clamper
17
2. Projecting an Image (Basic Operation)
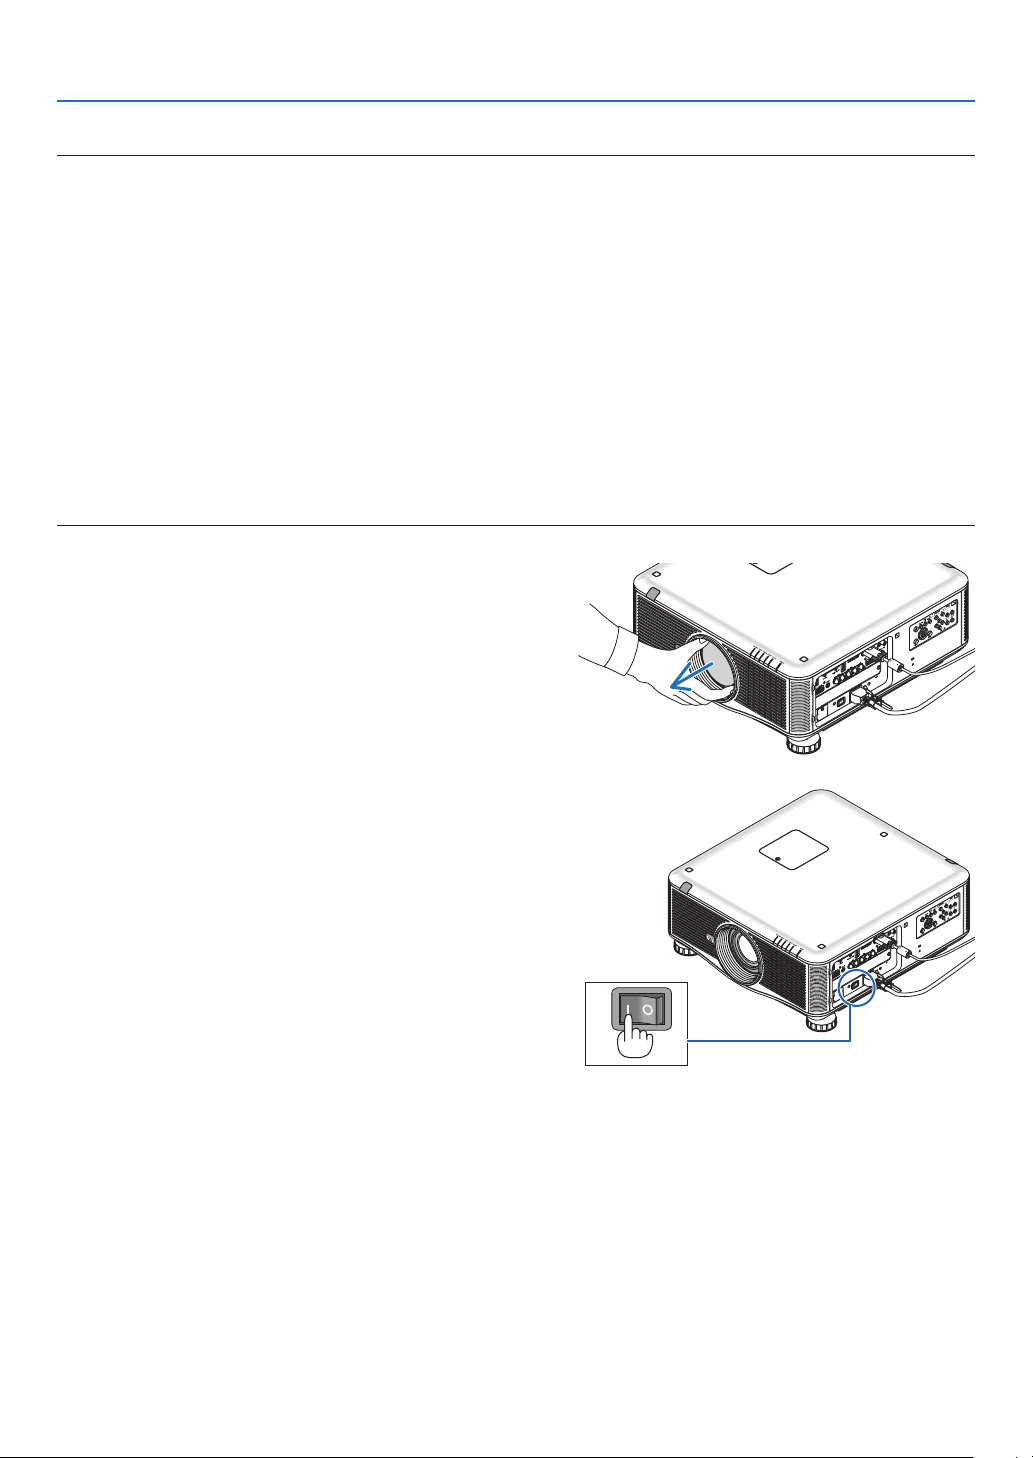
❸ Turning on the Projector
NOTE:
• Theprojectorhastwopowerswitches:AmainpowerswitchandaPOWERbutton(POWERONandOFFontheremotecontrol)
•Turningontheprojector:
1. PressthemainpowerswitchtotheONposition(I).
The projector will go into standby mode.
2. PressthePOWERbutton.
The projector will become ready to use.
•Turningofftheprojector:
1. PressthePOWERbutton.
The confirmation message will be displayed.
2. PressthePOWERbuttonagain.
The projector will go into standby mode.
3. PressthemainpowerswitchtotheOFFposition(O).
The projector will be turned off.
Remove the lens cap.
1. PressthemainpowerswitchtotheONposition(I).
The projector will go into standby mode. When in standby
mode, the POWER indicator will light orange and the STA-
TUS indicator will light green when [NORMAL] is selected
for[STANDBYMODE].SeethePowerIndicatorsection.
(→ page 229)

18
2. Projecting an Image (Basic Operation)
2. Press the (POWER)buttonontheprojectorcabinet
orthePOWERONbuttonontheremotecontrol.
The POWER indicator will turn to blue and the projector
will become ready to use.
TIP:
• Whenthemessage“PROJECTORISLOCKED!ENTERYOUR
PASSWORD.” is displayed,it meansthat the[SECURITY]
featureisturnedon.(→ page 44)
• When the ECO message isdisplayed, it means that [ON] is
selectedfor[ECOMESSAGE].(→ page 121)
After you turn on your projector, ensure that the computer
or video source is turned on.
NOTE:Thelogoscreen([LOGO]background)isdisplayedwhenno
signalisbeinginput(byfactorydefaultmenusettings).
Performing Lens Calibration
Afterinstallationorreplacementofthelens,besuretoperform
[CALIBRATION]bypressingandholdingtheORIENTATION
buttonforatleasttwosecondsorbyholdingtheCTLbutton
andpressingtheINFO/L-CALIBbuttonontheremotecontrol.
Calibrationcorrectstheadjustablezoomandfocusrange.If
calibrationisnotperformed,youmaynotbeabletogetthe
bestfocusandzoomevenifyouadjustthefocusandzoom
forthelens.
• Thefollowinglensesneedcalibration:
NP16FL,NP17ZL,NP18ZL,NP19ZL,NP20ZL,NP21ZL,
NP31ZL
Standby Blinking PowerOn
Steady orange
light
Blinking blue
light
Steady blue
light
(→page229)
19
2. Projecting an Image (Basic Operation)
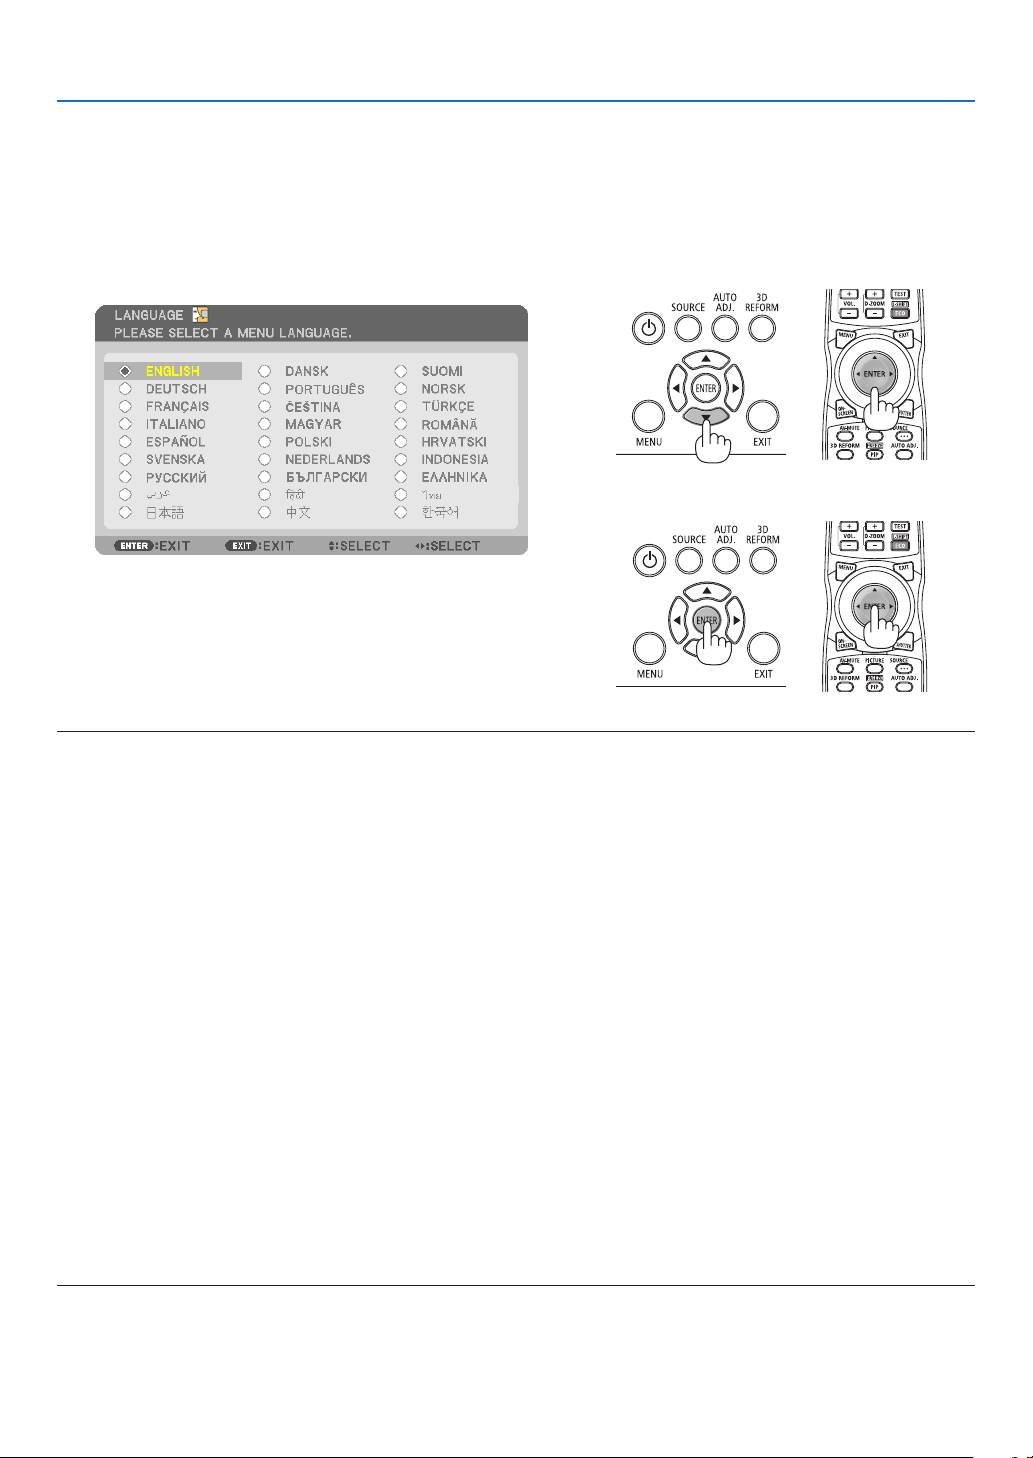
Note on Startup screen (Menu Language Select screen)
Whenyourstturnontheprojector,youwillgettheStartupmenu.Thismenugivesyoutheopportunitytoselectone
ofthe27menulanguages.
Toselectamenulanguage,followthesesteps:
1. Use the ▲, ▼, ◀ or ▶buttontoselectoneofthe27lan-
guagesfromthemenu.
2. PresstheENTERbuttontoexecutetheselection.
Afterthishasbeendone,youcanproceedtothemenuoperation.
Ifyouwant,youcanselectthemenulanguagelater.
(→[LANGUAGE]onpage102and120)
NOTE:
• Turningthepowerbackondirectlyafteritisturnedoff(bydirectpoweroff)whileanimageisbeingprojectedcanresultinmal-
function.Besuretowaitatleast1secondbeforeturningthepowerbackon.
• Keepthelenscapoffthelenswhiletheprojector’spowerison.
If the lens cap is on, it could be warped due to high temperature.
• Ifoneofthefollowingthingshappens,theprojectorwillnotturnon.
- Iftheinternaltemperatureoftheprojectoristoohigh,theprojectordetectsabnormalhightemperature.Inthisconditionthe
projectorwillnotturnontoprotecttheinternalsystem.Ifthishappens,waitfortheprojector’sinternalcomponentstocool
down.
- Startingunderlowtemperatureconditions
Iftheusageenvironmenttemperatureislowerthantheprojector’soperatingtemperature,theTEMP.indicatorwillash.Increase
theusageenvironmenttemperatureto0°Corhigherandturnontheprojectoragain.
Ifyouturnontheprojectorataround0°C,itmaytake5minutestowarmuptheprojector.
Duringwarm-up,theTEMP.indicatorwillash.Whenthewarm-upiscompleted,theTEMP.indicatorwilllightout.
- Whenthelampreachesitsendofusablelife,theprojectorwillnotturnon.Ifthishappens,replacethelamp.
- IftheSTATUSindicatorlightsorangewiththepowerbuttonpressed,itmeansthatthe[CONTROLPANELLOCK]isturnedon.
Cancelthelockbyturningitoff.(→ page 126)
- Ifthelampfailstolight,andiftheLAMP1orLAMP2indicatorashesonandoffinacycleofsixtimes,waitafullminuteand
then turn on the power.
• WhilethePOWERindicatorisblinkingblueinshortcycles,thepowercannotbeturnedoffbyusingthepowerbutton.
• Immediatelyafterturningontheprojector,screenickermayoccur.Thisisnormal.Wait3to5minutesuntilthelamplightingis
stabilized.
• Whentheprojectoristurnedon,itmaytakesometimebeforethelamplightbecomesbright.
• Ifyouturnontheprojectorimmediatelyafterthelampisturnedofforwhenthetemperatureishigh,thefansrunwithoutdisplay-
ing an image for some time and then the projector will display the image.
20
2. Projecting an Image (Basic Operation)
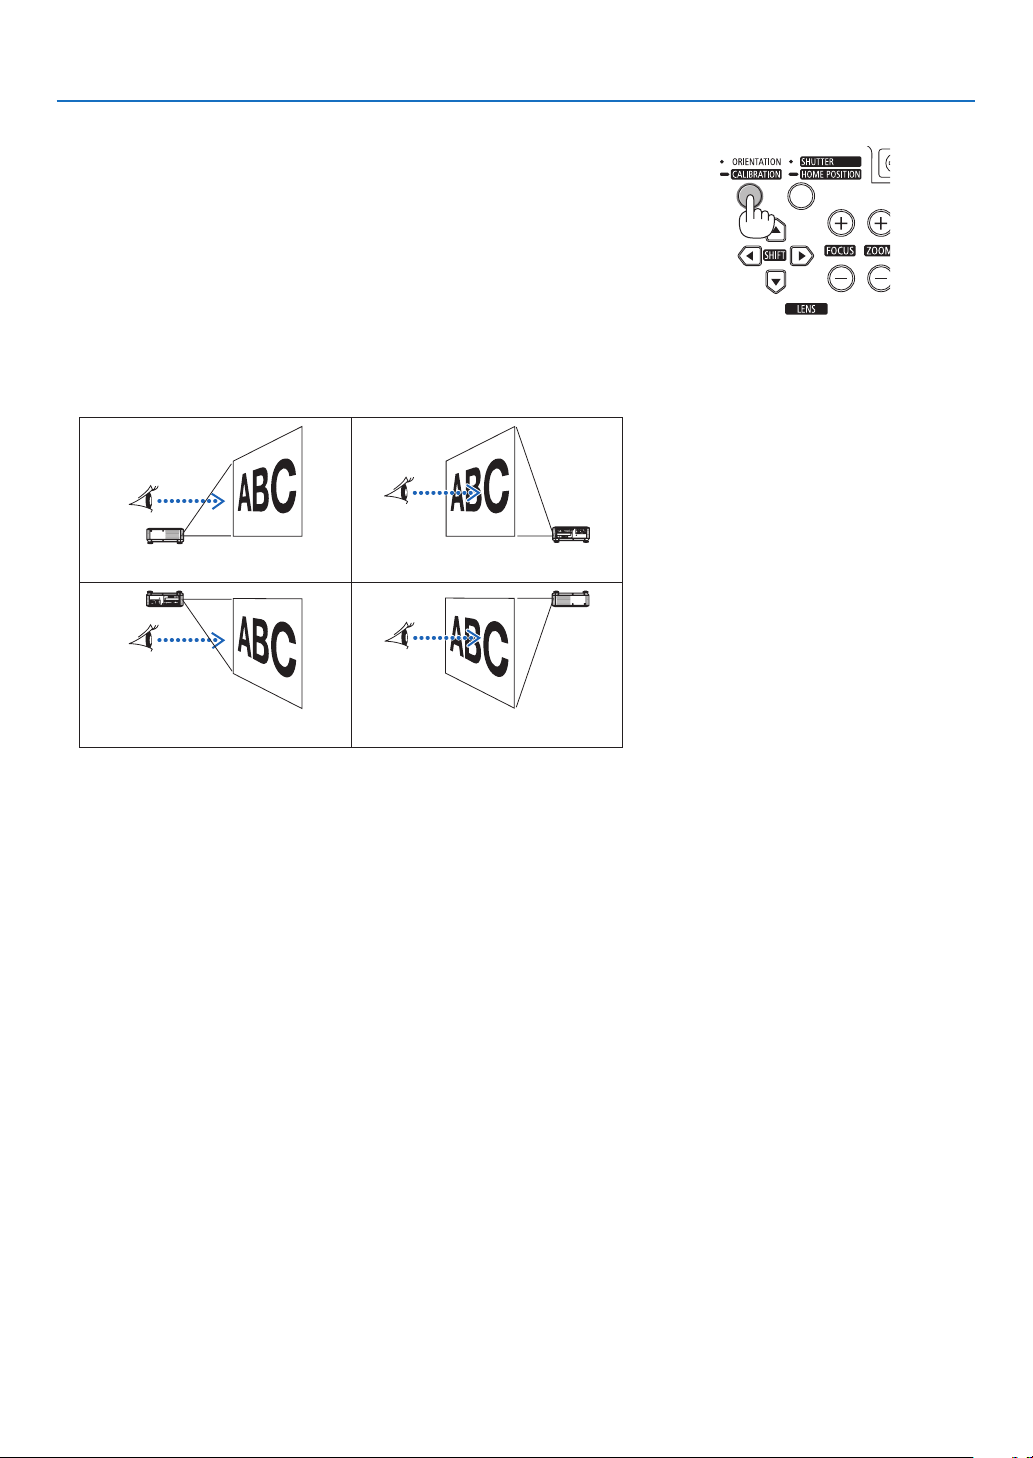
If the projected image is inverted or upside down
1 PresstheORIENTATIONbutton.
The[ORIENTATION]screenwillbedisplayed.
2 Press again to select a correct orientation.
EachtimetheORIENTATION/CALIBRATIONbuttonispressed,the
choice you highlight will be changed.
DESKTOP FRONT DESKTOP REAR
CEILINGFRONT CEILINGREAR
3 StoppressingtheORIENTATIONbutton.
The menu will be closed in about two seconds and the projected image
will be displayed in the orientation you select.
A confirmation message will be also displayed.
4 PresstheENTERbutton.
The confirmation message will be closed.
21
2. Projecting an Image (Basic Operation)
❹ Selecting a Source
Selecting the computer or video source
NOTE:Turnonthecomputerorvideosourceequipmentconnectedtotheprojector.
DetectingtheSignalAutomatically
PresstheSOURCEbuttononce.Theprojectorwillsearchfortheavail-
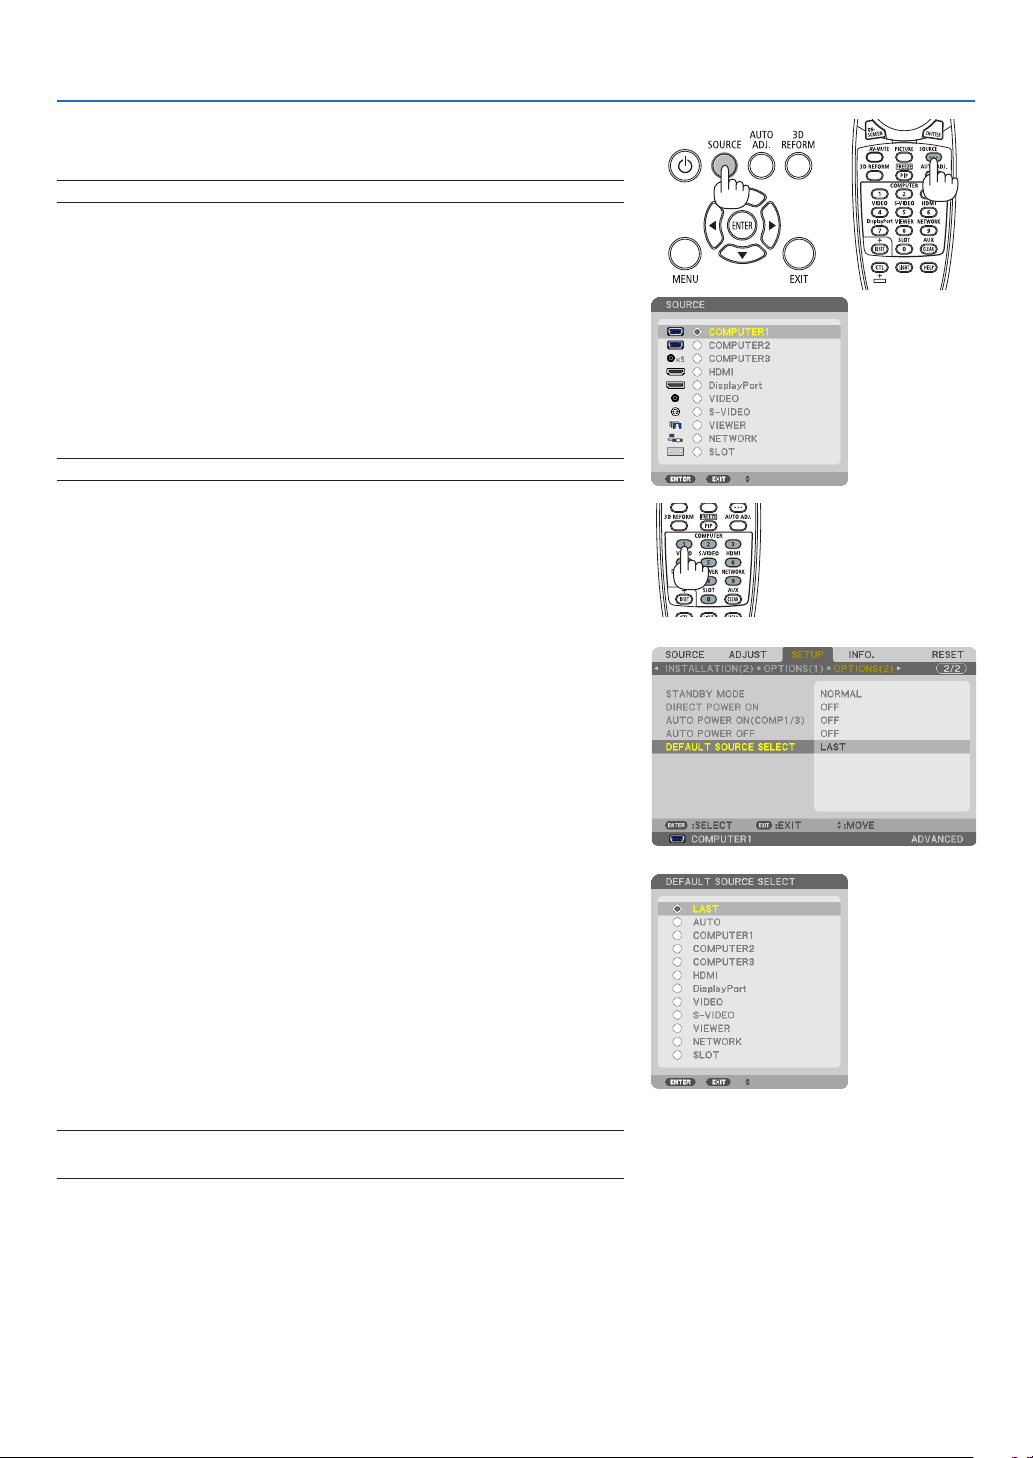
ableinputsourceanddisplayit.Theinputsourcewillchangeasfollows:
COMPUTER1→COMPUTER2→COMPUTER3→HDMI→Display-
Port→VIDEO→S-VIDEO→VIEWER→SLOT→COMPUTER1→ ...
• WiththeSOURCEscreendisplayed,youcanpresstheSOURCE
buttonafewtimestoselecttheinputsource.
TIP:Ifnoinputsignalispresent,theinputwillbeskipped.
Using the Remote Control
PressanyoneoftheCOMPUTER1,COMPUTER2,COMPUTER3,HDMI,
DisplayPort,VIDEO,S-VIDEO,VIEWER,NETWORK,orSLOTbuttons.
Selecting Default Source
Youcansetasourceasthedefaultsourcesothatitwillbedisplayed
eachtimetheprojectoristurnedon.
1. Press the MENU button.
The menu will be displayed.
2. Press the ▶buttontwicetoselect[SETUP]andpressthe▼ but-
tonortheENTERbuttontoselect[BASIC].
3.
Press the
▶
buttonvetimestoselect[OPTIONS(2)].
4. Press the ▼buttonvetimestoselect[DEFAULTSOURCESE-
LECT]andpresstheENTERbutton.
The [DEFAULT SOURCE SELECT] screen will be displayed.
(→ page 131)
5. Selectasourceasthedefaultsource,andpresstheENTERbut-
ton.
6. PresstheEXITbuttonafewtimestoclosethemenu.
7. Restart the projector.
The source you selected in step 5 will be projected.
NOTE:Evenwhen[AUTO]isturnedon,the[NETWORK]willnotbeautomatically
selected.Tosetyournetworkasthedefaultsource,select[NETWORK].
TIP:
• Whentheprojector isinStandbymode,applyingacomputersignalfroma
computerconnectedtotheCOMPUTER1/3INinputwillpowerontheprojector
andsimultaneouslyprojectthecomputer’simage.
([AUTOPOWERON(COMP1/3)]→ page 131)
• OntheWindows7keyboard,acombinationoftheWindowsandPkeysallows
you to set up external display easily and quickly.
22
2. Projecting an Image (Basic Operation)
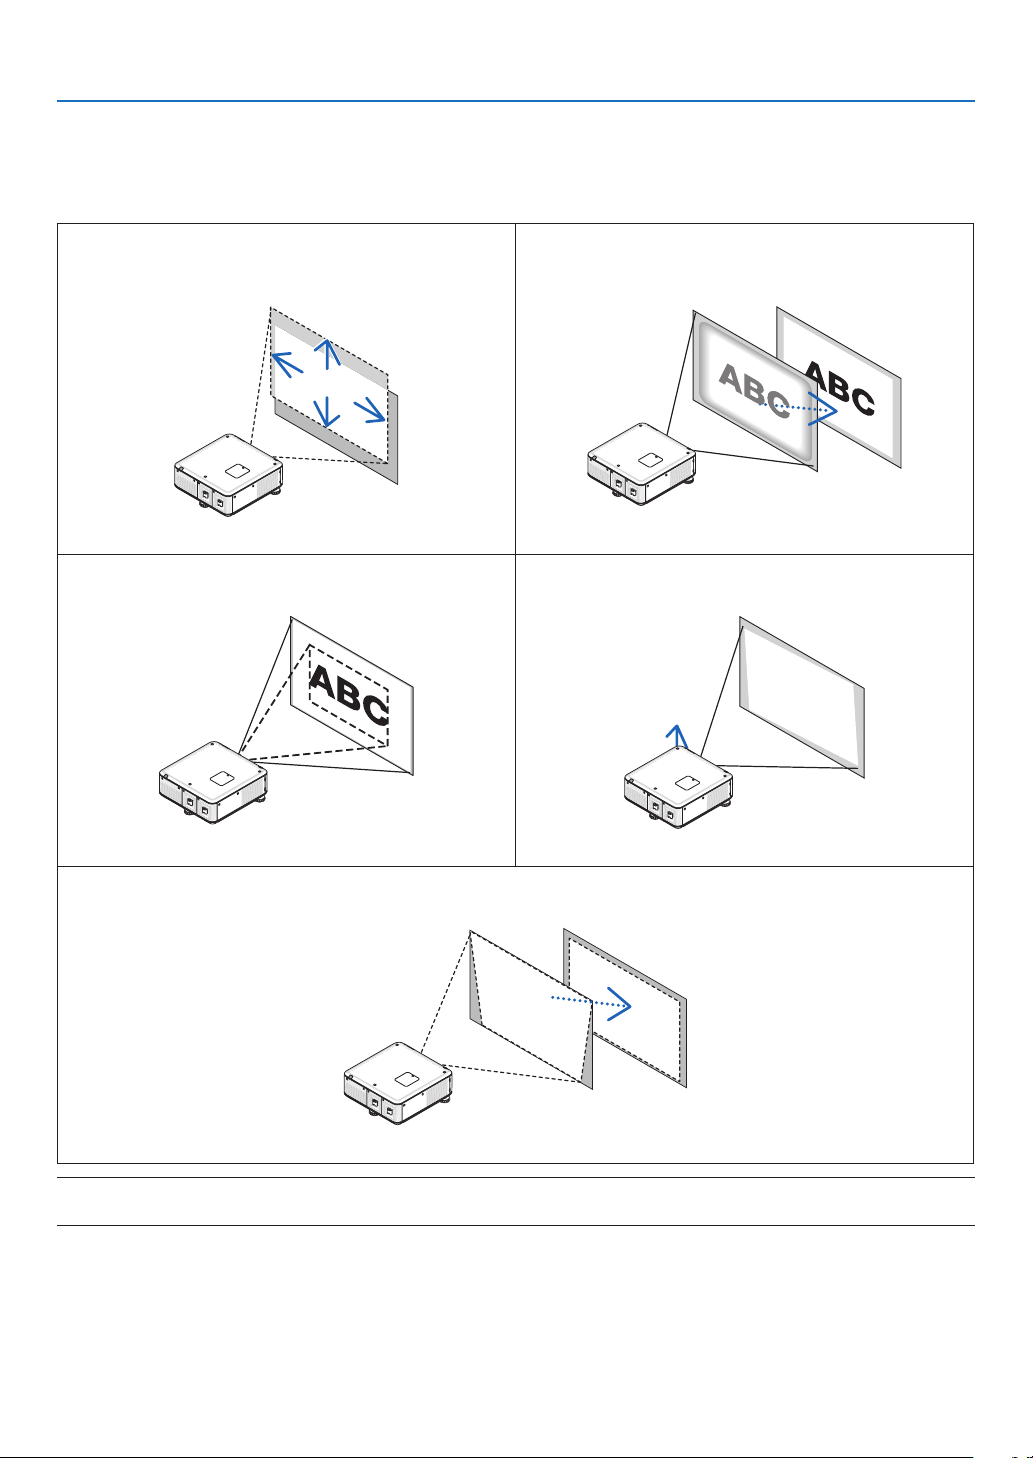
❺ Adjusting the Picture Size and Position
Usethelensshiftdial,theadjustabletiltfootlever,thezoombuttonsandthefocusbuttonstoadjustthepicturesize
andposition.
Inthischapterdrawingsandcablesareomittedforclarity.
Adjustingtheprojectedimage’sverticalandhorizontal
position
[Lensshift]
Adjustingthefocus
[Focus]
(→ page 23) (→ page 25)
Finelyadjustingthesizeofanimage
[Zoom]
Adjustingtheprojectedimage’sheightandhorizontaltilt
[Tiltfoot]*¹
(→ page 28) (→ page 29)
Adjustingthekeystonecorrection
[Keystone]
(→ page 30)
NOTE*
1
:Adjusttheprojectedimage’sheightusingthetiltfeetwhenyouwanttoprojecttheimageatapositionhigherthanthelens
shift adjustment range.
TIP:
• Built-intestpatternscanbeconvenientlyusedforadjustingthepicturesizeandposition.(→ page 104)
ApressoftheTESTbuttonwilldisplaythetestpattern.The◀ or ▶ button can select one test pattern. To close the test pattern,
change the source to another.
23
2. Projecting an Image (Basic Operation)
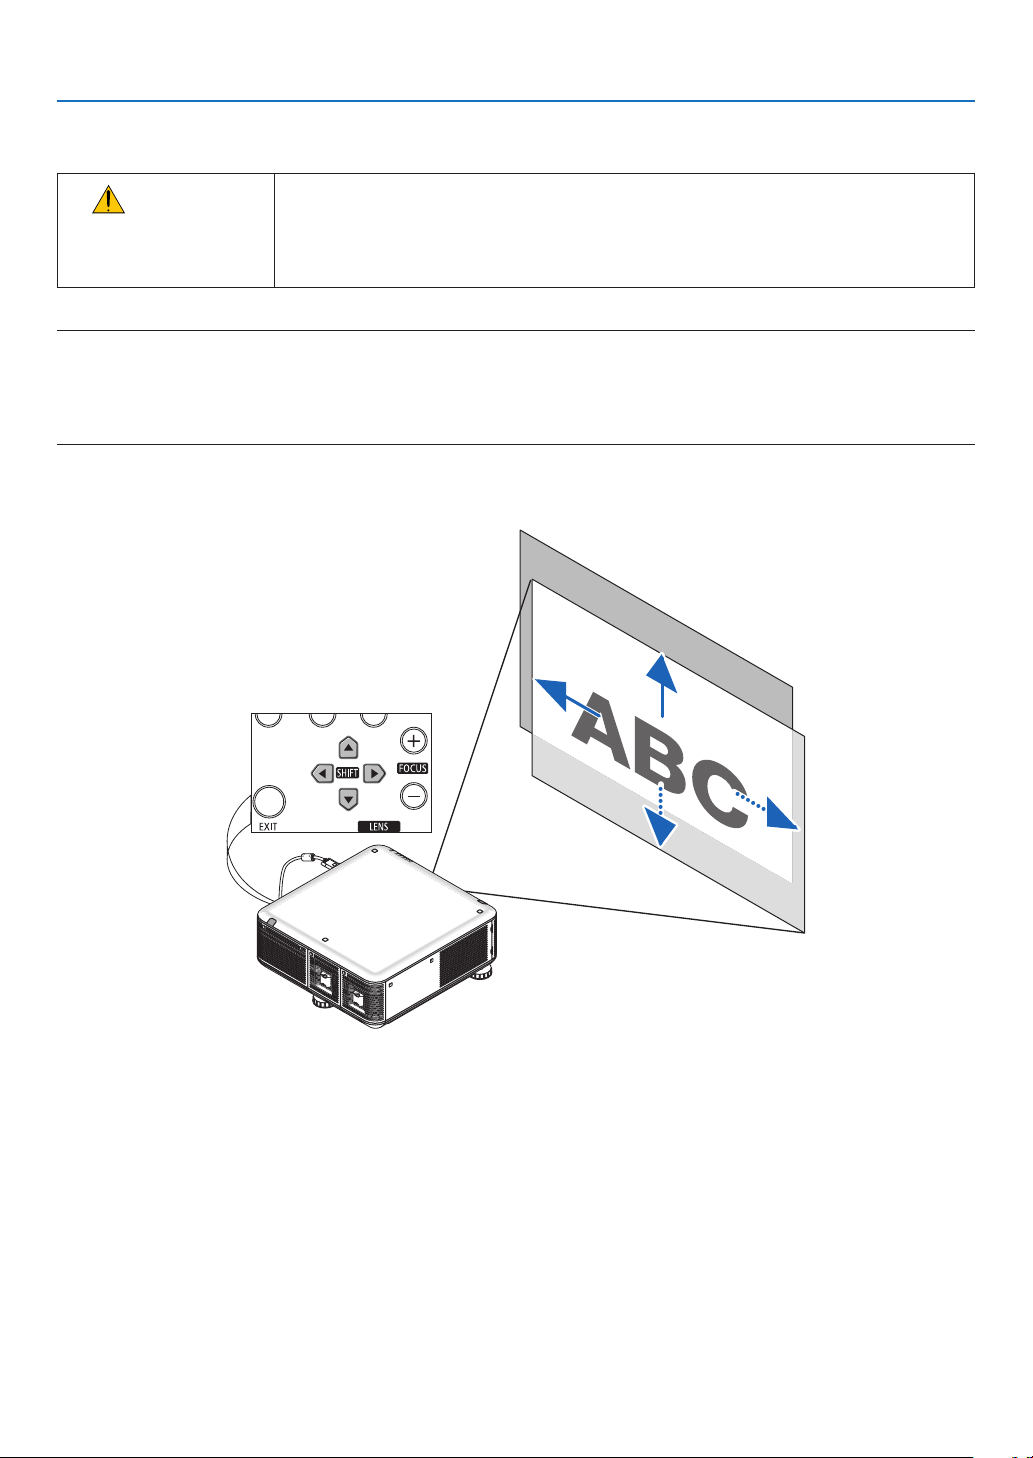
Adjusting the vertical position of a projected image (Lens shift)
CAUTION
• Performtheadjustmentfrombehindorfromthesideoftheprojector.Adjustingfrom
thefrontcouldexposeyoureyestostronglightwhichcouldinjurethem.
• Keephandsawayfromthelensmountingportionwhilethelensshiftisinoperation.
Failuretodosocouldresultinhandsbeingpinchedbythemovinglens.
NOTE:
• ThelensshiftfunctionisnotavailableontheprojectorwithNP16FL(PX750U2)andNP06FL(PX700W2/PX800X2)lensinstalled.
Returnthelensshiftpositiontothehomepositionbeforeinstallingthelenstotheprojector.
• Shiftingthelenstothemaximumintwodirectionscombinedwillcausetheedgesoftheimagetobecomedarkorwillcause
some shadows.
Adjusting with buttons on the cabinet
1. PressoneoftheLENSSHIFT▼▲◀▶ buttons.
2. UsetheLENSSHIFT▼▲◀▶ buttons to move the projected image.
Returningthelensshiftpositiontothehomeposition
PressandholdtheSHUTTER/HOMEPOSITIONbuttonfor2secondstoreturnthelensshiftpositiontothehome
position(nearlycenterposition)
24
2. Projecting an Image (Basic Operation)
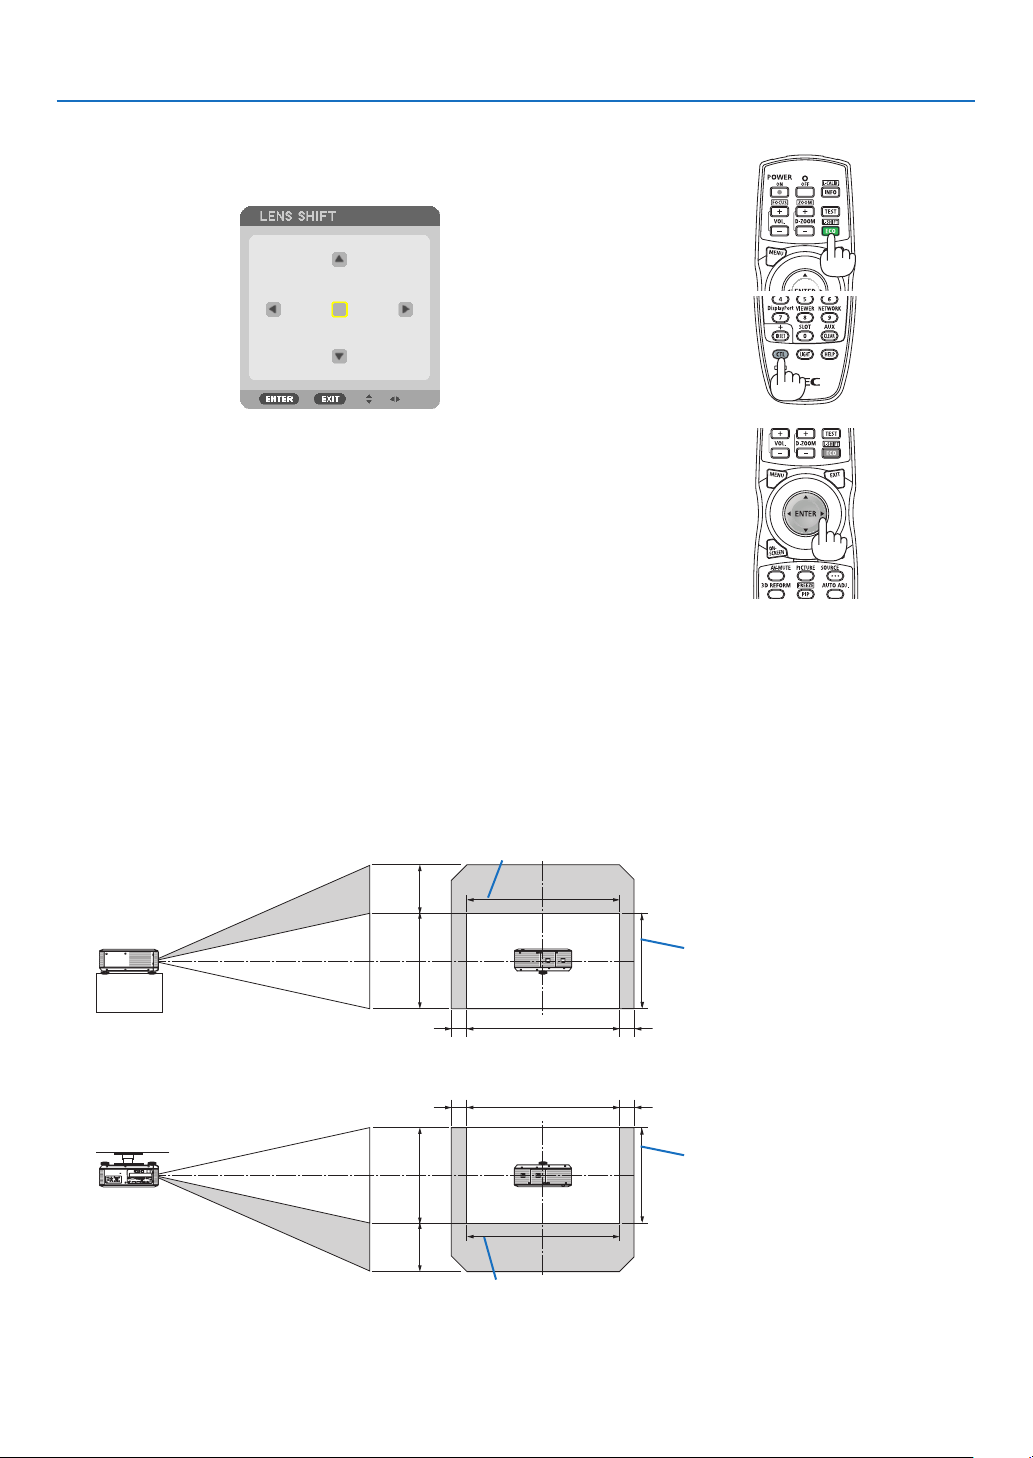
Adjusting with the remote control
1. HoldtheCTLbuttonandpresstheECO/L-SHIFTbutton.
The Lens Shift screen will be displayed.
2. Press the ▼▲◀ or ▶ button.
Use the ▼▲◀▶ buttons to move the projected image.
TIP:
• Thediagrambelowshowsthelensshiftadjustmentrangeforthedesktopfront.Toraisetheprojectionpositionhigherthanthis,
usethetiltfeet.(→ page 29)
• Fortheceilingmount/frontprojectionlensshiftadjustmentrange,seepage216.
1V
1H
0.1H 0.1H
0.5V*
Height of projected image
Width of projected image
1V
1H
0.1H 0.1H
0.5V*
Height of projected image
Width of projected image
* ForPX800X2,thevalueshouldbe0.43VontheNP31ZLlens.
25
2. Projecting an Image (Basic Operation)
Focus
Applicablelens:
• PX750U2:NP16FL/NP17ZL/NP18ZL/NP19ZL/NP20ZL/NP21ZL
• PX700W2/PX800X2:NP06FL/NP07ZL/NP08ZL/NP09ZL/NP10ZL
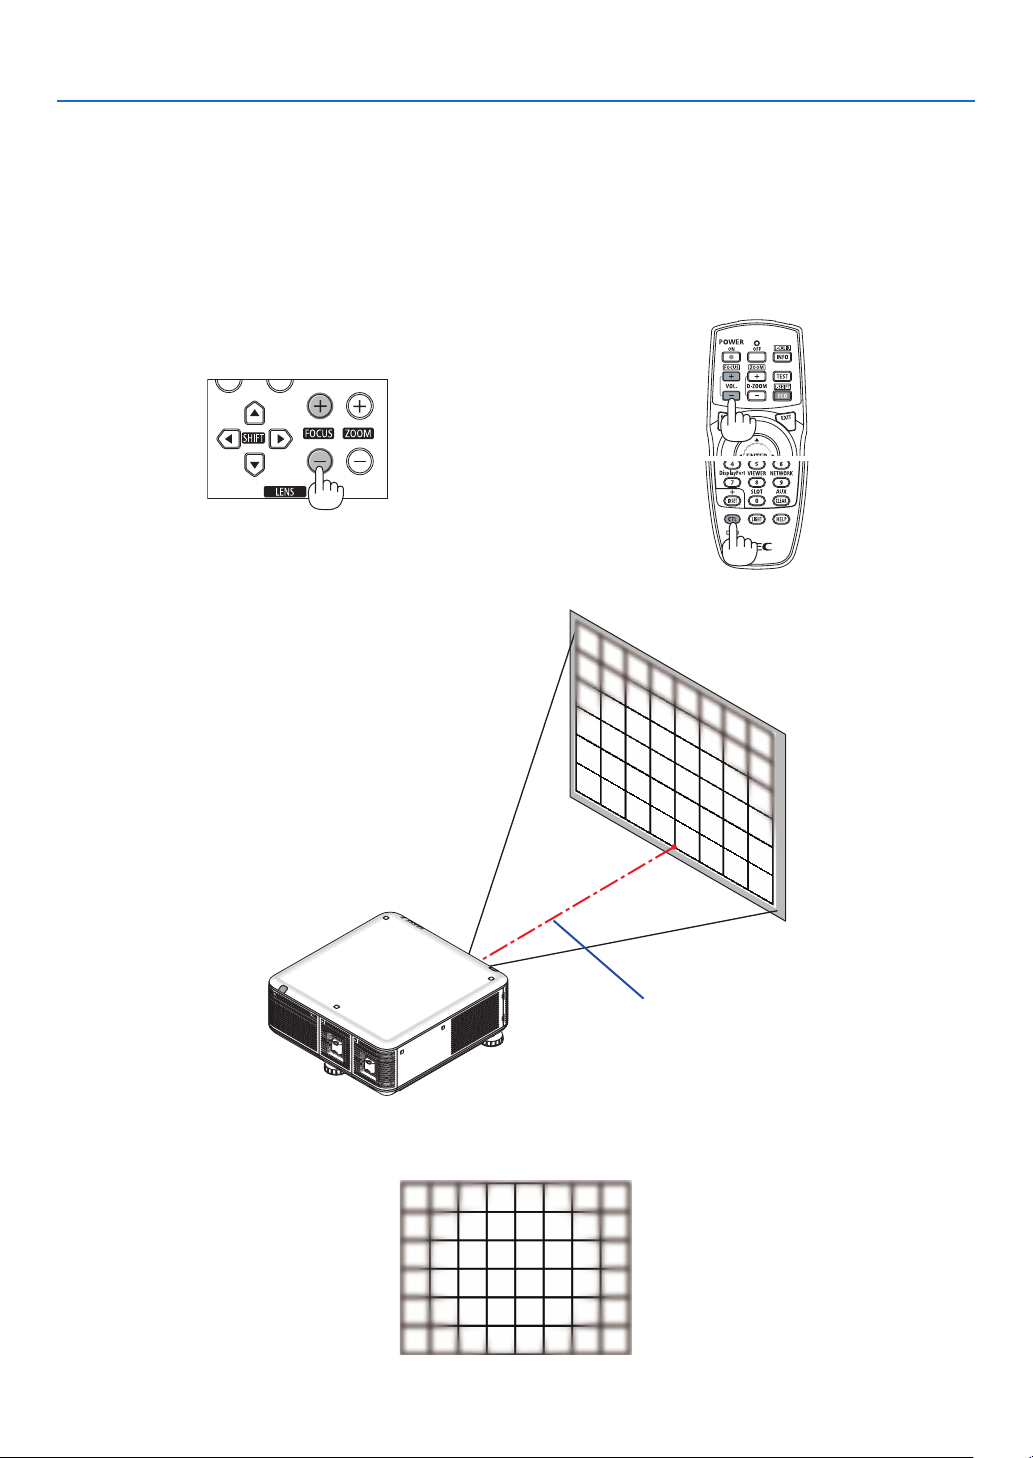
UsetheFOCUS(+)or(−)buttonontheprojectorcabinettoobtainthebestfocus.
TIP:Toobtainthebestfocus,performthefollowing(forxedinstallation)
Preparation:Warmuptheprojectorforonehour.
1.UsetheFOCUS+/−buttonstomakesureyouobtainthebestfocus.Ifyoudonot,movetheprojectorbackandforth.
2.Selectthe[TESTPATTERN]fromthemenuanddisplaythetestpattern.(→ page 104)
• YoucanalsousetheTESTbuttonontheremotecontroltodisplaythetestpattern.
3.KeeppressingtheFOCUS−buttonuntilthegridofthetextpatternismadeinvisible.
4.KeeppressingtheFOCUS+buttonuntilyouobtainthebestfocus.
If you adjust beyond the best focal point, go back to step 3 and repeat the procedures.
Adjusting with the remote control
• HoldtheCTLbuttonandpresstheVOL/FOCUS+/−button.
26
2. Projecting an Image (Basic Operation)
Applicablelens:
• PX750U2/PX700W2/PX800X2:NP31ZL
1. Focusontheprojectedimagearoundtheopticalaxis.(Poweredfocus)
Thedrawingbelowshowsanexamplewhentheprojectedimageisshiftedupward.Inthiscasetheopticalaxisis
at the bottom edge of the projected image.
Adjusting with buttons on the cabinet
Use the FOCUS (+) or (−) button on the projector cabinet.
Adjusting with the remote control
Hold the CTL button and press the VOL/FOCUS +/−
button.
Optical axis
* Withthelensshiftinthecenterpositiontheopticalaxisisatthecenteroftheimage.Inthiscase,adjustthe
focus at the center of the projected image.
27
2. Projecting an Image (Basic Operation)
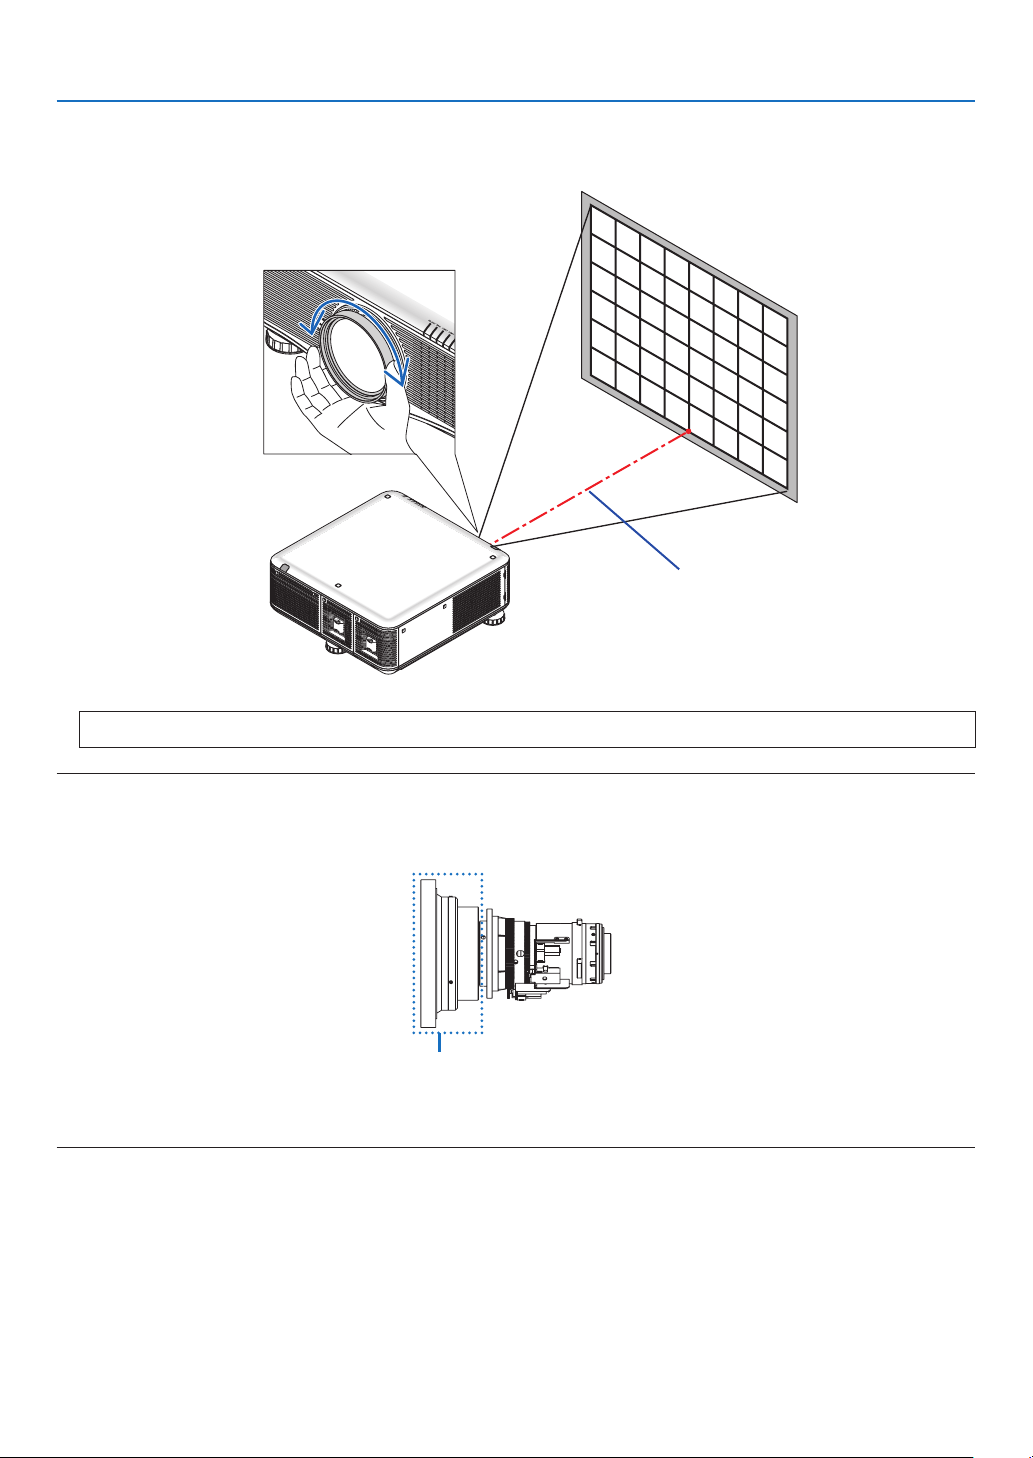
2. Adjustthefocusattheedgesoftheprojectedimage.(Manualfocus)
Turn the edge focus ring clockwise or counterclockwise.
Optical axis
Thiscompletesadjustingtheprojectedimage’soverallfocus.
NOTE:
TheNP31ZLsupportstheLensMemoryfunction,whichallowsyoutostorechangesforLensShift,Zoom,andFocus.
IfyouaccidentallymovetheEdgefocusring(drawingshownbelow)afterhavingstoredadjustedvalues,theadjustedvaluesstored
intheLensMemorywillnotbecorrectlyapplied.
Edge focus ring
Afterhavingremovedthelensfromtheprojectorandmounteditback,calluptheadjustedvaluesstoredintheLensMemoryand
thenfollowStep2intheprocedureabovetoadjustthefocusattheedgesoftheprojectedimageagain.
TIP:Toobtainthebestfocus,performthefollowing(forxedinstallation)
Preparation:Warmuptheprojectorforonehour.
1.UsetheFOCUS+/−buttonstomakesureyouobtainthebestfocus.Ifyoudonot,movetheprojectorbackandforth.
2.Selectthe[TESTPATTERN]fromthemenuanddisplaythetestpattern.(→ page 104)
• YoucanalsousetheTESTbuttonontheremotecontroltodisplaythetestpattern.
3.KeeppressingtheFOCUS−buttonuntilthegridofthetextpatternismadeinvisible.
4.KeeppressingtheFOCUS+buttonuntilyouobtainthebestfocus.
If you adjust beyond the best focal point, go back to step 3 and repeat the procedures.
5.Turntheedgefocusringclockwiseorcounterclockwisetoadjustthefocusattheedgesoftheprojectedimage.
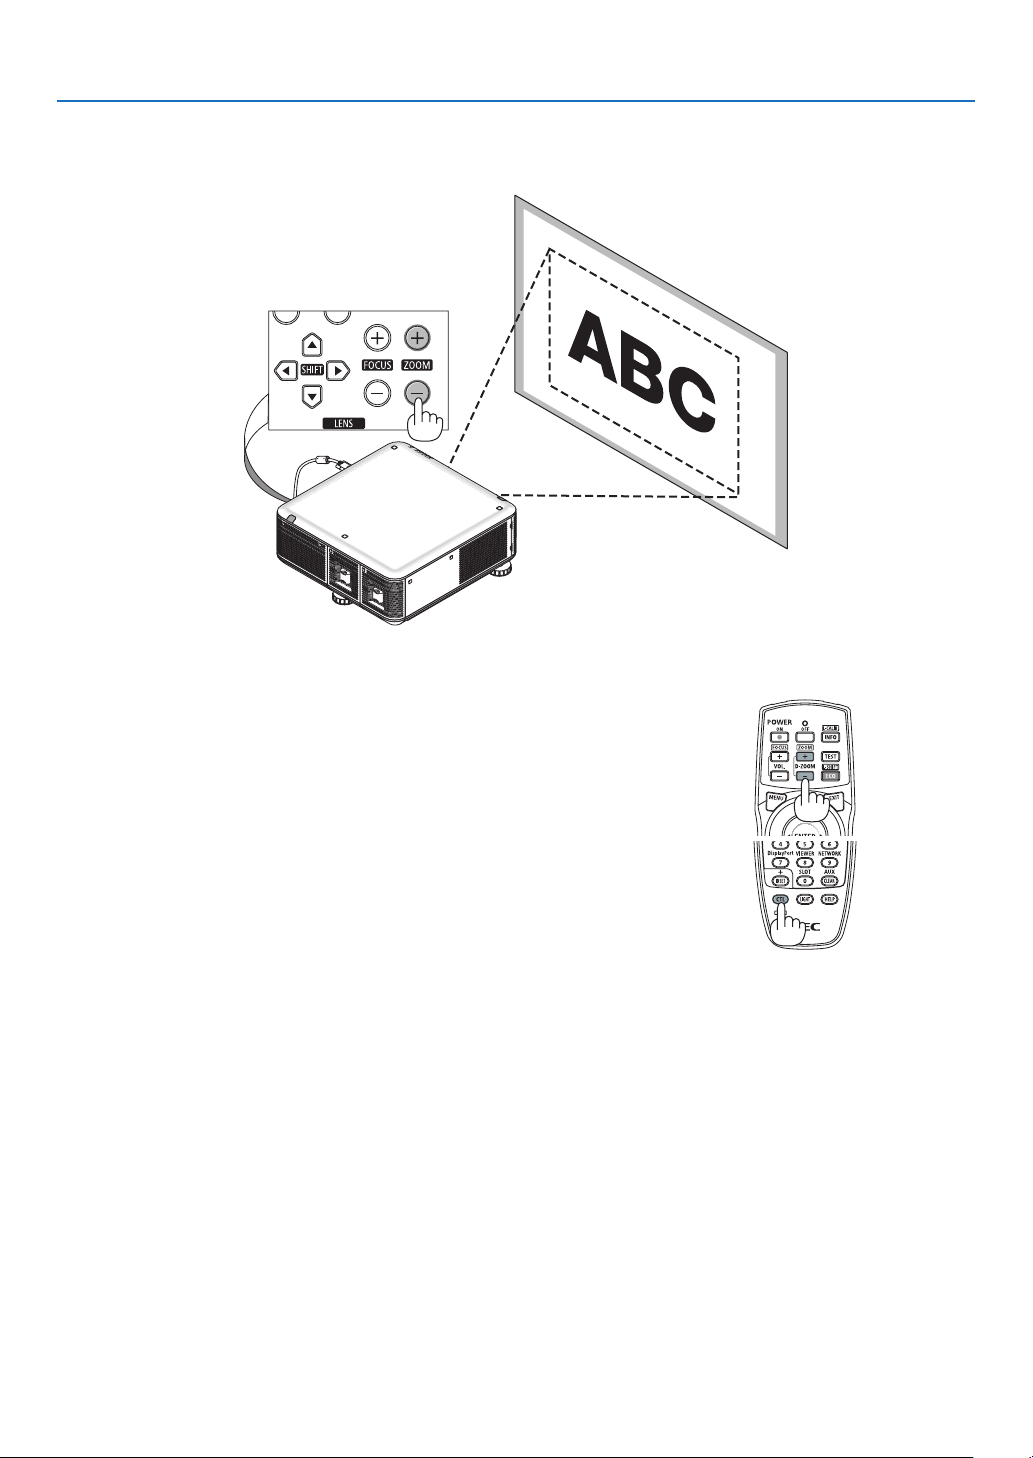
28
2. Projecting an Image (Basic Operation)
Zoom
UsetheZOOM(+)or(−)buttonontheprojectorcabinettozoominorout.
• ThezoomisnotavailableontheseparatelysoldNP16FL(PX750U2)andNP06FL(PX700W2/PX800X2)lens.
Adjusting with the remote control
• HoldtheCTLbuttonandpresstheD-ZOOM/ZOOM+/−button.
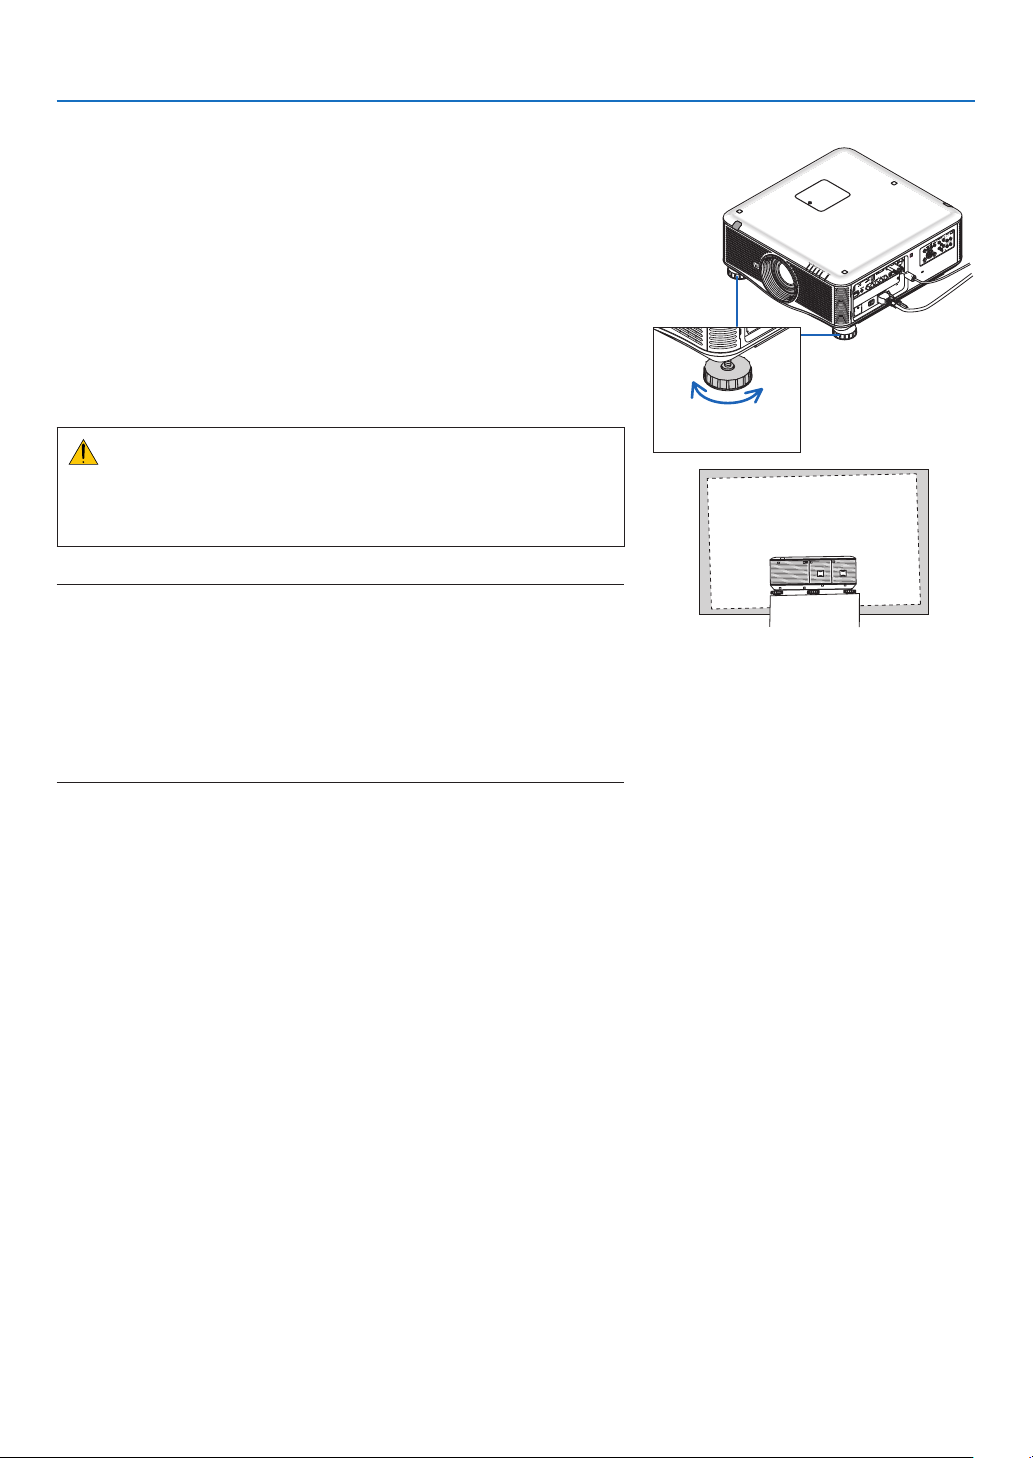
29
2. Projecting an Image (Basic Operation)
Adjusting the Tilt Feet
• Turntheleftandrighttiltfeetontheright,left,andreartoadjust.
Thetiltfeetlengthenandshortenwhenturned.
Theheightoftheprojectedimageisadjustedbyturningtheleft
andrighttiltfeet.
Iftheprojectedimageistilted,turnoneofthetiltfeettoadjust
the image so that it is level.
- Iftheprojectedimageisdistorted,see“2-6CorrectingKeystone
Distortion” (→ page 30).
- The tilt feet can be used to tilt +/− 50 mm/1.97" (6.75°), −9 mm/0.35"
(1.2°).
CAUTION
Therearventsoftheprojectormaybecomeheatedduringnormal
projectoroperation.
Usecautionwhenadjustingthetiltfootontherearside.
NOTE:
• Donotlengthenthetiltfeetontherightandleftanymorethan50mm/1.97"
andthetiltfootontherearanymorethan9mm/0.35"ontherear.Theforce
of doing so may cause the rear foot to come off, resulting in damage to the
projector.
• Donotusethetilt feet for anypurposeotherthanadjustingtheprojector’s
projection angle.
Handling the tilt feet improperly, such as carrying the projector by grasping the
tilt feet or hooking it onto a wall using the tilt feet, could damage the projector.
Up
Tilt foot
Down

30
2. Projecting an Image (Basic Operation)
❻ Correcting Keystone Distortion
Whentheprojectorisnotexactlyperpendiculartothescreen,keystonedistortionoccurs.Toovercomeit,youcanusethe
“Keystone”function,adigitaltechnologythatcanadjustforkeystone-typedistortion,resultinginacrisp,squareimage.
Thefollowingprocedureexplainshowtousethe[KEYSTONE]screenfromthemenutocorrecttrapezoidaldistortions.
Whentheprojectorisplaceddiagonallytothescreen,
Whentheprojectorissetupatanangleinrelationtothescreen,adjusttheHorizontaloptionoftheKeystonemenu
sothatthetopandbottomofsidesoftheprojectedimageareparallel.
1. Pressthe3DREFORMbuttonontheremotecontrolortheprojector
cabinet.
The Keystone screen will be displayed on the screen.
2. Press the ▼buttontoselect[VERTICAL]andthenusethe◀ or ▶ so
thattheleftandrightsidesoftheprojectedimageareparallel.
* Adjust the vertical keystone distortion.
3. Aligntheleft(orright)sideofthescreenwiththeleft(orright)side
oftheprojectedimage.
• Usetheshortersideoftheprojectedimageasthebase.
• Intherightexample,usetheleftsideasthebase.
4. Press the ▲buttontoselect[HORIZONTAL]andthenusethe◀ or ▶
sothatthetopandbottomsidesoftheprojectedimageareparallel.
• Adjustthehorizontalkeystonedistortion.
Screen frame
Projected area
Align left side

31
2. Projecting an Image (Basic Operation)
NOTE:
• Iftheprojectionangleisthesameasinthelastuse,thepreviouscorrectionsettingvaluesareretainedinthememory.
• WhendoingStep2,adjustthepositionofimagesothatthescreenissmallerthantheareaoftheprojectedarea.
• Toresetthe3DReformcorrectionsettingvalues,pressandholdthe3DREFORMbuttonforaminimumof2seconds.
• Eachtimethe3DREFORMbuttonispressed,theitemwillchangeasfollows:KEYSTONE→CORNERSTONE→ None →KEY-
STONE→ ...
Forinformationon[CORNERSTONE],see“CorrectingHorizontalandVerticalKeystoneDistortion(Cornerstone)”onpage39.
• TheCornerstoneadjustmentwillnotbeavailableduringtheKeystoneadjustment.ToperformtheCornerstoneadjustment,press
andholdthe3DREFORMbuttonforaminimumof2secondstoresettheKeystonecorrectionsettingvalues.TheKeystone
adjustmentwillnotbeavailableduringtheCornerstoneadjustment.ToperformtheKeystoneadjustment,pressandholdthe3D
REFORMbuttonforaminimumof2secondstoresettheCornerstonecorrectionsettingvalues.
• The3DReformfeaturecancauseanimagetobeslightlyblurredbecausethecorrectionismadeelectronically.
5. Repeat steps 2 and 4 to correct keystone distortion.
6. AftercompletingKeystonecorrection,presstheEXITbutton.
The Keystone screen will disappear.
• ToperformKeystonecorrectionagain,pressthe3DREFORMbutton
to display the Keystone screen and repeat above steps 1 to 6.
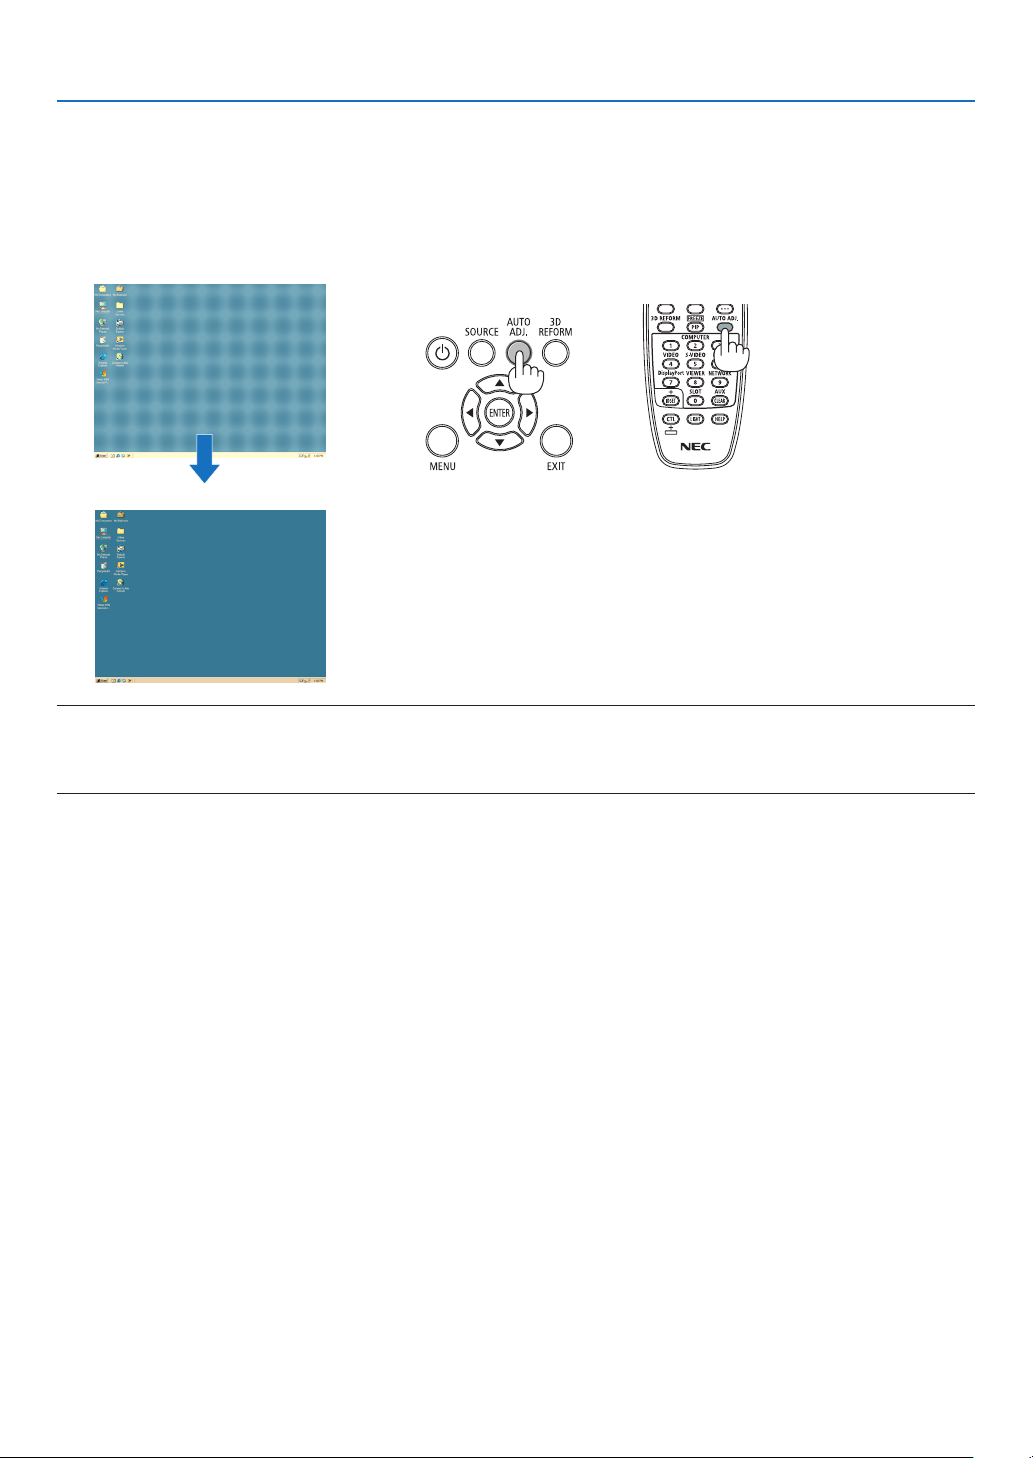
32
2. Projecting an Image (Basic Operation)
❼ Optimizing Computer Signal Automatically
Adjusting the Image Using Auto Adjust
Optimizingacomputerimageautomatically.(COMPUTER1/COMPUTER2/COMPUTER3)
PresstheAUTOADJ.buttontooptimizeacomputerimageautomatically.
Thisadjustmentmaybenecessarywhenyouconnectyourcomputerforthersttime.
[Poor picture]
[Normal picture]
NOTE:
Somesignalsmaytaketimetodisplayormaynotbedisplayedcorrectly.
• IftheAutoAdjustoperationcannotoptimizethecomputersignal,trytoadjust[HORIZONTAL],[VERTICAL],[CLOCK],and[PHASE]
manually.(→ page 111, 112)
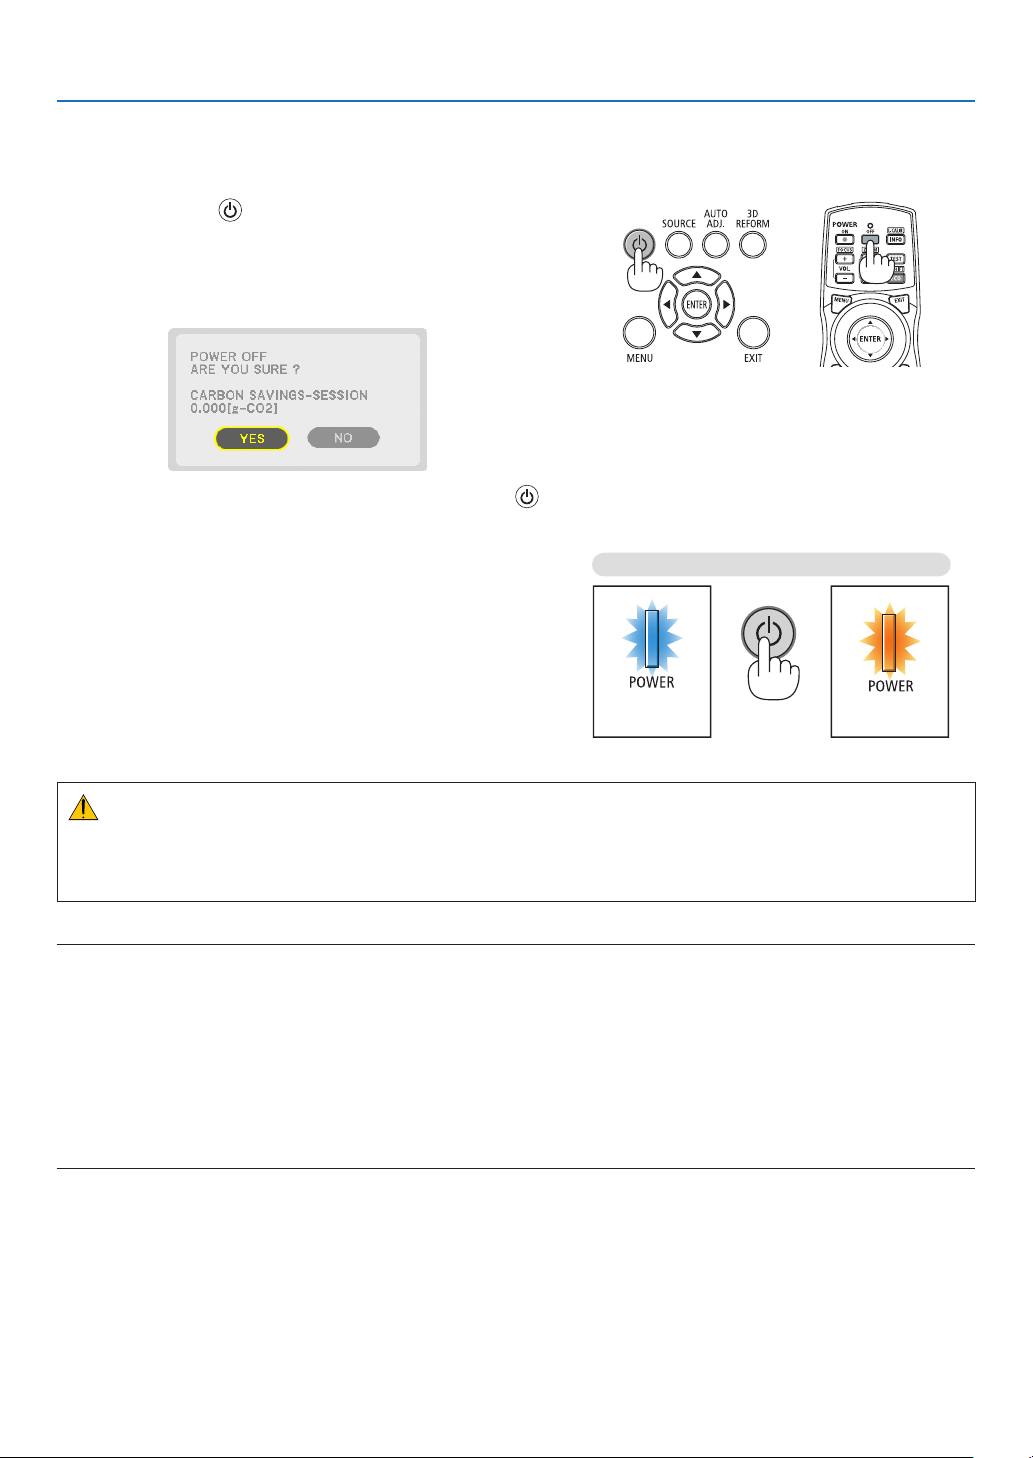
33
2. Projecting an Image (Basic Operation)
❽ Turning off the Projector
To turn off the projector:
1. First, press the (POWER) buttonon the projector
cabinetorthePOWEROFFbuttonontheremotecon-
trol.
The [POWER OFF / ARE YOU SURE ? / CARBON SAV-
INGS-SESSION0.000[g-CO2]]messagewillappear.
2. Secondly,press the ENTER button or press the
(POWER)orthePOWEROFFbuttonagain.
The lamp will turn off and the projector will go into standby
mode. When in standby mode, the POWER indicator will
light orange and the STATUS indicator will light green when
[NORMAL] is selected for [STANDBY MODE].
3. PressthemainpowerswitchtotheOFFposition(O).
The POWER indicator will go off and the main power will
turn off.
PowerOn
Steady blue light
Standby
Steady
orange light
Press twice
CAUTION:
PartsoftheprojectormaybecometemporarilyheatediftheprojectoristurnedoffwiththePOWERbuttonorifthe
ACpowersupplyisdisconnectedduringnormalprojectoroperation.
Usecautionwhenpickinguptheprojector.
NOTE:
• WhilethePOWERindicatorisblinkingblueinshortcycles,thepowercannotbeturnedoff.
• Youcannotturnoffthepowerfor60secondsimmediatelyafterturningitonanddisplayinganimage.
• Waitatleast20minutesafterthepoweristurnedon(afterstartingtoproject)beforeturningtheACpoweroffwhileanimageis
being projected or while the cooling fan is running.
• Donotunplugthepowercordfromtheprojectororfromthepoweroutletwhileanimageisbeingprojected.Doingsocould
deterioratetheprojector’sACinputconnectororthepowerplug’scontact.ToturnofftheACpowerwhileanimageisbeing
projected,usetheprojector'smainpowerswitch,thepowerstrip’sswitch,thebreaker,etc.
• DonotdisconnecttheACpowersupplytotheprojectorwithin10secondsofmakingadjustmentorsettingchangesandclosing
the menu. Doing so can cause loss of adjustments and settings.

34
2. Projecting an Image (Basic Operation)
❾ After Use
Preparation:Makesurethattheprojectoristurnedoff.
1. Unplug the power cord.
2. Disconnectanyothercables.
• RemovetheUSBmemoryifitisinsertedintotheprojector.
3. Mount the lens cap on the lens.
4. Beforemovingtheprojector,screwinthetiltfeetiftheyhavebeenlengthened.
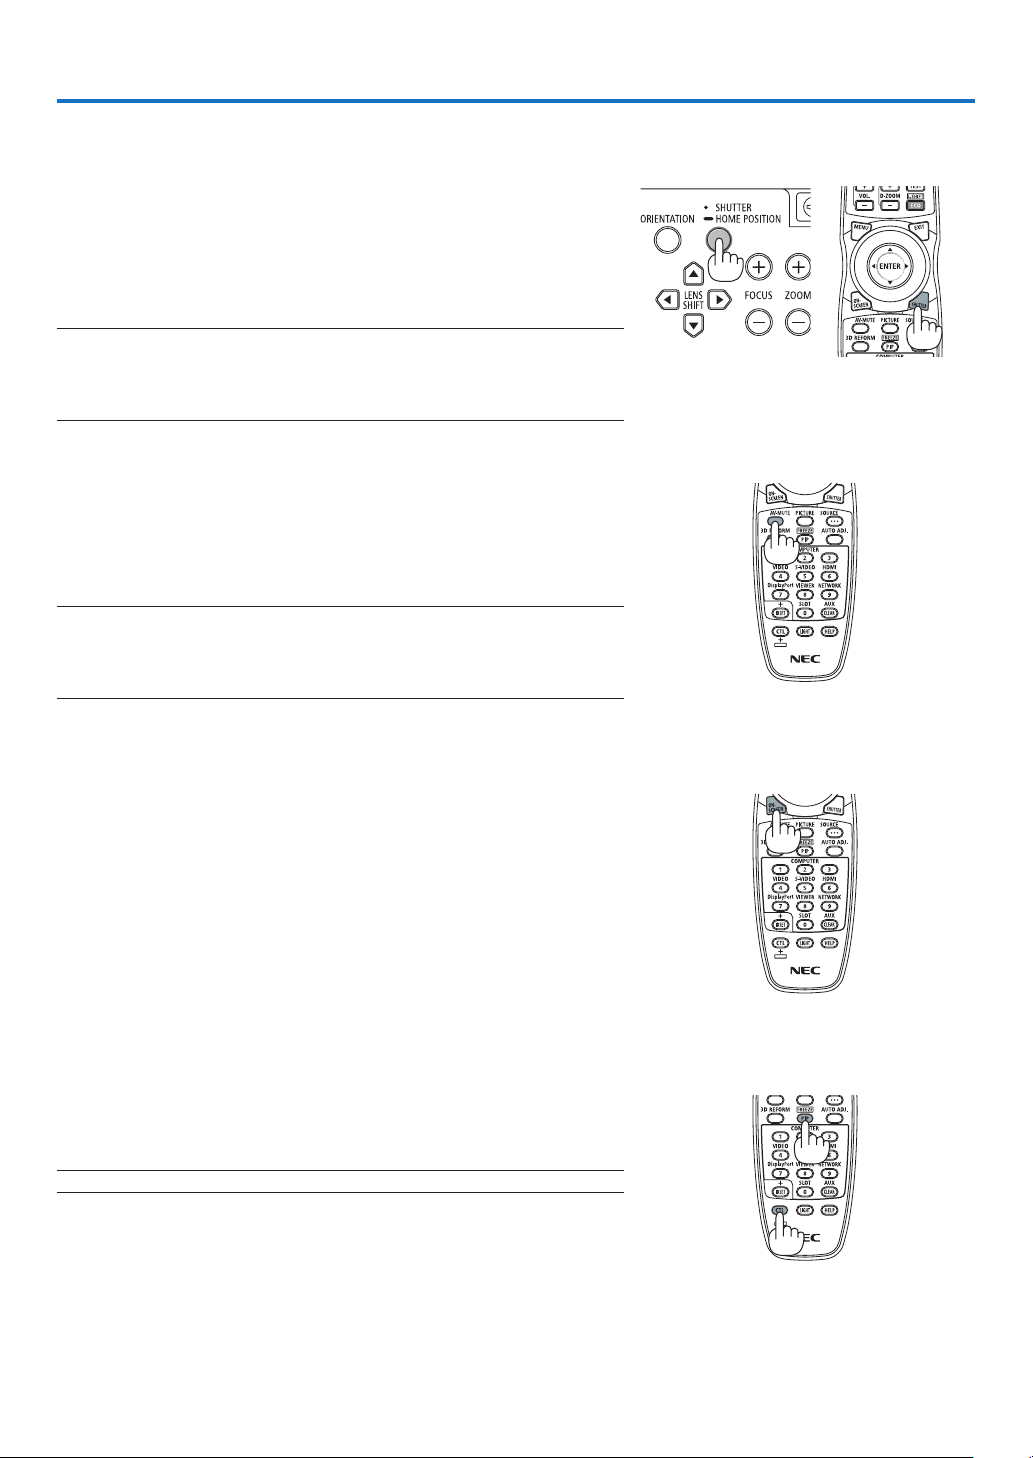
35
3. Convenient Features
❶ Blocking the lamp light (LENS
SHUTTER)
PresstheSHUTTER/HOMEPOSITIONbuttontoblockthelampslight
fromhittingthescreen.Pressagaintoallowthescreentobecomeil-
luminatedagain.
• AnotherwaytoshutthelamplightoffistopresstheSHUTTERbutton
ontheremotecontrol.
NOTE:
• DonotpressandholdtheSHUTTER/HOMEPOSITIONbuttonfor2secondsor
longer.
Doing so will cause the lens shift position to return to the home position.
❷ Turning off the Image
PresstheAV-MUTEbuttontoturnofftheimageforashortperiodoftime.
Pressagaintorestoretheimage.
Theprojector’spower-savingfunctionwillworkinsomesecondsafterthe
imageisturnedoff.Asaresult,thelamppowerwillbereduced.
NOTE:
• Torestoretheimage,evenifyoupresstheAV-MUTEbuttonimmediatelyafter
thestartofthepower-savingfunction,thelampbrightnessmaynotberestored
toitsoriginallevel.
❸ Turning Off the On-Screen Menu
(On-Screen Mute)
ApressoftheON-SCREENbuttonontheremotecontrolwillhidethe
on-screenmenu,thesourcedisplayandothermessages.Pressagain
torestorethem.
TIP:
• Toconrmthattheon-screenmuteisturnedon,presstheMENUbutton.Ifthe
on-screenmenuisnotdisplayedeventhoughyoupresstheMENUbutton,it
meanstheon-screenmuteisturnedon.
• Theon-screenmuteismaintainedevenwhentheprojectoristurnedoff,
• HoldingdowntheMENUbuttonforatleast10secondswillturnofftheon-screen
mute.
❹ Freezing a Picture
HoldtheCTLbuttonandpressthePIP/FREEZEbuttontofreezeapicture.
Pressagaintoresumemotion.
NOTE:Theimageisfrozenbuttheoriginalvideoisstillplayingback.
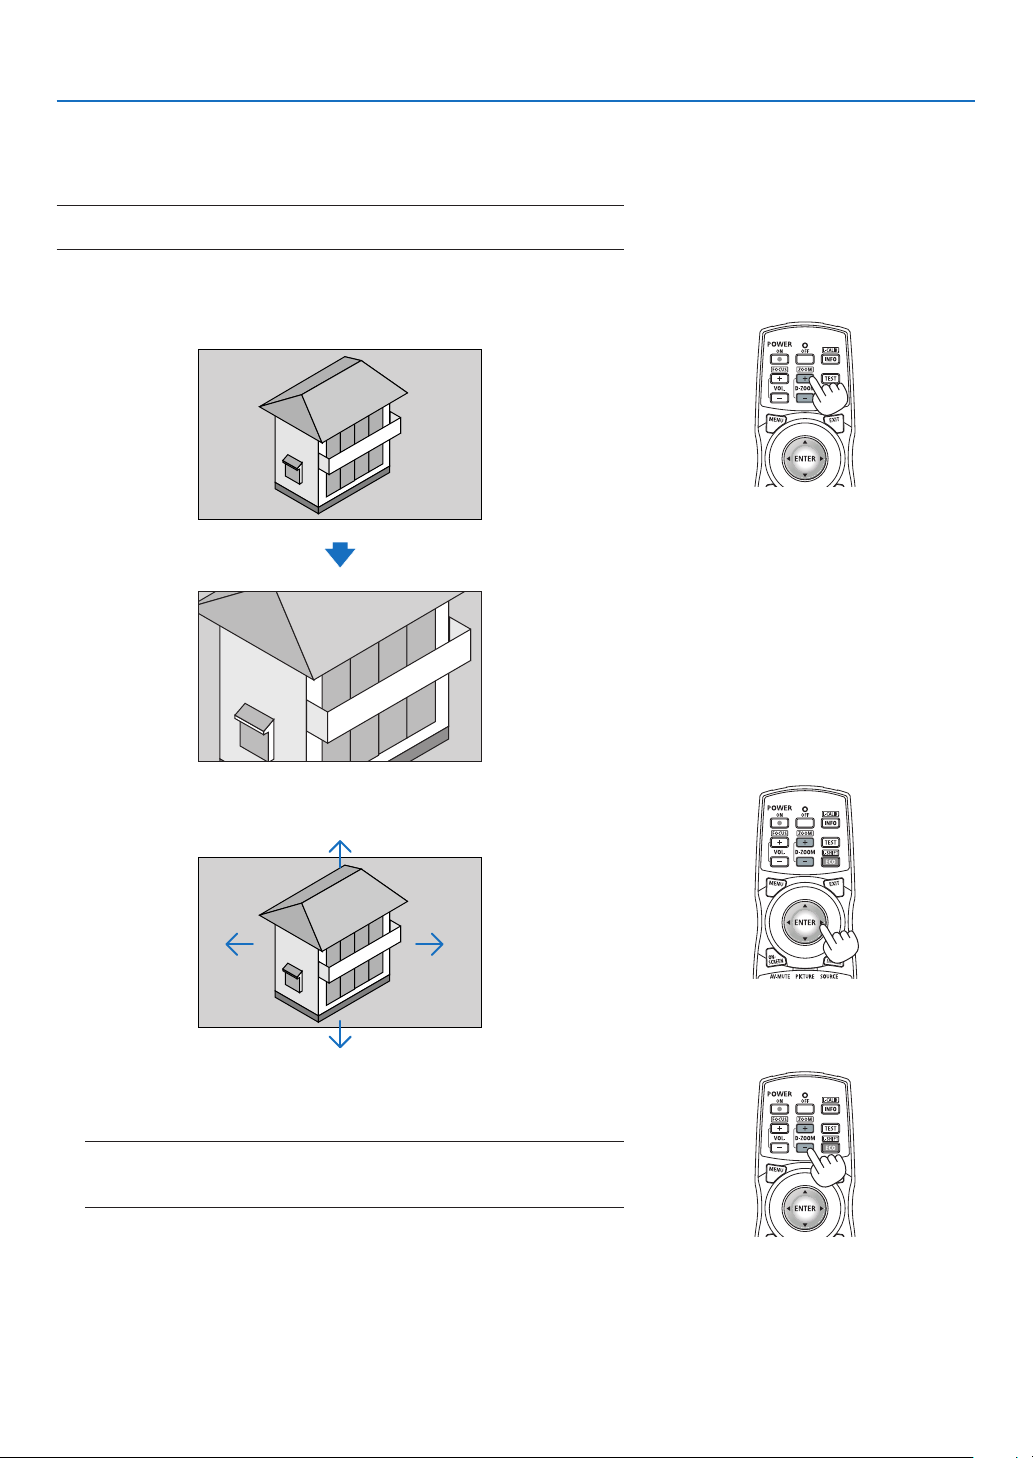
36
3. Convenient Features
❺ Enlarging a Picture
Youcanenlargethepictureuptofourtimes.
NOTE:Themaximummagnicationmaybelessthanfourtimesdependingon
the signal.
Todoso:
1. PresstheD-ZOOM/ZOOM(+)buttontomagnifythepicture.
2. Press the ▲▼◀▶ button.
The area of the magnified image will be moved
3. PresstheD-ZOOM/ZOOM(−)button.
Each time the D-ZOOM/ZOOM (−) button is pressed, the image is
reduced.
NOTE:
• Theimagewillbeenlargedorreducedatthecenterofthescreen.
• Displayingthemenuwillcancelthecurrentmagnication.

37
3. Convenient Features
❻ Changing Eco Mode/Checking Energy-Saving Effect Using
Eco Mode [ECO MODE]
Thisfeatureenablesyoutoselecttwobrightnessmodesofthelamp:
OFFandONmodes.Thelamplifecanbeextendedbyturningonthe[ECOMODE].
[ECOMODE] Description
[OFF]
Thisisthedefaultsetting(100%Brightness).
[ON] Lowlamppowerconsumption(approx.80%Brightness).
Toturnonthe[ECOMODE],dothefollowing:
1. PresstheECO/L-SHIFTbuttonontheremotecontroltodisplay[ECOMODE]screen.
2. Use the ▲ or ▼buttontoselect[ON].
3. PresstheENTERbutton.
Tochangefrom[ON]to[OFF],GobacktoStep2andselect[OFF].RepeatStep3.
NOTE:
• The[ECOMODE]canbechangedbyusingthemenu.
Select[SETUP]→[BASIC]→[LAMPMODE]→[ECOMODE].
• Thelampliferemainingandlamphoursusedcanbecheckedin[USAGETIME].Select[INFO.]→[USAGETIME].
• [ECOMODE]isalwayssetto[OFF]immediatelyafterthelampisturnedon.Thelampconditionwillnotbeaffectedevenwhen
[ECOMODE]ischanged.
• Afteralapseof1minutefromwhentheprojectordisplaysablue,blackorlogoscreen,[ECOMODE]willautomaticallyswitchto
[ON].
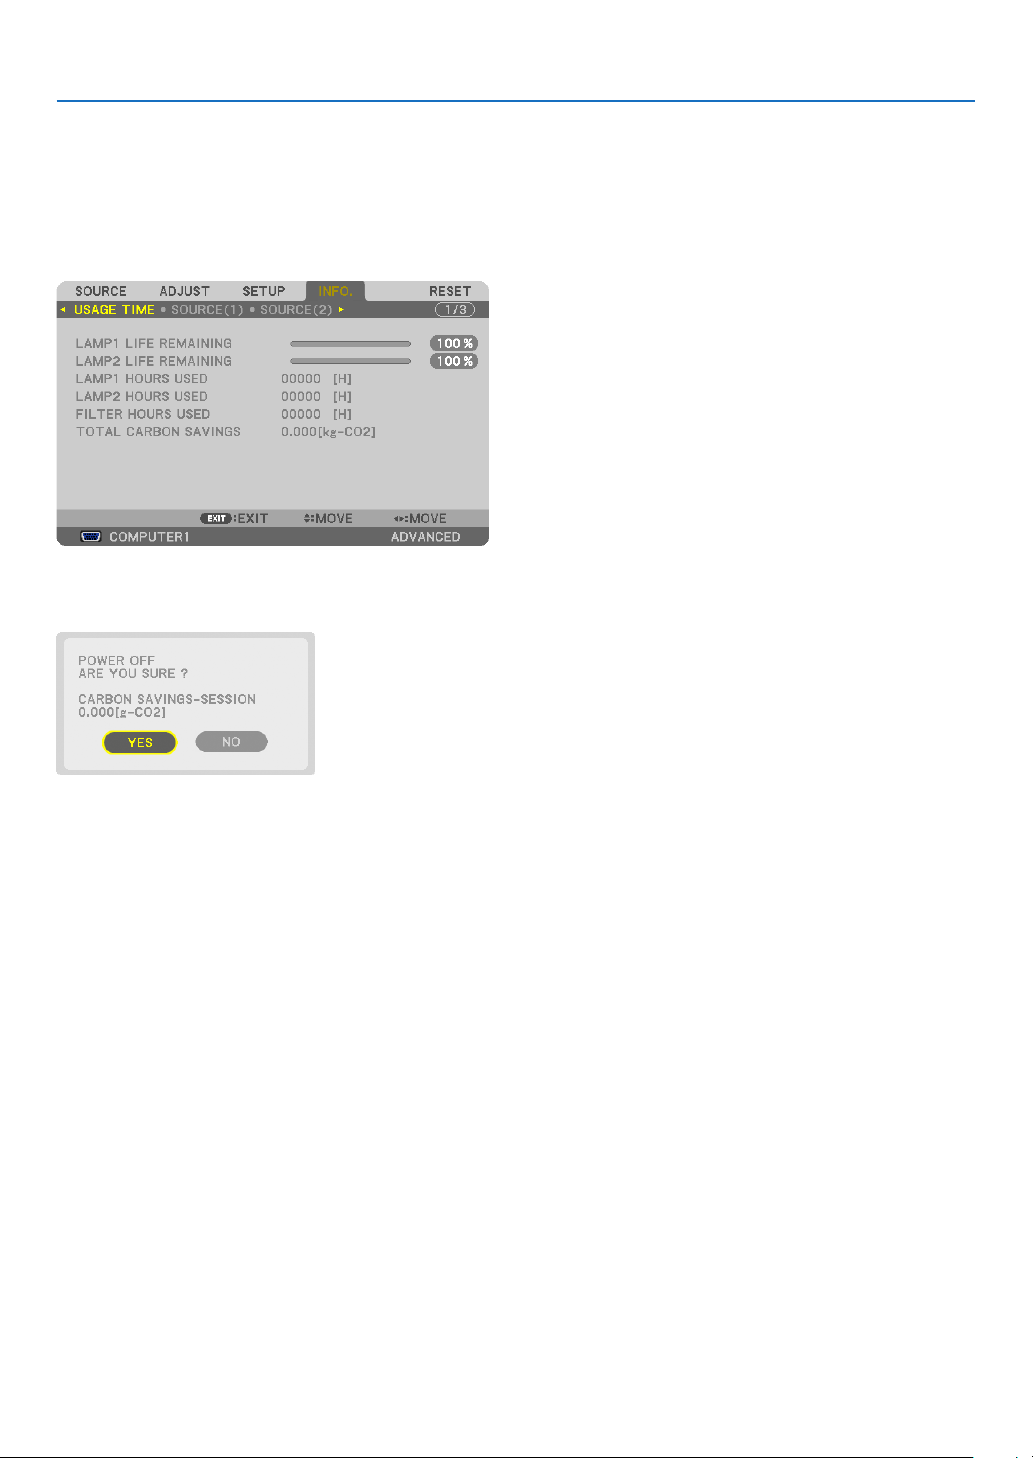
38
3. Convenient Features
Checking Energy-Saving Effect [CARBON METER]
Thisfeaturewillshowenergy-savingeffectintermsofCO
2
emissionreduction(kg)whentheprojector’s[ECOMODE]
issetto[OFF],or[ON].Thisfeatureiscalledas[CARBONMETER].
Therearetwomessages:[TOTALCARBONSAVINGS]and[CARBONSAVINGS-SESSION].The[TOTALCARBON
SAVINGS]messageshowsthetotalamountofCO
2
emissionreductionfromthetimeofshipmentuptonow.Youcan
checktheinformationon[USAGETIME]from[INFO.]ofthemenu.(→page133)
The[CARBONSAVINGS-SESSION]messageshowstheamountofCO
2
emissionreductionbetweenthetimeof
changingtoECOMODEimmediatelyafterthetimeofpower-onandthetimeofpower-off.The[CARBONSAVINGS-
SESSION]messagewillbedisplayedinthe[POWEROFF/AREYOUSURE?]messageatthetimeofpower-off.
TIP:
• TheformulaasshownbelowisusedtocalculatetheamountofCO
2
emission reduction.
AmountofCO
2
emissionreduction=(PowerconsumptioninOFFforECOMODE−PowerconsumptioninONforECOMODE)×
CO
2
conversionfactor.*Whentheimageisturnedoff,theamountofCO
2
emission reduction will also increase.
*CalculationforamountofCO
2
emissionreductionisbasedonanOECDpublication“CO
2
EmissionsfromFuelCombustion,2008
Edition”.
• The[TOTALCARBONSAVINGS]iscalculatedbasedonsavingsrecordedin15minutesintervals.
• Thisformulawillnotapplytothepowerconsumptionwhichisnotaffectedbywhether[ECOMODE]isturnedonoroff.
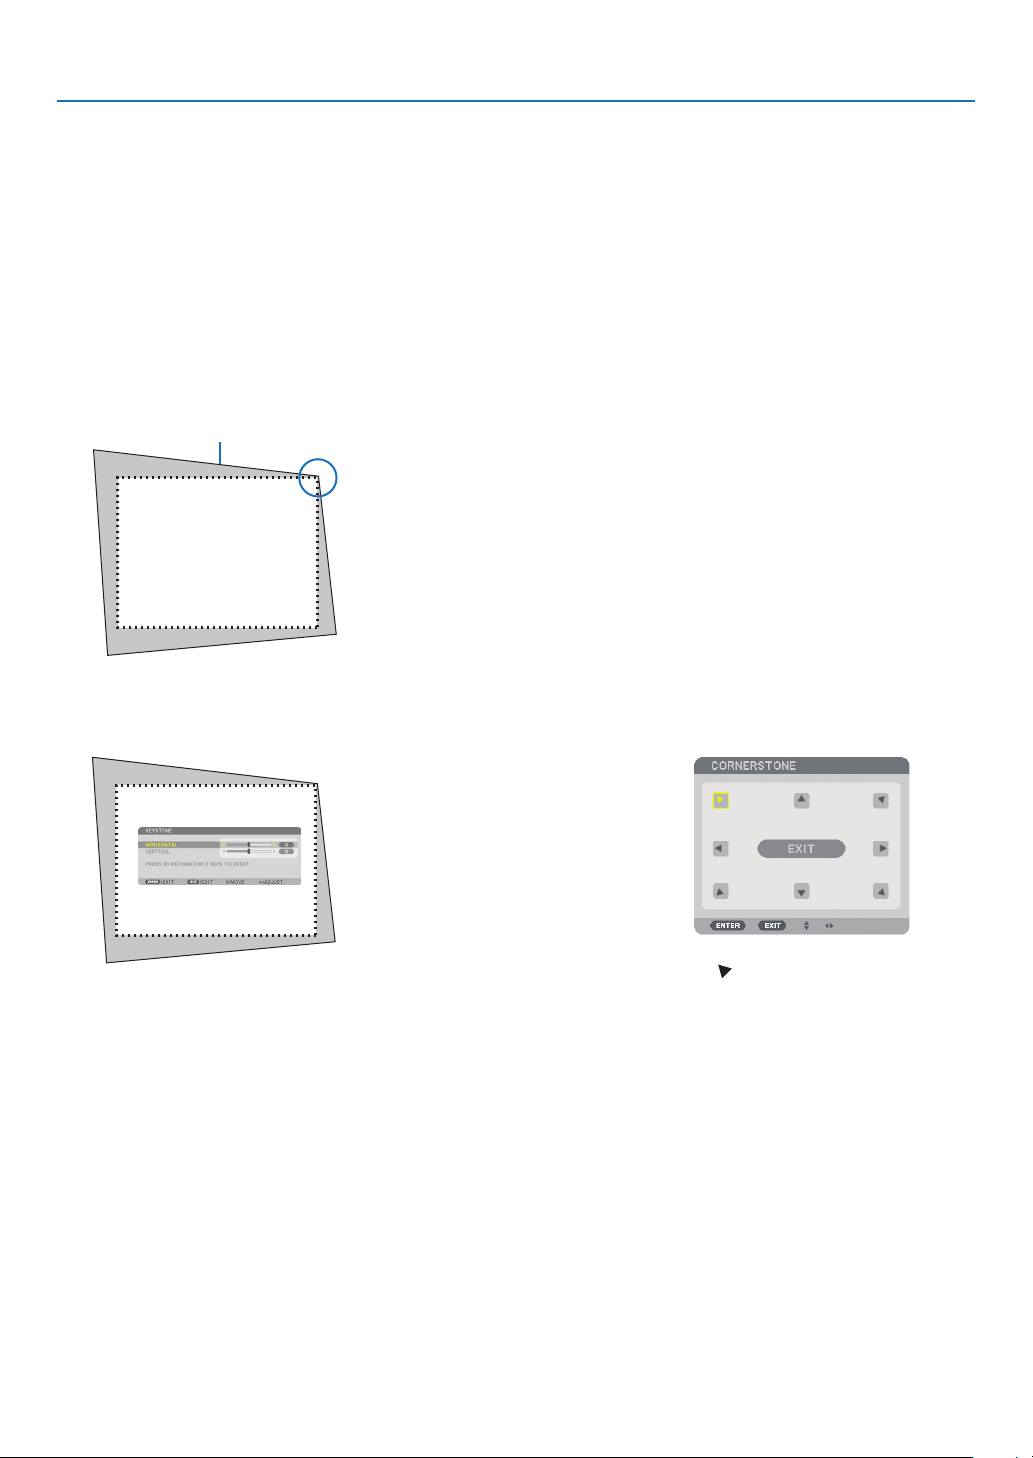
39
3. Convenient Features
❼ Correcting Horizontal and Vertical Keystone Distortion
[CORNERSTONE]
Usethe3DReformfeaturetocorrectkeystone(trapezoidal)distortiontomakethetoporbottomandtheleftorright
sideofthescreenlongerorshortersothattheprojectedimageisrectangular.
Cornerstone
1. Pressandholdthe3DREFORMbuttonforaminimumof2secondstoresetcurrentadjustments.
Current adjustments for [KEYSTONE] or [CORNERSTONE] will be cleared.
2. Projectanimagesothatthescreenissmallerthantheareaoftheraster.
3. Pickupanyoneofthecornersandalignthecorneroftheimagewithacornerofthescreen.
Projected image
The drawing shows the up-
per right corner.
4. Pressthe3DREFORMbuttontwice.
The Cornerstone adjustment screen is displayed.
5. Use the ▲▼◀▶ button to select one icon (▲) which points in the direction you wish to move the projected
imageframe.
6. PresstheENTERbutton.
TIP: If youare adjusting [KEYSTONE], [CORNERSTONE] will not be
available.Ifthishappens,pressandholdthe3DREFORMbuttonfora
minimumof2secondstoresetthe[KEYSTONE]adjustments.
The drawing shows the upper left
icon ( ) is selected.
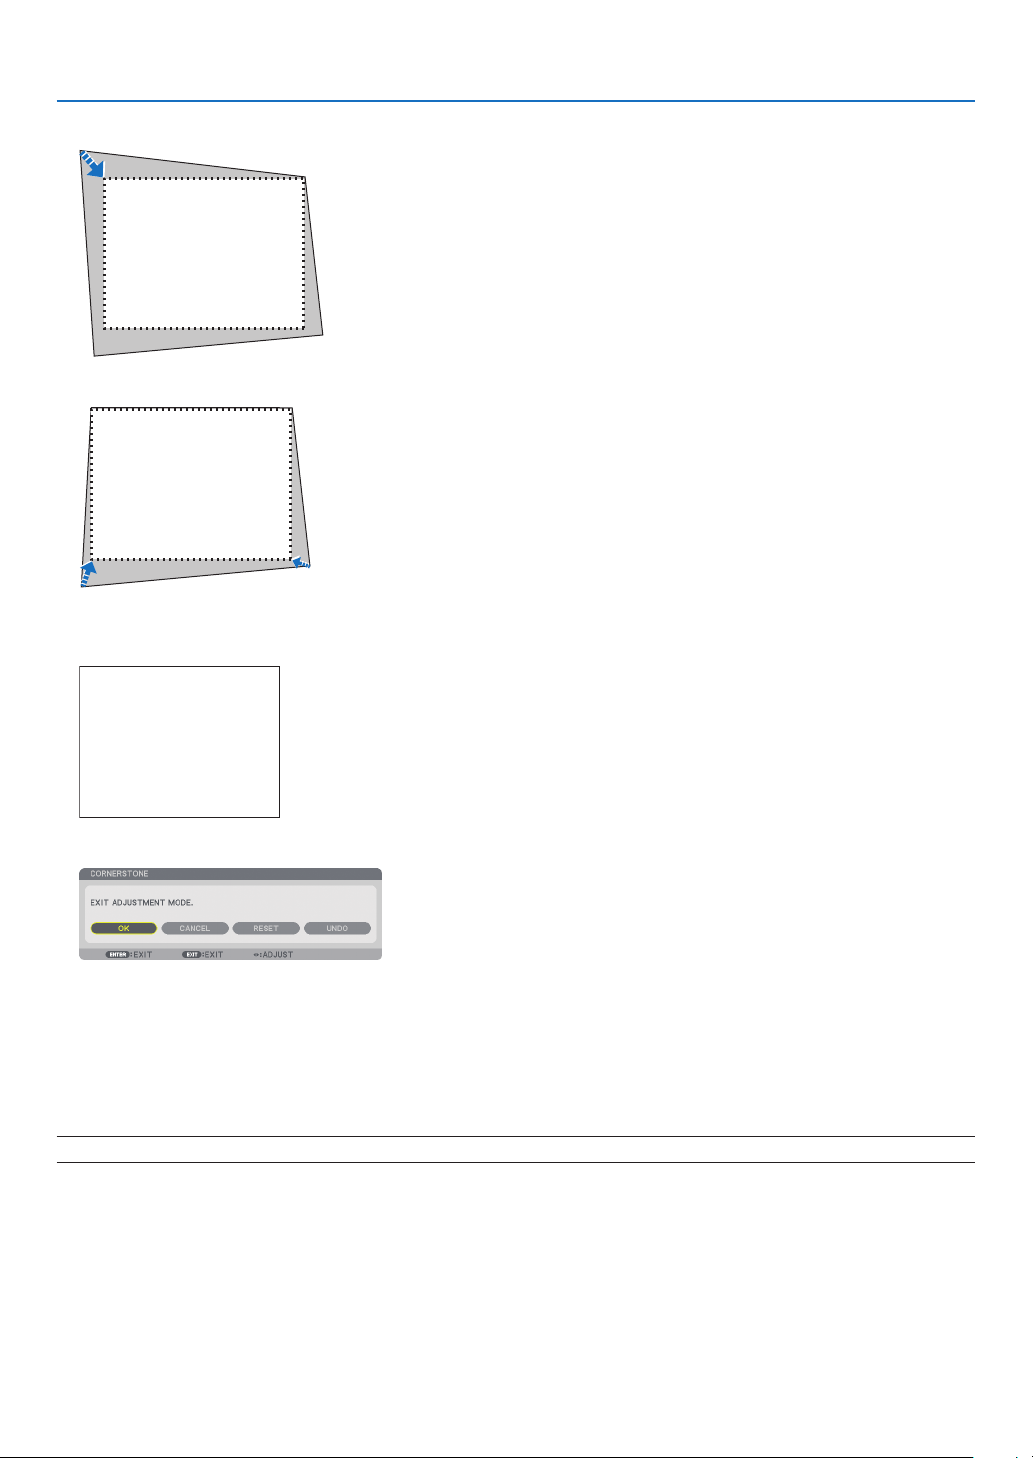
40
3. Convenient Features
7. Use the ▲▼◀▶buttontomovetheprojectedimageframeasshownontheexample.
8. PresstheENTERbutton.
9. Use the ▲▼◀▶ button to select another icon which points in the direction.
OntheCornerstoneadjustmentscreen,select[EXIT]orpresstheEXITbuttonontheremotecontrol.
The confirmation screen is displayed.
10
. Press the ◀ or ▶buttontohighlightthe[OK]andpresstheENTERbutton.
ThiscompletestheCornerstonecorrection.
Selecting[CANCEL]willreturntotheadjustmentscreenwithoutsavingchanges(Step3).
Selecting[RESET]willreturntothefactorydefault.
Selecting[UNDO]willexitwithoutsavingchanges.
NOTE:Toresetthe3DReformcorrectionsettingvalues,pressandholdthe3DREFORMbuttonforaminimumof2seconds.

41
3. Convenient Features
Theadjustablerangesfor3DReformareasfollows:
HORIZONTAL VERTICAL
CORNERSTONE
PX750U2:Max.+/−35°approx.
PX700W2/PX800X2:Max.+/−40°approx.
Max.+/−30°approx.
KEYSTONE
* Thefollowingareconditionsunderwhichthemaximumangleisachieved:
• WhentheNP18ZL(PX750U2)andNP08ZL(PX700W2/PX800X2)lensisused
• Whenthelensshiftissettothecenter
Whenthelensshiftisusedandyettheimageisnotdisplayedinthecenterofthescreen,theadjustablerange
willbeincreasedordecreased.
• Imageisprojectedinmaximumwidewiththezoom
NOTE:
• Evenwhentheprojectoristurnedon,thelastusedcorrectionvaluesareapplied.
• IftheCornerstonescreenisunavailable(grayed),pressandholdthe3DREFORMbuttonforaminimumof2secondstoreset
thecurrentcorrectiondata.TheCornerstonefunctionbecomesavailable.
• Turningontheprojectorwillresetthepreviouscorrectionsettingvaluesandcorrectdistortionanewiftheprojectionangleis
changed from the last use.
Iftheprojectionangleisthesameasinthelastuse,thepreviouscorrectionsettingvaluesareretainedinthememory.
• Therangeofkeystonecorrectionisnotthemaximumtiltangleofprojector.
NOTE:Using3DReformcorrectioncancausetheimagetobeslightlyblurredbecausethecorrectionismadeelectronically.
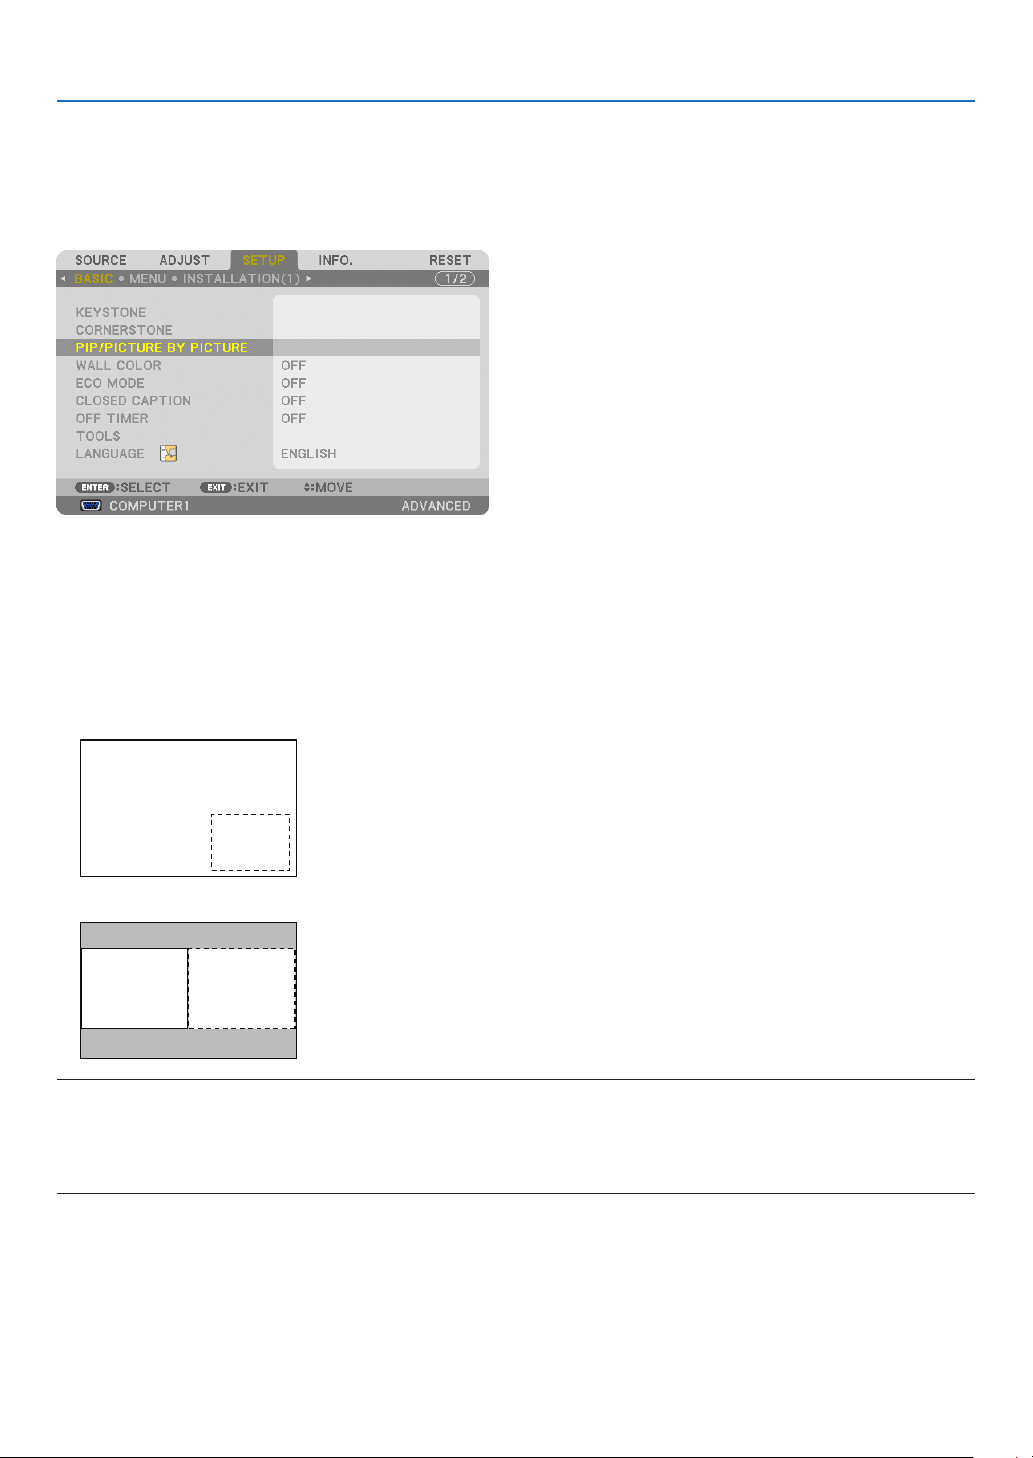
42
3. Convenient Features
❽ Displaying Two Pictures at the Same Time
Theprojectorhasafeaturethatallowsyoutoviewtwodifferentsignalssimultaneously.Youhavetwomodes:PIP
modeandPICTUREBYPICTUREmode.
• Fromthemenuyoucanselect[SETUP]→[BASIC]→[PIP/PICTUREBYPICTURE].
The[PIP/PICTUREBYPICTURE]menuitemhasthefollowingthreeoptions:MODE,POSITION,andSOURCE.
Usethe▲or▼buttontoselect[MODE],[POSITION]or[SOURCE]andpresstheENTERbutton.
Selecting the PIP or PICTURE BY PICTURE Mode [MODE]
Thisoptionallowsyoutoselecttwomodes:PIPandPICTUREBYPICTURE.
Usethe▲or▼buttontoselect[PIP]or[PICTUREBYPICTURE]andpresstheENTERbutton.
PIP:Thisoptionallowsyoutoviewasubpictureinthemainpicture.
Main picture
Sub picture
PICTUREBYPICTURE:Thisallowsyoutoviewtwopicturessidebyside.
Main picture Sub picture
NOTE:
• Themainpicturewillbedisplayedontheleftsideandthesubpictureontherightside.
• ThemainpicturesignalsupportstheCOMPUTER1,COMPUTER2,andCOMPUTER3connectors.
ThesubpicturesignalsupportstheVIDEOINandS-VIDEOINconnectors.
• ThemainpicturesupportsanRGBsignalwitharesolutionof1280×1024pixelsorless.
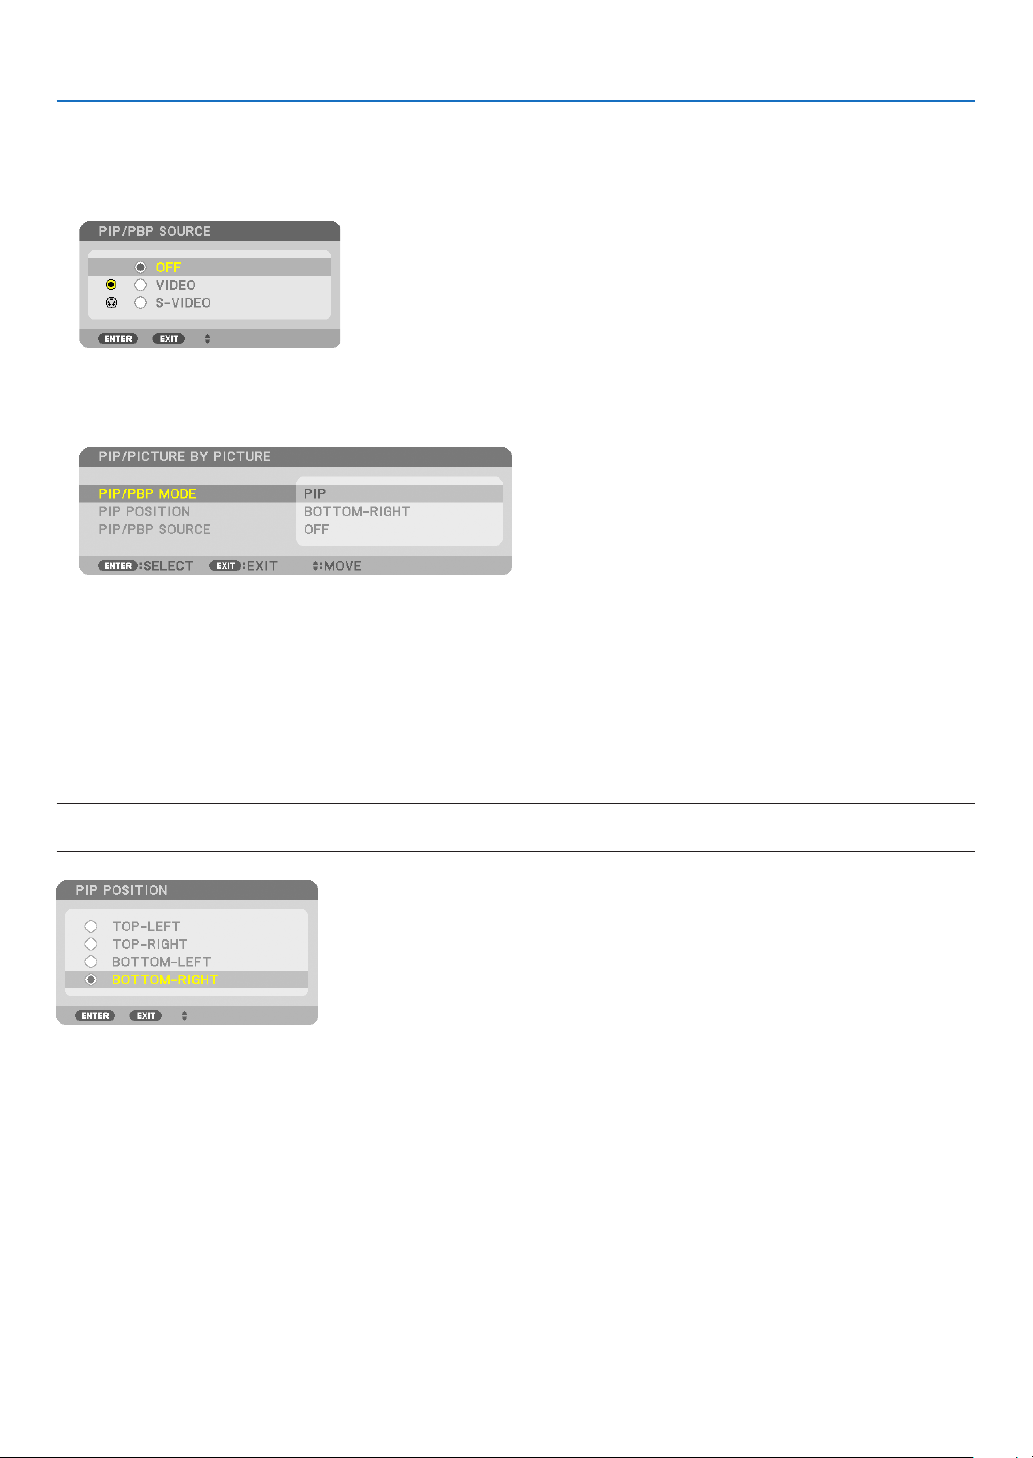
43
3. Convenient Features
ViewingTwoPictures
1. PressthePIP/FREEZEbuttonontheremotecontrol.
ThePIP/PBPSOURCEscreenwillbedisplayed.
2. Use the ▲ or ▼buttontoselectthesourceandpresstheENTERbutton.
ThePIPscreenorPICTURE BY PICTUREscreenwillbe displayed,dependingonwhich wasselectedin the
[MODE] setting screen.
3. PressthePIP/FREEZEbuttonagaintoreturntothenormalscreen(singlepicture).
TIP:
• Selectinganothersourcewillreturntothenormalscreen.
• Selectingasourcenotsupportedforthemainpictureorthesubpicturewillreturntothenormalscreen.
[POSITION]
Thisoptionallowsyoutoselectthepositionofasubpictureinthemainpicture.
NOTE:
• Thedefaultsettingis[BOTTOM-RIGHT].
Usethe▲or▼buttontoselectthesubpicture’spositionandpresstheENTERbutton.
Theoptionsare:TOP-LEFT,TOP-RIGHT,BOTTOM-LEFT,andBOTTOM-RIGHT.
Thefollowingadjustmentsandsettingsareavailableforthemainpictureonly.
-Adjustingpicture
-MagnifyingapicturewiththeD-ZOOM/ZOOM+/−button.
Thefollowingoperationsareavailableforboththemainandsubpictures.
-Picturemute
-Freezingamovingpicture
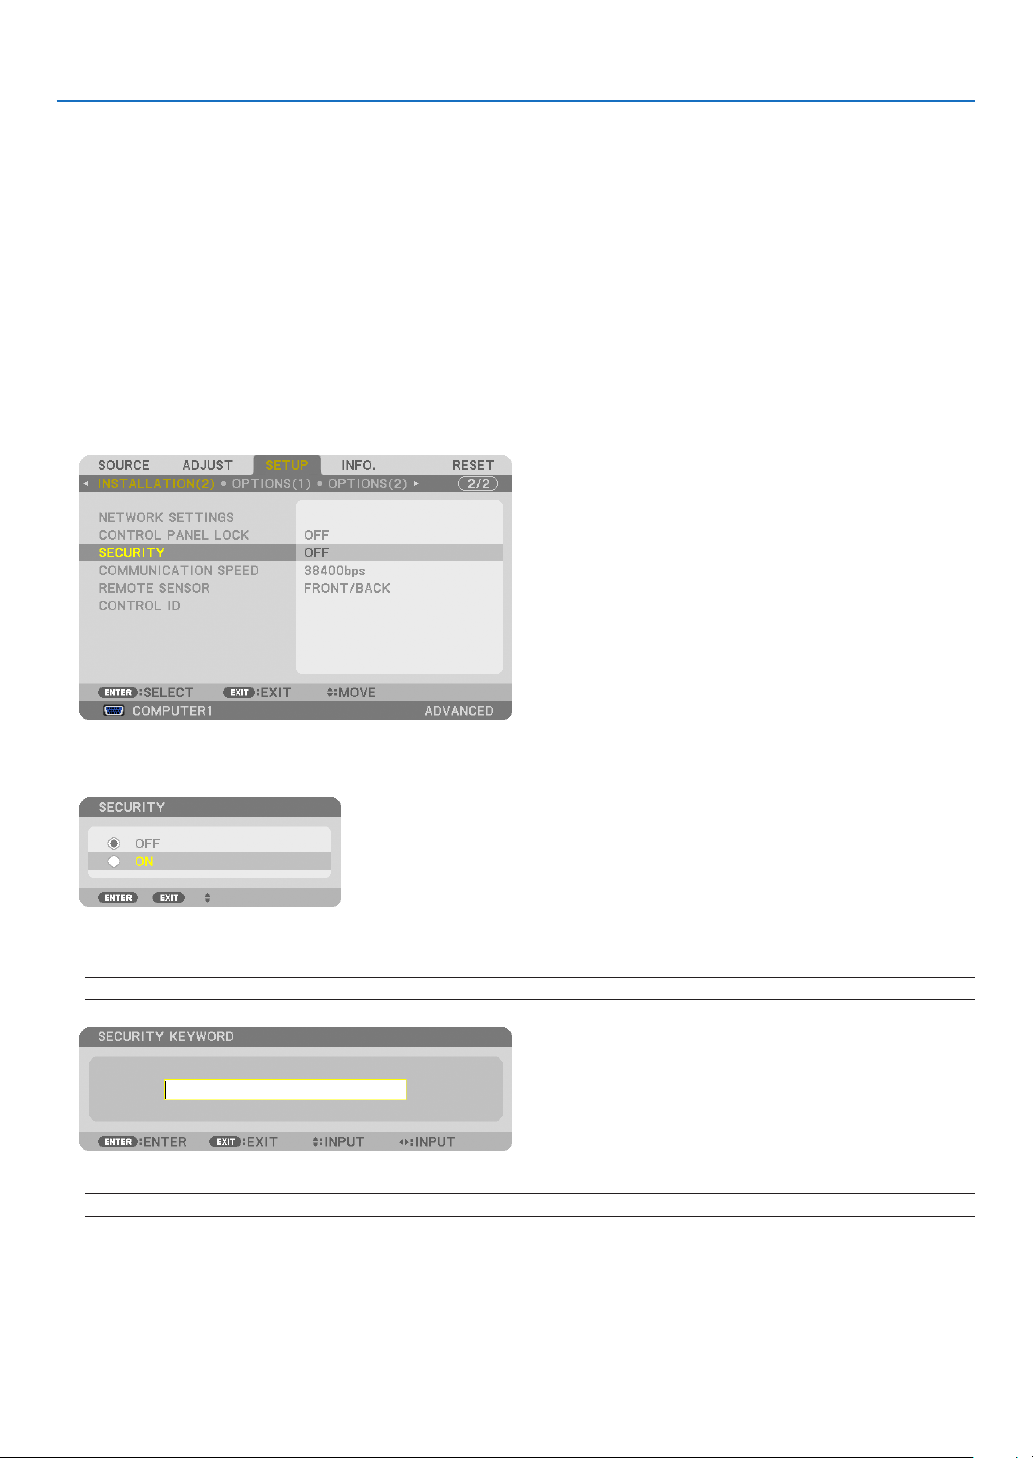
44
3. Convenient Features
❾
Preventing the Unauthorized Use of the Projector [SECURITY]
AkeywordcanbesetforyourprojectorusingtheMenutoavoidoperationbyanunauthorizeduser.Whenakeyword
isset,turningontheprojectorwilldisplaytheKeywordinputscreen.Unlessthecorrectkeywordisentered,thepro-
jectorcannotprojectanimage.
•The[SECURITY]settingcannotbecancelledbyusingthe[RESET]ofthemenu.
ToenabletheSecurityfunction:
1. Press the MENU button.
The menu will be displayed.
2. Press the ▶buttontwicetoselect[SETUP]andpressthe▼buttonortheENTERbuttontoselect[BASIC].
3. Press the ▶buttontoselect[INSTALLATION(2)].
4. Press the ▼buttonthreetimestoselect[SECURITY]andpresstheENTERbutton.
The OFF/ON menu will be displayed.
5. Press the ▼buttontoselect[ON]andpresstheENTERbutton.
The[SECURITYKEYWORD]screenwillbedisplayed.
6. Typeinacombinationofthefour▲▼◀▶buttonsandpresstheENTERbutton.
NOTE:Akeywordmustbe4to10digitsinlength.
The[CONFIRMKEYWORD]screenwillbedisplayed.
NOTE:Makeanoteofyourpasswordandstoreitinasafeplace.
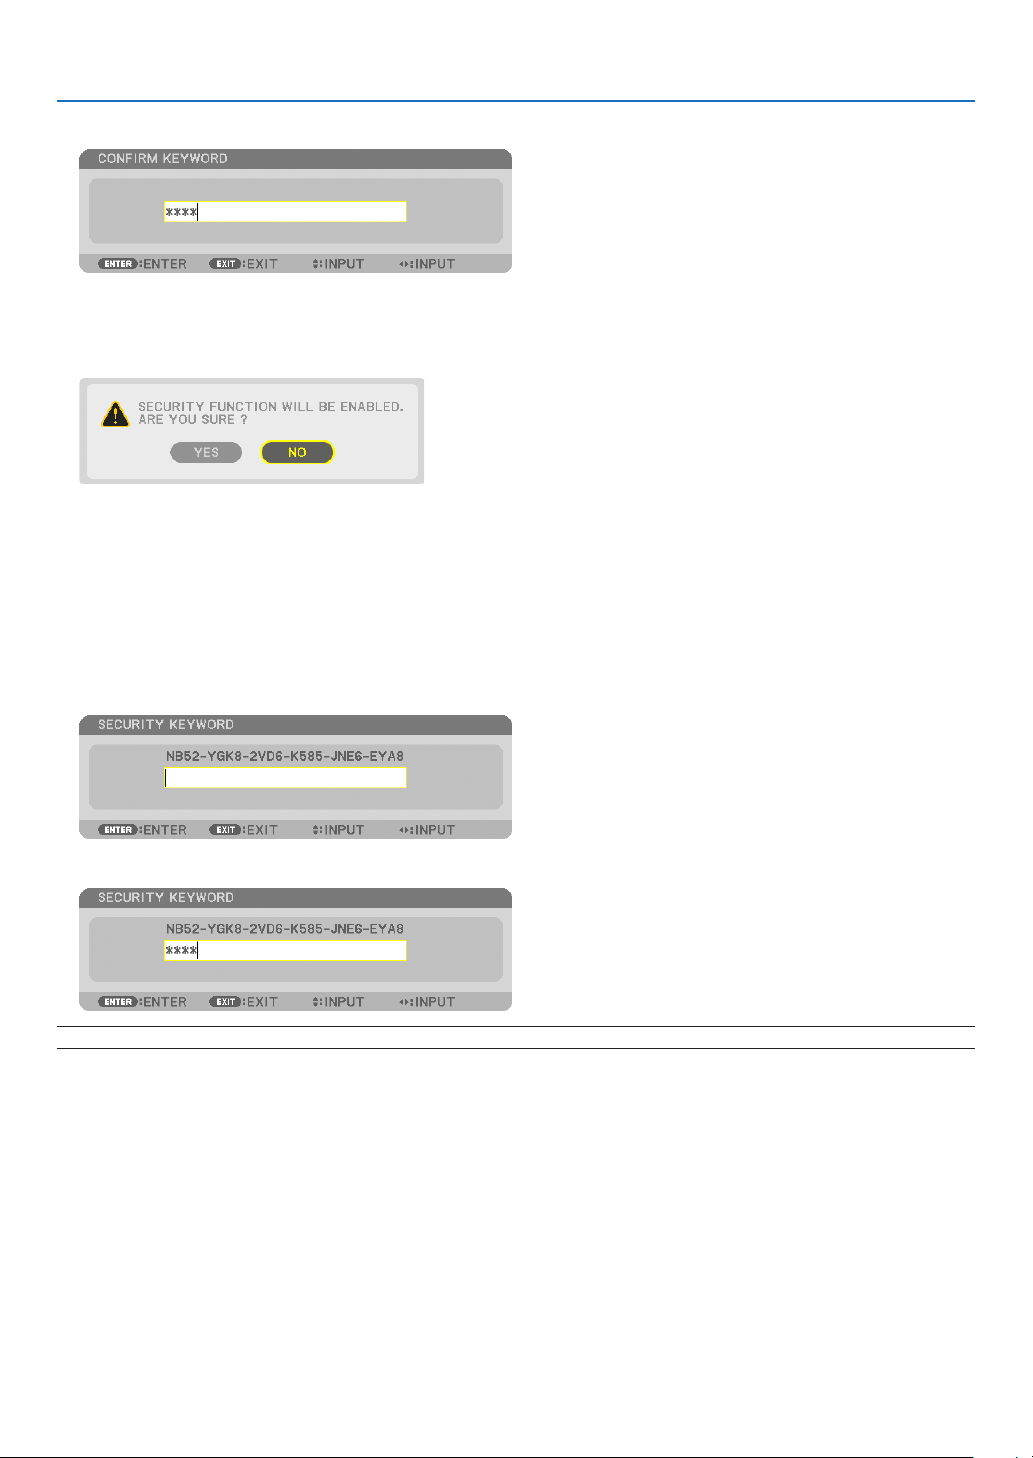
45
3. Convenient Features
7. Typeinthesamecombinationof▲▼◀▶buttonsandpresstheENTERbutton.
The confirmation screen will be displayed.
8. Select[YES]andpresstheENTERbutton.
TheSECURITYfunctionhasbeenenabled.
To turn on the projector when [SECURITY] is enabled:
1. PressthePOWERbutton.
The projector will be turned on and display a message to the effect that the projector is locked.
2. Press the MENU button.
3. TypeinthecorrectkeywordandpresstheENTERbutton.Theprojectorwilldisplayanimage.
NOTE: The security disable mode is maintained until the main power is turned off or unplugging the power cord.
46
3. Convenient Features
To disable the SECURITY function:
1. Press the MENU button.
The menu will be displayed.
2.Select[SETUP]→[INSTALLATION(2)]→[SECURITY]andpresstheENTERbutton.
The OFF/ON menu will be displayed.
3. Select[OFF]andpresstheENTERbutton.
TheSECURITYKEYWORDscreenwillbedisplayed.
4. TypeinyourkeywordandpresstheENTERbutton.
Whenthecorrectkeywordisentered,theSECURITYfunctionwillbedisabled.
NOTE:Ifyouforgetyourkeyword,contactyourdealer.Yourdealerwillprovideyouwithyourkeywordinexchangeforyourrequest
code.YourrequestcodeisdisplayedintheKeywordConrmationscreen.Inthisexample[NB52-YGK8-2VD6-K585-JNE6-EYA8]
is a request code.

47
3. Convenient Features
❿ Storing Changes for Lens Shift, Zoom, and Focus [LENS
MEMORY]
TheadjustedvaluescanbestoredinprojectormemorywhenusingtheLENSSHIFT,ZOOMandFOCUSbuttons
oftheprojector.Adjustedvaluescanbeappliedtothesignalyouselected.Thiswilleliminatetheneedtoadjustlens
shift,focus,andzoomatthetimeofsourceselection.Therearetwowaystosaveadjustedvaluesforlensshift,zoom,
andfocus.
Functionname Description page
REF.LENSMEMORY Adjustedvaluescommontoalltheinputsignals.
Ifnoadjustedvaluesarestoredin[LENSMEMORY],thevaluesstored
in[REF.LENSMEMORY]willbeappliedforlensadjustment.
→page125
LENSMEMORY Adjustedvaluesforeachinputsignal.
Usetheadjustedvaluesforthesignalwithadifferentaspectratioor
resolution.Theadjustedvaluescanbeappliedatthetimeofsource
selection.
→page116
NOTE:
• Thelensshift,zoom,andfocusadjustmentscanbeperformedwiththeremotecontrol.(→ page 24, 25, 28)
• PX700W2/PX800X2:TheNP06FL,NP07ZL,NP08ZL,NP09ZLandNP10ZLlensesdonotsupportZoompositionandFocusposi-
tion.DonotusetheLENSMEMORYfunctiontostorethelensshiftpositiondatawhenusingtheNP06FLlens.Doingsomay
cause a shadow on the screen.
• PX750U2:DonotusetheLENSMEMORYfunctiontostorethelensshiftpositiondatawhenusingtheNP16FLlens.Doingso
may cause a shadow on the screen.
ZoompositiondatacannotbestoredbecausetheNP16FLlensdoesnothaveazoomfunction.
• Besuretoperform[CALIBRATION]afterreplacementofthelens.
Usage Example
Whenyouwishtodisplayonascreenhavinga4:3aspectratioanNTSCorother4:3aspectratiosignalandan
SXGAorother5:4aspectratiosignal:
Performshift,focus,andzoomadjustmentstosettheverticalscreensizeoftheverticallytall5:4aspectratiosignal
tostandard.
Both4:3aspectratiosignalsand5:4aspectratiosignalscannowbedisplayed.
Notethatwiththeseshift,focus,andzoomadjustments,the4:3aspectratiosignalwillbecomesmalleronthescreen.
Toeliminatethissizereduction,adjusttheshift,focusandzoomtotheoptimumconditionforeachofthe4:3aspect
ratiosignalandthe5:4aspectratiosignal.
Memory(storage)ofeachofthesevalueswillpermitprojectionatanoptimumconditionuponsignalswitching.
To store your adjusted values in [REF. LENS MEMORY]:
1. Press the MENU button.
The menu will be displayed.
2. Press the ▶buttontoselect[SETUP]andpresstheENTERbutton.
48
3. Convenient Features
3. Press the ▶buttontoselect[INSTALLATION(1)].
4. Press the ▼buttontoselect[REF.LENSMEMORY]andpresstheENTERbutton.
The [REF. LENS MEMORY] screen will be displayed.
5. Select[STORE]andpresstheENTERbutton.
The confirmation screen will be displayed.
6. Press the ◀buttontoselectand[YES]andpresstheENTERbutton.
The adjusted values for lens shift, zoom, and focus have been stored in [REF. LENS MEMORY].
7. Press the MENU button.
The menu will be closed.
TIP:
• Tostoreadjustedvaluesforeachinputsource,usetheLensMemoryfunction.
49
3. Convenient Features
To call up your adjusted values from [REF. LENS MEMORY]:
1. Press the MENU button.
The menu will be displayed.
2. Press the ▶buttontoselect[SETUP]andpresstheENTERbutton.
3. Press the ▶buttontoselect[INSTALLATION(1)].
4. Press the ▼buttontoselect[REF.LENSMEMORY]andpresstheENTERbutton.
The [REF. LENS MEMORY] screen will be displayed.
5. Select[MOVE]andpresstheENTERbutton.
The confirmation screen will be displayed.
6. Press the ◀buttontoselectand[YES]andpresstheENTERbutton.
The adjusted values will be applied to the current signal. .
7. Press the MENU button.
The menu will be closed.
50
3. Convenient Features
TIP:
Tocalluptheadjustedvaluesfrom[LENSMEMORY]:
1. Fromthemenu,select[ADJUST]→[LENSMEMORY]→[MOVE]andpresstheENTERbutton.
The confirmation screen will be displayed.
2. Press the ◀buttontoselectand[YES]andpresstheENTERbutton.
The adjusted values stored in [LENS MEMORY] will be applied to the current signal.
Toautomaticallyapplytheadjustedvaluesatthetimeofsourceselection:
1. Fromthemenu,select[SETUP]→[REF.LENSMEMORY]→[LOADBYSIGNAL]andpresstheENTERbut-
ton.
2. Pressthevbuttontoselectand[ON]andpresstheENTERbutton.
This will move the lens automatically to the position at the time of source selection according to the adjusted values.
NOTE:TheLensMemoryfunctionmaynotproduceacompletelyalignedimage(duetotolerancesinthelenses)usingtheadjusted
valuesstoredintheprojector.AftercallingupandapplyingtheadjustedvaluesfromtheLensMemoryfunction,nelyadjustthe
lens shift, zoom and focus to produce the best possible image.
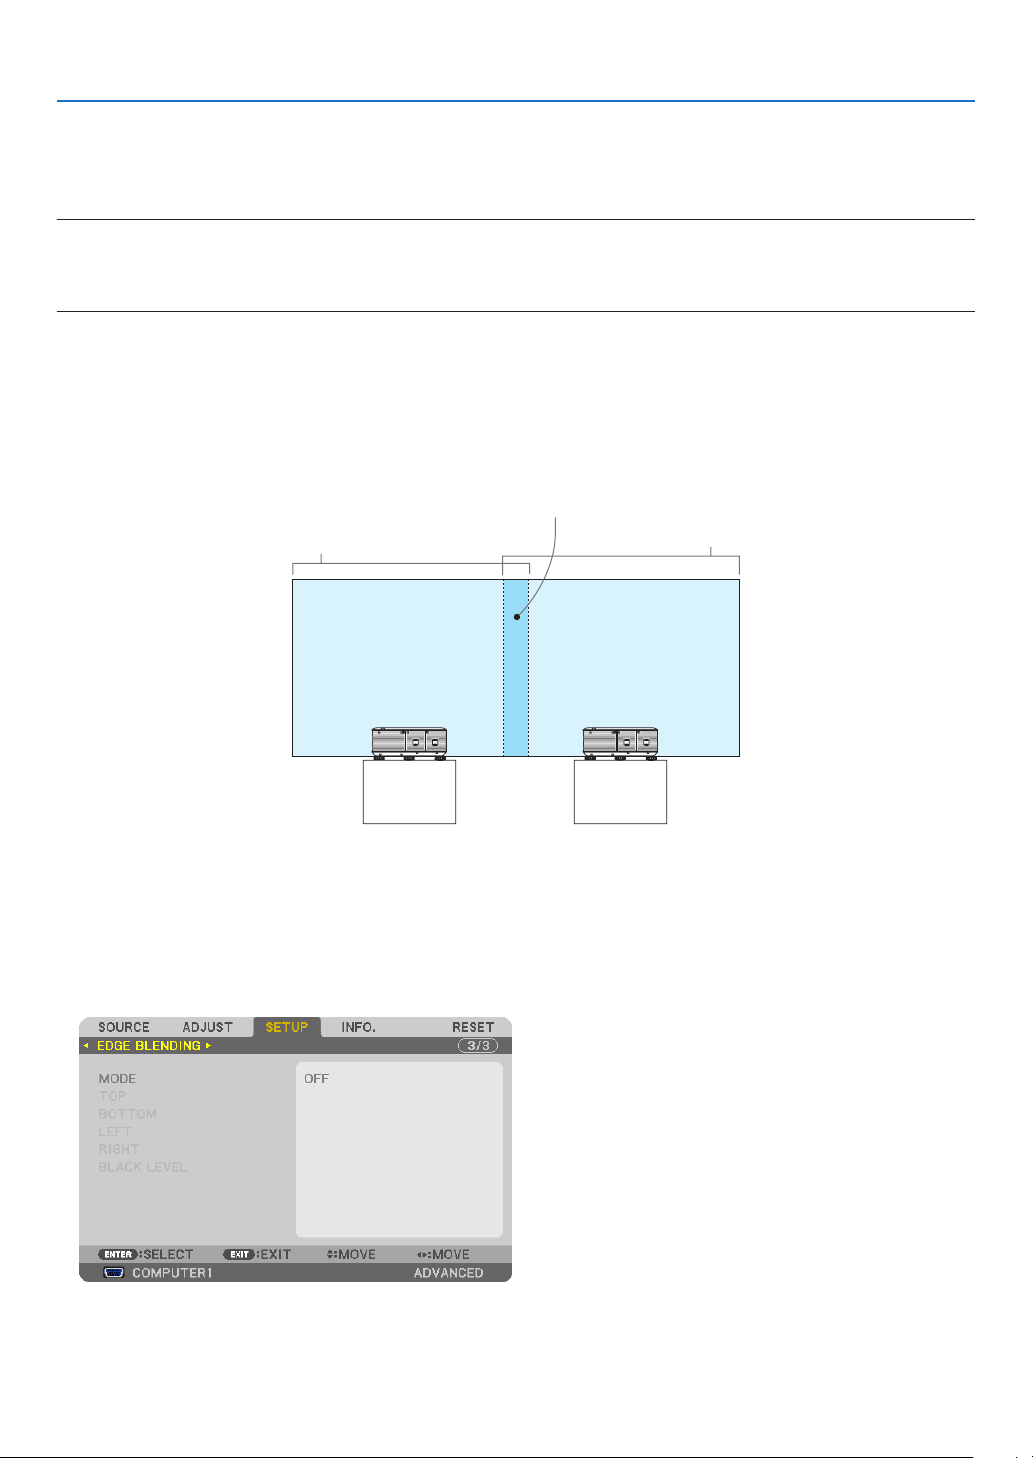
51
3. Convenient Features
⓫ Displaying a Picture Using [EDGE BLENDING]
TheEDGEBLENDINGfunctionallowsamulti-screenimagewithhighresolutiontobedisplayedonalargescreen.
Thisfunctionadjustsoverlappingedgesofimagesprojectedfromeachprojectortouniformmulti-screenimages.
NOTE:
• Forprojectorthrowdistances,referto“Throwdistanceandscreensize”onpage212, 213, 214, 215.
• BeforeperformingtheEdgeBlendingfunction,placetheprojectorinthecorrectpositionsothattheimagebecomessquarein
theappropriatesize,andthenmakeopticaladjustments(lensshift,focus,andzoom).
Before explaining use of the Edge Blending function
Thissectionexplainsthecasefor“Example:Placingtwoprojectorssidebyside”.Asshown,theprojectedimageon
theleftisreferredtoas“ProjectorA”andtheprojectedimageontherightisreferredto“ProjectorB”.Unlessotherwise
speciedhereinafter,the“projector”isusedtomeanbothAandB.
Example:Placingtwoprojectorssidebyside
Edge Blending area
Projected area
Projected area
Projector A Projector B
Preparation:
• Turnontheprojectoranddisplayasignal.
• Tousetwoormoreprojectors,youhavetoturnon[CONTROLID]fromthemenu.Formoreinformation,referto
“SettingIDtotheProjector[CONTROLID]”onpage126.
① Enable [EDGE BLENDING].
1 Select[SETUP]→[EDGEBLENDING]andpresstheENTERbutton.
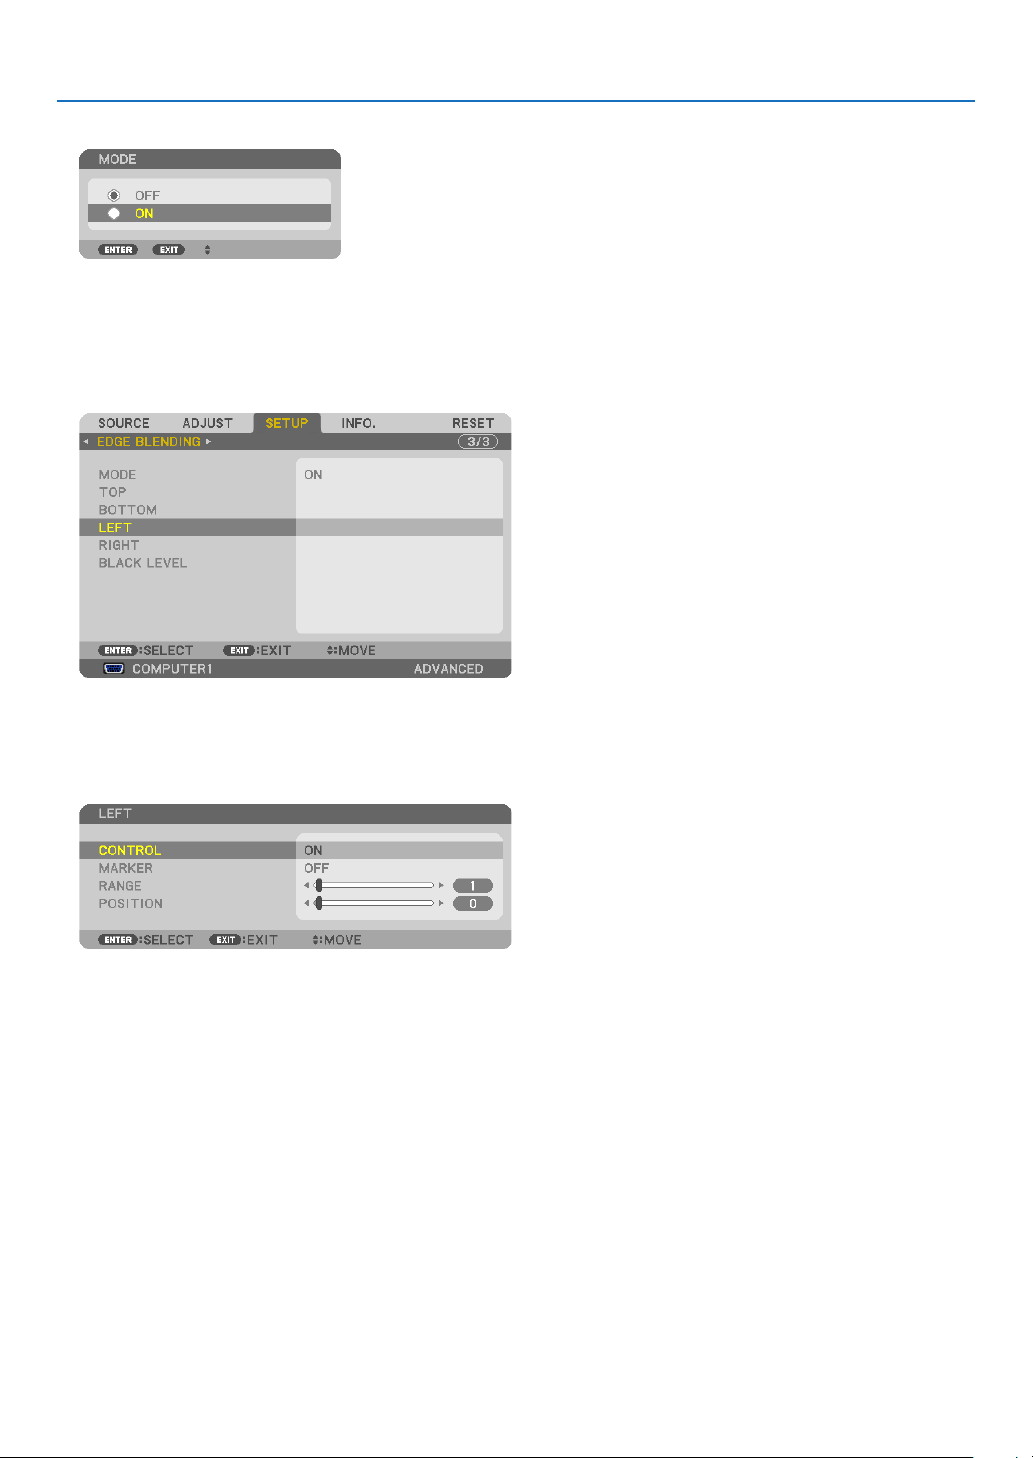
52
3. Convenient Features
2 Select[MODE]→[ON]andpresstheENTERbutton.
This enables the Edge Blending function. The following menu items are available:
[TOP],[BOTTOM],[LEFT],[RIGHT],and[BLACKLEVEL]
3 Select[RIGHT]forProjectorAand[LEFT]forProjectorB.
Press the ENTER button.
The following items are available:
[CONTROL],[MARKER],[RANGE],and[POSITION]
4 Select[CONTROL]→[ON]andpresstheENTERbutton.
Each[TOP],[BOTTOM],[LEFT],[RIGHT],and[BLACKLEVEL]hasitsown[CONTROL],[MARKER],[RANGE],
and[POSITION].Turningon[CONTROL]willmake[MARKER],[RANGE],and[POSITION]available.
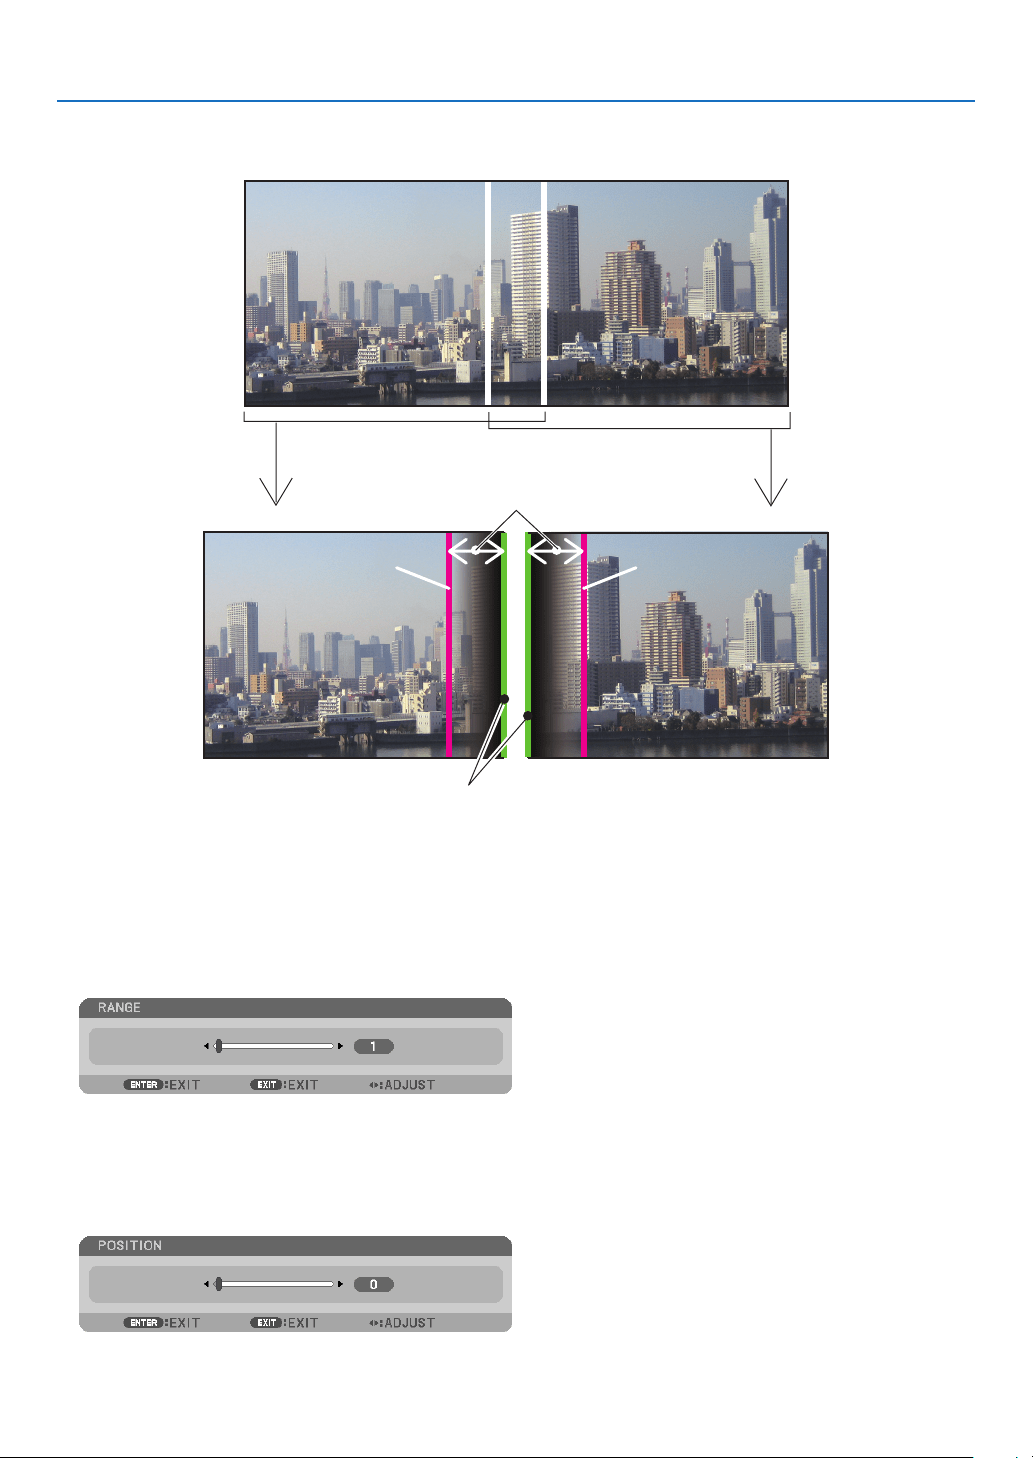
53
3. Convenient Features
② Adjust [RANGE] and [POSITION] to determine an area of overlapped edges of images
projected from each projector.
[RANGE]
(Determine an area of overlapped edges of
images.)
[POSITION]
(Determine the position of overlapped edges of images.)
Greenmarker
Turnon[RIGHT]
Magenta marker
Turn on [LEFT]
Magenta marker
Turningon[MARKER]willdisplaymarkersinmagentaandgreen.
Themagentamarkerisusedfor[RANGE]andgreenonefor[POSITION].
1 Adjust[RANGE].
Use the ◀ or ▶ button to adjust the overlapped area.
TIP:
• Adjusttooverlaponeprojector’markerwiththeotherprojector’smarker.
2 Adjust[POSITION].
Use the ◀ or ▶ button to align one edge with the other edge of overlapped images.
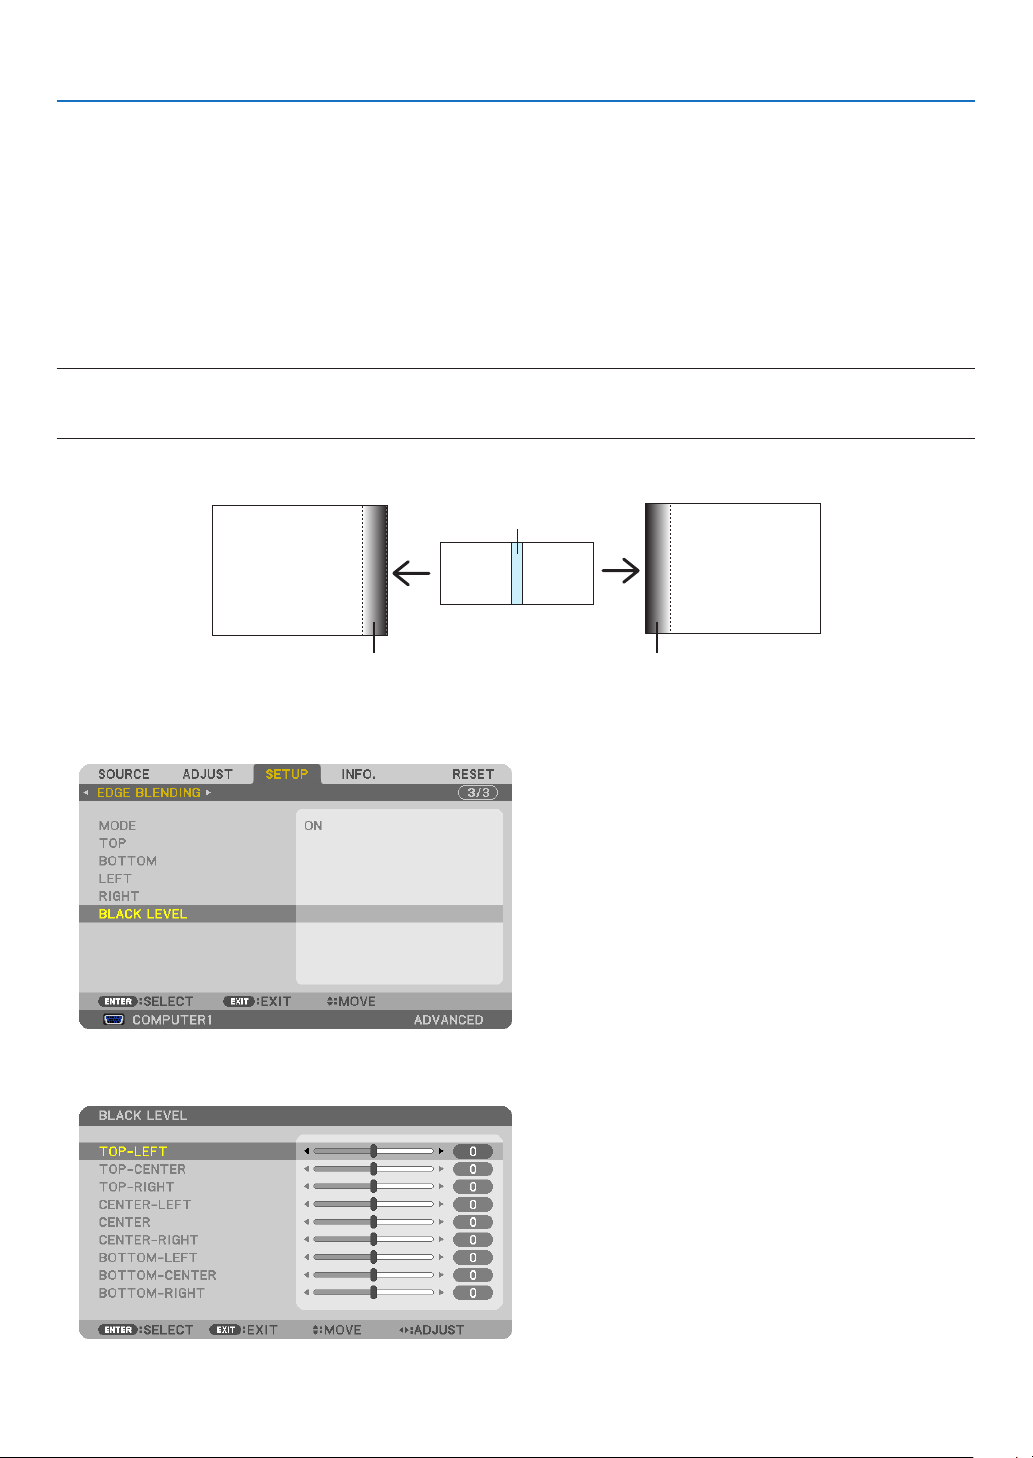
54
3. Convenient Features
TIP:
• Whendisplayingasignalwithadifferentresolution,performtheEdgeBlendingfunctionfromthestart.
• Settingof[MARKER]willnotbesavedandreturnto[OFF]whentheprojectoristurnedoff.
• Todisplayorhidethemarkerwhiletheprojectorisrunning,turnonoroff[MARKER]fromthemenu.
• Ifyouwanttomakedifferencesinwhitebalanceandbrightnessbetweenprojectorslessvisible,adjust[REF.WHITEBALANCE]
and[MULTI-SCREENCOMP.]toobtainthepossiblebestresults.(→ page 124)
Black Level Adjustment
Ifyounoticeanydifferencesinthebrightnessofanimage,use[BLACKLEVEL]toadjustthedarkestpartorthelevel
ofbrightness.
NOTE:
Thisfunctionisenabledonlywhen[MODE]isturnedon.
Adjustableareavariesdependingonwhatcombinationof[TOP],[BOTTOM],[LEFT]and[RIGHT]areturnedon.
Example:AdjustingtheBlackLevelwhenplacingtwoprojectorssidebyside
Width of overlap
Adjust [CENTER] Adjust [CENTER]
Projector A’s
image
Projector B’s
image
Adjust[CENTER-RIGHT] Adjust [CENTER-LEFT]
1. Turnon[MODE]
2. Select[BLACKLEVEL]andpresstheENTERbutton.
3. Use the ▼ or ▲ button to select an item and use the ◀ or ▶ to adjust the black level.
Do this for the other projector if necessary.
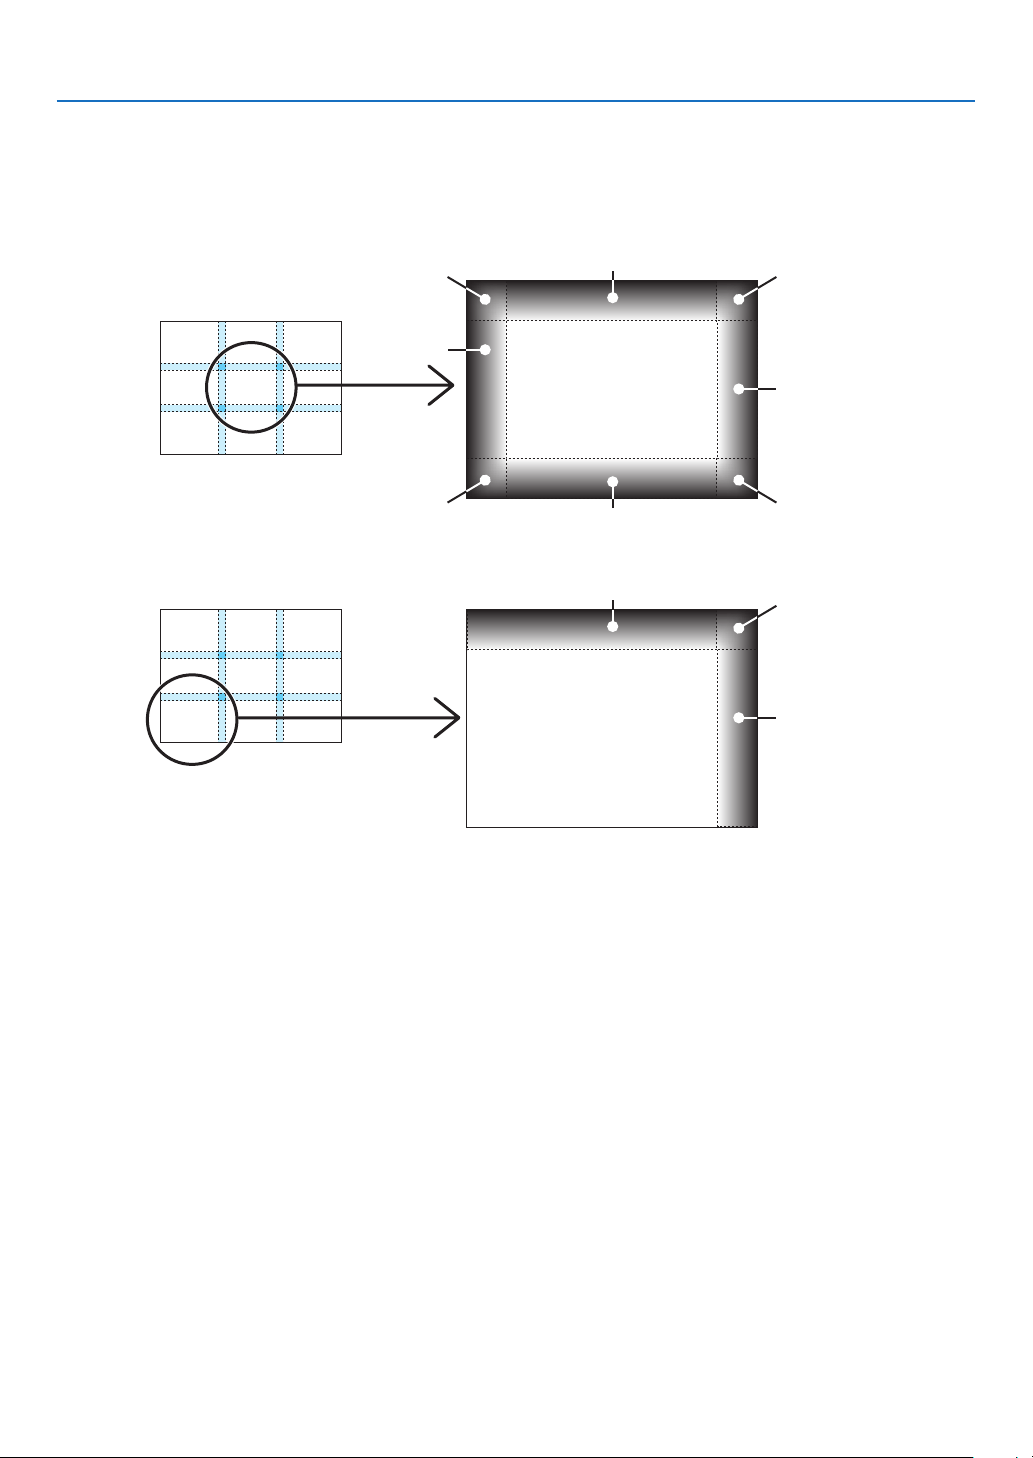
55
3. Convenient Features
9-segmented portions for Black Level adjustment
Thecenterprojector
Thisfunctionadjuststhebrightnesslevelof9-segmentedportionsforthecenterprojectorand4-segmentedportions
fortheleftbottomprojectorasshownbelow.
TOP-LEFT
BOTTOM-LEFT
CENTER-
LEFT
TOP-RIGHT
CENTER-RIGHT
BOTTOM-RIGHT
TOP-CENTER
CENTER
CENTER
BOTTOM-CENTER
TOP-RIGHT
CENTER-RIGHT
TOP-CENTER

56
3. Convenient Features
⓬ Controlling the Projector by Using an HTTP Browser
Overview
TheHTTPServerfunctionprovidessettingsandoperationsfor:
1. Settingforwired/wirelessnetwork(NETWORKSETTINGS)
To use wireless LAN connection, the optional USB Wireless LAN Unit is required. (→ page 172)
To use wired/wireless LAN connection, connect the projector to the computer with a commercially available LAN
cable. (→ page 171)
2. SettingAlertMail(ALERTMAIL)
When the projector is connected to a wired/wireless network, lamp replace time or error messages will be sent via
e-mail.
3. Operatingtheprojector
Power on/off, selecting input, and picture adjustments are possible.
4. SettingPJLinkPASSWORDandAMXBEACON
TwowaysofaccesstotheHTTPserverfunctionareavailable:
• StarttheWebbrowseronthecomputerviathenetworkconnectedtotheprojectorandenterthefollowing
URL:
http://<theprojector’sIPaddress>/index.html
• UseImageExpressUtility2.0containedonthesuppliedNECProjectorCD-ROM.
TIP:ThefactorysettingIPaddressis[DHCPON].
NOTE:
• Tousetheprojectorinanetwork,consultwithyournetworkadministratoraboutnetworksettings.
• Thedisplay’sorbutton’sresponsecanbesloweddownoroperationmaynotbeaccepteddependingthesettingsofyournetwork.
Shouldthishappen,consultyournetworkadministrator.Theprojectormaynotrespondifitsbuttonsarerepeatedlypressedin
rapidintervals.Shouldthishappen,waitamomentandrepeat.Ifyoustillcan’tgetanyresponse,turnoffandbackontheprojec-
tor.
• IfthePROJECTORNETWORKSETTINGSscreendoesnotappearinthewebbrowser,presstheCtrl+F5keystorefreshyourweb
browser(orclearthecache).
• Thisdeviceuses“JavaScript”and“Cookies”andthebrowsershouldbesettoacceptthesefunctions.Thesettingmethodwill
varydependingontheversionofbrowser.Pleaserefertothehelplesandtheotherinformationprovidedinyoursoftware.
Preparation before Use
ConnecttheprojectortoacommerciallyavailableLANcablebeforeengaginginbrowseroperations.(→page171)
Operationwithabrowserthatusesaproxyservermaynotbepossibledependingonthetypeofproxyserverandthe
settingmethod.Althoughthetypeofproxyserverwillbeafactor,itispossiblethatitemsthathaveactuallybeenset
willnotbedisplayeddependingontheeffectivenessofthecache,andthecontentssetfromthebrowsermaynotbe
reectedinoperation.Itisrecommendedthataproxyservernotbeusedunlessitisunavoidable.
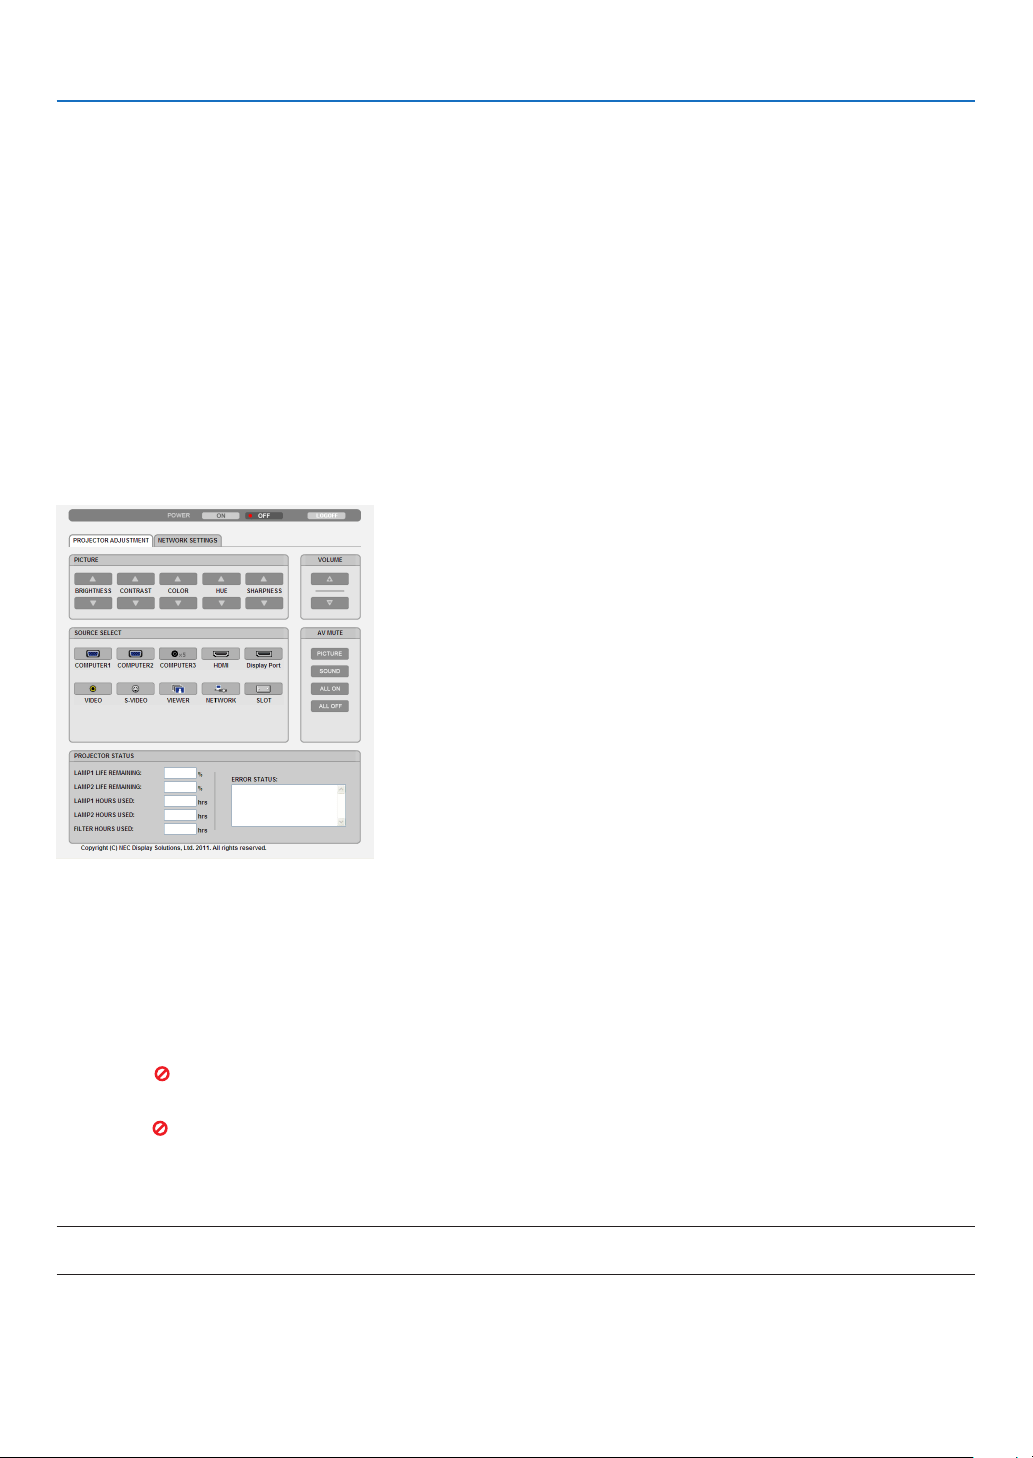
57
3. Convenient Features
Handling of the Address for Operation via a Browser
RegardingtheactualaddressthatisenteredfortheaddressorenteredtotheURLcolumnwhenoperationofthepro-
jectorisviaabrowser,thehostnamecanbeusedasitiswhenthehostnamecorrespondingtotheIPaddressofthe
projectorhasbeenregisteredtothedomainnameserverbyanetworkadministrator,orthehostnamecorresponding
totheIPaddressoftheprojectorhasbeensetinthe“HOSTS”leofthecomputerbeingused.
Example1:Whenthehostnameoftheprojectorhasbeensetto“pj.nec.co.jp”,accessisgainedtothenetwork
settingbyspecifying
http://pj.nec.co.jp/index.html
fortheaddressortheentrycolumnoftheURL.
Example2:WhentheIPaddressoftheprojectoris“192.168.73.1”,accessisgainedtothenetworksettingby
specifying
http://192.168.73.1/index.html
fortheaddressortheentrycolumnoftheURL.
PROJECTOR ADJUSTMENT
POWER:Thiscontrolsthepoweroftheprojector.
ON ������������������������� Power is switched on�
OFF ������������������������ Power is switched off�
VOLUME:Thiscontrolisnotavailableonthismodel.
AV-MUTE:Thiscontrolsthemutefunctionoftheprojector.
PICTURE ���������������� Mutes the video�
PICTURE ����������� Cancels the video muting�
SOUND* ���������������� Mutes the audio�
SOUND* ������������ Cancels the audio muting�
ALL ON ������������������ Mutes each of the video, and audio* functions�
ALL OFF ����������������� Cancels the muting of each of the video, and audio* functions�
NOTE:
* Thesoundmutefunctionisnotavailablebecausetheprojectordoesnothaveanaudiofunction.

58
3. Convenient Features
PICTURE:Controlsthevideoadjustmentoftheprojector.
BRIGHTNESS ▲ ���� Increases the brightness adjustment value�
BRIGHTNESS ▼ ���� Decreases the brightness adjustment value�
CONTRAST ▲ �������� Increases the contrast adjustment value�
CONTRAST ▼ �������� Decreases the contrast adjustment value�
COLOR ▲ �������������� Increases the color adjustment value�
COLOR ▼ �������������� Decreases the color adjustment value�
HUE ▲ ������������������� Increases the hue adjustment value�
HUE ▼ ������������������� Decreases the hue adjustment value�
SHARPNESS ▲ ����� Increases the sharpness adjustment value�
SHARPNESS ▼ ����� Decreases the sharpness adjustment value�
• Thefunctionsthatcanbecontrolledwillvarydependingonthesignalbeinginputtotheprojector.(→page110)
SOURCESELECT:Thisswitchestheinputconnectoroftheprojector.
COMPUTER 1 �������� Switches to the COMPUTER 1 IN connector�
COMPUTER 2 �������� Switches to the COMPUTER 2 IN connector�
COMPUTER 3 �������� Switches to the COMPUTER 3 IN connector�
HDMI ��������������������� Switches to the HDMI IN connector�
DisplayPort ������������ Switches to the DisplayPort�
VIDEO �������������������� Switches to the VIDEO IN connector�
S-VIDEO ���������������� Switches to the S-VIDEO IN connector�
VIEWER ����������������� Switches to the data on the USB memory device�
NETWORK ������������� Switches to a LAN signal�
SLOT ���������������������� Switches to the optional board�
PROJECTORSTATUS:Thisdisplaystheconditionoftheprojector.
LAMP 1 LIFE REMAINING ��Displays the remaining life of the lamp 1 as a percentage�
LAMP 2 LIFE REMAINING ��Displays the remaining life of the lamp 2 as a percentage�
LAMP 1 HOURS USED ��������Displays how many hours the lamp 1 has been used�
LAMP 2 HOURS USED ��������Displays how many hours the lamp 2 has been used�
FILTER HOURS USED ���������Displays how many hours the filter has been used�
ERROR STATUS ������������������Displays the status of errors occurring within the projector�
LOGOFF:Loggingoffyourprojectorandreturningtotheauthenticationscreen(LOGONscreen).

59
3. Convenient Features
NETWORK SETTINGS
•SETTINGS
WIRED or WIRELESS
SETTING SetforwiredLANorforwirelessLAN.
APPLY ApplyyoursettingstowiredLANorwirelessLAN.
DHCPON AutomaticallyassignIPaddress,subnetmask,andgatewaytotheprojectorfromyour
DHCPserver.
DHCPOFF SetIPaddress,subnetmask,andgatewaytotheprojectorassignedbyyournetwork
administrator.
IPADDRESS SetyourIPaddressofthenetworkconnectedtotheprojector.
SUBNETMASK Setyoursubnetmasknumberofthenetworkconnectedtotheprojector.
GATEWAY Setthedefaultgatewayofthenetworkconnectedtotheprojector.
WINS SettheIPaddressofyourWINSserverofthenetworkconnectedtotheprojectorwhen
[DHCP]isturnedon,thisoptionisnotavailable.
AUTODNSON DHCPserverwillautomaticallyassignIPaddressofDNSserverconnectedtothe
projector.
AUTODNSOFF SetyourIPaddressofDNSserverconnectedtotheprojector.
Setting for WIRED LAN
PROFILE1/PROFILE2 TwosettingscanbesetforwiredLANconnection.SelectPROFILE1orPROFILE2.
DISABLE TurnoffwiredLANconnection
SettingforWIRELESSLAN(theoptionalWirelessLANUnitrequiredforEurope,Australia,andAsiancountries)
EASYCONNECTION ExecuteawirelessLANusingEASYCONNECTION.
SIMPLEACCESPOINT Settheprojectorforsimpleaccesspoint.
WPS UseWPS(Wi-FiProtectedSetup™)tosetupthewirelessLANfortheprojector.
NOTE:Usetheprojector’smenustomakeWPSconnectionsandchangetheWPS
prolesettings.
CHANNEL Selectachannel.Availablechannelsvarydependingonthecountryandregion.When
youselect[INFRASTRUCTURE],makesurethattheprojectorandyouraccesspoint
areonthesamechannel;whenyouselect[ADHOC],makesurethattheprojectorand
yourcomputerareonthesamechannel.
PROFILE1/PROFILE2 TwosettingscanbesetforwirelessLANconnection.SelectPROFILE1orPROFILE2.
SSID Enteranidentier (SSID)forwirelessLAN.Communicationcanbedoneonlywith
equipmentwhoseSSIDmatchesSSIDforyourwirelessLAN.
60
3. Convenient Features
SITESURVEY DisplaysalistofavailableSSIDsforwirelessLANonsite.SelectanSSIDwhichyou
canaccess.
NETWORKTYPE SelectcommunicationmethodwhenusingwirelessLAN.
INFRASTRUCTURE:Selectthisoptionwhencommunicatingwithoneormoreequip-
mentconnectedtothewirelessLANnetworkviaawirelessaccesspoint.
ADHOC:SelectthisoptionwhenusingthewirelessLANtodirectlycommunicatewith
acomputerinpeer-to-peermode.
SECURITYTYPE Turnonorofftheencryptionmodeforsecuretransmission.Whenturnontheencryp-
tionmode,setWEPkeyorencryptedkey.
DISABLE Willnotturnontheencryptionfeature.Yourcommunicationsmay
bemonitoredbysomeone.
WEP64bit Uses64-bitdatalengthforsecuretransmission.
WEP128bit Uses128-bitdatalengthforsecuretransmission.Thisoptionwill
increaseprivacyand security when compared to useof64-bit
datalengthencryption.
WPA-PSKTKIP/WPA-PSKAES/
WPA2-PSKTKIP/WPA2-PSKAES/
WPA-EAPTKIPEAP-TLS/
WPA-EAPAESEAP-TLS/
WPA-EAPTKIPPEAP-MSCHAPv2/
WPA-EAPAESPEAP-MSCHAPv2/
WPA2-EAPTKIPEAP-TLS/
WPA2-EAPAESEAP-TLS/
WPA2-EAPTKIPPEAP-MSCHAPv2/
WPA2-EAPAESPEAP-MSCHAPv2
Theseoptionsparovidestrongersecurity
thanWEP.
NOTE:
• TheWEPsettingsmustbethesameascommunicationdevicessuchasPCoraccesspointin
your wireless network.
• WhenyouuseWEP,yourimagetransmissionspeedwillslowdown.
• OtherencryptionkeysthanWEP64bitandWEP128bitarenotavailablewhen[ADHOC]is
selectedfrom[NETWORKTYPE].
• Toinstalladigitalcerticate,usetheprojector’smenu.(→ page 149)
INDEX
Selectencryptionkeywhenselecting[WEP64bit]or[WEP128bit]in[SECURITY
TYPE].
KEY
Whenselecting[WEP64bit]or[WEP128bit]in[SECURITYTYPE]:
EnterWEPkey.
Select Characters(ASCII) Hexadecimaldigit(HEX)
WEP64bit Upto5characters Upto10characters
WEP128bit Upto13characters Upto26characters
Whenselecting [WPAPSK-TKIP],[WPA PSK-AES],[WPA2 PSK-TKIP]or[WPA2
PSK-AES]:
Enterencryptionkey.Keylengthmustbe8orgreaterand63orless.
USERNAME SetausernameforWPA-EAP/WPA2-EAP.
PASSWORD SetapasswordforWPA-EAPTKIPPEAP-MSCHAPv2/WPA-EAPAESPEAP-MSCHAP
v2/WPA2-EAPTKIPPEAP-MSCHAPv2/WPA2-EAPAESPEAP-MSCHAPv2.
USEDIGITALCERTIFI-
CATE
SelectthisifyouuseadigitalcerticateforWPA-EAPTKIPPEAP-MSCHAPv2/WPA-
EAPAESPEAP-MSCHAPv2/WPA2-EAPTKIPPEAP-MSCHAPv2/WPA2-EAPAES
PEAP-MSCHAPv2.

61
3. Convenient Features
•NAME
PROJECTORNAME Enteranameforyourprojectorsothatyourcomputercanidentifytheprojector.A
projectornamemustbe16charactersorless.
TIP:Projectornamewillnotbeaffectedevenwhen[RESET]isdonefromthemenu.
HOSTNAME Enterthehostnameofthenetworkconnectedtotheprojector.Ahostnamemustbe
15orless.
DOMAINNAME Enterthedomainnameofthenetworkconnectedtotheprojector.Adomainname
mustbe60charactersorless.
•ALERTMAIL
ALERTMAIL Thisoptionwillnotifyyourcomputeroflampreplacetimeorerrormessagesviae-mail
whenusingwirelessorwiredLAN.
PlacingacheckmarkwillturnontheAlertMailfeature.
ClearingacheckmarkwillturnofftheAlertMailfeature.
Sampleofamessagetobesentfromtheprojector:
Thelampandltersareattheendofitsusablelife.Pleasereplacethelampand
lters.
ProjectorName:XXXXX
Lamp1HoursUsed:XXX[H]
Lamp2HoursUsed:XXX[H]
SENDER’SADDRESS Entersender’saddress.
SMTPSERVERNAME EntertheSMTPservernametobeconnectedtotheprojector.
RECIPIENT’SADDRESS
1,2,3
Enteryourrecipient’saddress.Uptothreeaddressescanbeentered.
TESTMAIL Sendatestmailtocheckwhetheryoursettingsarecorrectornot
NOTE:
• Ifyouexecuteatest,youmaynotreceiveanAlertmail.Shouldthishappen,checkifnetwork
settings are correct.
• Ifyouenteredanincorrectaddressinatest,youmaynotreceiveanAlertmail.Shouldthis
happen,checkiftheRecipient’sAddressiscorrect.
SAVE Clickthisbuttontosaveyoursettingstotheprojector’smemory.

62
3. Convenient Features
•NETWORKSERVICE
PJLinkPASSWORD SetapasswordforPJLink*.Apasswordmustbe32charactersorless.Donotforget
yourpassword.However,ifyouforgetyourpassword,consultwithyourdealer.
HTTPPASSWORD SetapasswordforHTTPserver.Apasswordmustbe10charactersorless.
AMXBEACON TurnonorofffordetectionfromAMXDeviceDiscoverywhenconnectingtothenetwork
supportedbyAMX’sNetLinxcontrolsystem.
TIP:
WhenusingadevicethatsupportsAMXDeviceDiscovery,allAMXNetLinxcontrolsystemwill
recognizethedeviceanddownloadtheappropriateDeviceDiscoveryModulefromanAMXserver.
PlacingacheckmarkwillenabledetectingtheprojectorfromAMXDeviceDiscovery.
ClearingacheckmarkwilldisabledetectingtheprojectorfromAMXDeviceDiscovery.
NOTE: If you forget your password, contact your dealer.
*WhatisPJLink?
PJLinkisastandardizationofprotocolusedforcontrollingprojectorsofdifferentmanufacturers.Thisstandard
protocolisestablishedbyJapanBusinessMachineandInformationSystemIndustriesAssociation(JBMIA)in2005.
TheprojectorsupportsallthecommandsofPJLinkClass1.
SettingofPJLinkwillnotbeaffectedevenwhen[RESET]isdonefromthemenu.
CRESTRONROOMVIEWcompatibility
TheprojectorsupportsCRESTRONROOMVIEW,allowingmultipledevicesconnectedinthenetworktobemanaged
andcontrolledfromacomputeroracontroller.
Formoreinformation,visithttp://www.crestron.com
<Setting Procedure>
AccesstotheHTTPserverfunction,andmakenecessarysettingsfor[CRESTRON]in[NETWORKSETTINGS].
•ROOMVIEWformanagingfromthecomputer.
DISABLE DisablesROOMVIEW.
ENABLE EnablesROOMVIEW.
•CRESTRONCONTROLformanagingfromthecontroller.
DISABLE DisablesCRESTRONCONTROL.
ENABLE EnablesCRESTRONCONTROL.
IPADDRESS SetyourIPaddressofCRESTRONSERVER.
IPID SetyourIPIDofCRESTRONSERVER.
•INFORMATION
WIREDLAN DisplayalistofsettingsofwiredLANconnection.
WIRELESSLAN DisplayalistofsettingsofwirelessLANconnection.
UPDATE Reectsettingswhentheyarechanged.
TIP:TheCRESTRONsettingsarerequiredonlyforusewithCRESTRONROOMVIEW.
Formoreinformation,visithttp://www.crestron.com
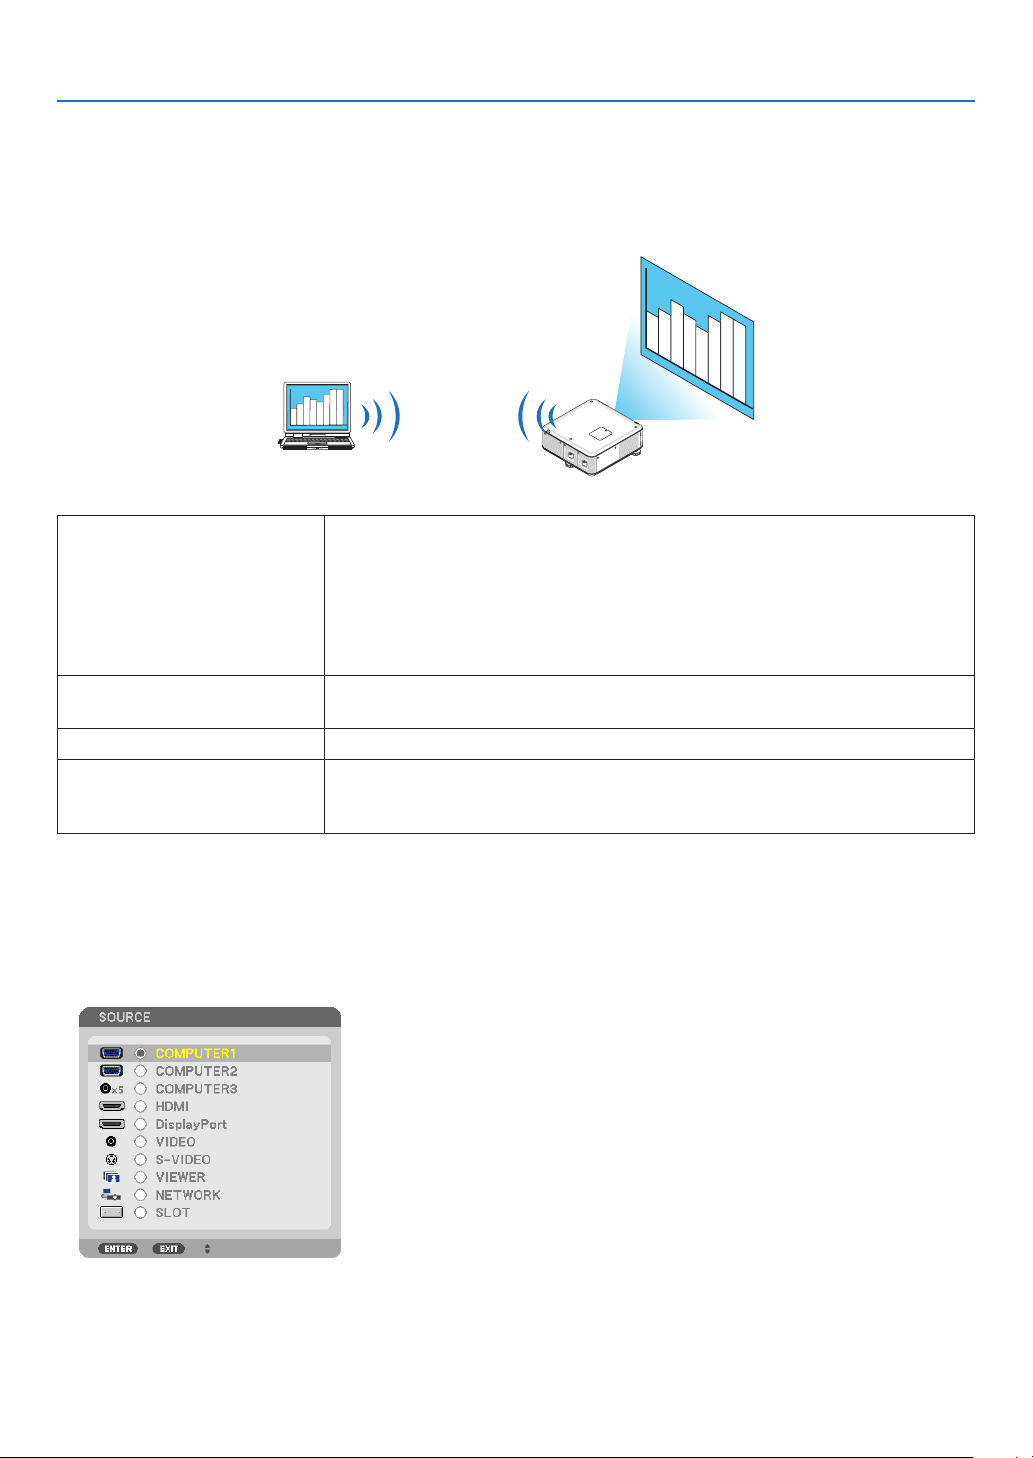
63
3. Convenient Features
⓭ Projecting Your Computer’s Screen Image from the
Projector via a Network [NETWORK PROJECTOR]
ByselectingtheprojectorconnectedtothesamenetworkasthatofyourPC,thePCscreenimagecanbeprojected
tothescreenvianetwork.Thereisnoneedofconnectionusingthecomputercable(VGA).
Operation Environment
ApplicableOS Windows7Professional
Windows7Ultimate
Windows7Enterprise
WindowsVistaHomePremium
WindowsVistaBusiness
WindowsVistaUltimate
WindowsVistaEnterprise
Hardwarespecications ThespecicationsrecommendedbyMicrosoftastheoperationenvironmentfor
Windows7/WindowsVistashouldbesatised.
NetworkEnvironment WiredLANorwirelessLANenvironmentthatsupportsTCP/IPisrequired.
Screencolor HighColor(16bits)
TrueColor(24bitsand32bits)
*Settingwith256colorsorlessisnotavailable.
SettingtheProjectortoNetworkProjectorInputMode
1. Withtheprojectorturnedon,presstheSOURCEbutton.
The input selection window appears.
Another way to display the input selection window is to press the NETWORK button on the remote control. The
APPLICATIONMENUscreenwillbedisplayed.Gotostep3.
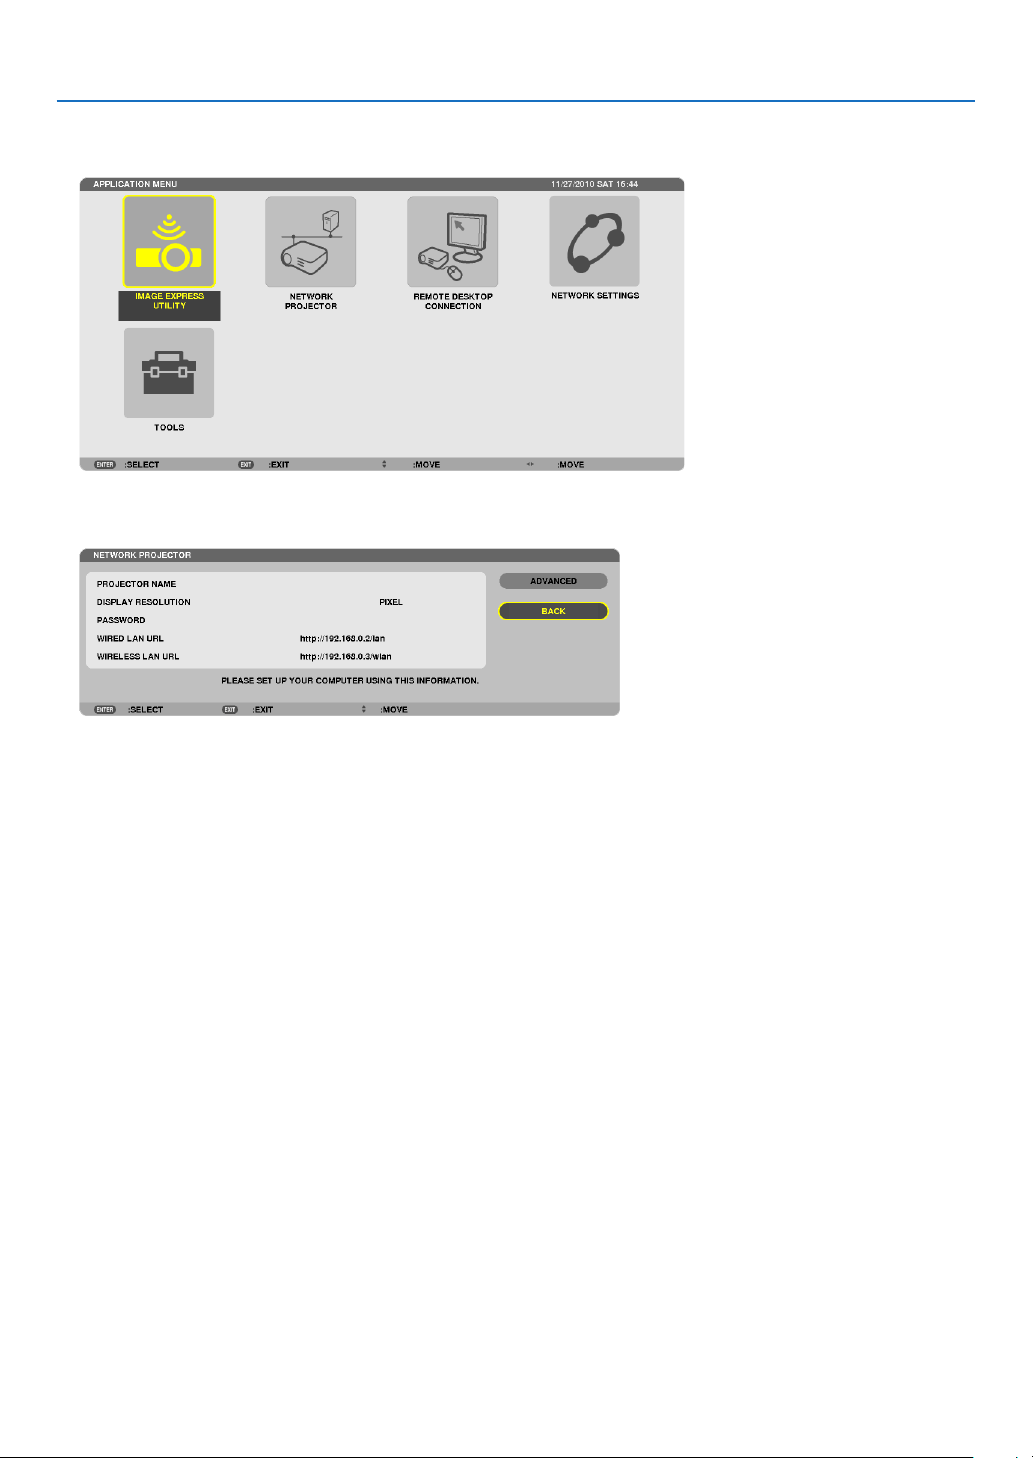
64
3. Convenient Features
2. Press the ▼ or ▲buttontoselect[NETWORK]andpresstheENTERbutton.
Inthescreen,the[APPLICATIONMENU]menuisdisplayed.
3. Fromthe[APPLICATIONMENU]menu,select[NETWORKPROJECTOR].
The[PROJECTORNAME/DISPLAYRESOLUTION/PASSWORD/URL]willbedisplayed.

65
3. Convenient Features
ProjectingtheImagewithNetworkProjector
1. Click[Start]fromthedesktopofWindows7.
2. Click[AllPrograms].
3. Click[Accessories].
4. Click[ConnecttoaNetworkProjector].
When the [Permission Connect to a Network Projector] window appears, click [Yes.].
The “Connect to a Network Projector” window appears.
5. Click[→Searchforaprojector(recommended)].
Inthe“Availableprojectors”box,“PX750USeries”isdisplayed.
6. Click[PX750USeries].
The message “Enter the password for the projector that you selected.” is displayed at the bottom of the window.
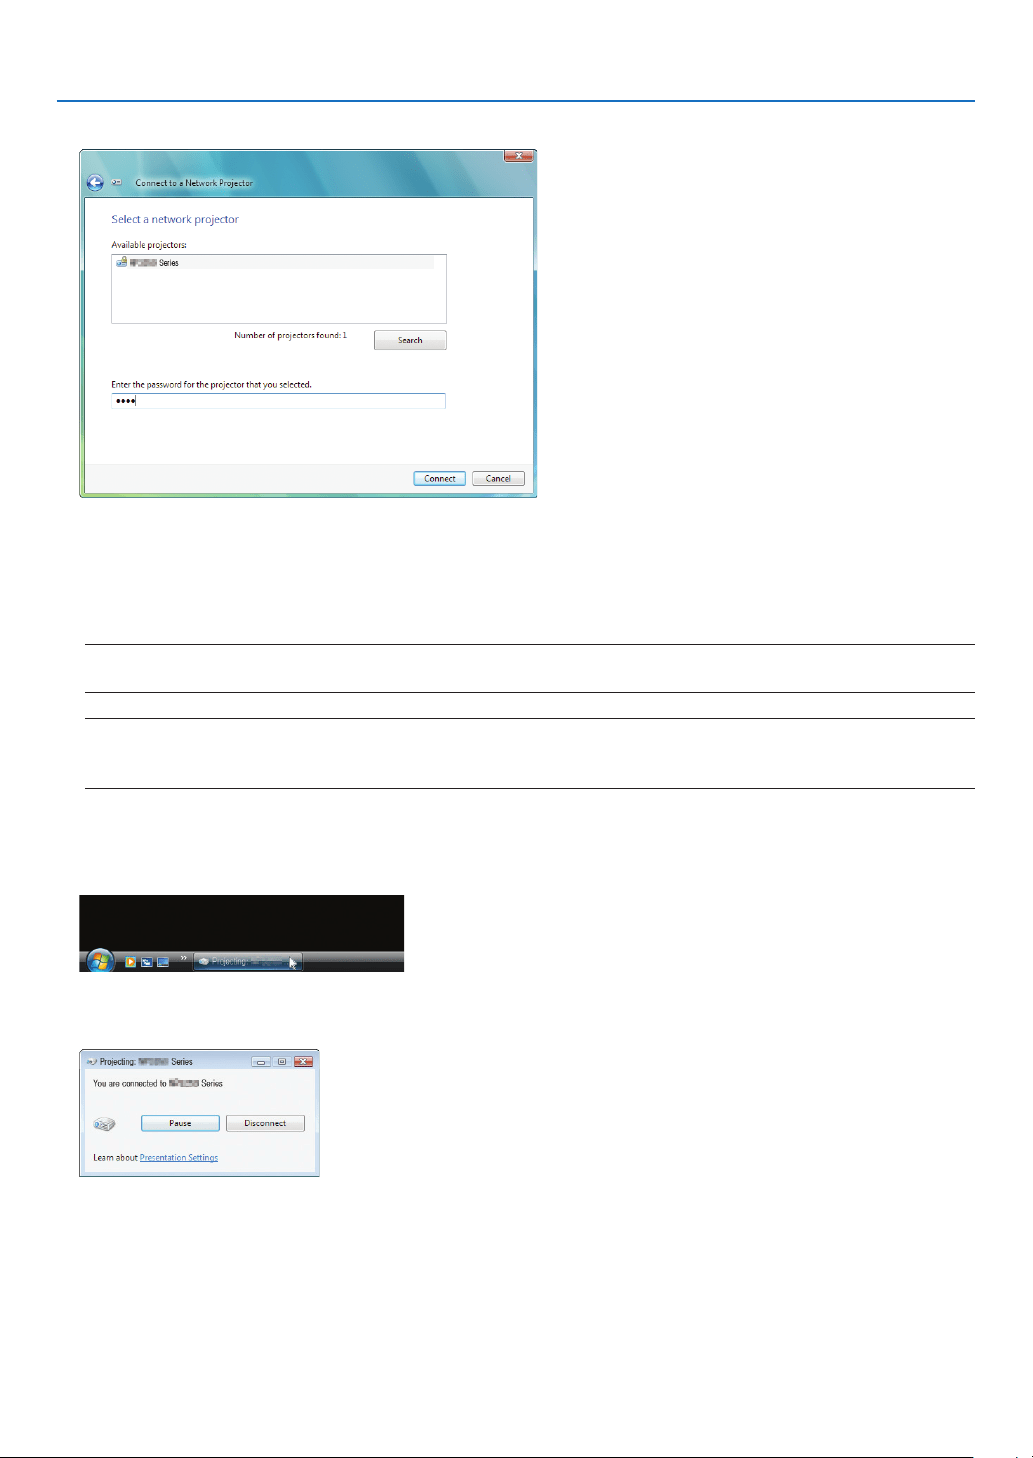
66
3. Convenient Features
7. Inputthepasswordtothepasswordinputboxdisplayedbytheoperationatstep3onpage64.
8. Click[Connect].
The network projector function works and the screen of Windows 7 is projected from the projector.
• Iftheresolutionofyourcomputer’sscreenisdifferentfromtheprojector’sscreenresolution,theNETWORK
PROJECTORfunctionmaynotwork.Ifthishappens,changetheresolutionofthecomputer’sscreentolower
resolution than the one displayed at Step 3 on page 64.
NOTE:Whenthenetworkprojectorfunctionworks,thebackgroundcolorofthedesktopchangestosolidcolor.Whenthenetwork
projector function is stopped, the original background color is restored.
Reference:IftheprojectorcannotbefoundatStep5,click[→Entertheprojectoraddress].Then,inputthe“Networkaddress”
(Inputexample:http://10.32.97.61/lan)and“Projectorpassword”(Inputexample:82291627)displayedinthescreenprojected
from the projector.
ExitingtheNetworkProjectorOperation
1. Click[Projecting:PX750USeries]intheWindowsVistataskbar.
2. Click[Disconnect].
The Network Projector function is stopped.
3. PresstheSOURCEbuttonoftheprojectortoselectaninputterminalotherthan[NETWORK].
When using the remote control, press a button other than the NETWORK button.

67
3. Convenient Features
⓮ Using the Projector to Operate Your Computer via a Network
[REMOTE DESKTOP]
• ByselectingthePCconnectedtothesamenetworkasthatoftheprojector,thePCscreenimagecanbeprojected
tothescreenvianetwork.
Then,byoperatingthekeyboard,youcanoperateWindows7,WindowsVistaorWindowsXPonthePCconnected
withthenetwork.
• WiththeRemoteDesktopfunction,youcanremotelyoperatethePCplacedatadistancefromtheprojector.
Meeting room
Office
NOTE:
• The[REMOTEDESKTOP]functionwillworkonthefollowingWindowseditions.
Windows7Professional
Windows7Ultimate
Windows7Enterprise
WindowsVistaBusiness
WindowsVistaUltimate
WindowsVistaEnterprise
WindowsXPProfessionalwithServicePack3
(Note)
• Inthisuser’smanualthisfeatureisdescribedusingWindows7asanexample,butWindowsVistaandWindowsXPProfessional
ServicePack2orlaterwillalsoworkwiththisfeature.
• AkeyboardisrequiredtousetheRemoteDesktopfunction.
• TheRemoteDesktopfunctioncanbeoperatedwithakeyboard.Usingawirelessmousewithawirelesskeyboardismoreuseful
for operating.
Useacommerciallyavailablewirelesskeyboard,awirelessmouse,andaUSBwirelessreceiver.
UseacommerciallyavailableUSBkeyboardandUSBmouse.
• AUSBkeyboardwithabuilt-inUSBhubcannotbeusedwiththeprojector.
• AwirelesskeyboardormousethatsupportsBluetoothcannotbeusedwiththeprojector.
• WedonotwarrantthattheUSBportoftheprojectorwillsupportallUSBdevicesinthemarket.
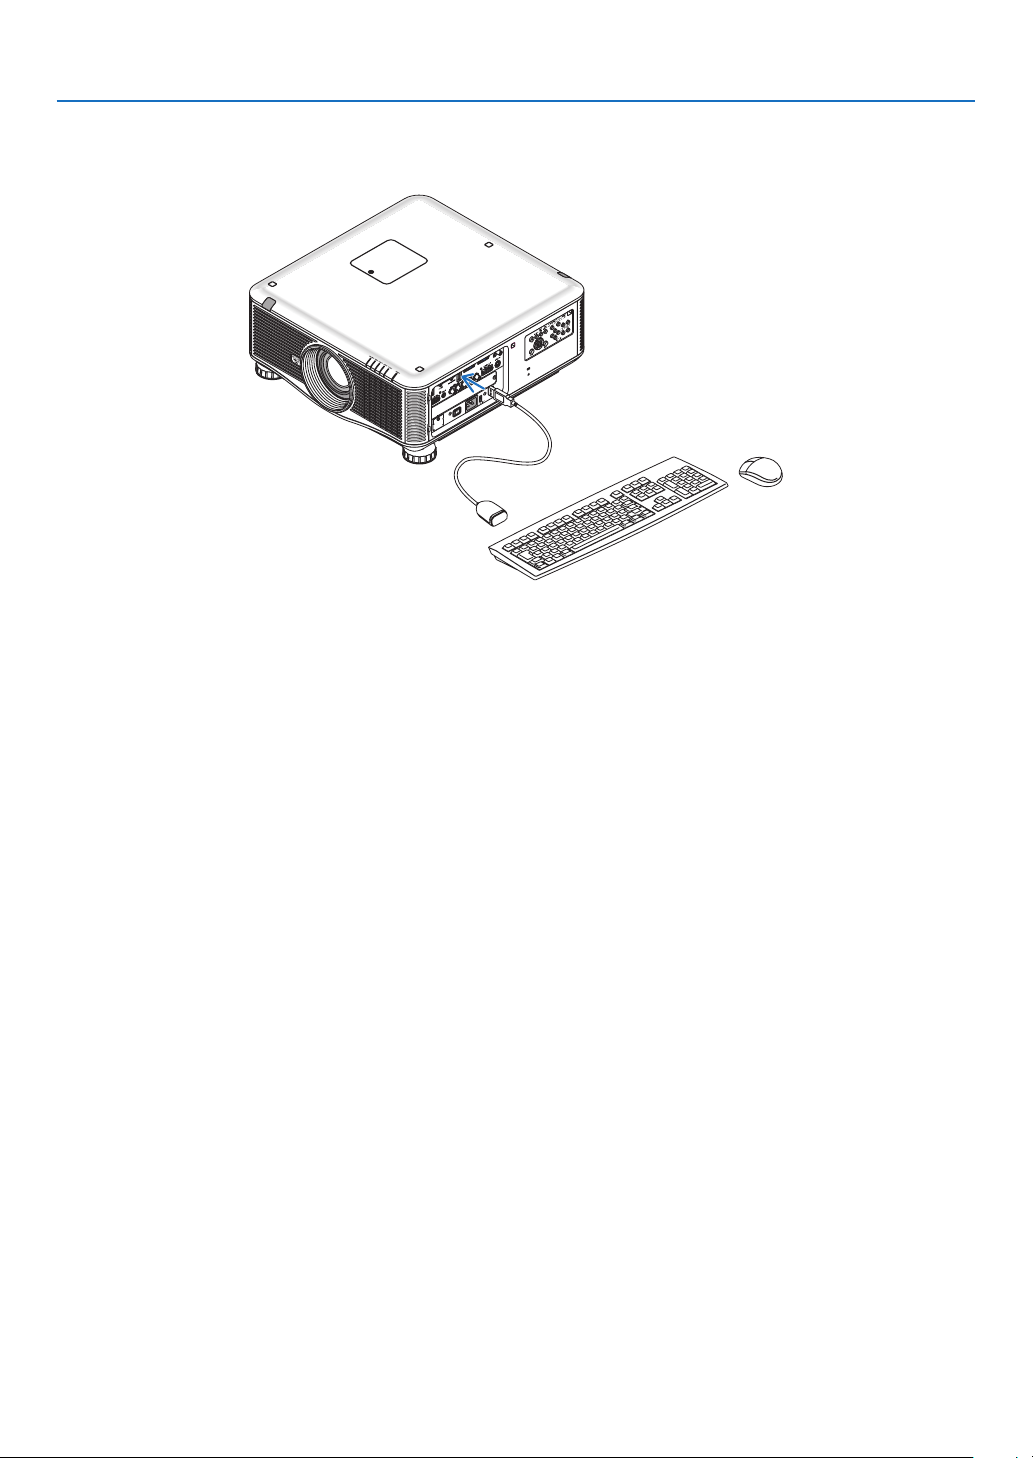
68
3. Convenient Features
Prepareacommerciallyavailablewirelesskeyboard(USlayoutversion).
ConnecttheUSBwirelessreceivertotheUSBport(TypeA)oftheprojector.Makeallnecessarysettingsforyour
wirelesskeyboardandmouse.
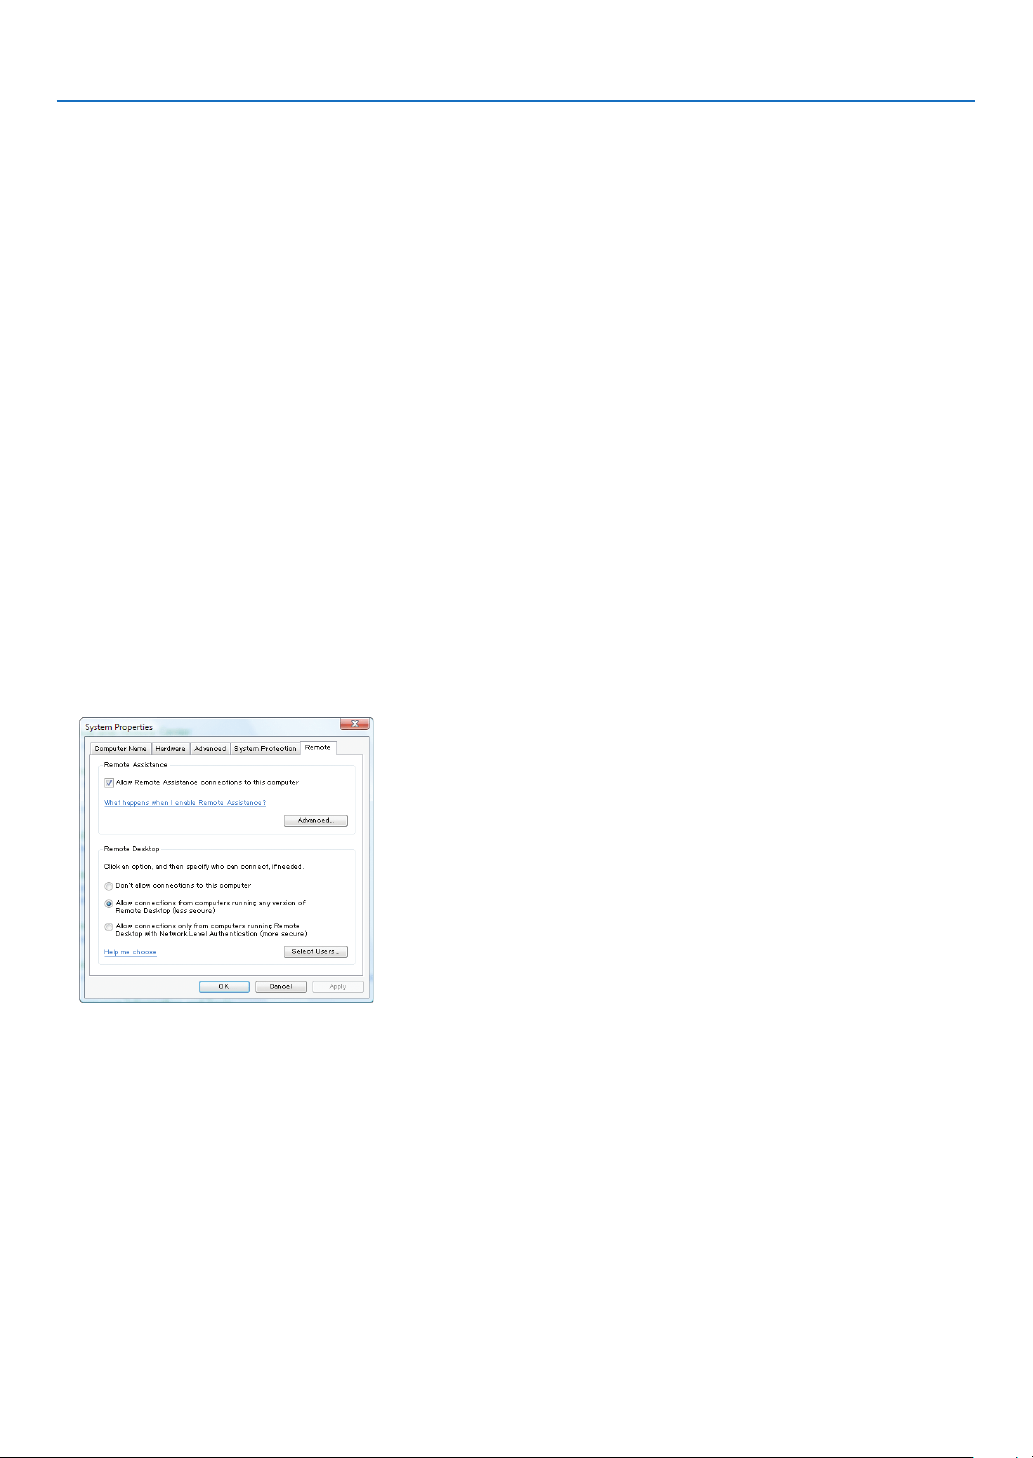
69
3. Convenient Features
SettingthepasswordtotheuseraccountofWindows7
TIP:Ifapasswordhasbeensetforanaccount,thesteps1to9canbeskipped.
1. Click[Start]fromthedesktopofWindows7.
2. Click[ControlPanel].
3. Click[Addorremoveuseraccounts]displayedunder[UserAccounts].
4. Whenthe[UserAccountControl]conrmationwindowappears,click[Continue].
5. Click[Administrator].
6. Click[Createapassword].
7. Inputthepasswordtothe[Newpassword]box.
8. InputthesamepasswordasthatatStep7tothe[Conrmnewpassword]box.
9. Click[Createapassword].
The Administrator is changed to [Password Protection].
Setting the Remote Access
1. Click[Start]fromthedesktopofWindows7.
2. Click[ControlPanel].
3. Click[SystemandSecurity].
4. Click[Allowremoteaccess]displayedunder[System].
5. Whenthe[UserAccountControl]conrmationwindowappears,click[Continue].
The [System Properties] window appears.
6. Click[AllowconnectionsfromcomputersrunninganyversionofRemoteDesktop(lesssecure)]inthe
RemoteDesktopboxandclick[OK].
CheckingtheIPaddressonWindows7
1. Click[Start]fromthedesktopofWindows7.
2. Click[ControlPanel].
3. Click[Viewnetworkstatusandtasks]displayedunder[NetworkandInternet].
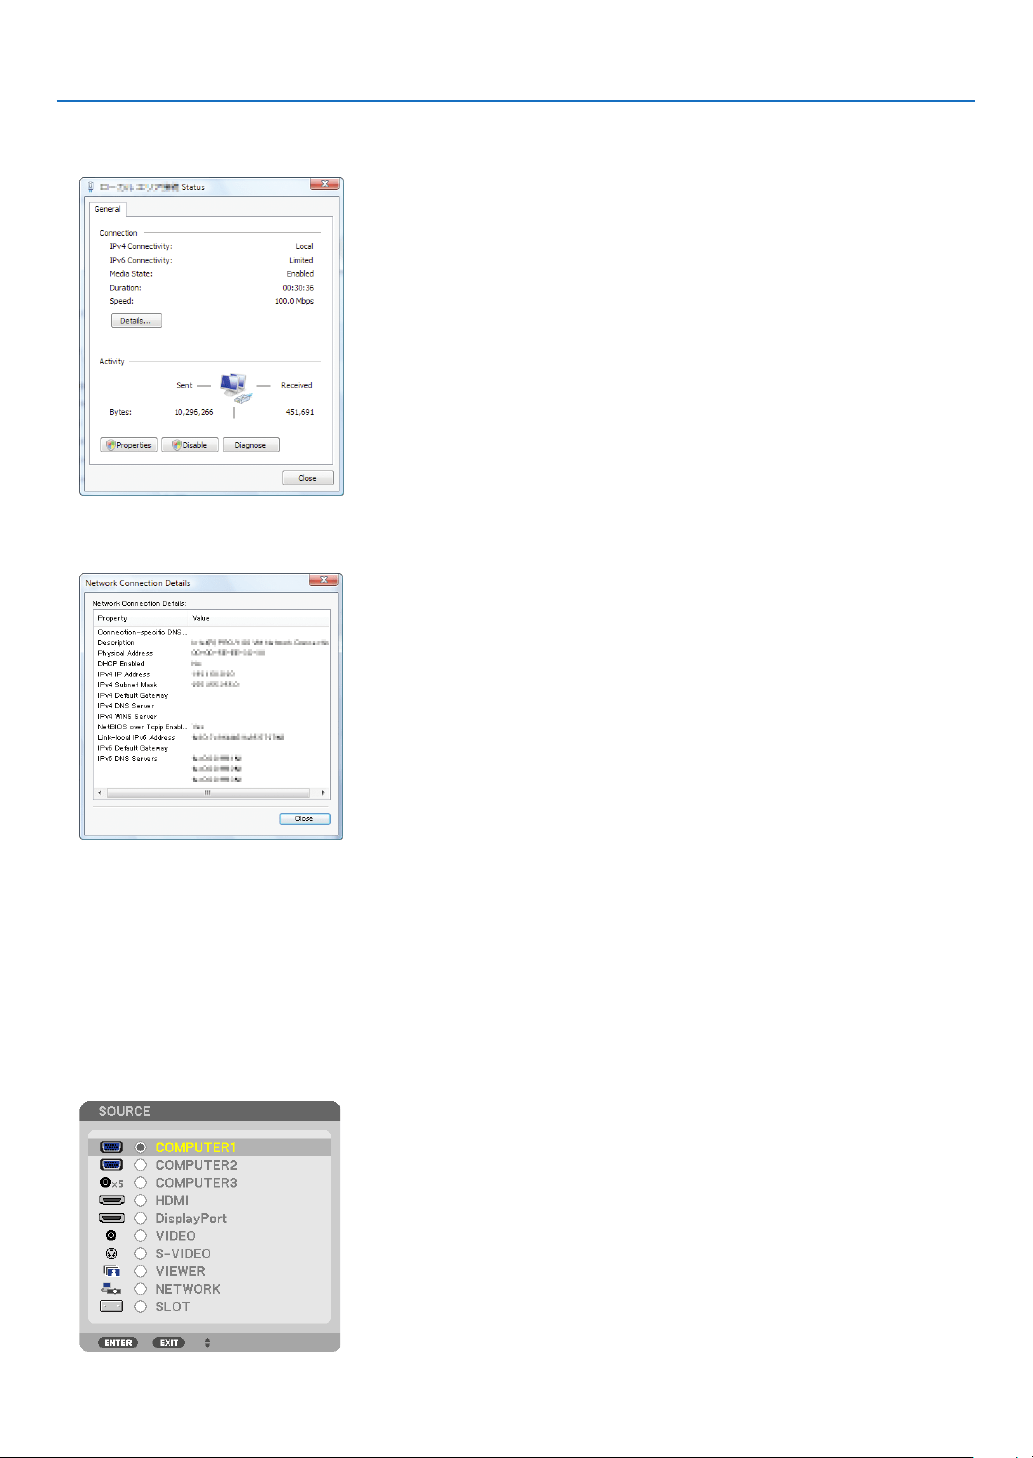
70
3. Convenient Features
4. Click[Viewstatus]displayedinblueontherightof[LocalAreaConnection]inthewindow.
The [Local Area Connection Status] window appears.
5. Click[Details...].
Writedownthevaluefor“IPv4IPAddress”(xxx.xxx.xxx.xxx)displayed.
6. Click[Close].
7. Click[X]attheupperrightofthewindow.
The system goes back to the desktop.
StartingtheRemoteDesktop
1. Withtheprojectorturnedon,presstheSOURCEbutton.
The input selection window appears.
Another way to display the input selection window is to press the NETWORK button on the remote control. The
APPLICATIONMENUscreenwillbedisplayed.Gotostep3.
71
3. Convenient Features
2. Press the ▼ or ▲buttontoselect[NETWORK]andpresstheENTERbutton.
The[APPLICATIONMENU]menuwillbedisplayed.
3. Fromthe[APPLICATIONMENU]menu,usethewirelesskeyboardtoselect[REMOTEDESKTOPCONNEC-
TION].
The[REMOTEDESKTOPCONNECTION]windowappears.
4. OperatethewirelesskeyboardtoinputtheIPaddressofWindows7andclick“Connect”.
The log-on screen of Windows 7 is displayed in the screen projected by the projector.
5. Operatethewirelesskeyboardtoinputtheuser’spasswordandpress“Enter”.
The remote desktop function is started.
Windows 7 desktop is displayed in the screen projected by the projector.
Log out the computer.
Use the wireless keyboard connected to the projector to operate Windows 7.
NOTE:Whentheprojectionismadewiththeremotedesktopfunction,thebackgroundcolorofthedesktopischangedtosolidcolor.

72
3. Convenient Features
ExitingtheRemoteDesktop
1. Operatethewirelesskeyboardtoclick[Start]fromthedesktopscreenprojectedbytheprojector.
2. Click[X]ontherightofthestartmenu.
The remote desktop function is stopped.
3. PresstheSOURCEbuttonoftheprojectortoselectaninputterminalotherthan[NETWORK].
When using the remote control, press a button other than the NETWORK button.
TIP:
Setting[OPTIONS]inREMOTEDESKTOP
Clicking[OPTIONS]displaysthe[PERFORMANCE]screen.
Makingsettingsto[OPTIONS]willallowyoutodisplaythedesktopbackground,ortoenablethewindowanimationfunctionduring
theRemoteDesktopoperation.However,doingthiswillcausethedisplay’sormouse’sresponsetoslowdown.
Ifthedisplay’sormouse’sresponseissloweddown,tryoneormoreofthefollowing:
DESKTOPBACKGROUND:Clearthecheckmarktodisplaythedesktopbackgroundinsolidcolor.
MENUANDWINDOWANIMATION:Clearthecheckmarktodisablemenuandwindowanimation.
THEMES:ClearthecheckmarknottouseThemes.
SHOWCONTENTSOFWINDOWWHILEDRAGGING:Clearthecheckmarktoshowonlythewindowpanewhile
dragging.

73
4. Using the Viewer
❶ What you can do with the Viewer
TheViewerfeatureallowsyoutoviewslidesormovielesstoredonaUSBmemoryontheprojector,orashared
folderinacomputerconnectedtothenetwork.
TheViewerhasthefollowingfeatures.
• WhenacommerciallyavailableUSBmemorythatstoresimagelesisinsertedintotheUSBport(TypeA)ofthe
projector,theViewerallowsyoutoviewtheimagelesontheUSBmemory.
Evenifnocomputerisavailable,presentationscanbeconductedsimplywiththeprojector.
• Movielecanbeplayedback.
• AMicrosoftPowerPointleorAdobePDFlecanbesimplyprojectedonthescreenwithoutconnectingacomputer.
• Imageandmovielesstoredinasharedfolderinacomputerconnectedtoanetworkcanbeprojected.
Thecomputerwith“MediaSharing”ofWindowsMediaPlayer11turnedoncanbeusedasamediaserver.
Supported graphic formats
Format Filenameextension
JPEG .jpg,.jpe,.jpeg(CMYKisnotsupported.)
BMP .bmp(biteldnotsupported)
PNG .png(InterlacedPNGandαchannelPNGarenotsupported.)
GIF .gif(InterlacedGIF,transparationGIF,andanimationGIFarenotsupported.)
*Ifanunsupportedimageisselected,theicon willbedisplayed.
NOTE:
Maximumnumberofpixelsofimagewhichcanbedisplayedare:
• BaselineJPEG:10000×10000
• ProgressiveJPEG:1280×1280
• GIF:1280×1280
• Others:4000×4000
• Somelessupportedbytheaboverequirementsmaynotbedisplayed.
Supported movie files
Filenameextension Videocompression/expansionmethod Audiocompression/expansionmethod
.mpg,.mpeg. MPEG2 MPEGAudioLayer2
MPEGAudioLayer3
.wmv VC-1/WMV9 WMA9Standard
.mp4 H.264/AVC AAC-LC
Playbackrequirements:
Resolution:320×240to1280×720
Videoframerate:upto30fps
Bitrate:upto15Mbps
Max.lesize:upto2GB
NOTE:
• Somelessupportedbytheaboverequirementsmaynotbeplayedback.
Whenasupportedmovieleisplayedback,itsaudiowillnotbeoutputfromtheprojector.

74
4. Using the Viewer
NOTE:
• Movielesconvertedbyusingthevideo/audioformatwhichisnotsupportedbythisprojectorcannotbeplayedback.
In this case, there will be no icon to show that playback is not possible.
• FileswithDigitalRightsManagement(DRM)protectioncannotbeplayedback.
• Someofthemovielesthatmeettheaboverequirementsmaynotbeplayedback.
• WMVformatvideolewillbedisplayedinanaspectratioof1to1independentlyofitsoriginalaspectratio.
• Filesthatcanbeplayedbackonthemediaserveraregraphicsandmovieles.InWindowsMediaPlayer11(WindowsXP/
WindowsVista)mp4lescannotbeplayedback.
Supported PDF files
Filenameextension Supportedleformat
.pdf AdobeAcrobatPDF
NOTE:
• FontsnotembeddedinPDFlemaynotbedisplayed
• FunctionsaddedtoPDFleaftercreatedwillnotworkordisplay.Functionsaddedarebookmarks,boxesinformtool,andnotes
will not be displayed.
AutoiporAutotransitionwillnotwork.
• SomePDFlesmaynotbedisplayed.
Supported PowerPoint files
Filenameextension Supportedleformat
.ppt,.pptx MicrosoftPowerPoint97–2007
NOTE:
• Playablefonts,colors,fontornament,placement,objectinsertionoranimationarerestricted.
• SomeMicrosoftPowerPoint97–2007lesmaynotbedisplayed.
SupportedUSBmemorydevices
- BesuretouseaUSBmemorydeviceformattedwiththeFAT,exFAT,FAT32orFAT16lesystem.
TheprojectordoesnotsupportNTFSformattedUSBmemory.
IftheprojectordoesnotrecognizeyourUSBmemory,checkiftheformatissupported.
ToformatyourUSBmemoryinyourcomputer,refertothedocumentorhelplethatcomeswithyourWindows.
- WedonotwarrantthattheUSBportoftheprojectorwillsupportallUSBmemoriesinthemarket.
- Waitatleast5secondsafterdisconnectingaUSBmemorydevicebeforereconnectingitandviceversa.
TheprojectormaynotidentifytheUSBmemorydeviceifitisrepeatedlyconnectedanddisconnectedinrapid
intervals.

75
4. Using the Viewer
Notices on shared folder and media server
• Filesfromasharedfolderormediaservermaynotbeprojectedifsecurityorantivirussoftwareisinstalledonyour
computer.
• Openthefollowingrewallports:
- Mediaserver
Portnumber Protocol
1900 UDP
2869 TCP
10243 TCP
10280-10284 UDP
- Sharedfolder
Portnumber Protocol
137 UDP/TCP
138 UDP/TCP
139 UDP/TCP
445 UDP/TCP
• Setyourcomputerforsharingandsecuritytograntaccesstolesinthesharedfolderandsetyoursecurityor
antivirussoftwaretograntaccesstolesinthesharedfolder.Consultyournetworkadministratorformoreinforma-
tion.
• Movielesinthesharedfolderorthemediaservermaynotbeplayedbackcorrectlydependingonyournetwork
environmentorthebitrateofyourle.
NOTE:
DonotdisconnectbetweentheprojectorandyourcomputerbyremovingtheLANcableorturningofftheprojectorwhenaPow-
erPointleorPDFleisdisplayedfromasharedfolder.
DoingsowillmakeViewerinoperable.
NOTE:
• ThefollowingoperationsbyusingthebuttonsontheprojectorarenotpossiblewhentheVIEWERscreensuchastheslidescreen
and the thumbnail screen is displayed.
- AutoAdjustmentbyusingtheAUTOADJ.button
• FreezingpicturebyusingtheCTL+PIP/FREEZEorAUTOADJ.buttonontheremotecontrolisnotpossiblewhentheVIEWER
screen such as the slide screen and the thumbnail screen is displayed.
• Executing[RESET]→[ALLDATA]fromthemenuwillreturnthesettingsfortheViewertoolbartothefactorydefault.
76
4. Using the Viewer
❷ Preparing presentation materials
1. Createyourpresentationmaterialsandsavetheminasupportedleformattoyourcomputer.
• Seepage98 for supported file formats.
• MakesurethatPowerPointleisdisplayedontheViewerbeforegivingyourrealpresentation.
With Viewer PPT Converter 3.0, you can convert your PowerPoint files to index files that can be displayed on
the Viewer. Viewer PPT Converter 3.0 can be downloaded from our website.
• WhencreatingaPDFle,embedyourfontsinyourPDFle.EmbeddingfontsrequiresAdobeAcrobat.This
cannot be done in Adobe Reader.
TIP:
•UsingPrintCommand
ExampleforfontembeddingusingPrintCommand.SeethehelpofAdobeAcrobatformoreinformation.
1. Select“Print”fromthe“File”menu.
2. Select“AdobePDF”from“Printername”andclickthe“Properties”but-
ton.
3. Clickthe“Edit”buttoninthe“AdobePDFSettings”tab.
4. ClickthefonttabintheEditwindowtoselectthefontembedwindow.
5. Placeacheckmarkfor“Embedallfonts”.
Click “OK” to return to the Print window, and click “OK” to start creating a
PDF file.
2. Save a file to your drive.
To save a file to your USB memory:
Use the Windows Explore to copy the file to your USB memory.
To place a file in a shared folder you create in your computer, see page 89.
To use “Media Sharing” in Windows Media Player 11, see page 93.
77
4. Using the Viewer
❸ Projecting images stored in a USB memory device
ThissectionexplainsthebasicoperationoftheViewer.
TheexplanationprovidestheoperationalprocedurewhentheViewertoolbarissettothefactorydefault.
Preparation:BeforestartingtheViewer,storeimagestotheUSBmemoryusingyourcomputer.
Starting the Viewer
1. Turnontheprojector.(→ page 17)
2. InserttheUSBmemoryintotheUSBportoftheprojec-
tor.
NOTE:
• DonotremovetheUSBmemoryfromtheprojectorwhileit’sLED
ashes.Doingsomaycorruptthedata.
TIP:
YoucanaUSBmemoryinserttheprojectorwhenthedrivelistscreen
is displayed.
3. PresstheSOURCEbuttontoselect[VIEWER].
A press of the SOURCE button will display the source select
screen.
A few more presses of the SOURCE button will display the
drive list screen.
Anotherwaytoselect[VIEWER]istopresstheVIEWER
button on the remote control.
TIP:
• Formoreinformationaboutthedrivelistscreen,seepage81.
• Todisplaygraphicsinasharedfolder,seepage89; to display still
imagesormovielesinamediaserver,seepage93.
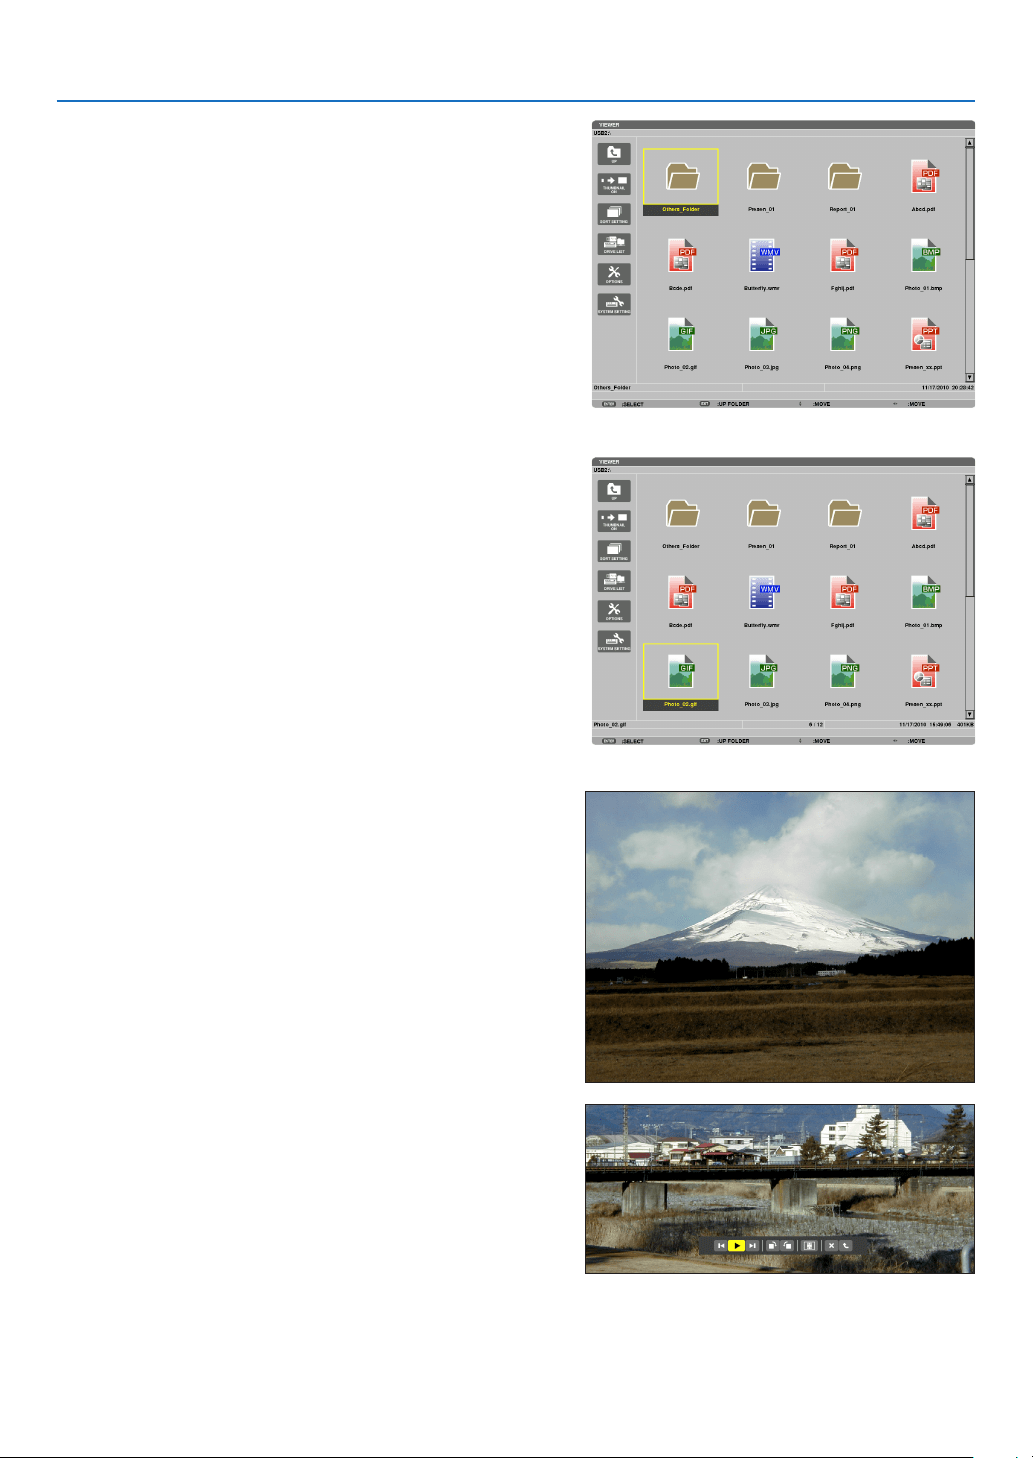
78
4. Using the Viewer
4. Press the ▶ button to select“USB1” and press the
ENTERbutton.
The “USB1” thumbnail screen will be displayed.
TIP:
• Formoreinformationaboutthumbnailscreen,seepage83.
5. Use the ▲▼◀ or ▶ button to select an icon.
• The→ (arrow) symbol on the right indicates there are
more pages.
6. PresstheENTERbutton.
Operation varies depending on the selected file.
•Stillimage
The selected slide will be displayed.
The ◀ or ▶ button can be used to select the next (right)
slide or the previous (left) slide in the thumbnail screen.
• PressingtheENTERbuttonwilldisplaythecontrolbar
with which is used to select or rotate an slide.(→ page
84)
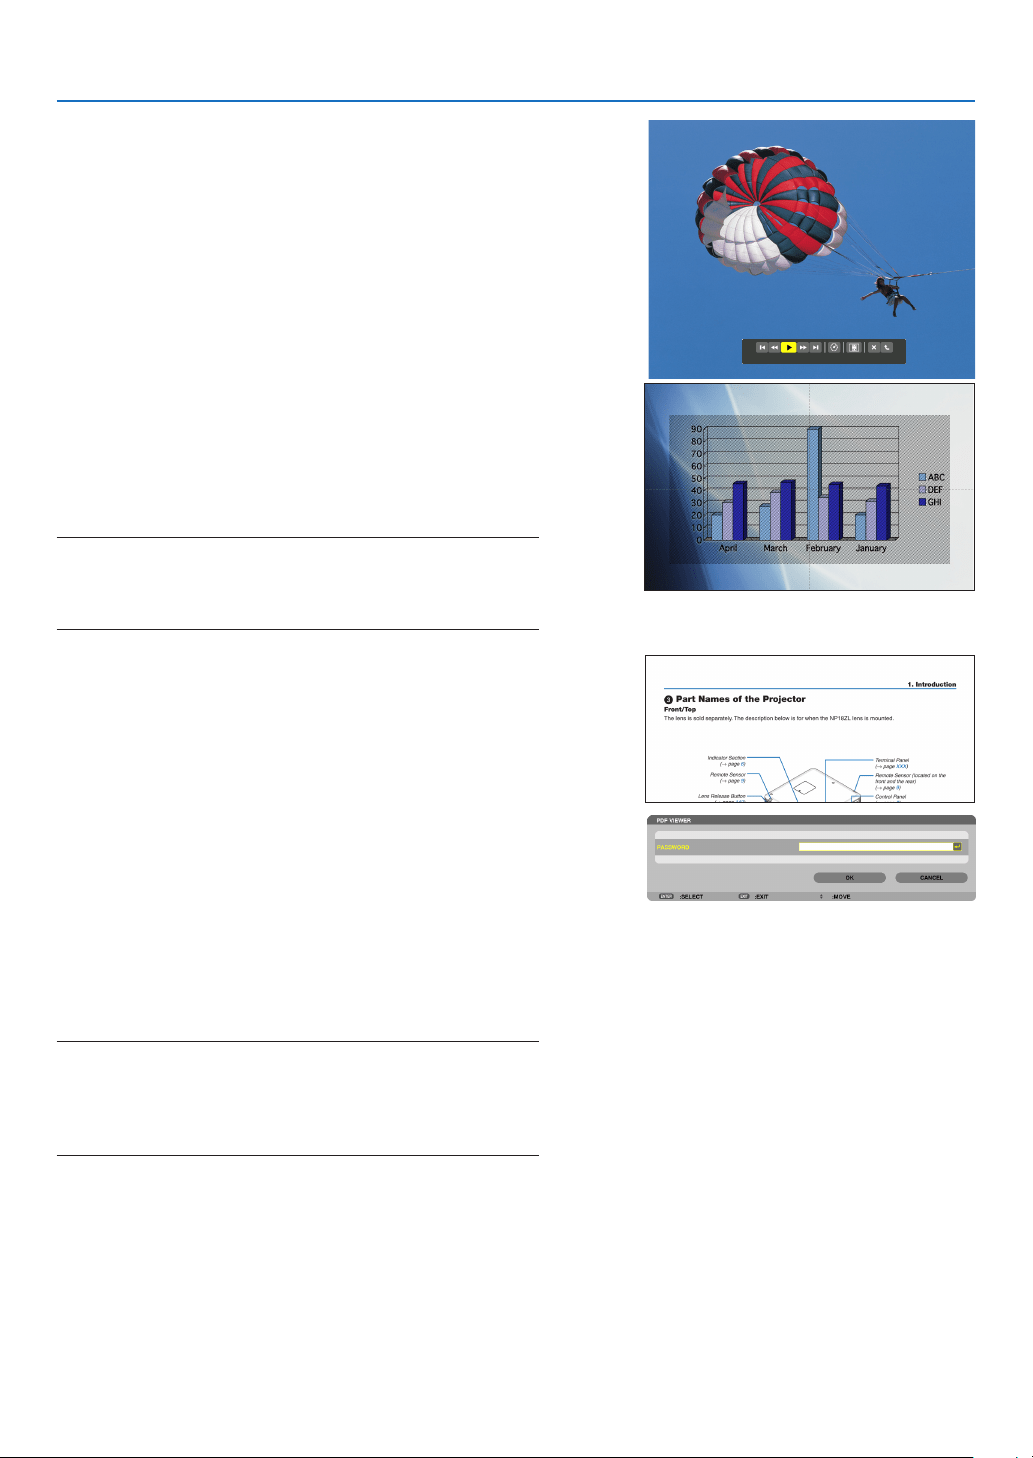
79
4. Using the Viewer
•Moviele
The movie file will start playing.
After finishing the playback, the screen will turn to black.
PresstheEXITbuttontoreturntothethumbnailscreen.
• Pressing the ENTER button will display the movie’s
control bar with which you can pause or fastforward and
some other operations.
•MicrosoftPowerPointle
The slide on the first page will be displayed.
Press ▶ to select the next slide; press ◀ to select the previ-
ous slide.
• Youcanalsousethe▼ or ▲ button to select a page. To
returntothethumbnailscreen,presstheEXITbutton.
NOTE:
• Fileswith slideshow or animation effectsmay not be correctly
displayedontheViewer.
See“SupportedPowerPointles”onpage74, 98.
•AdobePDFle
The first page will be displayed.
• ThePDFlewillllthewidthofthescreen.
Pressing the ▼ or ▲ button will scroll the screen down or
up.
Toreturntothethumbnailscreen,presstheEXITbutton.
• Whenapassowordinputwindowisdisplayed,itmeans
that the PDF file is password-protected.
Pressing the ENTER button will show the software key-
board. Use the software keyboard to enter your password.
Select [OK] and press the ENTER button. The PDF file
will be displayed.
• Formoreinformationonthesoftwarekeyboard,seepage
152.
NOTE:
BookmarksandnotesthatwereaddedafterPDFconversionwillnot
be displayed.
IffontswerenotembeddedatthetimeofPDFconversion,thosefonts
will not be displayed.
TIP:
It takes sometime (about 30 seconds to two minutes)to display
alargesizeleortoturnpagesofaPDFlethathasmanypages.
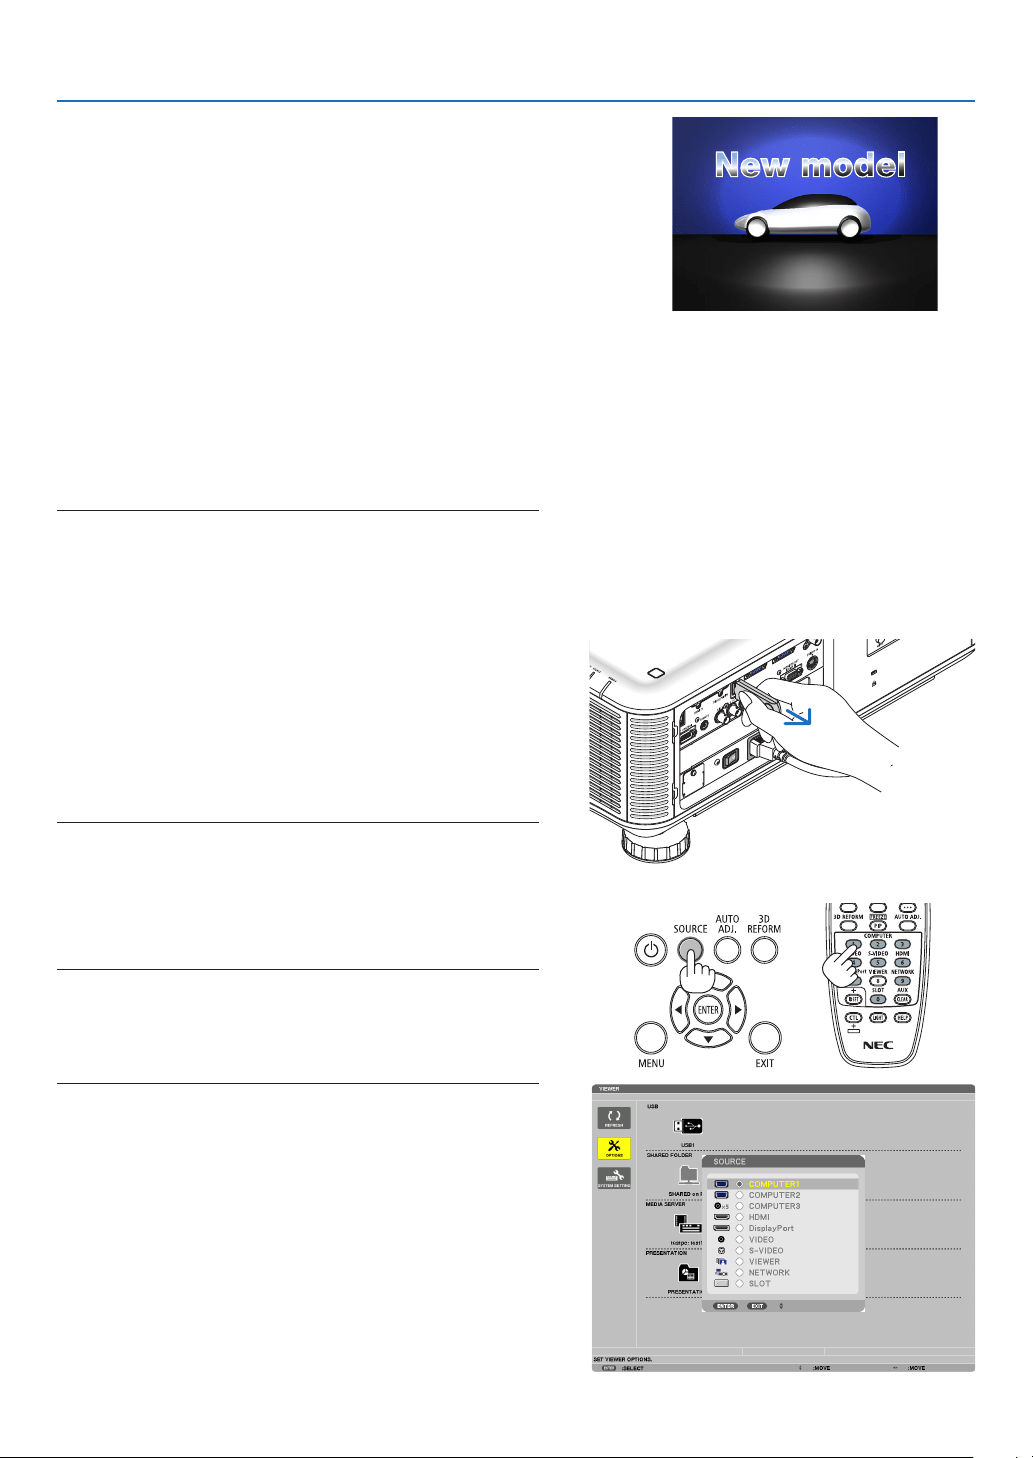
80
4. Using the Viewer
•Indexle(extension:.idx)
• Index les, which is converted by usingViewerPPT
Converter 3.0, will appear in the Thumbnail screen.
OnlyfoldersandJPEGlesconvertedbyusingViewer
PPT Converter 3.0 will appear in the Thumbnail screen.
• Toselectslideshowofindexles,openthe[PRESENTA-
TION]folderintheDRIVELISTscreen.
However, index files will not appear. Only folders and
JPEGleswillappear.
• UptofourindexfoldersinyourUSBandsharedfolder
are displayed. The four folders will be displayed in reverse
chronological order
• WhenyouinserttheUSBmemorydevicestoringindex
with the Viewer in operation, the content of the index files
will be displayed.
NOTE:
• Theplaymode(MANUAL/AUTO)forslidesofindexleworksin
the following way:
Incaseof[MANUAL]for[PLAYMODE]
Whenyouselect[OPTIONS]→[SLIDESETTING]→[PLAYMODE]
→[MANUAL],indexleswillbesetformanualplaybackinregard-
lessofwhether[INTERVAL]isset.
Incaseof[AUTO]selectedfor[PLAYMODE]
Whenyouselect[OPTIONS]→[SLIDESETTING]→[PLAYMODE]
→ [AUTO], index les will be set for auto playback at intervals
speciedbyusing[INTERVAL].
When,however,[-1]isselectedfor[INTERVAL],theplaymodewill
besetforautoplaybackaccordingtothesettingfor[OPTIONS]→
[SLIDESETTING]→[INTERVAL].
7. RemovetheUSBmemoryfromtheprojector.
Return to the drive list screen. Make sure that the LED on
the USB memory is not flashing before removing the USB
memory.
NOTE:IfyouremovetheUSBmemoryfromtheprojectorwithaslide
displayed, the projector may not operate correctly. If this happens,
turn off the projector, turn off the main power switch, and unplug the
powercord.Wait3minutes,thenconnectthepowercord,turnon
the main power switch, and turn on the projector.
Exiting the Viewer
1. PresstheSOURCEbuttontoselectasourceotherthan
[VIEWER].
A press of the SOURCE button will display the source select
screen.
A few more presses of the SOURCE button will display
another source.
• To exittheViewer using the remote control, select a
sourceotherthan[VIEWER].
XXXX Motors
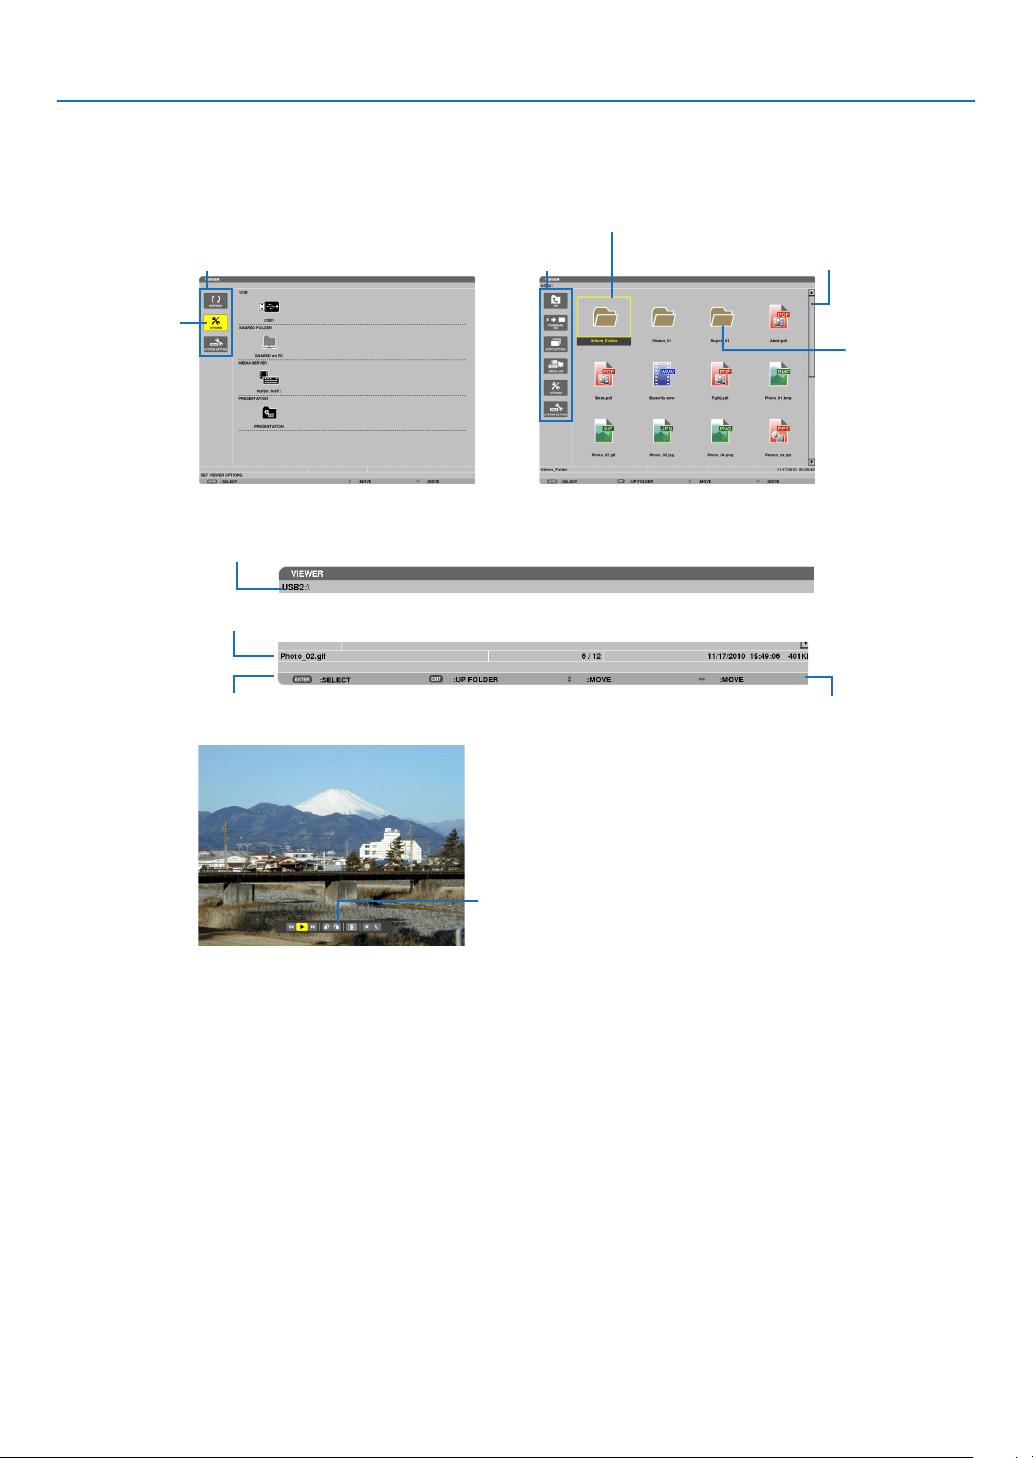
81
4. Using the Viewer
Names and functions of Viewer screen
TheViewerhasthreescreens:Drivelistscreen,Thumbnailscreen,andSlidescreen.
•Drivelistscreen
Displaysalistofdrivesconnectedtotheprojector.
Menu operation
• Usethe▼ or ▲buttontomovethecursorupordown.SelectthemenuitemandpresstheENTERbutton
to display the submenu.
Operation for Drive list screen
1. Press the ▶ button to move the cursor to the drive list.
(Use the ◀ or ▶ button to switch between the menu and the drive list.)
Press the ▼ or ▲ button to select a type of drive; press the ◀ or ▶ button to select the drive connected to the
projector.
2. SelectthedriveandpresstheENTERbuttontoswitchtothethumbnailscreenoftheselecteddrive.
Cursor (yellow)
Cursor (yellow)
Menu Menu Scroll bar
[Drive list screen] [Thumbnail screen]
Folder icon
Path information
Drive information/File information
Menu guide
Operation button guide
Control bar
* The operation for still image differs from that for movie.
[Slide screen]
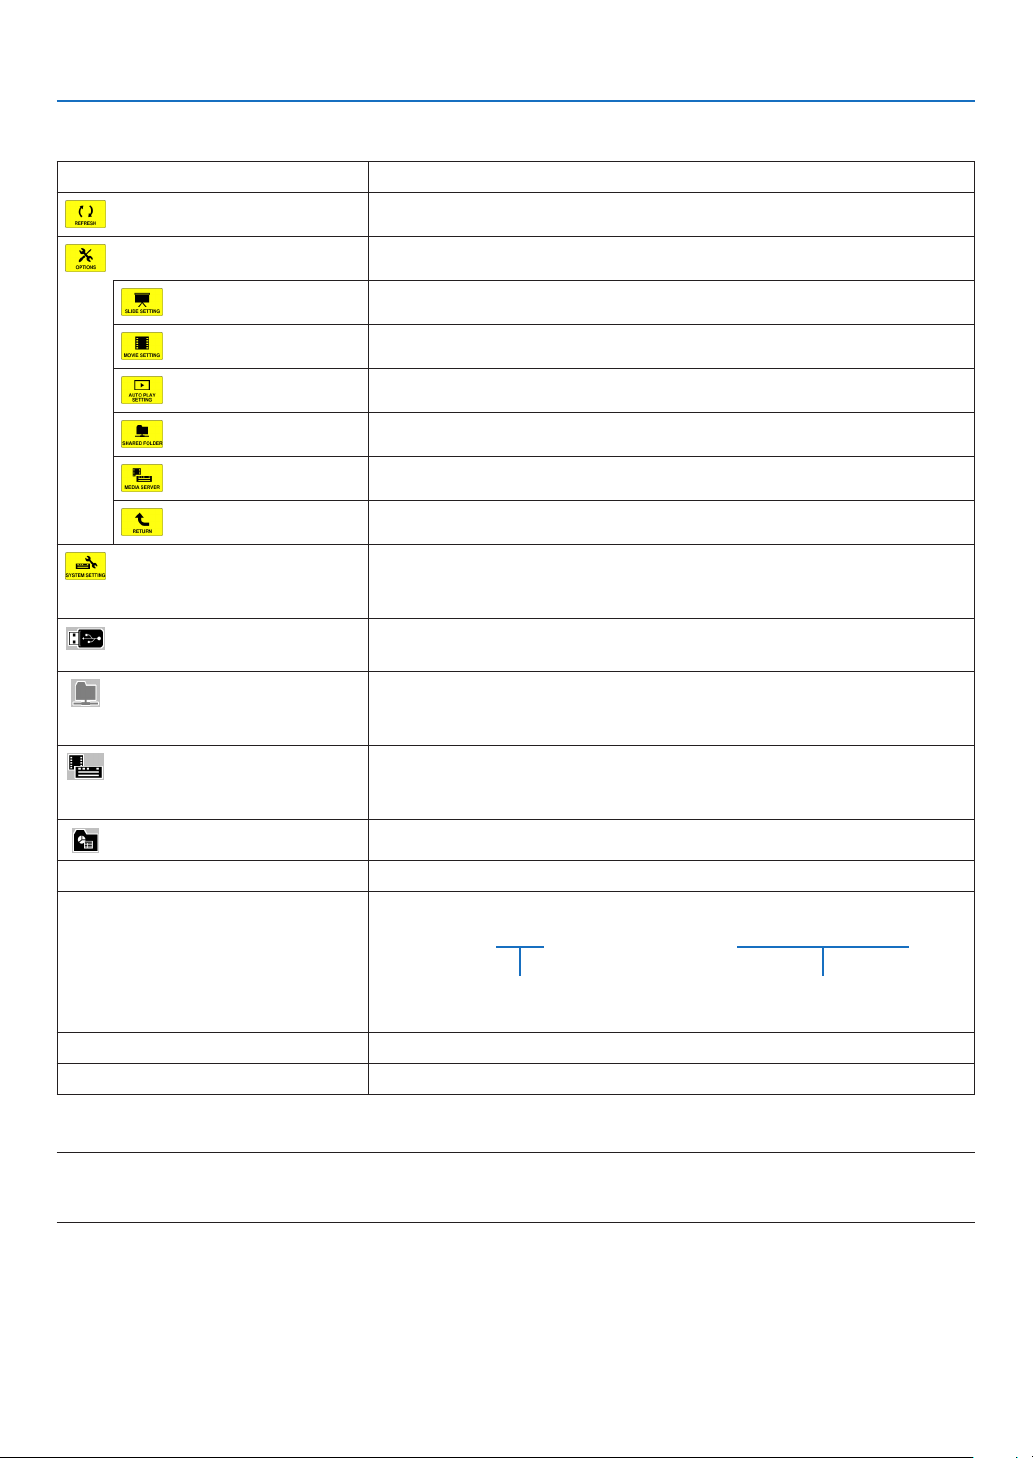
82
4. Using the Viewer
Functions
Name Description
REFRESH Displaysadditionalmediaserversinthedrivelistscreen.
OPTIONS OpenstheOPTIONSmenu.
SLIDESETTING Setsupslides.(→page86)
MOVIESETTING Setsupmovieles.(→page87)
AUTOPLAYSETTING Setsupautoplay.(→page87)
SHAREDFOLDER Setsupasharedfolder.(→page89)
MEDIASERVER Setsupamediaserver.(→page93)
RETURN ClosestheOPTIONSmenu.
SYSTEMSETTING Switchestothesystemsettingmenu.SeewiredLAN,wirelessLAN,WPS,
network information,mouse,and keyboardin“9. Application Menu”. (→
page139)
USB Displays theiconforaUSB memoryinsertedinto the USB portofthe
projector.
SHAREDFOLDER DisplaysuptofourdrivesofacomputerconnectedtoaLAN(setforcon-
nectingasharedfolder).
*Seepage89forsettingupforconnectingasharedfoleroftheprojector.
MEDIASERVER DisplaysuptofourdrivesofacomputerconnectedtoaLAN(setforcon-
nectingamediaserver).
*Seepage93forsettingupforconnectingamediaserveroftheprojector
PRESENTATION DisplaystheiconwhenaUSBmemoryorsharedfolerstoresindexles.
Pathinformation Displaysthelocationofafolderorle.
Driveinformation [Example]
USB1 314MBFREE/492MB
Displaysthedrive. Displaysfreespaceandcapcityof
adrive.(USBonly)
Menuguide Displaysthedescriptionofaselectedmenu.
Operationbuttonguide Displaysinformationaboutoperationbuttons.
*Itisdisplayedinthree-digitnumber(roundingup)
NOTE:
WhentheOPTIONSmenuisdisplayed,thedrivelistscreenorthumbnailscreenisnotdisplayed.Todisplayit,selectthe[RETURN]
iconandpresstheENTERbutton.
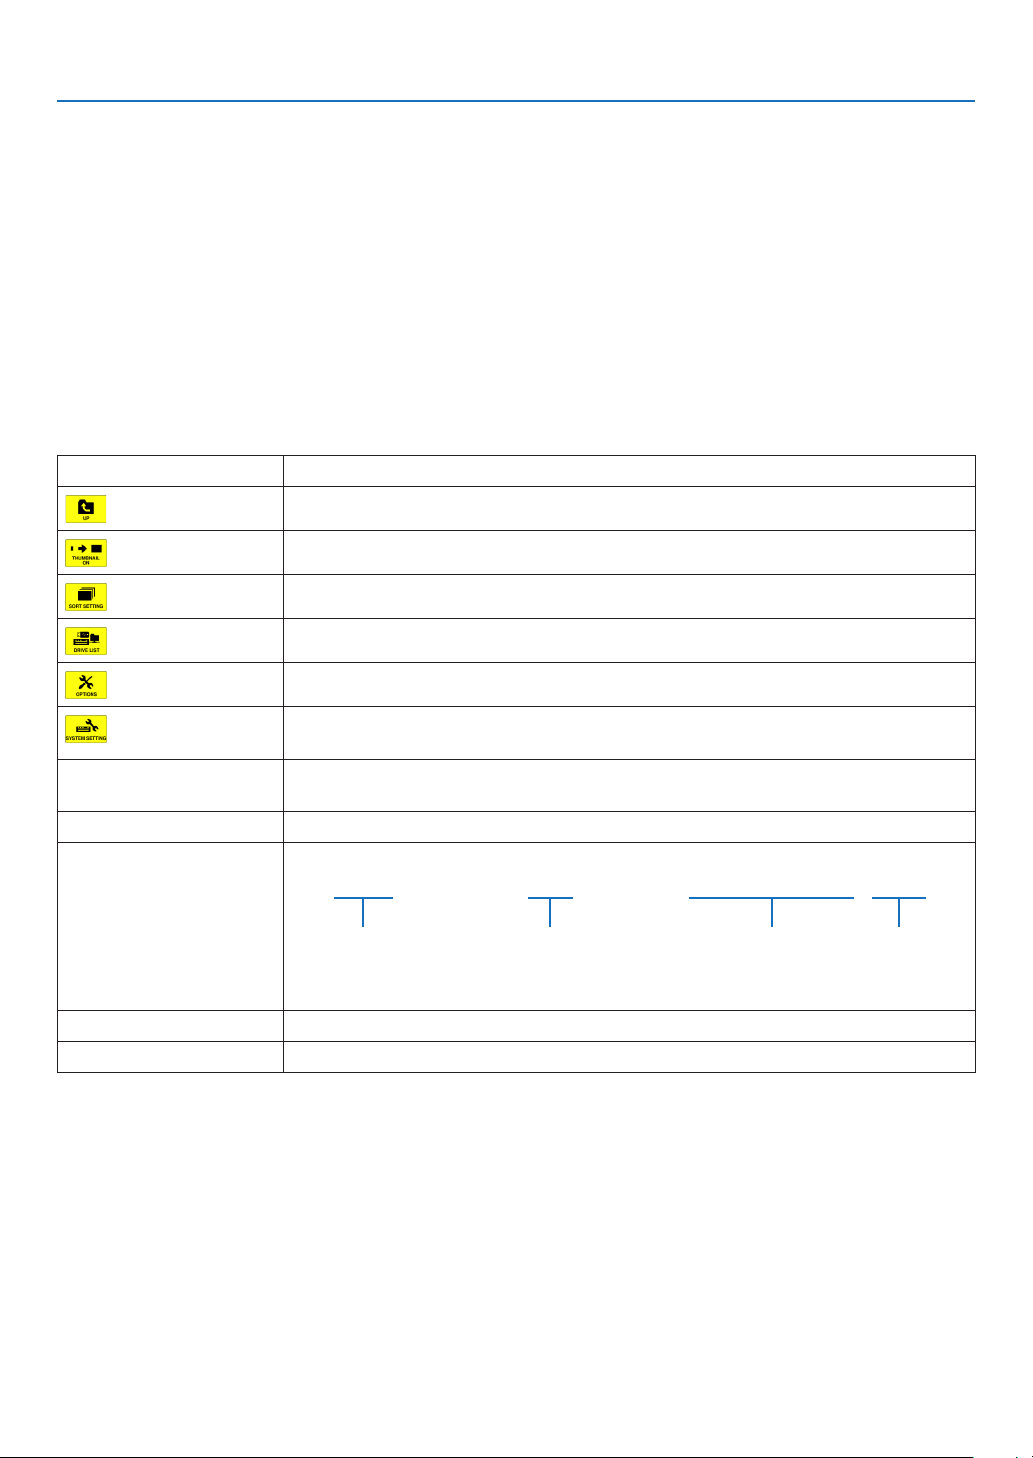
83
4. Using the Viewer
•Thumbnailscreen
Displaysalistoffolders,thumbnails,andiconsinthedriveselectedonthedrivelistscreen.
Menu operation
• Usethe▼ or ▲buttontomovethecursorupordown.SelectthemenuitemandpresstheENTERbutton
to display the menu or setting screen.
Operation for Thumbnail screen
1. Press the ▶buttontomovethecursortothethumbnailscreenwhentheOPTIONSmenuisnotdisplayed.
2. Press the ▼, ▲, ◀, or ▶buttontoselectaleorfolder.
3. PresstheENTERbuttontostartslideshoworplaybackoftheselectedle.Selectingafolderwilldisplay
its thumbnail screen.
Functions
Name Description
UP Goestooneupperlevelmenu.
THUMBNAIL Switchestwodisplaysbetweenthumbnailandicon.
SORTSETTING Rearrangesfoldersorles.
DRIVELIST Returnstothedrivelistscreen.
OPTIONS ChangestotheOPTIONSmenu.
SYSTEMSET-
TING
Opensthesystemsettingmenu.
Scrollbar Thumbnailscreenwilldisplay12leswith4by3.Ifthethumbnailscreenhastwelve
ormorelesorfolders,thescrollbarwillbedisplayedattherightside.
Pathinformation Displaysthelocationofafolderorle.
Thumbnailinformation [Example]
005.jpg 5/200 11/03/201013:25:12 502KB
Selectedfolder
nameorle
name
Numbersandorderof
lesinafolder(only
whenfolderselected)
Create/Changedate:
M/D/Y/H/M/B
Displaysle
capacity
Menuguide Displaysthedescriptionofaselectedmenu.
Operationbuttonguide Displaysinformationaboutoperationbuttons.
TIP:
• Ifanunsupportedimageisselected,theicon[?]willbedisplayed,
• Themaximumdisplayablenumberofimagesis300inthethumbnailscreenincludingthenumberoffolders.
• Ifalenameorpathofafolderislongerthanspecied,itwillbedisplayedwithcentercharactersorpathskipped.
Example:“123456789.jpg”willbedisplayedin“123..789.jpg”.
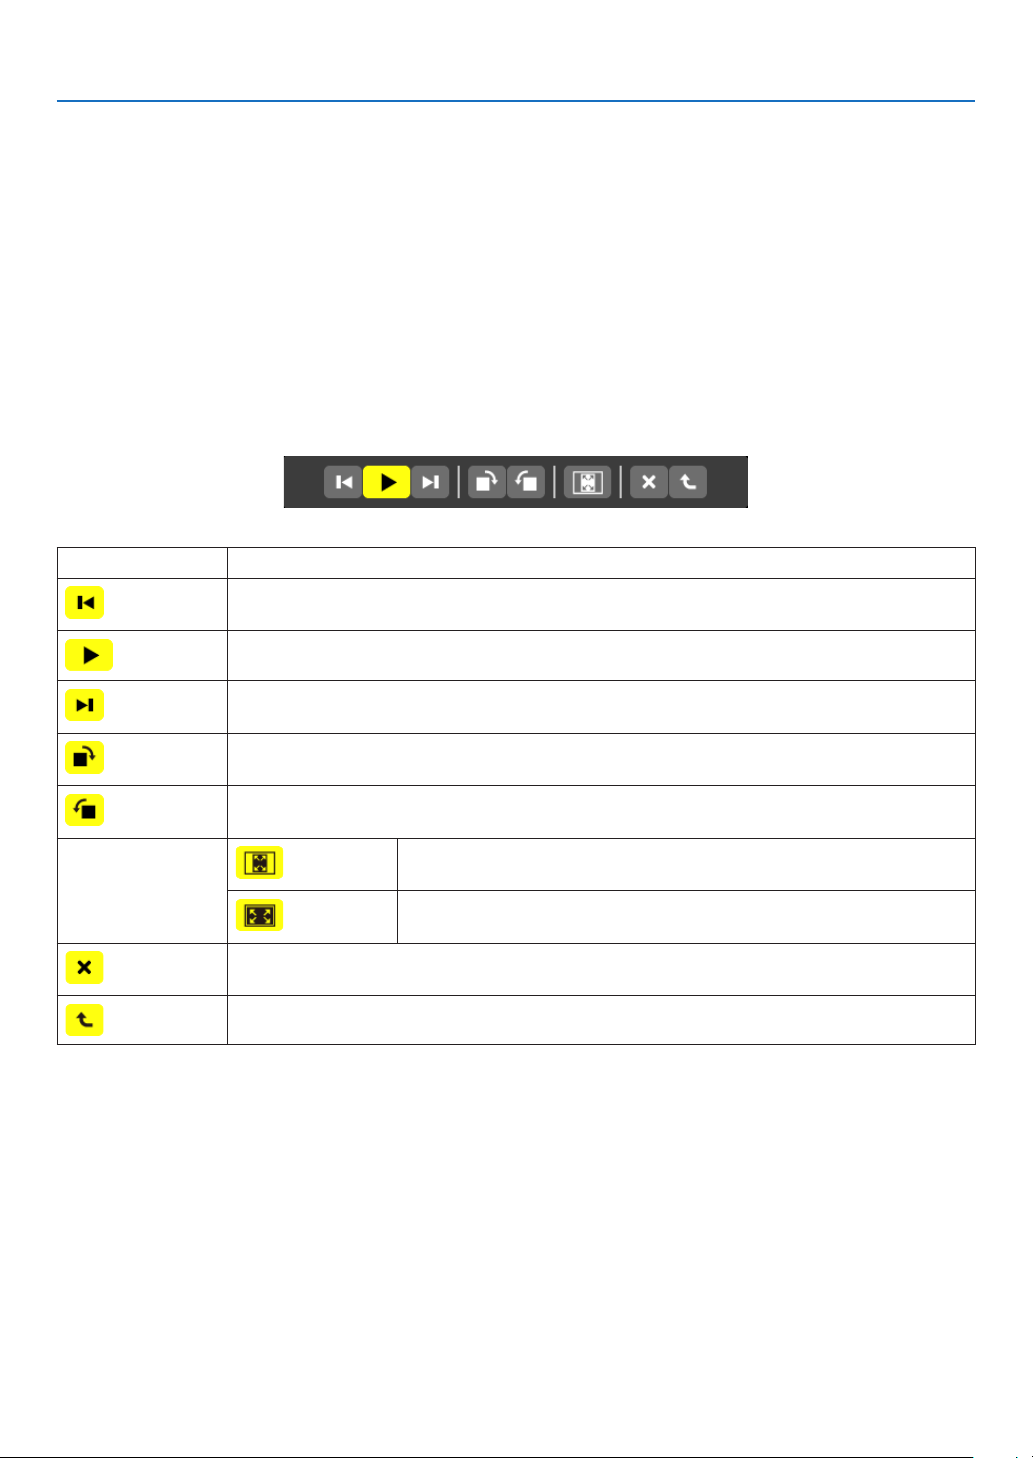
84
4. Using the Viewer
•Slidescreen(stillimage/movie)
Playsaleselectedfromalistofthumbnailsoricons.
• ForoperatingaMicrosoftPowerPointleandAdobePDFle,seepage79.
Control bar operation
• Thecontrolbarwillbedisplayedonlywhenastillimage(orindexle)andamovieleisselected.
• Thecontrolbarforstillimagesdiffersfromthatformovieles.
1. PressingtheENTERbuttoninSlidescreenwilldisplaythecontrolbaratthebottomofthescreen.
2. Use the ◀ or ▶buttontoselectaleandpresstheENTERbutton.
• Theselectedfunctionwillbeexecuted.
Functions of still image control bar
Name Description
PREV Goesbacktothepreviousimage.
The▲buttonwilldothesamefunction.
PLAY Playstheimage.Thisbuttonalsoisusedtostoporstartplayinganimage.
NEXT Goestothenextimage.
The▼buttonwilldothesamefunction.
RIGHT Rotatestheimage90°clockwise.
• Tocancel,selectanotherfolder.
LEFT Rotatestheimage90°counterclockwise.
• Tocancel,selectanotherfolder.
SIZE BESTFIT Displaystheimagewithits aspectratiointheprojector’sdisplayable
maximumresolution.
ACTUAL
SIZE
Displaystheimageinitsactualsize.
CLOSE Closesthecontrolbar.
• YoucanalsopresstheEXITbuttontoclosethecontrolbar.
END Stopsplayingslidesorslideshow,andclosesthecontrolbartoreturntothethumbnailscreen.
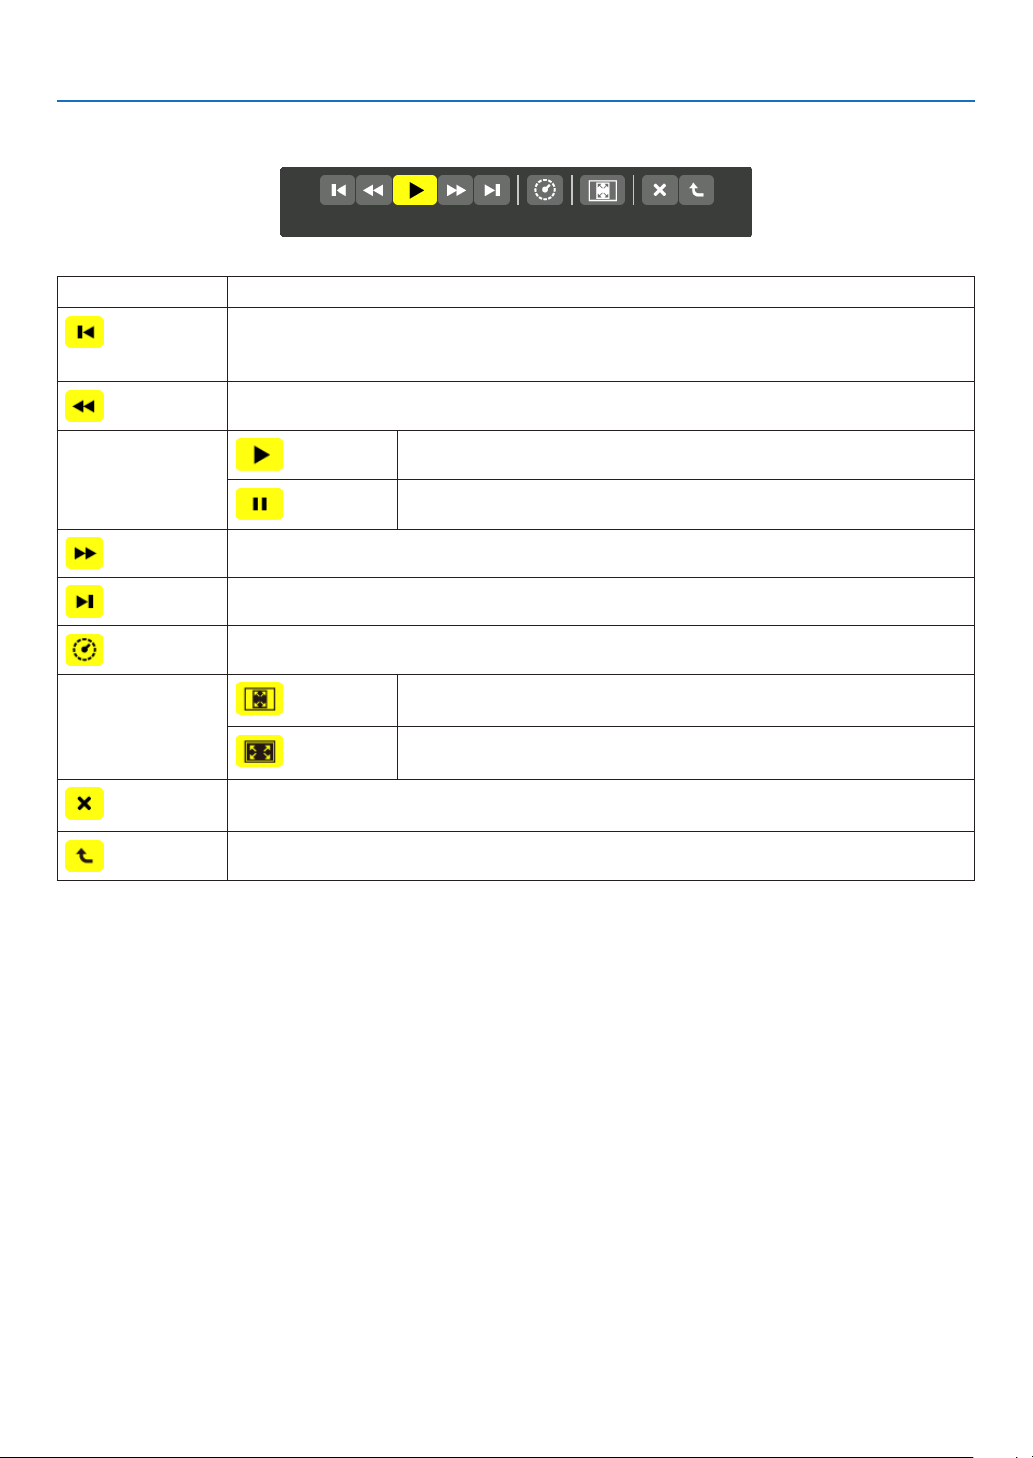
85
4. Using the Viewer
Functions of movie control bar
Name Description
PREV Goesbacktothebeginningofamoviele.
• Goesbacktothebeginningofthepreviousmovieleifexecutedimmediatelyafterbeing
startedplaying.
FR Fast-rewindsamovieleforabout7seconds.
PLAY/PAUSE PLAY Playsamoviele.
PAUSE Stopsplayingamoviele.
FF Fast-forwardsamovieleforabout7seconds.
NEXT Goestothebeginningofanextmoviele.
TIME Displaysanelapsedtimeforplaybackorpause.
SIZE BESTFIT Displaystheimagewithitsaspectratiointheprojector’sdisplayable
maximumresolution.
ACTUAL
SIZE
Displaystheimageinitsactualsize.
CLOSE Closesthecontrolbar.
• YoucanalsopresstheEXITbuttontoclosethecontrolbar.
END Stopsplayingamovie,andclosesthecontrolbartoreturntothethumbnailscreen.

86
4. Using the Viewer
Viewer option settings
•SLIDESETTING
Setsstillimagesorslides.
Name Options Description
SCREENSIZE BESTFIT Displaystheimagewithitsaspectratiointheprojector’sdisplay-
ablemaximumresolution.
ACTUALSIZE Displaystheimageinitsactualsize.
PLAYMODE MANUAL Selectsmanualplay.
AUTO Selectsautoplay.
INTERVAL 5-300seconds Speciesintervaltimewhen[AUTO]isselectedforPLAYMODE.
REPEAT Checkmark Turnsonorofftherepeatfunction.
TIP
• Toplayoneormoreslides,placethoselesintoafolder.
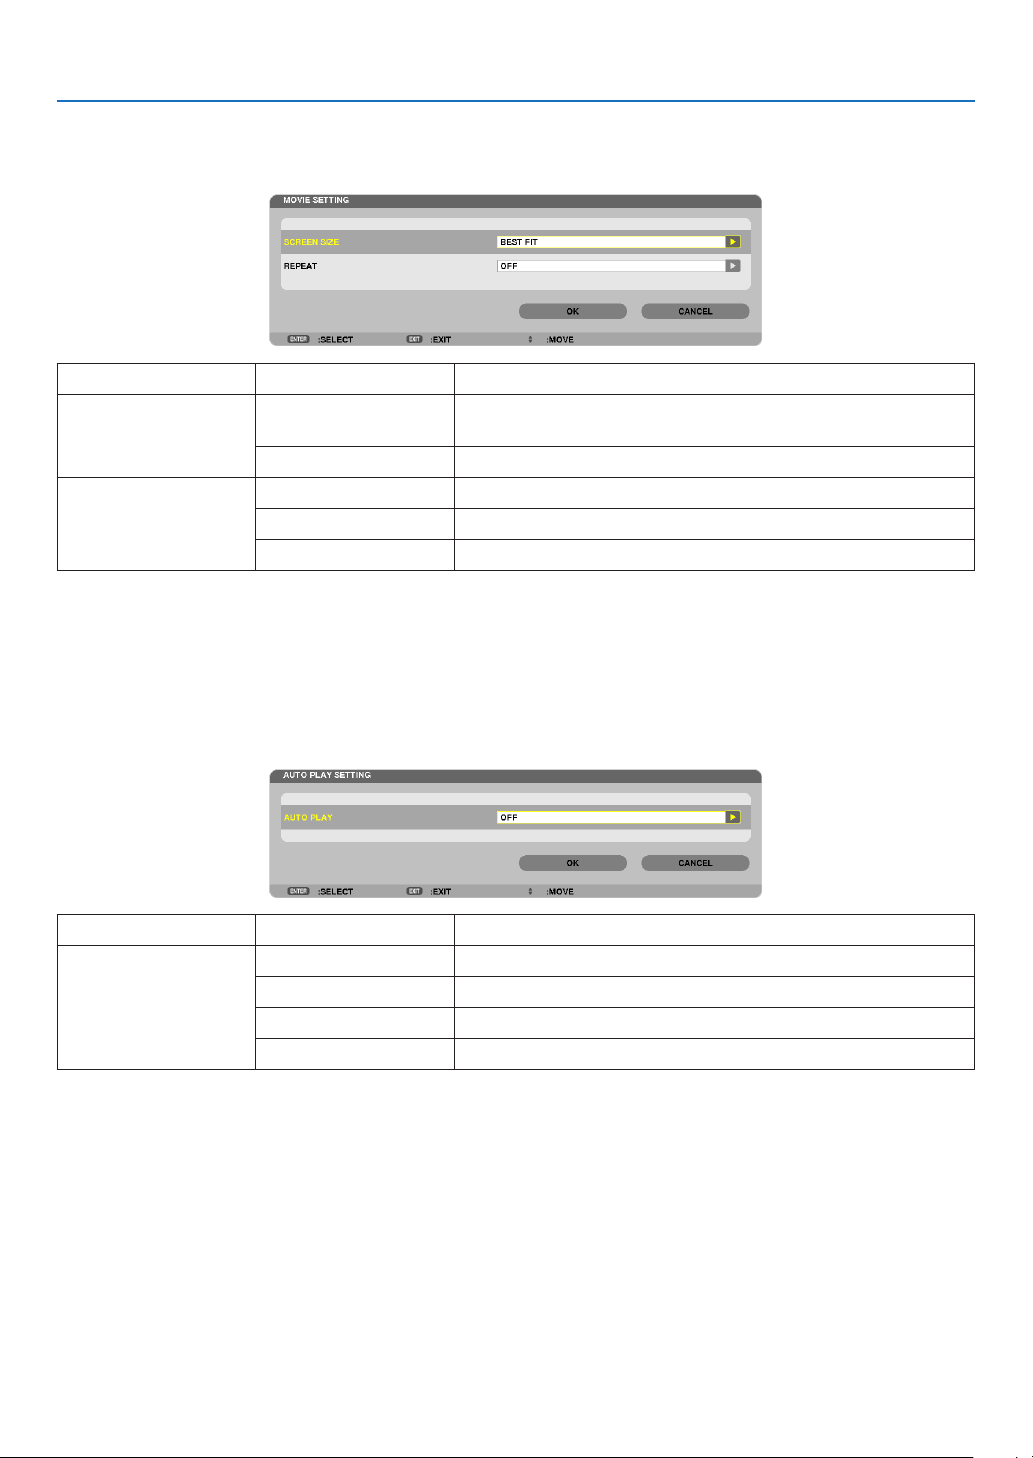
87
4. Using the Viewer
•MOVIESETTING
Setsthefunctionsforamoviele.
Name Options Description
SCREENSIZE BESTFIT Displaystheimagewithitsaspectratiointheprojector’sdisplay-
ablemaximumresolution.
ACTUALSIZE Displaystheimageinitsactualsize.
REPEAT OFF Turnsonorofftherepeatfunction.
ONEREPEAT Repeatsoneleonly.
ALLREPEAT Repeatsalllesinthecurrentfolder.
TIP
• Turningon[REPEAT]willdisplayblackscreenduringintermissionbetweenmovies.
•AUTOPLAYSETTING
SetsautoplayforslideshowwhenaUSBmemorydeviceisinsertedintotheUSBportoftheprojector,orwhen
[VIEWER]isselectedfor[SOURCE].
Name Options Description
AUTOPLAY OFF —
PICTURE
Playstherststillimagefoundinadrive.
MOVIE Playstherstmoviefoundinadrive.
PowerPoint PlaystherstPowerPointlefoundinadrive.
TIP
• AutoplaybehaviorisdifferentbetweenwhenaUSBmemorydeviceisinsertedintotheUSBportoftheprojectorandwhen
[VIEWER]isselectedfor[SOURCE].
• AutoplaystartsfortherstfoundlesupportingtheletypesetupforAutoPlay.Thelewillbesearchedinthedriverootor
lowerlevel.
• When[VIEWER]isselectedfor[SOURCE],thelastselectedlewillbeautomaticallyplayedifitisfound,orthelastselectedfolder
willbesearchedandtherstfoundlewillbeautomaticallyplayed.
ToautomaticallyplayamovieleinaUSBmemory,storeonemovieleorchangeitslenamesothatitcanbesearchedrst.

88
4. Using the Viewer
•SORTSETTING
Setstheorderofdisplayingthumbnailsorslides.
Name Options Description
SORT
NAME(ABC..) Displaysthelesalphabeticallybynameinascendingorder.
NAME(ZYX..) Displaysthelesalphabeticallybynameindescendingorder.
EXT.(ABC..) Displaysthelesalphabeticallybyextensioninascendingorder.
EXT.(ZYX..) Displaysthelesalphabeticallybyextensionindescendingorder.
DATE(NEW) Displaysthelesinreversechronologicalorder.
DATE(OLD) Displaysthelesinchronologicalorder.
SIZE(BIG) Displaysthelesindescendingorderofitslesize.
SIZE(SMALL) Displaysthelesinascendingorderofitslesize.
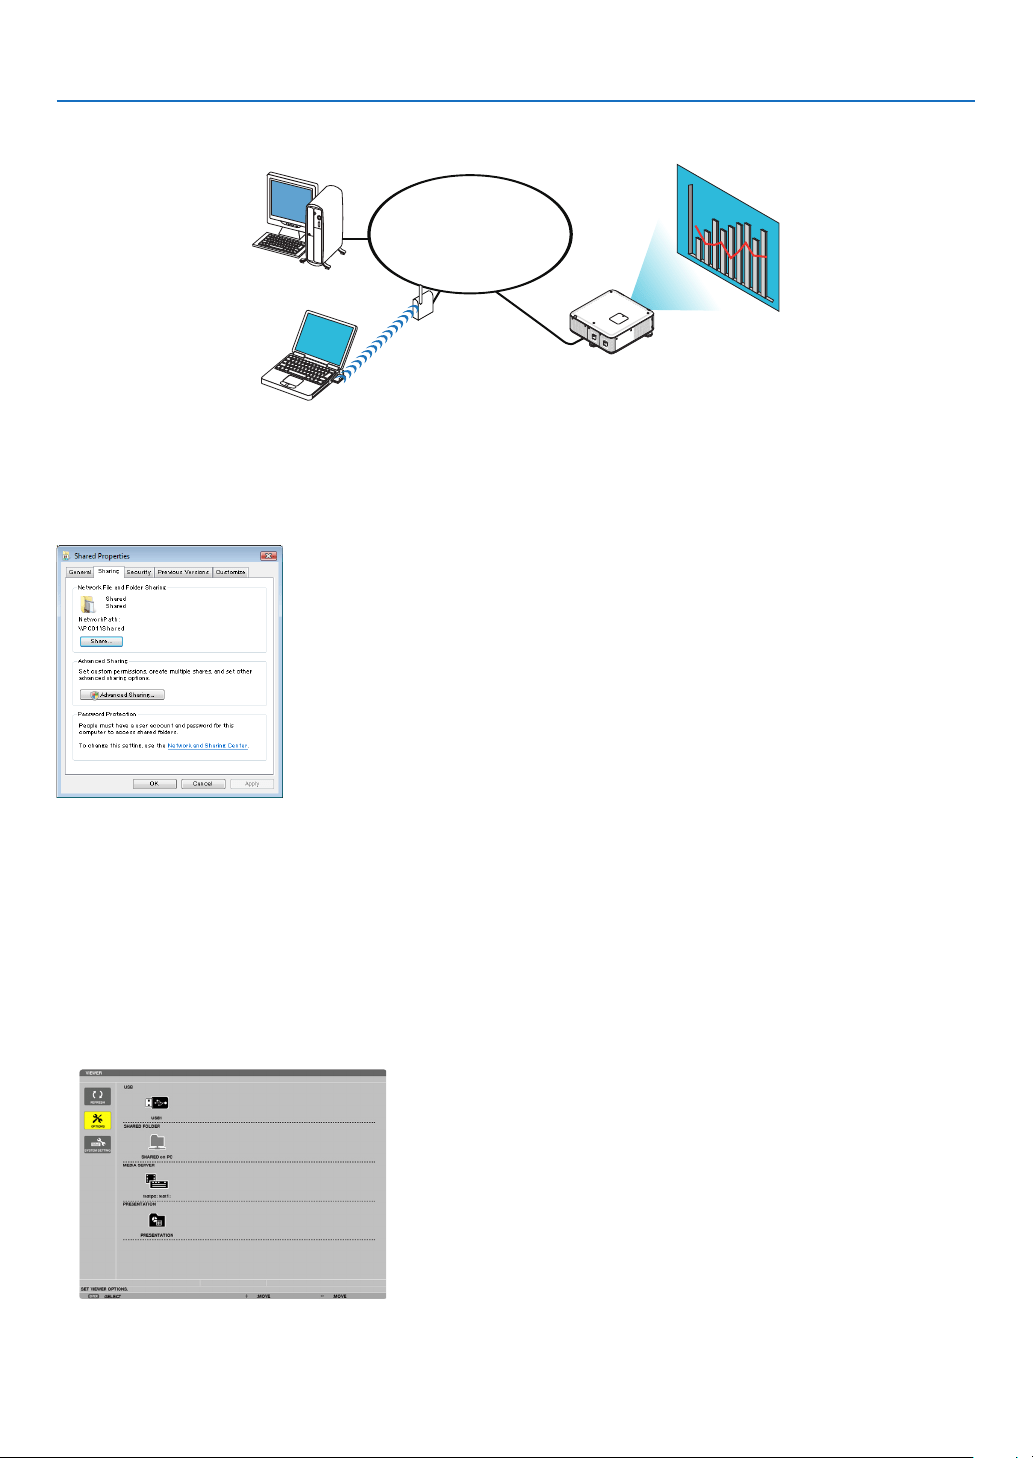
89
4. Using the Viewer
❹ Projecting data from shared folder
LAN
Shared folder
Wireless LAN
Projector
Shared folder
Preparation
Forprojector:Connecttheprojectortothenetwork.
Forcomputer:Placelestobeprojectedinasharedfolderandnotethefolder’spath.Memorizeorwritedownthe
pathforlateruse.
• Forsharingafolder,refertoyouruserguideorhelpleaccompaniedwithyourWindowscomputer.
• Useakeyboardtogiveanametothesharedfolderinalphanumericcharacters.
• Toconnectthesharedfolderbeyondthesubnet,set[WINSCONFIGURATION]in[NETWORKSETTINGS]from
themenu.
• Digitalsignature(SMBsignature)isnotsupported.
Connecting the projector to the shared folder
1. PresstheVIEWERbuttonontheremotecontrol.
The drive list window will be displayed.
• AnotherwaytostarttheVIEWERistopresstheSOURCEbuttonafewtimesontheprojectorcabinet.(→ page
21)
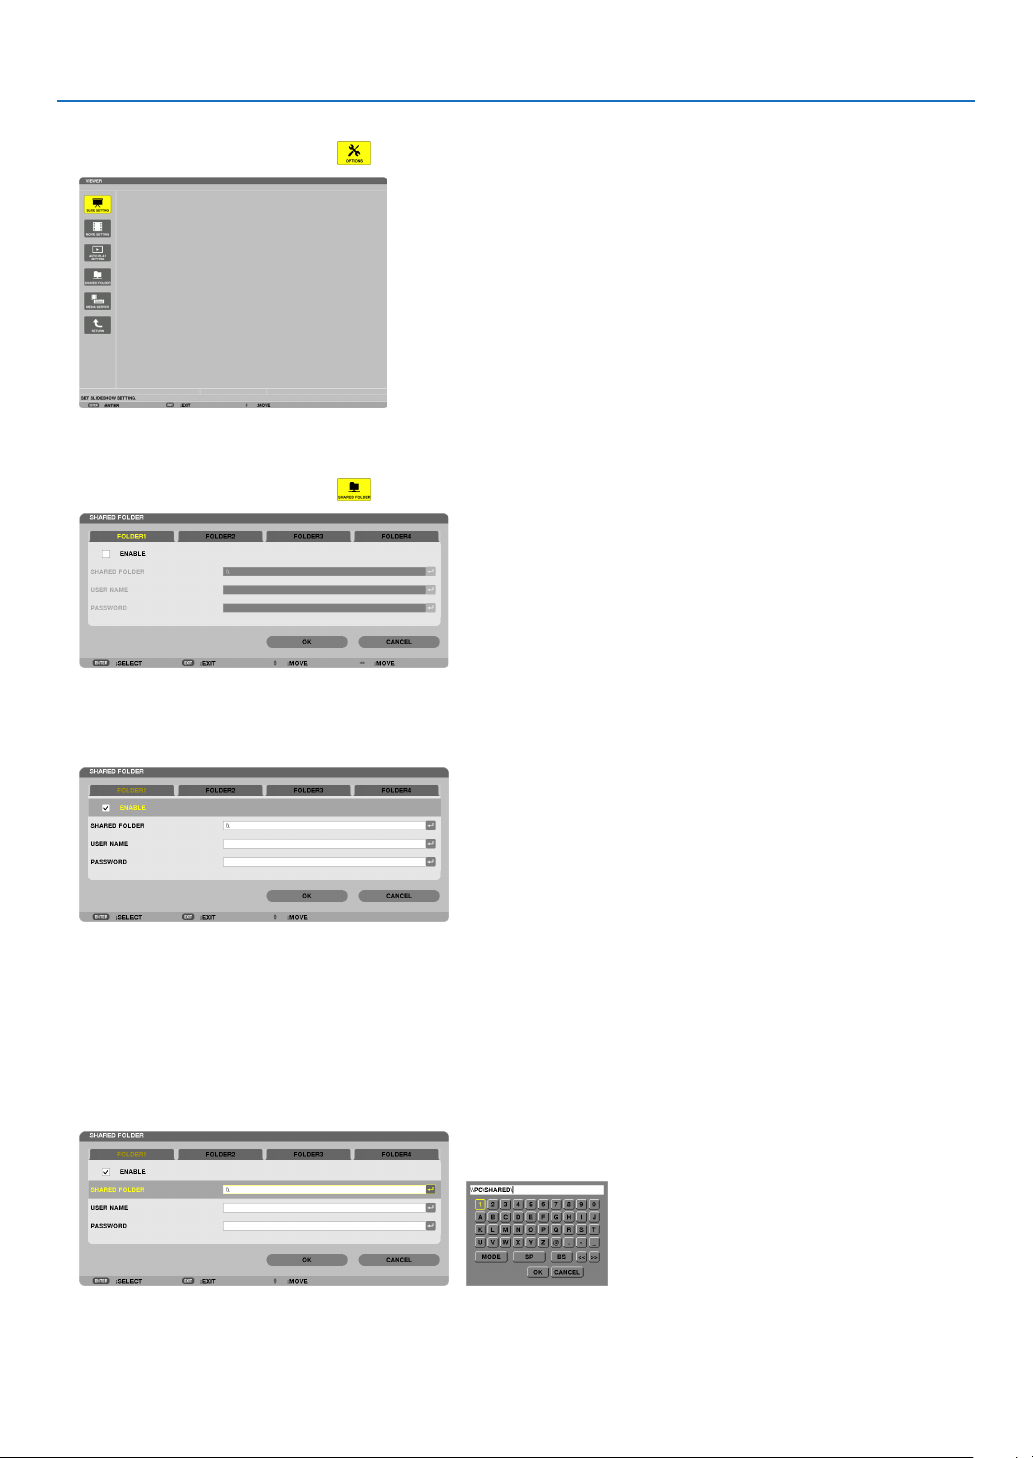
90
4. Using the Viewer
2. Displaysthe[OPTIONS]menu.
Press the ▼ button to select the (OPTIONS)iconandpresstheENTERbutton.
• WhentheOPTIONSmenuisdisplayed,thedrivelistwillnotbedisplayed.
3. Displaythe[SHAREDFOLDERSETTING]screen.
Press the ▼ button to select the (SHAREDFOLDERSETTING)iconandpresstheENTERbutton.
4. Selectafoldernumberandplacetoenableit.
Press the ◀ or ▶ button to a shared folder number and press the ▼ button to select [ENABLE] , and then press
the ENTER button.
5. Enterthepath,username,andpasswordforthesharedfolder.
Press the ▼ button to select the [SHARED FOLDER] field. The software keyboard will be displayed.
For using the software keyboard, see page 152.
• Ifyourcomputerisnotpasswordprotected,enteringapasswordisnotrequired.
• Uptofoursharedfolderscanbeadded.
• Themaximumlengthofapathofthesharedfoldermustbe15alphanumericcharactersforcomputernameand
23 alphanumeric characters for folder name.

91
4. Using the Viewer
6. Exitthesetting.
Press the ▼ button to select [OK] and press the ENTER button.
This will close the [SHARED FOLDER] screen.
• Ifanerrormessageappear,yoursettingsarenotcorrect.Tryagain.

92
4. Using the Viewer
Disconnecting the shared folder from the projector
• Disablethenumberofasharedfolderyouwishtodisconnect
Press the ▼ button to select [ENABLE] and press the ENTER button to clear it.
NOTE:
• WhenaPowerPointleorPDFleisdisplayed,donotdisconnectyourLANcable.Ifdoingso,theViewerwillnotwork.
TIP:
• ConnectingsettingsforSharedfolder
Settingsofuptofourfolderscanbesaved.
Restartingtheprojectorwilldisplaysetting-savedsharedfoldersingreyfoldericononthedrivelistscreen.
Selectingthegreyiconfolderwillskipentryforafolderpath.
• Failingtoconnectwithasharedfolderwilldisplaythefoldericonwith“x”mark.Ifthishappen,checkyourfoldersetting.
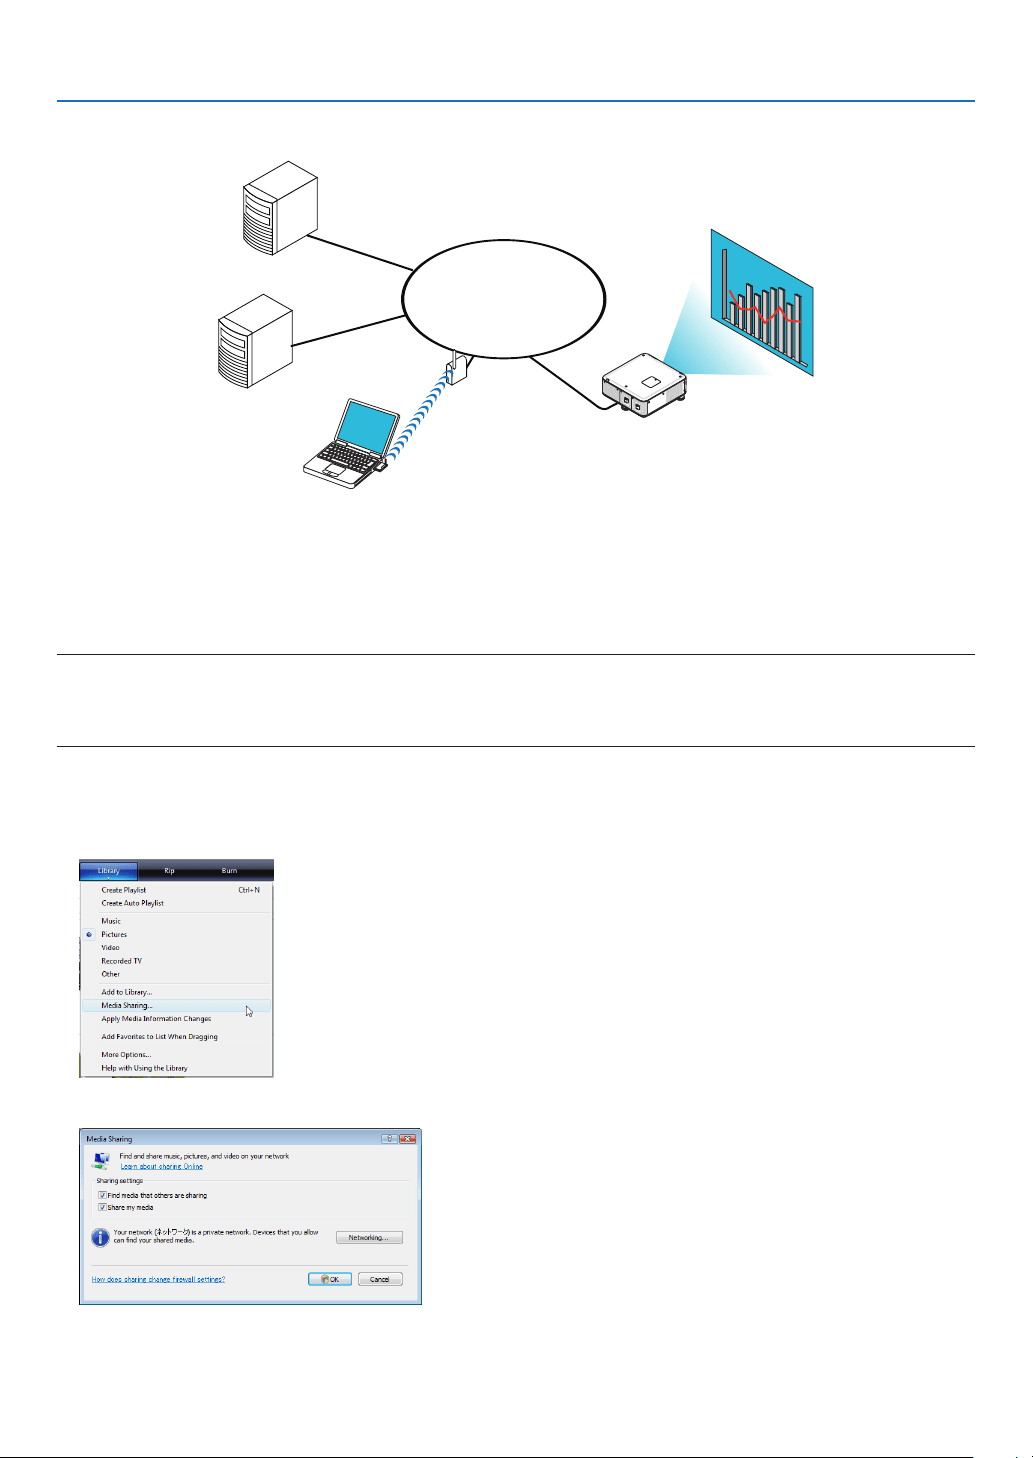
93
4. Using the Viewer
❺ Projecting data from media server
LAN
Media server
Media server
Wireless LAN
Media server
Projector
Preparation
Forprojector:Connecttheprojectortothenetwork.
Forcomputer:Prepareimagelesormovielestobeprojected,andsetup“MediaSharing”inWindowsMediaPlayer
11orWindowsMediaPlayer12.
NOTE:
• Boththeprojectorandthemediaservermustbeonthesamesubnet.Connectingtothemediaserverbeyondthesubnetisnot
possible.
• TypesofimagesandmovieswhichcanbesharedmayvarydependingonWindowsversion.
Setting up “Media Sharing” in Windows Media Player 11
1. StartWindowsMediaPlayer11.
2. Select“MediaSharing”from“Library”.
The “Media Sharing” dialog box will be displayed.
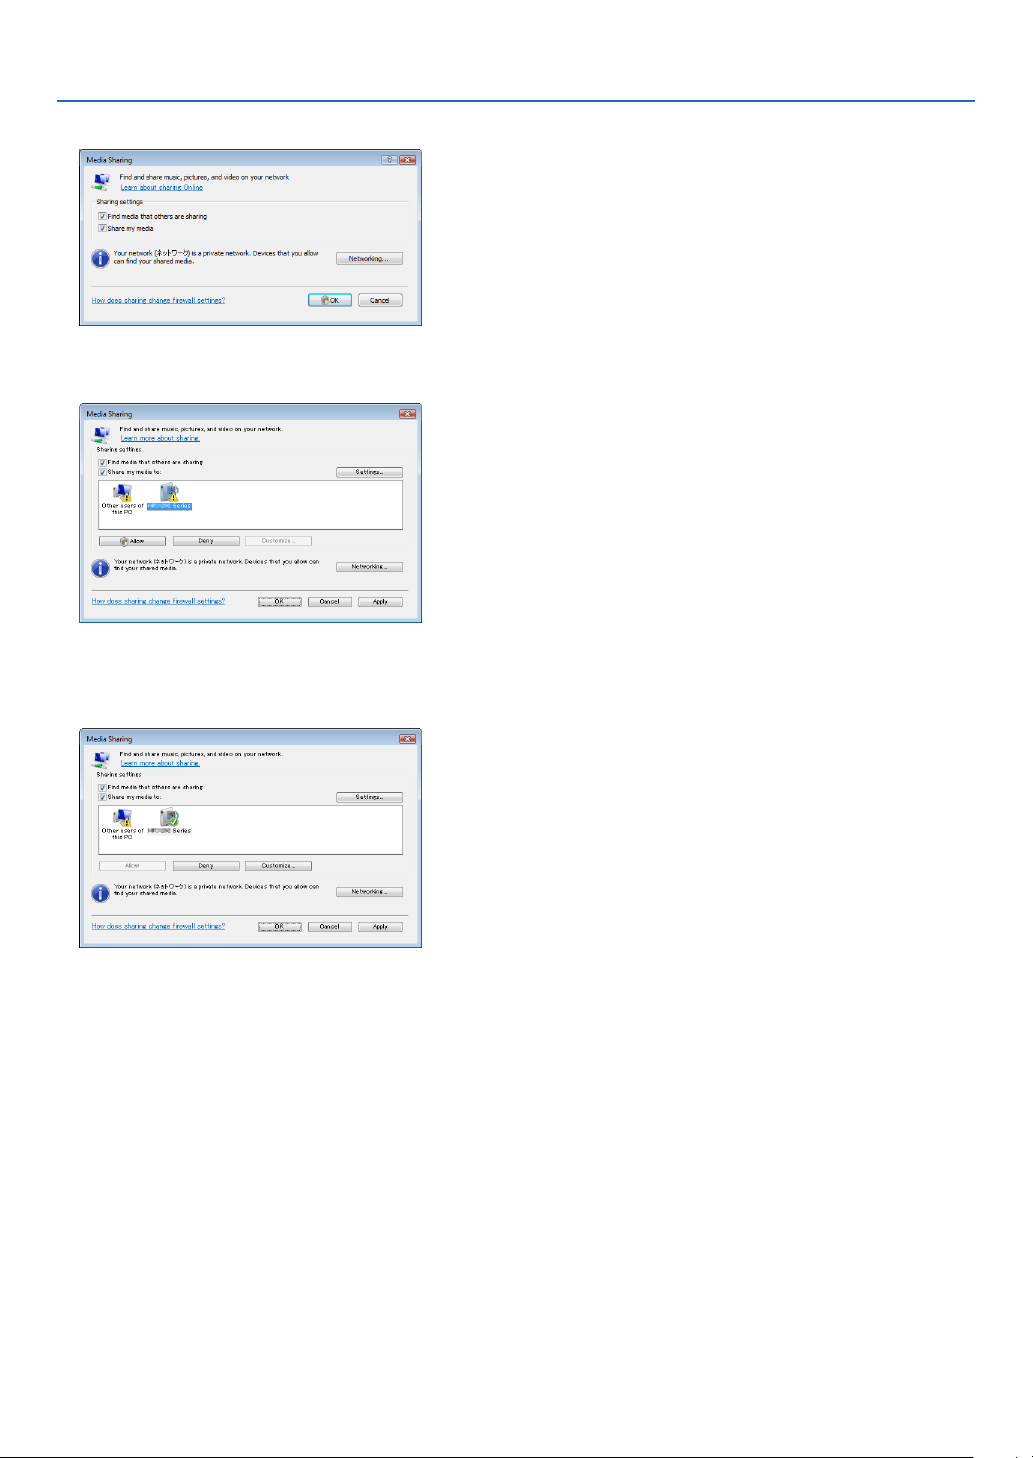
94
4. Using the Viewer
3. Select“Sharemymedia”checkbox,andthenselectOK.
A list of accessible devices will be displayed.
4. Select“PX750USeries”andthen“Allow”.
A check mark will be added to the “PX750U Series” icon.
• The“PX750USeries”isaprojectornamespeciedin[NETWORKSETTINGS].
5. Select“OK”.
This will make pictures and video in “Library” available from the projector.
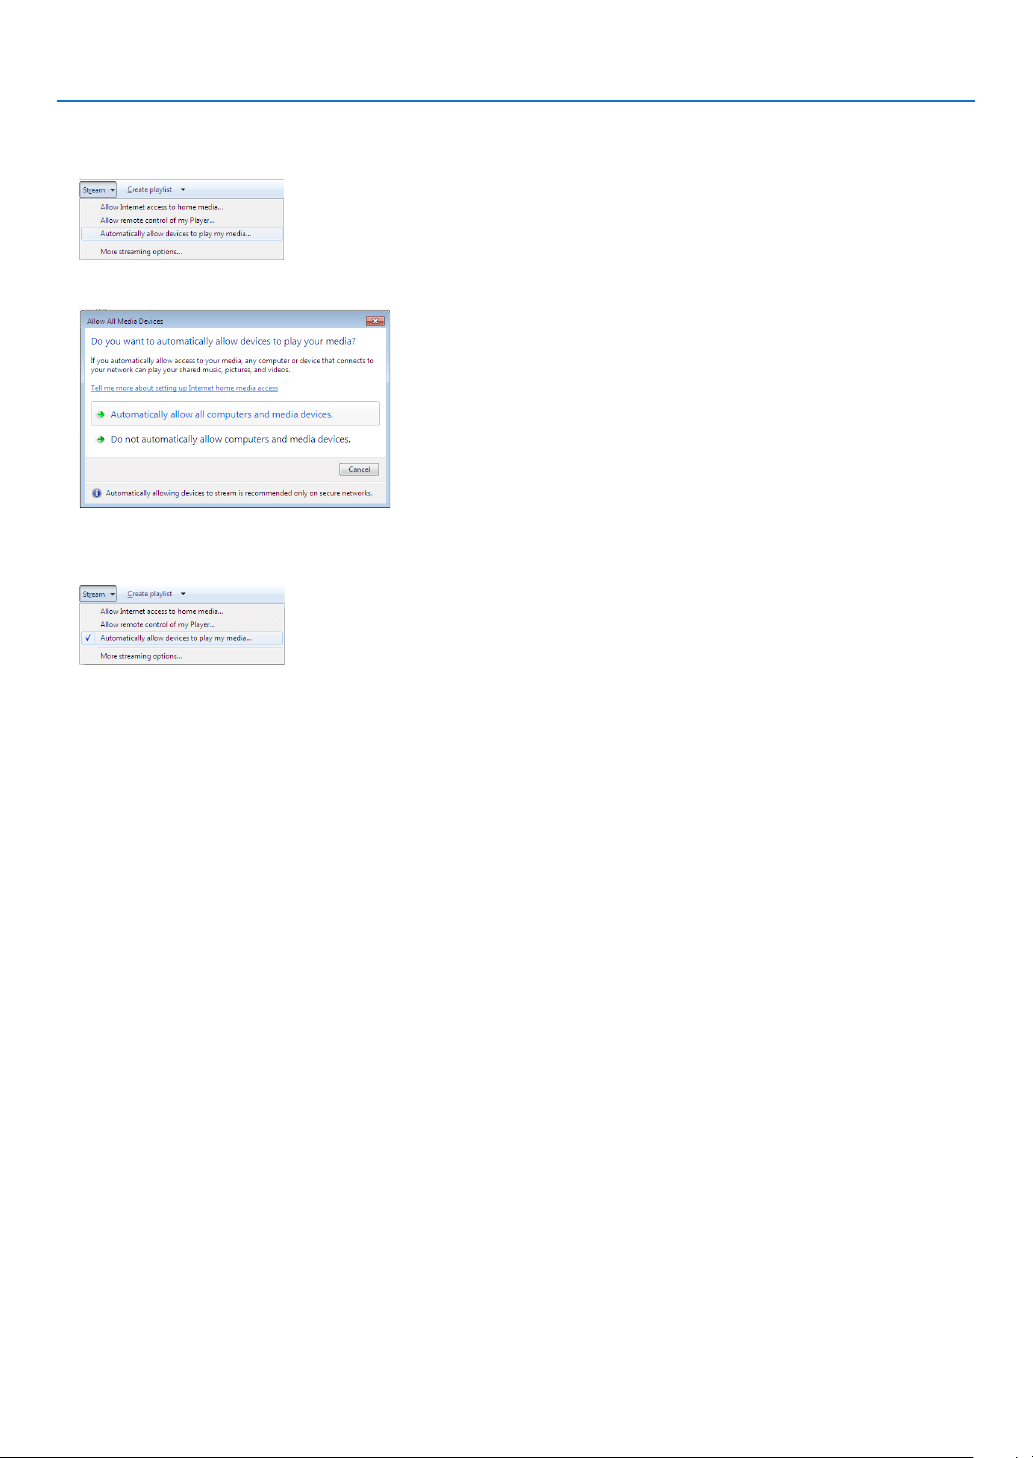
95
4. Using the Viewer
Setting up “Media Sharing” in Windows Media Player 12
1. StartWindowsMediaPlayer12.
2. Select“Stream”,andthenselect“Automaticallyallowdevicestoplaymymedia”.
The “Allow All Media Devices” windows will be displayed.
3. Select“Automaticallyallowallcomputersandmediadevices”.
Graphicsandmovielesin“Library”canbeusedfromtheprojector.

96
4. Using the Viewer
Connecting the projector to the media server
PresstheVIEWERbuttonontheremotecontrol.
TheVIEWERwillstart.
• AnotherwaytostarttheVIEWERistopresstheSOURCEbuttonafewtimesontheprojectorcabinet.(→page
21)
• Thiswillstartsearchingforacomputerwith“mediasharing”enabledinthenetworkandaddittothe“Mediaserver”
ofthethumbnailscreen.
Anotherwaytodothisistopointthecursorto“Mediaserver”andselect[REFRESH]fromthethumbnailmenu
andpresstheENTERbutton.
NOTE:
• Uptofouraccessiblemediaserverscanbeautomaticallysearchedanddisplayed.Thefthdeviceorlatercannotbedisplayed.
(→page77)
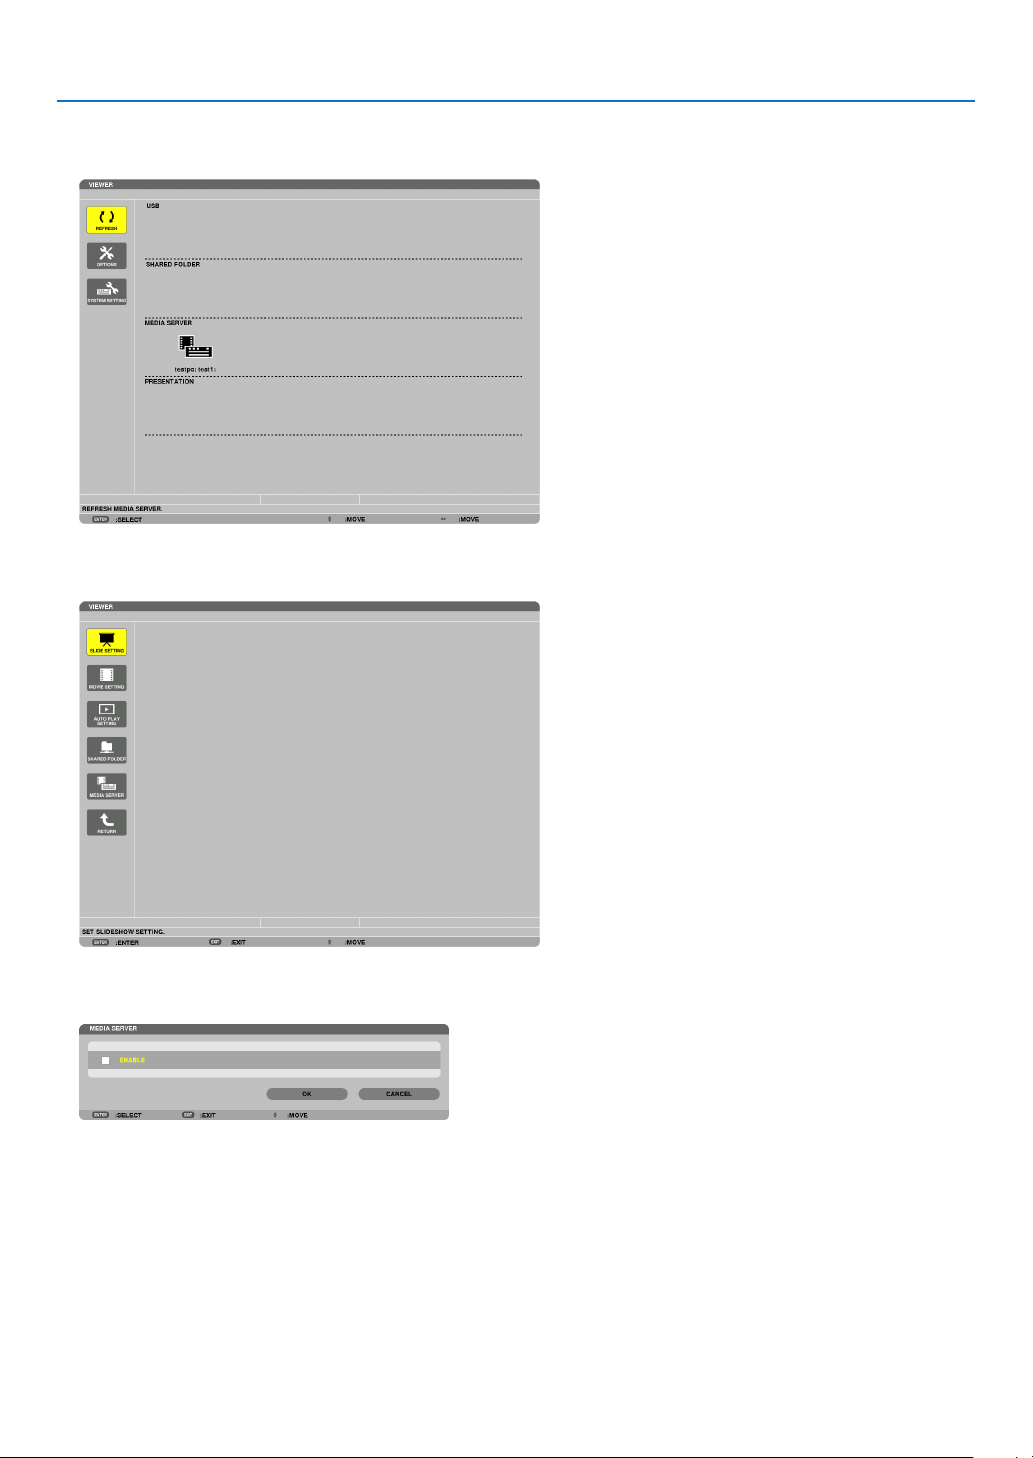
97
4. Using the Viewer
Disconnecting the projector from the media server
1. DisplaytheOPTIONSmenu.
Press the ▼buttontoselectthe[OPTIONS]iconandselecttheENTERbutton.
2. DisplaytheMEDIASERVERsettingscreen.
Press the ▼buttontoselecttheMEDIASERVERiconandpresstheENTERbutton.
3. Disabletheconnection.
Press the ENTER button to clear the checkmark to disable the connection.
Press the ▼buttontoselect[OK]andpresstheENTERbuttontoclosetheMEDIASERVERsettingscreen.

98
4. Using the Viewer
❻ Restrictions on displaying files
TheViewerallowsyoutogiveasimplieddisplayofaPowerPointleorPDFle.
Duetosimplieddisplay,however,actualdisplaymaybedifferentfromtheoneonyourcomputerapplicationprogram.
Some restrictions on PowerPoint files
• Fontswillbeautomaticallyconvertedtothefontsinstalledintheprojector.Fontscanvaryinsizeorwidth,causing
layoutcorruption
Somecharactersorfontsmaynotbedisplayed.
• Somefunctionsincludedinfontarenotsupported.
Example:Therearesomerestrictionsonanimation,selection,orhyperlink.
• Itmaytakelongertimetofeedpagescomparedwithacomputer
• InsomecasesMicrosoftPowerPoint97-2007formatlesmaynotbedisplayed.
Some restrictions on PDF files
• FontsnotembeddedatthetimeofPDFcreationmaynotbedisplayed.
• Somefunctionsincludedinfontarenotsupported.
Example:Therearesomerestrictionsonannotations,selection,form,orcolorspace.
• Itmaytakelongertimetofeedpagescomparedwithacomputer
• InsomecasesAdobeAcrobatformatlesmaynotbedisplayed.
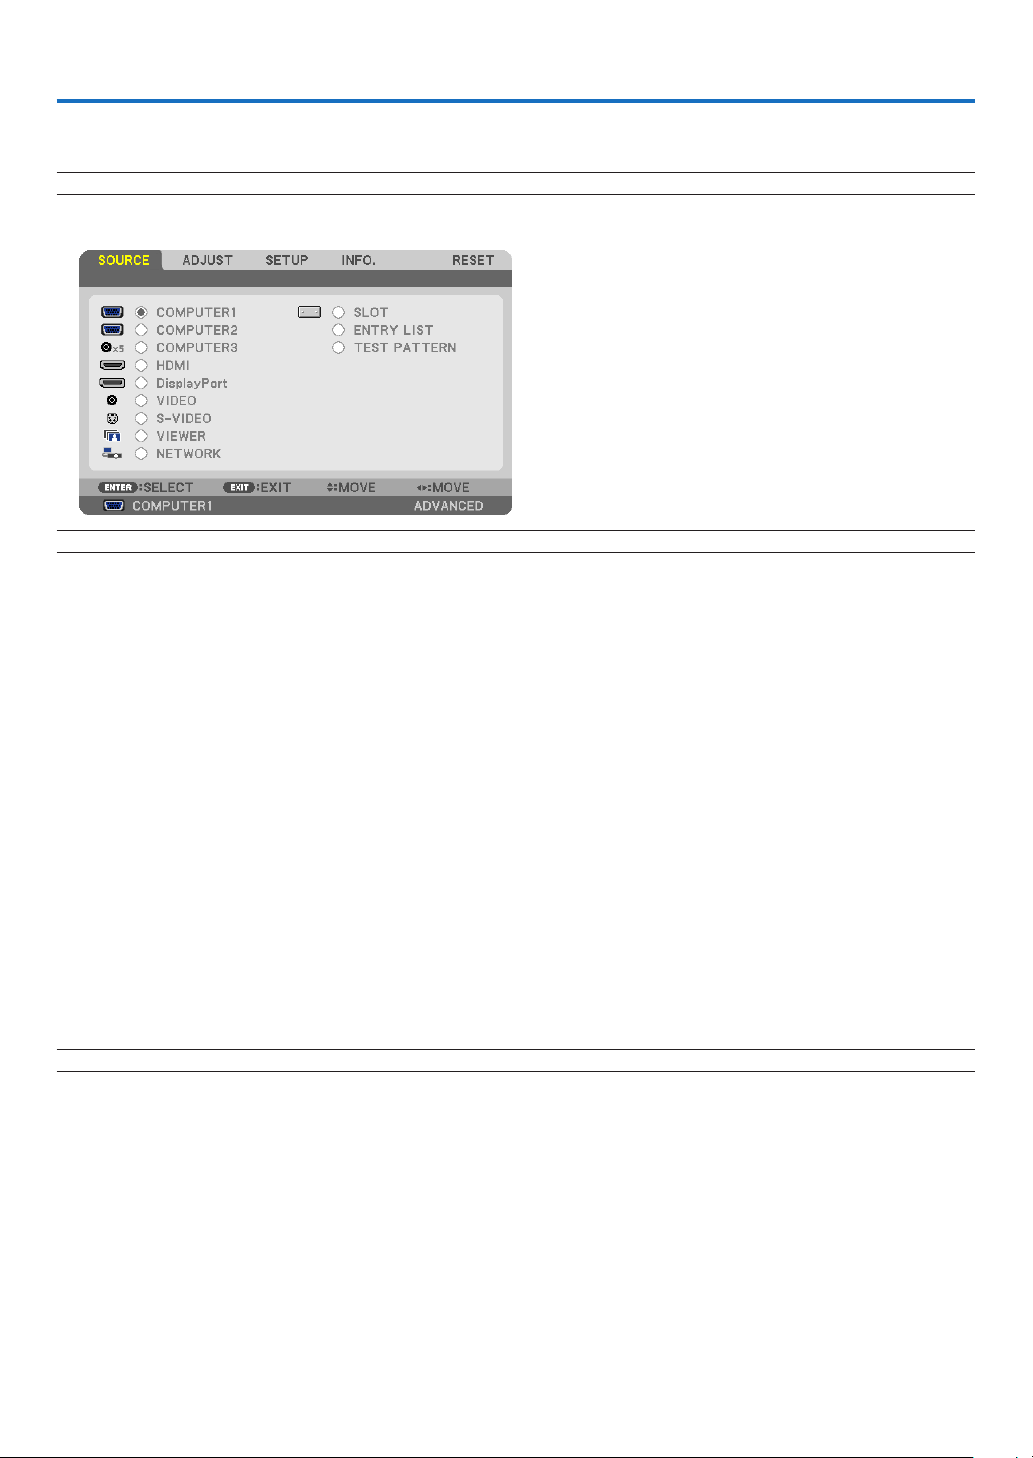
99
5. Using On-Screen Menu
❶ Using the Menus
NOTE:Theon-screenmenumaynotbedisplayedcorrectlywhileinterlacedmotionvideoimageisprojected.
1. Press the MENU button on the remote control or the projector cabinet to display the menu.
NOTE: The commands such as ENTER,EXIT,▲▼, ◀▶inthebottomshowavailablebuttonsforyouroperation.
2. Press the ◀▶ buttons on the remote control or the projector cabinet to display the submenu.
3. PresstheENTERbuttonontheremotecontrolortheprojectorcabinettohighlightthetopitemortherst
tab.
4. Use the ▲▼ buttons on the remote control or the projector cabinet to select the item you want to adjust or
set.
Youcanusethe◀▶ buttons on the remote control or the projector cabinet to select the tab you want.
5. PresstheENTERbuttonontheremotecontrolortheprojectorcabinettodisplaythesubmenuwindow.
6. Adjustthelevelorturntheselecteditemonoroffbyusingthe▲▼◀▶ buttons on the remote control or
the projector cabinet.
Changesarestoreduntiladjustedagain.
7. Repeatsteps2-6toadjustanadditionalitem,orpresstheEXITbuttonontheremotecontrolortheprojec-
tor cabinet to quit the menu display.
NOTE:Whenamenuormessageisdisplayed,severallinesofinformationmaybelost,dependingonthesignalorsettings.
8. Press the MENU button to close the menu.
Toreturntothepreviousmenu,presstheEXITbutton.
100
5. Using On-Screen Menu
❷ Menu Elements
Slide bar
Solid triangle
Menu mode
Ta b
Radio button
High Altitude symbol
ECO mode symbol
Wireless symbol
Menuwindowsordialogboxestypicallyhavethefollowingelements:
Highlight ����������������������������� Indicates the selected menu or item�
Solid triangle ����������������������Indicates further choices are available� A highlighted triangle indicates the item is active�
Tab ��������������������������������������Indicates a group of features in a dialog box� Selecting on any tab brings its page to the front�
Radio button ����������������������� Use this round button to select an option in a dialog box�
Source ��������������������������������Indicates the currently selected source�
Menu mode ������������������������Indicates the current menu mode: BASIC or ADVANCED�
Off Timer remaining time ���� Indicates the remaining countdown time when the [OFF TIMER] is preset�
Slide bar �����������������������������Indicates settings or the direction of adjustment�
ECO mode symbol ��������������Indicates [ECO MODE] is set�
Key Lock symbol ����������������Indicates the [CONTROL PANEL LOCK] is enabled�
High Altitude symbol ����������Indicates the [FAN MODE] is set to [HIGH ALTITUDE] mode�
Wireless symbol �����������������Indicate the wireless LAN connection is enabled�
Source
Available buttons
Key Lock symbol
Off Timer remaining
time
Highlight
101
5. Using On-Screen Menu
❸ List of Menu Items
Somemenuitemsarenotavailabledependingontheinputsource.
MenuItem Default Options
SOURCE
COMPUTER1 *
COMPUTER2 *
COMPUTER3 *
HDMI *
DisplayPort *
VIDEO *
S-VIDEO *
VIEWER *
NETWORK *
SLOT
ENTRYLIST
TESTPATTERN
ADJUST
PICTURE
MODE STANDARD
STANDARD,PROFESSIONAL
PRESET *
HIGH-BRIGHT,PRESENTATION,VIDEO,MOVIE,GRAPHIC,
sRGB
DETAILSETTINGS
GENERAL
REFERENCE *
HIGH-BRIGHT,PRESENTATION,VIDEO,MOVIE,GRAPHIC,
sRGB
GAMMA
CORRECTION
DYNAMIC,NATURAL,BLACKDETAIL
COLOR
TEMPERATURE*
1
* 5000,6500,7800,8500,9300,10500
DYNAMIC
CONTRAST
*
OFF,ON
BrilliantColor OFF OFF,MEDIUM,HIGH
WHITEBALANCE
CONTRASTR 0
CONTRASTG 0
CONTRASTB 0
BRIGHTNESSR 0
BRIGHTNESSG 0
BRIGHTNESSB 0
SATURATION
RED 0
GREEN 0
BLUE 0
YELLOW 0
MAGENTA 0
CYAN 0
CONTRAST 50
BRIGHTNESS 50
SHARPNESS 10
COLOR 50
HUE 0
RESET
IMAGEOPTIONS
CLOCK *
PHASE *
HORIZONTAL *
VERTICAL *
BLANKING *
TOP,BOTTOM,LEFT,RIGHT
OVERSCAN * AUTO,0[%],5[%],10[%]
ASPECTRATIO
*
(COMPUTER1/2/3)AUTO,4:3,5:4,16:9,15:9,16:10,
NATIVE
*
(COMPONENT/VIDEO/S-VIDEO)AUTO,4:3,LETTERBOX,
WIDESCREEN,ZOOM
*
(COMPONENT/VIDEO/S-VIDEO)AUTO,4:3WINDOW,
LETTERBOX,WIDESCREEN,4:3FILL
RESOLUTION * –
VIDEO
NOISE
REDUCTION
RANDOMNR * OFF,LOW,MEDIUM,HIGH
MOSQUITONR OFF OFF,LOW,MEDIUM,HIGH
BLOCKNR OFF OFF,ON
DEINTERLACE AUTO AUTO,VIDEO,FILM
3DY/CSEPARATION ON OFF,ON
DETAILENHANCEMENT *
SIGNALTYPE RGB RGB,COMPONENT
VIDEOLEVEL AUTO AUTO,NORMAL,ENHANCED
LENSMEMORY
STORE
MOVE
RESET
* Theasterisk(*)indicatesthatthedefaultsettingvariesdependingonthesignal.
*1 When[PRESENTATION]or[HIGH-BRIGHT]isselectedin[REFERENCE],the[COLORTEMPERATURE]isnotavailable.
•Basicmenuitemsareindicatedbyshadedarea.
102
5. Using On-Screen Menu
SETUP
BASIC
KEYSTONE
HORIZONTAL 0
VERTICAL 0
CORNERSTONE
PIP/PICTUREBY
PICTURE
PIP/PBPMODE PIP PIP,PICTUREBYPICTURE
PIPPOSITION BOTTOM-RIGHT TOP-LEFT,TOP-RIGHT,BOTTOM-LEFT,BOTTOM-RIGHT
PIP/PBPSOURCE OFF OFF,VIDEO,S-VIDEO
WALLCOLOR OFF
OFF,BLACKBOARD,BLACKBOARD(GRAY),LIGHT
YELLOW,LIGHTBLUE,LIGHTROSE
LAMPMODE
ECOMODE OFF OFF,ON
LAMPSELECT DUAL DUAL,SINGLE,LAMP1ONLY,LAMP2ONLY
LAMPINTERVAL
MODE
OFF
OFF,12HOURS,24HOURS,1WEEK
LAMPSWITCHING
TIME
00:00
00:00-24:00
LAMPSWITCHING
DAY
SUN
SUN,MON,TUE,WED,THU,FRI,SAT
CLOSEDCAPTION OFF
OFF,CAPTION1,CAPTION2,CAPTION3,CAPTION4,
TEXT1,TEXT2,TEXT3,TEXT4
OFFTIMER OFF OFF,0:30,1:00,2:00,4:00,8:00,12:00,16:00
TOOLS
ADMINISTRATORMODE,PROGRAMTIMER,TIME,
MOUSE
LANGUAGE ENGLISH
ENGLISH,DEUTSCH,FRANÇAIS,ITALIANO,ESPAÑOL,
SVENSKA,日本語
DANSK,PORTUGUÊS,ČEŠTINA,MAGYAR,POLSKI,
NEDERLANDS,SUOMI
NORSK,TÜRKÇE,РУССКИЙ, , Ελληνικά, 中文, 한국어
ROMÂNĂ, HRVATSKA, БЪЛГАРСКИ, INDONESIA, ,
ไทย
MENU
COLORSELECT COLOR COLOR,MONOCHROME
SOURCEDISPLAY ON OFF,ON
MESSAGEDISPLAY ON OFF,ON
IDDISPLAY ON OFF,ON
ECOMESSAGE OFF OFF,ON
DISPLAYTIME AUTO45SEC MANUAL,AUTO5SEC,AUTO15SEC,AUTO45SEC
BACKGROUND LOGO BLUE,BLACK,LOGO
FILTERMESSAGE OFF OFF,100[H],500[H],1000[H],2000[H],5000[H]
INSTALLATION
(1)
ORIENTATION
DESKTOP
FRONT
DESKTOPFRONT,CEILINGREAR,DESKTOPREAR,
CEILINGFRONT
SCREEN
SCREENTYPE 4:3SCREEN 4:3SCREEN,16:9SCREEN,16:10SCREEN
POSITION*
1
(PX800X2only)
0 [16:9]:-96to96,[16:10]:-64to64
GEOMETRICCORRECTION OFF OFF,1,2,3
MULTI-SCREEN
COMP.
MODE OFF
OFF,ON
CONTRAST 0
BRIGHTNESS 0
REF.WHITE
BALANCE
CONTRASTR 0
CONTRASTG 0
CONTRASTB 0
BRIGHTNESSR 0
BRIGHTNESSG 0
BRIGHTNESSB 0
UNIFORMITYR 0
UNIFORMITYB 0
REF.LENS
MEMORY
STORE
MOVE
RESET
LOADBYSIGNAL
FORCEDMUTE
CALIBRATION
INSTALLATION
(2)
NETWORKSETTINGS
WIREDLAN,WIRELESSLAN,WPS,NETWORK
INFORMATION,PROJECTORNAME,DOMAIN,ALERT
MAIL,NETWORKSERVICE
CONTROLPANELLOCK OFF OFF,ON
SECURITY OFF OFF,ON
COMMUNICATIONSPEED 38400bps 4800bps,9600bps,19200bps,38400bps,115200bps
REMOTESENSOR FRONT/BACK FRONT/BACK,FRONT,BACK
CONTROLID
CONTROLID
NUMBER
1 1–254
CONTROLID OFF OFF,ON
* Theasterisk(*)indicatesthatthedefaultsettingvariesdependingonthesignal.
*1 Thisitemisavailablewhen[16:9SCREEN]or[16:10SCREEN]isselectedfor[SCREENTYPE].

103
5. Using On-Screen Menu
SETUP
OPTIONS(1)
AUTOADJUST NORMAL OFF,NORMAL,FINE
FANMODE
AUTO MODE:AUTO,HIGH,HIGHALTITUDE
FLOOR
SETTING:FLOOR,CEILING,VERTICALTILTUP,VERTICAL
TILTDOWN
SIGNALSELECT(COMP3)
RGB/
COMPONENT
RGB/COMPONENT,VIDEO
SEAMLESSSWITCHING(forPX750U2
only)
OFF
OFF,ON
COLORSYSTEM
VIDEO AUTO
AUTO,NTSC3.58,NTSC4.43,PAL,PAL-M,PAL-N,PAL60,
SECAM
S-VIDEO AUTO
AUTO,NTSC3.58,NTSC4.43,PAL,PAL-M,PAL-N,PAL60,
SECAM
COMPUTER3
(VIDEO)
AUTO
AUTO,NTSC3.58,NTSC4.43,PAL,PAL-M,PAL-N,PAL60,
SECAM
SLOTPOWER
PROJECTORON ON OFF,ON
PROJECTOR
STANDBY
ENABLE
DISABLE,ENABLE
OPTIONS(2)
STANDBYMODE POWER-SAVING NORMAL,POWER-SAVING,NORMAL2
DIRECTPOWERON OFF OFF,ON
AUTOPOWERON(COMP1/3) OFF OFF,COMPUTER1,COMPUTER3
AUTOPOWEROFF 0:30 OFF,0:05,0:10,0:20,0:30
DEFAULTSOURCESELECT LAST
LAST,AUTO,COMPUTER1,COMPUTER2,COMPUTER3,
HDMI,DisplayPort,VIDEO,S-VIDEO,VIEWER,NETWORK
EDGEBLENDING MODE OFF
OFF,ON
(ON:TOP,BOTTOM,LEFT,RIGHT,BLACKLEVEL)
INFO.
USAGETIME
LAMP1LIFEREMAINING
LAMP2LIFEREMAINING
LAMP1HOURSUSED
LAMP2HOURSUSED
FILTERHOURSUSED
TOTALCARBONSAVINGS
SOURCE(1)
INPUTTERMINAL
RESOLUTION
HORIZONTALFREQUENCY
VERTICALFREQUENCY
SYNCTYPE
SYNCPOLARITY
SCANTYPE
SOURCENAME
ENTRYNO.
SOURCE(2)
SIGNALTYPE
VIDEOTYPE
BITDEPTH
VIDEOLEVEL
LINKRATE
LINKLANE
WIREDLAN
IPADDRESS
SUBNETMASK
GATEWAY
MACADDRESS
WIRELESS
LAN(1)
IPADDRESS
SUBNETMASK
GATEWAY
MACADDRESS
WIRELESS
LAN(2)
SSID
NETWORKTYPE
WEP/WPA
CHANNEL
SIGNALLEVEL
VERSION(1)
FIRMWARE
DATA
FIRMWARE2
VERSION(2) FIRMWARE3
OTHERS
PROJECTORNAME
MODELNO.
SERIALNUMBER
LANUNITTYPE
CONTROLID(when[CONTROLID]
isset)
RESET
CURRENTSIGNAL
ALLDATA
ALLDATA(INCLUDINGENTRYLIST)
CLEARLAMP1HOURS
CLEARLAMP2HOURS
CLEARFILTERHOURS

104
5. Using On-Screen Menu
❹ Menu Descriptions & Functions [SOURCE]
COMPUTER 1, 2, and 3
SelectsthecomputerconnectedtoyourCOMPUTER1,2,orCOMPUTER3inputconnectorsignal.
NOTE:WhenthecomponentinputsignalisconnectedtotheCOMPUTER1IN,COMPUTER2IN,orCOMPUTER3INconnector,select
[COMPUTER1],[COMPUTER2]or[COMPUTER3]respectively.TheprojectorautomaticallydetermineswhethertheCOMPUTER1,
2,or3inputsignalisanRGBorcomponentsignal.
HDMI
SelectstheHDMIcompatibleequipmentconnectedtoyourHDMIINconnector.
DisplayPort
ProjectstheimageofthedeviceconnectedtotheDisplayPortinputconnector.
VIDEO
SelectswhatisconnectedtoyourVIDEOinput-VCR,DVDplayerordocumentcamera.
S-VIDEO
SelectswhatisconnectedtoyourS-VIDEOinput-VCRorDVDplayer.
NOTE:Aframemayfreezeforabriefperiodoftimewhenavideoisplayedbackinfast-forwardorfast-rewindwithaVideoorS-
Videosource.
VIEWER
ThisfeatureenablesyoutomakepresentationsusingaUSBmemorythatcontainsslides.
(→page73“4.UsingtheViewer”)
NETWORK
SelectsasignalfromtheLANport(RJ-45)ortheinstalledUSBwirelessLANunit(optionalformodelsforEurope,
Australia,AsiaandothercountriesthanNorthAmerica).
SLOT (for optional board)
Selectsasignalfromtheoptionalboard(SB-01HCorotherNEC’sinterfaceboards)whenitisinstalled.
ENTRY LIST
Displaysalistofsignals.Seethefollowingpages.
TEST PATTERN
Displaysthetestpattern.
NOTE:
• Thetestpatterncanbedisplayedevenwhenthemenuisdisplayed.Unavailablemenuitemsaredisplayedingrey.
105
5. Using On-Screen Menu
UsingtheEntryList
Whenanysourceorlensmemoryadjustmentsaremade,theadjustmentsareautomaticallyregisteredintheEntry
List.The(adjustmentvaluesof)registeredsignalscanbeloadedfromtheEntryListwhenevernecessary.
However,onlyupto100patternscanberegisteredintheEntryList.When100patternshavebeenregisteredinthe
EntryList,anerrormessageisthendisplayedandnoadditionalpatternscanberegistered.Youshouldthusdelete
(adjustmentvaluesof)signalsthatarenolongerneeded.
DisplayingtheEntrylist
1. Press the MENU button.
The menu will be displayed.
2. Press the ◀ or ▶buttontoselect[SOURCE].
The SOURCE list will be displayed.
3. Use the ◀, ▶, ▲, or ▼toselect[ENTRYLIST]andpresstheENTERbutton.
TheENTRYLISTwindowswillbedisplayed.
IftheENTRYLISTwindowisnotdisplayed,switchthemenuto[ADVANCED].
Toswitchthemenubetween[ADVANCED]and[BASIC],select[APPLICATIONMENU]→ [TOOLS] →[ADMINIS-
TRATOR MODE]. (→ page 157)

106
5. Using On-Screen Menu
EnteringthecurrentlyprojectedsignalintotheEntryList[STORE]
1. Press the ▲ or ▼ button to select any number.
2. Press the ◀ or ▶buttontoselect[STORE]andpresstheENTERbutton.
CallingupasignalfromtheEntryList[LOAD]
Pressthe▲or▼buttontoselectasignalandpresstheENTERbutton.
EditingasignalfromtheEntryList[EDIT]
1. Press the ▲ or ▼ button to select a signal you wish to edit.
2. Press the ◀, ▶, ▲, or ▼buttontoselect[EDIT]andpresstheENTERbutton.
The Edit window will be displayed.
SOURCENAME Enterasignalname.Upto18alphanumericcharacterscanbeused.
INPUTTERMINAL Selecttheinputsource.
LOCK Setsothattheselectedsignalcannotbedeletedwhen[ALLDELETE] isexecuted.The
changesmadeafterLOCKexecutioncannotbesaved.
SKIP Setsothattheselectedsignalwillbeskippedduringautosearch.
3. Settheaboveitemsandselect[OK]andpresstheENTERbutton.
NOTE: The input terminal cannot be changed to the currently projected signal.

107
5. Using On-Screen Menu
CuttingasignalfromtheEntryList[CUT]
1. Press the ▲ or ▼ button to select a signal you wish to delete.
2. Press the ◀, ▶, ▲, or ▼buttontoselect[CUT]andpresstheENTERbutton.
The signal will be deleted from the Entry List and the deleted signal will be displayed on the clipboard at the bottom
of the Entry List.
NOTE:
• Thecurrentlyprojectedsignalcannotbedeleted.
• Whenthelockedsignalisselected,itwillbedisplayedingraywhichindicatesitisnotavailable.
TIP:
• DataontheclipboardcanbepassedontotheEntryList.
• DataontheclipboardwillnotbelostaftertheEntryListisclosed.
CopyingandpastingasignalfromtheEntryList[COPY]/[PASTE]
1. Press the ▲ or ▼ button to select a signal you wish to copy.
2. Press the ◀, ▶, ▲, or ▼buttontoselect[COPY]andpresstheENTERbutton.
The copied signal will be displayed on the clipboard at the bottom of the Entry List.
3. Press the ◀ or ▶ button to move to the list.
4. Press the ▲ or ▼ button to select a signal.
5. Press the ◀, ▶, ▲, or ▼buttontoselect[PASTE]andpresstheENTERbutton.
Data on the clipboard will be pasted to the signal.
DeletingallthesignalsfromtheEntryList[ALLDELETE]
1. Press the ◀, ▶, ▲, or ▼buttontoselect[ALLDELETE]andpresstheENTERbutton.
The confirmation message will be displayed.
2. Press the ◀ or ▶buttontoselect[YES]andpresstheENTERbutton.
NOTE: The locked signal cannot be deleted.
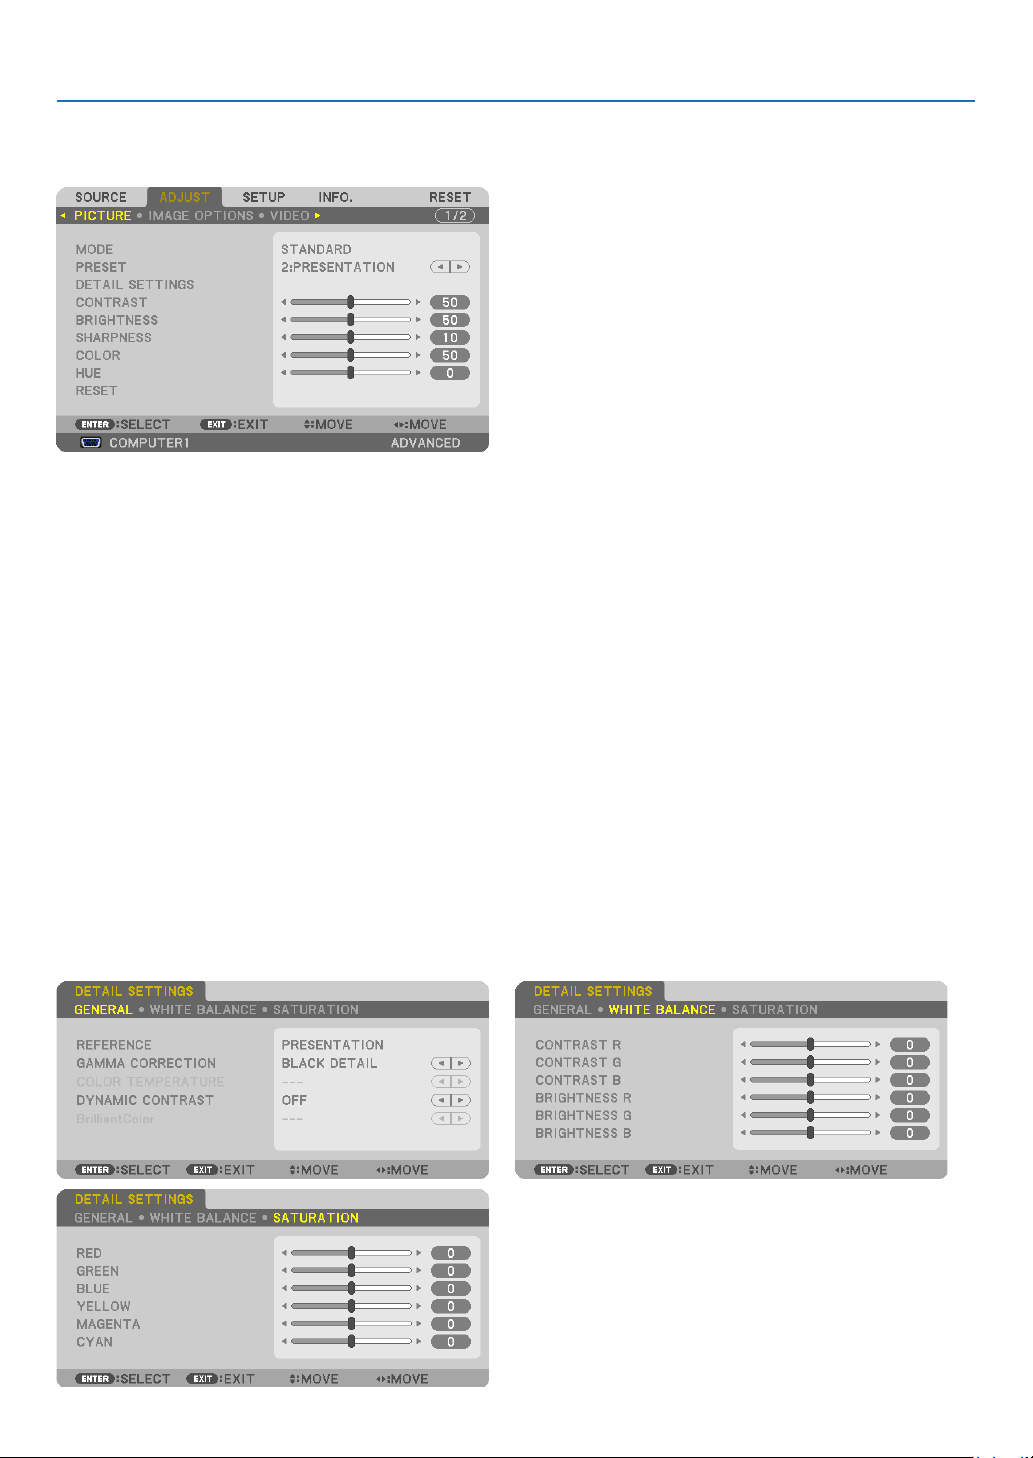
108
5. Using On-Screen Menu
❺ Menu Descriptions & Functions [ADJUST]
[PICTURE]
[MODE]
Thisfunctionallowsyoutodeterminehowtosavesettingsfor[DETAILSETTINGS]of[PRESET]foreachinput.
STANDARD ������������ Saves settings for each item of [PRESET] (Preset 1 through 6)
PROFESSIONAL
����� Saves all the settings of [PICTURE] for each input�
[PRESET]
Thisfunctionallowsyoutoselectoptimizedsettingsforyourprojectedimage.
Youcanadjustneutraltintforyellow,cyanormagenta.
Therearesixfactorypresetsoptimizedforvarioustypesofimages.Youcanalsouse[DETAILSETTINGS]tosetuser
adjustablesettingstocustomizeeachgammaorcolor.
Yoursettingscanbestoredin[PRESET1]to[PRESET6].
HIGH-BRIGHT �������� Recommended for use in a brightly lit room�
PRESENTATION ����� Recommended for making a presentation using a PowerPoint file�
VIDEO �������������������� Recommended for typical TV program viewing�
MOVIE ������������������� Recommended for movies�
GRAPHIC ��������������� Recommended for graphics�
sRGB ��������������������� Standard color values
[DETAIL SETTINGS]

109
5. Using On-Screen Menu
[GENERAL]
StoringYourCustomizedSettings[REFERENCE]
Thisfunctionallowsyoutostoreyourcustomizedsettingsin[PRESET1]to[PRESET6].
First,selectabasepresetmodefrom[REFERENCE],thenset[GAMMACORRECTION]and[COLORTEMPERATURE].
HIGH-BRIGHT �������� Recommended for use in a brightly lit room�
PRESENTATION ����� Recommended for making a presentation using a PowerPoint file�
VIDEO �������������������� Recommended for typical TV program viewing�
MOVIE ������������������� Recommended for movies�
GRAPHIC ��������������� Recommended for graphics�
sRGB ��������������������� Standard color values�
Selecting Gamma Correction Mode [GAMMA CORRECTION]
Eachmodeisrecommendedfor:
DYNAMIC �������������� Creates a high-contrast picture�
NATURAL ��������������� Natural reproduction of the picture�
BLACK DETAIL ������� Emphasizes detail in dark areas of the picture�
Adjusting Color Temperature [COLOR TEMPERATURE]
Thisoptionallowsyoutoselectthecolortemperatureofyourchoice.
NOTE:
• When[PRESENTATION]or[HIGH-BRIGHT]isselectedin[REFERENCE],thisfunctionisnotavailable.
• Whenacoloroptionotherthan[OFF]isselectedfor[WALLCOLOR],thisfunctionisnotavailable.
Adjusting Brightness and Contrast [DYNAMIC CONTRAST]
Thisfunctionallowsyoutoadjustthecontrastratioopticallyusingthebuilt-iniris.
Toincreasethecontrastratio,select[ON].
NOTE:
• Fromtheon-screenmenu[DYNAMICCONTRAST]isavailableonlywhen[DUAL]isselectedfor[LAMPSELECT]from[LAMP
MODE].(→ page 119)
Adjusting Brightness of White Areas [BrilliantColor]
Thisfunctionallowsyoutoadjustthebrightnessofthewhiteareas.Asthepicturebecomesdim,itlooksmorenatural.
OFF ������������������������ Turns off the BrilliantColor feature�
MEDIUM ���������������� Increases brightness of the white areas�
HIGH ���������������������� Increases more brightness of the white areas�
NOTE:
• [BrilliantColor]isnotavailablewhen[HIGH-BRIGHT]or[PRESENTATION]isselectedfor[REFERENCE].

110
5. Using On-Screen Menu
Adjusting White Balance [WHITE BALANCE]
Thisallowsyoutoadjustthewhitebalance.Contrastforeachcolor(RGB)toadjustthewhitelevelofthescreen;
Brightnessforeachcolor(RGB)isusedtoadjusttheblacklevelofthescreen.
[SATURATION]
Correctsthesaturationforallsignals.
Adjuststhesaturationforthecolorsred,green,blue,yellow,magentaandcyan.
RED ����������������������� Adjusts the color in red areas, centered around the red�
GREEN ������������������� Adjusts the color in green areas, centered around the green�
BLUE ���������������������� Adjusts the color in blue areas, centered around the blue�
YELLOW ���������������� Adjusts the color in yellow areas, centered around the yellow�
MAGENTA �������������� Adjusts the color in magenta areas, centered around the magenta�
CYAN ��������������������� Adjusts the color in cyan areas, centered around the cyan�
[CONTRAST]
Adjuststheintensityoftheimageaccordingtotheincomingsignal.
[BRIGHTNESS]
Adjuststhebrightnesslevelorthebackrasterintensity.
[SHARPNESS]
Controlsthedetailoftheimage.
[COLOR]
Increasesordecreasesthecolorsaturationlevel.
[HUE]
Variesthecolorlevelfrom+/−greento+/−blue.Theredlevelisusedasreference.
Inputsignal CONTRAST BRIGHTNESS SHARPNESS COLOR HUE
COMPUTER/DisplayPort/HDMI(RGB) Ye s Ye s Ye s
No(Yes:SDTV/
HDTV)
No(Yes:SDTV/
HDTV)
COMPUTER/DisplayPort/HDMI
(COMPONENT)
Yes Ye s Ye s Ye s Ye s
VIDEO/S-VIDEO/COMPONENT Yes Ye s Ye s Ye s Ye s
VIEWER/NETWORK Yes Yes Yes No No
Yes=Adjustable,No=Notadjustable
[RESET]
Thesettingsandadjustmentsfor[PICTURE]willbereturnedtothefactorysettingswiththeexceptionofthefollowing;
Presetnumbersand[REFERENCE]withinthe[PRESET]screen.
Thesettingsandadjustmentsunder[DETAILSETTINGS]withinthe[PRESET]screenthatarenotcurrentlyselected
willnotbereset.
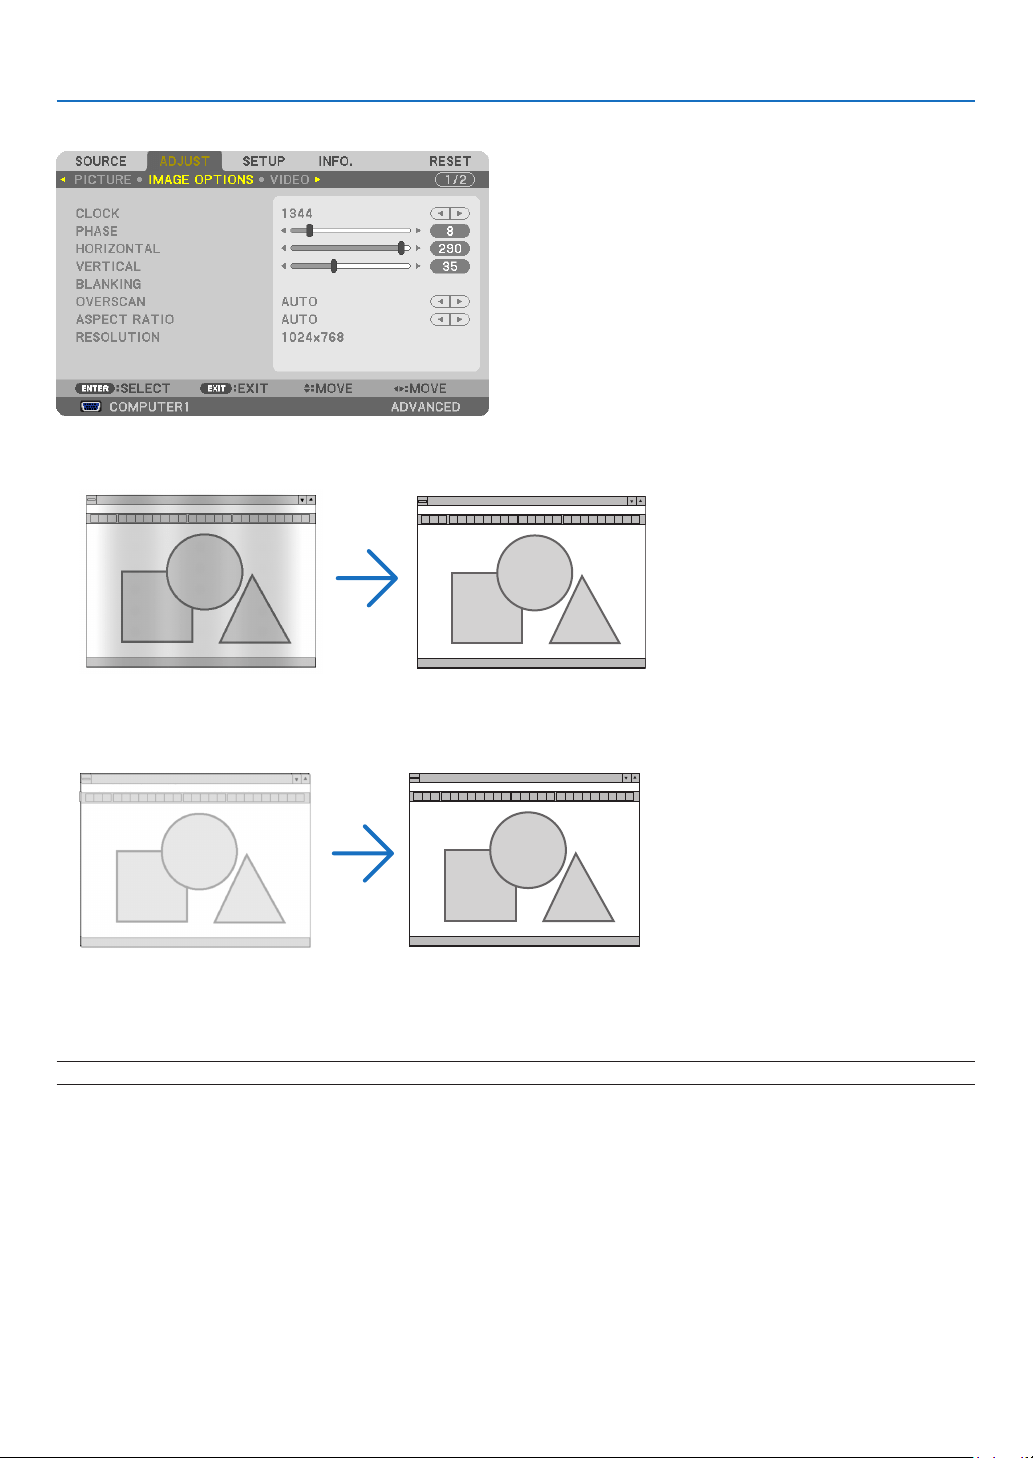
111
5. Using On-Screen Menu
[IMAGE OPTIONS]
AdjustingClockandPhase[CLOCK/PHASE]
ThisallowsyoutomanuallyadjustCLOCKandPHASE.
CLOCK ������������������� Use this item to fine tune the computer image or to remove any vertical banding that might appear� This
function adjusts the clock frequencies that eliminate the horizontal banding in the image�
This adjustment may be necessary when you connect your computer for the first time�
PHASE ������������������� Use this item to adjust the clock phase or to reduce video noise, dot interference or cross talk� (This is
evident when part of your image appears to be shimmering�)
Use [PHASE] only after the [CLOCK] is complete�
NOTE:The[CLOCK]and[PHASE]itemsareavailableforRGBsignalsonly.
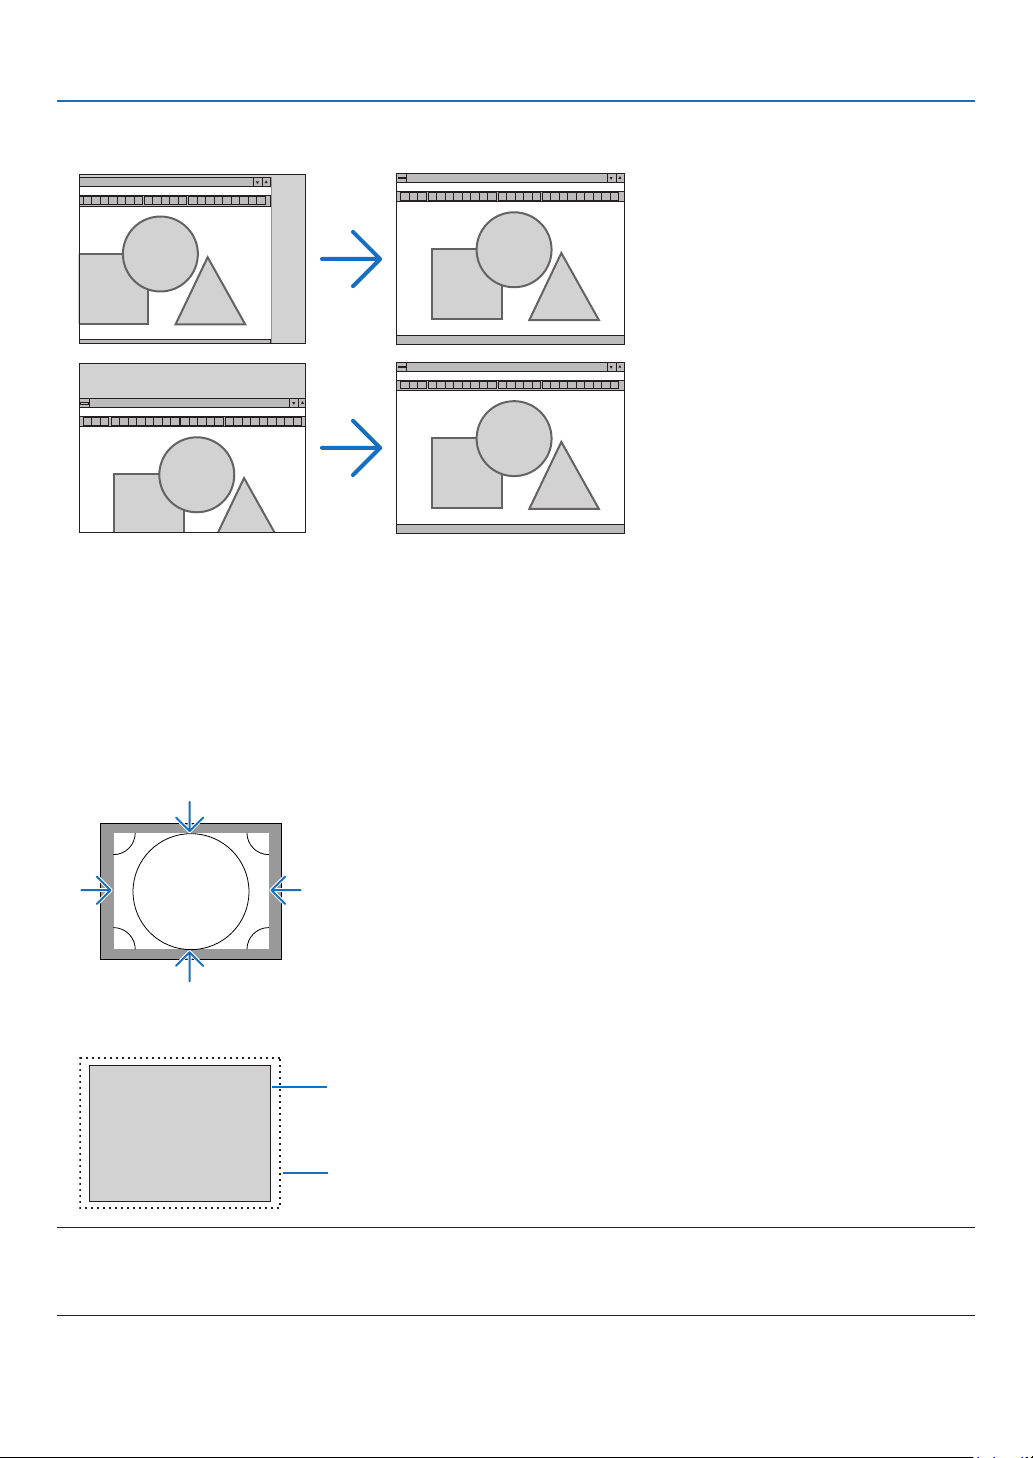
112
5. Using On-Screen Menu
AdjustingHorizontal/VerticalPosition[HORIZONTAL/VERTICAL]
Adjuststheimagelocationhorizontallyandvertically.
- Animagecanbedistortedduringtheadjustmentof[CLOCK]and[PHASE].Thisisnotmalfunction.
- Theadjustmentsfor[CLOCK],[PHASE],[HORIZONTAL],and[VERTICAL]willbestoredinmemoryforthe
currentsignal.Thenexttimeyouprojectthesignalwiththesameresolution,horizontalandverticalfrequency,
itsadjustmentswillbecalledupandapplied.
Todeleteadjustmentsstoredinmemory,fromthemenu,youselect[RESET]→[CURRENTSIGNAL]andreset
theadjustments.
[BLANKING]
Adjuststhedisplayrange(blanking)atthetop,bottom,leftandrightedgesoftheinputsignal.
SelectingOverscanPercentage[OVERSCAN]
Selectoverscanpercentage(Auto,0%,5%and10%)forsignal.
Projected image
Overscaned by 10%
NOTE:
• The[OVERSCAN]itemisnotavailable:
-when[NATIVE]isselectedfor[ASPECTRATIO].
-when[VIEWER]or[NETWORK]isselectedfor[SOURCE]
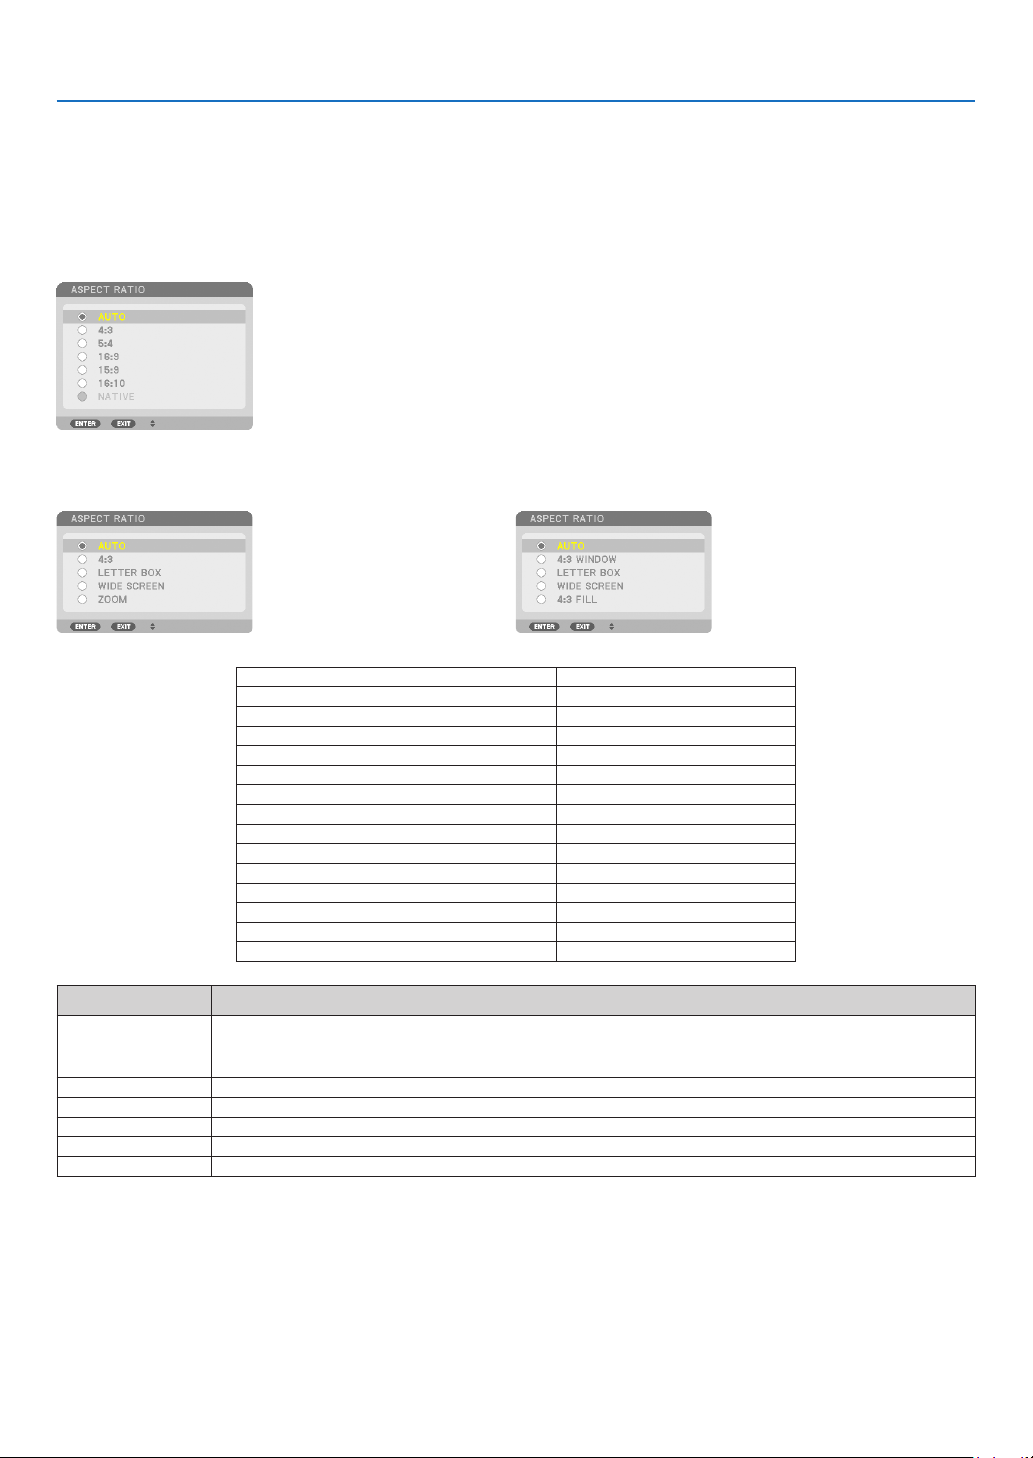
113
5. Using On-Screen Menu
Selecting the Aspect Ratio [ASPECT RATIO]
Usethisfunctiontoselectthescreen’svertical:horizontalaspectratio.
Selectthescreentype(4:3screen,16:9screenor16:10screen)atthescreensettingbeforesettingtheaspectratio.
(→page123)
Theprojectorautomaticallyidentiesthesignalbeinginputandsetstheoptimumaspectratio.
For Computer signal
ForComponent/Video/S-Videosignals
Whenthescreentypeissetto4:3 Whenthescreentypeissetto16:9or16:10
Resolution AspectRatio
VGA 640×480 4:3
SVGA
800×600 4:3
XGA
1024×768 4:3
WXGA
1280×768 15:9
WXGA
1280×800 16:10
HD(FWXGA)
1366×768 approx.16:9
WXGA+ 1440×900 16:10
SXGA
1280×1024 5:4
SXGA+
1400×1050 4:3
WXGA++
1600×900 16:9
UXGA
1600×1200 4:3
WSXGA+
1680×1050 16:9
FHD(1080P)
1920×1080 16:9
WUXGA
1920×1200 16:10
Options Function
AUTO
Theprojectorwillautomaticallydeterminetheincomingsignalanddisplayitinitsaspectratio.
Theprojectormayerroneouslydeterminetheaspectratiodependingonitssignal.Ifthisoccurs,
selecttheappropriateaspectratiofromthefollowing.
4:3 Theimageisdisplayedin4:3aspectratio.
5:4 Theimageisdisplayedin5:4aspectratio
16:9 Theimageisdisplayedin16:9aspectratio
15:9 Theimageisdisplayedin15:9aspectratio
16:10 Theimageisdisplayedin16:10aspectratio
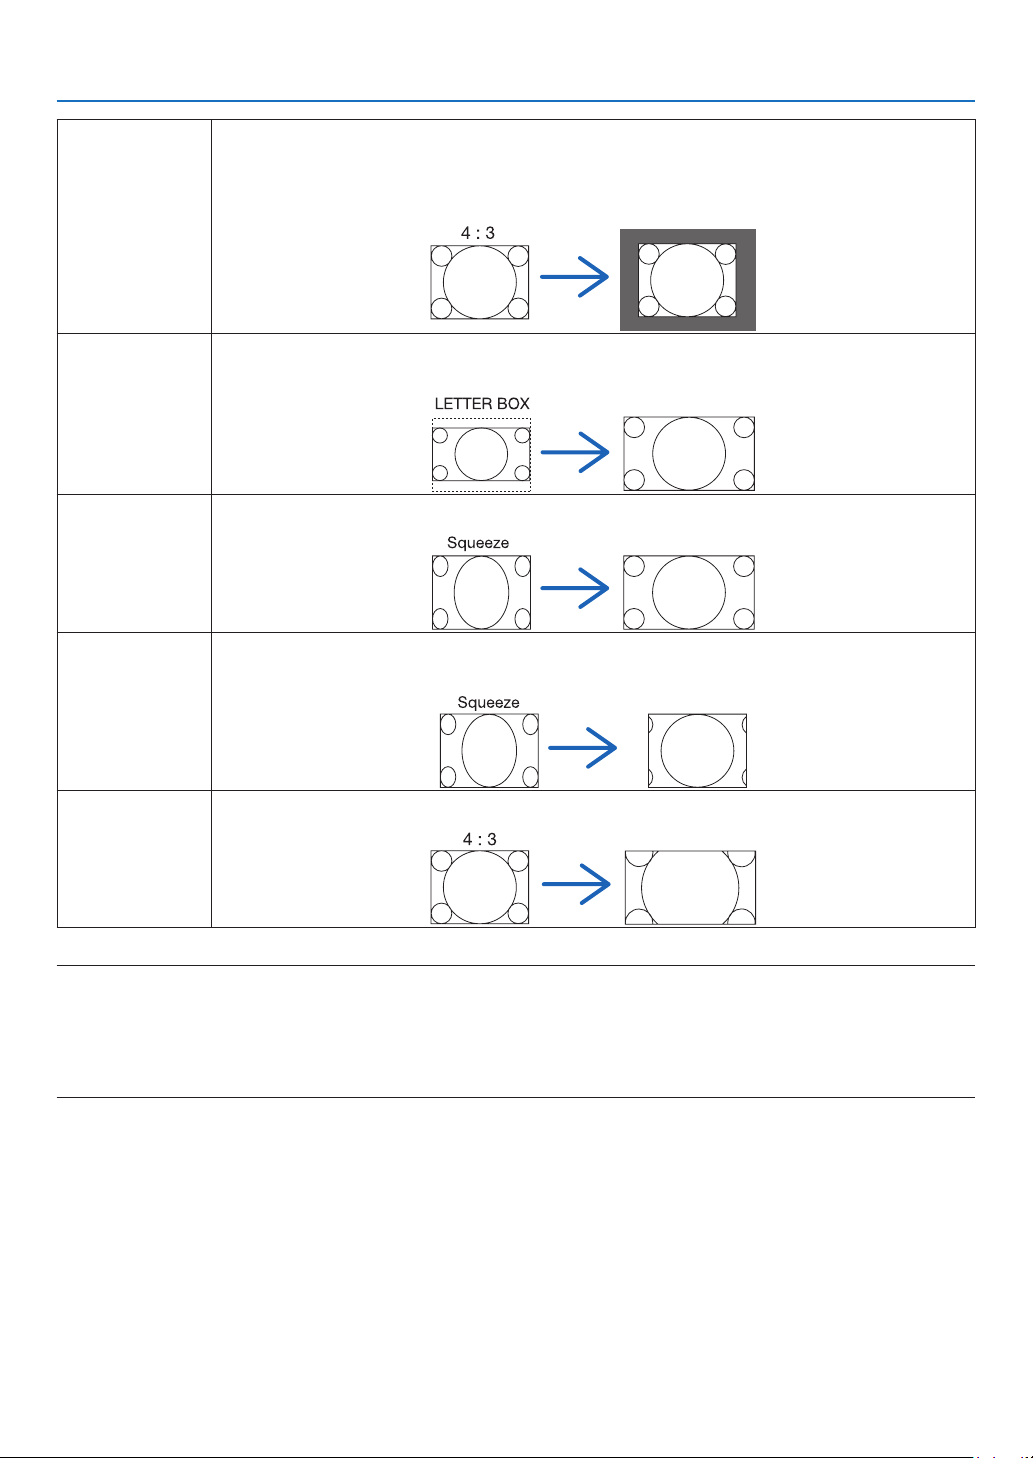
114
5. Using On-Screen Menu
NATIVE Theprojectordisplaysthecurrentimageinitstrueresolutionwhentheincomingcomputersignal
hasalowerorhigherresolutionthantheprojector’snativeresolution.(→page2, 224)
Whentheincomingcomputersignalhasahigherresolutionthantheprojector'snativeresolution,
thecenterofanimagewillbedisplayed.
LETTERBOX Theimageofaletterboxsignal(16:9)isstretchedequallyinthehorizontalandverticaldirections
totthescreen.
WIDESCREEN Theimageofasqueezesignal(16:9)isstretchedleftandrightin16:9.
ZOOM Theimageofasqueezesignal(16:9)isstretchedleftandrightin4:3.
Partsofthedisplayedimagearecroppedattheleftandrightedgesandthereforenotvisible.
4:3FILL Theimageofasignal(4:3)isstretchedleftandrightin16:9.
TIP:
• Imagepositioncanbeadjustedverticallyusing[POSITION]whenthe[16:9],[15:9],or[16:10]aspectratiosareselected.
• Theterm“letterbox”referstoamorelandscape-orientedimagewhencomparedtoa4:3image,whichisthestandardaspect
ratioforavidesource.
Theletterboxsignalhasaspectratioswiththevistasize“1.85:1”orcinemascopesize“2.35:1”formovielm.
• Theterm“squeeze”referstothecompressedimageofwhichaspectratioisconvertedfrom16:9to4:3.
[RESOLUTION]
Thisfunctionsetstheresolutionofaprojectedimageifauto-detectfailstoworkwell.

115
5. Using On-Screen Menu
[VIDEO]
Using Noise Reduction [NOISE REDUCTION]
Thisfunctionisusedtoreducevideonoise.
RANDOM NR ��������� Reduces flickering random noise in an image�
MOSQUITO NR ������ Reduces mosquito noise that appears around the edges of an image during DVD playback�
BLOCK NR ������������� Reduces block noise or mosaic-like patterns by selecting ON�
Selecting Interlaced Progressive Conversion Process Mode [DEINTERLACE]
Thisfunctionallowsyoutoselectaninterlaced-to-progressiveconversionprocessforvideosignals.
AUTO ��������������������� Determines an appropriate interlaced-to-progressive conversion process automatically�
VIDEO �������������������� Applies a normal interlaced-to-progressive conversion process�
FILM ���������������������� Applies the automatic detection mode for telecine signals� This option is recommended for a movie picture�
NOTE:ThisfunctionisnotavailablewithRGBsignals.
Turning On or Off the 3D Dimensional Separation [3D Y/C SEPARATION]
WhenprojectinganimagefromaVIDEOinput,settoONtoprojectthehighestqualityimage.
OFF ������������������������ Turns off the 3 dimensional separation feature�
ON ������������������������� Turns on the 3 dimensional separation feature�
NOTE:OnlyavailableforNTSC3.58videosignals.
[DETAIL ENHANCEMENT]
Thisfunctionenhancesthecontoursoftheimagewhenprojectingcomponentsignals.
NOTE:
Thisfunctionmaynotbeavailabledependingonthesignalorscreensetting.
[SIGNAL TYPE]
TheprojectorautomaticallyidentieswhethertheCOMPUTER1,COMPUTER2orCOMPUTER3*inputsignals
areRGBorcomponentsignalstoprojecttheimage.Ifthecolorsareunnatural,however,tryswitchingthesetting.
*ForCOMPUTER3,thecomputersignalandvideosignalcanbeselectedatSIGNALSELECT(COMP3).
RGB ����������������������� Switches to the RGB input�
COMPONENT ��������� Switches to the component signal input�
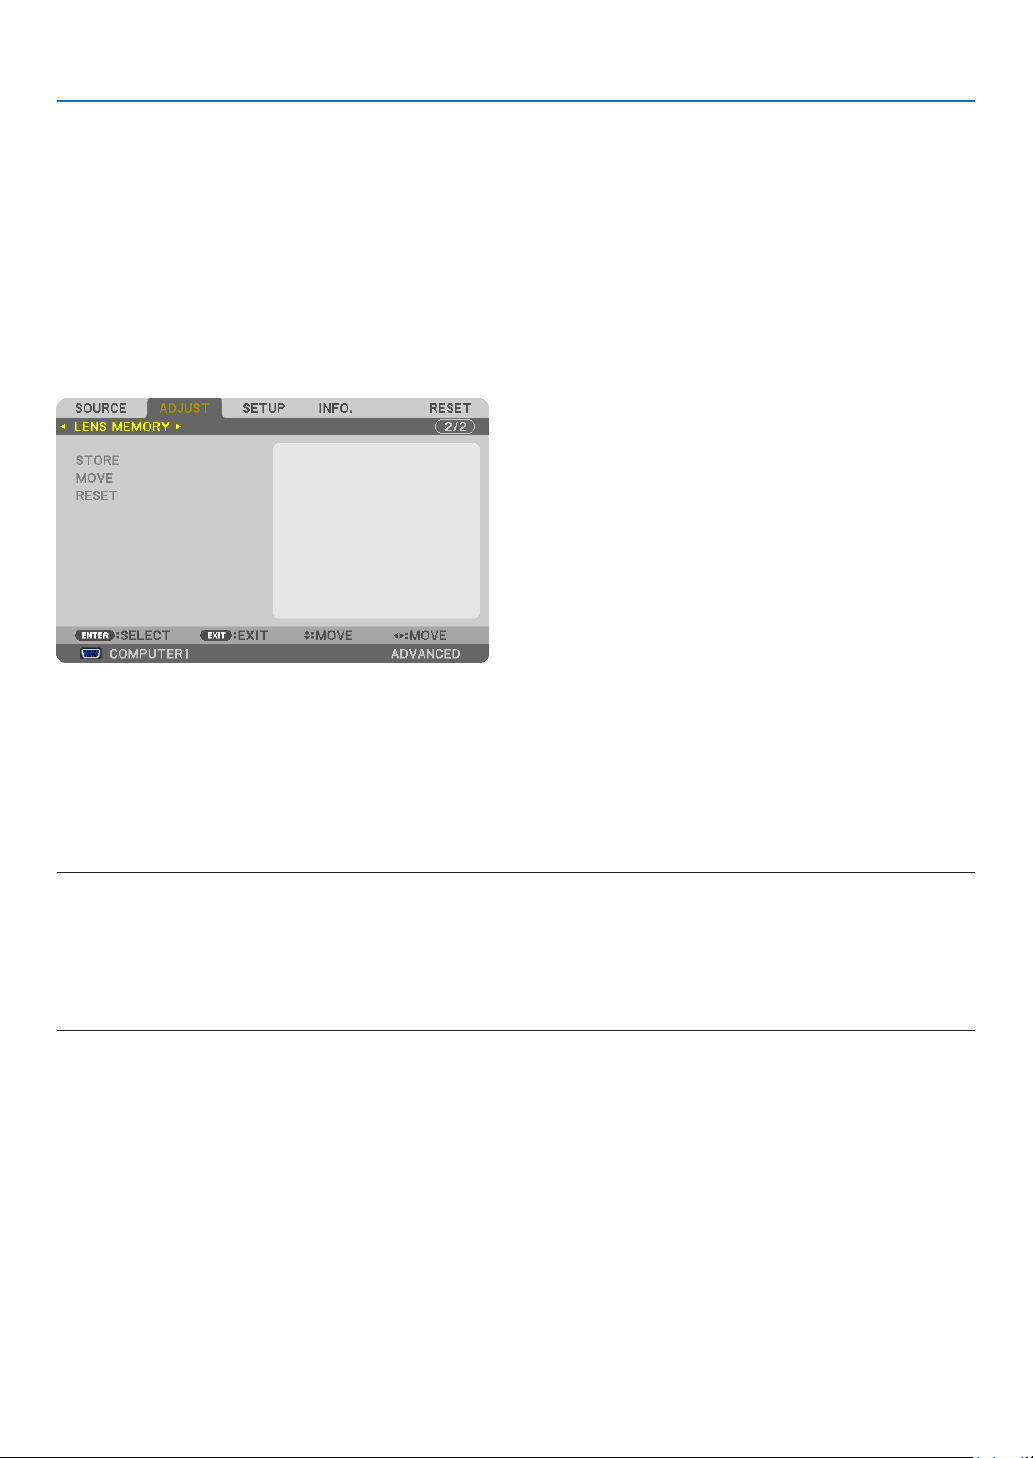
116
5. Using On-Screen Menu
[VIDEOLEVEL]
Thisfunctionselectsvideosignallevelwhentheprojector’sHDMIandDisplayPortinputconnectorsandanexternal
deviceareconnected.
AUTO ��������������������� The video level is switched automatically based on the information from the device outputting the signal�
Depending on the connected device, this setting may not be made properly� In this case, switch to “NORMAL”
or “ENHANCED” from the menu and view with the optimum setting�
NORMAL ���������������� This disables the enhanced mode�
ENHANCED ������������ This improves the image’s contrast, expressing the dark and light sections more dynamically�
Using the Lens Memory Function [LENS MEMORY]
ThisfunctionservestostoretheadjustedvaluesforeachinputsignalwhenusingtheLENSSHIFT,ZOOMandFO-
CUSbuttonsoftheprojector.Adjustedvaluescanbeappliedtothesignalyouselected.Thiswilleliminatetheneed
toadjustlensshift,focus,andzoomatthetimeofsourceselection.
STORE ������������������� Stores the current adjusted values in memory for each input signal�
MOVE �������������������� Applies the adjusted values to the current signal�
RESET �������������������� Returns the adjusted values to the last condition�
NOTE:
• Thelensshift,zoom,andfocusadjustmentscanbeperformedwiththeremotecontrol.(→ page 24, 25, 28)
• Tostoreadjustedvaluescommontoalltheinputsources,usetheREF.LENSMEMORYfunction.Seepage47, 125.
• LensmemoryadjustmentswillbeautomaticallyregisteredtheENTRYLIST.Theselensmemoryadjustmentscanbeloadedfrom
theENTRYLIST.(→ page 106)
Notethatperforming[CUT]or[ALLDELETE]intheENTRYLISTwilldeletelensmemoryadjustmentsaswellassourceadjust-
ments. This deletion will not take effect until other adjustments is loaded.
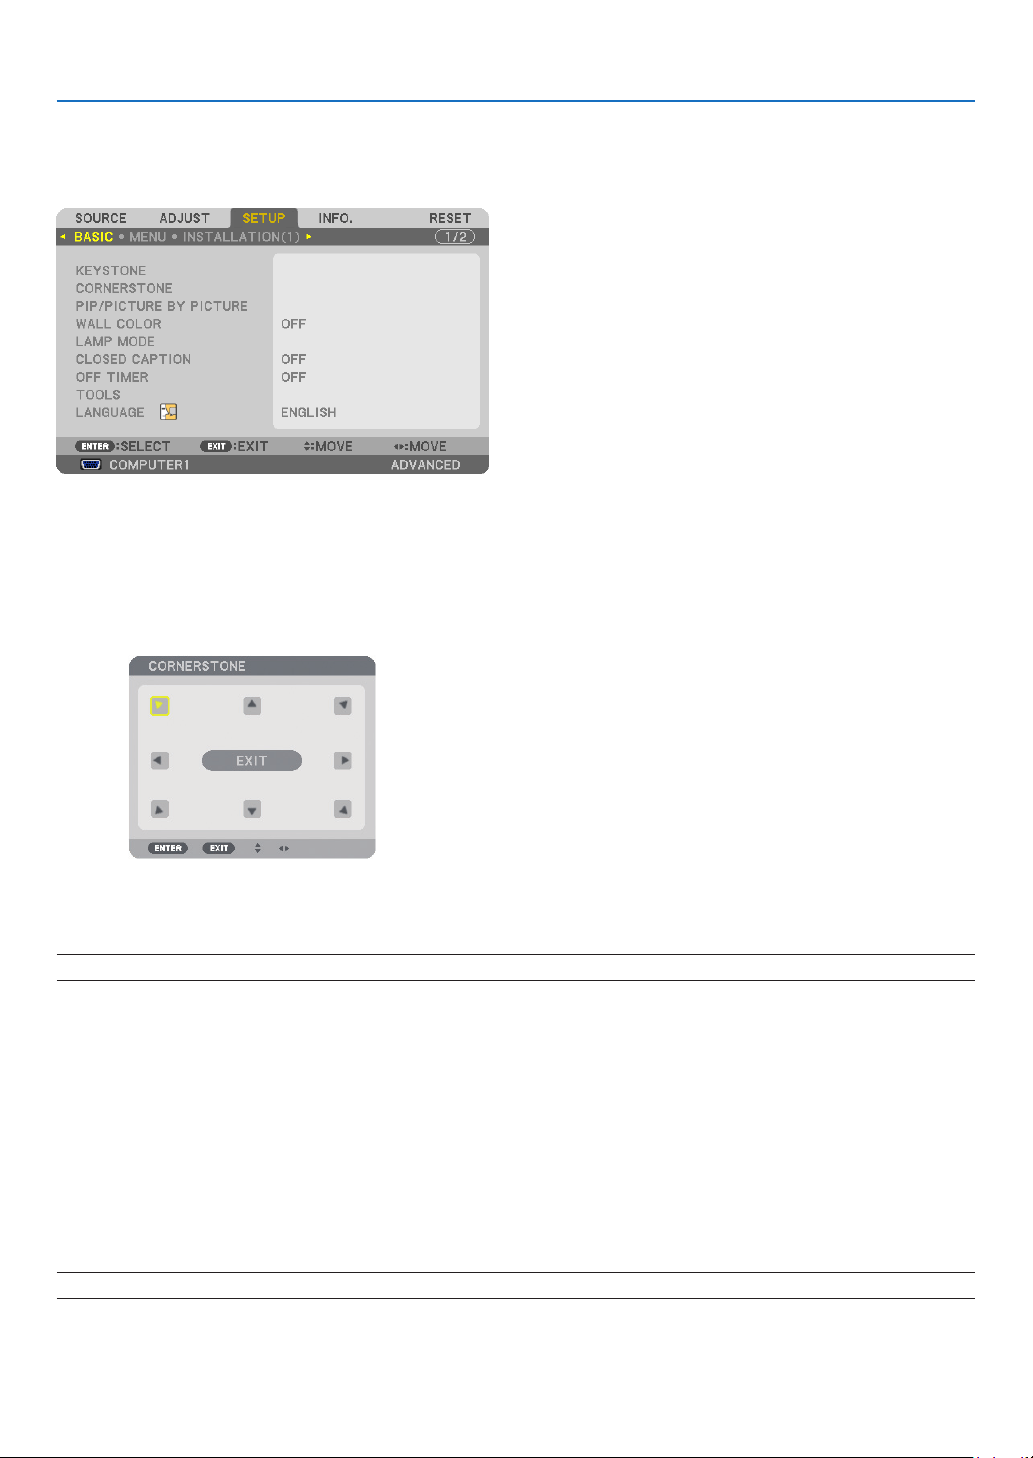
117
5. Using On-Screen Menu
❻ Menu Descriptions & Functions [SETUP]
[BASIC]
CorrectingVerticalKeystoneDistortionManually[KEYSTONE]
Youcancorrectverticaldistortionmanually.(→page30)
TIP:Whenthisoptionishighlighted,pressingtheENTERbuttonwilldisplayitsslidebarforadjustment.
Selecting Cornerstone Mode [CORNERSTONE]
Thisoptionallowsyoutocorrecttrapezoidaldistortion.
SelectingthisitemwilldisplaytheCornerstoneadjustmentscreen.(→page39)
NOTE:The[CORNERSTONE]itemisnotavailablewhen[KEYSTONE]or[GEOMETRICCORRECTION]isselected.
Using the PIP/PICTURE BY PICTURE Function [PIP/PICTURE BY PICTURE]
Thisfunctionallowsyoutoviewtwodifferentsignalssimultaneously.(→page42)
MODE:
Thisoptionallowsyoutoselecttwomodes:PIPandPICTUREBYPICTURE.
PIP:Thisoptionallowsyoutoviewasubpictureinthemainpicture.
PICTUREBYPICTURE:Thisallowsyoutoviewtwopicturessidebyside.
POSITION:
When[PIP]isselectedfor[MODE],thisoptionallowsyoutoselectthepositionofasubpictureinthemainpicture.
Theoptionsare:TOP-LEFT,TOP-RIGHT,BOTTOMLEFT,andBOTTOMRIGHT.
NOTE:The[POSITION]cannotbeselectedwhen[PICTUREBYPICTURE]isselected.
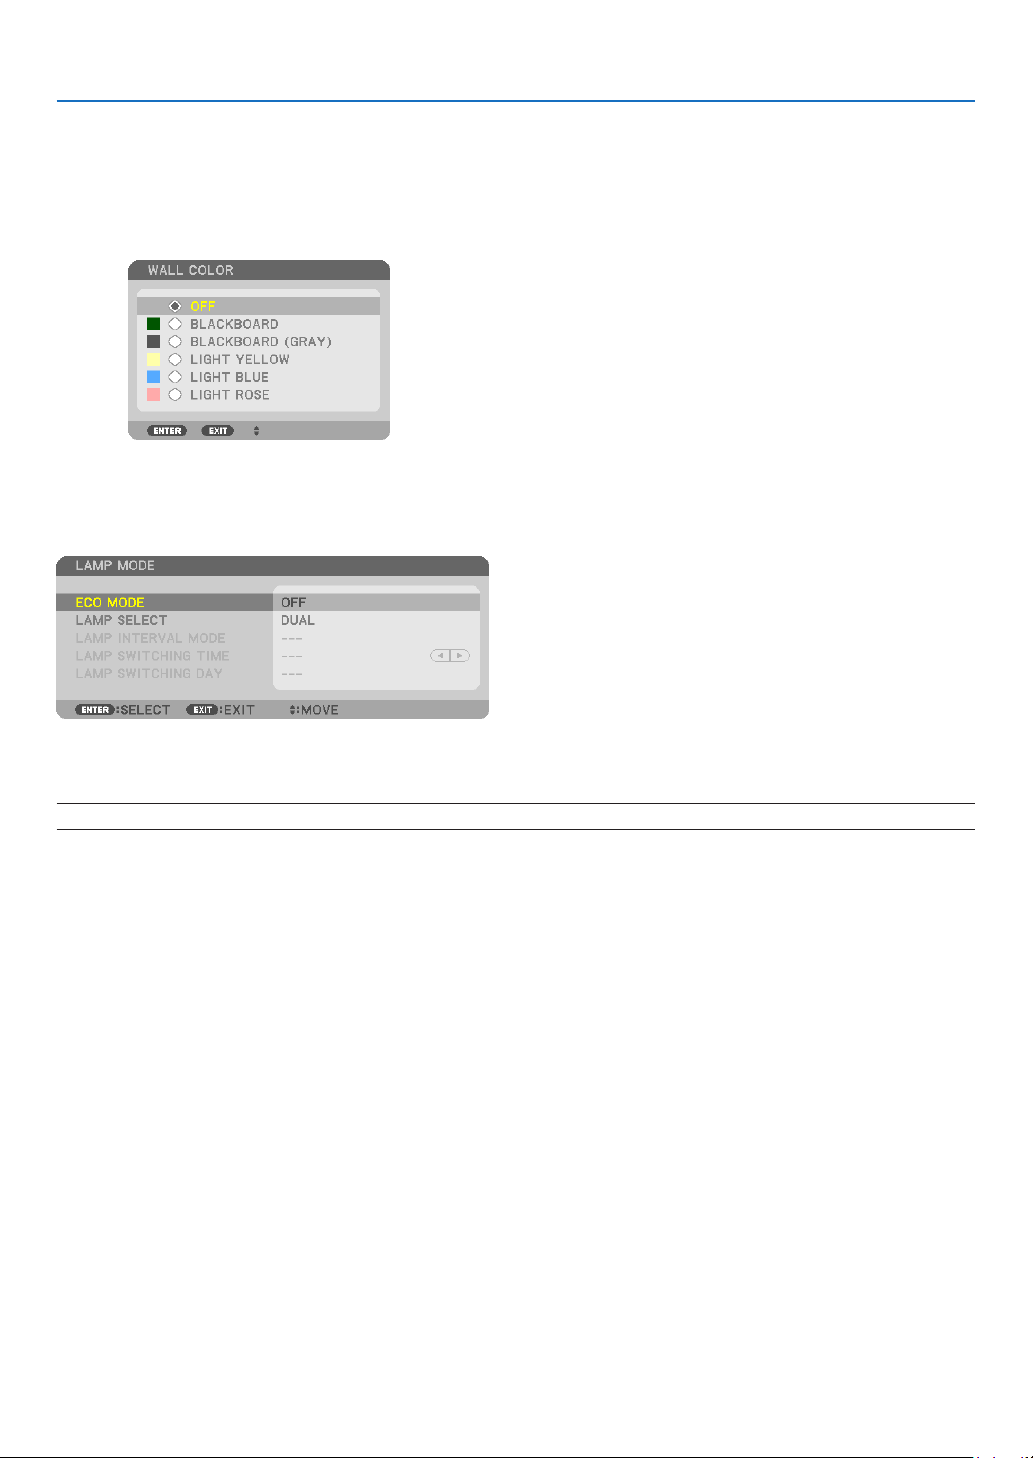
118
5. Using On-Screen Menu
SOURCE:
Thisoptionallowsyoutoselectasubpicturesignal.
Theoptionsare:OFF,VIDEOandS-VIDEO.
Selecting[OFF]willcancelthePIP/PICTUREBYPICTUREmodeandreturntothenormalscreen.
Using the Wall Color Correction [WALL COLOR]
Thisfunctionallowsforquickadaptivecolorcorrectioninapplicationswherethescreenmaterialisnotwhite.
[LAMP MODE]
Theprojectorisdesignedtoaccepttwolamps(duallampsystem).
Thisduallampsystemprovidesprolongedlamplifeorhighbrightnessorextralamp(Extendedlifelamp).
The[LAMPMODE]itemhas3options:[ECOMODE],[LAMPSELECT],and[LAMPINTERVALMODE].
NOTE:Besuretousethesamelamptypeforbothlamp1and2.
Setting Eco Mode [ECO MODE]
TheECOMODEincreaseslamplife,whileloweringpowerconsumptionandcuttingdownonCO
2
emissions.
Twobrightnessmodesofthelampcanbeselected:[OFF]and[ON]modes.
(→page37)

119
5. Using On-Screen Menu
Selecting the lamp to be used [LAMP SELECT]
Thisfeatureallowsyoutoselectwhichlamptobeused.
NOTE:ThisoptionisnotdisplayedintheBasicmenu.
DUAL ��������������������� Select to use the two lamps at the same time to increase brightness�
SINGLE ������������������ Lights either lamp 1 or 2 whichever was used last� This option also selects Lamp 1 or Lamp 2 according to
the time preset with Lamp Interval�
LAMP 1 ONLY �������� Select to use the Lamp 1 of the two lamps� (Lamp 1 on the right of the rear side)
LAMP 2 ONLY �������� Select to use the Lamp 2 of the two lamps� (Lamp 2 on the left of the rear side)
TIP:
OnSelecting[SINGLE]for[LAMPSELECT]
• Alamphasapropertythatitsbrightnessgraduallydecreaseswithage.Tokeepthebrightnessoftwolampsonthesamelevelas
muchaspossible,select[SINGLE]for[LAMPSELECT].
• Lamplifewilldecreasewhenshorterlampintervaltimesaresetwithintheon-screenmenu.Youarerecommendedtoextendthe
lampintervaltime.
Settingthelampinterval[LAMPINTERVALMODE]
Thisallowsyoutospecifythetimeforswitchingbetweenthetwolampsalternately.Thisoptionisavailableonlywhen
[SINGLE]isselectedfor[LAMPSELECT].
OFF ������������������������ Turns off the lamp interval mode setting�
12 HOURS/24 HOURS/1 WEEK
������������������������������ Select one of these three options for interval time�
NOTE:
• Thisfunctionisavailableonlywhen[SINGLE]isselectedfor[LAMPSELECT].
• Beforesetting[LAMPINTERVALMODE],[LAMPSWITCHINGTIME]or[LAMPSWITCHINGDAY],makesurethatthecurrentdate
andtimeissetfortheprojector.Tosetthedateandtimefortheprojector,select[APPLICATIONMENU]→[TOOLS]→[DATE
ANDTIME]fromthemenu.(→ page 161)
Setting the time for changing the lamp [LAMP SWITCHING TIME]
Thisallowsyoutosetthetimeforchangingthelamp.
Example–When[SINGLE]isselectedfor[LAMPSELECT]and[24HOURS]for[LAMPINTERVALMODE]:
Lamp 1
Lamp 2
24 hours 24 hours
24 hours 24 hours
This indicates the lamp is turned on.
This indicates the lamp is turned off.
Current Time Switching Time* Switching Time
(*) After setting the Current Time, if the value between Current Time and Switching Time is less than five (5) minutes, the first
lamp switching instance does not take place.

120
5. Using On-Screen Menu
Settingthedayforchangingthelamp[LAMPSWITCHINGDAY]
Thisallowsyoutosetthedayforchangingthelamp.
Theoptionsare:SUN(Sunday),MON(Monday),TUE(Tuesday),WED(Wednesday),THU(Thursday),FRI(Friday),
andSAT(Saturday).
NOTE:
• Thisfunctionisavailableonlywhen[1WEEK]isselectedfor[LAMPINTERVALMODE].
Setting Closed Caption [CLOSED CAPTION]
ThisoptionsetsseveralclosedcaptionmodesthatallowtexttobesuperimposedontheprojectedimageofVideo
orS-Video.
OFF ������������������������ This exits the closed caption mode�
CAPTION 1-4 ��������� Text is superimposed�
TEXT 1-4 ���������������� Text is displayed�
Using Off Timer [OFF TIMER]
1. Selectyourdesiredtimebetween30minutesand16hours:OFF,0:30,1:00,2:00,4:00,8:00,12:00,16:00.
2. PresstheENTERbuttonontheremotecontrol.
3. Theremainingtimestartscountingdown.
4. Theprojectorwillturnoffafterthecountdowniscomplete.
NOTE:
• Tocancelthepresettime,set[OFF]forthepresettimeorturnoffthepower.
• Whentheremainingtimereaches3minutesbeforetheprojectoristurnedoff,the[THEPROJECTORWILLTURNOFFWITHIN3
MINUTES]messagewillbedisplayedonthebottomofthescreen.
[TOOLS]
See“APPLICATIONMENU”onpage139.
Selecting Menu Language [LANGUAGE]
Youcanchooseoneof27languagesforon-screeninstructions.
NOTE:Yoursettingwillnotbeaffectedevenwhen[RESET]isdonefromthemenu.
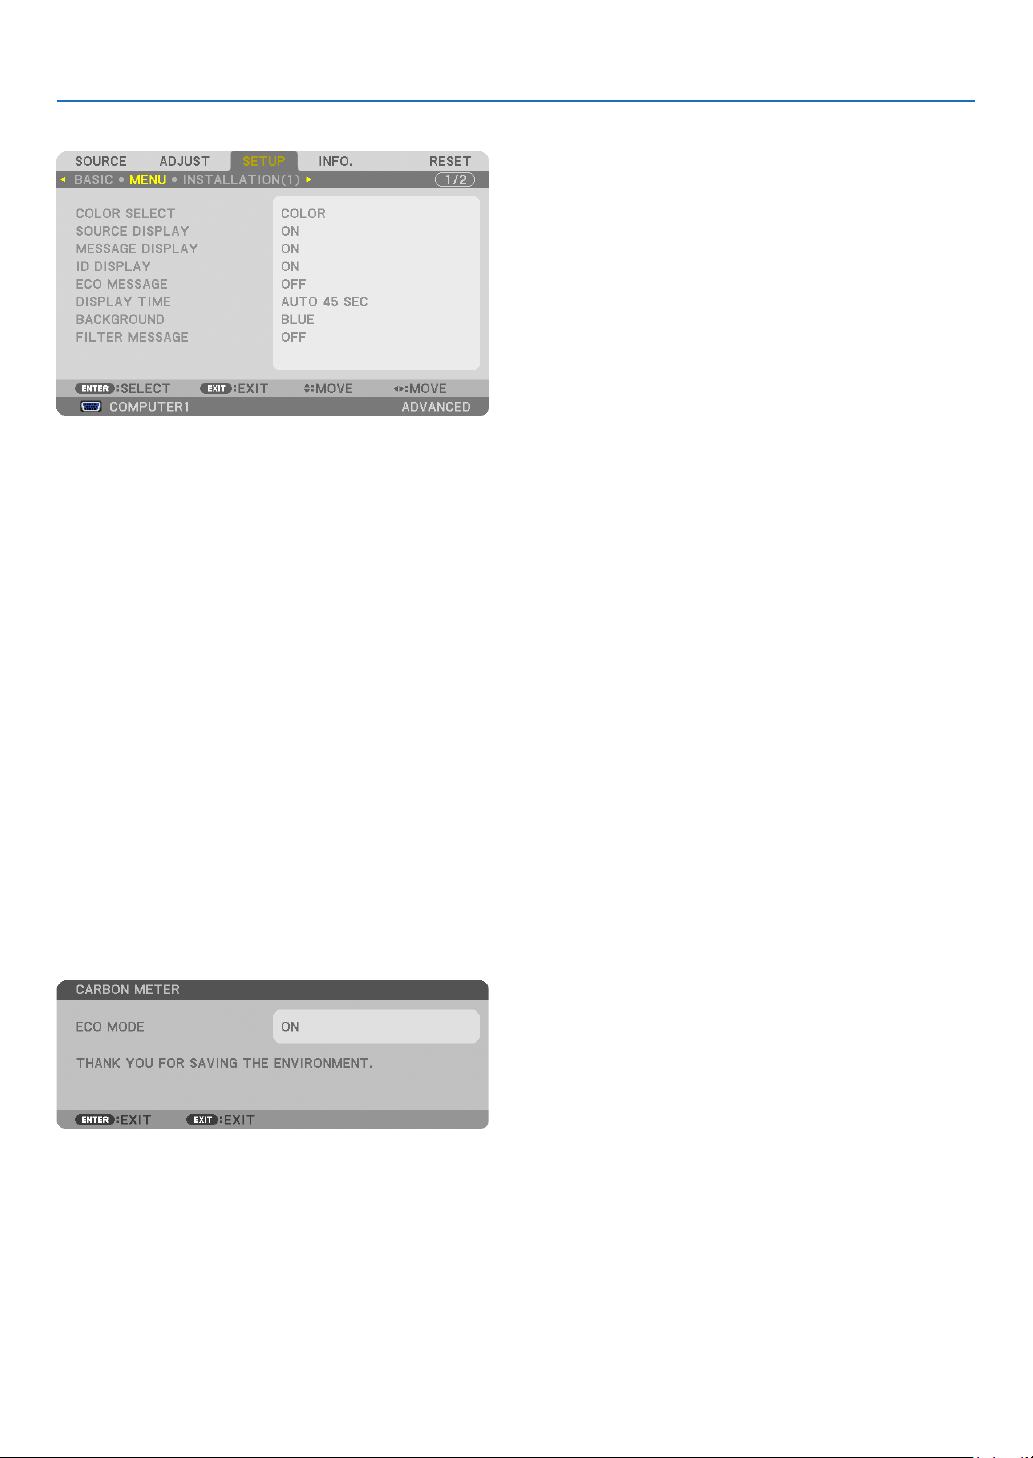
121
5. Using On-Screen Menu
[MENU]
Selecting Menu Color [COLOR SELECT]
Youcanchoosebetweentwooptionsformenucolor:COLORandMONOCHROME.
TurningOn/OffSourceDisplay[SOURCEDISPLAY]
ThisoptionturnsonoroffinputnamedisplaysuchasCOMPUTER1,COMPUTER2,COMPUTER3,HDMI,Display-
Port,VIDEO,S-VIDEO,VIEWER,NETWORKtobedisplayedonthetoprightofthescreen.
Turning messages on and off [MESSAGE DISPLAY]
Thisoptionselectswhetherornottodisplayprojectormessagesatthebottomoftheprojectedimage.
Evenwhen“OFF”isselected,thesecuritylockwarningisdisplayed.Thesecuritylockwarningturnsoffwhenthe
securitylockiscanceled.
Turning ON/OFF Control ID [ID DISPLAY]
ID DISPLAY ����������� This option turns on or off the ID number which is displayed when the ID SET button on the remote control
is pressed� (→ page 126)
Turning On / Off Eco Message [ECO MESSAGE]
Thisoptionturnsonoroffthefollowingmessageswhentheprojectoristurnedon.
TheEcoMessagepromptstheusertosaveenergy.When[OFF]isselectedfor[ECOMODE],youwillgetamessage
topromptyoutoselect[ON]for[ECOMODE].
When[ON]isselectedfor[ECOMODE]
Toclosethemessage,pressanyoneofthebuttons.Themessagewilldisappearifnobuttonoperationisdonefor
30seconds.
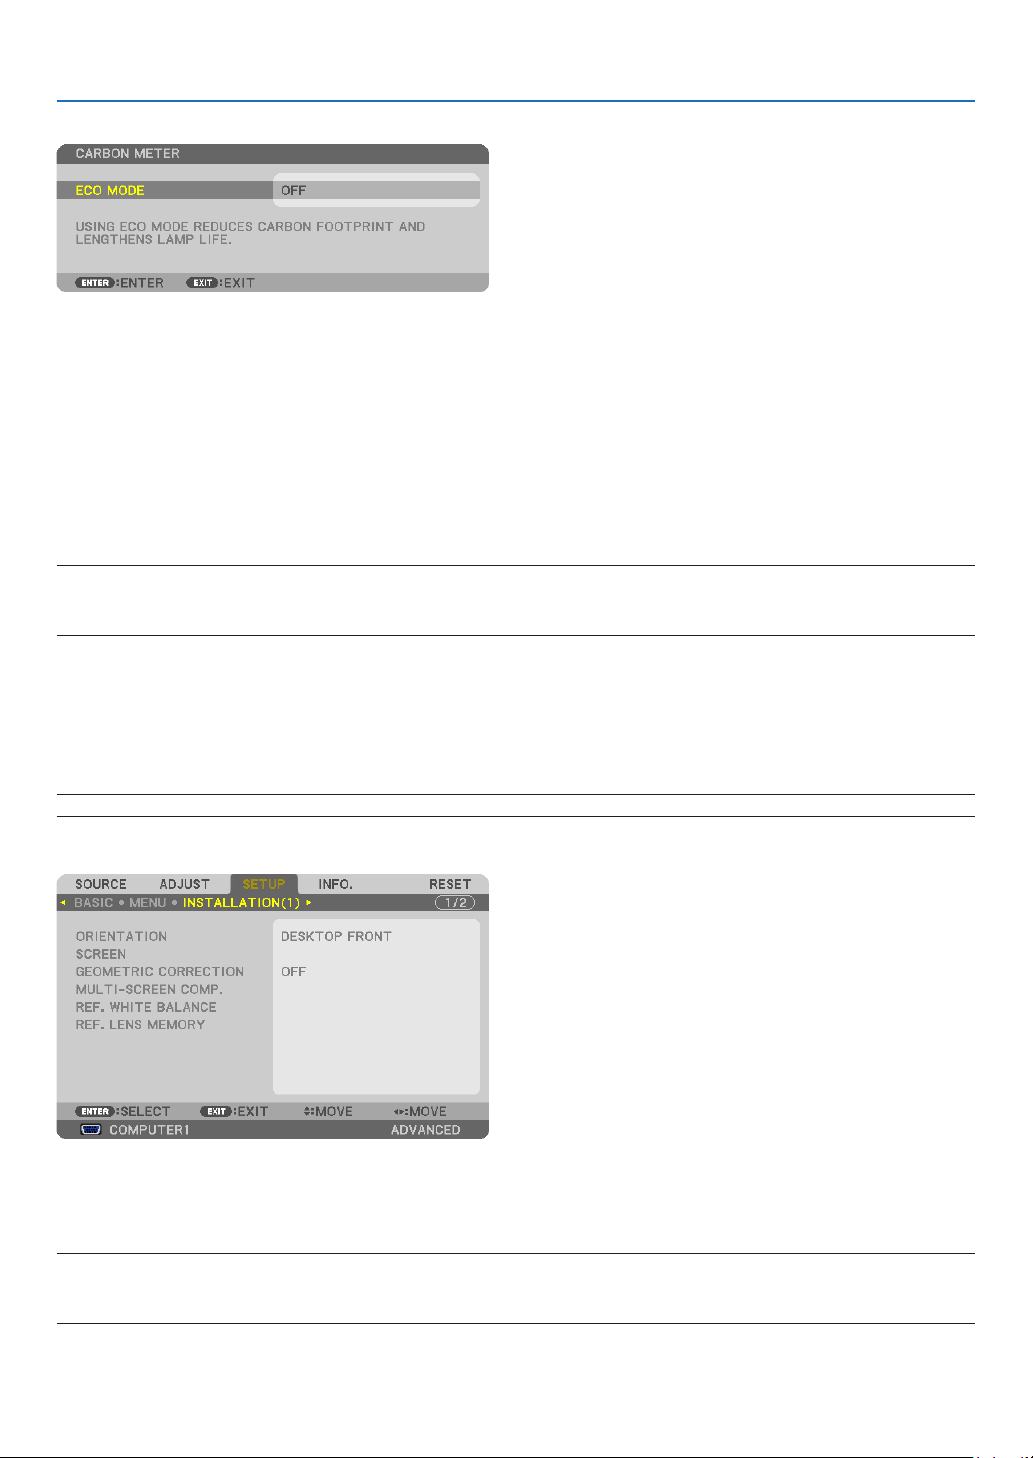
122
5. Using On-Screen Menu
When[OFF]isselectedfor[ECOMODE]
PressingtheENTERbuttonwilldisplaythe[ECOMODE]screen.(→page37)
Toclosethemessage,presstheEXITbutton.
SelectingMenuDisplayTime[DISPLAYTIME]
Thisoptionallowsyoutoselecthowlongtheprojectorwaitsafterthelasttouchofabuttontoturnoffthemenu.The
presetchoicesare[MANUAL],[AUTO5SEC],[AUTO15SEC],and[AUTO45SEC].The[AUTO45SEC]isthefac-
torypreset.
SelectingaColororLogoforBackground[BACKGROUND]
Usethisfeaturetodisplayablue/blackscreenorlogowhennosignalisavailable.Thedefaultbackgroundis[LOGO].
NOTE:
• Evenwhenthebackgroundlogoisselected,iftwopicturesaredisplayedin[PIP/PICTUREBYPICTURE]mode,thebluebackground
is displayed without the logo when there is no signal.
Selecting Interval Time for Filter Message [FILTER MESSAGE]
Thisoptionallowsyoutoselectthetimepreferencebetweendisplayingthemessageforcleaningthelters.Clean
thelterwhenyougetthemessage“PLEASECLEANFILTER.”(→page179)
Sixoptionsareavailable:OFF,100[H],500[H],1000[H],2000[H],5000[H]
Thedefaultsettingis[OFF].
NOTE:Yoursettingwillnotbeaffectedevenwhen[RESET]isdonefromthemenu.
[INSTALLATION(1)]
Selecting Projector Orientation [ORIENTATION]
Thisreorientsyourimageforyourtypeofprojection.Theoptionsare:desktopfrontprojection,ceilingrearprojection,
desktoprearprojection,andceilingfrontprojection.
NOTE:
Thisprojectorisatilt-freeprojectorwithwhichitispossibletoprojectimagesontheceiling(upward)oroor(downward).When
changingtheprojectororientation,alsochangethe[SETTING]optionof[FANMODE]accordingly.(→ page 128)
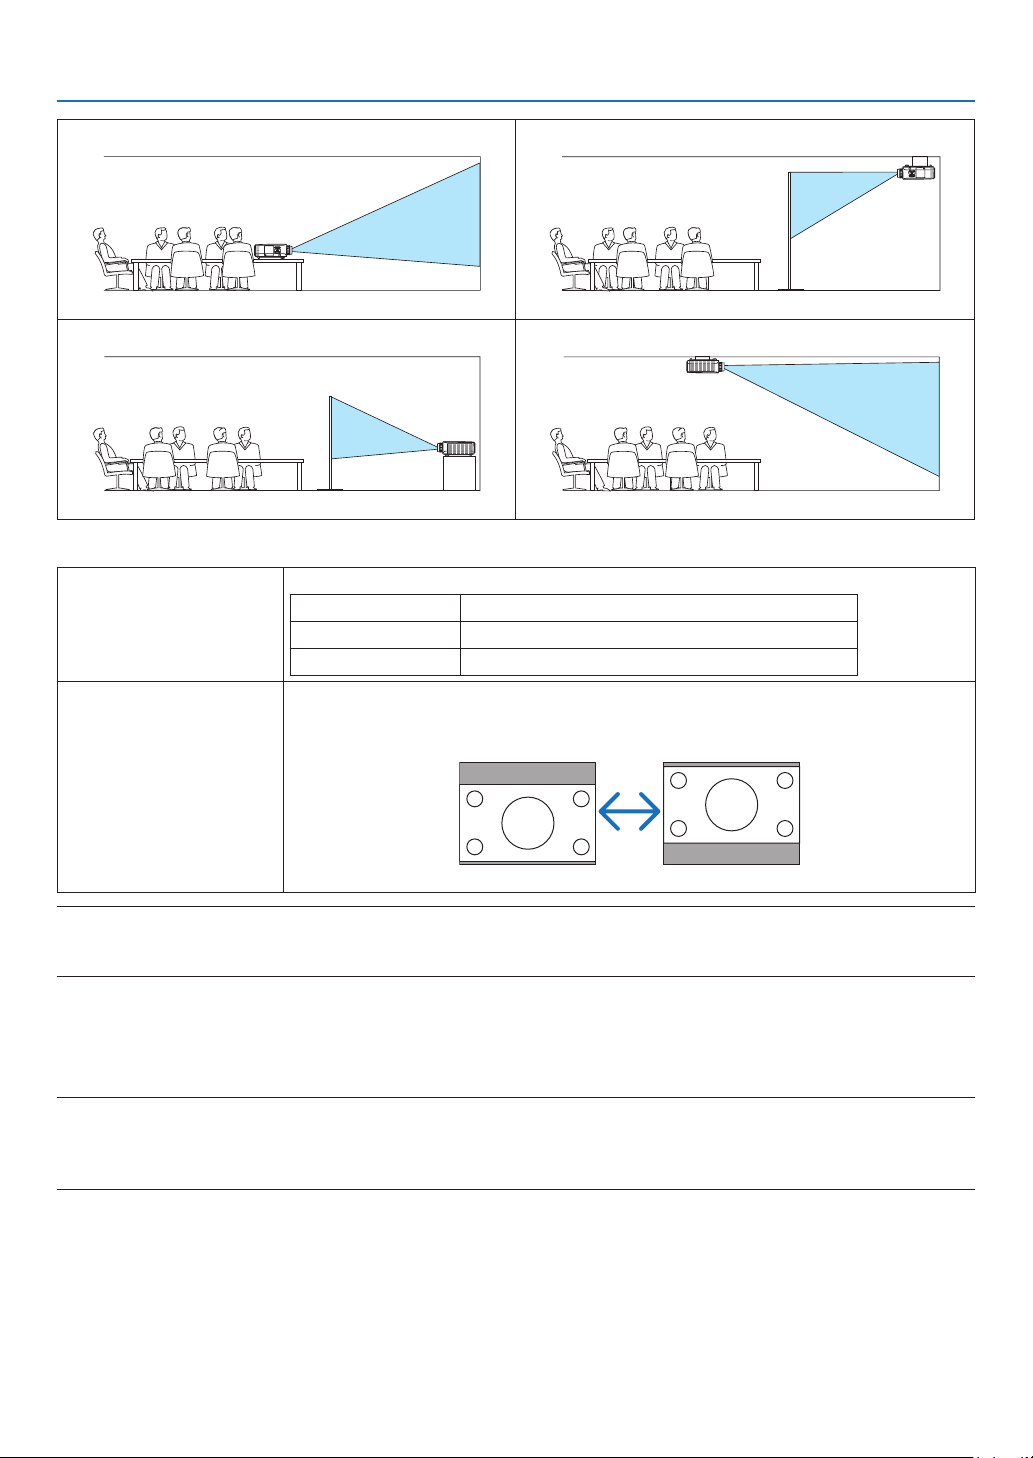
123
5. Using On-Screen Menu
DESKTOPFRONT
CEILINGREAR
DESKTOPREAR
CEILINGFRONT
Selecting Aspect Ratio and Position for Screen [SCREEN]
Screentype[SCREEN
TYPE]
Setstheaspectratiooftheprojectionscreen.
4:3screen Forascreenwitha4:3aspectratio
16:9screen Forascreenwitha16:9aspectratio
16:10screen Forascreenwitha16:10aspectratio
Displayposition[POSI-
TION](forPX800X2only)
Whenthescreentypeissetto16:9or16:10,adjuststheverticalpositionofthedisplay
range.
Downward
Upward
NOTE:
• Afterchangingthescreentype,checkthesettingof[ASPECTRATIO]inthemenu.
(→ page 113)
Using Geometric Correction [GEOMETRIC CORRECTION]
Thisfeatureretrievesgeometricdataregisteredintheprojectormemory.
Threepresetsofgeometricdatahavebeenregistered.Toturnoffthisfeature,select[OFF].
NOTE:
• The[KEYSTONE]and[CORNERSTONE]adjustmentsarenotavailablewhengeometricdataisapplied.
• Toclearyourgeometricdata,pressthe3DREFORMbuttonforaminimumof2seconds.
• The[GEOMETRICCORRECTION]featurecancauseanimagetobeslightlyblurredbecausethecorrectionismadeelectronically.

124
5. Using On-Screen Menu
UsingMulti-ScreenCompensation[MULTI-SCREENCOMP.]
Thisfeatureallowsyoutomatchbrightnessofimagesprojectedfrommultipleprojectors.
Beforeusing[MULTI-SCREENCOMP.],youneedtomatchcolorofimagesprojectedfrommultipleprojectors.
MODE �������������������� OFF: Turns off this function�
ON: Turns on this function� The [BRIGHTNESS] and the [CONTRAST] can be adjusted�
CONTRAST ������������ Adjusts the bright part of the picture�
BRIGHTNESS ��������� Adjusts the dark part of the picture�
Adjusting
1. Prepare black and white images so that the images can be displayed on the computer screen.
2. Display the black image on the computer screen, and project the image from the projector.
3. Select[MULTI-SCREENCOMP.]→ [MODE] → [ON].
4. Adjust the dark part of the images.
Press the ▼buttontoselect[BRIGHTNESS]andusethe◀ or ▶ to match the black part of another projector.
5. Display the white screen on the computer screen.
Project the image from two or more projectors.
6. Adjust the bright part of the images.
Press the ▼ button to select [CONTRAST] and use the ◀ or ▶ to match the white part of another projector.
Moving the slide bar toward [+] (plus) can change the white part of the image. Should this happen, move the
slide bar toward [−] (minus) to adjust the brightness.
TIP:
• Whenyouusemultipleprojectors,youcanusethe[CONTROLID]functiontooperateasingleprojectororalltheprojectorsfrom
theremotecontrol.(→ page 126)
• Yoursettingwillnotbeaffectedevenwhen[RESET]isdonefromthemenu.
[REF. WHITE BALANCE]
Thisfeatureallowsyoutoadjustthewhitebalanceforallsignals.
Thewhiteandblacklevelsofthesignalareadjustedforoptimumcolorreproduction.
Uniformityisalsoadjustedwhentheredness(R)andblueness(B)ofthewhitecolorinthescreen’shorizontal(left/
right)directionareuneven.
BRIGHTNESS R/BRIGHTNESS G/BRIGHTNESS B
������������������������������ These adjust the picture’s black color�
CONTRAST R/CONTRAST G/CONTRAST B
������������������������������ These adjust the picture’s white color�
UNIFORMITY R ������ The further this is set to the + side, the stronger the redness on the left side of the picture (increasing
towards the left edge) and the weaker the redness on the right side of the picture (decreasing towards the
right edge)�
This is reversed when set to the − side�
UNIFORMITY B ������ The further this is set to the + side, the stronger the blueness on the left side of the picture (increasing
towards the left edge) and the weaker the blueness on the right side of the picture (decreasing towards the
right edge)�
This is reversed when set to the − side�

125
5. Using On-Screen Menu
UsingtheReferenceLensMemoryFunction[REF.LENSMEMORY]
ThisfunctionservestostoretheadjustedvaluescommontoallinputsourceswhenusingtheLENSSHIFT,ZOOM
andFOCUSbuttonsoftheprojectorortheremotecontrol.Theadjustedvaluesstoredinmemorycanbeusedasa
referencetothecurrent.
STORE ������������������� Stores the current adjusted values in memory as a reference�
MOVE �������������������� Applies the adjusted reference values stored in [STORE] to the current signal�
RESET �������������������� Returns the adjusted reference values to the factory default setting�
LOAD BY SIGNAL �� For change to take effect at the time of source selection, select [YES]�
FORCED MUTE ������ To turn off the image during lens shift, select [YES]�
CALIBRATION �������� Corrects the adjustable zoom and focus range�
The adjustable zoom and focus range can vary depending on the lens in use� Be sure to perform [CALIBRATE]
after replacement of the lens�
The following lenses need calibration:
• NP16FL,NP17ZL,NP18ZL,NP19ZL,NP20ZL,NP21ZL,NP31ZL
NOTE:Thisoptionisonlyavailablewhen[YES]isselectedfor[MOVEWITHSIGNALCHANGE].
NOTE:
• Adjustedvaluesin[REF.LENSMEMORY]willnotbereturnedtodefaultwhenperforming[CURRENTSIGNAL]or[ALLDATA]for
[RESET]fromthemenu.
• Tostoreadjustedvaluesforeachinputsource,usetheLensMemoryfunction.(→ page 47, 116)

126
5. Using On-Screen Menu
[INSTALLATION(2)]
DisablingtheCabinetButtons[CONTROLPANELLOCK]
ThisoptionturnsonorofftheCONTROLPANELLOCKfunction.
NOTE:
• ThisCONTROLPANELLOCKdoesnotaffecttheremotecontrolfunctions.
• Whenthecontrolpanelislocked,pressingandholdingtheEXITbuttonontheprojectorcabinetforabout10secondswillchange
thesettingto[OFF].
TIP:Whenthe[CONTROLPANELLOCK]isturnedon,akeylockicon[ ]willbedisplayedatthebottomrightofthemenu.
EnablingSecurity[SECURITY]
ThisfeatureturnsonorofftheSECURITYfunction.
Unlessthecorrectkeywordisentered,theprojectorcannotprojectanimage.(→page44)
NOTE:Yoursettingwillnotbeaffectedevenwhen[RESET]isdonefromthemenu.
Selecting Communication Speed [COMMUNICATION SPEED]
ThisfeaturesetsthebaudrateofthePCControlport(D-Sub9P).Itsupportsdataratesfrom4800to115200bps.
Thedefaultis38400bps.Selecttheappropriatebaudrateforyourequipmenttobeconnected(dependingonthe
equipment,alowerbaudratemayberecommendedforlongcableruns).
NOTE:
• Select[38400bps]orlesswhenusingtheUserSupportware.
• Yourselectedcommunicationspeedwillnotbeaffectedevenwhen[RESET]isdonefromthemenu.
Turning On or Off Remote Sensor [REMOTE SENSOR]
Thisoptiondetermineswhichremotesensorontheprojectorisenabledinwirelessmode.
Theoptionsare:FRONT/BACK,FRONT,andBACK.
Iftheremotecontrolsystemdoesnotfunctionwhendirectsunlightorstrongilluminationstrikestheremotecontrol
sensoroftheprojector,changeanotheroption.
Setting ID to the Projector [CONTROL ID]
YoucanoperatemultipleprojectorsseparatelyandindependentlywiththesingleremotecontrolthathastheCONTROL
IDfunction.IfyouassignthesameIDtoalltheprojectors,youcanconvenientlyoperatealltheprojectorstogether
usingthesingleremotecontrol.Todoso,youhavetoassignanIDnumbertoeachprojector.
CONTROL ID NUMBER ������� Select a number from 1 to 254 you wish to assign to your projector�
CONTROL ID �����������������������Select [OFF] to turn off the CONTROL ID setting and select [ON] to turn on the CONTROL ID setting�
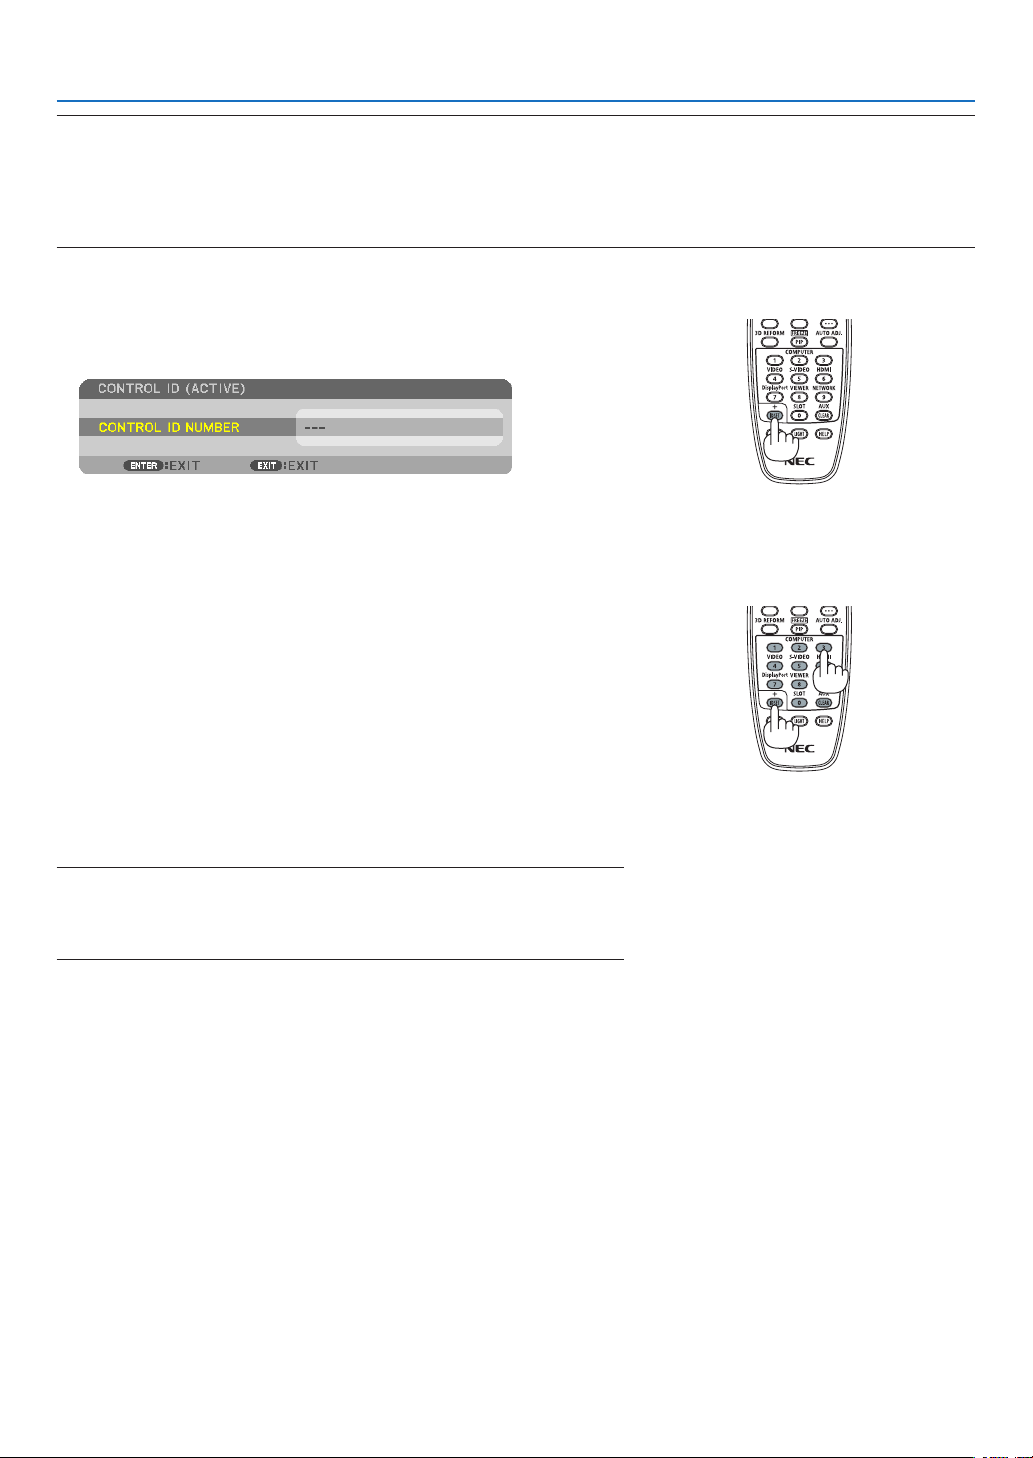
127
5. Using On-Screen Menu
NOTE:
• When[ON]isselectedfor[CONTROLID],theprojectorcannotbeoperatedbyusingtheremotecontrolthatdoesnotsupport
theCONTROLIDfunction.(Inthiscasethebuttonsontheprojectorcabinetcanbeused.)
• Yoursettingwillnotbeaffectedevenwhen[RESET]isdonefromthemenu.
•PressingandholdingtheENTERbuttonontheprojectorcabinetfor10secondswilldisplaythemenuforcancelingtheControl
ID.
Assigning or Changing the Control ID
1. Turnontheprojector.
2. PresstheIDSETbuttonontheremotecontrol.
TheCONTROLIDscreenwillbedisplayed.
IftheprojectorcanbeoperatedwiththecurrentremotecontrolID,the
[ACTIVE]willbedisplayed.Iftheprojectorcannotbeoperatedwiththe
currentremotecontrolID,the[INACTIVE]willbedisplayed.Tooperate
theinactiveprojector,assignthecontrolIDusedfortheprojectorby
using the following procedure (Step 3).
3. Pressoneofnumerickeypadbuttonswhilepressingandholding
theIDSETbuttonontheremotecontrol.
Example:
To assign “3”, press the “3” button on the remote control.
NoIDmeansthatalltheprojectorscanbeoperatedtogetherwitha
singleremotecontrol.Toset“NoID”,enter“000”orpresstheCLEAR
button.
TIP:TherangeofIDsisfrom1to254.
4. ReleasetheIDSETbutton.
TheupdatedCONTROLIDscreenwillbedisplayed.
NOTE:
• TheIDscanbeclearedinafewdaysafterthebatteriesarerundownorremoved.
•Accidentallypressinganyoneofthebuttonsoftheremotecontrolwillclear
currentlyspeciedIDwithbatteriesremoved.
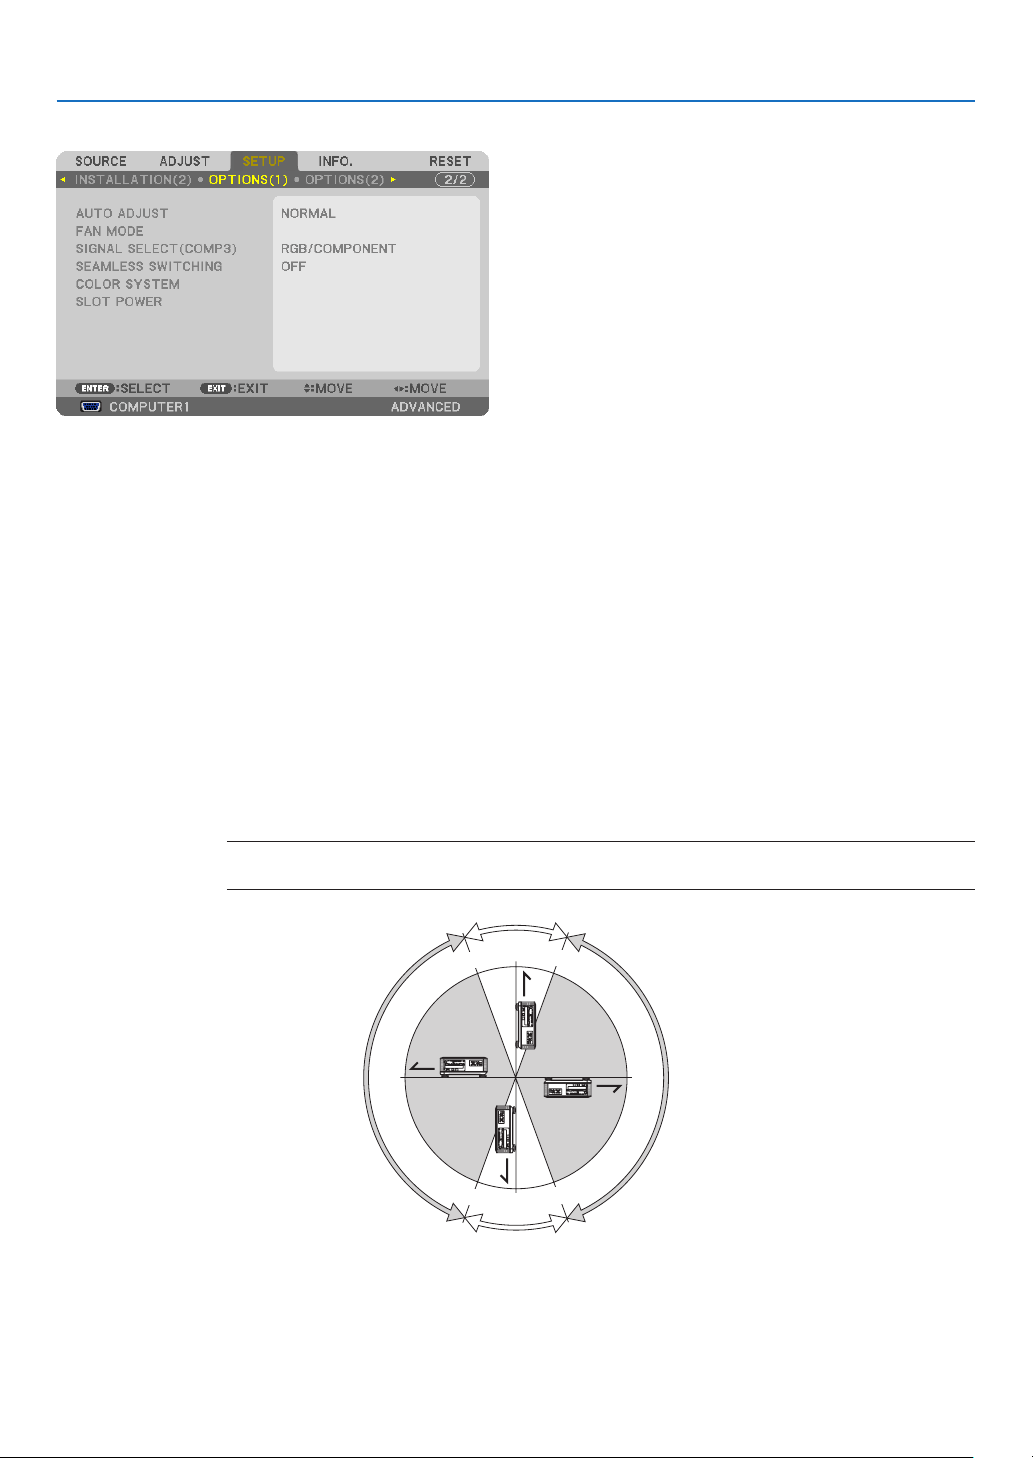
128
5. Using On-Screen Menu
[OPTIONS(1)]
Setting Auto Adjust [AUTO ADJUST]
ThisfeaturesetstheAutoAdjustmodesothatthecomputersignalcanbeautomaticallyormanuallyadjustedfor
noiseandstability.Youcanautomaticallymakeadjustmentintwoways:[NORMAL]and[FINE].
OFF ������������������������ The computer signal will not be automatically adjusted� You can manually optimize the computer signal�
NORMAL ���������������� Default setting� The computer signal will be automatically adjusted� Normally select this option�
FINE ����������������������� Select this option if fine adjustment is needed� It takes more time to switch to the source than when [NOR-
MAL]is selected�
Selecting Fan Mode [FAN MODE]
FanModeisusedtosetthespeedoftheinternalcoolingfan.
MODE �������������������� Select three modes for fan speed: AUTO, HIGH, and HIGH ALTITUDE�
AUTO: The built-in fans automatically run at a variable speed according to the internal temperature�
HIGH: The built-in fans run at high speed
HIGH ALTITUDE: The built-in fans run at a high speed� Select this option when using the projector at altitudes
approximately5500feet/1600metersorhigher.
SETTING ���������������� Select one of the four options ([FLOOR], [CEILING], [VERTICAL TILT DOWN], or [VERTICAL TILT UP])
according to the installation angle of the projector� See the drawing below�
NOTE:Besuretoselectthe[SETTING]optionaccordingtotheprojector’sorientation.Failuretodosomay
cause product malfunction.
0°
70°
90°
250°
180°
110°
270°
290°
Select [VERTICAL TILT UP] for this angle
Select [VERTICAL TILT DOWN] for this angle
Select [FLOOR] for this angle
Select [CEILING] for this angle
Whenyouwishtocooldownthetemperatureinsidetheprojectorquickly,select[HIGH].

129
5. Using On-Screen Menu
NOTE:
• When[HIGHALTITUDE]isselectedfor[FANMODE],asymbolicon will be displayed at the bottom of the menu.
• ItisrecommendedthatyouselectHighspeedmodeifyouusetheprojectornon-stopforconsecutivedays.
•Set[FANMODE]to[HIGHALTITUDE]whenusingtheprojectorataltitudesapproximately5500feet/1600metersorhigher.
• Usingtheprojectorataltitudesapproximately5500feet/1600metersorhigherwithoutsettingto[HIGHALTITUDE]cancause
theprojectortooverheatandtheprotectorcouldshutdown.Ifthishappens,waitacoupleminutesandturnontheprojector.
•Usingtheprojectorataltitudeslessthanapproximately5500feet/1600metersandsettingto[HIGHALTITUDE]cancausethe
lamptoovercool,causingtheimagetoicker.Switch[FANMODE]to[AUTO].
•Usingtheprojectorataltitudesapproximately5500feet/1600metersorhighercanshortenthelifeofinternalpartssuchasthe
lamp.
• Yoursettingwillnotbeaffectedevenwhen[RESET]isdonefromthemenu.
Selecting the Signal Format [SIGNAL SELECT(COMP3)]
WhenanoutputdeviceisconnectedtotheCOMPUTER3videoinputconnectors,thissetstheinputsignal.
RGB/COMPONENT � RGB and component signals are identified automatically�
VIDEO �������������������� This switches to the video signal�
NOTE:Whenavideocable(commerciallyavailable)isconnectedtotheCOMPUTER3videoinputconnectors’G/Yconnector,video
signalscanbeprojected.Inthiscase,setto“VIDEO”.
[SEAMLESSSWITCHING](forPX750U2only)
Whentheinputconnectorisswitched,theimagedisplayedbeforeswitchingisheldtoswitchtothenewimagewithout
abreakduetoabsenceofasignal.
[COLOR SYSTEM]
ThisfeatureallowsyoutoselecttheTVvideosignal,whichdiffersfromcountrytocountry(NTSC,PAL,etc.).
Thisissetto[AUTO]byfactorydefault.Setthisiftheprojectorcannotidentifythesignalautomatically.
Setting for the Optional Board [SLOT POWER]
WhenusingtheoptionalboardsuchasSB-01HCinstalledintheslot,setthefollowingoptions.
PROJECTOR ON �����������������Thisfeaturewillturnonoroffthepowertotheoptionalboard.
OFF: Forcibly turn off the power to the optional board installed in the slot�
ON (Default): Turn on the power to the optional board installed in the slot�
PROJECTOR STANDBY �������Thisfeaturewillautomaticallyenableordisabletheoptionalboardinstalledintheslot
whentheprojectorisinstandby.
DISABLE: Select this option to disable the optional board in the projector standby�
ENABLE (Default): Select this option to enable the optional board in the projector standby�
NOTE:
• Select[OFF]whentheoptionalboardisnotinstalledintotheslot.

130
5. Using On-Screen Menu
[OPTIONS(2)]
SelectingPower-savingin[STANDBYMODE]
Theprojectorhasthreestandbymodes:[NORMAL],[POWER-SAVING]and[NORMAL2].
ThePOWER-SAVINGmodeisthemodethatallowsyoutoputtheprojectorinthepower-savingconditionwhich
consumeslesspowerthantheNORMALmode.TheprojectorispresetforPOWER-SAVINGmodeatthefactory.
NORMAL ���������������� Power indicator: Orange light/STATUS indicator: Green light
POWER-SAVING
���� Power indicator: Red light/STATUS indicator: Off
The following connectors, buttons or functions will not work during this mode�
- MONITOR OUT (COMP� 1) connector
- LAN and Mail Alert functions
- Buttons other than POWER button on the cabinet
- Buttons other than POWER ON button on the remote control
- Virtual Remote Tool fucntion
- [AUTO POWER ON (COMP1/3)]
- PC control commands for other than power-on
NORMAL2
�������������� When in the standby mode, the POWER indicator will light orange and the STATUS indicator will not light�
This shows that the projector’s power can be turned on by wired LAN�
When in the standby mode, the following connectors, buttons or functions will not work:
- MONITOR OUT (COMP� 1) connector
- Wireless LAN Unit
- [AUTO POWER ON (COMP1/3)]
- Buttons other than POWER button on the cabinet
- Buttons other than POWER ON button on the remote control
- PC control commands for other than power-on
Important:
• When[CONTROLPANELLOCK]or[CONTROLID]isturnedon,orwhen[COMPUTER1]or[COMPUTER3]isselectedfor[AUTO
POWERON(COMP1/3)],the[STANDBYMODE]settingbecomesinvalid.
Thismeansthattheprojectorisinthesameconditionwhenthe[NORMAL]isselectedfor[STANDBYMODE].
NOTE:
• Evenwhen[POWER-SAVING]isselectedfor[STANDBYMODE],poweronoroffcanbedonebyusingthePCCONTROLport.
• ThepowerconsumptioninthestandbymodewillnotbeincludedincalculatingCO
2
emission reduction.
• Yoursettingwillnotbeaffectedevenwhen[RESET]isdonefromthemenu.
Enabling Direct Power On [DIRECT POWER ON]
Turnstheprojectoronautomaticallywhenthepowercordisinsertedintoanactivepoweroutlet.Thiseliminatesthe
needtoalwaysusethePOWERbuttonontheremotecontrolorprojectorcabinet.

131
5. Using On-Screen Menu
TurningOntheProjectorByApplyingComputerSignal[AUTOPOWERON(COMP1/3)]
WhentheprojectorisinStandbymode,applyingacomputersignalfromacomputerconnectedtotheCOMPUTER1
INorCOMPUTER3INinputwillpowerontheprojectorandsimultaneouslyprojectthecomputer’simage.
ThisfunctionalityeliminatestheneedtoalwaysusethePOWERbuttonontheremotecontrolortheprojectorcabinet
topowerontheprojector.
Tousethisfunction,rstconnectacomputertotheprojectorandtheprojectortoanactiveACinput.
NOTE:
• Disconnectingacomputersignalfromthecomputerwillnotpowerofftheprojector.Werecommendusingthisfunctionincom-
binationoftheAUTOPOWEROFFfunction.
• Thisfunctionwillnotbeavailableunderthefollowingconditions:
- whenacomponentsignalisappliedtotheCOMPUTER1INorCOMPUTER3INconnector
- whenaSynconGreenRGBsignalorcompositesyncsignalisapplied
• When[AUTOPOWERON(COMP1/3]isset,the[STANDBYMODE]settingbecomesinvalid.Thismeansthattheprojectorisin
thesameconditionwhenthe[NORMAL]isselectedfor[STANDBYMODE].
• ToenabletheAUTOPOWERON(COMP1/3)afterturningofftheprojector,wait3secondsandinputacomputersignal.
Ifacomputersignalisstillpresentwhentheprojectoristurnedoff,theAUTOPOWERON(COMP1/3)willnotworkandthe
projector remains in standby mode.
Enabling Power Management [AUTO POWER OFF]
Whenthisoptionisselectedyoucanenabletheprojectortoautomaticallyturnoff(attheselectedtime:5min.,10min.,
20min.,30min.)ifthereisnosignalreceivedbyanyinputorifnooperationisperformed.
NOTE:
• The[AUTOPOWEROFF]functionwillnotworkwhen[VIEWER]or[NETWORK]isselectedfor[SOURCE].
Selecting Default Source [DEFAULT SOURCE SELECT]
Youcansettheprojectortodefaulttoanyoneofitsinputseachtimetheprojectoristurnedon.
LAST ���������������������� Sets the projector to default to the previous or last active input each time the projector is turned on�
AUTO ��������������������� Searches for an active source in order of COMPUTER1 → COMPUTER2 → COMPUTER3 → HDMI →
DisplayPort → VIDEO → S-VIDEO → VIEWER → COMPUTER1 and displays the first found source�
COMPUTER1 ��������� Displays the computer signal from the COMPUTER 1 IN connector every time the projector is turned on�
COMPUTER2 ��������� Displays the computer signal from the COMPUTER 2 IN connector every time the projector is turned on�
COMPUTER3 ��������� Displays the computer signal from the COMPUTER 3 IN connector every time the projector is turned on�
HDMI ��������������������� Displays the digital source from the HDMI IN connector every time the projector is turned on�
DisplayPort ������������ Displays the digital source from the DisplayPort every time the projector is turned on�
VIDEO �������������������� Displays the Video source from the VIDEO IN connector every time the projector is turned on�
S-VIDEO ���������������� Displays the Video source from the S-VIDEO IN connector every time the projector is turned on�
VIEWER ����������������� Displays slides or plays back movie files from the USB memory device every time the projector is turned
on�
NETWORK ������������� Displays the data sent from the computer via the LAN port (RJ-45) or the wireless LAN unit (sold separately)
mounted on the projector is projected�
SLOT ���������������������� Displaysasignalfromtheoptional(SB-01HCorotherNEC’soptionalboards)whenitisinstalled.

132
5. Using On-Screen Menu
[EDGE BLENDING]
Thisfunctionadjustsoverlappingedgesofimagesprojectedfromeachprojectortouniformmulti-screenimages.
Turns on or off the Edge Blending function. [MODE]
Turningon[MODE]willmake[TOP],[BOTTOM],[LEFT],[RIGHT],and[BLACKLEVEL]available.(Default:OFF).
Selectsedgeoftop,bottom,left,andrightofthescreentoperformtheEdgeBlendingfunction.
[TOP/BOTTOM/LEFT/RIGHT]
Turningon[CONTROL]willmake[MARKER],[RANGE],and[POSITION]available.(→page51)
CONTROL �������������� Turns on or off [TOP], [BOTTOM], [LEFT], and [RIGHT]�
MARKER ���������������� Turns on or off a marker for the range and position adjustment� Turning on [MARKER] will display a magenta
marker for [RANGE] and green marker for [POSITION]�
RANGE ������������������� Adjusts the Edge Blending range (width)�
POSITION �������������� Adjusts the Edge Blending start position�
Adjuststhebrightnesslevelof9-segmentedportions.[BLACKLEVEL]
9-segmentedportionsare [TOP-LEFT],[TOP-CENTER], [TOP-RIGHT],[CENTER-LEFT],[CENTER],[CENTER-
RIGHT],[BOTTOM-LEFT],[BOTTOM-CENTER],and[BOTTOM-RIGHT].(→page54)
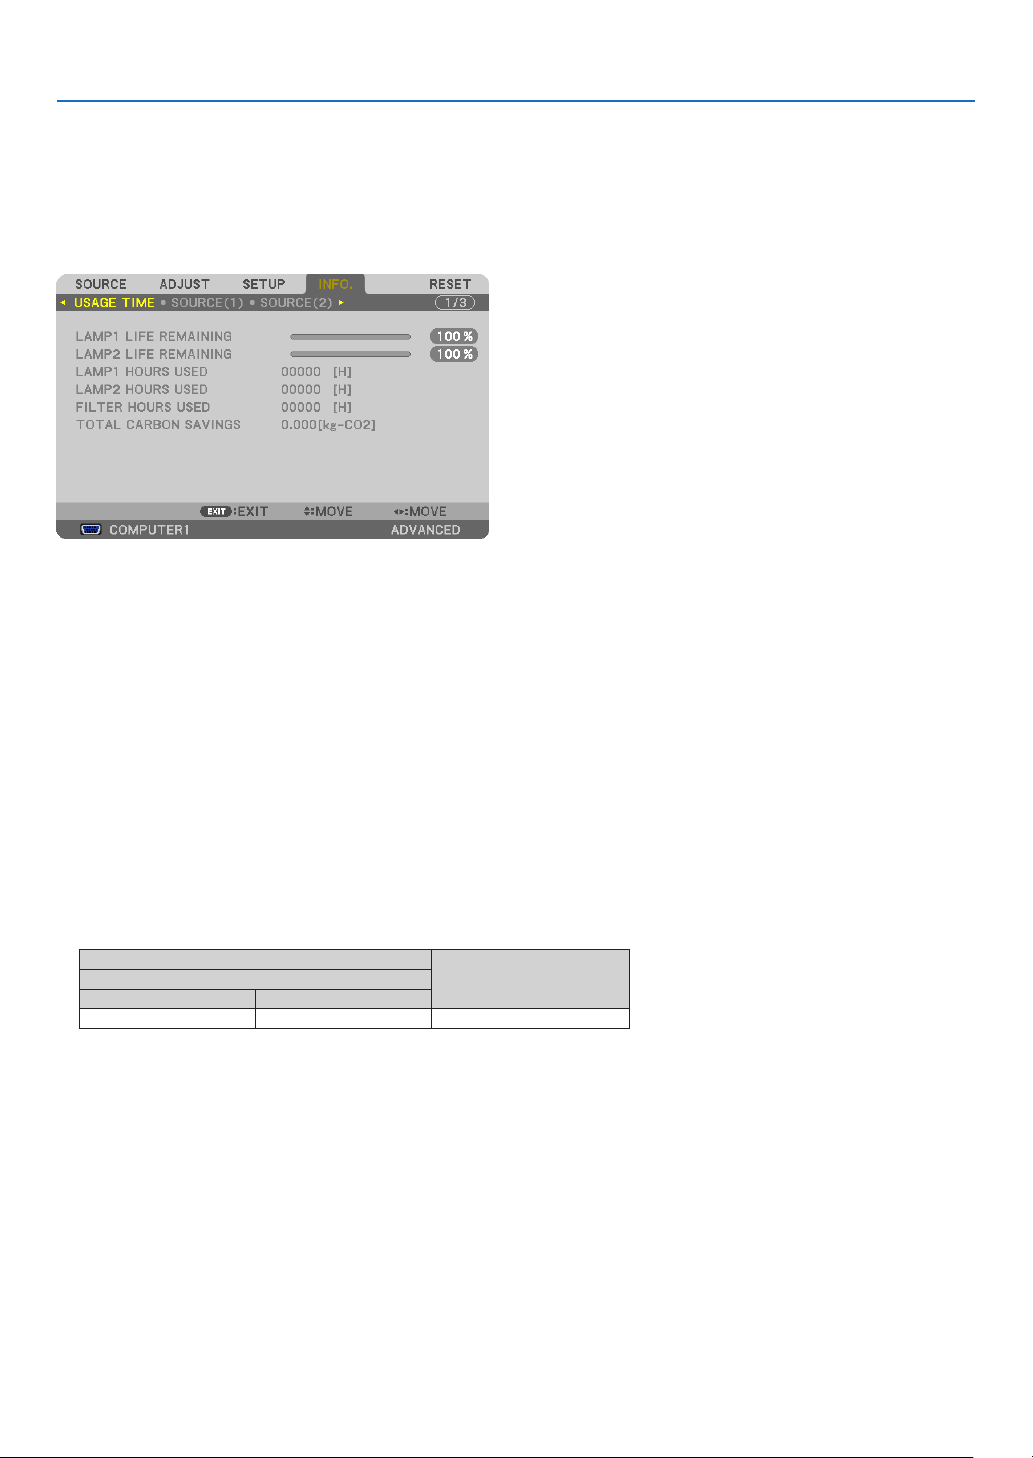
133
5. Using On-Screen Menu
❼ Menu Descriptions & Functions [INFO.]
Displaysthestatusofthecurrentsignalandlampusage.Thisitemhasninepages.Theinformationincludedisasfollows:
TIP:PressingtheHELPbuttonontheremotecontrolwillshowthe[INFO.]menuitems.
[USAGE TIME]
[LAMP1LIFEREMAINING](%)*
[LAMP2LIFEREMAINING](%)*
[LAMP1HOURSUSED](H)
[LAMP2HOURSUSED](H)
[FILTERHOURSUSED](H)
[TOTALCARBONSAVINGS](kg-CO2)
* Theprogressindicatorshowsthepercentageofremainingbulblife.
Thevalueinformsyouoftheamountoflampusage.Whentheremaininglamptimereaches0,theLAMPLIFE
REMAININGbarindicatorchangesfrom0%to100Hoursandstartscountingdown.
Iftheremaininglamptimereaches0hours,theprojectorwillnotturnon.
• Themessagetotheeffectthatthelamportheltersshouldbereplacedwillbedisplayedforoneminutewhen
theprojectoristurnedonandwhenthePOWERbuttonontheprojectorortheremotecontrolispressed.
Todismissthismessage,pressanybuttonontheprojectorortheremotecontrol.
Lamp life(H)
Replacement lampECO MODE
OFF ON
2000 2500 NP22LP
• [TOTALCARBONSAVINGS]
Thisdisplaystheestimatedcarbonsavinginformationinkg.Thecarbonfootprintfactorinthecarbonsavingcal-
culationisbasedontheOECD(2008Edition).(→page38)
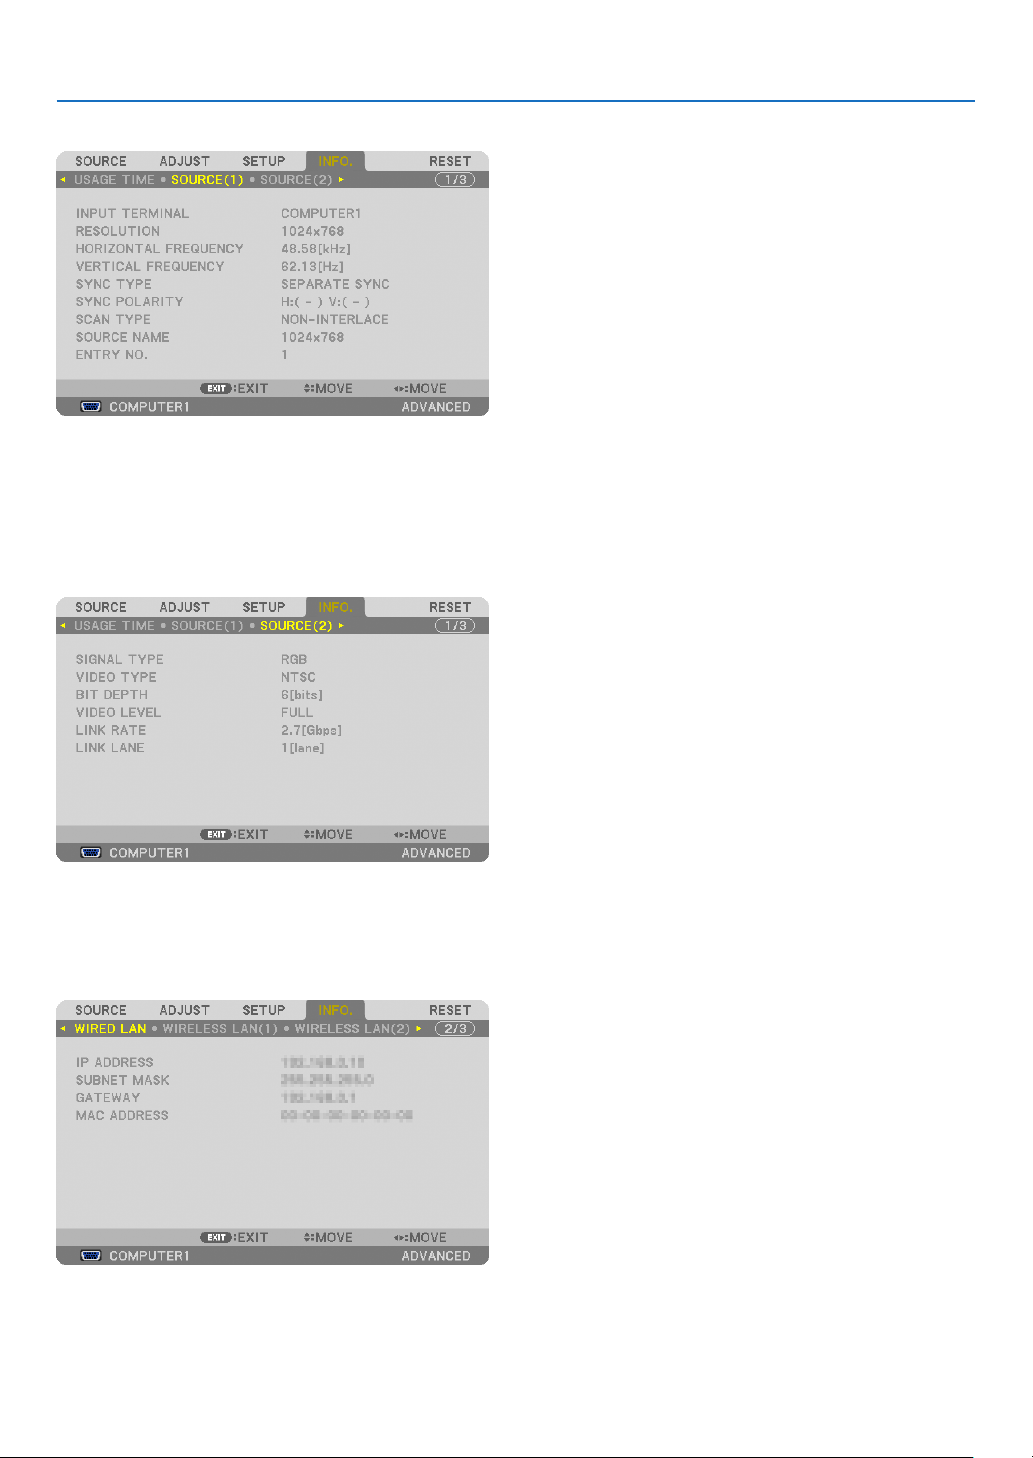
134
5. Using On-Screen Menu
[SOURCE(1)]
INPUTTERMINAL RESOLUTION
HORIZONTALFREQUENCY VERTICAL FREQUENCY
SYNCTYPE SYNCPOLARITY
SCANTYPE SOURCENAME
ENTRYNO.
[SOURCE(2)]
SIGNALTYPE VIDEOTYPE
BITDEPTH VIDEOLEVEL
LINKRATE LINKLANE
[WIRED LAN]
IPADDRESS SUBNETMASK
GATEWAY MACADDRESS
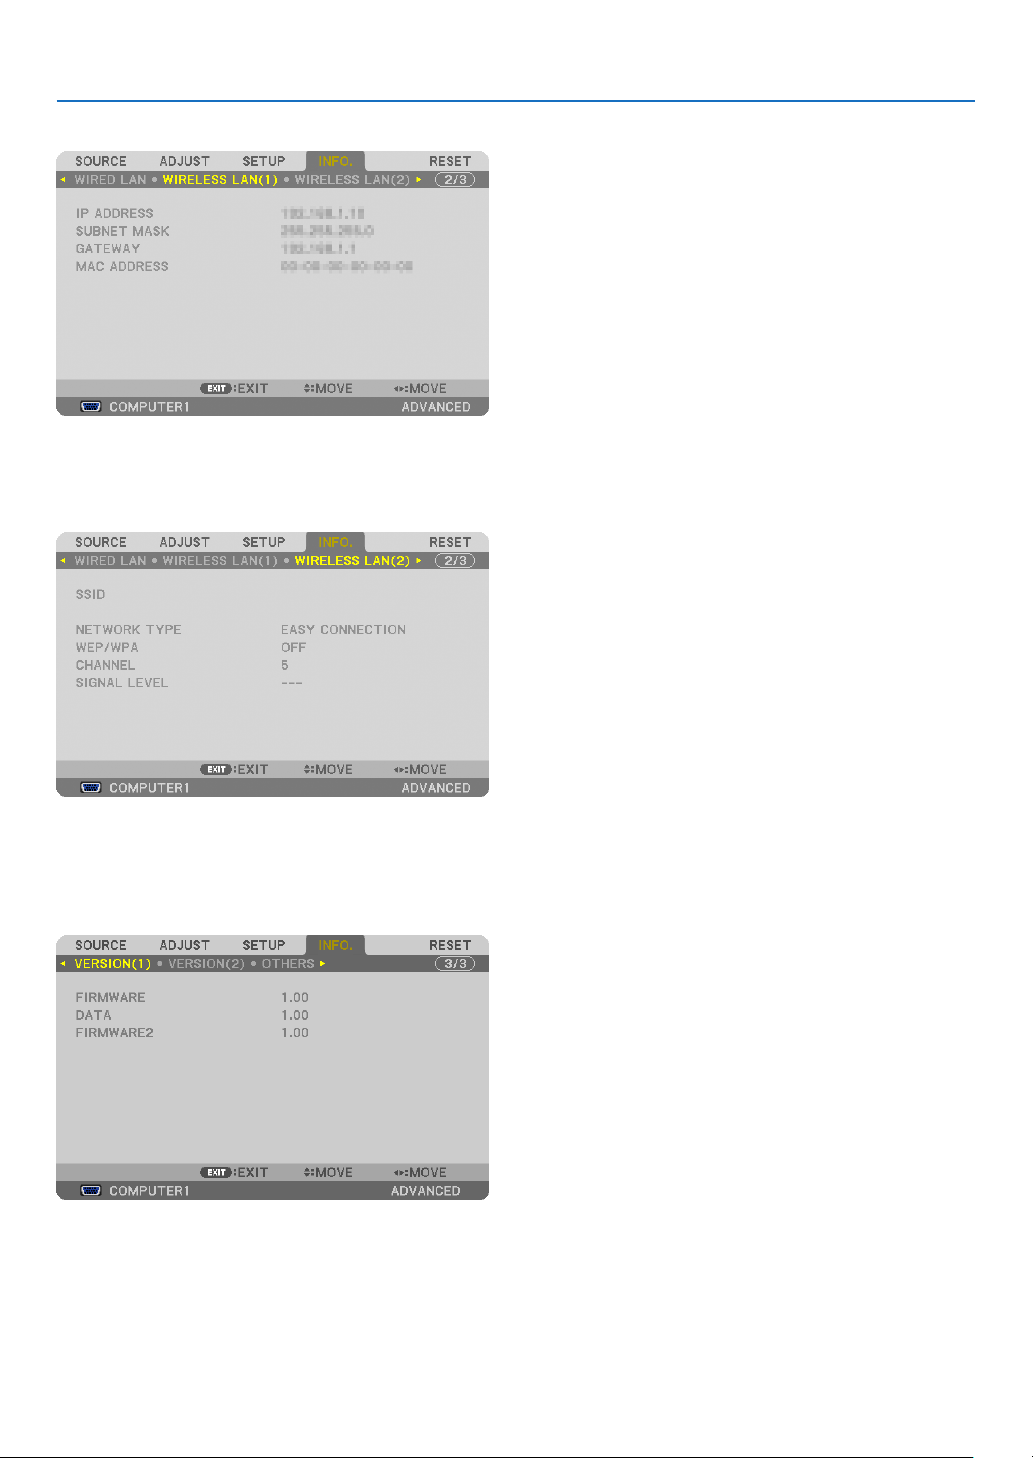
135
5. Using On-Screen Menu
[WIRELESS LAN(1)]
IPADDRESS SUBNETMASK
GATEWAY MACADDRESS
[WIRELESS LAN(2)]
SSID NETWORKTYPE
WEP/WPA CHANNEL
SIGNALLEVEL
[VERSION(1)]
FIRMWARE DATA
FIRMWARE2
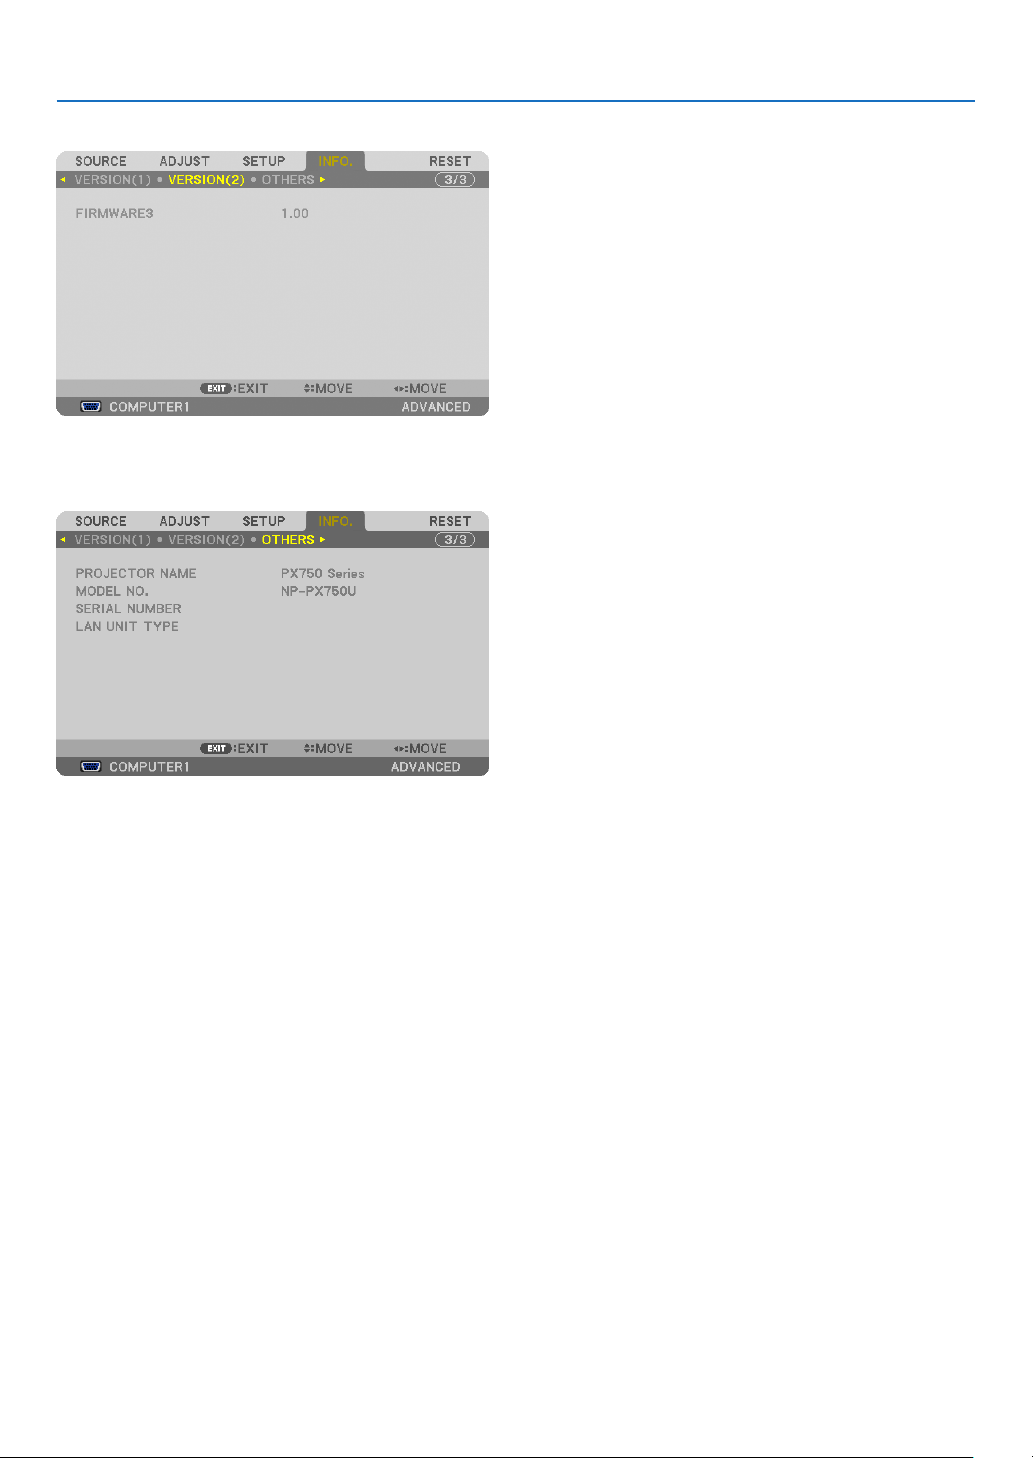
136
5. Using On-Screen Menu
[VERSION(2)]
FIRMWARE3
[OTHERS]
PROJECTORNAME MODELNO.
SERIALNUMBER LANUNITTYPE
CONTROLID(when[CONTROLID]isset)

137
5. Using On-Screen Menu
❽ Menu Descriptions & Functions [RESET]
Returning to Factory Default [RESET]
TheRESETfeatureallowsyoutochangeadjustmentsandsettingstothefactorypresetfora(all)source(s)except
thefollowing:
[CURRENTSIGNAL]
Resetstheadjustmentsforthecurrentsignaltothefactorypresetlevels.
NOTE:
• LockedsignalsintheEntryListwillnotbereset.
[ALLDATA]
Resetalltheadjustmentsandsettingsforallthesignalstothefactorypreset.
AllitemscanberesetEXCEPT[ENTRYLIST],[LANGUAGE],[BACKGROUND],[FILTERMESSAGE],[SCREEN],
[GEOMETRICCORRECTION],[MULTI-SCREENCOMP.],[REF.WHITEBALANCE],[CONTROLPANELLOCK],
[SECURITY],[COMMUNICATION SPEED], [CONTROLID],[SEAMLESSSWITCHING],[STANDBY MODE],
[FANMODE],[EDGEBLENDING],[REF.LENSMEMORY],[DATEANDTIME],[LAMPLIFEREMAINING],[LAMP
HOURSUSED],[FILTERHOURSUSED],[TOTALCARBONSAVINGS],[WIREDLAN],and[WIRELESSLAN].
Toresetthelampusagetime,see“ClearingLampHourMeter[CLEARLAMPHOURS]”below.
[ALL DATA (INCLUDING ENTRY LIST)]
Resetalltheadjustmentsandsettingsforallthesignalstothefactorypresetexcept[LANGUAGE],[BACKGROUND],
[FILTERMESSAGE],[SCREEN],[MULTI-SCREENCOMP.],[REF.WHITEBALANCE],[CONTROLPANELLOCK],
[SEAMLESSSWITCHING],[SECURITY],[COMMUNICATIONSPEED],[CONTROLID],[FANMODE],[EDGEBLEND-
ING],[GEOMETRICCORRECTION],[REF.LENSMEMORY],[DATEANDTIME],[STANDBYMODE],[LAMPLIFE
REMAINING],[LAMPHOURSUSED],[FILTERHOURSUSED],[TOTALCARBONSAVINGS],[WIREDLAN],and
[WIRELESSLAN].
Alsodeletesallthesignalsinthe[ENTRYLIST]andreturnstothefactorypreset.
NOTE:LockedsignalsinEntryListcannotbereset.
Clearing Lamp Hour Meter [CLEAR LAMP 1 HOURS/CLEAR LAMP 2 HOURS]
Resetsthelampclockbacktozero.Selectingthisoptiondisplayssubmenuforaconrmation.Select[YES]andpress
theENTERbutton.
NOTE:Elapsedtimeofthelampusewillnotbeaffectedevenwhen[RESET]isdonefromthemenu.
NOTE: The projector will turn off and go into standby mode when you continue to use the projector for another 100 hours after the
lamp has reached the end of its life. In this condition you cannot clear the lamp hour meter on the menu. If this happens, press
theHELPbuttonontheremotecontrolfor10secondstoresetthelampclockbacktozero.Dothisonlyafterreplacingthelamp.

138
5. Using On-Screen Menu
Clearing the Filter Usage Hours [CLEAR FILTER HOURS]
Resetsthelterusagebacktozero.Selectingthisoptiondisplayssubmenuforaconrmation.Select[YES]andpress
theENTERbutton.
The[OFF]itemisselectedfor[FILTERMESSAGE]atthetimeofshipment.When[OFF]isselected,youdonotneed
toclearthelterusagehour.
NOTE:Elapsedtimeofthelterusewillnotbeaffectedevenwhen[RESET]isdonefromthemenu.
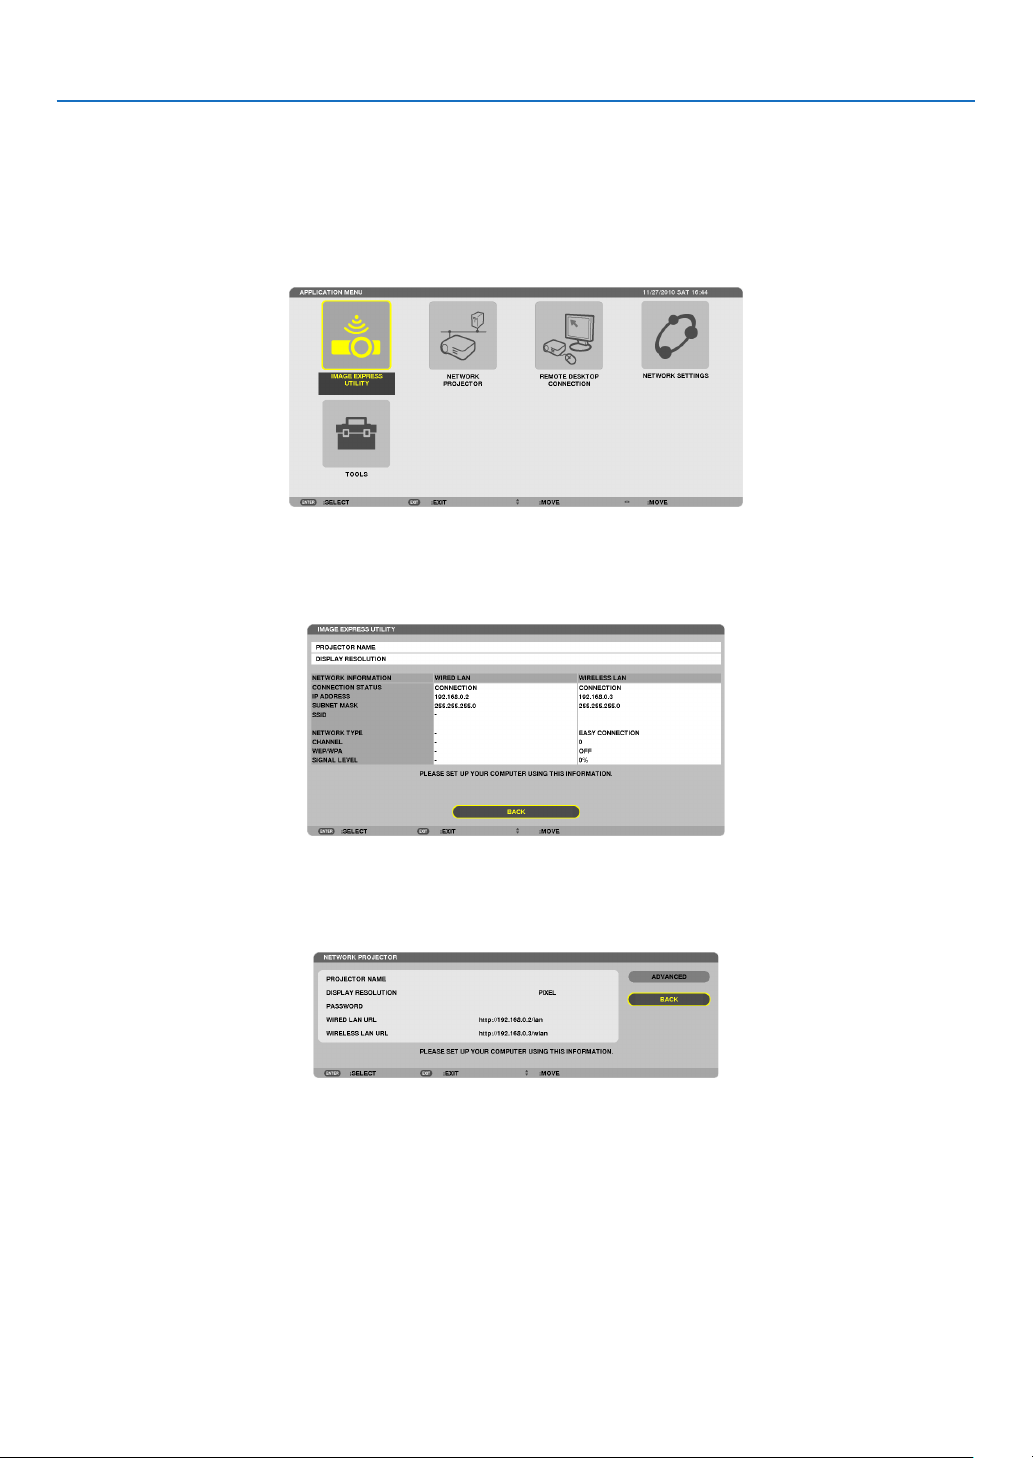
139
5. Using On-Screen Menu
❾ Application Menu
When[NETWORK]isselectedfromthe[SOURCE]menu,theapplicationmenu[APPLICATIONMENU]willbedisplayed.
TheapplicationmenuallowsyoutosetuptheUserSupportware,NetworkSettings(NETWORKSETTINGS)and
Tools(TOOLS).
TheUserSupportwareiscontainedonthesuppliedNECProjectorCD-ROM.
In[ADMINISTRATORMODE],either[ADVANCED]menuor[BASIC]menucanbeselected.(→page157)
The[BASIC]menucontainsminimumessentialsofmenusandcommands.
IMAGE EXPRESS UTILITY
Thisshowsinformationforprojectorname,resolution,andnetwork(wired/wireless)whicharerequiredtouseImage
ExpressUtility.
Usethisinformationtosetupforyourcomputer.
NETWORK PROJECTOR
Thisshowsinformationforprojectorname,resolution,andnetwork(wired/wireless)whicharerequiredtouseNetwork
Projector.
Usethisinformationtosetupforyourcomputer.

140
5. Using On-Screen Menu
REMOTE DESKTOP CONNECTION
ThisallowsyoutosetupforcomputernameentryandeffectsforRemoteDesktop.
NOTE:
• AUSBkeyboardisrequiredtosetuptheRemoteDesktopConnection.
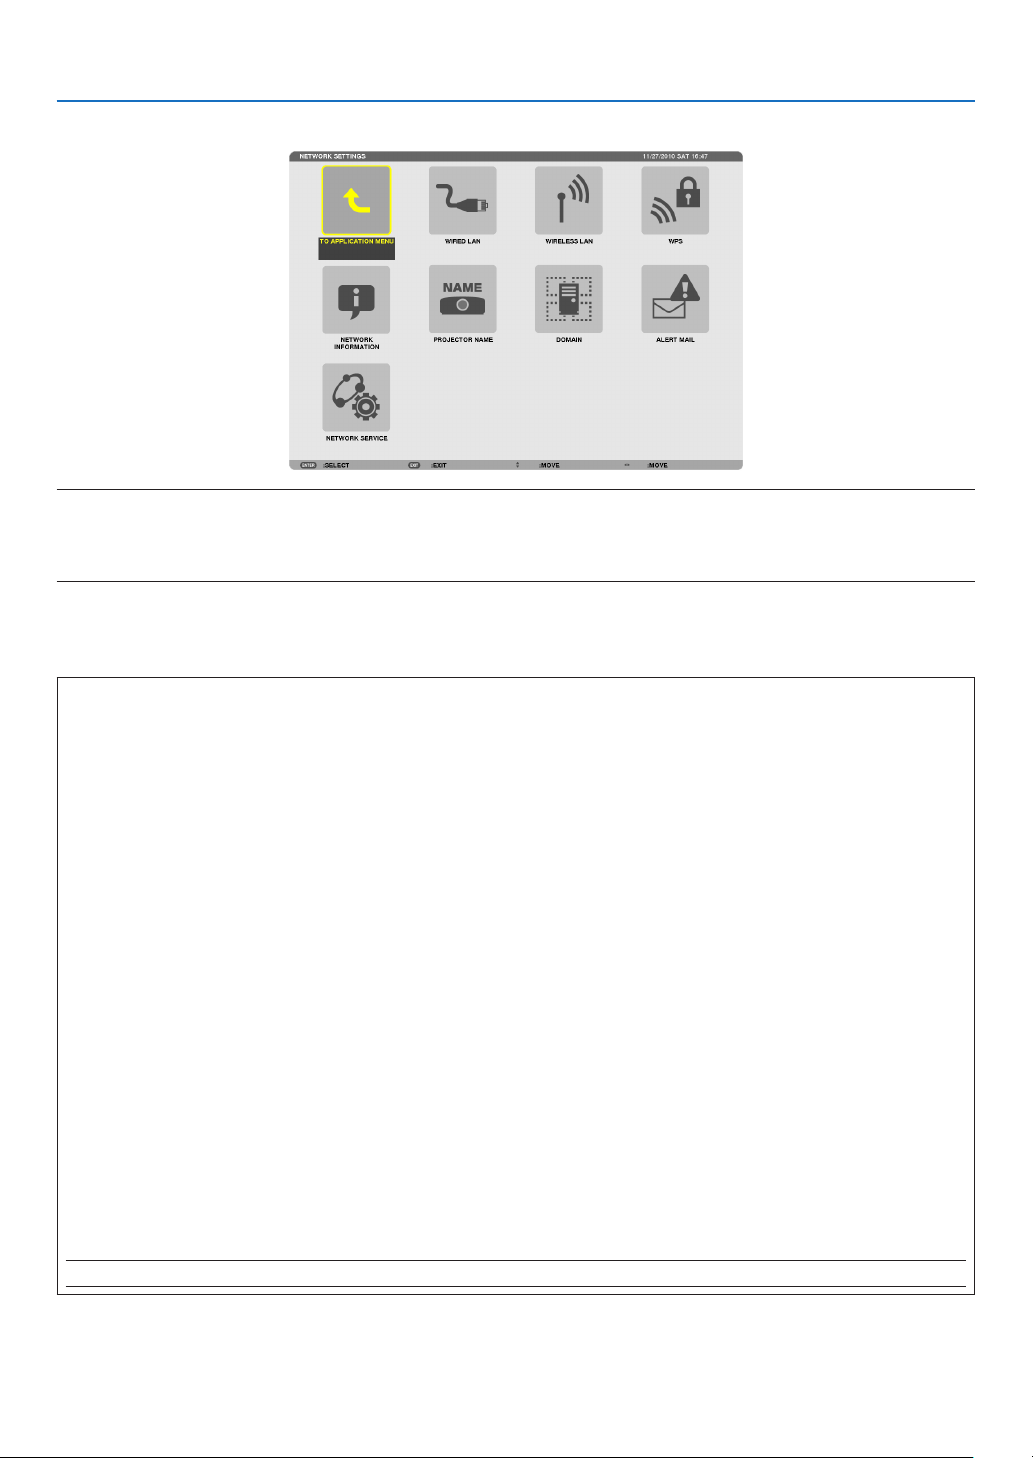
141
5. Using On-Screen Menu
NETWORK SETTINGS
Important:
• Consultwithyournetworkadministratoraboutthesesettings.
• WhenusingawiredLANconnection,connectaLANcable(Ethernetcable)totheLANport(RJ-45)oftheprojector.(→ page
171)
TIP:Thenetworksettingsyoumakewillnotbeaffectedevenwhen[RESET]isdonefromthemenu.
Hints on How to Set Up LAN Connection
To set up the projector for a LAN connection:
Select[WIREDLAN]or[WIRELESSLAN]→[PROFILES]→[PROFILE1]or[PROFILE2].
TwosettingscanbesetforwiredorwirelessLAN.
Nextturnonorofffor[DHCP],[IPADDRESS],[SUBNETMASK],and[GATEWAY]andselect[OK]andpressthe
ENTERbutton.(→page142)
To recall LAN settings stored in the profile number:
Select[PROFILE1]or[PROFILE2]forwiredorwirelessLAN,andthenselect[OK]andpresstheENTERbutton.
(→page142)
To connect a DHCP server:
Turnon[DHCP]forwiredorwirelessLAN.Select[ON]andpresstheENTERbutton.TospecifyIPaddresswithout
usingtheDHCPserver,turnoff[DHCP].(→page143)
TosetonlyforwirelessLAN(NETWORKTYPEandWEP/WPA):
Select[PROFILE1]or[PROFILE2]forwirelessLAN,andthenselect[ADVANCED]and[OK]andpresstheENTER
button.TheAdvancedmenuwillbedisplayed.(→page144)
To select an SSID:
Select[ADVANCED]→[SITESURVEY]andpresstheENTERbutton.
SelectanSSIDandpressthe>buttontoselect[OK]andpresstheENTERbutton.
Ifyoudonotuse[SITESURVEY],typetheSSIDandselect[INFRASTRUCTURE]or[ADHOC].(→page144)
Toreceivelampreplacementtimeorerrormessagesviae-mail:
Select[ALERTMAIL],andset[SENDER'SADDRESS],[SMTPSERVERNAME],and[RECIPIENT'SADDRESS].
Last,select[OK]andpresstheENTERbutton.(→page155)
Toexecute[EASYCONNECTION]usingImageExpressUtility2.0orImageExpressUtility2forMac:
The[EASYCONNECTION]isamodethatcanabbreviatethetroublesomeLANsettingswhenusingtheImage
ExpressUtilityandconnectingthePCandprojectorviaawirelessLAN.
ImageExpressUtility2.0andImageExpressUtility2forMacarecontainedonthesuppliedNECProjectorCD-ROM.
Touse[EASYCONNECTION],select[WIRELESSLAN]→[PROFILES]→[EASYCONNECTION].
NOTE:The[EASYCONNECTION]functionisavailableonWindows7,WindowsVistaorWindowsXPSP3.

142
5. Using On-Screen Menu
WIREDLANorWIRELESSLAN(ADVANCEDmenuonly)
*TousethewirelessLANfunctions,connectaseparatelysoldwirelessLANunittotheprojector.(→page172)
PROFILES • UptotwosettingsfortheLANportorUSBwirelessLANunit
canbestoredinmemoryoftheprojector.Totaloffoursettings
canbestored.
Fivesettingscanbestored:twoforthebuilt-inLANport,two
forwirelessLANandoneforWPS.
• Select[PROFILE1]or[PROFILE2]andthendosettingsfor
[DHCP]andtheotheroptions.
Afterdoingthis,select[OK]andpresstheENTERbutton.This
willstoreyoursettingsinmemory.
• Torecallthesettingsfrommemory:
Afterselecting[PROFILE1]or[PROFILE2]fromthe[PRO-
FILES]list.
Select[OK]andpresstheENTERbutton.
• TostopemittingradiowavesfromtheUSBWirelessLANUnit,
select[DISABLE]fromthe[PROFILES]list.
• Selecting[SIMPLEACCESSPOINT]willallowtheprojectorto
createaninfrastructurenetwork.
AnSSIDwillbeautomaticallycreated.
WhentheIPaddressoftheprojectorischanged,itwillauto-
maticallytakeeffectinoneortwominutes.
Select“ObtainanIPAddressAutomatically”tosettheIPad-
dressofaconnectedcomputer.
Ittakesafewsecondsforachangeofyourcomputer’sIPad-
dresstocomeintoeffectinWindows7/WindowsVistawhileit
takesoneortwominutesinWindowXP.
Whenyou connectwithyour computertosaveyourprole
andselect“Automaticallyconnectwhenwithinrange”fromthe
PropertiestabofWirelessNetworkinWindowsforyourselected
prole,yourwirelessLANwillbeaccessedunderthefollowing
conditions:
• atthetimeofturningonthecomputerortheprojector
• whenthenotebooktypeiswithintherangeoftheprojector’s
wirelessLANcanbeachieved.
DatatransmissionbetweenwirelessLANandwiredLANisnot
possible.
Whenthe[SIMPLEACCESSPOINT]modeisusedtosend
images,itisrecommendedtoconnecttoonlyonecomputer.
—

143
5. Using On-Screen Menu
• Whenselecting[WPS],thenetworkwillbeconnectedbyusing
settingsstoredautomaticallywiththeWPSfunction.
Selecting[WPS]willallowtheprojectortoaccessthenetwork
byusingthesettingstheWPSfunctionautomaticallystored.
DHCP PlaceacheckmarktoautomaticallyassignanIPaddresstothe
projectorfromyourDHCPserver.
ClearthischeckboxtoregistertheIPaddressorsubnetmask
numberobtainedfromyournetworkadministrator.
—
IPADDRESS SetyourIPaddressofthenetworkconnectedtotheprojector
when[DHCP]isturnedoff.
Upto12numeric
characters
SUBNETMASK Setyoursubnetmasknumberofthenetworkconnectedtothe
projectorwhen[DHCP]isturnedoff.
Upto12numeric
characters
GATEWAY
Setthedefaultgatewayofthenetworkconnectedtotheprojector
when[DHCP]isturnedoff.
Upto12numeric
characters
WNSCONFIGURA-
TION
SettheIPaddressofyourWINSserverofthenetworkconnected
totheprojectorwhen[DHCP]isturnedoff.
Upto12numeric
characters
AUTODNS PlaceacheckmarktoautomaticallyassigntheIPaddressofyour
DNSserverconnectedtotheprojectorfromyourDHCPserver.
ClearthischeckboxtosettheIPaddressofyourDNSserver
connectedtotheprojector.
Upto12numeric
characters
DNSCONFIGURA-
TION
SettheIPaddressofyourDNSserveronthenetworkconnected
totheprojectorwhen[AUTODNS]iscleared.
Upto12numeric
characters
ADVANCED*
ThismenuallowsyoutosetvariousitemsforyourwirelessLAN
connection(networktype,security).
—
RECONNECT
Retrytoconnecttheprojectortoanetwork.Trythisifyouhave
changed[PROFILES].
—
*The[ADVANCED]settingscreenisavailablefor[WIRELESSLAN]only.
NOTE:
• Ifyouselect[EASYCONNECTION]from[PROFILES],youcannotmakesettingstoDHCPanditsfollowingitemsexcept[CHAN-
NEL]in[ADVANCED].
AdvancedSettings(settingsonlyrequiredwhenusingaseparatelysoldwirelessLANunit)
(ADVANCEDmenuonly)

144
5. Using On-Screen Menu
SITESURVEY DisplaysalistofavailableSSIDsforwirelessLANonsite.Select
anSSIDwhichyoucanaccess.
ToselectanSSID,highlight[SSID]andusethe▶toselect[OK]
andpresstheENTERbutton.
����������������������� Wireless access point
����������������������� Ad Hoc PC
����������������������� WEP or WPA enabled
—
SECURITY
Thiswillturnonorofftheencryptionmodeforsecuretransmis-
sion.
Touseencryption,specifyaWEPkeyorencryptionkey.Select
yoursecuritytypeappropriateforyourcomputerandthewire-
lessLANunit.
DISABLE ���������������� Will not turn on the encryption feature� Your
communications may be monitored by someone�
WEP(64bit) ������������ Uses 64-bit datalength for secure transmission�
WEP(128bit) ���������� Uses128-bitdatalengthforsecuretransmission.
This option will increase privacy and security
when compared to use of 64-bit datalength en-
cryption�
WPA-PSK/WPA2-PSK/WPA-EAP/WPA2-EAP
������������������������������ These options provide stronger security than
WEP�
NOTE:
• Thesecuritytype,WEPkey,andencryptionkeysettingsmustbethe
sameascommunicationdevicessuchasPCoraccesspointinyour
wireless network.
• Whenyouuse[SECURITY],yourimagetransmissionspeedwillslow
down.
• [WPA-PSK],[WPA-EAP],[WPA2-PSK]and[WPA2-EAP]arenotavail-
ablewhen[ADHOC]isselectedfrom[NETWORKTYPE].
—
SSID
Enteranidentier(SSID)forwirelessLAN.Communicationcan
bedoneonlywithequipmentwhoseSSIDmatchesSSIDforyour
wirelessLAN.
Upto32alphanumeric
characters(case
sensitive).
NETWORKTYPE SelectcommunicationmethodwhenusingwirelessLAN.
INFRASTRUCTURE ���Select this option when communicating with
one or more equipment connected to the wire-
less or wired LAN network via a wireless access
point�
AD HOC ��������������������Select this option when using the wireless LAN
to directly communicate with a computer in
peer-to-peer mode�
—
CHANNEL
Selecta channel.Available channelsvarydepending on the
countryandregion.Whenyouselect[INFRASTRUCTURE],make
surethattheprojectorandyouraccesspointareonthesame
channel;whenyouselect[ADHOC],makesurethattheprojector
andyourcomputerareonthesamechannel.
—

145
5. Using On-Screen Menu
When[WEP(64bit)]or[WEP(128bit)]isselectedfor[SECURITYTYPE]
KEYSELECT SelectsoneWEPkeyfromthefourkeysbelow.
KEY1,KEY2,KEY3,
KEY4
EnteraWEPkey.
•Maximumnumberofcharacters
Option Alphanumeric(ASCII) Hexadecimal(HEX)
WEP64bit 5 10
WEP128bit 13 26
When[WPA-PSK],[WPA-EAP],[WPA2-PSK],or[WPA2-EAP]isselectedfor[SECURITYTYPE]
ENCRYPTIONTYPE Select[TKIP]or[AES].
KEY Enterencryptionkey.Keylengthmustbe8orgreaterand63orless.
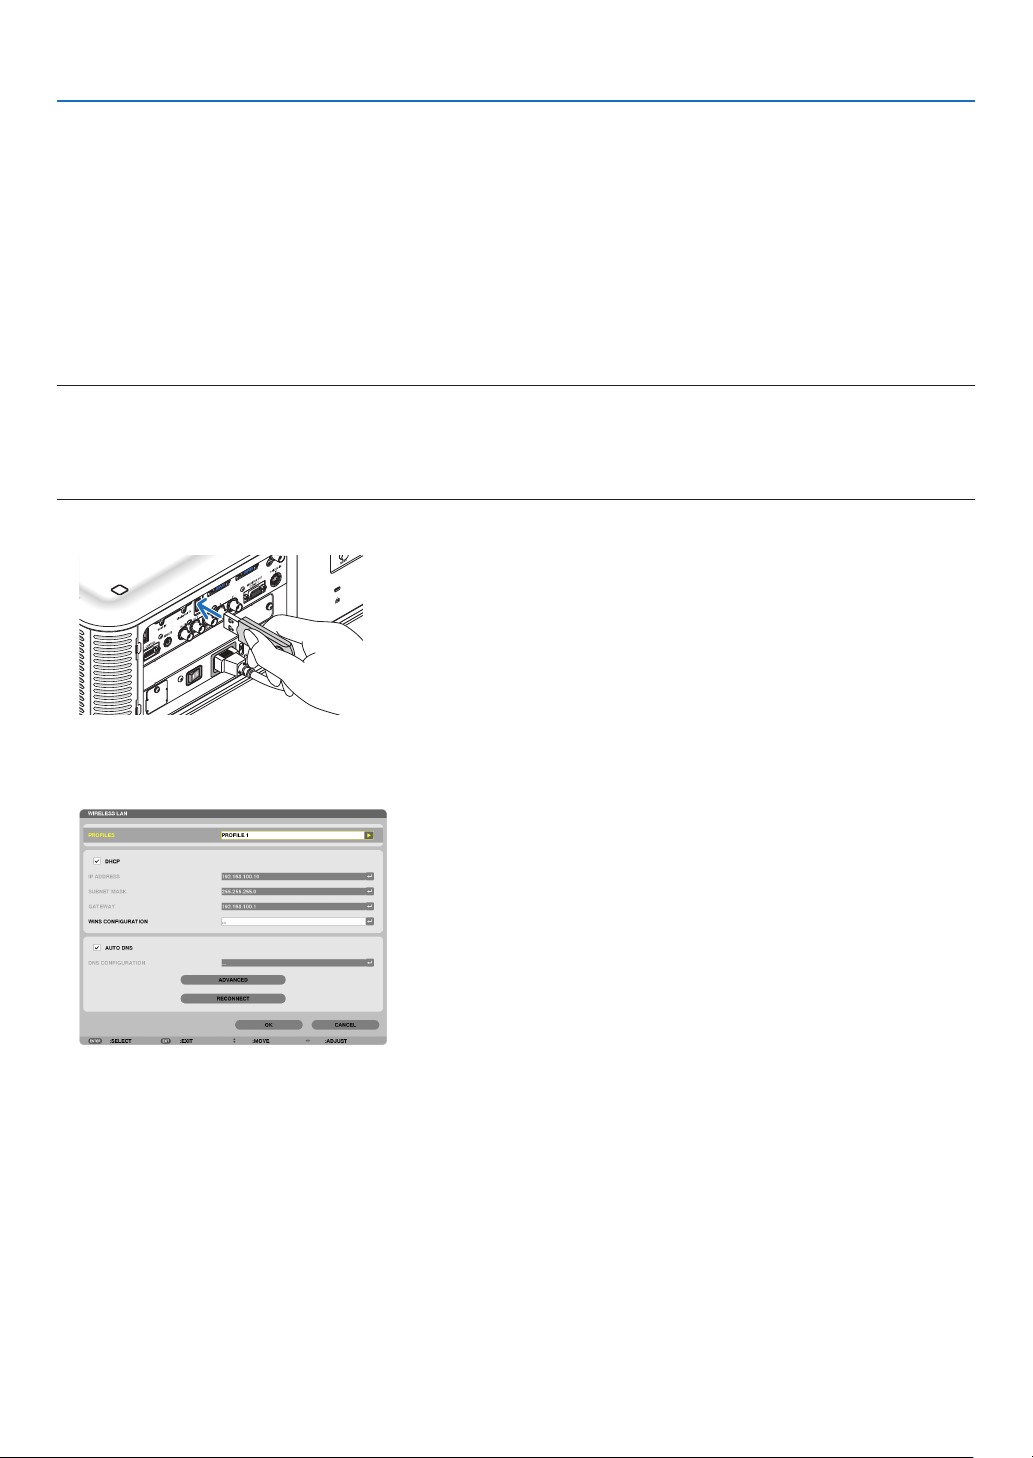
146
5. Using On-Screen Menu
[AUTHENTICATION](requiredforwirelessonly)
SettingisrequiredforusingWPA-EAPorWPA2-EAP.
Preparation before setting
SelectawirelessLANcompliantWPA-EAPorWPA2-EAPauthenticationandinstalladigitalcerticateontheprojector.
1. Set[DATEANDTIME]ontheprojector.(→ page 161)
2. Useacomputertosavedigitalcerticates(les)forWPA-EAPorWPA2-EAPsettingtoyourUSBmemory
device.
After completing saving the file, remove the USB memory device from the computer.
Important:
• TheleformatsofdigitalcerticatethataresupportedbytheprojectorareDERandPKCS#12only.
• Theprojectorcannothandleanydigitalcerticatewhoselesizeexceeds8KB.
• CRL(CerticateRelocationList)isnotsupported.
• Clientcerticatechainisnotsupported.
3. PlugtheUSBmemorydeviceintotheUSBportoftheprojector.
Setting Procedures
1. Select[NETWORKSETTINGS]→[WIRELESSLAN].
2. SetitemssuchasPROFILES,DHCP,IPADDRESS,SUBNETMASKandothersasrequired.
• Select[PROFILE1]or[PROFILE2]for[PROFILES].If[EASYCONNECTION]isselected,WPA-PSK,WPA2-
PSK, WPA-EAP, or WPA2-EAP is not available.
3. Select[ADVANCED]andpresstheENTERbutton.
The [ADVANCED] setting screen will be displayed.
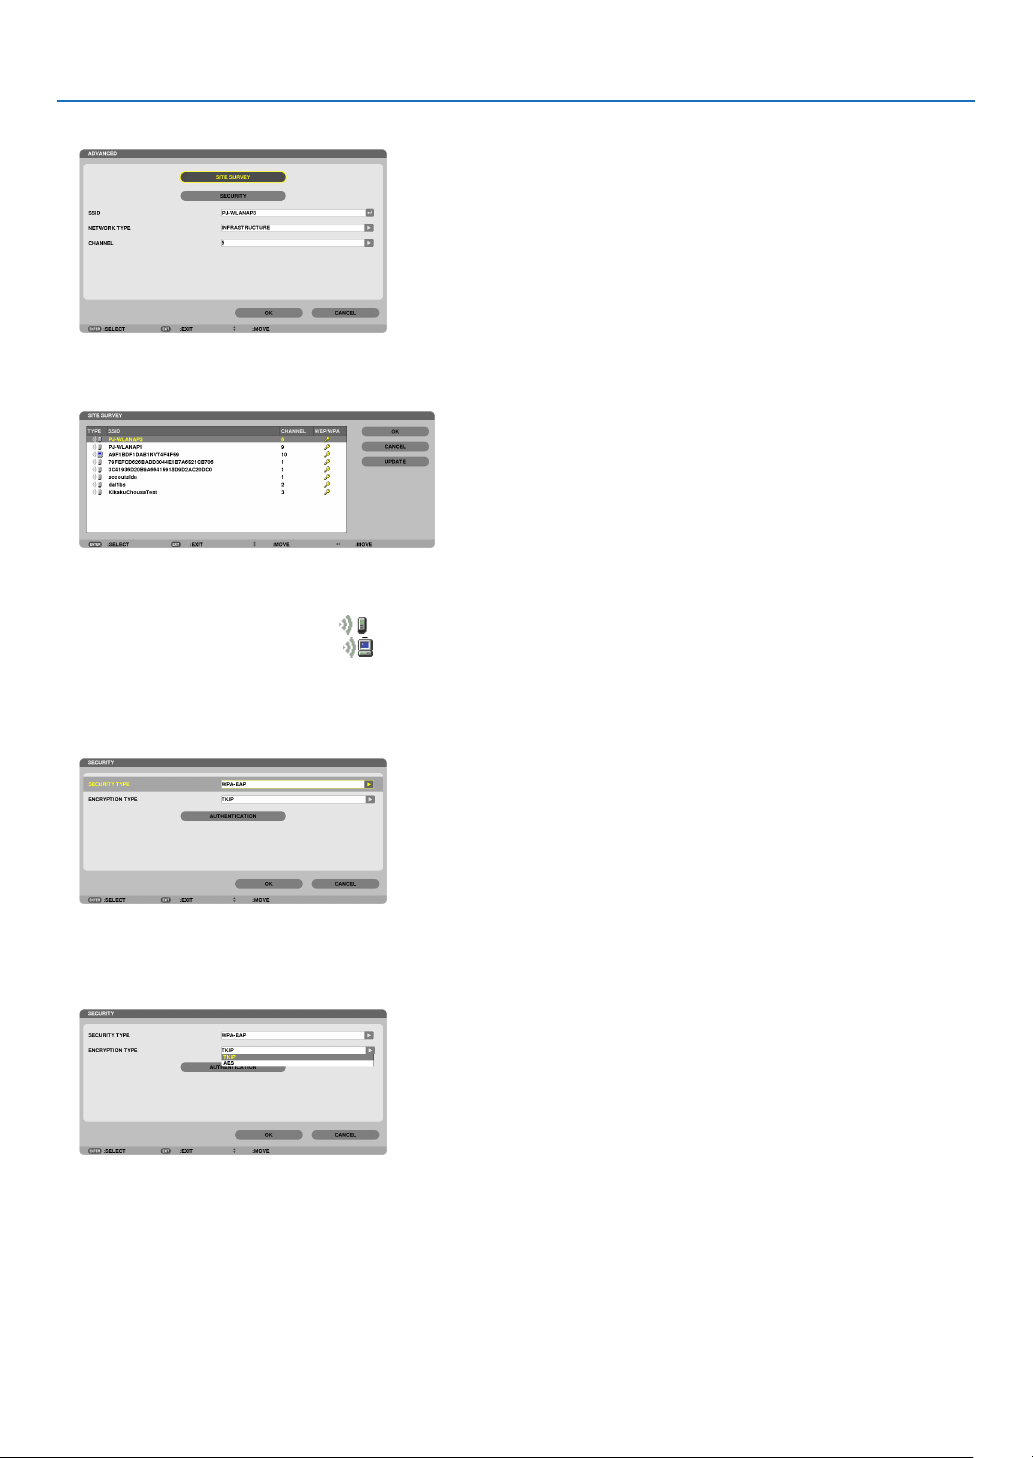
147
5. Using On-Screen Menu
4. Select[SITESURVEY]andpresstheENTERbutton.
The“SSID”listwillbedisplayed.
5. SelectaconnectingSSID,andthenselect[OK].
Finally press the ENTER button.
• SelecttheSSIDforwhichWPA-PSKorWPA2-PSKisset.
• Select[INFRASTRUCTURE( )] for [NETWORK TYPE]. WPA-PSK, WPA2-PSK, WPA-EAP, or WPA2-EAP is
not available when [AD HOC ( )] is selected.
6. Selectthe[SECURITY]tab.
The[SECURITY]pagewillbedisplayed.
7. Selectthe[SECURITYTYPE]eldandpresstheENTERbutton.
The pull-down list will be displayed.
8. Select[WPA-EAP]or[WPA2-EAP]andpresstheENTERbutton.
9. Selectthe[TKIP/AES]eldandpresstheENTERbutton.
The pull-down list will be displayed.
10
.Select[TKIP]or[AES]andpresstheENTERbutton.
Select[TKIP]or[AES]accordingtothesettingforyouraccesspoint.
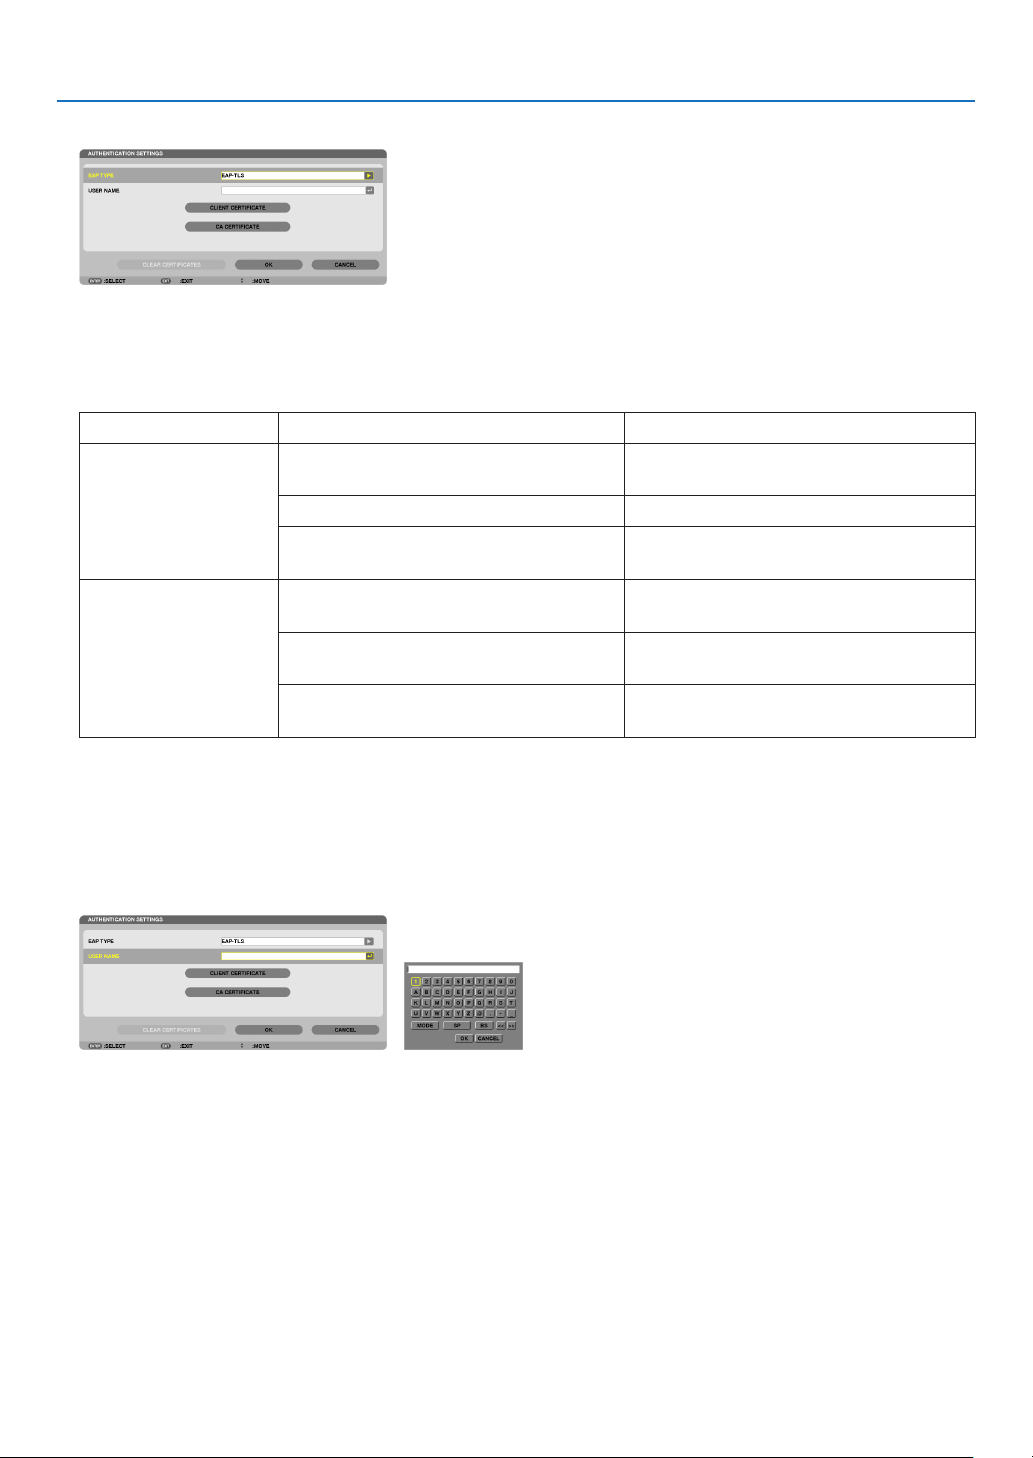
148
5. Using On-Screen Menu
11
.Selectthe[AUTHENTICATION]tab.
The[AUTHENTICATION]pagewillbedisplayed.
Select either [EAP-TLS] or [PEAP-MSCHAPv2] for [EAP TYPE]. The setting items vary depending on the EAP type.
See the table below.
EAPType SettingItem Note
EAP-TLS
UserName 1characterormoreand32charactersor
less
ClientCerticate PKCS#12formatle
CACerticate
(Certicateauthority’scerticate)
DERformatle
PEAP-MSCHAPv2 UserName 1characterormoreand32charactersor
less
Password
1characterormoreand32charactersor
less
CACerticate
(Certicateauthority’scerticate)
DERformatle
①Selecting[EAP-TLS]for[EAPTYPE]:
The following section explains the operation for selecting [EAP-TLS].
For selecting [PEAP-MSCHAPv2], go on to Step 12 on page 150.
12.
Selectthe[USERNAME]eldandpresstheENTERbutton.
The character entry screen (software keyboard) will be displayed. Set a user name.
• Ausernamemustbe1characterormoreand32charactersorless.
(→ page 152)

149
5. Using On-Screen Menu
13.
Select[CLIENTCERTIFICATE]andpresstheENTERbutton.
A list of files (thumbnail screen) will be displayed.
• Foroperatingthethumbnailscreen,see“4.UsingtheViewer”inthe“User’sManual”(PDF).
• Toreturntothe[AUTHENTICATION]page,presstheEXITbutton.
NOTE:
Installing a digital certificate
Youcaninstalleachdigitalcerticate(clientcerticateandCAcerticate)for[PROFILE1(or2)]onale-by-lebasis.
• InstallarootCAcerticateforaCAcerticate.
• Ifyouinstalladigitalcerticateoveryourexistingdigitalcerticate,theexistingdigitalcerticatewillbeoverwrittenwiththenew
digitalcerticate.
• Onceadigitalcerticatehasbeeninstalled,itsinformationcannotbedeletedevenifyoustopsettingWPA-EAPorWPA2-EAP.
14.
Onthethumbnailscreen,selectadigitalcerticate(PKCS#12formatle)savedinyourUSBmemorydevice
andpresstheENTERbutton.
The password screen will be displayed.
15.
Select[PASSWORD]eldandpresstheENTERbutton.
The character entry screen (software keyboard) will be displayed. Set the password of the private key. A password
must be 1 character or more and 32 characters or less.
The selected digital certificate file will be installed on the projector.
• WhentherootCAcerticateisnotincludedinthelethatwasselectedinStep14,proceedtoStep16.When
the root certification authority certificate is included, proceed to Step 18.
16.Select[CACERTIFICATE]andpresstheENTERbutton.
The drive list screen will be displayed.
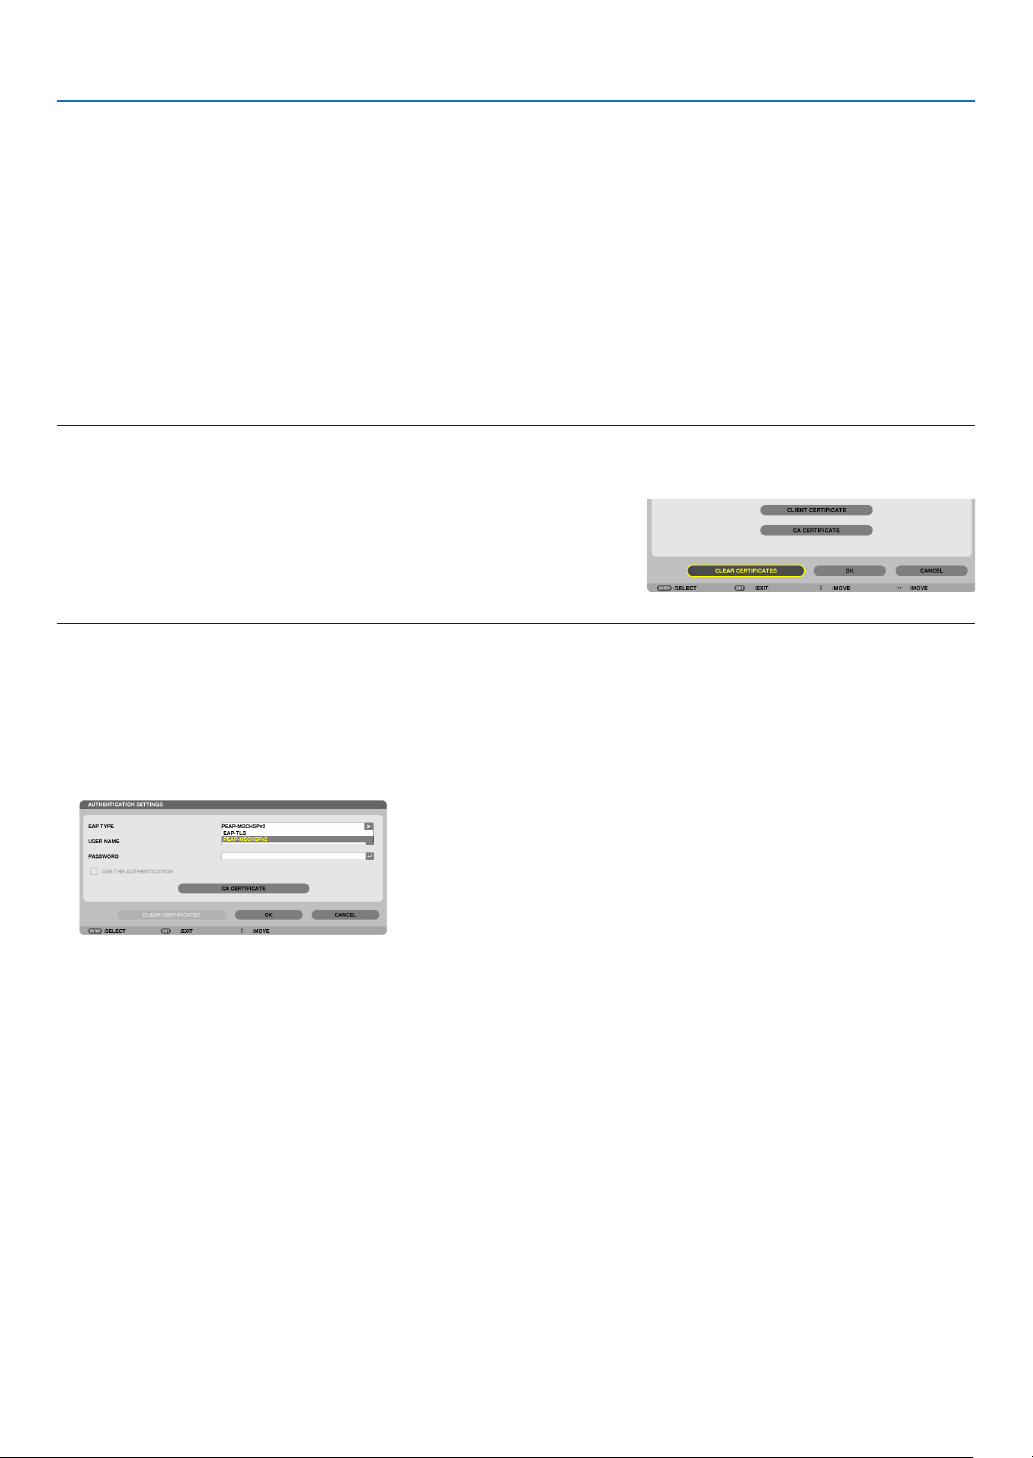
150
5. Using On-Screen Menu
17.
Onthethumbnailscreen,selectadigitalcerticate(DERformatle)savedinyourUSBmemorydevice
andpresstheENTERbutton.
• SelectyourrootCAcerticatehere.
The selected digital certificate will be installed on the projector.
18.
Aftercompletingrequiredsettings,select[OK]andpresstheENTERbutton.
The[WIRELESS]pagewillbereturned.
19.
Select[RECONNECT]andpresstheENTERbutton.
20.
Select[OK]andpresstheENTERbutton.
Thiswillcompletesetting[EAP-TLS]for[EAPTYPE]in[WPA-EAP]or[WPA2-EAP].
TIP:
Clearing the digital certificate that is installed on the projector
Toclearthedigitalcerticateinstalledontheprojector,followthestepsbelow.
Bydoingthefollowingprocedure,allthedigitalcerticatesforthecurrentlydisplayedprolewillbecleared.
1. Select [CLEAR CERTIFICATES] in the bottom left of the [AD-
VANCED]settingscreenandpresstheENTERbutton.
A message for confirmation will be displayed.
2. Select[YES]andpresstheENTERbutton.
The digital certificates will be cleared.
TIP:
• ThePKCS#12formatdigitalcerticateincludingaCAcerticatewillbeinstalledasarootCAcerticate.
②Selecting[PEAP-MSCHAPv2]for[EAPTYPE]:
12.
Fromthe[AUTHENTICATION]page,select[EAPTYPE]eldandpresstheENTERbutton.
The pull-down list will be displayed.
13.
Select[PEAP-MSCHAPv2]andpresstheENTERbutton.
14.
Select[USERNAME]eldandpresstheENTERbutton.
The character entry screen (software keyboard) will be displayed. Set a user name.
• Ausernamemustbe32charactersorless.
(→ page 152)
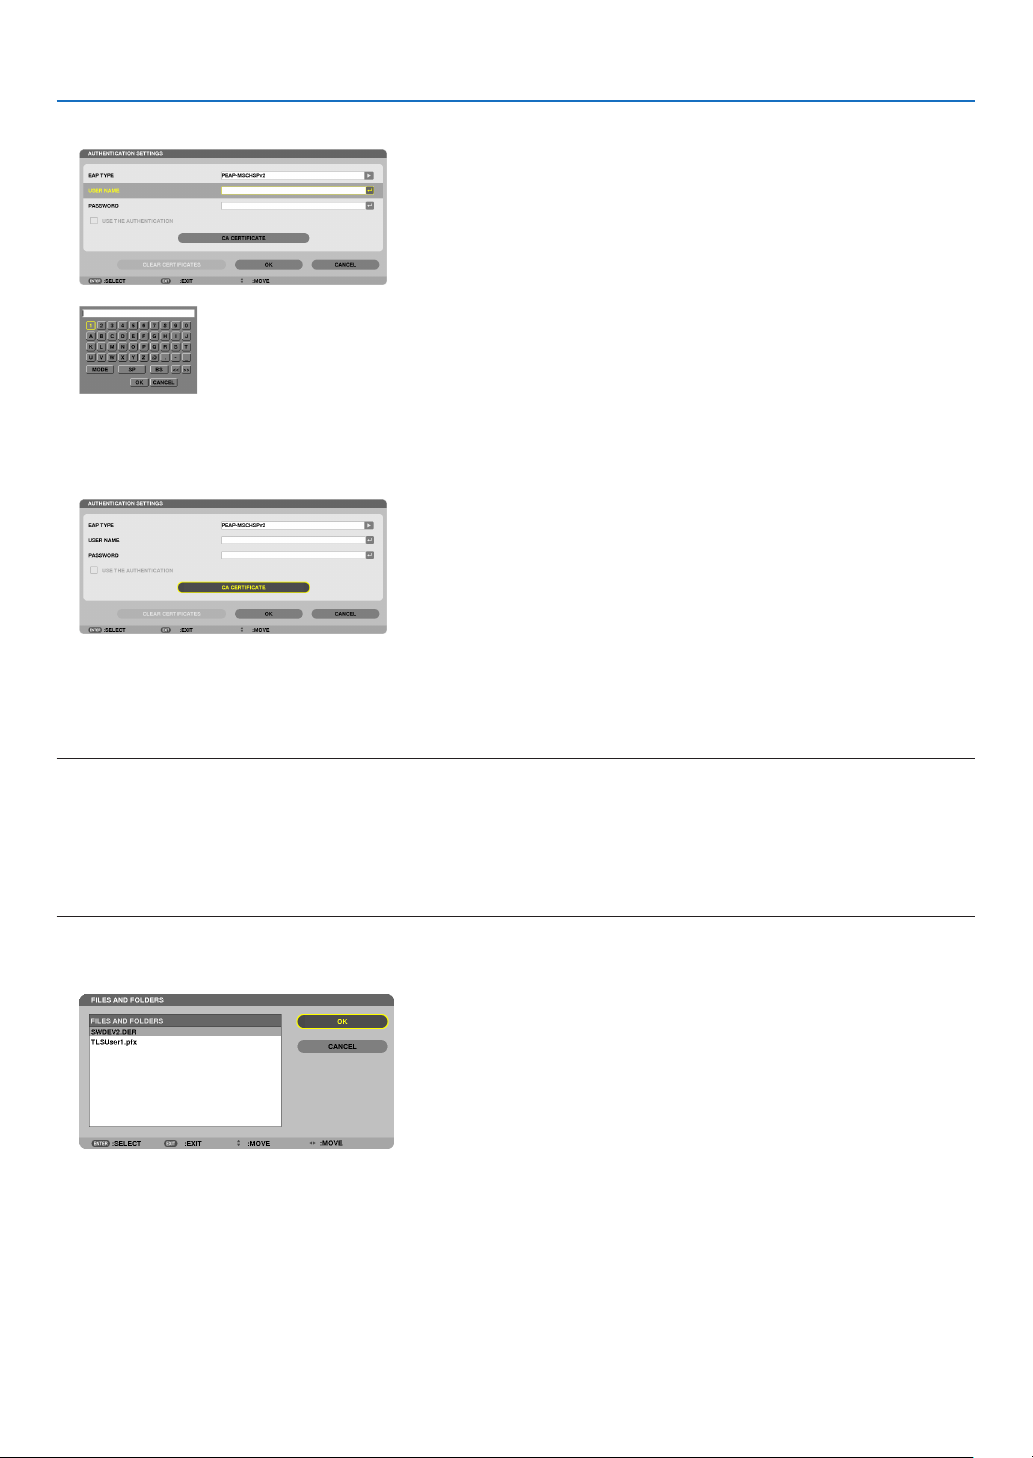
151
5. Using On-Screen Menu
15.
Aftercompletingsettingausername,selectthe[PASSWORD]eldandpresstheENTERbutton.
The character entry screen (software keyboard) will be displayed. Set a password.
• Apasswordmustbe32charactersorless.
16.
Aftercompletingsettingthepassword,select[CACERTIFICATE]eldandpresstheENTERbutton.
The drive list screen will be displayed.
• Foroperatingthethumbnailscreen,see“4.UsingtheViewer”inthe“User’sManual”(PDF).
• Toreturntothe[AUTHENTICATION]page,presstheEXITbutton.
NOTE:
Installing a digital certificate
Youcaninstalleachdigitalcerticate(clientcerticateandCAcerticate)for[PROFILE1(or2)]onale-by-lebasis.
• InstallarootCAcerticateforaCAcerticate.
• Ifyouinstalladigitalcerticateoveryourexistingdigitalcerticate,theexistingdigitalcerticatewillbeoverwrittenwiththenew
digitalcerticate.
• Onceadigitalcerticatehasbeeninstalled,itsinformationcannotbedeletedevenifyoustopsettingWPA-EAPorWPA2-EAP.
17.
Onthethumbnailscreen,selectadigitalcerticate(DERformatle)savedinyourUSBmemorydevice
andpresstheENTERbutton.
• SelectyourrootCAcerticatehere.
The selected digital certificate will be installed on the projector.
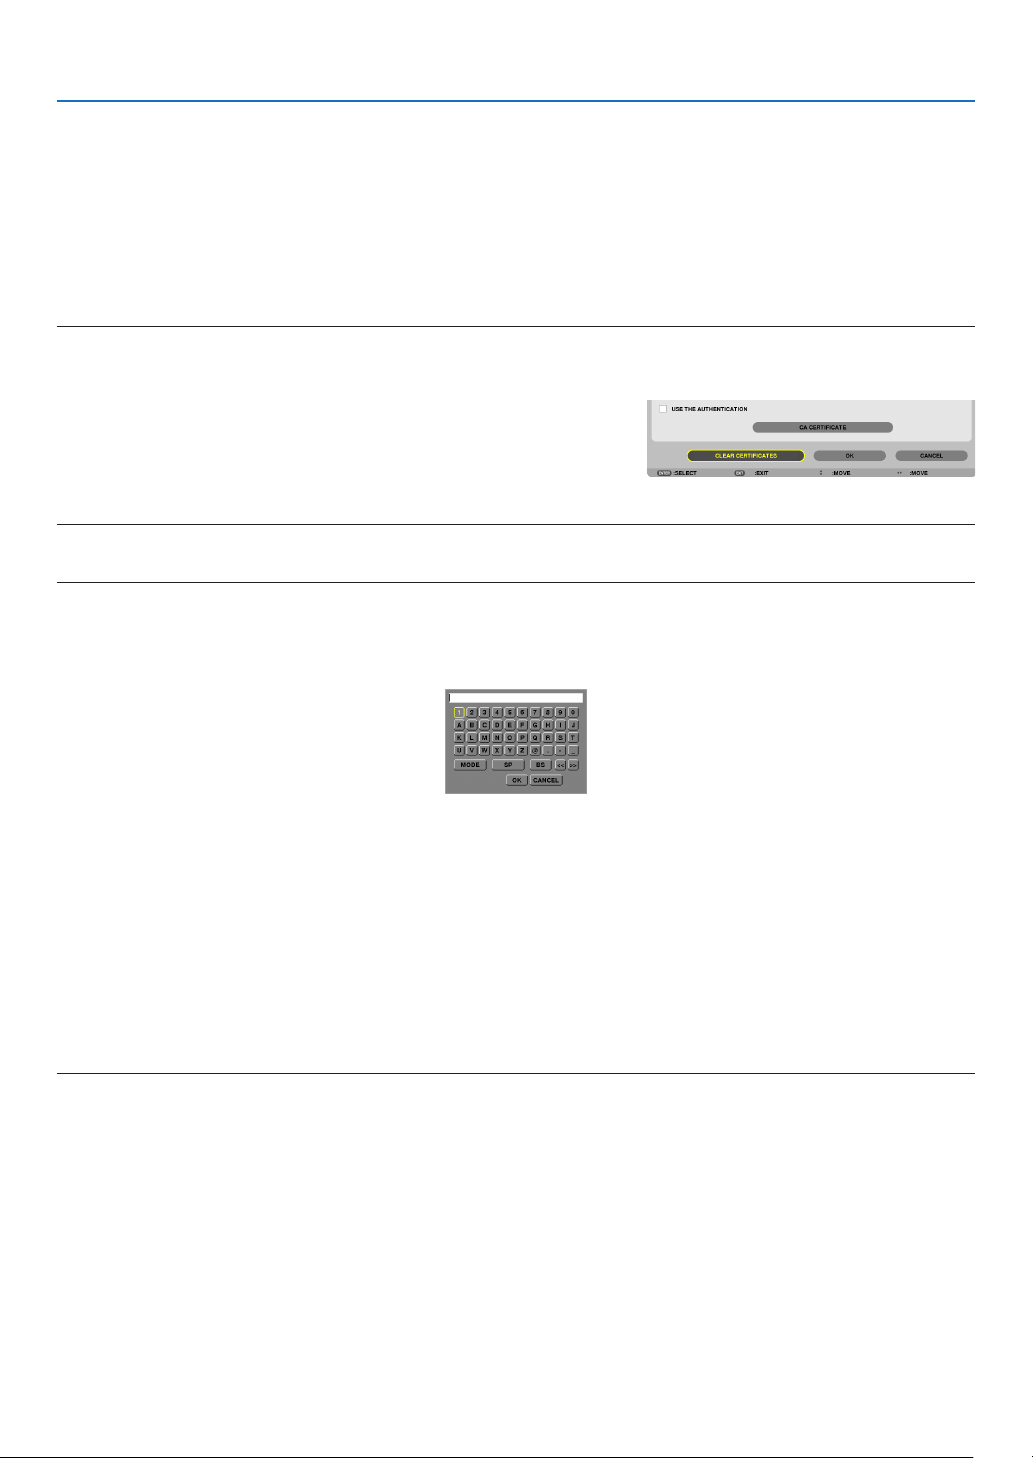
152
5. Using On-Screen Menu
18.
Aftercompletingrequiredsettings,select[OK]andpresstheENTERbutton.
The[WIRELESS]pagewillbereturned.
19.
Select[RECONNECT]andpresstheENTERbutton.
20.
Select[OK]andpresstheENTERbutton.
Thiswillcompletesetting[PEAP-MSCHAPv2]for[EAPTYPE]in[WPA-EAP]or[WPA2-EAP].
TIP:
Clearing the digital certificate that is installed on the projector
Toclearthedigitalcerticateinstalledontheprojector,followthestepsbelow.
Bydoingthefollowingprocedure,allthedigitalcerticatesforthecurrentlydisplayedprolewillbecleared.
1. Select [CLEAR CERTIFICATES] in the bottom left of the [AD-
VANCED]settingscreenandpresstheENTERbutton.
A message for confirmation will be displayed.
2. Select[YES]andpresstheENTERbutton.
The digital certificates will be cleared.
TIP:
EnteringWEPkeys(SwitchingbetweenAlphanumericcharactersandhexadecimal)
Toenterfrom[KEY1]to[KEY4],dothefollowing:
1. Selectoneof[KEY1],[KEY2],[KEY3]and[KEY4]andpresstheENTERbutton.
The character entry screen (software keyboard) will be displayed.
2. Use the ▼, ▲, ◀, or ▶buttontoselectacharacterandpresstheENTERbutton.
• ToenteraWEPkeyorpassphrase,usealphanumericcharacters(ASCII)orhexadecimal(HEX).ToenteraPSK
key,usealphanumericcharacters(ASCII).
• Pressthe[HEX]buttontochangeto[ASCII]tosetthekeyinASCIIdigit.Youcantogglethisbuttonbetween
[ASCII]and[HEX].
• Enter0x(numeralandalphabetrespectively)rightinfrontofyourkeycode.
• Hexadecimaluses0to9andAtoF.
3. AfterenteringyourWEPkeyorpassphrase,usethe▼, ▲, ◀, or ▶buttontoselect[OK]andpresstheENTER
button.
The character entry screen (software keyboard) will be closed.
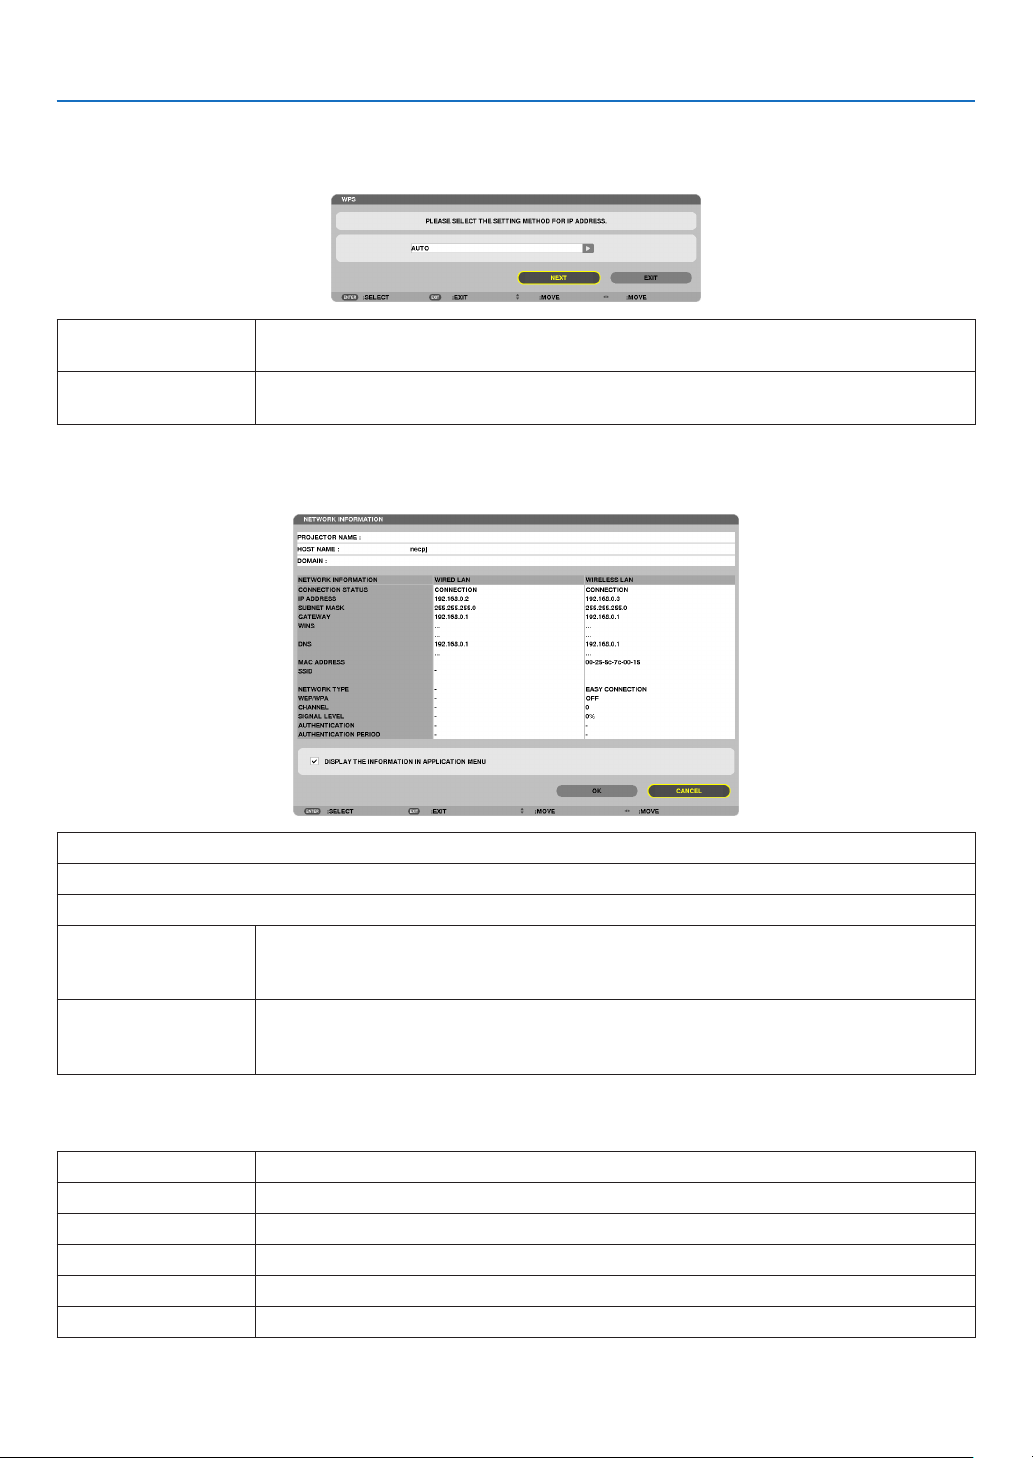
153
5. Using On-Screen Menu
WPS
WhenthewirelessLANaccesspointconnectedtotheprojectorsupportsWPS(Wi-FiProtectedSetupTM),youcan
usePINmethodorpushbuttonmethodtosetupthewirelessLANfortheprojector.
PINTYPE Seta4-digitor8digit-PINcodeofWPSforyouraccesspointtocompletesettingforthe
SSIDsecurity.
PUSHBUTTONTYPE Pressthededicatedbuttonoftheaccesspointandtheprojector’swirelessLANunitto
completesettingfortheSSIDsecurity.
NETWORKINFORMATION
Thefollowinginformationwillbedisplayedwhentheprojectorisconnectedtoanetwork(wiredLANorwirelessLAN).
PROJECTORNAME
HOSTNAME
DOMAIN
NETWORKINFOR-
MATION(WIRED
LAN/WIRELESSLAN)
CONNECTIONSTATUS,IPADDRESS,SUBNETMASK,GATEWAY,WINS,DNS,MAC
ADDRESS,SSID,NETWORKTYPE,WEP/WPA,CHANNEL,SIGNALLEVEL,AU-
THENTICATION,AUTHENTICATIONPERIOD
DISPLAYTHEINFOR-
MATIONINAPPLICA-
TIONMENU
Turnonoroffthedisplayofthenetworkinformation.
Themeaningsofthesestatusstatementsaredescribedbelow.
Statement Authenticationstatus
Authenticated Authenticationisdonecorrectly.
Failure Authenticationfailed.
Authenticating… Authenticationisinprocess.
Expired Thedigitalcerticateisexpired.Or[DATE,TIMEPRESET]isnotsetcorrectly.
TimeError The[DATE,TIMEPRESET]hasbeencleared.Setthecorrectdateandtime.
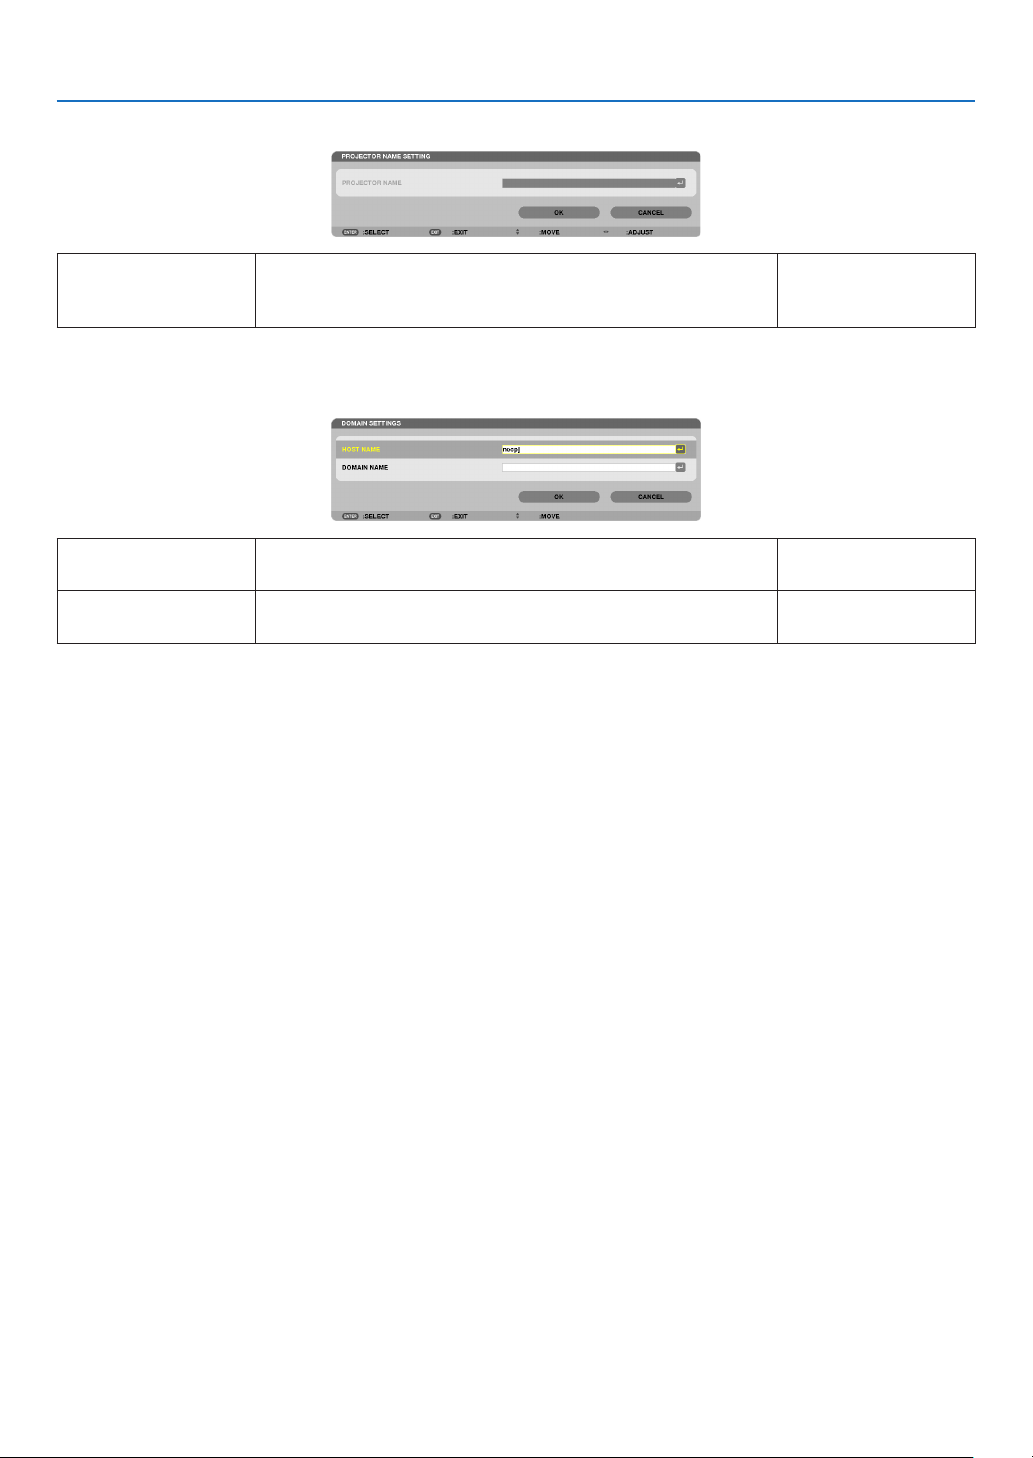
154
5. Using On-Screen Menu
PROJECTORNAME(ADVANCEDmenuonly)
PROJECTORNAME Setauniqueprojectorname. Upto16alphanu-
mericcharactersand
symbols
DOMAIN(ADVANCEDmenuonly)
Setahostnameanddomainnameoftheprojector.
HOSTNAME Setahostnameoftheprojector. Upto15alphanumeric
characters
DOMAINNAME Setadomainnameoftheprojector. Upto60alphanumeric
characters

155
5. Using On-Screen Menu
ALERTMAIL(ADVANCEDmenuonly)
ALERTMAIL Thisoptionwillnotifyyourcomputeroflampreplacetimeorerror
messagesviae-mailwhenusingwirelessorwiredLAN.
Placing a checkmark will turn on the Alert Mail feature�
Clearing a checkmark will turn off the Alert Mail feature�
Sample of a message to be sent from the projector:
Thelampandltersareattheendofitsusablelife.Please
replacethelampandlters.
ProjectorName:NECProjector
Lamp1HoursUsed:xxxx[H]
Lamp2HoursUsed:xxxx[H]
—
HOSTNAME Typeinahostname. Upto15alphanumeric
characters
DOMAINNAME Typeinadomainnameofthenetworkconnectedtotheprojector. Upto60alphanumeric
characters
SENDER'SAD-
DRESS
Specifythesender’saddress. Upto60alphanu-
mericcharactersand
symbols
SMTPSERVER
NAME
TypeintheSMTPservernametobeconnectedtotheprojector. Upto60alphanumeric
characters
RECIPIENT'SAD-
DRESS1,2,3
Typeinyourrecipient’saddress. Upto60alphanu-
mericcharactersand
symbols
TESTMAIL Sendatestmailtocheckifyoursettingsarecorrect.
NOTE:
• Ifyouenteredanincorrectaddressinatest,youmaynotreceivean
Alert mail. Should this happen,check ifthe Recipient’s Address is
correctly set.
• Unless any one of the [SENDER'S ADDRESS], [SMTP SERVER'S
NAME]or[RECIPIENT'SADDRESS1-3]isselected,[TESTMAIL]is
notavailable.
• Besuretohighlight[OK]andpresstheENTERbuttonbeforeexecuting
[TESTMAIL].
—
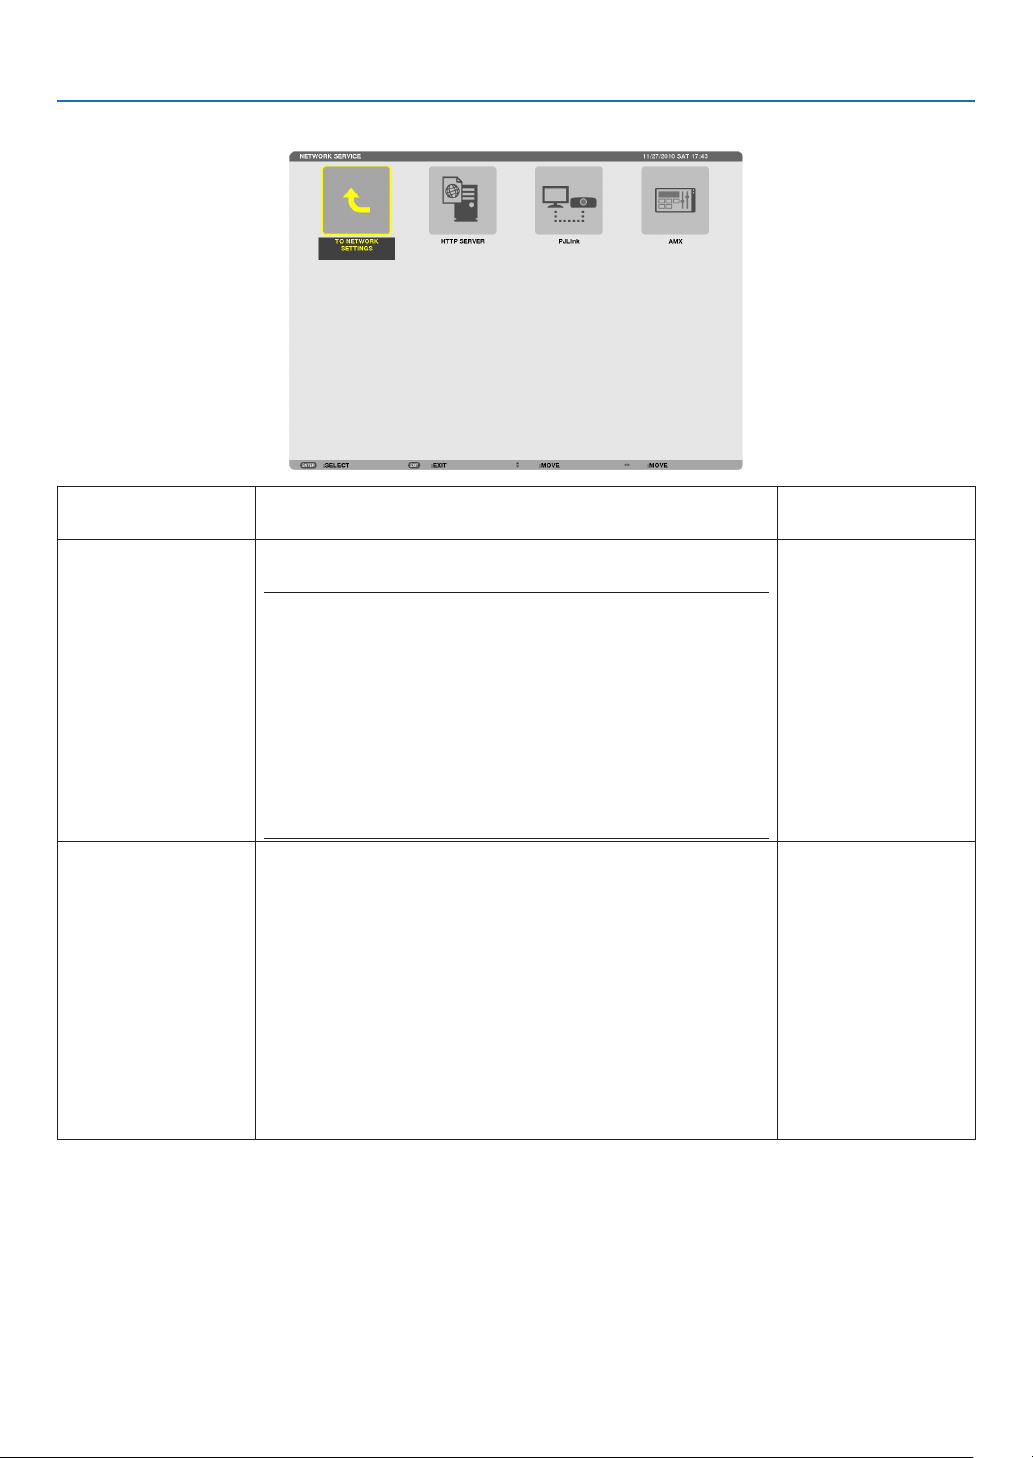
156
5. Using On-Screen Menu
NETWORKSERVICE(ADVANCEDmenuonly)
HTTPSERVER SetapasswordforyourHTTPserver. Upto10alphanumeric
characters
PJLink
Thisoptionallowsyoutoset a passwordwhen youuse the
PJLinkfeature.
NOTE:
• Donotforgetyourpassword.However,ifyouforgetyourpassword,
consult with your dealer.
• WhatisPJLink?
PJLinkisastandardizationofprotocolusedforcontrollingprojectors
of different manufacturers. This standard protocol is established by
JapanBusinessMachineandInformationSystemIndustriesAssocia-
tion(JBMIA)in2005.
TheprojectorsupportsallthecommandsofPJLinkClass1.
• SettingofPJLinkwillnotbeaffectedevenwhen[RESET]isdonefrom
the menu.
Upto32alphanumeric
characters
AMX
TurnonorofffordetectionfromAMXDeviceDiscoverywhen
connectingtothenetworksupportedbyAMX’sNetLinxcontrol
system.
TIP:
WhenusingadevicethatsupportsAMXDeviceDiscovery,allAMXNetLinx
controlsystemwillrecognizethedeviceanddownloadtheappropriate
DeviceDiscoveryModulefromanAMXserver.
Placing a checkmark will enable detecting the projector from AMX Device
Discovery�
Clearing a checkmark will disable detecting the projector from AMX
Device Discovery�
—
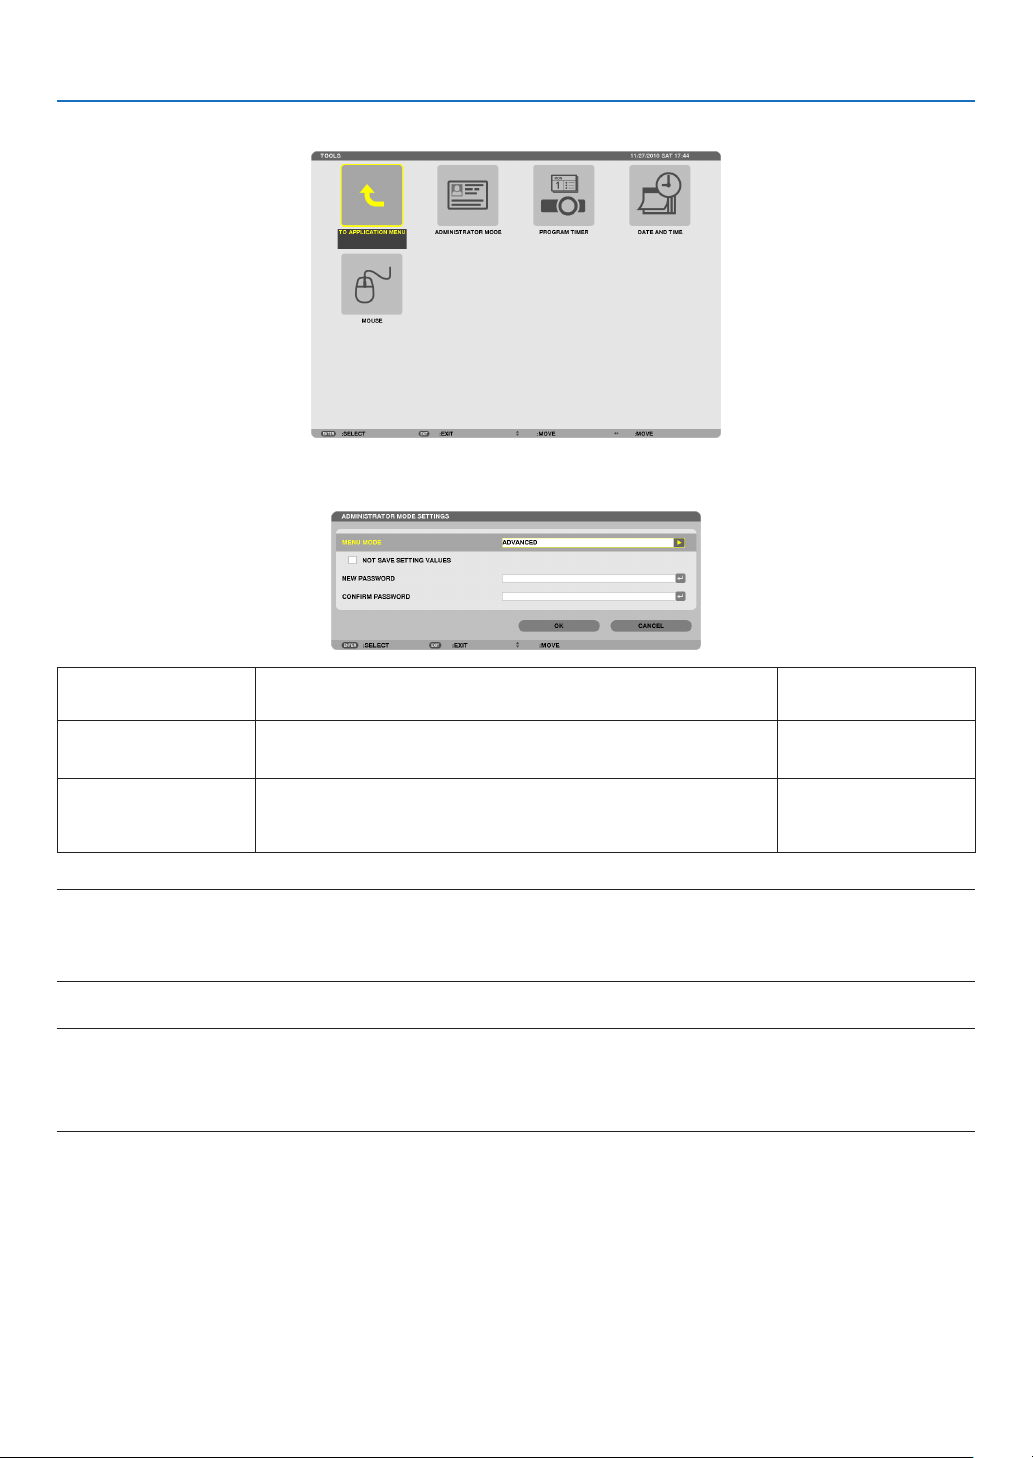
157
5. Using On-Screen Menu
TOOLS
ADMINISTRATOR MODE
ThisallowsyoutoselectMENUMODE,savesettings,andsetapasswordfortheadministratormode.
MENUMODE Selecteither[BASIC]or[ADVANCED]menu.
(→page101)
—
NOTSAVESETTING
VALUES
Placing a check mark will not save your projector settings�
Clear this check box to save your projector settings�
—
NEWPASSWORD/
CONFIRMPASS-
WORD
Assignapasswordfortheadministratormode. Upto10alphanumeric
characters
NOTE:
When[LAST]isselectedfor[DEFAULTSOURCESELECT],placingacheckmarkfor[NOTSAVESETTINGVALUES]willforcibly
selectNETWORKforsourceateverypower-ontime.
Toavoidthis,select[AUTO]for[DEFAULTSOURCESELECT]beforeplacingacheckmarkfor[NOTSAVESETTINGVALUES].
TIP:
ToreturntotheADVANCEDmenufromtheBASICmenu,dothefollowing:
1. UsetheSOURCEbuttononthecabinetorpresstheNETWORKbuttonontheremotecontroltoselect
[NETWORK]todisplaytheAPPLICATIONMENU.
2. Select[TOOLS]→[ADMINISTRATORMODE]→[MENUMODE]→[ADVANCEDMODE].
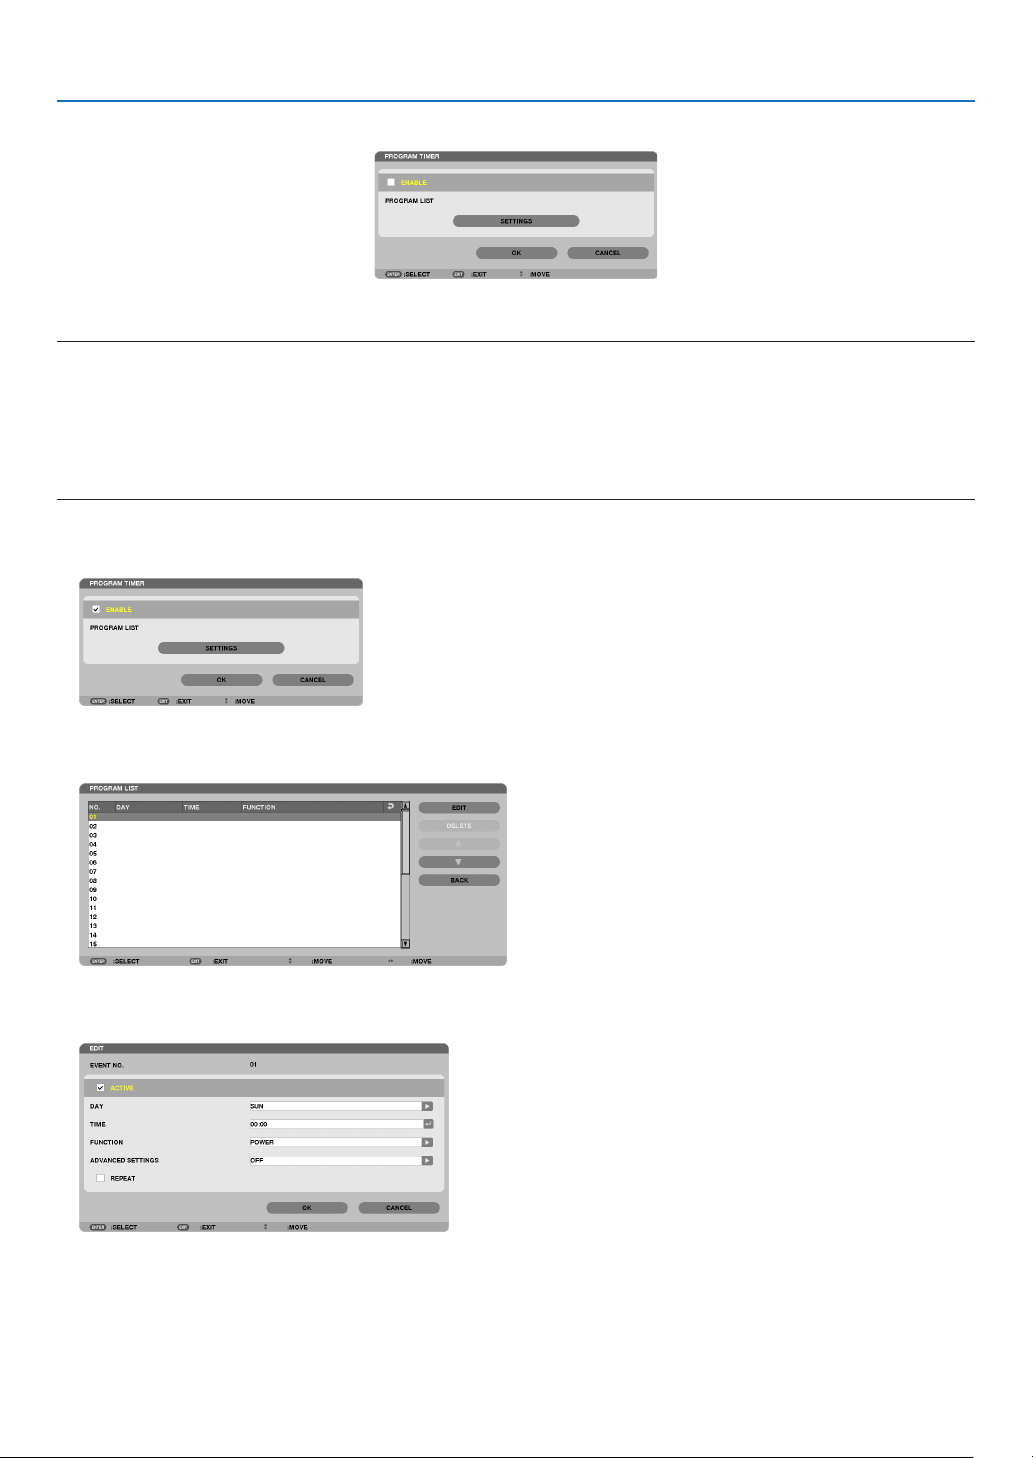
158
5. Using On-Screen Menu
PROGRAM TIMER
Thisoptionturnson/offtheprojectorandchangesvideosignals,andselectsECOmodeautomaticallyataspeciedtime.
NOTE:
• Beforeusing[PROGRAMTIMER],makesurethatthe[DATEANDTIME]featureisset.(→ page 161)
• MakesurethattheprojectorisinthestandbyconditionwiththePOWERcordconnected.
• Theprojectorhasabuilt-inclock.Theclockwillkeepworkingforabouttwoweeksafterthemainpoweristurnedoff.Ifthemain
powerisnotsuppliedtotheprojectorfortwoweeksormore,thebuilt-inclockstopsworking.
• When[PROGRAMTIMER]isenabled,the[STANDBYMODE]settingbecomesinvalid.
Thismeansthattheprojectorisinthesameconditionwhenthe[NORMAL]isselectedfor[STANDBYMODE].
Setting a new program timer
1. OnthePROGRAMTIMERscreen,usethe▲ or ▼buttontoselect[SETTINGS]andpresstheENTERbutton.
The[PROGRAMLIST]screenwillbedisplayed.
2. SelectablankprogramnumberandpresstheENTERbutton.
The[EDIT]screenwillbedisplayed.
3. Makesettingsforeachitemasrequired.
ACTIVE ������������������ Place a check mark to enable the program�
DAY ������������������������ Select days of the week for the program timer� To execute the program from Monday to Friday, select [MON-
FRI]�To execute the program in everyday basis, select [EVERYDAY]�
TIME ���������������������� Set the time to execute the program� Enter time in 24-hour format�
FUNCTION ������������� Select a function to be executed� Selecting [POWER] will allow you to turn on or off the projector by setting

159
5. Using On-Screen Menu
[ADVANCED SETTINGS]� Selecting [SOURCE] will allow you to select a video source by setting [ADVANCED
SETTINGS]� Selecting [ECO MODE] will allow you to select [ECO MODE] by setting [ADVANCED SETTINGS]�
ADVANCED SETTINGS
������������������������������ Select power on/off, a type of video source, or ECO MODE for the selected item in [FUNCTION]�
REPEAT ������������������ Place a check mark to repeat the program continuing basis� To use the program this week only, clear the
check mark�
4. Select[OK]andpresstheENTERbutton.
This will complete the settings.
Youwillbereturnedtothe[PROGRAMLIST]screen.
5. Select[BACK]andpresstheENTERbutton.
Youwillbereturnedtothe[PROGRAMTIMER]screen.
6. Select[OK]andpresstheENTERbutton.
You will be returned to the [TOOLS] screen.
NOTE:
• Upto30differenttimersettingscanbeprogrammed.
• When[PROGRAMTIMER]isturnedon,the[STANDBYMODE]settingisignored.
• TheProgramTimerisexecutedonasettimebasis,notinaprogrambasis.
• Oncetheprogramnotmarkedwithacheckin[REPEAT]hasbeenexecuted,thecheckmarkinthe[ACTIVE]checkboxwillbe
cleared automatically and the program will be disabled.
• Whentheon-timeandtheoff-timesetforthesametime,theoff-timesettingwilltakepreference.
• Twodifferentsourcesaresetforthesametime,thelargerprogramnumberwilltakepreference.
• Theon-timesettingwillnotbeexecutedwhilethecoolingfansarerunningoranerrorisoccurring.
• Iftheoff-timesettingisexpiredundertheconditioninwhichthepoweroffisnotpossible,theoff-timersettingwillnotbeexecuted
until the power off becomes possible.
• Programsnotmarkedwithacheckmarkin[ACTIVE]ofthe[EDIT]screenwillnotbeexecutedeveniftheProgramTimeris
enabled.
• Whentheprojectoristurnedonbyusingtheprogramtimerandifyouwanttoturnofftheprojector,settheoff-timeordoit
manuallysoasnottoleavetheprojectoronforalongperiodoftime.

160
5. Using On-Screen Menu
Activating the program timer
1. Select[ENABLE]onthe[PROGRAMTIMER]screenandpresstheENTERbutton.
The [ENABLE] will be activated.
2. Select[OK]andpresstheENTERbutton.
The[PROGRAMTIMER]screenwillbechangedtothe[TOOL]screen.
NOTE:
• Clearing[ENABLE]willdisabletheProgramTimerevenwhenaprogramismarkedwithacheckmarkon[PROGRAMLIST]screen.
• When[ENABLE]isselected,the[PROGRAMLIST]cannotbeedited.Toedittheprograms,select[ENABLE]toturnofftheProgram
Timer.
Changing the programmed settings
1. Onthe[PROGRAMLIST]screen,selectaprogramyouwanttoeditandpresstheENTERbutton.
2. Changethesettingsonthe[EDIT]screen.
3. Select[OK]andpresstheENTERbutton.
The programmed settings will be changed.
Youwillbereturnedtothe[PROGRAMLIST]screen.
Changing the order of programs
1. Onthe[PROGRAMLIST]screen,selectaprogramwhoseorderyouwanttochangeandpressthe▶ button.
2. Press the ▼ button to select ▲ or ▼.
3. PresstheENTERbuttonafewtimestoselectarowtowhichyouwishtomovetheprogram.
The order of the programs will be changed.
Deleting the programs
1. Onthe[PROGRAMLIST]screen,selectaprogramnumberyouwanttodeleteandpressthe▶ button.
2. Press the ▼buttontoselect[DELETE].
3. PresstheENTERbutton.
The confirmation screen will be displayed.
4. Select[YES]andpresstheENTERbutton.
The program will be deleted.
This will complete deleting the program.

161
5. Using On-Screen Menu
DATE AND TIME
Youcansetthecurrenttime,month,date,andyear.
NOTE:Theprojectorhasabuilt-inclock.Theclockwillkeepworkingforabout2weeksafterthemainpoweristurnedoff.Ifthe
mainpowerisofffor2weeksormore,thebuilt-inclockwillcease.Ifthebuilt-inclockceases,setthedateandtimeagain.The
built-inclockwillnotceasewhileinthestandbymode.
TIMEZONESETTINGS �������������� Select your time zone�
DATE AND TIME SETTINGS ������ Set your current date (MM/DD/YYYY) and time (HH:MM)�
INTERNET TIME SERVER ��������� If you place a check mark, the projector’s built-in clock will be synchronized with an Internet
time server in every 24 hours and at the time of projector’s startup�
UPDATE ������������������������������������ Synchronizes the projector’s built-in clock immediately� The UPDATE button is not available
unless the INTERNET TIME SERVER check box is turned on�
SUMMER TIME SETTINGS ������� If you place a check mark, the clock for daylight saving will be enabled�
MOUSE
ThisoptionletsyoutochangeyourUSBmousesettings.ThemousesettingsfeatureisavailableforUSBmouseonly.
Choosethesettingsyouwant:
MOUSE BUTTON ���������������������� [RIGHT HAND] or [LEFT HAND]
MOUSE SENSITIVITY
��������������� [FAST], [MEDIUM] or [SLOW]
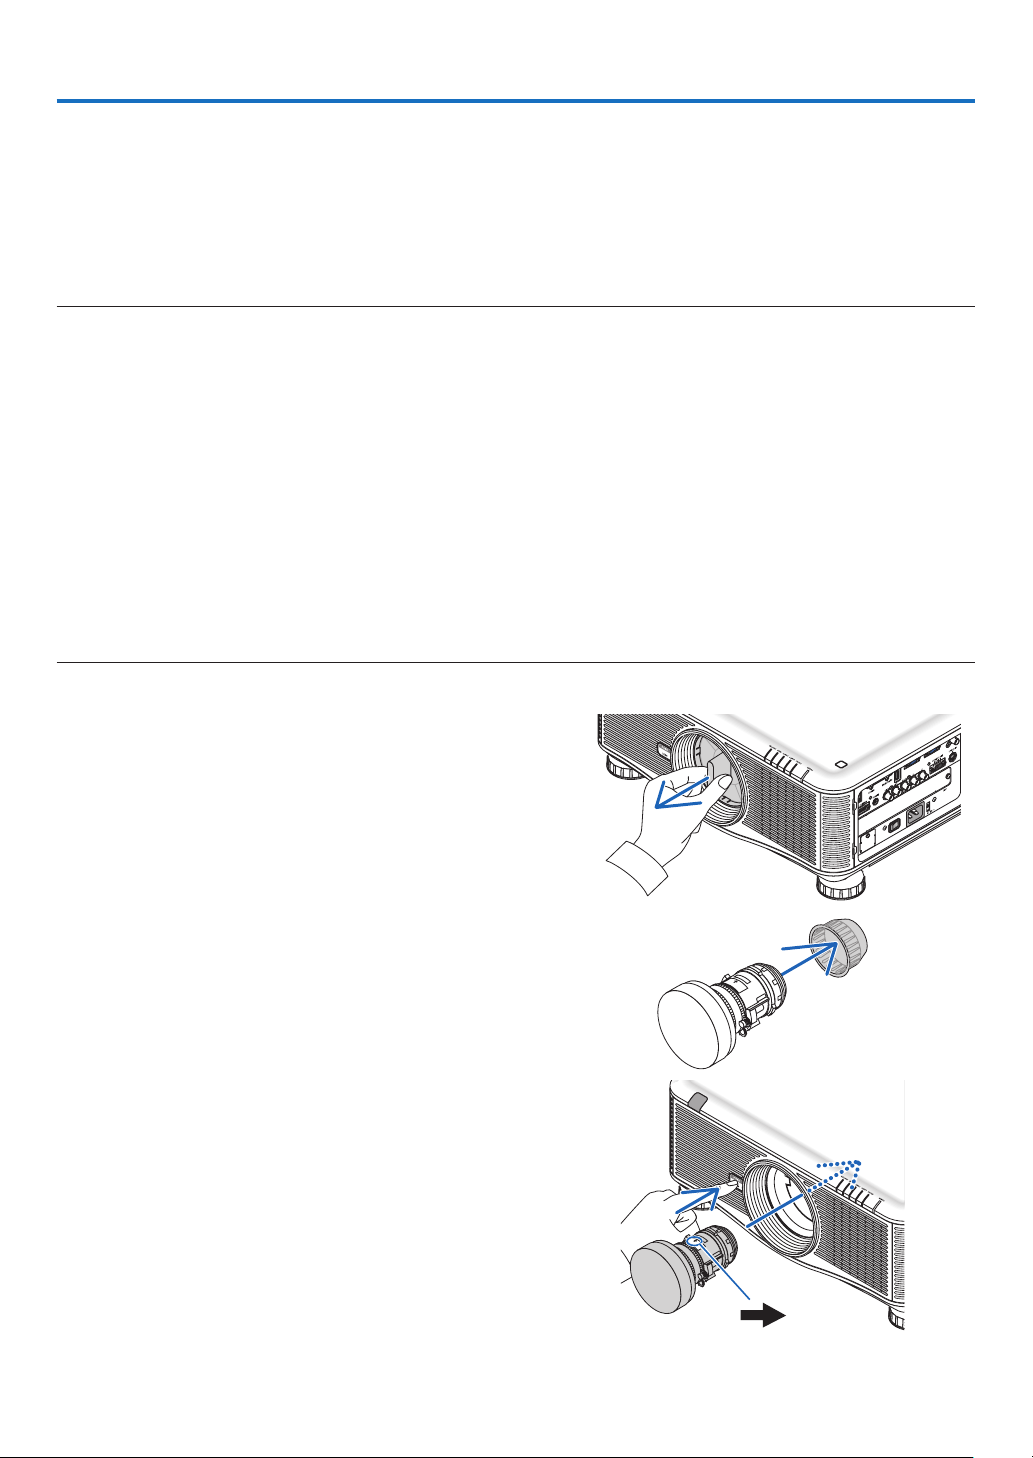
162
6. Connecting to Other Equipment
❶ Mounting a lens (sold separately)
Optionalbayonetstylelensescanbeusedwiththisprojector.ThedescriptionsherearefortheNP18ZL(1.3xzoom)
lensonthePX750U2.Mountotherlensesinthesamemanner.
Important:
• Besuretoperform[CALIBRATE]afterreplacementofthelens.(→page125)
NOTE:
• Theprojectorandlensesaremadeofprecisionparts.Donotsubjectthemtoshockorexcessiveforces.
• Removetheseparatelysoldlenswhenmovingtheprojector.Ifnot,thelenscouldbesubjecttoshockwhiletheprojectorisbeing
moved,damagingthelensandthelensshiftmechanism.
• Turnoffthepowerandwaitforthecoolingfantostopandturnoffthemainpowerswitchbeforemountingorremovingthelens.
• Whendismountingthelensfromtheprojector,returnthelenspositiontothehomepositionbeforeturningoffthepower.Failure
todosomaypreventthelensfrombeingmountedordismountedbecauseofnarrowspacebetweentheprojectorandthelens.
• Nevertouchthelenssurfacewhiletheprojectorisoperating.
• Beverycarefulnottoletdirt,grease,etc.,onthelenssurfaceandnottoscratchthelenssurface.
• Performtheseoperationsonaatsurfaceoverapieceofcloth,etc.,topreventthelensfromgettingscratched.
• Whenleavingthelensofftheprojectorforlongperiodsoftime,mountthedustcapontheprojectortopreventdustordirtfrom
getting inside.
• Ifyouhavemultipleprojectors,becarefulofthefollowing:
Thefollowinglensesdesignedexclusivelyforthisprojectorcannotmountedontoanotherprojector.
- PX750U2:NP16FL/NP17ZL/NP18ZL/NP19ZL/NP20ZL/NP21ZL/NP31ZL
- PX700W2/PX800X2:NP06FL/NP07ZL/NP08ZL/NP09ZL/NP10ZL/NP31ZL
Mounting the lens
1. Removethedustcapfromtheprojector.
2. Removethelenscaponthebackofthelens.
• ThelensNP18ZLisusedasanexample.
3. WhilepressingtheLENSbuttonontheprojector'sfront
panelfullyin,insertthelensontotheprojectorwiththe
arrowmarkinthelabelonthelensfacingupwards.
Insertthelensslowlyallthewayin,keepingthepositioning
slit at the same angle.
Arrow mark
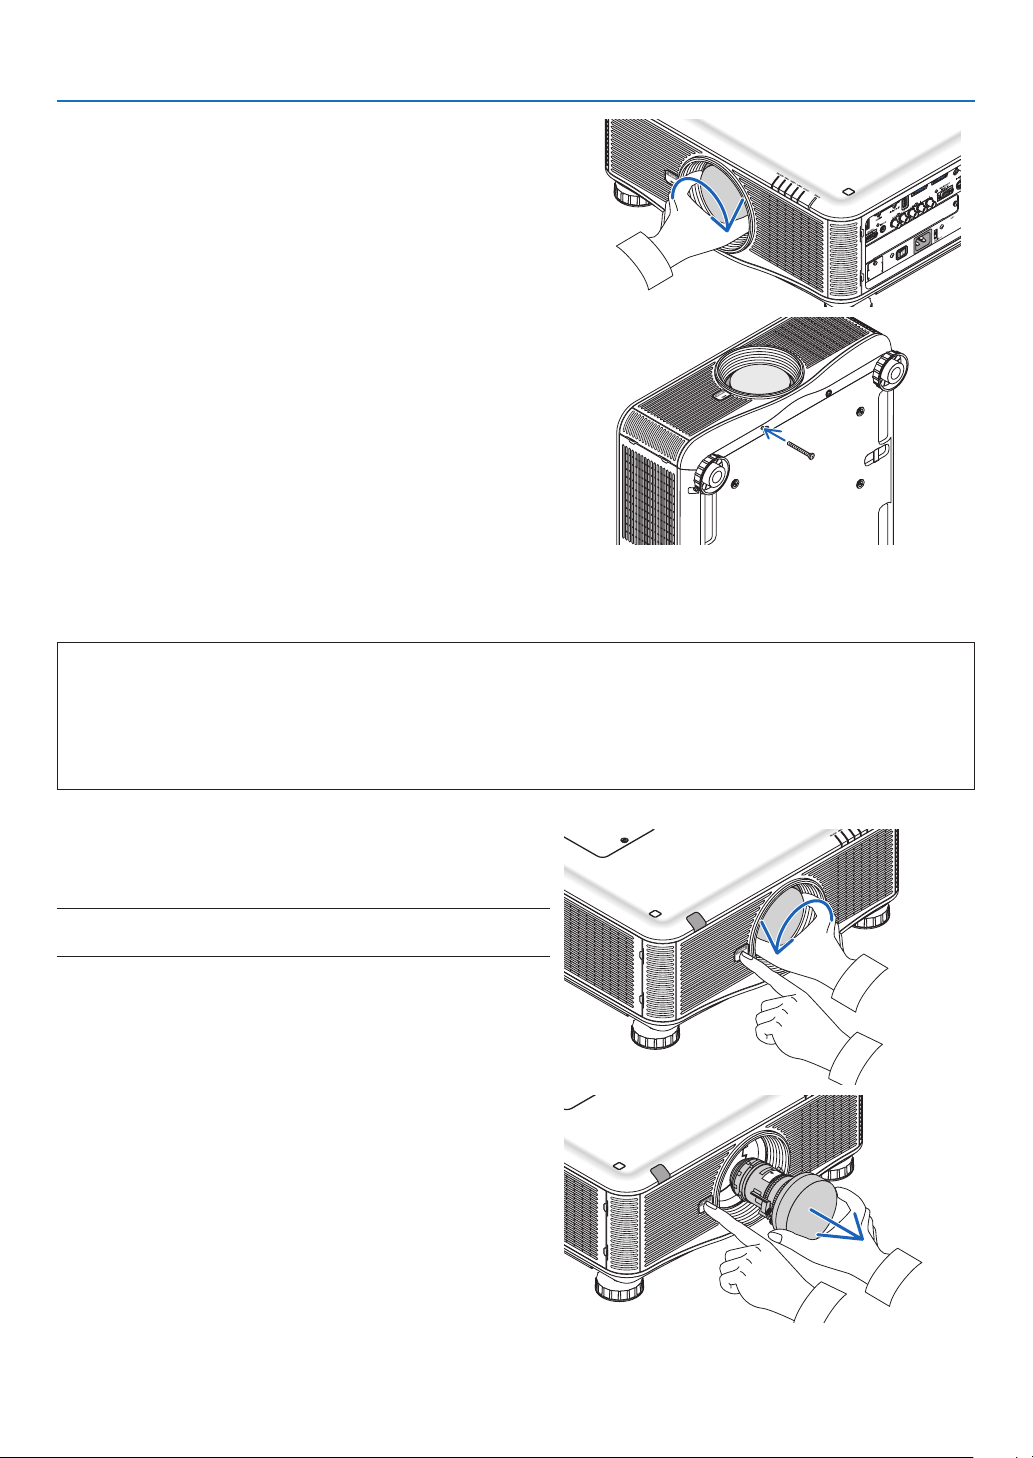
163
6. Installation and Connections
4. ReleasetheLENSbuttonandthen,turn.
Turn until a click is heard.
The lens is now fastened onto the projector.
TIP:Mountingthelenstheftpreventionscrew
Fastenthelenstheftpreventionscrewincludedwiththeprojectorto
thebottomoftheprojectorsothatthelenscannotberemovedeasily.
Removing the lens
Before removing the lens:
1. Turnontheprojectoranddisplayanimage.(→ page 17)
2. PressandholdtheSHUTTER/HOMEPOSITIONbuttonfor2seconds.
The lens position will be moved to the home position.
3. Turnofftheprojector,turnoffthemainpowerswitch,andthenunplugthepowercord.
4. Waituntiltheprojectorcabinetiscoolenoughtohandle.
1. WhilepressingtheLENSbuttonontheprojector’sfront
panelfullyin,turnthelenscounterclockwise.
The lens comes off.
NOTE:IfthelenscannotberemovedwhentheLENSbuttonispressed,
checkwhetherthelenstheftpreventionscrewismounted.
2. Afterslowlypullingthelensofftheprojector,releasethe
LENSbutton.
- After removing the lens, mount the lens caps (front and
back) included with the lens before storing the lens.
- Ifnolensisgoingtobemountedontheprojector,mount
the dust cap included with the projector.
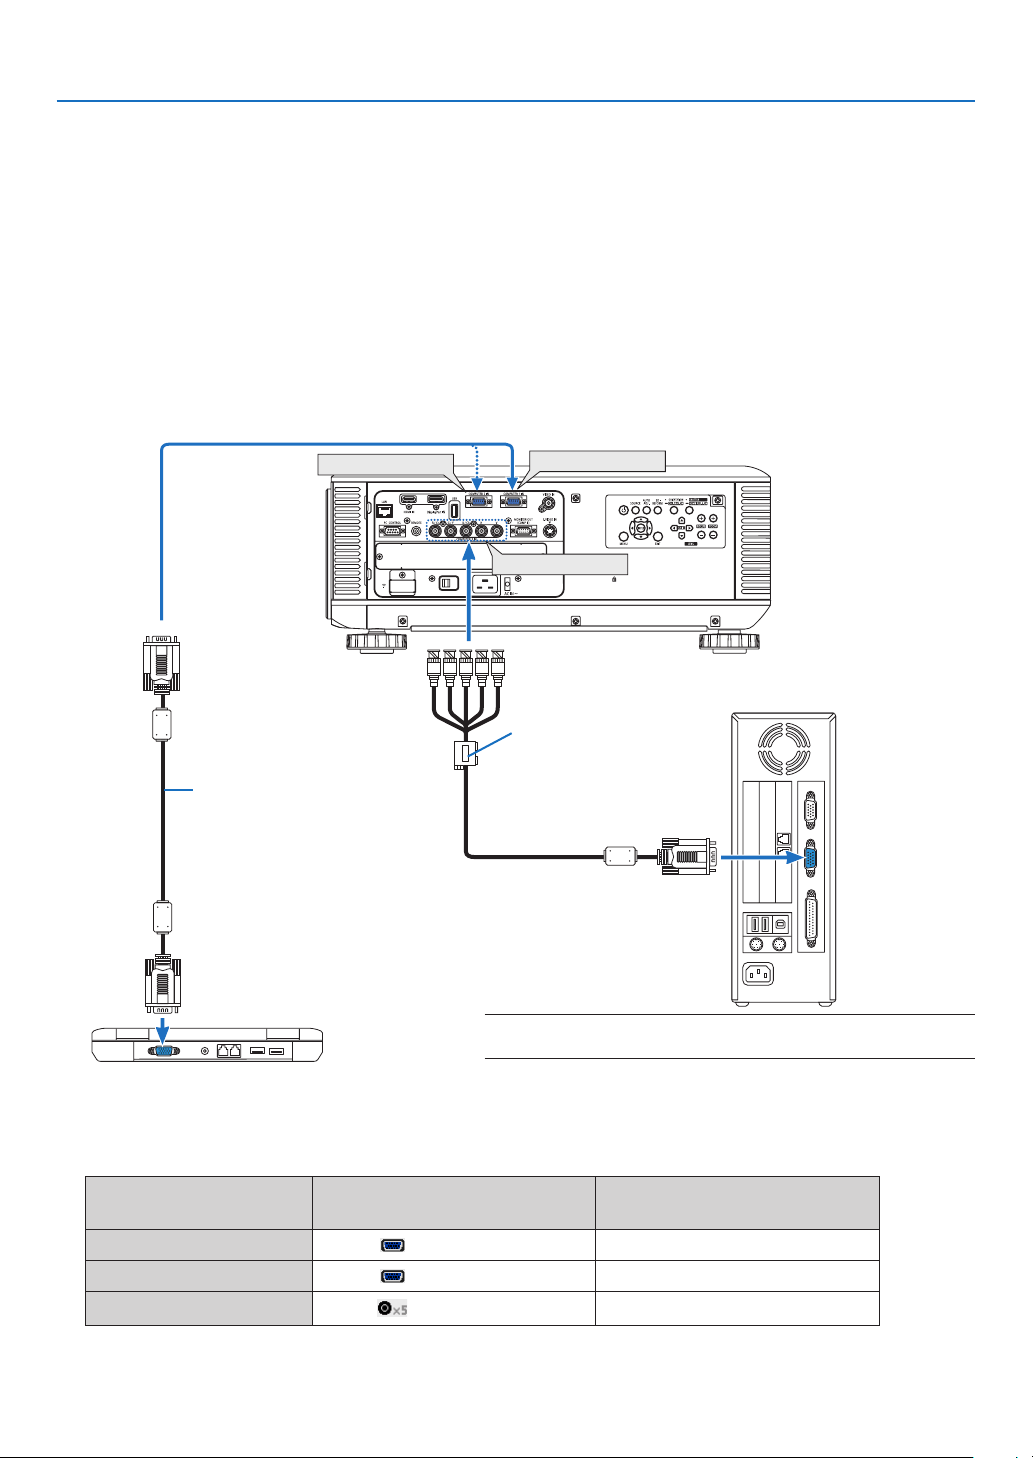
164
6. Installation and Connections
COMPUTER 2 IN
COMPUTER 3 IN
COMPUTER 1 IN
Computercable(VGA)(supplied)
To mini D-Sub 15-pin connector
ontheprojector.Itisrecommend-
ed that you use a commercially
available distribution amplifier if
connecting a signal cable longer
than the cable supplied.
NOTE:ForMacintosh,useacommerciallyavailablepinadapter(not
supplied)toconnecttoyourMac’svideoport.
RGB-to-BNCcable(not
supplied)
❷ Making Connections
Theprojectorcanbeconnectedtoacomputerusingthecomputercable,a5xBNCcable,HDMIcableorDisplayPort
cable.
Preparecommerciallyavailablecablesforconnection.
Analog RGB signal connection
• Connectthecomputercablebetweenthecomputer’sdisplayoutputconnector(miniD-Sub15-pin)andtheprojec-
tor’sComputer1orComputer2videoinputconnector.
• Whenconnectingthecomputer’sdisplayoutputconnector(miniD-Sub15-pin)andtheprojector’sComputer3
videoinputconnector,useaBNCcable(5-core)→miniD-Sub15-pinconvertercable.
• Tooutputaudiofromthecomputer,usecommerciallyavailableaudiosystem.
• Selectthesourcenameforitsappropriateinputconnectorafterturningontheprojector.
Inputconnector
SOURCEbuttonontheprojector
cabinet
Buttonontheremotecontrol
COMPUTER1IN COMPUTER1 COMPUTER1
COMPUTER2IN COMPUTER2 COMPUTER2
COMPUTER3IN
COMPUTER3
COMPUTER3
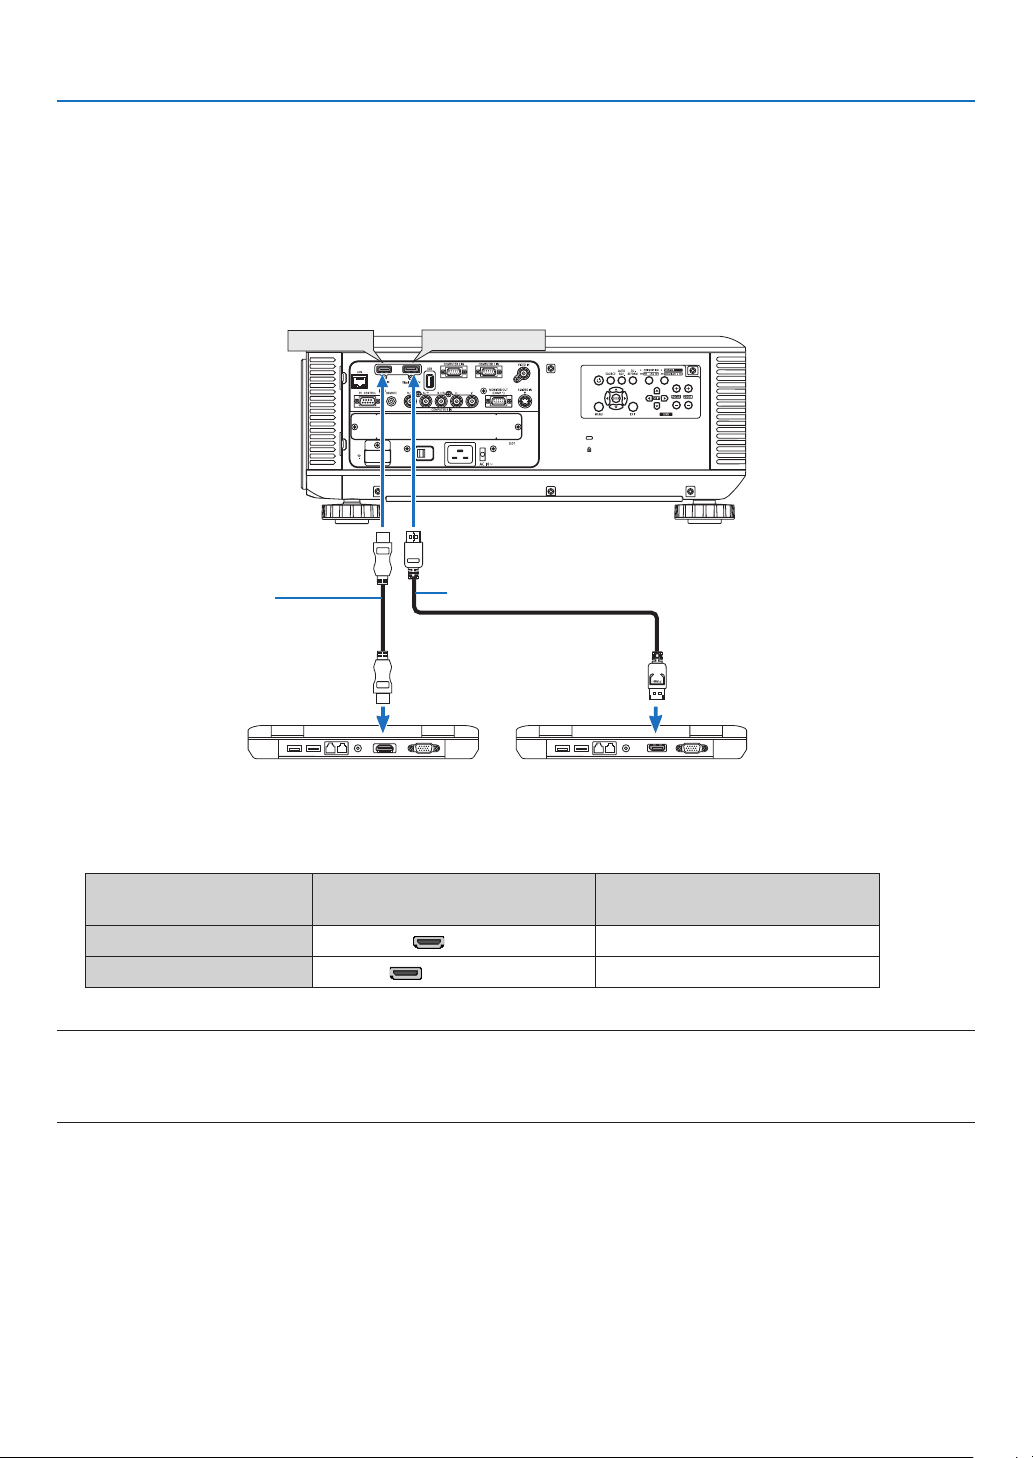
165
6. Installation and Connections
DisplayPort IN
HDMI IN
Digital RGB signal connection
• ConnectacommerciallyavailableHDMIcablebetweenthecomputer’sHDMIoutputconnectorandtheprojector’s
HDMIinputconnector.
• ConnectacommerciallyavailableDisplayPortcablebetweenthecomputer’sDisplayPortoutputconnectorand
theprojector’sDisplayPortinputconnector.
• Selectthesourcenameforitsappropriateinputconnectorafterturningontheprojector.
Inputconnector
SOURCEbuttonontheprojector
cabinet
Buttonontheremotecontrol
HDMIIN HDMI HDMI
DisplayPortIN DisplayPort DisplayPort
NOTE:
• Turnoffthepowerofthecomputerandprojectorbeforeconnecting.
• ThisprojectordoesnotsupportNECvideounit(modelISS-6020)videodecodedoutputs.
• Whenavideodeckisconnectedviaascanconverter,etc.,thedisplaymaynotbecorrectduringfast-forwardingandrewinding.
TIP
• TheComputer1andComputer2videoinputconnectorssupportWindowsPlugandPlay.TheComputer3videoinputconnector
doesnotsupportWindowsPlugandPlay.
• AMacintoshsignaladapter(commerciallyavailable)mayberequiredtoconnectaMacintoshcomputer.
ToconnectaMacintoshcomputerequippedwithaMiniDisplayPorttotheprojector,useacommerciallyavailableMiniDisplayPort
→DisplayPortconvertercable.
HDMIcable(notsupplied)
DisplayPort cable (not supplied)
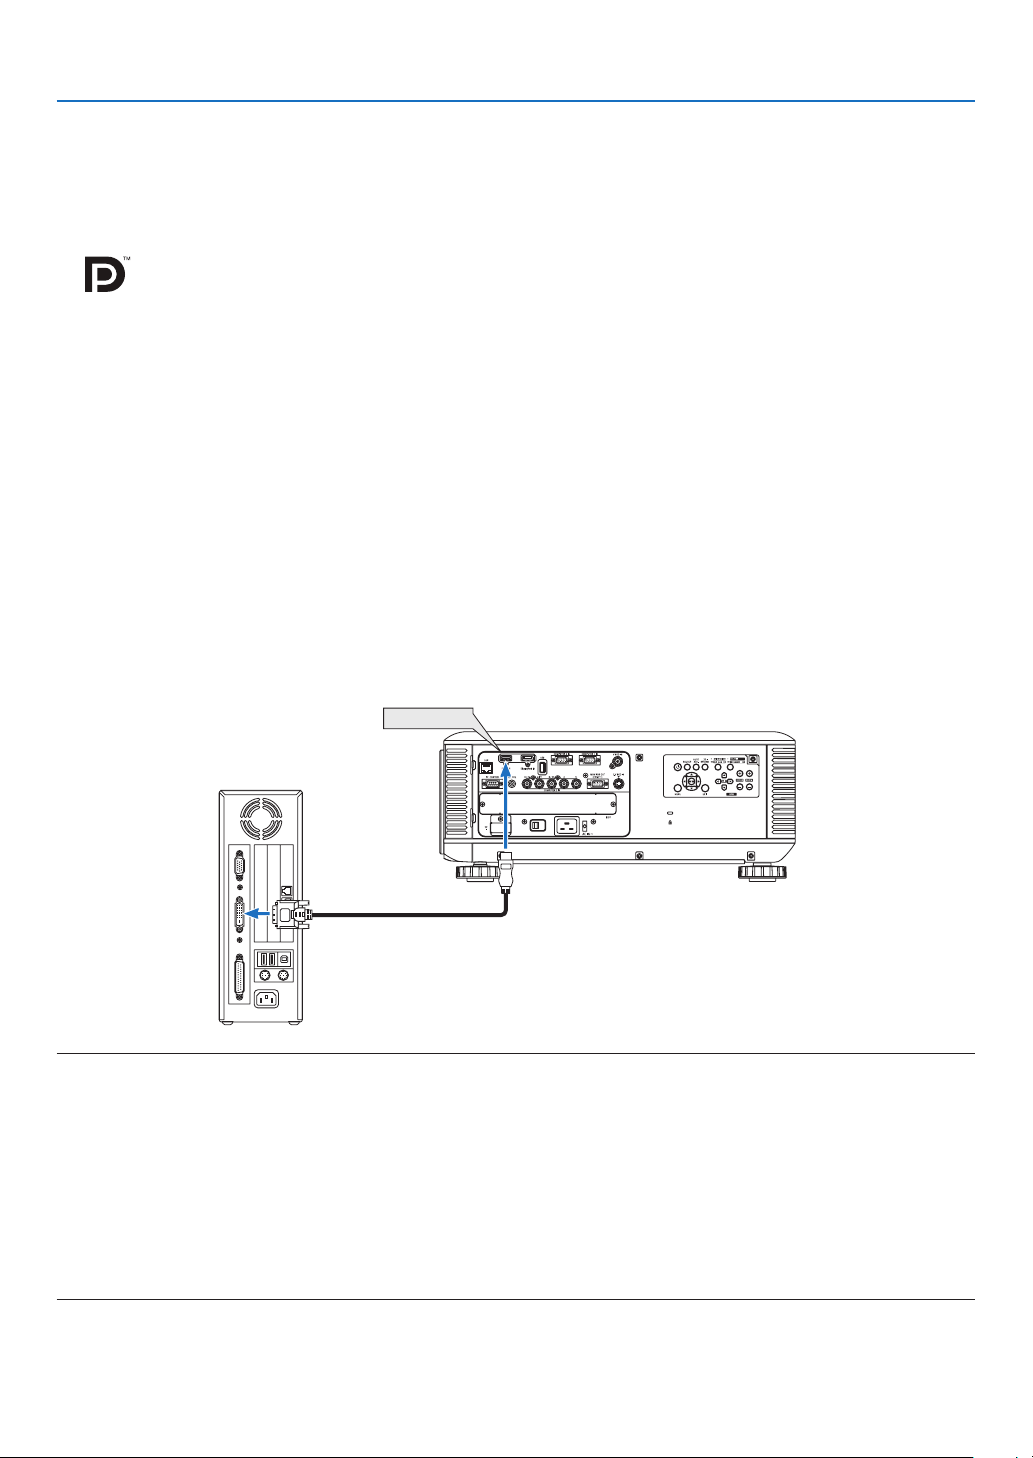
166
6. Installation and Connections
Cautions when connecting an HDMI cable
• UseacertiedHighSpeedHDMI
®
CableorHighSpeedHDMI
®
CablewithEthernet.
CautionswhenconnectingaDisplayPortcable
• UseacertiedDisplayPortcable.
• Dependingonthecomputer,sometimemayberequireduntiltheimageisdisplayed.
• SomeDisplayPortcables(commerciallyavailable)havelocks.
• Todisconnectthecable,pressthebuttononthetopofthecable’sconnector,thenpullthecableout.
• NopowerissuppliedfromtheDisplayPortinputconnectortotheconnecteddevice.
• WhensignalsfromadevicethatusesasignalconverteradapterareconnectedtotheDisplayPortinputconnector,
insomecasestheimagemaynotbedisplayed.
• WhentheHDMIoutputofacomputerisconnectedtotheDisplayPortinputconnector,useaconverter(commer-
ciallyavailable).
CautionswhenusingaDVIsignal
• WhenthecomputerhasaDVIoutputconnector,useacommerciallyavailableconvertercabletoconnectthe
computertotheprojector’sHDMIinputconnector(onlydigitalvideosignalscanbeinput).
Toconnectthecomputer’sDVIoutputconnectortotheprojector’sDisplayPortinputconnector,useacommercially
availableconverter.
HDMI IN
NOTE:WhenViewingaDVIDigitalSignal
• UseaDVI-to-HDMIcablecompliantwithDDWG(DigitalDisplayWorkingGroup)DVI(DigitalVisualInterface)revision1.0stan-
dard.Thecableshouldbewithin197"/5mlong.
• TurnofftheprojectorandthePCbeforeconnectingtheDVI-to-HDMIcable.
• ToprojectaDVIdigitalsignal:Connectthecables,turntheprojectoron,thenselecttheHDMIinput.Finally,turnonyourPC.
Failuretodosomaynotactivatethedigitaloutputofthegraphicscardresultinginnopicturebeingdisplayed.Shouldthishappen,
restartyourPC.
• SomegraphicscardshavebothanalogRGB(15-pinD-Sub)andDVI(orDFP)outputs.Useofthe15-pinD-Subconnectormay
result in no picture being displayed from the digital output of the graphics card.
• DonotdisconnecttheDVI-to-HDMIcablewhiletheprojectorisrunning.Ifthesignalcablehasbeendisconnectedandthen
reconnected,animagemaynotbecorrectlydisplayed.Shouldthishappen,restartyourPC.
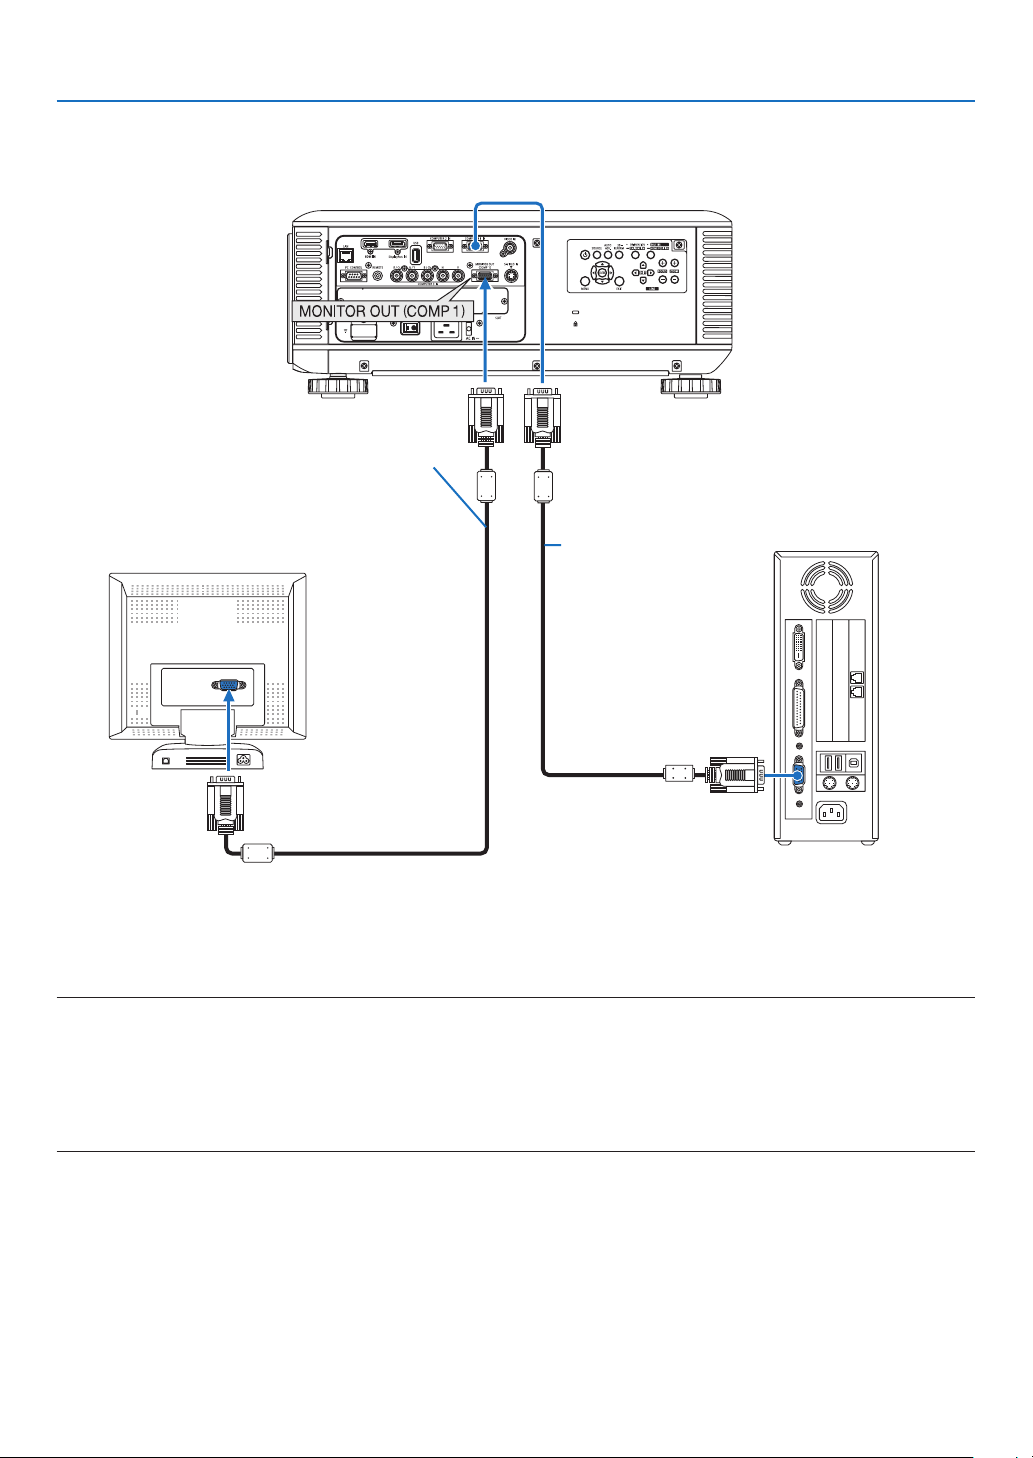
167
6. Installation and Connections
Connecting an External Monitor
Youcanconnectaseparate,externalmonitortoyourprojectortosimultaneouslyviewonamonitorthecomputer
analogimageyou’reprojecting.
NOTE:
• Daisychainconnectionisnotpossible.
• ThesignalonlyfromtheCOMPUTER1INconnectorwillbeoutputtotheMONITOROUT(COMP1)connector.
• When[POWER-SAVING]or[NORMAL2]isselectedfor[STANDBYMODE]withintheon-screenmenu,thesignalwillnotbeoutput
totheMONITOROUT(COMP1)connectorinstandby.
• WhenthesignalfromtheCOMPUTER3INconnectorsisprojected,novideosignalwillbeoutputtotheMONITOROUT(COMP1)
connector.
Computercable(VGA)
(supplied)
Computercable(VGA)
(not supplied)
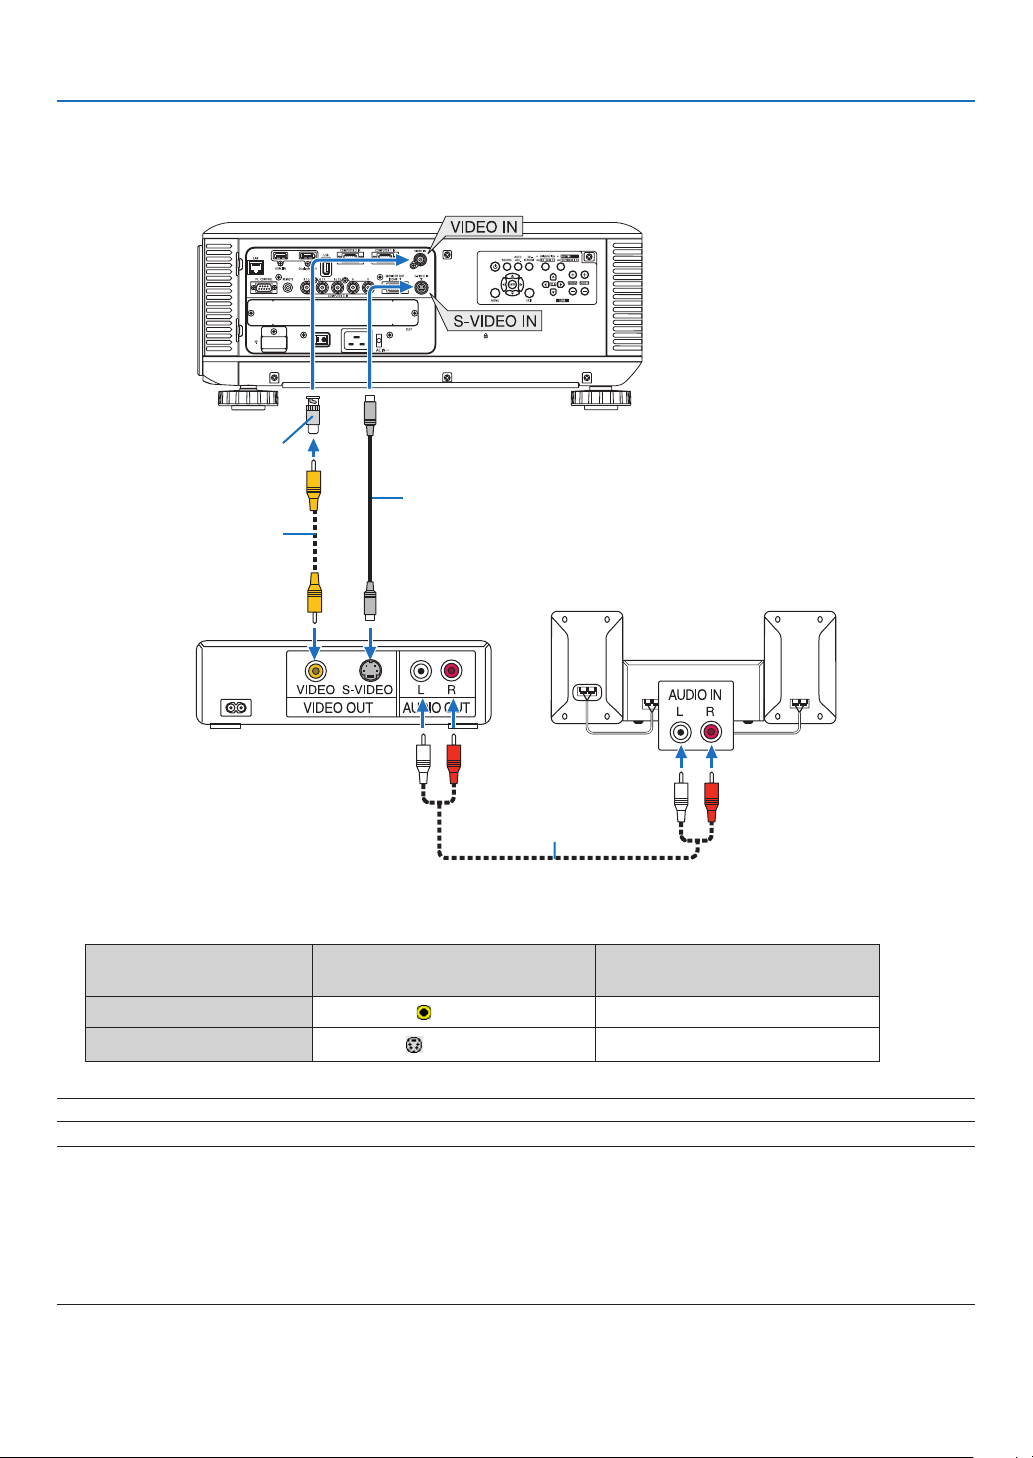
168
6. Installation and Connections
Connecting Your DVD Player or Other AV Equipment
ConnectingVideo/S-VideoInput
• Selectthesourcenameforitsappropriateinputconnectorafterturningontheprojector.
Inputconnector
SOURCEbuttonontheprojector
cabinet
Buttonontheremotecontrol
VIDEOIN
VIDEO
VIDEO
S-VIDEOIN
S-VIDEO
S-VIDEO
NOTE:RefertoyourVCRowner’smanualformoreinformationaboutyourequipment’svideooutputrequirements.
NOTE:
• AnimagemaynotbedisplayedcorrectlywhenaVideoorS-Videosourceisplayedbackinfast-forwardorfast-rewindviaascan
converter.
• Videosignalscanbeprojectedwhenavideocable(commerciallyavailable)isconnectedtotheComputer3videoinputconnec-
tor’sG/Yconnector.
Inthiscase,settheon-screenmenu’sSETUP→OPTION(1)→SIGNALSELECT(COMP3)to[VIDEO]andselectComputer3for
the input selection.
Video cable (not supplied)
BNC (male) to RCA (female)
adapter (not supplied)
S-Video cable (not supplied)
Audio equipment
Audio cable (not supplied)
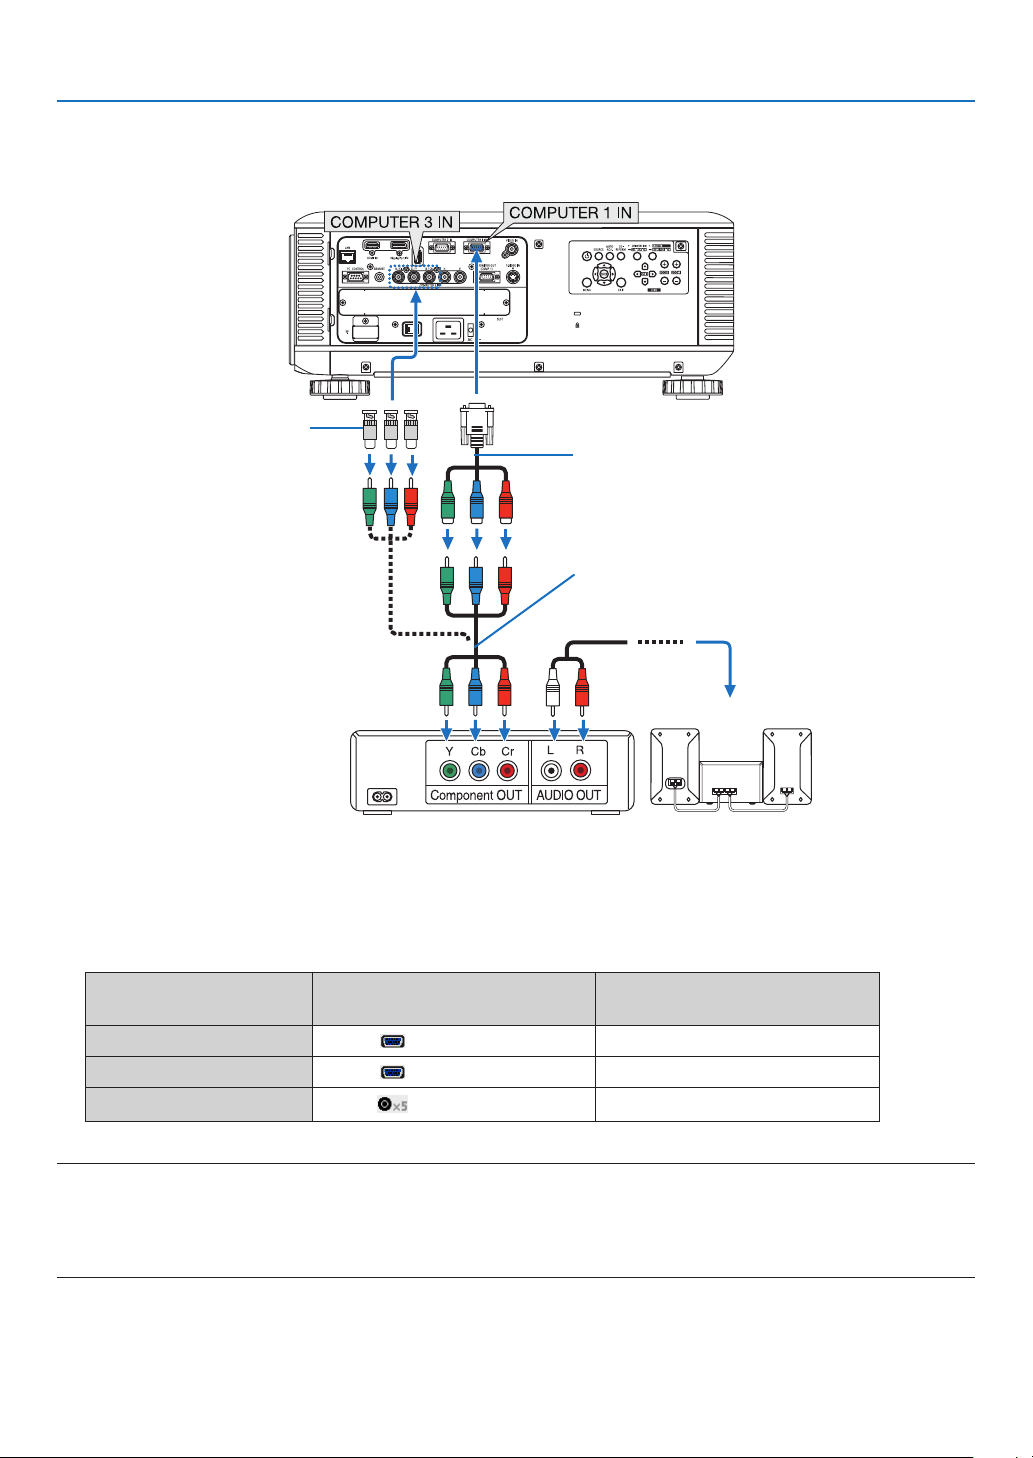
169
6. Installation and Connections
Connecting Component Input
• Selectthesourcenameforitsappropriateinputconnectorafterturningontheprojector.
Inputconnector
SOURCEbuttonontheprojector
cabinet
Buttonontheremotecontrol
COMPUTER1IN COMPUTER1 COMPUTER1
COMPUTER2IN COMPUTER2 COMPUTER2
COMPUTER3IN
COMPUTER3
COMPUTER3
NOTE:
• Normallythecomputersignalandcomponentsignalareidentiedandswitchedautomatically.Ifthesignalcannotbeidentied,
however,selectthesignalat[ADJUST]→[VIDEO]→[SIGNALTYPE]ontheprojector’son-screenmenu.Select“COMPUTER”
or“VIDEO”fortheComputer3videoinputconnectorat[SETUP]→[OPTION(1)]→[SIGNALSELECT(COMP3)](→ page 129).
• ToconnecttoavideodevicewithaDconnector,usethesoldseparatelyDconnectorconverteradapter(modelADP-DT1E).
15-pin - to - RCA (female) × 3 cable adapter
(ADP-CV1E)
BNC (male) to RCA (female)
adapter (not supplied)
Component video RCA × 3 cable (not supplied)
DVD player
Audio Equipment
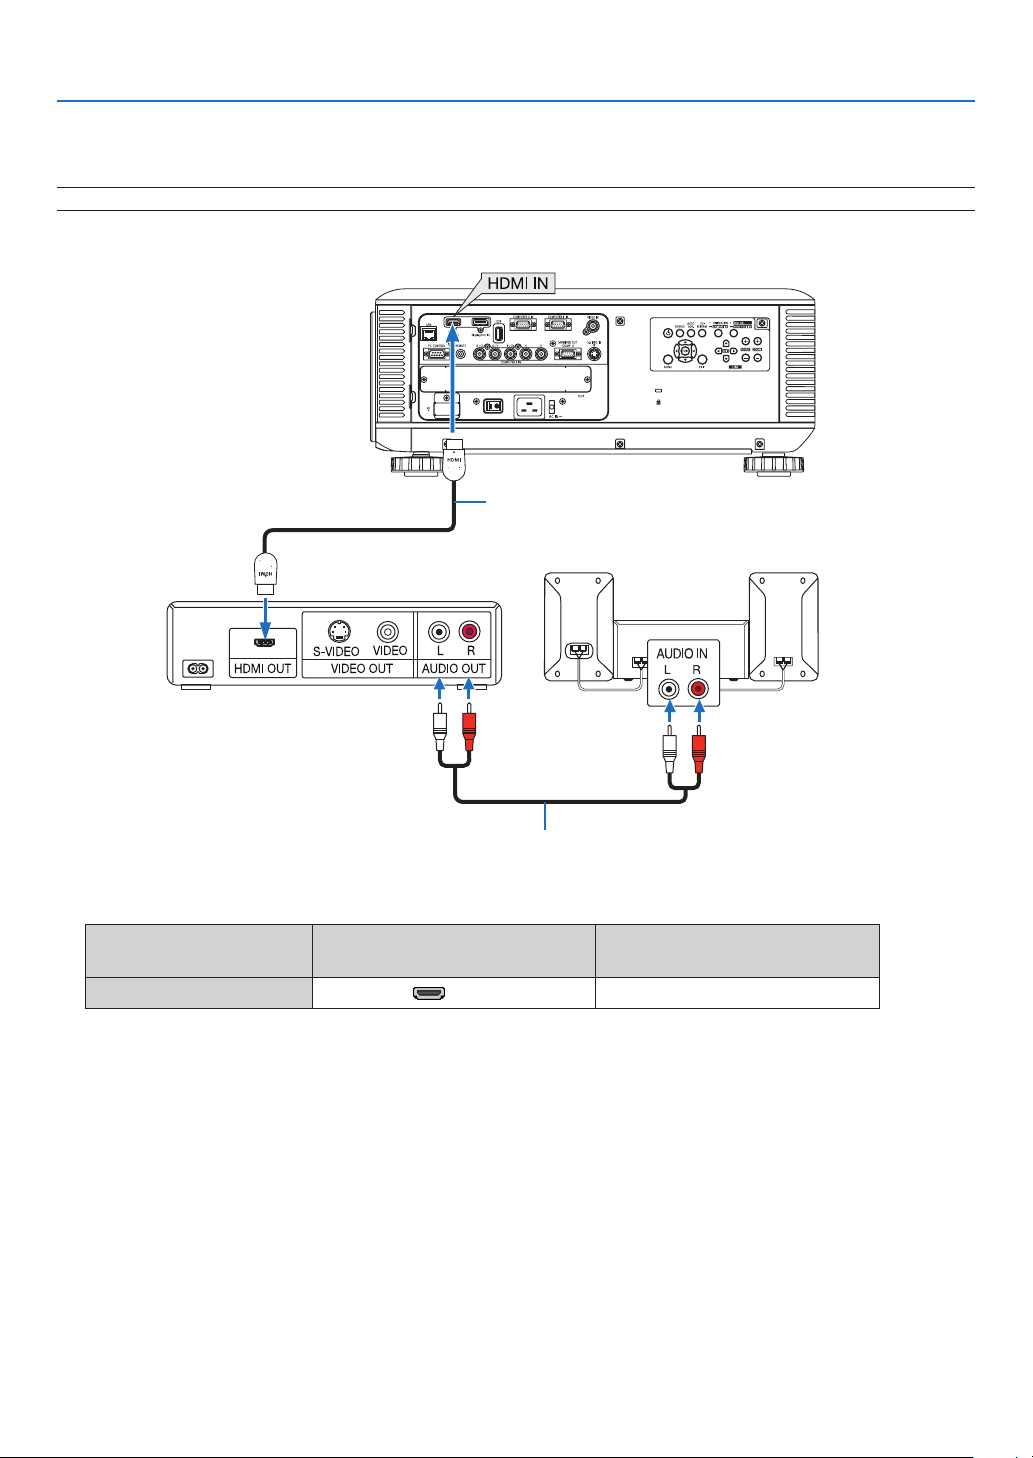
170
6. Installation and Connections
Connecting HDMI Input
YoucanconnecttheHDMIoutputofyourDVDplayer,harddiskplayer,Blu-rayplayer,ornotebooktypePCtothe
HDMIINconnectorofyourprojector.
NOTE:TheHDMIINconnectorsupportsPlug&Play(DDC2B).
Audio cable (not supplied)
HDMIcable(notsupplied)
UseHighSpeedHDMI
®
Cable.
Inputconnector
SOURCEbuttonontheprojector
cabinet
Buttonontheremotecontrol
HDMIIN HDMI HDMI
TIP:ForusersofaudiovideoequipmentwithanHDMIconnector:
Select“Enhanced”ratherthan“Normal”ifHDMIoutputisswitchablebetween“Enhanced”and“Normal”.
Thiswillprovideimprovedimagecontrastandmoredetaileddarkareas.
Formoreinformationonsettings,refertotheinstructionmanualoftheaudiovideoequipmenttobeconnected.
• WhenconnectingtheHDMIINconnectoroftheprojectortotheDVDplayer,theprojector’svideolevelcanbe
madesettingsinaccordancewiththeDVDplayer’svideolevel.Inthemenuselect[ADJUST]→[VIDEO]→[VIDEO
LEVEL]andmakenecessarysettings.
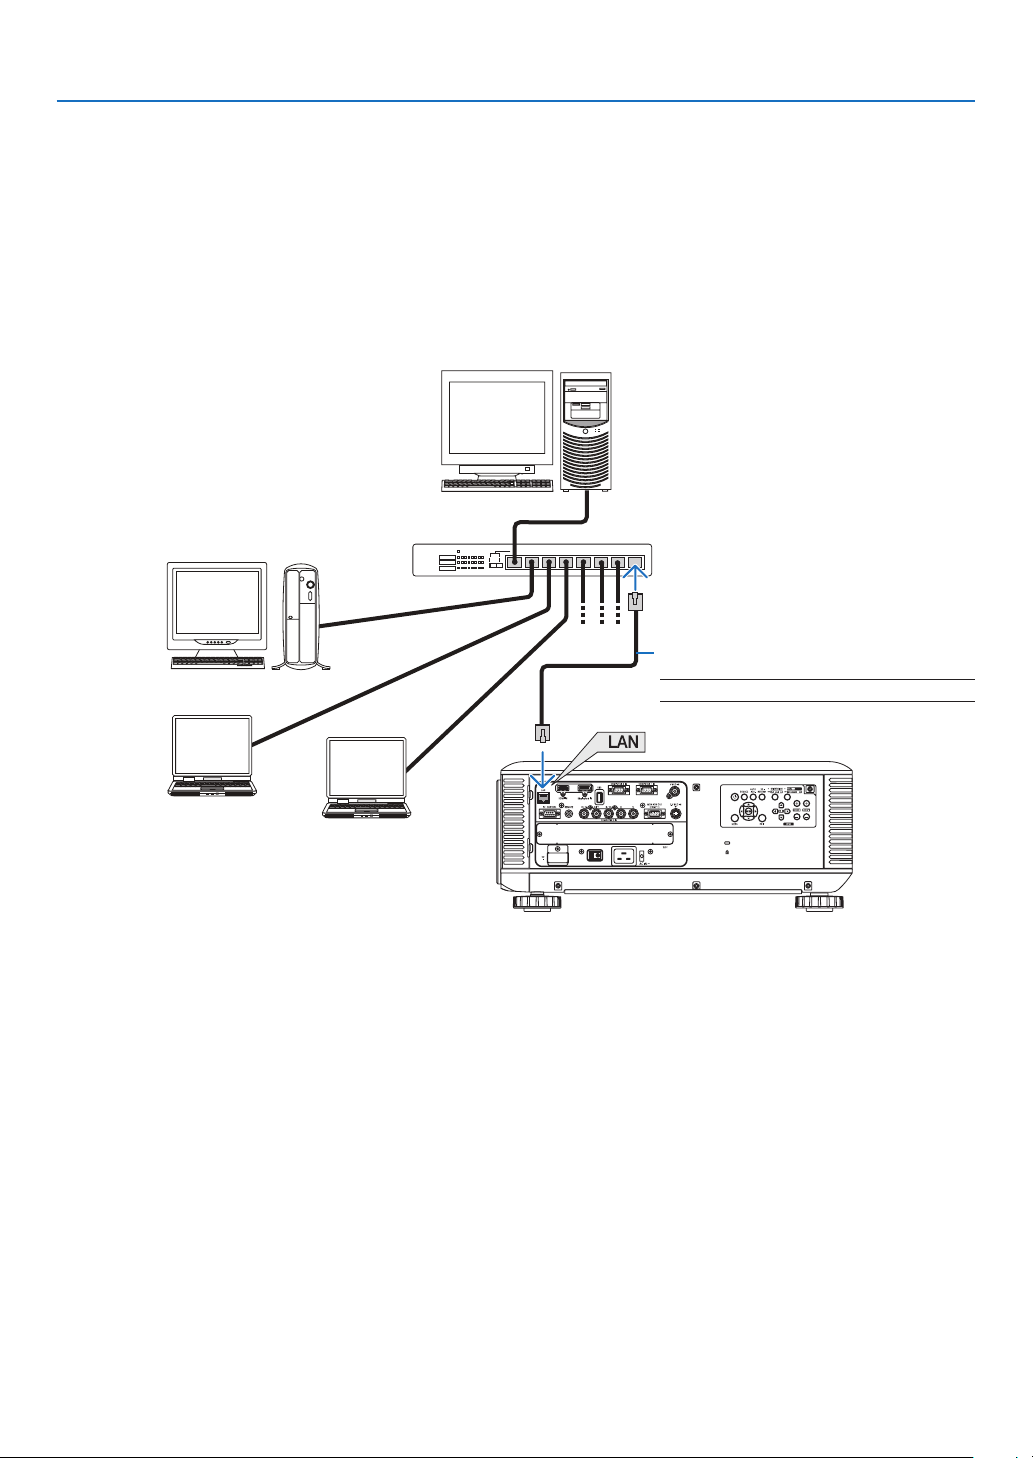
171
6. Installation and Connections
Connecting to a Wired LAN
TheprojectorcomesstandardwithaLANport(RJ-45)whichprovidesaLANconnectionusingaLANcable.
TouseaLANconnection,youarerequiredtosettheLANontheprojectormenu.Select[APPLICATIONMENU]→
[NETWORKSETTINGS]→[WIREDLAN].(→page142).
Example of LAN connection
ExampleofwiredLANconnection
Server
Hub
LAN cable (not supplied)
NOTE:UseaCategory5orhigherLANcable.

172
6. Installation and Connections
Connecting to a Wireless LAN (sold separately)
TheseparatelysoldwirelessLANunitallowsyoutouseawirelessLANenvironment.Whenusingtheprojectorina
wirelessLANenvironment,theIPaddressandothersettingsmustbemadeontheprojector.
Important:
• IfyouusetheprojectorwiththeUSBWirelessLANUnitintheareawheretheuseofwirelessLANequipmentis
prohibited,removetheUSBWirelessLANUnitfromtheprojector.
• BuytheappropriateUSBWirelessLANUnitforyourcountryorarea.
NOTE:
• ThegreenLEDontheUSBWirelessLANUnitashestoshowthattheUSBWirelessLANUnitisworking.
• Yourcomputer’swirelessLANadapter(orunit)mustbecompliedwithWi-Fi(IEEE802.11b/g/n)standard.
Flow of Setting Wireless LAN
Step 1: AttachtheUSBWirelessLANUnittotheprojector.(→ page 173)
Step 2: Display[NETWORKSETTINGS]from[APPLICATIONMENU].(→ page 141)
Step 3: Select[NETWORKSETTINGS]→[WIRELESSLAN]→[PROFILES]andset[EASYCONNECTION],
[PROFILE1],or[PROFILE2].(→ page 142)
TIP:
AccesstheHTTPserverfunctiontoset[NETWORKSETTINGS]→[SETTINGS]→[WIRELESS]→[EASYCONNECTION],[PRO-
FILE1],[PROFILE2].
Mounting a wireless LAN unit
NOTE:
• ThewirelessLANunithasafrontandabackandmustbemountedinthewirelessLANportinaspecicdirection.Theportis
designed so that the unit cannot be mounted in the opposite direction, but trying to push it in by force could damage the wireless
LANunitport.
• Topreventdamageduetostaticelectricity,touchanearbymetalobject(adoorknob,aluminumsash,etc.)beforetouchingthe
wirelessLANunittoeliminatethestaticelectricityfromyourbody.
• TurnoffthemainpowerbeforemountingandremovingthewirelessLANunit.
MountingandremovingthewirelessLANunitwhiletheprojector’spowerisoncoulddamagethewirelessLANunitorresultin
malfunctionontheprojector.Iftheprojectorshouldmalfunction,turnofftheprojector’spower,turnoffthemainpowerswitch,
and unplug the power cord, then plug the power cord back in.
• DonotconnectanyUSBdeviceotherthanthewirelessLANunittotheUSB(LAN)port.Also,donotconnectthewirelessLAN
unittotheUSBportintheconnectorsection.
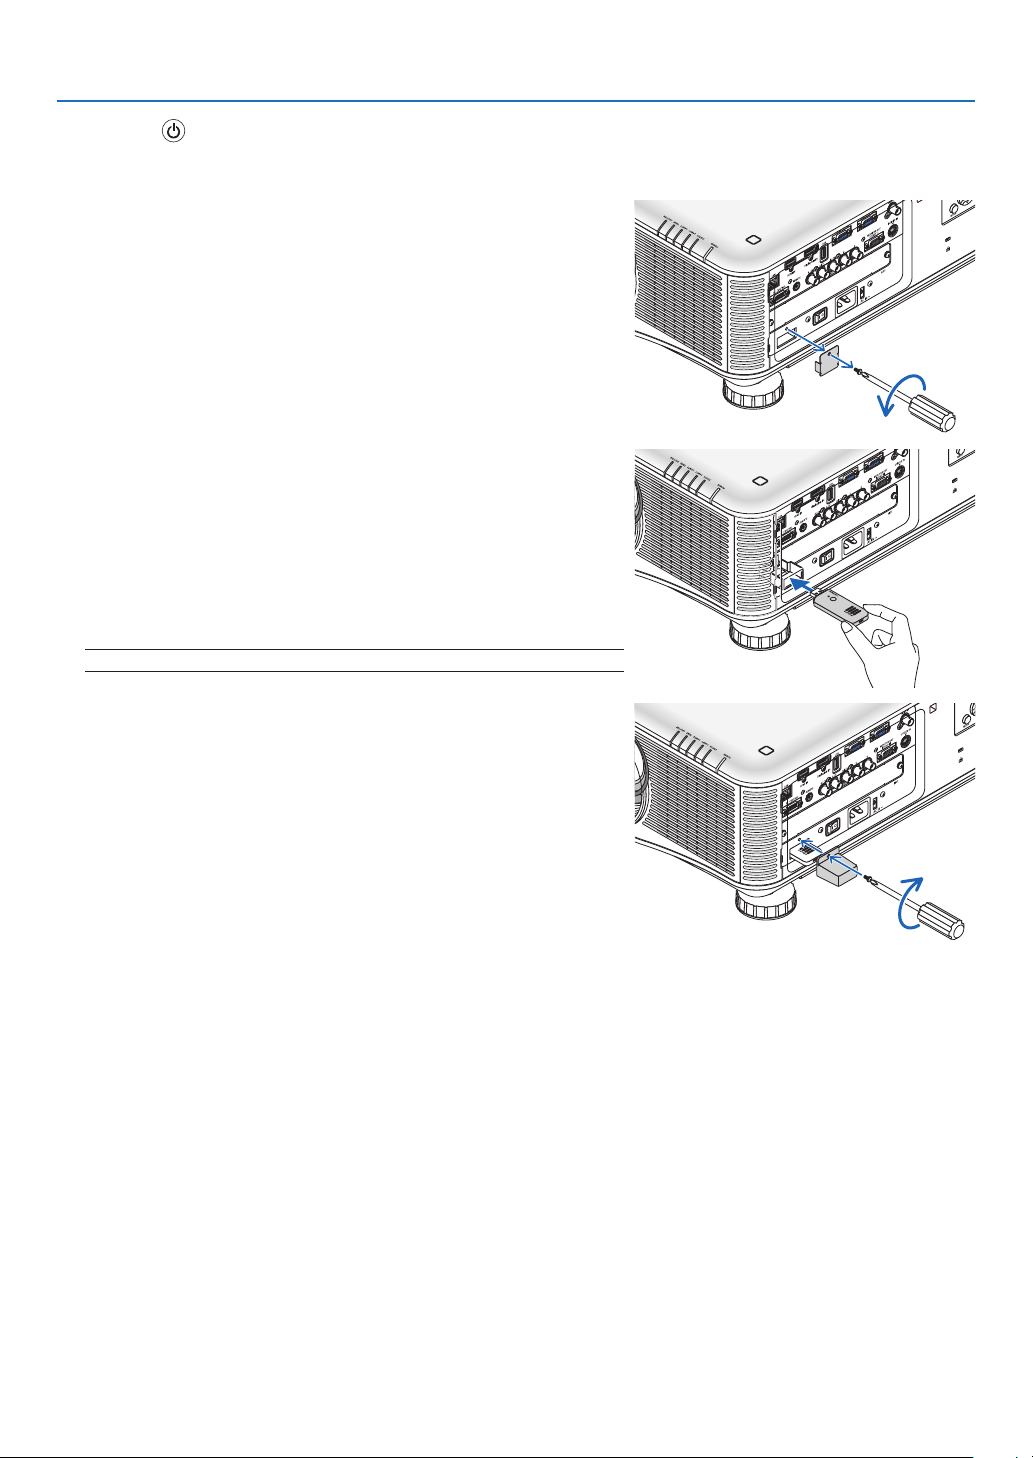
173
6. Installation and Connections
1. Press the button to set the projector to the standby mode, then
turnoffthemainpowerswitch.
2. Remove the plate (port cover).
Loosen the screw security port cover.
• Thescrewisnotremovable.
3. SlowlyinsertthewirelessLANunitintotheUSB(LAN)port.
- Remove the wireless LAN unit’s cap, set the unit with the front (the
side with the indicator) facing upwards, hold the back edge and
insert the unit gently.
Next, press the wireless LAN unit in with a finger.
- The cap you have removed will be used when the wireless LAN unit
is removed, so store it in a safe place.
NOTE:IfthewirelessLANunitishardtoinsert,donotpushitinbyforce.
4. Attachtheanti-theftcapforwirelessLANunit.
Use the screw you removed at Step 2 to secure the anti-theft cap.
Plate
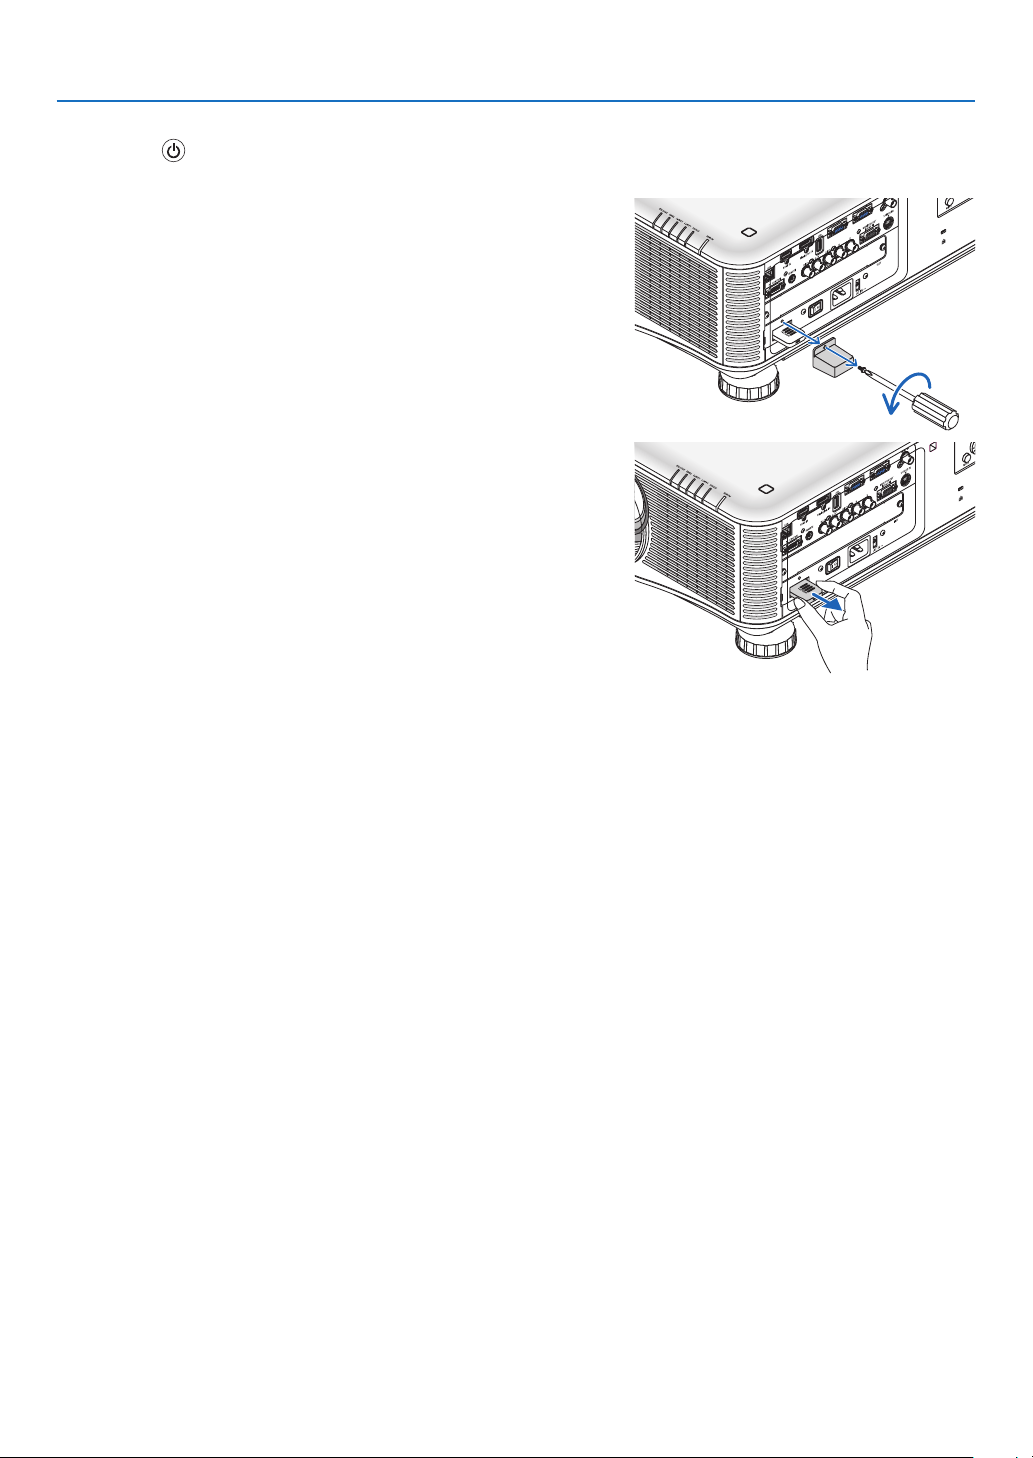
174
6. Installation and Connections
To remove the wireless LAN unit
1. Press the button to set the projector to the standby mode, then
turnoffthemainpowerswitch.
2. Removetheanti-theftcap.
Loosen the screw and remove the anti-theft cap for the Wireless LAN
Unit.
3. PullouttheWirelessLANUnitfromtheUSB(LAN)port.
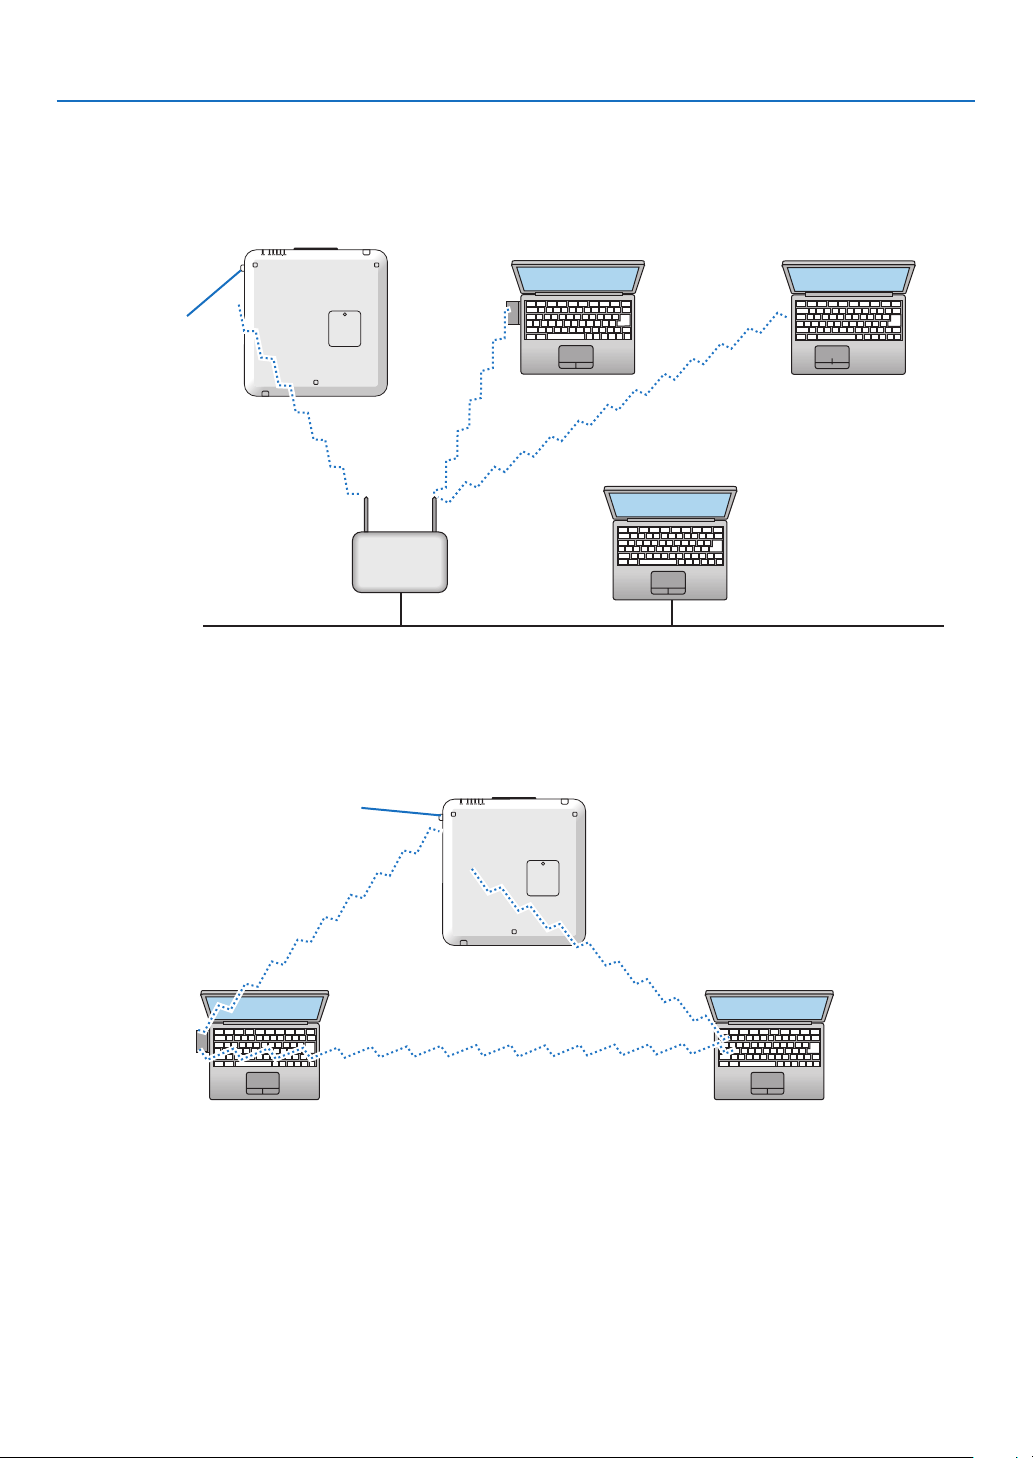
175
6. Installation and Connections
ExampleofwirelessLANconnection
(NetworkType→Infrastructure)
(→page144)
PC with wireless LAN card
inserted
PC with built-in wireless LAN
function
Wired LAN
Wireless access point
USB Wireless LAN Unit
Toenabledirectcommunication(i.e.,peer-to-peer)betweencomputersandprojectors,youneedtoselecttheAd
Hocmode.(→page144)
PC with wireless LAN card
inserted
PC with built-in wireless LAN
function
ExampleofwirelessLANconnection(NetworkType→AdHoc)
USB Wireless LAN Unit
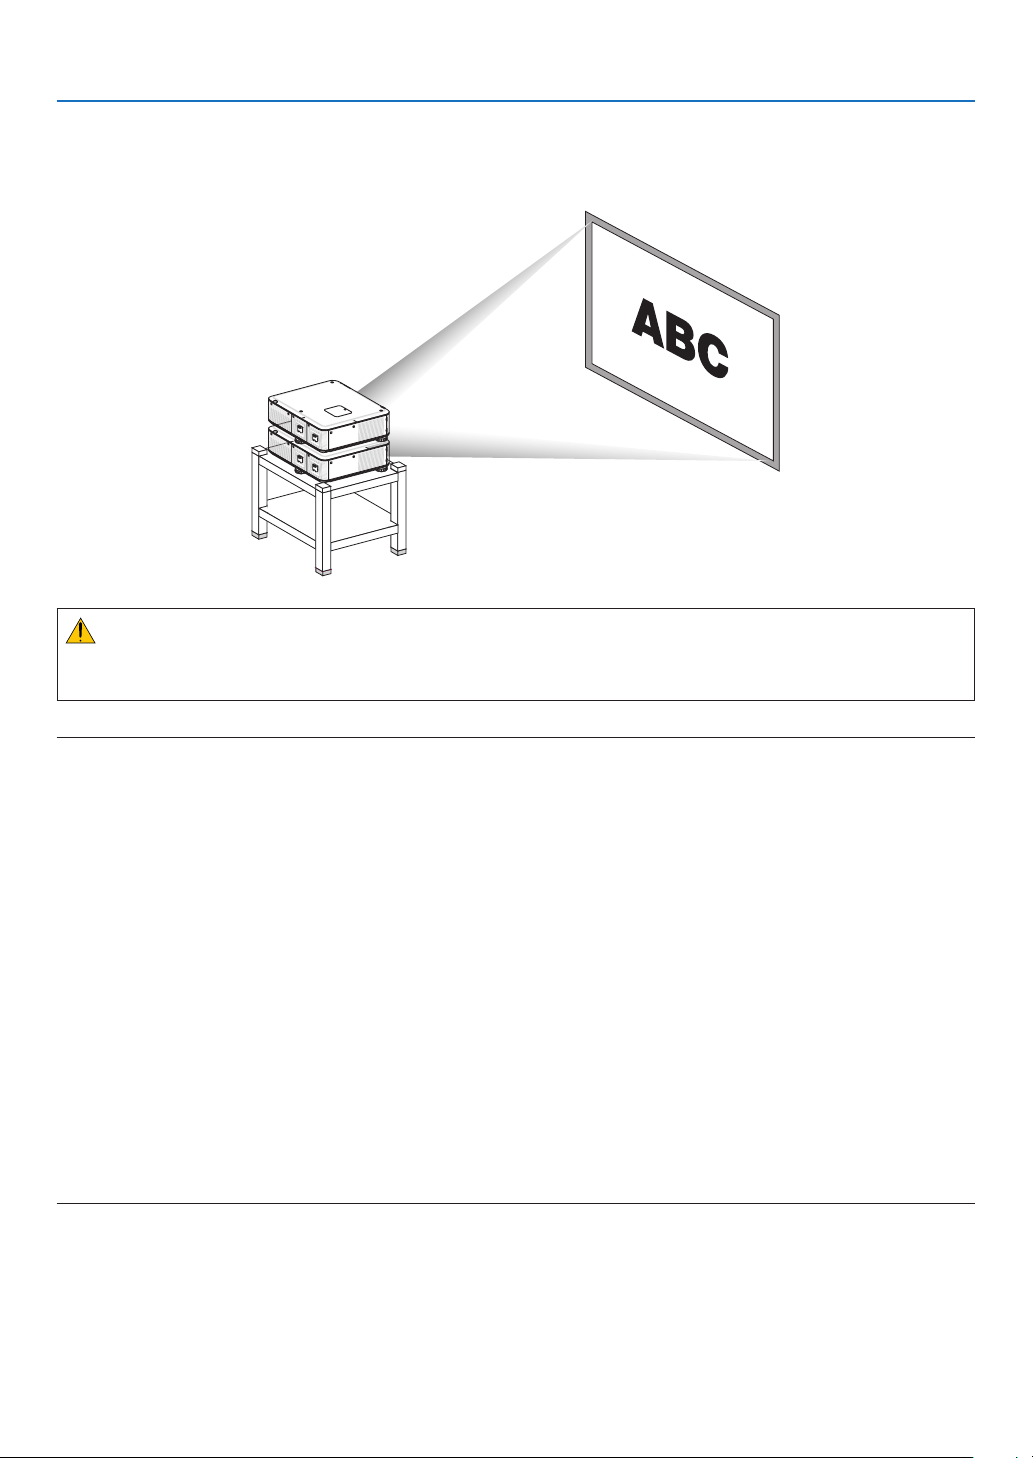
176
6. Installation and Connections
Stacking projectors
Theprojectedimagebrightnesscanbedoubledbygravitystackinguptotwoprojectorswithoutexternalsupport.This
iscalled“StackingProjection”.
CAUTION:
Aminimumoftwopersonsarerequiredtocarrytheprojector.Otherwisetheprojectormaytumbleordrop,causing
personalinjury.
NOTE:
• Projectorswithdifferentmodelnumberscannotbegravitystacked.
Optional lenses with the same model numbers must be used for stacking projection.
• Forstackingprojectors,attachthesuppliedthreestackingholderstothetopofthelowerprojector.(→ next page)
• Thestackingprojectiondoesnotsupportaccuracyforoverlayingtwoimagesperfectlysothatsmalltextanddetailedgraphics
can be clearly read or seen.
• Useacommerciallyavailabledistributionampliertoboththeprimary(upper)andthesecondary(lower)projectorstodistribute
signal to two outputs of the two projectors.
• Notesforstacking
- Askyourservicepersonforsettingupandadjustingprojectors.
- Setuptheprojectorsinaplaceorstructureinawaywithsufcientstrengthtosupportthecombinedweightofthetwoprojec-
tors.Thesingleprojectorwithalensweighsuptoapproximately21kg/47lbs.
- Topreventtheprojectorsfromfalling,fastentheminawaytowithstandearthquakes.
- Doublestackingwillcauseroomtemperaturetoincrease.Ventilatetheroomwell.
- Donotattempttostackprojectorsontheceiling.Gravitystackingcannotbedoneontheceiling.
- Warmuptheprojectorsforonehourbeforethedesiredprojectionisobtained.
- Makesurethatthepositionoftheupperprojectordoesnotexceeditsspecications.Whensettingupthetwoprojectors,
adjustable height range for the tilt feet on the upper projector is added to the total adjustable range.
- Setuptheprojectorssothattheprojectedimageshowsaslittlegeometricdistortionsaspossible.Thelensisdifferentin
geometricdistortionbetweenwide(+)andtele(−)forzoom.
- Adjustthehorizontallensshifttothelenscenter.
s
177
6. Installation and Connections
AttachingStackingHolders
Attachthreestackingholderstothreelocationsonthetopofthelowerprojector.
Preparation:
ToolsrequiredarePhillipsscrewdriver(plus-head)andthreestackingholderspackagedwiththeprojector.
Loosenthetiltfeet(threelocations)oftheprojector.
1. Remove rubber caps and screws at three locations.
(1) Use your tweezers or nail to pinch and pull up the rubber cap.
(2) Remove the screw from a square hole.
(1) (2)
2. Attach the three stacking holders at three locations.
(1) Place a stacking holder in a square hole.
(2) Use the screw removed at Step 1 to fix the stacking holder in the square hole.
(3) Put the rubber cap removed at Step 1 back into the square hole.
• Snapthetabsonbothoftherubbercapintotheslitsonbothsidesinthesquarehole.
(1) (2) (3)
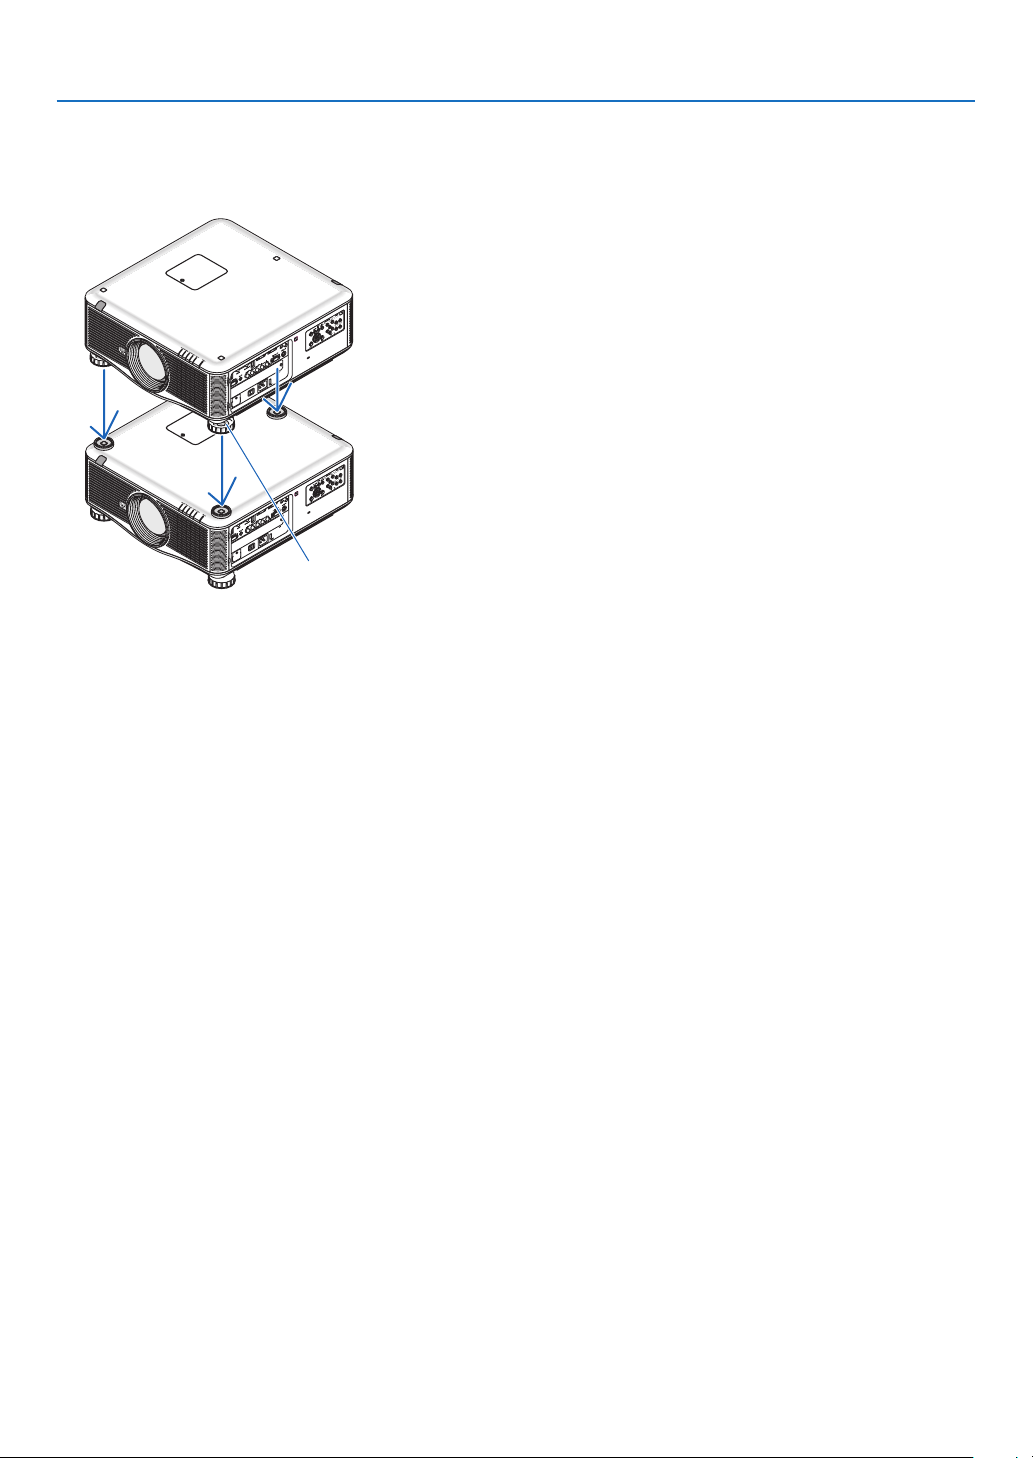
178
6. Installation and Connections
3. Put another projector on the first projector.
Put each tilt foot of the upper projector on the stacking holders (three locations).
• Eachtiltfoothasarubber.Placeeachtiltfootrubberonstackingholders(threelocations).
Foot rubber
TIP:
• Toremovethestackingholders,performtheabovestepsinreverseorder.
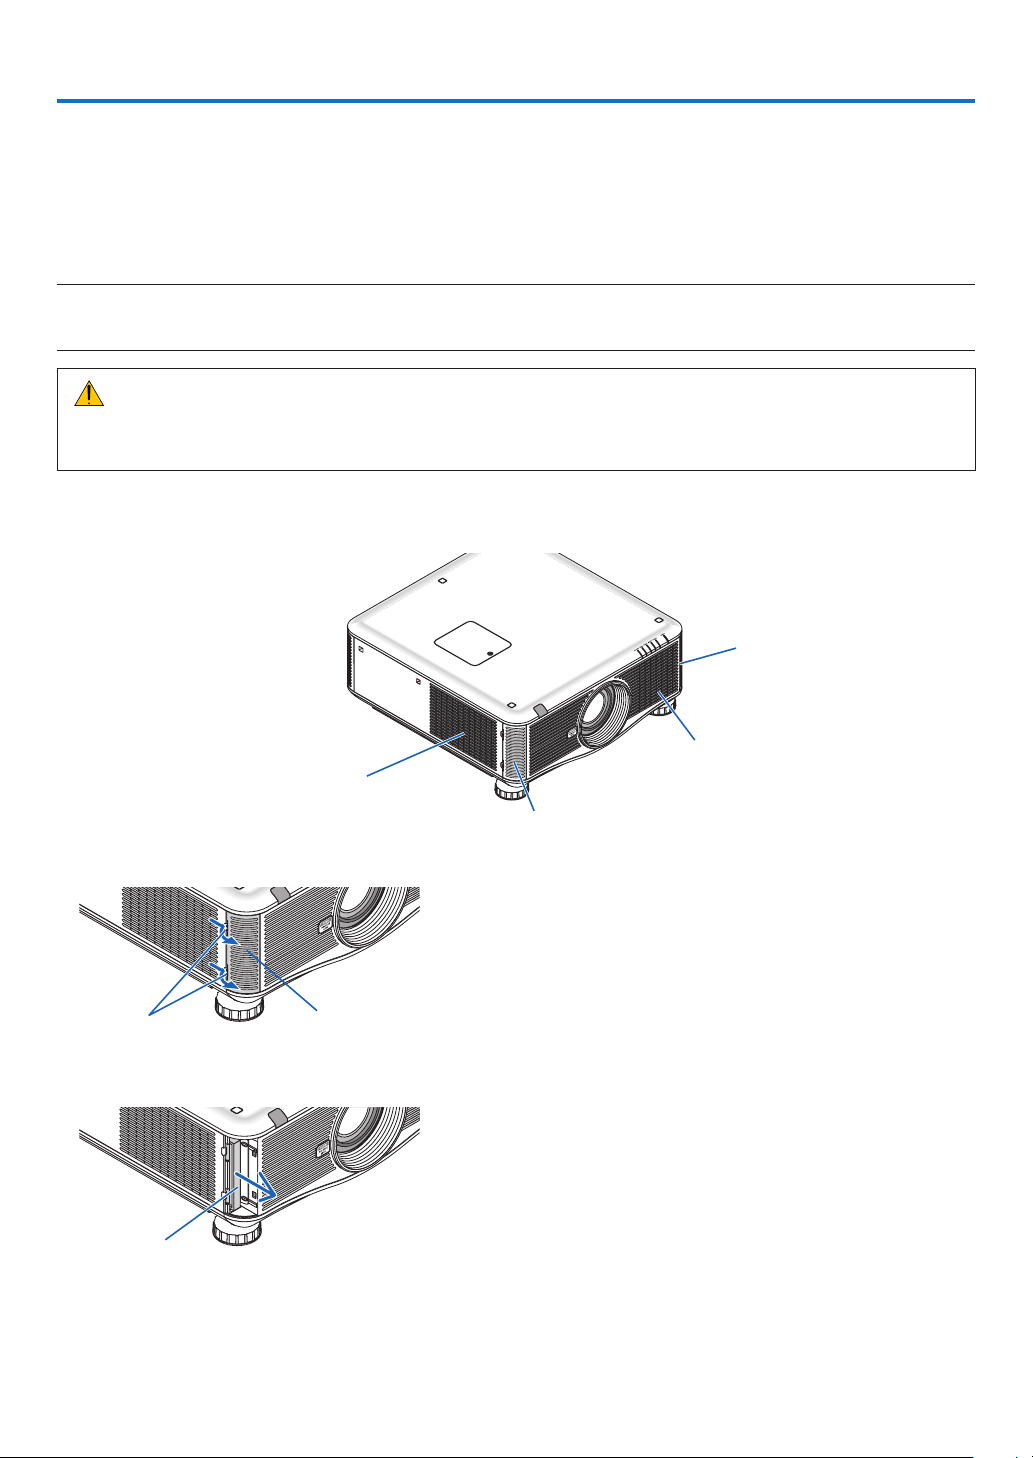
179
Thissectiondescribesthesimplemaintenanceproceduresyoushouldfollowtocleanthelters,thelens,thecabinet,
andtoreplacethelampandthelters.
❶ Cleaning the Filters
Theair-lterspongekeepsdustanddirtfromgettinginsidetheprojectorandshouldbefrequentlycleaned.Ifthelter
isdirtyorclogged,yourprojectormayoverheat.
NOTE:Themessageforltercleaningwillbedisplayedforoneminuteaftertheprojectoristurnedonoroff.Whenthemessageis
displayed,cleanthelters.Thetimetocleantheltersissetto[OFF]attimeofshipment.(→ page 122)
To cancel the message, press any button on the projector cabinet or the remote control.
CAUTION
• Beforecleaningthelters,turnofftheprojector,disconnectthepowercordandthenallowthecabinettocool.
Failuretodosocanresultinelectricshockorburninjuries.
Preparation:Beforecleaningthelters,useavacuumcleanertocleantheventilations(inlet).
Therearetwoltersonthefront(frontlter)andleftside(sidelter).
Whenreplacingthelters,buytheoptionallterNP02FTinadvance.
Filter cover
Inlet
(The small filter is inside)
Filter cover
Inlet
(The large filter is inside.)
1. Push the positions shown (2 locations) to release the filter cover and remove it.
Filter cover
Buttons
2. Remove the two filters by pulling out.
Filter unit
7. Maintenance
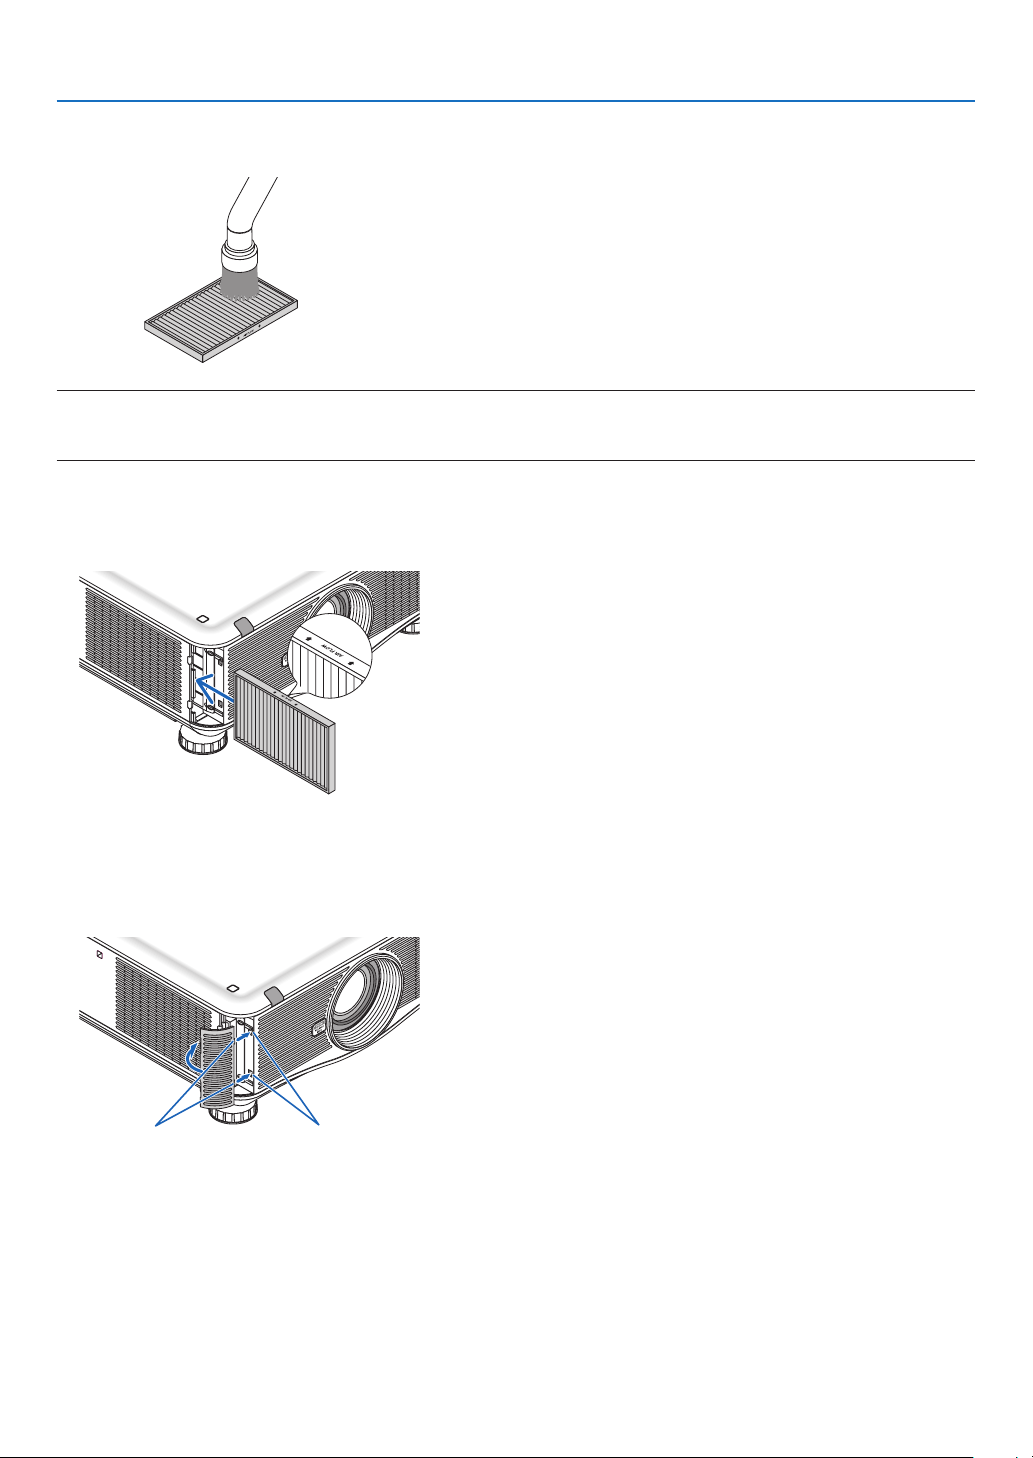
180
7. Maintenance
3. Use a vacuum cleaner to vacuum all the dust inside.
Getridofdustintheaccordionlter
NOTE:
• Wheneveryouvacuumthelter,usethesoftbrushattachmenttovacuum.Thisistoavoiddamagetothelter.
• Donotwashthelterwithwater.Doingsocanresultinlterclogging.
4. Put the filters back into place
The filter cannot be inserted from the outside.
Insertthelterwith“↓AIRFLOW↓” facing the projector.
5. Put the filter cover back to the projector cabinet.
Insertthecatchesonthetopandbottomoftheltercoverintothegroovesintheprojector,thenpressthetopand
bottom buttons to close.
• Pushtheltercoveruntilitclicksintoplace.
ButtonsCatches
6. Clearthelterusagehours:
Plug the power cord into the wall outlet, turn on the main power switch, and then turn on the projector.
From the menu, select [RESET] →[CLEARFILTERHOURS].andresetthelterusagehours.(→ page 138)
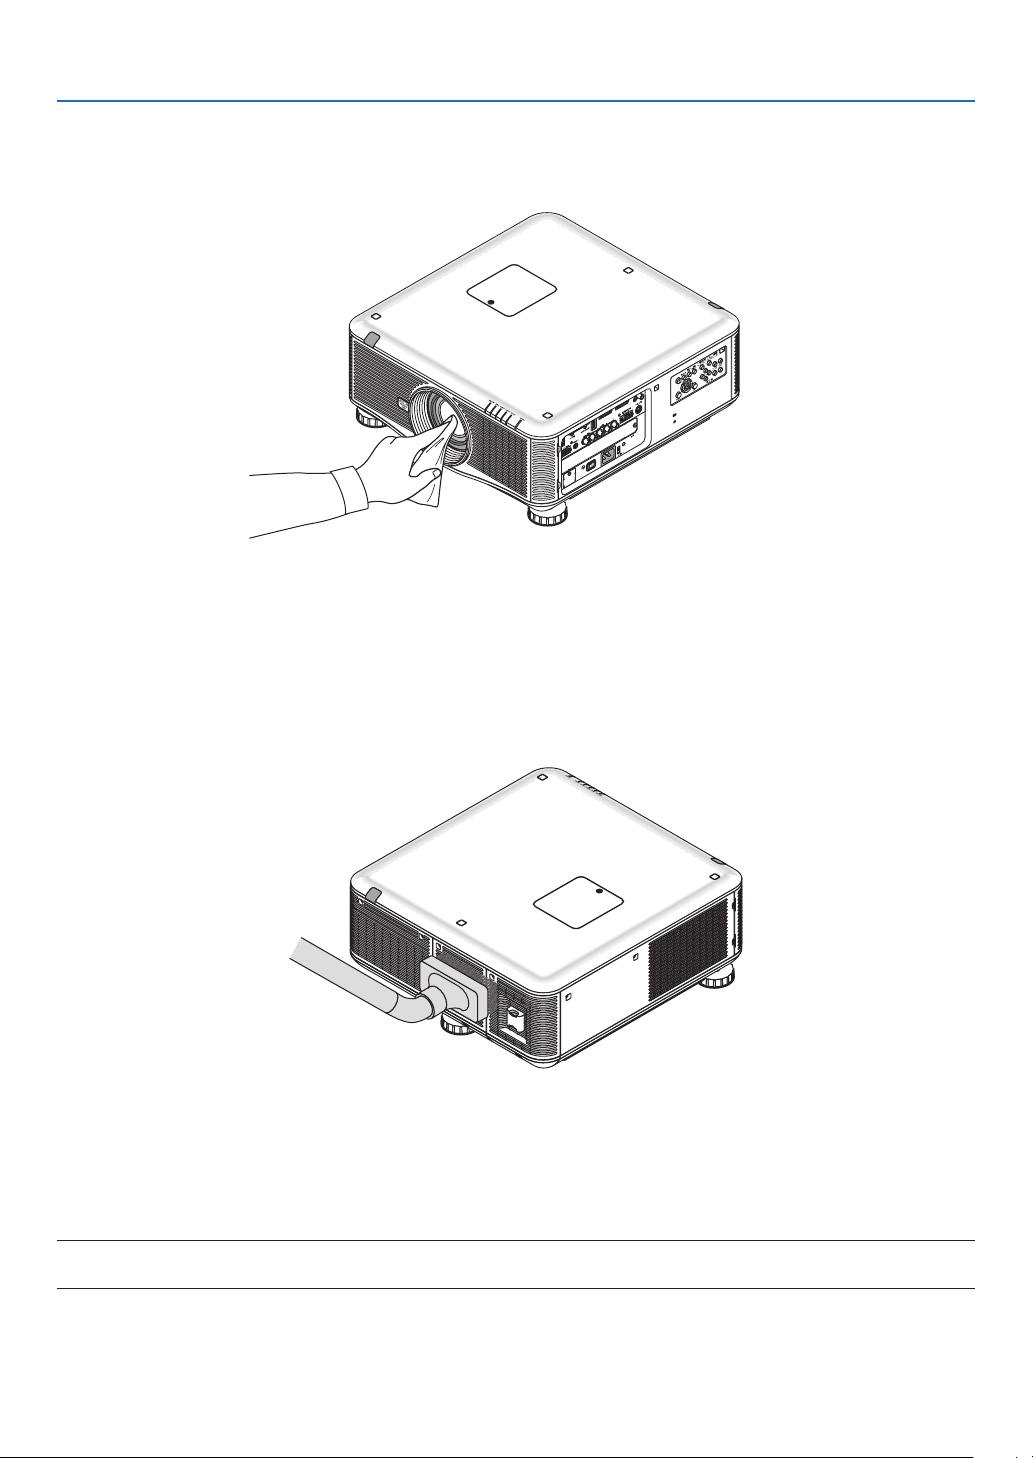
181
7. Maintenance
❷ Cleaning the Lens
• Turnofftheprojectorbeforecleaning.
• Useablowerorlenspapertocleanthelens,andbecarefulnottoscratchormarthelens.
❸ Cleaning the Cabinet
Turnofftheprojector,andunplugtheprojectorbeforecleaning.
• Useadrysoftclothtowipedustoffthecabinet.
Ifheavilysoiled,useamilddetergent.
• Neverusestrongdetergentsorsolventssuchasalcoholorthinner.
• Whencleaningtheventilationslitsorthespeakerusingavacuumcleaner,donotforcethebrushofthevacuum
cleanerintotheslitsofthecabinet.
Vacuum the dust off the ventilation slits.
• Cloggedventilationslitsmaycauseariseintheinternaltemperatureoftheprojector,resultinginmalfunction.
• Donotscratchorhitthecabinetwithyourngersoranyhardobjects
• Contactyourdealerforcleaningtheinsideoftheprojector.
NOTE:Donotapplyvolatileagentsuchasinsecticideonthecabinet,thelens,orthescreen.Donotleavearubberorvinylproduct
inprolongedcontactwithit.Otherwisethesurfacenishwillbedeterioratedorthecoatingmaybestrippedoff.

182
7. Maintenance
❹ Replacing the Lamp and the Filters
Whenthelampreachestheendofitslife,theLAMPindicatorinthecabinetwillblinkredandthemessage“THELAMP
HASREACHEDTHEENDOFITSUSABLELIFE.PLEASEREPLACETHELAMP1(OR2).USETHESPECIFIED
LAMPFORSAFETYANDPERFORMANCE.”willappear(*).Eventhoughthelampmaystillbeworking,replacethe
lamptomaintaintheoptimalprojectorperformance.Afterreplacingthelamp,besuretoclearthelamphourmeter.
(→page137)
CAUTION
• DONOTTOUCHTHELAMPimmediatelyafterithasbeenused.Itwillbeextremelyhot.Turntheprojectoroff
andthendisconnectthepowercord.Allowatleastonehourforthelamptocoolbeforehandling.
• Usethespeciedlampforsafetyandperformance.
• DONOTREMOVEANYSCREWSexcepttwo(2)lampcoverscrewandthree(3)lamphousingscrews.Youcould
receiveanelectricshock.
• Donotbreaktheglassonthelamphousing.
Keepngerprintsofftheglasssurfaceonthelamphousing.Leavingngerprintsontheglasssurfacemightcause
anunwantedshadowandpoorpicturequality.
• Theprojectorwillturnoffandgointostandbymodewhenyoucontinuetousetheprojectorforanother100hours
afterthelamphasreachedtheendofitslife.Ifthishappens,besuretoreplacethelamp.Ifyoucontinuetouse
thelampafterthelampreachestheendofitslife,thelampbulbmayshatter,andpiecesofglassmaybescattered
inthelampcase.Donottouchthemasthepiecesofglassmaycauseinjury.Ifthishappens,contactyourNEC
dealerforlampreplacement.
*NOTE: This message will be displayed under the following conditions:
• foroneminuteaftertheprojectorhasbeenpoweredon
• whenthe (POWER)buttonontheprojectorcabinetorthePOWEROFFbuttonontheremotecontrolispressed
To turn off the message, press any button on the projector cabinet or the remote control.
Optionallampandtoolsneededforreplacement:
• Phillipsscrewdriver(plus-head)
• Replacementlamp:
NP22LP
Flow of Replacing the Lamp and the Filters
Thefollowingprocedureisanexampleforreplacingbothlamps.
Step 1. Replace the lamp
Step 2. Replace the filters (→ page 185)
Step 3. Clearthelampusagehoursandthelterusagehours(→ page 137, 138)
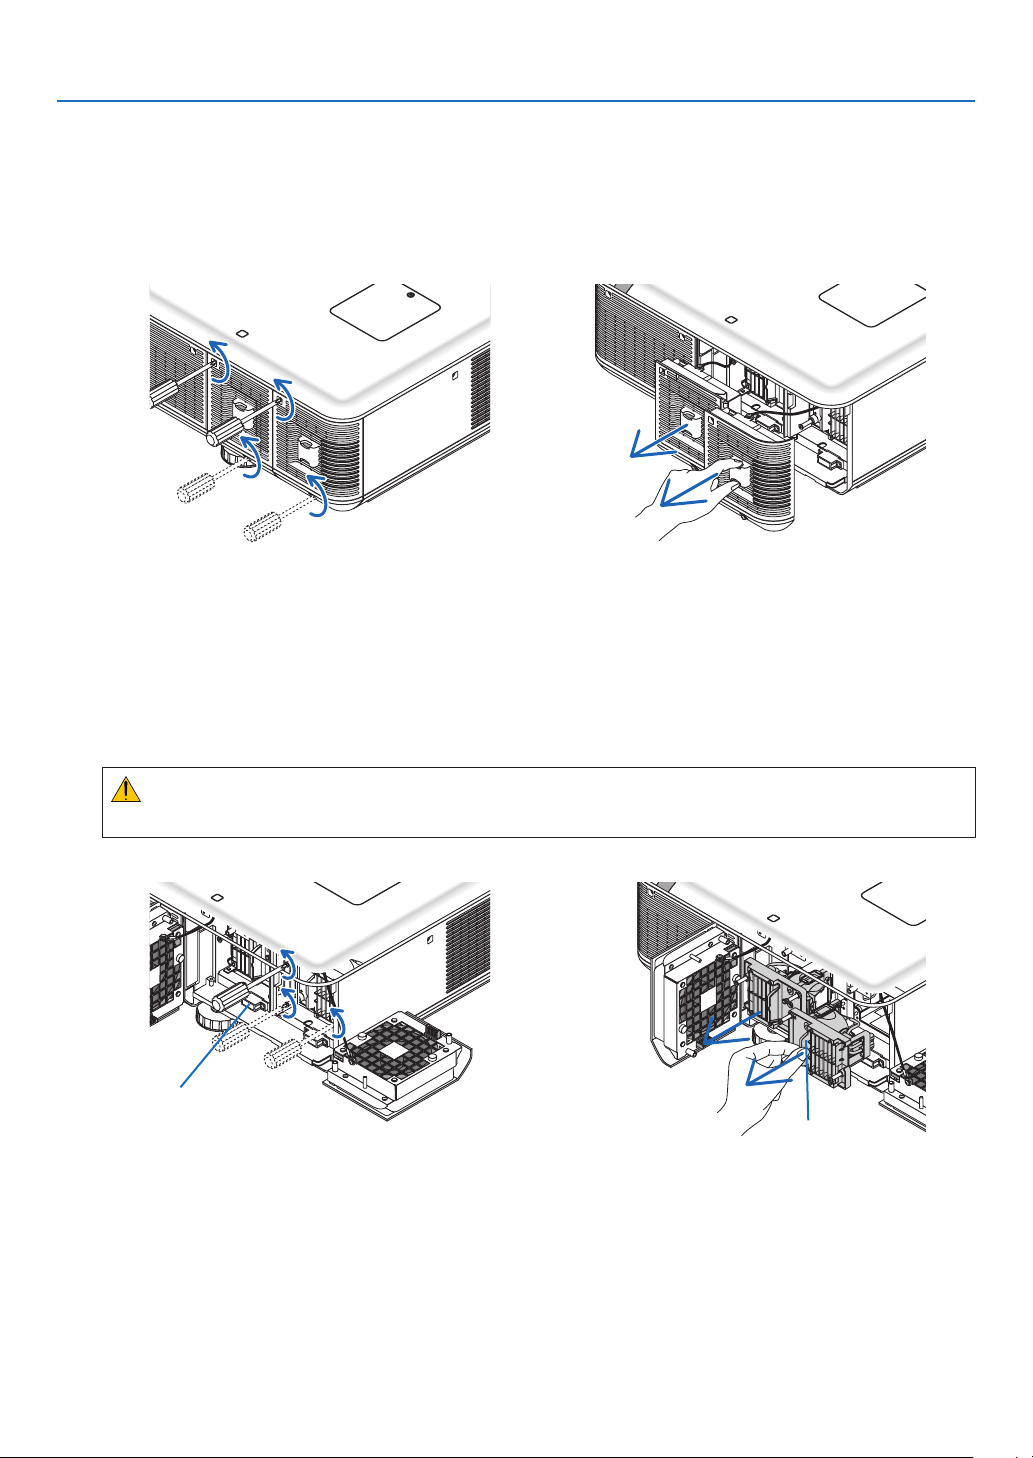
183
7. Maintenance
To replace the lamp:
1. Remove the lamp cover.
(1)Loosenthetwolampcoverscrews.
•Thelampcoverscrewisnotremovable.
(2)Pullthelampcovertowardsyouandremoveit.
2. Remove the lamp housing.
(1)Loosenthethreescrewssecuringthelamphousinguntilthephillipsscrewdrivergoesintoafreewheelingcondi-
tion.
•Thethreescrewsarenotremovable.
•Thereisaninterlockonthiscasetopreventtheriskofelectricalshock.Donotattempttocircumventthis
interlock.
(2)Removethelamphousingbyholdingit.
CAUTION:
Makesurethatthelamphousingiscoolenoughtohandlebeforeremovingit.
Exhaust fan power con-
nector
Handle
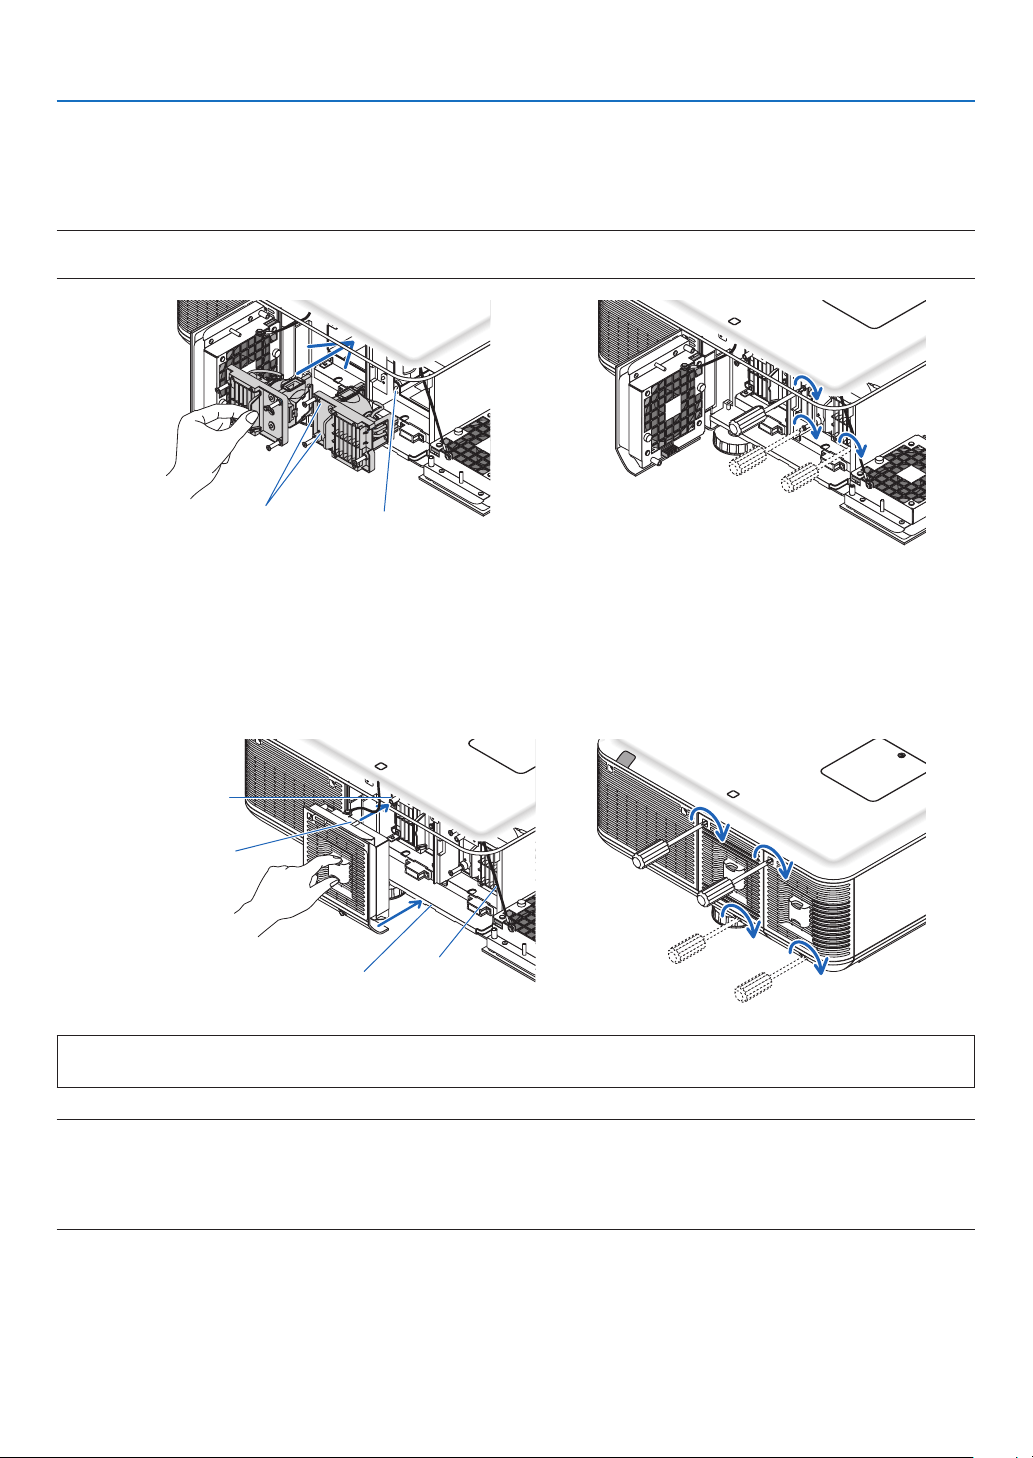
184
7. Maintenance
3. Install a new lamp housing.
(1)Insertanewlamphousinguntilthelamphousingispluggedintothesocket.
(2)Secureitinplacewiththethreescrews.
•Besuretotightenthescrews.
NOTE:
• BesuretoinstallbothLamp1andLamp2.Theprojectorwillnotturnonunlessboththelampsareinstalled.
Alignment hole
Guidepin
4. Reattach the lamp cover.
(1)Replacethelampcover.
(2)Tightenthetwoscrewstosecurethelampcover.
•Besuretotightenthescrews.
Guidepipe
Guidepin
Frame
Wire
This completes the lamp replacement.
Go on to the filter replacement.
NOTE:Whenyoucontinuetousetheprojectorforanother100hoursafterthelamphasreachedtheendofitslife,bothLAMP1
andLAMP2indicatorswilllightredandtheprojectorcannotturnonandthemenuisnotdisplayed.
Ifthishappens,presstheHELPbuttonontheremotecontrolfor10secondstoresetthelampclockbacktozero.
Whenthelamptimeclockisresettozero,theLAMPindicatorgoesout.Whenonlyonelampisreplaced,select[RESET]fromthe
menutoresetthelamphourused.DonotpresstheHELPbutton.
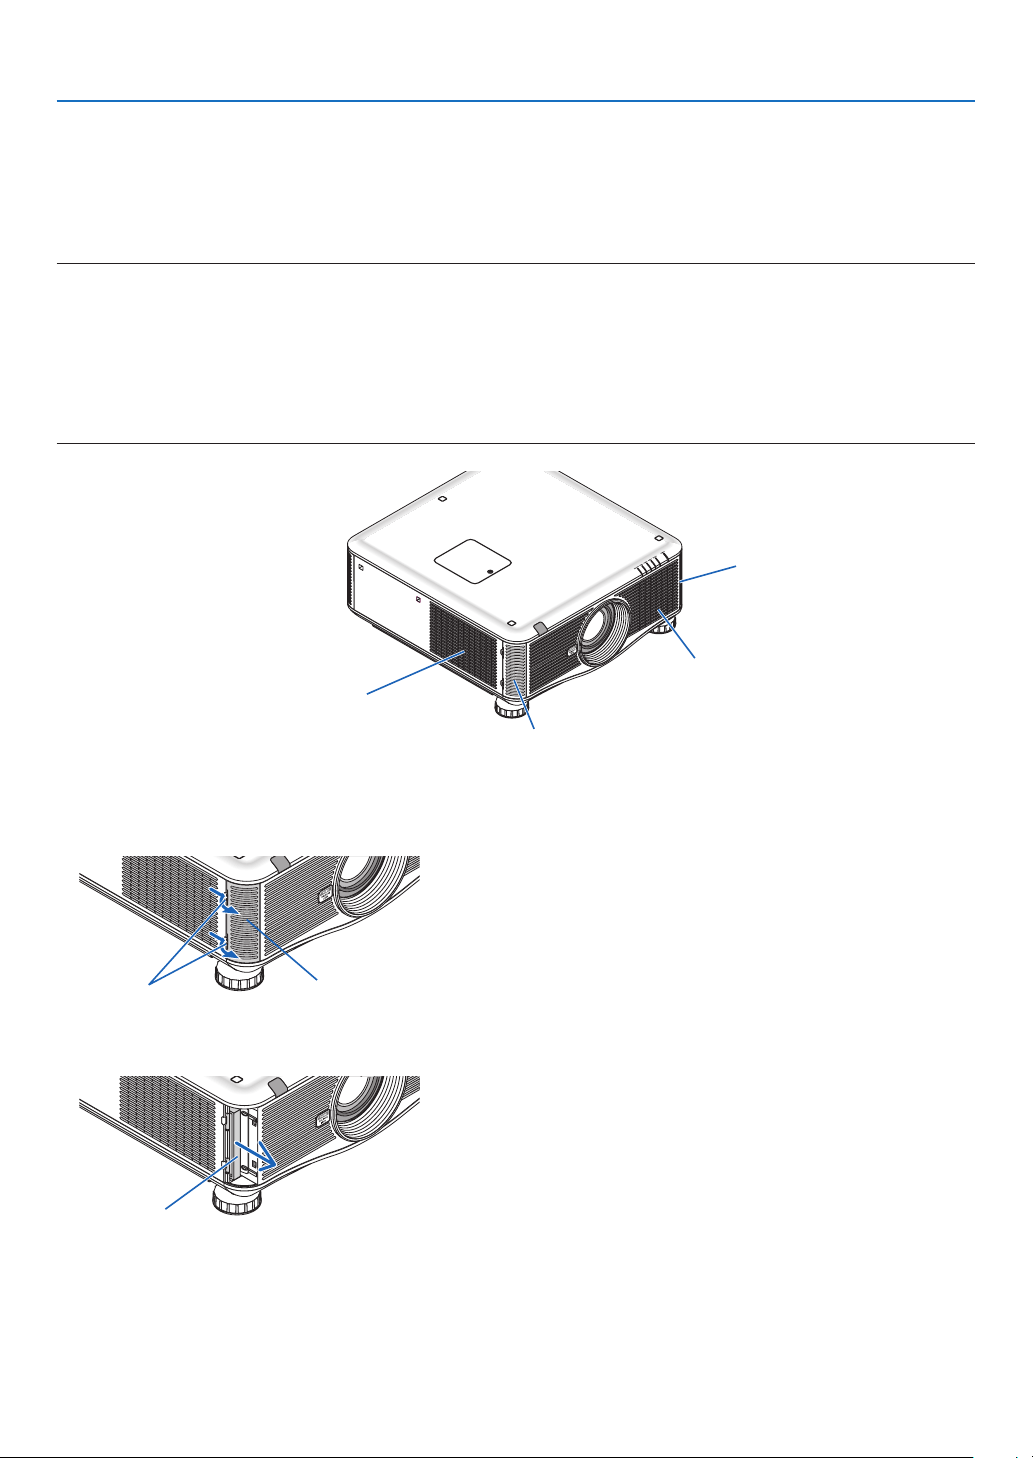
185
7. Maintenance
❺ Replacing the Filters
Therearetwolters,onelocatedatthefrontoftheprojectorandoneontheside.
Optionallters(twolter)areavailable.
Smalloneforthefront
Largeonefortheleftside
NOTE:
• Replacebothlterswiththenewonesatthesametime.
• Beforereplacingthelters,useavacuumcleanertovacuumdustanddirtfromthevents(inlet)oftheprojectoranduseadry
soft cloth to wipe dust off the cabinet.
• Theprojectorcontainshigh-precisionparts.Keepoutdustanddirtduringlterreplacement.
• Donotwashthelterwithwater.Waterwilldamagetheltermembrane.
• Attachthelterinthecorrectorientation.Failuretodosomaycausedustanddirttoenterinsidetheprojector,resultinginprojec-
tor malfunction.
Filter cover
Inlet
(The small filter is inside)
Filter cover
Inlet
(The large filter is inside.)
To replace the filters:
1. Push the positions shown (2 locations) to release the filter cover and remove it.
Filter cover
Buttons
2. Remove the two filters by pulling out.
Filter unit
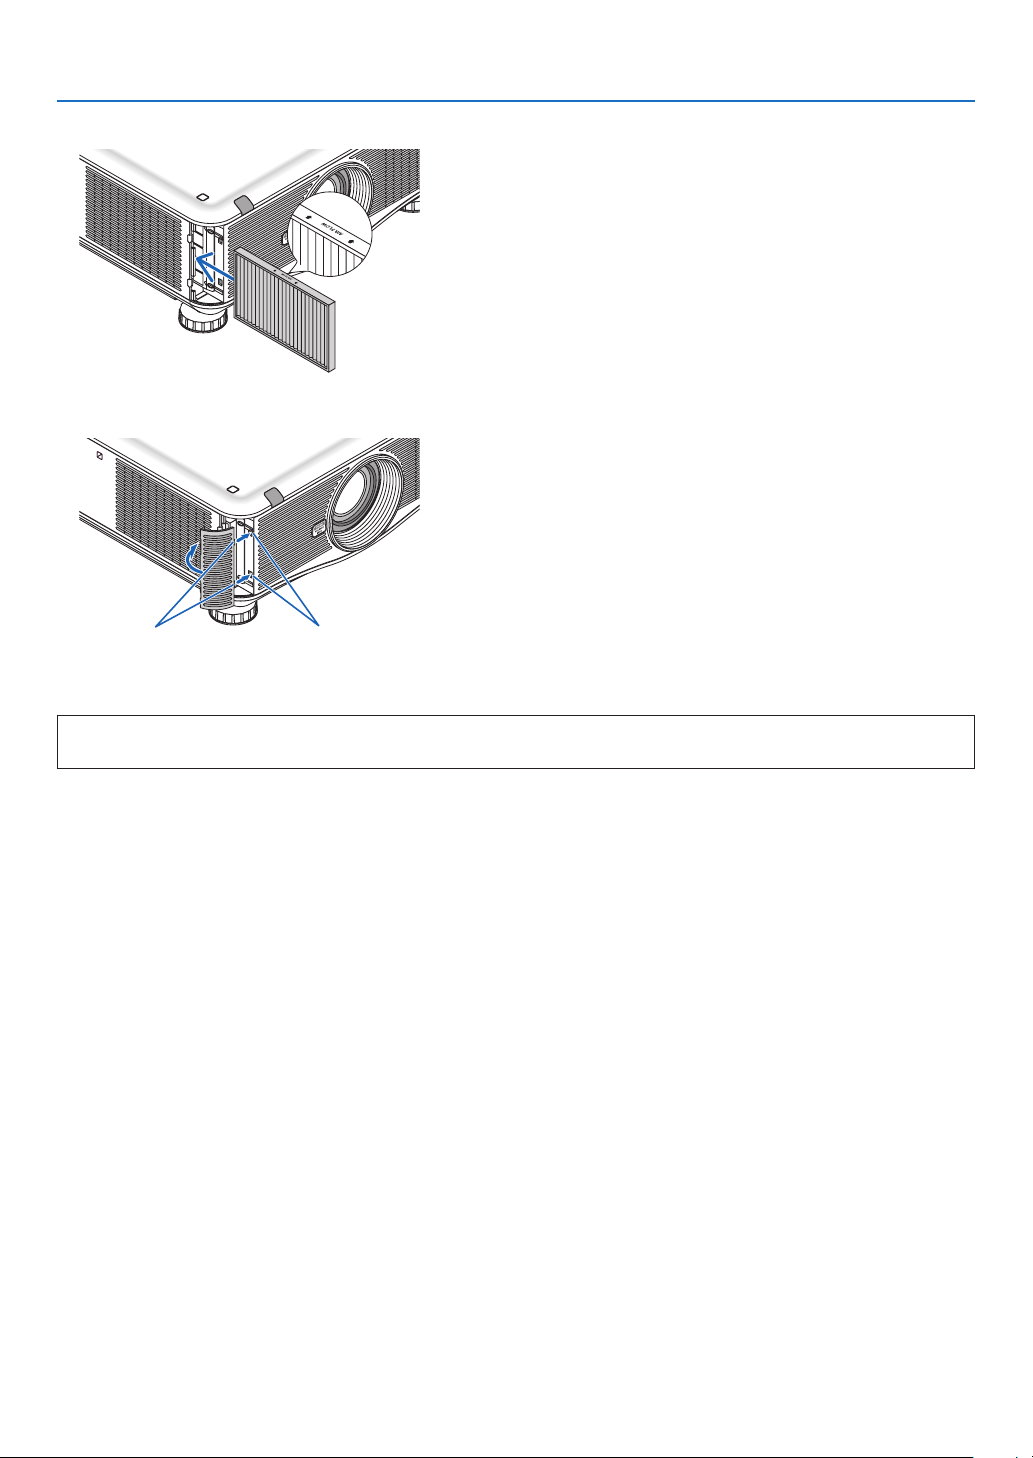
186
7. Maintenance
3. Insert new filters.
4. Put the filter cover back in.
ButtonsCatches
This completes the filter replacement.
Go on to the clearing lamp and filter hour meters.
To clear the lamp usage hours and the filter usage hours:
1. Place the projector where you use it.
2. Plug the power cord into the wall outlet, and then turn on the projector.
3. Clearthelampusagehoursandthelterusagehours.
1. From the menu, select [RESET] → [CLEAR LAMP HOURS] and reset the lamp usage hours.
2. Select[CLEARFILTERHOURS].andresetthelterusagehours.(→ page 138)

187
8. User Supportware
❶ Installing Software Program
Installation for Windows software
ThesoftwareprogramsexceptImageExpressUtility2forMacsupportWindows7,WindowsVista,andWindowsXP.
NOTE:
• Toinstalloruninstalleachsoftwareprogram,theWindowsuseraccountmusthave“Administrator”privilege(Windows7,Win-
dowsVista)or“ComputerAdministrator”privilege(WindowsXP).
• Exitallrunningprogramsbeforeinstallation.Ifanotherprogramisrunning,theinstallationmaynotbecompleted.
• TorunVirtualRemoteToolorPCControlUtilityPro4onWindowsXPHomeEditionandWindowsXPProfessional,“Microsoft
.NETFrameworkVersion2.0orlater”isrequired.TheMicrosoft.NETFrameworkVersion2.0orlaterisavailablefromMicrosoft’s
web page. Download and install it on your computer.
ImageExpressUtility2.0/PCControlUtilityPro4
1 InserttheaccompanyingNECProjectorCD-ROMintoyourCD-ROMdrive.
The menu window will be displayed.
TIP:
If the menu window will not be displayed, try the following procedure.
ForWindows7
1. Click“start”onWindows.
2. Click“AllPrograms”→“Accessories”→“Run”.
3. Type yourCD-ROM drive name (example:“Q:\”) and“LAUNCHER.EXE” in“Name”. (example: Q:\
LAUNCHER.EXE)
4. Click“OK”.
the menu window will be displayed.

188
8. User Supportware
2 Clickasoftwareprogramyouwishtoinstallonthemenuwindow.
The installation will start.
• Followtheinstructionsontheinstallerscreenstocompletetheinstallation.
TIP:
Uninstalling a Software Program
Preparation:
Exitthesoftwareprogrambeforeuninstalling.Touninstallthesoftwareprogram,theWindowsuseraccountmust
have“Administrator”privilege(Windows7andWindowsVista)or“ComputerAdministrator”privilege(WindowsXP).
•ForWindows7/WindowsVista
1 Click“Start”andthen“ControlPanel”.
The Control Panel window will be displayed.
2 Click“Uninstallaprogram”under“Programs”
The “Programs and Features” window will be displayed.
3 Selectthesoftwareprogramandclickit.
4 Click“Uninstall/Change”or“Uninstall”.
•Whenthe“UserAccountControl”windowsisdisplayed,click“Continue”.
Follow the instructions on the screens to complete the uninstallation.
•ForWindowsXP
1 Click“Start”andthen“ControlPanel”.
The Control Panel window will be displayed.
2 Double-click“Add/RemovePrograms”.
The Add / Remove Programs window will be displayed.
3 Clickthesoftwareprogramfromthelistandthenclick“Remove”.
Follow the instructions on the screens to complete the uninstallation.

189
8. User Supportware
VirtualRemoteTool/ViewerPPTConverter3.0
1. Connectyourcomputertotheinternetandvisitourwebsite(http://www.nec-display.com/dl/en/index.html).
2. Download“VirtualRemoteTool”or“ViewerPPTConverter3.0”from“Download”andsavean“.exe”leto
your computer.
File name is different depending on the version of the software program.
3. Clickthe“.exe”le.
The installation will start.
Follow the instructions on the installer screens to complete the installation.
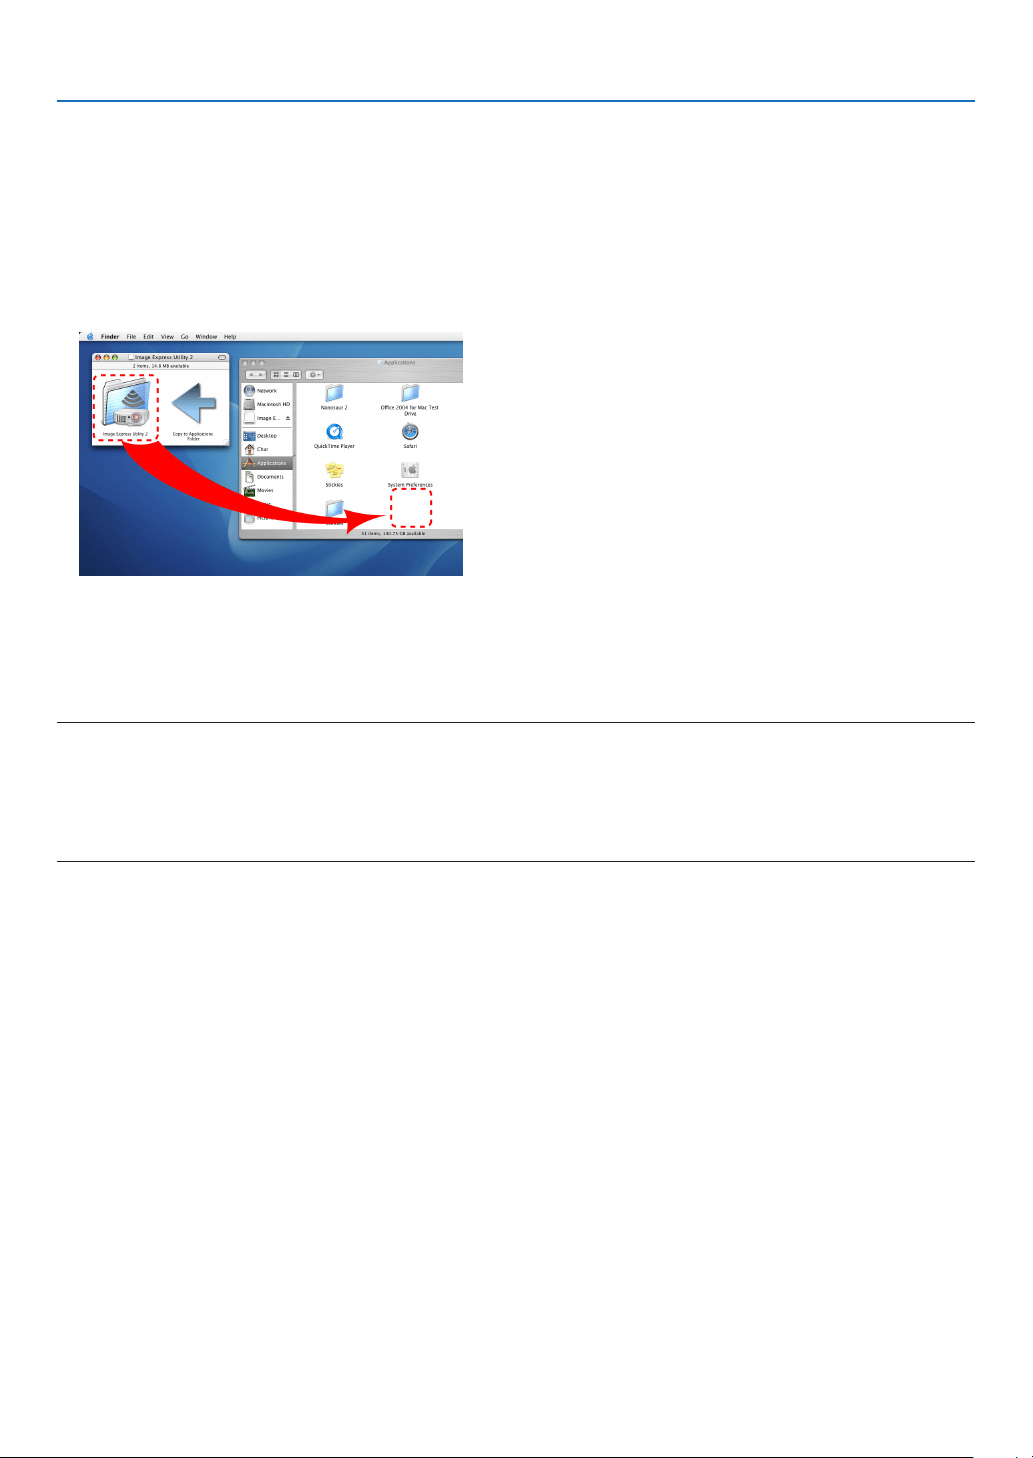
190
8. User Supportware
Installation for Macintosh software
ImageExpressUtility2forMacsupportsMacOSX.
1 InserttheaccompanyingNECProjectorCD-ROMintoyourCD-ROMdrive.
The menu window will be displayed.
2 Double-clicktheCD-ROMicon.
3 Double-clickthe“MacOSX”folder.
4 Double-click“ImageExpressUtility2(Intel).dmg”.
The“ImageExpressUtility2”folderwillbedisplayed.
• IfyourMacisPowerPC-based,double-click“ImageExpressUtility2.dmg”.
5 Movethe“ImageExpressUtility2”folderto“Applications”folderusingadrag-and-dropoperation.
TIP:
•Uninstallingasoftwareprogram
1. Putthe“ImageExpressUtility2”foldertotheTrashicon.
2. PutthecongurationleofImageExpressUtility2totheTrashicon.
• ThecongurationleofImageExpressUtility2islocatedin“/user/yourusername/library/Preferences/jp.co.
nec.nevt.ImageExpressUtility.plist”.
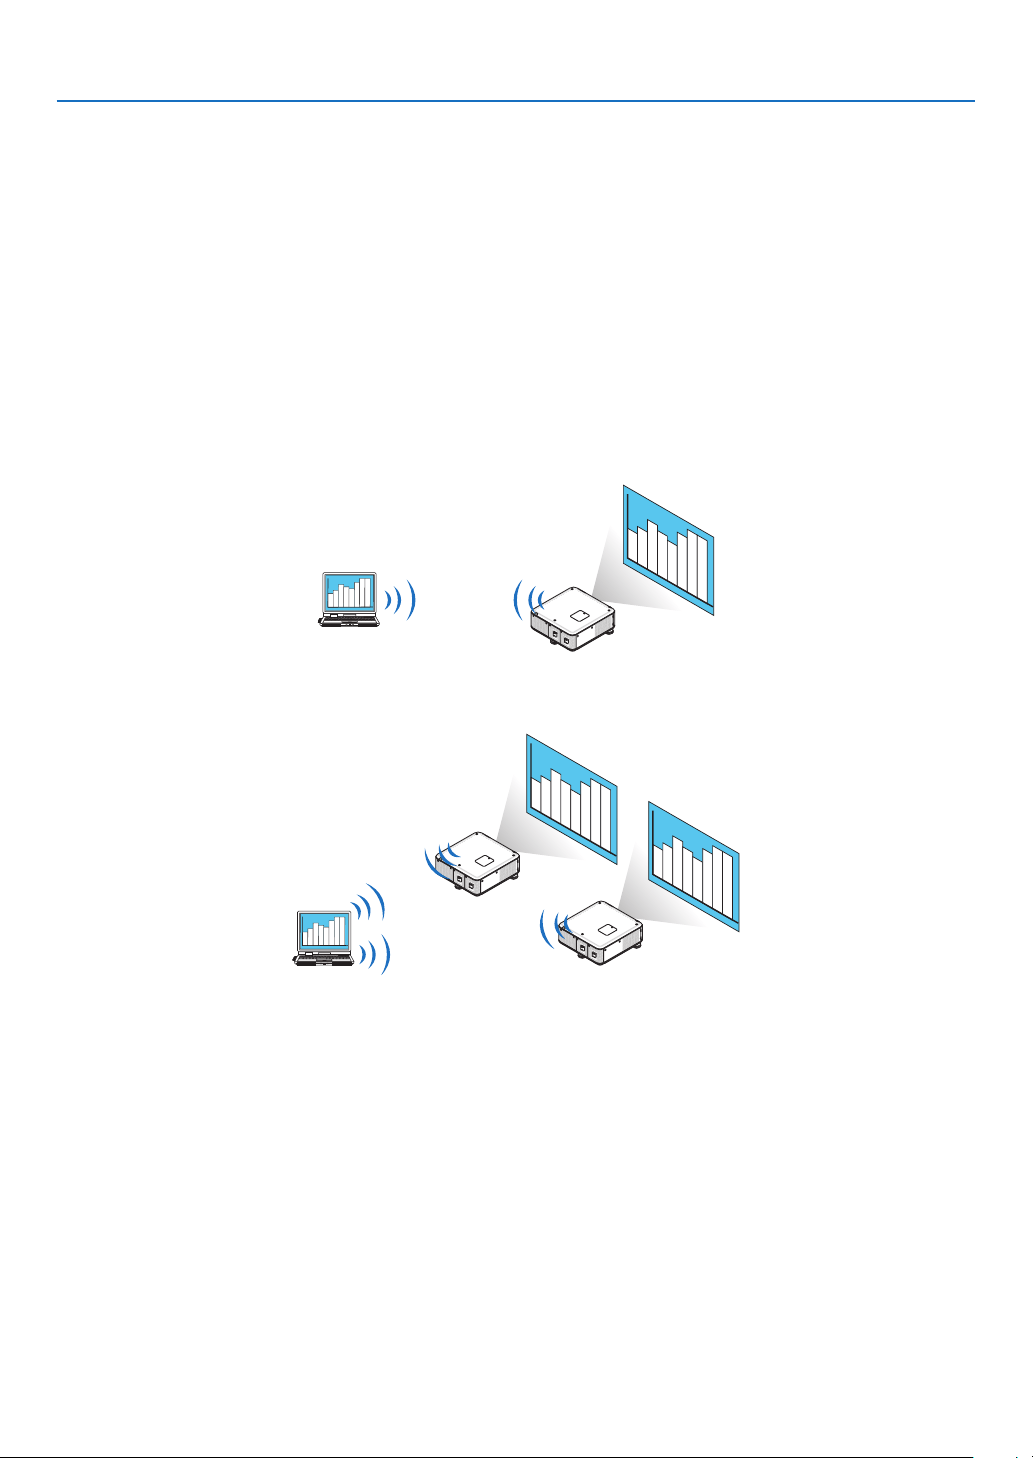
191
8. User Supportware
❷ Projecting Images or Videos from the Projector over a LAN
(Image Express Utility 2.0)
What you can do with Image Express Utility 2.0
• UsingImageExpressUtility2.0allowsyoutosendthescreensofyourcomputerstotheprojectorviawired/wire-
lessLAN.
Theprojectedimagescanbesentfromacomputertonotonlyoneprojectorbutalsototwoormoreprojectorsat
thesametime.
When“MeetingMode”isused,projectedimagescanbesentandreceivedbetweentwoormorecomputers.
• High-speed,high-qualityimagetransmissionsbasedonNEC’soriginalcompressionalgorithm
NEC’soriginalcompressionalgorithmallowshigh-qualityimagestobesentoverthenetworkathighspeed,from
yourcomputertotheprojector.
• Simultaneousprojectionbymultipleprojectors
Imagescanbesentfromacomputertonotonlyoneprojectorbutalsototwoormoreprojectorsatthesametime.
• “EasyConnection”functionforconnectingwirelessLAN
Byusing“EasyConnection”function*
1
,thecomplicatedsettingofwirelessLANcanbesimplied.
*
1
ThisfunctioncanbeusedwhenWindowsXPisusedastheOSandwhenyouhavea“ComputerAdministrator”
privilege.IftheOSisWindows7/WindowsVista,inputoflogonpasswordas“Administrator”maybeprompted.
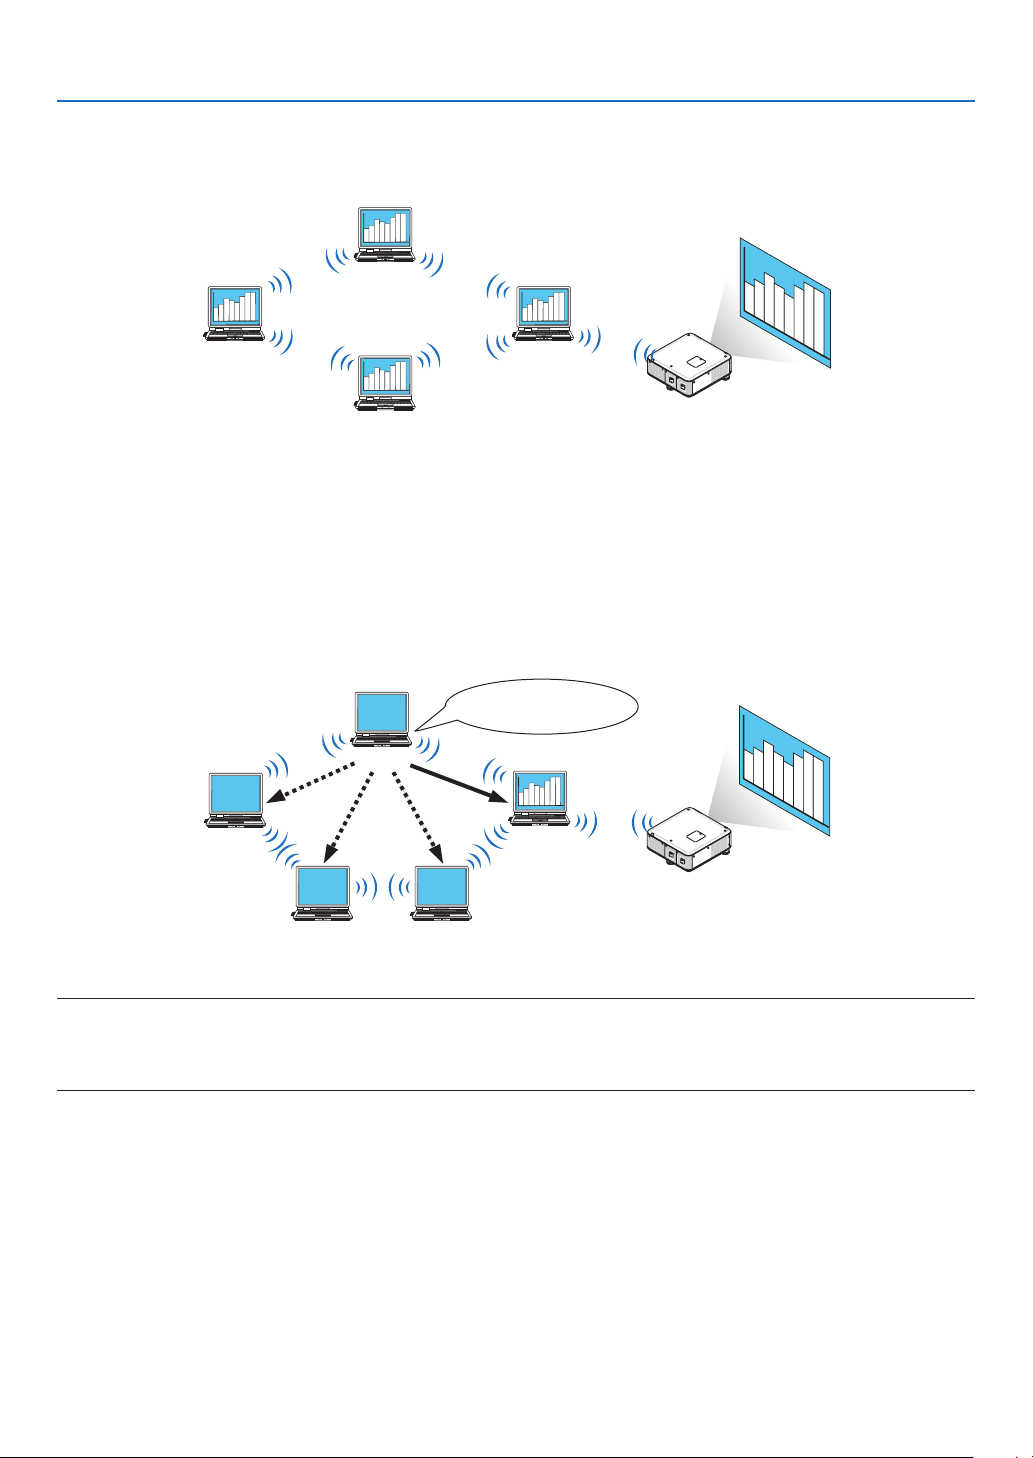
192
8. User Supportware
• Projectedimagescanbetransferredandsavedtocomputers.
When“MeetingMode”isused,projectedimagescanbesenttothecomputersofalltheparticipants(attendants)
ofa“Meeting”.Thereceivedimagescanbesavedtoyourcomputerwithamemo(textdata)attached.
Presenter
Attendant
Attendant
Attendant
• 1-clickswitchingofpresenter
Whenswitchingtoanotherpresenterduringtheconference,theparticipants(attendants)cansimplyclickabutton
toswitchovertothenewpresenter.
• Centralmanagementoftheprojectingcomputer
UsingtheTrainingModeallowsyoutouseasinglecomputer(Manager)tomanagewhichcomputer(Attendant)
projects.Possibleoperationincludesswitchingprojectingcomputerstoprojectfrom,aswellastemporarilytermi-
natingcommunicationwiththeprojector.
Mr� D, please start
your presentation�
Manager
Attendant CAttendant B
Attendant D
(presenter)
Attendant A
NOTE::
TheTrainingModeisnotinstalledviathe“Typical”installationoptionwhenImageExpressUtility2.0isinstalled.
TouseTrainingMode,select“Extension”installationoptionontheinstallselectionscreenthatisdisplayedwhileImageExpress
Utility2.0installationisinprogress,andselect“TrainingMode(Attendant)”or“TrainingMode(Manager)”.
Connecting the projector to a LAN
ConnecttheprojectortotheLANbyfollowingtheinstructionsin“ConnectingtoaWiredLAN”(→page171),“Con-
nectingtoaWirelessLAN”(→page172)and“9ApplicationMenus-NETWORKSETTINGS”(→page141)
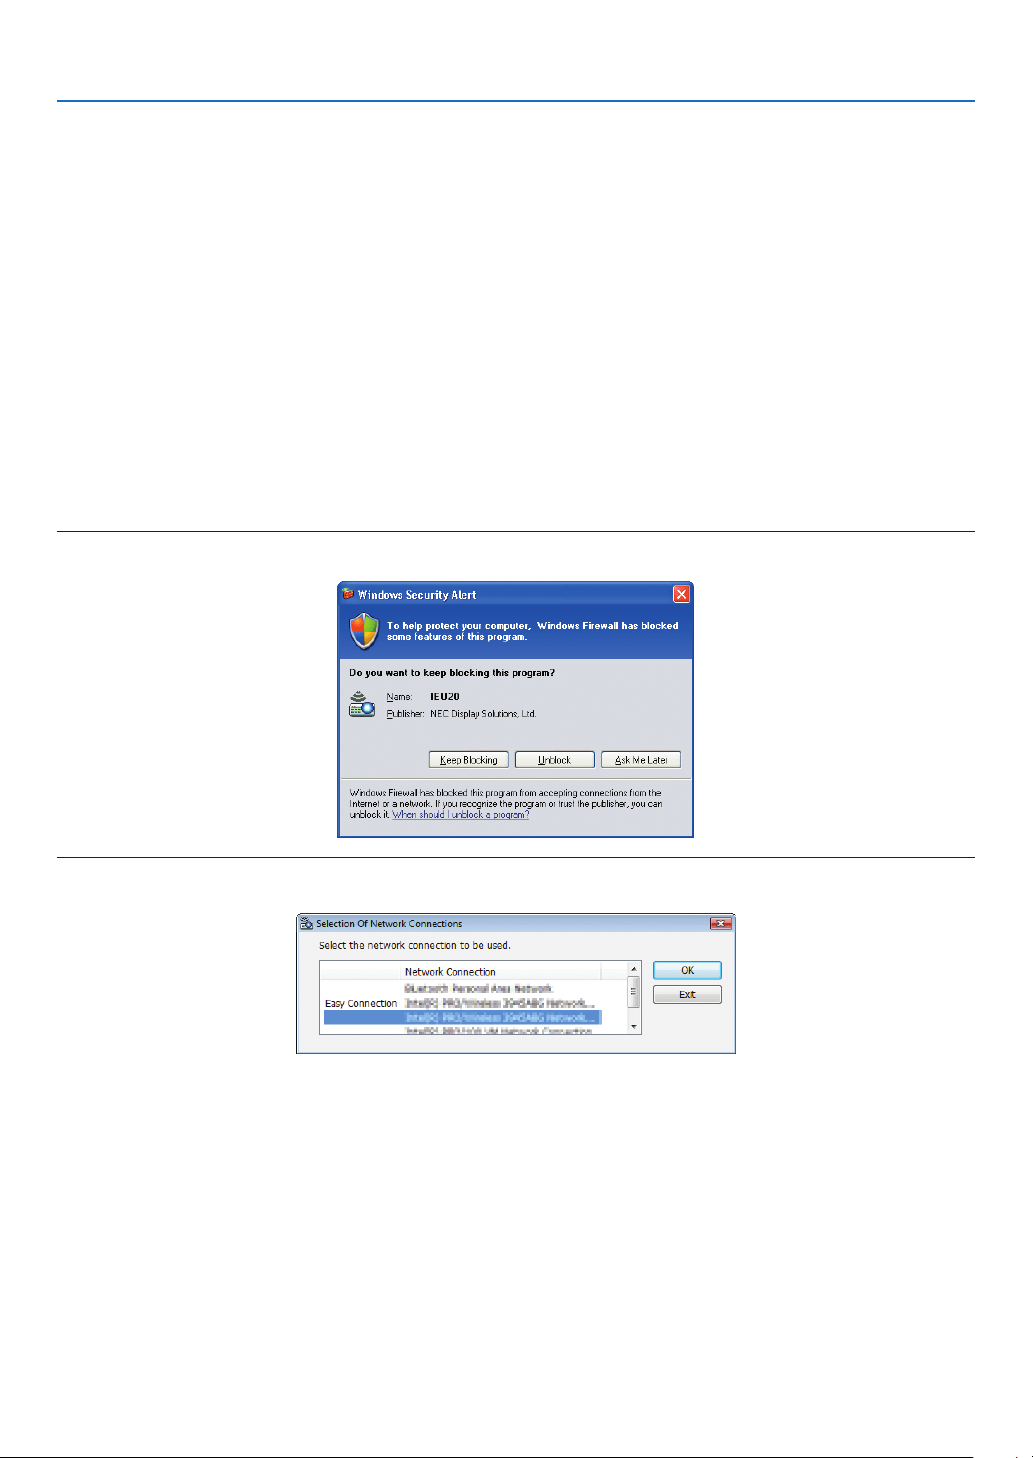
193
8. User Supportware
Basic Operation of Image Express Utility 2.0
ThissectionexplainsthefollowingthreecasesasexamplesofoperatingImageExpressUtility2.0.
(1)Transferringimagestotheprojector
(2)Holdingaconference
(3)Participatinginaconference
Sending Images to Projector
•Connectingprojector
1 TurnonthepowertotheprojectorforwhichLANhasbeenset.
2 ClickWindows[Start]→[AllPrograms]→[NECProjectorUserSupportware]→[ImageExpressUtility2.0]
→[ImageExpressUtility2.0],inthatorder.
The “Selection Of Network Connections” window will be displayed.
A list of the network equipment connected to your computer will be displayed.
IMPORTANT:
AscreenliketheonebelowisdisplayedwhenthesoftwareisstartedonaPCinstalledwithWindowsXPServicePack2(SP2)(orlater).
Click“Unblock”ifthisisdisplayed.
3 Selectthenetworkequipmentthatistobeusedandclick[OK].
Select the network device displaying “Easy Connection” if the product LAN setting is for “Easy Connection.” This
will call up the “Projector List” window.
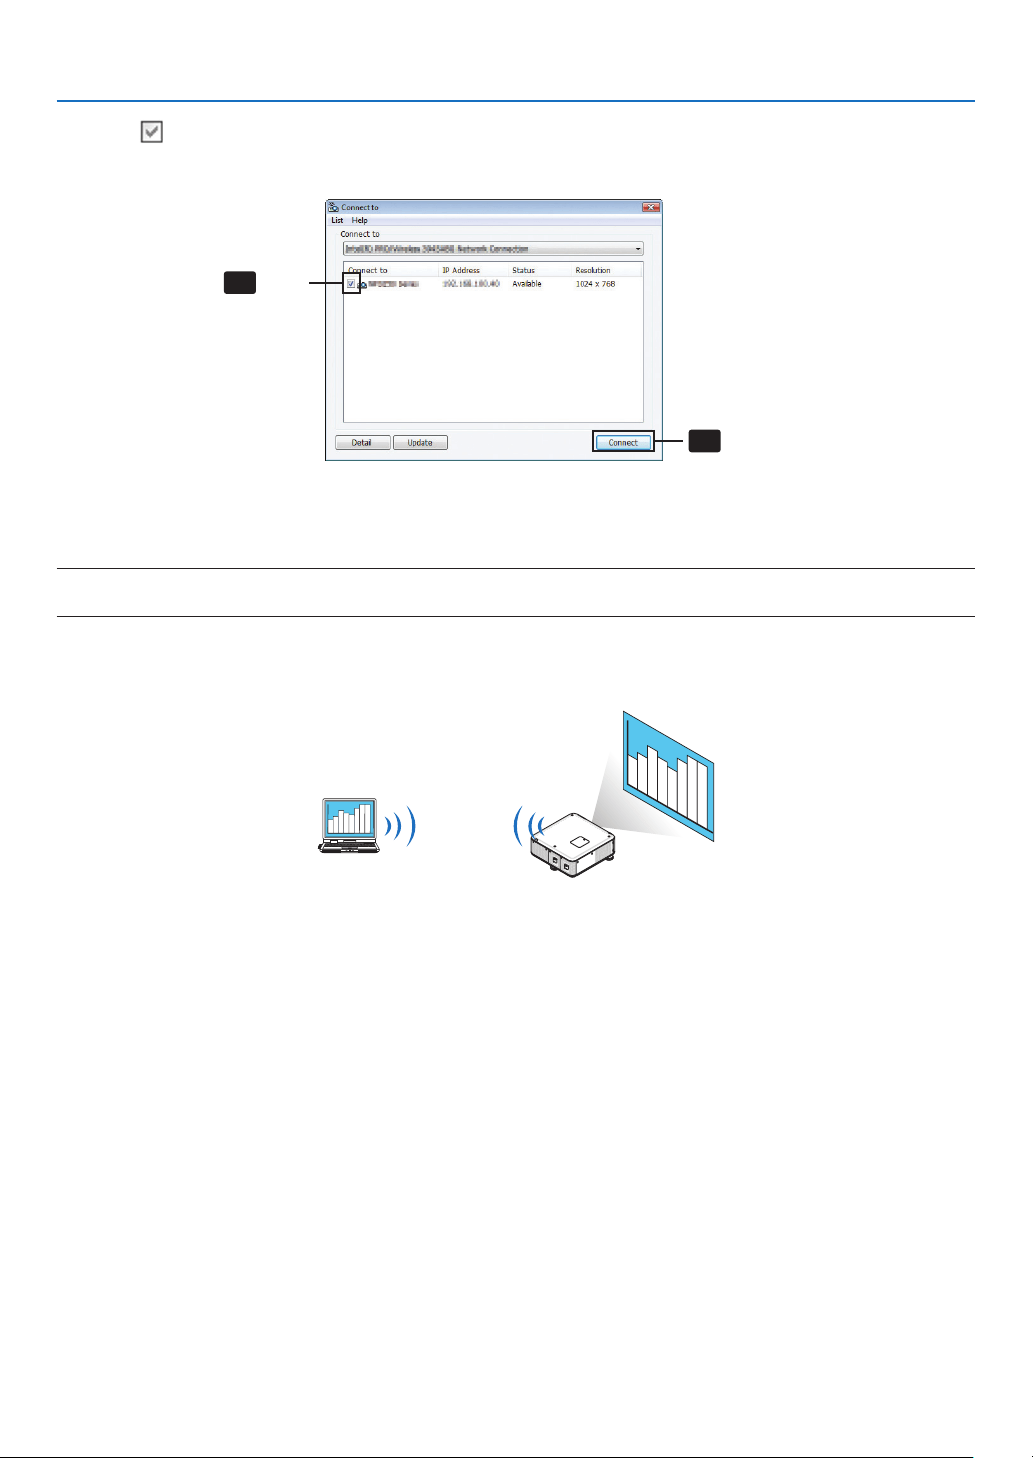
194
8. User Supportware
4 Check( )theprojectortoconnectandclick[Connect].
Ifthenameoftheprojectortoconnectisnotonthelistorifitishidden,click[Update].
4
-1
4-2
Click
Click
The screen of your computer will be projected from the projector.
At this time, the input signal of the projector will automatically change to “NETWORK”.
NOTE:
• Whentheprojectorisfound,“1280×800”willbedisplayedintheresolutioneld.
•Transferringimages
Whenyourcomputerisconnectedtotheprojector,thescreenofthecomputerisprojectedfromtheprojectorasis.To
makeyourpresentationbyusingaPowerPointle,openthePowerPointleandstartyourpresentation.
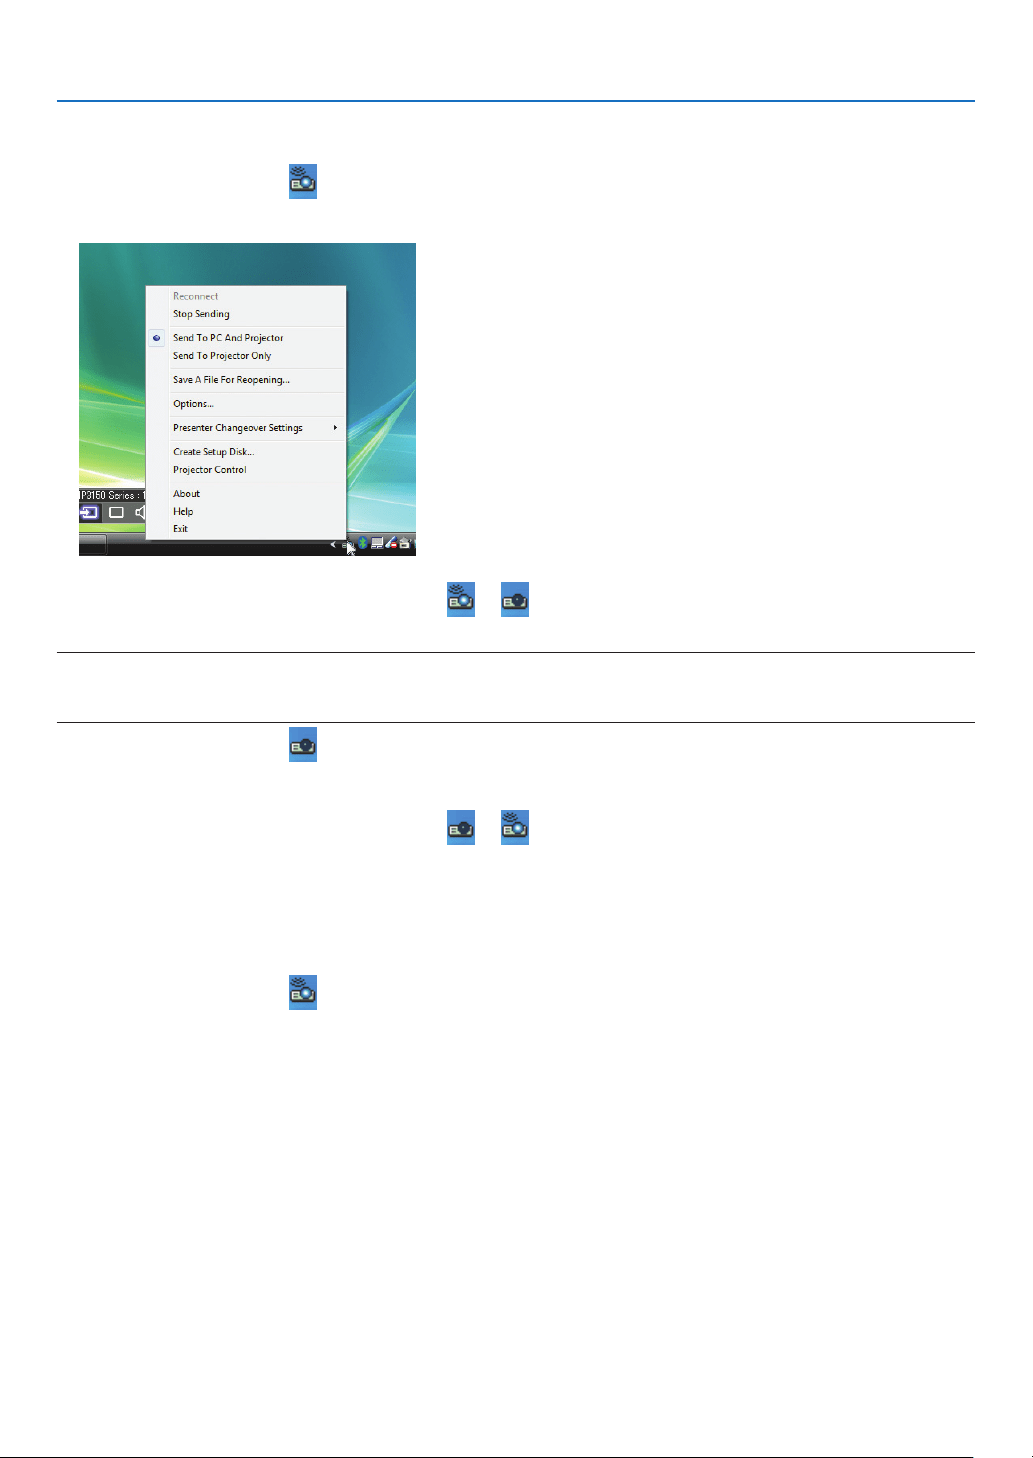
195
8. User Supportware
•Stoppingorresumingthetransmissionofimages
Thetransmissionofthescreenofthecomputertotheprojectorcanbetemporarilystoppedandthenresumed.
1 Clicktheprojectoricon( )ontheWindowstaskbar.
A pop-up menu will be displayed.
2 Click[StopSending].
The projector icon on the taskbar will change ( → ).
NOTE:
Evenifthescreenofthecomputerischangedinthisstatus,theimageprojectedfromtheprojectordoesnotchange.
Tomanipulatethescreenthatshouldnotbedisclosed(projectedfromtheprojector),stoptransmission.
3 Clicktheprojectoricon( )ontheWindowstaskbar.
A pop-up menu will be displayed.
4 Click[StartSending].
The projector icon on the taskbar will change ( → ).
The transmission of the screen for the computer will be resumed, and the current screen of the computer will be
projected from the projector.
•Endthetransmissionofimages
ExitImageExpressUtility2.0.
1 Clicktheprojectoricon( )ontheWindowstaskbar.
A pop-up menu will be displayed.
2 Click[Exit].
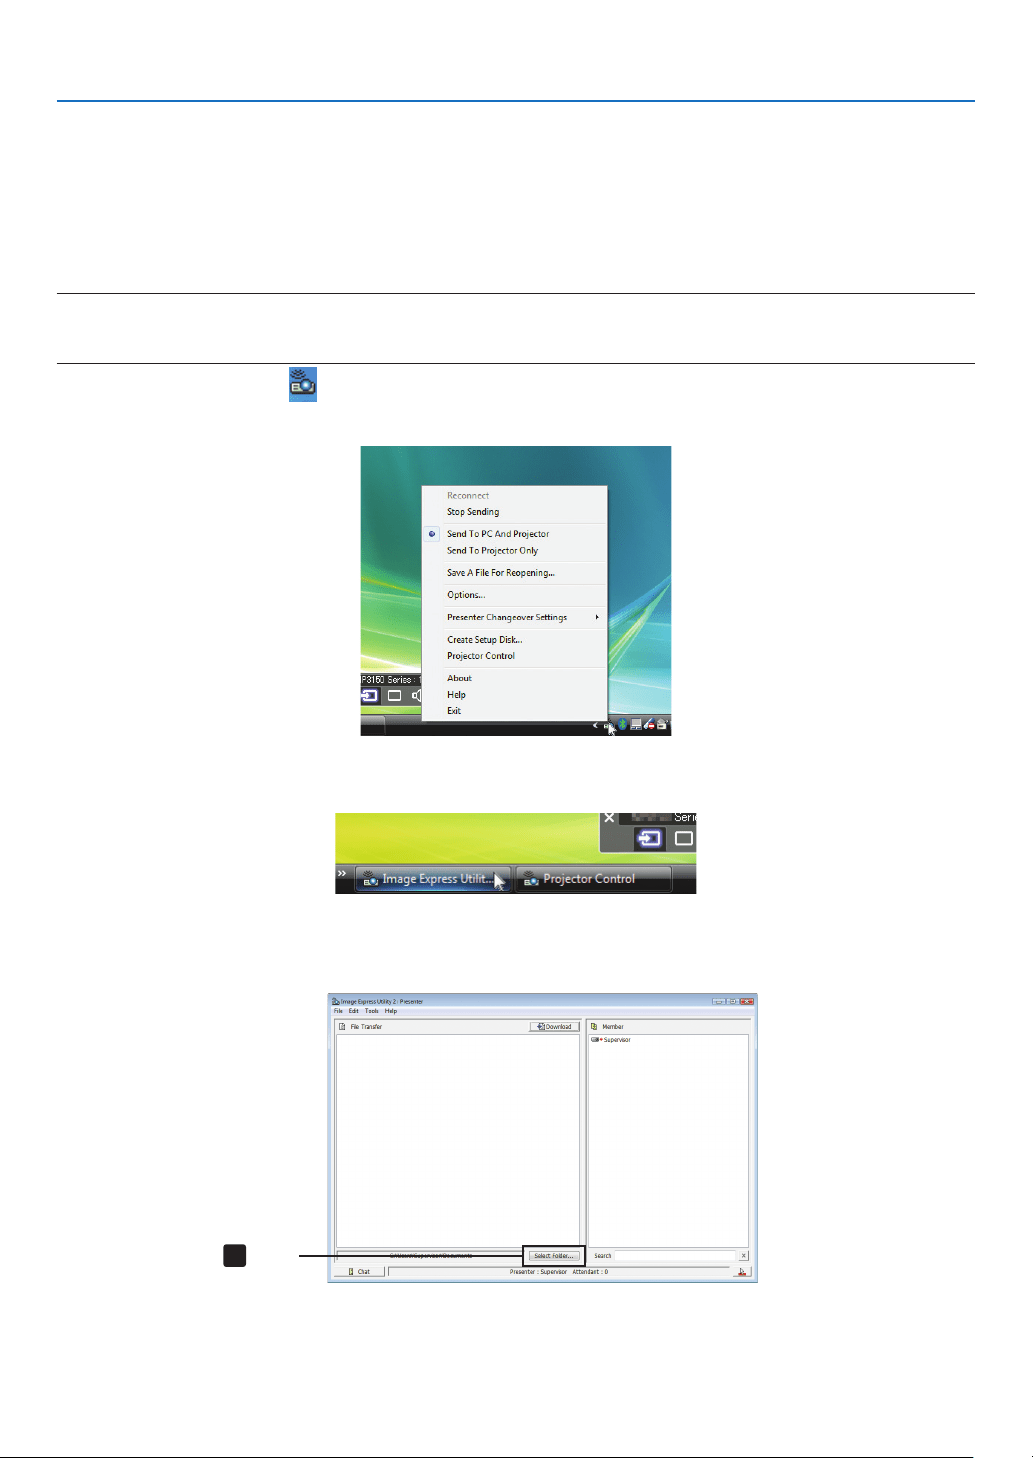
196
8. User Supportware
Holding Conferences
•Holdingconferences
1 Followsteps1through4in“Connectingprojector”of“SendingImagestoProjector”(→ page 193).
The screen of your computer will be projected from the projector.
•Disclosealetotheparticipantsoftheconference.
NOTE:
Todisclosealetotheparticipants,selectioncanbemadeonlyinfolderunits.
Therefore,afolderonlyhavinglesthatcanbedisclosedtotheparticipantsmustbecreatedinadvance.
1 Clicktheprojectoricon( )ontheWindowstaskbar.
A pop-up menu will be displayed.
2 Beforeclicking[SendtoPCandProjector],checkthatthereisa“•”markapplied.
3 Clickthe[ImageExpressUtility2.0]buttononthetaskbar.
The presenter window will be opened.
4 Click[SelectFolder].
4
Click
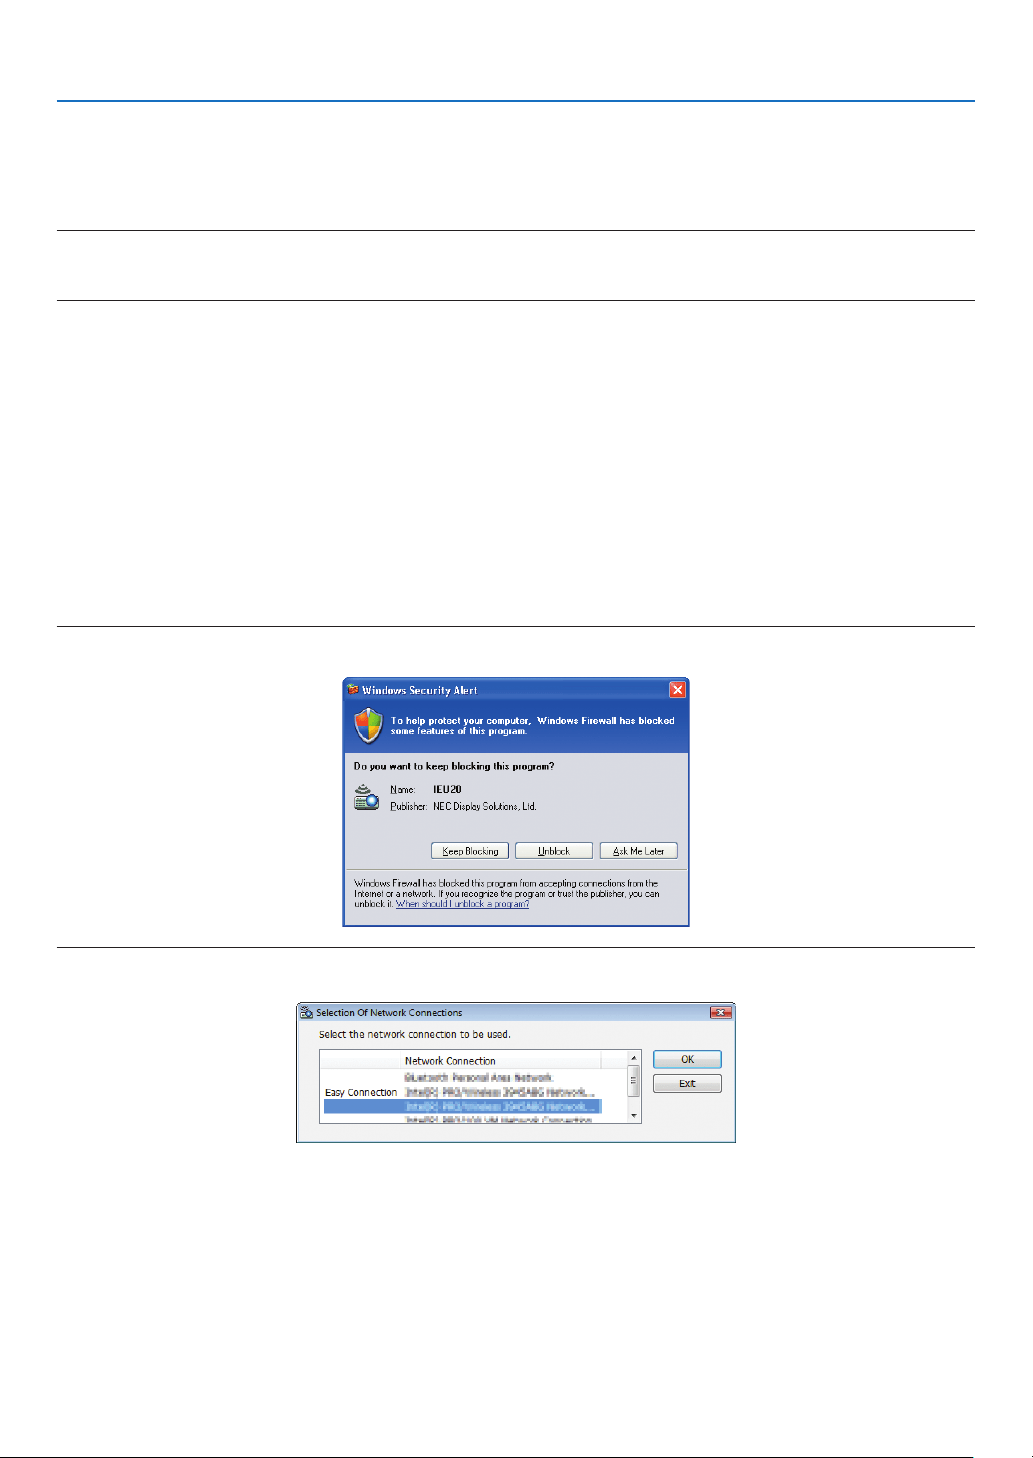
197
8. User Supportware
5 Selectafoldersavingtheletobedisclosedtotheparticipants,andclick[OK].
The file in the selected folder will be displayed in the list of files to transfer.
6 Click[Download].
The file will be shown to the participants.
NOTE:
Whenthecomputerisconnectedtotheprojector,thecomputerscreenthatisinofbeingprogressisalsoprojectedfromtheprojec-
tor.Tomanipulateascreenthatshouldnotbeshown(notprojected),temporarilystopthetransmission(→ page 195).
•Endingconference
1 Click[File]inthepresenterwindow,andclick[Exit].
You can also end the conference by clicking [×] at the upper right of the presenter window.
Participating in Conference
•Participatinginconferences
1 ClickWindows[Start]→[AllPrograms]→[NECProjectorUserSupportware]→[ImageExpressUtility2.0]
→[ImageExpressUtility2.0],inthatorder.
The “Selection Of Network Connections” window will be displayed.
A list of the network equipment connected to your computer will be displayed.
IMPORTANT:
AscreenliketheonebelowisdisplayedwhenthesoftwareisstartedonaPCinstalledwithWindowsXPServicePack2(SP2)(orlater).
Click“Unblock”ifthisisdisplayed.
2 Selectthenetworkequipmentthatistobeusedandclick[OK].
Select the network device displaying “Easy Connection” if the product LAN setting is for “Easy Connection.” This
will call up the “ Meeting List” window.
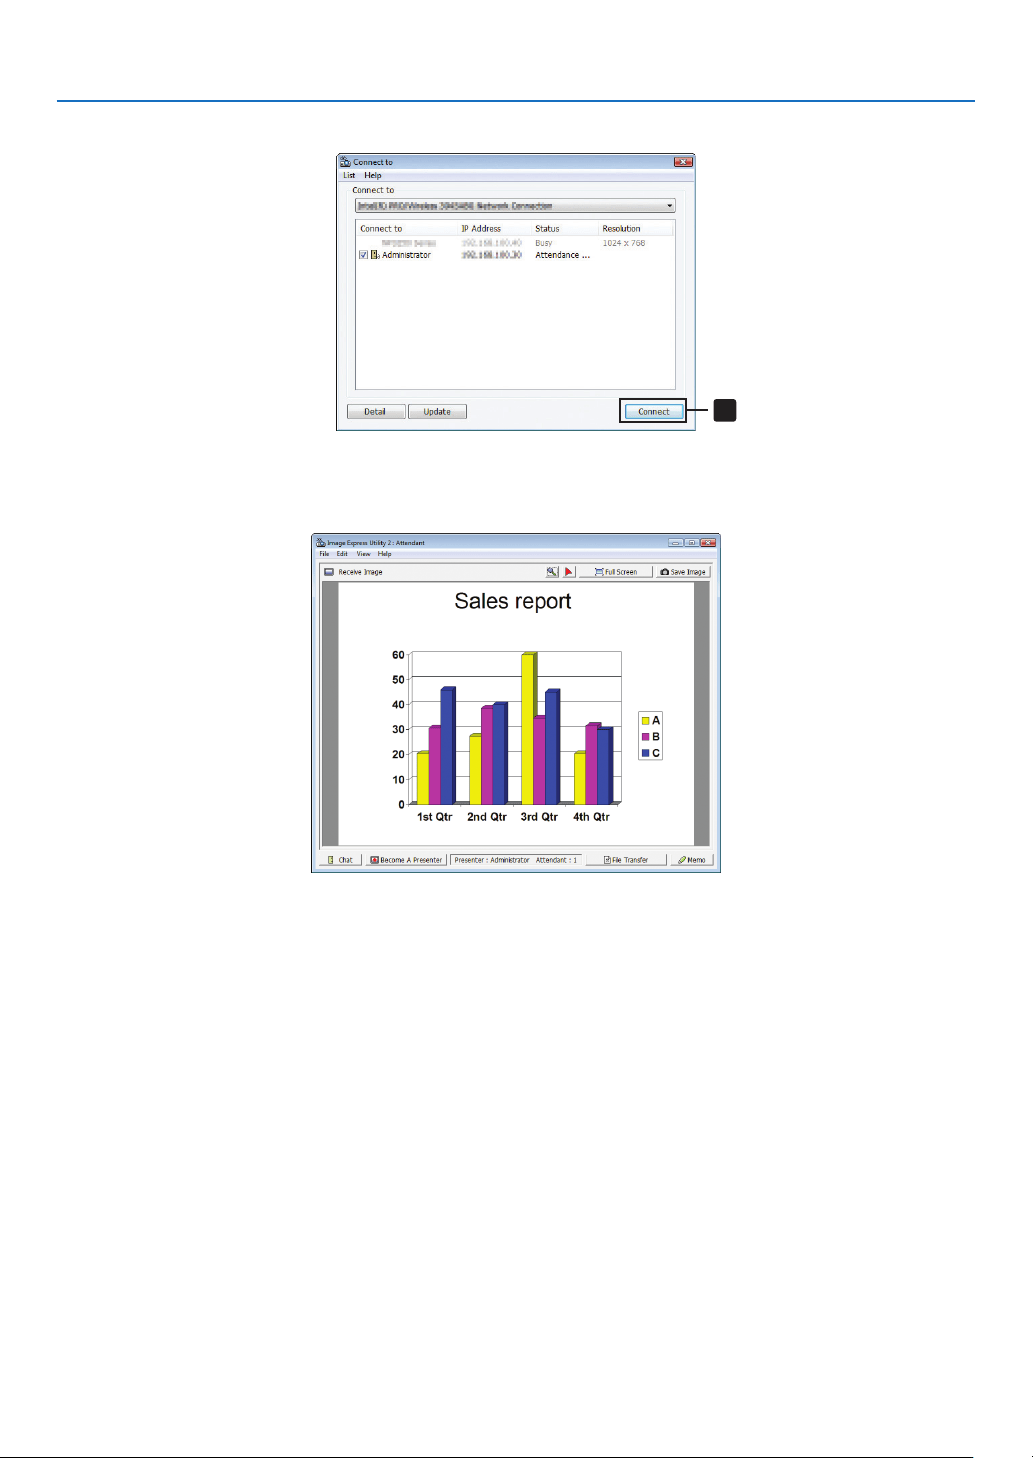
198
8. User Supportware
3 ClicktheMeetingNametoparticipate,andclick[Connect].
3
Click
The computer will be connected to the selected conference and the attendant window will be displayed.
Ifthepresenterselects“SendtoPCAndProjector”,theimageprojectedfromtheprojectorisdisplayedintheat-
tendant window.
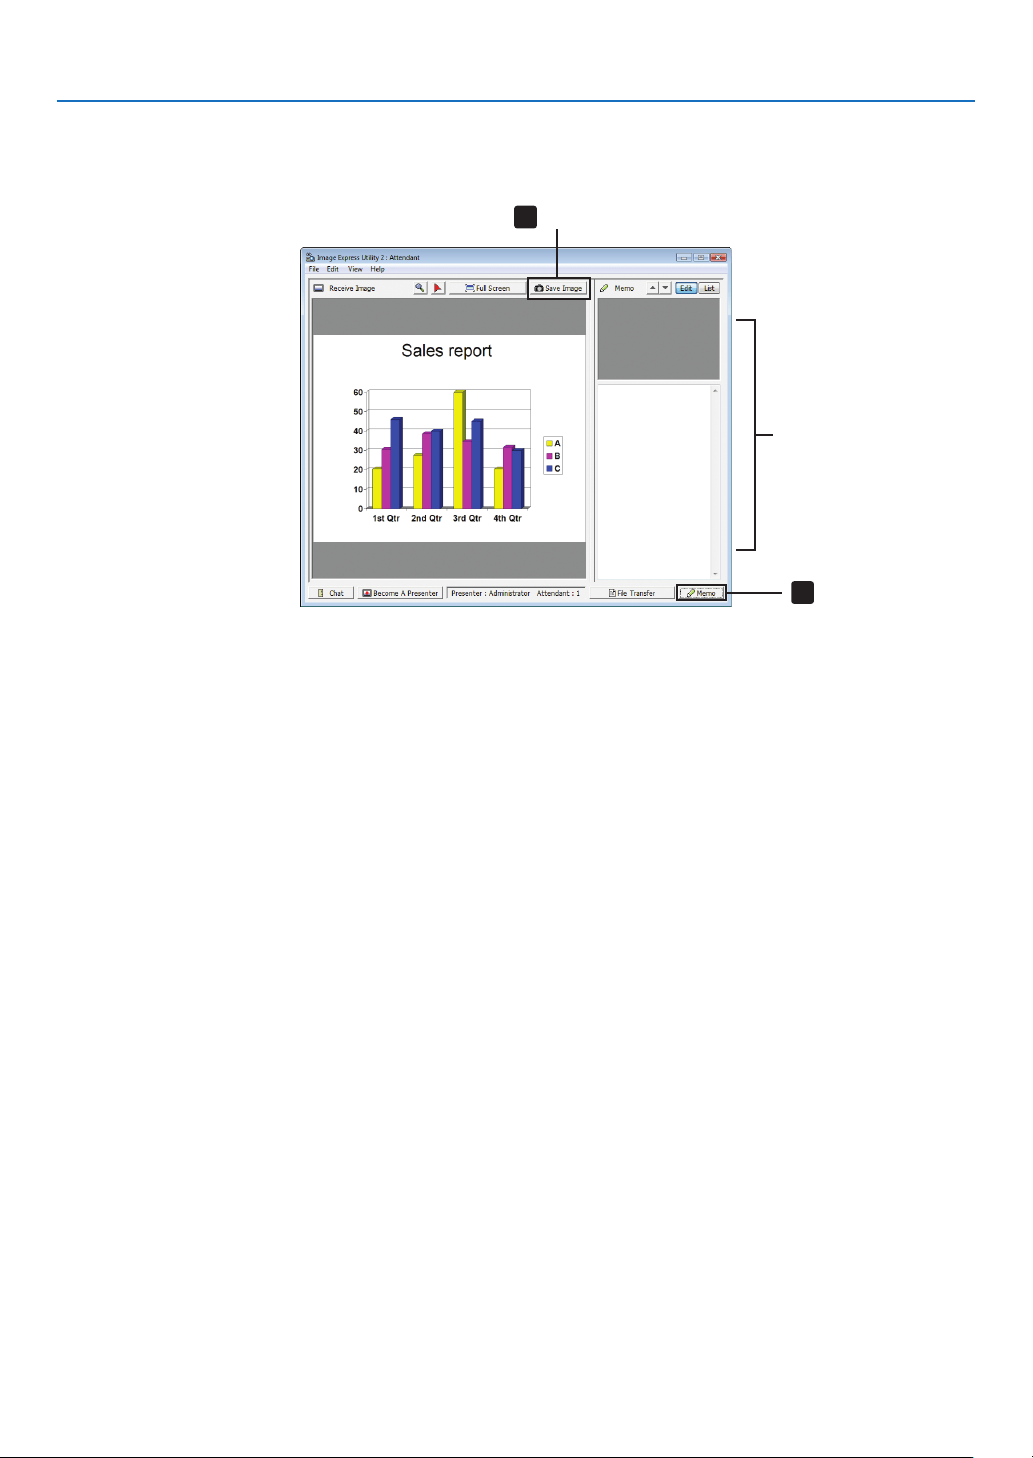
199
8. User Supportware
•Savingreceivedimages
1 Click[Memo]intheattendantwindow.
A memo pane will be displayed.
2
1
Click
Memo pane
Click
2 Click[SaveImage]intheattendantwindow.
The image displayed in the attendant window will be saved.
• Thesavedimageisaddedtothememolistandathumbnailisdisplayed.
• Amemocanbeattachedtothesavedimage.
REFERENCE:
• IncaseofWindowsXP,acreatedleissavedto“MyDocuments\ImageExpress\”underthedefaultsettings.IncaseofWindows
7/WindowsVista,“Document\ImageExpress\”isthedefaultfoldertosaveacreatedle.
• Afolderiscreatedbelowthedefaultfolderbasedonthetimeanddateoftheconference,andtheimageissavedtoaleinthe
created folder.
Forexample,ifaconferenceisheldat11:20onMay14,2009,thedefaultfoldernameonWindowsXPwillbe“MyDocuments\
ImageExpress\2009-05-14_11-20_MeetingRecords”.
Inthisfolder,anHTMLlenamed“MeetingRecords”iscreated.
Thesavedimageissavedin“Images”folder.
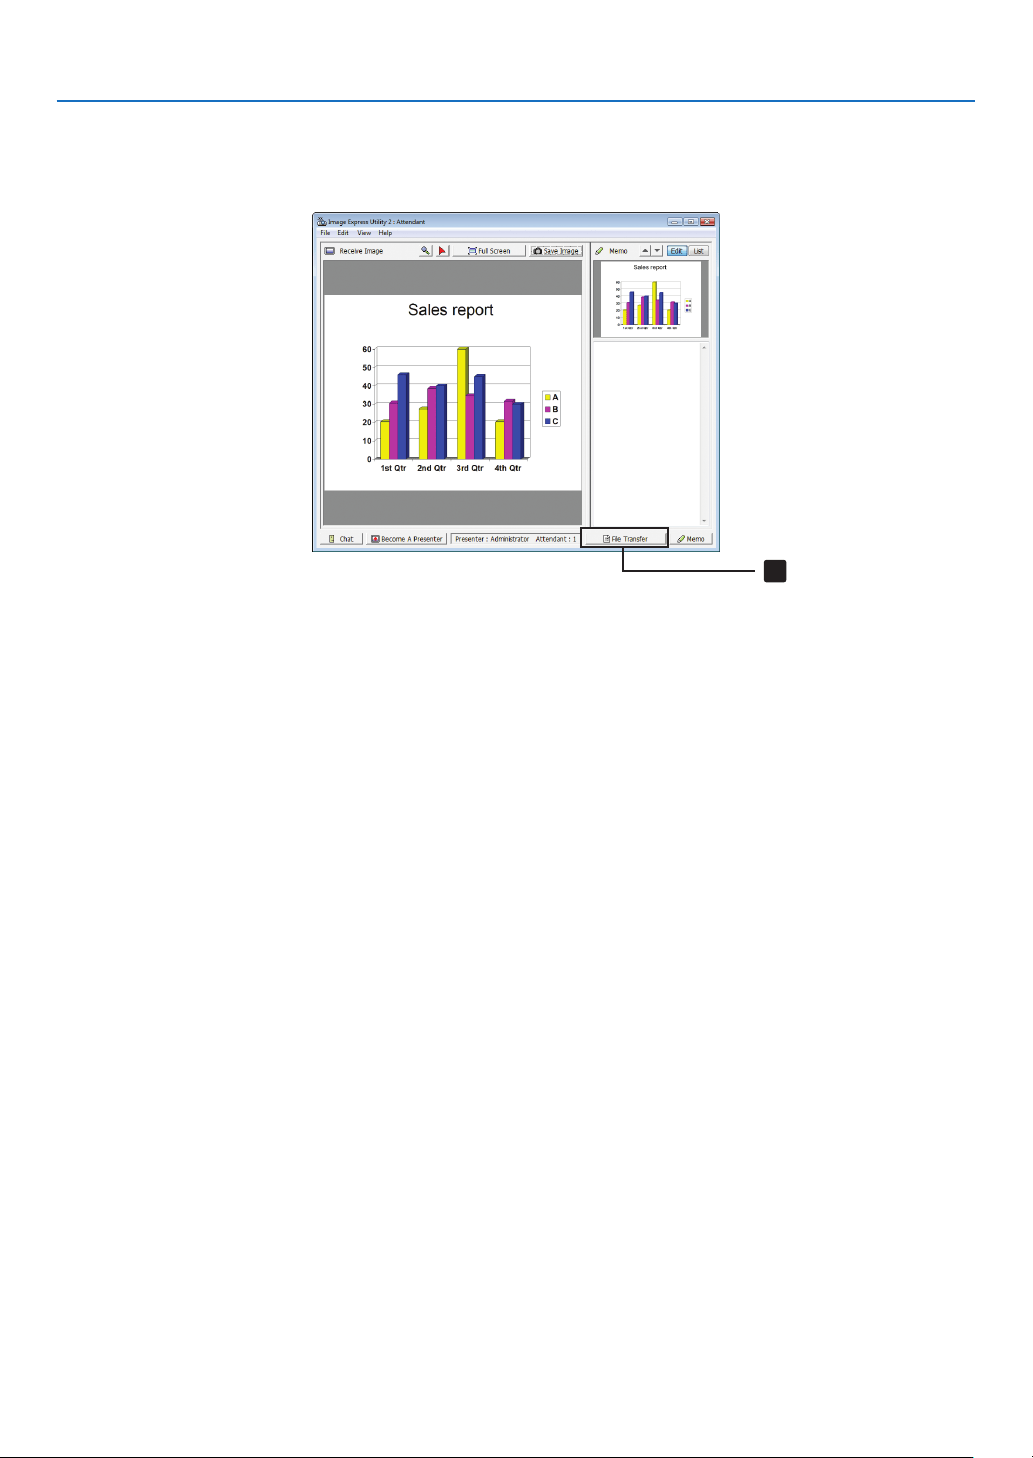
200
8. User Supportware
•Downloadingdisclosedle
1 Click[FileTransfer]intheattendantwindow.
The “File Transfer” window will be opened.
1
Click
2 Selectaletodownload,andclick[Download].
Downloading will begin.
The progress of the downloading is displayed at the lower left of the window.
3 Whendownloadingiscomplete,click[File]inthe“FileTransfer”window,andclick[Exit].
The “File Transfer” window will be closed.
REFERENCE:
• If“OpenAfterDownloading”ischecked,theleisopenedbyspeciedWindowsapplicationsoftwareafterdownloadingiscom-
plete.
• IncaseofWindowsXP,acreatedleissavedto“MyDocuments\ImageExpress\”underthedefaultsettings.IncaseofWindows
7/WindowsVista,“Document\ImageExpress\”isthedefaultfoldertosaveacreatedle.
• Afolderiscreatedbelowthedefaultfolderbasedonthetimeanddateoftheconference,andtheimageissavedtoaleinthe
created folder.
Forexample,ifaconferenceisheldat11:20onMay14,2009,thedefaultfoldernameonWindowsXPwillbe“MyDocuments\
ImageExpress\2009-05-14_11-20_MeetingRecords”.
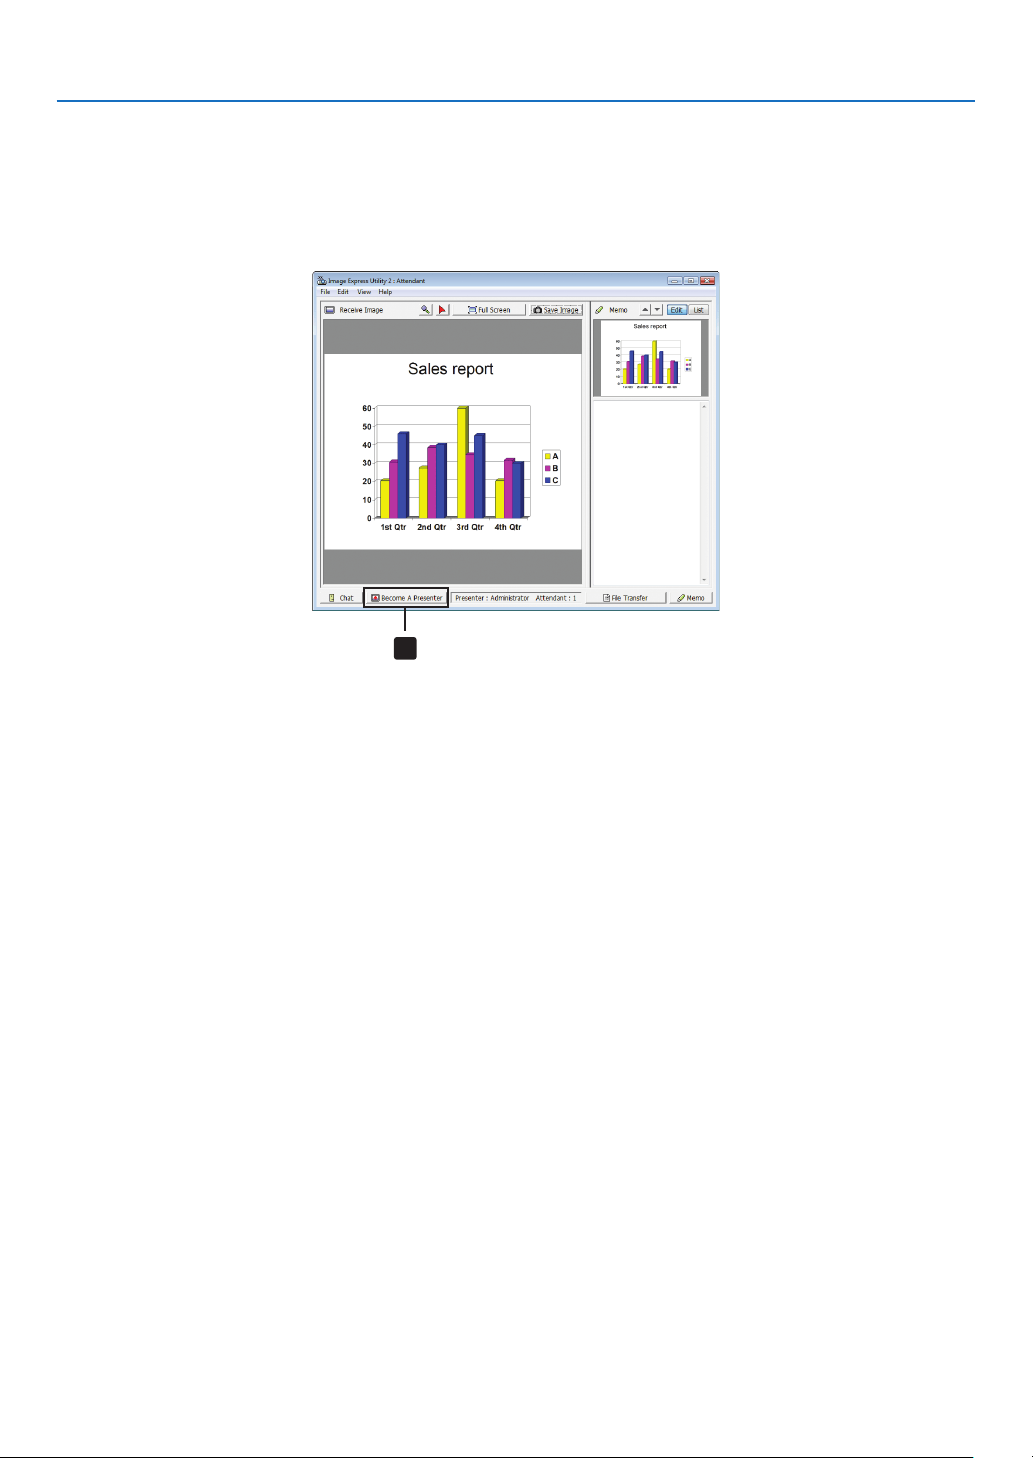
201
8. User Supportware
•Changingpresenter
Threetypesofsettingsmaybemadetochangethepresenter:“NotApproved”,“Approved”,and“ChangingProhibited”
(thesecanbeselectedonlybythepresenter).
Inthefollowingexample,“NotApproved”isselected.
• Click[BecomeAPresenter]intheattendantwindow.
You will change from a participant to a presenter.
1
Click
•Leavingconference
LeavetheconferenceandexitImageExpressUtility2.0.
• Click[File]intheattendantwindow,andclick[Exit].
You can also leave the conference by clicking [×] at the upper right of the attendant window.

202
8. User Supportware
❸
Controlling the Projector over a LAN (PC Control Utility Pro 4)
Usingtheutilitysoftware“PCControlUtilityPro4”,theprojectorcanbecontrolledfromacomputeroveraLAN.
Control Functions
PowerOn/Off,signalselection,picturefreeze,picturemute,adjusting,errormessagenotication,eventschedule.
ScreenofPCControlUtilityPro4
ThissectionprovidesanoutlineofpreparationforuseofPCControlUtilityPro4.ForinformationonhowtousePC
ControlUtilityPro4,seeHelpofPCControlUtilityPro4.
TIP:
• PCControlUtilityPro4canbeusedwithaserialconnection.
Connect the projector to a LAN.
ConnecttheprojectortotheLANbyfollowingtheinstructionsin“ConnectingtoaWiredLAN”(→page171),“Connecting
toaWirelessLAN(soldseparately)”(→page172)and“9ApplicationMenus-NETWORKSETTINGS”(→page141)
Start PC Control Utility Pro 4
Click“Start”→“Allprograms”or“Programs”→“NECProjectorUserSupportware”→“PCControlUtilityPro4”→
“PCControlUtilityPro4”.
NOTE:
• FortheSchedulefunctionofthePCControlutilityPro4towork,youmusthaveyourcomputerrunningandnotinstandby/
sleepmode.Select“PowerOptions”fromthe“ControlPanel”inWindowsanddisableitsstandby/sleepmodebeforerunningthe
scheduler.
[Example]ForWindows7:
Select“ControlPanel”→“SystemandSecurity”→“PowerOptions”→“Changewhenthecomputersleeps”→“Putthecomputer
to sleep” →“Never”.
NOTE:
• When[POWER-SAVING]isselectedfor[STANDBYMODE]fromthemenu,theprojectorcannotbeturnedonviathenetwork
(wiredLAN/wirelessLAN)connection.
When[NORMAL2]isselectedfor[STANDBYMODE],theprojectorcannotbeturnedonviawirelessLANconnection.
TIP:
ViewingtheHelpofPCControlUtilityPro4
• DisplayingtheHelpleofPCControlUtilityPro4whileitisrunning.
Click “Help (H)” → “Help (H) …” of window of PC Control Utility Pro 4 in this order.
The pop-up menu will be displayed.
• DisplayingthehelpleusingtheStartMenu.
Click “Start” → “All programs” or “Programs” → “NEC Projector User Supportware” → “PC Control Utility Pro 4” →
“PC Control Utility Pro 4 Help”.
The Help screen will be displayed.

203
8. User Supportware
❹ Projecting Your Mac’s Screen Image from the Projector over
a LAN (Image Express Utility 2 for Mac)
UsingImageExpressUtility2forMaccontainedallowsyoutosendtheMac’sscreenimagetotheprojectorovera
network(wiredorwirelessLAN).
ImageExpressUtility2forMacrunsonMacOSX10.2.8orlater.
ItrunsonbothMacOSX(PowerPC)andMacOSX(Intel).
Hereafter,“ImageExpressUtility2forMac”isabbreviatedas“ImageExpressUtility2”.
What you can do with Image Express Utility 2
• ViathenetworkimagesonthescreenofyourMaccanbesenttotheprojectorandprojectedonthescreen.
• Onecomputercansendimagestomorethanoneprojector.
Operating environment
Supported OS
MacOSX10.2.8orlaterrequired
MacOSX10.3.0orlaterrecommended
Processor (CPU)
PowerPCG3600MHzprocessorrequired
PowerPCG4800MHzorhigherrecommended
or
IntelCoreSolo1.5GHzorhigherrequired
Memory
256MBorhigherrequired
Networkenvironment
WiredorwirelessLANrequiredthatsupportsTCP/IP
OnlytheAirPortandAirPortExtremewirelessLANcardsareguaranteedtoworkwithImageExpressUtility2.
“EasyConnection”supportsonlyAirPortandAirPortExtreme.
Supported resolution
VGA(640×480)orhigherrequired
XGA(1024×768)recommended
(1024×768-1280×800recommended)
Supported screen colors
32thousandsofcolors,16.7millioncolorsrequired
*256orfewercolorsarenotsupported.
Connecting the projector to a LAN
ConnecttheprojectortotheLANbyfollowingtheinstructionsin“ConnectingtoaWiredLAN”(→page171),“Con-
nectingtoaWirelessLAN”(→page172)and“9ApplicationMenus-NETWORKSETTINGS”(→page141)
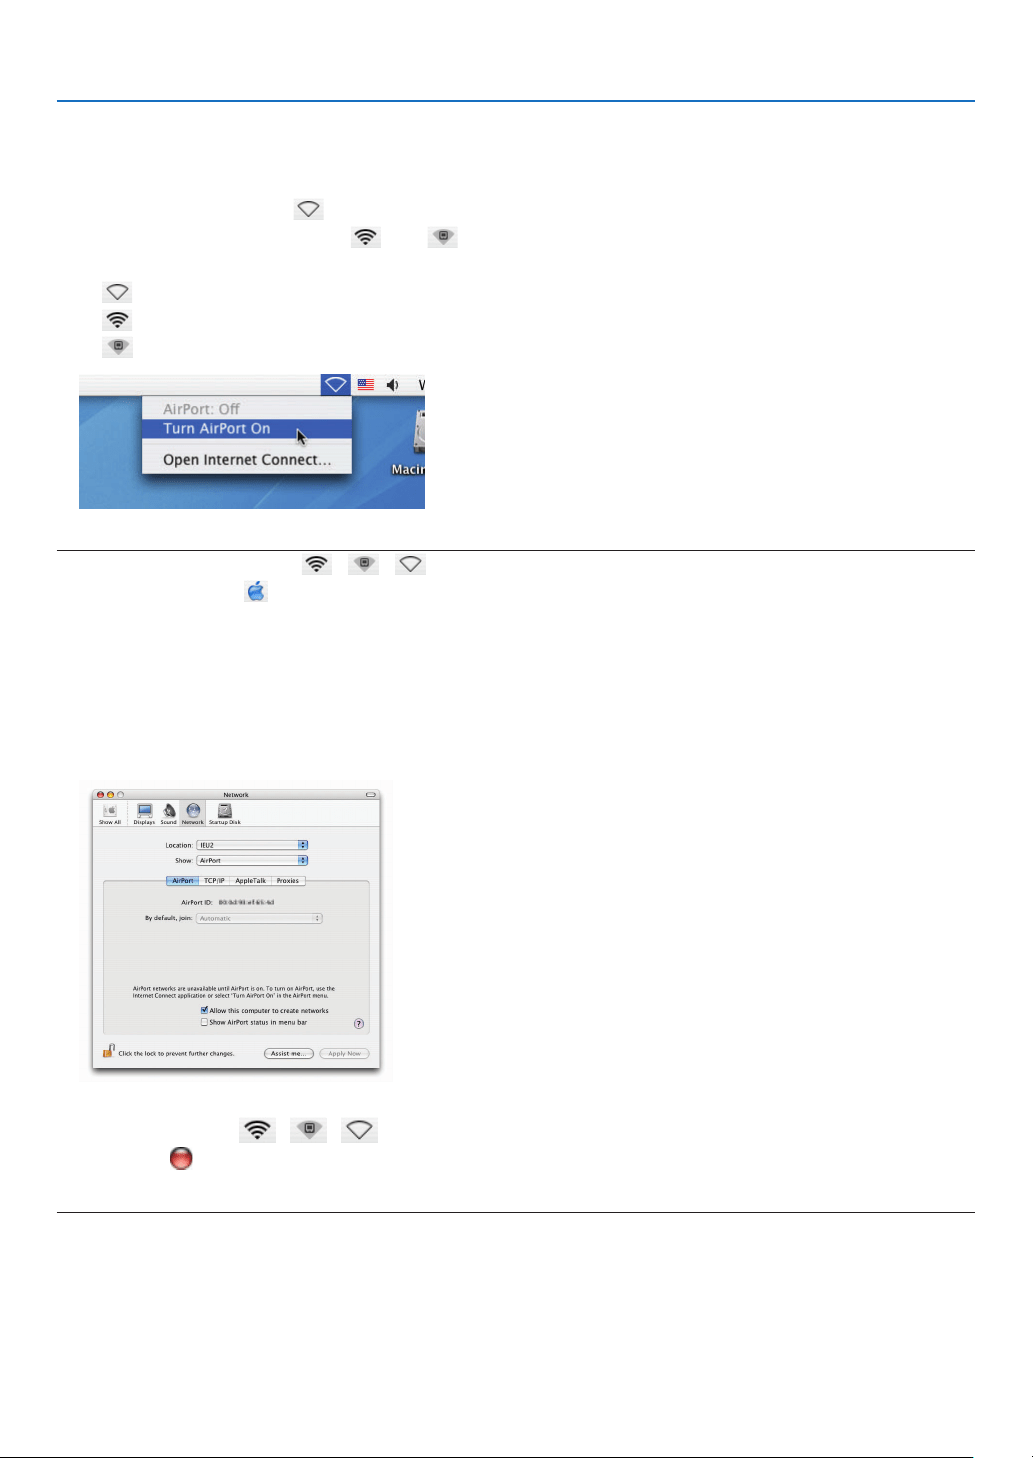
204
8. User Supportware
Using Image Express Utility 2
Connecting to a projector
1 Conrmthattheprojectorhasbeenturnedon.
2 ClicktheAirPortstatus( )ontheMacintoshmenubar,andclick“TurnAirPortOn”.
The AirPort status is changed to “ ” or “ ”.
• AirPortstatustypesandmeanings
...AirPort : Off
...AirPort : On ( in infrastructure connection )
...AirPort : On ( in adhoc connection )
REFERENCE:
When the AirPort status ( / / )isnotdisplayedonthemenubar:
1 ClickAppleMenu( )and[SystemPreferences...].
The “System Preferences” window will be displayed.
2 Click[Network].
The Network configuration window will be displayed.
3 Select[AirPort]in[Show].
4 Click[AirPort]tab.
The AirPort configuration item will be displayed.
5 Checkthe“ShowAirPortstatusinmenubar”checkboxatthebottomcongurationitem.
The AirPort status ( / / ) will be displayed on the menu bar.
6 Clickthe[ ]buttonattheupperleftontheNetworkcongurationwindow.
The Network configuration window will be closed.
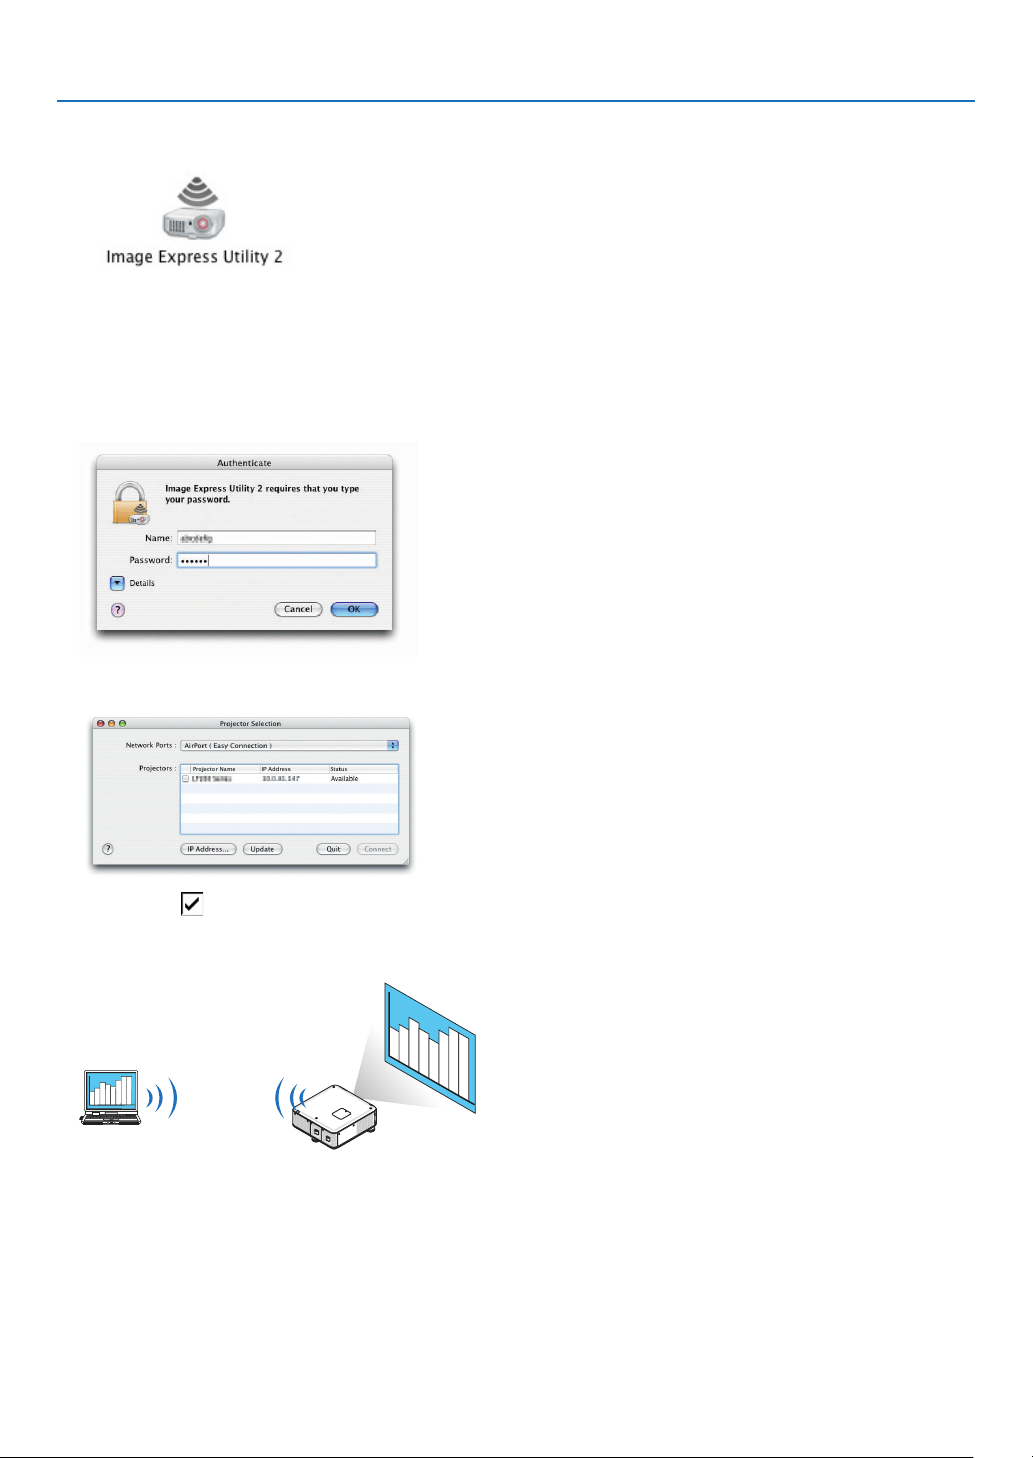
205
8. User Supportware
3 Double-clickthe“ImageExpressUtility2”iconinthe“ImageExpressUtility2”folder.
• Attheinitialstart,the“LicenseAgreement”windowisdisplayed.
Thoroughlyreadtheagreementshownonthescreen,andclick“Iacceptthetermsinthelicenseagreement”
and the [OK] button.
Next, the “Authenticate” window will be displayed.
4 EntertheadministratornameandpasswordofyourMacintoshcomputer,andclickthe[OK]button.
The [Projector Selection] window will be displayed.
5 Checkthe( )checkboxtotheleftoftheprojectornametoconnectandclick[Connect].
The Macintosh computer and the projector are connected via wireless LAN, and images on the Macintosh screen
are projected from the projector.
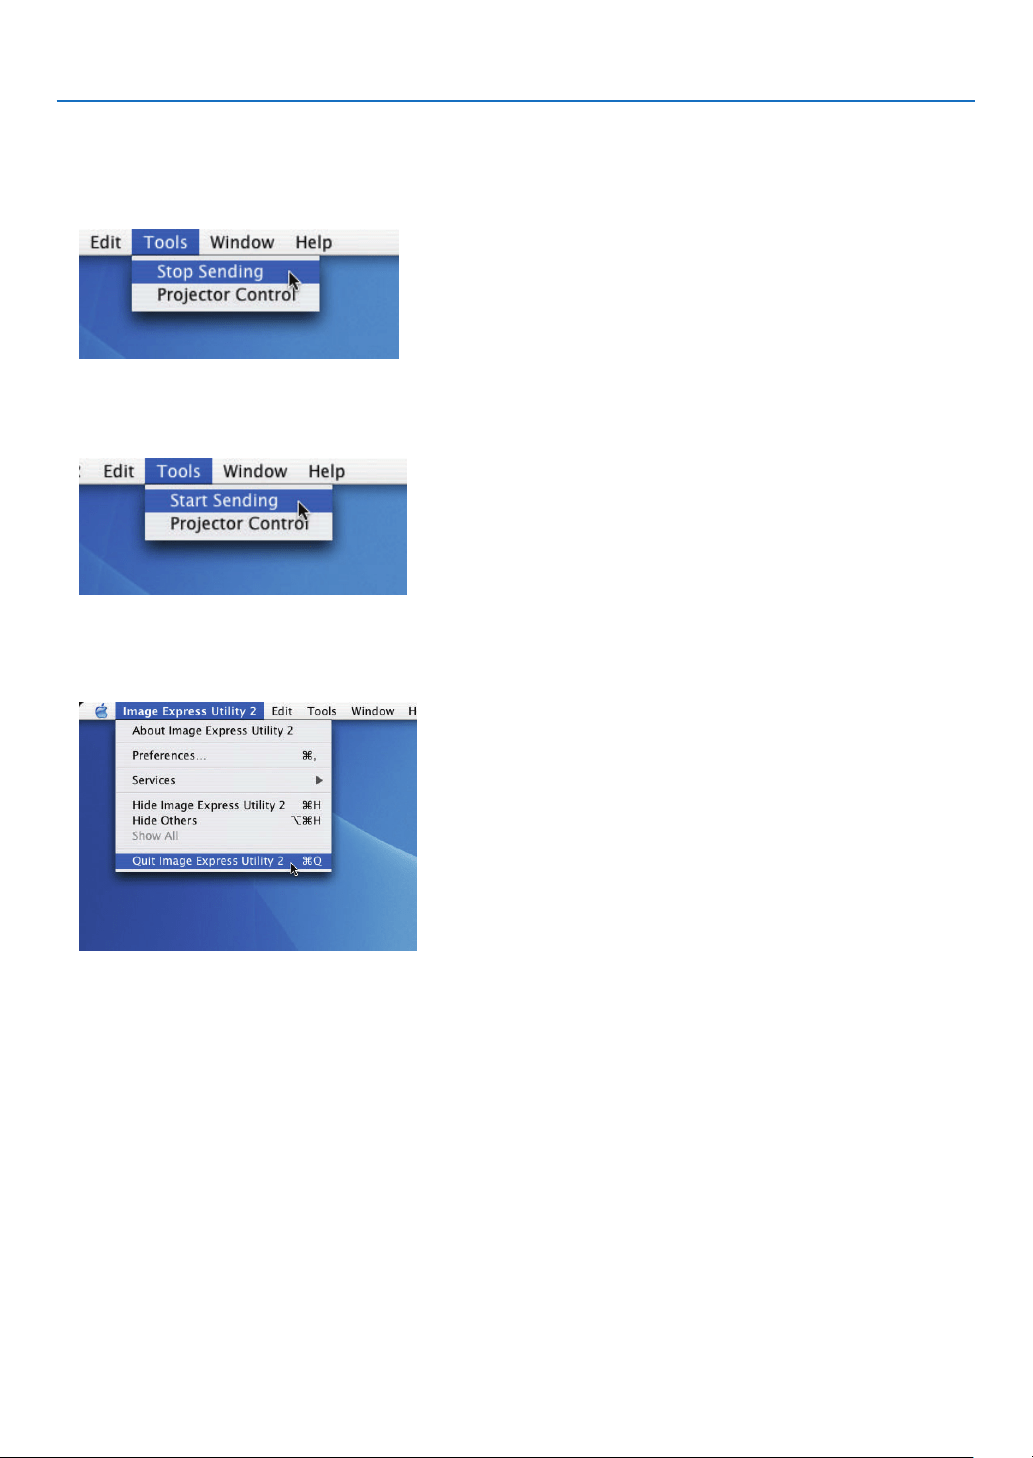
206
8. User Supportware
Stopping/Restarting Image Transmission
•Stoppingimagetransmission
1 Click[Tools]onthemenubar,andclick[StopSending].
Imagetransmissionistemporarilystopped.
•Restartingimagetransmission
1 Click[Tools]onthemenubar,andclick[StartSending].
Imagetransmissionisstartedagain.
ExitingImageExpressUtility2
1 Click[ImageExpressUtility2]onthemenubar,andclick[QuitImageExpressUtility2].
ImageExpressUtility2isexited.
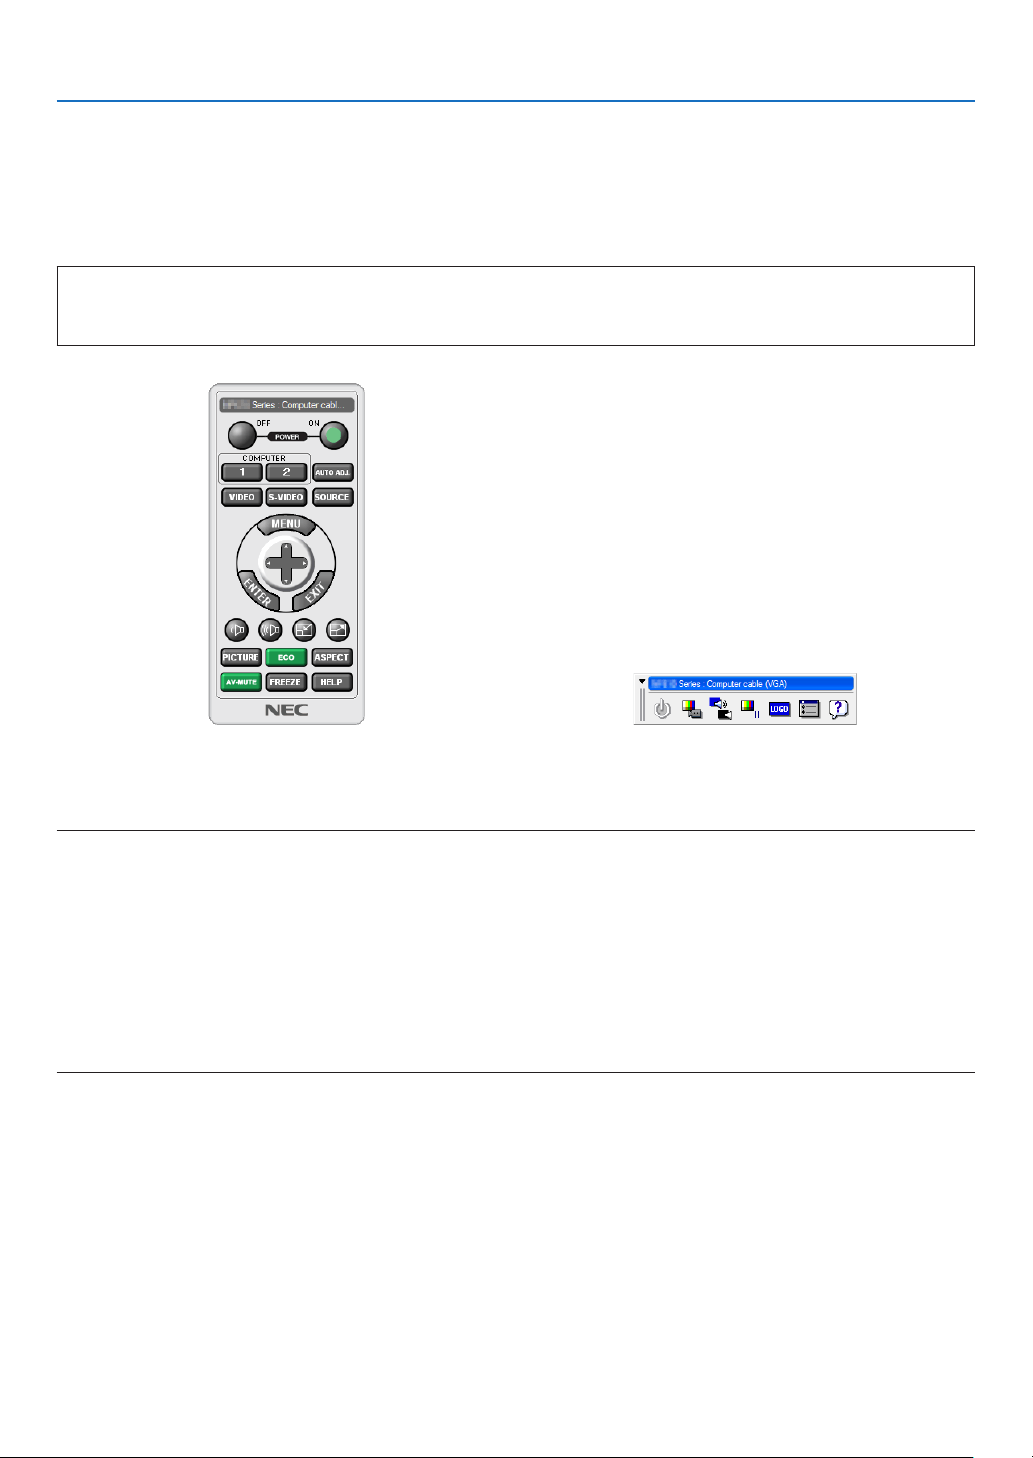
207
8. User Supportware
❺ Operating the Projector Via the LAN (Virtual Remote Tool)
Usingthesoftwareprogram“VirtualRemoteTool”thatyoucandownloadfromourwebsite,VirtualRemotescreen
(ortoolbar)canbedisplayedonyourcomputerscreen.
Thiswillhelpyouperformoperationssuchasprojector’spoweronoroffandsignalselectionviaaLANconnection.It
isalsousedtosendanimagetotheprojectorandregisteritasthelogodataoftheprojector.Afterregisteringit,you
canlockthelogotopreventitfromchanging.
Control Functions
PowerOn/Off,signalselection,picturefreeze,picturemute,Logotransfertotheprojector,andremotecontrol
operationonyourPC.
VirtualRemotescreen
RemoteControlWindow Toolbar
ThissectionprovidesanoutlineofpreparationforuseofVirtualRemoteTool.
ForinformationonhowtouseVirtualRemoteTool,seeHelpofVirtualRemoteTool.(→page209)
NOTE:
• Logodata(graphics)thatcanbesenttotheprojectorwithVirtualRemoteToolhasthefollowingrestrictions:
- Filesize:256KBorless
- Imagesize(resolution):thenativeresolutionoftheprojector
- Fileformat:JPEG
• ThelogodatathatissentwithVirtualRemoteToolwillbedisplayedatthecenterofthescreen.Itssurroundingwillbepainted
out in black.
• Onceyouhavechangedthebackgroundselectionfromthedefault“NEClogo”toanotherselection,youcannotreturnthelogo
tothedefault“NEClogo”evenafterusing[RESET].Toputthedefault“NEClogo”backinthebackgroundlogo,youneedto
registerit asthe background logo by using the imagele (\Logo\NEC_logo_black_WUXGA.jpg; NEC_logo_black_XGA.jpg;
NEC_logo_black_1280x800.jpg)includedonthesuppliedNECProjectorCD-ROM.
TIP:
• VirtualRemoteToolcanbeusedalsowithaserialconnection.
• TodownloadorupdateVirtualRemoteTool,visitourwebsite:http://www.nec-display.com/dl/en/index.html
Connect the projector to a LAN.
ConnecttheprojectortotheLANbyfollowingtheinstructionsin“ConnectingtoaWiredLAN”(→page171),“Connecting
toaWirelessLAN(soldseparately)”(→page172)and“9ApplicationMenus-NETWORKSETTINGS”(→page141)
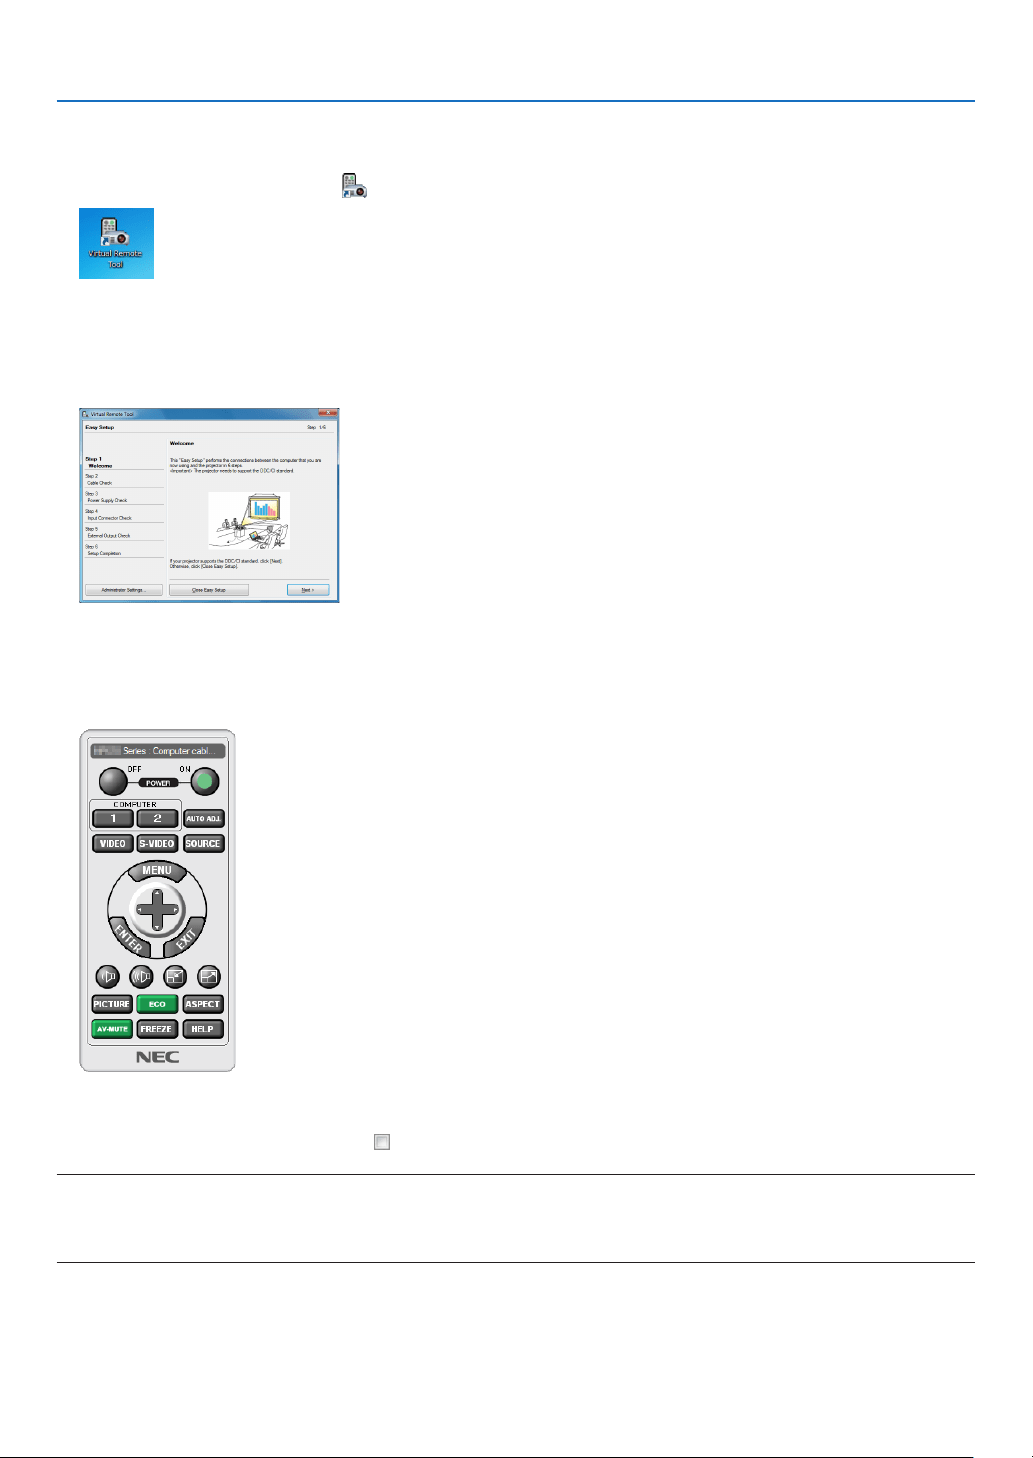
208
8. User Supportware
Start Virtual Remote Tool
Start using the shortcut icon
• Double-clicktheshortcuticon ontheWindowsDesktop.
Start from the Start menu
• Click[Start]→[AllPrograms]or[Programs]→[NECProjectorUserSupportware]→[VirtualRemoteTool]
→[VirtualRemoteTool].
When Virtual Remote Tool starts for the first time, “Easy Setup” window will be displayed.
The “Easy Setup” feature is not available on this model. Click “Close Easy Setup”.
Closing the “Easy Setup” window will display the “Projector List” window.
Select your projector you wish to connect. This will display the Virtual Remote screen.
TIP:
• TheVirtualRemoteToolscreen(orToolbar)canbedisplayedwithoutdisplaying“EasySetup”window.
To do so, click to place a check mark for “ DonotuseEasySetupnexttime”onthescreen.
NOTE:
• When[POWER-SAVING]isselectedfor[STANDBYMODE]fromthemenu,theprojectorcannotbeturnedonviathenetwork
(wiredLAN/wirelessLAN)connection.When[NORMAL2]isselectedfor[STANDBYMODE],theprojectorcannotbeturnedon
viawirelessLANconnection.
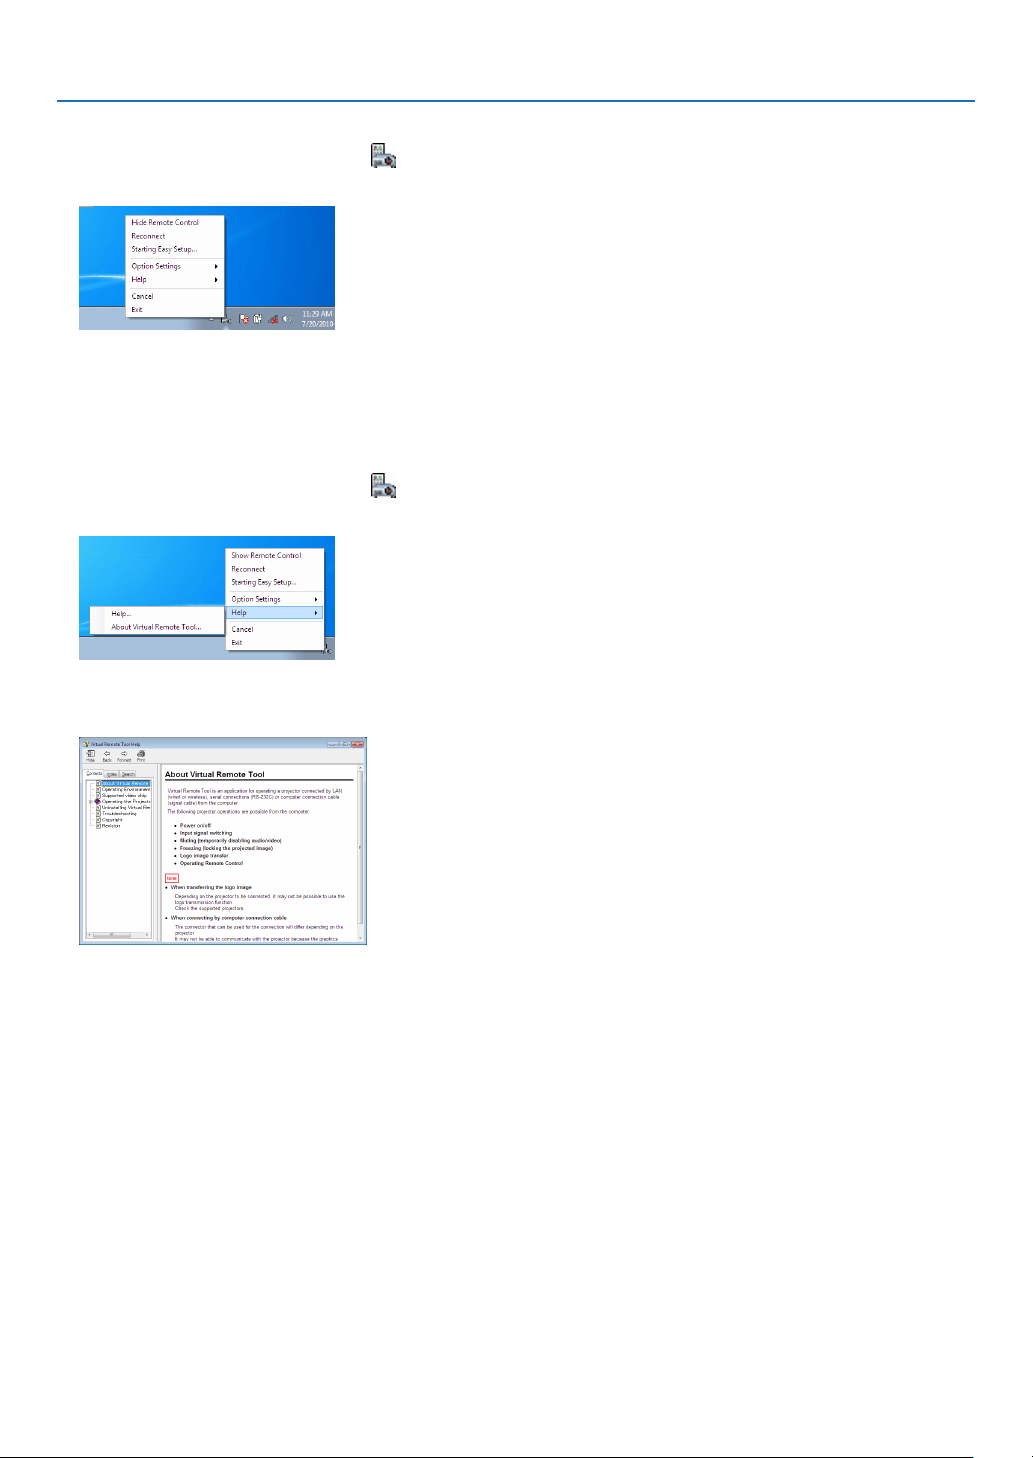
209
8. User Supportware
ExitingVirtualRemoteTool
1 ClicktheVirtualRemoteToolicon ontheTaskbar.
The pop-up menu will be displayed.
2 Click“Exit”.
The Virtual Remote Tool will be closed.
ViewingthehelpleofVirtualRemoteTool
•Displayingthehelpleusingthetaskbar
1 ClicktheVirtualRemoteToolicon onthetaskbarwhenVirtualRemoteToolisrunning.
The pop-up menu will be displayed.
2. Click“Help”.
The Help screen will be displayed.
•DisplayingthehelpleusingtheStartMenu.
1. Click“Start”.“Allprograms”or“Programs”.“NECProjectorUserSupportware”.“VirtualRemoteTool”.and
then“VirtualRemoteToolHelp”inthisorder.
The Help screen will be displayed.
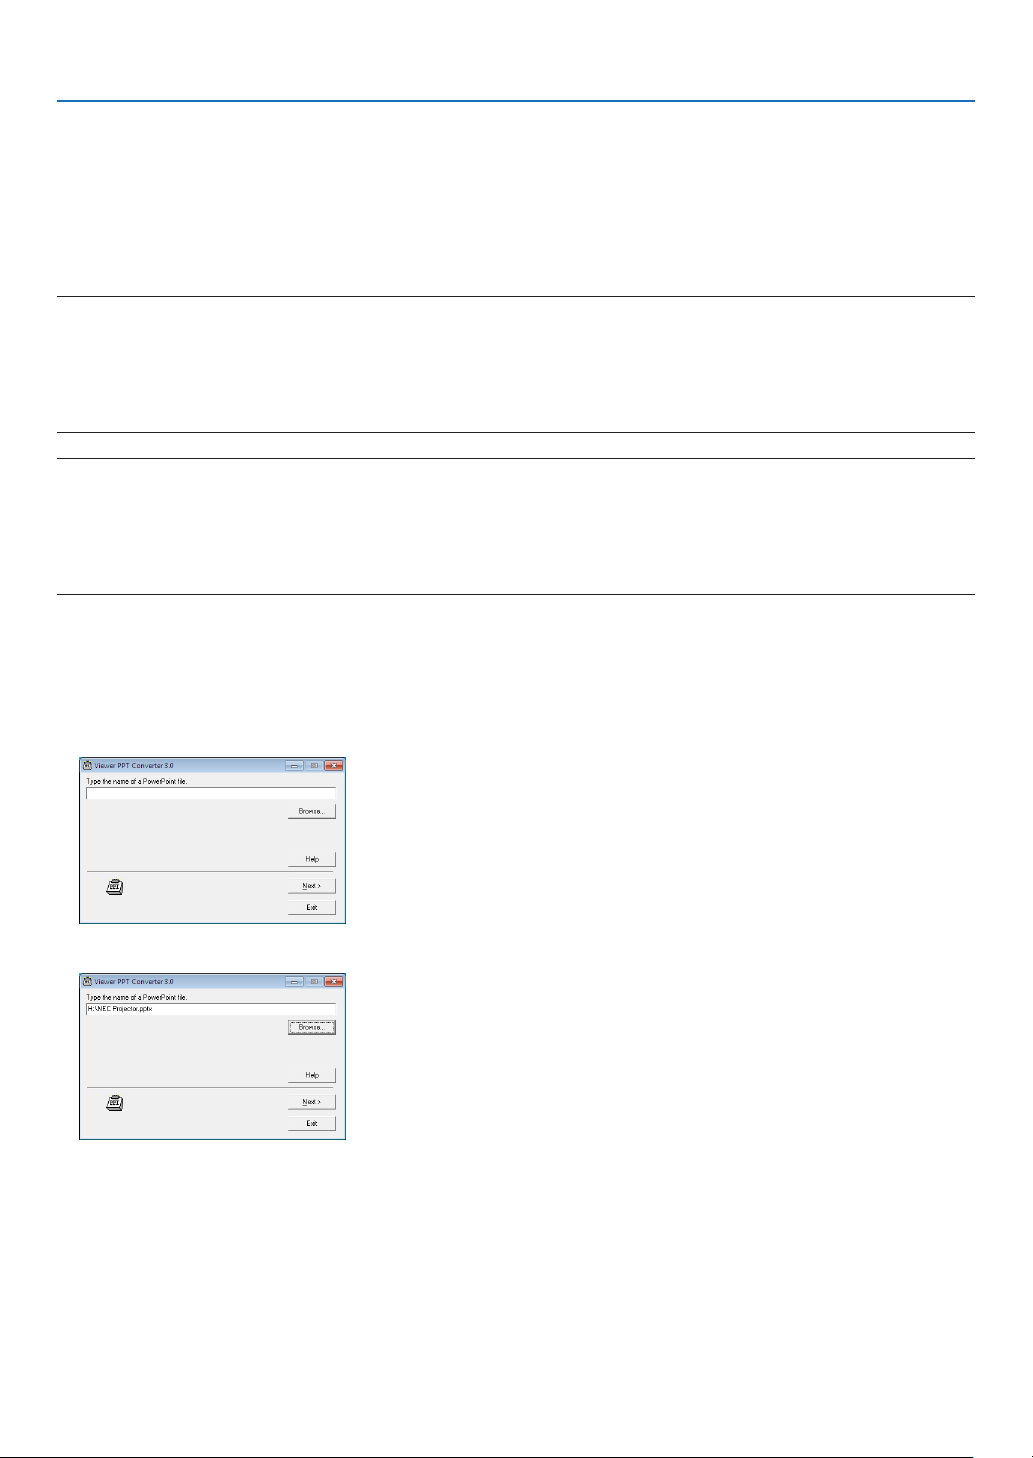
210
8. User Supportware
❻ Converting PowerPoint files to Slides (Viewer PPT Converter
3.0)
UsingViewerPPTConverter3.0allowsyoutoconvertPowerPointlesintoJPEGles.ConvertedJPEGlesand
Indexles(.idx)canbesavedtoaUSBmemory.WhentheUSBmemoryinsertedintotheprojector,theseJPEG
lesandIndexles(.idx)canbedisplayedwiththeviewerfunctionoftheprojectorwithoutconnectingacomputer.
NOTE:
WhenViewerPPTConverter3.0hasbeeninstalled,oncestartViewerPPTConverter3.0oncewiththeprivilegeusedforinstallation.
ThenexitfromViewerPPTConverter3.0withoutdoinganything.
•Starting
ClickWindow’s[Start]→[AllPrograms]→[NECProjectorUserSupportware]→[ViewerPPTConverter3.0]→[ViewerPPT
Converter3.0],inthatorder.
NOTE:
• WheninstallingViewerPPTConverter3.0ontoacomputerthathasPowerPointinstalled,ViewerPPTConverter3.0isautomati-
callyregisteredasaPower-Pointadd-in.
ItisnecessarytocancelViewerPPTConverter3.0add-inbeforeuninstallingViewerPPTConverter3.0.
RefertoViewerPPTConverter3.0Helptounregistertheadd-in.
• Theprojectordoesnotsupporttheadd-in's“RunSlideShow”.
Converting PowerPoint files and saving them to a USB memory
1. InserttheUSBmemoryintotheUSBportofthecomputer.
2. OnWindows,click“Start”→“Allprograms”→“NECProjectorUserSupportware”→“ViewerPPTConverter
3.0”→“ViewerPPTConverter3.0”.
Viewer PPT Converter 3.0 will start.
3. Click“Brows...”andselectaPowerPointleyouwishtoconvert,andthenclick“Open”.
4.Click“Next”.

211
8. User Supportware
5. SelecttheUSBmemorydrivefor“CardDrive”andtypein“Indexname”.
Indexnamemustbeeightalphanumericcharactersorless.2-bytecharacterandlewithalonglenamecannot
be used.
6. Click“Export”.
A confirmation message will be displayed.
7. Click“OK”.
Exporting a file will start.
8. Click“OK”.
9. Click“Exit”.
Viewer PPT Converter 3.0 will exit.
10.RemovetheUSBmemoryfromthecomputer.
NOTE:
• BeforeremovingtheUSBmemoryfromtheUSBportofthecomputer,clickthe“SafetoRemoveHardware”icononthetaskbar.
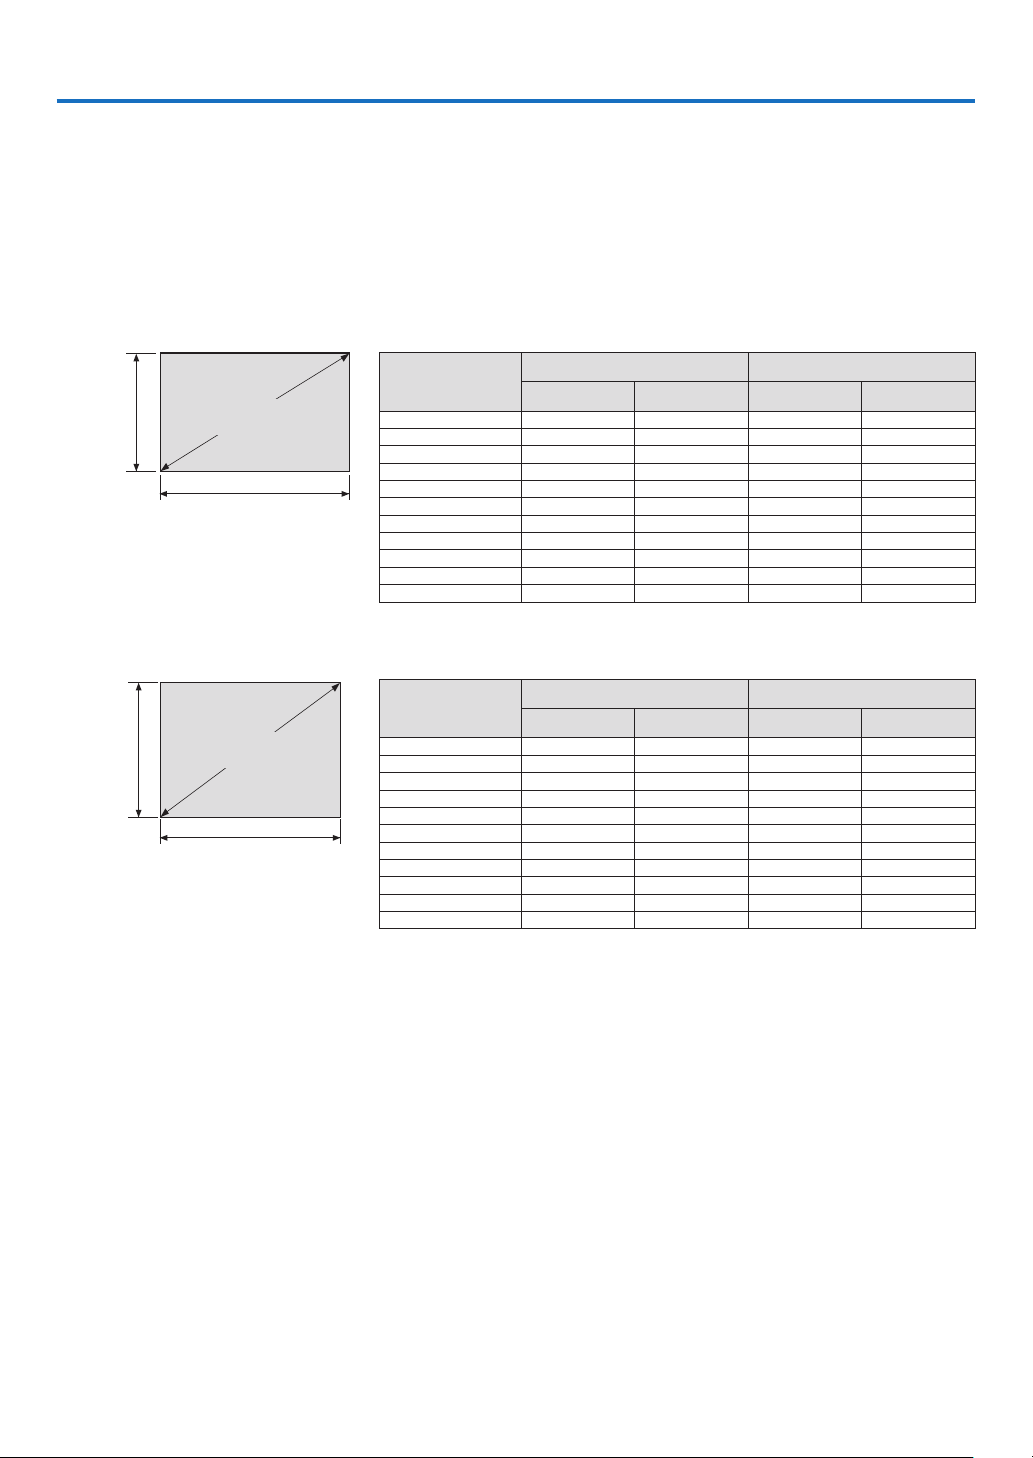
212
9. Appendix
❶ Throw distance and screen size
Optionalbayonetstylelensescanbeusedonthisprojector.Refertotheinformationonthispageandusealenssuited
fortheinstallationenvironment(screensizeandthrowdistance).Forinstructionsonmountingthelens,seepage162.
Eachnumberprovidedinthetablebelowmeansthethrowdistancebetweenthelenssurfaceandthescreen.
Tables of screen sizes and dimensions
[PX750U2/PX700W2]
Screen
height
Screen width
16:10 screen size
(diagonal)
Size(inches) Screenwidth Screenheight
(inches) (cm) (inches) (cm)
40 33.9 86.2 21.2 53.8
60 50.9 129.2 31.8 80.8
80 67.8 172.3 42.4 107.7
100 84.8 215.4 53.0 134.6
120 101.8 258.5 63.6 161.5
150 127.2 323.1 79.5 201.9
200 169.6 430.8 106.0 269.2
240 203.5 516.9 127.2 323.1
300 254.4 646.2 159.0 403.9
400 339.2 861.6 212.0 538.5
500 424.0 1077.0 265.0 673.1
[PX800X2]
Screen
height
Screen width
4:3 screen size
(diagonal)
Size(inches) Screenwidth Screenheight
(inches) (cm) (inches) (cm)
40 32 81.3 24 61.0
60 48 121.9 36 91.4
80 64 162.6 48 121.9
100 80 203.2 60 152.4
120 96 243.8 72 182.9
150 120 304.8 90 228.6
200 160 406.4 120 304.8
240 192 487.7 144 365.8
300 240 609.6 180 457.2
400 320 812.8 240 609.6
500 400 1016.0 300 762.0
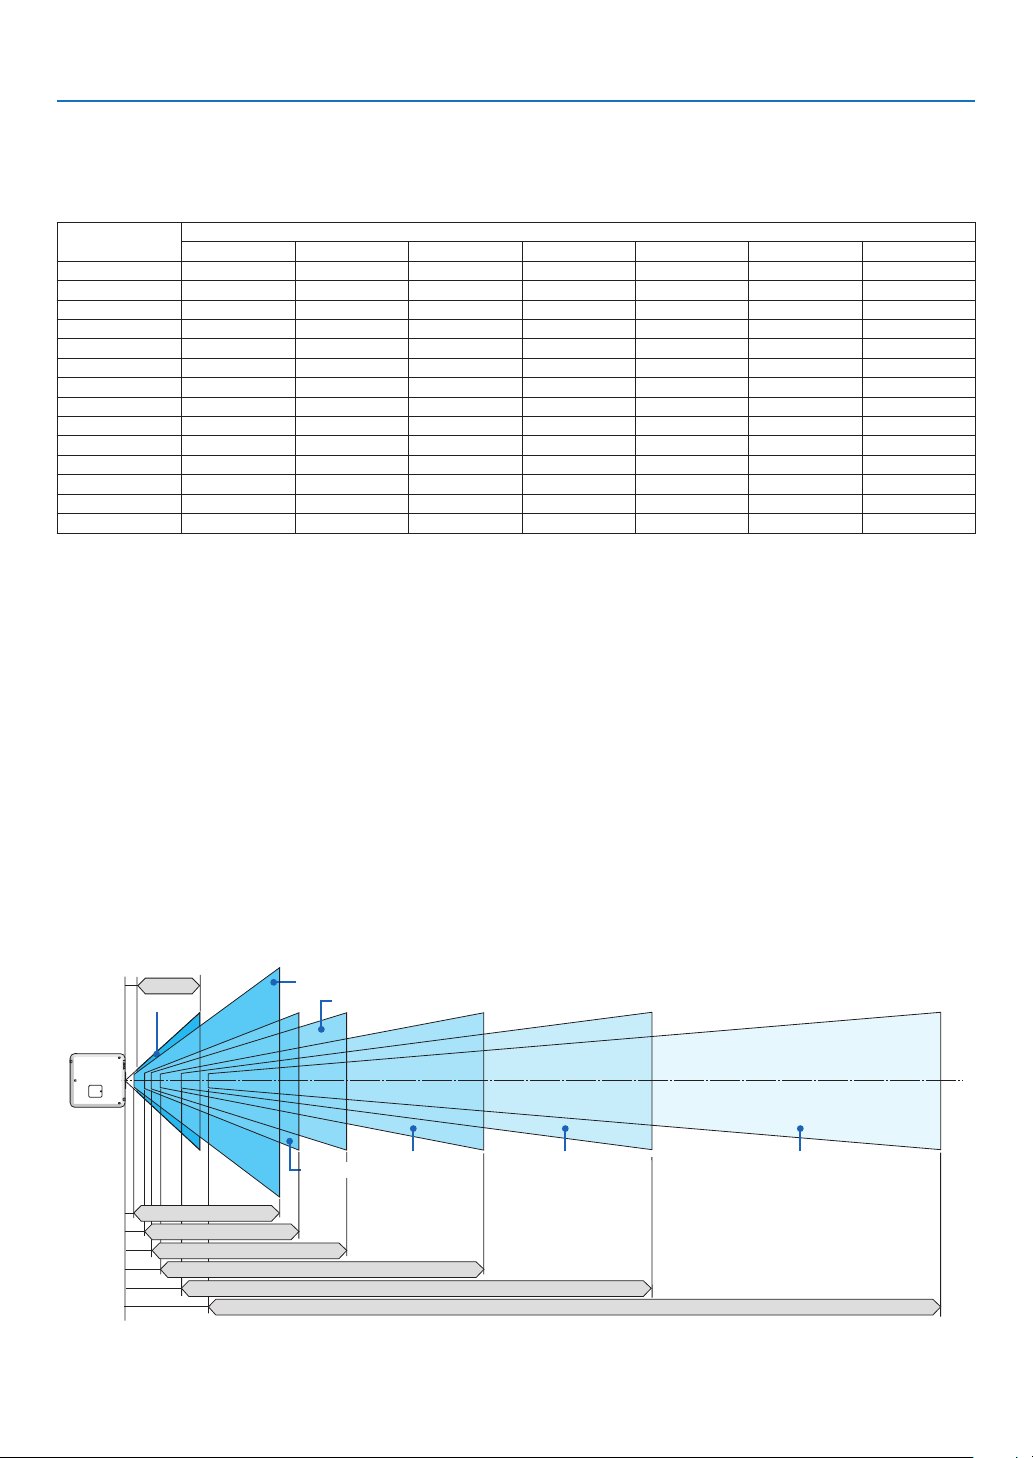
213
9. Appendix
Lens types and throw distance
unit=m
[PX750U2]
Screensize Lensmodelname
NP16FL NP17ZL NP18ZL NP19ZL NP20ZL NP21ZL NP31ZL
40"
0.6–0.8
50" 0.8 1.3–1.9 1.8–2.4 2.4–4.0 3.8–5.8 5.6–8.9 0.8–1.0
60" 1.0 1.6–2.3 2.2–2.9 2.8–4.8 4.6–7.0 6.8–10.7 1.0–1.2
80" 1.3 2.2–3.1 3.0–3.9 3.8–6.4 6.2–9.3 9.1–14.4 1.3–1.6
100" 1.7 2.7–3.9 3.7–4.9 4.8–8.0 7.7–11.7 11.5–18.1 1.6–2.0
120" 2.0 3.3–4.7 4.5–5.9 5.8–9.6 9.3–14.1 13.8–21.7 2.0–2.5
150" 2.5 4.1–5.8 5.6–7.4 7.2–12.0 11.7–17.6 17.4–27.3 2.5–3.1
200" 3.4 5.5–7.8 7.5–9.9 9.7–16.1 15.6–23.5 23.3–36.4 3.3–4.1
240" 4.1 6.6–9.4 9.1–11.9 11.6–19.3 18.8–28.3 28.0–43.8 4.0–5.0
300" 5.1 8.2–11.7 11.3–14.9 14.5–24.1 23.5–35.4 35.0–54.8 5.0–6.2
350" 5.8–7.3
400" 6.6–8.3
450" 7.5–9.4
500" 8.3–10.4
TIP
Calculationofthethrowdistancefromthescreensize
NP16FLlensthrowdistance(m)=H×0.8:0.8m(min.)to5.1m(max.)
NP17ZLlensthrowdistance(m)=H×1.3toH×1.8:1.3m(min.)to11.7m(max.)
NP18ZLlensthrowdistance(m)=H×1.7toH×2.3:1.8m(min.)to14.9m(max.)
NP19ZLlensthrowdistance(m)=H×2.2toH×3.7:2.4m(min.)to24.1m(max.)
NP20ZLlensthrowdistance(m)=H×3.6toH×5.4:3.8m(min.)to35.4m(max.)
NP21ZLlensthrowdistance(m)=H×5.3toH×8.3:5.6m(min.)to54.8m(max.)
NP31ZLlensthrowdistance(m)=H×0.8toH×0.9:0.6m(min.)to10.4m(max.)
“H”(Horizontal)referstothescreenwidth.
*Figuresdifferbyseveral%withthetableabovebecausethecalculationisapproximate.
Ex.:ThrowdistancewhenusingthePX750U2toprojectona150"screenusingtheNP18ZLlens:
Accordingtothe“ScreenSize(forreference)”table(→ page 212),H(screenwidth)=323.1cm.
Thethrowdistanceis323.1cm×1.7to323.1cm×2.3=549.3cmto743.13cm(becauseofthezoomlens).
Projection range for the different lenses
[PX750U2]
50-300"
40-500"
50-300"
50-300" 50-300" 50-300"
0.8–5.1 m
NP16FL :
NP17ZL: 1.3–11.7 m
NP31ZL: 0.6–10.4 m
NP18ZL: 1.8–14.9 m
NP19ZL: 2.4–24.1 m
NP20ZL: 3.8–35.4 m
NP21ZL: 5.6–54.8 m
50-300"
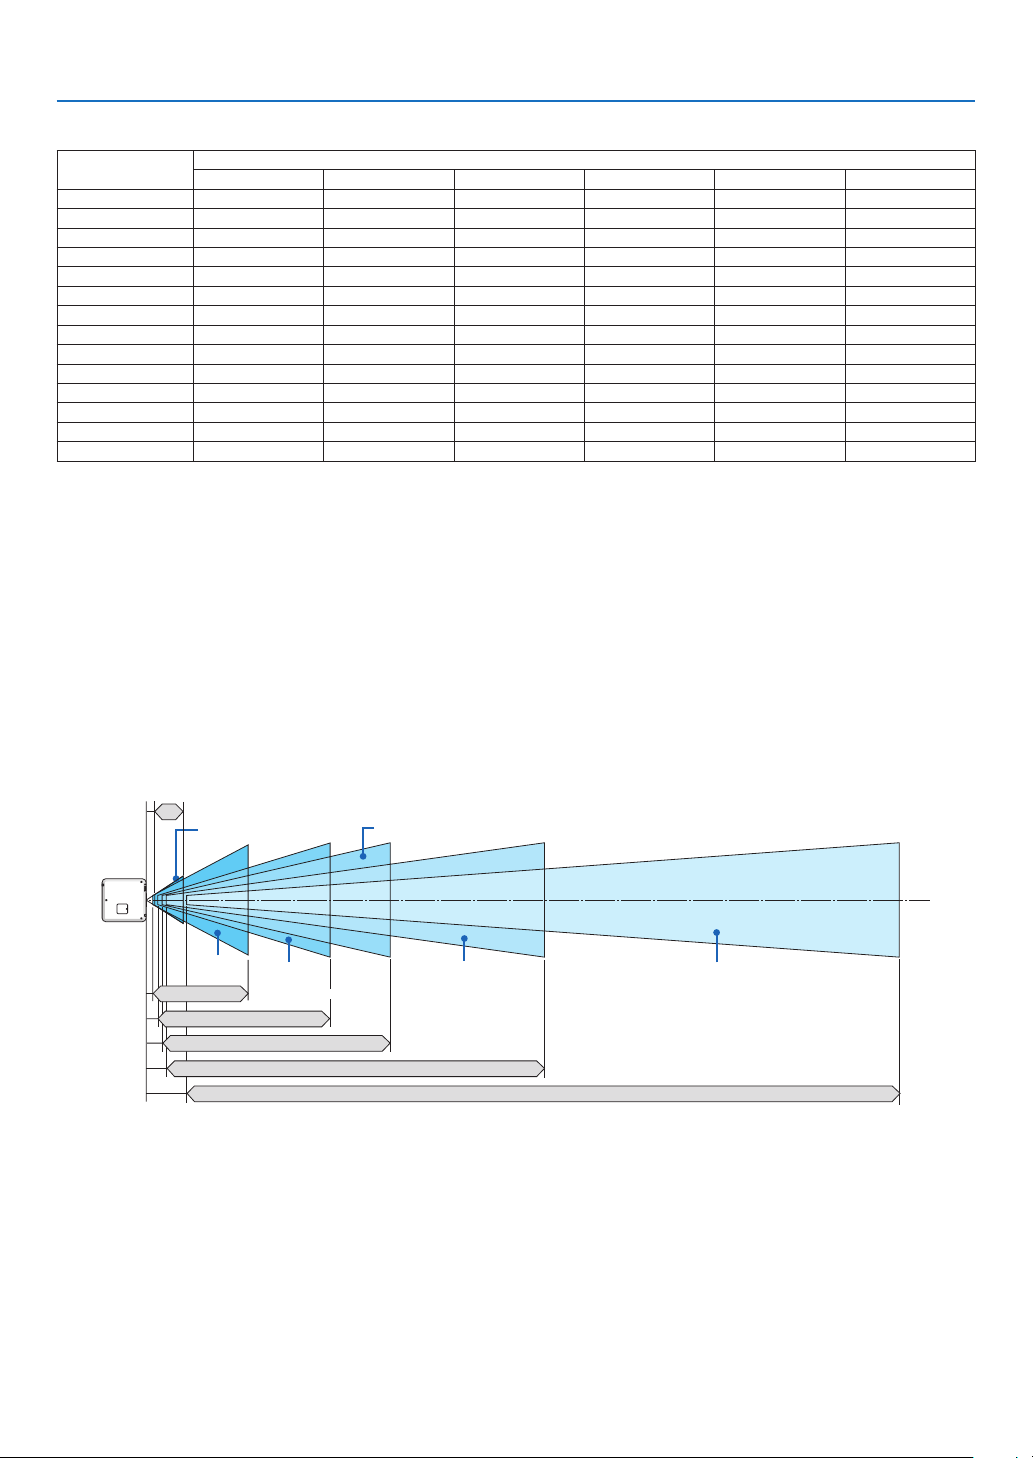
214
9. Appendix
[PX700W2]
Screensize Lensmodelname
NP06FL NP07ZL NP08ZL NP09ZL NP10ZL NP31ZL
40"
1.1–1.6 1.5–2.0 1.9–3.9 3.8–7.3 0.7–0.8
50" 0.8 1.4–2.0 1.9–2.6 2.4–4.9 4.8–9.1 0.8–1.1
60" 1.0 1.7–2.4 2.3–3.1 2.9–5.9 5.8–11.0 1.0–1.3
80" 1.4 2.3–3.1 3.1–4.1 3.9–7.9 7.8–14.7 1.4–1.7
100" 1.7 2.9–3.9 3.9–5.2 4.9–9.9 9.7–18.4 1.7–2.1
120" 2.1 3.5–4.7 4.7–6.2 5.9–11.9 11.7–22.1 2.1–2.6
150" 2.6 4.4–5.9 5.9–7.8 7.4–14.9 14.7–27.7 2.6–3.2
200" 3.5 5.9–7.9 7.9–10.4 9.9–19.9 19.6–36.9 3.5–4.3
240" 7.1–9.5 9.5–12.5 11.9–23.9 23.5–44.3 4.2–5.2
300" 8.9–11.9 11.9–15.7 14.9–29.9 29.5–55.5 5.2–6.5
350" 10.3–13.9 13.8–18.3 17.4–34.9 34.4–64.7 6.1–7.6
400" 11.8–15.9 15.8–20.9 20.0–39.9 39.3–74.0 7.0–8.7
450" 13.3–17.9 17.8–23.5 22.5–44.9 44.3–83.3 7.8–9.8
500" 14.8–19.9 19.8–26.2 25.0–49.9 49.2–92.5 8.7–10.9
TIP
Calculationofthethrowdistancefromthescreensize
NP06FLlensthrowdistance(m)=H×0.8:0.8m(min.)to3.5m(max.)
NP07ZLlensthrowdistance(m)=H×1.4toH×1.8:1.1m(min.)to19.9m(max.)
NP08ZLlensthrowdistance(m)=H×1.8toH×2.4:1.5m(min.)to26.2m(max.)
NP09ZLlensthrowdistance(m)=H×2.3toH×4.6:1.9m(min.)to49.9m(max.)
NP10ZLlensthrowdistance(m)=H×4.6toH×8.6:3.8m(min.)to92.5m(max.)
NP31ZLlensthrowdistance(m)=H×0.8toH×1.0:0.7m(min.)to10.9m(max.)
“H”(Horizontal)referstothescreenwidth.
*Figuresdifferbyseveral%withthetableabovebecausethecalculationisapproximate.
Projection range for the different lenses
[PX700W2]
50-200"
NP06FL: 0.8–3.5 m
40-500"
40-500"
40-500"
NP07ZL: 1.1–19.9 m
NP08ZL: 1.5–26.2 m
40-500" 40-500"
NP09ZL: 1.9–49.9 m
NP10ZL: 3.8–92.5 m
NP31ZL: 0.7–10.9 m
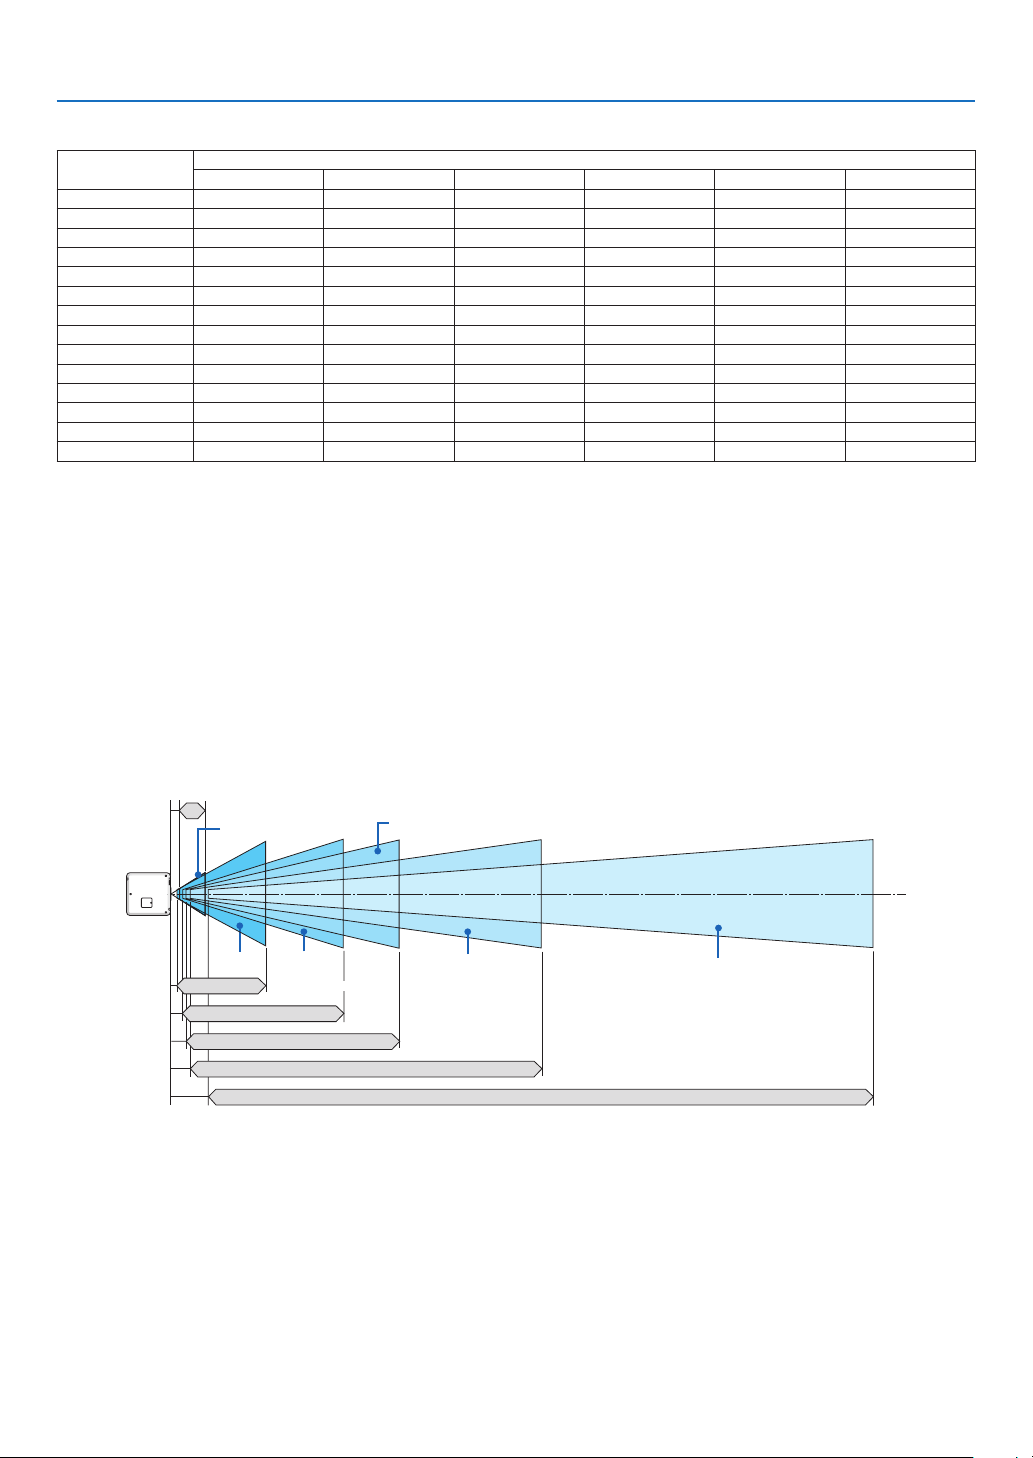
215
9. Appendix
[PX800X2]
Screensize Lensmodelname
NP06FL NP07ZL NP08ZL NP09ZL NP10ZL NP31ZL
40"
1.1–1.4 1.4–1.9 1.8–3.6 3.5–6.8 0.6–0.8
50" 0.8 1.3–1.8 1.8–2.4 2.2–4.5 4.5–8.5 0.8–1.0
60" 0.9 1.6–2.2 2.2–2.9 2.7–5.5 5.4–10.2 0.9–1.2
80" 1.3 2.2–2.9 2.9–3.8 3.6–7.3 7.2–13.7 1.3–1.6
100" 1.6 2.7–3.7 3.6–4.8 4.6–9.2 9.0–17.2 1.6–2.0
120" 1.9 3.3–4.4 4.4–5.8 5.5–11.1 10.9–20.6 1.9–2.4
150" 2.4 4.1–5.5 5.5–7.3 6.9–13.8 13.6–25.8 2.4–3.0
200" 3.2 5.5–7.4 7.3–9.7 9.2–18.5 18.2–34.5 3.2–4.0
240" 6.6–8.9 8.8–11.7 11.1–22.2 21.9–41.4 3.9–4.9
300" 8.2–11.1 11.0–14.6 13.9–27.8 27.4–51.8 4.8–6.1
350" 9.6–13.0 12.9–17.0 16.2–32.5 32.0–60.4 5.7–7.1
400" 11.0–14.8 14.8–19.5 18.6–37.1 36.6–69.1 6.5–8.1
450" 12.4–16.7 16.6–21.9 20.9–41.8 41.2–77.7 7.3–9.1
500" 13.8–18.6 18.5–24.4 23.2–46.4 45.7–86.4 8.1–10.2
TIP
Calculationofthethrowdistancefromthescreensize
NP06FLlensthrowdistance(m)=H×0.8:0.8m(min.)to3.2m(max.)
NP07ZLlensthrowdistance(m)=H×1.4toH×1.8:1.1m(min.)to18.6m(max.)
NP08ZLlensthrowdistance(m)=H×1.8toH×2.4:1.4m(min.)to24.4m(max.)
NP09ZLlensthrowdistance(m)=H×2.3toH×4.6:1.8m(min.)to46.4m(max.)
NP10ZLlensthrowdistance(m)=H×4.5toH×8.5:3.5m(min.)to86.4m(max.)
NP31ZLlensthrowdistance(m)=H×0.8toH×1.0:0.6m(min.)to10.2m(max.)
“H”(Horizontal)referstothescreenwidth.
*Figuresdifferbyseveral%withthetableabovebecausethecalculationisapproximate.
Projection range for the different lenses
[PX800X2]
50-200"
NP06FL: 0.8–3.2 m
40-500"
40-500"
40-500"
NP07ZL: 1.1–18.6 m
NP08ZL: 1.4–24.4 m
40-500"
40-500"
NP09ZL: 1.8–46.4 m
NP10ZL: 3.5–86.4 m
NP31ZL: 0.6–10.2 m
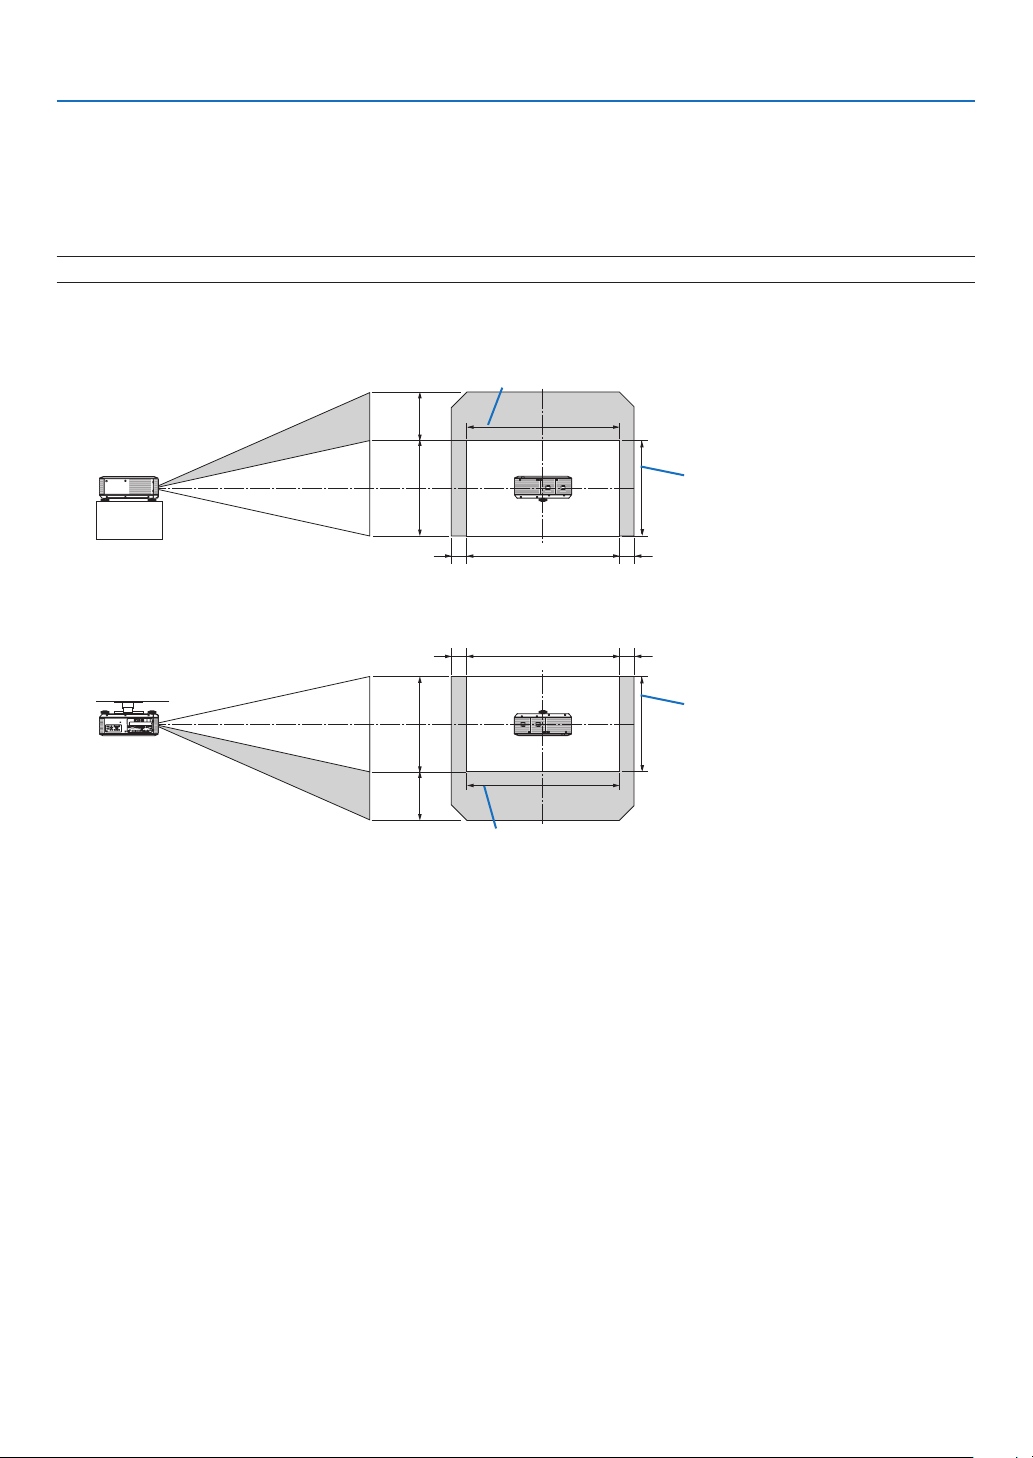
216
9. Appendix
Lens shifting range
ThisprojectorisequippedwithalensshiftfunctionforadjustingthepositionoftheprojectedimagebyusingtheLENS
SHIFT▼▲◀▶buttons.Thelenscanbeshiftedwithintherangeshownbelow.
Descriptionofsymbols:Vindicatesvertical(heightoftheprojectedimage),Hindicateshorizontal(widthofthepro-
jectedimage).
NOTE:ThelensshiftfunctioncannotbeusedwhenusingtheNP16FL(PX750U2)andNP06FL(PX700W2/PX800X2)lens.
Desk/frontprojection
1V
1H
0.1H 0.1H
0.5V*
Height of projected image
Width of projected image
Ceiling/frontprojector
1V
1H
0.1H 0.1H
0.5V*
Height of projected image
Width of projected image
* ForPX800X2,thevalueshouldbe0.43VontheNP31ZLlens.
Ex.:WhenusingthePX750U2toprojectona150"screen
Accordingtothetablesofscreensizesanddimensionsfor16:10(→page212),H=323.1cm,V=201.9cm.
Adjustmentrangeintheverticaldirection:Theprojectedimagecanbemovedupwards0.5×201.9cm≈101cm,
(whenthelensisatthecenterposition).Foraceiling/frontinstallation,theaboveguresareinverted.
Adjustmentrangeinthehorizontaldirection:Theprojectedimagecanbemovedtotheleft0.1×323.1cm≈32cm,
totheright0.1×323.1cm≈32cm.
*Figuresdifferbyseveral%becausethecalculationisapproximate.

217
9. Appendix
❷ Replacing the Color Wheel (included)
Theprojectorcomeswithacolorwheel(6-segmentWhite)installed.Anadditionalcolorwheel(6-segmentColor)is
includedwiththeaccessoriesthatcomewiththebox.
TIP:
Youcanreplacethepre-installed6-segmentWhitecolorwheelwiththeincluded6-segmentcolorwheeltocreateimageswithmore
brilliant colors to match the source.
Toreplacethecolorwheel,refertothefollowingguide.
CAUTION:
Beforereplacingthecolorwheel,besuretoturnofftheprojector,waituntilthecoolingfansstop,andturnoffthemain
powerswitch.Allow1hourbeforereplacingthecolorwheel.
• Donottouchthediskofthecolorwheel.Doingsomayscratchthediskorleavengerprints,causingtheimage
qualitytodegrade.
• Donotremovescrewsexceptwhenspeciedinthefollowinginstructions
• Heedthefollowinginformationifyouowntwoormoreprojectors:
Whenreplacingorre-installingthecolorwheel,theoriginalcolorwheelpreinstalledorsuppliedasanaccessory
mustgobacktoitsoriginalprojector.Yourcolorwheelandprojectorcolorwheelcoveraregivenanidentication
number.Besuretousethecolorwheelpre-installedorsuppliedwithyourprojectortomatchitsidentication
number.
Ifyouremoveacolorwheelfromoneprojectorandre-installitintoanotherprojector,performancemaybecom-
promised.
• Besureturnoffthemainpowerswitchbeforereplacingthecolorwheel.Failuretodosomayresultinelectrical
shockordamagetotheprojector,andcauseanirregularcoloroftheprojectedimage.
Toolneeded:Phillipsscrewdriver(plus-head)
1. Remove the color wheel cover
• Loosenthescrewonthecolorwheelcover.
• Thescrewiscaptiveandnotremovable.
(shown from the rear side of the projector)
• Slideandremovethecolorwheelcover.
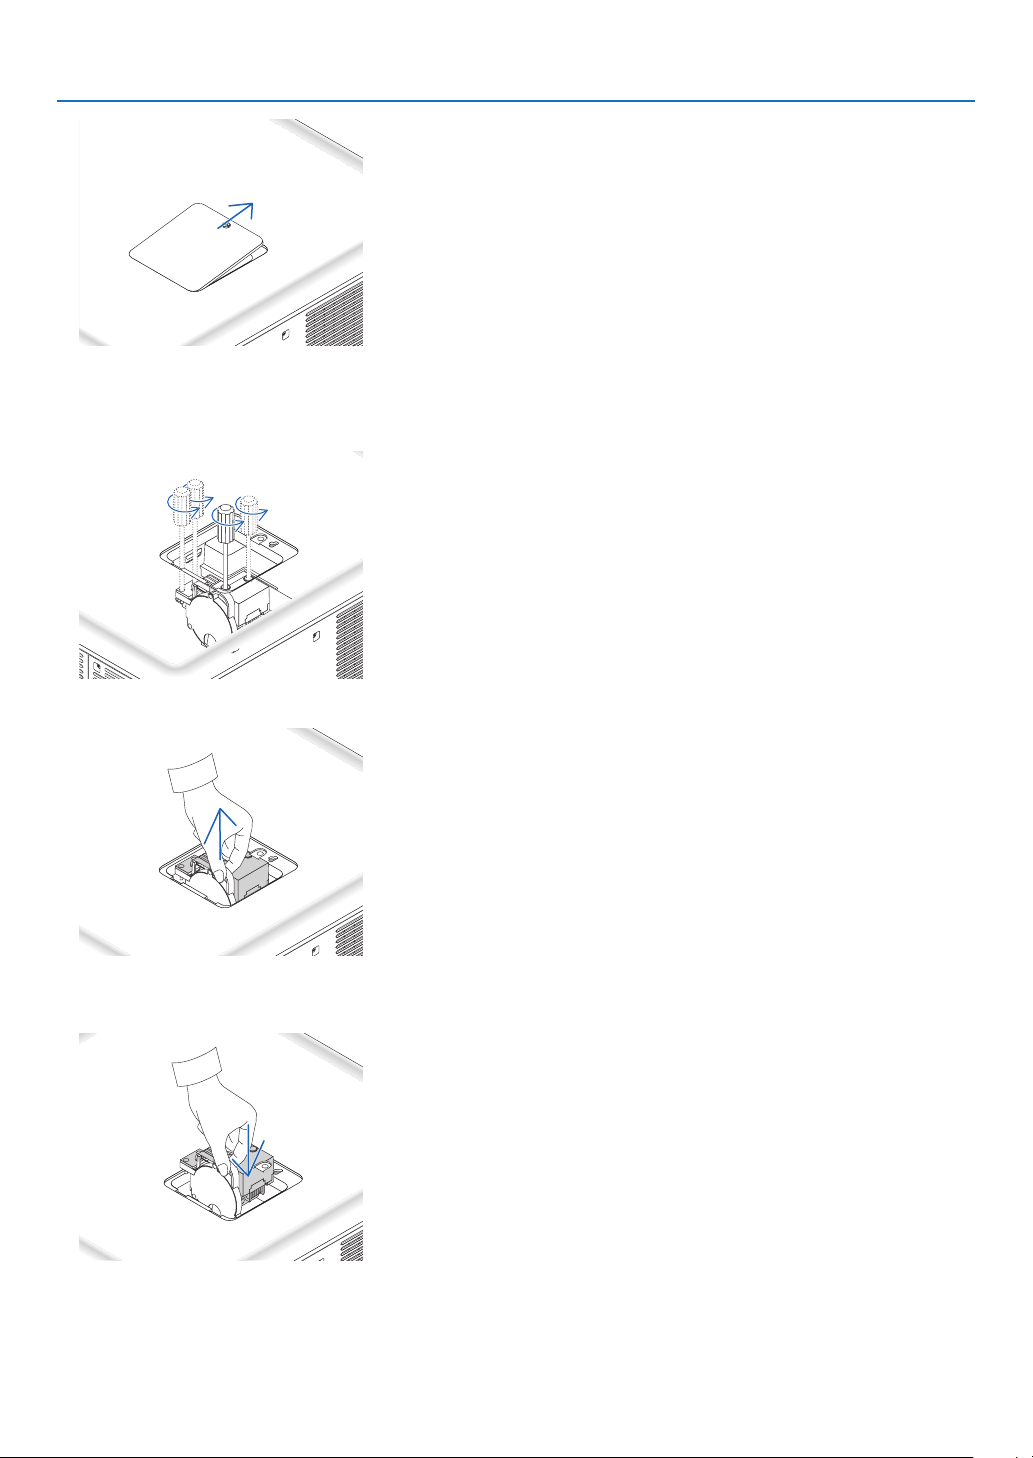
218
9. Appendix
2. Remove the color wheel (6-segment white).
• Loosenthefourscrewsonthecolorwheel.
• Thescrewsarecaptiveandnotremovable.
• Liftupthecolorwheel(6-segmentwhite)
3. Install the supplied color wheel (6-segement color).
• Insertthesuppliedcolorwheel.
• Tightenthefourscrewstosecurethecolorwheel.
• Besuretotightenthescrews.
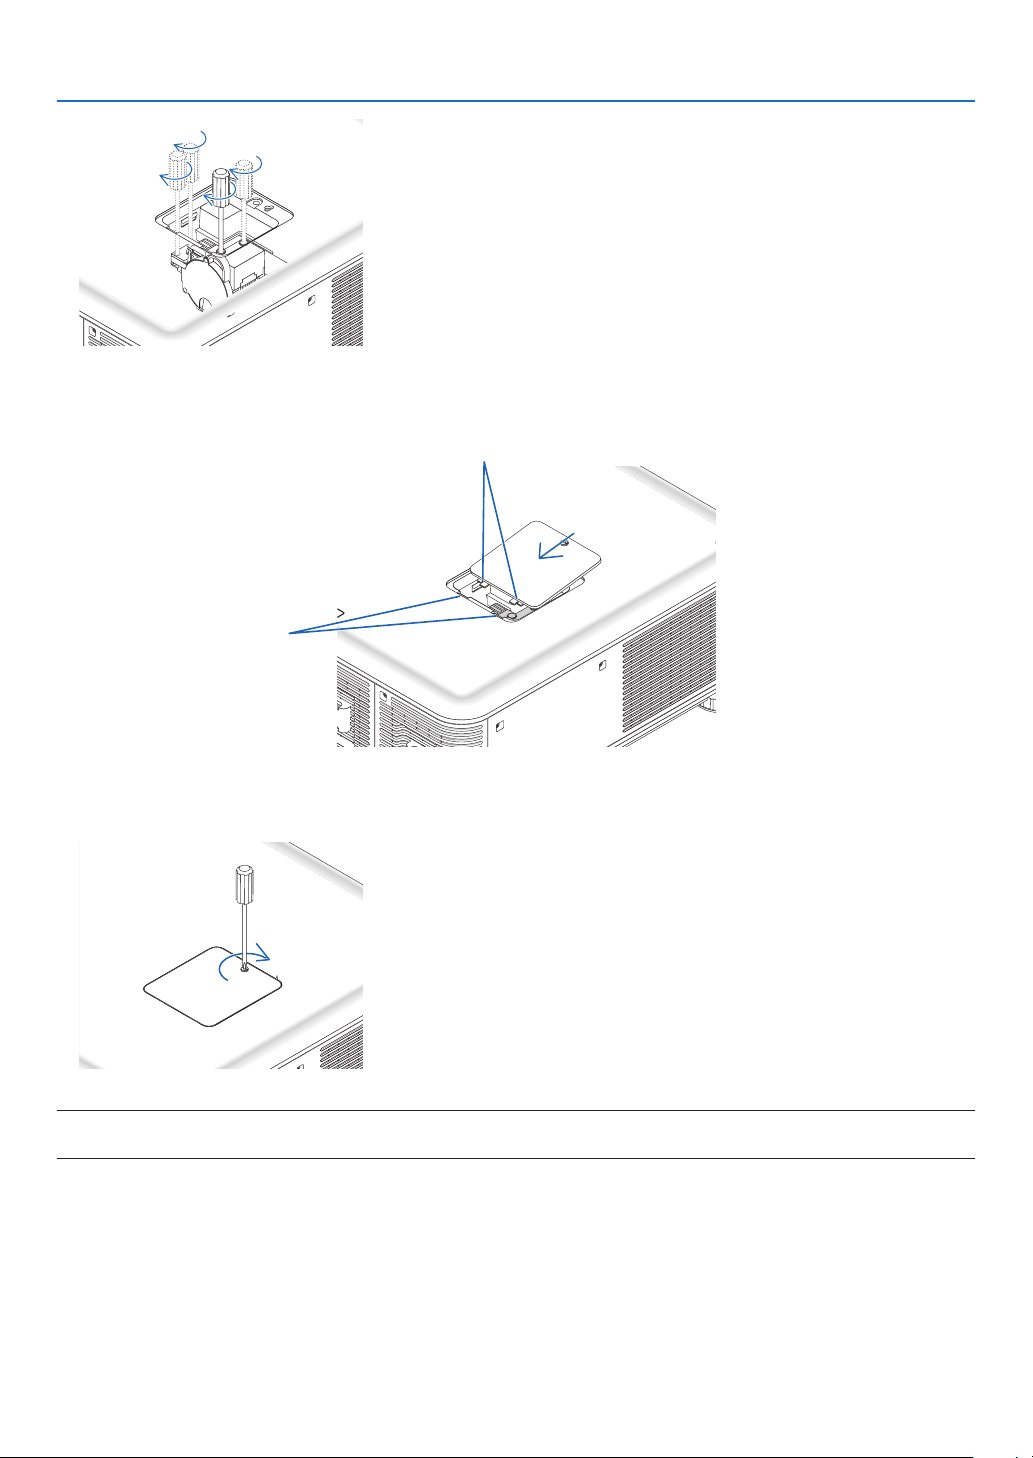
219
9. Appendix
4. Replace the color wheel cover.
• Insertthetwotabsofthecolorwheelintothetwogroovesofthecabinet.
Tabs
Grooves
• Tightenthescrew.
• Besuretotightenthescrew.
NOTE:
Improper(loose)installationofthecolorwheelpreventsanimagefrombeingdisplayed.
Storing Unused Color Wheel:
Keeptheunusedcolorwheelinthezipperbaginwhichthesupplied6-segmentcolorwheelwaspackaged.Thisbag
preventsdustfromfallingorcollectingonthecolorwheel.
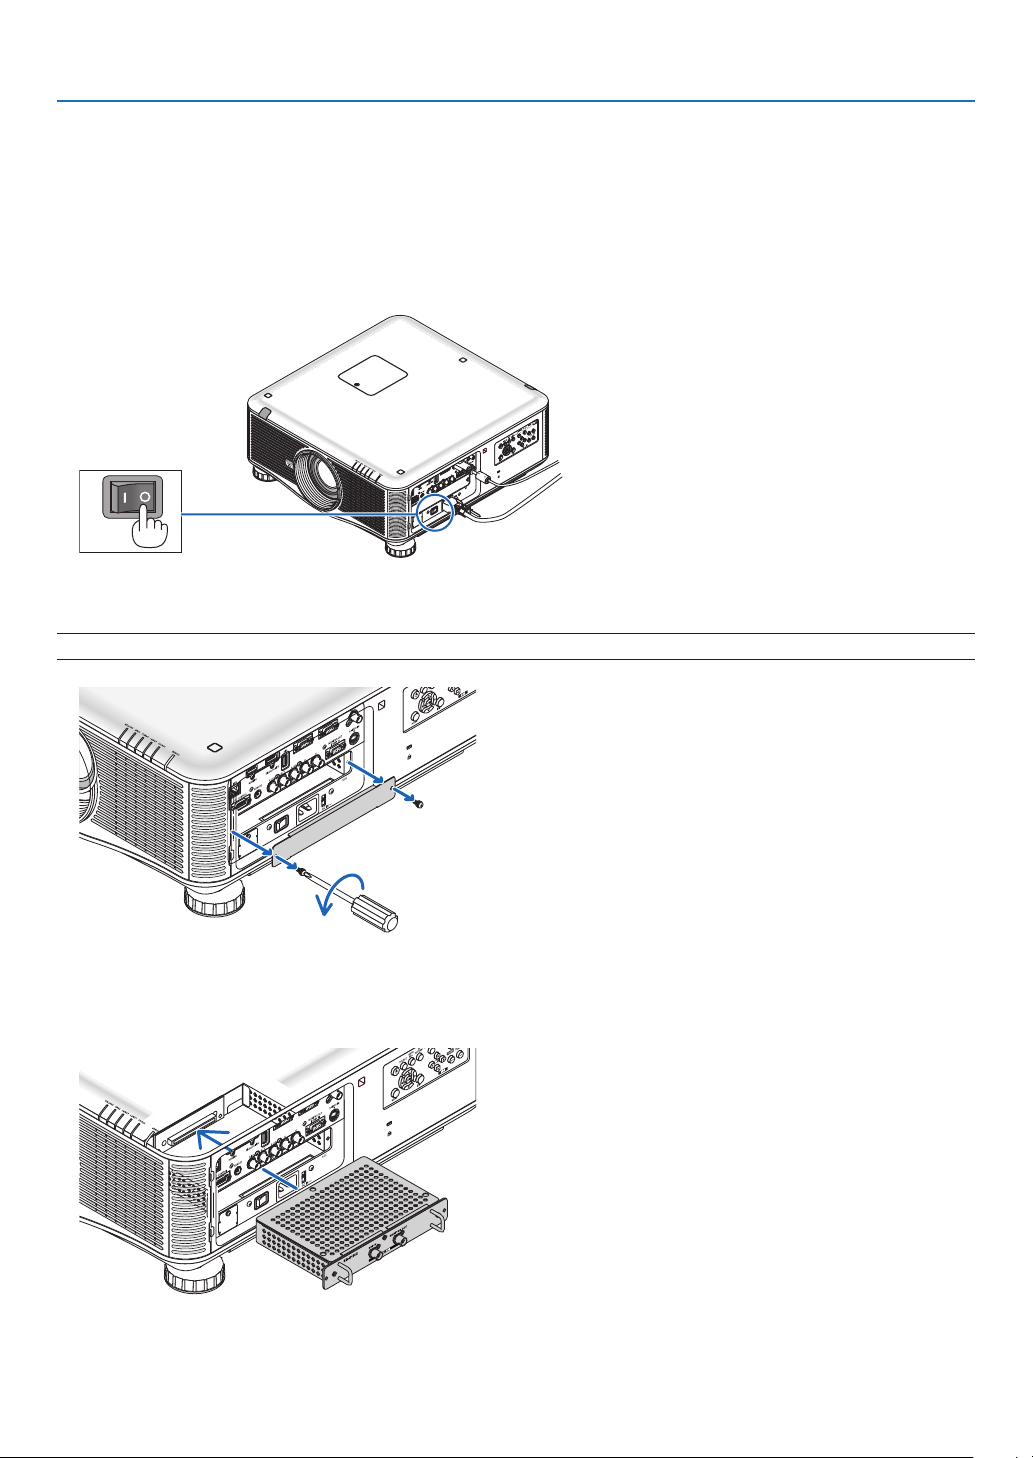
220
9. Appendix
❸ Mounting the Optional Board (sold separately)
CAUTION
Beforemountingorremovingtheoptionalboard,besuretoturnofftheprojector,waitforthefanstostopandturn
offthemainpowerswitch.
Toolneeded:Phillipsscrewdriver(plus-head)
TheSB-01HCboardisusedasanexample.
1. Turnoffthemainpowerswitchoftheprojector.
2. Loosenthetwoscrewsontheslotcoveroftheterminalpanel.
Remove the two screws and the slot cover.
NOTE:Keepthetwoscrewsandtheslotcover.
3. Insert the optional board into the slot.
Make sure that the board is inserted into the slot in the correct orientation.
Incorrectorientationmaycausemiscommunicationbetweentheoptionalboardandprojector.
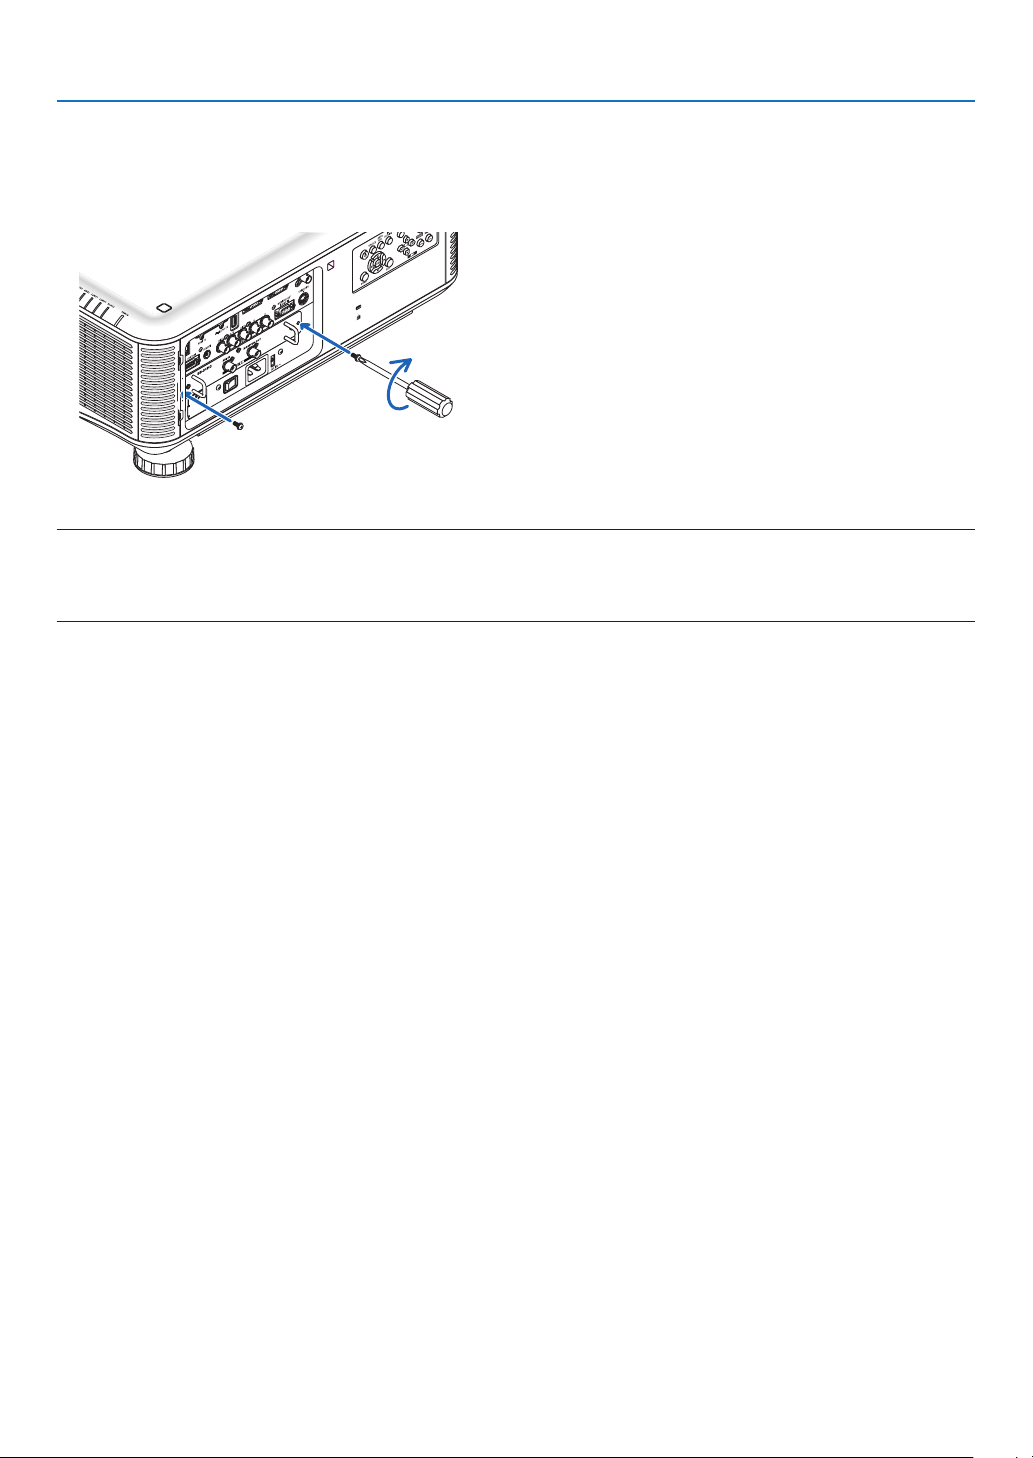
221
9. Appendix
4. Tightenthetwoscrewsonbothsidesoftheslot.
• Besuretotightenthescrews.
This will complete installation of the optional board.
Refer to the user’s manual included with the board for source selection.
NOTE:
• Mountingtheoptionalboardmaycausethefanstoruninthestandbymodeforthepurposeofcoolingdependingontheoptional
board.Thefanspeedmayalsoincreaseinordertocooltheprojectorproperly.Bothoftheseinstancesareconsiderednormal
and not a malfunction of the projector.

222
9. Appendix
❹ Compatible Input Signal List
Analog RGB
Signal Resolution(dots) AspectRatio RefreshRate(Hz)
VGA 640 × 480 4 : 3 60/72/75/85/iMac
SVGA 800 × 600 4 : 3 56/60/72/75/85/iMac
XGA 1024 × 768 4 : 3 60/70/75/85/iMac
XGA+ 1152 × 864 4 : 3 60/70/75/85
WXGA 1280 × 768 15 : 9 60
1280 × 800 16 : 10 60
1360 × 768 *
1
16 : 9 60
1366 × 768 *
1
16 : 9 60
Quad-VGA 1280 × 960 4 : 3 60/75/85
SXGA 1280 × 1024 5 : 4 60/75/85
SXGA+ 1400 × 1050 4 : 3 60/75
WXGA+ 1440 × 900 16 : 10 60
WXGA++ 1600 × 900 16 : 9 60
UXGA 1600 × 1200 4 : 3 60/65/70/75
WSXGA+ 1680 × 1050 16 : 10 60
WUXGA 1920 × 1200 16 : 10
60(ReducedBlanking)
HD 1280 × 720 16 : 9 60
FullHD 1920 × 1080 16 : 9 60
MAC13" 640 × 480 4 : 3 67
MAC16" 832 × 624 4 : 3 75
MAC19" 1024 × 768 4 : 3 75
MAC21" 1152 × 870 *
2
4 : 3 75
MAC23" 1280 × 1024 5 : 4 65
HDMI
Signal Resolution(dots) AspectRatio RefreshRate(Hz)
VGA 640 × 480 4 : 3 60
SVGA 800 × 600 4 : 3 60
XGA 1024 × 768 4 : 3 60
HD 1280 × 720 16 : 9 60
WXGA 1280 × 768 15 : 9 60
1280 × 800 16 : 10 60
1366 × 768 *
1
16 : 9 60
Quad-VGA 1280 × 960 4 : 3 60
SXGA 1280 × 1024 5 : 4 60
SXGA+ 1400 × 1050 4 : 3 60
WXGA+ 1440 × 900 16 : 10 60
WXGA++ 1600 × 900 16 : 9 60
WSXGA+ 1680 × 1050 16 : 10 60
UXGA 1600 × 1200 4 : 3 60
FullHD 1920 × 1080 16 : 9 60
WUXGA 1920 × 1200 16 : 10
60(ReducedBlanking)
HDTV(1080p) 1920 × 1080 16 : 9 50/60
HDTV(1080i) 1920 × 1080 16 : 9 50/60
HDTV(720p) 1280 × 720 16 : 9 50/60
SDTV(480p) 720 × 480 4:3/16:9 60
SDTV(576p) 720 × 576 4:3/16:9 50
SDTV(480i) 1440 × 480
4:3/16:9 60
SDTV(576i) 1440 × 576
4:3/16:9 50

223
9. Appendix
DisplayPort
Signal Resolution(dots) AspectRatio RefreshRate(Hz)
VGA 640 × 480 4 : 3 60
SVGA 800 × 600 4 : 3 60
XGA 1024 × 768 4 : 3 60
HD 1280 × 720 16 : 9 60
WXGA 1280 × 768 15 : 9 60
1280 × 800 16 : 10 60
1366 × 768 *
1
16 : 9 60
Quad-VGA 1280 × 960 4 : 3 60
SXGA 1280 × 1024 5 : 4 60
SXGA+ 1400 × 1050 4 : 3 60
WXGA+ 1440 × 900 16 : 10 60
WXGA++ 1600 × 900 16 : 9 60
WSXGA+ 1680 × 1050 16 : 10 60
UXGA 1600 × 1200 4 : 3 60
FullHD 1920 × 1080 16 : 9 60
WUXGA 1920 × 1200 16 : 10
60(ReducedBlanking)
HDTV(1080p) 1920 × 1080 16 : 9 50/60
HDTV(720p) 1280 × 720 16 : 9 50/60
SDTV(480p) 720 × 480 4:3/16:9 60
SDTV(576p) 720 × 576 4:3/16:9 50
Component
Signal Resolution(dots) AspectRatio RefreshRate(Hz)
HDTV(1080p) 1920 × 1080 16 : 9 50/60
HDTV(1080i) 1920 × 1080 16 : 9 50/60
HDTV(720p) 1280 × 720 16 : 9 50/60
SDTV(480p) 720 × 480 4:3/16:9 60
SDTV(576p) 720 × 576 4:3/16:9 50
SDTV(480i) 720 × 480
4:3/16:9 60
SDTV(576i) 720 × 576
4:3/16:9 50
CompositeVideo/S-Video
Signal AspectRatio RefreshRate(Hz)
NTSC 4 : 3 60
PAL 4 : 3 50
PAL60 4 : 3 60
SECAM 4 : 3 50
*1Theprojectormayfailtodisplaythesesignalscorrectlywhen[AUTO]isselectedfor[ASPECTRATIO]intheon-screenmenu.
Thefactorydefaultis[AUTO]for[ASPECTRATIO].Todisplaythesesignals,select[16:9]for[ASPECTRATIO].
*2Theprojectormayfailtodisplaythesesignalscorrectlywhen[AUTO]isselectedfor[ASPECTRATIO]intheon-screenmenu.
Thefactorydefaultis[AUTO]for[ASPECTRATIO].Todisplaythesesignals,select[4:3]for[ASPECTRATIO].
• Signalsexceedingtheprojector’sresolutionarehandledwithscalingtechnology.
• Withscalingtechnology,thesizeofcharactersandruledlinesmaybeunevenandcolorsmaybeblurred.
• Uponshipment,theprojectorissetforsignalswithstandarddisplayresolutionsandfrequencies,butadjustments
mayberequireddependingonthetypeofcomputer.
224
9. Appendix
❺ Specifications
Thissectionprovidestechnicalinformationaboutprojector’sperformance.
Optical
ModelName PX750U2/PX700W2/PX800X2 PX750UG2/PX700WG2/PX800XG2
ProjectionSystem PX750U2/PX750UG2:SingleDLP
®
chip(0.67",aspectratio16:10)
PX700W2/PX700WG2:SingleDLP
®
chip(0.65",aspectratio16:10)
PX800X2/PX800XG2:SingleDLP
®
chip(0.7",aspectratio4:3)
Resolution*
1
PX750U2/PX750UG2:1920×1200pixels(WUXGA)
PX700W2/PX700WG2:1280×800pixels(WXGA)
PX800X2/PX800XG2:1024×768pixels(XGA)
Lens Option(seepage226)
PX750U2/PX750UG2 PX700W2/PX700WG2/PX800X2/PX800XG2
NP16FL NP06FL
NP17ZL NP07ZL
NP18ZL NP08ZL
NP19ZL NP09ZL
NP20ZL NP10ZL
NP21ZL NP31ZL
NP31ZL
PowerLensShift PX750U2/PX750UG2:+0.5V,+/−0.1H(NP17ZL,NP18ZL,NP19ZL,NP20ZL,NP21ZL,
NP31ZL)
PX700W2/PX700WG2:+0.5V,+/−0.1H(NP07ZL,NP08ZL,NP09ZL,NP10ZL,NP31ZL)
PX800X2/PX800XG2:+0.5V,+/−0.1H(NP17ZL,NP18ZL,NP19ZL,NP20ZL,NP21ZL)
+0.43V,+/−0.1H(NP31ZL)
Lamp 400WAC(320WinECO)
LightOutput*
2
*
3
PX750U2/PX750UG2:7,500lumens
PX700W2/PX700WG2:7,000lumens
PX800X2/PX800XG2:8,000lumens
ECO:80%
ContrastRatio*
3
(fullwhite:fullblack)
1000:1(2100:1withDYNAMICCONTRASTON)
ImageSize(Diagonal) PX750U2/PX750UG2:50-300"
PX700W2/PX700WG2:40-500"
PX800X2/PX800XG2:40-500"
ProjectionDistance
(Min.-Max.)
(dependingonthelens→page213, 214, 215)
*1 Effectivepixelsaremorethan99.99%.
*2 Thisisthelightoutputvalue(lumens)whenthe[PRESET]modeissetto[HIGH-BRIGHT]andthepre-installed6-segmentWhite
colorwheelisusedandwhentheoptionallensesNP18ZL(forPX750U2)andNP08ZL(forPX700W2/PX800X2)areused.Ifany
othermodeisselectedasthe[PRESET]mode,thelightoutputvaluemaydropslightly.
*3 CompliancewithISO21118-2005
Electrical
ModelName PX750U2 PX700W2 PX800X2 PX750UG2 PX700WG2 PX800XG2
Inputs
2×RGB/Component(miniD-Sub15P),5×BNC,
1×HDMITypeA(HDMI
®
Connector)HDCPsupported*
4
,
1×DisplayPort(20pinconnecter)HDCPsupported*
4
,
1×S-Video(DIN4P),1×Video(BNC)
1×OptionSlot
Outputs 1×RGB(D-Sub15P)
PCControl 1×PCControlPort(D-Sub9P)
WiredRemote 1×StereominiJack
WiredLANPort 1×RJ-45(10BASE-T/100BASE-TX)
WirelessLANPort(Optional) IEEE802.11b/g/n(optionalWirelessLANUnit[NP02LMSeries]required)
USBPort 1×TypeA
ColorReproduction 10-bitsignalprocessing(1.07billioncolors)(VIEWER,NETWORK:Colors,16.7million
colors)
CompatibleSignals*
5
Analog:VGA/SVGA/XGA/XGA+/WXGA/WXGA+/SXGA/SXGA+/UXGA/WUXGA/480i/480p
/576i/576p/720p/1080i/1080p
HDMI:VGA/SVGA/XGA/WXGA/SXGA/SXGA+/UXGA/WUXGA/480p/576p/720p/1080i/108
0p(Refreshrate:60Hzonly)
VideoBandwidth RGB:165MHz(Max.)

225
9. Appendix
ModelName PX750U2 PX700W2 PX800X2 PX750UG2 PX700WG2 PX800XG2
HorizontalResolution 540TVlines:NTSC/NTSC4.43/PAL/PAL-M/PAL-N/PAL60
300TVlines:SECAM
ScanRate Horizontal:15kHzto108kHz(RGB:24kHzorover)
Vertical:48Hzto120Hz(HDMI:50Hzto85Hz)
SyncCompatibility SeparateSync/CompositeSync/SynconGreen
PowerRequirement/InputCurrent 100-240VAC,50/60Hz,10.8-4.3A 200-240VAC,50/60Hz,5.2A
PowerCon-
sumption
ECO
MODE
OFF
(NORMAL)
Duallamp 1006W(100-
130V)/958W
(200-240V)
969W(100-
130V)/931W
(200-240V)
963W(100-
130V)/927W
(200-240V)
958W(200-
240V)
931W(200-
240V)
927W(200-
240V)
Single
lamp
530W(100-
130V)/515W
(200-240V)
506W(100-
130V)/494W
(200-240V)
500W(100-
130V)/489W
(200-240V)
515W(200-
240V)
494W(200-
240V)
489W(200-
240V)
ECO
MODEON
Duallamp 810W(100-
130V)/777W
(200-240V)
778W(100-
130V)/753W
(200-240V)
777W(100-
130V)/752W
(200-240V)
777W(200-
240V)
753W(200-
240V)
752W(200-
240V)
Single
lamp
439W(100-
130V)/429W
(200-240V)
413W(100-
130V)/405W
(200-240V)
412W(100-
130V)/404W
(200-240V)
429W(200-
240V)
405W(200-
240V)
404W(200-
240V)
STANDBY(NORMAL) 33W(100-
130V)/34W
(200-240V)
27W(100-
130V)/27W
(200-240V)
28W(100-
130V)/28W
(200-240V)
34W(200-
240V)
27W(200-
240V)
28W(200-
240V)
NORMAL2
23W(100-
130V)/23W
(200-240V)
17W(100-
130V)/18W
(200-240V)
19W(100-
130V)/18W
(200-240V)
23W(200-
240V)
18W(200-240V)
STANDBY(POWER-
SAVING)
0.2W(100-130V)
0.4W(200-240V)
0.4W(200-240V)
*4 HDMI
®
(DeepColor,LipSync)/DisplayPortwithHDCP
WhatisHDCP/HDCPtechnology?
HDCPisanacronymforHigh-bandwidthDigitalContentProtection.HighbandwidthDigitalContentProtection(HDCP)isasystem
forpreventingillegalcopyingofvideodatasentoveraHigh-DenitionMultimediaInterface(HDMI).
IfyouareunabletoviewmaterialviatheHDMIandDisplayPortinput,thisdoesnotnecessarilymeantheprojectorisnotfunction-
ingproperly.WiththeimplementationofHDCP,theremaybecasesinwhichcertaincontentisprotectedwithHDCPandmight
notbedisplayedduetothedecision/intentionoftheHDCPcommunity(DigitalContentProtection,LLC).
Video:DeepColor;8/10/12-bit,LipSync
Audio:LPCM;upto2ch,samplerate32/44.1/48KHz,samplebit;16/20/24-bit
*5 Animagewithhigherorlowerresolutionthantheprojector’snativeresolution(1920×1200)willbedisplayedwithscalingtech-
nology.
Mechanical
ModelName PX750U2/PX700W2/PX800X2 PX750UG2/PX700WG2/PX800XG2
Installation
Orientation
Desktop/Front,Desktop/Rear,Ceiling/Front,Ceiling/Rear
Dimensions 19.8"(W)×7.6"(H)×20.3"(D)/504mm(W)×192mm(H)×516mm(D)(notincludingprotrusions)
Weight 43.4lbs/19.7kg(notincludingthelens)
Environmental
Considerations
OperationalTemperatures:32°to104°F(0°to40°C),
StorageTemperatures:14°to122°F(−10°to50°C),
20%to80%humidity(non-condensing)
Operatingaltitude:0to2600m/8500feet(1600to2600m/5500to8500feet:Set[FANMODE]to[HIGH
ALUTITUDE])
Regulations
For United States:
ULApproved(UL60950-1)
MeetsFCCClassBrequirements
For Canada:
ULApproved(CSA60950-1)
MeetsDOCCanadaClassBrequirements
ForAustralia/NewZealand:
MeetsAS/NZSCISPR.22ClassB
For Europe:
MeetsEMCDirective(EN55022,EN55024,EN61000-3-2,EN61000-3-3)
MeetsLowVoltageDirective(EN60950-1,TÜVGSApproved)

226
9. Appendix
Foradditionalinformationvisit:
US:http://www.necdisplay.com/
Europe:http://www.nec-display-solutions.com/
Global:http://www.nec-display.com/global/index.html
Forinformationonouroptionalaccessories,visitourwebsiteorseeourbrochure.
Thespecicationsaresubjecttochangewithoutnotice.
Option lens
[PX750U2]
NP16FL Powerfocus
throwratio0.76:1,F1.85,f=11.6mm
ImageSize(Diagonal):50–300inches/1.27–7.62m
ProjectionDistance(Min.–Max.):0.81–5.08m
NP17ZL Powerzoomandfocus
throwratio1.25–1.79:1,F1.85–2.5,f=18.7–26.5mm
ImageSize(Diagonal):50–300inches/1.27–7.62m
ProjectionDistance(Min.–Max.):1.33–11.74m
NP18ZL Powerzoomandfocus
throwratio1.73–2.27:1,F1.64–1.86,f=25.7–33.7mm
ImageSize(Diagonal):50–300inches/1.27–7.62m
ProjectionDistance(Min.–Max.):1.83–14.88m
NP19ZL Powerzoomandfocus
throwratio2.22–3.67:1,F1.86–2.48,f=32.91–54.23mm
ImageSize(Diagonal):50–300inches/1.27–7.62m
ProjectionDistance(Min.–Max.):2.36–24.13m
NP20ZL Powerzoomandfocus
throwratio3.6–5.4:1,F1.85–2.41,f=52.8–79.1mm
ImageSize(Diagonal):50–300inches/1.27–7.62m
ProjectionDistance(Min.–Max.):3.80–35.36m
NP21ZL Powerzoomandfocus
throwratio5.3–8.3:1,F1.85–2.48,f=78.5–121.9mm
ImageSize(Diagonal):50–300inches/1.27–7.62m
ProjectionDistance(Min.–Max.):5.60–54.81m
NP31ZL Powerzoomandfocus
throwratio0.75–0.93:1,F1.96–2.3,f=11.3–14.1mm
ImageSize(Diagonal):40–500inches/1.02–12.7m
ProjectionDistance(Min.–Max.):0.62–10.41m
[PX700W2/PX800X2]
NP06FL Powerfocus
throwratio0.77:1,F2.0,f=11.4mm
ImageSize(Diagonal):50–200inches/1.27–5.08m
ProjectionDistance(Min.–Max.):0.84–3.48m(PX700W2)/0.78–3.24m(PX800X2)
NP07ZL Powerzoomandfocus
throwratio1.33–1.79:1,F1.8–2.3,f=19.3–25.8mm
ImageSize(Diagonal):40–500inches/1.02–12.7m
ProjectionDistance(Min.–Max.):1.14–19.92m(PX700W2)/1.06–18.56m(PX800X2)
NP08ZL Powerzoomandfocus
throwratio1.78–2.35:1,F1.7–1.9,f=26–34mm
ImageSize(Diagonal):40–500inches/1.02–12.7m
ProjectionDistance(Min.–Max.):1.53–26.16m(PX700W2)/1.42–24.35m(PX800X2)
NP09ZL Powerzoomandfocus
throwratio2.22–4.43:1,F2.1–2.9,f=32–63mm
ImageSize(Diagonal):40–500inches/1.02–12.7m
ProjectionDistance(Min.–Max.):1.90–49.85m(PX700W2)/1.76–46.42m(PX800X2)
NP10ZL Powerzoomandfocus
throwratio4.43–8.3:1,F2.2–3.1,f=63.5–117.4mm
ImageSize(Diagonal):40–500inches/1.02–12.7m
ProjectionDistance(Min.–Max.):3.81–92.53m(PX700W2)/3.54–86.36m(PX800X2)
NP31ZL Powerzoomandfocus
throwratio0.79–0.98:1,F1.96–2.3,f=11.3–14.1mm
ImageSize(Diagonal):40–500inches/1.02–12.7m
ProjectionDistance(Min.–Max.):0.66–10.91m(PX700W2)/0.61–10.16m(PX800X2)
• Thesespecicationsandtheproduct’sdesignaresubjecttochangewithoutnotice.
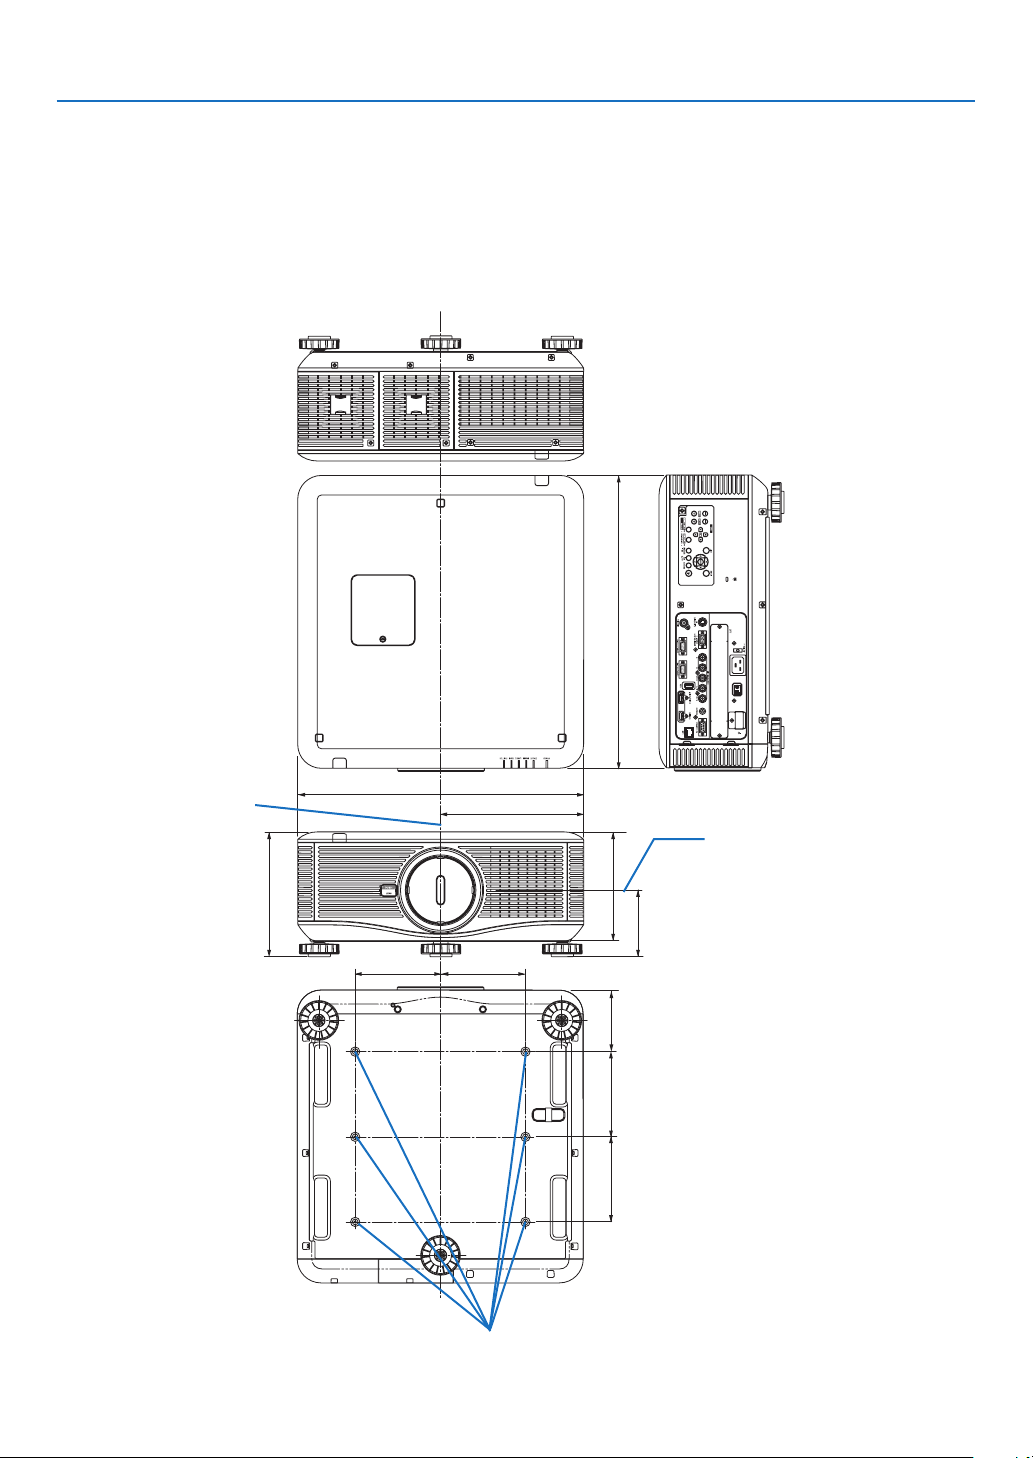
227
9. Appendix
504 (19.8)
252 (9.9)
150 (5.9) 150 (5.9)
192 (7.6)
220 (8.7)
117.4 (4.62)
109 (4.3)150 (5.9)150 (5.9)
516 (20.3)
❻ Cabinet Dimensions
Lens center
Lens center
Holes for ceiling mount
Unit:mm(inch)

228
9. Appendix
❼ Pin Assignments of D-Sub COMPUTER Input Connector
Mini D-Sub 15 Pin Connector
SignalLevel
Videosignal:0.7Vp-p(Analog)
Syncsignal:TTLlevel
51423
10
11 12 13 14 15
6978
Pin No. RGB Signal (Analog) YCbCr Signal
1 Red Cr
2
GreenorSynconGreen Y
3 Blue Cb
4 Ground
5 Ground
6
RedGround CrGround
7 GreenGround YGround
8 BlueGround CbGround
9 NoConnection
10 SyncSignalGround
11 NoConnection
12 Bi-directionalDATA(SDA)
13 HorizontalSyncorComposite
Sync
14
VerticalSync
15 DataClock

229
9. Appendix
❽ Troubleshooting
Thissectionhelpsyouresolveproblemsyoumayencounterwhilesettinguporusingtheprojector.
Indicator Messages
POWER Indicator
Indicatordisplay Projectorstatus Procedure
Off Powerisoff. –
Flashing
Blue(shortashes) Preparingtoturnpoweron Waitawhile.
Blue(longashes) Offtimer(enabled)
Programtimer(offtimeenabled)
–
Orange(short
ashes)
Projectorcooling Waitawhile.
Orange(longashes) Programtimer(ontimeenabled)
Lit Blue Poweron –
Orange
Standbymode(NORMALorNORMAL2) –
Red Standbymode(POWER-SAVING) –
STATUS Indicator
Indicatordisplay Projectorstatus Procedure
Off
Noproblem,or
standbymode
(POWER-SAVINGor
NORMAL2)
–
Flashing
Red(cycles
of1)
Coverproblem Thelampcoverisnotproperlymounted.Mountitproperly.(→
Page184)
Red(cycles
of4)
Fanproblem Thecoolingfanhasstoppedturning.ContactanNECprojector
customersupportcenterforrepairs.
Flashing Orange Networkconict Itisnotpossible to connecttheprojector’s built-inLANand
wirelessLANsimultaneouslytothesamenetwork.Toconnect
theprojector’sbuilt-inLANandwirelessLANsimultaneously,
connectthemtodifferentnetworks.
Lit Green Standbymode
(NORMAL)
–
Orange
Buttonhasbeen
pressedwhile
projectorisinkeylock
mode
Theprojector’skeysarelocked.Thesettingmustbecanceled
tooperatetheprojector.(→Page126)
Projector’sIDnumber
andremotecontrol’s
IDnumberdonot
match
CheckthecontrolIDs.(→Pages126and127)

230
9. Appendix
LAMP 1/LAMP 2 Indicator
Indicatordisplay Projectorstatus Procedure
Off
Thelampisturnedoff. –
Flashing Green
Preparingtorelightlampafter
lightinghasfailed
Waitawhile.
Red Lampreplacementgrace
period
Thelamphas reachedtheendofitsservice lifeand
isnowin thereplacementgraceperiod (100 hours).
Replacethelampassoonaspossible.(→page182)
Red(cycles
of6)
Lampdoesnotlight Thelamphasnotturnedon.Waitatleast1minute,then
turnthepowerbackon.Ifthelampstilldoesnotlight,
contactanNECprojectorcustomersupportcenter.
Lit Red Lampusagetimeexceeded Thelamphasexceededitsusagetime.Theprojector’s
powercannotbeturnedonuntilthelampisreplaced.
(→page182)
Green
Lamplit –
TEMP. Indicator
Indicatordisplay Projectorstatus Procedure
Off
Noproblem
Flashing Red Temperatureproblem Thetemperatureprotectorhasbeen activated. If the
roomtemperatureishigh,movetheprojectortoacool
place.IftheTEMP.indicatorstillbeashingwhenthe
projectorisusedatoperatingtemperatures,contactan
NECprojectorcustomersupportcenter.
Orange Warmingup Theusageenvironmenttemperatureislowerthanthe
projector’s operating temperature(0°C).Inthatcase,
raisetheusageenvironmenttemperaturetoa0°Cor
higherandturnontheprojector.Iftheprojectoristurned
onataround0°C,itmaytake5minutestowarmupthe
projector.Duringthiswarm-upperiodtheTEMP.indicator
willash.Whenthewarm-upiscompleted,theTEMP.
indicatorwillgooff.
SHUTTER Indicator
Indicatordisplay Projectorstatus Procedure
Off Light –
Flashing Green
Lenscalibrationisinprocess. –
On Green
Lightshuttered –
If the temperature protector is activated
Iftheprojector’sinternaltemperaturerisesabnormally,thelampturnsoffandthetemperatureindicatorashes(re-
peatedlyincyclesof2).
Itmayhappenthattheprojector’stemperatureprotectorissimultaneouslyactivatedandtheprojector’spowerturnsoff.
Ifthishappens,dothefollowing:
- Unplugthepowercordfromthepoweroutlet.
- Ifusinginaplacewherethesurroundingtemperatureishigh,movetheprojectortoadifferent,coolplace.
- Ifthereisdustintheventilationholes,clean.(→pages179and181)
- Waitassuchabout1hourfortheprojector’sinternaltemperaturetolower.

231
9. Appendix
Common Problems & Solutions
(→“Power/Status/LampIndicator”onpage229.)
Problem CheckTheseItems
Does not turn on or
shut down
• Checkthatthepowercordispluggedinandthatthepowerbuttonontheprojectorcabinetortheremotecontrol
is on� (→ pages 14, 17, 18)
• Ensurethatthelampcoverisinstalledcorrectly.(→ page 184)
• Checktoseeiftheprojectorhasoverheated.Ifthereisinsufcientventilationaroundtheprojectororiftheroom
where you are presenting is particularly warm, move the projector to a cooler location�
• Checktoseeifyoucontinuetousetheprojectorforanother100hoursafterthelamphasreachedtheendofits
life� If so, replace the lamp� After replacing the lamp, reset the lamp hours used� (→ page 137)
• Thelampmayfailtolight.Waitafullminuteandthenturnonthepoweragain.
• Set[FANMODE]to[HIGHALTITUDE]whenusingtheprojectorataltitudesapproximately5500feet/1600meters
orhigher.Usingtheprojectorataltitudesapproximately5500feet/1600metersorhigherwithoutsettingto[HIGH
ALTITUDE] can cause the projector to overheat and the projector could shut down� If this happens, wait a couple
minutes and turn on the projector� (→ page 128)
If you turn on the projector immediately after the lamp is turned off, the fans run without displaying an image for
some time and then the projector will display the image� Wait for a moment�
Will turn off • Ensurethatthe[OFFTIMER],[AUTOPOWEROFF]or[PROGRAMTIMER]isoff.(→ page 120, 131)
No picture
• Checkiftheappropriateinputisselected.(→ page 21) If there is still no picture, press the SOURCE button or one
of the input buttons again�
• Ensureyourcablesareconnectedproperly.
• Usemenustoadjustthebrightnessandcontrast.(→ page 110)
• Ensurethatthelenscoverisopen.(→ page 17)
• Resetthesettingsoradjustmentstofactorypresetlevelsusingthe[RESET]intheMenu.(→ page 137)
• EnteryourregisteredkeywordiftheSecurityfunctionisenabled.(→ page 44)
• IftheHDMIinputortheDisplayPortsignalcannotbedisplayed,trythefollowing.
- Reinstall your driver for the graphics card built in your computer, or use the updated driver�
For reinstalling or updating your driver, refer to the user guide accompanied with your computer or graphics
card, or contact the support center for your computer manufacturer�
Install the updated driver or OS on your own responsibility�
We are not liable for any trouble and failure caused by this installation�
• BesuretoconnecttheprojectorandnotebookPCwhiletheprojectorisinstandbymodeandbeforeturningon
the power to the notebook PC�
In most cases the output signal from the notebook PC is not turned on unless connected to the projector before
being powered up�
* If the screen goes blank while using your remote control, it may be the result of the computer’s screen-saver
or power management software�
• Seealsothepage233�
Color tone or hue is
unusual
• Checkifanappropriatecolorisselectedin[WALLCOLOR].Ifso,selectanappropriateoption.(→ page 118)
• Adjust[HUE]in[PICTURE].(→ page 110)
Image isn’t square to
the screen
• Repositiontheprojectortoimproveitsangletothescreen.(→ page 22)
• UsetheKeystonecorrectionfunctiontocorrectthetrapezoiddistortion.(→ page 30)
Picture is blurred
• Adjustthefocus.(→ page 25)
• Repositiontheprojectortoimproveitsangletothescreen.(→ page 22)
• Ensurethatthe distance between the projector and screen is within the adjustment range of the lens.
(→ page 213, 214, 215)
• Hasthelensbeenshiftedbyanamountexceedingtheguaranteedrange?(→ page 216)
• Condensationmayformonthelensiftheprojectoriscold,broughtintoawarmplaceandisthenturnedon.
Should this happen, let the projector stand until there is no condensation on the lens�
Flicker appears on
screen
• Set[FANMODE]tootherthan[HIGHALTITUDE]modewhenusingtheprojectorataltitudesapproximately5500
feet/1600metersorlower.Usingtheprojectorataltitudeslessthanapproximately5500feet/1600metersand
setting to [HIGH ALTITUDE] can cause the lamp to overcool, causing the image to flicker� Switch [FAN MODE] to
[AUTO]� (→ page 128)
Image is scrolling
vertically, horizontally
or both
• Checkthecomputer’sresolutionandfrequency.Makesurethattheresolutionyouaretryingtodisplayissupported
by the projector� (→ page 222)
• AdjustthecomputerimagemanuallywiththeHorizontal/Verticalinthe[IMAGEOPTIONS].(→ page 112)

232
9. Appendix
Remote control does
not work
• Installnewbatteries.(→ page 9)
• Makesuretherearenoobstaclesbetweenyouandtheprojector.
• Standwithin22feet(7m)oftheprojector.(→ page 9)
• IftheremotecontrolcableplugisinsertedintotheREMOTEjack,theremotecontroldoesnotfunctionwirelessly.
(→ page 10)
• Makesurethattheremotecontrol’sIDcorrespondswiththeprojector’sID.(→ page 126, 127)
Indicator is lit or
blinking
• SeethePOWER/STATUS/LAMPIndicator.(→ page 229)
Cross color in RGB
mode
• PresstheAUTOADJ.buttonontheprojectorcabinetortheremotecontrol.(→ page 32)
• Adjustthecomputerimagemanuallywith[CLOCK]/[PHASE]in[IMAGEOPTIONS]inthemenu.(→ page 111)
No on-screen display
• Checkiftheon-screenmuteisturnedon.Toturnofftheon-screenmute,presstheON-SCREENbuttononthe
remotecontrolorholddowntheMENUbuttonontheprojectorcabinetforatleast10seconds.(→ page 35)
Formoreinformationcontactyourdealer.

233
9. Appendix
If there is no picture, or the picture is not displayed correctly.
• PoweronprocessfortheprojectorandthePC.
BesuretoconnecttheprojectorandnotebookPCwhiletheprojectorisinstandbymodeandbeforeturningon
thepowertothenotebookPC.
InmostcasestheoutputsignalfromthenotebookPCisnotturnedonunlessconnectedtotheprojectorbefore
beingpoweredup.
NOTE:Youcancheckthehorizontalfrequencyofthecurrentsignalintheprojector’smenuunderInformation.Ifitreads“0kHz”,
thismeansthereisnosignalbeingoutputfromthecomputer.(→ page 134 or go to next step)
• Enablingthecomputer’sexternaldisplay.
DisplayinganimageonthenotebookPC’sscreendoesnotnecessarilymeanitoutputsasignaltotheprojector.
WhenusingaPCcompatiblelaptop,acombinationoffunctionkeyswillenable/disabletheexternaldisplay.Usu-
ally,thecombinationofthe“Fn”keyalongwithoneofthe12functionkeysgetstheexternaldisplaytocomeon
oroff.Forexample,NEClaptopsuseFn+F3,whileDelllaptopsuseFn+F8keycombinationstotogglethrough
externaldisplayselections.
• Non-standardsignaloutputfromthecomputer
IftheoutputsignalfromanotebookPCisnotanindustrystandard,theprojectedimagemaynotbedisplayed
correctly.Shouldthishappen,deactivatethenotebookPC’sLCDscreenwhentheprojectordisplayisinuse.Each
notebookPChasadifferentwayofdeactivate/reactivatethelocalLCDscreensasdescribedinthepreviousstep.
Refertoyourcomputer’sdocumentationfordetailedinformation.
• ImagedisplayedisincorrectwhenusingaMacintosh
WhenusingaMacintoshwiththeprojector,settheDIPswitchoftheMacadapter(notsuppliedwiththeprojector)
accordingtoyourresolution.Aftersetting,restartyourMacintoshforthechangestotakeaffect.
ForsettingdisplaymodesotherthanthosesupportedbyyourMacintoshandtheprojector,changingtheDIPswitch
onaMacadaptermaybounceanimageslightlyormaydisplaynothing.Shouldthishappen,settheDIPswitch
tothe13"xedmodeandthenrestartyourMacintosh.Afterthat,restoretheDIPswitchestoadisplayablemode
andthenrestarttheMacintoshagain.
NOTE:AVideoAdaptercablemanufacturedbyAppleComputerisneededforaPowerBookwhichdoesnothaveaminiD-Sub
15-pinconnector.
• MirroringonaPowerBook
* WhenusingtheprojectorwithaMacintoshPowerBook,outputmaynotbesetto1024×768unless“mirroring”
isoffonyourPowerBook.Refertoowner’smanualsuppliedwithyourMacintoshcomputerformirroring.
• FoldersoriconsarehiddenontheMacintoshscreen
Foldersoriconsmaynotbeseenonthescreen.Shouldthishappen,select[View]→[Arrange]fromtheApple
menuandarrangeicons.
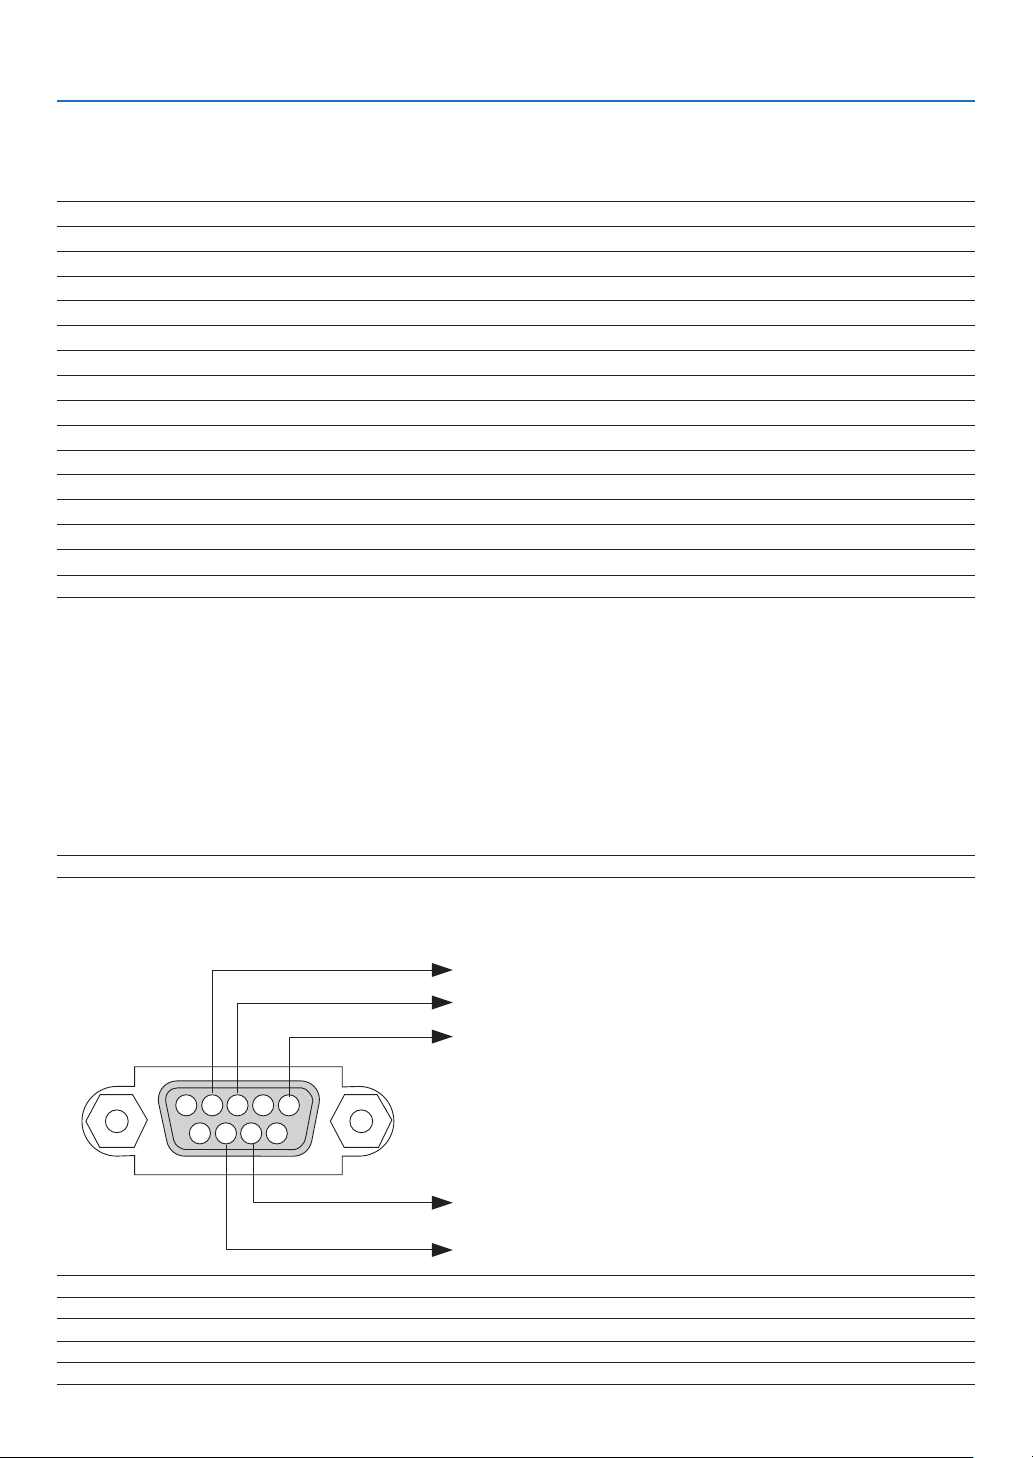
234
9. Appendix
❾ PC Control Codes and Cable Connection
PC Control Codes
Function Code Data
POWERON 02H 00H 00H 00H 00H 02H
POWEROFF 02H 01H 00H 00H 00H 03H
INPUTSELECTCOMPUTER1 02H 03H 00H 00H 02H 01H 01H 09H
INPUTSELECTCOMPUTER2 02H 03H 00H 00H 02H 01H 02H 0AH
INPUTSELECTCOMPUTER3 02H 03H 00H 00H 02H 01H 03H 0BH
INPUTSELECTHDMI 02H 03H 00H 00H 02H 01H 1AH 22H
INPUTSELECTDisplayPort 02H 03H 00H 00H 02H 01H 1BH 23H
INPUTSELECTVIDEO 02H 03H 00H 00H 02H 01H 06H 0EH
INPUTSELECTS-VIDEO 02H 03H 00H 00H 02H 01H 0BH 13H
INPUTSELECTVIEWER 02H 03H 00H 00H 02H 01H 1FH 27H
INPUTSELECTNETWORK 02H 03H 00H 00H 02H 01H 20H 28H
PICTUREMUTEON 02H 10H 00H 00H 00H 12H
PICTUREMUTEOFF 02H 11H 00H 00H 00H 13H
NOTE:ContactyourlocaldealerforafulllistofthePCControlCodesifneeded.
Cable Connection
CommunicationProtocol
Baud rate ���������������������������������� 38400bps
Data length ������������������������������� 8bits
Parity ���������������������������������������� No parity
Stop bit
������������������������������������� One bit
X on/off
������������������������������������� None
Communications procedure
������ Full duplex
NOTE: Depending on the equipment, a lower baud rate may be recommended for long cable runs.
PC Control Connector (D-SUB 9P)
NOTE1:Pins1,4,6and9arenoused.
NOTE2:Jumper“RequesttoSend”and“CleartoSend”togetheronbothendsofthecabletosimplifycableconnection.
NOTE3:Forlongcablerunsitisrecommendedtosetcommunicationspeedwithinprojectormenusto9600bps.
15243
67 98
ToGNDofPC
To RxD of PC
To TxD of PC
To RTS of PC
To CTS of PC

235
9. Appendix
No image is displayed from your PC or video equipment to the
projector�
Still no image even though you connect the projector to the PC
first, then start the PC�
Enabling your notebook PC’s signal output to the projector�
• Acombinationoffunctionkeyswillenable/disabletheexter-
naldisplay.Usually,thecombinationofthe“Fn”keyalong
with one of the 12 function keys turns the external display
on or off.
No image (blue or black background, no display)�
Still no image even though you press the AUTO ADJUST button�
Still no image even though you carry out [RESET] in the
projector’s menu�
Signal cable’s plug is fully inserted into the input connector
A message appears on the screen�
( _____________________________________________ )
The source connected to the projector is active and available�
Still no image even though you adjust the brightness and/or
the contrast�
Input source’s resolution and frequency are supported by the
projector�
❿ Troubleshooting Check List
Beforecontactingyourdealerorservicepersonnel,checkthefollowinglisttobesurerepairsareneededalsoby
referringtothe“Troubleshooting”sectioninyouruser’smanual.Thischecklistbelowwillhelpussolveyourproblem
moreefciently.
*Printthispageandthenextpageforyourcheck.
Frequency of occurrence □ always □sometimes(Howoften?_____________________) □ other (__________________)
Power
No power (POWER indicator does not light blue) See also “Status
Indicator (STATUS)”�
Power cord’s plug is fully inserted into the wall outlet�
Main power switch is pressed to the ON position�
Lamp cover is installed correctly�
Lamp Hours Used (lamp operation hours) was cleared after
lamp replacement�
No power even though you press and hold the POWER button
for 1 second�
Shut down during operation�
Power cord’s plug is fully inserted into the wall outlet�
Lamp cover is installed correctly�
[AUTO POWER OFF] is turned off (only models with the [AUTO
POWER OFF] function)�
[OFF TIMER] is turned off (only models with the [OFF TIMER]
function)�
Video and Audio
Image is too dark�
Remains unchanged even though you adjust the brightness
and/or the contrast�
Image is distorted�
Image appears to be trapezoidal (unchanged even though you
carry out the [KEYSTONE] adjustment)�
Parts of the image are lost�
Still unchanged even though you press the AUTO ADJUST
button�
Still unchanged even though you carry out [RESET] in the
projector’s menu�
Image is shifted in the vertical or horizontal direction�
Horizontal and vertical positions are correctly adjusted on a
computer signal�
Input source’s resolution and frequency are supported by the
projector�
Some pixels are lost�
Image is flickering�
Still unchanged even though you press the AUTO ADJUST
button�
Still unchanged even though you carry out [RESET] in the
projector’s menu�
Image shows flickering or color drift on a computer signal�
Still unchanged even though you change [FAN MODE] from
[HIGH ALTITUDE] to [AUTO]�
Image appears blurry or out of focus�
Still unchanged even though you checked the signal’s resolution
on PC and changed it to projector’s native resolution�
Still unchanged even though you adjusted the focus�
Other
Remote control does not work�
No obstacles between the sensor of the projector and the
remote control�
Projector is placed near a fluorescent light that can disturb the
infrared remote controls�
Batteries are new and are not reversed in installation�
Buttons on the projector cabinet do not work (only models with the
[CONTROL PANEL LOCK] function)
[CONTROL PANEL LOCK] is not turned on or is disabled in
the menu�
Still unchanged even though you press and hold the EXIT button
foraminimumof10seconds.
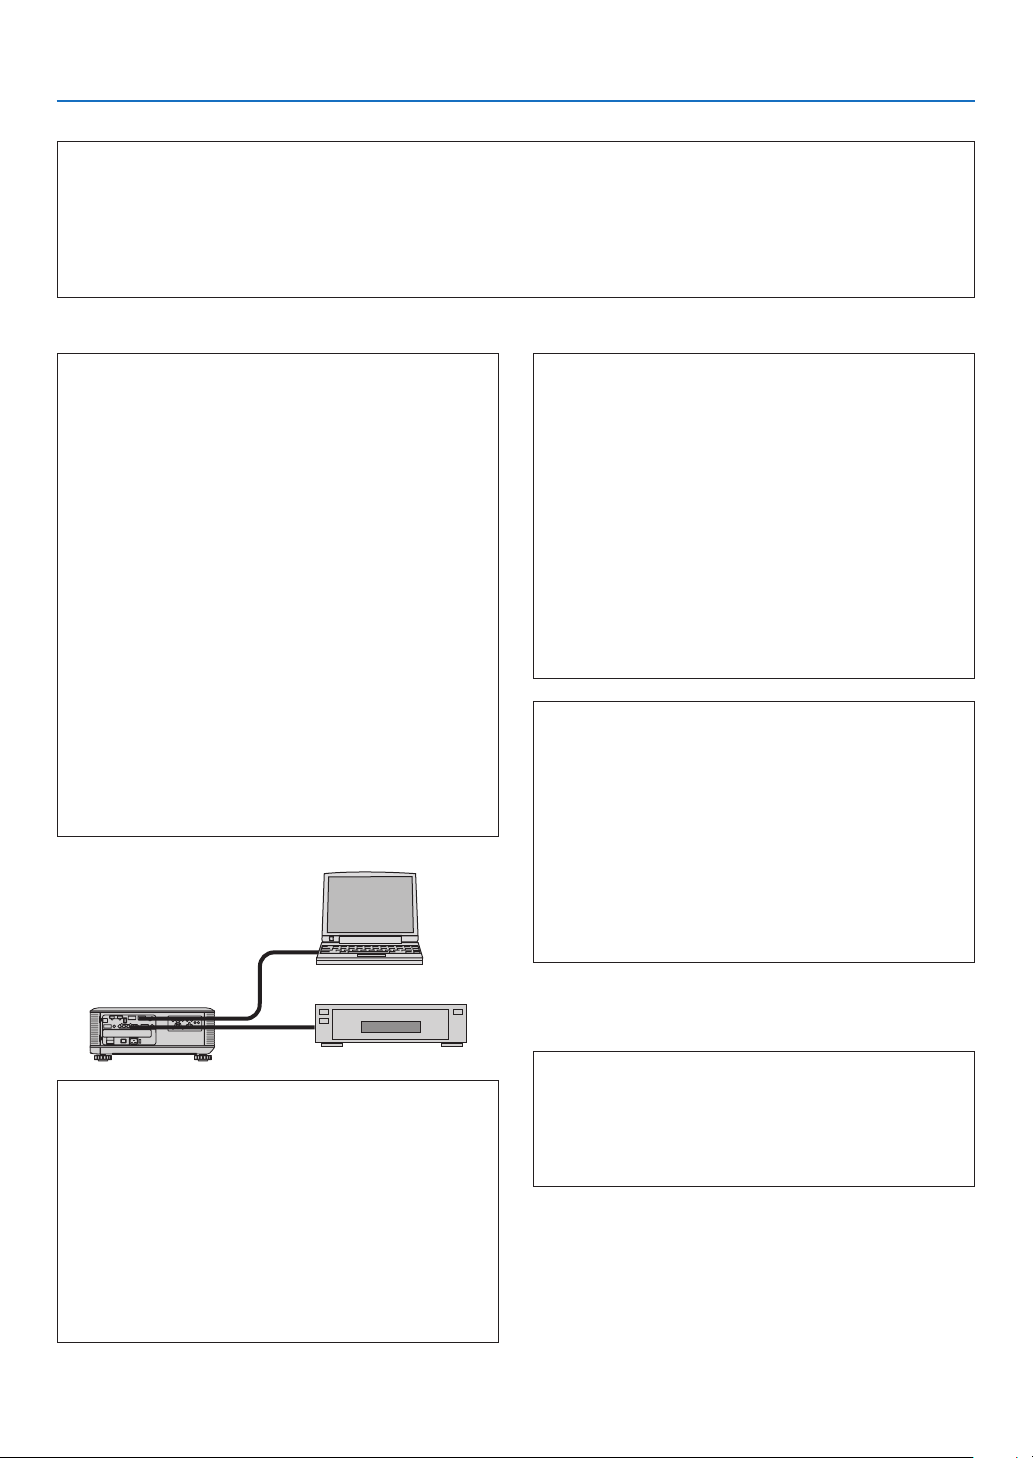
236
9. Appendix
In the space below please describe your problem in detail.
Information on application and environment where your projector is used
Projector
Model number:
Serial No�:
Date of purchase:
Lamp operating time (hours):
Eco Mode: □ OFF □ ON
Information on input signal:
Horizontal synch frequency [ ] kHz
Vertical synch frequency [ ] Hz
Synch polarity H □ (+) □ (−)
V □ (+) □ (−)
Synch type □ Separate □ Composite
□ Sync on Green
STATUS Indicator:
Steady light □ Orange □ Green
Flashing light [ ] cycles
Remote control model number:
Signal cable
NECstandardorothermanufacturer’scable?
Model number: Length: inch/m
Distribution amplifier
Model number:
Switcher
Model number:
Adapter
Model number:
Projector
PC
DVD player
Installation environment
Screen size: inch
Screen type: □ White matte □ Beads □ Polarization
□ Wide angle □ High contrast
Throw distance: feet/inch/m
Orientation: □ Ceiling mount □ Desktop
Power outlet connection:
□
Connected directly to wall outlet
□ Connected to power cord extender or other (the
number of connected equipment______________)
□
Connected to a power cord reel or other (the number
of connected equipment______________)
Computer
Manufacturer:
Model number:
Notebook PC □ / Desktop □
Native resolution:
Refresh rate:
Video adapter:
Other:
Videoequipment
VCR, DVD player, Video camera, Video game or other
Manufacturer:
Model number:

237
9. Appendix
⓫ REGISTER YOUR PROJECTOR! (for residents in the United
States, Canada, and Mexico)
Pleasetaketimetoregisteryournewprojector.ThiswillactivateyourlimitedpartsandlaborwarrantyandInstaCare
serviceprogram.
Visitourwebsiteatwww.necdisplay.com,clickonsupportcenter/registerproductandsubmityourcompletedformonline.
Uponreceipt,wewillsendaconrmationletterwithallthedetailsyouwillneedtotakeadvantageoffast,reliable
warrantyandserviceprogramsfromtheindustryleader,NECDisplaySolutionsofAmerica,Inc.

©NECDisplaySolutions,Ltd.2014 7N952052