
Sound Bar
User Guide
EN

CONTENTS
INTRODUCTION 5
About this User Guide................................................................................5
Features..................................................................................................6
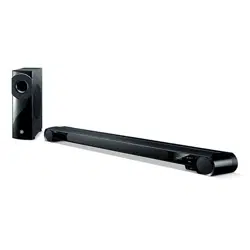
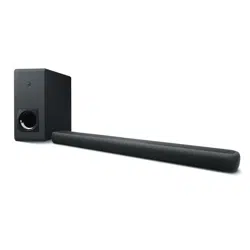
Confirming the included items....................................................................8
PART NAMES AND FUNCTIONS 10
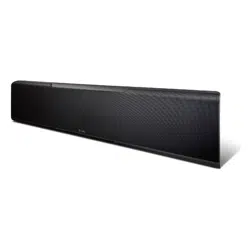
Part names of the sound bar (front/top).. ................................................... 10
Part names of the sound bar (rear).............................................................12
Part names of the subwoofer.. .................................................................. 13
Part names of the remote control..............................................................14
PREPARATION 16
Preparation............................................................................................16
Precautions for preparation......................................................................18
Installing the product.. ............................................................................ 20
Connecting a TV.. .................................................................................... 22
Connecting a TV to the sound bar.. .........................................................................................................................................22
Connecting a TV using only the included digital optical audio cable....................................................................................24
Connecting a TV using an HDMI cable (commercially available)...........................................................................................26
Connecting an audio device.. .................................................................... 30
Preparing the remote control....................................................................34
Turning on and off the sound bar...............................................................35
PLAYBACK 36
Basic control during playback...................................................................36
2
CONTENTS

Adjusting the sound to your preference......................................................38
Sound functions of this product..............................................................................................................................................38
Surround playback...................................................................................................................................................................40
Stereo playback........................................................................................................................................................................41
Adjusting the volume of the subwoofer..................................................................................................................................42
Playing back human voices clearly (CLEAR VOICE).. ..............................................................................................................43
Enjoying rich bass sound (BASS EXT).. ....................................................................................................................................44
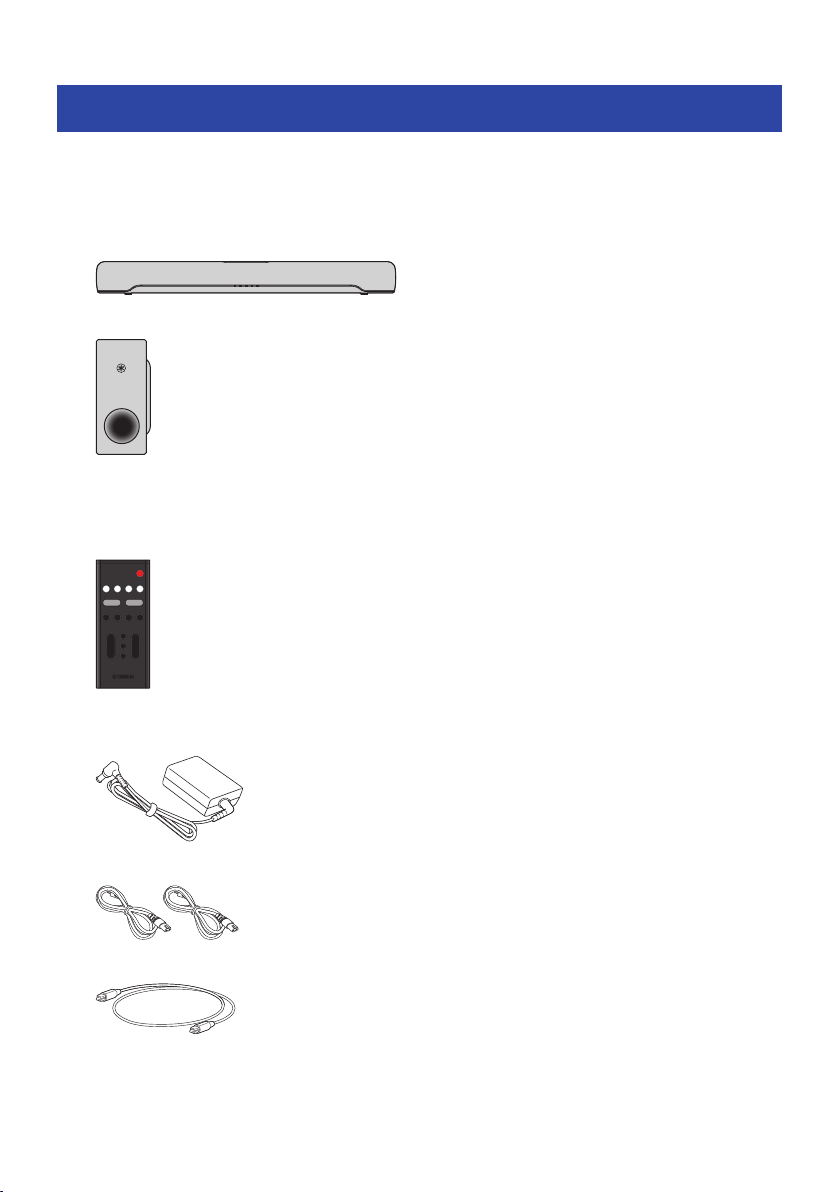
Listening to audio from a Bluetooth® device................................................45
ADDITIONAL FEATURES 48
Changing the brightness of the indicators (Dimmer).....................................48
Using a TV’s remote control to control the sound bar (HDMI Control)..............49
Showing the type of audio signal and settings for functions.. ........................ 50
Controlling the sound bar with the smartphone app.....................................51
CONFIGURATION 52
Enabling/disabling the HDMI Control function.............................................52
Enabling/disabling the Auto Power Standby function................................... 53
Enabling/disabling the Child Lock function.. ............................................... 54
Enabling/disabling the Bluetooth Standby function.. ................................... 55
Enabling/disabling the Bluetooth function..................................................56
Setting the dynamic range compression level..............................................57
Setting the frequency characteristics of the sound according to how the sound
bar is installed........................................................................................59
Initializing the sound bar..........................................................................61
TROUBLESHOOTING 62
Check the following first when any problem occurs......................................62
When a problem occurs: Power or overall functionality.. .............................. 63
When a problem occurs: Audio...................................................................71
When a problem occurs: Bluetooth®...........................................................76
When a problem occurs: App.....................................................................78
3
CONTENTS

Other actions..........................................................................................79
How to connect AV devices such as BD/DVD players..............................................................................................................79
How to minimize standby power consumption.. ...................................................................................................................80
Precautions for remote control batteries.. .............................................................................................................................81
How to replace the remote control battery............................................................................................................................82
What to do if the sound bar and subwoofer are not paired automatically.. .........................................................................83
How to reset the sound bar.. ...................................................................................................................................................85
APPENDIX 86
Specifications.........................................................................................86
Supported digital audio signal formats.......................................................89
List of indicator displays.. ........................................................................ 90
About third party software programs.........................................................94
List of support centers.............................................................................95
4
CONTENTS

INTRODUCTION
About this User Guide
(
This User Guide uses the following signal words for important information:
(
WARNING
This content indicates “risk of serious injury or death.”
(
CAUTION
This content indicates “risk of injury.”
(
NOTICE
Indicates points that you must observe in order to prevent product failure, damage or malfunction and
data loss, as well as to protect the environment.
(
NOTE
Indicates notes on instructions, restrictions on functions, and additional information that may be
helpful.
(
The illustrations and screens in this User Guide are for instructional purposes only.
(
The company names and product names in this User Guide are the trademarks or registered trademarks of
their respective companies.
(
Various smartphones and tablet devices are collectively referred to as “mobile devices”. When necessary,
the type of mobile device is specified in the explanations.
(
A [Search tag] is a keyword for searching. This serves as a link from the Quick Start Guide to the User
Guide.
NOTE
The Safety Brochure and the Quick Start Guide are included with this product. See the Safety Brochure first.
5
INTRODUCTION > About this User Guide
Features
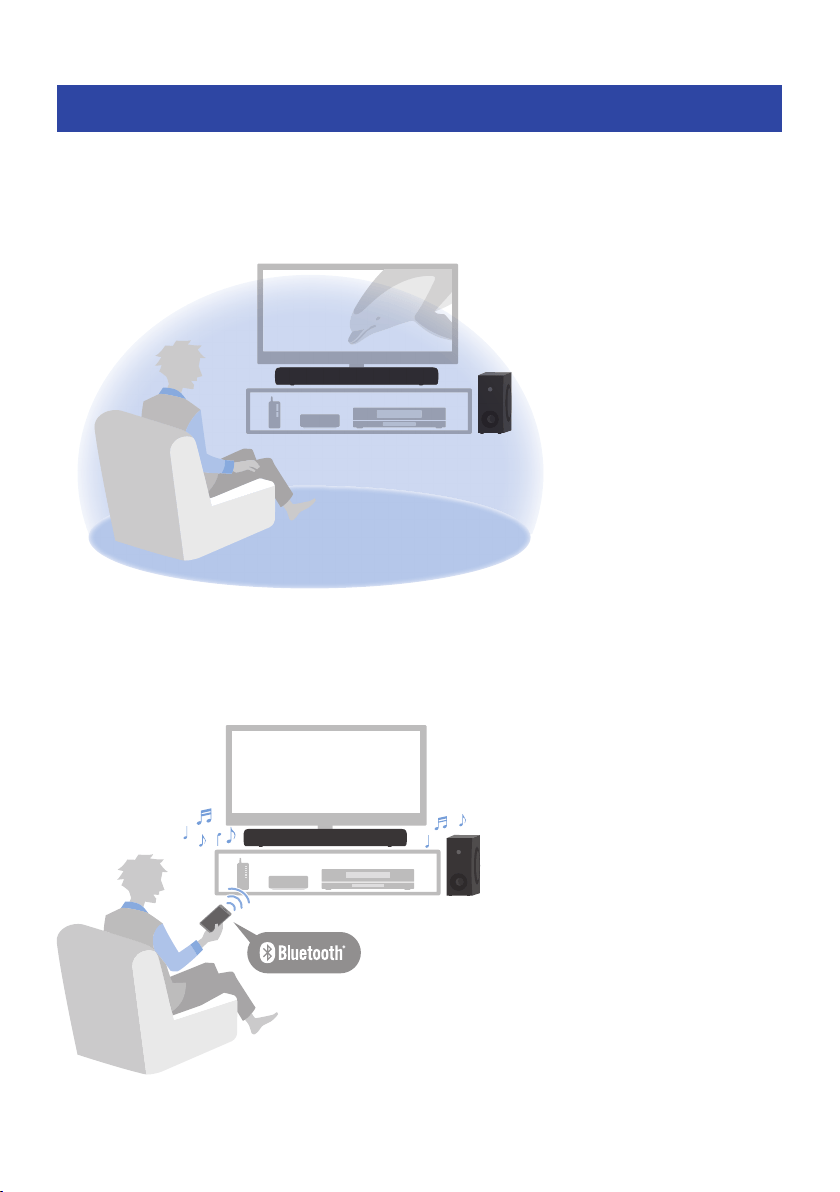
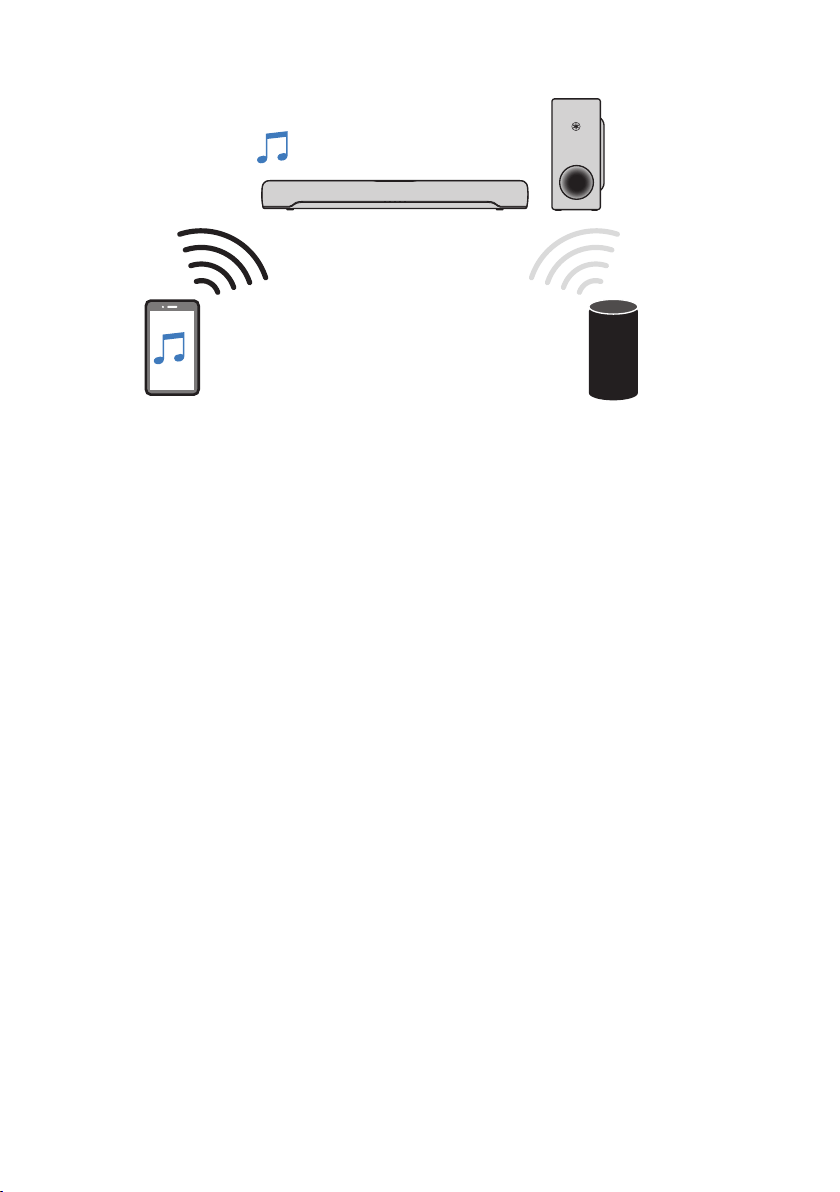
This product is a bar-shaped speaker system for your TV that allows you to easily enjoy surround sound on
the TV with a rich sense of presence.
n
Produce surround sound just by connecting to a TV
Related links
“Surround playback”(p.40)
n
Easily play audio content from a Bluetooth device
6
INTRODUCTION > Features

Related links
“Listening to audio from a Bluetooth® device”(p.45)
n
Configure the sound to match the situation
Clear Voice
This function focuses on the acoustic image of human voices such as dialog and narration within the audio
and emphasizes the voices without changing the overall volume or individuality of the sound. Only the
human voices become easier to hear, and it gives a clear sense of localization to the human voices.
(
“Playing back human voices clearly (CLEAR VOICE)”(p.43)
Bass Extension
This function focuses on the acoustic image of the bass portion and enhances bass sound. It allows you to
enjoy rich bass performance with a strong presence without disturbing the balance of the overall sound.
(
“Enjoying rich bass sound (BASS EXT)”(p.44)
n
Multiple control methods to suit various usage situations
In addition to the sound bar’s controls and the included remote control, the TV’s remote control and the
dedicated smartphone app “Sound Bar Remote” can also be used to control the sound bar.
Audio Return Channel (ARC) and HDMI Control function
An HDMI control function compatible TV allows for controlling the sound bar’s basic functions using the TV’s
remote control. An Audio Return Channel (ARC) compatible TV can be connected to the sound bar using a
single HDMI cable.
(
“Using a TV’s remote control to control the sound bar (HDMI Control)”(p.49)
(
“Connecting a TV using an HDMI cable (commercially available)”(p.26)
Dedicated smartphone app: “Sound Bar Remote”
The sound bar can also be controlled from your mobile device. The app allows you to check the current
sound mode, sound settings, and volume level of the sound bar.
n
Certified as a Yamaha Eco-Product
Yamaha Eco-Label is a mark that certifies products of high environmental performance.
With an advanced energy saving design, this product achieves a low power consumption of 1.8 W or less
when in standby mode.
7
INTRODUCTION > Features
Confirming the included items
The following items are included with this product. Make sure that all of the included items are present.
n
Main devices
(
Sound bar (SR-CUC30A)
(
Subwoofer (SR-WSWC30A)
n
Accessories
(
Remote control
* A Lithium battery (CR2025) has already been inserted into the remote control.
(
AC adaptor (model number: ANAD-420FIOT-B)
(
Power cords (×2)
(
Digital optical audio cable
8
INTRODUCTION > Confirming the included items
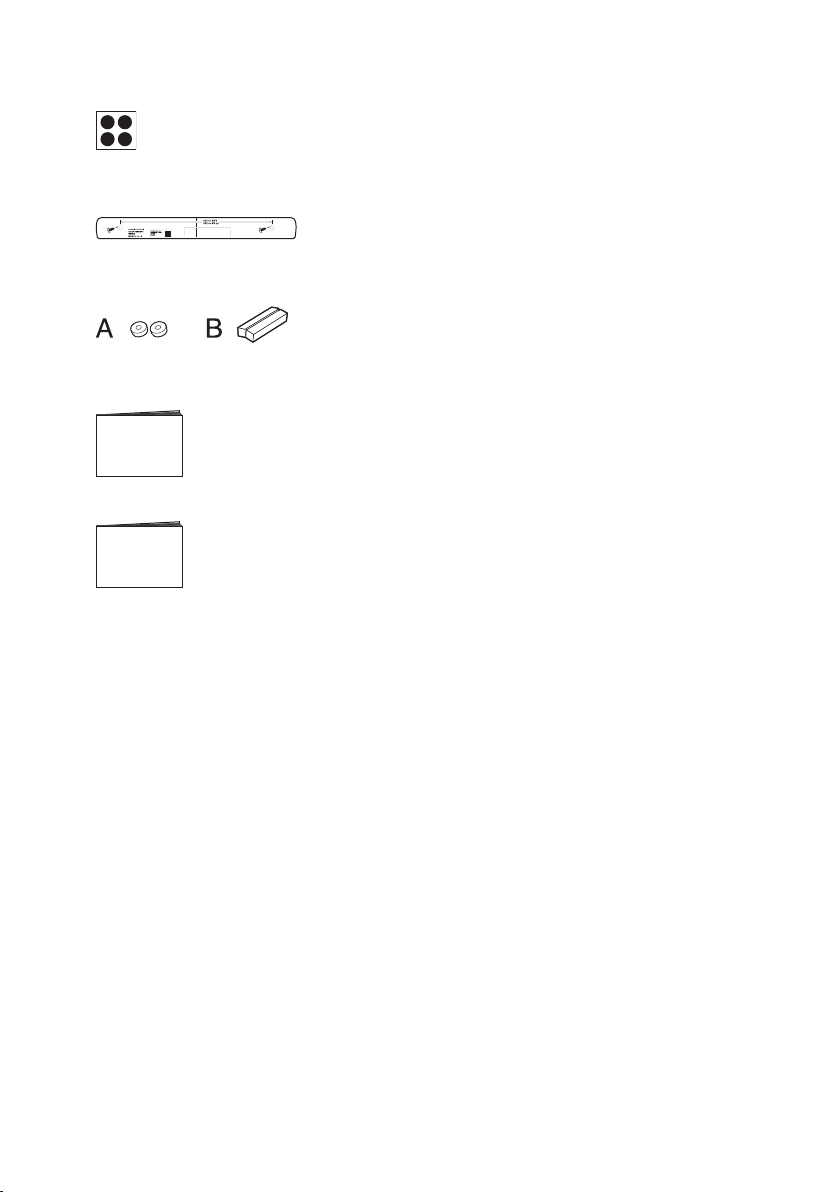
(
Non-skid pads (×4 on 1 sheet)
* Attach these to the bottom of the subwoofer.
(
Mounting template
* Use when mounting the sound bar on a wall.
(
Spacers (A: ×2, B: ×2 on 1 sheet)
* Use when mounting the sound bar on a wall.
(
Quick Start Guide
(
Safety Brochure
9
INTRODUCTION > Confirming the included items
PART NAMES AND FUNCTIONS
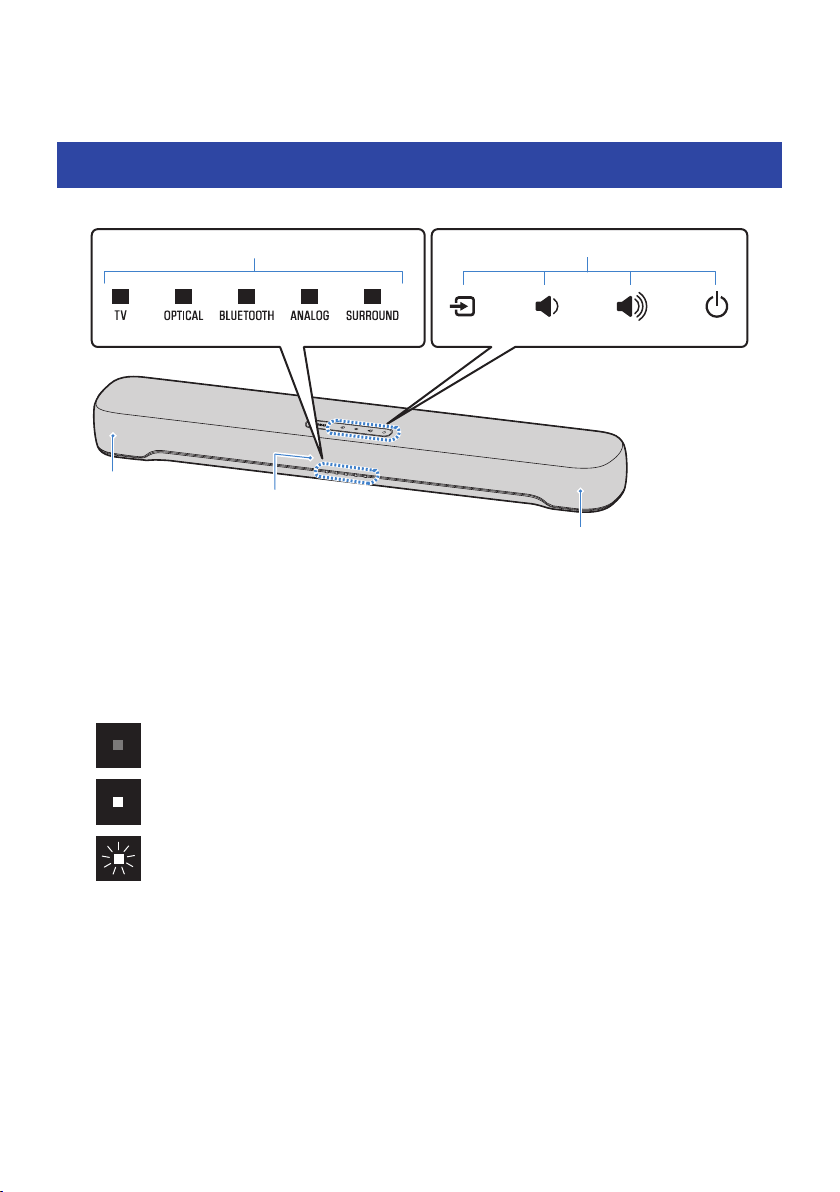
Part names of the sound bar (front/top)
This section describes the part names and functions of the front/top of the sound bar.
a
d
b
c
c
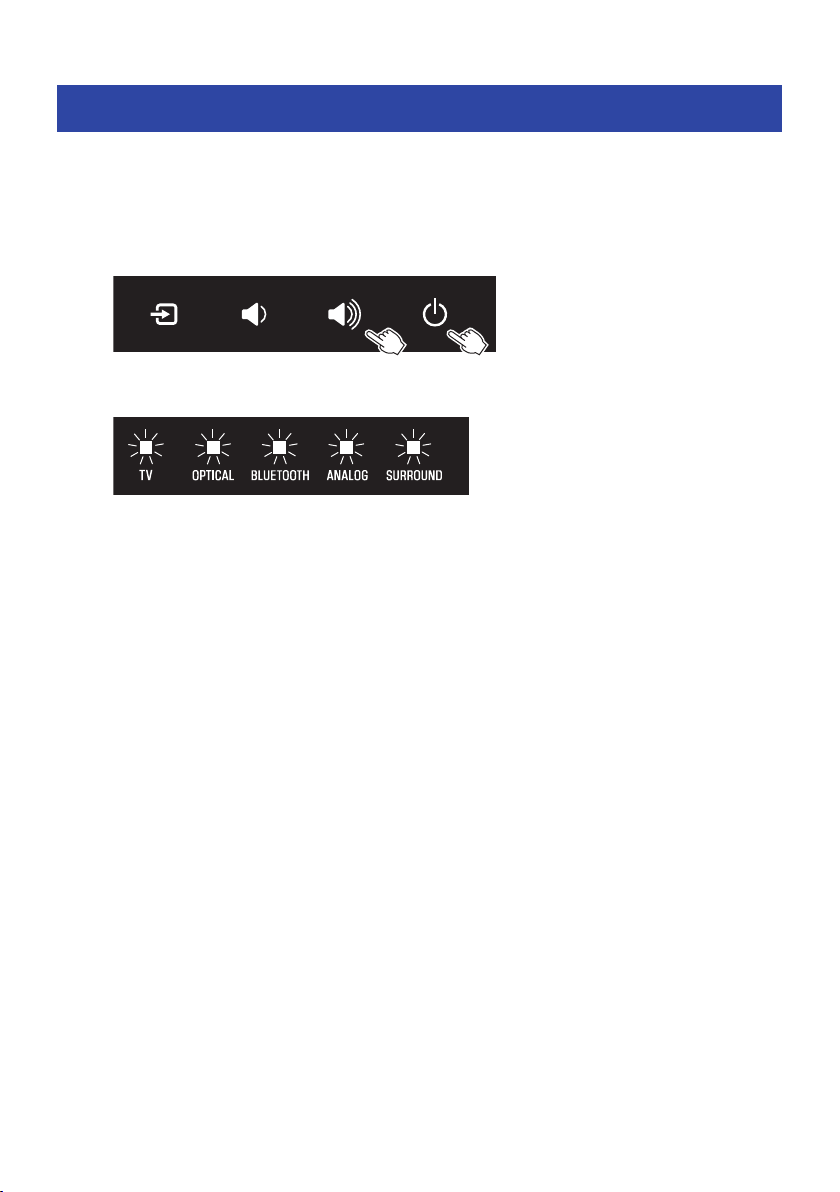
a
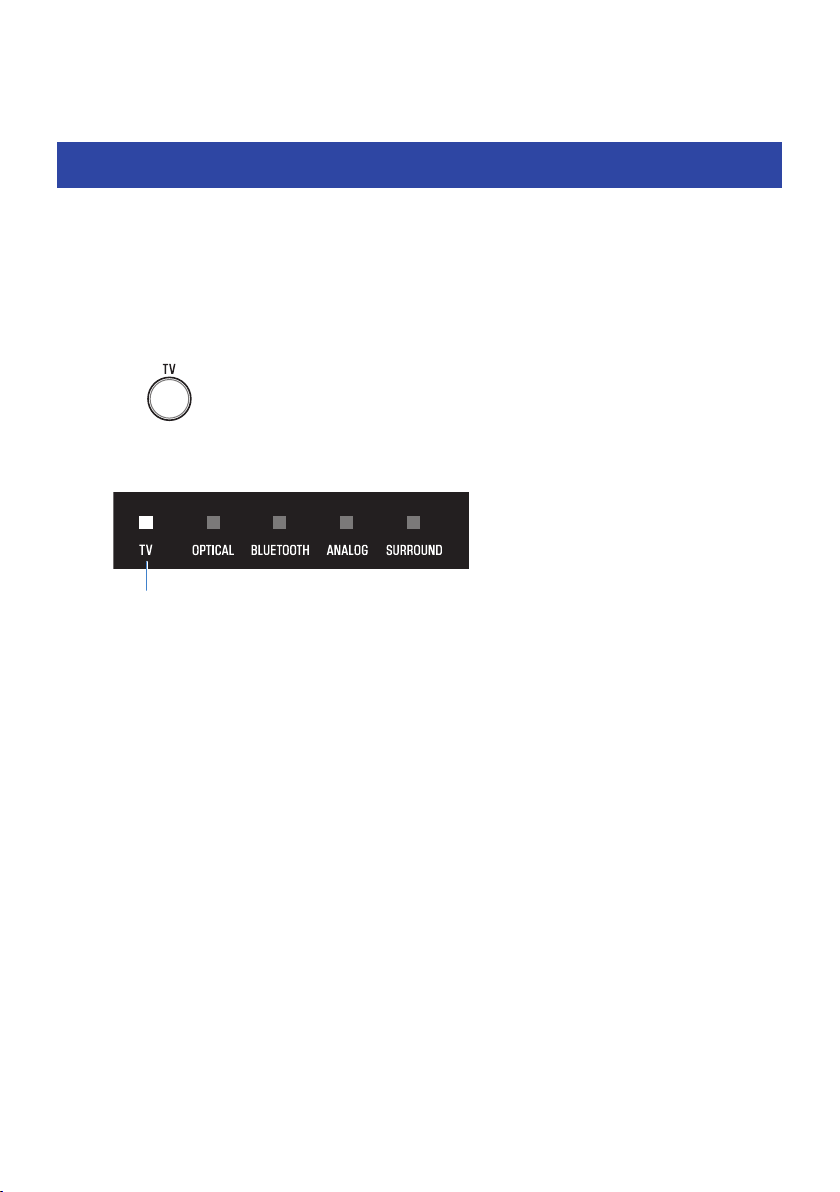
Indicators
The indicators flash or glow to show the operation and setting status. During normal playback, the setting status is
indicated as follows:
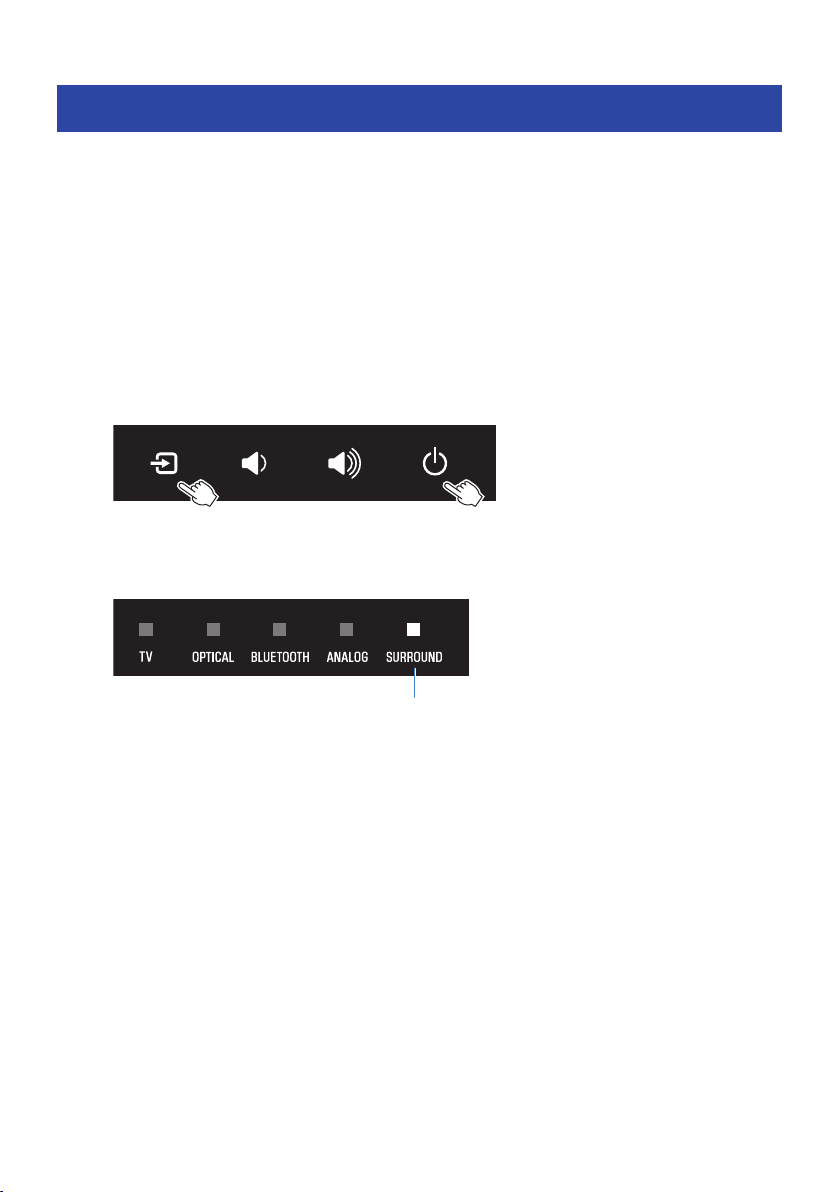
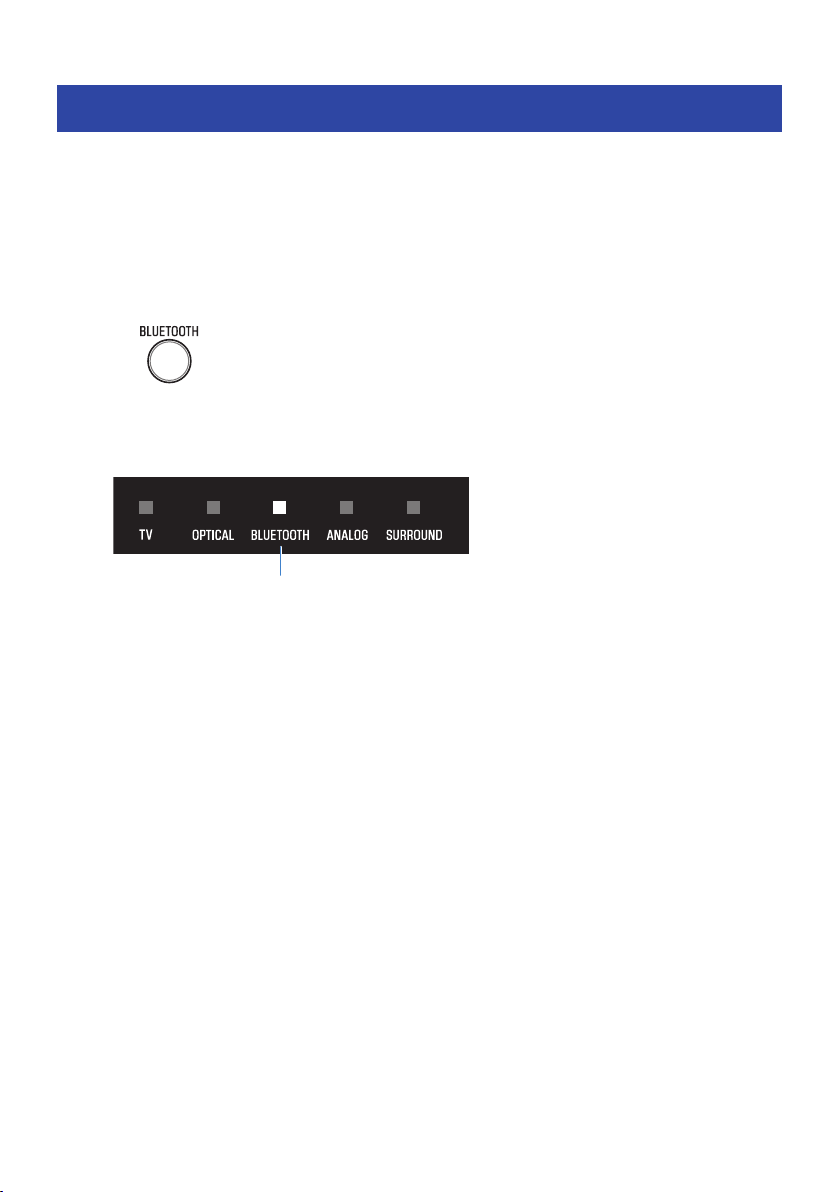
TV, OPTICAL, BLUETOOTH, or ANALOG: Selected playback device
SURROUND: Surround playback (glowing) / Stereo playback (off)
NOTE
This document uses the following illustrations to show that indicators are off, glowing, or flashing.
Off
Glowing
Flashing
b
Controls
Touch the symbols with your fingertip to control the sound bar.
y (Input): Select an input source (p.36).
} / { (Volume +/-): Adjust the volume (p.36).
z (Power): Turn the sound bar on and off.
c
Speakers
d
Remote control sensors
10
PART NAMES AND FUNCTIONS > Part names of the sound bar (front/top)

NOTE
(
To prevent unintended operation, do not place anything on the controls of the sound bar.
Enabling the Child Lock function prevents accidental operation.
(
The brightness of the indicators can be adjusted by pressing DIM.
Related links
(
“Enabling/disabling the Child Lock function”(p.54)
(
“Changing the brightness of the indicators (Dimmer)”(p.48)
(
“List of indicator displays”(p.90)
11
PART NAMES AND FUNCTIONS > Part names of the sound bar (front/top)
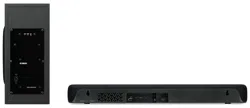
Part names of the sound bar (rear)
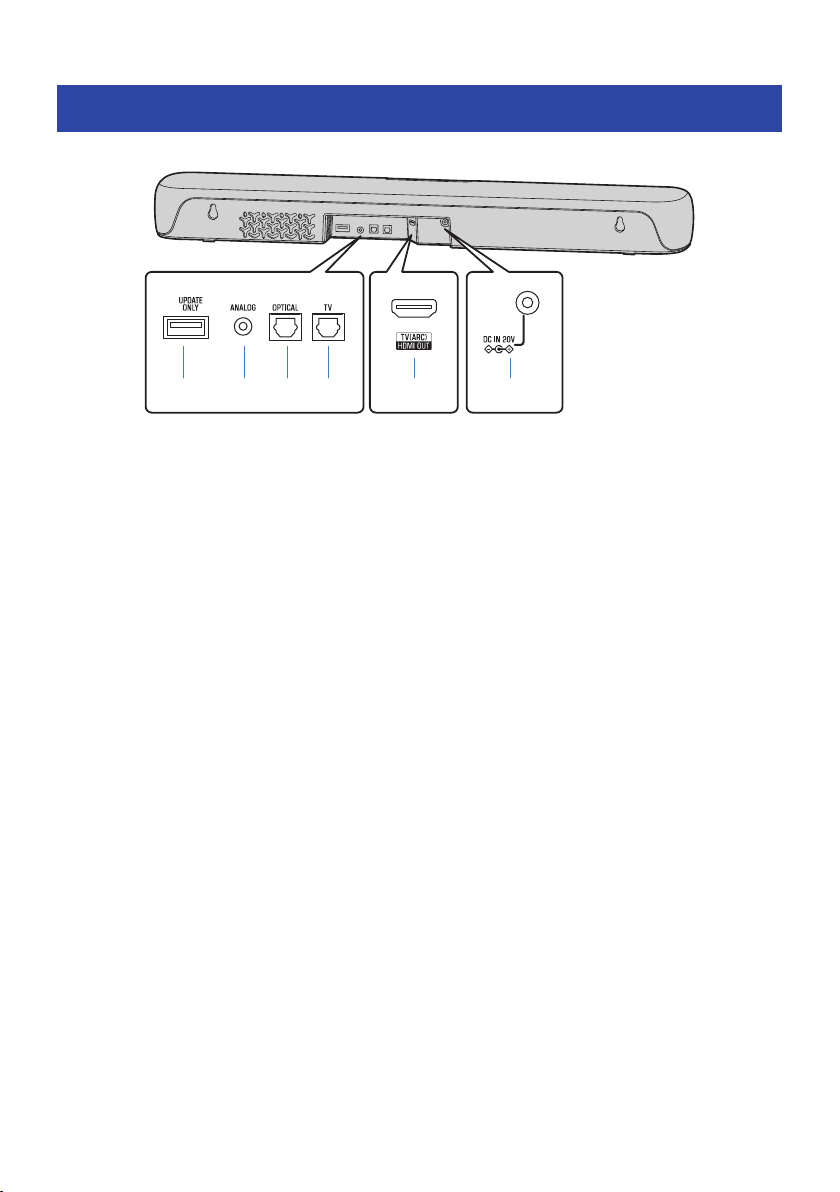
This section describes the part names and functions of the rear of the sound bar.
a b c d e f
a
UPDATE ONLY jack
Use to update the sound bar’s firmware.
Refer to the instructions supplied with the firmware for details.
b
ANALOG input jack (p.30)
c
OPTICAL input jack (p.30)
d
TV input jack (p.22)
e
HDMI OUT/TV (ARC) jack (p.26)
f
DC IN (20V) jack
Related links
(
“Part names of the sound bar (front/top)”(p.10)
(
“Part names of the remote control”(p.14)
12
PART NAMES AND FUNCTIONS > Part names of the sound bar (rear)
Part names of the subwoofer
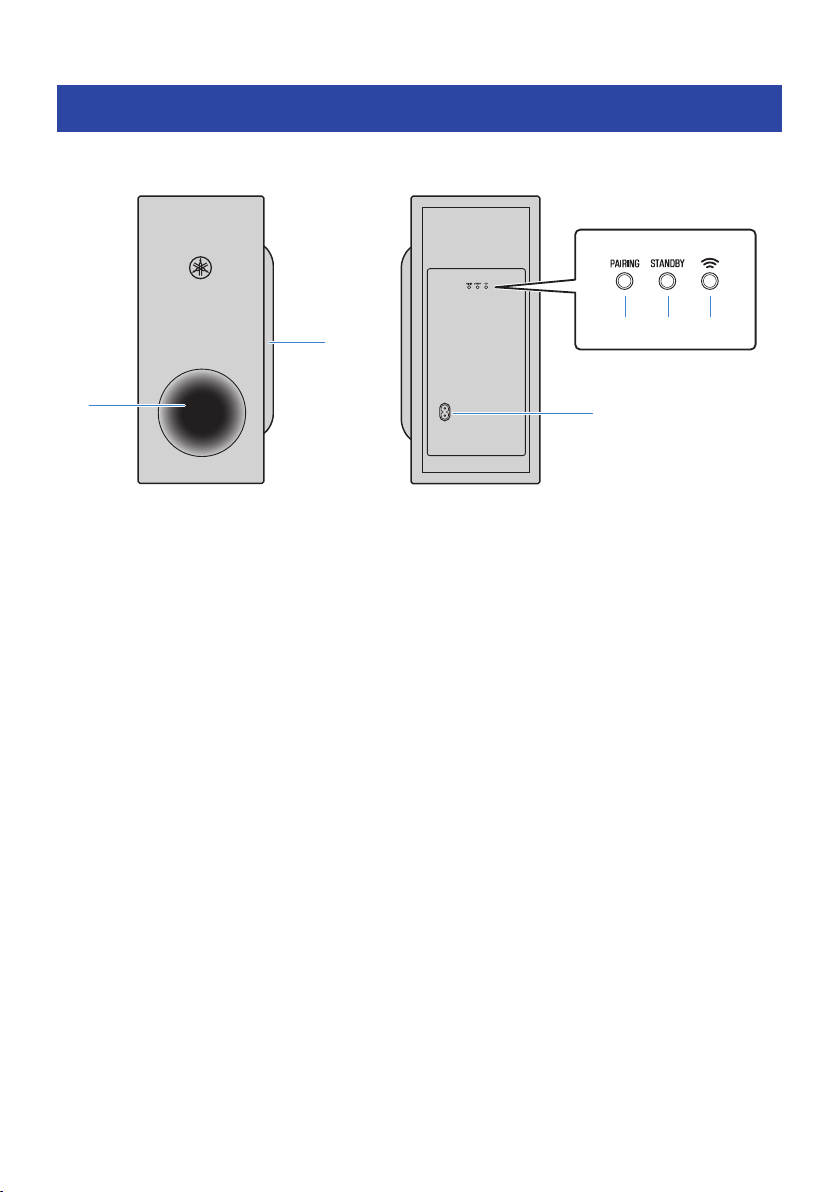
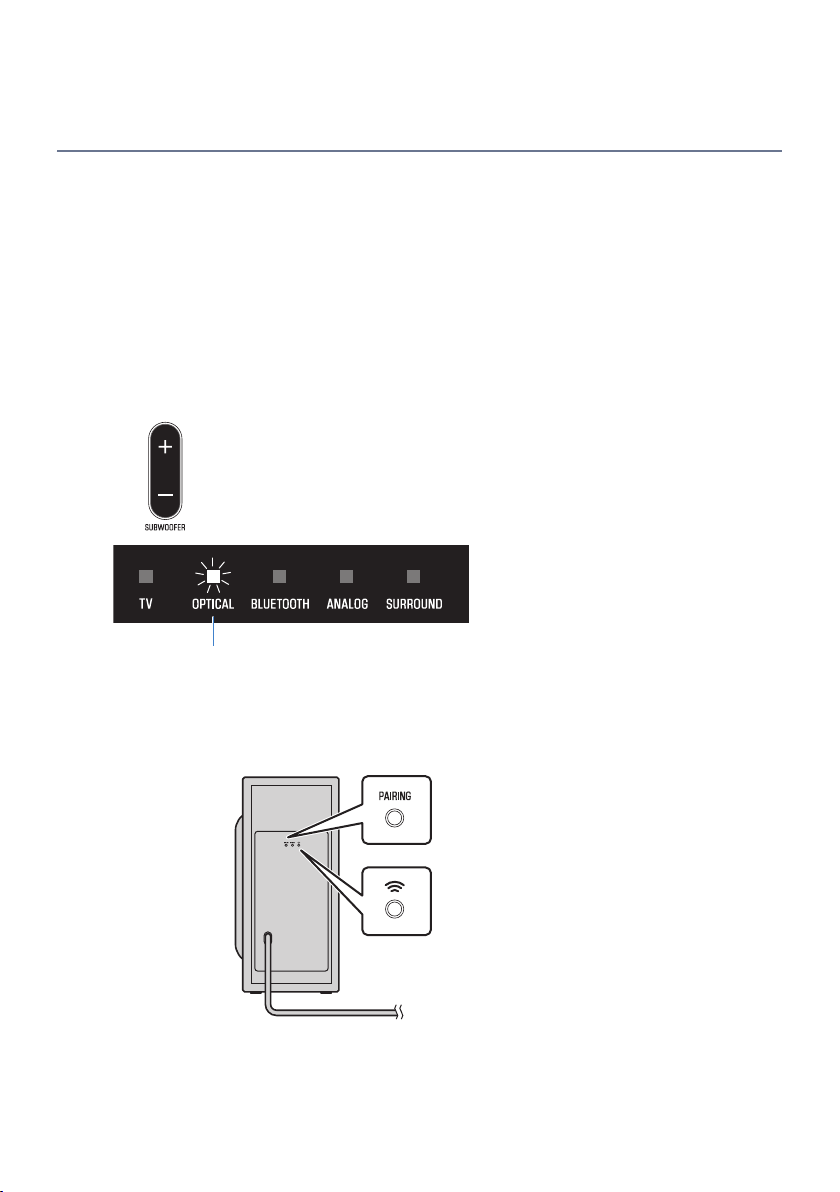
This section describes the part names and functions of the subwoofer.
RearFront
a
f
b
c d e
a
Bass reflex port
b
Speaker
c
PAIRING button
Use to pair the sound bar with the subwoofer manually. (p.83).
d
STANDBY indicator
Indicates the status of the subwoofer (p.72).
e
* Indicator
Glows when the subwoofer is connected to the sound bar (p.35).
f
AC power input connector
Use to connect the power cord of the subwoofer.
Related links
“List of indicator displays”(p.90)
13
PART NAMES AND FUNCTIONS > Part names of the subwoofer
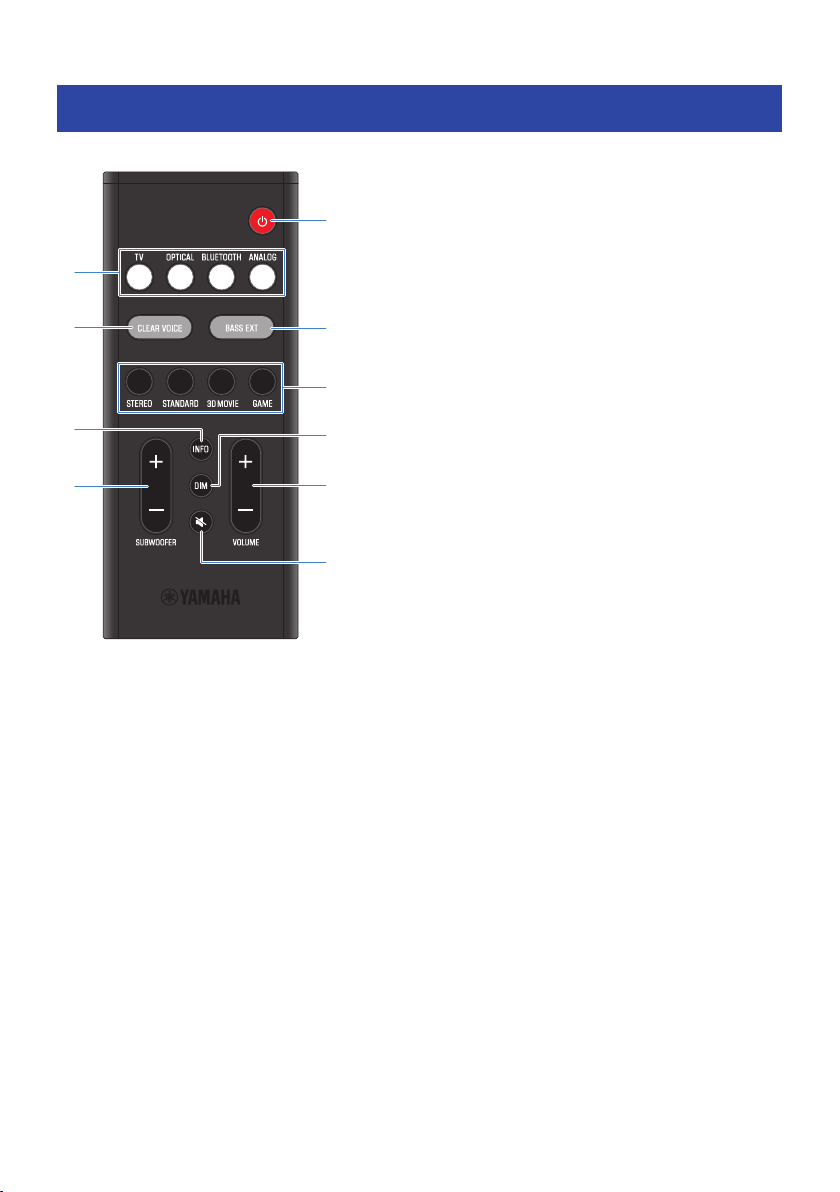
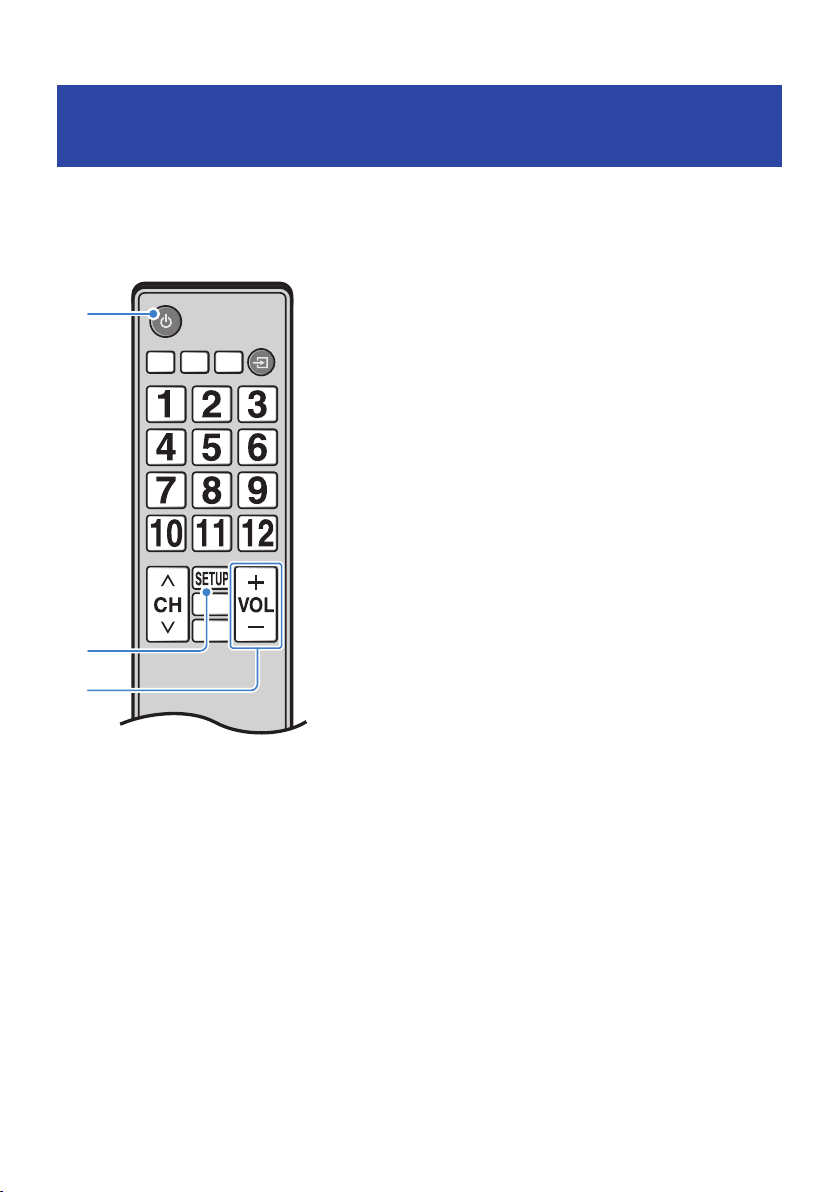
Part names of the remote control
This section describes the part names and functions of the remote control.
b
c
f
h
a
d
e
i
g
j
a
z (Power) button
Turn the sound bar on and off (p.35).
b
Input source buttons
Select an audio input source (p.36).
(
TV button: Audio from a TV
(
OPTICAL button: Audio from a device connected to the OPTICAL input jack
(
BLUETOOTH button: Audio from a Bluetooth device
(
ANALOG button: Audio from a device connected to the ANALOG input jack
c
CLEAR VOICE button
Enable or disable the Clear Voice function (p.43).
d
BASS EXT button
Enable or disable the Bass Extension function (p.44).
14
PART NAMES AND FUNCTIONS > Part names of the remote control
e
Sound mode buttons
Switch to your preferred sound mode (p.38).
(
STEREO
(
STANDARD
(
3D MOVIE
(
GAME
f
INFO button
Check information such as the type of audio signal being played and the settings for the sound bar’s functions
(p.50).
g
DIM button
Switch the brightness of the indicators of the sound bar (p.48).
h
SUBWOOFER (+/-) button
Adjust the volume of the subwoofer (p.42).
i
VOLUME (+/-) button
Adjust the volume of the sound bar (p.36).
j
| (Mute) button
Mute the audio output (p.36). Press this button again, or press VOLUME (+/-) to unmute.
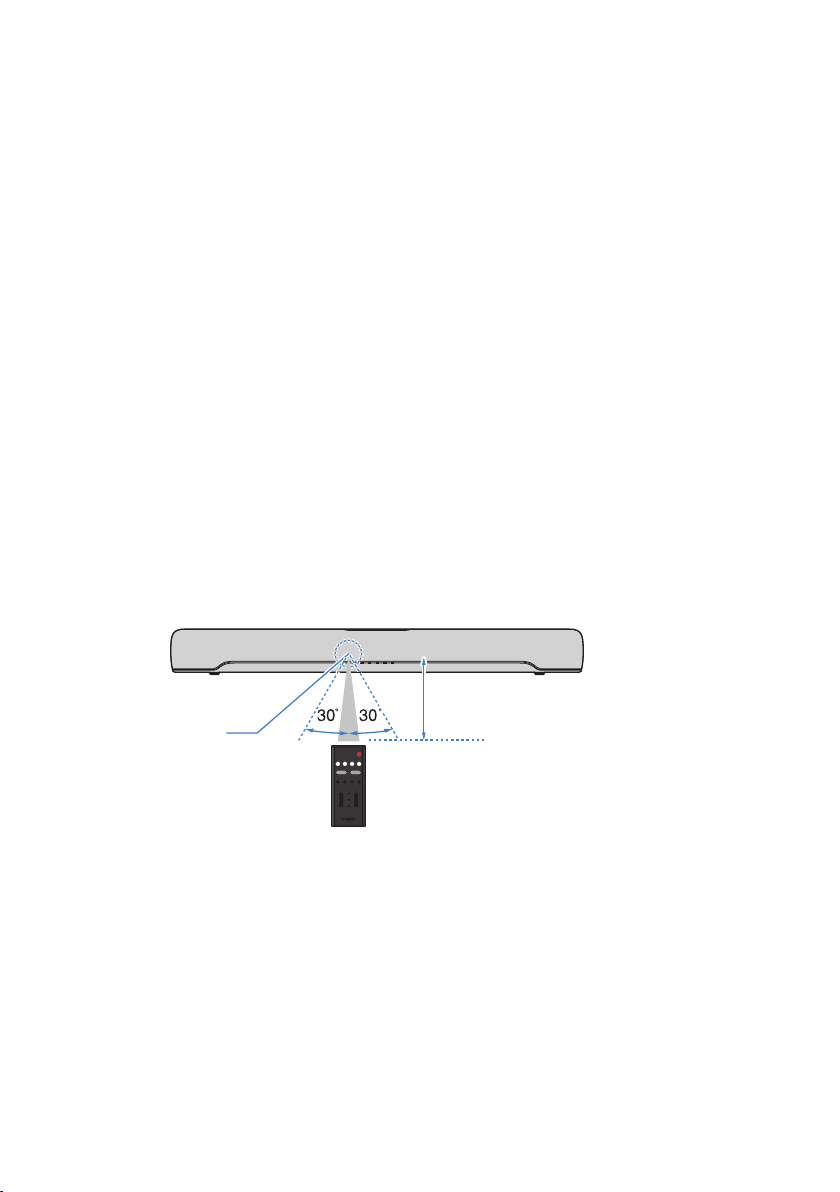
NOTE
Use the remote control within the range shown in the following illustration:
Within 6 m
Remote control sensor
Related links
“Part names of the sound bar (front/top)”(p.10)
15
PART NAMES AND FUNCTIONS > Part names of the remote control

PREPARATION
Preparation
Install the sound bar and connect a TV to it.
1 Install the sound bar and subwoofer.
“Installing the product”(p.20)
2 Connect a TV to the sound bar.
Connect the TV to the sound bar using a method suitable for the type of jacks on the TV and
the functions to be used.
“Connecting a TV using only the included digital optical audio cable”(p.24)
“Connecting a TV using an HDMI cable (commercially available)”(p.26)
3 Connect an audio device (if required).
“Connecting an audio device”(p.30)
4 Prepare the remote control.
“Preparing the remote control”(p.34)
5 Turn on the sound bar.
When the sound bar is turned on, the subwoofer turns on at the same time.
“Turning on and off the sound bar”(p.35)
16
PREPARATION > Preparation

NOTE
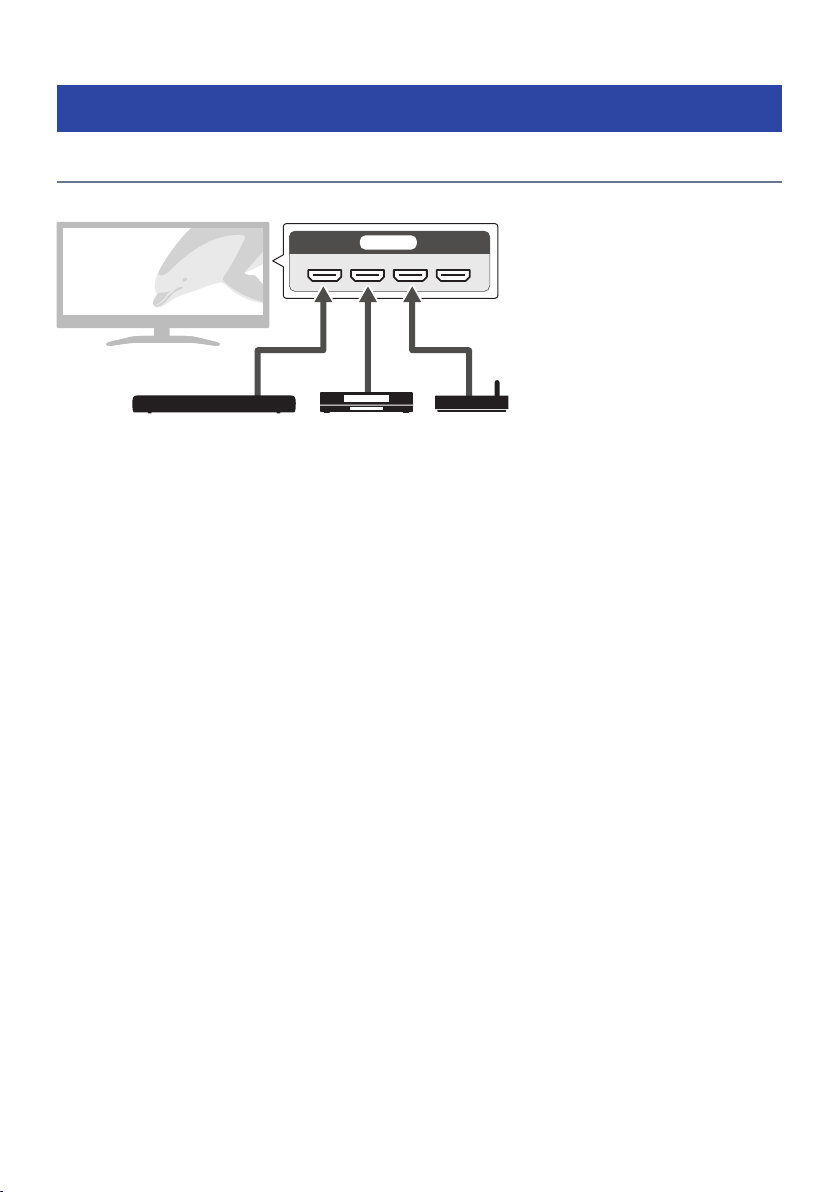
(
Connect AV devices (such as BD/DVD players and set top boxes) to the TV’s HDMI input jacks.
HDMI IN
This sound bar AV devices
(
When playing audio from a TV or AV device via the sound bar, set the input sources as follows:
(
Sound bar’s input source: TV
(
TV’s input source: AV device playing the content
(
Audio Return Channel (ARC) is a function that transmits audio signals from the TV’s HDMI input jack. This provides the same quality
of audio as when connected with an digital optical audio cable.
17
PREPARATION > Preparation
Precautions for preparation
Before installing the sound bar and connecting other devices, be sure to read the following precautions. Be
sure to follow the precautions.
n
Precautions for installation
WARNING
(
Install as instructed in the User Guide. Failure to observe this may cause devices to fall and result in injury.
(
Confirm that the finished installation is safe and secure. Also, carry out safety inspections periodically. Failure to observe this
may cause devices to fall and result in injury.
(
Do not expose the product to rain, use it near water or in damp or wet conditions, or place on the product any containers (such
as vases, bottles or glasses) containing liquids which might spill into any openings or places where water may drop. A liquid
such as water getting into the product may cause a fire, electric shocks, or malfunctions.
(
Do not place any burning items or open flames near the product, since they may cause a fire.
(
Do not use this product near medical devices or inside medical facilities. Radio waves from this product may affect electro-
medical devices.
CAUTION
(
Do not place the product in an unstable position where it might accidentally drop or fall over and cause injuries.
(
When installing this product, do not obstruct heat dissipation. Failure to observe this may trap heat inside the product, causing
a fire or malfunctions.
(
Avoid being near the product during a disaster, such as an earthquake. Since the product may turn over or fall and cause injury,
quickly move away from the product and go to a safe place.
NOTICE
(
Do not install the product in places where it may come into contact with corrosive gases or salt air, or places that have
excessive smoke or steam. Doing so may result in malfunction.
(
Do not press hard on the speaker units or fabric-covered portion of this product.
(
Do not place any objects susceptible to magnetism (such as a hard disk drive or magnetic card) near the product. The magnetic
effect of the sound bar may cause damage to the object or its recorded data.
(
Do not use this product in a location that becomes extremely hot, such as in direct sunlight or near a heater, or that becomes
extremely cold, or that is subject to excessive dust or vibration. Failure to observe this may cause this product’s panel to
become deformed, the internal components to malfunction, or for operation to become unstable.
(
If using a wireless function, avoid installing this product near metal walls or desks, microwave ovens, or other wireless network
devices. Obstructions could shorten the transmission distance.
(
Do not stack the sound bar and subwoofer directly on top of one another. Also, do not stack other AV devices directly on or
under this product. These devices may malfunction due to vibrations.
(
Do not place the subwoofer in the following ways. Doing so may cause a loss in bass sound volume.
(
With the speaker units (fabric-covered portion) placed tightly against the wall
(
With the bass reflex port blocked
(
Do not place furniture or other objects made of metal between the sound bar and subwoofer. Doing so may interfere with the
wireless connection.
18
PREPARATION > Precautions for preparation
n
Precautions for connections
WARNING
(
Use this product with the power supply voltage printed on it. Failure to observe this may cause a fire, electric shocks, or
malfunctions.
(
Be sure to use the included power cord and AC adaptor. Do not use the included power cord and AC adaptor for other devices.
Failure to observe this may cause a fire, electric shocks, or malfunctions.
(
Never insert or remove an electric plug with wet hands. Do not handle this product with wet hands. Failure to observe this may
cause electric shocks or malfunctions.
(
Do not touch the power plug or cord if there is a chance of lightning. Failure to observe this may cause electric shocks.
(
When setting up the product, make sure that the AC outlet you are using is easily accessible. If some trouble or malfunction
occurs, immediately turn off the power switch and disconnect the plug from the AC outlet. Even when the power switch is
turned off, as long as the power cord is not unplugged from the wall AC outlet, the product will not be disconnected from the
power source.
(
If not using the product for long periods of time, be sure to pull the power plug from the AC outlet. Failure to observe this may
cause a fire or malfunctions.
(
Check the electric plug periodically and remove any dirt or dust which may have accumulated on it. Failure to observe this may
cause a fire or electric shocks.
CAUTION
(
Do not use an AC outlet where the power plug fits loosely when inserted. Failure to observe this may cause a fire, electric
shocks, or burns.
(
When disconnecting the power plug, always hold the plug itself and not the cord. Pulling by the cord can damage it and cause
electric shocks or a fire.
(
Insert the power plug firmly all the way into the AC outlet. Using the product when it is not plugged in sufficiently can cause
dust to accumulate on the plug, causing a fire or burns.
NOTICE
(
If connecting external devices, be sure to thoroughly read the User Guide for each device and connect them in accordance with
the instructions. Failure to properly handle a device in accordance with the instructions could cause malfunctions.
(
Do not connect this product to industrial devices. This product has been designed to connect to consumer-use devices.
Connection to an industrial-use device could cause this product to malfunction.
19
PREPARATION > Precautions for preparation
Installing the product
(
Before installing the sound bar, be sure to read the following precautions.
(
“Precautions for preparation”(p.18)
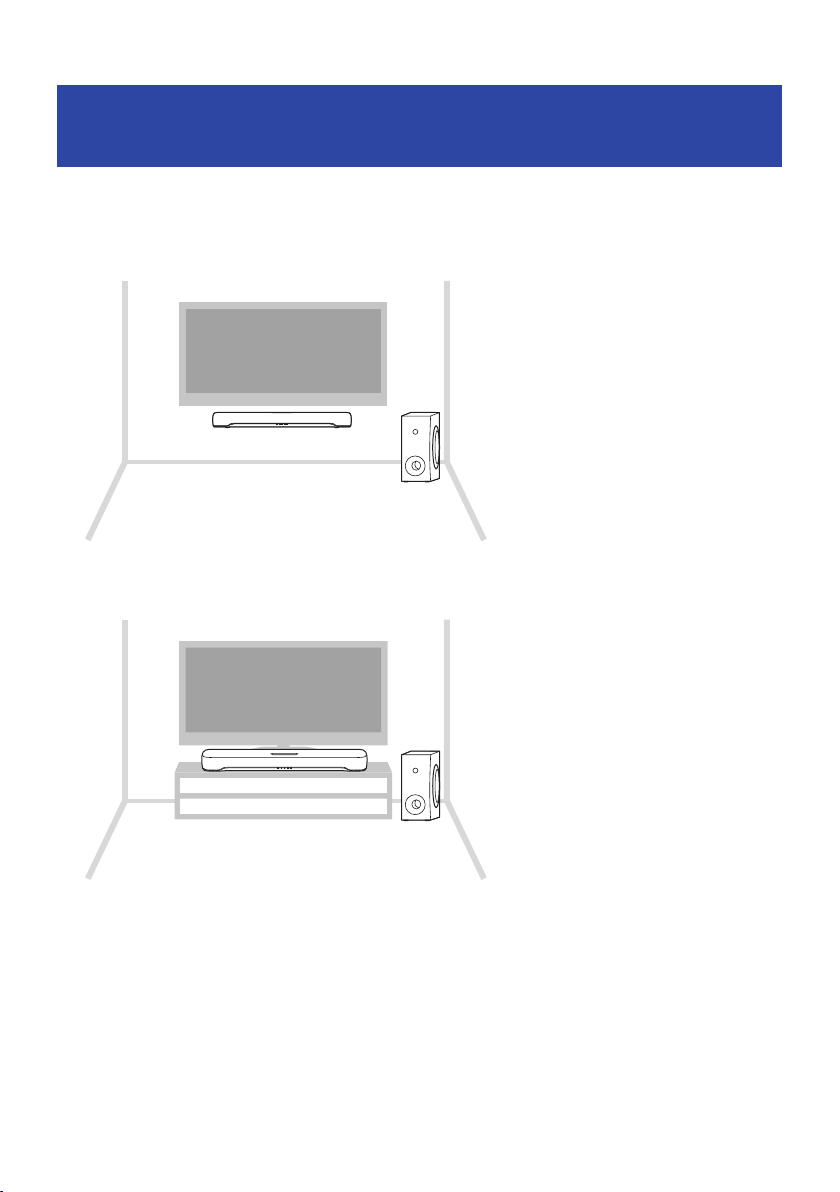
Install the sound bar as shown in the following illustration.
Controls
n
Installing the subwoofer
There are two ways to install the subwoofer: upright and on its side. Attach the non-skid pads to the bottom
of the subwoofer according to how the subwoofer is installed.
Installing the subwoofer upright
20
PREPARATION > Installing the product
Installing the subwoofer on its side
[Search tag] # Q01 Subwoofer horizontal
NOTICE
(
When installing the subwoofer on a rack, ensure the following amount of space so as not to interfere with heat dissipation and
bass output.
20 cm (8 in) or
more
20 cm (8 in) or more
20 cm (8 in) or
more
NOTE
(
For proper installation of the sound bar on a wall, make sure to have it done by the dealer from which you purchased the unit or by
a qualified contractor. Refer to the Wall Mounting Installation Guide for more information.
https://manual.yamaha.com/av/sb/wallmount/src20a_c30a/
(
If you change how the sound bar is installed, switch the frequency characteristics. This will make the sound suitable for whichever
way the sound bar is installed (p.59).
Related links
“Setting the frequency characteristics of the sound according to how the sound bar is installed”(p.59)
21
PREPARATION > Installing the product
Connecting a TV
Connecting a TV to the sound bar
Select the connection procedure according to the type of jacks on the TV and the functions to be used.
n
Connecting a TV equipped with a digital optical audio output jack, and controlling the
sound bar using the remote control included with this product
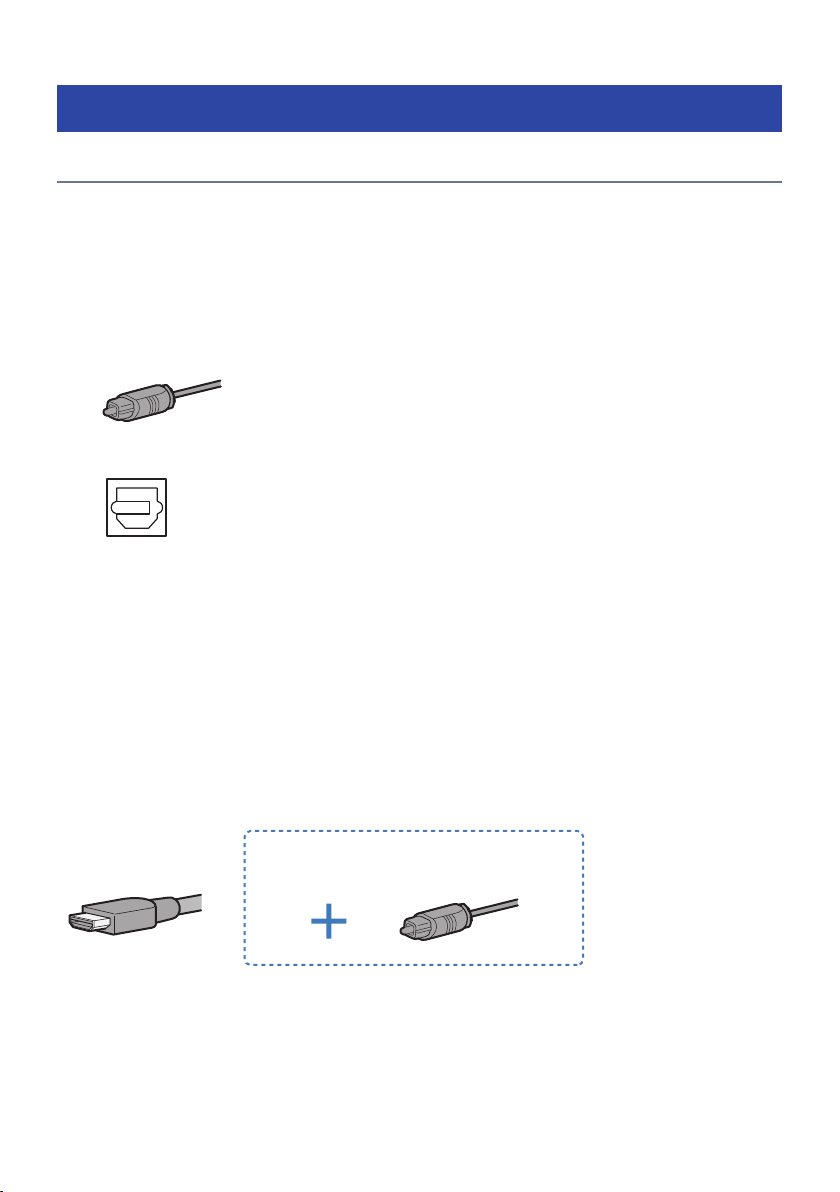
Connect the TV using the included digital optical audio cable.
Cable: Digital optical audio cable (included)
Jack of TV to connect to: Digital optical audio output jack
Connection procedure
“Connecting a TV using only the included digital optical audio cable”(p.24)
n
Controlling the sound bar using the TV’s remote control
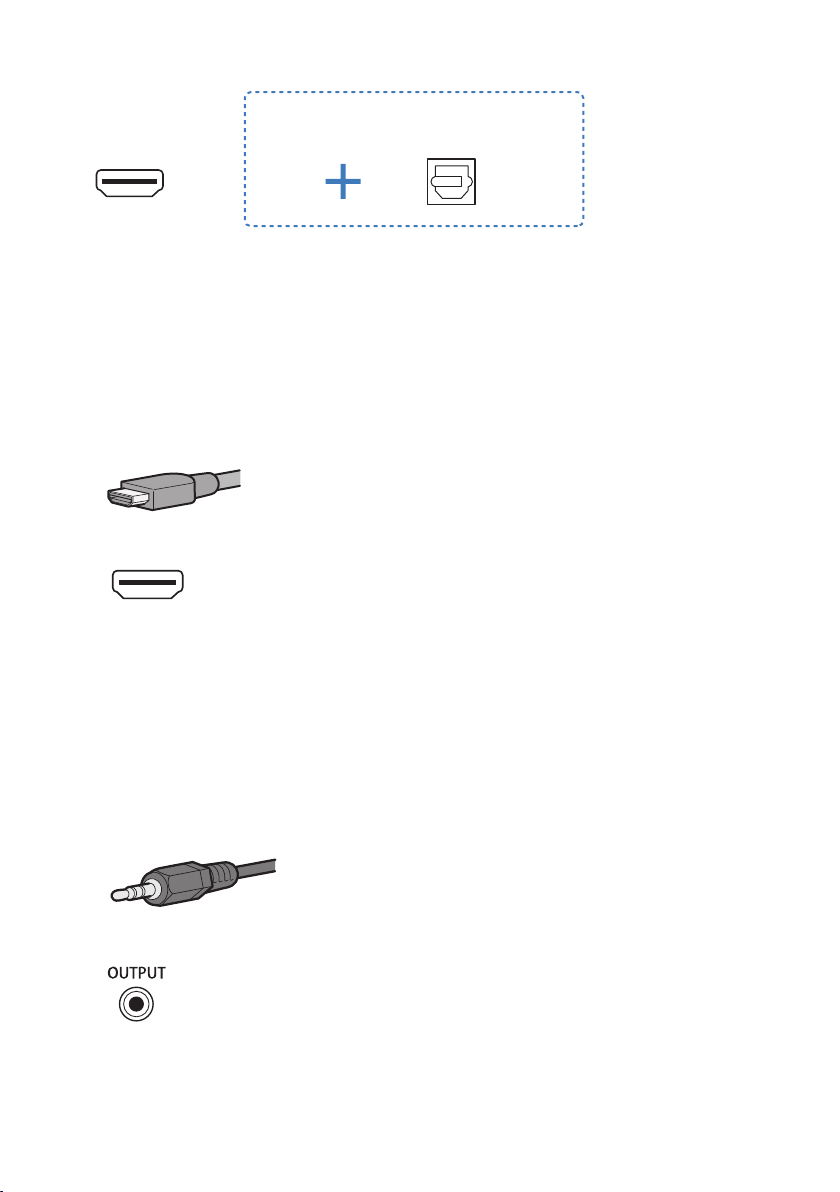
Connect a TV using an HDMI cable. Prepare a commercially available HDMI cable compatible with Audio
Return Channel (ARC). When connecting to an HDMI input jack not compatible with ARC, also connect the
included digital optical audio cable.
Audio Return Channel (ARC) is a function that transmits audio signals from the TV’s HDMI input jack. An ARC-
compatible HDMI input jack is labeled as “ARC.”
Cable: HDMI cable (commercially available) and, if needed, digital optical audio cable (included)
When connecting to an HDMI input jack not
compatible with ARC
Jack of TV to connect to: HDMI input jack (compatible with ARC) and, if needed, digital optical audio output
jack
22
PREPARATION > Connecting a TV
When connecting to an HDMI input jack not
compatible with ARC
Connection procedure
“Connecting a TV using an HDMI cable (commercially available)”(p.26)
n
TV without a digital optical audio output jack, but equipped with an HDMI input jack
compatible with Audio Return Channel (ARC)
Connect a TV using an HDMI cable. Prepare a commercially available HDMI cable compatible with ARC.
Cable: HDMI cable (commercially available)
Jack of TV to connect to: HDMI input jack (compatible with ARC)
Connection procedure
“Connecting a TV using an HDMI cable (commercially available)”(p.26)
n
TV without a digital optical audio output jack and also without an HDMI input jack
compatible with Audio Return Channel (ARC)
If the TV is equipped with an analog audio output jack or headphones jack, use one of these analog jacks to
connect. Prepare a commercially available 3.5 mm stereo mini plug analog audio cable.
Cable: 3.5 mm stereo mini plug cable (commercially available)
Jack of TV to connect to: Analog audio output jack or headphones jack
Connection procedure
“Connecting an audio device”(p.30)
23
PREPARATION > Connecting a TV
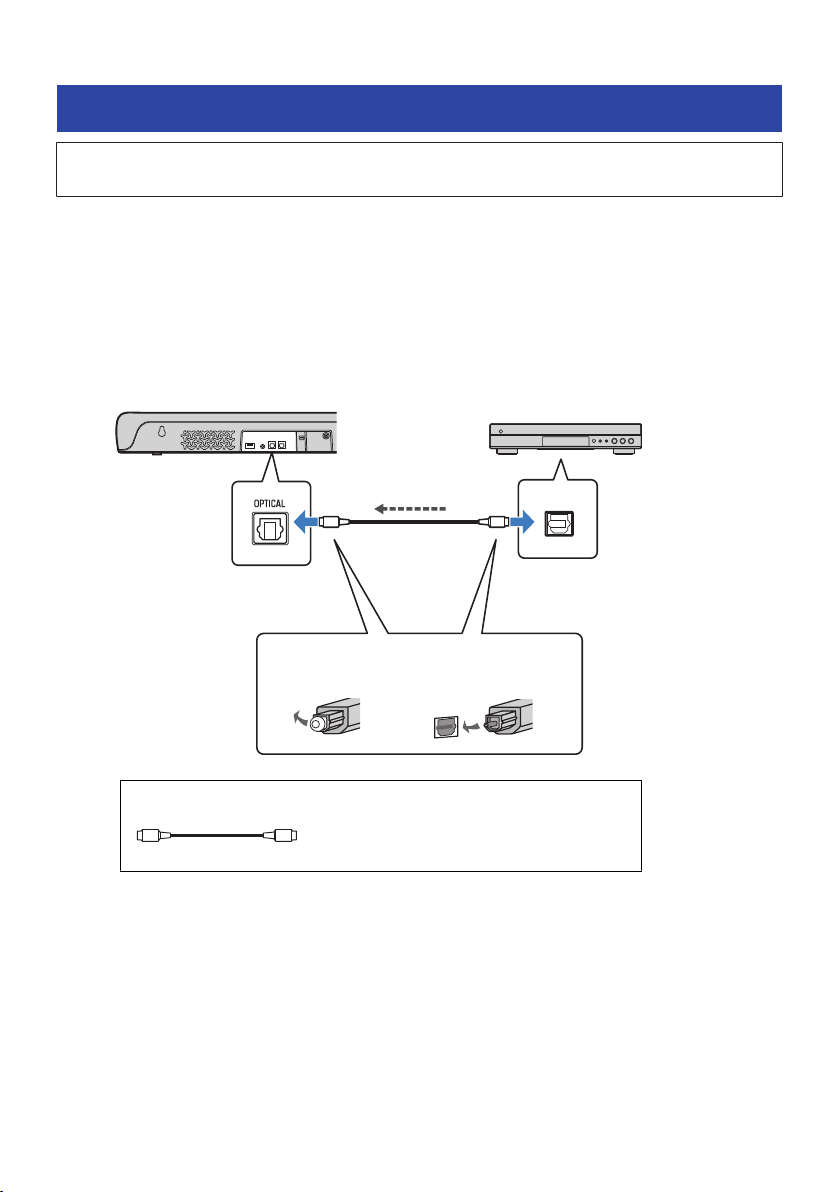
Connecting a TV using only the included digital optical audio
cable
(
Before connecting devices, be sure to read the following precautions.
(
“Precautions for preparation”(p.18)
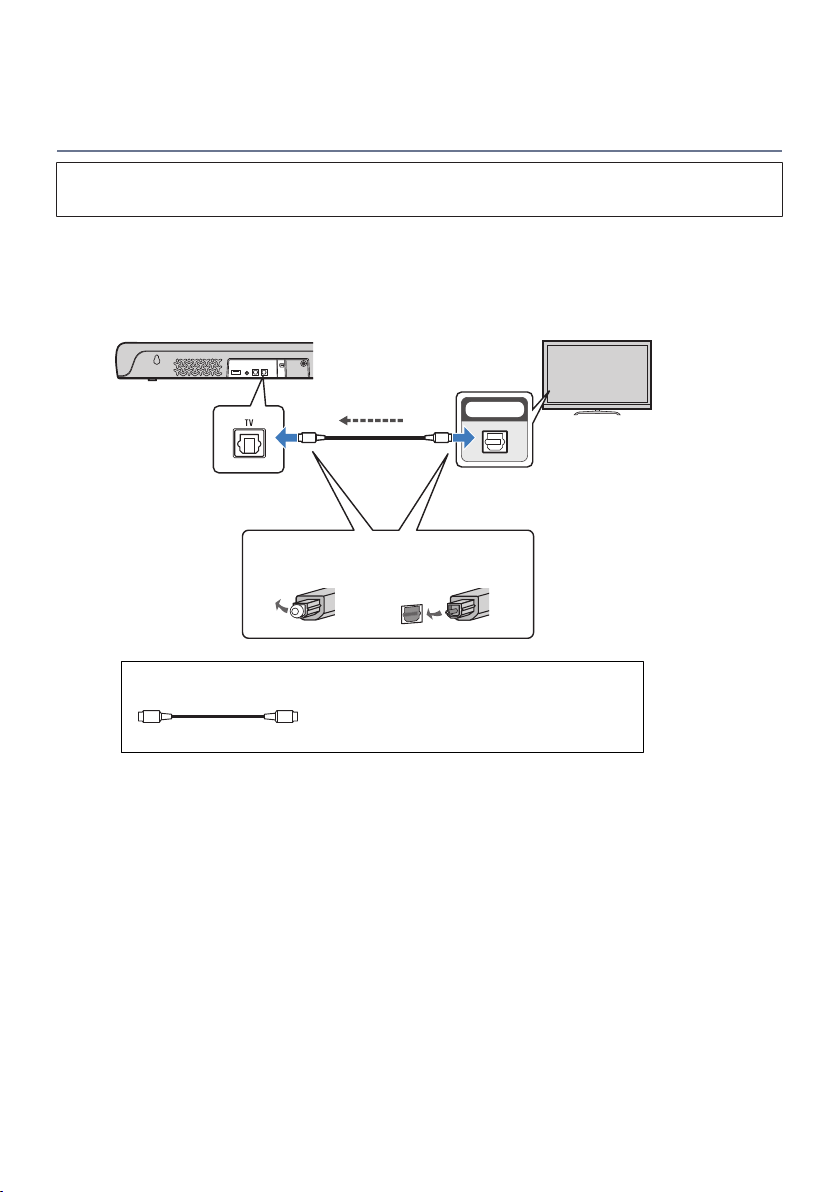
Connect a TV using the included digital optical audio cable.
The TV’s audio signal is transmitted to the sound bar.
1 Connect a TV to the sound bar.
OPTICAL
OO OO
Sound bar (rear)
TV jack
Digital optical audio output jack
TV
Remove the cap.
1. 2.
Check the
orientation of the
plug.
TV’s audio signal
Cable to use
O O
Digital optical audio cable (included)
24
PREPARATION > Connecting a TV

2 Connect the sound bar and subwoofer to power.
To an AC wall outlet
Power cord (included)
Sound bar (rear)
AC adaptor (included)
To an AC wall outlet
Power cord (included)
Subwoofer (rear)
NOTE
Connect an AV device (such as a set top box) to the TV.
25
PREPARATION > Connecting a TV
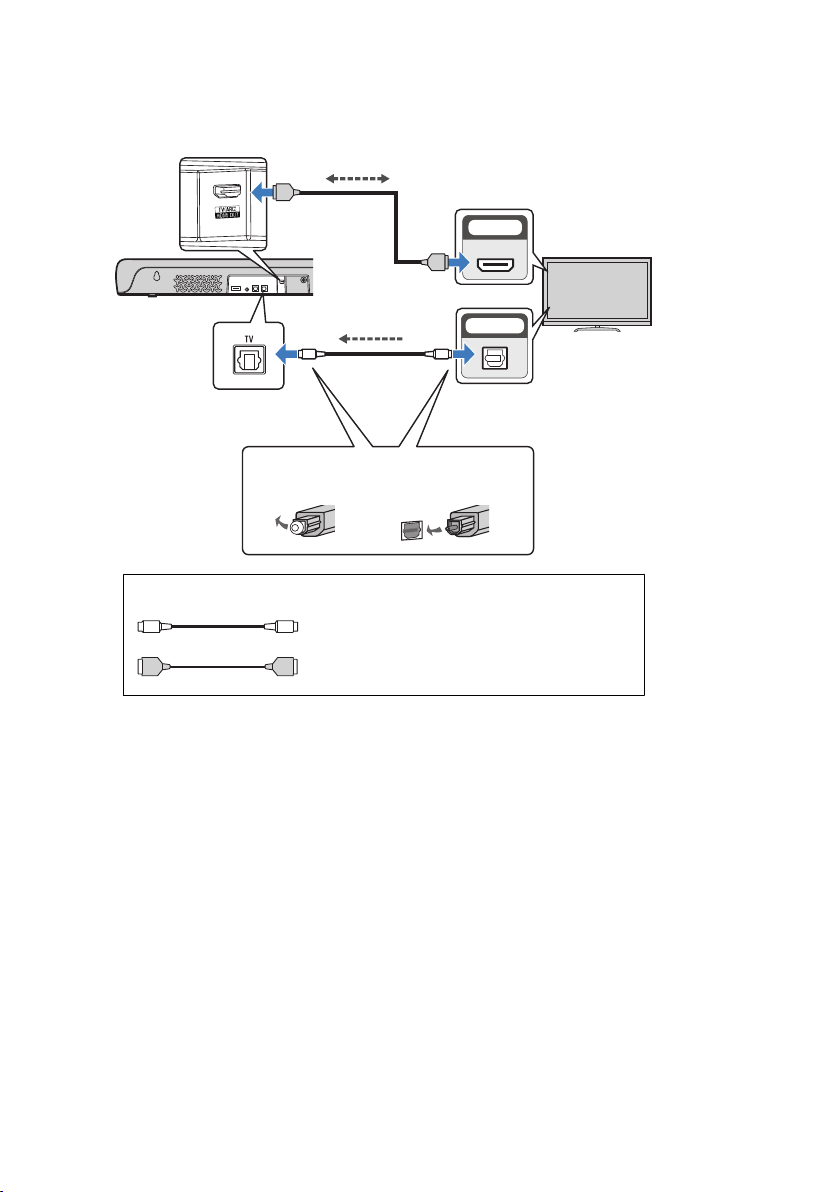
Connecting a TV using an HDMI cable (commercially available)
(
Before connecting devices, be sure to read the following precautions.
(
“Precautions for preparation”(p.18)
If a TV is connected via an HDMI cable, the sound bar can be controlled by the HDMI Control function using
the TV’s remote control.
n
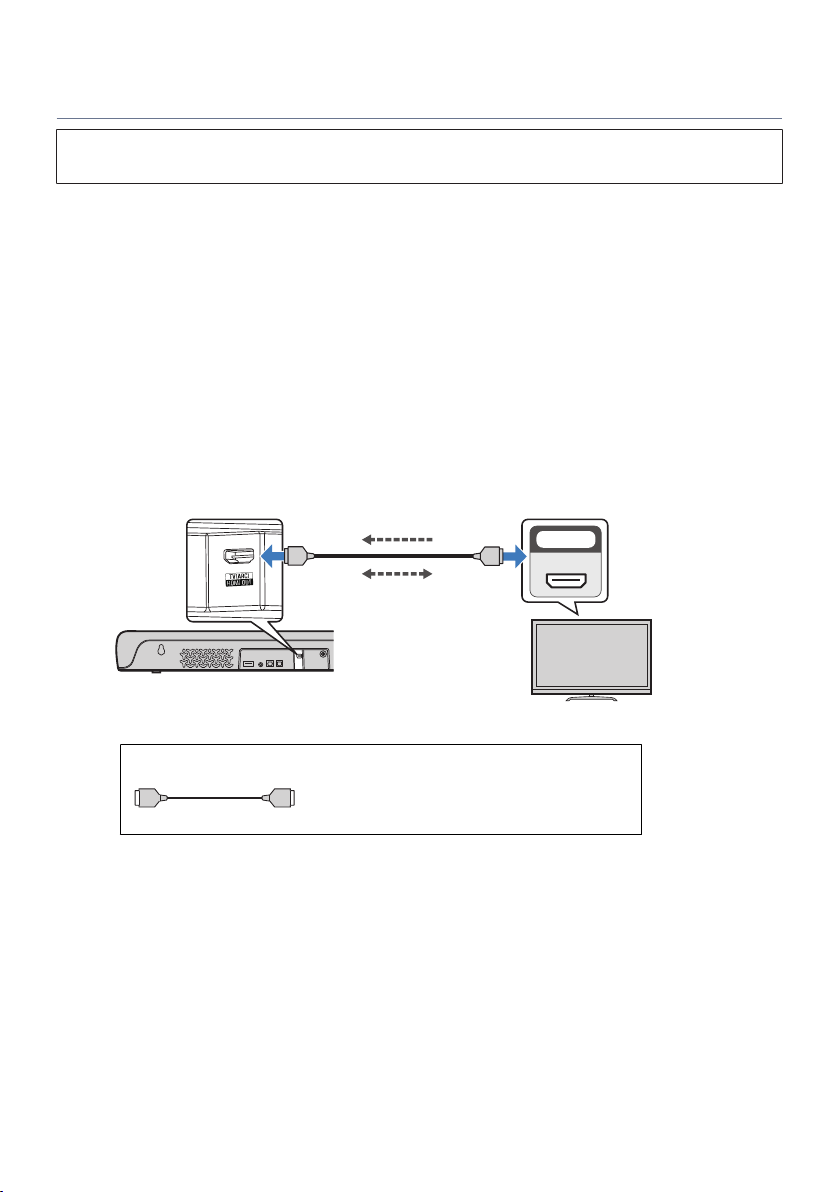
Connecting to an HDMI input jack compatible with Audio Return Channel (ARC)
Connect the TV using an ARC-compatible HDMI cable (commercially available).
The HDMI cable transmits the TV’s audio signal and the control signal for controlling the sound bar using the
TV’s remote control.
1 Connect a TV to the sound bar.
Connect an HDMI cable to the HDMI input jack compatible with Audio Return Channel (labeled
as “ARC”) on the TV.
HDMI IN
ARC
HDMI
HDMIHDMI
HDMI OUT/TV (ARC) jack
Sound bar (rear)
TV
HDMI input jack (compatible
with ARC)
TV’s audio signal
Control signal
Cable to use
HDMI cable (commercially available)
HDMI HDMI
26
PREPARATION > Connecting a TV

2 Connect the sound bar and subwoofer to power.
To an AC wall outlet
Power cord (included)
Sound bar (rear)
AC adaptor (included)
To an AC wall outlet
Power cord (included)
Subwoofer (rear)
n
When connecting to an HDMI input jack not compatible with ARC
Connect the TV using an HDMI cable (commercially available) and included digital optical audio cable.
The digital optical audio cable transmits the TV’s audio signal to the sound bar. The HDMI cable transmits the
control signal for controlling the sound bar using the TV’s remote control (HDMI Control function). If you do
not want to use the HDMI Control function, you do not need to connect an HDMI cable.
27
PREPARATION > Connecting a TV
1 Connect a TV to the sound bar.
OPTICAL
HDMI IN
OO OO
HDMI
HDMI
HDMI
HDMI OUT/TV (ARC) jack
Sound bar (rear)
TV jack
Digital optical audio output jack
HDMI input jack
TV
Remove the cap.
1. 2.
Check the
orientation of the
plug.
Control signal
TV’s audio signal
Cable to use
HDMI cable (commercially available)
HDMI HDMI
Digital optical audio cable (included)
O O
28
PREPARATION > Connecting a TV

2 Connect the sound bar and subwoofer to power.
To an AC wall outlet
Power cord (included)
Sound bar (rear)
AC adaptor (included)
To an AC wall outlet
Power cord (included)
Subwoofer (rear)
NOTE
(
When connected to an ARC-compatible HDMI input jack, enable the HDMI Control function of the sound bar. Default setting:
Enabled
(
Use a 19-pin HDMI cable with the HDMI logo printed on it.
(
Use a cable that is as short as possible to prevent any degradation in signal quality.
(
Connect an AV device (such as a set top box) to the TV.
Related links
“Enabling/disabling the HDMI Control function”(p.52)
29
PREPARATION > Connecting a TV
Connecting an audio device
(
Before connecting devices, be sure to read the following precautions.
(
“Precautions for preparation”(p.18)
Devices equipped with audio output jacks can be connected directly to the sound bar.
n
A device with a digital optical audio output jack
Connect an audio device using a digital optical audio cable.
1 Connect an audio device to the sound bar.
OUTPUT
OO OO
Sound bar (rear)
Audio device
OPTICAL jack
Digital optical
audio output
jack
Remove the cap.
1. 2.
Check the orientation
of the plug.
Audio signal
Cable to use
O O
Digital optical audio cable (included)
30
PREPARATION > Connecting an audio device

2 Connect the sound bar and subwoofer to power.
To an AC wall outlet
Power cord (included)
Sound bar (rear)
AC adaptor (included)
To an AC wall outlet
Power cord (included)
Subwoofer (rear)
NOTE
When connecting a device equipped with video output, connect the video output jack directly to the video input jack on the TV.
n
A device with an analog audio output jack
Connect an audio device using a 3.5 mm stereo mini plug cable (commercially available).
31
PREPARATION > Connecting an audio device
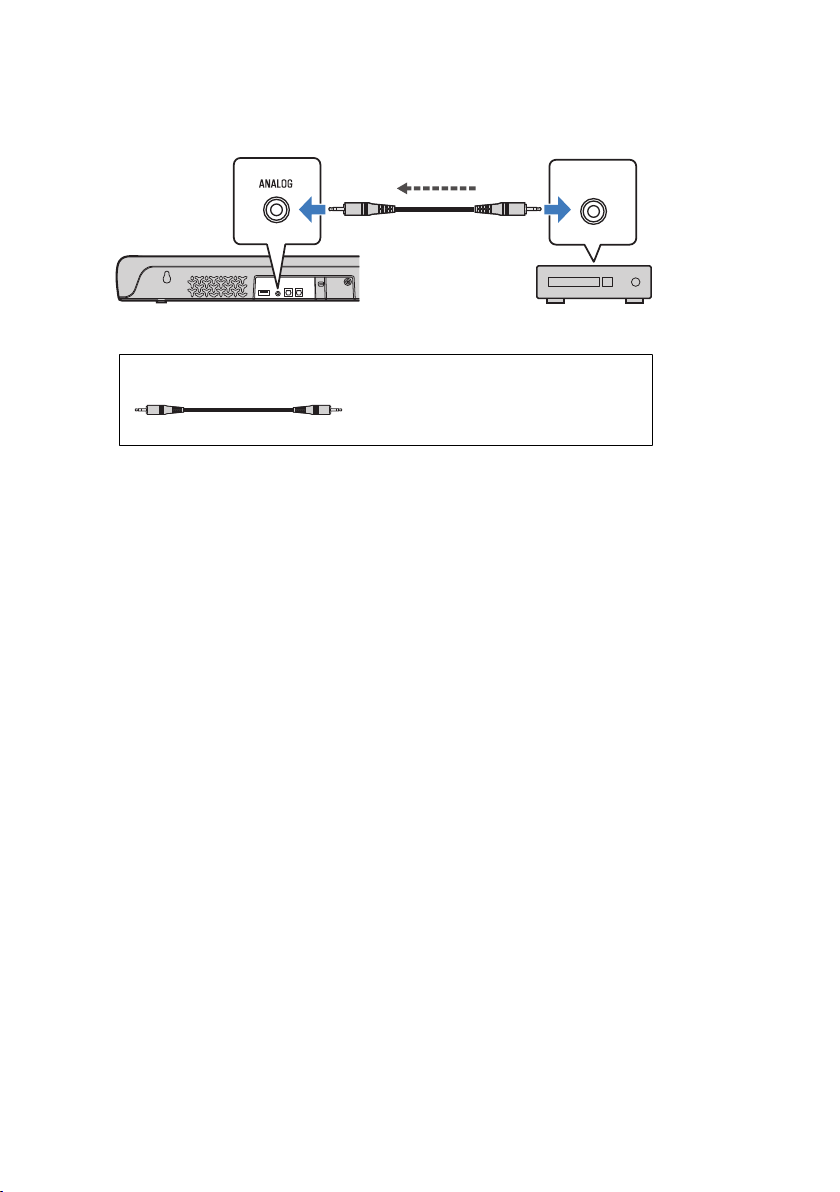
1 Connect an audio device to the sound bar.
OUTPUT
Sound bar (rear) Audio device
ANALOG jack Audio output jack
Audio signal
Cable to use
3.5 mm stereo mini plug cable (commercially
available)
32
PREPARATION > Connecting an audio device
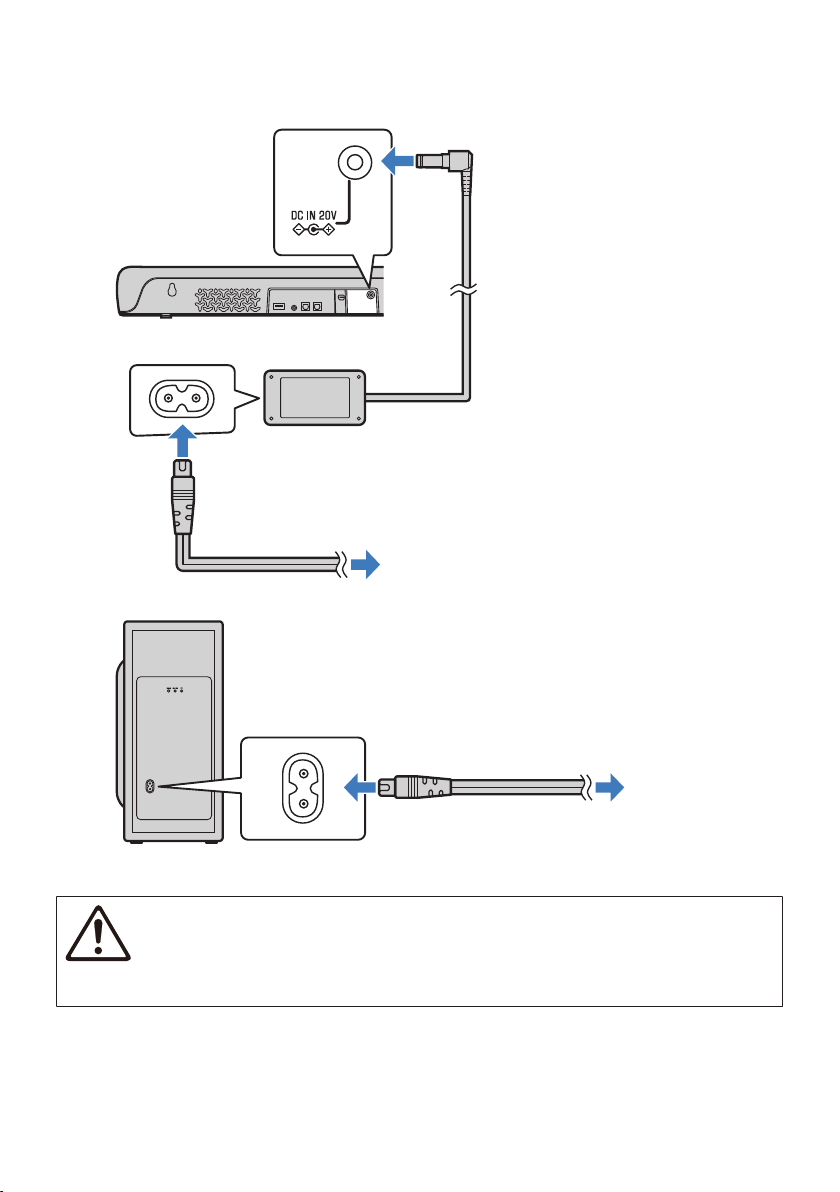
2 Connect the sound bar and subwoofer to power.
To an AC wall outlet
Power cord (included)
Sound bar (rear)
AC adaptor (included)
To an AC wall outlet
Power cord (included)
Subwoofer (rear)
CAUTION
(
If the volume can be adjusted on a device connected to the ANALOG input jack of the sound bar, adjust the volume of the device
so that the volume is about the same for both the TV and the device.
NOTE
When connecting a device equipped with video output, connect the video output jack directly to the video input jack on the TV.
33
PREPARATION > Connecting an audio device
Turning on and off the sound bar
Turn the sound bar on and off.
1 Press z (power) button.
Pressing the button turns the sound bar on and off.
z
(Power)
When the sound bar is turned on, all the indicators glow, and then some indicators remain
glowing to show the setting status (normal display).
When the sound bar is turned off, the indicators go off.
NOTE
(
The same operation can also be performed from the sound bar’s z (power) button.
(
When the sound bar is turned on, the sound bar and subwoofer are automatically connected wirelessly. When the connection is
established, the * indicator on the rear of the subwoofer glows.
35
PREPARATION > Turning on and off the sound bar
PLAYBACK
Basic control during playback
This section describes the basic control operations available during playback.
n
Selecting an input source
Press one of the following buttons.
(
TV button: Audio from a TV
(
OPTICAL button: Audio from a device connected to the OPTICAL input jack
(
BLUETOOTH button: Audio from a Bluetooth device
(
ANALOG button: Audio from a device connected to the ANALOG input jack
The indicator of the selected input source button glows.
One of the indicators glows
n
Adjusting volume
Press VOLUME (+/-) to adjust the volume.
The number of glowing indicators changes to show the volume level.
Volume is turned up (+)
Volume is turned down (-)
36
PLAYBACK > Basic control during playback

If audio is being output from both the TV speakers and the sound bar, mute the TV.
To temporarily mute the sound bar, press |. To unmute, press | again or press VOLUME (+/-).
While muted, the indicators will show the following.
Flashing
NOTE
The same operations can also be performed from the sound bar’s controls.
(
y (Input): For selecting a device to play.
(
} / { (Volume +/-): For adjusting the volume.
Related links
(
“Surround playback”(p.40)
(
“Stereo playback”(p.41)
(
“Playing back human voices clearly (CLEAR VOICE)”(p.43)
(
“Enjoying rich bass sound (BASS EXT)”(p.44)
(
“Listening to audio from a Bluetooth® device”(p.45)
37
PLAYBACK > Basic control during playback

Adjusting the sound to your preference
Sound functions of this product
This product is equipped with sound modes for surround playback and for stereo playback. There are also
various sound settings for adjusting the sound to suit your preferences even better.
n
Sound modes
A sound mode can be selected from among three sound modes for surround playback and one sound mode
for stereo playback.
STEREO
This sound mode provides stereo playback. This sound mode is best suited for music playback.
STANDARD
This sound mode provides surround playback that is best suited for TV programs such as sports broadcasts.
It emphasizes the acoustic image of human voices and makes the voices easier to hear, while reproducing a
wide sound field.
3D MOVIE
This sound mode provides surround playback that is best suited for movies. It reproduces a three-
dimensional sound field and creates a sound space that seems to envelop your body.
GAME
This sound mode provides surround playback that is best suited for video games. It accurately reproduces
and emphasizes the localization of individual sound effects for a highly immersive gaming experience.
n
Sound settings
The sound settings allow you to adjust the sound to better suit your preferences.
Clear Voice
The human voices within the audio can be heard more easily without turning up volume when the Clear
Voice function is enabled. The function is recommended for enjoying movies or dramas at a low volume, and
for movies or dramas that use a lot of background music and sound effects.
Bass Extension
The acoustic image of bass sound is enhanced when the Bass Extension function is enabled. It allows you to
enjoy rich bass performance with a strong presence without disturbing the balance of the overall sound.
38
PLAYBACK > Adjusting the sound to your preference


Adjusting the volume of the subwoofer
Adjust the volume of the subwoofer only.
Press SUBWOOFER (+/-) to adjust the volume.
The glowing indicator changes to show the volume level.
Volume is turned down (-) Volume is turned up (+)
42
PLAYBACK > Adjusting the sound to your preference
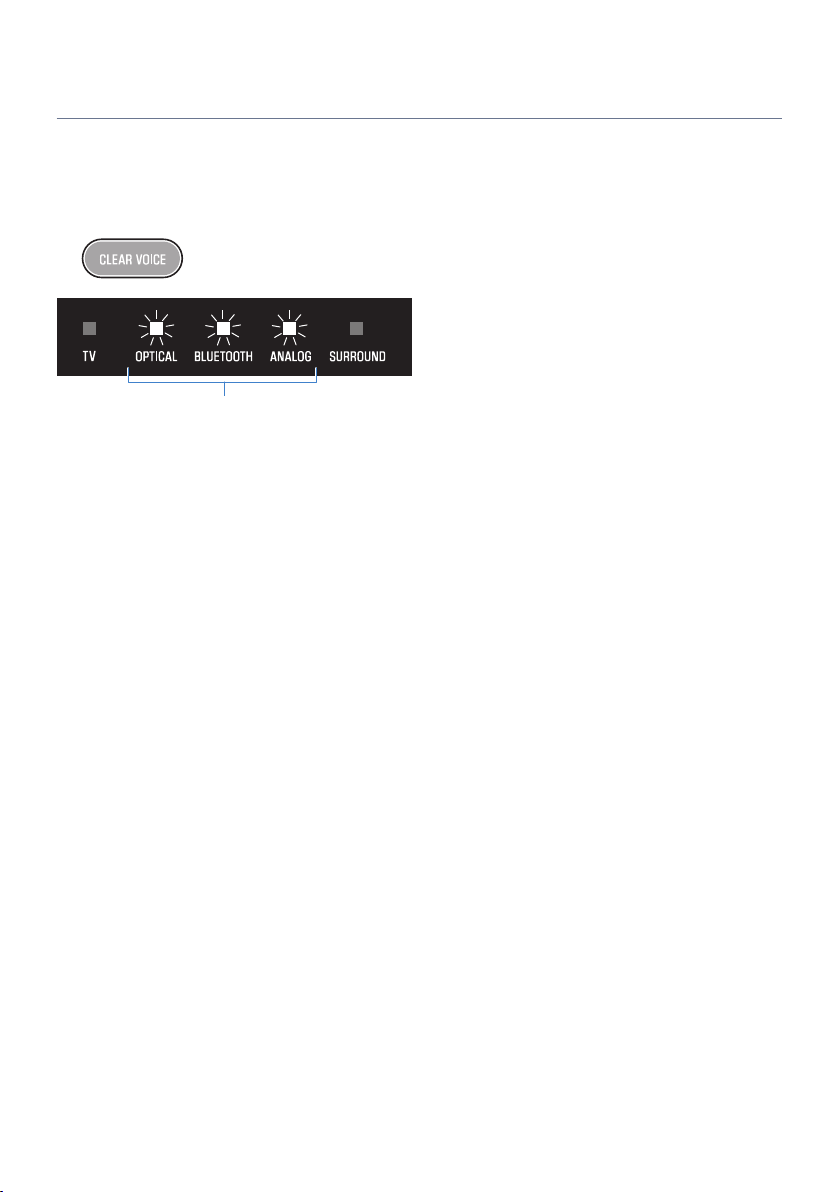
Playing back human voices clearly (CLEAR VOICE)
The human voices within the audio can be heard more easily without turning up volume when the Clear
Voice function is enabled. The function is recommended for enjoying movies or dramas at a low volume, and
for movies or dramas that use a lot of background music and sound effects.
Press CLEAR VOICE to enable or disable the function.
Flashes three times: enabled
Flashes one time: disabled
NOTE
(
Press INFO to see whether the Clear Voice function is enabled or disabled.
(
Clear Voice is a function that focuses on and emphasizes the acoustic image of human voices within the audio. Only the human
voices are emphasized without changing the overall volume and frequency characteristics, and it gives a clear sense of localization
to the human voices.
Related links
“Showing the type of audio signal and settings for functions”(p.50)
43
PLAYBACK > Adjusting the sound to your preference
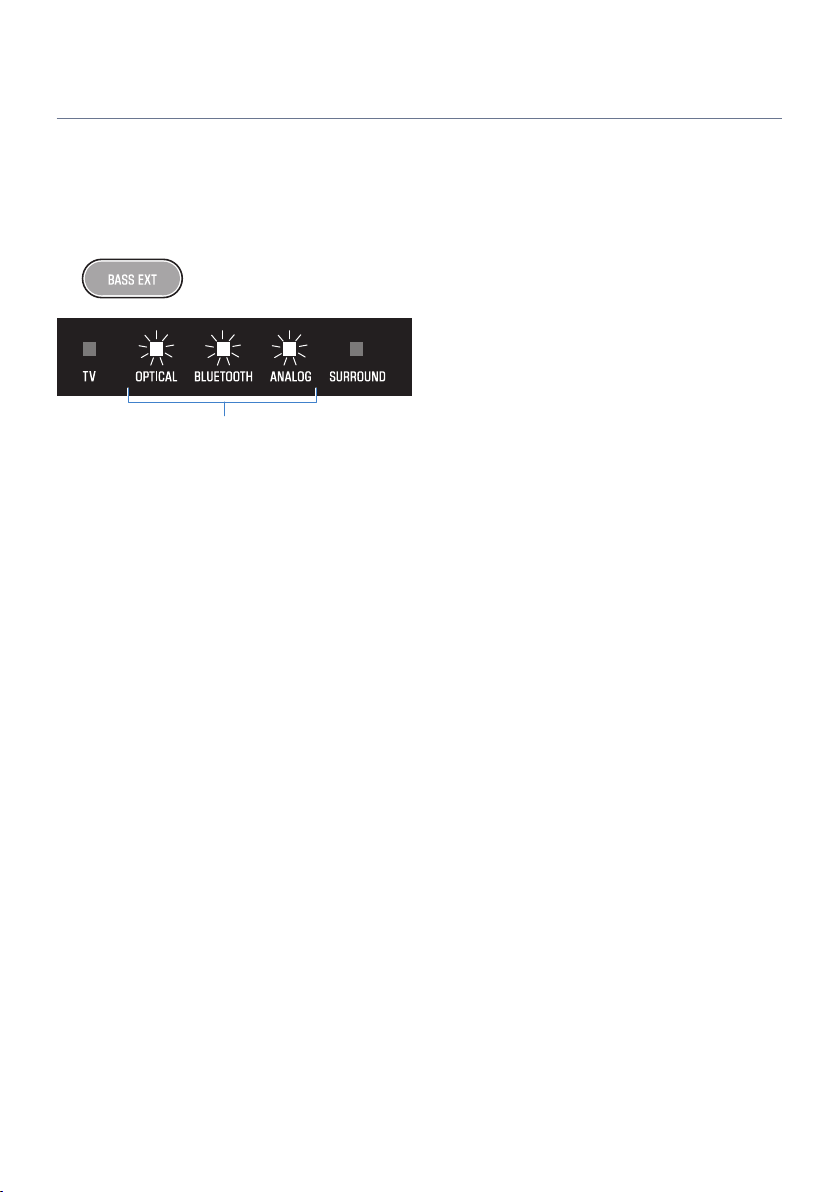
Enjoying rich bass sound (BASS EXT)
The acoustic image of bass sound is enhanced when the Bass Extension function is enabled. It allows you to
enjoy rich bass performance with a strong presence without disturbing the balance of the overall sound. This
function is recommended when you want to increase the bass while suppressing the volume of the
subwoofer, or when you want to emphasize the sounds of low-pitched instruments.
Press BASS EXT to enable or disable the function.
Flashes three times: enabled
Flashes one time: disabled
NOTE
Press INFO to see whether the Bass Extension function is enabled or disabled.
Related links
“Showing the type of audio signal and settings for functions”(p.50)
44
PLAYBACK > Adjusting the sound to your preference
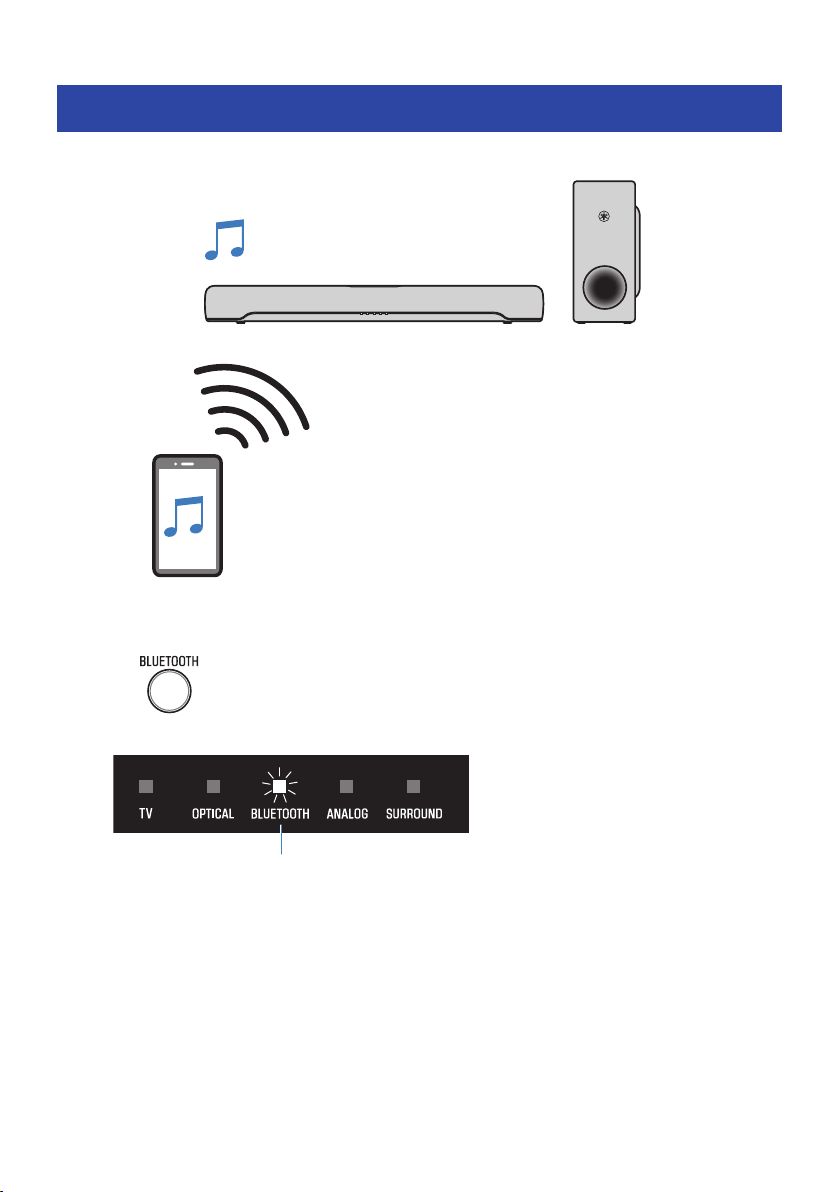
Listening to audio from a Bluetooth® device
Audio content from a Bluetooth device can be played through the sound bar.
Bluetooth device
1 Press BLUETOOTH to switch the input source to Bluetooth.
The sound bar enters the connection wait status, and the BLUETOOTH indicator flashes.
Flashes
2 On the Bluetooth device, enable the Bluetooth function.
45
PLAYBACK > Listening to audio from a Bluetooth® device
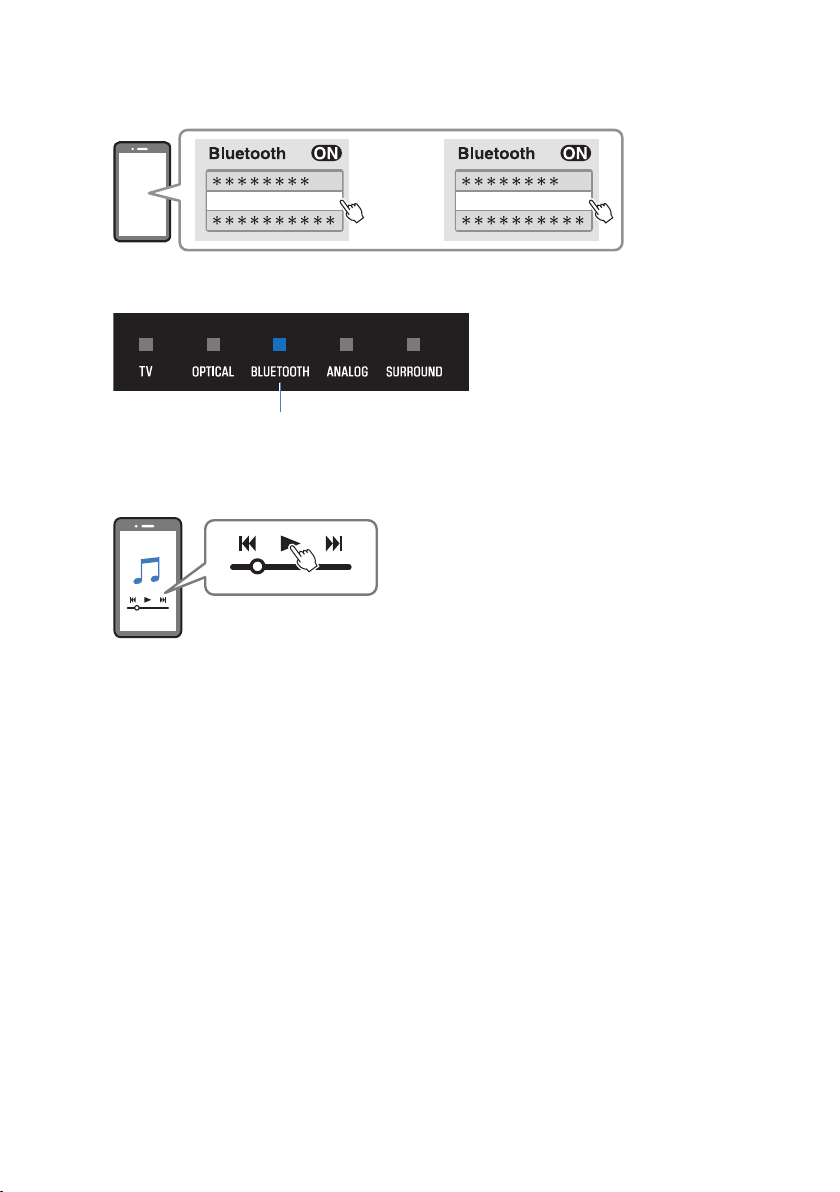
3 Select the sound bar on the Bluetooth device.
Yamaha SR-C30A YamahaAV
or
When the connection is established, the BLUETOOTH indicator on the sound bar stops flashing
and starts glowing blue.
Glowing blue
4 Start playback on the Bluetooth device.
The sound bar will begin playing audio from the Bluetooth device.
NOTE
(
“Compressed Music Enhancer” is enabled during playback from a Bluetooth device to reproduce the rich, deep sound that the
audio had prior to compression.
(
Enabling the Bluetooth standby function allows the sound bar to be turned on automatically when a connection operation is
performed with a Bluetooth device.
(
If other Bluetooth devices have been connected before, the sound bar will connect to the last connected device when the input
source is switched to Bluetooth.
(
The Bluetooth connection is terminated if one of the following operations is performed.
(
The Bluetooth function of the Bluetooth device is turned off.
(
BLUETOOTH on the sound bar’s remote control is held down for at least five seconds.
(
An input source other than Bluetooth is selected on the sound bar.
(
Turn off the sound bar.
(
Adjust the volume level of the Bluetooth device if necessary.
(
Perform Bluetooth device operations within 10 m (33 ft) of the sound bar.
Related links
“Enabling/disabling the Bluetooth Standby function”(p.55)
n
Switching Bluetooth devices for playback (multipoint connection)
The sound bar can be connected to two Bluetooth devices simultaneously. It is easy to switch between the
Bluetooth devices for playback.
46
PLAYBACK > Listening to audio from a Bluetooth® device
Bluetooth device (performing playback) Bluetooth device (playback stopped)
Perform the following procedures to switch between devices for playback.
1 Stop playback on the Bluetooth device.
2 Start playback on the other Bluetooth device.
Audio from the other Bluetooth device can be heard on the sound bar.
NOTE
When connecting a new Bluetooth device, disconnect the currently connected Bluetooth device and then connect the new
device.
47
PLAYBACK > Listening to audio from a Bluetooth® device

ADDITIONAL FEATURES
Changing the brightness of the indicators (Dimmer)
Change the brightness of the indicators of the sound bar to one of three levels: “Bright”, “Dim”, or “Off”.
The brightness is “Dim” by default.
1 Turn on the sound bar.
2 Press DIM.
Press the button to change the brightness in the order of “Dim”, “Off” and “Bright”.
NOTE
Indicators glow brightly just after operation and then change to the specified brightness after a few seconds.
48
ADDITIONAL FEATURES > Changing the brightness of the indicators (Dimmer)
Using a TV’s remote control to control the sound bar
(HDMI Control)
When the sound bar is connected to a TV via an HDMI cable, the sound bar can be controlled using the TV’s
remote control. This is called the HDMI Control function.
a
b
c
TV’s remote control (example)
a
Turn the power on and off
Both the TV and the sound bar turn on/off at the same time.
b
Switch the audio output device
The audio output device can be switched to the TV or the sound bar. Control operations vary depending on the TV’s
type.
c
Adjust volume
The sound bar’s volume can be adjusted when the TV’s audio output is set to the sound bar.
Related links
“Enabling/disabling the HDMI Control function”(p.52)
49
ADDITIONAL FEATURES > Using a TV’s remote control to control the sound bar (HDMI Control)
Showing the type of audio signal and settings for
functions
The type of audio signal being played and settings for the sound bar’s functions can be checked.
1 Press INFO.
The indicators on the sound bar will show the following information on the type of audio
signal and the settings for functions for three seconds immediately after INFO is pressed.
a b c d
a
Type of audio signal
TV glows white: Dolby Digital
OPTICAL glows white: AAC
TV and OPTICAL off: PCM, analog, or no input signal
b
Whether Dolby Pro Logic II is enabled or disabled
Glows: enabled
Off: disabled
NOTE
Dolby Pro Logic II is enabled automatically when 2-channel stereo signals are played in surround.
c
Whether the Bass Extension function is enabled or disabled
Glows: enabled
Off: disabled
d
Whether the Clear Voice function is enabled or disabled
Glows: enabled
Off: disabled
50
ADDITIONAL FEATURES > Showing the type of audio signal and settings for functions
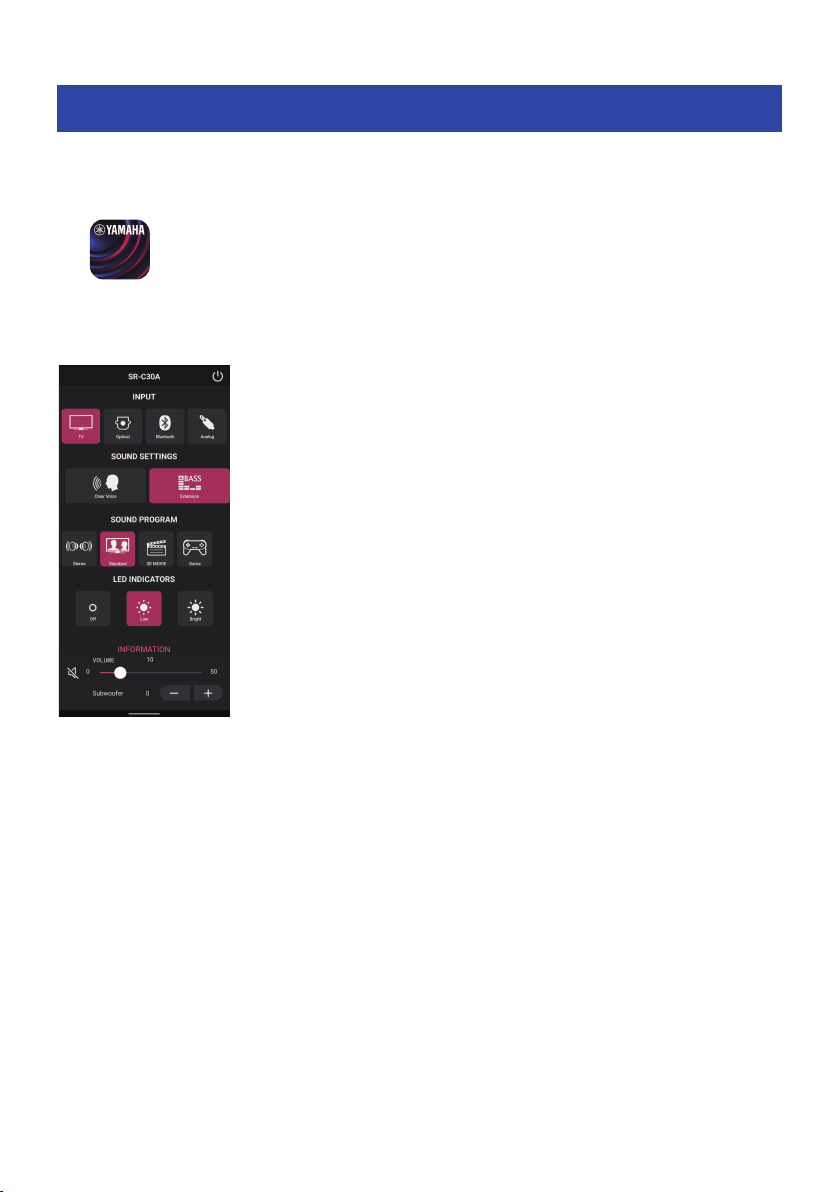
Controlling the sound bar with the smartphone app
By installing the free dedicated app “Sound Bar Remote” on a smartphone, the sound bar can also be
controlled from that smartphone.
Search for “Sound Bar Remote” on the App Store or Google Play and install it on the mobile device.
After installing the app on your smartphone, connect to the sound bar via Bluetooth and open the app.
The app allows you to control the sound bar while checking its current settings via the following simple
screen.
For details on the app, see the description of the app on the App Store or Google Play.
NOTE
(
This sound bar supports Sound Bar Remote only. This sound bar cannot be controlled using other apps (such as Sound Bar
Controller).
(
To control the sound bar using the app, configure the settings on the mobile device as follows:
(
Enable the Bluetooth function.
(
For devices using the Android 11 OS or earlier, configure the settings to allow location information to be obtained.
The Sound Bar Remote app uses location information from the Android device only to detect the sound bar. The acquired
location information will not be used for any other purpose.
(
For devices using the Android 12 OS or later, configure the settings to allow the use of nearby devices.
51
ADDITIONAL FEATURES > Controlling the sound bar with the smartphone app
CONFIGURATION
Enabling/disabling the HDMI Control function
Enabling the HDMI Control function allows the sound bar to be controlled using the TV’s remote control.
Default setting: Enabled
1 Turn off the sound bar.
2 Hold down TV for at least five seconds.
The HDMI Control function switches from enabled to disabled, or from disabled to enabled.
The indicator shows the setting status as follows, and the sound bar is turned on.
Glows: enabled
Off: disabled
NOTE
When connected to a TV’s ARC-compatible HDMI input jack, enable the HDMI Control function.
Related links
(
“Connecting a TV using an HDMI cable (commercially available)”(p.26)
(
“The sound bar cannot be controlled using the TV’s remote control”(p.70)
52
CONFIGURATION > Enabling/disabling the HDMI Control function
Enabling/disabling the Auto Power Standby function
Enabling the Auto Power Standby function turns off the sound bar in any of the following situations.
(
No control operations for eight hours
(
No audio input and no control operations for 20 minutes (except when ANALOG is selected as the input
source)
The default setting varies depending on the model.
Models for U.S.A., Canada, Mexico, Australia, China and Taiwan: Disabled
Models for Europe, U.K., Korea, and other areas: Enabled
1 Turn off the sound bar.
2 While holding down y on the sound bar, hold down z for at least five seconds.
The Auto Power Standby function switches from enabled to disabled, or from disabled to
enabled.
The indicator shows the setting applied as follows, and the sound bar is turned on.
Glows: disabled
Off: enabled
53
CONFIGURATION > Enabling/disabling the Auto Power Standby function

Enabling/disabling the Child Lock function
Locking the controls of the sound bar prevents accidental operation (Child Lock function).
Default setting: Disabled (no Child Lock)
1 Turn off the sound bar.
2 Hold down INFO for at least five seconds.
The Child Lock function switches from enabled to disabled, or from disabled to enabled.
The indicator shows the setting applied as follows, and the sound bar is turned on.
Glows: enabled (Child Lock)
Off: disabled (no Child Lock)
54
CONFIGURATION > Enabling/disabling the Child Lock function
Enabling/disabling the Bluetooth Standby function
Enabling the Bluetooth Standby function allows the sound bar to be turned on automatically when a
Bluetooth device connects to the sound bar.
Default setting: Enabled
1 Turn off the sound bar.
2 Hold down BLUETOOTH for at least five seconds.
The Bluetooth Standby function switches from enabled to disabled, or from disabled to
enabled.
The indicator shows the setting applied as follows, and the sound bar is turned on.
Glows: enabled
Off: disabled
55
CONFIGURATION > Enabling/disabling the Bluetooth Standby function

Enabling/disabling the Bluetooth function
The Bluetooth function can be disabled.
Default setting: Enabled
1 Turn off the sound bar.
2 Hold down DIM for at least five seconds.
The Bluetooth function switches from enabled to disabled, or from disabled to enabled.
The indicator shows the setting applied as follows, and the sound bar is turned on.
Glows: enabled
Off: disabled
56
CONFIGURATION > Enabling/disabling the Bluetooth function

Setting the dynamic range compression level
Compressing the dynamic range of audio signals (the volume difference between the loudest and quietest
sounds) makes it easier to listen at a low volume. This setting is applied only when Dolby Digital audio
signals are being played.
Default setting: No compression
1 Turn off the sound bar.
57
CONFIGURATION > Setting the dynamic range compression level

2 Hold down one of the following buttons for at least five seconds.
Compression level Function Button of remote control
Maximum compression
Apply the maximum amount of dynamic
range compression.
Standard compression
Apply an amount of dynamic range
compression well suited for a typical room.
No compression Dynamic range compression is not applied.
The dynamic range compression level setting is changed.
The indicator shows the setting status as follows, and the sound bar is turned on.
Compression level Sound bar’s indicators
Maximum compression
Glows red
Standard compression
Glows white
No compression
Glows white
58
CONFIGURATION > Setting the dynamic range compression level
Setting the frequency characteristics of the sound
according to how the sound bar is installed
Switch the frequency characteristics of the sound bar so that the sound suits the way it is installed.
Default setting: Installed on a stand
Wall-mounted
Installed on a stand
1 Turn off the sound bar.
59
CONFIGURATION > Setting the frequency characteristics of the sound according to how the sound bar is
installed

2 According to how the sound bar is installed, hold down one of the following
buttons for at least five seconds.
(
Wall-mounted
(
Installed on a stand
The frequency characteristics setting is changed.
The indicator shows the setting status as follows, and the sound bar is turned on.
Wall-mounted
Glow
Sound bar’s indicators
Installed on a stand
Glow
Sound bar’s indicators
60
CONFIGURATION > Setting the frequency characteristics of the sound according to how the sound bar is
installed
Initializing the sound bar
Reset the settings of the sound bar to the factory presets.
1 The sound bar is turned off.
2 While holding down } on the sound bar, hold down z until all indicators flash.
Initialization is performed. When initialization is complete, the indicators will show the
following.
Flash (initialization complete)
61
CONFIGURATION > Initializing the sound bar

TROUBLESHOOTING
Check the following first when any problem occurs
Make sure of the following when the product does not function properly.
(
The power cords of all the devices are connected to AC wall outlets securely.
(
The product, TV and AV devices are turned on.
(
The connectors of each cable are securely inserted into the jacks on each device.
Related links
“List of support centers”(p.95)
62
TROUBLESHOOTING > Check the following first when any problem occurs

When a problem occurs: Power or overall functionality
The power turns off suddenly
(
The Auto Power Standby function turned off the sound bar.
Enabling the Auto Power Standby function turns off the sound bar automatically in any of the following
situations.
(
No control operations for eight hours
(
No audio input and no control operations for 20 minutes (except when ANALOG is selected as the input
source)
Turn on the sound bar again. The Auto Power Standby function can be disabled.
(
“Enabling/disabling the Auto Power Standby function”(p.53)
(
The protection circuitry has been activated. (The TV indicator on the sound bar flashes red.)
After confirming that all connections are made properly, turn on the sound bar again. If the power still
turns off frequently, unplug the power cord from the AC wall outlet and contact the nearest authorized
Yamaha dealer or service center.
(
“List of support centers”(p.95)
63
TROUBLESHOOTING > When a problem occurs: Power or overall functionality

The power cannot be turned on
(
The protection circuitry has been activated three times consecutively.
To protect the product, the power cannot be turned on. Unplug the power cord from the AC wall outlet
and contact the nearest authorized Yamaha dealer or service center.
(
“List of support centers”(p.95)
64
TROUBLESHOOTING > When a problem occurs: Power or overall functionality


The sound bar does not function correctly
(
The internal microcomputer is frozen due to an external electric shock (such as lightning or
excessive static electricity) or to a drop in the power supply voltage.
(
Unplug the power cords of the sound bar and subwoofer from the AC wall outlets, and then plug them
in again after at least 10 seconds.
67
TROUBLESHOOTING > When a problem occurs: Power or overall functionality


The sound bar cannot be controlled with the remote control
(
The sound bar is out of the operating range.
Use the remote control within the operating range.
(
“Part names of the remote control”(p.14)
(
The battery has run out.
Replace the battery with a new one.
(
“How to replace the remote control battery”(p.82)
(
The remote control sensor of the sound bar is exposed to direct sunlight or strong lighting.
Adjust the lighting angle or reposition the sound bar.
69
TROUBLESHOOTING > When a problem occurs: Power or overall functionality

The sound bar cannot be controlled using the TV’s remote
control
(
The HDMI Control function is not properly configured.
Confirm that the settings are properly configured as follows:
(
The HDMI Control function of the sound bar is enabled.
(
The HDMI Control function is enabled on the TV.
(
In the TV’s HDMI settings, the audio output destination is set to an option other than the TV’s built-in
speakers.
If the sound bar still cannot be controlled with the TV’s remote control, perform the following:
(
Turn off the sound bar and the TV, and then turn them back on again.
(
Unplug the power cord of the sound bar, as well as the power cords of external devices connected to
the sound bar via an HDMI cable, from the AC wall outlet. Plug them in again after about 30 seconds.
Related links
“Enabling/disabling the HDMI Control function”(p.52)
(
The TV does not support the sound bar’s control functions.
Even if your TV supports the HDMI Control function, some functions may not be available. For details, see
the documentation supplied with your TV.
70
TROUBLESHOOTING > When a problem occurs: Power or overall functionality

When a problem occurs: Audio
No sound
(
The input source you are attempting to play back from is not selected.
Select the correct input source.
(
“Basic control during playback”(p.36)
(
The mute function is active.
Cancel the mute function.
(
“Basic control during playback”(p.36)
(
The volume is too low.
Turn up the volume.
(
“Basic control during playback”(p.36)
(
The power cord of the sound bar is not connected securely.
Make sure that the power cord of the sound bar is properly connected to an AC wall outlet.
(
An input jack is connected to another input jack.
Connect the input jack on the sound bar to the output jack on the AV device.
(
A signal that the sound bar cannot play is being input.
Change the digital audio output setting on the TV or AV device to a type of audio signal supported by the
sound bar.
(
“Supported digital audio signal formats”(p.89)
(
The HDMI Control function is disabled.
When connecting a TV that supports ARC (Audio Return Channel) to the sound bar using an HDMI cable
only, enable the HDMI Control function.
To output audio from the sound bar when the HDMI Control function is disabled, connect the TV’s digital
optical audio output jack to the sound bar’s TV jack (digital optical) via a digital optical audio cable.
(
“Enabling/disabling the HDMI Control function”(p.52)
(
“Connecting a TV using an HDMI cable (commercially available)”(p.26)
(
The audio output destination of a TV using HDMI Control is the TV’s built-in speakers.
In the TV’s HDMI settings, set the audio output destination to an option other than the TV’s built-in
speakers.
71
TROUBLESHOOTING > When a problem occurs: Audio

No sound is coming from the subwoofer
(
The playback source does not contain subwoofer channel signals or low-frequency signals.
Try to play content containing subwoofer channel signals, to see if any sound can be heard from the
subwoofer.
(
The volume of the subwoofer is too low.
Turn up the volume of the subwoofer.
(
“Adjusting the volume of the subwoofer”(p.42)
(
The power cord of the subwoofer is not connected to an AC wall outlet.
Connect the power cord of the subwoofer to an AC wall outlet.
(
The protection circuitry has been activated. (Both the STANDBY indicator and * indicator on the
subwoofer are flashing.)
To protect the product, the power of the subwoofer cannot be turned on. Unplug the power cord from
the AC wall outlet and contact the nearest authorized Yamaha dealer or service center.
(
The * indicator on the subwoofer is flashing.
The condition of the wireless connection is bad, and the subwoofer cannot be connected to the sound
bar. Try the following.
(
Place the subwoofer closer to the sound bar.
(
If metal furniture is placed between the sound bar and subwoofer, change the layout or relocate the
subwoofer.
(
If a device emitting electromagnetic waves (such as a microwave oven or a wireless LAN device) is
located nearby, place the subwoofer and sound bar farther away from it.
(
The subwoofer is waiting for pairing with the sound bar. (The STANDBY indicator on the subwoofer
is flashing.)
If the sound from the subwoofer could be heard until now without any problem:
The PAIRING button on the subwoofer was accidentally pressed, and the subwoofer has been in the
pairing state.
Unplug the power cord of the subwoofer from the AC wall outlet, and then plug it in again after at least
five seconds. Then, turn on the sound bar and it will function properly.
If this problem occurs after performing a pairing operation:
Pairing failed.
Unplug the power cord of the subwoofer from the AC wall outlet, and then plug it in again after at least
five seconds. Check that the sound bar and subwoofer are installed properly, and try pairing the sound
bar and subwoofer manually.
(
“What to do if the sound bar and subwoofer are not paired automatically”(p.83)
72
TROUBLESHOOTING > When a problem occurs: Audio

The volume decreases when the sound bar is turned on
(
The Automatic Volume Adjustment function lowered the volume.
To prevent unexpected excessive loudness, the sound bar is equipped with the Automatic Volume
Adjustment function. If the sound bar was turned off with the volume set high, the volume is
automatically adjusted to a safe listening level the next time the sound bar is turned on. Turn up the
volume if necessary.
(
“Basic control during playback”(p.36)
73
TROUBLESHOOTING > When a problem occurs: Audio

No surround effect
(
Stereo playback is selected.
Select surround playback.
(
“Surround playback”(p.40)
(
The volume is too low.
Turn up the volume.
(
“Basic control during playback”(p.36)
(
The TV or AV device is set to output 2-channel audio (such as PCM) only.
Change the audio output setting on the TV or AV device to output Bitstream audio signals.
(
Sound is also heard from the TV’s built-in speakers.
Turn the TV’s volume all the way down.
(
You are listening from a position that’s extremely close to the sound bar.
You should listen at some distance from the sound bar.
74
TROUBLESHOOTING > When a problem occurs: Audio

Noise is heard
(
The sound bar is too close to another digital or high-frequency device.
Move those devices away from the sound bar.
75
TROUBLESHOOTING > When a problem occurs: Audio

When a problem occurs: Bluetooth®
The sound bar cannot be connected to a Bluetooth® device
(
Bluetooth is not selected as the input source of the sound bar.
Select Bluetooth as the input source.
(
“Listening to audio from a Bluetooth® device”(p.45)
(
The sound bar is too far away from the Bluetooth device.
Move the Bluetooth device closer to the sound bar.
(
A device emitting electromagnetic waves (such as a microwave oven or a wireless device) is
located nearby.
Do not use the sound bar near devices that emit electromagnetic waves.
(
The Bluetooth device you are using does not support the A2DP profile.
Use a Bluetooth device that supports the A2DP profile.
(
The connection profile registered in the Bluetooth device is not functioning correctly.
Delete the connection profile in the Bluetooth device, and then connect the Bluetooth device to the
sound bar.
(
The passkey for devices such as a Bluetooth adaptor is not “0000”.
Use a Bluetooth device with a passkey of “0000”.
(
The sound bar is already connected to another Bluetooth device (when connecting a Bluetooth
device for the first time).
Terminate the current Bluetooth connection, and then connect to the new device.
(
The sound bar is already connected to two Bluetooth devices (when these devices have been
connected to the sound bar before).
Disconnect one of the currently connected Bluetooth devices, and then connect to another device.
(
The Bluetooth function of the sound bar is disabled.
Enable the Bluetooth function.
(
“Enabling/disabling the Bluetooth function”(p.56)
76
TROUBLESHOOTING > When a problem occurs: Bluetooth®

No sound can be heard or the sound cuts off intermittently
from a Bluetooth® device
(
The volume on the Bluetooth device is too low.
Raise the volume on the Bluetooth device.
(
Bluetooth is not selected as the input source of the sound bar.
Select Bluetooth as the input source.
(
“Listening to audio from a Bluetooth® device”(p.45)
(
Playback is not being performed on the Bluetooth device.
Perform playback on the Bluetooth device.
(
The audio output destination on the Bluetooth device is not set to the sound bar.
Select the sound bar as the audio output destination on the Bluetooth device.
(
The connection to the Bluetooth device was terminated.
Connect to the Bluetooth device again.
(
The sound bar is too far away from the Bluetooth device.
Move the Bluetooth device near the sound bar.
(
A device emitting electromagnetic waves (such as a microwave oven or a wireless device) is
located nearby.
Do not use the sound bar near devices that emit electromagnetic waves.
(
Playback is being performed on another Bluetooth device.
Stop the current playback, and perform playback on the other Bluetooth device.
77
TROUBLESHOOTING > When a problem occurs: Bluetooth®

When a problem occurs: App
The app cannot detect the sound bar
(
An app not supported by the sound bar is being used.
This sound bar supports Sound Bar Remote only. Sound Bar Controller, Home Theater Controller, and
MusicCast Controller cannot be used.
(
The Bluetooth function on the mobile device is disabled.
Enable the Bluetooth function on the mobile device.
(
On an Android device, the function for obtaining location information is disabled.
The Sound Bar Remote app uses the location information of the Android device only to detect the sound
bar. According to your Android device OS, change the settings as follows:
(
For devices using the Android 11 OS or earlier, configure the settings to allow location information to
be obtained.
(
For devices using the Android 12 OS or later, configure the settings to allow the use of nearby devices.
78
TROUBLESHOOTING > When a problem occurs: App
Other actions
How to connect AV devices such as BD/DVD players
Connect AV devices, such as BD/DVD players and set top boxes, to the TV’s HDMI input jacks.
HDMI IN
This sound bar AV devices
When playing audio from a TV or AV device via the sound bar, set the input sources as follows:
(
Sound bar’s input source: TV
(
TV’s input source: AV device playing the content
79
TROUBLESHOOTING > Other actions

Precautions for remote control batteries
Before replacing the remote control battery with a new one, be sure to read the following precautions. Be
sure to follow the precautions.
WARNING
(
The remote control included with this product contains a coin/button cell battery. Do not ingest the coin/button battery. Keep
new and used batteries away from children. If the battery compartment does not close securely, keep it away from children. If
the coin/button cell battery is swallowed, it can cause severe chemical burns and dissolve tissues inside the body in less than 2
hours, and can lead to death. If you think batteries might have been swallowed or placed inside any part of the body, seek
immediate medical attention.
(
Do not dispose of a battery in fire. Do not expose a battery to high temperatures, such as direct sunlight or a fire. Do not attempt
to charge the battery installed in the included remote control. The battery could burst or leak, causing a fire or injury.
(
Do not disassemble a battery. If the battery leaks, avoid contact with the leaked fluid. If the contents of the battery get on your
hands or in your eyes, it can cause blindness or chemical burns. If the battery fluid should come in contact with your eyes,
mouth, or skin, wash immediately with water and consult a doctor.
CAUTION
(
Do not use a battery other than the specified one. Doing so may cause fire or burns, or result in fluid leakage that may cause
skin inflammation.
(
Always make sure the battery is inserted in conformity with the +/- polarity markings. Failure to do so might result in a fire,
burns, or inflammation due to fluid leaks.
(
When the battery runs out, or if the sound bar is not to be used for a long time, remove the battery from the remote control to
prevent possible leakage of the battery fluid.
(
Do not put in a pocket or bag, carry, or store batteries together with pieces of metal. The battery could short, burst, or leak,
causing a fire or injury.
(
When storing or discarding batteries, insulate the terminal area by applying tape, or some other protection. Mixing them with
other batteries or metal objects can cause a fire, burns, or inflammation due to fluid.
81
TROUBLESHOOTING > Other actions
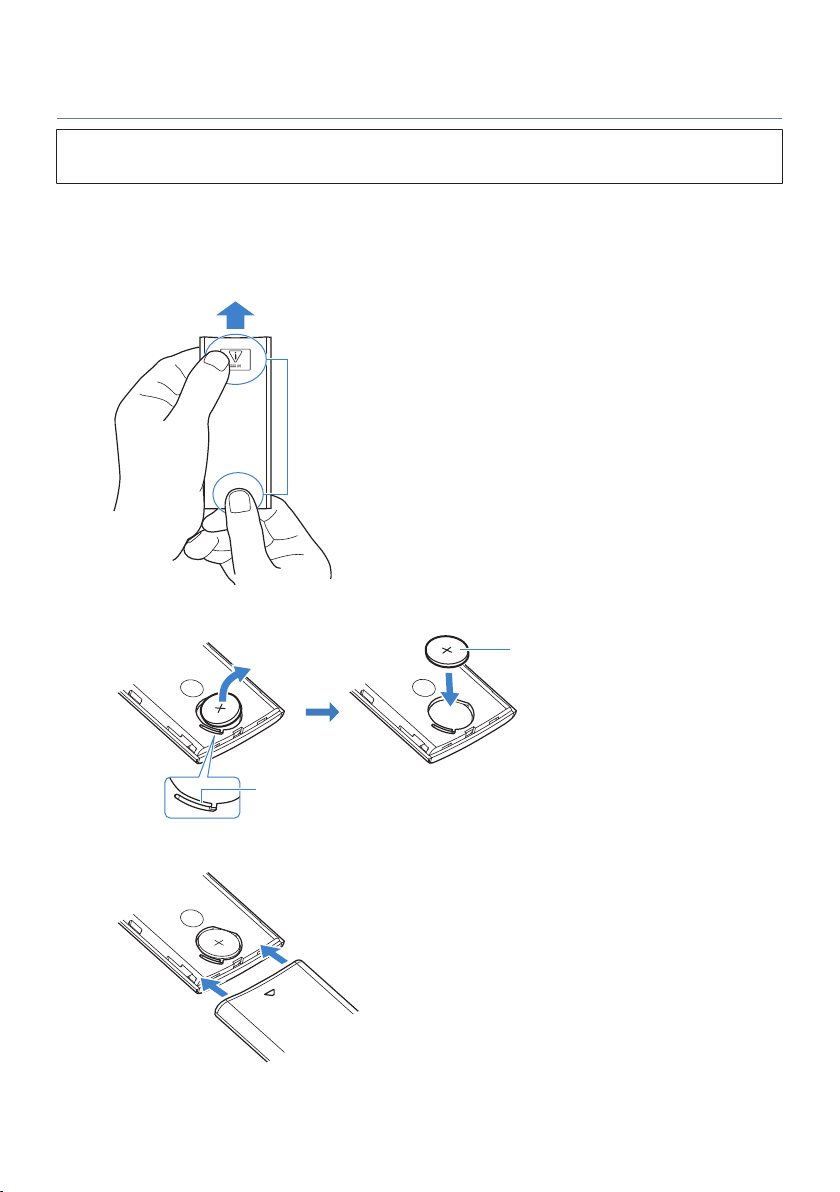
How to replace the remote control battery
(
Before replacing the battery with a new one, be sure to read the following precautions.
(
“Precautions for remote control batteries”(p.81)
When the battery runs out, the sound bar can no longer be controlled with the remote control. Replace the
battery with a new one.
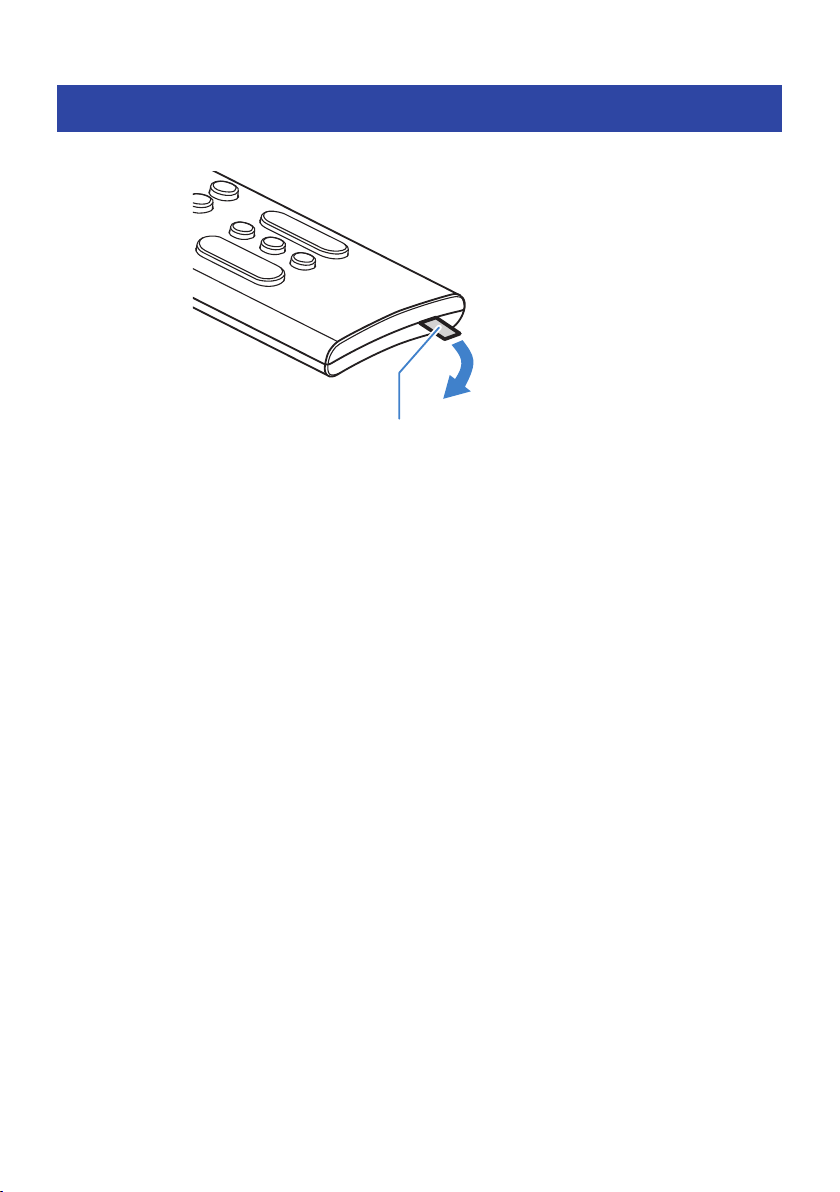
1 Slide the cover in the direction of the arrow to remove it.
Rear cover
Slide the cover with holding these positions firmly.
2 Remove the old battery and insert a new one.
CR2025
+
CR2025
+
Lithium battery (CR2025 ×1)
Pull the lever
3 Slide the cover back into its position in the direction of the arrow.
CR2025
+
82
TROUBLESHOOTING > Other actions
What to do if the sound bar and subwoofer are not paired
automatically
Normally, the sound bar and subwoofer are paired automatically, but if they are not properly paired due to a
temporary communications failure, pair them manually.
NOTE
Pairing is the process of having the sound bar and subwoofer recognize one another as devices to connect to.
1 Turn off the sound bar.
2 Press and hold SUBWOOFER (-) on the remote control for at least five seconds.
The sound bar is turned on, and the OPTICAL indicator on the sound bar flashes.
Flashes
3 Within 30 seconds, press and hold PAIRING on the rear of the subwoofer for at least
five seconds.
When the sound bar and subwoofer have been paired successfully, the * indicator glows.
If the * indicator on the subwoofer does not glow after following the procedure above, do the following and
then perform pairing manually again.
(
Move the subwoofer and/or the sound bar so that they are closer to each other.
83
TROUBLESHOOTING > Other actions

(
Install the sound bar and subwoofer in positions where they are not obstructed from each other by metal
furniture.
(
If a device emitting electromagnetic waves (such as a microwave oven or a wireless LAN device) is located
nearby, place the subwoofer and sound bar farther away from it.
84
TROUBLESHOOTING > Other actions

How to reset the sound bar
Reset the sound bar by performing the following operations.
n
To restart the sound bar
Unplug the power cords of the sound bar and subwoofer from the AC wall outlets, and then plug them in
again after at least 10 seconds and turn on the power.
n
To initialize the sound bar
Refer to the following explanation and reset the settings of the sound bar to the factory presets.
“Initializing the sound bar”(p.61)
85
TROUBLESHOOTING > Other actions

APPENDIX
Specifications
The specifications of this product are as follows.
n
Sound bar
Amplifier section
Maximum rated output power
(
Front L/R 20 W × 2 channels
Speaker section
Front L/R
(
Type
Acoustic suspension type
(non-magnetic shielding)
(
Driver 4.6 cm (1-13/16") cone × 2
(
Frequency response 210 Hz to 22 kHz
(
Impedance 6 Ω
Decoder
Supported audio signal
(HDMI (ARC)/optical input)
PCM (up to 2 channels)
Dolby Digital (up to 5.1 channels)
Input jacks
Digital optical 2 (TV, OPTICAL)
Analog (3.5 mm stereo mini) 1 (ANALOG)
Output jacks
HDMI 1 (HDMI OUT/TV (ARC))
Other jacks
USB 1 (UPDATE ONLY)
86
APPENDIX > Specifications

Bluetooth
Function Sink function (source device to this unit)
Bluetooth version Ver 5.0
Supported profiles A2DP
Supported codecs Sink function: SBC, AAC
Bluetooth class Bluetooth Class 1
Range (line-of-sight) Approx. 10 m (33 ft)
Supported content protection method SCMS-T (sink function)
Models for U.K. and Europe
(
Radio frequency 2402 MHz to 2480 MHz
(
Maximum output power (EIRP) 7.8 dBm (6.0 mW)
General
Power supply
(
Models for U.S.A., Canada, Taiwan and Mexico AC 100 to 120 V, 50/60 Hz
(
Models for U.K., Europe, and other areas AC 100 to 240 V, 50/60 Hz
Power consumption (AC adaptor output voltage/current) 20 V/2.1 A
Standby power consumption
(
[Models for U.S.A., Canada, Taiwan and Mexico]
(
HDMI Control/Bluetooth Standby: Off 0.3 W
(
HDMI Control/Bluetooth Standby: On 0.5 W
(
[Models for U.K., Europe, and other areas]
(
HDMI Control/Bluetooth Standby: Off 0.3 W
(
HDMI Control/Bluetooth Standby: On 0.5 W
Dimensions (W x H x D)
(
Installing the Sound Bar in front of a TV, etc.
600 × 64 × 94 mm
(23-5/8" × 2-1/2" × 3-3/4")
(
Mounting the Sound Bar on a wall, with spacers
600 × 64 × 102 mm
(23-5/8" × 2-1/2" × 4")
Weight 1.3 kg (2.9 lb)
NOTE
The contents of this User Guide apply to the latest specifications as of the publishing date. The latest version of the User Guide is
available to download from the Yamaha website.
87
APPENDIX > Specifications

n
Subwoofer
Amplifier section
Maximum rated output power 50 W
Speaker section
(
Type Bass reflex (non-magnetic shielding)
(
Driver 13 cm (5-1/8") cone × 1
(
Frequency response 40 Hz to 210 Hz
(
Impedance 3 Ω
Wireless function (Wireless communication between the sound bar and subwoofer)
(
Radio frequency band 2.4 GHz
(
Transmission range Approx. 10 m ([33 ft] without interference)
Models for U.K. and Europe
(
Radio frequency 2405.35 MHz to 2477.35 MHz
(
Maximum output power (EIRP) 9.0 dBm (7.9 mW)
General
Power supply
(
Models for U.S.A., Canada, Taiwan and Mexico AC 100 to 120 V, 50/60 Hz
(
Models for U.K., Europe, and other areas AC 100 to 240 V, 50/60 Hz
Power consumption 20 W (Rated)
Standby power consumption 0.8 W
Dimensions (W x H x D)
(
Installing the subwoofer upright, with non-skid pads
160 × 337 × 364 mm
(6-1/4" × 13-1/4" × 14-3/8")
(
Installing the subwoofer horizontal, with non-skid pads
335 × 162 × 364 mm
(13-1/4" × 6-3/8" × 14-3/8")
Weight 5.7 kg (12.6 lb)
NOTE
The contents of this User Guide apply to the latest specifications as of the publishing date. The latest version of the User Guide is
available to download from the Yamaha website.
88
APPENDIX > Specifications

Supported digital audio signal formats
The following digital audio signals are supported by this product.
TV, OPTICAL, and TV (ARC)
Audio formats Details
2-channel Linear PCM 2 channels, 32 / 44.1 / 48 / 88.2 / 96 kHz, up to 24-bit
Bitstream Dolby Digital
NOTE
The contents of this User Guide apply to the latest specifications as of the publishing date. The latest version of the User Guide is
available to download from the Yamaha website.
89
APPENDIX > Supported digital audio signal formats
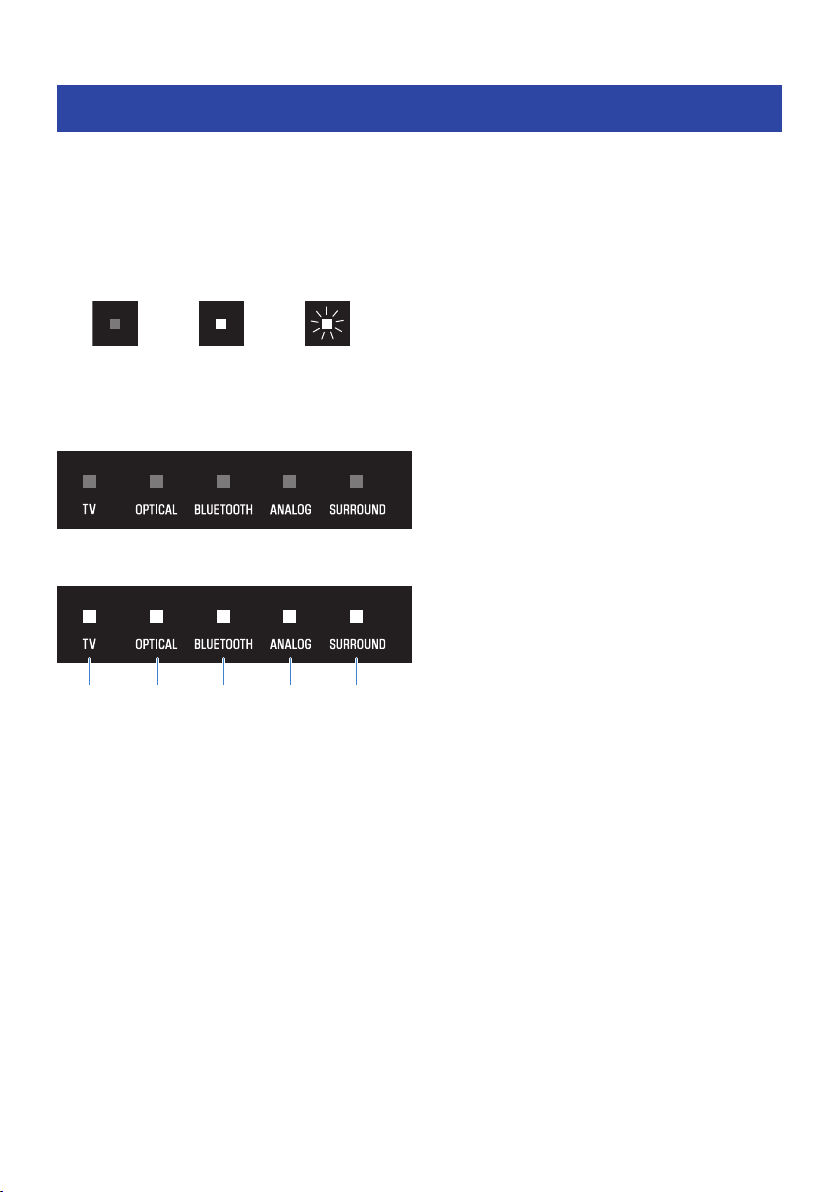
List of indicator displays
The indicators of this product display information primarily in the following ways:
n
Sound bar’s indicators
NOTE
This document shows indicator glowing status as follows:
Off Glowing Flashing
Power off state
Normal playback state
ca b d e
a
TV
Glowing: Playing audio from the TV
b
OPTICAL
Glowing: Playing audio from the OPTICAL input jack
c
BLUETOOTH
Glowing blue: Bluetooth device connection established
Flashing white: Bluetooth device connection wait status
d
ANALOG
Glowing: Playing audio from the ANALOG input jack
e
SURROUND
Glowing white: Surround playback
Off: Stereo playback
90
APPENDIX > List of indicator displays
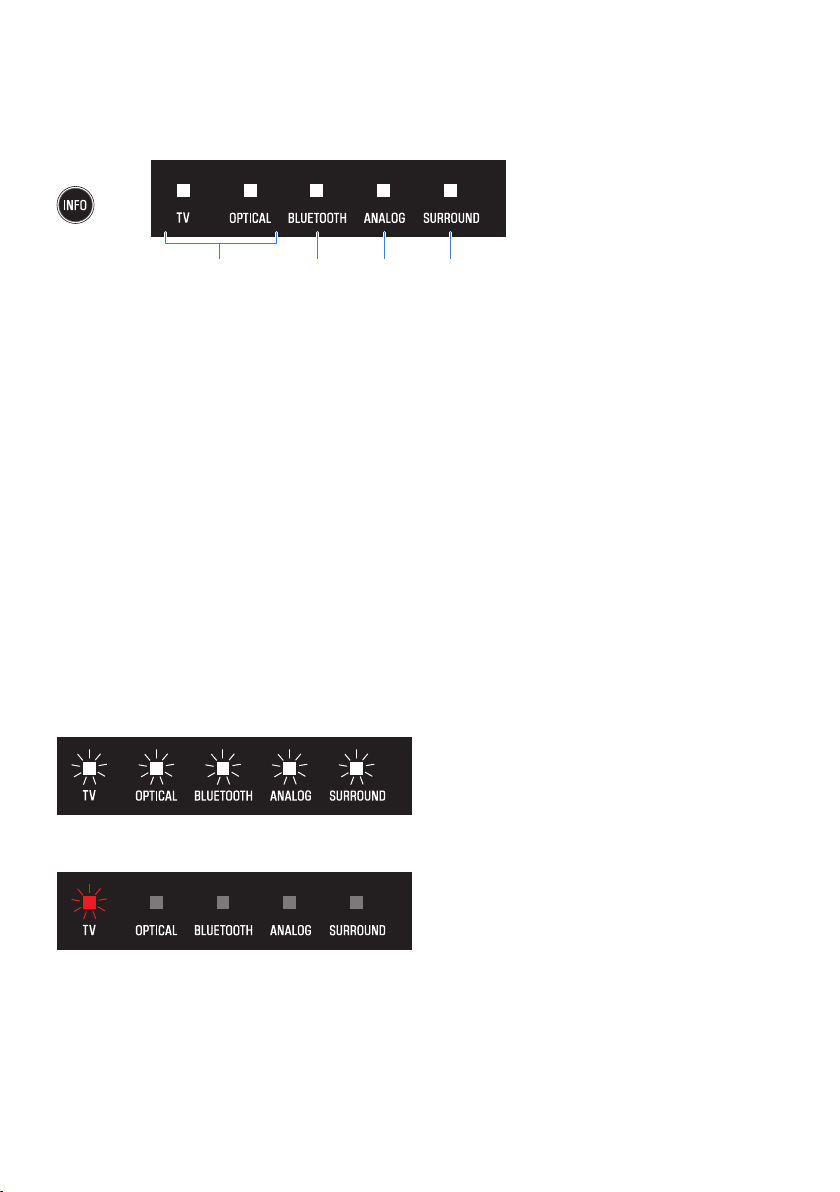
Showing the type of audio signal and settings for functions
The indicators on the sound bar will show the following information on the type of audio signal and the
settings for functions for three seconds immediately after INFO is pressed.
a b c d
a
Type of audio signal
TV glows white: Dolby Digital
OPTICAL glows white: AAC
TV and OPTICAL off: PCM, analog, or no input signal
b
Whether Dolby Pro Logic II is enabled or disabled
Glows: enabled
Off: disabled
NOTE
Dolby Pro Logic II is enabled automatically when 2-channel stereo signals are played in surround.
c
Whether the Bass Extension function is enabled or disabled
Glows: enabled
Off: disabled
d
Whether the Clear Voice function is enabled or disabled
Glows: enabled
Off: disabled
Muted state
An error occurred
Flashes red
NOTE
(
When the brightness of the indicators is set to “Off”, the indicators glow only during control operations.
(
See the description of each setting for what the indicators will show when the setting is changed.
91
APPENDIX > List of indicator displays
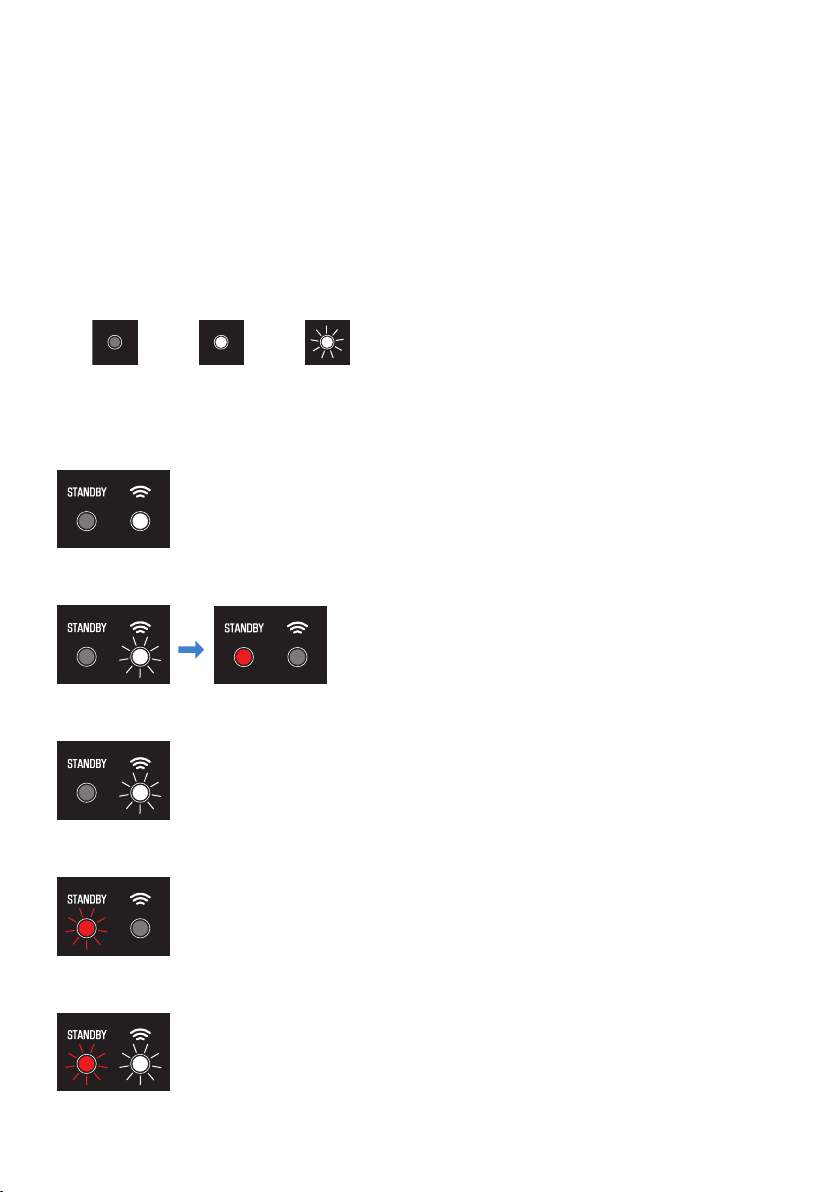
Related links
(
“Basic control during playback”(p.36)
(
“Showing the type of audio signal and settings for functions”(p.50)
(
“Changing the brightness of the indicators (Dimmer)”(p.48)
(
“When a problem occurs: Power or overall functionality”(p.63)
n
Information displayed by the indicators of the subwoofer
NOTE
This document shows indicator glowing status as follows:
Off Glowing Flashing
Power on state
Power off state
Establishing a connection to the sound bar
Waiting for pairing with the sound bar
An error occurred and the protection circuitry has been activated
92
APPENDIX > List of indicator displays

Trademarks
Dolby, Dolby Audio, Pro Logic, and the double-D symbol are trademarks of Dolby Laboratories Licensing Corporation.
Manufactured under license from Dolby Laboratories.
Confidential unpublished works. Copyright © 2012–2021 Dolby Laboratories. All rights reserved.
The terms HDMI and HDMI High-Definition Multimedia Interface, and the HDMI Logo are trademarks or registered
trademarks of HDMI Licensing Administrator, Inc. in the United States and other countries.
The Bluetooth® word mark and logos are registered trademarks owned by Bluetooth SIG, Inc. and any use of such marks by
Yamaha Corporation is under license. Other trademarks and trade names are those of their respective owners.
93
APPENDIX > Trademarks

About third party software programs
This sound bar uses third party software programs.
For the copyright and the license agreement terms and conditions of third party software programs that are
used, see the following website.
https://manual.yamaha.com/av/cm/sla/22/src30a/
94
APPENDIX > About third party software programs

List of support centers
If the trouble still cannot be solved, please contact us for product support as shown below.
For customers within Japan
(
Please contact the store where you purchased this product, or the Product Support Center as listed in the
“Safety Brochure” included with this product.
For customers outside of Japan
(
Please contact your nearest authorized Yamaha dealer or service center.
https://manual.yamaha.com/av/support/
95
APPENDIX > List of support centers

Yamaha Global Site
https://www.yamaha.com/
Yamaha Downloads
https://download.yamaha.com/
© 2022 Yamaha Corporation
Published 05/2022 NV-A0
AV21-0115
Layout Folder: YMH_PDF_Manual_A5_AV
Stylesheet Name: 01_YMH_PDF_Manual_A5_AV_En-Multi
Stylesheet Version: 2022.04.13