
Loading ...
Loading ...
Loading ...
ENGLISH
5
DO NOT use under wet conditions or in presence of
flammable liquids orgases.
The surface grinding shroud is a professional tool. DO NOT
let children come into contact with the tool. Supervision is
required when inexperienced operators use thistool.
Recommended power tools to be used with this
attachment are available at extra cost from your local
dealer or authorized service center. Refer to Accessories for
contact information.
ASSEMBLY AND ADJUSTMENTS
WARNING: To reduce the risk of serious personal
injury, turn unit off and disconnect it from
power source before making any adjustments or
removing/installing attachments or accessories.
An accidental start-up can causeinjury.
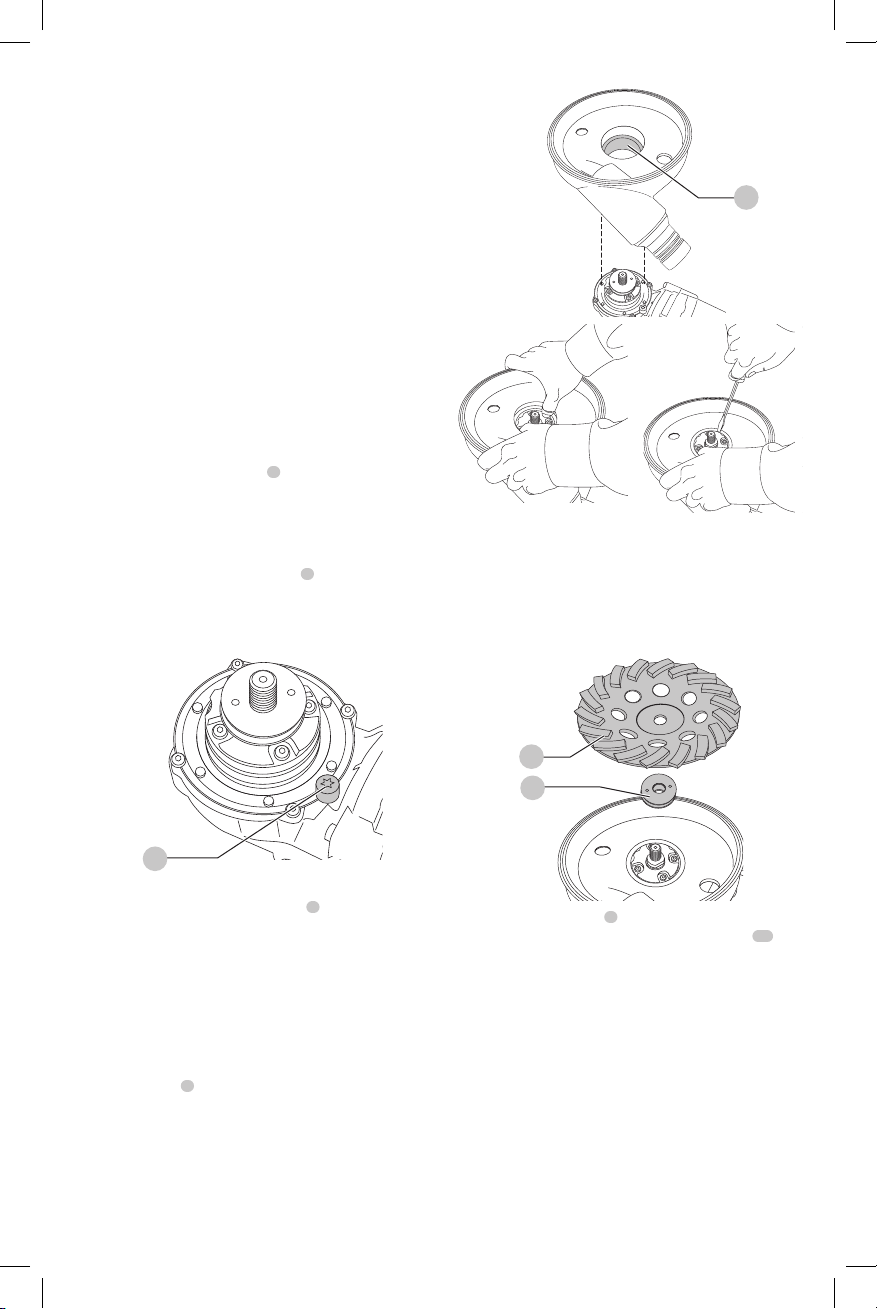
Mounting and Removing Surface Grinding
Shroud (Fig. A–C)
NOTE: The shroud and adaptor
5
have a tight fit onto the
grinder. Take extra care when mounting the shroud.
1. Follow the mounting and removing guard instructions
in the power tool manual to remove the existing guard
from grinder.
2. If present, remove the stop screw
8
from your
DeWALT
Grinder with a T40 star wrench. If a star wrench is
unavailiable, use a flat head screwdriver or a pair locking
pliers to remove the screw.
Fig. B
8
3. With the beveled edge facing upward from the shroud
collar, insert the gear case adaptor
5
partially into the
collar as seen in FigureC.
4. Aligning the adaptor and shroud with the gear casing,
push the both down onto the gear case with your
thumbs. You can also use a large flathead screwdriver to
be sure the adaptor is seated correctly. Both the shroud
and the adaptor should slide down onto the gear case
at the same time.
5. Position shroud to desired orientation, and tighten hose
clamp screw
1
securely.
6. To remove the shroud, repeat these steps in reverse.
NOTICE: If surface grinding shroud cannot be tightened by
the hose clamp screw, do not use the tool and take the tool
and surface grinding shroud to a service center to repair or
replace the surface grinding shroud.
Fig. C
5
Mounting Dry Diamond Surface
Cup Wheels (Fig. D)
Follow the mounting and using cutting wheels instructions
in the tool manual and mount the grinding wheel. DO NOT
use Type 1 cutting wheels or bonded abrasive wheels.
Fig. D
9
10
Dry diamond surface cup
9
wheels are recommended for
use with this shroud. The inner soft mount washer
10
should be installed behind the wheel, allowing free tool
removal and proper fit and alignment to shroud.
Hose Connection (Fig. E–F)
WARNING: Use only power tools recommended by
D
e
WALT with this attachment.
For more information about D
e
WALT power tools
compatible with this attachment, please contact your local
dealer, call 1–800–4-D
e
WALT (1–800–433–9258) or visit our
website www.
DeWALT
.com.
WARNING: This attachment must be used with a dust
extractor system. ALWAYS wear certified safety face
or dust mask.
NOTE: Ensure hose connection is secure.
Loading ...
Loading ...
Loading ...