Loading ...
Loading ...
Loading ...
4 5
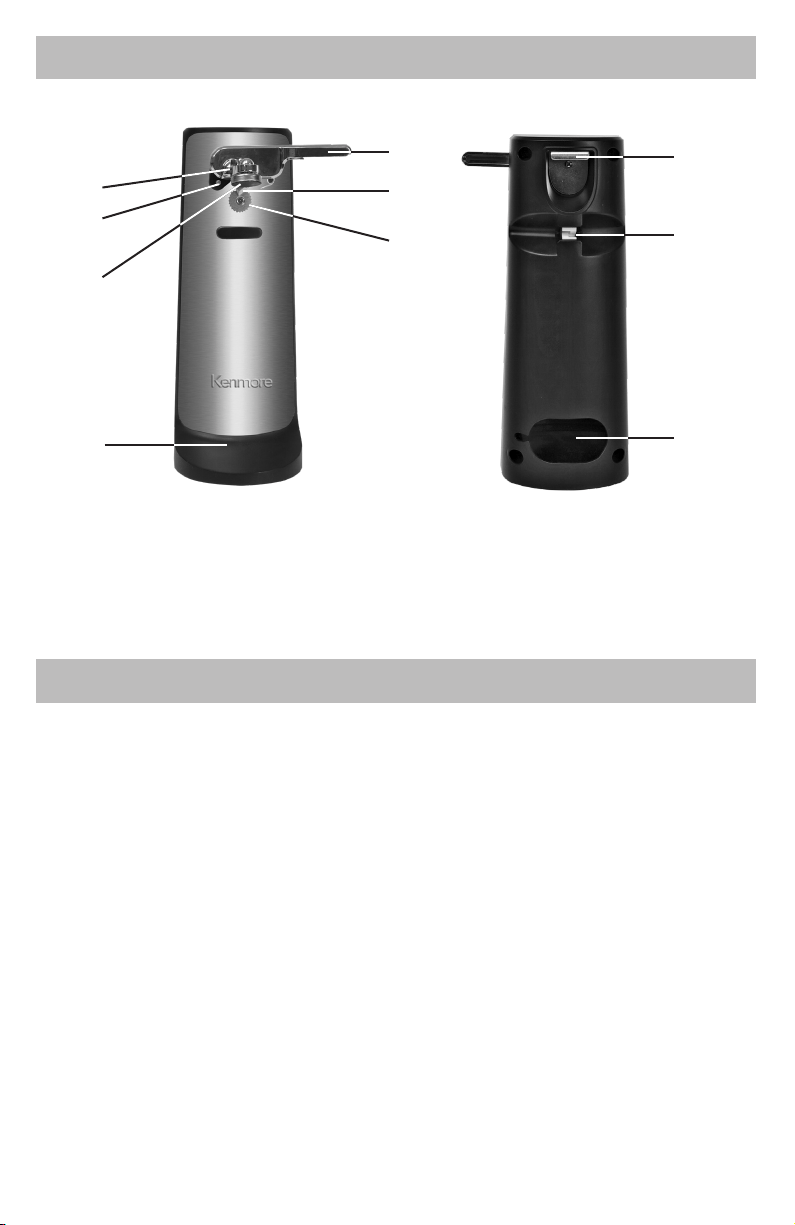
PARTS AND FEATURES
SET UP AND ASSEMBLY
USING YOUR CAN OPENER
A. Blade assembly
B. Locating pin
C. Magnetic lid holder
D. Can rest
A
B
C
D
E
F
G
H
I
J
E. Piercing lever
F. Cutting blade
G. Drive wheel
H. Bottle opener
I. Knife sharpener
J. Cord storage compartment
Read these instructions thoroughly and save for future reference. Carefully unpack the appliance
from its packaging and check that all parts are present. Remove any promotional labels or stickers
and safely dispose of plastic bags or small pieces that could present a suocation or choking
hazard.
1. Wipe the electric can opener base and blade assembly with a clean, damp cloth to remove any
dirt or dust. Do not immerse any part of the can opener, power cord, or electrical plug in any
liquid. Do not use abrasive cleansers or scouring pads.
2. Assemble the can opener: Align the tabs on the blade assembly with the slots in the opening
near the top of the can opener front. (Image) Push the blade assembly into the can opener body
and then gently guide the lever downwards until you meet resistance. If positioned correctly, the
blade assembly will settle easily into place.
3. Place the can opener on a at, dry surface and plug the power cord into the electrical outlet.
Tuck any excess cord length into the cord storage compartment.
. Check that the magnetic lid holder is extended. Lift the piercing lever and position the can
against the can rest with the top of the rim touching the locating pin and the bottom of the rim
resting on the drive wheel. (Image)
2. Continuing to hold the can with one hand, lower the piercing lever to allow the magnet to stick
to the can lid, making sure that the cutting blade is positioned inside the can's rim.
3. Press rmly on the piercing lever until the cutting blade punctures the lid and the drive wheel
starts rotating. At this point you can let go of the can and piercing lever. If the can being opened
weighs more than 30 oz(850 g), you must hold the can opener rmly to prevent it from overturn-
ing. The drive wheel will rotate the can until the lid is completely cut through and then stop
automatically.
4. When the can is opened, the can opener will stop automatically. To remove the can, hold it with
one hand and lift the piercing lever with the other. Carefully detach the lid from the magnet and
discard. Be careful not to touch the cut edges of the can or lids as they are sharp.
CAN OPENING TIPS
- Do not try to open cans meant to be opened by another method, such as pull tab, peel-o foil
seal, rolling key, rimless cans, or cans with angled corners.
- This can opener is designed for circular cans with diameter larger than 2 in (5 cm) and height less
than 7 in (17.8 cm) that weigh less than 50 oz. (1.42 kg).
- If there is a dent in the rim of a can, open the other end or start the cutting action just beyond
the dent.
- Cans with heavy seams, uneven rims or odd shapes may cause the can opener to stall. If this
occurs, turn the can slightly by hand to aid the cutting action.
- Frozen juices or foods in cardboard cans should be opened as soon as they are removed from the
freezer. Aluminum lids will not stick to the magnet.
USING YOUR BOTTLE OPENER
1. Unplug the appliance from the power supply before using the bottle opener. Position the
bottle with the cap against the inside of the metal hook on the top surface of the bottle opener.
(image)
2. Holding the can opener rmly in place with your other hand, pull the bottle down to pop the
cap o.
Loading ...
Loading ...
Loading ...