en Instruction manual
fr Mode d`emploi
nl Gebruiksaanwijzing
es Instrucciones de uso
BSS1POWER
✆
Register your new Bosch now:
www.bosch-home.com/welcome
Οδηγίες χρήσης
Kullanım kılavuzu
Instrukcja obsługi
Návod k použití
Инструкция по эксплуатации
مادﺧﺗﺳﻻا تادﺎﺷرإ
هدﺎﻔﺗﺳا یﺎﻣﻧھار
使用说明书
✆
Οδηγίες χρήσης
Kullanım kılavuzu
Instrukcja obsługi
Návod k použití
Инструкция по эксплуатации
مادﺧﺗﺳﻻا تادﺎﺷرإ
هدﺎﻔﺗﺳا یﺎﻣﻧھار
使用说明书

22
en .................................................................................................................................3
fr ................................................................................................................................38
nl ...............................................................................................................................74
es .............................................................................................................................110

33
Table of content
en
Safety information ...................................................................5
Intended use .............................................................................. 5
Safety information .....................................................................5
Proper use .................................................................................6
Li-ion batteries ...........................................................................8
Transportation information ........................................................9
Your vacuum cleaner ..............................................................10
Before using your appliance for the first time .......................12
Connecting the suction pipe to the appliance ........................12
Connecting the suction pipe to the floor nozzle ......................12
Connecting the battery to the appliance .................................13
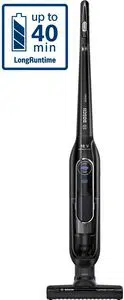
Charging .................................................................................. 14
Fitting the docking station ......................................................14
Stowing accessories in the docking station .............................15
Charging with a charging cable only ........................................16
Charging using the quick charger ............................................17
Charging in the docking station ............................................... 17
Status indicator when charging ...............................................18
Vacuuming ...............................................................................19
Switching in the appliance ......................................................19
Controlling the suction power .................................................19
In operation status indicator ...................................................20
Vacuum-cleaning with accesssories .........................................21
Professional upholstery nozzle ................................................22
Vacuum-cleaning stairs ............................................................23
After using the appliances......................................................24
Switching off the appliance ..................................................... 24
Stowing the appliance .............................................................24

44
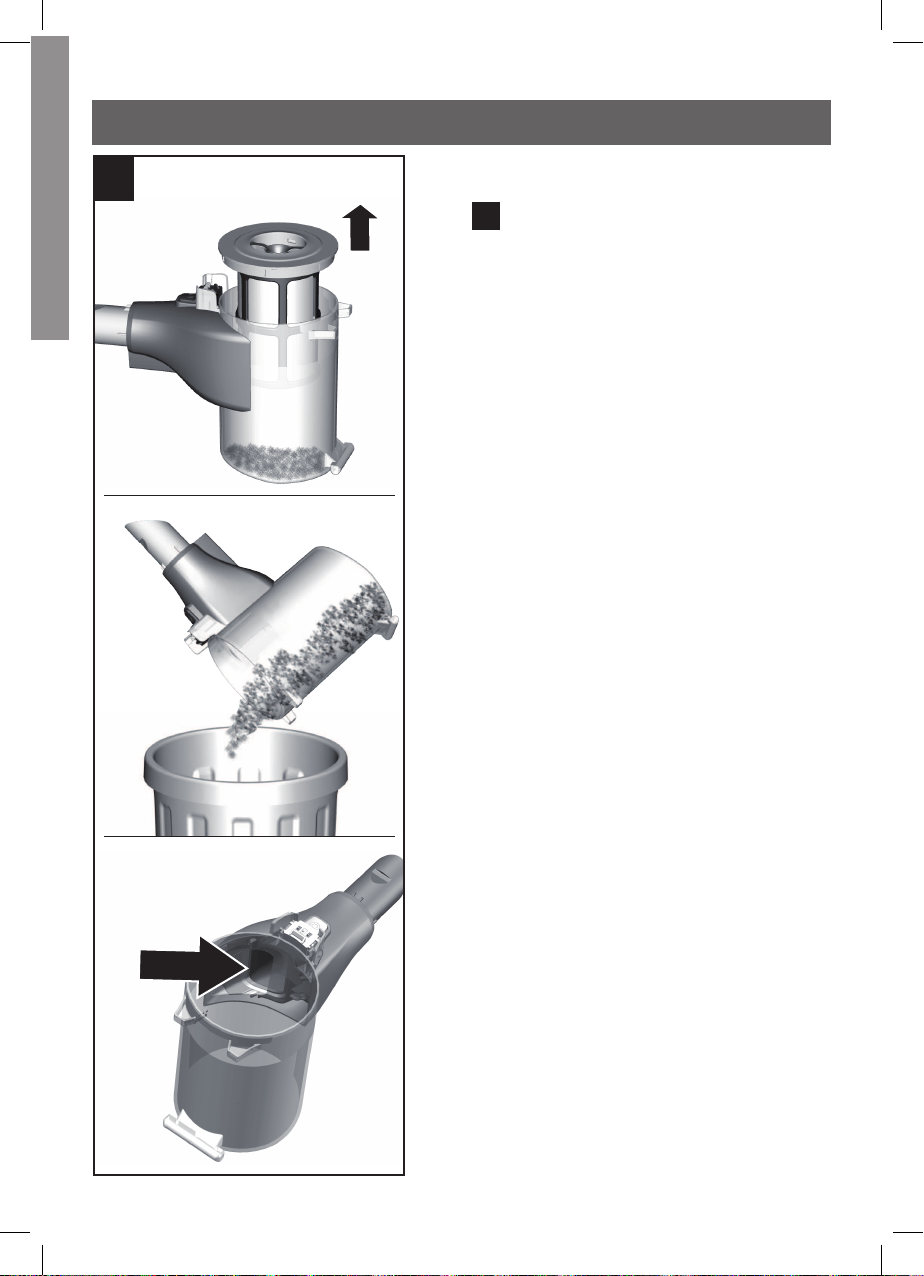
Emptying the dust container ...................................................25
Removing the dust container ................................................... 25
Removing the filter unit ...........................................................26
Inserting the dust container ....................................................27
Removal...................................................................................28
Removing the suction pipe from the appliance .......................28
Removing the suction pipe from the floor nozzle ....................28
Filter care ................................................................................29
Cleaning the fluff filter ............................................................. 29
Cleaning the fin filter (motor protection filter) ........................30
Tapping out the fin filter ..........................................................31
Cleaning the floor nozzle ........................................................32
Cleaning the floor nozzle .........................................................32
Cleaning instructions ..............................................................33
Faults and customer service ..................................................34
Status indicators .....................................................................35
Disposal...................................................................................36
Costumer Service & Guarantee ............................................146
Table of content
en

5
Please keep this instruction manual for future reference.
When giving the vacuum cleaner to a third party, please also pass
on this instruction manual.
Intended use
This appliance is intended for domestic use and the household
environment only. This appliance is intended for use up to a ma-
ximum height of 2000 metres above sea level.
In order to prevent injuries and damage, the vacuum cleaner
must not be used for:
Vacuum-cleaning persons or animals.
Vacuuming up:
− Hazardous, sharp-edged, hot or burning substances.
− Damp substances or liquids.
− Highly flammable or explosive substances and gases.
− Ash, soot from tiled stoves and central heating systems.
− Toner dust from printers and copiers.
Safety information
This vacuum cleaner complies with the generally accepted rules
of good engineering practice and the relevant safety regulations.
The appliance may be used by children over the age of 8, by
persons with reduced physical, sensory or mental capacity, or
by persons with a lack of experience and/or knowledge provi-
ded that they are supervised or have been instructed on how
to use the appliance safely and that they have understood the
potential dangers of using the appliance.
Do not let children play with the appliance also when it is placed
in the docking station.
Cleaning and user maintenance must not be performed by
children unless they are supervised.
Plastic bags and film must be kept out of the reach of children
and disposed of.
>= Risk of suffocation!
afet
5
Safety information
en

6
Spare parts, accessories
Our original spare parts, original (special) accessories are desi-
gned to work with the features and requirements of our vacuum
cleaners. We therefore recommend that you only use our original
spare parts, original (special) accessories. This will ensure that
your vacuum cleaner has a long service life and that the quality of
its cleaning performance will remain consistently high throughout.
!
Please note:
Using unsuitable or inferior-quality spare parts, (special) acces-
sories can damage your vacuum cleaner. Damage caused by the
use of such products is not covered by our guarantee.
Proper use
To charge the appliance, only use the charging cable included
with the appliance or the original quick charger.
The charging cable and quick charger must only be connected
and operated as specified on the rating plate.
The appliance must only be stored and charged indoors.
Do not expose the appliance to temperatures below 0 °C or
above 45 °C.
Never vacuum-clean without the dust container, motor protec-
tion filter or exhaust filter.
>= Otherwise, this may damage the appliance.
Keep the vacuum cleaner away from your head when using the
tube and nozzles. => This could cause injury.
Do not use the charging cable if it is damaged. Replace it with
an original charging cable.
When disconnecting the charging cable from the mains, pull
the plug itself to remove it – do not pull on the power cord.
Do not pull the charging cable over sharp edges or allow it to
become trapped.
Before carrying out any work on the vacuum cleaner, switch off
the appliance and disconnect it from the charging cable and
the mains.
6
Safety information
en

7
Do not operate the vacuum cleaner if it is damaged.
In the event of a fault, switch off the appliance and disconnect
it from the charging cable and the mains.
For safety reasons, only authorised after-sales service person-
nel are permitted to carry out repairs and fit replacement parts
to the vacuum cleaner.
In the following cases, you must stop using the appliance im-
mediately and contact the after-sales service:
− If you have accidentally vacuumed up some liquid or liquid
has entered the inside of the appliance;
− If the appliance has been dropped and damaged.
Protect the vacuum cleaner from outside weather conditions,
moisture and sources of heat.
Do not pour flammable substances or substances containing al-
cohol onto the filters (filter bag, motor protection filter, exhaust
filter, etc.).
The vacuum cleaner is not suitable for use on construction si-
tes. => Vacuuming up building rubble may damage the appli-
ance.
Switch off the appliance when it is not in use.
The vacuum cleaner can not stand by itself. Avoid dropping the
unit. Do not lean the vacuum cleaner on walls or table edges.
The packaging is designed to protect the vacuum cleaner from
being damaged during transportation. We therefore recom-
mend keeping the packaging in case the appliance needs to be
transported in the future.
Keep hair, loose clothing, fingers, and all parts of the body away
from openings and moving parts, such as the brush bar. Do not
point the hose, wand or tools at your eyes or ears or put them
in your mouth.
7
Safety information
en

8
Li-ion batteries
Read all the safety information and instructions.
>= Failure to act in accordance with the safety information and
instructions may result in electric shock, fire and/or serious
injury.
Keep all the safety information and instructions for future refe-
rence.
This safety information applies to Bosch Li-ion batteries only.
Only batteries from the "Power for ALL" series are compatible
with this appliance.
Do not open the battery.
>= Risk of short circuit.
Protect the battery from heat sources, for example avoiding
long periods in the sun and exposure to fire, as well as from
water and moisture.
>= Risk of explosion.
Fumes may be released if the battery is damaged or used im-
properly. Circulate fresh air, and seek medical assistance in the
event of physical symptoms arising as a result of exposure.
>= The fumes may irritate the airway.
If the battery is defective, liquid may leak out onto objects in
the vicinity. Check any components that may be affected by
this.
>= Clean these components, or replace them if necessary.
Only use the battery in your Bosch electrical appliance.
>= Dangerous overloading may occur if the battery is used in
other appliances.
Only use chargers recommended by the manufacturer to char-
ge batteries.
>= There is a risk of fire if a charger that is designed for a parti-
cular type of batteries is used to charge other batteries.
Always use the specified batteries in the electrical appliances.
>= Using other batteries may result in injury or fire.
Safety information
en
8

9
When not in use, keep the battery away from paper clips, coins,
keys, nails, screws and other small metal objects that may cause
the contacts to be bridged.
>= If a short circuit occurs between the battery contacts, this
may result in burns or even fire.
If the battery is used incorrectly, liquid may leak out of the
battery. Avoid touching the liquid. In the event of accidental
contact, rinse the affected area with water. If the liquid comes
into contact with the eyes, seek medical assistance.
>= If battery liquid leaks, it can irritate or burn the skin.
Transportation information
The contained lithium-ion batteries are subject to the Dange-
rous Goods Legislation requirements. The user can transport
the batteries by road without further requirements. When being
transported by third parties (e.g.: air transport or forwarding
agency), special requirements on packaging and labelling must
be observed. For preparation of the item being shipped, consul-
ting an expert for hazardous material is required.
Dispatch batteries only when the housing is undamaged. Tape
or mask off open contacts and pack up the battery in such a
manner that it cannot move around in the packaging. Please
also observe possibly more detailed national regulations.
9
Safety information
en
1010
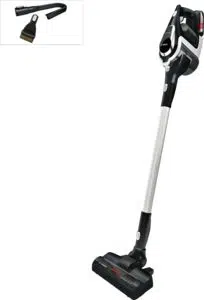
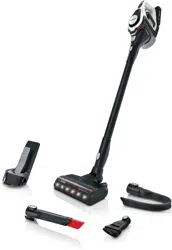
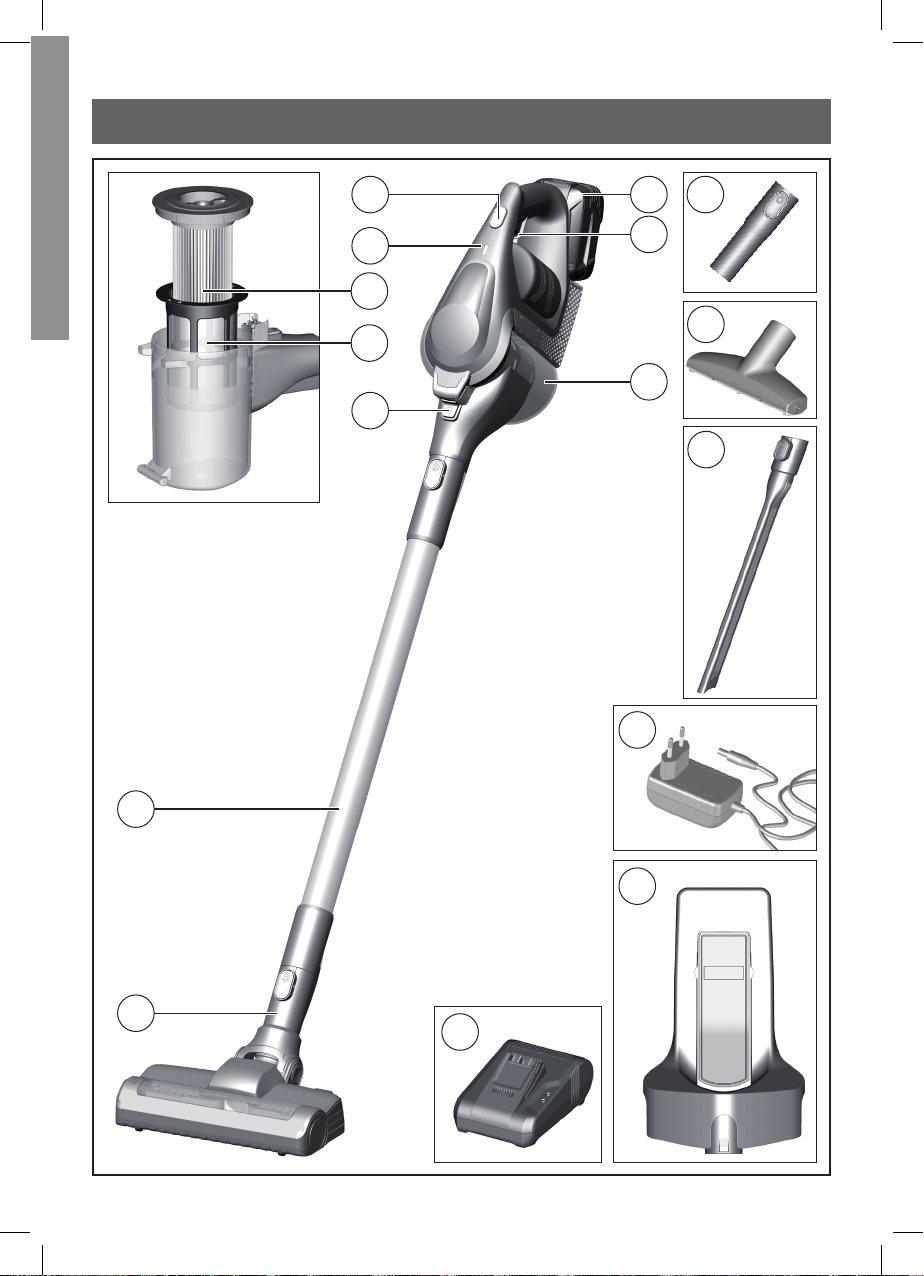
Your vacuum cleaner
en
12
13
14
15
11
1
2
4
5
3
8
9
10
6
7
16
11
Your vacuum cleaner
1 Floor nozzle with electric
brush
2 Suction tube
3 Dust box release button
4 Fluff filter
5 Plate filter
6 Battery status indicator
7 Turbo switch
8 Battery
9 On/off switch
10 Dust box
11 Short tube
12 XXL upholstery nozzle
13 Flexible crevice nozzle
14 Charging cable
15 Docking station
16 Quick charger
11
en

1212
Before using the appliance for the first time
en
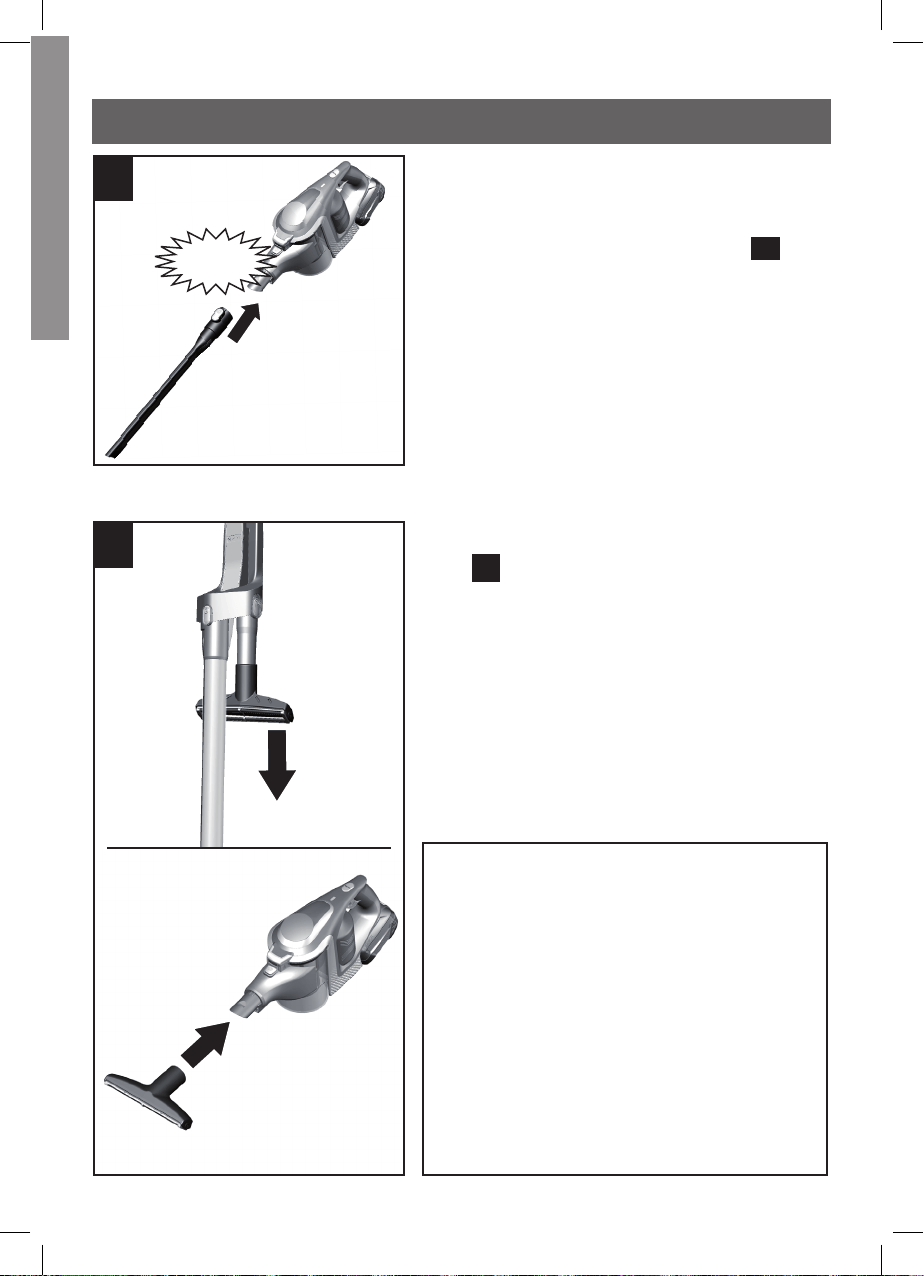
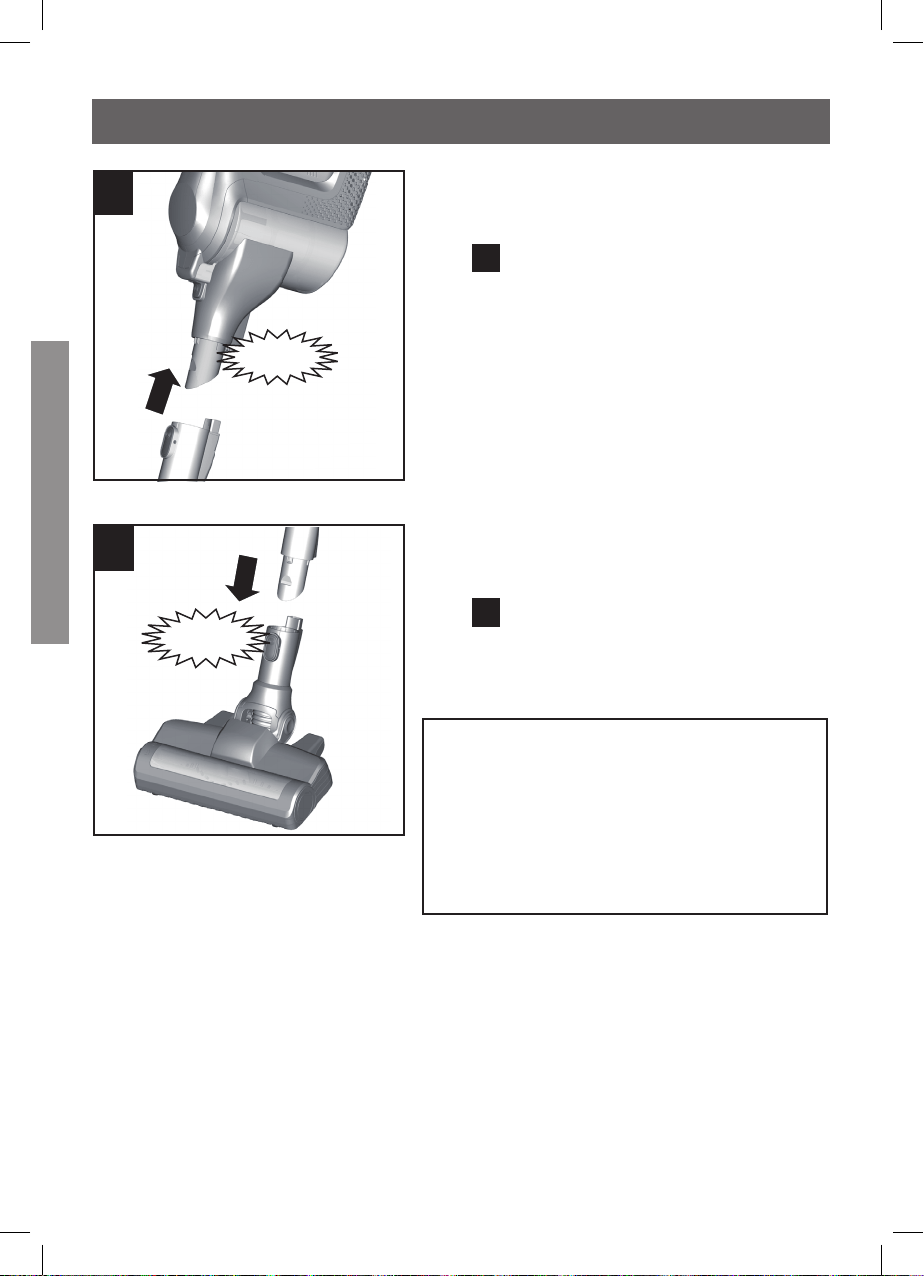
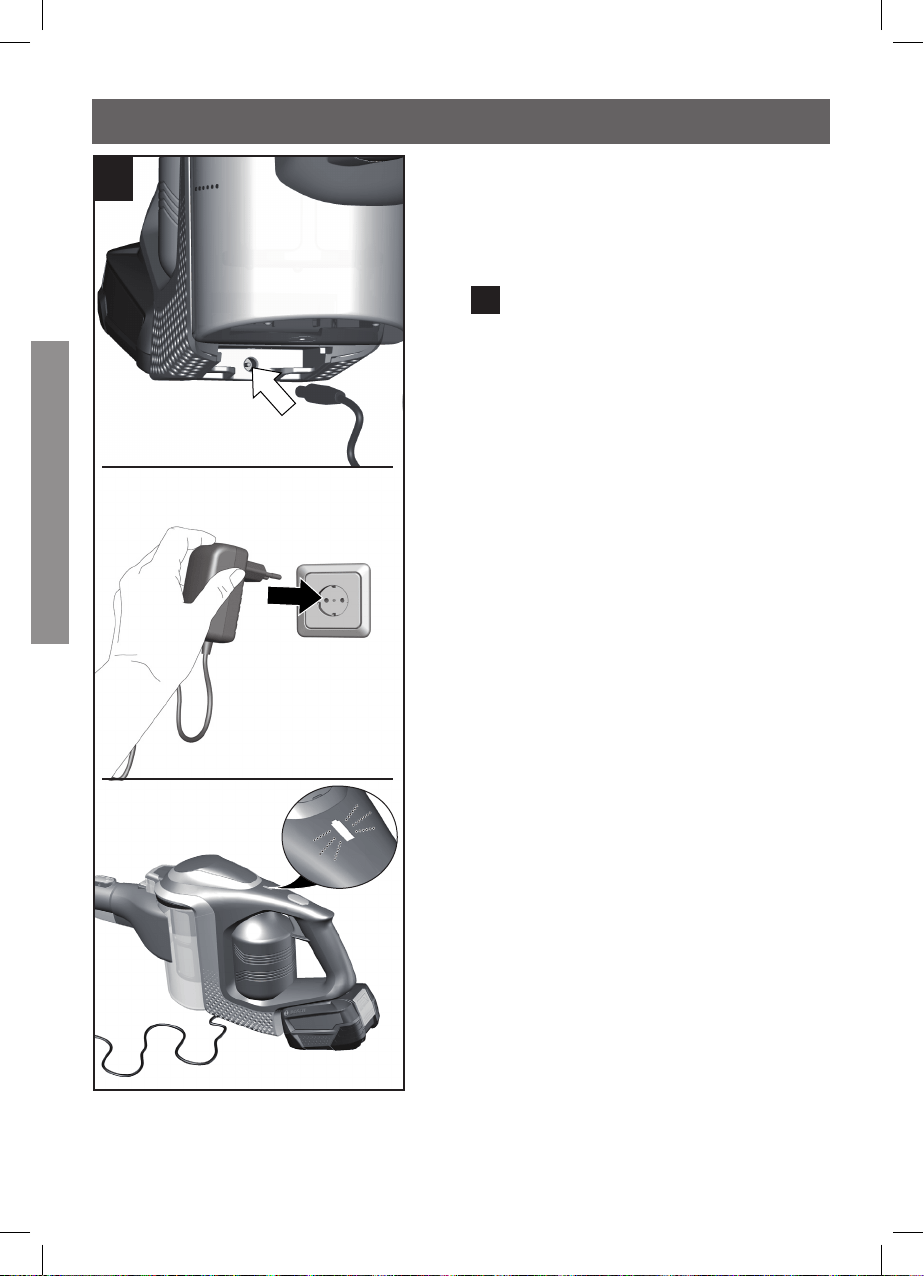
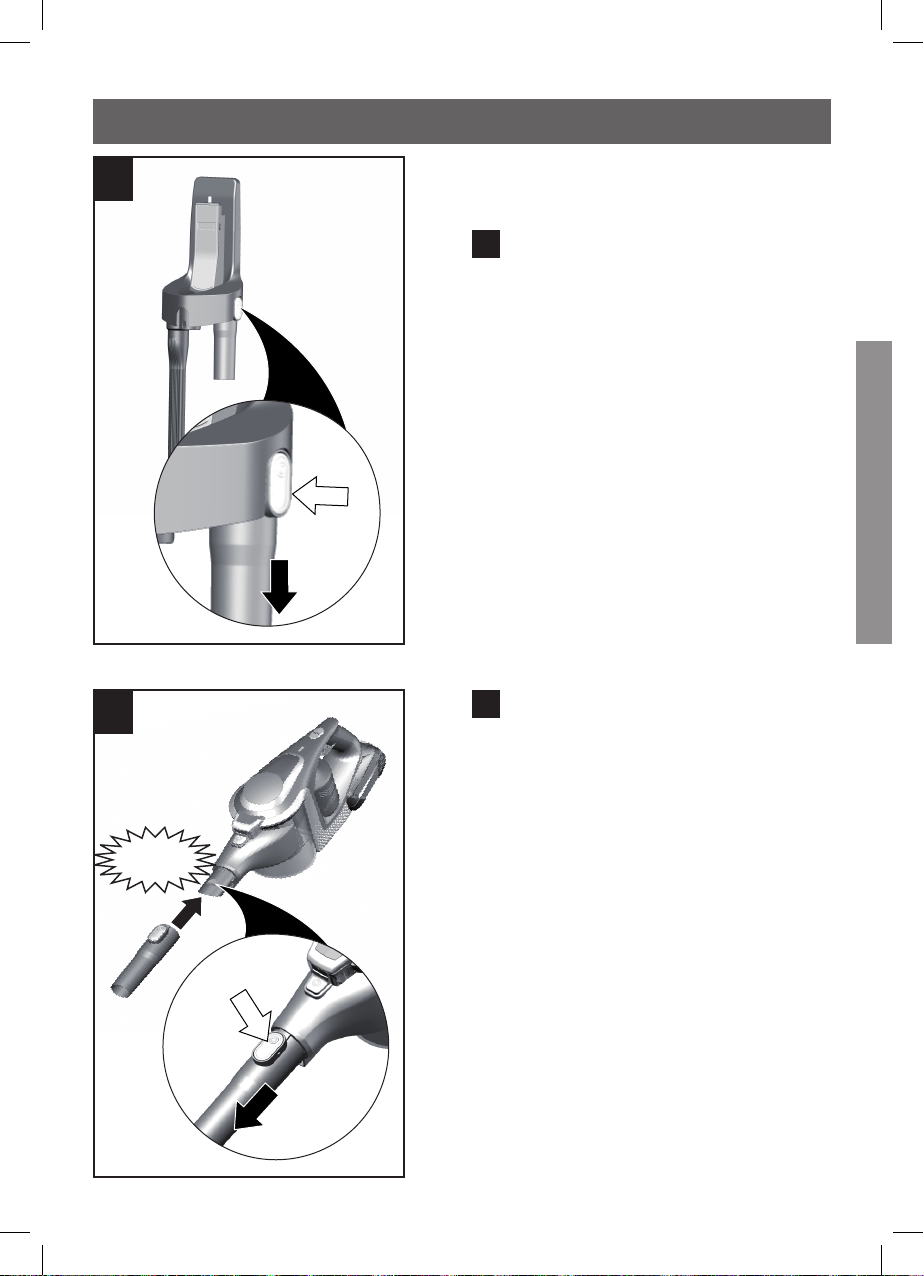
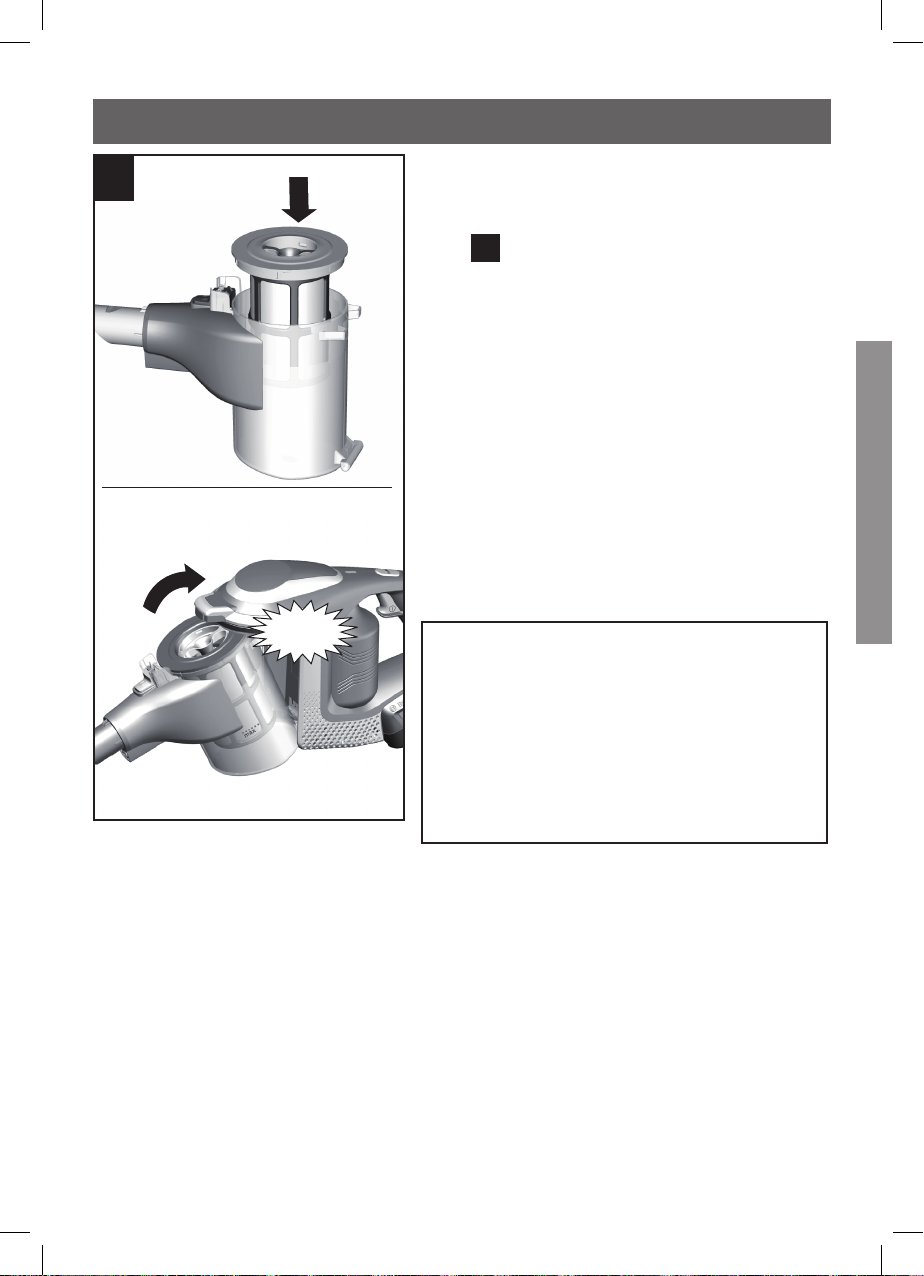
Connecting the suction pipe to the
appliance
Fig.
1
•
Insert the end of the suction pipe
into the vacuum cleaner's connec-
tion port and lock it in place.
Click
Connecting the suction pipe to the
floor nozzle
Fig.
2
•
Insert the end of the suction pipe
into the floor nozzle and lock it in
place.
Caution!
The floor nozzle is not suitab-
le for vacuuming up small parts
such as shards, toys, pins, paper
clips, etc.
2
Click
1

13
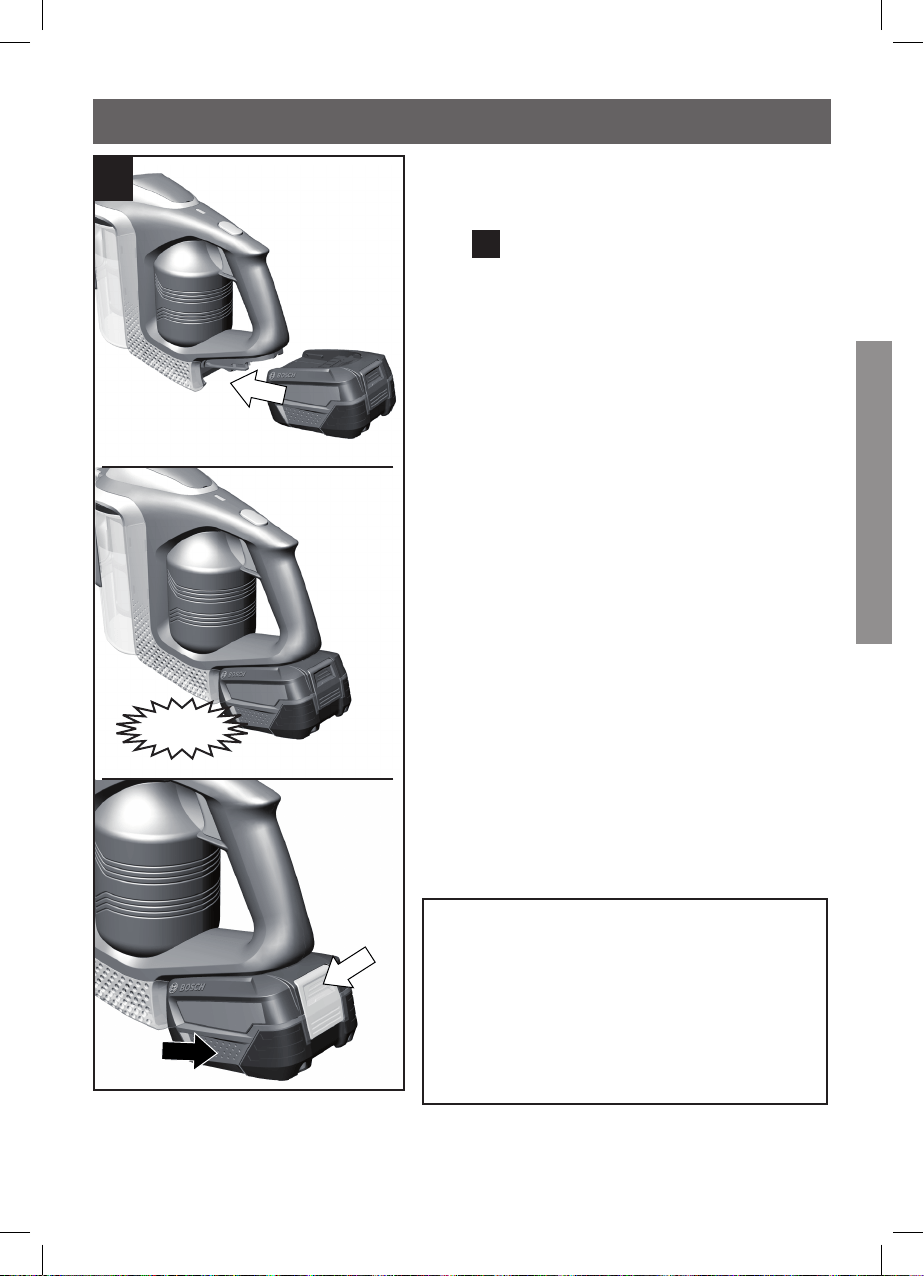
Connecting the battery to the
appliance
Fig.
3
•
Insert the battery into the vacuum
cleaner by means of the guide rail
and lock it in place.
•
To release the connection, press
the release button and pull the
battery out from the back of the
appliance.
Caution!
Before using the vacuum cleaner
for the first time, the batteries
must be charged for at least 6
hours.
Only charge the appliance with
the charging cable supplied.
Click
3
1
2
13
Before using the appliance for the first time
en
14
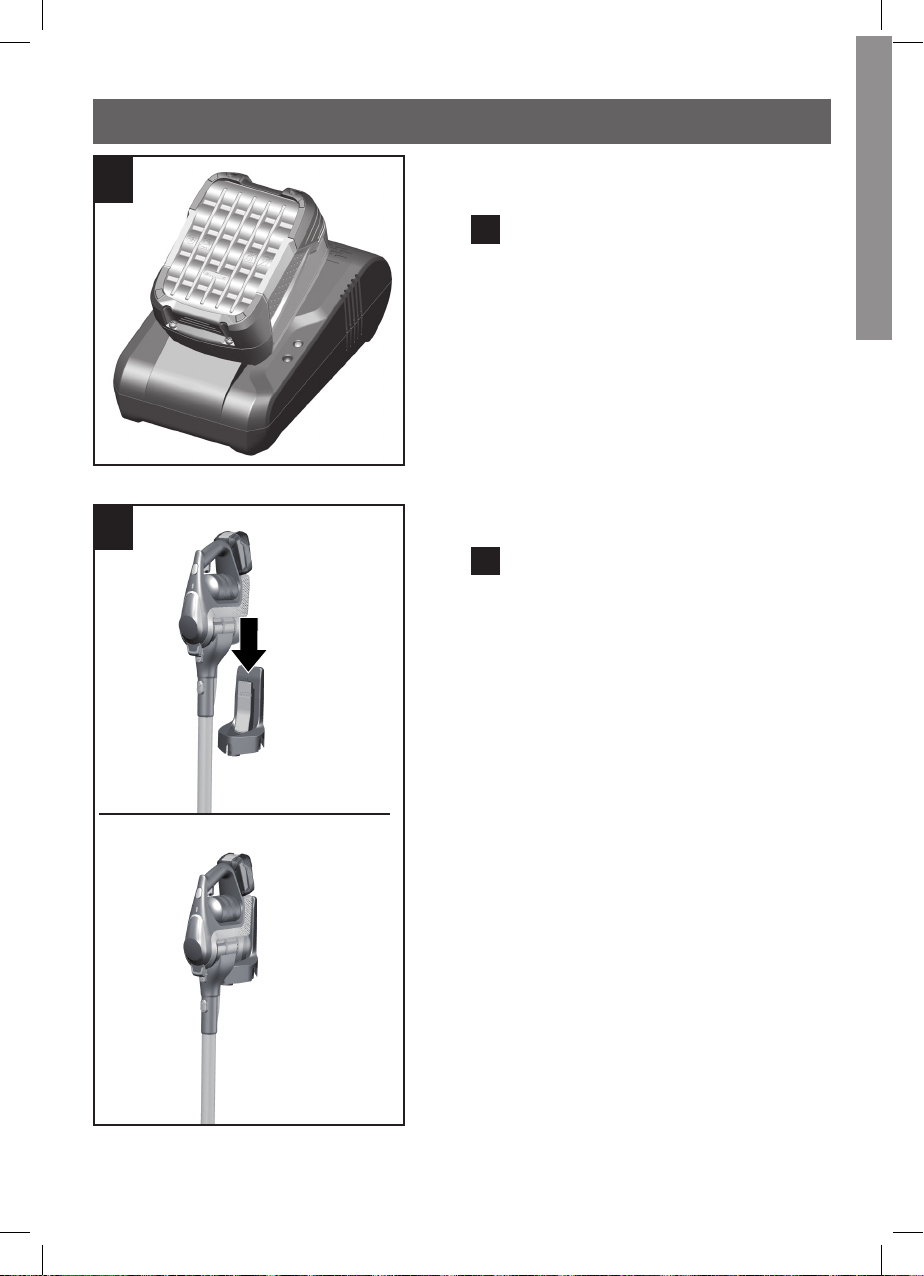
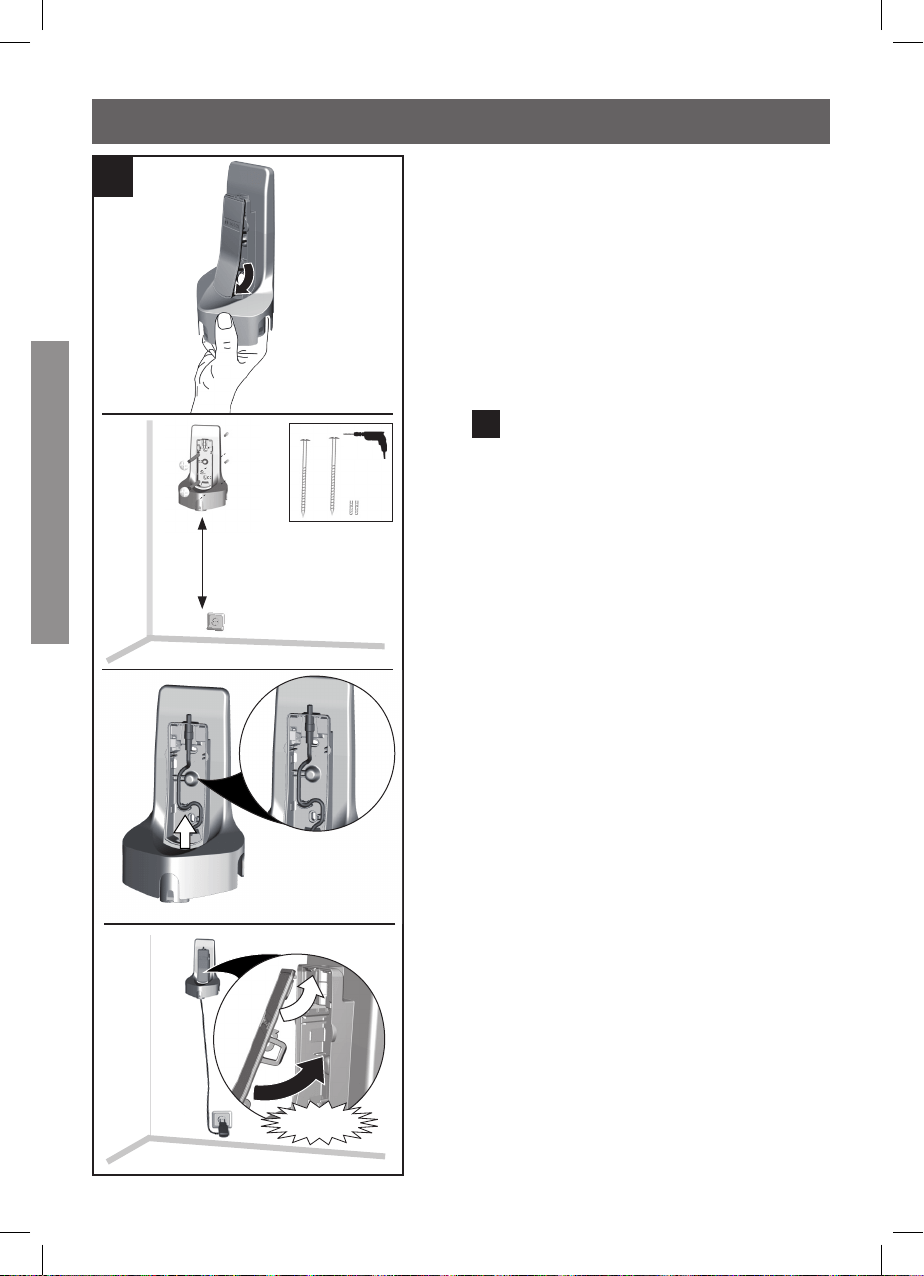
Fitting the docking station
It is recommended that the docking
station is used for charging and sto-
ring the appliance as this takes up
less space.
However, it is also possible to char-
ge and store the appliance without
a docking station.
Fig.
4
•
Fit the docking station close to a
socket.
•
To do this, remove the front plate
from the docking station. Insert
your finger into the docking stati-
on from below, and push the front
plate from the inside and out of
the locking mechanism. Use the
screws provided (or equivalent
screws) to mount the docking sta-
tion on the wall.
•
Insert the small connector on the
charging cable into the docking
station from below, and then up
and into the preformed recess.
•
Put the front plate back on and
lock it in place to secure the con-
nection in place.
•
Plug the charging cable's mains
plug into the socket.
4
1
2
Click
14
Charging
en
15
Charging
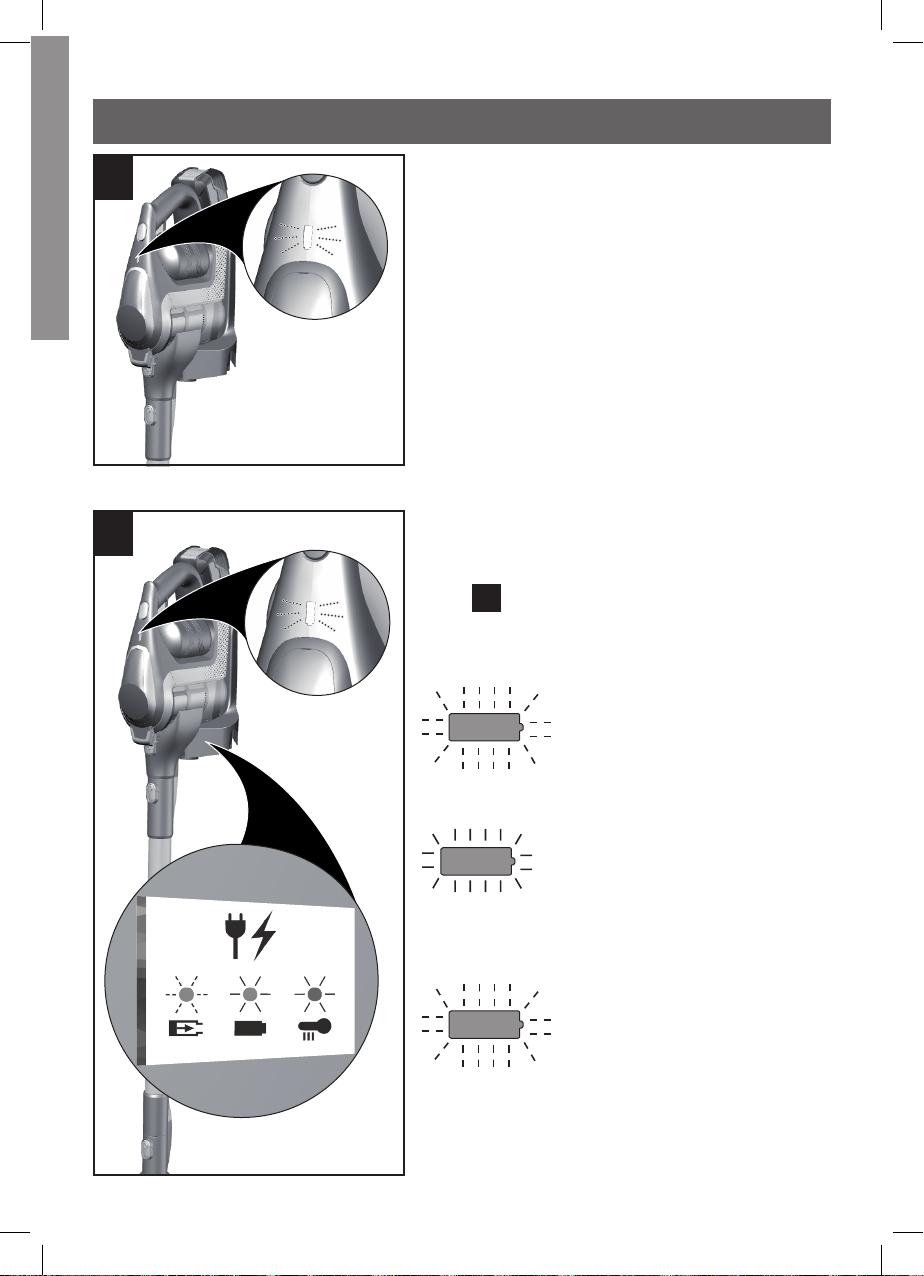
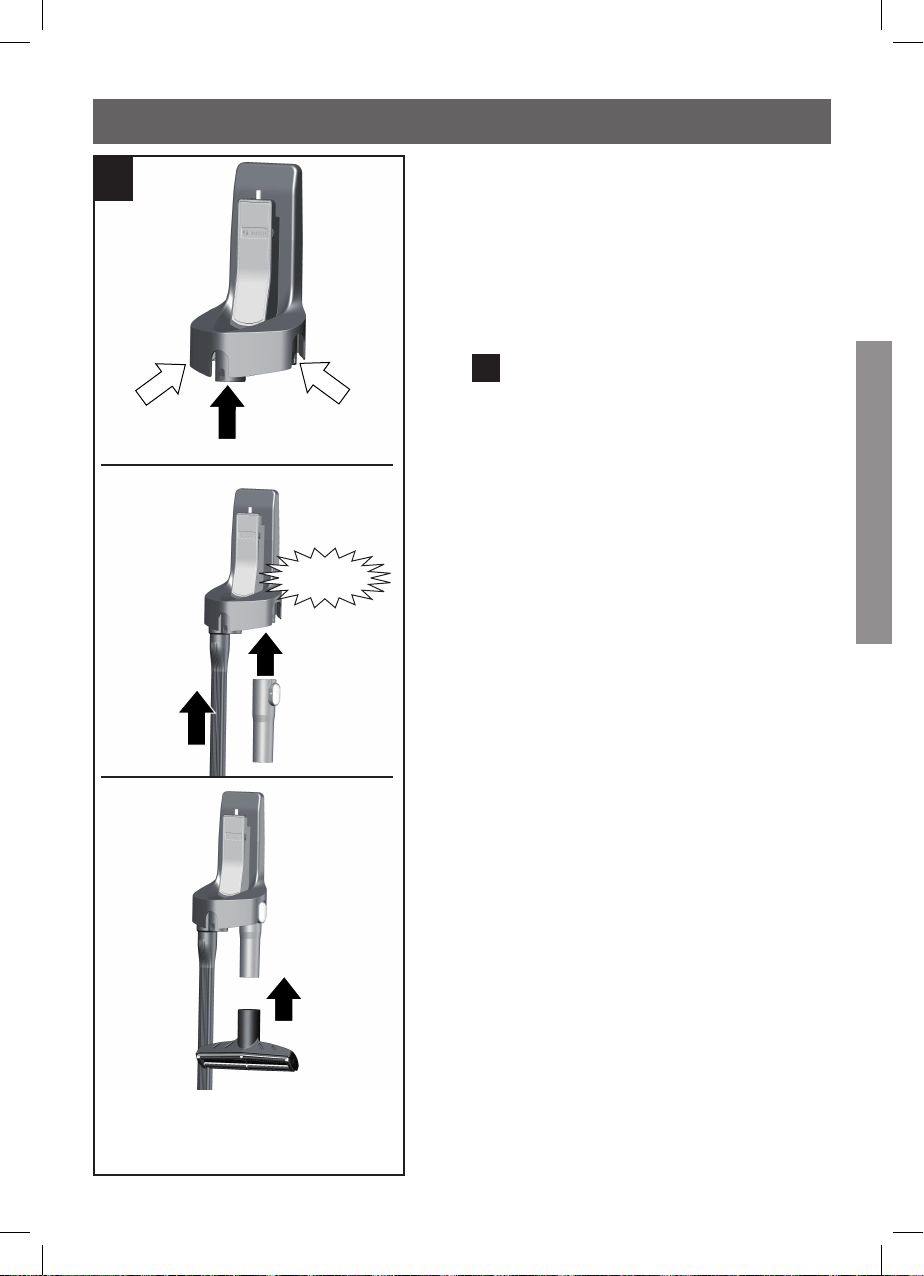
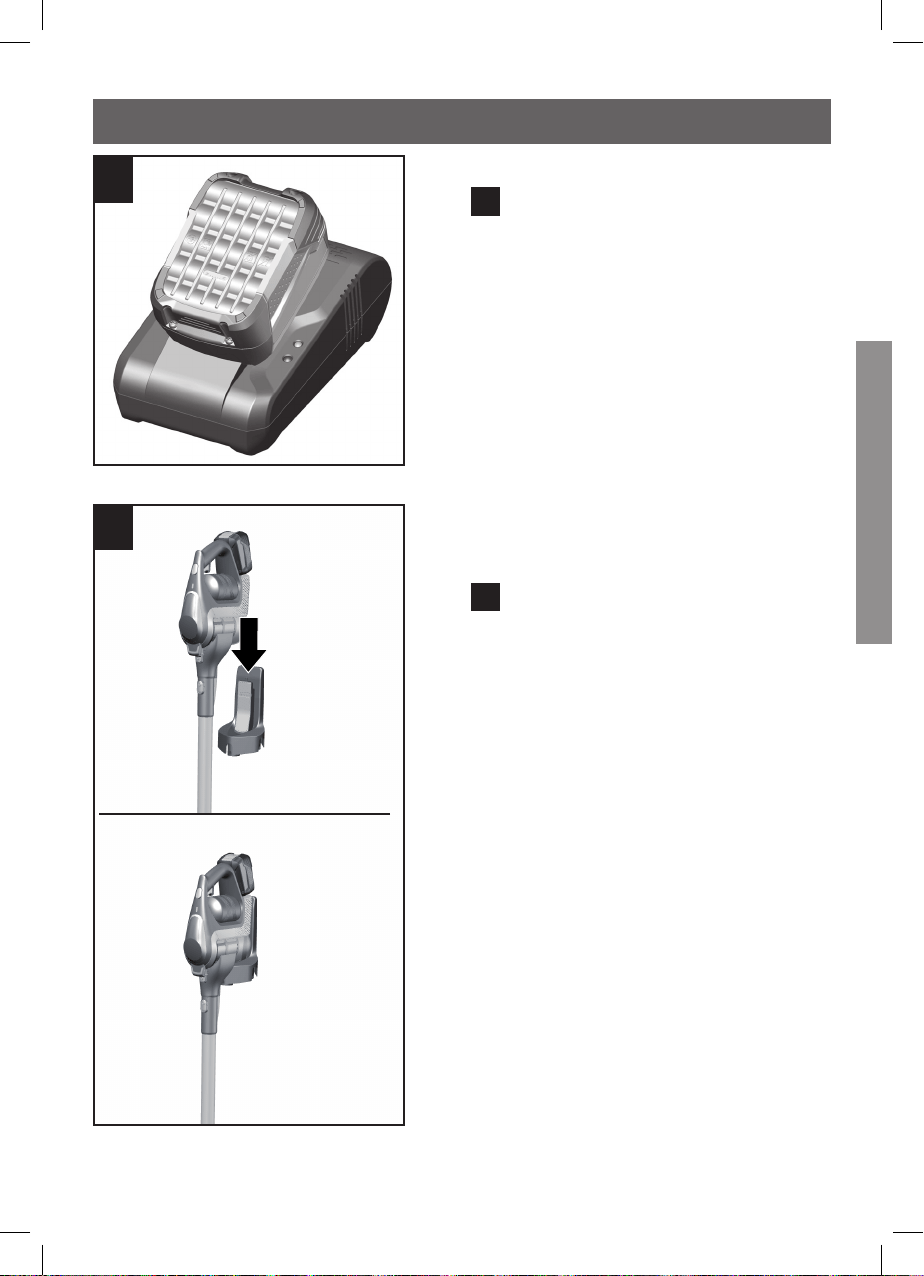
Stowing accessories in the
docking station
Additional accessories can be sto-
wed in the fitted docking station to
save space.
Fig.
5
•
The docking station has two slots
for storing accessories with ac-
cessory connection (1) and one
slot for storing the suction pipe
(2).
•
Insert the flexible crevice nozzle
and the short suction pipe in the
docking station from underneath
by applying slight pressure and
lock them in place.
•
Fit the professional upholstery
nozzle onto the end of the short
suction pipe.
Click
5
1
2
1
15
en
16
Charging
Charging with a charging cable
only
Fig.
6
•
To charge the vacuum cleaner,
place it near to a socket.
•
Plug the charging cable into the
connection point at the bottom of
the appliance.
•
Plug the charging cable plug into
the socket.
•
The vacuum cleaner's status indi-
cator will flash green when it is
charging.
•
Once the battery is fully charged,
the status indicator will remain
continuously lit green for a few
minutes before going out.
Disconnect the appliance from
the mains briefly to check it. The
indicator will then light up green
again.
•
It is normal for the charging cable
and upright vacuum cleaner to be-
come hot and this is not a cause
for concern.
•
You can charge the vacuum clea-
ner whenever it is not in use.
6
1
2
16
Charging
en
17
Charging
Charging using the quick char-
ger
Fig.
7
•
To use the quick charger for char-
ging, the battery must be remo-
ved from the appliance.
•
Please see the user manual provi-
ded for more information on how
the quick charger works.
Charging in the docking station
Fig.
8
•
Place the vacuum cleaner into the
docking station from above.
•
The vacuum cleaner's status indi-
cator will flash green when it is
charging.
8
7
17
en
18
•
Once the battery is fully char-
ged, the status indicator will remain
continuously lit green for a few mi-
nutes before going out.
Disconnect the appliance from the
mains briefly to check it. The indica-
tor will then light up green again.
•
It is normal for the charging cable
and upright vacuum cleaner to be-
come hot and this is not a cause for
concern.
•
You can charge the vacuum cleaner
whenever it is not in use.
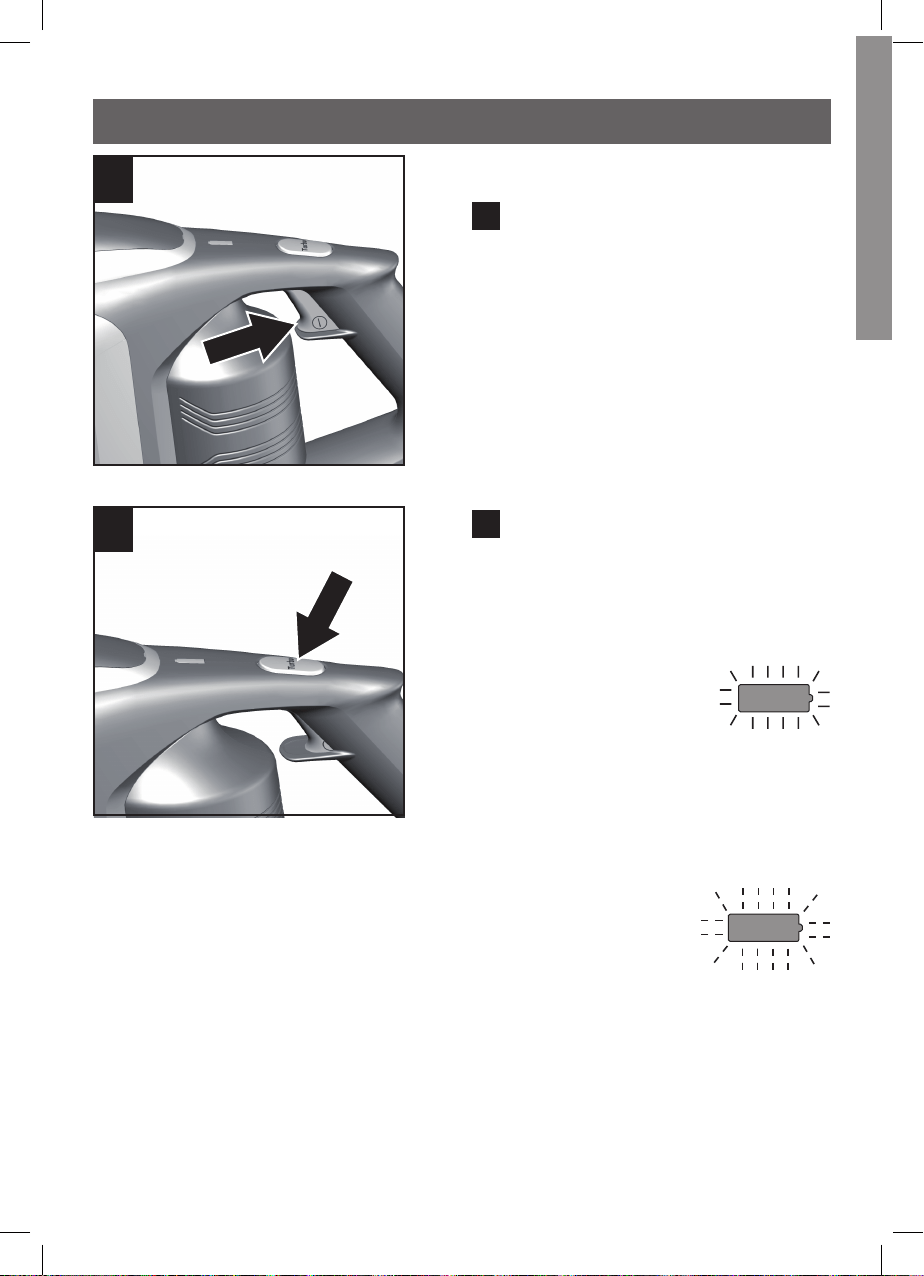
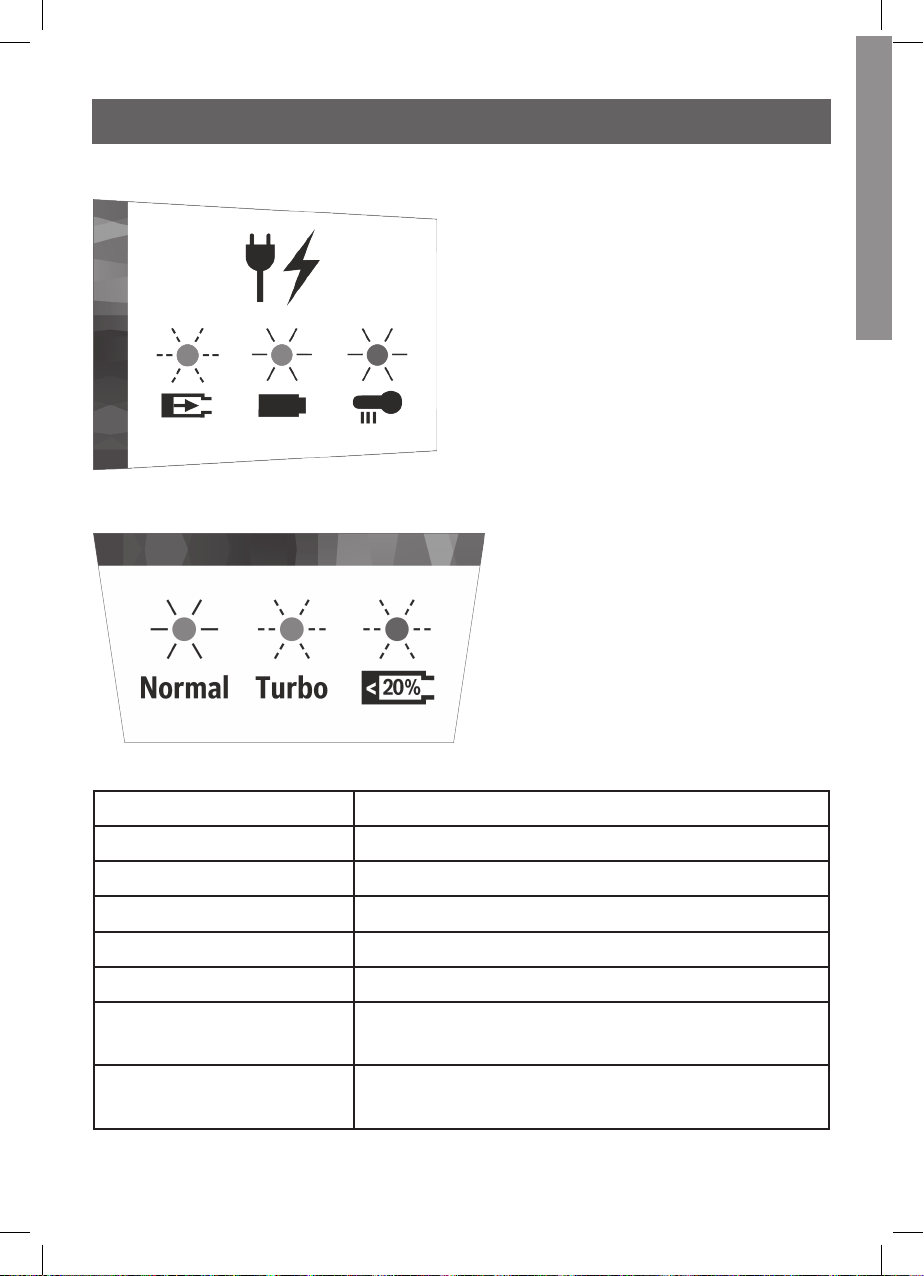
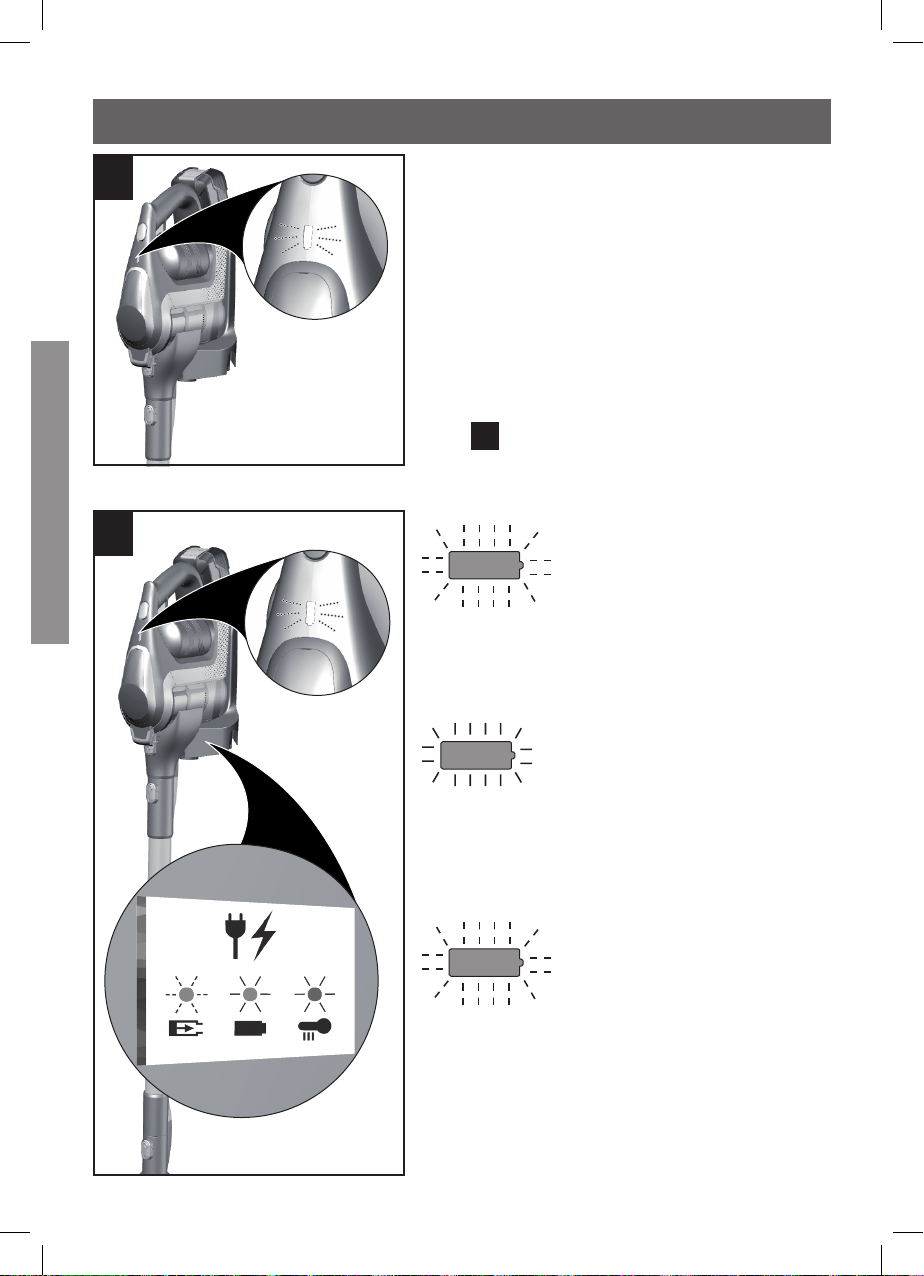
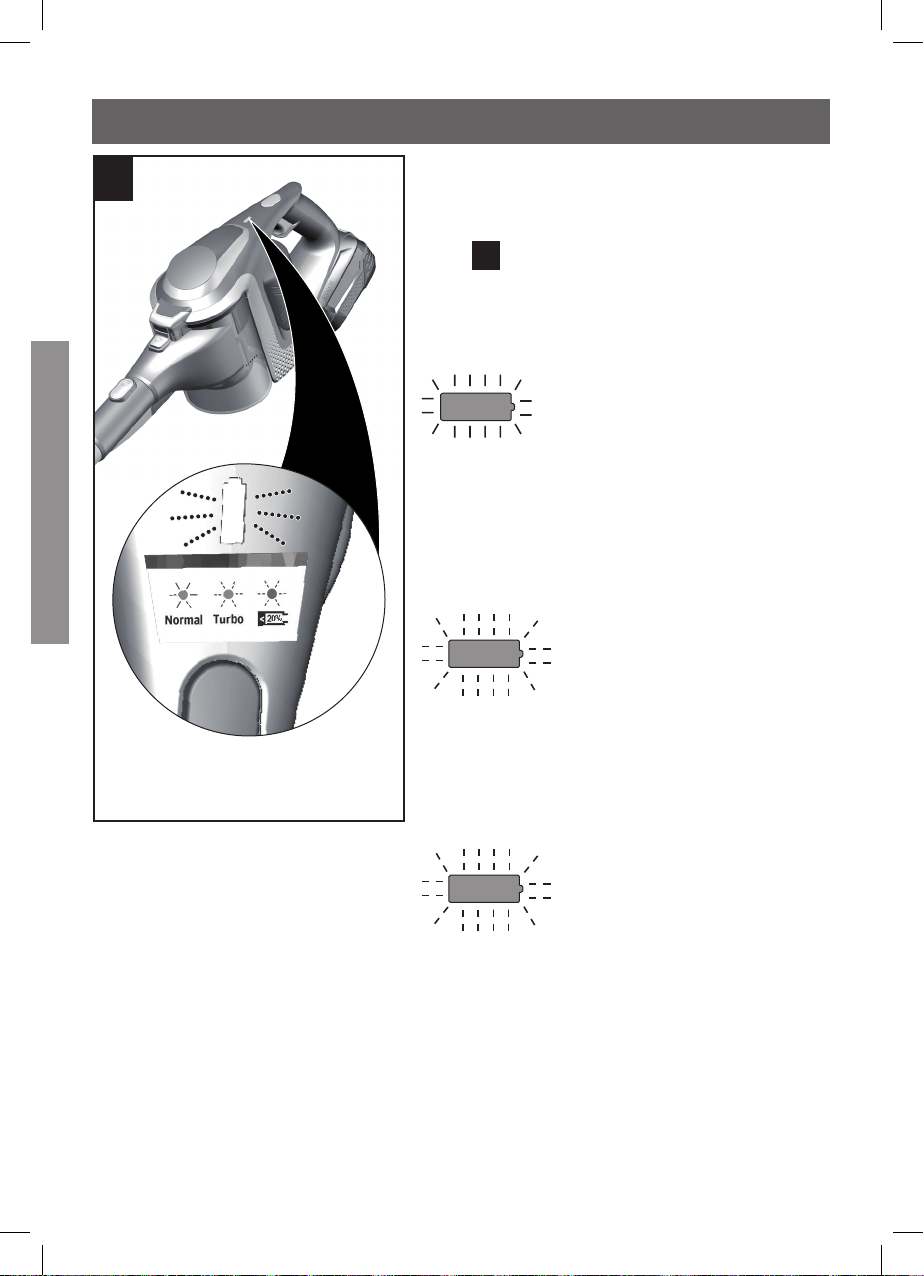
Status indicator when charging
Fig.
9
The indicator shows the charging
status of the battery.
green
Battery charging
(green)
When the status indica-
tor flashes green, the
battery is charging.
green
Battery fully charged
(green)
When the status indica-
tor lights up green, the
battery is fully charged.
red
Battery fault (red)
When the status indica-
tor flashes red, the bat-
tery is not being char-
ged. The battery may
be too hot or too cold.
9
8
18
Charging
en
19
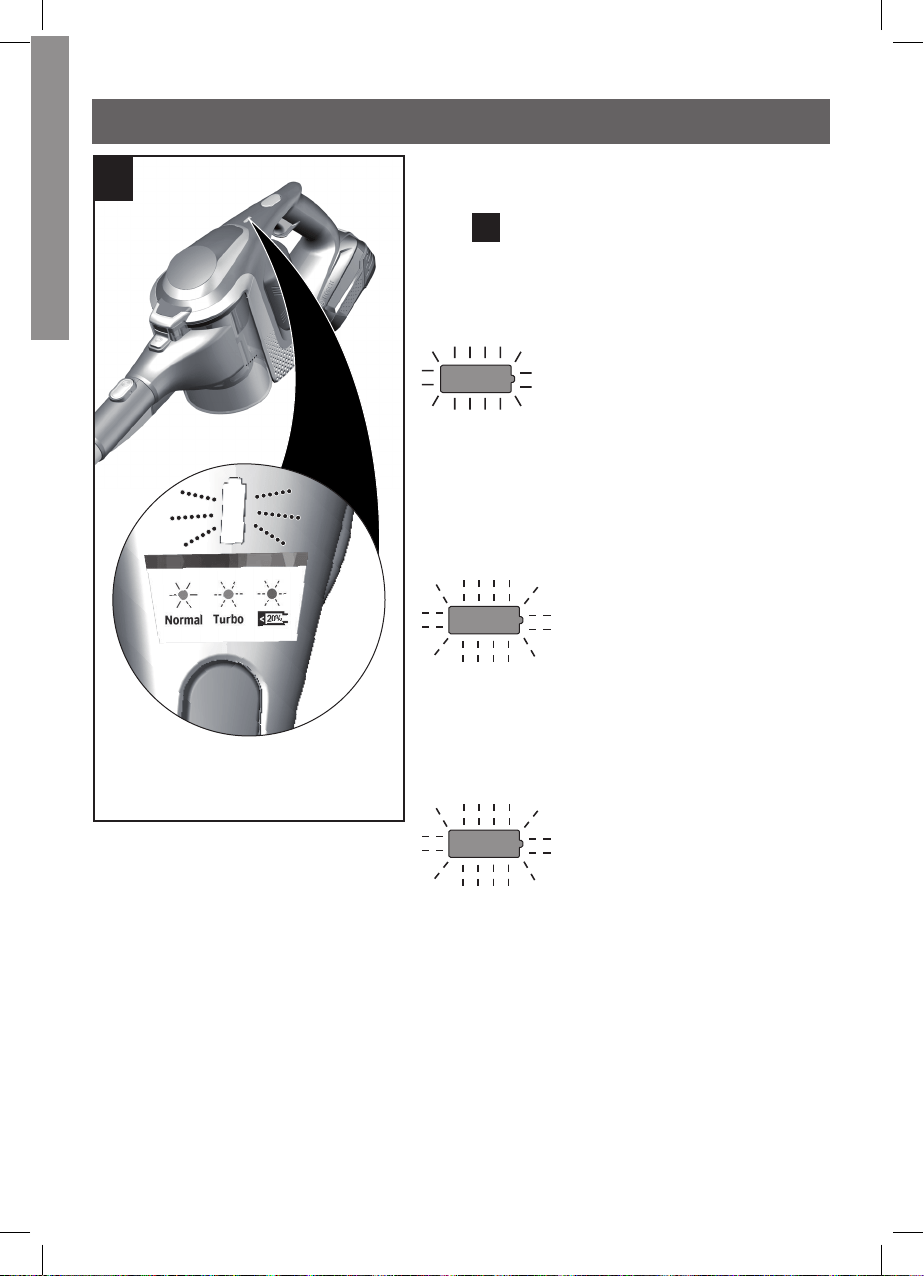
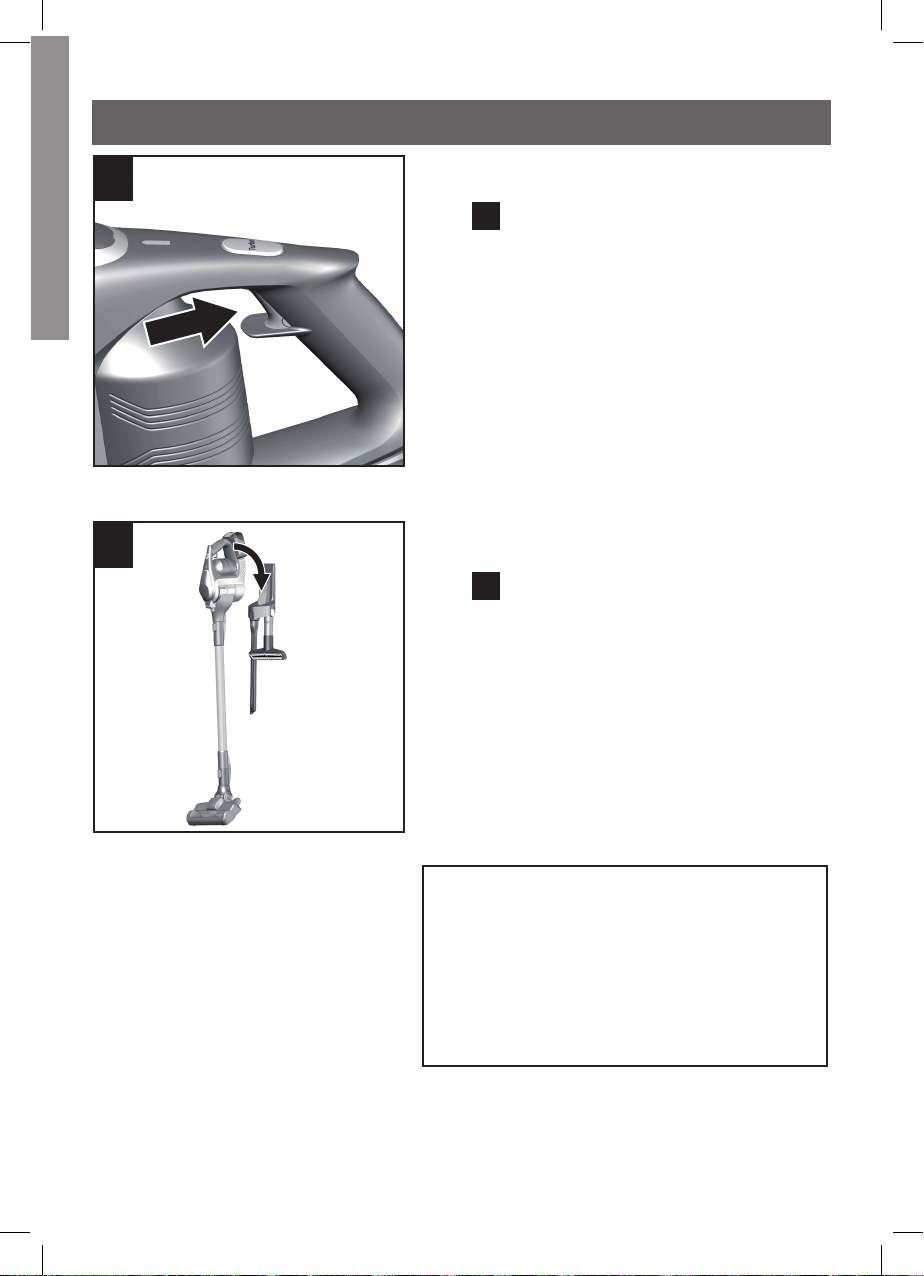
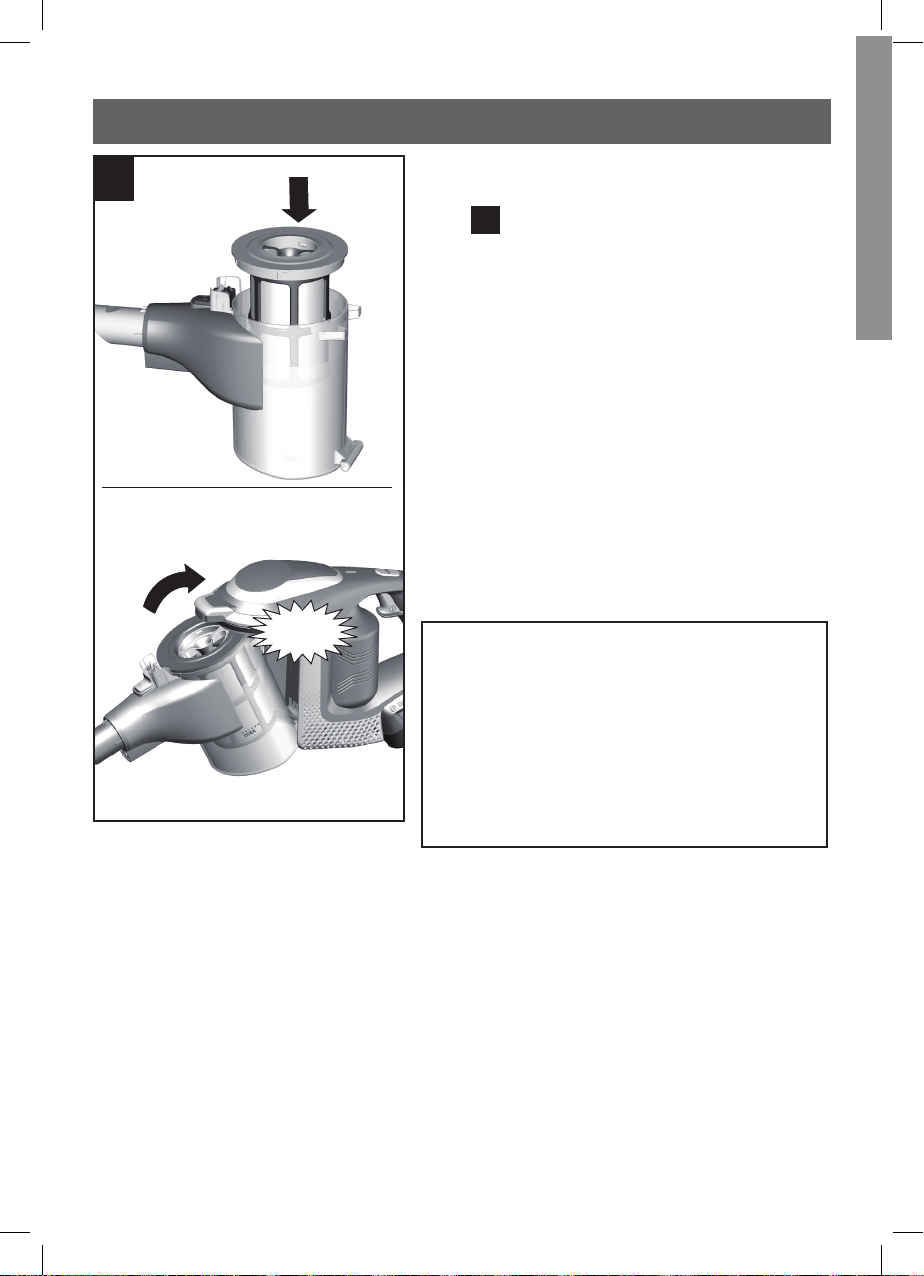
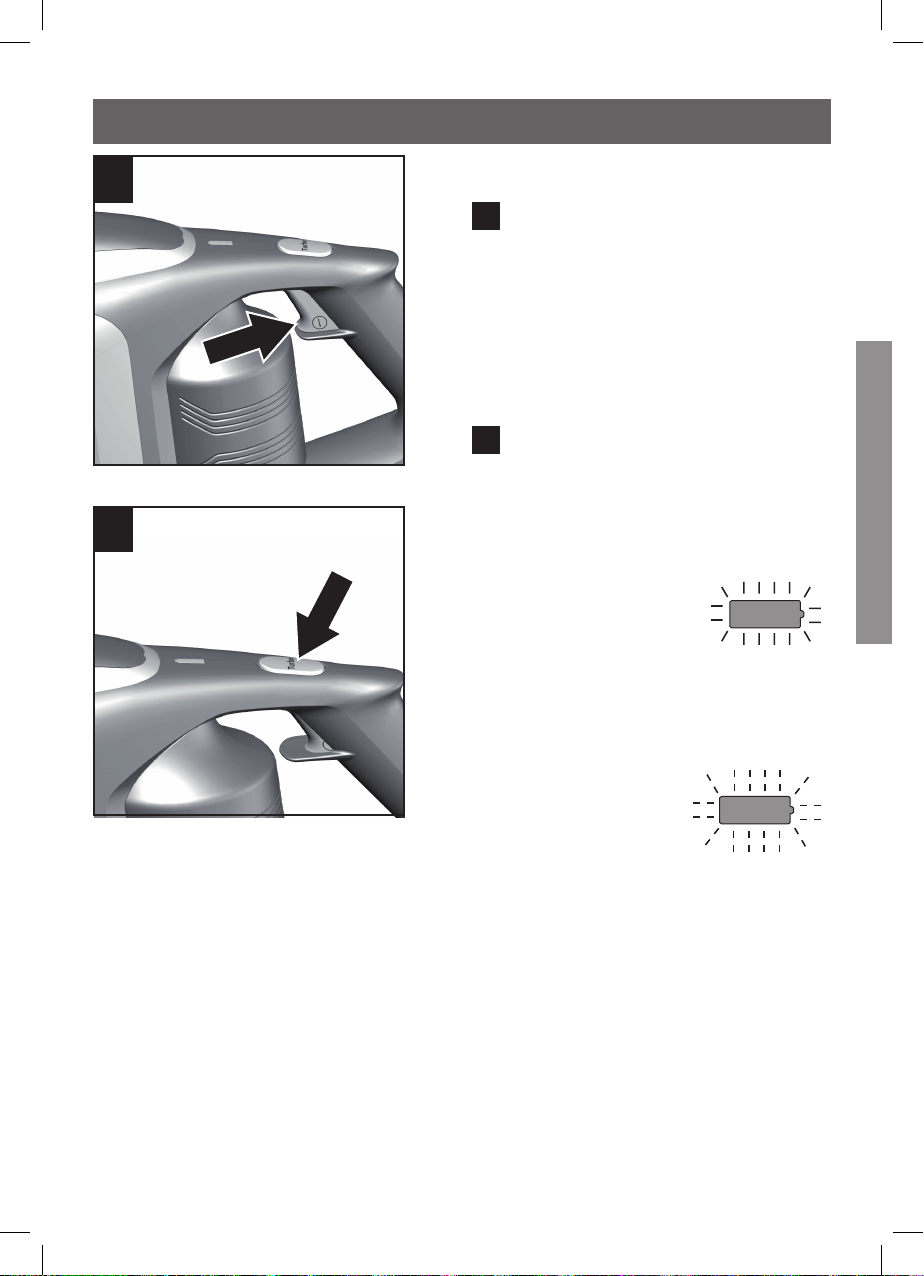
Switching in the appliance
Fig.
10
•
Move the on/off button in the di-
rection of the arrow. When the ap-
pliance is in operation, the status
indicator lights up green.
Controlling the suction power
Fig.
11
In addition, move the turbo but-
ton in the direction of the arrow to
switch on the turbo function. The
status indicator flashes green.
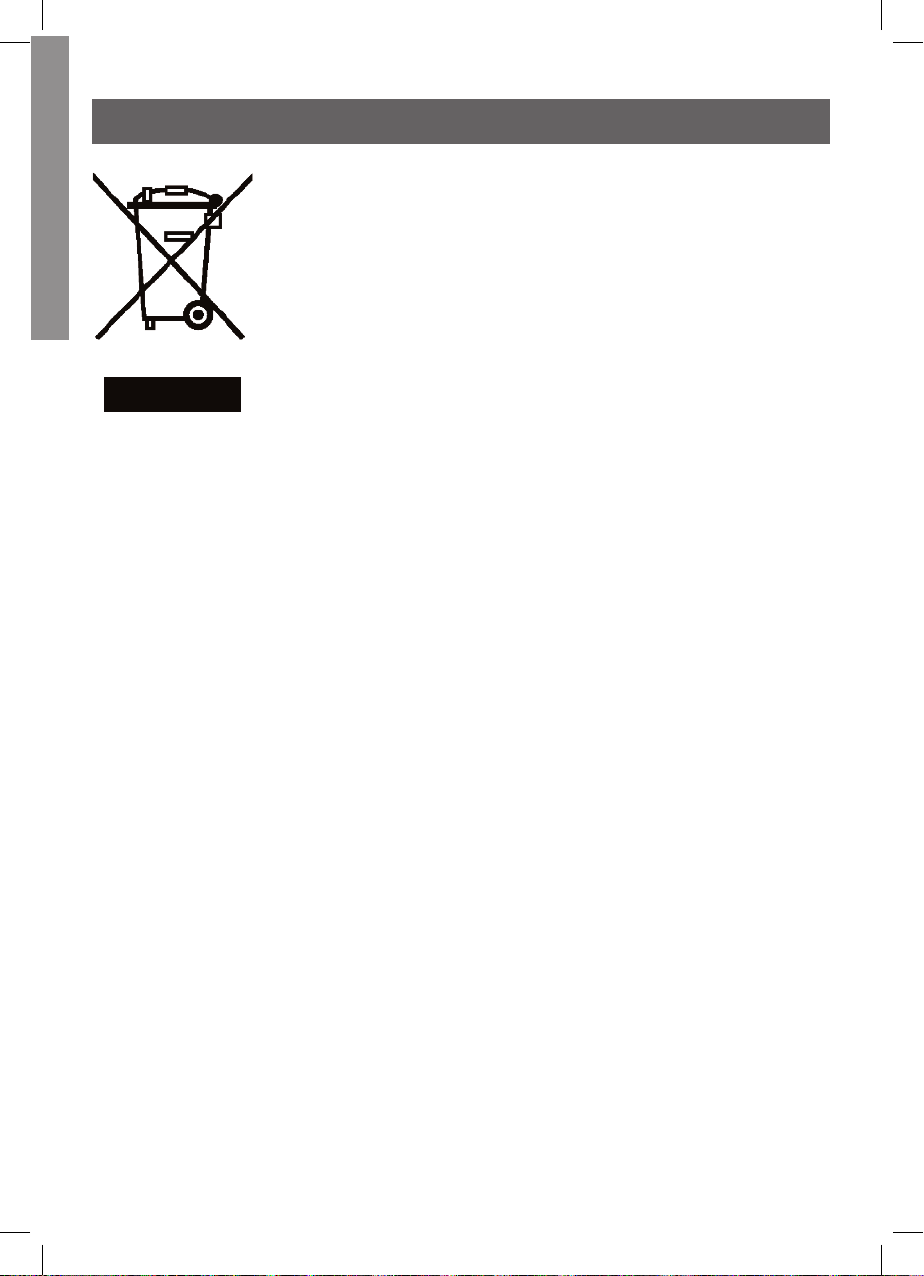
Standard setting:
green
•
For vacuuming sensitive carpets
and the daily cleaning with little
pollution. The appliance achieves
the maximum run time with this
setting.
Turbo setting:
green
•
For vacuuming hard floors and
heavily soiled carpets and car-
pets.
The appliance achieves a shorter
run time with this setting. When
vacuum-cleaning using accesso-
ries, always use the turbo setting.
10
11
19
Vacuuming
en
20
In operation status indicator
Fig.
12
The LED in the indicator shows the
operating status of the appliance.
green
Operation with stan-
dard setting
When the status indi-
cator lights up green,
the appliance is being
operated in standard
power mode.
green
Operation with turbo
setting
When the status indica-
tor flashes green, the
appliance is being ope-
rated in turbo power
mode.
red
Battery low
When the status indi-
cator flashes red, the
battery must be re-
charged.
12
20
Charging
en

21
Vacuum-cleaning with acces-
sories
Fig.
13
•
To remove the accessories, press
the release button and pull the ac-
cessory down and out of the do-
cking station.
•
After use, stow the accessories
back in the docking station.
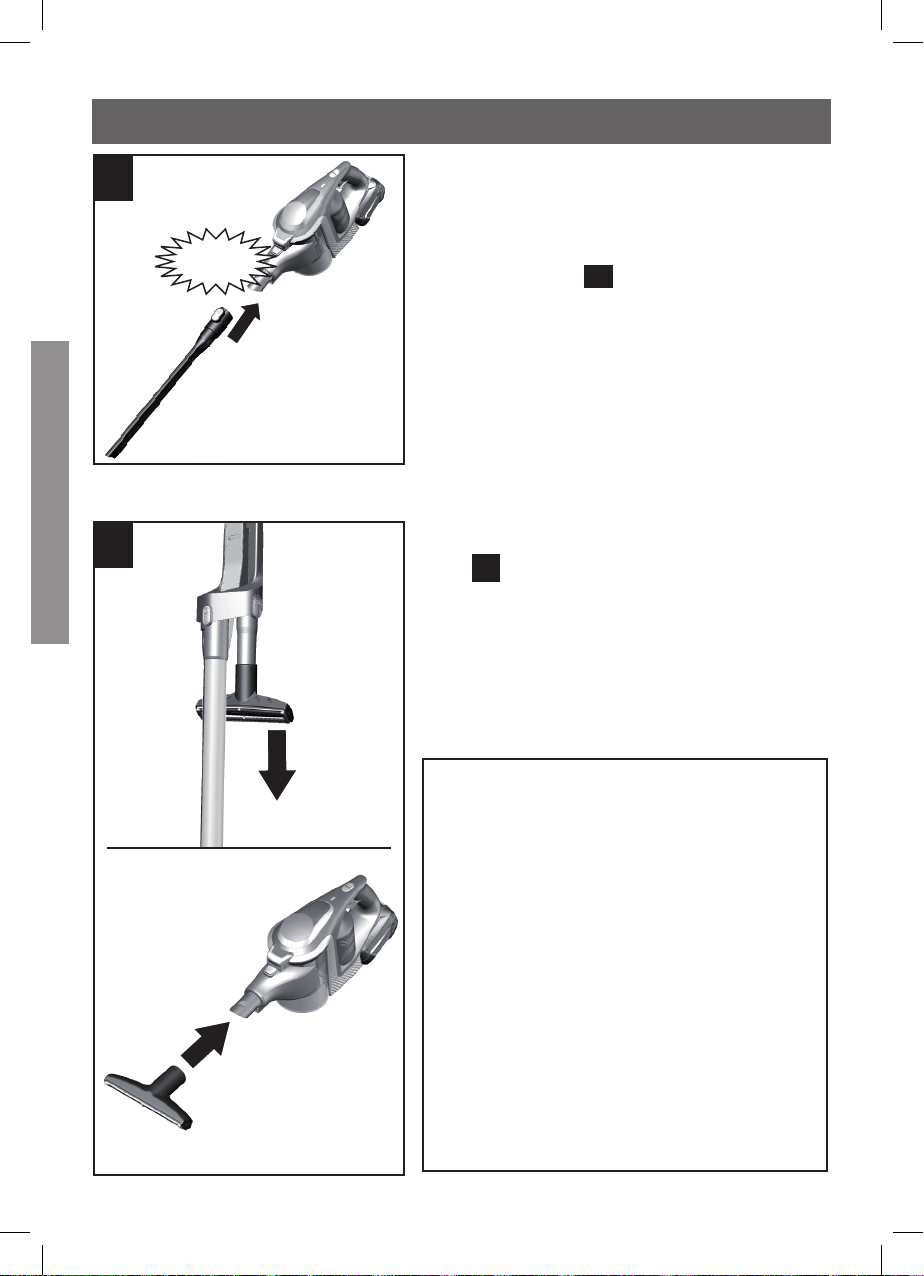
Fig.
14
Attach the nozzles or short suc-
tion pipe to the suction pipe or the
appliance's connection port as re-
quired:
a) Short suction pipe for vacuuming
up larger dirt particles or small
items, e.g. shards, paper clips,
etc. Attach nozzles to the suction
pipe or the appliance's connec-
tion port as required:
Click
1
2
14
13
1
2
a
Vacuuming
21
en
22
Click
b
Professional upholstery nozzle
Fig.
15
•
Remove the professional uphols-
tery nozzle in the direction of the
arrow from the short suction pipe
and out of the docking station.
•
Professional upholstery nozzle for
vacuuming upholstered furniture,
curtains, etc.
Setting the appliance to the high-
est power setting. It may be ad-
visable to adjust the appliance
to a lower power setting depen-
ding on the surface quality of the
upholstery. Move the nozzle gent-
ly and do not let it suck onto the
upholstery.
To clean sensitive materials such
as curtains, return the power
setting to the lowest setting.
15
14
b) Crevice nozzle for vacu-
uming crevices and corners, etc.
•
After use, stow accessories in the
docking station again. Fig.
5
Vacuuming
en
22
23
•
After use, reattach the pro-
fessional upholstery nozzle to the
short suction pipe in the docking
station.
•
To clean the professional uphols-
tery nozzle, simply vacuum it using
the appliance.
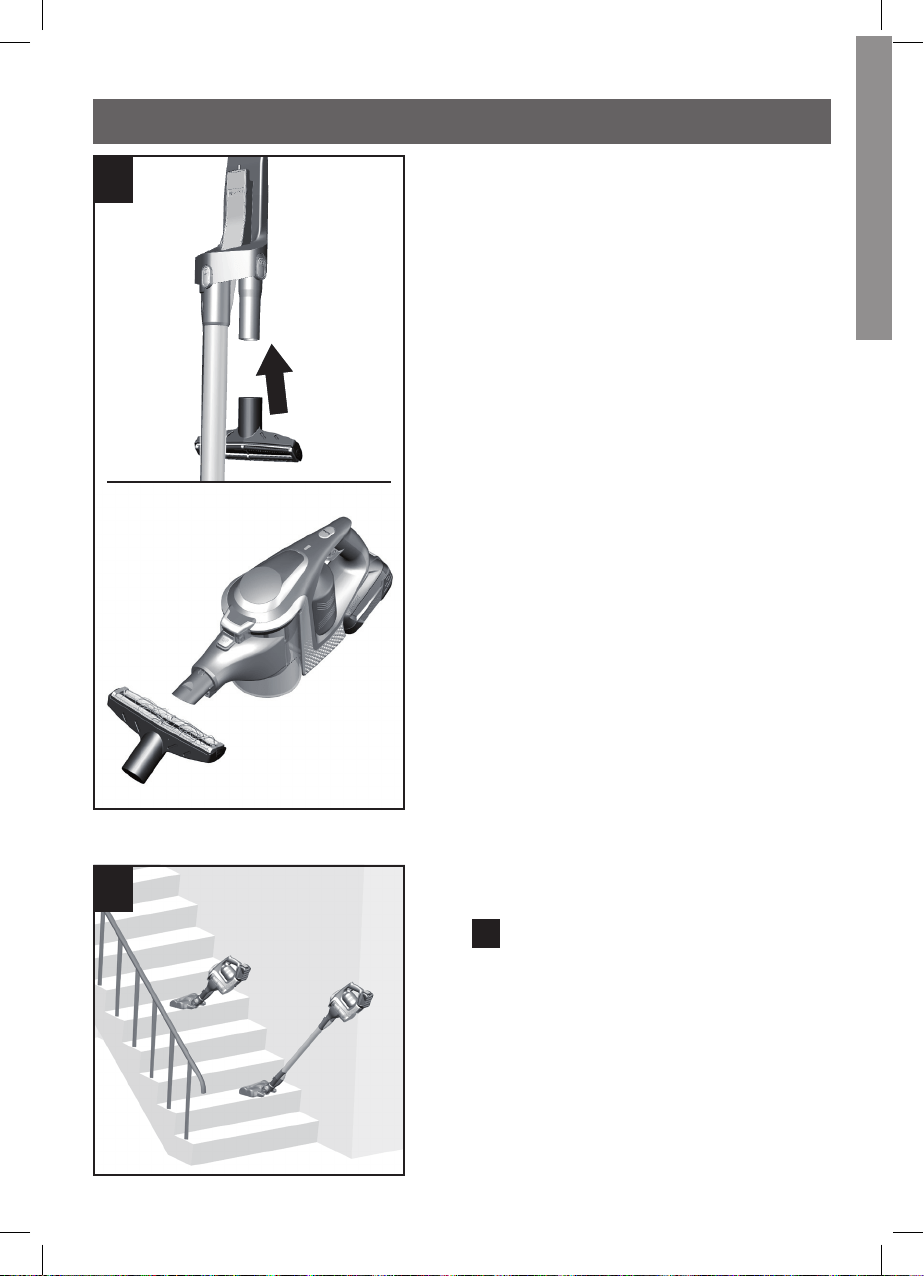
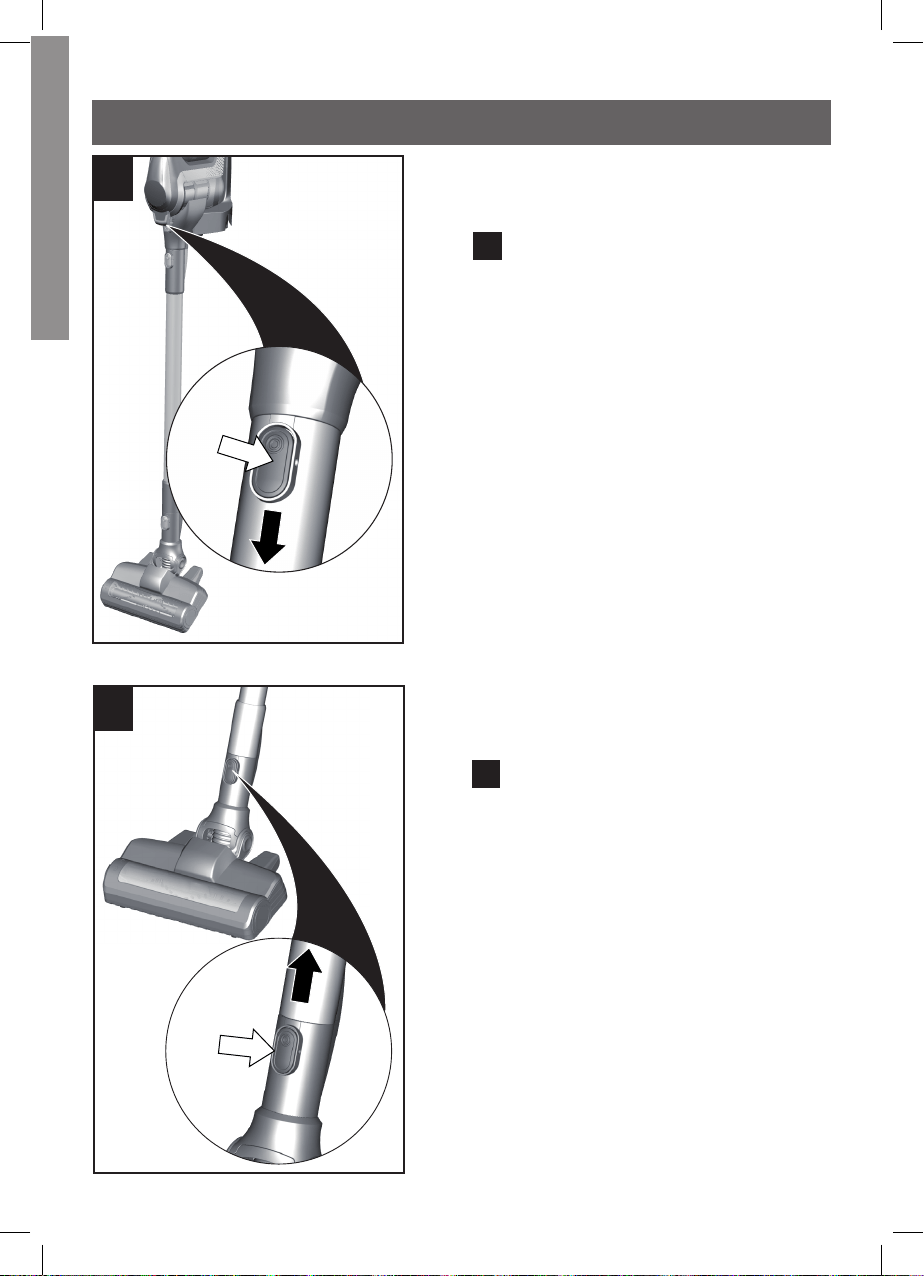
Vacuum-cleaning stairs
Fig.
16
When vacuum-cleaning stairs, to
provide better access, the suction
pipe can also be removed and the
floor nozzle placed directly on the
appliance.
The suction pipe can be stowed in
the fitted docking station during
this time.
16
15
Vacuuming
en
23
24
17
Switching off the appliance
Fig.
17
Switch off the appliance once you
have finished vacuuming.
•
Move the on/off button in the di-
rection of the arrow. The status
indicator goes out.
Stowing the appliance
Fig.
18
•
Placing the appliance in the do-
cking station.
To save space, it is recommended
that you stow the appliance in the
docking station. The appliance can
also be stowed in the docking sta-
tion when the battery is fully char-
ged.
Caution!
To prevent the appliance from tip-
ping over, store it safely against
a wall in the corner of a room or
place the appliance in the do-
cking station.
18
After using the appliance
en
24
25
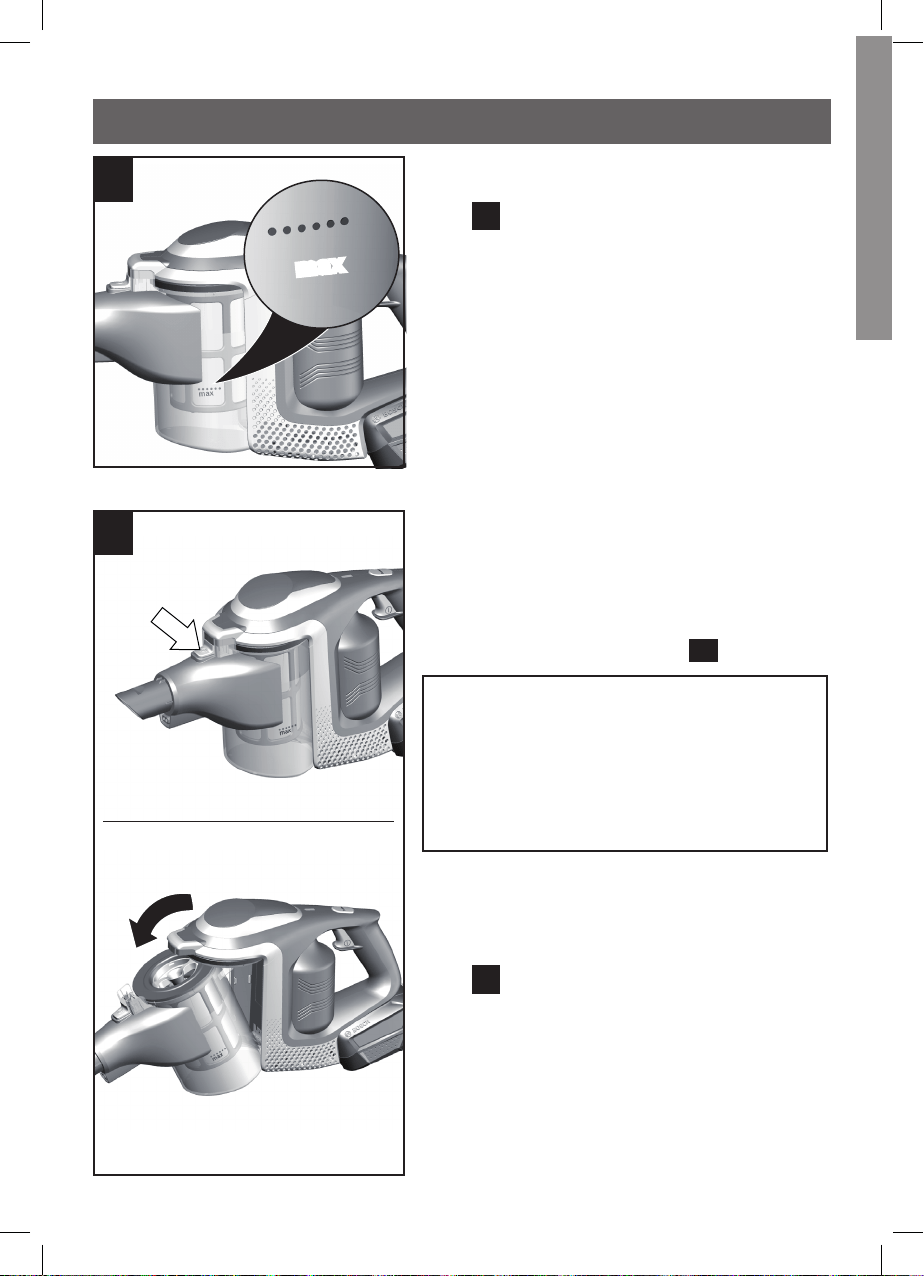
20
Removing the dust container
Fig.
20
•
Use the release button to release
the dust container and remove it
from the appliance.
1
2
19
max
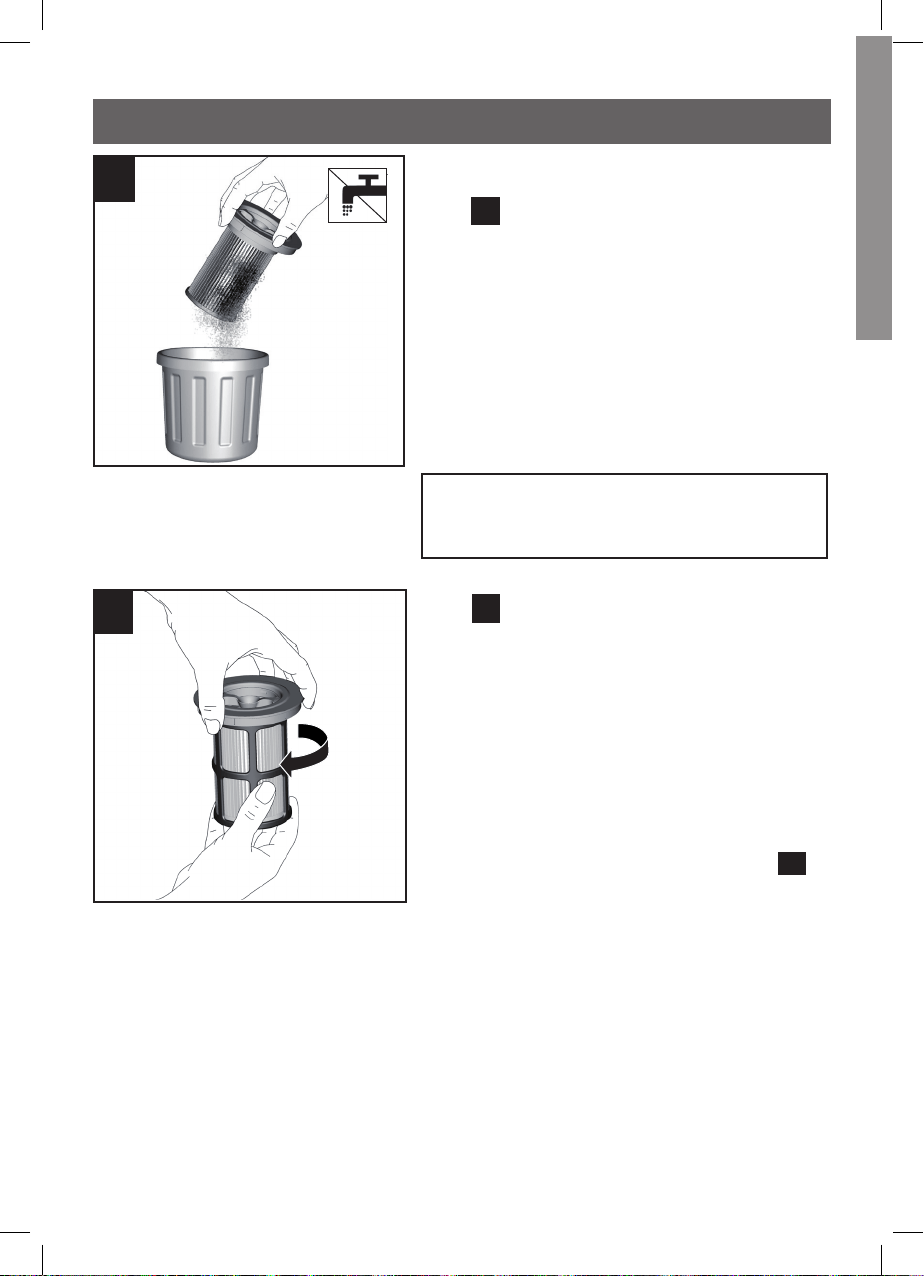
Emptying the dust container
Fig.
19
In order to achieve the best possib-
le vacuuming results, the dust con-
tainer should be emptied after eve-
ry use or, at the latest, when dust at
one point in the dust container has
reached the mark.
We recommend that you do not fill
the dust container beyond the mark
as this may lead to the filter beco-
ming clogged with dust.
When emptying the dust container,
always check how much dust there
is in the filter unit and, if necessary,
clean it as detailed in the "Filter
care" instructions. Fig.
25
Caution!
The filter can only be cleaned if
the appliance is switched off. Ne-
ver vacuum-clean without the fil-
ter unit in place.
After using the appliance
en
25
26
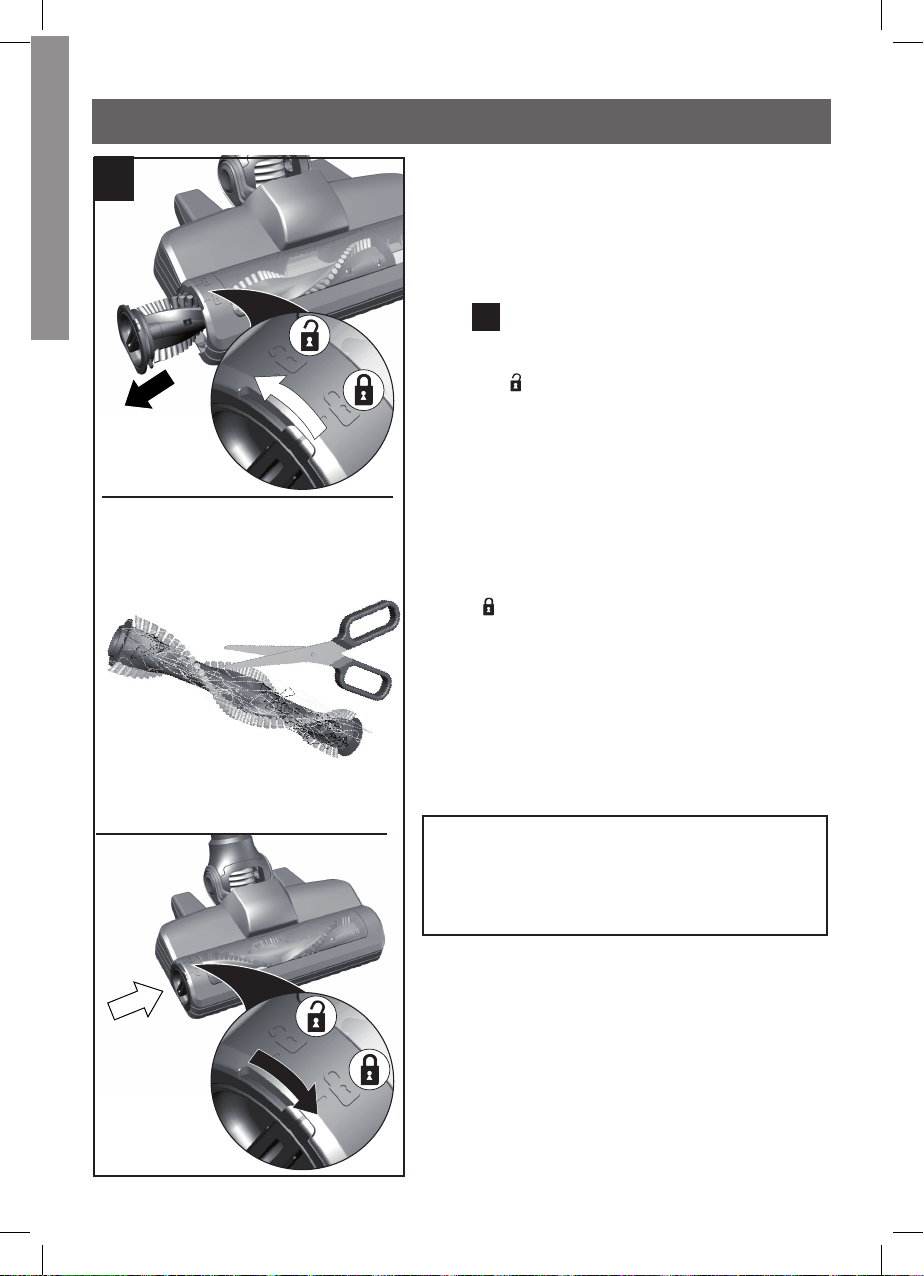
Removing the filter unit
Fig.
21
•
Take the filter unit out of the dust
container
•
Empty the dust container.
If necessary, wipe the dust contai-
ner with a damp cloth.
•
Remove any dirt that may have
been lodged underneath the con-
tainer ejector opening.
21
After using the appliance
en
26
27
Click
Inserting the dust container
Fig.
22
•
Insert the filter unit into the dust
container, making sure it is cor-
rectly seated.
•
Insert the dust container into the
appliance so that it clicks audibly
into place.
Caution!
If you notice any resistance when
inserting the dust container,
check that the filter is complete
and that the filter unit and dust
container are correctly seated.
22
After using the appliance
en
27
28
1
2
Removing the suction pipe
from the appliance
Fig.
23
•
To release the suction pipe, press
the release button and pull the
suction pipe down to remove it.
Removing the suction pipe from
the floor nozzle
Fig.
24
•
To release the floor nozzle, press
the release button and pull the
suction pipe out of the floor nozz-
le.
24
23
1
2
Removal
en
28
29
Caution!
The filter can only be cleaned if
the appliance is switched off.
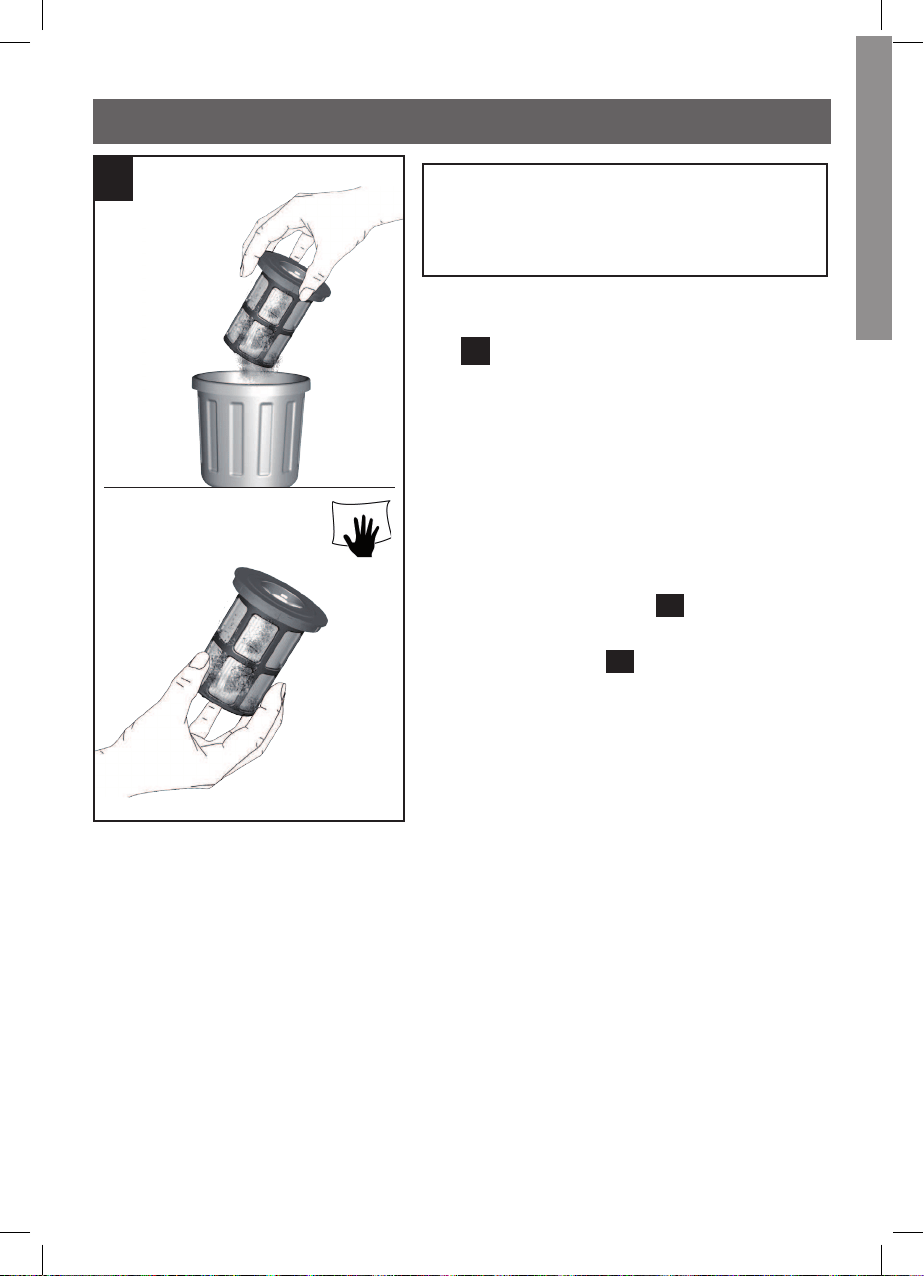
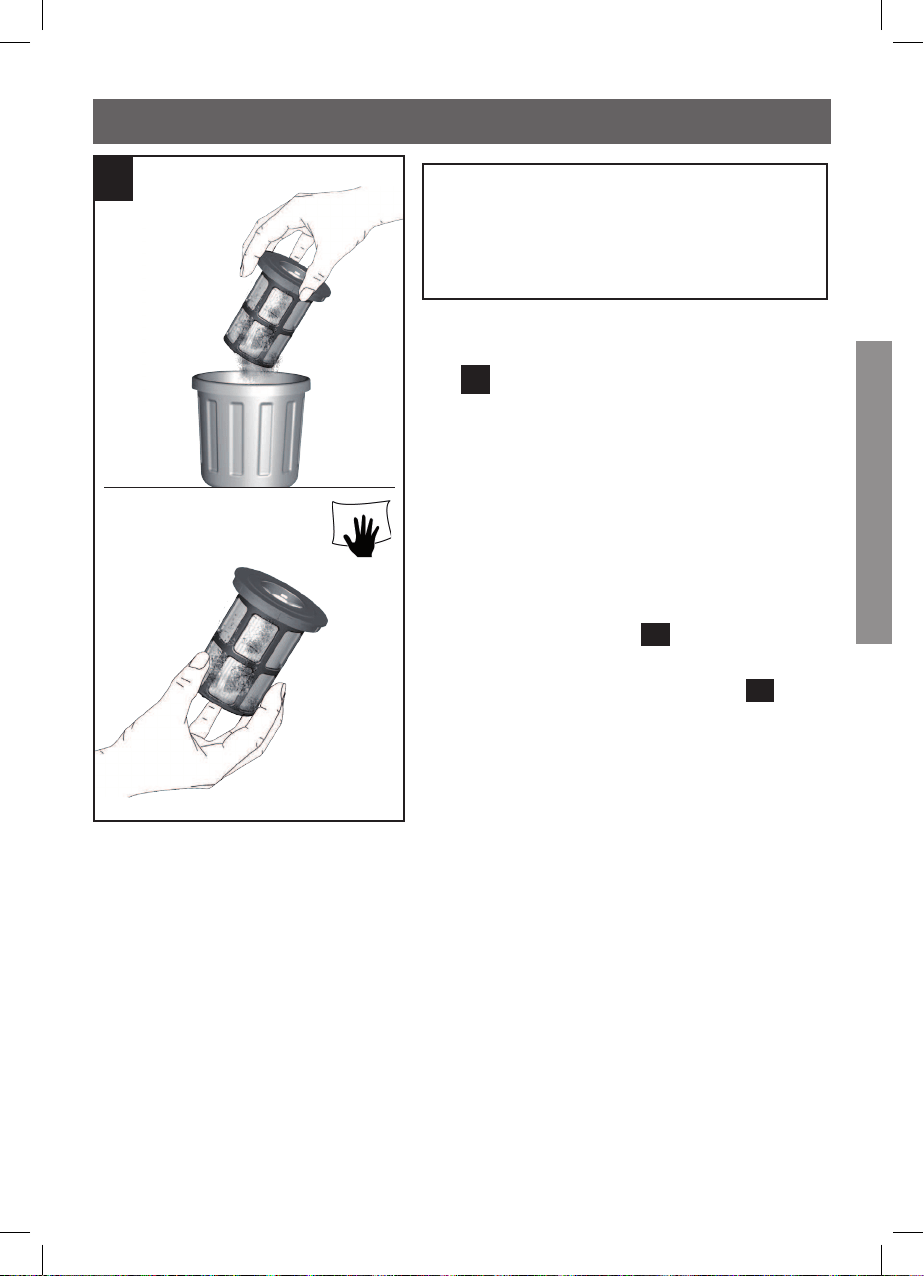
Cleaning the fluff filter
Fig.
25
The fluff filter should be cleaned at
regular intervals in order to ensure
that the vacuum cleaner continues
to perform optimally.
•
Please switch off the appliance to
clean the outer filter unit.
•
Remove the dust container from
the appliance.Fig.
20
•
Take the filter unit out of the dust
container.
Fig.
21
•
Clean the outer filter unit.
a) It is usually sufficient to lightly
shake or tap out the fluff filter
when the dust container is emp-
tied in order to dislodge any par-
ticles of dirt.
b) If this is not sufficient, you can
use a damp cloth to remove dirt
particles from the surface.
25
b
a
Filter care
en
29

30
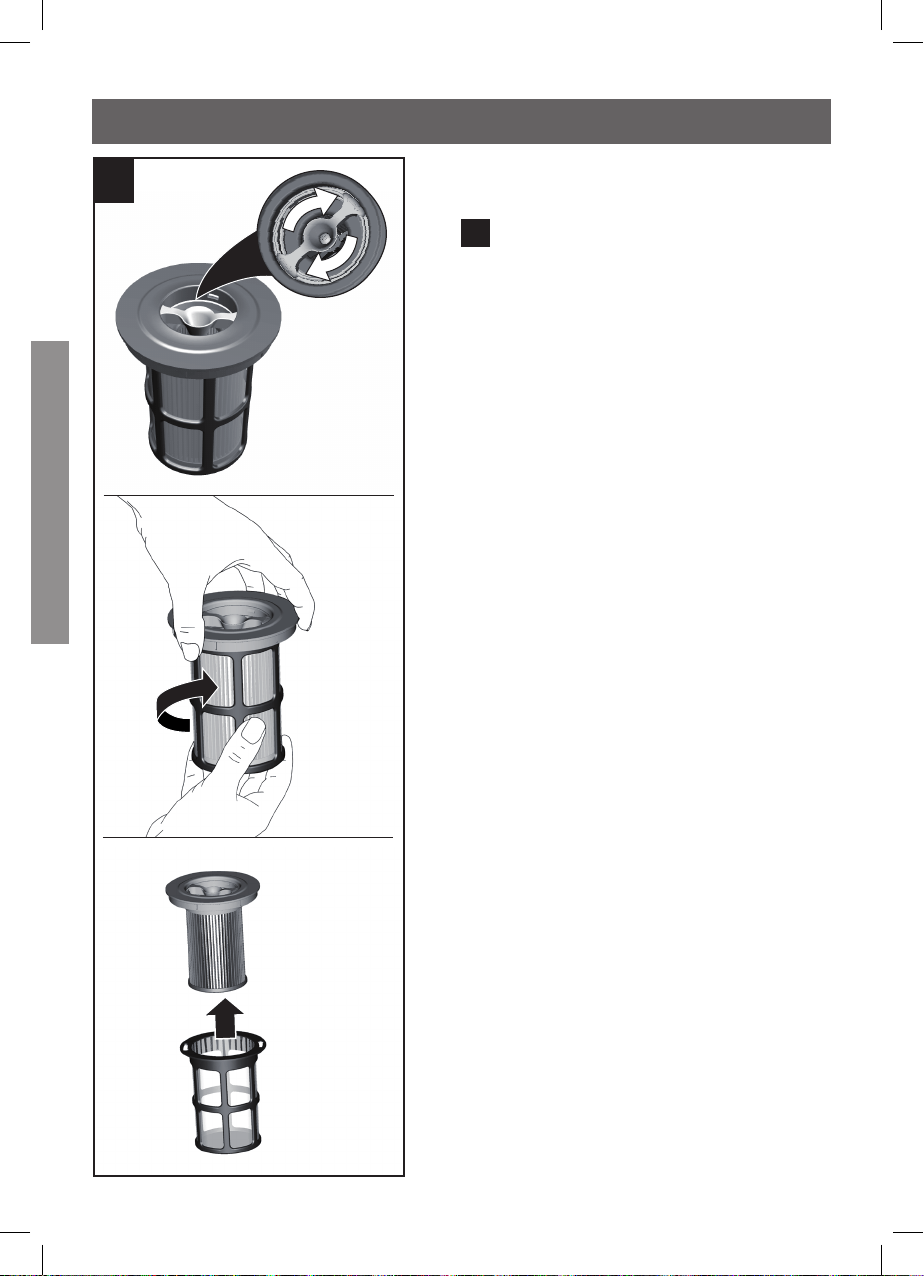
Cleaning the plate filter (mo-
tor protection filter)
Fig.
26
•
Switch off the appliance in order
to clean the plate filter.
•
To clean the plate filter, turn the
knob at least three turns through
180°.
•
Then remove the plate filter from
the outer filter unit and empty the
dirt.
We recommend that you clean the
plate filter each time you empty the
dust container.
If the plate filter is defective, a new
one can be ordered from our custo-
mer service under the following spa-
re part number: 12023349.
26
Filter care
en
30
31
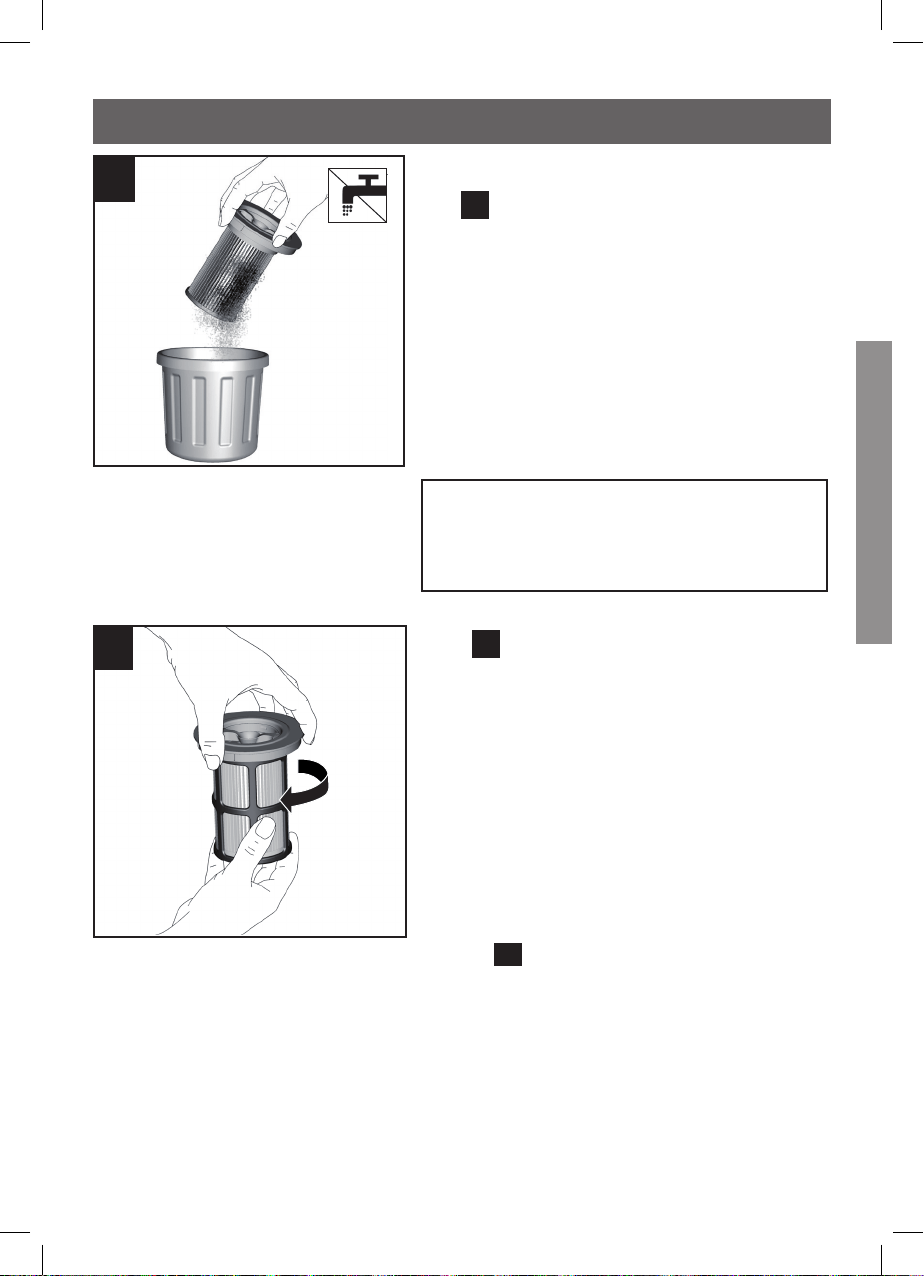
Tapping out the plate filter
Fig.
27
If the plate filter is particularly dirty,
the dirt can also be tapped out.
•
To do this, remove the plate filter
from the outer filter unit and tap it
out over a bin.
•
Once you have cleaned the plate
filter, it is ready for use immedia-
tely.
Caution!
Do not wash out the plate filter.
27
Fig.
28
•
Insert the plate filter into the ou-
ter filter unit and lock it in place
by turning it clockwise.
•
Insert the filter unit into the dust
container, making sure it is cor-
rectly seated. Insert the dust con-
tainer into the appliance so that it
clicks audibly into place. Fig.
22
28
Filter care
en
31
32
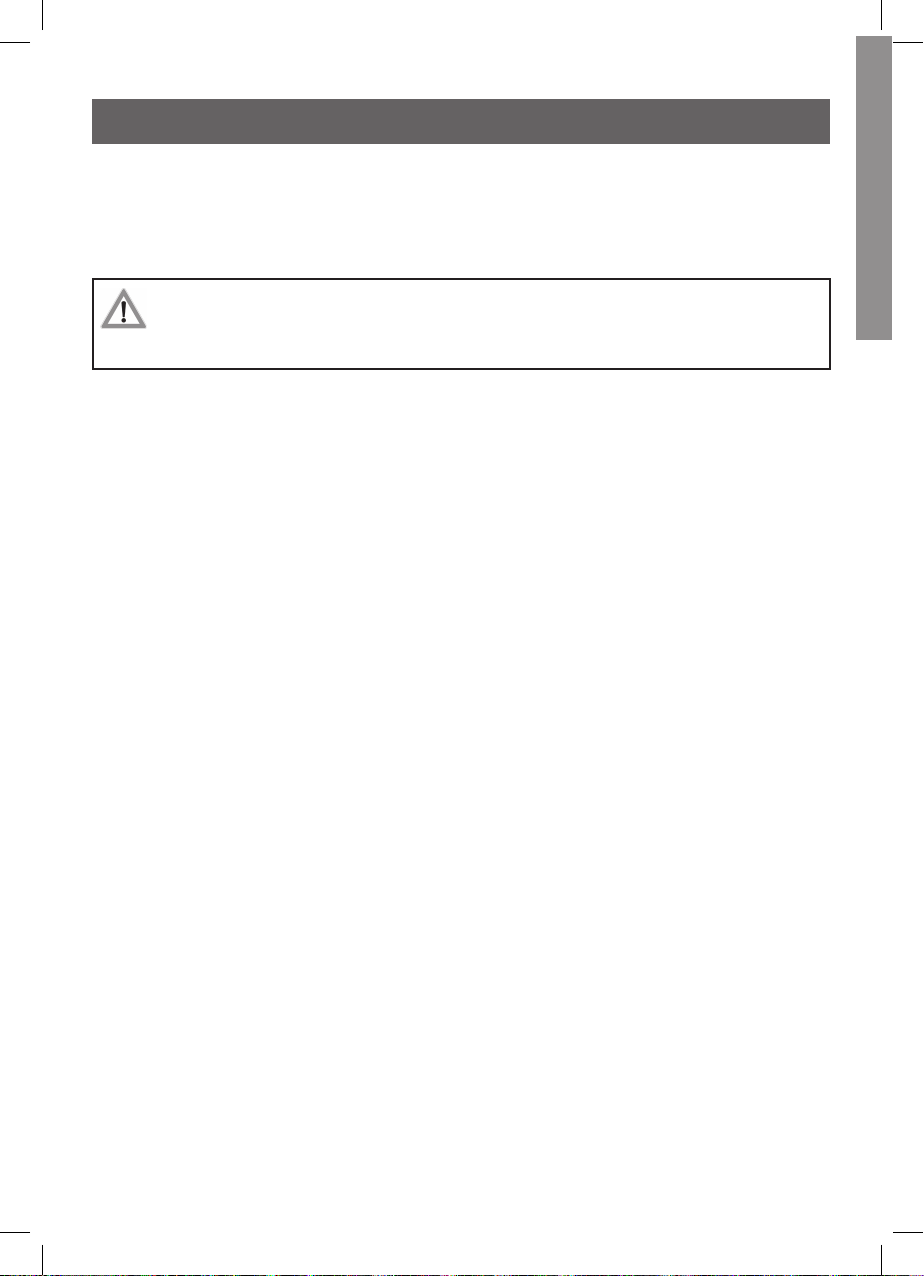
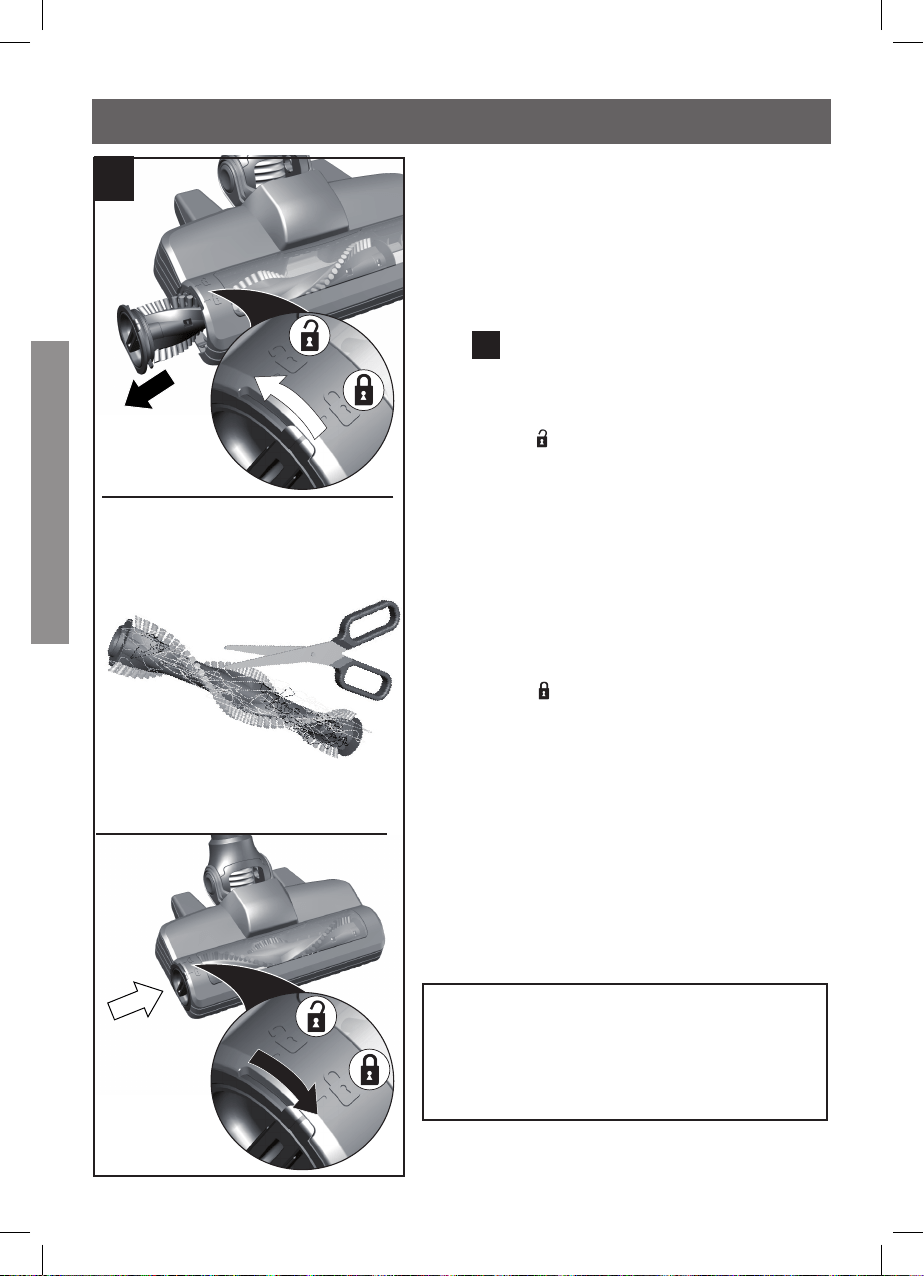
Cleaning the floor nozzle
Before carrying out any mainte-
nance work, switch off the vacuum
cleaner and disconnect it from the
charging cable.
Fig.
29
a) Turn the rotary
brush anti-clock-
wise
to
unlock it and pull it out
to the side of the floor nozzle.
b) Use scissors to cut through th-
reads and hairs wound round the
brush and then remove them.
c) Slide the rotary brush in at the
side of the floor nozzle and along
the guide bar, and turn it clockwi-
se
to lock it in place.
•
The brush roller is also self-
cleaning. Use scissors to cut the
hairs and fibres lengthways on
two opposite sides. Then operate
the brush roller for 30 seconds to
vacuum these up automatically.
Caution!
The floor nozzle must only be
used with the brush roller fitted.
b
a
29
2
1
1
2
c
Cleaning the floor nozzle
en
32
33
Make sure that the upright vacuum cleaner is switched off
and disconnected from the charging cable before cleaning it.
The vacuum cleaner and plastic accessories can be cleaned with
standard plastic cleaner.
Do not use abrasive, glass-cleaning or all-purpose
cleaning products. Never immerse the vacuum cleaner
in water.
Subject to technical modifications.
33
Cleaning instructions
en
34
Faults and customer service
en
Troubleshooting
In the following cases, you should stop using the appliance imme-
diately and contact customer service:
If you have accidentally vacuumed up some liquid or liquid has
entered the inside of the appliance.
If the appliance has been dropped.
In these cases, the electrical safety of the appliance can no lon-
ger be guaranteed, even if no damage is visible on the outside.
Possible fault Remedial action
The appliance is not working
and there is no signal on the
battery status indicator
Make sure that the battery is cor-
rectly inserted and/or that the
battery is charged.
The appliance is not working
and/or the battery status in-
dicator lights up red for 10
seconds.
The battery may be too hot or
too cold. Wait until battery has
reached a suitable temperature.
The electric brush is not
working or is making unusu-
al noises
Clean the brush and remove any
foreign objects where necessary
Check whether the brush was in-
serted correctly and is locked in
place
If the problem continues, contact
customer service
The brush switches off when
the appliance is in operation
Switch off the appliance and
check the nozzle for blockages.
Remove any blockages and clean
the nozzle.
On carpets, select a lower power
setting and start the cleaning pro-
cess again.
If you cannot switch the nozzle
back on again, contact customer
service.
34
35
Charging status indicator
In operation status indicator
Appliance status Status indicator function
Normal setting Indicator lights up green.
Turbo setting Indicator flashes green.
Battery charge < 20% Indicator flashes red.
Battery is empty Indicator goes out.
Charging Indicator flashes green.
Battery is fully char-
ged
Indicator lights up green and goes out
after approx. 2 minutes.
Fault indicator Indicator lights up red and goes out af-
ter approx. 10 seconds.
Status indicators
en
35
36
Disposal information
Vacuum cleaners, batteries, accessories and packaging should
be recycled in an environmentally responsible manner.
Do not dispose of the vacuum cleaner or the batteries along with
your normal household waste.
Packaging
The packaging is designed to protect the vacuum cleaner from
being damaged in transit. It is made of environmentally friendly
materials and can therefore be recycled. Dispose of packaging
that is no longer required at an appropriate recycling point.
Old appliances
Old appliances often still contain valuable materials. You should
therefore take appliances that have reached the end of their
service life to your dealer or a recycling centre so that they can
be recycled. Please ask your dealer or your local council about
current disposal methods.
"This appliance is labelled in accordance
with European Directive 2012/19/EU con-
cerning used electrical and electronic ap-
pliances (waste electrical and electronic
equipment - WEEE). The guideline deter-
mines the framework for the return and
recycling of used appliances as applicable
throughout the EU."
اين دستگاه مطابق ضوابط اروپائی در
باره دستگاه های کهنه برقی و الکترونيکی
مشخص شده است
این ضوابط که در سراسر اوپا معتبر است، چهار چوب
کلی شيوه بازپس گرفتن و بازيافت دستگاه های
کهنه را تعيين می کند
36
Disposal
اين دستگاه مطابق ضوابط اروپائی در
باره دستگاه های کهنه برقی و الکترونيکی
مشخص شده است
این ضوابط که در سراسر اوپا معتبر است، چهار چوب
کلی شيوه بازپس گرفتن و بازيافت دستگاه های
کهنه را تعيين می کند
37
Batteries:
According to the European Guideline 2006/66/EC, defective or
used battery packs/batteries, must be collected separately and
disposed of in an environmentally correct manner.
Batteries no longer suitable for use can be directly returned at:
Great Britain
Robert Bosch Ltd. (B.S.C.)
P.O. Box 98
Broadwater Park
North Orbital Road
Denham
Uxbridge
UB 9 5HJ
At www.bosch-pt.co.uk you can order spare parts or arrange
the collection of a product in need of servicing or repair.
Tel. Service: (0344) 7360109
E-Mail: boschservicece[email protected]
Battery packs/batteries:
Li-ion:
Please observe the instructions in section “Notes on trans-
port”
Disposal
37

3838
Table des matières
fr
Consignes de sécurité ...........................................................40
Utilisation conforme aux prescriptions et à l'emploi prévu .....40
Consignes de sécurité .............................................................40
Utilisation correcte ..................................................................42
Batterie au lithium-ion .............................................................43
Remarques sur le transport ..................................................... 45
Description de l`appareil .......................................................46
Avant la première utilisation ..................................................48
Assembler l'appareil et le tuyau d'aspiration ..........................48
Assembler le tuyau d'aspiration et la brosse pour sols ............ 48
Assembler la batterie et l'appareil ...........................................49
Rechargement ......................................................................... 50
Montage de la fixation murale ................................................50
Rangement des accessoires dans la cage murale ....................51
Charger la batterie uniquement avec le cordon de charge ......52
Charger la batterie dans la cage murale ..................................53
Charge avec le chargeur rapide ..................................................54
Affichage du statut lors de la charge .......................................54
Aspiration................................................................................55
Allumer l'appareil .....................................................................55
Régler la puissance d'aspiration ..............................................55
Affichage du statut fonctionnement .........................................56
Aspirer avec des accessoires supplémentaires ........................ 57
Suceur ameublement profesionnel .......................................... 58
Aspirer sur des escaliers ..........................................................59

3939
Table des matières
fr
Après utilisation......................................................................60
Mettre l’appareil hors tension .................................................. 60
Ranger l'appareil ......................................................................60
Vider le collecteur de poussières .............................................61
Enlever le collecteur de poussières .........................................61
Extraire l'unité de filtre ............................................................62
Mettre le collecteur de poussières en place ............................63
Démontage .............................................................................. 64
Assembler l'appareil et le tuyau d'aspiration ...........................64
Assembler le tuyau d'aspiration et la brosse pour sols ............ 64
Entretien des filtres ................................................................ 65
Nettoyer le filtre à peluche.......................................................65
Nettoyer le filtre à lamelles (filtre de protection du moteur) ...66
Débourrer le filtre à lamelles ...................................................67
Nettoyage de la brosse pour sols ........................................... 68
Nettoyage de la brosse pour sols .............................................68
Consignes de nettoyage .........................................................69
Dérangements et service après-vente ...................................70
Affichages de statut ................................................................71
Consignes pour la mise au rebut ............................................72
Service clients & Garantie ....................................................146

40
Conservez la présente notice d'utilisation. Si vous remettez
l'aspirateur à une tierce personne, veuillez-y joindre sa notice
d'utilisation.
Utilisation conforme à l’usage prévu
Cet appareil est destiné exclusivement à une utilisation domesti-
que et non professionnelle. Cet appareil est conçu pour une utili-
sation jusqu'à une altitude maximale de 2000 m.
Pour éviter toute blessure ou tout dommage, l'aspirateur ne doit
pas être utilisé :
sur des personnes ou des animaux.
pour aspirer des :
− substances nocives, coupantes, chaudes ou incandescentes.
− substances humides ou liquides.
− substances et gaz facilement inflammables ou explosifs.
− cendres, suies de poêles et d'installations de chauffage cen-
tral.
− poussières de toner provenant d'imprimantes et de photocopi-
eurs.
Consignes de sécurité
Cet aspirateur répond aux règles techniques reconnues et aux
prescriptions de sécurité applicables.
Cet appareil peut être utilisé par des enfants à partir de l'âge de
8 ans et par des personnes ayant des capacités physiques, senso-
rielles ou mentales restreintes ou ayant un manque d'expérience
et/ou de connaissances, s'ils sont sous surveillance ou ont été
informés de la manipulation sûre de l'appareil et ont compris les
dangers qui en résultent.
Ne laissez pas les enfants jouer avec l’appareil, même lorsqu'il
est suspendu à la cage murale.
Le nettoyage de l’appareil et l’entretien par l’utilisateur ne peu-
vent pas être réalisés par des enfants sans surveillance.
afet
40
Consignes de sécurité
fr

41
Les films et les sacs plastiques doivent être conservés hors de
portée des jeunes enfants et être éliminés.
>= Il existe un risque d'asphyxie !
Pièces détachées, accessoires
Tout comme nos pièces détachées d'origine, nos accessoires
d'origine et nos accessoires spéciaux sont adaptés aux propriétés
et aux exigences de nos aspirateurs. Par conséquent, nous vous
recommandons d'utiliser exclusivement nos pièces détachées
d'origine, nos accessoires d'origine, nos accessoires spéciaux.
Ainsi, vous pouvez garantir une grande durée de vie ainsi qu'une
qualité supérieure durable de la puissance de nettoyage de votre
aspirateur.
!
Remarque
L'utilisation de pièces détachées, d'accessoires/accessoires
spéciaux peut entraîner des dommages sur votre aspirateur qui
ne sont pas couverts par notre garantie dans la mesure où ces
dommages ont expressément été causés par l'utilisation de tels
produits.
41
Consignes de sécurité
fr

42
Utilisation correcte
Pour recharger la batterie, utilisez exclusivement le cordon de
charge ou le chargeur rapide d'origine compris dans la livraison.
Raccordez et mettez en service le cordon de charge et le char-
geur rapide uniquement selon les indications figurant sur la
plaque signalétique.
Rangez et chargez l'appareil uniquement à l'intérieur.
N'exposez pas l'appareil à des températures inférieures à 0°C ni
supérieures à 45°C.
N'aspirez jamais sans le réservoir à poussières ni sans le filtre de
protection du moteur.
>= L'appareil risque d'être endommagé !
Évitez d'aspirer avec le suceur et le tube à proximité de la tête.
=> Il existe un risque de blessure !
N'utilisez plus le cordon de charge s'il est endommagé ; rempla-
cez-le par un cordon de charge d'origine.
Pour débrancher le cordon de charge, ne tirez pas sur le cordon
d'alimentation, mais sur la fiche.
Ne tirez pas le cordon de charge au-dessus d'arêtes coupantes
et veillez à ne pas le coincer.
Avant toute intervention sur l'aspirateur, éteignez l'appareil ou
bien débranchez le cordon de charge du secteur.
Ne mettez pas l'aspirateur en service s'il est défectueux.
En cas de panne, éteignez l'appareil ou bien débranchez le cor-
don de charge du secteur.
Pour éviter tout risque de danger, seul le service après-vente ag-
réé est autorisé à effectuer des réparations et à remplacer des
pièces sur l’aspirateur.
Dans les cas suivants, vous devez immédiatement mettre
l'appareil hors service et appeler le service après-vente :
− si par inadvertance vous avez aspiré du liquide ou si du liquide
est parvenu à l'intérieur de l'appareil
− si l'appareil est tombé et est endommagé.
N'exposez pas l'aspirateur aux influences atmosphériques, à
l'humidité ni aux sources de chaleur.
42
Consignes de sécurité
fr

43
Ne mettez pas de substances inflammables ou à base d'alcool
sur les filtres (sac aspirateur, filtre de protection du moteur, filtre
de sortie d'air etc.).
L'aspirateur n'est pas compatible pour un travail de chantier.
=>L'aspiration de gravats risque d'endommager l'appareil.
Éteignez l'appareil si vous ne l'utilisez pas.
Cet aspirateur n'est pas doté d'une fonction d'autonomie. Évitez
de faire tomber l'appareil. Ne posez pas l'aspirateur contre un
mur ou des bords de table.
L'emballage protège l'aspirateur des dommages pendant le
transport. Nous vous recommandons par conséquent de conser-
ver l'emballage pour des transports ultérieurs.
Veillez à ne pas faire entrer en contact les cheveux, les vête-
ments amples, les doigts et les autres parties du corps avec les
ouvertures ou les pièces mobiles, telles que le rouleau brosse.
Ne dirigez pas les tubes, les tuyaux ni les buses vers les yeux ou
les oreilles, et ne les mettez pas dans votre bouche.
Batterie au lithium-ion
Lisez toutes les notices et consignes de sécurité.
>= Le non-respect des notices et consignes de sécurité peut pro-
voquer des chocs électriques, des incendies et/ou de graves
blessures.
Conservez toutes les notices et consignes de sécurité pour une
utilisation ultérieure.
Ces consignes de sécurité sont uniquement valables pour les
batteries au lithium-ion de Bosch ! Seules les batteries de la
gamme "Power for ALL" sont adaptées à cet appareil.
N'ouvrez pas la batterie.
>= Cela peut provoquer un court-circuit.
Protégez la batterie de la chaleur, par ex. même pendant une
exposition prolongée aux rayons du soleil, un incendie, l'eau et
l'humidité. => Il existe un risque d'explosion.
Consignes de sécurité
43
fr

44
En cas d'endommagement et d'utilisation incorrecte de la batte-
rie, des vapeurs peuvent s'échapper. Respirez de l'air frais et en
cas de troubles, consultez un médecin.
>= Les vapeurs peuvent irriter les voies respiratoires.
En cas de batterie défectueuse, du liquide peut s'échapper et
asperger les objets attenants. Vérifiez les parties concernées.
>= Nettoyez-les ou remplacez-les le cas échéant.
Utilisez uniquement la batterie avec votre appareil électrique
Bosch.
>= C'est le seul moyen de protéger la batterie contre une
surcharge dangereuse.
Rechargez la batterie uniquement à l'aide du chargeur recom-
mandé par le fabricant.
>= Si vous utilisez un chargeur adapté à un certain type de batte-
rie pour d'autres types de batterie, vous risquez de provoquer
un incendie.
Utilisez uniquement la batteries spécialement adaptées à votre
appareil électrique.
>= L'utilisation d'autres batteries peut provoquer des blessures
et un incendie.
Éloignez les batteries non utilisées des trombones, pièces de
monnaie, clés, clous, vis, ou tout autre petit objet métallique qui
pourrait provoquer un pontage des contacts.
>= Un court-circuit entre les contacts de batterie peut entraîner
des brûlures ou un incendie.
En cas d’utilisation inadéquate, du liquide peut s'échapper des
batteries. Évitez tout contact avec ce liquide. En cas de contact
accidentel, rincez abondamment à l'eau. En cas de contact du
liquide avec les yeux, consultez immédiatement un médecin.
>= Le liquide s'échappant d'une batterie peut irriter la peau ou
provoquer des brûlures.
44
Consignes de sécurité
fr

45
Remarques sur le transport
Les batteries au lithium-ion intégrées sont soumises aux exigen-
ces du droit relatif aux marchandises dangereuses. Les batte-
ries peuvent être transportées par l'utilisateur sur la route sans
autres dispositions. En cas d'expédition par un tiers (par ex.
transport aérien ou routier), des exigences particulières doivent
être respectées en termes d'emballage et de marquage. Dans
ce cas, pour la préparation de l'équipement à envoyer, il faut
faire appel à un expert spécialisé dans le transport de marchan-
dises dangereuses.
Expédiez les batteries uniquement si le boîtier n'est pas en-
dommagé. Masquez les contacts ouverts avec du ruban adhésif
et emballez la batterie de manière à ce qu'elle ne bouge pas à
l'intérieur de l'emballage. Veuillez également respecter les autres
réglementations nationales en vigueur.
45
Consignes de sécurité
fr

4646
Description de l'appareil
fr
12
13
14
15
11
1
2
4
5
3
8
9
10
6
7
16
47
Description de l'appareil
1 Brosse pour sols avec
électrobrosse
2 Tuyau d'aspiration
3 Touche de déverrouillage du
collecteur de poussières
4 Filtre à peluche
5 Filtre à cartouche
6 Indicateur d'état de charge de
la batterie
7 Interrupteur Turbo
8 Batterie
9 Interrupteur Marche /
Arrêt
10 Collecteur de poussières
11 Tube d'aspiration court
12 Suceur ameublement XXL
13 Suceur long flexible
14 Cordon de charge
15 Cage murale
16 Chargeur rapide
47
fr
4848
Avant la première utilisation
fr
Assembler l'appareil et le tuyau
d'aspiration
Fig.
1
•
Enfichez le tuyau d'aspiration sur
le tube de l'aspirateur et verrouil-
lez-le.
Click
Assembler le tuyau d'aspiration et
la brosse pour sols
Fig.
2
•
Fixez le tuyau d'aspiration dans la
brosse pour sols et encliquetez-le.
Attention!
La brosse pour sols ne convient
pas pour aspirer des petites pi-
èces telles que des tessons, jou-
ets, épingles, trombones, etc.
2
Click
1
49
Assembler la batterie et
l'appareil
Fig.
3
•
Insérez la batterie au-dessus des
rails de guidage dans l'aspirateur,
et verrouillez-la.
•
Pour la détacher, appuyez sur le
bouton de déverrouillage et re-
tirez la batterie vers l'arrière de
l'appareil.
Attention!
Les accus de l'aspirateur doivent
être chargés au moins 6 heures
avant la première utilisation.
Chargez uniquement l'appareil
avec le cordon de charge fourni.
Click
3
1
2
49
Avant la première utilisation
fr
50
Montage de la fixation murale
L'utilisation d'une cage murale pour
la charge et le stockage de l'appareil
est recommandée pour la bonne ca-
pacité de rangement.
La charge et le rangement sont ce-
pendant également possibles sans
cage murale.
Fig.
4
•
Installez la cage murale à proximi-
té d'une prise.
•
Pour ce faire, retirez la façade de
la cage murale. Saisissez la cage
murale par le bas et appuyez de
l'intérieur sur la façade pour la fai-
re sortir du verrouillage. Installez
la cage murale sur le mur à l'aide
des vis fournies ou adaptées.
•
Enfilez la petite fiche du cordon
de charge du bas dans la cage mu-
rale et placez-la en haut dans le
creux préformé.
•
Le raccord est fixé en le posant et
le verrouillant.
•
Connectez la fiche du cordon de
charge dans la prise secteur.
4
1
2
Click
50
Rechargement
fr
51
Rechargement
Rangement des accessoires
dans la cage murale
Les accessoires supplémentaires
peuvent être rangés dans la cage
murale montée pour économiser de
la place.
Fig.
5
•
La cage murale dispose de deux
emplacements pour le rangement
d'accessoires avec connexion
des accessoires (1) et d'un em-
placement pour ranger le tuyau
d'aspiration (2).
•
Insérez le suceur long flexible et le
tuyau d'aspiration court du bas en
exerçant une légère pression dans
la cage murale, puis verrouillez-
les.
•
Enfichez le suceur ameuble-
ment professionnel sur le tuyau
d'aspiration court.
Click
5
1
2
1
51
fr
52
Rechargement
Charger la batterie uniquement
avec le cordon de charge
Fig.
6
•
Placez l'aspirateur à charger à pro-
ximité d'une prise.
•
Branchez le cordon de charge en-
dessous dans le connecteur de
l'appareil.
•
Connectez la fiche du cordon de
charge dans la prise secteur.
•
L'affichage du statut de l'aspirateur
clignote lentement en vert pendant
tout le processus de charge.
•
Dès que la batterie est entière-
ment chargée, l'affichage du statut
cesse de clignoter et s'allume en
vert fixe pendant quelques minu-
tes avant de s'éteindre.
Pour vérifier si la charge est cor-
recte, débranchez brièvement
l'appareil du secteur. L'affichage
s'allume ensuite de nouveau en
vert.
•
Le cordon de charge et l'aspirateur
balai peuvent chauffer : cela est
normal et sans risque.
•
Vous pouvez toujours charger l'aspi-
rateur lorsqu'il n'est pas utilisé.
6
1
2
52
Rechargement
fr
53
Rechargement
Charge avec le chargeur rapide
Fig.
7
•
Pour charger dans le chargeur ra-
pide, la batterie doit être retirée
de l'appareil.
•
La notice d'utilisation jointe vous
fournit des explications sur le fon-
ctionnement du chargeur rapide.
Charger la batterie dans la cage
murale
Fig.
8
•
Déposez l'aspirateur de haut en
bas dans la cage murale.
•
L'affichage du statut de l'aspirateur
clignote lentement en vert pen-
dant tout le processus de charge.
•
Dès que la batterie est entièrement
chargée, l'affichage de statut cesse
de clignoter et s'allume en vert fixe
pendant quelques minutes avant de
s'éteindre.
Pour vérifier si la charge est correc-
te, débranchez brièvement l'appa-
reil du secteur. L'affichage s'allume
ensuite de nouveau en vert.
8
7
53
fr
54
•
Le cordon de charge et
l'aspirateur balai peuvent chauffer:
cela est normal et sans risque.
•
Vous pouvez toujours charger
l'aspirateur lorsqu'il n'est pas uti-
lisé.
Affichage du statut lors de la charge
Fig.
9
L'indicateur indique l'état de charge
de la batterie.
vert
La batterie est en char-
ge. (vert)
Lorsque l'affichage du
statut clignote en vert,
la batterie est en train
de charger.
vert
Batterie entièrement
chargée (vert)
Si l'affichage du statut
s'allume en vert, la bat-
terie est entièrement
chargée.
rouge
Défaut de la batterie
(rouge)
Si l'affichage du statut
clignote en rouge, la
batterie n'est pas en
train de charger. La bat-
terie peut surchauffer
ou être trop froide.
9
8
54
Rechargement
fr
55
Allumer l'appareil
Fig.
10
•
Poussez l'interrupteur marche/ar-
rêt dans le sens de la flèche. En
fonctionnement, l'affichage du
statut s'allume en vert.
Régler la puissance d'aspiration
Fig.
11
Appuyez en plus sur la touche Turbo
dans le sens de la flèche pour acti-
ver la fonction Turbo. L'affichage du
statut clignote en vert.
Niveau Standard:
vert
•
Aspirer à puissance normale pour
des tâches de nettoyage norma-
les. L'appareil atteint ici la durée
de marche maximale.
Niveau Turbo:
vert
•
Pour des tâches de nettoyage par-
ticulièrement exigeantes comme
l'aspiration de poussières fines
sur toutes surfaces (par ex. tapis
ou sols durs) et pour un nettoyage
intensif.
L'appareil atteint une durée de
marche plus courte. Aspiration
avec des accessoires supplémen-
taires uniquement au niveau Tur-
bo.
10
11
55
Aspiration
fr
56
Affichage du statut fonction-
nement
Fig.
12
La LED de l'affichage indique l'état
de fonctionnement de l'appareil.
vert
Fonctionnement niveau
Standard
Si l'affichage du sta-
tut s'allume en vert,
l'appareil fonctionne
en mode de puissance
Standard.
vert
Fonctionnement du ni-
veau Turbo
Si l'affichage du sta-
tut clignote en vert,
l'appareil fonctionne
en mode de puissance
Turbo.
rouge
Charge résiduelle faib-
le
Si l'affichage du statut
clignote en rouge, la
batterie doit être re-
chargée.
12
56
Aspiration
fr
57
Aspirer avec des accessoires
supplémentaires
Fig.
13
•
Pour retirer les accessoires, ap-
puyez sur le bouton de déverrouil-
lage et retirez les accessoires par
le bas de la cage murale.
•
Après utilisation, rangez les acces-
soires dans la
fixation murale.
Fig.
14
Insérez les buses ou le tuyau
d'aspiration court sur le tube
d'aspiration ou sur le tube de
l'appareil, selon les besoins :
a) Le tuyau d'aspiration court sert à
aspirer les plus grosses particu-
les de poussières ou les petites
pièces, telles que les tessons,
des trombones, etc. Insérez les
buses sur le tube d'aspiration ou
sur le tube de l'appareil, selon les
besoins :
Click
1
2
14
13
1
2
a
Aspiration
57
fr
58
Click
b
Suceur ameublement profession-
nel
Fig.
15
•
Retirez de la cage murale le su-
ceur ameublement professionnel
du tuyau d'aspiration court.
•
Suceur ameublement professi-
onnel pour aspirer sur les tissus
d’ameublement, rideaux, etc.
Réglez l'appareil à la puissance
maximale. Il est éventuellement
nécessaire de corriger le réglage
de la puissance en la réduisant,
selon la nature de la surface du
capitonnage. Vous devez pouvoir
bouger facilement le suceur et ce
dernier ne doit pas se coller sur
le capitonnage.
Pour le nettoyage de matières
délicates, telles que des rideaux
et voilages, ramenez la puis-
sance à la plage de faible puis-
sance.
15
14
b) Suceur long, pour aspirer
dans les joints et les coins etc.
•
Après utilisation, rangez de nou-
veau les accessoires dans la cage
murale.
Fig.
5
Aspiration
fr
58

59
•
Après utilisation, enfichez
de nouveau le suceur ameuble-
ment professionnel sur le tuyau
d'aspiration court dans la cage
murale.
•
Pour le nettoyage, aspirez simple-
ment le suceur ameublement pro-
fessionnel avec l'appareil.
Aspirer sur des escaliers
Fig.
16
Lorsque vous passez l'aspirateur sur
des escaliers, pour une meilleure
accessibilité, le tuyau d'aspiration
peut être aussi démonté et vous
pouvez enficher directement la
brosse pour sols sur l'appareil.
Le tuyau d'aspiration peut être ran-
gé dans la cage murale montée.
16
15
Aspiration
fr
59

60
17
Mettre l’appareil hors tension
Fig.
17
Éteignez l'appareil après le nettoya-
ge.
•
Poussez l'interrupteur marche/
arrêt dans le sens de la flèche.
L'affichage du statut s'éteint.
Ranger l'appareil
Fig.
18
•
Placez l'appareil sur la cage mura-
le.
Pour économiser de la place, il est
recommandé de ranger l'appareil
dans la cage murale. L'appareil
peut aussi être rangé dans la cage
murale même avec une batterie
entièrement chargée.
Attention!
pour éviter tout basculement de
l'appareil, mettez-le en sécurité
dans un coin de mur ou placez
l'appareil dans la cage murale.
18
Après utilisation
fr
60

61
20
Enlever le collecteur de poussières
Fig.
20
•
Déverrouillez le collecteur de
poussières à l'aide du bouton
de déverrouillage et retirez-le de
l'appareil.
1
2
19
max
Vider le collecteur de pous-
sières
Fig.
19
Afin d'obtenir un résultat de nettoy-
age optimal, il est recommandé de
vider le collecteur de poussières
après chaque utilisation, et au plus
tard lorsque la poussière a atteint le
repère du collecteur de poussières.
Nous vous recommandons de veiller
à ne pas dépasser le repère du coll-
ecteur de poussières, car cela con-
duit à un important encrassement
du filtre.
Lorsque vous videz le collecteur de
poussières, veillez également à tou-
jours contrôler le degré de salissure
de l'unité de filtre extérieure et à
nettoyer celle-ci si besoin en procé-
dant selon les instructions « Entre-
tien des filtres ». Fig.
25
Attention!
il est impératif de débrancher
l’appareil avant de réaliser toutes
les opérations suivantes. N'aspirez
jamais sans unité de filtre.
Après utilisation
fr
61
62
Extraire l'unité de filtre
Fig.
21
•
Extrayez l'unité de filtre du coll-
ecteur de poussières
•
Videz le collecteur de poussières.
Si nécessaire, essuyez le bac à pous-
sière avec un chiffon humide.
•
Éliminez les saletés éventuelle-
ment présentes en-dessous de
l'ouverture d'éjection.
21
Après utilisation
fr
62
63
Click
Mettre le collecteur de poussières
en place
Fig.
22
•
Insérez l'unité de filtre dans le
collecteur de poussières, tout en
veillant à ce qu'elle soit correcte-
ment en place.
•
Placez le collecteur de poussières
dans l'appareil et encliquetez-le
de manière audible.
Attention!
si vous sentez une résistance en
installant le collecteur de pous-
sières, vérifiez si les filtres sont
au complet et si l'unité de filtre et
le collecteur de poussières sont
correctement mis en place.
22
Après utilisation
fr
63

64
1
2
Assembler l'appareil et le tu-
yau d'aspiration
Fig.
23
•
Pour retirer le tuyau d'aspiration, ap-
puyez sur le bouton de déverrouil-
lage et retirez le tuyau d'aspiration
vers le bas.
Assembler le tuyau d'aspiration et
la brosse pour sols
Fig.
24
•
Pour retirer la brosse pour sols,
appuyez sur le bouton de dé-
verrouillage et retirez le tuyau
d'aspiration de la brosse.
24
23
1
2
Démontage
fr
64
65
Attention!
le nettoyage des filtres est possi-
ble uniquement lorsque l'appareil
est éteint.
Nettoyer le filtre à peluche
Fig.
25
Le filtre à peluches doit être nettoyé
régulièrement, afin que l'aspirateur
fonctionne de façon optimale.
•
Veuillez éteindre l'appareil pour
nettoyer l'unité de filtre extérieu-
re.
•
Retirez le collecteur de poussières
de l'appareil.Fig.
20
•
Extrayez l'unité de filtre du coll-
ecteur de poussières.
Fig.
21
•
Nettoyer l'unité de filtre extérieu-
re.
a) Généralement il suffit de secou-
er ou de tapoter légèrement sur
le filtre à peluche lors du vidage
du collecteur de poussières, afin
que les éventuelles saletés se dé-
collent.
b) Si cela ne suffit pas, veuillez uti-
liser un chiffon humide pour reti-
rer les saletés sur la surface.
25
b
a
Entretien des filtres
fr
65
66
Nettoyer le filtre à lamelles
(filtre de protection du moteur)
Fig.
26
•
Veuillez éteindre l'appareil pour
nettoyer le filtre à lamelles.
•
Pour nettoyer le filtre à lamelles,
tournez la manette au moins 3 fois
à 180°.
•
Ensuite, retirez le filtre à lamelle
de l'unité de filtre extérieure et vi-
dez la poussière.
Nous vous recommandons de net-
toyer le filtre à lamelles à chaque
fois que vous videz le collecteur de
poussières.
Si le filtre à lamelles est défectu-
eux, vous pouvez en commander un
nouveau auprès de notre service cli-
entèle sous le numéro de pièce de
rechange suivant:
12023349.
26
Entretien des filtres
fr
66
67
Débourrer le filtre à lamelles
Fig.
27
Le filtre à lamelles peut aussi être
débourré s'il est très encrassé.
•
Pour ce faire, retirez le filtre à la-
melles de l'unité de filtre extérieu-
re et tapotez-le au-dessus d'une
poubelle.
•
Le filtre à lamelles peut ainsi être
réutilisé immédiatement après
nettoyage.
Attention!
le filtre à lamelles ne doit pas être
lavé.
27
Fig.
28
•
Posez le filtre à lamelles dans
l'unité de filtre extérieure et ver-
rouillez-le en le tournant dans le
sens horaire.
•
Insérez l'unité de filtre dans le
collecteur de poussières, tout en
veillant à ce qu'elle soit correcte-
ment en place. Placez le collecteur
de poussières dans l'appareil et
encliquetez-le de manière audible.
Fig.
22
28
Entretien des filtres
fr
67
68
Nettoyage de la brosse pour
sols
Avant chaque entretien, éteignez
l'aspirateur et débranchez-le ou
bien séparez-le du cordon de char-
ge.
Fig.
29
a) Déverrouillez la brosse cylin-
drique en la tournant dans le sens
horaire
et retirez-la latéralement
de la brosse pour sols.
b) Coupez et retirez les fils et les
cheveux enroulés avec des cise-
aux.
c) Introduisez la brosse cylindrique
latéralement le long de la tige de
guidage dans la brosse pour sols,
puis verrouillez-la dans le sens
horaire
.
•
La brosse rotative est également
dotée d'une fonction d'auto-netto-
yage. Pour ce faire, coupez avec
des ciseaux les cheveux et les fils
sur les deux côtés opposés. Lors
du fonctionnement ultérieur de la
brosse rotative de plus de 30 se-
condes, ceux-ci sont automatique-
ment aspirés.
Attention!
la brosse pour sols doit unique-
ment être utilisée avec une bros-
se rotative en place.
b
a
29
2
1
1
2
c
Nettoyage de la brosse pour sols
fr
68
69
Avant chaque nettoyage de l'aspirateur balai, il faut l'éteindre
et le séparer du cordon de charge. L'aspirateur et les accessoires
en plastique peuvent être entretenus avec un produit de nettoya-
ge pour plastique usuel du commerce.
N'utilisez pas de produits récurants, de nettoyants pour
vitres ni de nettoyants universels. Ne plongez jamais
l'aspirateur dans l'eau.
Sous réserve de modifications techniques.
69
Consignes de nettoyage
fr
70
Dérangements et service après-vente
fr
Résolution de problème
Dans les cas suivants, vous devez immédiatement mettre l'appareil
hors service et appeler le service après-vente :
Si par inadvertance vous avez aspiré du liquide ou si du liquide
est parvenu à l'intérieur de l'appareil.
Si l'appareil est tombé.
Dans ces cas, la sécurité électrique de l'appareil n'est éventuel-
lement plus garantie, même si aucun endommagement apparent
n'est décelable.
Dérangement se produi-
sant
Solution
L'appareil ne fonctionne
pas, et absence de signal
de l'affichage du statut de
la batterie
Assurez-vous que la batterie est
correctement insérée et/ou qu'elle
est chargée.
L'appareil ne fonctionne
pas, et/ou affichage du sta-
tut de la batterie en rouge
pendant 10 secondes.
La batterie peut surchauffer ou
être trop froide. Patientez jusqu'à
ce que la batterie atteigne la tem-
pérature adaptée.
L'électrobrosse ne fonc-
tionne pas ou émet des
bruits inhabituels
Nettoyez la brosse et le cas échéant,
retirez les corps étrangers
Vérifiez si la brosse est correcte-
ment en place et verrouillée
Si le problème persiste, contactez
le service après-vente
La brosse s'éteint pendant
l'aspiration
Éteignez l'appareil et vérifiez si la
brosse est bloquée. Éliminez le
blocage et nettoyez la brosse.
Choisissez une puissance moins
élevée sur des tapis et recom-
mencez le processus de nettoyage.
Si la brosse ne s'allume plus, con-
tactez le service après-vente.
70

71
Affichage de statut du processus de charge
Affichage de statut du fonctionnement
État de l'appareil Fonction d'affichage de statut
Niveau Normal L'affichage s'allume en vert.
Niveau Turbo L'affichage clignote en vert.
Charge de la batterie
< à 20 %
L'affichage clignote en rouge.
La batterie est vide L'affichage s'éteint.
Processus de charge L'affichage clignote en vert.
La batterie est enti-
èrement chargée
L'affichage s'allume en vert et s'éteint
après environ 2 minutes.
Affichage de défaut L'affichage s'allume en rouge et s'éteint
après environ 10 secondes.
Affichages de statut
fr
71
72
Consignes pour la mise au rebut
Les aspirateurs, les batteries, les accessoires et les emballages
doivent être recyclés de manière écologique.
Ne jetez pas les aspirateurs ni les batteries ou piles avec les or-
dures ménagères !
Emballage
L'emballage protège l'aspirateur des dommages pendant le
transport. Il est constitué de matériaux écologiques et est donc
recyclable. Les matériaux d'emballage qui ne sont plus utilisés
doivent être mis au rebut aux points de collecte du système de
recyclage « Point vert ».
Appareil usagé
Les appareils usagés contiennent encore souvent des matériaux
précieux. Apportez donc votre appareil usagé au revendeur ou à
un centre de recyclage pour la revalorisation. Pour connaître les
possibilités de mise au rebut actuelles, renseignez-vous auprès
de votre revendeur ou de votre mairie.
Eliminez l’emballage en respectant l’envi-ronne-
ment. Cet appareil est marqué selon la directive
européenne 2012/19/UE relative aux appareils
électriques et électroniques usagés (waste elec-
trical and electronic equipment – WEEE). La direc-
tive définit le cadre pour une reprise et une récup-
ération des appareils usagés applicables dans les
pays de la CE. S’informer auprès du revendeur sur
la procédure actuelle de recyclage.
72
Consignes pour la mise au rebut
fr
73
Consignes pour la mise au rebut
fr
Seulement pour les pays de l’Union Européenne :
Conformément à la directive européenne 2012/19/UE, les équi-
pements électriques dont on ne peut plus se servir, et confor-
mément à la directive européenne 2006/66/CE, les accus/piles
usés ou défectueux doivent être isolés et suivre une voie de
recyclage appropriée.
Les batteries/piles dont on ne peut plus se servir peuvent être
déposées directement auprès de:
Suisse
Batrec AG
3752 Wimmis BE
Batteries/piles :
Lithium ion :
Respectez les indications données dans le chapitre
« Transport ».
Sous réserve de modifications.
73

7474
Inhoudsopgave
nl
Veiligheidsvoorschriften ........................................................76
Juist gebruik ............................................................................ 76
Veiligheidsaanwijzingen ...........................................................76
Doelmatig gebruik ...................................................................77
Li-Ion-accu`s ............................................................................79
Aanwijzingen voor het transport ..............................................81
Beschrijving van het toestel ..................................................82
Voor het eerste gebruik .......................................................... 84
Apparaat en zuigbuis koppelen ............................................... 84
Het vloermondstuk verbinden met de zuigbuis ........................ 84
Accu inbrengen in het apparaat ...............................................85
Opladen ................................................................................... 86
Wandhouder monteren ...........................................................86
Accessoires opbergen in de wandhouder ................................87
Accu alleen laden met de laadkabel .........................................88
Laden met het snellaadapparaat .............................................89
Accu opladen in de wandhouder .............................................89
Statusindicatie tijdens het laden ..............................................90
Zuigen ......................................................................................91
Apparaat inschakelen ...............................................................91
Zuigkracht regelen ...................................................................91
Statusindicatie Functie ............................................................92
Zuigen met extra accessoires ..................................................93
Professioneel bekledingsmondstuk..........................................94
Schoonzuigen van trappen .......................................................95

7575
Inhoudsopgave
nl
Na gebruik ...............................................................................96
Apparaat uitzetten ...................................................................96
Het apparaat opbergen ............................................................ 96
Stofreservoir leegmaken ..........................................................97
Stofreservoir verwijderen ........................................................97
Filtereenheid verwijderen ........................................................98
Stofreservoir plaatsen ..............................................................99
Demontage ............................................................................ 100
Zuigbuis ontkoppelen van het apparaat .................................100
Vloermondstuk ontkoppelen van de zuigbuis .........................100
Filteronderhoud ....................................................................101
Pluisfilter reinigen ..................................................................101
Lamellen-filter (Motorbeveiligingsfilter) schoonmaken ..........102
Lamellen-filter uitkloppen ......................................................103
Het vloermondstuk schoonmaken ........................................104
Het vloermondstuk schoonmaken .........................................104
Schoonmaakinstructies ........................................................105
Storingen en de servicedienst ..............................................106
Statusindicaties ....................................................................107
Instructies voor recycling ..................................................... 108
Klantenservice & Garantie ....................................................146

76
De gebruiksaanwijzing goed bewaren. Wanneer u de stofzuiger
doorgeeft aan derden, voeg de gebruiksaanwijzing er dan bij.
Juist gebruik
Dit apparaat is alleen bestemd voor huishoudelijk gebruik en de
huiselijke omgeving. Dit apparaat is bestemd voor gebruik tot een
hoogte van maximaal 2000 meter boven zeeniveau.
Ter voorkoming van letsel en schade mag de stofzuiger niet wor-
den gebruikt voor:
het schoonzuigen van mensen of dieren.
het opzuigen van:
− stoffen die schadelijk voor de gezondheid, heet of gloeiend zijn
of scherpe randen hebben.
− vochtige of vloeibare stoffen.
− licht ontvlambare of explosieve stoffen en gassen.
− As, roest van open haarden en centrale verwarmingsinstalla-
ties.
− Tonerstof van printers en kopieerapparaten.
Veiligheidsaanwijzingen
Deze stofzuiger voldoet aan de erkende regels van de techniek en
de geldende veiligheidsbepalingen.
Het apparaat kan worden gebruikt door kinderen vanaf 8 jaar en
door personen met beperkte fysieke, sensorische of geestelijke
vermogens of personen die gebrek aan kennis of ervaring heb-
ben, indien zij onder toezicht staan of, met het oog op een veilig
gebruik, volledig over de bediening van het apparaat zijn geïnfor-
meerd en op de hoogte zijn van de gevaren die hieruit kunnen
voortvloeien.
Er mogen geen kinderen met het apparaat spelen. Ook niet als
het aan de wandhouder hangt.
Reiniging en onderhoud mogen niet worden uitgevoerd door kin-
deren die niet onder toezicht staan.
afet
76
Veiligheidsvoorschriften
nl

77
Plastic zakken en folie dienen buiten het bereik van kleine kinde-
ren te worden gehouden en te worden gerecycled.
>= Er bestaat een risico van verstikking!
Onderdelen, toebehoren
Onze originele onderdelen en originele en aanvullende onderde-
len zijn afgestemd op de kenmerken en vereisten van onze stofzu-
igers. We raden u daarom aan alleen originele reserveonderdelen
en onze originele en extra accessoires te gebruiken. Dit zorgt er-
voor dat uw stofzuiger een lange levensduur heeft en dat de reini-
gingsprestaties constant hoog blijven.
!
Aanwijzing:
Door het gebruik van niet goed passende of kwalitatief mindere
onderdelen, toebehoren/ extra toebehoren kan uw stofzuiger
beschadigd raken. Indien deze schade veroorzaakt is door het
gebruik van dergelijke producten valt hij niet onder de garantie.
Doelmatig gebruik
Voor het laden alleen de meegeleverde laadkabel resp. het ori-
ginele snellaadapparaat gebruiken.
Laadkabel en snellaadapparaat alleen volgens het typeplaatje
aansluiten en in gebruik nemen.
Het toestel mag alleen binnen worden bewaard en opgeladen.
Stel het toestel niet bloot aan temperaturen beneden 0°C en
boven 45°C.
Gebruik het apparaat nooit zonder stofzakken en motorbeveili-
gingsfilters.
>= Dan kan hij beschadigd raken!
Zuig niet met mondstuk en buis in de nabijheid van het hoofd. =>
Dit brengt het risico van letsel met zich mee!
Een beschadigde laadkabel mag niet meer worden gebruikt en
dient te worden vervangen door een origineel exemplaar.
77
Veiligheidsvoorschriften
nl

78
Het toestel met behulp van de stekker van de stroom halen, niet
aan de laadkabel trekken.
De laadkabel niet over scherpe randen trekken en niet bekneld
laten raken.
Voor alle werkzaamheden aan de stofzuiger het toestel uitscha-
kelen resp. het elektriciteitssnoer ontkoppelen en het van de
stroom halen.
Wanneer de stofzuiger beschadigd is, mag hij niet in gebruik
worden genomen.
In geval van een storing het toestel uitschakelen resp. van de
stroom halen en het elektriciteitssnoer ontkoppelen.
Ter voorkoming van risico's mag alleen onze servicedienst repa-
raties aan de stofzuiger uitvoeren en onderdelen vervangen.
In de volgende gevallen dient u het toestel direct uit te schakelen
en contact op te nemen met de klantenservice:
− wanneer u per ongeluk vloeistof heeft opgezogen of als er vlo-
eistof in het binnenste van het toestel is gekomen
− wanneer het toestel naar beneden gevallen en beschadigd is.
De stofzuiger beschermen tegen weersinvloeden, vocht en hitte-
bronnen.
Zorg ervoor dat er geen brandbare of alcoholhoudende stoffen
op de filters (filterzak, motorbeveiligingsfilter, uitblaasfilter, etc.)
terechtkomen.
De stofzuiger is niet geschikt voor gebruik op bouwplaatsen.
=>Het opzuigen van bouwafval kan leiden tot beschadiging van
het apparaat.
Apparaat uitschakelen als er niet gezogen wordt.
De stofzuiger beschikt niet over een functie om rechtop te blij-
ven staan. Vermijd het omvallen van het apparaat. Plaats de stof-
zuiger niet tegen muren of de rand van een tafel.
De verpakking beschermt de stofzuiger tegen beschadiging tij-
dens het transport. Daarom raden wij u aan de verpakking voor
transportdoeleinden te bewaren.
78
Veiligheidsvoorschriften
nl

79
Let erop dat haren, los zittende kleding, vingers en andere
lichaamsdelen niet in de nabijheid van openingen of beweegli-
jke delen komen, zoals borstelrollen. Geen slang, buis of mond-
stukken op ogen of oren richten en niets hiervan in uw mond
steken.
Li-Ion-accu's
Lees alle veiligheidsaanwijzingen en instructies.
>= Het niet naleven van de veiligheidsaanwijzingen en instructies
kan elektrische schokken, brand en/of ernstig letsel veroorza-
ken.
Bewaar alle veiligheidsaanwijzingen en instructies voor toekoms-
tig gebruik.
Deze veiligheidsaanwijzingen gelden alleen voor Bosch Li-Ion-
accu's! Voor dit apparaat zijn alleen accu's van de serie "Power
for ALL" geschikt.
Open de accu niet. => Er bestaat gevaar voor een kortsluiting.
Bescherm de accu tegen hitte, bijv. ook tegen permanente zon-
nestraling, vuur, water en vocht.
>= Kans op explosie.
Bij beschadiging en ondeskundig gebruik van de accu kunnen
dampen lekken. Zorg voor verse lucht en neem bij klachten con-
tact op met een arts.
>= De dampen kunnen de luchtwegen irriteren.
Bij een defecte accu kan vloeistof lekken en aangrenzende voor-
werpen nat maken. Controleer de desbetreffende delen.
>= Reinig deze of vervang deze eventueel.
Gebruik de accu alleen in combinatie met uw elektrisch apparaat
van Bosch.
>= Alleen zo wordt de accu tegen gevaarlijke overbelasting be-
schermd.
Laad de accu's alleen in laadapparaten die door de fabrikant
worden aanbevolen.
>= Voor een laadapparaat dat voor een bepaald soort accu's is
geschikt, is er brandgevaar als het met andere accu's wordt
gebruikt.
Veiligheidsvoorschriften
79
nl

80
Gebruik alleen de daarvoor bestemde accu's in uw elektrisch
apparaat.
>= Het gebruik van andere accu's kan letsels en brandgevaar ver-
oorzaken.
Houd de niet gebruikte accu uit de buurt van paperclips, munten,
sleutels, spijkers, schroeven of andere kleine metalen voorwer-
pen die een overbrugging van de contacten kunnen veroorzaken.
>= Een kortsluiting tussen de accucontacten kan verbrandingen
of vuur tot gevolg hebben.
Bij onjuist gebruik kan vloeistof uit de accu lekken. Raak deze
vloeistof niet aan. Bij toevallig contact met water afspoelen. Als
de vloeistof in de ogen terechtkomt, dient u een arts te raadple-
gen.
>= Lekkende accuvloeistof kan huidirritaties of verbrandingen
veroorzaken.
80
Veiligheidsvoorschriften
nl

81
Aanwijzingen voor het transport
De Lithium-ion accu's voldoen aan de wettelijke voorschriften
voor het transport van gevaarlijke stoffen. De accu's kunnen door
de gebruiker zonder verdere documentatie over straat getrans-
porteerd worden. Bij verzending door derden (bijv. luchttrans-
port of een expeditiebedrijf) dienen bijzondere eisen ten aanzien
van de verpakking en etikettering in acht te worden genomen. In
dit geval moet bij de voorbereiding van het verzendstuk een ex-
pert op het gebied van gevaarlijke stoffen worden geraadpleegd.
Stuur alleen accu's op wanneer de behuizing onbeschadigd is.
Open contacten dienen afgeplakt te worden en de accu dient
zo te worden verpakt dat hij niet kan bewegen inde verpakking.
Eventuele overige nationale voorschriften dienen in acht te wor-
den genomen.
81
Veiligheidsvoorschriften
nl
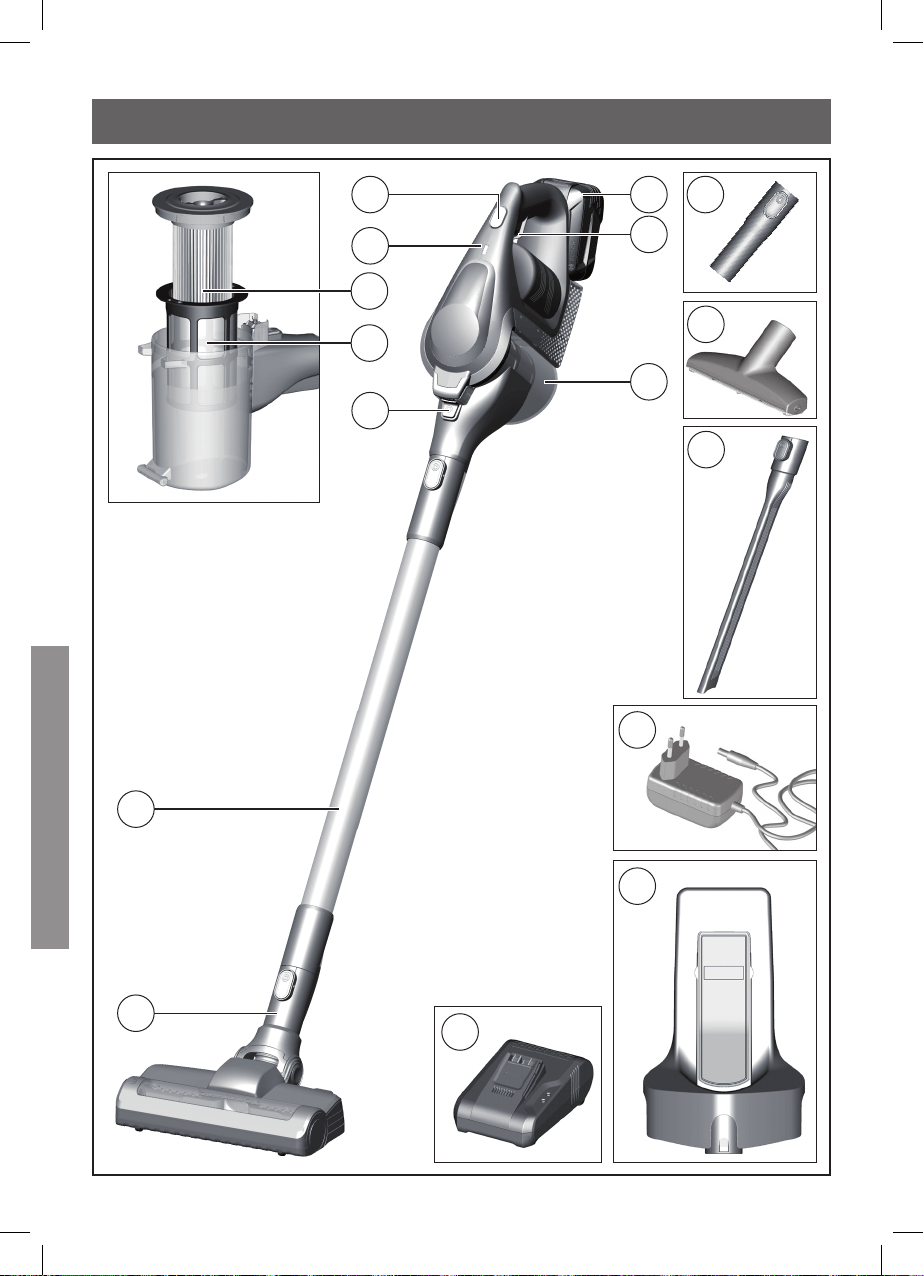
82
12
13
14
15
11
1
2
4
5
3
8
9
10
6
7
82
Beschrijving van het toestel
nl
16
83
Beschrijving van het toestel
1 Vloermondstuk met
elektrische borstel
2 Zuigbuis
3 Ontgrendelingsknop
stofreservoir
4 Pluiszeef
5 Lamellenfilter
6 IIndicatie acculaadtoestand
7 Turboschakelaar
8 Accu
9 Aan-/uit-schakelaar
10 Stofreservoir
11 Adapter
12 XXL-bekledingsmondstuk
13 Flexibel kierenmondstuk
14 Laadkabel
15 Wandhouder
16 Snellaadapparaat
nl
83
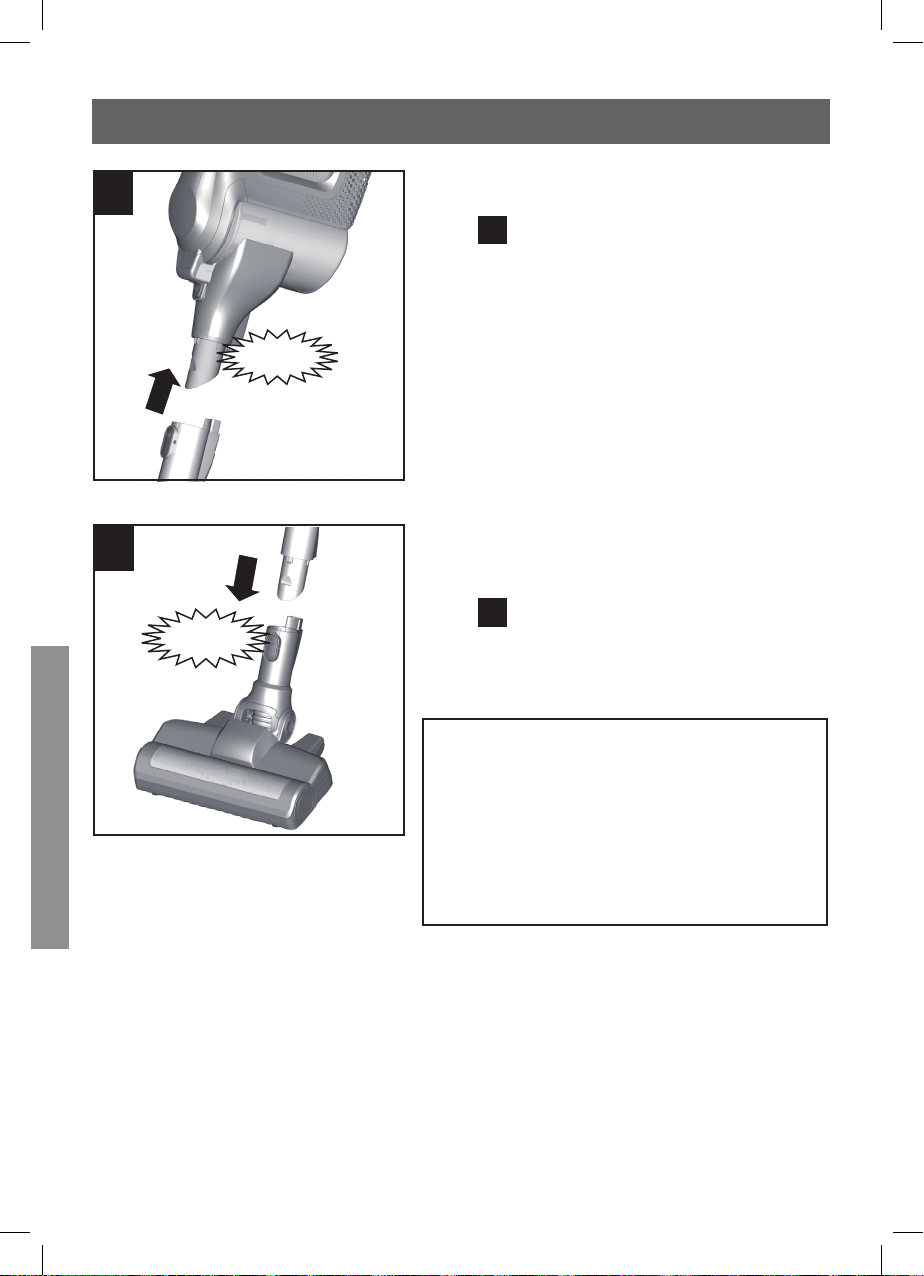
8484
Voor het eerste gebruik
nl
Apparaat en zuigbuis koppelen
Afb.
1
•
Zuigbuis op de aansluiting van de
stofzuiger steken en vergrende-
len.
Click
Het vloermondstuk verbinden met
de zuigbuis
Afb.
2
•
Zuigbuis in het vloermondstuk
steken en vergrendelen.
Let op!
Het vloermondstuk is niet ge-
schikt voor het opzuigen van klei-
ne voorwerpen zoals scherven,
speelgoed, spelden, paperclips,
etc.
2
Click
1

8585
Accu inbrengen in het ap-
paraat
Afb.
3
•
Accu via de geleidingsrail in de
stofzuiger plaatsen en vergrende-
len.
•
Om de verbinding op te heffen de
ontgrendelingsknop indrukken en
de accu naar achteren uit het ap-
paraat nemen.
Let op!
Voor het eerste gebruik moeten
de accu's van de stofzuiger mins-
tens 6 uur worden opgeladen.
Apparaat alleen opladen met de
bijbehorende laadkabel.
Click
3
1
2
Voor het eerste gebruik
nl

8686
Wandhouder monteren
Wij raden aan om de wandhouder te
gebruiken voor het laden en opber-
gen van het apparaat.
Dit is echter ook mogelijk zonder
wandhouder.
Afb.
4
•
Monteer de wandhouder in de bu-
urt van een stopcontact.
•
Verwijder hiervoor de frontplaat
van de wandhouder. Met uw vin-
ger de frontplaat van binnen uit de
wandhouder drukken. De wand-
houder met de bijbehorende of
andere geschikte schroeven aan
de wand monteren.
•
De kleine stekker van de laadkabel
van onderen in de wandhouder
steken en van boven in de voorge-
vormde vorm leggen.
•
Door de frontplaat aan te brengen
en te vergrendelen wordt de aans-
luiting bevestigd.
•
Stekker van de laadkabel in het
stopcontact steken.
4
1
2
Click
Opladen
nl
8787
Opladen
Accessoires opbergen in de
wandhouder
Om ruimte te besparen kunnen ac-
cessoires in de wandhouder wor-
den opgeborgen.
Afb.
5
•
De wandhouder heeft twee ops-
lagplaatsen voor accessoires met
een aansluiting (1) en een voor de
opslag van de zuigbuis (2).
•
De flexibele zuigbuis en de korte
zuigbuis met een lichte druk van
onderaf in de wandhouder plaats-
en en vergrendelen.
•
Het professionele mondstuk aan
de korte zuigbuis bevestigen.
Click
5
1
2
1
nl
8888
Opladen
Accu alleen laden met de laadka-
bel
Afb.
6
•
Om de stofzuiger op te laden,
plaatst u hem dichtbij een con-
tactdoos.
•
Laadkabel onderaan in de aanslu-
iting van het apparaat steken.
•
Stekker van de laadkabel in de
contactdoos steken.
•
Tijdens de hele laadprocedure
knippert de statusindicatie van de
stofzuiger groen.
•
Zodra de accu compleet is gela-
den, is de statusindicatie gedu-
rende enkele minuten permanent
groen verlicht voordat hij uitgaat.
Koppel het apparaat ter controle
kort los van het net. Daarna is de
indicatie weer groen verlicht.
•
Het is mogelijk dat de laadkabel en
de handstofzuiger warm worden.
Dit is normaal en niet bezwaarlijk.
•
Als de stofzuiger niet wordt gebru-
ikt, kunt u hem altijd laden.
6
1
2
Opladen
nl

8989
Opladen
Laden met het snellaadap-
paraat
Afb.
7
•
Om te laden met het snellaadap-
paraat moet de accu uit het ap-
paraat worden genomen.
•
De werkwijze van het snellaadap-
paraat vindt u in de meegeleverde
gebruiksaanwijzing.
Accu opladen in de wandhouder
Afb.
8
•
Plaats de stofzuiger van boven in
de wandhouder.
•
Tijdens de hele laadprocedure
knippert de statusindicatie van de
stofzuiger groen.
•
Zodra de accu compleet is gela-
den, is de statusindicatie gedu-
rende enkele minuten permanent
groen verlicht voordat hij uitgaat.
Koppel het apparaat ter controle
kort los van het net. Daarna is de
indicatie weer groen verlicht.
nl
8
7

9090
•
Het is mogelijk dat de laad-
kabel en de handstofzuiger warm
worden. Dit is normaal en niet be-
zwaarlijk.
•
U kunt de stofzuiger altijd laden
als hij niet wordt gebruikt.
Statusindicatie tijdens het laden
Afb.
9
De laadtoestand van de accu wordt
weergegeven.
groen
De accu wordt geladen.
(groen)
Als de statusindicatie
groen knippert, wordt
de accu geladen.
groen
Accu volledig opgeladen
(groen)
Wanneer de statusindi-
catie groen verlicht is, is
de accu volledig opgela-
den.
rood
Storing accu (rood)
Knippert de status indi-
catie rood, dan wordt
de accu niet opgeladen.
De accu kan oververhit
of te koud zijn.
9
Opladen
nl
8
9191
Apparaat inschakelen
Afb.
10
•
Druk de aan-/uitknop in de richting
van de pijl. Tijdens het gebruik is
de statusindicatie groen verlicht.
Zuigkracht regelen
Afb.
11
Om eveneens de turbofunctie in te
schakelen drukt u op de turbo-knop
in de richting van de pijl. De statu-
sindicatie knippert groen.
Standaard stand:
groen
•
Zuigen in normale stand voor nor-
maal schoon zuigen. Het apparaat
heeft hierbij de maximale looptijd.
Turbo stand:
groen
•
Voor bijzonder veeleisende reini-
gingswerkzaamheden, zoals het
opzuigen van fijne stof van alle
oppervlakken (bijv. vloerkleden of
harde vloeren).
De looptijd van het apparaat wordt
hiermee korter.Stofzuigen met ex-
tra accessoires alleen op de turbo-
stand.
10
11
Zuigen
nl
9292
Statusindicatie Functie
Fig.
12
De LED van de indicatie geeft de
functie van het apparaat aan.
groen
Functie Standaard-
stand
Is de statusindicatie
groen verlicht, dan
staat het apparaat in
de standaard-stand.
groen
Functie Turbo-stand
Knippert de statusindi-
catie groen, dan staat
het apparaat in de tur-
bo-stand.
rood
Geringe restlading
Knippert de statusin-
dicatie rood, dan moet
de accu weer worden
opgeladen.
12
Zuigen
nl

9393
Zuigen met extra accessoires
Fig.
13
•
Voor het verwijderen van de ac-
cessoires de ontgrendelingsknop
indrukken en de accessoires naar
beneden uit de wandhouder ne-
men.
•
Berg de accessoires na gebruik
terug in de wandhouder.
Fig.
14
Mondstukken of de korte zuigbuis
naar behoefte op de zuigbuis of de
apparaataansluiting steken:
a) Korte zuigbuis voor het opzuigen
van grotere vuildeeltjes of kleine
voorwerpen, zoals scherven, pa-
perclips etc. Het mondstuk naar
behoefte verbinden met de zuig-
buis of de apparaataansluiting:
Click
1
2
14
13
1
2
a
Zuigen
nl
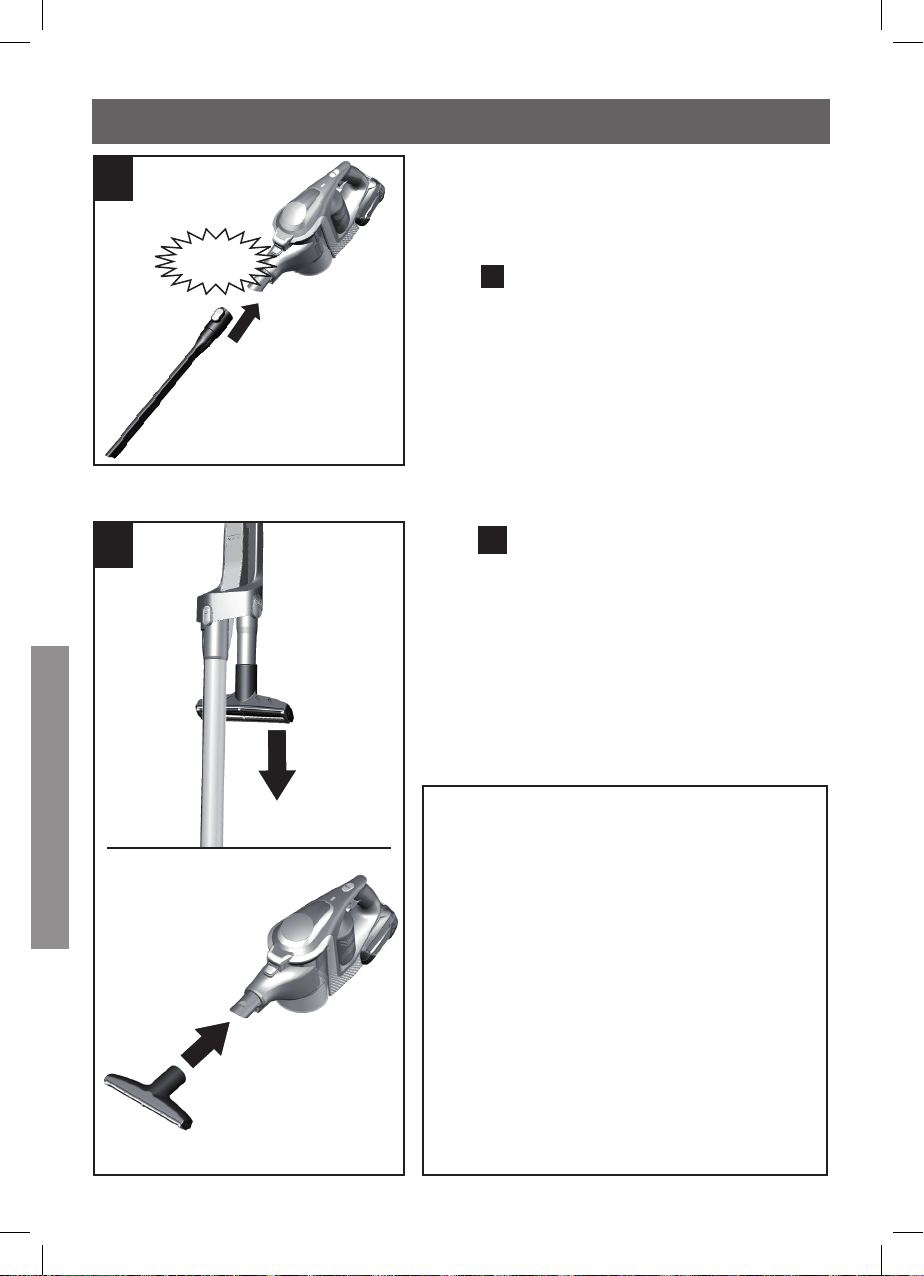
94
Click
b
Professioneel bekledingsmond-
stuk
Afb.
15
•
Het professionele bekledings-
mondstuk in de richting van de pijl
van de korte zuigbuis uit de wand-
houder nemen.
•
Het professinele bekledingsmond-
stuk voor het schoonzuigen van
gestoffeerde meubels, gordijnen
etc.
Het apparaat instellen op de
hoogste stand. Eventueel is het
aanbevolen om later een lagere
stand te gebruiken, afhankelijk
van het oppervlak van de bekle-
ding. Het mondstuk moet gemak-
kelijk kunnen worden bewogen
en mag zich niet aan de bekleding
vastzuigen.
Voor het schoonmaken van ge-
voelige materialen, zoals gordij-
nen, dient u de laagste stand te
gebruiken.
15
14
b) Kierenmondstuk voor het
reinigen van kieren, hoeken etc.
•
Na gebruik de accessoires weer
opbergen in de wandhouder.
Afb.
5
Zuigen
nl
94
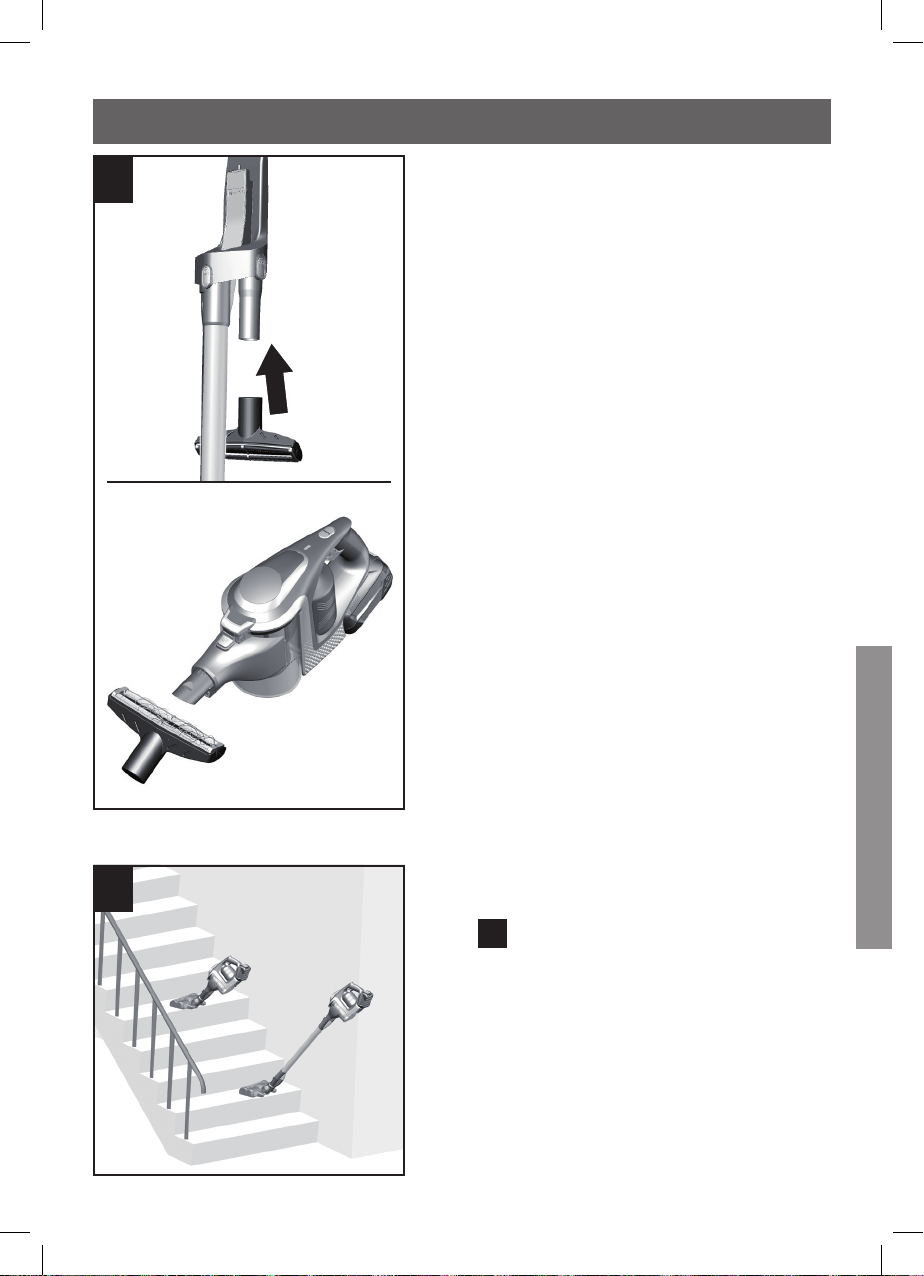
95
•
Het professionele mondstuk
na gebruik weer op de korte zuig-
buis in de wandhouder plaatsen.
•
U kunt het professionele bekle-
dingsmondstuk eenvoudig met
het apparaat schoonzuigen.
Schoonzuigen van trappen
Afb.
16
Om bij het stofzuigen van trappen
overal gemakkelijker bij te kunnen,
kan de zuigbuis worden afgenomen
en het vloermondstuk direct aan het
apparaat worden bevestigd.
De zuigbuis kan zolang worden op-
geborgen in de wandhouder.
16
15
Zuigen
nl
95
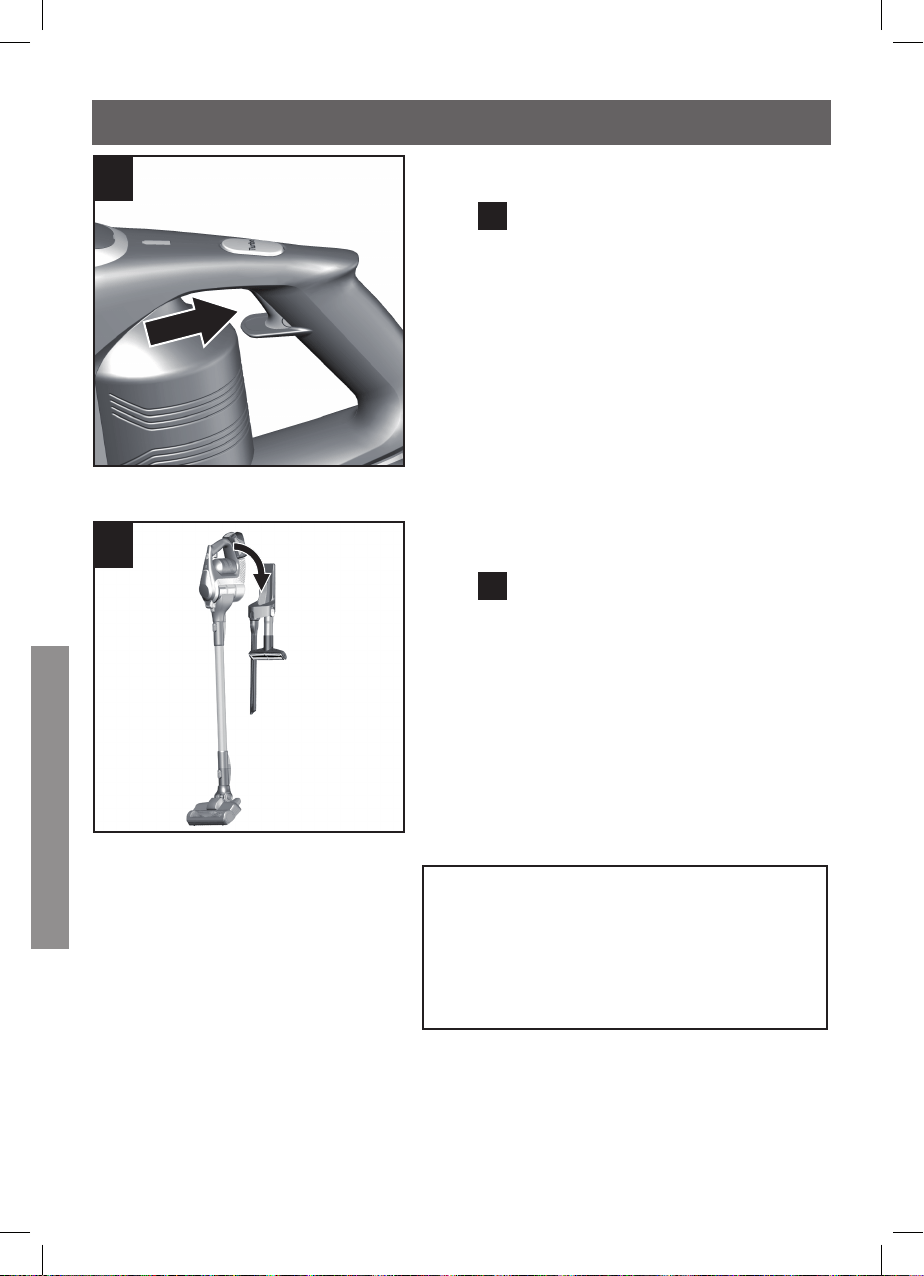
96
17
Apparaat uitzetten
Afb.
17
Het apparaat na gebruik uitzetten.
•
Druk in de richting van de pijl op
de aan-/uitknop. De statusindica-
tie gaat uit.
Het apparaat opbergen
Afb.
18
•
Het apparaat in de wandhouder
plaatsen.
Om ruimte te besparen wordt aan-
bevolen om het apparaat op te
bergen in de wandhouder. Het ap-
paraat kan ook wanneer de accu
volledig is opgeladen worden op-
geborgen in de wandhouder.
Let op!
Plaats het apparaat, om omvallen
te voorkomen, veilig in een hoek
tegen de muur of in de wand-
houder.
18
Na gebruik
nl
96

97
20
Stofreservoir verwijderen
Afb.
20
•
Het stofreservoir met behulp van
de ontgrendelingstoets loskop-
pelen en uit het apparaat nemen.
1
2
19
max
Stofreservoir leegmaken
Afb.
19
Voor een goed resultaat moet het
stofreservoir na gebruik altijd wor-
den leeggemaakt. Dit dient echter
op zijn laatst te gebeuren op het
moment dat het stof op een plek in
het stofreservoir de markering heeft
bereikt.
Wij raden u aan het stofreservoir
niet verder te vullen dan de marke-
ring, omdat dit tot sterke verontrei-
niging van de filter leidt.
Bij het leegmaken van het stofreser-
voir ook altijd controleren hoe ve-
rontreinigd de filtereenheid is en
deze zo nodig schoonmaken vol-
gens de aanwijzingen in "Filter
schoonmaken". Afb.
25
Let op!
de filter kan alleen worden gerei-
nigd wanneer het apparaat is uit-
geschakeld. Nooit zuigen zonder
filtereenheid.
Na gebruik
nl
97
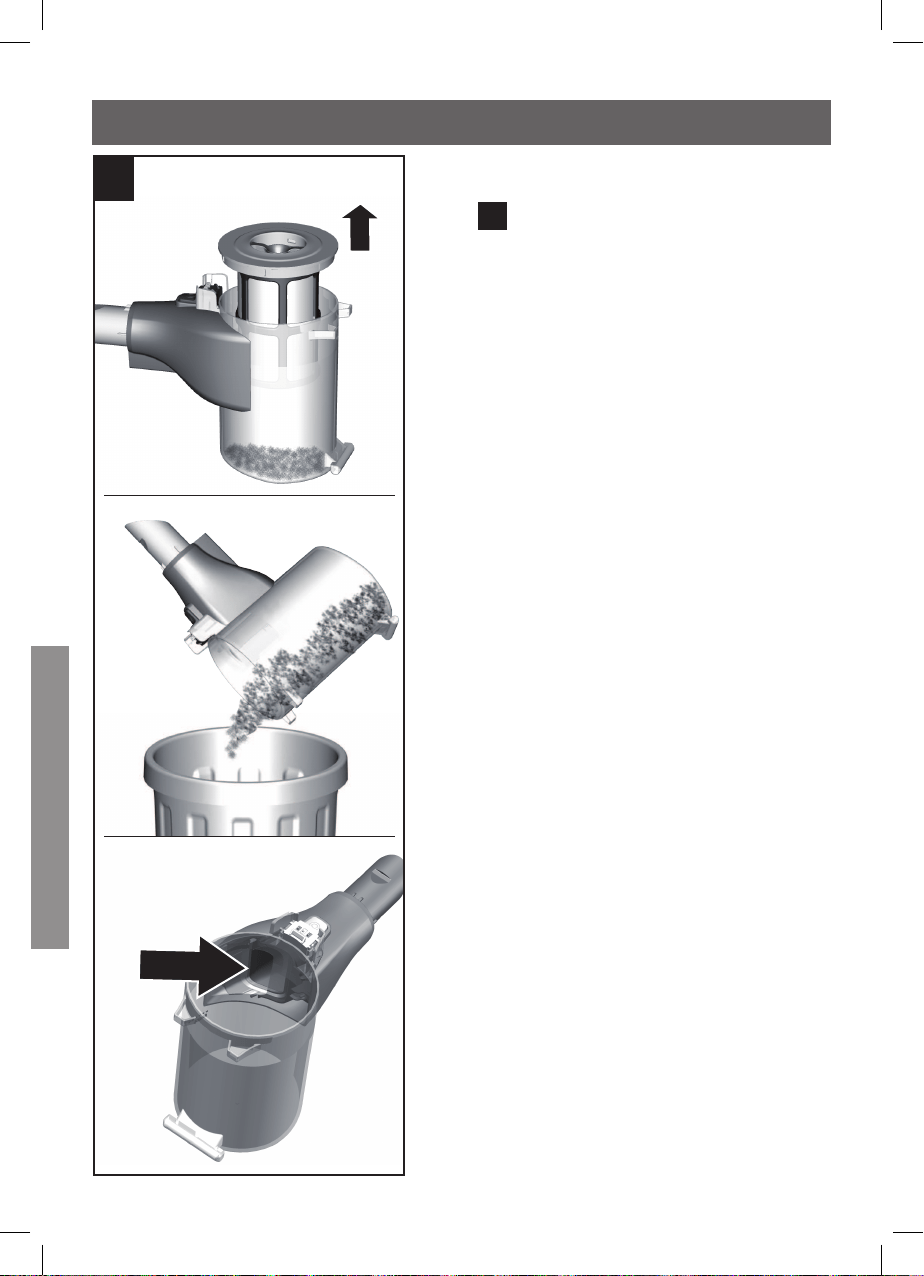
98
Filtereenheid verwijderen
Afb.
21
•
Filtereenheid uit het stofreservoir
nemen
•
Stofreservoir leegmaken.
Veeg de stofbak indien nodig af met
een vochtige doek.
•
Eventueel vuil onder de uitlaato-
pening verwijderen.
21
Na gebruik
nl
98
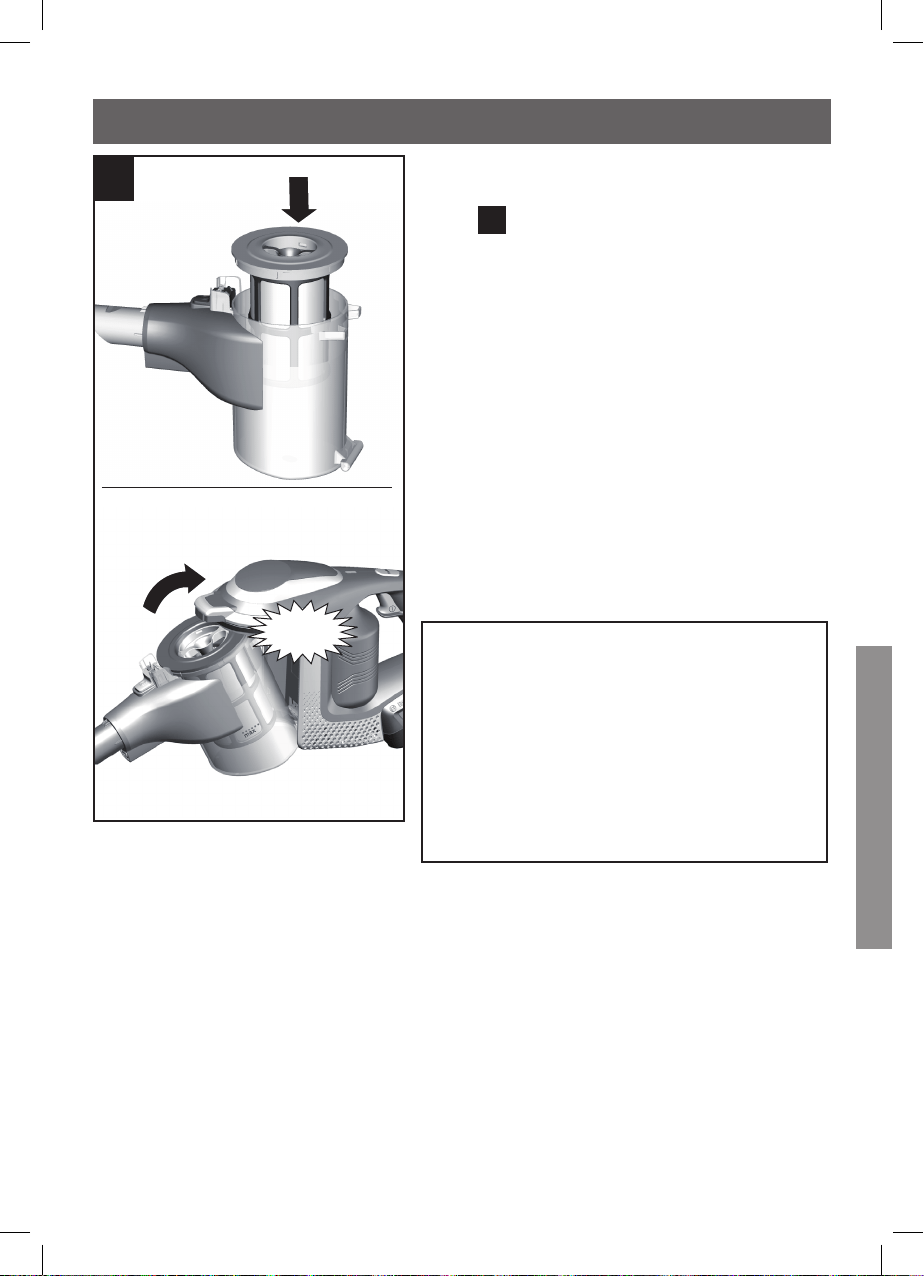
99
Click
Stofreservoir plaatsen
Afb.
22
•
Filtereenheid in het stofreservoir
plaatsen. Let er hierbij op dat
hij op de juiste wijze wordt inge-
bracht.
•
Stofreservoir in het apparaat
plaatsen en hoorbaar laten inklik-
ken.
Let op!
Stuit u bij de plaatsing van het
stofreservoir op een weerstand,
controleer de filters dan op volle-
digheid en ga na of de filtereen-
heid en het stofreservoir op de
juiste wijze zijn ingebracht.
22
Na gebruik
nl
99
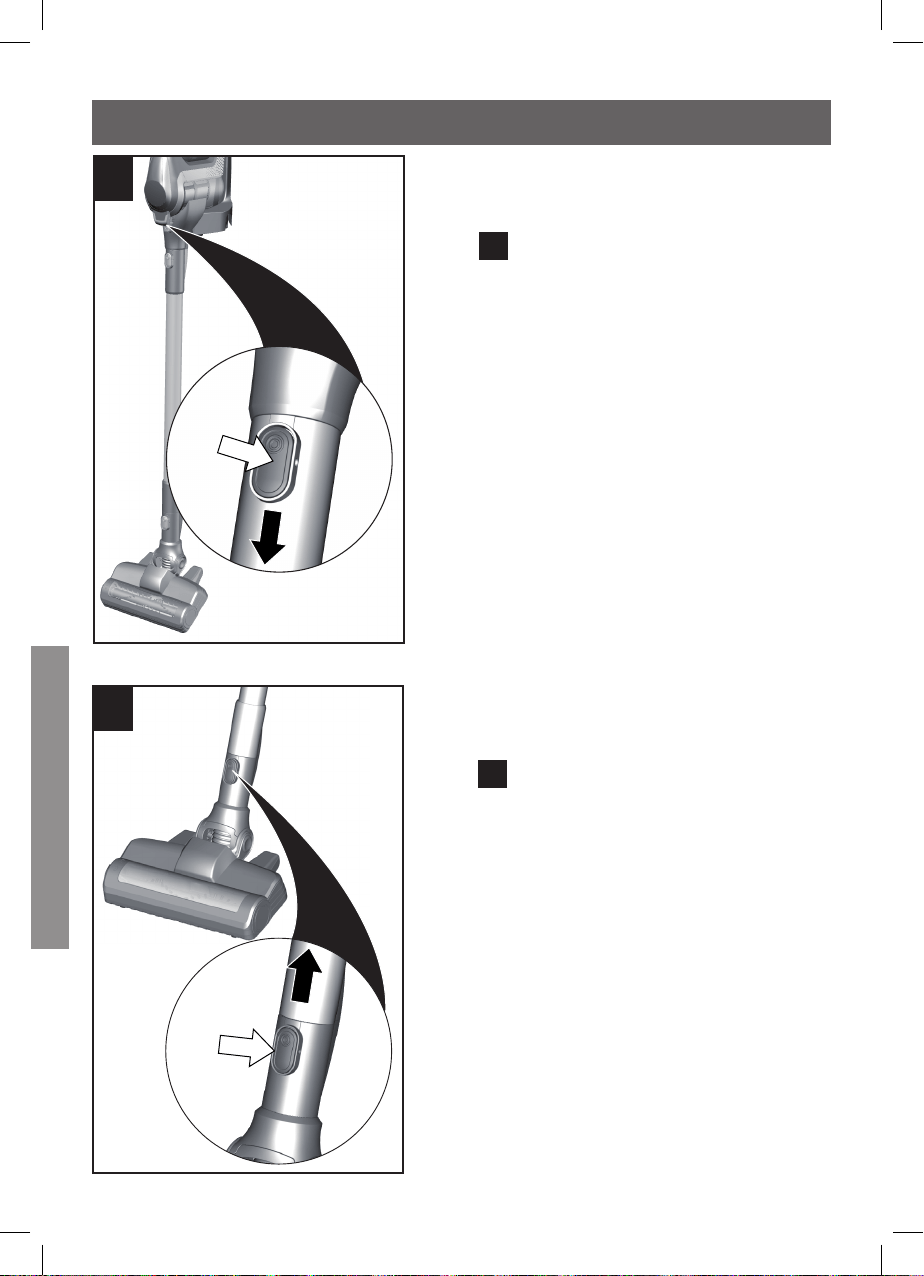
100
1
2
Zuigbuis ontkoppelen van het
apparaat
Afb.
23
•
Om de zuigbuis los te maken, de
ontgrendelingsknop indrukken en
de buis naar beneden afnemen.
Vloermondstuk ontkoppelen van
de zuigbuis
Afb.
24
•
Om het vloermondstuk los te ma-
ken op de ontgrendelingsknop
drukken en de zuigbuis uit het vlo-
ermondstuk trekken.
24
23
1
2
Demontage
nl
100

101
Let op!
De filter kan alleen worden
schoongemaakt wanneer het ap-
paraat uitgeschakeld is.
Pluisfilter reinigen
Afb.
25
Om de stofzuiger optimaal te laten
functioneren dient de pluiszeef re-
gelmatig te worden schoongemaakt.
•
Om de buitenste filtereenheid
schoon te maken dient u het ap-
paraat uit te zetten.
•
Stofreservoir uit het apparaat ne-
men. Afb.
20
•
Filtereenheid uit het stofreservoir
nemen. Afb.
21
•
Buitenste filtereenheid schoonma-
ken.
a) In de regel volstaat het om de
pluiszeef tijdens het leegmaken
van het stofreservoir even uit te
schudden of te kloppen, zodat
mogelijke stofdeeltjes losraken.
b) Is dit niet afdoende, gebruik dan
een vochtige doek om de vuil-
deeltjes af te nemen van het op-
pervlak.
25
b
a
Filteronderhoud
nl
101
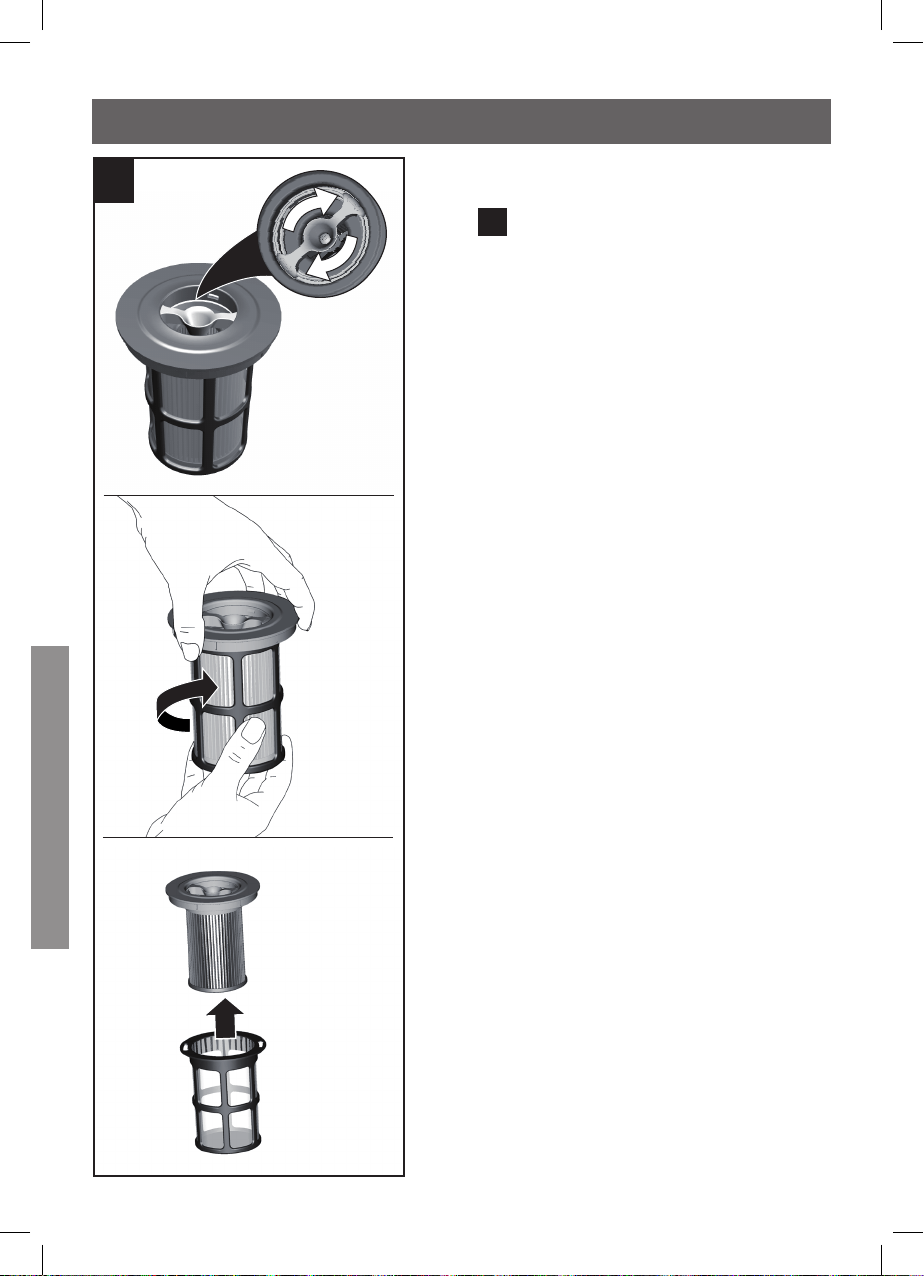
102
Lamellen-filter (Motorbeveili-
gingsfilter) schoonmaken
Afb.
26
•
Om de lamellen-filter schoon te
maken dient u het apparaat uit te
zetten.
•
Om de lamellen-filter schoon te
maken de knop minstens 3 keer
180° draaien.
•
Daarna de lamellen-filter uit de
buitenste filtereenheid halen en
leegmaken.
Wij adviseren om de lamellen-filter
altijd schoon te maken voordat u
het stofreservoir leegmaakt.
Als het lamellen-filter defect is, kunt
u een nieuw exemplaar bestellen bij
onze klantenservice onder het vol-
gende artikelnummer: 12023349.
26
Filteronderhoud
nl
102
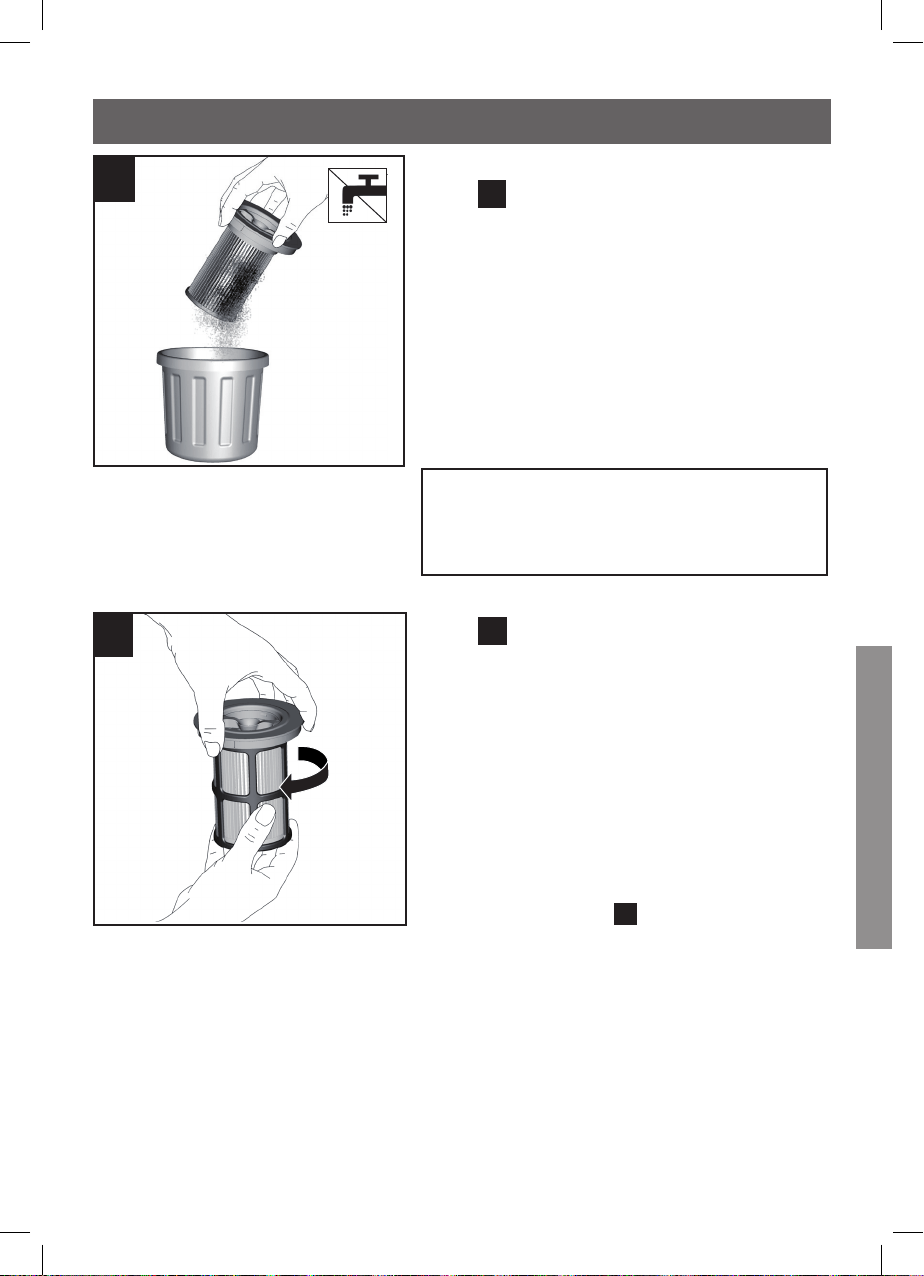
103
Lamellen-filter uitkloppen
Afb.
27
Bij bijzonder sterke verontreiniging
kan de lamellen-filter ook worden
uitgeklopt.
•
De lamellen-filter hiervoor uit de
buitenste filtereenheid halen en
boven een vuilnisbak uitkloppen.
•
De lamellen-filter is hierdoor on-
middellijk na de reiniging opnieuw
inzetbaar.
Let op!
De lamellen-filter mag niet wor-
den uitgewassen.
27
Afb.
28
•
Lamellen-filter in de buitenste fil-
tereenheid plaatsen en vergren-
delen door hem naar rechts te
draaien.
•
Filtereenheid in het stofreservoir
plaatsen. Let er hierbij op dat hij
op de juiste wijze wordt inge-
bracht. Stofreservoir in het ap-
paraat plaatsen en hoorbaar laten
inklikken. Afb.
22
28
Filteronderhoud
nl
103
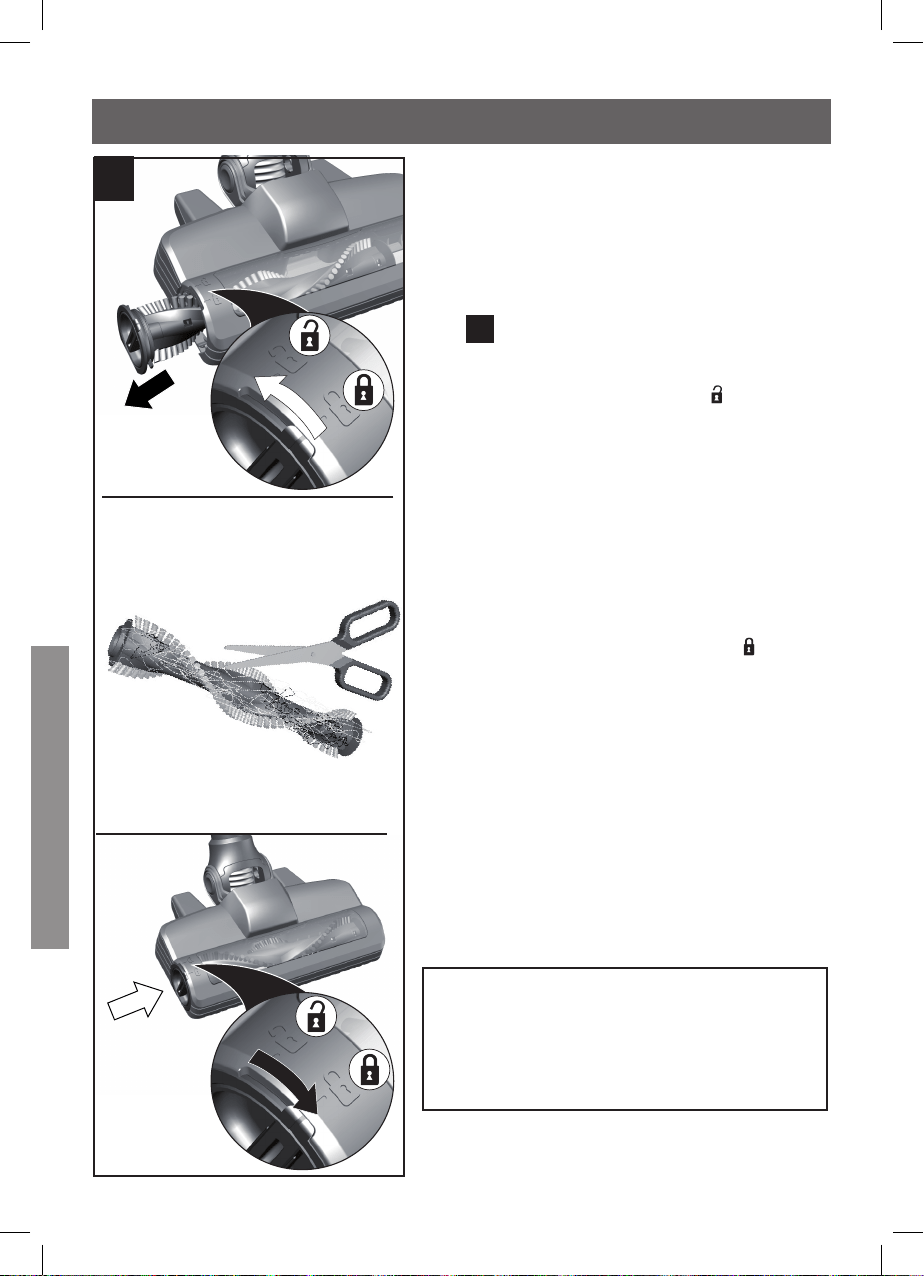
104
Het vloermondstuk schoon-
maken
Alvorens onderhoud te plegen dient
u de stofzuiger altijd uit te zetten of
van de stroom te halen.
Afb.
29
a) Borstelrol ontgrendelen door
hem tegen de klok in
te draai-
en en hem zijwaarts uit het vloer-
mondstuk trekken.
b) Opgewikkelde draden en haren
met een schaar doorknippen en
verwijderen.
c) Borstelrol zijwaarts langs de ge-
leiding in het vloermondstuk
schuiven en vergrendelen door
hem rechtsom te draaien
.
•
De borstelrol heeft ook een zel-
freinigingsfunctie. Knip voor dit
doel het haar en de vezels aan
twee tegenover elkaar liggende zi-
jden in de lengte met een schaar
door. Tijdens het daaropvolgende
gebruik van de borstelrol gedu-
rende 30 seconden, worden deze
automatisch opgezogen.
Let op!
Het vloermondstuk mag alleen in
gebruik worden genomen wan-
neer de borstelrol is ingebracht.
b
a
29
2
1
1
2
c
Het vloermondstuk schoonmaken
nl
104
105
Alvorens de handstofzuiger schoon te maken dient deze uit-
geschakeld en losgekoppeld te zijn van de laadkabel. Stofzuigers
en accessoires van kunststof kunnen worden onderhouden met
een in de handel gebruikelijk schoonmaakmiddel voor kunststof.
Geen schuurmiddelen, glas of universele reinigingsmid-
delen gebruiken. De stofzuiger nooit in water dompelen.
Technische wijzigingen voorbehouden.
Schoonmaakinstructies
nl
105
106
Storingen en de servicedienst
nl
Verhelpen van storingen
In de volgende gevallen dient u het apparaat direct uit te zetten
en contact op te nemen met de servicedienst:
Wanneer u per ongeluk vloeistof heeft opgezogen of als er vlo-
eistof in het binnenste van het apparaat is gekomen.
Wanneer het apparaat naar beneden gevallen is.
In deze gevallen is de elektrische veiligheid van het apparaat mo-
gelijk niet meer gewaarborgd, ook al is er van buiten geen be-
schadiging te zien.
Optredende storing Oplossing
Het apparaat functio-
neert niet en er is geen
signaal van de statusin-
dicatie Accu
Controleer of de accu correct is ge-
plaatst en/of de accu is geladen.
Het apparaat functio-
neert niet en/of er is 10
sec. een rood signaal
van de statusindicatie
van de accu te zien.
De accu kan oververhit of te koud
zijn. Wacht tot de accu een geschikte
temperatuur heeft bereikt.
De elektrische bors-
tel functioneert niet of
maakt ongewone gelui-
den
De borstel schoonmaken en eventu-
eel vreemde elementen verwijderen
Controleren of de borstel juist inge-
bracht en vergrendeld is
Neem contact op met de servicedienst
als het probleem zich blijft voordoen
De borstel wordt tijdens
het zuigen uitgeschakeld
Apparaat uitzetten en nagaan of het
mondstuk geblokkeerd is.
Blokkering verwijderen en het mond-
stuk reinigen.
Bij vloerkleden de stofzuiger een stand
lager zetten en opnieuw starten.
Neem contact op met de service-
dienst als het mondstuk niet meer
kan worden ingeschakeld.
106

107
Statusindicatie Laadprocedure
Statusindicatie Functie
Toestand van het
apparaat
Werking statusindicatie
Normale stand Indicatie is groen verlicht.
Turbo-stand Indicatie knippert groen.
Acculading < 20% Indicatie knippert rood.
Accu is leeg Indicatie gaat uit.
Laadprocedure Indicatie knippert groen.
Accu is compleet ge-
laden
Indicatie is groen verlicht en gaat na ca.
2 minuten uit.
Foutindicatie Indicatie is rood verlicht en gaat na ca.
10 seconden uit.
Statusindicaties
nl
107

108
Instructies voor recycling
Stofzuigers, accu's, accessoires en verpakkingen dienen op mili-
euvriendelijke wijze te worden afgevoerd.
Geef stofzuigers en accu's niet mee met het huisvuil!
Verpakking
De verpakking beschermt de stofzuiger tegen beschadiging tij-
dens het transport. Deze bestaat uit milieuvriendelijk materiaal
en is daarom recyclebaar. Breng verpakkingsmateriaal dat u niet
meer nodig heeft naar een verzamelplaats voor de verwerking
van afval.
Oude apparaten
Oude apparaten bevatten vaak nog waardevol materiaal. Geef
daarom uw oude apparaat voor hergebruik af aan uw handelaar
of een recyclecentrum. Informatie over actuele methoden van
afvalverwijdering kunt u krijgen bij uw handelaar of uw gemeen-
te.
Dit apparaat is gekenmerkt in overeenstem-
ming met de Europese richtlijn 2012/19/EU
betreffende afgedankte elektrische en elek-
tronische apparatuur (waste electrical and
electronic equipment - WEEE). De richtlijn
geeft het kader aan voor de in de EU geldige
terugneming en verwerking van oude appa-
raten.
اين دستگاه مطابق ضوابط اروپائی در
باره دستگاه های کهنه برقی و الکترونيکی
مشخص شده است
این ضوابط که در سراسر اوپا معتبر است، چهار چوب
کلی شيوه بازپس گرفتن و بازيافت دستگاه های
کهنه را تعيين می کند
108
Instructies voor recycling
اين دستگاه مطابق ضوابط اروپائی در
باره دستگاه های کهنه برقی و الکترونيکی
مشخص شده است
این ضوابط که در سراسر اوپا معتبر است، چهار چوب
کلی شيوه بازپس گرفتن و بازيافت دستگاه های
کهنه را تعيين می کند
nl
109
Afvalverwijdering
Elektrische gereedschappen, accu’s, toebehoren en verpakkin-
gen moeten op een voor het milieu verantwoorde wijze worden
hergebruikt.
Gooi elektrische gereedschappen, accu’s en batterijen niet bij
het huisvuil.
Accu’s en batterijen:
Li-ion:
Lees de aanwijzingen in het gedeelte „Vervoer”,
pagina 46 en neem deze in acht.
Wijzigingen voorbehouden.
109
Instructies voor recycling
nl

110110
Tabla de contenidos
es
Consejos y advertencias de seguridad ...............................112
Uso debido ............................................................................112
Indicaciones de seguridad ..................................................... 112
Uso apropiado .......................................................................113
Baterías de iones de litio .......................................................115
Indicaciones para el transporte ............................................. 117
Descriptión de los aparatos ................................................118
Antes de usar el aparato por primera vez ............................120
Acoplar el aparato al tubo de aspiración ..............................120
Acoplar el tubo de aspiración a la boquilla para suelo ...........120
Acoplar el aparato y la batería ...............................................121
Cargar ....................................................................................122
Montar el retén mural ...........................................................122
Almacenar los accesorios en el retén mural ...........................123
Cargar la batería con el cable de carga..................................124
Carga con el cargador de carga rápida ........................................ 125
Cargar la batería en el retén mural ........................................125
Indicador de funcionamiento durante la carga .......................126
Aspirar...................................................................................127
Encender el aparato ...............................................................127
Regular la potencia de aspiración ..........................................127
Indicador de funcionamiento durante el uso ..........................128
Aspirar con los accesorios adicionales ..................................129
Boquilla profesional para tapicería ........................................130
Aspirar escaleras ...................................................................131

111111
Tabla de contenidos
es
Tras concluir el trabajo .........................................................132
Desconectar el aparato ..........................................................132
Almacenar el aparato .............................................................132
Vaciar el depósito de polvo .................................................... 133
Retirar el depósito de polvo ...................................................133
Retirar la unidad filtrante .......................................................134
Colocar el depósito de polvo .................................................135
Desmontar .............................................................................136
Soltar el aparato y el tubo de aspiración ...............................136
Soltar el tubo de aspiración y la boquilla para suelo .............136
Cuidar y limpiar el filtro .......................................................137
Limpiar el filtro para pelusas .................................................137
Limpiar el filtro de láminas (filtro protector del motor) .........138
Sacudir el filtro de láminas ....................................................139
Limpiar la boquilla para suelo ..............................................140
Limpiar la boquilla para suelo ................................................140
Consejos de limpieza ............................................................ 141
Averías y Servicio de Atención al Cliente ............................142
Indicadores de funcionamiento ............................................ 143
Indicaciones para eliminar el material de embalaje ............144
Servicio al cliente & Garantía ...............................................146

112
Conservar las instrucciones de uso. Deberán entregarse, en su
caso, al siguiente propietario del aspirador.
Uso debido
Este aparato ha sido diseñado exclusivamente para uso privado en
el ámbito doméstico. Este aparato está previsto para ser utilizado
a una altura máxima de 2000 metros sobre el nivel del mar.
Para evitar daños y lesiones, no usar la aspiradora en los sigui-
entes casos:
Aspiración de personas o animales.
Aspiración de:
− sustancias tóxicas, objetos afilados, calientes o incandescen-
tes;
− sustancias húmedas o líquidas;
− materiales o gases inflamables o explosivos;
− ceniza, hollín de estufas e instalaciones de calefacción central.
− polvo de tóner de impresoras y fotocopiadoras.
Indicaciones de seguridad
Esta aspiradora cumple las reglas técnicas reconocidas y las cor-
respondientes normas y disposiciones de seguridad.
Este aparato puede ser utilizado por niños a partir de 8 años y
por personas que presenten limitaciones de las facultades físi-
cas, sensoriales o psíquicas, o que carezcan de la experiencia y
el conocimiento necesarios, siempre que sean supervisados por
otra persona o que se les haya enseñado a utilizar el aparato de
forma segura y hayan comprendido los peligros que entraña.
Los niños no pueden jugar con el aparato, tampoco cuando
esté colgado en el retén mural.
La limpieza y el cuidado del aparato no deben quedar a cargo de
los niños, a no ser que estén bajo la supervisión de una persona
adulta responsable de su seguridad.
afet
112
Consejos y advertencias de seguridad
es

113
Las bolsas y láminas de plástico deberán guardarse o desechar-
se en lugares que estén fuera del alcance de los niños.
>= ¡Peligro de asfixia!
Recambios, accesorios
Nuestras piezas de repuesto originales, accesorios originales y
accesorios especiales se adaptan perfectamente a las caracterí-
sticas y requisitos de nuestras aspiradoras. Por lo tanto, reco-
mendamos utilizar solo nuestras piezas de repuesto originales,
accesorios originales y especiales. Esto garantiza una larga vida
útil y una calidad alta y duradera del rendimiento de limpieza de
la aspiradora.
!
Aviso:
El uso de recambios, accesorios, accesorios especiales pue-
de causar daños en la aspiradora no cubiertos por nuestra ga-
rantía, siempre cuando dichos daños se deriven del uso de tales
productos.
Uso apropiado
Utilizar únicamente el cable de carga incluido en la entrega para
realizar la carga o el cargador de carga rápida original.
La conexión y puesta en funcionamiento del cable de carga y del
cargador rápido debe efectuarse únicamente según las indicaci-
ones de la placa de características.
Almacenar y cargar el aparato únicamente en espacios interio-
res.
No exponer el aparato a temperaturas por debajo de 0 °C ni por
encima de 45 °C.
No aspirar nunca sin el depósito de polvo o sin el filtro de protec-
ción del motor. => ¡El aparato puede sufrir daños!
No acercar las boquillas y los tubos a la cabeza cuando se esté
aspirando. => ¡Peligro de lesiones!
113
Consejos y advertencias de seguridad
es

114
Dejar de usar el cable de carga si está dañado y sustituirlo por
un cable de carga original.
Para desenchufar el cable de carga, no tirar del mismo, sino del
enchufe.
No colocar el cable de carga encima de bordes afilados ni
aplastarlo.
Antes de realizar cualquier trabajo en la aspiradora, deberá de-
sconectarse el aparato desenchufándolo de la red y del cable de
carga.
No poner en marcha la aspiradora si esta presenta algún desper-
fecto.
Si se produce una avería, deberá desconectarse el aparato de-
senchufándolo de la red y del cable de carga.
Para evitar riesgos, las reparaciones y el cambio de piezas de
la aspiradora solo deben ser llevados a cabo por el Servicio de
Atención al Cliente autorizado.
Desconectar inmediatamente el aparato y ponerse en contacto
con el servicio de asistencia técnica en los siguientes casos:
− Si se ha aspirado algún líquido por descuido o si ha entrado
líquido en el interior del aparato
− Si el aparato se ha caído y está dañado.
Proteger la aspiradora de las inclemencias del tiempo, la hume-
dad y las fuentes de calor.
No utilizar productos inflamables o que contengan alcohol en
los filtros (bolsas filtrantes, filtro protector del motor, filtro de
salida, etc.).
La aspiradora no ha sido diseñada para su uso en obras. =>La
aspiración de escombros puede provocar daños en el aparato.
Desconectar el aparato cuando no se esté usando.
La aspiradora no dispone de función de autosoporte. Evitar que
el aparato se caiga. No apoyar la aspiradora contra paredes ni
cantos de mesas.
El embalaje protege la aspiradora contra daños durante el trans-
porte. Por tanto, recomendamos que se guarde para posibles
transportes.
114
Consejos y advertencias de seguridad
es

115
Tener cuidado de no acercar pelo, ropa holgada, dedos u otras
partes del cuerpo a las aberturas o piezas móviles, tales como
el rodillo del cepillo. No apuntar los tubos ni las boquillas hacia
los ojos o las orejas, y no introducírselos en la boca.
Baterías de iones de litio
Leer las indicaciones de seguridad e instrucciones en su totali-
dad.
>= Las negligencias en el cumplimiento de las indicaciones de
seguridad y las instrucciones pueden provocar descargas elé-
ctricas, incendios y/o lesiones graves.
Conservar todas las indicaciones de seguridad e instrucciones
para el futuro.
Estas indicaciones de seguridad son válidas únicamente para la
baterías de iones de litio de Bosch. Para este aparato solo son
aptas las baterías de la serie «Power for ALL».
No abrir la batería.
>= Hay peligro de cortocircuito.
Proteger la batería del calor, y también, p. ej., de radiación solar
prolongada, fuego, agua o humedad.
>= Peligro de explosión.
En caso de daño y de uso no adecuado, pueden salir vapores de
la batería. Ventilar con aire fresco y, en caso de molestias, acudir
a un médico.
>= Los vapores pueden irritar las vías respiratorias.
Si la batería está defectuosa puede expulsar líquido y humede-
cer objetos circundantes. Comprobar las piezas afectadas.
>= Se deben limpiar o sustituir en caso necesario.
Utilizar la batería solo junto con su aparato eléctrico Bosch.
>= Esa es la única forma de protegerla frente a una sobrecarga
peligrosa.
Cargar la batería solo con cargadores recomendados por el fab-
ricante.
>= Un cargador adecuado para un tipo determinado de baterías
corre riesgo de incendiarse si se utiliza con otras baterías.
Consejos y advertencias de seguridad
115
es

116
Utilizar en el aparato eléctrico solo las baterías previstas para
ello.
>= El uso de otras baterías puede producir daños y peligro de
incendio.
Mantener la batería no utilizada lejos de clips, monedas, llaves,
clavos, tornillos u otros objetos metálicos pequeños que podrían
causar un puenteo de los contactos.
>= Un cortocircuito entre los contactos de la batería puede pro-
vocar quemaduras o fuego.
En caso de uso incorrecto puede salir líquido de la batería. ¡Evite
el contacto con él! En caso de un contacto accidental, lavar con
agua. Si el líquido penetra en los ojos, acudir a un médico como
precaución adicional.
>= El líquido que sale de la batería puede provocar irritaciones
de la piel o quemaduras.
Consejos y advertencias de seguridad
es
116

117
Consejos y advertencias de seguridad
Indicaciones para el transporte
Las baterías de iones de litio incluidas cumplen con las disposi-
ciones relativas al transporte de mercancías peligrosas. El usua-
rio puede transportar las baterías por carretera sin necesidad de
cumplir ningún requisito especial. Para el envío de las baterías
a través de terceros (p. ej., transporte aéreo o mediante una
empresa de transporte) deben cumplirse requisitos especiales
en cuanto al embalaje y la identificación. Para ello, es necesario
consultar con un experto en mercancías peligrosas antes de pre-
parar el paquete de envío.
Enviar las baterías solo cuando la carcasa no presente daños.
Sellar los contactos abiertos y embalar la batería de modo que
no se mueva dentro del paquete. Tener en cuenta también las
normas nacionales adicionales que pudieran existir.
117

118
12
13
14
15
11
1
2
4
5
3
8
9
10
6
7
118
Descripción de los aparatos
es
16

119
Descripción de los aparatos
1 Boquilla para suelo con cepillo
eléctrico
2 Tubo de aspiración
3 Tecla de desbloqueo del
depósito de polvo
4 Filtro para pelusas
5 Filtro de láminas
6 Display de estado de carga de
la batería
7 Interruptor turbo
8 Batería
9 Interruptor de
encendido/ apagado
10 Depósito de polvo
11 Adaptador
12 Boquilla para
tapicerías XXL
13 Boquilla para juntas
flexible
14 Cable de carga
15 Retén mural
16 Aparato de carga rápida
119
es

120120
Antes de usar el aparato por primera vez
es
Acoplar el aparato al tubo de aspi-
ración
Figura
1
•
Introducir el tubo de aspiración
en el tubo de empalme de la aspi-
radora y encajarlo.
Click
Acoplar el tubo de aspiración a la
boquilla para suelo
Figura
2
•
Introducir el tubo de aspiración
en la boquilla para suelo y enca-
jarlo.
Atención!
La boquilla para suelo no es apta
para aspirar piezas pequeñas,
como añicos, juguetes, alfileres,
clips, etc.
2
Click
1
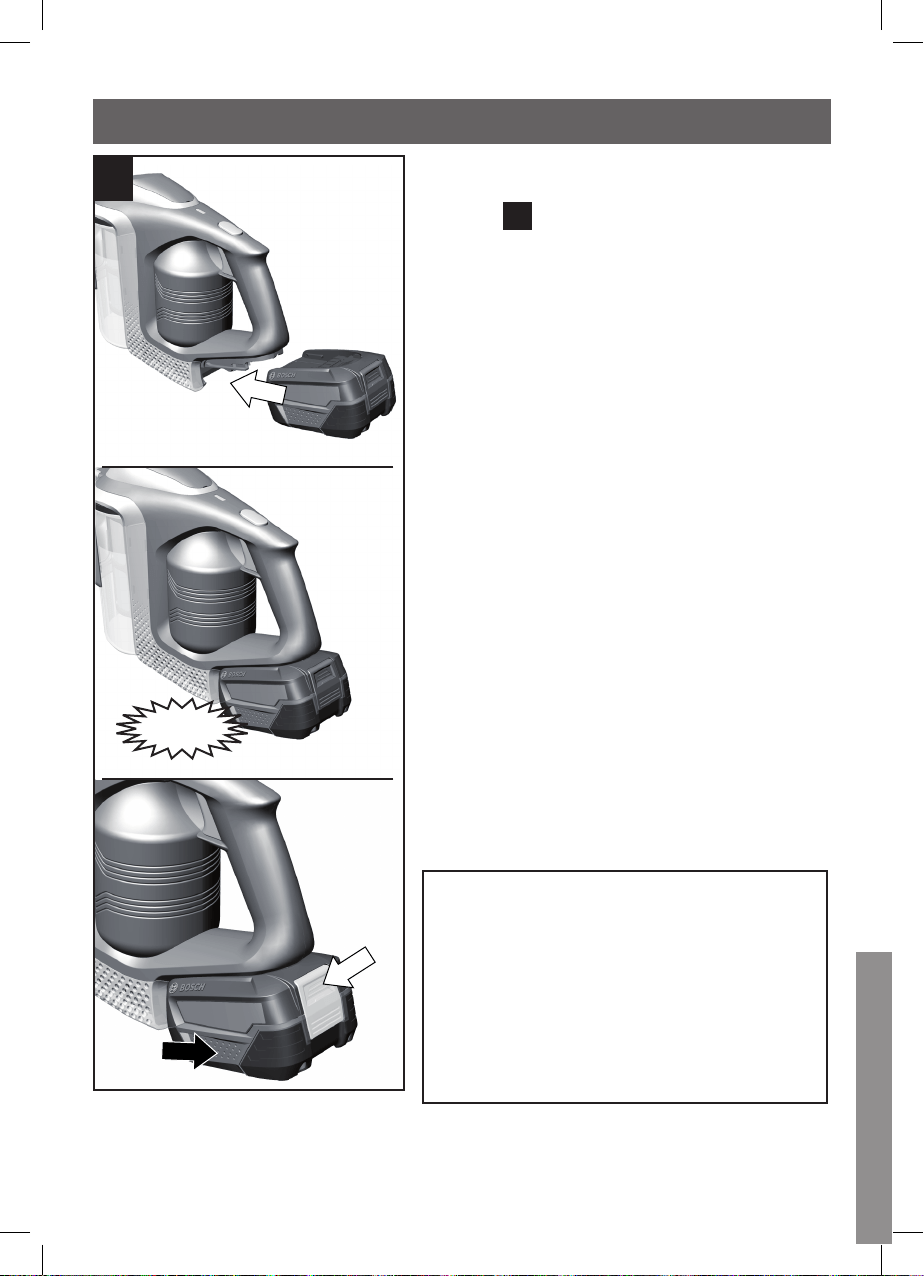
121121
Acoplar el aparato y la batería
Figura
3
•
Colocar la batería en los carriles
de guía de la aspiradora y enca-
jarlos.
•
Para soltar la unión, pulsar el
botón de desbloqueo y extraer la
batería del aparato hacia atrás.
Atención
!
Antes del primer uso, las baterías
de la aspiradora deberán haber-
se cargado como mínimo durante
6 horas.
Cargar el aparato solo con el
cable de carga suministrado.
Click
3
1
2
Antes de usar el aparato por primera vez
es

122122
Montar el retén mural
Se recomienda el uso del retén mu-
ral para cargar y almacenar el apara-
to, ya que se optimiza el espacio de
almacenamiento.
Sin embargo, también es posible
cargar y almacenar el aparato sin el
retén mural.
Figura
4
•
Montar el retén mural cerca de un
enchufe.
•
Para tal fin, retirar la placa fron-
tal del retén mural. Con el dedo,
agarrar el retén mural por la par-
te de abajo y presionar la placa
frontal desde adentro para extra-
erla del bloqueo. Montar el retén
mural en la pared con los tornillos
adjuntos u otros similares.
•
Introducir el enchufe pequeño del
cable de carga de la parte inferior
del retén mural y colocarlo arriba
en la cavidad preformada.
•
Al colocar y encajar la placa fron-
tal, queda fijada la conexión.
•
Introducir el enchufe del cable de
carga en la toma de corriente.
4
1
2
Click
Cargar
es

123123
Cargar
Almacenar los accesorios en
el retén mural
Los accesorios adicionales se pue-
den almacenar en el retén mural
montado para ahorrar espacio.
Figura
5
•
El retén mural dispone de dos ra-
nuras para almacenar los acces-
orios con conexión (1) y una ra-
nura para almacenar el tubo de
aspiración (2).
•
Introducir desde abajo la boquilla
para juntas flexible y el tubo de
aspiración corto en el retén mu-
ral, ejerciendo un poco de presi-
ón, y encajar.
•
Introducir la boquilla profesional
para tapicería en el tubo de aspi-
ración corto.
Click
5
1
2
1
es
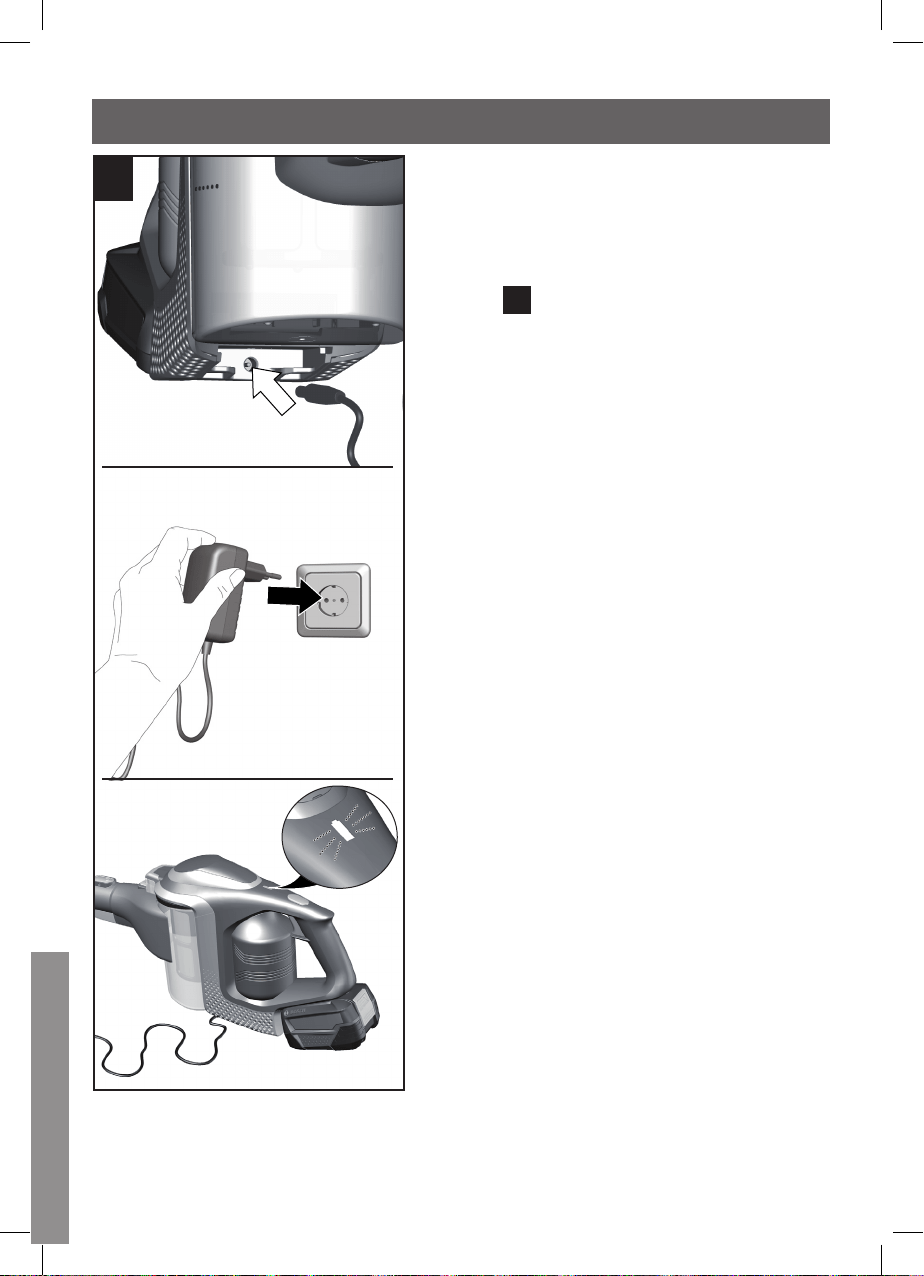
124124
Cargar
Cargar la batería con el cable de
carga
Figura
6
•
Para cargar la aspiradora, esta se
debe colocar cerca de una toma
de corriente.
•
Enchufar el cable de carga por de-
bajo en la conexión del aparato.
•
Conectar el enchufe del cable de
carga en la toma de corriente.
•
El indicador de funcionamiento de
la aspiradora parpadea en verde
durante todo el proceso de carga.
•
Tan pronto como la batería esté
totalmente cargada, el indicador
de funcionamiento se iluminará en
verde de forma continua durante
unos minutos antes de apagarse.
Desconectar brevemente el apara-
to de la red eléctrica para su veri-
ficación. Después el indicador vol-
verá a iluminarse en verde.
•
Es normal que el cable de carga y
la aspiradora de mano se calien-
ten, y no supone ningún peligro.
•
La aspiradora se puede cargar
siempre que no esté en uso.
6
1
2
Cargar
es
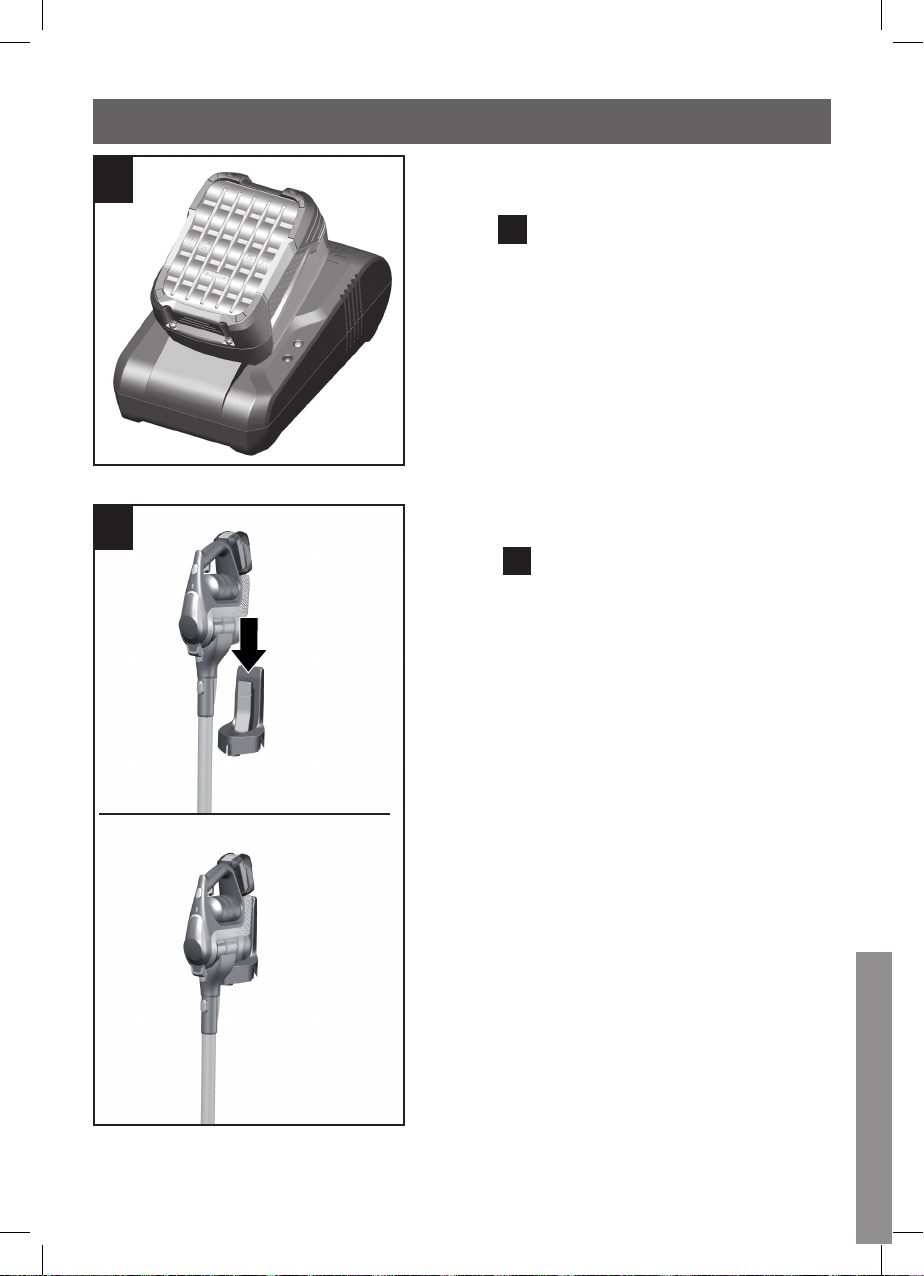
125125
Cargar
Carga con el cargador de carga
rápida
Figura
7
•
Para la carga con el cargador de
carga rápida, debe extraerse la ba-
tería del aparato.
•
En el manual de instrucciones ad-
junto se puede consultar el funci-
onamiento del cargador de carga
rápida.
Cargar la batería en el retén mural
Figura
8
•
Colocar la aspiradora en el retén
mural desde arriba.
•
El indicador de funcionamiento de
la aspiradora parpadea en verde
durante todo el proceso de carga.
•
Tan pronto como la batería esté
totalmente cargada, el indicador
de funcionamiento se iluminará en
verde de forma continua durante
unos minutos antes de apagarse.
Desconectar brevemente el apara-
to de la red eléctrica para su veri-
ficación. Después el indicador vol-
verá a iluminarse en verde.
es
8
7
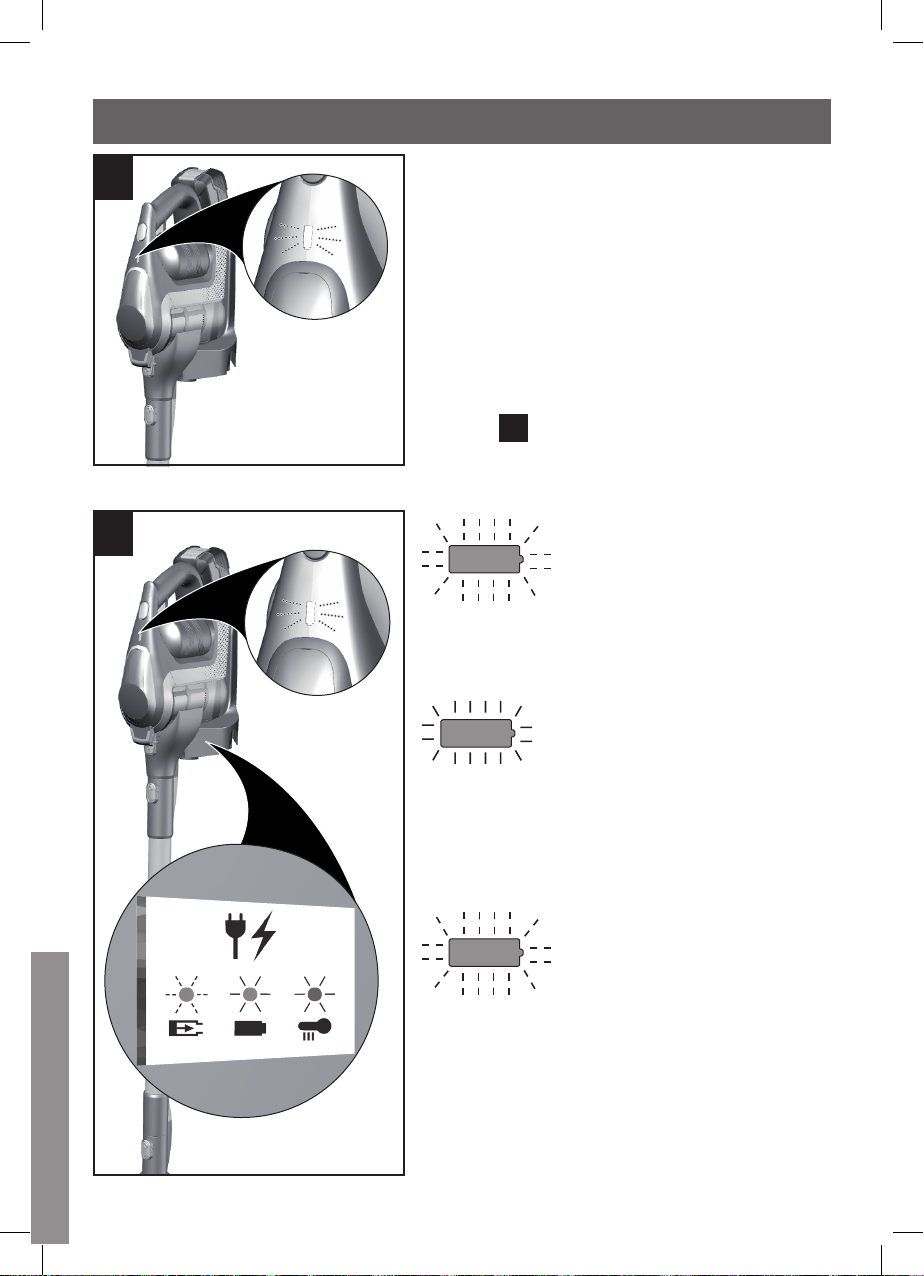
126126
•
Es normal que el cable de
carga y la aspiradora de mano se
calienten, y no supone ningún pe-
ligro.
•
La aspiradora se puede cargar
siempre que no esté en uso.
Indicador de funcionamiento duran-
te la carga
Figura
9
El indicador muestra el estado de
carga de la batería.
verde
La batería se está car-
gando. (verde)
Si el indicador de funci-
onamiento parpadea en
verde, la batería se está
cargando.
verde
La batería está comple-
tamente cargada (verde)
Si el indicador de fun-
cionamiento se ilumina
en verde, la batería está
completamente carga-
da.
rojo
Se ha producido una
avería en la batería (rojo)
Si el indicador de fun-
cionamiento parpadea
en rojo, la batería no se
está cargando. Es posi-
ble que la batería esté
demasiado caliente o
demasiado fría.
9
Cargar
es
8
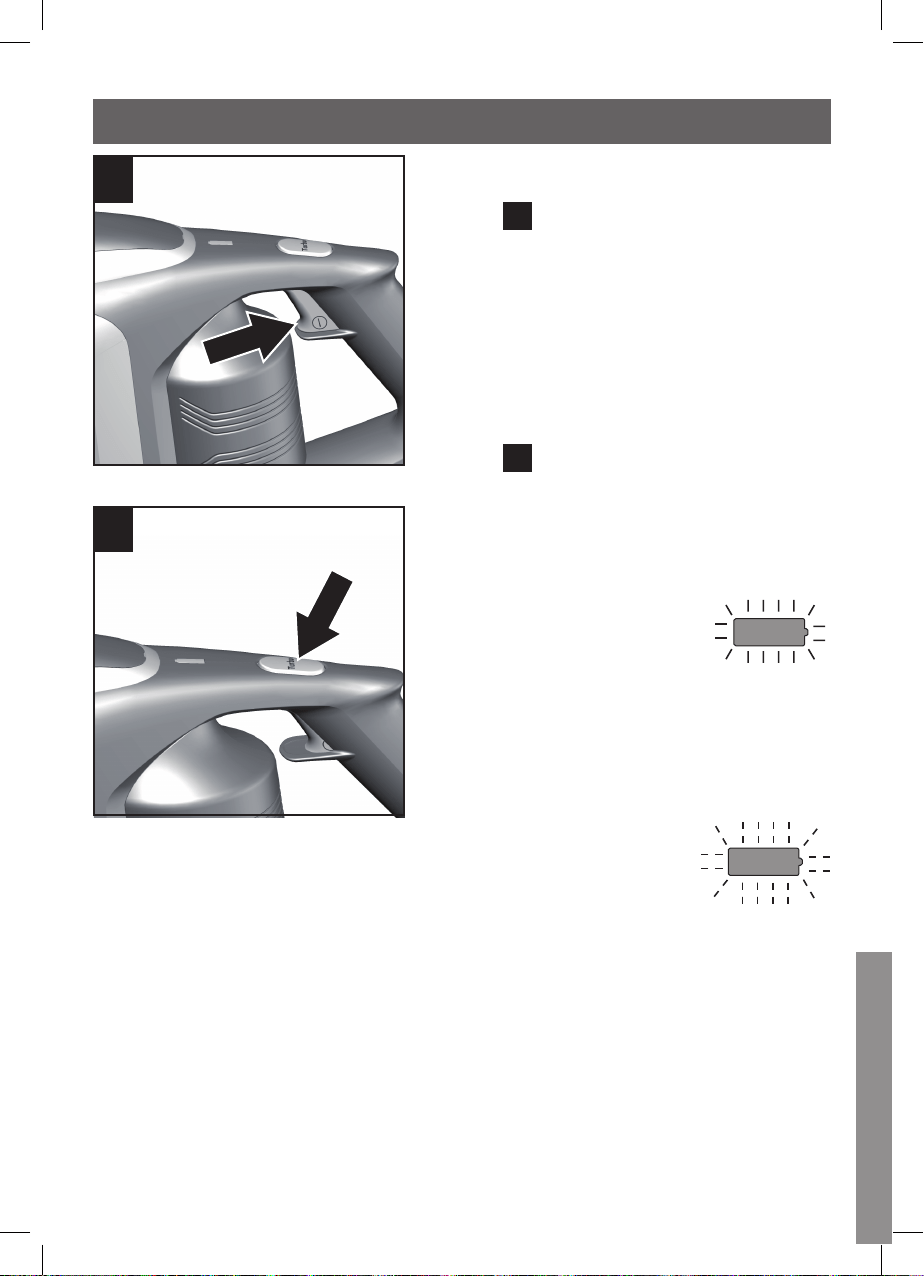
127127
Encender el aparato
Figura
10
•
Accionar el interruptor de conexi-
ón y desconexión en el sentido de
la flecha. El indicador de funcio-
namiento se ilumina en verde du-
rante el funcionamiento.
Regular la potencia de aspiración
Figuar
11
Pulsar también la tecla Turbo en el
sentido de la flecha para activar la
función Turbo. El indicador de funci-
onamiento parpadea en verde.
Nivel estándar
:
verde
•
Potencia de aspiración normal
para tareas de limpieza normales.
Con este modo el aparato apro-
vecha su máximo tiempo de fun-
cionamiento.
Nivel Turbo
:
verde
•
Para tareas de limpieza especial-
mente exigentes, como la aspira-
ción de partículas finas en todas
las superficies (p. ej., alfombras o
suelos duros), y para una limpieza
intensiva.
Con este modo el aparato tiene un
tiempo de funcionamiento menor.
Con los accesorios adicionales as-
pirar solo en el nivel Turbo.
10
11
Aspirar
es
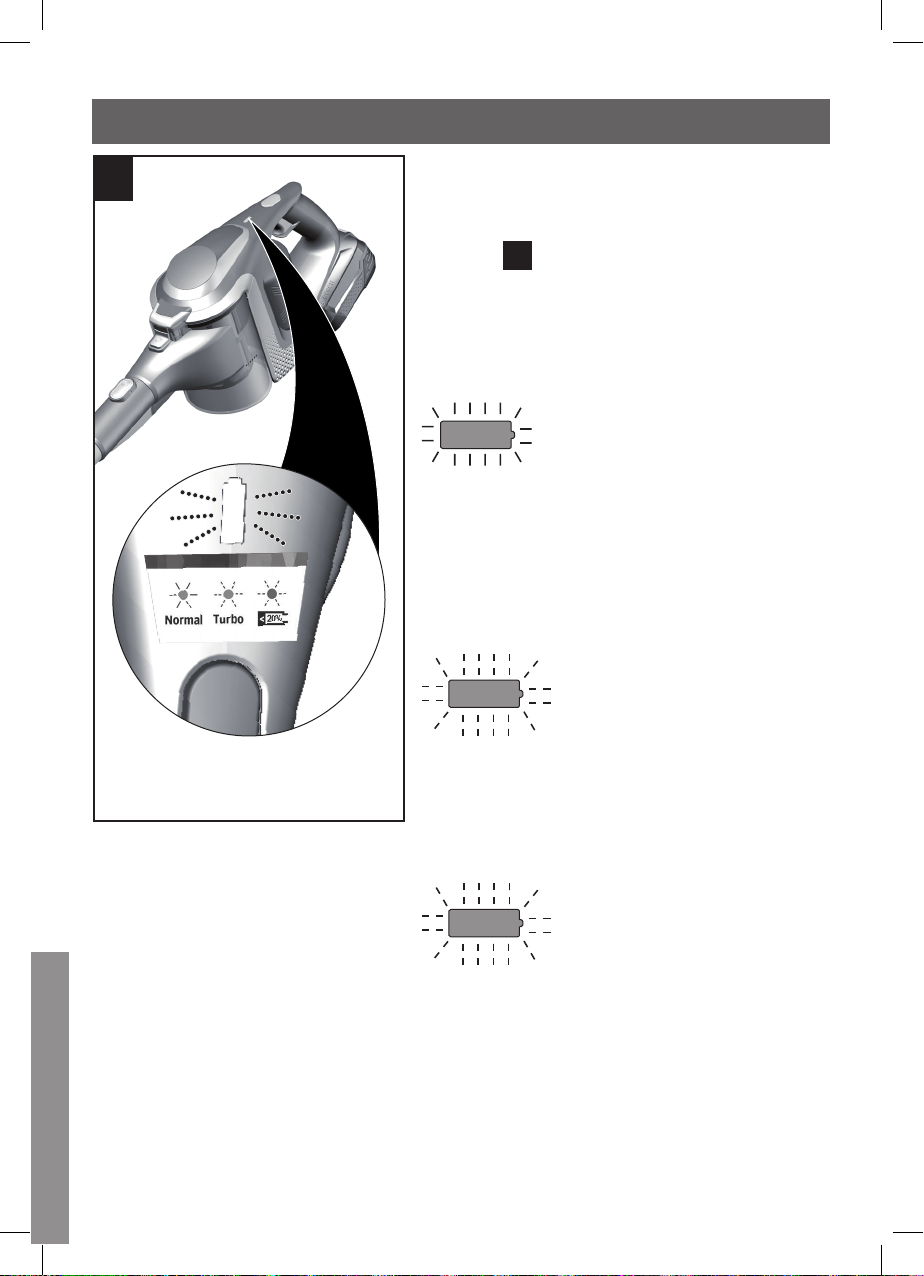
128128
Indicador de funcionamiento
durante el uso
Figura
12
El LED del indicador informa sob-
re el estado de funcionamiento del
aparato.
verde
Funcionamiento del ni-
vel estándar
Si el indicador de fun-
cionamiento se ilumina
en verde, el aparato
está funcionando en el
modo de potencia es-
tándar.
verde
Funcionamiento del ni-
vel Turbo
Si el indicador de fun-
cionamiento parpadea
en verde, el aparato
está funcionando en el
modo de potencia Tur-
bo.
rojo
Carga residual baja
Si el indicador de fun-
cionamiento parpadea
en rojo, se debe volver
a cargar la batería.
12
Aspirar
es
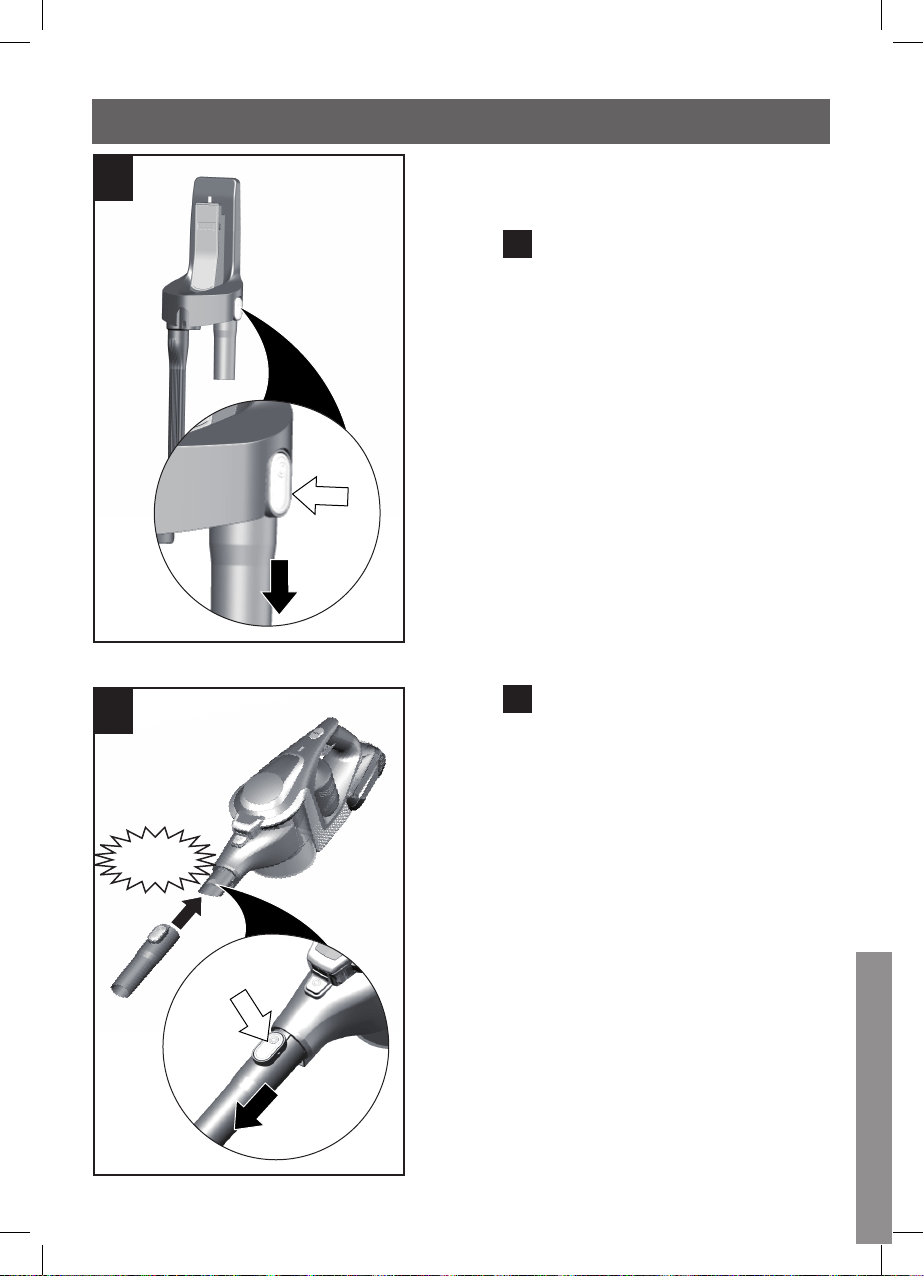
129129
Aspirar
es
Aspirar con los accesorios adicio-
nales
Figura
13
•
Para retirar los accesorios, pulsar
el botón de desbloqueo y tirar ha-
cia abajo de los accesorios del re-
tén mural.
•
Después del uso, vuelva a guardar
los accesorios en el
retén mural.
Figura
14
Colocar las boquillas o el tubo de
aspiración corto en el tubo de aspi-
ración o en el tubo de empalme del
aparato según sea necesario:
a) Tubo de aspiración corto, para
aspirar partículas de suciedad
grandes o piezas pequeñas,
como añicos, clips, etc. Colocar
las boquillas en el tubo de aspira-
ción o en el tubo de empalme del
aparato según sea necesario:
Click
1
2
14
13
1
2
a

130
Click
b
Boquilla profesional para tapicería
Figura
15
•
Retirar la boquilla profesional
para tapicería del retén mural en
la dirección de la flecha del tubo
de aspiración corto.
•
Boquilla profesional para tapi-
cería, para aspirar muebles tapiz-
ados, cortinas, etc.
Ajustar el aparato al máximo nivel
de potencia. En algunas casos se
recomienda ajustar el aparato a
niveles de potencia más bajos, en
función del acabado de las super-
ficies de la tapicería. La boquilla
debe poder moverse ligeramente
y no quedar fijada por succión a
la tapicería.
Para limpiar materiales delica-
dos, como cortinas, volver a
ajustar la potencia al nivel más
bajo.
15
14
b) Boquilla para juntas, para
aspirar juntas, esquinas, etc.
•
Después de utilizar los accesori-
os, volver a almacenarlos en el re-
tén mural.
Figura
5
Aspirar
es
130
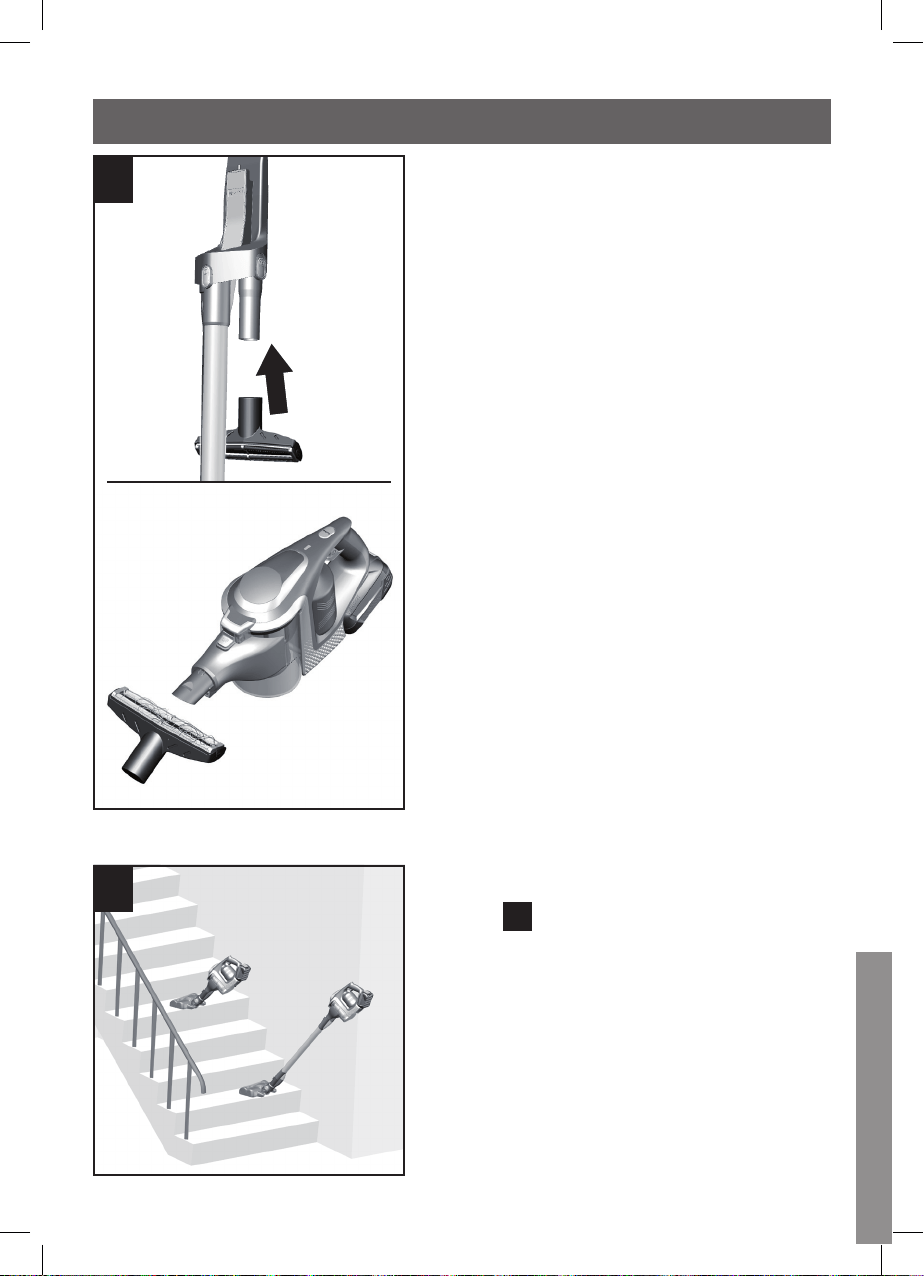
131
•
Después de utilizar la boquil-
la profesional para tapicería, vol-
ver a introducirla en el tubo de as-
piración corto en el retén mural.
•
Para limpiar la boquilla profesio-
nal para tapicería, simplemente
aspirarla con el aparato.
Aspirar escaleras
Figura
16
Para tener un mejor acceso a la
hora de aspirar escaleras, también
se puede desmontar el tubo de as-
piración y acoplar la boquilla para
suelo directamente en el aparato.
El tubo de aspiración siempre se
puede almacenar en el retén mural
montado.
16
15
Aspirar
es
131

132
17
Desconectar el aparato
Figura
17
Una vez terminada la aspiración, de-
sconectar el aparato.
•
Accionar el interruptor de conexi-
ón y desconexión en el sentido de
la flecha. El indicador de funcion-
amiento se apaga.
Almacenar el aparato
Figura
18
•
Colocar el aparato en el retén mu-
ral.
Para ahorrar espacio se recomi-
enda almacenar el aparato en el
retén mural. El aparato también
se puede almacenar en el retén
mural con la batería totalmente
cargada.
Atención
!
Para evitar que el aparato vuel-
que, colocarlo de forma segura
en una esquina de una pared o en
el retén mural.
18
Tras concluir el trabajo
es
132
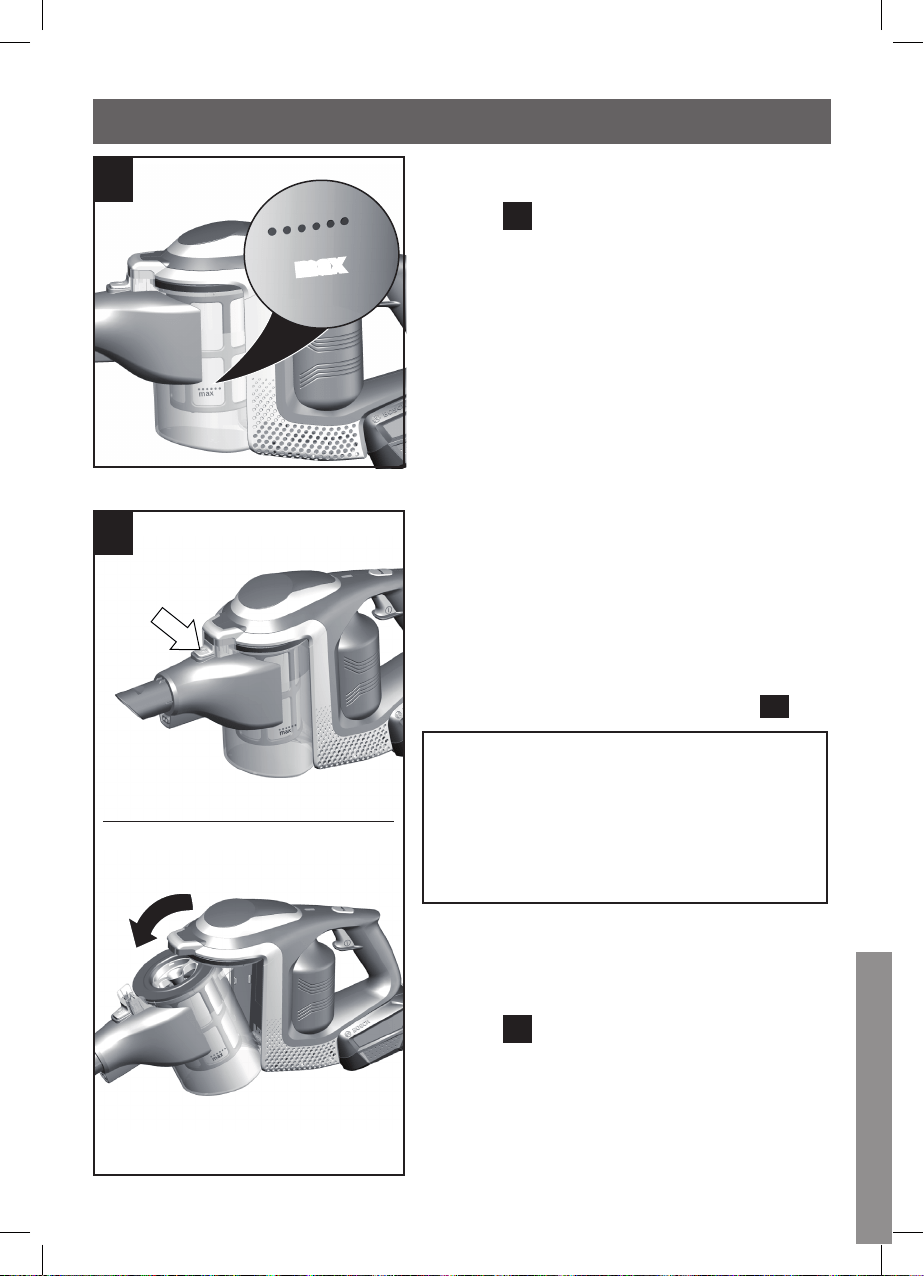
133
20
Retirar el depósito de polvo
Figura
20
•
Desbloquear el depósito de polvo
mediante la tecla de desbloqueo y
extraerlo del aparato.
1
2
19
max
Vaciar el depósito de polvo
Figura
19
Para conseguir un buen resultado
de aspiración, el depósito de polvo
deberá vaciarse después de cada
proceso de aspiración; en todo
caso, se deberá vaciar si el polvo
contenido en el depósito alcanza la
marca de nivel máximo.
Recomendamos no llenar el depósi-
to de polvo por encima de la marca,
ya que esto podría contribuir a un
exceso de suciedad en el filtro.
Al vaciar el depósito de polvo, se
deberá comprobar también el gra-
do de suciedad de la unidad filtran-
te y, en caso necesario, limpiarla
como se indica en la guía sobre el
cuidado de los filtros.
Figura
25
Atención!
únicamente es posible limpiar los
filtros con el aparato apagado.
No aspirar nunca sin colocar la
unidad filtrante.
Tras concluir el trabajo
es
133
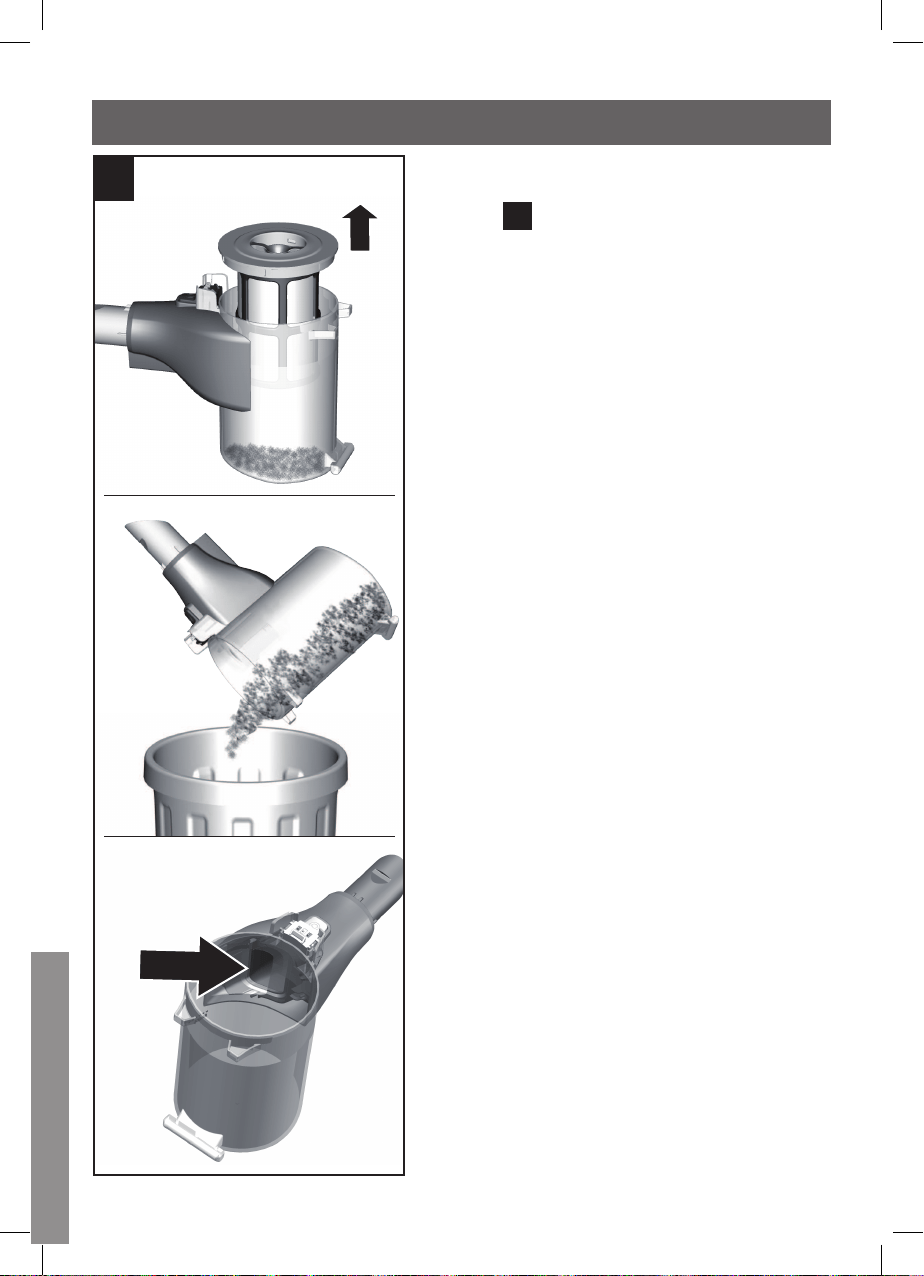
134
Retirar la unidad filtrante
Figura
21
•
Retirar la unidad filtrante del
depósito de polvo.
•
Vaciar el depósito de polvo.
Si es necesario, limpie el contene-
dor de polvo con un paño húmedo.
•
Eliminar los restos de suciedad
que pueda haber debajo del orifi-
cio de evacuación.
21
Tras concluir el trabajo
es
134
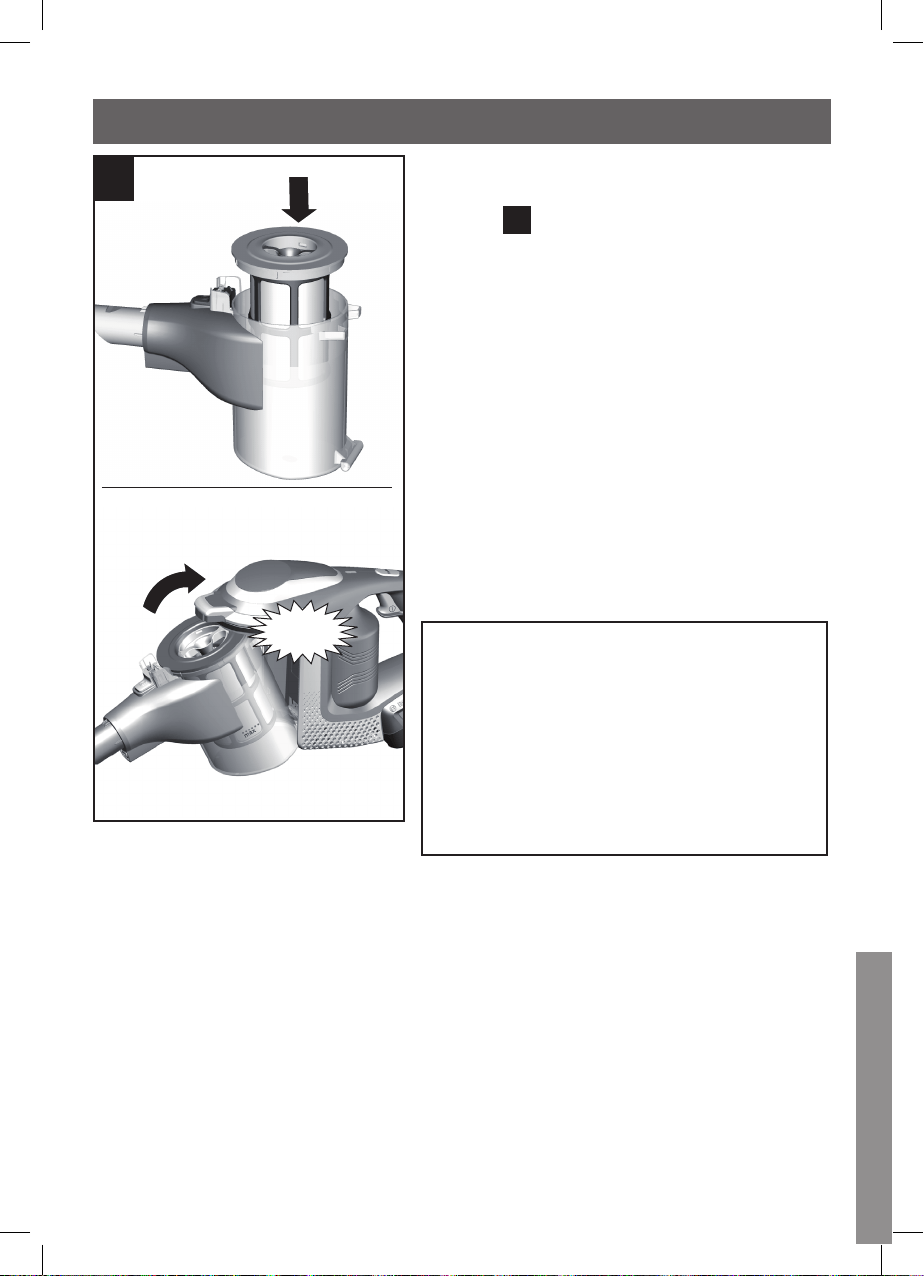
135
Click
Colocar el depósito de polvo
Figura
22
•
Introducir la unidad filtrante en el
depósito de polvo; se debe poner
especial cuidado de que encaje
correctamente.
•
Colocar el depósito de polvo den-
tro del aparato y encajarlo de for-
ma audible.
Atención
!
si al colocar el depósito de polvo
se nota cierta resistencia, se ha
de comprobar que el filtro esté
íntegro y que tanto la unidad fil-
trante como el depósito de polvo
estén correctamente encajados.
22
Tras concluir el trabajo
es
135

136
1
2
Soltar el aparato y el tubo de
aspiración
Figura
23
•
Para soltar el tubo de aspiración,
pulsar el botón de desbloqueo y
extraer el tubo de aspiración ha-
cia abajo.
Soltar el tubo de aspiración y la
boquilla para suelo
Figura
24
•
Para soltar la boquilla para suelo,
pulsar el botón de desbloqueo y
extraer el tubo de aspiración de
la boquilla.
24
23
1
2
Desmontar
es
136

137
Atención!
únicamente es posible limpiar los
filtros con el aparato apagado.
Limpiar el filtro para pelusas
Figura
25
Limpiar el filtro para pelusas de for-
ma periódica para garantizar el fun-
cionamiento óptimo de la aspirado-
ra.
•
Desconectar el aparato para lim-
piar la unidad filtrante externa.
•
Retirar el depósito de polvo del
aparato.
Figura
20
•
Retirar la unidad filtrante del
depósito de polvo.
Figura
21
•
Limpiar la unidad filtrante externa.
a) Por regla general, es suficiente
con agitar o sacudir ligeramente
el filtro para pelusas al vaciar el
depósito de polvo para que se
desprendan las partículas de su-
ciedad que pueda haber.
b) Si esto no basta, se puede em-
plear un paño
húmedo para reti-
rar las partículas de suciedad de
la superficie.
25
b
a
Cuidar y limpiar el filtro
es
137
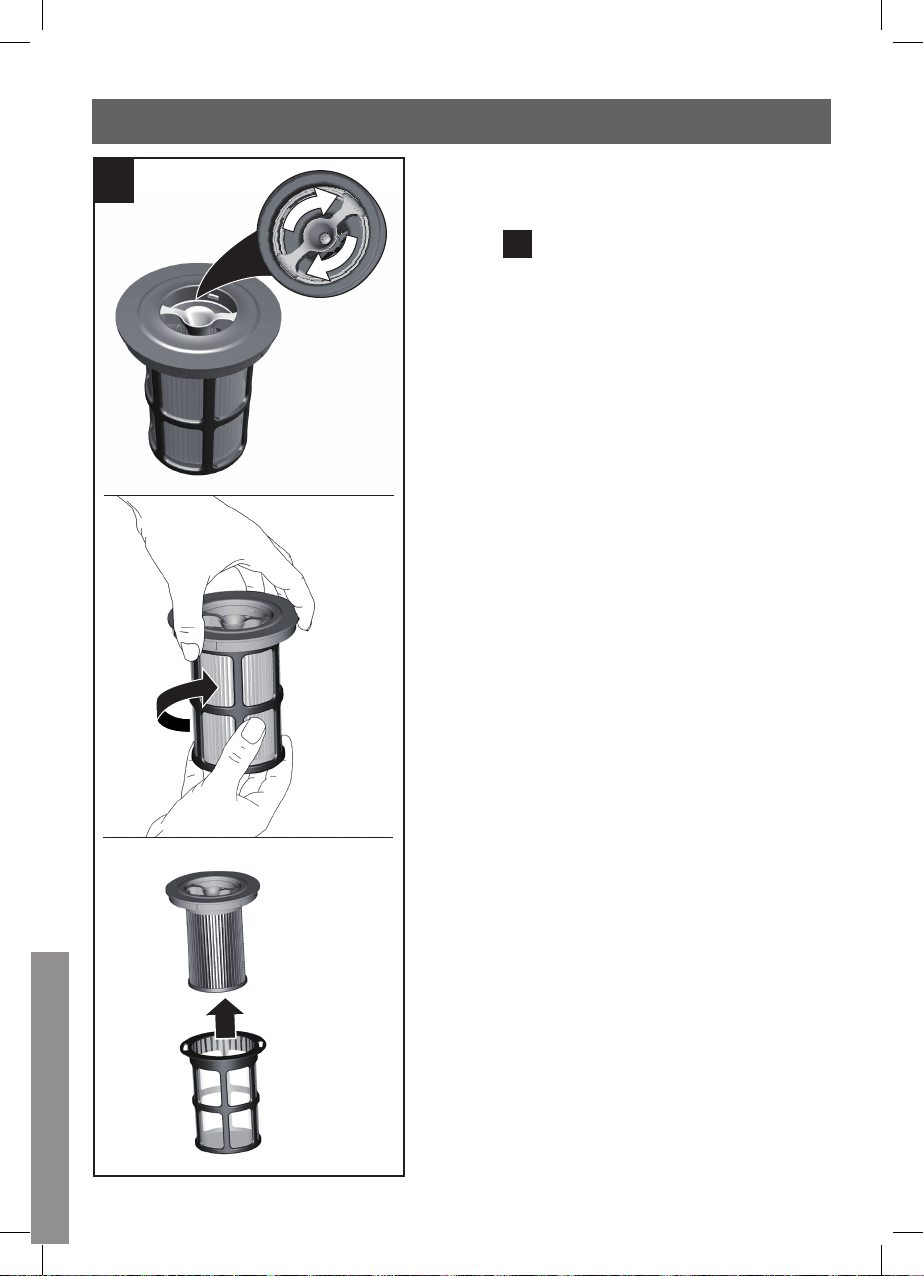
138
Limpiar el filtro de láminas
(filtro protector del motor)
Figura
26
•
Desconectar el aparato para lim-
piar el filtro de láminas.
•
Para limpiar el filtro de láminas,
girar el mando 180º al menos 3
veces.
•
A continuación, retirar el filtro de
láminas de la unidad filtrante ex-
terior y eliminar la suciedad.
Se recomienda limpiar el filtro de
láminas con cada vaciado del depó-
sito de polvo.
En el caso de un limpiar el filtro de
láminas defectuoso, se puede soli-
citar uno nuevo a nuestro servicio
de atención al cliente con el sigui-
ente número de pieza de repuesto:
12023349.
26
Cuidar y limpiar el filtro
es
138
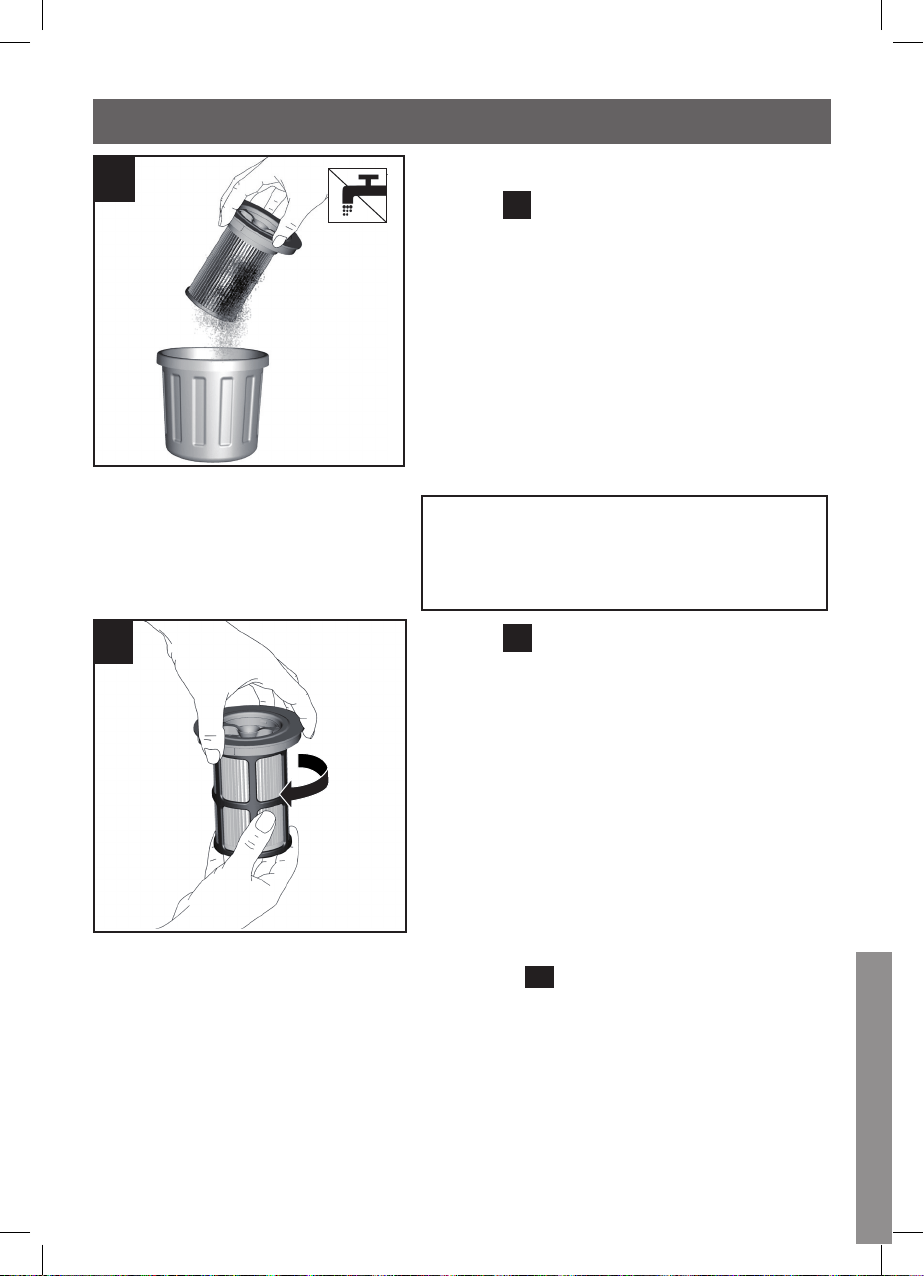
139
Sacudir el filtro de láminas
Figura
27
Si el filtro de láminas está muy su-
cio, también puede sacudirse.
•
Retirar para ello el filtro de lámi-
nas de la unidad filtrante exterior
y sacudirlo sobre un cubo de ba-
sura.
•
El filtro de láminas puede volver a
utilizarse de inmediato tras la lim-
pieza.
Atención
!
no se debe lavar el filtro de lámi-
nas.
27
Figura
28
•
Colocar el filtro de láminas en la
unidad filtrante exterior y encajar-
lo mediante un movimiento girato-
rio en el sentido de las agujas del
reloj.
•
Insertar la unidad filtrante en el
depósito de polvo; se debe poner
especial cuidado de que encaje
correctamente. Colocar el depósi-
to de polvo dentro del aparato y
encajarlo de forma audible.
Figura
22
28
Cuidar y limpiar el filtro
es
139

140
Limpiar la boquilla para suelo
Antes de realizar cualquier tarea de
mantenimiento, desconectar la as-
piradora o retirar el cable de carga.
Figura
29
a) Desbloquear el rodillo del cepillo
mediante un movimiento giratorio
en el sentido contrario a las agu-
jas del reloj
y extraerlo por el
lateral de la boquilla para suelo.
b) Cortar los hilos y pelos enreda-
dos con unas tijeras y retirarlos.
c) Insertar el rodillo del cepillo por
el lateral de la boquilla para suelo
a lo largo de la varilla de guía y
encajarlo mediante un movimien-
to giratorio en el sentido de las
agujas del reloj
.
•
El rodillo del cepillo dispone de
una función de autolimpieza. Para
ello, cortar los pelos y fibras lon-
gitudinalmente por ambos lados
con unas tijeras. Se aspiran au-
tomáticamente cuando el rodillo
del cepillo se ponga en funciona-
miento de nuevo en 30 segundos.
Atención
!
la boquilla para suelo solo podrá
ponerse en funcionamiento si lle-
va montado el rodillo del cepillo
b
a
29
2
1
1
2
c
Limpiar laboquilla para suelo
es
140

141
Antes de cada limpieza de la aspiradora de mano, esta de-
berá desconectarse y desenchufarse del cable de carga. La aspi-
radora y las piezas de plástico de los accesorios pueden limpiarse
con cualquier producto de limpieza convencional para plásticos.
No utilizar productos abrasivos, limpiacristales o pro-
ductos de limpieza de uso general. No sumergir nunca la
aspiradora en agua.
Reservado el derecho a introducir modificaciones técnicas.
Consejos de limpieza
es
141
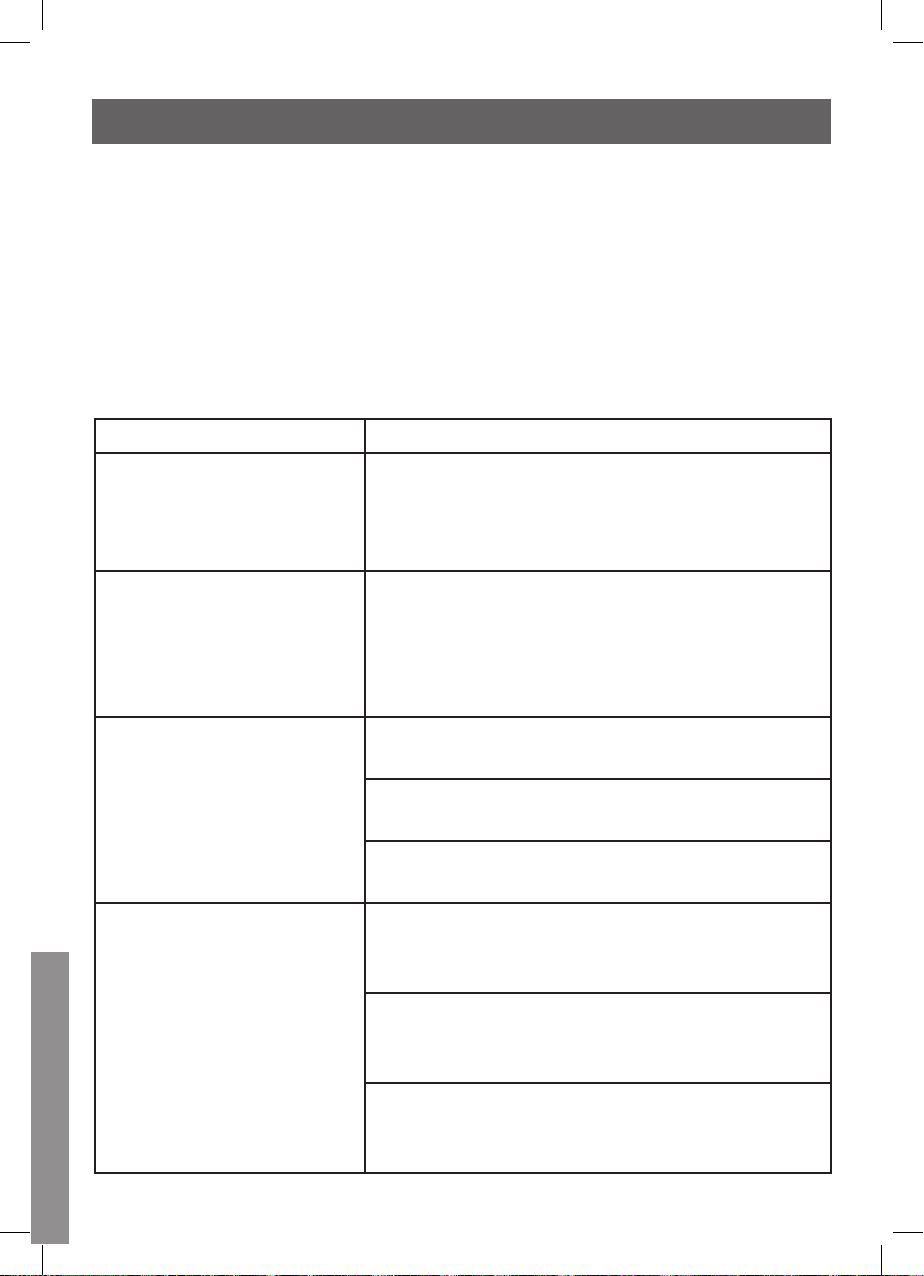
142
Averías y Servicio de Atención al Cliente
es
Solución de averías
Desconectar inmediatamente el aparato y ponerse en contacto con
el Servicio de Atención al Cliente en los siguientes casos:
Si se ha aspirado algún líquido por descuido o si ha entrado líqui-
do en el interior del aparato.
Si el aparato se ha caído.
En estos casos, ya no se puede garantizar la seguridad eléctrica del
aparato, incluso aunque no se puedan detectar daños desde el ex-
terior.
Posibles averías Ayuda
El aparato no funciona y
no hay ninguna señal en
el indicador de funciona-
miento de la batería.
Comprobar que la batería esté correcta-
mente colocada y/o que esté cargada.
El aparato no funciona
y/o el indicador de funci-
onamiento de la batería
se ilumina en rojo duran-
te 10 segundos.
Es posible que la batería esté demasiado
caliente o demasiado fría. Esperar a que
la batería haya alcanzado una temperatura
adecuada.
El cepillo eléctrico no
funciona o produce ru-
idos extraños.
Limpiar el cepillo y retirar los cuerpos ext-
raños si es necesario.
Comprobar que el cepillo se haya colocado
correctamente y esté encajado.
En el caso de que el problema continúe, con-
tactar con el Servicio de Atención al Cliente.
El cepillo se apaga du-
rante el aspirado.
Desconectar el aparato y comprobar si la
boquilla está bloqueada.
Desbloquear la boquilla y limpiarla.
A la hora de limpiar alfombras o moquetas,
seleccionar un nivel de potencia bajo y volver
a iniciar el proceso de limpieza.
Si la boquilla no se puede volver a encender,
contactar con el Servicio de Atención al Clien-
te.
142
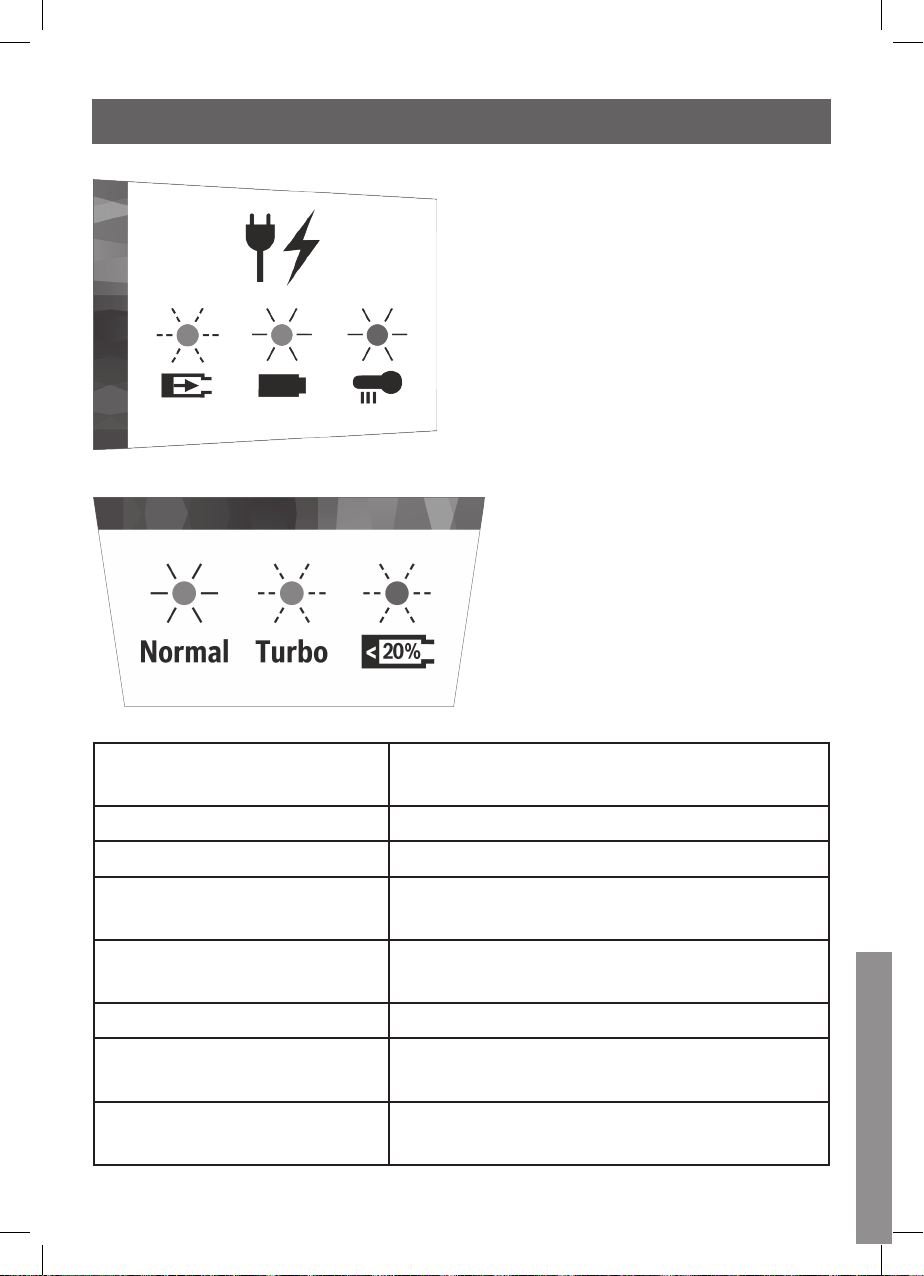
143
Indicador de funcionamiento del proceso de carga
Indicador de funcionamiento durante el uso
Estado del aparato Funcionamiento del indicador de
funcionamiento
Nivel normal El indicador se ilumina en verde.
Nivel Turbo El indicador parpadea en verde.
Carga de la batería <
20 %
El indicador parpadea en rojo.
La batería está descar-
gada
El indicador se apaga.
Proceso de carga El indicador parpadea en verde.
La batería está total-
mente cargada
El indicador se ilumina en verde y se
apaga al cabo de aprox. 2 minutos.
Indicador de avería El indicador se ilumina en rojo y se
apaga al cabo de aprox. 10 segundos.
Indicadores de funcionamiento
es
143
144
Indicaciones para eliminar el material de embalaje
Las aspiradoras, las baterías, los accesorios y los embalajes de-
ben reciclarse de forma respetuosa con el medio ambiente.
No eliminar las aspiradoras ni las baterías junto con los residuos
domésticos.
Embalaje
El embalaje protege la aspiradora contra daños durante el trans-
porte. Está compuesto por materiales no contaminantes y, por
lo tanto, se puede reciclar. El material de embalaje que ya no
se necesite deberá desecharse debidamente en los puntos de
recogida selectiva para su reciclaje.
Aparato usado
Los aparatos usados contienen aún muchos materiales apro-
vechables. Por este motivo, es necesario entregar los aparatos
usados en el comercio habitual o en el centro de reciclaje para
su reaprovechamiento. Consultar las alternativas vigentes para
la eliminación de residuos a su distribuidor o en el ayuntamien-
to de su municipio.
Este aparato está marcado con el símbolo
de cumplimiento con la Directiva Europea
2012/19/UE relativa a los aparatos eléctri-
cos y electrónicos usados (Residuos de apa-
ratos eléctricos y electrónicos RAEE). La di-
rectiva proporciona el marco general válido
en todo el ámbito de la Unión Europea para
la retirada y la reutilización de los residuos
de los aparatos eléctricos y electrónicos.
اين دستگاه مطابق ضوابط اروپائی در
باره دستگاه های کهنه برقی و الکترونيکی
مشخص شده است
این ضوابط که در سراسر اوپا معتبر است، چهار چوب
کلی شيوه بازپس گرفتن و بازيافت دستگاه های
کهنه را تعيين می کند
144
Indicaciones para eliminar el material de embalaje
اين دستگاه مطابق ضوابط اروپائی در
باره دستگاه های کهنه برقی و الکترونيکی
مشخص شده است
این ضوابط که در سراسر اوپا معتبر است، چهار چوب
کلی شيوه بازپس گرفتن و بازيافت دستگاه های
کهنه را تعيين می کند
145
Eliminación
Las herramientas eléctricas, acumuladores, accesorios y em-
balajes deberán someterse a un proceso de recuperación que
respete el medio ambiente.
¡No arroje las herramientas eléctricas, acumuladores o pilas a
la basura!
España
Servicio Central de Bosch
Servilotec, S.L.
Polig. Ind. II, 27
Cabanillas del Campo
Tel.: +34 9 01 11 66 97
Acumuladores/pilas:
Iones de Litio:
Observe las indicaciones comprendidas en el apartado “Trans-
porte”
Reservado el derecho de modificación.
145
Indicaciones para eliminar el material de embalaje
146146
Customer service / Service Clients / Klantenservice / Servicio al cliente
0,40 €
/ min
0,40 €
/ min
Kongurator und viele weitere Infos
Zubehör, Produkt-Informationen:
Round About 13, Plot Nr MO-0532A
* Sun-Thu: 8.00 am to 5.00 pm
(exclude public holidays)
ELEKTRO-SERVIS sh.p.k
Pallati “Matrix Konstruksion”,
Kati 0 dhe +1
1023 Tirane
Tel.: 4 2278 130, -131
Fax: 4 2278 130
EXPERT SERVIS
Kulla B Nr 223/1 Kati I
1023 Tirane
Tel.: 4 227 4941
Fax: 4 227 0448
Cel: +355 069 60 45555
Werkskundendienst für Hausgeräte
Quellenstrasse 2a
Ersatzteile und Zubehör und viele
weitere Infos unter:
Produktinformationen
Tel.: 0810 550 511
Wir sind an 365 Tagen rund um die Uhr für
BSH Home Appliances Pty. Ltd.
Gate 1, 1555 Centre Road
Clayton, Victoria 3168
* Mo-Fr: 24 hours
“HIGH” d.o.o.
Gradačačka 29b
Tel./Fax: 033 21 35 13
mailto:[email protected]
Avenue du Laerbeek 74
Tel.: 02 475 70 01
BSH Domakinski Uredi Bulgaria EOOD
Business center FPI, oor 5,
Cherni vrah Blvd. 51B
1407 Soa
Tel.: 0700 208 17
BLD 898, R 533, TASHAN 405
Manama
Tel.: 01 740 05 53*
* Sat-Thu: 7.00 am to 5.00 pm
(exclude public holidays)
BY Belarus,Беларусь
OOO “БСХ Бытовая техника”
тел.: 495 737 2961
mailto:[email protected]
Fahrweidstrasse 80
8954 Geroldswil
Produktinformationen
Tel.: 0848 888 200
CY Cyprus,Κύπρος
BSH Ikiakes Syskeves-Service
39, Arh. Makaariou III Str.
2407 Egomi/Nikosia (Lefkosia)
Fax: 022 65 8128
mailto:[email protected]
CZ ČeskáRepublika,CzechRepublic
Více informací (např. záruční podmínky,
prodloužená záruka aj.) naleznete na webo -
vých stránkách www.bosch-home.com/cz/
nebo nás kontaktujte na +420 251 095 511
BSH domácí spotřebiče s.r.o.
Radlická 350/107c
158 00 Praha 5
Příjem oprav
Tel.: +420 251 095 043
mailto:[email protected]
BSH Hvidevarer A/S
2750 Ballerup
mailto:[email protected]
www.bosch-home.dk
SIMSON OÜ
Türi tn.5
Tel.: 0627 8730
Fax: 0627 8733
Renerki Kaubanduse OÜ
Tammsaare tee 134B (Euronicsi kaupluses)
12918 Tallinn
Tel.: 0651 2222
Fax: 0516 7171
mailto:[email protected]
Eliser OÜ
Mustamäe tee 24
10621 Tallinn
Tel.: 0665 0090
mailto:hooldus@eliser.ee
www.kodumasinate-remont.ee
BSH Electrodomésticos España S.A.
Servicio Ocial del Fabricante
C/ Manfredonia, 6
50197 Zaragoza
Tel.: 976 305 713
Fax: 976 578 425
mailto:[email protected]
BSH Kodinkoneet Oy
Itälahdenkatu 18 A, PL 123
00201 Helsinki
Tel.: 0207 510 705
mailto:[email protected]
www.bosch-home.
matkapuhelimesta 8,35 snt/puh + 16,69 snt/min.
FR France
BSH Electroménager S.A.S.
50 rue Ardoin – CS 50037
93406 SAINT-OUEN cedex
Service interventions à domicile:
01 40 10 11 00
Service Consommateurs:
0 892 698 010
mailto:[email protected]
Service Pièces Détachées et
Accessoires:
0 892 698 009
www.bosch-home.fr
GB Great Britain
BSH Home Appliances Ltd.
Grand Union House
Old Wolverton Road
Wolverton
Milton Keynes MK12 5PT
To arrange an engineer visit, to order
spare parts and accessories or for
product advice please visit
www.bosch-home.co.uk
or call Tel.: 0344 892 8979*
* Calls are charged at the basic rate, please
check with your telephone service provider
for exact charges.
GR Greece,Ελλάς
BSH Ikiakes Siskeves A.B.E.
17 km E.O. Athinon-Lamias & Potamou 20
14564 Kisia
Tηλέφωνο: 210 4277 500
Tηλέφωνο: 210 4277 701
BSH Home Appliances Limited
Unit 1 & 2, 3rd Floor, North Block,
Skyway House, 3 Sham Mong Road
Tel.: 2626 9655 (HK)
Toll free 0800 863 (Macao)
Fax: 2565 6681
BSH kućanski uređaji d.o.o.
Ulica grada Vukovara 269F
Tel.: 01 5520 888
HU Magyarország,Hungary
BSH Háztartási Készülék Kereskedelm Kft.
Árpád fejedelem útja 26-28
1023 Budapest
Call Center: +06 80 200 201
BSH Home Appliances Ltd.
M50 Business Park
Ballymount Road Upper
Dublin 12
To arrange an engineer visit, to order
spare parts and accessories or for
product advice please call
Tel.: 01450 2655*
* Calls are charged at the basic rate, please
check with your telephone service provider
C/S/B/ Home Appliance Ltd.
North Industrial Park
Lod, 7129801
Tel.: 08 9777 222
Fax: 08 9777 245
mailto:[email protected]
IN India,Bhārat,
BSH Household Appliances Mfg. Pvt. Ltd.
Arena House, Main Bldg, 2nd Floor,
Plot No. 103, Road No. 12,
MIDC, Andheri East
Mumbai 400 093
Toll Free 1800 266 1880*
* Mo-Sa: 8.00am to 8.00pm
(exclude public holidays)
Smith & Norland hf.
105 Reykjavik
Tel.: 0520 3000
Fax: 0520 3011
BSH Elettrodomestici S.p.A.
Via. M. Nizzoli 1
20147 Milano (MI)
Tel.: 02 412 678 100
Dong Suh Foods Corporation
Dongsuh Bldg., 324,
Dongmak-ro, Mapo-gu
Seoul 121-730
Tel.: 080 025 9114
KZ Kazakhstan,Қазақстан
Dostyk 117/6,
Business Center “Khan Tengri”
Almaty
Hotline: 5454*
* Toll free from mobile only
Boulevard Dora 4043 Beyrouth
Jdeideh, 1202 2040
Tel.: 01 255 211
mailto:Info@Teheni-Hana.com
Senuku prekybos centras UAB
Jonavos g. 62
44192 Kaunas
Tel.: 037 212 146
Fax: 037 212 165
UAB “AG Service”
R. Kalantos g. 32
52494 Kaunas
Tel.: 0700 556 55
Baltic Continent Ltd.
Lukšio g. 23
09132 Vilnius
Tel.: 870 055 595
Fax: 052 741 722
UAB Emtoservis
Savanorių pr. 1 (Centrinė būstinė)
Tel.: 870 044 724
Fax: 052 737 368
BSH électroménagers S.A.
13-15, ZI Breedeweues
1259 Senningerberg
Tel.: 26 349 811
Fax: 26 349 315
SIA “General Serviss”
Buļļu iela 70c
Tel.: 067 42 52 32
BALTIJAS SERVISS
Brivibas gatve 201
Tel.: 067 07 05 20; -36
Fax: 067 07 05 24
Tadaiķu iela 4
Fax: 067 60 12 35
S.R.L. “Rialto-Studio”
ул. Щусева 98
2012 Кишинев
тел./ факс: 022 23 81 80
mailto:[email protected]
Oktobarske revolucije 129
81000 Podgorica
Tel./Fax: 020 674 631
Mobil: 069 324 812
MK Macedonia,Makeдoния
Jane Sandanski 69 lok. 3
Tel.: 02 2454 600
Mobil: 070 233 689
mailto:[email protected]
Oxford House Ltd.
Notabile Road
Mriehel BKR 14
Tel.: 021 442 334
Fax: 021 488 656
www.oxfordhouse.com.mt
Lintel Investments and
Management Services Pvt. Ltd.
Ma. Maadheli, Majeedhee Magu
Malé
Tel.: 03 010 200
mailto:[email protected]
NL Nederlande, Netherlands
BSH Huishoudapparaten B.V.
Taurusavenue 36
2132 LS Hoofddorp
Storingsmelding:
Tel.: 088 424 4010
mailto:[email protected]
Onderdelenverkoop:
Tel.: 088 424 4010
Fax: 088 424 4801
mailto:[email protected]
www.bosch-home.nl
BSH Husholdningsapparater A/S
Tel.: 22 66 05 54
Tel.: 22 66 06 00
BSH Home Appliances Ltd.
Level 3, Air NZ Building, Smales Farm
74 Taharoto Road, Takapuna
Auckland 0622
Tel.: 0800 245 700*
* Mo-Fr: 8.30 am to 5.00 pm
(exclude public holidays)
BSH Sprzęt Gospodarstwa
02-222 Warszawa
Tel.: 801 191 534
Fax: 022 572 7709
mailto:[email protected]
BSHP Electrodomésticos,
Sociedade Unipessoal, Lda.
Rua Alto do Montijo, nº 15
2790-012 Carnaxide
Tel.: 214 250 730
Fax: 214 250 701
mailto:bosch.electrodomesticos.pt@
nr. 19-21, sect.1
13682 Bucuresti
Tel.: 021 203 9748
Fax: 021 203 9733
RU Russia,Россия
ООО «БСХ Бытовые Приборы»
Сервис от производителя
Малая Калужская, 15
119071 Москва
Тел.: 8 (800) 200 29 61
mailto:[email protected]
SA
Abdul Latif Jameel Electronics
and Airconditioning Co. Ltd.
BOSCH Service centre,
Kilo 5 Old Makkah Road
(Next to Toyota), Jamiah Dist.,
P
Jeddah 21472
Tel.: 800 127 9999*
mailto:[email protected]
www
*
(exclude public holidays)
Landsvägen 32
169 29 Solna
Tel.: 0771 11 22 77 local rate
BSH Home Appliances Pte. Ltd.
Block 4012, Ang Mo Kio Avenue 10
Singapore 569628
Tel.: 6751 5000*
Fax: 6751 5005
* Mo-Fr: 8.30am to 7.00pm, Sa: 8.30am to 5.30pm
(exclude public holidays)
BSH Hišni aparati d.o.o.
Tel.: 01 5830 700
Fax: 01 5830 889
Viac informácií (napr. záručné
podmienky, predĺžená záruka a i.)
nájdete na webových
ránkach www.bosch-home.com/sk/ alebo
nás kontaktujte na +420 251 095 511
BSH domácí spotřebiče s.r.o.
organizačná zložka Bratislava
Trnavská cesta 50
821 02 Bratislava
Príjem opráv
Tel.: +421 238 106 115
mailto:[email protected]
BSH Home Appliances Limited
Ital Thai Tower, 2034/31-39, 1st oor,
New Petchburi Road
Bangkapi, Huay Kwang
Tel.: 02 975 5353*
* Mo-Sa: 8.00am to 6.00pm
(exclude public holidays)
BSH Ev Aletleri Sanayi
Fatih Sultan Mehmet Mahallesi
Balkan Caddesi No: 51
34771 Ümraniye, Istanbul
Tel.: 0 216 444 6333*
Fax: 0 216 528 9188*
mailto:[email protected]
* Çağrı merkezini sabit hatlardan
aramanın bedeli şehir içi ücretlendirme,
Cep telefonlarından ise kullanılan
tarifeye gore değişkenlik göstermektedir
台湾
我們期盼您不斷的鼓勵與指導,
任何咨詢或服務需求,
歡迎洽詢客服專線
BSH Home Appliances Private Limited
台北市內湖區洲子街 號 樓
Taipei City 11493
Fax: 02 2627 9788
UA Ukraine,Україна
TOB “БСХ Побутова Техніка”
тел.: 044 490 2095
rr.Magjistralja Ferizaj Prishtine
Tel.: 00381 (0) 290 330 723
Tel.: 00377 44 172 309
mailto:[email protected]
BSH Kućni aparati d.o.o.
Milutina Milankovića br. 9ž
11070 Novi Beograd
Tel.: 011 353 70 08
Fax: 011 205 23 89
BSH Home Appliances (Pty) Ltd.
15th Road Randjespark
Private Bag X36, Randjespark
1685 Midrand – Johannesburg
Tel.: 086 002 6724
Kongurator und viele weitere Infos
Zubehör, Produkt-Informationen:
Round About 13, Plot Nr MO-0532A
* Sun-Thu: 8.00 am to 5.00 pm
(exclude public holidays)
ELEKTRO-SERVIS sh.p.k
Pallati “Matrix Konstruksion”,
Kati 0 dhe +1
1023 Tirane
Tel.: 4 2278 130, -131
Fax: 4 2278 130
EXPERT SERVIS
Kulla B Nr 223/1 Kati I
1023 Tirane
Tel.: 4 227 4941
Fax: 4 227 0448
Cel: +355 069 60 45555
Werkskundendienst für Hausgeräte
Quellenstrasse 2a
Ersatzteile und Zubehör und viele
weitere Infos unter:
Produktinformationen
Tel.: 0810 550 511
Wir sind an 365 Tagen rund um die Uhr für
BSH Home Appliances Pty. Ltd.
Gate 1, 1555 Centre Road
Clayton, Victoria 3168
* Mo-Fr: 24 hours
“HIGH” d.o.o.
Gradačačka 29b
Tel./Fax: 033 21 35 13
mailto:[email protected]
Avenue du Laerbeek 74
Tel.: 02 475 70 01
BSH Domakinski Uredi Bulgaria EOOD
Business center FPI, oor 5,
Cherni vrah Blvd. 51B
1407 Soa
Tel.: 0700 208 17
BLD 898, R 533, TASHAN 405
Manama
Tel.: 01 740 05 53*
* Sat-Thu: 7.00 am to 5.00 pm
(exclude public holidays)
BY Belarus,Беларусь
OOO “БСХ Бытовая техника”
тел.: 495 737 2961
mailto:[email protected]
Fahrweidstrasse 80
8954 Geroldswil
Produktinformationen
Tel.: 0848 888 200
CY Cyprus,Κύπρος
BSH Ikiakes Syskeves-Service
39, Arh. Makaariou III Str.
2407 Egomi/Nikosia (Lefkosia)
Fax: 022 65 8128
CZ ČeskáRepublika,CzechRepublic
Více informací (např. záruční podmínky,
prodloužená záruka aj.) naleznete na webo -
vých stránkách www.bosch-home.com/cz/
nebo nás kontaktujte na +420 251 095 511
BSH domácí spotřebiče s.r.o.
Radlická 350/107c
158 00 Praha 5
Příjem oprav
Tel.: +420 251 095 043
mailto:[email protected]
BSH Hvidevarer A/S
2750 Ballerup
mailto:[email protected]
www.bosch-home.dk
SIMSON OÜ
Türi tn.5
Tel.: 0627 8730
Fax: 0627 8733
Renerki Kaubanduse OÜ
Tammsaare tee 134B (Euronicsi kaupluses)
12918 Tallinn
Tel.: 0651 2222
Fax: 0516 7171
mailto:[email protected]
Eliser OÜ
Mustamäe tee 24
10621 Tallinn
Tel.: 0665 0090
mailto:hooldus@eliser.ee
www.kodumasinate-remont.ee
ES España, Spain
BSH Electrodomésticos España S.A.
Servicio Ocial del Fabricante
Parque Empresarial PLAZA,
C/ Manfredonia, 6
50197 Zaragoza
Tel.: 976 305 713
Fax: 976 578 425
mailto:[email protected]
www.bosch-home.es
BSH Kodinkoneet Oy
Itälahdenkatu 18 A, PL 123
00201 Helsinki
Tel.: 0207 510 705
mailto:[email protected]
www.bosch-home.
matkapuhelimesta 8,35 snt/puh + 16,69 snt/min.
BSH Electroménager S.A.S.
50 rue Ardoin – CS 50037
93406 SAINT-OUEN cedex
Service interventions à domicile:
0 892 698 010
Service Pièces Détachées et
0 892 698 009
Guarantee / Garantie / Garantie / Garantía
GB Conditions of guarantee
For this appliance the guarantee conditions as set
out by our representatives in the country of sale
apply. Details regarding same may be obtained
from the dealer from whom the appliance was
purchased. For claims under guarantee the sales
receipt must be produced.
FR Conditions de garantie
A l’étranger, les conditions de garantie applicables
à cet appareil sont celles s’accordées par la filiale
du pays concerné.
Celles-ci peuvent être fournies par le Revendeur
auprès duquel vous avez acheté l’appareil ou
directement auprès de notre filiale. Si vous aviez
besoin d’utiliser la garantie, la présentation de la
facture d’achat sera nécessaire.
NL Garantievoorwaarden
Voor het aangeschafte apparaat gelden de
garantievoorwaarden welke door de vertegen-
woordiging van de moederorganisatie in het land
van aankoop zijn uitgegeven.
Eventuele bijzonderheden hiervoor zal de leveran-
cier, waarbij het apparaat is gekocht, desgevraagd
verschaffen.
Om aanspraak te kunnen maken op eventuele
garantie is het overleggen van de aankoopbon met
koopen/of leverdatum vereist.
ES Condiciones de garantia
A este aparato son aplicables las condiciones de
garantia acordadas por la representación de
nuestra firma en el pais de compra. Para más
detalles sirvanse dirgir al correspondiente
establecimiento del ramo en que se ha comprado
el aparato. En caso de hacer uso de la garantia es
necesario presentar el correspondiente
comprobante de compra.
TR Garanti Șartları
147
6
147

148
6
148

149
6
149
150
6
150

151
6
151

*8001139344*
8001139344
990131