Loading ...
Loading ...
Loading ...

13
RANGE HOOD TROUBLESHOOTING
How to adjust and replace the fan wheel
• Disconnect the main power.
• Remove the hood from its mounting location.
• Remove the duct and expose the blower fan wheel.
Follow these instructions to re-seat the fan wheel:
• Slowly rotate the fan wheel to check which part
of it is in contact with or too close to the casing.
• Rotate the fan wheel so that the blade with
two small cuts is facing you. (
Figure 6
)
• Use a long screwdriver to slightly loosen the
fixing screw.
DO NOT remove the screw completely. It's very
difficult to put it back in.
• Adjust the fan wheel left or right to seat it to
the center.
• Tighten the fixing screw and plug in the hood to
the main power.
• Run the hood in different speeds to check if the
issue is fixed.
Follow these instructions to replace the fan wheel
with a new one:
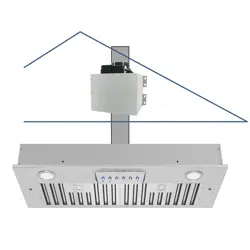
• Remove all 4 screws holding the blower casing.
(
Figure 7
)
• Take out the blower casing.
• Rotate the fan wheel so that the blade with
two small cuts is facing you. (
Figure 6
)
• Use a long screwdriver to slightly loosen the
fixing screw.
• Remove all 3 screws on the motor brackets and
take off the motor.
• Put the motor to the new fan wheel assembly
and slightly tighten the fixing screw to the
motor shaft.
• Adjust the fan wheel left or right to the center
of the casing.
• Tighten the fixing screw.
• Put the blower casing back into the blower unit
and tighten all 4 screws.
• Connect to the main power and run the hood in
different speeds to check if the new fan wheel
is working properly.
Figure 6 Fixing Screw
Figure 7
Loading ...
Loading ...
Loading ...