1
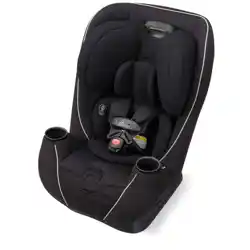
ETERNIS S
Owner’s Manual - Keep for future use.
1
2
4
3
6
A
R
M
P
I
T
L
E
V
E
L
ENES
To reduce the risk of serious injury or death, read
this owner’s manual prior to installing and using
this child restraint.
WARNING
Para reducir el riesgo de lesiones graves o
muerte, lea este manual del propietario antes de
instalar y usar este sistema de sujeción infantil.
ADVERTENCIA
Manual del propietario – Guarde para uso futuro.

2
Welcome to the CYBEX family.
Thank you for purchasing the CYBEX ETERNIS S. We are proud to bring this German-engineered
product to the United States. We hope the ETERNIS S will make your child’s travel both safer and
more pleasant, as well as make installation and use for you as simple as possible.
The ETERNIS S brings a few important safety innovations to the All-In-One car seat category.
CYBEX Linear Side-Impact Protection (L.S.P.) System
The L.S.P. System allows the forces from a side impact collision to be reduced gradually to
minimize injuries. An adjustable head rest, deep side wings lined with thick energy absorbing EPS
foam, and an adjustable device create the CYBEX L.S.P. system. This system has been
optimized to protect and reduce forces on your child in the event of side impact crashes.
Statistics show that over 75% of car seats are being used incorrectly!
Please read and follow these instructions carefully to install the ETERNIS S correctly, even if the
installation and use of this Child Restraint might seem simple and intuitive.
WELCOME TO CYBEX!

3
Before the first use of the ETERNIS S Child Restraint, please make sure you have followed all the
steps in the Safety Checklist on page 112.
Following the American Academy of Pediatrics' recommendations for safe transportation of infants,
we recommend children remain in a REARFACING car safety seat as long as possible, until
they reach the highest weight or height allowed by their seat.
Visit www.aap.org for more information on the Academy's recommendation.
No car seat can guarantee protection from injury in every situation, but proper use helps reduce
the risk of death or serious injury. If you have any questions or need assistance, please contact
CYBEX at 1-877-242-5676. Also, please remember to register your Child Restraint so we can con-
tact you in the unlikely event of a recall. Keep this Owner’s Manual for future reference by storing
it in the compartment on the back of the ETERNIS S Child Restraint. We appreciate your purchase
and invite you to visit www.cybex-online.com/us to see other great CYBEX products.

4
ETERNIS S CAR SEAT USER GUIDE. READ ALL INSTRUCTIONS BEFORE USE.
KEEP INSTRUCTIONS FOR FUTURE USE.
TABLE OF CONTENTS
REGISTRATION AND RECALL INFORMATION .......................................................................................................67
WARNINGS AND IMPORTANT SAFETY INFORMATION ....................................................................................... 827
OVERVIEW OF THE ETERNIS S CHILD RESTRAINT .......................................................................................... 2829
CHILD USAGE GUIDELINES ...............................................................................................................................3035
CHILD RESTRAINT FEATURES .......................................................................................................................... 3645
CUPHOLDER ........................................................................................................................................................36
HARNESS COVERS .............................................................................................................................................. 37
NEWBORN INSERT .............................................................................................................................................. 37
CROTCH STRAP ................................................................................................................................................... 38
HEIGHTADJUSTABLE HEADREST .......................................................................................................................39
RECLINING HEADREST ........................................................................................................................................39
USING THE LINEAR SIDEIMPACT PROTECTION L.S.P ......................................................................................40
ACTIVATING THE L.S.P...........................................................................................................................................41
LOWER ANCHOR STRAP ..................................................................................................................................... 42
TETHER STRAP .................................................................................................................................................... 43
SENSORSAFE APPLICATION .................................................................................................................................. 44

5
IF THESE INSTRUCTIONS ARE NOT FOLLOWED, THE SAFETY OF A CHILD
MAY BE SEVERELY ENDANGERED. KEEP INSTRUCTIONS FOR FUTURE USE.
TABLE OF CONTENTS
USING CHILD RESTRAINT REARFACING WITH LOWER ANCHOR CONNECTORS ......................................... 4653
USING CHILD RESTRAINT REARFACING WITH LAP/SHOULDER BELT .......................................................... 5459
USING CHILD RESTRAINT REARFACING WITH LAP BELT .............................................................................. 6065
USING CHILD RESTRAINT FORWARDFACING WITH LOWER ANCHOR CONNECTORS ................................ 6675
USING CHILD RESTRAINT FORWARDFACING WITH LAP/SHOULDER BELT ................................................... 7681
USING CHILD RESTRAINT FORWARDFACING WITH LAP BELT ..................................................................... 8287
USING CHILD RESTRAINT IN BOOSTER MODE ................................................................................................ 8891
SECURING CHILD WITH HARNESS ................................................................................................................... 9297
SECURING CHILD RESTRAINT IN AN AIRCRAFT .....................................................................................................98
INSTALLING CHILD RESTRAINT REARFACING IN AN AIRCRAFT .................................................................. 99102
INSTALLING CHILD RESTRAINT FORWARDFACING IN AN AIRCRAFT ......................................................... 103107
CARE AND CLEANING ..................................................................................................................................... 1081111
SAFETY CHECKLIST .............................................................................................................................................. 112
GENERAL INFORMATION ABOUT SENSORSAFE ............................................................................................. 114117
USING SENSORSAFE ....................................................................................................................................... 118121
RESOURCES ................................................................................................................................................... 122123
WARRANTY ..................................................................................................................................................... 124125

6
Child restraints could be recalled for safety reasons.
You must register this restraint to be reached in a
recall. Send your name, address, e-mail address,
if available, and the restraint’s model number and
manufacturing date to:
REGISTERING YOUR CHILD RESTRAINT
Please complete the pre-paid registration card that is
attached to your child restraint and send in the portion
shown below today.
Call the U.S. Government’s Vehicle Safety Hotline
at 1-888-327-4236 (TTY:1-800-424-9153), or go to
www.NHTSA.gov.
This child restraint conforms to all applicable Federal
motor vehicle safety standards.
When used WITH the internal harness and properly
installed pursuant to these instructions, this restraint
is certified for use only in passenger and multi-
purpose passenger motor vehicles, buses and
trucks equipped with either lap belts only or lap/
shoulder belt systems and for use in aircraft.
When used WITHOUT the internal harness system
in BOOSTER MODE and properly installed pursuant
to these instructions, this restraint is certified
for use only in passenger and multi-purpose
passenger motor vehicles, buses, and trucks
equipped with lap/shoulder belt systems only.
When used in BOOSTER MODE, this restraint is
NOT certified for use in aircraft. A belt-positioning
booster requires the use of a lap/shoulder belt
system, which is not available in aircraft.
CERTIFICATION
FOR RECALL INFORMATION
Columbus Trading-Partners USA Inc.
Attn: ParentLink
1801 Commerce Drive
Piqua, Ohio 45356
or call 1-877-242-5676
or register online at:
http://register.cybex-online.com/us/carseats
REGISTRATION AND RECALL INFORMATION
Tear off and mail this part
Consumer: Just fill in your name and address and e-mail address.
Your Name
CHILD RESTRAINT REGISTRATION CARD
Your Street Address
State
Zip Code
City
E-mail Address
RG5009
Date of Manufacture: xxxx/xx/xx
Model Number : xxxxx
Model Name : Eternis S

7
IF YOU NEED ASSISTANCE OR HAVE QUESTIONS
If you have any questions regarding installation of your child restraint, please contact us at:
Columbus Trading-Partners USA Inc.
Attn: ParentLink
1801 Commerce Drive
Piqua, Ohio 45356, USA
1-877-242-5676
For helpful information regarding child restraints:
www.safekids.org
https://www.nhtsa.gov/equipment/car-seats-and-booster-seats
REGISTRATION AND RECALL INFORMATION
8
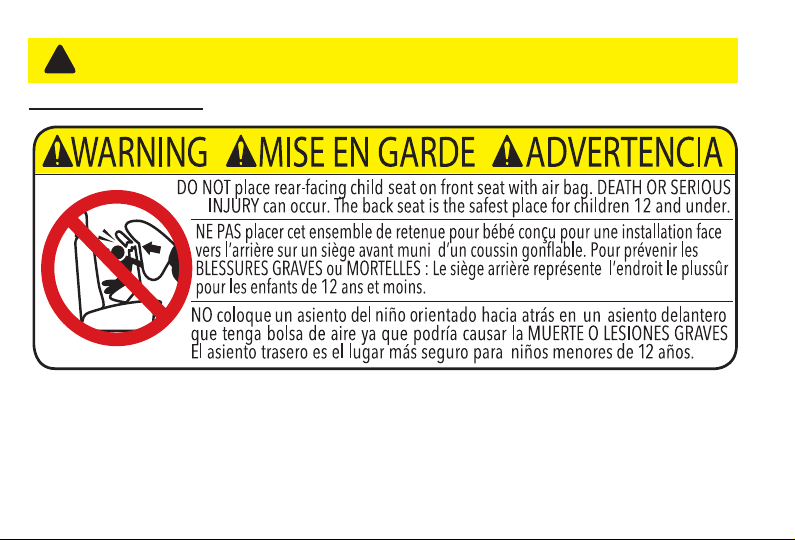
AIRBAG WARNING
WARNING! DEATH or SERIOUS INJURY can occur.
!
WARNINGS AND IMPORTANT INFORMATION
9
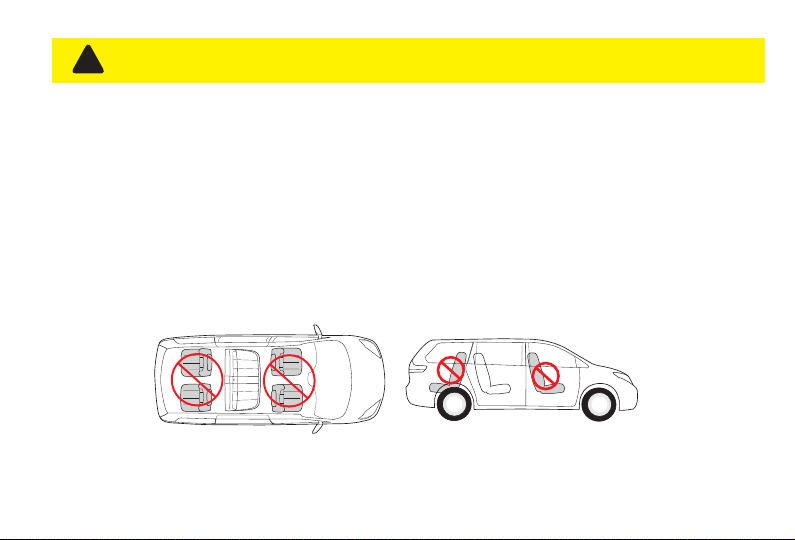
• DO NOT use this restraint in the front seat of a vehicle equipped with an air bag. Interaction
between a REARFACING restraint and air bags may cause serious injury or death. If your vehicle
has an air bag, refer to the vehicle owner’s manual for child restraint installation.
• If the rear seat of your vehicle is equipped with side air bags, refer to the following information
for proper usage.
• Vehicles built prior to the 2002 model year:
DO NOT use this restraint in a vehicle seating position equipped with a side air bag unless
authorized by the vehicle manufacturer.
Model year 2002 and newer vehicles:
Refer to your vehicle owner’s manual before placing this restraint in a seating position equipped
with a side air bag.
• DO NOT place any objects between the restraint and the side air bag, as an expanding air bag
may cause the items to strike your child.
WARNINGS AND IMPORTANT INFORMATION
WARNING! DEATH or SERIOUS INJURY can occur.
!

10
! !
WARNING!
Children have STRANGLED in loose or partially
buckled harness straps. Fully restrain the child.
Algunos niños se han ESTRANGULADO con correas
del arnés parcialmente abrochadas o sueltas.
A
R
M
P
I
T
L
E
V
E
L
A
R
M
P
I
T
L
E
V
E
L
¡ADVERTENCIA!
WARNING! DEATH or SERIOUS INJURY can occur.
!
GENERAL WARNINGS
• READ this Owner’s Manual carefully before first
use, and keep it for future reference.
• FOLLOW ALL INSTRUCTIONS on this child
restraint and in the written instructions stored
in the compartment on the back of the child
restraint.
• NEVER leave child unattended.
• DO NOT use a used child restraint whose
history you do not know.
• DO NOT allow others to install or use this
child restraint unless they understand how
to correctly install and use it.
• This product contains magnets. Swallowed
magnets can stick together across
intestines causing serious infections and
death. Seek immediate medical attention
if magnet(s) are swallowed or inhaled.
Before use, consult your family doctor
about the compatibility of this product with
pacemakers and similar devices.

11
GENERAL WARNINGS
• NEVER USECHILD RESTRAINT IF IT HAS
DAMAGED, BROKEN OR MISSING PARTS.
• ALWAYS REPLACE THE CHILD RESTRAINT
AFTER A CRASH OF ANY KIND EVEN IF
IT WAS UNOCCUPIED. A crash can cause
unseen damage to the child restraint that
may not be visible.
• NEVER install or use this child restraint
until you have read and understand the
instructions in this manual, the labels on
your child restraint and in your vehicle
Owner’s Manual. If there is a conflict
between the two, the vehicle Owner’s
Manual must be followed. Failure to follow
these instructions can result in death or
serious injury to your child in a crash.
• NEVER allow someone else to use this child
restraint without also passing along this
manual to them.
WARNING! DEATH or SERIOUS INJURY can occur.
!
• The primary protection for occupants of a
vehicle in a collision is the structure of the
vehicle itself. Correctly used, this child restraint
will substantially improve the chances for
survival in most crashes.
• ALWAYS check buckles and other parts for hot
surfaces before placing your child in the child
restraint. A hot surface could burn your child!
Cover an unoccupied child restraint with a
blanket when leaving it in a vehicle exposed to
sunlight.
• NEVER leave an empty child restraint
unsecured in your vehicle. This restraint must
always be secured, even when not occupied.
An unsecured child restraint could injure vehicle
occupants in a sudden stop or crash.
• DO NOT attempt to make repairs to or
otherwise modify or tamper with this child
restraint.
12
WARNING! DEATH or SERIOUS INJURY can occur.
!
LOCATION WARNINGS
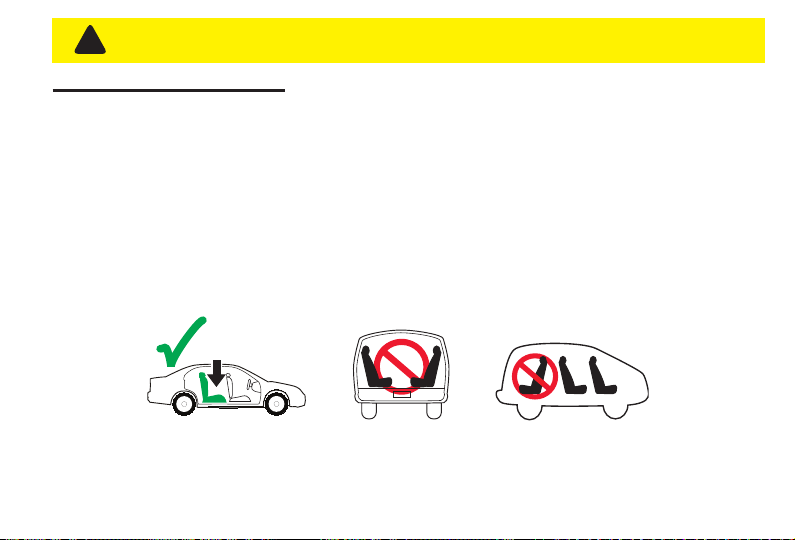
• ACCORDING TO ACCIDENT STATISTICS, children are safer when properly restrained in rear vehicle
seating positions, rather than in the front seating positions.
• ONLY place this child restraint in a vehicle seating location allowed by the vehicle manufacturer.
Refer to your vehicle‘s Owner’s Manual for information about vehicle seat belt systems, air bags,
side air bags, front passenger side air bags and child restraint installations, to determine allowable
seating positions.
• Not every location within a vehicle may be safe for the installation of this child restraint. In fact,
some vehicles have no seating position that is safe for the installation of this child restraint. Improper
placement of this child restraint within a vehicle will increase the risk of death or serious injury.
• NEVER use this child restraint in a vehicle seating position where it cannot be secured tightly. A
loosely installed child restraint will not protect your child in a crash.
• NEVER LEAVE a vehicle seat back with a folding mechanism unlocked. In the event of a sudden
stop, an unlocked vehicle seat back could prevent this child restraint from protecting your child.
• NEVER use this child restraint with any motorized, or door mounted vehicle seat belts. Your child
restraint would not be properly restrained in the event of a crash.
• NEVER use this child restraint on boats, low speed vehicles (LSV), all-terrain vehicles (ATV), golf
carts, or any other non-certified application.
• ONLY use this child restraint on vehicle seats with backs that lock into place.
• This child restraint is allowed to touch the vehicle seat in front of it as long as the recline angle of
the
child restraint is not aected.
13
LOCATION WARNINGS
• NEVER LEAVE CHILD UNATTENDED in or around the vehicle even for one minute. Vehicle
backovers can happen in any type of vehicle. Vehicles have blind spots, the areas around the
vehicle that you can not see from the driving position. Always check around the vehicle before
moving your vehicle.
• ALWAYS use a Linear Side-impact Protection (L.S.P.) (see page 40-41) device on the side of the
child restraint immediately adjacent to a vehicle door or panel.
• NEVER extend a Linear Side-impact Protection (L.S.P.) device toward a passenger or another
child restraint.
• ONLY use this child restraint on FORWARDFACING vehicle seat. NEVER install this child
restraint in vehicle seats that face the rear or side of the vehicle.
WARNING! DEATH or SERIOUS INJURY can occur.
!
• VEHICLE TYPES WHICH THE RESTRAINT SYSTEM CAN NOT BE USED:
- This child restraint is not to be used in vehicles that do not have vehicle seat belts or lower
anchorages (LATCH).
• DO NOT USE this child restraint with inflatable seat belts.
14
REAR-FACING WARNINGS
• When using this restraint REARFACING, DO NOT loosen the vehicle seat belt to provide more
leg room, as this may keep the child restraint from protecting the child.
• Fold-down armrests could pose a hazard to a REARFACING child in certain types of collisions.
Consult your vehicle owner’s manual before installing any REARFACING child restraint in front
of a fold-down armrest.
• NEVER turn a child restraint FORWARDFACING with a child who weighs less than 22 lbs (10 kg).
Crash forces may cause serious injury or death.
• DO NOT use the tether strap when the child restraint is in the REARFACING position.
• The headrest on the vehicle seat that the child faces when sitting in the REARFACING mode
should be placed in the lowest position. The vehicle seat back that the child faces must be fully
padded and free of any hard objects.
• IMPORTANT: Infants may have diculty breathing when in an upright seated position. Make sure
they recline enough for their head to lie back comfortably and safely. Failure to properly recline
the child restraint could increase the child’s risk of serious injury or death.
• DO NOT USE this child restraint if the top of your child‘s head is less than 1 inch (2.5 cm) from the
top of the headrest when used REARFACING.
• SOME CHILDREN WITH SPECIAL NEEDS, such as preemies or those who have tested positive
for positional apnea, may be at increased risk of suering breathing or other diculties in a child
restraint. Please consult a physician to determine what type of child restraint should be used.
WARNING! DEATH or SERIOUS INJURY can occur.
!
15
CHILD FIT WARNINGS
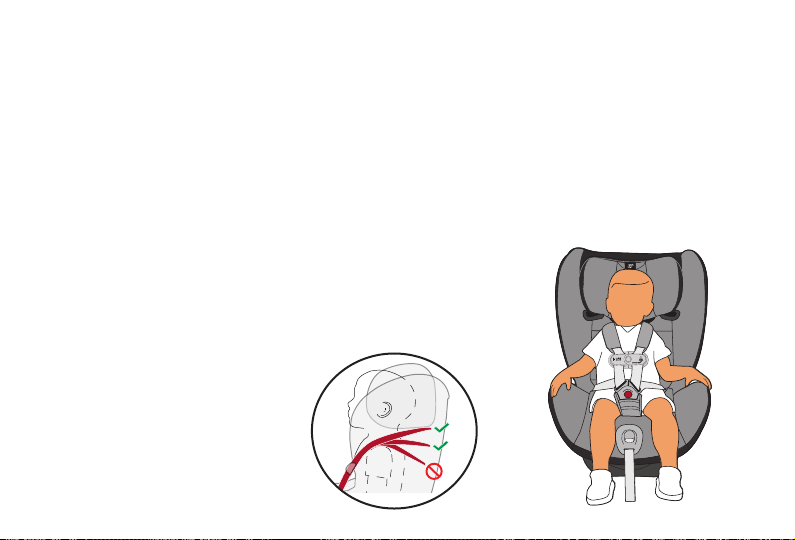
• ALWAYS check the harness buckle to make sure it is securely latched.
• SNUGLY ADJUST the belts provided with this child restraint around your child.
• NEVER use bulky clothing or blankets that will interfere with properly positioning or tightening
the harness.
• ALWAYS keep your child properly secured in the harness. A snug strap should not allow any
slack. It lies in a relatively straight line without sagging. It does not press on the child’s flesh or
push the child’s body into an unnatural position.
FORWARD-FACING WARNINGS
• If your child weighs more than 65 lbs (29.4 kg) or their shoulders are above the highest harness
level, you MUST use child restraint in booster mode.
• Adjust, or remove, the vehicle headrest in the seat where the child restraint is to be installed, so
that the back of the child restraint rests against the vehicle seat back.
• The headrest on the vehicle seat in front of the child should be put in its lowest position. The
vehicle seat back that the child faces must be fully padded and free of any hard objects.
WARNING! DEATH or SERIOUS INJURY can occur.
!
16
BOOSTER MODE WARNINGS
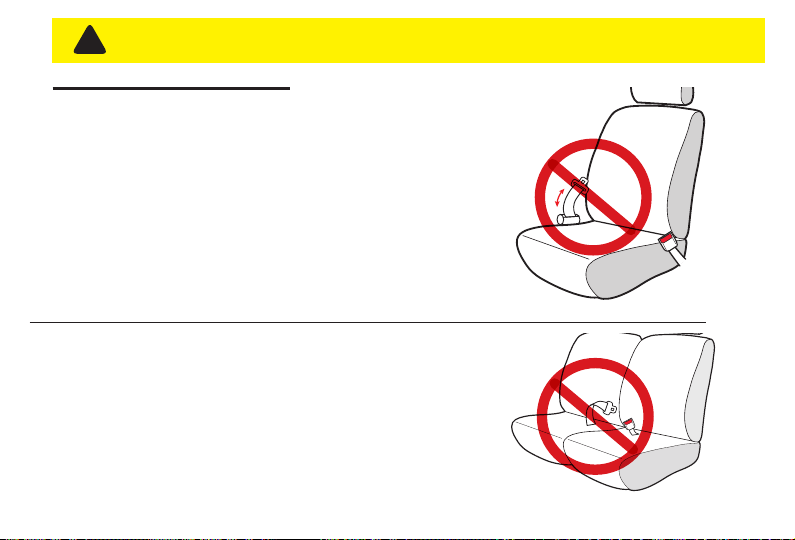
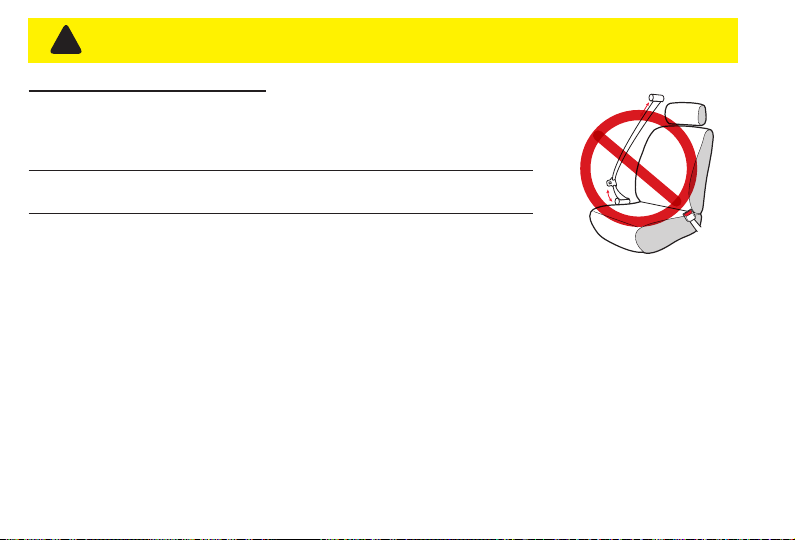
• DO NOT use this booster seat REARFACING.
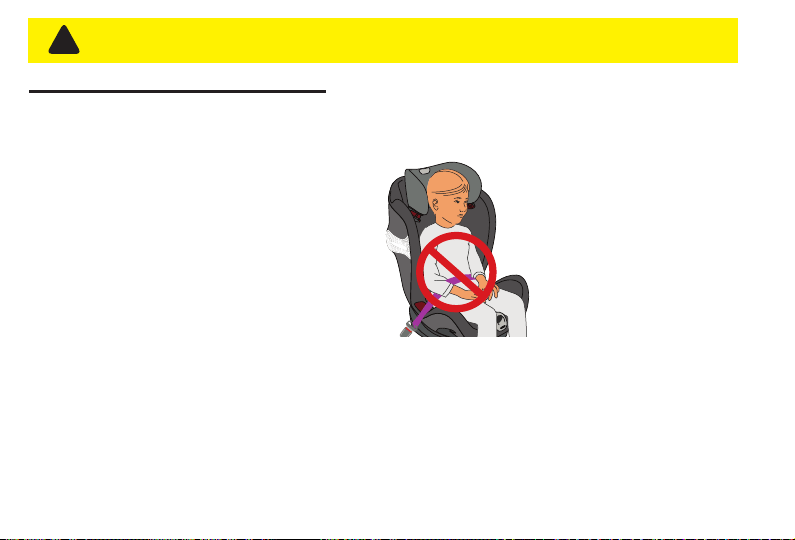
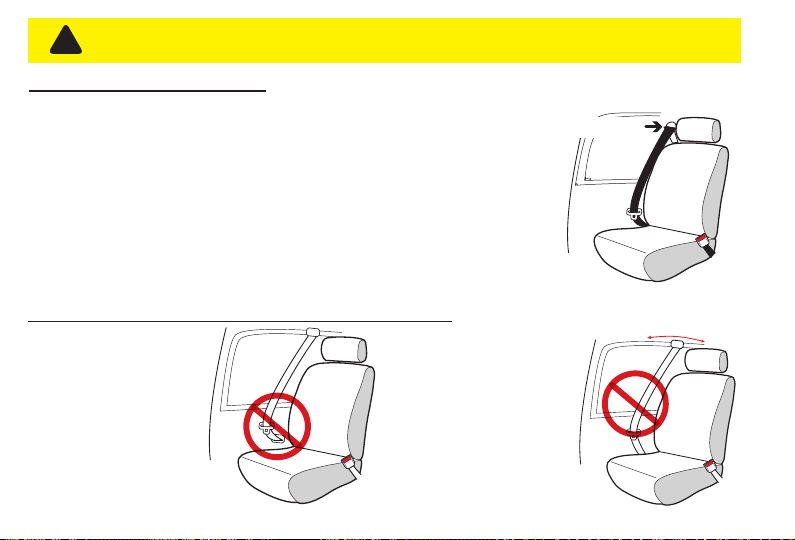
• WARNING! Use ONLY the vehicle’s lap AND shoulder belt system when restraining the child in
this booster seat.
• NEVER use a lap belt only.
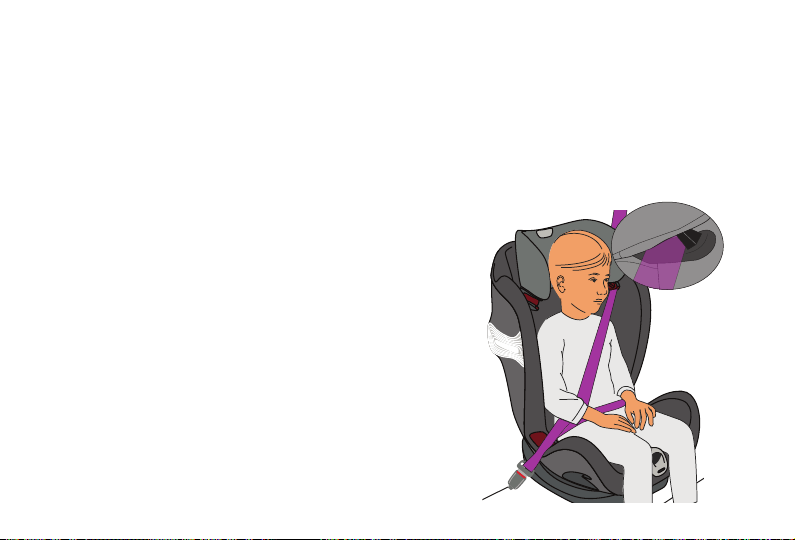
• The shoulder belt MUST be threaded
through the shoulder belt guide.
• DO NOT use this booster seat if the
tops of the child’s ears are above the
back of the booster seat headrest.
• The shoulder belt MUST NOT cross
the child’s neck or fall o the child’s
shoulder. If you cannot adjust the
shoulder belt to properly lie midway between the child’s shoulder and neck AND at or just above
the shoulder, try another seating location or do not use the booster seat.
WARNING! DEATH or SERIOUS INJURY can occur.
!
17
WARNING! DEATH or SERIOUS INJURY can occur.
!
ADDITIONAL WARNINGS
• If the lower anchor connectors are not being used make sure they are securely stored.
• NEVER use this child restraint when it is older than ten (10) years. The date of manufacture can be
found on a label axed to the bottom the child restraint.
• NEVER use this child restraint if any of the Harness or LATCH straps are cut, frayed, or damaged in
any way.
• NEVER use accessories or parts with this child restraint other than those approved by CYBEX. Use
of accessories or parts from other manufacturers could alter the performance of the child restraint.
• REGISTER your child restraint with the manufacturer. This is the best way to reach you in the event
of a recall.
• DO NOT allow children to play with this child restraint.
• DO NOT allow children to play with vehicle seat belts. They may create an entanglement hazard
for any child that can reach the seat belt and may wrap it around his or her neck.
• DO NOT leave loose objects (e.g. groceries, books, bags) in a vehicle. In the event of a sudden
stop, loose objects will keep moving, potentially causing serious injuries.
• NEVER tend to your child’s needs while driving. ALWAYS safely stop your vehicle in order to tend
to your child.
• NEVER take your child out of the child restraint while the vehicle is moving. Unrestrained
occupants are at a greatly increased risk of death or serious injury in a car crash.
• DO NOT place any cups that contain hot liquids in the cup holder.
18
SEAT BELT WARNINGS
• ALWAYS read your vehicle owner's manual to determine what
vehicle belts and retractors are used in your vehicle belt. If not
able to secure a tight installation, the vehicle belt MUST lock and
MUST NOT loosen after the seat belt is tightened.
• DO NOT use this child restraint if it moves more than 1 in. (2.5
cm) side to side or front to back at either the REARFACING or
FORWARDFACING belt path on the child restraint. Serious injury
or death may result from poor installation. If you cannot tightly
secure the child restraint, try again or move it to another location.
Retractor
• DO NOT use this child
restraint in a vehicle
with seat belts that
automatically move
along the vehicle
frame when the
door is opened.
• DO NOT use this child
restraint in a seating
position with
door-mounted seat
belts.
WARNING! DEATH or SERIOUS INJURY can occur.
!
19
• DO NOT use this child restraint in a vehicle equipped
with lap belts that only lock during a sudden stop or
crash (emergency locking retractor – ELR). You must use
a seating location with a locking seat belt. Check your
vehicle owner’s manual to see if you have lap belts with
ELRs.
SEAT BELT WARNINGS
• DO NOT use on vehicle seats when both portions of the
vehicle belts are positioned forward of the seat crease.
WARNING! DEATH or SERIOUS INJURY can occur.
!
20
• DO NOT use with lap/shoulder belts with two retractors. If the vehicle
seat belts are not routed and fastened correctly, the child restraint may
not protect the child in a crash.
• DO NOT use with inflatable seat belts.
• Check your vehicle owner’s manual to determine how to lock your
seat belt for child restraint installation.
• DO NOT allow the vehicle seat belt release button to touch the child restraint. Accidental contact
may cause the seat belt to release. If necessary, turn the seat belt release button away from the
child restraint or move the child restraint to a dierent location.
• Failure to adjust the harness or vehicle seat belts snugly around the child may result in the child
striking the vehicle’s interior during a sudden stop or crash. Serious injury or death may occur.
• Child restraint systems should be securely belted to the vehicle, even when it is not occupied,
since in a crash an unsecured child restraint system may injure other occupants.
SEAT BELT WARNINGS
WARNING! DEATH or SERIOUS INJURY can occur.
!
21
• If your vehicle was built prior to model year 1996, and has a
lap/shoulder belt that is equipped with an emergency locking
retractor (ELR) AND sliding latch plate, you MUST use a Locking
Clip. Check your vehicle owner’s manual to identify which
vehicle belt system is in your vehicle.
• If your vehicle is model year 1996 or newer, it likely has a
vehicle belt system that can be locked when tightened, and
will not require use of a Locking Clip. Consult your vehicle
owner’s manual before installing a locking clip. If your
vehicle requires a Locking Clip, please call ParentLink at
1-877-242-5676 to obtain a Locking Clip and instructions on how to install
and use it. Remove Locking Clip from vehicle seat belt when not used with a child restraint,
or the vehicle seat belt will not properly restrain an adult or child. Serious injury
could occur.
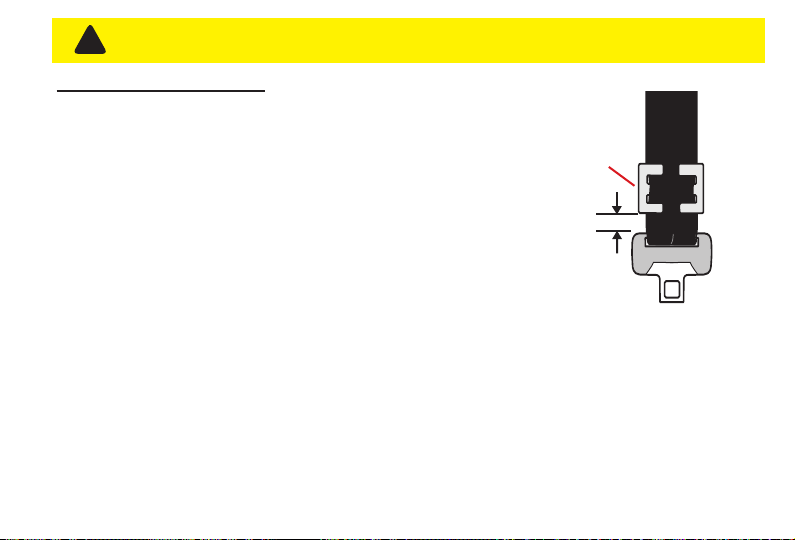
• Locking
Clip
installed
properly
• 0.5 in.
(13 mm)
LOCKING CLIP USE:
WARNING! DEATH or SERIOUS INJURY can occur.
!
22
• If you have any of these types of vehicle belt systems listed, these are SAFE to use to install your
child restraint in the vehicle. Review vehicle owner’s manual for specific instructions on child
restraint installation.
LATCH can be used IN PLACE OF these vehicle belt types. Refer to the REARFACING and
FORWARDFACING weight limits on LATCH use on pg. 31 and 33. Refer to your vehicle owner’s
manual for LATCH locations.
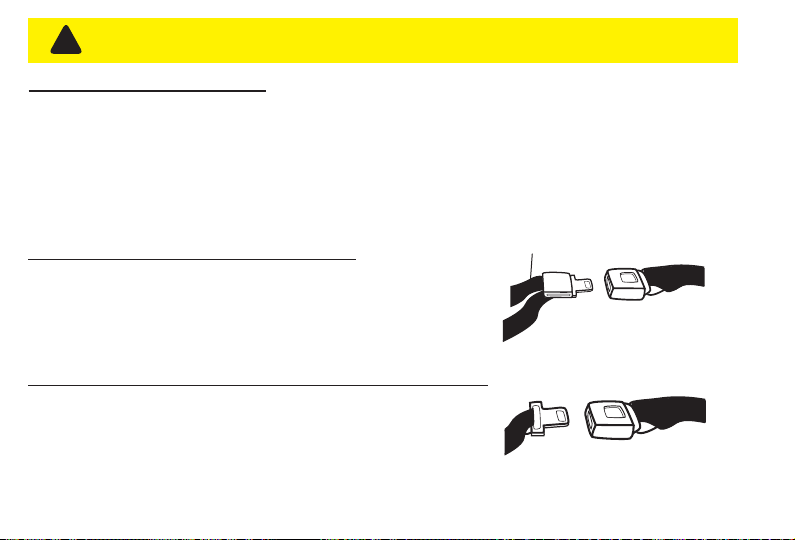
Lap Belt with Automatic Locking Retractor (ALR)
• The automatic locking retractor does not allow the lap belt to
get longer once it is buckled. The vehicle belt is tightened by
feeding seat belt webbing into retractor.
• Once buckled, the vehicle belt is tightened by pulling on the
free end of the strap until the belt is tight.
Free End
Lap Belt with Locking Latch Plate
SEAT BELT WARNINGS
WARNING! DEATH or SERIOUS INJURY can occur.
!
23
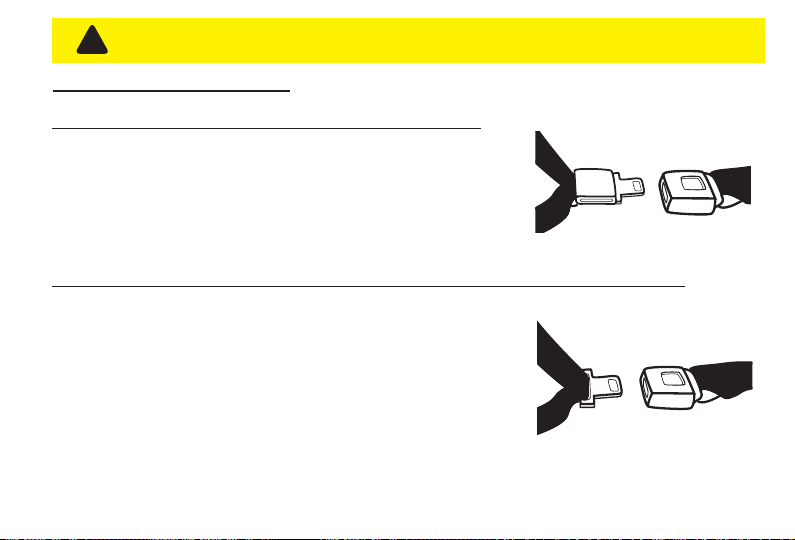
Lap/Shoulder Belt with Locking Latch Plate
Lap/Shoulder Belt with Sliding Latch Plate with Locking Retractor
• The latch plate slides freely along the lap/shoulder belt.
Vehicle belts with sliding latch plates are typically locked at the
shoulder belt retractor by buckling the belt and pulling all of
the webbing out slowly to switch the retractor.
• Check vehicle owner’s manual for specific instructions. The
vehicle belt is tightened after switching the retractor by pulling
up on shoulder belt and feeding the webbing into the retractor.
• The lap portion of this belt does not loosen once the belt is
buckled.
• The vehicle belt is tightened by pulling up hard on shoulder
belt and feeding the extra webbing into the retractor.
SEAT BELT WARNINGS
WARNING! DEATH or SERIOUS INJURY can occur.
!
24
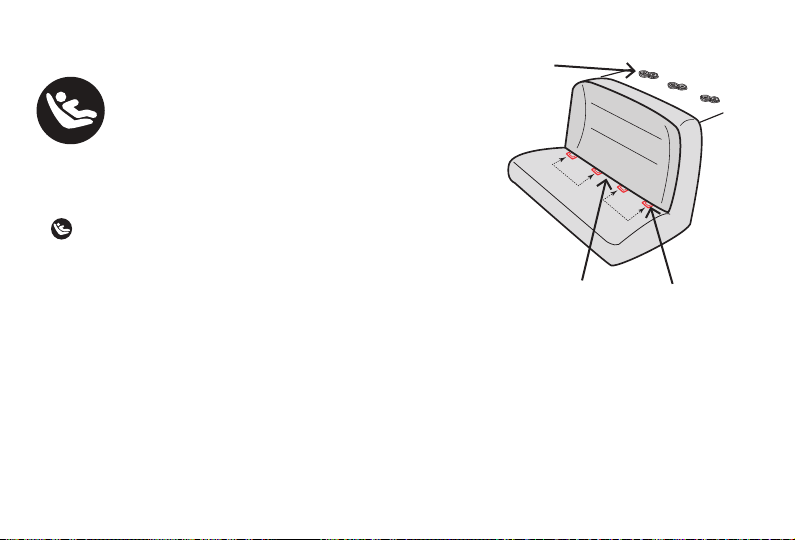
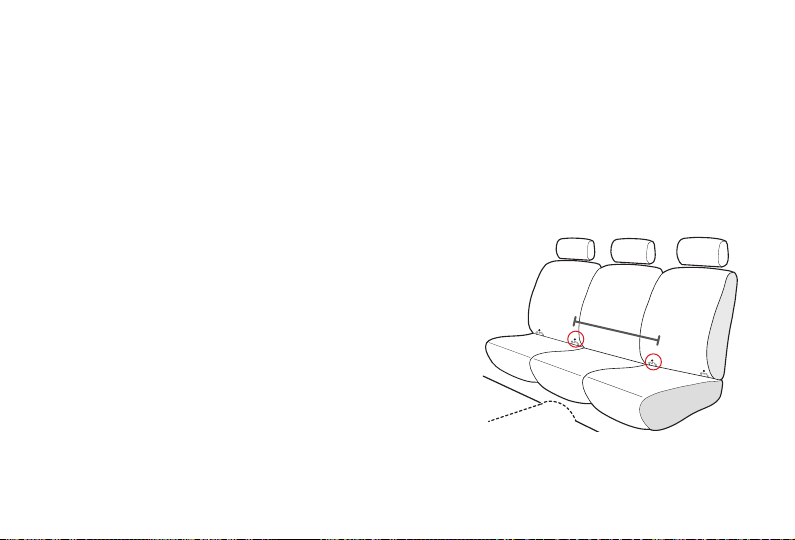
What is LATCH?
LATCH is an acronym for Universal Anchorage
System and refers to a pair of fixed Lower Anchors (or
bars) and a Top Tether anchor that are built into your
vehicle, in vehicles built after September 1, 2002.
The lower LATCH anchors are located in the crease,
or bight, between the vehicle seat back and seat
cushion, and if not visible, will typically be indicated
by symbols. Top tether anchors are located in
various places behind the rear vehicle seat.
LATCH typically oers an easier and more consistent installation.
However, this child restraint can be safely installed using either
LATCH or vehicle belts and meets the requirements of Federal
Motor Vehicle Safety Standard FMVSS 213 with either installation
method. Either method is safe for your child when installed
correctly. When using either method, ALWAYS use tether when installing in the FORWARD
FACING position.
LATCH is standard in vehicles manufactured after September 1, 2002. Refer to your vehicle
Owner’s Manual for lower LATCH anchor positions in your vehicle.
USING LATCH
Vehicle Top Tether Anchor Points
11 in.
(28 cm)
11 in.
(28 cm)
Vehicle
Lower
Anchors
Vehicle
Seat
Crease
25
Outer Seating Positions
Use the lower LATCH anchors OR a vehicle seat belt to install the child restraint in outboard
seating positions (those on either side of the center position).
NEVER use LATCH together with the vehicle belts to install this child restraint. Using both is not
approved and may cause improper performance of the child restraint.
Center Seating Positions
If your vehicle does not have Lower Anchors in the center seating position, check your Vehicle
Owner’s Manual to see if you are allowed to use the two inner Lower Anchors from the outboard
seating positions to install a Child Restraint.
CYBEX allows this child restraint to be installed using
the two inner Lower Anchors from the outboard seating
positions if the distance between the inner Lower Anchors
is between 11 and 20 inches (28-51 cm) AND if your vehicle
manufacturer allows it. (If distance is not correct and/or not
allowed by vehicle manufacturer, use the vehicle belt for
installation in the center position.)
When using the inner Lower Anchors make sure there are
no obstructions from a buckle stalk for the installation and
that the LATCH straps or connectors do not block vehicle belt buckles.
11- 20 in.
28 - 51 cm
USING LATCH
26
• DO NOT use the lower anchors of the child restraint anchorage system (LATCH system) to attach
this child restraint when restraining a child weighing more than 40 lbs (18.1 kgs) in FORWARD
FACING position with the internal harness OR 35 lbs (15.9 kg) in REARFACING position. ONLY
USE VEHICLE BELT INSTALLATION.
• In addition to these instructions, read and follow your vehicle owner’s manual regarding
installation of the child restraint and LATCH. If there is a discrepancy, follow your vehicle owner’s
manual.
• ONLY use for securing child restraint to vehicle lower anchor bars.
• NEVER attach two lower anchor connectors to one vehicle lower anchor bar.
• NEVER use the vehicle seat belts when using the lower anchor connector assembly. Using both
together can cause slack in a sudden stop or crash.
• To avoid strangulation, you must properly store the unused LATCH straps.
• ALWAYS be sure that the lower anchor connectors are attached to the vehicle lower anchor
bars by pulling hard on the lower anchor connectors. If they are not attached, the lower anchor
connector assembly will not secure your child restraint. Serious injury or death may result.
LATCH WARNINGS
WARNING! DEATH or SERIOUS INJURY can occur.
!
27
• DO NOT use this child restraint if it moves more than 1 in. (2.5 cm) side to side or front to back at
either the REARFACING or FORWARDFACING belt path on the child restraint. Serious injury or
death may result from poor installation. If you cannot tightly secure the child restraint, try again or
move it to another location.
LATCH WARNINGS
WARNING! DEATH or SERIOUS INJURY can occur.
!
• To avoid a strangulation hazard, you MUST store the tether inside the tether storage
compartment on the back of the child restraint. Attach the tether hook to the storage clip when
not in use.
This will keep an unused tether or tether hook from hitting someone during a crash.
• The tether strap is for FORWARDFACING use ONLY.
• Refer to your vehicle owner‘s manual for the location of the tether anchor in your vehicle. Older
vehicles may not come equipped with tether anchor hardware. Check with your vehicle dealer.
TETHER STRAP WARNINGS
WARNING! DEATH or SERIOUS INJURY can occur.
!
28
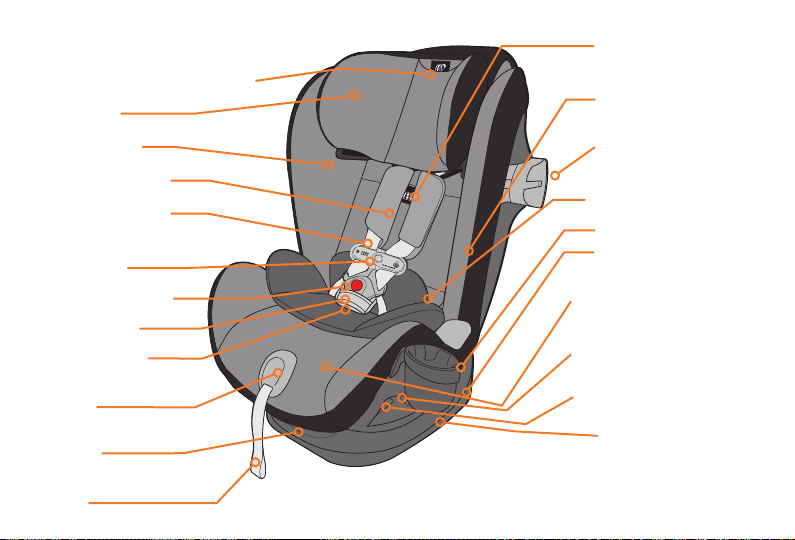
FRONT VIEW
Harness Buckle
SensorSafe
Chest Clip
Harness Adjustment
Strap
Harness Adjustment
Button
Buckle Pad
Crotch Strap
Recline Adjustment
Handle
Seat Cover
Headrest
Shoulder Pads
Harness Straps
Newborn Insert
L.S.P. device
(fully extended)
Magnetic Buckle
Tongue Holders
Recline Position
Indicator
REARFACING
Belt Path (Each Side)
REARFACING
Lock-O (Each Side)
Level Indicator
Headrest Height
Adjustment Handle
Cup Holder
1
2
4
3
6
5
A
R
M
P
I
T
L
E
V
E
L
1
2
4
3
6
5
Headrest Recline
Handle
Lower anchor storage
compartment
(under pad)
OVERVIEW OF THE ETERNIS S CHILD RESTRAINT

29
ETERNIS S
Owner‘s Manual - Keep for future use.
To reduce the risk of serio us injury or
death, read this own er’s manual prio r to
installing and u sing this child re straint.
Para reducir el ries go de lesiones grav es o
muerte, lea este man ual del usuario a ntes de
instalar y usar el a siento infanti l para el automóvi l.
Manual del Propie tario - Guarde pa ra uso futuro.
WARNING
ADVERTENCIA
EN
ES
1
2
4
3
6
A
R
M
P
I
T
L
E
V
E
L
BACK VIEW
L.S.P. device (Stored)
Lower Anchor Connector
Lower Anchor Adjuster Button
Tether Strap (Stored)
FORWARDFACING
Lock-O (Each Side)
FORWARDFACING
Belt Path (Each Side)
Owner's
Manual
(Stored inside
compartment)
Lower Anchor Release Strap
Lower Anchor Strap
Tether Strap
(not-stored)
Tether
Adjuster
Tether
Hook
OVERVIEW OF THE ETERNIS S CHILD RESTRAINT
ETERNIS S
Owner‘s Manual - Keep for future use.
To reduce the risk of serious injury or
death, read this owner’s manual prior to
installing and using this child restraint.
Para reducir el riesgo de lesiones graves o
muerte, lea este manual del usuario antes de
instalar y usar el asiento infantil para el automóvil.
Manual del Propietario - Guarde para uso futuro.
WARNING
ADVERTENCIA
ENES
1
2
4
3
6
A
R
M
P
I
T
L
E
V
E
L

30
A
R
M
P
I
T
L
E
V
E
L
REARFACING USE:
YOUR CHILD MUST MEET THE REQUIREMENTS LISTED:
WEIGHT: 4 50 LBS 1.8 22.6 KG
HEIGHT: 17 48 IN 43.2 121.9 CM
CHILD’S HEAD MUST BE 1 IN 2.5 CM OR MORE
BELOW THE TOP OF THE HEADREST.
REAR-FACING use of this child restraint is ONLY for children who meet ALL of the
requirements shown here. If the child is not within these requirements because they are too
small, select a dierent child seat (such as a REARFACING infant car seat).
If the child is NOT within these requirements because the child is too large, review the
FORWARD-FACING guidelines to determine if this Child Restraint may be used.
REAR-FACING MODE:
Newborn
Insert
OPTIONAL USE:
Newborn Insert - To ensure a better fit
for smaller infants, the Newborn Insert
may be needed.
CHILD USAGE GUIDELINES
Harness straps must be
adjusted to be AT or
JUST BELOW child’s
shoulders.
Minimum 1 in (2.5 cm)
31
6
5
4
3
2
1
4
3
2
1
REAR-FACING MODE:
When used REAR-FACING, only use Recline
Positions 1, 2, 3 and 4 as shown.
DO NOT use LATCH in REARFACING mode
if child weighs more than 35 lbs (15.9 kg).
CHILD USAGE GUIDELINES
REAR-FACING
1 through 4
RECLINE POSITIONS
(1.8 kg)
4 lbs.
(22.6 kg)
50 lbs.
NO LATCH
(15.9 kg)
35 lbs.
32
A
R
M
P
I
T
L
E
V
E
L
FORWARD-FACING USE:
YOUR CHILD MUST MEET THE REQUIREMENTS LISTED:
WEIGHT: 22 65 LB 10 29.4 KG
HEIGHT: 28 49 IN 71.1 124.5 CM
• Top of ears are below the top of the Headrest.
• AGE: at least 1 year old
• Harness straps must be adjusted
to be AT or JUST ABOVE child’s
shoulders.
FORWARD-FACING use of this child restraint is ONLY for children who meet ALL of the
requirements shown here. If the child is not within these requirements because they are too
large, refer to booster mode instructions to see if child is appropriate for that usage.
The American Academy of Pediatrics recommends children should ride REARFACING for as
long as possible until they reach maximum height and weight for their seat.
If the child is NOT within these requirements because the child is too small, review the
REAR-FACING guidelines to determine if this Child Restraint may be used.
FORWARD-FACING MODE:
CHILD USAGE GUIDELINES
33
FORWARD-FACING MODE:
When used FORWARD-FACING, only use
Recline Positions 5 and 6 as shown.
DO NOT use LATCH in FORWARDFACING
mode if child weighs more than 40 lbs (18.1 kg).
6
5
4
3
2
1
6
5
CHILD USAGE GUIDELINES
FORWARD-FACING
NO LATCH
(10 kg)
22 lbs.
(18.1 kg)
40 lbs.
(29.4 kg)
65 lbs.
5 and 6
RECLINE POSITIONS
34
BOOSTER MODE USE:
YOUR CHILD MUST MEET THE REQUIREMENTS LISTED:
WEIGHT: 40 120 LB 18.1 54.4 KG
HEIGHT: 44 57 IN 111.8 144.8 CM
Top of ears are below the top of the Headrest.
• AGE: at least 3 years old
• The shoulder belt MUST pass through the shoulder belt
guide and the belt guide should be EVEN with or JUST
ABOVE the shoulders.
• The shoulder belt MUST cross midway between the child's
shoulder and neck.
• The lap belt is stretched low and snug across the child's
hips within the lower belt guides and fastened into the
buckle.
BOOSTER MODE use of this child restraint is ONLY for children who meet ALL of the requirements
shown here. If the child is not within these requirements because they are too large, discontinue use of
this seat. Your child may be ready to use the vehicle belt system only at this time.
If the child is NOT within these requirements because the child is too small, review the
REAR-FACING and FORWARD-FACING guidelines to determine if this Child Restraint may be used.
BOOSTER MODE :
Shoulder
belt guide
CHILD USAGE GUIDELINES

35
BOOSTER MODE:
When used in BOOSTER MODE ONLY use
Recline Position 6 as shown.
LATCH is allowed to be used in BOOSTER
MODE ONLY to secure the booster seat to
the vehicle seat. The vehicle lap/shoulder belt
is required to be used in booster mode when
child is in the booster seat.
6
5
4
3
2
1
6
CHILD USAGE GUIDELINES
BOOSTER without HARNESS
LATCH
(18.1 kg)
40 lbs.
(54.4 kg)
120 lbs.
6
RECLINE POSITION

36
• ONLY use cup holders that have come with your original car seat or
that were specifically designed for it by CYBEX.
• DO NOT use the cup holder to hold hot liquids (e.g. coee), even in
enclosed or lidded containers. Placing hot liquids in the holder could
result in spills and burn injuries to you or your child.
• NEVER place sharp or pointed objects in the cup holder. In a crash
these objects could hit you or your child and cause serious injuries.
• ONLY use containers that fit securely all the way to the bottom of
the cup holder. They should not stop halfway down when placing
containers in the cup holder.
• ONLY use containers with a capacity of 12 oz./355ml or less.
• NEVER use any containers which are made of brittle material (e.g.
glass). This could lead to injuries in the event of an crash.
• NEVER leave open containers in the cup holder during the journey.
There is a risk of spilling e.g. when braking, which may cause damage
to the electrical components of the vehicle or seat upholstery.
• ALWAYS remove containers, before removing the cup holder from the
car seat.
• ALWAYS remove containers from the cup holder before reclining the
car seat. There is a risk of spilling, which may cause damage to the
electrical components of the vehicle or seat upholstery.
CUP HOLDER
6
5
4
3
2
1
Slide the Cup Holder onto
either side of the Child
Restraint where indicated by
the Cup Holder icon.
6
5
4
3
2
1
CHILD RESTRAINT FEATURES
WARNING! DEATH or SERIOUS INJURY can occur.
!

37
HARNESS COVERS
NEWBORN INSERT (REAR-FACING ONLY)
• To ensure a better fit for smaller infants, the Newborn Insert may be
needed. DO NOT use any other infant insert or pillows.
Only use the one provided by CYBEX for this Child Restraint.
• Pull Harness Buckle through slot in the bottom of Newborn Insert.
• Pull both Harness Straps over the side panels of Newborn Insert.
• Push Newborn Insert firmly into Child Restraint to make sure it is
properly positioned.
• When positioning the headrest make sure the bottom of the headrest
flap is behind the infant insert flap.
6
5
4
3
2
1
Install harness covers above chest clip. Harness covers are optional
for comfort. Wrap harness covers around harness straps and fasten the
snaps.
ALWAYS make sure the harness covers DO NOT bunch up when
tightening the harness.
CHILD RESTRAINT FEATURES

38
CROTCH STRAP
L
E
V
E
L
As your child grows, you will need to change
the crotch strap position so that it is in the
slot closest to your child. The crotch strap
should ALWAYS be as close as possible to,
but NEVER under, the child's bottom.
Remove buckle pad.
Unfasten snaps on seat cover behind
headrest pad and lift cover up.
Pull the seat cover forward. Slide the harness
buckle through the pad opening.
Grasp the bottom of the Crotch Strap and
twist it to align with the lengthwise slot.
Move to forward slot position
OR
Move to rear slot position based on your
child's size.
Twist strap back into position.
Re-attach the seat cover and buckle pad.
2
3 4
5
1
2
3
4
5
1
OR
CHILD RESTRAINT FEATURES
39
The 3 position reclining headrest helps to prevent child's head from
falling forward should they fall asleep during travel time. It does not
work in all height adjustable headrest positions mentioned above.
Height Adjustable Position 1-3 - NO RECLINE AVAILABLE
Height Adjustable Position 4 - RECLINE 1 and 2 available
Height Adjustable Position 5-12 - RECLINE 1, 2 and 3 available
To recline headrest into one of the three recline positions, squeeze
button at top of head rest and adjust to desired position.
HEIGHT-ADJUSTABLE HEADREST
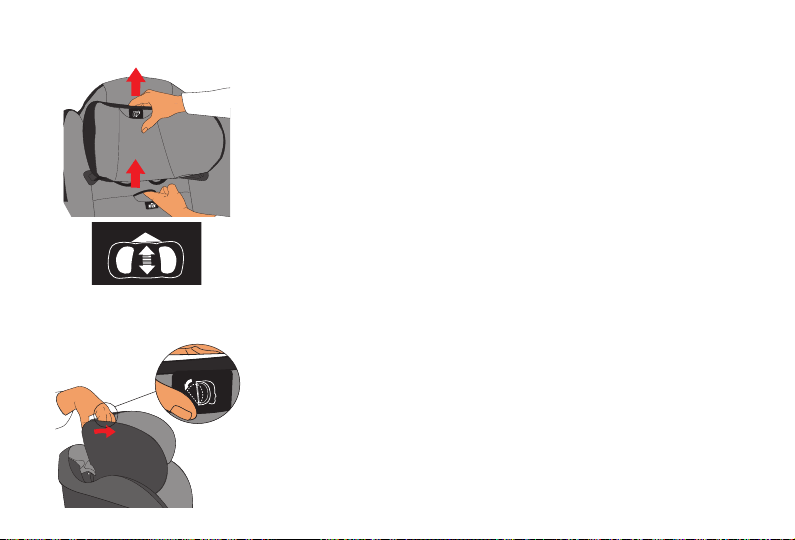
The seat has a headrest that automatically adjusts the harness height
without the need to re-thread it. The headrest may be adjusted up and
down and lock into one of the twelve positions.
Lift the lever located in the slot near the height adjust label.
For REARFACING use, adjust headrest so the harness straps are
AT or JUST BELOW the child's shoulders.
For FORWARD-FACING use, adjust headrest so the harness straps
are AT or JUST ABOVE the child's shoulders.
NOTE: Regularly check for proper harness height as your child grows.
Height adjust label
CHILD RESTRAINT FEATURES
RECLINING HEADREST
40
L.S.P.
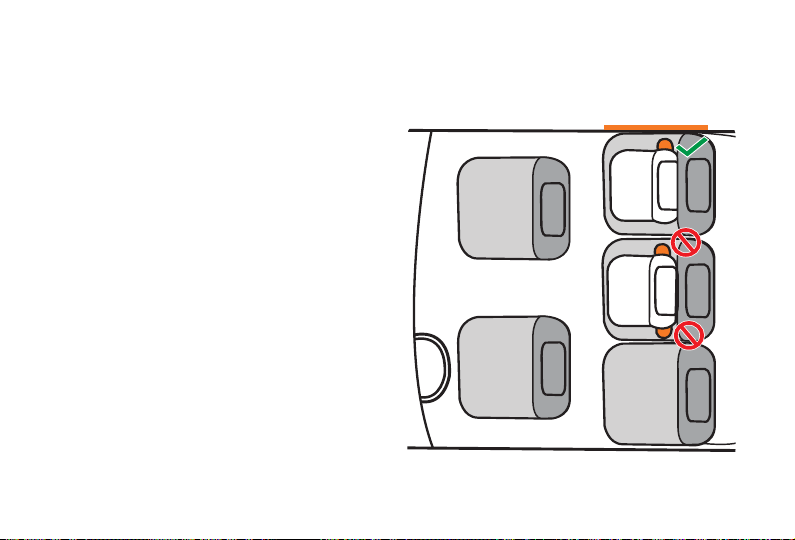
The “Linear Side-impact Protection” (L.S.P.) is built
into the Eternis S. This system enhances the safety
of your child in the event of a side crash. In order to
achieve the best possible protective eect, extend
the L.S.P. as far as possible towards the car door
closest to the child restraint.
ALWAYS USE the L.S.P. device when the child
restraint is installed in an outer seating position.
ALWAYS USE an L.S.P. device on the side of the child
restraint immediately adjacent to a vehicle door or
panel.
NEVER USE the L.S.P. device when the child restraint
is placed in the rear middle seating position.
NEVER extend an L.S.P. device toward a passenger
or another child restraint.
NEVER lift or carry the child restraint using the L.S.P.
(Linear Side-impact Protection) devices.
USING THE LINEAR SIDE-IMPACT PROTECTION (L.S.P.)
CHILD RESTRAINT FEATURES

41
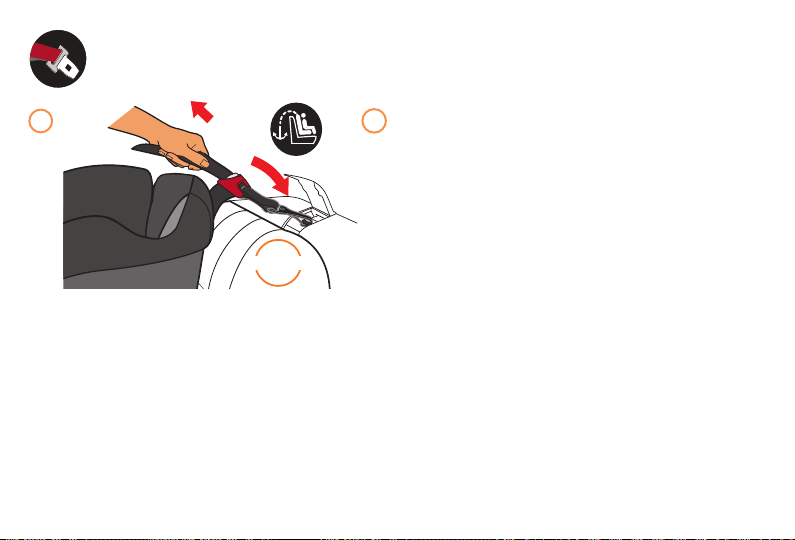
The "Linear Side-Impact Protection" System
(L.S.P.) can be extended fully by pressing the
L.S.P. button(s).
There are a total of three different
L.S.P. settings.
1. Storage position
2. Half extension
3. Full extension
To push the L.S.P. into the second position
once fully extended, press the L.S.P. button
and push the L.S.P. into the housing halfway,
then release the L.S.P. button. Pressing the
L.S.P. button again and pushing the L.S.P. all
the way into the housing will put the L.S.P.
back into the storage position.
1
2
3
ACTIVATING THE L.S.P.
CLICK!
CHILD RESTRAINT FEATURES
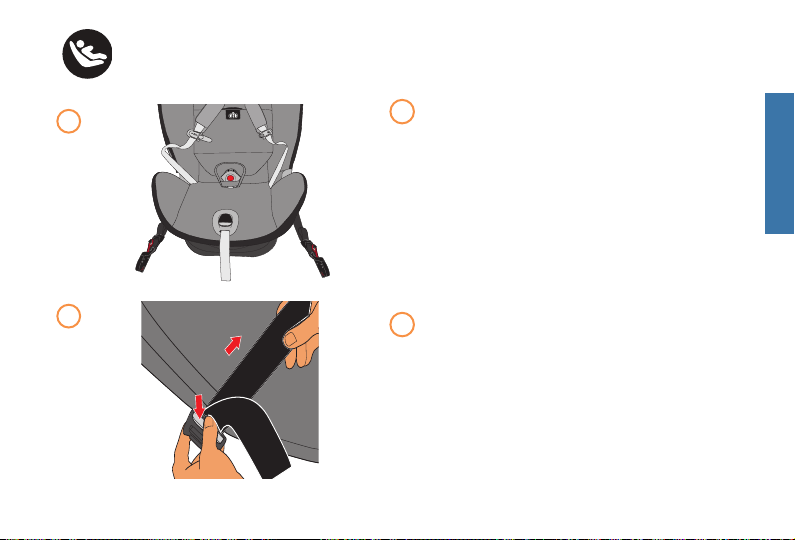
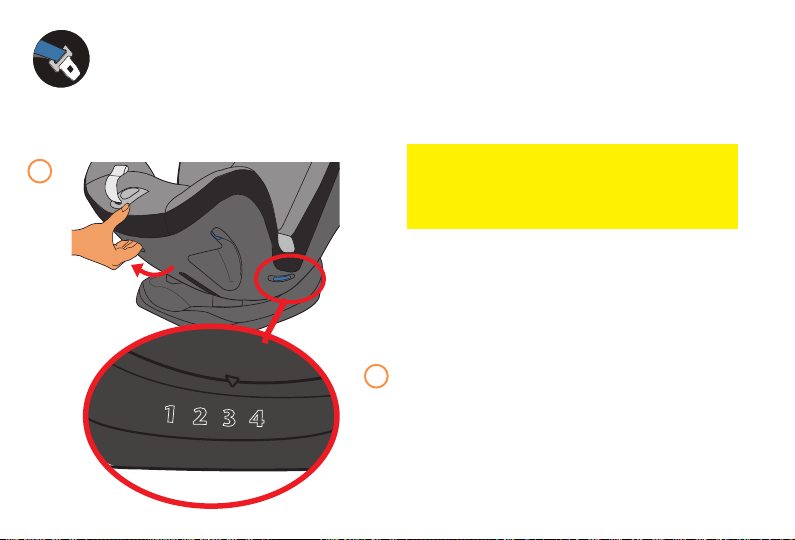
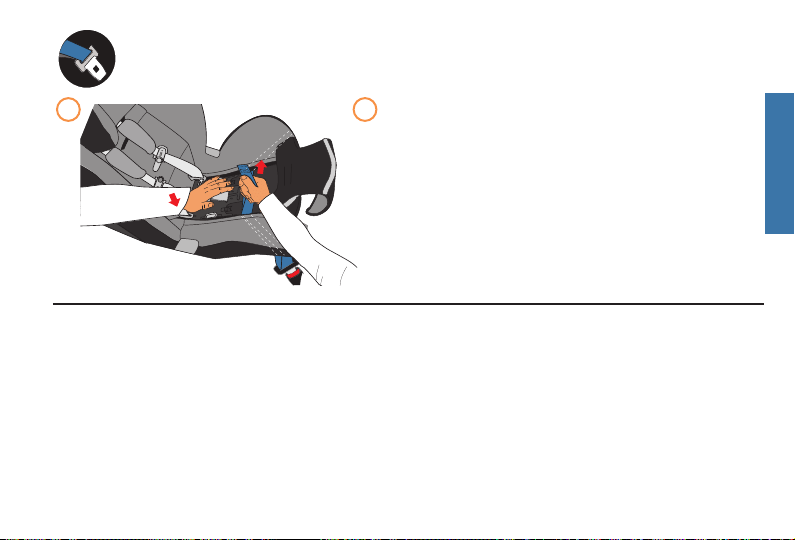
42
Raise Headrest to its highest position and
unbuckle chest clip and harness. Unfasten
the snaps on the seat cover and push crotch
buckle through in order to expose the lower
anchor storage compartment.
Push tabs in as shown and
open the storage compartment to access
the lower anchor strap.
1
LOWER ANCHOR STRAP
2
1
2
REMOVING THE LOWER ANCHOR STRAP
To store the strap, remove from the belt
path, unfasten the snaps on seat pad, open
storage compartment and place lower
connector strap back into compartment.
Re-assemble seat pad.
When using vehicle belt installation, you
MUST always store the lower connector
strap in the storage compartment.
CHILD RESTRAINT FEATURES
STORING THE LOWER ANCHOR STRAP
43
Rear Shelf
Back Wall
Back of
Vehicle Seat
Vehicle Floor
Vehicle Roof
6
5
4
3
2
1
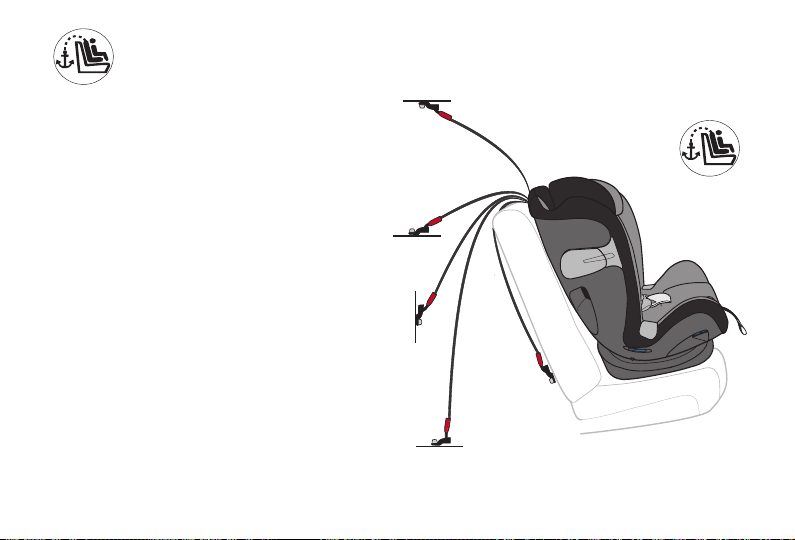
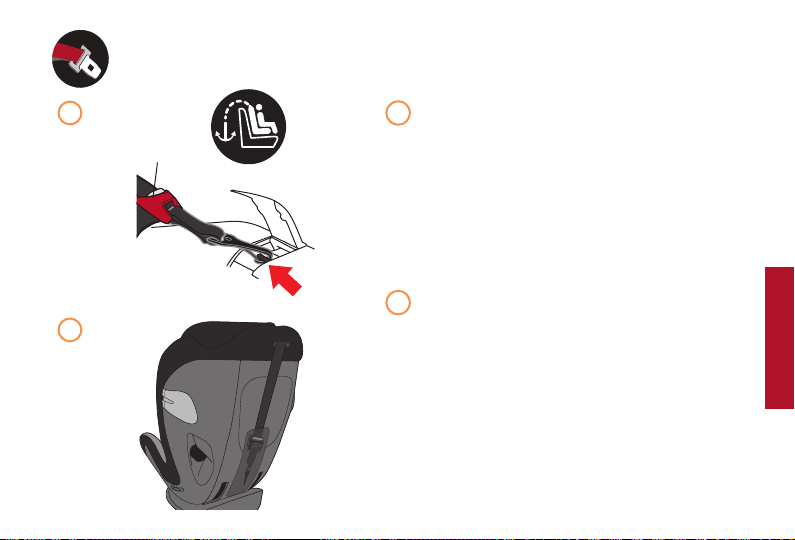
WHAT IS A TETHER?
A tether reduces movement of a
FORWARD-FACING child restraint in
a crash and helps to achieve a tight
installation. Tether anchor locations vary
from vehicle to vehicle.
Some of the typical locations are shown
here. Refer to your vehicle owner's
manual for exact locations, anchor
identification, and requirements.
See tether installation and storage in
the appropriate FORWARD-FACING
installation section for your child restraint.
LOOK FOR THE TETHER
ANCHOR SYMBOL.
TETHER STRAP
CHILD RESTRAINT FEATURES
44
SENSORSAFE
TM
APPLICATION
This seat works with the SensorSafe mobile app which can be downloaded from:
The App Store
®
or Google Play
™
.*
The SensorSafe mobile app can provide the following information directly to your smartphone:
• Reminder that your child is still in your automobile
• Current temperature of your automobile interior
• Owners Manuals
• Installation Videos
• Customer care contact information
SensorSafe
®
Technology
Questions? Comments?:
Visit us at: http://cybex-online.com/us/contact.html
or call CYBEX at: 1-877-242-5676
* Trademarks are the property of their respective owners.
WARNING! DEATH or SERIOUS INJURY can occur
!
NEVER install or use this child restraint until you have read and understand the instructions in this
manual and in your vehicle Owner’s Manual. If there is a conflict between the two, the vehicle
Owner’s Manual must be followed.

45
NOTES
46
USING CHILD RESTRAINT REAR-FACING
WITH LOWER ANCHOR CONNECTORS
Your child restraint comes with the lower anchor strap stored in the lower anchor storage
compartment. Before installing child restraint, remove lower anchor strap from storage
compartment.
1
2
Raise Headrest to its highest position and
unbuckle chest clip and harness.
Unfasten the snaps on the seat cover and
push crotch buckle through pad to expose
the lower anchor storage compartment.
L
E
V
E
L
1
2
DO NOT install by this method for a child weighing more than 35 lbs (15.9 kg).
ALWAYS store the tether strap when using the child restraint REARFACING. (p.75)
47
Push tabs in on the storage door as shown.
Open the lower anchor storage compart-
ment and pull the strap out.
3
4
USING CHILD RESTRAINT REAR-FACING
WITH LOWER ANCHOR CONNECTORS
3
4
REAR-FACING
48
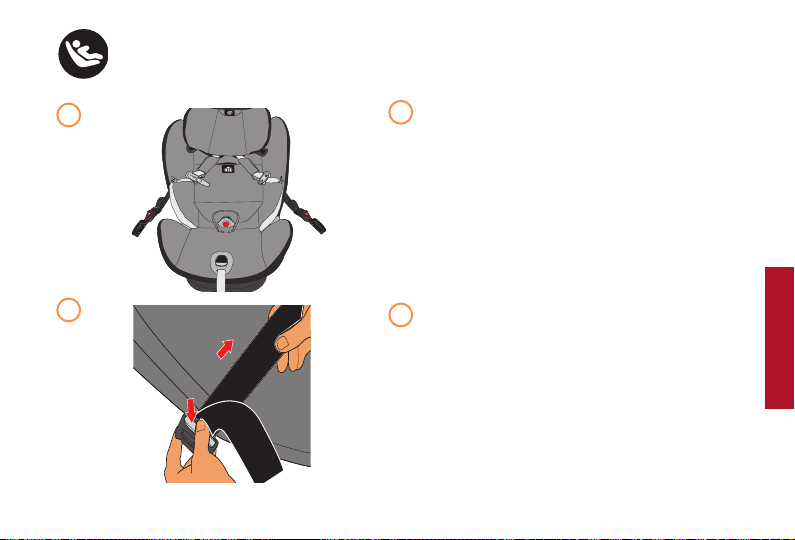
5
6
Route the lower anchor strap through the belt
paths marked REAR-FACING.
MAKE SURE the strap lies flat across the
storage compartment in front of the buckle
strap.
CHECK to make sure the strap is not twisted
in the plastic
retention strap.
5
6
USING CHILD RESTRAINT REAR-FACING
WITH LOWER ANCHOR CONNECTORS
49
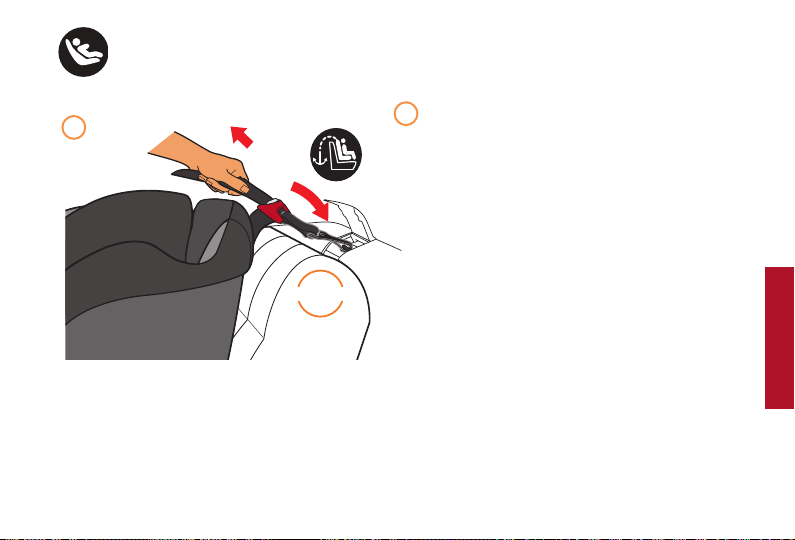
Re-attach the seat pad as shown.
Lengthen the strap between the connectors
using the lower anchor adjuster buttons
located next to the connectors. Push down
on the adjuster button while lengthening
strap.
7
8
USING CHILD RESTRAINT REAR-FACING
WITH LOWER ANCHOR CONNECTORS
7
8
REAR-FACING
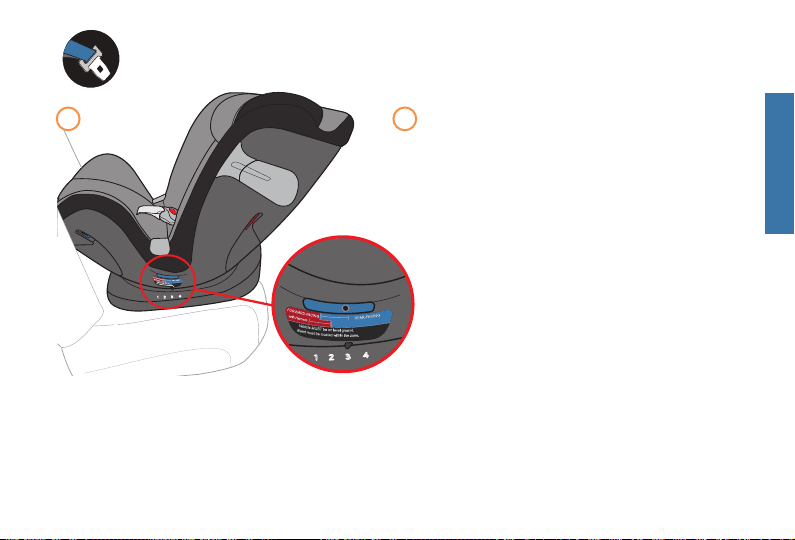
50
9
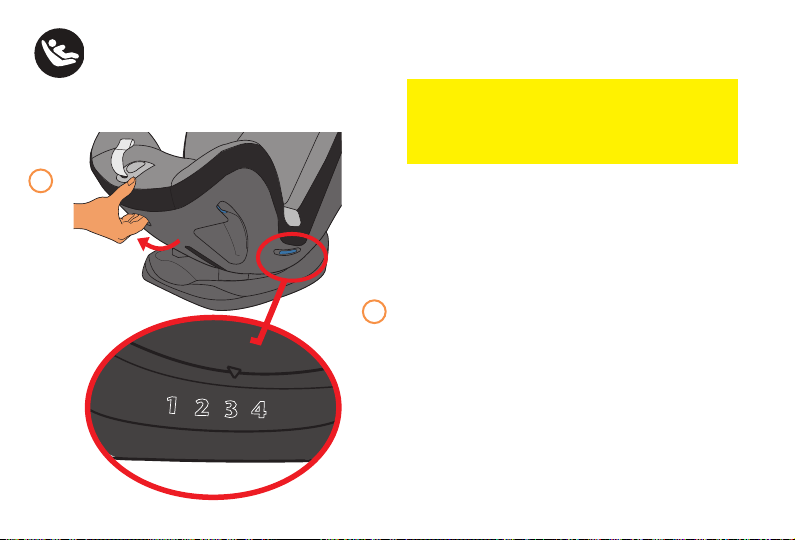
Failure to properly recline the child restraint
could increase the child’s risk of serious injury
or death. Infants may have difficulty breathing
when in an upright seated position. Make
sure they recline enough for their head to lie
back comfortably and safely.
Squeeze the recline handle and adjust the
seat recline to the REAR-FACING Positions
1, 2, 3 or 4 ONLY.
1
2
3
4
9
USING CHILD RESTRAINT REAR-FACING
WITH LOWER ANCHOR CONNECTORS
WARNING!
DEATH or SERIOUS INJURY
can occur
51
6
5
4
3
2
1
4
3
2
1
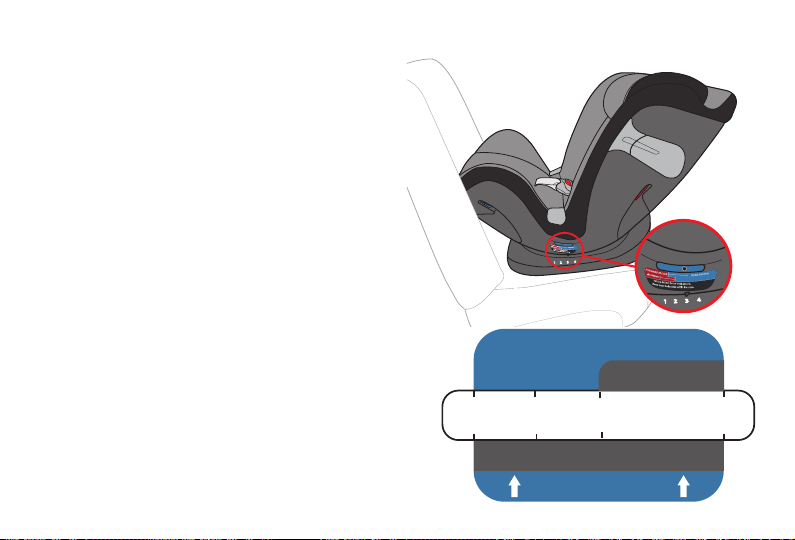
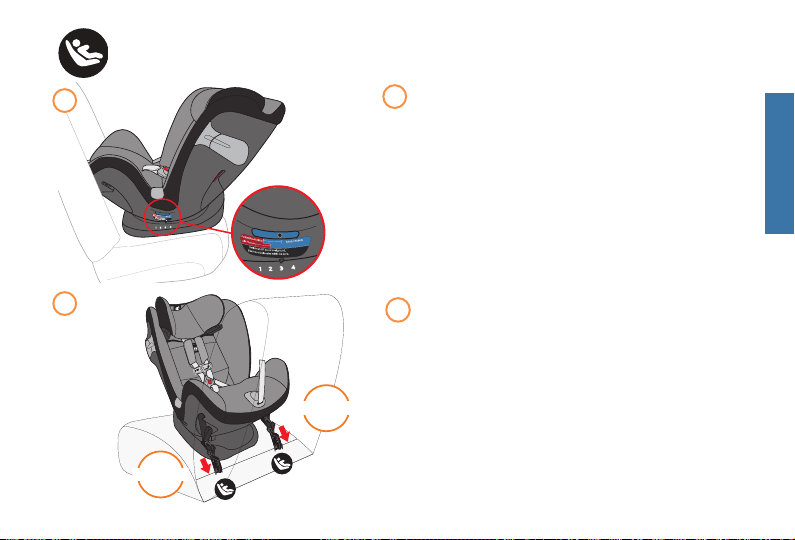
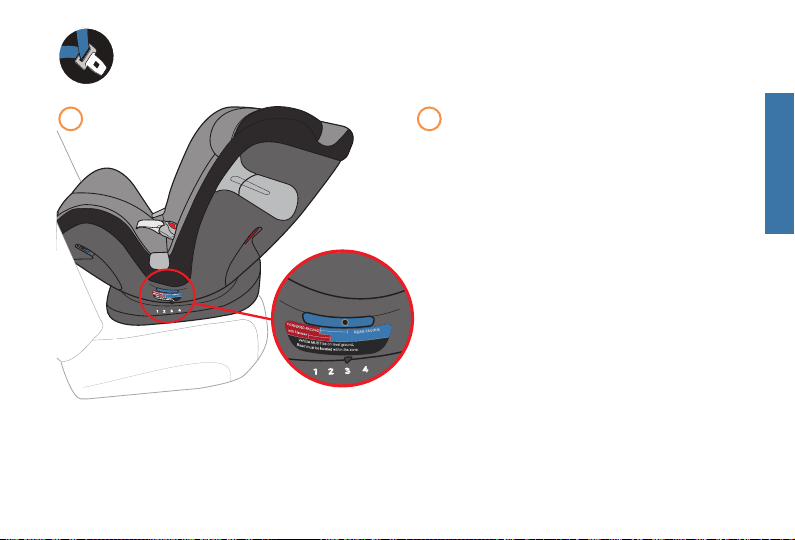
MAKE SURE the vehicle is on level ground
before installing the child restraint.
Place child restraint REARFACING on an
approved LATCH vehicle seat location.
Always make sure the bottom sits flat on the
vehicle seat.
MAKE SURE that the seat is positioned so
that the leveling ball is in the blue zone for
REAR-FACING use.
10
10
USING CHILD RESTRAINT REAR-FACING
WITH LOWER ANCHOR CONNECTORS
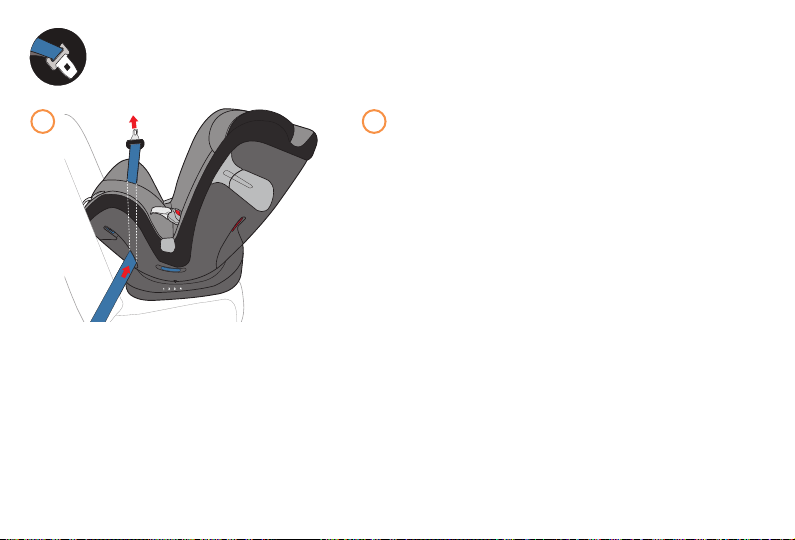
Locate the lower anchor bars in your vehicle.
Attach both lower anchor connectors to the
vehicle lower anchor bars until they lock onto
the anchors with an audible click.
Extend the L.S.P, see page 40-41.
1
2
3
4
5
6
CLICK!
11
11
CLICK!
REAR-FACING

52
1
2
3
4
5
6
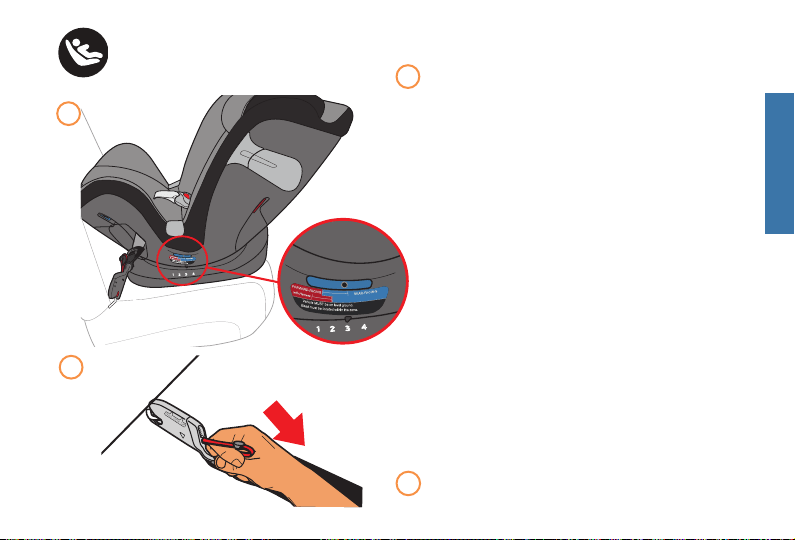
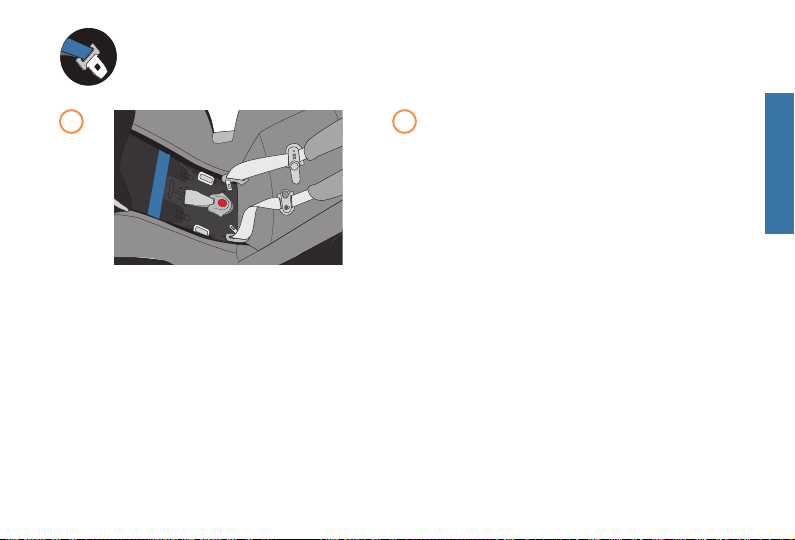
NOTE: To further tighten, pull the end of each
lower anchor strap by reaching through the
REARFACING belt path on the inside of the
child restraint.
12
13
13
USING CHILD RESTRAINT REAR-FACING
WITH LOWER ANCHOR CONNECTORS
While pushing down on the child restraint,
pull up on the end of the lower anchor strap
until strap is tight using adjuster on either
side of the child restraint.
12
53
USING CHILD RESTRAINT REAR-FACING
WITH LOWER ANCHOR CONNECTORS
14
6
5
4
3
2
1
4
3
2
1
RE-CHECK the level indicator, the ball should
be in between the blue zone for REAR-FACING.
NOTE: In some vehicles in the most reclined
position, it may be necessary to place a rolled
towel or small blanket beneath the front edge of
the child restraint to provide enough recline so
that the leveling ball is in the blue zone for REAR-
FACING use.
CHECK YOUR WORK
Hold child restraint at each side near REAR
FACING belt paths and pull side to side and
forward. Child restraint should not move more than
1 in. (2.5 cm) from the vehicle seatback or side-to-
side.
Make sure child restraint is level for REARFACING
use. Make sure child's head does not fall forward.
If necessary, loosen the lower anchor strap,
re-adjust recline and repeat installation steps to
make sure child restraint is installed properly.
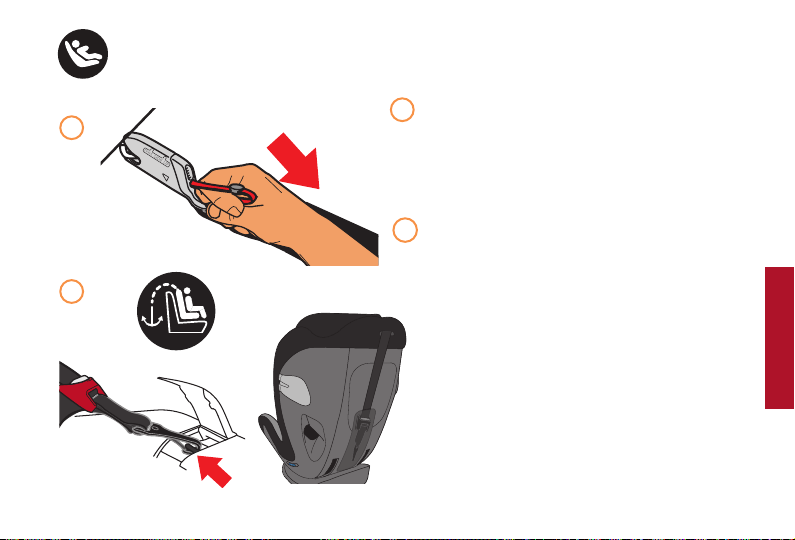
To remove lower anchor connector, pull the red
release strap on both sides of the seat as
shown.
14
15
15
REAR-FACING

54
1
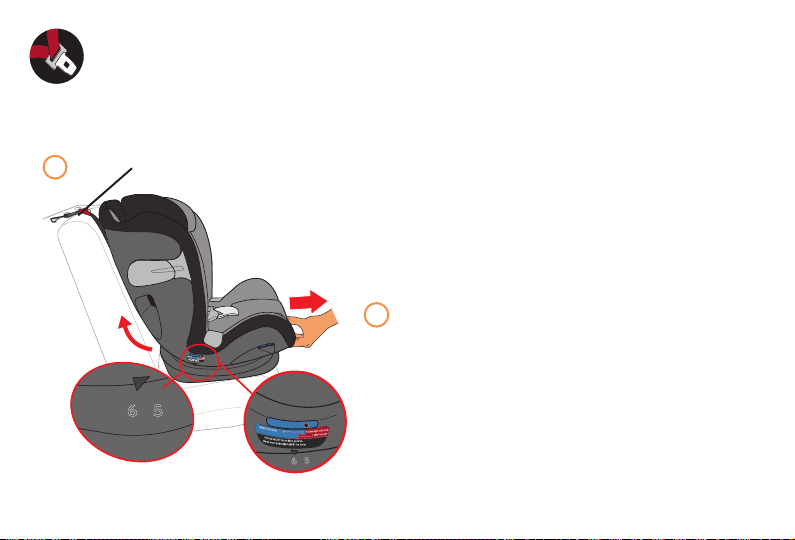
Failure to properly recline the child restraint
could increase the child’s risk of serious injury
or death. Infants may have difficulty breathing
when in an upright seated position. Make
sure they recline enough for their head to lie
back comfortably and safely.
Squeeze the recline handle and adjust the
seat recline to the REAR-FACING Positions
1, 2, 3 or 4 ONLY.
1
2
3
4
1
USING CHILD RESTRAINT REAR-FACING
WITH LAP/SHOULDER BELT
BEFORE installing the child restraint with the lap/shoulder belt, you MUST store the
lower anchor strap in the lower anchor storage compartment, see page 42.
ALWAYS store the tether strap when using child restraint REAR-FACING, see page 75.
WARNING!
DEATH or SERIOUS INJURY
can occur
55
6
5
4
3
2
1
4
3
2
1
MAKE SURE the vehicle is on level
ground before installing the child
restraint.
Place child restraint REARFACING on
an approved vehicle seat location.
Always make sure the bottom sits flat on
the vehicle seat.
MAKE SURE that the seat is positioned
so that the leveling ball is in the blue
zone for REAR-FACING use.
2 2
USING CHILD RESTRAINT REAR-FACING
WITH LAP/SHOULDER BELT
REAR-FACING
56
6
5
4
3
2
1
Route vehicle lap/shoulder belt through the
REARFACING Belt Path on the side of the
Child Restraint and under the seat cover.
Continue through to the opposite side of seat.
USING CHILD RESTRAINT REAR-FACING
WITH LAP/SHOULDER BELT
3
3
57
4
USING CHILD RESTRAINT REAR-FACING
WITH LAP/SHOULDER BELT
IMPORTANT:
Place vehicle belt in FRONT of the buckle.
MAKE SURE belt lies flat without twisting
as shown.
NOTE: See page 38 for proper Crotch
Strap adjustment. The Crotch Strap should
ALWAYS be as close as possible to, but
NEVER under, the child's bottom.
Belt in front of crotch strap
4
REAR-FACING

58
A
R
M
P
I
T
L
E
V
E
L
6
5
4
3
2
1
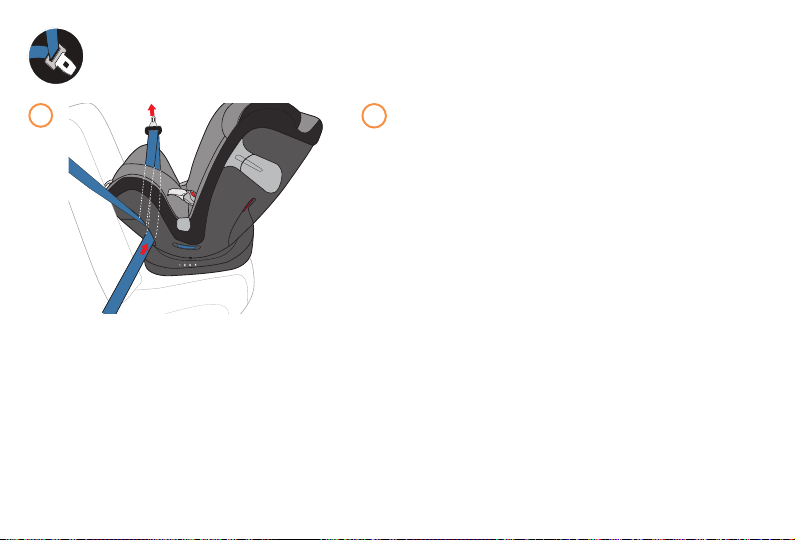
Pull vehicle belt down through the REAR
FACING Belt Path on opposite side of the
Child Restraint. Fasten the vehicle belt and
listen for an audible click.
Extend L.S.P, see 40-41.
NOTE: Before tightening the vehicle belt, route the
shoulder belt through the Lock-Off.
While pushing the Child Restraint down and into
the seat crease (pg. 24), pull the shoulder belt at
the Belt Path to remove all slack. Continue to pull
on the shoulder belt while positioning the shoulder
belt in the middle of the Lock-off area. Lock-Off
will not function properly if the vehicle belt is not
positioned properly.
USING CHILD RESTRAINT REAR-FACING
WITH LAP/SHOULDER BELT
5
6
5
6
CLICK!
59
CHECK YOUR WORK
MAKE SURE the belt is tight and locked. If you
can move the child restraint more than 1 in. (2.5
cm) side to side or front to back at the REAR
FACING belt path, the vehicle belt is not tight
enough.
Re-check recline level, pg.55.
If you have not tightly secured the child restraint,
try again or:
• lock the vehicle retractor
• move it to another location
• or install with the lower anchor strap.
If your shoulder belt still needs to be tightened,
you may need to refer to page 18-23, Seat Belt
Warnings, to determine the type of vehicle belt in
your vehicle and how to lock it.
To remove seat, unbuckle the vehicle seat belt.
USING CHILD RESTRAINT REAR-FACING
WITH LAP/SHOULDER BELT
7
REAR-FACING
LOCK-OFF
7
6
5
4
3
2
1
6
5
4
3
2
1
REAR-FACING
60
1
Failure to properly recline the child restraint
could increase the child’s risk of serious injury
or death. Infants may have difficulty breathing
when in an upright seated position. Make
sure they recline enough for their head to lie
back comfortably and safely.
Squeeze the recline handle and adjust the
seat recline to the REAR-FACING Positions
1, 2, 3 or 4 ONLY.
1
2
3
4
1
USING CHILD RESTRAINT REAR-FACING
WITH LAP BELT
BEFORE installing the child restraint with the lap belt, you MUST store the lower anchor
strap in the lower anchor storage compartment, see page 42.
ALWAYS store the tether strap when using child restraint REAR-FACING, see page 75.
WARNING!
DEATH or SERIOUS INJURY
can occur
61
6
5
4
3
2
1
4
3
2
1
MAKE SURE the vehicle is on level ground
before installing the child restraint.
Place child restraint REARFACING on an
approved vehicle seat location.
Always make sure the bottom sits flat on
the vehicle seat.
MAKE SURE that the seat is positioned so
that the leveling ball is in the blue zone for
REAR-FACING use.
2 2
USING CHILD RESTRAINT REAR-FACING
WITH LAP BELT
REAR-FACING
62
6
5
4
3
2
1
Route vehicle lap belt through the REAR
FACING Belt Path on the side of the
Child Restraint and under the seat cover.
Continue through to the opposite side of
seat.
USING CHILD RESTRAINT REAR-FACING
WITH LAP BELT
3 3
63
4
USING CHILD RESTRAINT REAR-FACING
WITH LAP BELT
IMPORTANT:
Place vehicle belt in FRONT of the
buckle.
MAKE SURE belt lies flat without twisting
as shown.
NOTE: See page 38 for proper Crotch
Strap adjustment. The Crotch Strap
should ALWAYS be as close as possible
to, but NEVER under, the child's bottom.
Belt in front of crotch strap
4
REAR-FACING

64
6
5
4
3
2
1
Pull vehicle belt down through the
REARFACING Belt Path on opposite side of
the Child Restraint. Fasten the vehicle belt
and listen for an audible click.
Extend the L.S.P, see p. 40-41.
USING CHILD RESTRAINT REAR-FACING
WITH LAP BELT
5
5
CLICK!
65
A
R
M
P
I
T
L
E
V
E
L
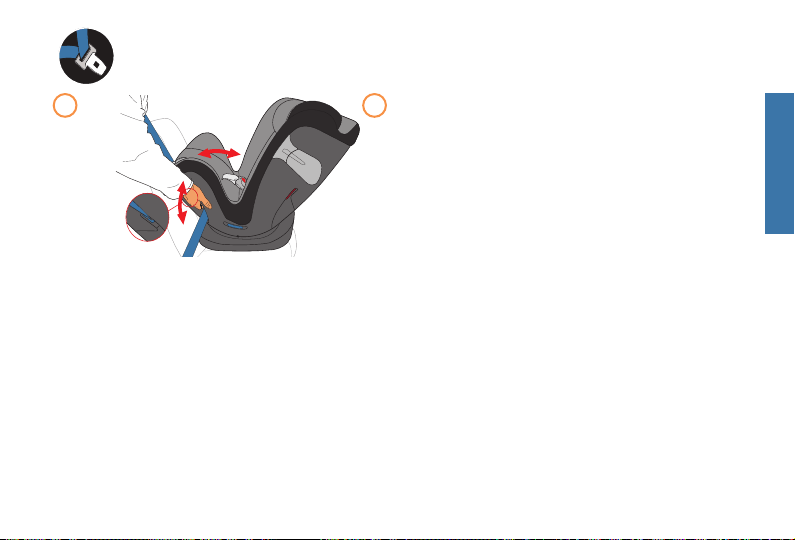
NOTE: The Lock-Off is for lap/shoulder belt
systems only and is NOT needed for lap belt
only installation.
While pushing the Child Restraint down and into
the seat crease (pg. 24), remove all slack at the
belt path and continue tightening the lap belt.
USING CHILD RESTRAINT REAR-FACING
WITH LAP BELT
6 6
REAR-FACING
CHECK YOUR WORK
MAKE SURE the belt is tight and locked. If you
can move the child restraint more than 1 in. (2.5
cm) side to side or front to back at the REAR
FACING belt path, the vehicle belt is not tight
enough.
Re-check recline level, pg.63.
If you have not tightly secured the child
restraint, try again or:
• lock the vehicle retractor
• move it to another location
• or install with the lower anchor strap.
To remove seat, unbuckle the vehicle seat belt.
66
Your child restraint comes with the lower anchor strap stored in the lower anchor storage
compartment. Before installing child restraint, remove lower anchor strap from storage
compartment.
1
2
Raise Headrest to its highest position and
unbuckle chest clip and harness.
Unfasten the snaps on the seat cover and
push crotch buckle through pad to expose
the lower anchor storage compartment.
L
E
V
E
L
1
2
DO NOT install by this method for a child weighing more than 40 lbs (18.1 kg).
ALWAYS use TETHER STRAP.
USING CHILD RESTRAINT FORWARD-FACING
WITH LOWER ANCHOR CONNECTORS
WARNING! DEATH or SERIOUS INJURY can occur.
!
67
Push tabs in on the storage door as shown.
Open the lower anchor storage
compartment and pull the strap out.
3
4
USING CHILD RESTRAINT FORWARD-FACING
WITH LOWER ANCHOR CONNECTORS
3
4
FORWARD-FACING
68
5
6
Route the lower anchor strap through the belt
paths marked FORWARD-FACING.
MAKE SURE the lower anchor strap lies flat
across the seat.
CHECK to make
sure the strap is
not twisted in the
plastic retention
strap.
5
6
USING CHILD RESTRAINT FORWARD-FACING
WITH LOWER ANCHOR CONNECTORS
69
Re-attach the seat pad as shown.
Lengthen the strap between the connectors
using the lower anchor adjuster buttons
located next to the connectors. Push down
on the adjuster button while lengthening
strap.
7
8
USING CHILD RESTRAINT FORWARD-FACING
WITH LOWER ANCHOR CONNECTORS
7
8
FORWARD-FACING

70
9
When installing this child restraint with lower
anchor connectors (OR the vehicle seat belt
see p. 76-87), always use the Tether.
A tether reduces movement of a FORWARD
FACING child restraint in a crash and helps
to achieve a tight installation. Tether anchor
locations vary from vehicle to vehicle.
Refer to your vehicle owner's manual for
exact locations, anchor identification, and
requirements.
IF TETHER ANCHOR IS AVAILABLE IN YOUR
VEHICLE - Before placing the child restraint
in the vehicle, remove tether from the tether
compartment by unfastening it from the hook
inside the compartment. If a tether anchor
is not available, the tether should be stored
properly.
USING CHILD RESTRAINT FORWARD-FACING
WITH LOWER ANCHOR CONNECTORS
9

71
Squeeze the recline handle and adjust the
seat recline to the FORWARD-FACING
Positions 5 or 6 ONLY.
MAKE SURE the vehicle is on level ground
before installing the child restraint.
Place child restraint FORWARDFACING
on an approved LATCH vehicle seat
location.
Always make sure the bottom sits flat on
the vehicle seat. Unhook tether from rear
of seat and place over back of vehicle
seat.
10
10
6
5
4
3
2
1
6
5
6
5
Tether
USING CHILD RESTRAINT FORWARD-FACING
WITH LOWER ANCHOR CONNECTORS
MAKE SURE that the seat is positioned so
that the leveling ball is in the red zone for
FORWARD-FACING use.
FORWARD-FACING

72
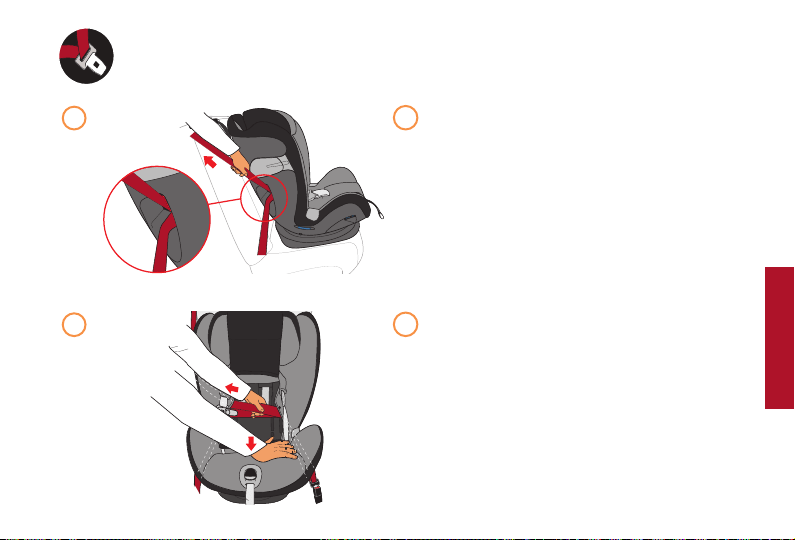
11
11
Locate the lower anchor bars in your vehicle.
Attach both lower anchor connectors to the
vehicle lower anchor bars until they lock onto
the anchors.
While pushing down on the child restraint,
pull up on the free end of the lower anchor
strap until strap is tight using adjuster on
either side of the child restraint.
CHECK YOUR WORK
HOLD child restraint at each side near
FORWARDFACING belt paths. Pull side to
side and forward. Child restraint should not
move more than 1 in. (2.5 cm) from vehicle
seat back or side-to-side.
MAKE SURE ball is in red zone for
FORWARDFACING use (p. 71). If necessary,
loosen the lower anchor, re-adjust recline
and repeat installation steps to make sure
child restraint is installed properly.
USING CHILD RESTRAINT FORWARD-FACING
WITH LOWER ANCHOR CONNECTORS
CLICK!
CLICK!
73
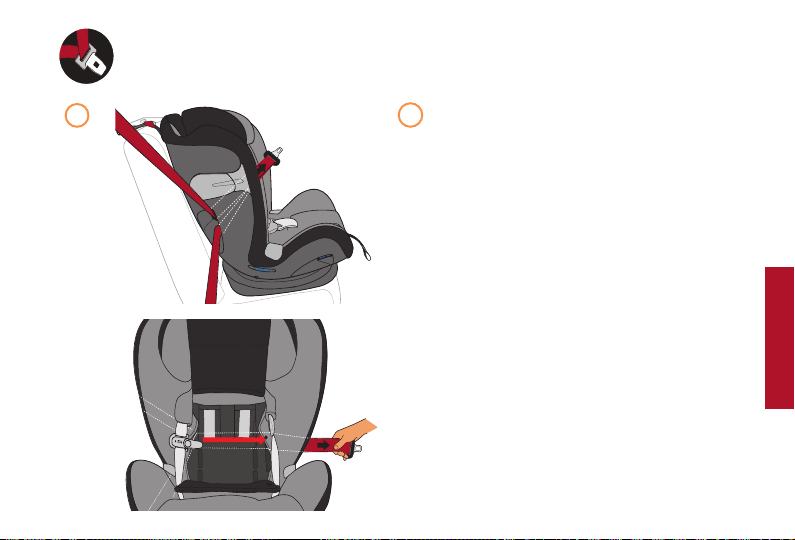
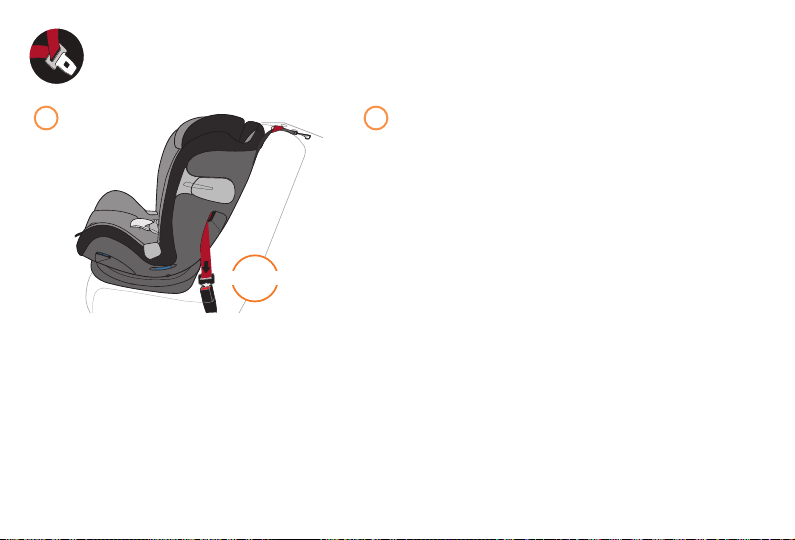
12
12
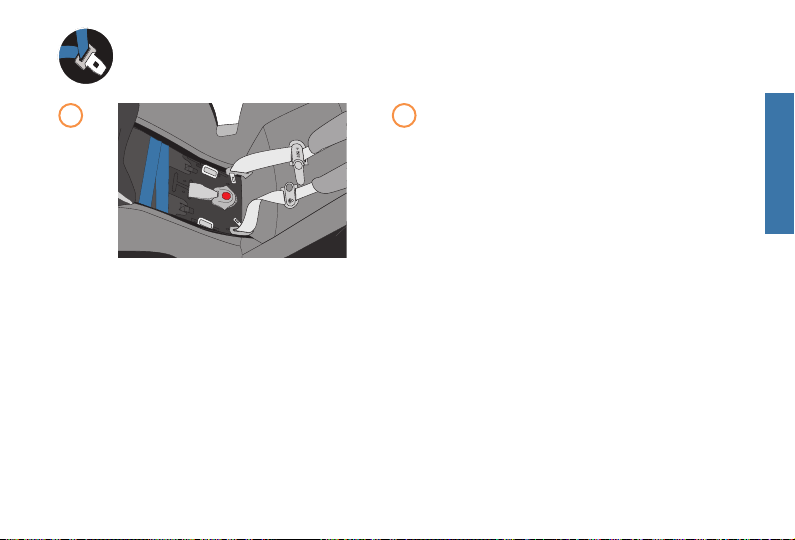
Locate tether anchor in your vehicle. Attach
tether hook. Pull tether adjuster strap to
tighten.
Extend the L.S.P, see p. 40-41.
6
5
4
3
2
1
USING CHILD RESTRAINT FORWARD-FACING
WITH LOWER ANCHOR CONNECTORS
CLICK!
FORWARD-FACING

74
RE-CHECK the level indicator, the ball should
be in between the red zone for FORWARD-
FACING.
CHECK YOUR WORK
Hold child restraint at each side near REAR
FACING belt paths and pull side to side and
forward. Child restraint should not move more
than 1 in. (2.5 cm) from the vehicle seatback
or side-to-side.
MAKE SURE child restraint is level for
FORWARDFACING use.
If necessary, loosen the lower anchor strap,
re-adjust recline and repeat installation
steps to make sure child restraint is installed
properly.
13
13
6
5
4
3
2
1
6
5
6
5
USING CHILD RESTRAINT FORWARD-FACING
WITH LOWER ANCHOR CONNECTORS
75
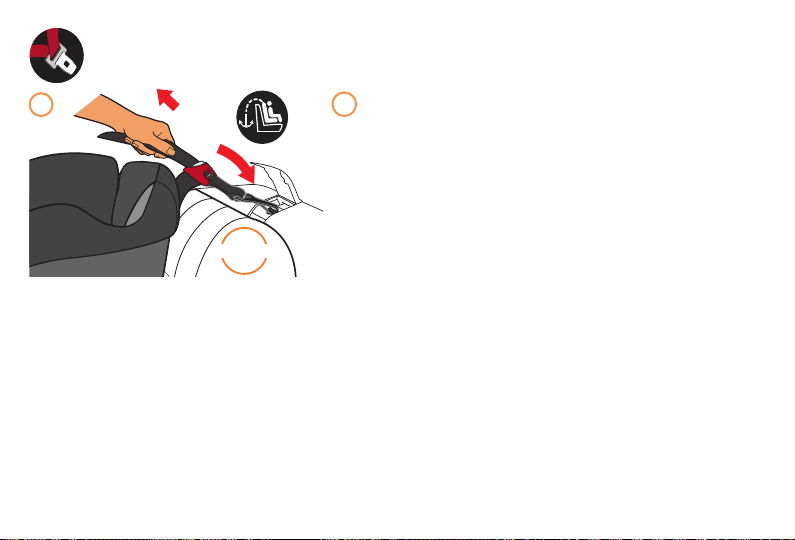
To remove lower anchor connectors, pull
the red release strap on both sides of the
seat as shown.
To remove the tether, press the adjuster
release button to loosen the strap and
unhook from the tether anchor.
Store tether in the compartment in the back
of child restraint, as shown.
ALWAYS use the tether when installing this
child restraint FORWARDFACING if your
vehicle is equipped with a tether anchor.
MAKE SURE compartment door is properly
closed after storing.
14
14
USING CHILD RESTRAINT FORWARD-FACING
WITH LOWER ANCHOR CONNECTORS
15
15
FORWARD-FACING
76
1
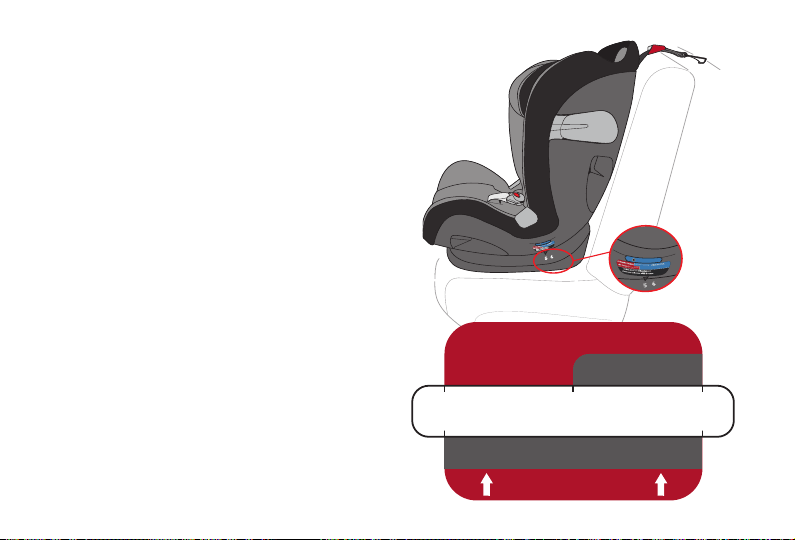
MAKE SURE the vehicle is on level ground
before installing the child restraint.
Place child restraint FORWARDFACING on
an approved vehicle seat location.
Always make sure the bottom sits flat on the
vehicle seat. Unhook tether from rear of seat
and place over back of vehicle seat.
Squeeze the recline handle and adjust the
seat recline to the FORWARDFACING
Positions 5 or 6 ONLY.
MAKE SURE that the seat is positioned so
that the leveling ball is in the red zone for
FORWARDFACING use.
1
USING CHILD RESTRAINT FORWARD-FACING
WITH LAP/SHOULDER BELT
BEFORE installing the child restraint with the lap/shoulder belt, you MUST store the
lower anchor strap in the lower anchor storage compartment, see page 42.
ALWAYS use TETHER STRAP.
6
5
4
3
2
1
6
5
6
5
Tether
77
2
USING CHILD RESTRAINT FORWARD-FACING
WITH LAP/SHOULDER BELT
6
5
4
3
2
1
Route vehicle lap/shoulder belt through the
FORWARD-FACING belt path on the side of
the child restraint and under the seat cover.
Continue through to the opposite side of
seat.
IMPORTANT: Make sure the lap/shoulder
belt lies flat without twisting.
2
FORWARD-FACING
78
USING CHILD RESTRAINT FORWARD-FACING
WITH LAP/SHOULDER BELT
6
5
4
3
2
1
Pull vehicle belt down through the
FORWARD-FACING belt path on opposite
side of the child restraint. Fasten the vehicle
belt and listen for an audible click.
3 3
CLICK!
79
USING CHILD RESTRAINT FORWARD-FACING
WITH LAP/SHOULDER BELT
6
5
4
3
2
1
NOTE: Before tightening the vehicle belt,
route the shoulder belt through the Lock-Off.
While pushing the Child Restraint down and
into the seat crease (pg. 24), pull the shoulder
belt at the Belt Path to remove all slack.
Continue to pull on the shoulder belt while
positioning the shoulder belt in the middle of
the Lock-off area. Lock-Off will not function
properly if the vehicle belt is not positioned
properly.
Extend L.S.P, see p. 40-41.
4
5
FORWARD-FACING LOCK-OFF
4
5
FORWARD-FACING
80
6
5
4
3
2
1
USING CHILD RESTRAINT FORWARD-FACING
WITH LAP/SHOULDER BELT
6
6
Locate tether anchor in your vehicle. Attach tether
hook. Pull tether adjuster strap to tighten.
CHECK YOUR WORK
MAKE CERTAIN the belt is tight and locked. If you can
move the child restraint more than 1 in. (2.5 cm) side
to side or front to back at the FORWARDFACING belt
path, the vehicle belt is not tight enough.
Re-check recline level, pg. 76.
If you have not tightly secured the child restraint, try
again or:
• lock the vehicle retractor
• move it to another location
• or install with the lower anchor strap.
If your shoulder belt still needs to be tightened, you
may need to refer to page 23, Seat Belt Warnings, to
determine the type of vehicle belt in your vehicle and
how to lock it.
To remove seat, unbuckle the vehicle seat belt.
CLICK!
81
USING CHILD RESTRAINT FORWARD-FACING
WITH LAP/SHOULDER BELT
TETHER STORAGE:
To remove the tether, press the adjuster
release button to loosen the strap and
unhook from the tether anchor.
Store tether in the compartment in the back
of child restraint, as shown.
ALWAYS use the tether when installing this
child restraint FORWARDFACING if your
vehicle is equipped with a tether anchor.
MAKE SURE compartment door is properly
closed after storing.
7
8
7
8
Adjuster
Release
Button
FORWARD-FACING
82
USING CHILD RESTRAINT FORWARD-FACING
WITH LAP BELT
1
MAKE SURE the vehicle is on level ground
before installing the child restraint.
Place child restraint FORWARDFACING on
an approved vehicle seat location.
Always make sure the bottom sits flat on the
vehicle seat. Unhook tether from rear of seat
and place over back of vehicle seat.
Squeeze the recline handle and adjust the
seat recline to the FORWARDFACING
Positions 5 or 6 ONLY.
MAKE SURE that the seat is positioned so
that the leveling ball is in the red zone for
FORWARDFACING use.
1
BEFORE installing the child restraint with the lap belt, you MUST store the lower anchor
strap in the lower anchor storage compartment, see page 42.
ALWAYS use TETHER STRAP.
6
5
4
3
2
1
6
5
6
5
Tether
83
USING CHILD RESTRAINT FORWARD-FACING
WITH LAP BELT
6
5
4
3
2
1
2
Route vehicle lap belt through the
FORWARDFACING belt path on the side
of the child restraint and under the seat
cover. Continue through to the opposite
side of seat.
IMPORTANT: Make sure the lap belt lies
flat without twisting.
2
FORWARD-FACING
84
6
5
4
3
2
1
USING CHILD RESTRAINT FORWARD-FACING
WITH LAP BELT
Pull vehicle belt down through the
FORWARD-FACING belt path on opposite
side of the child restraint. Fasten the vehicle
belt and listen for an audible click.
3
3
CLICK!

85
USING CHILD RESTRAINT FORWARD-FACING
WITH LAP BELT
NOTE: The Lock-Off is for lap/shoulder belt
systems only and is not needed for lap belt
only installation.
While pushing the Child Restraint down
and into the seat crease (pg. 24), remove
all slack at the belt path and continue
tightening the lap belt.
Extend the L.S.P, see p. 40-41.
4
4
FORWARD-FACING
86
USING CHILD RESTRAINT FORWARD-FACING
WITH LAP BELT
5
5
Locate tether anchor in your vehicle. Attach
tether hook. Pull tether adjuster strap to
tighten.
CHECK YOUR WORK
MAKE SURE the belt is tight and locked. If
you can move the child restraint more than
1 in. (2.5 cm) side to side or front to back at
the FORWARDFACING belt path, the vehicle
belt is not tight enough.
Re-check recline level, pg. 82.
If you have not tightly secured the child
restraint, try again or:
• lock the vehicle retractor
• move it to another location
• or install with the lower anchor strap.
To remove seat, unbuckle the vehicle seat
belt.
6
5
4
3
2
1
CLICK!
87
USING CHILD RESTRAINT FORWARD-FACING
WITH LAP BELT
TETHER STORAGE:
To remove the tether, press the adjuster
release button to loosen the strap and
unhook from the tether anchor.
Store tether in the compartment in the
back of child restraint, as shown.
Always use the tether when installing this
child restraint FORWARDFACING if your
vehicle is equipped with a tether anchor.
Make sure compartment door is properly
closed after storing.
6
7
6
7
Adjuster
Release
Button
FORWARD-FACING
88
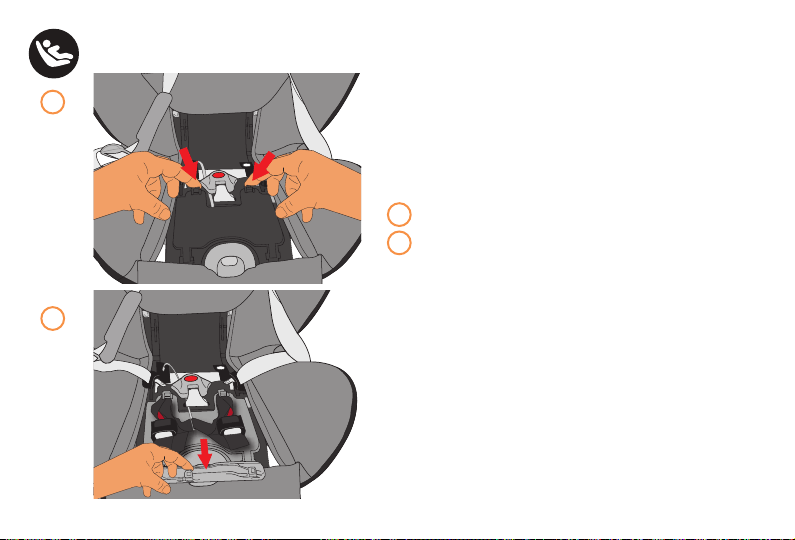
USING CHILD RESTRAINT IN BOOSTER MODE
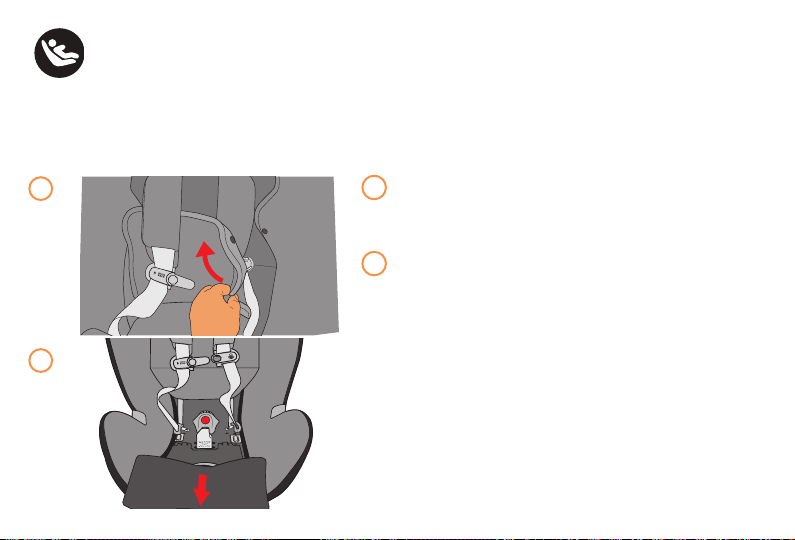
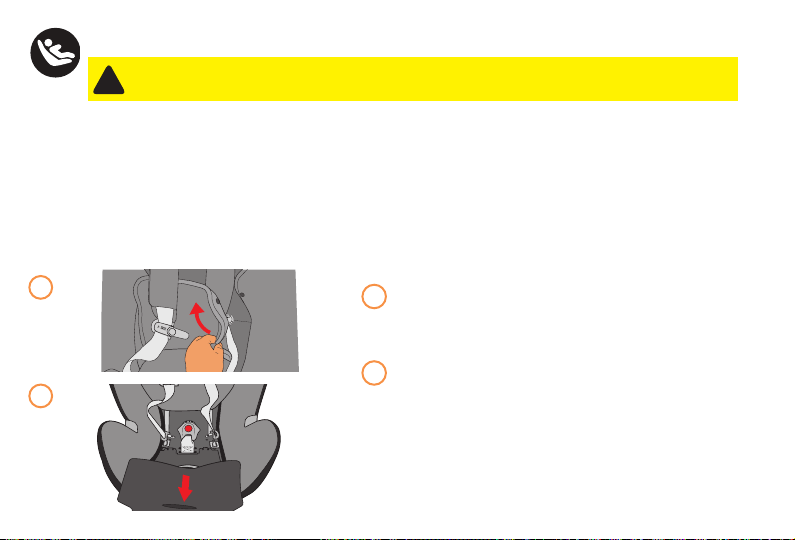
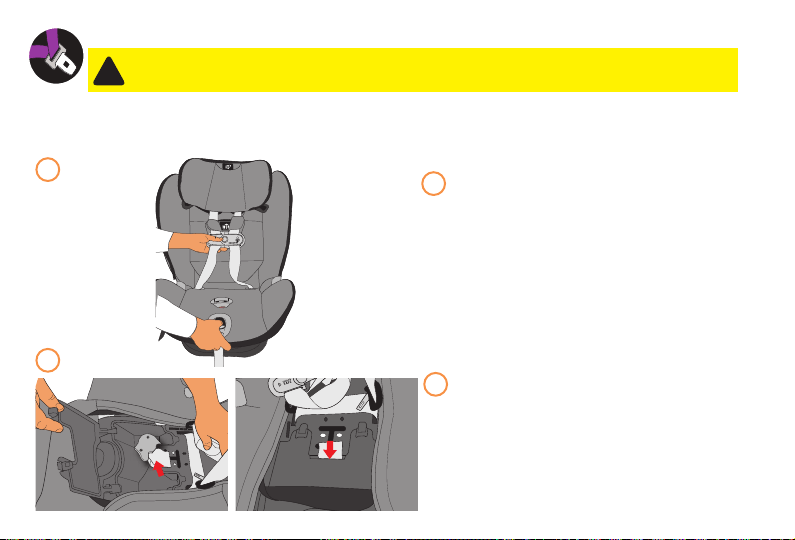
1
CONVERTING TO BOOSTER MODE
Loosen harness straps by pushing
the harness release button on the front
of the seat. At the same time, pull on
the harness straps.
Raise the headrest to the highest
position (p.39).
Unfasten chest clip and buckle.
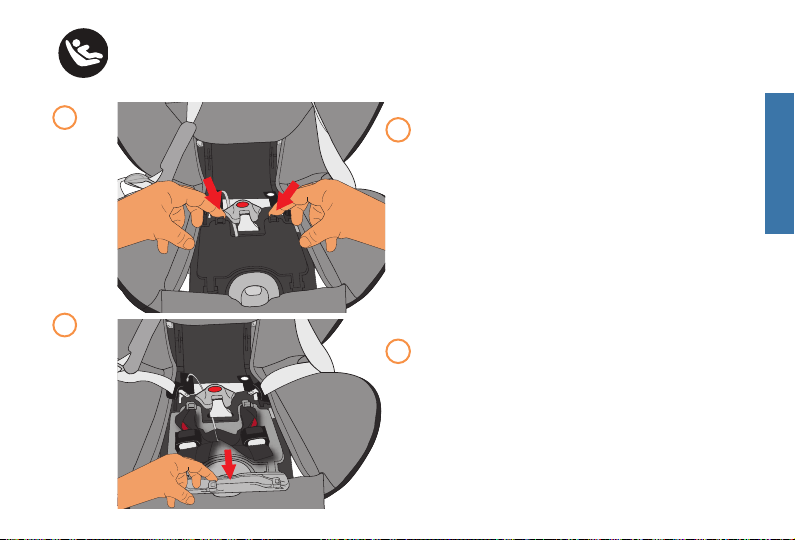
Unfasten the seat pad (p.46) then open
the lower anchor storage compartment.
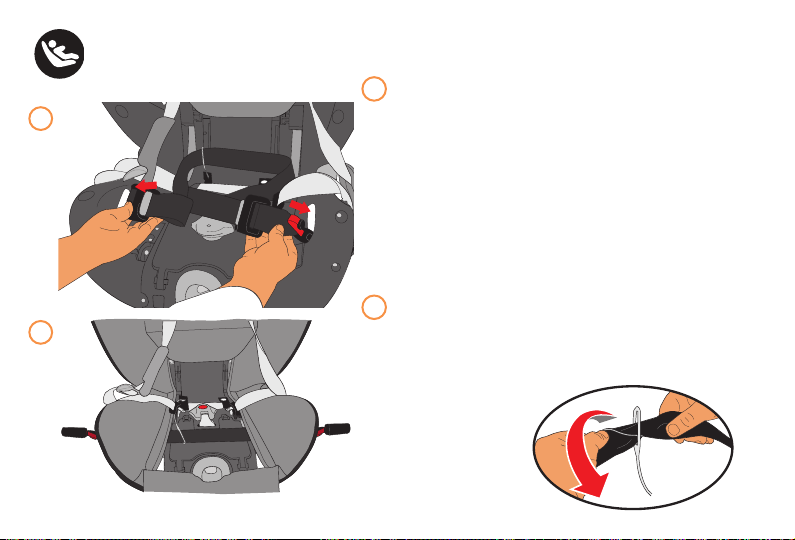
Move the crotch buckle to the front slot
and store the crotch buckle in
the lower anchor storage
compartment.
Close the compartment door.
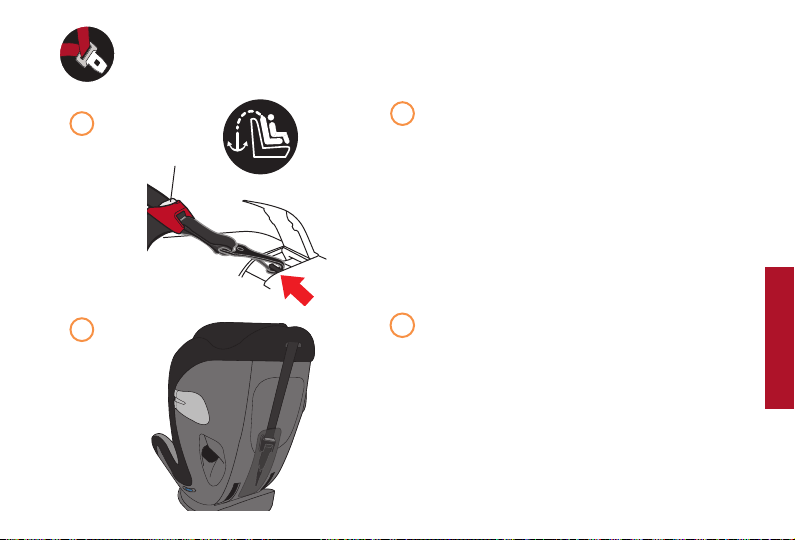
2
1
2
Refer to pgs. 34-35 for Child Use Guidelines
WARNING! DEATH or SERIOUS INJURY can occur.
!
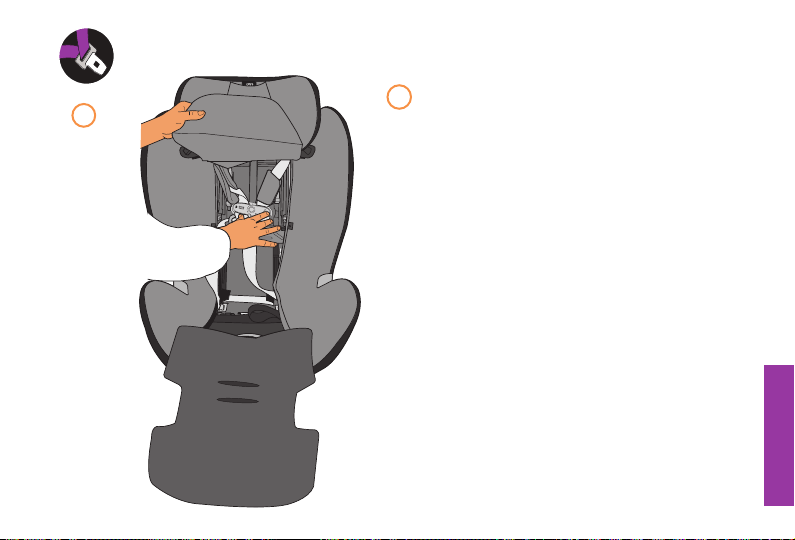
89
USING CHILD RESTRAINT IN BOOSTER MODE
3
Place the harness straps, chest clip
and buckle tongues into the seat back
compartment behind the seat pad as shown.
3
BOOSTER MODE

90
USING CHILD RESTRAINT IN BOOSTER MODE
4
Raise the seat pad and re-fasten the snaps at
the shoulder strap openings.
Adjust booster seat to position 6.
Conversion to BOOSTER MODE is complete.
Reverse steps to convert back to
FORWARDFACING harness mode.
4
6
5
4
3
2
1
6
5
5
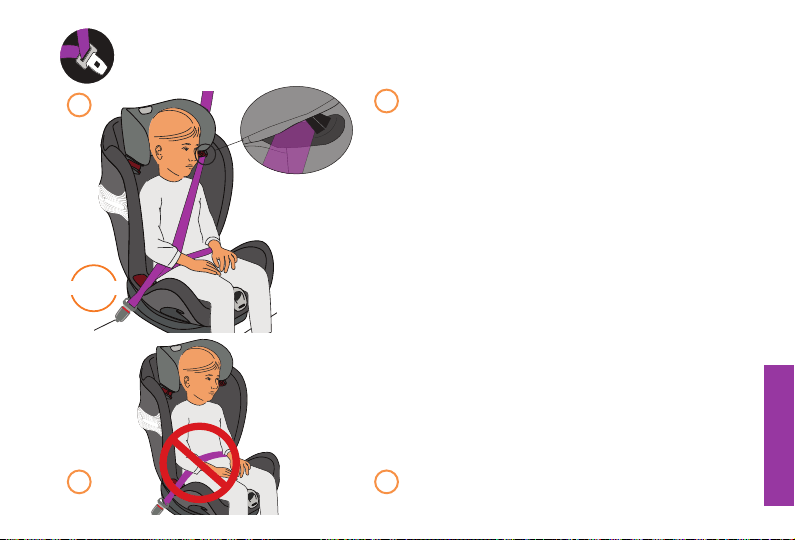
91
USING CHILD RESTRAINT IN BOOSTER MODE
Place booster seat on a FORWARDFACING
vehicle seat with a lap/shoulder belt. The base
should sit as flat as possible on the vehicle seat
touching the vehicle seat back and bottom.
IMPORTANT: You may use the tether strap and
lower anchor connectors to secure this booster
seat to the vehicle seat as long as the position
of the booster seat in the vehicle and/or the
resulting fit of the vehicle seat belt over the child
are not affected.
When installing the booster seat, place child in
booster seat and fasten buckle and listen for an
audible click. Always pass shoulder belt portion
of vehicle belt through the shoulder belt guide as
shown.
Adjust head support so the vehicle shoulder
belt lies between child's neck and shoulder.
Vehicle belts must lie flat and not be twisted.
NEVER use a lap belt only.
6
6
7 7
Shoulder
belt guide
CLICK!
BOOSTER MODE
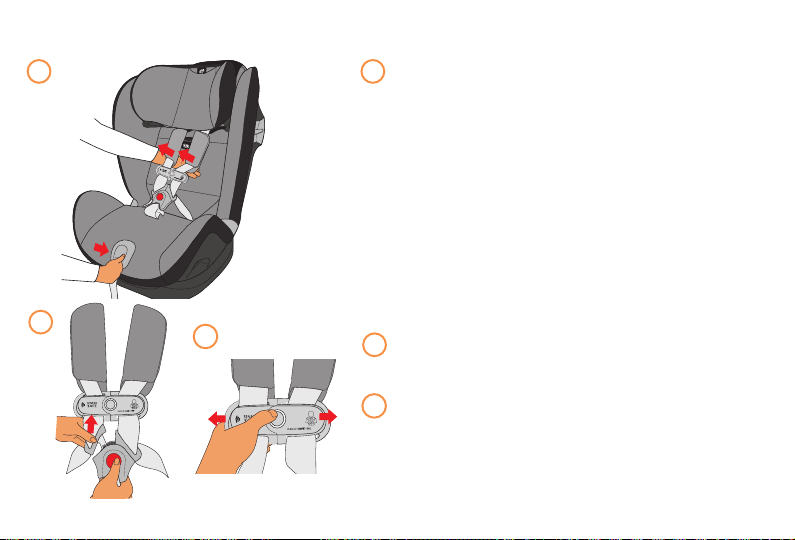
92
6
5
4
3
2
1
SECURING CHILD WITH HARNESS
SECURING THE CHILD
Loosen harness by firmly pressing down on
the harness adjustment button while pulling
forward on both straps at shoulder level.
Press red button on harness buckle to
release tongues.
Separate chest clip and spread straps apart.
1
2
3
1
2
3

93
Place child in child restraint with child's back and
bottom flat against the restraint. Pull harness straps
over the child's shoulders and around the child's
waist.
Straps must lie flat, free of twists and in the center
of the child's shoulders.
Make sure there are no twists in the harness straps.
Position chest clip at armpit level as shown.
Never secure child in child restraint with child
dressed in bulky or heavy clothing. Heavy clothing
can prevent Harness from being properly tightened
around the child.
SECURING CHILD WITH HARNESS
Never secure child in child restraint with child wrapped in a blanket. To keep child warm, place a
blanket over the child AFTER you have properly secured and tightened Harness around the child.
To ensure a better fit with smaller infants, the newborn insert may need to be used. Never place
extra padding under or behind the child. Only use the newborn insert.
If crotch strap is under the child, the crotch strap will need to be adjusted. Refer to page 38 for
"Crotch Strap".
CHEST CLIP
AT ARMPIT
LEVEL
4 4
FORWARD-FACING
REAR-FACING

94
Adjust the headrest height so that the headrest is
positioned properly (p.39).
The child's head should be centered in the
headrest.
REAR-FACING - Position
the Harness Straps AT or
JUST BELOW the child's
shoulders.
FORWARD-FACING -
Position the Harness Straps
AT or JUST ABOVE the
child’s shoulders.
SECURING CHILD WITH HARNESS
5
5

95
SECURING CHILD WITH HARNESS
NOTE: If using the lower
headrest/harness positions,
make sure the bottom of the
headrest flap is behind the
infant insert flap.
1
2
4
3
6
5
FORWARD-FACING
REAR-FACING
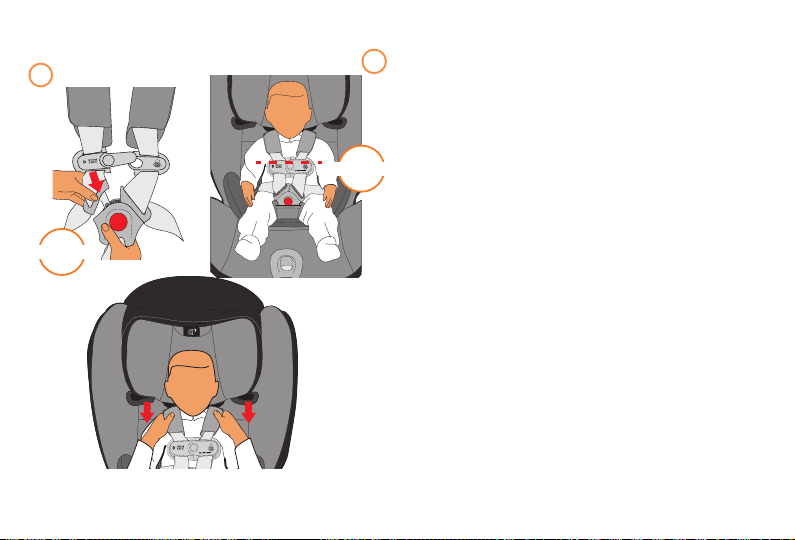
96
A
R
M
P
I
T
L
E
V
E
L
Fasten buckle by inserting one tongue at a
time into the harness buckle listening for an
audible CLICK. Pull up firmly on both Buckle
Tongues to make sure they are securely
latched.
CHECK that the Buckle functions properly
and is kept free of dirt and debris.
Make sure harness straps are not twisted.
Fasten chest clip by snapping both sides
together; listen for a click and slide to armpit
level.
Push chest clip and shoulder pads down
away from the child's neck and towards the
Harness Buckle. Pull up on both shoulder
straps to remove all slack from the child's
hips.
6
A
R
M
P
I
T
L
E
V
E
L
SECURING CHILD WITH HARNESS
6
CLICK!
CLICK!
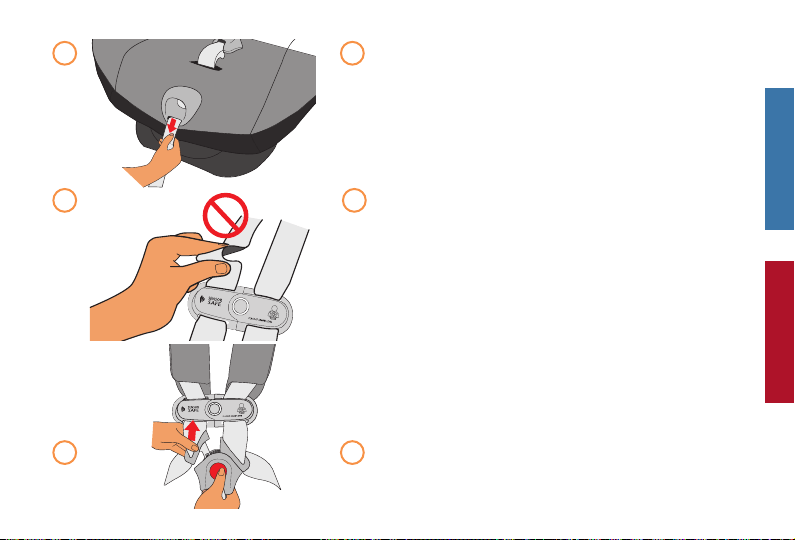
97
Slowly pull the adjuster strap to tighten the
Shoulder Straps while holding the chest clip so that
it does not ride up into child's neck.
If you can pinch the strap at the child's shoulders,
the harness is too loose. Adjust as needed.
To tighten, pull the Harness Adjuster Strap until
Harness is snug on the child. A snug strap should
not allow any slack. It lies in a relatively straight line
without sagging. It does not press on the child’s
flesh or push the child’s body into an unnatural
position.
To loosen Harness, firmly press down the Harness
Adjustment Button while pulling forward on both
Harness Straps at shoulder level.
To remove child from the seat, press center button
on chest clip and buckle and pull them apart.
SECURING CHILD WITH HARNESS
77
88
9 9
FORWARD-FACING
REAR-FACING

98
The Federal Aviation Administration (FAA) recommends that you secure your child for air travel
in an appropriate Child Restraint based on your child's weight and size. Turbulence can happen
with little or no warning. When turbulence occurs, the safest place for your child is in a properly
installed Child Restraint, not in an adult's lap or on the aircraft seat with its seat belt. Keeping
your child in a Child Restraint during the flight will help ensure your family arrives safely at your
destination.
The FAA recommends that a child weighing:
• more than 40 lbs (18 kg) use an aircraft seat belt;
• less than 20 lbs (9 kg) use a REARFACING Child Restraint; and
• from 20 to 40 lbs (9 to 18 kg) use a FORWARDFACING Child Restraint.
Please note that these FAA recommendations may vary from those applicable to the use of your
Child Restraint in a motor vehicle.
NOTE: For more specific information, check your airline’s policies prior to flying.
SECURING CHILD RESTRAINT IN AN AIRCRAFT
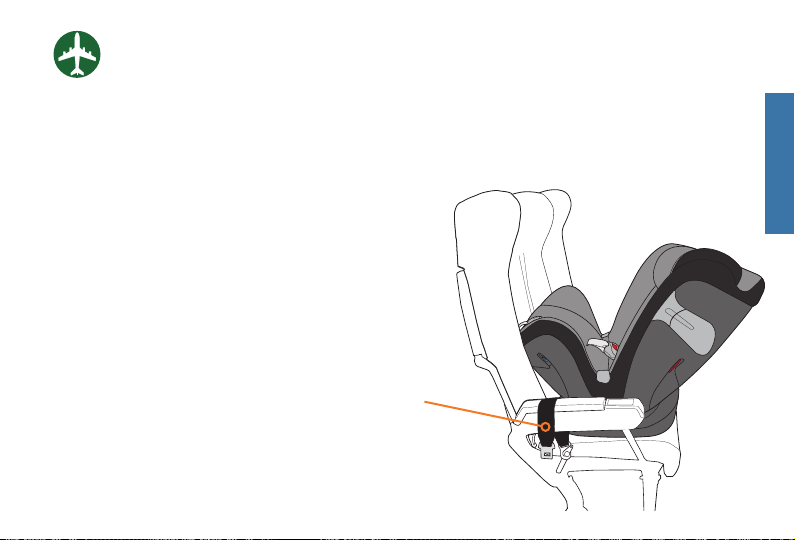
99
Aircraft
Seat Belt
1. PLACE THE CHILD RESTRAINT
IN AIRCRAFT SEAT.
Adjust the Child Restraint for REARFACING use.
Refer to page 60. Place the Child Restraint on the
aircraft seat REARFACING, as shown.
NOTE: Do not use Lock-O with Aircraft seat belt because it is for use with lap/shoulder
belt systems only.
IMPORTANT: Before installing the Child Restraint make sure the aircraft seat is in a fully
upright position.
NOTE: After landing, refer to pages 46-65 for vehicle installation.
6
5
4
3
2
1
INSTALLING CHILD RESTRAINT REAR-FACING IN AN AIRCRAFT
FORWARD-FACING
REAR-FACING
REAR-FACING
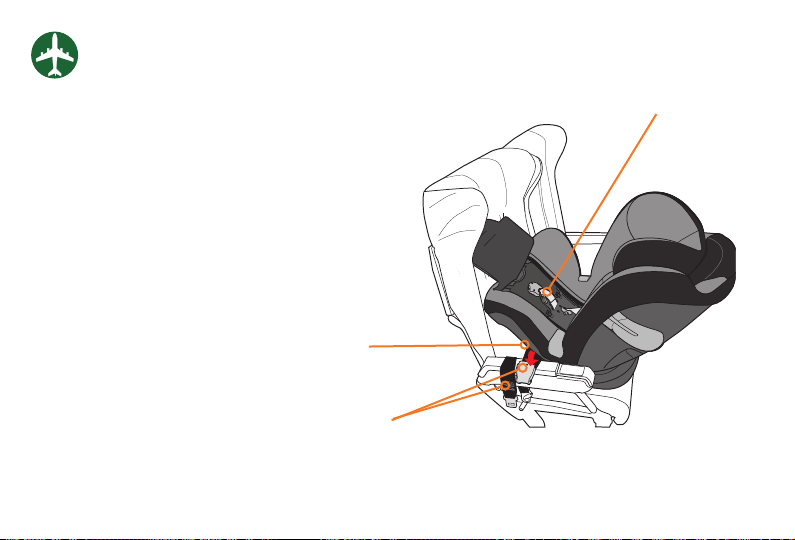
100
Crotch Strap
Aircraft Seat Belt
REAR-FACING
Belt Path Opening
2. ROUTE AIRCRAFT SEAT BELT
THROUGH REAR-FACING BELT
PATH.
Route the aircraft seat belt buckle through the
REARFACING Belt Path opening on one side and
continue through the opening on the opposite
side of the Child Restraint, as shown.
Route the aircraft seat belt UNDER the seat
padding and in front of the Crotch Strap when
Crotch Strap is located in either rear or forward
position.
INSTALLING CHILD RESTRAINT REAR-FACING IN AN AIRCRAFT
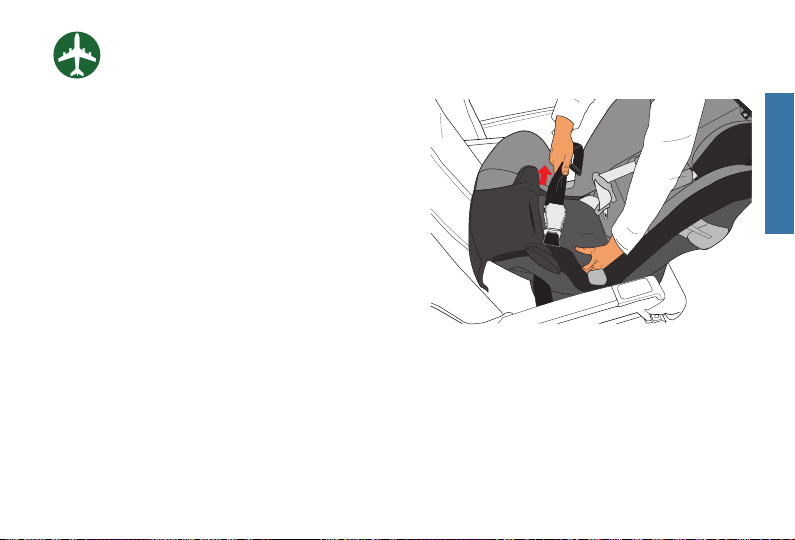
101
3. FASTEN THE AIRCRAFT SEAT
BELT, THEN REMOVE ALL
SLACK FROM THE BELT.
The aircraft seat belt must be as tight as possible.
Using your full weight, push the Child Restraint
firmly onto the aircraft seat while pulling on
the seat belt to tighten. Route the excess seat
belt strap through the REARFACING Belt Path
opening.
6
5
4
3
2
1
INSTALLING CHILD RESTRAINT REAR-FACING IN AN AIRCRAFT
REAR-FACING
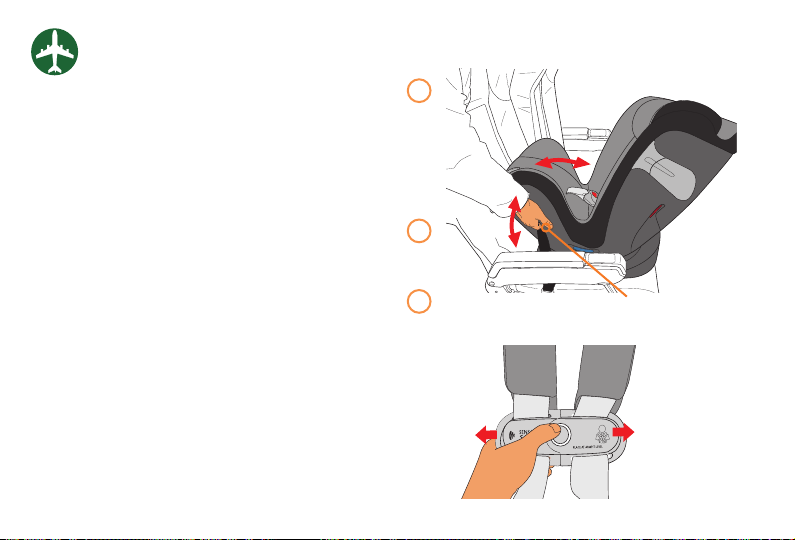
102
REAR-FACING
Belt Path
6
5
4
3
2
1
5
4
INSTALLING CHILD RESTRAINT REAR-FACING IN AN AIRCRAFT
6
4. CHECK YOUR WORK.
MAKE SURE the aircraft seat belt is tight and
locked. If you can move the child restraint more
than 1 in. (2.5 cm) side to side or front to back at
the REARFACING belt path, the belt is not tight
enough and you MUST install again until the seat
belt is tight.
5. SECURE CHILD WITH HARNESS.
Place child in restraint and follow “Securing Child
with Harness” section, see pages 92-97.
6. UNFASTEN SENSORSAFE CHEST
CLIP DURING TAXI, TAKEOFF, AND
LANDING
In order to comply with the FAA regulation for
Portable Electronic Devices (PED), the SensorSafe
Chest Clip MUST be unfastened during taxi, take-
o, and landing. The SensorSafe Chest Clip may
be refastened during flight or once the plane has
safely landed and the use of electronic devices is
permitted by the flight crew.
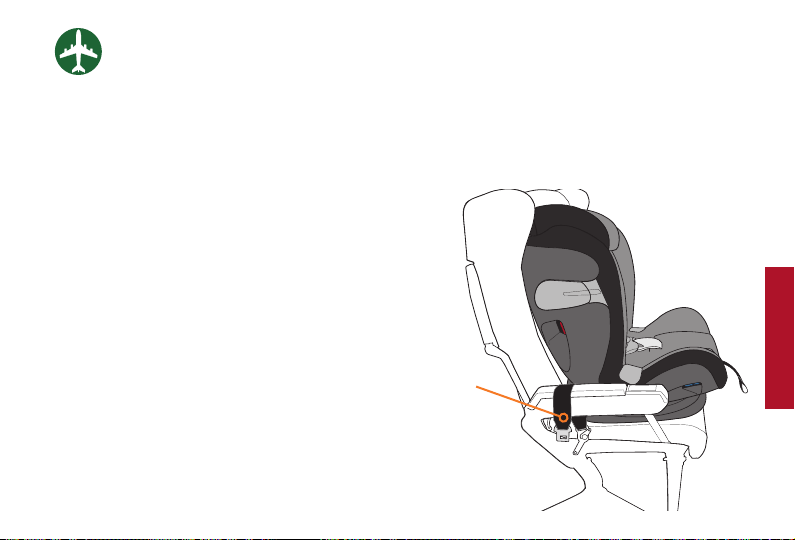
103
1. PLACE THE CHILD RESTRAINT
IN POSITION.
Adjust the Child Restraint to its most upright
position, then place it on the aircraft seat
FORWARDFACING, as shown.
DO NOT use Lock-O with Aircraft seat belt because it is for use with lap/shoulder belt
systems only.
IMPORTANT: Before installing the Child Restraint, make sure the aircraft seat is in a fully
upright position.
NOTE: After landing, refer to page 66-87 for vehicle installation.
Aircraft Seat
Belt
6
5
4
3
2
1
INSTALLING CHILD RESTRAINT
FORWARD-FACING IN AN AIRCRAFT
FORWARD-FACING

104
Aircraft Seat Belt
Access Flap
2. ROUTE AIRCRAFT SEAT BELT
THROUGH FORWARD-FACING
BELT PATH.
Move the Child Restraint's Harness out of the way
and raise the access flap. Route the aircraft seat
belt buckle through the FORWARDFACING Belt
Path opening on one side and continue through
the opening on the opposite side of the Child
Restraint, as shown.
INSTALLING CHILD RESTRAINT
FORWARD-FACING IN AN AIRCRAFT
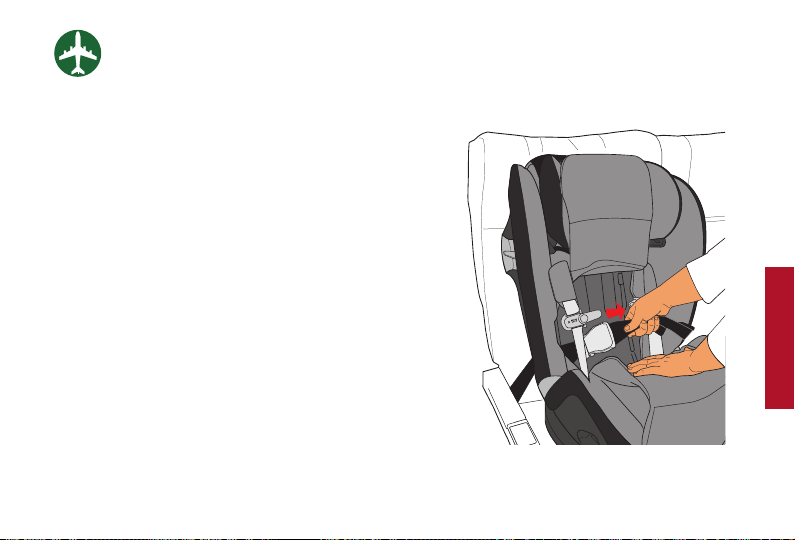
105
NOTE: Because of the fixed length of aircraft seat
belts, the belt buckle could be behind the child's
back after tightening the belt. For your child's
comfort, CYBEX recommends cushioning the
child's back by placing a small pillow or
folded-up blanket, or a folded-up jacket, over the
belt buckle.
Remember to remove this cushioning when
removing from aircraft and installing in your
motor vehicle after your flight.
3. FASTEN THE AIRCRAFT SEAT
BELT, THEN REMOVE ALL SLACK
FROM THE BELT.
The aircraft seat belt must be as tight as possible.
Using your full weight, push the Child Restraint
firmly onto the aircraft seat while pulling on the
aircraft seat belt to tighten. Route the excess seat
belt strap through the FORWARDFACING Belt
Path opening.
INSTALLING CHILD RESTRAINT
FORWARD-FACING IN AN AIRCRAFT
FORWARD-FACING
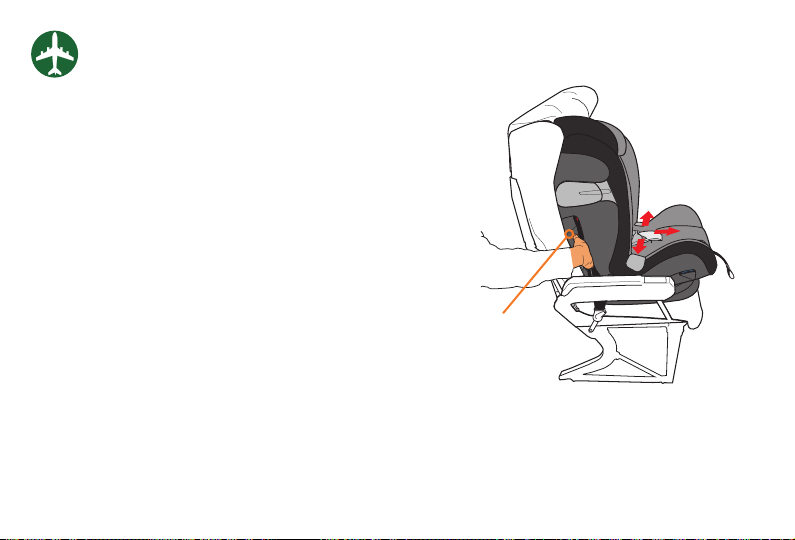
106
FORWARD-FACING
Belt Path
4. CHECK YOUR WORK.
MAKE SURE the aircraft seat belt is tight and
locked. If you can move the child restraint more
than 1 in. (2.5 cm) side to side or front to back at
the FORWARDFACING belt path, the belt is not
tight enough and you MUST install again until the
seat belt is tight.
6
5
4
3
2
1
INSTALLING CHILD RESTRAINT
FORWARD-FACING IN AN AIRCRAFT
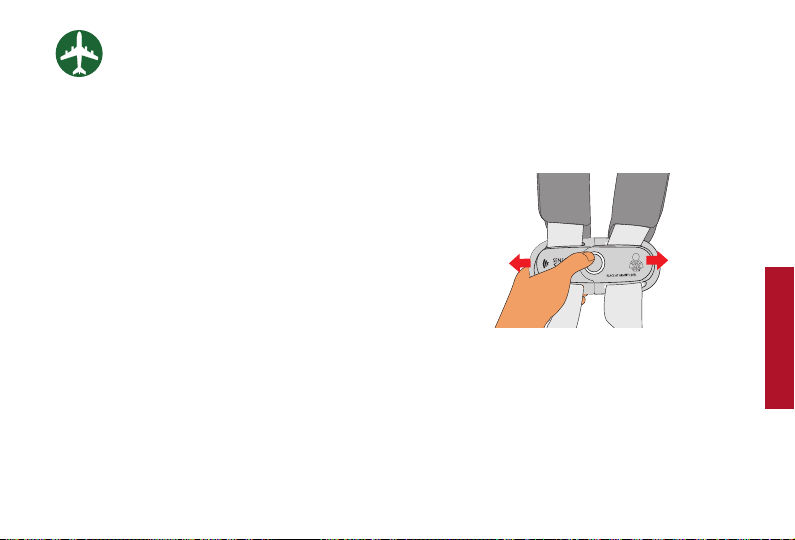
107
5. SECURE CHILD WITH HARNESS.
Place child in restraint and follow “Securing Child
with Harness” section, see pages 92-97.
INSTALLING CHILD RESTRAINT
FORWARD-FACING IN AN AIRCRAFT
6.UNFASTEN SENSORSAFE CHEST
CLIP DURING TAXI, TAKEOFF, AND
LANDING
In order to comply with the FAA regulation for
Portable Electronic Devices (PED), the SensorSafe
Chest Clip MUST be unfastened during taxi, take-
o, and landing. The SensorSafe Chest Clip may
be refastened during flight or once the plane has
safely landed and the use of electronic devices is
permitted by the flight crew.
FORWARD-FACING

108
1. REMOVING SHOULDER PADS
Unsnap and remove Shoulder Pads as shown.
2. INSTALLING SHOULDER PADS
Re-attach Shoulder Pads by folding the snaps over the Harness Strap. Secure both snaps.
Make sure they are oriented as shown.
1
2
CARE AND CLEANING

109
Removing the Seat Cover
To remove please follow these steps:
1. Unfasten the harness buckle.
2. Unfasten the chest clip.
3. If using the newborn insert, remove it.
4. If using buckle cover, remove it.
5. Unsnap the shoulder pads.
6. Adjust the headrest to its highest position.
7. Unsnap the back of the headrest.
8. Unsnap the two snaps creating the harness
slot.
9. Lift back pad and headrest cover o the
headrest.
10. Unsnap each side of the back padding
and pull forward.
11. Pull seat cover away from harness
adjustment cover.
12. Starting at the bottom of the seat, pull the
seat cover away from the child restraint.
Installing the Seat Cover
Reverse the removal instructions to reinstall the
Seat Cover.
The integrated harness system cannot be removed from the seat. NEVER remove or attempt
to remove parts of the harness system.
WARNING! The child restraint must NEVER be used without the cover.
DO NOT damage, remove, or dispose of any EPS foam.
CARE AND CLEANING
GENERAL
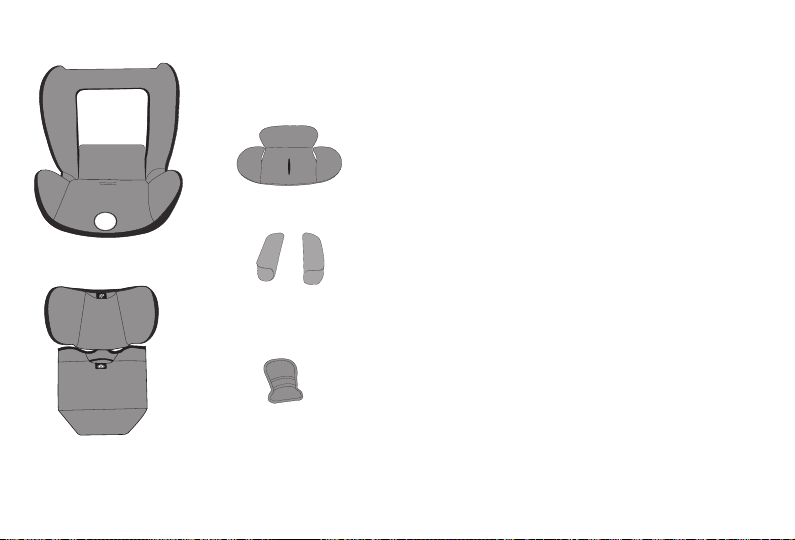
110
SPOT CLEANING
Spot clean Seat Covers, Shoulder Pads,
Buckle Pad, and the Newborn Insert as
needed with a clean cloth using mild
detergent and water.
WASHING INSTRUCTIONS
All seat cover parts can be washed as follows:
• Machine wash separately in COLD water,
delicate cycle, mild detergent
• Drip Dry
TO AVOID SHRINKAGE,:
• DO NOT machine wash warm or hot
DO NOT TUMBLE DRY
• DO NOT iron
• DO NOT use bleach
Buckle Pad
Shoulder Pads
Newborn Insert
Headrest Cover
CARE AND CLEANING
Seat Cover

111
CARE AND CLEANING
SensorSafe Chest Clip
• DO NOT SUBMERGE IN WATER. Wipe
clean with mild detergent and warm
water.
Harness Buckle
Food, drink or other debris may collect
inside the Harness Buckle which can aect
proper function.
• DO NOT SUBMERGE THE BUCKLE
STRAP IN WATER.
• Wipe clean with a damp cloth.
• DO NOT use bleach, detergents or
lubricants.
• When inserting the Buckle Tongues, be
sure you can hear an audible CLICK
to make sure the buckle is working
properly.
• DO NOT use the Child Restraint if the
Buckle Tongues DO NOT click into the
buckle. Try cleaning the buckle. If this
does not remedy the problem, please
call Customer Service 1-877-242-5676
before using the Child Restraint.
Harness Straps
• NEVER SUBMERGE THE LOWER ANCHOR
STRAPS OR HARNESS STRAPS.
• Sponge clean using warm water and mild
soap.
• Air dry.
• DO NOT iron.
Lower Anchor Connectors
• Sponge clean or thoroughly rinse Lower
Anchor Connectors with warm water.
• Allow to dry thoroughly.
• Test by connecting and disconnecting until
an audible CLICK is heard after attaching
each connector to a lower anchor. If
clicks are not heard, repeat the cleaning
procedure.
Plastic Parts
Wipe clean with mild detergent and warm water.
GENERAL

112
Did you read and understand this Owner’s Manual and all labels found on this Child Restraint?
Is the Child Restraint positioned correctly (REARFACING/FORWARDFACING/BOOSTER MODE)
for the child's size?
Is the seat recline angle correct according to the Level Indicator?
Did you check for hot surfaces in sunny weather?
Is the Harness adjusted to the correct position for the size of the child with the Harness AT
or JUST BELOW child’s shoulders (REARFACING), or AT or JUST ABOVE child's shoulders
(FORWARDFACING)?
Is the Harness snug around the child and secured properly with the Chest Clip positioned at
armpit level?
Is the Tether Strap being used when using the seat FORWARDFACING?
If the Child Restraint is next to a vehicle door or panel, is the adjacent L.S.P. device extended?
Does your child meet the Child Usage Guidelines for the seat, p. 30-35?
Is today’s date before the “Do Not Use After” date on the Child Restraint?
If you answered YES to all of these questions, you are good to go, and please DRIVE SAFELY!
SAFETY CHECKLIST

113
115
NOTES
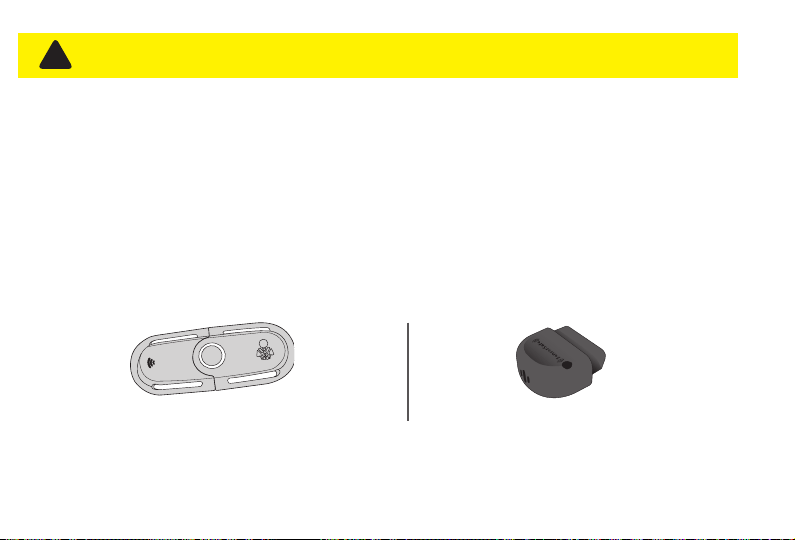
114
Secure your child into the child restraint as you would normally. The SensorSafe Receiver Plug
monitors both the Chest Clip Transmitter and the vehicle. When you arrive at your destination and
turn your vehicle o, the SensorSafe system sounds a series of gentle tones reminding you that
your baby is in the vehicle. Install it once and SensorSafe is always ready to alert you.
IMPORTANT USAGE INFORMATION
• The SensorSafe system consists of two components: (1) The Chest Clip Transmitter and (2) The
Receiver Plug. The system will not work unless both of these components are present in the
vehicle with the Receiver installed in the vehicle’s OBDII port (page 118).
• This system works with the SensorSafe Application which can be downloaded from: The App
Store
®
or Google Play
™
.*
* Trademarks are the property of their respective owners.
PLACE AT ARMPIT LEVEL
SENSOR
SAFE
CHEST CLIP TRANSMITTER RECEIVER PLUG
GENERAL INFORMATION ABOUT SENSORSAFE
®
WARNING! DEATH or SERIOUS INJURY can occur
!
This product contains magnets. Before use, consult your family doctor about the compatibility of this
product with pacemakers and similar devices.

115
• The SensorSafe Chest Clip is designed to go into a sleep mode after being clipped for 12 hours.
Although 12-hour vehicle trips without stops are uncommon and not recommended, the Chest Clip
must be opened and closed after 12 hours to reactivate the SensorSafe system.
• The Receiver Plug has ONLY been tested with 2008 or newer vehicles purchased in the U.S. or
Canada. If you would like to use the SensorSafe Chest Clip with a Hybrid or Electric vehicle, you will
need to download the application from the App Store
®
or Google Play
™
.* Additional Receiver Plugs
can be purchased for additional vehicles. If you have questions, please download the SensorSafe
app or contact CYBEX at: 1-877-242-5676 or online at
http://cybex-online.com/us/contact.html.
BATTERY USAGE
• TO PRESERVE BATTERY LIFE, ALWAYS STORE THE SENSORSAFE CHEST CLIP IN THE
UNCLIPPED POSITION.
• The Chest Clip ships with 1-button cell lithium battery installed that can be replaced.
• The SensorSafe is designed to alert you of a low battery. If your Chest Clip battery is getting low,
the SensorSafe Receiver will make a “low battery” alarm and LED will flash 10 times when the
Chest Clip is fastened. This “low battery” alarm will sound dierent from the beeps you typically
hear when activating your SensorSafe system. The SensorSafe Chest Clip uses a Panasonic
™
CR2032 Lithium button cell Battery. Should you have problems with SensorSafe hardware, please
contact CYBEX at: 1-877-242-5676 or online at http://cybex-online.com/us/contact.html to
order a replacement battery/parts.
GENERAL INFORMATION ABOUT SENSORSAFE
®
* Trademarks are the property of their respective owners.

116
SensorSafe
®
Technology
Questions? Comments?:
Visit us at: http://cybex-online.com/us/contact.html or call CYBEX at: 1-877-242-5676
GENERAL INFORMATION ABOUT SENSORSAFE
®
This device meets the requirements of SAE J3005.
FCC CERTIFIED:
Chest Clip Model: SOSR2, FCC ID: 2ABS2-SOSR3
Receiver Plug Model: SS2, FCC ID: 2ABS2-SS2
This device complies with Part 15 of the FCC Rules
.
Operation is subject to the following two
conditions:
1. This device may not cause harmful interference.
2. This device must accept any interference received, including interference that may cause
undesired operation.
117
WARNING! DEATH or SERIOUS INJURY can occur
!
This equipment generates, uses, and can radiate radio frequency energy and, if not installed and
used in accordance with the instructions, may cause harmful interference to radio communications.
However, there is no guarantee that interference will not occur in a particular installation. If
this equipment does cause harmful interference to radio or television reception, which can be
determined by turning the equipment o and on, the user is encouraged to try to correct the
interference by one or more of the following measures:
• Reorient or relocate the receiving antenna.
• Increase the separation between the equipment and receiver.
• Connect the equipment into an outlet on a circuit dierent from that to which the receiver is
connected.
• Consult the dealer or an experienced radio/TV technician for help.
Chest Clip:
RF warning statement: The device has been evaluated to meet general RF exposure requirement.
The device can be used in portable exposure condition without restriction.
GENERAL INFORMATION ABOUT SENSORSAFE
®
Changes or modifications not expressly approved by the party responsible for compliance could
void the user’s authority to operate the equipment.
NOTE: This equipment has been tested and found to comply with the limits for a Class B digital
device, pursuant to Part 15 of the FCC Rules. These limits are designed to provide reasonable
protection against harmful interference in a residential installation.

118
a
USING SENSORSAFE
®
Receiver Plug:
FCC Radiation Exposure Statement: This equipment complies with FCC radiation exposure limits
set forth for an uncontrolled environment. This equipment should be installed and operated with
minimum distance 7.87 in (20 cm) between the radiator & your body.
1. INSTALL THE SENSORSAFE RECEIVER.
Locate the 16PIN OBDII port
a
in your vehicle. Refer to your
vehicle Owner’s Manual for location. Plug in the SensorSafe
Receiver. If unable to locate your vehicle manual, the
SensorSafe Application may contain information regarding the
location of the 16PIN OBDII port for your vehicle.
Your SensorSafe Receiver will sound when it first communicates
with the vehicle network. In some vehicles this occurs
immediately after installing the SensorSafe Receiver. In other
vehicles the tone will not be heard until the vehicle has been
started.
This initialization signal only occurs one time after installation.
2. POWER UP THE VEHICLE.
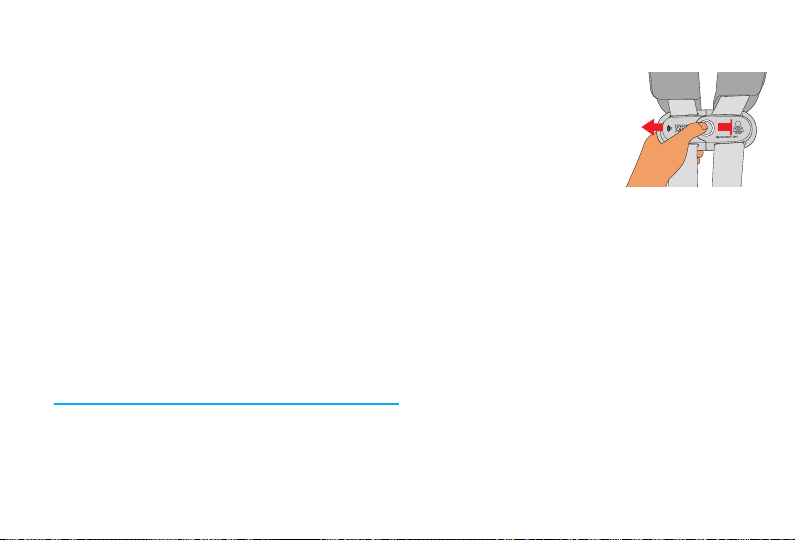
119
USING SENSORSAFE
®
3. CYCLE THE SENSORSAFE CHEST CLIP.
Your SensorSafe Chest Clip is designed to “go to sleep” if left fastened for
more than 12 hours. To reset, or “wake up” the Chest Clip, unfasten then
re-fasten it. When you do this, the blue LED will flash two times.
TO PRESERVE BATTERY LIFE, ALWAYS STORE THE SENSORSAFE CHEST
CLIP IN THE UNCLIPPED POSITION.
4. DRIVE THE VEHICLE.
The SensorSafe Receiver is designed to respond after the vehicle has been driven at 5 miles (8 km)
per hour or more.
5. PARK THE VEHICLE AND TURN OFF THE IGNITION.
Within 2 seconds of parking your vehicle and turning o the ignition you will hear the SensorSafe
reminder, alerting you that your baby is in the vehicle. If you don’t hear the reminder tone, test
your SensorSafe by following steps 1-5 again. Contact CYBEX at: 1-877-242-5676 or online at:
http://cybex-online.com/us/contact.html if the reminder tone again fails to sound.
NOTE: SensorSafe Receiver will also alarm if your child unclips the Chest Clip after the vehicle has
been driven at 5 miles (8 km) per hour or more, but only if the vehicle is on.

120
REPLACING THE SENSORSAFE CHEST CLIP BATTERY.
USING SENSORSAFE
®
1. Loosen Harness by pressing Harness Release Button on the front of the Child Restraint and
pulling forward on both Harness Straps.
2. Unbuckle Harness by pressing the button on the Crotch Buckle and pulling out both Buckle
Tongues.
3. Open Chest Clip by pressing the Release Button and pulling the Chest Clip apart.
1 3
2
6
5
4
3
2
1
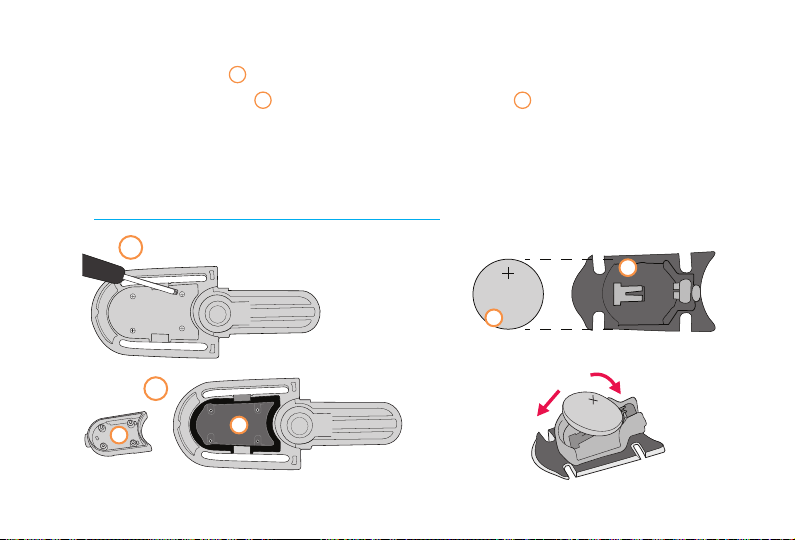
121
4. Turn the male side of the Chest Clip over and loosen screws with a small Phillips screwdriver.
Remove the cover
a
.
5. Remove Circuit Board
b
from Chest Clip. Remove Battery
c
from Circuit Board. Replace
Battery with new Panasonic
™
CR2032 Lithium button cell Battery, as shown.
6. Place the Circuit Board with the new Battery in the Chest Clip. Replace the Cover and tighten
the screws. This completes the battery replacement process.
If you have questions, please contact CYBEX at: 1-877-242-5676 or online at:
http://cybex-online.com/us/contact.html.
CR2032
b
c
USING SENSORSAFE
®
* Trademarks are the property of their respective owners.
CR2032
2
1
4
a
b
5

122
IF YOU NEED HELP
Please contact our Customer Care Department, where we have many Child Passenger Safety
(CPS) Technicians on staff, with any questions you may have concerning installation, parts, mainte-
nance, or warranty information.
When you contact us, please have the Model Number and Manufactured on Date ready so that we
may help you efficiently. This information can be found on the underside of your Child Restraint
Base.
Please contact CYBEX Customer Care at 1-877-242-5676.
E-mail: [email protected]
Web: www.cybex-online.com
RESOURCES

123
RESOURCES
GENERAL
Additional information, tips, and installation videos can be found in the SensorSafe mobile app.
75% OF ALL CAR SEATS ARE INSTALLED INCORRECTLY!
Installing your car seat correctly in your vehicle is extremely important for your child’s safety. Make
sure your car seat is installed correctly by using one of the following resources:
https://www.nhtsa.gov/equipment/car-seats-and-booster-seats
www.safekids.org
To find an available CPS Technician in your area, go to bit.ly/FindATech
Recycling : Once your seat has reached its expiration date, we recommend recycling the seat.
Contact your local community recycling center for the best way to dispose of your seat. We do not
recommend giving or selling the seat to anyone, or simply putting it in the garbage.

124
IMPORTANT: Immediately register your Eternis S so we can contact you in the unlikely event of a
safety recall. Register online at http://register.cybex-online.com/carseats, or mail in the separate
registration card provided.
LIMITED WARRANTY
CYBEX warrants to the original consumer purchaser that this product will be free from defects
in material and workmanship for two (2) years from the date of original purchase (the“Warranty
Period”). During the Warranty Period, CYBEX, at its option, may repair or replace this product if
it is found by the manufacturer to be defective in material or workmanship. CYBEX reserves the
right to discontinue or change parts, fabrics, models, or products, or to substitute this product
with a comparable model or product. To make a claim under this warranty, please contact us at
[email protected], call us at 1–877–242–5676, or write to us at:
CYBEX Warranty
Columbus Trading Partners USA, Inc.
1801 Commerce Drive
Piqua, Ohio 45356
An original receipt is required to validate your warranty, and shipping charges will be the
responsibility of the original consumer purchaser. To expedite the processing of any future
warranty claims and to verify the original date of purchase, please complete and mail the pre-
addressed owner registration card within thirty (30) days of purchase.
WARRANTY

125
WARRANTY
WARRANTY LIMITATIONS
This warranty does not cover the effects of normal wear and tear or damages resulting from
negligence, modification, improper installation, accidents, misuse, or abuse of this product. It is
expressly agreed that the obligations of CYBEX and the original consumer purchaser’s remedies
under the limited warranty contained herein are exclusive and are strictly limited to the repair or
replacement of the product.
This limited warranty is conditional upon strict compliance with the provisions of the Owner’s
Manual. In no event will CYBEX or the dealer selling this product be liable to you for any damages,
including incidental or consequential damages, arising out of the use or inability to use this
product.
LIMITATION OF WARRANTIES AND STATE/PROVINCIAL LAW RIGHTS
The warranty and remedies as set forth above are exclusive and in lieu of all others, oral or written,
express or implied. To the extent permitted by applicable law, any implied warranties, including
implied warranties of merchantability and fitness for a particular purpose, are hereby disclaimed.
Some states/provinces do not allow limitations as to how long an implied warranty lasts or the
exclusion or limitation of incidental or consequential damages, so the above limitations may not
apply to you.
This warranty gives you specific legal rights, and you may have other rights, which vary from state/
province to state/province. Neither CYBEX nor the dealer selling this product has authorized any
person to create for it any other warranty, obligation, or liability in connection with this product.
GENERAL

126
Bienvenido a la familia CYBEX.
Gracias por adquirir el sistema CYBEX ETERNIS S. Nos sentimos orgullosos de traer a los Estados
Unidos este producto diseñado en Alemania. Esperamos que el sistema ETERNIS S haga que los
viajes del niño sean más seguros y agradables, y que la instalación y el uso sean tan sencillos
como sea posible para usted.
El sistema ETERNIS S aporta algunas innovaciones importantes de seguridad a la categoría de
asientos de seguridad para automóvil todo en uno.
SISTEMA DE PROTECCIÓN LINEAL CONTRA IMPACTOS LATERALES L.S.P. DE CYBEX
El sistema L.S.P. permite reducir gradualmente las fuerzas de una colisión con impacto lateral para minimi-
zar las lesiones. Una cabecera ajustable, aletas laterales profundas forradas con espuma EPS gruesa que
absorbe energía y un dispositivo ajustable integran el sistema L.S.P. CYBEX. Este sistema se optimizó para
proteger y reducir las fuerzas que afectan al niño en caso de choques con impacto lateral.
¡Las estadísticas muestran que más del 75 % de los asientos de seguridad para automóvil se
usan incorrectamente!
Lea y siga cuidadosamente estas instrucciones para instalar el sistema ETERNIS S correctamente,
incluso si la instalación y el uso de este sistema de sujeción infantil pueden parecer sencillos e
intuitivos.
¡BIENVENIDO A CYBEX!

127
Antes de usar el sistema de sujeción ETERNIS S por primera vez, asegúrese de seguir todos los
pasos de la lista de verificación de seguridad en la página 236.
Siguiendo las recomendaciones de la Academia Estadounidense de Pediatría para el transporte
seguro de niños, recomendamos que los niños permanezcan en un asiento de seguridad para
automóvil ORIENTADO HACIA ATRÁS tanto tiempo como sea posible, hasta que alcancen el
peso o la altura más altos permitidos por el asiento.
Visite www.aap.org para obtener más información sobre la recomendación de la academia.
Ningún asiento para niño puede garantizar la protección contra lesiones en todos los casos, pero
el uso adecuado ayuda a reducir el riesgo de lesiones graves o la muerte. Si tiene preguntas
o necesita ayuda, comuníquese con CYBEX al 1-877-242-5676. Además, recuerde registrar su
sistema de sujeción infantil para que nos podamos comunicar con usted en el improbable caso de
que se retire el producto del mercado. Guarde este manual del propietario en el compartimiento
ubicado en la parte trasera del sistema de sujeción infantil ETERNIS S, para mantenerlo como
referencia futura. Apreciamos su compra y lo invitamos a que visite www.cybex-online.com/
us para ver otros magníficos productos de CYBEX

128
GUÍA DEL USUARIO DEL ASIENTO DE SEGURIDAD PARA AUTOMÓVIL DE
ETERNIS. LEA TODAS LAS INSTRUCCIONES ANTES DEL USO. GUARDE LAS
INSTRUCCIONES PARA USO FUTURO.
ÍNDICE
REGISTRO E INFORMACIÓN SOBRE EL RETIRO DE PRODUCTOS DEL MERCADO .......................................130131
ADVERTENCIAS E INFORMACIÓN IMPORTANTE DE SEGURIDAD .................................................................. 132151
DESCRIPCIÓN GENERAL DEL SISTEMA DE SUJECIÓN INFANTIL ETERNIS S ............................................... 152153
PAUTAS DE USO PARA EL NIÑO ....................................................................................................................154159
CARACTERÍSTICAS DEL SISTEMA DE SUJECIÓN INFANTIL ......................................................................... 160167
PORTAVASOS ......................................................................................................................................................160
CUBIERTAS DEL ARNÉS ......................................................................................................................................161
INSERTO PARA BEBÉ ...........................................................................................................................................161
CORREA DE LA ENTREPIERNA ........................................................................................................................... 162
CABECERA CON ALTURA AJUSTABLE ...............................................................................................................163
CABECERA RECLINABLE ....................................................................................................................................163
USO DE LA PROTECCIÓN LINEAL CONTRA IMPACTOS LATERALES L.S.P ....................................................... 164
ACTIVACIÓN DEL SISTEMA L.S.P.. ......................................................................................................................165
CORREA DEL ANCLAJE INFERIOR .....................................................................................................................166
CORREA DE SUJECIÓN ...................................................................................................................................... 167
APLICACIÓN SENSORSAFE
®
..................................................................................................................................168
INSTALACIÓN DEL SISTEMA DE SUJECIÓN INFANTIL ORIENTADO HACIA ATRÁS
CON LOS CONECTORES DE ANCLAJE INFERIOR ...........................................................................................170177
INSTALACIÓN DEL SISTEMA DE SUJECIÓN INFANTILORIENTADO HACIA ATRÁS
CON EL CINTURÓN PARA REGAZO Y HOMBRO ........................................................................................... 178183

129
SI NO SE CUMPLEN ESTAS INSTRUCCIONES, LA SEGURIDAD DE UN NIÑO
SE PUEDE VER SERIAMENTE AMENAZADA. GUARDE LAS INSTRUCCIONES
PARA USO FUTURO.
ÍNDICE
INSTALACIÓN DEL SISTEMA DE SUJECIÓN INFANTIL ORIENTADO HACIA ATRÁS
CON EL CINTURÓN PARA REGAZO ................................................................................................................184189
INSTALACIÓN DEL SISTEMA DE SUJECIÓN INFANTIL ORIENTADO HACIA ADELANTE
CON LOS CONECTORES DE ANCLAJE INFERIOR .......................................................................................... 190199
INSTALACIÓN DEL SISTEMA DE SUJECIÓN INFANTIL ORIENTADO HACIA ADELANTE
CON EL CINTURÓN PARA REGAZO Y HOMBRO .......................................................................................... 200205
INSTALACIÓN DEL SISTEMA DE SUJECIÓN INFANTIL ORIENTADO HACIA ADELANTE
CON EL CINTURÓN PARA REGAZO ................................................................................................................206211
UTILIZACIÓN DEL SISTEMA DE SUJECIÓN INFANTIL EN EL MODO DE ASIENTO ELEVADOR .................. 212215
CÓMO ASEGURAR EL SISTEMA DE SUJECIÓN INFANTIL EN UN AVIÓN .............................................................222
INSTALACIÓN DEL SISTEMA DE SUJECIÓN INFANTIL ORIENTADO HACIA ATRÁS EN UN AVIÓN ........... 223226
INSTALACIÓN DEL SISTEMA DE SUJECIÓN INFANTIL ORIENTADO HACIA ADELANTEEN UN AVIÓN ...... 227231
CUIDADO Y LIMPIEZA ...................................................................................................................................232235
LISTA DE VERIFICACIÓN DE SEGURIDAD ............................................................................................................ 236
INFORMACIÓN GENERAL ACERCA DE SENSORSAFE
®
................................................................................. 238241
CÓMO USAR SENSORSAFE
®
........................................................................................................................ 242245
RECURSOS .................................................................................................................................................... 246247
GARANTÍA..................................................................................................................................................... 248249
130
Los sistemas de sujeción infantil se pueden retirar del
mercado por razones de seguridad. Debe registrar
este sistema de sujeción para recibir notificaciones
en caso de que se retire del mercado. Envíe su
nombre, domicilio, dirección de correo electrónico si
está disponible, el número de modelo y la fecha de
fabricación del sistema de sujeción a:
CÓMO REGISTRAR EL SISTEMA DE
SUJECIÓN INFANTIL
Por favor complete la tarjeta de registro prepagada
que se adjunta a su sistema de sujeción infantil y
envíe la parte
que se muestra a
continuación hoy.
Llame a la línea directa para el consumidor del
Departamento de Seguridad Vehicular del Gobierno de los
Estados Unidos al 1-888-327-4236 (TTY: 1-800-424-9153), o
visite www.NHTSA.gov.
Este sistema de sujeción infantil cumple con todos los
requisitos aplicables del Estándar Federal de Seguridad para
Vehículos Automotores.
Cuando se usa CON el arnés interno y se instala
correctamente de acuerdo con estas instrucciones, este
sistema de sujeción está certificado para usarse solo en
vehículos motorizados, autobuses y camiones, diseñados
para pasajeros o para uso múltiple con pasajeros y
equipados con sistemas de cinturón para regazo, o
cinturón para regazo y hombro, y para usarse en aviones.
Cuando se usa SIN el sistema de arnés interno en MODO
DE ASIENTO ELEVADOR e instalado adecuadamente
de acuerdo con estas instrucciones, este sistema de
sujeción está certificado para usarse solo en vehículos
motorizados, autobuses y camiones, diseñados para
pasajeros o para uso múltiple con pasajeros y equipados
con sistemas de cinturón para regazo y hombro.
Cuando se usa en MODO DE ASIENTO ELEVADOR, este
sistema de sujeción infantil NO está certificado para
usarlo en aviones. Un asiento elevador con posicionamiento
de cinturón requiere el uso de un sistema de cinturón para el
regazo/hombro, que no está disponible en un avión.
CERTIFICACIÓN
INFORMACIÓN SOBRE EL RETIRO DE
PRODUCTOS DEL MERCADO
Columbus Trading-Partners USA Inc.
Attn: ParentLink
1801 Commerce Drive
Piqua, Ohio 45356
o llame 1-877-242-5676
o registre el producto en línea en:
http://register.cybex-online.com/us/carseats
REGISTRO E INFORMACIÓN SOBRE RETIRO DE PRODUCTO DEL MERCADO
Tear off and mail this part
Consumer: Just fill in your name and address and e-mail address.
Your Name
CHILD RESTRAINT REGISTRATION CARD
Your Street Address
State
Zip Code
City
E-mail Address
RG5009
Date of Manufacture: xxxx/xx/xx
Model Number : xxxxx
Model Name : Eternis S

131
SI NECESITA AYUDA O TIENE PREGUNTAS
Si tiene alguna pregunta sobre la instalación de su sistema de sujeción infantil, póngase en
contacto con nosotros:
Columbus Trading-Partners USA Inc.
Attn: ParentLink
1801 Commerce Drive
Piqua, Ohio 45356, USA
1-877-242-5676
Para obtener información útil sobre los sistemas de sujeción infantil:
www.safekids.org
https://www.nhtsa.gov/equipment/car-seats-and-booster-seats
REGISTRO E INFORMACIÓN SOBRE RETIRO DE PRODUCTO DEL MERCADO
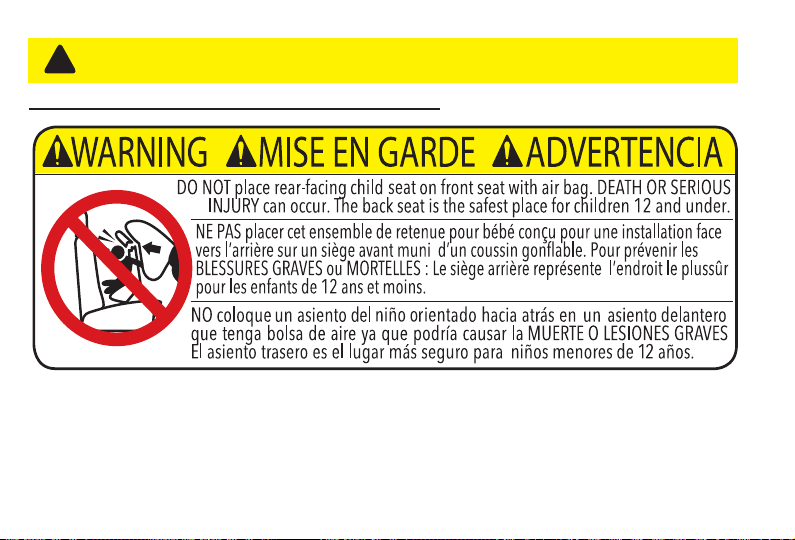
132
ADVERTENCIAS SOBRE LA BOLSA DE AIRE
ADVERTENCIAS E INFORMACIÓN IMPORTANTE
¡ADVERTENCIA!
!
Pueden ocurrir LESIONES GRAVES
o la MUERTE.
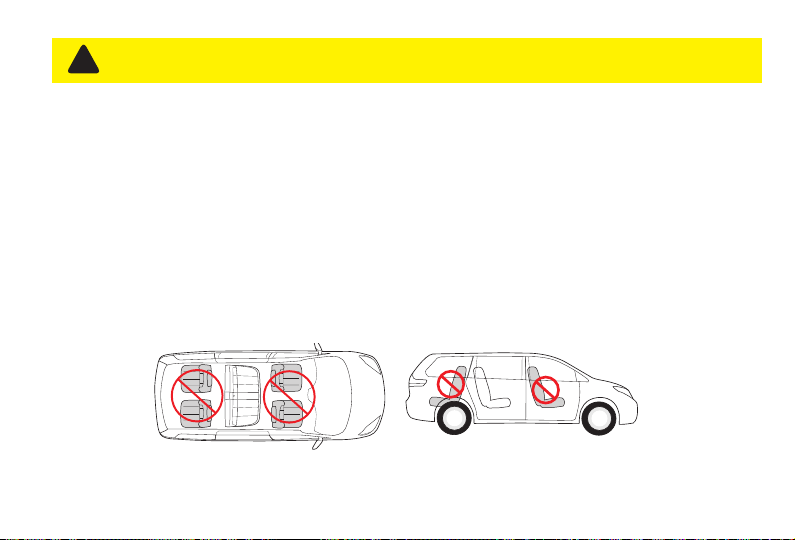
133
• NO use este sistema de sujeción en el asiento delantero de un vehículo equipado con bolsa
de aire. La interacción entre un sistema de sujeción para uso ORIENTADO HACIA ATRÁS y las
bolsas de aire puede causar lesiones graves o la muerte. Si el vehículo tiene una bolsa de aire,
consulte el manual del propietario del vehículo para obtener información sobre la instalación del
sistema de sujeción infantil.
• Si el asiento trasero del vehículo está equipado con bolsas de aire laterales, consulte la
información a continuación para el uso correcto.
• Modelos de vehículos fabricados antes del año 2002:
NO use este sistema de sujeción en el asiento de un vehículo equipado con bolsa de aire lateral,
a menos que lo autorice el fabricante del vehículo.
Modelos del año 2002 y vehículos más recientes:
consulte el manual del propietario del vehículo antes de colocar este sistema de sujeción en el
asiento de un vehículo equipado con bolsa de aire lateral.
• NO coloque ningún objeto entre el sistema de sujeción y la bolsa de aire lateral ya que, al
expandirse, la bolsa de aire puede ocasionar que los objetos golpeen al niño.
ADVERTENCIAS E INFORMACIÓN IMPORTANTE
¡ADVERTENCIA!
!
Pueden ocurrir LESIONES GRAVES
o la MUERTE.
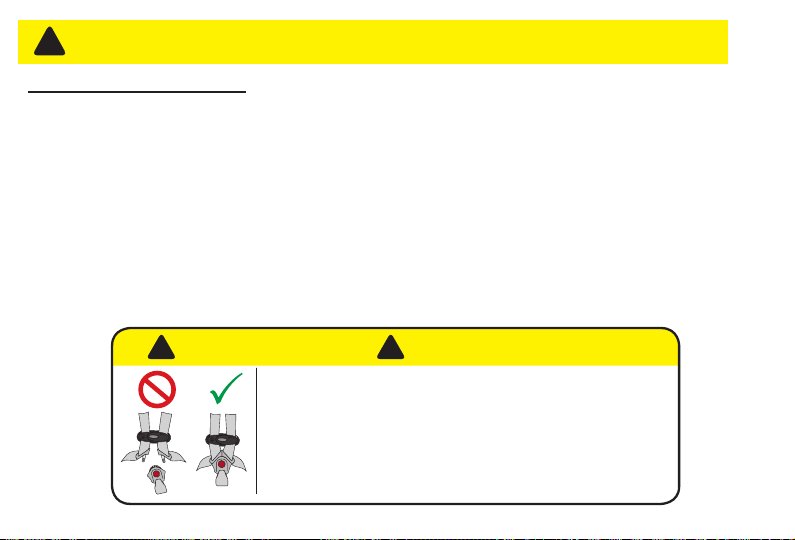
134
! !
WARNING!
Children have STRANGLED in loose or partially
buckled harness straps. Fully restrain the child.
Algunos niños se han ESTRANGULADO con correas
del arnés parcialmente abrochadas o sueltas.
A
R
M
P
I
T
L
E
V
E
L
A
R
M
P
I
T
L
E
V
E
L
¡ADVERTENCIA!
ADVERTENCIAS GENERALES
• LEA con cuidado este manual del propietario
antes de usar el producto por primera vez y
guárdelo para uso futuro.
• SIGA TODAS LAS INSTRUCCIONES de este
sistema de sujeción infantil y las instrucciones
escritas almacenadas en el compartimiento
ubicado en la parte trasera del sistema de
sujeción infantil.
• NUNCA deje al niño sin supervisión.
• NO use un sistema de sujeción infantil con un
historial de uso que no conozca.
• NO permita que otras personas instalen
o usen este sistema de sujeción infantil a
menos que comprendan cómo instalarlo y
usarlo correctamente.
• Este producto contiene imanes. Los
imanes ingeridos pueden adherirse entre
ellos a través de los intestinos causando
infecciones graves y la muerte. Busque
atención médica de inmediato si se ingieren
o se inhalan los imanes. Antes de usarlo,
consulte con el médico familiar acerca de
la compatibilidad de este producto con
marcapasos y dispositivos similares.
¡ADVERTENCIA!
!
Pueden ocurrir LESIONES GRAVES
o la MUERTE.
135
ADVERTENCIAS GENERALES
• NUNCA USE EL SISTEMA DE SUJECIÓN
INFANTIL SI TIENE PARTES DAÑADAS, ROTAS O
FALTANTES.
• REEMPLACE SIEMPRE EL SISTEMA DE
SUJECIÓN INFANTIL Y LA BASE DESPUÉS DE
UN CHOQUE DE CUALQUIER TIPO INCLUSO
SI ESTABA DESOCUPADO. Un choque puede
causar daños no aparentes al sistema de sujeción
infantil que pueden no ser visibles.
• NUNCA instale ni use este sistema de
sujeción infantil hasta que lea y comprenda las
instrucciones en este manual, las etiquetas en
el sistema de sujeción infantil y en el manual del
propietario del vehículo. Si la información de los
dos manuales no concuerda, se debe seguir el
manual del propietario del automóvil. Si no se
siguen estas instrucciones, se pueden causar
lesiones graves o la muerte al niño en un choque.
• NUNCA permita que otra persona use este
sistema de sujeción infantil sin que haya leído
este manual.
• La protección principal para los ocupantes de un
vehículo en un choque es la propia estructura del
vehículo. Si se usa correctamente, este sistema
de sujeción infantil aumentará sustancialmente las
posibilidades de supervivencia en la mayoría de los
choques.
• Compruebe SIEMPRE que las hebillas y otras
partes no tengan superficies calientes antes de
colocar al niño en el sistema de sujeción infantil.
¡Una superficie caliente podría quemar al niño!
Cubra con una manta el sistema de sujeción infantil
desocupado cuando lo deje en un vehículo expuesto
a la luz solar.
• NUNCA deje un sistema de sujeción infantil vacío
que no esté afianzado en el vehículo. Este sistema
de sujeción debe estar siempre afianzado, incluso
cuando no esté ocupado. Un sistema de sujeción
infantil que no esté asegurado puede lesionar a
los ocupantes del vehículo en caso de un choque o
parada repentina.
• NO intente hacer reparaciones ni modificar o alterar
de otro modo este sistema de sujeción infantil.
¡ADVERTENCIA!
!
Pueden ocurrir LESIONES GRAVES
o la MUERTE.
136
ADVERTENCIAS SOBRE LA UBICACIÓN
• SEGÚN LAS ESTADÍSTICAS DE ACCIDENTES, los niños están más seguros cuando están adecuadamente sujetos
en un asiento trasero del vehículo, en lugar de en los asientos delanteros.
• Coloque este sistema de sujeción infantil SOLO en el asiento que permita el fabricante del vehículo. Consulte el
manual del propietario del vehículo para obtener información sobre los sistemas de cinturón de seguridad del
vehículo, las bolsas de aire, las bolsas de aire laterales y las bolsas de aire delanteras en el lado del pasajero para
determinar las posiciones del asiento permitidas.
• Es posible que no todas las ubicaciones en el interior de un vehículo sean seguras para la instalación de este
sistema de sujeción infantil. De hecho, algunos vehículos no tienen ninguna posición del asiento que sea segura
para la instalación de este sistema de sujeción infantil. La colocación incorrecta de este sistema de sujeción infantil
dentro de un vehículo aumentará el riesgo de muerte o lesiones graves.
• NUNCA use este sistema de sujeción infantil en un asiento del vehículo donde no se pueda afianzar firmemente. Un
sistema de sujeción infantil que se instale con holgura no protegerá al niño en un choque.
• NUNCA DEJE el respaldo de un asiento del vehículo con el mecanismo de plegado desbloqueado. En caso de una
parada repentina, un respaldo desbloqueado podría impedir que el sistema de sujeción infantil proteja al niño.
• NUNCA use este sistema de sujeción infantil con cualquier cinturón de seguridad motorizado o montado en la
puerta del vehículo. Su sistema de sujeción infantil no estaría debidamente seguro en caso de un choque.
• NUNCA use este sistema de sujeción infantil en barcos, vehículos de baja velocidad (LSV), vehículos todo terreno
(ATV), carros de golf ni en ninguna otra aplicación no certificada.
• Use este sistema de sujeción infantil SOLO en asientos de vehículo con respaldos que queden bloqueados en su
lugar.
• Este sistema de sujeción infantil puede tocar el asiento del vehículo que queda enfrente, siempre y cuando el ángulo
de reclinado del sistema de sujeción infantil no se vea afectado.
¡ADVERTENCIA!
!
Pueden ocurrir LESIONES GRAVES
o la MUERTE.
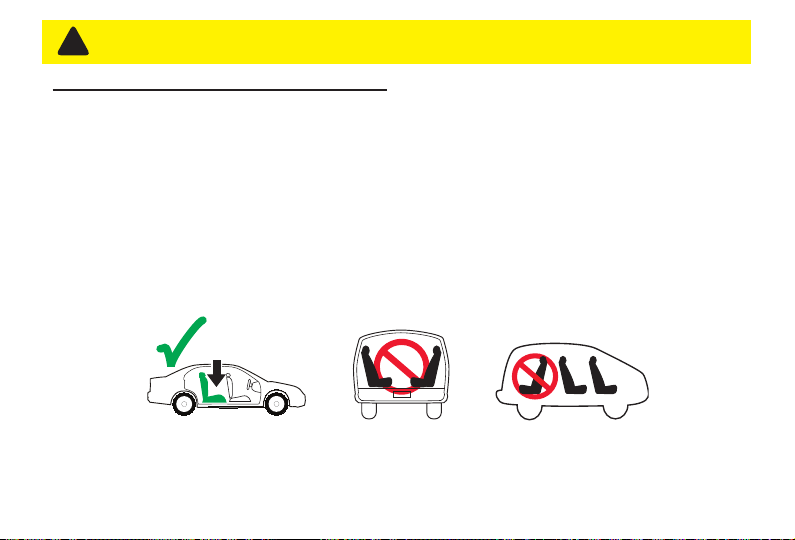
137
ADVERTENCIAS SOBRE LA UBICACIÓN
• NUNCA DEJE AL NIÑO SIN SUPERVISIÓN dentro o alrededor del vehículo incluso por un minuto. Los
retrocesos de vehículos pueden ocurrir en cualquier tipo de vehículo. Los vehículos tienen puntos ciegos,
las áreas alrededor del vehículo que usted no puede ver desde la posición de conducción. Siempre revise
alrededor del vehículo antes de moverlo.
• Use SIEMPRE un dispositivo de protección lineal contra impactos laterales (L.S.P.) (vea la pág. 164-165) en la
parte lateral del sistema de sujeción infantil inmediatamente adyacente a una puerta o panel del vehículo.
• NUNCA extienda el dispositivo de protección lineal contra impactos laterales (L.S.P.) hacia un pasajero u
otro sistema de sujeción infantil.
• Use este sistema de sujeción infantil SOLO en asientos de vehículo ORIENTADOS HACIA ADELANTE.
NUNCA instale este sistema de sujeción infantil en asientos del vehículo orientados hacia la parte trasera o
la parte lateral del vehículo.
• TIPOS DE VEHÍCULOS EN LOS QUE NO PUEDE UTILIZARSE EL SISTEMA DE SUJECIÓN:
- Este sistema de sujeción infantil no se debe usar en vehículos que no tengan cinturones de seguridad del
vehículo o anclajes inferiores (LATCH).
• NO USE este sistema de sujeción infantil con cinturones de seguridad inflables.
¡ADVERTENCIA!
!
Pueden ocurrir LESIONES GRAVES
o la MUERTE.

138
ADVERTENCIAS SOBRE EL USO ORIENTADO HACIA ATRÁS
• Al usar este sistema de sujeción ORIENTADO HACIA ATRÁS, NO afloje el cinturón de seguridad del vehículo para
proporcionar más espacio para las piernas ya que esto evitará que el sistema de sujeción infantil proteja al niño.
• Los reposabrazos abatibles podrían presentar riesgos para un niño ORIENTADO HACIA ATRÁS en ciertos tipos de
colisiones. Consulte el manual del propietario del vehículo antes de instalar cualquier sistema de sujeción infantil
ORIENTADO HACIA ATRÁS delante de un reposabrazos abatible.
• NUNCA cambie un sistema de sujeción infantil a la posición ORIENTADO HACIA ADELANTE con un niño que pese
menos de 22 lb (10 kg). Las fuerzas de choque pueden ocasionar lesiones graves o la muerte.
• NO use la correa de sujeción cuando el sistema de sujeción infantil esté en la posición ORIENTADO HACIA ATRÁS.
• La cabecera del asiento del vehículo que quede frente al niño cuando se sienta ORIENTADO HACIA ATRÁS se
debe colocar en la posición más baja. El respaldo del asiento del vehículo que está enfrente del niño debe estar
totalmente acojinado y no debe tener objetos rígidos.
• IMPORTANTE: los bebés pueden tener dificultad para respirar cuando están sentados en posición erguida.
Asegúrese de que el bebé se recline lo suficiente para mantener la cabeza descansando hacia atrás cómodamente
y de manera segura. Si no se reclina correctamente el sistema de sujeción infantil, se podría aumentar el riesgo de
que el niño sufra lesiones graves o la muerte.
• NO USE este sistema de sujeción infantil si la parte superior de la cabeza del niño queda a menos de 1 in (2.5 cm)
de la parte superior de la cabecera cuando se usa ORIENTADO HACIA ATRÁS.
• ALGUNOS NIÑOS CON NECESIDADES ESPECIALES, como los bebés prematuros o con diagnóstico positivo de
apnea posicional, pueden tener un mayor riesgo de sufrir dificultades respiratorias o de otro tipo en un sistema de
sujeción infantil. Consulte a un médico para determinar qué tipo de sistema de sujeción infantil se debe usar.
¡ADVERTENCIA!
!
Pueden ocurrir LESIONES GRAVES
o la MUERTE.
139
ADVERTENCIAS SOBRE EL AJUSTE PARA NIÑOS
• Compruebe SIEMPRE la hebilla del arnés para asegurarse de que esté abrochada firmemente.
• AJUSTE CEÑIDAMENTE alrededor del niño los cinturones que se incluyen con este sistema de sujeción infantil.
• NUNCA use ropa voluminosa ni mantas que interfieran con la colocación o ajuste correcto del arnés.
• Mantenga SIEMPRE al niño correctamente asegurado en el arnés. Una correa ceñida no debe tener holgura. Queda en
una línea relativamente recta sin estar floja. No presiona la piel del niño ni empuja el cuerpo del niño a una posición poco
natural.
ADVERTENCIAS SOBRE EL USO ORIENTADO HACIA ADELANTE
• Si el niño pesa más de 65 lb (29.4 kg) o los hombros del niño quedan encima del nivel más alto del arnés, DEBE usar este
sistema de sujeción infantil en el modo de asiento elevador.
• Ajuste o retire la cabecera del vehículo en el asiento donde se instalará el sistema de sujeción infantil, de manera que el
respaldo del sistema de sujeción infantil descanse contra el respaldo del asiento del vehículo.
• La cabecera del asiento del vehículo ubicado delante del niño debe colocarse en la posición más baja. El respaldo del
asiento del vehículo que está enfrente del niño debe estar totalmente acojinado y no debe tener objetos rígidos.
¡ADVERTENCIA!
!
Pueden ocurrir LESIONES GRAVES
o la MUERTE.
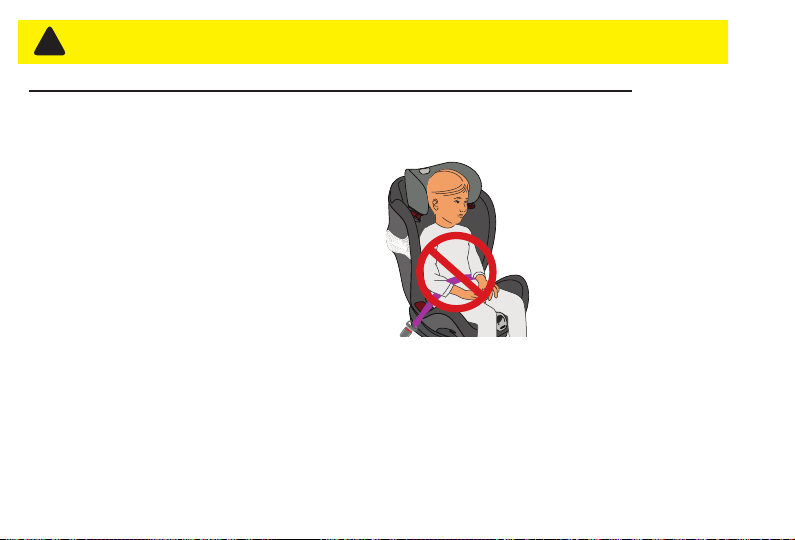
140
ADVERTENCIAS SOBRE EL MODO DE ASIENTO ELEVADOR
• NO use este asiento elevador en la posición ORIENTADO HACIA ATRÁS.
• ¡ADVERTENCIA! Use SOLO el sistema de cinturón para regazo Y hombro del vehículo al sujetar al niño en el asiento
elevador.
• NUNCA use solo el cinturón para regazo.
• El cinturón para el hombro DEBE pasarse a través de
la guía del cinturón para el hombro.
• NO use este asiento elevador si las partes superiores
de las orejas del niño quedan por encima de la parte
trasera de la cabecera del asiento elevador.
• El cinturón para el hombro NO DEBE cruzar el cuello del niño
ni resbalar del hombro del niño. Si no puede ajustar
el cinturón para el hombro correctamente para que
quede entre el hombro y el cuello del niño, Y en
o apenas por encima del hombro, intente instalarlo
en otro asiento o no use el asiento elevador.
¡ADVERTENCIA!
!
Pueden ocurrir LESIONES GRAVES
o la MUERTE.

141
ADVERTENCIAS ADICIONALES
• Si los conectores del anclaje inferior no se están utilizando, asegúrese de que estén bien guardados.
• NUNCA use este sistema de sujeción infantil si tiene de más de diez (10) años. La fecha de fabricación se encuentra en
una etiqueta adhesiva en la parte inferior del sistema de sujeción infantil.
• NUNCA use este sistema de sujeción infantil si alguna de las correas LATCH o del arnés tiene cortes, o si está
deshilachada o dañada de alguna manera.
• NUNCA use accesorios o partes con este sistema de sujeción infantil que no tengan la aprobación de CYBEX. El uso de
accesorios o partes de otros fabricantes podría alterar el rendimiento del sistema de sujeción infantil.
• REGISTRE el sistema de sujeción infantil con el fabricante. Esta es la forma más eficaz de comunicarse con usted en caso
de un retiro de productos del mercado.
• NO permita que los niños jueguen con el sistema de sujeción infantil.
• NO permita que los niños jueguen con los cinturones de seguridad del vehículo. Pueden crear un peligro de enredo para
cualquier niño que pueda alcanzar el cinturón de seguridad y puede envolverlo alrededor de su cuello.
• NO deje objetos sueltos (por ejemplo, comestibles, libros, bolsas) en un vehículo. En caso de una parada repentina, los
objetos sueltos seguirán en movimiento y podrían causar lesiones graves.
• NUNCA atienda las necesidades del niño al conducir. Detenga SIEMPRE el vehículo de manera segura para atender al
niño.
• NUNCA retire al niño del sistema de sujeción infantil mientras el vehículo está en movimiento. Los ocupantes que no
estén sujetos corren un riesgo mucho mayor de muerte o lesiones graves en un choque automovilístico.
• NO coloque ningún vaso que contenga líquidos calientes en el portavasos.
¡ADVERTENCIA!
!
Pueden ocurrir LESIONES GRAVES
o la MUERTE.
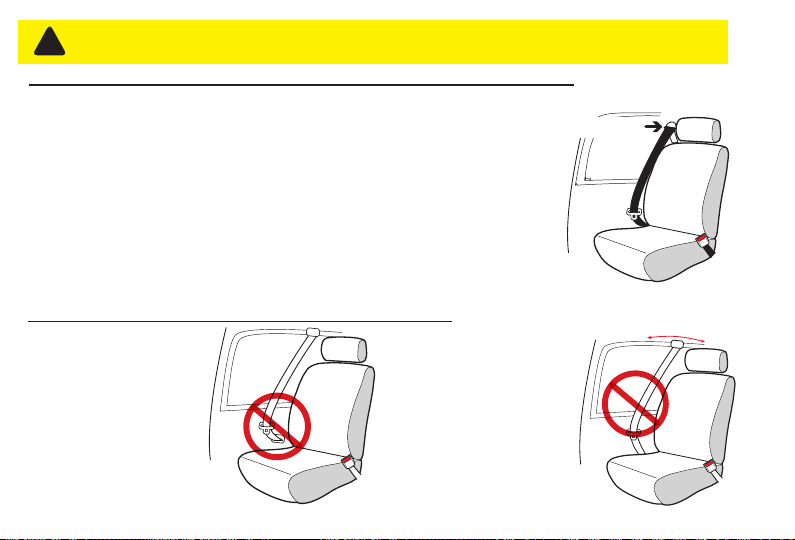
142
ADVERTENCIAS SOBRE LOS CINTURONES DE SEGURIDAD
• Lea SIEMPRE el manual del propietario del vehículo para determinar qué
cinturones de seguridad y retractores se usan en el vehículo. Si no es capaz de
asegurar una instalación segura, el cinturón del vehículo DEBE quedar bloqueado
y NO DEBE aflojarse después de apretar el cinturón de seguridad.
• NO use este sistema de sujeción infantil si se mueve más de 1 in (2.5 cm) de lado
a lado o de atrás hacia adelante en la trayectoria del cinturón en el sistema de
sujeción infantil, ya sea para uso ORIENTADO HACIA ATRÁS o HACIA ADELANTE.
La instalación incorrecta podría ocasionar lesiones graves o la muerte. Si no
puede asegurar firmemente el sistema de sujeción infantil, intente de nuevo o
muévalo a otro asiento del vehículo.
Retractor
• NO use este sistema
de sujeción infantil
en un vehículo que
tenga cinturones de
seguridad que se mueven
automáticamente a lo
largo de la estructura del
vehículo cuando se abre
la puerta.
• NO use este sistema de
sujeción infantil en un
asiento con cinturones de
seguridad montados en la
puerta.
¡ADVERTENCIA!
!
Pueden ocurrir LESIONES GRAVES
o la MUERTE.
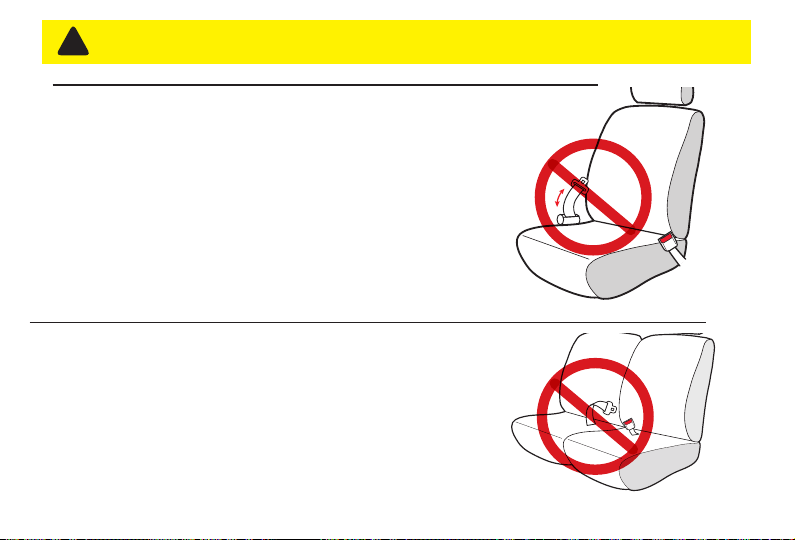
143
• NO use este sistema de sujeción infantil en vehículos equipados con
cinturones para regazo que solo se bloquean al frenar súbitamente o en
un choque (retractores de bloqueo de emergencia - ELR). Se debe usar
un asiento del vehículo que tenga un cinturón de seguridad con bloqueo.
Consulte el manual del propietario del vehículo para ver si su automóvil
tiene cinturones para regazo con retractores de bloqueo de emergencia.
ADVERTENCIAS SOBRE LOS CINTURONES DE SEGURIDAD
• NO lo use en los asientos del vehículo cuando ambas partes de los
cinturones del vehículo estén colocadas por delante del pliegue del
asiento.
¡ADVERTENCIA!
!
Pueden ocurrir LESIONES GRAVES
o la MUERTE.
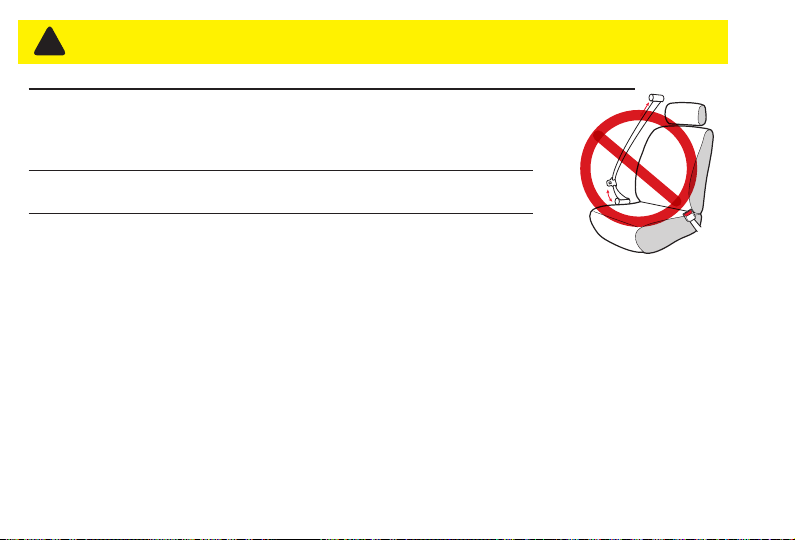
144
• NO lo use con cinturones para regazo y hombro con dos retractores. Si los cinturones de
seguridad del vehículo no se colocan y abrochan correctamente, es posible que el sistema
de sujeción infantil no proteja al niño en un choque.
• NO lo use con cinturones de seguridad inflables.
• Consulte el manual del propietario del vehículo para determinar cómo bloquear el
cinturón de seguridad para instalar el sistema de sujeción infantil.
• NO permita que el botón de liberación del cinturón de seguridad del vehículo toque el sistema de
sujeción infantil. El contacto accidental puede causar que se libere el cinturón de seguridad. Si es necesario, voltee el botón
de liberación del cinturón de seguridad en dirección opuesta al sistema de sujeción infantil o mueva el sistema de sujeción
infantil a otro asiento del vehículo.
• Si no se ajustan ceñidamente el arnés o los cinturones de seguridad del vehículo alrededor del niño, el niño se podría
golpear contra el interior del vehículo al frenar súbitamente o en un choque. Pueden ocurrir lesiones graves o la muerte.
• Los sistemas de sujeción infantil se deben afianzar bien con el cinturón de seguridad del vehículo, incluso cuando no esté
ocupado, ya que en un choque, un sistema de seguridad que no esté asegurado puede lesionar a otros ocupantes.
ADVERTENCIAS SOBRE LOS CINTURONES DE SEGURIDAD
¡ADVERTENCIA!
!
Pueden ocurrir LESIONES GRAVES
o la MUERTE.
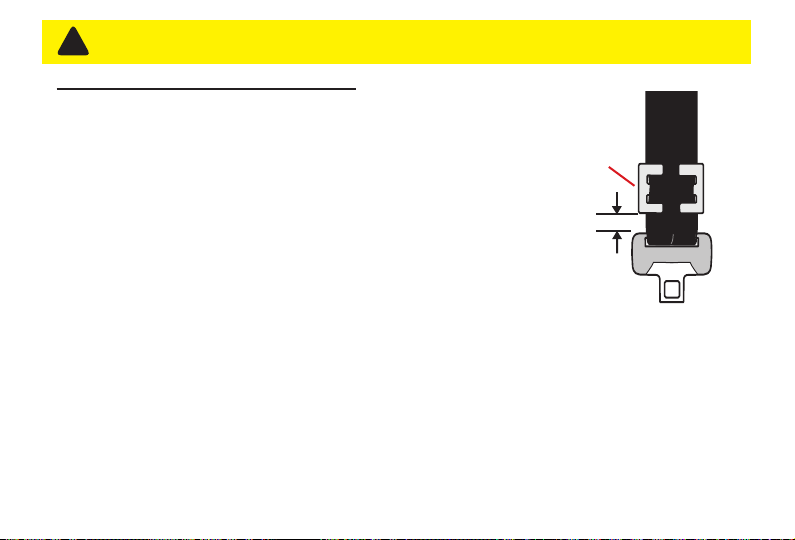
145
• Si el vehículo es un modelo anterior al año 1996, y tiene un cinturón para
regazo y hombro equipado con un retractor de bloqueo de emergencia
(ELR) Y una placa de sujeción deslizante, DEBE usar el clip de bloqueo.
Consulte el manual del propietario del vehículo para identificar el sistema
de cinturón que tiene el vehículo.
• Si el vehículo es un modelo del año 1996 o posterior, es probable que
cuente con un sistema de cinturón que se puede bloquear al apretarlo y no
requerirá el uso del clip de bloqueo. Consulte el manual del propietario
del vehículo antes de instalar el clip de bloqueo. Si el vehículo requiere
un clip de bloqueo, llame a ParentLink al 1-877-242-5676, para obtener el clip de bloqueo
y las instrucciones sobre cómo instalarlo y usarlo. Retire el clip de bloqueo del cinturón de
seguridad del vehículo cuando no lo use con el sistema de sujeción infantil; de lo contrario, el
cinturón de seguridad del vehículo no sujetará correctamente a un niño o adulto. Podrían ocurrir lesiones graves.
• Clip de
bloqueo
instalado
correctamente
• 0.5 in.
(13 mm)
USO DEL CLIP DE BLOQUEO:
¡ADVERTENCIA!
!
Pueden ocurrir LESIONES GRAVES
o la MUERTE.
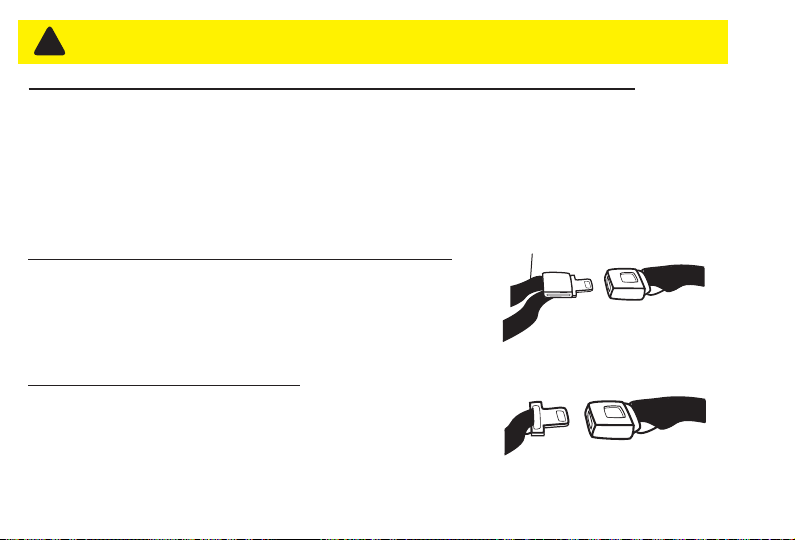
146
• Si tiene alguno de estos tipos de sistemas de cinturón de vehículo enumerados, estos son SEGUROS de usar para
instalar el sistema de sujeción infantil en el vehículo. Consulte el manual del propietario del vehículo para obtener
instrucciones específicas sobre la instalación del sistema de sujeción infantil. El sistema LATCH se puede usar EN LUGAR
DE estos tipos de cinturón de vehículo. Consulte los límites de peso para uso ORIENTADO HACIA ATRÁS y
ORIENTADO HACIA ADELANTE con el sistema LATCH en las páginas 155 y 157. Consulte el manual del propietario del
vehículo para obtener información sobre las ubicaciones del sistema LATCH.
Cinturón para regazo con retractor
de bloqueo automático (ALR)
• El retractor de bloqueo automático no permite que el cinturón para regazo se
alargue una vez abrochado. El cinturón del vehículo se aprieta introduciendo la
correa del cinturón en el retractor.
• Una vez abrochado, el cinturón del vehículo se aprieta jalando el extremo
libre de la correa hasta que el cinturón quede apretado.
Extremo libre
Cinturón para regazo con placa de sujeción de bloqueo
ADVERTENCIAS SOBRE LOS CINTURONES DE SEGURIDAD
¡ADVERTENCIA!
!
Pueden ocurrir LESIONES GRAVES
o la MUERTE.
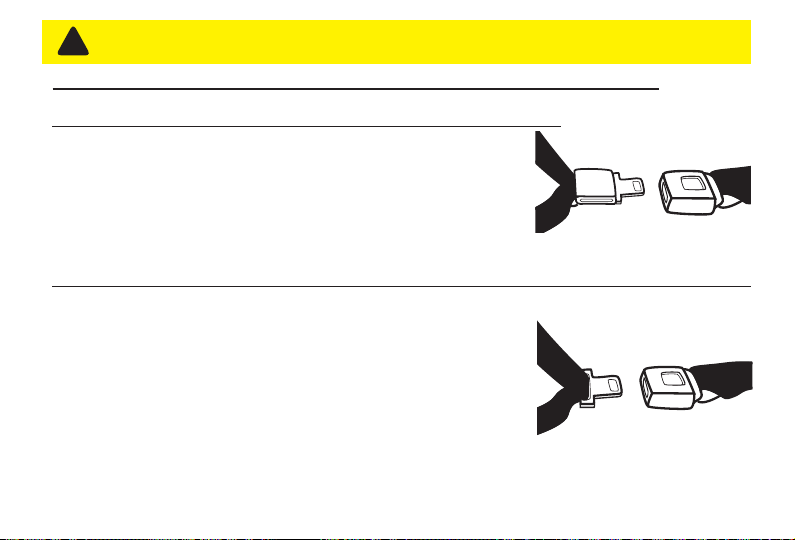
147
Cinturón para regazo y hombro con placa de sujeción de bloqueo
Cinturón para regazo y hombro con placa de sujeción deslizante con retractor de bloqueo
• La placa de sujeción se desliza libremente a lo largo del cinturón para regazo
y hombro. Los cinturones de vehículo con placas de sujeción deslizantes
normalmente se bloquean en el retractor del cinturón para hombro
abrochando el cinturón y jalando toda la correa lentamente para cambiar el
retractor.
• Consulte el manual del propietario del vehículo para obtener instrucciones
específicas. El cinturón del vehículo se aprieta después de cambiar el retractor
jalando hacia arriba el cinturón para el hombro y colocando la correa adicional
en el retractor.
• La parte para el regazo de este cinturón no se afloja una vez que el cinturón
queda abrochado.
• El cinturón del vehículo se aprieta jalando hacia arriba con fuerza el cinturón
para el hombro y colocando la correa adicional en el retractor.
ADVERTENCIAS SOBRE LOS CINTURONES DE SEGURIDAD
¡ADVERTENCIA!
!
Pueden ocurrir LESIONES GRAVES
o la MUERTE.
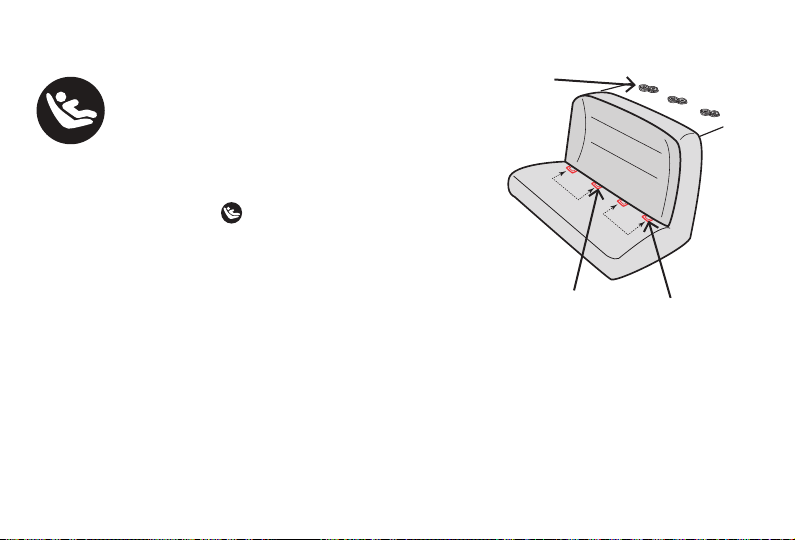
148
¿En qué consiste el sistema LATCH?
LATCH es el acrónimo de Universal Anchorage System
(Sistema de anclaje universal) y se refiere a un par de anclajes
inferiores fijos (o barras) y un anclaje de amarre superior que
están incorporados en su vehículo, en vehículos fabricados
después del 1 de septiembre de 2002.
Los anclajes LATCH inferiores están ubicados en el pliegue o unión entre el
respaldo y el cojín del asiento del vehículo y, si no son visibles, generalmente
están indicados por los símbolos .Los anclajes de la correa de sujeción
superior están ubicados en varios lugares detrás del asiento posterior del
vehículo.
El sistema LATCH generalmente ofrece una instalación más fácil y uniforme.
Sin embargo, este sistema de sujeción infantil se puede instalar de forma
segura usando tanto el sistema LATCH como los cinturones de seguridad y
cumple los requisitos de la norma Estándar Federal de Seguridad 213 para
Vehículos Automotores (FMVSS 213) con cualquiera de los dos métodos de
instalación. Cualquiera de los métodos es seguro para el niño cuando el sistema
se instala correctamente. Al usar cualquiera de los dos métodos, SIEMPRE use la correa de sujeción al instalarlo
ORIENTADO HACIA ADELANTE.
El sistema LATCH se incluye estándar en vehículos fabricados después del 1 de septiembre de 2002. Consulte el
Manual del propietario de su vehículo para obtener información sobre las posiciones inferiores de los anclajes LATCH.
USO DEL SISTEMA LATCH
Puntos de anclaje de la correa de
sujeción superior del vehículo
11 in.
(28 cm)
11 in.
(28 cm)
Anclajes
inferiores
del vehículo
Pliegue del
asiento del
vehículo

149
Asientos laterales
Use los anclajes inferiores LATCH O un cinturón de seguridad del vehículo para instalar el sistema de sujeción infantil en
los asientos exteriores (ubicados a cada lado de la posición central).
NUNCA utilice LATCH junto con los cinturones de seguridad del vehículo para instalar este sistema de sujeción infantil. El
uso de ambos no está aprobado y puede causar un rendimiento inadecuado del sistema de sujeción infantil.
Asientos centrales
Si el vehículo no tiene anclajes inferiores en el asiento central, consulte el manual del propietario del vehículo para ver si
puede usar los dos anclajes inferiores internos de los asientos exteriores para instalar un sistema de sujeción infantil.
CYBEX permite que este sistema de sujeción infantil se instale utilizando los dos anclajes inferiores interiores desde los
asientos exteriores si la distancia entre los anclajes inferiores interiores tiene
entre 11 y 20 in (28 a 51 cm) Y si el fabricante de su vehículo lo permite.
(Si la distancia no es correcta o el fabricante del vehículo no lo
permite, use el cinturón del vehículo para instalarlo en la posición central).
Cuando use los anclajes inferiores internos, asegúrese de que ningún
vástago de hebilla obstruya la instalación y de que los conectores
o correas LATCH no bloqueen las hebillas del cinturón del vehículo.
11 a 20 in
28 a 51 cm
USO DEL SISTEMA LATCH
150
• NO use los anclajes inferiores del sistema de anclaje del sistema de sujeción infantil (sistema LATCH) para acoplar
este sistema de sujeción infantil al sujetar a un niño que pesa más de 40 lb (18.1 kg) en la posición ORIENTADO
HACIA ADELANTE con el arnés interior O 35 lb (15.9 kg) en la posición ORIENTADO HACIA ATRÁS. USE SOLO LA
INSTALACIÓN CON EL CINTURÓN DEL VEHÍCULO.
• Además de estas instrucciones, lea y siga las instrucciones sobre la instalación del sistema de sujeción infantil y
del sistema LATCH que se incluyen en el manual del propietario del vehículo. Si existe una discrepancia, siga las
instrucciones descritas en el manual del propietario del vehículo.
• Use SOLO para asegurar el sistema de sujeción infantil a las barras de anclaje inferior del vehículo.
• NUNCA acople dos conectores de anclaje inferior a una misma barra de anclaje inferior del vehículo.
• NUNCA use los cinturones de seguridad del vehículo cuando use el ensamble de los conectores de anclaje inferior. Usar
ambos al mismo tiempo puede causar holgura al frenar súbitamente o en una colisión.
• Para evitar el estrangulamiento, usted debe almacenar adecuadamente las correas del sistema LATCH.
• Asegúrese SIEMPRE de que los conectores de anclaje inferior estén acoplados a las barras de anclaje inferior del
vehículo jalando con fuerza de los conectores de anclaje inferior. Si no está acoplado, el ensamblado del conector del
anclaje inferior no asegurará el sistema de sujeción infantil. Se pueden ocasionar lesiones graves o la muerte.
ADVERTENCIAS SOBRE EL SISTEMA LATCH
¡ADVERTENCIA!
!
Pueden ocurrir LESIONES
GRAVES o la MUERTE.
151
• NO use este sistema de sujeción infantil si se mueve más de 1 in (2.5 cm) de lado a lado o de atrás hacia adelante en la
trayectoria del cinturón en el sistema de sujeción infantil, ya sea para uso ORIENTADO HACIA ATRÁS o
HACIA ADELANTE. La instalación incorrecta podría ocasionar lesiones graves o la muerte. Si no puede asegurar
firmemente el sistema de sujeción infantil, intente de nuevo o muévalo a otro asiento del vehículo.
ADVERTENCIAS SOBRE EL SISTEMA LATCH
• Para evitar el peligro de estrangulación, DEBE guardar la correa de sujeción dentro del compartimiento de
almacenamiento de la correa de sujeción ubicado en la parte trasera del sistema de sujeción infantil. Acople el gancho
de la correa de sujeción al clip de almacenamiento cuando no lo use.
Esto evitará que el gancho o la correa de sujeción sin usar golpeen a alguien durante un choque.
• La correa de sujeción se usa SOLO en la posición ORIENTADO HACIA ADELANTE.
• Consulte el manual del propietario del vehículo para ubicar el anclaje de la correa de sujeción en el vehículo. Es posible
que los vehículos de modelos anteriores no estén equipados con anclajes para correa de sujeción. Consulte con el
concesionario de su vehículo.
ADVERTENCIAS DE LA CORREA DE SUJECIÓN
¡ADVERTENCIA!
!
Pueden ocurrir LESIONES
GRAVES o la MUERTE.
¡ADVERTENCIA!
!
Pueden ocurrir LESIONES
GRAVES o la MUERTE.
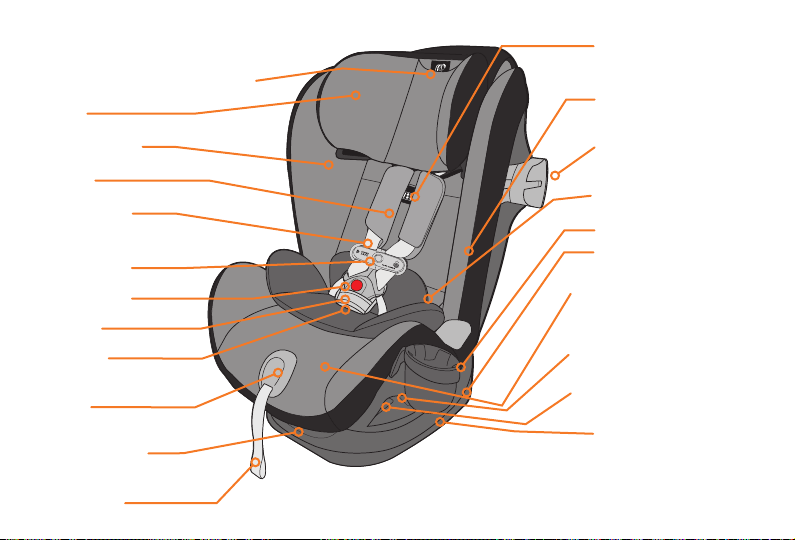
152
VISTA
DELANTERA
Hebilla del arnés
SensorSafe
Clip para el pecho
Correa de
ajuste del arnés
Botón de ajuste
del arnés
Acojinado de
la hebilla
Correa de la
entrepierna
Manija de ajuste de la
posición de reclinado
Cubierta del asiento
Cabecera
Hombreras
Correas del arnés
Inserto para bebé
Dispositivo L.S.P.
(completamente
extendido)
Soportes magnéticos para
lengüeta de hebilla
Indicador de la posición de
reclinado
Trayectoria del cinturón
(Cada lado) EN LA POSICIÓN
ORIENTADO HACIA ATRÁS
Bloqueo (En cada lado) EN LA
POSICIÓN ORIENTADO HACIA
ATRÁS
Indicador de nivel
Asa de ajuste de la altura
de la cabecera
Portavasos
1
2
4
3
6
5
A
R
M
P
I
T
L
E
V
E
L
1
2
4
3
6
5
Asa de la posición de
reclinado de la cabecera
Compartimiento de
almacenamiento del anclaje
inferior (debajo del acojinado)
DESCRIPCIÓN GENERAL DEL SISTEMA DE SUJECIÓN INFANTIL ETERNIS S
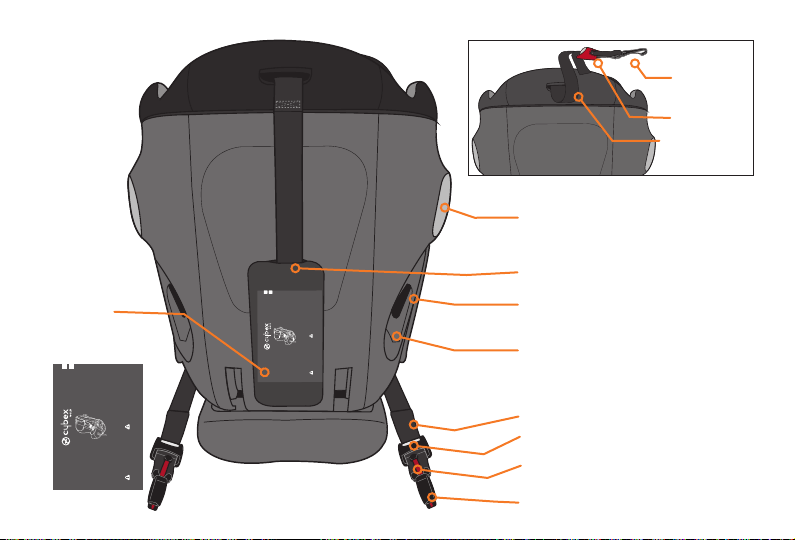
153
ETERNIS S
Owner‘s Manual - Keep for future use.
To reduce the risk of serio us injury or
death, read this own er’s manual prio r to
installing and u sing this child re straint.
Para reducir el ries go de lesiones grav es o
muerte, lea este man ual del usuario a ntes de
instalar y usar el a siento infanti l para el automóvi l.
Manual del Propie tario - Guarde pa ra uso futuro.
WARNING
ADVERTENCIA
EN
ES
1
2
4
3
6
A
R
M
P
I
T
L
E
V
E
L
VISTA
POSTERIOR
Dispositivo L.S.P. (almacenado)
Conector de anclaje inferior
Botón de ajuste del anclaje inferior
Correa de sujeción
(almacenada)
Bloqueo (En cada lado) EN LA POSICIÓN
ORIENTADO HACIA ADELANTE
Trayectoria del cinturón (En cada lado)
EN LA POSICIÓN ORIENTADO
HACIA ADELANTE
Manual del
usuario
(Guardado en
el interior del
compartimiento)
Correa de liberación del anclaje
inferior
Correa del anclaje inferior
Correa de
sujeción
(no almacenada)
Ajustador de
la correa de
sujeción
Gancho de
la correa de
sujeción
DESCRIPCIÓN GENERAL DEL SISTEMA DE SUJECIÓN INFANTIL ETERNIS S
ETERNIS S
Owner‘s Manual - Keep for future use.
To reduce the risk of serious injury or
death, read this owner’s manual prior to
installing and using this child restraint.
Para reducir el riesgo de lesiones graves o
muerte, lea este manual del usuario antes de
instalar y usar el asiento infantil para el automóvil.
Manual del Propietario - Guarde para uso futuro.
WARNING
ADVERTENCIA
ENES
1
2
4
3
6
A
R
M
P
I
T
L
E
V
E
L
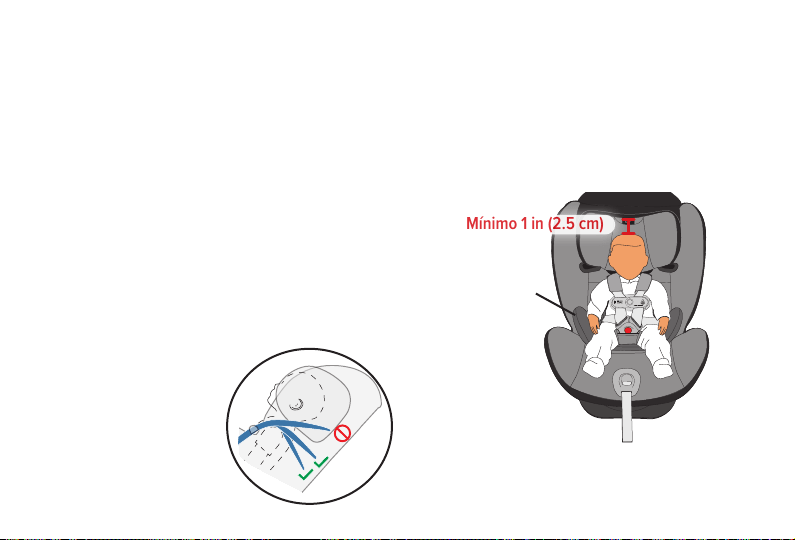
154
A
R
M
P
I
T
L
E
V
E
L
USO ORIENTADO HACIA ATRÁS:
SU NIÑO DEBE CUMPLIR LOS REQUISITOS INDICADOS:
PESO: 4 A 50 LB 1.8 A 22.6 KG
ALTURA: 17 A 48 IN 43.2 A 121.9 CM
LA CABEZA DEL NIÑO DEBE ESTAR 1 IN 2.5 CM O MÁS
DEBAJO DE LA CABECERA.
Las correas del arnés se deben ajustar de manera
que queden EN o
El uso ORIENTADO HACIA ATRÁS de este sistema de sujeción infantil es SOLO para niños que cumplen
TODOS los requisitos que se muestran aquí. Si el niño no está dentro de estos requisitos porque es demasiado
pequeño, seleccione un asiento infantil diferente (como un asientos de seguridad para automóvil
ORIENTADO HACIA ATRÁS).
Si el niño no cumple estos requisitos debido a que es demasiado grande, consulte las pautas para uso
ORIENTADO HACIA ADELANTE para determinar si puede usar este sistema de sujeción infantil.
MODO ORIENTADO HACIA ATRÁS:
Inserto
para bebé
USO OPCIONAL:
Inserto para bebé - Para garantizar un mejor
ajuste para los bebés más pequeños, es
posible que se necesite el inserto para bebé.
PAUTAS DE USO PARA EL NIÑO
APENAS POR DEBAJO
de los hombros del niño.
Mínimo 1 in (2.5 cm)
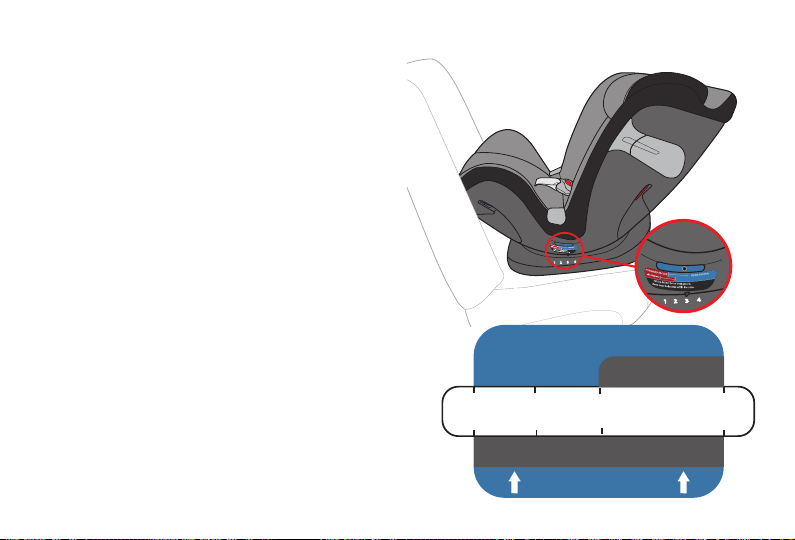
155
6
5
4
3
2
1
4
3
2
1
MODO ORIENTADO HACIA ATRÁS:
Cuando se usa ORIENTADO HACIA ATRÁS, sólo
utilice las posiciones de reclinación 1, 2, 3 y 4 como
se muestra.
NO use el sistema LATCH en modo
ORIENTADO HACIA ATRÁS si el niño pesa más
de 35 lb (15.9 kg).
PAUTAS DE USO PARA EL NIÑO
ORIENTADO HACIA ATRÁS
1 a 4
POSICIONES DE RECLINADO
(1.8 kg)
4 lb.
(22.6 kg)
50 lb.
SIN LATCH
(15.9 kg)
35 lb.
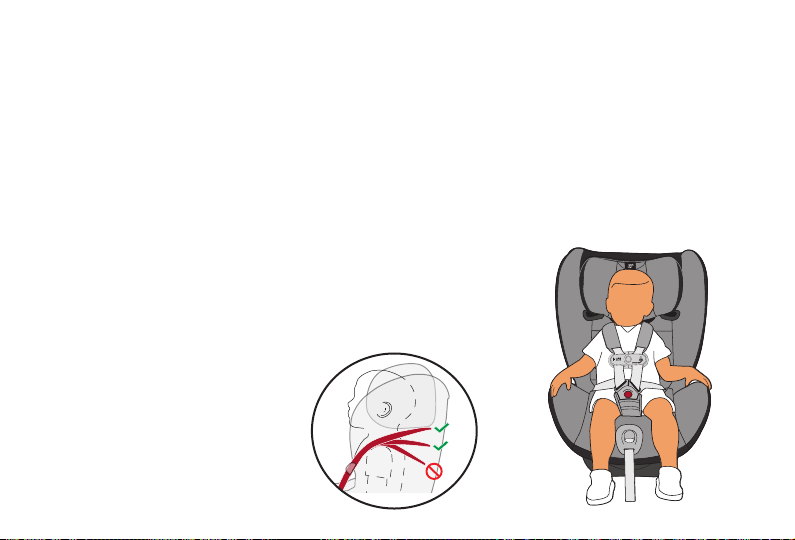
156
A
R
M
P
I
T
L
E
V
E
L
USO ORIENTADO HACIA ADELANTE:
SU NIÑO DEBE CUMPLIR LOS REQUISITOS INDICADOS:
PESO: 22 A 65 LB 10 A 29.4 KG
ALTURA: 28 A 49 IN 71.1 A 124.5 CM
• La parte superior de las orejas está debajo de la
parte superior de la cabecera.
• EDAD: por lo menos 1 año de edad
• Las correas del arnés se deben ajustar
de manera que queden EN o APENAS
POR ARRIBA de los hombros del niño.
El uso ORIENTADO HACIA ADELANTE de este sistema de sujeción infantil es SOLO para niños que
cumplen TODOS los requisitos que se muestran aquí. Si el niño no cumple estos requisitos debido a que es
demasiado grande, consulte las instrucciones sobre el modo de asiento elevador para ver si el niño es apropiado
para ese uso.
La Academia Estadounidense de Pediatría recomienda que los niños deben viajar ORIENTADOS HACIA ATRÁS
durante el mayor tiempo posible hasta que alcancen la altura y el peso máximo para el asiento.
Si el niño NO cumple estos requisitos debido a que es demasiado pequeño, consulte las pautas para uso
ORIENTADO HACIA ATRÁS para determinar si puede usar este sistema de sujeción infantil.
MODO ORIENTADO HACIA ADELANTE:
PAUTAS DE USO PARA EL NIÑO
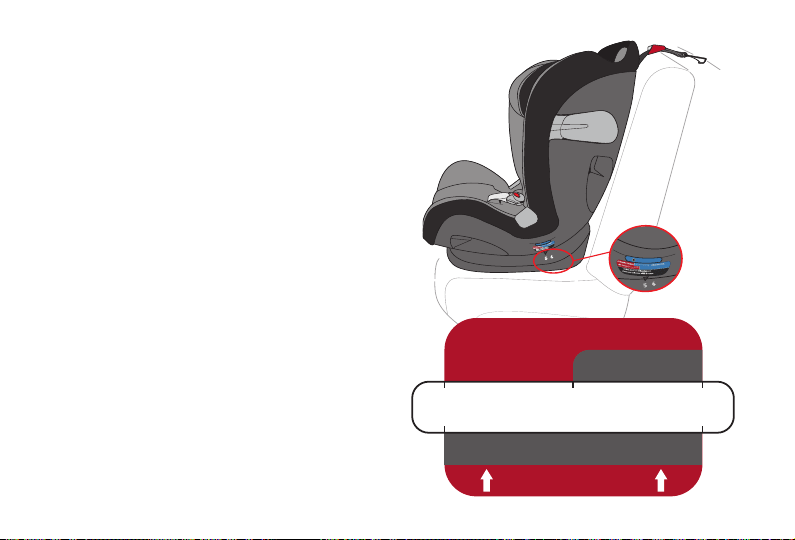
157
MODO ORIENTADO HACIA ADELANTE:
Cuando se usa ORIENTADO HACIA
ADELANTE, sólo utilice las posiciones de
reclinado 5 y 6 como se muestra.
NO use el sistema LATCH en modo
ORIENTADO HACIA ADELANTE si el niño pesa
más de 40 lb (18.1 kg).
6
5
4
3
2
1
6
5
PAUTAS DE USO PARA EL NIÑO
ORIENTADO HACIA ADELANTE
SIN LATCH
(10 kg)
22 lb.
(18.1 kg)
40 lb.
(29.4 kg)
65 lb.
5 y 6
POSICIONES DE RECLINADO

158
USO EN MODO DE ASIENTO ELEVADOR:
SU NIÑO DEBE CUMPLIR LOS REQUISITOS INDICADOS:
PESO: 40 A 120 LB 18.1 A 54.4 KG
ALTURA: 44 A 57 IN 111.8 A 144.8 CM
La parte superior de las orejas está por debajo de la parte
superior de la cabecera.
• EDAD: por lo menos 3 años de edad
• El cinturón de hombro DEBE pasar a través de la guía para el
cinturón de hombro y la guía del cinturón debe estar PAREJO o
APENAS POR ARRIBA de los hombros.
• El cinturón para el hombro DEBE pasar entre el hombro y el
cuello del niño.
• El cinturón para el regazo pase por la parte baja y quede ceñido de
un lado a otro de la cadera del niño, dentro de las guías del cinturón y
abrochado en la hebilla.
El uso en MODO DE ASIENTO ELEVADOR de este sistema de sujeción infantil es SOLO para niños que
cumplan con TODOS los requisitos que se muestran aquí. Si el niño no cumple estos requisitos debido a que es
demasiado grande, suspenda el uso de este asiento. Es posible que su niño esté listo para usar solamente el
sistema de cinturón del vehículo en este momento.
Si el niño NO cumple estos requisitos debido a que es demasiado pequeño, consulte las pautas para uso
ORIENTADO HACIA ATRÁS y ORIENTADO HACIA ADELANTE para determinar si puede usar este sistema de
sujeción infantil.
MODO DE ASIENTO ELEVADOR:
Guía del
cinturón
para el
hombro
PAUTAS DE USO PARA EL NIÑO
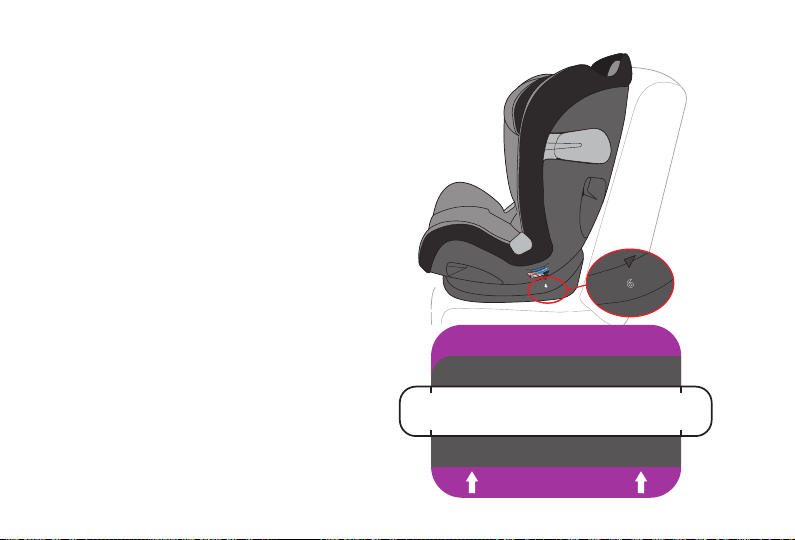
159
MODO DE ASIENTO ELEVADOR:
Cuando se usa SOLAMENTE EN MODO DE
ASIENTO ELEVADOR, utilice la posición de
reclinado 6 como se muestra.
El sistema LATCH se puede utilizar SOLAMENTE
EN MODO DE ASIENTO ELEVADOR para
asegurar el asiento elevador al asiento del vehículo.
El cinturón de seguridad para regazo y hombro del
vehículo se debe utilizar en modo de asiento elevador
cuando el niño está en el asiento elevador.
6
5
4
3
2
1
6
PAUTAS DE USO PARA EL NIÑO
MODO DE ASIENTO ELEVADOR sin ARNÉS
LATCH
(18.1 kg)
40 lb.
(54.4 kg)
120 lb.
6
POSICIÓN DE RECLINADO
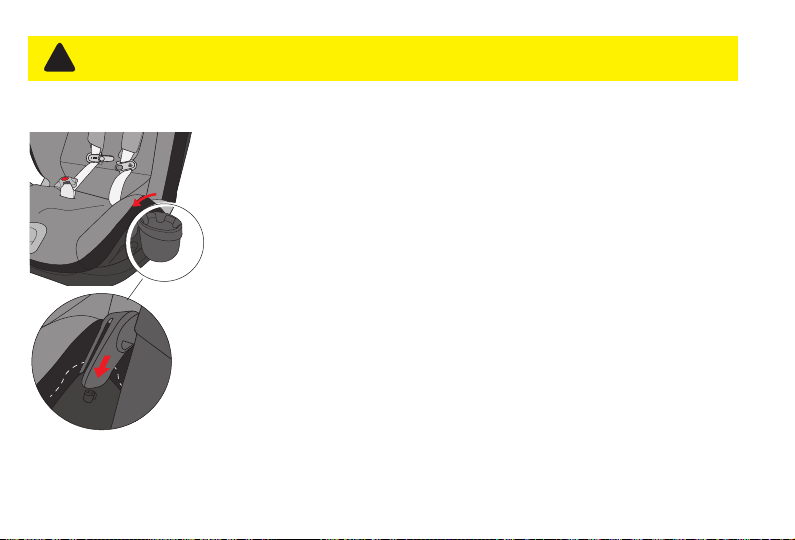
160
• Use SOLO los portavasos que se incluyen con el asiento original o que fueron
diseñados por CYBEX específicamente para el asiento.
• NO use el portavasos para colocar líquidos calientes (por ejemplo, café), ni
siquiera en recipientes cerrados o con tapa. Colocar líquidos calientes en el
portavasos podría ocasionar derrames y quemaduras a usted o al niño.
• NUNCA coloque objetos afilados o puntiagudos en el portavasos. En un choque,
estos objetos podrían golpearlo a usted o al niño y causar lesiones graves.
• Use SOLO recipientes que se ajusten firmemente hasta el fondo del portavasos.
No se deben detener a medio camino al colocar recipientes en el portavasos.
• Use SOLO recipientes con una capacidad de 12 oz/355ml o menos.
• NUNCA use contenedores que estén hechos de materiales frágiles (por ejemplo,
vidrio). Esto podría ocasionar lesiones en caso de un choque.
• NUNCA deje recipientes abiertos en el portavasos durante el viaje. Existe el
riesgo de derrames, por ejemplo, al frenar, lo que puede dañar los componentes
eléctricos del vehículo o la tapicería del asiento.
• Retire SIEMPRE los recipientes antes de retirar el portavasos del asiento.
• Retire SIEMPRE los recipientes del portavasos antes de reclinar el asiento.
Existe el riesgo de derrames, lo que puede dañar los componentes eléctricos del
vehículo o la tapicería del asiento.
PORTAVASOS
6
5
4
3
2
1
Deslice el portavasos en cualquiera
de los lados del sistema de sujeción
infantil donde lo indique el icono de
portavasos.
6
5
4
3
2
1
CARACTERÍSTICAS DEL SISTEMA DE SUJECIÓN INFANTIL
¡ADVERTENCIA!
!
Pueden ocurrir LESIONES GRAVES
o la MUERTE.
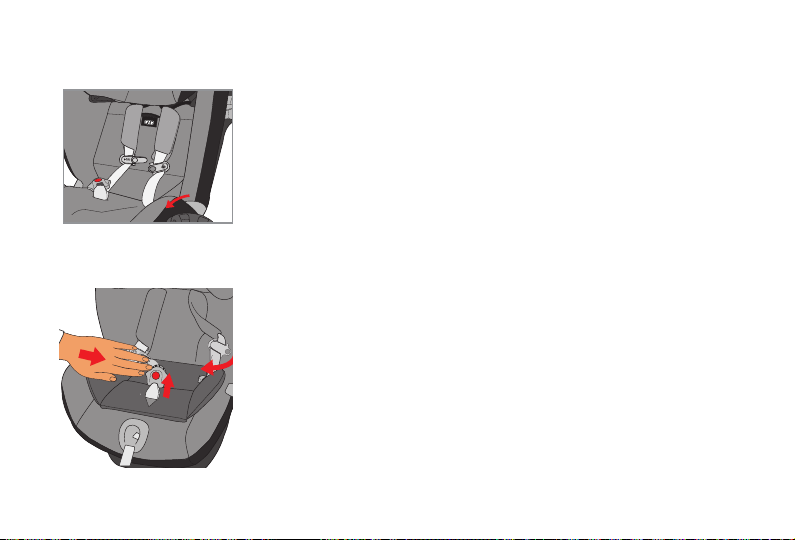
161
CUBIERTAS DEL ARNÉS
INSERTO PARA BEBÉ (SOLAMENTE ORIENTADO HACIA ATRÁS)
• Para garantizar un mejor ajuste para los bebés más pequeños, es posible que se
necesite el inserto para recién nacido. NO use cualquier otro inserto o almohada
para bebés. Utilice únicamente el que le proporcionado por CYBEX para este
sistema de sujeción infantil.
• Jale la hebilla del arnés a través de la ranura en la parte inferior del inserto para
recién nacido.
• Jale ambas correas del arnés sobre los paneles laterales del inserto para recién
nacido.
• Empuje el inserto para recién nacido firmemente en el sistema de sujeción infantil
para asegurarse de que esté colocado correctamente.
• Al cambiar la posición de la cabecera, asegúrese de que la parte inferior de la
solapa de la cabecera esté detrás de la solapa del inserto para bebé.
6
5
4
3
2
1
Instale las cubiertas del arnés más arriba del clip para el pecho. Las cubiertas del
arnés son opcionales para mayor comodidad. Envuelva las cubiertas del arnés
alrededor de las correas del arnés y abroche los broches.
Asegúrese SIEMPRE de que las cubiertas del arnés NO se amontonen al apretar
el arnés.
CARACTERÍSTICAS DEL SISTEMA DE SUJECIÓN INFANTIL
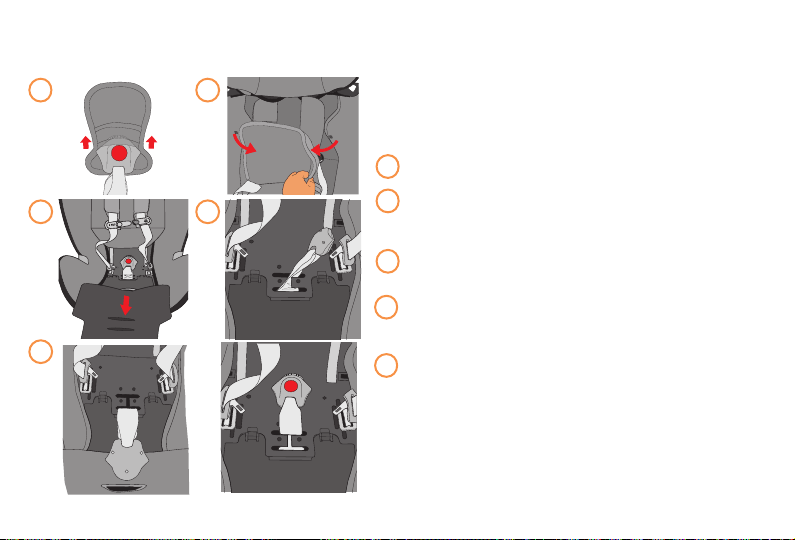
162
CORREA DE LA ENTREPIERNA
L
E
V
E
L
Al crecer el niño, será necesario cambiar la posición
de la correa para la entrepierna para que quede
en la ranura más cercana al niño. La correa para la
entrepierna debe estar SIEMPRE lo más cerca posible,
pero NUNCA debajo de la parte posterior del niño.
Retire el acojinado de la hebilla.
Desabroche los broches de la cubierta del asiento
detrás del acojinado de la cabecera y levante la
cubierta.
Jale la cubierta del asiento hacia adelante. Deslice la
hebilla del arnés por la abertura del acojinado.
Sostenga la parte inferior de la correa de la
entrepierna y gírela para alinearla con la ranura
longitudinal.
Coloque en la posición de la ranura delantera
O
en la posición de la ranura trasera basada en el
tamaño de su niño.
Vuelva a girar la correa a su posición original.
Vuelva a acoplar la cubierta del asiento y el acojinado
de la hebilla.
2
3 4
5
1
2
3
4
5
1
O
CARACTERÍSTICAS DEL SISTEMA DE SUJECIÓN INFANTIL
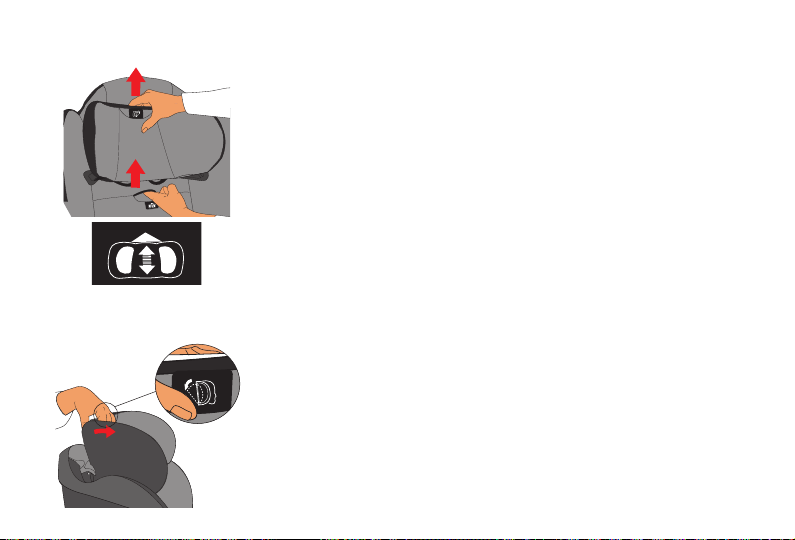
163
La cabecera reclinable de 3 posiciones ayuda a evitar que la cabeza del niño se
caiga hacia adelante en caso de que se duerma durante el viaje. No funciona
en todas las posiciones de la altura de la cabecera ajustable mencionadas
anteriormente.
Posición ajustable de altura de 1 a 3 - NO HAY RECLINACIÓN DISPONIBLE
Posición ajustable de altura 4 - RECLINACIÓN en 1 y 2 disponible
Posición ajustable de altura 5 a 12 - RECLINACIÓN en 1, 2 y 3 disponible
Para reclinar la cabecera en una de las tres posiciones de reclinado, apriete
en el botón situado en la parte superior de la cabecera y ajuste a la posición
deseada.
CABECERA CON ALTURA AJUSTABLE
El asiento tiene una cabecera que ajusta automáticamente la altura del arnés sin
necesidad de reinsertar las correas. La cabecera puede ajustarse hacia arriba y
hacia abajo y bloquearse en una de las doce posiciones.
Levante la palanca situada en la ranura cerca de la etiqueta de ajuste de la altura.
Para uso
ORIENTADO HACIA ATRÁS
, ajuste la cabecera de manera que las correas
del arnés estén EN o APENAS POR DEBAJO de los hombros del niño.
Para uso ORIENTADO HACIA ADELANTE, ajuste la cabecera de manera que las
correas del arnés estén EN o APENAS POR ARRIBA de los hombros del niño.
NOTA: compruebe con frecuencia que la altura del arnés sea la apropiada según va creciendo
el niño.
Etiqueta de ajuste de la altura
CARACTERÍSTICAS DEL SISTEMA DE SUJECIÓN INFANTIL
CABECERA RECLINABLE

164
L.S.P.
El sistema de protección lineal contra impactos laterales
(L.S.P.) está integrado en el sistema Eternis S. Este
sistema mejora la seguridad del niño en caso de que se
produzca un choque lateral. Para lograr el mejor efecto
de protección posible, extienda el sistema L.S.P. tanto
como sea posible hacia la puerta del automóvil más
cercana al sistema de sujeción infantil.
USE SIEMPRE el dispositivo L.S.P. cuando el sistema de
sujeción infantil se instale en un asiento lateral.
USE SIEMPRE un dispositivo L.S.P. en el lado del
sistema de sujeción infantil inmediatamente adyacente
a una puerta o panel del vehículo.
NUNCA USE el dispositivo L.S.P. cuando el sistema de
sujeción infantil esté colocado en el asiento trasero
central.
NUNCA extienda el dispositivo L.S.P. hacia un pasajero
u otro sistema de sujeción infantil.
NUNCA levante ni transporte el sistema de sujeción
infantil usando los dispositivos L.S.P. (sistema de
protección lineal contra impactos laterales).
USO DE LA PROTECCIÓN LINEAL CONTRA IMPACTOS LATERALES (L.S.P)
CARACTERÍSTICAS DEL SISTEMA DE SUJECIÓN INFANTIL
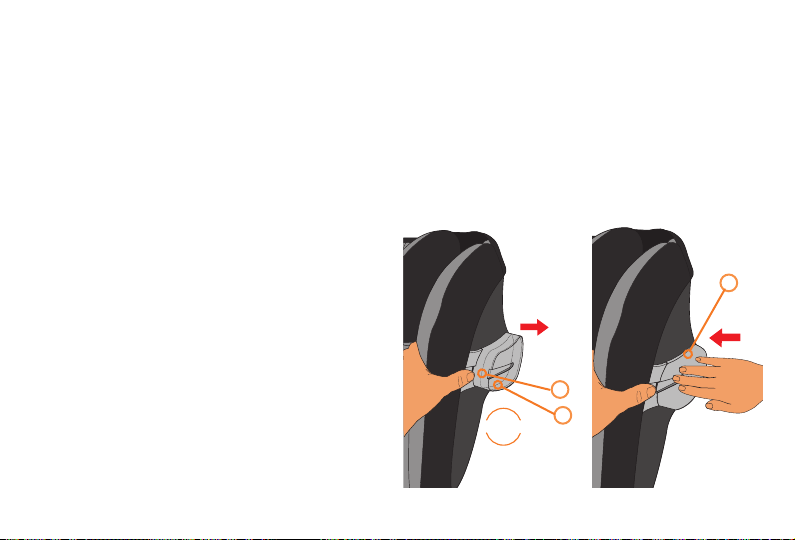
165
El sistema de protección lineal contra impactos
laterales (L.S.P.) puede extenderse completamente al
presionar el botón(es) L.S.P.
Hay un total de tres tipos de
configuraciones L.S.P.
1. Posición de almacenamiento
2. Extendido hasta la mitad
3. Extendido completamente
Para empujar el sistema L.S.P. a la segunda posición
una vez que esté completamente extendido,
presione el botón L.S.P. y empuje el L.S.P. en la
estructura hasta la mitad, luego suelte el botón L.S.P.
Al presionar el botón L.S.P. de nuevo y presionando
el L.S.P. hasta que esté completamente dentro
de la estructura, el L.S.P. volverá a la posición de
almacenamiento.
1
2
3
ACTIVACIÓN DEL SISTEMA L.S.P.
CARACTERÍSTICAS DEL SISTEMA DE SUJECIÓN INFANTIL
¡CLIC!

166
Ajuste la cabecera a la posición más alta y
desabroche el clip para el pecho y el arnés.
Desabroche los broches de la cubierta del asiento
y empuje la hebilla de la entrepierna para exponer
el compartimiento de almacenamiento del anclaje
inferior.
Empuje las lengüetas hacia adentro como se
muestra y
abra el compartimiento de almacenamiento para
acceder a la correa del anclaje inferior.
1
CORREA DEL ANCLAJE INFERIOR
2
1
2
CÓMO RETIRAR LA CORREA DE
ANCLAJE INFERIOR
Para guardar la correa, retírela de la trayectoria del
cinturón, afloje los broches de presión del acojinado
del asiento, abra el compartimiento de almace-
namiento y coloque la correa del conector inferior
en el compartimento. Vuelva a montar el acojinado
del asiento.
Cuando se utiliza la instalación del cinturón de
seguridad del vehículo, usted siempre DEBE
almacenar la correa del conector inferior en el
compartimiento de almacenamiento.
CARACTERÍSTICAS DEL SISTEMA DE SUJECIÓN INFANTIL
CÓMO ALMACENAR LA CORREA DE
ANCLAJE INFERIOR
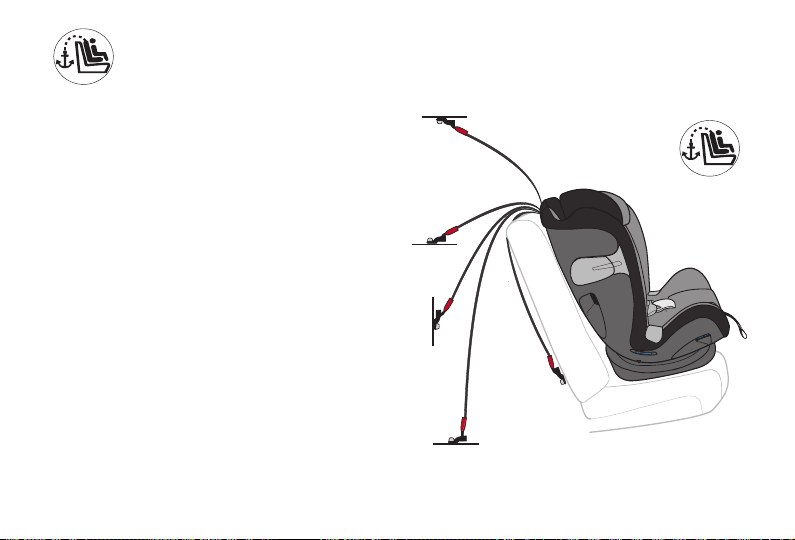
167
Repisa trasera
Pared trasera
Respaldo
del asiento
del vehículo
Piso del vehículo
Techo del vehículo
6
5
4
3
2
1
¿QUÉ ES UNA CORREA DE
SUJECION?
Una correa de sujeción reduce el movimiento
de un sistema de sujeción infantil ORIENTADO
HACIA ADELANTE en un choque y ayuda a
lograr una instalación ajustada. La ubicación
del anclaje de la correa de sujeción varía de un
vehículo a otro.
Aquí se muestran algunas de las ubicaciones
típicas. Consulte el manual del propietario del
vehículo para obtener información sobre las
ubicaciones exactas, la identificación del anclaje
y los requisitos.
Vea la instalación y el almacenamiento de la
correa de sujeción en la sección de instalación
apropiada ORIENTADO HACIA ADELANTE para
su sistema de sujeción infantil.
BUSQUE EL SÍMBOLO DEL
ANCLAJE DE LA CORREA
DE SUJECIÓN.
CORREA DE SUJECIÓN
CARACTERÍSTICAS DEL SISTEMA DE SUJECIÓN INFANTIL
168
APLICACIÓN SENSORSAFE
®
Este asiento funciona con la aplicación SensorSafe, que se puede descargar de:
App Store® o Google Play™.*
La aplicación SensorSafe puede proporcionar la siguiente información directamente a su
teléfono inteligente:
• Recordatorio de que el niño aún está en el automóvil
• La temperatura actual en el interior del automóvil
• Manuales del usuario
• Videos de instalación
• Información de contacto para atención al cliente
Tecnología SensorSafe
®
¿Preguntas? ¿Comentarios?:
Visítenos en: http://cybex-online.com/us/contact.html
O llame a CYBEX al: 1-877-242-5676
*Las marcas comerciales son propiedad de sus respectivos dueños.
NUNCA instale ni use este sistema de sujeción infantil hasta que lea y comprenda las
instrucciones en este manual y en el manual del propietario del vehículo. Si la información de
los dos manuales no concuerda, se debe seguir el manual del propietario del vehículo.
¡ADVERTENCIA!
!
Pueden ocurrir LESIONES GRAVES
o la MUERTE.

169
NOTAS
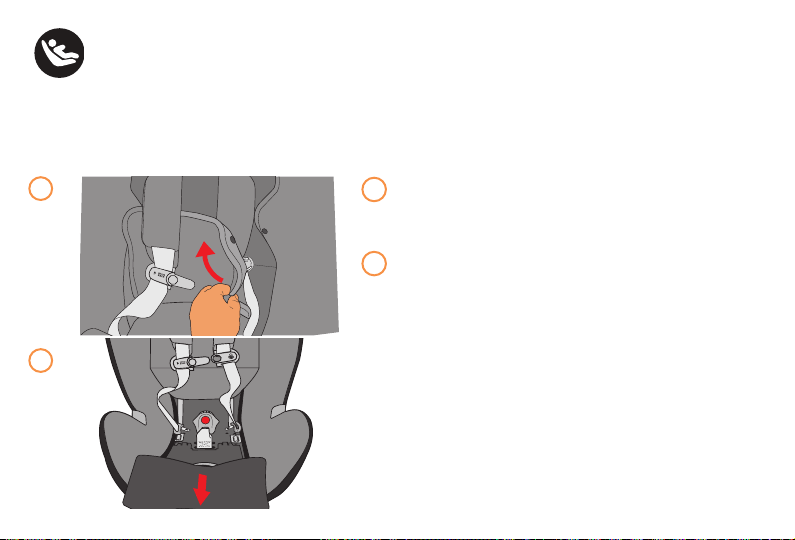
170
INSTALACIÓN DEL SISTEMA DE SUJECIÓN INFANTIL ORIENTADO HACIA ATRÁS
CON LOS CONECTORES DE ANCLAJE INFERIOR
Su sistema de sujeción infantil viene con la correa de anclaje inferior almacenada en el compartimiento de
almacenamiento del anclaje inferior. Antes de instalar el sistema de sujeción infantil, retire la correa de anclaje
inferior del compartimiento de almacenamiento.
1
2
Ajuste la cabecera a la posición más alta y
desabroche el clip para el pecho y el arnés.
Desabroche los broches de la cubierta del asiento
y empuje la hebilla de la entrepierna a través del
acojinado para exponer el compartimiento de
almacenamiento del anclaje inferior.
L
E
V
E
L
1
2
NO instale usando este método con niños que pesan más de 35 lb (15.9 kg).
SIEMPRE guarde la correa de sujeción cuando use el sistema de sujeción infantil
ORIENTADO HACIA ATRÁS. (pág. 199)
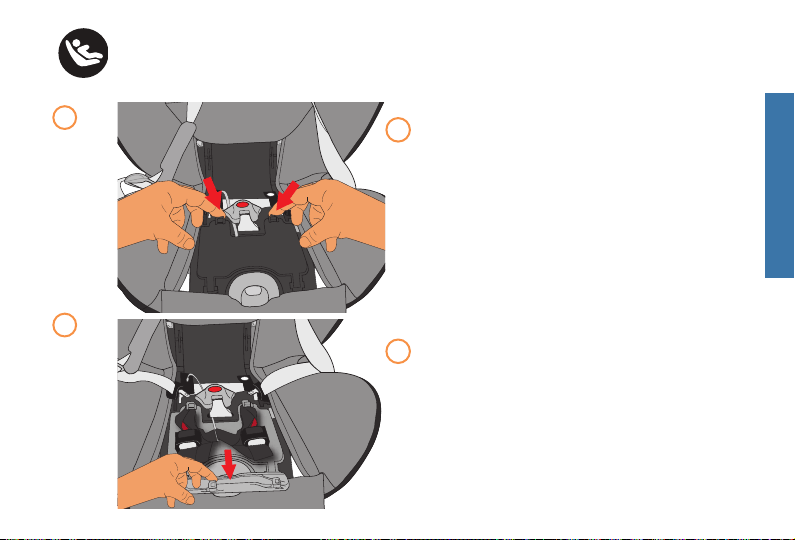
171
Introduzca las lengüetas en la puerta de
almacenamiento como se muestra.
Abra el compartimento de almacenamiento del
anclaje inferior y tire de la correa.
3
4
INSTALACIÓN DEL SISTEMA DE SUJECIÓN INFANTIL ORIENTADO HACIA ATRÁS
CON LOS CONECTORES DE ANCLAJE INFERIOR
3
4
ORIENTADO HACIA ATRÁS

172
5
6
Pase la correa de anclaje inferior a través de las
trayectorias del cinturón marcados con ORIENTADO
HACIA ATRÁS.
VERIFIQUE que la correa quede plana a través del
compartimiento de almacenamiento en frente de la
correa de la hebilla.
VERIFIQUE para asegurarse de que la correa no
esté torcida en la
correa de retención
de plástico.
5
6
INSTALACIÓN DEL SISTEMA DE SUJECIÓN INFANTIL ORIENTADO HACIA ATRÁS
CON LOS CONECTORES DE ANCLAJE INFERIOR

173
Vuelva a colocar el acojinado del asiento como se
muestra.
Alargue la correa entre los conectores utilizando los
botones de ajuste del anclaje inferior situados junto
a los conectores. Presione hacia abajo el botón de
liberación del ajustador mientras alarga la correa.
7
8
INSTALACIÓN DEL SISTEMA DE SUJECIÓN INFANTIL ORIENTADO HACIA ATRÁS
CON LOS CONECTORES DE ANCLAJE INFERIOR
7
8
ORIENTADO HACIA ATRÁS
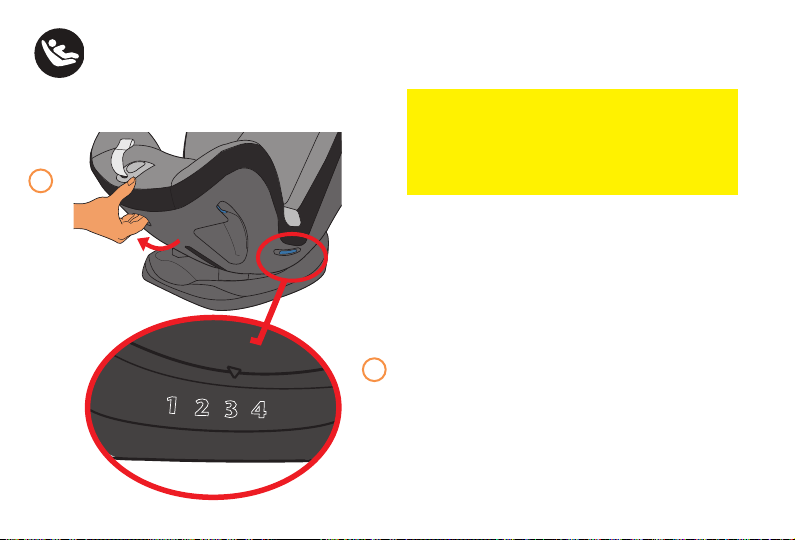
174
9
Si no se reclina correctamente el sistema de sujeción
infantil, se podría aumentar el riesgo de que el
niño sufra lesiones graves o la muerte. Los bebés
pueden tener dificultad para respirar cuando están
sentados en posición erguida. Asegúrese de que el
bebé se recline lo suficiente para mantener la cabeza
descansando hacia atrás cómodamente y de manera
segura.
Apriete el asa de la posición de reclinado y ajuste la
inclinación del asiento a las posiciones ORIENTADO
HACIA ATRÁS 1, 2, 3 o 4 SOLAMENTE.
1
2
3
4
9
INSTALACIÓN DEL SISTEMA DE SUJECIÓN INFANTIL ORIENTADO HACIA ATRÁS
CON LOS CONECTORES DE ANCLAJE INFERIOR
¡ADVERTENCIA!
Pueden ocurrir LESIONES
GRAVES o la MUERTE
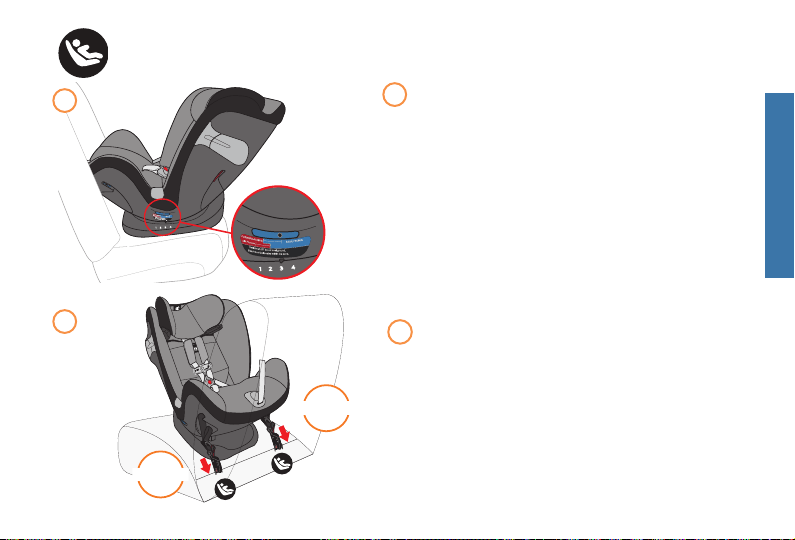
175
6
5
4
3
2
1
4
3
2
1
ASEGÚRESE de que el vehículo esté sobre terreno
nivelado antes de instalar el sistema de sujeción
infantil.
Coloque el sistema de sujeción infantil
ORIENTADO HACIA ATRÁS en una ubicación
del asiento del vehículo aprobado para LATCH.
Asegúrese siempre de que la parte inferior quede
plana en el asiento del vehículo.
ASEGÚRESE de que el asiento está colocado de tal
manera que la burbuja de nivel está en la zona azul
para el uso en la posición
ORIENTADO HACIA ATRÁS.
10
10
INSTALACIÓN DEL SISTEMA DE SUJECIÓN INFANTIL ORIENTADO HACIA ATRÁS
CON LOS CONECTORES DE ANCLAJE INFERIOR
Ubique las barras de anclaje inferior en su vehículo.
Conecte ambos conectores de anclaje inferior a las
barras de anclaje inferiores del vehículo hasta que
encajen en los anclajes con un clic audible.
Para la extensión del sistema L.S.P., vea la pág.
164-165.
1
2
3
4
5
6
CLICK!
11
11
CLICK!
ORIENTADO HACIA ATRÁS
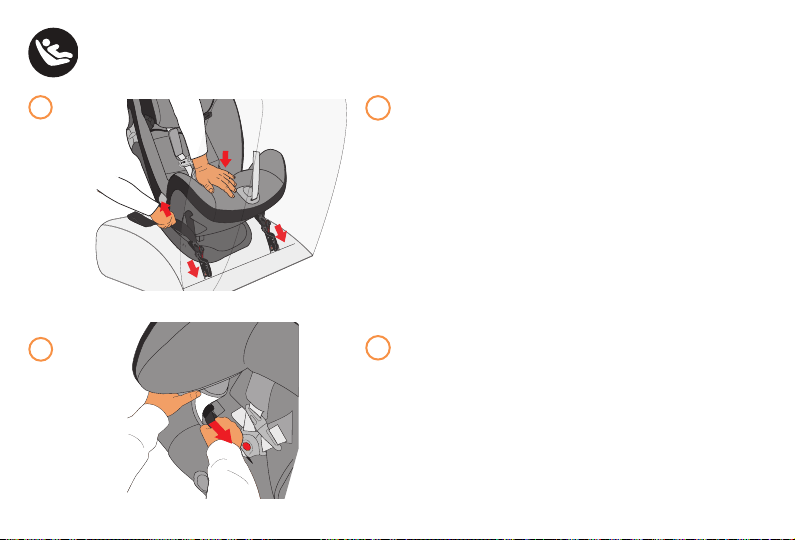
176
1
2
3
4
5
6
NOTA: para apretar aún más, tire del extremo de
cada correa de anclaje inferior hasta llegar a la
trayectoria del cinturón en la posición ORIENTADO
HACIA ATRÁS en el interior del sistema de sujeción
infantil.
12
13
13
INSTALACIÓN DEL SISTEMA DE SUJECIÓN INFANTIL ORIENTADO HACIA ATRÁS
CON LOS CONECTORES DE ANCLAJE INFERIOR
Mientras empuja hacia abajo el sistema de sujeción
infantil, hale hacia arriba en el extremo de la correa
de anclaje inferior hasta que la correa está apretada
usando el ajustador en cualquiera de los dos lados
del sistema de sujeción infantil.
12
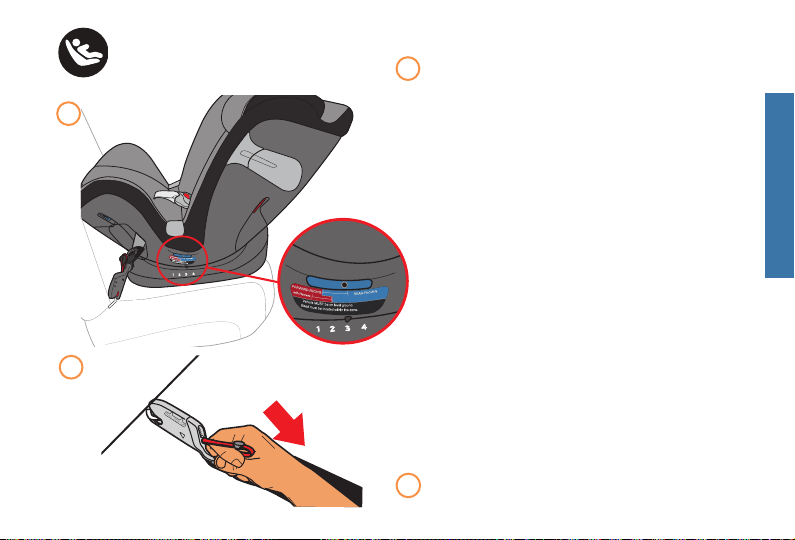
177
INSTALACIÓN DEL SISTEMA DE SUJECIÓN INFANTIL ORIENTADO HACIA ATRÁS
CON LOS CONECTORES DE ANCLAJE INFERIOR
14
6
5
4
3
2
1
4
3
2
1
VUELVA A VERIFICAR el indicador de nivel, la burbuja de nivel
debe estar entre la zona azul para la posición ORIENTADO
HACIA ATRÁS.
NOTA: en algunos vehículos, para la posición más reclinada,
podría ser necesario colocar una toalla o cobertor pequeño
enrollado debajo del borde frontal del sistema de sujeción
infantil para proporcionar suficiente reclinado de manera que
la burbuja de nivel esté en la zona azul para uso ORIENTADO
HACIA ATRÁS.
COMPRUEBE SU TRABAJO
Sostenga el sistema de sujeción infantil a cada lado cerca
de las trayectorias del cinturón en la posición ORIENTADO
HACIA ATRÁS y hale de lado a lado y hacia adelante. El
sistema de sujeción infantil no debe moverse más de 1 in
(2.5 cm) del respaldo del asiento del vehículo ni de lado a
lado.
Asegúrese de que el sistema de sujeción infantil esté
nivelado para el uso ORIENTADO HACIA ATRÁS. Asegúrese
de que la cabeza del niño no caiga hacia adelante. Si es
necesario, afloje la correa del anclaje inferior, vuelva a ajustar
la posición de reclinado y repita los pasos de instalación
para asegurarse de que el sistema de sujeción infantil esté
instalado correctamente.
Para retirar el conector de anclaje inferior, tire de la correa de
liberación roja a ambos lados del asiento como se muestra.
14
15
15
ORIENTADO HACIA ATRÁS
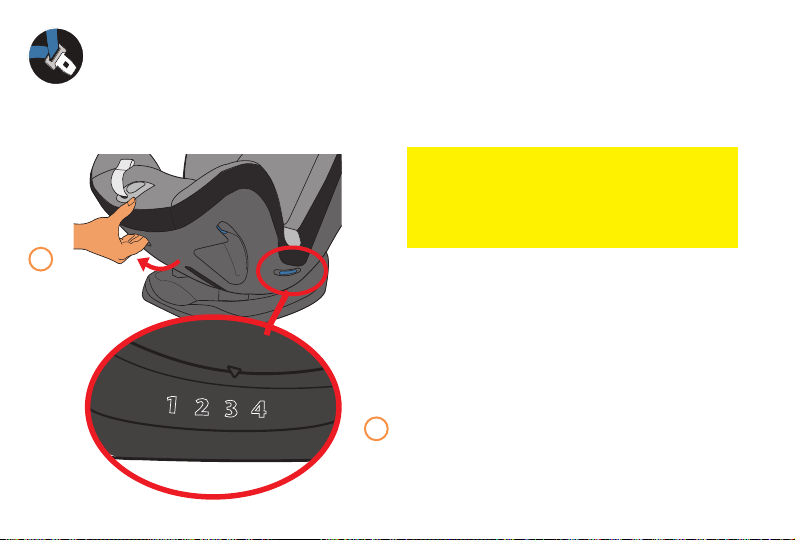
178
1
Si no se reclina correctamente el sistema de sujeción
infantil, se podría aumentar el riesgo de que el
niño sufra lesiones graves o la muerte. Los bebés
pueden tener dificultad para respirar cuando están
sentados en posición erguida. Asegúrese de que el
bebé se recline lo suficiente para mantener la cabeza
descansando hacia atrás cómodamente y de manera
segura.
Apriete el asa de la posición de reclinado y ajuste la
inclinación del asiento a las posiciones
ORIENTADO HACIA ATRÁS 1, 2, 3 o 4 SOLAMENTE.
1
2
3
4
1
INSTALACIÓN DEL SISTEMA DE SUJECIÓN INFANTIL ORIENTADO HACIA ATRÁS
CON EL CINTURÓN PARA REGAZO Y HOMBRO
ANTES de instalar el sistema de sujeción infantil con el cinturón para regazo y hombro, usted DEBE
guardar la correa de anclaje inferior en el compartimiento de almacenamiento del anclaje inferior, vea
la página 166.
SIEMPRE guarde la correa de sujeción cuando use el sistema de sujeción infantil ORIENTADO HACIA
ATRÁS, vea la página 187.
¡ADVERTENCIA!
Pueden ocurrir LESIONES
GRAVES o la MUERTE
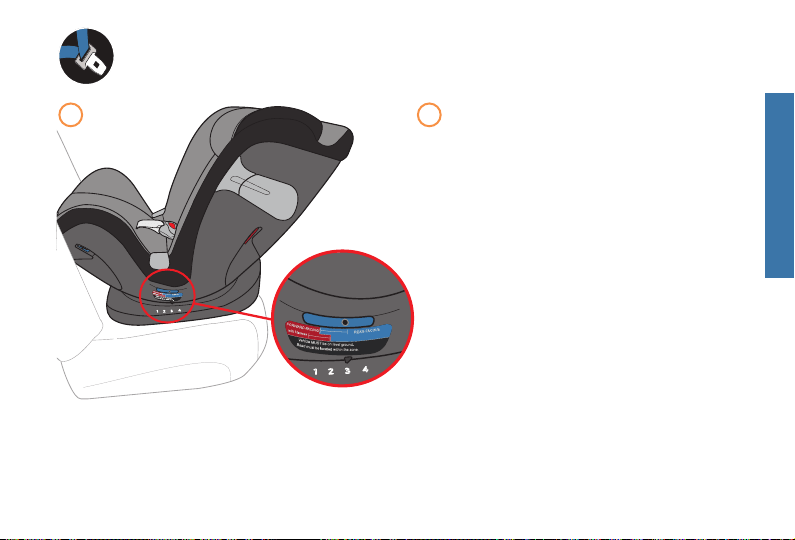
179
6
5
4
3
2
1
4
3
2
1
ASEGÚRESE de que el vehículo esté sobre
terreno nivelado antes de instalar el sistema de
sujeción infantil.
Coloque el sistema de sujeción infantil
ORIENTADO HACIA ATRÁS en una ubicación
del asiento del vehículo aprobado.
Asegúrese siempre de que la parte inferior
quede plana en el asiento del vehículo.
ASEGÚRESE de que el asiento está colocado
de tal manera que la burbuja de nivel está
en la zona azul para el uso en la posición
ORIENTADO HACIA ATRÁS.
2 2
INSTALACIÓN DEL SISTEMA DE SUJECIÓN INFANTIL ORIENTADO HACIA ATRÁS
CON EL CINTURÓN PARA REGAZO Y HOMBRO
ORIENTADO HACIA ATRÁS
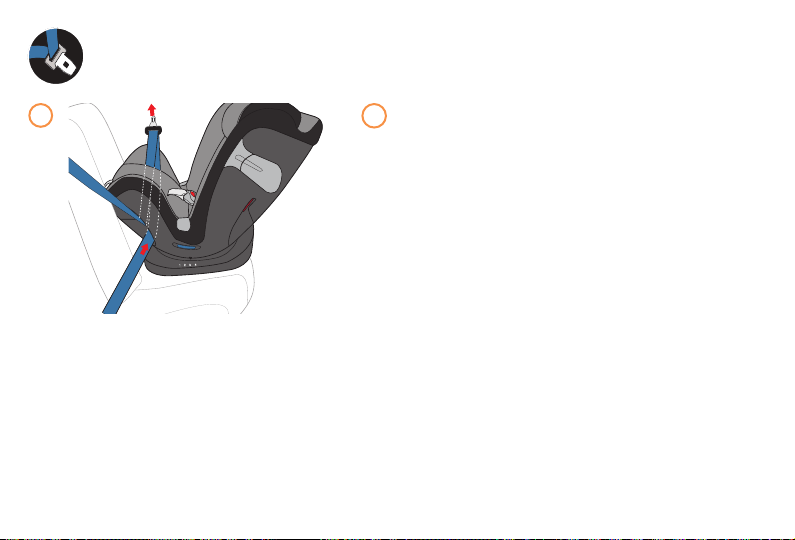
180
6
5
4
3
2
1
Pase el cinturón de regazo/hombro del vehículo por
trayectoria del cinturón para regazo y hombro en
la posición ORIENTADO HACIA ATRÁS a un lado
del sistema de sujeción infantil y por debajo del
acojinado del asiento. Continúe por el lado opuesto
del asiento.
INSTALACIÓN DEL SISTEMA DE SUJECIÓN INFANTIL ORIENTADO HACIA ATRÁS
CON EL CINTURÓN PARA REGAZO Y HOMBRO
3
3
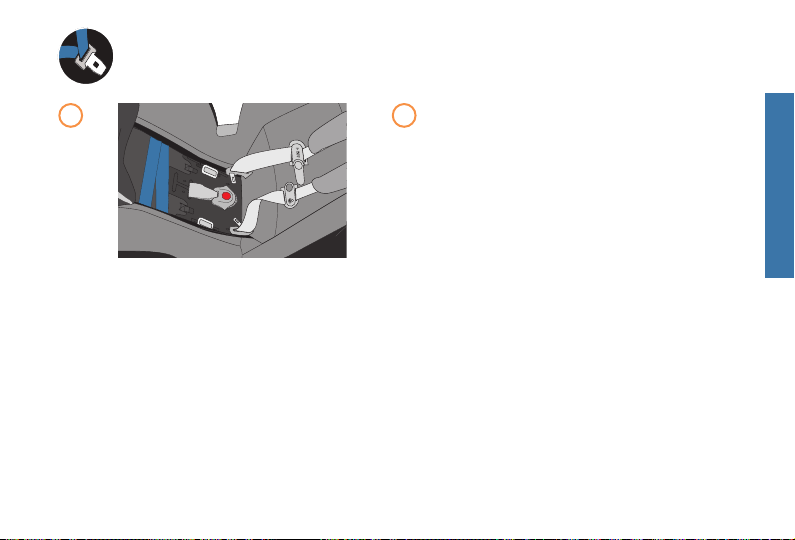
181
4
INSTALACIÓN DEL SISTEMA DE SUJECIÓN INFANTIL ORIENTADO HACIA ATRÁS
CON EL CINTURÓN PARA REGAZO Y HOMBRO
IMPORTANTE:
coloque el cinturón del vehículo en PARTE
DELANTERA de la hebilla.
ASEGÚRESE de que el cinturón quede plano sin
torcerse, como se muestra.
NOTA: vea la página 162 para el ajuste adecuado
de la correa de entrepierna. La correa para la
entrepierna debe estar SIEMPRE lo más cerca
posible, pero NUNCA debajo de la parte posterior
del niño.
Cinturón delante de la correa de
entrepierna
4
ORIENTADO HACIA ATRÁS
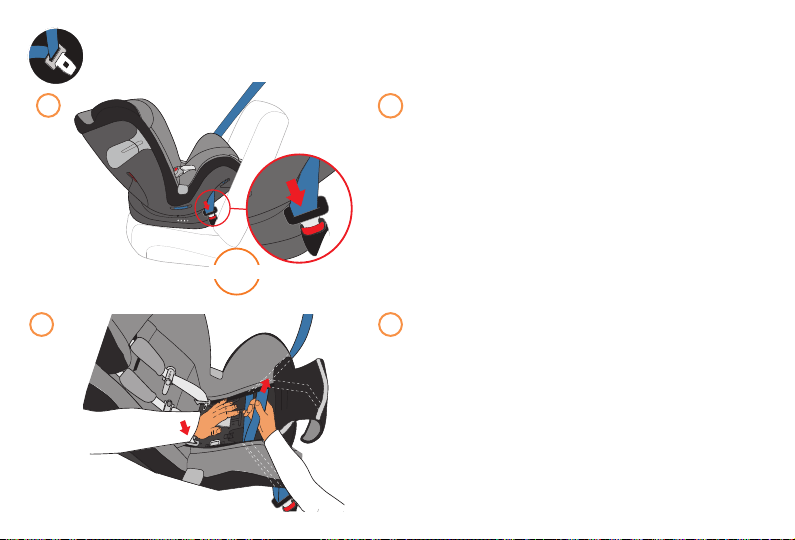
182
A
R
M
P
I
T
L
E
V
E
L
6
5
4
3
2
1
Tire del cinturón del vehículo hacia abajo a través
de la trayectoria del cinturón al estar ORIENTADO
HACIA ADELANTE en el lado opuesto del sistema de
sujeción infantil. Abróchese el cinturón del vehículo y
escuche un clic.
Extensión del sistema L.S.P., vea la pág. 164-165.
NOTA: antes de apretar el cinturón del vehículo, pase
el cinturón del hombro a través del bloqueo.
Mientras empuja el sistema de sujeción infantil hacia
abajo y dentro del pliegue del asiento (pág. 148), jale
el cinturón de hombro de la trayectoria del cinturón
para quitar toda holgura. Continúe tirando del
cinturón de hombro mientras coloca el cinturón de
hombro en el centro del área de cierre. El bloqueo no
funcionará correctamente si el cinturón del vehículo
no está colocado correctamente.
INSTALACIÓN DEL SISTEMA DE SUJECIÓN INFANTIL ORIENTADO HACIA ATRÁS
CON EL CINTURÓN PARA REGAZO Y HOMBRO
5
6
5
6
¡CLIC!

183
COMPRUEBE SU TRABAJO
Asegúrese de que el cinturón esté apretado y bloqueado.
Si puede mover el sistema de sujeción infantil más de
1 in (2.5 cm) de lado a lado o de adelante hacia atrás en la
trayectoria del cinturón del vehículo al estar ORIENTADO
HACIA ATRÁS, el cinturón del vehículo no está bien
apretado.
Vuelva a comprobar el nivel de la posición de reclinado,
pág. 179.
Si no ha asegurado bien el sistema de sujeción infantil,
inténtelo de nuevo o:
• bloquee el retractor del cinturón del vehículo
• muévalo a otro asiento del vehículo
• o instale con la correa de anclaje inferior.
Si aún necesita apretar el cinturón de hombro, es posible
que deba consultar la página 142 a 147, advertencias
sobre el cinturón de seguridad, para determinar el tipo de
cinturón de seguridad de su vehículo y cómo bloquearlo.
Para quitar el asiento, desabroche el cinturón de
seguridad del vehículo.
INSTALACIÓN DEL SISTEMA DE SUJECIÓN INFANTIL ORIENTADO HACIA ATRÁS
CON EL CINTURÓN PARA REGAZO Y HOMBRO
7
BLOQUEO EN POSICIÓN
ORIENTADO HACIA ATRÁS
7
6
5
4
3
2
1
6
5
4
3
2
1
ORIENTADO HACIA ATRÁS

184
1
Si no se reclina correctamente el sistema de sujeción
infantil, se podría aumentar el riesgo de que el
niño sufra lesiones graves o la muerte. Los bebés
pueden tener dificultad para respirar cuando están
sentados en posición erguida. Asegúrese de que el
bebé se recline lo suficiente para mantener la cabeza
descansando hacia atrás cómodamente y de manera
segura.
Apriete el asa de la posición de reclinado y ajuste
la inclinación del asiento a las posiciones 1, 2, 3 o 4
ORIENTADO HACIA ATRÁS SOLAMENTE.
1
2
3
4
1
INSTALACIÓN DEL SISTEMA DE SUJECIÓN INFANTIL ORIENTADO HACIA ATRÁS
CON EL CINTURÓN PARA REGAZO
ANTES de instalar el sistema de sujeción infantil con el cinturón para regazo, usted DEBE guardar la
correa de anclaje inferior en el compartimiento de almacenamiento del anclaje inferior, vea la página 166.
SIEMPRE guarde la correa de sujeción cuando use el sistema de sujeción infantil ORIENTADO HACIA
ATRÁS, vea la página 199.
¡ADVERTENCIA!
Pueden ocurrir LESIONES
GRAVES o la MUERTE

185
6
5
4
3
2
1
4
3
2
1
ASEGÚRESE de que el vehículo esté sobre
terreno nivelado antes de instalar el sistema de
sujeción infantil.
Coloque el sistema de sujeción infantil
ORIENTADO HACIA ATRÁS en una ubicación del
asiento del vehículo aprobado.
Asegúrese siempre de que la parte inferior quede
plana en el asiento del vehículo.
ASEGÚRESE de que el asiento esté colocado de
tal manera que la burbuja de nivel está en la zona
azul para el uso en la posición
ORIENTADO HACIA ATRÁS.
2 2
INSTALACIÓN DEL SISTEMA DE SUJECIÓN INFANTIL ORIENTADO HACIA ATRÁS
CON EL CINTURÓN PARA REGAZO
ORIENTADO HACIA ATRÁS

186
6
5
4
3
2
1
Pase el cinturón de regazo del vehículo por la
trayectoria del cinturón para regazo y hombro
ORIENTADO HACIA ATRÁS a un lado del sistema
de sujeción infantil y por debajo del acojinado del
asiento. Continúe por el lado opuesto del asiento.
INSTALACIÓN DEL SISTEMA DE SUJECIÓN INFANTIL ORIENTADO HACIA ATRÁS
CON EL CINTURÓN PARA REGAZO
3 3
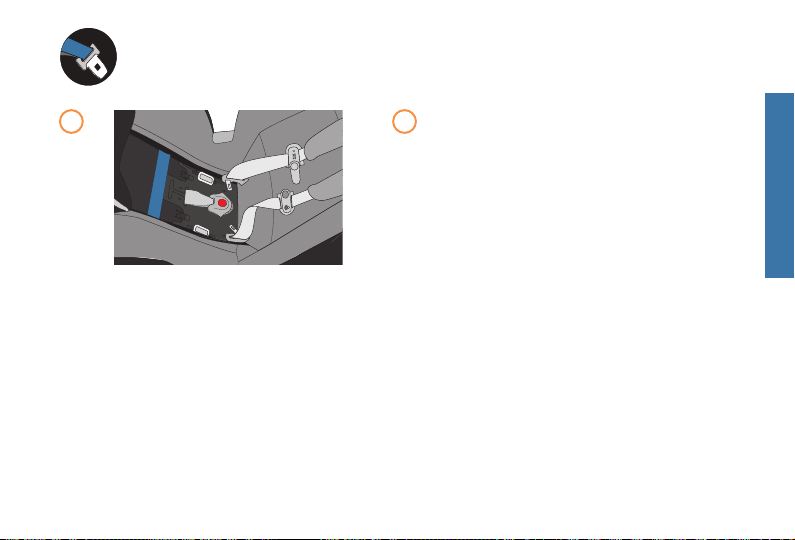
187
4
INSTALACIÓN DEL SISTEMA DE SUJECIÓN INFANTIL ORIENTADO HACIA ATRÁS
CON EL CINTURÓN PARA REGAZO
IMPORTANTE:
coloque el cinturón del vehículo en PARTE
DELANTERA de la hebilla.
ASEGÚRESE de que el cinturón quede plano sin
torcerse, como se muestra.
NOTA: vea la página 162 para el ajuste
adecuado de la correa de entrepierna. La correa
para la entrepierna debe estar SIEMPRE lo más
cerca posible, pero NUNCA debajo de la parte
posterior del niño.
Cinturón delante de la correa
de entrepierna
4
ORIENTADO HACIA ATRÁS

188
6
5
4
3
2
1
Tire del cinturón del vehículo hacia abajo a través de
la trayectoria del cinturón en la posición
ORIENTADO HACIA ATRÁS en el lado opuesto del
sistema de sujeción infantil. Abróchese el cinturón del
vehículo y escuche un clic.
Para la extensión del sistema L.S.P., vea la pág.
164-165.
INSTALACIÓN DEL SISTEMA DE SUJECIÓN INFANTIL ORIENTADO HACIA ATRÁS
CON EL CINTURÓN PARA REGAZO
5
5
CLICK!
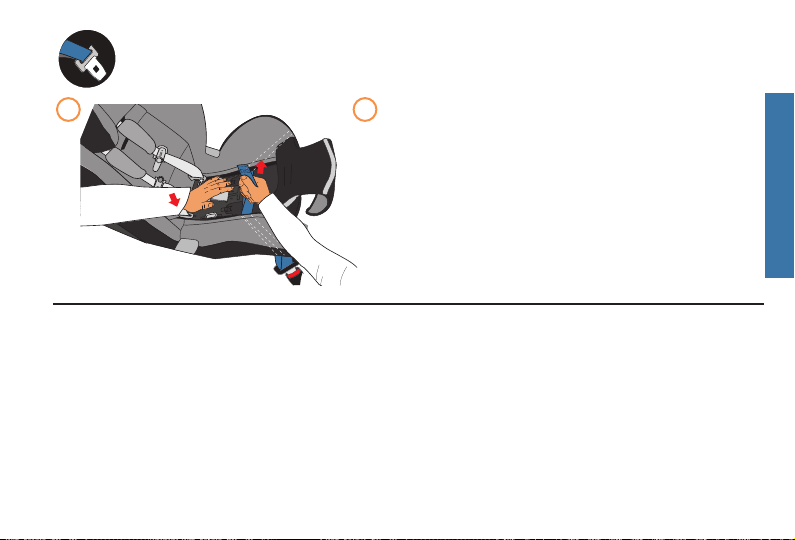
189
A
R
M
P
I
T
L
E
V
E
L
NOTA: el bloqueo es sólo para sistemas de cinturones de
regazo/hombro y NO es necesario para la instalación de
cinturones de regazo.
Mientras empuja el sistema de sujeción infantil hacia
abajo y dentro del pliegue del asiento (pág. 148), retire
toda la holgura de la trayectoria del cinturón y continúe
apretando el cinturón de regazo.
INSTALACIÓN DEL SISTEMA DE SUJECIÓN INFANTIL ORIENTADO HACIA ATRÁS
CON EL CINTURÓN PARA REGAZO
6 6
COMPRUEBE SU TRABAJO
ASEGÚRESE de que el cinturón esté apretado y
bloqueado. Si puede mover el sistema de sujeción
infantil más de 1 in (2.5 cm) de lado a lado o de
adelante hacia atrás en la trayectoria del cinturón
del vehículo al estar ORIENTADO HACIA ATRÁS, el
cinturón del vehículo no está bien apretado.
Vuelva a comprobar el nivel de la posición de
reclinado, pág. 185.
Si no ha asegurado bien el sistema de sujeción infantil,
inténtelo de nuevo o:
• bloquee el retractor del cinturón del vehículo
• muévalo a otro asiento del vehículo
• o instale con la correa de anclaje inferior.
Para quitar el asiento, desabroche el cinturón de
seguridad del vehículo.
ORIENTADO HACIA ATRÁS
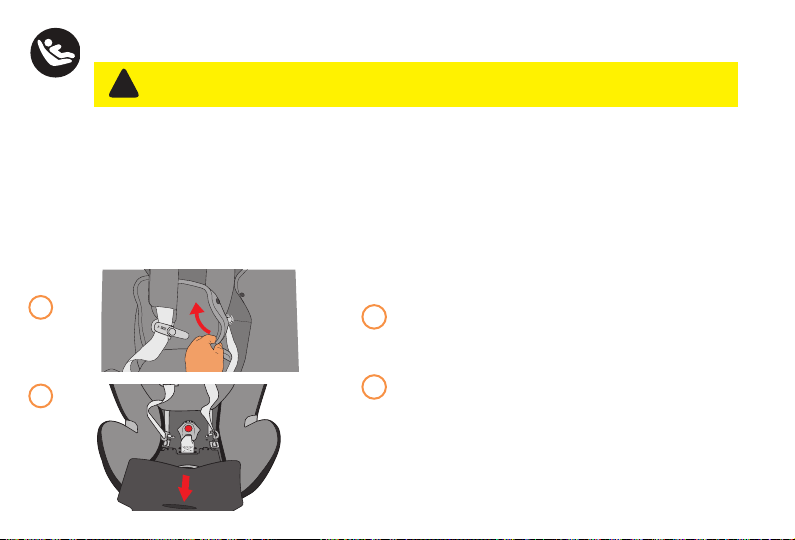
190
Su sistema de sujeción infantil viene con la correa de anclaje inferior almacenada en el compartimiento de
almacenamiento del anclaje inferior. Antes de instalar el sistema de sujeción infantil, retire la correa de anclaje
inferior del compartimiento de almacenamiento.
1
2
Ajuste la cabecera a la posición más alta y
desabroche el clip para el pecho y el arnés.
Desabroche los broches de la cubierta del asiento
y empuje la hebilla de la entrepierna a través del
acojinado para exponer el compartimiento de
almacenamiento del anclaje inferior.
L
E
V
E
L
1
2
NO instale usando este método con niños que pesan más de 40 kg (18.1 lb).
SIEMPRE use la CORREA DE SUJECIÓN.
INSTALACIÓN DEL SISTEMA DE SUJECIÓN INFANTIL ORIENTADO HACIA ADELANTE
CON LOS CONECTORES DE ANCLAJE INFERIOR
¡ADVERTENCIA!
!
Pueden ocurrir LESIONES
GRAVES o la MUERTE.
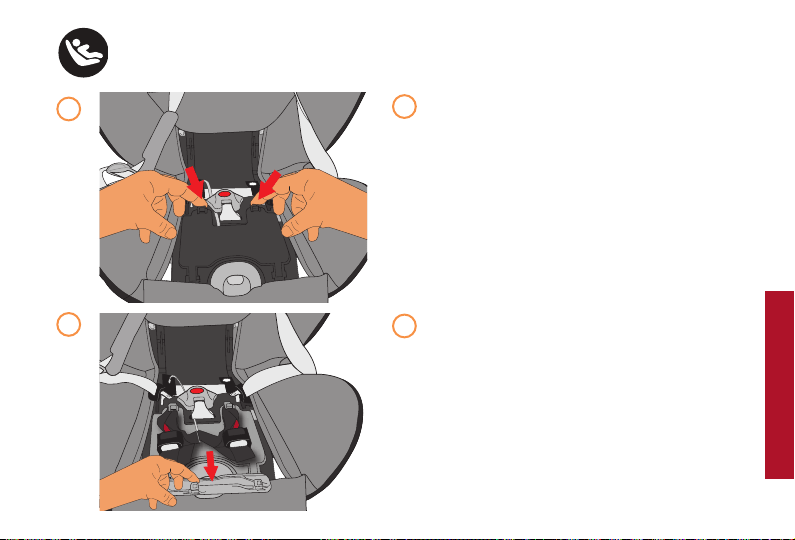
191
Introduzca las lengüetas en la puerta de
almacenamiento como se muestra.
Abra el compartimento de almacenamiento
del anclaje inferior y tire de la correa.
3
4
INSTALACIÓN DEL SISTEMA DE SUJECIÓN INFANTIL ORIENTADO HACIA ADELANTE
CON LOS CONECTORES DE ANCLAJE INFERIOR
3
4
ORIENTADO HACIA ADELANTE
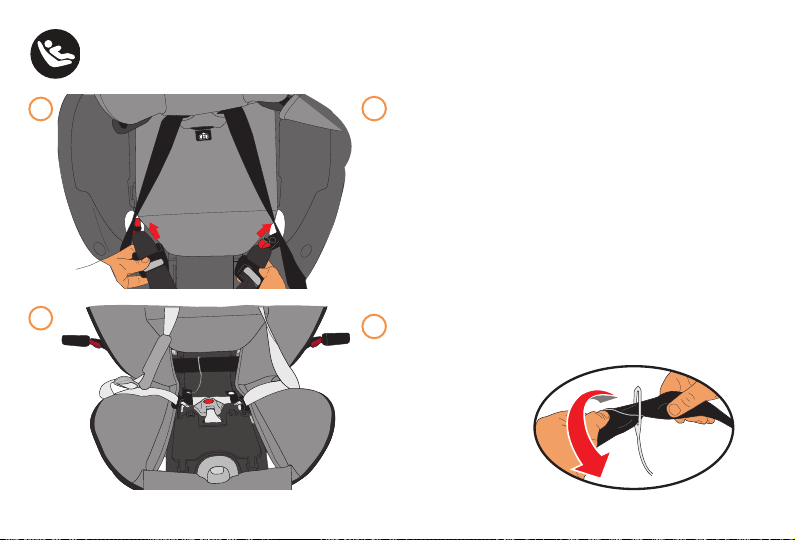
192
5
6
Pase la correa de anclaje inferior a través de las
trayectorias del cinturón marcados con ORIENTADO
HACIA ADELANTE.
ASEGÚRESE de que la correa de anclaje inferior
quede plana a lo largo del asiento.
VERIFIQUE para
asegurarse de que
la correa no esté
torcida en la correa
de retención de
plástico.
5
6
INSTALACIÓN DEL SISTEMA DE SUJECIÓN INFANTIL ORIENTADO HACIA ADELANTE
CON LOS CONECTORES DE ANCLAJE INFERIOR
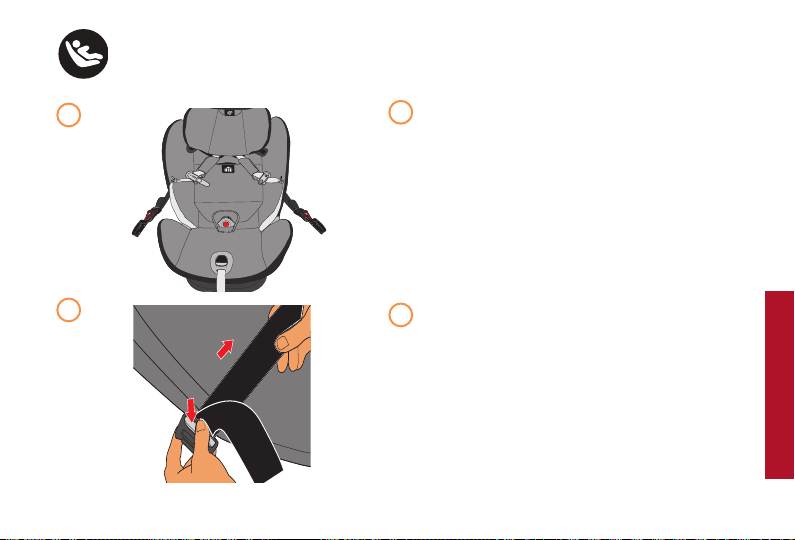
193
Vuelva a colocar el acojinado del asiento como se
muestra.
Alargue la correa entre los conectores utilizando los
botones de ajuste del anclaje inferior situados junto
a los conectores. Presione hacia abajo el botón de
liberación del ajustador mientras alarga la correa.
7
8
INSTALACIÓN DEL SISTEMA DE SUJECIÓN INFANTIL ORIENTADO HACIA ADELANTE
CON LOS CONECTORES DE ANCLAJE INFERIOR
7
8
ORIENTADO HACIA ADELANTE
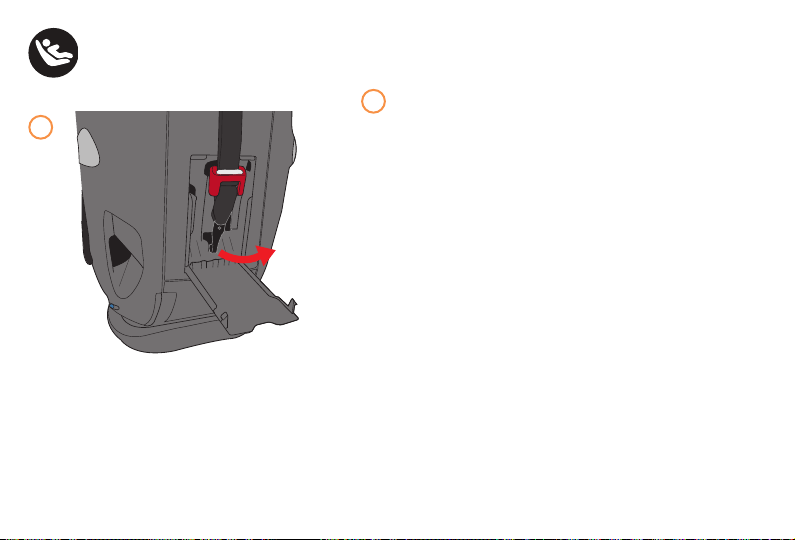
194
9
Al instalar este sistema de sujeción infantil con
conectores de anclaje inferior, (O con el cinturón
de seguridad del vehículo vea la pág. 200 a 211),
siempre utilice la correa de sujeción.
Una correa de sujeción reduce el movimiento de
un sistema de sujeción infantil ORIENTADO HACIA
ADELANTE en un choque y ayuda a lograr una
instalación ajustada. La ubicación del anclaje de
la correa de sujeción varía de un vehículo a otro.
Consulte el manual del propietario del vehículo para
obtener información sobre las ubicaciones exactas, la
identificación del anclaje y los requisitos.
SI EL ANCLAJE DE LA CORREA DE SUJECIÓN ESTÁ
DISPONIBLE EN SU VEHÍCULO: antes de colocar el
sistema de sujeción infantil en el vehículo, retire la
correa de sujeción del compartimiento de la correa
de sujeción al desengancharla del gancho dentro
del compartimiento. Si no se dispone de un anclaje
para la correa de sujeción, ésta debe almacenarse
adecuadamente.
INSTALACIÓN DEL SISTEMA DE SUJECIÓN INFANTIL ORIENTADO HACIA ADELANTE
CON LOS CONECTORES DE ANCLAJE INFERIOR
9
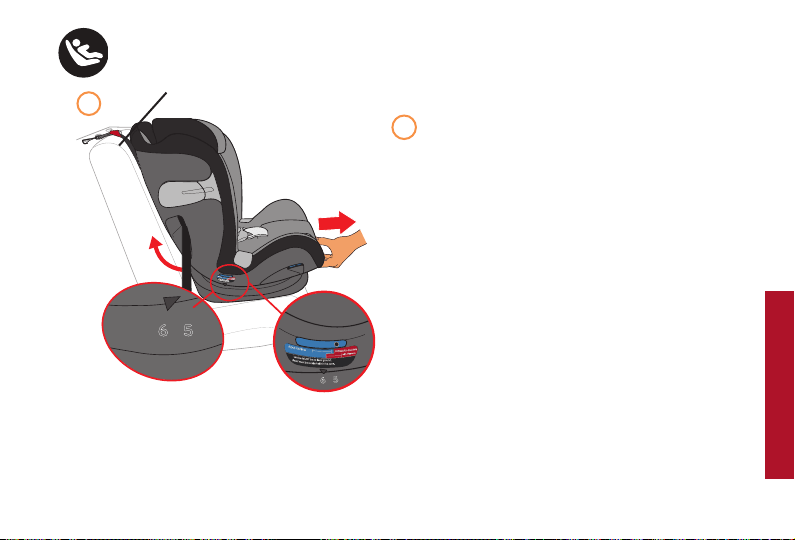
195
Apriete el asa de la posición de reclinado y ajuste
la inclinación del asiento a las posiciones 5 o 6
ORIENTADO HACIA ADELANTE SOLAMENTE.
ASEGÚRESE de que el vehículo esté sobre
terreno nivelado antes de instalar el sistema de
sujeción infantil.
Coloque el sistema de sujeción infantil
ORIENTADO HACIA ADELANTE en un lugar
aprobado del asiento del vehículo con el sistema
LATCH.
Asegúrese siempre de que la parte inferior quede
plana en el asiento del vehículo. Desenganche la
correa de sujeción de la parte trasera del asiento
y colóquela sobre el respaldo del asiento del
vehículo.
10
10
6
5
4
3
2
1
6
5
6
5
Correa de sujeción
INSTALACIÓN DEL SISTEMA DE SUJECIÓN INFANTIL ORIENTADO HACIA ADELANTE
CON LOS CONECTORES DE ANCLAJE INFERIOR
ASEGÚRESE de que el asiento está colocado de tal
manera que la burbuja de nivel está en la zona roja para
el uso en la posición
ORIENTADO HACIA ADELANTE.
ORIENTADO HACIA ADELANTE

196
11
11
Ubique las barras de anclaje inferior en su vehículo.
Conecte ambos conectores de anclaje inferiores a las
barras de anclaje inferiores del vehículo hasta que se
anclen en los anclajes.
Mientras empuja hacia abajo el sistema de sujeción
infantil, tire hacia arriba del extremo libre de la correa
del anclaje inferior hasta que la correa está apretada
usando el ajustador en cualquiera de los dos lados
del sistema de sujeción infantil.
COMPRUEBE SU TRABAJO
SOSTENGA el sistema de seguridad infantil a cada
lado cerca de las trayectorias del cinturón en la
posición ORIENTADO HACIA ADELANTE. Tire de
lado a lado y hacia adelante. El sistema de sujeción
infantil no debe moverse más de 1 in (2.5 cm) del
respaldo del asiento del vehículo ni de lado a lado.
ASEGÚRESE de que la burbuja de nivel esté en la
zona roja para el uso en la posición
ORIENTADO HACIA ADELANTE (pág. 195) Si es
necesario, afloje el anclaje inferior, vuelva a ajustar la
posición de reclinado y repita los pasos de instalación
para asegurarse de que el sistema de sujeción infantil
esté instalado correctamente.
INSTALACIÓN DEL SISTEMA DE SUJECIÓN INFANTIL ORIENTADO HACIA ADELANTE
CON LOS CONECTORES DE ANCLAJE INFERIOR
CLICK!
CLICK!
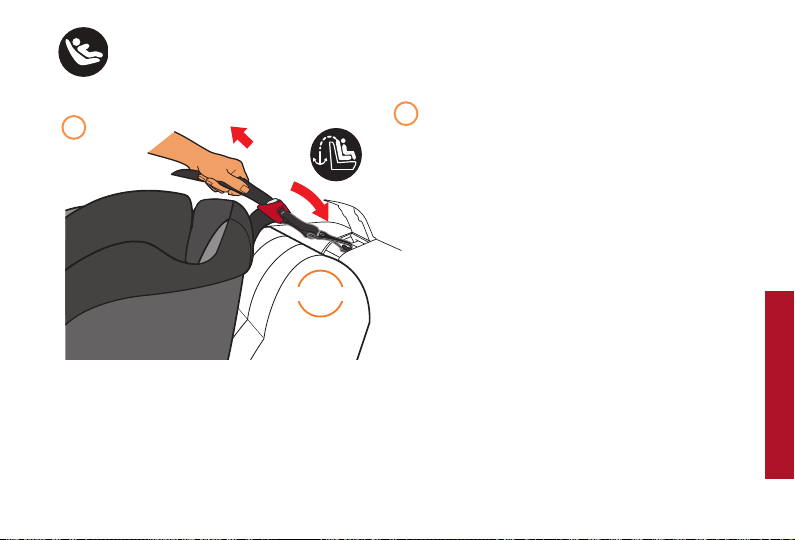
197
12
12
Ubique el anclaje de la correa de sujeción en
su vehículo. Coloque el gancho de la correa de
sujeción. Jale la correa del ajustador de la correa
de sujeción para apretarla.
Para la extensión del sistema L.S.P., vea la
pág. 164-165.
6
5
4
3
2
1
INSTALACIÓN DEL SISTEMA DE SUJECIÓN INFANTIL ORIENTADO HACIA ADELANTE
CON LOS CONECTORES DE ANCLAJE INFERIOR
CLICK!
ORIENTADO HACIA ADELANTE

198
VUELVA A VERIFICAR el indicador de nivel, la burbuja
de nivel debe estar entre la zona roja para la posición
ORIENTADO HACIA ADELANTE.
COMPRUEBE SU TRABAJO
Sostenga el sistema de sujeción infantil a cada lado
cerca de las trayectorias del cinturón en la posición
ORIENTADO HACIA ATRÁS y hale de lado a lado y
hacia adelante. El sistema de sujeción infantil no debe
moverse más de 1 in (2.5 cm) del respaldo del asiento
del vehículo ni de lado a lado.
ASEGÚRESE de que el sistema de sujeción infantil
esté nivelado para el uso ORIENTADO HACIA
ADELANTE.
Si es necesario, afloje la correa del anclaje inferior,
vuelva a ajustar la posición de reclinado y repita
los pasos de instalación para asegurarse de que
el sistema de sujeción infantil esté instalado
correctamente.
13
13
6
5
4
3
2
1
6
5
6
5
INSTALACIÓN DEL SISTEMA DE SUJECIÓN INFANTIL ORIENTADO HACIA ADELANTE
CON LOS CONECTORES DE ANCLAJE INFERIOR
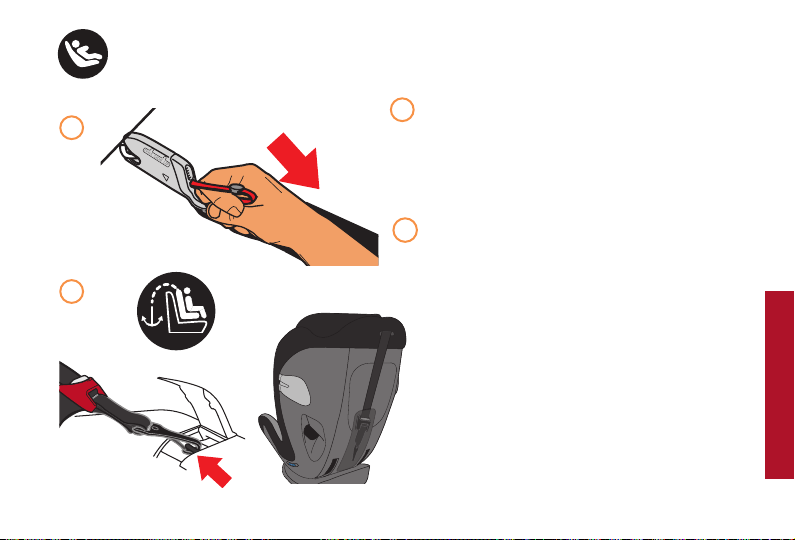
199
Para retirar los conectores de anclaje inferior, tire
de la correa de liberación roja a ambos lados del
asiento como se muestra.
Para quitar la correa de sujeción, presione el botón
de liberación del ajustador para aflojar la correa y
desenganche del anclaje de la correa de sujeción.
Guarde la correa de sujeción en el compartimiento
en la parte trasera del sistema de sujeción infantil,
como se muestra.
SIEMPRE use la correa de sujeción al instalar este
sistema de sujeción infantil ORIENTADO HACIA
ADELANTE si su vehículo está equipado con un
anclaje para correa de sujeción.
ASEGÚRESE de que la puerta del compartimiento
está cerrada correctamente después de guardarla.
14
14
INSTALACIÓN DEL SISTEMA DE SUJECIÓN INFANTIL ORIENTADO HACIA ADELANTE
CON LOS CONECTORES DE ANCLAJE INFERIOR
15
15
ORIENTADO HACIA ADELANTE
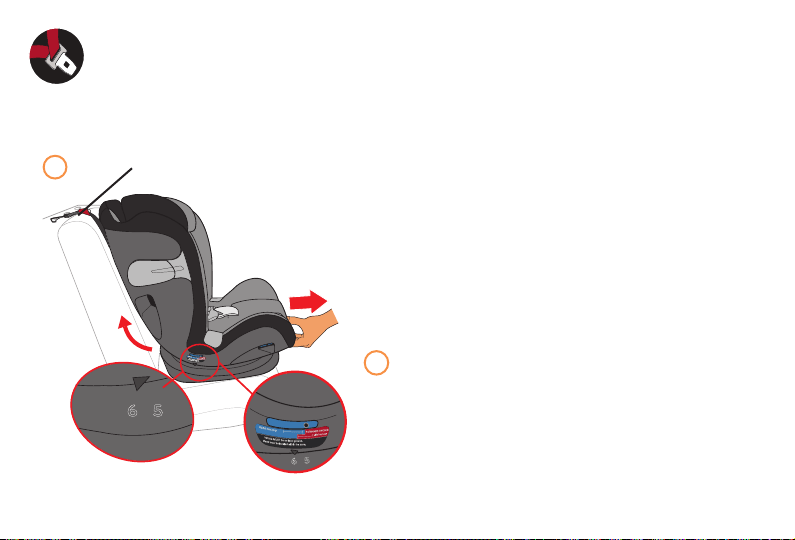
200
1
ASEGÚRESE de que el vehículo esté sobre terreno
nivelado antes de instalar el sistema de sujeción
infantil.
Coloque el sistema de sujeción infantil
ORIENTADO HACIA ADELANTE en un lugar
aprobado del asiento del vehículo. Asegúrese
siempre de que la parte inferior quede plana en el
asiento del vehículo.
Desabroche la correa de sujeción de la parte trasera
del asiento y colóquela sobre el respaldo del asiento
del vehículo.
Apriete el asa de la posición de reclinado y ajuste la
inclinación del asiento a las posiciones
ORIENTADO HACIA ADELANTE 5 o 6 SOLAMENTE.
ASEGÚRESE de que el asiento está colocado de tal
manera que la burbuja de nivel está en la zona roja
para el uso en la posición
ORIENTADO HACIA ADELANTE.
1
INSTALACIÓN DEL SISTEMA DE SUJECIÓN INFANTIL ORIENTADO HACIA ADELANTE
CON EL CINTURÓN PARA REGAZO Y HOMBRO
ANTES de instalar el sistema de sujeción infantil con el cinturón para regazo y hombro, usted DEBE
guardar la correa de anclaje inferior en el compartimiento de almacenamiento del anclaje inferior, vea
la página 166.
SIEMPRE use la CORREA DE SUJECIÓN.
6
5
4
3
2
1
6
5
6
5
Correa de sujeción
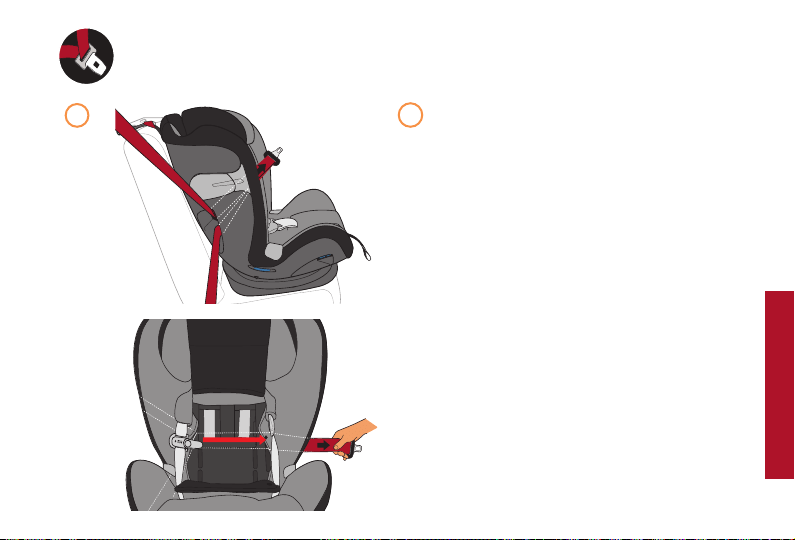
201
2
UTILIZACIÓN DEL SISTEMA DE SUJECIÓN INFANTIL ORIENTADO HACIA ADELANTE
CON EL CINTURÓN PARA REGAZO Y HOMBRO
6
5
4
3
2
1
Pase el cinturón de regazo/hombro del vehículo por
la trayectoria del cinturón para regazo y hombro en
la posición ORIENTADO HACIA ADELANTE a un
lado del sistema de sujeción infantil y por debajo
del acojinado del asiento. Continúe por el lado
opuesto del asiento.
IMPORTANTE: asegúrese de que el cinturón para
regazo y hombro quede plano sin torcerse.
2
ORIENTADO HACIA ADELANTE

202
INSTALACIÓN DEL SISTEMA DE SUJECIÓN INFANTIL ORIENTADO HACIA ADELANTE
CON EL CINTURÓN PARA REGAZO Y HOMBRO
6
5
4
3
2
1
Tire del cinturón del vehículo hacia abajo a través de
la trayectoria del cinturón en la posición ORIENTADO
HACIA ADELANTE en el lado opuesto del sistema de
sujeción infantil. Abróchese el cinturón del vehículo y
escuche un clic.
3 3
¡CLIC!

203
INSTALACIÓN DEL SISTEMA DE SUJECIÓN INFANTIL ORIENTADO HACIA ADELANTE
CON EL CINTURÓN PARA REGAZO Y HOMBRO
6
5
4
3
2
1
NOTA: antes de apretar el cinturón del vehículo, pase
el cinturón del hombro a través del bloqueo.
Mientras empuja el sistema de sujeción infantil hacia
abajo y dentro del pliegue del asiento (pág. 148),
jale el cinturón de hombro de la trayectoria del
cinturón para quitar toda holgura. Continúe tirando
del cinturón de hombro mientras coloca el cinturón
de hombro en el centro del área de bloqueo. El
bloqueo no funcionará correctamente si el cinturón
del vehículo no está colocado correctamente.
Para la extensión del sistema L.S.P., vea la
pág. 164-165.
4
5
FORWARD-FACING LOCK-OFF
4
5
ORIENTADO HACIA ADELANTE

204
6
5
4
3
2
1
INSTALACIÓN DEL SISTEMA DE SUJECIÓN INFANTIL ORIENTADO HACIA ADELANTE
CON EL CINTURÓN PARA REGAZO Y HOMBRO
6
6
Ubique el anclaje de la correa de sujeción en su vehículo. Coloque
el gancho de la correa de sujeción. Jale la correa del ajustador de
la correa de sujeción para apretarla.
COMPRUEBE SU TRABAJO
ASEGÚRESE de que el cinturón esté apretado y bloqueado. Si
puede mover el sistema de sujeción infantil más de 1 in (2.5 cm)
de lado a lado o de adelante hacia atrás en la trayectoria del
cinturón del vehículo al estar ORIENTADO HACIA ADELANTE, el
cinturón del vehículo no está bien apretado.
Vuelva a comprobar el nivel de la posición de reclinado, pág. 200.
Si no ha asegurado bien el sistema de sujeción infantil, inténtelo
de nuevo o:
• bloquee el retractor del cinturón del vehículo
• muévalo a otro asiento del vehículo
• o instale con la correa de anclaje inferior.
Si aún necesita apretar el cinturón de hombro, es posible que
deba consultar la página 147, advertencias sobre el cinturón de
seguridad, para determinar el tipo de cinturón de seguridad de su
vehículo y cómo bloquearlo.
Para quitar el asiento, desabroche el cinturón de seguridad del
vehículo.
¡CLIC!
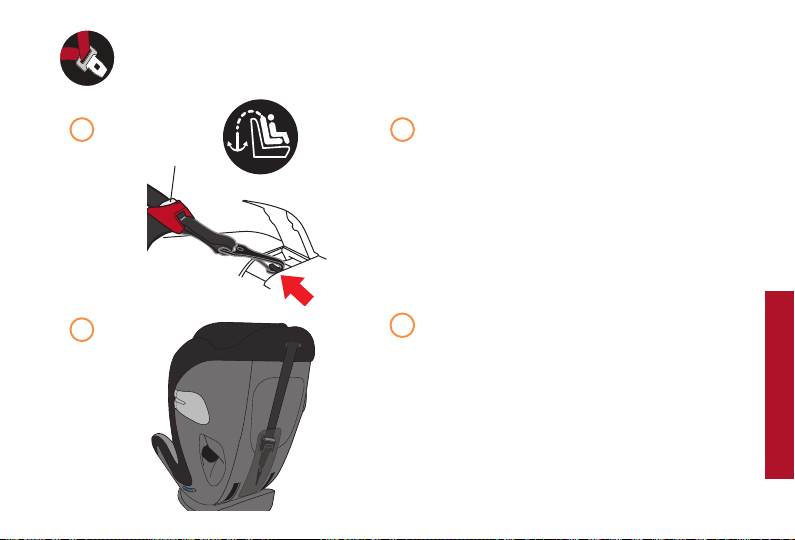
205
INSTALACIÓN DEL SISTEMA DE SUJECIÓN INFANTIL ORIENTADO HACIA ADELANTE
CON EL CINTURÓN PARA REGAZO Y HOMBRO
ALMACENAMIENTO DE LA CORREA DE
SUJECIÓN:
Para quitar la correa de sujeción, presione el botón
de liberación del ajustador para aflojar la correa y
desenganche del anclaje de la correa de sujeción.
Guarde la correa de sujeción en el compartimiento
en la parte trasera del sistema de sujeción infantil,
como se muestra.
SIEMPRE use la correa de sujeción al instalar este
sistema de sujeción infantil ORIENTADO HACIA
ADELANTE si su vehículo está equipado con un
anclaje para correa de sujeción.
ASEGÚRESE de que la puerta del compartimiento
esté cerrada correctamente después de guardarla.
7
8
7
8
Botón de
liberación
del ajustador
ORIENTADO HACIA ADELANTE

206
INSTALACIÓN DEL SISTEMA DE SUJECIÓN INFANTIL ORIENTADO HACIA ADELANTE
CON EL CINTURÓN PARA REGAZO
1
ASEGÚRESE de que el vehículo esté sobre terreno
nivelado antes de instalar el sistema de sujeción
infantil.
Coloque el sistema de sujeción infantil
ORIENTADO HACIA ADELANTE en un lugar
aprobado del asiento del vehículo. Asegúrese
siempre de que la parte inferior quede plana en
el asiento del vehículo. Desabroche la correa de
sujeción de la parte trasera del asiento y colóquela
sobre el respaldo del asiento del vehículo.
Apriete el asa de la posición de reclinado y ajuste la
inclinación del asiento a las posiciones ORIENTADO
HACIA ADELANTE 5 o 6 SOLAMENTE.
ASEGÚRESE de que el asiento esté colocado de
tal manera que la burbuja de nivel esté en la zona
roja para el uso en la posición ORIENTADO HACIA
ADELANTE.
1
ANTES de instalar el sistema de sujeción infantil con el cinturón para regazo, usted DEBE guardar la
correa de anclaje inferior en el compartimiento de almacenamiento del anclaje inferior, vea la página
166.
SIEMPRE use la CORREA DE SUJECIÓN.
6
5
4
3
2
1
6
5
6
5
Tether
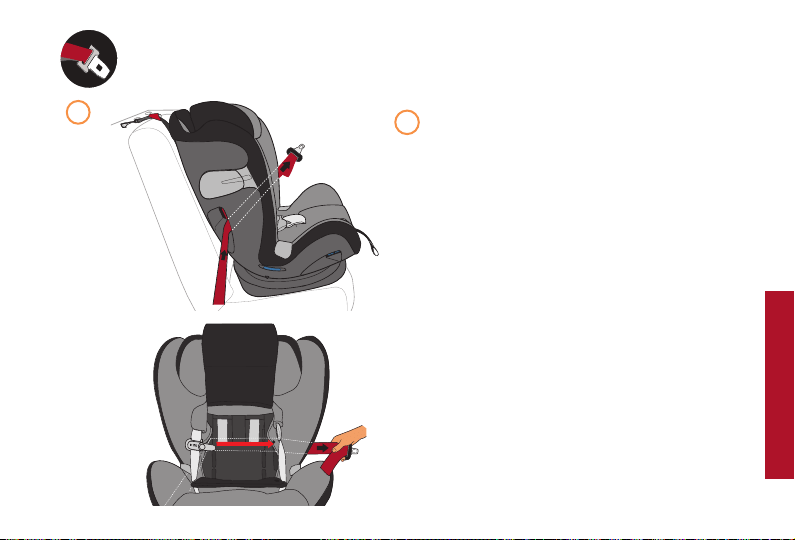
207
INSTALACIÓN DEL SISTEMA DE SUJECIÓN INFANTIL ORIENTADO HACIA ADELANTE
CON EL CINTURÓN PARA REGAZO
6
5
4
3
2
1
2
Pase el cinturón de regazo del vehículo por la
trayectoria del cinturón para regazo y hombro
ORIENTADO HACIA ADELANTE a un lado del
sistema de sujeción infantil y por debajo del
acojinado del asiento. Continúe por el lado
opuesto del asiento.
IMPORTANTE: asegúrese de que el cinturón para
regazo quede plano sin torcerse.
2
ORIENTADO HACIA ADELANTE

208
6
5
4
3
2
1
INSTALACIÓN DEL SISTEMA DE SUJECIÓN INFANTIL ORIENTADO HACIA ADELANTE
CON EL CINTURÓN PARA REGAZO
Tire del cinturón del vehículo hacia abajo a través
de la trayectoria del cinturón en la posición
ORIENTADO HACIA ADELANTE en el lado opuesto
del sistema de sujeción infantil. Abróchese el
cinturón del vehículo y escuche un clic.
3
3
¡CLIC!
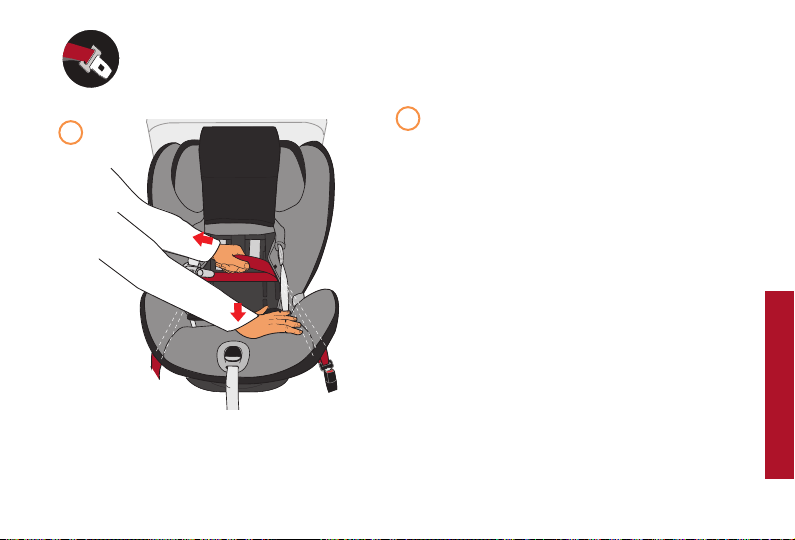
209
INSTALACIÓN DEL SISTEMA DE SUJECIÓN INFANTIL ORIENTADO HACIA ADELANTE
CON EL CINTURÓN PARA REGAZO
NOTA: el bloqueo es sólo para sistemas de
cinturones de regazo/hombro y NO es necesario
para la instalación de cinturones de regazo.
Mientras empuja el sistema de sujeción infantil
hacia abajo y dentro del pliegue del asiento (pág.
148), retire toda la holgura de la trayectoria del
cinturón y continúe apretando el cinturón de regazo.
Para la extensión del sistema L.S.P., vea la pág.
164-165.
4
4
ORIENTADO HACIA ADELANTE
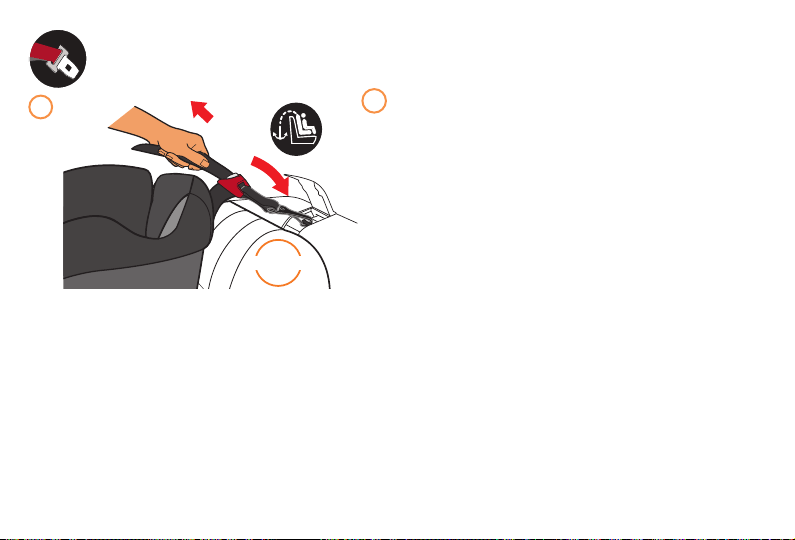
210
INSTALACIÓN DEL SISTEMA DE SUJECIÓN INFANTIL ORIENTADO HACIA ADELANTE
CON EL CINTURÓN PARA REGAZO
5
5
Ubique el anclaje de la correa de sujeción en su
vehículo. Coloque el gancho de la correa de sujeción.
Jale la correa del ajustador de la correa de sujeción
para apretarla.
COMPRUEBE SU TRABAJO
ASEGÚRESE de que el cinturón esté apretado y
bloqueado. Si puede mover el sistema de sujeción
infantil más de 1 in (2.5 cm) de lado a lado o de
adelante hacia atrás en la trayectoria del cinturón del
vehículo al estar ORIENTADO HACIA ADELANTE, el
cinturón del vehículo no está bien apretado.
Vuelva a comprobar el nivel de la posición de
reclinado, pág. 206.
Si no ha asegurado bien el sistema de sujeción
infantil, inténtelo de nuevo o:
• bloquee el retractor del cinturón del vehículo
• muévalo a otro asiento del vehículo
• o instale con la correa de anclaje inferior.
Para quitar el asiento, desabroche el cinturón de
seguridad del vehículo.
6
5
4
3
2
1
¡CLIC!
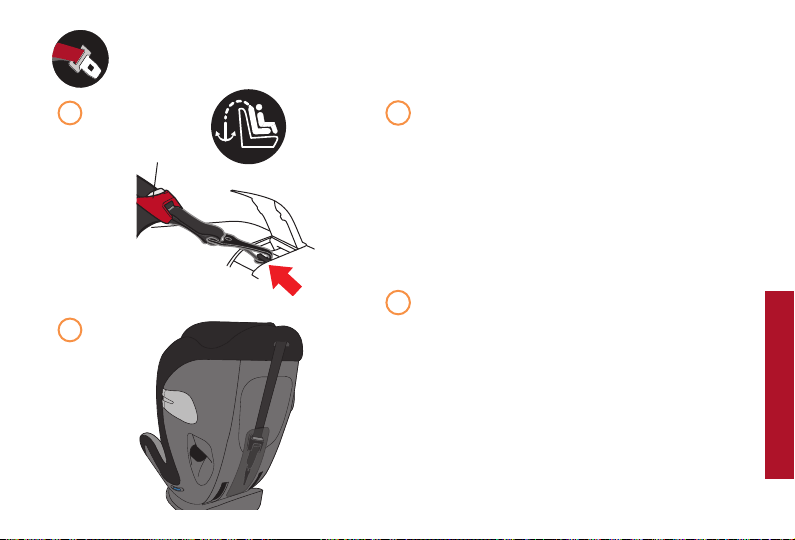
211
INSTALACIÓN DEL SISTEMA DE SUJECIÓN INFANTIL ORIENTADO HACIA ADELANTE
CON EL CINTURÓN PARA REGAZO
ALMACENAMIENTO DE LA CORREA DE
SUJECIÓN:
Para quitar la correa de sujeción, presione el
botón de liberación del ajustador para aflojar la
correa y desenganche del anclaje de la correa de
sujeción.
Guarde la correa de sujeción en el compartimiento
en la parte trasera del sistema de sujeción infantil,
como se muestra.
Siempre use la correa de sujeción al instalar este
sistema de sujeción infantil ORIENTADO HACIA
ADELANTE si su vehículo está equipado con un
anclaje para correa de sujeción. ASEGÚRESE de
que la puerta del compartimiento esté cerrada
correctamente después de guardarla.
6
7
6
7
Botón de
liberación
del ajustador
ORIENTADO HACIA ADELANTE

212
UTILIZACIÓN DEL SISTEMA DE SUJECIÓN INFANTIL EN EL MODO DE ASIENTO ELEVADOR
1
CONVERSIÓN AL
MODO DE ASIENTO ELEVADOR
Afloje las correas del arnés al presionar el
botón de liberación del arnés ubicado en la
parte delantera del asiento. Al mismo tiempo,
tire de las correas del arnés.
Levante la cabecera a la posición más alta (pág.
163).
Desabroche el clip para el pecho y abroche.
Suelte el acojinado del asiento (pág. 168) y
abra el compartimiento de almacenamiento del
anclaje inferior.
Mueva la hebilla de la entrepierna a la ranura
frontal y guarde la hebilla de la entrepierna
en el compartimiento de almacenamiento del
anclaje inferior.
Cierre la puerta del compartimento.
2
1
2
Refiérase a las páginas 158 y 159 para las pautas para el uso con los niños
¡ADVERTENCIA!
!
Pueden ocurrir LESIONES
GRAVES o la MUERTE.
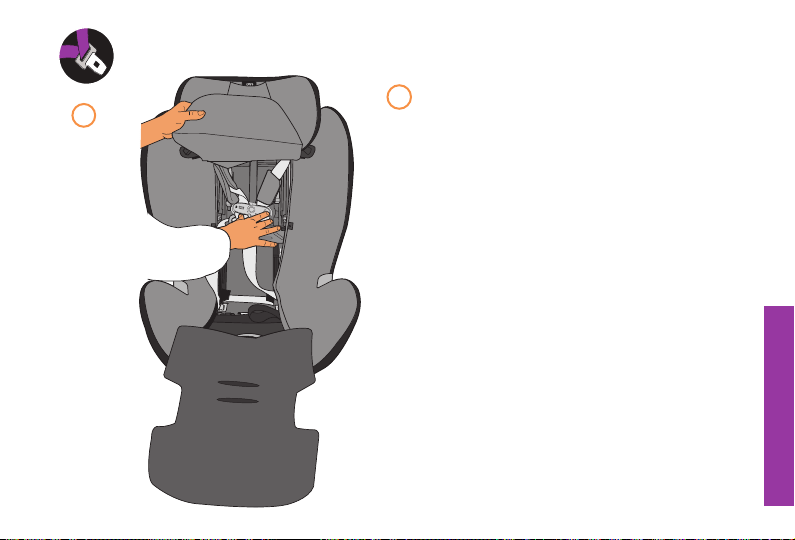
213
UTILIZACIÓN DEL SISTEMA DE SUJECIÓN INFANTIL EN EL MODO DE ASIENTO ELEVADOR
3
Coloque las correas del arnés, el clip de pecho y
las lengüetas de la hebilla en el compartimiento
del respaldo del asiento detrás del acojinado del
asiento como se muestra.
3
MODO DE ASIENTO ELEVADOR
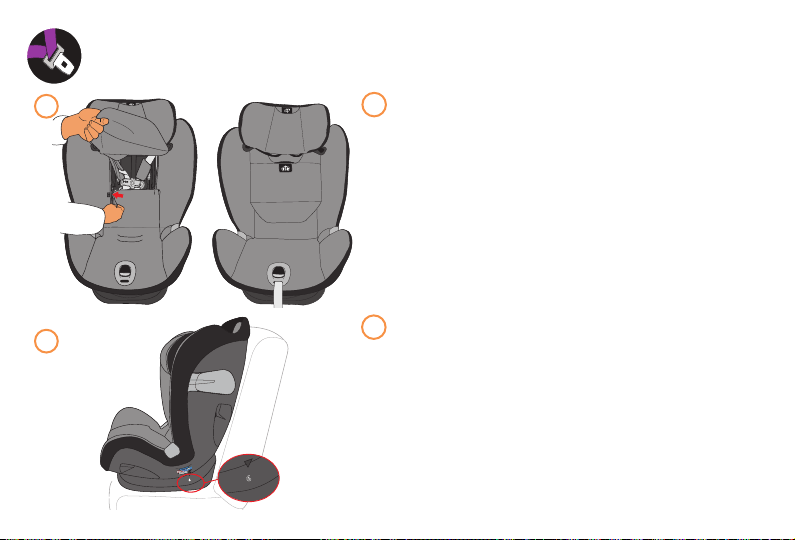
214
UTILIZACIÓN DEL SISTEMA DE SUJECIÓN INFANTIL EN EL MODO DE ASIENTO ELEVADOR
4
Levante el acojinado del asiento y vuelva a abrochar
los broches en las aberturas de las correas de los
hombros.
Ajuste el asiento elevador a la posición 6.
Ya ha finalizado la transición al
MODO DE ASIENTO ELEVADOR.
Invierta los pasos para regresar al modo del arnés
ORIENTADO HACIA ADELANTE.
4
6
5
4
3
2
1
6
5
5
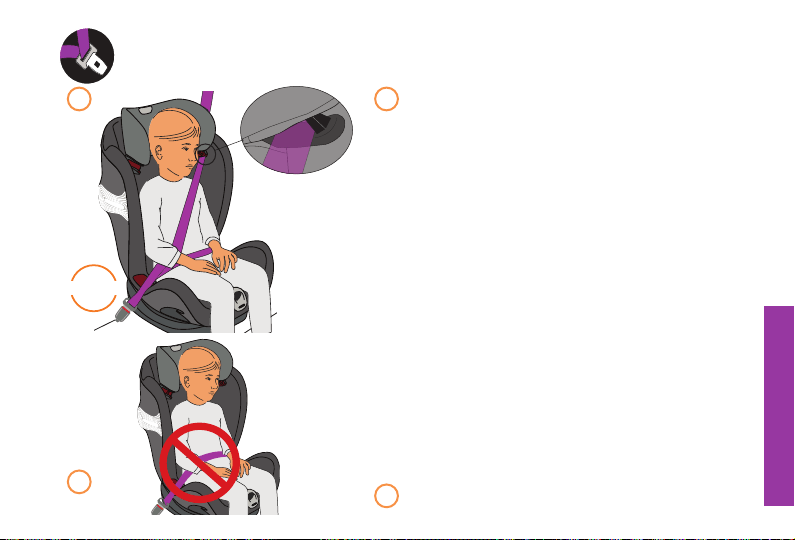
215
UTILIZACIÓN DEL SISTEMA DE SUJECIÓN INFANTIL EN EL MODO DE ASIENTO ELEVADOR
Coloque el asiento elevador en el asiento del vehículo
ORIENTADO HACIA ADELANTE con el cinturón de
seguridad de regazo/hombro. La base debe estar lo
más plana posible en el asiento del vehículo, tocando el
respaldo y la parte inferior del mismo.
IMPORTANTE: usted puede usar la correa de sujeción y
los conectores de anclaje inferior para fijar este asiento
elevador al asiento del vehículo siempre y cuando la
posición del asiento elevador en el vehículo y/o el ajuste
resultante del cinturón de seguridad del vehículo sobre el
niño no se afectan.
Cuando instale el asiento elevador, coloque al niño en el
asiento elevador y abroche la hebilla hasta escuchar un
chasquido. Siempre pase la parte del cinturón de hombro
del vehículo a través de la guía del cinturón de hombro
como se muestra.
Ajuste el soporte de la cabecera de manera que el
cinturón para el hombro del vehículo quede entre el
cuello y el hombro del niño. Los cinturones de seguridad
de los vehículos deben estar planos y no deben estar
torcidos.
NUNCA use solo el cinturón para regazo.
6 6
7
7
Guía del
cinturón para
el hombro
MODO DE ASIENTO ELEVADOR
¡CLIC!
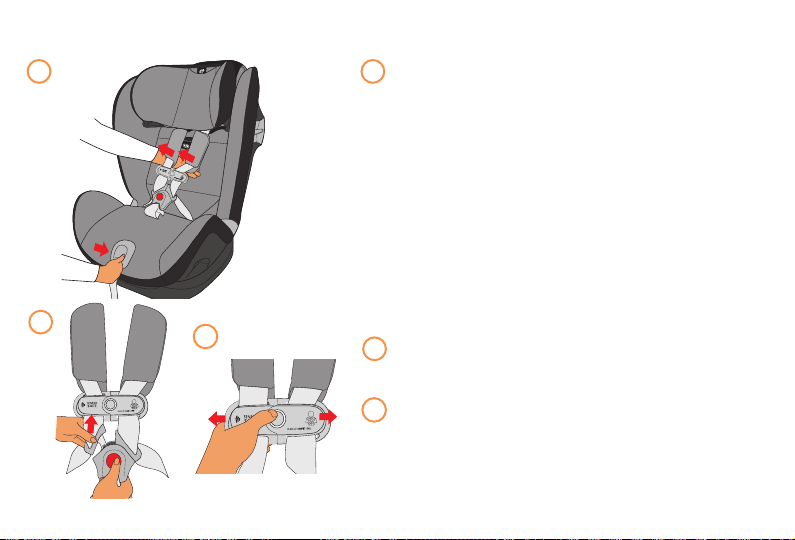
216
6
5
4
3
2
1
CÓMO ASEGURAR AL NIÑO CON EL ARNÉS
CÓMO ASEGURAR AL NIÑO
Afloje el arnés presionando firmemente hacia abajo
el botón de ajuste del arnés mientras jala hacia
adelante ambas correas al nivel del hombro.
Presione el botón rojo en la hebilla del arnés para
liberar las lengüetas.
Separe el clip para el pecho y separe las correas.
1
2
3
1
2
3
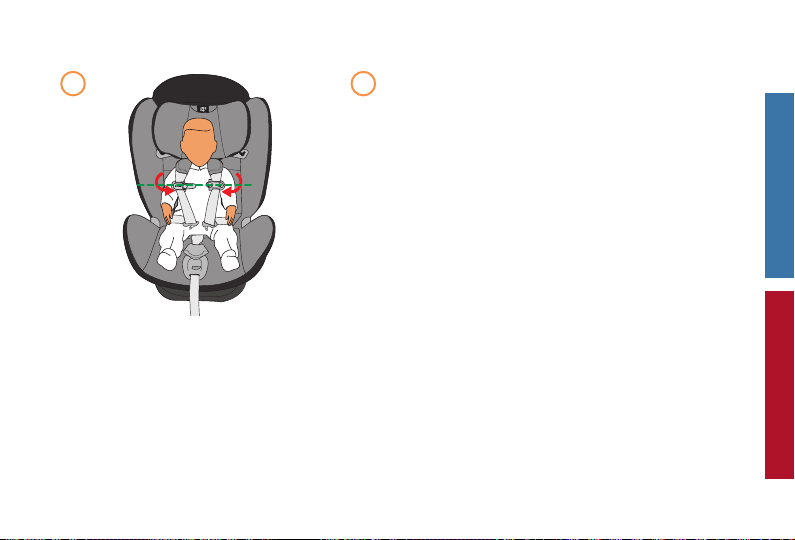
217
Coloque al niño en el sistema de sujeción infantil con la
espalda y el trasero bien apoyados contra el sistema de
sujeción. Coloque las correas del arnés sobre los hombros
del niño y alrededor de la cintura del niño.
Las correas deben quedar planas, sin torceduras y centradas
entre los hombros del niño.
Asegúrese de que no haya torceduras en las correas del
arnés. Coloque el clip para el pecho al nivel de las axilas,
como se muestra.
Nunca sujete al niño en el sistema de sujeción infantil con el
niño vestido con ropa voluminosa o pesada. La ropa pesada
puede impedir que el arnés quede ceñido correctamente
alrededor del niño.
CÓMO ASEGURAR AL NIÑO CON EL ARNÉS
Nunca sujete al niño en el sistema de sujeción infantil con el niño envuelto en una manta. Para mantener al niño
abrigado, coloque una manta sobre el niño DESPUÉS de que haya afianzado y ceñido el arnés correctamente
alrededor del niño.
Para garantizar un mejor ajuste para los bebés más pequeños, es posible que necesite usar el inserto para recién
nacido. Nunca coloque acojinado adicional debajo o detrás del niño. Utilice únicamente el inserto para bebé.
Si la correa de la entrepierna queda debajo del niño, se deberá ajustar. Consulte la página 162 para la „Correa de la
entrepierna“.
CLIP PARA
EL PECHO AL
NIVEL DE LA
AXILA
4 4
ORIENTADO HACIA ADELANTE
ORIENTADO HACIA ATRÁS
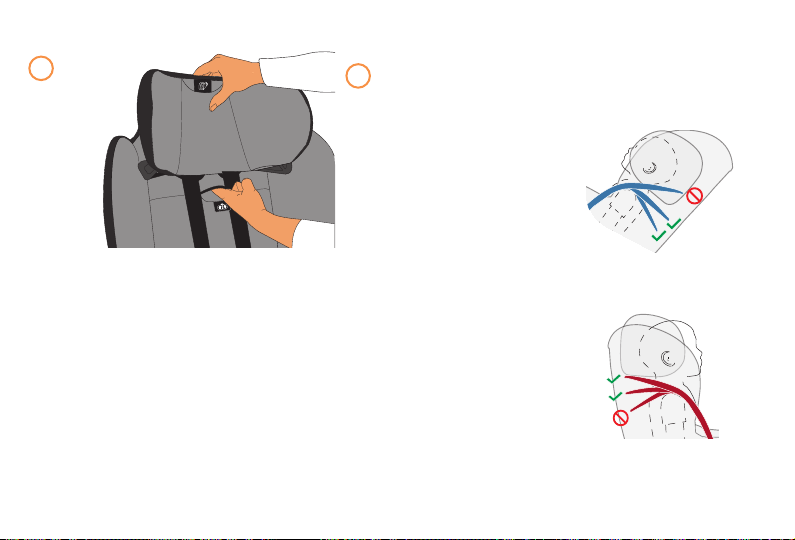
218
Ajuste la altura de la cabecera de manera que esté
correctamente colocada (pág. 163).
La cabeza del niño debe estar centrada en la cabecera.
ORIENTADO HACIA ATRÁS -
Coloque las correas del arnés
EN o APENAS POR DEBAJO
de los hombros del niño.
ORIENTADO HACIA ADELANTE -
Coloque las correas del arnés
EN o APENAS POR ARRIBA
de los hombros del niño.
CÓMO ASEGURAR AL NIÑO CON EL ARNÉS
5
5

219
CÓMO ASEGURAR AL NIÑO CON EL ARNÉS
NOTA: si se utilizan las
posiciones inferiores de la
cabecera/arnés, asegúrese de
que la parte inferior de la solapa
de la cabecera esté detrás de la
solapa del inserto para bebé.
1
2
4
3
6
5
ORIENTADO HACIA ADELANTE
ORIENTADO HACIA ATRÁS

220
A
R
M
P
I
T
L
E
V
E
L
Abroche la hebilla insertando las lengüetas de una
en una en la hebilla del arnés hasta que escuche
un CLIC. Jale hacia arriba firmemente ambas
lengüetas de la hebilla para asegurarse de que estén
abrochadas de forma segura.
COMPRUEBE que la hebilla funcione correctamente y
se mantenga libre de suciedad y residuos.
Asegúrese de que las correas del arnés no estén
torcidas.
Abroche el clip para el pecho abrochando ambos
lados; escuche un clic y deslícelo hasta el nivel de la
axila.
Empuje el clip para el pecho y las hombreras hacia
abajo, lejos del cuello del niño y en dirección a la
hebilla del arnés. Jale hacia arriba ambas correas
para el hombro para eliminar toda la holgura de las
caderas del niño.
6
A
R
M
P
I
T
L
E
V
E
L
CÓMO ASEGURAR AL NIÑO CON EL ARNÉS
6
¡CLIC!
¡CLIC!
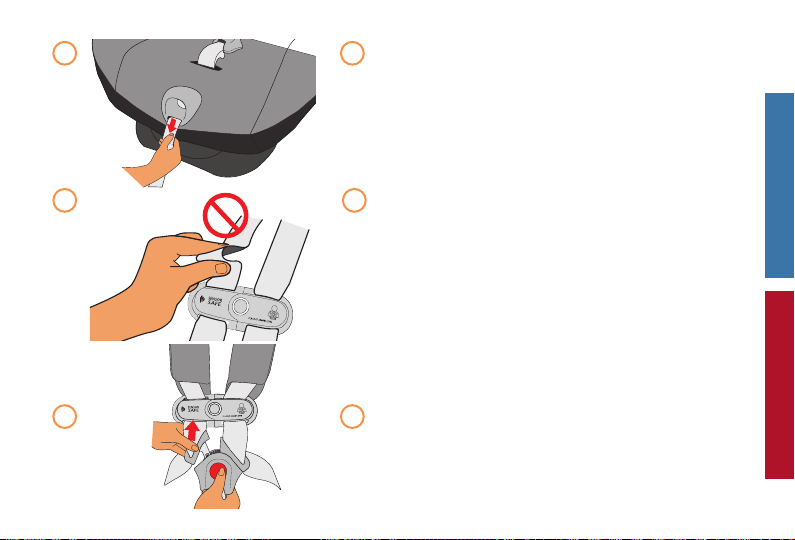
221
Jale lentamente la correa del ajustador para apretar las
correas del hombro mientras sostiene el clip para el pecho
de manera que no se suba al cuello del niño.
Si puede pellizcar la correa en los hombros del niño, el arnés
está demasiado flojo. Ajuste según sea necesario.
Para apretarlo, jale la correa del ajustador del arnés hasta
que el arnés quede ceñido al niño. Una correa ceñida no
debe tener holgura. Queda en una línea relativamente recta
sin estar floja. No presiona la piel del niño ni empuja el
cuerpo del niño a una posición poco natural.
Para aflojar el arnés, presione firmemente hacia abajo el
botón de ajuste del arnés mientras jala hacia adelante
ambas correas del arnés al nivel del hombro.
Para retirar al niño del asiento, presione el botón central en
el clip para el pecho y la hebilla, y sepárelos.
CÓMO ASEGURAR AL NIÑO CON EL ARNÉS
77
88
9 9
ORIENTADO HACIA ADELANTE
ORIENTADO HACIA ATRÁS

222
La Administración Federal de Aviación (FAA) recomienda asegurar al niño al viajar en avión en un sistema de
sujeción infantil apropiado, en función del peso y el tamaño del niño. Puede ocurrir turbulencia con poca o ninguna
advertencia. Cuando se produce turbulencia, el lugar más seguro para el niño es en un sistema de sujeción infantil
correctamente instalado, no en el regazo de un adulto o en el asiento del avión con el cinturón de seguridad.
Mantener al niño en un sistema de sujeción infantil durante el vuelo ayudará a asegurar que la familia llegue a
salvo a su destino.
La FAA recomienda que un niño que pesa:
• más de 40 lb (18 kg), use el cinturón de seguridad del asiento del avión;
• menos de 20 lb (9 kg), use un sistema de sujeción infantil ORIENTADO HACIA ATRÁS; y
• de 20 a 40 lb (9 a 18 Kg), use un sistema de sujeción infantil ORIENTADO HACIA ADELANTE.
Tome nota de que estas recomendaciones de la FAA pueden ser distintas a las aplicables al uso del sistema de
sujeción infantil en un vehículo motorizado.
NOTA: para obtener información más específica, verifique las normas de su aerolínea antes de volar.
CÓMO ASEGURAR EL SISTEMA DE SUJECIÓN INFANTIL EN UN AVIÓN

223
Cinturón de
seguridad del
avión
1. COLOQUE EL SISTEMA DE
SUJECIÓN INFANTIL EN EL
ASIENTO DE UN AVIÓN.
Ajuste el sistema de sujeción infantil para el uso
ORIENTADO HACIA ATRÁS Consulte la página 174.
Coloque el sistema de sujeción infantil en el asiento del
avión ORIENTADO HACIA ATRÁS, como se muestra.
NOTA: no utilice el bloqueo con el cinturón de seguridad del avión, ya que sólo se puede utilizar con los
sistemas de cinturón para regazo y hombro.
IMPORTANTE: antes de instalar el sistema de sujeción infantil, asegúrese de que el asiento del avión esté
por completo en la posición vertical.
NOTA: después del aterrizaje, consulte las páginas 170 - 189 para la instalación en el vehículo.
6
5
4
3
2
1
INSTALACIÓN DEL SISTEMA DE SUJECIÓN INFANTIL ORIENTADO HACIA ATRÁS EN UN AVIÓN
ORIENTADO HACIA ATRÁS
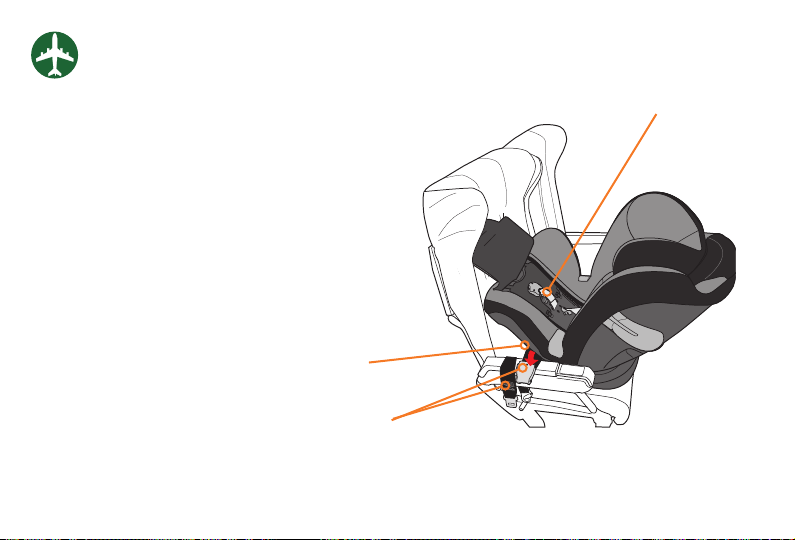
224
Correa de la
entrepierna
Cinturón de seguridad
del avión
Abertura para la trayectoria
del cinturón en la posición
ORIENTADO HACIA ATRÁS
2. PASE EL CINTURÓN DE SEGURIDAD DEL
AVIÓN A TRAVÉS DE LA TRAYECTORIA
DEL CINTURÓN ORIENTADO HACIA
ATRÁS.
Pase la hebilla del cinturón de seguridad del avión a través
de la abertura de la trayectoria del cinturón de seguridad en
la posición ORIENTADO HACIA ATRÁS en un lado y continúe
a través de la abertura en el lado opuesto del sistema de
sujeción infantil, como se muestra.
Pase el cinturón de seguridad del avión por DEBAJO del
acojinado del asiento y por la parte delantera de la correa
de la entrepierna cuando la correa de la entrepierna se
encuentre en la posición orientado hacia atrás o adelante.
INSTALACIÓN DEL SISTEMA DE SUJECIÓN INFANTIL ORIENTADO HACIA ATRÁS EN UN AVIÓN
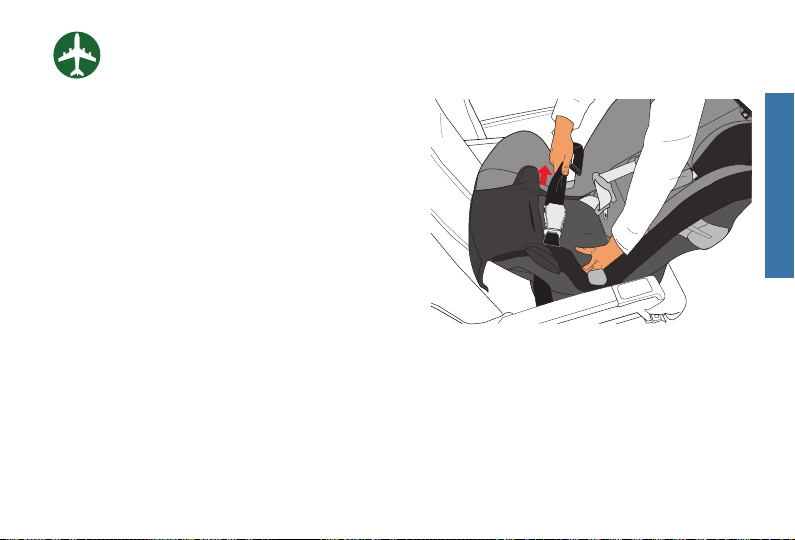
225
3. ABROCHE EL CINTURÓN DE SEGURIDAD
DEL AVIÓN Y LUEGO ELIMINE TODA LA
HOLGURA DEL CINTURÓN.
El cinturón de seguridad del avión debe estar lo más
apretado posible. Usando todo su peso, empuje el sistema
de sujeción infantil firmemente contra el asiento del avión,
mientras jala del cinturón de seguridad para apretarlo. Pase
el exceso de la correa del cinturón de seguridad a través
de la abertura de la trayectoria del cinturón en la posición
ORIENTADO HACIA ATRÁS.
6
5
4
3
2
1
INSTALACIÓN DEL SISTEMA DE SUJECIÓN INFANTIL ORIENTADO HACIA ATRÁS EN UN AVIÓN
ORIENTADO HACIA ATRÁS

226
Trayectoria del cinturón para uso
ORIENTADO HACIA ATRÁS
6
5
4
3
2
1
5
4
INSTALACIÓN DEL SISTEMA DE SUJECIÓN INFANTIL
ORIENTADO HACIA ATRÁS EN UN AVIÓN
6
4. COMPRUEBE SU TRABAJO.
ASEGÚRESE de que el cinturón del asiento del avión
esté apretado y bloqueado. Si puede mover el sistema
de sujeción infantil más de 1 in (2.5 cm) de lado a lado o
de adelante hacia atrás en la trayectoria del cinturón en
la posición ORIENTADO HACIA ATRÁS, el cinturón no
está bien apretado y DEBERÁ instalarlo de nuevo hasta
que el cinturón esté apretado.
5. ASEGURE AL NIÑO CON ARNÉS.
Coloque al niño en el sistema de sujeción y siga la
sección „Cómo asegurar al niño con el arnés“, vea las
páginas 216-221.
6. DESABROCHE EL CLIP PARA EL PECHO
SENSORSAFE DURANTE EL RODAJE, EL
DESPEGUE Y EL ATERRIZAJE.
Para cumplir con la regulación de la FAA para disposi-
tivos electrónicos portátiles (PED), el clip para el pecho
SensorSafe DEBE estar desabrochado durante el
rodaje, el despegue y el aterrizaje. El clip para el pecho
SensorSafe se puede abrochar durante el vuelo o o una
vez que el avión haya aterrizado de manera segura y
la tripulación de vuelo permita el uso de dispositivos
electrónicos.
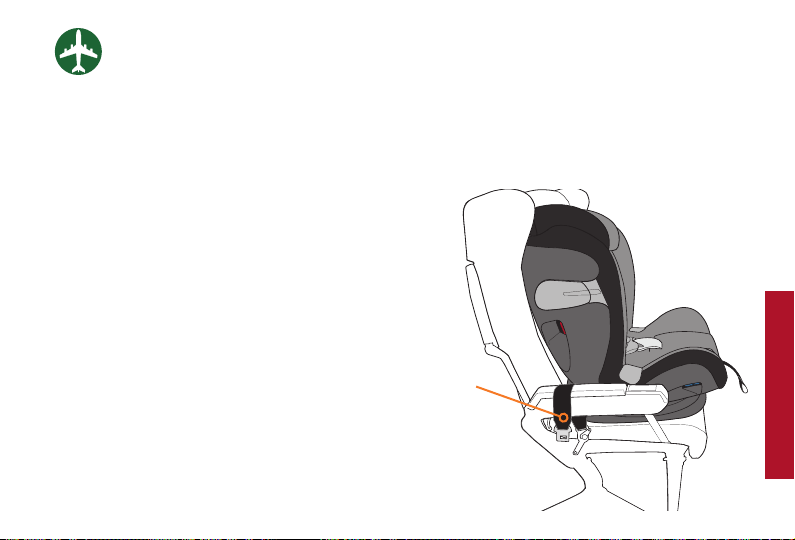
227
1. COLOQUE EL SISTEMA DE SUJECIÓN
INFANTIL EN POSICIÓN.
Ajuste el sistema de sujeción infantil a su posición
más recta, luego colóquelo en el asiento del avión
ORIENTADO HACIA ADELANTE, como se muestra.
NO utilice el bloqueo con el cinturón de seguridad del avión, ya que sólo se puede utilizar con los
sistemas de cinturón para regazo y hombro.
IMPORTANTE: antes de instalar el sistema de sujeción infantil, asegúrese de que el asiento del avión
esté por completo en la posición vertical.
NOTA: después del aterrizaje, consulte las páginas 190-211 para la instalación en el vehículo.
Cinturón de
seguridad del
avión
6
5
4
3
2
1
INSTALACIÓN DEL SISTEMA DE SUJECIÓN INFANTIL
ORIENTADO HACIA ADELANTE EN UN AVIÓN
ORIENTADO HACIA ADELANTE
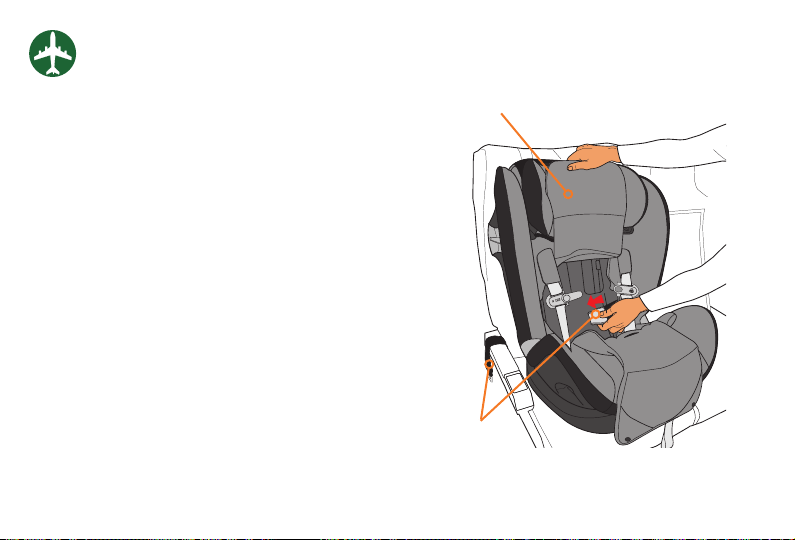
228
Cinturón de seguridad
del avión
Solapa de acceso
2. PASE EL CINTURÓN DE SEGURIDAD
DEL AVIÓN A TRAVÉS DE LA
TRAYECTORIA DEL CINTURÓN
ORIENTADO HACIA ADELANTE.
Mueva el arnés del sistema de sujeción infantil a un
lado y levante la solapa de acceso. Pase la hebilla del
cinturón de seguridad del avión a través de la abertura
de la trayectoria del cinturón de seguridad en posición
ORIENTADO HACIA ADELANTE en un lado y continúe a
través de la abertura en el lado opuesto del sistema de
sujeción infantil, como se muestra.
INSTALACIÓN DEL SISTEMA DE SUJECIÓN INFANTIL
ORIENTADO HACIA ADELANTE EN UN AVIÓN
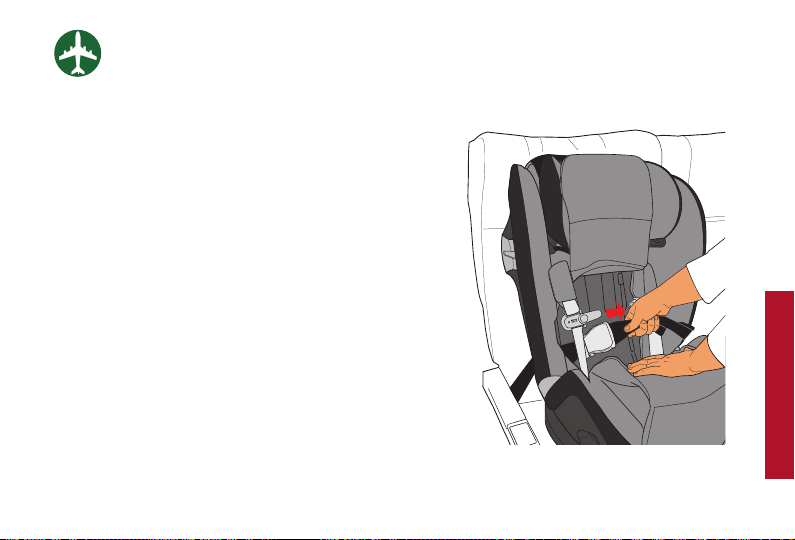
229
NOTA: debido a que los cinturones de seguridad de los
aviones tienen una longitud fija, la hebilla del cinturón
podría quedar detrás de la espalda del niño después
de apretar el cinturón. Para comodidad del niño, CYBEX
recomienda acojinar la espalda del niño colocando una
almohada pequeña o cobertor o chaqueta doblados,
sobre la hebilla del cinturón.
Recuerde quitar este acojinado cuando lo retire del avión
y lo instale en su vehículo automotor después de su vuelo.
3. ABROCHE EL CINTURÓN DE
SEGURIDAD DEL AVIÓN Y LUEGO
ELIMINE TODA LA HOLGURA DEL
CINTURÓN.
El cinturón de seguridad del avión debe estar lo más
apretado posible. Usando todo su peso, empuje el sistema
de sujeción infantil firmemente contra el asiento del
avión, mientras jala del cinturón de seguridad del avión
para apretarlo. Pase el exceso de la correa del cinturón
de seguridad a través de la abertura de la trayectoria del
cinturón en la posición ORIENTADO HACIA ADELANTE.
INSTALACIÓN DEL SISTEMA DE SUJECIÓN INFANTIL
ORIENTADO HACIA ADELANTE EN UN AVIÓN
ORIENTADO HACIA ADELANTE

230
Trayectoria del cinturón
en la posición
ORIENTADO HACIA
ADELANTE
4. COMPRUEBE SU TRABAJO.
ASEGÚRESE de que el cinturón del asiento del avión
esté apretado y bloqueado. Si puede mover el sistema
de sujeción infantil más de 1 in (2.5 cm) de lado a lado o
de adelante hacia atrás en la trayectoria del cinturón en
la posición ORIENTADO HACIA ADELANTE, el cinturón
no está bien apretado y DEBERÁ instalarlo de nuevo
hasta que el cinturón esté apretado.
6
5
4
3
2
1
INSTALACIÓN DEL SISTEMA DE SUJECIÓN INFANTIL
ORIENTADO HACIA ADELANTE EN UN AVIÓN
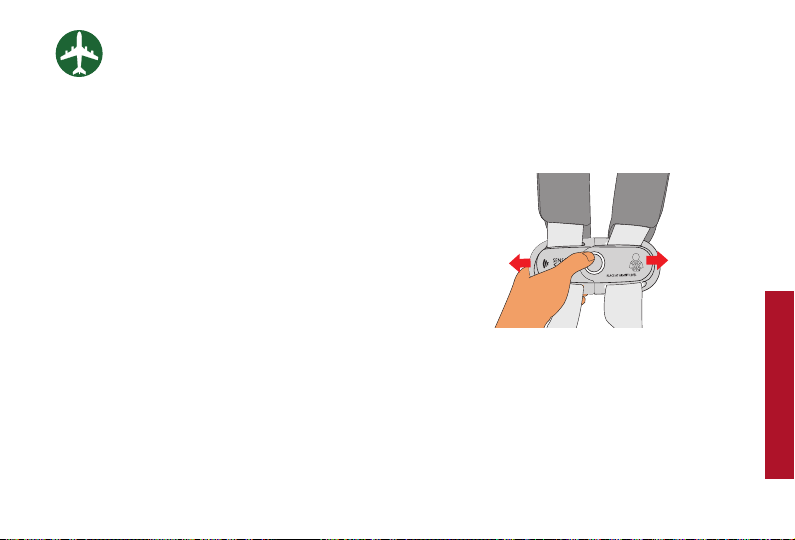
231
5. ASEGURE AL NIÑO CON ARNÉS.
Coloque al niño en el sistema de sujeción y siga la
sección „Cómo asegurar al niño con el arnés“, vea las
páginas 216-221.
INSTALACIÓN DEL SISTEMA DE SUJECIÓN INFANTIL
ORIENTADO HACIA ADELANTE EN UN AVIÓN
6. DESABROCHE EL CLIP PARA EL
PECHO SENSORSAFE DURANTE EL
RODAJE, EL DESPEGUE Y EL ATERRIZAJE.
Para cumplir con la regulación de la FAA para disposi-
tivos electrónicos portátiles (PED), el clip para el pecho
SensorSafe DEBE estar desabrochado durante el
rodaje, el despegue y el aterrizaje. El clip para el pecho
SensorSafe se puede abrochar durante el vuelo o o una
vez que el avión haya aterrizado de manera segura y
la tripulación de vuelo permita el uso de dispositivos
electrónicos.
ORIENTADO HACIA ADELANTE
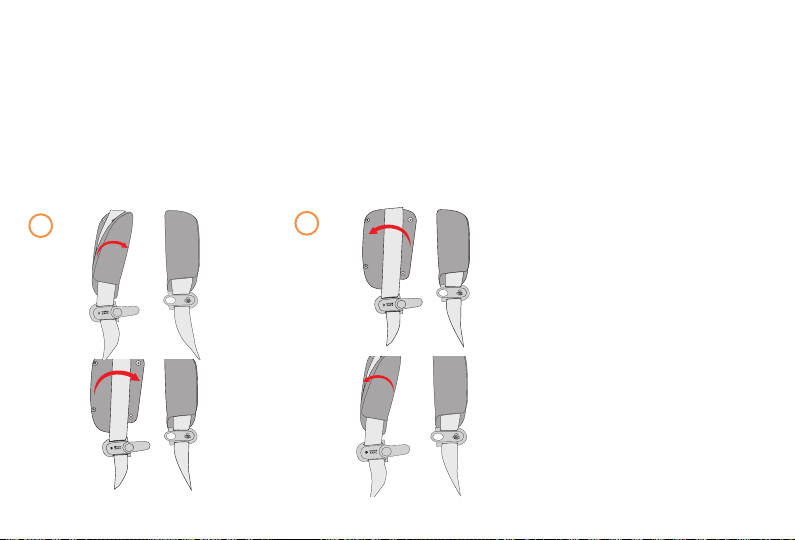
232
1. CÓMO RETIRAR LAS HOMBRERAS
Desabroche y retire las hombreras, como se muestra.
2. INSTALACIÓN DE LAS HOMBRERAS
Vuelva a colocar las hombreras plegando los broches sobre la correa del arnés. Asegure ambos broches.
Asegúrese de que estén orientados como se muestra.
1
2
CUIDADO Y LIMPIEZA

233
Cómo retirar la cubierta del asiento
Para retirar, por favor siga estos pasos:
1. Desabroche la hebilla del arnés.
2. Desabroche el clip para el pecho.
3. Si usa el inserto para recién nacido, retírelo.
4. Si utiliza la cubierta de la hebilla, retírela.
5. Desabroche las hombreras.
6. Ajuste la cabecera a la posición más alta.
7. Desenganche la parte posterior de la cabecera.
8. Desenganche los dos broches que crean la ranura
del arnés.
9. Levante el acojinado del respaldo y la cubierta de
la cabecera.
10. Desenganche cada lado del acojinado trasero y
tire hacia adelante.
11. Tire del acojinado del asiento hacia fuera de la
cubierta de ajuste del arnés.
12. Comenzando por la parte inferior del asiento, tire
del acojinado del asiento para alejarlo del sistema
de sujeción infantil.
Instalación de la cubierta del asiento
Invierta las instrucciones de desmontaje para volver a
instalar el acojinado del asiento.
El sistema de arnés integrado no se puede retirar del asiento. NUNCA quite o intente quitar partes del
sistema de arnés.
¡ADVERTENCIA! El sistema de sujeción infantil no se debe usar NUNCA sin el acojinado del asiento.
NO dañe, retire ni deseche ningún acojinado de espuma EPS.
CUIDADO Y LIMPIEZA
GENERAL

234
LIMPIEZA DE MANCHAS
Limpie las manchas de las cubiertas del asiento, las
hombreras, el acojinado de la hebilla y el inserto
para bebé con un paño limpio según sea necesario
usando detergente suave y agua.
INSTRUCCIONES DE LAVADO
Todas las partes de la cubierta del asiento se pueden
lavar de la siguiente manera:
• Lavar en lavadora por separado con agua FRÍA,
ciclo para ropa delicada, detergente suave
• Dejar escurrir
PARA EVITAR QUE ENCOJA:
• NO lave en lavadora con agua tibia o caliente
NO SECAR EN LA SECADORA
• NO planche
• NO use blanqueador
Acojinado de la hebilla
Hombreras
Inserto para bebé
Cubierta de la cabecera
CUIDADO Y LIMPIEZA
Cubierta del asiento

235
CUIDADO Y LIMPIEZA
SensorSafe clip para el pecho
• NO LO SUMERJA EN EL AGUA. Use un paño
para limpiar con jabón suave y agua tibia.
Hebilla del arnés
Es posible que se acumulen comida, bebidas u otros
desechos dentro de la hebilla del arnés, lo que
puede afectar el funcionamiento correcto.
• NO SUMERJA LA CORREA DE LA HEBILLA
EN AGUA.
• Limpie con un paño húmedo.
• NO use blanqueador, detergentes ni lubricantes.
• Cuando inserte las lengüetas de la hebilla,
asegúrese de que escucha un CLIC, que indica
que la hebilla está funcionando correctamente.
• NO use el sistema de sujeción infantil si las
lengüetas de la hebilla NO hacen clic en la
hebilla. Intente limpiar la hebilla. Si esto no
soluciona el problema, llame a servicio al cliente
al 1-877-242-5676 antes de usar el sistema de
sujeción infantil.
Correas del arnés
• NUNCA SUMERJA LAS CORREAS DEL SISTEMA
DE ANCLAJE INFERIOR O DEL ARNÉS.
• Limpie con esponja usando agua tibia y jabón
suave.
• Deje secar al aire.
• NO las planche.
Conectores de anclaje inferior
• Limpie con esponja o enjuague a fondo los
conectores de anclaje inferior con agua tibia.
• Deje secar por completo.
• Haga una prueba conectando y desconectando
hasta escuchar un CLIC después de acoplar cada
conector al anclaje inferior. Si no se escuchan clics,
repita el procedimiento de limpieza.
Partes de plástico
Use un paño para limpiar con jabón suave y agua tibia.
GENERAL

236
¿Leyó y comprendió este manual del propietario y todas las etiquetas que se encuentran en este sistema de
sujeción infantil?
¿El sistema de sujeción infantil está en la posición correcta (ORIENTADO HACIA ATRÁS/ORIENTADO HACIA
ADELANTE/MODO DE ASIENTO ELEVADOR) para el tamaño del niño?
¿Es correcto el ángulo de reclinado del asiento de acuerdo con el indicador de nivel?
¿Comprobó que no haya superficies calientes en días soleados?
¿Está el arnés ajustado en la posición correcta para el tamaño del niño con el arnés EN o APENAS POR DEBAJO
de los hombros del niño (ORIENTADO HACIA ATRÁS) o EN o APENAS POR ARRIBA de los hombros del niño
(ORIENTADO HACIA ADELANTE)?
¿Está el arnés ceñido alrededor del niño y afianzado correctamente con el clip para el pecho colocado al nivel de
las axilas?
¿Se usa la correa de sujeción cuando se usa el asiento ORIENTADO HACIA ADELANTE?
Si el sistema de sujeción infantil está junto a una puerta o panel del vehículo, ¿está extendido el dispositivo L.S.P.
adyacente?
¿Cumple el niño las Pautas de uso del asiento para el niño (pág. 154-159)?
¿Es la fecha de hoy anterior a la fecha “Do Not Use After” (No usar después del) que se indica en el sistema de
sujeción infantil?
Si respondió SÍ a todas estas preguntas, está listo para viajar y por favor ¡MANEJE CON CUIDADO!
LISTA DE VERIFICACIÓN DE SEGURIDAD

237
NOTAS
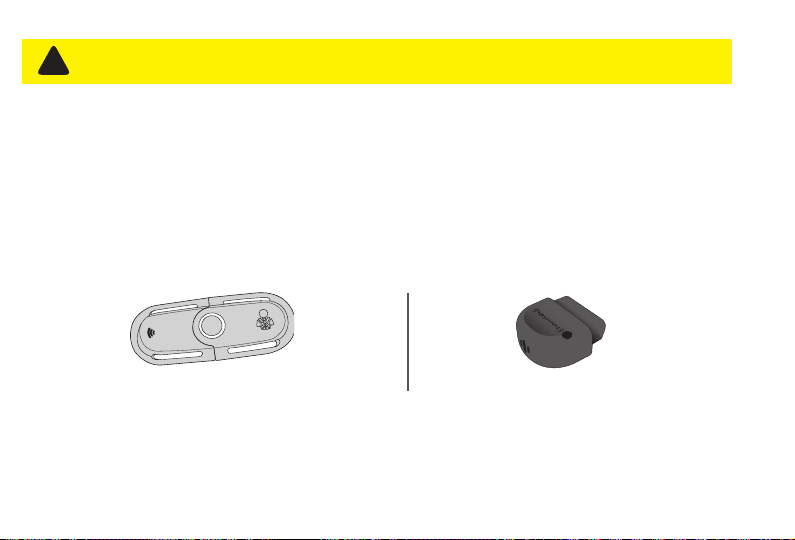
238
Afiance al niño en el sistema de sujeción infantil como lo haría normalmente. El enchufe del receptor SensorSafe
monitorea el transmisor del clip para el pecho y el vehículo. Cuando llegue a su destino y apague su vehículo,
el sistema SensorSafe hace sonar una serie de tonos suaves que le recuerdan que su bebé está en el vehículo.
Instálelo una vez y SensorSafe estará siempre listo para alertarlo.
INFORMACIÓN IMPORTANTE DE USO
• El sistema SensorSafe consiste en dos componentes: (1) El transmisor del clip para el pecho y (2) el enchufe
receptor. El sistema no funcionará a menos que ambos componentes estén presentes en el vehículo con el
receptor instalado en el puerto OBDII del vehículo (página 242).
• Este sistema funciona con la aplicación SensorSafe que se puede descargar de: App Store
®
o Google Play
™
.*
* Las marcas comerciales son propiedad de sus respectivos dueños.
PLACE AT ARMPIT LEVEL
SENSOR
SAFE
TRANSMISOR DEL CLIP PARA EL PECHO ENCHUFE RECEPTOR
INFORMACIÓN GENERAL ACERCA DE SENSORSAFE
®
Este producto contiene imanes. Antes de usarlo, consulte con el médico familiar acerca de la compatibilidad de este
producto con marcapasos y dispositivos similares.
¡ADVERTENCIA!
!
Pueden ocurrir LESIONES GRAVES
o la MUERTE.

239
• El clip para el pecho SensorSafe está diseñado para entrar en modo de suspensión después de estar abrochado
durante 12 horas. Aunque los viajes de 12 horas sin parar en un vehículo son poco comunes y no se recomiendan,
el clip para el pecho debe abrirse y cerrarse después de 12 horas para reactivar el sistema SensorSafe.
• El enchufe receptor se ha probado SOLO con vehículos modelo 2008 o posteriores comprados en EUA o Canadá.
Si desea usar el clip para el pecho SensorSafe con un vehículo híbrido o eléctrico, deberá descargar la aplicación
de App Store
®
o Google Play
™
.* Se pueden comprar enchufes receptores adicionales para vehículos adicionales. Si
tiene preguntas, descargue la aplicación SensorSafe o comuníquese con CYBEX al: 1-877-242-5676 o en línea en:
http://cybex-online.com/us/contact.html.
USO DE LA BATERÍA
• PARA CONSERVAR LA VIDA ÚTIL DE LA BATERÍA, SIEMPRE ALMACENE EL CLIP PARA EL PECHO SENSORSAFE
EN LA POSICIÓN DESABROCHADA.
• El clip para el pecho se envía con una batería de botón de litio instalada, que se puede reemplazar.
• SensorSafe está diseñado para alertarlo si la batería está baja. Si la batería del clip para el pecho se está
agotando, el receptor SensorSafe sonará una alarma de “batería baja” y la luz LED parpadeará 10 veces cuando el
clip para el pecho esté abrochado. Esta alarma de “batería baja” tendrá un sonido diferente de los sonidos agudos
que escucha normalmente al activar el sistema SensorSafe. El clip para el pecho SensorSafe usa una batería
de botón de litio Panasonic
™
CR2032. Si tiene problemas con el producto SensorSafe, comuníquese con CYBEX
al: 1-877-242-5676 o en línea en: http://cybex-online.com/us/contact.html para pedir baterías o partes de
repuesto.
INFORMACIÓN GENERAL ACERCA DE SENSORSAFE
®
* Las marcas comerciales son propiedad de sus respectivos dueños.

240
Tecnología SensorSafe®
¿Tiene preguntas? ¿Comentarios?:
Visítenos en: http://cybex-online.com/us/contact.html o llame a CYBEX al: 1-877-242-5676
INFORMACIÓN GENERAL ACERCA DE SENSORSAFE
®
Este dispositivo cumple los requisitos de SAE J3005.
CERTIFICADO POR LA FCC:
Clip para el pecho modelo: SOSR2, ID de la FCC: 2ABS2-SOSR3
Enchufe receptor modelo: SS2, ID de la FCC: 2ABS2-SS2
Este dispositivo cumple la parte 15 de las reglas de la FCC. Su operación está sujeta a las dos condiciones siguientes:
1. Este dispositivo no puede causar interferencia perjudicial.
2. Este dispositivo debe aceptar cualquier interferencia recibida, incluso interferencias que puedan causar una
operación no deseada.
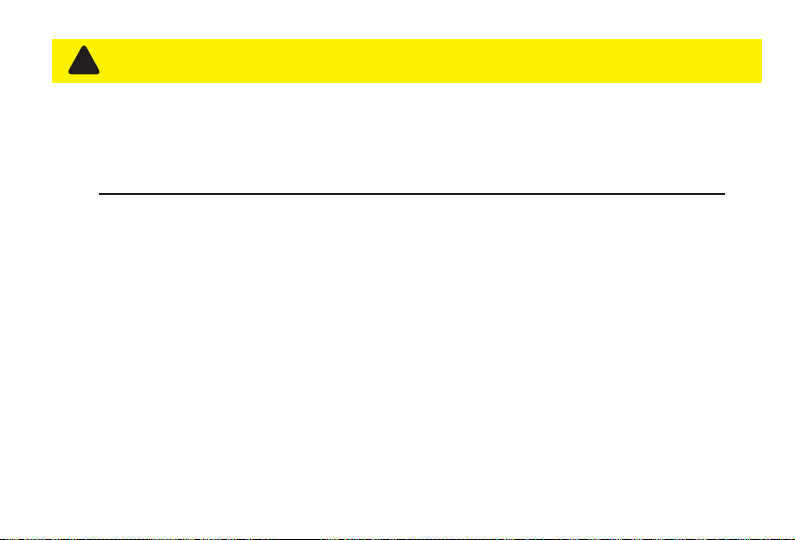
241
Este equipo genera, usa y puede irradiar energía de radiofrecuencia y, si no se instala y usa de acuerdo con
las instrucciones, puede causar interferencia perjudicial en las comunicaciones de radio. No obstante, no hay
garantía de que no se producirá interferencia en una instalación particular. Si este equipo causa interferencia
perjudicial en la recepción de radio o televisión, lo cual puede comprobarse apagando y volviendo a
encender el equipo, se sugiere al usuario que trate de corregir la interferencia aplicando una o más de las
siguientes medidas:
• Cambiar la orientación o la ubicación de la antena receptora.
• Aumentar la separación entre el equipo y el receptor.
• Conectar el equipo en un tomacorriente de un circuito diferente al cual está conectado el receptor.
• Solicitar ayuda al distribuidor o a un técnico experimentado en radio y televisión.
Clip para el pecho:
Declaración de advertencia de RF: El dispositivo se evaluó y se determinó que cumple los requisitos
generales de exposición a RF. El dispositivo se puede usar sin restricciones en condiciones de exposición
portátil.
INFORMACIÓN GENERAL ACERCA DE SENSORSAFE
®
Los cambios o modificaciones que no haya aprobado expresamente la parte responsable del cumplimiento podrían
invalidar la autoridad del usuario para operar este equipo.
NOTA: Este equipo se sometió a pruebas y se determinó que cumple con los límites de un dispositivo digital clase
B, de conformidad con la parte 15 de las reglas de la FCC. Estos límites están diseñados para brindar protección
razonable contra interferencias perjudiciales en una instalación residencial.
¡ADVERTENCIA!
!
Pueden ocurrir LESIONES GRAVES
o la MUERTE.
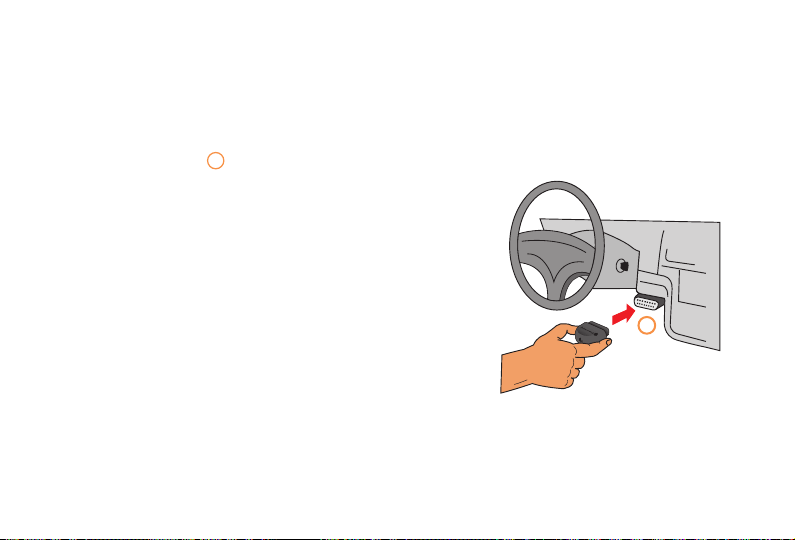
242
a
CÓMO USAR SENSORSAFE
®
Enchufe receptor:
Declaración de exposición a la radiación de la FCC: Este equipo cumple los límites de exposición a la radiación de la FCC
indicados para un ambiente no controlado. Este equipo se debe instalar y operar con una distancia mínima de 20 cm
(7.87 in) entre el radiador y el cuerpo.
1. INSTALE EL RECEPTOR SENSORSAFE.
Localice el puerto 16PIN OBDII
a
en el vehículo. Consulte el manual del
propietario del vehículo para obtener información sobre la ubicación.
Enchufe el receptor SensorSafe. Si no puede localizar el manual del
vehículo, la aplicación SensorSafe puede contener información sobre la
ubicación del puerto 16PIN OBDII para su vehículo.
El receptor SensorSafe emitirá un sonido cuando se comunique con
la red del vehículo por primera vez. En algunos vehículos esto ocurre
inmediatamente después de instalar el receptor SensorSafe. En otros
vehículos el tono no se escuchará hasta que el vehículo arranque.
Esta señal de inicialización solo ocurre una vez después de la instalación.
2. ENCIENDA EL VEHÍCULO.
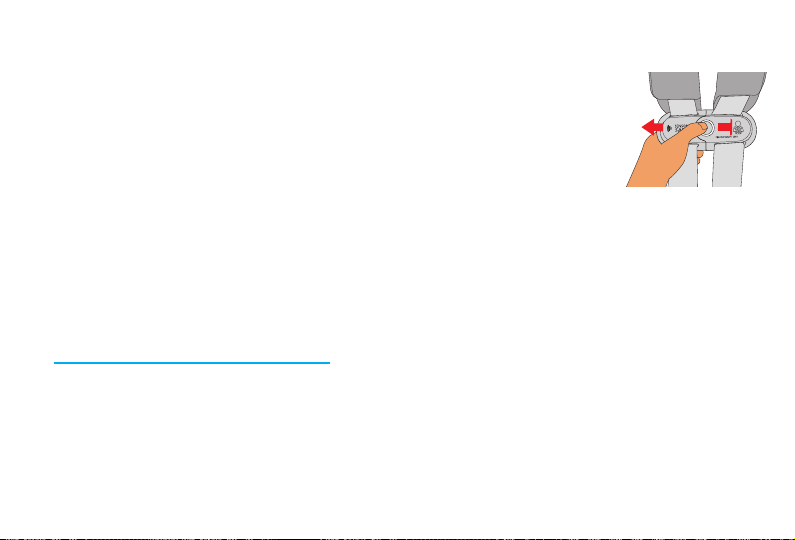
243
CÓMO USAR SENSORSAFE
®
3. DESABROCHE Y ABROCHE EL CLIP PARA EL PECHO SENSORSAFE.
El clip para el pecho SensorSafe está diseñado para entrar en modo de suspensión si per-
manece abrochado durante más de 12 horas. Para restablecer, o volver a activar el clip para
el pecho, desabróchelo y vuelva a abrocharlo. Cuando haga esto, la luz LED azul parpadeará
dos veces.
PARA CONSERVAR LA VIDA ÚTIL DE LA BATERÍA, SIEMPRE ALMACENE EL CLIP PARA EL
PECHO SENSORSAFE EN LA POSICIÓN DESABROCHADA.
4. CONDUZCA EL VEHÍCULO.
El receptor SensorSafe está diseñado para responder después de que el vehículo se conduzca a una velocidad de
8 km (5 mi) por hora o más.
5. ESTACIONE EL VEHÍCULO Y APAGUE EL ENCENDIDO.
2 segundos después de estacionar el vehículo y apagar el encendido, escuchará el recordatorio SensorSafe, para
avisarle de que su bebé está en el vehículo. (Si no escucha el tono de recordatorio, pruebe SensorSafe siguiendo
de nuevo los pasos 1 a 5. Comuníquese con CYBEX al: 1-877-242-5676 o en línea en:
http://cybex-online.com/us/contact.html si el tono de recordatorio sigue sin activarse.
NOTA: El receptor SensorSafe también activará la alarma si el niño se desabrocha el clip para el pecho después
de que el vehículo se haya conducido a una velocidad de 8 km (5 mi) por hora o más, pero solo si el vehículo está
encendido.
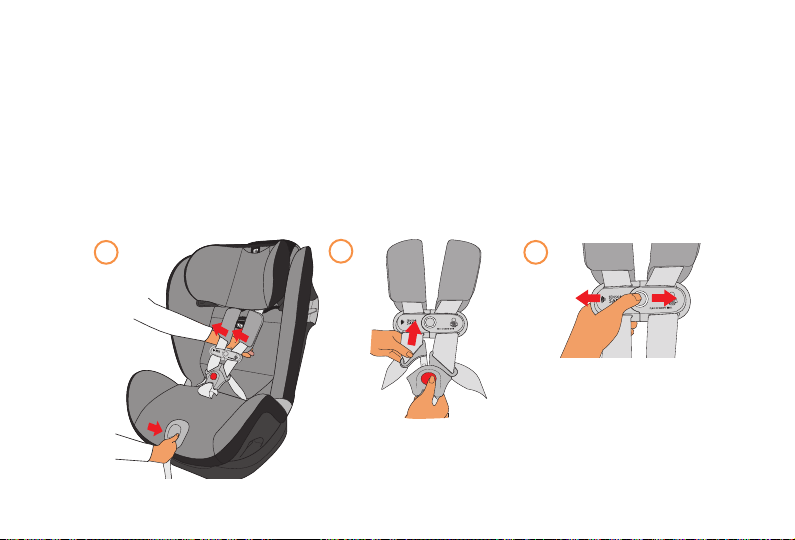
244
CÓMO REEMPLAZAR LA BATERÍA DEL CLIP PARA EL PECHO SENSORSAFE.
CÓMO USAR SENSORSAFE
®
1. Presione el botón de liberación del arnés en la parte delantera del sistema de sujeción infantil y jale ambas
correas del arnés hacia adelante para aflojarlo.
2. Presione el botón en la hebilla de la entrepierna y jale hacia afuera ambas lengüetas de la hebilla para
desabrochar el arnés.
3. Presione el botón de liberación y jale el clip para el pecho para abrirlo.
1 3
2
6
5
4
3
2
1

245
4. Voltee el lado macho del clip para el pecho y afloje los tornillos con un desarmador Phillips pequeño. Retire la
cubierta
a
.
5. Retire la placa de circuitos
b
del clip para el pecho. Retire la batería
c
de la placa de circuitos. Reemplace
la batería con una batería de botón de litio Panasonic
™
CR2032 nueva, como se muestra.
6. Coloque la placa de circuitos con la nueva batería en el clip para el pecho. Vuelva a colocar la cubierta y
apriete los tornillos. Esto completa el proceso de reemplazo de la batería.
Si tiene preguntas, comuníquese con CYBEX al: 1-877-242-5676 o en línea en:
http://cybex-online.com/us/contact.html.
CR2032
b
c
CÓMO USAR SENSORSAFE
®
* Las marcas comerciales son propiedad de sus respectivos dueños.
CR2032
2
1
4
a
b
5

246
SI NECESITA AYUDA
Comuníquese con nuestro Departamento de Atención al Cliente, donde contamos con un amplio equipo de per-
sonal técnico especializado en Seguridad de Pasajeros Infantiles (CPS) para abordar cualquier pregunta que pueda
tener relacionada con la instalación, partes, mantenimiento o información sobre la garantía.
Cuando se comunique con nosotros, tenga a mano el número de modelo del producto y la fecha de fabricación
para que podamos ayudarlo eficazmente. Esta información se puede encontrar en la parte inferior de la base del
sistema de sujeción infantil.
Comuníquese con Atención al cliente de CYBEX al 1-877-242-5676.
Correo electrónico: [email protected]
Sitio web: www.cybex-online.com
RECURSOS

247
RECURSOS
Se puede encontrar información adicional, consejos y videos de instalación en la aplicación móvil SensorSafe.
¡EL 75 % DE LOS SISTEMAS DE SUJECIÓN SE INSTALAN INCORRECTAMENTE!
Instalar el sistema de sujeción correctamente en el vehículo es muy importante para la seguridad del niño.
Asegúrese de que el sistema de sujeción se instale correctamente usando uno de los recursos siguientes:
https://www.nhtsa.gov/equipment/car-seats-and-booster-seats
www.safekids.org
Para encontrar un técnico de CPS disponible en su área, visite bit.ly/FindATech
Reciclaje : Una vez que el asiento llegue a la fecha de vencimiento, se recomienda reciclar el asiento.
Comuníquese con el centro de reciclaje de su comunidad local para obtener información sobre la mejor manera de
desechar el asiento. No se recomienda regalar ni vender el asiento a nadie, ni simplemente colocarlo en la basura.
GENERAL

248
IMPORTANTE: Registre de inmediato su Eternis S para que nos podamos comunicar con usted en el caso
poco probable de que se retire el producto del mercado por razones de seguridad. Regístrelo en línea en
http://register.cybex-online.com/carseats o por correo con la tarjeta de registro que se proporciona por separado.
GARANTÍA LIMITADA
CYBEX garantiza al comprador consumidor original que este producto estará libre de defectos de material y mano
de obra durante dos (2) años a partir de la fecha de compra original (el “período de garantía”). Durante el periodo de
garantía, CYBEX, a su discreción, puede reparar o sustituir el producto si el fabricante determina que tiene defectos
de material o mano de obra. CYBEX se reserva el derecho de descontinuar o cambiar partes, telas, modelos o
productos, o de sustituir este producto con un modelo o producto comparable. Para presentar una reclamación bajo
esta garantía, comuníquese con nosotros en: [email protected], llame al 1–877–242–5676 o escriba a:
Garantía CYBEX
Columbus Trading Partners USA, Inc.
1801 Commerce Drive
Piqua, Ohio 45356
Se requiere el comprobante original de compra para validar su garantía y los gastos de envío serán responsabilidad
del comprador consumidor original. Para agilizar el procesamiento de cualquier reclamación futura de la garantía
y para verificar la fecha original de compra, llene debidamente y envíe por correo la tarjeta de registro para el
propietario con la dirección preimpresa en un plazo de treinta (30) días a partir de la fecha de compra.
GARANTÍA

249
GARANTÍA
LIMITACIONES DE LA GARANTÍA
Esta garantía no cubre los efectos del uso y desgaste normales o daños resultantes de la negligencia,
modificación, instalación inadecuada, accidentes, mal uso o abuso de este producto. Se acuerda expresamente
que las obligaciones de CYBEX y los remedios del comprador consumidor original en virtud de la garantía limitada
contenida en el presente documento son exclusivos y están estrictamente limitados a la reparación o sustitución
del producto.
Esta garantía limitada está condicionada al estricto cumplimiento de lo dispuesto en el Manual del propietario.
Bajo ninguna circunstancia CYBEX o el distribuidor que vende este producto será responsable legalmente ante
usted de ningún daño, incluidos daños incidentales o consecuentes que surjan del uso o incapacidad de usar este
producto.
LIMITACIÓN DE GARANTÍAS Y DERECHOS LEGALES ESTATALES O PROVINCIALES
La garantía y los recursos especificados anteriormente son exclusivos y sustituyen a cualquier otro, ya sea
oral, escrito, expreso o implícito. En la medida que la ley vigente lo permita, por medio del presente se excluye
cualquier garantía implícita, incluidas garantías de comerciabilidad o idoneidad para un propósito determinado.
Algunos estados o provincias no permiten limitaciones sobre la duración de una garantía implícita o la exclusión o
limitación de daños incidentales o directos; por lo tanto, es posible que las limitaciones anteriores no se apliquen
en su caso.
Esta garantía le otorga derechos legales específicos y usted podría tener también otros derechos que pueden
variar de un estado a otro o de una provincia a otra. Ni CYBEX ni el distribuidor que vende este producto autorizan a
ninguna persona a crear ninguna otra garantía, obligación o responsabilidad legal en conexión con este producto.
GENERAL

250
CYBEX Industrial Limited
Suite 1222, 12/F | Leighton Centre | 77 Leighton Road | Causeway Bay | Hong Kong
www.cybex-online.com
Distributed in the United States by Columbus Trading Partners USA Inc.
1801 Commerce Drive | Piqua, OH 45356 | USA
Tel: 1-877-242-5676 | e-mail: suppor[email protected] | www.cybex-online.com
© 2019 CYBEX Industrial Limited. All rights reserved. Printed in China. This product and its components are subject to change without notice.
Patents pending.
25701535 11/19