
- QUICK GUIDE -
2
Rorrorem veri rehen-
dae corerum
Rorrorem veri rehen-
dae corerum
Remove stickers &
packing materials
Fill water tank.
Insert the drip tray
with cup grill.
Wash and dry ac-
cessories; including
water tank.
Plug in machine
and switch on the
main power.
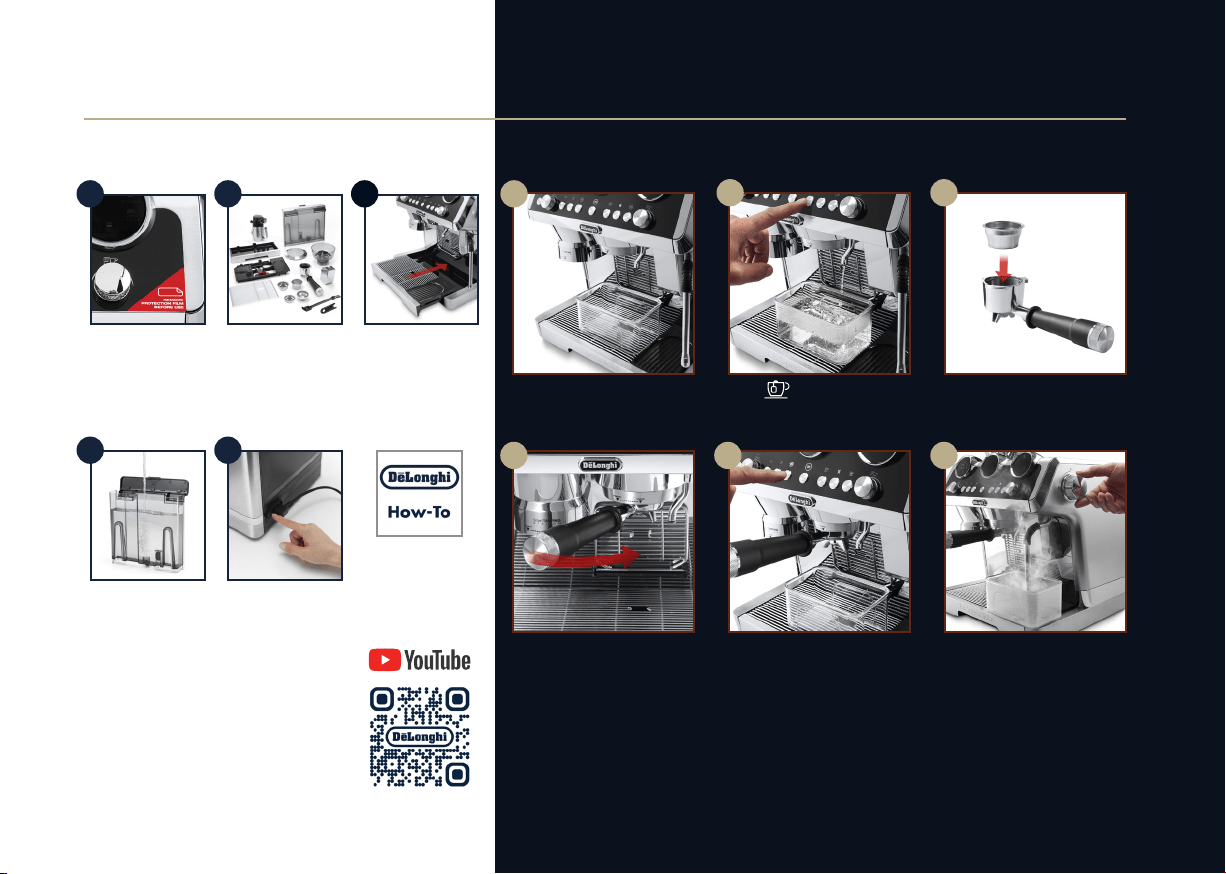
PREPARING YOUR MACHINE
321
54
Place a container under the
water spout.
Attach the portafilter.
Press to rinse.
Press to rinse.
Insert filter basket into
portafilter.
Open the steam dial for a few
seconds. For optimal steam
performance we recommend
you repeat this action 3 or
4 times. This is to purge the
steam arm before frothing or
steaming your milk.
SETTING LA SPECIALISTA FOR FIRST USE
1
2 3
4 5 6
For more details on
setting up your La
Specialista please
check out the
De’Longhi How To
Channel
3
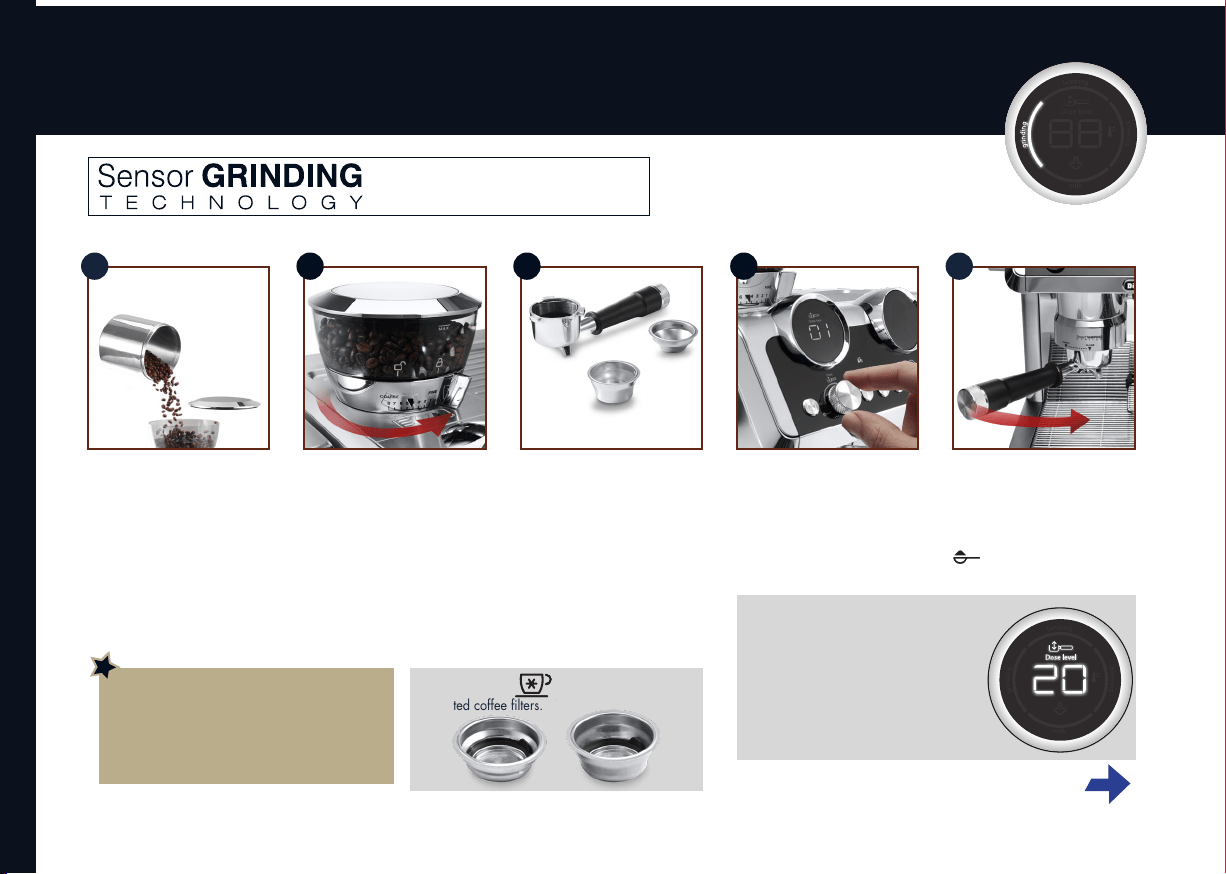
Add beans to hopper.
Fresh is best; fill in just with
the quantity you need.
Store the remainder of
your beans in a vacuum
container.
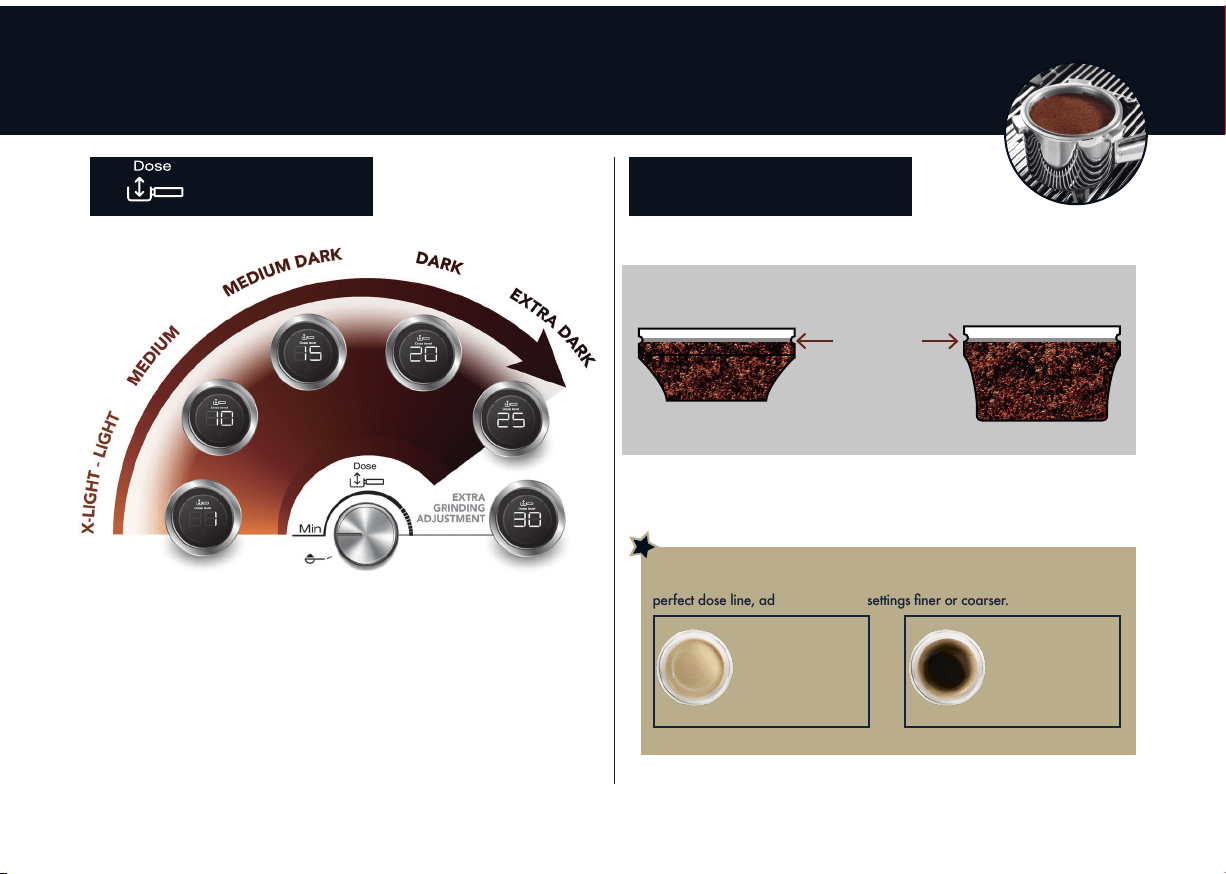
The ideal setting depends on
your coffee bean type. The
factory default is 5 but for a
finer or coarser grind we invite
you to check on the coffee
guide settings table. If
you need to adjust, do it
while grinding.
Select single or double
dose filter and place in the
portafilter. If you are using
the double filter, press the
X2 button.
Please note: the x 2 button
will double the volume of
the espresso shot as well.
Set the dose level by adju-
sting the dial starting from
the min. position.
Attach portafilter.
Once locked into place,
grinding will start.
To disable the grinder from
auto starting turn the dial to
setting.
1 2 3 54
X2
Step 1 - grinding
When preparing Espresso Cool, use the
dedicated coffee filters.
The numbers displayed are a setting
reference once the right level of coffee
in the portafilter is reached. They do
not correspond to grinder settings or to
measurement units (gr/oz) or to grinding
time.
Refer to coffee guide table settings to find
useful indications on dosages, based on
the coffee beans and roast levels.
Refer to “Focus on perfect dose” on next
page for suggestions.
BARISTA TIPS:
A grinding level between 3 and 6 is
recommended for most coffees. A grinding
level of 1 or 2 is very ne and should be
used with special coffees only (light roasted)
X2
Guarantees a precise and consistent coffee
dose even when changing the grind size,
ensuring extraction consistency.
4
Focus on perfect dose
Adjust dose
Achieve Espresso perfection
Each variety of coffee beans can behave differently during grinding and this is the
reason why setting the dose at the beginning might require extra care.
With this illustration we give you some indications on how to regulate the dose. Please
note these suggested setting ranges, based on the roasting level, are certainly a good
starting point, but they might slightly vary depending on specific composition of your
coffee beans.
1. Set the dose (to reach the mark inside of the filter basket, see image for perfect
dose) starting from the minimum position.
2. Look at which roasting level your coffee is and based on that, turn the knob slowly,
referencing the ranges.
The coffee filters have a mark inside to identify the level for perfect dose.
The perfect quantity corresponds to the line in relief.
Perfect dose
BARISTA TIPS:
If your coffee is over or under extracted and the dose corresponds to the
perfect dose line, adjust the grinder settings ner or coarser.
OVER EXTRACTED
COFFEE
(pouring too slowly)
needs coarser grind
UNDER EXTRACTED
COFFEE
(pouring too fast)
needs ner grind.
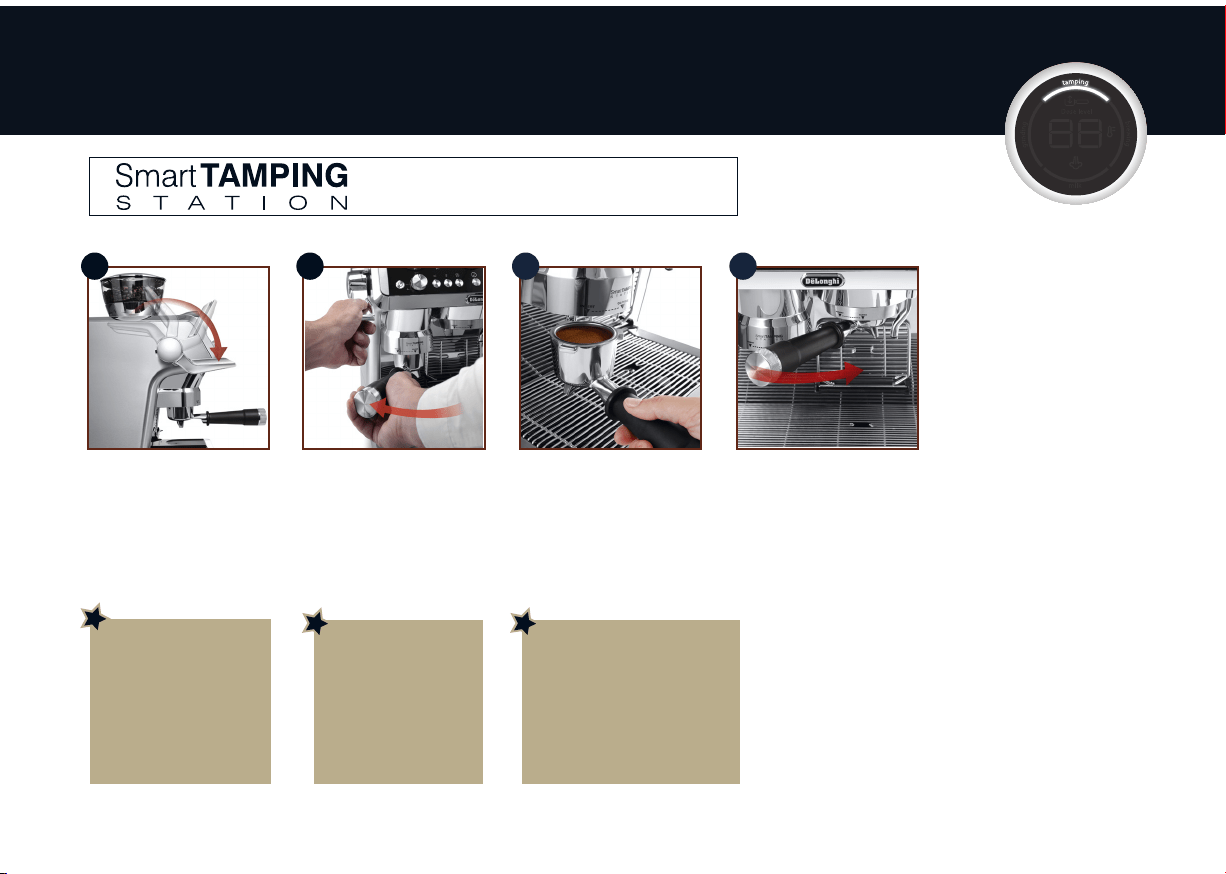
5
After grinding, pull the lever
down fully (do not remove
portafilter). For a perfect
result, you can do it twice.
Keep the lever down while
removing the portafilter.
Once it is done, place
back the lever in its original
position.
Check the level.
1 2 3
Attach the portafilter to the
brewing unit.
4
BARISTA TIPS:
Pull the lter holder out
while the tamper is still
down for polished nish
of coffee.
Step 2 - tamping
BARISTA TIPS:
Ensure the coffee is at the
recommended dosage
level after tamping. You
may need to adjust the
dosage dial more times
before reaching the
perfect dose.
BARISTA TIPS:
Coffee left on the edges of the
lter after pressing does not in
any way compromise the quality
of the brewing and therefore the
end result.
This technology allows you to reach consistent pressure
results on the dose, without having any mess of spilled
coffee grounds on the machine and on the working area.

6
Rinsing before preparing drinks
Select the beverage you want to prepare.
Press the button: hot or cold
water runs from the coffee spout
(in this way the coffee circuit will
heat up or cool down).
3
When preparing a cold drink after a hot drink and viceversa, the result in cup could be not at the
ideal temperature. It is recommended, before brewing, to run a rinse with the dedicated button.
1
HOT
COLDCOLD
The OK light turns white if you
selected a hot drink or blue if you
selected a cold drink.
2
HOT COLDCOLD
Proceed preparing coffee drinks
as illustrated in the following
pages.
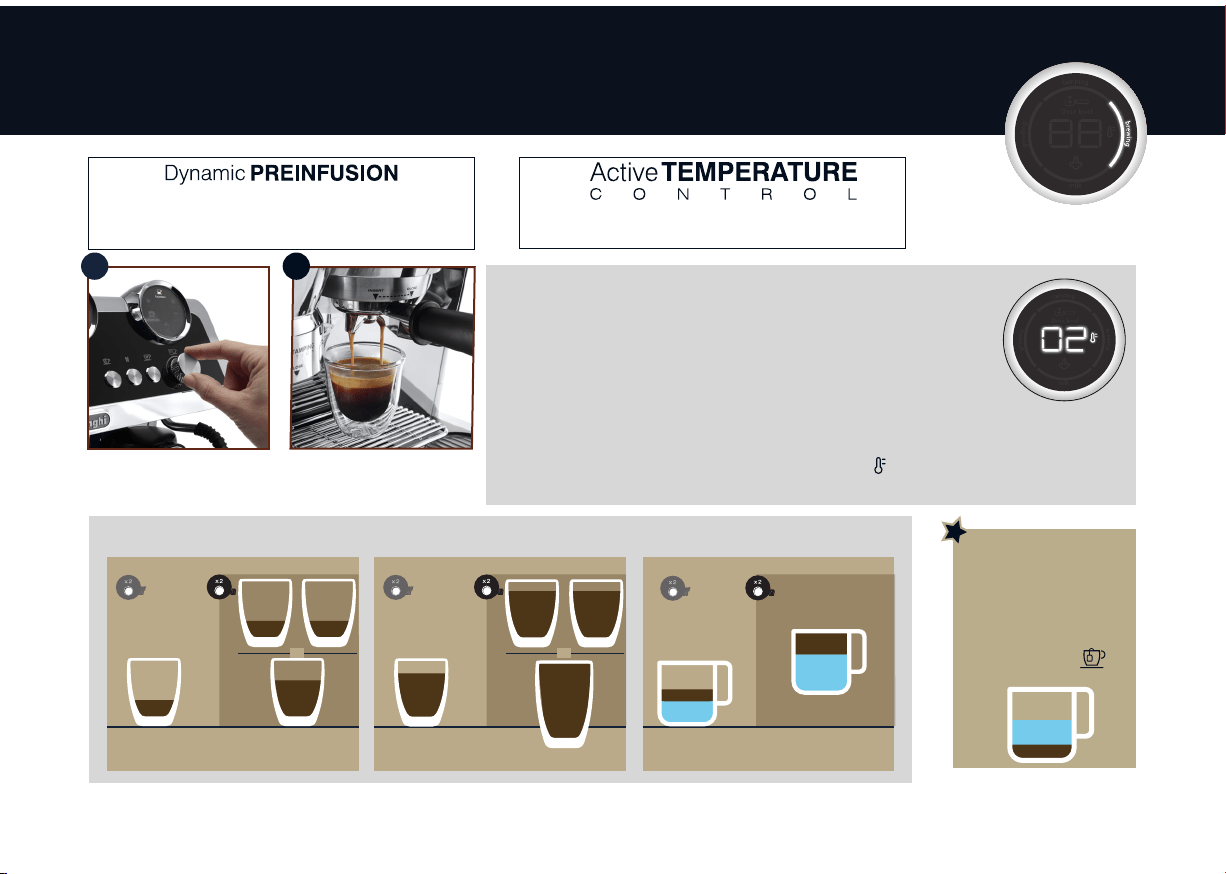
7
Select your beverage. Press OK to start brewing
(preinfusion and infusion).
1 2
Step 3 - brewing hot coffee drinks
Espresso
Approx.
35 ml
Approx.
35 ml
Approx.
35 ml
OR
o
Single dose
o
Water (≃65ml)
Espresso (≃35 ml)
o
Single dose
o
Approx.
70 ml
Double dose
onon
Coee
Long Black
Approx.
80 ml
Approx.
100 ml
OR
o
Single dose
o
Double dose
onon
Approx.
80 ml
Approx.
80 ml
Approx.
160 ml
Double dose
onon
Approx.
200 ml
Water (≃130ml)
Espresso (≃70 ml)
ESPRESSO BASED BEVERAGES MENU
INFUSION TEMPERATURE PROFILES
• There are 5 temperatures proles (1 to 5 on the display) to set, based on the
coffee beans.
Setting 1: ≃ 90°C
Setting 2: ≃ 92°C
Setting 3: ≃ 94°C
Setting 4: ≃ 96°C
Setting 5: ≃ 98°C
• To understand which is the preferred temperature prole refer to coffee guide
settings table.
• This is not the nal in-cup temperature, but the water temperature to infuse. To maintain a perfect
temperature of the beverage we suggest to pre-heat the cup.
• To select the temperature setting, keep pressing the button to switch from one setting to the other
until you reach the preferred one.
DO YOU WANT TO
MAKE AN AMERICANO?
Step 1: make an Espresso
using a large cup.
Step 2: once delivered
the espresso, press to
delivery hot water.
Coee (≃35 ml)
It works by adapting the pre-infusion length to the density of
the coffee dose to ensure that the entire surface of the pods
is evenly and gently wet for an optimal extraction
The water temperature is precisely controlled throughout
the entire brewing process to ensure the ideal temperature
stability for the extraction
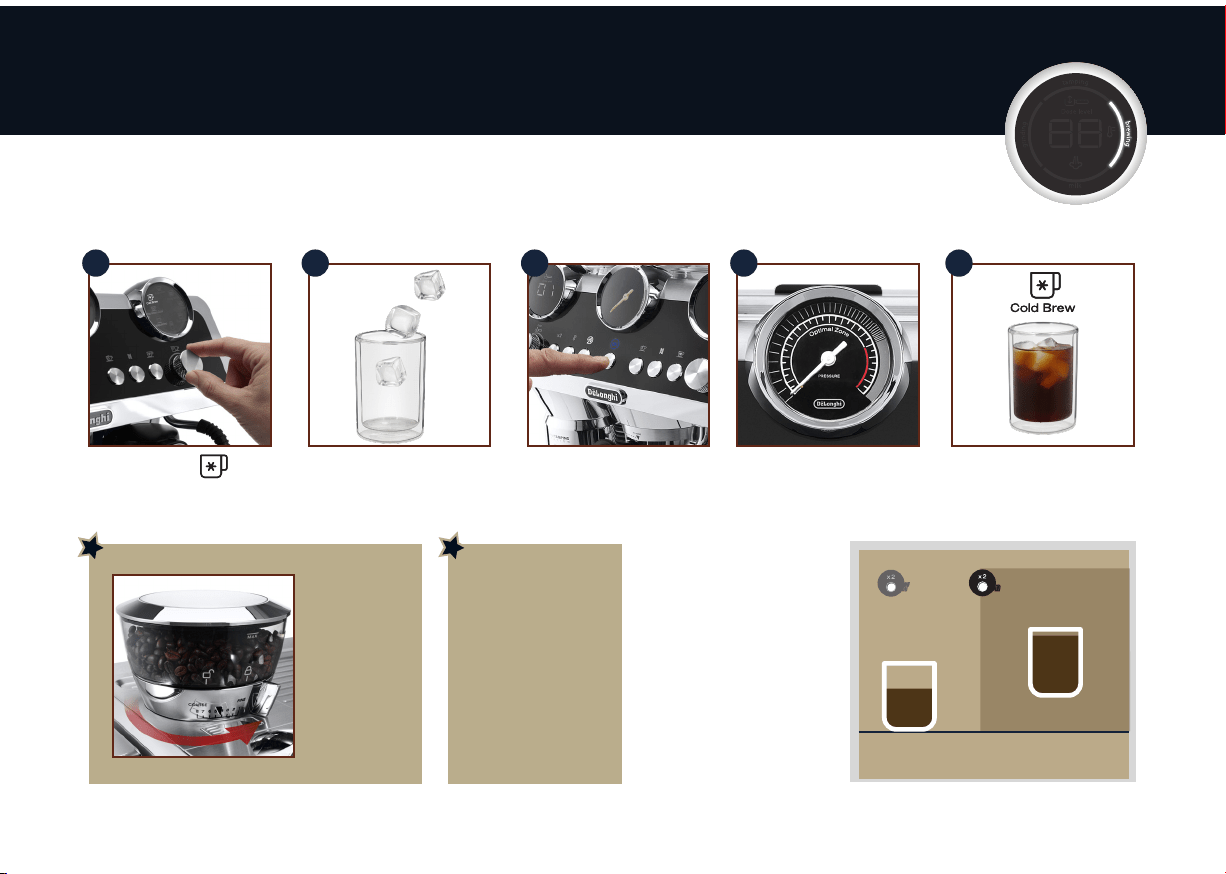
8
Step 3 - brewing Cold Brew
Select Cold Brew
Prepare the glass adding 2 or 3
ice cubes.
The OK light is blue to indicate
that a cold coffee is selected.
Press it to start brewing.
As no pressure is produced
to brew this beverage, the
manometer will not turn to a
higher position
1 2 3 4 5
Espresso Cool
Approx.
40 ml
Approx.
40 ml
Approx.
40 ml
OR
o
Single dose
o
o
Single dose
o
Approx.
80 ml
Double dose
onon
Cold Brew
Approx.
110 ml
Double dose
onon
Approx.
180 ml
BARISTA TIPS:
When preparing
Cold Brew, a
grinding level
between 4 and 6
is recommended
BARISTA TIPS:
Fresh water is best: be
sure the water in the tank
is fresh.
If the water is a couple of
days old, empty and rinse
the water tank thoroughly.
Always keep the water
tank clean.
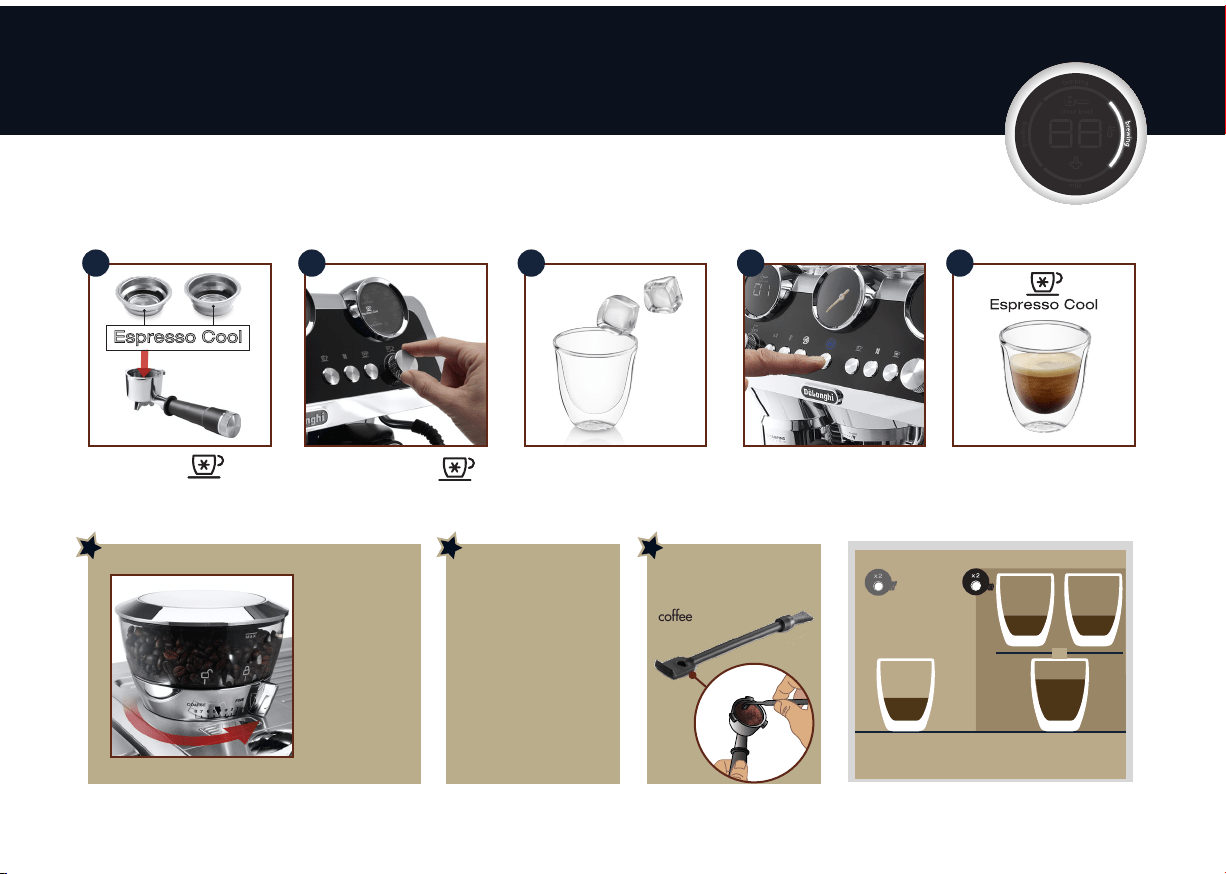
9
BARISTA TIPS:
When preparing
Espresso Cool, a
grinding level
between 3 and 6
is recommended
When preparing Espresso
Cool, use the dedicated coffee
filters. Proceed with steps 1 -
-Grinding and 2 - Tamping.
Select Espresso Cool
Prepare the glass adding 1 or 2
ice cubes.
The OK light is blue to indicate
that a cold coffee is selected.
Press it to start brewing.
1 2 3 4 5
Step 3 - brewing Espresso Cool
X2
Espresso Cool
Approx.
40 ml
Approx.
40 ml
Approx.
40 ml
OR
o
Single dose
o
o
Single dose
o
Approx.
80 ml
Double dose
onon
Cold Brew
Approx.
110 ml
Double dose
onon
Approx.
180 ml
BARISTA TIPS:
Fresh water is best: be
sure the water in the tank
is fresh.
If the water is a couple of
days old, empty and rinse
the water tank thoroughly.
Always keep the water
tank clean.
BARISTA TIPS:
After brewing, use the
scraper tool to remove the
coffee
10
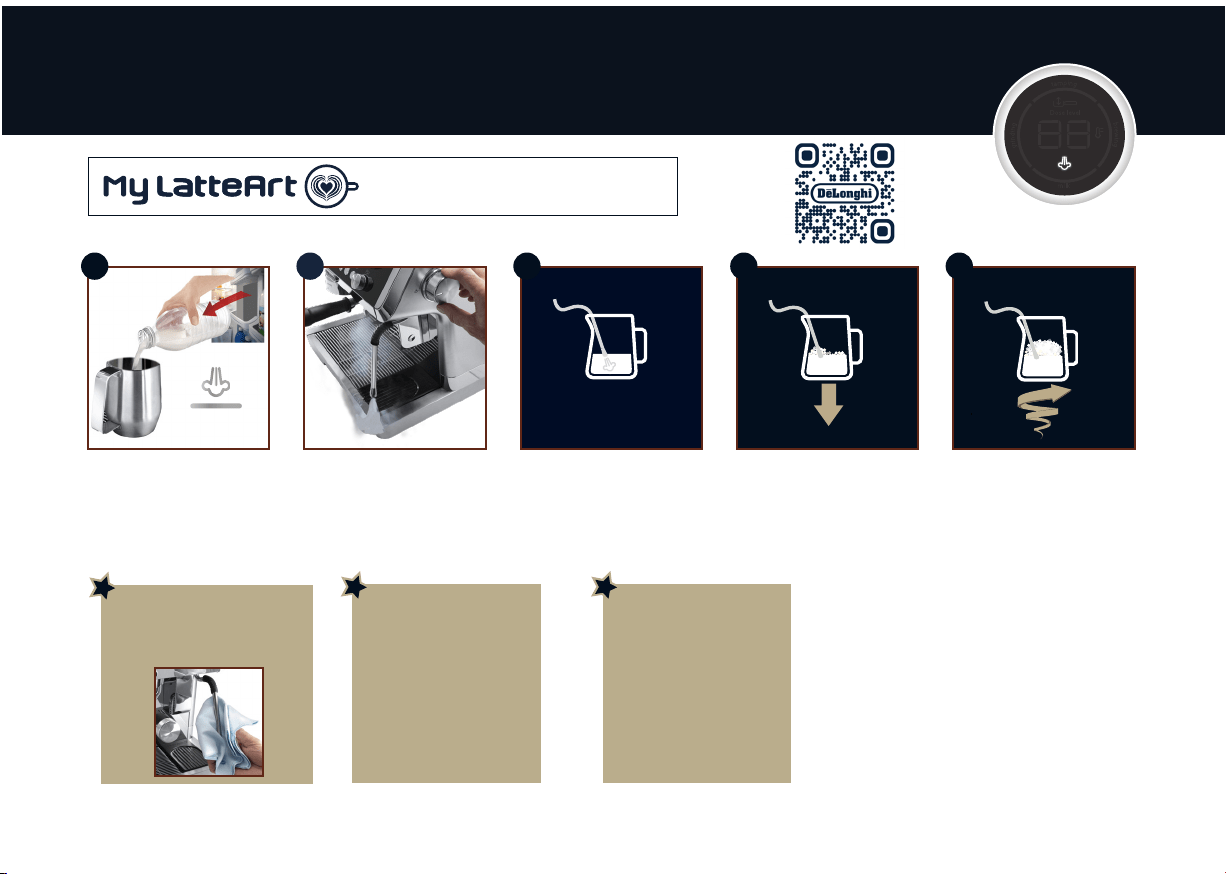
Step 4 - manual frothing
Turn the steam wand on
briefly to purge condensa-
tion. Make sure the wand is
pointing away from you.
Keep the steam nozzle just
on the surface, careful not to
make big bubbles by letting
too much air in.
Fill the milk jug with fresh
cold milk. Milk will up to
triple in volume.
To make the froth, put the
nozzle on the surface of
the milk and air will catch
by the mixing of milk and
steam.
Insert the steam nozzle just
under the milk: this creates
a vortex. Once the desired
temperature is reached turn
the steam knob off and wait till
steam stops completely before
removing jug.
1 2 3 54
BARISTA TIPS:
Fresh is best : Be sure
to use fresh cold milk
every time. Whole milk
is recommended for best
results. Dairy and Non
Dairy alternatives will
vary in ease of texturing
depending on type.
BARISTA TIPS:
After foaming milk,
eliminate unwanted
bubbles by swirling the
jug and tapping this on a
surface.
CLEANING TIP:
Always clean the steam nozzle with a
clean damp cloth and release a short
burst of steam to remove milk residue.
In Latte Art, microfoam texture and temperature
are the two elements that, when combined, play
an essential role in achieving the desired result.
Find out more in
our dedicated
video
11
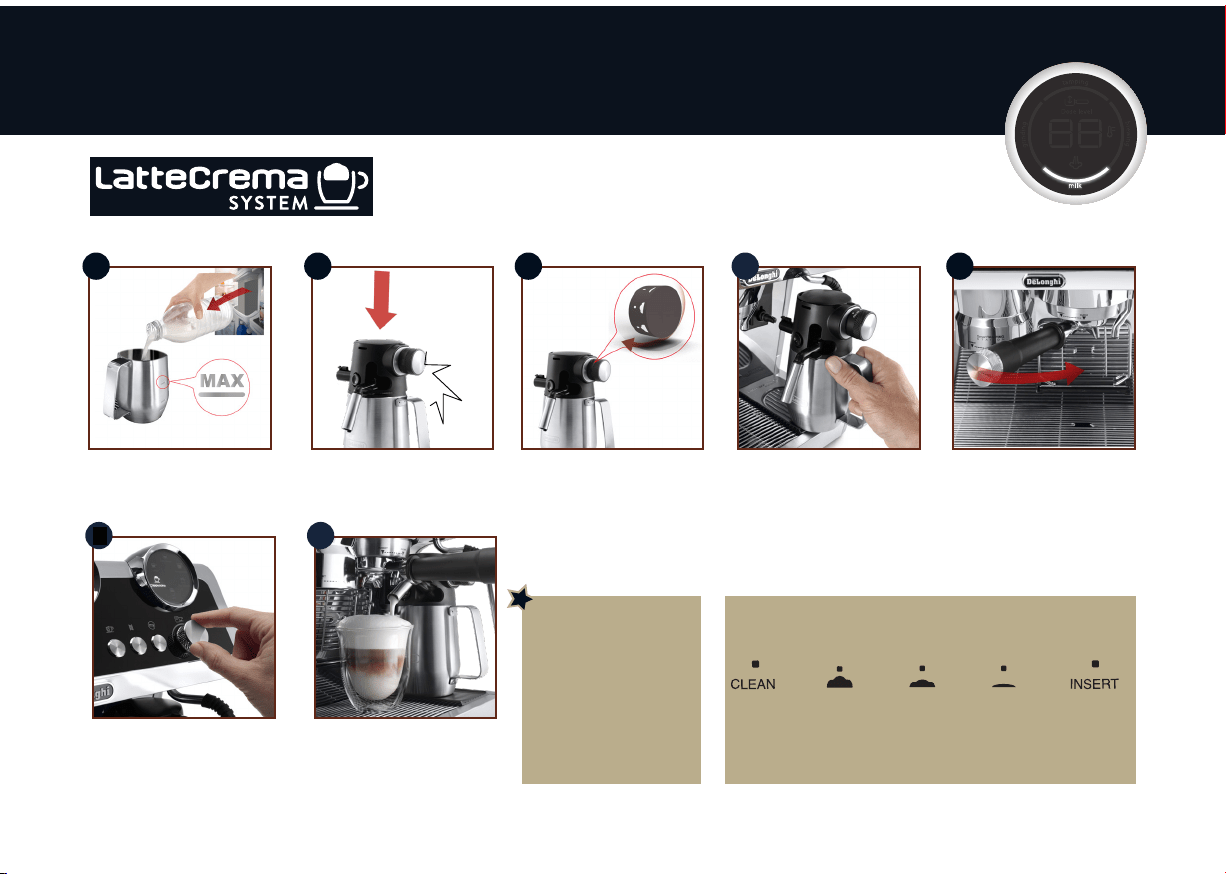
Step 4 -automatic frothing
Close with the lid. Attach the milk container.Fill the milk container with
fresh cold milk from the
refrigerator (4-6°C).
Turn the knob to select the
desired froth.
1 2 3 4
Select your beverage. Adjust milk spout. Press OK
to start brewing. The ap-
pliance automatically brews
coffee and milk in sequence.
Prepare the perfect dose
(see Steps 1- grinding &
2- tamping) and attach the
portafilter.
5
6 7
BARISTA TIPS:
For the best milk texturing
always use fresh cold
milk from the refrigerator.
Texturing quality will
vary with dairy and non
dairy milk alternatives.
Click
MILK FROTH KNOB POSITIONS:
MAX MED MIN
Froth Froth Froth
To clean To extract
Latte Crema or insert
System after the knob
each use
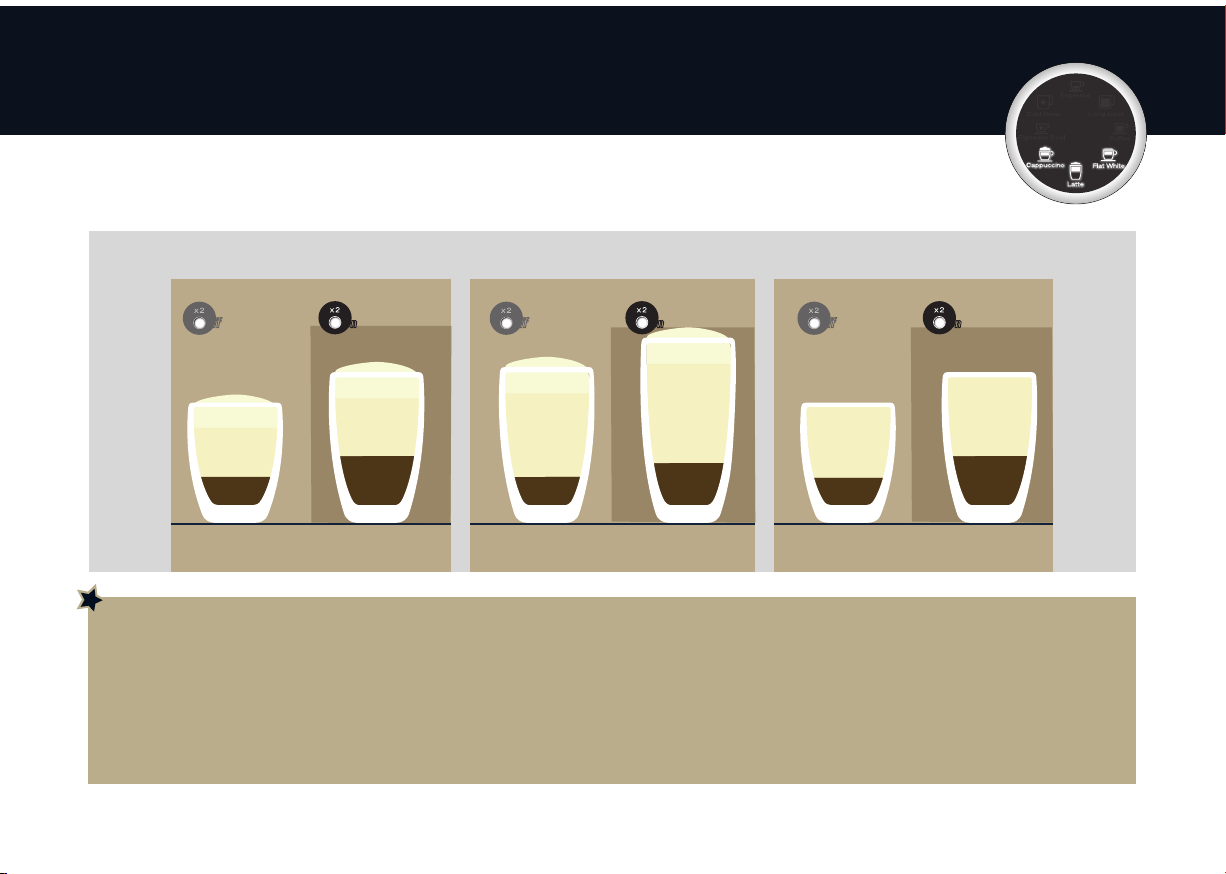
12
Flat White
Milk
Approx. 150 ml
Milk
Approx. 230 ml
LatteCappuccino
Milk
Milk foam
Approx. 150 ml
1-shot
Espresso
Milk
Milk foam
Approx. 230 ml
Double dose
Milk
Milk foam
Approx. 330 ml
Milk
Milk foam
Approx.
250 ml
2-shots
Espresso
2-shots
Espresso
1-shot
Espresso
2-shots
Espresso
1-shot
Espresso
o
Single dose
o onon
Double dose
o
Single dose
o onon
Double dose
o
Single dose
o onon
Milk recipes
DOUBLE DOSE MILK BEVERAGES:
Fill the milk container with a sufcient quantity of milk, not exceeding the MAX level marked on the container. Each mark on the side of the container corresponds to
about 100 ml of milk.
Using fresh cold full cream milk will achieve the best results.
CLEANING THE MILK FROTHER LID:
The milk frother lid must be cleaned each time you use a milk function: see next page.
AUTOMATIC ESPRESSO & MILK BASED BEVERAGES
13
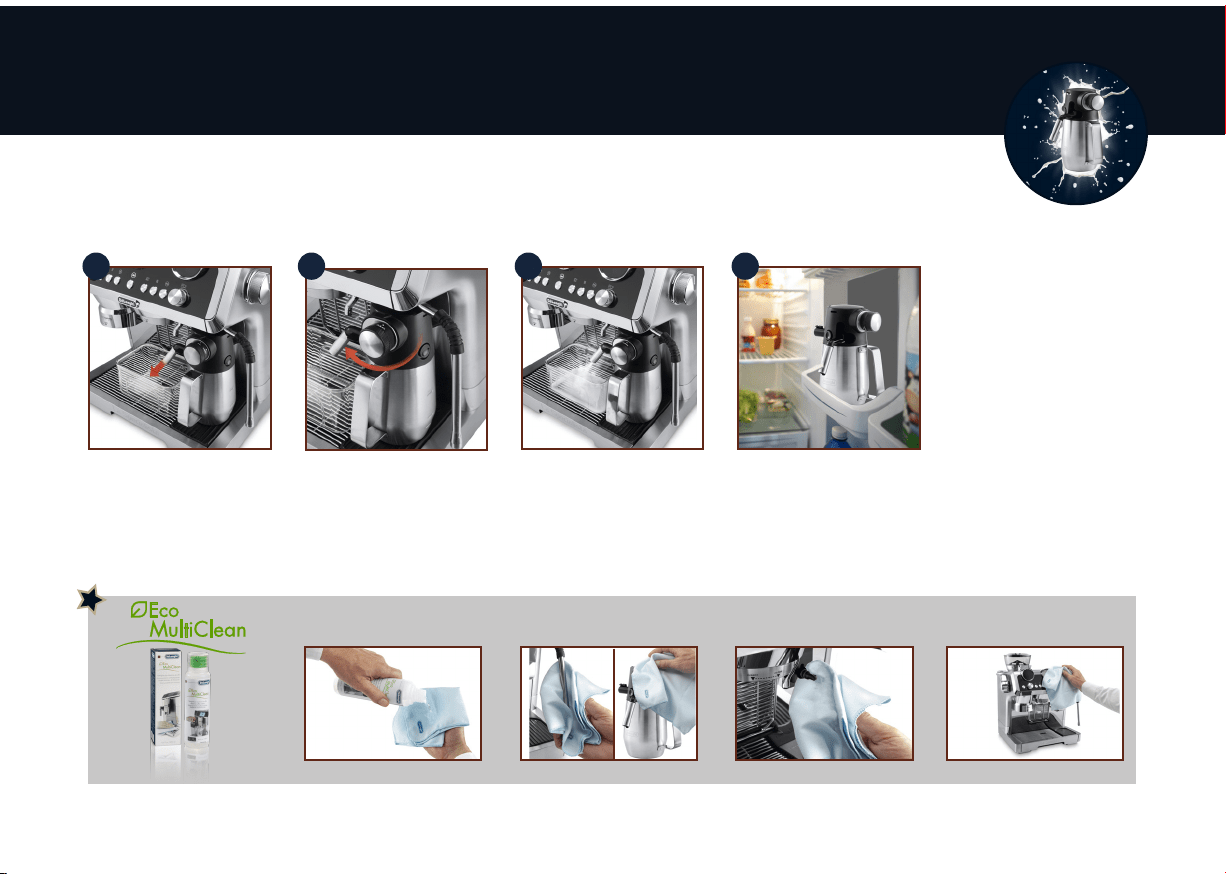
Cleaning & Maintenance - Lattecrema system
Turn the knob to “Clean”. Remove the milk container
and put it in the refrigerator
and use soon.
Leave the milk container in
the machine (you do not
need to empty it).
Place a cup or other
container under the frothed
milk spout.
Cleaning automatically
starts and stops.
WATCH OUT: Remember,
after cleaning, to turn the
knob back on foam setting.
1 2 3 4
For perfect cleaning, we recommend Eco MultiClean: it ensures hygiene by removing milk proteins and fats from the milk frother and
milk container and can be used to clean the whole machine.
EAN: 8004399333307
Pour the cleaner on the cloth and clean: • Nozzle and milk container • Milk container connection • Entire machine

14
Cleaning & Maintenance - Coffee lters
After using the appliance,
always rinse the filters under
abundant running water.
Extract the perforated filter Rinse with running water Check the holes are not
blocked. If necessary, clean
with a pin
Dry with a cloth. Put the
perforated filter back in the
housing and press as far as
it will go
The coffee filters have been developed to deliver optimal extraction results with this recipe. For best
results, the filters must always be clean and free from all coffee residues.
Cleaning the dedicated filter for
Once a month, clean the coffee filters thoroughly:
15
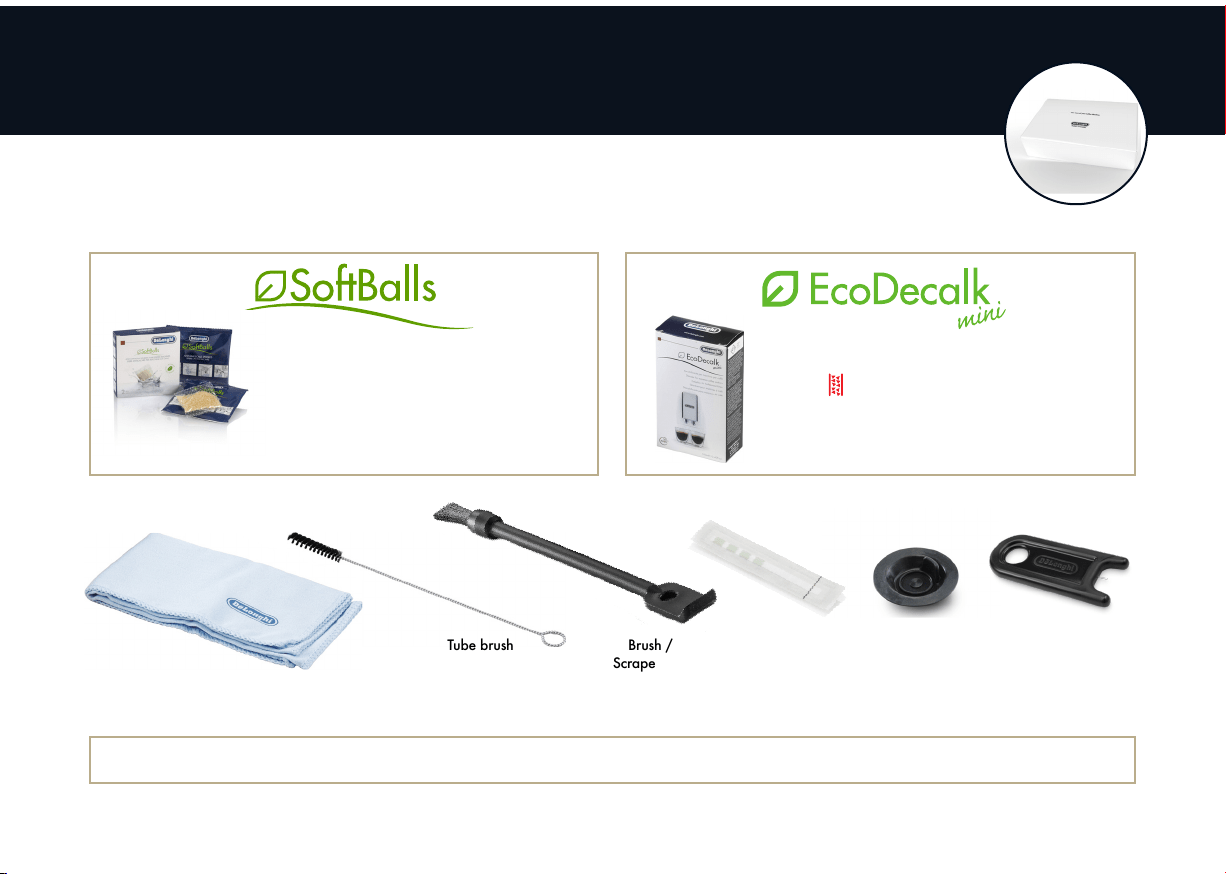
Tube brush Water hardness
test
Brush /
Scraper tool
Accessory for
cleaning with tabs
Take Care of your Coee Machine
Its top quality ingredients make EcoDecalk a highly
effective and natural limescale remover.
When the light comes on, follow the steps illustrated in
the user manual to descale correctly the machine.
Microbre cloth Cleaning needle
for steam wand
Innovative patented system that prevents
limescale formation. Extends the life of the
coffee machine without altering the sensory
properties of the water, guaranteeing
consistently creamy and aromatic coffee.
Visit “Delonghi.com” for more information

www.delonghi.com
57132C7873_02_0622