®
Electric Range
Estufa electrica
Models/Modelos 665.92002/92004/92005/92012/92014/92015/92022/92023
92024/92025/92029
665.95002/95004/95005/95012/95014/95015/95022/95023
95024/95025/95029/95032/95033/95034/95039
665.95822/95823/95824/95825/95829
Super Capacity with ULTRABAKE TM System
Capacidad extra con el Sistema ULTRABAKE TM
8523357A Sears Roebuck and Co, Hoffman Estates, IL 60179 U S A www.sears.com
TABLE OF CONTENTS
WE SERVICE WHAT WE SELL ...................................................... 3
WARRANTY .................................................................................... 3
RANGE SAFETY ............................................................................. 4
The Anti-Tip Bracket 4
PARTS AND FEATURES ................................................................ 7
COOKTOP USE .............................................................................. 8
Control Knobs 8
Cooktop Lockout 8
Radiant Glass 9
Dual Cooking Zone 9
SURESIMMER TM 9
STEADYTEMP TM Warming Zone 10
Home Canning 10
Cookware 10
ELECTRONIC OVEN CONTROL ................................................. 11
Display
Start/Enter
Off/Cancel
Clock
Tones
Fahrenheit and Celsius
Timer
Oven Lockout
Oven Temperature Control
11
11
11
11
11
12
12
12
12
OVEN USE ..................................................................................... 13
Aluminum Foil
Positioning Racks and Bakeware
STURDIGLIDE TM Oven Racks
Bakeware
Meat Thermometer
Oven Vent
Baking and Roasting
Brolhng
RECIPE RECALL T'_
Serve Warm
Timed Oven Control
Using Warm & Ready Drawer
12-Hour Shut-Off
RANGECARE ............................................................................... 19
JNDICE
REPARAMOS LO QUE VENDEMOS ........................................... 28
GARANTIA .................................................................................... 28
SEGURIDAD DE LA ESTUFA ...................................................... 29
El Soporte antwuelco 29
PIEZAS Y CARACTERISTICAS ................................................... 32
USO DE LA SUPERFICIE DE COCCION .................................... 33
Penllas de control 33
Bloqueo de la Superflcie de coccion 33
Vidno radiante 34
Zona de cocc[on dual 34
SURESIMMER Tr'_ 35
La zona de calentamtento STEADYTEMP TM 35
Enlatado casero 36
Utensihos de coctna 36
CONTROL ELECTRONICO DEL HORNO .................................. 37
Pantalla 37
StarttEnter (In[clo/Ingreso) 37
Off/Cancel (Apagado/Anulado) 37
Reloj 37
Ser_ales audibles 37
Fahrenheit y Centlgrados 38
Temponzador 38
Bloqueo del homo 38
Control de temperatura del homo 38
USO DEL HORNO ........................................................................39
13 Papel de alumlnlo 39
13 Pos_c_onde las pamllas y los utenslhos para homear 39
13 Pamllas del homo STURDIGLIDE TM 39
14 Utensihos para homear 40
14 Termometro para carnes 40
14 Ducto de ventilaclon del homo 40
14 Como homear y asar 40
15 Como asar 4!
16 RECIPE RECALL TM (Repet[cton de recetas) 42
16 Caractenst[ca "Servlr cahente" 43
17 Control temponzado del homo 43
18 Como usar la gaveta Warm & Ready (Cahente y hsto) 45
18 Interruptor de 12 horas 46
CUIDADO DE LA ESTUFA ........................................................... 46
Self-Cleaning Cycle 19
General Cleaning 21
Oven Light 23
Console Night Light 23
Oven Door 24
Storage Drawer 24
Warming Drawer 25
TROUBLESHOOTING .................................................................. 25
Ciclo de autol[mpleza 46
Limpleza general 48
Luz del homo 50
La luz nocturna de la consola 50
Puerta del homo 51
Gave[a de almacenamtento 52
Gaveta calentadora 52
SOLUCION DE PROBLEMAS ..................................................... 53
WE SERVICE
WHAT WE SELL
Your purchase has added value because you can depend on
Sears HomeCentral for service W_th over 12,000 trained repair
specialists and access to over 4 2 million parts and accessories,
we have the tools, parts, knowledge and skdls to ensure our
pledge We Service What We Sell
Sears Maintenance Agreements
Your Kenmore apphance is designed, manufactured and tested
to provide years of dependable operation Yet any major
apphance may require service from time to time The Sears
Maintenance Agreement offers you an outstanding service
program, affordably priced
The Sears Maintenance Agreement
I Is your way to buy tomorrow's service at today's price
I Ehmtnates repair bills resulting from normal wear and tear
I Provides for non-technical and instructional assistance
I Even _fyou don't need repairs, prowdes an annual Preventive
Maintenance Check, at your request, to ensure that your
apphance is in proper runnmg condition
Some limitations apply, For more information, call
1-800-827-6655,
For information concerning Sears Canada Maintenance
Agreements, call 1-800-361-6665.
WARRANTY
FULL ONE-YEAR WARRANTY ON ALL PARTS
For one year from the date of purchase, when this range ts
installed and operated according to instructions prowded in the
Installation Instructions and Use & Care Guide, Sears w_ll repair
th_s range, free of charge, if defective m matenal or workmanship
LIMITED FIVE-YEAR WARRANTY ON RADIANT GLASS
COOKTOP AND COOKTOP COOKING ELEMENTS
After the first year and until five years from the date of purchase,
when the range _sinstalled and operated in accordance w_th the
instructions provided _nthe Installation Instructions and Use &
Care Guide, Sears will repair or replace parts for the radiant glass
cooktop as listed below due to defective materials or
workmanship Customer assumes any labor costs
I Cracking of the radiant glass cooktop due to thermal shock
i Wear-off of the pattern on the radrant glass cooktop
a Cracking of the rubber seal between the radiant glass
cooktop and the porcelain edge
I Burn-out of any of the radiant glass cooktop cooking
elements
WARRANTY RESTRICTION
If the range ISsubject to other than private family use the above
warranty coverage is effective for only 90 days
WARRANTY SERVICE
WARRANTY SERVICE IS AVAILABLE BY CONTACTING THE
NEAREST SEARS SERVICE CENTER IN THE UNITED STATES
This warranty applies only while the product is in use in the
United States This warranty gives you specific legal rights and
you may also have other rights which vary from state to state
For Sears warranty information in the United States, please
reference the service numbers located on the back page of th_s
manual
Sears, Roebuck and Co.
D/817WA, Hoffman Estates, IL 60179
PRODUCT RECORD
In the space below, record your complete model number, serial
number, and purchase date You can find this information on the
model and senal number label, located as shown in the Parts and
Features section of thLs book Have this information available to
help you quickly obtan assistance or service when you contact
Sears concerning your apphance
Model number 665.
Serial number
Purchase date
Save these instructions and your sales receipt for future
reference.
RANGE SAFETY
Your safety and the safety of others are very important.
We have provided many important safety messages in this manual and on your apptance Always read and obey all
safety messages
Th_s _sthe safety alert symbol.
This symbol alerts you to potential hazards that can kll or hurt you and others.
All safety messages wtl follow the safety alert symbol and e_ther the word "DANGER" or
"WARNING "These words mean
You can be killed or seriously injured if you don't
immediately follow instructions.
You can be killed or seriously injured if you don't
follow instructions.
All safety messages wtl tell you what the potenbal hazard _s, tell you how to reduce the chance of _njury, and tell you
what can happen if the instructions are not followed.
:" I! I Jl I: "
¢'i J , j • '
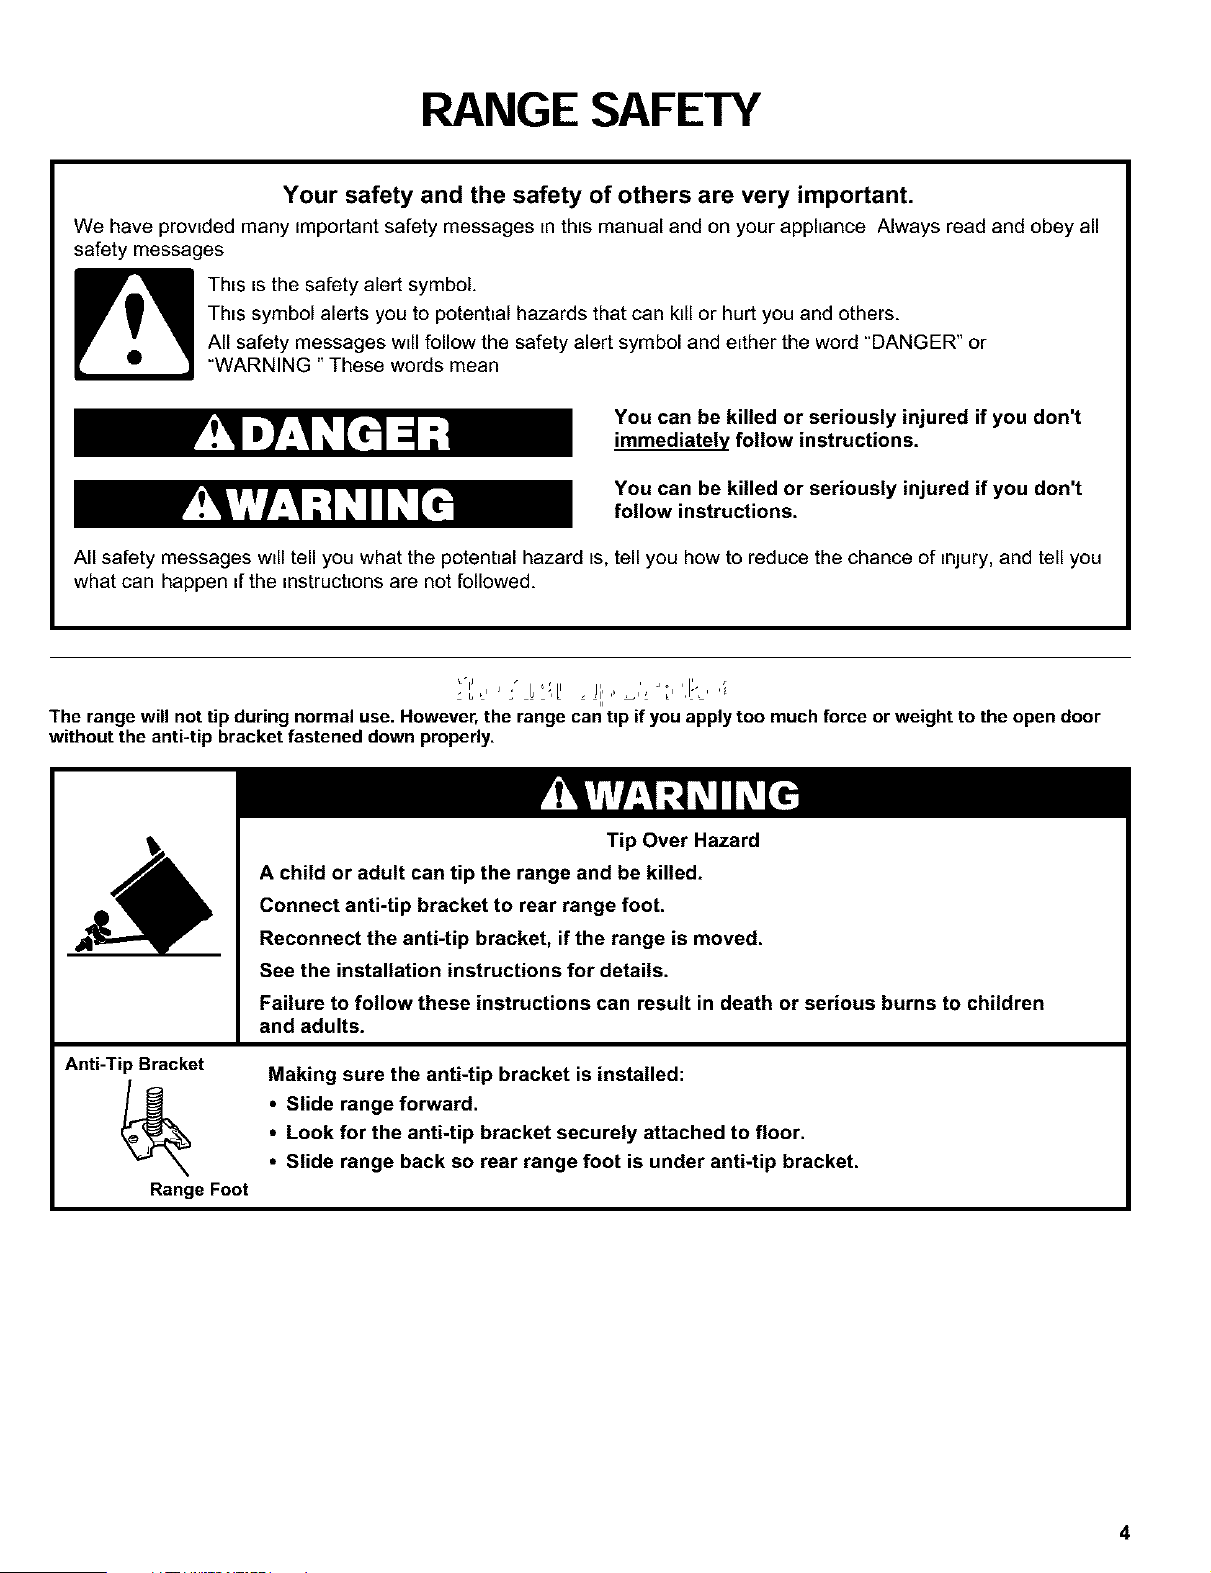
Tie range will not tiI lurin I normal use. However, tie range can l_I if you apply too much force or weight to tie open door
without tie anti-ti I bracket fastened lown properly.
Anti-Tip Bracket
Range Foot
Tip Over Hazard
A child or adult can tip the range and be killed.
Connect anti-tip bracket to rear range foot.
Reconnect the anti-tip bracket, if the range is moved.
See the installation instructions for details.
Failure to follow these instructions can result in death or serious burns to children
and adults.
Making sure the anti-tip bracket is installed:
• Slide range forward.
• Look for the anti-tip bracket securely attached to floor.
• Slide range back so rear range foot is under anti-tip bracket.
IMPORTANT SAFETY INSTRUCTIONS
WARNING: To reduce the nsk of hre, electncal
shock, =njury to persons, or damage when us=ng the
range, follow bas=c precaut=ons, including the
following
• WARNING: TO REDUCE THE RISK OF
TIPPING OF THE RANGE, THE RANGE MUST BE
SECURED BY PROPERLY INSTALLED ANTI-TIP
DEVICES TO CHECK IF THE DEVICES ARE
INSTALLED PROPERLY, SLIDE RANGE FORWARD,
LOOK FOR ANTI-TIP BRACKET SECURELY
ATTACHED TO FLOOR, AND SLIDE RANGE BACK
SO REAR RANGE FOOT IS UNDER ANTI-TIP
BRACKET
• CAUTION: Do not store items of =nterest to
ch=ldren _n cab=nets above a range or on the back-
guard of a range - chddren chmblng on the range to
reach items could be senously injured
• Proper Installation - Be sure the range =sproperly
installed and grounded by a quahfled technician
• Never Use the Range for Warming or Heating the
Room
• Do Not Leave Ch=ldren Alone - Chddren should not
be left alone or unattended =narea where the range
is in use They should never be allowed to sit or
stand on any par[ of the range
• Wear Proper Apparel - Loose-fltt=ng or hanging
garments should never be worn whde us=ng the
range
• User Servicing - Do not repair or replace any par[ of
the range unless spec=flcally recommended _nthe
manual All other serwc_ng should be referred to a
quahfled techn_ctan
• Storage =nor on the Range - Flammable matenals
should not be stored Jn an oven or near surface
units
• Do Not Use Water on Grease Fires - Smother fire or
flame or use dry chemical or foam-type extinguisher
• Use Only Dry Potholders - Moist or damp
potholders on hot surfaces may result in burns from
steam Do not let potholder touch hot heatng
elements Do not use a towel or other bulky cloth
• DO NOT TOUCH SURFACE UNITS OR AREAS
NEAR UNITS - Surface units may be hot even
though they are dark Jn color Areas near surface
units may become hot enough to cause burns
Dunng and after use, do not touch, or let clothing or
other flammable matenals contact surface units or
areas near units until they have had suff_c=ent time
to cool Among those areas are the cooktop and
surfaces factng the cooktop
• Use Proper Pan S=ze - The range =sequipped with
one or more surface un=ts of d_fferent size Select
utens=ls hawng flat bottoms large enough to cover
the surface unit heatng element The use of under-
sized utensds will expose a port=on of the heating
element to direct contact and may result _n ignition
of clothing Proper relationship of utensd to burner
will also _mprove efficiency
• Never Leave Surface Units Unattended at H_gh Heat
Settings - Bodover causes smoking and greasy
spdlovers that may _gn_te
• Make Sure Reflector Pans or Dnp Bowls Are _n
Place - Absence of these pans or bowls dunng
cook_ng may subject w_nng or components under-
neath to damage
• Protective Lners - Do not use aluminum fo_l to hne
surface unit dnp bowls or oven bottoms, except as
suggested _nthe manual Improper _nstallat_on of
these hners may result _na nsk of electric shock, or
fire
• Glazed Cook_ng Utensds - Only certain types of
glass, glass/ceramic, ceramic, earthenware, or other
glazed utensds are suitable for range-top service
w_thout breakeng due to the sudden change _n
temperature
• Utensd Handles Should Be Turned Inward and Not
Extend Over AdJacent Surface Units - To reduce the
nsk of burns, egn_t_onof flammable materials, and
spdlage due to unintentional contact w_th the utensd,
the handle of a utensil should be positioned so that
_t _sturned _nward, and does not extend over
adjacent surface units
• Do Not Soak Removable Heating Elements -
Heating elements should never be _mmersed _n
water
• Do Not Cook on Broken Cooktop - If cooktop
should break, cleaning solutions and spdlovers may
penetrate the broken cooktop and create a nsk of
electnc shock Contact a quahfled technician
_mmed_ately
• Clean Cooktop W_th Caution - If a wet sponge or
cloth _s used to w_pe spdls on a hot cook_ng area,
be careful to avoid steam burn Some cleaners can
produce noxious fumes _fapphed to a hot surface
• Use Care When Opening Door - Let hot a_ror
steam escape before remowng or replacing food
• Do Not Heat Unopened Food Containers - Bu_ld-up
of pressure may cause container to burst and result
in injury
SAVE THESE INSTRUCTIONS
IMPORTANT SAFETY INSTRUCTIONS
• Keep Oven Vent Ducts Unobstructed
• Placement of Oven Racks - Always place oven
racks _ndesired location wh_le oven _scool If rack
must be moved whde oven _shot, do not let
potholder contact hot heating element _n oven
• DO NOT TOUCH HEATING ELEMENTS OR
INTERIOR SURFACES OF OVEN - Heating
elements may be hot even though they are dark in
color Intenor surfaces of an oven become hot
enough to cause burns Dunng and after use, do
not touch, or let clothing or other flammable
matenals contact heating elements or ntenor
surfaces of oven untd they have had sufficLent time
to cool Other surfaces of the apphance may
become hot enough to cause burns - among these
surfaces are oven vent openings and surfaces near
these openings, oven doors, and wLndows of oven
doors
For self-cleaning ranges -
• Do Not Clean Door Gasket - The door gasket =s
essent=al for a good seal Care should be taken not
to rub, damage, or move the gasket
• Do Not Use Oven Cleaners - No commercial oven
cleaner or oven hner protectwe coating of any kind
should be used in or around any part of the oven
• Clean Only Parts L=sted =nManual
• Before Self-CleanLng the Oven - Remove bro=ler pan
and other utens=ls
For units with ventilating hood -
• Clean Ventilating Hoods Frequently - Grease should
not be allowed to accumulate on hood or filter
• When flaming foods under the hood, turn the fan on
SAVE THESE INSTRUCTIONS
The Cahforn_a Safe Drinking Water and Toxic Enforcement Act requires the Governor of Cahfornta to pubhsh a hst
of substances known to the State of Cahforn_a to cause cancer, btrth defects, or other reproducttve harm, and
requires businesses to warn of potential exposure to such substances.
WARNING Th_s product contatns a chemtcal known to the State of Cahforn_a to cause cancer, birth defects, or
other reproductwe harm
Thts apphance can cause low-level exposure to some of the substances listed, includ_ng benzene, formaldehyde,
carbon monoxide, and toluene.
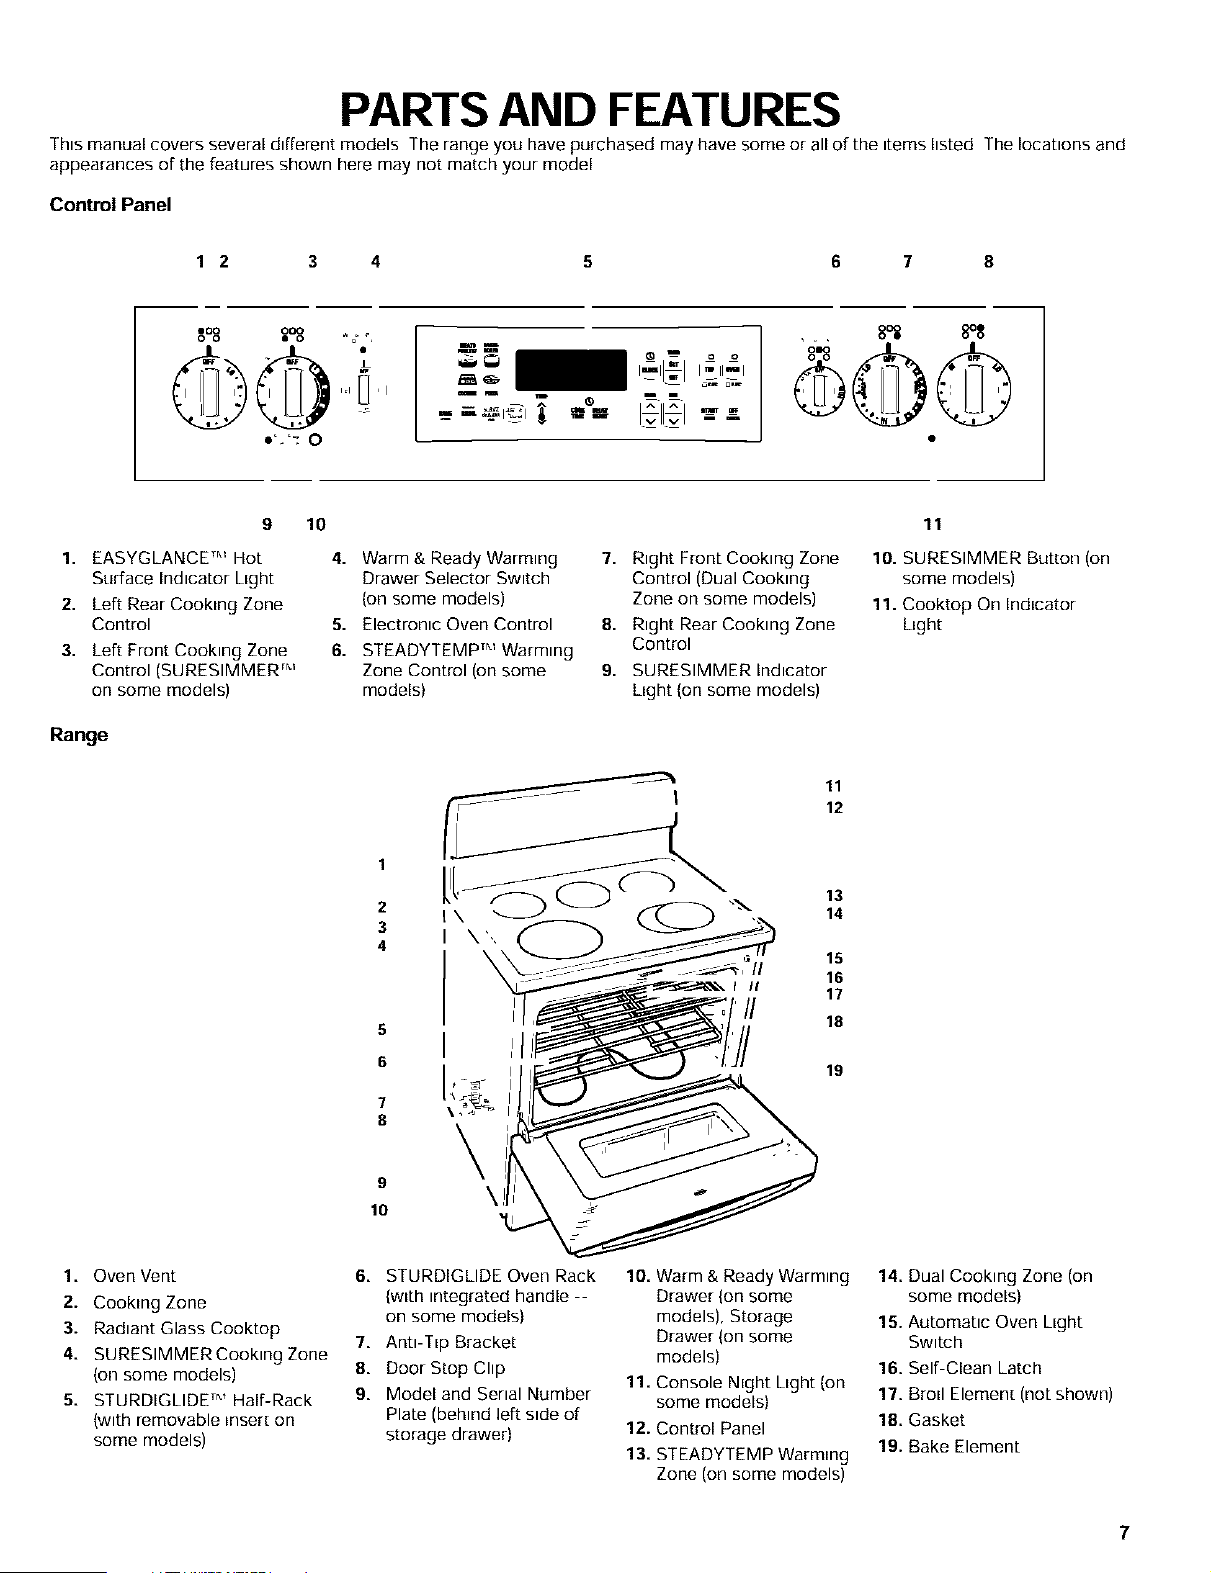
PARTS AND FEATURES
Th_s manual covers several d_fferent models The range you have purchased may have some or all of the _tems hsted The Iocalons and
appearances of the features shown here may not match your model
Control Panel
1 2 3 4 5 6 7 8
,oo o08
o o _,
L
i,i , I
e'.'=_ 0
89 8°_
:,-,.- %@@
i^li^l-.
9
10
1. EASYGLANCE Tr'_Hot
Surface Indicator Light
2. Left Rear Cooktng Zone
Control 5.
3. Left Front Cooking Zone 6.
Control (SURESIMMER rr'_
on some models)
Range
4. Warm & Ready Warming
Drawer Selector Sw_tch
(on some models)
Electronic Oven Control
STEADYTEMP TM Warming
Zone Control (on some
models)
7. Right Front Cooking Zone
Control (Dual Cooking
Zone on some models)
8. Right Rear Cooking Zone
Control
9. SURESIMMER Indicator
Light (on some models)
2
3
4
5
6
9
10
11
10. SURESIMMER Button (on
some models)
11. Cooktop On Ind=cator
Dght
1. Oven Vent
2. Cookng Zone
3. Radiant Glass Cooktop
4. SURESIMMERCooklng Zone
(on some models)
5. STURDIGLIDE TM Half-Rack
(with removable insert on
some models)
6. STURDIGLIDE Oven Rack
(w_th integrated handle --
on some models)
7. Anti-Tip Bracket
8. Door Stop Chp
9. Model and Senal Number
Plate (behind left side of
storage drawer)
10. Warm & Ready Warming
Drawer (on some
models), Storage
Drawer (on some
models)
11. Console Night Light {on
some models)
12. Control Panel
13. STEADYTEMP Warming
Zone (on some models)
14. Dual Cooking Zone (on
some models)
15. Automatic Oven LEght
Switch
16. Self-Clean Latch
17. Broil Element (not shown)
18. Gasket
19. Bake Element
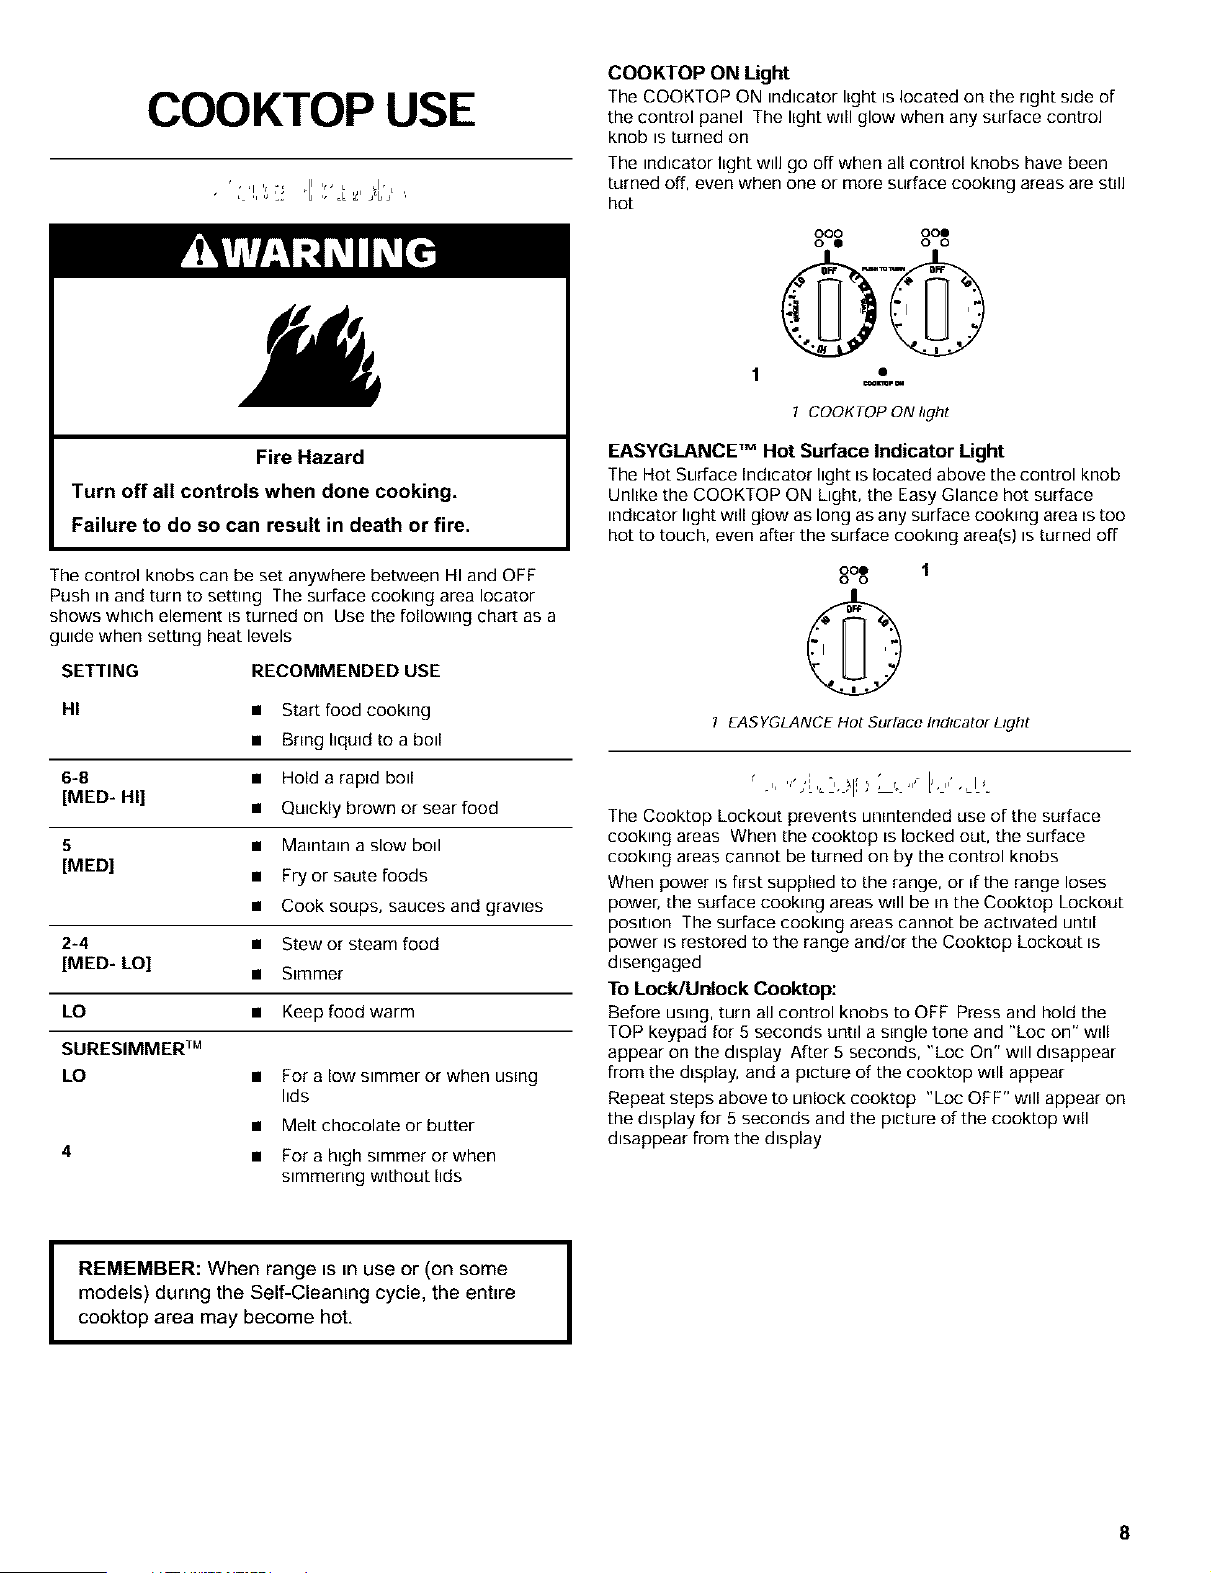
COOKTOP USE
_ Jb ',
Fire Hazard
Turn off all controls when done cooking.
Failure to do so can result in death or fire.
The control knobs can be set anywhere between HI and OFF
Push =n and turn to setting The surface cooking area Iocator
shows which element =sturned on Use the following chart as a
guide when settng heat levels
SETTING RECOMMENDED USE
HI • Start food cooking
• Beng hqu_d to a boll
6-8 • Hold a rapid boll
[MED- HI] • Quickly brown or sear food
5 • Mantain a slow bod
[MED] • Fry or saute foods
• Cook soups, sauces and gravies
2-4 • Stew or steam food
[MED- LO] • Simmer
• Keep food warm
LO
SURESIMMER TM
LO
4
For a low simmer or when using
lids
Melt chocolate or butter
For a h(gh simmer or when
slmmenng w)thout hds
COOKTOP ON Light
The COOKTOP ON indicator light is located on [he right side of
the control panel The light will glow when any surface control
knob is turned on
The indicator I)ght will go off when all control knobs have been
turned off, even when one or more surface cooking areas are stll]
hot
000 00@
O @ O 0
0©
1 •
_mF _,d
I COOKTOP ON hght
EASYGLANCE "M Hot Surface Indicator Light
The Hot Surface Indicator light _slocated above the control knob
Unhke the COOKTOP ON Light, the Easy Glance hot surface
indtcator light wdl glow as long as any surface cookng area _stoo
hot to touch, even after the surface cooking area{s) is turned off
ooe 1
O O
©
I EASYGLANCEHotSurfacelndlcatorLyght
. L I!E'
The Cooktop Lockout prevents unntended use of the surface
cooking areas When [he cooktop _slocked out, the surface
cooking areas cannot be turned on by the control knobs
When power is first supphed to [he range, or Efthe range loses
power, [he surface cookng areas well be Enthe Cooktop Lockout
position The surface cooking areas cannot be activated until
power _srestored to the range and/or the Cooktop Lockout Es
disengaged
To Lock/Unlock Cooktop:
Before using, turn all control knobs to OFF Press and hold the
TOP keypad for 5 seconds unt(I a single tone and "Loc on" w(ll
appear on the display After 5 seconds, "toe On" will disappear
from the dLsplay, and a p(cture of the cooktop w(ll appear
Repeat steps above to unlock cooktop "toe OFF" will appear on
the display for 5 seconds and the picture of the cooktop will
disappear from the display
I
REMEMBER: When range is in use or (on some
models) dunng the Self-Cleaning cycle, the enture
cooktop area may become hot.
I
E,.,_",K'_LL "' "', _l / , _/: ,,o, ', _, _r I .... I, ' '
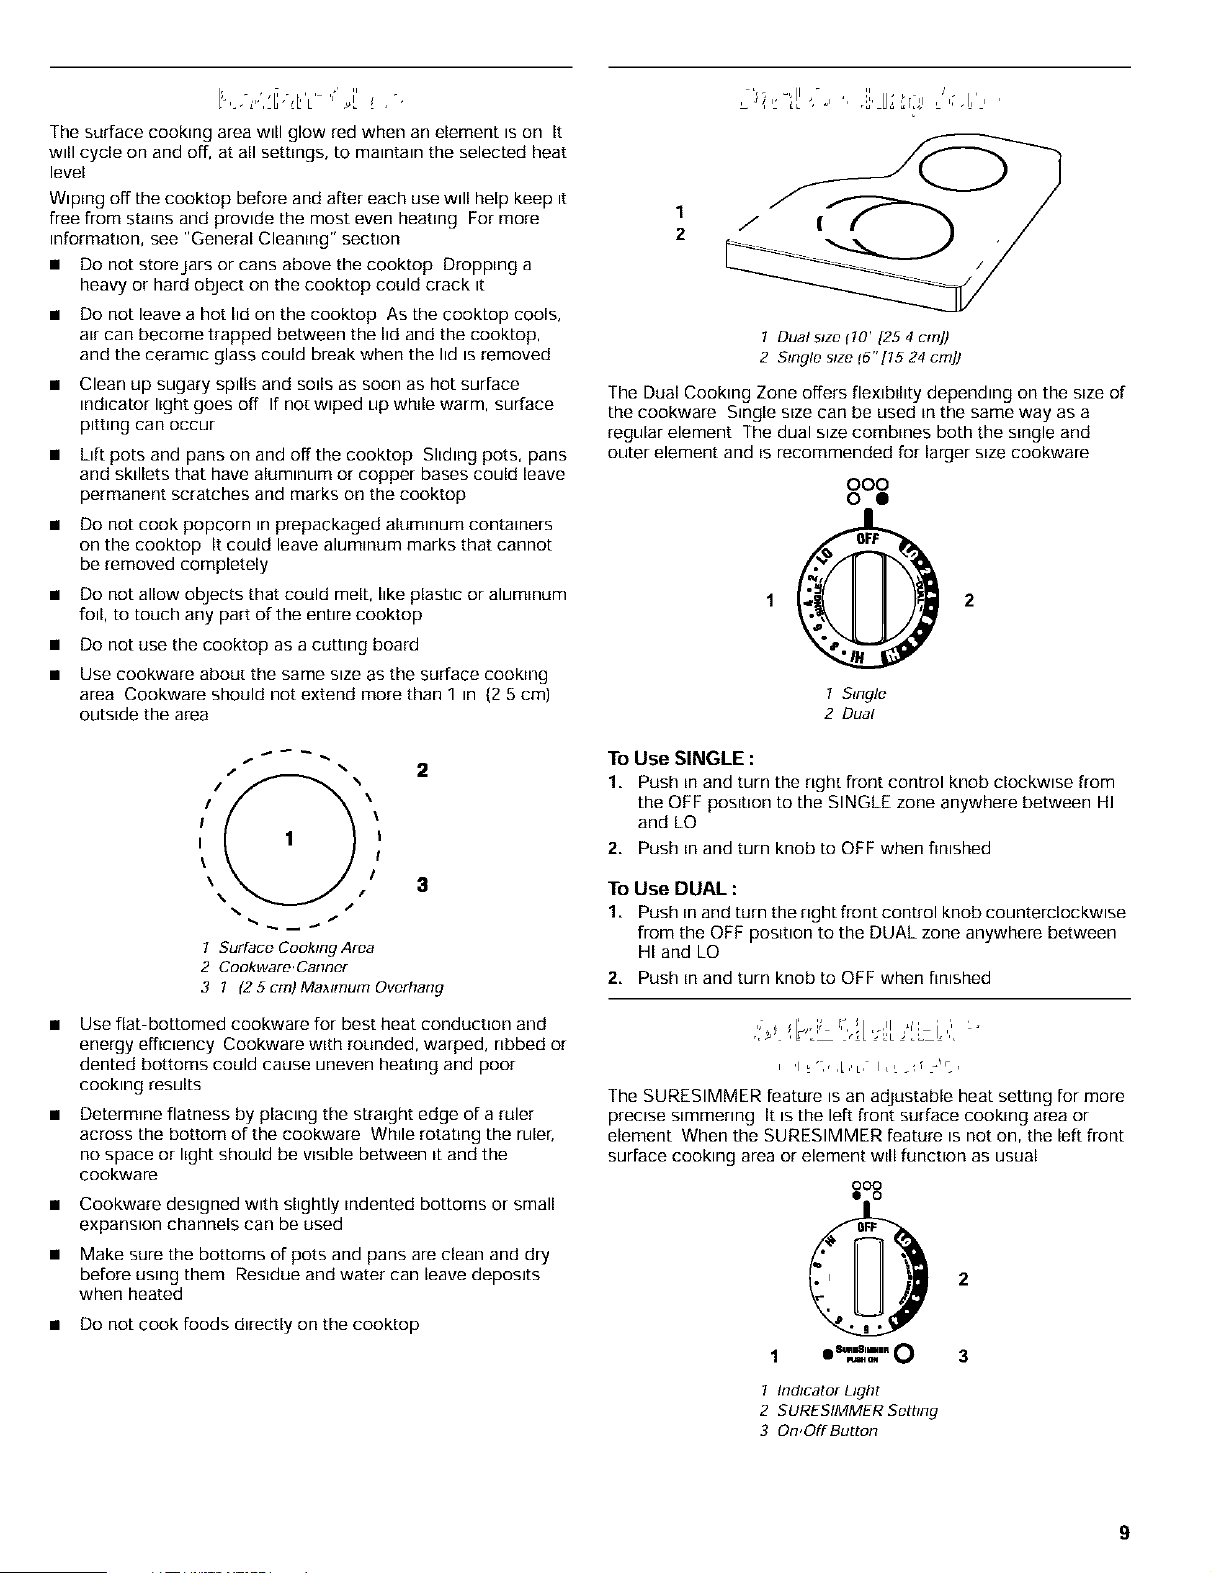
The surface cooking area will glow red when an element is on It
will cycle on and off, at all settings, to maintain the selected heat
level
Wiping off the cooktop before and after each use will help keep it
free from stains and provide the most even heating For more
information, see "General Cleaning" section
• Do not storejars or cans above the cooktop Dropping a
heavy or hard object on the cooktop could crack it
• Do not leave a hot lid on the cooktop As the cooktop cools,
atr can become trapped between the lid and the cooktop,
and the ceramic glass could break when the lid is removed
• Clean up sugary spills and soils as soon as hot surface
mdicator light goes off If no[ wiped up while warm, surface
pitting can occur
• Lift pots and pans on and off the cooktop Shdmgpots, pans
and skillets that have aluminum or copper bases could leave
permanent scratches and marks on the cooktop
• Do not cook popcorn in prepackaged alummum containers
on the cooktop It could leave aluminum marks that cannot
be removed completely
• Do not allow objects [hat could melt, hke plastic or aluminum
foil, to touch any part of the entire cooktop
• Do not use [he cooktop as a cutting board
• Use cookware about the same size as the surface cooking
area Cookware should not extend more than 1 in {2 5 cm)
outside the area
I\ ii
\ ,, 3
I Surface Cooking Area
2 Cookware,Canner
3 I (2 5 cm) Ma_mum OverhatTg
Use flat-bottomed cookware for best beat conduction and
energy efflaency Cookware with rounded, warped, nbbed or
dented bottoms could cause uneven heating and poor
cooking results
Determtne flatness by placing the straight edge of a ruler
across the bottom of the cookware While rotating the ruler,
no space or light should be wslble between _tand the
cookware
• Cookware designed with slightly indented bottoms or small
expansion channels can be used
• Make sure the bottoms of pots and pans are clean and dry
before using them Restdue and water can leave deposits
when heated
• DO not cook foods dtrectly on the cook[op
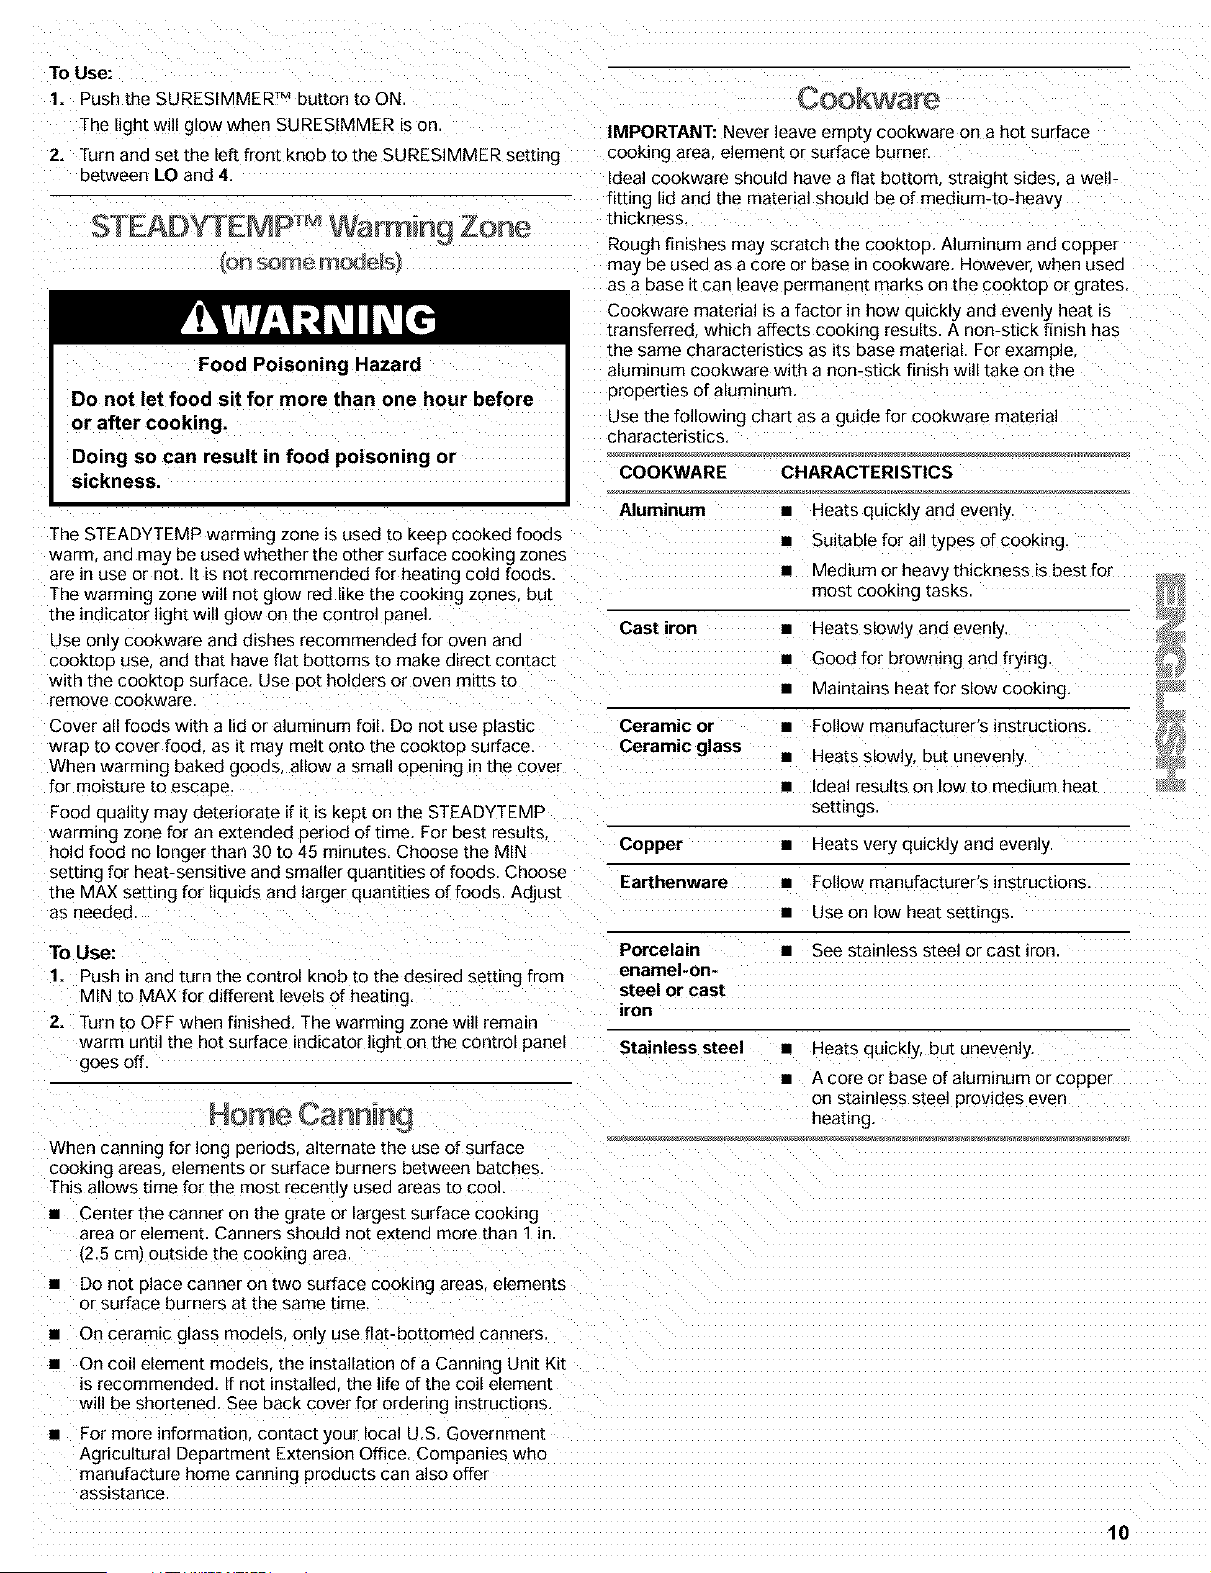
1 Dual size t!O' [25 4 cm])
2 Stngle size f5"[15 24 cm])
The Dual Cooking Zone offers flexlblhty depending on the s_ze of
the cookware Single s_ze can be used m the same way as a
regular element The dual size combines both the single and
outer element and B recommended for larger s_ze cookware
000
0 •
7 S_ngle
2 Dual
To Use SINGLE :
1. Push m and turn the right front control knob clockwise from
the OFF poslt_on to the SINGLE zone anywhere between HI
and LQ
2. Push m and turn knob to OFF when finished
To Use DUAL :
1. Push m and turn the right front control knob counterclockwise
from the OFF posmon to the DUAL zone anywhere between
HI and LQ
2. Push m and turn knob to OFF when finished
I 'I!'C',LIIL, I,L_1 f_'IF'
The SURESIMMER feature ISan adjustable heat setting for more
precBe simmering It is the left front surface cooking area or
element When the SURESIMMER feature is not on, the left front
surface cooking area or element will function as usual
ooo
• 0
0
1 ItTd/cator Light
2 SURESIMMER Setting
30n,OffButton
To Use:
1. Push the SURESIMMER TM 3utton to ON
The light will glow when SURESIMMER is on
2. Turn and set the left front knob to the SURESIMMER setting
between LO and 4
"_ TM
TEADYTEMP Warm nQ Zone
Food Poisoning Hazard
Do not let food sit for more than one hour before
or after cooking.
Doing so can result in food poisoning or
sickness.
IMPORTANT: Never leave empty cookware on a hot surface
cookin£ area element or surface Burner.
Ideal cookware should have a flat bottom s[rmght sides, a well-
fitting lid and the material should be of medium-to-heav)
thickness
Rough finishes may scratch the CooktoD. Aluminum and copper
may De usea as a core or base in cookware. Howeve" when usea
as a ease ir can leave eermanent marks on the CoOktoe or grates.
Cookware material is a factor in how auickly and evenly heat is
transferred, which affects cooking results. A non-stick finish has
the same characteristics as its base material For example,
aluminum cookware with a non-stick finish will take on the
Drooerties of aluminum.
Use the following chart as a guide for cookware material
characteristics.
COOKWARE CHARACTERISTICS
Aluminum
The STEADYTEMP warming zone is used to keep cooked foods
warm ana may be used whether the other surface cooking zones
are Jn use or no[ It is not recommended for heating cold foods
The warming zone will not glow red like the cooking zones but
the indicator light will glow on the control 3anel.
Cast iron
Use only cookware and dishes recommended for oven and
cooktoe use and that have flat bottoms to make direct contact
with the cooktop surface. Use oct holders or oven mitts [o
remove cookware.
Cover all foods with a lid or aluminum foil. Do not use plastic
wrap [o cover food. as it may melt onto the cooktoe surface.
When warming baked gooas allow a small opening _nthe cover
for moisture to escaoe
Ceramic or
Ceramic glass
Copper
Earthenware
• Use on low heat settings.
Porcelain • See stainless steel or cast iron
enamel-on-
steel or cast
iron
Stainless steel • Heats auickly, but unevenly.
:cod aual[ty may deteriorate if it is kept on the STEADYTEMP
warming zone for an extended period of time. For best results.
hold food no longer than 30 to 45 minutes. Choose the MIN
se[eng for heat-sensitive and smaller quantities of foods. Choose
the MAX setting for liquids and larger quantities of foods. Adjus[
as needed
• Hears quickly and evenly
• Suitable for all types of cooking.
• Medium or heavy thickness is best for
most cooking tasks
• Heats slowly and evenly
• Good for browning and frying
• Maintains heat for slow cooking.
• Follow manufacturer's instructions
• Heats slowly, DU[ uneventy.
• Ideal results on low to medium heat
settings
• Heats very quickly and evenly.
• Follow manufacturer's instructions
To Use:
1. Push in aria turn the control knob to the desired setting from
MIN to MAX for different levels of heating.
2. Turn to OFF when finished. The warming zone will remain
warm until the hot surface indicator light on the control panel
goes off.
When canning for long periods, alternate the use of surface
cooking areas elements or surface burners between batches
This allows time for the most recently usea areas to cool.
• Center the canner on the grate or largest surface cooking
• A sore or base of aluminum or coppe-
on stainless steel provides even
heating.
area or element. Canners should not extend more than 1 in
(2.5 cm) outside the cooking area
Do not place canner on two surface cooking areas elements
or surface burners at the same ume.
On ceramic glass models only use flat-bottomed canners.
On coil element models the installation of a Canning Unit Kit
is recommended. If not installed the life of the coil element
will be shortened. See back cover for ordering instructions.
For more information, contact your local U.S. Government
Agricultural Department Extension Office. Companies who
manufacture home canning proauc[s can also offer
asms[ance
10
ELECTRONIC OVEN CONTROL
3 4 5 6
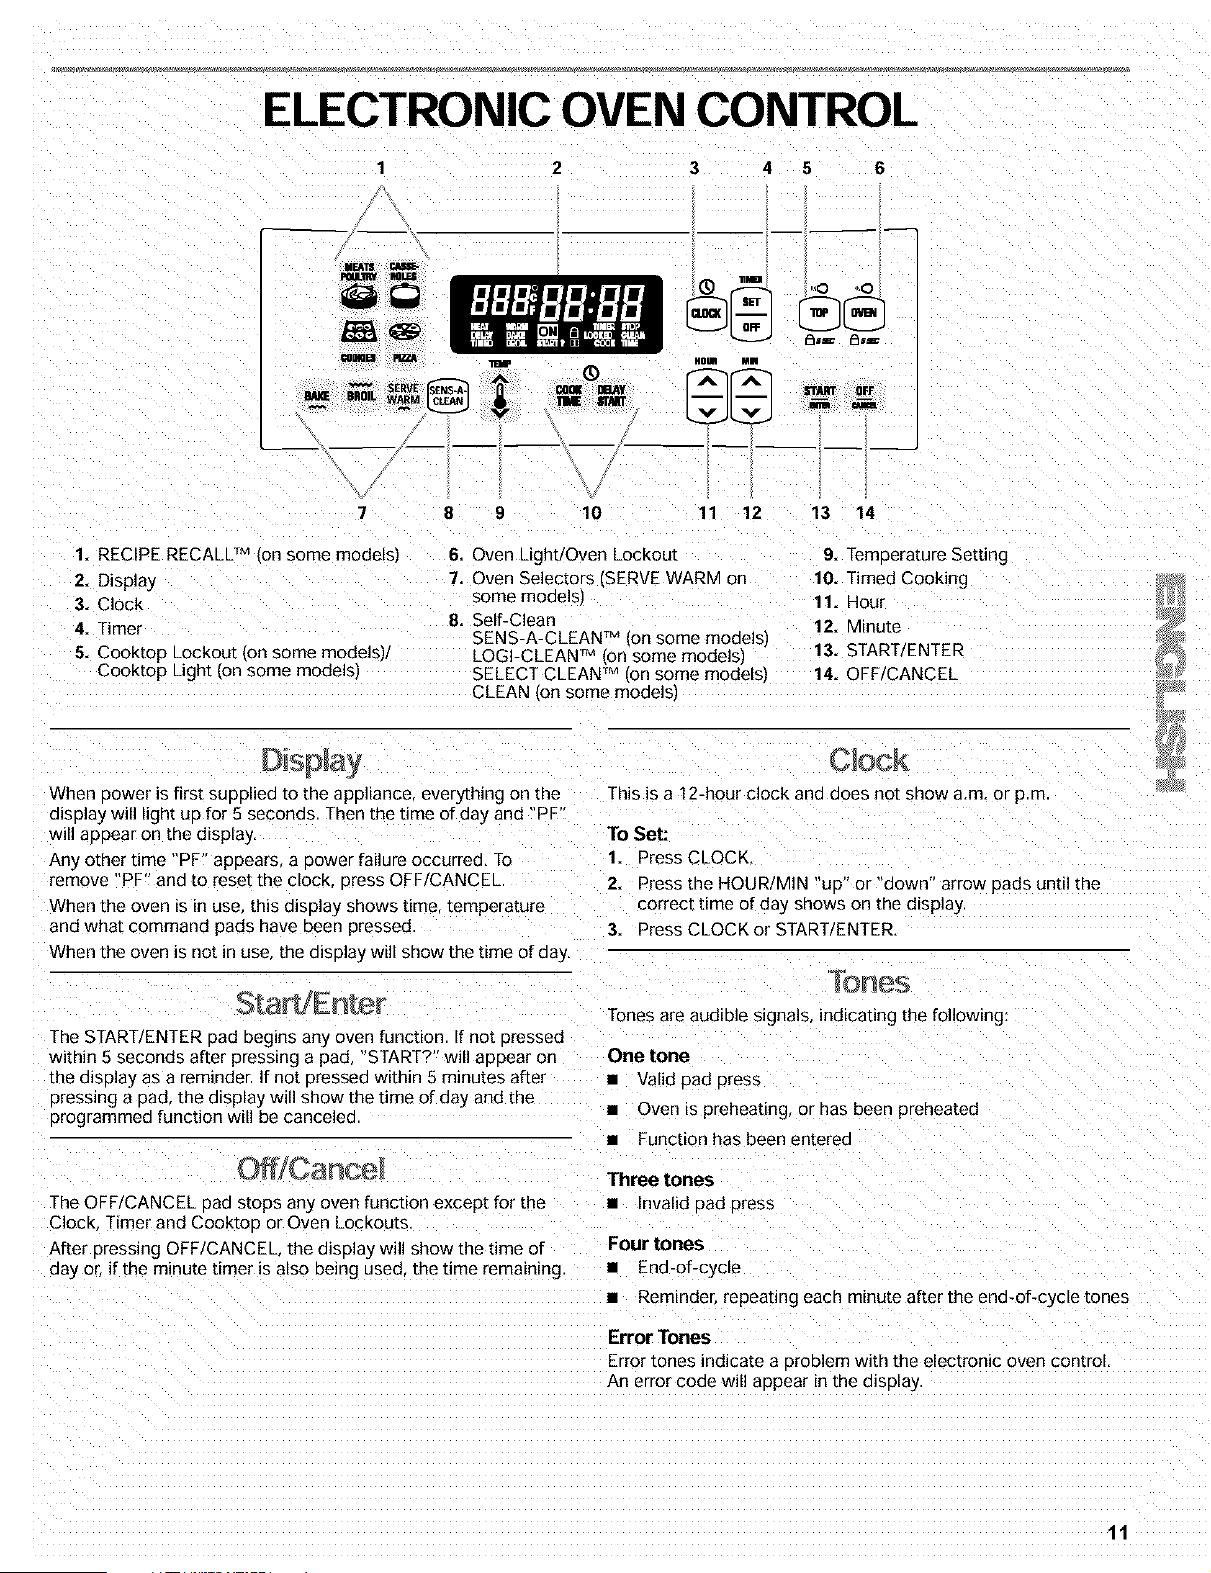
1. RECIPE RECALL TM ion some models)
2. Display
3. Clock
4. Timer
5. Cooktop Lockout ,on some models)
Cooktop Light (on some models
8 9 10 11 12 13 14
6. Oven Light/Oven Lockout
7. Oven Selectors (SERVE WARM on
some models'
8. Self-Clea_
SENS-A-CLEAN TM on some models'
LOGI-CLEAN TM ion some modelsl
SELECT CLEAN TM )on some models
CLEAN ,on some models1
9. Temperature Setting
10. Timed Cooking
11. Hour
12. Minute
13. START/ENTER
14. OFF/CANCEL
When Dower is first SUDOlied tO the appliance, everything on the
display will light up for 5 seconds. Then the time of day and "PF
will appear on the display
Any other time "PF" appears, a Dower failure occurred. To
remove "PF" and to reset the clock Dress OFF/CANCEL
When the oven is in use. this display Shows time temperature
and what command pads nave bee_ pressee
When the oven is not in use. the ChSDlaywill Show the time of day.
This is a 12-hour clock ann noes not snow a.m. or p.m.
To Set:
1. Press CLOCK.
2. Press the HOUR/MIN "uo" or"down" arrow pads until the
correct time of day shows on the display
3. Press CLOCK or START ENTER.
The START/ENTER Dad begins any oven function If not Dressed
within 5 seconds after pressing a pad START?" will appear on
the diSDlay as a reminder. Jf not Dressed within 5 minutes after
3ressmg a Dad. the display will show the time of da!_ and the
3rogrammed function will be canceled
The OFF/CANCEL oaa slops any oven function except for the
Clock Timer and Cooktoo or Oven Lockouts.
After Dressing OFF/CANCEL the display will show the time of
aay or if the minute timer is also being used the time remainin£
Tones are audible signals, indicating the following:
One tone
• Valid Dad Dress
• Oven B preheating, or has been preheated
• Function has been entered
Three tones
• invalid Dad Dress
Four tones
• End-of-cycle
• Reminder repeaDng each minute after the end-of-cycletones
Error Tones
Error tones indicate a Droblem with the electronic oven control.
An error code will appear in the display.
11
Tone Volume
The volume can be adJusted between high and low.
To Change: Press and hold DELAY START for 5 seconds. A short
tone will sound ana either "Snd HI" or "Snd Lo" will appear on the
display. Press and hold DELAY START again for 5 seconds to
cnange to desired setting,
To remove "Snd on " "Snd OFE" "rEP on," "rEP off." "Snd HI" or
"Snd Lo" Dress any paa and the keyed function will appear on
the disDlay.
Reminder Tones
Reminder tones are four 1-second tones which indicate that the
set time has exDired for a timer or a timed oven control function,
Timer
To Turn Tones Off/On: Press and hold SET for 5 seconds, A
short tone will sound and "rEP OFF" will appear on the display
Repeat to turn back on
Timed Cooking
To Turn Tones Off/On: Press ana hold COOK TIME. A short tone
will sounc and "Snd OFF" will appear on the display. ReDea[ to
[urn back on,
Fahrenheit and Celsius
The temDerature is areset at Fahrenheit but can be changed to
Celsius
To Change: Press and hold BROIL for 5 seconds. A short tone
will sound and the temperatures @splayed will switch to "°C
Repeat to change back to Fahrenheit
timer
The Timer can be set in minutes ana seconds or hours ant
minutes ana counts down the set time, The Timer does not start
or sic o me oven,
To Set:
1. Press TIMER SET.
2. Press the HOUR/MIN "up" or "down" arrow pads until the
correct length of time shows on the d{SD]ay.
3. Press START/ENTER orTIMER SET
The Timer will beg_n counDng down after the Timer is startec
The display will count down in hours and minutes if remaining
time is one hour or more and in minutes and seconds il
remaning time is less than one hour
When the set ttme ends four 1-second tones if enabled will
sounG then reminder tones will sound every minute
4. Press TIMER OFF anytime to cancel the Timer ana/or SIOD
remlnaer tones
Oven Lockout
The Oven Lockout prevents unintended use of the control aanel
command keypads. The oven can only be locked out when the
oven is not in use or the oven control has not been set.
The oven will remanD locked out after a Dower failure if it was
locked before the Dower failure
To Enable/Disable Oven Lockout:
Press and hold OVEN for 5 seconds. A single tone wdl sound
and "Loc on" and a lock icon will appear on the display, After 5
seconds "Loc on" will disappear from the display and "Loc" will
appear,
Three tones will sound when the oven is locked ana any
commanc pad other than CLOCK TIMER. START/ENTER OFF/
CANCEL or OVEN has bee_ pressec
To unlock oven press and hold OVEN for 5 seconds Loc OFF"
will appear on the display and lock icon will disappear from the
display.
IMPORTANT: Do not use a thermometer to measure oven
[emDerature because opening the oven door and element o"
burner cycling may g_ve _ncorrect reaangs.
The oven provides accura[e temperatures: however it may cook
faster or slower than your Drevlous over SOthe temperature
calibration can be adjustea. It can be changed in Fahrenheit or
Celsius
A minus sign means the oven will cook cooler by the adjustment
amount. No sign means the oven will cook warmer by the
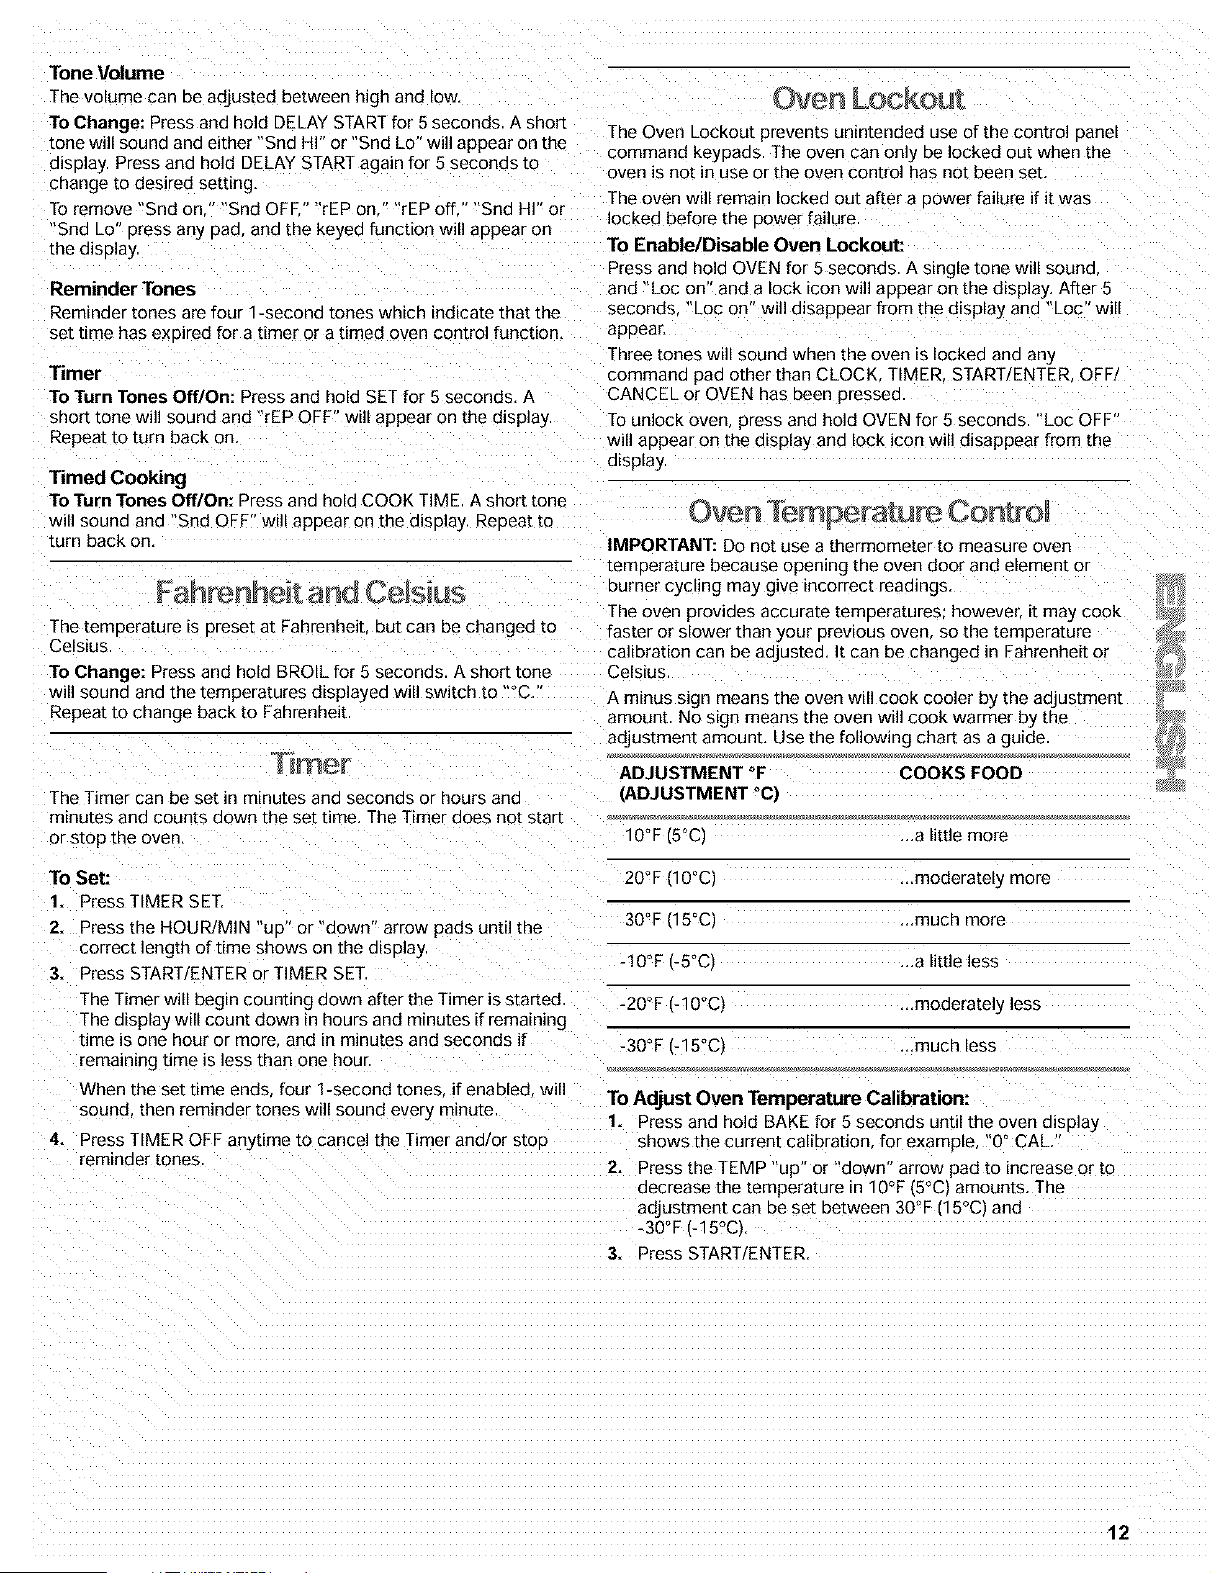
adjustmem amoum, Use the following chart as a guide.
ADJUSTMENT °F
(ADJUSTMENT °C)
COOKS FOOD
10°F [5°CI ...a little more
20°F [10°C1 ..,moderately more
30°F [15°C1 ...much more
-10°F (-5°C) ...a little less
-20°F (-10°C) ,,,moderately less
-30°F (-15°C) .,,much less
To Adjust Oven Temperature Calibration:
1. Press and hold BAKE for 5 seconds until the oven alsplay
shows the current calibration [or example "0 ° CAL.
2. Press the TEUP "up or aown arrow pad to increase or to
decrease the temperature in 10°F (5°C) amounts, The
adjustmem can be set between 30°F [15°C anG
-30°F (-15°C).
3. Press START, ENTER,
12
OVEN USE
Odors are normal when the range is new, This happens the first
time the oven is used or when the oven is heavily soiled,
IMPORTANT: The health of some birds is extremely sensitive to
the fumes given off. Exposure to the fumes may result in death to
certain birds. Always move birds to another closed and wel
ventilated room,
IMPORTANT: Do not line the oven bottom w_thany [ype of foil
liners or cookware because oermanen[ oamage will occur to the
oven OO[[Om finish.
• Do not cover entire rack with foil because air must be able to
move freely for best cooking results,
• To catch spills place foil on rack below dish Make sure foil is
at least 1 in. (2.5 cm) larger than the dish and that it is turned
uo at the edges
Pos tionin9 Racks and Bakewar÷
IMPORTANT: Never place food or bakeware directly on the oven
ooor or bottom. Permanent damage will occur to the Dorcelai_
finish,
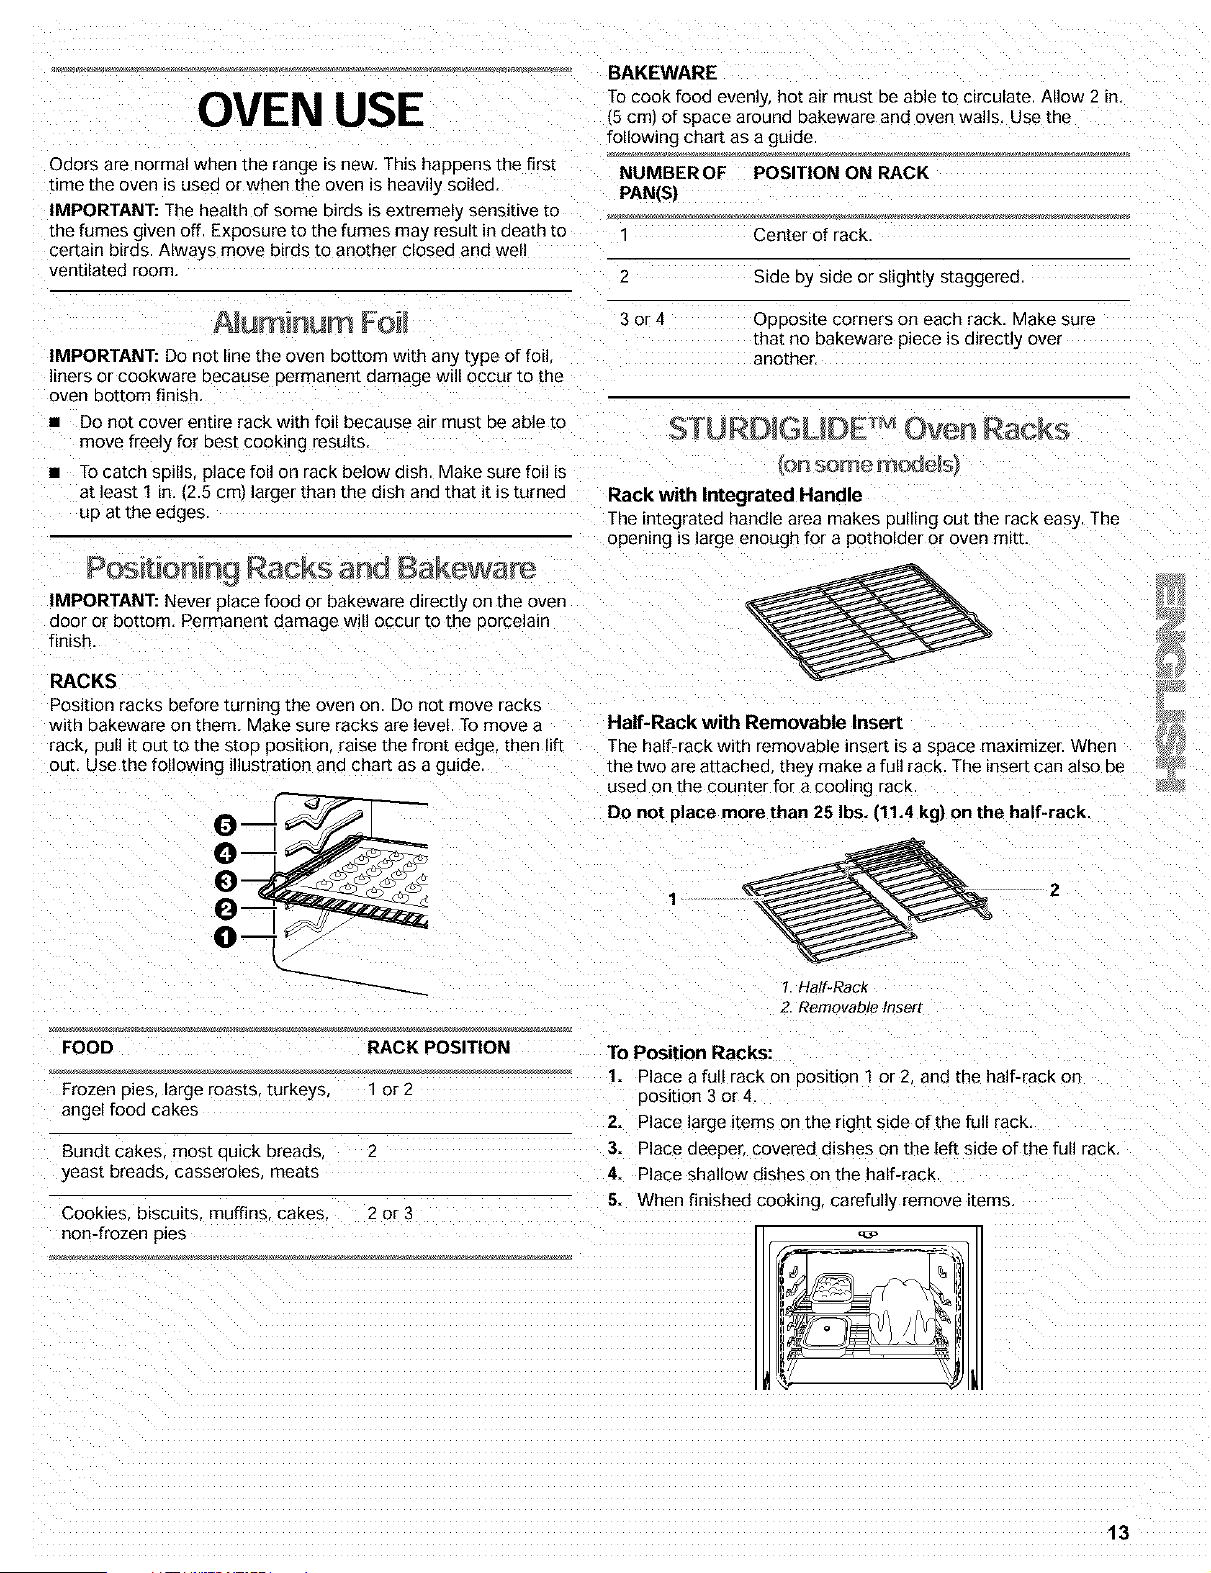
RACKS
3osition racks before turning the oven on. Do not move racks
with baKeware on them. Make sure racks are level. To move a
rack. DUll It OUttO the SlOB pos{t_on raise the front edge. then lift
our. Use the following illustration and chart as a guide.
o
t
FOOD RACK POSITION
Frozen Dies. large roasts, turkeys, " or 2
angel food cakes
Bundt cakes mos[ ouick breads 2
yeas[ breads casseroles meats
Cookies biscuits, muffins, cakes. 2 or 3
non-frozen Dies
BAKEWARE
To cook food evenly, hot air must be able to circulate. Mow 2 in.
(5 cm) of space around bakeware and oven walls. Use the
following chart as a guide
NUMBER OF POSITION ON RACK
PAN(S)
Center of rack
2 Side By side or slightly staggered
3or4 ODDOSlte corners on each rack. Make sure
Lhatno bakeware piece is directly oveJ
another,
STURDIGL DE {)yen Racks
.on sore@ _YI_]@_S
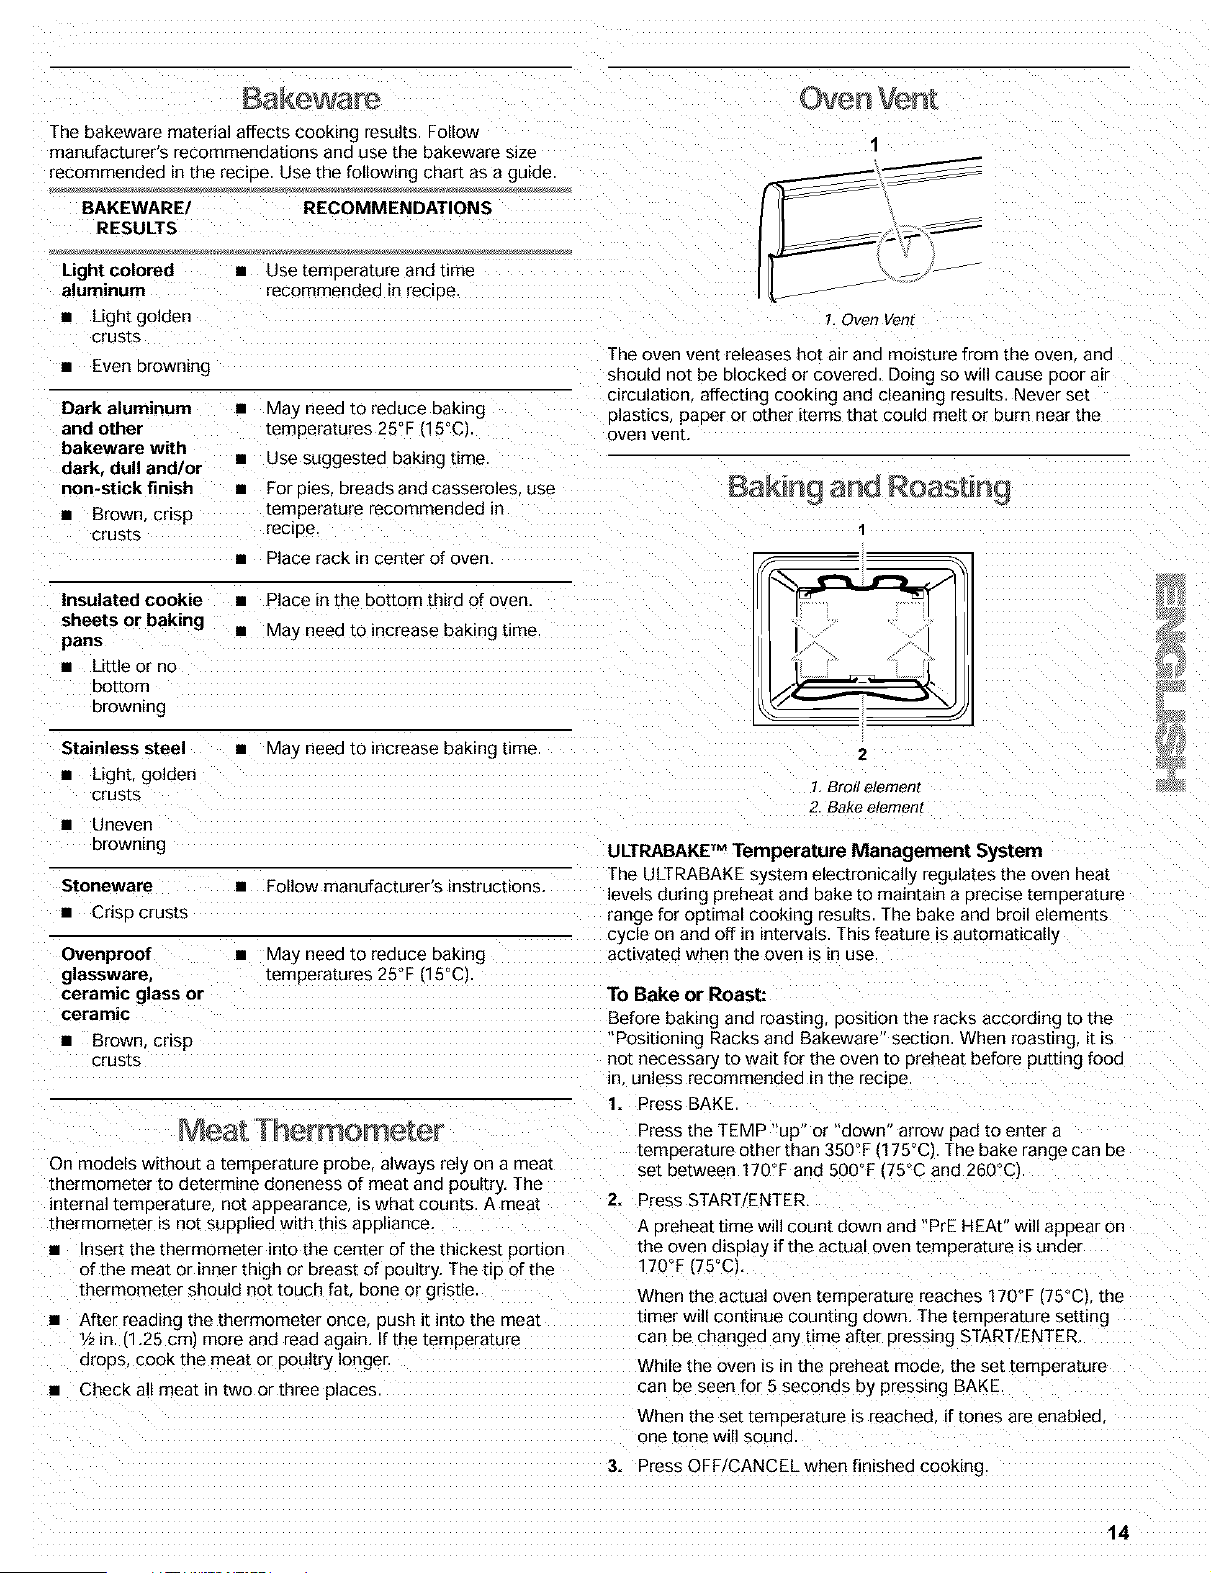
Rack with Integrated Handle
The integrated handle area makes Dulling out the rack easy. The
opening is large enough for a potholder or oven mitt.
Half-Rack with Removable Insert
The half-rack with removable insert is a space maximizer. When
the two are attached, they make a full rack. The insert can also be
used on the counter for a cooling rack.
Do not place more than 25 Ibs. (11.4 kg) on the half-rack
I. Half-RacK
2. Removable Insert
To Position Racks:
1. Place a full rack on oOSlDOn1 or 2 and the half-rack on
position 3 or 4
2. Place large items on the right side of the full rack.
3. Place deeper covered dishes on the left side of the full rack
4. Place shallow dishes on the half-rack.
5. When finished cooking, carefully "emove items.
13
The bakeware matena] affects cooking results Follow
manufacturer's recommendations and Jse the bakeware size
recommended in the recipe. Use the following chart as a guide
BAKEWARE/ RECOMMENDATIONS
RESULTS
Light colored
aluminum
• Light golden
crusts
• Even browning
• Use temDerature and time
recommended in recede
Dark aluminum •
and other
bakeware with
dark, dull and/or
non-stick finish •
• Brown cesp
crusts
May need to reduce baking
temperatures 25°F (15°Ci
Use sugges[ea baking ume
For Dies. breads and casseroles use
temperature recommended in
recipe
Place rack in center of oven.
Insulated cookie
sheets or baking
pans
• Little or no
DoEom
browning
• Place in the bottom third of oven
• May need to increase baking ume
1
Y
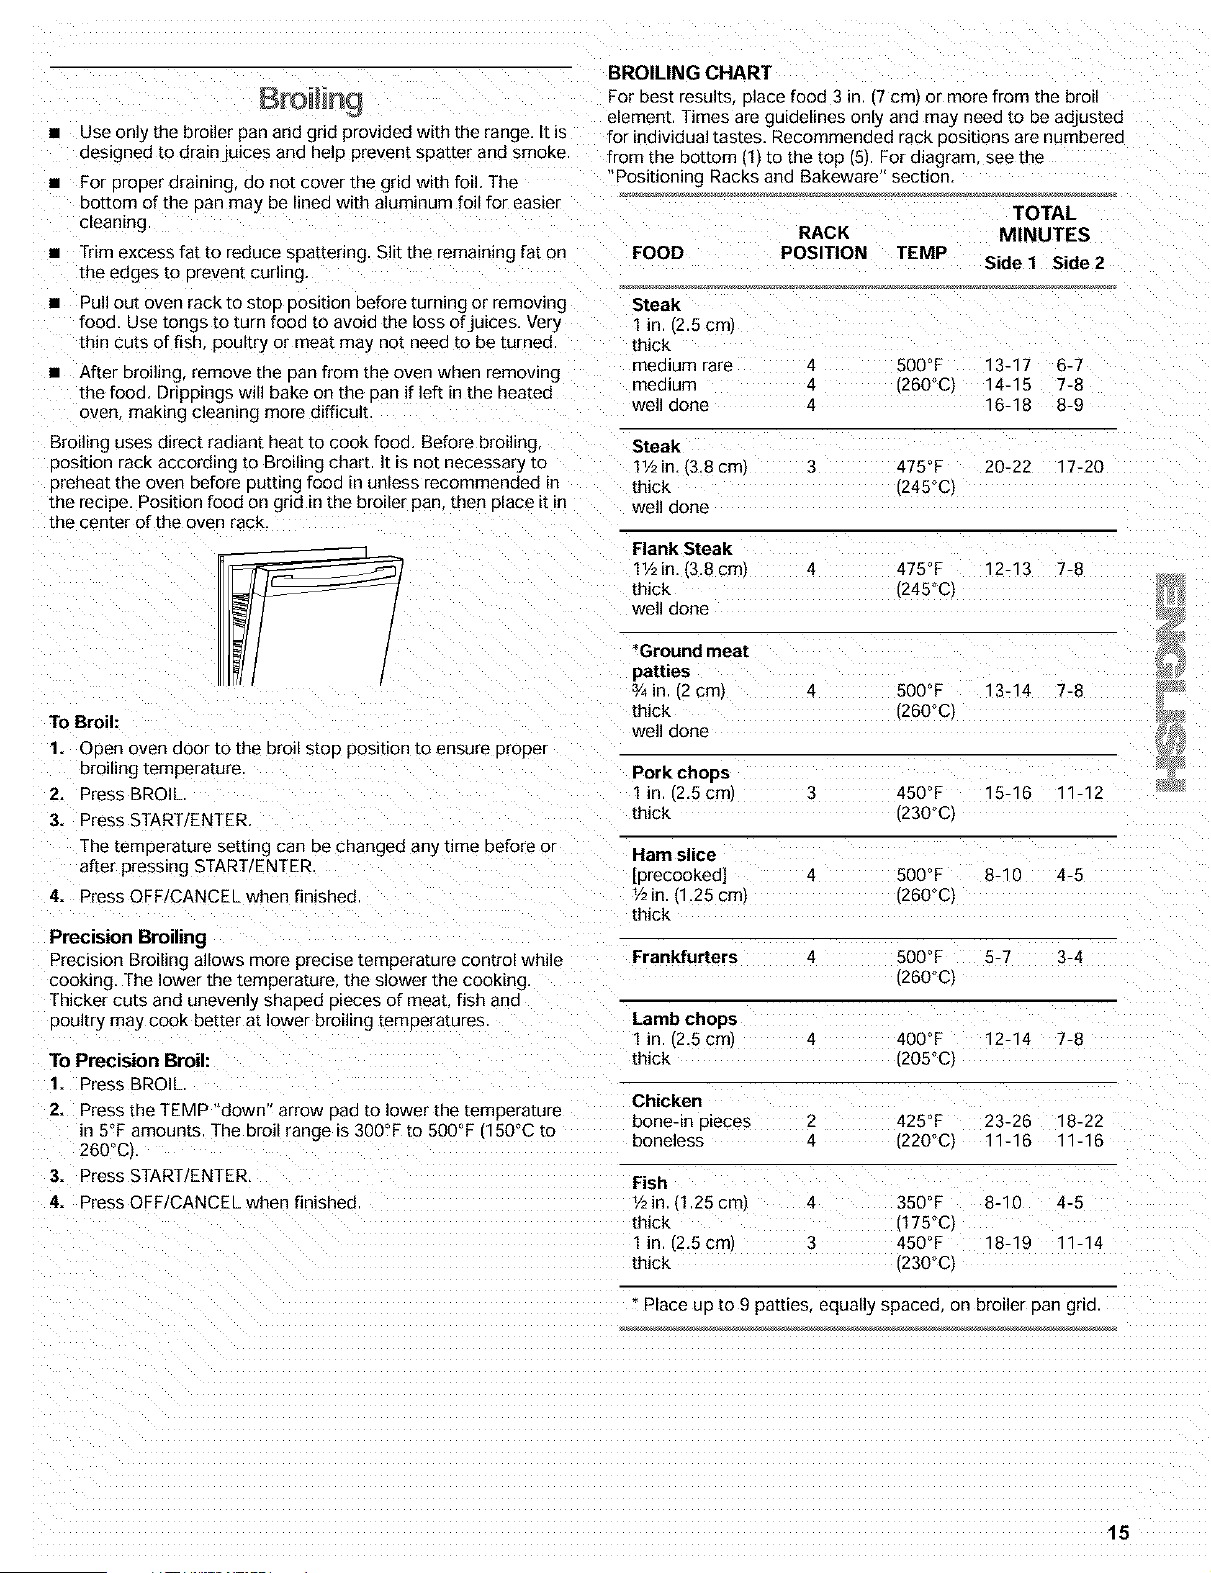
1. Oven Vent
The oven vent releases hot a_rand moisture from the oven ana
should not be blocked or covered. Doing so will cause Door air
circulation affecting cooking and cleaning results. Never set
Dlastics paper or other items that could melt or burn near the
oven vent.
Baking and Roasting
Stainless steel • May need to increase baking time
• Light, golden
crusts
• Uneven
browning
Stoneware • Follow manufacturer's instructions.
• Criso crusts
Ovenproof • May neea to reauce baking
glassware, temperatures 25°F (15°CI
ceramic glass or
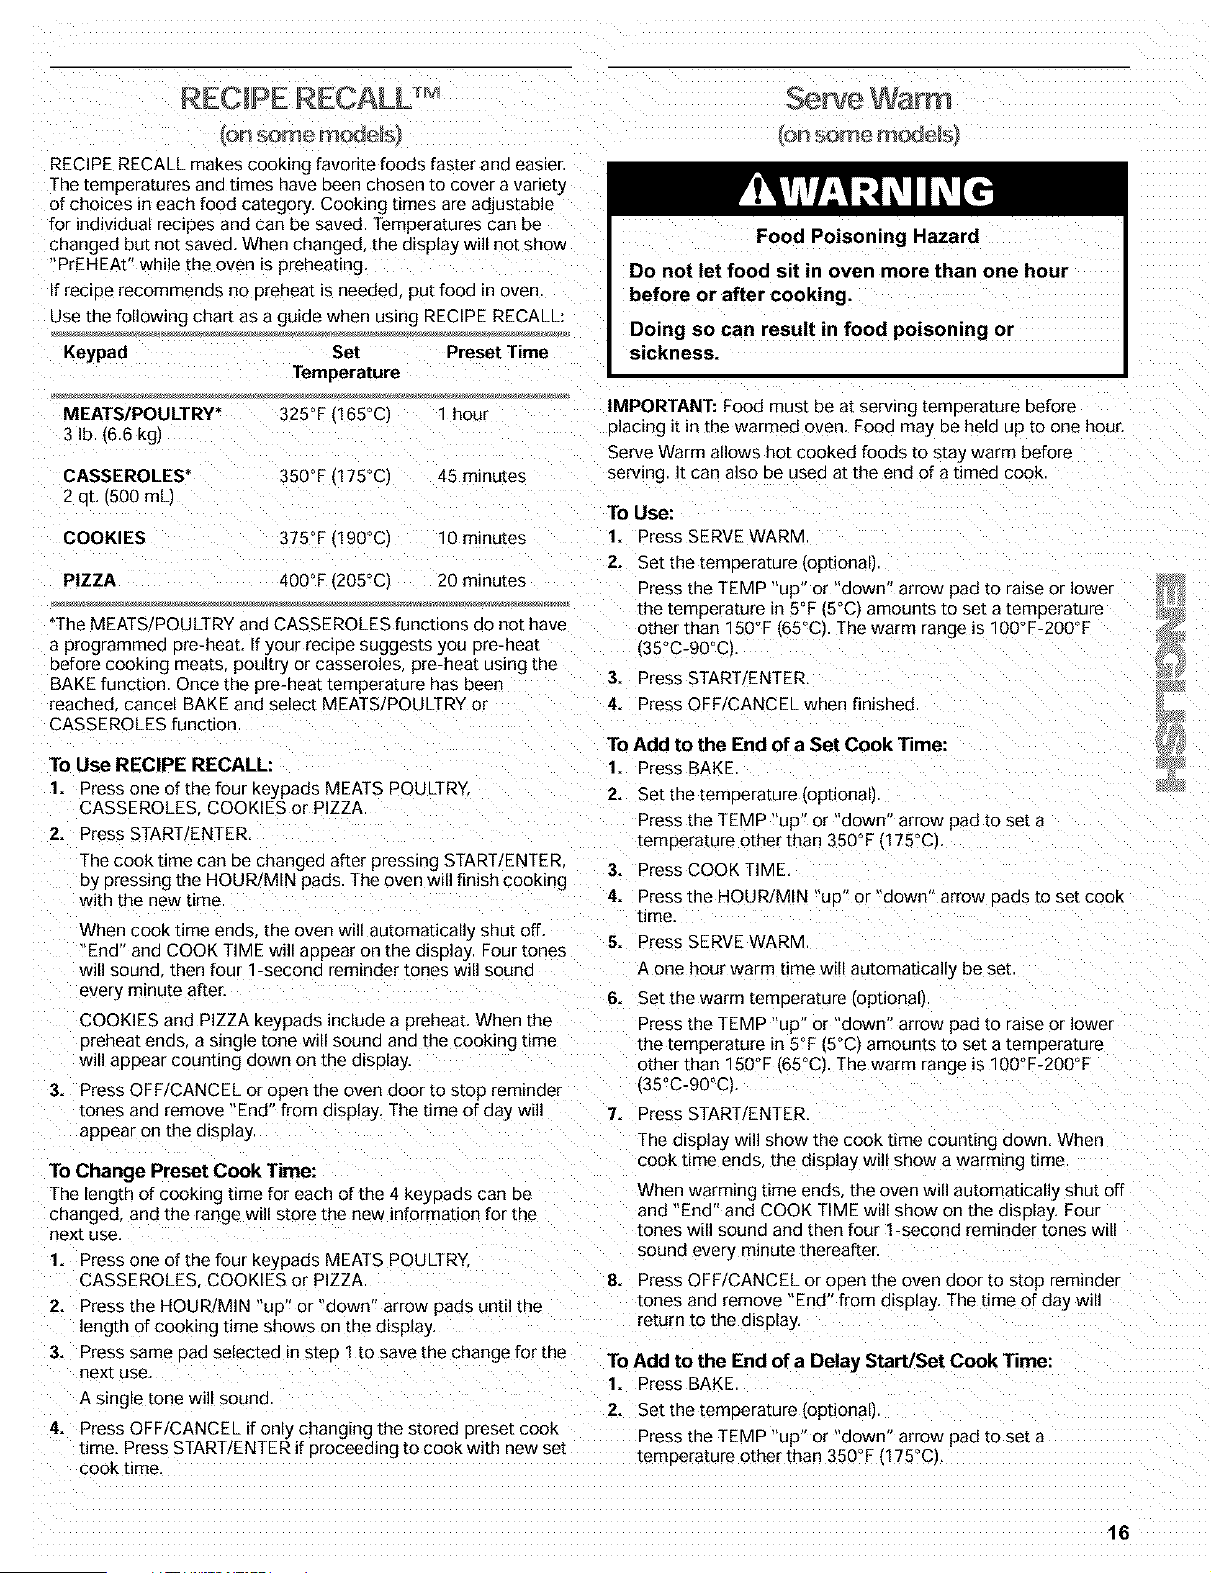
2
1. Broil element
2. Bake element
ULTRABAKE TM Temperature Management System
The ULTRABAKE system electronically regulates the oven heat
levels during preheat and bake to maintain a Drec_se [emDerature
range for optimal cooking results The bake and broil elements
cycle on aria off in intervals. This feature is automatically
activated when the oven is in use
To Bake or Roast:
ceramic Before baking aria roast=ng DOS=OaRme racks according to the
• Brown. crisp Positioning Racks and Bakeware" section. When roasting, it is
crusts not necessary to wait for the oven to oreheat before puEmg food
in Jnless recommended in the recipe.
1. Press BAKE
On models without a temperature probe, always rely on a meat
thermometer to determine doneness of meat and poultry. The
internal temperature, not aDDearance, is what counts A meat
thermometer _snot supplied with this appliance
• Insert the thermometer into the center of the thickest poruon
of the meat or inner thigh or breast of poultry. The tio of the
thermometer should not touch fat. Done or gristle.
• After reading the thermometer once. push it into the meat
V2in (1.25 cmJ more and read again. If the temoerature
aroDs, cook the meat or DOUltry longer.
• Check all meat in two or three places
Press the TEMP "up or aown arrow pad [o enter a
temDerature other than 350°F (175°C1. The bake range can De
set between 170°F and 500°F (75°C and 260°CJ
2. Press START/ENTER,
A oreheat time will count down and PrE HEAt" will appear on
the oven disolay if the actual oven temperature is unaer
170°F .75°Cl.
When the actual oven [emDerature reaches 170°F (75°C) [he
timer w_ll conunue counung down. The temperature setting
can be changea any time after Dressing START/ENTER
While the oven is in the oreheat mode the set temperature
can De seen for 5 seconds by pressing BAKE
When the set temoerature is reached if tones are enabled
one tone will sauna
3. Press OFF/CANCEL when finished cooking
14
Use only the broiler pan and grid provided with the range. It is
aesJgned to dratn juices ana help prevent spatter and smoke.
For proper draining, do not cover the grid with foil, The
bottom of the nan may be lined with aluminum foil for easier
cleaninc
• Trim excess fat to reduce spattering. Slit the remaining fat on
the edges to prevent curling.
BROILING CHART
For Des£results D]ace food 3 i_ (7 cm, or more from the broil
element. Times are guidelines only and may neea [o De adjusted
for individual tastes. Recommended rack oositions are numbered
from the DoEom [1) to the top (5). For diagram see the
Positioning Racks and Bakeware" section.
TOTAL
RACK MINUTES
FOOD POSITION TEMP
Side 1 Side 2
• Pull out oven rack to StOD oosition before turning or removing
_ooa. Use tongs [o [urn food to avoid the loss of_uices. Very
thin cuts of fish poultry or meat may not need to be turned
• After broiling, remove the Dan from the oven when removing
the food. Drippings will bake on the Dan if left in the heated
oven. making cleaning more difficult
Steak
1 in. (2.5 cm.
thick
mealum rare 4 500°F 13-17 6-7
mealum 4 [260°C) 14-15 7-8
well Gone 4 16-18 8-9
3roiling uses direct radiant heat to cook food. Before broiling
3osition rack according to Broiling chart It is not necessary [o
3reheat the oven before Gutting food in unless recommended in
the recipe. Position food on grid in the broiler pan, then place _tin
the center of the oven rack,
Steak
11/2in. (3.8 cm} 3 475°F 20-22 17-20
thick [245°C)
well Gone
Flank Steak
11/2in. (3.8 cm) 4 475°F 12-13 7-8
thick ',245°C,
well Gone
'Ground meat
patties
¥4 in (2 cm) 4 500°F 13-14 7-8
(hick ',260°C)
well aone
Pork chops
1 in. (2.5 cm 3 450°F 15-16 11-12
thick [230°C}
Ham slice
[precooked] 4 500°F 8-10 4-5
V2in (1 25 cml '260°C)
thick
Frankfurters 4 500°F 5-7 3-4
'260°C,
To Broil:
1. aden oven door to the broil stop position to ensure proper
broiling temperature
2, Press BROIL
3. Press START ENTER.
The [emoerature setting can be changed any time before or
after pressing START ENTER
4. Press OF F/CANCE L when finished
Precision Broiling
3recision Broiling allows more precise temperature control while
cooking The lower the temperature the slower the cooking.
Thicker cuts and unevenly shaded pieces of meat, fish and
poultry may cook better at lower broiling temperatures Lamb chops
To Precision Broil:
1. Press BROIL
! in. (2.5 cm) 4 400°F 12-14 7-8
thick [205°C,
Chicken
2. Press the TEMP "down" arrow Dan [o lower the temperature bone-in o_eces
_n5°F amounts. The broil range is 300°F to 500°F (150°C to
260oc}. boneless
425°F 23-26 18-22
[220°C} 11-16 11-16
3. Press START ENTER. Fish
4. Press OFF/CANCEL when finished V2i_ (1.25 cml 4 350°F 8-10 4-5
thick '175°C}
1 in. (2.5 cm) 3 450°F 18-19 11-14
[hick '230°C}
" Place UDto 9 patties, equally spaced on broiler Dan gna.
15
RE(; IPE JALL
i_n Some m_s_
RECIPE RECALL makes cooking favorite foods faster and easier.
The temperatures and times have been chosen to cover a variety
of choices in each food category. Cooking times are adJustable
for individual recipes and can be saved. Temperatures can De
changed but not saved, When changed, the display will not show
"PrEHEAt" while the oven is preheating.
f recide recommenas no preheat is needed put food in oven
Use the following chart as a guide when using :_ECIPE RECALL:
Keypad Set Preset Time
Temperature
MEATS/POULTRY* 325°F !165°CI 1 hour
3 Ib [6.6 kg)
CASSEROLES* 350°F (175°C) 45 minutes
2 at. (500 mL)
COOKIES 375°F t190°C1 10 minutes
2.
PIZZA 400°F (205°C/ 20 minutes
*The MEATS/POULTRY and CASSEROLES functions ao not have
a programmea ore-heat. If your recipe suggests you ore-heat
3efore cooking meats, poultry or casseroles, pre-heat using the
3AKE function. Once the pre-heat temperature has been 3.
reached cancel BAKE and select MEATS/POULTRY or 4.
CASSEROLES function
To Use RECIPE RECALL:
1. Press one of the four keypads MEATS POULTRY
CASSEROLES COOKIES or PIZZA
2. Press START ENTER.
The cook time can be changed after pressing START/ENTER.
By pressing the HOUR/MIN pads. The oven will finish cooking
with the new hme.
When cook time ends the oven will automatically shut off.
End" and COOK TIME will appear on the display :our tones
will sound then four 1-second reminder tones will souna
every minute after.
COOKIES and PIZZA keypads include a preheat. When the
preheat ends a single tone will sound and the cooking eme
will appear counting down on the display.
Food Poisoning Hazard
Do not let food sit in oven more than one hour
before or after cooking.
Doing so can result in food poisoning or
sickness.
IMPORTANT: Food must be at serving temperature before
placing it in the warmed oven. Food may be held up to one hour.
Serve Warm allows hot cooked foods to stay warm before
serving. It can also be used at the end of a timed cook
To Use:
1. Press SERVEWARM
Set the temperature Ioptionall
Press the TEMP "up or aown arrow pad to raise or lower
the temperature in 5°F r5°cl amounts to set a temperature
other than 150"F (65°C] The warm range is 100°F-200°F
(35°C-90°C).
Press START, ENTER,
Press OFF/CANCEL when finished
To Add to the End of a Set Cook Time:
1. Press BAKE
2. Set the temperature Ioptlonal)
Press the TEMP "up" or "down" arrow pad to set a
temuerature other than 350°F (175°CI.
3. Press COOK TIME
4. Press the HOUR/MIN "UO" or "down'" arrow oaas to set cook
time
5. Press SERVE WARM
A one hour warm time will automatically be set
6. Set the warm temperature ioptloeal)
Press the TEMP "up or "down" arrow pad to raise or lower
the temperature in 5°F '5°C_ amounts to set a temperature
other than 150°F (65°Ci The warm range is 100°F-200°F
3.
Loeesand remove "End" from display. The time of day will
appear on the display.
,35°C-90°CL
Press OFF/CANCEL or open the oven door to stop remmae/
7. Press START/ENTER.
To Change Preset Cook Time:
The length of cooking time for each of the 4 keyDaas can De
changed and the range will store the new information for the
next use.
1. Press one of the four keypads MEATS POULTRY.
CASSEROLES COOKIESor PIZZA 8.
2. Press the HOUR/MIN "up" or "down" arrow pads until the
length of cooking time shows on the display.
3. Press same uaa selected in steu 1 tO save the change for the
next use
A single tone will souna
Press OFF/CANCEL if only changing the stored 3reset cook
time. Press START/ENTER if 3roceeang to cook with new set
cook time.
To
1.
2.
4.
The display will show the cook time counting down. When
cook time ends Lhedisplay will show a warming ume
When warming time ends the oven will automatically shut off
and "End" and COOK TIME will show on the display. Four
tones will sound and then four !-second reminder tones will
sound every "ninute thereafter
Press OFF/CANCEL or oden me oven door [o slop remmaer
tones and remove "End" from display. The time of day will
_eturn to the display.
Add to the End of a Dela} Start/Set Cook Time:
Press BAKE
Set the temperature ioptional)
Press the TEMP "up" or "down" arrow pad to set a
temDeratureother than 350°F 175°Cl
16
3. Press COOK TIME
Press the HOUR/MIN "UB or aown arrow pads to set cook
ume,
4. Press DELAY START.
Press the HOUR/MIN "uo" or "down" arrow clads to set the
time of day to start cooking
5. Press SERVE WARM
A one hour warm time will automatically be set
6. Set the warm temoerature (optional)
Press the TEMP "up" or "down" arrow pad to rase or lower
the temperature in 5°F f5°C) amounts to set a temperature
other than 150°F ,65°Cl The warm range is 100°F-200°F
35°C-90°Cl,
7. Press START ENTER.
8.
When the start time is reached, the diselay will show the cook
time counting aown. When cook time ends. the d_spla_ will
show a warming ume.
When warming time ends the oven will automatically shut off
and "End" and COOK TIME will show on the display. Four
tones will sound and then four !-second reminder tones will
sound every minute thereafter.
Press OFF/CANCEL or open the oven door to stop rem_nae/
tones and remove "End" from display The time of day will
return to the disulay.
[im Oven Cont o
Food Poisoning Hazard
5. Press OFF/CANCEL or eden the oven door to remove "End"
from display. The time of day will appear on the display
To Set a Cook Time and Stop Time [Delay Start]:
1. Press BAKE
Press the TEMP "up" or "down" arrow pad to set a
temuerature other than 350°F 175°Cl.
2. Press COOK TIME
3. Press the HOUR/MIN UB" or "down" arrow 3aas [o enter the
ength of time to cook.
4. Press DELAY START.
5. Press the HOUR/MIN "UB" or "down" arrow 3aas [o enter the
time of day to start
6. Press START/ENTER.
"DELAY" and the time of day will appear on the oven disulay.
When the start time is reached the oven will automatically
turn on. display the cook time ana immediately start
counung down.
When cook time ends four tones will sound then four 1_
second reminder tones will sound every m_nute.
7. Press OFF/CANCEL or eden the oven door to remove "End"
from display The time of day will appear on the display
To Recall Programmed Timed Settings (displayed for 5
seconds):
To Recall Set Press
Cook Time COOK TIME"
--)elayStart DELAY START
Temoerature BAKE
Do not let food sit in oven more than one hour
before or after cooking.
Doing so can result in food poisoning or
sickness,
qf cook time has begun, when DELAY START is oressec the
display will show the time it started When COOK TIME is
dressed, the display will remove the seconds from the reman_ng
countdown time
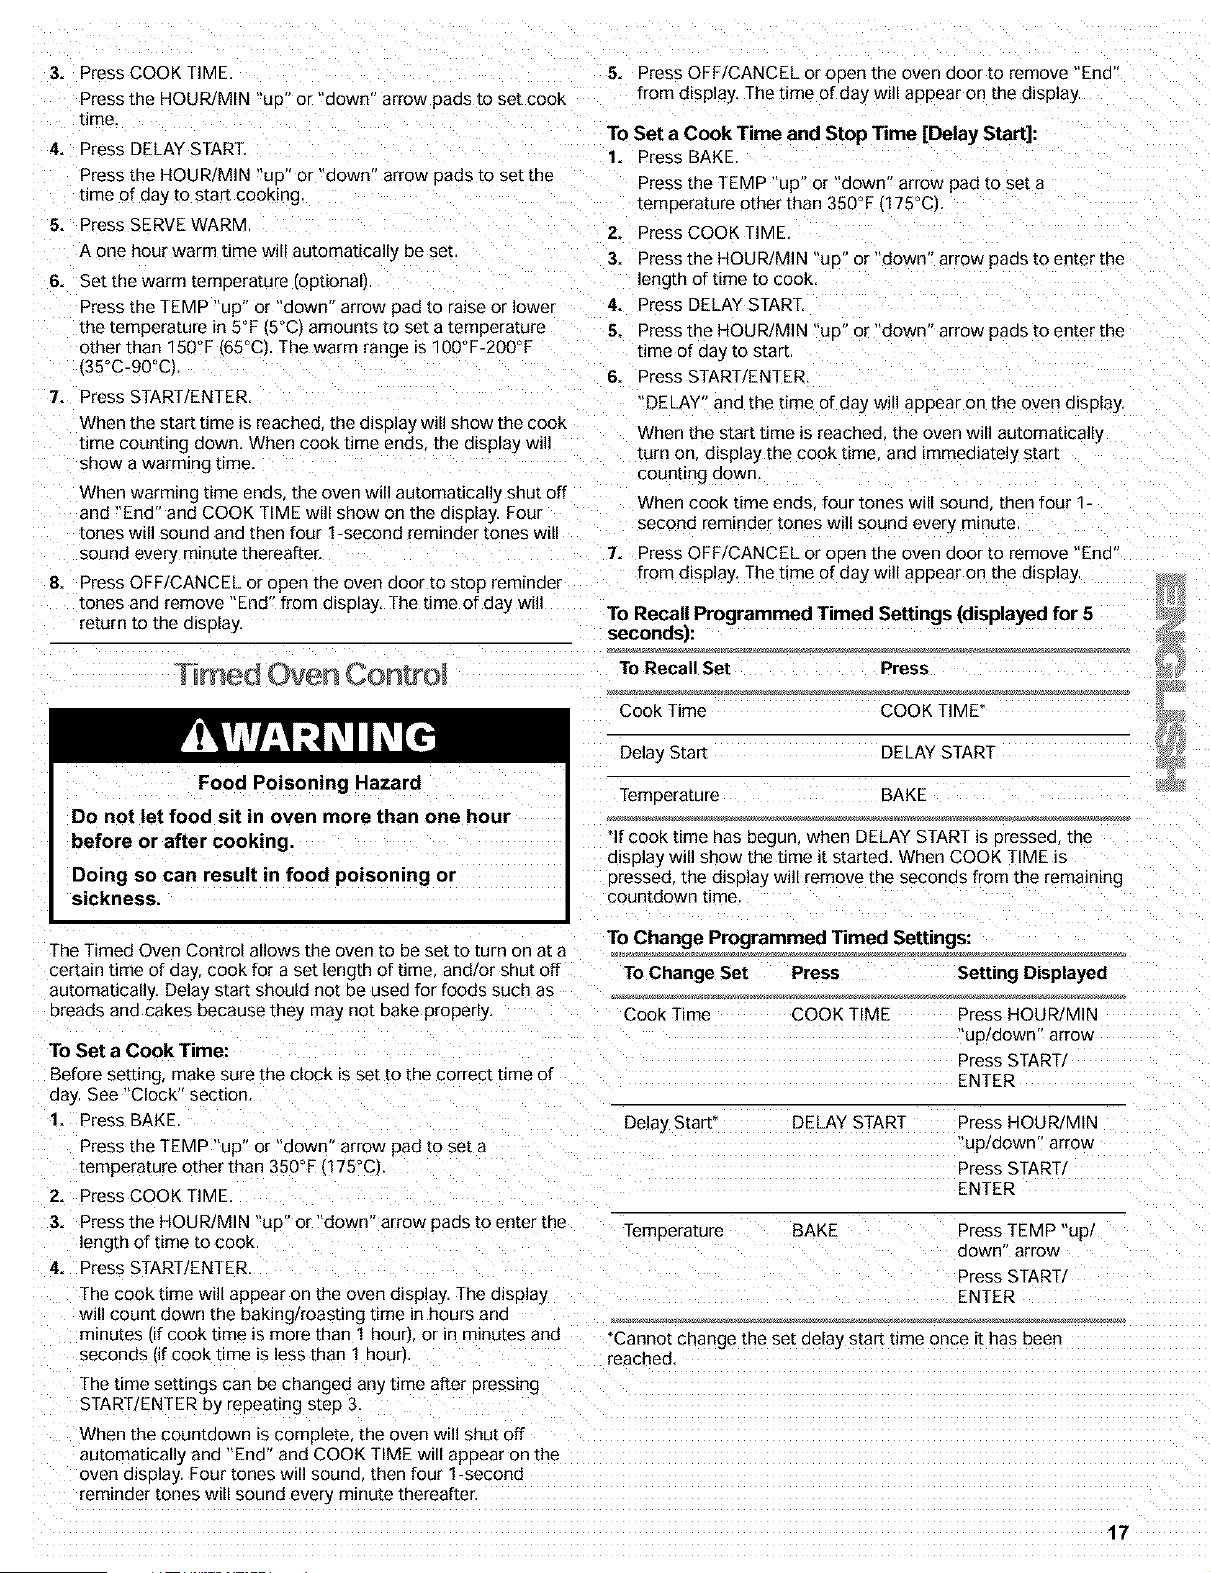
The Timed Oven Control allows the oven to be set to turn on at a
certain time of day, cook for a set length of time and/or shut off
automatically. Delay start should not De usea for foods such as
3reads and cakes because they may not bane aropeny
To Set a Cook Time:
Before setting make sure the clock is set to the correct time of
aay. See "Clock" section.
1. Press BAKE
Press the TEMP "up" or "down" arrow pad to set a
temperature other than 350°F 1175°C).
2. Press COOK TIME
3. Press the HOUR/MIN "uo" or "down" arrow pads to enter the
length of time to cook
4. Press START ENTER.
The cook time will appear on the oven display. The disolay
will count down the baking/roasting time in hours and
To Change Programmed Timed Settings:
To Change Set Press Setting Displayed
Cook Time COOK TIME Press HOUR MIN
"up/down" arrow
Press START
ENTER
Delay Start* DELAY START Press HOUR MIN
up/down" arrow
Press START/
ENTER
TemDerature BAKE Press TEMP "up/
down" arrow
Press START
ENTER
m_nutes [_fcook time is more than 1 hour' or in minutes and
seconds ,_f cook time is less than 1 hour/
"Cannot change the set dela)- start time once it has been
reached
The time settings can De changed any time after pressing
START/ENTER by repeating step 3.
When the countdown is complete the oven will shut off
automatically and "End" and COOK TIME will appear on the
oven o_sulay Four tones will soune then four 1-second
reminder tones w_ll sound every minute thereafter.
17
° sin 9 Warm & Ready Drawer
Food Poisoning Hazard
FOOD SETTING
Coffee cake pastries LO
Cooked cereal MED
Eggs MED
=ish Seafood 'No breading] ViED
:ish Seafood 'Breaded)" ViED
:tied foods HI
Gravy, Cream Sauces HI
Ham ViED
qors a oeuvres ',soft) Hi
-{ors a oeuvres ,crisp) HI
=amb ViED
Sancakes waffles" ViED
3ies custare ViED
3ies. single crust LO
Dies double crust LO
3izza HI
3ork V1ED
3otatoes baked HI
3ota[oes mashed ViED
Do not let food sit for more than one hour before
or after cooking.
Doing so can result in food poisoning or
sickness.
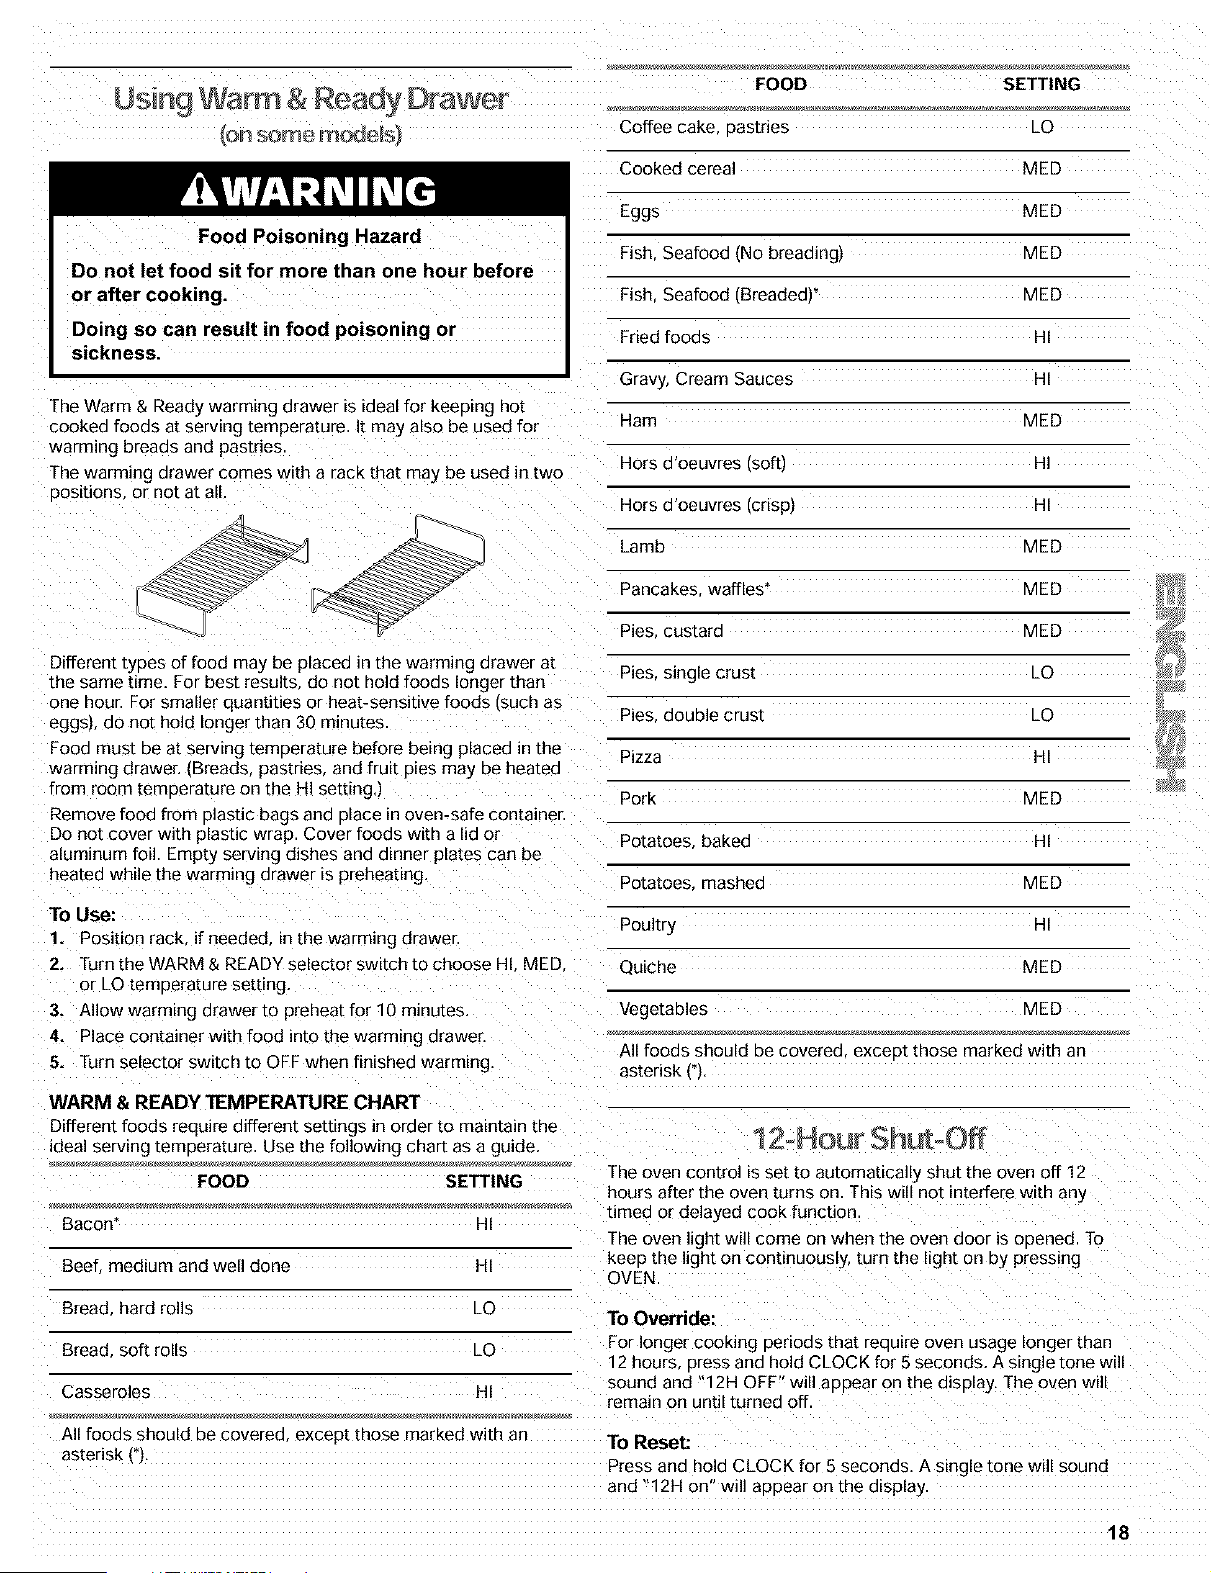
The Warm & Ready warming drawer is ideal for keeping hot
cooked foods at serving temperature. It may also be used for
warming breads and pastries
The warming arawer comes with a rack that may be used in two
positions or not at all
Different types of food may be placed in the warming drawer at
the same hme. For best results do not hold foods longer than
one hour. For smaller quantities or heat-sensitive foods ISUChas
eggsl do not hold longer than 30 minutes
=ood must De a[ serwng temeerature before being placed in the
warmma drawer. (Breads pastries, and fruit pies may be heatea
from ro_m temoerature on the HI setting.]
_emove food from plaStic bags aria place in oven-safe container.
DO not cover with p_asbc wrap. Cover foods with a _Jdor
aluminum foil Empty serving dishes and dinner plates can be
heated while the warming drawer is preheating.
To Use:
1. Position rack if needed in the warming drawer.
2. Turn the WARM & READY selector switch to choose HI MED.
or LO temperature setting,
3. Allow warming arawer to preheat for 10 minutes
4. Place container with food into the warming arawer
5. Turn selector switch to OFF when finished warming.
;oultr3 HI
Quiche MED
Vegetables V1ED
All foods should De coverea except those marked with an
asterisk if).
WARM & READY "IEMPERATURE CHART
Different foods require different settings in order to maintain the
ideal serving [emDerature. Use the following chart as a guide,
FOOD SETTING
Bacon _ HI
Beef medium and well done HI
The oven control is set to automatically shut the oven off !2
hours after the oven turns on. This will not interfere with any
umee or delayed cook function
The oven light will come on when the oven aoor is opened. To
keee the light on continuously turn the light on by pressing
OVEN
Bread hard rolls LO
Bread soft rolls LO
Casseroles HI
To Override:
For longer cooking periods that reauire oven usage longer than
12 hours, oress and hold CLOCK for 5 seconds. A single tone will
sound and "12H OFF" will aeDear on the display. The oven will
remain on until turned off.
All foods should be coverec except those marked with an To Reset:
asterisk (q Press and hold CLOCK for 5 seconds. A single tone will sound
and "12H on" will appear on the display.
18

IMPORTANT: The heating and cooling of porcelain on steel in the
oven may result in discoloring, loss of gloss hairline cracks and
RANGE CARE DODD,ngsounas
SELECT CLEAN TM Self-Cleaning Cycle
(on some models)
3n SO_e _T_(_e_E
J)))
Burn Hazard
Do not touch the oven during the
Self-Cleaning cycle.
Keep children away from oven during
Self-Cleaning cycle.
Failure to follow these instructions can result
in burns.
IMPORTANT: The health of some birds B extremely sensmve [o
the fumes given off during the Self-Cleaning cycle. Exposure [o
the fumes may result in death [o cer[mn birds. Always move birds
to another closed and well ventilated room
Self-clean the oven before it becomes heavily soiled Heavy so_l
results in longer cleaning ana more smoke.
Keep the kitchen well-ventilated during the Self-Cleaning cycle to
help get rid of heat. oaors, and smoke
3o not block the oven vent(s) during the Self-Cleaning cycle. Air
must be able to move freely See "Oven Ventls¢' section
:3o not clean rub. damage or move the oven aoor gasket. The
aoor gasket is essential for a good seal
Prepare Oven:
• Remove the broiler Dan, gna, cookware and baKeware and
on some moae_s the [empera[ure probe from the oven.
• Remove any foil from the oven because it may burn or melt
aamagmg the oven,
• Remove oven racks to keep them shiny and easy to slide.
See "General Cleaning ' section for more information
Hand clean inside door eoge and the 1V2in. (3.8 cm) area 3.
around the inside oven cavity frame, being careful no[ [o
move or Dena the gasket. This area aces no[ get hot enough 4.
during self-cleaning to remove soil. Dc not let wate_ cleaner
How the Cycle Works
The SELECT CLEAN Self-Cleaning cycle uses very high
temperatures and dissolves soil to a powdery ash
SELECT CLEAN will set the clean time automatically, once the
soil level is set.
The soil level can be manually set to light, average or heavy soil
levels by repeatedly pressing SELECT CLEAN
The oven will automatically shut off once it is clean. The door w_ll
not unlock until the oven cools
Once the oven has completely cooled remove ash with a aamD
cloth. Do not wide down any of the inside surfaces until the oven
has completely cooled dow_ Applying a cool. damp cloth to the
inner door glass before it has cooled completely coula result in
the glass breaking
The oven light will not work during the Self-Cleaning cycle.
To Set SELECT CLEAN:
• Press once for light so_ls and "SoilL" will appear on the
display.
• Press two times for average soils, and "SoilA" will appear on
the display
• Press three times for heavy soils and "SoilH" will appear on
the display
To Set CLEAN:
• Press CLEAN. This will automatically set a 3 hour 30 minute
Self-Cleaning cycle
• Press the HOUR/MIN "DO" or "down" arrow paas to set a
Self-Cleaning cycle longer or shorter than the 3 hour 30
minute cycle.
To Start Self-Clean:
Before self-cleaning, make sure the door is closed completely or
it will not lock and the cycle will not begin
1. Set SELECT CLEAN ton some models_ or CLEAN.
2. Press START, ENTER.
The oven door will lock in 6 seconds and "LOCKED the start
time and stop time will appear on the display The door will
not unlock until the oven cools. The qycle time includes a 30
minute cool down time.
When the cycle is complete ana the oven cools "End" will
appear on the disPlay and "LOCKED" will disappear.
Press OFF/CANCEL or open the door to remove "End" from
the display
Close doo[
The time of day will appear on the display.
At high temperatures foods react with porcelain. Staining,
etching pitting or faint white spots can result. This will not
affect cooking performance,
e[c. enter slots on door frame. Use a aamp cloth to clean this
area, To Delay Start Self-Clean:
WiDe out any loose soil to reduce smoke and avoid damage. Before delay starting Self-Clean make sure the clock is set to the
correct time of day. See "Clock" section. Also make sure the
door is closed completely or it will not lock and the cgcle will not
begin.
1. Set SELECT CLEAN [on some modelsl or CLEAN.
Prepare Cooktop and Storage Drawer:
• Remove olastic items from the cooktoD because they may
melt,
• Remove all items from the storage arawer
2. Press DELAY START.
Press the HOUR/MIN UP" or "down" arrow pad to set time of
any to start the Self-Cleaning cycle,
19
3. Press START ENTER,
The start time is automatically calculated and displayed. The
door will automatically lock. and "LOCKED DELAY" and
the time of day will appear on the display.
When the start rime is reached the oven will automatically
[urn on
When the cycle is complete and the oven cools "End" will
appear on the display and "LOCKED" will disappear.
4. Press OFF/CANCEL or open the door to remove End"from
the display.
5. Close door.
The time of day will appear on the display.
To Stop Self-Clean any time:
3ress OFFICANCEL, and "cln." "ON." "cool ana "LOCKED" will
appear on the display Jntil the oven cools, Then "End" will
appear and the door will unlock.
LOGICLEAN TM Self-Cleaning Cycle
(on some models}
How the Cycle Works
The LOGICLEAN Self-Cleaning cycle is a "one-touch" step that
uses very high temperatures and dissolves soil to a powdery ash.
"SEnS" setting w_ll automatically determine the length of cleaning
t_me needed based on the number of times the oven has been
used since the last self-clean cycle. Maximum clean time is 4
hours 30 minutes and minimum is 2 hours.
The oven will automatically shut off once it is clean. The door will
no[ unlock until the oven cools.
Once the oven has completely cooled remove ash with a damp
cloth. Do not wioe down any of the inside surfaces until the oven
has completely cooled down. Applying a cool. damD cloth to the
inner door glass before it has cooled completely could result in
the glass breaking
The soil level can be manually set to light, average or heavy soil
levels by repea[eoly pressing LOGICLEAN
To Self-Clean:
3efore self-cleaning, make sure the door is closed completely or
it will not lock and the cycle will not begin
1. Press LOGICLEAN.
2. Press START ENTER.
The oven door will lock in 6 seconds and "CLN SENS
HEAT." "ON "LOCKED and "CLEAN" will _Doear on the
display. The door will not unlock until the oven cools. The
cycle time includes a 30 minute cool down ume
When the cycle is complete and the oven cools 'End" will
appear on the disDlay and "LOCKED" will disappear.
To Delay Start Self-Clean:
Before delay starting Self-Clean make sure the clock is set to the
correct hme of day. See "Clock" section. Also _nake sure the
door is closed completely or it will not lock and the cycle will not
begin.
1. Press LOGICLEAN.
2. Press DELAY START.
Press the HOUR/MIN "UP" or "down" arrow pad to set time c _
aay to start the Self-Cleaning cycle.
3. Press START/ENTER.
The door will automatically lock. and "LOCKED 'DELAY
and the time of day will appear on the display.
When the start time is reached the oven will automatically
turn on
When the cycle is complete aria the oven cools. "End" will
appear on the alsplay and "LOCKED" will d_sappear.
4. Press OFF/CANCEL or ooen the door to remove "End" from
the display.
5. Close door
The time of day will aoDear on the display.
To Manually Set Soil Level:
• Press twice for light soils, and "SoilL" will appear on the
o[splay
• Press three times for average soils aria "SoilA" will appear
on the display
• Press four times for heavy soils and "SoilH" will appear o_
the display
The oven light will not work during the Self-Cleaning cycle.
To Stop Self-Clean any time:
Press OFF/CANCEL and "cln." "ON," "cool and "LOCKED" will
appear on the display until the oven cools. Then "End" will
appear and the door will unlock
SENS-A-CLEAN TM Self-Cleaning Cycle
(on some models)
How the Cycle Works
The SENS-A-CLEAN Self-Cleaning cycle uses very high
temperatures and dissolves soil to a powdery ash.
The sophisticated electronic sensor continuously monitors by-
oroducts of the burning off of the baked-on foods, and adJUStS
the cleaning time accordingly The maximum clean time is 4
hours 30 minutes and the minimum is 2 hours
The oven will automatically shut off once it senses it is clean. The
door will not unlock until the oven cools
Once the oven has completely cooled, remove ash w_th a aamp
3. Press OFF/CANCEL or open the door to remove End" from cloth, Do not wioe down any of the inside surfaces until the oven
the disolay, has completely cooled dow_ Applying a cool. damp cloth to the
4. Close door. inner ooor glass before it has cooled comDletel_ could result in
[he glass breaking
The time of da'y w_ll appear on the display. The soil level can be manually set to light, average or heavy soil
levels by repea[ealy pressing SENS-A-C _EAN
20

To Start Self-Clean:
3efore self-cleaning, make sure the door is closed completely or
it will not lock and the cycle will not begin
1. Press SENS-A-CLEAN.
The SEnS setting will automatically determine the length of
cleanm¢ time.
2. Press START/ENTER,
The oven door will lock in 6 seconds and "CLN SENS
HEAT." "ON "LOCKED and "CLEAN"wi]] aeeear on the
alsDlay, The door will not unlock until the oven cools. The
cycle time includes a 30 minute cool down time
When the cycle is complete and the oven cools End" will
appear on the display and "LOCKED will disappear.
3. Press OFF/CANCEL or open the door to remove "End" from
[he d_splay.
4. Close door,
The time of day w_ll appear on the display,
IMPORTANT: Before cleaning make sure all controls are off and
the oven and cooKtop are cool, Always follow label instructions
on cleaning products,
Soap water ana a soft cloth or sponge are suggested first unless
otherwise noted
EXTERIOR PORCELAIN ENAMEL SURFACES
(on some models)
Food Spills containing ac_as SUChas wnegar ana tomato should
be cleaned as soon as the entire appliance is COOLThese spills
may affect the finish
• Glass cleane_ mild liquid cleaner or non-aeraswe scrubbing
Daa:
Gently clean around the model and serial numbe[ olate
because scrubbing may remove numbers,
To Delay Start Self-Clean:
3efore delay starung Self-Clean make sure the clock is set to the
correct time of day. See "Clock" section. Also make sure the
aoor is closed comeletely or it will not lock and the cycle will not
Degm.
1. Press SENS-A-CLEAN,
The SEnS setting will automatically determine the length of
cleaning time.
If desired, set the aDDroriate soil level by repeatedly pressing
the SENS-A-CLEAN paa,
2. Press DELAY START,
Press HOUR/MIN "up or aown arrow pads to set the hme
of day to start the Self-Cleaning cycle.
3. Press START ENTER,
The door will automatically lock and "LOCKED, DELAY'
and the time of day will appear on the display,
When the start eme is reached the oven will automatically
[urn on
When the cycle is complete and the oven cools 'End" will
RADIANT GLASS
Do not use steel wool abrasive powder cleansers chlorine
bleach rust remover or ammonia because damage may occur
Always wipe with a clean wet cloth and dry thoroughly to prevent
streaking ana staining
A blue 3M SCOTCH-BRITE no scratch scrub sponge supplied
with your range is also recommended for stubborn soils. This Dad
is designed seecifically to keep your radiant glass clean, Do not
use this paa to clean any other surfaces
A Cooktoe Scraeer is also recommended for stubborn so_ls and
can be ordered as an accessory Ask for stock number
22-364-WX10X302 when ordenng The Cooktop Scraper uses
razor blades, Store razor blades out of the reach of children.
Cooktop Cleaning Creme should also be used regularly to help
orevent scratches Bitting and abrasions and to condition the
cooktoe, and can be purchased as a kit along with the Cooktop
Scraper. Ask for stock number 22-364-WX10Xl 17 whe_
ordering
Light to moderate soil
appear on the display and "LOCKED" will disappear. •
4. PressOFF/CANCEL oropen the doorto remove End" from
the d_selay.
5. Close door,
The time of day will appear on the diselay.
To Manually Set Soil Level:
• Press twice for light soils and "SoilL" will appear on the
display,
• Press three times for average soils, ana "SoilA" will appear
on the display.
• Press four times for heavy soils, aria "SoiiH" will appear on
the display.
Paper towels or blue 3M SCOTCH-BRITE _"no scratch scl _e
sponge
Clean while the cooktoo is still warm. You may want to wear
even mitts while doing so,
Sugary spills (jellies, candy, syrup)
• Blue 3M SCOTCH-BRITE _ no scratch SCFUDsponge:
Clean while the cooktoo is still warm. You will want to wear
oven mitts while doing so.
• CooktoD Scraper, Cooktop Cleaning Creme and clean damp
pacer towel
Clean as soon as cooktoe has cooled down, Rub creme into
surface with a aamp cadet towel or soft cloth. Continue
"uPPing until white film disappears.
The oven light will not work during the Self-Cleaning cycle.
To Stop Self-Clean any time:
3ress OFF/CANCEL, and "cln," "ON," "cool ana "LOCKED" will
appear on the display Jntil the oven cools, Then "End" will
appear and the door will unlock.
Heavy soil, dark streaks, specks and discoloration
• Cooktoe Scraper, CooktoD Cleaning Creme or non-abrasive
cleanser:
Rue oroduct into SOilwith a damp paper towel or soft cloth,
Continue rubbing until white film disappears.
21

Burned-on soil
• Cooktop Cleaning Creme and blue 3M SCOTCH-BRITE" no
scratch scrub suonge
Rub creme into soil with damp paper towel. Reoeat for
stubborn SOOTS.Polish entire cooktop w_tn creme anc paper
[OWeL
Metal marks from aluminum and copper
• CooktopCleaning Creme
Clean as soon as cooktou has cooled down. Rub creme into
surface with a damn Daeer towel or soft cloth. Continue
rubbing until white film disappears. The marks will not totally
disappear but after many cleanings become less noticeable
Tiny scratches and abrasions
• CooktopCleaning Creme
Rub creme into surface with a dame Bauer towel or soft
cloth. Continue rubbing until white film disaueears. Scratches
and abrasions do not affect cooking eerformance and after
many cleanmgs become less noticeable.
COOKTOPCONTROLS
OVEN CAVITY
Do not use oven cleaners
Food spills should be cleaned when oven cools. At high
temeera[ures foods react with oorcelain and staining, etching,
pitting or faint white spots can result
• Self-Cleaning cycle:
See "Self-Cleaning Cycle" first.
OVEN AND ROASTING RACKS
• Self-Cleaning cycle:
See "Self-Cleaning Cycle" first Remove racks or they will
discolor and become harder to slide. If this hauuens, a lignl
coaung of vegetable oil applied to the rack guides will help
them slide.
• Steel wool pad
BROILER PAN AND GRID
Do not clean in the Self-Cleaning cycEe.
:30 not use steel wool. abrasive cleansers or oven cleaner.
• Mildly abrasive cleanser
:30 not soak knobs
When replacing knobs, make sure knobs are in the OFF pos_uon.
On some models ao not remove seals under knobs
• Scab aria water or dishwasher
Pull knobs straight away from control panel to remove.
Scrub with wet scouring pan
• Solution of 1/2CUD1125 mU ammonia to 1 gaL 13.75 L) water:
Soak for 20 minutes then scrub with scouring or steel woo
Daa,
• Oven cleaner:
OVEN DOOR EXTERIOR
Glass cleaner and paper towels or non-abrasive plastic
scrubbing pad
Apply glass cleaner to soft cloth or sponge, not directly on
panel
Follow product label ms[rucuons.
Porcelain enamel only, not chrome
• Dishwasher
STORAGE DRAWER (on some modelsj
• For models with stainless steel oven doors see "Stainless
Steel" section in "General Cleaning.
STAINLESS STEEL Ion some models}
Make sure drawer is cool and emery before cleaning.
For more information see "Storage Drawer" section
• Mild detergent
Drawer Liner (on some models)
:30 not use soao-filled scouring paas abrasive cleaners Cooktop Remove all stored items from drawer and lift out drawer liner.
3olishing Creme. steel-wool uaas. gritty wash cloths or some • Clean with mild detergent
3aoer towels. Damage may occur.
:_ub in direction of grain to avoid damaging.
• Stainless Steel Cleaner & Polish mot included,
See back cover for ordering information
• Liquid detergent or all-ouroose cleaner:
Rinse with clean water and ary w_th soft Pint-free cloth.
WARMING DRAWER (on some models}
Make sure drawer is cool.
• Mila ae[ergen[
• Vinegar for hard water SDO[S
CONTROL PANEL
:30 not use abrasive cleaners steel-wool DadS. gritty wash Cloths
or some paper towels. Damage may occur.
• Glass cleaner and soft cloth or sponge:
Apply glass cleaner to soft cloth or sponge, not directly on
panel.
22
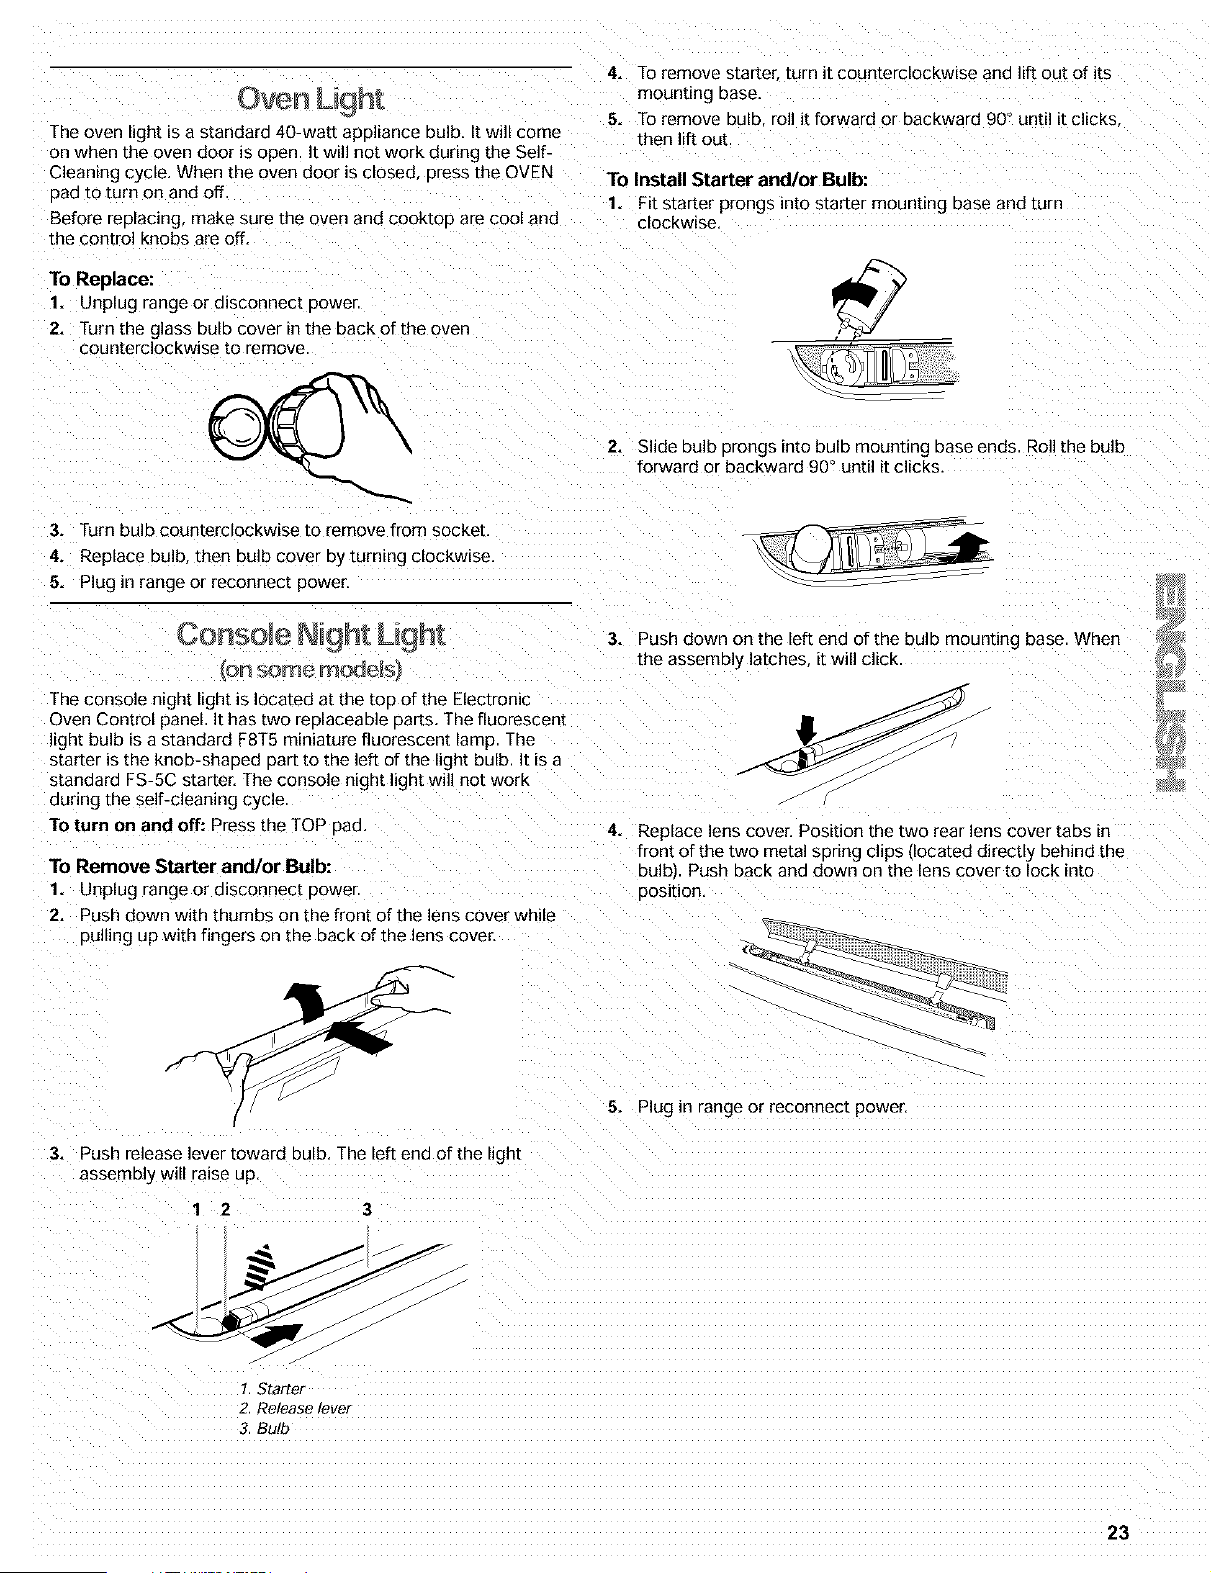
The oven light is a standard 40-watt appliance bulb. It will come
on when the oven door is open. It will not work dueng the Self-
Cleaning cycle. When the oven door is closed Dress the OVEN
3ad to turn on and off
3efore reDlacing, make sure the oven and cooktoD are cool and
the control knobs are off.
To Replace:
1. Unplug range or a_sconnect Dower
2. Turn the glass bulb cover m the back of the oven
counterclockwise [o remove
3. Turn bulb counterclockwise to remove from socket,
4. Replace bulb then bulb cover By [urnmg cloct{wBe.
5. Plug in range or reconnect power.
4. To remove starter turn it counterclockwise and lift out of its
rnounung Base.
5. To remove bulb roll it forward or backward 90 ° until it clicks
then lift out
To Install Starter and/or Bulb:
1. Fit starter prongs into starter mounting Base and [urn
clockwise,
2. Slide bulb prongs into bulb mounting base ends. Roll the bulb
forward or backward 90 ° until it clicks.
The console night light is located at the tOD of the Electronic
Oven Control panel It has two reDlaceable Darts. The fluorescent
light bulb is a standard F8T5 miniature fluorescent lamp, The
starter is the knob-shaDed Dart to the left of the light bulb, It is a
s[anaara FS-5C starter. The console night light will not work
aunng the self-cleaning cycle,
To turn on and off: Press the TOP 3an.
To Remove Starter and/or Bulb:
1. Unplug range or a_sconnec[Dower
2. Push down with thumbs on the front of the lens cover while
pulling up with fingers on the back of the lens coven
3. Push down on the left end of the bulb mounDng base. When
the assembly latches =twill click
4. Replace lens cover. Position the two rear lees cover tabs in
front of the two metal sDnng cI_ps (located directly 3ehind the
bulb) Push back ann down on the lens cover to lock into
position.
3.
/ 5. Plug m range or reconnec[ power.
Push release lever toward bulb. The left end of the light
assembly will raise up.
1 2 3
J
J
1. Starter
2. Release lever
3. Bulb
23
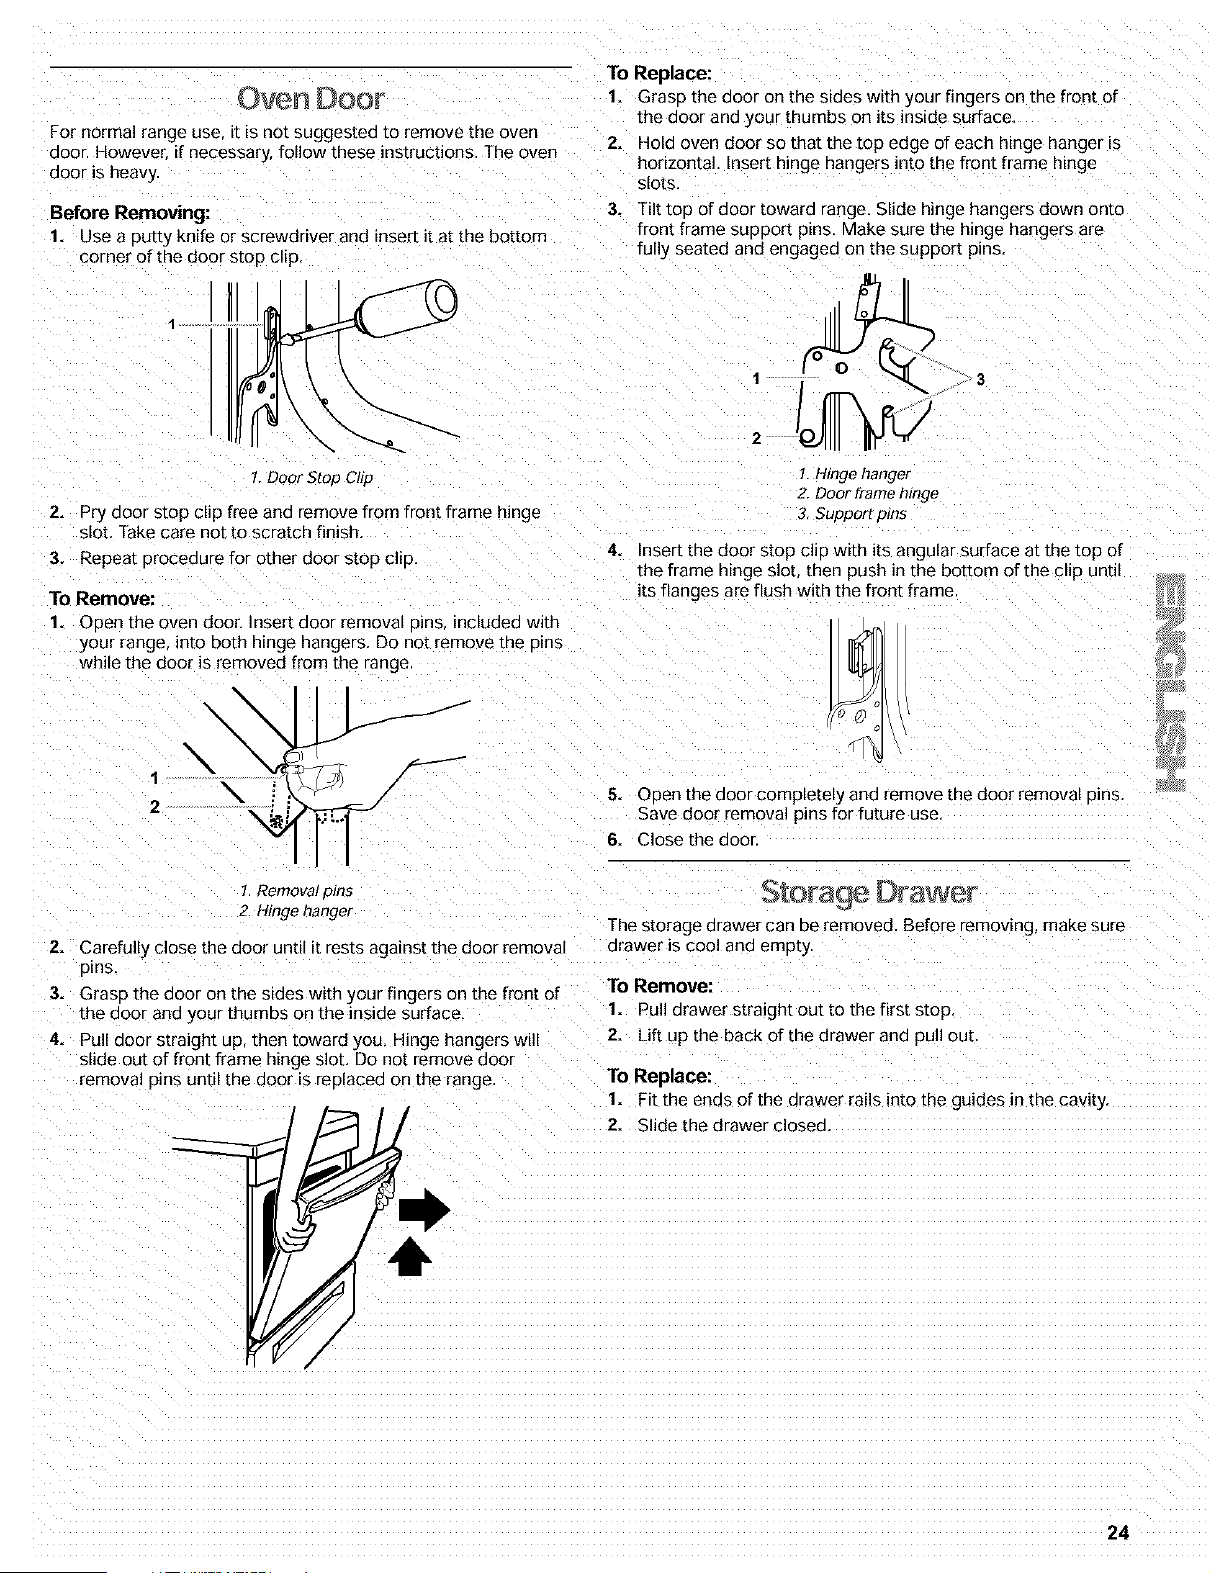
--or normal range use, it is not suggested to remove the oven
door. However if necessary, follow these instructions. The oven
door is heavy
To Replace:
1. GrasD the door on the sides with your fingers on the front of
the door and your thumbs on its inside surface
2. HOld oven door so that the top edge of each hinge hanger is
horizontal. Insert hinge hangers into the front frame hinge
SlOtS,
Before Removing:
1. Use a DuEy Knife or screwdriver and insert it at the bottom
corner of the door stop clip,
3.
Tilt too of door toward range, Slide hinge hangers down onto
front frame support p_ns. Make sure the hinge hangers are
full:y seated and engagea on the support plns,
1
2
3
!. Door Stop Clip
2. Pry door stop clip free and remove from front frame hinge
slot, Take care no[ to scratch finish,
3. Repeat procedure for other door stop clip,
4.
To Remove:
I. Open the oven door, Insert door removal Dins ncluded with
your range into both hinge hangers. Do not remove the Dins
while the door is removed from the range
\
\
I
\
2
\
1. Hinge hanger
Z Door frame hinge
3. Support pins
Insert the door stop ClIDwith its angular surface at the top of
the frame hinge slot then push in the bottom of the clip until
its flanges are flush with the front frame
5. ODen the door completely and remove the cioor removal 3ins.
Save door removal pins for future use.
6. Close the door
1. Removal pins
2. Hinge hanger
2. Carefully close the door until it rests against the door removal
DInS
3. Graso the door on the s_des w_th your fingers on the front of
the door and your thumbs on the inside surface,
4. Pull door straight up then towarc you, Hinge hangers w_ll
Sto[sc _=D_awe_
The storage drawer can be removed. Before removing, make sure
drawer is cool and emD[y.
To Remove:
1. Pull drawer straight out to the first stop,
2. Lift up the back of the drawer and pull out
slide out of front frame hinge slot. Do not remove aoor
removal Dins until the door is re31aced on the range. To Replace:
I. Fit the ends of the drawer rails into the guides in the cavity
2. Slide the drawer closec
24
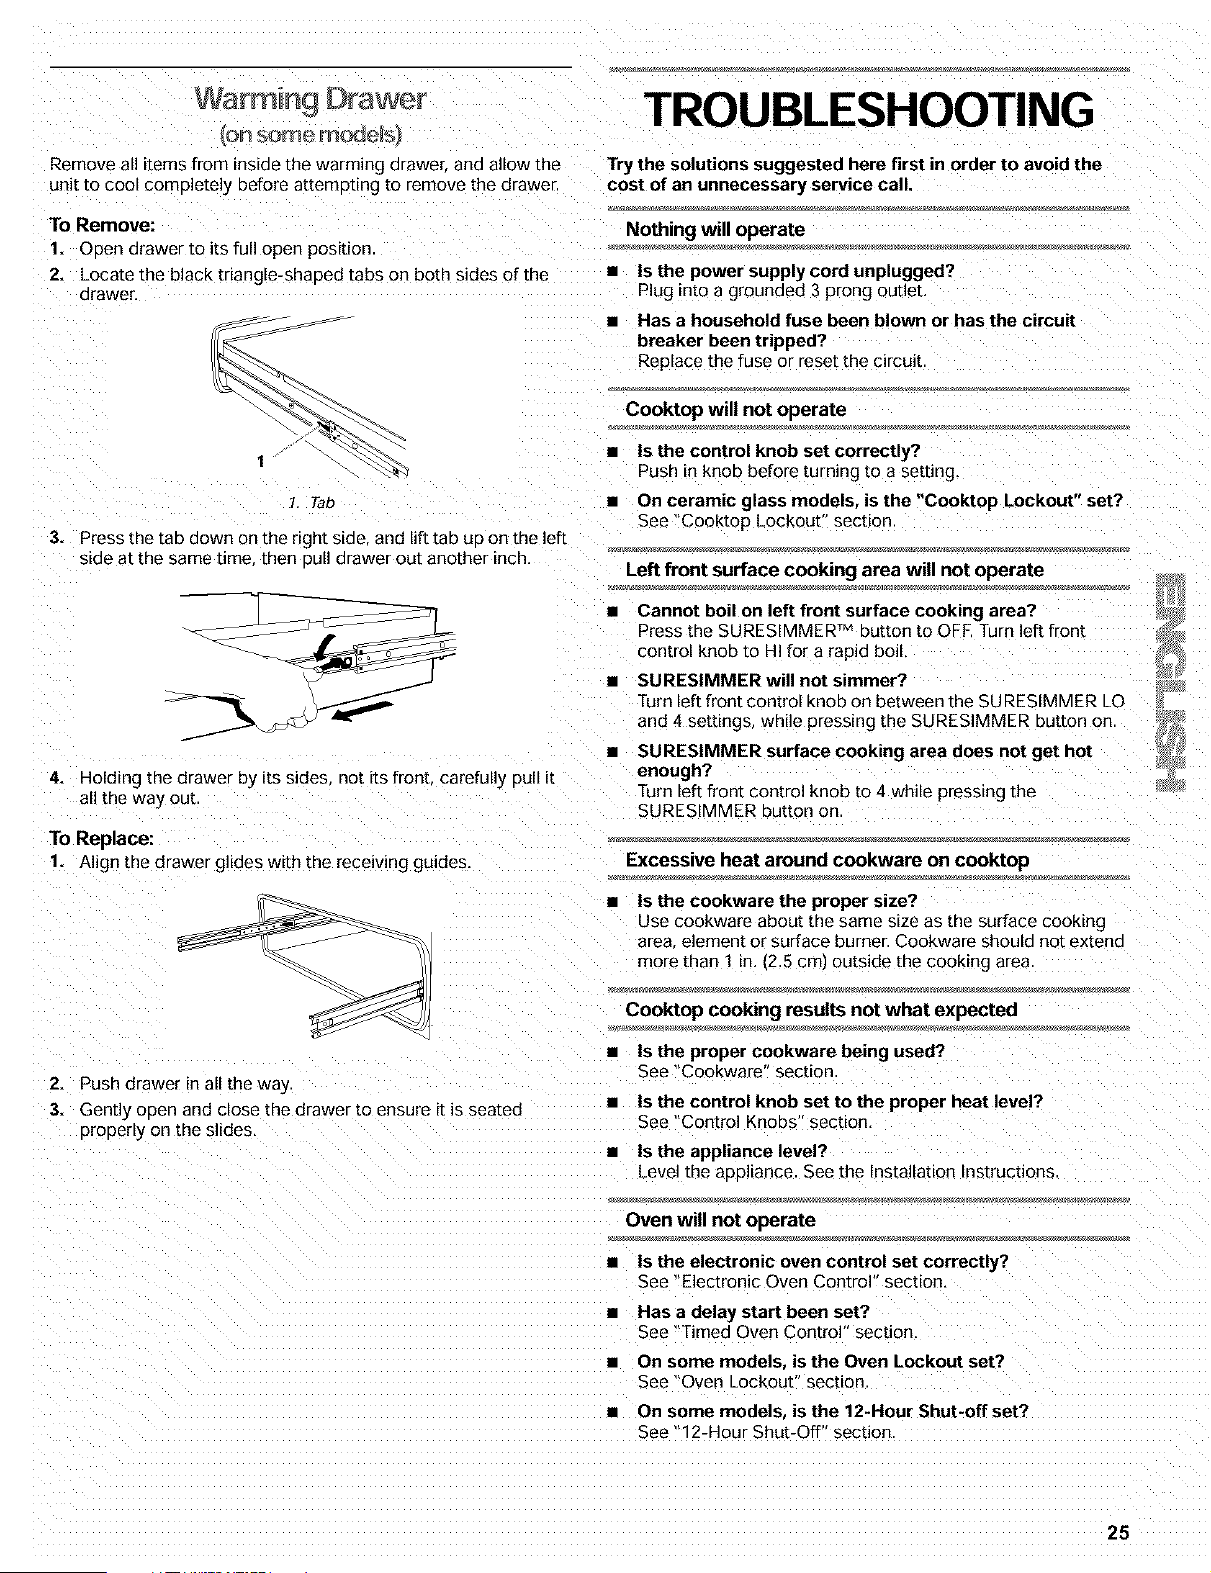
TROUBLESHOOTING
:_emove all items from inside the warming orawe[ and allow the
unit to cool completely before attempting to remove the drawer.
Try the solutions suggested here first in order to avoid the
cost of an unnecessary service call.
To Remove:
1• Open drawer to its full open position
2• Locate the black triangle-shaped tabs on both sides of the •
clrawer,
Nothing will operate
Is the power supply cord unplugged?
Plug into a grounded 3 prong outlet,
1
• Has a household fuse been blown or has the circuit
breaker been tripped?
Replace the fuse or reset the circuit
Cooktop will not operate
• Is the control knob set correctly?
Push in knob before turning to a setting,
3•
7 Tab
Press the tab down on the right side, and lift tab uo on the left
s_oe a_ the same time, then oull drawer out another inci_.
• On ceramic glass models, is the "Cooktop Lockout" set?
See "Cooktop Lockout" section
Left front surface cooking area will not operate
4. Holding the drawer by its sides not its front, carefully Dull it
all the way out
To Replace:
1• Align the drawer glides with the receiving guides.
Cannot boil on left front surface cooking area?
Press the SURESIMMER TM button to OFR Turn left front
control knob to HI for a rapid boil,
SURESIMMER will not simmer?
Turn left front control knob on between the SU RESIMM ER LO
and 4 settings, while pressing LheSURESIMMER button on
SURESIMMER surface cooking area does not get hot
enough?
Turn left front control knob to 4 while pressing the
SURESIMMER button on
Excessive heat around cookware on cooktop
• Is the cookware the proper size?
Use cookware about the same size as the surface cooking
area element or surface burner. Cookware should not extend
more than 1 in 12.5 cm) outside the cooking area
2• Push drawer in all the way.
3• Gently open and close the drawer to ensure it is seated
DroDeay on the slides,
Cooktop cooking results not what expected
• Is the proper cookware being used?
See "Cookware" section
• Is the control knob set to the proper heat level?
See "Control Knobs" section
• Is the appliance level?
Leve] the apD]iance. See the [nsta(lation Instructions
Oven will not operate
• Is the electronic oven control set correctly?
See "Electronic Oven Control" section
• Has a delay start been set?
See "Timed Oven Control" section.
• On some models, is the Oven Lockout set?
See "Oven Lockout" section
• On some models, is the 12-Hour Shut-off set?
See "12-Hour Shut-Off" section
25
Oventemperaturetoohighor toolow Ovencookingresultsnotwhatexpected
• Does the oven temperature calibration need adjustment? • Is the appliance level?
See "Oven Temperature Control" section, Level the aeDliance. See the Installation Instructions
Display shows messages
• Is the proper temperature set?
Double-check the recioe Jna reliable cookbook.
Is the display showing "PF"?
There has been a power failure. Clear the display. See
Disola'y section. On some models reset the clock if
needed See "Clock" section.
Is the proper oven temperature calibration set?
See "Oven Temperature Control" section,
Was the oven preheated?
See "Baking ana Roasting" section.
• Is the display showing a letter followed by a number?
Clear the display. See "Diselay" section, If it reappears
contact a Sears trained repair specialist, See back cove£
Self-Cleaning cycle will not operate
• Is the oven door open?
Close the oven door all the way. •
• Has the function been entered?
See "Self-Cleaning Cycle" section. •
• On some models, has a delay start Self-Clean cycle been
set?
See "Self-Cleaning Cycle" section.
Has a delay start been set?
See "Timed Oven Control" section •
On double oven models, is one oven self-cleaning?
When one oven is self-cleaning, the other oven cannot be set •
to self-clean
• Is the proper bakeware being used?
See "Bakeware" section
• Are the racks positioned properly?
See "Positioning :_acks and Bakeware" section.
• Is there proper air circulation around bakeware?
See "Positioning _acks and Bakeware" section.
Is the batter evenly distributed in the pan?
Check to make sure batter is level in the pan
Is the proper length of time being used?
Adjust cooking ume.
• Has the oven door been opened while cooking?
Oven peeking releases oven heat and can result in longer
cooking times
Are baked items too brown on the bottom?
Move rack to higher position in the oven
Are pie crust edges browning early?
Use aluminum foil to cover the eege of the crust
26

27
REPARAMOS LO QUE
VENDEMOS
Su compra adqu_ere un nuevo valor ya que usted puede confiar
en Sears aomeCentraF Dara oD[ener servlcio ae reDaraci0n. Coll
m_s de 12.000 especJal_stas capacitados en reDaracJones y
acceso a mds de 4.2 millones de o_ezas de repues[o y
accesonos contamos con las herramientas Dlezas.
conoclmiento y la destreza Dare asegurarnos ee cumpllr euestra
3romesa de eue: ReDaramos Io aue vendemos.
GARANT|A LIMITADA DE CINCO AI_IOSPAPA LA
SUPERFICIE DE COCClON DE VIDRIO RADIANTE Y LOS
ELEMENTOS DE COCCION DE LA SUPERFICIE DE
COCCION
Despues del primer ahoy por un max_mo de ctnco amos a Darur
de la fecha de compra, s_empre y cuando la estufa sea instalada
y operada de acuerdo con las instrucciones DroDorcionadas en el
Manual de uso _ cuEaaao y ]as instrucciones de instalacion
Sears reDarara o reemplazara piezas para la superficie ae
cocci0n de vidrio radiante segt]n se enumera a continuacion
debido a defectos en los materiales o la mano de obra. El cliente
se har_ cargo de eualquier gasto de mano de obra
• Agrietamiento de la superficie de cocci0n de vidrio radiante
debldo a chooue t_rmico
Contratos de mantenimiento Sears •
Su electrodom_stico Kenmore" est_ disemado fabricado y
someoao a prueba para proporcionarle amos de funcionamiento •
confiable. No obstante cualcaier electrodomestico moderno
auede necesitar servicio tecnico de vez en cuando. El contrato
ae mantenimiento Sears le ofrece un programa de servicio •
exceocionaL a un Drecio accesible
Desgaste del diseho en la superficie de cocci6e de vidrio
"adiante
Agrietamiento del sello de goma que est_ entre la superfieie
de coecion de vidrio radiante y el borde de Dorcelana
Quemaaura de cualquiera de los elementos de cocci0n de la
superficie de coccion de vidrio radiante
El contrato de mantenimiento Sears RESTRICCION DE LA GARANTIA
• Es la manera de adcairir el servicio tecnico del mahana a Si se some[e a la estufa a un uso ajeno al domestico arivado, la
Drecios de hoy. cobertura de las garantfas arriba citadas oueda restringtaa a s(No
90 dias.
• Elimina las facturas de reparacion produeidas por el uso
normal y el desgas[e
Proporciona asistencia no tecnJca j eaucauva,
At]n cuando no necesite reparaciones le DroDorclona una
revision anual de mantenimiento Dreventivo a solicitud suya,
para asegurarse de que su eleetrodomestico esta en
cond_c_ones apropiadas de funcionamiento.
Se aplican ciertas restricciones. Para obtener m_is
informacibn, Ilame al 1-888-784-6427.
Para obtener informaci0n referente a los contratos de
mantenimiento de Sears Canad& Ilame al 1-800-361-6665.
GARANTiA
GARANTIA COMPLETA DE UN AI_IO PARA TODAS LAS
PIEZAS
3urante un aho a Dartir de la fecha de compra, siempre y cuando
la estufa sea instalada y operada de acuerdo con las
SERVIClO DE REPARACION DE LA GARANT|A
EL SERVICIO DE REPARACION DE LA GARANTIA ESTA A SU
DISPOSICION AL CONTACTARSE CON EL CENTRO DE
SERVICIO SEARS DE SU LOCALIDAD EN LOS ESTADOS
UNIDOS. Esta garant_a corresDonde sd)]o mientras se use el
oroouc[o en los Estados Unidos Esta garanua le otorga
derechos legales especificos yes DoSible que usted [enga
tamb_en otros derechos que pueden variar de un estado a otro
Pare recibir informacion acerca de la garantia de Sears en los
Estados Unidos sirvase tomar como referencia los numeros de
servicio tecnico ubicados en la contraoortada del manual.
Sears, Roebuck and Co.
D/817WA, Hoffman Estates. IL 60179
REGISTRO DEL PRODUCTO
En el esoac_o a continuaciOn anote el nL]mero completo del
modelo _/ de la sene as] como la fecha de comDra. Usted podra
encontrar esta informacion en la etK]ueta con el numero del
modelo _/ de la serie Iocalizada tal como se ilustra en la secci(Sn
ae Piezas _ caracteristicas de este manual. Siempre que se
Donga en contacto con Sears respec[o a su electrodomesticc
instruceiones proporc_onaaas en el Manual de uso y cuidado y tenga esta informaci0n a mano pare facilitar la obtencion de
las instrucciones de instalaci0n Sears reoarara esta estufa s_n asJs[enc_a o servicio.
costo alguno si tuviese defectos de materiales o ae mano ae
Nt_merode modelo _ __
obra.
Nt_mero de serie
Fecha de compra
Guarde estas instrucciones y su comprobante de ventas para consul=
ta futura.
28
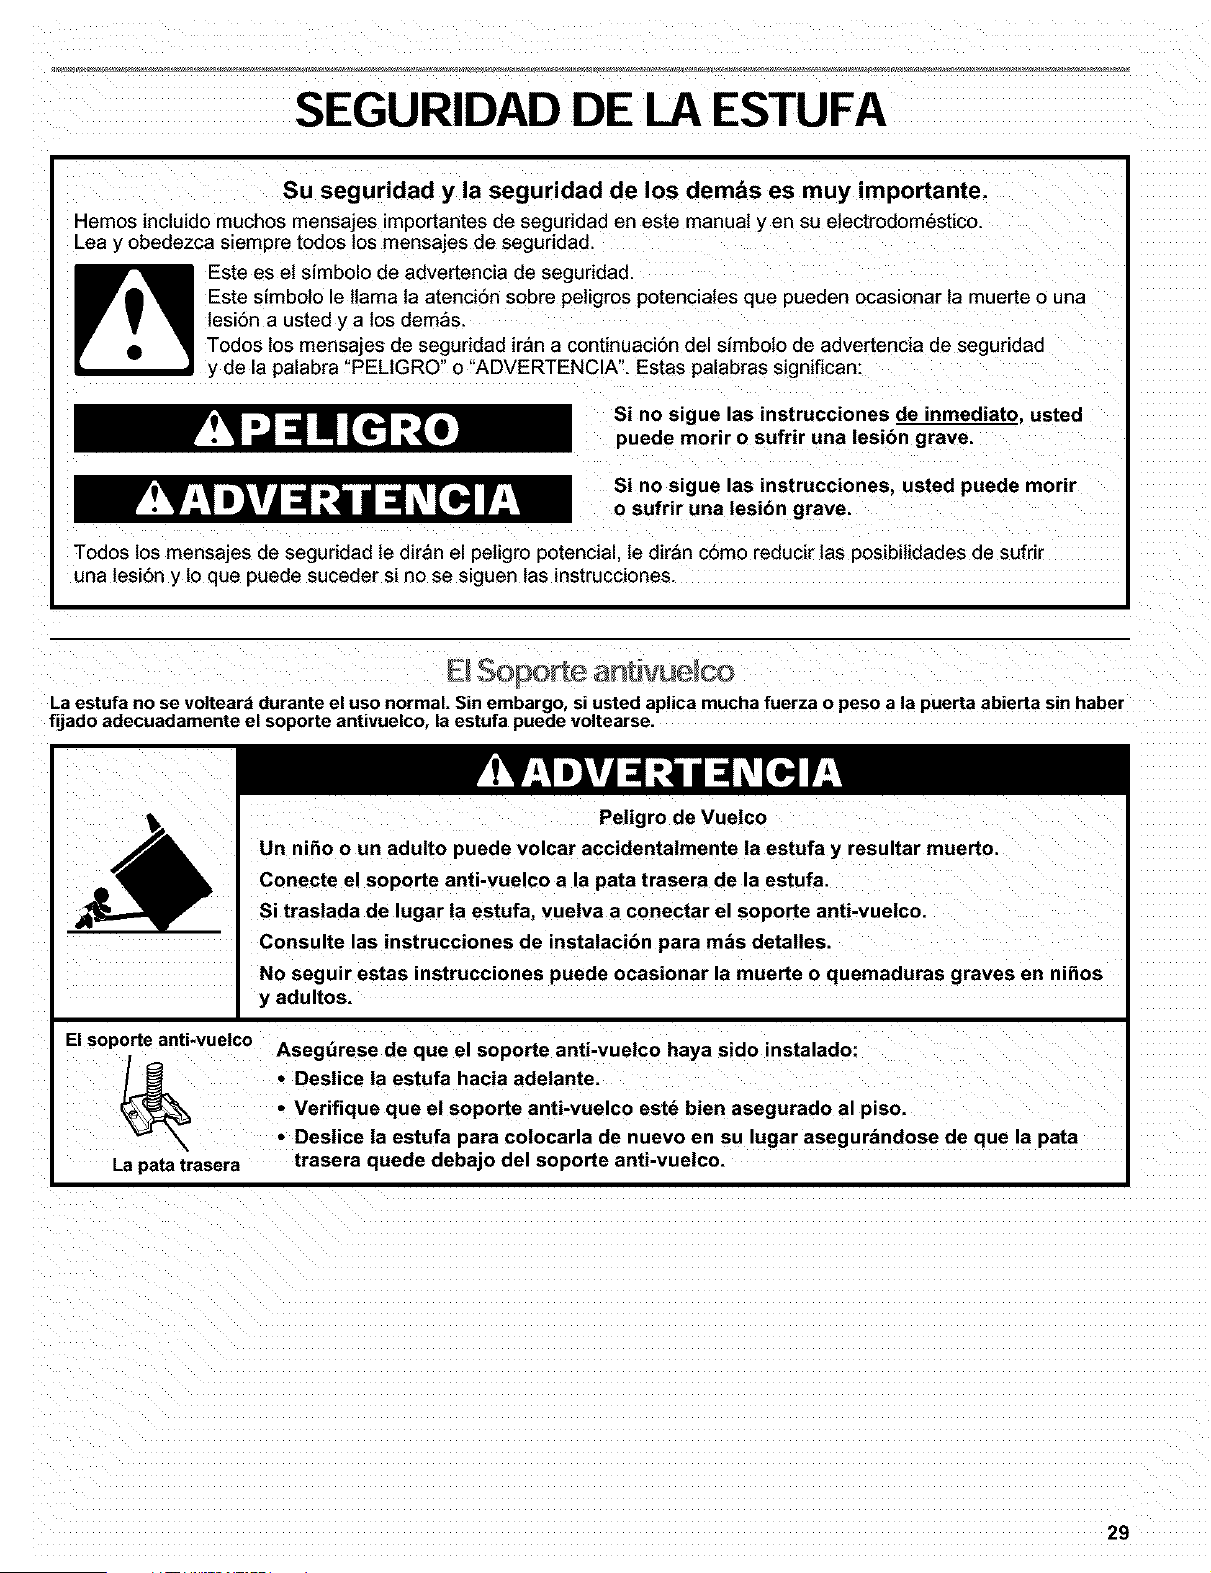
SEGURIDAD DE LA ESTUFA
Su seguridad y la seguridad de los demas es muy importante.
Hemos incluido muchos mensajes importantes de seguddad en este manual yen su electrodomestico.
Lea y obedezca siempre todos los mensajes de seguddad.
Este es el simbolo de advertencia de seguddad.
Este simbolo le llama ta atenci6n sobre peligros potenciales que pueden ocasionar ta muerte o una
lesion a usted y a los demas.
Todos los mensajes de seguridad iran a continuaci6n del simboto de advertencia de seguridad
y de la palabra "PELIGRO" o "ADVERTENCIA". Estas palabras significan:
Si no sigue las instrucciones de inmediato, usted
puede morir o sufrir una lesion grave,
Si no sigue las instrucciones, usted puede morir
o sufrir una lesion grave,
Todos los mensajes de seguridad le diran el petigro potencial, te diran c6mo reducir tas posibitidades de sufrir
una tesi6n y 1oque puede suceder si no se siguen tas instrucciones.
SoooA÷ antivue co
La estufa no se voltear_ durante el uso normal. Sin embargo, si usted aplica muchafuerza o peso a la puerta abierta sin haber
fijado adecuadamente el soporte antivuelco, la estufa puede voltearse.
El soporte anti-vue|co
La pata trasera
Peligro de Vuelco
Un niho o un adulto puede volcar accidentalmente la estufa y resultar muerto.
Conecte el soporte anti-vuelco a la pata trasera de la estufa.
Si traslada de lugar la estufa, vuelva a conectar el soporte anti-vuelco.
Consulte las instrucciones de instalacibn para mas detalles.
No seguir estas instrucciones puede ocasionar la muerte o quemaduras graves en nihos
y adultos.
Asegt_rese de que el soporte anti-vuelco haya sido instalado:
• Deslice la estufa hacia adelante.
• Verifique que el soporte anti-vuelco estd bien asegurado al piso.
• Deslice la estufa para colocarla de nuevo en su lugar asegur&ndose de que la pata
trasera quede debajo del soporte anti-vuelco.
29
INSTRUCCIONES IMPORTANTES DE SEGURIDAD
ADVERTENCIA: Para reducir el riesgo de incendio
electrocucion lesiones a personas o daC_osal usar
la estufa siga precauciones basicas, incluyendo
las sigulentes:
• ADVERTENClA: PARA REDUCIR EL RIESGO
DE VUELCO DE LA ESTUFA, ESTA DEBE ASEGUR-
ARSE EN EL PISO MEDIANTE LA INSTALACION
DEBIDA DE DISPOSITIVOS ANTIVUELCO. PARA
VERIFICAR SI LOS DISPOSITIVOS ESTAN
DEBIDAMENTE INSTALADOS. DESLICE LA ESTUFA
HACIA DELANTE CERCIORESE DE OUE EL
SOPORTE ANTIVUELCO ESTE BIEN FIJO EN EL
PISO Y DESLICE LA ESTUFA HAC A ATRAS DE
MANERA QUE LA PATA TRASERA DE LA ESTUFA
QUEDE FIJA DEBAJO DEL SOPORTE ANTIVUELCO.
• AVISO: No guarde articulos que interesen a los
nihos en los armarios que estan enclma de la estufa
o en el respaldo de proteccion de la estufa - cuando
los nihos suban encima de la estufa para poder coger
obJetos podrian lastimarse seriamente.
• Instalacion apropiada - Cerciorese de que la instalacion
y puesta a tierra de la estufa sean efectuadas adec-
uadamente por un tecnico competente.
• Nunca use la estufa como calefaccion del cuarto.
• NO TOQUE LAS U _IIDADES EXTERIORES O AREAS
oscuro. Las unidades extenores podrian estar
calientes no obstante su color sea oscuro. Las areas
cercanas a las unidades exteriores se pueden
calentar Io suficiente para ocasionar quemaduras.
Durante y despues del uso no toque ni deje que la
ropa u otros *nateriales inflamables toquen las
superficies exteriores o las areas cercanas a las
unidades hasta que haya transcurrido tiempo
suficiente para que se enfrien. {ntre esas areas
estan la superficie de coccion y las superficies que
estan frente a la superficie de coccion.
• Use cacerolas de tama_o apropiado - La estufa esta
equipada con una o mas unidades exteriores de
tamano distinto. Seleccione utensilios que tengan
el asiento liso Io suficientemente grande para cubrir
el elemento calefactor de la unidad exterior. El uso
de utensilios de menor tamano expondra una porcion
del elemento calefactor a contacto directo y puede
ocasionar que la ropa se incendie. La relacion
apropiada entre el utensilio y el quemador tambien
mejorara el rendimiento energetico
• Nunca deje sin supervision las unidades exteriores a
fuego alto. Los derrames pot ebullicion ocasionan
salpicaduras grasosas y humeantes que pueden
incendiarse.
• No deje a los niflos solos - No se debe dejar a los
nlnos sin supervision en el area donde la estufa est_
en uso. Jamas se les debe aermitir que se s_enten o
se paten en parte alguna de la estufa.
• Use ropa apropiada - Nunca debe ponerse ropa
holgada o que se este colgando mientras este usando
la estufa.
• Servicio del usuario - No repare ni reemplace pieza
alguna de la estufa a menos que se recomiende
especificamente en el manual. Cualquier otro servicio
se debe dejar en las manos de un tecnico competente.
• Almacenaje dentro o encima de la estufa - No se debe
guardar material inflamable en el homo ni cerca de las
unidades exteriores,
• No use agua en incendios provocados pot grasa -
Extinga el incendio o la llama o use un extinguidor de
tipo espuma o quimico seco
• Use solo agarradores de ollas secos - Los agarrad-
ores de ollas humedos o mojados en las superficies
calientes pueden ocas_onar quemaduras pot vapor.
No deje que el agarrador de ollas toque los elementos
calefactores calientes. No use toallas u otros pahos
voluminosos.
• Cerciorese de que las charolas reflectoras o platillos
para goteo esten en su lugar - La ausencia de estos
durante la coccion puede ocasionar dahos al
alambrado o componentes que estan debaio,
• Forros protectores - No use papel de aluminio para
forrar los platillos para goteo de las unidades
exteriores o el rondo del homo excepto como Io
sugiera el manual. La instalacion inapropiada de
estos forros puede dar lugar a riesgos de
electrocucion o incendio
• Utensilios de estufa vidriados - SOlo algunos tipos
de utensilios de vidric ceramica vitrificada ceram_ca.
Ioza de barro u otros utensilios vidriados son
adecuados para uso en la estufa sin que se rompan
debido a cambios repentinos de temperatura.
• Los mangos de los utensilios deben colocarse hacla
adentro y no deben extenderse basra las unidades
exteriores adyacentes - Para reducir riesgos de
ouemaduras incendio de materiales inflamables y
salpicaduras debido a contacto accidental con el
utensilio el mango del utensilio debe colocarse hacia
adentro y no debe extenderse hasta las unidades
exteriores adlfacentes
GUARDE ESTAS INSTRUCCIONES
3O
INSTRUCCIONES IMPORTANTES DE SEGURIDAD
• No remoje los elementos calefactores desmontables -
Nunca se deben sumergir los elementos calefactores
en el agua.
• No cocine en una superficie de coccion quebrada -
Si la superficie de coccion se quiebra as soluciones
de limp_eza y derrames pueden penetrar en la
superficie de cocc_6n y dar lugar a un riesgo de
electrocucion. Pongase en contacto con un tecnico
competente de inmediato.
• Limpie la superficie de coccion con cuidado - Si usa
una esponja o un paf_o mojado para limpiar los
derrames en el area de coccion caliente tenga
cuidado 0ara evitar quemaduras pot vapor. AIgunos
productos de limp_eza paeden producir gases
nocivos al ser aplieados en una superficie caliente.
• Tenga cuidado al abrir la puerta - Deje que el aire
caliente o el vapor se escape antes de retirar o volver
a colocar los alimentos.
• No caliente recipientes sellados de alimentos - La
acumulacion de preseon podria hacer estallar el
recip_ente y ocas_onar una lesion.
• Mantenga despejados los conductos de ventilacion
del homo.
• Ubicacion de las parrillas del horno- coloque siempre
las parrillas del homo en la ubicacion deseada
mientras el homo este frio. Si tiene que mover la
parrilla cuando el homo esta caliente, no deje que
el agarrador de ollas toque el elemento calefactor
caliente en el homo.
• NO TOQUE LOS ELEMENTOS CALEFACTORES O
LAS SUPERFICIES INTERIORES DEL HORNO - No
obstante su color oscuro, los elementos calefactores
podrian estar calientes. Las superficies interiores de
un homo se calientan Io suficiente como para
ocasionar quemaduras. Durante y despues del uso.
no toque ni deJe que la ropa u otros materiales
inflamables toquen los elementos calefactores o las
superficies interiores del homo hasta que haya
transcurrido suficiente tiempo para que se enfrien.
Otras superficies del electrodomestico pueden
calentarse Io suficiente para ocasionar quemaduras -
entre estas superficies se encuentran los orificios de
los conductos de ventilacion del homo y las
superficies cercanas a estos orific_os, puertas de
homo _ ventanas de las puertas del homo.
Para cocinas de autolimpieza -
• No limpie lajunta de la puerta. La junta de la puerta
es esencial para un buen cierre. Se debe tenet
cuidado de no frotar, da_ar o mover lajunta
• No use productos de limpieza para hornos - No se
debe usar productos comerciales de lirr a_eza para
nornos o revestimientos protectores para el forro del
homo de ningun tipo en o alrededor de cualquier
parte del homo.
• Limpie unicamente las 0iezas enumeradas en
el manual
• Antes de realizar la autolimpieza del homo - quite la
charola para asar y otros utensilios.
Para unidades con campana de ventilacion -
• Limpie las campanas de ventilacion con frecuencia -
No se debe dejar que la grasa se acumule en la
campana o en el filtro,
• AI flamear los alimentos debajo de la campana,
encienda el ventilador.
GUARDE ESTAS INSTRUCCIONES
La California Safe Drinking Water and Toxic Enforcement Act (La tey de la protecci6n del agua potable y
la eliminaciOn de sustancias t6xicas de California) exige que el gobernador de California publique una lista de
aquellas sustancias identificadas por et estado de California como causantes de cancer, defectos congenitos
o atgen otro tipo de daOos en la funciOn reproductora y exige a los comerciantes que adviertan de los posibles
nesgos de exposiciOn a tales sustancias.
ADVERTENCIA: Este producto contiene una sustancia quimica identificada pot el estado de California como
causante de cancer, defectos congenitos o algen otro tipo de daOos en la funci6n reproductora
Este electrodomestico puede producir una exposiciOn de bajo nivel a alguna de las sustancias enumeradas.
incluyendo el benceno, formaldehido monoxido de carbono y tolueno.
31

PIEZAS Y CARACTER|STICAS
Zste manual abarca varios modelos distintos. La estufa que us_ea ha adquJrido puede tener algunos o todos los articulos que se
enumeran. LaS UD_Cac_onesy aspecto de las caractenst_cas que aqui se ilustran auiz_s no coincidan con su modelo.
Tablero de control
1 2 3 4 5 6 7 8
ooo
• o
•%",,":"0
ooo _oe
oe _o
oeo
9 10 11
I. Luz Jnalcaaora ae 4. ImerruDtor selector de la
SuDerfieie caliente gave[a calentadora Warrr
EASYGLANC--TM & Ready (en algunos
2. Control de la zona de modelosl
cocci0n trasera izqu_eraa 5. Control electronico del
3. Control de la zona homo
delantera izauJeraa
,SURESIMMER rM en
algunos moaelosl
7. Control de la zona ae 10. Boton SURESIMMER len
coccion delantera derecha algunos moaelos,
tzona de cocciOn dual en 11. Luz indicadora COOKTOP
algunos modelos, ON [superficie de coccion
8. Perilla de control de la encendlda,
zona de coccion trasera
derecha
6. Control de la zona ae
calentamiento 9. Luz indicadora
STEADYTEMP rM len SURESIMMER [en algunos
algunos moaelos_ modelosl
Estufa
11
12
1. Ducto de ventilacion del
homo
2. Zona de cocciOn
3. Suoerficie de coccion ae
vidrio radiante
4. Zona de coccion
SURESIMMER (en algunos
modelosJ
5. Media pardlla
STURDIGLIDE TM icon
inserto desmontable en
algunos moaelosr
2
3
4
13
14
15
16
I_1II 17
18
6
7
8
9
10
6. Parrilla del horno
STURDIGLIDE icon
agarradera Entegrada -- en
algunos modelos_
7. Scaorte antivuelco
8. Gancho de tope de la
ouer[a
9. Placa del numero ae
10. Gaveta calentadora Warm
& Ready (en algunos
modelosl Gaveta ae
almacenamlento [en
algunos modelos
11. Luz nocturna de la consola
'en algunos moaelos_
12. Tablero de control
modelo y de serie (detr_s 13.Zona de calentamiento
de] lado izouierdo de la STEADYTEMP [en algunos
gave[a de modelos
almacenamiento_
14. Zona de coccion dual (en
algunos modelos,
15. Interruotor automat_co de
luz del homo
16. Pestillo de autolimpieza
17. Elemento 3ara asar Ino se
ilustraJ
18. Junta
19. Elemento 3ara nornear
32
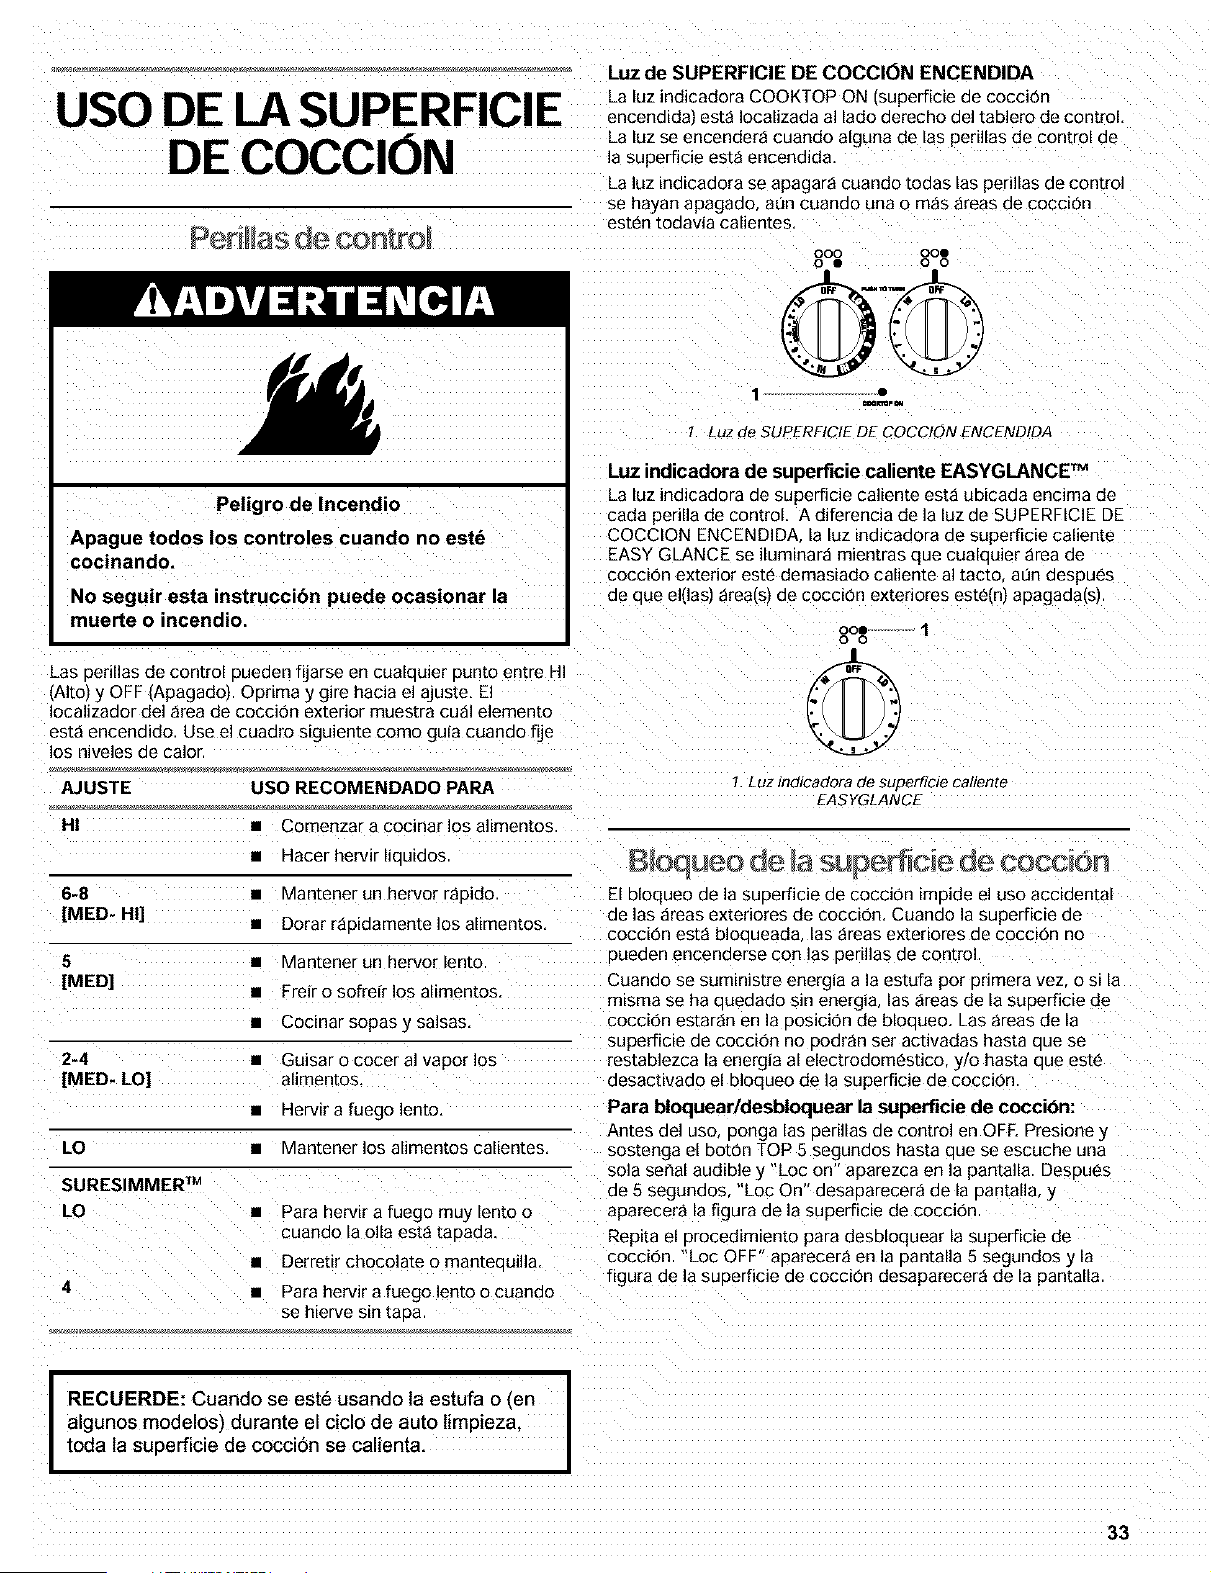
USO DE LA SUPERFIClE
DE COCClON
Luz de SUPERFICIE DE COCCION ENCENDIDA
La luz indicadora COOKTOP ON ,superficie de cocci6n
encendida, esta Iocalizada al lado derecho del tablero de control.
La luz se encendera cuando alguna de las perillas de control de
la superficie esta encendida.
La luz indicadora se apagara cuando todas las perillas de control
se hayan apagaeo nun cuando una o mas areas de cocciOn
esten todavia calientes.
Peligro de Incendio
Apague todos los controles cuando no est_
cocinando.
No seguir esta instruccibn puede ocasionar la
muerte o incendio.
000 DO@
0 @ 0 O
0©
1 o
1. Luz de SUPERFICIE DE COCCION ENCENDIDA
Luz indicadora de superficie caliente EASYGLANCE TM
La luz indicadora oe superficie caliente est4 ubicada encima de
carla perilla de control. A diferencia de la luz de SUPERFICIE DE
COCCION ENCENDIDA la luz indicaoora oe superficie caliente
EASY GLANCE se iluminar4 mientras que cualquier area de
cocci6n exterior este demasiado caliente al tacto aun oespues
oe oue elOas) area(s, de coccion extenores este(n) apagada(s)
Las oerillas de control pueden fijarse en cualouier Dunto entre HI
(Alto) y OFF (Apagado). Oprima y gire hacia el ajuste. El
Iocalizador de] area de coccion exterior muestra cu41 elemento
esta encendido. Use el cuadro siguien[e como guia cuando fije
los nweles de calor
ool 1
O O
©.
AJUSTE
HI
6-8
[MED- HI]
5
[MED]
2-4
[MED- LO]
LO
USO RECOMENDADO PARA
• Comenzar a cocinar los alimentos
• Hacer hervir liouioos.
• Mantener un hervor roD)do
• Dorar r4oidamentelos alimentos.
• Mantener un hervor lento
• Freir o sofreir los alimentos.
• Cocinar sopas y salsas.
• Guisar o cocer al vapor los
allmentos,
• Hervir a fuego lento,
• Uantener los alimentos calientes.
SURESIMMER TM
LO • Para nervir a fuego muy lento o
cuando la olla esta ta3aoa.
• Derretir chocolate o manteouiUa.
4 • Para hervir a fuego lento o cuando
se hierve sin [aoa
1. Luz /na/caeora ae superficie caliente
EASYGLANCE
BIo ueo de la sul erficie de coccion
El bloqueo de la suDerficie de coccion imoide el uso accidental
de las areas exteriores de coccion. Cuando la superficie de
cocci6n esta bloeueada as areas exteriores de coccion no
oueeen encenoerse con las oerillas de control
Cuando se suministre energ_a a la estufa por primera vez o sila
mBma se ha ouedado sin energ_a las areas de la suoerficie de
cocci0n estaran en la oosici0n de blooueo. Las areas de la
superficie de cocgi6n no 3odran ser activadas hasta oue se
restablezca la energia al electrodomestlco y/o hasta oue este
desactlvado el bloqueo de la superficie de cocci6n
Para bloquear/desbloquear la superficie de cocciOn:
Antes del usc oonga las Derillas de control en OFF. Presione
sostenga el boton TOP 5 segundos hasta oue se escucne una
sola sehal audible 2/"Loc on aparezca en la pantalla. Desoues
de 5 segunoos Loc On" desaoarecera de la Dantalla y
aparecera la figura de la superficie de coccion
Repita el 3rocedimiento para desbloquear la superficie de
coccion "Loc OFF" aoarecera en la oantalla 5 segundos y la
figura de la suoerficie de coccion desaparecera de la pantalla
I
RECUERDE: Cuando se este usando ta estufa o (en
algunos modelos) durante el ciclo de auto timpieza.
toda la superficie de coccion se calienta.
33
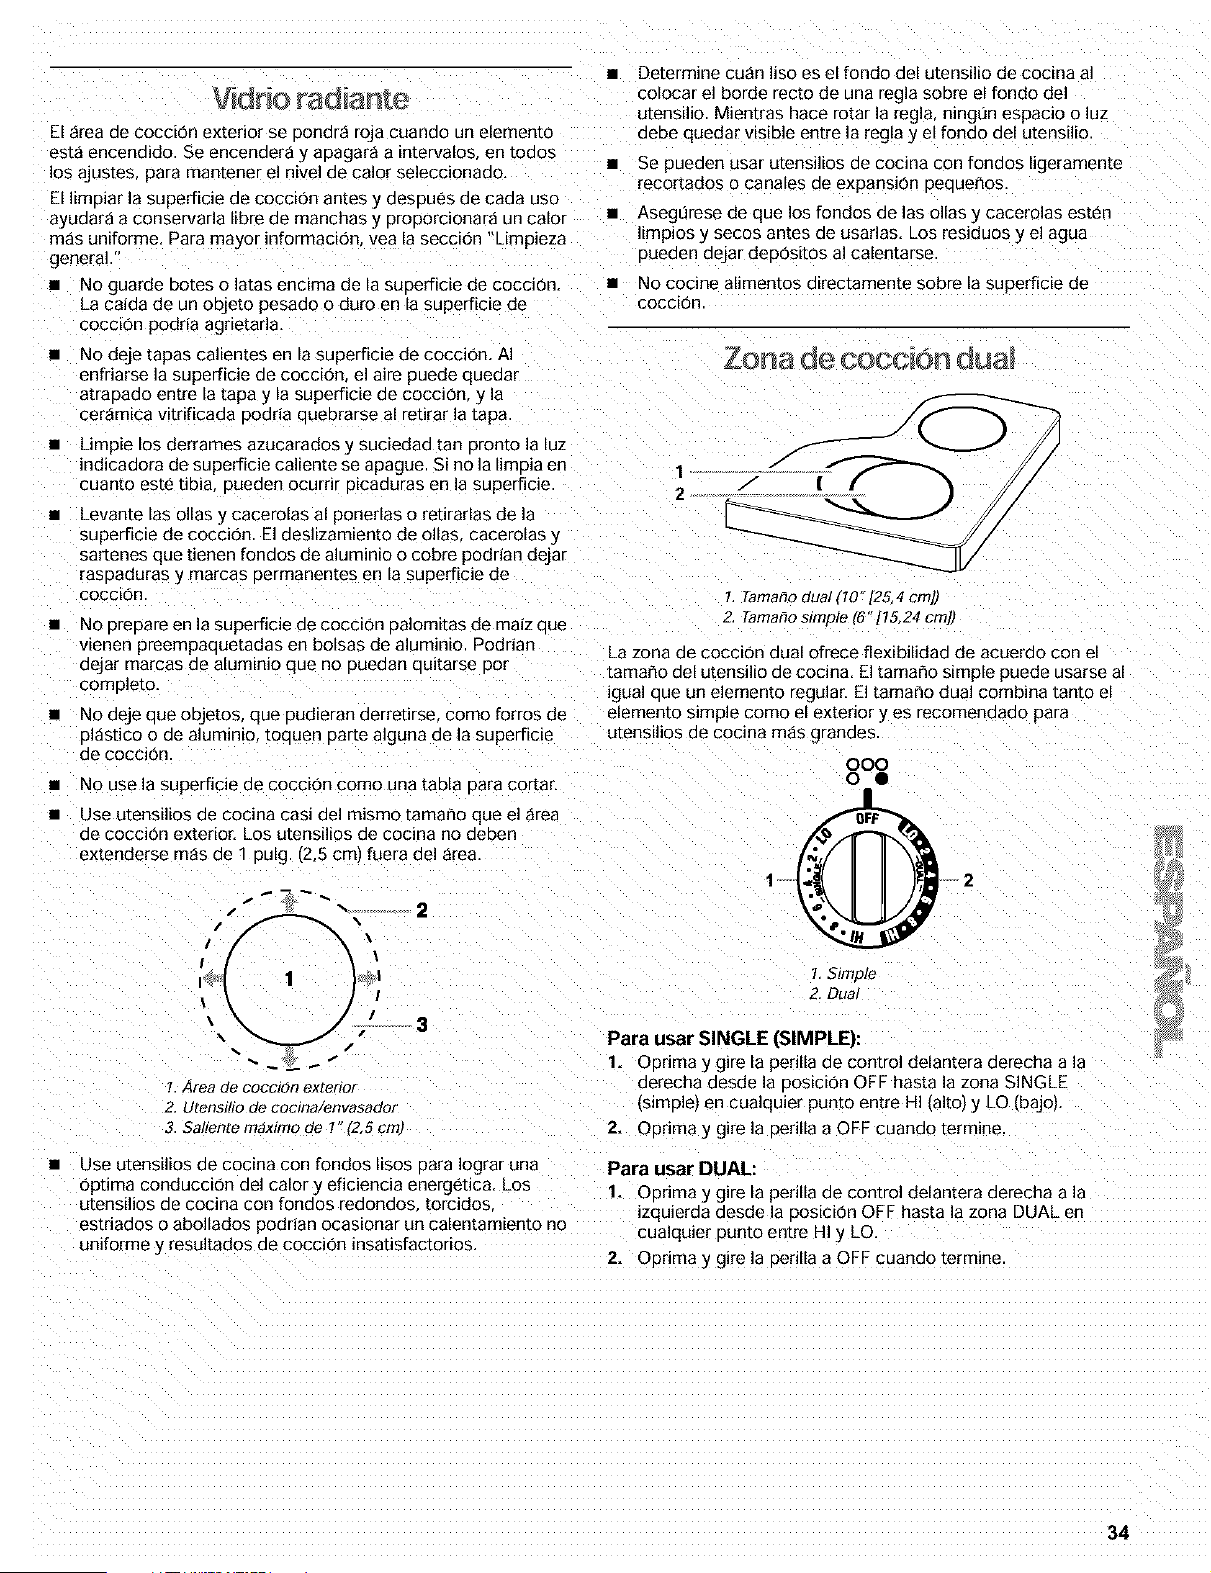
)rio radiante
:_1area de cocci0n exterior se pondr_ roja cuanao un elemento
est_ encendido. Se encender_ y apagara a mtervalos en toads
los ajustes, para mantener el nivel de calor seleccionado. •
:J limpiar la superficie de coccion antes y aesoues de cada use
ayuaara a conservarla libre de manchas y orooorcionar8 un calor •
m_s uniforme. Para mayor informacion yea la secci0n "Limp_eza
general."
• No guarde botes olatas engima de la suDerficie de cocci6n.
La caida de un oeJeto pesado o duro en la superficie de
coccion podria agnetarla,
Determine cu_n liso es el fondo del utensilio de cocina al
colocar el borde recto de una regla sobre el fondo del
Jtensilio Mientras nace rotar la regla, ningiJn espacio o luz
aeDe quedar visible entre la regla y el fondo del utensilio
Se pueden usar utensilios de cocina con fondos ligeramen[e
"ecortados o canales de expansion pequenos.
Asegurese de que los rondos de las elias y cacerolas esten
limpios y secos antes ae usarlas. Los residues y el agua
E)ueaen dejar dep0sitos al calentarse
• No cocine alimentos directamente sobre la superficie de
coccion
No deje tapas callentes en la superficie de cocci0n. AI Zeta d_ COOCiOn dUS_
enfriarse la superficie de coccion, el abe auede queaar
atraoaao en[re la tapa y ia superficJe de cocci6n y la
cer_mica vitrificada oodna auebrarse al retirar la tapa
• LJmpie los derrames azucarados _ suciedad tan oronto la luz
indicadora de superficie caliente se apague. Si no la limoia en 1
cuanto este tibia Dueden ocurrir oicaduras en la superficie 2
• Levante las elias _ cacerolas al ponerlas o retirarlas de la
superficie de coecion. El deslizamiento de elias eacerolas y
sartenes que tienen rondos de aluminio o cobre podnan dejar
rasDaduras y marcas oermanentes en la superficie de
cocclon
No Dreoare en la superficie de cocci0n oalomitas de maiz aue
wenen preempaquetadas en bolsas de aluminio. Podrian
aejar mamas ae alumlelO que no ouedan auitarse DOt
comDleto.
• No deje que objetos, que pudieran derretirse come forros de
ol_stico O de aluminia toauen Darte alguna de la superficie
de coccion
/ :Z:/ ,,
1. Tamano dual (10"125,4 cm])
2. Tamano simple (6"[15,24 cm])
La zona de coccion dual ofrece flexibilidad de acuerdo con el
tamale del utensilio de cocina. El tamale simple puede usarse al
igual aue un elemento regular. El tama¢_o dual combina tanto el
elemento simple come el extenor y es recomenaaao para
utensilios de cocina mas granaes
No use la superflcie de cocci0n come una tabla oara corta£
Use utensilios de coeina casi del mismo tamar_o que el _rea
de cocciOn exterior. LOS utensilios de cocina no aeDen
extenderse m_s de 1 pulg (2,5 cm) fuera del _rea.
/ \
\
I I
( ,
\x ? 3
!. A ea ae cocc#on exterior
Z UteRSlllO die cociRa/eRvasacIor
3. Saliente m,_ximo de 1 [2,5 cml
000
0 •
1. Simp#e
2. Dual
Para usar SINGLE (SIMPLE):
1. ODrima y gire la penila de control delantera derecha a Is
derecha desde la 3osici0n OFF hasta la zona SINGLE
(simple) en cualquier punto entre HI (alto} y LO (bajo).
2. ODrima y gire la 3erilla a OFF cuando termine
Use utensilios de cocina con rondos lisos Dare Iograr una
optima conducci0n del calory eficiencia energet_ca. Los
utensilios de cocina con rondos redondos [orcidos
estriados o abollados podrian ocasionar un calentamiento no
uniforme y resultados de cocci0n insatisfactorios.
Para usar DUAL:
1. Oorima y gire la perilla de control delantera derecha ala
zquierda descle a OOSiCiOnOFF hasta la zona DUAL en
cualquier punto entre HI y LO
2. Oprima y gire la 3erilla a OFF cuando termine
34
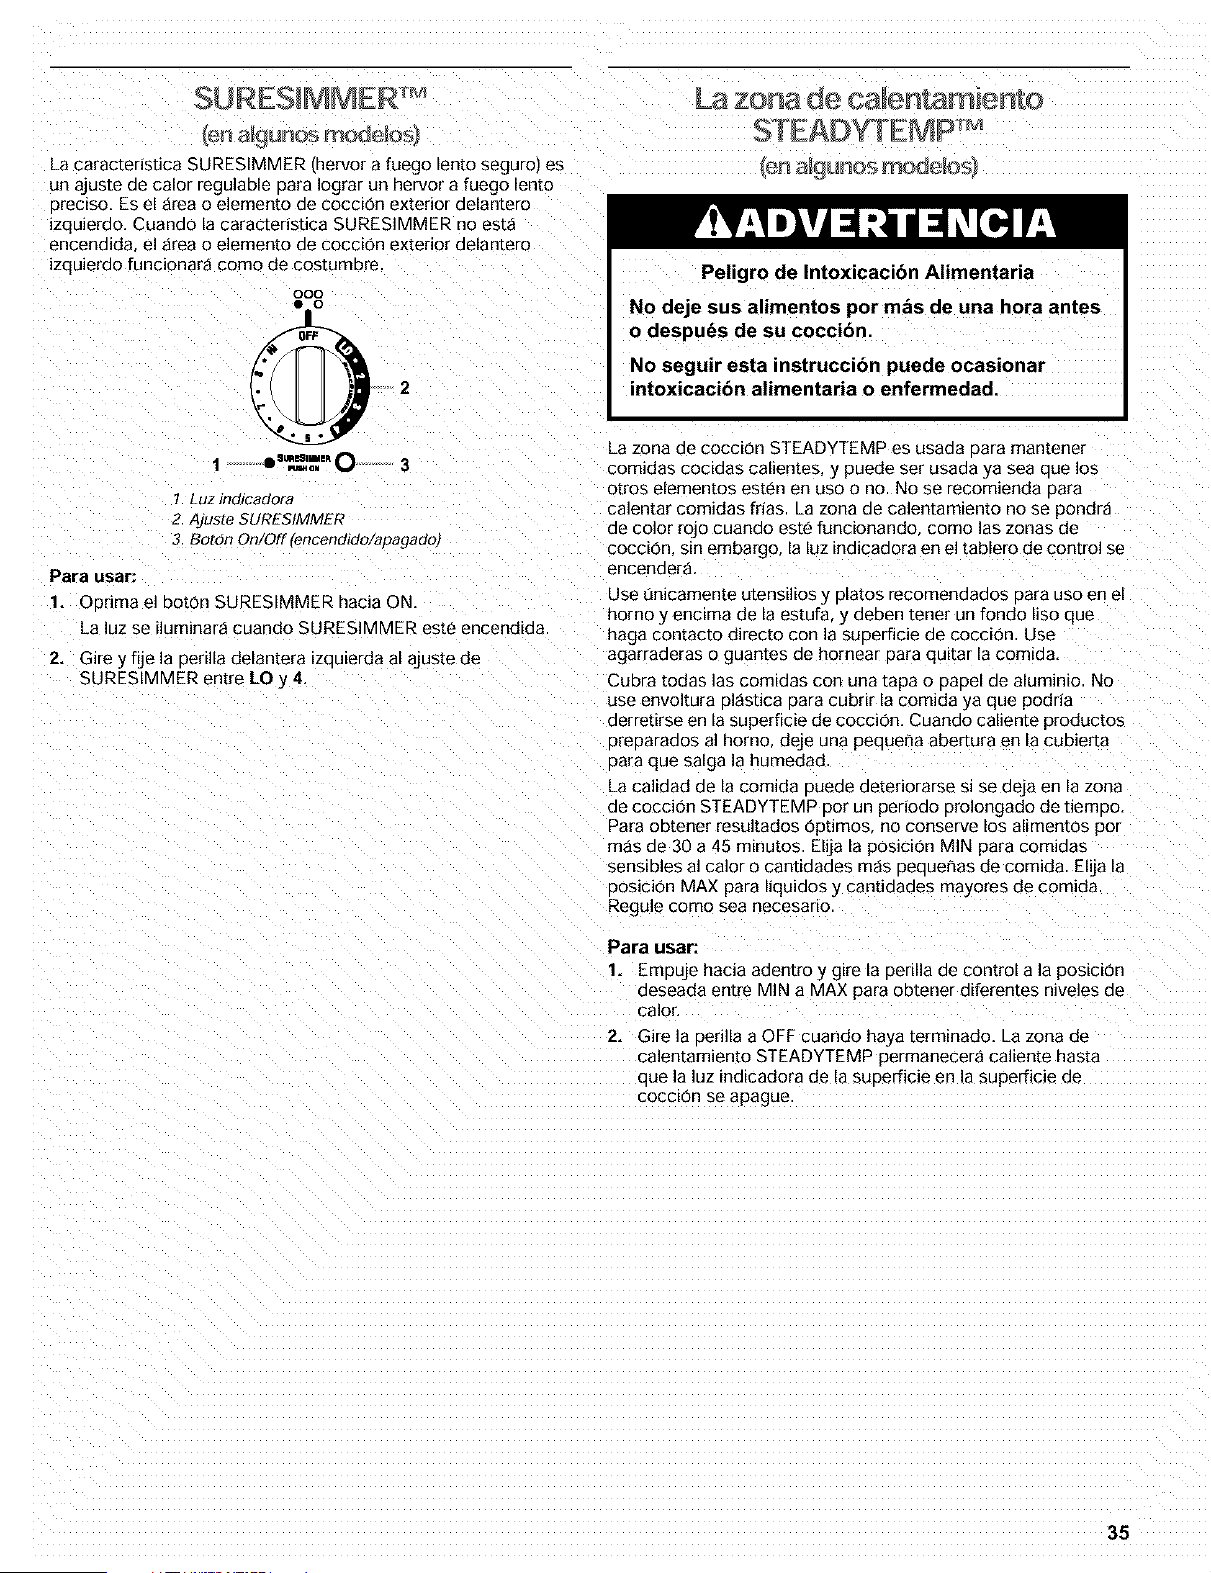
SURESIMMER
_a caracteristica SURESIMMER inervor a fuego lento seguro) es
un ajuste de calor regulable Dara Iograr un hervor a fuego lento
areciso. Es el area o elemento de cocci0n exterior delantero
izquierdo. Cuando la carac[ensdca SURESIMMER no est_
encendida el area o elemento de cocci0n extenor delantero
izquierdo funcionar_ como de costumbre
OOO
La zona ae calen- m en[o
STEADYTEMP
Peligro de Intoxicacion Alimentaria
No deje sus alimentos por mas de una hora antes
o despuds de su coccion
No seguir esta instruccibn puede ocasionar
intoxicacibn alimentaria o enfermedad.
1.Luz indicadora
2. Ajuste SURESIMMER
3. Boron On/Off encenalao/apagaam
Para usar:
1. ODrima el bot0n SURESIMMER hacia ON
La luz se iluminar_ cuando SURESIMMER este encendlda
2. Gire y fije la Deri]la delantera izau_erda al ajuste de
SURESIMMER entre LOy 4,
La zona de coccion STEADYTEMP es usaa_ oara man[ene/
comidas cocidas cal_entes y puede ser usada ya sea cue los
otros elementos esten en uso o no. No se recomienda oara
calentar comidas frias La zone de calentam[ento no se pondra
de color rojo cuando este funcionando como las zonas de
coccior sm embargo, la Iuz indicadora en el tablero de control se
encenaera.
Use t]nicamente utensiIios y Dlatos recomendados Dara uso en el
homo y encima de la estufa y deben tener un fondo liso que
haga contacto directo con ]a suoerficie de coccion. Use
agarraaeras o guantes de hornear para qu_tar la comtda.
Cubra todas Ins comidas con una tapa o DaDel de aluminio. Ne
use envoltura DI_StiCa Darn cubrir la comida ya que podna
derretirse en la superficie de cocci0n. Cuando caliente productos
DreDarados al homo. deje una peque_a abertura en la cubierta
para que salga la humedad
La calidad de la comida auede deteriorarse si se deja en la zona
de coccion STEADYTEMP por un periodo Drolongado de tiemDo.
Para obtener resultados 0pt]mos no conserve los al_mentos por
m_s de 30 a 45 minutos. Elija la posicion MIN para comidas
sensibles al calor o cantidades m_s aeaueflas de comida. Elija la
oosicion MAX aara liquidos y cantidades mayores de comida
Regule como sea necesano
Para usar:
1. Empuje hacia adentro y g=re la 3erilla de control a la pos=c=on
deseada entre MIN a MAX para obtener diferentes niveles de
2alor,
2. Gire la 3erilla a OFF cuando haya terminado. La zona (_e
calentamien[o STEADYTEMP permanecer_ cal_ente hasta
oue la luz indicadora de la suoerficie en la superficie de
cocc_on se apague
35
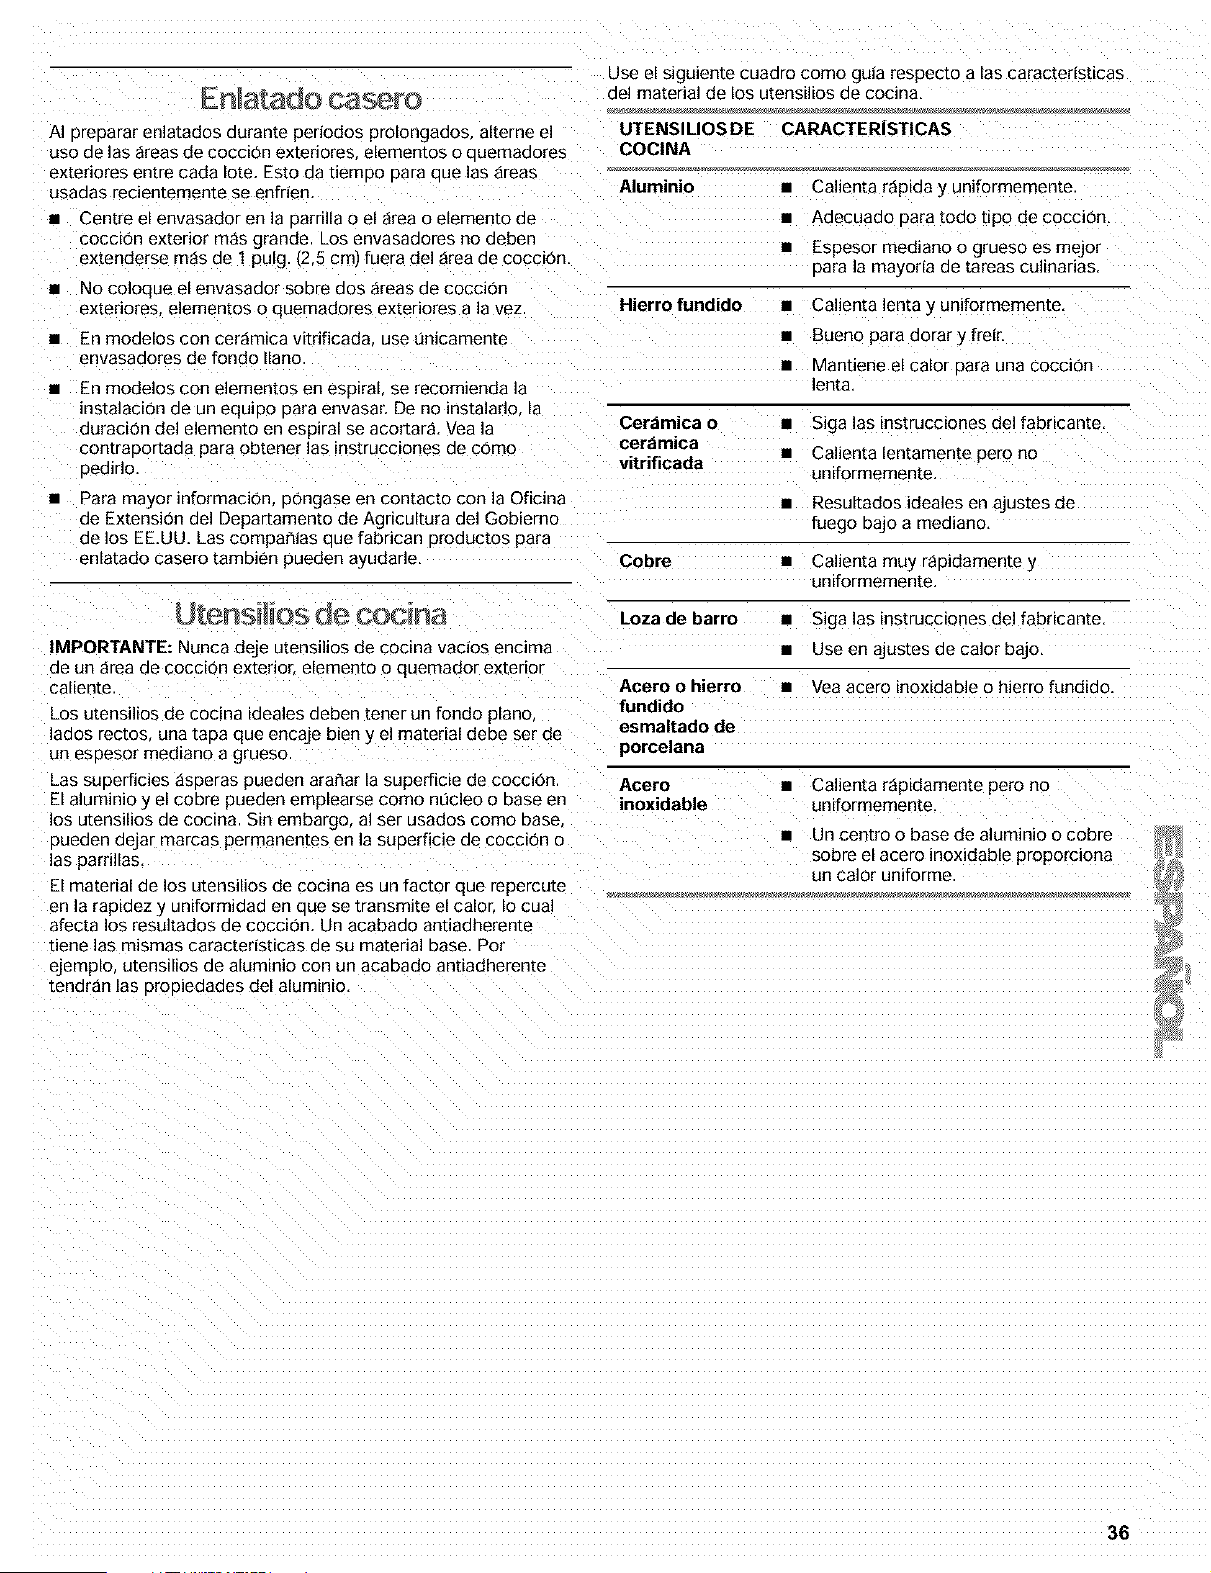
rise el siguiente cuadro como gu_a respecto alas caractenst_cas
del material de los utensilios de cocina,
AI DreDarar enlatados durante periodos prolongaaos, alterne el
uso de las areas de cocciOn exteriores elementos o ouemaaores COCINA
exteriores entre cada Iote, Esto aa uemDo Dare aue las areas
usadas recientemente se enfrien, Aluminio •
• Centre el envasador en la Darnlla o el area o elemen[o ae •
coccion exterior mas grande. Los envasadores no aeben
extenderse mas de 1 pulg (2,5 cml fuera del area ae cocclon,
• No coloque el envasador sobre dos areas de coccion
exteriores elementos o quemadores exteriores ala vez Hierro fundido •
• EB modelos con ceramica vitrificada use un_camen[e •
envasadores de fondo llano. •
En modelos con elementos en esp_ral, se recomienda la
instalacion de un equipo Dara envasar, De no instalaflo a
duracton del elemento en esp_ral se acortara Vea la Cer_lmica o
con[raDoEaoa pare obtener las iestrucciones de cOmo cer_lmica
oedlrlo, vitrificada
Para mayor informacion pongase en contacto con la Oficina
de Extension del Departamento de Agncultura del Gobierno
de los EE.UU. Las compar_ias aue fabrican oroauc[os para
enlatado casero tambien pueden ayudarle,
UTENSlLIOS DE CARACTERISTICAS
Calienta rap_aa y uniformemen[e
Adecuado Dare [oao [ipo de cocclon,
Espesor mediano o grueso es mejo[
Data la mayoria de tareas culinarias,
Calienta lenta _ uniformemente,
Bueno para aora[ y freir
Mantlene el calor Data una coccion
lenta
• Siga las instrucciones del fabricante.
• Calienta lentamente pero no
uniformemente,
• Resultados ideales en ajustes de
fuego bajo a mediano,
Cobre • Calienta muy rapidamentey
uniformemente,
Loza de barro • Siga las instrucciones del fabricante,
• Use en ajustes de calor bajo,
Acero o hierro • Yea acero inoxidable o hierro fundido
fundido
esmaltado de
porcelana
Acero • Calienta rapidamente pero no
inoxidable uniformemente,
IMPORTANTE: Nunca deje utensi]ios de cocma vac_os encima
ae un area de coccion exterior elemento o quemador exterior
caliente.
=os utensilios de cocina _aeales deben [ener un rondo 31ano.
lados rectos, una tape que encaje bien y el matenal debe ser de
un esoesor mediano a grueso
_as superficies asperas pueaen arar_ar la superficie de cocclon
:-I aluminio y el cobre pueaen emplearse como nL_cleo o base en
los utensilios de cocina. Sin embargo, al ser usados como base
3ueaen aejar mamas permanen[es en la suoerficie de COCCl(_no
las parrillas,
El material de los utensilios de cocina es un factor que repercu[e
• Un cen[ro o base de aluminio o cobre
sobre el acero inoxidable proporciona
un calor uniforme
en la raplaez y Jniformidad en aue se transmlte el calor, Io cual
afecta los resultados de coccion, Un acabado antiadherente
tiene las mismas caracteristicas de su material base Por
ejemplo utensilios de aluminio con un acabado antiadherente
tendran las orooiedades del aluminio,
36
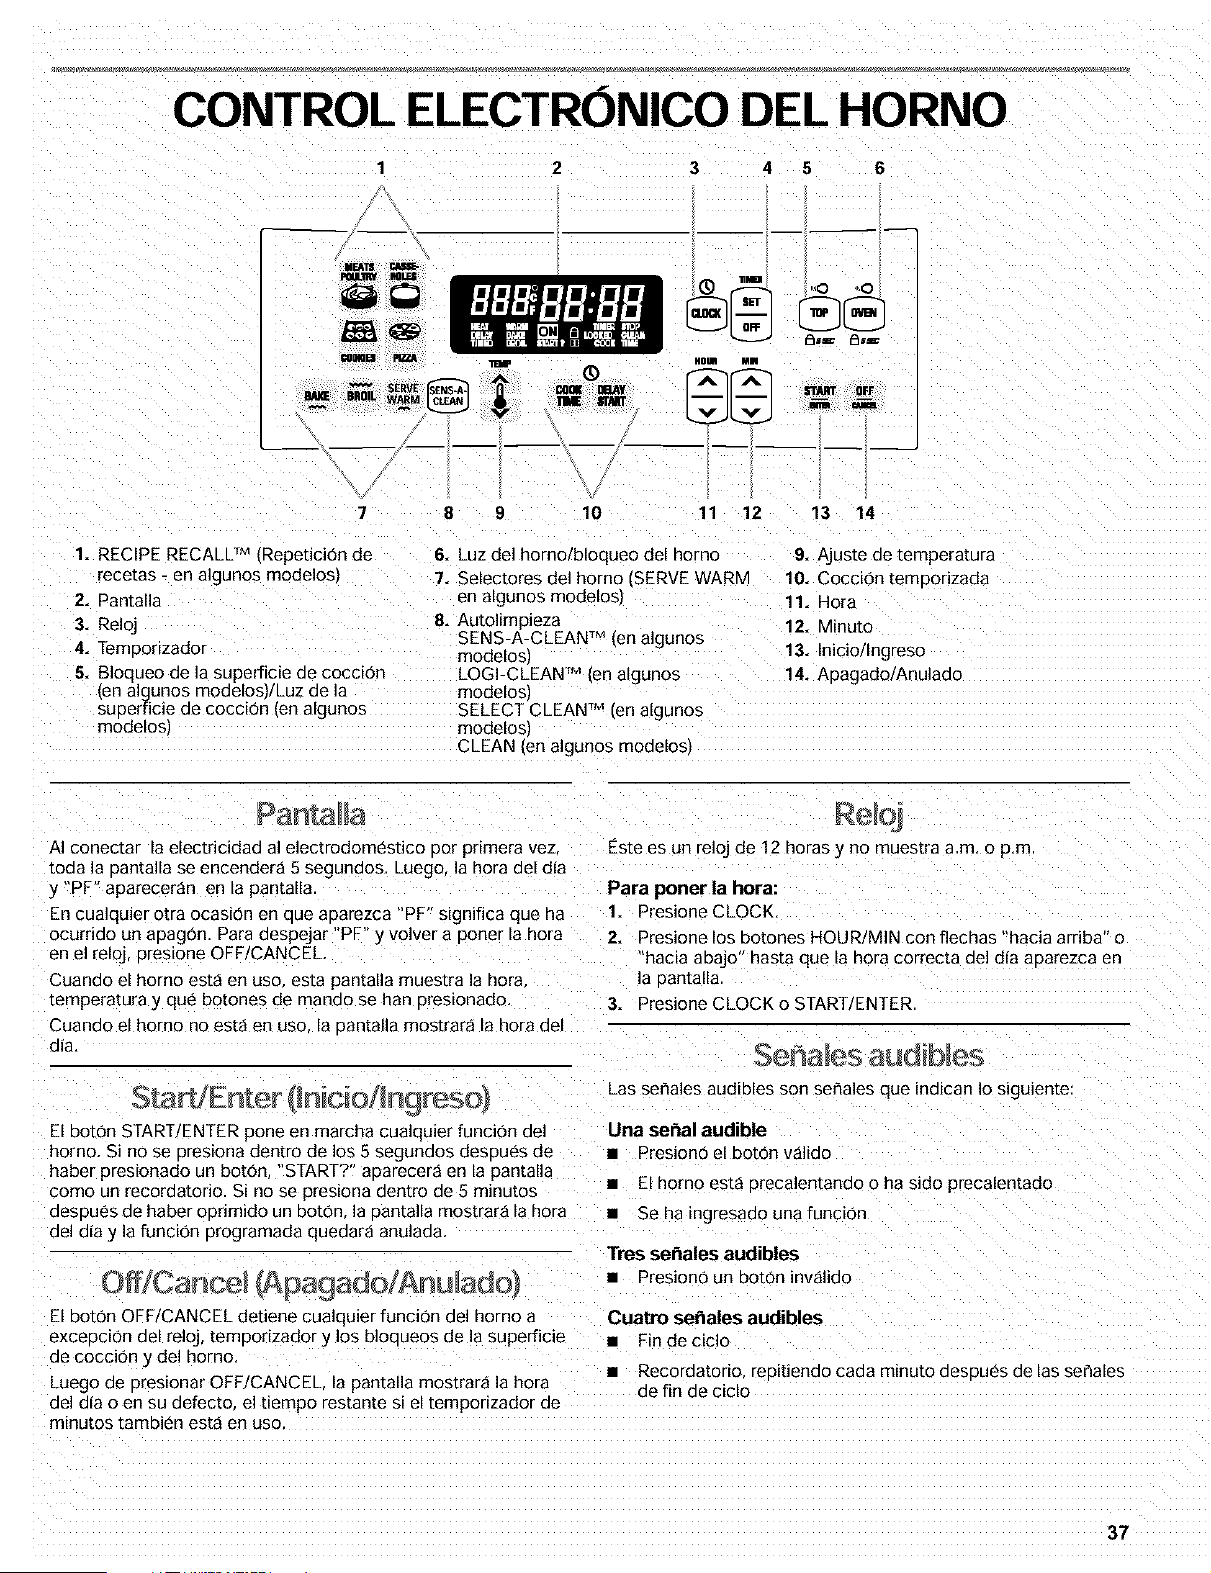
CONTROL ELECTRONICO DEL HORNO
3 4 5 6
w
1. RECIPE RECALL TM (RepeticiOn de
rece[as - en a]gunos modelos,
2. Pantalla
3. Reloj
4. Temoor[zador
5. Bloqueo de la superficie de cocci0n
(en algunos modelos)/Luz de la
suoerficie de coccion {en algunos
modelos_
8 9 10 11 12 13 14
6. Luz de] homo/bloqueo del norno
7. Selectores del homo (SERVE WARM
en algunos modelos.
8. Autolimp]eza
SENS-A-CLEAN TM (en aigunos
modelosJ
LOGI-CLEAN TM (en algunos
modelos/
SELECT CLEAN TM (en algunos
modelos_
CLEAN (en algunos modelos,
9. Ajus[e ae tempera[ura
10. Coccion temeorizada
11. Hora
12. Minuto
13. Inicio/lngreso
14. Apagado/Anulado
AI conectar la electricidad a] electrodomestico por primera vez,
toda la oantalla se encender_ 5 segunaos. Luego, la hora del dia
y "PF" apareceran en la pantalla
En cuaiqu]er o[ra ocasEon en aue aDarezca PF" signiflca que na
ocurrido un aDagon. Para despejar "PF y volver a boner la hora
en el reloj, presione OFF/CANCEL.
Cuando el homo est_ en uso es[a pantalla muestra la hora
[emperatura y que botones de mando se ha_ oresionado.
Cuando el homo no est_ en use la oantalla mostrara la nora del
dia.
S Enter lnic o/Inqreso o
El boron START/ENTER pone en marcha cualquier funcion del
homo. Si no se 3resiona dentro de los 5 segundos desDues de
haber pres[onado un bot0n "START?" aoarecer8 en la pantalla
como un recordatorio. Si no se presiona dentro de 5 minutos
aesoues de haber oDnmldo un boton. ]a oantalla mostrara la nora
del alia y la funci0n 3rogramada quedara anulada.
O /Cance (ADagado/Anu ado,
El boron OFF/CANCEL detiene cualquier funcion del homo a
exceocion del reloj, temporizador _ los bloaueos de la superficie
de cocci0n } del homo.
=ueao ae 3resionar OFF/CANCEL a pantalla mostrar_ ]a hora
del dia o en su defecte el tiempo restante si el temporizador de
minutos tambien est_ en uso
Este es un reloj de 12 horas y no mues[ra a.m. o 3.m
Para poeer la nora:
1. Presione CLOCK•
2. Presione los botones HOUR/MIN con flechas hacia arriba" o
hac=a abajo" hasta que la nora correcta de] dia aoarezca en
a eantalla
3. Presione CLOCK o START'ENTER.
Las se_ales audibles son se_ales que indican 1osiguiente:
Una serial audible
• Pres_ono el boron v_]ido
• El homo est_ erecalentando o ha sido precalentado
• Se ha ingresado una funci0n
Tres set,ales audibles
• Presiono un bot0n inwtlido
Cuatro senales audibles
• Fin decic]o
• Recordatorio. reeitiendo cada minuto desuues de las se_ales
de fin de title
37
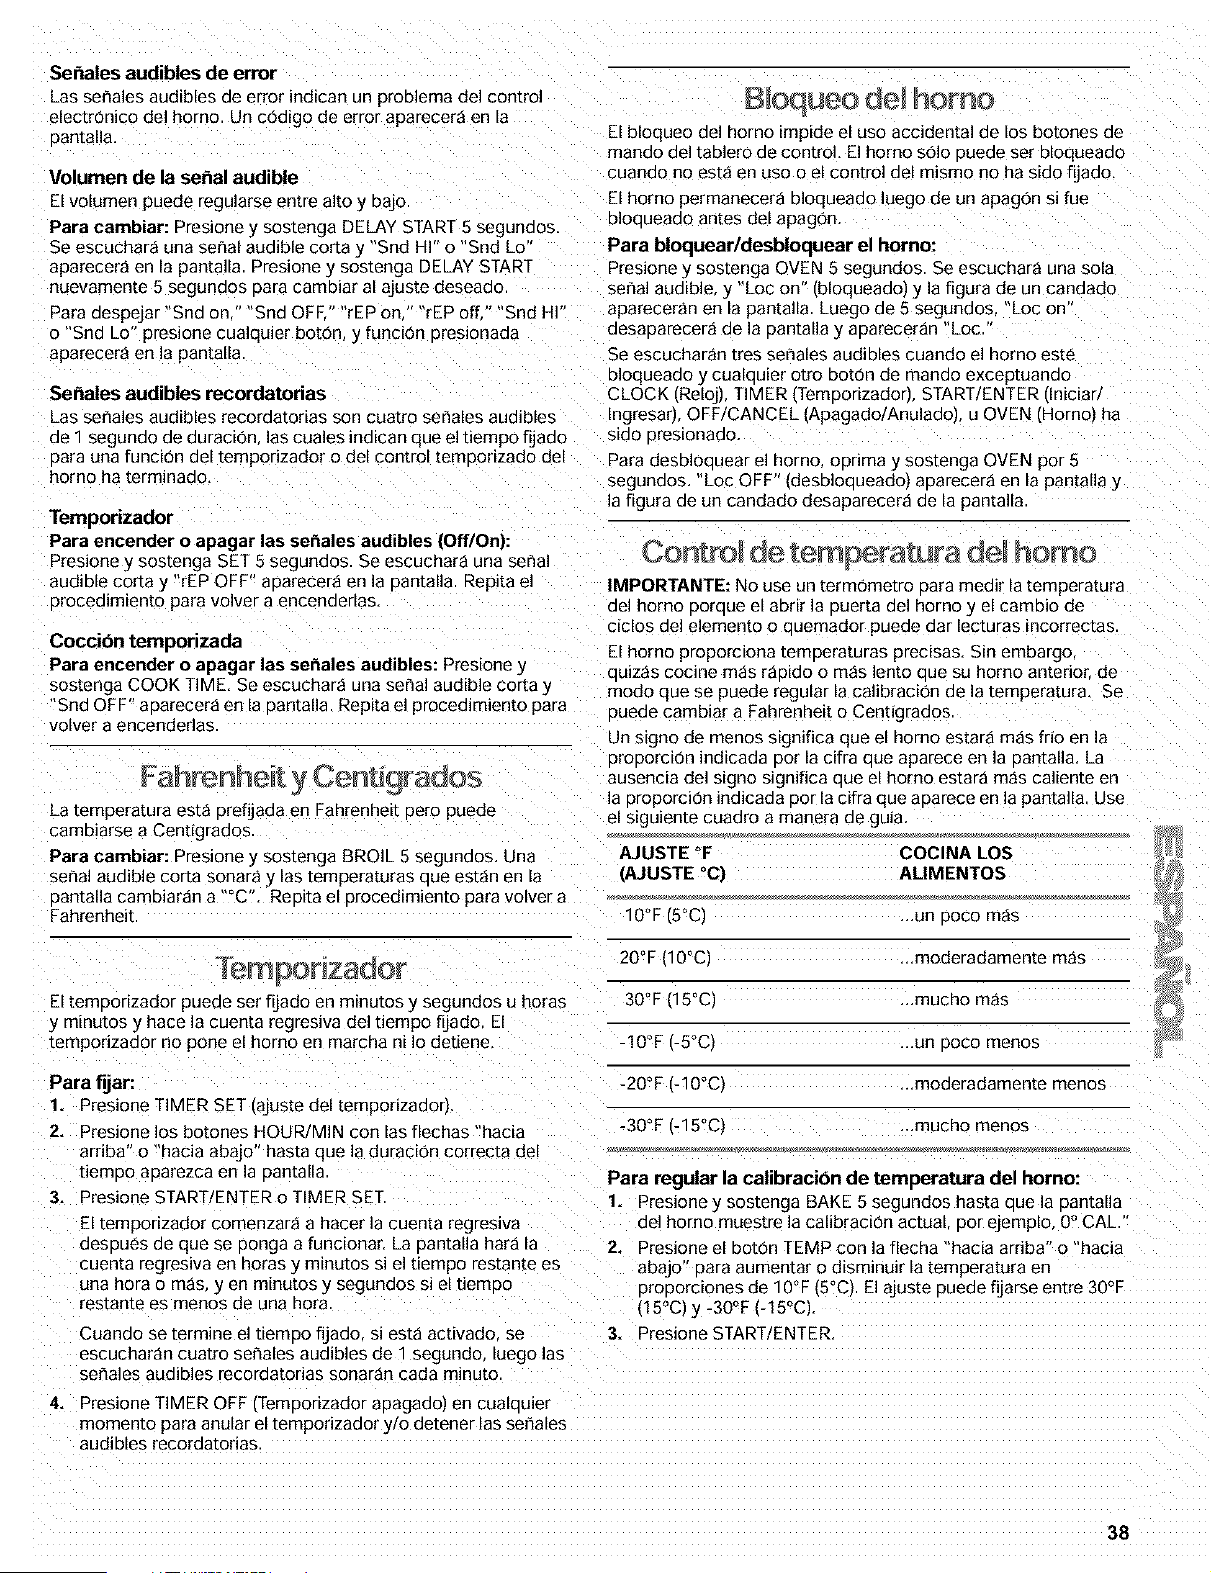
Ser_alesaudiblesdeerror
=as set, ales audibles de error indican un problema de] control
electronico del homo. Un codigo de error aparecera en la
aantalla.
Volumen de la sepal audible
El volumen puede regularse entre alto y bajo.
Pare eambiar: Presione y sosmnga DELAY START 5 segunaos.
Se escuchara una sepal audible corta y "Snd HI" o Snd Lo
aparecera en la pantalla. Presione y sosmnga DELAY START
nuevamente 5 segunaos Bare cambiar al ajuste deseado.
B OQUeO Gel OFnO
El bloqueo del homo _mpide el uso accidental de los bomnes ae
manao del tablero de control, El homo solo Dueae ser bloqueaao
cuando no esta en uso o el control del mismo no ha sido fijaao,
El homo permanecera bloqueado luego ae un apagon si rue
blooueado antes del apagon.
Para bloquearldesbloquear el hereo:
Presione y sosmnga OVEN 5 segundos Se escuchar_ una sole
sepal audible y "Loc on" (bloqueado] y la figure de un candado
3are despejar "Snd on Snd OFF " "rEP on." "rEP off " "Snd HI" apareceran en la pantalla Luego de 5 segunaos. _oc on
o "Snd LO presione cualquier boron y funciOn pres_onaaa aesaoarecer_ de la Dantalla _ aoarecer_n "Loc
aparecer_ en la pantalla Se escucharan tres seflales audibles cuando el homo este
bloqueaao y cualauier otro boron de mando excepmanao
Senales audibles recordatorias CLOCK (Reloj), TIMER (Temoorizadorl START/ENTER (In[cmr/
_as se_ales audibles recordatorias son cuatro seEales audibles Ingresar OFF/CANCEL (Apagado/Anuladol. u OVEN (Hornc ha
ae" segunao de aurae[on, las cuales indican que el tiempo fijaao s[ao ores_onaao.
aara una funcion del temporizador o del Control temDonzado del
homo ha terminado,
Temporizador
Para encender o apagar las senales audibles (Off/On):
_resione y sosmnga SET 5 segunaos. Se escuchara una sefla
audible corta y "rEP OFF" aDarecera en la oantaBa. Repita el
3rocealmlen[o pare volver a encenderlas.
Cocci6n temporizada
Para encender o apagar las senales audibles: Presione y
sos[enga COOK TIME. Se escuchara una serial audible corta y
"Snd OFF" aoarecera en la oantalla. Repita el procedimiento pare
volver a encenderlas
Fahrenheit y Cen 9raaos
La temperatura esta prefijada en Fahrenheit pero puede
cambiarse a Centigraaos.
Para cambiar: Presione y sosmnga BROIL 5 segundos. Una
sehal audible corta sonar_ y Ins temperatures aue est_n en la
3antalla cambiar,Jn a "°C". ReBate el orocedimiento 3are volver a
:ahrenheit
Pare desbloauear el home opnma y sosmnga OVEN por 5
segunaos. Loc OFF" Idesbloaueado) aoarecera en la pantalla y
la figure de un candado desaparecera de la pantalla
Cont de tern peratura homo
IMPORTANTE: No use un termometro oara medir la temperature
del homo 3oraue el abrir la Duerta del homo _ el cambio de
ciclos del elemento o quemador puede dar lectures mcorrectas.
El homo proporc_ona mmoeramras precisas. Sin embargo
auiz_s cocine mas r_oEao O m_s lento aue SUhomo anterior de
modo que se puede regular la calibracion de la temperature Se
ouede cambiar a Fahrenheit o Centigraaos
Un signo de menos significa que el homo estara m_s fdo en la
proportion indicada oor Jacifra aue aparece en la 3antalle. La
ausencia de] signo sJgnifica aue el homo estar_ m_s caliente en
la proporcion indicada oor la cifra que aparece en la pantalla. Use
el siguiente cuadro a manera ae guia.
AJUSTE °F
(AJUSTE °C)
COCINA LOS
ALIMENTOS
10°F [5°C) un ooco m_s
ar]z do
El temporizador puede ser fijado en mmums y segundos u horas
y mmums y hace la cuenm regreswa del bempo fijado. El
mmponzaaor no pone el homo en marcha ni Io detiene.
20°F (10°C] ...moderadamente mas
30°F 115°C1 ...mucho mas
-10°F (-5°C) un ooco menos
...moderadamente menos
_.mueho menos
Para fijar: -20 ° F I-10°C}
1. Presione TIMER SET ,ajuste Clel temponzaooD.
2. Presione los botones HOUR/MIN con las flechas "hacia -30°F (-15°C)
arriba" o "hacia abajo" hasta que la duracion correcta del
tiemDo aoarezca en la oantalla
3. Presione START/ENTER o TIMER SET.
El mmporizador comenzara a hacer la cuenta regreswa
aesoues ae que se ponga a funcionar. La Dantalla hare m
cuen[a regreswa en horns y mtnu[os si el tiempo restante es
una horn o mas y en mmums y segundos si el tiemoo
resmnm es menos de una hora
Cuando se termine el tiempo fijaao, sJ est_ activado se
escuchar_n cuatro se_ales audibles de 1 segundo, luego las
se_ales audibles recordatorias sonar_n cada minuto.
Para regular la calibracibn de temperatura del homo:
1. Presione y sosmnga BAKE 5 segundos hasta aue la Dantalla
de] homo muestre la calibracion actual por ejemplo. 0° CAL
2. Presione el oomn TEMP con la flecha "hacia arriba" o "hacia
abajo' 3ara aumentar o disminuir la temperatura en
orooorciones de 10°F (5°C1 El ajuste puede fijarse entre 30°F
15°CI y -30°F (- 15°CI.
3. Presione START/ENTER.
4. Presione TIMER OFF ITemoonzador aDagado) en cualau_er
momenta para anular el temporizador y o detener las set, ales
audibles recordatonas
38
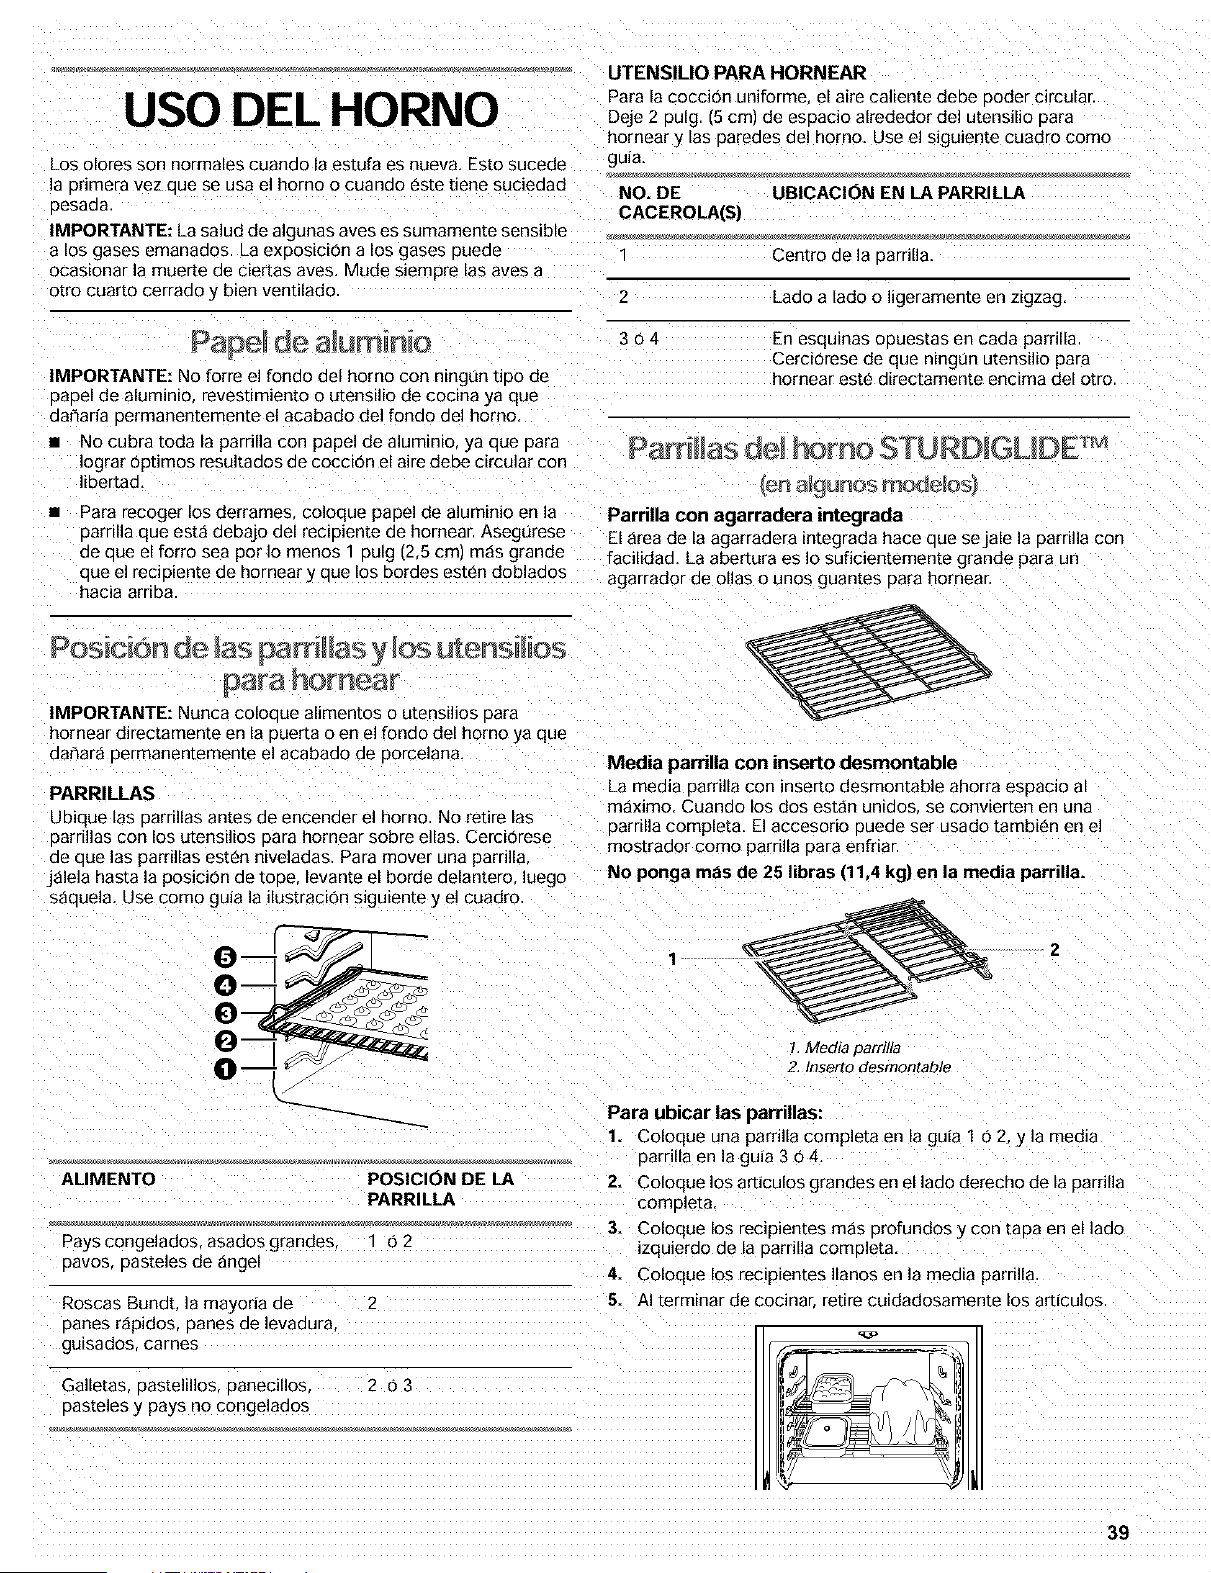
I DEL HORNO
_os oloms son normales cuando la estufa es nueva, Esto sucede
la Dnmera vez aue se usa el homo o cuando este tiene suciedad
3esaaa
IMPORTANTE: La salud de aigunas eves es sumamente sensible
a los gases emanaeos. La exeosicion a los gases pueae
ocasionar la muer[e de cier[as aves, Mude siempre Ins eves a
o[ro cuar[o cerraao y bien ventilado.
IMPORTANTE: No forre el rondo del homo con ningun UDOde
3aDel de aluminio revestimiento o utensilio de cocma ya que
daharia Dermanentemente el acabado del fondo del homo
• No cubra toda la parrilla con papel de alumlnlo ya que oara
Iograr optimos resultados de coccion el aire debe circular co_
liber[aa,
Pare recoger los derrames, coloque papel de aluminio en la
parnlla que esta aeDajo deF rec_piente de hornear. Asegurese
ae aue el forro sea per Io menos" aulg (2,5 cm) m_s grande
aue el reciDiente de hornear y que los hordes estee doblados
hacia arriba
UTENSILIO PARA HORNEAR
Para la coccion uniforme el aire cal_ente debe 3oder circular.
Deje 2 pulg (5 cm) de esDacio alrededor del utensilio oara
homear y las oaredes del horno, Use el siguiente cuadro come
guia.
NO. DE UBICACION EN LA PARRILLA
CACEROLA(S)
Centre de la earrilla,
Lade a lade o l_gerameme en z_gzag,
304
En esqulnas ooues[as en caaa aarrilla
Cerci0rese de que nmgun utensilio para
hornear este directamente encima del otro
Pare[Ins homo STURD[GUDE T'°
_ a_ Jr_os mo_e_o5
Pardlla con agarradera integrada
El _rea de la agarradera integrada hace aue sejale la earrilla con
=acilidad. La abertura es Io suficientemente grande para un
agarrador de elias o unos guantes Data hornear.
PosiciOn de amHas y bs utensi ios
IMPORTANTE: Nunca colooue alimentos o utensi]ios Dara
hornear d_rectamente en la 3uerta o ee el rondo del homo ya que
dahara eermanentemente el acabado de oorcelana,
PARRILLAS
UbJque las parrillas antes de encender el norno. No retire las
3arrillas con los utensilios oara hornear sobre elias. Cerciorese
ae aue las parrillas esten niveladas. Pare mover una parnlla
j_lela hasta la posJci0n de tope, levante el horde delantero uego
saauela, Use come guia la ilustraci0n siguiente _ el cuadro
o
ALIMENTO POSICION DE LA
PARRILLA
Media pardlla con inserto desmontable
La media oarrilla con inserto desmontable ahorra espac_o al
m_ximo. Cuando los dos est_n unidos se convter[en en una
oarrilla completa, El accesorio oueae ser usado tambien en el
mos[raaor come parrilla para enfriar.
NO ponga m_ls de 25 libras (11,4 kg) en la media parrilla,
1 @ 2
7, Meala parrllla
2, Inserto desmontable
Para ubicar las parrillas:
1. Coloque una parrilla completa en la gula I o 2, y la media
Darrilla en la guia 304.
2. Coloque los articulos grandes en el lade derecho de la pardlla
comDleta
Pays congelados, asados grandes o 2
naves Dasteles de angel
Roseas Bundt la mayoria de 2
Danes r_pidos, oanes ae levadura
guisados, carnes
Galletas Dastelillos. oanecillos. 2 6 3
oasteles y pays no congelados
3. Coloque los recipientes m_s Drofundos y con [apa en el lado
zquierdo de la Darrilla comoleta,
4. Coloque los recipientes llanos en la media parrilla
5. AI terminar de cocinar retire cuidadosamente los articulos.
39
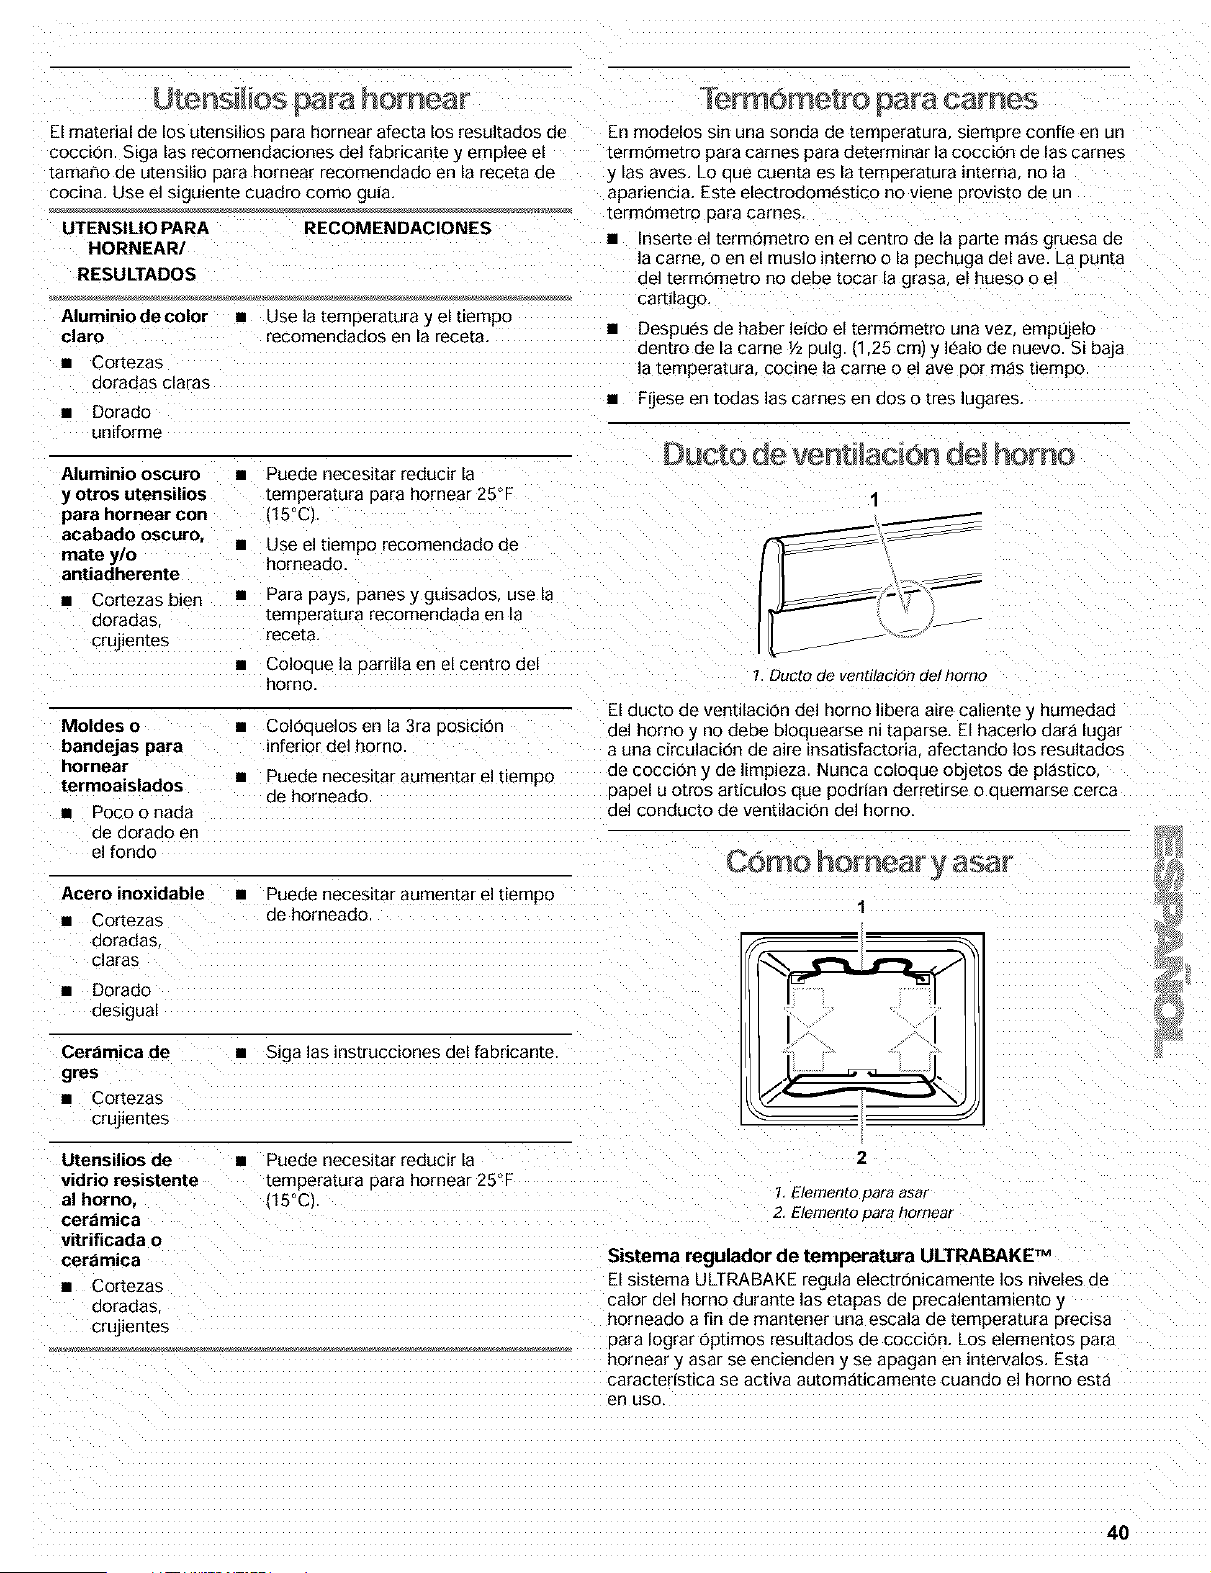
Utemsdios para homea
ZI material de los utensilios Data hornear afecta los resultados de
cocoton. Siga [as recomendaciones de] fabricante y emolee el
tamaffo de utensilio oara hornear recomendado en [a rece[a oe
cocina, Use el sJgu_ente cuadro como guia,
UTENSILIO PARA RECOMENDACIONES
HORNEAR/
RESULTADOS
Aluminio decolor • Use la temoera[ura y el [lempo
claro recomendados en la receta.
• Cortezas
doradas claras
• Dorado
uniforme
Aluminio oscuro •
y otros utensilios
para hornear con
acabado oscuro,
mate y/o
antiadherente
• Cortezas bien •
doradas
crujien[es
Puede necesitar reducir la
[empera[ura Dara hornear 25°F
(15°C).
Use el tiempo recomendado de
homeado.
Para Days panes y guisados, use la
[emperatura recomendada en la
rece[a,
Coloeue la oarrilla en el centro del
homo.
Moldes o
bandejas para
hornear
termoaislados
• Pocoonada
meooraoo en
el rondo
Col0ouelos en la 3ra aosici0_
inferior del homo
Puede necesltar aumentar el tlempo
de horneado
Acero inoxidable
• Cortezas
doradas
claras
• Dorado
oes_gual
Yerm6me o 3ara comes
CerCimica de
gres
• Cortezas
crujien_es
En modelos sin una sonda de temDeratura siempre confie en un
termometro para cames para determinar la coccion de las carnes
y las ayes. LO oue cuenta es la temoeratura interne no la
apariencia. Este electrodomestico no viene Drows[o oe un
termometro 3ara carries.
Inserte el termometro en el centro de la parle mas gruesa oe
a carrie, o en el muslo Jnterno o la pechuga del ave. La oun[a
del termometro no deDe [ocar la grasa el hueso o el
car[_lago.
• Despues de haber leido el termometro una vez. empt_je[o
oen[ro de la came Y2pulg (1,25 co) y I_alo de nuevo. Si baja
a tempera[ura cocine la came o el ave DOt m_s tiernpo.
• Fijese en todas las cames en dos o tres lugares.
Ducto de venti acion homo
1
V
!. DuCtO de voRtI/aCIOR de/homo
El ducto de ventilacion del homo libera aire caliente y humedad
del homo y no debe bloquearse nl [aDarse, El hacedo dar_ lugar
a una circulacion de aire insatisfactoria afectando los resultados
de coccion y de limpieza. Nunca coloque oDJe[os de pl_stico.
babel U otros articulos que podrian derretirse o ouemarse cerca
del conducto de ventdacEOn del horno.
• Puede necesitar aumentar el tiempo
de horeeado
• Siga las instrucciones del fabricante
36R O lomea V asa
1
Utensilios de • Puede necesitar reducer la
vidrio resistente [empera[ura oara hornear 25°F
al homo, 115°C_
cer_mica
vitrificada o
cer_mica
• Cortezas
doradas
crujien[es
2
1, Elemen[o Dora asa[
2, Elemen[o Data homear
Sistema regulador de temperatura ULTRABAKE TM
El slstema ULTRABAKE regula electrOnicamente los niveles de
calor del homo durante las etapas oe orecalentam_ento y
horneado a fin de mantener una escala de temperatura orecisa
oara Iograr opt_mos resultados de coccion. Los elementos oara
hornear y asar se encienden y se apagan en ntervalos. Esta
carac[ensuca se activa automaticamente cuando el homo esta
en uso
40
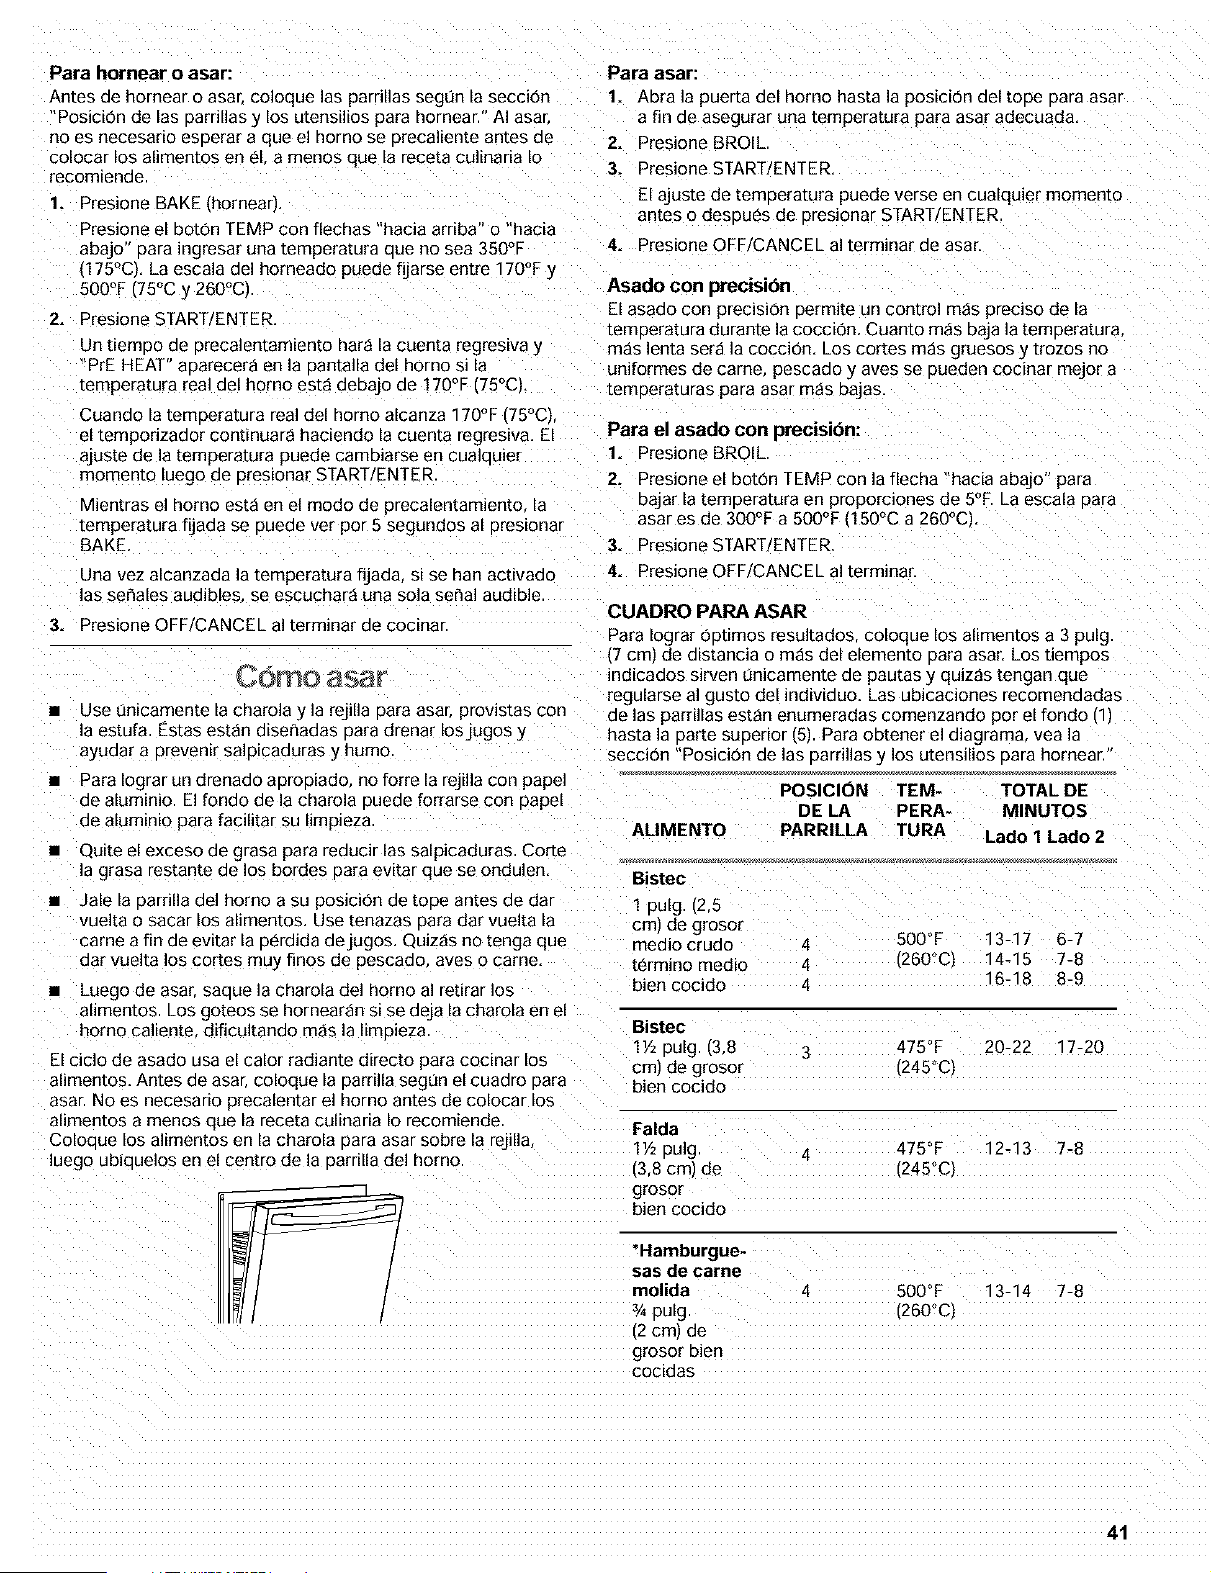
Para hornear o asar:
Antes de homear o asar. co]oque las parrillas segt_n la secciOn
"Posicion de las parrillas _ los utens_l_os para hornear." AI asar
no es necesano esperar a que el homo se erecallente an[es ae
colocar los allmentos en el. a menos que la receta culinaria Io
recomlenae
1. Presione BAKE [hornear).
Preslone el boron TEMP con flechas "hacia arriba" o "hacia
abajo" para ingresar una [emperatura que no sea 350°F
(175°C). La escala del horneado puede fijarse entre 170°F y
500°F (75°C y 260°C1.
2. Presione START ENTER.
Un t_emeo ae 3recalentam[ento hard la cuenta regres[va y
PrE HEAT" aearecera en la eantalla del homo si la
[emperatura real del homo est_ debajo de 170% (75°C}
Cuando la temoera[ura real del homo alcanza 170°F (75°0}
el [emporizador continuar_ haciendo la cuen[a regres_va. El
ajuste de la tempera[ura puede cambiarse en cualauier
momen[o luego ae eresionar START/ENTER
MJentras el homo esta en el mode de 3recalentamiento la
[emperatura fijada se Dueae ver per 5 segundos al Dres[onar
BAKE,
Una vez alcanzada la tempera[ura fiJaaa, s[ se ban act[vado
las se_ales audibles se escuchar_ una sola serial audible
3. Presione OFF/CANCEL al terminar de cocinar.
• Use untcamente la charola y la rejilla para asar, proves[as con
la estufa. Estas est_n diser_adas aara drenar Iosjugos y
ayuaar a prevenir salDicaduras y humo
• Para Iograr un drenado aeroeiado, no forre la rejilla con papel
de aluminio. El fondo de la charola Duede forrarse con papel
de aluminio para facilitar su limpleza
• Quite el exceso de grasa para reducJr las salpicaduras. Corte
la grasa restante de los bordes Dara evitar que se ondulen
Jale la 3arrilla del homo a su aos_cJon ae [ooe antes de dar
vuelta o sacar los alimentos. Use tenazas oara dar vuelta la
came a fin de evitar la eeraJcia deJugos. Qulzas no tenga que
dar vuelta los cortes muy fines de pescaeo ayes o came.
• Luego de asa£ saaue la charola del homo al retirar los
al_mentos. LOS goteos se nornearan s_se aeja la charola en el
homo caliente dificultando m_s la limpieza
El ciclo de asado usa el calor radiante directo para cocinar los
alimentos. Antes de asa_ coloque la parnlla segun el cuadro oara
asar. No es necesario precalentar el homo antes de colocar los
alimentos a menos que la receta culinaria Io recomiende
Coloeue los alimentos en la charola eara asar sobre _arejilla
luego ubiauelos en el centre de la oarrilla de] homo
Para asar:
1. Abra 1_puerta del homo hasta ]a posiciOn del toee Dara asar
a fin de asegurar una [emperatura para asar adecuada,
2. Presione BROIL
3. Presione START ENTER,
El ajuste de tempera[ura puede verse en cualquier momen[o
antes o desoues de Dresionar START 'ENTER.
4. Presione OFF/CANCEL a] terminar de asa[
Asado con precision
El asaao con precision Dermite un control m_s precise de la
[emeeratura durante la coccion. Cuanto m_s baja la temperatura.
m_s lenta sera la coccion, Los cortes m_s gruesos y [rozos no
uniformes de came pescaao y ayes se eueden cocinar mejor a
[emperaturas para asar mas bajas,
Para el asado con precision:
1. Presione BROIL
2. Presione el boron TEMP con la flecha "hacia abajo" para
Dajar la temperatura en proporciones de 5°R La escala 3ara
asar es de 300°F a 500°F 150°C a 260°CL
3. Presione START/ENTER,
4. Presione OFF/CANCEL al terminar,
CUADRO PAPA ASAR
Para Iograr ODtlmos resultados coloque lOSallmentos a 3 pulg.
_7 cm) de distancia o mas del elemento Dara asar. Los tiempos
indicados sirven t]nicamente de pautas y qulzas tengan que
regularse al gusto del individuo. Las ubicaciones recomendadas
de las aarrillas est_n enumeradas comenzando per el fondo [1)
hasta la Darte suoerior (5) Para obtener el diagrama vea la
seccion "Posicion de las Darrillas yos utensilios 3ara hornear.
POSICION
DE LA
ABMENTO PARRILLA
Bistec
TEM- TOTAL DE
PERA- MINUTOS
TURA Lado 1 Lado 2
1 pulg. {2,5
cml de grosor
medlo crude 4 500°F 13-17 6-7
termno med[o 4 ',260°C) 14-15 7-8
bien cocido 4 16-18 8-9
Bistec
1V2pulg (3,8 3 475°F
cml de grosor :245°C.
bien cocido
20-22 17-20
Falda
1v2 pulg
[3.8 cml de
grosor
bien cocido
475°F 12-13 7-8
'245°C)
'Hamburgue-
sas de came
molida
¥4 pulg
[2 cml ee
grosor bien
COclaas
4 500°F 13-14 7-8
'260°C)
41

ALIMENTO
POSICION TEM- TOTAL DE
DE LA PERA- MINUTOS
PARRILLA TURA Lado 1 Lado 2
Use el cuadro s_guJente como guia cuando emplee RECIPE
RECALL
BOTON TEMPERATURA TIEMPO
FIJADA PREFIJADO
325°F (165°C) 1 hora
Chuletas de
cerdo
1 pulg. _2.5
cm_ ae grosor
bien cocidas
450°F 15-16 11-12 *MEATS/POULTRY
[230°C) [CARNES/AVES)
3 Jb r5.6 kg}
Trozo ae
jamon 4 500°F 8-10 4-5
[precocido] (260°C)
1/2puig _1,25
cm)
de grosor
Salchichas 4 500°F 5-7 3-4
alemanas 1260°CI
Chuletas de
cordero 4 400°F 12-14 7-8
1 pulg. _2.5 (205°C)
cm) ee grosor
Polio
Trozos con 2 425°E 23-26 18-22
nueso 4 (220°C) 11-16 11-15
Deshuesados
Pescado
_/'2DUIg (1,25 4 350°F 8-10 4-5
1 °
cm) ae grosor ( 75 C)
1 pulg
(2,5 cml ae 3 450°E 18-19 11-14
grosor (230°C)
* Coloque hasta 9 hamburguesas seearaaas a _gual
distancia en la rejilla para asar.
'CASSEROLES
(*GUISADOS)
2 cuar[os r5oo mM
COOKIES (GALLETAS)
PIZZA
350°F _175°CI 45 minutos
REL RECALL
ehciOn de r etas.
_ECIPE RECALL agJllza y facilita la tarea de cocEnar sus
alimentos favoritos. Las temDeraturas y duraciones hen sido
seleccionadas a fin de incluir una variedad de opciones en cada
categoria de alimentos. Las durac[ones de cocc[On son
regulables Data las recetas individuales y se pueaen guardar. Las
temperaturas se oueden camb_ar Bern no guardar. AI cambiarlas
la pantalla no mostrar8 "PrEHEAt Brecalentamiento] m[en[ras e]
homo este orecalentanao.
375°F (190°C) 10 minutos
400°F (205°C) 20 minutos
"Las funciones MEATS/POULTRY _carnes/aves} y CASSEROLES
tguisadosl no tienen un orecalentamiento progamado. Si su
receta sugiere aue se urecaliente el homo antes de coeJnar
carnes aves o guisados, precalientelo usando la funcion BAKE.
Una vez alcanzada la temperatura de erecalentamiento anule
BAKE y seleccione la funcion MEATS/POULTRY o
CASSEROLES
Para usar RECIPE RECALL (Repeticibn de recetas):
1. Presione uno de Ins cuatro Dotones MEATS/POULTRY
CASSEROLES COOKIES o PIZZA.
2. Presione START/ENTER,
3.
El tiempo ae cocclon puede cambiarse luego ee uresionar
START/ENTER ureslonando Ins botones HOUR/MIN ,nora
rfllnuto_ El homo terminar_ de cocinar con el nuevo tiempo
AI terminar e] tiempo de cocc_on el homo se apagara
autom_ticamente. "Eric [Finf y COOK TIME (TiemDo de
:occ_om aoarecer_n en la oantalla. Se escuchar_n cuatro
se_ales audibles, luego cuatro se_ales audibles repetidas de
" segundo de duracion se escuchar_n cada minuto de alli en
adelante
LOS botones COOKIES (galletas} } PIZZA. incluyen an
Drecalentamiento. AI cabo del precalentam_ento se
escuchara una sola ser3al audible } el tlemuo de cocc_O_
aparecer_ en la pantalla haciendo la cuenta regreswa
Si la receta indica que no es necesano precalentar ponga Ins
alimentos en el horno.
Presione OFF/CANCEL o abra la puerta del homo eara
detener las se_ales audibles de reeeticion y despejar "End"
de la Dantalla. La hora del dia aparecera en la pantalla
Para cambiar el tiempo de coccibn prefijado:
La duracion del tiempo de cocci0n oara carla uno de Ins 4
uotones nuede cambiarse y la estufa guardar_ en la memoria la
nueva informaci0n para un uso posterior.
1. Presione uno de Ins cuatro botones MEATS POULTRY
CASSEROLES COOKIES o PIZZA.
2. Presione Ins botones HOUR/MIN con las flechas "hacia
arriba" o "hacia abajo" haste que la auractOn del uemuo de
coccion aoarezca en la nantalla
3. PresJone el mismo boton seleccionado en el DaSO 1 oara
guardar el cambio Bare un uso oosterior.
Se escuchar_ un solo sonido
4.
Presione OFF/CANCEL solo siesta cambiando eEuempo ae
coccion arefijado que tiene en la memoria. Presione START/
ENTER siva a continuar cocinando con el nuevo uemoo ae
cocci0n fijaao
42

Caractc dstica "SeA, it iente"
Peligro de Intoxicacion Alimentaria
No deje sus alimentos en el horno por mds de
una hora antes o despu_s de su coccibn.
No seguir esta instruccion puede ocasionar
intoxicacibn alimentaria o enfermedadL
Para agregar al final de un tiempo de coccibn fijado/inicio
diferido:
1. Presione BAKE
2. Fije la tempera_ura (opc_onal)
Presione el boron TEMP con la flecha "hacia arriba" o "hacia
abajo" para fijar una [emperatura que no sea 350°F (175°C).
3. Presione COOK TIME
Presione los botones HOUR/MIN con las flechas "hacia
arriba" o "hacia abajo" para fljar un uempo de coccion
4. Presione DELAY/START.
Presione los botones HOUR/MIN con las flechas "hacia
arriba" o "hacia abajo para _ngresar la hora del dia eara
aoner en marcha.
IMPORTANTE: Los alimentos deben estar ya calientes antes ae
colocarlos en el homo caliente. Los alimentos uueaen
conservarse hasta una hora
=a funcion Serve Warm (Servir caliente, permite que los
alimentos coc=dos cal[entes eermanezcan calientes antes de
servirlos. Tambien se puede usar al final de un ciclo de cocciOn
[emporizada.
Para usar:
1. Presione SERVE WARM.
2. Fije la temperatura (opcional)
Presione el boron TEMP con la fiecha "hacia arriba" o "hacia
abajo" para aumentar o bajar la temperatura en proporciones
de 5°F [5°C) para fijar una tempera_ura que no sea 150°F
(65°C). La escala de calor es de 100°F-200°F ,35°C-90°Cl
3. Presione START ENTER.
4. Presione OFF/CANCEL cuando termine
Para agregar al final de un tiempo de coccibn fijado:
1. Presione BAKE.
2. Fije la tempera_ura (opclonal)
Preslone el 13otonTEMP con la flecha hacia arriba" o "hacia
abajo" para fijar una temperatura que no sea 350°F (175°C).
3. Presione COOK TIME
4. Presione los botones HOUR/MIN con flechas "hacia arriba" o
hacia abajo" para fiJar el tiempo de cocclon.
5. Presione SERVE WARM (Servir calienteL
Una hora de calentamiento se fijara automaticamente.
6. Fije la temperatura de calentamiento (opciona])
Presione el boron TEMP con las flechas "hacia arriba" o
hacia abajo" para aumen[ar o eajar la tempera_ura e_
uroDorclones de 5°F {5°C) para fijar una tempera_ura que no
sea 150°F '65°Cl. La escala de calor es de 100°F-200 °c
35oC-90oC '
7. Presione START ENTER,
La eantalia mostrar_ la cuenta regresiva de] tiemoo de
coccton. Una vez terminado el tiemuo de cocciOe, ]a oantaila
mostrara un uemDo de calentamiento
5. PresioneSERVE WARM.
Una hora de calentamiento se f[[ara autom_t_camente.
6. Fije la temperatura de calentamiento iopcionalL
Presione el boron TEMP con las flechas "hacia arriba" o
hacta abajo" para aumen[ar o bajar la [emperatura en
DroDorcEones de 5°F _5°01 Dara fijar una [emperatura que no
sea 150°F (65°C}. La escala de calor es de 100°F-200°F
,35oC-90oC
7. Presione STARTtENTER.
Cuando alcance el tiempo de inicio, la oantalla mostrar_ la
cuen[a regresiva del tiemoo de coccion. Una vez terminado el
uemeo de coccion, la 3antalla mostrara un tiempo de
calentamlento.
Una vez oue termlne el tlempo de calentamlento, el ilorno se
apagara autom_ticamente y "End" y COOK TIME apareceran
en la oantalla. Se escuchar_n cuatro set, ales aud=bles y ]uego
as cuatro sehales audibles repeuevas ae un segundo
sonar_n cada minuto de alli en adelante
B*
Presione OFF/CANCEL o abra la puerta del homo Dara
detener las sehales audibles reeetitivas y despejar "End" de
a Dantalla. La hora del dia aparecer_ nuevamente en la
Dantalia
Cont[o tem0 odzado homo
Peligro de Intoxicacion Alimentaria
No deje sus alimentos en el homo per m_s de
una hora antes o despues de su coccibn.
No seguir esta instruccibn puede ocasionar
intoxicacibn alimentaria o enfermedad.
El Control [emDonzado del homo permite fijar el homo Dara
encenderlo a cierta hora del dia cocinar durante un ]a3so de
eemDo ee[erm[naao, y/o apagarlo automaticamente. El inicie
diferido no debe usarse para alimentos como panes y pasteles
Doraue no se hornear_n adecuadamente
Una vez que termine el tJemao de calentamiento el homo se
apagara automaticamente y "End" y COOK TIME apareceran
en la eantalla. Se escuchar_F cuatro sefiales audibles y luego
las cuatrc se_ales audibles repetitivas de un segunao
sonaran cada minuto de a]li en adelante.
8.
Presione OFF/CANCEL o abra la puer[a de] homo Dara
detener ]as sehales audibles reeetitwas y despejar "End" de
la uantalla La hora del dia aparecera nuevamente en la
eantalla.
43
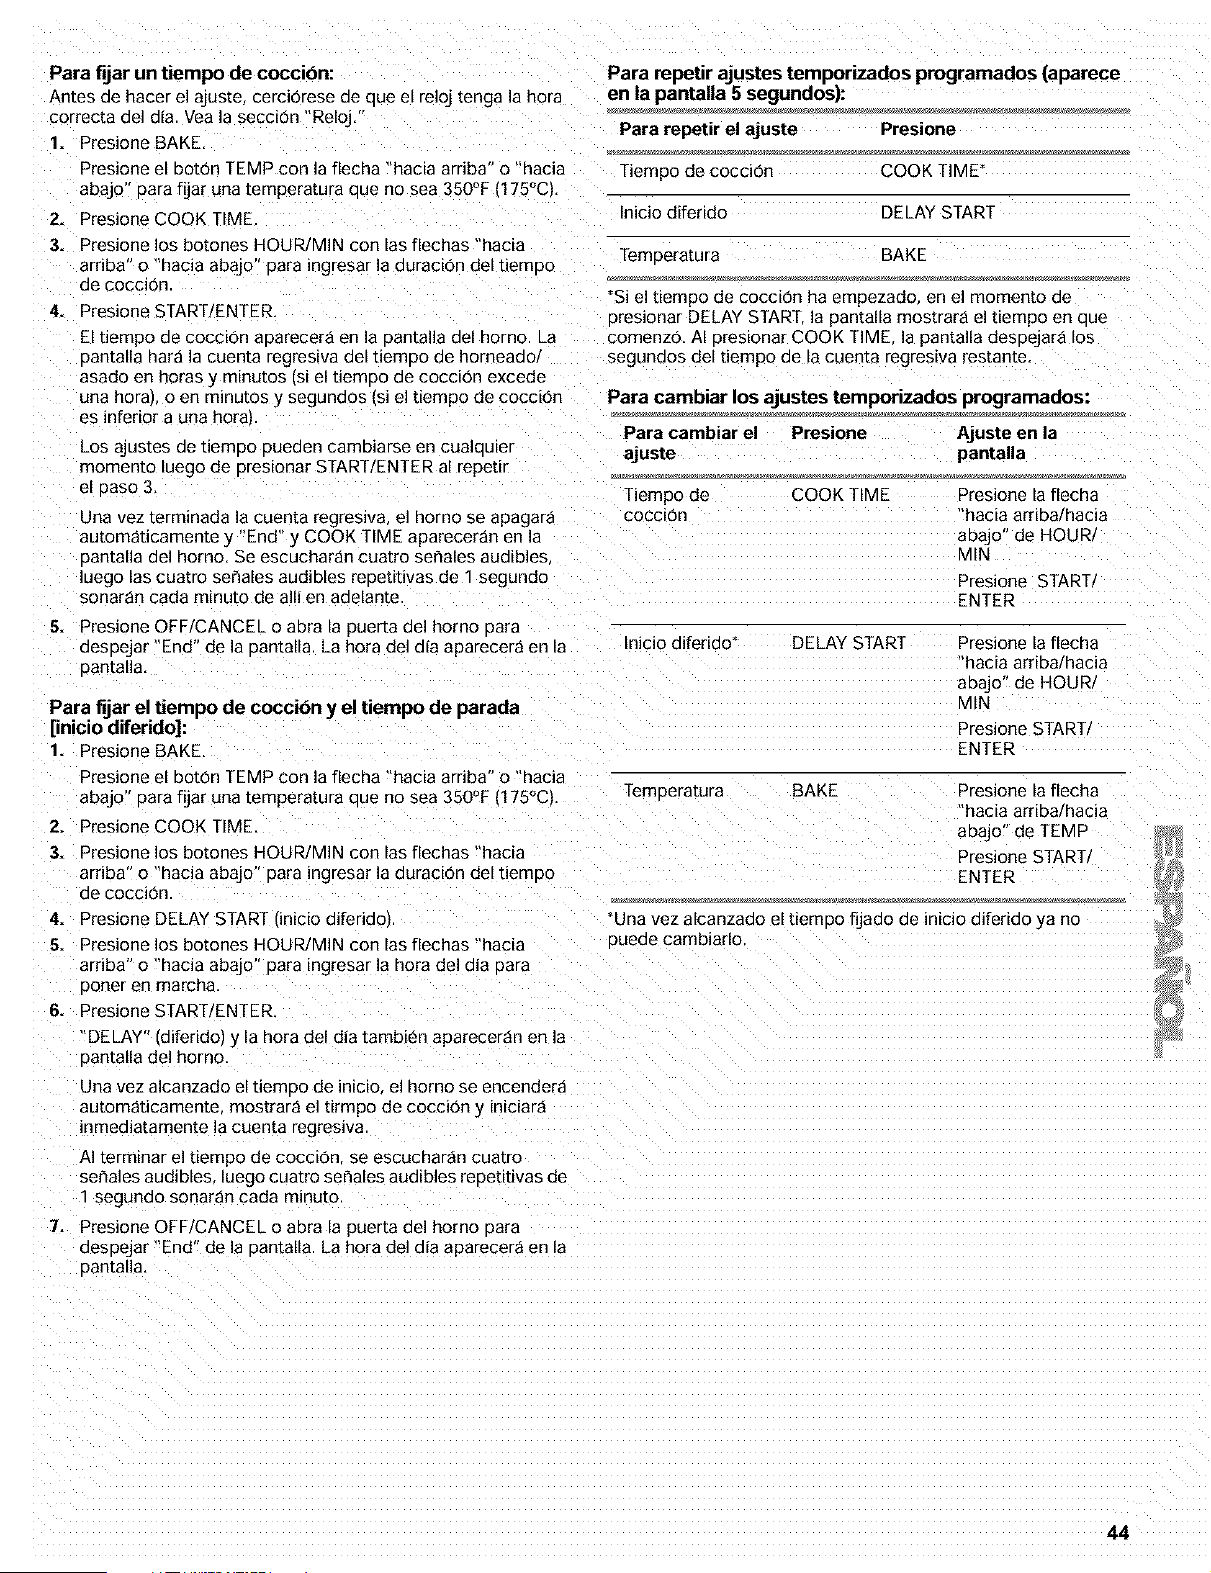
Para fijar un tiempo de cocci6n:
Antes de hater el ajuste cerciOrese ae aue el reloj tenga la hora
correcta del a_a Vea la seccion "Reloj.
1. Presione BAKE.
Presione el boron TEMP con la flecha "hacia arriba" o "hacia
abajo" para fijar una [emperatura aue no sea 350°F ,1750CL
2. Presione COOK TIME
3. Presione los botones HOUR/MIN con las fiechas "hacia
arriba" o "hacia abajo" para ingresar la duracion del tiemDo
oe cocclon
4. Presione START/ENTER.
El tiempo oe cocc_on aDarecera en la oantalla del homo. La
oantalla aara la cuema regres_va oel t_emoo de horneado
asado en horas y minutos s_el t_emDo de coccion excede
una hora. o en minu[os y segundos (si el tiempo de coccion
es inferior a una hora_
LOS ajus£es oe [lemoo oueden cambiarse en cualouler
momemo luego de aresionar START/ENTER al repeL#
el oaso 3,
Una vez terminada la cuenta regreslva, el homo se apagara
automatJcamente y "End" y COOK TIME apareceran en la
oantalla del horno. Se escuchar_n cuatro se_ales audibles
luego las cuatro sehales audibles reDetitivas de 1 segundo
sonaran cada minuto de alli en adelante.
5. Presione OFF/CANCEL o abra EapueEa del homo Dora
Para repetir ajustes temporizados programados (aparece
en la pantalla 5 segundos):
Para repetir el ajuste Presione
Tiempo de coccion COOK TIME x
nicio diferido DELAY START
_emoeratura BAKE
*Si el t_empo de coccion ha empezado, en el momento de
oresionar DELAY START a pantalla mostrara el t_empo en aue
comenzo. AI aresionar COOK TIME. la aantalla despejar_ los
segunaos del tiempo de _acuenta regresiva res[an£e.
Para cambiar los ajustes temporizados programados:
Para cambiar el
ajuste
Tiempo de
COCCIOIq
Presione Ajuste en la
pantalla
COOK TIME Presione la flecha
"hacia ardba/hacia
aoaJo" de HOURI
MIN
Presione START/
ENTER
Inicio diferido* DELAY START Presione la flecha
aespejar "End" de la oantalla. La hora (]el dia aparecer_ en la
oantalla. 'hacia ardba/hacia
aDajo" de HOUR/
Para fijar el tiempo de cocci6n y el tiempo de parada MIN
[inicio diferido]: Presione START/
1• Presione BAKE. ENTER
Presione el boton TEMP con la flecha "hacia arriba" o "hacia
abajo" para fijar una [empera[ura que no sea 350°E (1750CL
2• Presione COOK TIME
3• Presione los botones HOUR/MIN con los flechas "hacia
arriba" o "hacia abajo" para ingresar la duracion del tiemDo
oe cocclon
TemDeratura BAKE Presione la flecha
'hacia ardba/hacia
aDajo" de TEMP
Presione START/
ENTER
4•
5•
Presione DELAY START ',inicio diferido, "Jna vez alcanzado el uempo fiJado de inicio diferido ya no
Presione los botones HOUR/MIN con las flechas "hacia Duede cambiarlo
arriba" o "hacia abajo" para ingresar la hora del dia eara
boner en marcha.
6• Presione START/ENTER,
DELAY" (diferido) y la hora del dia tambien aparecer_n en la
eantalla del horno.
7.
Una vez alcanzado el tiemDo de inicio el homo se encendera
autom_ticamente mostrar_ el tirmpo de coccion 2/ iniciara
inmedlatamente la cuenta regreslva
AI termlnar el tiempo de cocci0n se escuchar_n cuatro
set, ales audibles luego cuatro se_ales audibles reoeuuvas ae
segundo sonaran cada mmuto
Presione OFF/CANCEL o abra la pueEa del homo oara
aespejar "End" de la oantalla. La hora del a_a aparecer_ en la
Dantalla.
44
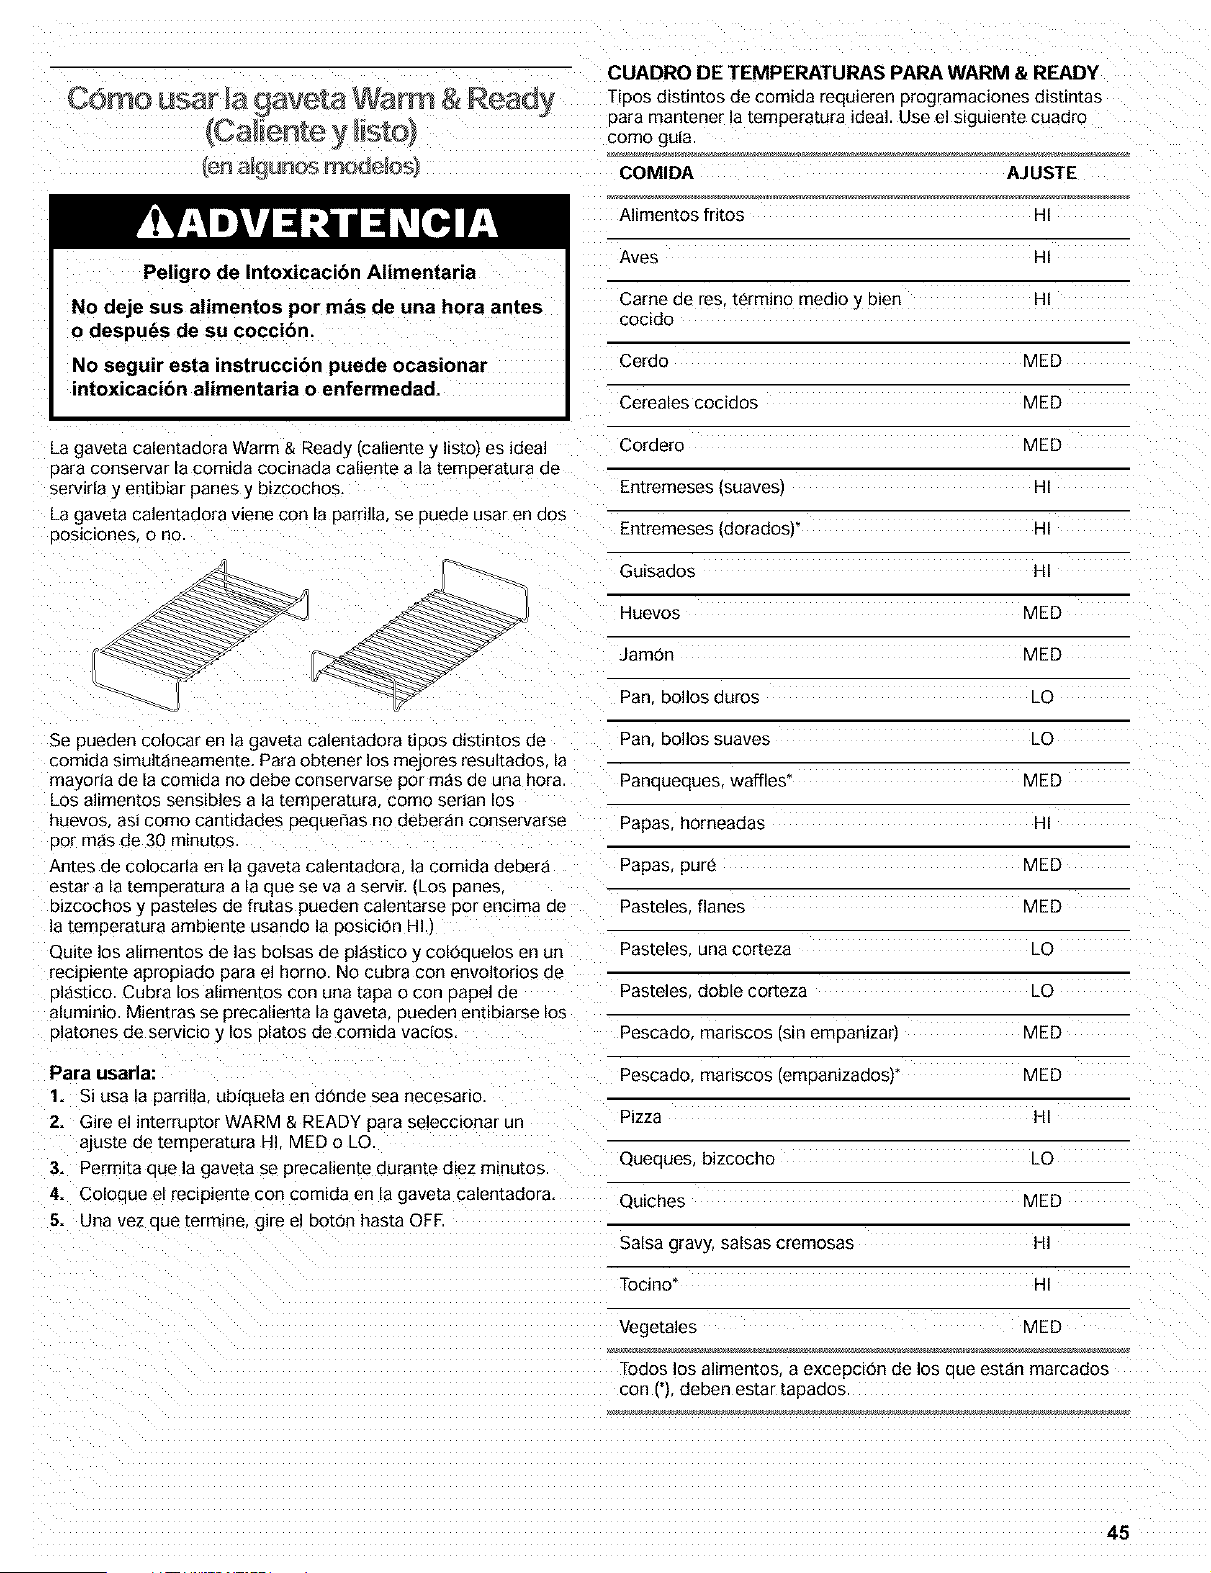
Como usar 9aveta Warm & Ready
_en a__anos _TK)ae_os_
CUADRO DE TEMPERATURAS PAPA WARM & READY
Tiaos distintosde comida requieren programacionesdistintas
oara mantener la temperatura ideal. Use el siguiente cuadro
como guia
COMIDA AJUSTE
Alimentos fritos HI
Ayes HI
Came de res termino medio y 3ien HI
cocido
Cerdo VIED
Cereales cocidos VIED
Cordero VIED
-ntremeses lsuavesJ HI
En_remeses ,doradosF HI
Peligro de Intoxicacion Alimentaria
No deje sus alimentos por mas de una hora antes
o despues de su coccion.
No seguir esta instruccibn puede ocasionar
intoxicacibn alimentaria o enfermedad.
_a gaveta calentadora Warm & Ready (caliente y Iistol es ideal
aara conservar la comida cocmada caliente a la temoeratura de
serv_na y entibiar panes y bizcochos,
_a gaveta calentadora viene con la 3amlla. se 3ueoe usar en oos
3osiciones, o no.
..ado
_ 4uevos
Jamon
_r _" _an bo],os ouros
HI
MED
MED
LO
Se pueden colocar en la gaveta calentadora boos distintos de
comida simultaneamente. Para obtener los mejores resultados, la
mayoda de la com_aa no debe conservarse por mas de una hora.
_os ahmenms senslbles a la temDeramra como senan los
huevos asJ como cantidades pequehas no deber_n conservarse
3or mas de 30 minutos
Antes de colocarla en la gave[a calentadora, la comida debera
3an bolIos suaves LO
3anqueques waffles _ VIED
3apas, horneadas HI
3apas, pure VIED
VIED
estar a [a temoeramra a [a que se va a servi£ _os oanes
3izcochos y DasteIes de frutas pueden ca]entarse oor encima de _asteIes flares
la temperatura ambiente usando la DOSiCiOnH].I
Quite los alimentos de las bolsas de pl_stico y coloauelos en un
recipiente apropiado para el homo. No cubra con envoltorios de
alast_co. Cubra los alimentos con una tapa o con papel de
aluminio Mientras se 3recalJenta la gave_a, Dueden entibiarse los
3latones de serv_c_oy los Dlatos de comida vacios
3asteles una corteza
3asteles doble corteza
_escaao manscos (sin emDanizarl
LO
LO
_ED
Para usarla:
1. Si usa la parrilla, ubiquela en donde sea necesano
2. Gire el interruotor WARM & READY 3ara seleccionar un
ajuste ae _emperatura HI MED o LO.
3. Permita aue la gave[a se precaliente durante diez minutos
4. Coloaue el rec_piente con comida en la gaveta calentadora
5. Una vez oue termine gire e] boton hasta OFK
3escaoo manscos [empanizadosY VIED
3izza HI
Queoues bizcocho LO
Quiches VIED
Salsa gravy, salsas cremosas HI
Tocino _ HI
Vegetales VIED
Todos los alimentos a excepcion de los aue estan marcados
con :l deben estar tapaoos
45

in[erru [ de 12 horns
El control del homo est_ fijado Data un apagado autom_tico del
homo 12 horas deseues de haberse encena_do. Esto no
obstaculizar_ funcion a_guna de cocci0n temoorizada o diferida.
=a luz del homo se encendera al abrir la eueEa del homo Para
mantener la luz encendida continuamente encienda la luz
3resionando OVEN (Homo}.
No limpie, frote da_e o mueva lajunta de la Duerta del norno La
junta de la euerta es esencial oara un buen cierre
Prepare el horno:
• Retire la charola Dara asar. la rejilla los utensilios de cocina y
de hornear y, en algunos modelos el medidor de temDeratura
de] horno.
• Retire todd forro de aluminio del homo ya que poana
auemarse o derretirse da_ando el homo.
Para anular: • Retire ]as parrillas del homo para mantenerlas lustrosas
3are Deriodos ae cocclon Drolongaaos que necesl[an usar el f_ciles de deslizarse. Para mayor informacion yea "Limpieza
general
horno oor mas de 12 horns, presione y sos[enga CLOCK (Reloj) 5
segunaos. Se escuchara una sola sehal audible y "12H OFF
aparecera en la oantalla. El horno permanecera encendido haste
que se ]e apague manuaimente.
Para reajustar:
3resione y sos[enga CLOCK 5 segundos Se escuchara una sola
sepal audible _ 12H on _ 3arecera en ]a eantalia.
CUIDADO DE LA
ESTUFA
Peligro de Quemadura
No toque el homo durante el ciclo de
autolimpieza,
Mantenga a los nihos lejos del homo durante el
ciclo de autolimpieza.
No seguir estas instrucciones puede ocasionar
quemaduras o enfermedades per inhalacibn de
gases peligrosos.
• Limpie manualmente el borde interior de la puerta y el area de
1y_ pulg. 3.8 cm! alrededor del marco ae la cawdad interna
de] horno asegurandose de no mover ni doblar la unta Esta
area no se calienta Io suficiente como para eliminar ]a
suciedad durante ]a autol_moieza. No deje que e_agua
Droducto de I_moieza. etc penetre en Ins ranuras del marco
de ]a ouerta. Use un oano humedo para ]imp_ar este area
Limpie cua]quier suciedad suelta darn reducir el humo y
evitar dar_os. A altas temoera[uras, los alimentos reaccioean
con [a porcelana pudiendo ocasionar manchas, p_caduras
corros_ones o mancnas blancas tenues. Esto no afectara el
"enalmlen[o de la coccion
Prepare la superficie de coccibn y la gaveta de
almacenamiento:
• Quite Eosarticulos de olastico de la superficie de cocciOn ya
aue oueaen aerreurse,
• Quite loads los articulos de la gaveta de almacenamtento
IMPORTANTE: El calentamJento y enfriamiento de la porcelana
sobre el acero en el homo auede dar lugar a decoloracion
oerdida del lustre, agrietamientos finds y estallidos
Ciclo de autolimpieza SELECT CLEAN TM
(en algunos modelos]
Cbmo funciona el ciclo
El ciclo de autolimoieza SELECT CLEAN usa temperaturas muy
aE[as y disuelve la suciedad hasta convertirla en cenizas
SELECT CLEAN fijara automaticamente el tiempo de limpeza
una vez aue se haya fijado el nivel de suciedad
El nivel de suciedad puede fijarse manua_mente en niveles de
suciedad ]igera. media o profunda al ores_onar cont_nuamente
SELECT CLEAN
El horrid se apagara automat_camente una vez que este ]imp_o.
La puerta no se desbloaueara nasta que el homo se enfde
Una vez aue el homo es[e completamente fdo. quite la ceniza
con un pacedhL)medo. No limo_e suoerficie interna alguna haste
aue el homo se haya enfriado Dot comoleto. El Baser un 3a_o
hL]medo fdo en el vidrio interior de la puerta antes de que se naya
enfriado por completo podna ocasionar la ruotura del vidrio.
IMPORTANTE: La salud de a]gunas ayes es sumamente sensible La luz del homo no funcionar_l durante el ciclo de
a _os gases emanados durante el c_clo de autol_moieza. La autolimpieza,
exposicion a los gases puede ocasionar ]a muerte de ciertas
aves. Mude siemore ]as aves a otro cuarto cerrado y bien
vent_lado
Haga ]a autolimpieza de] homo antes de que este mu_ sucio. La
suciedad orofunda da ]ugar a una ]imp_eza mas prolongaaa y
mas humo
V]antenga la estufa bien ventilada durante el ciclo de
autolimo_eza Data facilitar la eliminacion de] calor, olores y humo
No bloouee el (los) ducto(s) de ventilacion del homo durante el
ciclo de autolimdeza. El aire debe poaer moverse con ]ibertad.
Vea la seccion "Ductols_ de ventilacion del homo.
Para fijar SELECT CLEAN:
• Presione una vez para suciedad ligera, y "SoilL" aoarecera
en la oantal]a.
• Presione dos veces Dara suciedad media, y "SoilA"
aparecera en la pantalla
• Presione tres veces oara suc[edad profunda y "SoilH'
aparecera en ]a pantaHa
46
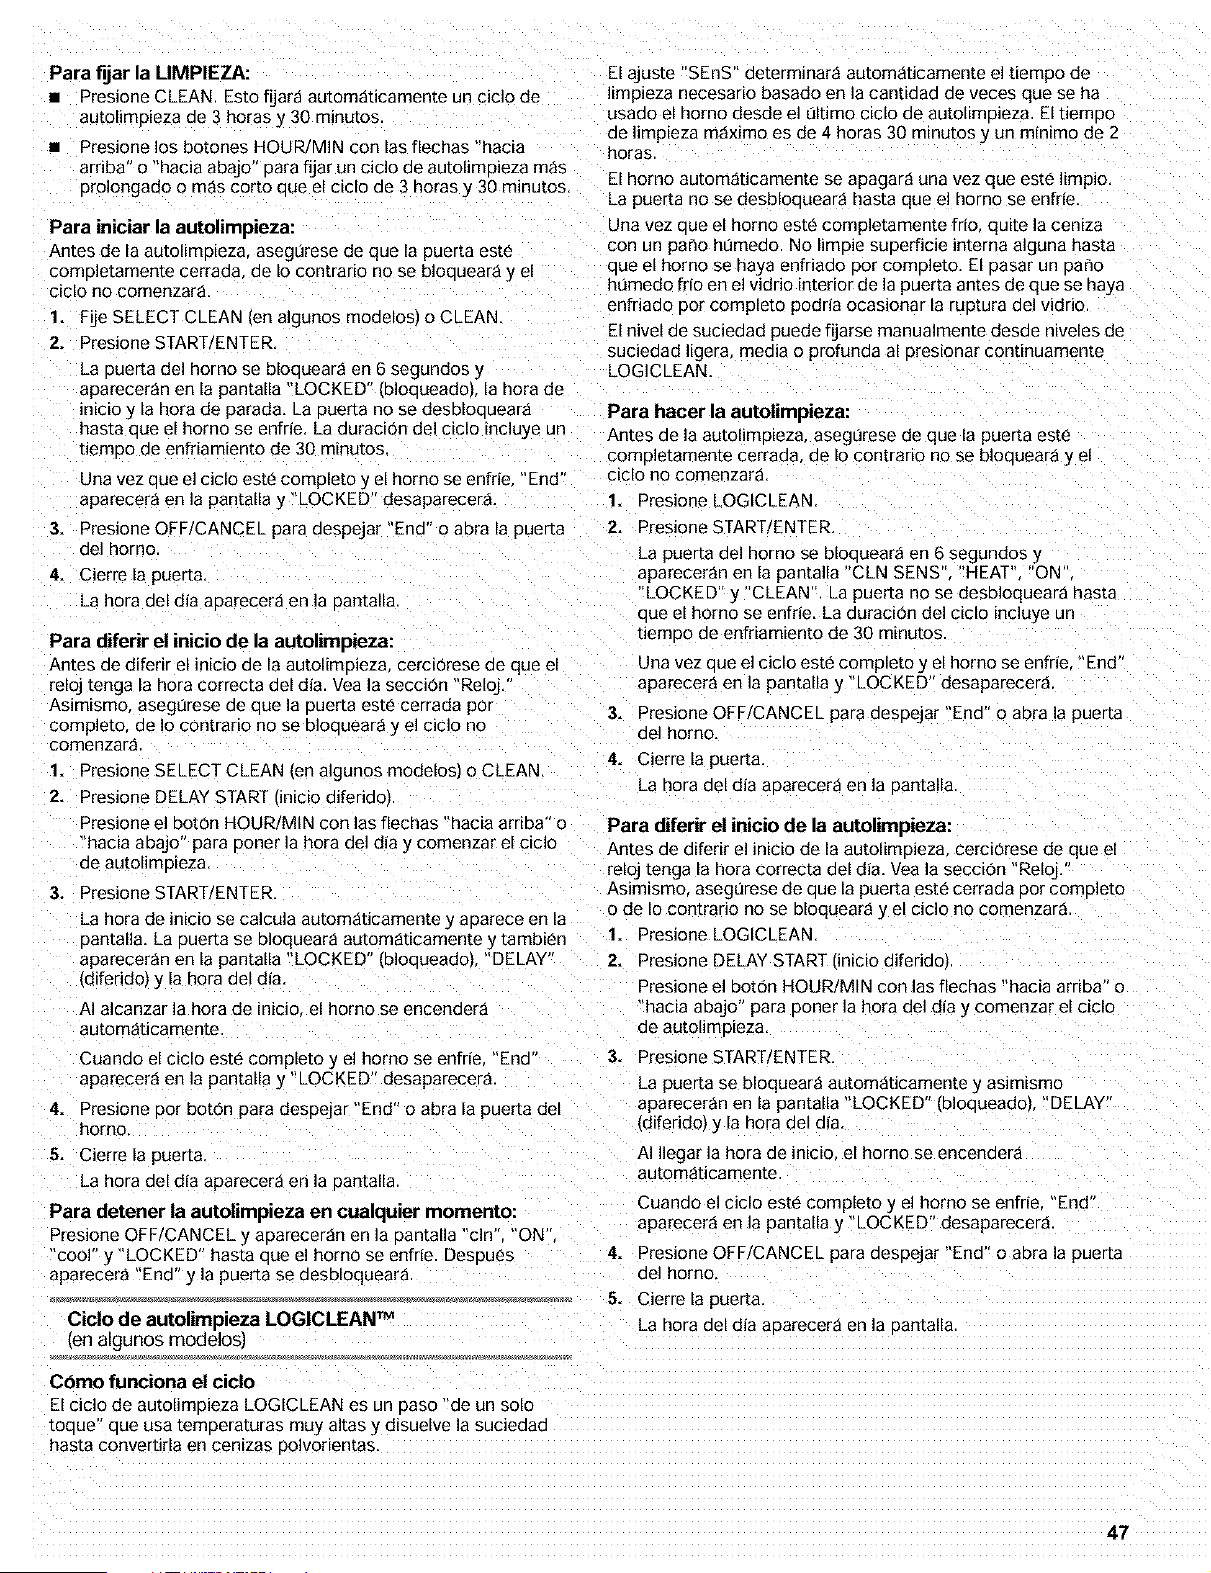
Para fijar la LIMPIEZA:
• Presione CLEAN Esto fijar_ autom_ticamente un cic]o de
autolimDieza de 3 horas y 30 minutos
• Presione los botones HOUR/MIN con las fiechas "hacia
arriba" o "hacia abajo" para fljar un ciclo de autolimoieza m_s
Dro]ongado o m_s cor[o Due el clclo de 3 horas y 30 minutos.
Para iniciar la autolimpieza:
Antes de la autolimpieza, asegurese de que la puerta este
comDletamente cerrada ae Io contrario no se bloaueara y el
ciclo no comenzara.
1. Fije SELECT CLEAN (en algunos moaelosl o CLEAN
2. Presione START/ENTER.
La Duerta del homo se bloaueara en 6 segundos y
apareceran en la pantalla "LOCKED' [blooueadol la nora de
_nicEoy la nora de parada, La Duerta no se desblocaeara
has[a aue el homo se enfrie. La duracion del c[clo incluye un
uemDo de enfriamiento de 30 minutos
Una vez ode el ciclo este completo y el homo se enfrie End"
aparecera en la pantalla y "LOCKED" desaparecer&
3. Presione OFF/CANCEL para despejar "End" o abra la puer[a
del homo
4. Cierre la puer_a.
La hora del dia aDarecer_ en ]a oantalla
Para diferir el inicio de la autolimpieza:
Antes de diferir el inicio de la autolimDleza cerclorese de que el
reloj tenga la nora correcta del dia. Vea la secci0n "Reloj,
Asimismo aseg0rese de que la Duerta este cerrada por
completo de Io contrario no se bloauear_ _ el ciclo no
comenzar_
1. Presione SELECT CLEAN (ee algunos modelos, o CLEAN,
2. Presione DELAY START nicio diferido,
Presione el DO[On HOUR/MIN con las flechas "hacia arriba" o
hac_a aDajo" para poner la hora del dia y comenzar el ciclo
de autolimo_eza.
3. Presione STARTIENTER,
4.
La hora de inicio se calcula autom_ticamente y aDarece en la
Dantalla. La Duerta se bloquear_ autom_ticamente 2/tambi_n
apareceran en la pantalla "LOCKED' [blooueadol "DELAY
(diferido) y la hora del dia.
AI alcanzar ]a hora de inicio el homo se encenaera
automat_camente
El ajuste "SEnS" determinar_ automat_camente el tiempo de
I_mpieza necesario basado en la cantidad ae veces que se ha
usado el homo desde el t]ltimo ciclo de autolimoieza. El tiemDo
de limpieza m_ximo es de 4 horas 30 minutos y an minimo de 2
horas
El norno autom_t_camente se apagara una vez que este ]imDo.
La puerta no se desbloaueara hasta que el horno se enfrie
Una vez aue el homo es[e completamente frio. quite la ceniza
con un paffo hL]medo No limD_e suDerficie interna alguna hasta
aue el homo se haya enfriado Dot comDleto. El Dasar un 3affo
humedo frio en el vidrio interior de la puer[a antes de que se naya
enfriado por completo podria ocasionar la ruDtura del vidrio.
El nivel de suc_edad puede fijarse manualmente desde n_veles de
suciedad ligera, meala o profunda al Dres_onar continuamente
LOGICLEAN.
Para hacer la autolimpieza:
Antes de ]a autolimD[eza, asegurese de que la puer_a este
comoletamente cerraaa, ae Io contrario no se bloaueara y el
ctclo no comenzara
1. Presione LOGICLEAN.
2= Presione START/ENTER.
3.
4.
Cuando el c_clo este completo y el horno se enfrie 'End" 3.
aparecera en la pantalla y "LOCKED" desaparecer_
Presione por boron para despejar "End" o abra la puerta del
homo,
5. Cierre la pueEa.
La hora del dia aparecer_ en la Dantalla
Para detener la autolimpmza en cualquier momento:
3resione OFFtCANCEL _ aDarecer_n en la Dantalla "cln". "ON"
"cool" y "LOCKED" hasta aue el homo se enfrie. Desoues
aparecer_ "End" y la puer[a se desbloqueara
La puerta del homo se bloauear_ en 6 segundos y
aparecer_n en la pantalla "CLN SENS HEAT", "ON
"LOCKED" _ 'CLEAN". La puer[a no se desbloqueara nasta
Due el homo se enfrie, La aurac_on del CiClo incluye un
tiemDo de enfriamiento de 30 minutos
Ciclo de autolimpieza LOGICLEAN TM
(en algunos modelos]
Una vez aue el ciclo este completo y el homo se enfrie "End
aparecer_ en la pantalla _ "LOCKED" desaparecera
Cbmo funciona el ciclo
El ciclo de autolimDieza LOGICLEAN es un Paso "de un solo
toaue" aue usa [emDera[uras muy altas y disuelve la suciedad
hasta convertirla en cenizas oolvorientas
Presione OFF/CANCEL para despejar "End" o abra la pueEa
del homo,
Cierre la pueEa.
La nora del alia aDarecera en la 3antalla.
Para diferir el inicio de la autolimpieza:
Antes de diferir el n_c_ode la autol_mDieza cerc_Orese de que el
reloj tenga la nora correc_a del dia. Vea la secci0n "Reloj.
As_m_smo asegurese de que la puerta este cerraaa Dor comoleto
O de Io contrario no se bloquear_ y el c_clo no comenzar_
1. Presione LOGICLEAN.
2. Presione DELAY START [inicio diferido,
4.
5.
Presione el boron HOUR/MIN con las flechas "hacia arriba" o
"hacia abajo" para ooner la hora del dia _ comenzar el ciclo
de autolimoieza
Presione START/ENTER,
La puerta se bloquear_ automat_camente _ asim_smo
apareceran en la pantalla "LOCKED' [blooueadol DELAY
(diferido))/la hora del dia.
A] ]]egar ]a hora de inicio el homo se encender_
autom_t_camente
Cuando el ciclo este completo y el homo se enfrie. End"
aparecera en ]a pantalla _ "LOCKED" desaparecer_
Presione OFF/CANCEL para despejar "End" o abra la puer[a
del homo,
Cierre la puerta.
La hora del dia aDarecera en ]a 3antalla.
47
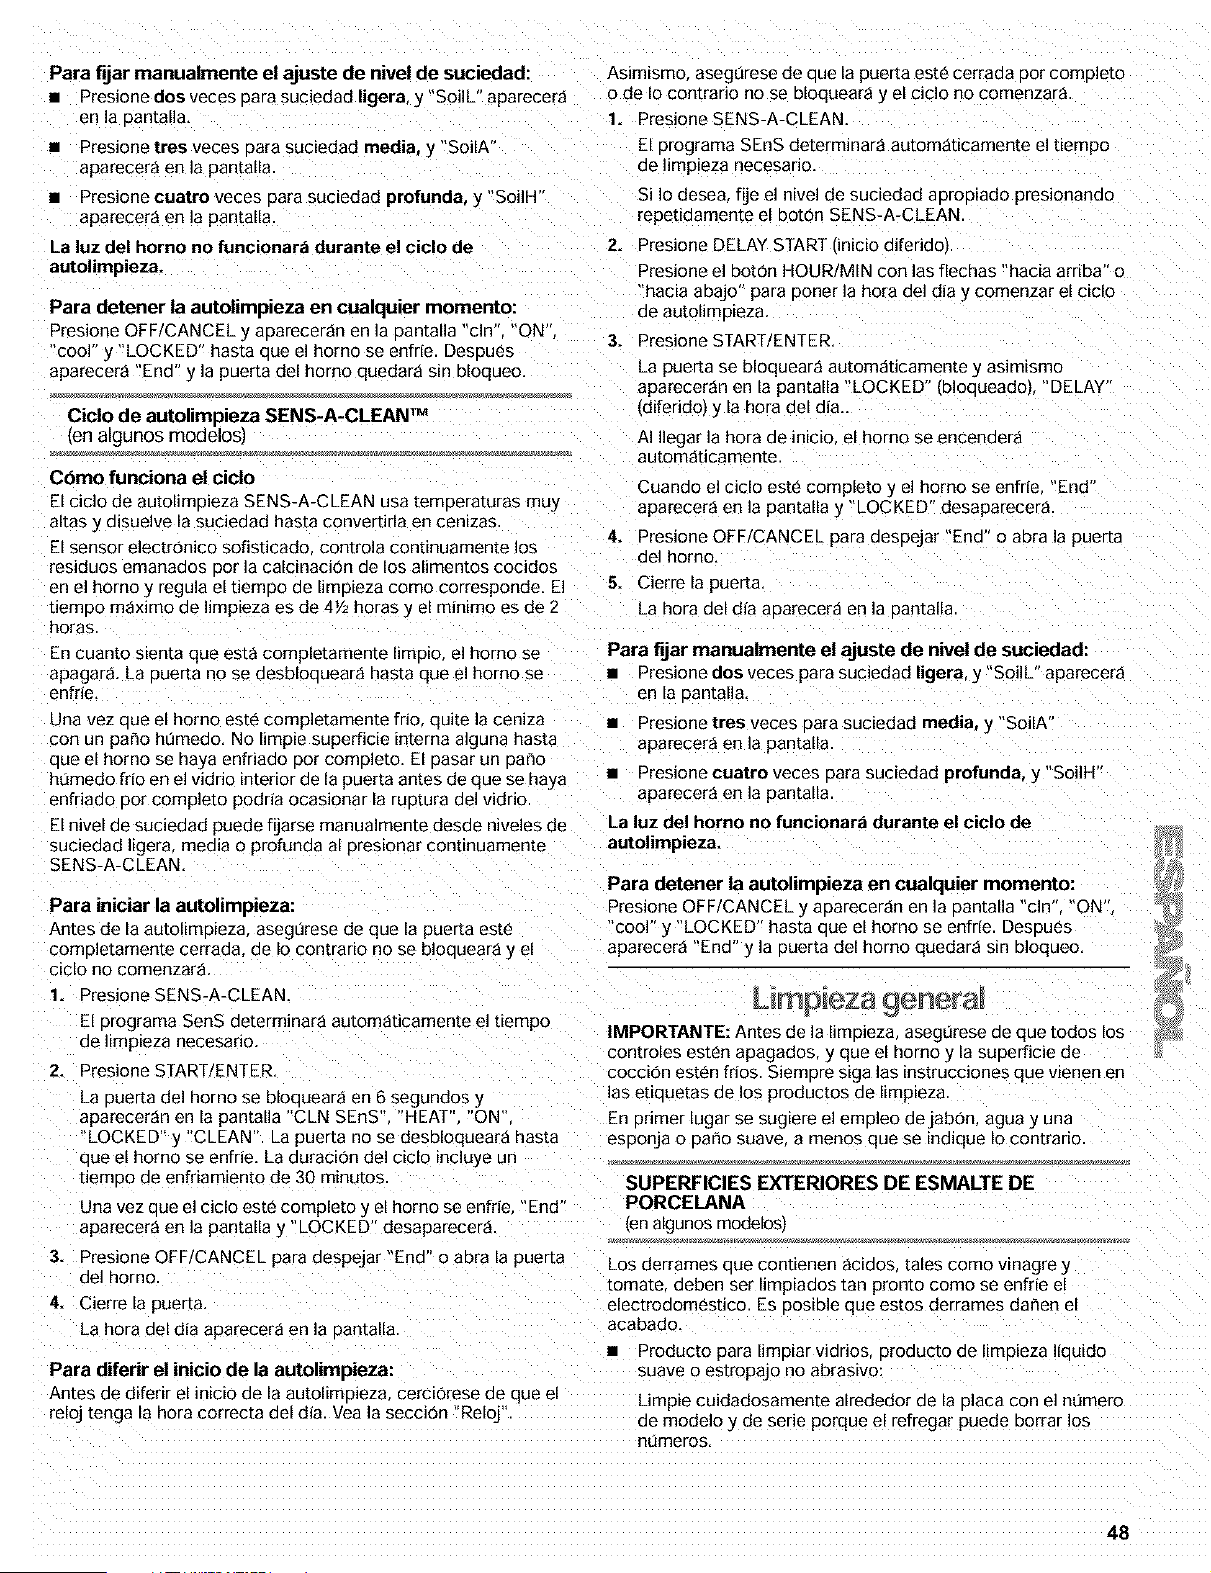
Para fijar manualmente el ajuste de nivel de suciedad:
• Presione dos veces Dara suciedad ligera, y "SoilL" aparecerd
en la oantal]a,
• Presione tres veces oara suciedad media, y "SoilA"
aparecer_ en la pantaHa
• Presione cuatro veces oara suciedad profunda, y"SoiiH
apareeera en la pantalla
La luz del homo no funcionar_ durante el ciclo de
autolimpieza,
Para detener la autolimpmza en cualquier momento:
3resione OFF/CANCEL _ aoareceran en la oantalla "cln". "ON",
"cool" y "LOCKED" hasta aue el homo se enfrie Desoues
aparecer_ "End" y la puerta del homo queclara s_n bloqueo.
Ciclo de autolimpieza SENS-A-CLEAN TM
(en algunos modelos)
Cbmo funciona el ciclo
El cic]o de autolimoieza SENS-A-CLEAN usa [emoera[uras muy
aEas y disuelve la suciedad hasta convertirla en cenizas
El sensor electronico sofisticado controla contmuamente los
residuos emanados oor la calc=nacJon de los alimentos cocidos
en el homo y regula el tiemeo de lime=eza corno corresponde. El
uemoo m_ximo de limpieza es de 4V2 horas y el rain=too es de 2
horas.
En cuanto s=en[a que esta completamente limoio el homo se
apagar& La ouerta no se desbloouear_ basra que el homo se
enfrie,
Una vez oue el homo es[e completamente frio quite la ceniza
con un paso hL_medo. No limp_e superficie interna alguna hasta
aue el homo se haya enfriado Dor comDleto. El Dasar un patio
ht]medo frio en el vidrio interior de la puerta antes de que se haya
enfriado por completo podria ocasionar la ruotura del vidrio.
El nivel de suciedad puede fijarse manuaimente desde niveles de
suciedad ligera, mea_a o profunda al Dresionar continuamente
SENS-A-C _EAN.
Para iniciar la autolimpieza:
Antes de la autollmpieza, asegurese de que la puerta este
comoletamente cerrada, de Io contrano no se bloqueara y el
clclo no comenzara
1. Presione SENS-A-CLEAN
El Drograma SenS determinar_ autom_ticamente el tiempo
de limpEeza necesario.
2. Presione STARTtENTER.
La Duerta del horno se bloaueara en 6 segundos y
apareceran en la pantalla "CLN SEnS" HEAT "ON
LOCKE D" ) 'CLEAN". La pueEa no se desbIoqueara basra
oue el homo se enfrie. La duracion del ciclo incluye un
uemeo de enfriamiento de 30 minu[os
Una vez ode el ciclo este completo y el homo se enfrie End
aparecera en la pantalla y "LOCKED" desaparecer_
3. Presione OFF/CANCEL para aespejar "End" o abra la puer[a
del homo
4. Cierre la puer[a.
La hora del dia aparecer_ en la oantalla
Para diferir el inicio de la autolimpieza:
Antes de diferir el inicio de la autolimo_eza cerciorese de que el
reloj tenga la hora correcta del dia. Yea la seccion "Reloj"
Asimismo asegurese de que la puerta este cerrada DOtCOmDleto
o de Io contrario no se bloqueara y el ciclo no comenzara
1. PresioneSENS-A-CLEAN
El erograma SEnS determinar_ automaticamente el uempo
de limp_eza necesano.
Si Io desea [ije el nivel de suc_edad aoroo_ado presionando
"epetidamente el boton SENS-A-CLEAN
2. Presione DELAY START (inicio diferido,
Presione el boton HOUR/MIN con las fiechas "hacia arriba" o
'hac_a abajo" para poner la hora del dia _ comenzar e_c_cLo
de autolirnoieza
3. Presione START/ENTER.
La puerta se bloqueara automat_camente _ asim_smo
apareceran en la pantalla "LOCKED' 'blooueado) DELAY
[diferido) _/la hora del dia.
AI liegar la hora de inicio el homo se encender_
autom_t_camente
4.
5.
Cuando el ciclo este completo y el homo se enfrie End"
aparecer_ en la pantalla y "LOCKED" desaparecer_
Presione OFF/CANCEL para despejar "End" o abra la puer[a
del horno.
Cierre la puer[a.
La hora del d_aaoarecera en la 3antalla
Para fijar manualmente el ajuste de nivel de suciedad:
• Presione dos veces aara suciedad ligera, y"Soi]L" aparecera
en la oantalla.
• Presione tres veces oara suc_edad media, y "SoilA"
aparecer_ en la pantalla
• Pres_one cuatro veces oara suciedad profunda, y "SoilH"
aparecera en la pantaHa
La luz del homo no funcionar_ durante el ciclo de
autolimpieza,
Para detener la autolimpieza en cualquier momento:
Presione OFFICANCEL y aDarecer_n en la Dantalla "cln' ON'
'cool" y "LOCKED" hasta aue el homo se enfrie DesDues
aparecer_ "End" y la Duerta del homo quedar_ s_n bloqueo.
Lira p eza 9eneral
IMPORTABTE: Antes de la limuleza asegt]rese de que todos los
controles esten apagados, y que el norno y la suoerficie de
coccion esten frios. Siemore s_ga las instrucciones que wenen en
las euaueras de los productos de limp_eza
En orimer lugar se sugiere el empleo dejabon, agua y una
esponja o pano suave a menos que se indique Io contrario
SUPERFICIES EXTERIORES DE ESMALTE DE
PORCELANA
len algunosmodelos_
Los derrames aue contienen _cidos tales como wnagre y
[ornate deben ser lirnpiados ta_ pronto como se enfrie el
electrodomestico. Es posible que estos derrames dar_en el
acabado
• Producto para limpiar vidrios 3roducto de I_mDieza liau_do
suave o es[ropajo no abrasivo:
Limpie cuidadosamente alrededor de la Dlaca con el nt]mero
de modelo y de serie porque el refregar puede borrar los
numeros.
48
VIDRIO RADIANTE
Rayones y marcas diminutos
• Crema de limpieza para superficies de cocceon
_1ouse oroductos de ]impieza de fibra metalica limDiadores
abrasivos en polvo, blanqueador con cloro dBolvente de oxido o
amoniaco ya que pueden da_ar el vidrio.
Limpie siempre con un Da_o limDiO y humedo y seaue
metlculosamente oara evitar el ve[eaao o las manchas.
Frote la crema sobre la sueerficie con una toalla de papel
humeda o un Dar_o suave. Continue frotando has[a aue la
Delicula blanca desaoarezca. Los rayones _ las marcas no
afectan el rendimiento de cocci0n y luego de mucnas
impiezas se hacen menos no[orios
Se recomienda tambien el uso del estropajo azul 3M SCOTCH-
3RITE _"que no raye suministrado con su estufa oara suciedad
rebelde. Este estropajo est8 especialmente dise_ado para
mantener su vidrio radiante limeio. No use este estropajo para
limplar o[ras suaerficies
Sara suciedad rebelde tambien se recomienda un raspador para
superficies de coccion y se Duede pedir como accesono.
Cuando ordene pida el numero ae articulo 22-364-WX10X302.
El raspaeor para superficies de coccion tiene cuchillas filosas.
Guarde las cuchillas filosas fuera del alcance de los nihos.
Se recomienda tamDien el uso regular de la crema de limDleza
3ara superficies de coccion para evitar rayones, marcas y
rasBaduras y para acondicionar la suDerficie de cocc_on, Puede
adaumrse como kit junto con el raspador para superficies de
coccion. Cuando ordene Dida el ar[iculo 22-364-WX10X117.
CONTROLES DE LA SUPERFICIE DE COCCION
No use Droductos de limoleza aDraslvos de fibra metallca o Data
limp_ar nornos.
No remoje las perillas.
Cuando vuelva a colocar las aenllas, asegurese de que las
mBmas esten en la oosicion OFF [Apagado)
En algunos modelos no euite los obturadores que estdn debaJo
de las aerillas.
• Agua yjabon o lavavajillas:
Jale las Derillas en seneao rec[o eara aultarlas del tablero de
control
Suciedad entre ligera y moderada
• ToaUas de aapel o estropajo azul 3M SCOTCH-BRITE que
no raye:
Limpie mientras la superficie de coccion aLJneste caliente.
Seria aconsejable que use guantes de nornear m_entras
realiza la limp_eza
Derrames azucarados (jaleas, caramelos, alm_ar)
• Estropajo azul 3M SCOTCH-BRITE" eue no raye:
Limp_e m_entras la superficie de cocciOn aun este caliente.
Seria aconsejable que use guantes de hornear m_entras
realiza la limp_eza
• Raspaaor para superficies de coccion crema de limpleza
Dara superficies de coccion y toalla de papel limpia y
humeda:
EXTERIOR DE LA PUERTA DEL HORNO
• Producto pard limpiar vidrios y toallaS de papel o un
estropdjo de pldstico no abrasivo
Aplique el producto para limpiar vidrios en una esponja o
oar_o suave, no Io haga d_rectamente sobre el panel.
• En los modelos de norno con puerta de acero inoxidable vea
a seccion "Acero inoxidable" en "Limp_eza general"
ACERO INOXIDABLE (en algunos modelos)
No use estropajos que vienen con jab0n, productos de limp_eza
abrasivos crema para pulir la superficie de cocci0n estropajos
de meta par_os asperos o ciertas toallas de papel. Pueden
ocurrir daflos.
LimDie [an pron[o como la suDerficie de coccion se haya
enffiado. Frote la crema sobre la suDerficie con una toalla de
DaDel humeda o u_ paso suave. Continue frotando hasta que
la Delicula blanca deszaarezcz
Suciedad profunda, vetas oscuras, manchitas y decoloracibn
• Raspaoor para superficies de cocci0n crema de I_mpleza
Dara superficies de cocci0n o Droducto de limp_eza no
abrasive:
Frote el producto sobre la suciedad con una toalla de papel
humeaa o un patio suave. Continue frotando hasta oue la
eelicula blanca desaoarezca
Frote en la direccion del hilo aara evl[ar oue se dar_e.
• LimDiador de Acero Inoxidable _no incluido
Vea la contraDortada aara informaci0n sobre Dedidos
• De[ergente Iiqu_do o producto de limDieza general
Enjuague con agua limpia y seque con un aar_o suave sm
oelusas,
• Vinagre Dara manchas de agua oura
TABLERO DE CONTROL
Suciedad quemada No use oroductos de limpieza abrasivos estropajos oe me[aL
Daf_os dseeros o ciertas toallas de BaBeL Pueden ocurrir da_os.
• Crema de limpiezd pard superficies de coccion y es[ropajc
azul 3M SCOTCH-BRITE _ oue no raye: • Producto Dara limDiar vidrios _ un patio suave o esponja
Frote Eacrema sobre la suciedad con una toalla de DaDel Aplique el producto para limpiar vidrios en una esponja o
humeda. Reoita el procedimieeto en las manchas rebeldes, oar_o suave no Io haga directamente sobre el panel.
Sdauele brillo a toda la superficie de cocci0n con la crema y
la toalla de papeL
Marcas met_tlicas de aluminio y cobre
• Crema de limpieza para superficies de coccion
LimDie [an pron[o como la suDerficie de cocci0n se haya
enffiado. Frote la crema sobre la suDerficie con una toalla de
DaDel humeda o u_ paso suave Continue frotando hasta que
la Delicula blanca deszaarezca, Las marcas no
aesaoarecerdn DOr completo Dero luego oe muchas
limpiezas se har_n menos notorias.
49
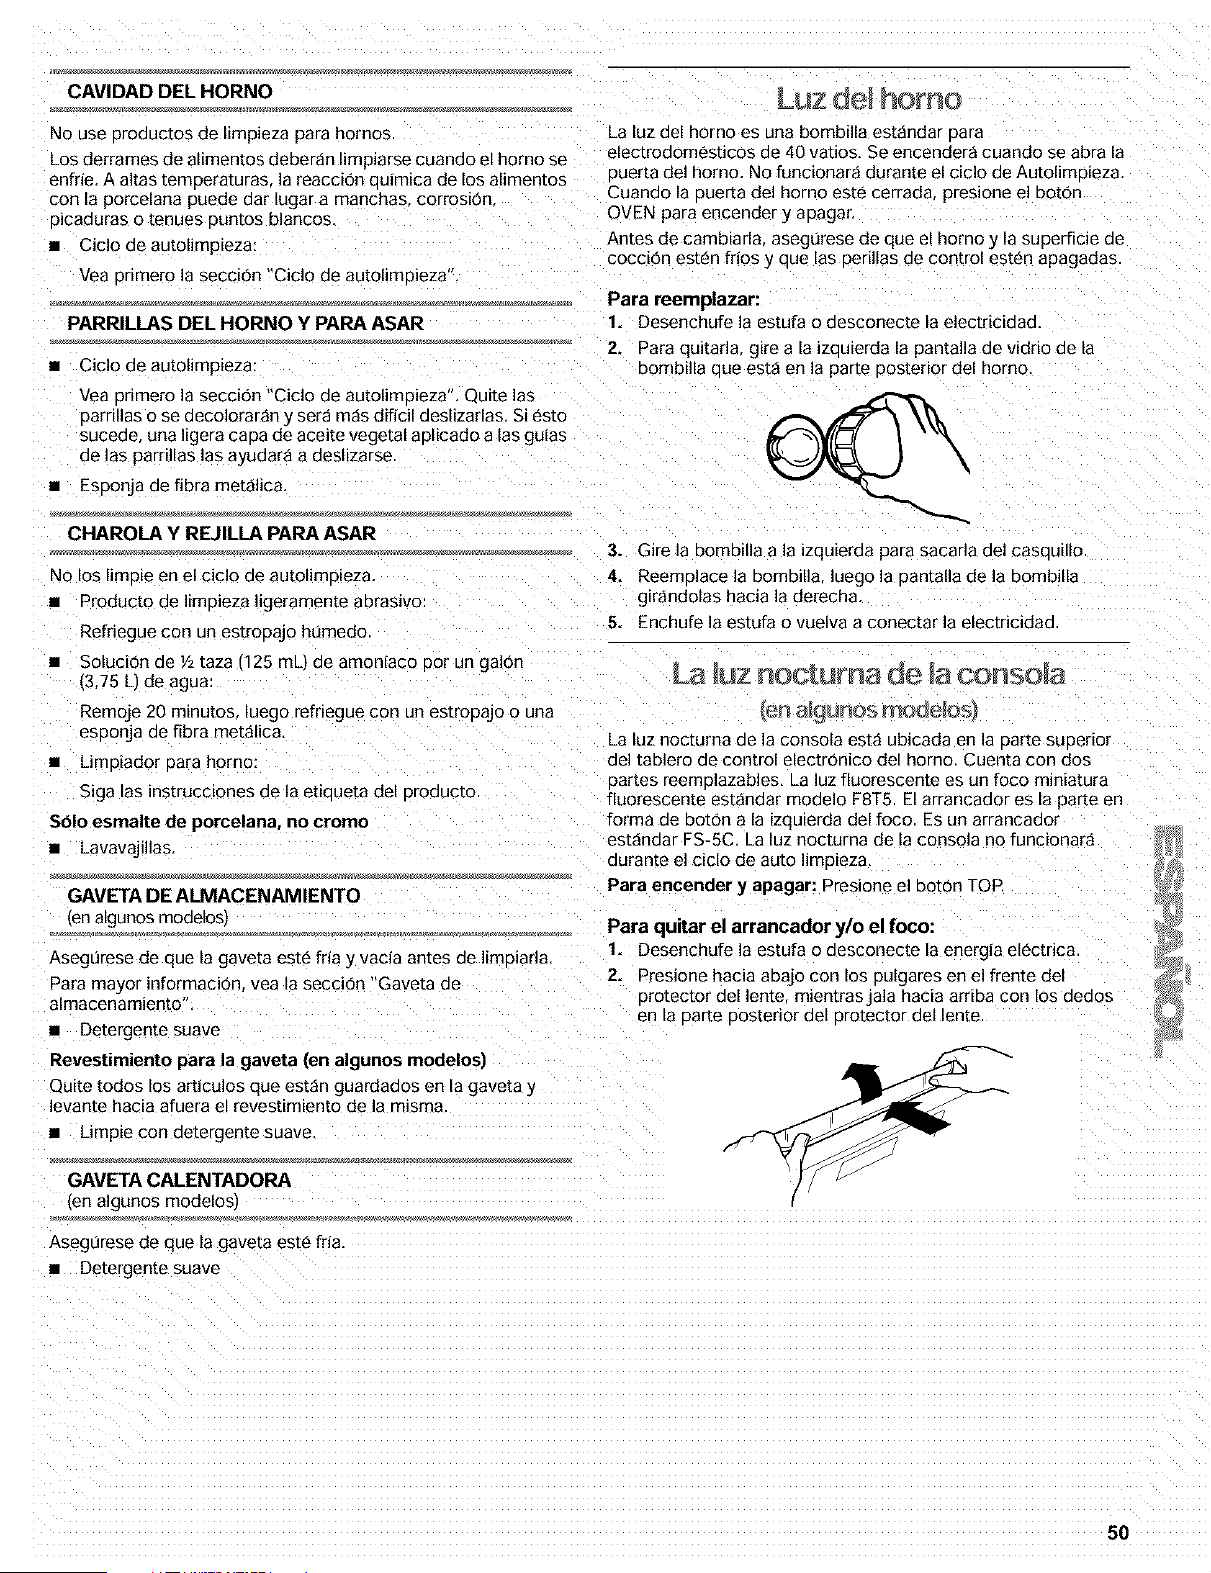
CAVIDAD DEL HORNO
_o use oroductos de I_mDeza para hornos
_as derrames de alimentos deber_n limpiarse cuando el homo se
enfrie. A altas temoera[uras la reacci0n ouimica de los alimentos
con _aporce_ana puede dar lugar a manchas corrosion
3icaduras o tenues Duntos blancos.
• Ciclo de autolimpieza:
Vea orimero la secci6n "Ciclo de autolimoieza",
La luz del homo es una bombiJla est_ndar 3ara
electrodomesticos de 40 vatios, Se encender_ cuando se abra la
ouerta del homo, No funcionar_ durante el ciclo de Autolimo[eza.
Cuando la 3uerta del homo este cerrada, presione el baton
OVEN para encender y apagar
Antes de cambiarla asegurese de que eJ homo y la superficie de
coccion esten frios y que las perillas de control esten apagadas
Para reemplazar:
PARRILLAS DEL HORNO Y PARA ASAR 1. Desenchufe la estufa o desconecte la electricidad.
............................................. 2. Para quitada gire a la izquierda la pantalla de vidrio de la
Ciclo de autolimDeza: bombilla aue est_ en la paEe postenor del homo.
Vea Drimero la seccion "Ciclo de autolimoieza". Quite las
oarnllas o se decolorar_n y sera m_s dificil deslizarlas, Siesto
suceae una ligera capa de aceite vegetal aplicado a las gu=as
de las parrillas las ayudara a desltzarse
• Esponja defibra met_lica.
CHAROLA Y REJILLA PAPA ASAR
No los limoie en el ciclo de autolimoteza.
• Producto de limDieza ligeramente abraswo
Refriegue con un es[ropajo ht]medo
• Soluci0n de Yztaza (125 mL de amoniaco DOt ue galon
13,75 L) de agua
Remoje 20 minutos, luego refriegue con un es[ropajo o una
esponja ae fibra met_lica,
• Limo_ador oara homo:
Siga las instrucciones de la etiaueta del Droauc[o
SOlo esmalte de porcelana, no cromo
• Lavavajiilas
GAVETA DE ALMACENAMIENTO
len algunosmoaelosl
AsegL_rese de que la gave[a este fria y vacia antes de ]ima_arla.
Sara mayor informaci0n vea la secci0n "Gaveta de
almacenamlento".
• De[ergen[e suave
Revestimiento para la gaveta (en algunos modelos}
Quite todos los articulos que est_n guardados en la gaveta y
levante hacia afuera el revestimiento de la misma
• LimDe con ae[ergente suave
GAVETA CALENTADORA
,en algunos mocielos'
Asegurese de que Ja gave[a este fria.
• be[ergen[e suave
3. Gim la bombilla a la Jzquierda para sacarla del casau_llo
4. ReemDlace la bombilla luego la Dantalla de la bombilla
gir_ndolas hacia la derecha.
5. Enchufe la estufa o vuelva a conectar la electricidad
La nocl , Jrna de c nso a
La [uz nocturna de ]a consola est_ ubicada en ]a 3arte superior
del tablero de control electronico del homo. Cuenta con dos
oartes reemolazables, La luz fluorescen[e es un foco mlnlatura
fluorescente est_ndar modelo FeT5. El arrancaaor es _apaEe en
forma de bot0n a la izqu_erda del foco. Es un arrancador
est_ndar FS-5C. La luz nocturna de la consola no funcionar_
durante el ciclo de auto I_mDeza.
Para encender y apagar: Presione el baton TOP
Para quitar el arrancador y/o el foco:
1. Desenchufe la estufa o desconecte la energia electrica
2. Presione hacia abajo con los pulgares en el frente del
arotector del lente mientrasjala hacia arriba con los dedos
en la Darte Dos[erlor ael protector del lente
5O
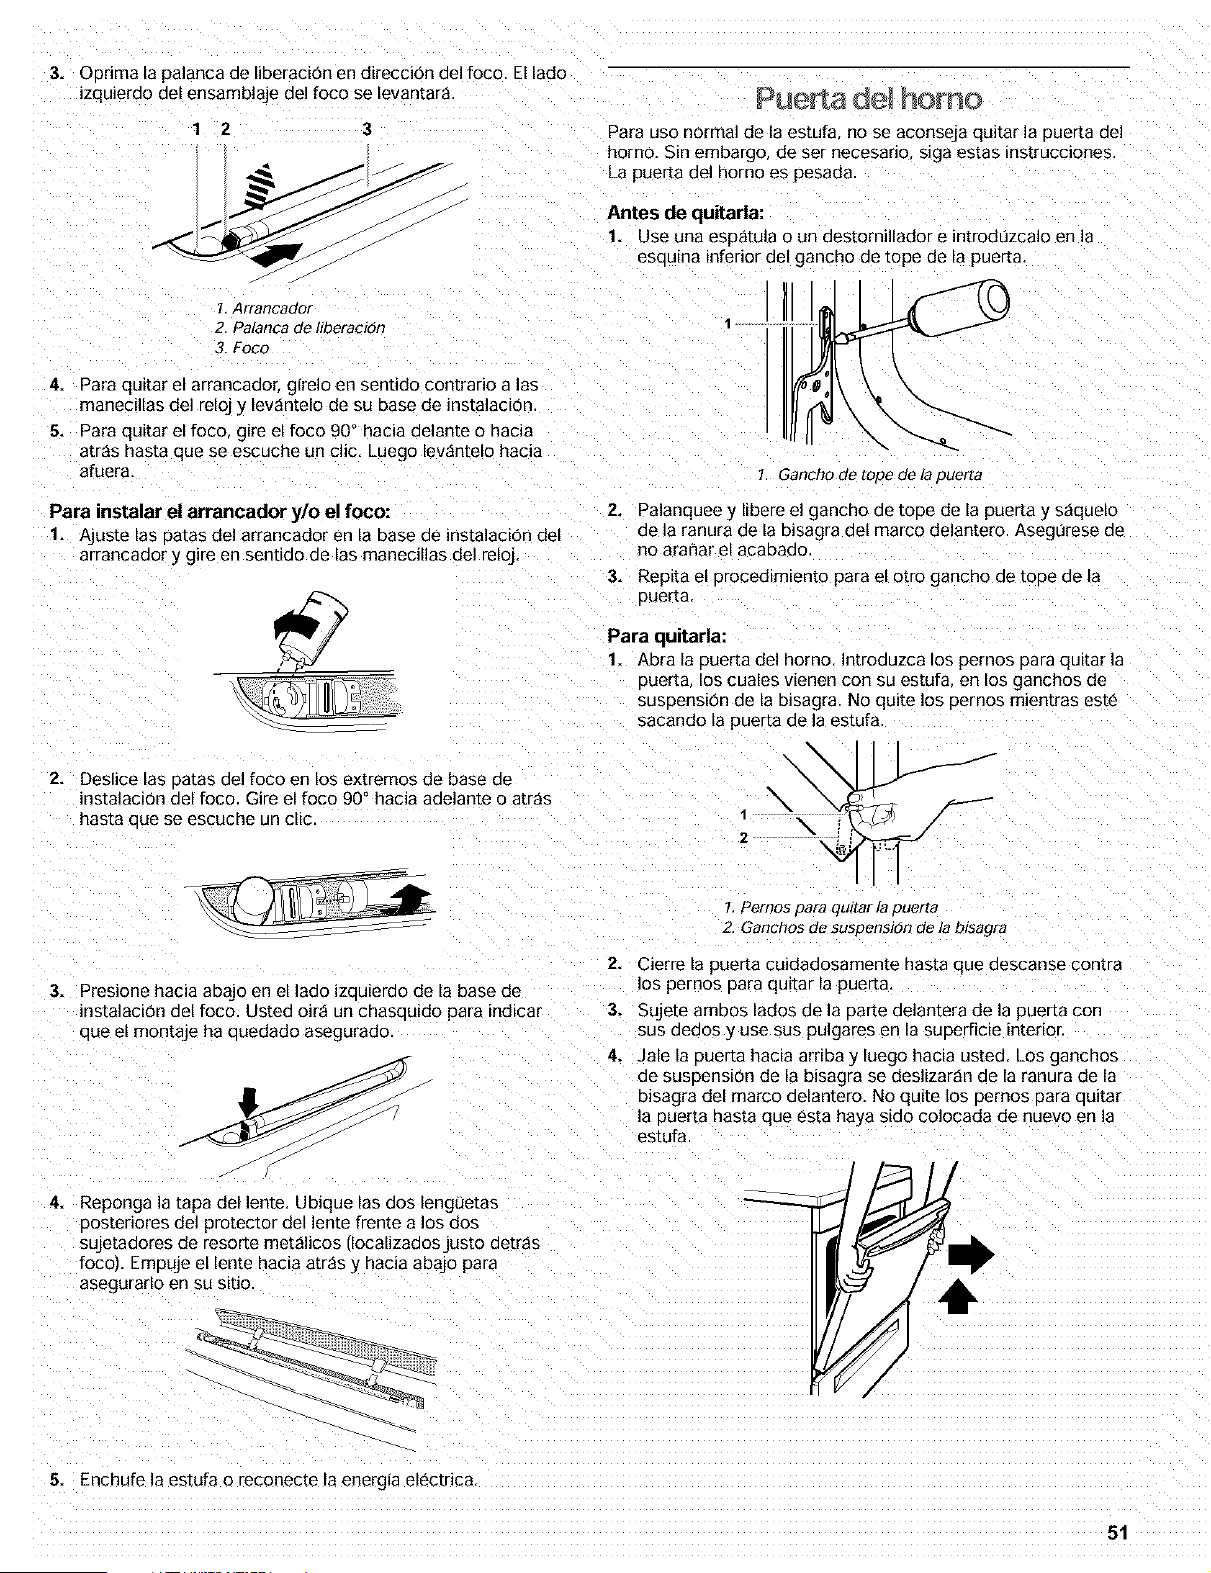
3. Oerima Eapalanca de liberaci0n en direcci0n del foco. El lado
izquierdo del ensamblaje del foco se levantar_
1 2 3
j_jj
!, Arrancaao[
2. Palanca de hberact6n
3. Foco
Pare uso normal de la estufa, no se aconseja quitar la Duerta de]
homo, Sin embargo de ser necesano, s_ga estas _nstrucciones
La Duerta del homo es pesada
Antes de quitarla:
1. Use una esp_tula o un destornillador e introdtJzcalo en la
esouina inferior del gancho de tope de la puer[a,
H
4. Para qu_[ar el arrancaao[ girelo en sentido contrario a las
manecillas de] reloj y ev_nte[o de su base de instalaci0_
5. Para qua[at el foco gire el foco 90 ° hacia delante o hacia
arras hasta que se escuche un clic, Luego lev_ntelo hacia
afuera.
1 Gancho de tope ae la puer[a
Para instalar el arrancador y/o el foco:
1. Ajuste las patas del arrancador en la base de instalaci0n del
arraneaaor y gire en sentido de las manecillas del reloj,
2. Palanquee y libere el gancho de toee de la puer[a y saquelo
de la ranura de la bisagra del marco delantero. Asegurese ae
no araflar el acaoaao
3. Repita el Drocedimiento pare el otro gancho de tooe de la
auerta
Para quitarla:
1. Abra la ouerta del norno, Introduzca los pernos Dara quitar la
auerta los cuales vienen con su estufa en los ganchos de
susaens_on de la bisagra No quite los pernos mientras este
sacando la puerta de la estufa
2.
Deslice las Datas de] foco en los extremos de base de
o
instalacion del foco. Gire el foco 90 hacia adelante o arras
basra aue se escuche un cllc
2
3. Presione hacia abajo en el lado izauierdo de la base de
instalaci0n del foco. Usted oir_ un chasqu_do para indicar
aue el montaje ha quedado asegurado
4.
Reponga la tapa del lente, Ubique las aos lengue[as
oosteriores de protector del lente frente a los aos
sujetadores de resorte met_l_cos ilocalizados jus[o detras
%col, Empuje el lente hacia atras y hacia abajo pare
asegurarlo en su s_tlo.
1, Pemos pare qu/[ar m puerta
2. Ganchos de suspension de la b/sagra
2. Cierre la pueEa cuidadosamente hasta aue aescanse comra
os aernos para qu_tar la pueEa,
3. Sujete amDos lados de ]a eaEe delantera de ]a pueEa con
sus aeaos y use SUSpulgares en la suoerficie interior.
4. Jale la ouerta hacia arriba y luego hacia usted, Los ganchos
ae suaoensi0n de la bisagra se deslizar_n de la ranura de la
bisagra del marco delantero, No qu_te los Demos Dare auitar
a ouerta nas[a que esta haya sido co]ocada de nuevo en la
estufa
5= Enchufe la estufa o reconecte la energia electrica
51
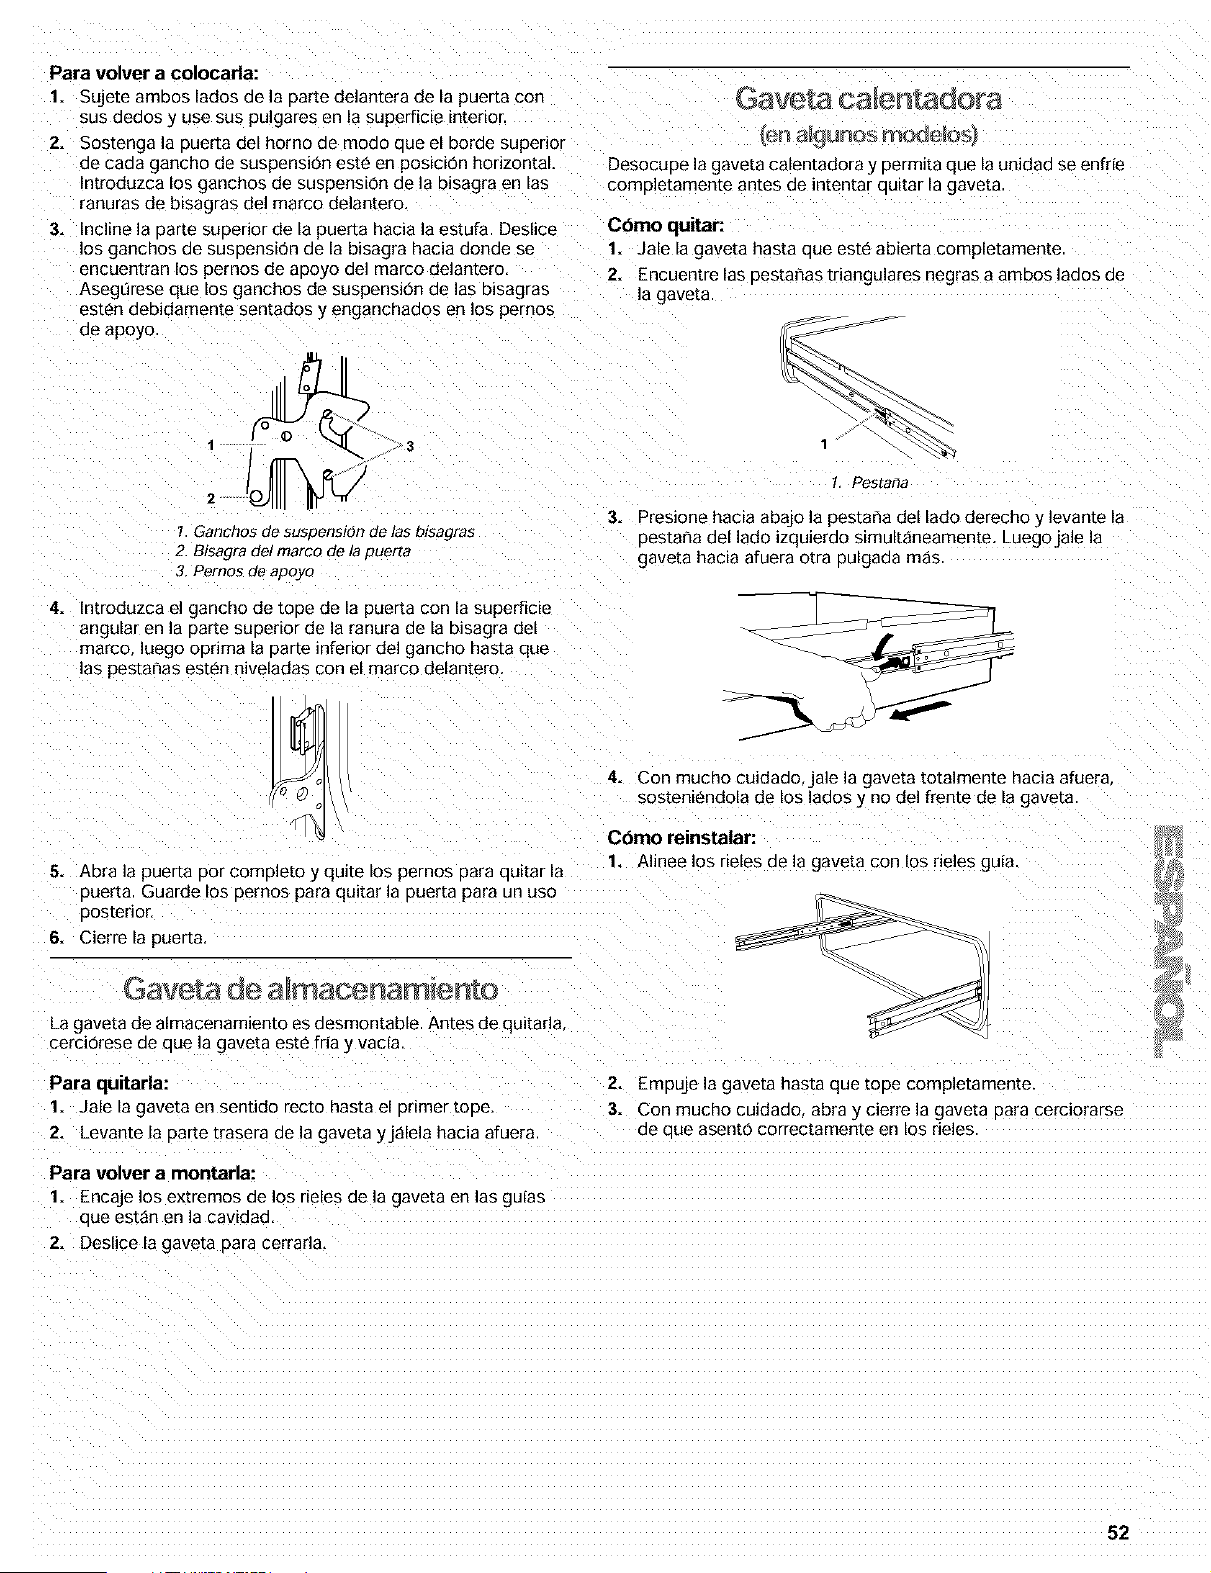
Para volver a colocarla:
1. Suje[e amoos lados de ]a oarte delantera de la puer[a con
sus aeaos y use SUSpulgares en la superficie interio_
2.
3.
Sostenga la Duer[a del homo de mode aue el Dorae supenor
ae caaa gancho de suspension este en pos_c_on horizontal
mtroduzca los ganchos de Suspension de la oBagra en las
ranuras de bBagras del marco delantero.
Incline la Darte superior de la puerta hacia la estufa. Deslice
los ganchos de SUsDension de la bisagra hacia donde se
encuentran los pernos de aooyo del marco delantero.
AsegL)rese que los ganchos de suspension de las bisagras
esten debidamente sentados y enganchados en los 3ernos
ae apoyo
1 Ganchos de suspenston de las b/sagra_
2. Bisagra de/marco de la puer[a
3. Pemos de apoyo
Desocupe la gaveta calentadora y perm_ta que la unidad se enfrie
comaletamente antes de intentar qu_tar la gaveta
Cbmo quitar:
1. Jale la gaveta hasta aue este abierta completamente.
2. Encuentre las oestahas triangulares negras a ambos lades de
a gave[a
1, Pestana
3. Presione hacia abajo la pestar_a del lade derecho 3' levante la
Destaha del lade iZqulerdo slmultaneamente. Luegojale la
£ave[a hacia afuera otra pulgaaa mas
4_
Introduzca el gancho de toDe de la puer_a con la superficie
angular en la uarte suuerior de la ranura de la bisagra del
marco, luego ourima la uarte inferior del gancho basra que
las pesta_as esten niveladas con el marco delantero
4. Con mucho cuidado jale la gaveta totalmente hacia afuera
sosteniendola de los lades y no del frente de la gave[a
Cbmo reinstalar:
5_
Abra la puerta per complete y qu_te los pernos para quitar la
ouerta. Guarde los 3ernos para quitar la puerta para un use
oos[enor,
1. Alinee los rieles de la gaveta con los rieles gula
6. Cierre la pueEa.
Gaveta de a macenamiento
=a gaveta de almacenamiento es desmontable. Antes de quitarla.
cerciorese de aue la gaveta este fria y vacla
Para quitarla:
1. Jale la gaveta en sentido recto hasta el Dnmer tODe.
2. Levante la oarm trasera de la gaveta yj_lela hacia afuera
2. Empuje la gaveta hasta que tope completamente.
3. Con mucho cuidado abra y cierre la gaveta para cerciorarse
ae cue asento correctamente en los neles
Para volver a montarla:
1. Encaje los extremes de los rieles de la gaveta en las guias
aue est_n en la cavidad.
2. Deslice la gave[a para cerrarla,
52
SOLUCION DE
PROBLEMAS
Pruebe primero las soluciones aqui sugeridas para evitar el
costo de una visita de servicio tecnico innecesaria.
Nada funciona
LEStZt desenchufado el cable electrico?
EnchL_felo en un contacto de tres terminales con conexi6n a
Lierra,
LSe ha quemado un fusible en casa o se ha disparado el
disyuntor?
Cambie el fusible o vuelva a conectar el c_rcu_[o.
La superficie de coccibn no funciona
i.Se ha fijado correctamente la perilla de control?
Optima la Deri]la antes ae girarla hacia un ajus[e
LEn modelos con cer_mica vitrificada, se fij6 el "Bloqueo
de la Superficie de cocci6n"?
Yea la seccion "Bloqueo de la Suoerficie de coccion,
El _rea de coccibn exterior delantera izquierda no
funciona
/No puede hervir en el _rea de cocci6n exterior delantera
izquierda?
Presione el boton SURESIMMER TM hacla OFF [apagado).
Gire la aerilla de control delantera izauierda hacia HI (alto)
para Iograr un hervor radicle,
• LSURESIMMER no hierve a fuego lento?
Gire y coloque la perilla de control delantera izqu_eraa emre
SURESIMMER LO y 4 ajustes al tiemDo aue Dresiona el
boton SURESIMMER para encenaerlo
&El ztrea de cocciOn exterior SURESIMMER no se calienta
Io suficiente?
Gire la perilla de control delantera izauierda a 4 al tiempo que
Drestona el boron SURESIMMER oara encenderlo,
Calor excesivo alrededor de los utensilios de cocina en
la superficie de coccidn,
&Es apropiado el tama_o del utensilio de cocina?
Use utensilios de cocJna de tama_o similar al del area de
coccion exterior elemento o quemador exterior. Los
utensilios de cocina no deben extenderse mas de 1 3ulg, _2,5
cm) fuera del area de cocci0n.
Resultados de cocci6n de la superficie de coccibn no
son los que se esperaba
• &Se est_n usando los utensilios de cocina apropiados?
Yea la seccion "Utensilios de cocina".
• &Se ha fijado la perilla de control en el nivel apropiado de
calor?
Yea la seccion "Perillas de control",
• LEst_ nevelado el electrodom_stico?
Nivele el electrodomestico. Vea las intrucciones de
nstalaclon
El horno no funciona
LSe ha fijado el control electr6nico del horno
correctamente?
Vea la seccion "Control electronico del homo.
LSe ha fijado un inicio diferido?
Yea la secci0n "Control [emoorizado del homo
LEn algunos modelos, se ha fijado el bloqueo del homo?
dea la seccion "Bloqueo del homo
iEn algunos modelos, se ha fijado el interrupter de 12
horas?
Yea la seccion 7nterruptor ae 12 horas".
Temperatura del homo demasiado alia o demasiado
baja
• LNecesita ajuste la calibraci6n de temperatura del
homo?
Yea la secci0n "Control de temoeratura del homo.
La pantalla muestra mensajes
LEst_t la pantalla mostrando "PF"?
Ha ocurrido un apag0n. Despeje la pantalla. Vea la secc=on
Pantalla." En a]gunos modeios, vuelva a boner el reloj a _a
hora de ser necesario. Vea la seccion "Reloj
iEst_ mostrando la pantalla una letra seguida de un
nt_mero?
Despeje la pantalla. Vea ]a secciOn "Pantalla." Si vuelve a
aparecer. Dongase en comac[o con un esoecialista
comoetente en reoaraciones de Sears, Vea la contraportada
53
Elciclodeautolimpiezanofunciona
&Est_t la puerta del homo abierta?
Cierre bien la Duerta del homo
ASe ha ingresado la funcibn?
Yea la seccion "Ciclo de autolimpieza
&En algunos modelos, se ha fijado el ciclo de
autolimpieza con inicio diferido?
Vea la seccion "Ciclo de autolimp_eza
f.Se ha fijado un inicio diferido?
Yea la section "Control [emBorizado del homo
&En modelos de homo doble, est_ uno de ellos realizando
una autolimpieza?
Cuando uno de los hornos est_ realizando una autolimpieza
Los resultados de cocci6n del homo no son los que se
esperaba
LEst_i nivelado el electrodomOstico?
Nivele el electrodomestico. Vea las _nstrucc_ones Be
nstalacion
• &Se ha fijado la temperatura apropiada?
Vuelva a verificar la receta en un libro de cocina confiable.
• &Se ha fijado una calibraci6n de temperatura del homo
adecuada?
dea la seccion "Control de temoeratura del homo.
• LSe ha precalentado el horno?
Vea la secci0n "ComB hornear _ asar.
• LSe estzin usando utensilios para hornear apropiados?
el otto homo no puede funcionar en autolimoieza a la vez dea la secci0n "Utensilios Data hornear."
• LSe hart ubicado las parrillas adecuadamente?
Vea la secci0n "Posici0n de las Barrillas y los utensilios para
hornear.
/.Hay circulaci6n de aire apropiada alrededor de los
utensilios para hornear?
Vea la seccion "Posicion de las Barrillas y los utensilios para
hornear.
&Se ha distribuido la masa en forma pareja en el molde
para hornear?
derifieue Bara asegurarse de que la masa este nivelada en el
molde para hornear.
LSe est_l usando un lapso de tiempo apropiado?
Regule el tiempo de coccion.
&Se ha abierto la puerta del homo durante la cocciOn?
Abrir el homo oara mirar los alimentos disminuye el calor del
mlsmo y puede prolongar los tiemoos de cocci0n
LEstzin los articulos horneados demasiado dorados en el
fondo?
Mueva la oarrilla a una Bosici0n m_s alta en el homo
• &Se estzin dorando antes de tiempo los bordes de las
cortezas de los pays?
Use BaBel de alumlnlo aara cubrir el horde de la corteza.
54

55

For repairof majorbrand appliancesin your own home...
no matterwho made it, no matter who soldit!
1-800-4-MY-HOM E® Anytime,day or night
(1-800-469-4663) (U.S.A.and Canada)
www.sears.com www.sears.ca
For repairof carry-inproducts like vacuums, lawn equipment,
and electronics,call forthe locationof yournearest
Sears Parts and Repair Center.
1-800-488-1222 Anytime,day or night (U.S.A.only)
www.sears.com
Forthe replacementparts,accessoriesand owner'smanuals
thatyou need to do-it-yourself,cell Sears ParteDirect_ t
1-800-366-PART 6a.m.- 11 p.m. CST, 7 daysa week
(1-800-366-7278) (U.S.A. only)
www.sears.com/partsdirect
To purchase or inquireabouta Sears ServiceAgreement
or Sears Maintenance Agreement:
1-800-827-6655 (U.S.A.) 1-800-361-6665 (Canada)
7 a.m. - 5 p.m.CST, Mon.- Sat. 9 a.m. - 8 p.m. EST, M- F, 4 p.m.Sat.
Para pedirserviciode reparaci6na
domicilio,y para ordenarpiezas:
1-888-SU-HOGAR su
(1-888-784-6427)
Au Canada pourserviceen franP._is:
1-800-LE-FOYER Mc
(1-800-533-6937)
www, sears,ca
SEARS
HomeCentral ®
4/02
TM SM
8523357A ® Registered Trademark / Trademark / Service Mark of Sears Roebuck and Co. Printed in U.S.A.
, TM . , SM , ,
Sears Roebuck and Co ® Marca Reglstrada / Marca de Fabrlca / Marca de Serv{cio de Sears Roebuck and Co. imoreso en EE. UU..

