Loading ...
2257-2
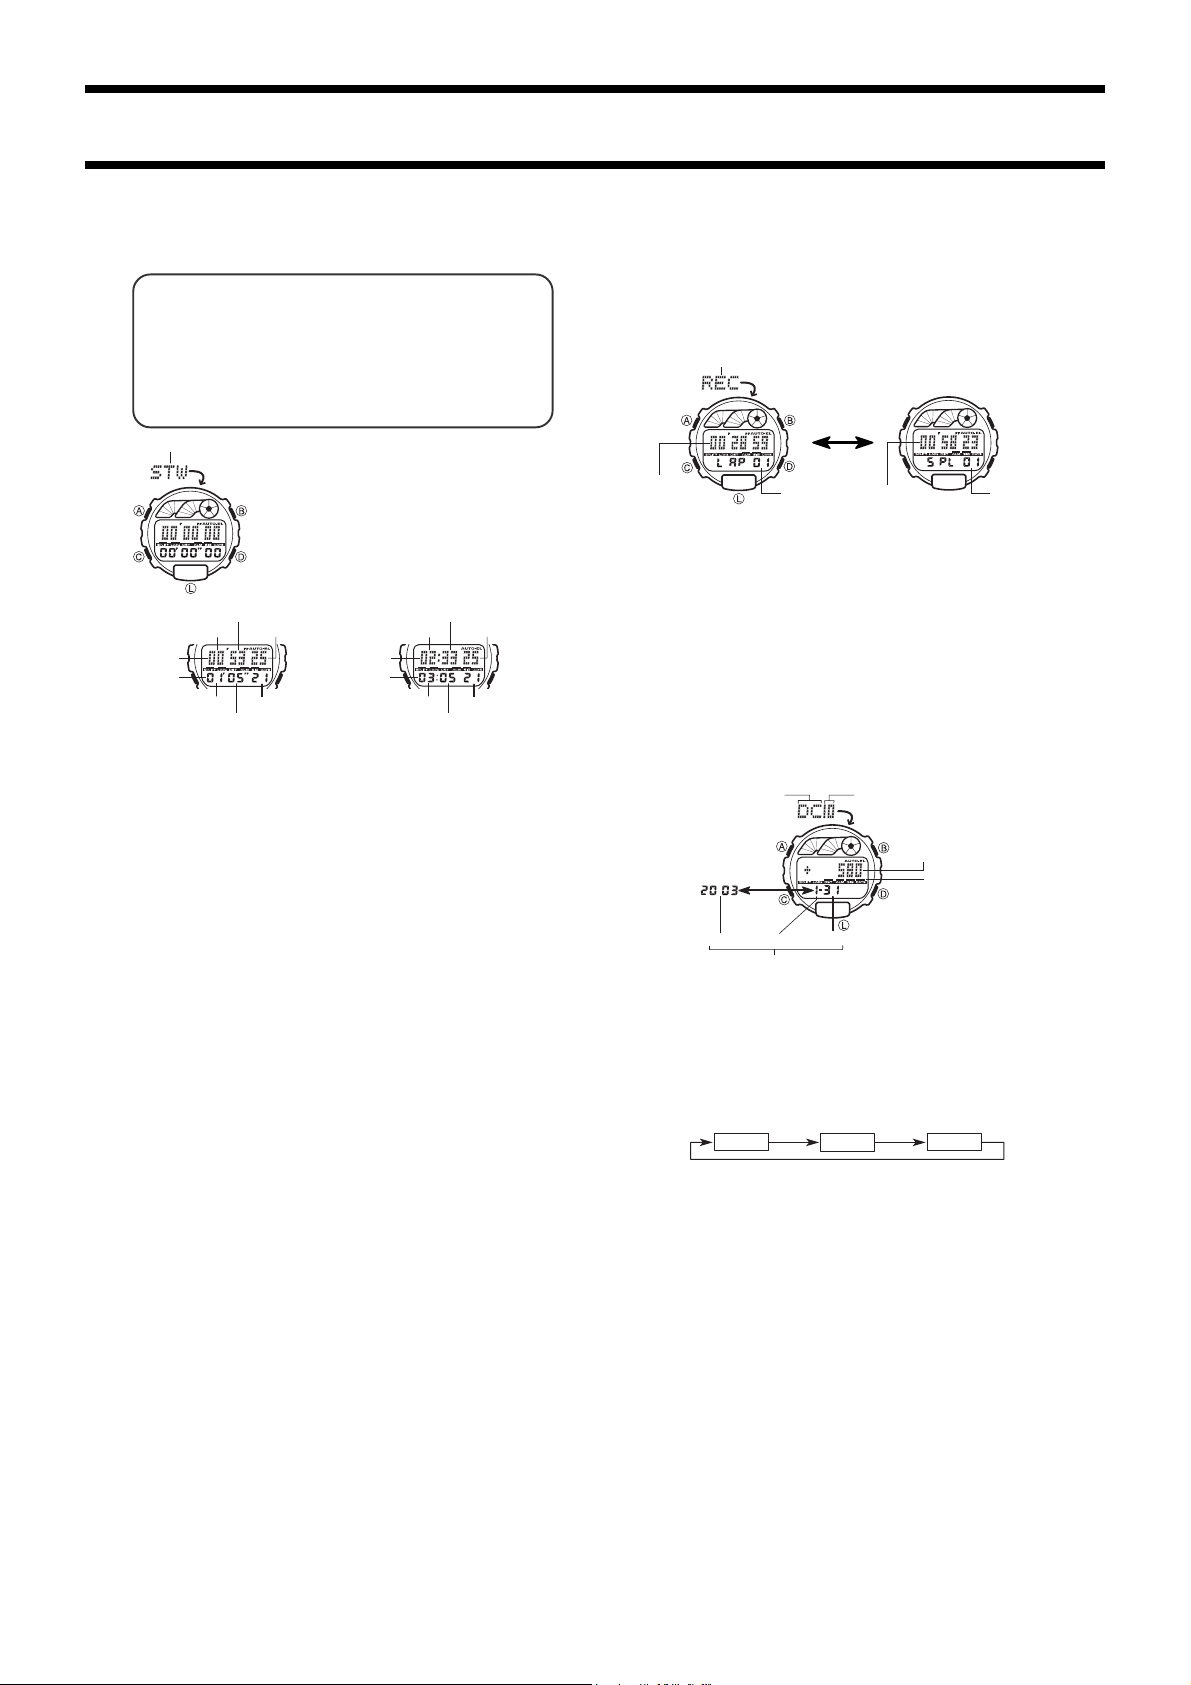
STOPWATCH MODE
About Lap times and Split times
Lap Times
A lap time is the amount of time it takes for you to get from one point to
another during a race. When running on a track, for example, you can time
how long it takes you to complete each lap.
Split Times
A split time is the time from the start of a race until the point that the split is
measured. For example, you could measure split times to determine how
long it takes for you to get from the starting line to the 5-kilometer mark, the
10-kilometer mark, etc.
The Stopwatch Mode lets you measure elapsed time, lap
times, and split times. The range of stopwatch is 23 hours,
59 minutes, 59 seconds. The first hour of a stopwatch
operation is measured in units of 1/100 second. After that,
elapsed time is measured in units of one second. You
can use the EL backlight by pressing L at any time while
the stopwatch is operating.
Mode indicator
Split time
Lap time
1/100 second
Minutes
Seconds
1/100 second
Minutes
Seconds
[Up to 1 hour]
Split time
Lap time
Second
s
Hours
Minutes
Second
s
Hours
Minutes
[After 1 hour]
• In the Stopwatch Mode, the upper part of the display shows lap times, while the
lower part shows split times. When recalling times in the Recall Mode, you can
display either lap times or split times in the upper part of the display. The lower part
of the display shows the corresponding lap time or split time number. Note that the
lap/split time count value appears on the display in the Recall Mode only. It is not
displayed in the Stopwatch Mode.
To measure elapsed time
1.Press D to start the stopwatch.
2.Press D to stop the stopwatch.
• You can resume the elapsed time measurement operation by pressing D again.
• You can stop the elapsed time measurement operation by pressing D again.
3.While the elapsed time is stopped on the display, press B to clear the stopwatch
to all zeros.
To measure lap and split times
1.Press D to start the stopwatch.
2.Press B, the lap time and split time for the lap whose time you just measured
appears for about seven seconds in the display. Stopwatch timing continues inter-
nally.
• After the above, the display automatically switches back to the elapsed time dis-
play. You can repeat the above step as many times as you like. The lap/split time
number increments up to 99. After that it reverts back to 00. Note that the lap/split
time count value appears on the display in the Recall Mode only. It is not displayed
in the Stopwatch Mode.
3.Press D to stop elapsed time measurement.
4.Press B to reset the stopwatch to all zeros.
About Lap/Split Memory
Lap/split times are automatically stored in memory whenever you press B while an
elapsed time operation is in progress in the Stopwatch Mode. The following describes
the rules that govern how lap/split times are recorded and stored in memory.
• Lap/split memory has 11 records: 10 records for the first 10 lap/split times you
record (lap/split times numbered 1 through 10), and one for the final set of lap/split
times you record. For example, let’s say you perform 25 lap/split time operations
(numbered 01 through 25) during an elapsed time operation in the Stopwatch Mode
and then stop the stopwatch without resetting to all zeros. Lap/split memory will
contain records for lap/split numbers 01 through 10, plus a record for lap/split num-
ber 25. The final time of the elapsed time operation (which is different from lap/split
number 25) remains on the display of the stopwatch.
• The record for lap/split number 25 in the above example remains in memory until
you reset the stopwatch to all zeros. Resetting the stopwatch deletes the record for
lap/split number 25, and replaces it with the final time on the stopwatch display.
• If you perform fewer than 10 lap/split time operations, all the recorded times are
stored in memory. For example, let’s say you perform seven lap/split time opera-
tions (numbered 01 through 07) and then stop the stopwatch. Lap/split memory will
contain records for lap/split numbers 01 through 07. Resetting the stopwatch stores
the final time on the stopwatch display in record number 08.
• Starting a new elapsed time operation automatically clears lap/split time memories.
RECALL MODE
In the Stopwatch Mode, the upper part of the display shows lap times, while the lower
part shows split times. When recalling times in the Recall Mode, you can display
either lap times or split times in the upper part of the display. The lower part of the
display shows the corresponding lap time or split time number. Note that the lap/split
time count value appears on the display in the Recall Mode only. It is not displayed in
the Stopwatch Mode.
Recalling Lap and Split times
Mode indicator
Split time
Lap time
Lap number
Split numbe
r
• Press button A to toggle between display of lap times and split times.
• Use button D(+) and button B(–) to scroll through lap/split times in memory.
• Screens for all 10 lap/split time memories appear when you scroll through Recall
Mode data, even if there is no data stored in a memory. The screen of a memory
that does not contain any data shows all zeros.
• All lap/split time data in memory is cleared automatically when you start the next
stopwatch elapsed time operation.
Press A.
DAY COUNTER MODE
The Day Counter Mode lets you count the number of days from the Timekeeping
Mode’s current date to a specific target date. Positive count value indicates a future
date, while a negative value indicates a past date.
This watch has ten day counters. Whenever the date specified by a day counter
matches the date of the Timekeeping Mode (regardless of the day counter’s year
setting), the DAYS indicator flashes on the Timekeeping Mode. In the Day Counter
Mode, the DAYS indicator flashes on the screen of the particular day counter whose
date matches the date of the Timekeeping Mode.
The initial default date for all Day Counters is January 1, 2001.
Mode indicator
Day counter number
Number of days
DAYS indicator
Alternate
at the
1-second
interval.
Year
Day
Target date
Month
• The day counter on the display when you exit the Day Counter Mode appears first
the next time you enter the Day Counter Mode.
Recalling Day Counter Data
In the Day Counter Mode, press D(+) or B(–) to scroll through the day counters.
To set the target date
1.In the Day Counter Mode, press D(+) or B(–) to display the number of the day
counter you want to set.
2.Hold down A until the year digits flash and the message [SET] appears on the
display. This indicates the setting screen.
3.Press C to move the flashing in the sequence shown below.
Day
Month
Year
4.Press D to increase the number. Holding down D changes the selection at high
speed.
• Pressing B and D at the same time causes the message [CLR] to appear on the
display, and sets today’s date as the target date. You can then make any changes
you want to the date.
5.After you make the settings you want, press A to exit the input screen.
• The date can be set within the range of January 1, 1940 to December 31, 2039.
Loading ...