
AC0850
User manual

1EN
Contents
1 Important �����������������������������������������������������������������������������������������
2
Safety ��������������������������������������������������������������������������������������������������������������������������������2
������������������������������������������������������������������������������
3
Product Overview ����������������������������������������������������������������������������������������������������������3
Controls Overview ���������������������������������������������������������������������������������������������������������4
���������������������������������������������������������������������
4
Understanding the air quality light �������������������������������������������������������������������������� 4
Installing the lter ���������������������������������������������������������������������������������������������������������5
Understanding Wi-Fi indicator ���������������������������������������������������������������������������������� 5
Wi-Fi connection �����������������������������������������������������������������������������������������������������������5
Connecting power �������������������������������������������������������������������������������������������������������� 6
Turning on and o ��������������������������������������������������������������������������������������������������������6
Changing the mode setting ���������������������������������������������������������������������������������������6
4 Cleaning �������������������������������������������������������������������������������������������
7
Cleaning schedule ���������������������������������������������������������������������������������������������������������7
Cleaning the body of the air purier �����������������������������������������������������������������������7
Cleaning the air quality sensor ���������������������������������������������������������������������������������� 7
Cleaning the surface of the lter ������������������������������������������������������������������������������8
������������������������������������������������������������������������
8
Understanding the healthy air protect lock ����������������������������������������������������������� 8
Replacing the lter �������������������������������������������������������������������������������������������������������8
Filter reset ������������������������������������������������������������������������������������������������������������������������9
6 Storage ����������������������������������������������������������������������������������������������
9
7 Troubleshooting �����������������������������������������������������������������������������
9
8 Notices �������������������������������������������������������������������������������������������
11
Electromagnetic elds (EMF) �����������������������������������������������������������������������������������11
Recycling ������������������������������������������������������������������������������������������������������������������������11
9 Guarantee and service ���������������������������������������������������������������
11
Order parts or accessories �����������������������������������������������������������������������������������������11

2 EN
1 Important
Safety
Read this user manual carefully before you use the appliance, and save it for future reference�
To ensure the best performance, kindly suggest your purier is upgraded to the latest version.
You can do this upgrade via the Air+ app�
Danger
•
Do not clean the appliance with water, any other liquid, or a (ammable) detergent to avoid
electric shock and/or a re hazard.
•
Do not spray any ammable materials such as insecticides or fragrance around the appliance.
Warning
•
Check if the voltage indicated on the appliance corresponds to the local power voltage before you
connect the appliance�
•
If the power cord is damaged, you must have it replaced by Philips, a service center authorized by
Philips, or similarly qualied persons in order to avoid a hazard.
•
Do not use the appliance if the adapter, the power cord, or the appliance itself is damaged�
•
Only use the approved adapter provided with the appliance�
•
This appliance can be used by children aged from 8 years and above and persons with reduced
physical, sensory or mental capabilities or lack of experience and knowledge if they have been
given supervision or instruction concerning use of the appliance in a safe way and understand the
hazards involved.
•
Children shall not play with the appliance�
•
Cleaning and maintenance shall not be made by children without supervision�
•
Do not block the air inlet and outlet, e�g� by placing items on the air outlet or in front of the air
inlet�
•
Make sure that foreign objects do not fall into the appliance through the air outlet.
•
Standard WiFi interface based on 802.11b/g/n at 2.4 GHz with a maximum output power of
31.62 mW EIRP (only for product with Wi-Fi function).
Caution
•
This appliance is not a substitute for proper ventilation, regular vacuum cleaning, or use of an
extractor hood or fan while cooking�
•
Always place and use the appliance on a dry, stable, level, and horizontal surface.
•
Leave at least 20cm free space around the appliance and leave at least 30cm free space above the
appliance�
•
Do not sit or stand on the appliance� Do not place anything on top of the appliance�
•
Do not place the appliance directly below an air conditioner to prevent condensation from
dripping onto the appliance�
•
Only use the original Philips lters specially intended for this appliance. Do not use any other lters.
•
Combustion of the lter may cause irreversible human hazard and/or jeopardize other lives. Do not
use the lter as fuel or for similar purpose.
•
Avoid knocking against the appliance (the air inlet and outlet in particular) with hard objects.
•
Do not insert your ngers or objects into the air outlet or the air inlet to prevent physical injury or
malfunctioning of the appliance�
•
Do not use this appliance when you have used indoor smoke-type insect repellents or in places
with oily residues, burning incense, or chemical fumes�
•
Do not use the appliance near gas appliances, heating devices or replaces.
•
Always turn o the air purier rst, then unplug adapter from wall outlet, when you want to
moving, cleaning appliance, replacing the lters or carry out other maintenance.
•
The appliance is only intended for household use under normal operating conditions�
3EN
•
Do not use the appliance in wet surroundings or in surroundings with high ambient temperatures,
such as the bathroom, toilet, or kitchen, or in a room with major temperature changes.
•
The appliance does not remove carbon monoxide (CO) or radon (Rn). It cannot be used as a safety
device in case of accidents with combeustion processes and hazardous chemicals.
2 Your air purifier
Congratulations on your purchase, and welcome to Philips!
To fully benet from the support that Philips oers, register your product at
www�philips�com/support�
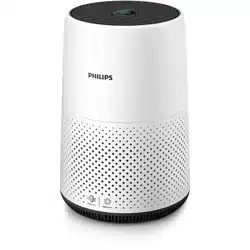
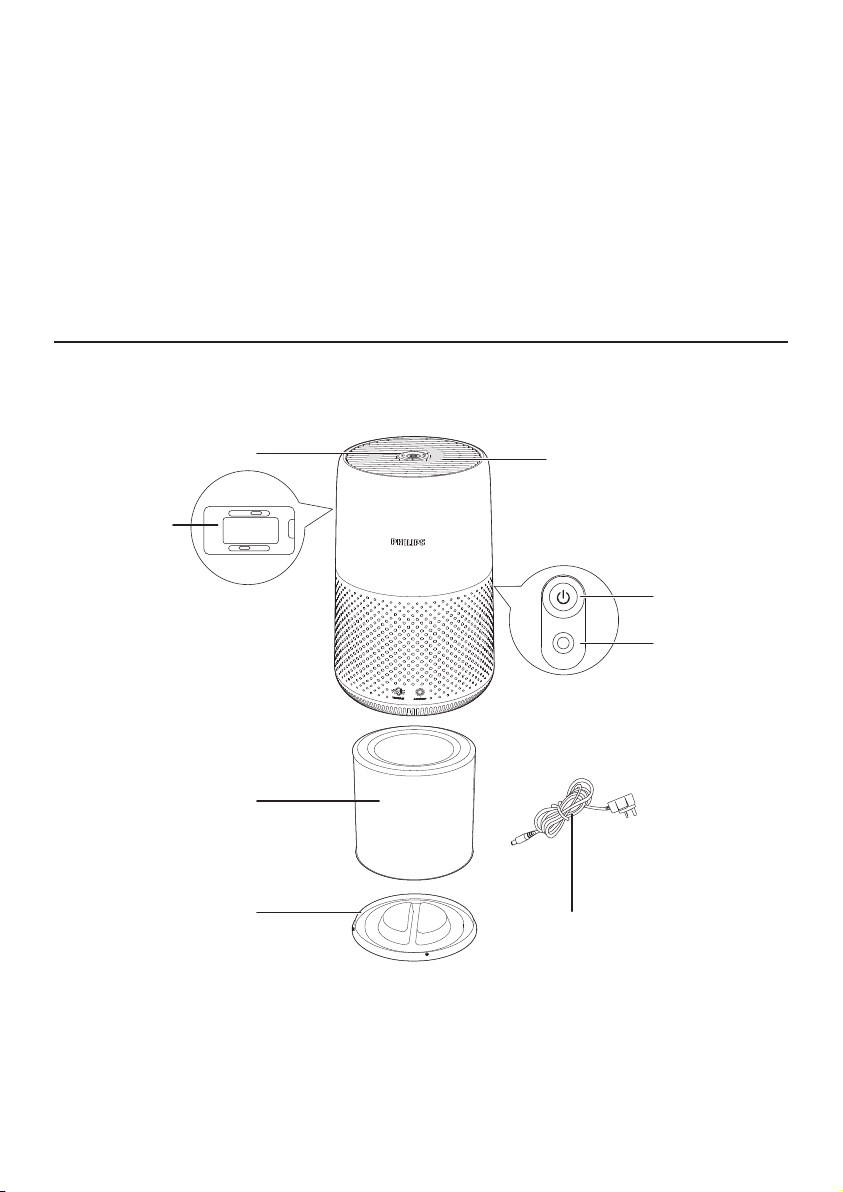
Product Overview
Control panel
Air outlet
Power on/o
button
Base
NanoProtect lter Series 2
(FY0293)
Air quality
sensor
Power socket
Adapter
*Please use only the adapter provided�
4 EN
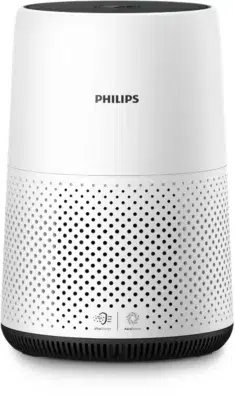
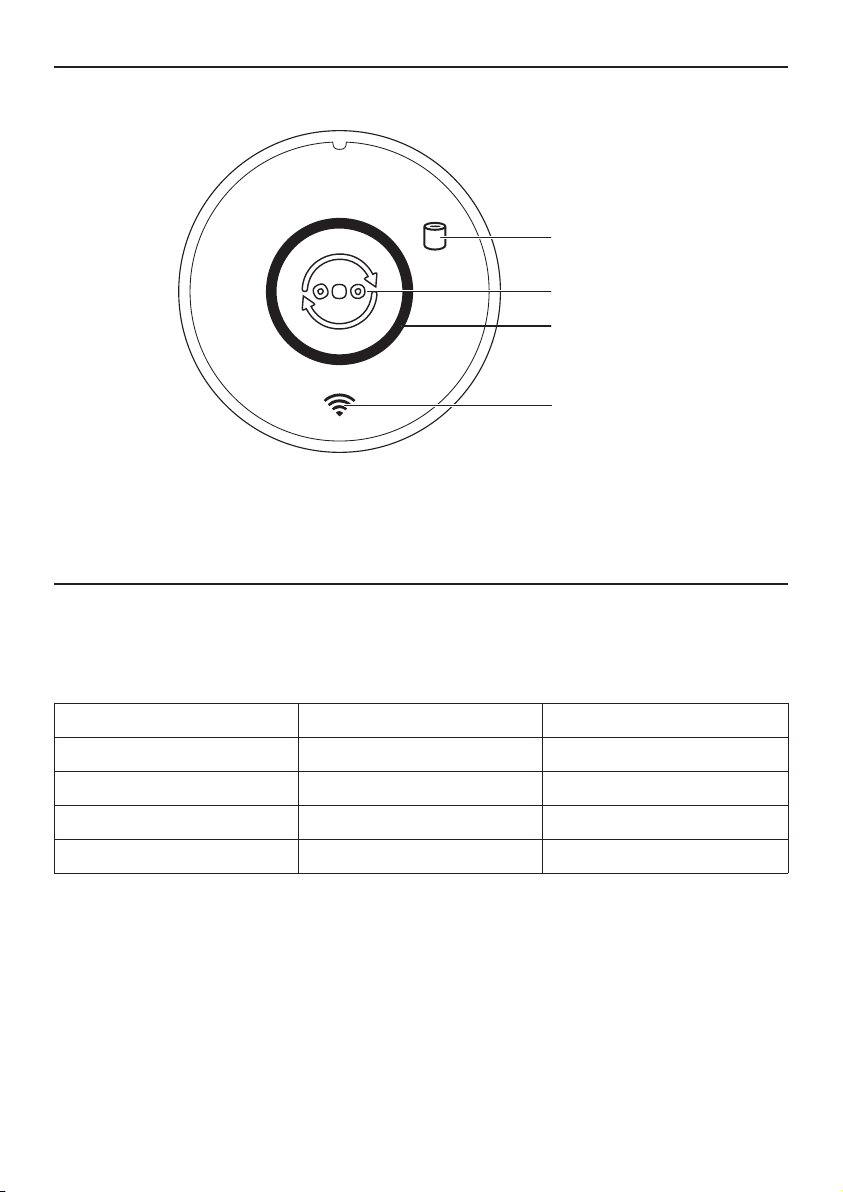
Controls Overview
3 Using the air purifier
Understanding the air quality light
The color of air quality light corresponds to the ambient air quality�
The brightness of air quality light reects the current running mode.
PM2�5 level Air quality light color Air quality level
≤12 Blue Good
13-35 Blue-purple Fair
36-55 Purple-red Poor
>55 Red Very poor
Filter replacement alert
Air quality light
Mode switch/
Filter reset button
Wi-Fi indicator

5EN
Remove all packaging of the lter before use.
Note: Make sure the air purier is unplugged from the electrical outlet before installing the lter.
CLOSEOPEN
CLOSEOPEN
1
2
3
4
5
1 Rotate the base anti-clockwise to remove it from the appliance�
2 Pull the lter out from the appliance.
3 Remove all packaging materials of the air purication lter.
4 Put the lter back into the appliance.
5 Reattach the base and rotate it clockwise to fasten the base�
Understanding Wi-Fi indicator
Wi-Fi icon status Wi-Fi connection status
Blink in orange Connecting to the smartphone
Stable in orange Connected to the smartphone
Blink in white Connecting to the server
Stable in white Connected to the server
O Wi-Fi function disabled
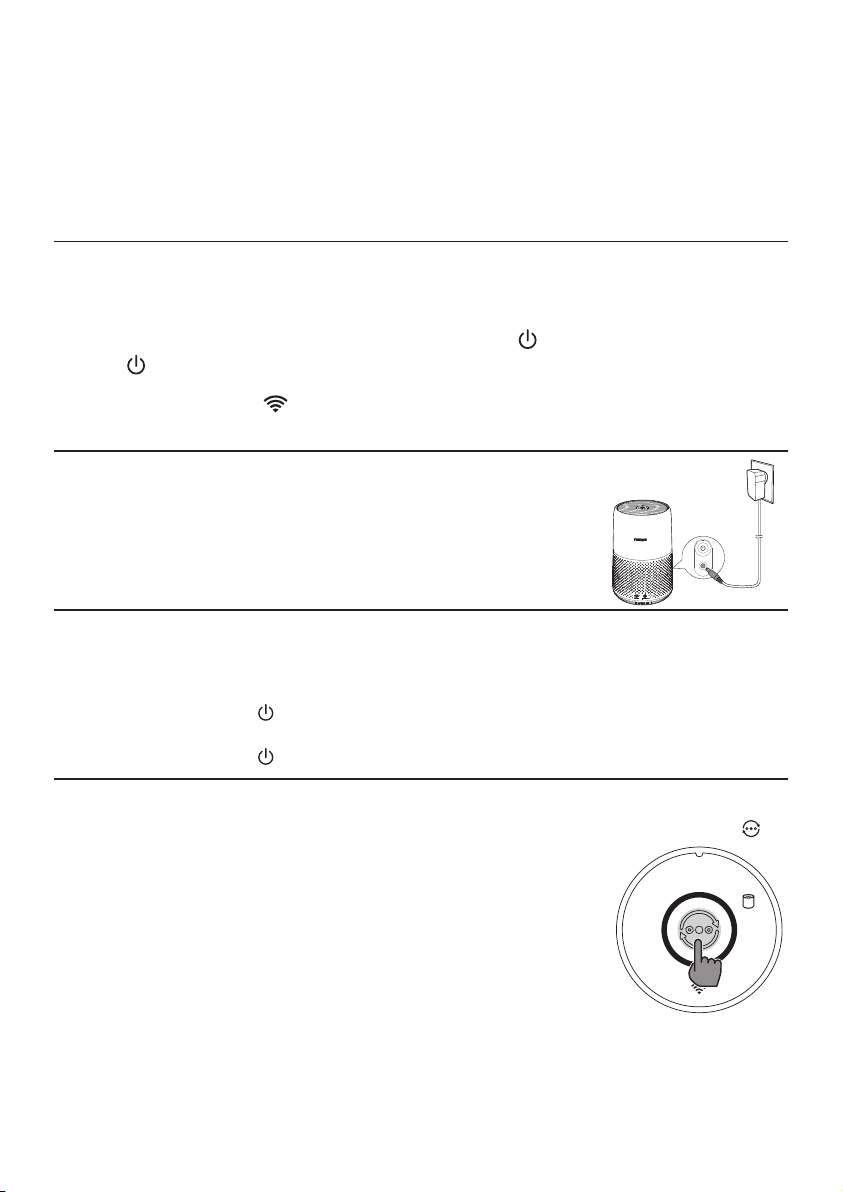
Wi-Fi connection
1 Download and install the Philips “Air+” app from the App Store or Google Play�
2 Put the plug of the air purier in the power socket and press to turn on the air
purier.
» The Wi-Fi indicator blinks orange for the rst time.
3 Make sure that your smartphone or tablet is successfully connected to your Wi-Fi
network�
4 Launch the Philips “Air+” app and click on “Connect a New Device” or press the “+” button on
the top of the screen. Follow the onscreen instructions to connect the air purier to your network.
6 EN
Note:
•
This instruction is only valid when the air purier is being set up for the rst time. If the network has
changed or the setup needs to be performed again, see Chapter "Reset the Wi-Fi connection" on
page 6�
•
If you want to connect more than one air purier to your smartphone or tablet, you have to do this
one by one�
•
Make sure that the distance between your smartphone or tablet and the air purier is less than 10 m
without any obstructions�
Reset the Wi-Fi connection
Note:
•
Reset the Wi-Fi connection when your default network has changed�
1 Put the plug of the air purier in the power socket and press to turn on the air purier.
2 Press for 3 seconds until you hear a beep�
» The air purier goes to pairing mode.
» The Wi-Fi indicator blinks orange�
3 Follow the steps 3-4 in section�
Connecting power
Note: Risk of electric shock! When you unplug the AC power cord, always
pull the plug from the socket� Never pull the cord�
Connect the power adapter to:
•
First, the power socket on the appliance�
•
Then, the wall outlet�
Note:
•
For optimum purication performance, close doors and windows.
1 Press the power button on the back of the air purier to switch on.
» The air purier operates in the auto mode by default.
2 Press the power button again to switch o the air purier.
Changing the mode setting
You can choose Auto mode, Turbo mode or the Sleep mode by pressing the mode switch button �
The brightness of air quality light reects the current running mode:
•
Sleep mode-lowest brightness
•
Auto mode-mid level brightness
•
Turbo mode-highest level brightness
Auto mode
In Auto mode, the appliance selects the fan speed in accordance with the
ambient air quality�
Turbo mode
In Turbo mode, the air purier operates on the highest speed.
Sleep mode
In Sleep mode, the air purier operates quietly at a low speed.

7EN
4 Cleaning
Note:
•
Never use abrasive, aggressive, or ammable cleaning agents such as bleach or alcohol to clean any
part of the appliance�
Cleaning schedule
Frequency Cleaning method
When necessary
Wipe the surface of the appliance with a soft dry cloth
Clean the air outlet cover
Every two months Clean the air quality sensor with a dry cotton swab
Every four weeks Clean the surface of the lter
Regularly clean the inside and outside of the air purier to prevent dust from collecting.
1 Use a soft, dry cloth to clean both the interior and exterior of the air purier.
2 The air outlet can also be cleaned with a dry, soft cloth�
Cleaning the air quality sensor
Clean the air quality sensor every two months for optimal functioning of the appliance�
Note:
•
If the air purier is used in a dusty environment, it may need to be cleaned more often.
•
If the humidity level in the room is very high, condensation may develop on the air quality sensor and
the air quality light may indicate a poorer air quality even though the air quality is actually good� If
this occurs, clean the air quality sensor or use the air purier on a manual speed setting.
1 Switch o the air purier and unplug from the power socket.
2
3
4
6
2 Clean the inlet and outlet of the air quality sensor with a soft brush�
3 Open the air quality sensor cover�
4 Clean the air quality sensor, the dust inlet and the dust outlet with a damp cotton swab�
5 Dry all parts thoroughly with a dry cotton swab�
6 Reattach the air quality sensor cover�
8 EN
Wipe the surface of the lter with soft wet cloth or clean the surface of the lter
with a vacuum cleaner�
Note:
•
if you use a high power/ industrial vacuum cleaner, it may damage the lter.
5 Replacing the filter
Understanding the healthy air protect lock
This appliance is equipped with the healthy air protect lock to make sure that the NanoProtect lter
is in optimal condition when the appliance is operating. When the lter is almost expired, the lter
replacement alert ( ) lights up red, which indicates that it needs to be replaced. If you do not replace
the lter in time, the lter replacement alert ( ) will ash. The appliance will stop operating and get
locked�
Note:
•
The lter is not washable or reusable.
•
Always turn o the air purier and unplug from the electrical outlet before replacing the lter.
CLOSEOPEN
CLOSEOPEN
1
2
3
4
5
1 Rotate the base anti-clockwise to remove it from the appliance�
2 Pull the lter out from the appliance. Discard the used lter.
3 Remove all packaging materials of the new lter.
4 Put the lter into the appliance.
5 Reattach the base and rotate it clockwise to fasten the base�
6 Put the plug of the air purier in the power socket.
7 Press the power button to switch on the appliance�
8 Press and hold for 3 seconds to reset the lter lifetime counter.
9 Wash your hands thoroughly after replacing the lter.
9EN
Filter reset
You can replace the lter even before lter replacement alert ( ) displays on the screen. After
replacing a lter, you need to reset the lter lifetime counter manually.
1 Press the power button to turn on the appliance�
2 Within 10 seconds after power on, press and hold the mode switch button for 5 seconds to
reset the lter lifetime counter.
6 Storage
1 Turn o the air purier and unplug from the power socket.
2 Clean the air purier, air quality sensor and the surface of the lter (see the chapter “Cleaning”).
3 Let all parts air dry thoroughly before storing�
4 Wrap the lter in air tight plastic bags.
5 Store the air purier, lter in a cool, dry location.
6 Always thoroughly wash hands after handling a lter.
7 Troubleshooting
This chapter summarizes the most common problems you could encounter with the appliance. If you
are unable to solve the problem with the information below, contact the Consumer Care Center in your
country�
Problem Possible solution
The appliance does not
work even though it is
plugged in�
•
The lter replacement alert is ashing but you have not replaced the
corresponding lter. As a result, the appliance is now locked. In this case,
replace the lter and reset the lter lifetime counter.
The airow that comes
out of the air outlet is
signicantly weaker
than before�
•
The surface of the lter is dirty. Clean the surface of the lter (see the
chapter “Cleaning”).
The air quality does not
improve, even though
the appliance has been
operating for a long
time�
•
Check if the packing material is removed from the lter.
•
Make sure that the lter is properly installed.
•
The air quality sensor is dirty or wet. Clean the air quality sensor (See the
chapter “Cleaning”).
•
Room size is large or the outdoor air quality is poor.
For optimum purication performance, please close the doors and
windows when operating the air purier.
•
There are indoor pollution resources� For instances, smoking, cooking,
incense�
•
Filter reaches the end of life. Replace the lter with a new one.
10 EN
Problem Possible solution
The appliance produces
a strange smell�
•
The rst few times you use the appliance, it may produce a plastic smell.
This is normal� However, if the appliance produces a burnt smell even if
removing the lter, contact your Philips dealer or an authorized Philips
service center. The lter may produce smell after being used for a while
because of the absorption of indoor gases� It’s recommended that you
reactivate the lter by putting it in direct sunlight for repeated use. If
odor still exists, replace the lter.
The appliance is extra
loud�
•
Check if the packing of the lter is removed.
•
The appliance will run in high speed when the air quality is poor, which
will causes higher noises� When using the appliance in a bedroom at
night, choose the Sleep speed�
•
if anything drops into air outlet, it may also cause abnormal loud sounds�
Immediate turn o appliance, turn appliance upside down, to get
foreign objectives out of appliance.
The appliance still
indicates that I need
to replace a lter, but I
already did�
•
Perhaps you did not reset the lter lifetime counter. Switch on the
appliance. Then press and hold the mode switch button ( ) for
3 seconds until disappears�
The Wi-Fi setup is not
successful�
• If the router your appliance is connected to is dual – band and currently
it is not connecting to a 2.4GHz network, please switch to another band
of the same router (2.4GHz) and try to pair your purier again. 5GHz
networks are not supported�
• Web authentication networks are not supported�
• Check if the appliance is within range of the Wi-Fi router� You can try to
locate the air purier closer to the Wi-Fi router.
• Check if the network name is correct� The network name is casesensitive�
• Check if the Wi-Fi password is correct� The password is casesensitive�
• Retry the setup with the instructions in the chapter “Wi-Fi connection”).
• The Wi-Fi connectivity can be interrupted by electromagnetic or other
interferences� Keep the appliance away from other electronic devices that
may cause interferences�
• Check if the mobile device is in airplane mode. Make sure to have the
airplane mode deactivated when connecting to the Wi-Fi network�
• Consult the help section in the app for extensive and up-to-date
troubleshooting tips�
Appliance keeps o,
but air quality light
blinks for one minute�
•
The appliance has malfunctions� Contact the Consumer Care Center in
your country�

11EN
8 Notices
This Philips appliance complies with all applicable standards and regulations regarding exposure to
electromagnetic elds.
Recycling
Do not throw away the product with the normal household waste at the end of its life, but hand it in at
an ocial collection point for recycling. By doing this, you help to preserve the environment.
Follow your country's rules for the separate collection of electrical and electronic products� Correct
disposal helps prevent negative consequences for the environment and human health�
9 Guarantee and service
If you need information or if you have a problem, please visit the Philips website at www�philips�com
or contact the Philips Consumer Care Center in your country (you can nd its phone number in the
worldwide guarantee leaet). If there is no Consumer Care Center in your country, go to your local
Philips dealer�
Order parts or accessories
If you have to replace a part or want to purchase an additional part, go to your Philips dealer or visit
www�philips�com/support�
If you have problems obtaining the parts, please contact the Philips Consumer Care Center in your
country (you can nd its phone number in the worldwide guarantee leaet).

© 2022 Philips Domestic Appliances Holding B�V�
All rights reserved�