Help Guide
Wireless Noise Canceling Stereo Headset
WF-1000XM5
Model: YY2963
Quick Start Guide
To prevent burning or malfunction due to getting wet
Download the app, and set up the headset
To use all functions and improved performances, update the software of the headset and “Sony | Headphones Connect”
app to the latest version. For details, refer to the following:
https://www.sony.net/elesupport/
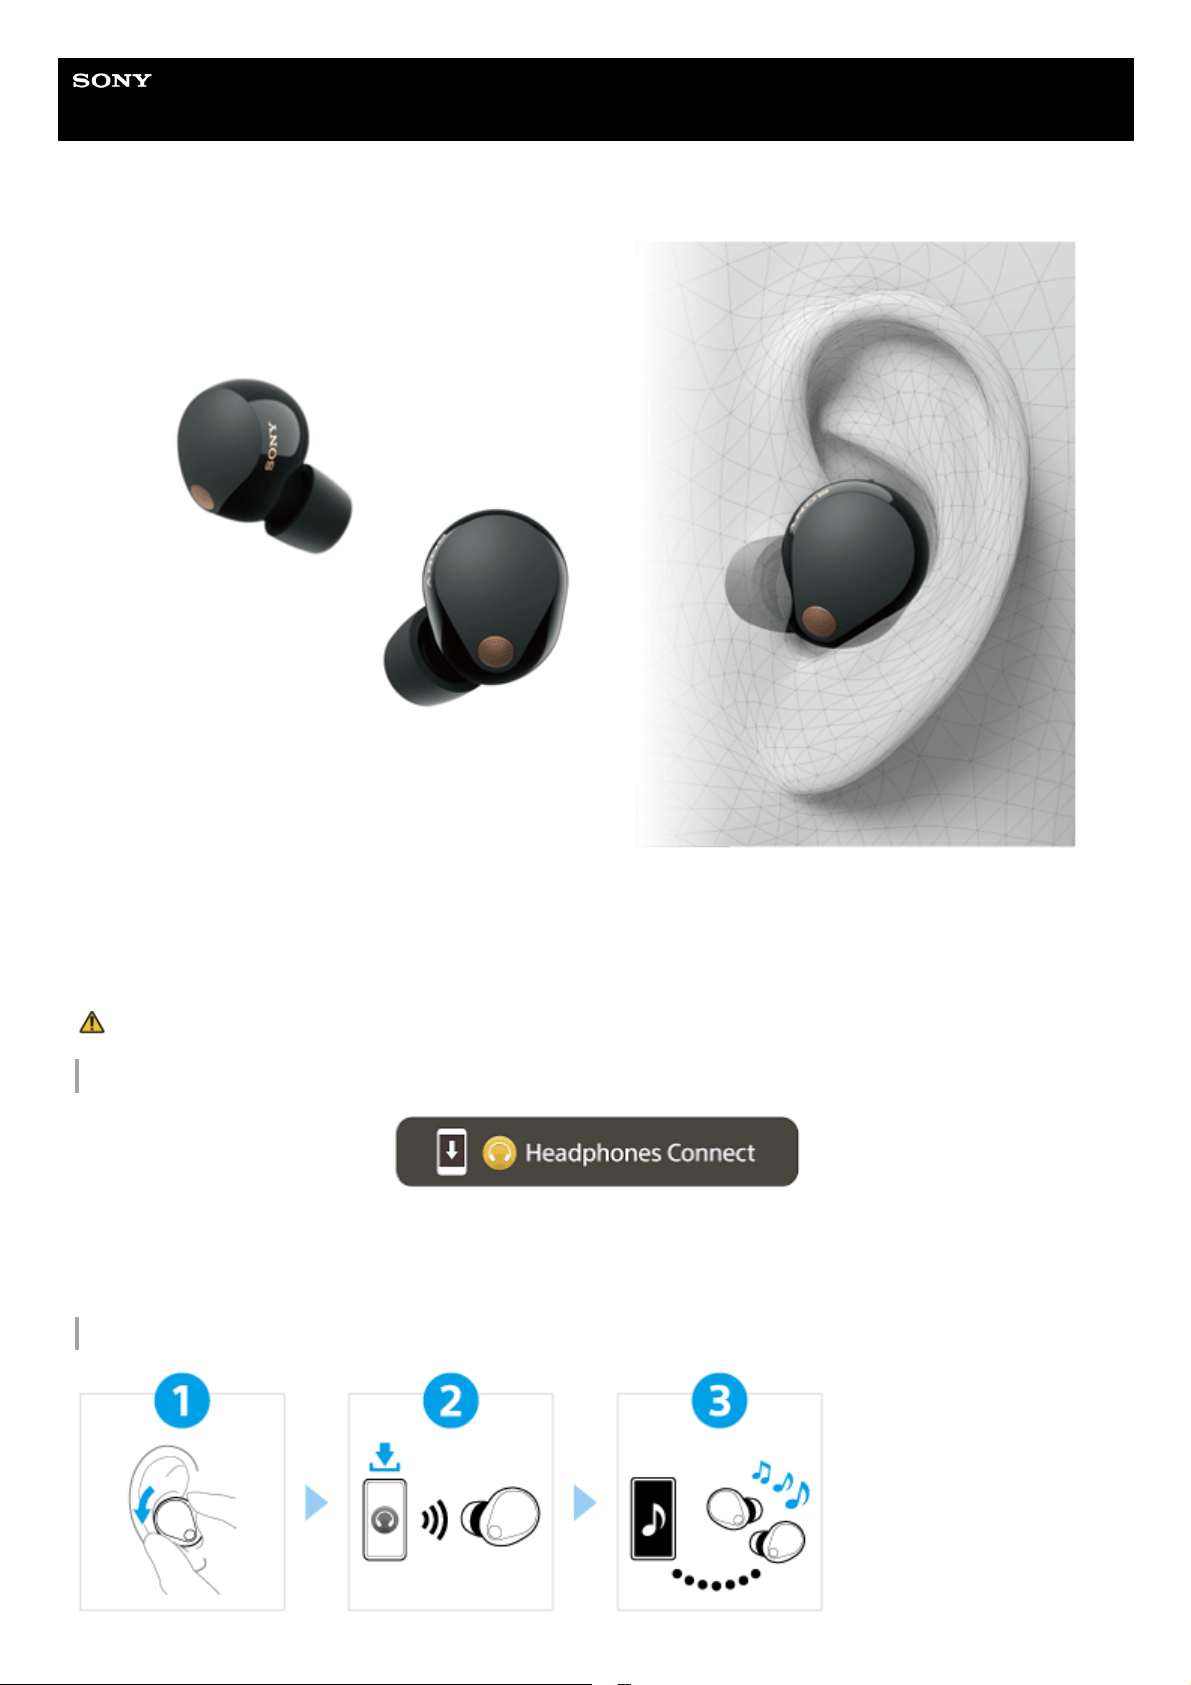
Let’s start to use
1
Related information
Establishing a Bluetooth connection manually
Charging the headset
Wearing the headset
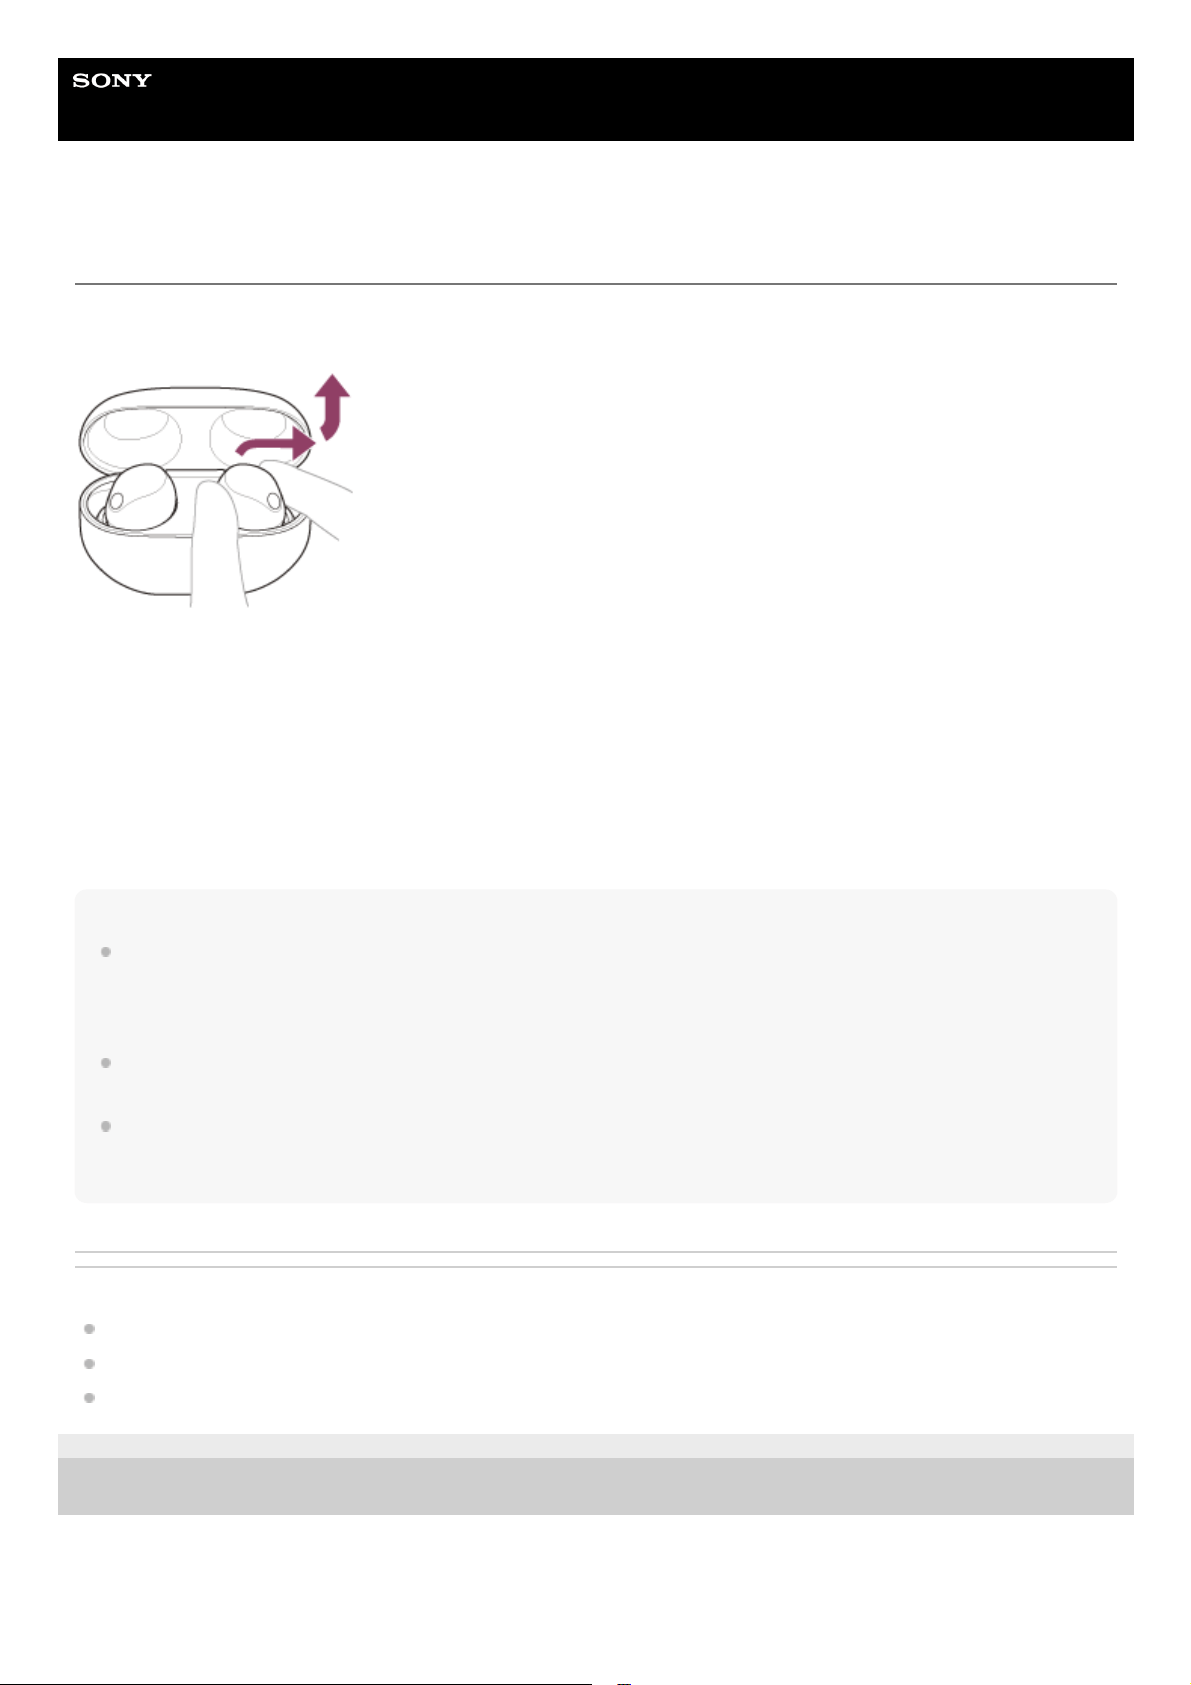
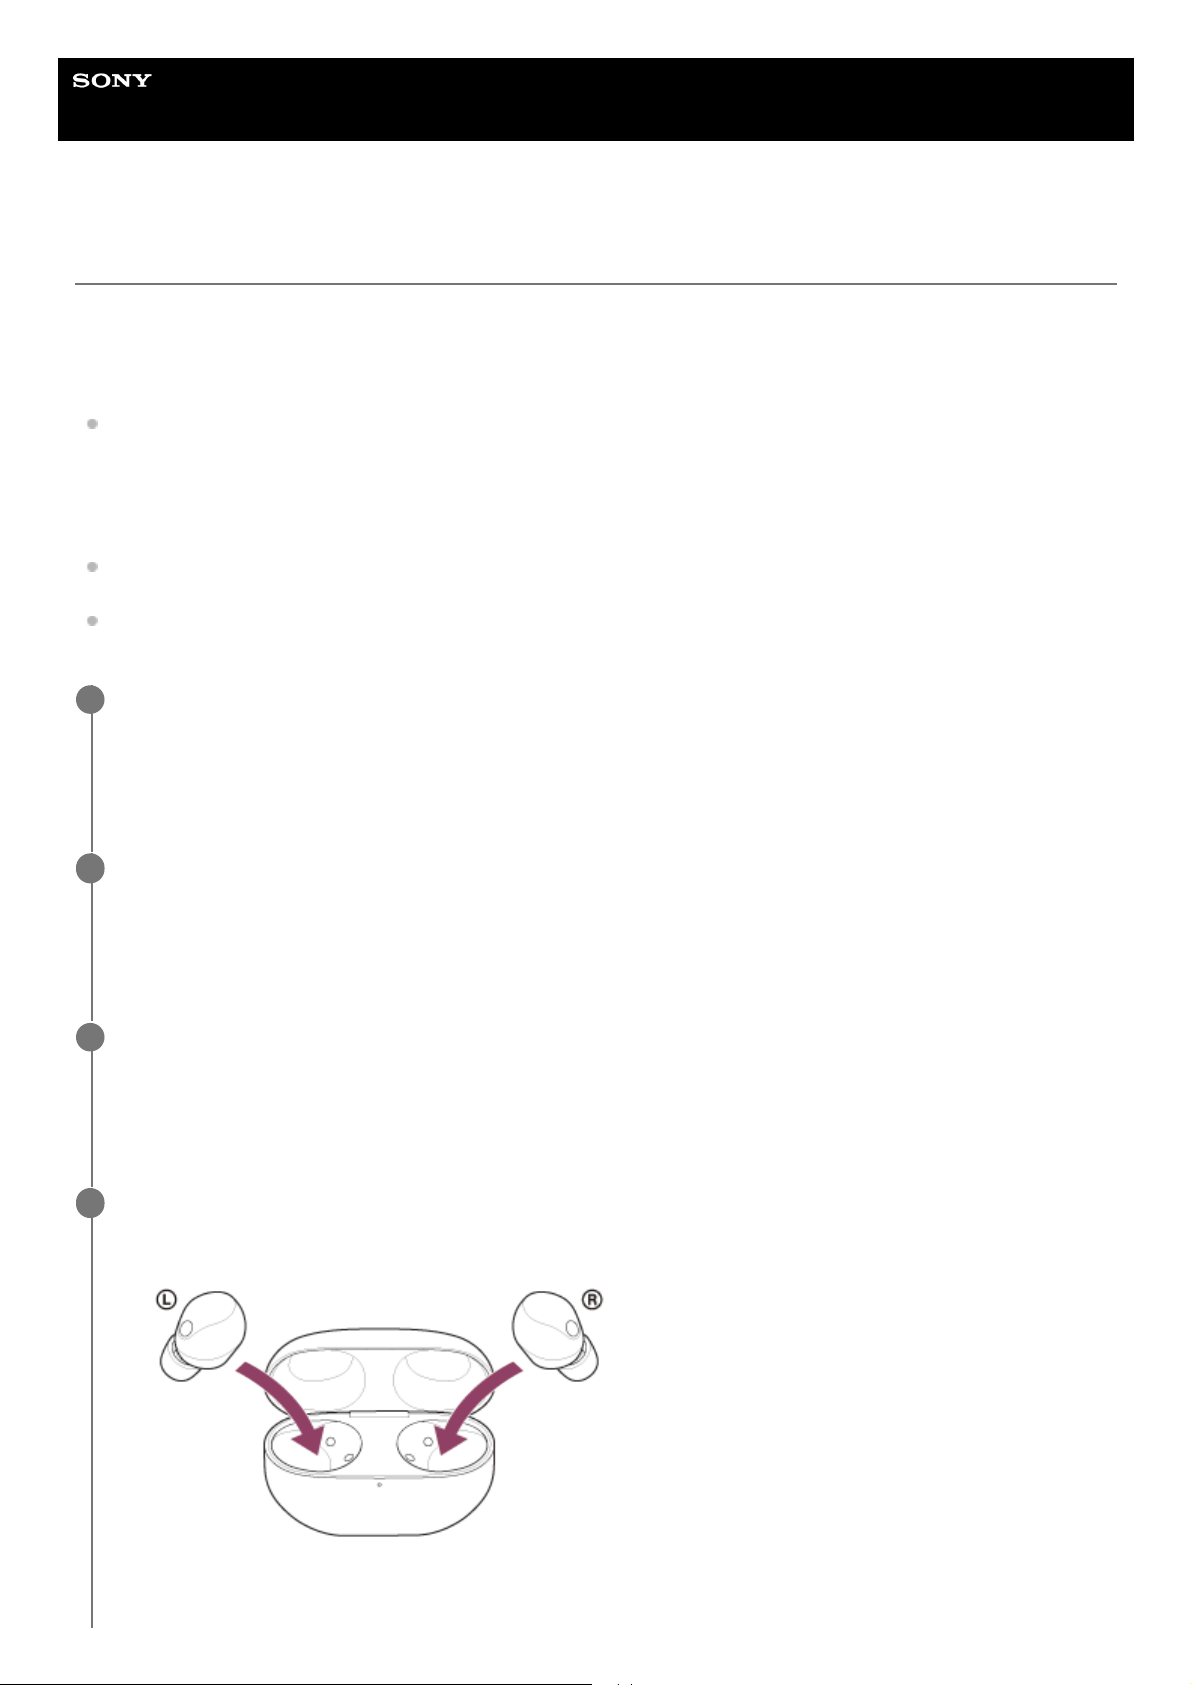
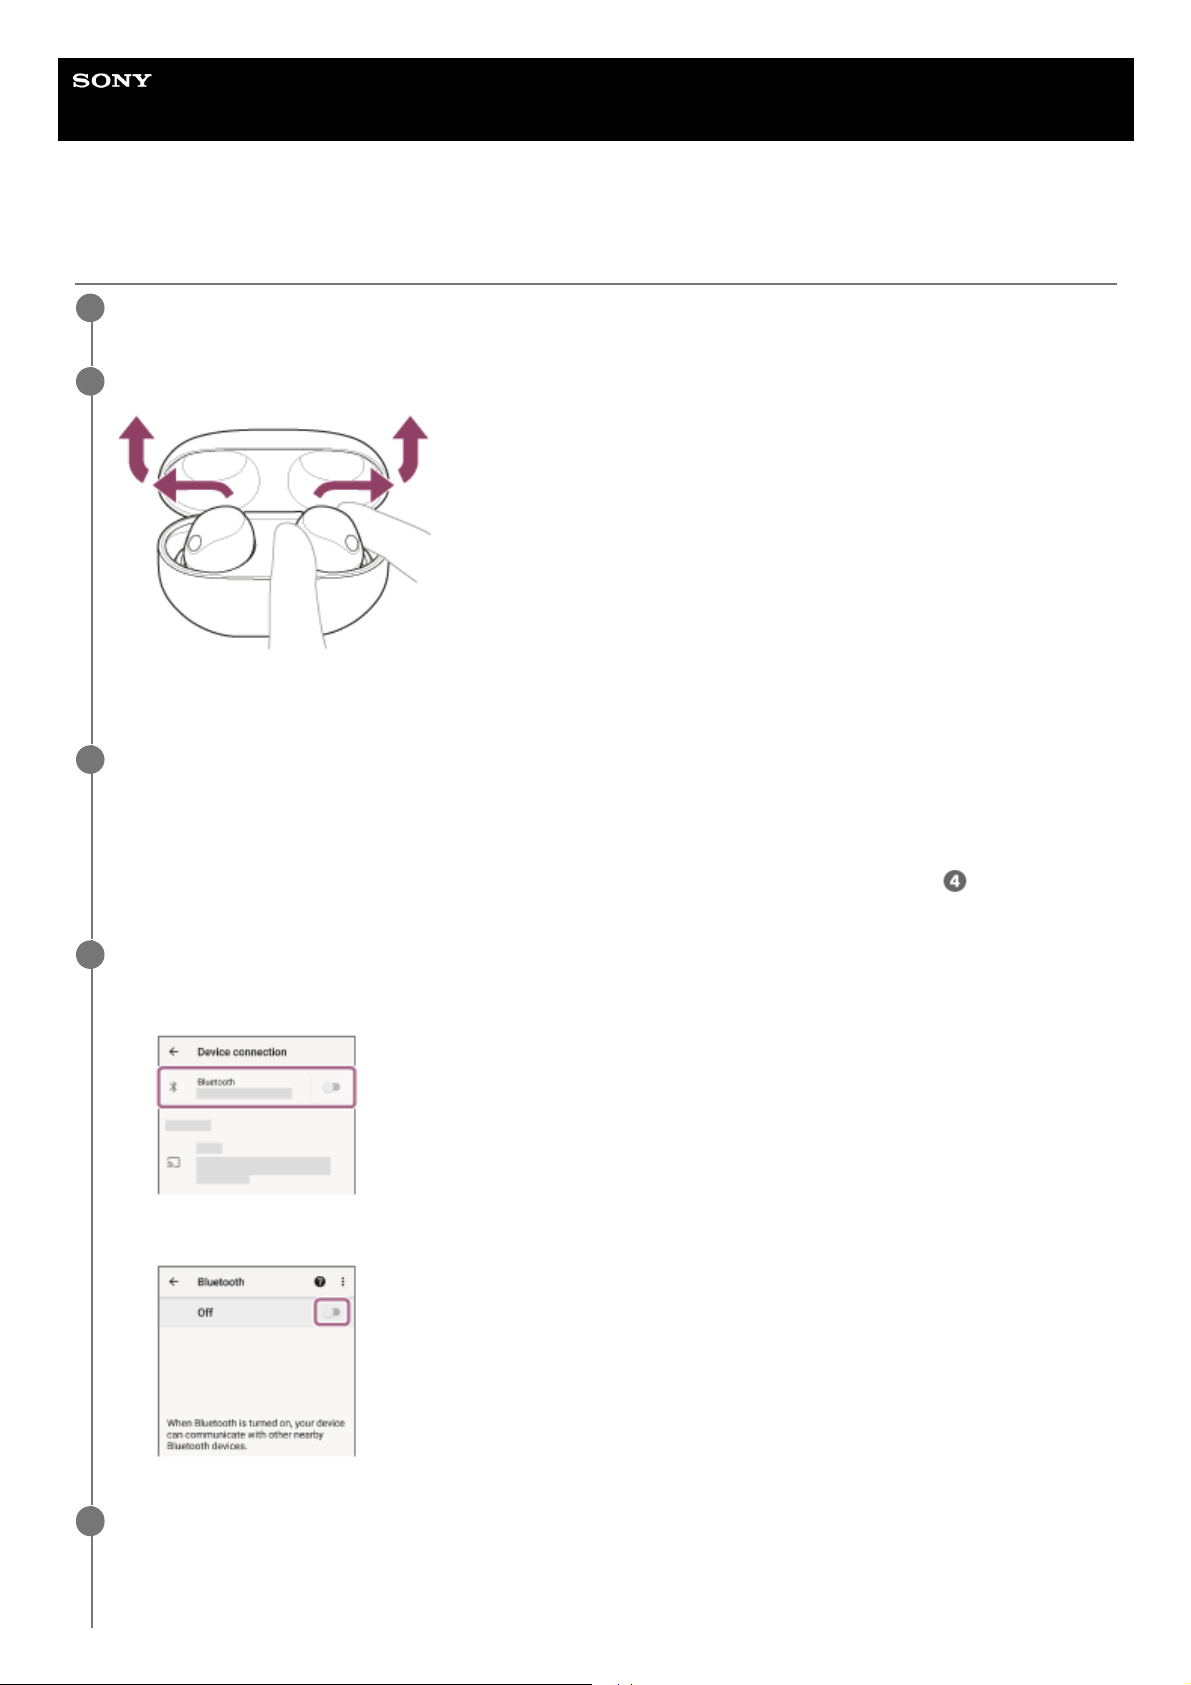
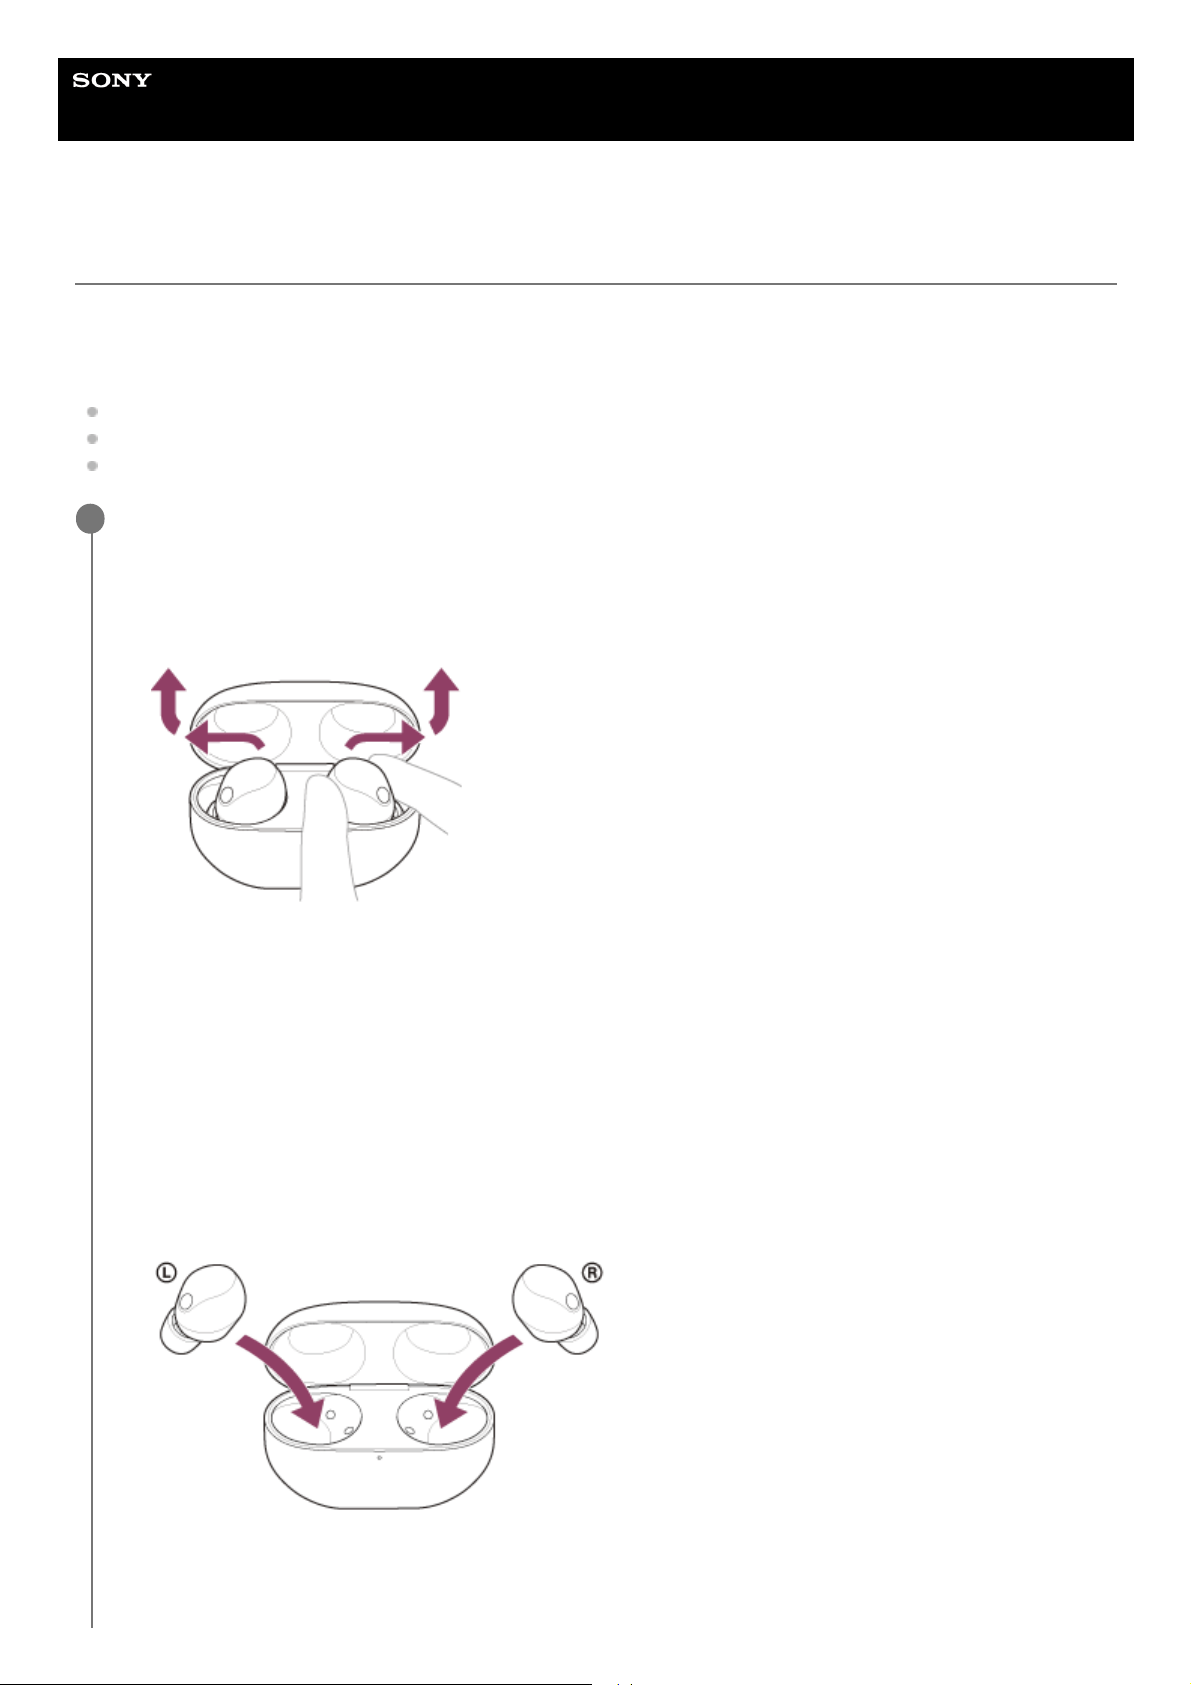
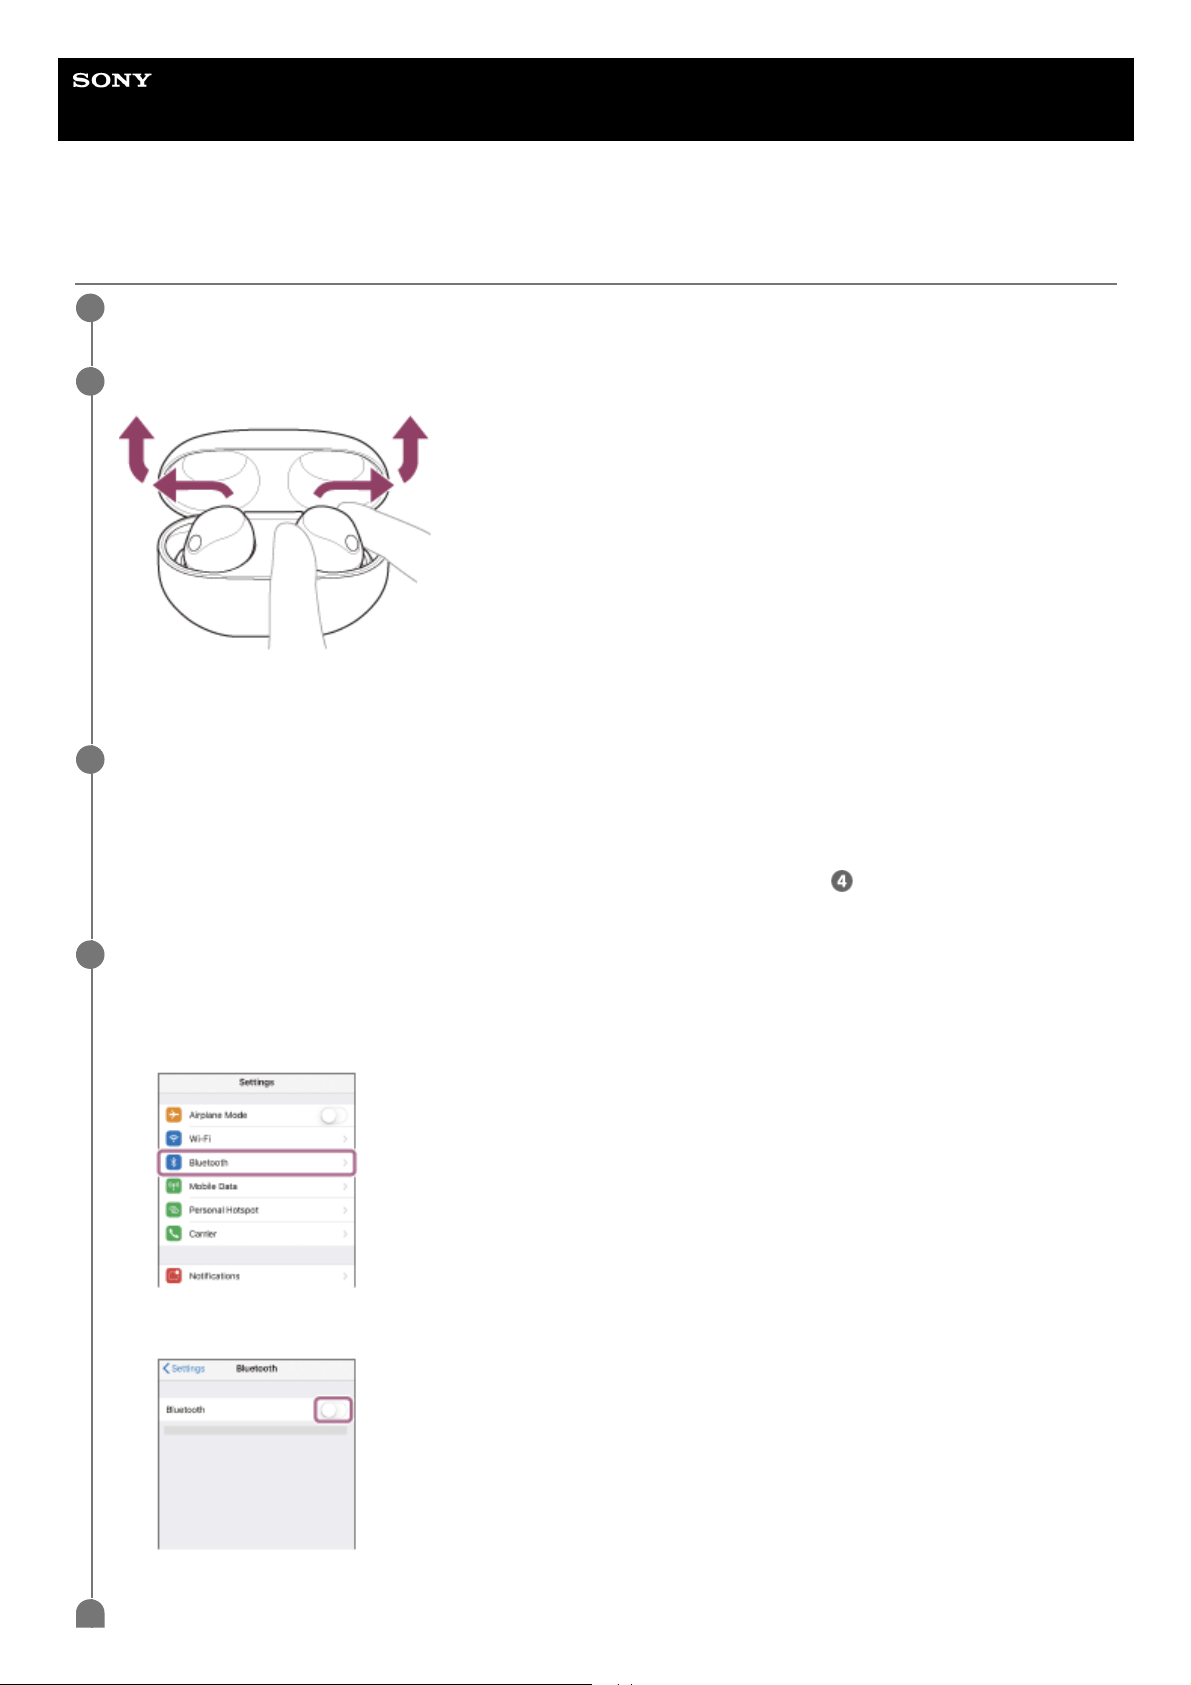
Simply turn the headset units on their sides to take them out of the charging case.
Put on the headset units by twisting them as you insert earbud tips deep into your ear canals.
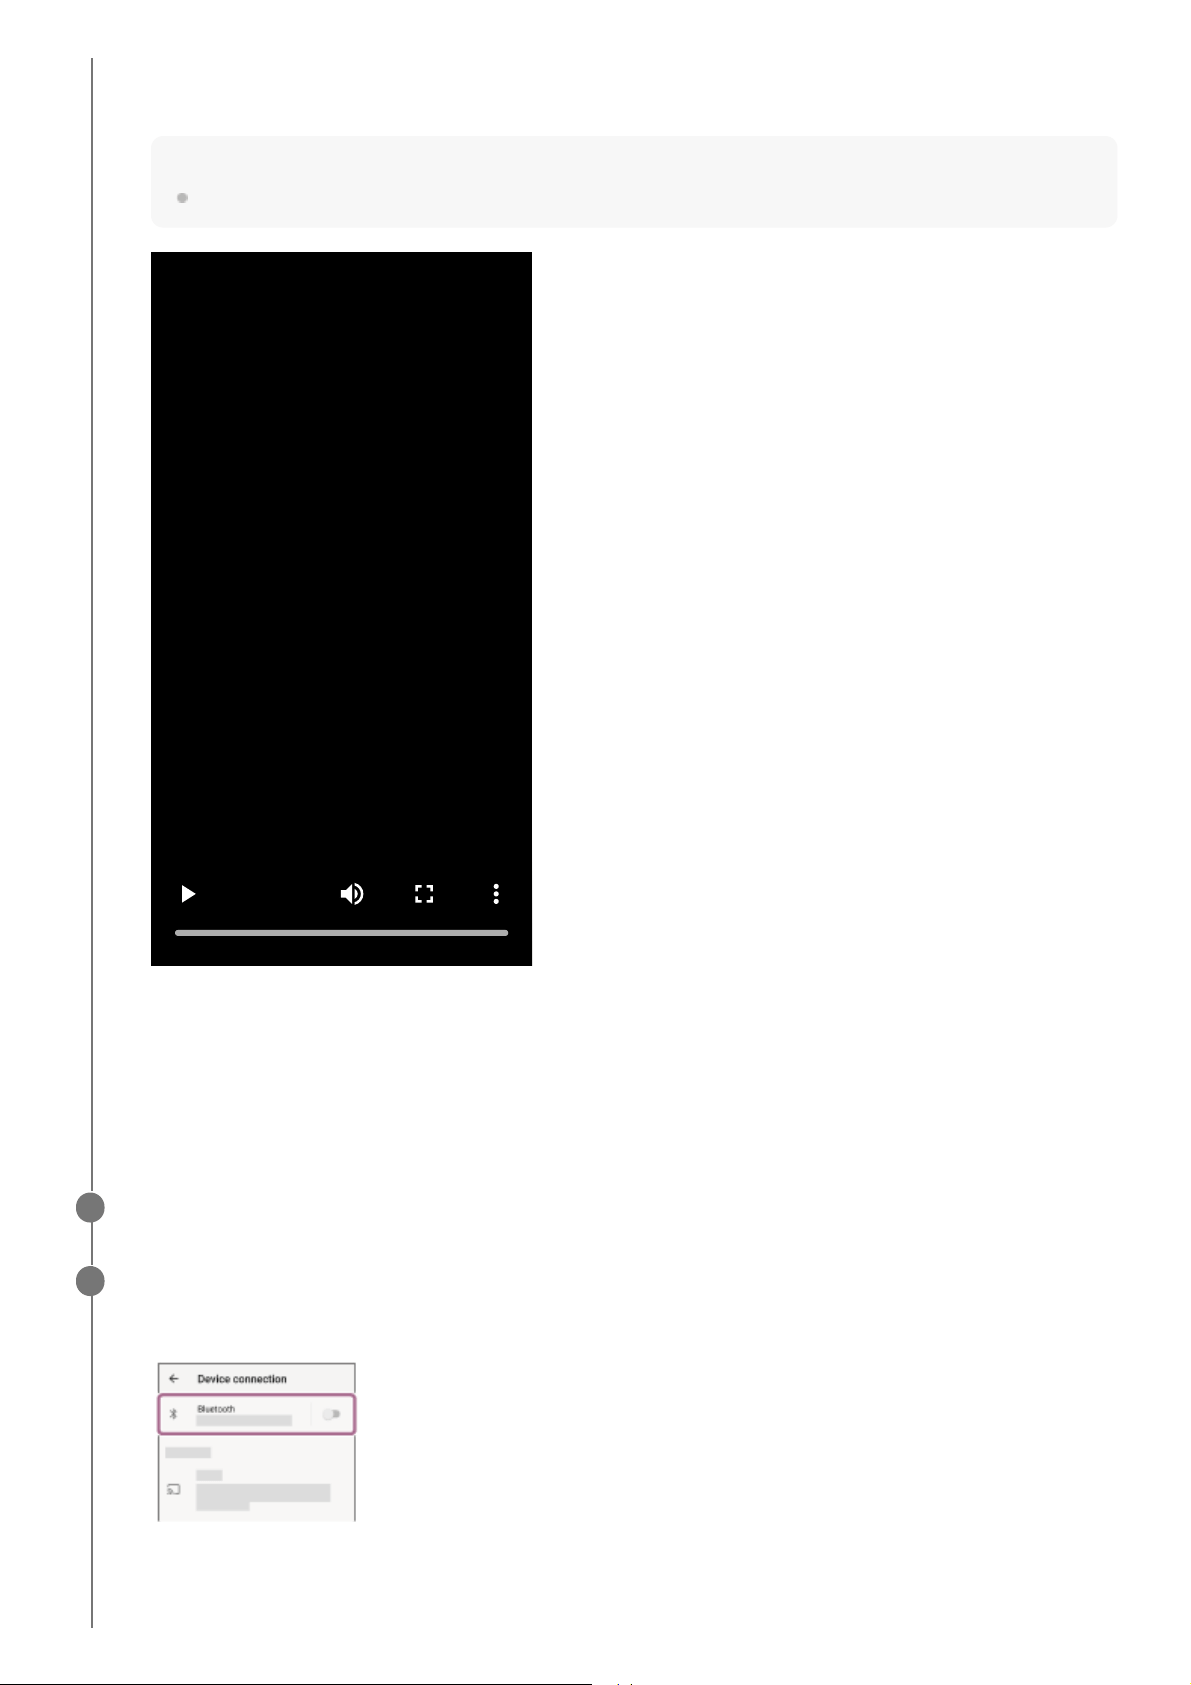
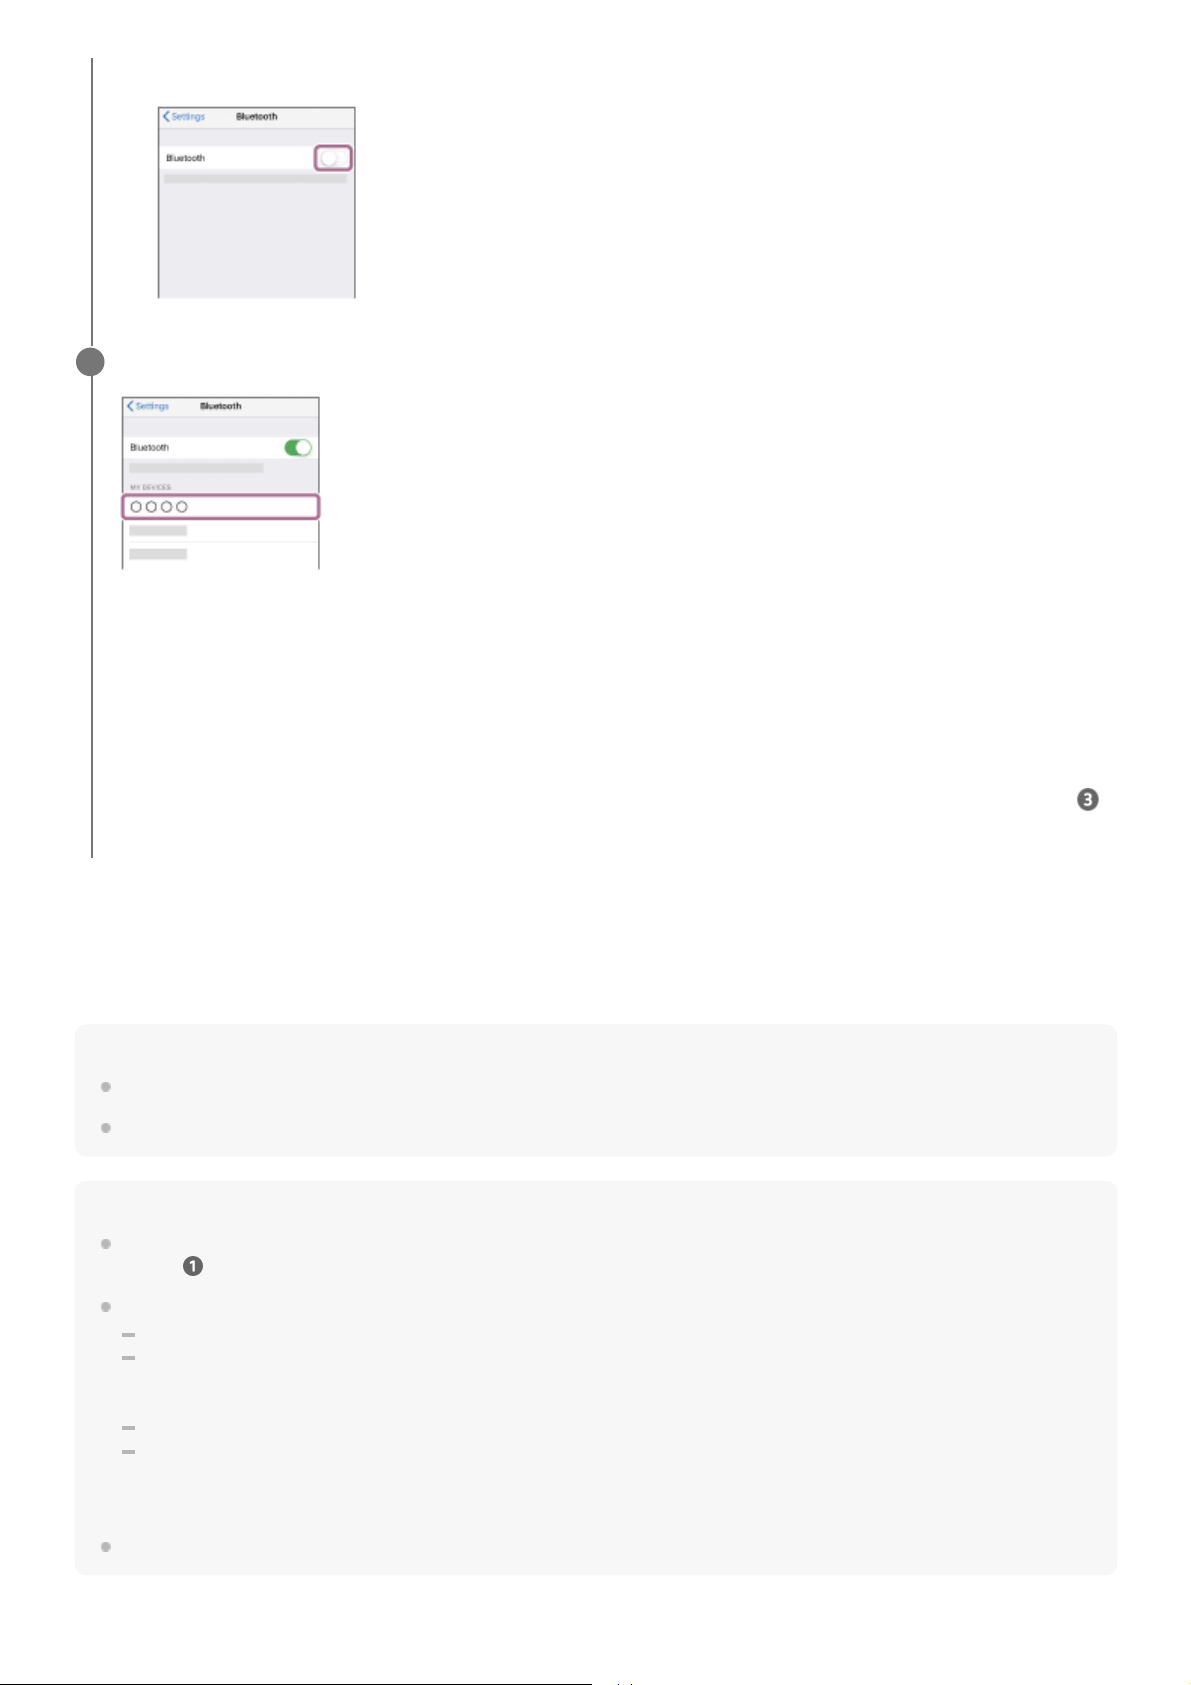
Establishing a BLUETOOTH® connection
The headset is turned on when the headset units are removed from the charging case.
Follow the downloaded “Sony | Headphones Connect” app instructions.
Operating the headset
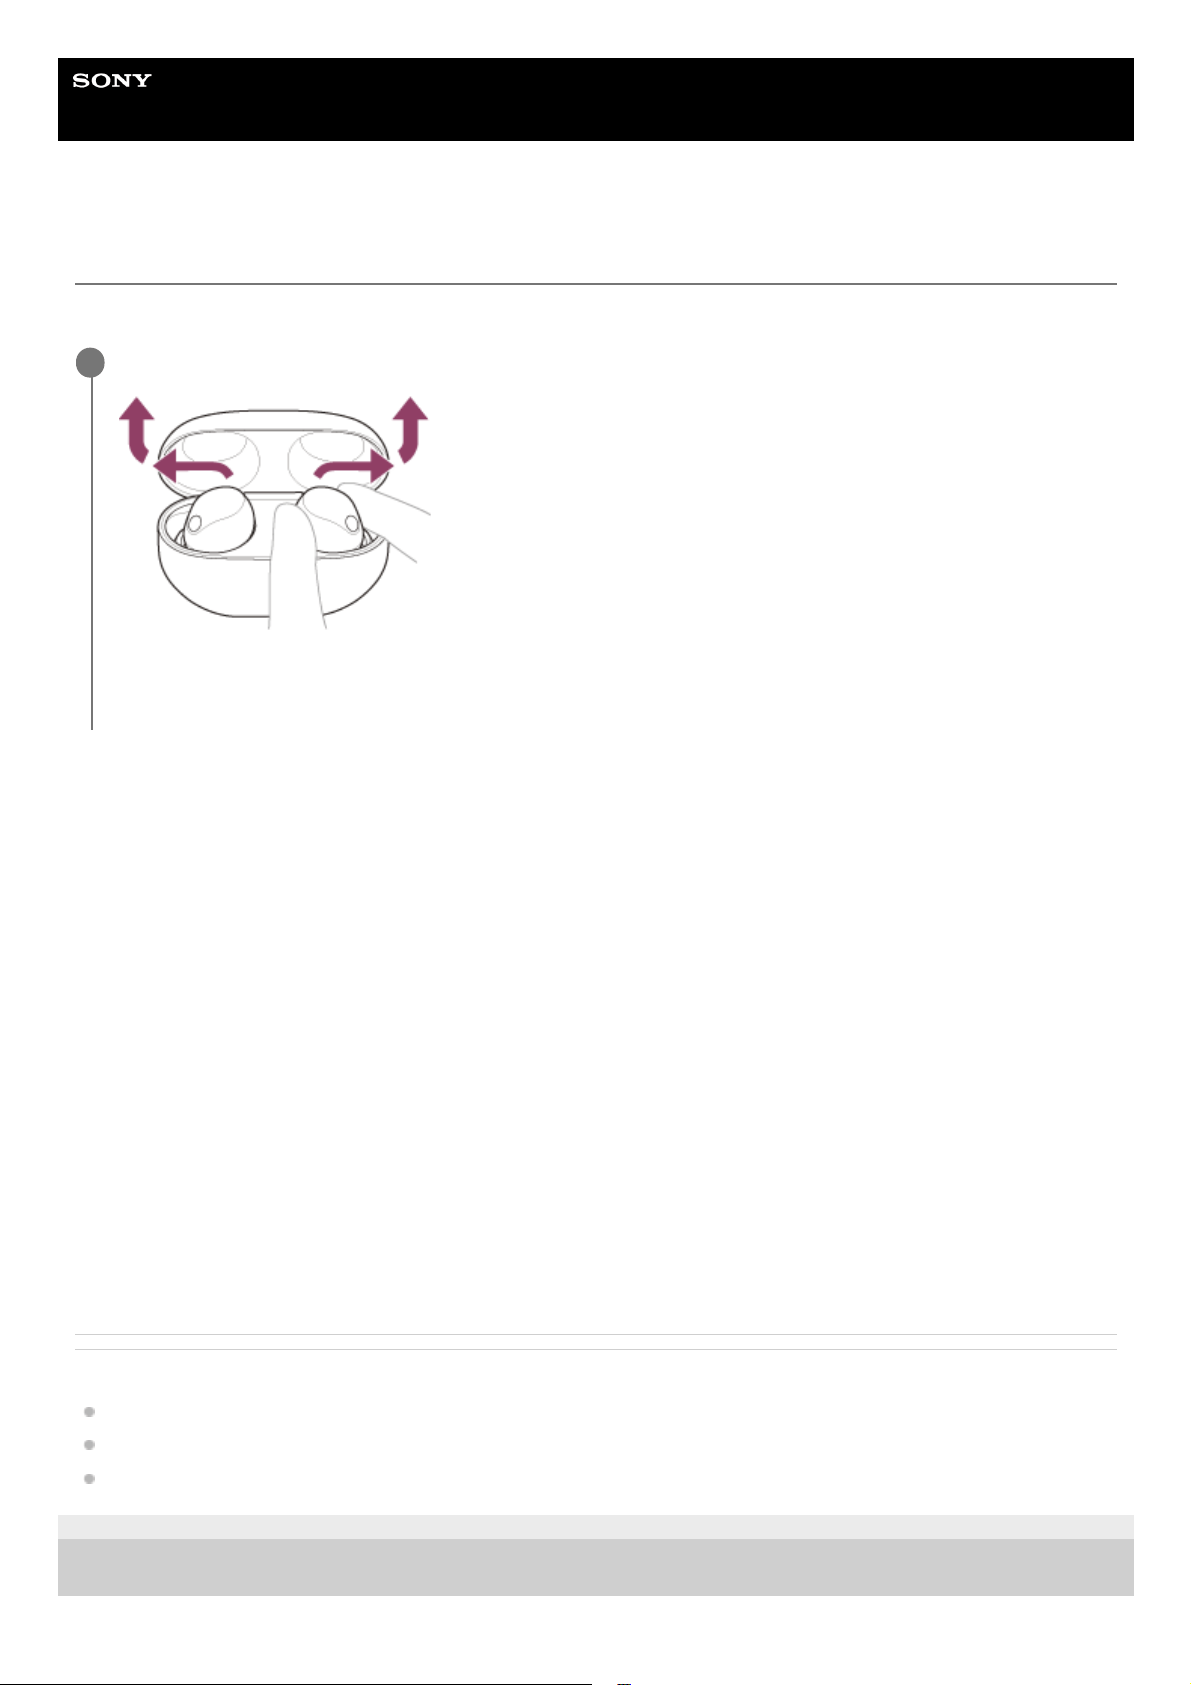
Tap the center of the touch sensor with the pad of your index finger.
Left
: To switch the noise canceling function and Ambient Sound Mode
: Quick Access (requires settings with the “Sony | Headphones Connect” app)
: Quick Access (requires settings with the “Sony | Headphones Connect” app)
...: To decrease the volume
: To activate the Quick Attention Mode
Right
: To play or pause music
: To skip to the beginning of the next track
: To skip to the beginning of the previous track (or the current track during playback)
...: To increase the volume
: To use or cancel the voice assist function (Google™ app/Siri)
Getting started
What you can do with the Bluetooth function
About the voice guidance
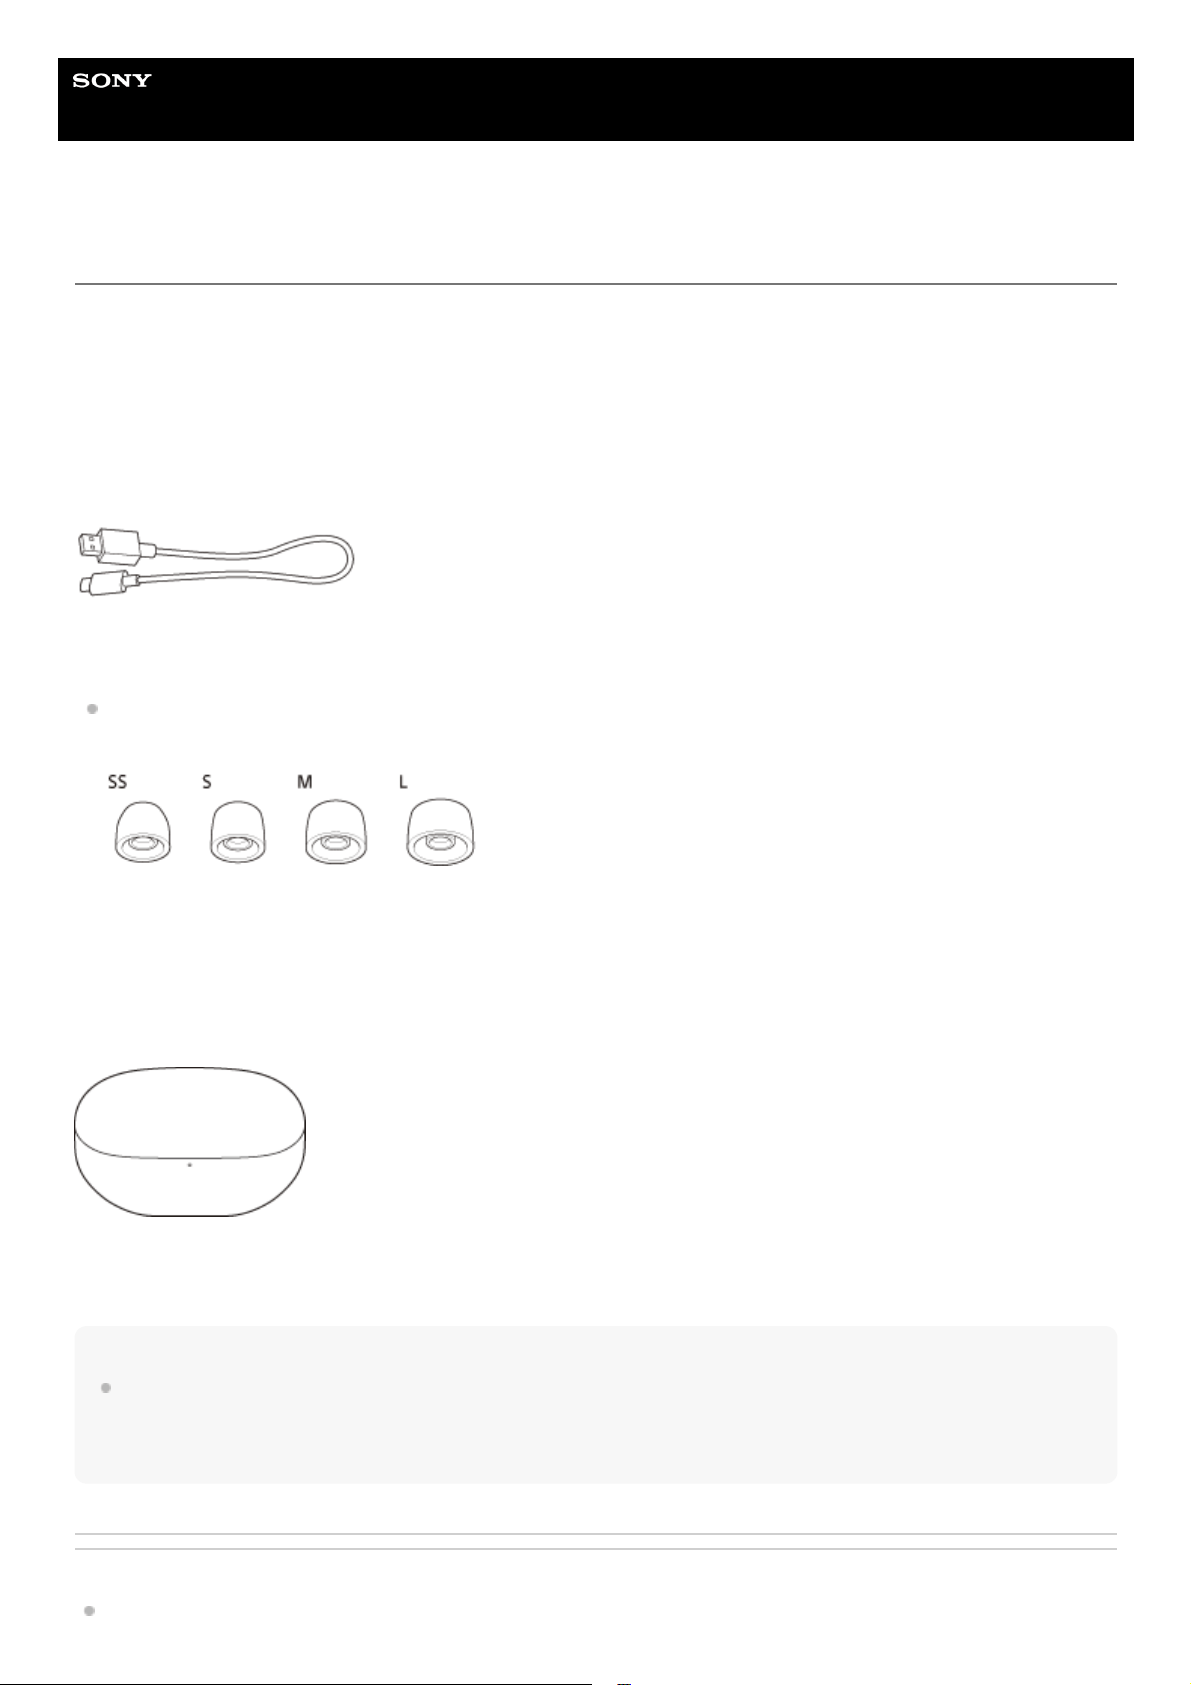
Supplied accessories
Checking the package contents
Replacing the earbud tips
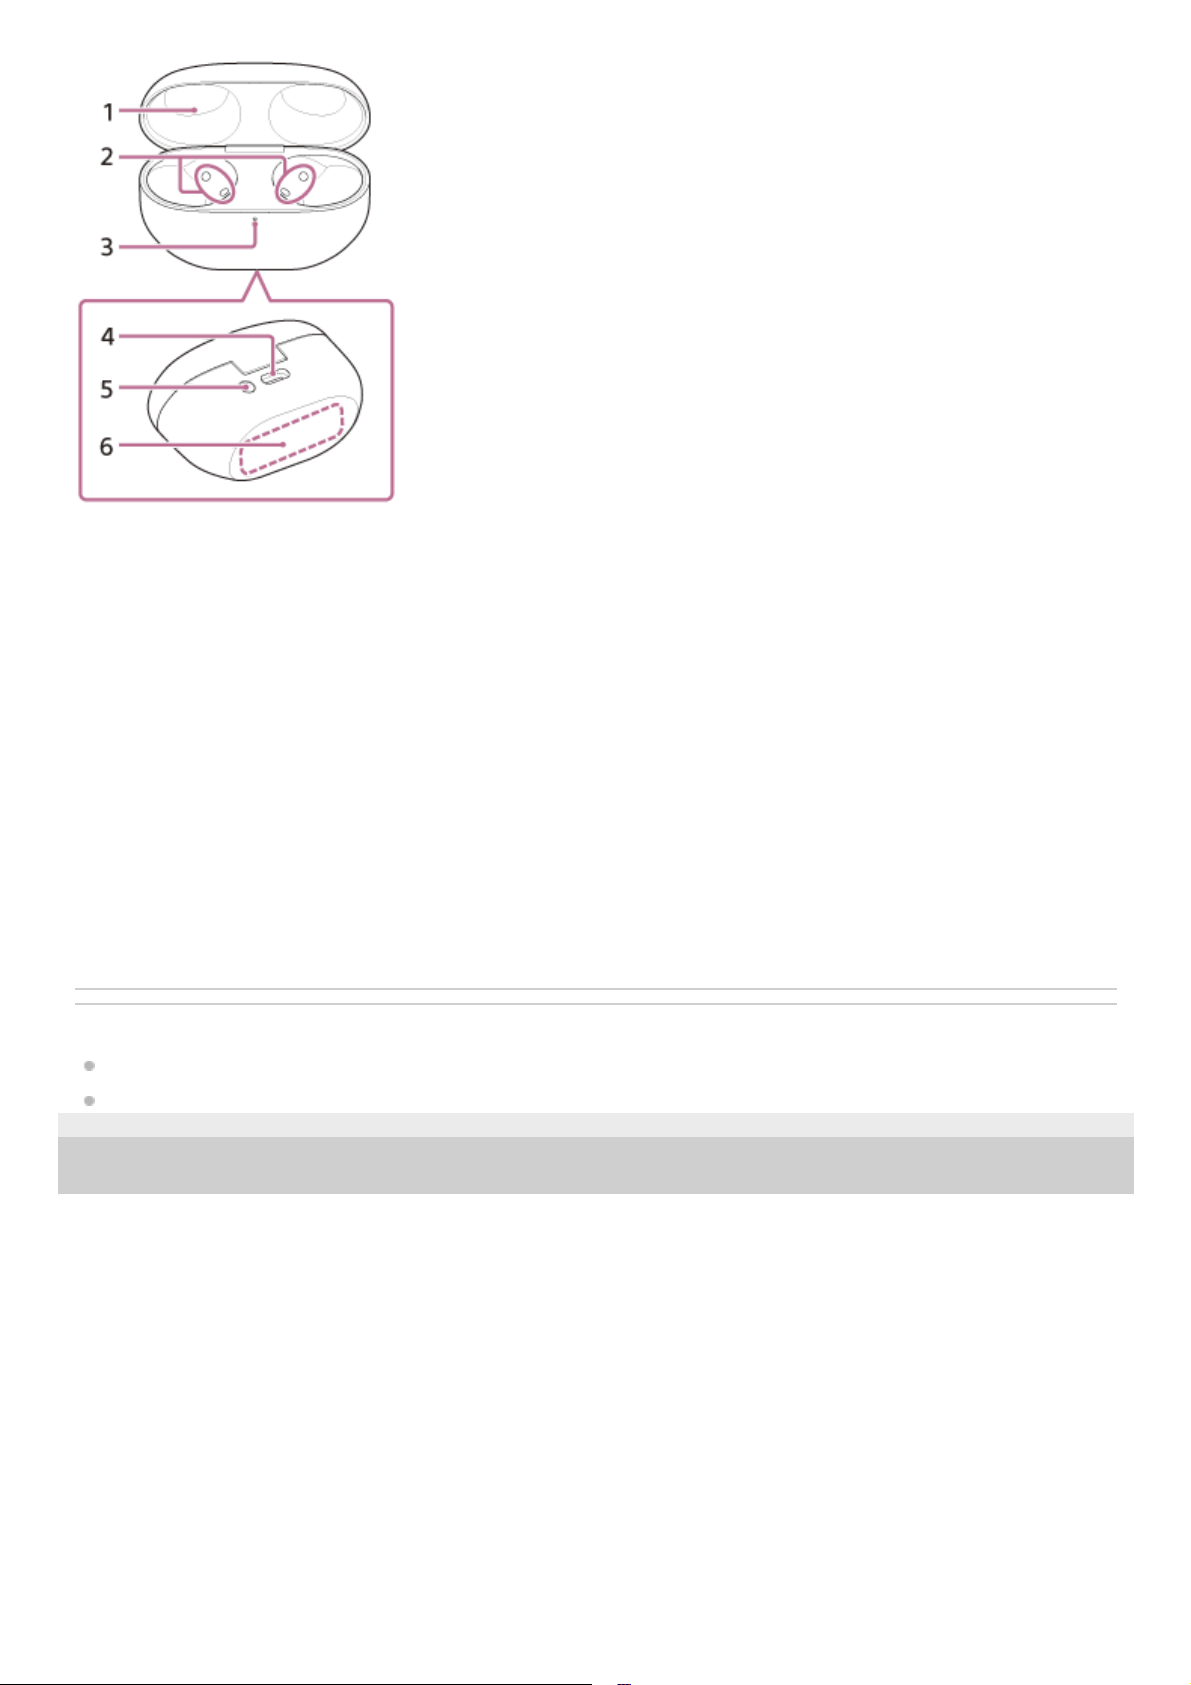
Parts and controls
Location and function of parts
About the indicator
2
Wearing the headset
Wearing the headset
Using only one headset unit
Operating the headset
About the touch sensor
Using Quick Access
Power/Charging
Charging
Available operating time
Checking the remaining battery charge
Turning on the headset
Turning off the headset
Making connections
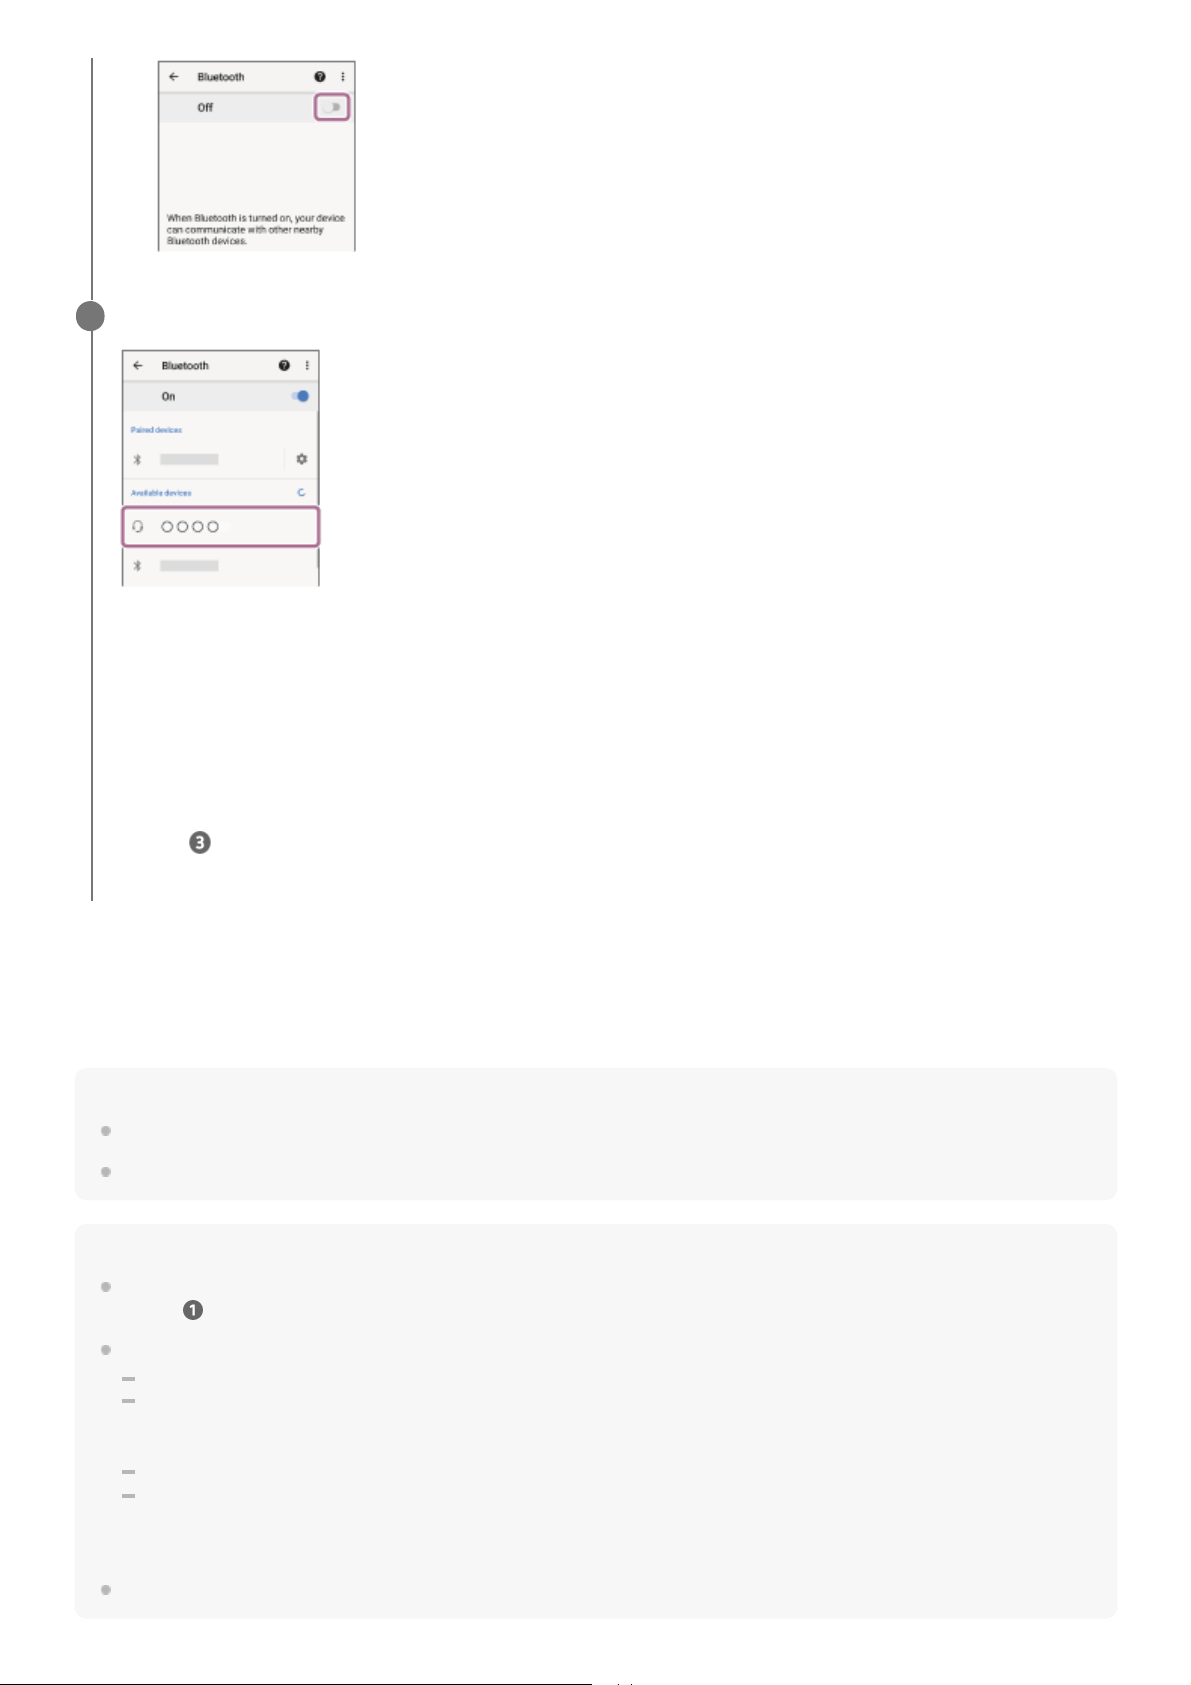
How to make a wireless connection to Bluetooth devices
Easy setup with app
Connecting with the “Sony | Headphones Connect” app
Android smartphone
Pairing and connecting with an Android smartphone
Pairing and connecting with an Android smartphone using LE Audio
Connecting to a paired Android smartphone
iPhone (iOS devices)
Pairing and connecting with an iPhone
Connecting to a paired iPhone
Computers
Pairing and connecting with a computer (Windows® 11)
Pairing and connecting with a computer (Windows 10)
Pairing and connecting with a computer (Mac)
Connecting to a paired computer (Windows 11)
Connecting to a paired computer (Windows 10)
3
Connecting to a paired computer (Mac)
Other Bluetooth devices
Pairing and connecting with a Bluetooth device
Connecting to a paired Bluetooth device
Multipoint connection
Connecting the headset to 2 devices simultaneously (multipoint connection)
Switching audio between multiple devices with “audio switch”
Listening to music
Listening to music via a Bluetooth connection
Listening to music from a device via a Bluetooth connection
Controlling the audio device (Bluetooth connection)
Disconnecting Bluetooth connection (after use)
About 360 Reality Audio
Noise canceling function
What is noise canceling?
Using the noise canceling function
Listening to ambient sound
Listening to ambient sound during music playback (Ambient Sound Mode)
Listening to ambient sound quickly (Quick Attention Mode)
Speaking with someone while wearing the headset (Speak-to-Chat)
Sound quality mode
About the sound quality mode
Supported codecs
About the DSEE Extreme function
Making phone calls
Receiving a call
Making a call
Functions for a phone call
Making a video call on your computer
4
Disconnecting Bluetooth connection (after use)
Using the voice assist function
Using Google Assistant (with touch sensor)
Using Amazon Alexa
Using Google Assistant (with voice activation)
Using the voice assist function (Siri)
Using the apps
What you can do with the “Sony | Headphones Connect” app
Installing the “Sony | Headphones Connect” app
Accessing support information from the “Sony | Headphones Connect” app
How to keep the software up-to-date (for comfortable use of the headset)
What you can do with partner services
What you can do with partner services
Important information
Precautions
When you have finished using the headset
Maintenance
To prevent burning or malfunction due to getting wet
When the headset units or charging case gets wet
Licenses
Trademarks
Customer support websites
Troubleshooting
What can I do to solve a problem?
Power/Charging
Unable to turn on the headset.
Headset cannot be charged or charging time is too long.
The available operating time is short, the battery power does not last long, the battery life of the left and right headset units is
different.
5
5-048-298-11(1) Copyright 2023 Sony Corporation
Sound
No sound, no sound from one side
Low sound level
Noise or unusual sound can be heard.
Sound skips frequently.
Low sound quality
The noise canceling effects are not sufficient.
Operation
The headset cannot be operated.
Bluetooth connection
Pairing with a Bluetooth device cannot be done.
Unable to make a Bluetooth connection.
Cannot hear the other person or the call volume is low during calls/The other person cannot hear you or their call volume is low
during calls.
The LE Audio connection cannot be established.
You cannot switch back to the Classic Audio connection.
Others
Earbud tips are damaged or lost.
An earache occurs.
Resetting or initializing the headset
Resetting the headset
Initializing the headset to restore factory settings
Specifications
Specifications
6
Help Guide
Wireless Noise Canceling Stereo Headset
WF-1000XM5
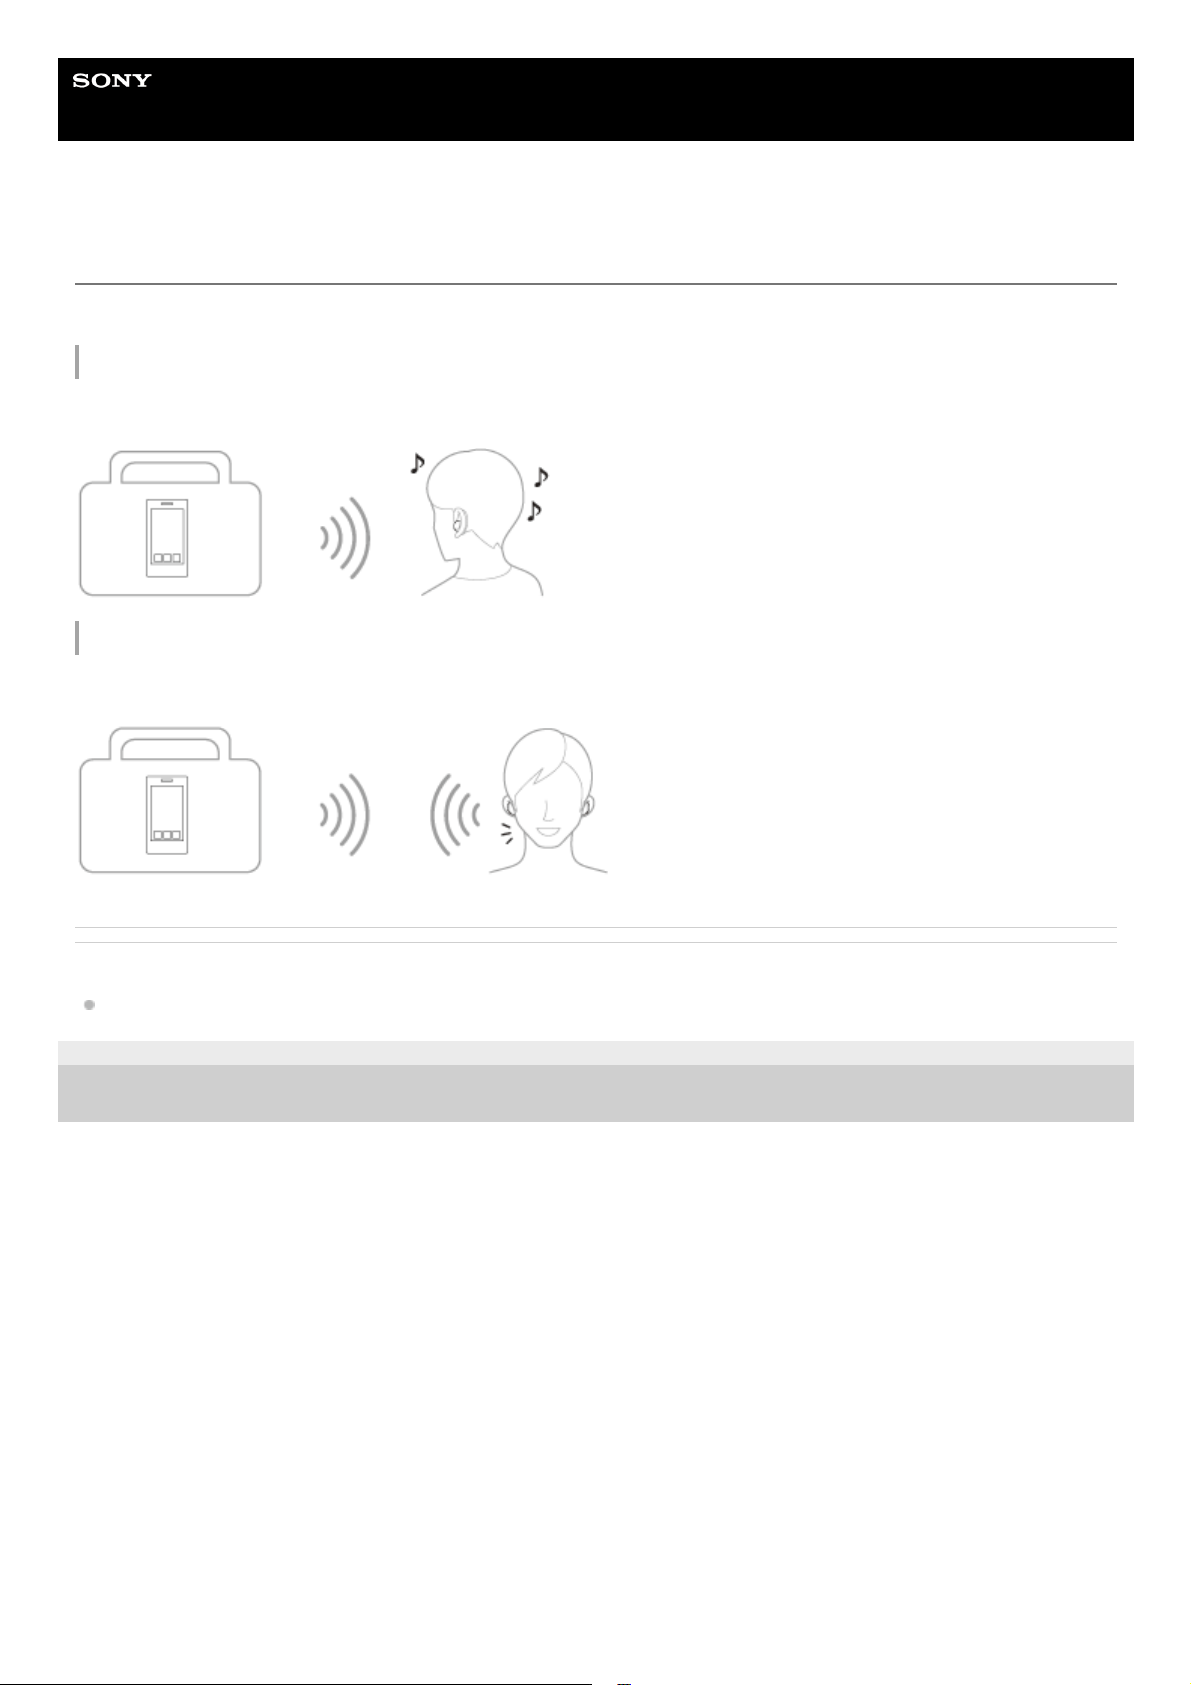
What you can do with the Bluetooth function
The headset uses Bluetooth wireless technology, allowing you to do the following.
Listening to music
You can enjoy music wirelessly from a smartphone or music player, etc.
Talking on the phone
You can make and receive calls hands-free, while leaving your smartphone or mobile phone in your bag or pocket.
Related Topic
How to make a wireless connection to Bluetooth devices
5-048-298-11(1) Copyright 2023 Sony Corporation
7

Help Guide
Wireless Noise Canceling Stereo Headset
WF-1000XM5
About the voice guidance
In the factory settings, when the headset is worn in your ears, you will hear the English voice guidance via the headset.
By using the “Sony | Headphones Connect” app, you can change the language of the voice guidance, turn on/off the
voice guidance, and set the voice guidance volume. For more details, refer to the “Sony | Headphones Connect” app
help guide.
https://rd1.sony.net/help/mdr/hpc/h_zz/
When entering pairing mode automatically by putting the headset units into your ears for the first time after purchase
or after initializing the headset (when there is no pairing information on the headset) / When manually entering
pairing mode and putting the headset units into your ears: “Pairing”
When the remaining battery charge of the headset is low: “Low battery”
When automatically turning off due to low battery of the headset: “Battery is empty”
When setting the voice guidance volume: “Voice guidance test”
When Google Assistant is not available on the smartphone connected to the headset even when operating the
headset unit to which Google Assistant is assigned: “Google Assistant is not connected”
When Amazon Alexa is not available on the smartphone connected to the headset even when operating the headset
unit to which Amazon Alexa is assigned: “Either your mobile device isn’t connected; or you need to open the Alexa
App and try again”
When operating Voice Assistant while connected in LE Audio: “The [Voice Assistant] is not available. Please open the
Headphones Connect and check the [Voice Assistant] settings.”
When [Connect to 2 devices simultaneously] is turned on and [LE Audio connection setting for headphones] is set to
[LE Audio Priority] in the “Sony | Headphones Connect” app and switching from Classic Audio connection to LE Audio
connection: “Multipoint connection has been disabled. Please open the Headphones Connect and check the
[Connect to 2 devices simultaneously] settings.”
When Quick Access is not available because Service Link is turned off: “Launch Headphones Connect to activate
Service Link”
When the corresponding app is not launched even if you operate the headset unit to which Quick Access is assigned:
“App assigned to the Quick Access is not launched on the mobile device”
When operating Quick Access while connected in LE Audio: “The Quick Access is not available. Please open the
Headphones Connect and check the [Services] tab.”
When Safe Volume Control starts: “The [Safe volume control] limits the volume.”
Note
When changing the language of the voice guidance, it may take up to about 20 minutes.
When you initialize the headset to restore to the factory settings after you change the language of the voice guidance, the
language will not return to the factory settings.
If the voice guidance is not heard after changing the voice guidance language or updating the software of the headset, set the
headset units into the charging case, and close the charging case lid to turn them off, then remove the headset units from the
charging case to turn them on again.
5-048-298-11(1) Copyright 2023 Sony Corporation
8
Help Guide
Wireless Noise Canceling Stereo Headset
WF-1000XM5
Checking the package contents
After opening the package, check that all of the items in the list are included. If any items are missing, contact your
dealer.
Numbers in ( ) indicate the item amount.
Wireless Noise Canceling Stereo Headset (1)
USB Type-C® cable (USB-A to USB-C®) (approx. 20 cm (7.88 in.)) (1)
Noise isolation earbud tips (SS/S/M/L 2 each)
M-sized earbud tips come attached to the left and right headset units at the time of purchase.
The size of the earbud tips can be determined based on the color of the inside of the earbud tips.
SS size: red
S size: orange
M size: green
L size: light blue
Charging case (1)
Documents (1 set)
Note
Earbud tips are consumables. If the earbud tips are damaged and need replacing, contact your nearest Sony dealer or purchase
the EP-NI1010 series
*
, sold separately.
Related Topic
Earbud tips are damaged or lost.
May not be supported in some countries or regions.*
9

5-048-298-11(1) Copyright 2023 Sony Corporation
10
Help Guide
Wireless Noise Canceling Stereo Headset
WF-1000XM5
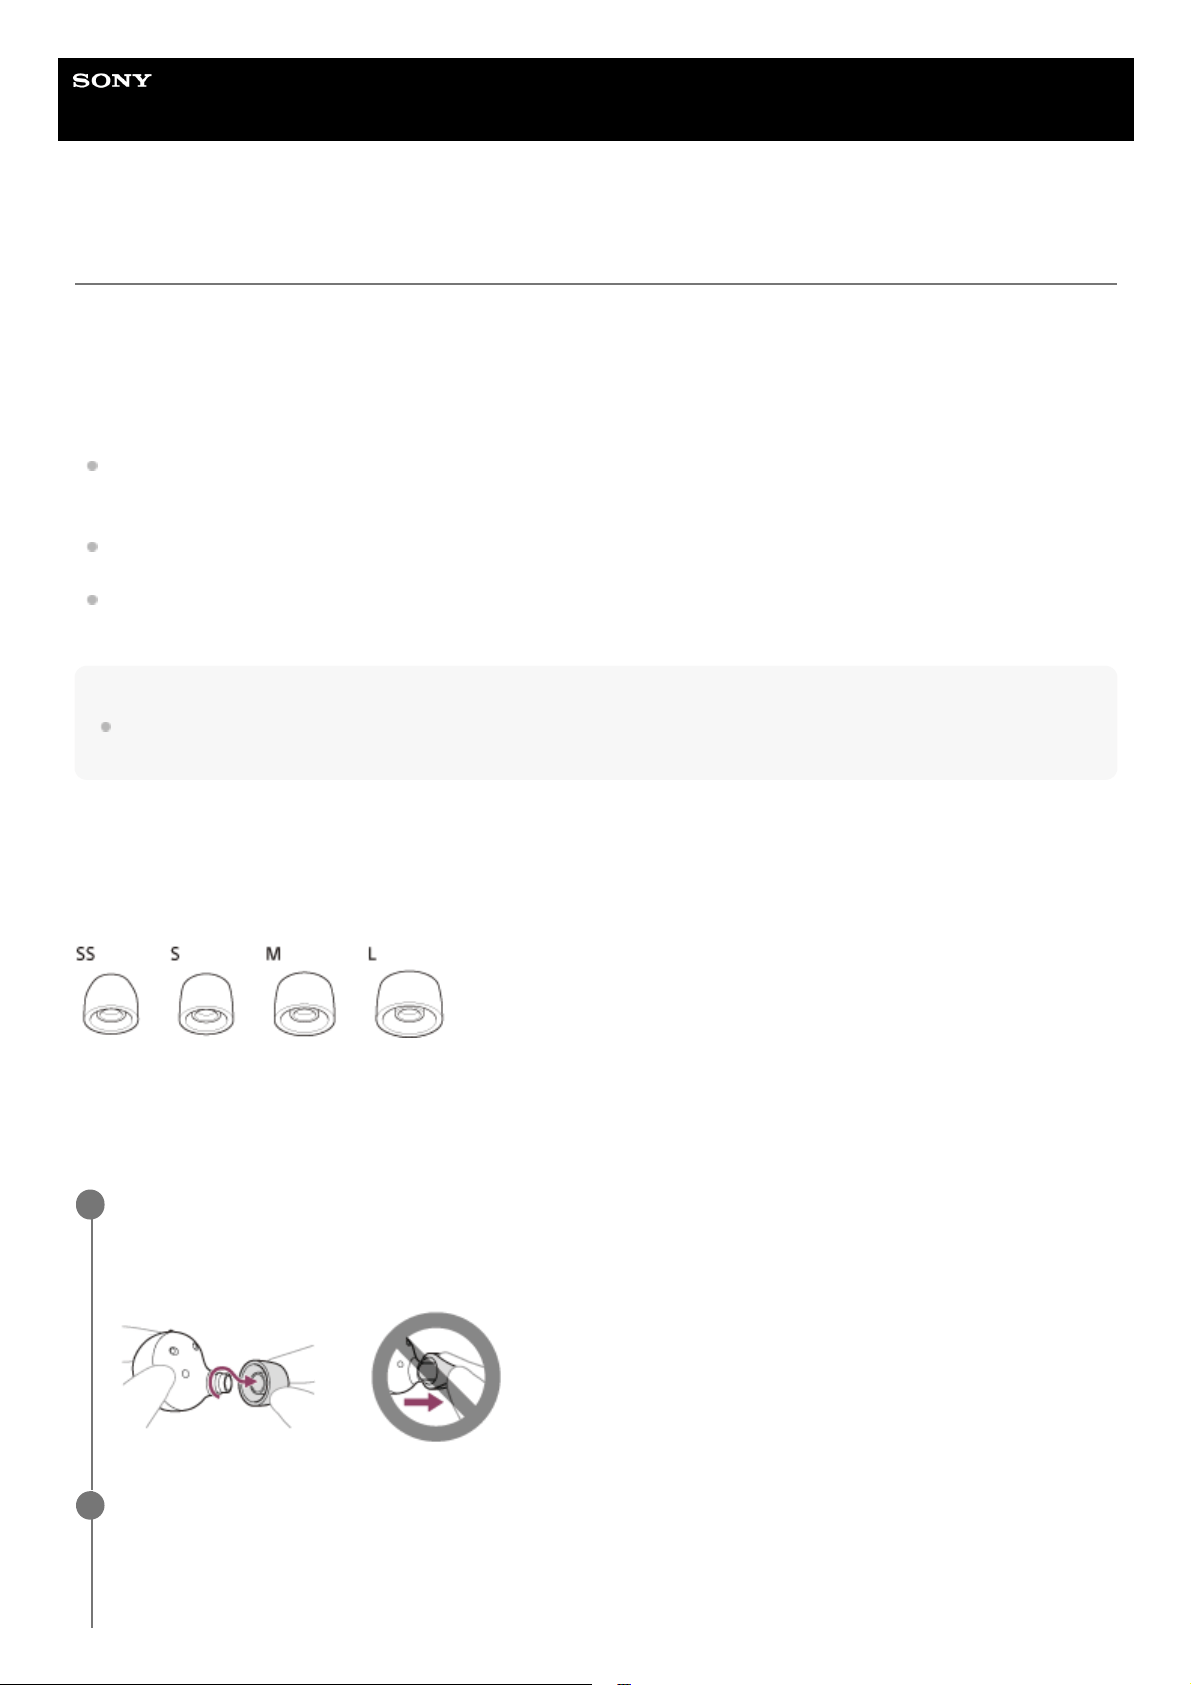
Replacing the earbud tips
M-sized earbud tips come attached to the left and right headset units at the time of purchase.
If the size of the earbud tips does not match the size of your ear canals or the headset is not worn properly in your ears,
tap operations or Speak-to-Chat speech detection may not work correctly, or you may not obtain the correct sound
qualities, noise canceling effects, or call performance.
If any of this is the case, try the following.
Change the earbud tips to ones that fit more snugly in your ears. When changing the earbud tips, try the earbud tip
sizes in order from the larger ones to the smaller ones. The most suitable size of the earbud tips for left and right
ears may be different.
The “Sony | Headphones Connect” app will help you to determine which earbud tips suit you best to achieve the
optimal noise canceling effect, sound quality, etc.
Check that you are wearing the headset properly in your ears. Wear the headset so that the earbud tip is comfortably
situated as deep in the ear canal as possible.
Hint
The function that determines the optimal earbud tips for you measures the air-tightness of the earbud tips and determines
whether or not the headset units are being worn in your ears correctly. Select a size that fits comfortably.
Noise isolation earbud tips
The size of the earbud tips can be determined based on the color of the inside of the earbud tips.
SS size: red
S size: orange
M size: green
L size: light blue
Remove the earbud tip.
Hold the headset unit and twist the earbud tip while rotating it to pull it out.
Do not pinch the end of the earbud tip when removing it.
1
Attach the earbud tip.
Push the earbud tip firmly onto the sound conduit (sound output tube) on the headset so that the earbud tip covers
the inner end of the sound conduit. Do not attach the earbud tip in a loose or skewed manner.
2
11
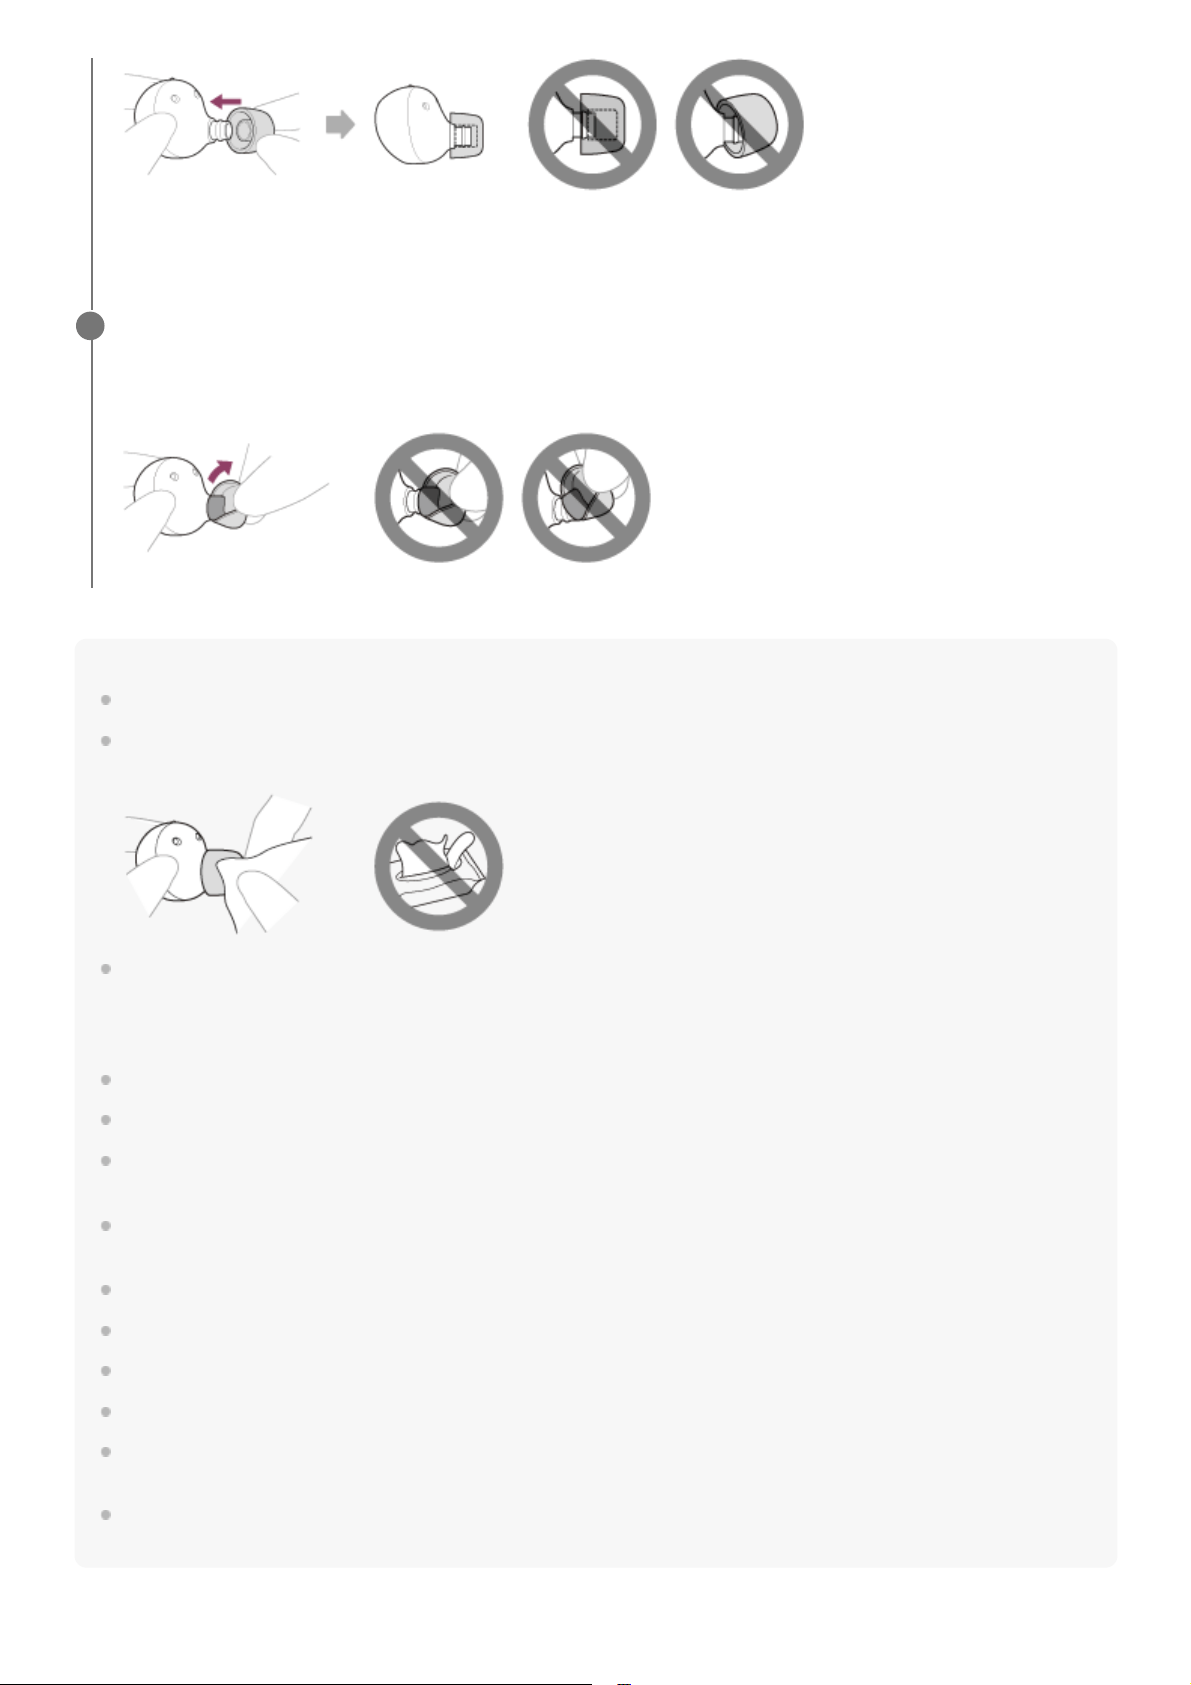
Note
Earbud tips are consumables.
Avoid washing with water, wet wipes, and the use of organic solvents such as alcohol, as these can cause premature
deterioration.
The earbud tips deteriorate through long-term use and storage. When there are cracked, peeled, or chipped portions, refrain from
using them.
If the earbud tips deteriorate, they cannot achieve proper sound qualities or noise canceling effects, and can cause injuries or
diseases as the earbud tips may come off and remain in the ear.
As the earbud tips fit more snugly in your ears, you may feel a strain to your ears. If you experience discomfort, discontinue use.
Do not pull on the polyurethane foam portion of the earbud tip. If it is separated from the earbud tip, it will not function.
Do not subject the polyurethane foam portion of the earbud tip to pressure for over long periods of time. It may cause deformation
and it may be difficult to return the earbud tip to the original shape.
When the earbud tips become dirty, do not wash them in water, and wipe off the dirt using a dry cloth. Do not use alcohol, etc.
Doing so may quicken the deterioration.
When the earbud tips get soaked, drain the liquid well, and make sure that the earbud tips are dried before use or storage.
The varying sizes of the holes on the polyurethane foam portion of the earbud tip have no effect on the sound quality.
You may hear a cracking noise in your ears when wearing the headset. However, this is not a malfunction.
The foam materials may become firm at a low temperature. Warm the earbud tips a little with your hands before use.
When the environmental temperature or usage temperature is high, the polyurethane foam may take time to return to its original
shape.
If you feel that the bass sound has become insufficient (or that the sound quality has deteriorated), exchange the earbud tips with
new ones.
If the earbud tip is not completely attached, the earbud tip may be removed from the headset and the sound quality,
noise canceling effects, and wearability may be impaired.
Check that the earbud tip is securely attached.
Twist the earbud tip to one side and check that the stem of the earbud tip is completely covering the sound conduit
on the headset unit.
3
12

Help Guide
Wireless Noise Canceling Stereo Headset
WF-1000XM5
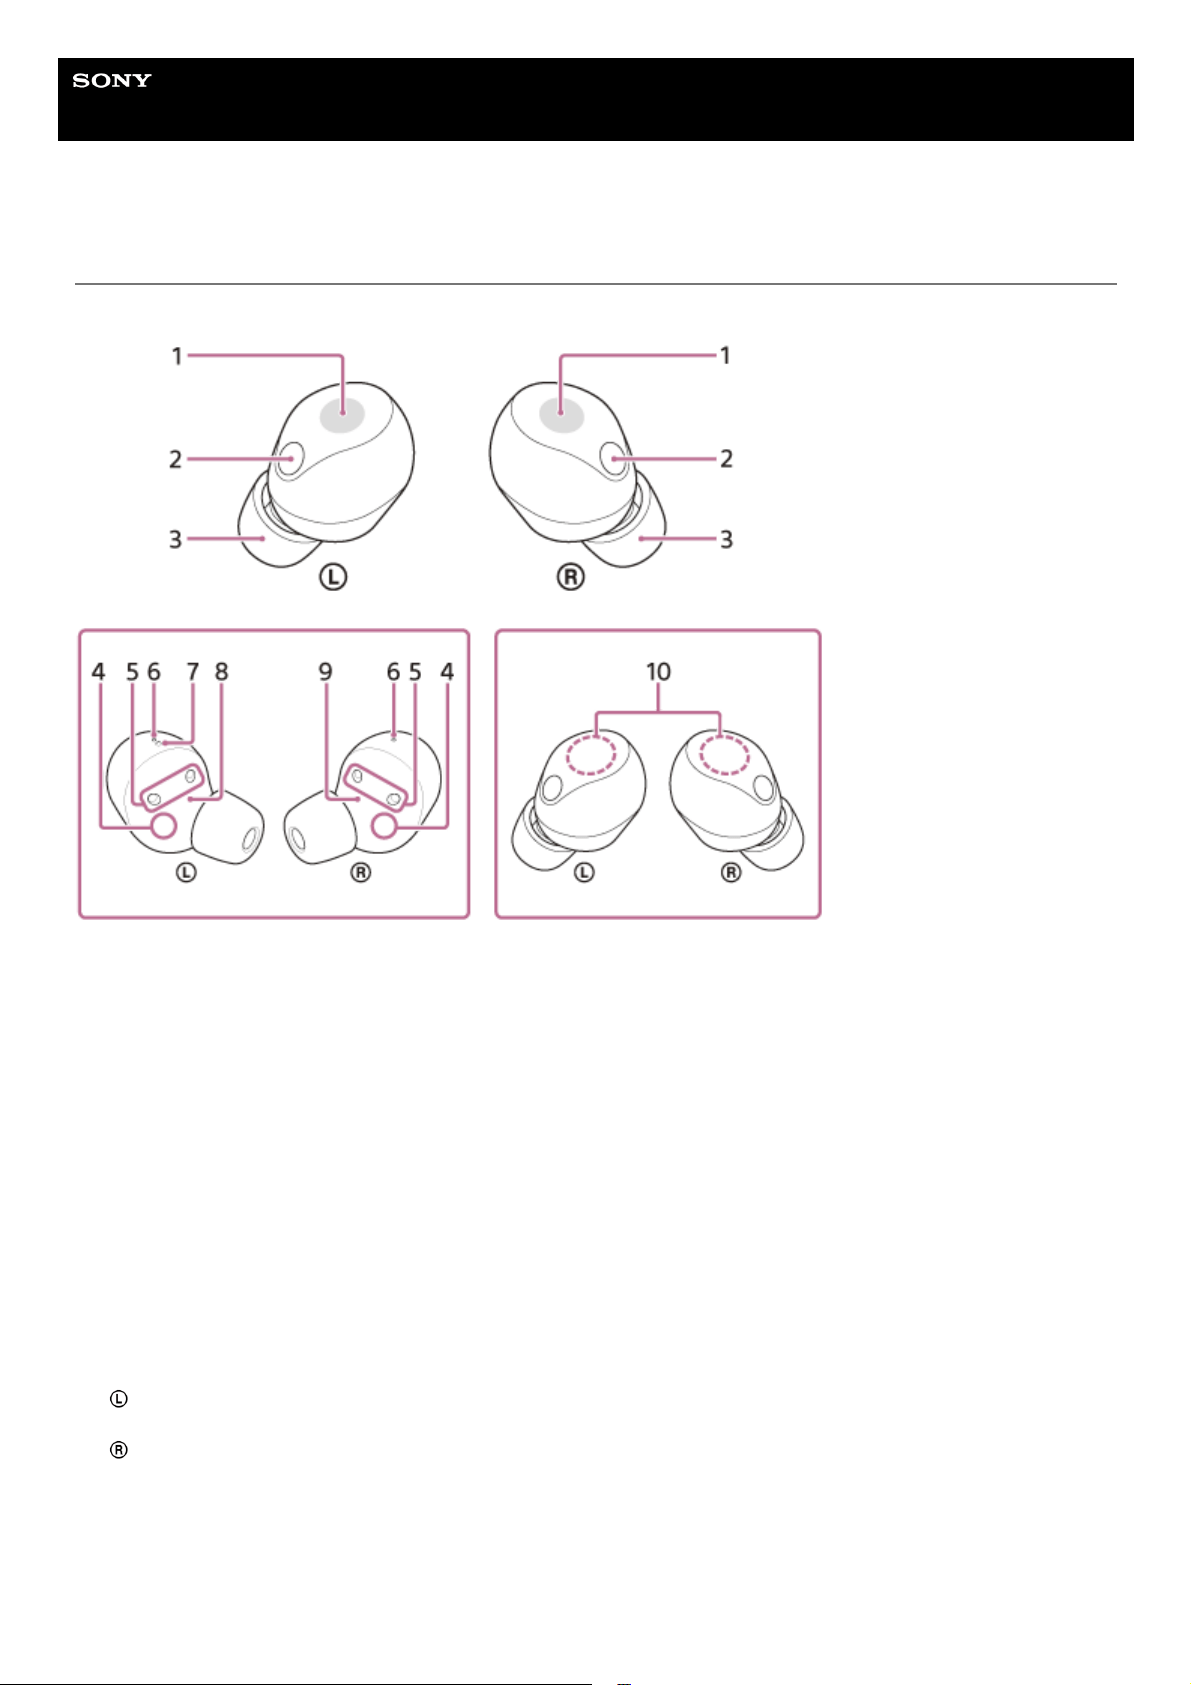
Location and function of parts
Headset
Charging case
Touch sensors (left, right)1.
Microphones (left, right)
Picks up the sound of your voice (when talking on the phone or in the Speak-to-Chat mode) and noise (when using
the noise canceling function/Ambient Sound Mode).
2.
Earbud tips (left, right)3.
IR sensors (left, right)4.
Charging ports (left, right)5.
Air holes (left, right)6.
Tactile dot
There is a tactile dot on the left headset unit.
7.
(left) mark8.
(right) mark9.
Built-in antennas (left, right)10.
14
Related Topic
About the indicator
Checking the remaining battery charge
5-048-298-11(1) Copyright 2023 Sony Corporation
Lid1.
Charging ports (left, right)2.
Indicator (green/orange/blue)
Indicates the remaining battery life of the headset units and charging case, the charging status, or the status of the
pairing mode.
3.
USB Type-C port
Using the supplied USB Type-C cable, connect the charging case to a computer or to an AC outlet via a
commercially available USB AC adaptor to simultaneously charge both the headset and the charging case.
4.
Pairing/reset/initialize button
Used when entering pairing mode, resetting or initializing the headset.
5.
Contact surface for the Qi charging6.
15

Help Guide
Wireless Noise Canceling Stereo Headset
WF-1000XM5
About the indicator
You can check various statuses of the headset/charging case by the indicator on the charging case.
: Turns on in green / : Turns on in orange / : Turns on in blue / -: Turns off
Indication of the remaining battery charge
When both headset units are stored in the charging case: Displays the remaining battery charge of the headset unit with
less remaining battery charge between the left and right headset units.
When either the left or right headset unit is stored in the charging case: Displays the remaining battery charge of the
headset unit stored in the charging case.
When both headset units are removed from the charging case: Displays the remaining battery charge of the charging
case.
When the charging case lid is opened or closed, or when the USB Type-C cable is removed after charging is complete,
the indicator lights up as follows depending on the remaining battery charge.
When the headset is stored in the charging case and the remaining battery charge of the headset is 95% or higher /
When the headset is not stored in the charging case and the remaining battery charge of the charging case is 31% or
higher
- - - - - - - (lights up in green for about 6 seconds)
When the headset is stored in the charging case and the remaining battery charge of the headset is between 94%
and 1% / When the headset is not stored in the charging case and the remaining battery charge of the charging case
is between 30% and 1%
- - - - - - - (lights up in orange for about 6 seconds)
When the headset is stored in the charging case and the remaining battery charge of the headset is less than 1% /
When the headset is not stored in the charging case and the remaining battery charge of the charging case is less
than 1%
- - - - - - - (turns off)
When the headset units are removed from the charging case, or when the headset units are set into the charging case,
the indicator lights up as follows depending on the remaining battery charge.
When the headset is stored in the charging case and the remaining battery charge of the headset is 95% or higher /
When the headset is not stored in the charging case and the remaining battery charge of the charging case is 31% or
higher
- - - - - - - (lights up in green for about 3 seconds)
When the headset is stored in the charging case and the remaining battery charge of the headset is between 94%
and 1% / When the headset is not stored in the charging case and the remaining battery charge of the charging case
is between 30% and 1%
- - - - - - - (lights up in orange for about 3 seconds)
When the headset is stored in the charging case and the remaining battery charge of the headset is less than 1% /
When the headset is not stored in the charging case and the remaining battery charge of the charging case is less
than 1%
- - - - - - - (turns off)
16
Charging status
While charging the headset units / While charging the charging case
(lights up in orange)
When the battery is fully charged when charging starts on the headset units/charging case
- - - - - (lights up in orange for about 1 minute, and then turns off)
When the battery becomes fully charged and charging is complete
- - - - - - - (turns off)
During charging, when the charging case lid is opened or closed / When the headset units are set into or removed
from the charging case
- - - - - - (lights up in orange while charging. turns off for about 0.5 seconds,
and then lights up in orange again)
Abnormal charging temperature
- - - - - - - - - - - - - - - (repeatedly flashes twice in orange with an interval of about 1 second)
When an error occurs while charging and charging cannot be performed
- - - - - - - - - - (repeatedly flashes slowly in orange with an
interval of about 0.5 seconds)
Abnormal combination of left and right headset units
- - - - - - - - - - - - (repeatedly flashes 3 times in orange with an interval of about 1.3 seconds)
Bluetooth connection status
Pairing mode
- - - - - - - - - - - - - - (repeatedly flashes twice in blue)
Connection process completed
... (flashes 10 times in blue)
Indicates when one or both headset units are stored in the charging case.
Other
When the charging case lid is opened while the software is updating automatically
- - - - - - - - - - - - - - - (repeatedly flashes in orange and blue with an interval of about 0.6
seconds)
Reset start preparation / Initialization start preparation
- - - - - - - - - (repeatedly flashes slowly in orange for up to about 5 seconds with an
interval of about 0.7 seconds about 15 seconds after you first press the reset/initialize button on the back of the
charging case)
For details, see “Resetting the headset” or “Initializing the headset to restore factory settings”.
Initialization completed
- - - (flashes 4 times in green with an interval of about 0.3 seconds)
For details, see “Initializing the headset to restore factory settings”.
Hint
When the headset is worn, you can check various statuses of the headset by the notification sound or voice guidance.
Related Topic
Charging
Checking the remaining battery charge
17

Help Guide
Wireless Noise Canceling Stereo Headset
WF-1000XM5
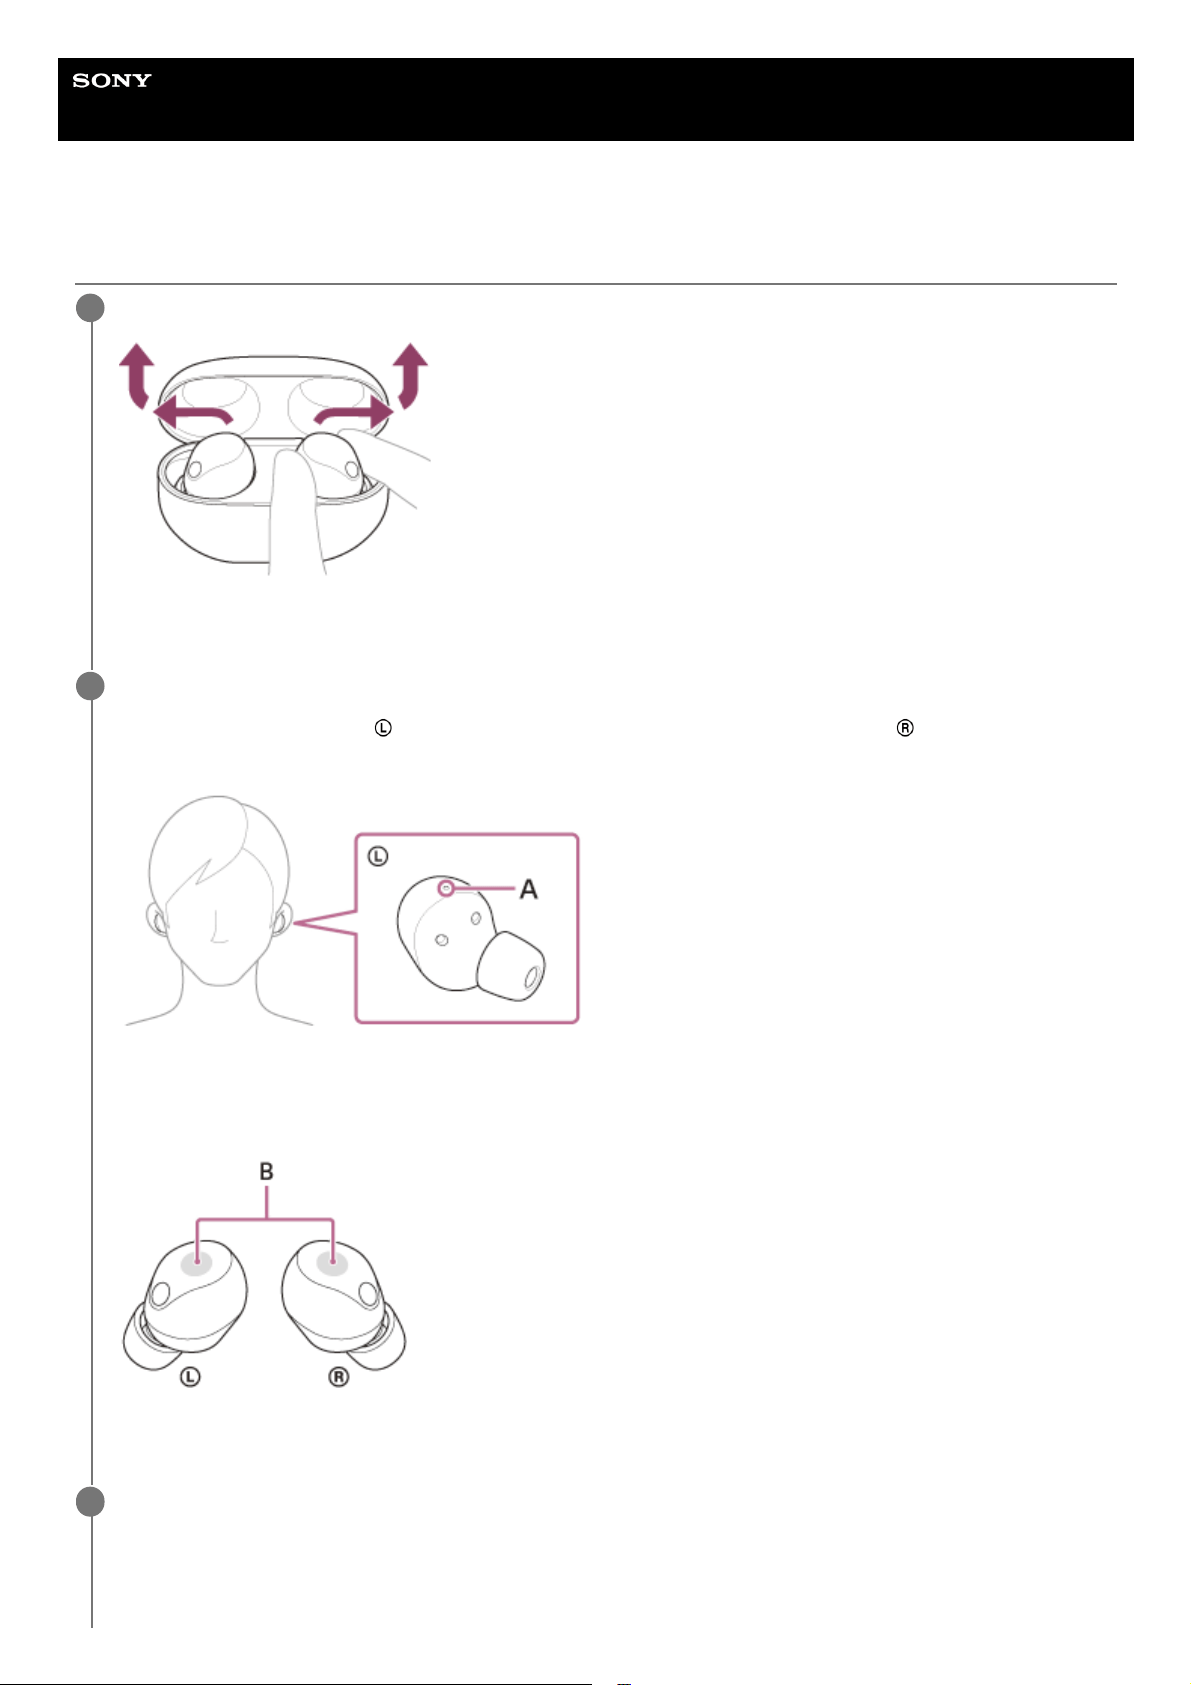
Wearing the headset
Lay the headset units on their sides and remove them from the charging case.
The headset turns on automatically.
1
Put the headset units into both ears.
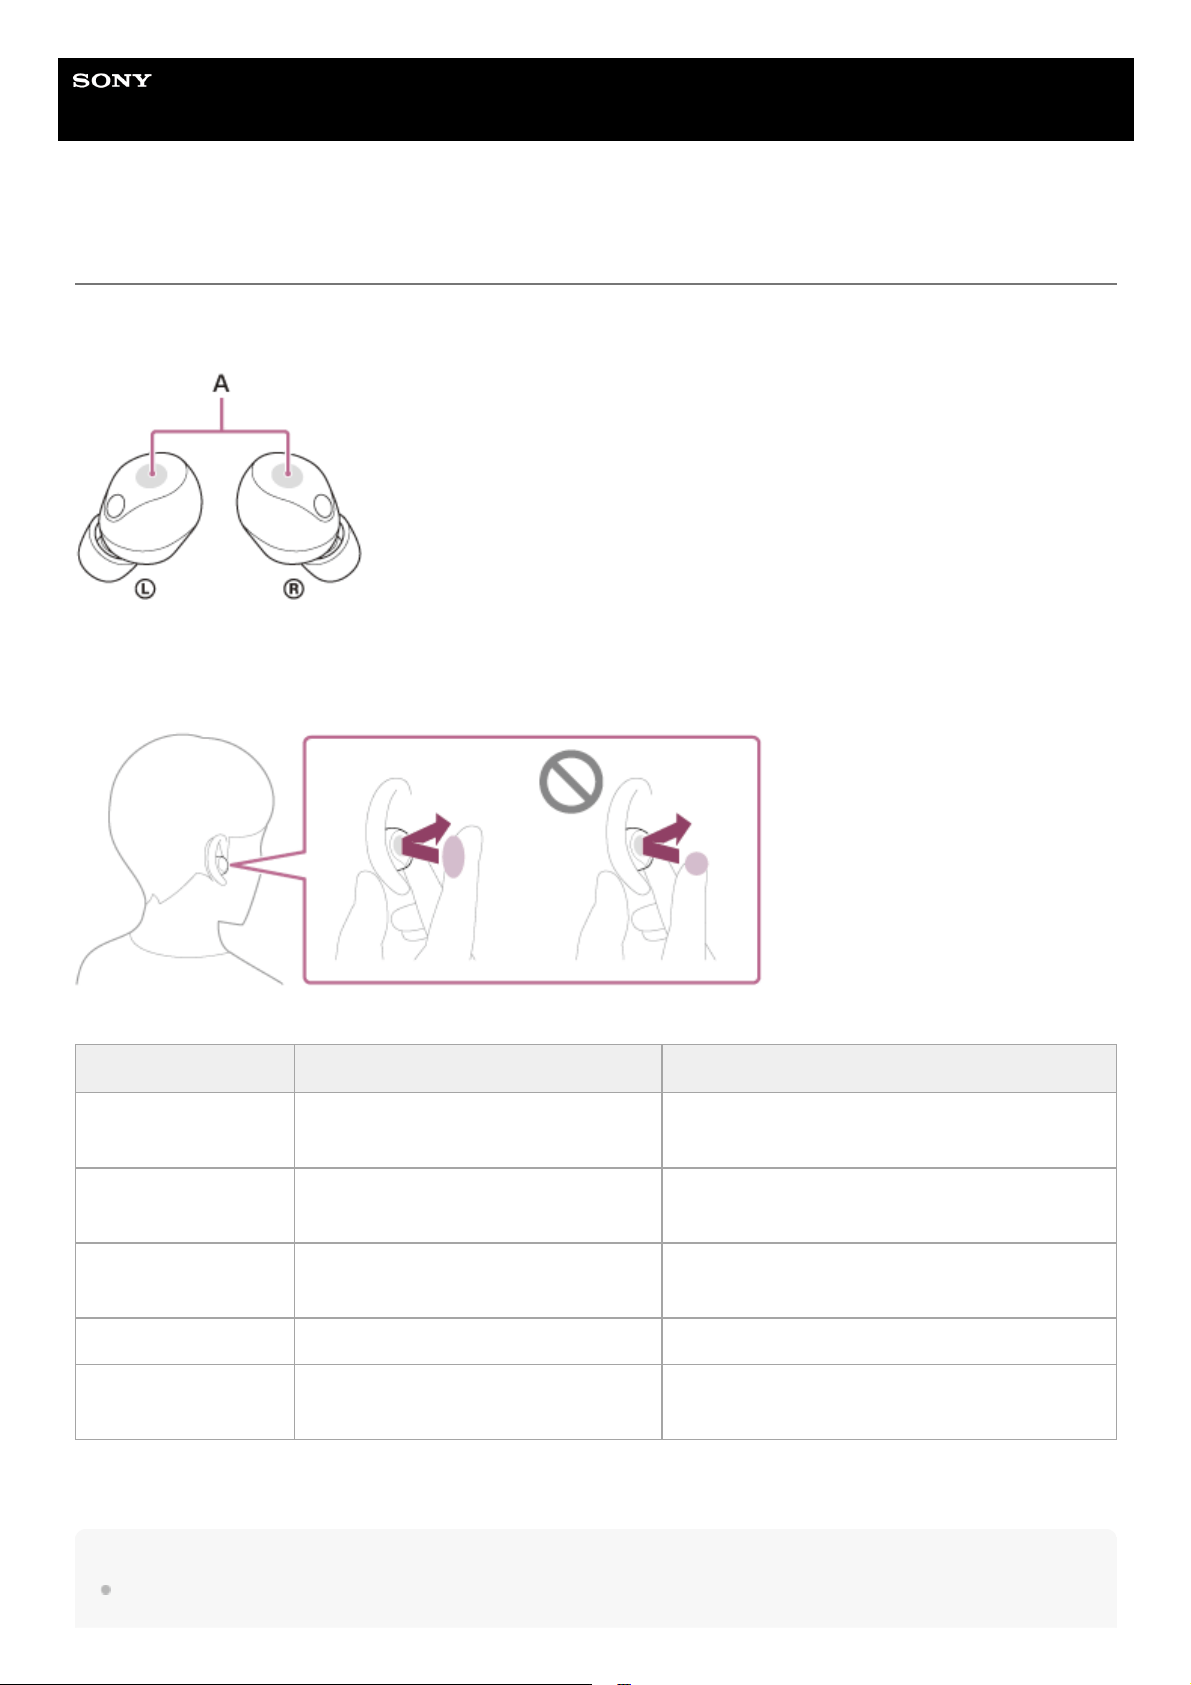
Put the headset unit with the
(left) mark into your left ear and the headset unit with the (right) mark into your
right ear. The left headset unit has a tactile dot.
A: Tactile dot
Be careful not to come in contact with the touch sensor when you put the headset units into both ears.
B: Touch sensors (left, right)
2
Adjust the fit of the headset to your ears.
Twist the headset unit to fit it snugly into the ear canal, and adjust the positioning of the headset unit until it fits
comfortably.
3
19
Hint
If you feel earbud tips are difficult to put into your ears, change the size of earbud tips or squeeze earbud tips lightly before
wearing the headset.
When you put the headset unit into your ear or adjust the positioning of the headset unit, see the illustration in step
for how to
hold the headset unit.
For the proper sound quality, noise canceling function, and call sound quality to be effective
If the size of the earbud tips does not match the size of your ear canals or the headset is not worn properly in your ears,
tap operations or Speak-to-Chat speech detection may not work correctly, or you may not obtain the correct sound
qualities, noise canceling effects, or call performance.
If any of this is the case, try the following.
Change the earbud tips to ones that fit more snugly in your ears. When changing the earbud tips, try the earbud tip
sizes in order from the larger ones to the smaller ones. The most suitable size of the earbud tips for left and right
ears may be different.
The “Sony | Headphones Connect” app will help you to determine which earbud tips suit you best to achieve the
optimal noise canceling effect, sound quality, etc.
See step
and check that you are wearing the headset properly in your ears. Wear the headset so that the earbud
tip is comfortably situated as deep in the ear canal as possible.
Hint
The function that determines the optimal earbud tips for you measures the air-tightness of the earbud tips and determines
whether or not the headset units are being worn in your ears correctly. Select a size that fits comfortably.
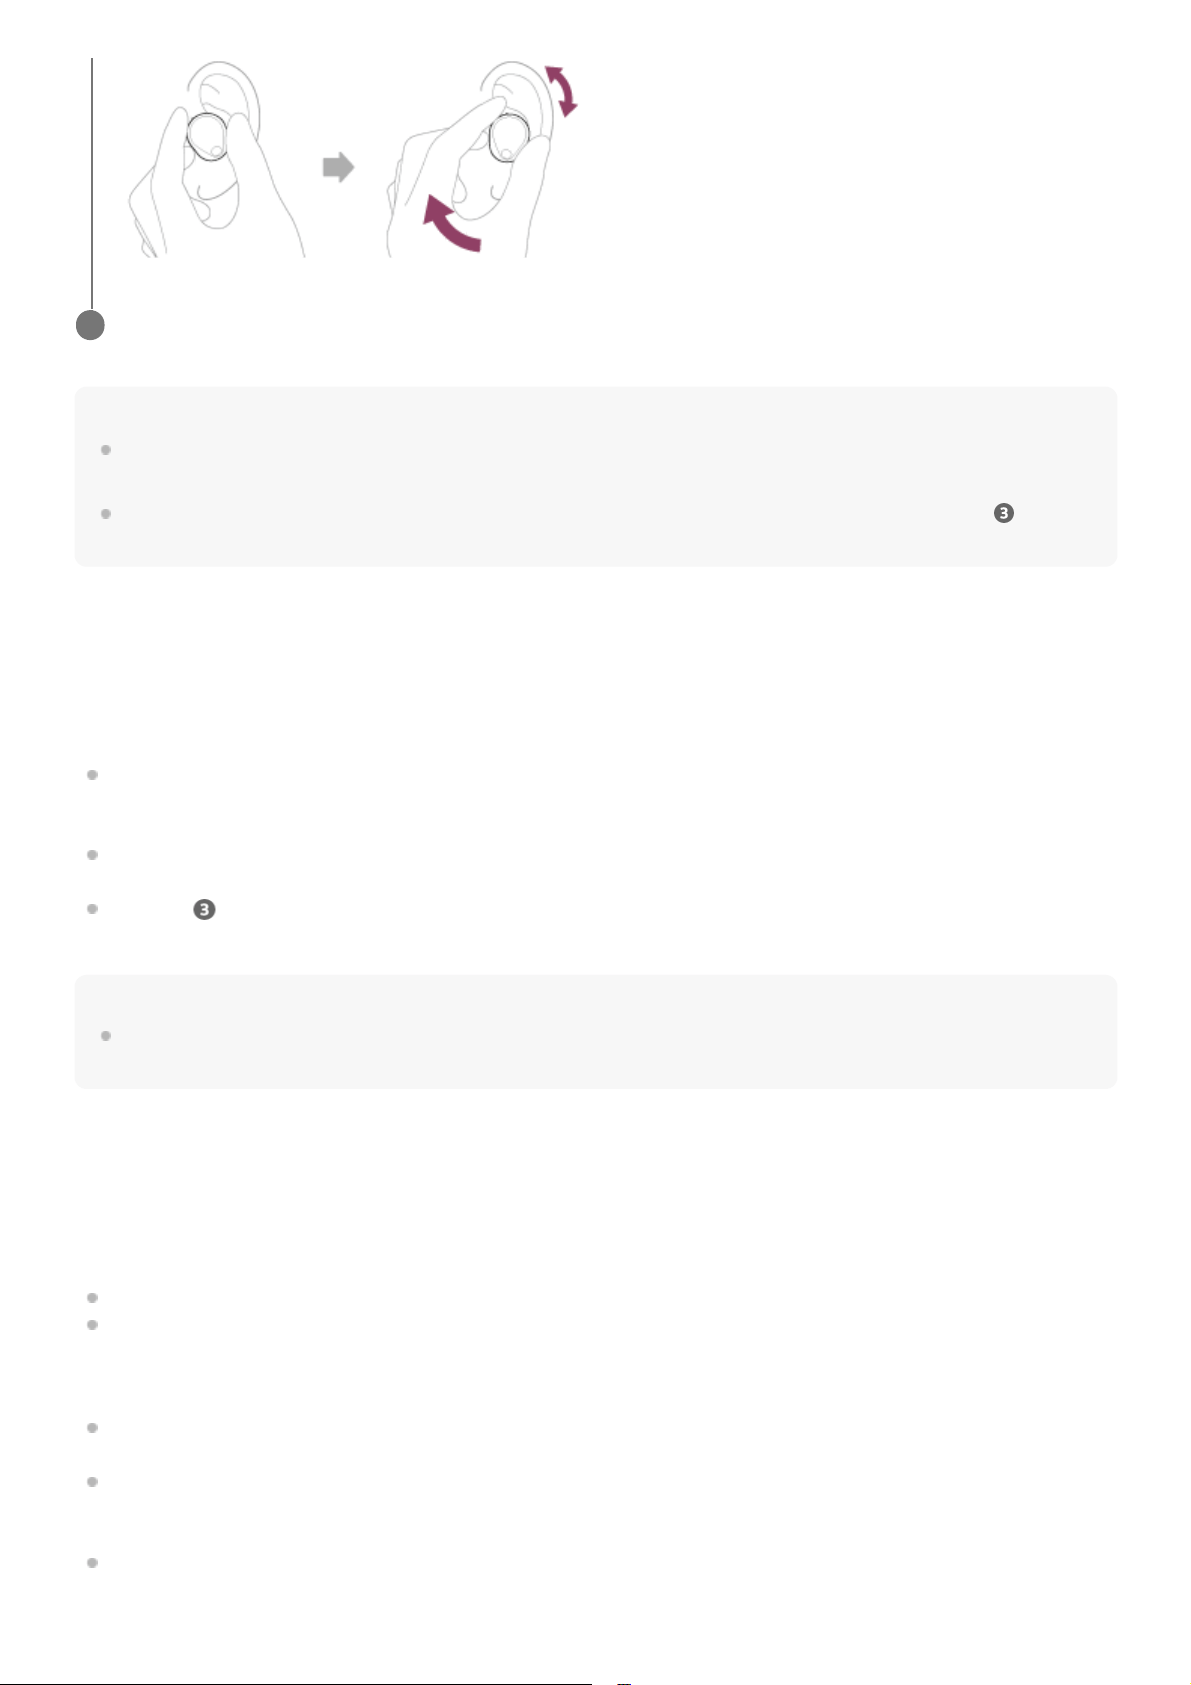
When attaching and removing the headset
In the factory settings, the built-in IR sensors detect when the headset is inserted in or removed from your ears to pause
or resume music playback and control the touch sensors and voice guidance.
When the headset is worn
You can use the touch sensors to play music, make and receive calls, etc.
You will hear a notification or voice guidance corresponding to the operation and status.
When the headset is removed
When you listen to music while wearing both headset units in your ears, the headset will pause music playback if one
or both headset units are removed. When the headset is worn again, the headset resumes music playback.
When the headset is not worn for about 15 minutes after being removed from the charging case, the headset turns
off automatically to save the battery. Turn the headset on by tapping the touch sensor or by putting the headset into
your ears.
In order to prevent the headset from reacting incorrectly, music playback, making and receiving calls as well as other
operations cannot be performed by tapping the touch sensors of the headset removed from your ears.
Wait for about 10 seconds for the earbud tip shape to stabilize.
4
20

Hint
You can also play music, make and receive calls, etc. when only one headset unit is worn in your ear.
By using the “Sony | Headphones Connect” app, you can change the setting of automatically pausing and resuming the music
playback, or automatically turning off the headset.
Related Topic
Replacing the earbud tips
Using only one headset unit
What you can do with the “Sony | Headphones Connect” app
5-048-298-11(1) Copyright 2023 Sony Corporation
21
Help Guide
Wireless Noise Canceling Stereo Headset
WF-1000XM5
Using only one headset unit
You can remove one headset unit from the charging case and use the headset unit by itself.
In this case, only the headset unit that has been removed from the charging case will turn on.
When you put on the other headset unit
The connection is automatically established between the left and right headset units, and you will hear the music or other
audio on both headset units.
Assigning functions to the touch sensors
Depending on the headset unit you are wearing, some functions may not be available in the factory settings. In this case,
you can change the function assignments to the touch sensors using the “Sony | Headphones Connect” app.
Hint
In the factory settings, the music playback function is assigned to the right headset unit.
When listening to music with one ear, if only the right headset unit is worn in your ear, use the touch sensor on the right headset
unit to play music.
If only the left headset unit is worn in your ear, operate the connected device to play music.
When you play music or other stereo audio while wearing only one headset unit, you will hear monaural sound with the left and
right channels mixed.
You can also enjoy hands-free calls even when you are wearing only one headset unit. When you receive an incoming call,
answer the call using the headset unit you are wearing. If you put the other headset unit into the other ear while you are talking
with only one headset unit, you can talk with both headset units.
Related Topic
Controlling the audio device (Bluetooth connection)
Functions for a phone call
What you can do with the “Sony | Headphones Connect” app
5-048-298-11(1) Copyright 2023 Sony Corporation
22
Help Guide
Wireless Noise Canceling Stereo Headset
WF-1000XM5
About the touch sensor
Tap the touch sensor for various operations, such as music playback, phone calls, or changing the setting of the noise
canceling function.
A: Touch sensors (left, right)
To operate the touch sensor, tap the center of the touch sensor with the pad of your index finger.
Some available operations
Hint
When tapping the touch sensor multiple times, tap it quickly with an interval of about 0.3 seconds between taps.
Left Right
Tap
To switch the noise canceling function
and Ambient Sound Mode
To play or pause music
Tap twice To receive or end a call
To skip to the beginning of the next track
To receive or end a call
Tap 3 times —
To skip to the beginning of the previous track (or
the current track during playback)
Tap 4 or more times To decrease the volume To increase the volume
Hold your finger to the
touch sensor
To activate the Quick Attention Mode
To use or cancel the voice assist function (Google
app/Siri)
23

You can change the function assigned to the touch sensors on the left and right headset units using the “Sony | Headphones
Connect” app. For example, you can change the music playback function which is assigned to the touch sensor on the right
headset unit at the time of purchase to the touch sensor on the left headset unit.
You can also choose not to assign any functions.
Note
You cannot operate the touch sensors when not wearing the headset. If you disable the wearing detection automatic power off
function with the “Sony | Headphones Connect” app, the touch sensors can be operated even when the headset is not worn.
When you make initial settings for Google Assistant on your smartphone, the function assignments to the touch sensors may
change automatically.
Check the function assignments to the touch sensors with the “Sony | Headphones Connect” app.
When you make initial settings for Amazon Alexa on your smartphone, the function assignments to the touch sensors may
change automatically.
Check the function assignments to the touch sensors with the “Sony | Headphones Connect” app.
Related Topic
What you can do with the “Sony | Headphones Connect” app
Controlling the audio device (Bluetooth connection)
Functions for a phone call
5-048-298-11(1) Copyright 2023 Sony Corporation
24
Help Guide
Wireless Noise Canceling Stereo Headset
WF-1000XM5
Using Quick Access
Quick Access is a feature that allows you to play content in the corresponding app by simply tapping the touch sensor of
the headset.
Hint
Quick Access can be used on the headset unit with the touch sensor that has the noise canceling function and Ambient Sound
Mode switching function assigned. In the factory settings, this function is assigned to the left unit. You can change the function
assignments to the touch sensors of the left and right units using the “Sony | Headphones Connect” app.
To use Quick Access, you need to install the corresponding smartphone app and connect to the Internet. Some apps will require
you to sign in.
For details on the latest specifications of Quick Access, refer to the [Services] tab of the “Sony | Headphones Connect” app.
You can also assign the same service to [Double Tap] and [Triple Tap] of Quick Access.
If the corresponding app is not launched even when tapping the touch sensor of the headset, the voice guidance “App assigned
to the Quick Access is not launched on the mobile device” is heard from both headset units (or from the headset unit you are
wearing).
Note
The services that can be assigned to Quick Access differ depending on the country or region.
Related Topic
What you can do with the “Sony | Headphones Connect” app
What you can do with partner services
5-048-298-11(1) Copyright 2023 Sony Corporation
Put the headset units into your ears and connect the headset to the smartphone via Bluetooth connection.
1
Launch the “Sony | Headphones Connect” app, and assign the services you want to link to Quick Access.
You can assign the different services to [Double Tap] and [Triple Tap].
For details on the “Sony | Headphones Connect” app, refer to the following URL.
https://rd1.sony.net/help/mdr/hpc/h_zz/
2
Launch the app of the service assigned to Quick Access.
3
Tap the touch sensor on the left unit to use Quick Access.
Depending on the number of taps, you can run the service assigned to [Double Tap] or [Triple Tap].
4
25
Help Guide
Wireless Noise Canceling Stereo Headset
WF-1000XM5
Charging
The headset and the charging case contain built-in lithium-ion rechargeable batteries. Use the supplied USB Type-C
cable to charge the headset before use.
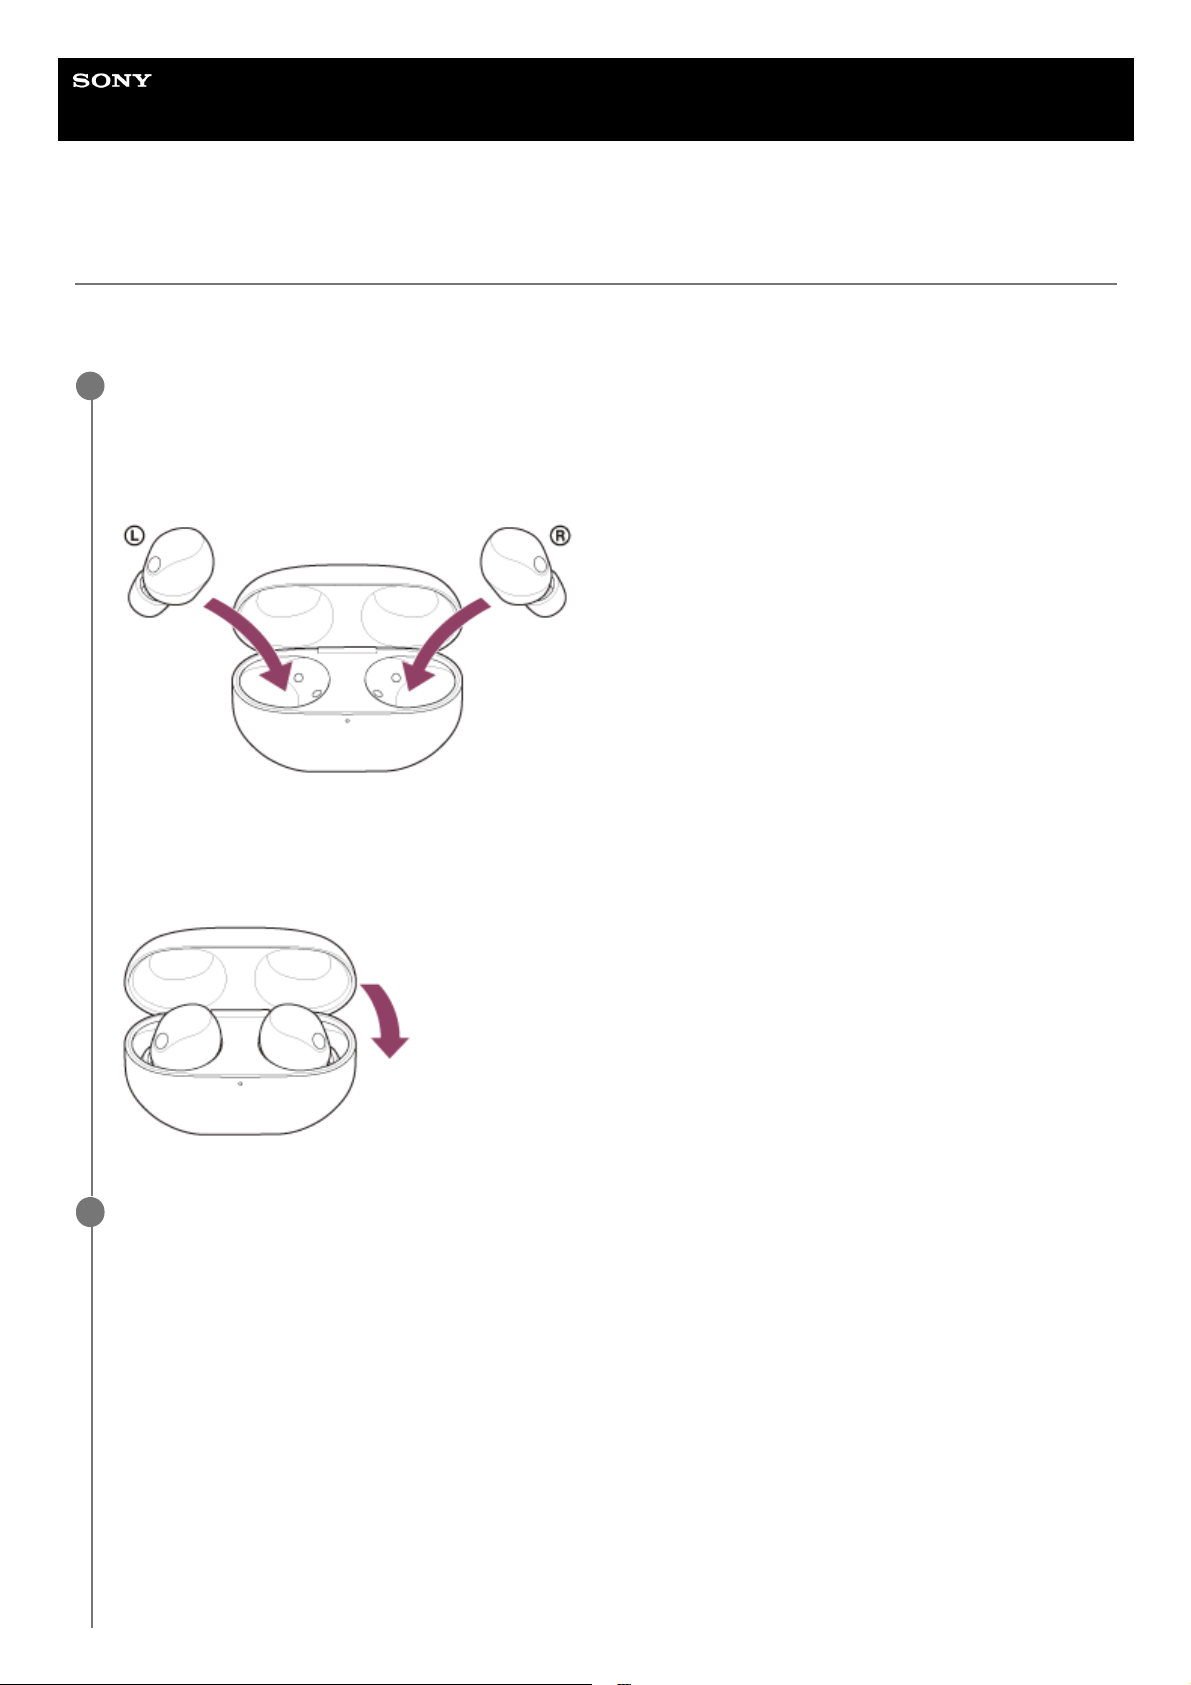
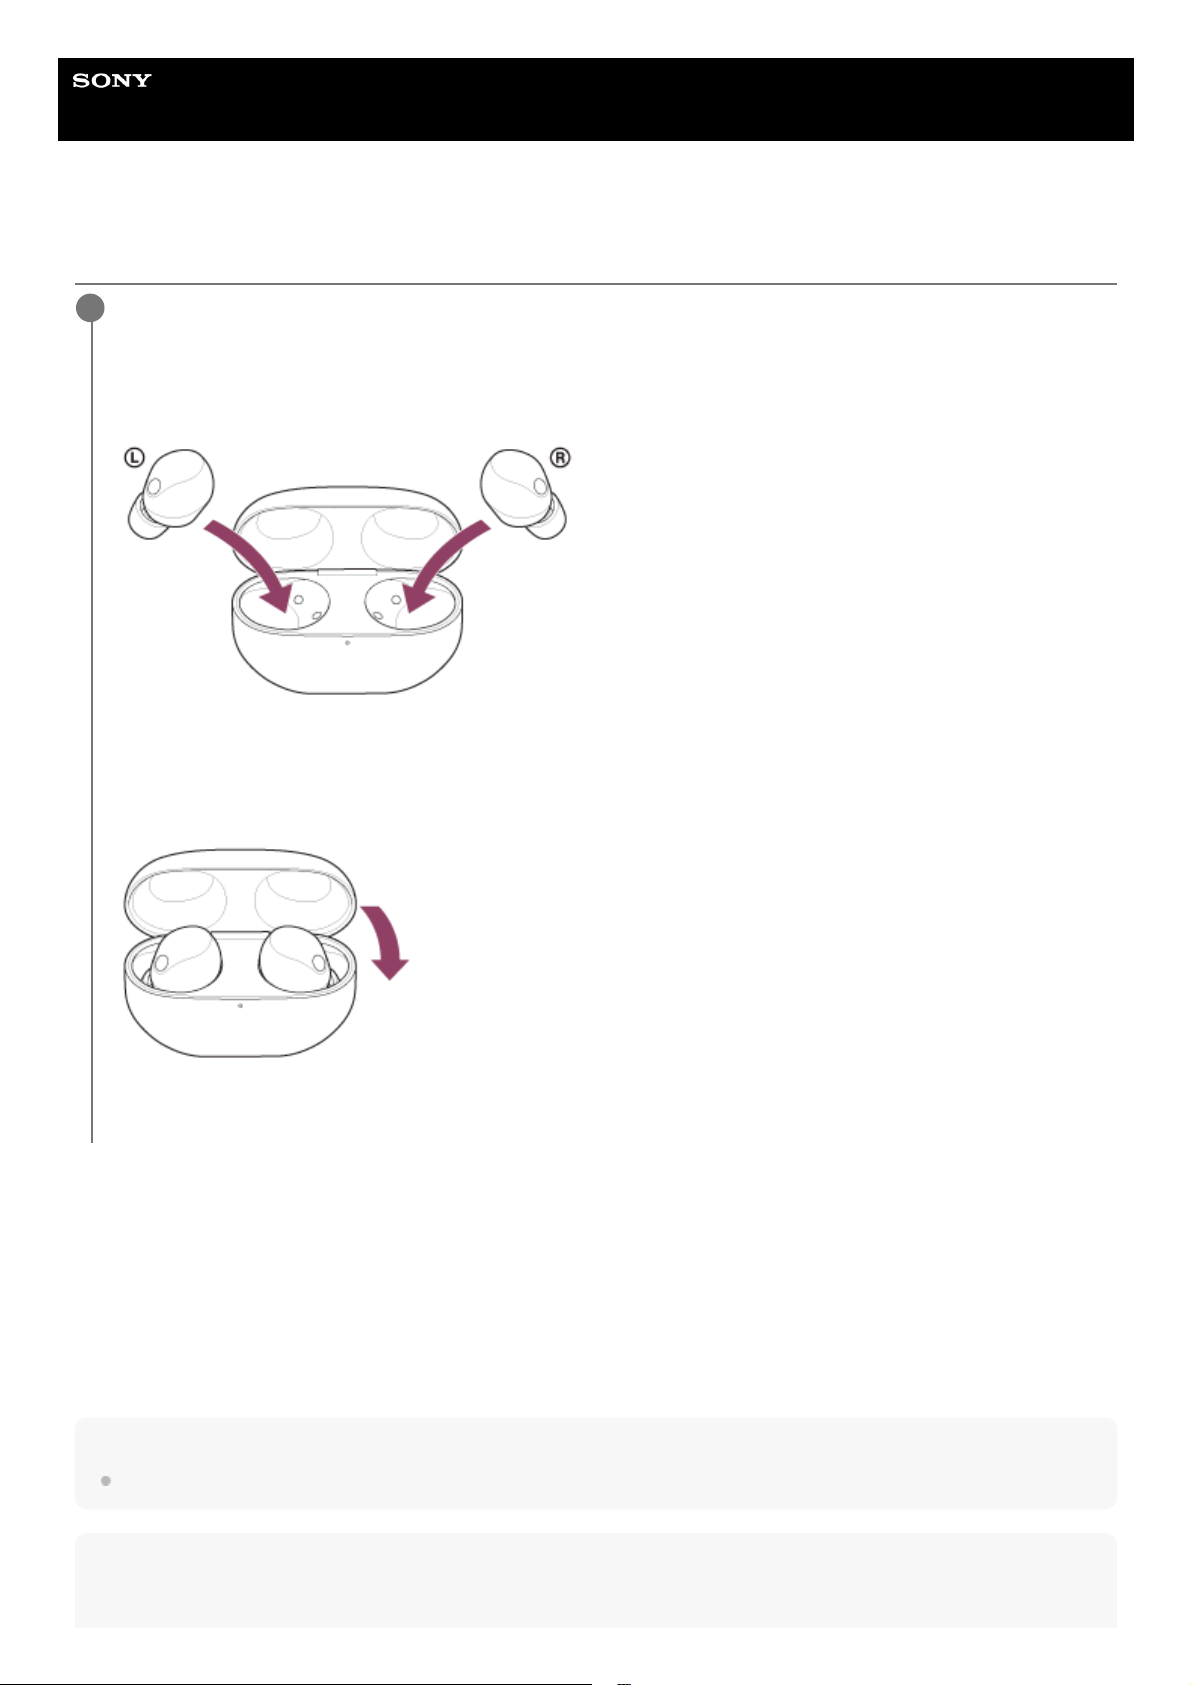
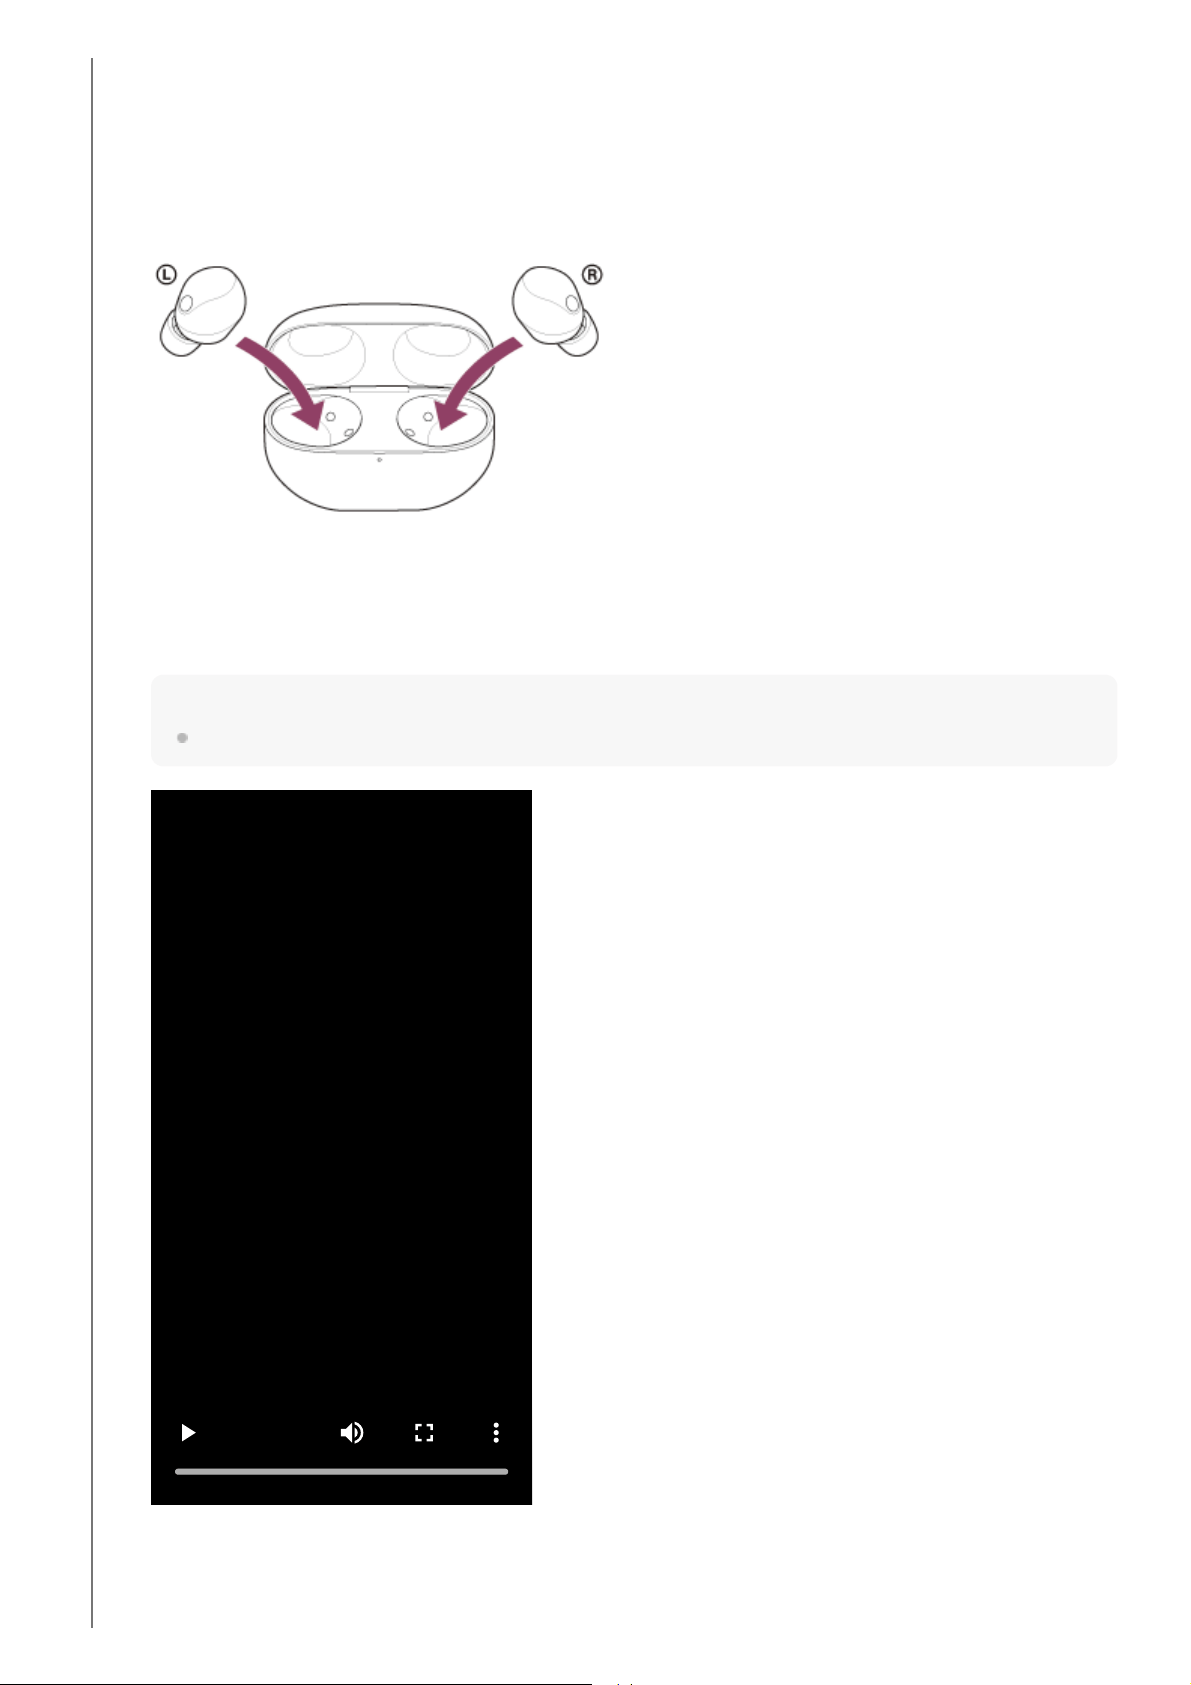
Set the headset units into the charging case.
Put the left headset unit (the headset unit with the tactile dot) back into the left hole of the charging case, and put
the right headset unit back into the right hole of the charging case. Each headset unit will be set to the correct
position in the charging case by the built-in magnet.
When the rechargeable battery of the charging case still has power, the indicator (orange or green) on the charging
case lights up for about 3 seconds.
The charging starts on the headset. Close the charging case lid.
1
Connect the charging case to an AC outlet.
Use the supplied USB Type-C cable and a commercially available USB AC adaptor.
2
26

About the charging time
The required time for fully charging the headset and the charging case is about 2 hours
*
.
Charging the headset when you are outside
A rechargeable battery is built into the charging case. If you charge the charging case in advance, you can use it to
charge the headset when you go out without a power supply.
The required time for fully charging the left and right headset units is about 1.5 hours.
System requirements for battery charge using USB
USB AC adaptor
A commercially available USB AC adaptor capable of supplying an output current of 0.5 A (500 mA) or more
Personal computer
Personal computer with a standard USB port
We do not guarantee operation on all computers.
Operations using a custom-built or homebuilt computer are not guaranteed.
Wireless charging
This headset is compatible with the wireless chargers that meet the Qi standard. Use a wireless charger that conforms to
the Qi standard.
Close the charging case lid and place it on the wireless charger with the SONY logo of the charging case facing upward
to charge.
See “Location and function of parts” for the location of the charging contact surface.
When charging, refer to the operating instructions supplied with the wireless charger.
Hint
The headset can be also charged by connecting the charging case to a running computer using the supplied USB Type-C cable.
Note
A: USB AC adaptor
Charging starts on the headset and charging case. The indicator (orange) on the charging case lights up.
After charging is complete, the indicator on the charging case turns off.
Remove the USB Type-C cable.
Time required for charging the empty battery to its full capacity. The charging time may differ depending on the conditions of use.
*
27

When charging via USB, be sure to use the supplied USB Type-C cable. Using a different cable may prevent charging.
Charging may not be successful depending on the type of USB AC adaptor.
The left or right headset unit works as the main headset unit, so it consumes the rechargeable battery faster than the other unit.
There is a difference in charging time between the left and right headset units, but this is not a malfunction.
The left or the right headset unit can be the “main headset unit” depending on the usage environment.
The headset cannot be charged when the computer goes into standby (sleep) or hibernation mode. In this case, change the
computer settings, and start charging once again.
If the indicator (orange) on the charging case lights up for about 3 seconds and then turns off when the left and right headset
units are removed from the charging case, the remaining battery charge of the charging case is low. Charge the charging case.
If the indicator on the charging case does not turn on even when the left and right headset units are removed from the charging
case, the battery charge of the charging case is empty. Charge the charging case.
If the headset is not used for a long time, the rechargeable battery usage hours may be reduced. However, the battery life will
improve after charging and discharging several times. If you store the headset for a long time, charge the battery once every 6
months to avoid over-discharge.
If the headset is not used for a long time, it may take longer to charge the battery.
Be sure to close the charging case lid to prevent the battery of the charging case from being consumed.
If there is a problem with the rechargeable battery of the headset or the charging case and something unusual is detected during
charging, the indicator (orange) on the charging case flashes. When charging wirelessly, charging may slow down or stop at high
or low temperatures depending on the wireless charger you are using.
It is recommended to charge in a place with an ambient temperature between 15 °C and 30 °C (59 °F - 86 °F). Charging outside
of this range may result in less efficient charging.
If the problem persists, consult your nearest Sony dealer.
If the headset is not used for a long time, the indicator (orange) on the charging case may not immediately light up when
charging. Wait a moment until the indicator (orange) lights up.
If the usage hours of the built-in rechargeable battery decrease significantly, the battery should be replaced. Consult your nearest
Sony dealer.
Avoid exposure to extreme temperature changes, direct sunlight, moisture, sand, dust, and electrical shock. Never leave the
headset in a parked vehicle.
When connecting the charging case to a computer, use only the supplied USB Type-C cable, and be sure to directly connect
them. Charging will not be properly completed when the charging case is connected through a USB hub.
Observe the following precautions when performing wireless charging. Failure to do so may cause fire, burns, injury, or electric
shock.
Do not attach metallic objects (such as stickers made of materials containing metal) to the wireless charger or the charging
case.
Remove the cover, etc. attached to the charging case, and do not place metallic objects (such as straps or clips containing
metal) on the wireless charger.
If something unusual occurs during wireless charging such as unusual odor, unusual sound, smoke, overheating, discoloration,
or deformation, carefully and safely remove the charging case from the wireless charger.
When you have medical electric devices such as pacemakers or defibrillators implanted, consult your doctor before using the
wireless charger. Radio waves may affect the operations of the medical electric devices.
Do not bring IC cards, magnetic cards, or magnetized objects close to the wireless charger. Doing so may cause IC cards to
malfunction. Magnetic data may be erased from cash cards, credit cards, telephone cards, or floppy disks. When strong
magnetism is brought close by, it may cause the wireless charger to malfunction.
When charging wirelessly, charging may slow down or stop if the charging case becomes misaligned with the wireless charger.
Depending on the wireless charger you are using, the headset and the charging case may become warm during charging or for a
while after charging. However, this is not a malfunction.
Do not charge the headset wirelessly in the following locations.
Where the headset is subject to high levels of humidity, dust or vibration, or near telephones, TVs, radios, etc.
Do not use the wireless charger when it is covered by a blanket, etc.
28

When noise is heard from the TV or radio while the headset is under wireless charging, charge the headset at a location away
from the TV or radio.
When charging wirelessly, if there are other devices compatible with wireless charging nearby, move the devices 30 cm (11.81
in.) or more away from the wireless charger. The charging case may not be detected properly and may not be able to charge.
Related Topic
About the indicator
Checking the remaining battery charge
5-048-298-11(1) Copyright 2023 Sony Corporation
29
Help Guide
Wireless Noise Canceling Stereo Headset
WF-1000XM5
Available operating time
The available operating times of the headset with the battery fully charged are as follows:
Bluetooth connection
Music playback time
About 1 hour of music playback is possible after 3 minutes charging.
If you make the following settings on the “Sony | Headphones Connect” app, the available operating time of the
battery becomes shorter than the ones described above.
Equalizer
DSEE Extreme™
Speak-to-Chat
Function to launch the voice assist function by your voice
Service Link
If you run the above settings at the same time, the available operating time of the battery becomes even shorter.
Communication time
Codec Noise canceling function/Ambient Sound Mode Available operating time
LDAC™ Noise canceling function: ON Max. 5 hours
LDAC Ambient Sound Mode: ON Max. 5 hours
LDAC OFF Max. 8 hours
AAC Noise canceling function: ON Max. 8 hours
AAC Ambient Sound Mode: ON Max. 8 hours
AAC OFF Max. 12 hours
SBC Noise canceling function: ON Max. 8 hours
SBC Ambient Sound Mode: ON Max. 8 hours
SBC OFF Max. 12 hours
LC3 Noise canceling function: ON Max. 7 hours
LC3 Ambient Sound Mode: ON Max. 7 hours
LC3 OFF Max. 11 hours
Noise canceling function/Ambient Sound Mode Available operating time
Noise canceling function: ON Max. 6 hours
Ambient Sound Mode: ON Max. 6 hours
OFF Max. 7 hours
30

Hint
By using the “Sony | Headphones Connect” app, you can check which codec is used for a connection.
Note
Usage hours may be different from the time described above depending on the settings for the headset functions and usage
conditions.
The left or right headset unit works as the main headset unit, so it consumes the rechargeable battery faster than the other unit.
There is a difference in remaining battery charge between the left and right headset units, but this is not a malfunction.
The left or the right headset unit can be the “main headset unit” depending on the usage environment.
Related Topic
Supported codecs
About the DSEE Extreme function
Speaking with someone while wearing the headset (Speak-to-Chat)
What you can do with the “Sony | Headphones Connect” app
5-048-298-11(1) Copyright 2023 Sony Corporation
Noise canceling function/Ambient Sound Mode Available operating time
31
Help Guide
Wireless Noise Canceling Stereo Headset
WF-1000XM5
Checking the remaining battery charge
You can check the remaining battery charge of the rechargeable batteries of the headset and the charging case by the
following operations.
If the remaining battery charge of the headset becomes low when you put the headset into your
ears or while using the headset
If a warning beep sounds and the voice guidance says, “Low battery”, charge the headset as soon as possible.
When the battery becomes completely empty, a warning beep sounds, the voice guidance says, “Battery is empty”, and
the headset automatically turns off.
When you are using an iPhone or iPod touch
When the headset is connected to an iPhone or iPod touch over an HFP (Hands-free Profile) Bluetooth connection, it will
show an icon that indicates the remaining battery charge of the headset on the screen of the iPhone or iPod touch.
The display position is an example.
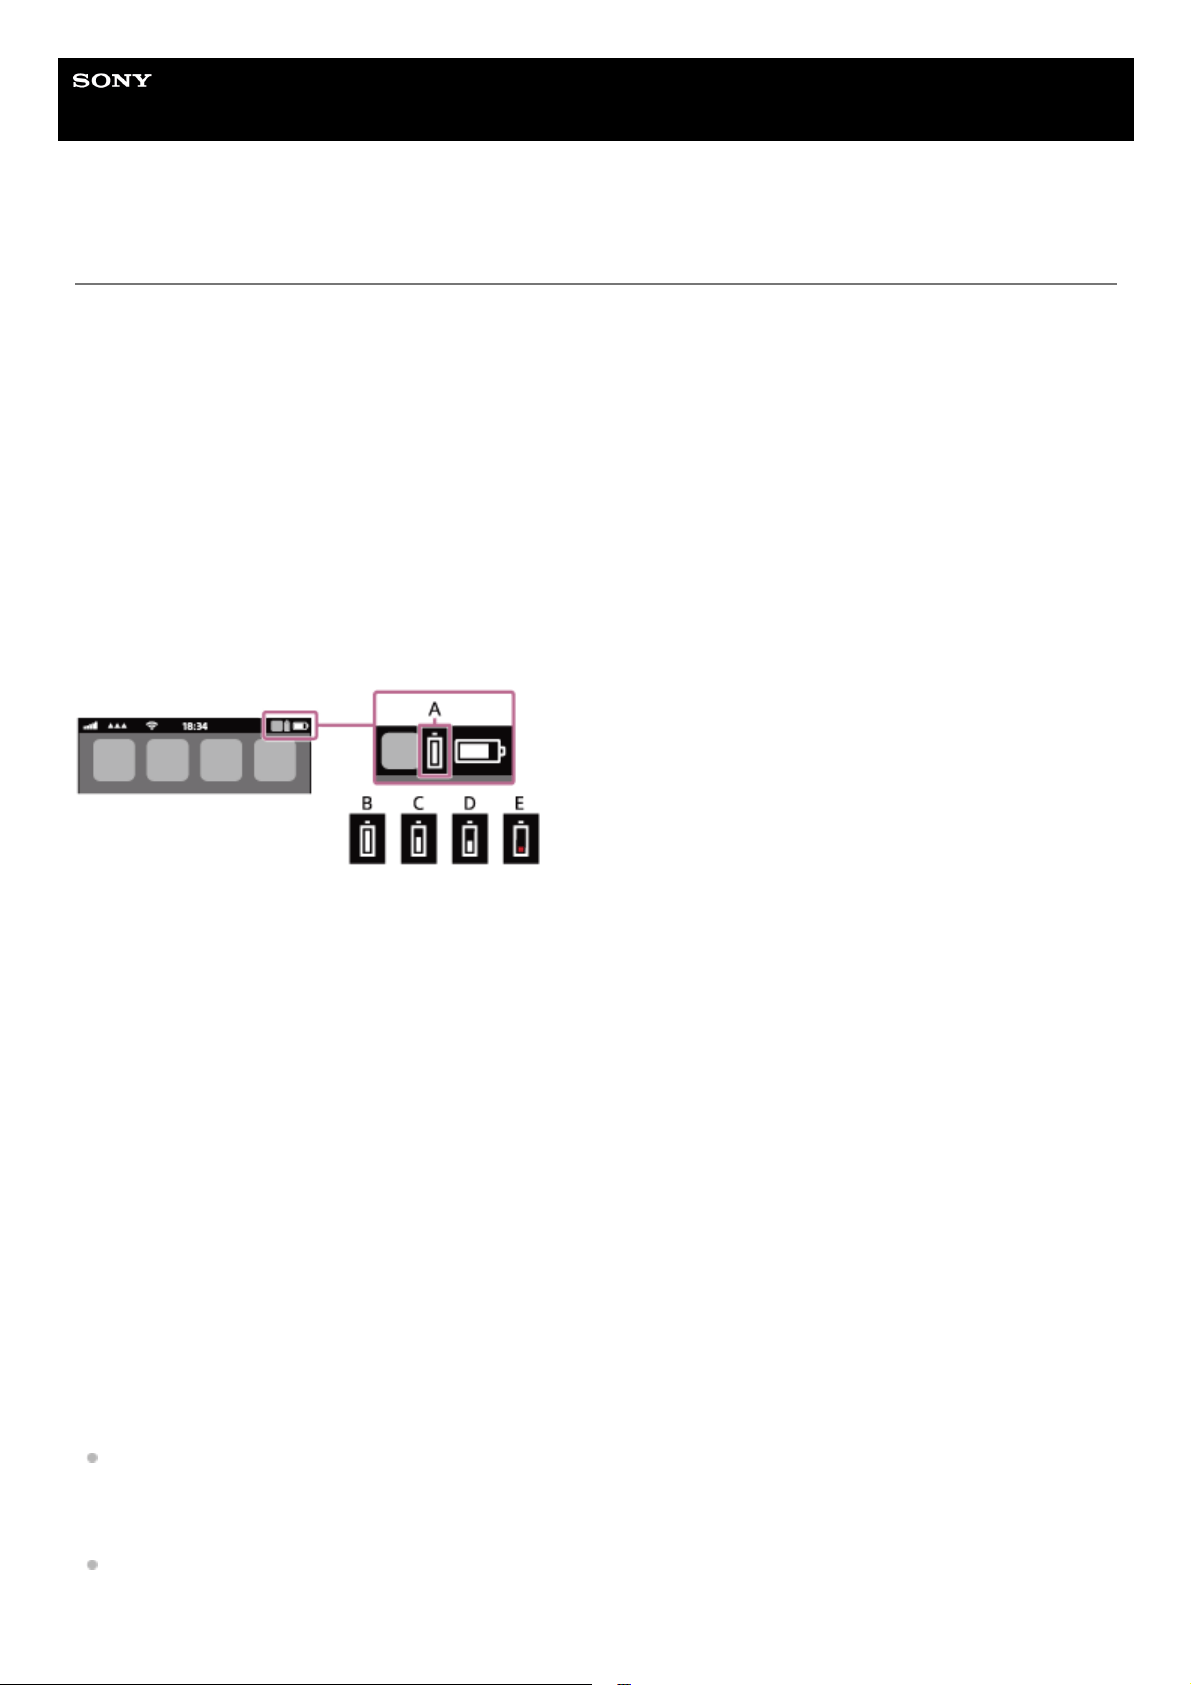
A: Remaining battery charge of the headset
The approximate remaining charge is shown at 10 different levels. B through E are display examples.
B: 100%
C: 70%
D: 50%
E: 10% or lower (requires charging)
The remaining battery charge of the headset is also displayed on the widget of an iPhone or iPod touch running iOS 11
or later. For more details, refer to the operating instructions supplied with the iPhone or iPod touch.
The remaining charge which is displayed may differ from the actual remaining charge in some cases. Use it as a rough
estimate.
When you are using an Android™ smartphone (OS 8.1 or later)
When the headset is connected to an Android smartphone via an HFP Bluetooth connection, you can check the
remaining battery charge of the headset on the smartphone. For details, refer to the operating instructions for the
Android smartphone.
The remaining charge which is displayed may differ from the actual remaining charge in some cases. Use it as a rough
estimate.
Checking the remaining battery charge of the charging case
If the indicator (orange) on the charging case lights up when both headset units are removed from the charging case,
or when the charging case lid is opened or closed with no headset units stored, the remaining battery charge of the
charging case is about 30% to 1%. The charging case cannot sufficiently charge the headset with this remaining level
of battery charge.
If the indicator on the charging case does not light up when both headset units are removed from the charging case,
or when the charging case lid is opened or closed with no headset units stored, the remaining battery charge of the
32

charging case is less than 1%. The headset cannot be charged with the charging case in this case.
Hint
The remaining battery charge of the headset may be different on the left and right sides depending on how you use them.
When checking the remaining battery charge on an iPhone/iPod touch or Android smartphone while using both headset units, the
remaining battery charge of the headset unit with less remaining battery charge between the left and right headset units is
displayed. When using only one headset unit, the remaining battery charge of the headset unit you are using is displayed.
You can also check the remaining battery charge of the headset unit and the charging case with the “Sony | Headphones
Connect” app. Android smartphones and iPhone/iPod touch both support this app.
Note
If the headset and smartphone are not connected with HFP, the remaining battery charge will not be correctly displayed.
If you connect the headset to an iPhone/iPod touch or Android smartphone with “Media audio” (A2DP) only in a multipoint
connection, the remaining battery charge will not be displayed correctly.
The remaining battery charge may not be properly displayed immediately after a software update or if the headset has not been
used for a long time. In this case, repeatedly charge and discharge the battery multiple times to properly display the remaining
battery charge.
Related Topic
What you can do with the “Sony | Headphones Connect” app
About the indicator
5-048-298-11(1) Copyright 2023 Sony Corporation
33
Help Guide
Wireless Noise Canceling Stereo Headset
WF-1000XM5
Turning on the headset
When the headset is stored in the charging case
When the headset is not stored in the charging case
When the headset is not worn in your ears for about 15 minutes after being removed from the charging case, the
headset turns off automatically. In this case, turn the headset on by tapping the touch sensor of the headset or by putting
the headset into your ears. The headset units will also turn on when they are set into the charging case and then
removed from the charging case.
By using the “Sony | Headphones Connect” app, you can change the setting of the headset so that it will not be turned
off automatically.
When the headset is turned on
When both headset units are removed from the charging case, the connection is established between the left and right
headset units.
When turning on the headset for the first time after purchase or just after initializing the headset, the headset goes into
Bluetooth pairing mode.
If you tap the touch sensor when the headset is not connected via a Bluetooth connection, you will hear a notification
sound indicating that the headset is turned on.
When you use the headset for the first time after purchase or just after initializing the headset, the noise canceling
function is turned on automatically when you put the headset units into your ears.
If the noise canceling settings were changed previously, the settings are retained.
Related Topic
Using only one headset unit
Turning off the headset
What you can do with the “Sony | Headphones Connect” app
5-048-298-11(1) Copyright 2023 Sony Corporation
Lay the headset units on their sides and remove them from the charging case.
The headset turns on automatically.
When you remove only one headset unit from the charging case, only the removed unit turns on.
1
34
Help Guide
Wireless Noise Canceling Stereo Headset
WF-1000XM5
Turning off the headset
When the headset is left removed
When the headset is not worn in your ears for about 15 minutes after being removed from the charging case, the
headset turns off automatically.
To turn off the power before the headset turns off automatically, set the headset units into the charging case, and close
the charging case lid.
By using the “Sony | Headphones Connect” app, you can change the setting of the headset so that it will not be turned
off automatically.
Hint
You can also turn off the headset with the “Sony | Headphones Connect” app.
Note
Set the headset units into the charging case.
Put the left headset unit (the headset unit with the tactile dot) back into the left hole of the charging case, and put
the right headset unit back into the right hole of the charging case. Each headset unit will be set to the correct
position in the charging case by the built-in magnet.
When the rechargeable battery of the charging case still has power, the indicator (orange or green) on the charging
case lights up for about 3 seconds.
The charging starts on the headset. Close the charging case lid.
The headset turns off.
1
35


Help Guide
Wireless Noise Canceling Stereo Headset
WF-1000XM5
How to make a wireless connection to Bluetooth devices
You can enjoy music and hands-free calling with the headset wirelessly by using your Bluetooth device’s Bluetooth
function.
Pairing
To use the Bluetooth function, both of the connecting devices must be registered in advance. The operation to register a
device is called “pairing”.
Pair the headset and the device manually.
Connecting to a paired device
Once a device is paired, it is not necessary to pair it again. Connect to devices already paired with the headset using the
methods necessary for each device.
Hint
When using the LE Audio function, you need to change the settings of the headset and pair the paired Android smartphone again.
For details, see “Pairing and connecting with an Android smartphone using LE Audio ”.
Related Topic
Pairing and connecting with an Android smartphone
Pairing and connecting with an Android smartphone using LE Audio
Pairing and connecting with an iPhone
Pairing and connecting with a computer (Windows® 11)
Pairing and connecting with a computer (Windows 10)
Pairing and connecting with a computer (Mac)
Pairing and connecting with a Bluetooth device
Connecting to a paired Android smartphone
Connecting to a paired iPhone
Connecting to a paired computer (Windows 11)
Connecting to a paired computer (Windows 10)
Connecting to a paired computer (Mac)
Connecting to a paired Bluetooth device
5-048-298-11(1) Copyright 2023 Sony Corporation
37
Help Guide
Wireless Noise Canceling Stereo Headset
WF-1000XM5
Connecting with the “Sony | Headphones Connect” app
Launch the “Sony | Headphones Connect” app on your Android smartphone/iPhone to connect the headset to a
smartphone or iPhone. For more details, refer to the “Sony | Headphones Connect” app help guide.
https://rd1.sony.net/help/mdr/hpc/h_zz/
Hint
To pair a second or subsequent device, the headset can be entered into pairing mode on the “Sony | Headphones Connect” app.
For more details, refer to the “Sony | Headphones Connect” app help guide.
Note
The connection with some smartphones and iPhone devices may become unstable when connecting using the “Sony |
Headphones Connect” app. In that case, follow the procedures in “Connecting to a paired Android smartphone”, or “Connecting
to a paired iPhone ” to connect to the headset.
Related Topic
Pairing and connecting with an Android smartphone
Pairing and connecting with an Android smartphone using LE Audio
Pairing and connecting with an iPhone
Pairing and connecting with a computer (Windows® 11)
Pairing and connecting with a computer (Windows 10)
Pairing and connecting with a computer (Mac)
Connecting to a paired Android smartphone
Connecting to a paired iPhone
What you can do with the “Sony | Headphones Connect” app
Installing the “Sony | Headphones Connect” app
5-048-298-11(1) Copyright 2023 Sony Corporation
38

Help Guide
Wireless Noise Canceling Stereo Headset
WF-1000XM5
Pairing and connecting with an Android smartphone
The operation to register the device that you wish to connect to is called “pairing”. First, pair a device to use it with the
headset for the first time.
Before starting the operation, make sure of the following:
The Android smartphone is placed within 1 m (3.2 ft) of the headset.
The headset is charged sufficiently.
The operating instructions for the Android smartphone is in hand.
Enter pairing mode on this headset.
When you pair the headset with a device for the first time after purchase or after initializing the
headset (when there is no pairing information on the headset)
When you pair a second or subsequent device (the headset has pairing information for other
devices)
1
Lay the headset units on their sides and remove both headset units from the charging case.
The headset turns on automatically.
The headset enters pairing mode automatically.
When you are wearing the headset, you will hear a notification sound from both headset units at the same time,
and you will hear a voice guidance say “Pairing”. When you are wearing only one headset unit, you will hear the
notification sound and voice guidance from the headset unit you are wearing.
1.
Set the headset units into the charging case.
Leave the charging case lid open.
1.
39
With the charging case lid open, press and hold the pairing button on the back of the charging case for about 5
seconds or more.
Note
The headset does not enter pairing mode with the charging case lid closed.
The indicator (blue) on the charging case repeatedly flashes twice in a row and the headset goes into pairing
mode.
You can remove the headset from the charging case after entering pairing mode.
When you are wearing the headset, you will hear a notification sound from both headset units at the same time,
and you will hear a voice guidance say “Pairing”. When you are wearing only one headset unit, you will hear the
notification sound and voice guidance from the headset unit you are wearing.
2.
0:00
Unlock the screen of the Android smartphone if it is locked.
2
Find the headset on the Android smartphone.
3
Select [Settings] - [Device connection] - [Bluetooth].
1.
Touch the switch to turn on the Bluetooth function.
2.
40
About the instruction manual video
Watch the video to find out how to perform pairing for the first time.
https://rd1.sony.net/help/mdr/mov0056/h_zz/
Hint
The operation above is an example. For more details, refer to the operating instructions supplied with the Android smartphone.
To delete all Bluetooth pairing information, see “Initializing the headset to restore factory settings”.
Note
If pairing is not established within 5 minutes, pairing mode is canceled. In this case, start the operation again from the beginning
of step
.
Once Bluetooth devices are paired, there is no need to pair them again, except in the following cases:
Pairing information has been deleted after repair, etc.
When a 9th device is paired
The headset can be paired with up to 8 devices. If a new device is paired after 8 devices are already paired, the registration
information of the paired device with the oldest connection date is overwritten with the information for the new device.
When the pairing information for the headset has been deleted from the Bluetooth device
When the headset is initialized
All of the pairing information is deleted. In this case, delete the pairing information for the headset from the connected device
and then pair them again.
The headset can be paired with multiple devices, but can only play music from 1 paired device at a time.
Touch [WF-1000XM5].
If Passkey
*
input is required, input “0000”.
The headset and smartphone are paired and connected with each other.
When the headset is placed in the charging case, the indicator (blue) on the charging case flashes 10 times.
When you are wearing the headset, you will hear a notification sound indicating that the connection is established
from both headset units at the same time. When you are wearing only one headset unit, you will hear the
notification sound from the headset unit you are wearing.
If they are not connected, see “Connecting to a paired Android smartphone”.
If [WF-1000XM5] does not appear on your Android smartphone screen, start the operation again from the beginning
of step
.
4
A Passkey may be called “Passcode”, “PIN code”, “PIN number”, or “Password”.
*
41

Related Topic
Wearing the headset
Using only one headset unit
How to make a wireless connection to Bluetooth devices
Connecting to a paired Android smartphone
Listening to music from a device via a Bluetooth connection
Disconnecting Bluetooth connection (after use)
Initializing the headset to restore factory settings
5-048-298-11(1) Copyright 2023 Sony Corporation
42
Help Guide
Wireless Noise Canceling Stereo Headset
WF-1000XM5
Pairing and connecting with an Android smartphone using LE Audio
LE Audio is a sound communication standard for Bluetooth technology.
Both the Android smartphone and the headset must support LE Audio.
Devices supporting LE Audio (as of June 2023)
Android smartphone Xperia 1 Ⅳ/Xperia 5 Ⅳ (use the latest version of the smartphone software)
For the latest information on the compatible devices, refer to the support website.
About LE Audio
LE Audio supports the “LC3” codec. When connection is established using LE Audio, you can enjoy sound from an
Android smartphone with less sound delay.
When connected using LE Audio, some of the headset functions cannot be used. For details, see “What you can do
with the “Sony | Headphones Connect” app”.
Install the “Sony | Headphones Connect” app on the Android smartphone, and connect the headset via
Bluetooth connection.
For details on how to connect via Bluetooth connection, see “Connecting with the “Sony | Headphones Connect”
app” or “Pairing and connecting with an Android smartphone”.
1
Launch the “Sony | Headphones Connect” app and select [LE Audio connection setting for headphones] -
[LE Audio Priority].
For more details, refer to the “Sony | Headphones Connect” app help guide.
https://rd1.sony.net/help/mdr/hpc/h_zz/
2
Using the Android smartphone, delete the pairing information (history of the Classic Audio connection).
3
Select [Settings] - [Device connection] - [Bluetooth].1.
Select [Paired devices] - [WF-1000XM5] to delete the paring information.2.
Enter pairing mode on this headset by operating the charging case.
4
Set the headset units into the charging case.
Leave the charging case lid open.
1.
43
To finish LE Audio
Reconnect the headset with the Android smartphone using Classic Audio.
Launch the “Sony | Headphones Connect” app and select [LE Audio connection setting for headphones] - [Classic Audio
only (conventional connection method)].
If you cannot switch to [Classic Audio only (conventional connection method)] in the “Sony | Headphones Connect” app,
initialize the headset.
Hint
With the charging case lid open, press and hold the pairing button on the back of the charging case for about 5
seconds or more.
Note
The headset does not enter pairing mode with the charging case lid closed.
The indicator (blue) on the charging case repeatedly flashes twice in a row and the headset goes into pairing
mode.
You can remove the headset from the charging case after entering pairing mode.
When you are wearing the headset, you will hear a notification sound from both headset units at the same time,
and you will hear a voice guidance say “Pairing”. When you are wearing only one headset unit, you will hear the
notification sound and voice guidance from the headset unit you are wearing.
2.
0:00
Reconnect the headset using LE Audio with the Android smartphone.
5
Select [Settings] - [Device connection] - [Bluetooth].1.
Touch [WF-1000XM5].2.
44

For more details, refer to the operating instructions supplied with the Android smartphone.
Related Topic
What you can do with the “Sony | Headphones Connect” app
Connecting with the “Sony | Headphones Connect” app
Pairing and connecting with an Android smartphone
Customer support websites
Initializing the headset to restore factory settings
5-048-298-11(1) Copyright 2023 Sony Corporation
45
Help Guide
Wireless Noise Canceling Stereo Headset
WF-1000XM5
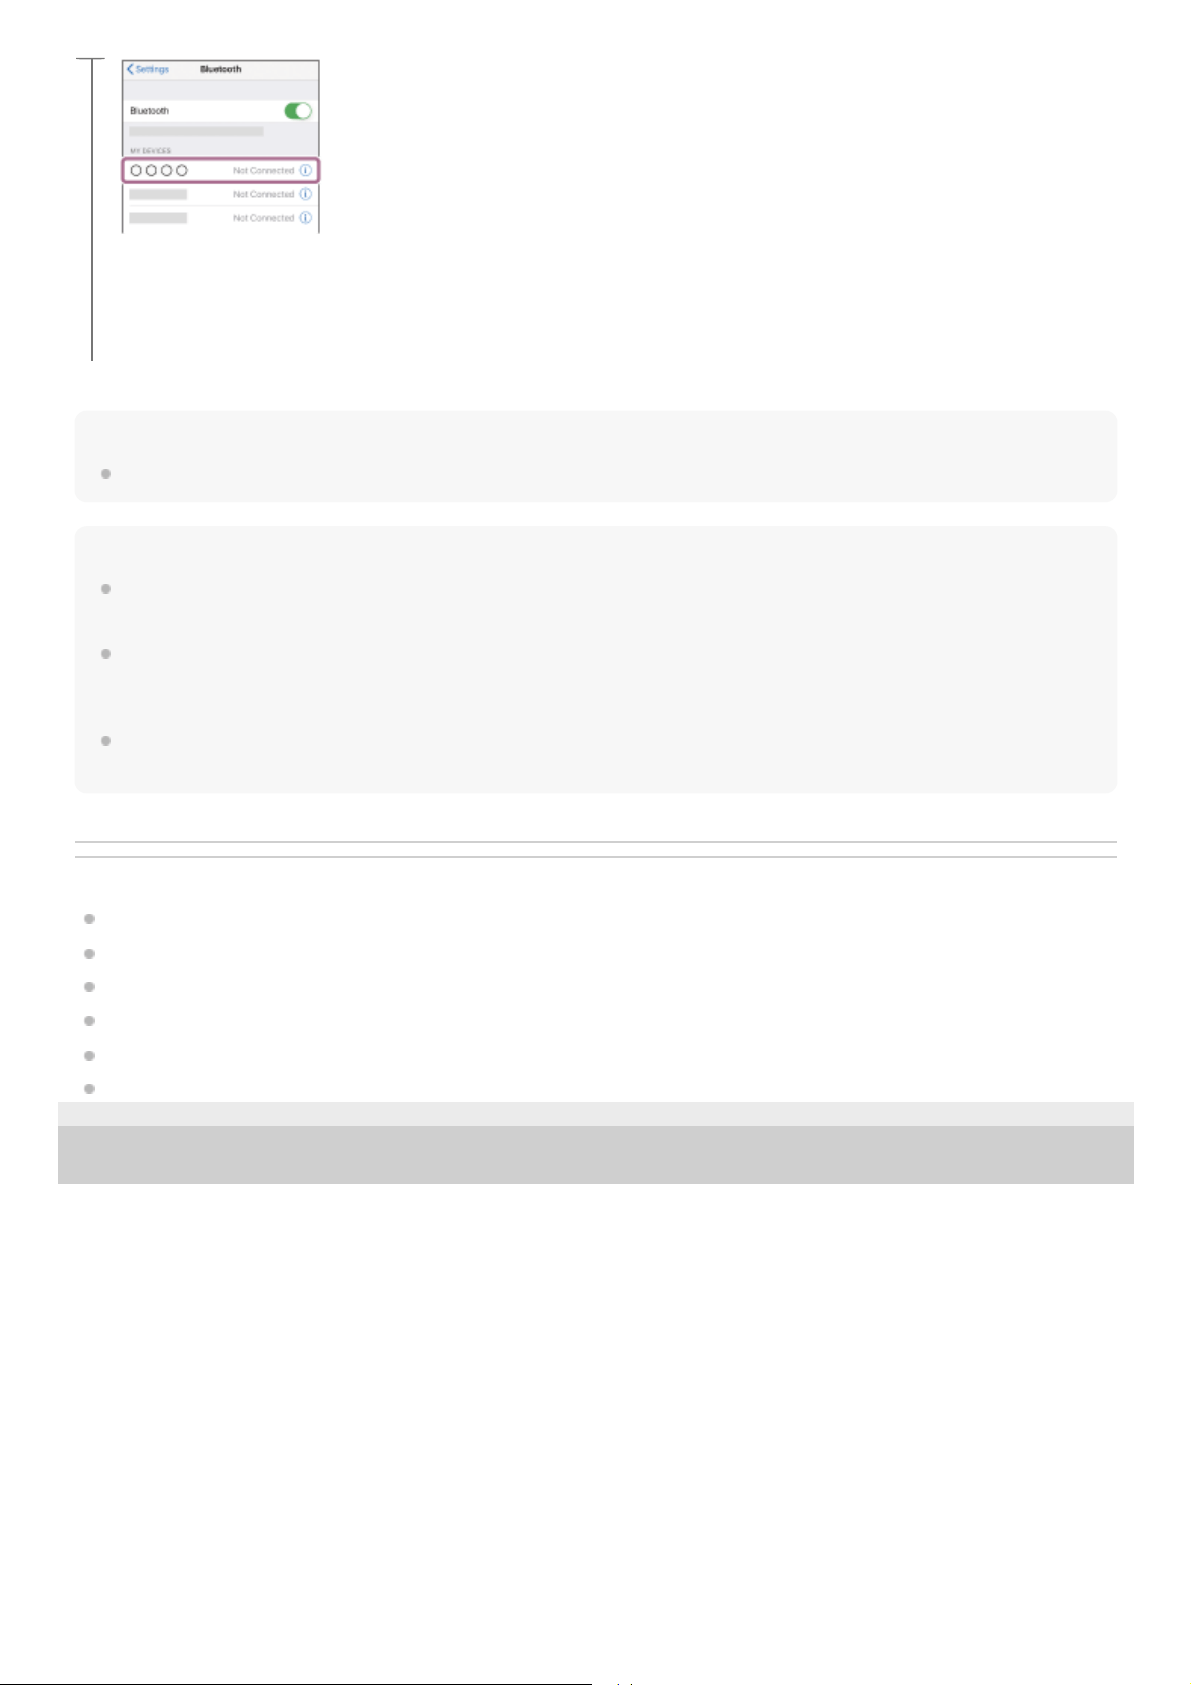
Connecting to a paired Android smartphone
Unlock the screen of the Android smartphone if it is locked.
1
Lay the headset units on their sides and remove them from the charging case.
The headset turns on automatically.
2
Put the headset units into both ears.
When the headset has automatically connected to the last connected device, you will hear a notification sound
indicating that the connection is established from both headset units at the same time. When you wear only one
headset unit, you will hear the notification sound from the headset unit you are wearing.
Check the connection status on the Android smartphone. If it is not connected, proceed to step
.
3
Display the devices paired with the Android smartphone.
4
Select [Settings] - [Device connection] - [Bluetooth].
1.
Touch the switch to turn on the Bluetooth function.
2.
Touch [WF-1000XM5].
5
46
Hint
The operation above is an example. For more details, refer to the operating instructions supplied with the Android smartphone.
Note
When connecting, [WF-1000XM5], [LE_WF-1000XM5], or both may be displayed on the connecting device. When both or [WF-
1000XM5] is displayed, select [WF-1000XM5]; when [LE_WF-1000XM5] is displayed, select [LE_WF-1000XM5].
If the last connected Bluetooth device is placed near the headset, the headset may automatically connect to the device when you
turn on the headset and may not connect to another device.
If this occurs, cancel the Bluetooth connection on the last connected device.
If you cannot connect your Android smartphone to the headset, delete the headset pairing information on your Android
smartphone and perform pairing again. As for the operations on your Android smartphone, refer to the operating instructions
supplied with the Android smartphone.
Related Topic
Wearing the headset
Using only one headset unit
How to make a wireless connection to Bluetooth devices
Pairing and connecting with an Android smartphone
Pairing and connecting with an Android smartphone using LE Audio
Listening to music from a device via a Bluetooth connection
Disconnecting Bluetooth connection (after use)
5-048-298-11(1) Copyright 2023 Sony Corporation
You will hear a notification sound indicating that the connection is established from both headset units at the same
time. When you wear only one headset unit, you will hear the notification sound from the headset unit you are
wearing.
47
Help Guide
Wireless Noise Canceling Stereo Headset
WF-1000XM5
Pairing and connecting with an iPhone
The operation to register the device that you wish to connect to is called “pairing”. First, pair a device to use it with the
headset for the first time.
Before starting the operation, make sure of the following:
The iPhone is placed within 1 m (3.2 ft) of the headset.
The headset is charged sufficiently.
The operating instructions for the iPhone is in hand.
Enter pairing mode on this headset.
When you pair the headset with a device for the first time after purchase or after initializing the
headset (when there is no pairing information on the headset)
When you pair a second or subsequent device (the headset has pairing information for other
devices)
1
Lay the headset units on their sides and remove both headset units from the charging case.
The headset turns on automatically.
The headset enters pairing mode automatically.
When you are wearing the headset, you will hear a notification sound from both headset units at the same time,
and you will hear a voice guidance say “Pairing”. When you are wearing only one headset unit, you will hear the
notification sound and voice guidance from the headset unit you are wearing.
1.
Set the headset units into the charging case.
Leave the charging case lid open.
1.
48
With the charging case lid open, press and hold the pairing button on the back of the charging case for about 5
seconds or more.
Note
The headset does not enter pairing mode with the charging case lid closed.
The indicator (blue) on the charging case repeatedly flashes twice in a row and the headset goes into pairing
mode.
You can remove the headset from the charging case after entering pairing mode.
When you are wearing the headset, you will hear a notification sound from both headset units at the same time,
and you will hear a voice guidance say “Pairing”. When you are wearing only one headset unit, you will hear the
notification sound and voice guidance from the headset unit you are wearing.
2.
0:00
Unlock the screen of the iPhone if it is locked.
2
Find the headset on the iPhone.
3
Select [Settings].
1.
Touch [Bluetooth].
2.
49
About the instruction manual video
Watch the video to find out how to perform pairing for the first time.
https://rd1.sony.net/help/mdr/mov0056/h_zz/
Hint
The operation above is an example. For more details, refer to the operating instructions supplied with the iPhone.
To delete all Bluetooth pairing information, see “Initializing the headset to restore factory settings”.
Note
If pairing is not established within 5 minutes, pairing mode is canceled. In this case, start the operation again from the beginning
of step
.
Once Bluetooth devices are paired, there is no need to pair them again, except in the following cases:
Pairing information has been deleted after repair, etc.
When a 9th device is paired
The headset can be paired with up to 8 devices. If a new device is paired after 8 devices are already paired, the registration
information of the paired device with the oldest connection date is overwritten with the information for the new device.
When the pairing information for the headset has been deleted from the Bluetooth device
When the headset is initialized
All of the pairing information is deleted. In this case, delete the pairing information for the headset from the connected device
and then pair them again.
The headset can be paired with multiple devices, but can only play music from 1 paired device at a time.
Touch the switch to turn on the Bluetooth function.
3.
Touch [WF-1000XM5].
If Passkey
*
input is required, input “0000”.
The headset and iPhone are paired and connected with each other.
When the headset is placed in the charging case, the indicator (blue) on the charging case flashes 10 times.
When you are wearing the headset, you will hear a notification sound indicating that the connection is established
from both headset units at the same time. When you are wearing only one headset unit, you will hear the
notification sound from the headset unit you are wearing.
If they are not connected, see “Connecting to a paired iPhone ”.
If [WF-1000XM5] does not appear on your iPhone screen, start the operation again from the beginning of step
.
4
A Passkey may be called “Passcode”, “PIN code”, “PIN number”, or “Password”.
*
50

Related Topic
Wearing the headset
Using only one headset unit
How to make a wireless connection to Bluetooth devices
Connecting to a paired iPhone
Listening to music from a device via a Bluetooth connection
Disconnecting Bluetooth connection (after use)
Initializing the headset to restore factory settings
5-048-298-11(1) Copyright 2023 Sony Corporation
51
Help Guide
Wireless Noise Canceling Stereo Headset
WF-1000XM5
Connecting to a paired iPhone
Unlock the screen of the iPhone if it is locked.
1
Lay the headset units on their sides and remove them from the charging case.
The headset turns on automatically.
2
Put the headset units into both ears.
When the headset has automatically connected to the last connected device, you will hear a notification sound
indicating that the connection is established from both headset units at the same time. When you are wearing only
one headset unit, you will hear the notification sound from the headset unit you are wearing.
Check the connection status on the iPhone. If it is not connected, proceed to step
.
3
Display the devices paired with the iPhone.
4
Select [Settings].
1.
Touch [Bluetooth].
2.
Touch the switch to turn on the Bluetooth function.
3.
Touch [WF-1000XM5].
52
Hint
The operation above is an example. For more details, refer to the operating instructions supplied with the iPhone.
Note
When connecting, [WF-1000XM5], [LE_WF-1000XM5], or both may be displayed on the connecting device. When both or [WF-
1000XM5] is displayed, select [WF-1000XM5]; when [LE_WF-1000XM5] is displayed, select [LE_WF-1000XM5].
If the last connected Bluetooth device is placed near the headset, the headset may automatically connect to the device when you
turn on the headset and may not connect to another device.
If this occurs, cancel the Bluetooth connection on the last connected device.
If you cannot connect your iPhone to the headset, delete the headset pairing information on your iPhone and perform pairing
again. As for the operations on your iPhone, refer to the operating instructions supplied with the iPhone.
Related Topic
Wearing the headset
Using only one headset unit
How to make a wireless connection to Bluetooth devices
Pairing and connecting with an iPhone
Listening to music from a device via a Bluetooth connection
Disconnecting Bluetooth connection (after use)
5-048-298-11(1) Copyright 2023 Sony Corporation
You will hear a notification sound indicating that the connection is established from both headset units at the same
time. When you are wearing only one headset unit, you will hear the notification sound from the headset unit you
are wearing.
5
53
Help Guide
Wireless Noise Canceling Stereo Headset
WF-1000XM5
Pairing and connecting with a computer (Windows® 11)
The operation to register the device that you wish to connect to is called “pairing”. First, pair a device to use it with the
headset for the first time.
Before starting the operation, make sure of the following:
Your computer has a Bluetooth function that supports music playback connections (A2DP).
The computer is placed within 1 m (3.2 ft) of the headset.
The headset is charged sufficiently.
The operating instructions for the computer is in hand.
Depending on the computer you are using, the built-in Bluetooth adaptor may need to be turned on. If you do not
know how to turn on the Bluetooth adaptor or are unsure if your computer has a built-in Bluetooth adaptor, refer to
the operating instructions supplied with the computer.
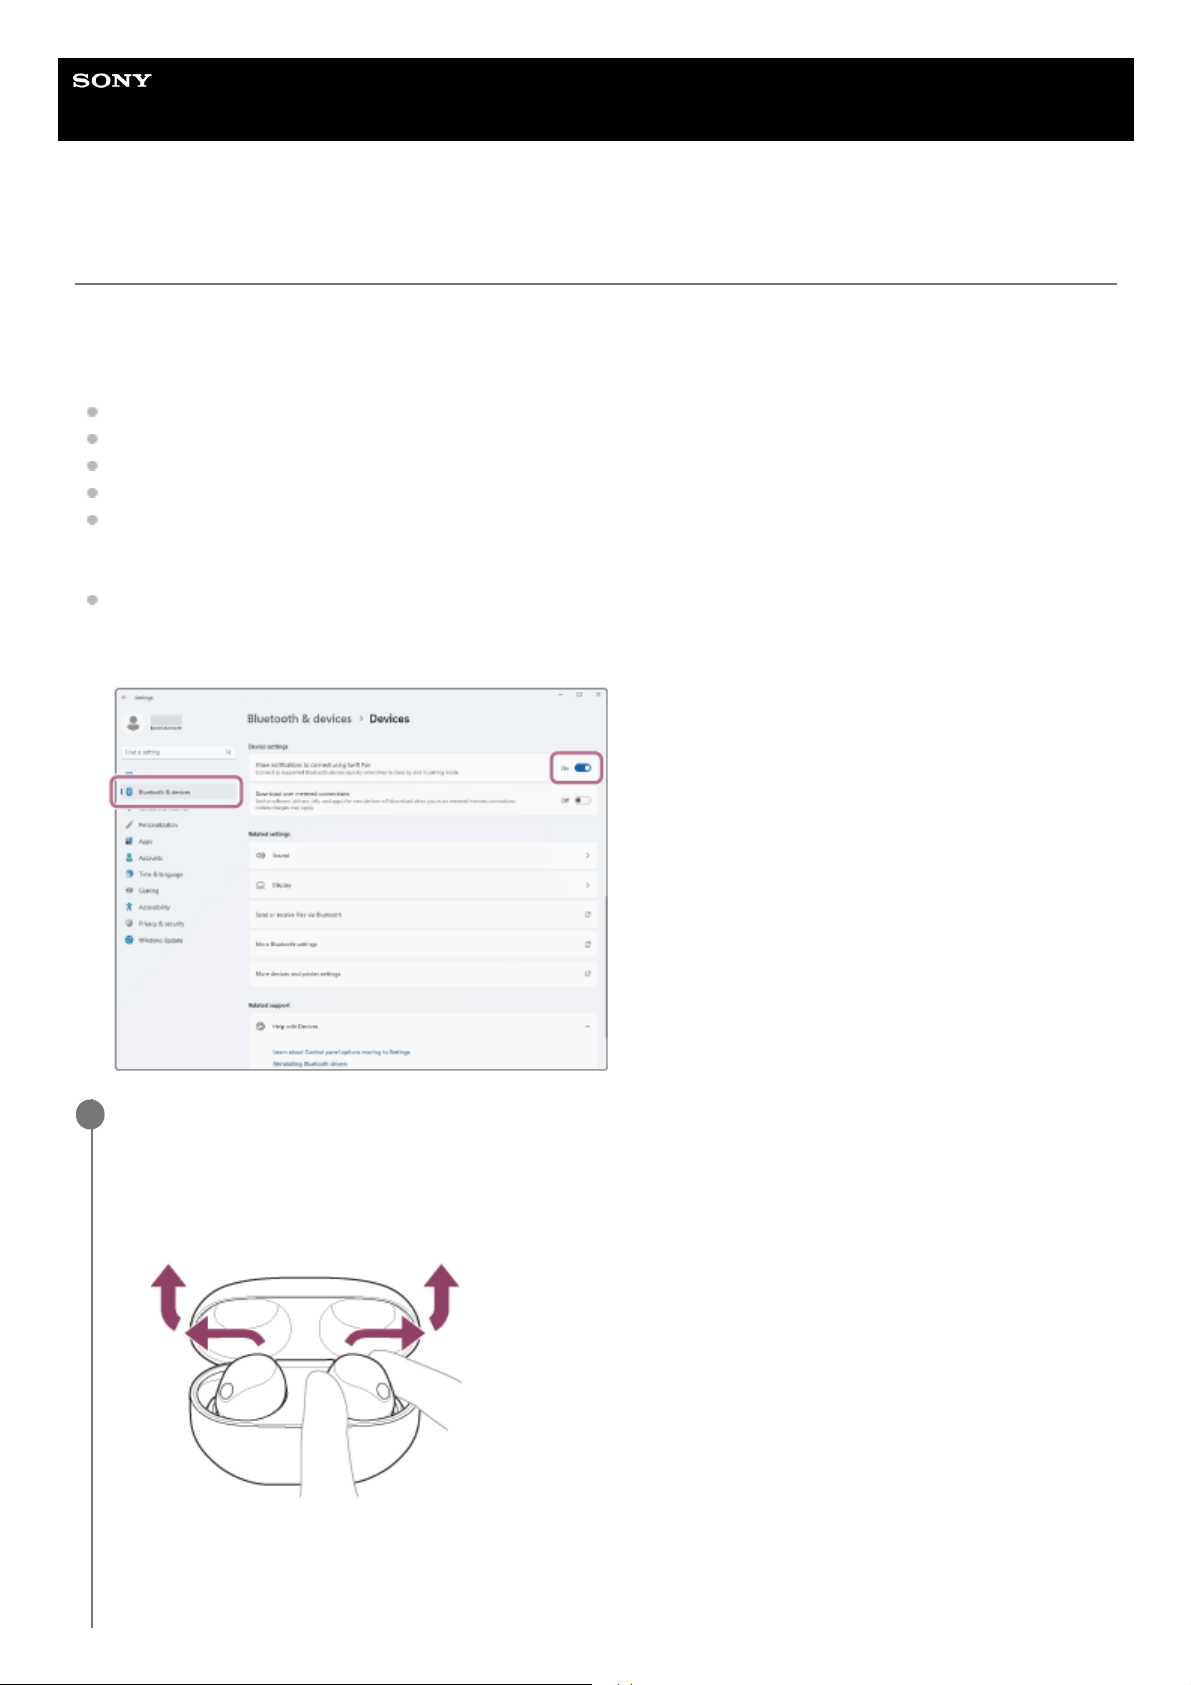
The Swift Pair function can be used to make pairing easier. To use the Swift Pair function, click the [Start] button -
[Settings] - [Bluetooth & devices] - [Devices] - [Show notifications to connect using Swift Pair] switch to turn on the
Swift Pair function.
Enter pairing mode on this headset.
When you pair the headset with a device for the first time after purchase or after initializing the
headset (when there is no pairing information on the headset)
1
Lay the headset units on their sides and remove both headset units from the charging case.
The headset turns on automatically.
The headset enters pairing mode automatically.
When you are wearing the headset, you will hear a notification sound from both headset units at the same time,
and you will hear a voice guidance say “Pairing”. When you are wearing only one headset unit, you will hear the
1.
54
When you pair a second or subsequent device (the headset has pairing information for other
devices)
notification sound and voice guidance from the headset unit you are wearing.
Set the headset units into the charging case.
Leave the charging case lid open.
1.
With the charging case lid open, press and hold the pairing button on the back of the charging case for about 5
seconds or more.
Note
The headset does not enter pairing mode with the charging case lid closed.
The indicator (blue) on the charging case repeatedly flashes twice in a row and the headset goes into pairing
mode.
You can remove the headset from the charging case after entering pairing mode.
2.
0:00
55
When you are wearing the headset, you will hear a notification sound from both headset units at the same time,
and you will hear a voice guidance say “Pairing”. When you are wearing only one headset unit, you will hear the
notification sound and voice guidance from the headset unit you are wearing.
Wake the computer up if the computer is in standby (sleep) or hibernation mode.
2
Pair the headset using the computer.
To connect using the Swift Pair function
To connect without using the Swift Pair function
3
Select [Connect] from the pop-up menu displayed on your computer screen.
1.
Click the [Start] button, then [Settings].1.
Click [Bluetooth & devices].
2.
Click the [Bluetooth] switch to turn on the Bluetooth function, then click [Add device].
3.
Click [Bluetooth].4.
56
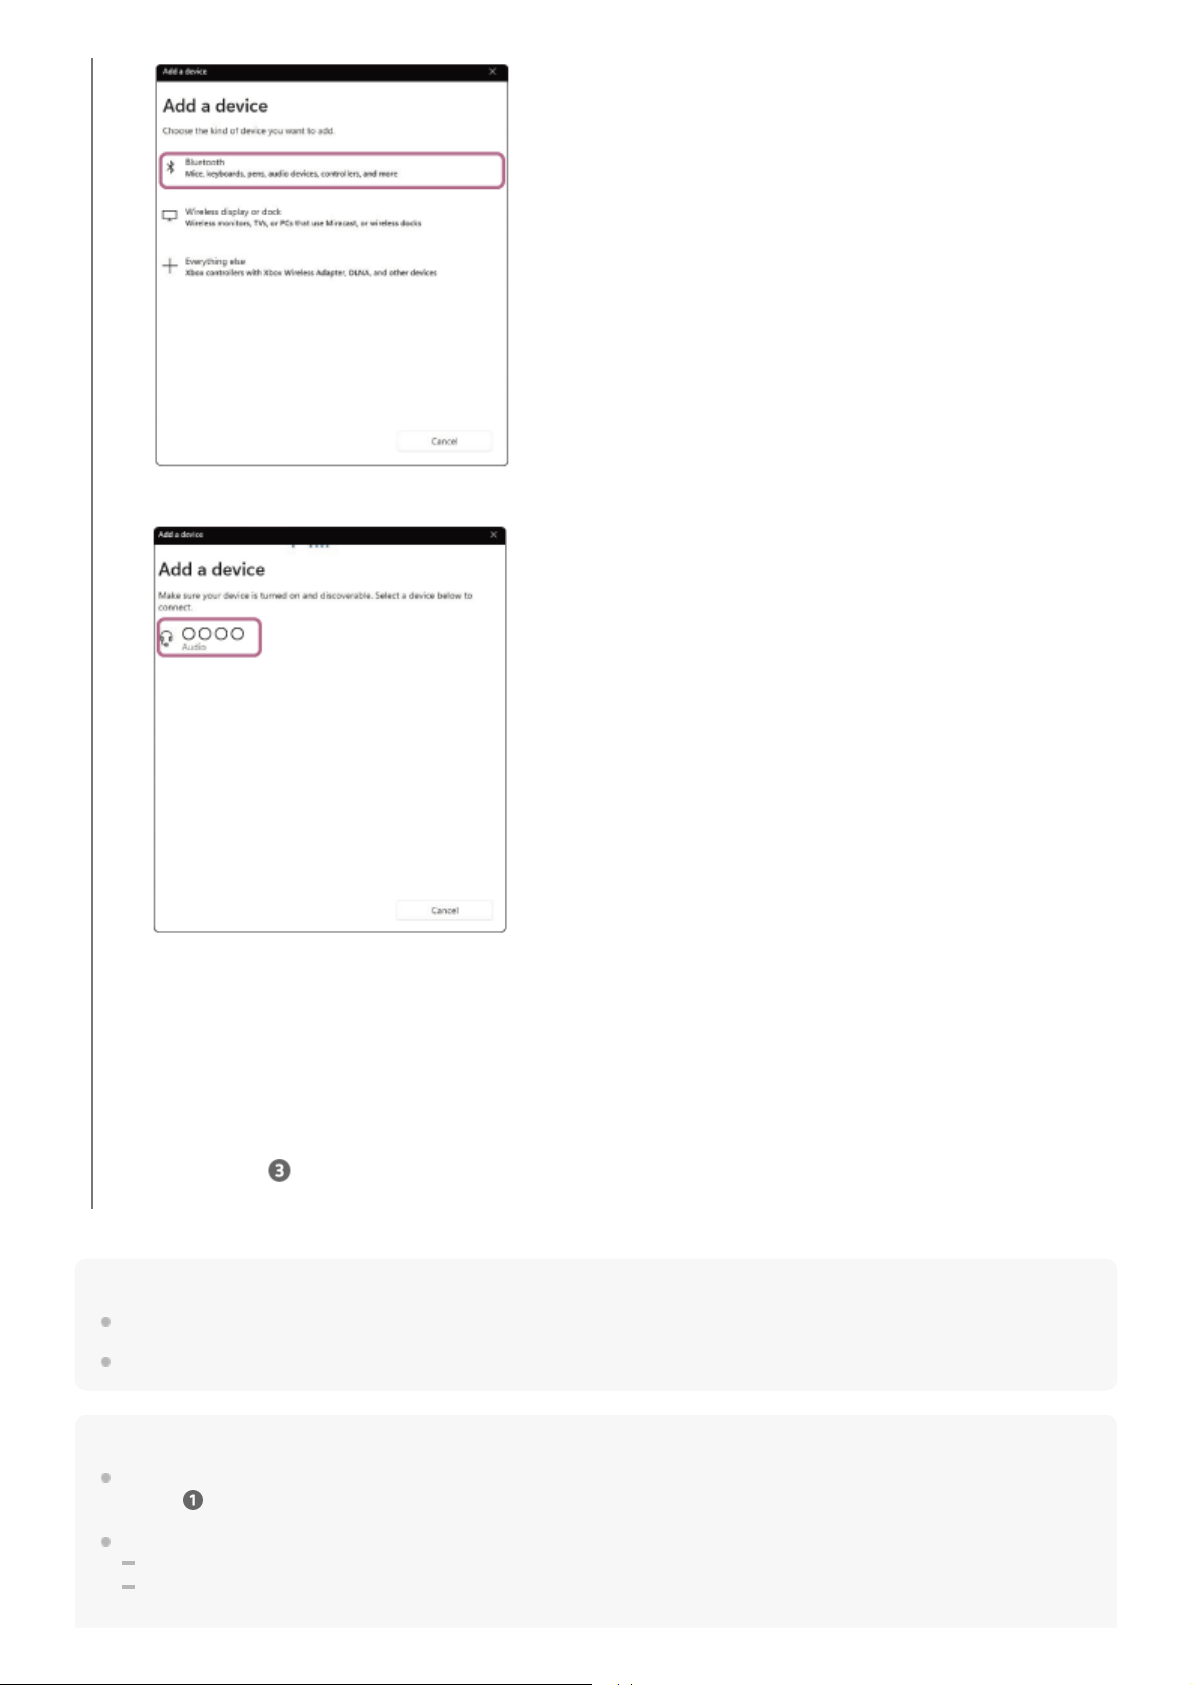
Hint
The operation above is an example. For more details, refer to the operating instructions supplied with the computer.
To delete all Bluetooth pairing information, see “Initializing the headset to restore factory settings”.
Note
If pairing is not established within 5 minutes, pairing mode is canceled. In this case, start the operation again from the beginning
of step
.
Once Bluetooth devices are paired, there is no need to pair them again, except in the following cases:
Pairing information has been deleted after repair, etc.
When a 9th device is paired
The headset can be paired with up to 8 devices. If a new device is paired after 8 devices are already paired, the registration
If Passkey
*
input is required, input “0000”.
The headset and computer are paired and connected with each other.
When the headset is placed in the charging case, the indicator (blue) on the charging case flashes 10 times.
When you are wearing the headset, you will hear a notification sound indicating that the connection is established
from both headset units at the same time. When you are wearing only one headset unit, you will hear the
notification sound from the headset unit you are wearing.
If they are not connected, see “Connecting to a paired computer (Windows 11)”.
If [WF-1000XM5] does not appear on your computer screen, try again from “To connect without using the Swift Pair
function” of step
.
Click [WF-1000XM5].5.
A Passkey may be called “Passcode”, “PIN code”, “PIN number”, or “Password”.
*
57

information of the paired device with the oldest connection date is overwritten with the information for the new device.
When the pairing information for the headset has been deleted from the Bluetooth device
When the headset is initialized
All of the pairing information is deleted. In this case, delete the pairing information for the headset from the connected device
and then pair them again.
The headset can be paired with multiple devices, but can only play music from 1 paired device at a time.
Related Topic
Wearing the headset
Using only one headset unit
How to make a wireless connection to Bluetooth devices
Connecting to a paired computer (Windows 11)
Listening to music from a device via a Bluetooth connection
Disconnecting Bluetooth connection (after use)
Initializing the headset to restore factory settings
5-048-298-11(1) Copyright 2023 Sony Corporation
58
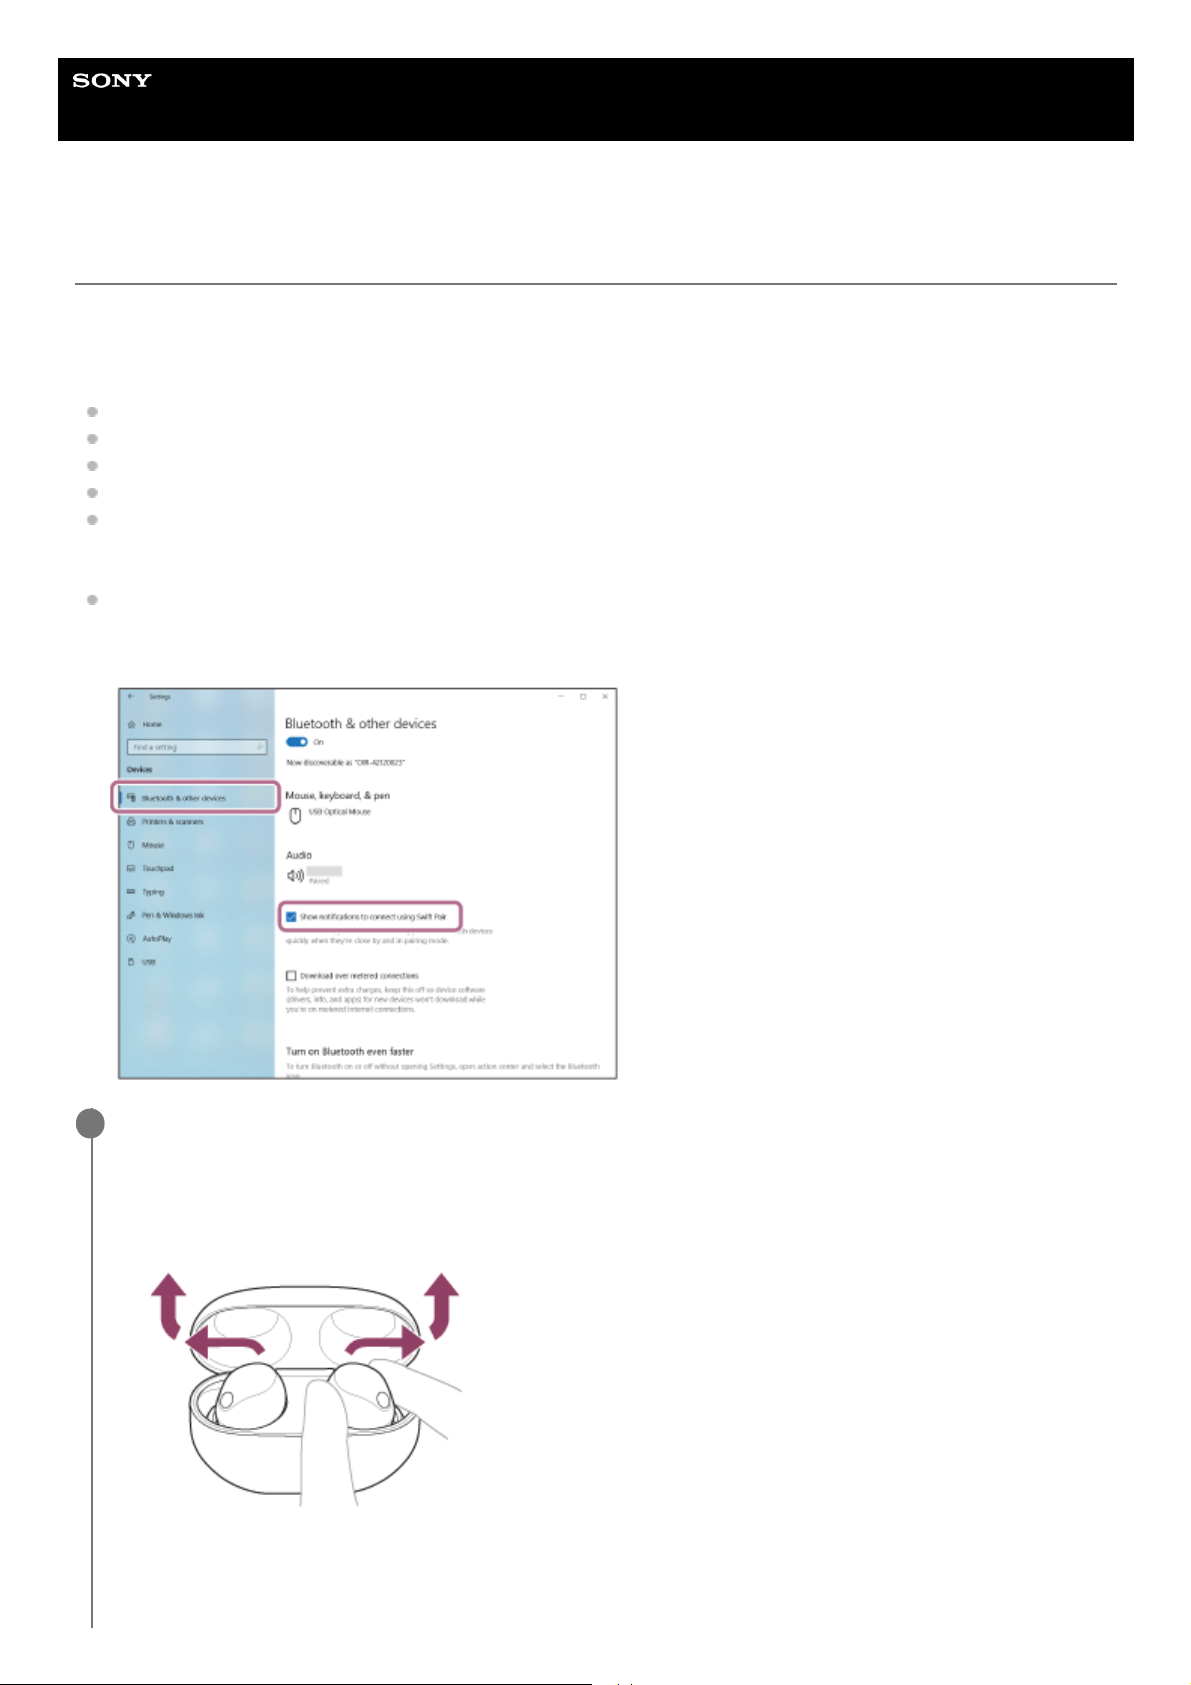
Help Guide
Wireless Noise Canceling Stereo Headset
WF-1000XM5
Pairing and connecting with a computer (Windows 10)
The operation to register the device that you wish to connect to is called “pairing”. First, pair a device to use it with the
headset for the first time.
Before starting the operation, make sure of the following:
Your computer has a Bluetooth function that supports music playback connections (A2DP).
The computer is placed within 1 m (3.2 ft) of the headset.
The headset is charged sufficiently.
The operating instructions for the computer is in hand.
Depending on the computer you are using, the built-in Bluetooth adaptor may need to be turned on. If you do not
know how to turn on the Bluetooth adaptor or are unsure if your computer has a built-in Bluetooth adaptor, refer to
the operating instructions supplied with the computer.
If your OS version is Windows 10 version 1803 or later, the Swift Pair function can be used to make pairing easier. To
use the Swift Pair function, click the [Start] button - [Settings] - [Devices] - [Bluetooth & other devices], and check the
[Show notifications to connect using Swift Pair] checkbox.
Enter pairing mode on this headset.
When you pair the headset with a device for the first time after purchase or after initializing the
headset (when there is no pairing information on the headset)
1
Lay the headset units on their sides and remove both headset units from the charging case.
The headset turns on automatically.
The headset enters pairing mode automatically.
1.
59
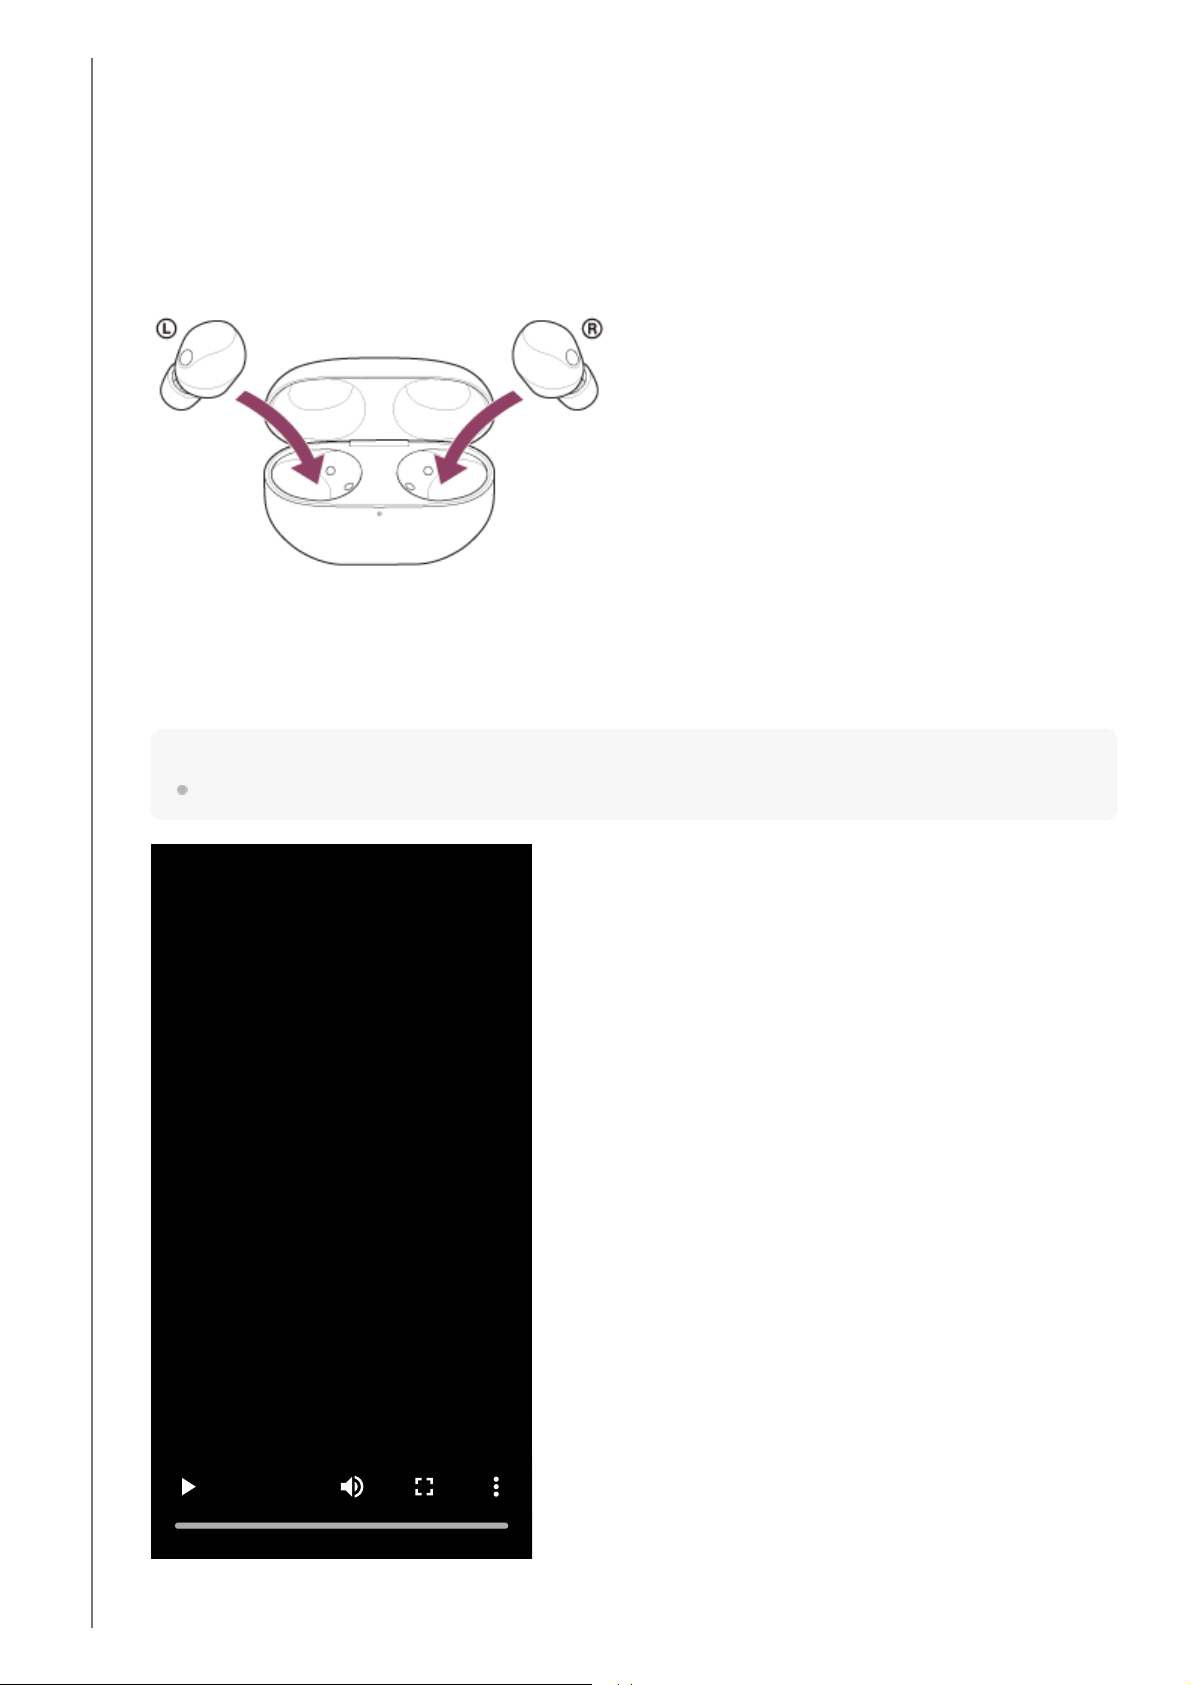
When you pair a second or subsequent device (the headset has pairing information for other
devices)
When you are wearing the headset, you will hear a notification sound from both headset units at the same time,
and you will hear a voice guidance say “Pairing”. When you are wearing only one headset unit, you will hear the
notification sound and voice guidance from the headset unit you are wearing.
Set the headset units into the charging case.
Leave the charging case lid open.
1.
With the charging case lid open, press and hold the pairing button on the back of the charging case for about 5
seconds or more.
Note
The headset does not enter pairing mode with the charging case lid closed.
2.
0:00
60
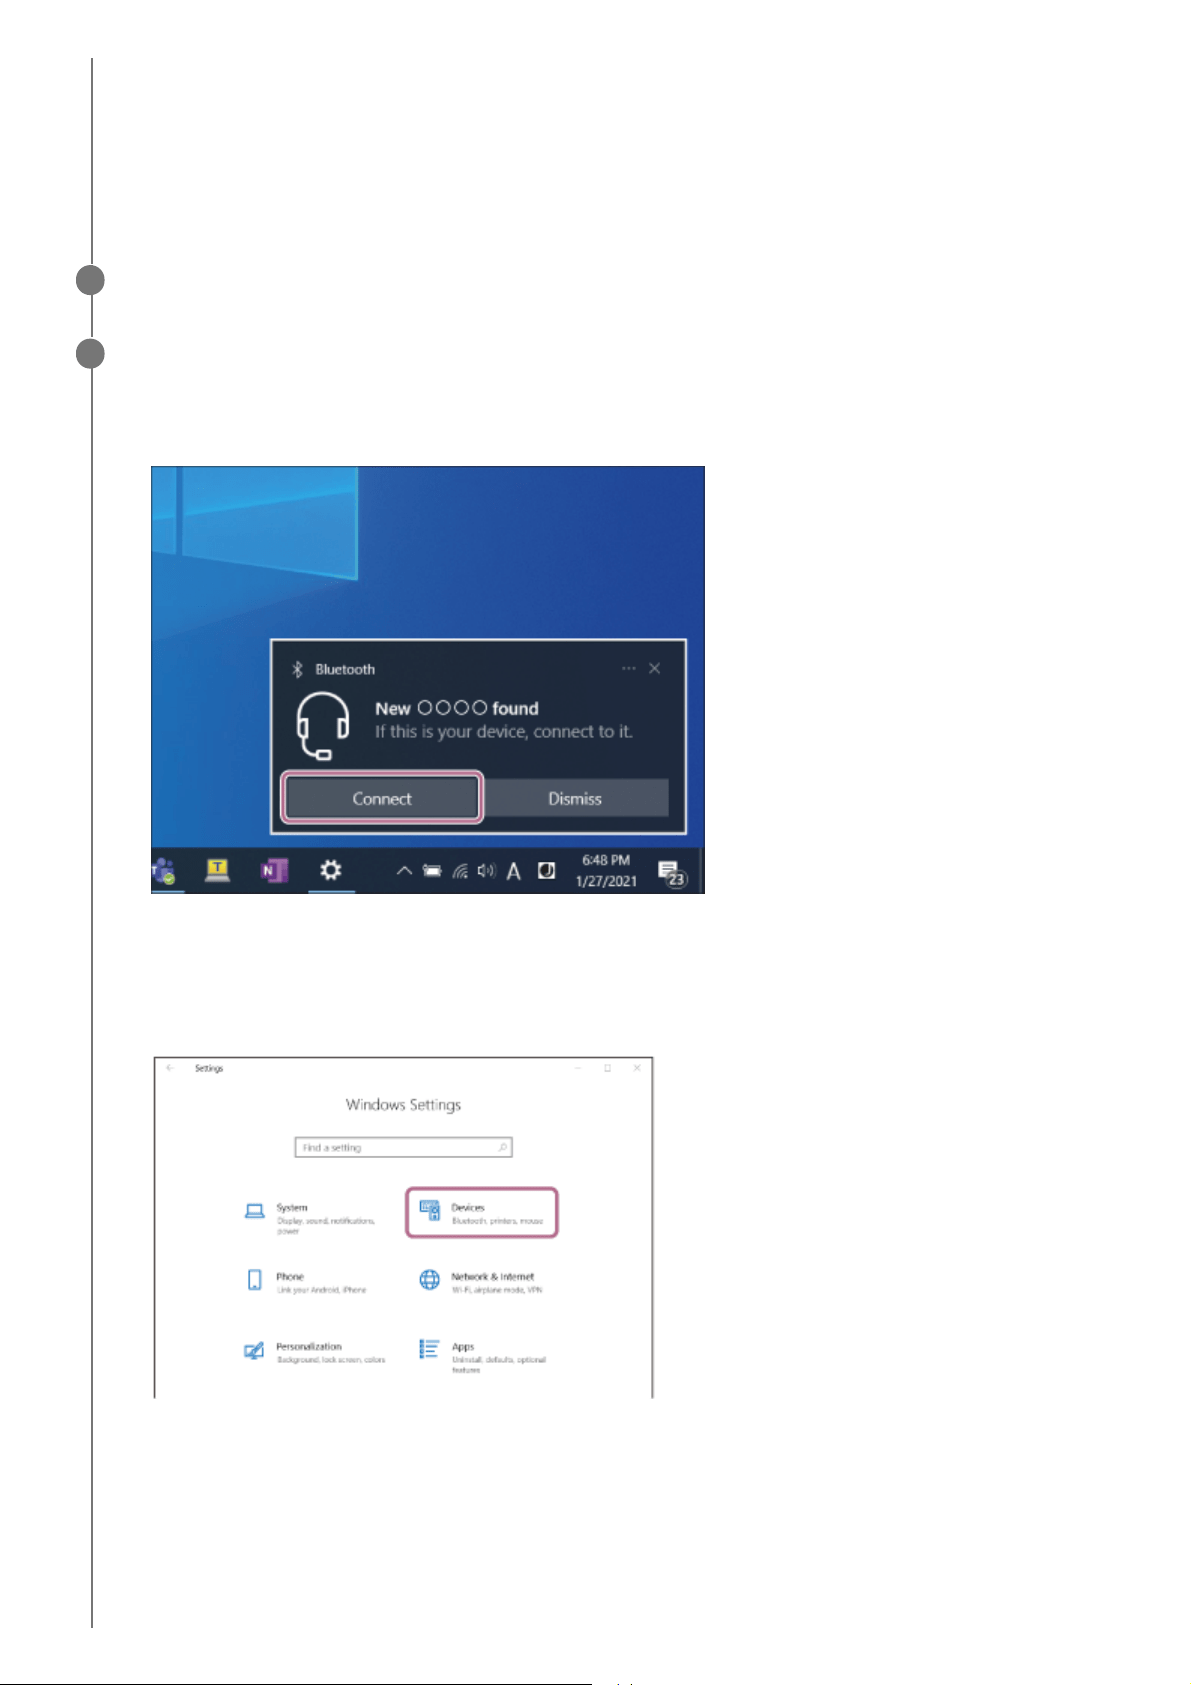
The indicator (blue) on the charging case repeatedly flashes twice in a row and the headset goes into pairing
mode.
You can remove the headset from the charging case after entering pairing mode.
When you are wearing the headset, you will hear a notification sound from both headset units at the same time,
and you will hear a voice guidance say “Pairing”. When you are wearing only one headset unit, you will hear the
notification sound and voice guidance from the headset unit you are wearing.
Wake the computer up if the computer is in standby (sleep) or hibernation mode.
2
Pair the headset using the computer.
To connect using the Swift Pair function
To connect without using the Swift Pair function
3
Select [Connect] from the pop-up menu displayed on your computer screen.
1.
Click the [Start] button, then [Settings].1.
Click [Devices].
2.
Click the [Bluetooth & other devices] tab, click the [Bluetooth] switch to turn on the Bluetooth function, then click
[Add Bluetooth or other device].
3.
61
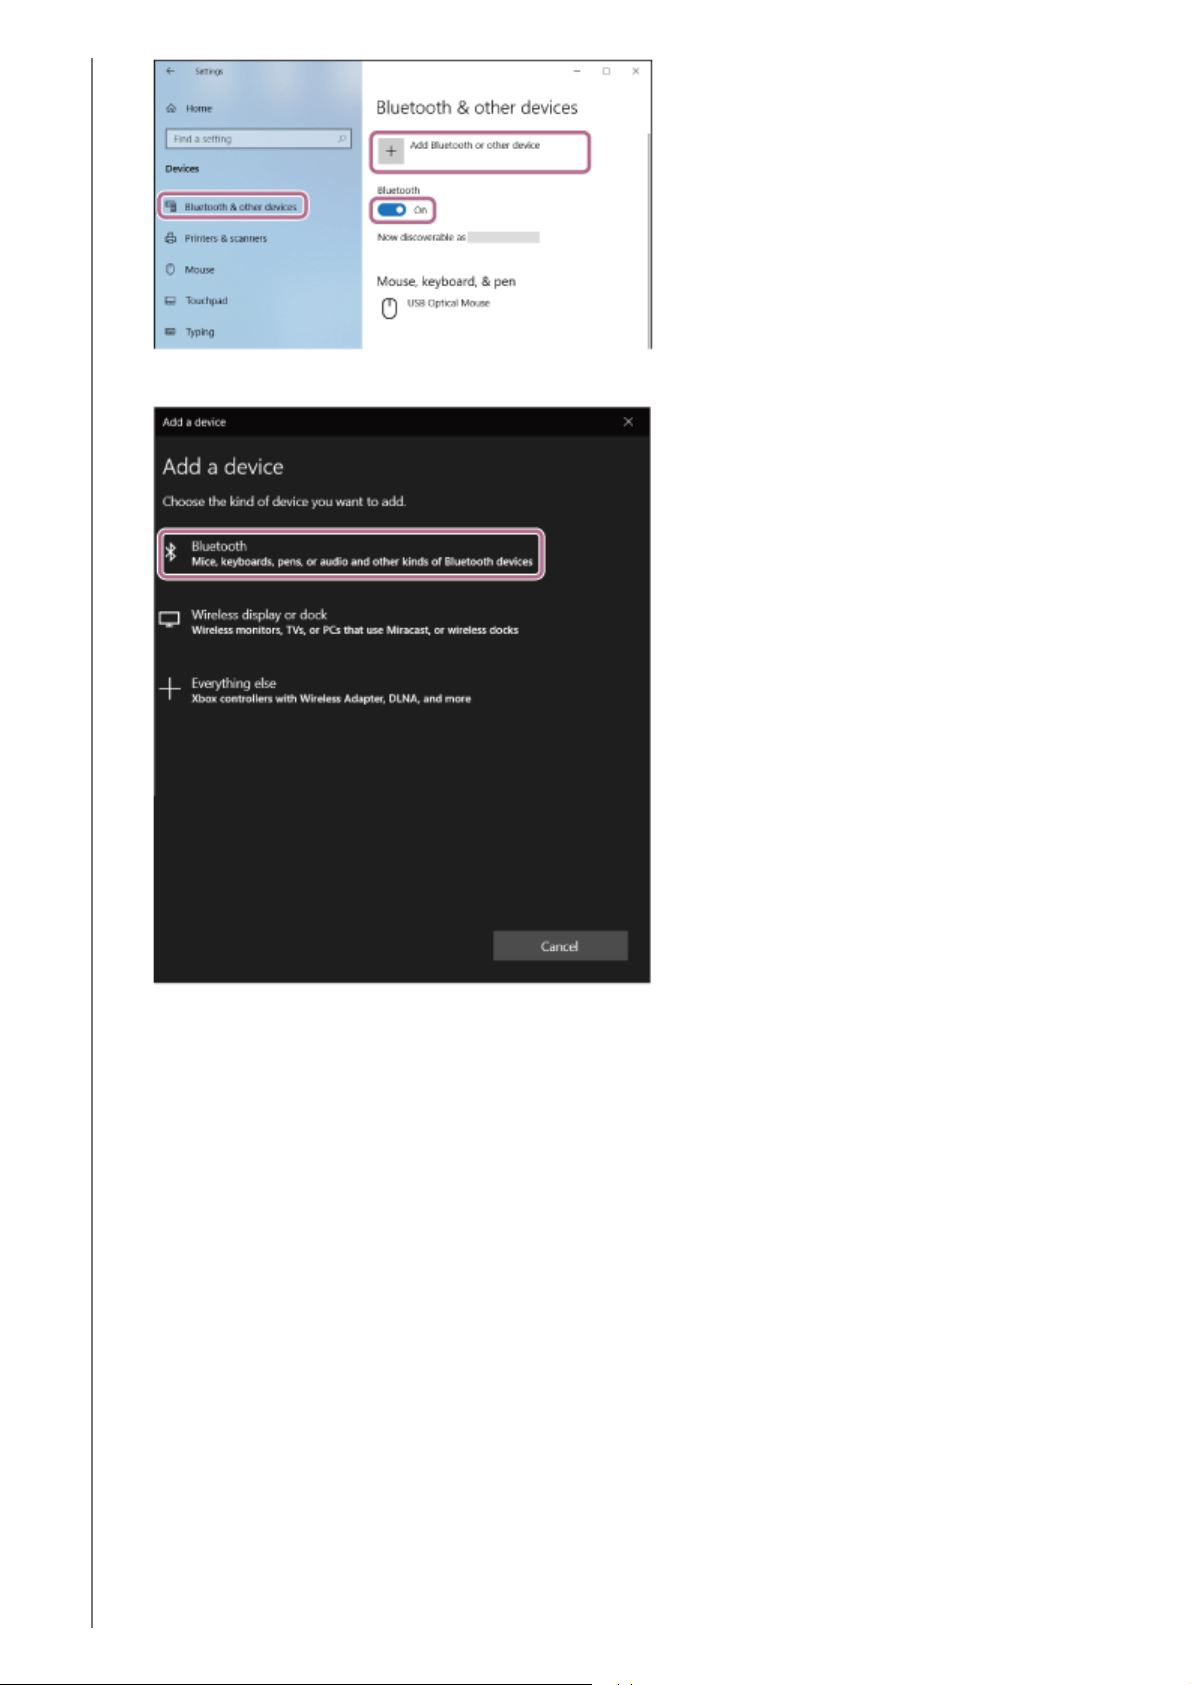
Click [Bluetooth].4.
Click [WF-1000XM5].5.
62
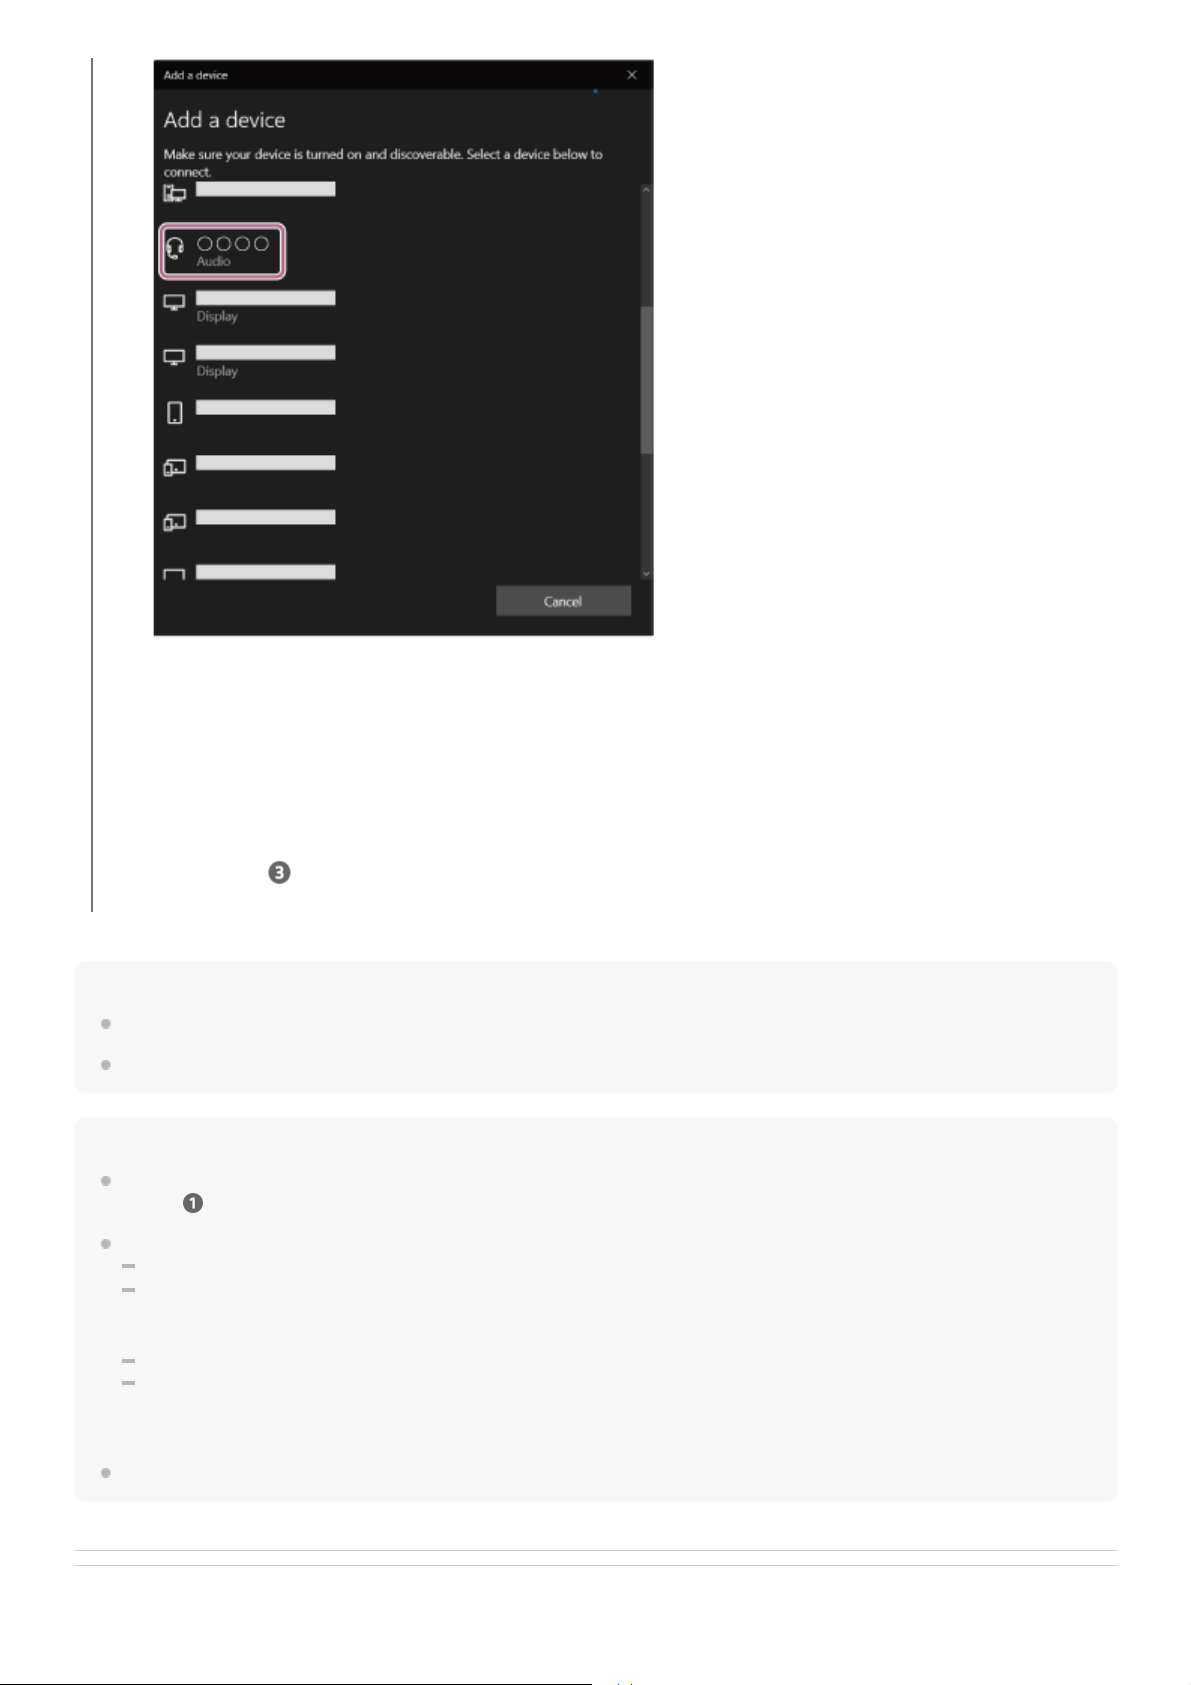
Hint
The operation above is an example. For more details, refer to the operating instructions supplied with the computer.
To delete all Bluetooth pairing information, see “Initializing the headset to restore factory settings”.
Note
If pairing is not established within 5 minutes, pairing mode is canceled. In this case, start the operation again from the beginning
of step
.
Once Bluetooth devices are paired, there is no need to pair them again, except in the following cases:
Pairing information has been deleted after repair, etc.
When a 9th device is paired
The headset can be paired with up to 8 devices. If a new device is paired after 8 devices are already paired, the registration
information of the paired device with the oldest connection date is overwritten with the information for the new device.
When the pairing information for the headset has been deleted from the Bluetooth device
When the headset is initialized
All of the pairing information is deleted. In this case, delete the pairing information for the headset from the connected device
and then pair them again.
The headset can be paired with multiple devices, but can only play music from 1 paired device at a time.
Related Topic
If Passkey
*
input is required, input “0000”.
The headset and computer are paired and connected with each other.
When the headset is placed in the charging case, the indicator (blue) on the charging case flashes 10 times.
When you are wearing the headset, you will hear a notification sound indicating that the connection is established
from both headset units at the same time. When you are wearing only one headset unit, you will hear the
notification sound from the headset unit you are wearing.
If they are not connected, see “Connecting to a paired computer (Windows 10)”.
If [WF-1000XM5] does not appear on your computer screen, try again from “To connect without using the Swift Pair
function” of step
.
A Passkey may be called “Passcode”, “PIN code”, “PIN number”, or “Password”.
*
63

Wearing the headset
Using only one headset unit
How to make a wireless connection to Bluetooth devices
Connecting to a paired computer (Windows 10)
Listening to music from a device via a Bluetooth connection
Disconnecting Bluetooth connection (after use)
Initializing the headset to restore factory settings
5-048-298-11(1) Copyright 2023 Sony Corporation
64
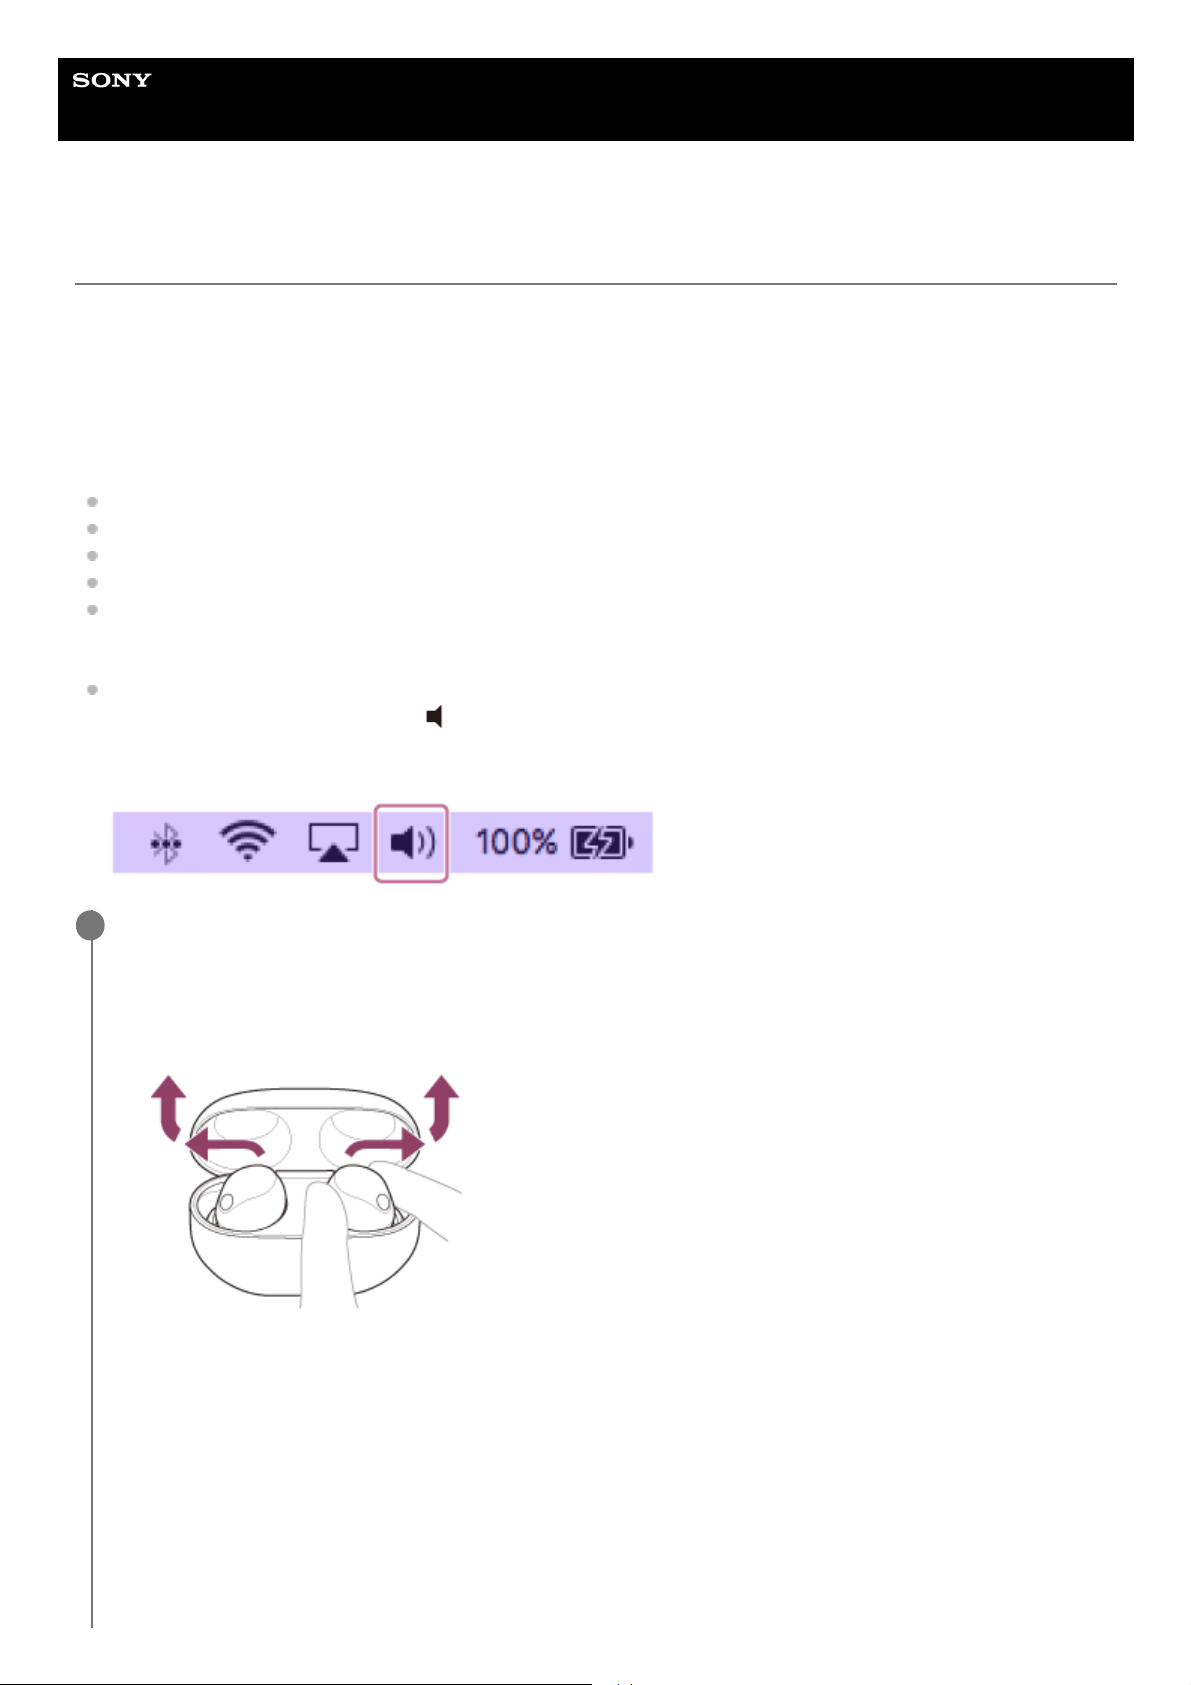
Help Guide
Wireless Noise Canceling Stereo Headset
WF-1000XM5
Pairing and connecting with a computer (Mac)
The operation to register the device that you wish to connect to is called “pairing”. First, pair a device to use it with the
headset for the first time.
Compatible OS
macOS (version 11 or later)
Before starting the operation, make sure of the following:
Your computer has a Bluetooth function that supports music playback connections (A2DP).
The computer is placed within 1 m (3.2 ft) of the headset.
The headset is charged sufficiently.
The operating instructions for the computer is in hand.
Depending on the computer you are using, the built-in Bluetooth adaptor may need to be turned on. If you do not
know how to turn on the Bluetooth adaptor or are unsure if your computer has a built-in Bluetooth adaptor, refer to
the operating instructions supplied with the computer.
Set the computer speaker to the ON mode.
If the computer speaker is set to the
“OFF” mode, no sound can be heard from the headset.
Computer speaker in the ON mode
Enter pairing mode on this headset.
When you pair the headset with a device for the first time after purchase or after initializing the
headset (when there is no pairing information on the headset)
When you pair a second or subsequent device (the headset has pairing information for other
devices)
1
Lay the headset units on their sides and remove both headset units from the charging case.
The headset turns on automatically.
The headset enters pairing mode automatically.
When you are wearing the headset, you will hear a notification sound from both headset units at the same time,
and you will hear a voice guidance say “Pairing”. When you are wearing only one headset unit, you will hear the
notification sound and voice guidance from the headset unit you are wearing.
1.
65
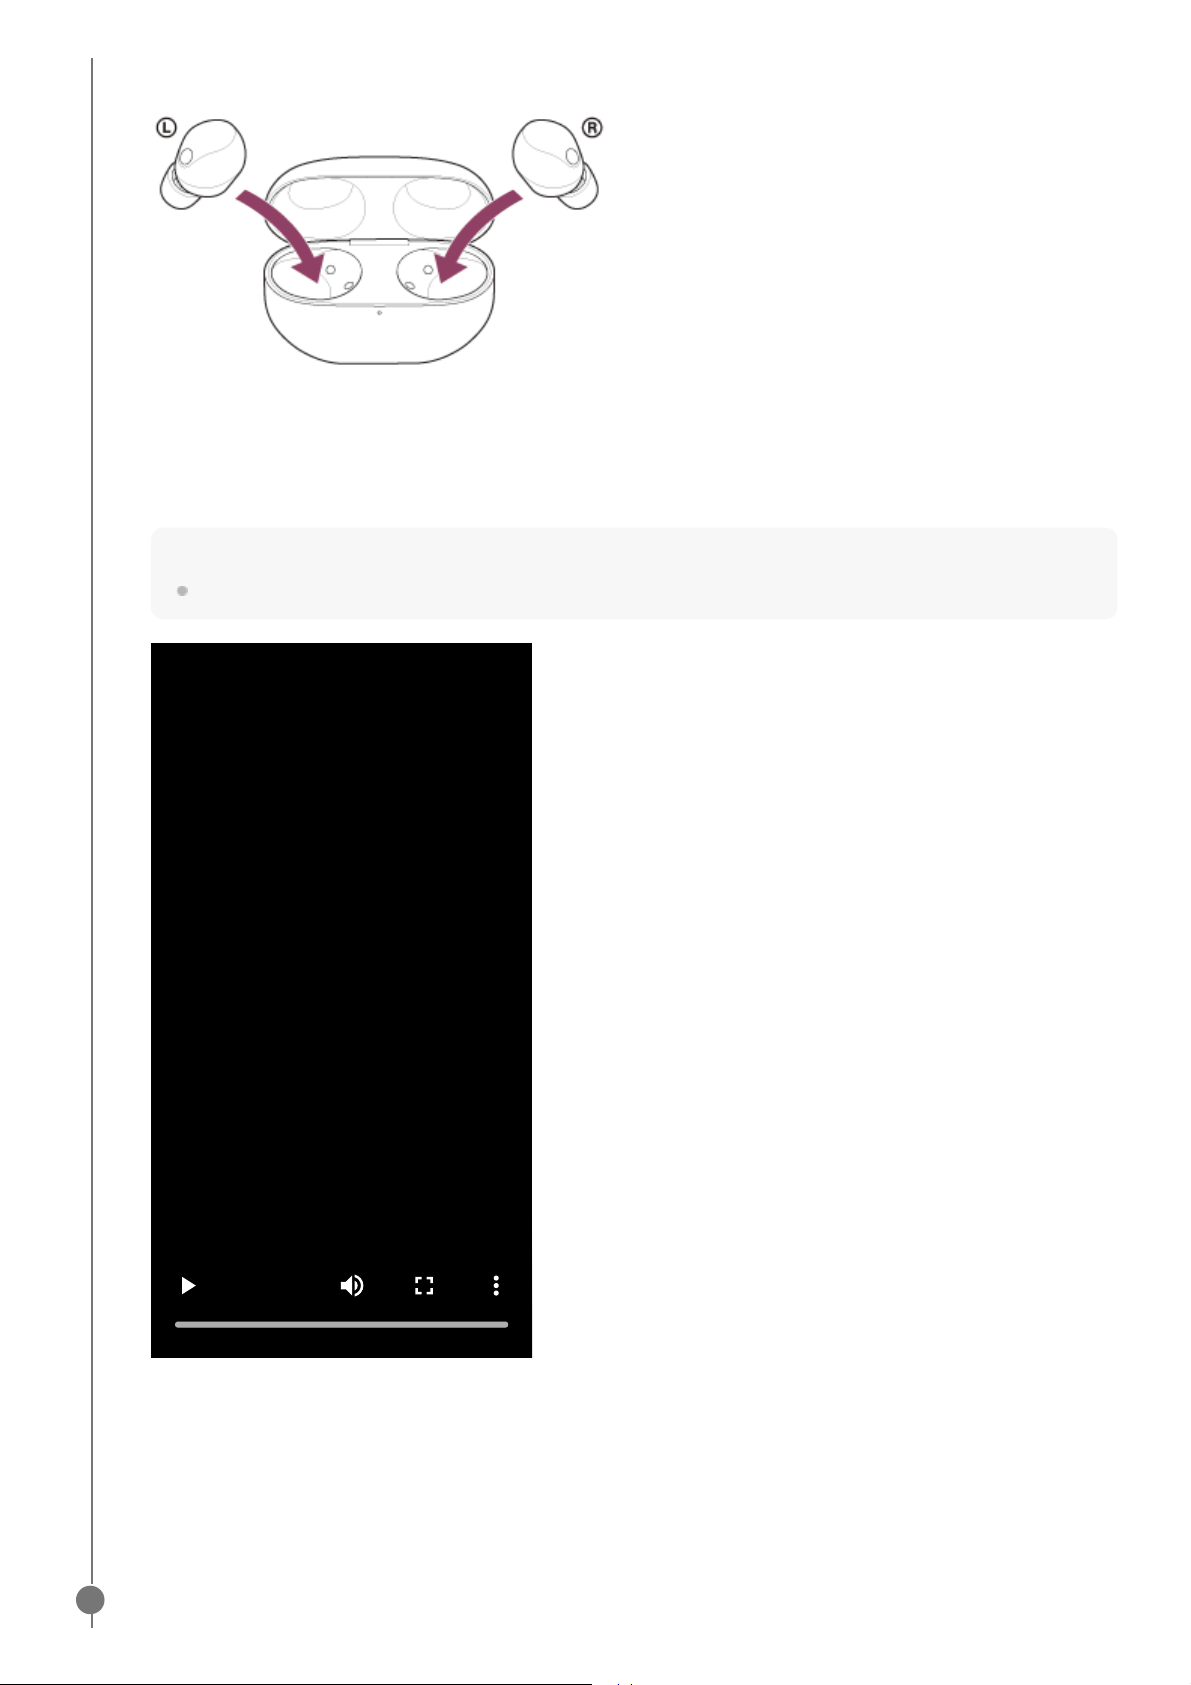
Set the headset units into the charging case.
Leave the charging case lid open.
1.
With the charging case lid open, press and hold the pairing button on the back of the charging case for about 5
seconds or more.
Note
The headset does not enter pairing mode with the charging case lid closed.
The indicator (blue) on the charging case repeatedly flashes twice in a row and the headset goes into pairing
mode.
You can remove the headset from the charging case after entering pairing mode.
When you are wearing the headset, you will hear a notification sound from both headset units at the same time,
and you will hear a voice guidance say “Pairing”. When you are wearing only one headset unit, you will hear the
notification sound and voice guidance from the headset unit you are wearing.
2.
0:00
Wake the computer up if the computer is in standby (sleep) or hibernation mode.
2
66
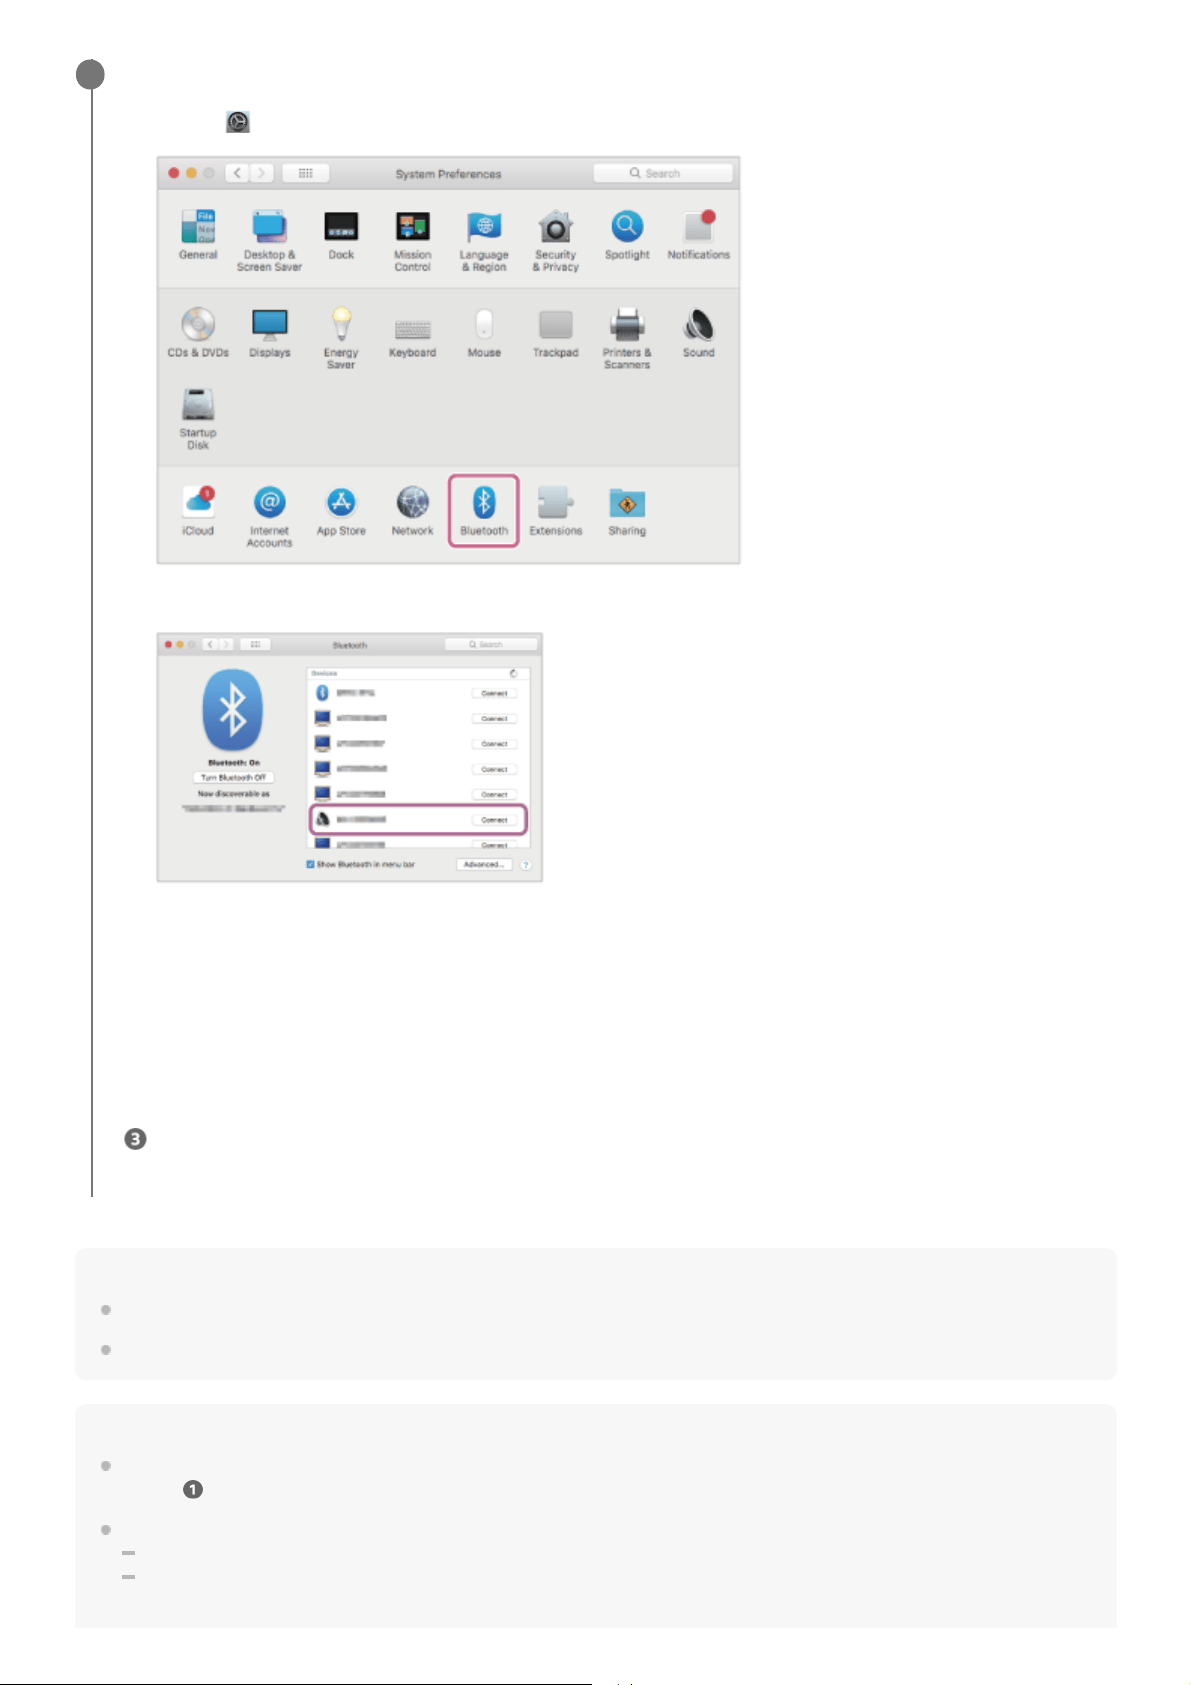
Hint
The operation above is an example. For more details, refer to the operating instructions supplied with the computer.
To delete all Bluetooth pairing information, see “Initializing the headset to restore factory settings”.
Note
If pairing is not established within 5 minutes, pairing mode is canceled. In this case, start the operation again from the beginning
of step
.
Once Bluetooth devices are paired, there is no need to pair them again, except in the following cases:
Pairing information has been deleted after repair, etc.
When a 9th device is paired
The headset can be paired with up to 8 devices. If a new device is paired after 8 devices are already paired, the registration
Pair the headset using the computer.
If Passkey
*
input is required, input “0000”.
The headset and computer are paired and connected with each other.
When the headset is placed in the charging case, the indicator (blue) on the charging case flashes 10 times.
When you are wearing the headset, you will hear a notification sound indicating that the connection is established
from both headset units at the same time. When you are wearing only one headset unit, you will hear the
notification sound from the headset unit you are wearing.
If they are not connected, see “Connecting to a paired computer (Mac)”.
If [WF-1000XM5] does not appear on your computer screen, start the operation again from the beginning of step
.
3
Select [
(System Preferences)] - [Bluetooth] from the Dock at the bottom of the screen.
1.
Select [WF-1000XM5] of the [Bluetooth] screen and click [Connect].
2.
A Passkey may be called “Passcode”, “PIN code”, “PIN number”, or “Password”.
*
67

information of the paired device with the oldest connection date is overwritten with the information for the new device.
When the pairing information for the headset has been deleted from the Bluetooth device
When the headset is initialized
All of the pairing information is deleted. In this case, delete the pairing information for the headset from the connected device
and then pair them again.
The headset can be paired with multiple devices, but can only play music from 1 paired device at a time.
Related Topic
Wearing the headset
Using only one headset unit
How to make a wireless connection to Bluetooth devices
Connecting to a paired computer (Mac)
Listening to music from a device via a Bluetooth connection
Disconnecting Bluetooth connection (after use)
Initializing the headset to restore factory settings
5-048-298-11(1) Copyright 2023 Sony Corporation
68
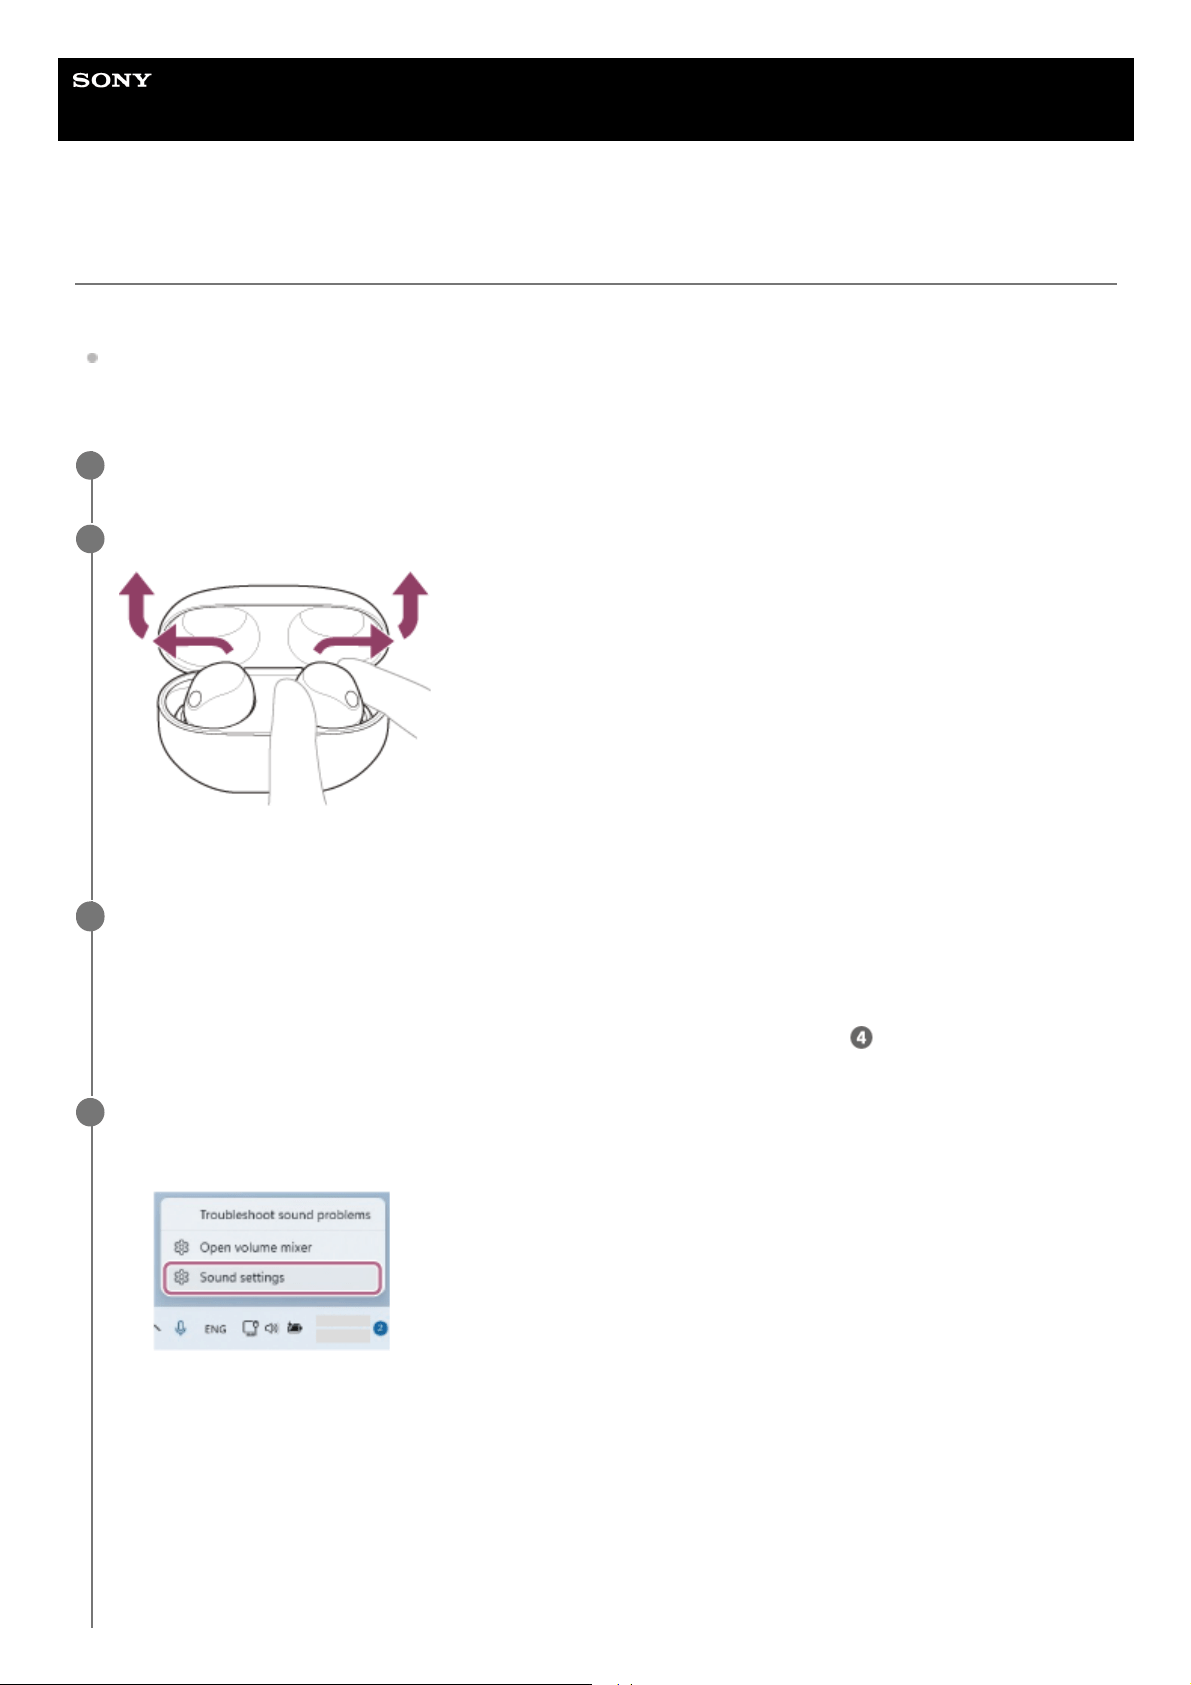
Help Guide
Wireless Noise Canceling Stereo Headset
WF-1000XM5
Connecting to a paired computer (Windows 11)
Before starting the operation, make sure of the following:
Depending on the computer you are using, the built-in Bluetooth adaptor may need to be turned on. If you do not
know how to turn on the Bluetooth adaptor or are unsure if your computer has a built-in Bluetooth adaptor, refer to
the operating instructions supplied with the computer.
Wake the computer up if the computer is in standby (sleep) or hibernation mode.
1
Lay the headset units on their sides and remove them from the charging case.
The headset turns on automatically.
2
Put the headset units into both ears.
When the headset has automatically connected to the last connected device, you will hear a notification sound
indicating that the connection is established from both headset units at the same time. When you wear only one
headset unit, you will hear the notification sound from the headset unit you are wearing.
Check the connection status on the computer. If it is not connected, proceed to step
.
3
Select the headset using the computer.
4
Right-click the speaker icon on the toolbar, then select [Sound settings].
1.
On the [Sound] screen, select [WF-1000XM5] for [Output] and [Input].2.
69
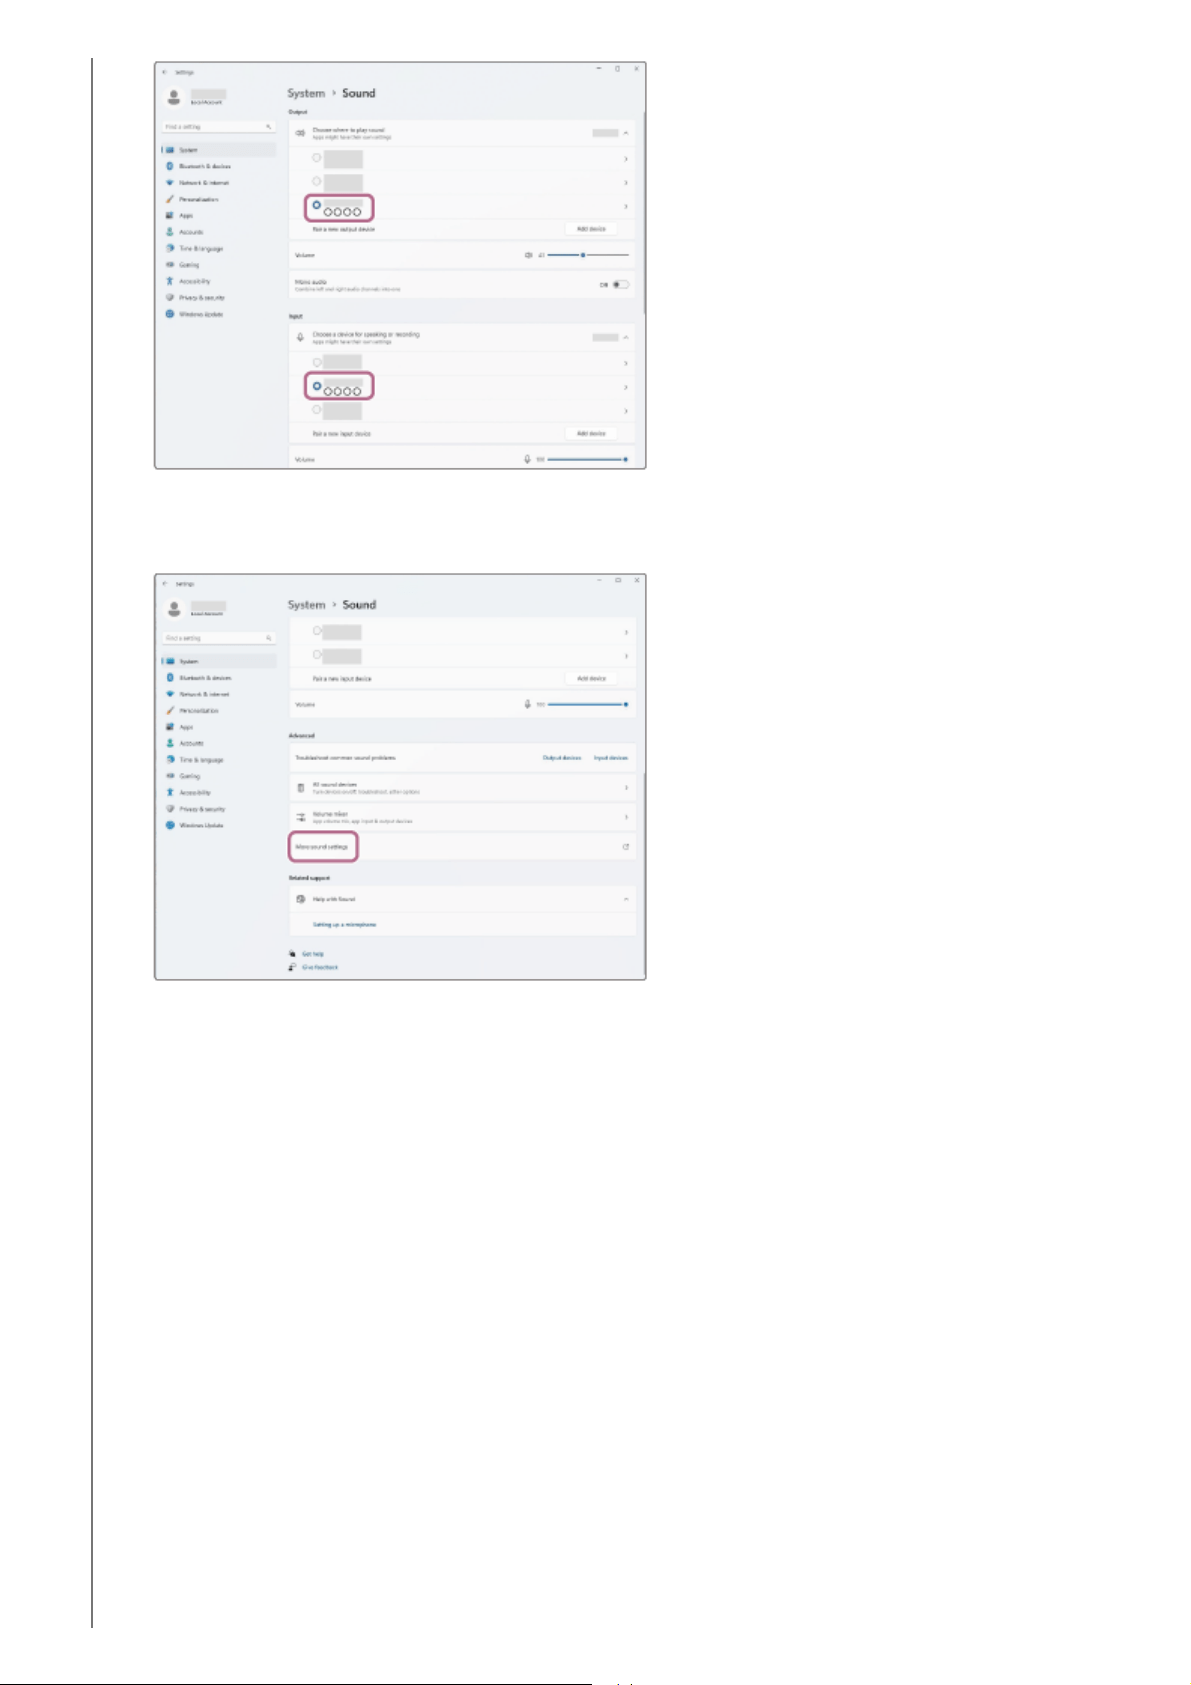
If [WF-1000XM5] is not displayed for [Output] and [Input], proceed to step 3.
Click [More sound settings].
3.
On the [Playback] tab on the [Sound] screen, select [WF-1000XM5], right-click it, and select [Connect] from the
displayed menu.
4.
70
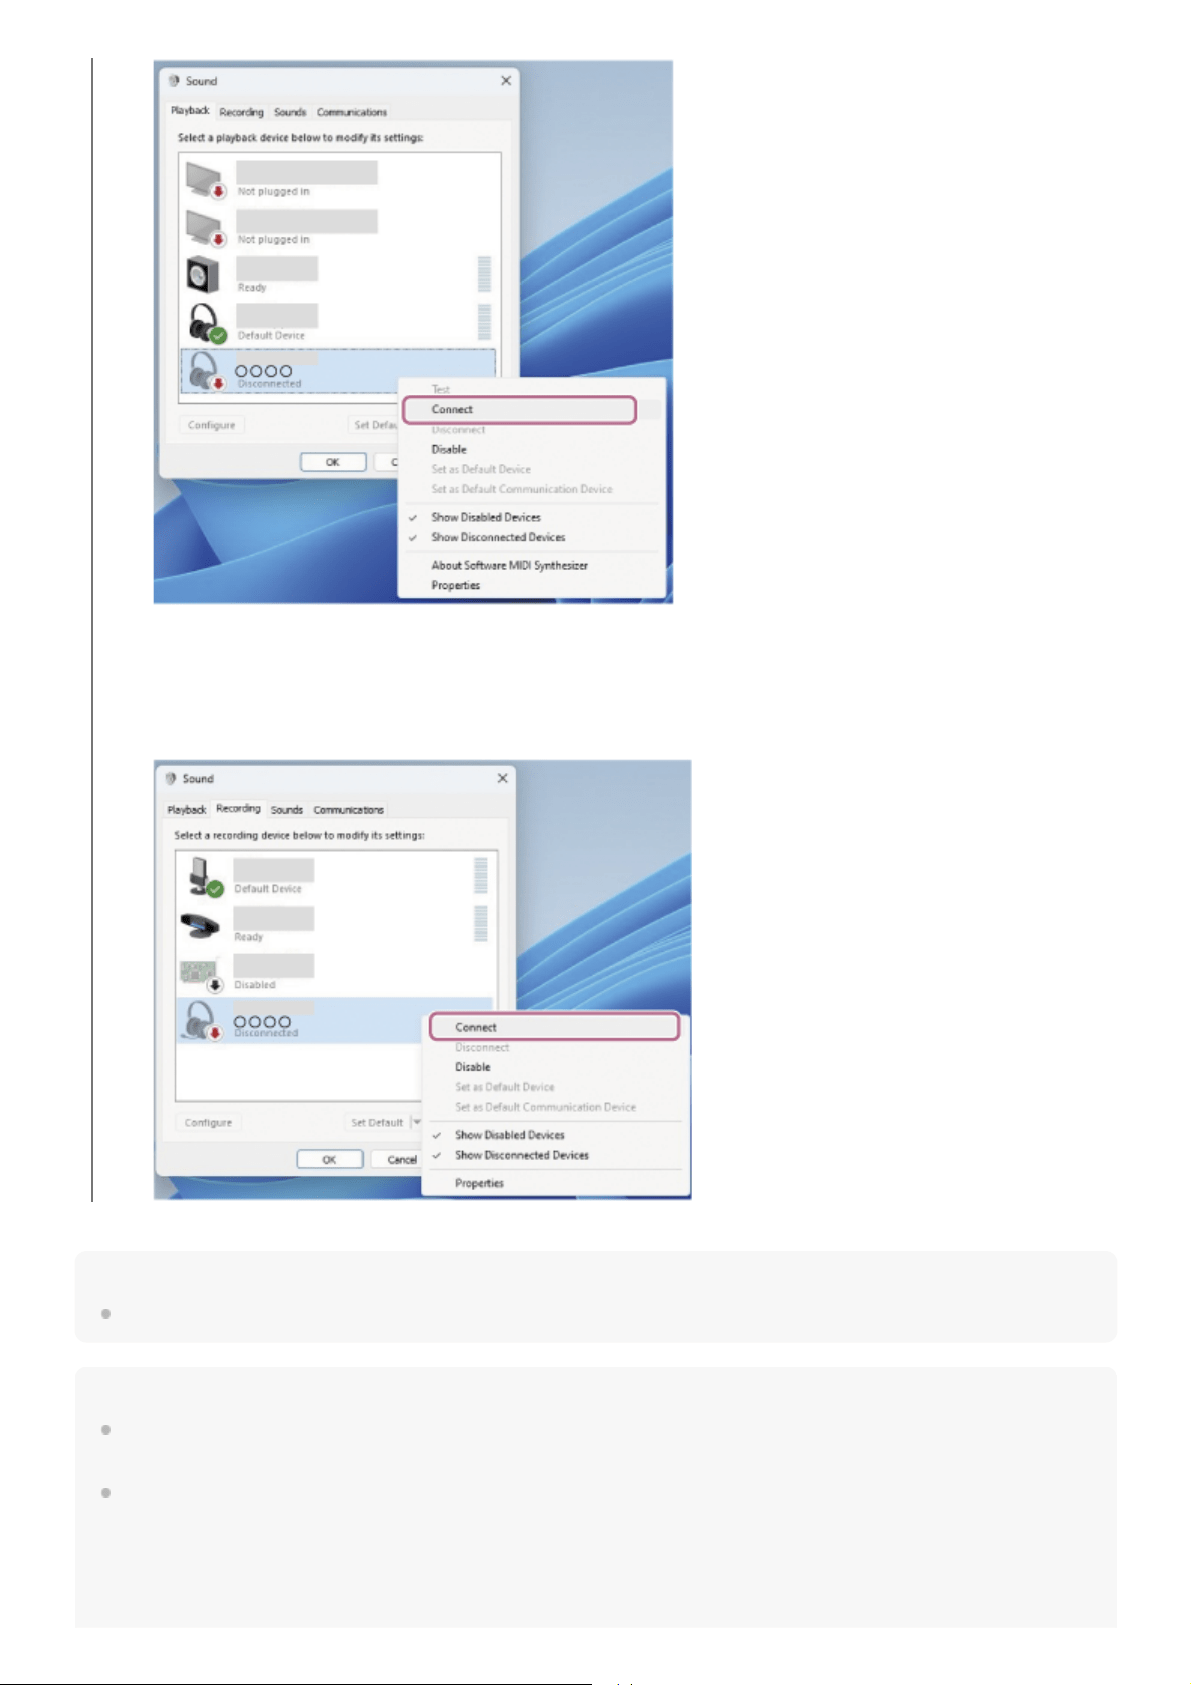
Hint
The operation above is an example. For more details, refer to the operating instructions supplied with the computer.
Note
If the music playback sound quality is poor, check that the A2DP function which supports music playback connections is enabled
in the computer settings. For more details, refer to the operating instructions supplied with the computer.
If the last connected Bluetooth device is placed near the headset, the headset may automatically connect to the device when you
turn on the headset and may not connect to another device.
If this occurs, cancel the Bluetooth connection on the last connected device.
You will hear a notification sound indicating that the connection is established from both headset units at the
same time. When you wear only one headset unit, you will hear the notification sound from the headset unit you
are wearing.
On the [Recording] tab, select [WF-1000XM5], right-click it, and select [Connect] from the displayed menu.
5.
71

If you cannot connect your computer to the headset, delete the headset pairing information on your computer and perform pairing
again. As for the operations on your computer, refer to the operating instructions supplied with the computer.
Related Topic
Wearing the headset
Using only one headset unit
How to make a wireless connection to Bluetooth devices
Pairing and connecting with a computer (Windows® 11)
Listening to music from a device via a Bluetooth connection
Disconnecting Bluetooth connection (after use)
Making a video call on your computer
5-048-298-11(1) Copyright 2023 Sony Corporation
72
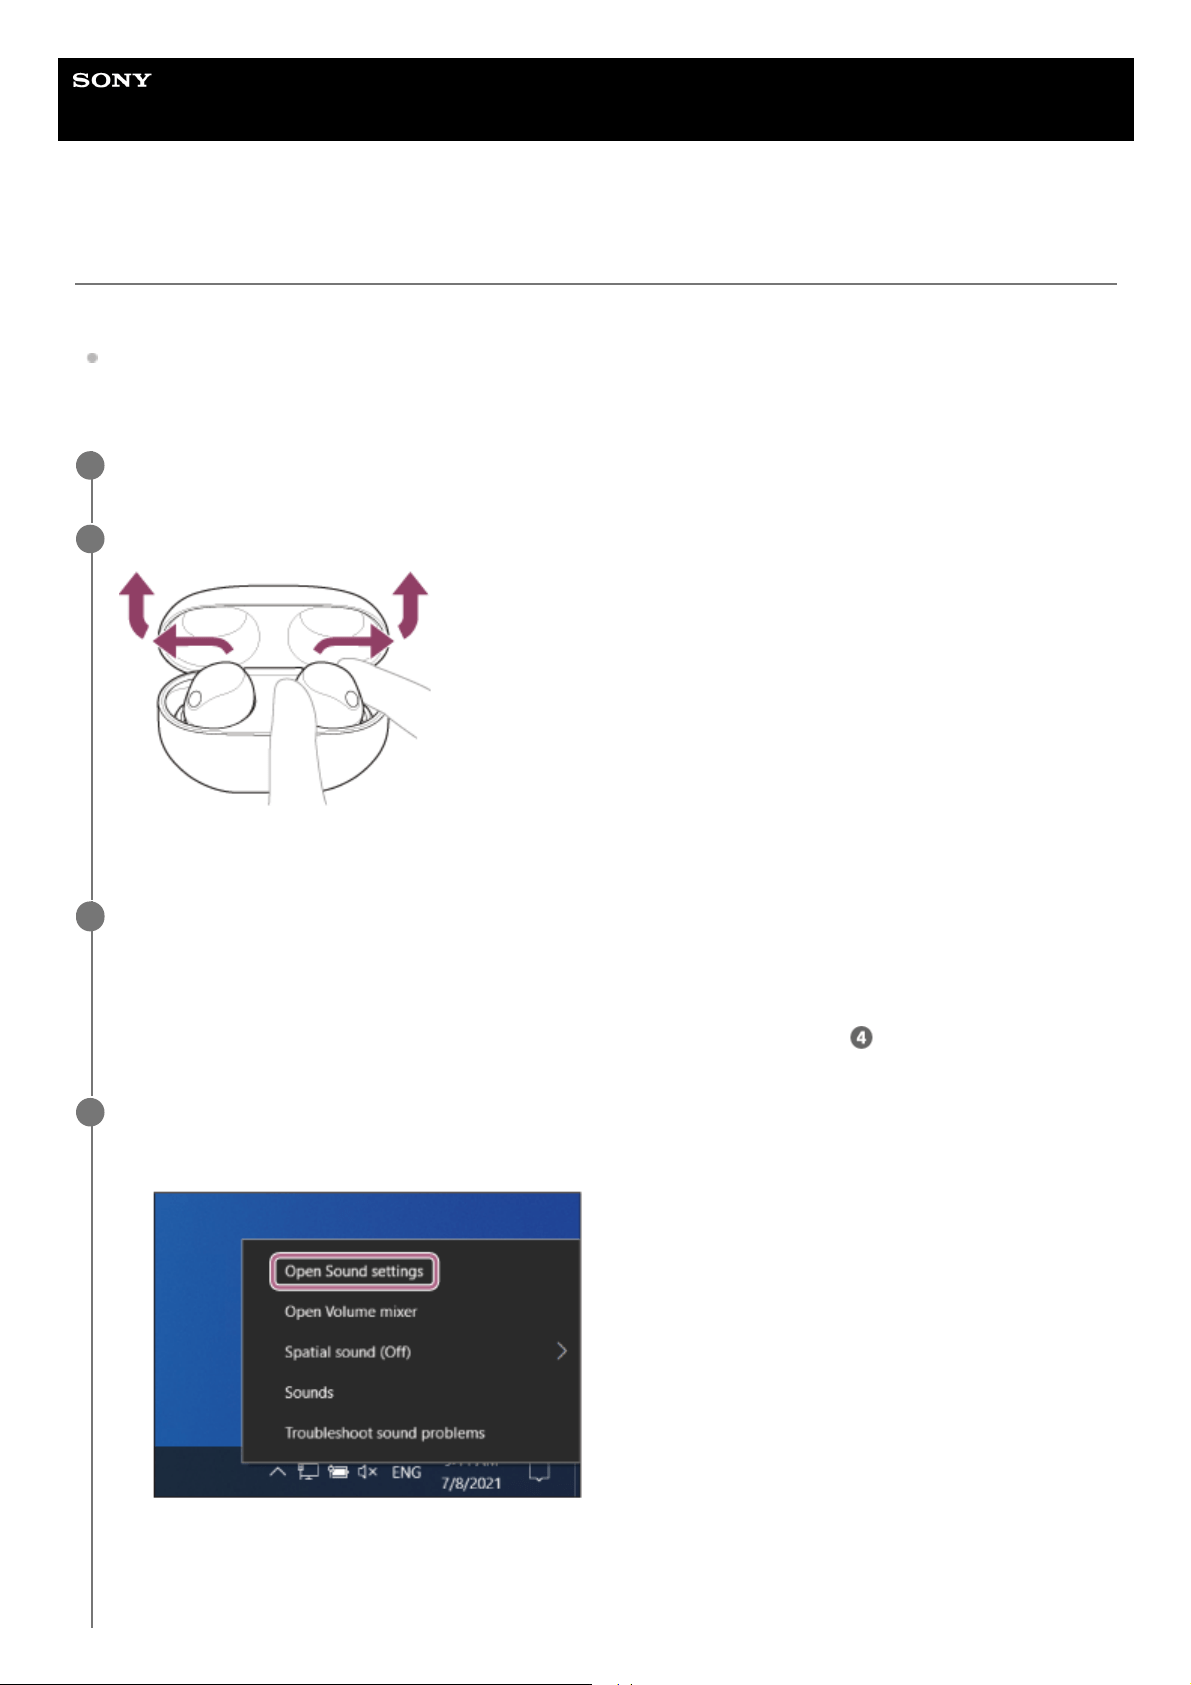
Help Guide
Wireless Noise Canceling Stereo Headset
WF-1000XM5
Connecting to a paired computer (Windows 10)
Before starting the operation, make sure of the following:
Depending on the computer you are using, the built-in Bluetooth adaptor may need to be turned on. If you do not
know how to turn on the Bluetooth adaptor or are unsure if your computer has a built-in Bluetooth adaptor, refer to
the operating instructions supplied with the computer.
Wake the computer up if the computer is in standby (sleep) or hibernation mode.
1
Lay the headset units on their sides and remove them from the charging case.
The headset turns on automatically.
2
Put the headset units into both ears.
When the headset has automatically connected to the last connected device, you will hear a notification sound
indicating that the connection is established from both headset units at the same time. When you wear only one
headset unit, you will hear the notification sound from the headset unit you are wearing.
Check the connection status on the computer. If it is not connected, proceed to step
.
3
Select the headset using the computer.
4
Right-click the speaker icon on the toolbar, then select [Open Sound settings].
1.
From the [Choose your output device] drop-down menu, select [Headphones (WF-1000XM5 Stereo)].2.
73
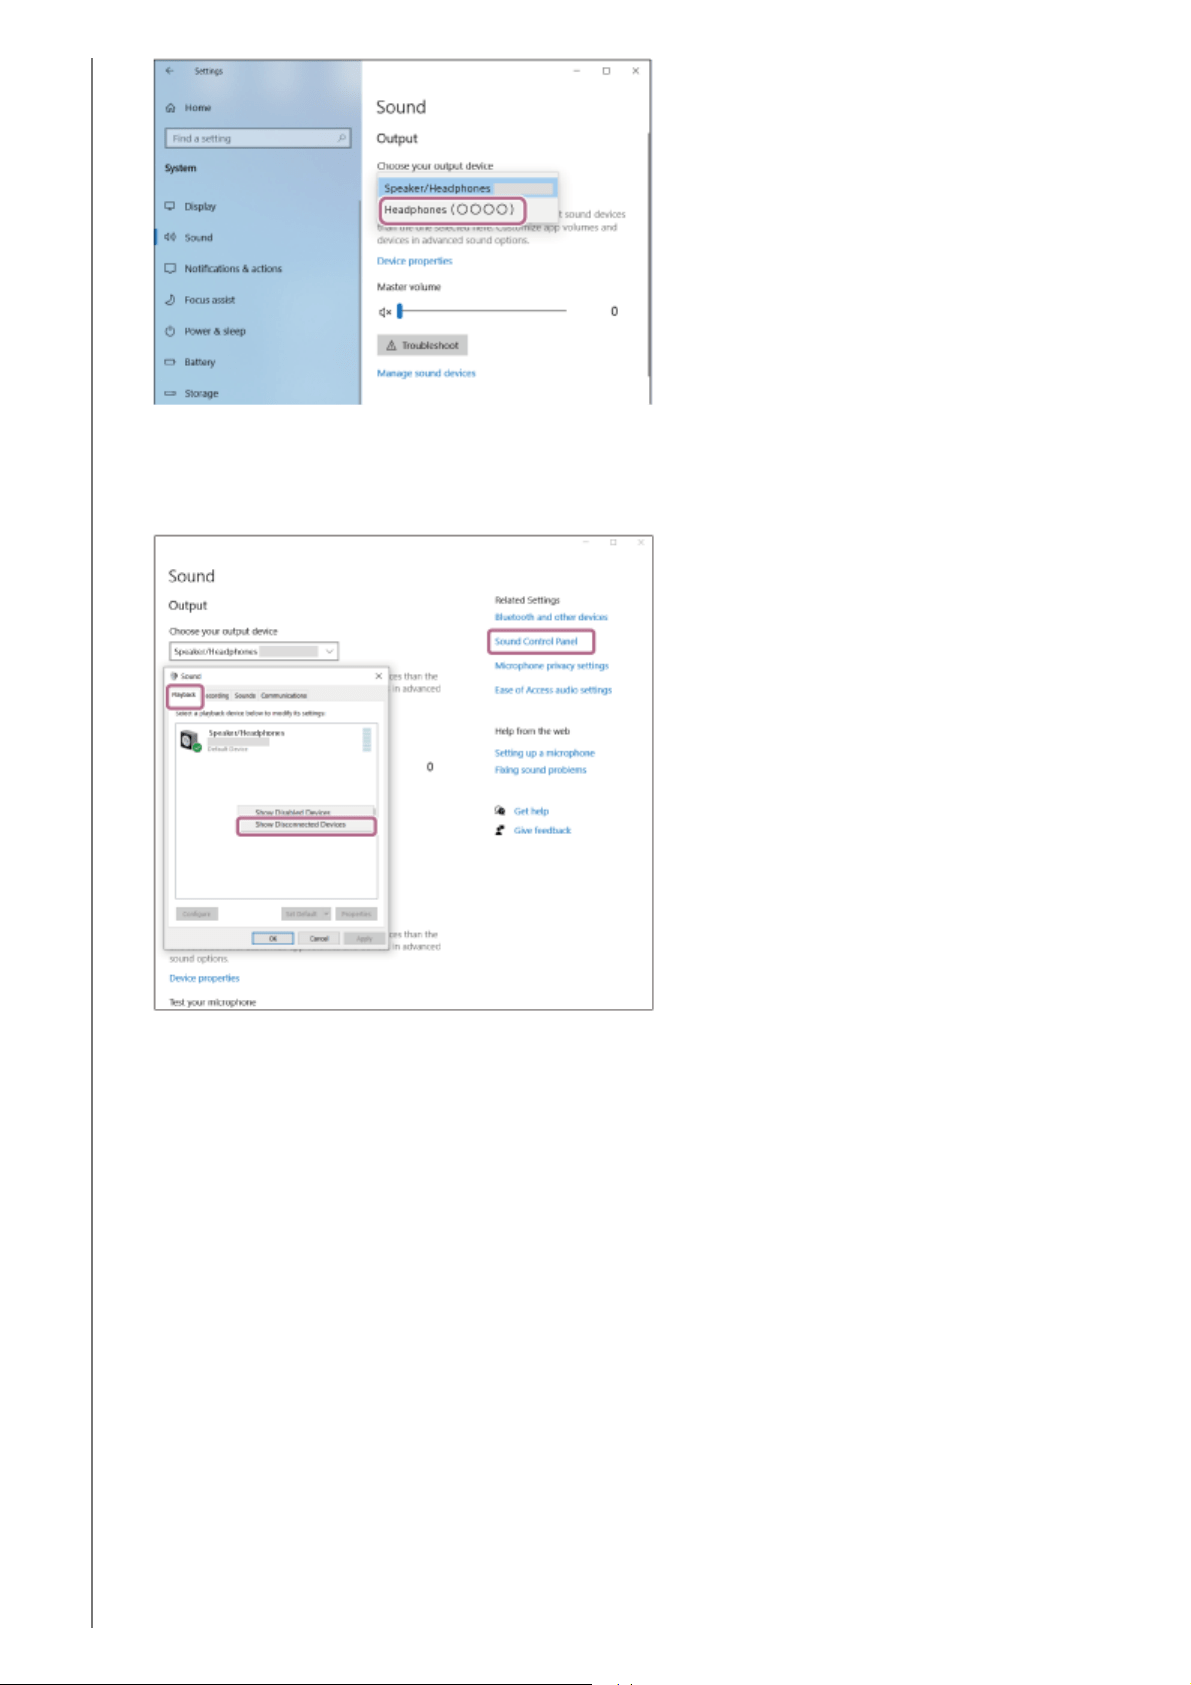
If [Headphones (WF-1000XM5 Stereo)] is not displayed on the drop-down menu, proceed to step 3.
Click [Sound Control Panel], right-click on the [Playback] tab on the [Sound] screen, and check the [Show
Disconnected Devices] checkbox.
3.
Select [Connect] from the displayed menu.4.
74
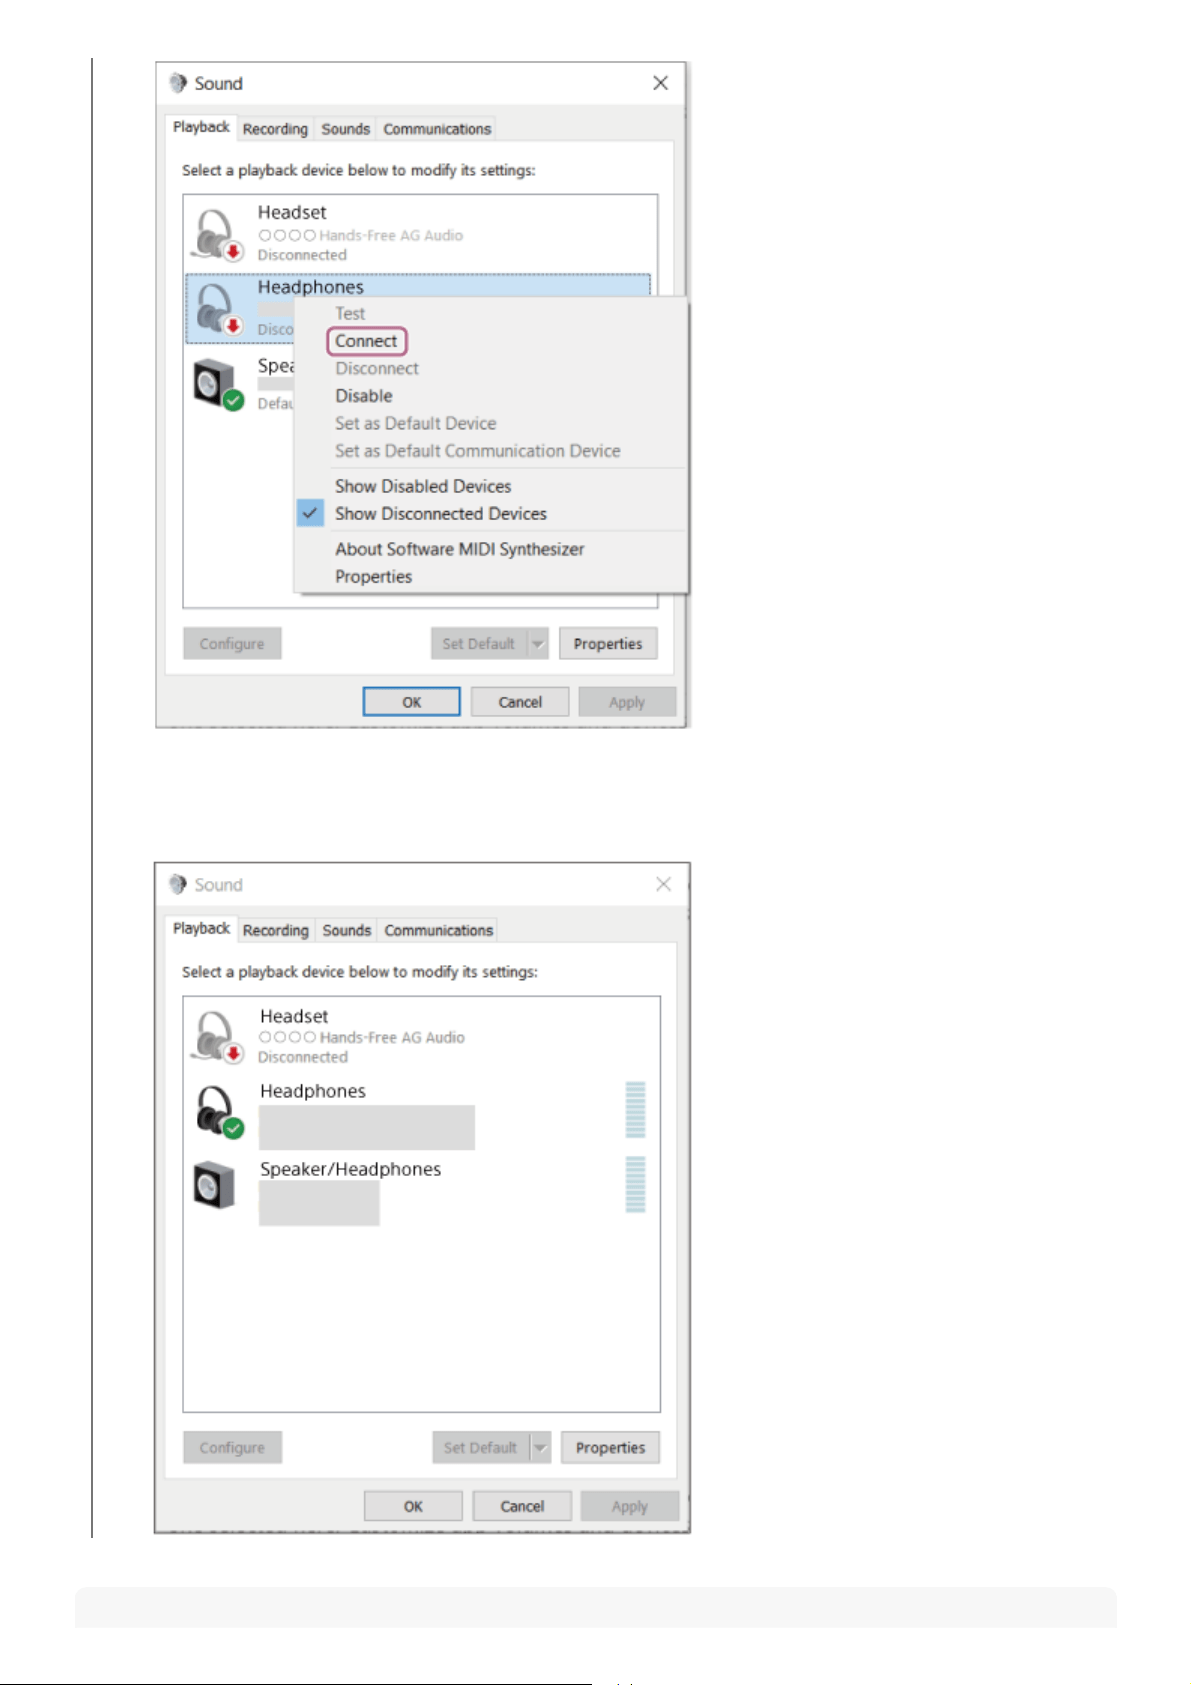
Hint
You will hear a notification sound indicating that the connection is established from both headset units at the
same time. When you wear only one headset unit, you will hear the notification sound from the headset unit you
are wearing.
75

The operation above is an example. For more details, refer to the operating instructions supplied with the computer.
Note
If the music playback sound quality is poor, check that the A2DP function which supports music playback connections is enabled
in the computer settings. For more details, refer to the operating instructions supplied with the computer.
If the last connected Bluetooth device is placed near the headset, the headset may automatically connect to the device when you
turn on the headset and may not connect to another device.
If this occurs, cancel the Bluetooth connection on the last connected device.
If you cannot connect your computer to the headset, delete the headset pairing information on your computer and perform pairing
again. As for the operations on your computer, refer to the operating instructions supplied with the computer.
Related Topic
Wearing the headset
Using only one headset unit
How to make a wireless connection to Bluetooth devices
Pairing and connecting with a computer (Windows 10)
Listening to music from a device via a Bluetooth connection
Disconnecting Bluetooth connection (after use)
Making a video call on your computer
5-048-298-11(1) Copyright 2023 Sony Corporation
76
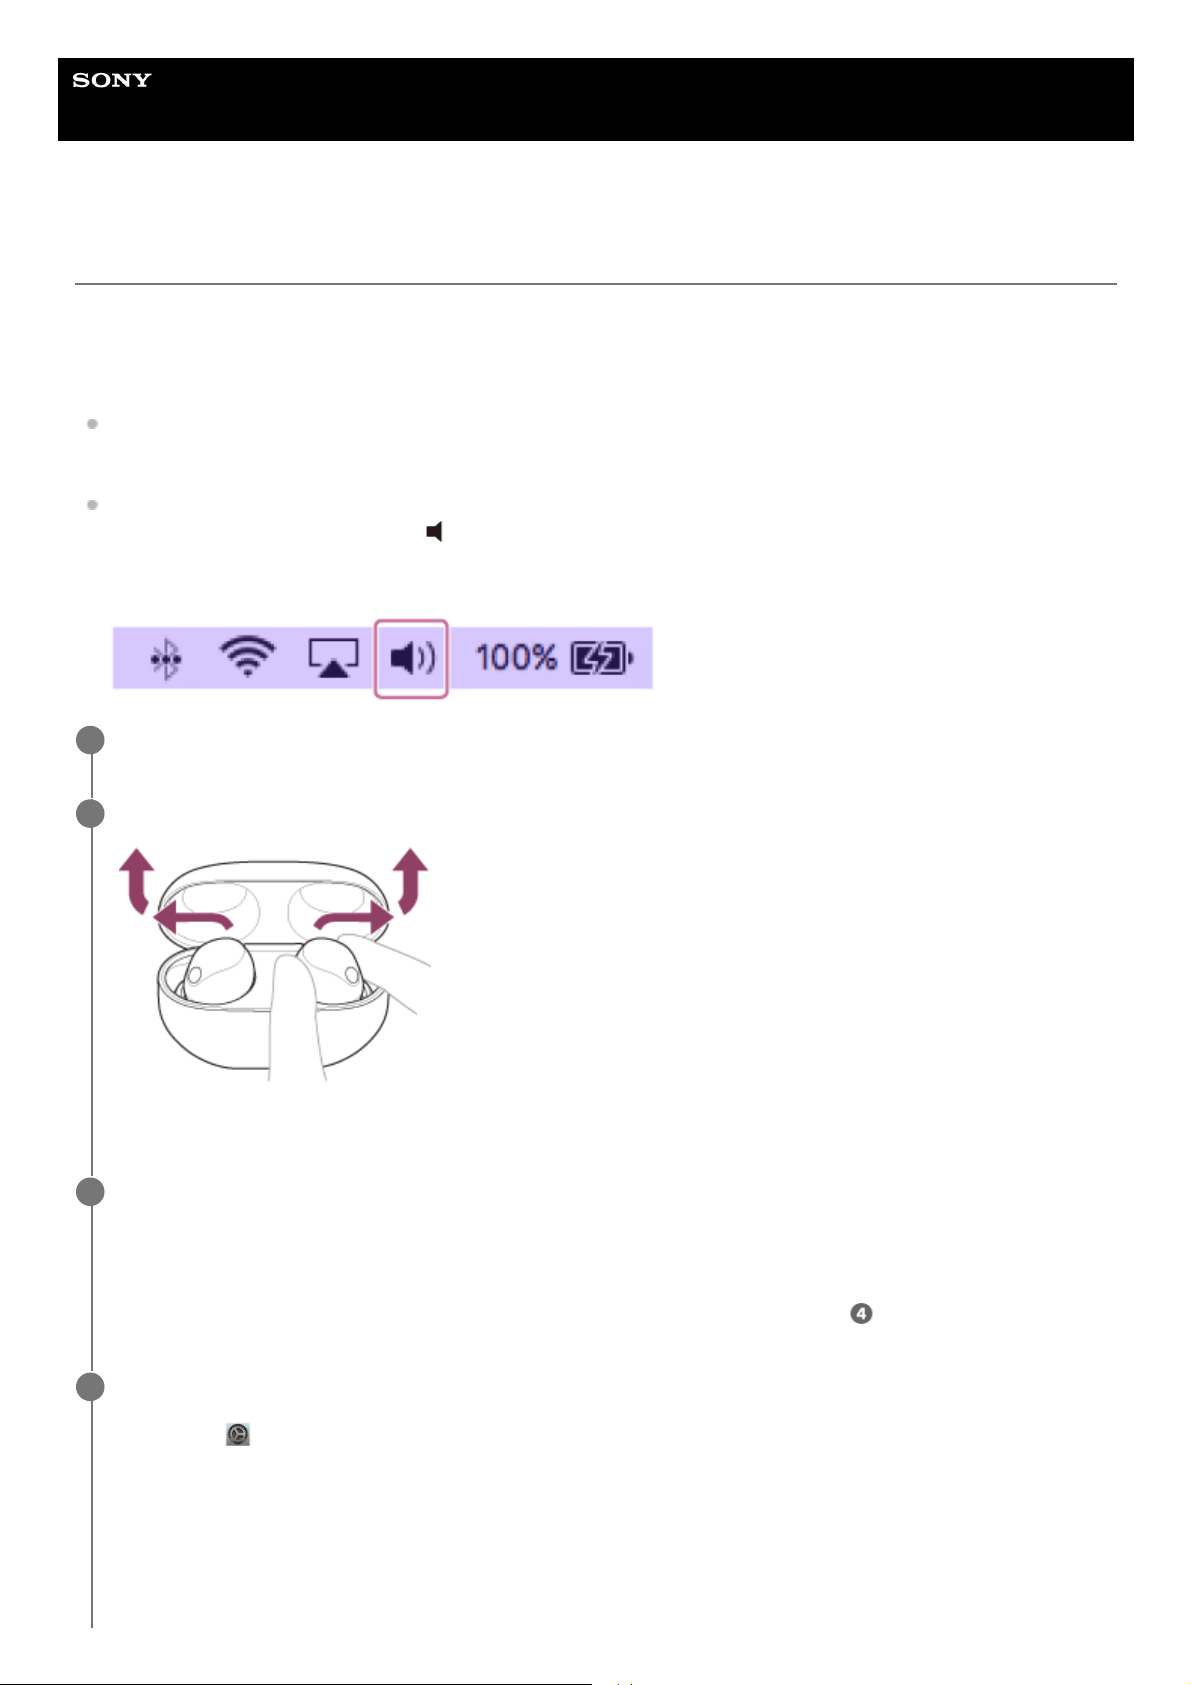
Help Guide
Wireless Noise Canceling Stereo Headset
WF-1000XM5
Connecting to a paired computer (Mac)
Compatible OS
macOS (version 11 or later)
Before starting the operation, make sure of the following:
Depending on the computer you are using, the built-in Bluetooth adaptor may need to be turned on. If you do not
know how to turn on the Bluetooth adaptor or are unsure if your computer has a built-in Bluetooth adaptor, refer to
the operating instructions supplied with the computer.
Set the computer speaker to the ON mode.
If the computer speaker is set to the
“OFF” mode, no sound can be heard from the headset.
Computer speaker in the ON mode
Wake the computer up if the computer is in standby (sleep) or hibernation mode.
1
Lay the headset units on their sides and remove them from the charging case.
The headset turns on automatically.
2
Put the headset units into both ears.
When the headset has automatically connected to the last connected device, you will hear a notification sound
indicating that the connection is established from both headset units at the same time. When you wear only one
headset unit, you will hear the notification sound from the headset unit you are wearing.
Check the connection status on the computer. If it is not connected, proceed to step
.
3
Select the headset using the computer.
4
Select [
(System Preferences)] - [Bluetooth] from the Dock at the bottom of the screen.
1.
77
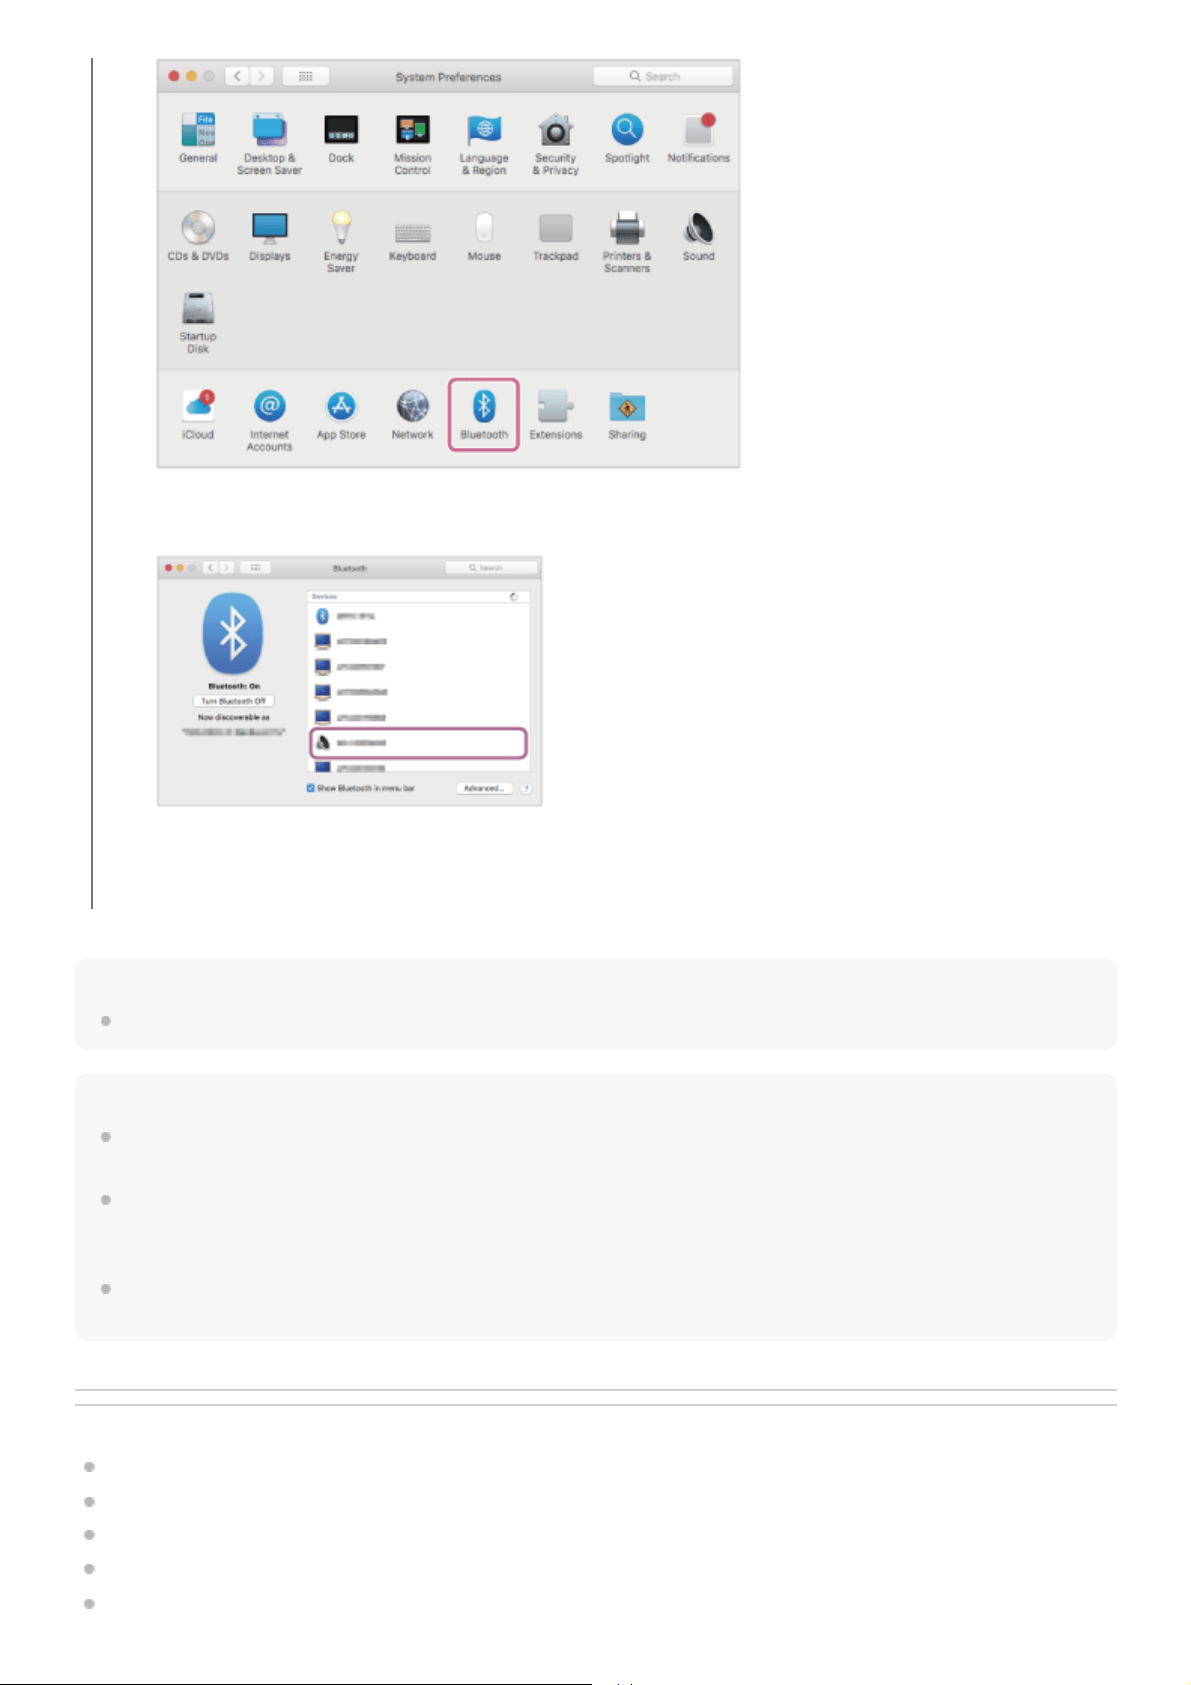
Hint
The operation above is an example. For more details, refer to the operating instructions supplied with the computer.
Note
If the music playback sound quality is poor, check that the A2DP function which supports music playback connections is enabled
in the computer settings. For more details, refer to the operating instructions supplied with the computer.
If the last connected Bluetooth device is placed near the headset, the headset may automatically connect to the device when you
turn on the headset and may not connect to another device.
If this occurs, cancel the Bluetooth connection on the last connected device.
If you cannot connect your computer to the headset, delete the headset pairing information on your computer and perform pairing
again. As for the operations on your computer, refer to the operating instructions supplied with the computer.
Related Topic
Wearing the headset
Using only one headset unit
How to make a wireless connection to Bluetooth devices
Pairing and connecting with a computer (Mac)
Listening to music from a device via a Bluetooth connection
Click [WF-1000XM5] on the [Bluetooth] screen while pressing the computer Control button and select [Connect]
from the pop-up menu.
You will hear a notification sound indicating that the connection is established from both headset units at the
same time. When you wear only one headset unit, you will hear the notification sound from the headset unit
you are wearing.
2.
78


Help Guide
Wireless Noise Canceling Stereo Headset
WF-1000XM5
Pairing and connecting with a Bluetooth device
The operation to register the device that you wish to connect to is called “pairing”. First, pair a device to use it with the
headset for the first time.
Before starting the operation, make sure of the following:
The Bluetooth device is placed within 1 m (3.2 ft) of the headset.
The headset is charged sufficiently.
The operating instructions for the Bluetooth device is in hand.
Enter pairing mode on this headset.
When you pair the headset with a device for the first time after purchase or after initializing the
headset (when there is no pairing information on the headset)
When you pair a second or subsequent device (the headset has pairing information for other
devices)
1
Lay the headset units on their sides and remove both headset units from the charging case.
The headset turns on automatically.
The headset enters pairing mode automatically.
When you are wearing the headset, you will hear a notification sound from both headset units at the same time,
and you will hear a voice guidance say “Pairing”. When you are wearing only one headset unit, you will hear the
notification sound and voice guidance from the headset unit you are wearing.
1.
Set the headset units into the charging case.
Leave the charging case lid open.
1.
80

With the charging case lid open, press and hold the pairing button on the back of the charging case for about 5
seconds or more.
Note
The headset does not enter pairing mode with the charging case lid closed.
The indicator (blue) on the charging case repeatedly flashes twice in a row and the headset goes into pairing
mode.
You can remove the headset from the charging case after entering pairing mode.
When you are wearing the headset, you will hear a notification sound from both headset units at the same time,
and you will hear a voice guidance say “Pairing”. When you are wearing only one headset unit, you will hear the
notification sound and voice guidance from the headset unit you are wearing.
2.
0:00
Perform the pairing procedure on the Bluetooth device to search for this headset.
[WF-1000XM5] will be displayed on the list of detected devices on the screen of the Bluetooth device.
If it is not displayed, start the operation again from the beginning of step
.
2
Select [WF-1000XM5] displayed on the screen of the Bluetooth device for pairing.
If Passkey
*
input is required, input “0000”.
3
A Passkey may be called “Passcode”, “PIN code”, “PIN number”, or “Password”.
*
Make the Bluetooth connection from the Bluetooth device.
The headset and Bluetooth device are connected to each other.
Some devices automatically connect with the headset when pairing is complete.
When the headset is placed in the charging case, the indicator (blue) on the charging case flashes 10 times.
4
81

Hint
The operation above is an example. For more details, refer to the operating instructions supplied with the Bluetooth device.
To delete all Bluetooth pairing information, see “Initializing the headset to restore factory settings”.
Note
If pairing is not established within 5 minutes, pairing mode is canceled. In this case, start the operation again from the beginning
of step
.
Once Bluetooth devices are paired, there is no need to pair them again, except in the following cases:
Pairing information has been deleted after repair, etc.
When a 9th device is paired
The headset can be paired with up to 8 devices. If a new device is paired after 8 devices are already paired, the registration
information of the paired device with the oldest connection date is overwritten with the information for the new device.
When the pairing information for the headset has been deleted from the Bluetooth device
When the headset is initialized
All of the pairing information is deleted. In this case, delete the pairing information for the headset from the connected device
and then pair them again.
The headset can be paired with multiple devices, but can only play music from 1 paired device at a time.
Related Topic
Wearing the headset
Using only one headset unit
How to make a wireless connection to Bluetooth devices
Connecting to a paired Bluetooth device
Listening to music from a device via a Bluetooth connection
Disconnecting Bluetooth connection (after use)
Initializing the headset to restore factory settings
5-048-298-11(1) Copyright 2023 Sony Corporation
When you are wearing the headset, you will hear a notification sound indicating that the connection is established
from both headset units at the same time. When you are wearing only one headset unit, you will hear the
notification sound from the headset unit you are wearing.
If they are not connected, see “Connecting to a paired Bluetooth device”.
82
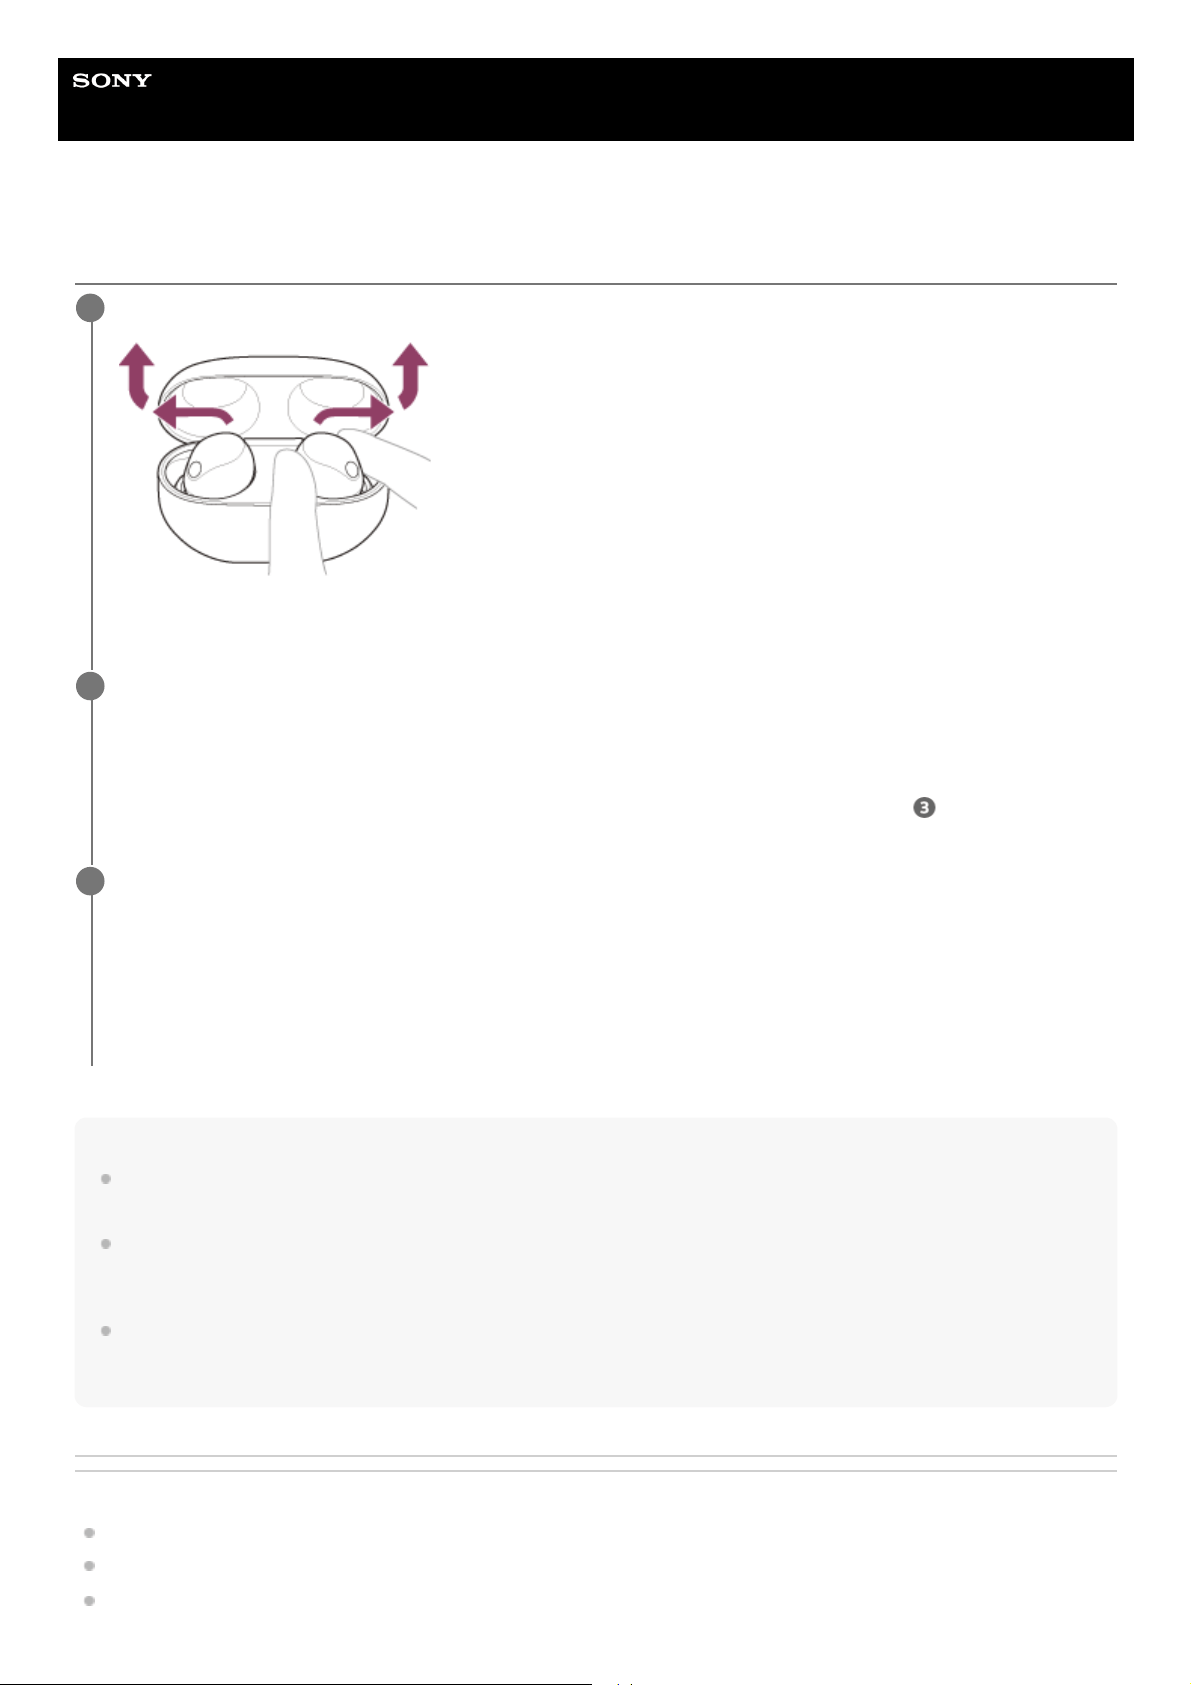
Help Guide
Wireless Noise Canceling Stereo Headset
WF-1000XM5
Connecting to a paired Bluetooth device
Note
When connecting, [WF-1000XM5], [LE_WF-1000XM5], or both may be displayed on the connecting device. When both or [WF-
1000XM5] is displayed, select [WF-1000XM5]; when [LE_WF-1000XM5] is displayed, select [LE_WF-1000XM5].
If the last connected Bluetooth device is placed near the headset, the headset may automatically connect to the device when you
turn on the headset and may not connect to another device.
If this occurs, cancel the Bluetooth connection on the last connected device.
If you cannot connect your Bluetooth device to the headset, delete the headset pairing information on your Bluetooth device and
perform pairing again. As for the operations on your Bluetooth device, refer to the operating instructions supplied with the
Bluetooth device.
Related Topic
Wearing the headset
Using only one headset unit
How to make a wireless connection to Bluetooth devices
Lay the headset units on their sides and remove them from the charging case.
The headset turns on automatically.
1
Put the headset units into both ears.
When the headset has automatically connected to the last connected device, you will hear a notification sound
indicating that the connection is established from both headset units at the same time. When you wear only one
headset unit, you will hear the notification sound from the headset unit you are wearing.
Check the connection status on the Bluetooth device. If it is not connected, proceed to step
.
2
Make the Bluetooth connection from the Bluetooth device.
As for the operations on your Bluetooth device, refer to the operating instructions supplied with the Bluetooth
device.
You will hear a notification sound indicating that the connection is established from both headset units at the same
time. When you wear only one headset unit, you will hear the notification sound from the headset unit you are
wearing.
3
83

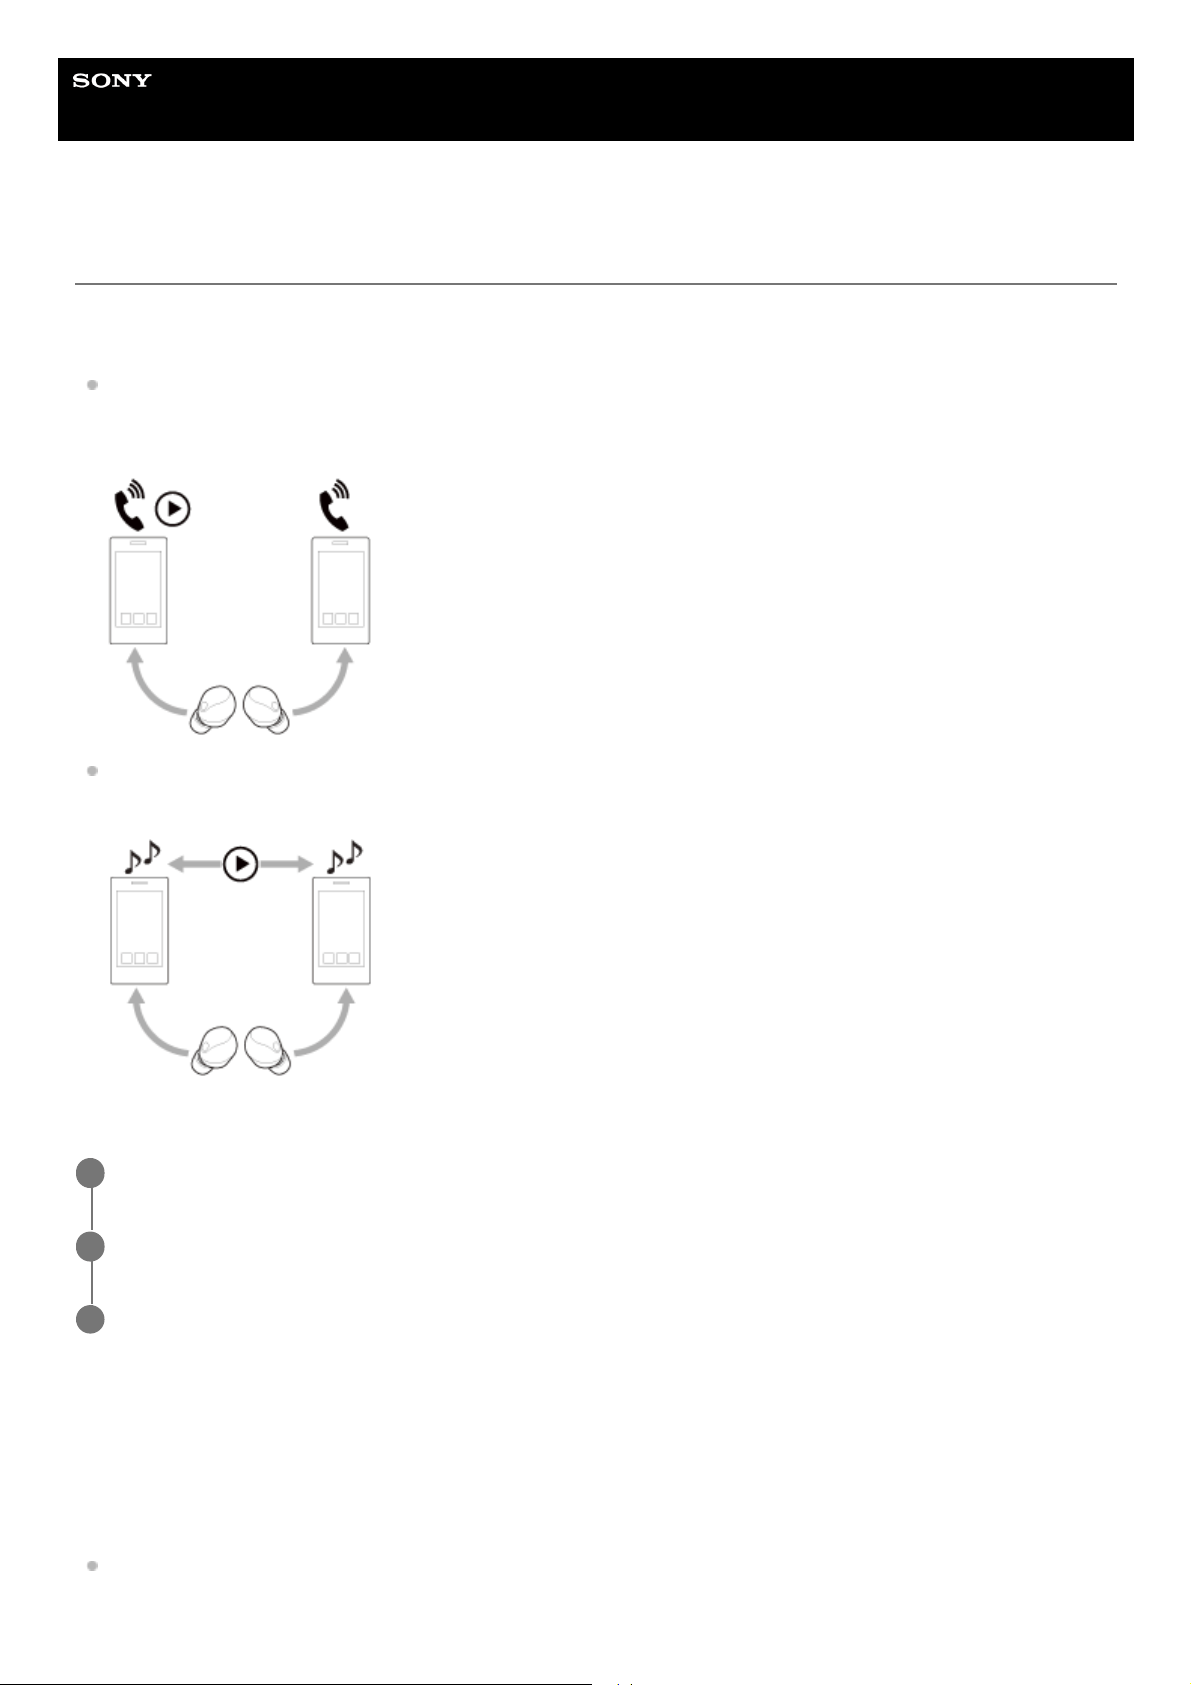
Help Guide
Wireless Noise Canceling Stereo Headset
WF-1000XM5
Connecting the headset to 2 devices simultaneously (multipoint connection)
The headset can be simultaneously connected to 2 devices via Bluetooth connections, allowing you to perform the
following.
Waiting for an incoming call for 2 smartphones
You can listen to music played on one smartphone with the headset, wait for an incoming call for both smartphones,
and talk if an incoming call arrives.
Switching music playback between 2 devices
You can switch the music playback from one device to the other without performing a Bluetooth reconnection.
Connecting the headset to 2 devices via Bluetooth connections simultaneously
When attempting to connect a paired third device to a headset via a Bluetooth connection while 2 devices are already
connected via Bluetooth connections, the Bluetooth connection with the device that was last playing music will be
maintained, and the Bluetooth connection with the other device will be disconnected. Then a Bluetooth connection
between the third device and the headset is established.
Music playback when the headset is connected to 2 devices via Bluetooth connections
When playing music by operating the headset, the music is played from the device that played last.
Pair the headset with 2 devices, respectively.
1
Operate the first device to establish a Bluetooth connection with the headset.
2
Operate the second device to establish a Bluetooth connection with the headset.
3
85

If you want to play music from the other device, stop playback on the device that is playing the music, and start
playback by operating the other device.
Even if you start playback by operating the second device while playing music on the first device, the music from the
first device will continue to be heard via the headset. In this state, if you stop playback on the first device, you can
listen to music from the second device via the headset.
Talking on the phone when the headset is connected to 2 devices via Bluetooth connections
When the headset is connected to 2 smartphones via Bluetooth connections simultaneously, both devices will be in
standby mode.
When an incoming call arrives to the first device, a ring tone is heard via the headset. When an incoming call arrives
to the second device while talking on the headset, a ring tone is heard via the second device.
If you finish the call on the first device, the ring tone from the second device will be heard via the headset.
Related Topic
What you can do with the “Sony | Headphones Connect” app
How to make a wireless connection to Bluetooth devices
Listening to music from a device via a Bluetooth connection
Controlling the audio device (Bluetooth connection)
Receiving a call
Functions for a phone call
5-048-298-11(1) Copyright 2023 Sony Corporation
86

Help Guide
Wireless Noise Canceling Stereo Headset
WF-1000XM5
Switching audio between multiple devices with “audio switch”
The “audio switch” function is a Google feature that switches audio between Android devices.
Headsets that support “audio switch” can connect to multiple devices. When you use your headset on devices with
“audio switch” turned on, the audio heard from your headset seamlessly switches between devices. Your device notifies
you when the audio has switched devices.
Compatible smartphones
Android 8.0 or later
For details on “audio switch”, refer to the following URL.
https://support.google.com/android/?p=switch_audio
To use this function, you need to connect your headset and device via Google Fast Pair.
For details on Google Fast Pair, refer to the following URL.
https://support.google.com/android/answer/9417604
Note
The specifications of “audio switch” are subject to change without notice.
5-048-298-11(1) Copyright 2023 Sony Corporation
87
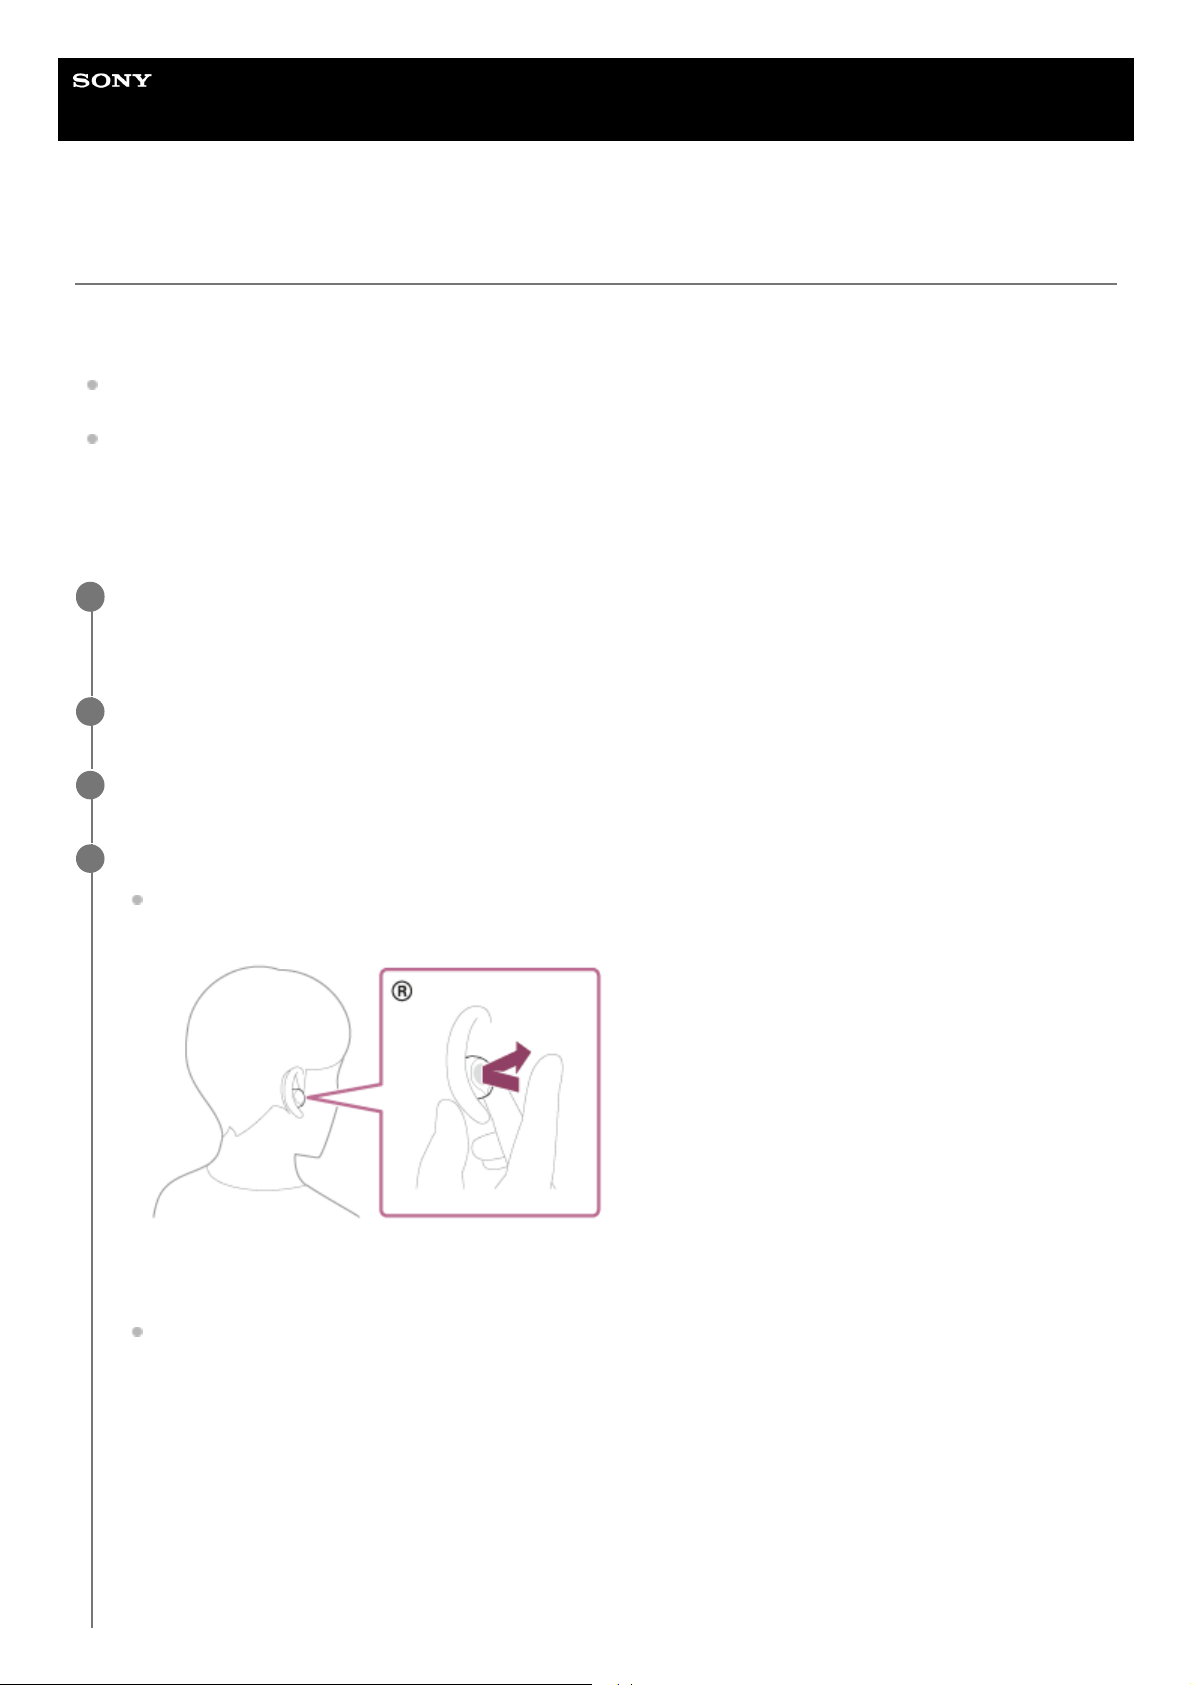
Help Guide
Wireless Noise Canceling Stereo Headset
WF-1000XM5
Listening to music from a device via a Bluetooth connection
If your Bluetooth device supports the following profiles, you can enjoy listening to music and control the device from your
headset via a Bluetooth connection.
A2DP (Advanced Audio Distribution Profile)
You can enjoy high-quality music wirelessly.
AVRCP (Audio Video Remote Control Profile)
You can adjust the volume, etc.
The operation may vary depending on the Bluetooth device. Refer to the operating instructions supplied with the
Bluetooth device.
Put the headset units into both ears.
See “Wearing the headset” to find out how to wear the headset in your ears.
1
Connect the headset to a Bluetooth device.
2
Operate the Bluetooth device to start playback and adjust the volume to a moderate level.
3
Tap the touch sensor on the left or right headset unit to adjust the volume.
Increase the volume: Tap the touch sensor on the right headset unit quickly 4 or more times (with an interval of
about 0.4 seconds or less between taps) during music playback.
As you repeatedly tap the touch sensor, a notification sound is emitted and the volume increases by 1 step
every 0.4 seconds, regardless of the number of times you tap.
Decrease the volume: Tap the touch sensor on the left headset unit quickly 4 or more times (with an interval of
about 0.4 seconds or less between taps) during music playback.
4
88

Hint
In the factory settings, when you listen to music while wearing both headset units, the headset will pause music playback if one or
both headset units are removed. When you put the removed headset unit into your ear again, the headset will resume music
playback.
The headset supports SCMS-T content protection. You can enjoy music and other audio on the headset from a device such as a
portable TV that supports SCMS-T content protection.
Depending on the Bluetooth device, it may be necessary to adjust the volume or set the audio output setting on the device.
The volume can also be adjusted on the “Sony | Headphones Connect” app.
The headset volume during a call and during music playback can be independently adjusted. Changing the call volume does not
change the volume of music playback and vice versa.
You can also listen to music by removing only one headset unit from the charging case and putting it into your ear.
If only the right headset unit is worn in your ear, use the touch sensor on the right headset unit to play music.
If only the left headset unit is worn in your ear, operate the connected device to play music.
When you are listening to music with only one headset unit, if you put the other headset unit into the other ear, you can listen to
music with both headset units.
Note
You cannot adjust the volume with the headset when no music is playing.
If the communication condition is poor, the Bluetooth device may react incorrectly to the operation on the headset.
Related Topic
Wearing the headset
Using only one headset unit
How to make a wireless connection to Bluetooth devices
Controlling the audio device (Bluetooth connection)
5-048-298-11(1) Copyright 2023 Sony Corporation
As you repeatedly tap the touch sensor, a notification sound is emitted and the volume decreases by 1 step
every 0.4 seconds, regardless of the number of times you tap.
When the volume reaches the maximum or minimum, an alarm sounds.
89
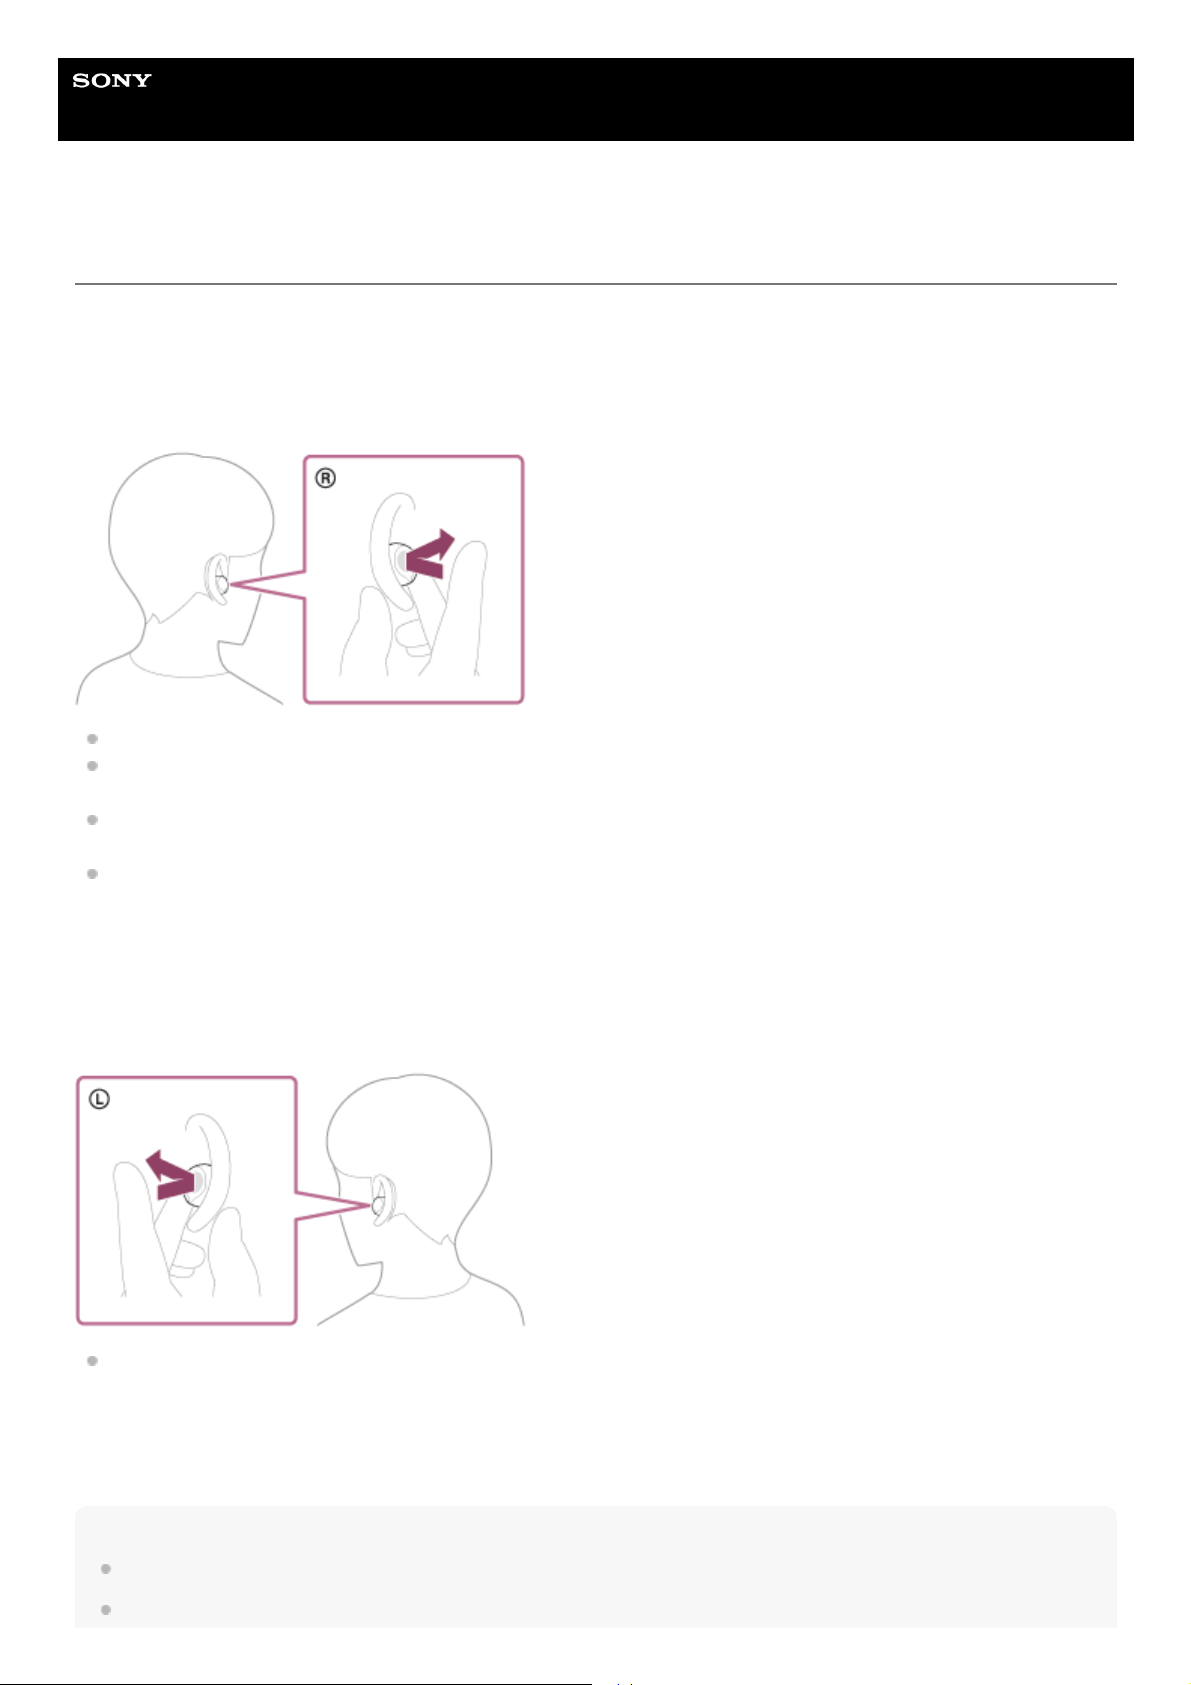
Help Guide
Wireless Noise Canceling Stereo Headset
WF-1000XM5
Controlling the audio device (Bluetooth connection)
If your Bluetooth device supports the device operating function (compatible profile: AVRCP), the following operations are
available. The available functions may vary depending on the Bluetooth device, so refer to the operating instructions
supplied with the device.
You can use the right headset unit to perform the following operations.
Play/Pause: Tap the touch sensor.
Skip to the beginning of the next track: Tap the touch sensor twice quickly (with an interval of about 0.3 seconds
between taps).
Skip to the beginning of the previous track (or the current track during playback): Tap the touch sensor 3 times
quickly (with an interval of about 0.3 seconds between taps).
Increase the volume: Tap the touch sensor quickly 4 or more times (with an interval of about 0.4 seconds or less
between taps) during music playback.
As you repeatedly tap the touch sensor, a notification sound is emitted and the volume increases by 1 step every 0.4
seconds, regardless of the number of times you tap.
When the volume reaches the maximum, an alarm sounds.
You can use the left headset unit to perform the following operations.
Decrease the volume: Tap the touch sensor quickly 4 or more times (with an interval of about 0.4 seconds or less
between taps) during music playback.
As you repeatedly tap the touch sensor, a notification sound is emitted and the volume decreases by 1 step every 0.4
seconds, regardless of the number of times you tap.
When the volume reaches the minimum, an alarm sounds.
Note
You cannot adjust the volume with the headset when no music is playing.
If the communication condition is poor, the Bluetooth device may react incorrectly to the operation on the headset.
90

The available operations may vary depending on the connected device, the music software, or app used. In some cases, it may
operate differently or may not work even when the operations described above are performed.
When you use an iPhone, Siri may be activated by holding your finger to the touch sensor on the right headset unit.
5-048-298-11(1) Copyright 2023 Sony Corporation
91
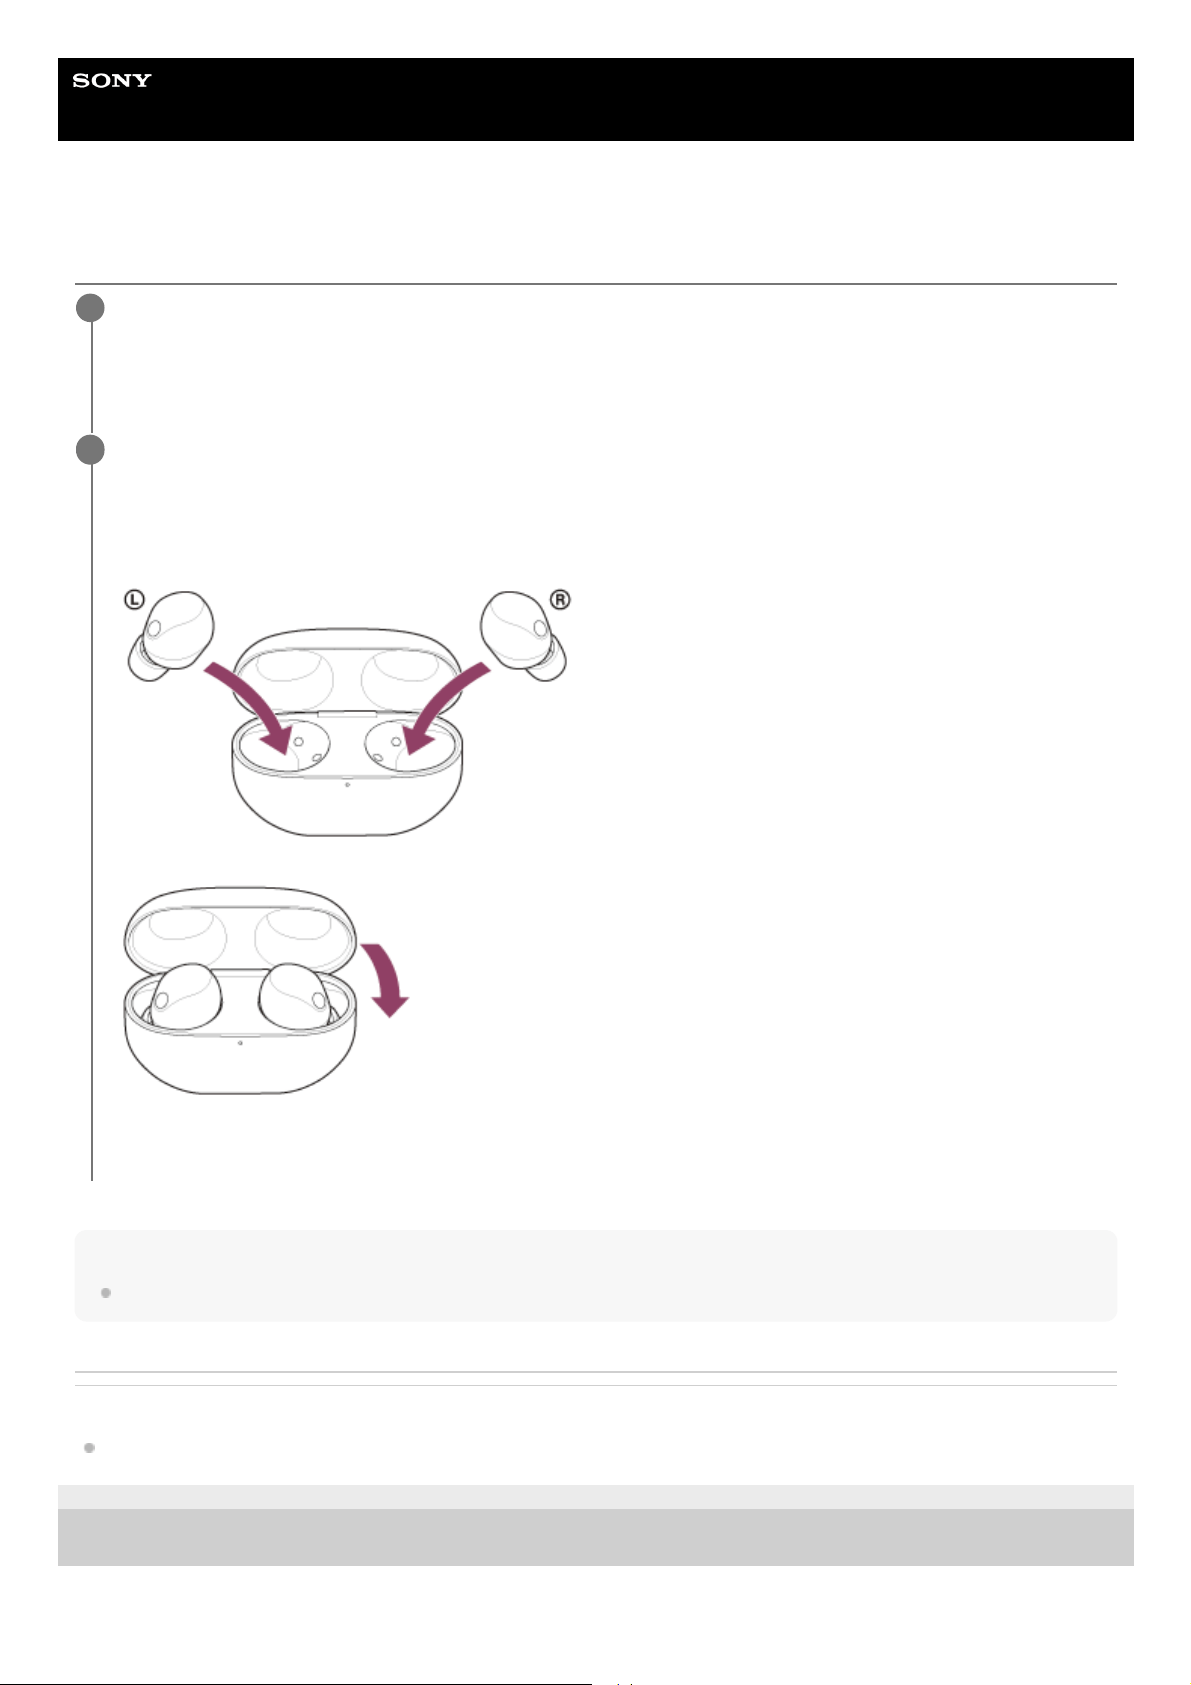
Help Guide
Wireless Noise Canceling Stereo Headset
WF-1000XM5
Disconnecting Bluetooth connection (after use)
Hint
When you finish playing music, the Bluetooth connection may terminate automatically depending on the Bluetooth device.
Related Topic
Turning off the headset
5-048-298-11(1) Copyright 2023 Sony Corporation
Disconnect the Bluetooth connection by operating the Bluetooth device.
When you are wearing the headset, you will hear a notification sound from both headset units (or from the headset
unit you are wearing) at the same time.
1
Set the headset units into the charging case, and close the charging case lid.
Put the left headset unit (the headset unit with the tactile dot) back into the left hole of the charging case, and put
the right headset unit back into the right hole of the charging case. Each headset unit will be set to the correct
position in the charging case by the built-in magnet.
The headset turns off.
2
92

Help Guide
Wireless Noise Canceling Stereo Headset
WF-1000XM5
About 360 Reality Audio
What is 360 Reality Audio?
360 Reality Audio is a new music experience using Sony’s 360 three-dimensional audio technology.
Positional information is attached to each sound source such as vocals, chorus, and musical instruments, and are placed
in a spherical space.
Listeners can experience a three-dimensional sound field as if they are immersed in a live performance of the artists.
Conditions of use
Download and use a music streaming service (charged) app that supports 360 Reality Audio on your smartphone or
tablet equipped with iOS or Android.
By optimizing the sound field and the acoustic feature of headset with the “Sony | Headphones Connect” app, you can
enjoy a more realistic sense of reality.
For details on 360 Reality Audio, refer to the following website:
https://www.sony.net/360RA/
Note
Service is not available in certain countries and regions.
Related Topic
What you can do with the “Sony | Headphones Connect” app
5-048-298-11(1) Copyright 2023 Sony Corporation
93
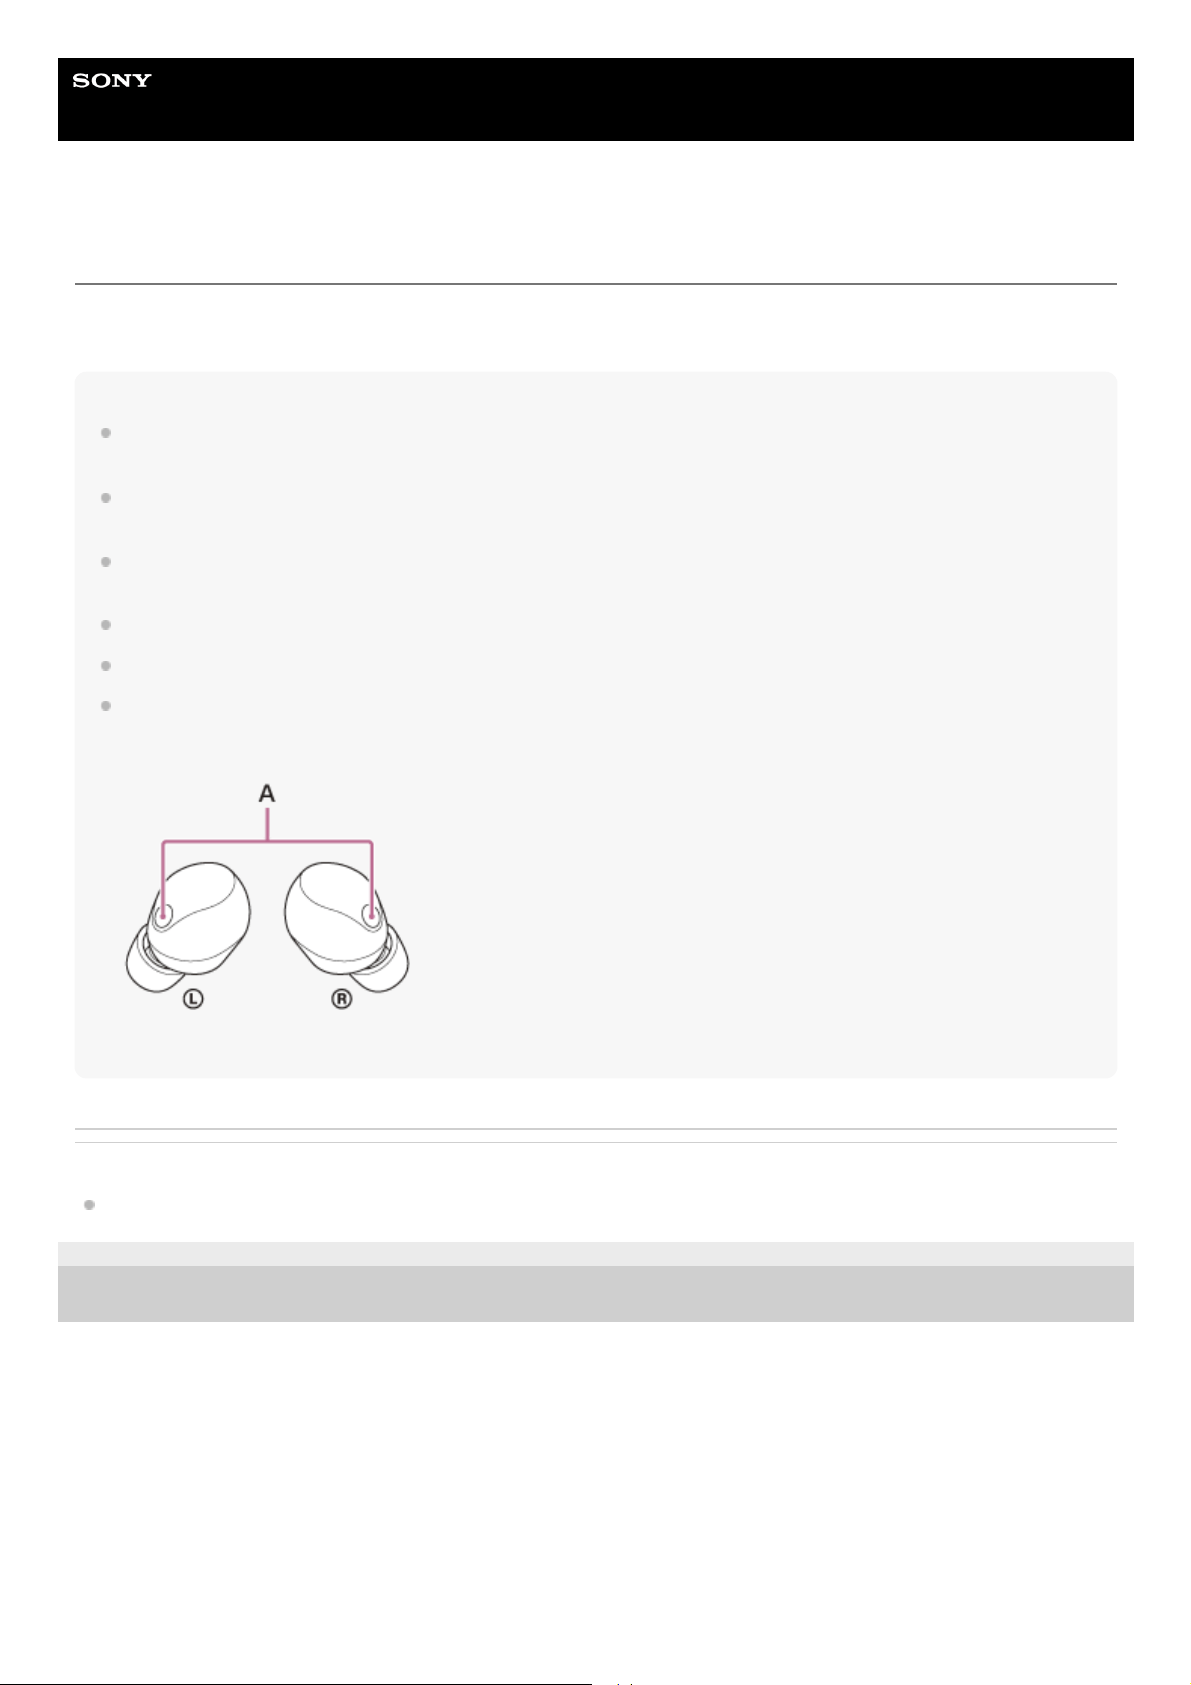
Help Guide
Wireless Noise Canceling Stereo Headset
WF-1000XM5
What is noise canceling?
The noise canceling function generates antiphase sound against outside surrounding noises (such as noises in vehicles
or noises from air conditioners indoors) to reduce the surrounding noises by canceling them out.
Note
Depending on the type of noise or if it is used in a very quiet environment, you may not feel the noise canceling effects, or you
may feel that some noise is increased.
When you are wearing the headset, depending on how you wear the headset, the noise canceling effects may be decreased or a
beeping sound (feedback) may be heard. In this case, take off the headset and put it on again.
The noise canceling function works primarily on noise in the low frequency band such as vehicles and air conditioning. While
noise is reduced, it is not completely canceled.
When you use the headset in a car or a bus, noise may occur depending on street conditions.
Mobile phones may cause interference and noise. Should this occur, move the headset further away from the mobile phone.
Do not cover the microphone part on the left or right headset unit with your hand, etc. The effect of the noise canceling function or
Ambient Sound Mode may not work properly or a beeping sound (feedback) may occur. If any of this is the case, remove your
hand, etc. from the left or right microphone part.
A: Microphones (left, right)
Related Topic
Using the noise canceling function
5-048-298-11(1) Copyright 2023 Sony Corporation
94
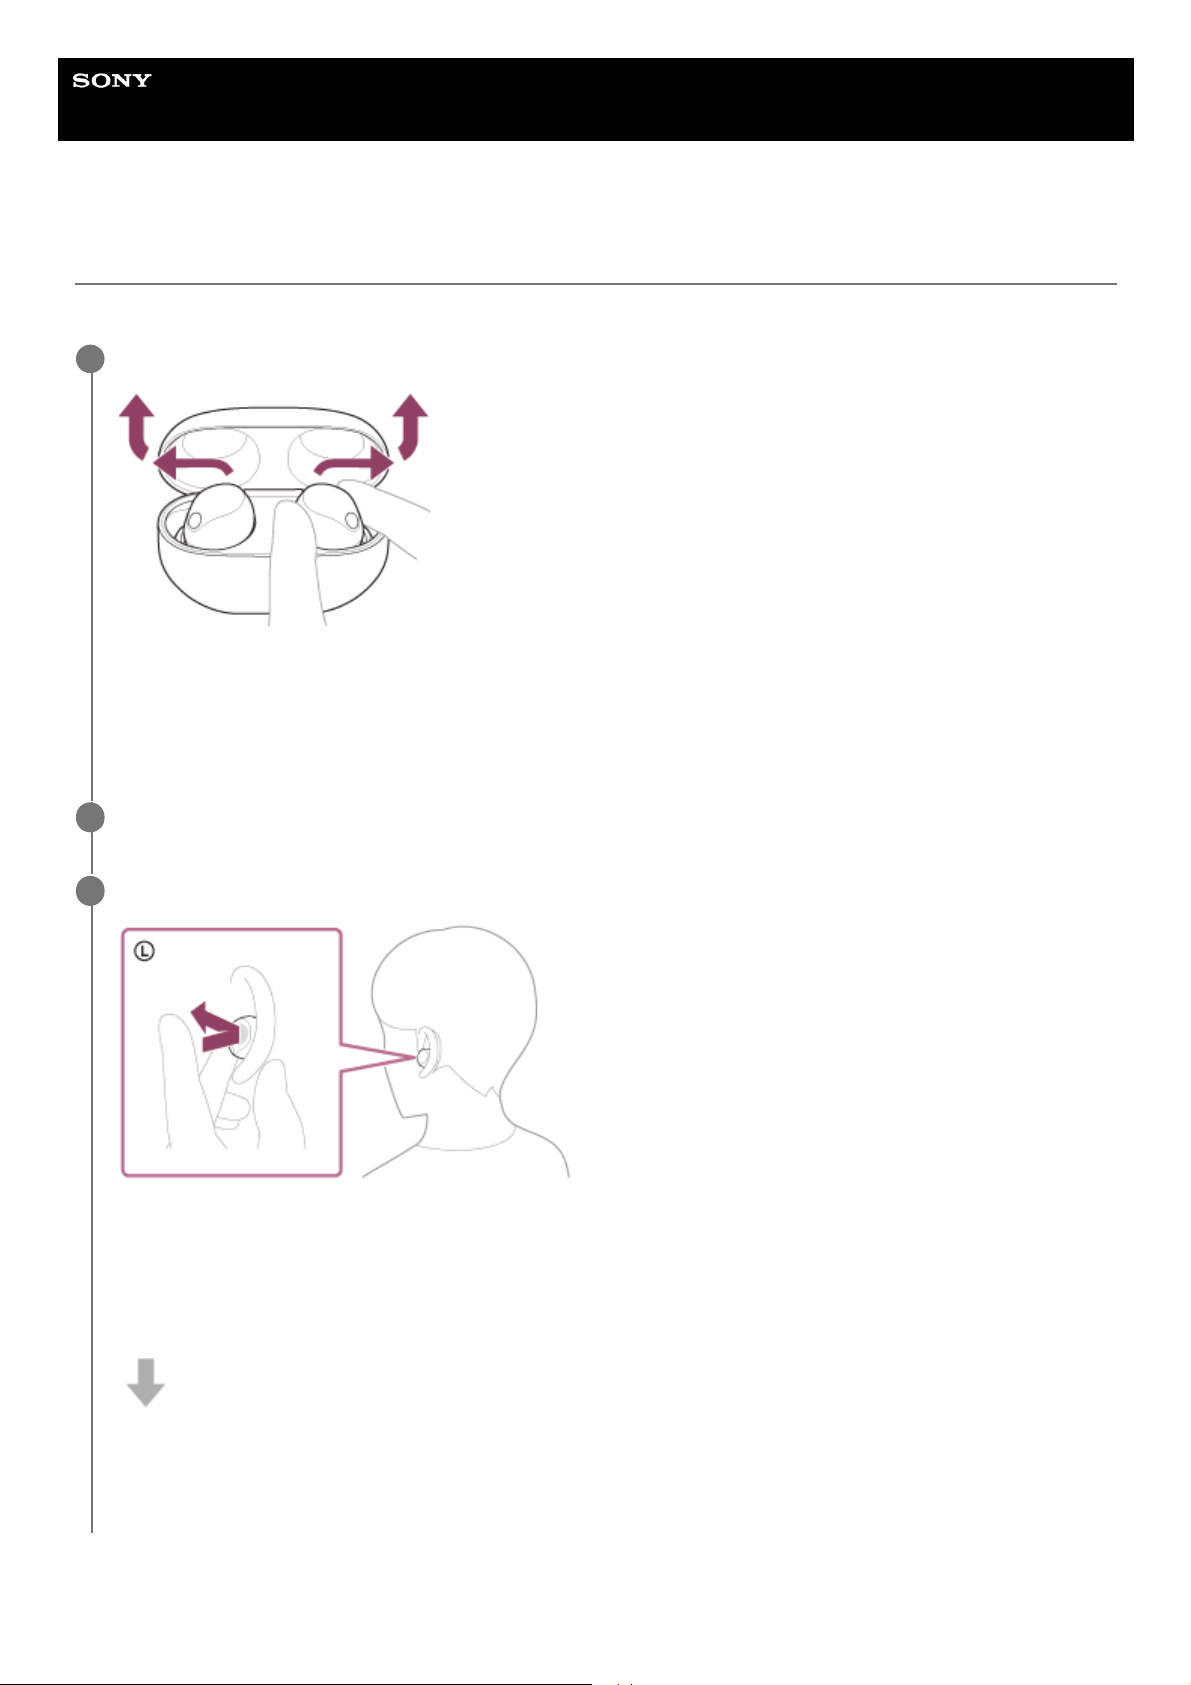
Help Guide
Wireless Noise Canceling Stereo Headset
WF-1000XM5
Using the noise canceling function
If you use the noise canceling function, you can enjoy music without being disturbed by ambient noise.
About the instruction manual video
Lay the headset units on their sides and remove them from the charging case.
The headset turns on automatically.
When you use the headset for the first time after purchase or just after initializing the headset, the noise canceling
function is turned on automatically when the headset is turned on. Any changes made to the settings are retained
from this point on.
1
Put the headset units into both ears.
2
Tap the touch sensor on the left headset unit to change the settings of the noise canceling function.
Each time you tap, the function switches as follows.
Ambient Sound Mode: ON
You will hear a notification sound from both headset units (or from the left headset unit when only the left headset
unit is worn) at the same time.
Noise canceling function: ON
You will hear a notification sound from both headset units (or from the left headset unit when only the left headset
unit is worn) at the same time.
3
95

Watch the video to find out how to use the noise canceling function.
https://rd1.sony.net/help/mdr/mov0057/h_zz/
Hint
You can also turn on/off the noise canceling function and change the settings of the noise canceling function and Ambient Sound
Mode with the “Sony | Headphones Connect” app.
You can select one of the following on the “Sony | Headphones Connect” app to set how you want the functions to change when
you tap the left headset unit.
Noise canceling function: ON
Ambient Sound Mode: ON Noise canceling function: OFF/Ambient Sound Mode: OFF
Noise canceling function: ON
Ambient Sound Mode: ON
Ambient Sound Mode: ON
Noise canceling function: OFF/Ambient Sound Mode: OFF
Noise canceling function: ON
Noise canceling function: OFF/Ambient Sound Mode: OFF
When only one headset unit is worn, the Ambient Sound Mode is set to ON, even if the headset was set to the noise canceling
function when you used the headset last. Putting on both headset units will turn on the noise canceling function.
Note
The headset cannot fully perform the noise canceling function unless the supplied earbud tips are used.
If the headset is not worn properly in your ears, the noise canceling function may not work correctly. Twist the headset to put it
into your ears properly.
Do not cover the microphone part on the left or right headset unit with your hand, etc. The effect of the noise canceling function or
Ambient Sound Mode may not work properly or a beeping sound (feedback) may occur. If any of this is the case, remove your
hand, etc. from the left or right microphone part.
Related Topic
Turning on the headset
Wearing the headset
What is noise canceling?
Listening to ambient sound during music playback (Ambient Sound Mode)
What you can do with the “Sony | Headphones Connect” app
5-048-298-11(1) Copyright 2023 Sony Corporation
96
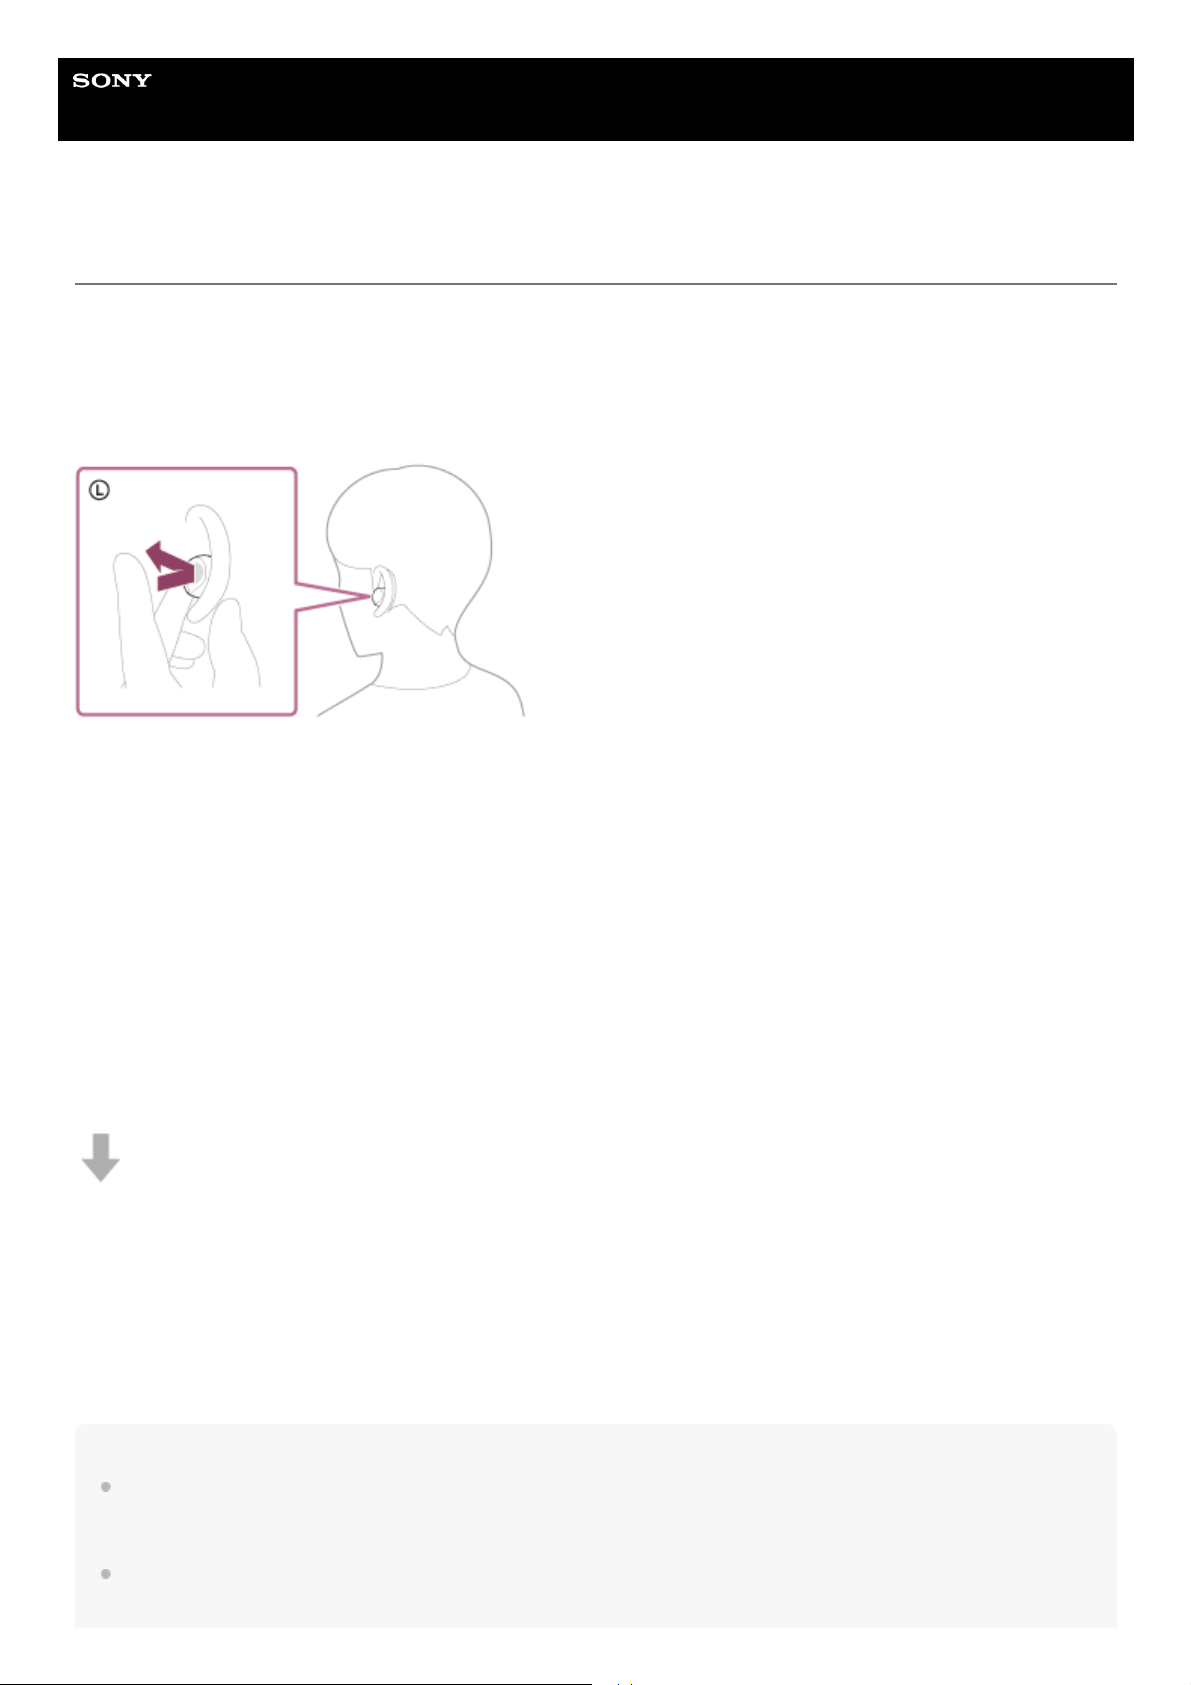
Help Guide
Wireless Noise Canceling Stereo Headset
WF-1000XM5
Listening to ambient sound during music playback (Ambient Sound Mode)
The microphones built into the left and right headset units make it easier to hear ambient sound. You can hear ambient
sound while enjoying music.
To activate the Ambient Sound Mode
Tap the touch sensor on the left headset unit while the noise canceling function is on.
To change the setting of the Ambient Sound Mode
You can change the settings of the Ambient Sound Mode by connecting the smartphone (with the “Sony | Headphones
Connect” app installed) and the headset via a Bluetooth connection.
Voice focus: Unwanted noise will be suppressed while announcements or people’s voices are picked up, allowing you
to hear them as you listen to music.
To turn off the Ambient Sound Mode
Tap the touch sensor on the left headset unit to turn off the Ambient Sound Mode.
Each time you tap, the function switches as follows.
Noise canceling function: ON
You will hear a notification sound from both headset units (or from the left headset unit when only the left headset unit is
worn) at the same time.
Ambient Sound Mode: ON
You will hear a notification sound from both headset units (or from the left headset unit when only the left headset unit is
worn) at the same time.
About the instruction manual video
Watch the video to find out how to use the Ambient Sound Mode.
https://rd1.sony.net/help/mdr/mov0057/h_zz/
Hint
Ambient Sound Mode settings changed with the “Sony | Headphones Connect” app are stored in the headset. Once you change
the settings, you can enjoy music with the stored settings just by turning on the Ambient Sound Mode even when the headset is
connected to other devices which do not have the “Sony | Headphones Connect” app installed.
You can select one of the following on the “Sony | Headphones Connect” app to set how you want the functions to change when
you tap the left headset unit.
97

Noise canceling function: ON Ambient Sound Mode: ON Noise canceling function: OFF/Ambient Sound Mode: OFF
Noise canceling function: ON
Ambient Sound Mode: ON
Ambient Sound Mode: ON
Noise canceling function: OFF/Ambient Sound Mode: OFF
Noise canceling function: ON
Noise canceling function: OFF/Ambient Sound Mode: OFF
Note
Depending on the ambient conditions and the type/volume of audio playback, ambient sounds may not be heard even when
using the Ambient Sound Mode. Do not use the headset in places where it would be dangerous if you are unable to hear ambient
sounds, such as on a road with car and bicycle traffic.
Depending on the surrounding environment, wind noise may increase when the Ambient Sound Mode is turned on. In this case,
set the Ambient Sound Mode to OFF.
If the headset is not worn properly in your ears, the Ambient Sound Mode may not work correctly. Twist the headset to put it into
your ears properly.
Do not cover the microphone part on the left or right headset unit with your hand, etc. The effect of the noise canceling function or
Ambient Sound Mode may not work properly or a beeping sound (feedback) may occur. If any of this is the case, remove your
hand, etc. from the left or right microphone part.
If the Ambient Sound Mode is enabled in a rather noisy environment, a noise may be heard. This is not a malfunction. In this
case, set the noise canceling function to ON or set the noise canceling function and the Ambient Sound Mode to OFF.
Related Topic
Wearing the headset
Using the noise canceling function
What you can do with the “Sony | Headphones Connect” app
5-048-298-11(1) Copyright 2023 Sony Corporation
98
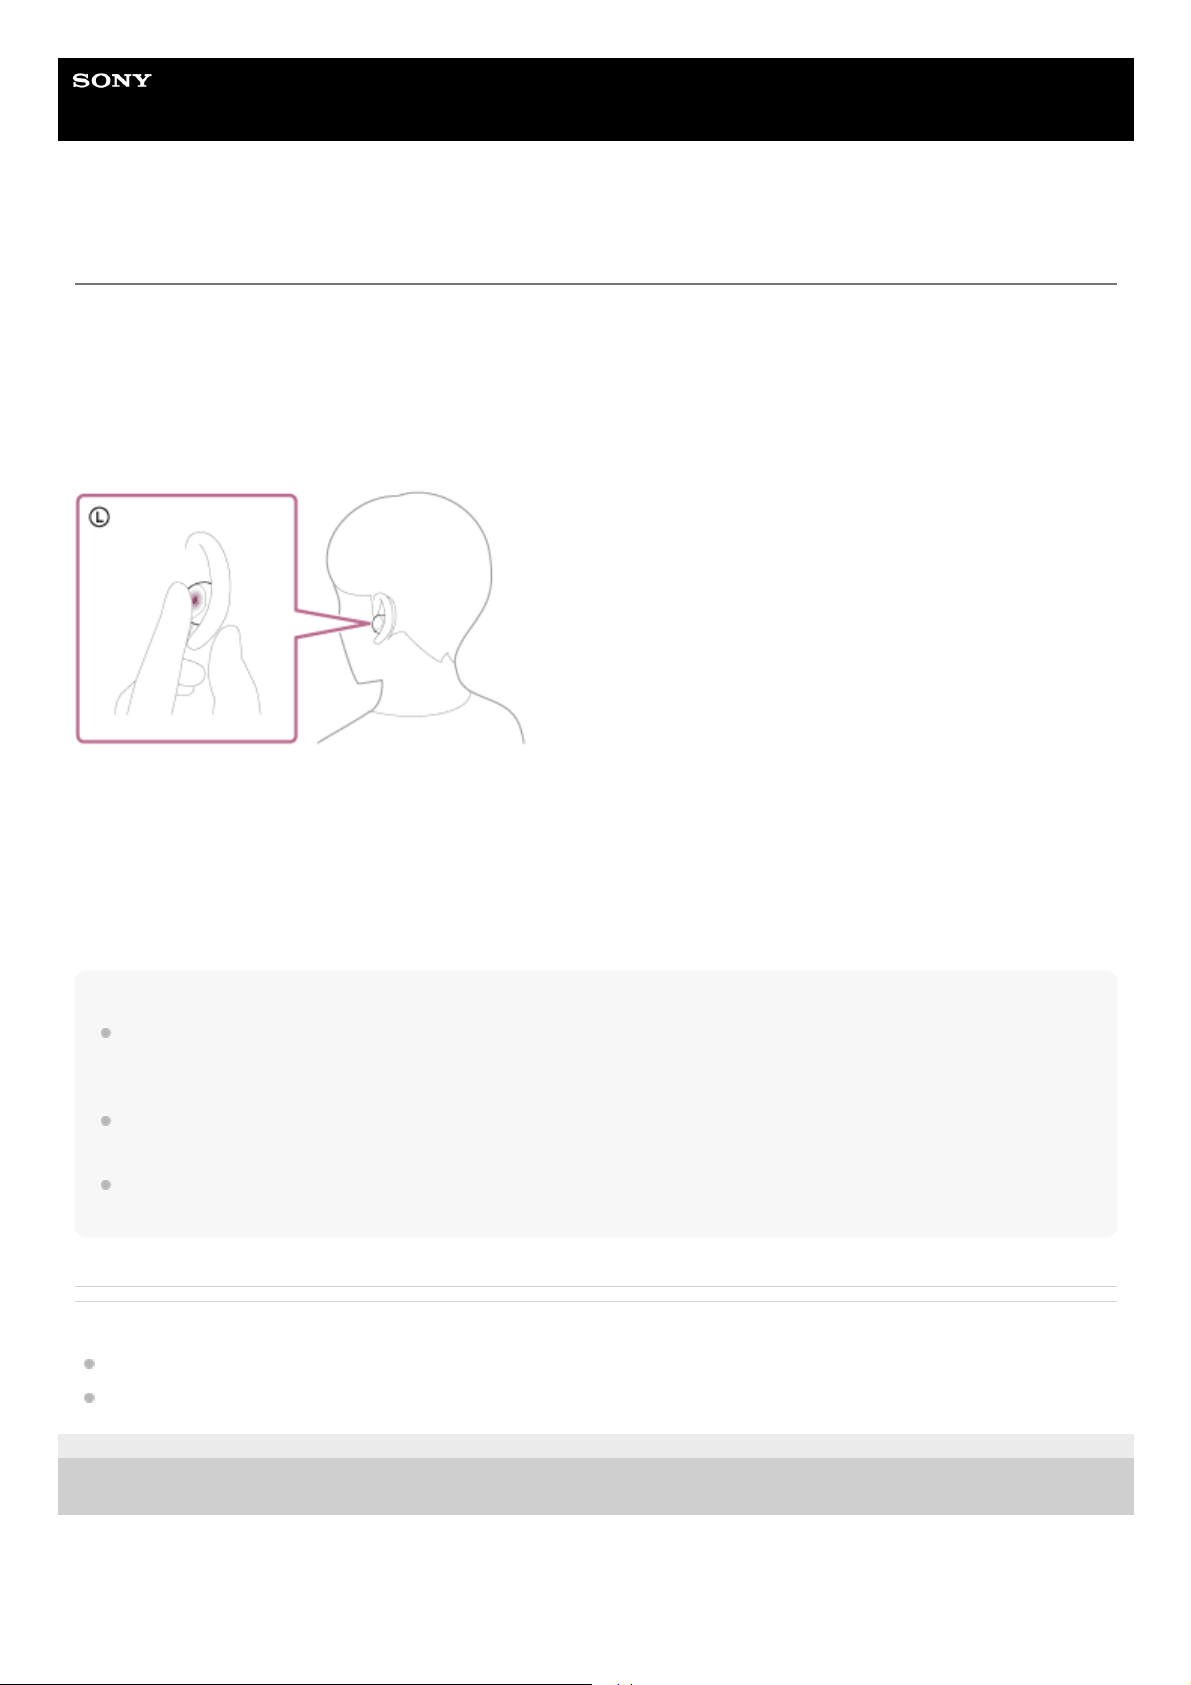
Help Guide
Wireless Noise Canceling Stereo Headset
WF-1000XM5
Listening to ambient sound quickly (Quick Attention Mode)
This function turns down the volume of music, call sounds, and the ringtone, and makes it easier to hear ambient sounds
by capturing these sounds. The Quick Attention Mode is useful when you want to listen to train announcements, etc.
To activate the Quick Attention Mode
Hold your finger to the touch sensor on the left unit. The Quick Attention Mode is activated only when you are touching
the touch sensor.
To deactivate the Quick Attention Mode
Release your finger from the touch sensor.
About the instruction manual video
Watch the video to find out how to use the Quick Attention Mode.
https://rd1.sony.net/help/mdr/mov0058/h_zz/
Note
Depending on the ambient conditions and the type/volume of audio playback, ambient sounds may not be heard even when
using the Quick Attention Mode. Do not use the headset in places where it would be dangerous if you are unable to hear ambient
sounds, such as on a road with car and bicycle traffic.
If the headset is not worn properly in your ears, the Quick Attention Mode may not work correctly. Twist the headset to put it into
your ears properly.
Depending on the size of the earbud tips you use, the Quick Attention Mode may not be fully effective. Choose the size that
allows you to hear the least ambient sounds.
Related Topic
Replacing the earbud tips
Wearing the headset
5-048-298-11(1) Copyright 2023 Sony Corporation
99

Help Guide
Wireless Noise Canceling Stereo Headset
WF-1000XM5
Speaking with someone while wearing the headset (Speak-to-Chat)
If Speak-to-Chat is enabled in advance, the Speak-to-Chat mode starts automatically when you talk to someone.
The headset pauses or mutes the music being played and captures the voice of the person you are conversing with on
the microphones to make it easier to hear.
When the headset does not detect the wearer’s voice for a certain period of time, the Speak-to-Chat mode ends
automatically.
If you want to end the mode before that, tap the touch sensor on the left or right headset unit.
To enable Speak-to-Chat
To activate the Speak-to-Chat mode, Speak-to-Chat must be enabled in advance.
In the factory settings, Speak-to-Chat is disabled. To enable, change the setting with the “Sony | Headphones Connect”
app.
To disable Speak-to-Chat
To disable, change the setting with the “Sony | Headphones Connect” app.
About the instruction manual video
Watch the video to find out how to use Speak-to-Chat.
https://rd1.sony.net/help/mdr/mov0059/h_zz/
Hint
The Speak-to-Chat mode also ends in the following instance.
When operating the connected device to play music
When both headset units are removed while the wearing detection automatic power off function is enabled
When you use the “Sony | Headphones Connect” app, you can change the sensitivity of the automatic audio detection and
change the time until the Speak-to-Chat mode ends, in addition to the mode to switch between enabling and disabling. In the
factory settings, the time until the mode ends is set to about 15 seconds.
Note
The Speak-to-Chat mode activates when the headset detects the speech of the person wearing the headset, but in rare cases it
may activate in response to vibrations caused by devices such as electric toothbrushes, electric massagers, and electric shavers,
or by activities such as brushing your teeth, coughing, or humming. In cases where the Speak-to-Chat mode frequently activates
by accident, set Speak-to-Chat to “L Sensitivity”.
Music playback is paused while the Speak-to-Chat mode is active only when connected via Bluetooth connection.
The connected device or playback application you are using may not support the pausing of music or video content playback
when the Speak-to-Chat mode is activated or the resuming of music playback when the Speak-to-Chat mode is deactivated.
100

If the sound volume is loud, the headset is not worn properly, or the volume of the spoken voice is low, the speech of the person
wearing the headset may not be detected, and the Speak-to-Chat mode may not activate.
If this is the case, speech detection may be improved by speaking more slowly or in a louder voice, making sure the headset is in
the correct position, turning down any music playing, or setting Speak-to-Chat to “H Sensitivity”.
Related Topic
What you can do with the “Sony | Headphones Connect” app
5-048-298-11(1) Copyright 2023 Sony Corporation
101

Help Guide
Wireless Noise Canceling Stereo Headset
WF-1000XM5
About the sound quality mode
The following 2 sound quality modes during Bluetooth playback can be selected. You can switch the settings and check
the sound quality mode with the “Sony | Headphones Connect” app.
Priority on sound quality: Prioritizes the sound quality.
Priority on stable connection: Prioritizes the stable connection (default).
When you want to prioritize the sound quality, select “Priority on sound quality”.
If the connection is unstable, such as when producing only intermittent sound, select “Priority on stable connection”.
Note
The maximum playback time may be shorter in the “Priority on sound quality” mode.
Depending on the ambient conditions in the area where you are using the headset, intermittent sound may still occur even if
“Priority on stable connection” is selected.
Related Topic
What you can do with the “Sony | Headphones Connect” app
5-048-298-11(1) Copyright 2023 Sony Corporation
102

Help Guide
Wireless Noise Canceling Stereo Headset
WF-1000XM5
Supported codecs
A codec is an “audio coding algorithm” used when transmitting sound wirelessly via a Bluetooth connection.
The headset supports the following codecs.
When connected in Classic Audio via an A2DP connection (for music playback): SBC, AAC, LDAC
When connected in LE Audio: LC3
SBC
This is an abbreviation for Subband Codec.
SBC is the standard audio coding technology used in Bluetooth devices.
All Bluetooth devices which use Classic Audio support SBC.
AAC
This is an abbreviation for Advanced Audio Coding.
AAC is mainly used in Apple products such as iPhone that can provide a higher sound quality than that of SBC.
LDAC
LDAC is an audio coding technology developed by Sony that enables the transmission of High-Resolution (Hi-Res)
Audio content, even over a Bluetooth connection. Unlike other Bluetooth-compatible coding technologies such as
SBC, it operates without any down-conversion of the High-Resolution Audio content
*
.
It allows approximately 3 times more data
**
than those other technologies to be transmitted over a Bluetooth wireless
network with unprecedented sound quality, employing efficient coding and optimized packetization.
LC3
This is an abbreviation for Low Complexity Communication Codec.
LC3 is a codec for LE Audio and achieves low latency transmission.
When music in one of the SBC, AAC, or LDAC codec is transmitted from a device connected in Classic Audio, the
headset switches to that codec automatically and plays back the music in the same codec.
When you want to play back music with LDAC, set the sound quality mode to “Priority on sound quality” using the “Sony |
Headphones Connect” app. In “Priority on stable connection” (factory settings), music cannot be played back with LDAC.
If the connected device supports a codec of higher sound quality than SBC, you may need to set the device beforehand
to enjoy music with the desired codec from the supported codecs.
Refer to the operating instructions supplied with the device regarding setting the codec.
Related Topic
About the sound quality mode
5-048-298-11(1) Copyright 2023 Sony Corporation
excluding DSD format contents.
*
in comparison with SBC when the bitrate of 990 kbps (96/48 kHz) or 909 kbps (88.2/44.1 kHz) is selected for LDAC.
**
103

Help Guide
Wireless Noise Canceling Stereo Headset
WF-1000XM5
About the DSEE Extreme function
DSEE Extreme uses AI technology to reproduce the frequency responses of the original sound source lost during
compression with high accuracy.
You can switch the settings with the “Sony | Headphones Connect” app.
Note
When DSEE Extreme is set to [Auto], the available operating time is reduced.
Related Topic
What you can do with the “Sony | Headphones Connect” app
Available operating time
5-048-298-11(1) Copyright 2023 Sony Corporation
104
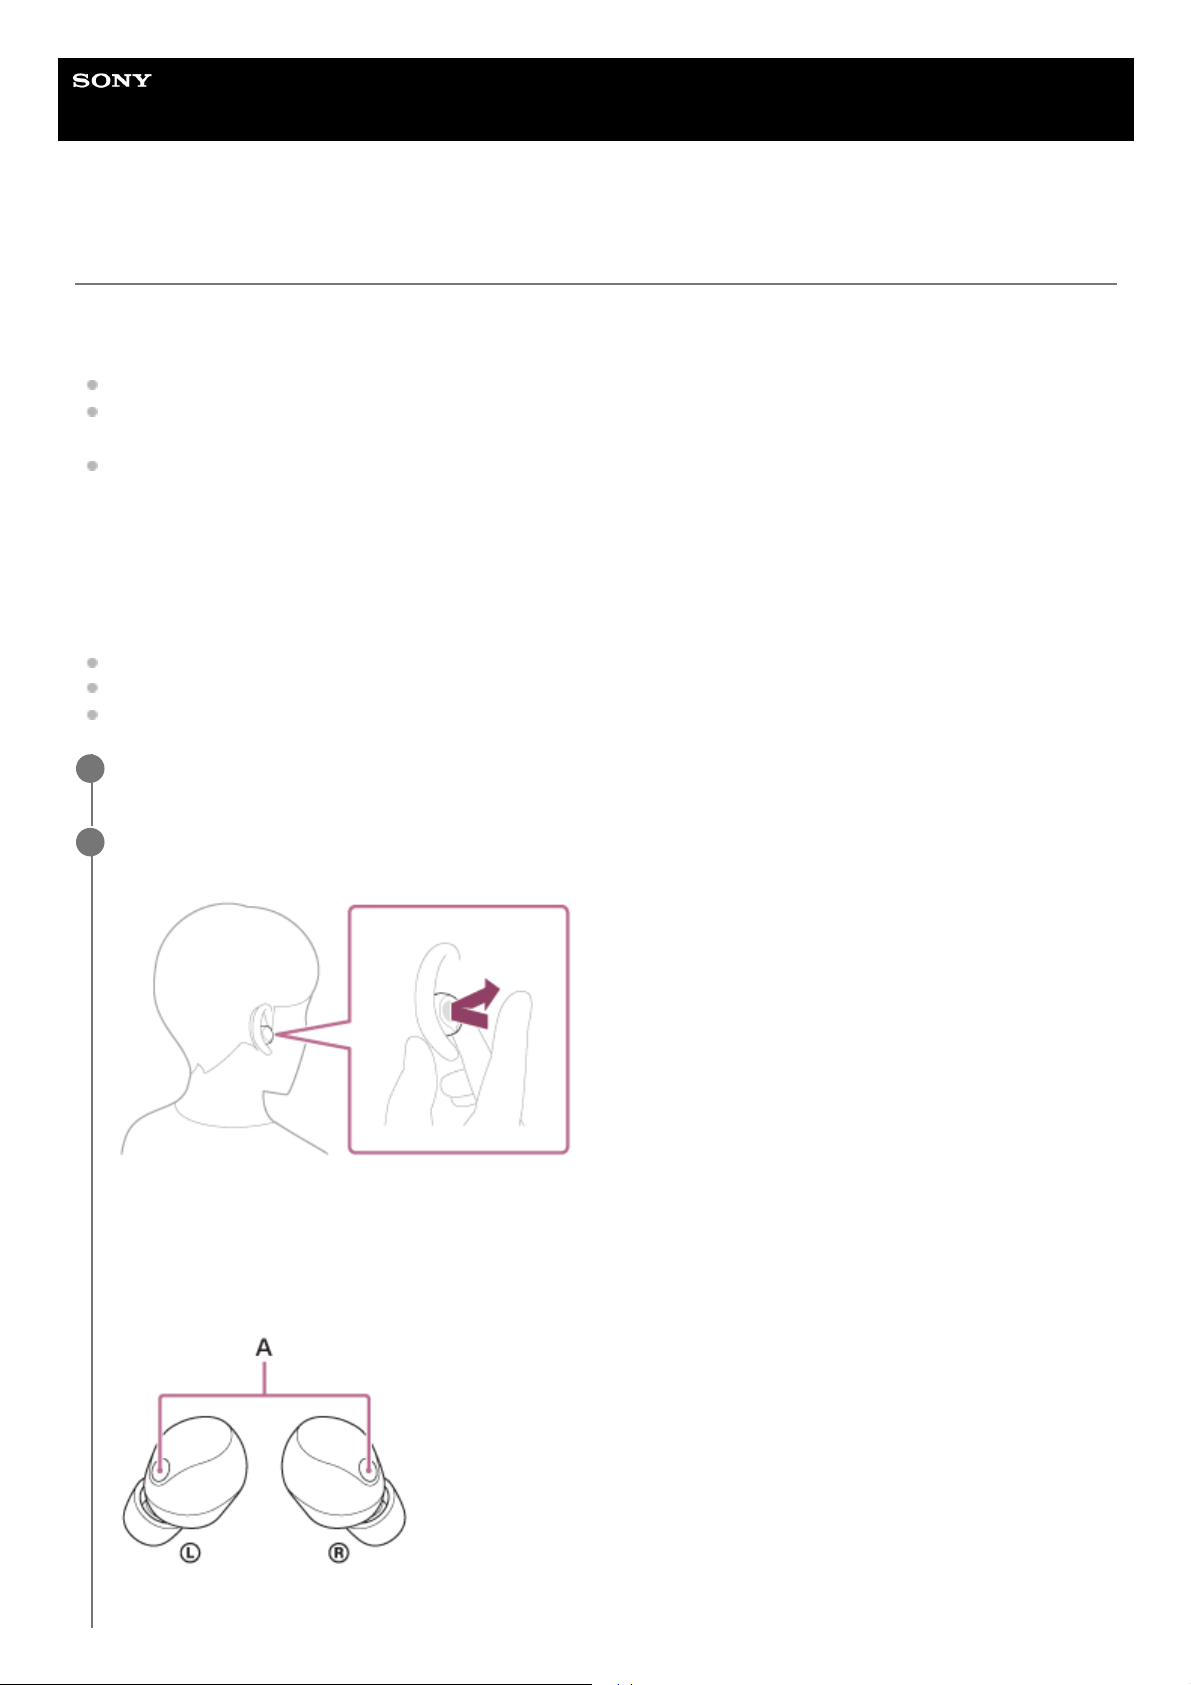
Help Guide
Wireless Noise Canceling Stereo Headset
WF-1000XM5
Receiving a call
You can enjoy a hands-free call with a smartphone or mobile phone that supports the Bluetooth profile HFP (Hands-free
Profile) or HSP (Headset Profile), via a Bluetooth connection.
If your smartphone or mobile phone supports both HFP and HSP, set it to HFP.
The operation may vary depending on the smartphone or mobile phone. Refer to the operating instructions supplied
with the smartphone or mobile phone.
Depending on the connected device or the application you are using, the functions may not work properly even if you
try to operate them with the headset.
Ring tone
When you receive an incoming call, a ring tone will be heard from the headset.
You will hear either of following ring tones, depending on your smartphone or mobile phone.
Ring tone set on the headset
Ring tone set on the smartphone or mobile phone
Ring tone only for a Bluetooth connection set on the smartphone or mobile phone
Connect the headset to a smartphone or mobile phone via a Bluetooth connection beforehand.
1
When you hear a ring tone, tap the touch sensor on the left or right headset unit twice quickly (with an
interval of about 0.3 seconds between taps) to receive the call.
A voice will be heard from the headset.
When you receive an incoming call while listening to music, playback pauses automatically and a ring tone will be
heard from the headset.
If playback is not paused, operate the headset to pause playback.
You can talk using the microphones on the left and right headset units.
A: Microphones (left, right)
2
105

Hint
When receiving a call on a smartphone or mobile phone, some smartphones or mobile phones may receive a call on the phone
instead of the headset. When using HFP connection, transfer the call to the headset by using your smartphone or mobile phone.
The volume can also be adjusted on the “Sony | Headphones Connect” app.
The headset volume during a call and during music playback can be independently adjusted. Even if you change the volume
during a call, the volume of music playback does not change.
You can also enjoy hands-free calls even when you are wearing only one headset unit. When you receive an incoming call,
answer the call using the headset unit you are wearing. If you put the other headset unit into the other ear while you are talking
with only one headset unit, you can talk with both headset units.
Note
Depending on the connected device or playback application you are using, playback may not pause even when you receive an
incoming call while playing back music. When you receive an incoming call while playing back music, playback may not resume
automatically even if you finish the call.
Use a smartphone or mobile phone at least 50 cm (19.69 in.) away from the headset. Noise may result if the smartphone or
mobile phone is too close to the headset.
In order to make it easier for you to hear your own voice during a phone call, the microphones work to capture ambient sounds
(Sidetone function). If your voice sounds too loud or the sounds in your surroundings are bothering you, turn off [Capture Voice
During a Phone Call] on the “Sony | Headphones Connect” app.
The volume during calls cannot be adjusted with the headset. Adjust the volume on the connected device or the “Sony |
Headphones Connect” app.
Depending on the caller’s voice characteristics or the ambient environmental noises, the audio signal processing that is mounted
on the headset may not work well and the call sound quality may be reduced.
Related Topic
Using only one headset unit
How to make a wireless connection to Bluetooth devices
Making a call
Functions for a phone call
What you can do with the “Sony | Headphones Connect” app
5-048-298-11(1) Copyright 2023 Sony Corporation
If no ring tone is heard via the headset
The headset may not be connected with the smartphone or mobile phone over HFP or HSP. Check the connection
status on the smartphone or mobile phone.
Operate the smartphone or mobile phone to adjust the volume.
3
When you have finished your call, tap the touch sensor on the left or right headset unit twice quickly (with
an interval of about 0.3 seconds between taps) to end the call.
If you received a call during music playback, music playback resumes automatically after ending the call.
4
106
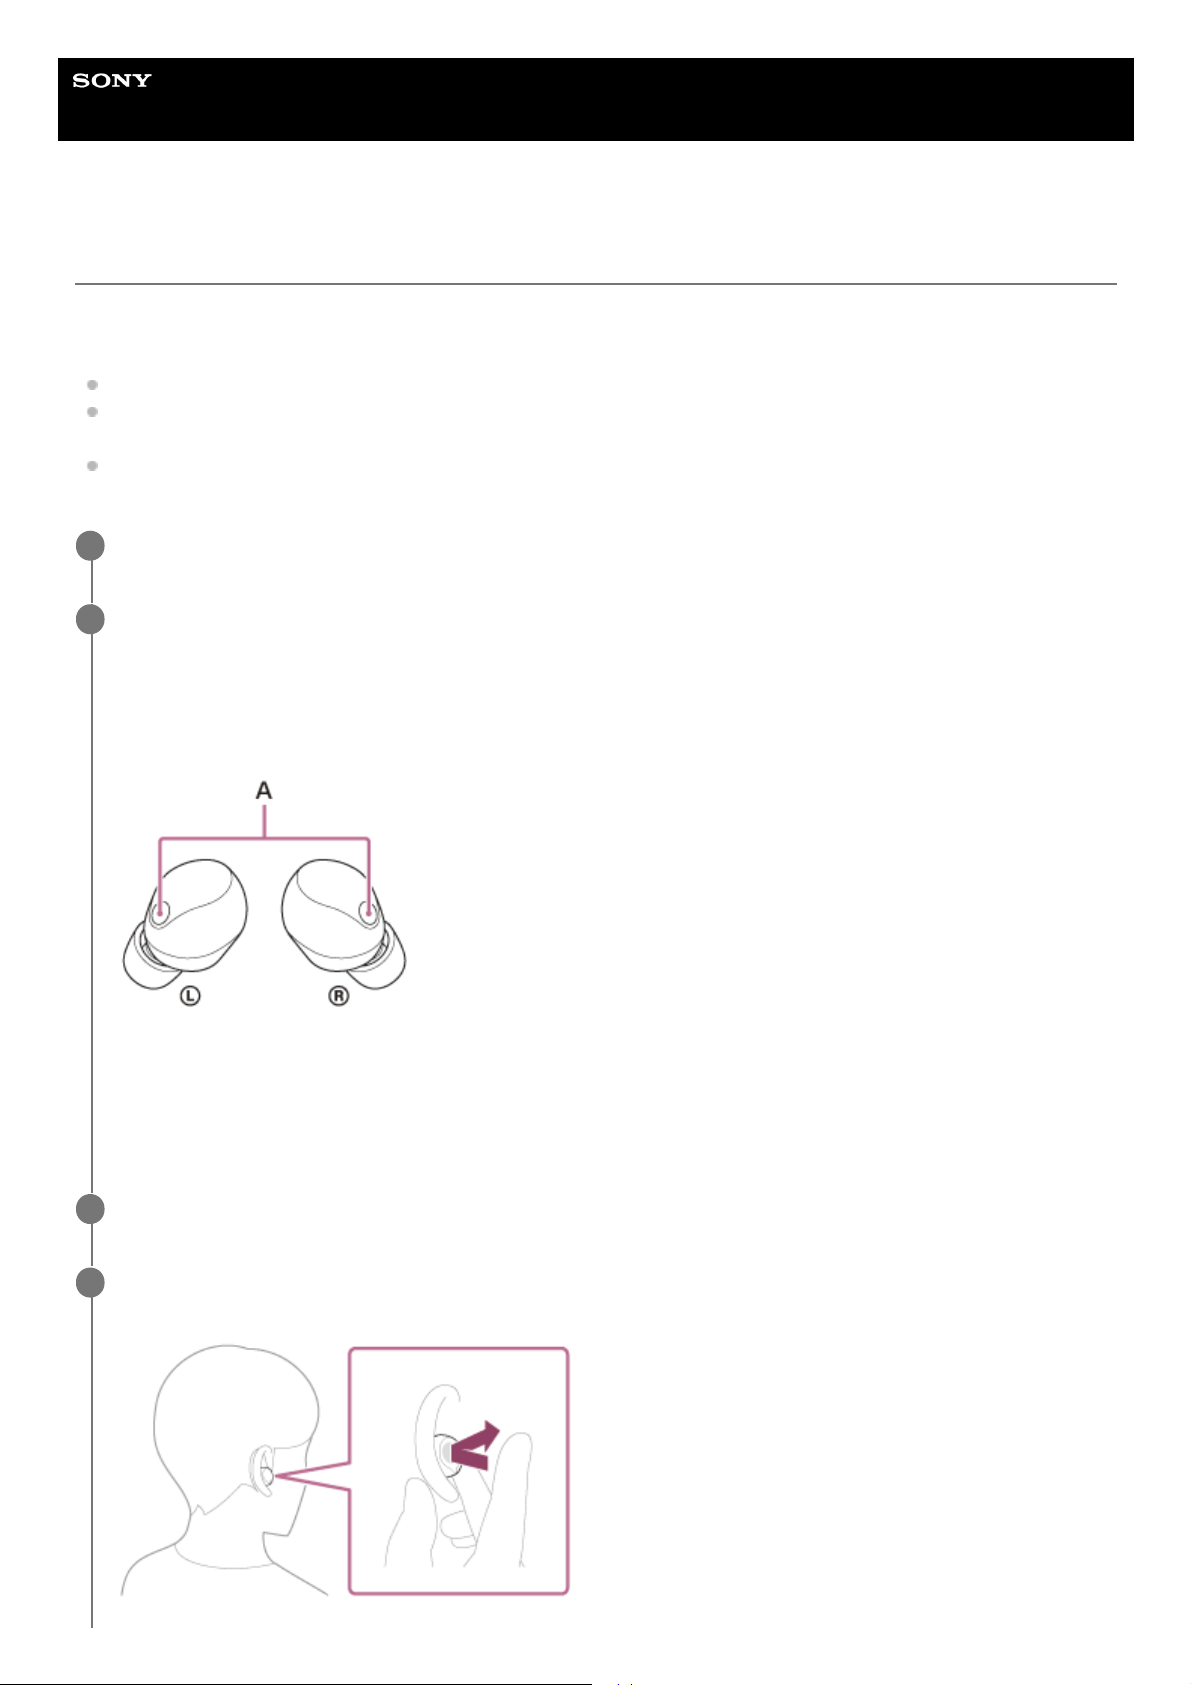
Help Guide
Wireless Noise Canceling Stereo Headset
WF-1000XM5
Making a call
You can enjoy a hands-free call with a smartphone or mobile phone that supports the Bluetooth profile HFP (Hands-free
Profile) or HSP (Headset Profile), via a Bluetooth connection.
If your smartphone or mobile phone supports both HFP and HSP, set it to HFP.
The operation may vary depending on the smartphone or mobile phone. Refer to the operating instructions supplied
with the smartphone or mobile phone.
Depending on the connected device or the application you are using, the functions may not work properly even if you
try to operate them with the headset.
Connect the headset to a smartphone or mobile phone via a Bluetooth connection.
1
Operate your smartphone or mobile phone to make a call.
When you make a call, the dial tone is heard from the headset.
If you make a call while listening to music, playback pauses automatically.
If playback is not paused, operate the headset to pause playback.
You can talk using the microphones on the left and right headset units.
A: Microphones (left, right)
If no dial tone is heard via the headset
Use your smartphone or mobile phone to transfer the call to the headset.
2
Operate the smartphone or mobile phone to adjust the volume.
3
When you have finished your call, tap the touch sensor on the left or right headset unit twice quickly (with
an interval of about 0.3 seconds between taps) to end the call.
4
107

Hint
The volume can also be adjusted on the “Sony | Headphones Connect” app.
The headset volume during a call and during music playback can be independently adjusted. Even if you change the volume
during a call, the volume of music playback does not change.
You can also enjoy hands-free calls even when you are wearing only one headset unit. If you put the other headset unit into the
other ear while you are talking with only one headset unit, you can talk with both headset units.
Note
Depending on the connected device or playback application you are using, when you make a call during music playback,
playback may not resume automatically even after you finish the call.
Use a smartphone or mobile phone at least 50 cm (19.69 in.) away from the headset. Noise may result if the smartphone or
mobile phone is too close to the headset.
In order to make it easier for you to hear your own voice during a phone call, the microphones work to capture ambient sounds
(Sidetone function). If your voice sounds too loud or the sounds in your surroundings are bothering you, turn off [Capture Voice
During a Phone Call] on the “Sony | Headphones Connect” app.
The volume during calls cannot be adjusted with the headset. Adjust the volume on the connected device or the “Sony |
Headphones Connect” app.
Depending on the caller’s voice characteristics or the ambient environmental noises, the audio signal processing that is mounted
on the headset may not work well and the call sound quality may be reduced.
Related Topic
Using only one headset unit
How to make a wireless connection to Bluetooth devices
Receiving a call
Functions for a phone call
What you can do with the “Sony | Headphones Connect” app
5-048-298-11(1) Copyright 2023 Sony Corporation
If you made a call during music playback, music playback resumes automatically after ending the call.
108
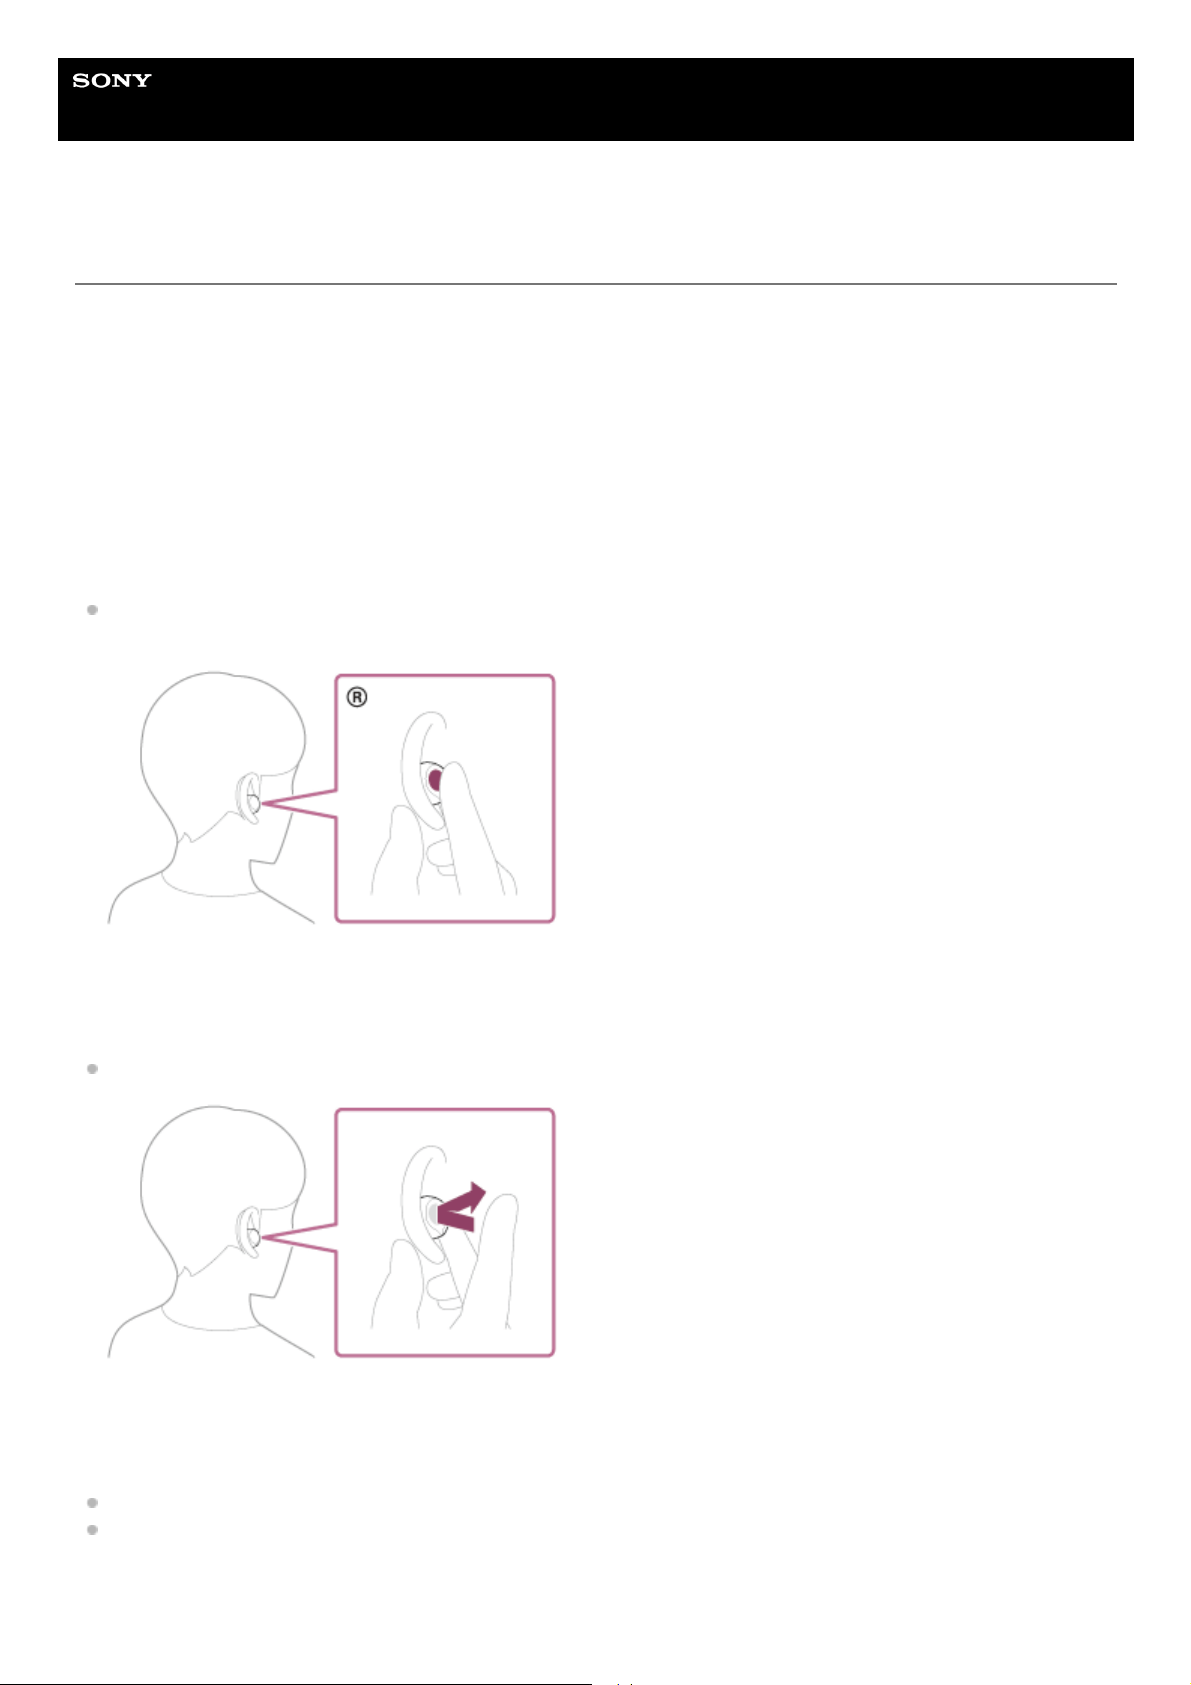
Help Guide
Wireless Noise Canceling Stereo Headset
WF-1000XM5
Functions for a phone call
The functions available during a call may vary depending on the profile supported by your smartphone or mobile phone.
In addition, even if the profile is the same, the available functions may vary depending on the smartphone or mobile
phone.
Depending on the connected device or the application you are using, the functions may not work properly even if you try
to operate them with the headset.
Refer to the operating instructions supplied with the smartphone or mobile phone.
Supported profile: HFP (Hands-free Profile)
During standby/music playback
You can use the right headset unit to perform the following operations.
Start up the voice dial function of the smartphone/mobile phone, or activate the Google app on the Android
smartphone or Siri on the iPhone: Hold your finger to the touch sensor for about 2 seconds or more.
Outgoing call
You can use either the left or right headset unit to perform the following operations.
When only one headset unit is worn in your ear, operate the headset unit that is worn.
Cancel an outgoing call: Tap the touch sensor twice quickly (with an interval of about 0.3 seconds between taps).
Incoming call
You can use either the left or right headset unit to perform the following operations.
When only one headset unit is worn in your ear, operate the headset unit that is worn.
Receive a call: Tap the touch sensor twice quickly (with an interval of about 0.3 seconds between taps).
Reject a call: Hold your finger to the touch sensor for about 2 seconds or more.
When [Head Gesture] is enabled on the “Sony | Headphones Connect” app, you can perform the following operations
while wearing the headset.
109
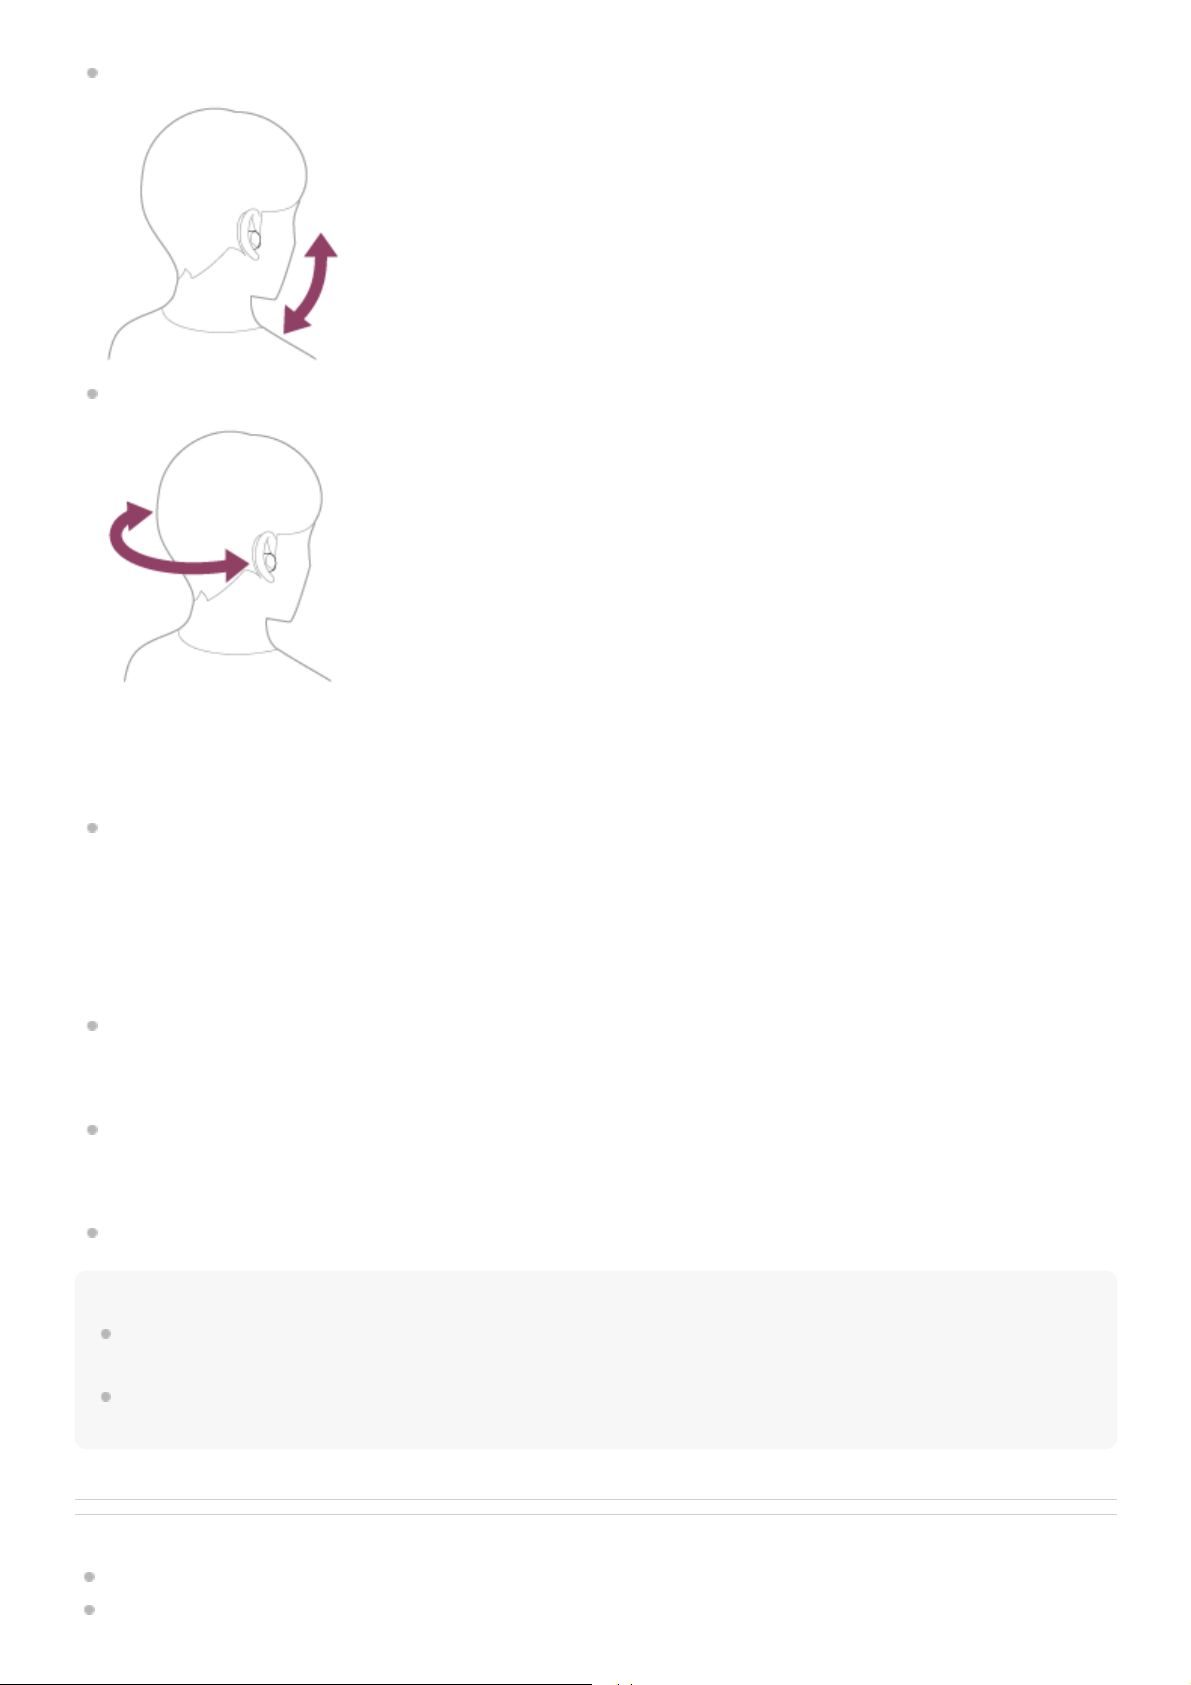
Receive a call: Nod your head.
Reject a call: Shake your head.
During call
You can use either the left or right headset unit to perform the following operations.
When only one headset unit is worn in your ear, operate the headset unit that is worn.
End a call: Tap the touch sensor twice quickly (with an interval of about 0.3 seconds between taps).
Supported profile: HSP (Headset Profile)
You can use either the left or right headset unit to perform the following operations.
When only one headset unit is worn in your ear, operate the headset unit that is worn.
Outgoing call
Cancel an outgoing call: Tap the touch sensor twice quickly (with an interval of about 0.3 seconds between taps).
Incoming call
Receive a call: Tap the touch sensor twice quickly (with an interval of about 0.3 seconds between taps).
During call
End a call: Tap the touch sensor twice quickly (with an interval of about 0.3 seconds between taps).
Note
When [Head Gesture] is enabled on the “Sony | Headphones Connect” app and you are using only one headset unit, the headset
may not work properly.
When [Head Gesture] is enabled on the “Sony | Headphones Connect” app, the functions may not work properly with the head
gesture controls depending on the connected device or the application you are using.
Related Topic
Using only one headset unit
Receiving a call
110


Help Guide
Wireless Noise Canceling Stereo Headset
WF-1000XM5
Making a video call on your computer
When you make a video call on your computer, you can talk wirelessly from your headset.
Hint
When the settings of the video calling application cannot be checked or calling connections [Headset (WF-1000XM5 Hands-
Free)] cannot be selected, select [Headset (WF-1000XM5 Hands-Free)] on the settings of your computer to make connections.
See “Connecting to a paired computer (Windows 11)”, “Connecting to a paired computer (Windows 10)” or “Connecting to a
paired computer (Mac)”.
Note
While Speak-to-Chat is enabled, if the microphone is not set up correctly, the Speak-to-Chat mode is activated when a voice is
detected, and the sound from the headset may be muted.
Depending on the video calling application you are using, microphone settings may not be available. If this is the case, disable
Speak-to-Chat using the “Sony | Headphones Connect” app.
Depending on the computer or application you are using, the headset may not work properly during a video call. This may be
improved by restarting the computer.
Related Topic
How to make a wireless connection to Bluetooth devices
Pairing and connecting with a computer (Windows® 11)
Connect the headset to your computer via a Bluetooth connection.
1
Launch the video calling application on your computer.
2
Check the settings
*
of the video calling application.
When you make a video call on your computer, select calling connections (HFP/HSP) and not music playback
connections (A2DP). If you select music playback connections, a video call may not be available.
On the speaker settings, select calling connections [Headset (WF-1000XM5 Hands-Free)]
**
. ([Headphones
(WF-1000XM5 Stereo)]
**
is for music playback connections.)
On the microphone settings, select calling connections [Headset (WF-1000XM5 Hands-Free)]
**
. When the
microphone is not set up, the Speak-to-Chat mode activates when the headset detects the speech of the
person wearing the headset, and the sound from the headset is muted.
Depending on the video calling application you are using, calling connections [Headset (WF-1000XM5 Hands-
Free)]
**
or music playback connections [Headphones (WF-1000XM5 Stereo)]
**
may not be selectable on the
speaker or microphone settings, and only [WF-1000XM5] may be displayed. If this is the case, select [WF-
1000XM5].
As for frequently asked questions and answers, refer to the customer support website.
3
Depending on the video calling application you are using, this function may not be available.
*
Names may vary according to the computer or the video calling application you are using.
**
112

Pairing and connecting with a computer (Windows 10)
Pairing and connecting with a computer (Mac)
Connecting to a paired computer (Windows 11)
Connecting to a paired computer (Windows 10)
Connecting to a paired computer (Mac)
Disconnecting Bluetooth connection (after use)
Speaking with someone while wearing the headset (Speak-to-Chat)
Customer support websites
5-048-298-11(1) Copyright 2023 Sony Corporation
113

Help Guide
Wireless Noise Canceling Stereo Headset
WF-1000XM5
Disconnecting Bluetooth connection (after use)
Hint
When you finish playing music, the Bluetooth connection may terminate automatically depending on the Bluetooth device.
Related Topic
Turning off the headset
5-048-298-11(1) Copyright 2023 Sony Corporation
Disconnect the Bluetooth connection by operating the Bluetooth device.
When you are wearing the headset, you will hear a notification sound from both headset units (or from the headset
unit you are wearing) at the same time.
1
Set the headset units into the charging case, and close the charging case lid.
Put the left headset unit (the headset unit with the tactile dot) back into the left hole of the charging case, and put
the right headset unit back into the right hole of the charging case. Each headset unit will be set to the correct
position in the charging case by the built-in magnet.
The headset turns off.
2
114
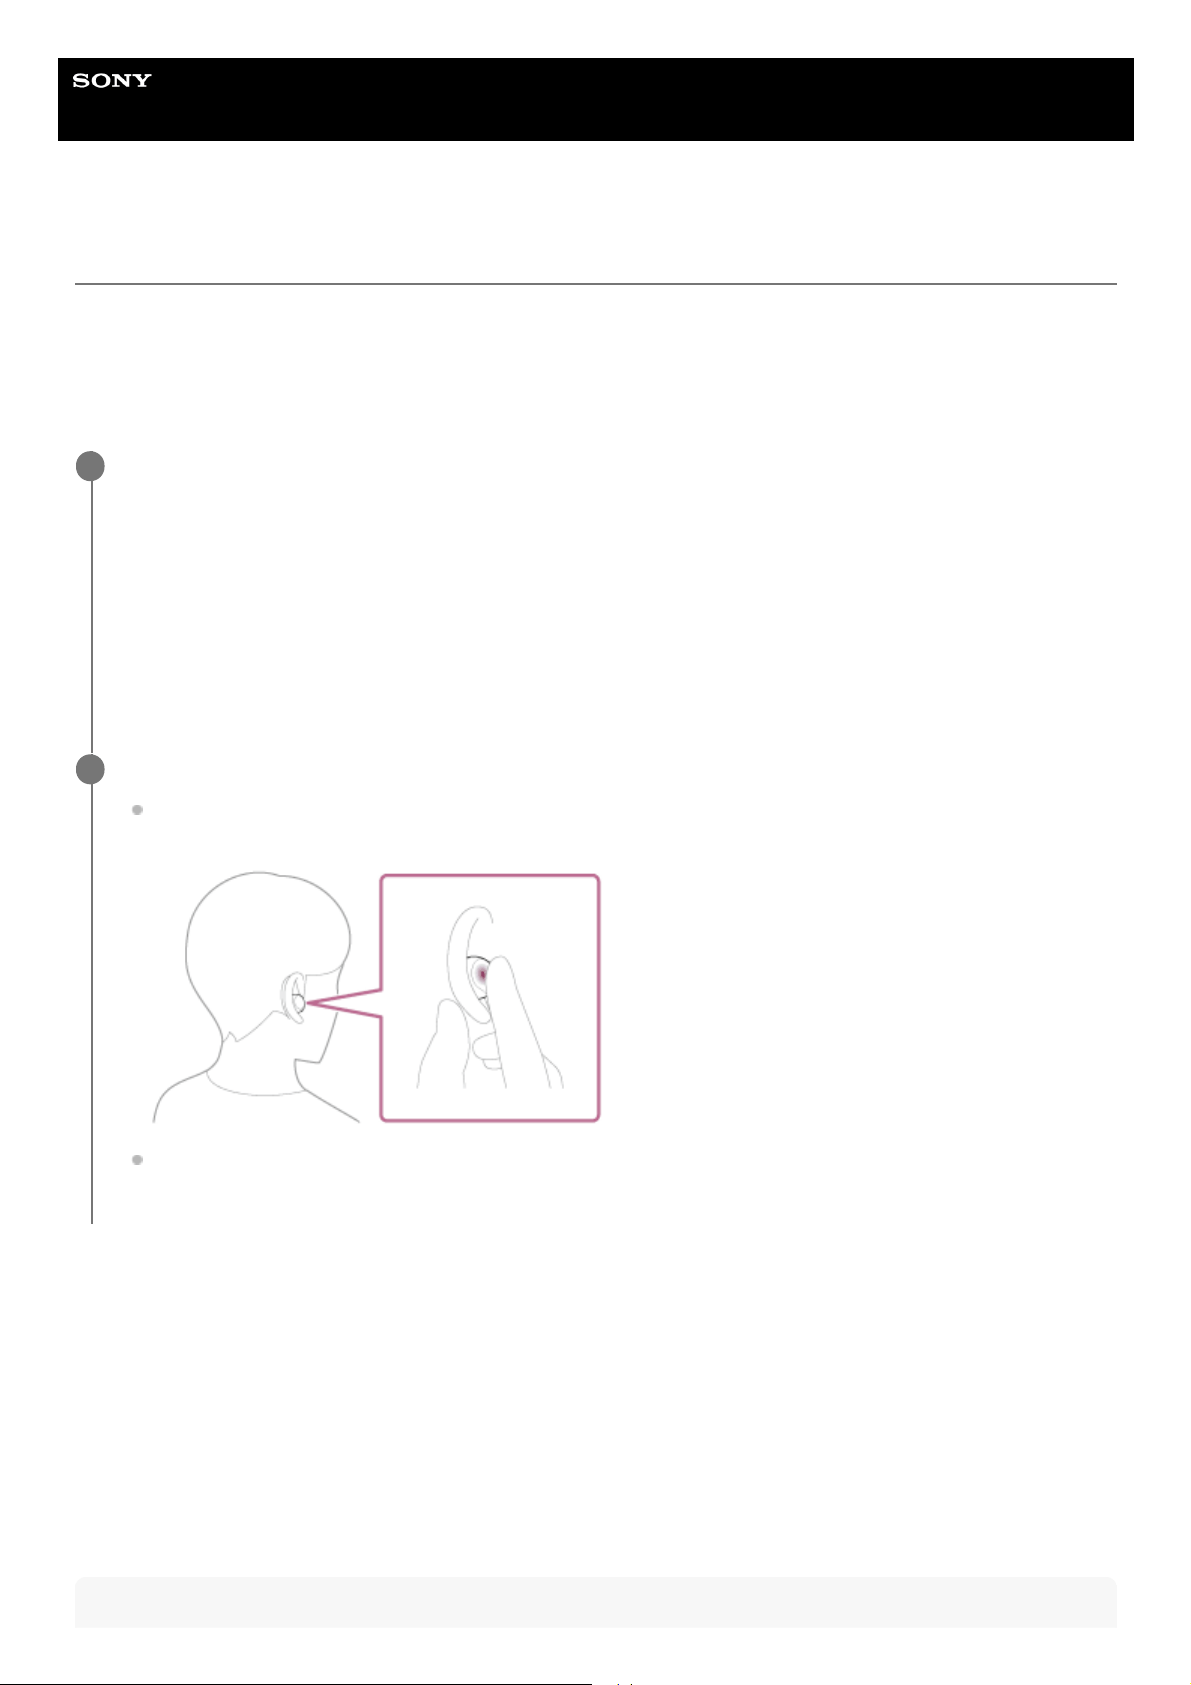
Help Guide
Wireless Noise Canceling Stereo Headset
WF-1000XM5
Using Google Assistant (with touch sensor)
By using Google Assistant feature that comes with the smartphone, you can speak to the headset’s microphones to
operate the smartphone or perform a search.
Compatible smartphones
Smartphones installed with Android™ 6.0 or later
For details on Google Assistant, refer to the following website:
https://assistant.google.com
https://g.co/headphones/help
Operating the headset with Google Assistant
By saying specific words on Google Assistant, you can perform noise canceling settings or other operations of the
headset.
For details, refer to the following website
*
:
https://support.google.com/assistant/answer/7172842#headphones
Hint
Open the “Sony | Headphones Connect” app, and set the function of the touch sensor as Google Assistant.
Google Assistant can be assigned to the headset unit with the touch sensor that has the music playback function
assigned. You can change the function assignments to the touch sensors of the left and right headset units using
the “Sony | Headphones Connect” app.
For details on the “Sony | Headphones Connect” app, refer to the following URL.
https://rd1.sony.net/help/mdr/hpc/h_zz/
When using Google Assistant for the first time, launch the Google Assistant app and touch [Finish headphones
setup] on the Conversation View, and follow the on-screen instructions to complete initial setup for Google
Assistant.
1
Operate the touch sensor to which you assigned Google Assistant to use Google Assistant.
Hold your finger to the touch sensor to input a voice command, and release your finger to finish the voice
command.
If no voice command is detected while holding your finger to the touch sensor, notifications are read out when
your finger is released.
2
It is not the case that the headset is compatible with all the specifications described in the web site.
*
115

Check or update the software version of the headset with the “Sony | Headphones Connect” app.
When Google Assistant is not available for reasons such as not being connected to the network, the voice guidance “Google
Assistant is not connected” is heard from both headset units (or from the headset unit you are wearing).
If you do not see [Finish headphones setup] on the Conversation View of the Google Assistant app, delete the pairing information
for the headset from the Bluetooth settings of your smartphone and redo the pairing process.
Note
When you perform the initial setup for Google Assistant on your smartphone, which touch sensor function on the left or right
headset unit is set as Google Assistant depends on the settings for the headset functions and usage conditions. You can restore
the touch sensor back to its previous functions by changing its settings on the “Sony | Headphones Connect” app.
Google Assistant can be assigned to the headset unit with the touch sensor that has the music playback function assigned. When
you want to use Google Assistant on either headset unit, assign the music playback function to the headset unit you want to use,
and then assign Google Assistant.
On the headset unit to which the music playback function is not assigned, Google Assistant cannot be used. You can change the
function assignments to the touch sensors of the left and right headset units using the “Sony | Headphones Connect” app.
Google Assistant and Amazon Alexa cannot be assigned to the headset at the same time.
Google Assistant is not available in certain languages, countries and region.
The function to operate the headset with Google Assistant depends on the specifications of Google Assistant.
The specifications of Google Assistant are subject to change without notice.
For details on the services provided by other companies such as Google Assistant or Amazon Alexa, consult each service
provider directly.
Sony shall assume no responsibility for any problems such as misunderstandings related to the services provided by other
companies.
5-048-298-11(1) Copyright 2023 Sony Corporation
116
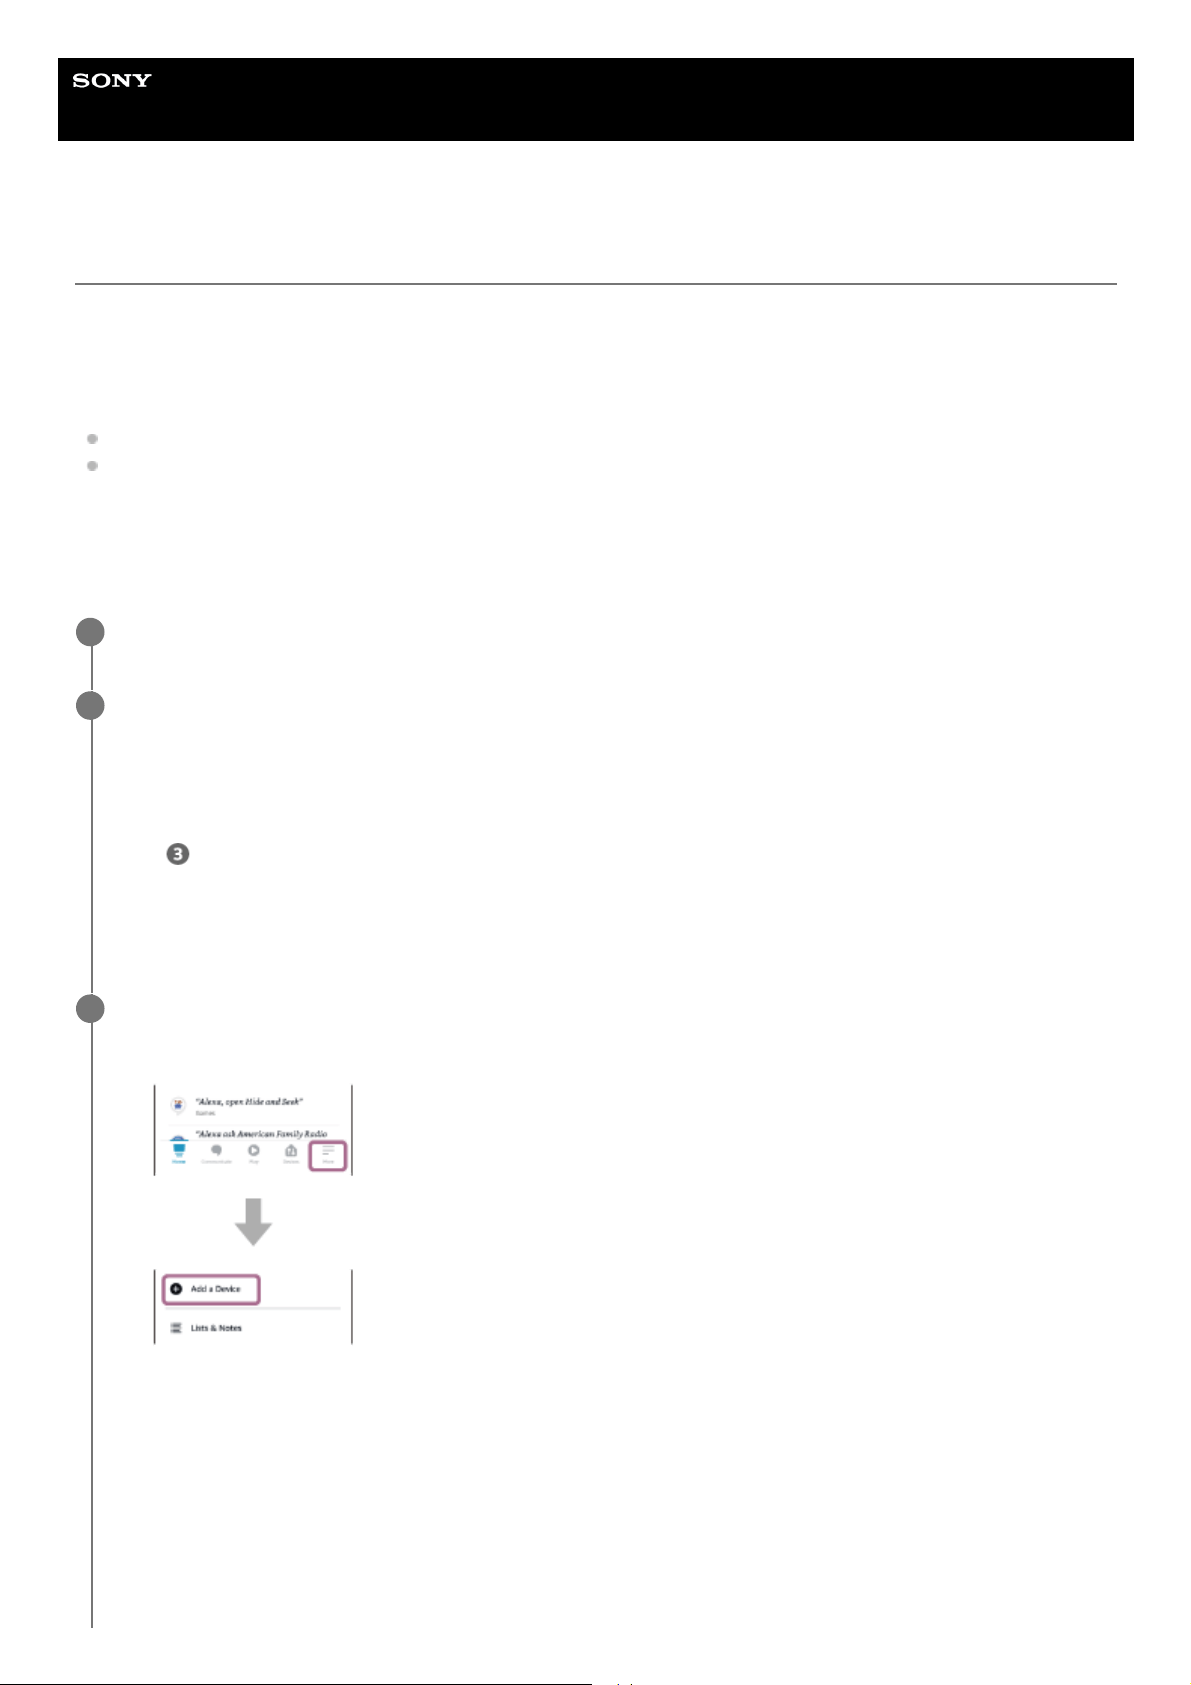
Help Guide
Wireless Noise Canceling Stereo Headset
WF-1000XM5
Using Amazon Alexa
By using the Amazon Alexa app installed on your smartphone, you can speak to the headset’s microphones to operate
the smartphone or perform a search.
Compatible smartphones
The OS version which supports the latest version of the Amazon Alexa app on Android or iOS
Installation of the latest Amazon Alexa app is required.
Open the app store on your mobile device.1.
Search for Amazon Alexa app.2.
Select Install.3.
Select Open.4.
Put the headset units into your ears and connect the headset to the smartphone via Bluetooth connection.
1
Launch the Amazon Alexa app.
Amazon Alexa can be assigned to the headset unit with the touch sensor that has the music playback function
assigned. You can change the function assignments to the touch sensors of the left and right units using the “Sony |
Headphones Connect” app.
When you use Amazon Alexa for the first time, you will need to login with your Amazon account, and proceed to
step
to set up your headset to the Amazon Alexa app.
If you have set up Amazon Alexa previously, but have configured the touch sensor on the left and right headset
units to a function other than Amazon Alexa, reconfigure the touch sensor on the left or right headset unit to
Amazon Alexa.
2
Perform the initial setup for Amazon Alexa.
3
Touch the [More] icon in the lower right corner of the Amazon Alexa app screen, and touch [Add a Device].
1.
On the [Which device would you like to set up?] screen, select [Headphones].2.
117
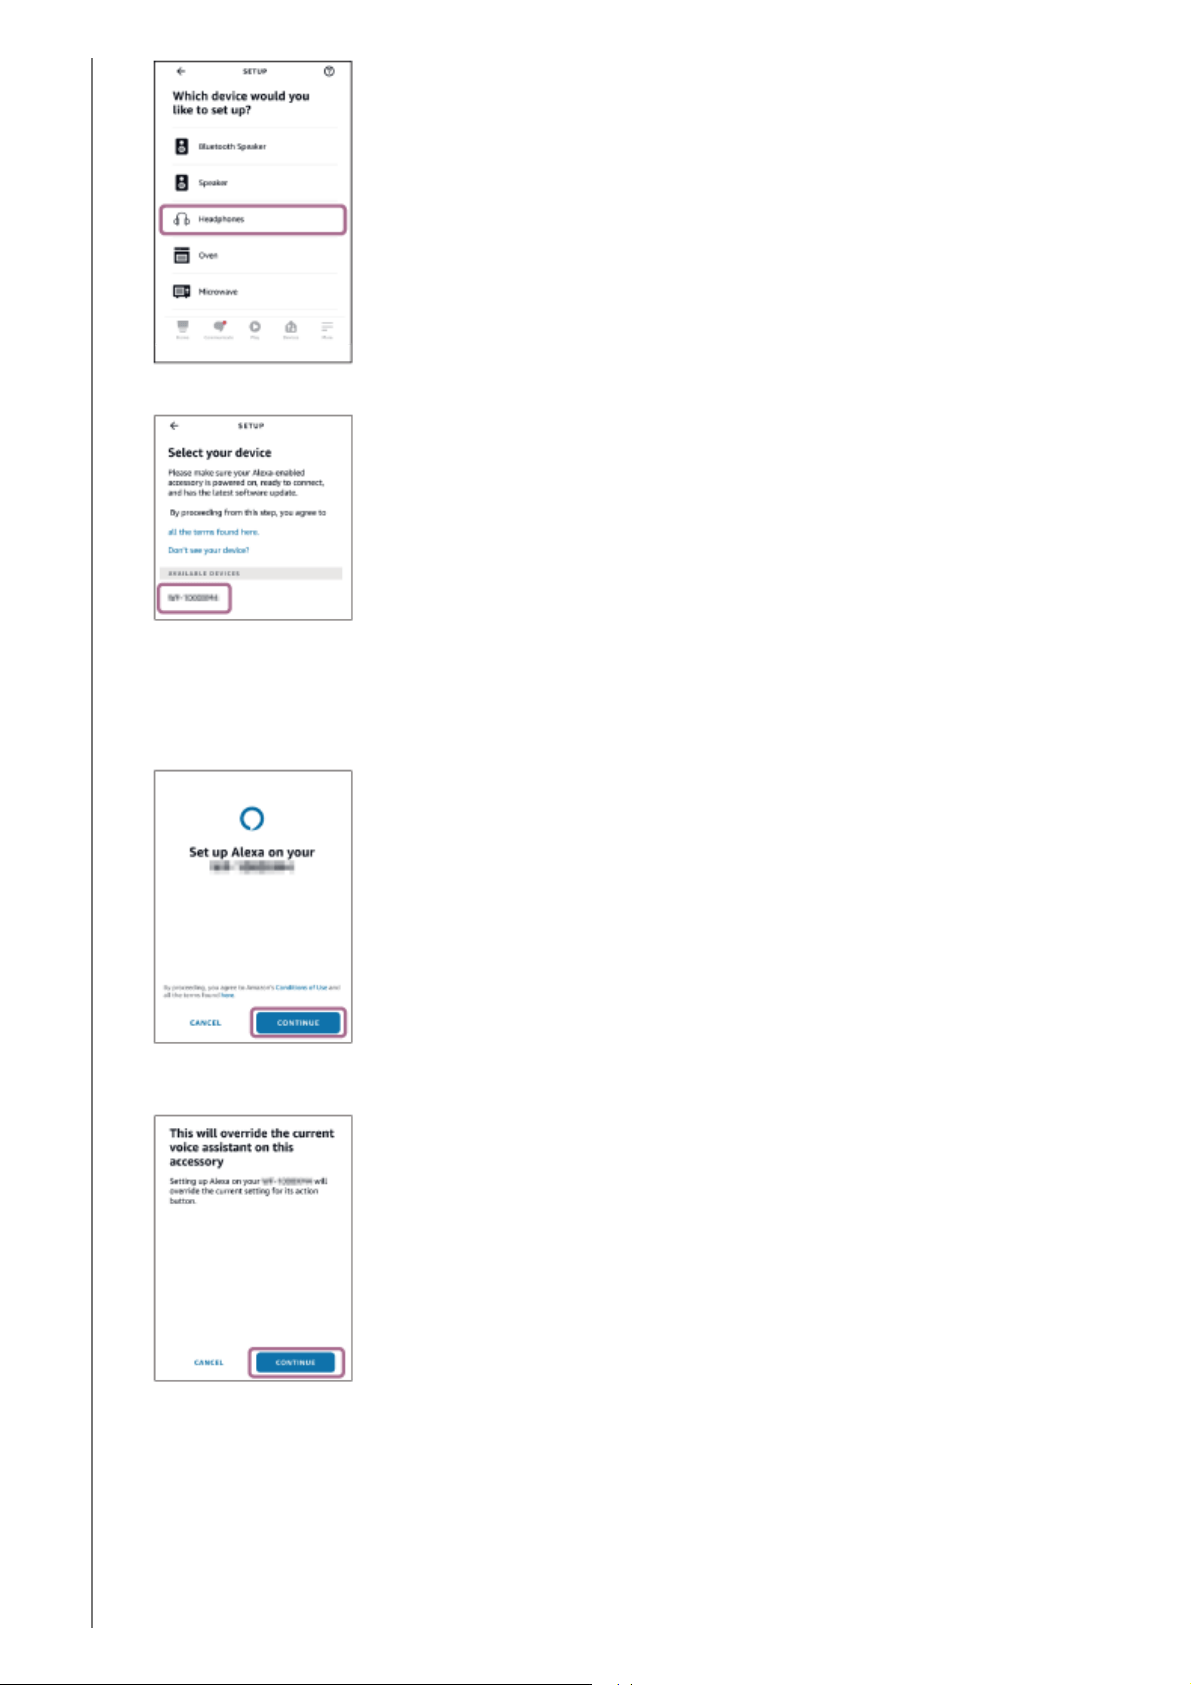
From [AVAILABLE DEVICES] on the [Select your device] screen, select [WF-1000XM5].
If you cannot find [WF-1000XM5] in [AVAILABLE DEVICES], the headset is not connected to the smartphone
via Bluetooth connection. Connect the headset to the smartphone via Bluetooth connection.
3.
On the [Set up Alexa on your WF-1000XM5] screen, touch [CONTINUE].
4.
If the [This will override the current voice assistant on this accessory] screen appears, touch [CONTINUE].
5.
On the [Setup Complete] screen, touch [DONE].6.
118
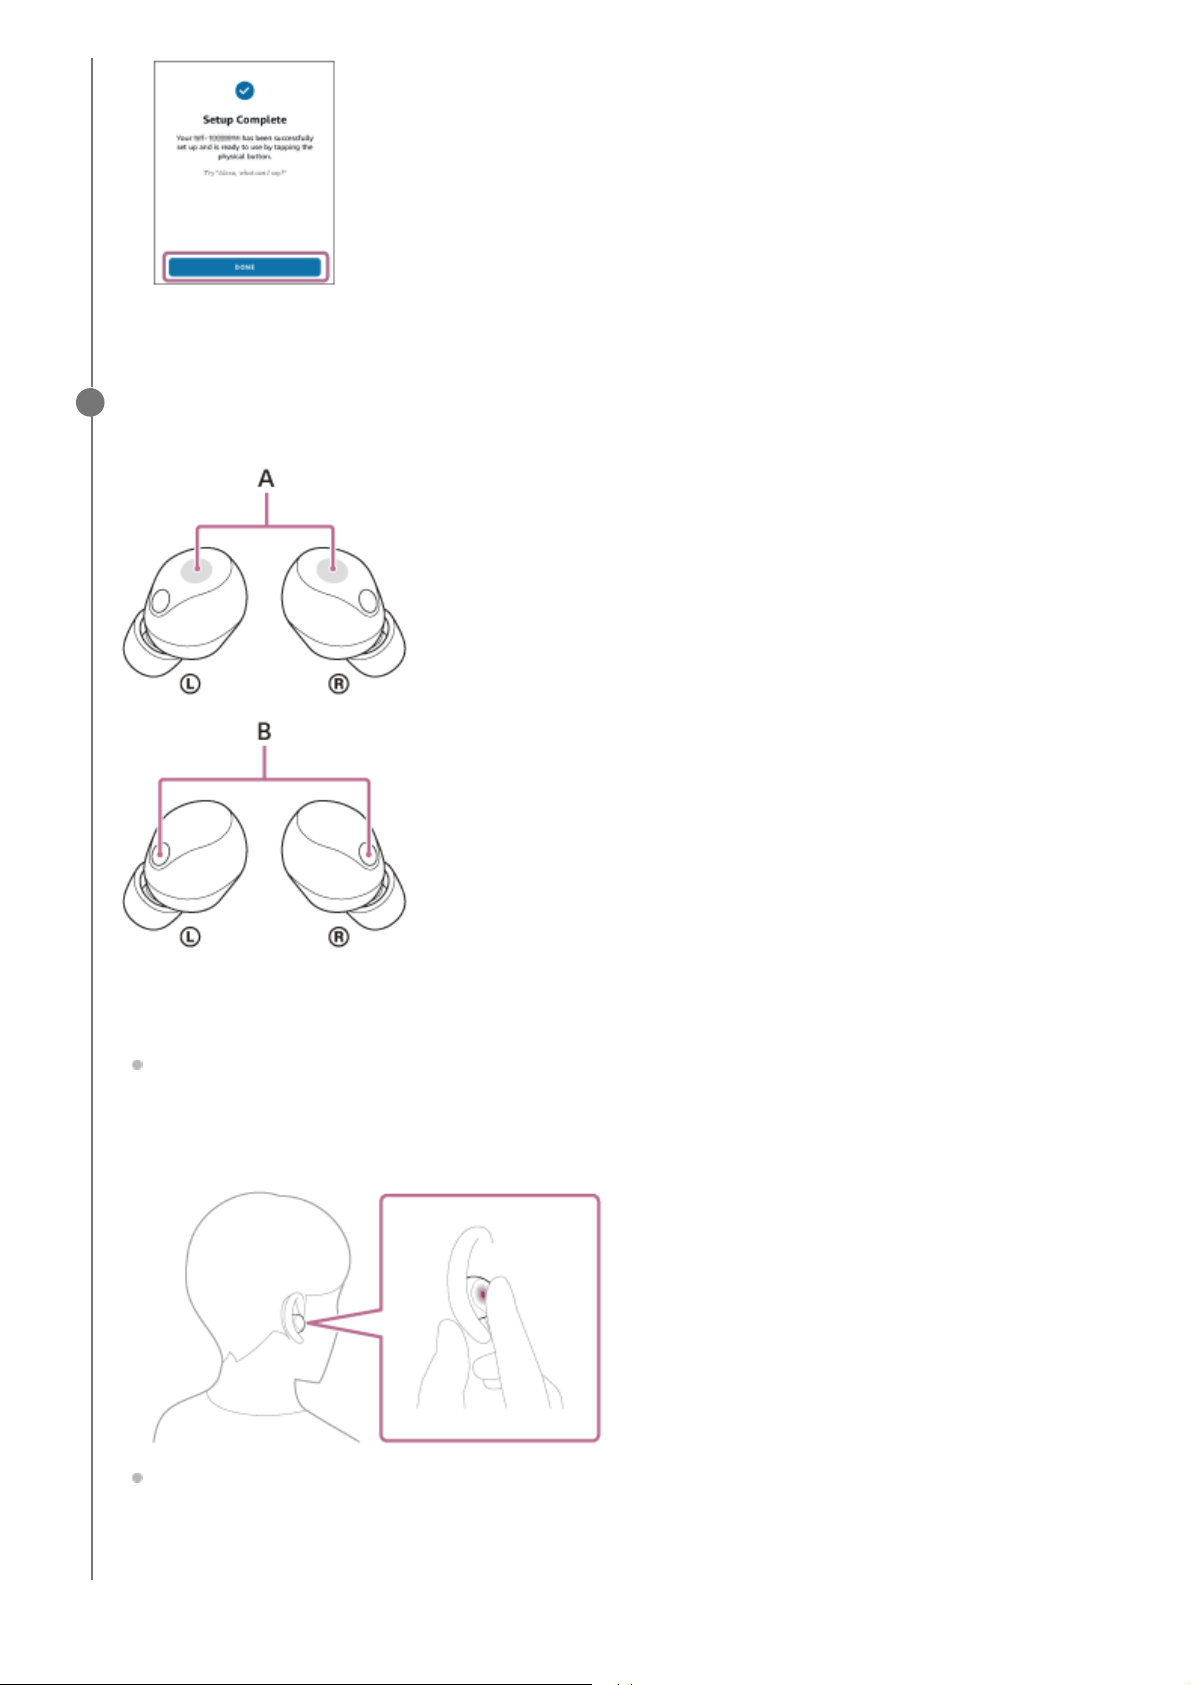
Once the initial setup is complete, the function of the touch sensor on the right headset unit (or the left headset unit
if only the left headset unit was worn for the initial setup) is changed to Amazon Alexa.
Say the wake word
*
(“Alexa”) or operate the touch sensor on the headset unit to which Amazon Alexa is
assigned to use Amazon Alexa.
A: Touch sensors (left, right)
B: Microphones (left, right)
Hold your finger to the touch sensor to input a voice command.
Example:
“What is the weather”
“Play music
**
”
If there is no voice, it will be automatically canceled.
4
To set the wake word, enable [Activate Voice Assistant with your Voice] on the “Sony | Headphones Connect” app.
*
Need Amazon or Prime Music subscription.
**
119

For details on Amazon Alexa and its capability, refer to the following website:
https://www.amazon.com/b?node=16067214011
Hint
You can use Amazon Alexa when you are wearing only one unit to which Amazon Alexa is assigned on your ear. When Amazon
Alexa is assigned to the headset and you are using only one headset unit, use the headset unit with Amazon Alexa assigned.
Check the setting of the headset with the “Sony | Headphones Connect” app.
Check or update the software version of the headset with the “Sony | Headphones Connect” app.
When Amazon Alexa is not available for reasons such as not being connected to the network, the voice guidance “Either your
mobile device isn’t connected; or you need to open the Alexa App and try again” is heard from both headset units (or from the
headset unit you are wearing).
Note
When you set up the headset on the Amazon Alexa app, which touch sensor function on the left or right headset unit is set as
Amazon Alexa depends on the settings for the headset functions and usage conditions. You can restore the touch sensor back to
its previous functions by changing its settings on the “Sony | Headphones Connect” app.
Amazon Alexa can be assigned to the headset unit with the touch sensor that has the music playback function assigned. When
you want to use Amazon Alexa on either headset unit, assign the music playback function to the headset unit you want to use,
and then assign Amazon Alexa.
On the headset unit to which the music playback function is not assigned, Amazon Alexa cannot be used. You can change the
function assignments to the touch sensors of the left and right units using the “Sony | Headphones Connect” app.
Amazon Alexa and Google Assistant cannot be assigned to the headset at the same time.
Amazon Alexa is not available in all languages and countries/regions. Alexa features and functionality may vary by location.
For details on the services provided by other companies such as Google Assistant or Amazon Alexa, consult each service
provider directly.
Sony shall assume no responsibility for any problems such as misunderstandings related to the services provided by other
companies.
5-048-298-11(1) Copyright 2023 Sony Corporation
120
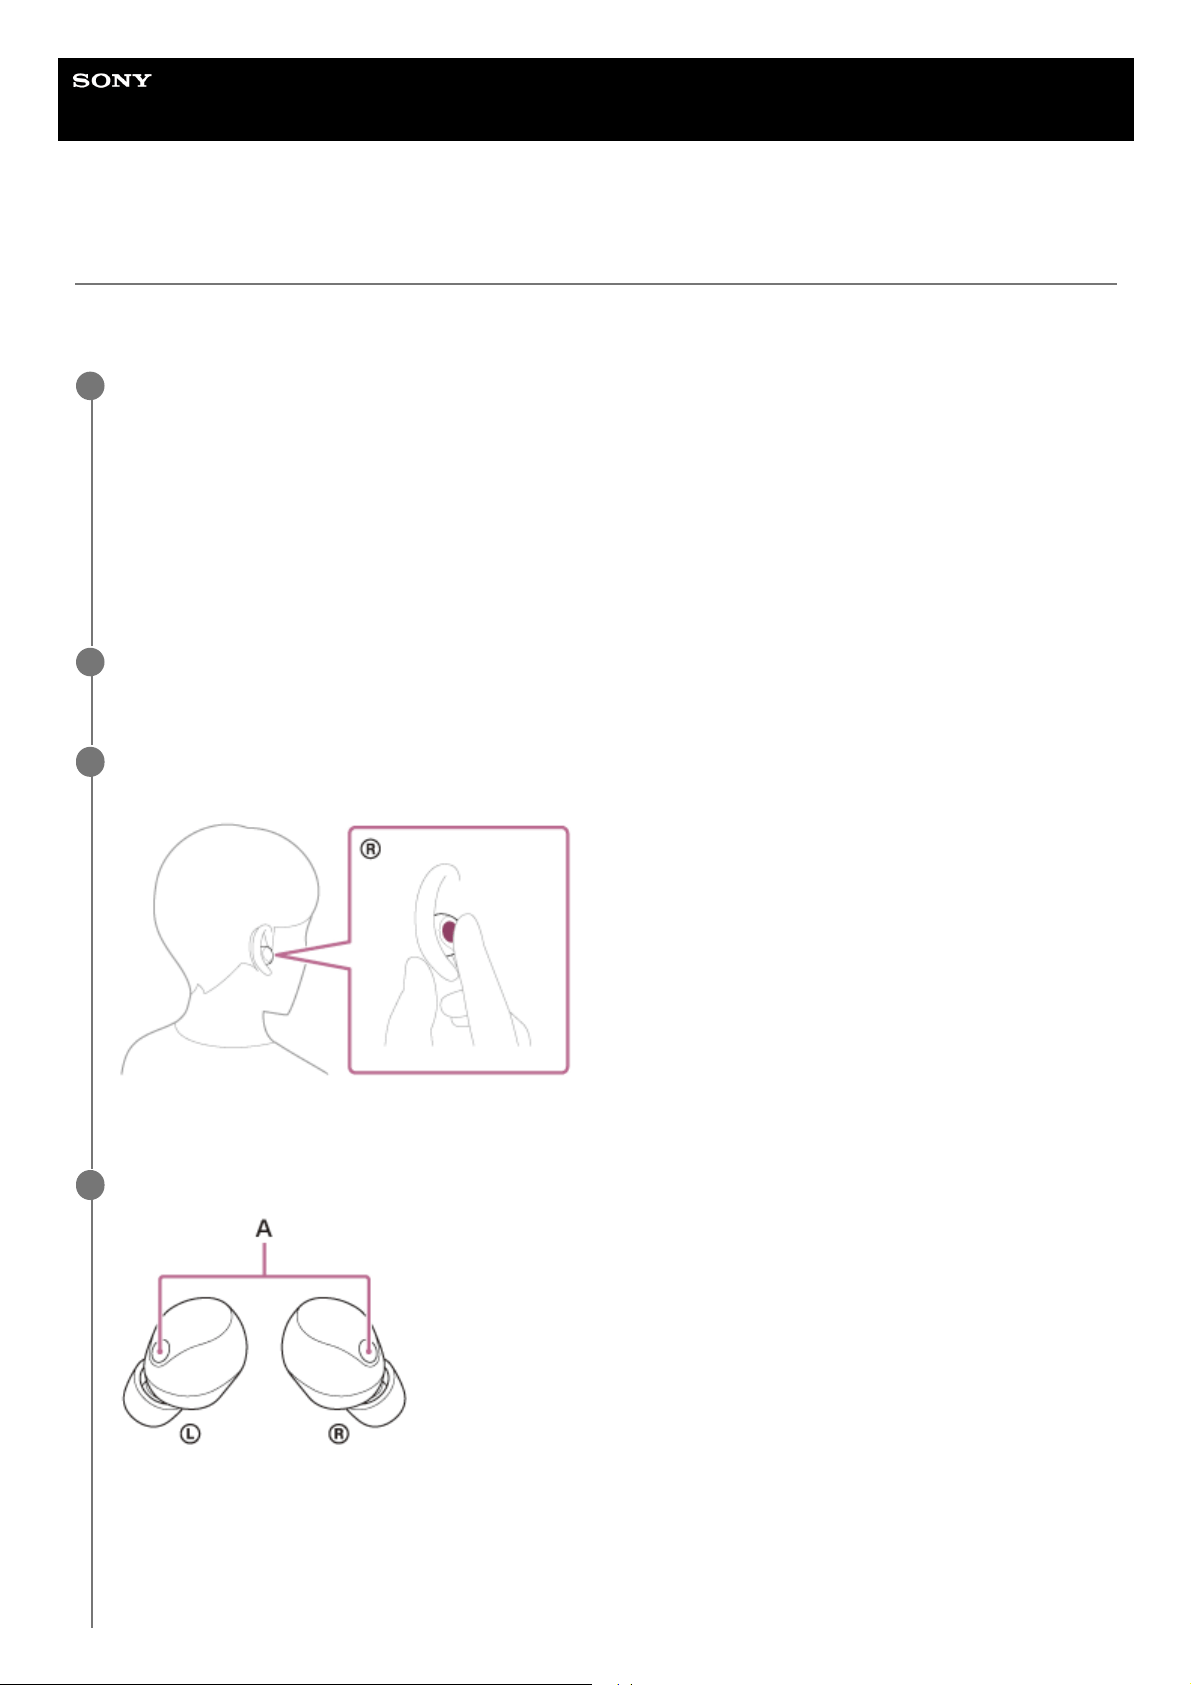
Help Guide
Wireless Noise Canceling Stereo Headset
WF-1000XM5
Using Google Assistant (with voice activation)
By using the Google app that comes with the Android smartphone, you can speak to the headset’s microphones to
operate the Android smartphone.
Set the assist and voice input selection to the Google app.
On the Android smartphone, select [Settings] - [Apps & notifications] - [Advanced] - [Default apps] - [Assist & voice
input], and set [Assist app] to the Google app.
The operation above is an example. For details, refer to the operating instructions for the Android smartphone.
Note: The latest version of the Google app may be required.
For details on the Google app, refer to the operating instructions or the support website of the Android smartphone,
or the Google Play store website.
The Google app may not be activated from the headset depending on specifications of the Android smartphone.
1
Put the headset units into your ears and connect the headset to the Android smartphone via a Bluetooth
connection.
2
When the Android smartphone is in standby or playing music, hold your finger to the touch sensor on the
right headset unit for about 2 seconds or more.
The Google app is activated.
3
Talk to Google through the app using the headset’s microphone.
A: Microphones (left, right)
For details on the apps which work with the Google app, refer to the operating instructions for the Android
smartphone.
4
121

Note
If the touch sensor on either the left or right headset unit is set as Google Assistant, the voice assist function (Google app) is not
available.
If the touch sensor on either the left or right headset unit is set as Amazon Alexa, the voice assist function (Google app) is not
available.
The Google app cannot be activated when you say “Ok Google” even when the Android smartphone’s “Ok Google” setting is on.
In order to make it easier for you to hear your own voice while using the voice assist function, the microphones work to capture
ambient sounds (Sidetone function). If your voice sounds too loud or the sounds in your surroundings are bothering you, turn off
[Capture Voice During a Phone Call] on the “Sony | Headphones Connect” app.
The Google app may not be activated depending on specifications of the smartphone or application version.
The Google app does not work when connected to a device not compatible with the voice assist function.
5-048-298-11(1) Copyright 2023 Sony Corporation
After activating the Google app, the voice command is canceled when a certain time has passed without requests.
122
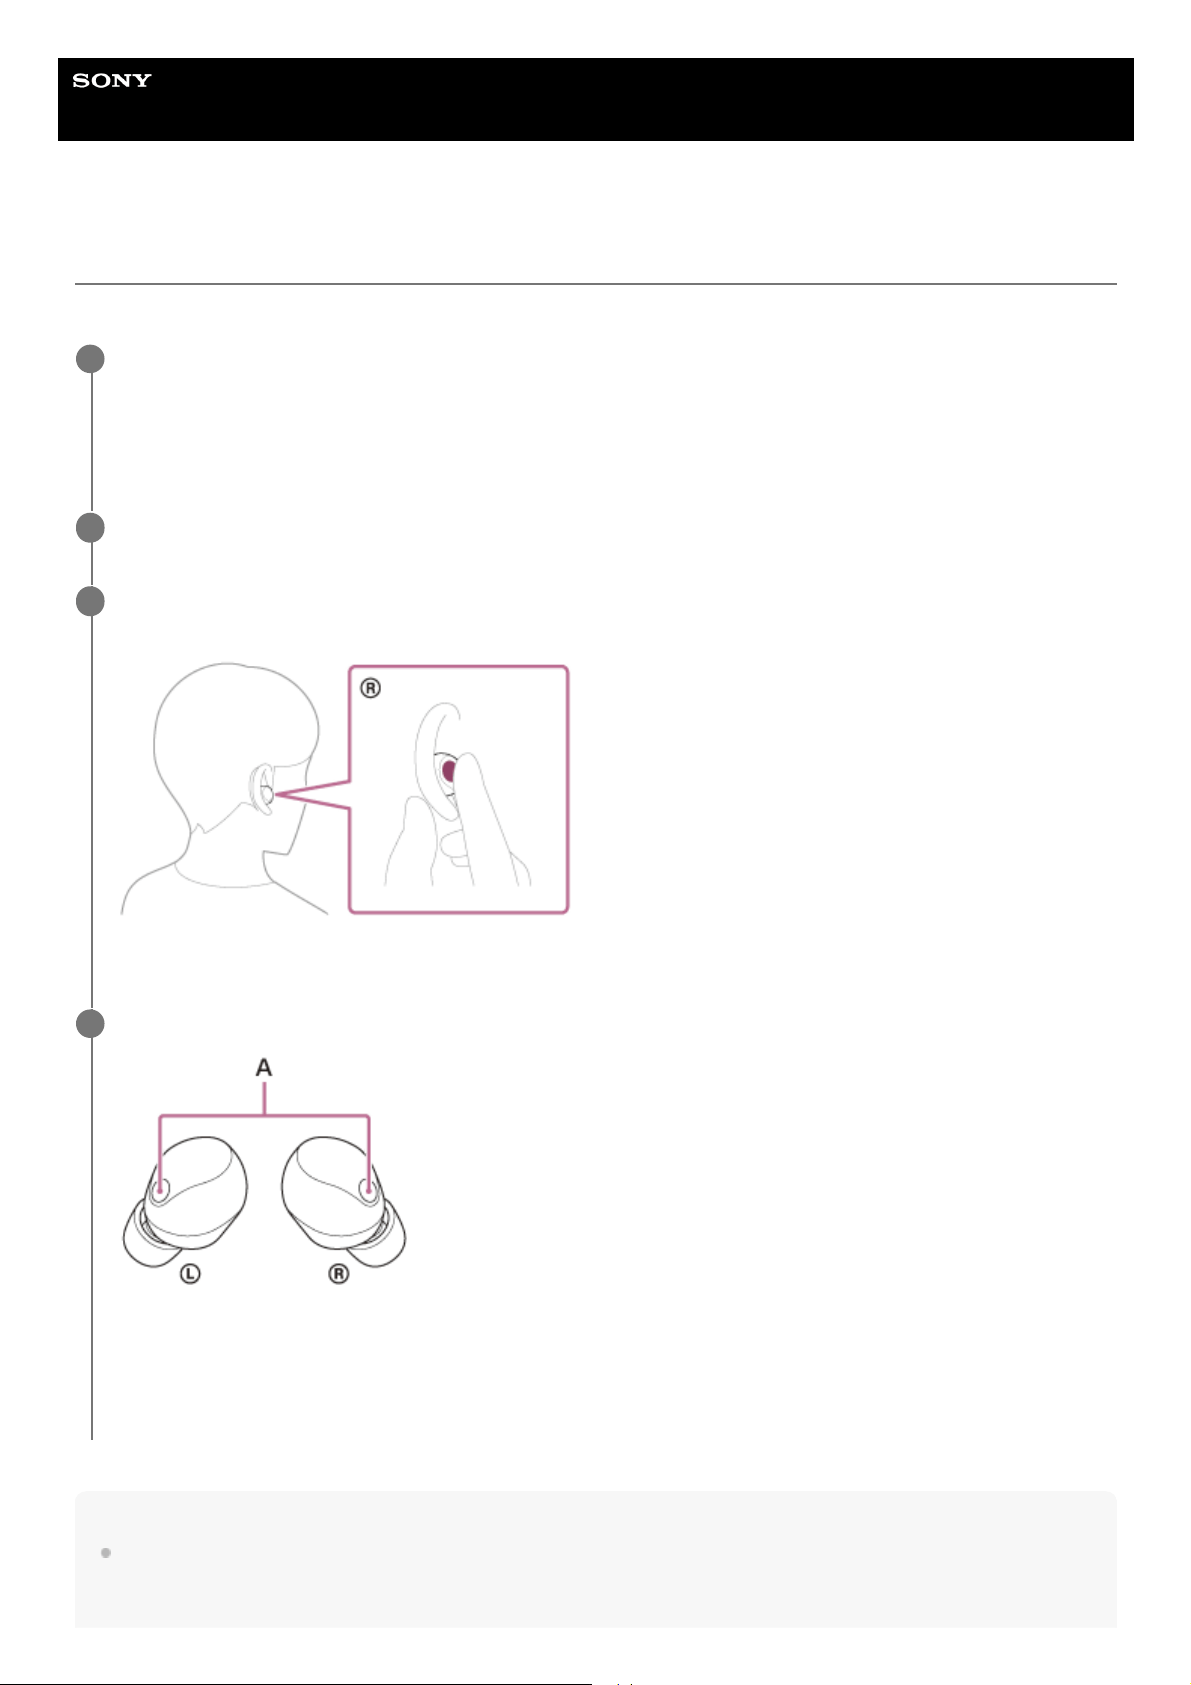
Help Guide
Wireless Noise Canceling Stereo Headset
WF-1000XM5
Using the voice assist function (Siri)
By using Siri that comes with iPhone, you can speak to the headset’s microphone to operate the iPhone.
Note
Siri cannot be activated when you say “Hey Siri” even when the iPhone’s “Hey Siri” setting is on.
Turn Siri on.
On iPhone, select [Settings] - [Siri & Search] to turn [Press Home for Siri] and [Allow Siri When Locked] on.
The operation above is an example. For details, refer to the operating instructions for the iPhone.
Note: For details on Siri, refer to the operating instructions or support website of the iPhone.
1
Put the headset units into your ears and connect the headset to the iPhone via a Bluetooth connection.
2
When the iPhone is in standby or playing music, hold your finger to the touch sensor on the right headset
unit for about 2 seconds or more.
Siri is activated.
3
Make a request to Siri through the headset’s microphones.
A: Microphones (left, right)
For details on the apps which work with Siri, refer to the operating instructions for the iPhone.
After activating Siri, Siri will be deactivated when a certain time has passed without requests.
4
123

In order to make it easier for you to hear your own voice while using the voice assist function, the microphones work to capture
ambient sounds (Sidetone function). If your voice sounds too loud or the sounds in your surroundings are bothering you, turn off
[Capture Voice During a Phone Call] on the “Sony | Headphones Connect” app.
5-048-298-11(1) Copyright 2023 Sony Corporation
124

Help Guide
Wireless Noise Canceling Stereo Headset
WF-1000XM5
What you can do with the “Sony | Headphones Connect” app
When you connect the smartphone with the “Sony | Headphones Connect” app installed and the headset via a Bluetooth
connection, you can do the following.
Update the headset software
Turn the automatic update on/off
Switch the voice guidance language
Set the voice guidance volume
Turn the notification sound and voice guidance on/off
Change the function of the touch sensor
Change the Voice Assistant setting
*
Turn the wake word of Amazon Alexa on/off
*
Set the Quick Access function
*
Turn Service Link on/off
*
Set the Bluetooth connection mode (sound quality mode)
*
Turn on/off voice capture (Sidetone function) during calls
Turn off the headset
Set the wearing detection automatic music playback pause/resume function
Set the wearing detection automatic power off function
Switch the multipoint connection (Connect the headset to 2 devices simultaneously) on/off setting
*
Change the device connected in a multipoint connection
*
LE Audio connection setting for headset
Initialize the headset
Assist to determine the optimal earbud tips for you
Turn the head gesture detection on/off
Check the headset software version
Display the Bluetooth connection status between the left or right headset units and the smartphone
Display the LE Audio connection status
Display the Bluetooth connection codec
Display the DSEE Extreme function setting status
Set the DSEE Extreme function
Display the remaining battery charge of the headset
Display the remaining battery charge of the charging case
Display notifications alerting you to charge the headset (when the remaining battery charge of the charging case is
low)
Select the Equalizer/CLEAR BASS setting
Customize the Equalizer setting
Adjust the noise canceling function and Ambient Sound Mode (ambient sound control)
Select the switching pattern when switching the noise canceling function/Ambient Sound Mode on the headset
Use auto adjustment of the noise canceling function by behavior recognition (Adaptive Sound Control)
Enable/disable the automatic audio detection for Speak-to-Chat and set it up
Play/pause music or skip to the beginning of the previous track (or the current track during playback)/skip to the
beginning of the next track
Adjust the volume during music playback/phone call
Easy pairing
*
Record and display information on the usage of the headset
Set the 360 Reality Audio function
Turn safe listening on/off
125

For details on the “Sony | Headphones Connect” app, refer to the following URL.
https://rd1.sony.net/help/mdr/hpc/h_zz/
Hint
The operation of the “Sony | Headphones Connect” app differs depending on the audio device. The app specifications and screen
design may change without prior notice.
Related Topic
Installing the “Sony | Headphones Connect” app
How to keep the software up-to-date (for comfortable use of the headset)
About the voice guidance
About the touch sensor
Using Quick Access
About the sound quality mode
Wearing the headset
Supported codecs
Checking the remaining battery charge
About the DSEE Extreme function
Using the noise canceling function
Listening to ambient sound during music playback (Ambient Sound Mode)
Speaking with someone while wearing the headset (Speak-to-Chat)
Connecting the headset to 2 devices simultaneously (multipoint connection)
About 360 Reality Audio
5-048-298-11(1) Copyright 2023 Sony Corporation
Cannot be used during LE Audio connection.
*
126
Help Guide
Wireless Noise Canceling Stereo Headset
WF-1000XM5
Installing the “Sony | Headphones Connect” app
Related Topic
What you can do with the “Sony | Headphones Connect” app
5-048-298-11(1) Copyright 2023 Sony Corporation
Download the “Sony | Headphones Connect” app from the Google Play store or App Store, and install the
app on your smartphone.
For details on the “Sony | Headphones Connect” app, refer to the following URL.
https://rd1.sony.net/help/mdr/hpc/h_zz/
1
After installing the app, launch the “Sony | Headphones Connect” app.
2
127

Help Guide
Wireless Noise Canceling Stereo Headset
WF-1000XM5
Accessing support information from the “Sony | Headphones Connect” app
You can access the latest support information from the “Sony | Headphones Connect” app.
5-048-298-11(1) Copyright 2023 Sony Corporation
Select [Help] on the “Sony | Headphones Connect” app screen.
1
The [Headphones Connect Help] screen appears and support information is displayed.
2
Select the desired item.
3
128
Help Guide
Wireless Noise Canceling Stereo Headset
WF-1000XM5
How to keep the software up-to-date (for comfortable use of the headset)
Install the latest headset software using the “Sony | Headphones Connect” app to enjoy new functions or to resolve a
certain number of issues with the headset.
Always use the headset with the latest software installed.
For details on the latest headset software and how to update the software, refer to the information on the support
website.
When the [Update automatically] setting is enabled on the “Sony | Headphones Connect” app and the following
conditions are met, the software update starts automatically at around night time when the headset is not in use.
The software has already transferred.
Both headset units are stored in the charging case and the charging case lid is closed.
The remaining battery charge of the headset units is more than 20%.
The remaining battery charge of the charging case is more than 10%.
If you open the charging case lid during an automatic update, the indicator (blue and orange) on the charging case will
flash. Close the charging case lid during an automatic update. The headset units cannot be used even if they are
removed from the charging case and put into your ears.
You can also update the headset software in the following way.
Note
When the mobile device used for the update has any other Bluetooth devices connected to it, turn off all the Bluetooth devices
until the update is complete.
Software may not be updated when the mobile device is connected with other devices compatible with Bluetooth Low Energy
(such as wearable devices, smart watches, etc.).
Note the following if the update cannot be completed.
Close all the apps installed on the mobile device except the “Sony | Headphones Connect” app.
Fully charge the headset and the mobile device.
Put the headset and the mobile device being used for the update as close to each other as possible before starting the update.
Keep wireless LAN devices and other Bluetooth devices away from the headset when updating.
Turn off the power saving mode
*
of your mobile device before updating the software.
Depending on the OS version of your mobile device, the update may not be completed under the power saving mode.
Related Topic
What you can do with the “Sony | Headphones Connect” app
Remove the headset from the charging case.
The headset turns on automatically.
1
Launch the “Sony | Headphones Connect” app on a mobile device such as a smartphone.
2
Update the headset software following the on-screen instructions.
3
Names may vary according to the mobile device you are using.*
129

5-048-298-11(1) Copyright 2023 Sony Corporation
130
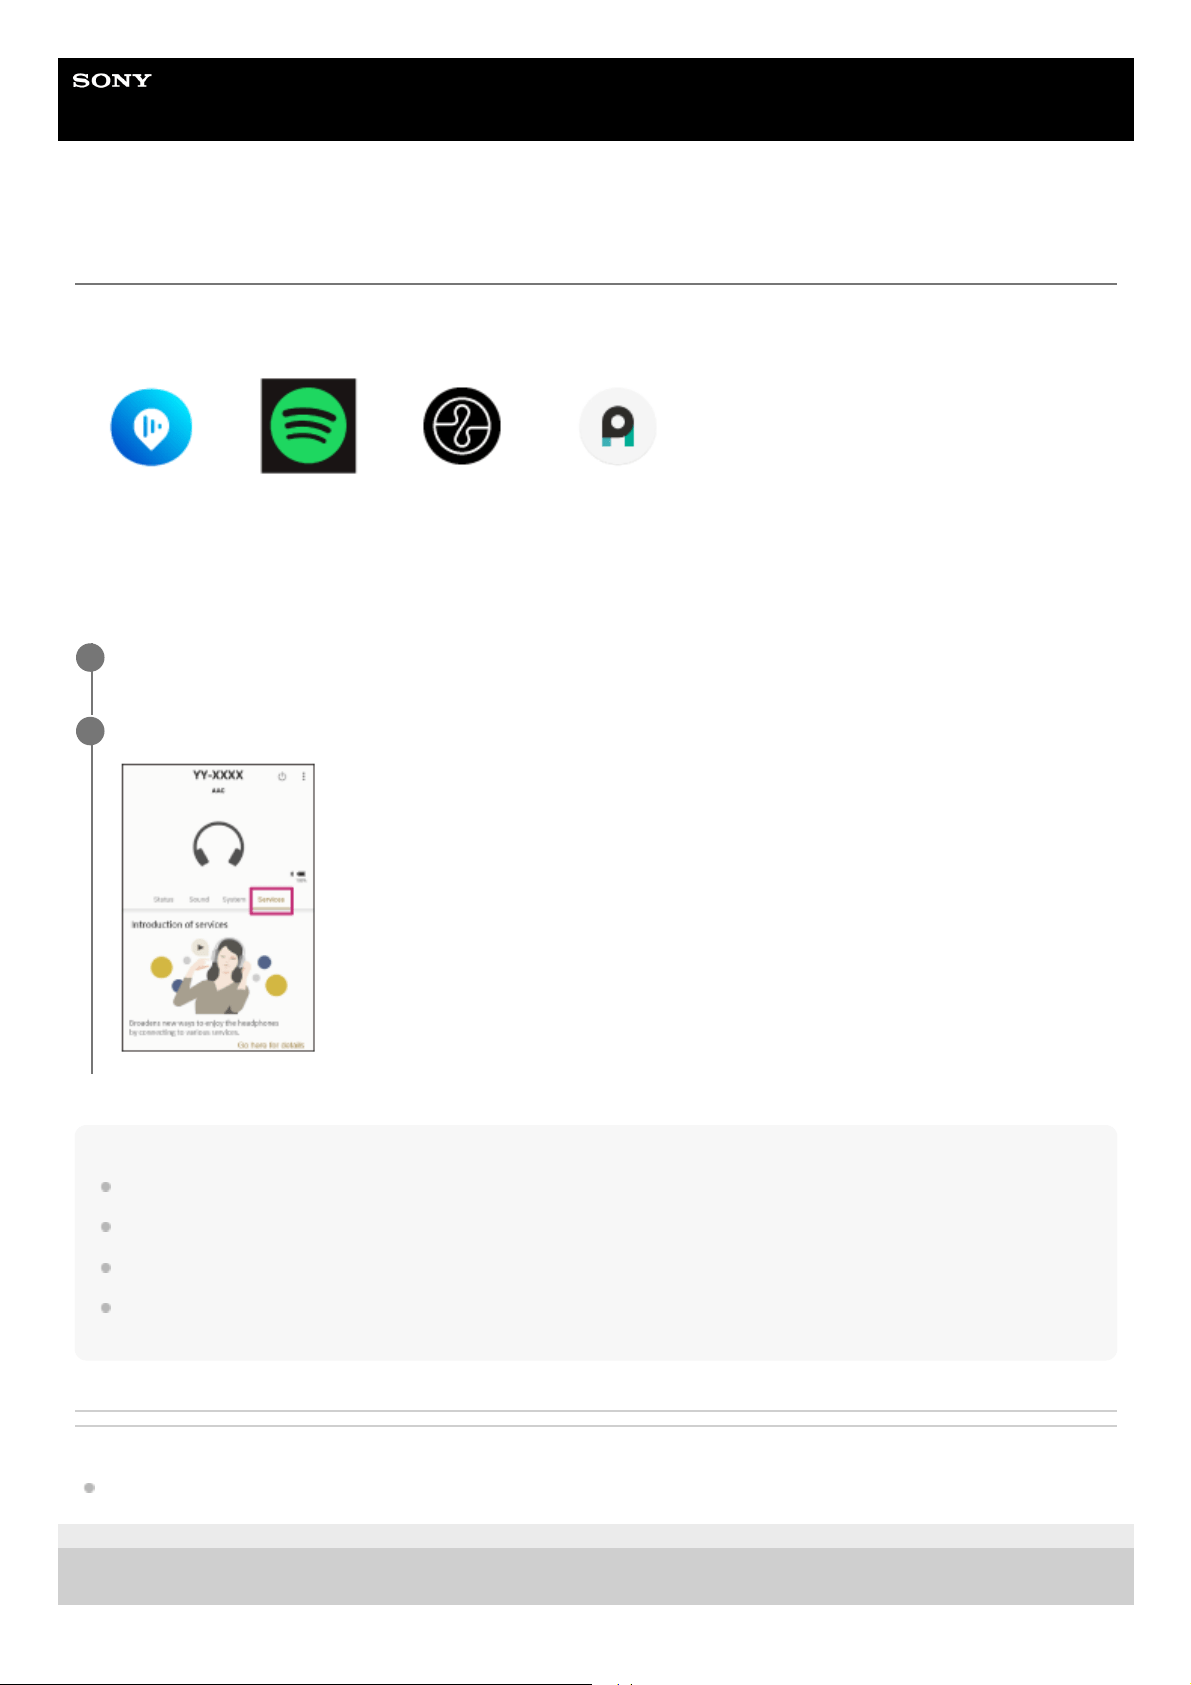
Help Guide
Wireless Noise Canceling Stereo Headset
WF-1000XM5
What you can do with partner services
After setting up on the “Sony | Headphones Connect” app, you can use the following apps
*
linked with the headset.
For details on the latest services and experiences you can have by linking, refer to the [Services] tab of the “Sony |
Headphones Connect” app.
Note
The services that can be linked differ depending on the country or region.
The specifications of the service that can be linked are subject to change without notice.
The corresponding app needs to be installed.
For details on Endel, refer to the following URL.
https://endel.io/
Related Topic
Installing the “Sony | Headphones Connect” app
5-048-298-11(1) Copyright 2023 Sony Corporation
Services that can be linked as of June 27, 2023 are listed.
*
Launch the “Sony | Headphones Connect” app.
1
Set up each service on the [Services] tab.
2
131

Help Guide
Wireless Noise Canceling Stereo Headset
WF-1000XM5
Precautions
On Bluetooth communications
Bluetooth wireless technology operates within a range of about 10 m (32.8 ft). The maximum communication
distance may vary depending on the presence of obstacles (people, metal objects, walls, etc.) or the electromagnetic
environment.
Microwaves emitting from a Bluetooth device may affect the operation of electronic medical devices. Turn off the
headset and other Bluetooth devices in the following locations, as it may cause an accident:
in hospitals, near priority seating in trains, locations where inflammable gas is present, near automatic doors, or
near fire alarms.
This product emits radio waves when used in wireless mode. When used in wireless mode on an airplane, follow
flight crew directions regarding permissible use of products in wireless mode.
The audio playback on the headset may be delayed from that on the transmitting device, due to the characteristics of
Bluetooth wireless technology. As a result, the sound may not be in sync with the image when viewing movies or
playing games.
The headset supports security functions that comply with the Bluetooth standard as a means of ensuring security
during communication using Bluetooth wireless technology. However, depending on the configured settings and other
factors, this security may not be sufficient. Be careful when communicating using Bluetooth wireless technology.
Sony shall assume no responsibility for any damages or loss resulting from information leaks that occur when using
Bluetooth communications.
Bluetooth connections with all Bluetooth devices cannot be guaranteed.
Bluetooth devices connected with the headset must comply with the Bluetooth standard prescribed by Bluetooth
SIG, Inc., and must be certified as compliant.
Even when a connected device complies with the Bluetooth standard, there may be cases where the
characteristics or specifications of the Bluetooth device make it unable to connect, or result in different control
methods, display, or operation.
When using the headset to perform hands-free talking on the phone, noise may occur depending on the
connected device or the communication environment.
Depending on the device to be connected, it may require some time to start communications.
Note on temperature rise
While charging the headset units or charging case, or when using the headset for a long time, the temperature of the
headset units or charging case may rise, but this is not a malfunction.
Note on static electricity
If you use the headset when the air is dry, you may experience discomfort due to static electricity accumulated on
your body. This is not a malfunction of the headset. You can reduce the effect by wearing clothes made of natural
materials that do not easily generate static electricity.
Notes on wearing the headset
After use, remove the headset from your ears slowly.
Because the headset achieves a tight seal over the ears, forcibly pressing it against your ears or quickly pulling it off
can result in eardrum damage. When wearing the headset, the speaker diaphragm may produce a click sound. This
is not a malfunction.
The long-term use of the headset may cause symptoms such as itching and irritation in the ears.
If you experience any of the above symptoms while using the headset, stop using it immediately and consult a doctor
or your nearest Sony dealer.
132

For long-term use, it is recommended that you remove the headset from your ears on a regular basis.
Other notes
Do not subject the headset to excessive shock as it is a precision device.
The touch sensors may not operate properly if you apply stickers or other adhesive items to the touch sensors.
The Bluetooth function may not work with a mobile phone, depending on the signal conditions and the surrounding
environment.
If you experience discomfort while using the headset, stop using it immediately.
The earbud tips may be damaged or deteriorate with long-term use and storage.
If water or foreign matter enters the headset, it may result in fire or electric shock. If water or foreign matter enters the
headset, stop use immediately and consult your nearest Sony dealer. In particular, be careful in the following cases.
When using the headset near a sink or liquid container
Be careful that the headset does not fall into a sink or container filled with water.
When using the headset in the rain or snow, or in humid locations
Do not drop the headset or expose it to mechanical shock. Doing so may deform or damage the headset, resulting in
deterioration of water resistance performance.
When the charging ports of the headset units or charging case get dirty, wipe them clean with a soft dry cloth.
Cleaning the headset
When the headset exterior is dirty, wipe it clean with a soft dry cloth. If the headset is particularly dirty, soak a cloth in
diluted neutral detergent, and wring it well before using it to clean the headset. Do not use solvents such as alcohol,
thinner, or benzene, as they may damage the finish on the surface of the headset or cause other damages.
Do not use the headset units and charging case near medical devices
Radio waves can affect cardiac pacemakers and medical devices. Do not use headset units and charging case in
crowded places such as crowded trains or inside a medical institution.
The headset units and charging case have magnets which may interfere with pacemakers, programmable shunt
valves for hydrocephalus treatment, or other medical devices. Do not place the headset units and charging case
close to persons who use such medical devices. Consult your doctor before using the headset if you use any such
medical device.
Keep the headset units and charging case away from the magnetic card
If you bring a magnetic card close to the headset, the card magnet may be affected and become unusable due to the
magnets used in the headset units and charging case or the leakage flux during wireless charging.
5-048-298-11(1) Copyright 2023 Sony Corporation
133
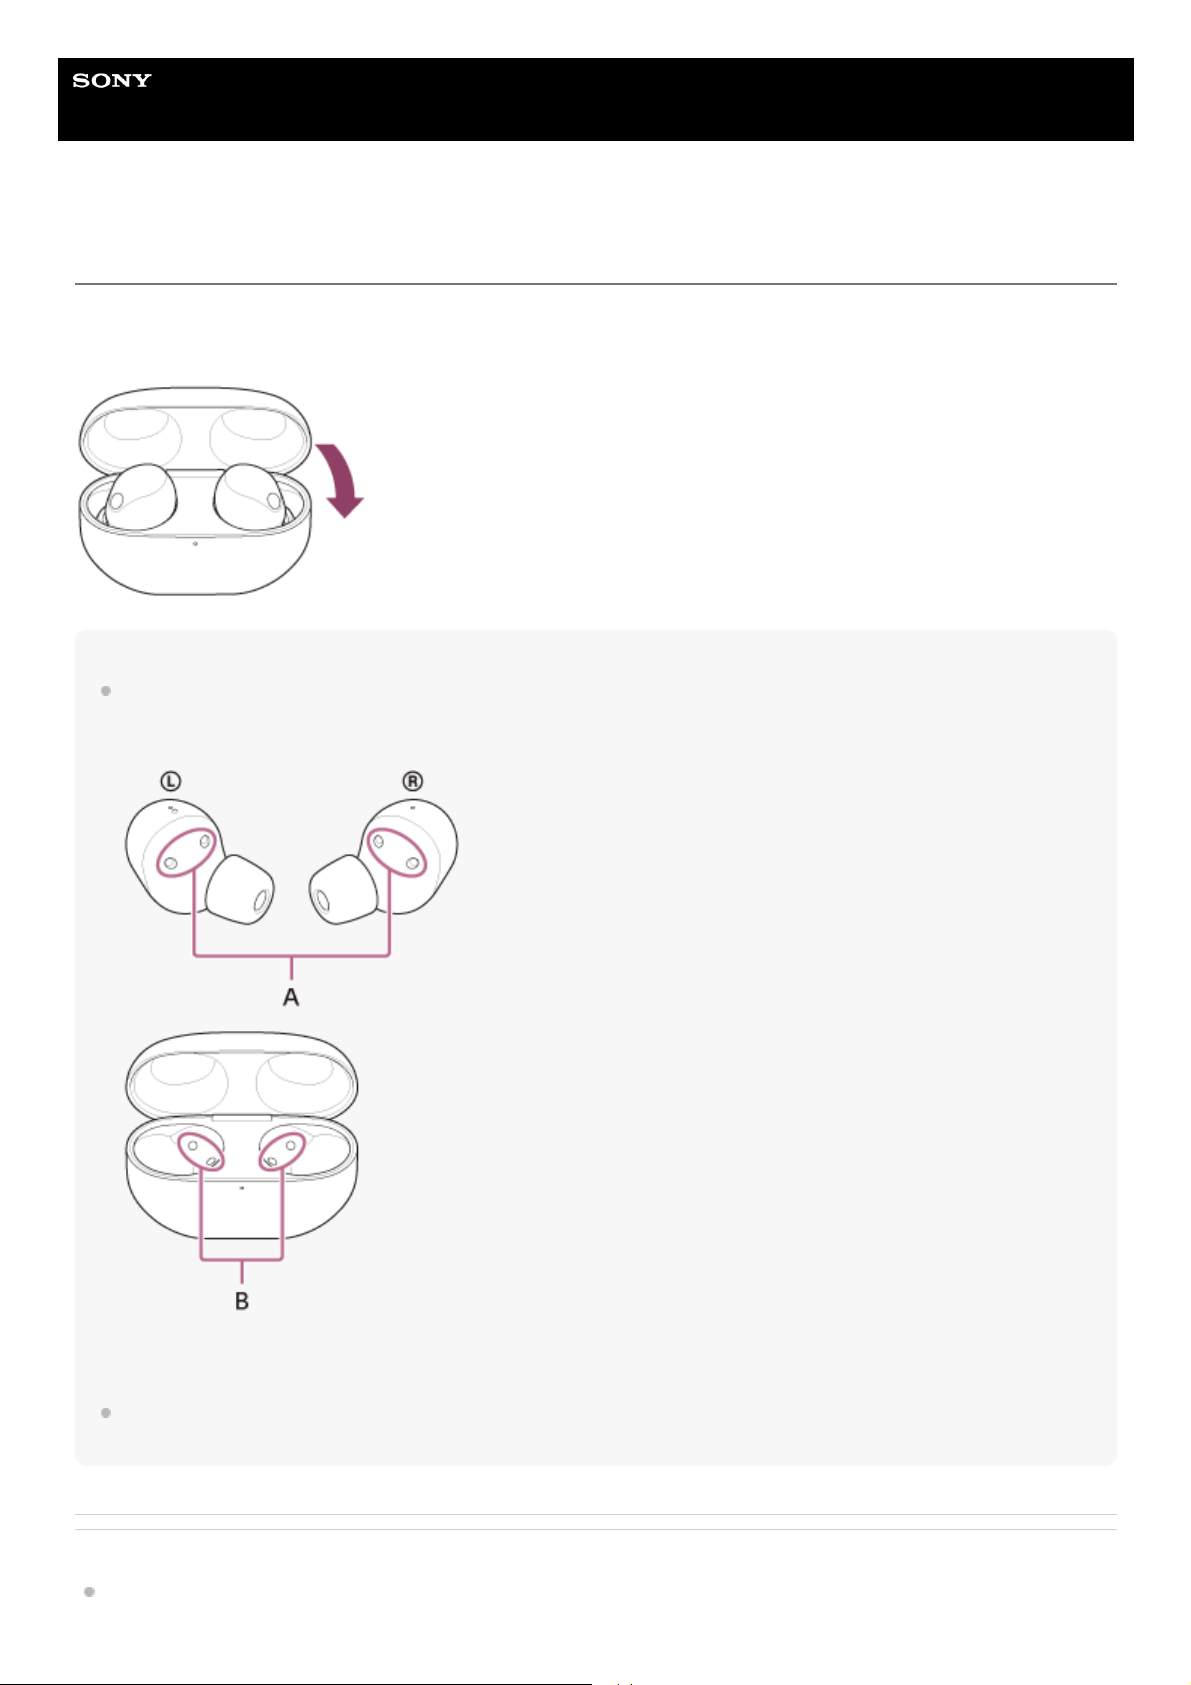
Help Guide
Wireless Noise Canceling Stereo Headset
WF-1000XM5
When you have finished using the headset
When you have finished using the headset, be sure to set the headset units into the charging case.
Close the charging case lid.
Note
If perspiration or water is left on the charging port, it may impair the ability to charge the headset. Immediately wipe off any
perspiration or water on the charging port after use. When the charging ports of the headset units or charging case get dirty, wipe
them clean with a soft dry cloth.
A: Charging ports of the headset units (left, right)
B: Charging ports of the charging case (left, right)
Also see the “Maintenance”, “To prevent burning or malfunction due to getting wet”, and “When the headset units or charging
case gets wet” sections.
Related Topic
Maintenance
134

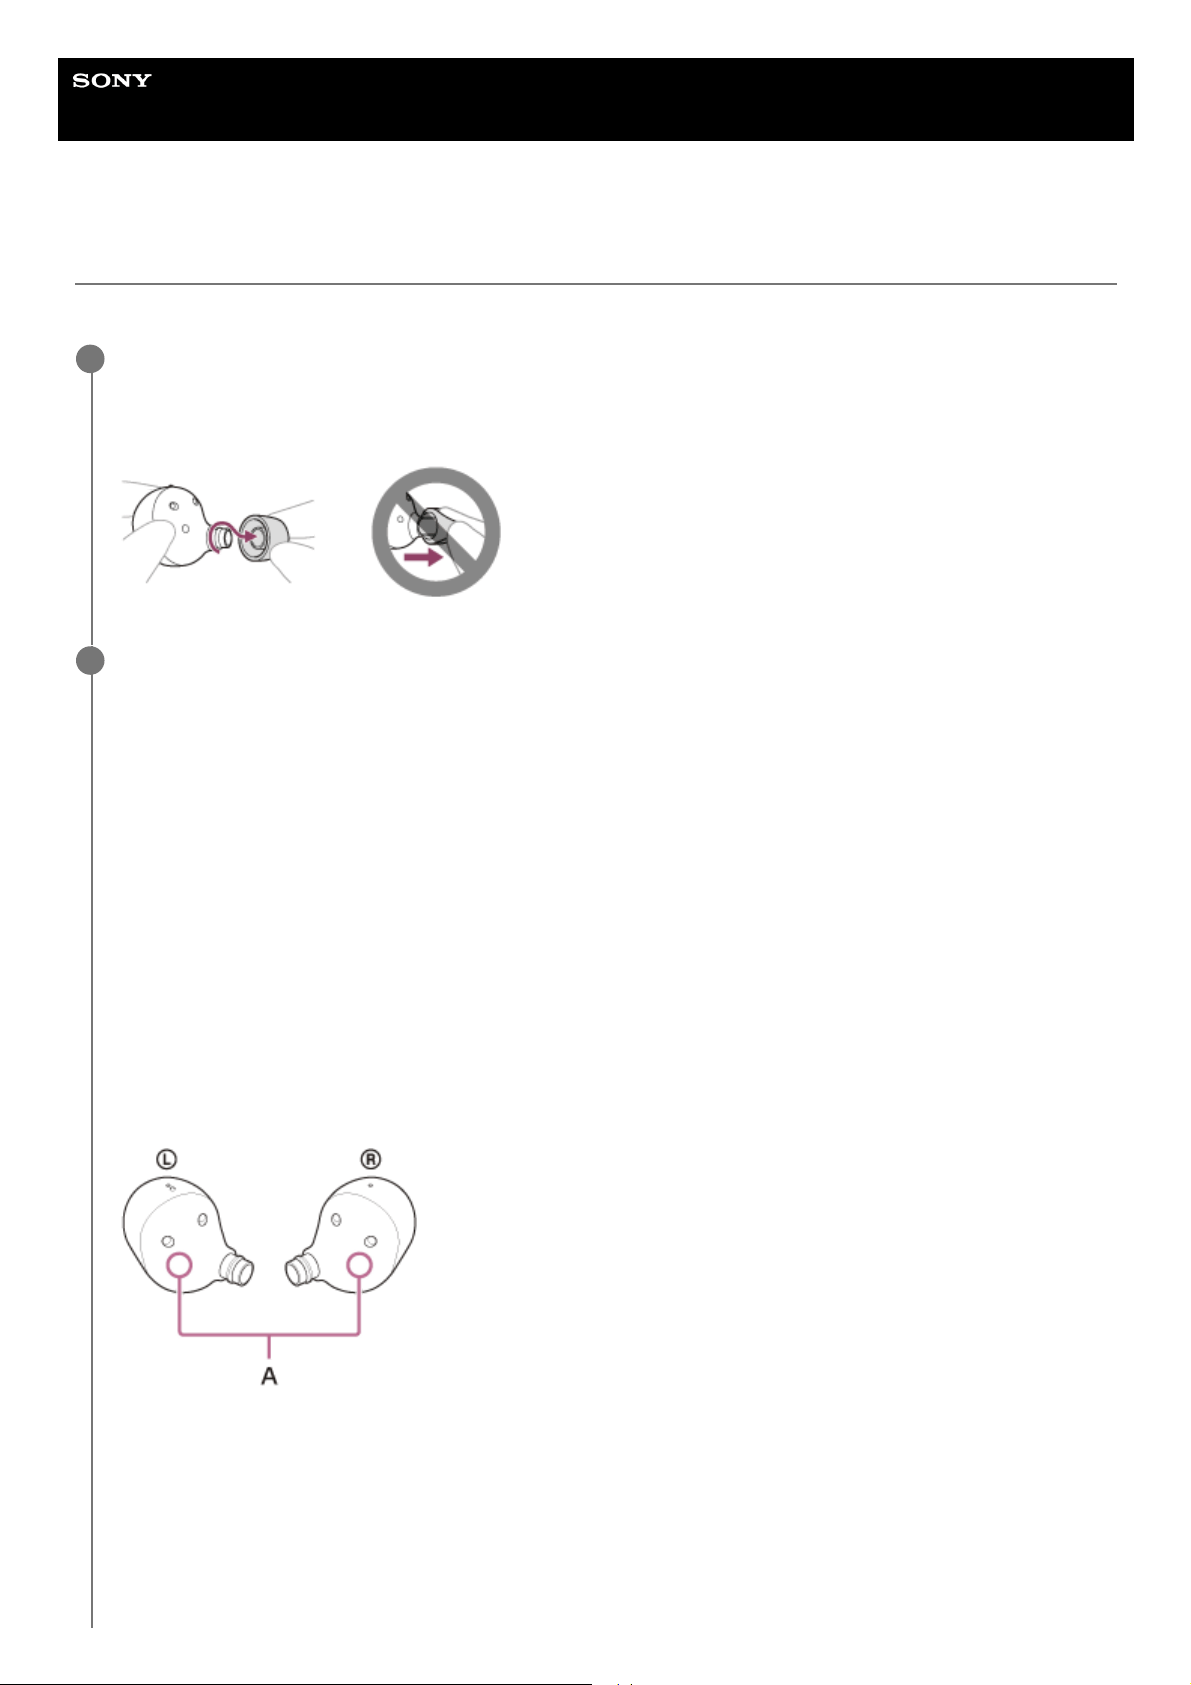
Help Guide
Wireless Noise Canceling Stereo Headset
WF-1000XM5
Maintenance
Perform regular maintenance by following the procedures below.
Remove the earbud tip.
Hold the headset unit and twist the earbud tip while rotating it to pull it out.
Do not pinch the end of the earbud tip when removing it.
1
Clean the headset.
Cleaning the headset units
When the headset exterior is dirty, wipe it clean with a soft dry cloth. If the headset is particularly dirty, soak a cloth
in diluted neutral detergent, and wring it well before using it to clean the headset. Do not use solvents such as
alcohol, thinner, or benzene, as they may damage the finish on the surface of the headset or cause other damages.
Use a soft dry cloth to wipe off any water that gets on the headset units.
Do not allow the headset to remain with water droplets attached in a cold environment as the water may freeze.
Cleaning the microphone parts
Wipe off any dirt on the mesh part of the headset unit with a cloth that has been moistened with water and wrung
out tightly.
Remove the dirt so that it does not push into the mesh part of the headset unit deeply.
Cleaning the IR sensors
If the IR sensors are dirty, wearing of the headset may not be detected and the headset may not work properly.
Wipe off any dirt on the IR sensors with a soft dry cloth, etc.
A: IR sensors (left, right)
Cleaning the charging ports
If foreign matter or moisture, such as sweat, etc., is left on the charging ports of the headset units or charging case,
charging port corrosion may occur and prevent charging.
When you have finished using the headset, make sure to gently clean the charging ports with a soft dry cloth or
cotton swab.
2
136
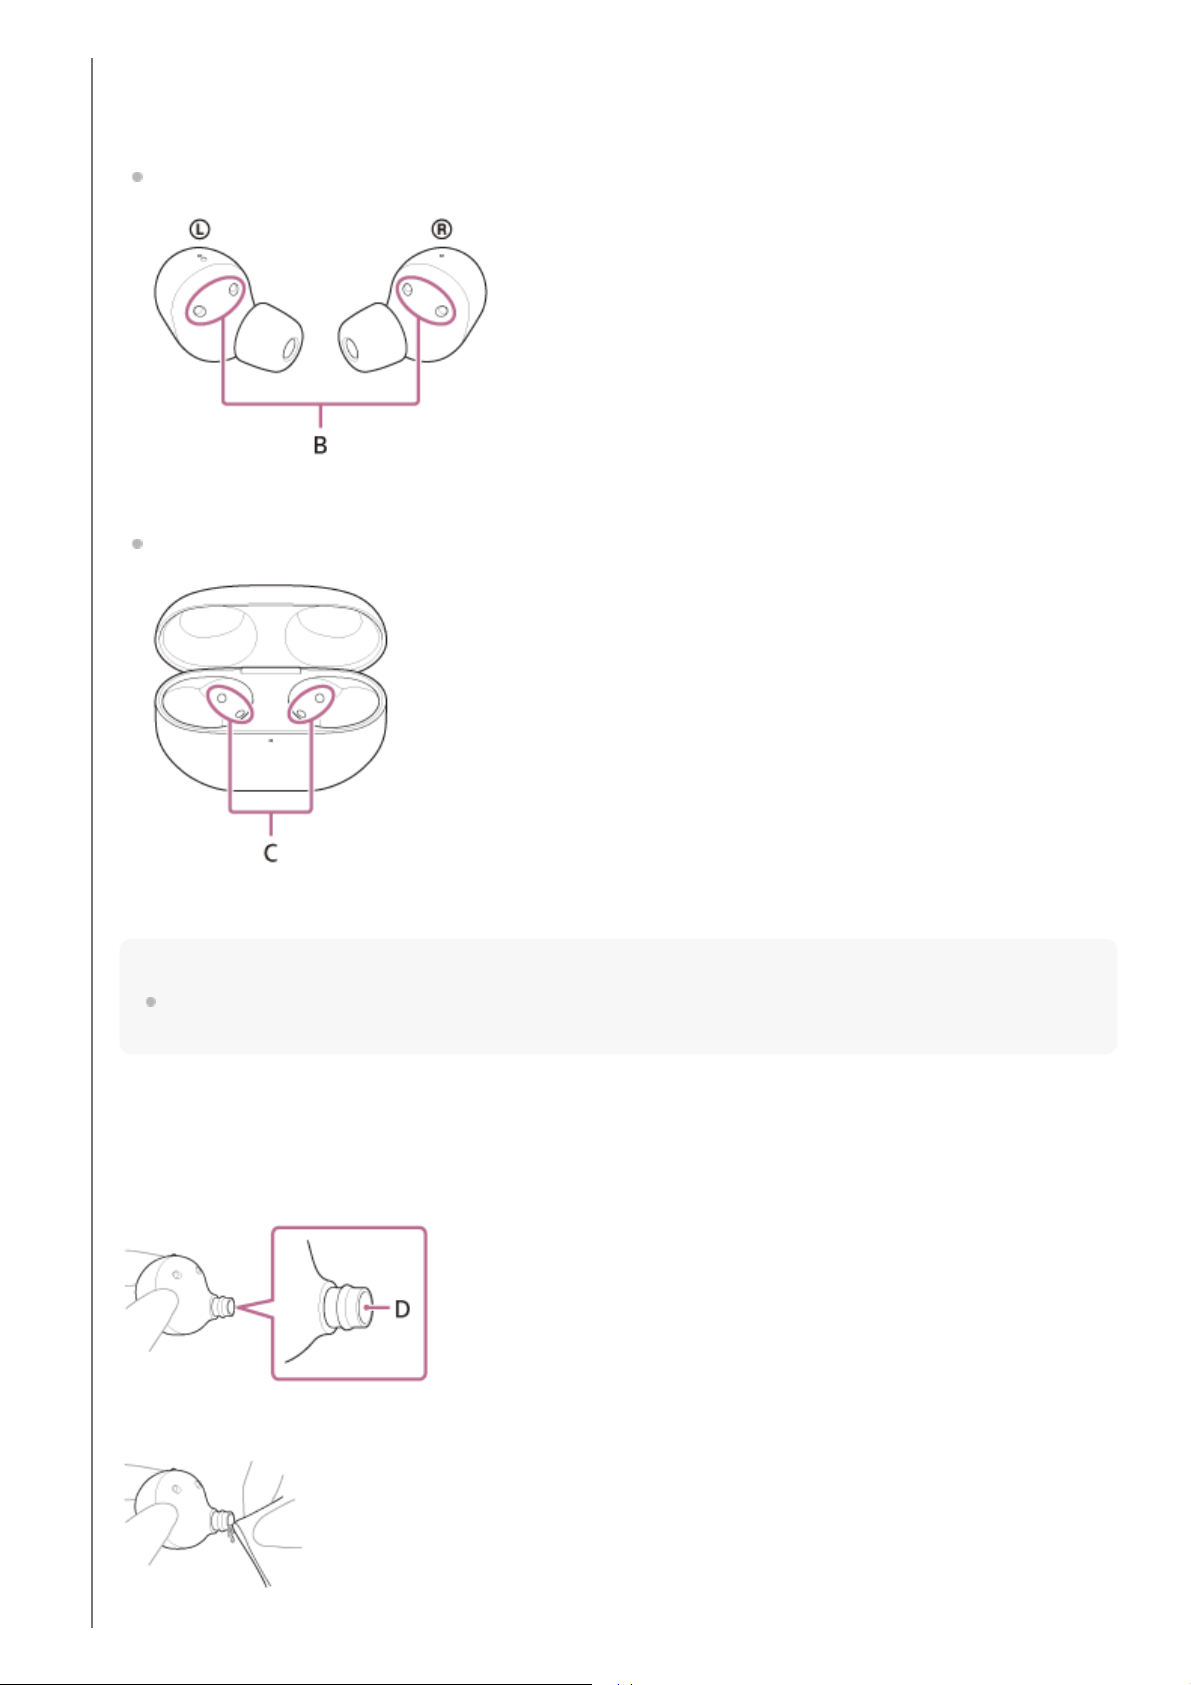
When the headset cannot be charged, it may help to try thoroughly cleaning the charging ports.
Charging ports that needs maintenance
Headset
B: Charging ports of the headset units (left, right)
Charging case
C: Charging ports of the charging case (left, right)
Note
Do not use an air duster, etc. to remove dust, etc.
Dust, etc. may enter the sound output hole and lead to malfunction.
Cleaning of the sound output holes
Wipe off any dirt such as earwax in the sound output hole of the headset unit with a cloth that has been moistened
with water and wrung out tightly.
Remove the dirt so that it does not push into the headset unit deeply.
D: Sound output hole
137
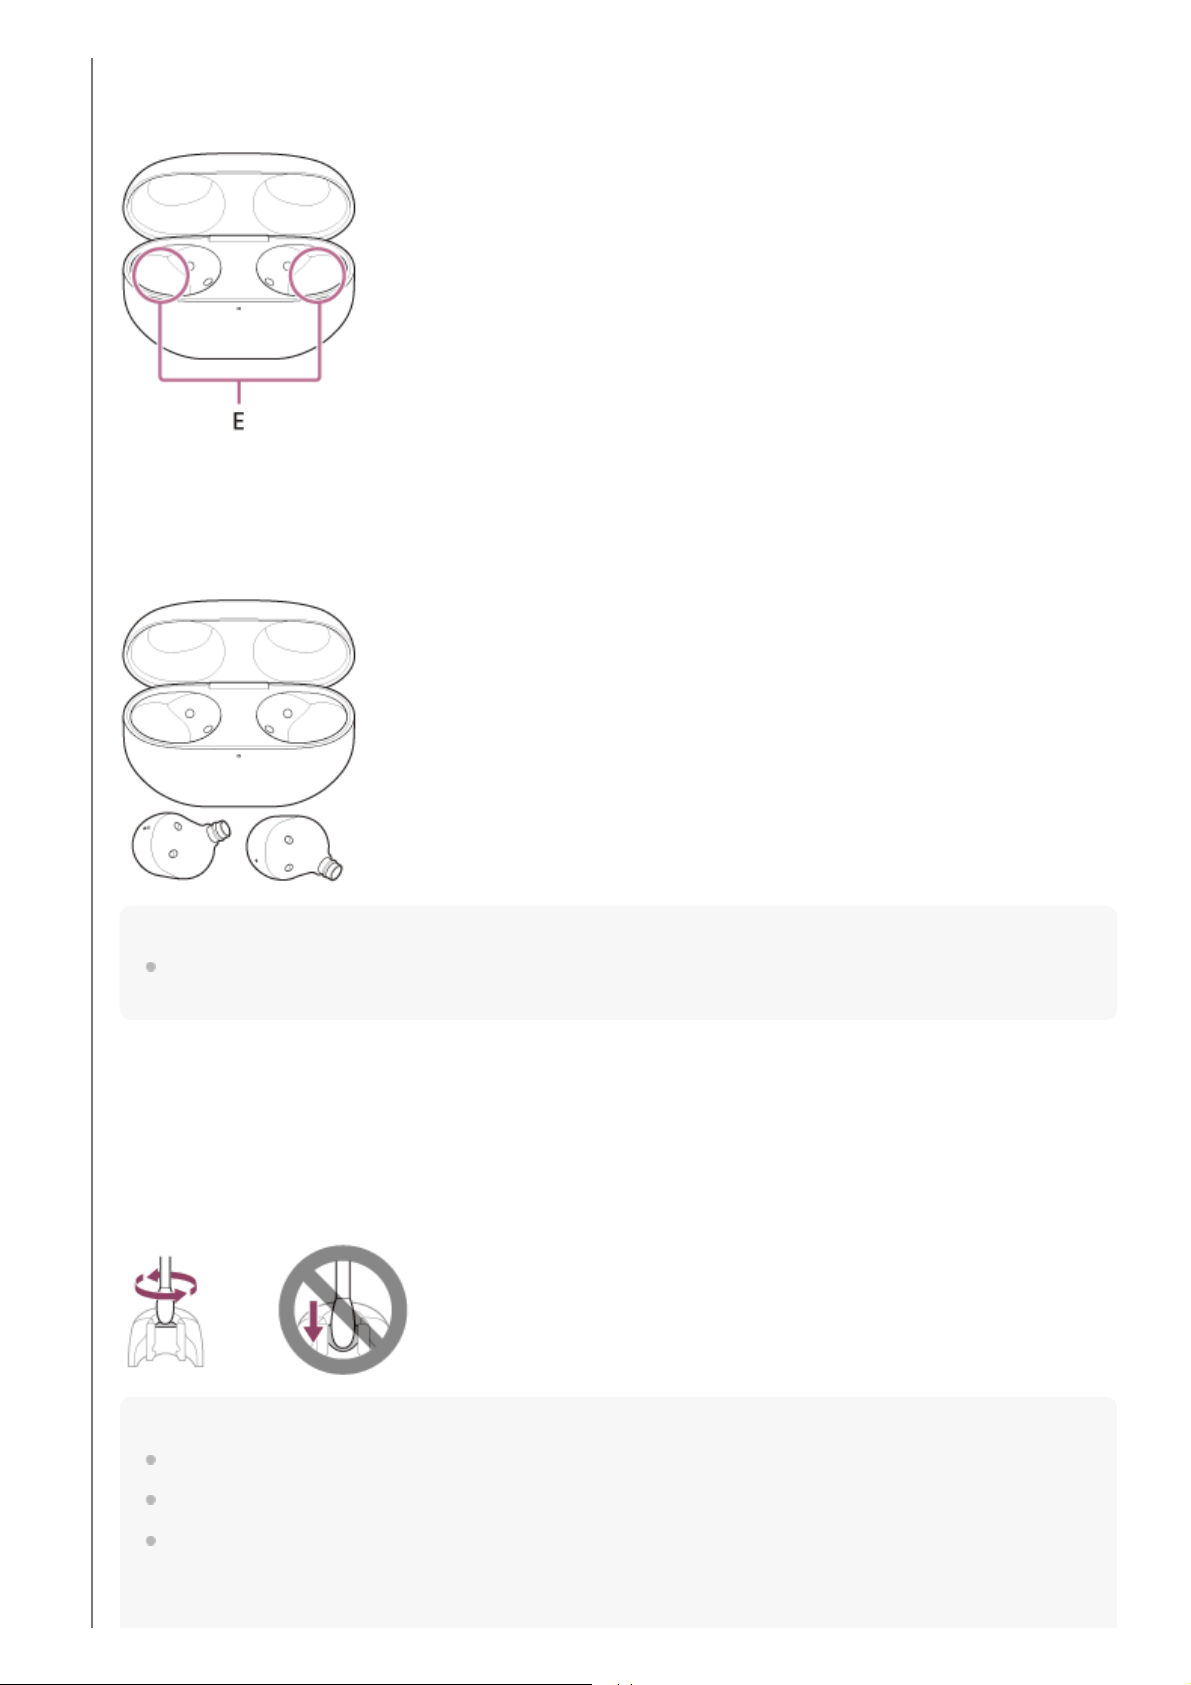
Cleaning the holes of the charging case
Clean the holes where the earbud tips fit with a cotton swab, etc.
E: Holes of the charging case (left, right)
Drying the headset
After cleaning is complete, leave the headset to dry thoroughly in room temperature.
Note
When drying the headset, if the IR sensors touch the table, the headset will be considered worn and the rechargeable
battery may continue to be consumed. Place the headset units with the IR sensors facing sideways or upwards.
Cleaning the noise isolation earbud tips
When the noise isolation earbud tips become dirty, wipe off the dirt with a dry cloth, etc.
If foreign material such as earwax becomes attached to the mesh part of the earbud tip, the sound may become
muffled or difficult to hear.
Remove the earbud tip from the headset, apply a cotton swab lightly to the mesh part, and rotate the cotton swab
slowly to wipe off the dirt. Be careful not to tear the mesh part.
Note
Earbud tips are consumables.
When the earbud tips get soaked, drain the liquid well, and make sure that the earbud tips are dried before use or storage.
Avoid washing with water, wet wipes, and the use of organic solvents such as alcohol, as these can cause premature
deterioration.
138
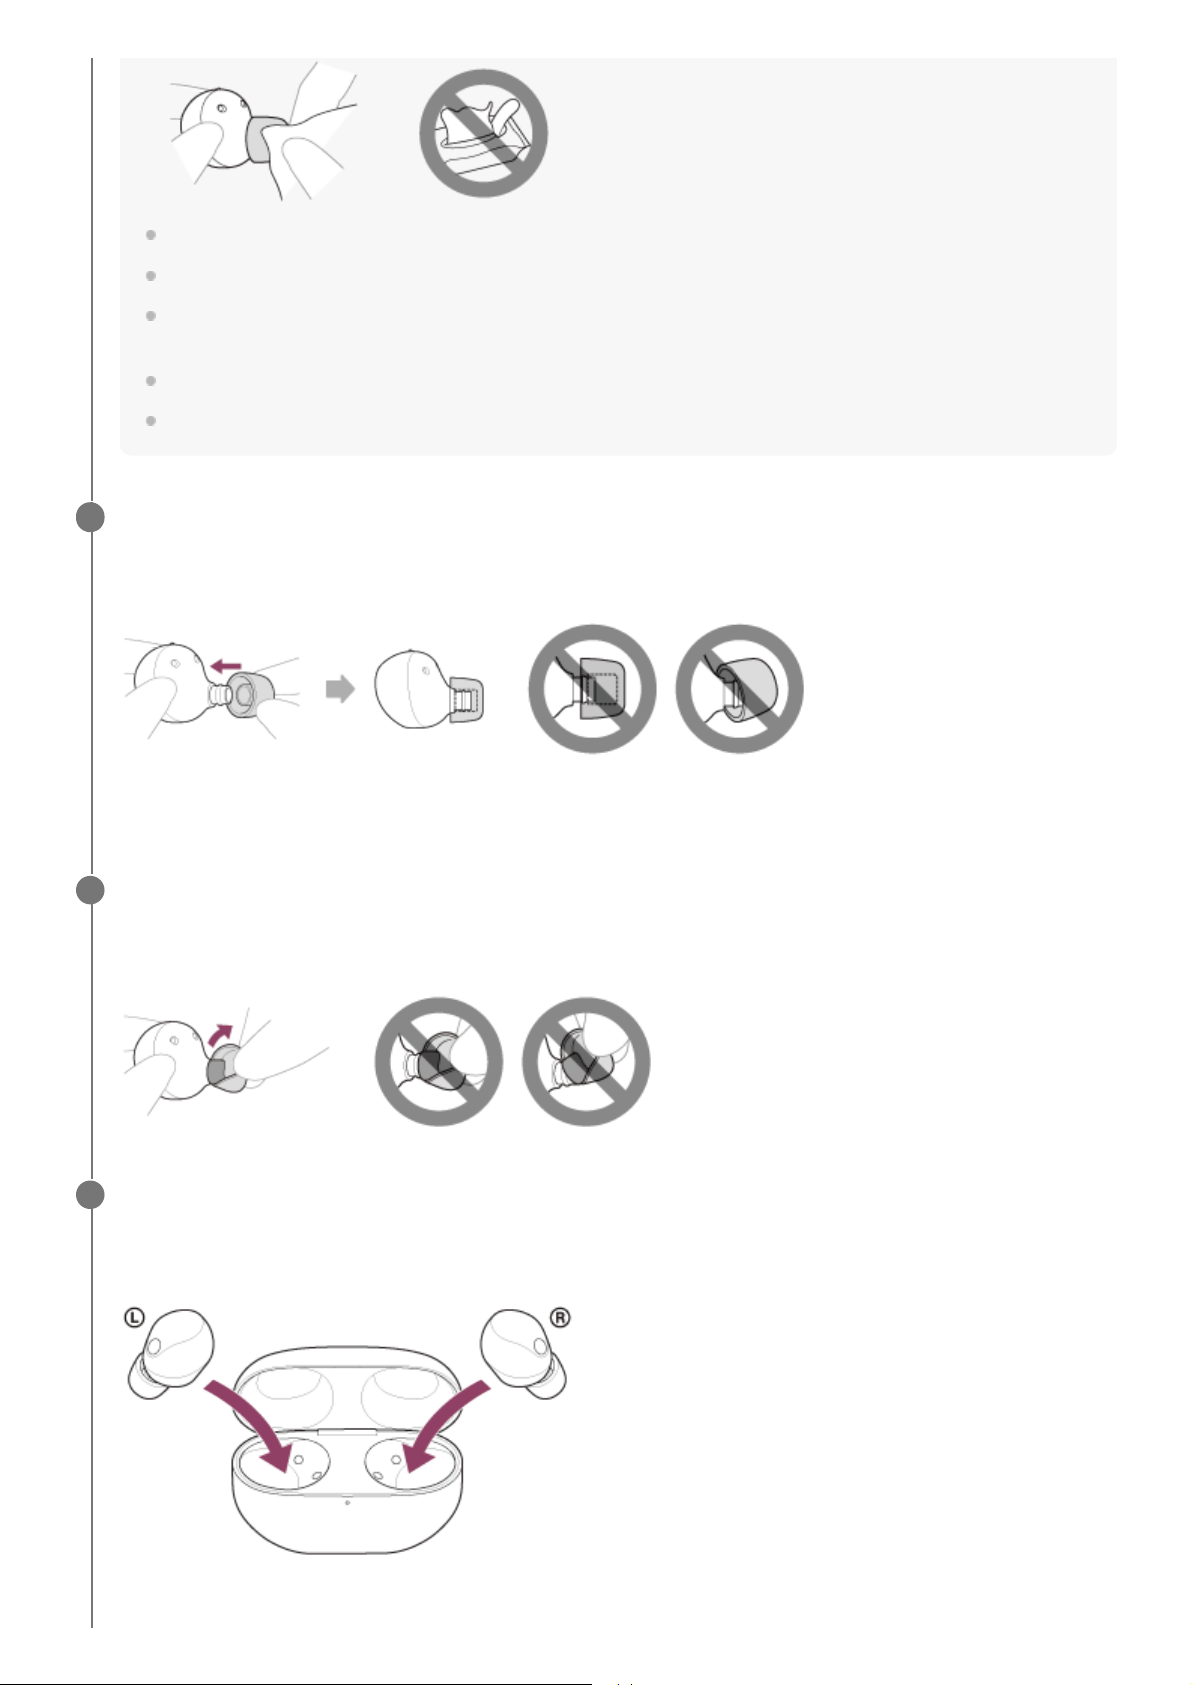
Rubbing with paper, using sharp metal objects, nails, adhesive tape, etc., may damage or deform the earbud tips.
Do not pull on the polyurethane foam portion of the earbud tip. If it is separated from the earbud tip, it will not function.
Do not subject the polyurethane foam portion of the earbud tip to pressure for over long periods of time. It may cause
deformation and it may be difficult to return the earbud tip to the original shape.
The foam materials may become firm at a low temperature. Warm the earbud tips a little with your hands before use.
When the environmental temperature or usage temperature is high, the polyurethane foam may take time to return to its
original shape.
Attach the earbud tip.
Push the earbud tip firmly onto the sound conduit (sound output tube) on the headset so that the earbud tip covers
the inner end of the sound conduit. Do not attach the earbud tip in a loose or skewed manner.
If the earbud tip is not completely attached, the earbud tip may be removed from the headset and the sound quality,
noise canceling effects, and wearability may be impaired.
3
Check that the earbud tip is securely attached.
Twist the earbud tip to one side and check that the stem of the earbud tip is completely covering the sound conduit
on the headset unit.
4
Set the headset in the charging case.
After maintenance as well as after cleaning and drying the headset, be sure to set the headset units in the charging
case.
Be sure to close the charging case lid.
5
139

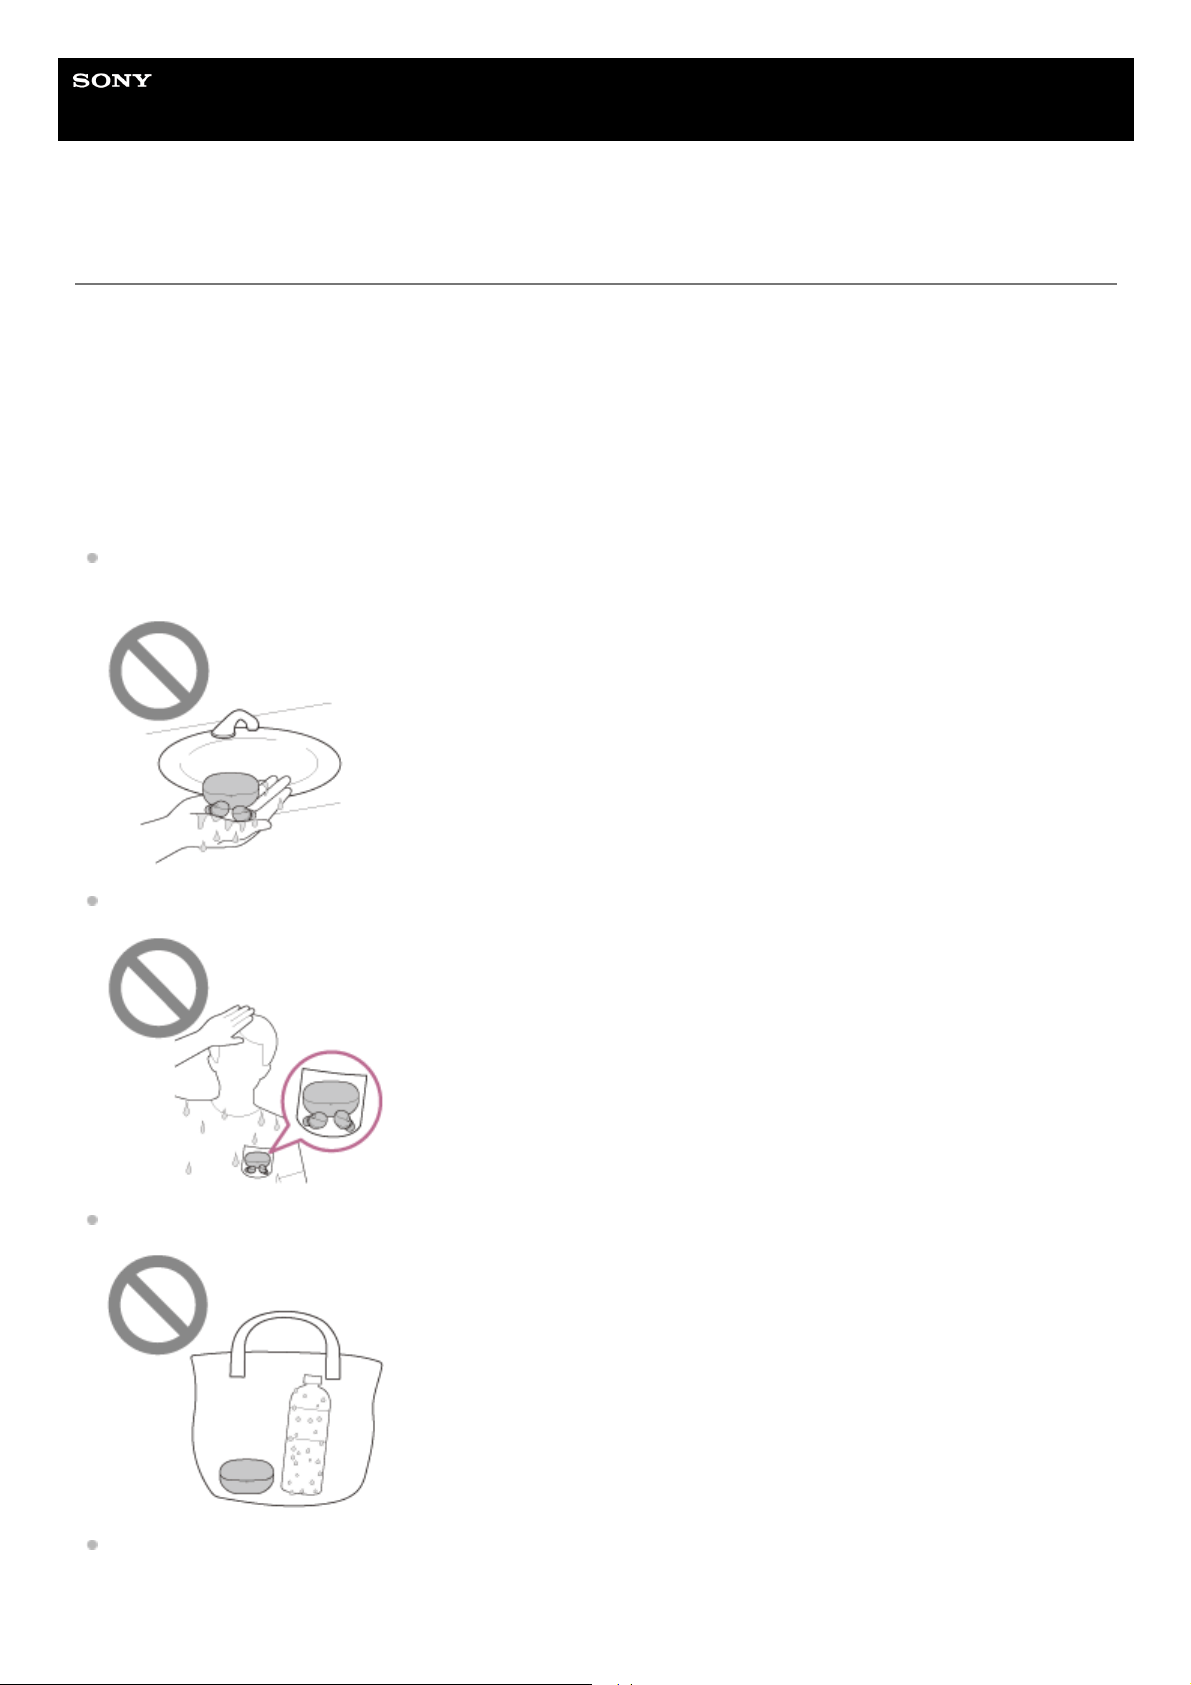
Help Guide
Wireless Noise Canceling Stereo Headset
WF-1000XM5
To prevent burning or malfunction due to getting wet
Be sure to clean after use
Charging with liquid such as water or sweat or foreign objects such as dust attached to the USB Type-C port of the
charging case or charging port of the headset may cause an accident such as burns or serious wounds due to fire,
electrocution, heat generation, smoke, or ignition. It may also cause a malfunction.
Avoid the following situations and be careful not to get moisture or dirt on the headset units or charging case.
If the headset units or charging case gets wet or dirty, see “When the headset units or charging case gets wet” and clean
them as described before use.
Touching the headset units or charging case without wiping your wet hands after doing housework in a kitchen or
washing your hands in a washroom.
Putting the headset units or charging case in the chest pocket of a damp article of clothing.
Putting the headset units or charging case in a bag with a cold PET bottle.
Spilling a drink while eating or drinking.
141

To protect the headset units and charging case from being damaged
Carefully note the precautions below to ensure proper use of the headset.
Do not splash water forcibly into the sound output parts, air holes, or microphone parts of the headset units.
Do not allow the headset to remain wet in a cold environment, as the water may freeze. To prevent malfunction,
make sure to wipe off any water after use.
Do not place the headset in water or use it in a humid place such as a bathroom.
If the headset gets wet,
If the headset units and charging case are charged while they are wet with sweat, etc., the charging ports will
corrode. Before charging, wipe off any moisture with a soft dry cloth and leave to dry in room temperature.
Repairs in case of a malfunction without care are not covered by the free warranty.
Use a soft dry cloth to wipe off any water that gets on the headset.1.
Remove the earbud tips, turn the sound conduits (sound output tubes) downward, and shake several times to get
the water out.
2.
Turn the microphone part or air hole part downward and gently tap it about 20 times on a dry cloth, etc. to remove
any water collected inside.
3.
Leave the headset to dry in room temperature.4.
142
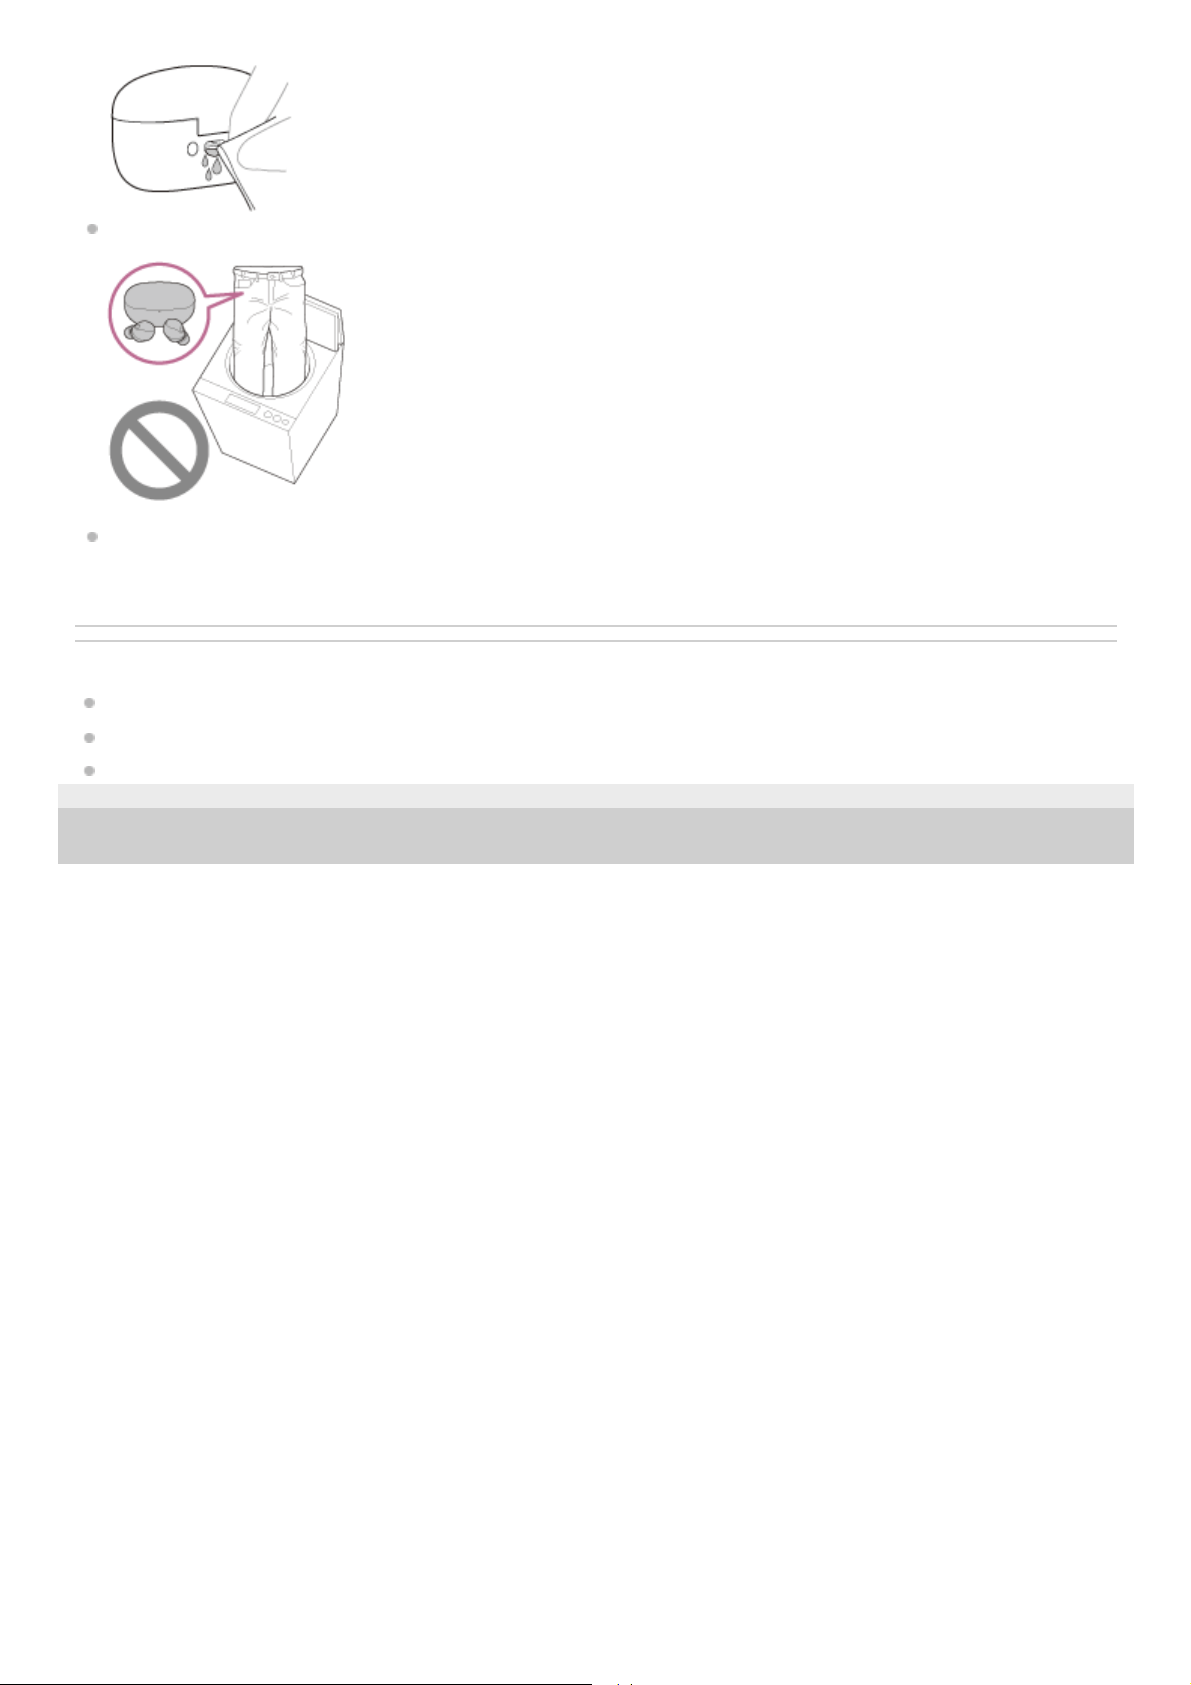
Do not wash pants or shirts with the headset units left in the pockets.
If the headset is cracked or deformed, refrain from using the headset near water, or contact your nearest Sony
dealer.
Related Topic
Replacing the earbud tips
Maintenance
When the headset units or charging case gets wet
5-048-298-11(1) Copyright 2023 Sony Corporation
143
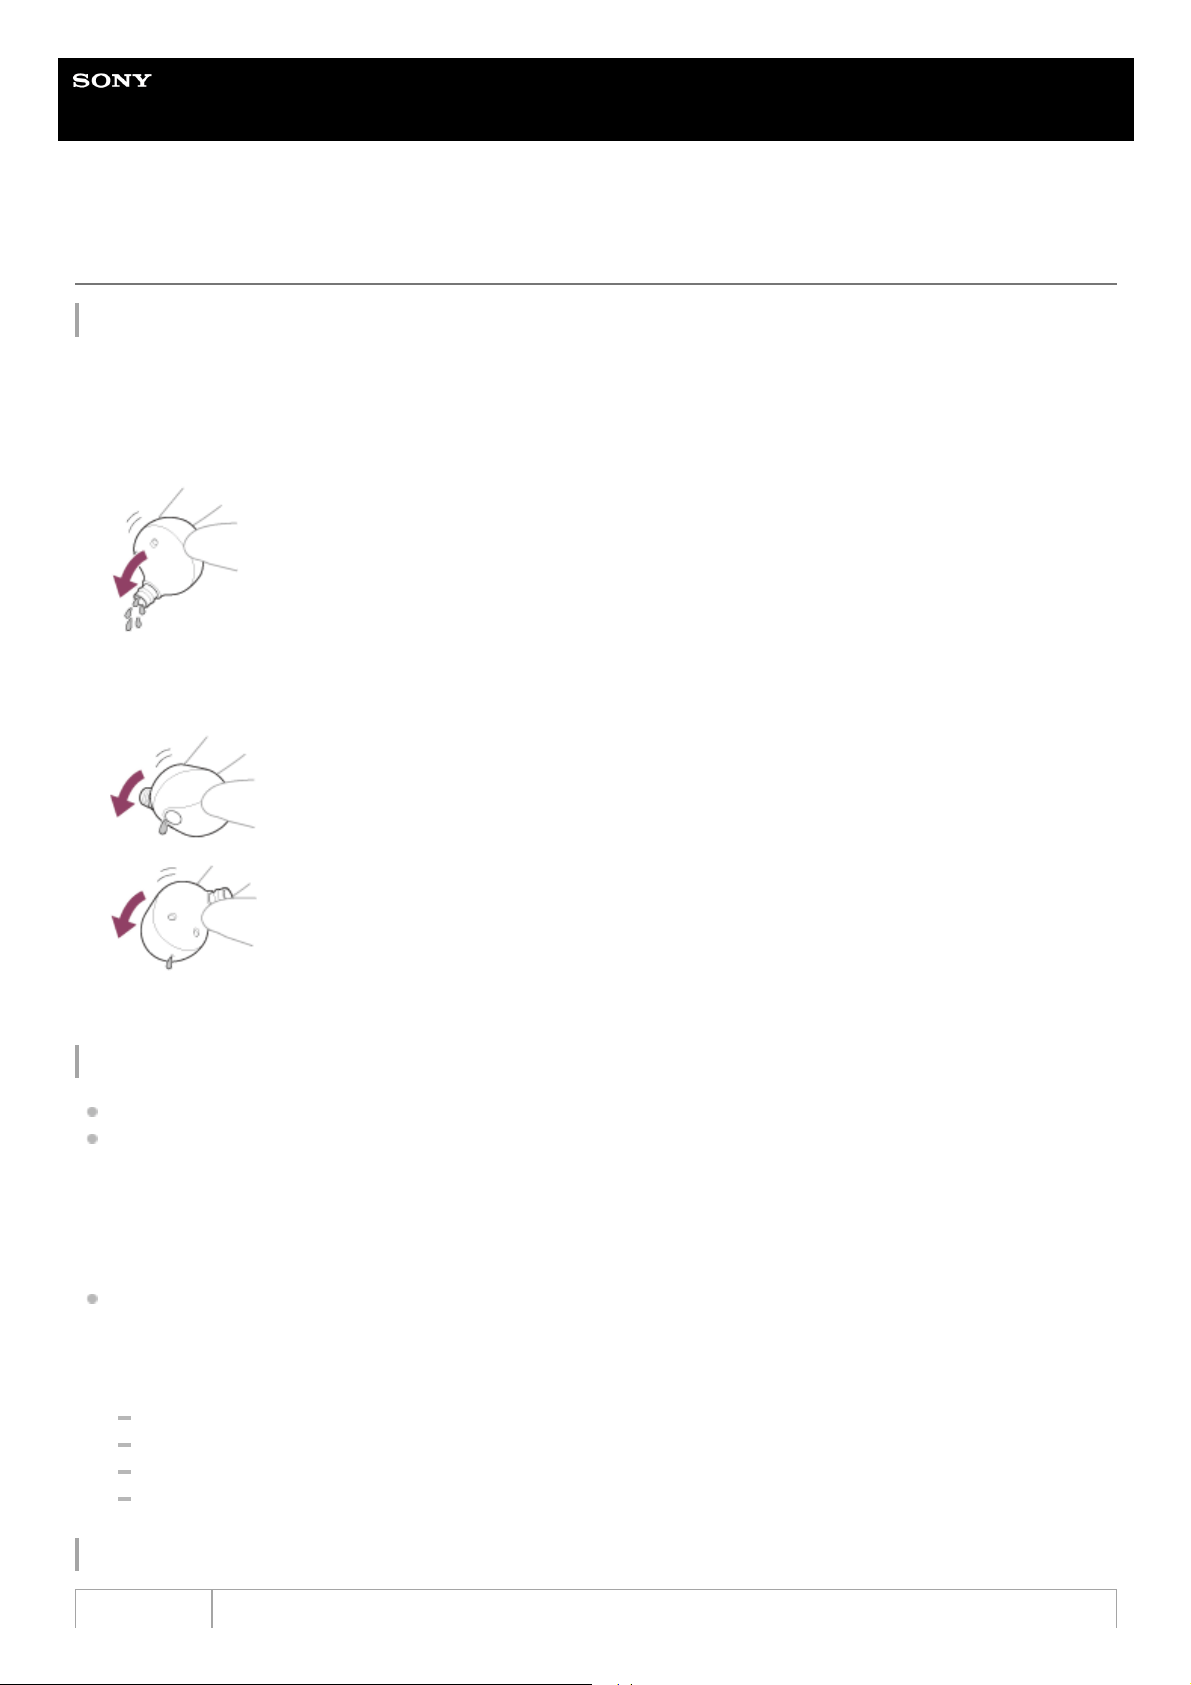
Help Guide
Wireless Noise Canceling Stereo Headset
WF-1000XM5
When the headset units or charging case gets wet
When the headset gets wet
On water resistant performance of the headset
The charging case is not water resistant.
The water resistant specifications of this headset are equivalent to IPX4 in IEC 60529 “Degrees of protection against
ingress of water (IP Code)”, which specifies the degree of protection provided against the entry of water. The headset
cannot be used in water.
Unless the headset is used correctly, water may get into the headset and cause fire, electrocution, or malfunctions.
Note the following cautions carefully and use the headset correctly.
IPX4: Protected against water splashing from any direction.
The sound conduits (sound output tubes), air holes, and microphone part of the headset are not completely
watertight.
If any water droplets are left in the sound conduits, air holes, or microphone part, the following issues may occur
temporarily. However, they are not malfunctions.
Sounds become difficult to hear.
The noise canceling effect is weakened.
Unusual sounds are heard.
Voices during phone calls become difficult to hear.
Liquids that the water resistant performance specifications of the headset apply to
Use a soft dry cloth to wipe off any water that gets on the headset.1.
Remove the earbud tips, turn the sound conduits (sound output tubes) downward, and shake several times to get the
water out.
2.
Turn the microphone part or air hole part downward and gently tap it about 20 times on a dry cloth, etc. to remove
any water collected inside.
3.
Leave the headset to dry in room temperature.4.
Applicable: Fresh water, tap water, perspiration
144

The water resistant performance of the headset is based on measurements performed by Sony under the conditions
described above. Note that malfunctions resulting from water immersion caused by customer misuse are not covered by
the warranty.
Related Topic
Replacing the earbud tips
Maintenance
To prevent burning or malfunction due to getting wet
5-048-298-11(1) Copyright 2023 Sony Corporation
Not
applicable:
Liquids other than those above (examples: soapy water, detergent water, water with bath agents,
shampoo, hot spring water, hot water, pool water, seawater, etc.)
145

Help Guide
Wireless Noise Canceling Stereo Headset
WF-1000XM5
Licenses
Use of the Made for Apple badge means that an accessory has been designed to connect specifically to the Apple
product(s) identified in the badge, and has been certified by the developer to meet Apple performance standards.
Apple is not responsible for the operation of this device or its compliance with safety and regulatory standards.
This product contains software that Sony uses under a licensing agreement with the owner of its copyright. We are
obligated to announce the contents of the agreement to customers under requirement by the owner of copyright for
the software. Please access the following URL and read the contents of the license.
https://rd1.sony.net/help/mdr/sl/23/
Services offered by third parties may be changed, suspended, or terminated without prior notice. Sony does not bear
any responsibility in these sorts of situations.
5-048-298-11(1) Copyright 2023 Sony Corporation
146

Help Guide
Wireless Noise Canceling Stereo Headset
WF-1000XM5
Trademarks
Microsoft and Windows are registered trademarks or trademarks of Microsoft Corporation in the United States and/or
other countries.
Apple, iPhone, iPod touch, macOS, Mac and Siri are trademarks of Apple Inc., registered in the U.S. and other
countries.
App Store is a service mark of Apple Inc., registered in the U.S. and other countries.
IOS is a trademark or registered trademark of Cisco in the U.S. and other countries and is used under license.
Google, Android and Google Play are trademarks of Google LLC.
Amazon, Alexa and all related logos are trademarks of Amazon.com, Inc. or its affiliates.
The Bluetooth® word mark and logos are registered trademarks owned by Bluetooth SIG, Inc. and any use of such
marks by Sony Group Corporation and its subsidiaries is under license.
The LDAC™ name is a trademark of Sony Group Corporation or its affiliates.
USB Type-C® and USB-C® are registered trademarks of USB Implementers Forum.
“DSEE” and “DSEE Extreme” are trademarks or registered trademarks of Sony Group Corporation or its affiliates.
All other trademarks and registered trademarks are trademarks or registered trademarks of their respective holders.
In this manual, TM and ® marks are not specified.
5-048-298-11(1) Copyright 2023 Sony Corporation
147

Help Guide
Wireless Noise Canceling Stereo Headset
WF-1000XM5
Customer support websites
For customers in the USA, Canada, and Latin America:
https://www.sony.com/am/support
For customers in European countries:
https://www.sony.eu/support
For customers in China:
https://service.sony.com.cn
For customers in other countries/regions:
https://www.sony-asia.com/support
5-048-298-11(1) Copyright 2023 Sony Corporation
148

Help Guide
Wireless Noise Canceling Stereo Headset
WF-1000XM5
What can I do to solve a problem?
Before asking for repair, check the following items again.
Find the symptoms of the issue in this Help Guide, and try any corrective actions listed.
Set the headset units into the charging case, and close the charging case lid.
You may be able to resolve some issues by setting the headset units into the charging case.
Charge the headset.
You may be able to resolve some issues by charging the headset battery.
Restart the device that is being connected to the headset.
You may be able to resolve some issues by restarting the device being connected such as your computer or
smartphone.
Reset the headset.
Initialize the headset.
This operation resets volume settings, etc. to the factory settings, and deletes all pairing information.
Look up information on the issue on the customer support website.
If the operations above do not work, consult your nearest Sony dealer.
Related Topic
Charging
Customer support websites
Resetting the headset
Initializing the headset to restore factory settings
5-048-298-11(1) Copyright 2023 Sony Corporation
149

Help Guide
Wireless Noise Canceling Stereo Headset
WF-1000XM5
Unable to turn on the headset.
Make sure the battery is fully charged.
You cannot turn on the headset when the headset is stored and being charged in the charging case. Remove the
headset from the charging case to turn on.
Charge the charging case.
Set the headset units into the charging case, and close the charging case lid.
You may be able to resolve some issues by setting the headset units into the charging case.
Clean the charging ports of the headset units and charging case, then set the headset units into the charging case
and check the status of the indicator on the charging case. For details, see “Maintenance”.
The headset cannot be used during an automatic headset software update. Set the headset into the charging case
and close the charging case lid, then wait for about 5 minutes.
Reset the headset.
Initialize the headset, and pair the headset and the device again.
Related Topic
Charging
Checking the remaining battery charge
Turning on the headset
Maintenance
How to keep the software up-to-date (for comfortable use of the headset)
Resetting the headset
Initializing the headset to restore factory settings
5-048-298-11(1) Copyright 2023 Sony Corporation
150
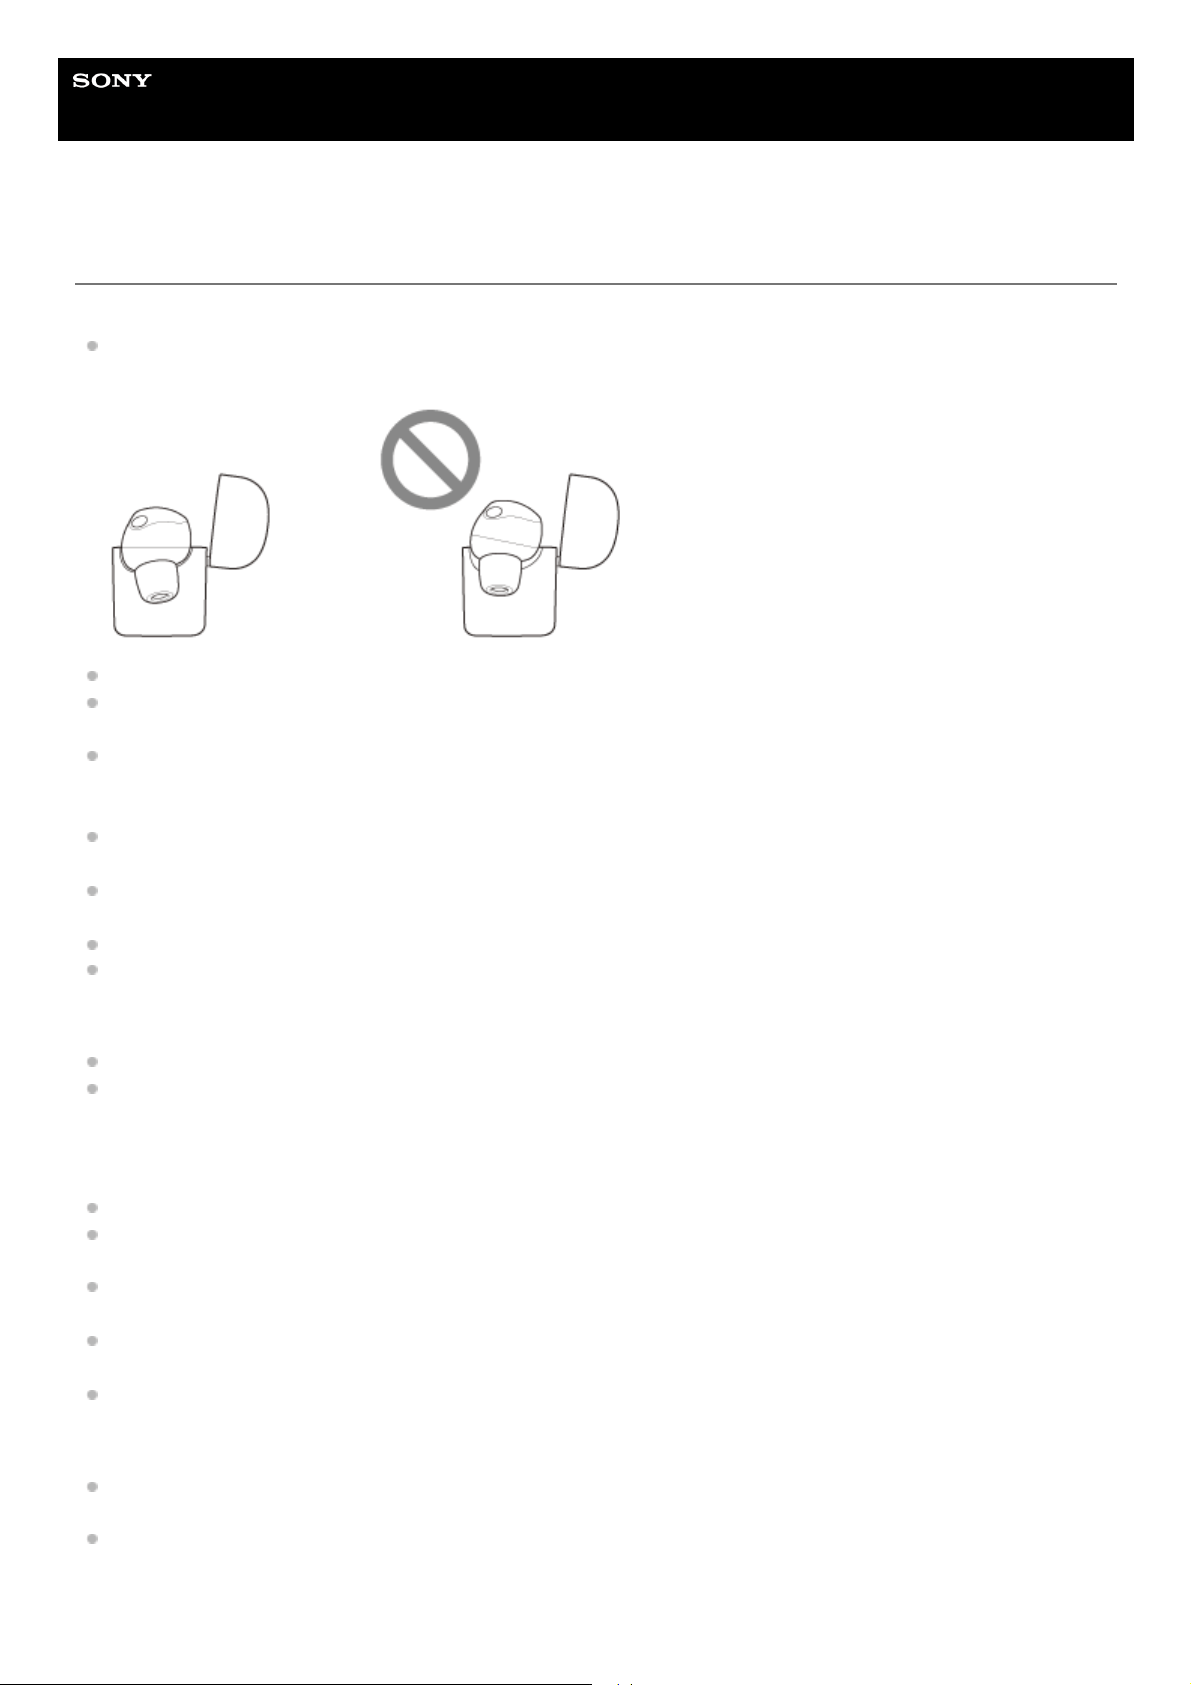
Help Guide
Wireless Noise Canceling Stereo Headset
WF-1000XM5
Headset cannot be charged or charging time is too long.
Common
Make sure the headset units are stored securely in the supplied charging case. If the headset units are floating in the
charging case, the headset units may not be charged.
Be sure to use the supplied USB Type-C cable and check that the cable is firmly connected to the charging case.
When the charging ports of the headset units or the charging case get dirty, the headset units may not be charged.
Clean the charging ports with a soft dry cloth. For details, see “Maintenance”.
The left or right headset unit works as the main headset unit, so it consumes the rechargeable battery faster than the
other unit. There is a difference in charging time between the left and right headset units, but this is not a malfunction.
The left or the right headset unit can be the “main headset unit” depending on the usage environment.
It is recommended to charge in a place with an ambient temperature between 15 °C and 30 °C (59 °F - 86 °F).
Charging outside of this range may result in less efficient charging.
While charging, be sure to keep the charging case lid closed to prevent the battery of the charging case from being
wasted.
Reset the headset.
Initialize the headset, and pair the headset and the device again.
When charging with a USB AC adaptor
Make sure that the USB AC adaptor is firmly connected to the AC outlet.
When using a commercially available USB AC adaptor, use one capable of supplying an output current of 0.5 A (500
mA) or more.
When charging with a computer
Check that the USB Type-C cable is firmly connected to the computer.
Check that the computer is turned on. Wake the computer up if the computer is in standby (sleep) or hibernation
mode.
Check that the charging case and the computer are directly connected and not via a USB hub. Also, this may be
improved by restarting the computer and trying the USB connection again.
There may be a problem with the USB port of the connected computer. Try connecting to another USB port on the
computer if one is available.
Update the OS of the computer.
When performing wireless charging
When charging wirelessly, charging may slow down or stop if the charging case becomes misaligned with the
wireless charger.
When charging wirelessly, charging may slow down or stop at high or low temperatures depending on the wireless
charger you are using.
151


Help Guide
Wireless Noise Canceling Stereo Headset
WF-1000XM5
The available operating time is short, the battery power does not last long, the battery
life of the left and right headset units is different.
If you set the following functions, the available operating time of the battery becomes short.
Sound quality mode during Bluetooth playback: Priority on sound quality
Noise canceling function/Ambient Sound Mode
Equalizer
DSEE Extreme
Speak-to-Chat
Function to launch the voice assist function by your voice
Service Link
If you run the above settings at the same time, the available operating time of the battery becomes even shorter.
The left or right headset unit works as the main headset unit, so it consumes the rechargeable battery faster than the
other unit. There is a difference in remaining battery charge between the left and right headset units, but this is not a
malfunction.
The left or the right headset unit can be the “main headset unit” depending on the usage environment.
If you use both headset units immediately after using only one headset unit, there may be a difference in the
remaining battery charge. This is not a malfunction because the remaining battery charge on one side is consumed.
When you have finished using the headset, be sure to set the headset units into the charging case. If the headset is
placed in the pockets, etc., the headset recognizes that the headset is worn, and it may not turn off after a period of
time has passed.
Be sure to close the charging case lid to prevent the battery of the charging case from being consumed.
The available battery operating time is shorter when talking on the phone than when listening to music.
Related Topic
Charging
Available operating time
5-048-298-11(1) Copyright 2023 Sony Corporation
153

Help Guide
Wireless Noise Canceling Stereo Headset
WF-1000XM5
No sound, no sound from one side
Common
Pair the headset and the Bluetooth device again.
When playing music, check that the headset and the transmitting Bluetooth device are connected via an A2DP
Bluetooth connection.
Charge the charging case.
Set the headset units into the charging case, and close the charging case lid.
You may be able to resolve some issues by setting the headset units into the charging case.
If foreign material such as earwax becomes attached to the mesh part of the earbud tip, the sound may become
muffled or difficult to hear. See “Maintenance” and clean the earbud tips as described before use.
Restart the smartphone or the computer you use.
No sound can be heard from the headset units during an automatic headset software update. Set the headset into
the charging case and close the charging case lid, then wait for about 5 minutes.
Reset the headset.
Initialize the headset, and pair the headset and the device again.
When the Speak-to-Chat mode is activated, music playback will pause. In this case, operate the touch sensor of the
headset to exit the Speak-to-Chat mode.
You can use the “Sony | Headphones Connect” app to switch between enable or disable for Speak-to-Chat.
When the headset is simultaneously connected to 2 devices via multipoint connection, depending on the connected
device, the device may keep sending the silent signal even if the playback of the music or video is stopped. In this
case, the headset remains connected with the device, and the connection may not be changed to another device. If
the sound from the second device cannot be heard after the playback is stopped on the first device, operate in the
following order and check whether the situation has improved.
Check with the “Sony | Headphones Connect” app that the setting of [Connect to 2 devices simultaneously] is on.
Stop the playback of the application on the first device.
Shut down the application on the first device.
Select the device you want to play from [Manage Connected Device] of [Device Currently Being Connected] on
the “Sony | Headphones Connect” app, and then start playback.
When connecting to a computer
If you are connecting a computer to the headset, make sure the audio output on the computer is set for a Bluetooth
device.
Restart the music app or video app.
When using a video calling application on a computer, check that the headset and the computer are connected via an
HFP or HSP Bluetooth connection.
Depending on the video calling application you are using, microphone settings may not be available.
When there is no sound on only one side
Depending on the smartphone app or computer application (which requires HFP (Hands-free Profile)/HSP (Headset
Profile)), you may hear a voice from only one headset unit.
Related Topic
Charging
Using only one headset unit
How to make a wireless connection to Bluetooth devices
Listening to music from a device via a Bluetooth connection
154


Help Guide
Wireless Noise Canceling Stereo Headset
WF-1000XM5
Low sound level
If foreign material such as earwax becomes attached to the mesh part of the earbud tip, the sound may become
muffled or difficult to hear. See “Maintenance” and clean the earbud tips as described before use.
If the size of the earbud tips does not match the size of your ear canals or the headset is not worn properly in your
ears, you may not obtain the correct sound qualities or volume.
If any of this is the case, try the following.
Change the earbud tips to ones that fit more snugly in your ears. When changing the earbud tips, try the earbud
tip sizes in order from the larger ones to the smaller ones. The most suitable size of the earbud tips for left and
right ears may be different.
Check that you are wearing the headset properly in your ears. Wear the headset so that the earbud tip is
comfortably situated as deep in the ear canal as possible.
Adjust the volume on the connected device.
You can adjust the volume with the headset during music playback.
The volume during calls cannot be adjusted with the headset. Adjust the volume on the connected device.
Connect the Bluetooth device to the headset once again.
The sound conduits (sound output tubes), air holes, and microphone part of the headset are not completely
watertight. If any water droplets are left in the sound conduits, air holes, or microphone parts, the sound level
becomes low temporarily. However, this is not a malfunction. See “When the headset units or charging case gets
wet” and clean them as described before use.
Set the headset units into the charging case, and close the charging case lid.
You may be able to resolve some issues by setting the headset units into the charging case.
Reset the headset.
Initialize the headset, and pair the headset and the device again.
Note
Depending on the connected device, the volume of the device and the headset may or may not be synced. If the volume on a
device is not synced to the volume on the headset, it will not be possible to use the device to turn up the volume on the headset
once the volume is turned down on the headset.
In that case, turn up the volume of both the headset and the connected device.
If the sound is still low even after adjusting the volume on the connected device, adjust the volume with the “Sony | Headphones
Connect” app.
Related Topic
Maintenance
Replacing the earbud tips
Wearing the headset
To prevent burning or malfunction due to getting wet
When the headset units or charging case gets wet
Resetting the headset
Initializing the headset to restore factory settings
5-048-298-11(1) Copyright 2023 Sony Corporation
156

Help Guide
Wireless Noise Canceling Stereo Headset
WF-1000XM5
Noise or unusual sound can be heard.
When using the headset, you may hear vibrations transmitted through your body while walking or running, and you
may also hear biological sounds such as heartbeats and breathing sounds. This may occur due to the nature of the
product and is not a malfunction.
When the noise canceling function is turned on, you may hear a small amount of noise, but this is due to the
characteristics of the noise canceling.
When putting on or adjusting the headset, the shape of the earbud tip may change and the internal bubbles may be
crushed or restored. At this time, you may hear a popping sound in your ear, but this is not abnormal.
When you push the headset units into your ears or tap the touch sensor strongly, you may hear a temporary sound
caused by the noise canceling function, Ambient Sound Mode, and the headset’s tight sealing properties. This is not
a malfunction.
If you tap the touch sensor when the headset is not connected via a Bluetooth connection, you will hear a notification
sound indicating that the headset is turned on.
The sound conduits (sound output tubes), air holes, and microphone part of the headset are not completely
watertight. If any water droplets are left in the sound conduits, air holes, or microphone parts, a beeping sound
(feedback) may be heard temporarily. This is not a malfunction. See “When the headset units or charging case gets
wet” and clean them as described before use.
If you cover the microphone part on the left or right headset unit with your hand, etc., or if you grasp the headset unit
in your hand, a beeping sound (feedback) may be heard. This is not a malfunction. If any of this is the case, remove
your hand, etc. from the left or right microphone part.
If the Ambient Sound Mode is enabled in a rather noisy environment, a noise may be heard. This is not a
malfunction. In this case, set the noise canceling function to ON or set the noise canceling function and the Ambient
Sound Mode to OFF.
Some devices that emit ultrasonic sound waves designed to repel rodents may occasionally be installed at the
entrances of commercial facilities or subway stations. Near such devices, the ultrasonic sound waves may cause
noise or unusual sound to be heard from the headset. Leave the place where the noise or unusual sound is heard.
Or turn off the noise canceling function/Ambient Sound Mode.
When the Adaptive Sound Control is turned on, the headset detects the wearer's actions and adjusts the noise
canceling function automatically. When this setting is changed, music may pause momentarily and a notification
sound may be heard. This sound notifies you that the setting has been changed.
If you want to deactivate this notification sound, use the “Sony | Headphones Connect” app to turn the setting off.
If none of the above items apply, try the following steps in sequence to improve the situation.
Charge the charging case.
Set the headset units into the charging case, and close the charging case lid.
You may be able to resolve some issues by setting the headset units into the charging case.
Reset the headset.
Initialize the headset, and pair the headset and the device again.
Related Topic
Using the noise canceling function
Listening to ambient sound during music playback (Ambient Sound Mode)
What you can do with the “Sony | Headphones Connect” app
To prevent burning or malfunction due to getting wet
When the headset units or charging case gets wet
Charging
157

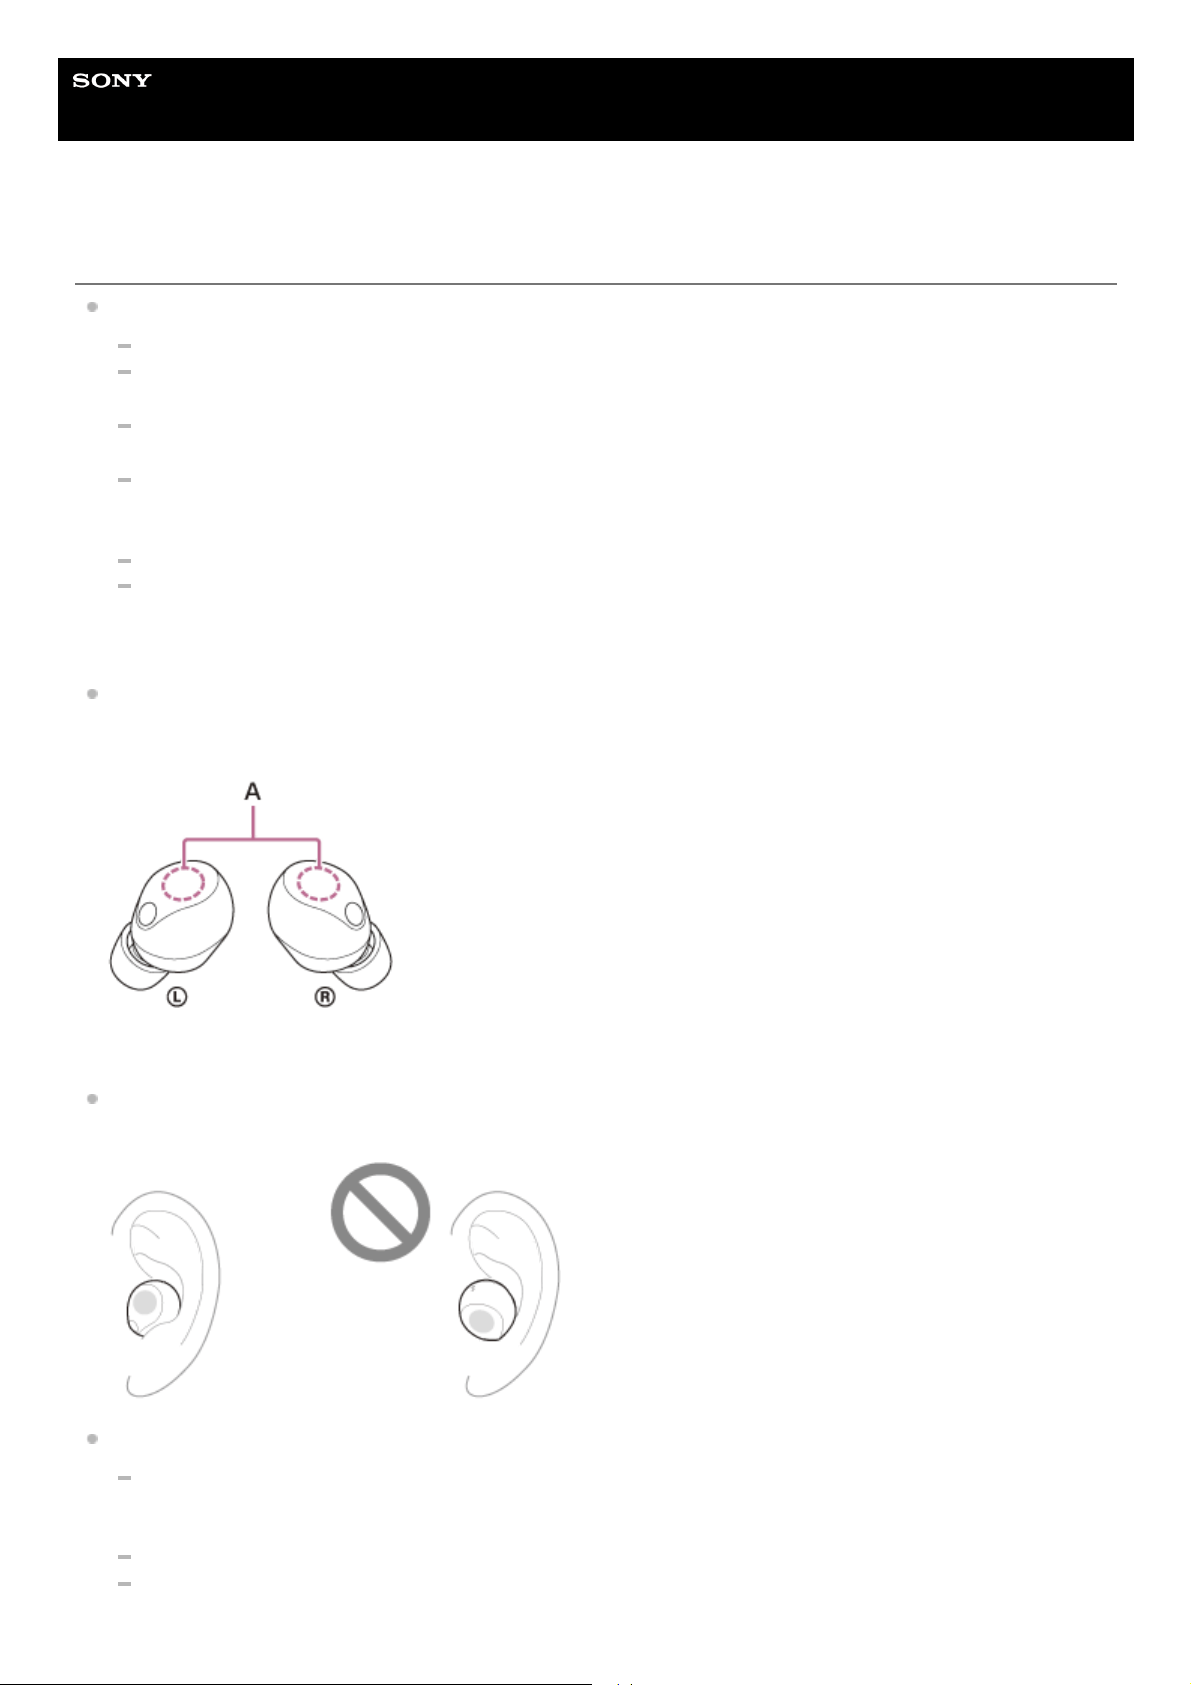
Help Guide
Wireless Noise Canceling Stereo Headset
WF-1000XM5
Sound skips frequently.
The following settings on the playback devices and headset may be affecting the sound quality.
Set the headset to “Priority on stable connection”. For details, see “About the sound quality mode”.
When the headset is simultaneously connected to 2 devices via multipoint connection, this can make it easier for
the sound to skip.
This issue can be improved by changing the wireless playback quality settings on the transmitting device. For
details, refer to the operating instructions supplied with the transmitting device.
When the Adaptive Sound Control is turned on, the headset detects the wearer's actions and adjusts the noise
canceling function automatically. When this setting is changed, music may pause momentarily. This is not a
malfunction.
Turning off Service Link on the “Sony | Headphones Connect” app may reduce the amount of audio dropout.
If Speak-to-Chat is enabled, the Speak-to-Chat mode starts automatically when you talk to someone.
The headset pauses or mutes the music being played. It may sound like the sound skips when this occurs, but it
is not a malfunction. If you wish to avoid this, disable Speak-to-Chat.
Remove any obstacles between the antenna of the connecting Bluetooth device and the antennas built into the left
and right headset units. The antenna of each left or right headset unit is built into the part shown in the dotted line
below.
A: Locations of the built-in antennas (left, right)
Sound may easily skip frequently depending on how the headset units are worn.
Wearing the left and right headset units with the antenna parts facing away from the ears may improve the condition.
Bluetooth communications may be disabled, or noise or audio dropout may occur under the following conditions.
When there is a human body between the headset and the Bluetooth device
In this case, moving the Bluetooth device closer to the antenna of the headset may improve the Bluetooth
communications.
When there is an obstacle, such as metal or a wall, between the headset and the Bluetooth device
In places with wireless LAN, where a microwave oven is used, electromagnetic waves are generated, etc.
159

Where there are other wireless communication audio devices or other people nearby, such as in train station
premises or on a crowded train
If you are enjoying music with your smartphone, the situation may be improved by closing unnecessary apps or
restarting your smartphone. If you are enjoying music with your computer, close unnecessary applications or
windows and restart the computer.
If a device other than the headset is connected via a Bluetooth connection to the playback device, disconnecting the
device may help reduce the skipping.
Connect the headset and the Bluetooth device once again.
Set the headset units into the charging case and close the charging case lid, and then remove the headset from the
charging case to connect the headset to the Bluetooth device.
Reset the headset.
Initialize the headset, and pair the headset and the device again.
Related Topic
About the sound quality mode
Connecting the headset to 2 devices simultaneously (multipoint connection)
What you can do with partner services
Speaking with someone while wearing the headset (Speak-to-Chat)
Resetting the headset
Initializing the headset to restore factory settings
5-048-298-11(1) Copyright 2023 Sony Corporation
160

Help Guide
Wireless Noise Canceling Stereo Headset
WF-1000XM5
Low sound quality
If the size of the earbud tips does not match the size of your ear canals or the headset is not worn properly in your
ears, tap operations or Speak-to-Chat speech detection may not work correctly, or you may not obtain the correct
sound qualities, noise canceling effects, or call performance.
If any of this is the case, try the following.
Change the earbud tips to ones that fit more snugly in your ears. When changing the earbud tips, try the earbud
tip sizes in order from the larger ones to the smaller ones. The most suitable size of the earbud tips for left and
right ears may be different.
The “Sony | Headphones Connect” app will help you to determine which earbud tips suit you best to achieve the
optimal noise canceling effect, sound quality, etc.
Check that you are wearing the headset properly in your ears. Wear the headset so that the earbud tip is
comfortably situated as deep in the ear canal as possible.
Hint
The function that determines the optimal earbud tips for you measures the air-tightness of the earbud tips and determines
whether or not the headset units are being worn in your ears correctly. Select a size that fits comfortably.
Turn down the volume of the playback device if it is too loud.
Switch the Bluetooth connection to A2DP with the connected device when the headset and the transmitting Bluetooth
device are connected via an HFP or HSP Bluetooth connection.
If the headset connects to the previously connected Bluetooth device, the headset may only establish the HFP/HSP
Bluetooth connection when it is turned on. Use the connected device to connect via an A2DP Bluetooth connection.
When listening to music from a computer on the headset, the sound quality may be poor (difficult to hear the singer’s
voice, etc.) for the first few seconds. This is due to the computer specifications (priority on stable connection at the
start of transmission and then switches to priority on sound quality several seconds later) and is not a headset
malfunction.
If the sound quality does not improve after a few seconds, use the computer to establish an A2DP connection. As for
the operations on your computer, refer to the operating instructions supplied with the computer.
Related Topic
Wearing the headset
Replacing the earbud tips
What you can do with the “Sony | Headphones Connect” app
5-048-298-11(1) Copyright 2023 Sony Corporation
161
Help Guide
Wireless Noise Canceling Stereo Headset
WF-1000XM5
The noise canceling effects are not sufficient.
Make sure the noise canceling function is turned on.
If the size of the earbud tips does not match the size of your ear canals or the headset is not worn properly in your
ears, tap operations or Speak-to-Chat speech detection may not work correctly, or you may not obtain the correct
sound qualities, noise canceling effects, or call performance.
If any of this is the case, try the following.
Change the earbud tips to ones that fit more snugly in your ears. When changing the earbud tips, try the earbud
tip sizes in order from the larger ones to the smaller ones. The most suitable size of the earbud tips for left and
right ears may be different.
The “Sony | Headphones Connect” app will help you to determine which earbud tips suit you best to achieve the
optimal noise canceling effect, sound quality, etc.
Check that you are wearing the headset properly in your ears. Wear the headset so that the earbud tip is
comfortably situated as deep in the ear canal as possible.
Hint
The function that determines the optimal earbud tips for you measures the air-tightness of the earbud tips and determines
whether or not the headset units are being worn in your ears correctly. Select a size that fits comfortably.
The noise canceling effects may not be achieved depending on how the headset units are worn.
Wearing the left and right headset units with the antenna parts facing away from the ears may improve the condition.
In order to make it easier for you to hear your own voice during a phone call, the microphones work to capture
ambient sounds (Sidetone function). If your voice sounds too loud or the sounds in your surroundings are bothering
you, turn off [Capture Voice During a Phone Call] on the “Sony | Headphones Connect” app.
The noise canceling function is effective in low frequency ranges such as airplanes, trains, offices, near air-
conditioning, and is not as effective for higher frequencies, such as human voices.
When the Adaptive Sound Control on the “Sony | Headphones Connect” app is turned on, the wearer's actions, like
walking or running, are detected. The noise canceling function is automatically adjusted and the Ambient Sound
Mode may be activated according to these actions.
To make the most of the noise canceling function, turn off the Adaptive Sound Control, and try to turn on the noise
canceling function manually when you need it.
Related Topic
Replacing the earbud tips
Wearing the headset
What is noise canceling?
162


Help Guide
Wireless Noise Canceling Stereo Headset
WF-1000XM5
The headset cannot be operated.
You cannot operate the headset when you are not wearing the headset. Put the headset into your ears to operate.
If the IR sensor of the headset cannot detect that the headset is being worn because the headset is not worn
properly, the earbud tips are not attached properly to the headset, or the IR sensor is dirty, the automatic power off
function may activate and automatically turn off the headset. Adjust the fit of the headset to your ears, and if the IR
sensor is dirty, clean it with a soft dry cloth.
When the automatic power off function is set to [Do not turn off] on the [System] tab of the “Sony | Headphones
Connect” app, wearing detection will continue to work and the symptom may be improved.
Note the following when tapping the touch sensor.
Hold the headset firmly between your thumb and middle finger to keep the headset from moving when tapping.
Tap the center of the touch sensor with the pad of your index finger.
If you tap with your nail or fingertip, tap the rim of the touch sensor, or forcibly press the touch sensor, the
headset may not operate.
If you are wearing gloves, remove them before operating.
If the surface of your index finger is wet, greasy, dirty, too dry, etc., the headset may not respond well to tapping.
If the touch sensor is in the following states, it may not work or may react incorrectly.
It is wet with water, sweat, etc.
It is touched by hair, wet towels, etc.
When you change the assignment of the functions to the touch sensors with the “Sony | Headphones Connect” app,
confirm on the app that the correct functions are assigned to the touch sensor.
Charge the charging case.
Set the headset units into the charging case, and close the charging case lid.
You may be able to resolve some issues by setting the headset units into the charging case.
Reset the headset.
Initialize the headset, and pair the headset and the device again.
Related Topic
Wearing the headset
Replacing the earbud tips
About the touch sensor
What you can do with the “Sony | Headphones Connect” app
Resetting the headset
Initializing the headset to restore factory settings
5-048-298-11(1) Copyright 2023 Sony Corporation
164

Help Guide
Wireless Noise Canceling Stereo Headset
WF-1000XM5
Pairing with a Bluetooth device cannot be done.
Bring the headset and the Bluetooth device within 1 m (3.2 ft) from each other.
When pairing for the first time after purchasing, initializing, or repairing the headset, the headset enters pairing mode
automatically if you remove the headset from the charging case. To pair a second or subsequent device, set the
headset units into the charging case, leave the charging case lid open, and press and hold the pairing button on the
back of the charging case for about 5 seconds or more to enter pairing mode.
The headset cannot go into pairing mode if the headset is not set securely in the charging case, such as when the
earbud tips are not properly attached to the headset. Make sure the headset is stored securely in the charging case.
When pairing a device once again after initializing or repairing the headset, you may be unable to pair the device if it
retains pairing information for the headset (iPhone or other devices). In this case, delete the pairing information of the
headset registered on the connected device before pairing.
If there is a device nearby that has been connected with the headset using LE Audio before, the device may be
automatically connected with the headset when the headset enters pairing mode. Turn off the Bluetooth setting of the
device with the connection history, and then pair the headset with a new device.
Restart the connected device such as a smartphone or a computer you use, and pair the headset and the device
again.
Charge the charging case.
Set the headset units into the charging case, close the charging case lid once, and then open it again.
You may be able to resolve some issues by setting the headset units into the charging case.
Reset the headset.
Initialize the headset, and pair the headset and the device again.
Related Topic
How to make a wireless connection to Bluetooth devices
Replacing the earbud tips
Charging
Resetting the headset
Initializing the headset to restore factory settings
5-048-298-11(1) Copyright 2023 Sony Corporation
165

Help Guide
Wireless Noise Canceling Stereo Headset
WF-1000XM5
Unable to make a Bluetooth connection.
Check that the headset is turned on.
Check that the Bluetooth device is turned on and the Bluetooth function is on.
If the headset automatically connects to the last connected Bluetooth device, you may fail to connect the headset to
other devices via a Bluetooth connection. If this is the case, operate the last connected Bluetooth device and
disconnect the Bluetooth connection.
Check if the Bluetooth device is in sleep mode. If the device is in sleep mode, cancel the sleep mode.
Check if the Bluetooth connection has been terminated. If terminated, make the Bluetooth connection again.
If the pairing information for the headset has been deleted on the Bluetooth device, pair the headset with the device
again.
Charge the charging case.
Set the headset units into the charging case, and close the charging case lid.
You may be able to resolve some issues by setting the headset units into the charging case.
Reset the headset.
Initialize the headset, and pair the headset and the device again.
Related Topic
How to make a wireless connection to Bluetooth devices
Charging
Resetting the headset
Initializing the headset to restore factory settings
5-048-298-11(1) Copyright 2023 Sony Corporation
166

Help Guide
Wireless Noise Canceling Stereo Headset
WF-1000XM5
Cannot hear the other person or the call volume is low during calls/The other person
cannot hear you or their call volume is low during calls.
Check that both the headset and the connected device are turned on.
Turn up the volume of the connected device if it is too low.
When you use the video calling application, open the settings
*
of the video calling application, and check that the
speaker or microphone setting is specified as [Headset (WF-1000XM5 Hands-Free)]
**
. When the settings of the
video calling application cannot be checked or calling connections [Headset (WF-1000XM5 Hands-Free)] cannot be
selected, select [Headset (WF-1000XM5 Hands-Free)] on the settings of your computer to make connections.
If the size of the earbud tips does not match the size of your ear canals or the headset is not worn properly in your
ears, tap operations or Speak-to-Chat speech detection may not work correctly, or you may not obtain the correct
sound qualities, noise canceling effects, or call performance.
If any of this is the case, try the following.
Change the earbud tips to ones that fit more snugly in your ears. When changing the earbud tips, try the earbud
tip sizes in order from the larger ones to the smaller ones. The most suitable size of the earbud tips for left and
right ears may be different.
The “Sony | Headphones Connect” app will help you to determine which earbud tips suit you best to achieve the
optimal noise canceling effect, sound quality, etc.
Check that you are wearing the headset properly in your ears. Wear the headset so that the earbud tip is
comfortably situated as deep in the ear canal as possible.
Hint
The function that determines the optimal earbud tips for you measures the air-tightness of the earbud tips and determines
whether or not the headset units are being worn in your ears correctly. Select a size that fits comfortably.
Set the headset units into the charging case, and close the charging case lid. Then, take out the headset, and
reconnect with the Bluetooth device.
Restart the Bluetooth device such as your smartphone or computer, and reconnect with the headset.
Set the headset units into the charging case, and close the charging case lid.
You may be able to resolve some issues by setting the headset units into the charging case.
Reset the headset.
Initialize the headset, and pair the headset and the device again.
Related Topic
How to make a wireless connection to Bluetooth devices
Receiving a call
Making a call
Wearing the headset
Replacing the earbud tips
What you can do with the “Sony | Headphones Connect” app
Resetting the headset
Initializing the headset to restore factory settings
Depending on the video calling application you are using, this function may not be available.
*
Names may vary according to the computer or the video calling application you are using.
**
167

5-048-298-11(1) Copyright 2023 Sony Corporation
168

Help Guide
Wireless Noise Canceling Stereo Headset
WF-1000XM5
The LE Audio connection cannot be established.
The devices that support LE Audio are Android smartphones Xperia 1 Ⅳ and Xperia 5 Ⅳ (use the latest version of
the smartphone software) (as of June 2023).
For the latest information on the compatible devices, refer to the support website.
Update the software of the headset to the latest version.
To switch to the LE Audio connection, use the “Sony | Headphones Connect” app. For details, see “Pairing and
connecting with an Android smartphone using LE Audio ”.
When the headset is connected to the Android smartphone using Classic Audio, you need to change the setting of
[LE Audio connection setting for headphones] to [LE Audio Priority] on the “Sony | Headphones Connect” app, and
pair the headset with the Android smartphone again. For details, see “Pairing and connecting with an Android
smartphone using LE Audio ”.
Related Topic
Pairing and connecting with an Android smartphone using LE Audio
Customer support websites
5-048-298-11(1) Copyright 2023 Sony Corporation
169

Help Guide
Wireless Noise Canceling Stereo Headset
WF-1000XM5
You cannot switch back to the Classic Audio connection.
To switch to the Classic Audio connection, use the “Sony | Headphones Connect” app. For details, see “Pairing and
connecting with an Android smartphone using LE Audio ”.
If you cannot switch to [Classic Audio only (conventional connection method)] in the “Sony | Headphones Connect”
app, initialize the headset.
Related Topic
Pairing and connecting with an Android smartphone using LE Audio
Initializing the headset to restore factory settings
5-048-298-11(1) Copyright 2023 Sony Corporation
170
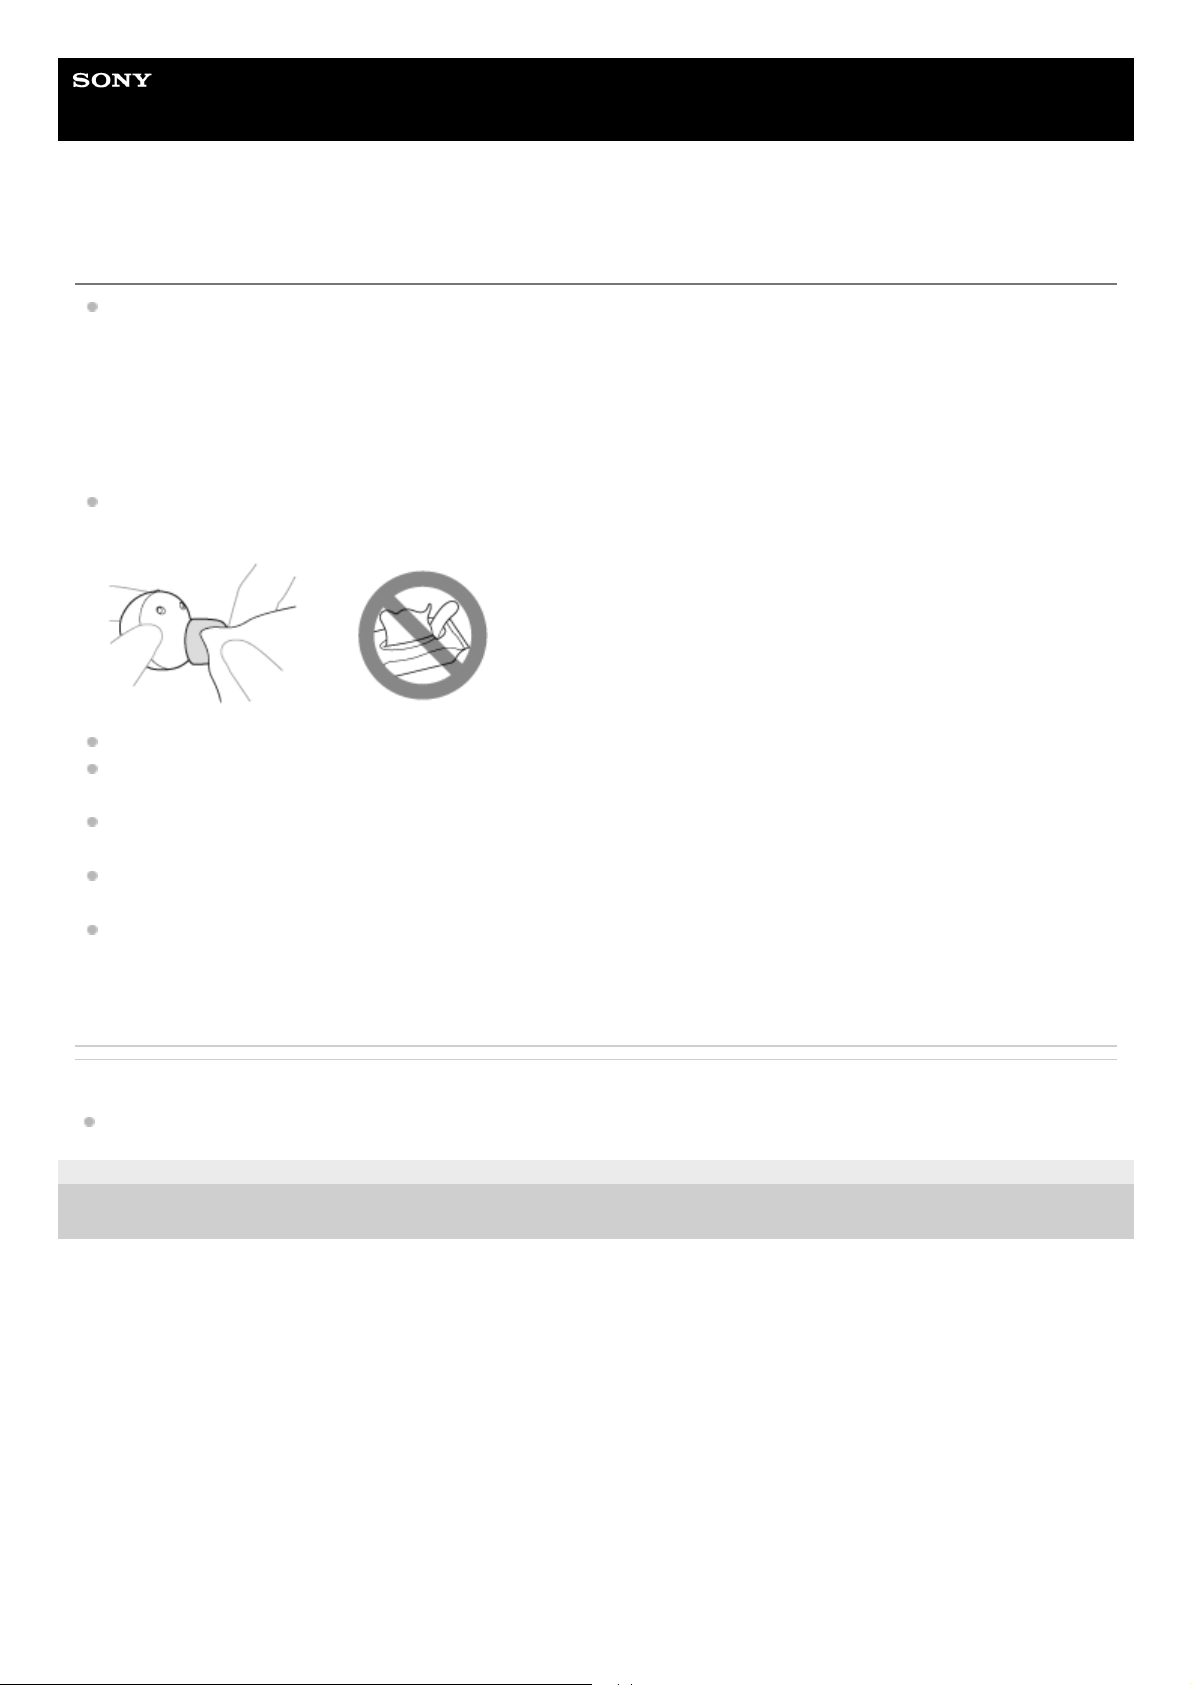
Help Guide
Wireless Noise Canceling Stereo Headset
WF-1000XM5
Earbud tips are damaged or lost.
Earbud tips are consumables. If the earbud tips are damaged and need replacing, contact your nearest Sony dealer
or purchase the EP-NI1010 series
*
, sold separately.
To protect the earbud tips from quick deterioration, follow the precautions below to continue using
them.
Avoid washing with water, wet wipes, and the use of organic solvents such as alcohol, as these can cause premature
deterioration.
Rubbing with paper, using sharp metal objects, nails, adhesive tape, etc., may damage or deform the earbud tips.
Do not pull on the polyurethane foam portion of the earbud tip. If it is separated from the earbud tip, it will not
function.
Do not subject the polyurethane foam portion of the earbud tip to pressure for over long periods of time. It may cause
deformation and it may be difficult to return the earbud tip to the original shape.
When the earbud tips get soaked, drain the liquid well, and make sure that the earbud tips are dried before use or
storage.
When there are cracked, peeled, or chipped portions in the earbud tips, refrain from using them.
If the earbud tips deteriorate, they cannot achieve proper sound qualities or noise canceling effects, and can cause
injuries or diseases as the earbud tips may come off and remain in the ear.
Related Topic
Maintenance
5-048-298-11(1) Copyright 2023 Sony Corporation
May not be supported in some countries or regions.
*
171

Help Guide
Wireless Noise Canceling Stereo Headset
WF-1000XM5
An earache occurs.
If you feel the size of the earbud tips does not fit your ears, change the earbud tips. When changing the earbud tips,
try the earbud tip sizes in order from the larger ones to the smaller ones. The most suitable size of the earbud tips for
left and right ears may be different.
The “Sony | Headphones Connect” app will help you to determine which earbud tips suit you best to achieve the
optimal noise canceling effect, sound quality, etc.
Check that you are wearing the headset properly in your ears.
If you wear the headset for a long time, your ears may start hurting. Use the headset while taking breaks periodically.
Hint
The function that determines the optimal earbud tips for you measures the air-tightness of the earbud tips and determines
whether or not the headset units are being worn in your ears correctly. Select a size that fits comfortably.
Related Topic
Replacing the earbud tips
What you can do with the “Sony | Headphones Connect” app
Wearing the headset
5-048-298-11(1) Copyright 2023 Sony Corporation
172

Help Guide
Wireless Noise Canceling Stereo Headset
WF-1000XM5
Resetting the headset
If the headset cannot be turned on or cannot be operated even when it is turned on, reset the headset.
Set the headset units into the charging case.
Leave the charging case lid open.
1
Press and hold the reset button on the back of the charging case for about 20 seconds or more.
After about 15 seconds, the indicator (orange) on the charging case flashes for about 5 seconds.
Then, the indicator on the charging case turns off and the headset will be reset.
Note
Do not release your finger from the reset button on the charging case while the indicator (orange) is flashing. If you release
your finger, the headset will be initialized.
2
173

The pairing information and other settings are retained.
If the headset does not operate correctly even after resetting, initialize the headset to restore factory settings.
About the instruction manual video
Watch the video to find out how to reset.
https://rd1.sony.net/help/mdr/mov0060/h_zz/
Related Topic
Initializing the headset to restore factory settings
5-048-298-11(1) Copyright 2023 Sony Corporation
Check that the indicator turns off and then release your finger.
3
174
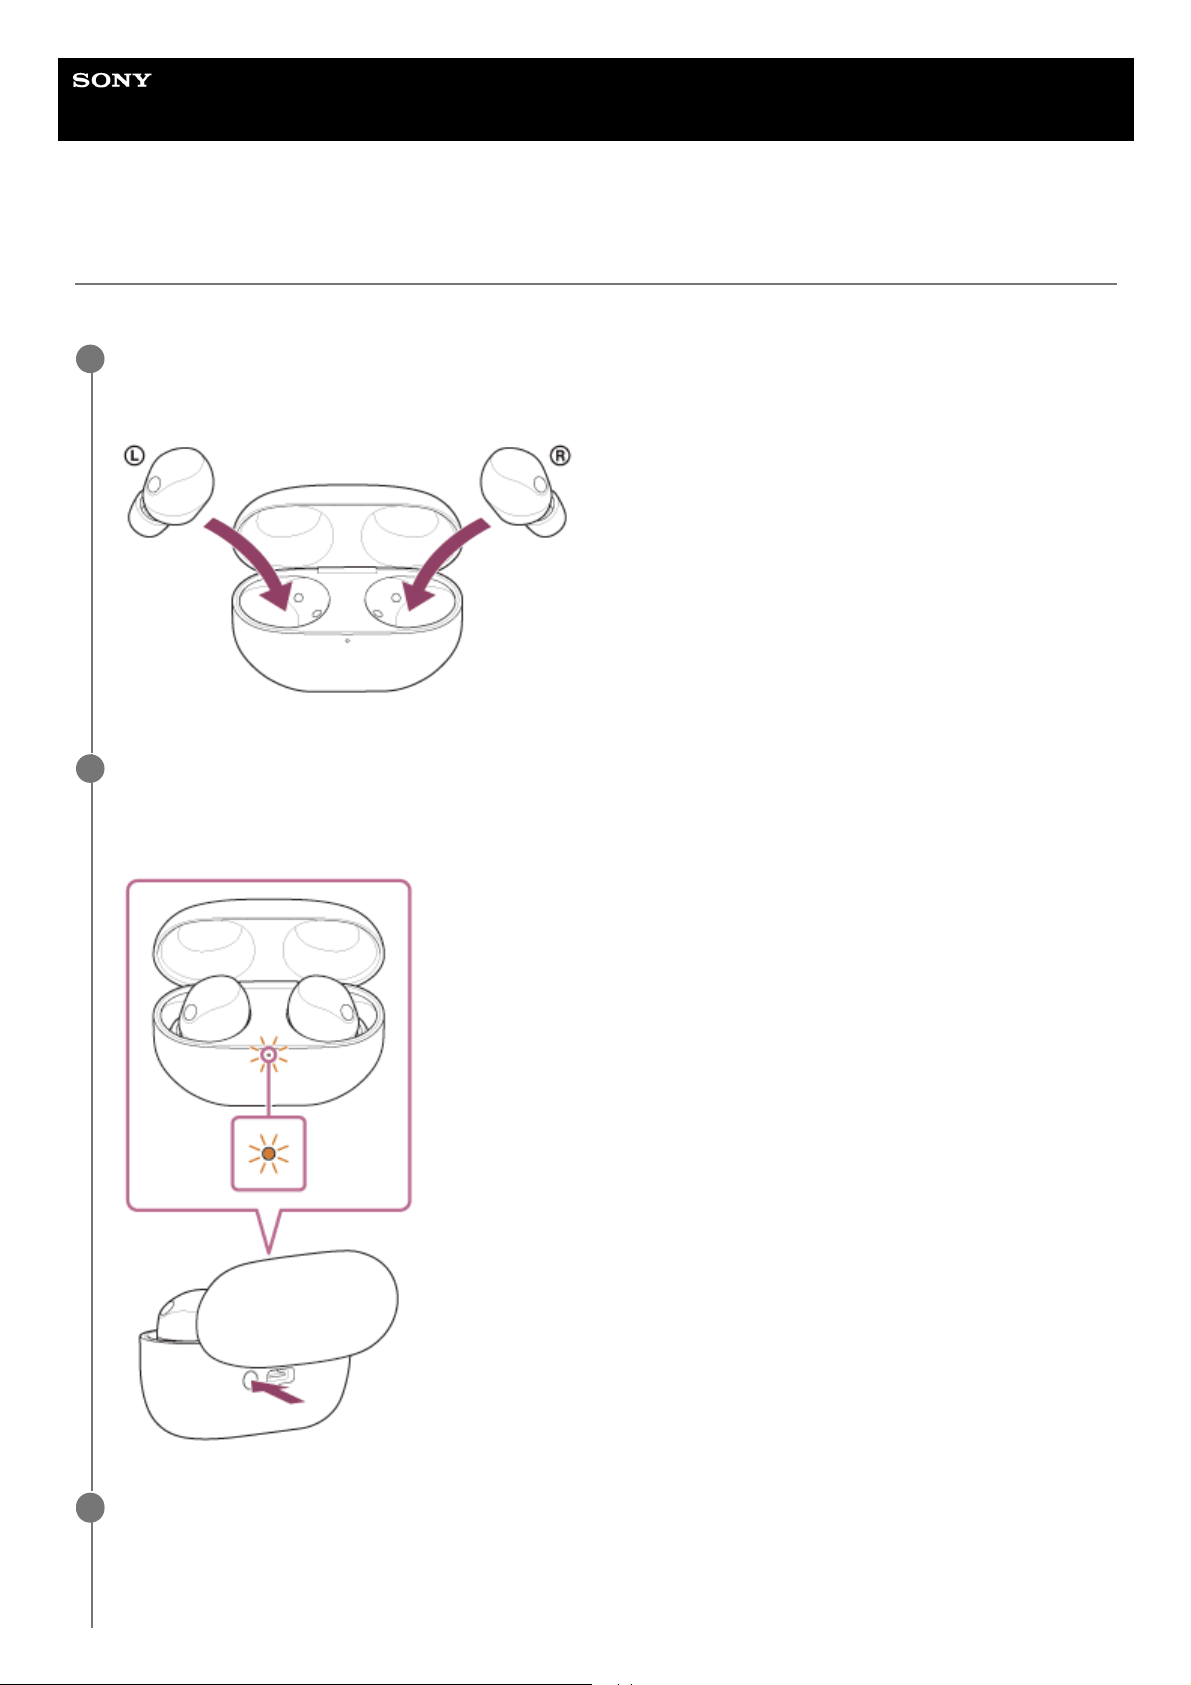
Help Guide
Wireless Noise Canceling Stereo Headset
WF-1000XM5
Initializing the headset to restore factory settings
If the headset does not operate correctly even after resetting, initialize the headset.
Set the headset units into the charging case.
Leave the charging case lid open.
1
Press and hold the initialize button on the back of the charging case for about 15 seconds or more.
The indicator (blue) on the charging case repeatedly flashes twice in a row, and then the indicator (orange) starts
flashing.
2
Release your finger within 5 seconds after the indicator (orange) on the charging case starts flashing.
When the initializing is complete, the indicator (green) on the charging case flashes 4 times.
3
175
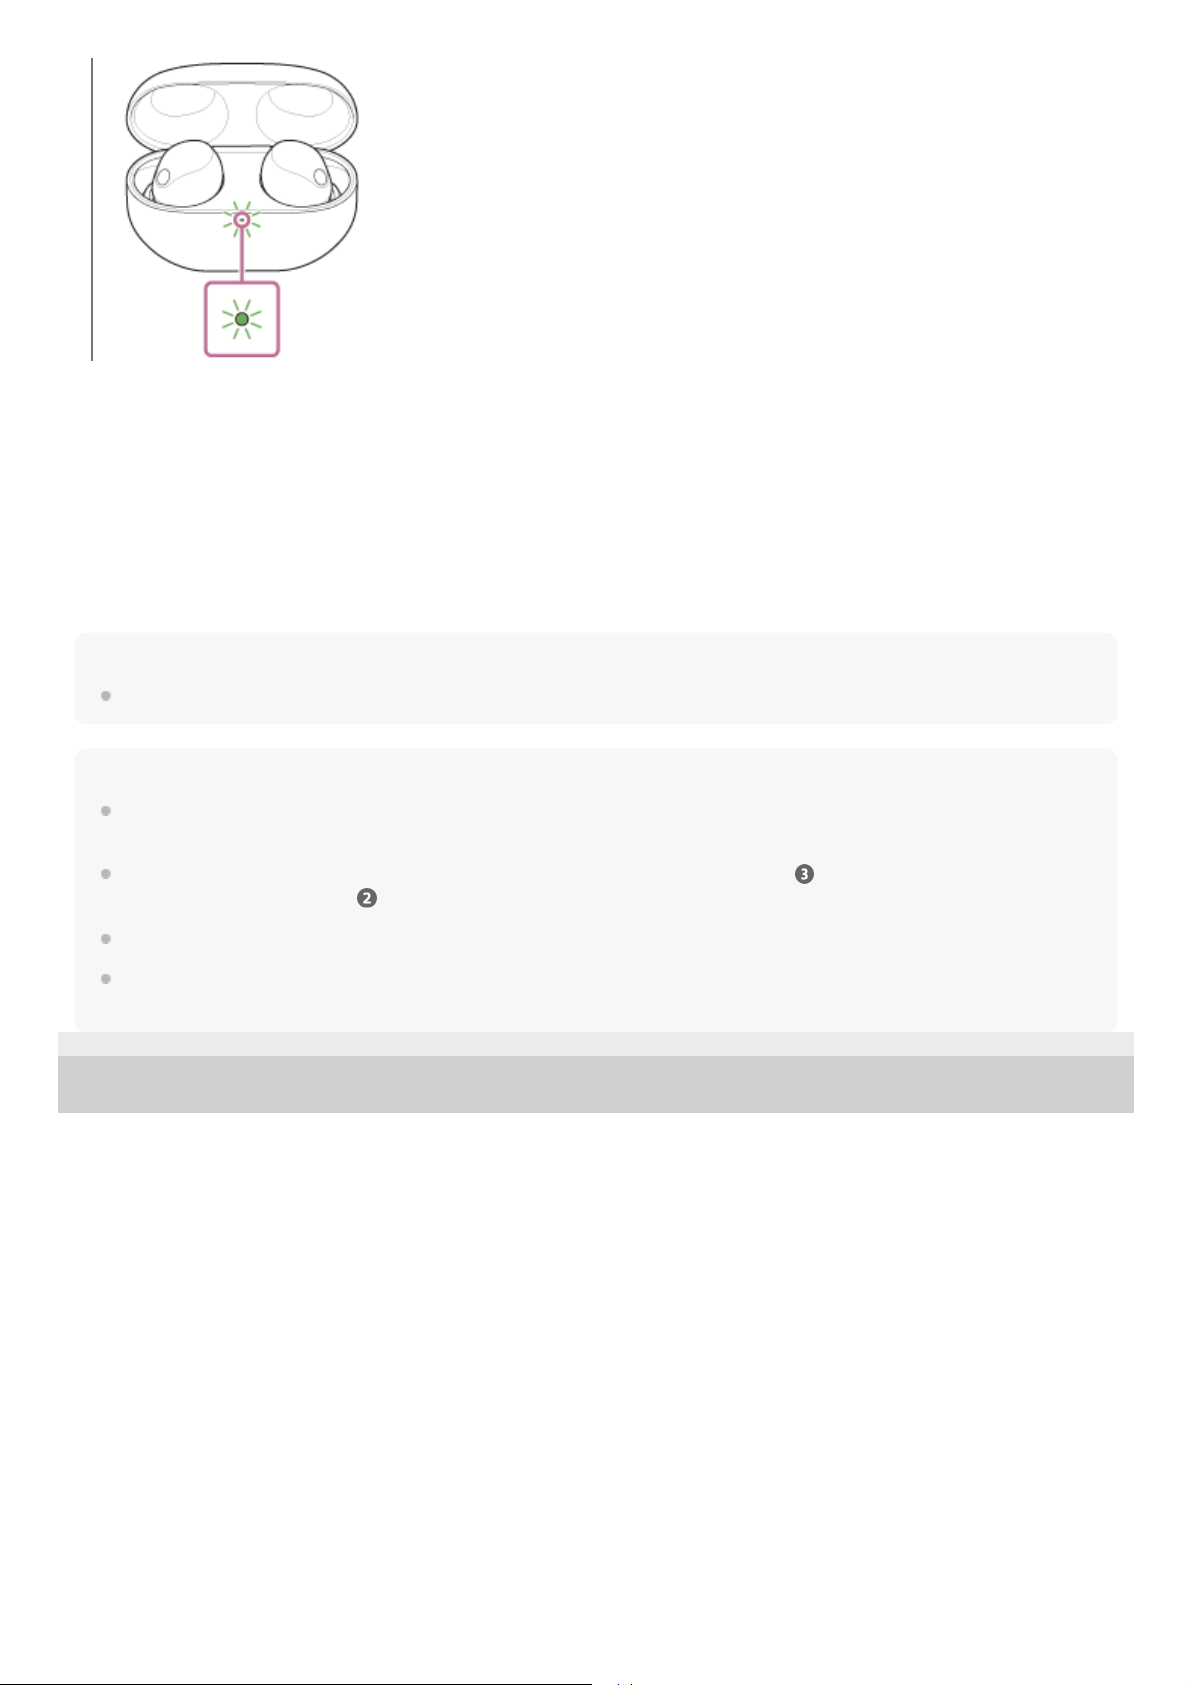
This operation resets volume settings, etc. to the factory settings, and deletes all pairing information. In this case, delete
the pairing information for the headset from the connected device and then pair them again.
If the headset does not operate correctly even after initializing, consult your nearest Sony dealer.
About the instruction manual video
Watch the video to find out how to initialize.
https://rd1.sony.net/help/mdr/mov0061/h_zz/
Hint
You can also initialize the headset with the “Sony | Headphones Connect” app.
Note
When the remaining battery charge of the charging case is not sufficient, the headset will not start initializing. Charge the
charging case.
If the indicator (green) on the charging case does not flash 4 times after performing step
, the headset has not been
initialized. Try again from step
.
If you have updated the software after purchasing the headset, the software is retained updated even if you initialize the headset.
When you initialize the headset to restore to the factory settings after you change the language of the voice guidance, the
language will not return to the factory settings.
5-048-298-11(1) Copyright 2023 Sony Corporation
176

Help Guide
Wireless Noise Canceling Stereo Headset
WF-1000XM5
Specifications
Headset
Power source:
DC 3.85 V: Built-in lithium-ion rechargeable battery
DC 5 V: When charged using USB
Operating temperature:
0 °C to 40 °C (32 °F to 104 °F)
Charging time:
Approx. 1.5 hours (Headset)
Approx. 2 hours (Charging case)
Note
Charging and usage hours may be different depending on the conditions of use.
Mass:
Approx. 5.9 g × 2 (0.21 oz × 2) (Headset (including earbud tips (M)))
Approx. 39 g (1.38 oz) (Charging case)
Communication specification
Communication system:
Bluetooth Specification version 5.3
Output:
Bluetooth Specification Power Class 1
Maximum communication range:
Line of sight approx. 10 m (32.8 ft)
1)
Frequency band:
2.4 GHz band (2.400 0 GHz - 2.483 5 GHz)
Compatible Bluetooth profiles
2)
:
A2DP/AVRCP/HFP/HSP
TMAP/CSIP/MCP/VCP/CCP
Supported Codec
3)
:
SBC
AAC
LDAC
LC3
177

Transmission range (A2DP):
20 Hz - 20 000 Hz (Sampling frequency 44.1 kHz)
20 Hz - 40 000 Hz (Sampling frequency LDAC 96 kHz, 990 kbps)
Design and specifications are subject to change without notice.
Compatible iPhone/iPod models
iPhone SE (3rd generation)
iPhone 13 Pro Max
iPhone 13 Pro
iPhone 13
iPhone 13 mini
iPhone 12 Pro Max
iPhone 12 Pro
iPhone 12
iPhone 12 mini
iPhone SE (2nd generation)
iPhone 11 Pro Max
iPhone 11 Pro
iPhone 11
iPhone XS Max
iPhone XS
iPhone XR
iPhone X
iPhone 8 Plus
iPhone 8
iPhone 7 Plus
iPhone 7
iPhone SE
iPhone 6s Plus
iPhone 6s
iPod touch (7th generation)
(As of March 2023)
5-048-298-11(1) Copyright 2023 Sony Corporation
The actual range will vary depending on factors such as obstacles between devices, magnetic fields around a microwave oven, static electricity,
reception sensitivity, antenna’s performance, operating system, software application, etc.
1)
Bluetooth standard profiles indicate the purpose of Bluetooth communications between devices.
2)
Codec: Audio signal compression and conversion format
3)
178
