BOOX Poke4Plus\Lite
Mighty E-ink Tablet
User Manual

Contents
1. Standard Accessories ..........................................................................................3
2. Safety Guide ..........................................................................................................4
3. Product Views ........................................................................................................6
4. Main Interface ......................................................................................................8
5. Library ..................................................................................................................21
6. Reader ....................................................................................................................32
7. Store ......................................................................................................................62
8. Storage ..................................................................................................................65
9. Apps ........................................................................................................................69
10. Settings ............................................................................................................103
11. Specifications ................................................................................................121
12. Declaration ......................................................................................................122

1. Standard Accessories
(1) BOOX Device x1
(2) Type-C Cable x1
(3) Quick Start Guide x1
(4) Warranty Sheet x1
Optional Accessories (purchased separately)
(1) Adapter
(2) Protective case
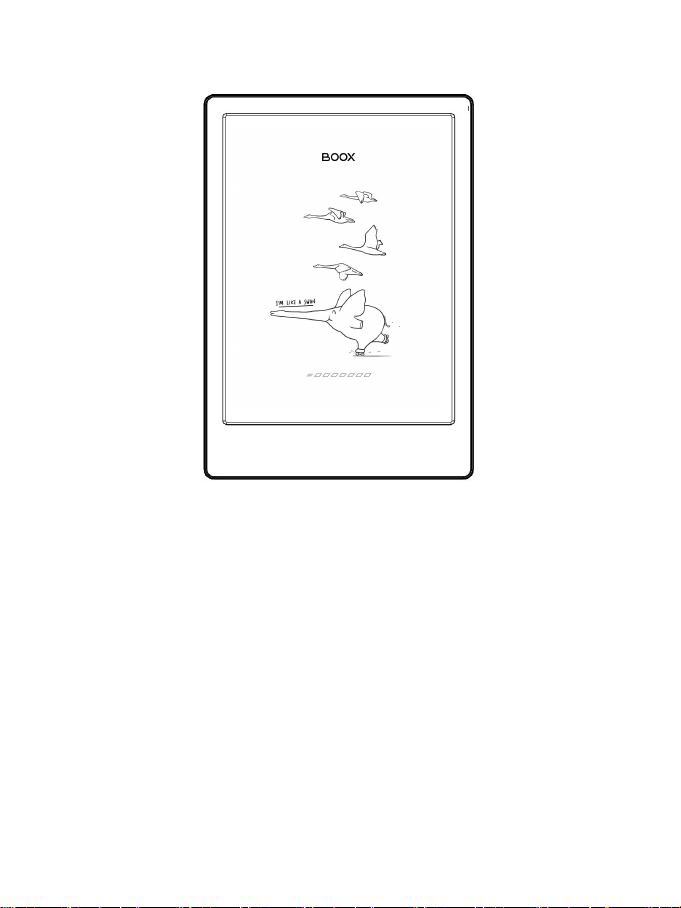
(Note: The E-books in the following illustration are not pre-stored)

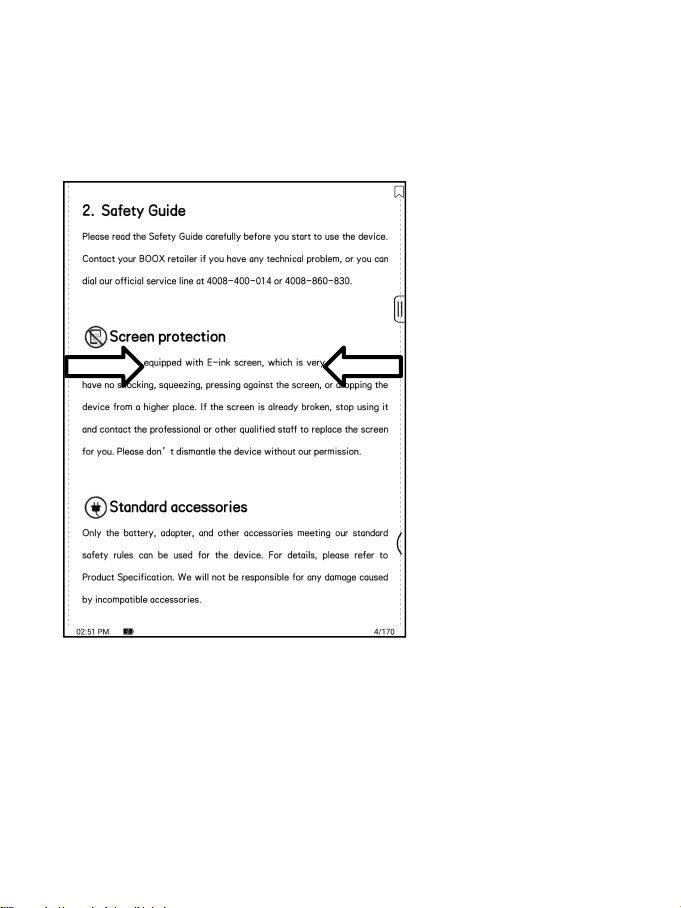
2. Safety Guide
Please read the Safety Guide carefully before you start to use the device.
Contact your BOOX retailer if you have any technical problem, or you can
dial our official service line at 4008-400-014 or 4008-860-830.
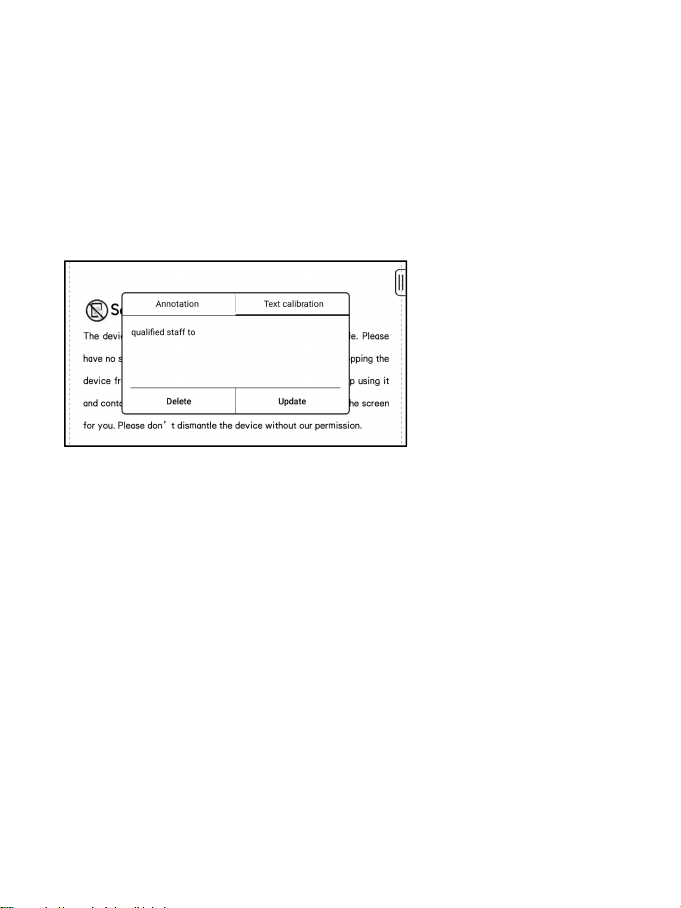
Screen protection
The device is equipped with E-ink screen, which is very fragile. Please
have no shocking, squeezing, pressing against the screen, or dropping the
device from a higher place. If the screen is already broken, stop using
it and contact the professional or other qualified staff to replace the
screen for you. Please don’t dismantle the device without our permission.
Standard accessories
Only the battery, adapter, and other accessories meeting our standard
safety rules can be used for the device. For details, please refer to
Product Specification. We will not be responsible for any damage caused
by incompatible accessories.
Stay away from liquids
The device is not waterproof. Don ’ t expose the device to a humid
environment or use it in the rain. Please keep it away from any corrosive
liquids.
Don’t dismantle the device
Please don’t dismantle the device in case of any damage.
Inappropriate battery model may cause explosion. Please contact official
after-sale team for battery replacement if needed. Users shall undertakes
the responsibility and deal with the obsolete battery if users replace
batteries themselves.
Using environment
The using environment of the device is 0°C-50°C.
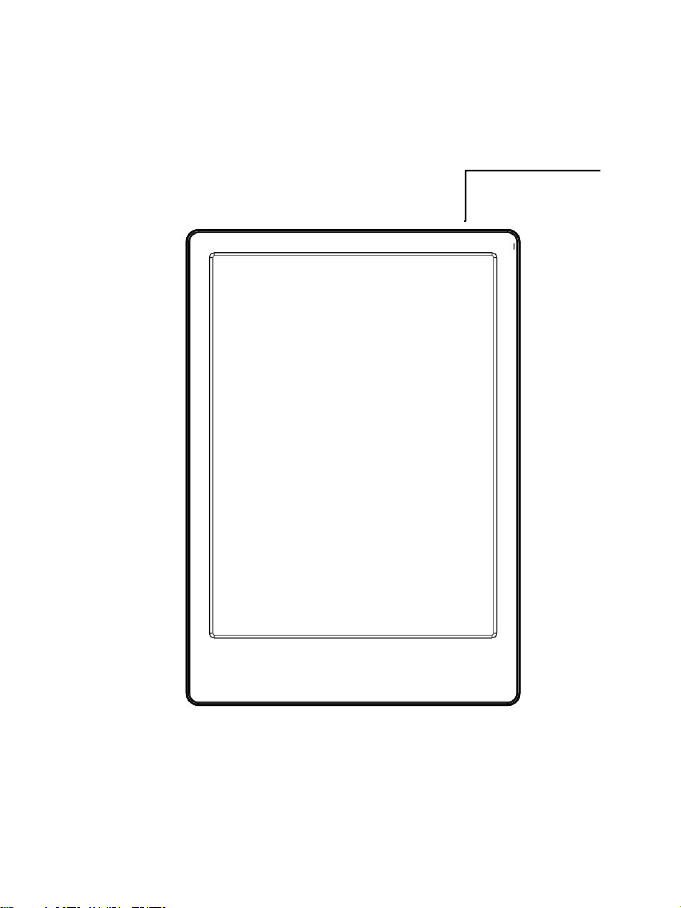
3. Product Views
Front View
Power

Bottom View
Button Function
Power/
sleep Button
Press the power button to turn on the device
Long-press the power button for 2 secs, then select “Power
off” in the menu to turn off the device
Press the power button and release quickly to let the
device goes into sleep mode
Press it again to wake up
Long-press for 10 secs to force shutdown
*Mic
Record voice
Recognize speech
(Only Poke4Plus support)
Type-C Port
Connect the device with PC to transfer data or charge
device.
Support Type-C earphone
Support OTG USB drive
*Mic
Type-C
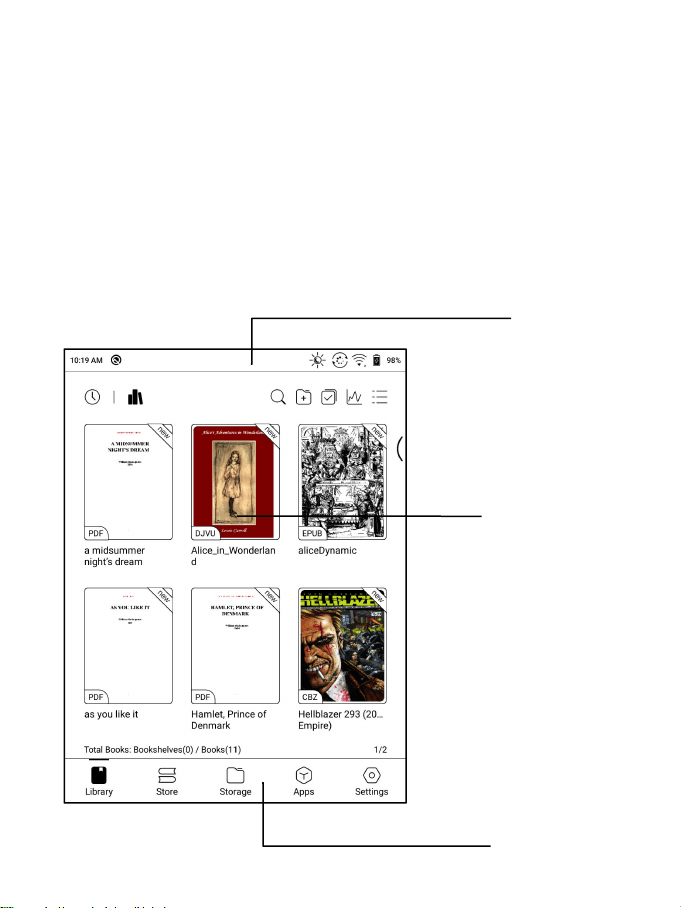
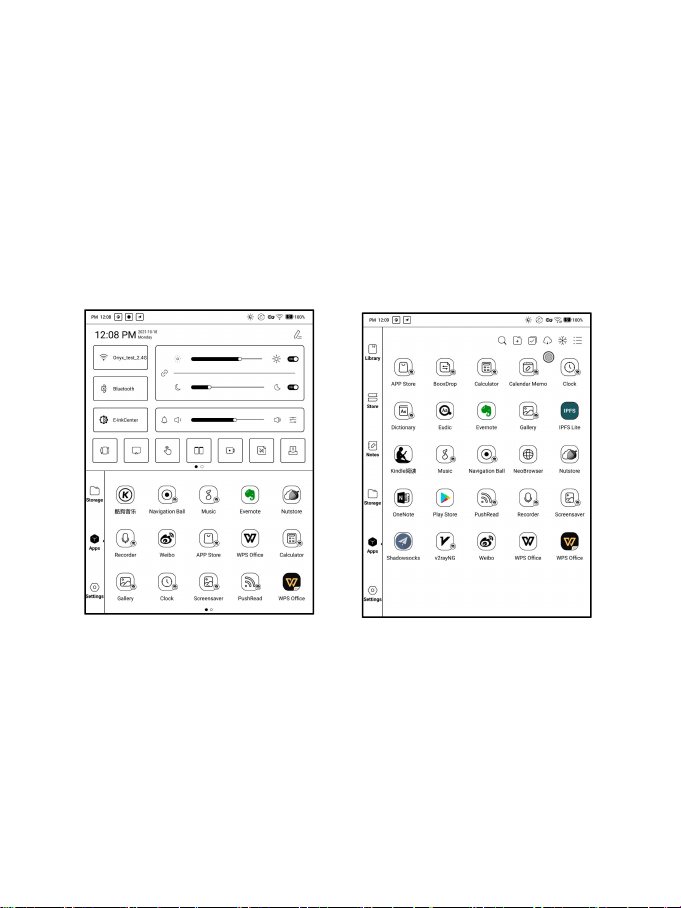
4. Main Interface
The main interface contains a system bar, content area, and function area.
The function area contains certain modules.
Double-click icons in function area can return to the main page of the
specific module.
Content Area
Function Area
System Bar

System Bar
This section displays the current state of the device, including: Time,
Notification, Refresh Mode, Wi-Fi Connection, Battery Usage. It is only
for status indication.
Split Mode (default):
Pull down " Notification Center" from the left side and pull-down Control
Panel from the right side.
Classic Mode:
Pull down both Notification Center and Control Panel in the same time.
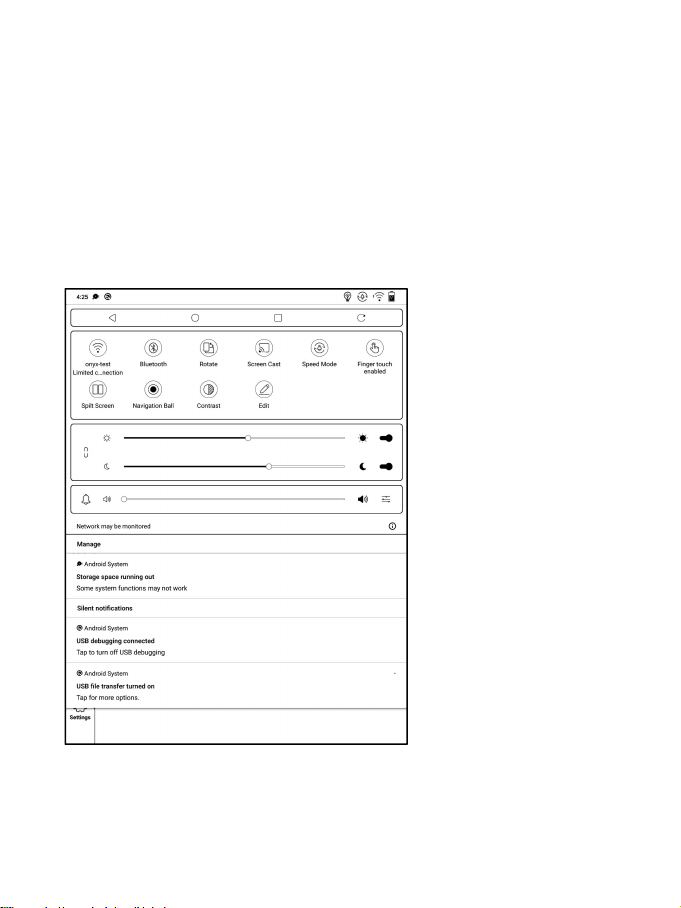
Notification Panel
This center contains information such as USB connection notification,
third-party push notification. Tap the notification to jump to the
corresponding app.
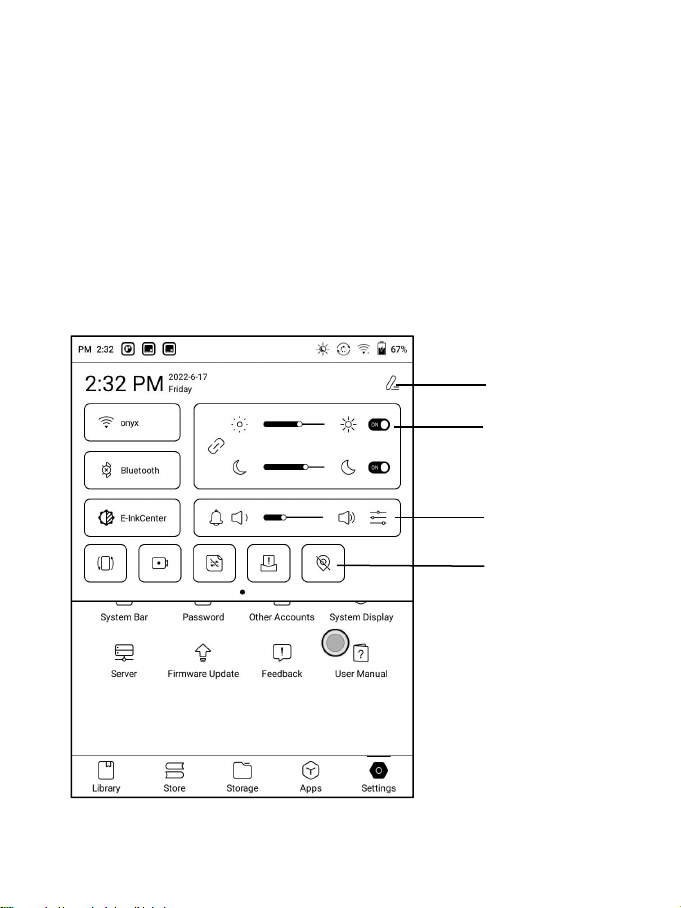
Control Panel
This panel contains Date and Time, Wi-Fi, Bluetooth, E Ink Center ,
Brightness adjustment, Volume adjustment. The above-mentioned items are
permanent and cannot be removed or edited.
Screen orientation, Hand Touch On/Off, Screen Record, BooxDrop, and
Feedback are optional items. You can edit them.
Shortcut switch
Edit
Volume adjustment
Brightness adjustment
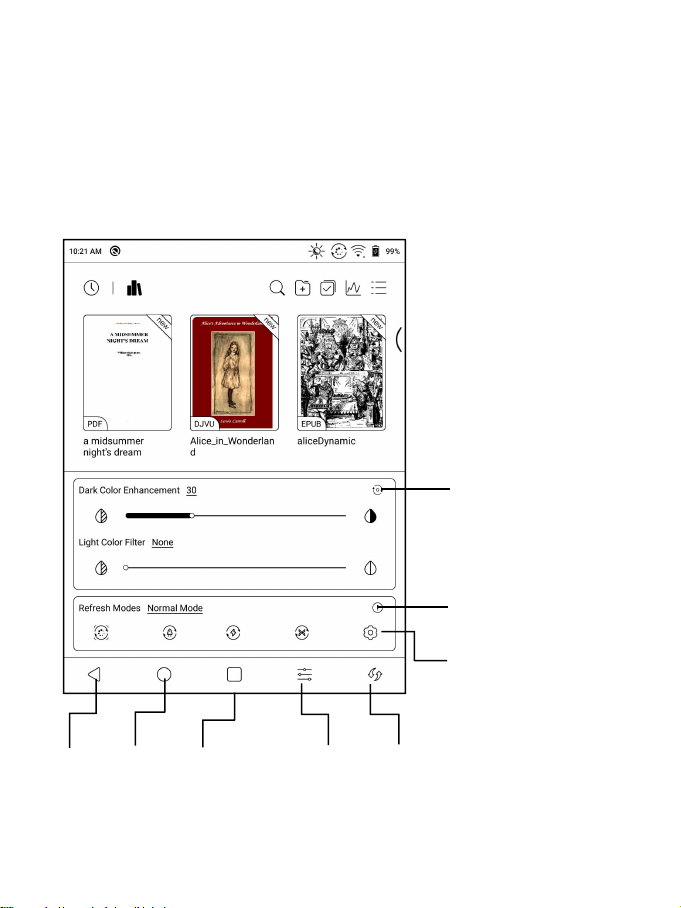
E Ink Center
Open it from Control Panel or swipe up from the bottom to open it. This
section includes Dark Color Enhancement, Light Color Filter, Refresh
Modes (System), Shortcuts...etc.
Back
Homepage
Multitask switcher
Full screen refresh
App Optimization
Reset
Optimization Guidence
More refresh settings

Refresh Modes
The system-level Refresh Mode takes precedence over the application
Refresh Mode. That is: when the system is set to the Normal Mode, the
application uses its own refresh settings; When the system is set to the
other modes, the applications will use the system's refresh mode.
There are 4 Refresh Modes:
Normal Mode (Default): Good display effect, suitable for ordinary text
reading.
Speed Mode: Slight ghosting and aliasing effect, suitable for thumbing
through eBooks with text and images.
A2 Mode: Slightly heavier ghosting and aliasing effect, suitable for
browsing images and text by quick sliding.
X Mode: Heaviest ghosting and aliasing effect accompanying detail loss,
suitable for browsing websites and video playback.
Use A2 Mode by default for scrolling
After you change the Refresh Mode, you can change contrast for a better
display effect.
The color model does not support X Mode.
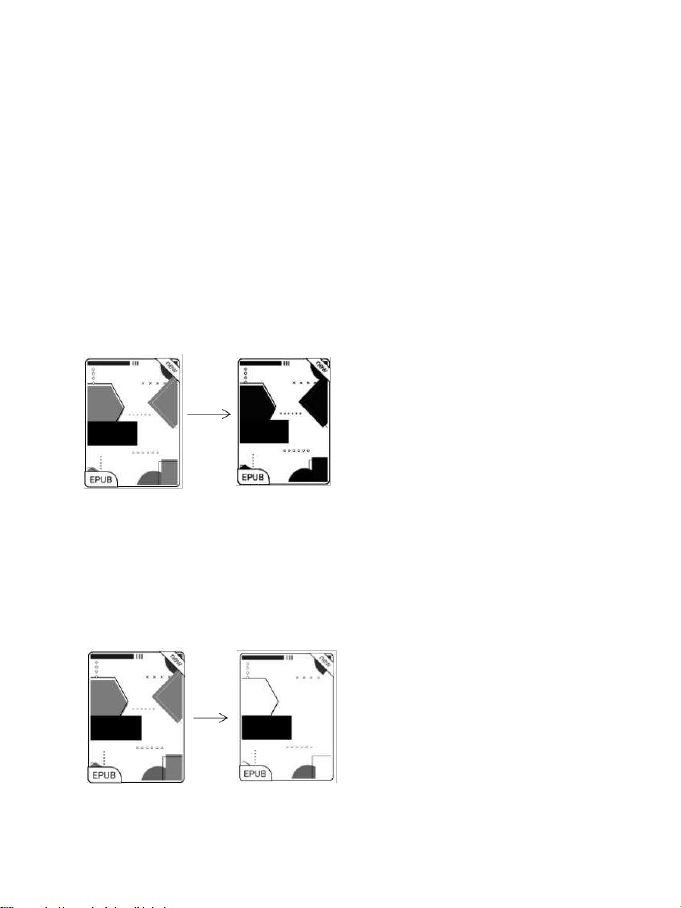
Dark Color Enhancement
You can deepen the darker color of the page to black, which is generally
used to enhance the foreground color, or the light-color page that needs
to be darkened such as color icons, PDFs with poor scanning quality, etc.;
Light Color Filter
This can dilute the lighter-color page to white. It is generally used to
bleach the background color;

Wi-Fi Setting
When using at the first time, you should enter into the Wi-Fi setting
interface to get a accessible connection. Then click the icon to turn
on/off the auto connection.
Bluetooth Setting
When using for the first time, you should enter into the Bluetooth setting
interface to match a device you want. The matched earphone, page turner
can be auto-connected by clicking the icon. Certain devices do not support
auto connection after disconnected.
Rotation
Easily change the orientation of the screen by clicking the direction you
want.

Function Area
The function area includes Library, Store, Storage, Apps, and Settings.
The default Homepage is Library. Double-tap the Navigation Ball to return
to the Homepage
Users can go to Settings / More Settings to set any of the other function
pages as a default Homepage.
Content Area
The contents are sorted by time by default. The contents includes the
following items.
Library
All books in supported format from internal storage are displayed here.
The scanning path can be modified via Library Settings.

Store
Enter into an online eBook store. Users can view more book information
and make a purchase. Purchased books will be added to the list of Library.
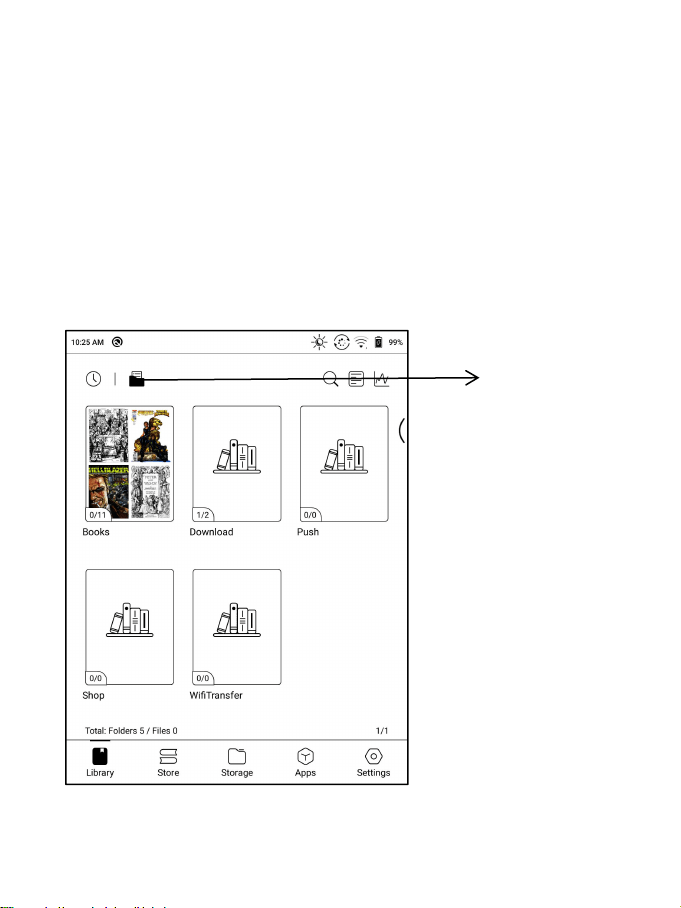
Storage
All folders from internal storage will be displayed here. Users can manage
documents and folders from the page.
Apps
All third-party apps are displayed here. Users are allowed to manage or
optimize the apps.
Settings
The list of system settings help to manage the device.
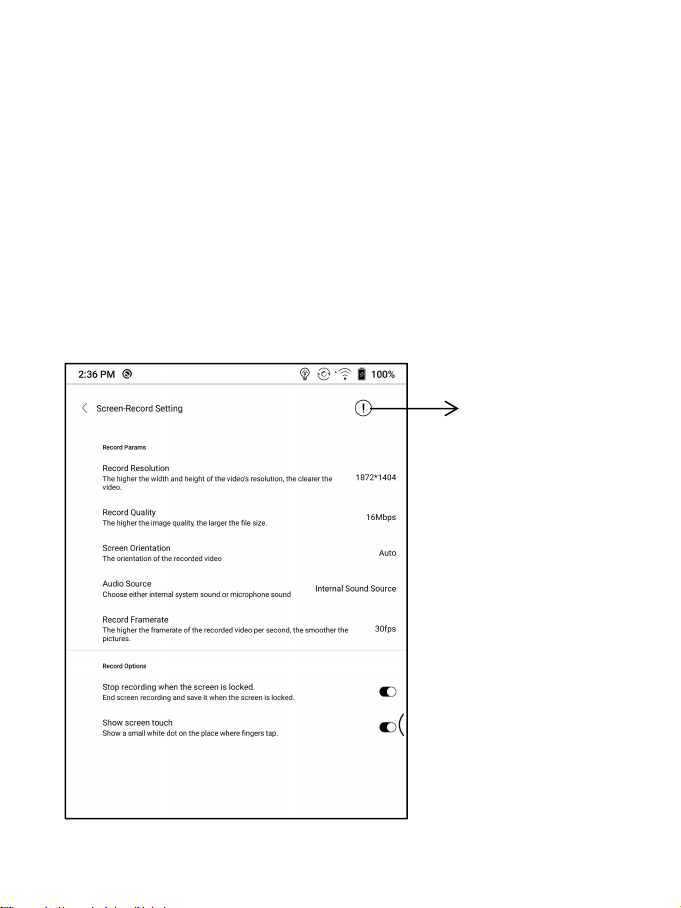
Screen Record
Long press Recording button on the screen to enter the Screen Recording
settings. You can customize Resolution, Image Quality, Screen Orientation,
Sound Source, etc.;
When you use Screen Recording for the first time, you are recommended to
adjust the relevant settings first.
Instructions

Tap the Screen Record icon to open the floating window of screen recording.
Tap the “Start” icon to start recording and tap the Close icon to stop
recording;
After you stop recording, there will a thumbnail displayed in the upper
right corner, and you can tap it to play or share; Long press the floating
window to drag it around on the screen. The floating window will not be
recorded into the video;
After the Screen Record is enabled, the floating window will always stay
on the upper layer of the screen. You can create new screen recordings
continuously. If you need to close it, you can manually tap X to close
it.
The Recordings’ format is MP4 and the save path is:
Storage/Movies/Captures
Preview
Share
Close
Start / Pause
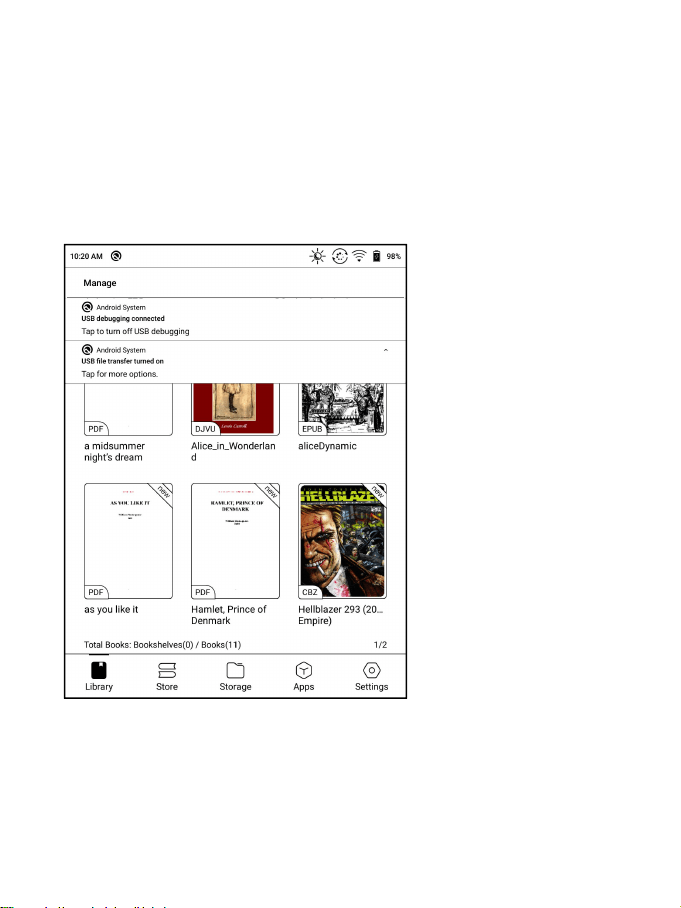
5. Library
The library only displays E-book documents in supported formats in the
storage. Book cover thumbnail is displayed by default. E-books are sorted
by the creation time.
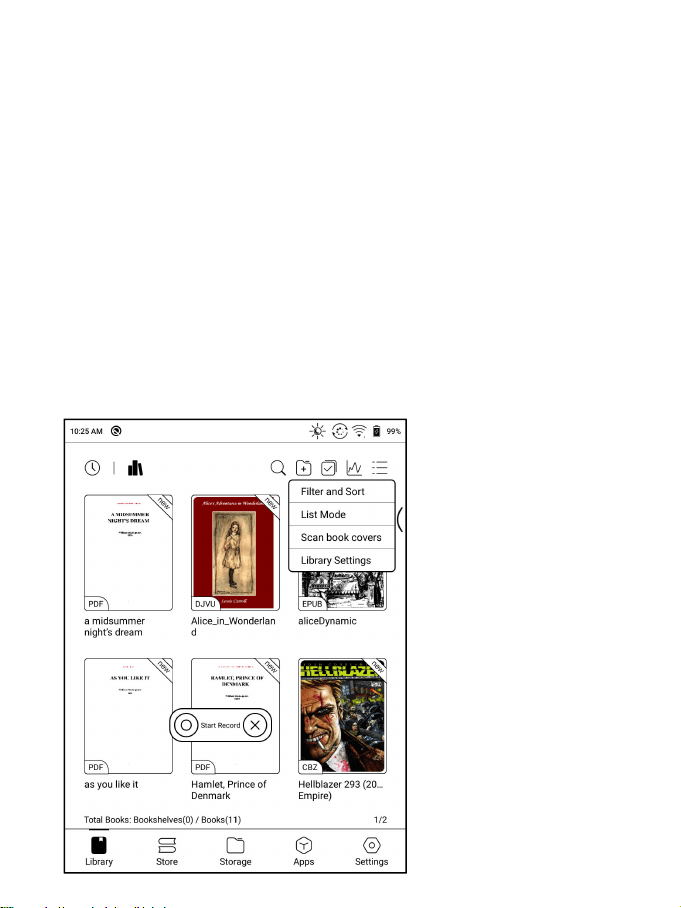
On the upper right working area of the Library, users can search, create
a new bookshelf, manage books in bulk, check Reading Statistics, pop up
the drop-down menu (including Filter, Refresh Library, Scan Covers,
Library Setting, Switch to List View)...etc.
Library Display Switch
Click on these icons to switch the library display. By default, it
auto-scans and loads all the supported documents in specified paths,
sorted by a specified way.
Another one is to display the content based on the structure of storage.
The icons change after clicking on it.
Switch mode
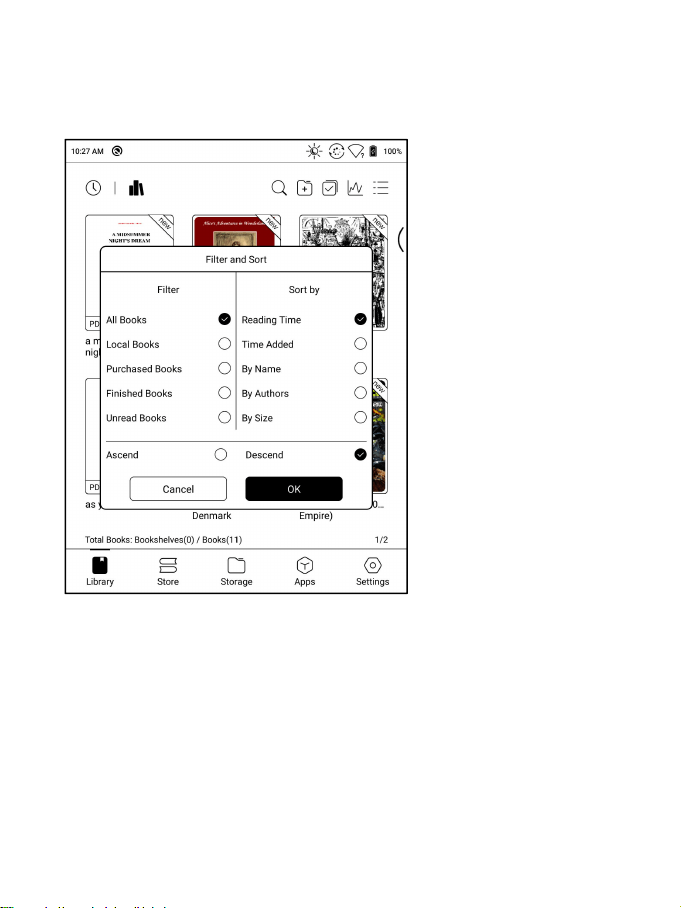
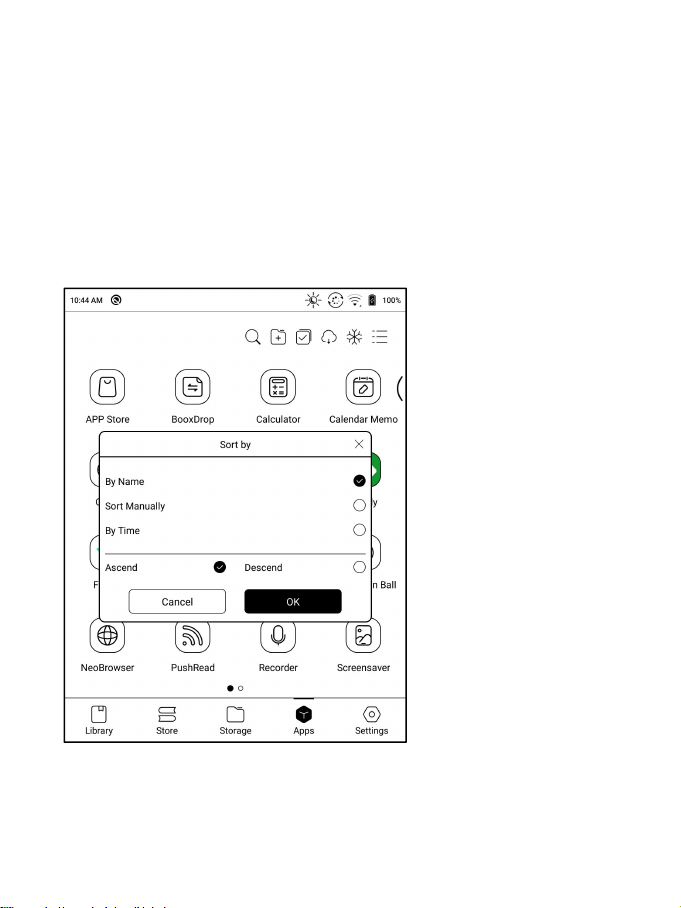
Filter & Sort
By default, it shows all books in descending order.
Refresh Library
“Refresh Library” gets all documents in supported formats scanned and
rebuild library list. This function does not delete the reading history.
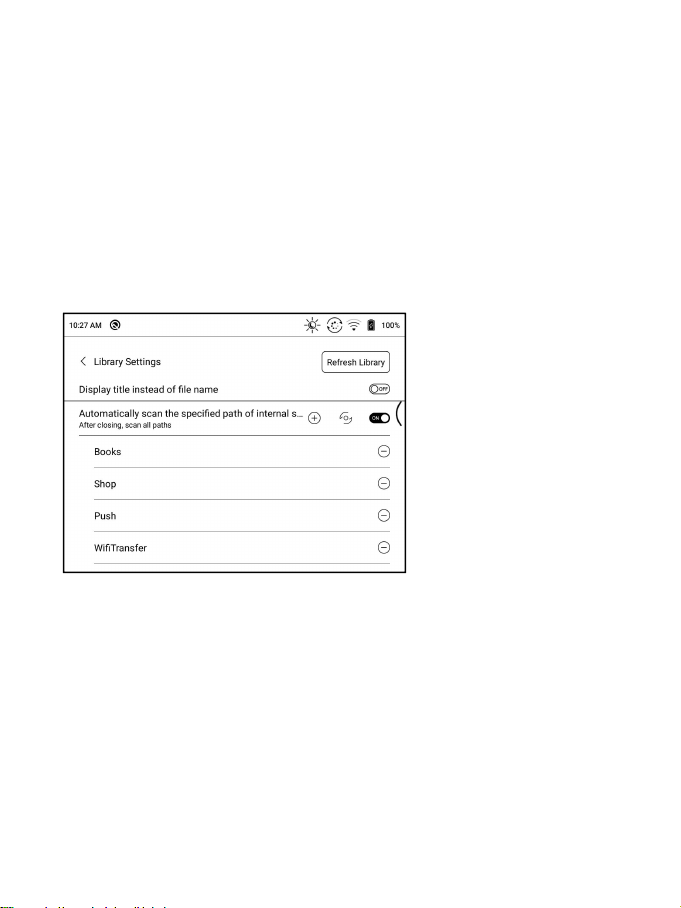
Library Settings
It supports custom scan path. You can set certain storing path as Automatic
Scan;
After the scan path is set, the Library will be reloaded. The books that
are not in the scan path will be removed. If you need to read the books,
you can find the original file in the storage;
Sub-library Attribute
Long-press on sub-library cover to view more information about
sub-library. To delete or rename sub-library are allowed. When deleting
sub-library, the containing books will be moved to Library and will not
be deleted with the sub-library.
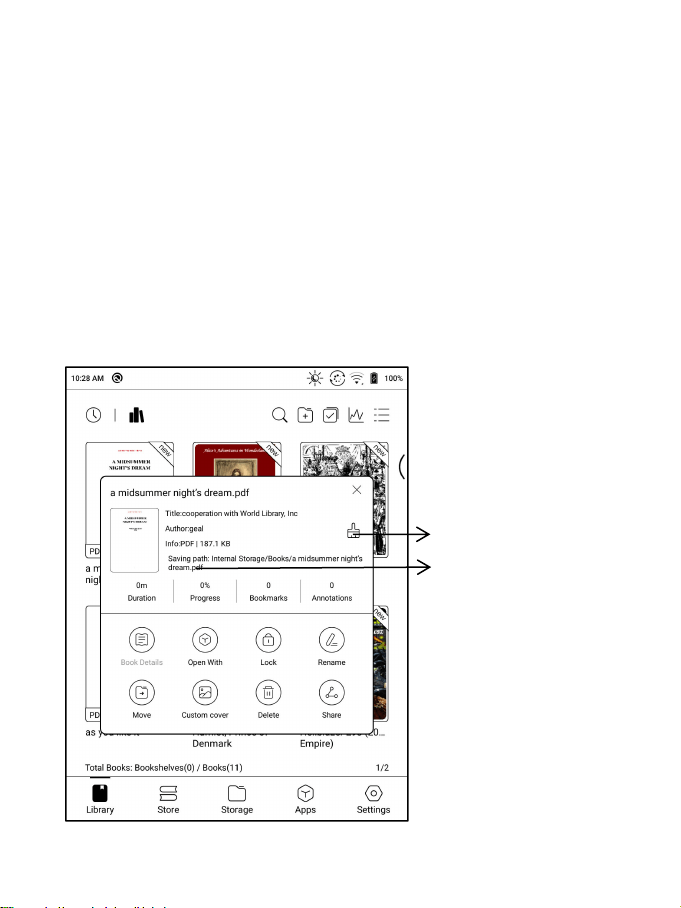
E-book Attribute
Long-press on book cover to view more information about E-book name,
author, format, size, reading progress, book detail(only available for
the E-books of Store), open way, Lock、rename, move(to sub-library) and
delete. One E-book only can be added to one Sub-library.
As for the books purchased from the Store, is allowed to view book details
by jumping to the Store page.
Clear settings including : clear password default settings , clear reading
Clear settings
Jump to Storage
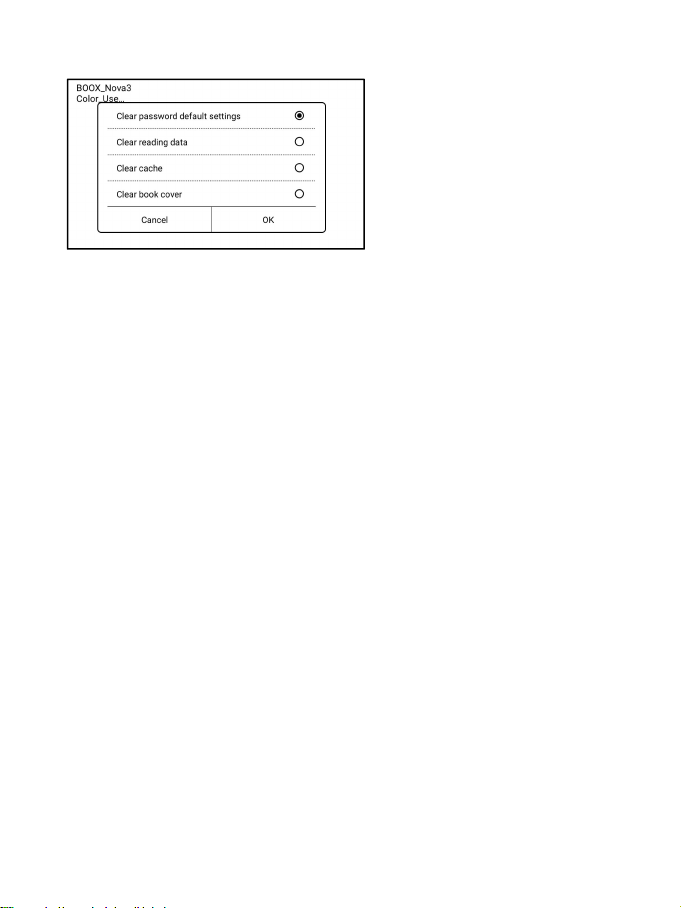
data , Clear Cache、Clear book Cover;
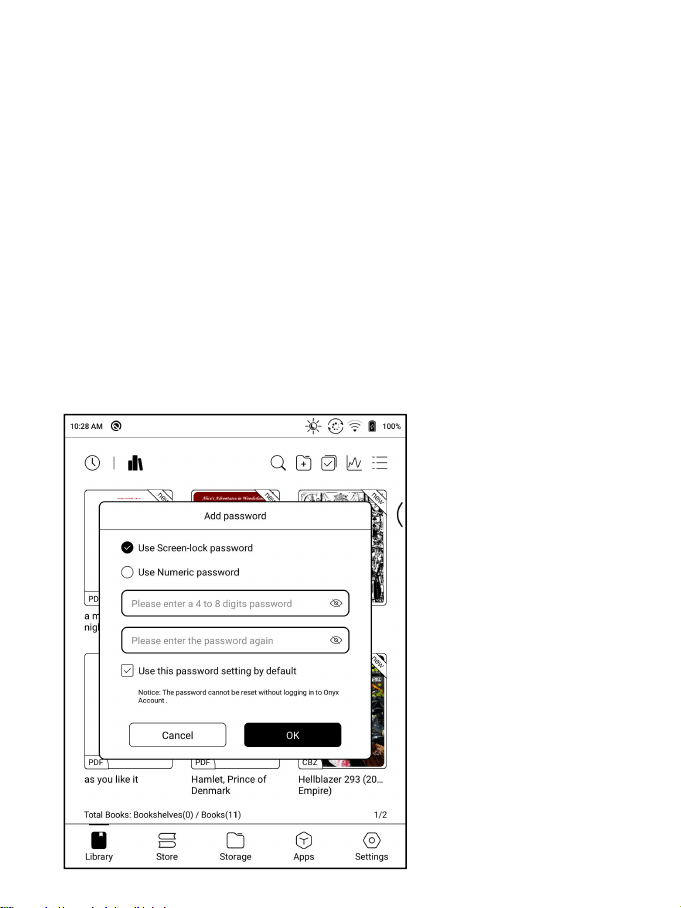
Lock ( Reading Password)
User can add (reading) Password to lock each file in order to protect
personal reading data;
The Password is used to open the file, but it only applies to the same
device and NeoReader. If you copy and export the file to other devices
or Apps, the Password will become invalid.
You can use the same Password as the Screen Lock. Or you can set a different
digits Password.

Digits Password only support one Password. After you have set the digits
Password, you do not need to set another digits Password and only need
to add the Lock.
Reading Password supports individual setting or setting in bulk (setting
in bulk is to add Locks). Currently It does not support to add Passwords
to all files directly.
If you choose to use this Password Setting by default, you can add Password
to other files quickly and do not need to re-select the Add Lock Option
every time after the Password is set for the first time.
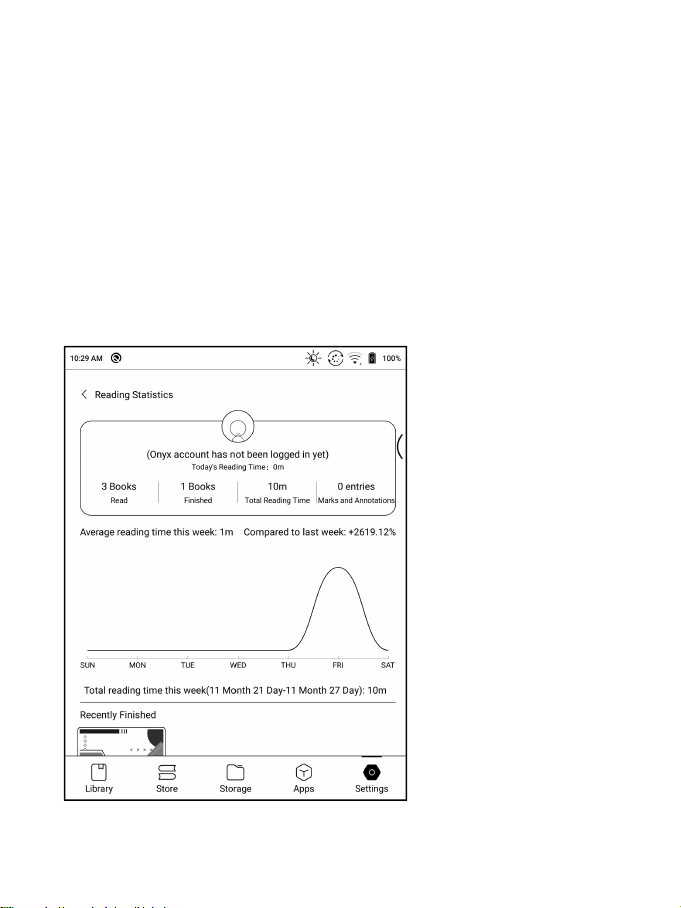
Reading Statistics
This page includes the Reading Time of Today, The Books that Have Been
read, The Books that Have Been Finished, Total Time, Highlights and
Annotations, and Recently Finished Books;
The average reading time this week is based on 7 days and calculates the
average daily reading time during the week;

Average Reading Time Distribution includes the reading time of all days
since Reading Statistics is turned on.
Under Reading Statistics, only highlights and annotations can be jumped
to and the books that recently have been finished can be opened. Other
data is only for analysis purpose.
The reading data of each device can only be available on the same device.
You cannot check the statistics of this device on another device.
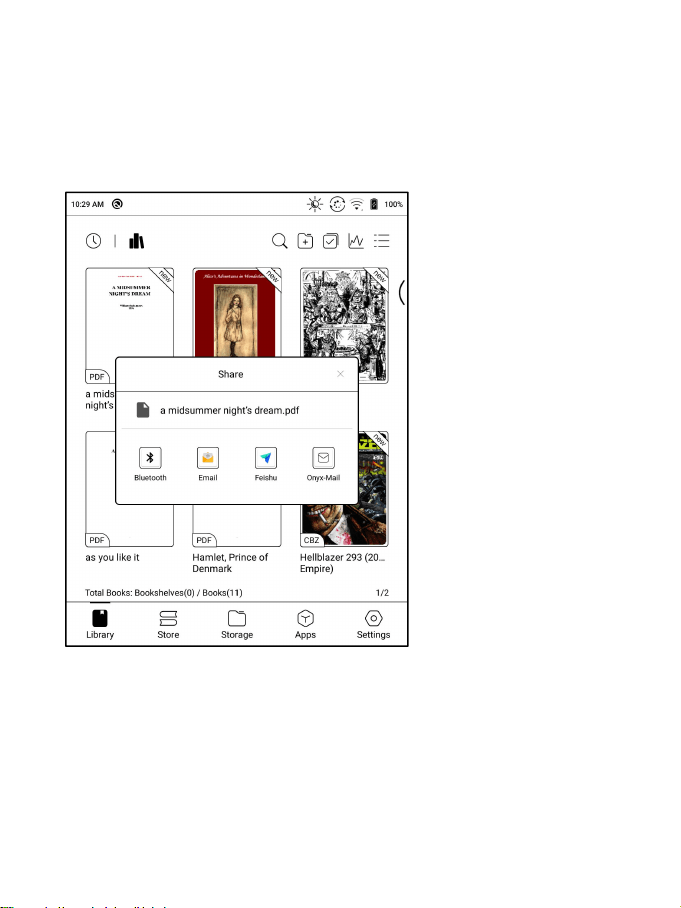
Share (Third-party App)
This supports sharing files through third-party App. The sharing path is
automatically obtained according to the installed Apps.

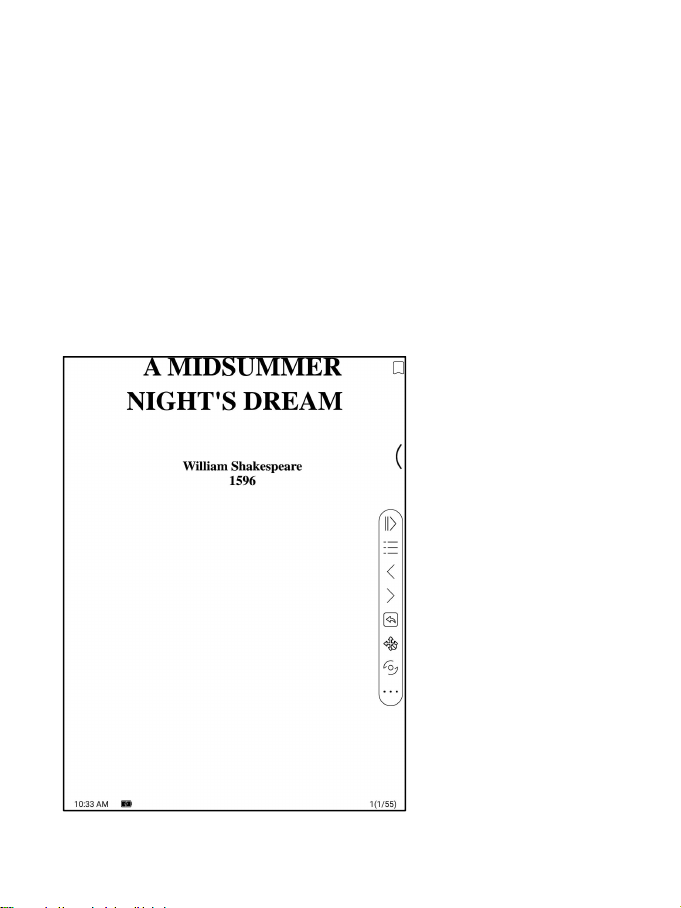
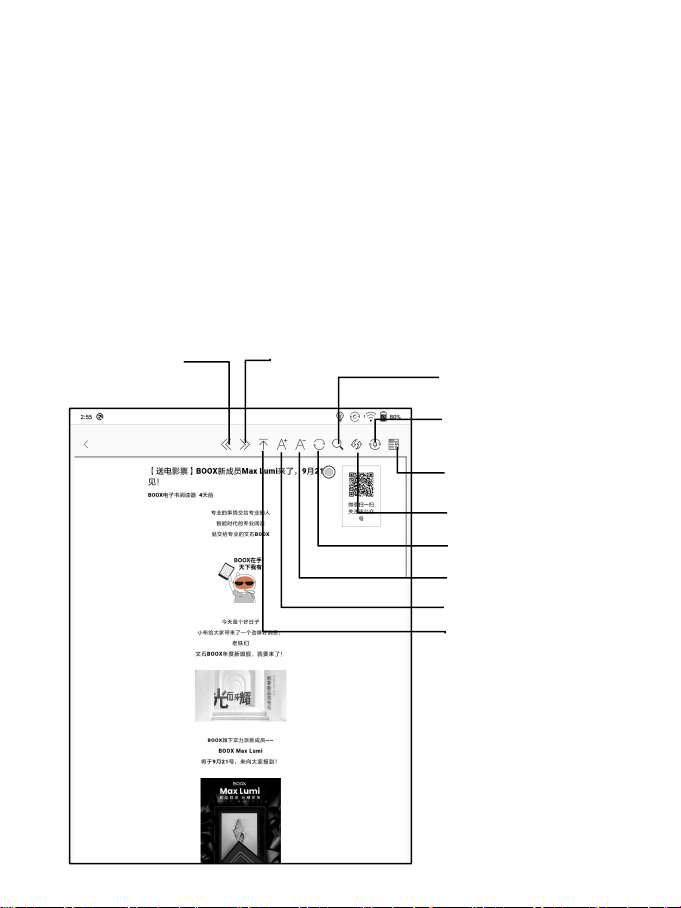
6. Reader
Tap any E-book cover to open an E-book. Full-screen reading without
showing status bar is set by default.
To pull down from the top of the screen can call out the status bar.
To tap on the center of the screen can call out the menu bar for switch
among different documents or other functions
Dictionary
Search
Other functions
TTS
Slideshow
Thumbnail view
redo
OCR
Open file
undo

Floating Toolbar
You can choose to activate the Floating Toolbar for the first time when
you open a file. Or you can go to Settings / Floating Toolbar Settings
to enable it and customize the function buttons in the Floating Toolbar.
The Floating Toolbar includes: Hide, Menu, Prev Page, Next Page, Cancel
(Progress)
Long press on the Floating Toolbar, you can drag it around on the screen.
You can expand or contract the Toolbar to the edge to avoid cover any
text on the screen. When you need it, just swipe from either side of edge
to the other side to expand it.
When the page is zoomed in, the Floating Toolbar would automatically
expand proportionally in order to manage the zoomed-in page better.
Under zooming status, singe tap on the screen is set for turning sub-pages
of each page(each original page will require several time page-turns to
be completed). But tapping the virtue page-turn buttons on the Floating
Toolbar is set for turning the whole original page.
You can disable the Floating Toolbar by going to Setting - General Setting.
When it is contracted to the edge, you can swipe from either side of edge
to the center of the screen to expand it.
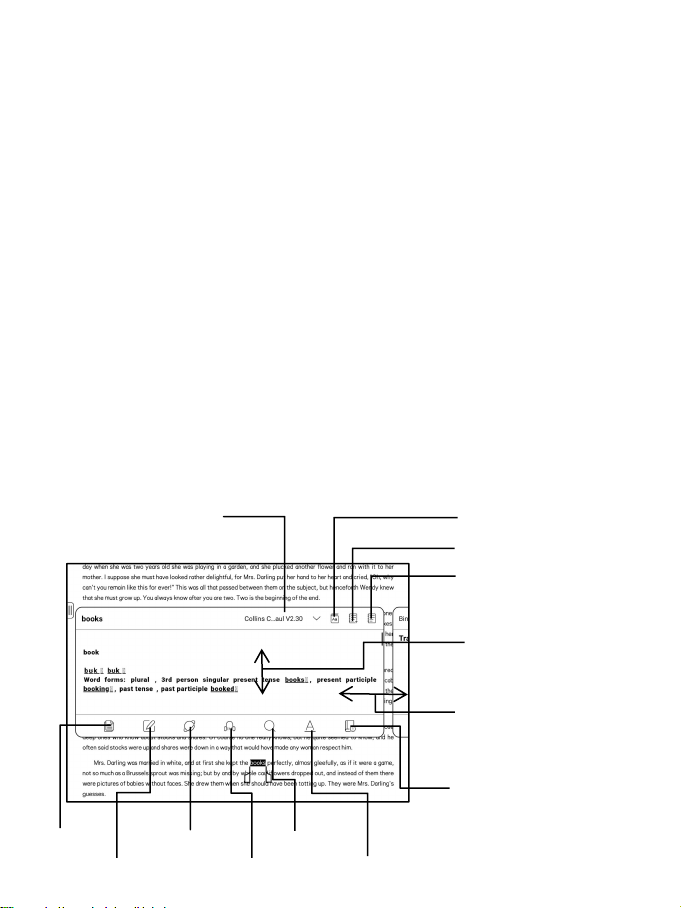
Word Menu
Long-press on the word to pop up dictionary dialog for look-ups.
English word recognition and look-ups are supported.
Through the drop-down list on the top right of the dialog, the dictionary
can be switched to others.
Users can download and install the dictionary themselves. Put dictionary
file on the path root directory\dicts\xxx (e.g
Storage\dicts\English-French), or download dictionary online directly.
Dictionary is available to use after being installed.
Tap on any position out of the dialog to exit the dialog.
Switch Dictionary
Jump to Dict App
Add to Vocabulary Builder
Jump to Vocabulary Builder
Turn page
Swipe to translation window
Third-party Dict
(Required to install separately)
Search
Highlight
Web search
TTS
Copy
Annotation
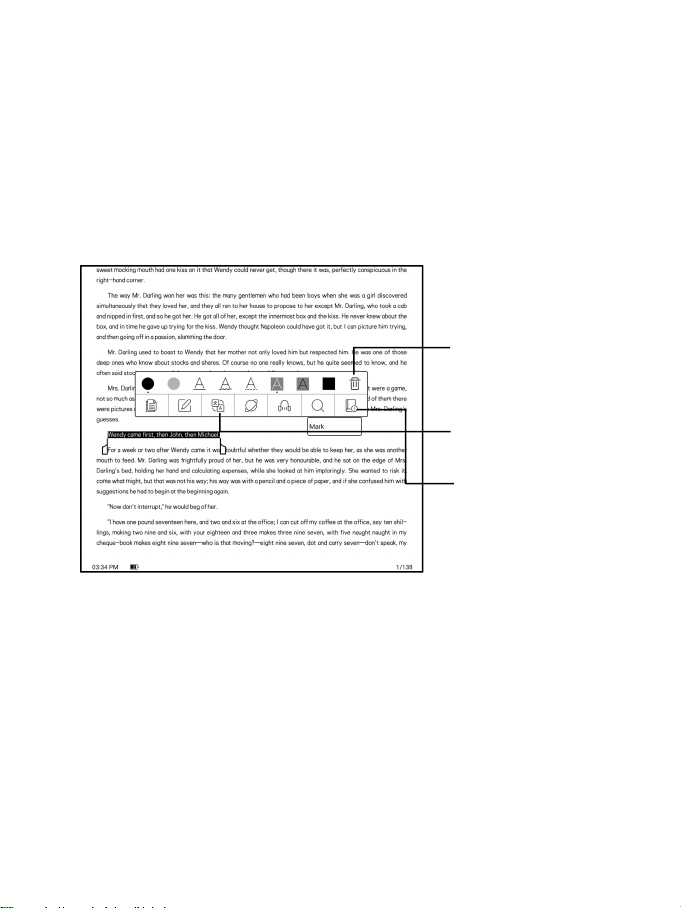
Long press on any word and drag to select the text you want to mark.
The highlight is set by default for selected text. Users can switch among
highlight, underline and others, the color highlight can be in black or
grey. The mark setting remains after a change. The marks before the change
will not be affected.
Tap on any position out of the dialog to exit the dialog.
Choose “Annotation” to pop out a text box to add notes if needed.
Delete highlight
Switch translation
Third-party Dict
(Required to install
separately)
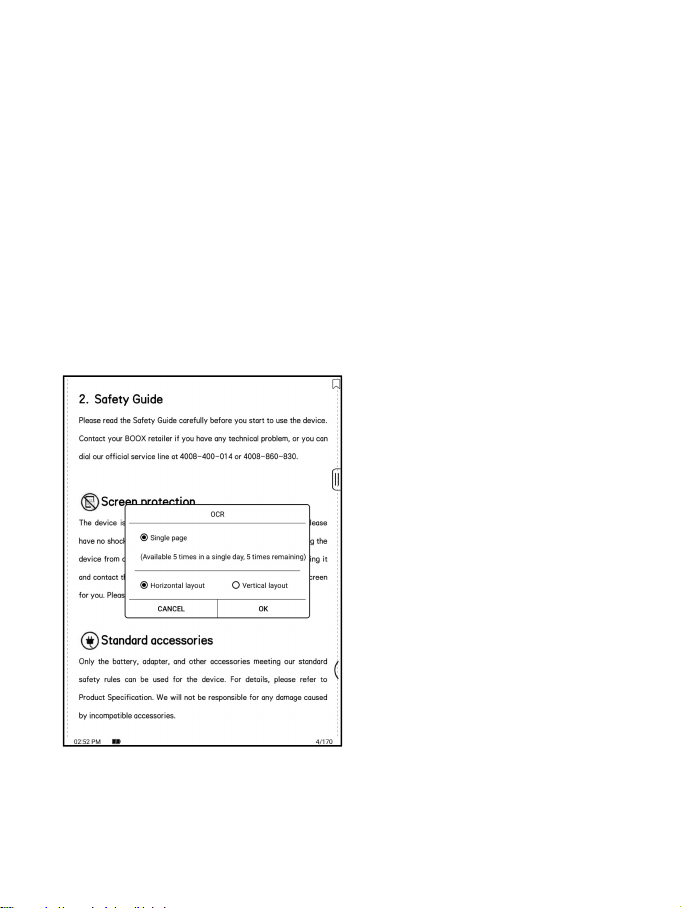
OCR (Beta Version)
Only supports pages in image formats PDF, CBR, CBZ, DJVU, and PNG.
Recognize one page only each time.
Choosing horizontal or vertical according to the document layout can
improve the recognition accuracy.
Recognize 5 times a day when you are not logged in to your ONYX account.
Recognize 10 times a day when you are logged in to your ONYX account.
You can long-press text to add annotation and lookup dictionary on the
recognized pages
If some individual characters are not recognized correctly, you can switch
to the original text in the annotation pop-up window to correct them, and
manually modify the recognized text content (Do not change the original
page text);
Pages recognized by OCR show the recognition mark in the upper right corner,
and the recognized pages can be viewed in the Directory-Bookmark, which
is convenient for quick locating and jumping;
Tapping the recognition icon again will clear the OCR content;
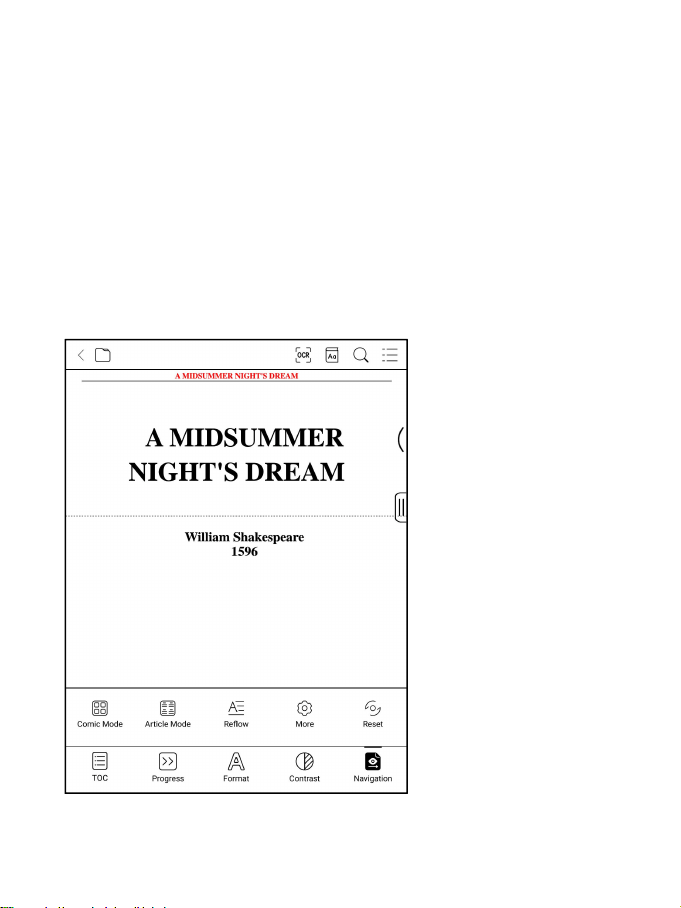
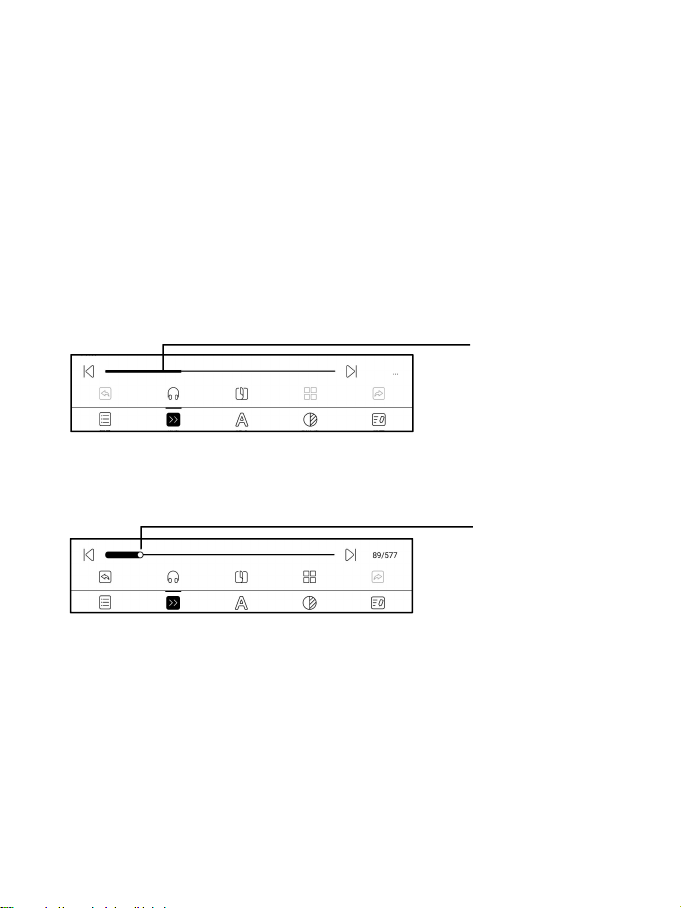
Bottom Menu Bar (PDF format)
This bar includes settings of TOC, Progress, Layout, Contrast,
Navigation.
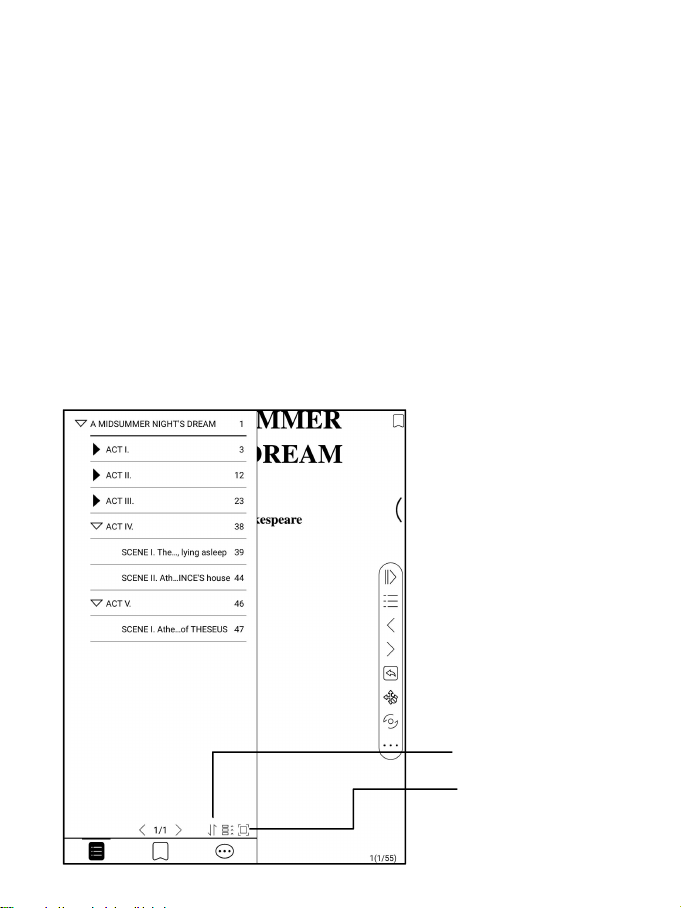
TOC
TOC contains Table of Content, Bookmark, Annotation.
TOC supports three-layer hierarchy. The current layer is underlined. Jump
to the corresponding page when tapping any of the layers.
Tap on any position out of the TOC to exit.
Order
Full screen

Bookmarks
Without calling out the menu, bookmark the reading page by simply tapping
a tag on the top right corner of the screen. Tap it again to un-bookmark
the page.
The bookmarks can be checked under the path of Doc-Bookmark, where users
can delete bookmarks.
Jump to the corresponding page by tapping any of the bookmarks.
Annotation
All highlighted/underlined/annotated content would be listed under the
page of Doc-Notes for further searching, editing and deleting.
Jump to the corresponding page/content by tapping any of the lists.
All contents on the Annotation page can be exported in txt format. Exported
files are saved under the directory folder Storage\Note\(same name as the
source file).
Progress
It displays the chapter name (book name if no chapter), page progress,
last/next chapter, page number, slideshow, undo, and redo.
Tap on the page number to enter a quick-flip interface. Click the page
numbers again and input number to jump to the page directly.

PDF files support for searching and using the files’ own page number
(custom page number type)
Format
This includes settings of Paging, Zoom, Crop, and Margin.

Zoom:
Zoom in, zoom out, and partial zoom are supported. Users can also pinch
fingers together or apart to zoom out or in on the reading pages.
When a single page exceeds the display area of the screen after zooming,
you can long press and drag the display area around. Single tap is to turn
sub-pages. You need to use the virtual page-turn buttons to turn the
original whole page;
Crop:
Auto-crop according to the margin set by users.
Margin:
The default reserved blank area during automatic cropping. You can
manually modify the automatic cropping area.
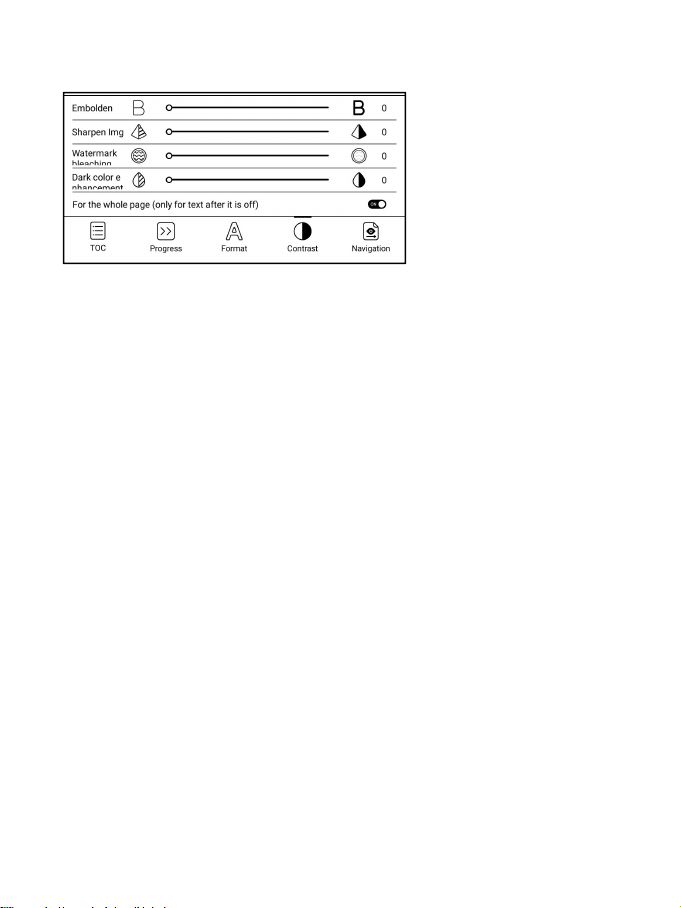
Contrast
Embolden only applies to text in PDF.
Sharpen Imag can sharpen the images.
Watermark Whitening can whiten the light-colored images or background in
the pages.
Dark Color Enhancement applies darker display to either the whole pages
or text only.
Navigation
Navigation allows users to have options of Reset, Comic Mode, Article Mode,
and More Settings including Crop, Split, and Subpage Order.
Comic Mode: the screen will be divided into four subpages and the reading
order is upper right – upper left – bottom right – bottom left.
Article Mode: the screen will be divided into four subpages and the reading
order is upper left – bottom left – upper right – bottom right.
More settings
Manually adjust the settings of area cropping, page split, and subpage
order.
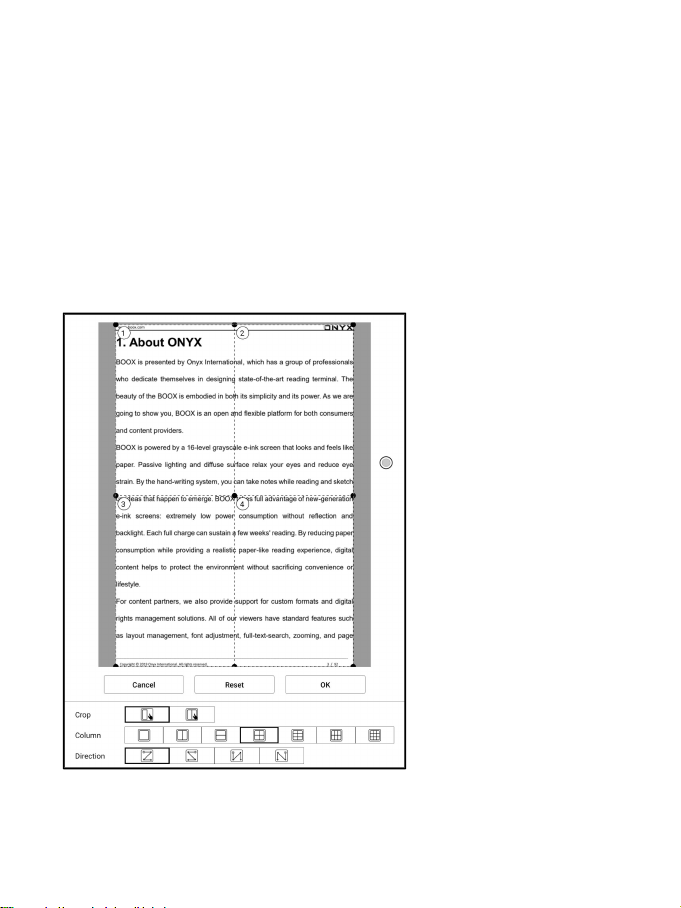
Crop: Manually select the cropping area for single or double pages.
Split: Split the pages into specified subpages in different ways.
Order: Decide the initial position and reading order for subpages.
Reflow
Reflow now supports both scanned and text versions.
Reflow is only available for PDF/DJVU/CBR/CBZ documents.
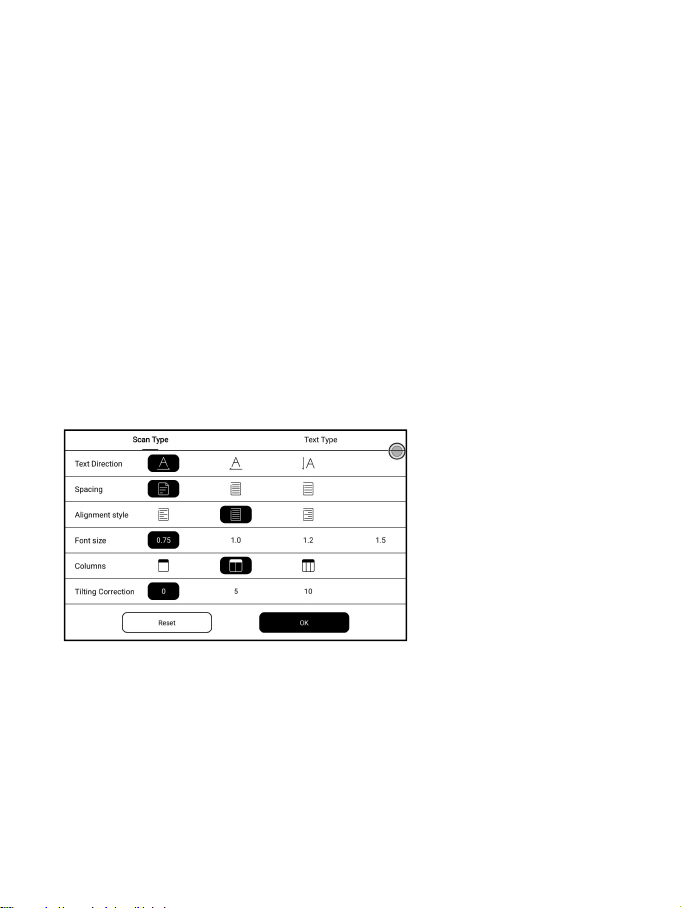
Scan Type
Reflow allows users to further customize the layout of documents including:
Line Spacing, Margin, Text Direction, Font Size, Columns, and Skew
Correction (for italic documents).
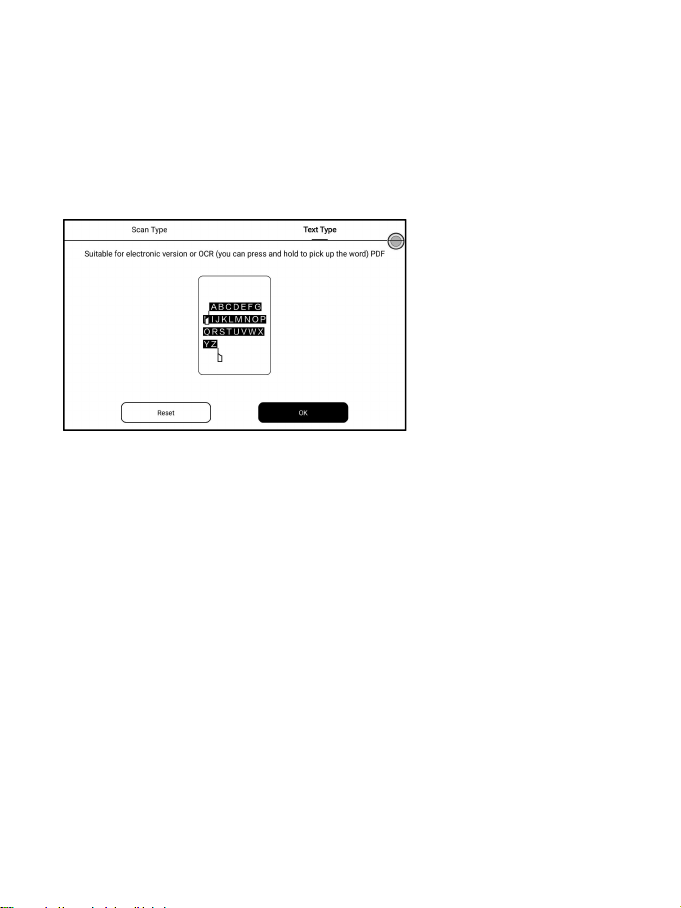
Text Type
Applicable to the digital PDFs or PDFs that have been recognized by OCR
(you can press and hold to look up words) PDF. The reflowed files can use
the features of flow documents.
Bottom Menu (other formats)
This includes settings of TOC, Progress, Format, Contrast, and Split View
and supports flow formats such as EPUB\TXT\MOBI\AZW3.
V2 Engine
Some flow formats (ePub\mobi\azw3\txt\word\jeb\html) use V2 engine by
default. Go to Reading Settings/Other Settings to switch to NeoReader
V2 engine supports the original layout of the document, including font,
line spacing, margin, graphic typesetting, indentation, etc.;
After being switched the V2 engine, the document will be closed
automatically, and the V2 engine will be used when you reopen the files;
If you need to switch back to NeoReader, you can cancel the V2 engine and
reopen the document;
V2 engine does not support to sync data from NeoReader such as Bookmarks,
Annotations, and Handwritten notes.
Progress
The document needs to be paginated again after switched to V2 engine, or
font and spacing adjustment. You can check the pagination progress in the
reading Menu>Progress. After the progress bar is loaded, it means the
pagination is completed. You can drag the progress bar to jump pages after
the pagination is completed.
Finished loading
Loading
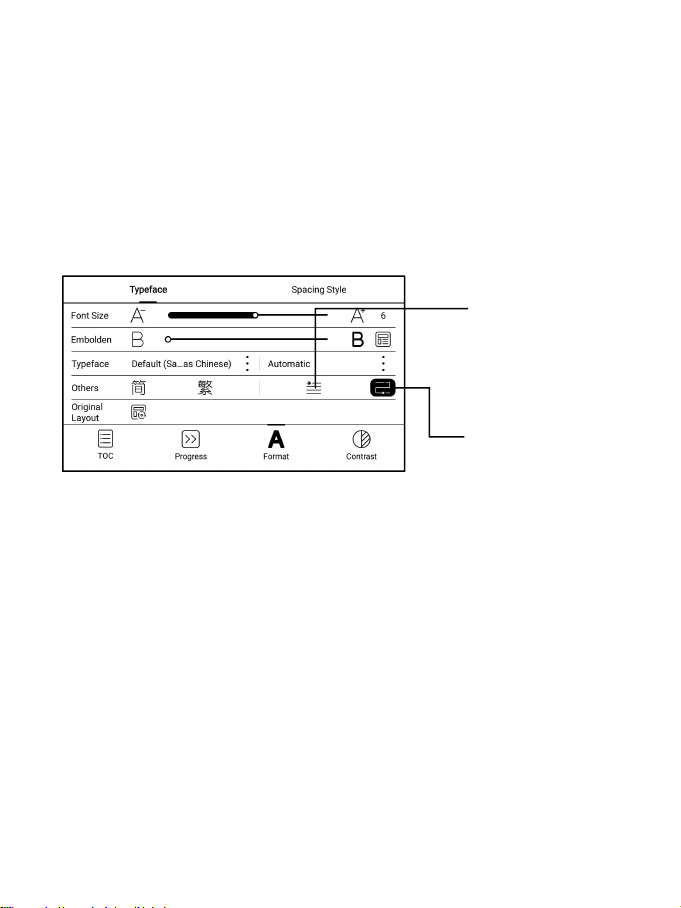
Format
The settings include Font Face, Display and Spacing.
Loading font face in the directory Storage\fronts is supported.
The settings for font size, font face, contrast, bold, spacing work on
all newly opened documents, but not work on the documents before settings.
First line
indent
Line break
hyphen switch
Screenshot
Diagonally tap on two corners of the screen to capture the screen in PNG
format. The function is only available on the reading page.
The screenshot will be saved to the local, or shared by scanning QR code.
The save path is Storage\Screenshots.
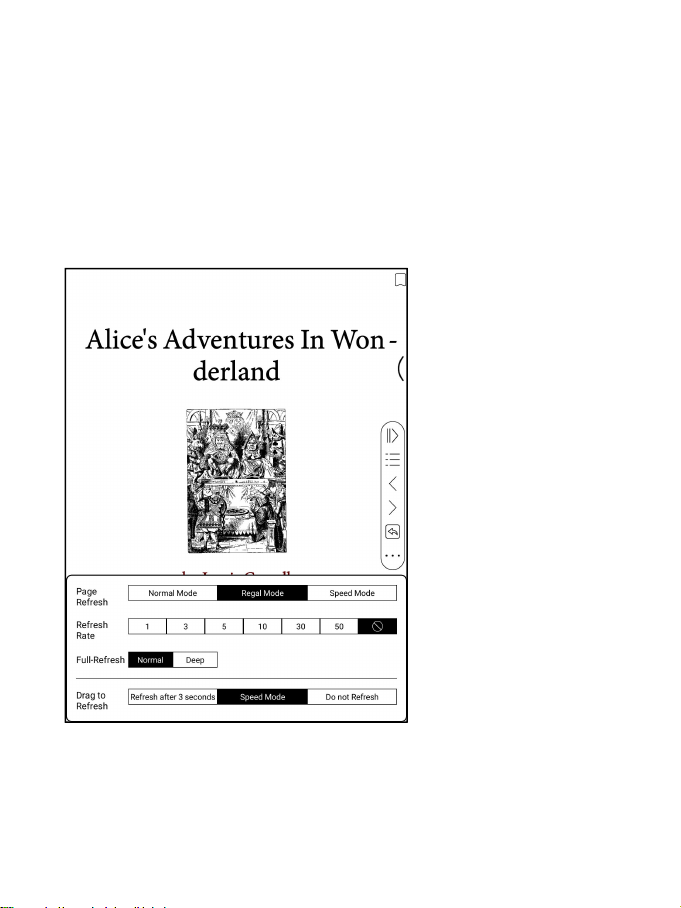
Refresh
Tap the hamburger menu located at the upper right corner to choose Refresh
and other related settings of refresh
Regal refresh and partial refresh are by default
When scrolling the page, speed mode is by default.
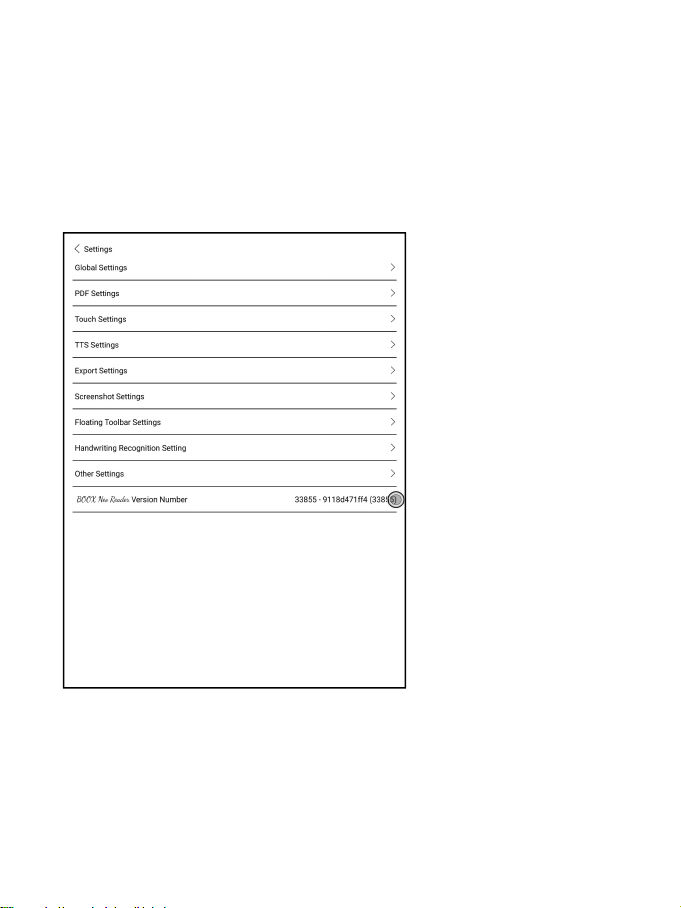
Settings
There are General Settings, Touch Settings, TTS Settings, Export Settings,
Screenshot Settings, Floating Toolbar Settings 、 Other Settings and
Version Name.
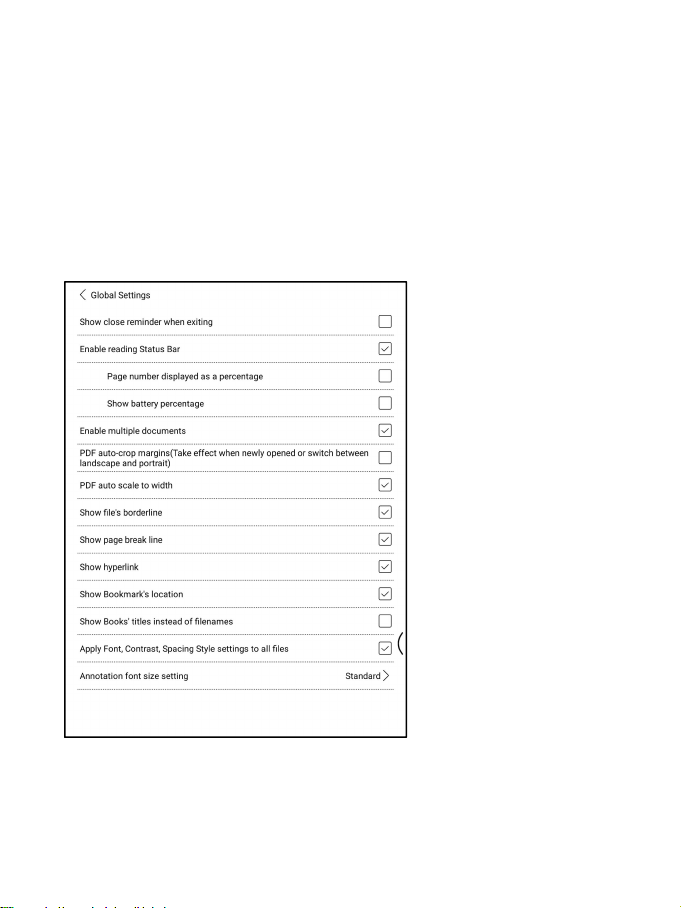
General Settings
There are Enable page close reminder, Enable system status bar, Enable
reader status bar, Enable multiple documents, Show file borderline,
Enable Floating Toolbar, Show hyperlink, Show bookmark position, Apply
certain options to all documents、Annotation Font Size Setting;.
Touch Settings
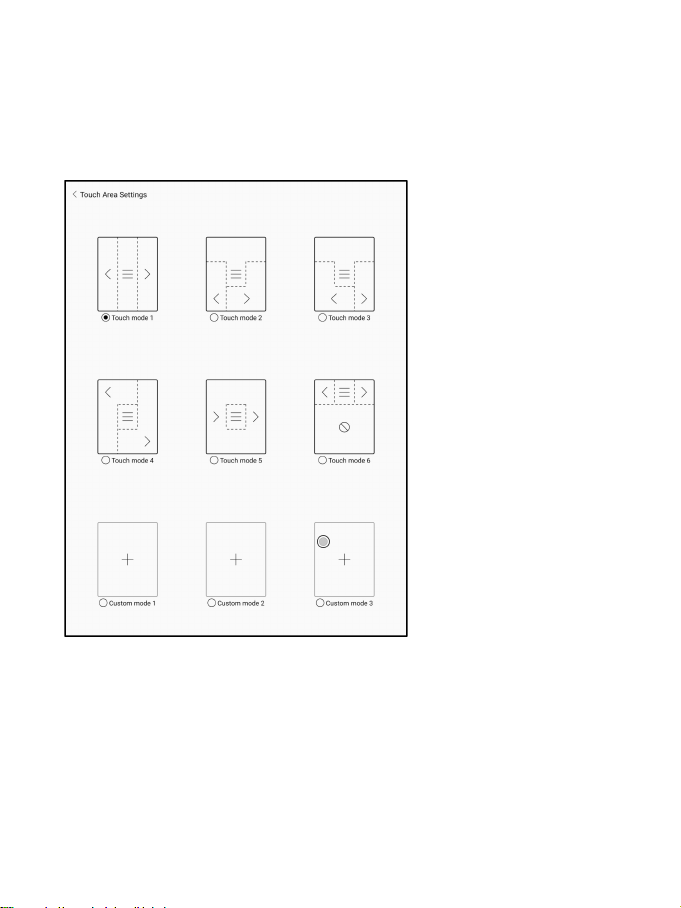
Users are able to customize the touch settings for different areas. There
are six default touch modes can be chosen and users can customize three
more.
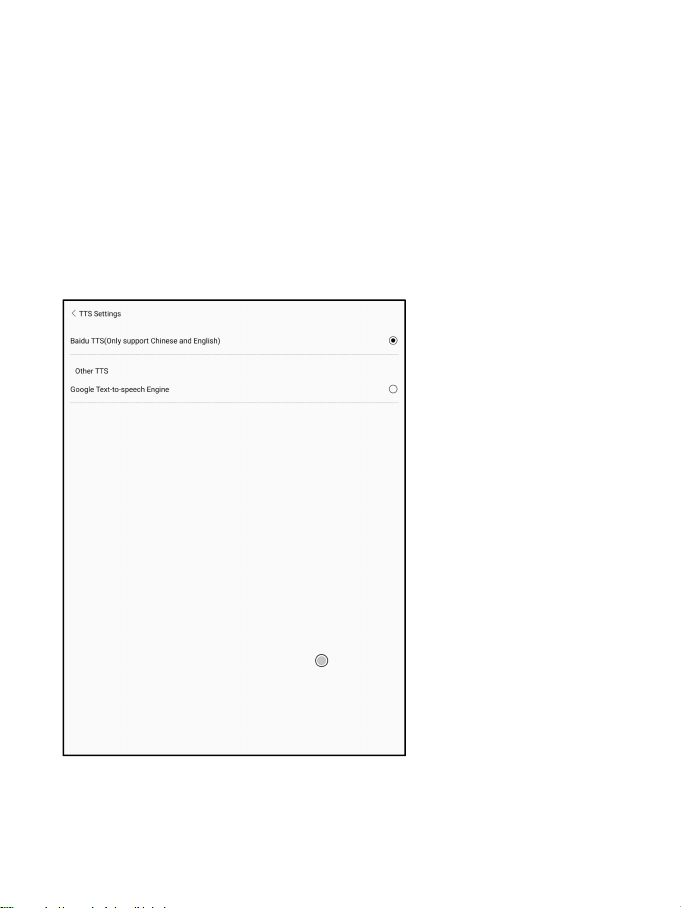
TTS Settings
The built-in Baidu TTS is set by default. English is supported. A network
connection is required at first use.
Switching to third-party TTS system is allowed. The built-in TTS settings
are not synchronized with the system TTS settings. The system TTS settings
work on the third-party TTS by default.
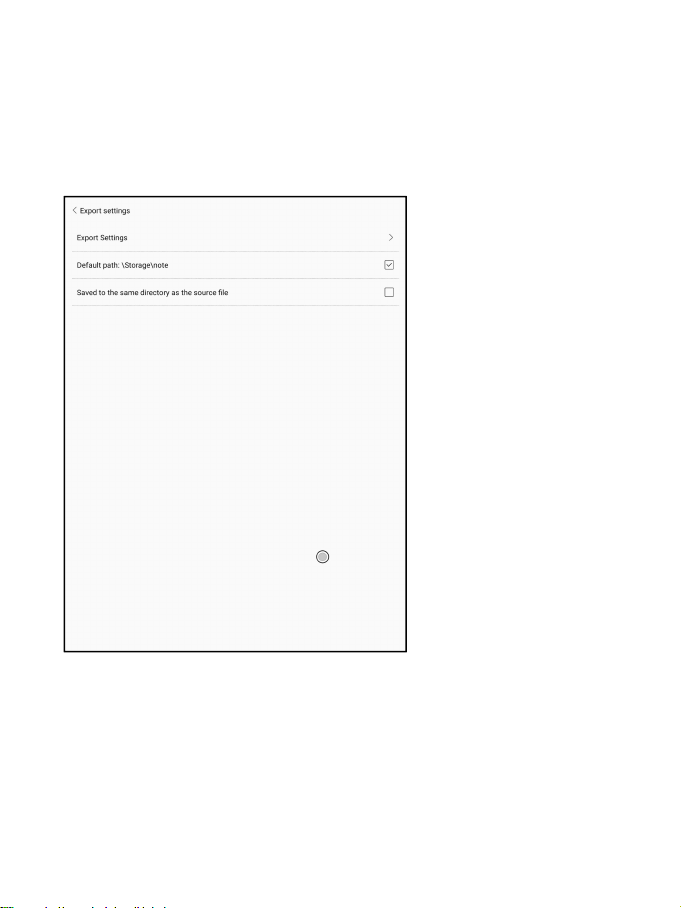
Export Settings
The default storage path is Storage\Note.
The export files can be also saved to the same directory as the source
file.

Floating Toolbar Settings
This page offers General Settings of Floating Toolbar Settings;
General Settings
It is enabled by default and can be turned off manually. After disabled,
it can no longer be called out;
It can be customized whether the indicator is displayed after it is
collapsed. Call out the Floating Toolbar by swiping from the screen edges.
The Toolbar’s size, display style and functions buttons are customizable.
Custom function buttons support up to 11 in horizontal style and up to
14 in vertical style;
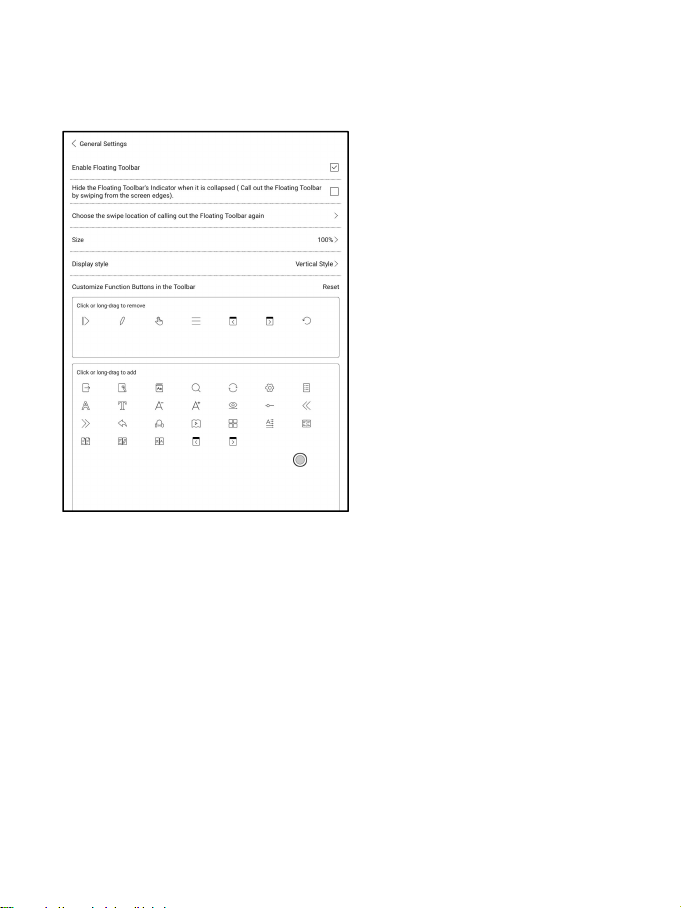
Press and hold the function button icon to display the definition of the
function button;
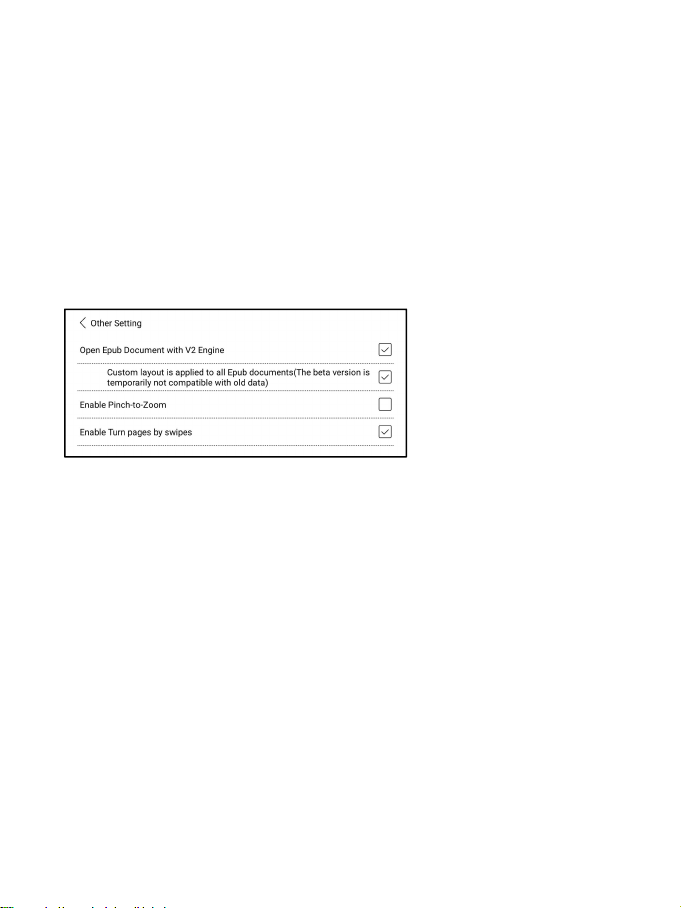
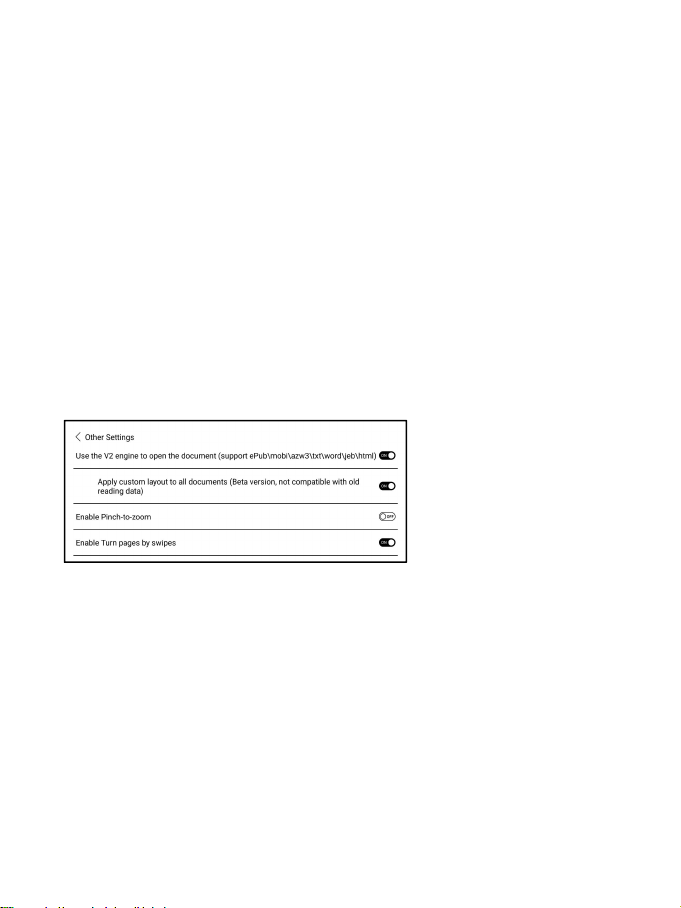
Other Settings
This setting page includes “Open ePUB documents with V2 engine”, Enable
“Pinch-to-Zoom”, and Enable “Turn pages by swipes”
When “Turn pages by swipes” is disabled, you can only turn pages by
tapping on the screen. This can avoid accidental page-turnings when you
are taking handwritten notes.
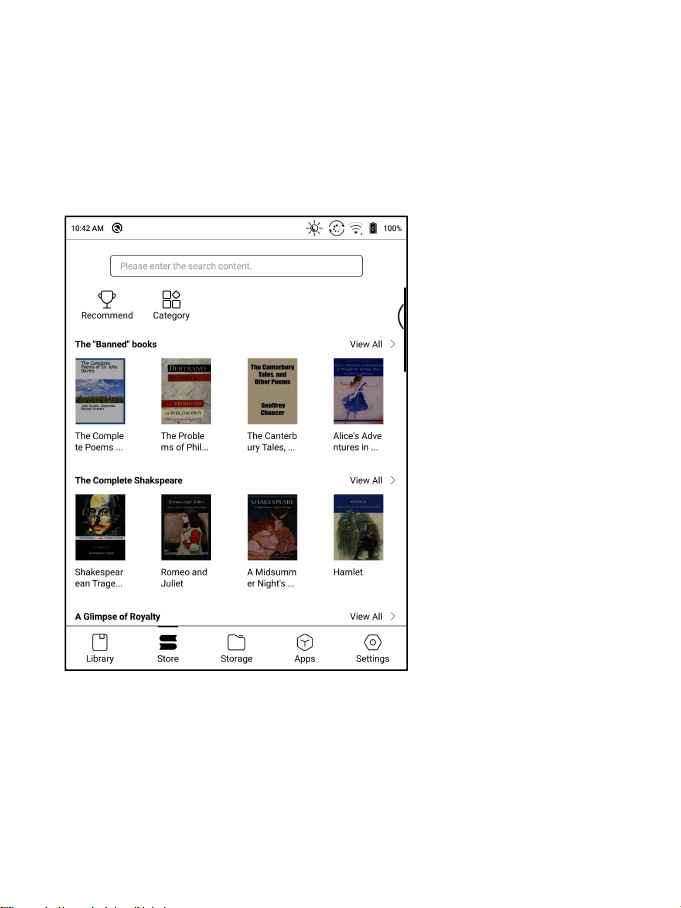
7. Store
In the language of non-Chinese, the Store is offering free publications
E-books from the Internet.
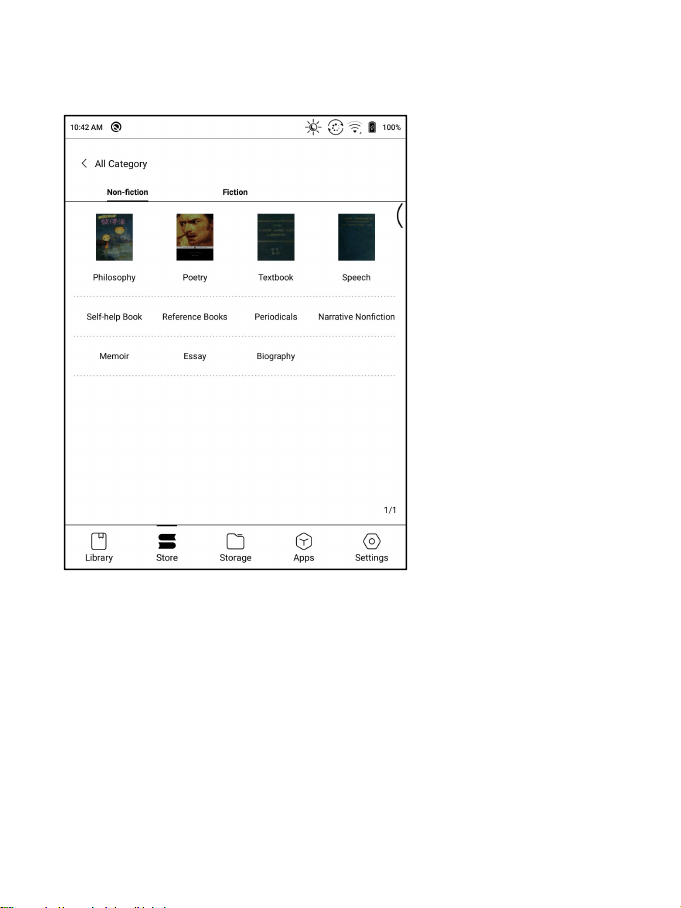
Category
Books can be screened according to different categories.
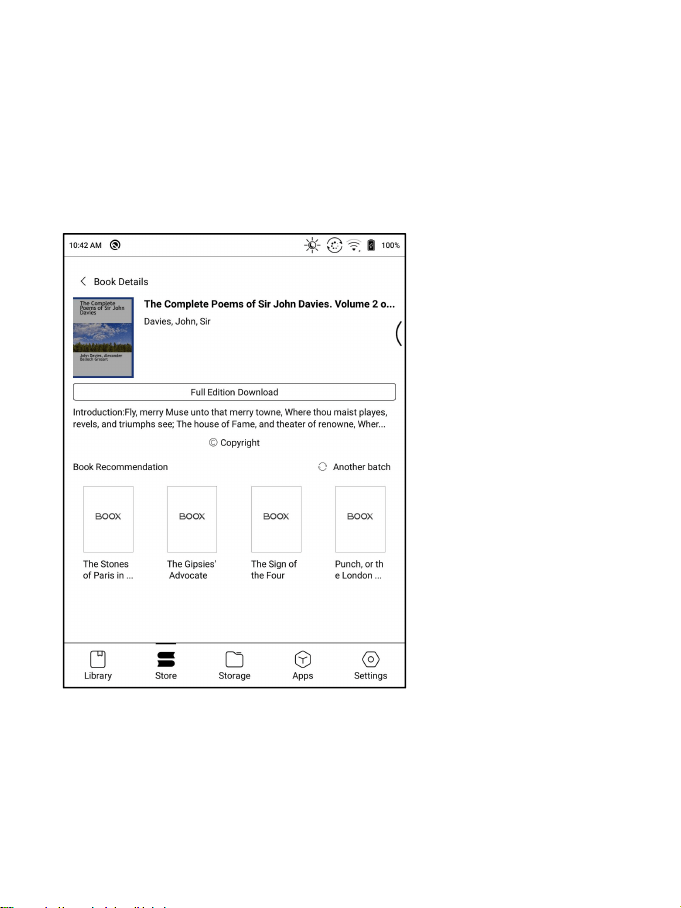
Book Detail
Click a book cover to open up book detail. The specific book information.
Click “Full Edition Download” to download the book, then you can see
this book cover in Library .
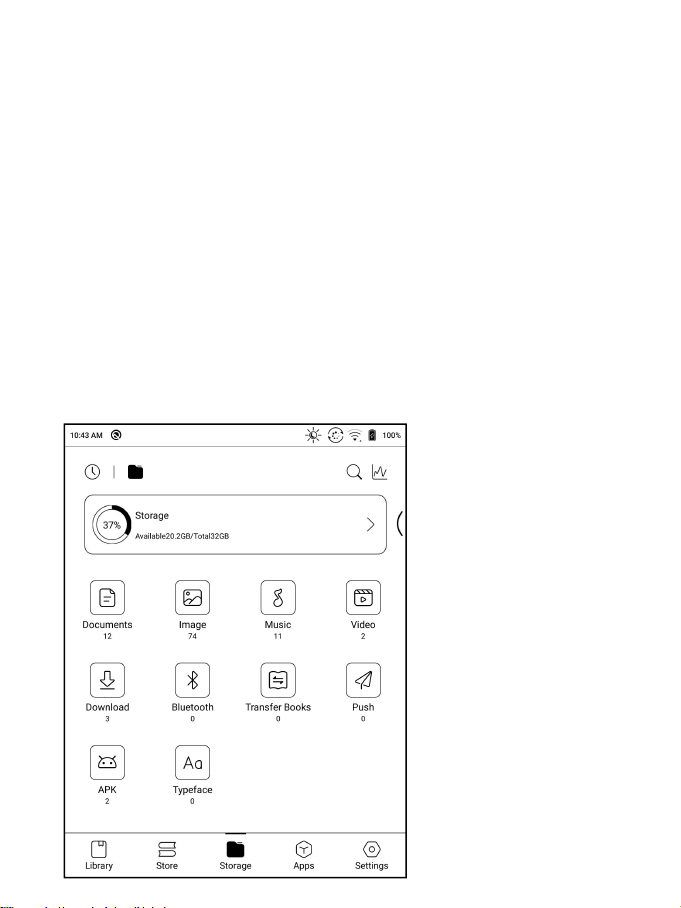
8. Storage
Recent Files
This section includes Shortcuts and Recently Updated Files, which are
sorted in reverse order by time.
All Storage
This section includes Storage path and Categories. files will be
classified according to the file formats, but the original storage
location of the file will not be changed;
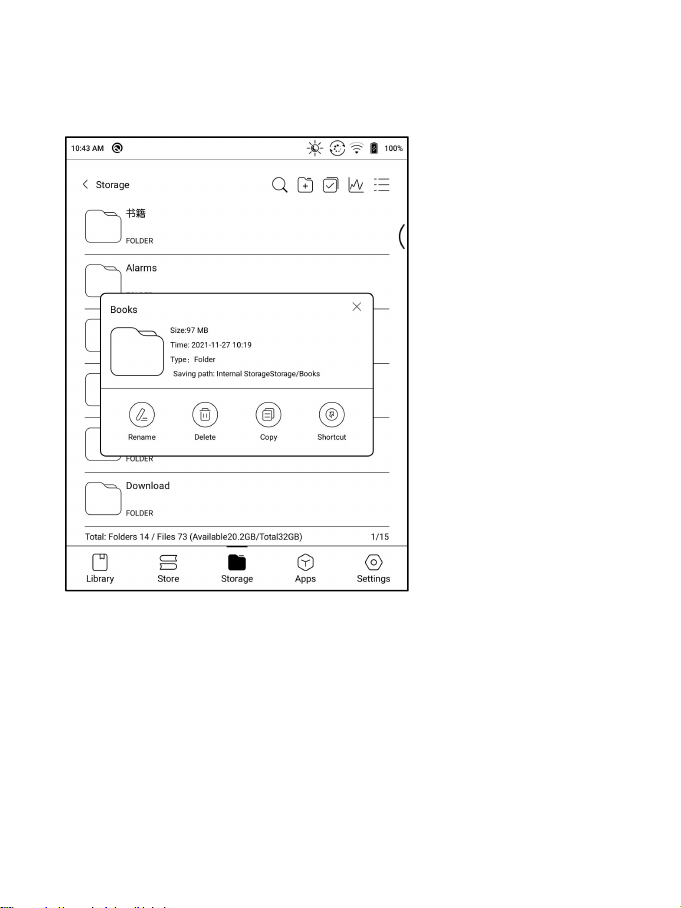
Long-press the folder to pop up Property Window and choose “Set as
Shortcut”, which offers quick access to open it.
OTG External Disk
OTG is supported. Users can connect the device with USB drive through a
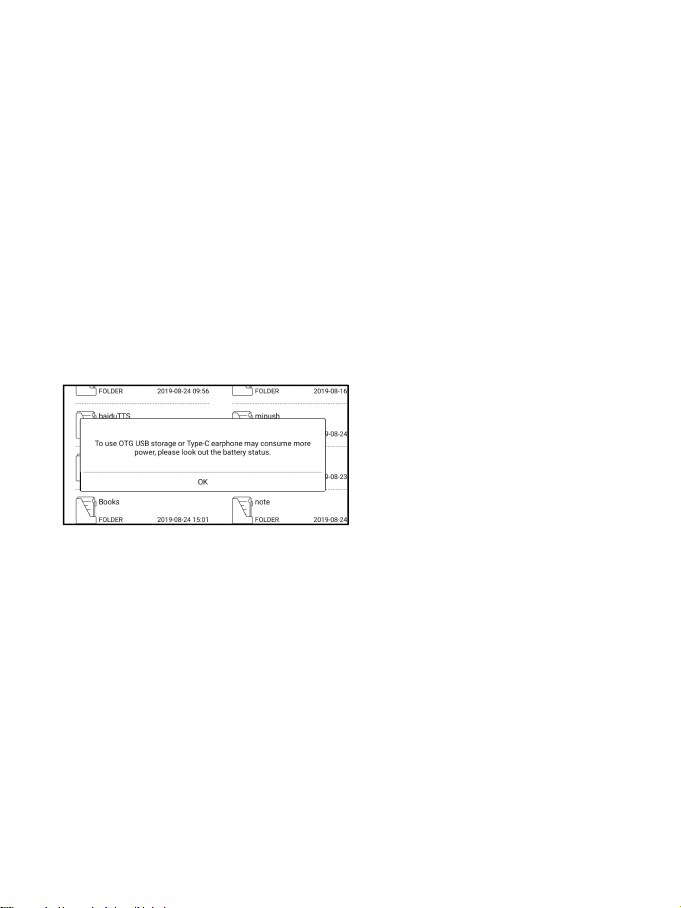
Type-C cable. The device will detect USB drive afterwards.
The OTG feature would consume more power since it supplies power to a USB
drive.
It supports analog and digital Type-C earphones ( You can use 3.5mm audio
jack converter);
Low storage space warning
Please reserve at least 300M of available storage space to ensure the
normal operation of the system and saving related data;
When it is lower than 300M, a warning icon will be displayed in the system
bar, indicating that the storage space is insufficient;
9. Apps
All installed apps are sorted by name by default. You can also sort them
by time and manually.
Long press an app to pop up options of Uninstall, Manage, Optimize, and
Add to a group
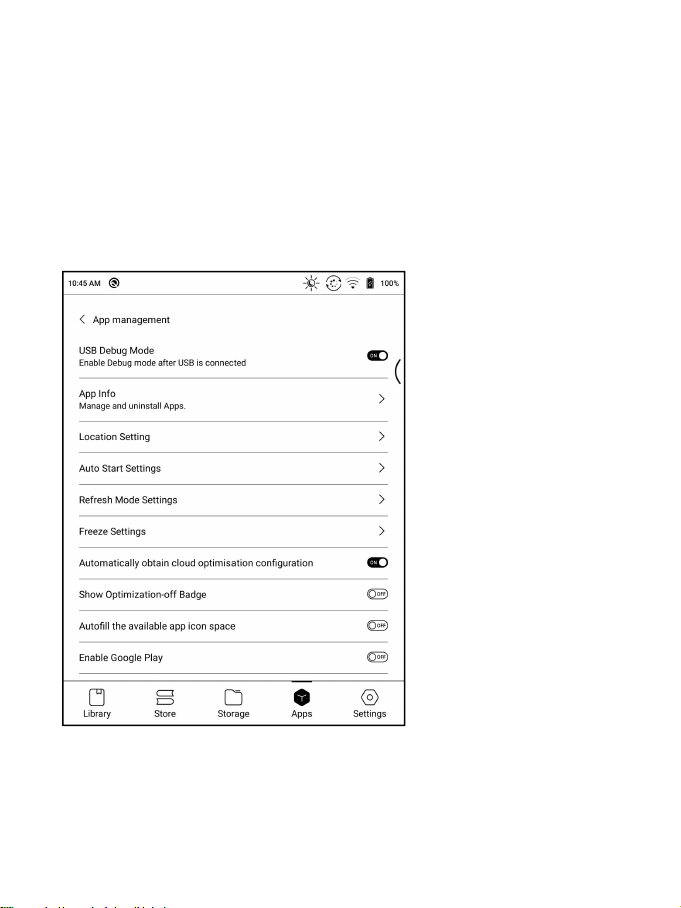
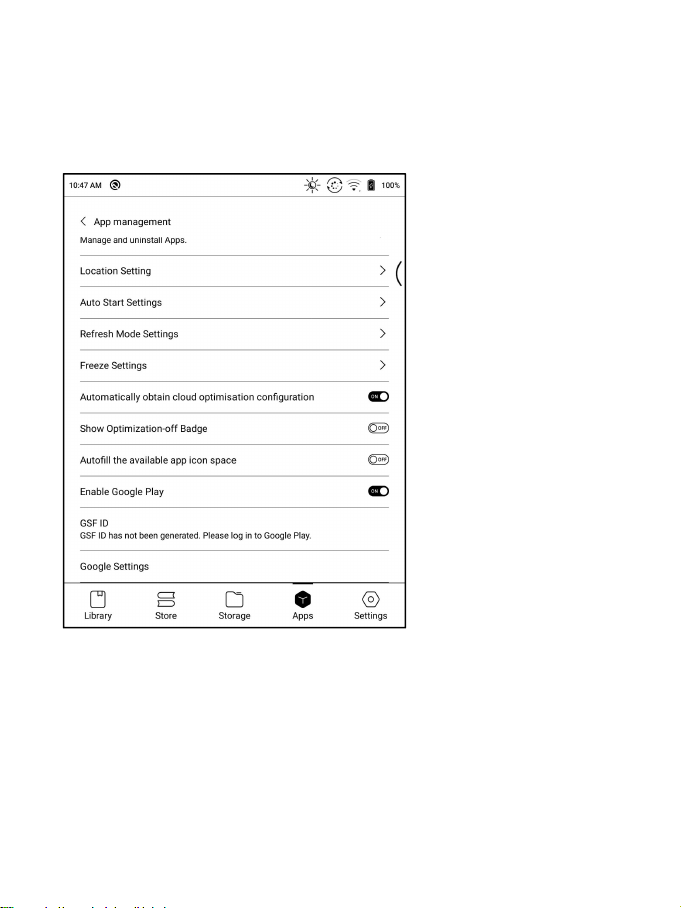
App Management
This page includes USB Debugging Mode, Application Info, Location
Settings, Auto-start Settings, Refresh Mode Settings, Freeze Settings,
Automatically update the Optimization config of third-party apps, Fill
in available space automatically, Enable Google Play.
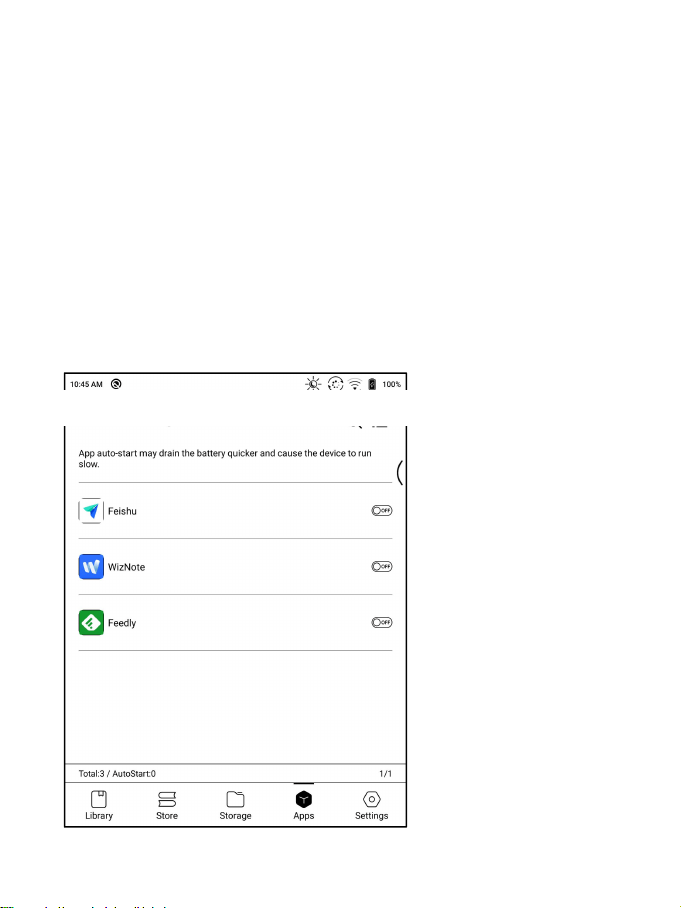
Auto-start Settings
Only applicable to device auto-start. After it is enabled, the
applications may take up more storage space and consumes more power.
Apps need to monitor the system start. After apks are installed, you need
to tap the app icon to start it once.
After it starts successfully, it only runs in the background and will not
show in recent running tasks.
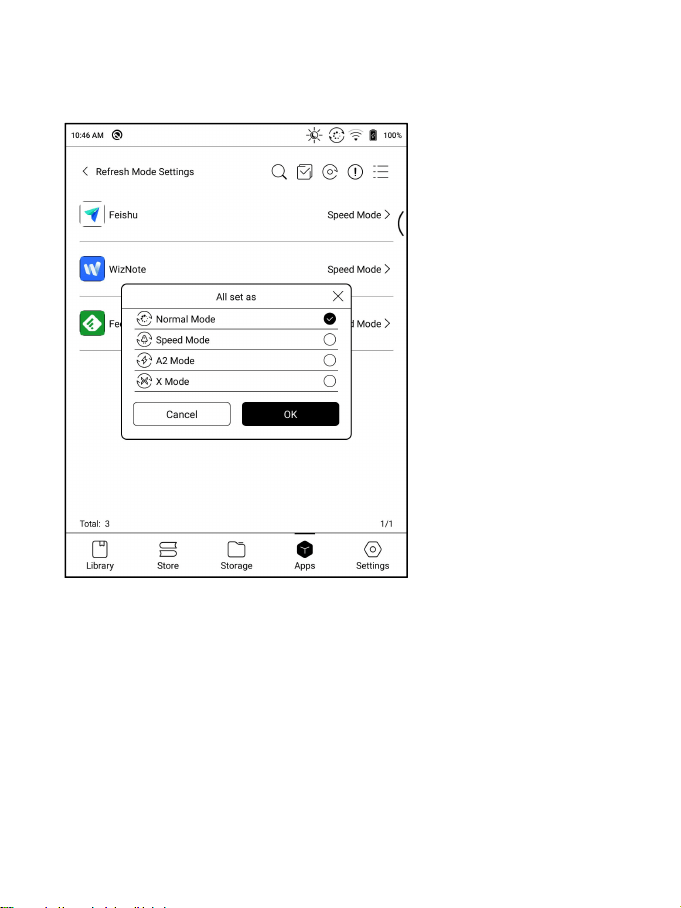
Refresh Mode Settings
This allows you to set the refresh modes of third-party apps in bulk.
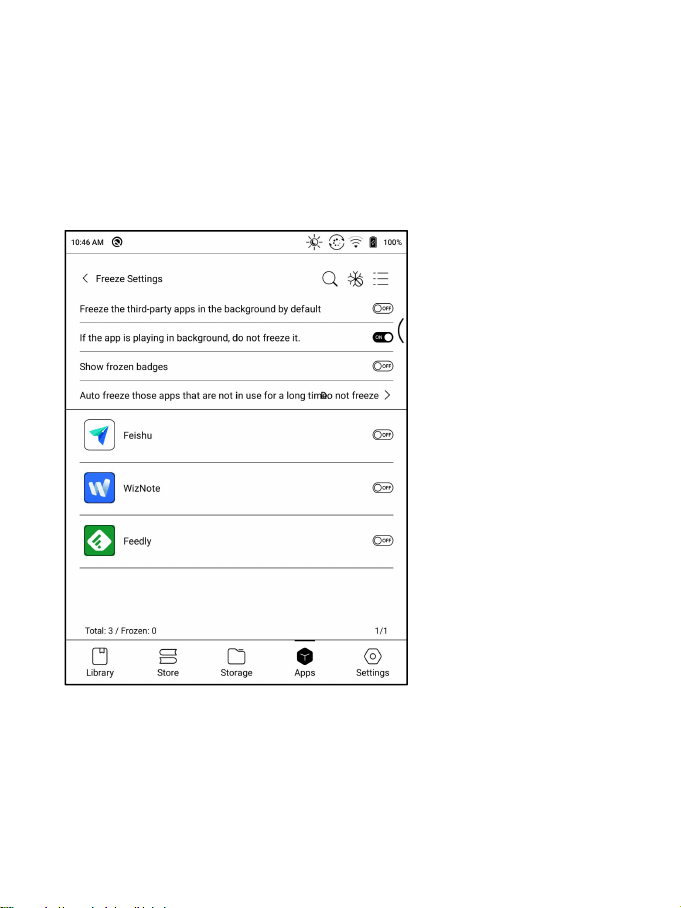
Freeze Settings
You can obtain the optimization settings of third-party apps with one
click and freeze all apps in the background with one click for a better
user experience and saving power.
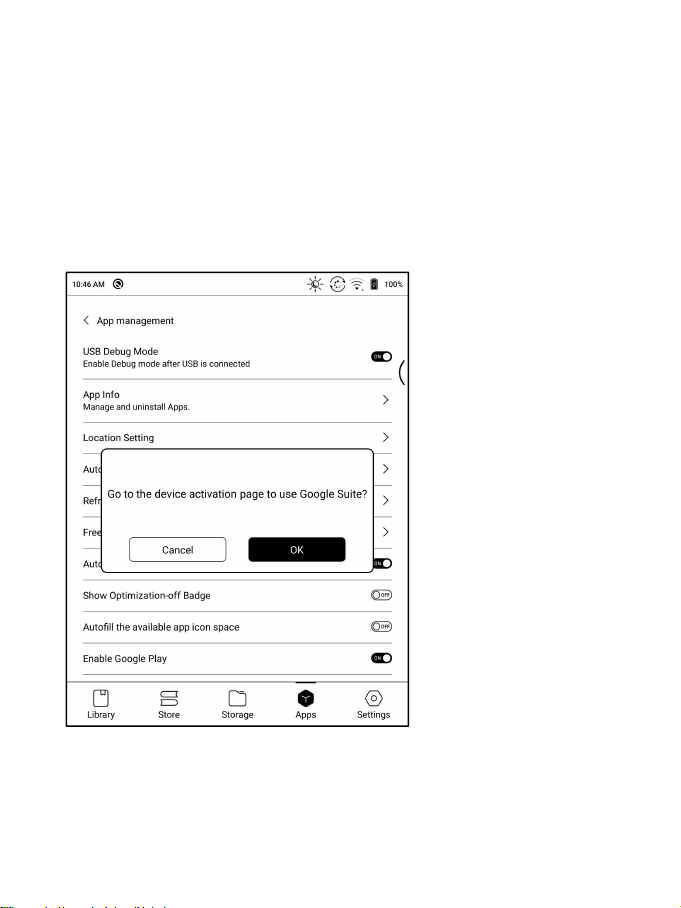
Enable Google Play
If you want to use Google Play, you need to enable Google suite by the
following steps:
1. Connect to internet. Go to Apps, drop down the menu on upper right
corner, select Application Management > Enable Google Play
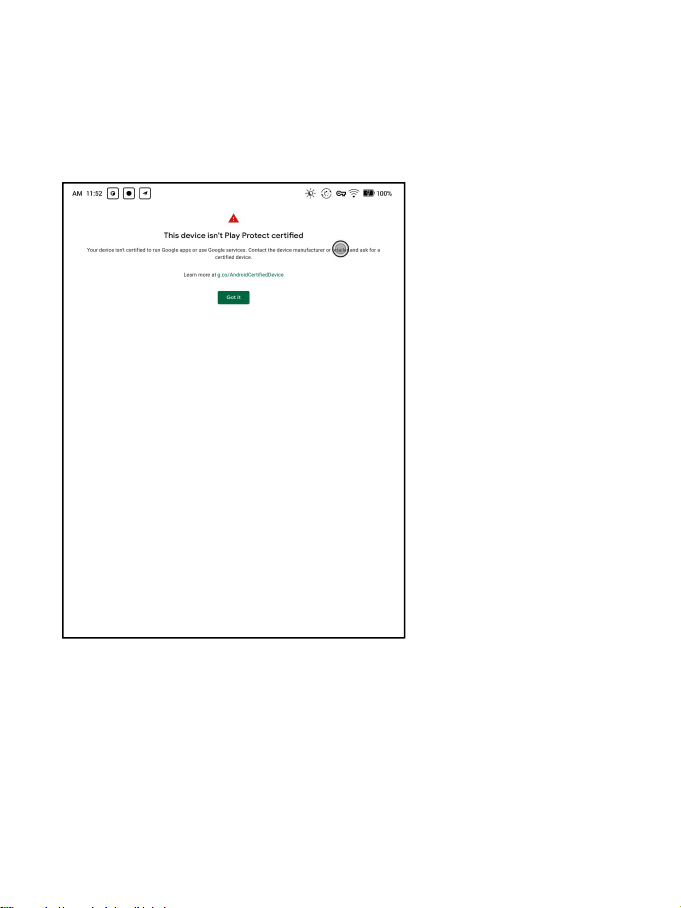
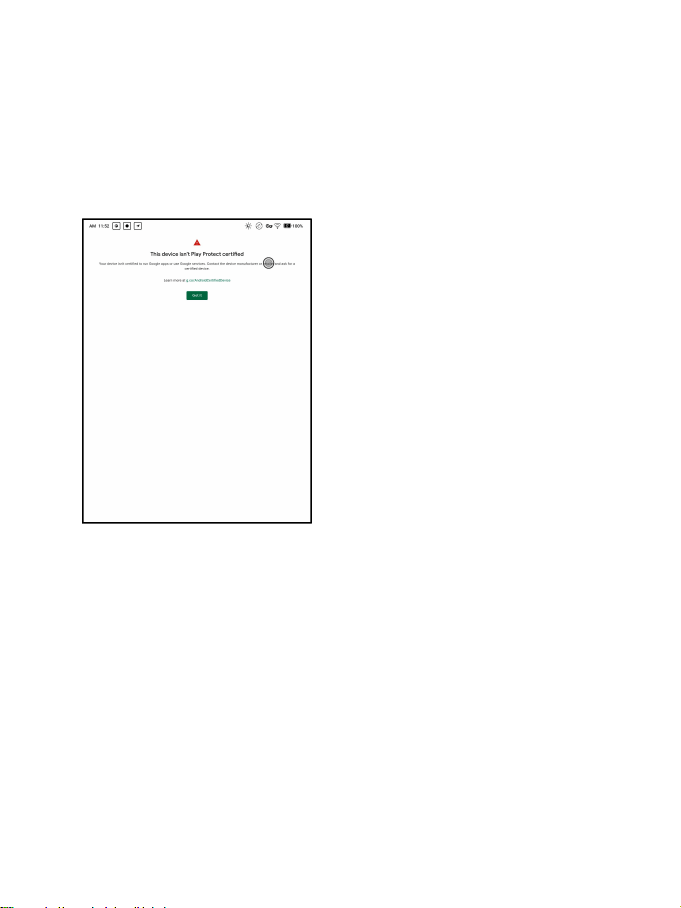
1. Tap “OK”when asked “Do you want to go to the activation page to enable
Google Play?”.Then log in your Google account. A note will pop up saying
“This device is not verified by Google”.
2. Go back to App Management page and tap GSF ID. You will go to GSF ID
application page. Tick Human-machine Authentication and tap “Sign up”.
(Google frame ID is automatically obtained and you do not need to enter.)
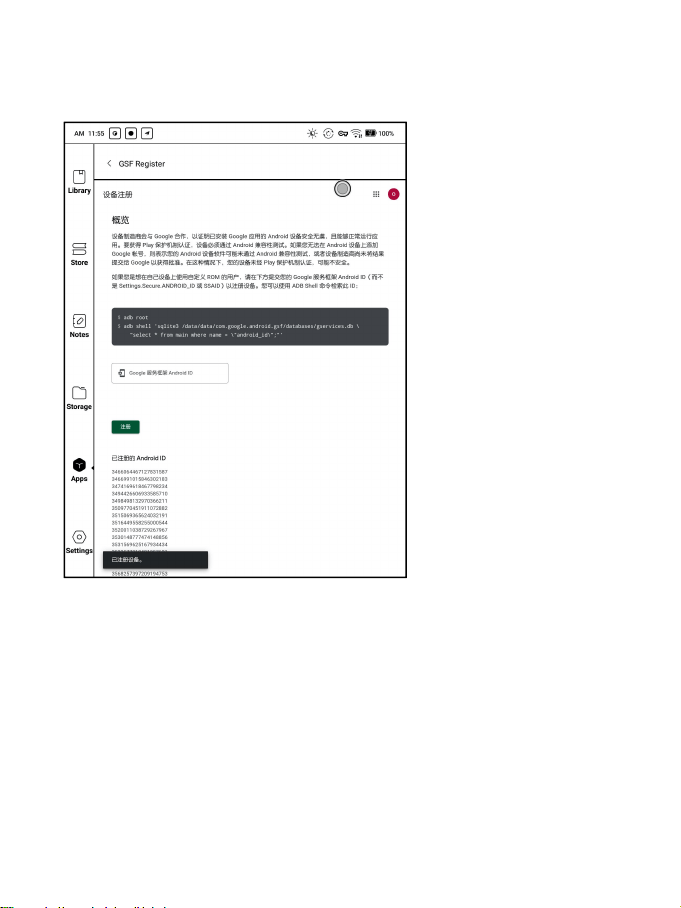
3. When you sign up successfully, there will be a note saying “The device
has been registered”
4. When the device is connected to internet, Google Play will
automatically download the latest version.
Please wait for 10-15 minutes for the Google server to return the
verification result
(Due to different regions and network conditions, the actual length of
time to pass the certification may vary)
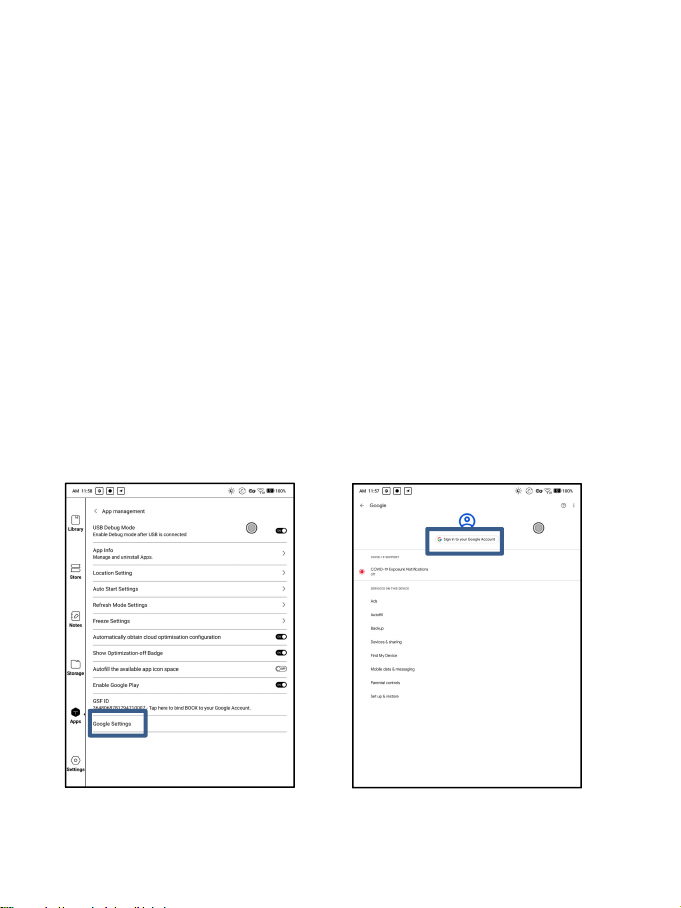
5. Without restarting, open the Application Management > Google
settings > log in to the Google account.
6. If it jumps to the login page here, it means it has been passed. You
can restart the device after logging in to the account.
B. If it does not jump the protection mechanism page, it means it still
hasn’t passed. Please wait for a bit long and try again.
7. If you wait for too long and it still shows that the device is not
verified by Google, it means the verification has not passed. Please start
again from step 3.
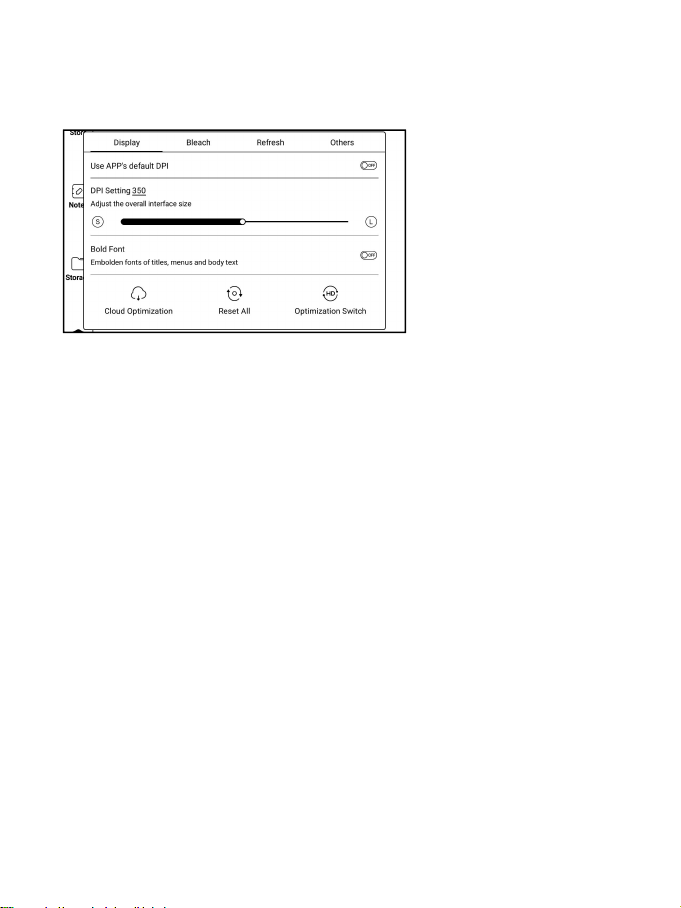
App Optimization
Display
DPI: Adjust the interface size of the app. The default value is 350,
If some content of the app interface has been cropped, you can reduce the
DPI value.
If the overall interface size of the app is too small, you can increase
the DPI value.
If you've adjusted the DPI value to the minimum, some content of some app
interfaces such as Kobo is still cropped, you can choose to use the app's
default DPI.

Bold Font: Embolden fonts of titles, menus and body text.
Cloud Optimization: Some apps are specifically optimized and you can
retrieve the cloud optimization configuration to obtain better results
than local optimization;
Reset All: Reset all modified configurations to the original
configurations.
Optimization Switch: when it is turned off, some optimization effects will
be canceled, but it won’t reset the configurations.
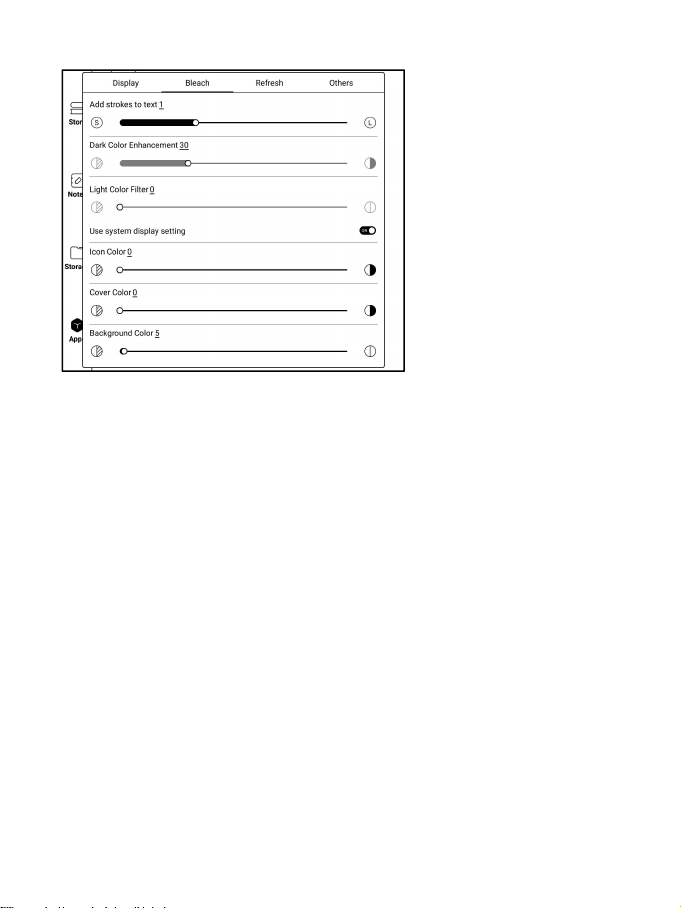
Bleach
Add strokes to text: The text and background on the same layer will not
be visible after being bleached together. This setting will add strokes
to text and make the text visible.
Icon Color: this darkens the colors of small color icons in the Menu.
Cover Color: This darkens the colors of big cover icons.
Background Color: This bleaches the background colors.
It is recommended to use it along with Font Color Enhancement and Icon
Color. Otherwise, the text and small icons on the background may be hardly
seen.
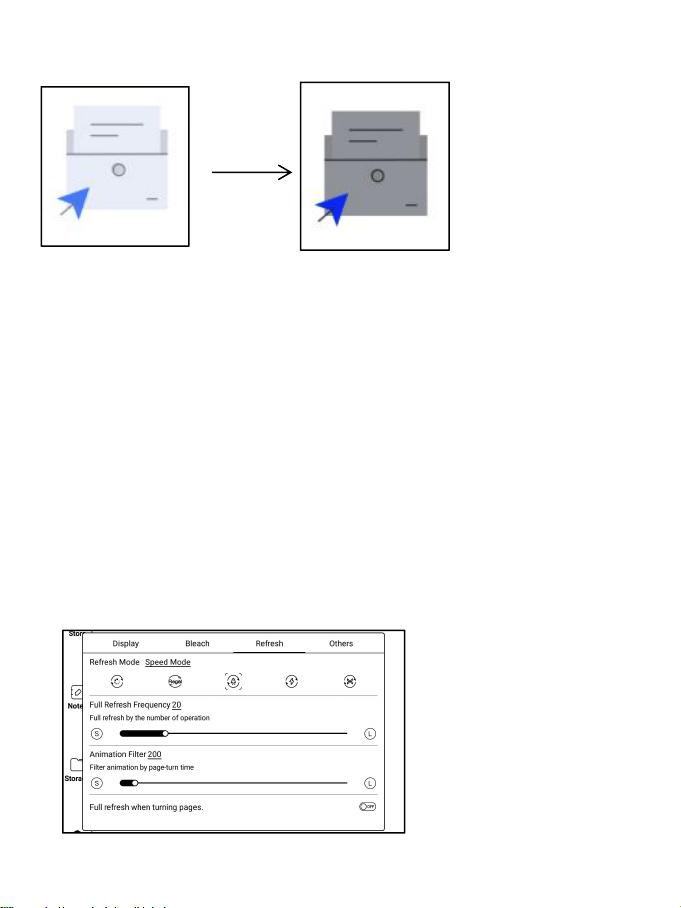
Refresh

Refresh Mode: This sets the refresh mode for individual apps. Normally
the default refresh mode is Speed Mode.
Only when system's refresh mode is Normal Mode, the app's refresh mode
will take effect.
When system's refresh mode is set to Speed\A2\X Mode, the system mode has
priority. And the app's refresh mode will not take effect.
Full Refresh Frequency: In app, fully refresh the screen by the number
of tapping in order to reduce ghosting.
The actual number of taps is related to the app's configuration. Sometimes
a single tap may have several consecutive responses. E.g, you've set 20
times, but full refresh may be initated after 15 taps.
Animation Filter: Filter the animation of turning pages in the app. Time
indicates the duration of the animation effect to be filtered. Generally,
the page animation is about 200 ms;
Others
Full refresh when turning pages. : When the main function bar in the app
is switched, full refresh is performed to reduce ghosting;
Switching some app function bar does not actually switch the pages, so
full refresh would not be performed.
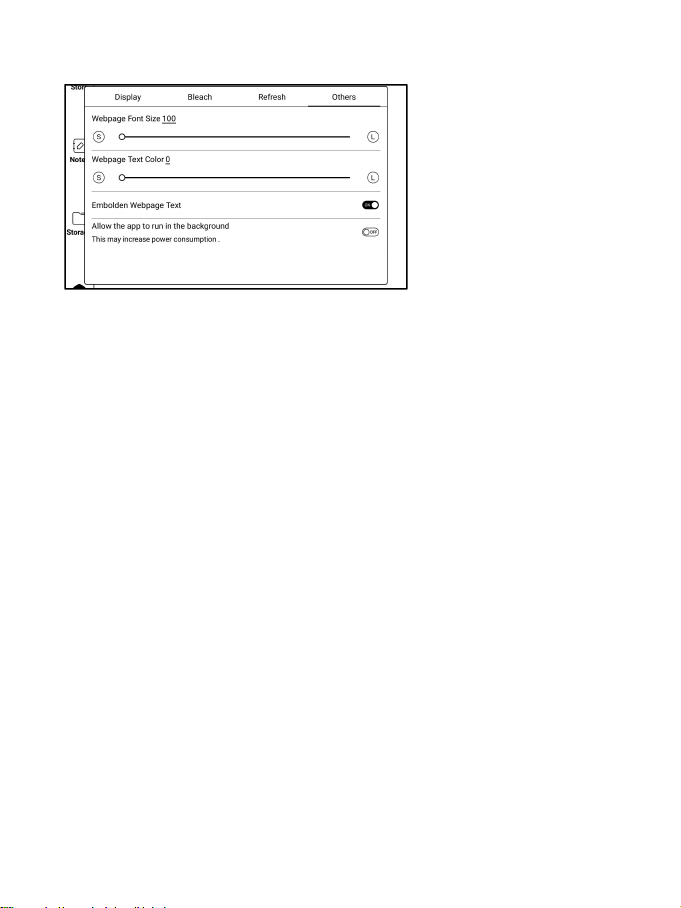
Webpage Font Size: Adjust the font size of the web view embedded in the
app. When adjusting DPI does not work, try to adjust the font size of the
webpage;

Webpage Text Color: When the adjustment of the bleaching does not work,
you can try to adjust the color of the webpage;
Embolden Webpage Text: When Bold Font under Display tab does not work,
try to embolden the text on the webpage;
Allow the app to run in the background:
For apps that need to run continuously in the background, such as Alarms,
Notifications, Downloads, Time statistics and other apps, you can allow
them to run in the background. But the continuous running in the background
may increase power consumption!
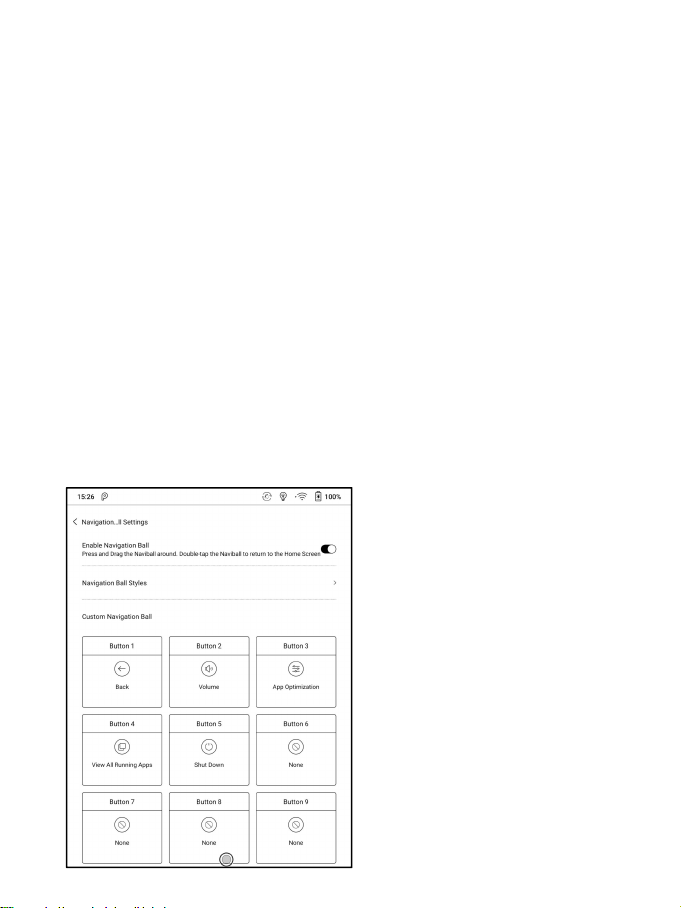
Navigation Ball
Navigation Ball is a circular ball that floats above all the apps on the
screen. 9 buttons can be customized.
Single click on the ball to expand and collapse navigation menu.
It requires to turn off and on again after the new button settings.
The Navigation Ball by fault is in Fan-shaped style. You can choose other
display styles (Horizontal Style, Vertical Style) from Navigation Setting.
You can also adjust the transparency of the Navigation Ball.
This supports to set as a resident button. After being set as a resident
button, the button will always be floating on the top layer;
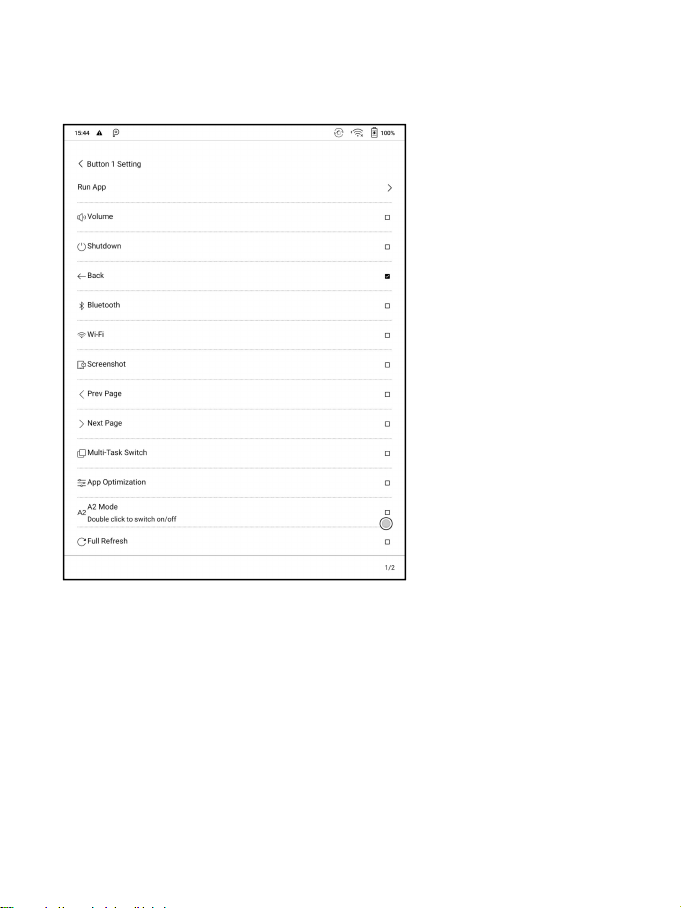
The 9 buttons can be set as multiple common functions including system
operation, app switching, app optimization and so on.
The app optimization can be called out in an app through the Navigation
Ball, for real-time review after optimization.
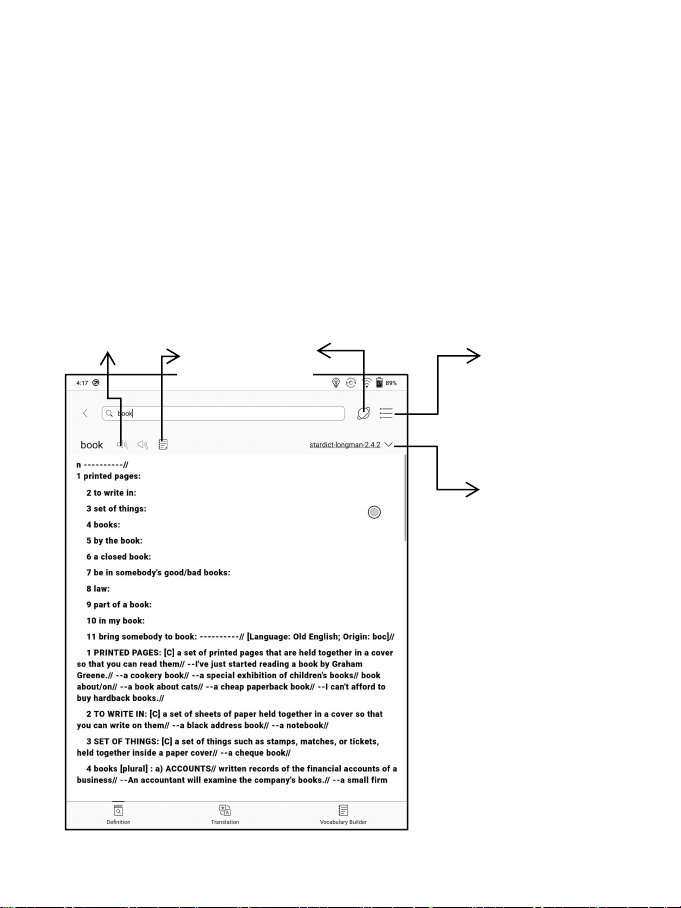
Dictionary
If users use dictionary apps the first time, to download dictionary
package to local will be asked.
This function requires network connection.
Word pronunciation needs a dictionary file comes with voice files,
currently TTS is not supported.
Add to vocabulary
Search Online
Pronunciation
Settings
Switch Dictionary
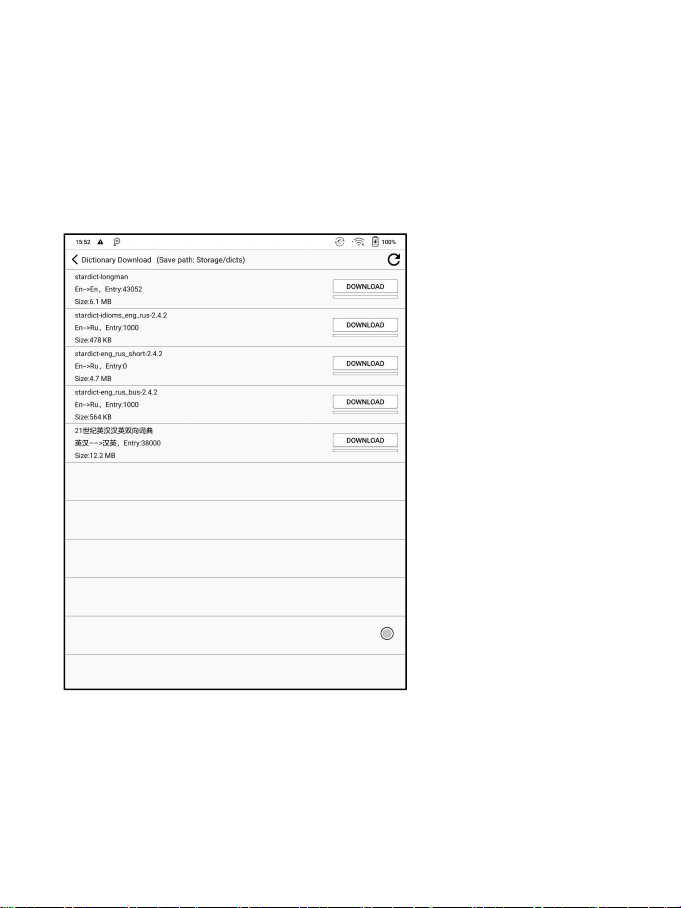
Users can install dictionaries themselves by putting the dictionary files
to designated directory Storage\dicts\.
Please save the files under a folder, e.g., dicts\English-English
Dictionary.

For the preferred dictionary settings, users can select up to 20 preferred
dictionaries. Users will be asked to select again if the select number
is less than 1 or more than 20.
After dictionaries are installed, users can look up new words in the search
bar. Switch between different dictionaries by tapping a corresponding
dictionary title on the bottom.
The search result is in terms of the related dictionary. If the word is
unfound, try to use other dictionaries.
Looked-up words can be added to Vocabulary.
Users can divide the Vocabulary into groups. The words will be saved into
the specified group once the group is selected.
BOOXDrop
Connect your BOOX with PC or mobile phone. You can send files to your BOOX
from PC or BOOX Assistant app, or save files on your BOOX to PC or mobile
phone.
Instruction:
1. Open BooxDrop from Apps page or drop-down Control Panel
2. Open a browser on your PC
2.1 Without login: Make sure your BOOX and PC are in the same network.
Enter the IP address on your BOOX to the browser on your PC.
ONYX Account
BooxDrop does not disconnect automatically. If you want to disconnect it,
please do it manually or switch it off from Control Panel.
Records
Disconnect

2.2 Logged in to ONYX Account: log in to push.boox.com. You can see the
connected devices on Push page. Click it to open.
3. When you open the web browser on your PC, it will automatically confirm
whether your PC and BOOX are in the same Wi-Fi network. If not, the page
cannot be opened. Please connect to the same Wi-Fi.
4. When web end and your BOOX are connected successfully, you can load
files and contents from your BOOX on your PC.
5. Send to BOOX: Select files from your PC and send to BOOX.
The sent files are automatically classified into the corresponding
directory according to the format types.
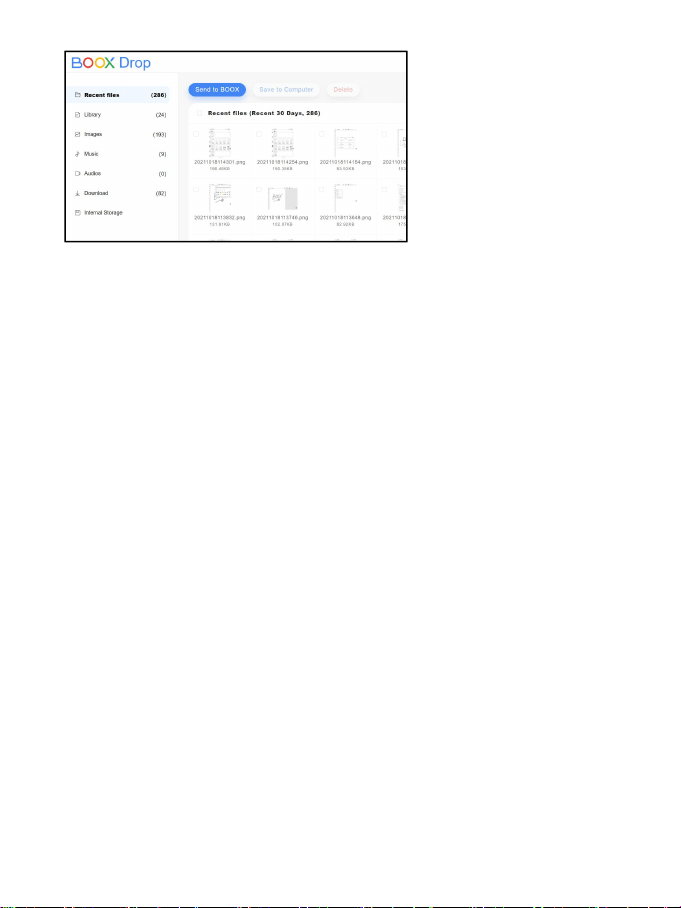
Recent Files: include all files and are sorted by time
Library: Books/xxx.epub ( This includes all supported eBook formats in the Library)
Pictures: Pictures/xxx.png
Music: Music/xxxx.mp3
Videos: Movies/xxxx.mp4
Downloads: Download/xxx.xxx
Internal Storage: Transfer the selected directories.
6. Save to Computer: Select the files on BOOX and save them to computer.
Records
You can only check the transfer history on BOOX devices.
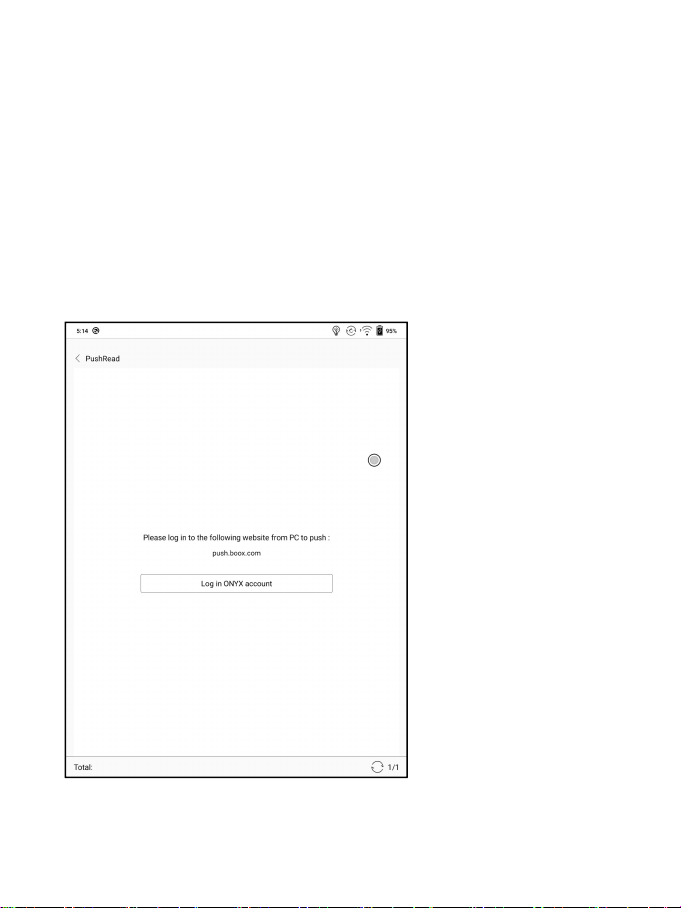
PushRead
From the Subscription section of push.boox.com or BOOX Assistant, you can
enter a webpage address, push it to your BOOX, and read the page in html
format.
To use the PushRead for the first time, you need to bind the same ONYX
account on the website push.boox.com and your BOOX;
You need to connect your BOOX with Wi-Fi to download the pushed URLs for
the first time. After loading once, it can be read offline later;
The layout of the content page defaults to Browsing Mode (the layout of
the original web page), and you can choose to switch between Browsing Mode
and Reading Mode from the More Menu;
The Reading Mode is a single page mode, tap the page to turn the page
directly;
Font size-
Font size+
Switch reading mode
Swith refresh mode
Search
Back to the Top
Full refresh
Refresh website
Prev. Article
Next Article
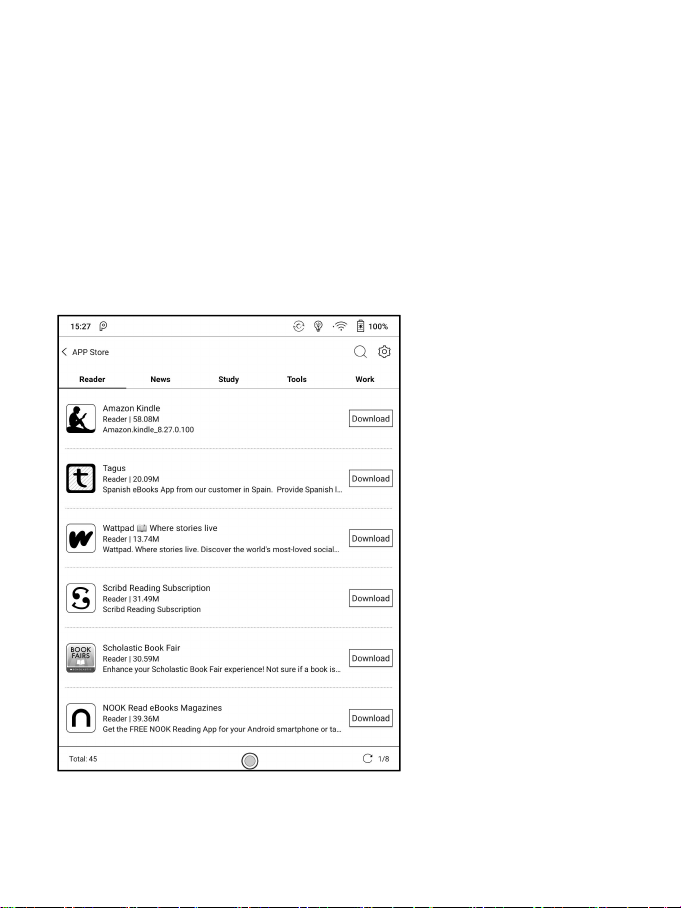
App Store (E-ink)
There are some usual third-party apps provided here. These apps are free
versions from developers and their compatibility are not verified as full
to the system. Paid apps download is not supported for now.
Users can choose to delete the installation package automatically after
Apps are installed.

Screensaver
The screensaver and shutdown image can be customizable. The shutdown image
only supports image formats.
Screensaver style
The Image Screensaver is by default.
The screensaver supports Image Screensaver, Poem Screensaver, Words
Screensaver, Calendar Screensaver, Clock Screensaver,and Transparent
Screensaver.
The clock, text, and Bottom Status Bar can be added to the other
screensavers aside from the Transparent Screensaver.
Clock refresh intervals are customizable. After the clock is added to a
screensaver, a certain frequency of refreshing screen will be retained
in the standby state, and the automatic shutdown timing cannot be
supported.
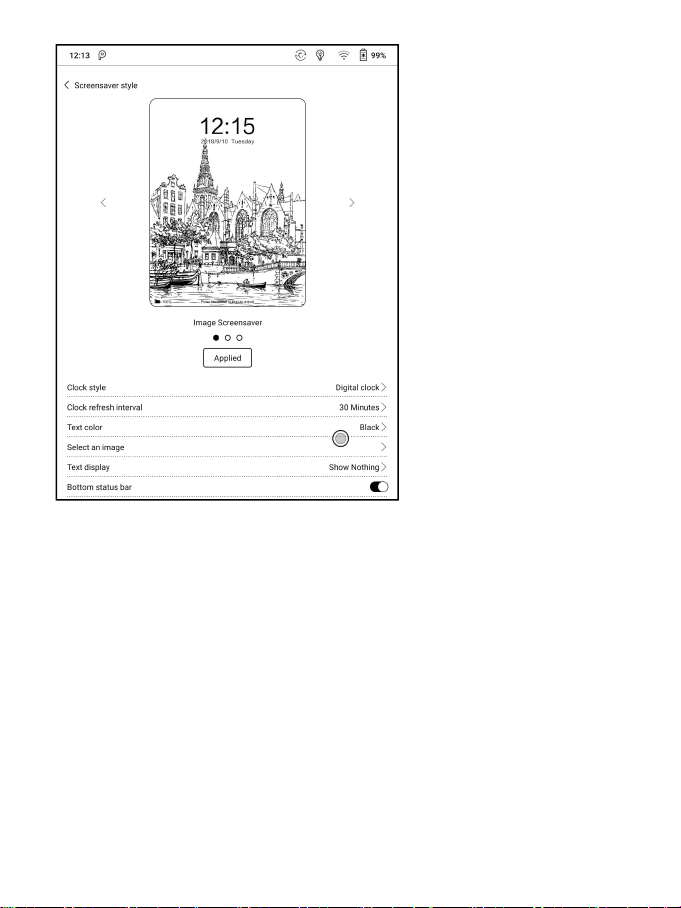
In Image Screensaver, when a single picture is selected, the screensaver
is a fixed picture. When multiple pictures are selected, the screensaver
will be shown in carousel format;
The Bottom Status Bar can display the battery status and lock screen
status;

Calendar Memo
The calendar Memo can display the notes and reading records under the
current date. You can open the notes or documents directly by tapping the
records;
You can add handwritten notes as a memo, which can be set as a screensaver.
Please go to Screensaver / Calendar Screensaver Setting for more details.
The content of Calendar Memo temporarily does not support the
synchronization.
After logging in to the ONYX account, you can use the mail function to
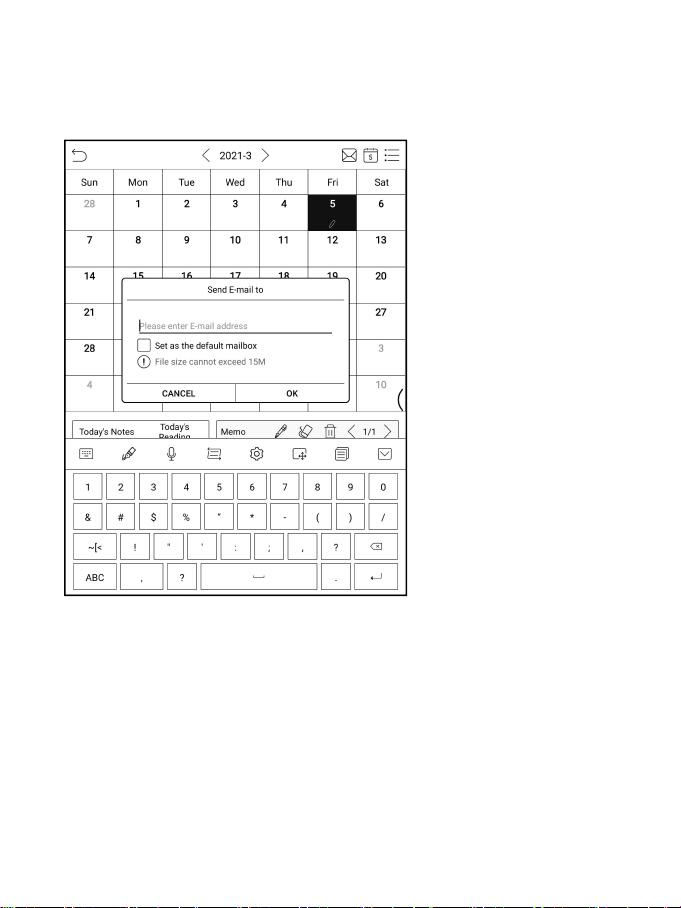
send the contents of the Memo to the designated mailbox as a PDF
attachment;
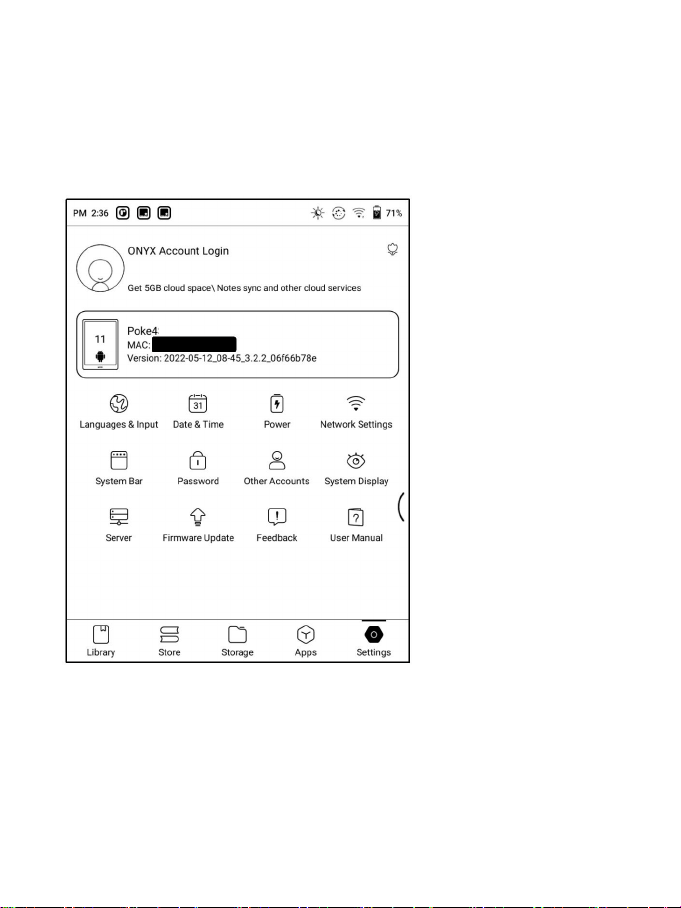
10. Settings
You can manage ONYX accounts, check device model and manage system global
settings.
ONYX Account
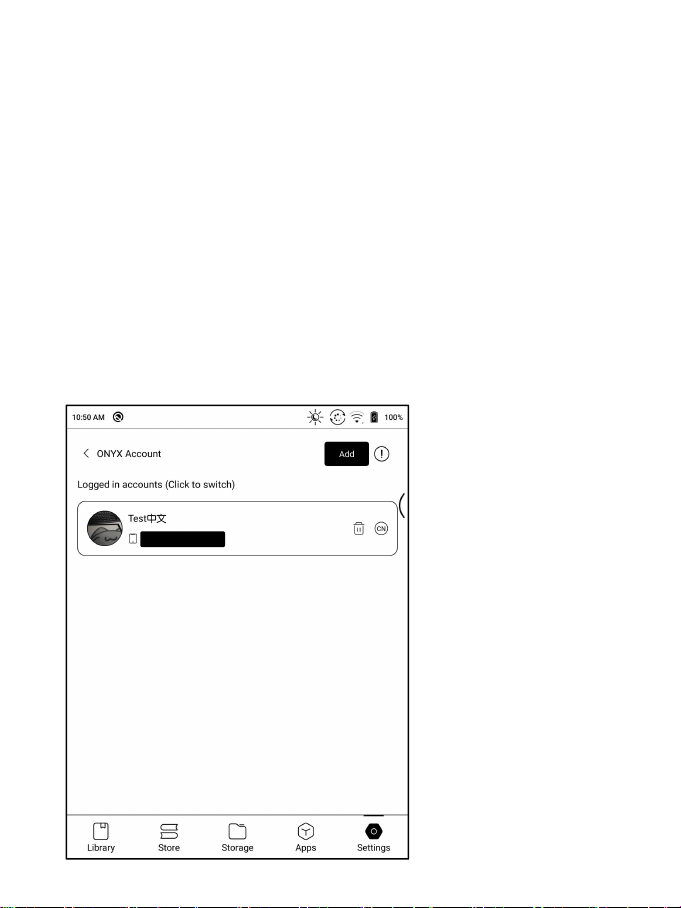
You can manage multiple accounts and switch them. Select accounts from
the list. Only account information is kept and login state is not
maintained. After switching to a different account, you need to log in
again.
If you log in to different accounts with different servers, please change
the server as well when switching accounts.
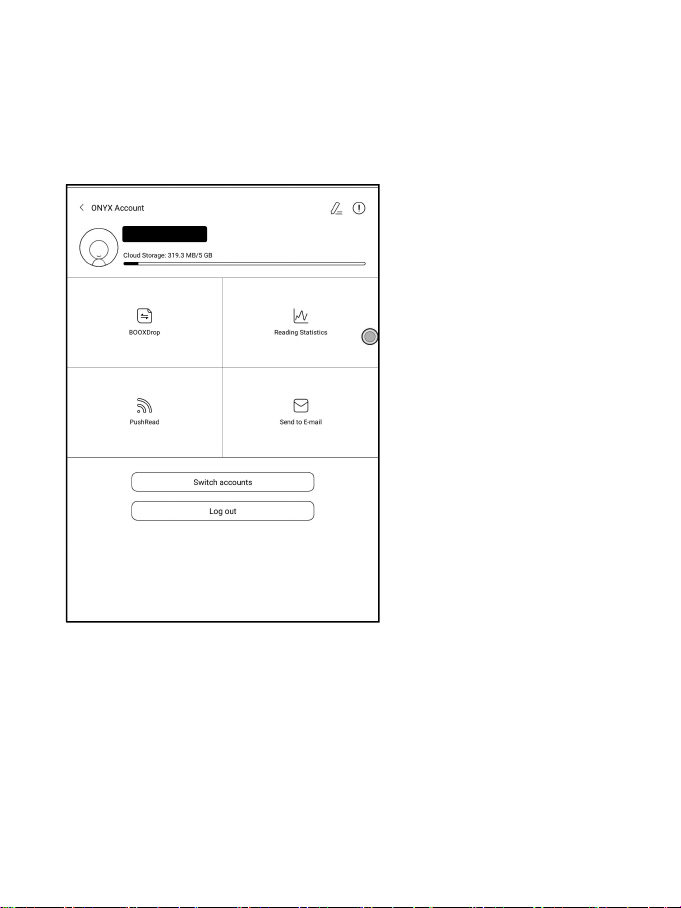
ONYX account included: BooxDrop, Reading Statistics, PushRead, Send to
E-mail.
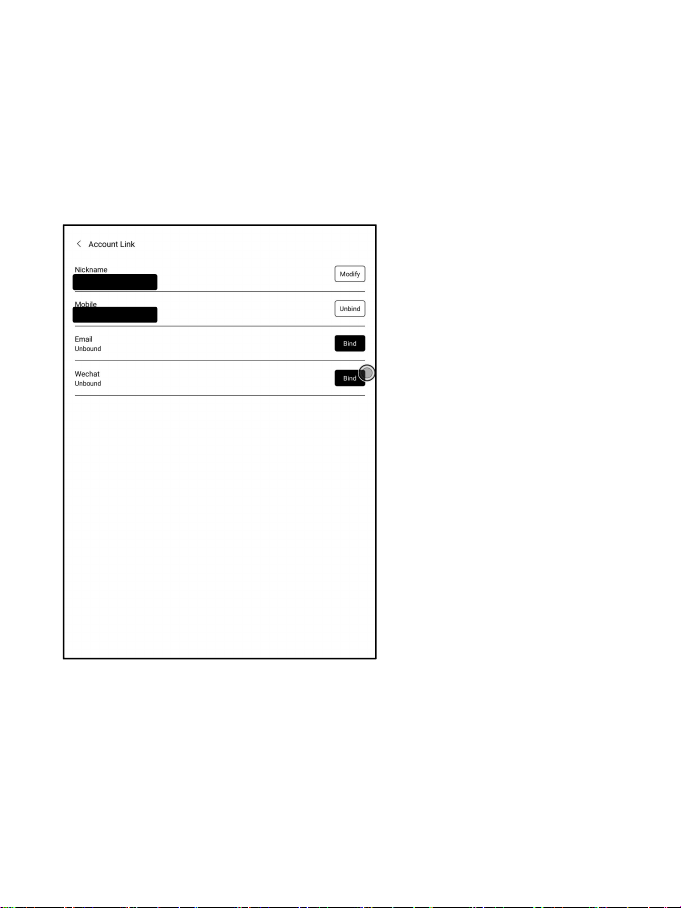
Account Link: After the main account is logged in, you can associate two
other login methods sharing the same ONYX account. Mobile and E-mail
accounts support unbinding, and WeChat accounts do not support unbinding.
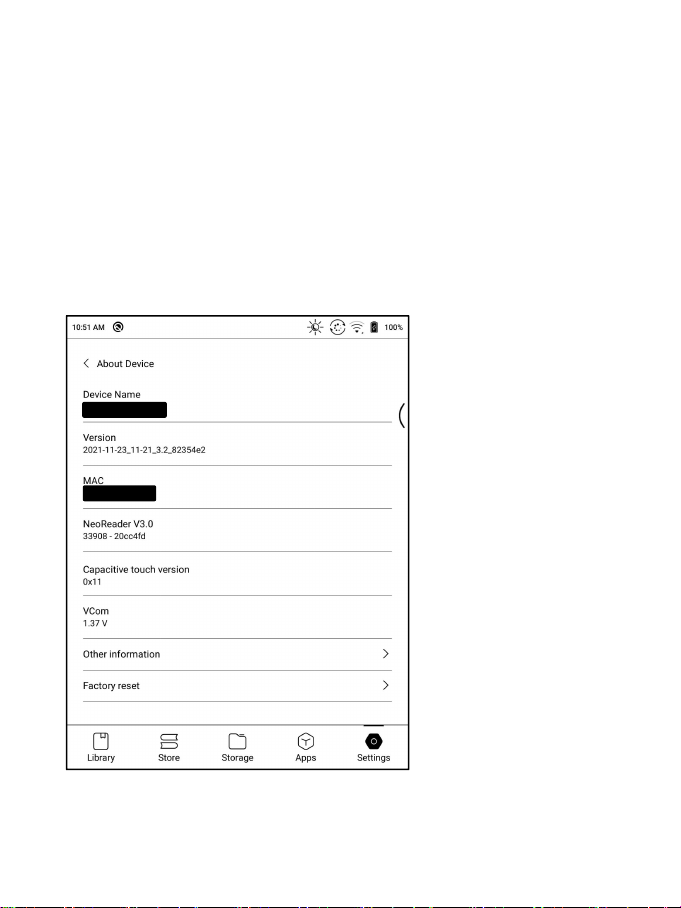
About Device
It contains model name, Android version, MAC address and firmware version.
Click the model number for more information, including Capacitive Touch
Version, VCom, Other information, Factory Reset, etc.
Note: To run the function of factory reset would remove all of the user
data. Please make a data backup first.
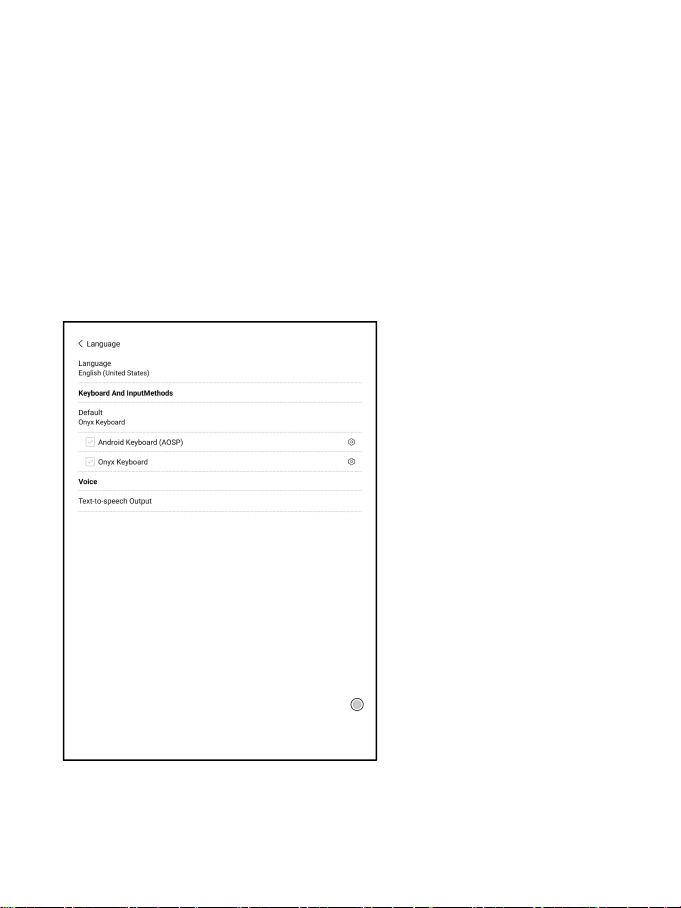
Languages & Input
Users can set system language, keyboard and input method and TTS on this
page;
Users can set languages of the system and virtue keyboard. The system has
an Android keyboard by default. Users can install third-party Apps for
more input methods.

Date & Time
Users can choose either auto setting or manual setting for date and time.
When the device is connected with internet, it will automatically set date
and time according to local time zone. Manual setting requires to set time
zone, date and time, and users can select their preferred time and date
display format;
Power
Users can set screen auto sleep timeout, Power off timeout, Delay
disconnection when the device goes to sleep mode, Battery usage、Battery
percentage、Auto-sleep when closing the cover, etc.
Network
This is for Wi-Fi \VPN\Bluetooth setting. When Wi-Fi is connected, users
can browse webs and download books via the internet on the device.

Wi-Fi Settings
Slide Wi-Fi On, then available networks will be listed. Users can
choose a network, then input password to connect with internet.
After Wi-Fi is connected successfully at the first time, the device will
save Wi-Fi information automatically. Users only need to turn on Wi-Fi
on notification bar if using the same WIFI next time.
Click the “+” button at the top right of the Wi-Fi page, users could
manually connect to other network which is not listed, such as 802.1xEAP.
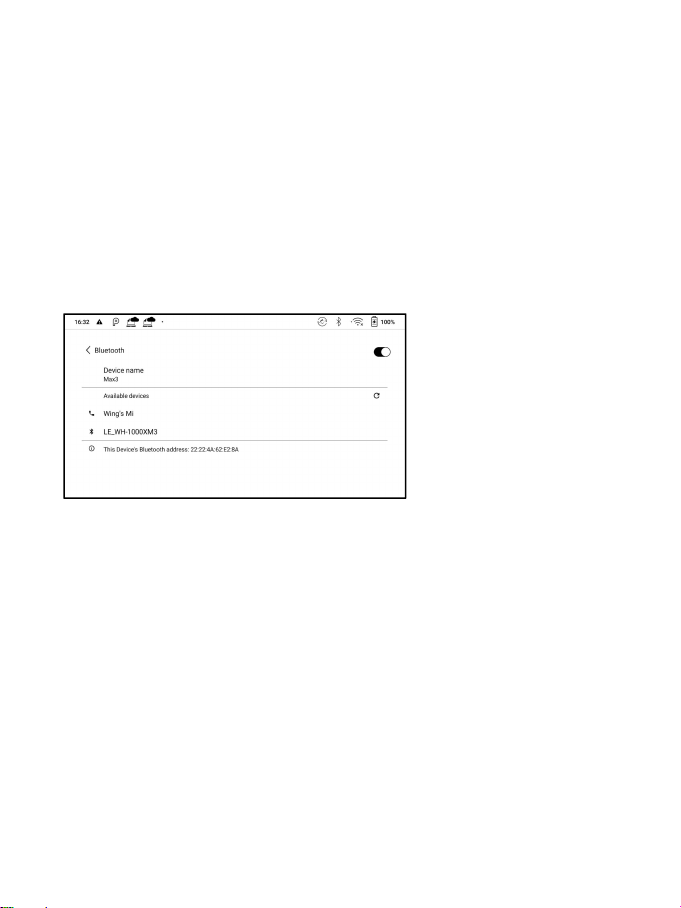
Bluetooth Settings
Turn on Bluetooth, you can search for nearby Bluetooth devices and then
send connection requests.
Bluetooth needs to be paired before use. Currently only support the
eReader to receive documents, send documents from Boox eReader to other
devices is not supported.
VPN Setting
When the VPN is turned on for the first time, the system requires to
set a password. This password needs to be used only for screen unlock
or when the factory settings are restored.
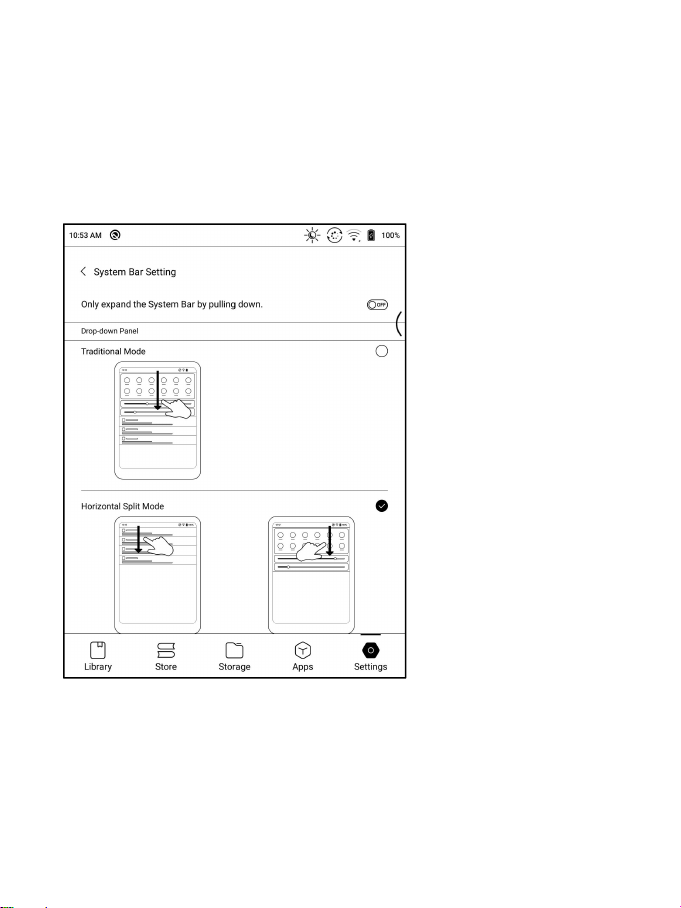
System Bar
You can customize the pull-down menu. Pull-down menu from left and right
sides are different.. The left pull-down is the Notification Center, and
the right pull-down is the Control Panel;
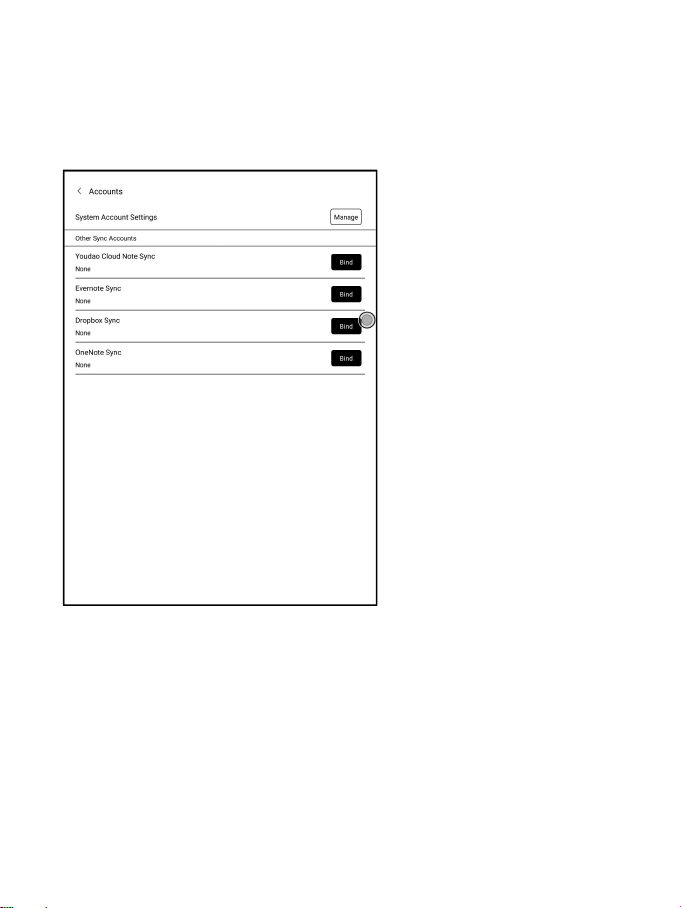
Other accounts
You can manage other accounts including Google, DropBox, OneNote,etc.
These accounts are only used for syncing notes.
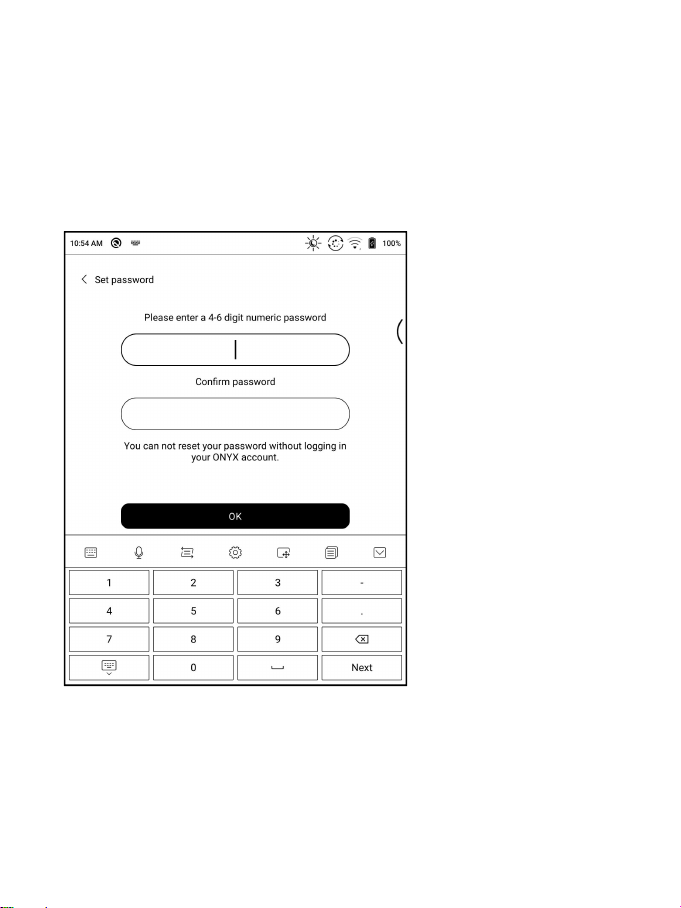
Password
You can set 4-16 digital screen-lock password.
The Android 11 models do not support resetting the password, please keep
the password properly by yourself.
System Display
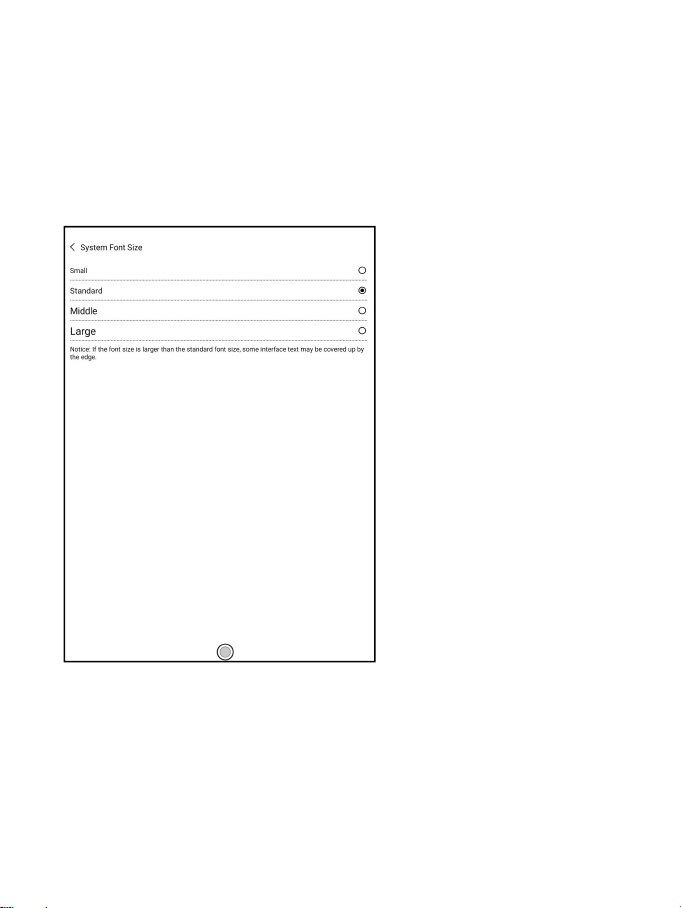
System Font size
Support to adjust the system font size, the default is the standard font
size, you can set a total of 4 sizes: small, standard, large, extra-large;

Custom Homepage
The default Homepage is Library. You can set any of the other Function
pages as the Homepage. You can return to the Homepage by tapping the
homepage icon from the dropdown notification center.
System full screen refresh frequency
The system performs one full refresh every 5 operations
The Library and Notes will be automatically refreshed once more due to
the loading list, and the actual number of operations will be one less
than the set number;
Function Area display icons only
The text under the Function icon can be hidden.
Enable Book Store
The built-in book store can be turned off, but cannot be uninstalled or
removed.

*Gesture Manager(Only Poke4Plus Support)
You can customize 3 gestures for the bottom and 2 gestures for the sides.
The default functions for the Bottom include: Back, Back Home,
Multitasking Switching…etc. Swipe up from the bottom to use them.
The default functions for the sides are Volume +/-, and Frontlight +/-.
Long press the sides to slide up and down to adjust.
Support modification to other functions;

Server
The server is allocated according to the system language by default. The
Chinese language system uses the Asia server, and the other language
systems use US server;
After manually selecting the server, it will no longer be automatically
matched according to the system language;
Please choose the server in your area. This will avoid the slow network
connection which impacts the use of some specific functions (including
bookstore, synchronization, application market, OTA detection and other
functions that require networking);
Firmware Update
Users can get the Model number, Android version, Build number and update
check. Upgrade checks the local package first then online package with
a network connection. Upgrade pause and breakpoint download are allowed.
Please ensure the device has more than 30% power and sufficient capacity
before the update.

Update History
Check Update History and the changelog of every update.
Feedback
FAQ
If having any problems, you can directly find the questions in the FAQ,
quickly locate and solve the problems.
Submit Feedback
Welcome to submit any technical problem or advice to us.
This function collects system information for problem judgment. And Onyx
shall never disclose users’ device information.
The related logs will be cleared after the device shuts down. If you need
to send feedback after the device is off, please enable Save Logs to local
in Feedback so that you can send related logs after restarting the
device.
11. Specifications
Poke4Plus
Poke4Lite
Processor
Quad-core 2.0 GHz
RAM
2G LPDDR4X
OS
Android 11
Storage
32G
16G
Screen
E-ink display with Regal refresh
Screen Size
6 inch
Resolution
1072*1448
758*1024
Touch
Capacitive touch
Front Light
Support
Wireless
WIFI(2.4G+5G)+ Bluetooth(5.0)
Battery
1500 mAh
USB
Type-C(support USB OTG)
Others
Mic
Do not support Mic
Size
153*109*6.8mm
Weight
≤150 g (battery included)
Operating
Temperature
0°C- 50°C
Book Formats
PDF, EPUB , TXT, DJVU, HTML, FB2, DOC, MOBI, CHM, etc.
Image Formats
PNG, JPG, BMP
Audio Formats
WAV , MP3
Apps
Third party APP installation is supported
Browser
Support

Language
Multi-language supported
Firmware Update
Locally update and OTA update are available
Certification
CE、RoHS、CCC、FCC、SRRC、TELEC
12. Declaration
Onyx International Inc. reserves the right to modify the content of the
Quick Start Guide and User Manual without further notice.
For more information, please visit our website at www.boox.com.

