Loading ...
Loading ...
Loading ...
76
Important!
Blower tubes and the intake cover must be installed
while adjusting engine idle! Engine idle speed will
also be affected if either the intake cover or blower
tubes are blocked, damaged or incorrectly installed!
Stopping the Engine
Cool the engine by allowing it to run at idle for 2 to 3 minutes.
Stop the engine by pulling the ignition switch.
Important!
If the engine continues to run while pulling the
ignition switch, stop the engine by pulling the choke
control out to the fully closed position. A clean and
unrestricted airflow is essential to your blower’s
engine performance and durability!
Before attempting any carburettor adjustments, inspect and clean
the engine air cleaner as described under the heading ‘Every 10
Hours’, on Page 6 of this manual.
Using the machine
Think Safety!
In the hands of an experienced operator, the machine can efficiently
move a wide variety of debris ranging from grass clippings to gravel.
As a general rule, try to operate your engine at the lowest throttle
setting necessary to get the job done:
Use low throttle settings when clearing lightweight materials from
around lawns or shrubbery.
Use medium to higher throttle settings to move lightweight grass or
leaves from parking lots or walkways.
Use full throttle when moving heavy loads such as dirt or snow.
User Information!
Noise increases at higher throttle settings! Always use the lowest
throttle setting required to get the job done!
Safe operation
Machine noise increases at higher throttle settings! Always use the
lowest throttle setting required to get the job done!
Never operate the blower when visibility is poor.
Always wear eye protection such as face shield or goggles while
operating this machine.
Wear a dust mask to reduce the risk of inhalation injuries.
Wear close fitting clothing to protect your legs and arms.
Wear hearing protection when operating this machine.
Never operate the blower if any component parts are damaged,
loose, or missing.
1. Using the blower
Always be aware of the strength and
direction of stream. Never direct the
blower discharge stream toward
people or animals.
Routine Maintenance
Warning!
Before performing any maintenance on this
blower, stop the engine and disconnect the spark
plug wire!
Daily Maintenance
Remove dirt and debris from the blower exterior.
Inspect the engine, tank, and hoses for possible fuel leaks, and
repair as necessary.
Inspect the engine cooling fins for accumulations of dirt or debris,
and clean as necessary.
Important!
Dirty or damaged cooling system components
may allow the engine to overheat, possibly
causing serious engine damage!
Important!
Operating the blower with loose, missing, or
damaged components could allow the engine
to over speed, possibly causing serious engine
damage!
Inspect the entire blower for damage, loose or missing components
or fastenings, and repair as necessary.
EVERY 10 HOURS
More frequently in dusty conditions.
Air
cleaner
cover
Cover
retaining
screw
Air
cleaner
element
Loosen the air cleaner cover retaining screw,
and remove the cover and filter element.
Inspect the element. If the element is distorted
or damaged, replace it with a new one.
Wash the element in clean fuel, and squeeze
or blow dry. Wash the air cleaner cover in
clean fuel, and wipe air blow dry.
Install the element and cover and then tighten
the cover retaining screw.
Remove sparkplug
by turning anti-
clockwise.
EVERY 10/15 HOURS
Use the spark plug wrench to remove
the spark plug (turn counter-clockwise to
remove).
Clean and adjust the spark plug gap to
0.6-0.7mm. Replace any damaged or visi-
bly worn plug with the correct plug or it’s
equivalent
Install the spark plug finger tight in the
cylinder head, then tighten it firmly with the
spark plug wrench. If a torque wrench is
available, torque the spark plug to 148-165
inch pounds.
Important!
Never allow dirt or debris to enter the cylinder
bore!Before removing the spark plug, thoroughly
clean the spark plug and cylinder head area!Allow
the engine to cool before servicing the spark plug!
Cylinder tightening or loosening the spark plug
while the engine is hot can result in serious engine
damage! Incorrect spark plug installation can result
in serious engine damage!
EVERY 50 HOURS
More frequently if you notice reduced performance.
INSPECTION
Inspect the entire blower and tubes for damage, including loose or
missing components, and repair as necessary.
SPARK PLUG
Replace the spark plug with a Champion RCJ6Y, gapped to (0.6-
0.7)mm.
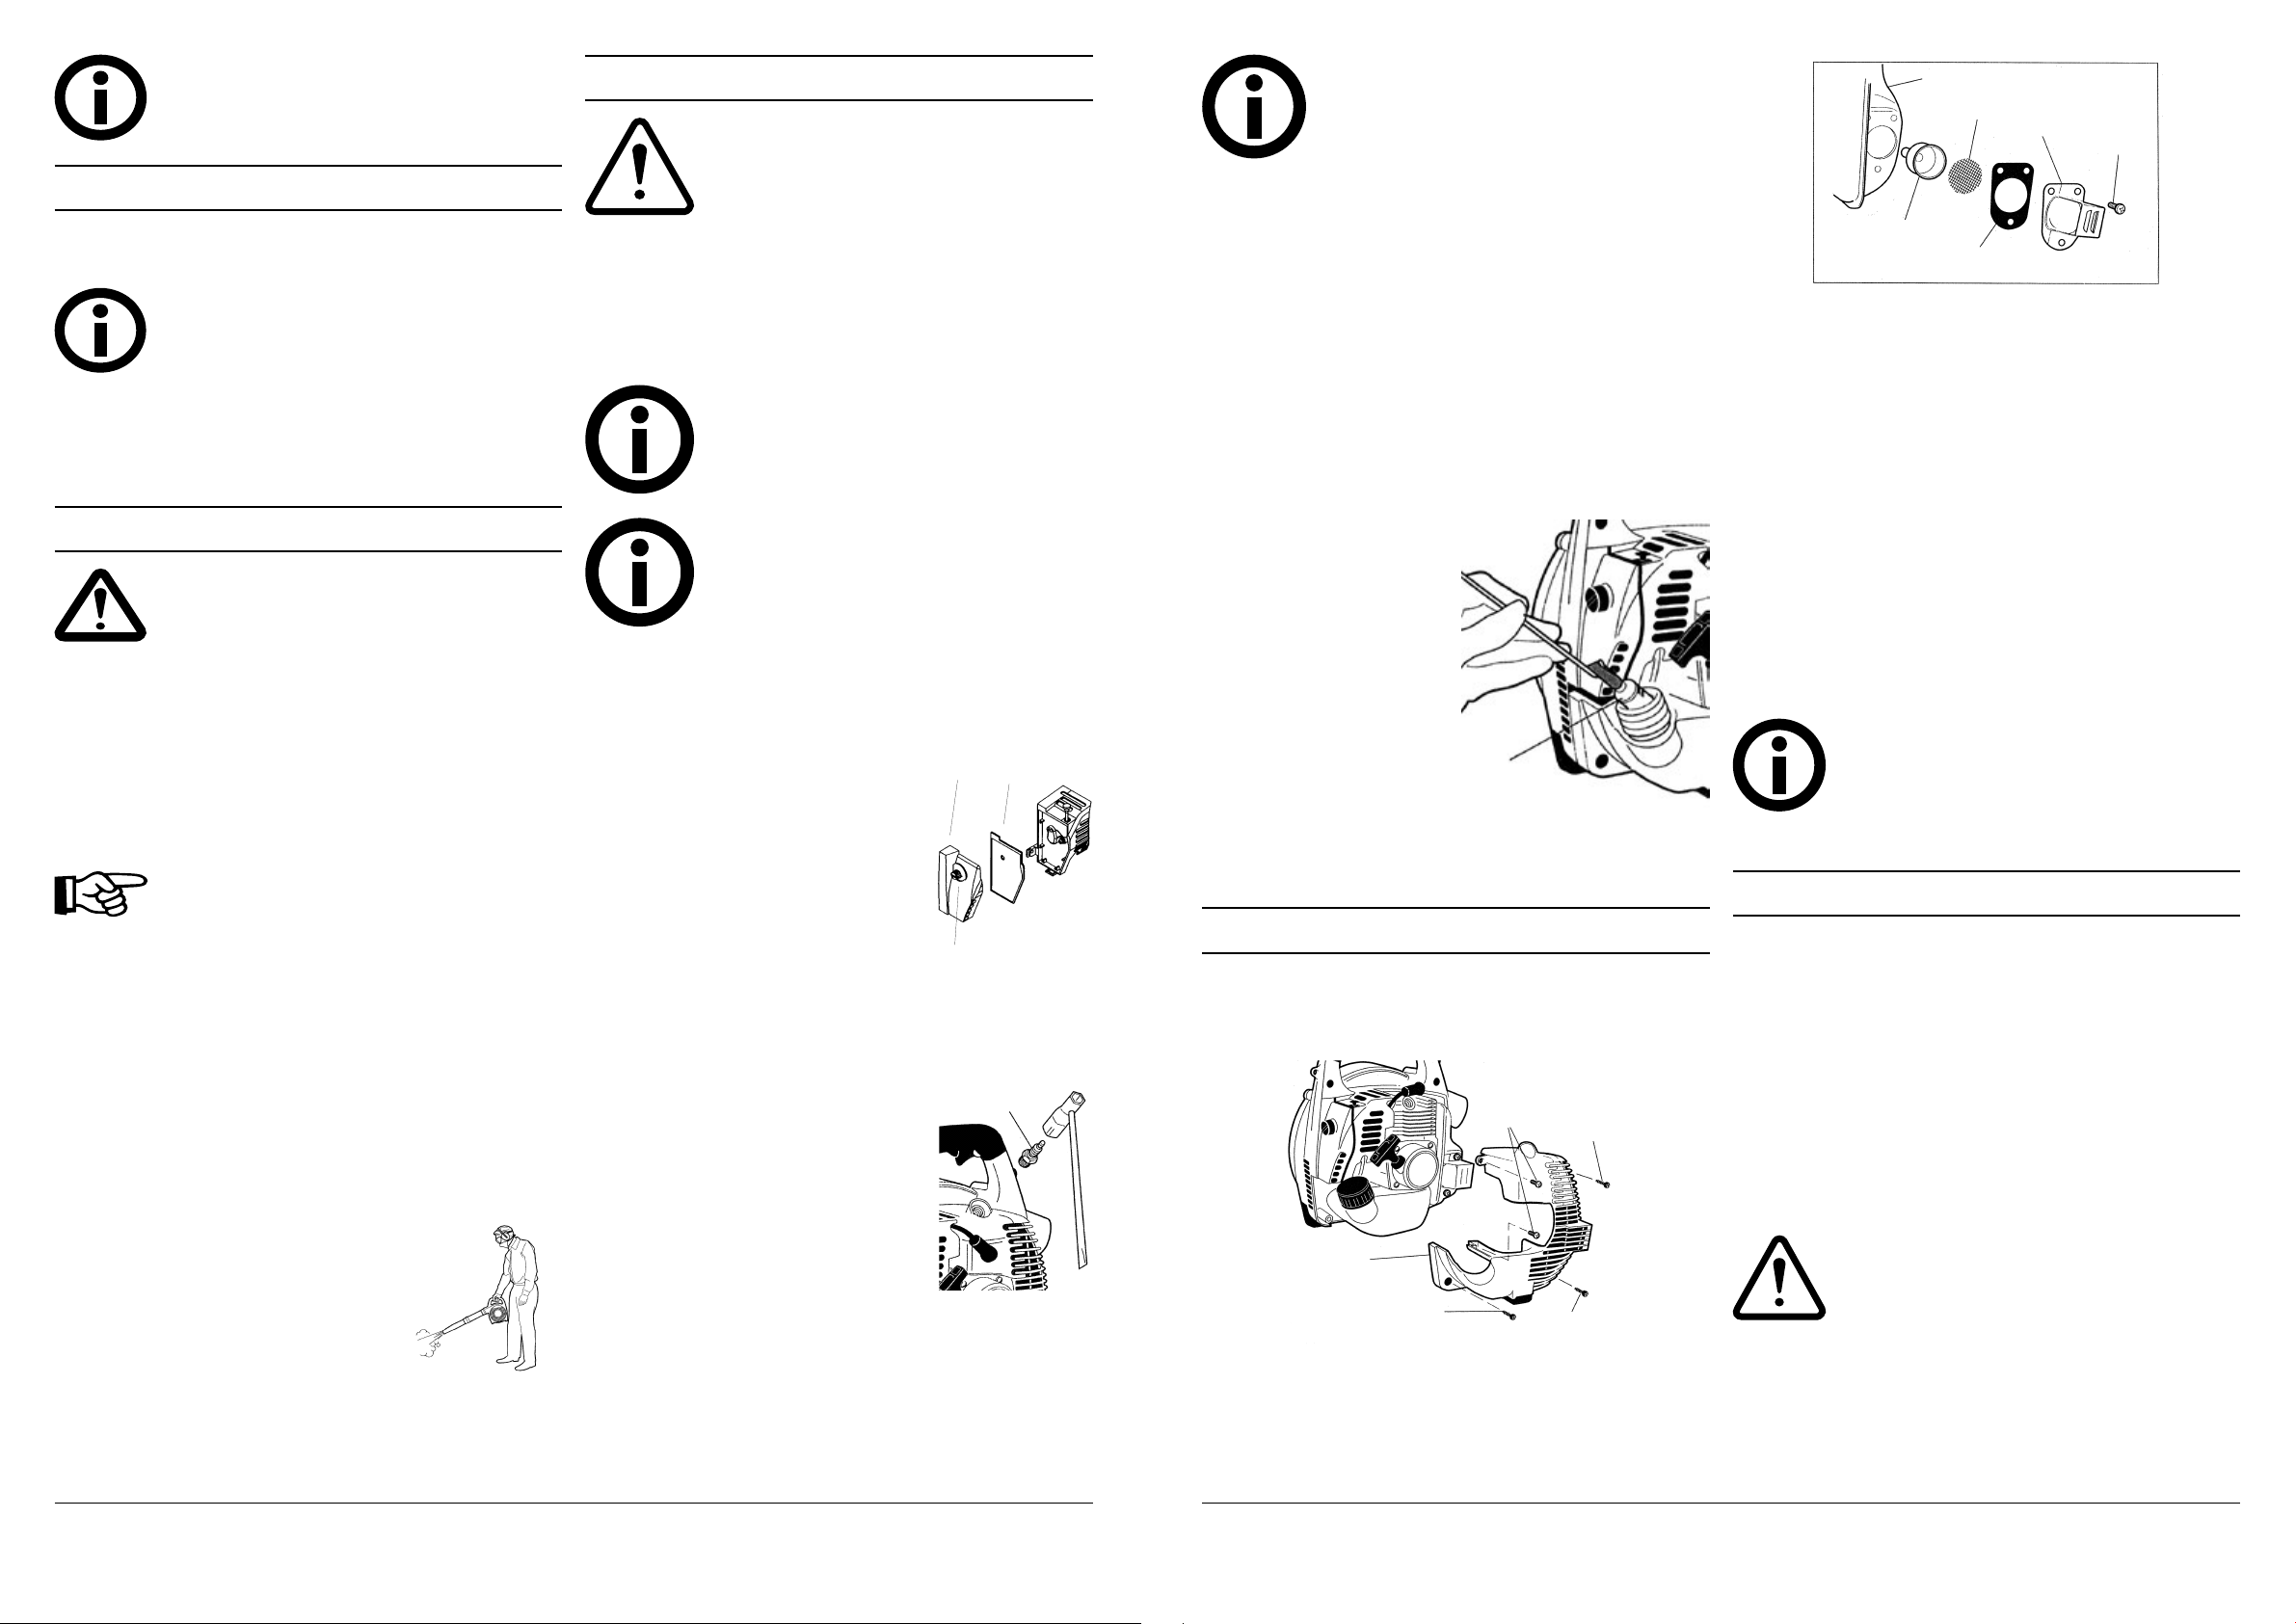
FUEL FILTER
Fuel filter
Use a wire hook to extract the
fuel filter from inside the fuel
tank, and then remove and
wash the filter element in clean
fuel. Before reinstalling the filter,
inspect the condition of the fuel
line. If damage or deterioration is
noted, the blower should not be
used until it can be inspected by
a trained service technician.
COOLING SYSTEM
Remove the engine cover (as
described under ‘Spark Arrestor Maintenance), and use a wood or
plastic scraper and a soft brush to remove dirt and debris from the
cylinder fins and crankcase.
Spark Arrestor Maintenance
Hard starting or gradual loss of performance can be caused by
carbon deposits lodged in the spark arrestor screen. For maximum
performance, the spark arrestor screen should be periodically
cleaned as follows:
Remove the
engine cover
Self tapping
screw
Spark
arrestor
screen
Spark
arrestor
chamber
Spark
arrestor
cover
Retaining
screw
Gasket
Self tapping
screw
Self tapping
screw
Machine
screws
Remove the
engine cover
Self tapping
screw
Spark
arrestor
screen
Spark
arrestor
chamber
Spark
arrestor
cover
Retaining
screw
Gasket
Self tapping
screw
Self tapping
screw
Machine
screws
Remove the spark plug.
Remove three self tapping screws and two machine screws from
the engine cover, and then gently move the engine cover aside.
Remove the three spark arrestor retaining screws, and then remove
the spark arrestor cover, screen, gasket, and chamber
Use a plastic scraper or wire brush to remove carbon deposits from
the arrestor screen, chamber, and cover.
Inspect the screen carefully, and replace any screen that has been
perforated, distorted, or is otherwise unserviceable.
Install the chamber, screen, gasket and cover in the reverse order
of disassembly, and then install and securely tighten the three cover
retaining screws.
Install the engine cover, and verify that the fuel line connections are
still tightly in place.
Install the engine cover retaining screws in the reverse order of
removal, and tighten securely.
Install and tighten the spark plug, and reconnect the spark plug
wire.
Drain the fuel if it is to be stored for an extended time.
Important!
Always replace cover screws in the same holes
from which they were removed. Substitution or
incorrect assembly of the engine cover screws
can permanently damage aluminium castings and
plastic components!
Storage for over 30 days
CLEANING Thoroughly clean the machine exterior.
INSPECTION Inspect the entire machine and tubes for damage,
including loose or missing components, and repair as necessary.
FUEL Drain the fuel tank, and then clear the carburettor and lines
by running the machine until it stops from lack of fuel.
LUBRICATION Remove the spark plug, and then pour
approximately 1/4-oz of oil into the cylinder through the spark plug
hole. Before reinstalling the spark plug, pull the recoil starter 2 or 3
times to distribute the oil over the cylinder walls.
AIR CLEANER Remove, clean, and reinstall the filter element as
described under “daily maintenance.”
STORAGE Store the machine in a clean, dry, dust free environment.
Warning!
Never store the machine with any fuel remaining in
the tank, fuel lines, or carburettor! Your warranty
does not include coverage for damage caused by
‘stale’ or contaminated fuels!
Loading ...
Loading ...
Loading ...