Loading ...
To keep this product working well and looking good, follow these guidelines:
• Avoid putting it near heating appliances and devices that generate electrical noise (for example,
motors or fluorescent lamps).
• DO NOT expose it to direct sunlight or moisture.
• Avoid dropping the product or treating it roughly.
• Clean with a soft cloth.
• DO NOT immerse the parent unit and the baby unit in water and do not clean them under the tap.
• DO NOT use cleaning spray or liquid cleaners.
• Make sure the parent unit and the baby unit are dry before you connect them to the mains again.
• Clean the USB charging port of dust, dirt, and lint regularly.
When you are not going to use the HD video monitor for some time, store the parent unit, the baby
unit and the adapters in a cool and dry place.
Below are the questions most frequently asked about the HD video monitor.
Can I turn off the
parent unit screen but
keep hearing sound
from the baby unit?
The parent unit’s LCD display will dim automatically after being inactive for some
time. Press MENU/SELECT will turn the LCD display back on.
Why does the baby
unit not respond
normally?
Try the following (in the order listed) for common cure:
1. Disconnect the power to the baby unit.
2. Wait a few minutes before connecting power back to the baby unit.
3. Reboot the parent unit.
Why is my screen in
black and white?
The baby unit has a light sensor that measures the ambient light. When the
ambient light is dim, such as during nighttime or in a dark room, the baby unit
activates its infrared LEDs, and displays the camera view in black and white.
Why does my baby
unit show offline? Why
is the connection lost
every now and then?
The baby unit may lose the Internet connection. Check your network and the
router setting.
Other electronic products may cause interference with your baby unit. Try
installing your baby unit as far away from these electronic devices as possible.
Why don’t I hear a
sound/Why can’t I
hear my baby cry?
The parent unit speaker volume may be too low. Press VOL + to increase the
volume.
You may have set a low sound sensitivity level. Set the sound sensitivity to a
higher level. For details, go to www.vtechphones.com for online help topics.
Frequently asked questions
General product care
Storage
mount the baby unit (optional)
Need help?
Use your smartphone or mobile device to access our online help.
• Go to
https://help.vtechphones.com/rm7764hd or
https://help.vtechphones.com/rm7764-2hd; OR
• Scan the QR code on the right. Launch the camera app or
QR code scanner app on your smartphone or tablet. Hold
the device’s camera up to the QR code and frame it. Tap
the notification to trigger the redirection of the online help.
- If the QR code is not clearly displayed, adjust your
camera’s focus by moving your device closer or
further away until it is clear.
If you would like to contact us, visit
https://help.vtechphones.com/cs.
Download app for mobile access
Test the sound level and position the HD video monitor
Basic operation
S
m
You can also call our Customer Support at
1-844-848-8324 (1-844-84-VTECH) [in US] or
1-888-211-2005 [in Canada] for help.
Driven by system updates, the software, online help topics, and online
FAQs will be updated periodically.
For operations and guides to help you using your HD video monitor,
and for latest information and supports, go and check the online help
topics and online FAQs.
Auto software and firmware update
If you plan to install your baby unit in a designated
location, and use your home Wi-Fi network to
connect your video monitor, you need to test
which of your selected monitoring areas within the
house have good Wi-Fi signal strength. After you
have powered on your parent unit, you can use
your parent unit’s Wi-Fi signal strength indicator
to assist in checking. Once you have identified the
suitable location, you can install your baby unit.
Adjust the distance between your baby unit and
the Wi-Fi router if needed.
• Depending on surroundings and obstructing
factors, such as the effect distance and internal
walls have on signal strength, you may experience
reduced Wi-Fi signal. To improve the Wi-Fi signal
strength, adjust the distance or direction of your
parent unit. Check with your parent unit again.
test the location for the baby unit
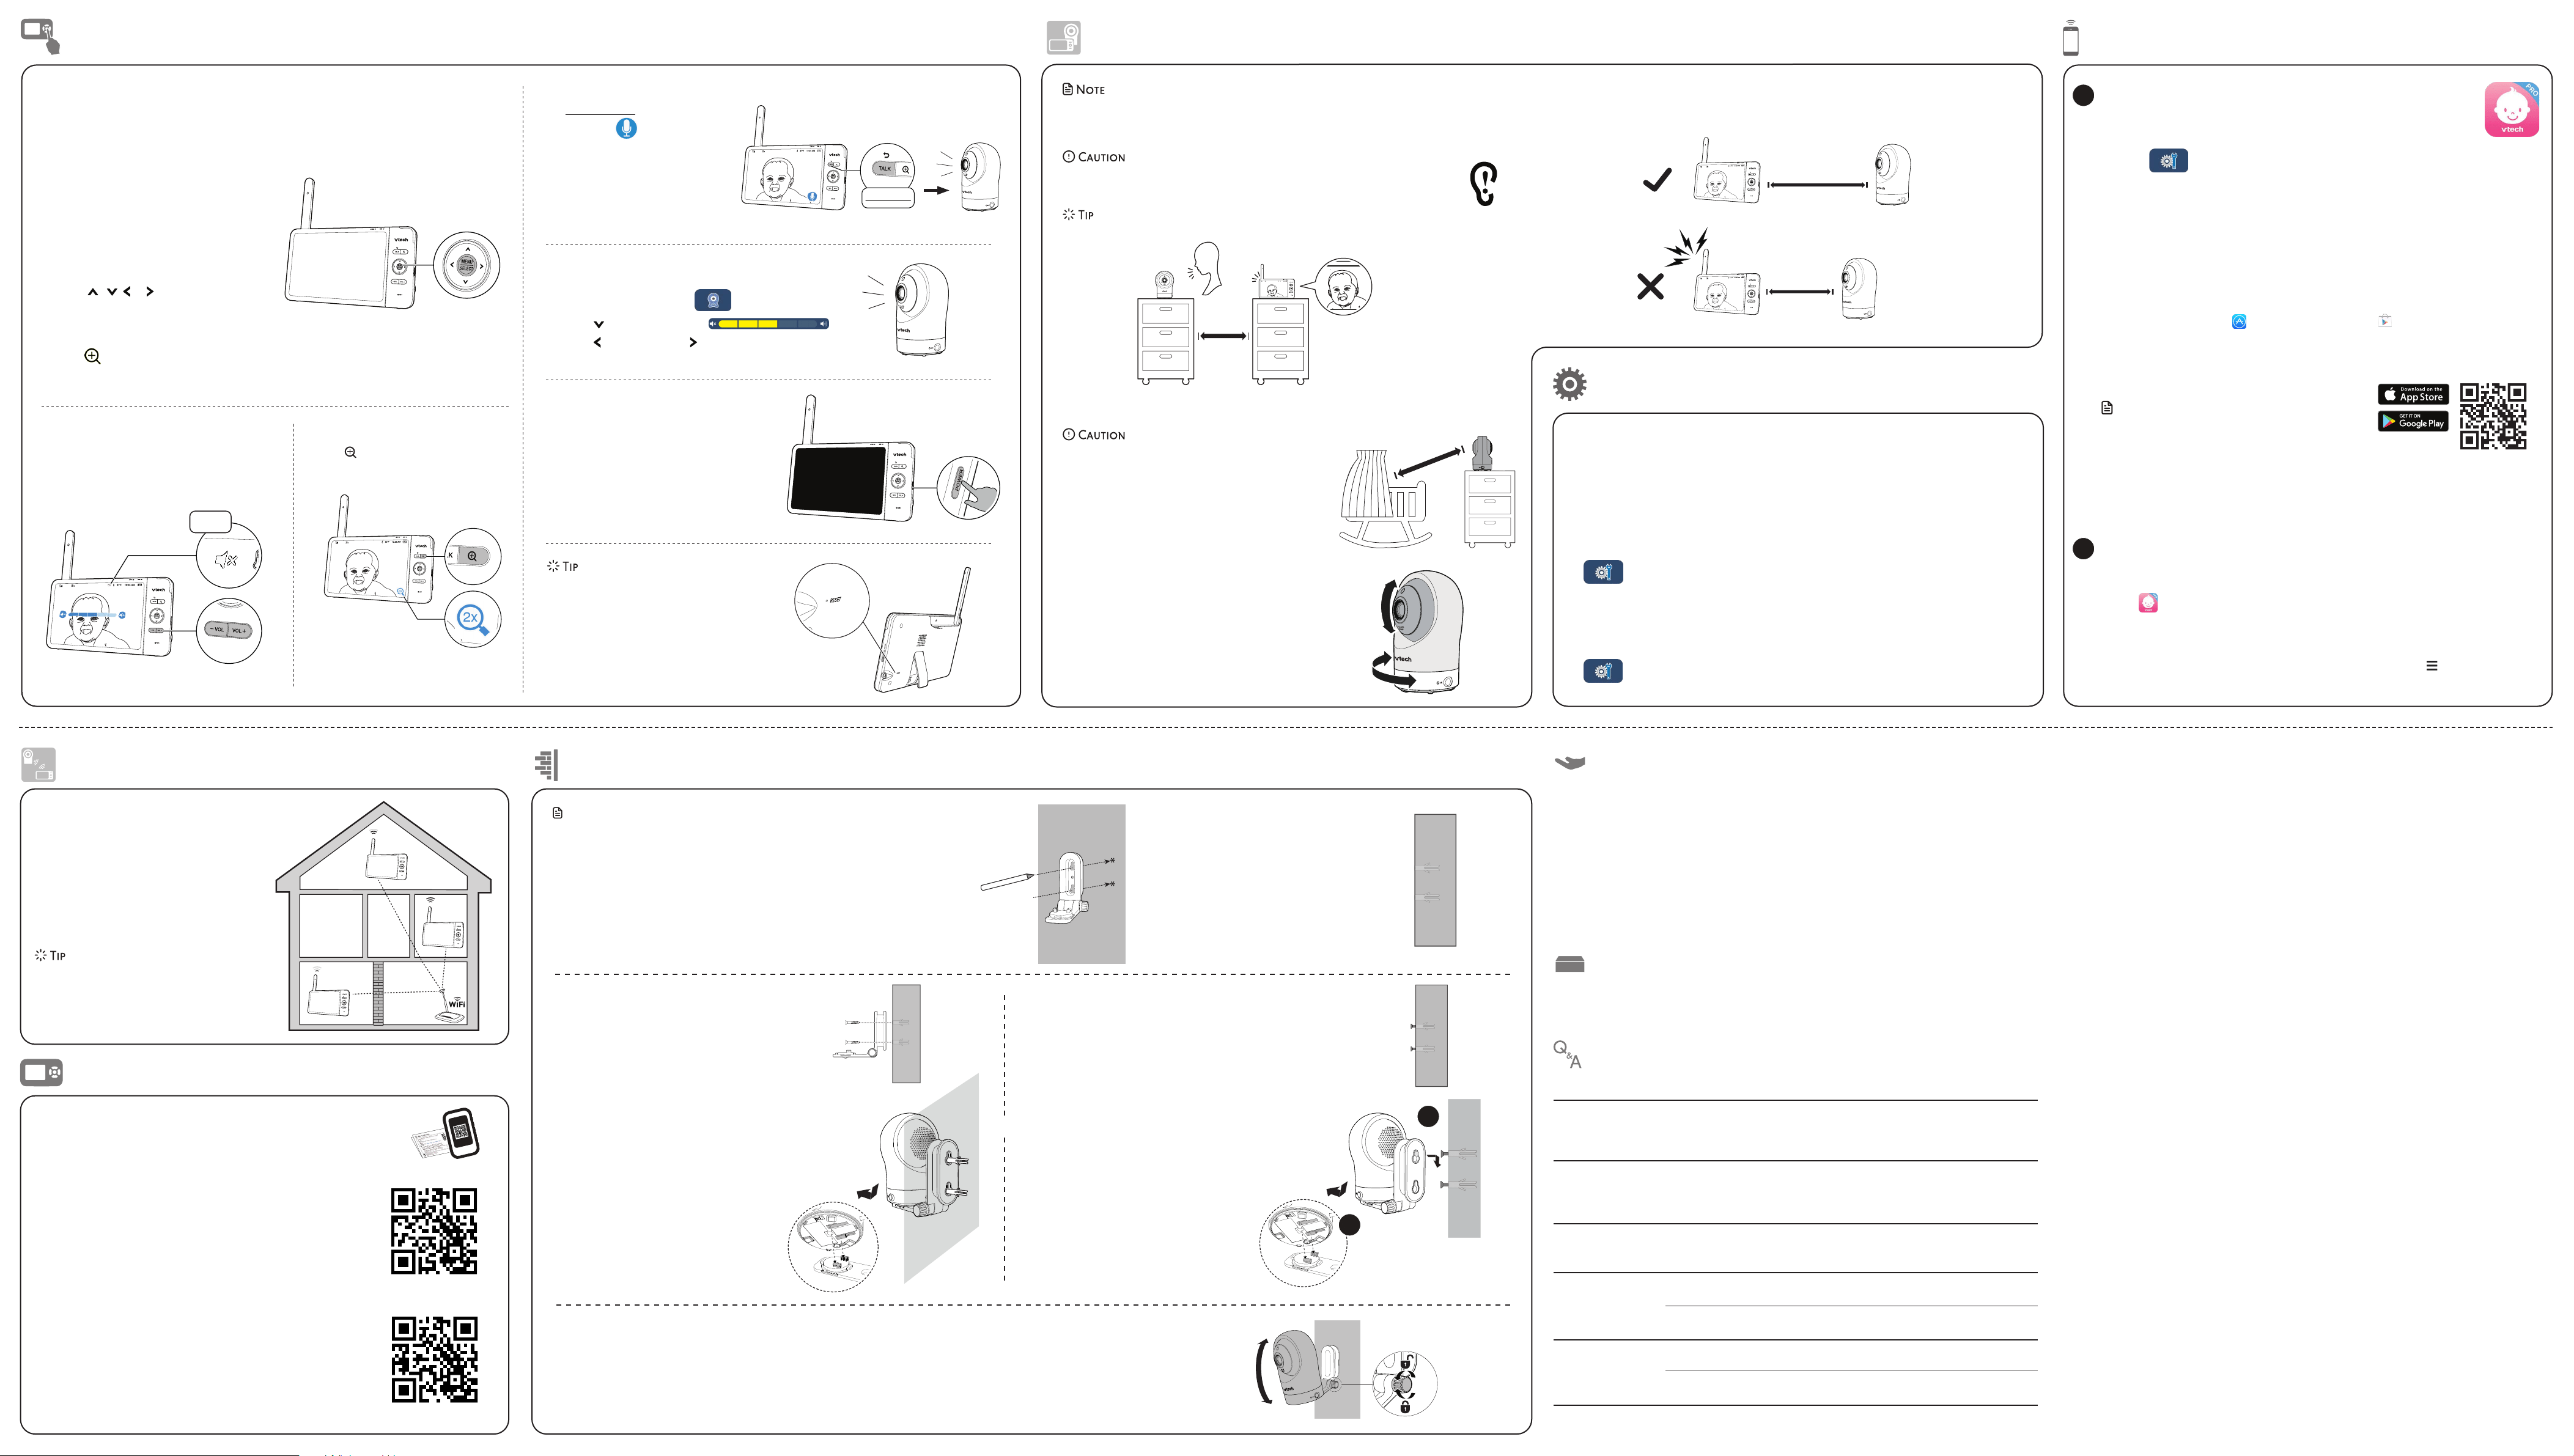
Talk to your baby via the baby unit
1. Press and hold the TALK key.
2. When the
icon displays on
screen, speak to your parent unit.
Your voice is transmitted to the
baby unit.
3. When finish talking, release
the TALK key and hear your baby
again.
Zoom
Press
to zoom in or out.
Adjust speaker volume
Press -VOL / VOL+ to adjust your parent unit
speaker volume. It determines the volume of
sound transmitted from your baby unit.
After powering up your video monitor, the parent unit streams live video in direct mode.
We recommend you follow the instructions on screen to set up home Wi-Fi network
with your monitor for functionality enhancements and mobile access. See Auto software
and firmware update and Download app for mobile access in this quick start guide.
Use the menu
Press MENU on the parent unit to enter the
main menu, choose a menu item, or save a
setting. You can use the parent unit menu
for advanced settings or operations, such as
to play or stop lullaby, or adjust the motion
and sound detection settings.
While in the menu:
• Press
, , or to scroll among the
menu options.
• Press SELECT to select an item.
• Press TALK to return to the live video.
• Press
to go to the Help & info page.
You can reset the parent unit by pressing the
RESET key at the back of the unit.
Use a pin and insert it into the hole on the
back of the parent unit, and then press the
button inside.
Turn on/off the parent unit screen
You can turn on or off the parent unit screen
without powering off the parent unit. You
can still hear sound from the baby unit.
• Press POWER on the parent unit to turn
off the screen.
• Press any keys on the parent unit to turn
on the screen again.
• This HD video monitor is intended as an aid. It is not a substitute for proper adult supervision, and should
not be used as such.
Testing the sound level of the HD video monitor
• For hearing protection, make sure the parent unit is more than 10 feet away from the baby
unit. If you hear any high-pitched noise from the parent unit, move the parent unit further
until the noise stops. You can also press - VOL on the parent unit to lower or mute the noise.
• Increase the parent unit speaker volume if you cannot hear the sounds transmitted from the baby unit.
Positioning the HD video monitor
• Keep the baby unit out of the reach of your baby. Never
place or mount the baby unit inside the baby’s crib or
playpen.
1. Place the baby unit more than 3 feet away from your
baby.
2. Adjust the angle of the baby unit to aim at your baby.
3. To avoid causing high-pitched screeching noise from your HD video monitor:
• Make sure your baby unit and parent unit are more than 10 feet apart; OR
• Turn down the volume of your parent unit.
RM7764HD online help
RM7764-2HD online help
> 3m
37
37
10:25 AM
10:25 AM
< 3m
> 3m
1. Place the wall mount bracket on a
wall and then use a pencil to mark
two holes in parallel. Remove the
wall mount bracket and drill two
holes in the wall (7/32 inch drill bit).
NONO
Notes
• Check for reception strength and baby
unit angle before drilling the holes.
• The types of screws and anchors you
need depend on the composition of
the wall. You may need to purchase the
screws and anchors separately to mount
your baby units.
2. If you drill the holes into a stud, go
to step 3.
• If you drill the holes into an
object other than a stud, insert
the wall anchors into the holes.
Tap gently on the ends with a
hammer until the wall anchors
are flush with the wall.
3. Align the wall mount bracket and screws with
the holes in the wall as shown. Tighten the screw
in the middle hole first, so that the wall mount
bracket position is fixed. You can tighten the
other screw in the top hole.
3. Insert the screws into the holes and
tighten the screws until only 1/4 inch of
the screws are exposed.
4. Place the baby unit on the wall
mount bracket, and then slide it
forward until it locks into place. Align
the holes on the wall mount bracket
with the screws on the wall, and slide
the wall mount bracket down until it
locks into place.
5. You can maximize your baby unit’s viewing angles by tilting the wall mount bracket.
Hold the baby unit, and then rotate the knob in anticlockwise direction. This will loosen the joint of the wall mount bracket.
Tilt your baby unit up or down to adjust to your preferred angle. Then, rotate the knob in clockwise direction to tighten the joint
and secure the angle.
OR
4. Place the baby unit on the wall mount bracket,
and then slide it forward until it locks into place.
Connect the power adapter to the baby unit
and a power supply not controlled by a wall
switch.
1
2
Muted
Press and hold
> 3ft (1m)
Adjust baby unit speaker volume
1. Press MENU.
2. Go to Baby unit settings
.
3. Press
to scroll to Volume
.
4. Press
to decrease and to increase the baby unit’s
speaker volume.
To ensure that your HD video monitor is always at its best performance, the parent unit
will prompt a message and ask you to update its software and the baby unit's firmware
when there are new versions available.
• Follow the instructions on the parent unit screen to update your HD video monitor.
If you skip the updates, the parent unit and baby unit will be updated automatically
when the parent unit is powered off, and then powered on again.
• To check if your device is running on the latest software, or to update your device
software, go to:
>
Software Update.
Connect your HD video monitor with home Wi-Fi network
• You must connect your video monitor to your secured home Wi-Fi network in order
to receive the latest software and firmware updates. To set Wi-Fi up, go to:
>
Configure Wi-Fi > Change Wi-Fi Networks.
Install MyVTech Baby Pro mobile app
1. Browse the App Store
or the Google Play store .
2. Search for the mobile app with the keyword “MyVTech Baby Pro“.
3. Download and install the MyVTech Baby Pro mobile app to your mobile device.
OR
Scan the QR code on the right to get the app.
Note
• Make sure your mobile device meets the
minimum requirement for the mobile app.
Minimum requirement
The mobile app is compatible with:
• Android
TM
6.0 or later; and
• iOS 12.0 or later.
You can download the free MyVTech Baby Pro mobile app and install it
to a mobile device, then use your mobile device and the mobile app to
monitor your areas remotely.
1. Press MENU when the parent unit is idle.
2. Go to
>
Connect Mobile Phone.
3. Scan the QR code in the parent unit to download the app into your
mobile device.
4. Follow the instructions in the mobile app to set up and pair your baby
unit to the mobile app.
Alternatively, you can download the mobile app from the App Store or
Google Play store.
1
After installing the mobile app, follow the instructions in the mobile app and parent
unit to set up and pair your baby unit.
In your mobile device:
1. Tap
to run the mobile app in your mobile device, and then create a user account.
2. We recommend that you use common webmail services, such as Google Gmail, for the
registration of your user account. Check your email (and Spam folder), and activate your
new user account via the email link. Then, sign in to your account.
3. Follow the instructions in the mobile app to pair the camera. Tap
, then Add Camera
in the mobile app to get started.
2
What does this limited warranty cover?
The manufacturer of this VTech Product warrants to the
holder of a valid proof of purchase (“Consumer” or “you”)
that the Product and all accessories provided in the sales
package (“Product”) are free from defects in material
and workmanship, pursuant to the following terms and
conditions, when installed and used normally and in
accordance with the Product operating instructions. This
limited warranty extends only to the Consumer for Products
purchased and used in the United States of America and
Canada.
What will VTech do if the Product is not free from defects
in materials and workmanship during the limited warranty
period (“Materially Defective Product”)?
During the limited warranty period, VTech’s authorized service
representative will replace at VTech’s option, without charge,
a Materially Defective Product. If we choose to replace
the Product, we may replace it with a new or refurbished
Product of the same or similar design. We will retain
defective parts, modules, or equipment. Replacement of the
Product, at VTech’s option, is your exclusive remedy. VTech
will return the replacement Products to you in working
condition. You should expect the replacement to take
approximately 30 days.
How long is the limited warranty period?
The limited warranty period for the Product extends for ONE
(1) YEAR from the date of purchase (90 days on products
purchased as Refurbished*). This limited warranty also
applies to the replacement Product for a period of either (a)
90 days from the date the replacement Product is shipped
to you or (b) the time remaining on the original one-year
warranty (90-day limited warranty on products that are
purchased as Refurbished*); whichever is longer.
*Refurbished products purchased from our online store
carry a 90-day replacement warranty.
What is not covered by this limited warranty?
This limited warranty does not cover:
1. Product that has been subjected to misuse, accident,
shipping or other physical damage, improper installation,
abnormal operation or handling, neglect, inundation,
fire, water or other liquid intrusion; or
2. Product that has been damaged due to repair, alteration
or modification by anyone other than an authorized
service representative of VTech; or
3. Product to the extent that the problem experienced is
caused by signal conditions, network reliability, or cable or
antenna systems; or
4. Product to the extent that the problem is caused by use
with non-VTech accessories; or
5. Product whose warranty/quality stickers, product serial
number plates or electronic serial numbers have been
removed, altered or rendered illegible; or
6. Product purchased, used, serviced, or shipped for repair
from outside the United States of America or Canada, or
used for commercial or institutional purposes (including
but not limited to Products used for rental purposes); or
7. Product returned without a valid proof of purchase (see
item 2 below); or
8. Charges for installation or set up, adjustment of customer
controls, and installation or repair of systems outside the
unit.
How do you get warranty service?
To obtain warranty service in the USA, please visit our
website at www.vtechphones.com or call 1 (800) 595-9511.
In Canada, go to www.vtechcanada.com or call
1 (800) 267-7377.
NOTE: Before calling for service, please review the user’s
manual - a check of the Product’s controls and features may
save you a service call.
Except as provided by applicable law, you assume the risk
of loss or damage during transit and transportation and are
responsible for delivery or handling charges incurred in the
transport of the Product(s) to the service location. VTech
will return replaced Product under this limited warranty.
Transportation, delivery or handling charges are prepaid.
VTech assumes no risk for damage or loss of the Product in
transit.
What must you return with the Product to get warranty
service?
1. Return the entire original package and contents including
the Product to the VTech service location along with a
description of the malfunction or difficulty; and
2. Include a “valid proof of purchase” (sales receipt)
identifying the Product purchased (Product model) and
the date of purchase or receipt; and
3. Provide your name, complete and correct mailing
address, and telephone number.
Other limitations
This warranty is the complete and exclusive agreement
between you and VTech. It supersedes all other written or
oral communications related to this Product. VTech provides
no other warranties for this Product. The warranty exclusively
describes all of VTech’s responsibilities regarding the
Product. There are no other express warranties. No one is
authorized to make modifications to this limited warranty and
you should not rely on any such modification. State/Provincial
Law Rights: This warranty gives you specific legal rights, and
you may also have other rights, which vary from state to state
or province to province.
Limitations: Implied warranties, including those of fitness
for a particular purpose and merchantability (an unwritten
warranty that the Product is fit for ordinary use) are limited
to one year from the date of purchase. Some states/
provinces do not allow limitations on how long an implied
warranty lasts, so the above limitation may not apply to you.
In no event shall VTech be liable for any indirect, special,
incidental, consequential, or similar damages (including,
but not limited to lost profits or revenue, inability to use
the Product or other associated equipment, the cost of
substitute equipment, and claims by third parties) resulting
from the use of this Product. Some states/provinces
do not allow the exclusion or limitation of incidental or
consequential damages, so the above limitation or exclusion
may not apply to you.
Please retain your original sales receipt as proof
of purchase.
Limited warranty