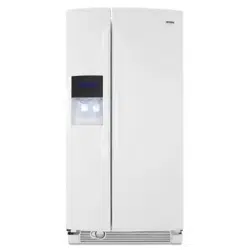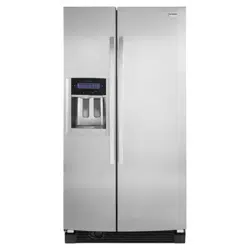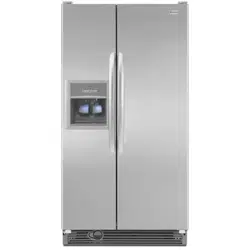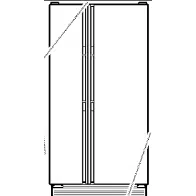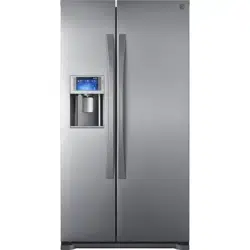
SIDE-BY-SIDE REFRIGERATOR
REFRIGERADOR DE DOS PUERTAS
lVlode|s/Modelos 41002, 41003, 41009
DA99=01746C REV(0.2)
Printed in Korea
Sears, Roebuck and Co,, Hoffman Estates, IL 60179 U,S,A, www, sears,corn
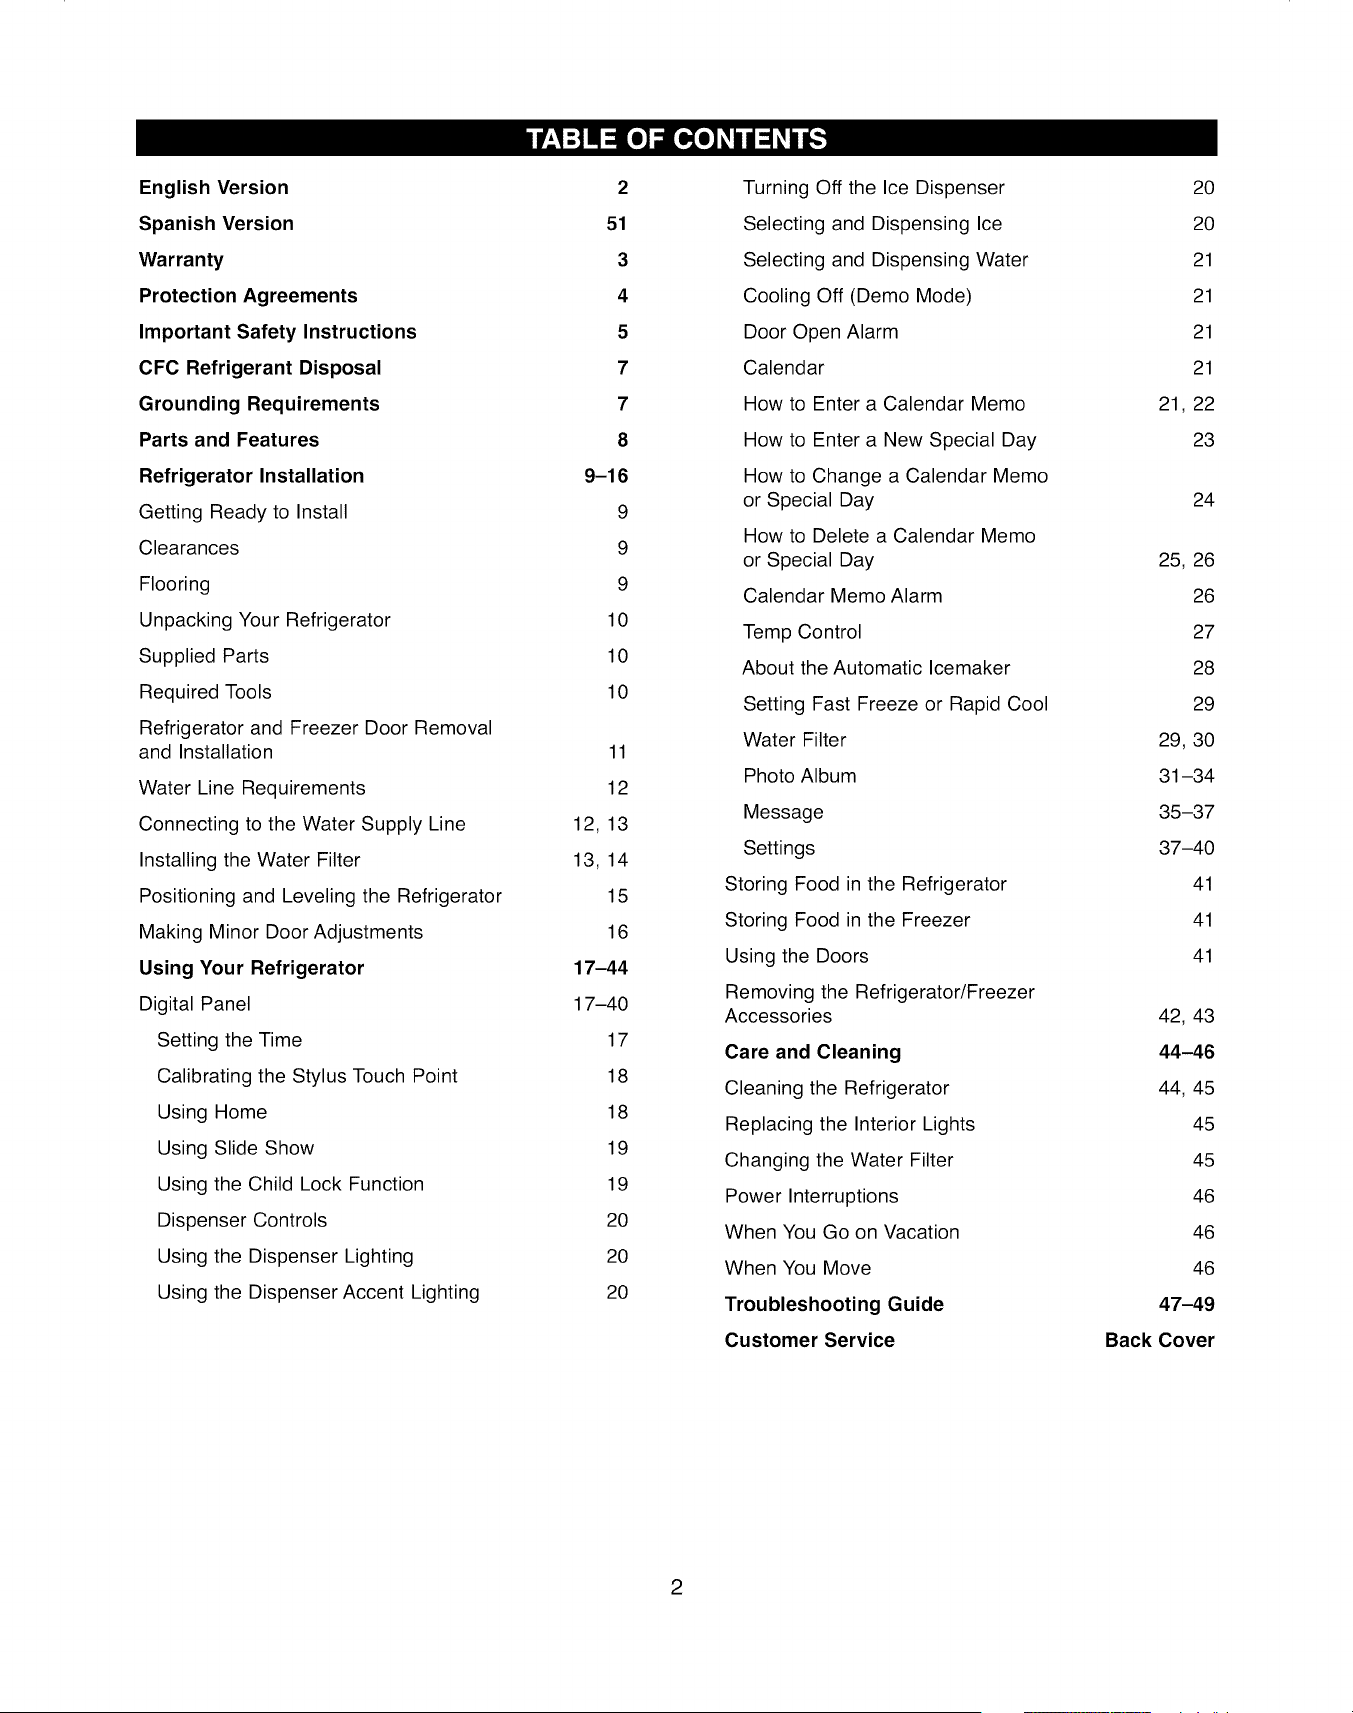
English Version
Spanish Version
Warranty
Protection Agreements
Important Safety Instructions
CFC Refrigerant Disposal
Grounding Requirements
Parts and Features
Refrigerator Installation
Getting Ready to Install
Clearances
Flooring
Unpacking Your Refrigerator
Supplied Parts
Required Tools
Refrigerator and Freezer Door Removal
and Installation
Water Line Requirements
Connecting to the Water Supply Line
Installing the Water Filter
Positioning and Leveling the Refrigerator
Making Minor Door Adjustments
Using Your Refrigerator
Digital Panel
Setting the Time
Calibrating the Stylus Touch Point
Using Home
Using Slide Show
Using the Child Lock Function
Dispenser Controls
Using the Dispenser Lighting
Using the Dispenser Accent Lighting
2
51
3
4
5
7
7
8
9-16
9
9
9
10
10
10
11
12
12, 13
13, 14
15
16
17-44
17-40
17
18
18
19
19
20
2O
2O
Turning Off the Ice Dispenser
Selecting and Dispensing Ice
Selecting and Dispensing Water
Cooling Off (Demo Mode)
Door Open Alarm
Calendar
How to Enter a Calendar Memo
How to Enter a New Special Day
How to Change a Calendar Memo
or Special Day
How to Delete a Calendar Memo
or Special Day
Calendar Memo Alarm
Temp Control
About the Automatic Icemaker
Setting Fast Freeze or Rapid Cool
Water Filter
Photo Album
Message
Settings
Storing Food in the Refrigerator
Storing Food in the Freezer
Using the Doors
Removing the Refrigerator/Freezer
Accessories
Care and Cleaning
Cleaning the Refrigerator
Replacing the Interior Lights
Changing the Water Filter
Power Interruptions
When You Go on Vacation
When You Move
Troubleshooting Guide
Customer Service
20
20
21
21
21
21
21, 22
23
24
25, 26
26
27
28
29
29, 30
31-34
35-37
37-40
41
41
41
42, 43
44-46
44, 45
45
45
46
46
46
47-49
Back Cover
2
REFRIGERATORWARRANTY
YKenmore Elite TM Limited Warranty
When installed, operated, and maintained according to all instructions supplied with the product, if any non-
expendable part of this appliance other than the sealed refrigerant system fails due to a defect in material and
workmanship within one year from the date of purchase, call 1-800-4-MY-HOME _ to arrange for free repair. This
coverage applies for only 90 days from the date of purchase if this appliance is ever used for other than private
family purposes.
If the sealed refrigerant system is defective within five years from the purchase date, call 1-800-4-MY-HOME _ to
arrange for free repair. This coverage applies for only one year from the date of purchase if this appliance is ever
used for other than private family purposes.
This warranty covers only defects in material and workmanship. Sears will NOT pay for:
1. Expendable items that can wear out from normal use, including but not limited to filters, belts, light bulbs, and
bags.
2. A service technician to instruct the user in correct product installation, operation, or maintenance.
3. A service technician to clean or maintain this product.
4. Damage to or failure of this product if it is not installed, operated, or maintained according to all the instructions
supplied with the product.
5. Damage to or failure of this product resulting from accident, abuse, misuse, or use for other than its intended
purpose.
6. Damage to or failure of this product caused by the use of detergents, cleaners, chemicals, or utensils other
than those recommended in all instructions supplied with the product.
7. Damage to or failure of parts or systems resulting from unauthorized modification made to this 3roduct.
Disclaimer of implied warranties, limitation of remedies
Customer's sole and exclusive remedy under this limited warranty shall be product repair as provided herein.
Implied warranties, including warranties of merchantability or fitness for a particular purpose, are limited to one
year or the shortest period allowed by law. Sears shall not be liable for incidental or consequential damages.
Some states do not allow the exclusion or limitation of incidental or consequential damages, or limitations on the
duration of implied warranties of merchantability or fitness, so these exclusions or limitations may not apply to you.
This warranty applies only while this appliance is used in the United States.
This warranty gives you specific legal rights, and you may also have other rights which vary from state to state.
Sears, Roebuck and Co., Hoffman Estates, IL 60179
J
3
Master Protection Agreements
Congratulations on making a smart purchase. Your new
Kenmore ® product is designed and manufactured for
years of dependable operation. But like all products, it
may require preventive maintenance or repair from time to
time. That's when having a Master Protection Agreement
can save you money and aggravation.
The Master Protection Agreement also helps extend the
life of your new product. Here's what the Agreement
includes:
Parts and labor needed to help keep products
operating properly under normal use, not just defects.
Our coverage goes well beyond the product
warranty. No deductibles, no functional failure
excluded from coverage-- real protection.
Expert service by a force of more than 10,000
authorized Sears service technicians, which means
someone you can trust will be working on your product.
Unlimited service calls and nationwide service, as
often as you want us, whenever you want us.
"No-lemon" guarantee--replacement of your covered
product if four or more product failures occur within
twelve months.
Product replacement if your covered product can't be
fixed.
Annual Preventive Maintenance Check at your
request--no extra charge.
Fast help by phone--we call it Rapid Resolution--
phone support from Sears representatives on all
products. Think of us as a "talking owner's manual."
Power surge protection against electrical damage
due to power fluctuations.
$250 Food Loss Protection annually for any food
spoilage that is the result of mechanical failure of any
covered refrigerator or freezer.
Rental reimbursement if repair of your covered
product takes longer than promised.
10% discount off the regular price of any noncovered
repair service and related installed parts.
Once you purchase the Agreement, a simple phone call is
all that it takes for you to schedule service. You can call
anytime day or night, or schedule a service appointment
online.
The Master Protection Agreement is a risk-free purchase.
If you cancel for any reason during the product warranty
period, we will provide a full refund or a prorated refund
anytime after the product warranty period expires.
Purchase your Master Protection Agreement today!
Some limitations and exclusions apply.
For prices and additional information in the U.S.A.,
call 1-800-827-6655.
Sears Installation Service
For Sears professional installation of home appliances,
garage door openers, water heaters, and other major
home items, in the U.S.A. call 1-800-MY-HOME ®.
In the space below, record the date of purchase, model, and serial number of your product. You will find the model and
serial number printed on an identification label located on the right-hand side of the refrigerator compartment. Have
these items of information available whenever you contact Sears concerning your product.
Model No. Date of Purchase
Serial No. Dealer
Save these instructions and attach your sales receipt for future reference.
4
BASIC SAFETY PRECAUTIONS
This guide contains many important safety messages. Always read and obey all safety messages.
This is the safety alert symbol. It alerts you to safety messages that inform you
of hazards that can kill or hurt you or others, or cause damage to the product.
All safety messages will be preceded by the safety alert symbol and the hazard
signal word DANGER, WARNING, or CAUTION. These words mean:
You will be killed or seriously injured if you don't follow instructions.
You can be killed or seriously injured if you don't follow instructions.
Indicates an imminently hazardous situation which, if not avoided,
may result in minor or moderate injury, or product damage only.
All safety messages will identify the hazard, tell you how to reduce the chance of injury, and tell you what can happen
if the instructions are not followed. Keep this guide in a safe place for future reference.
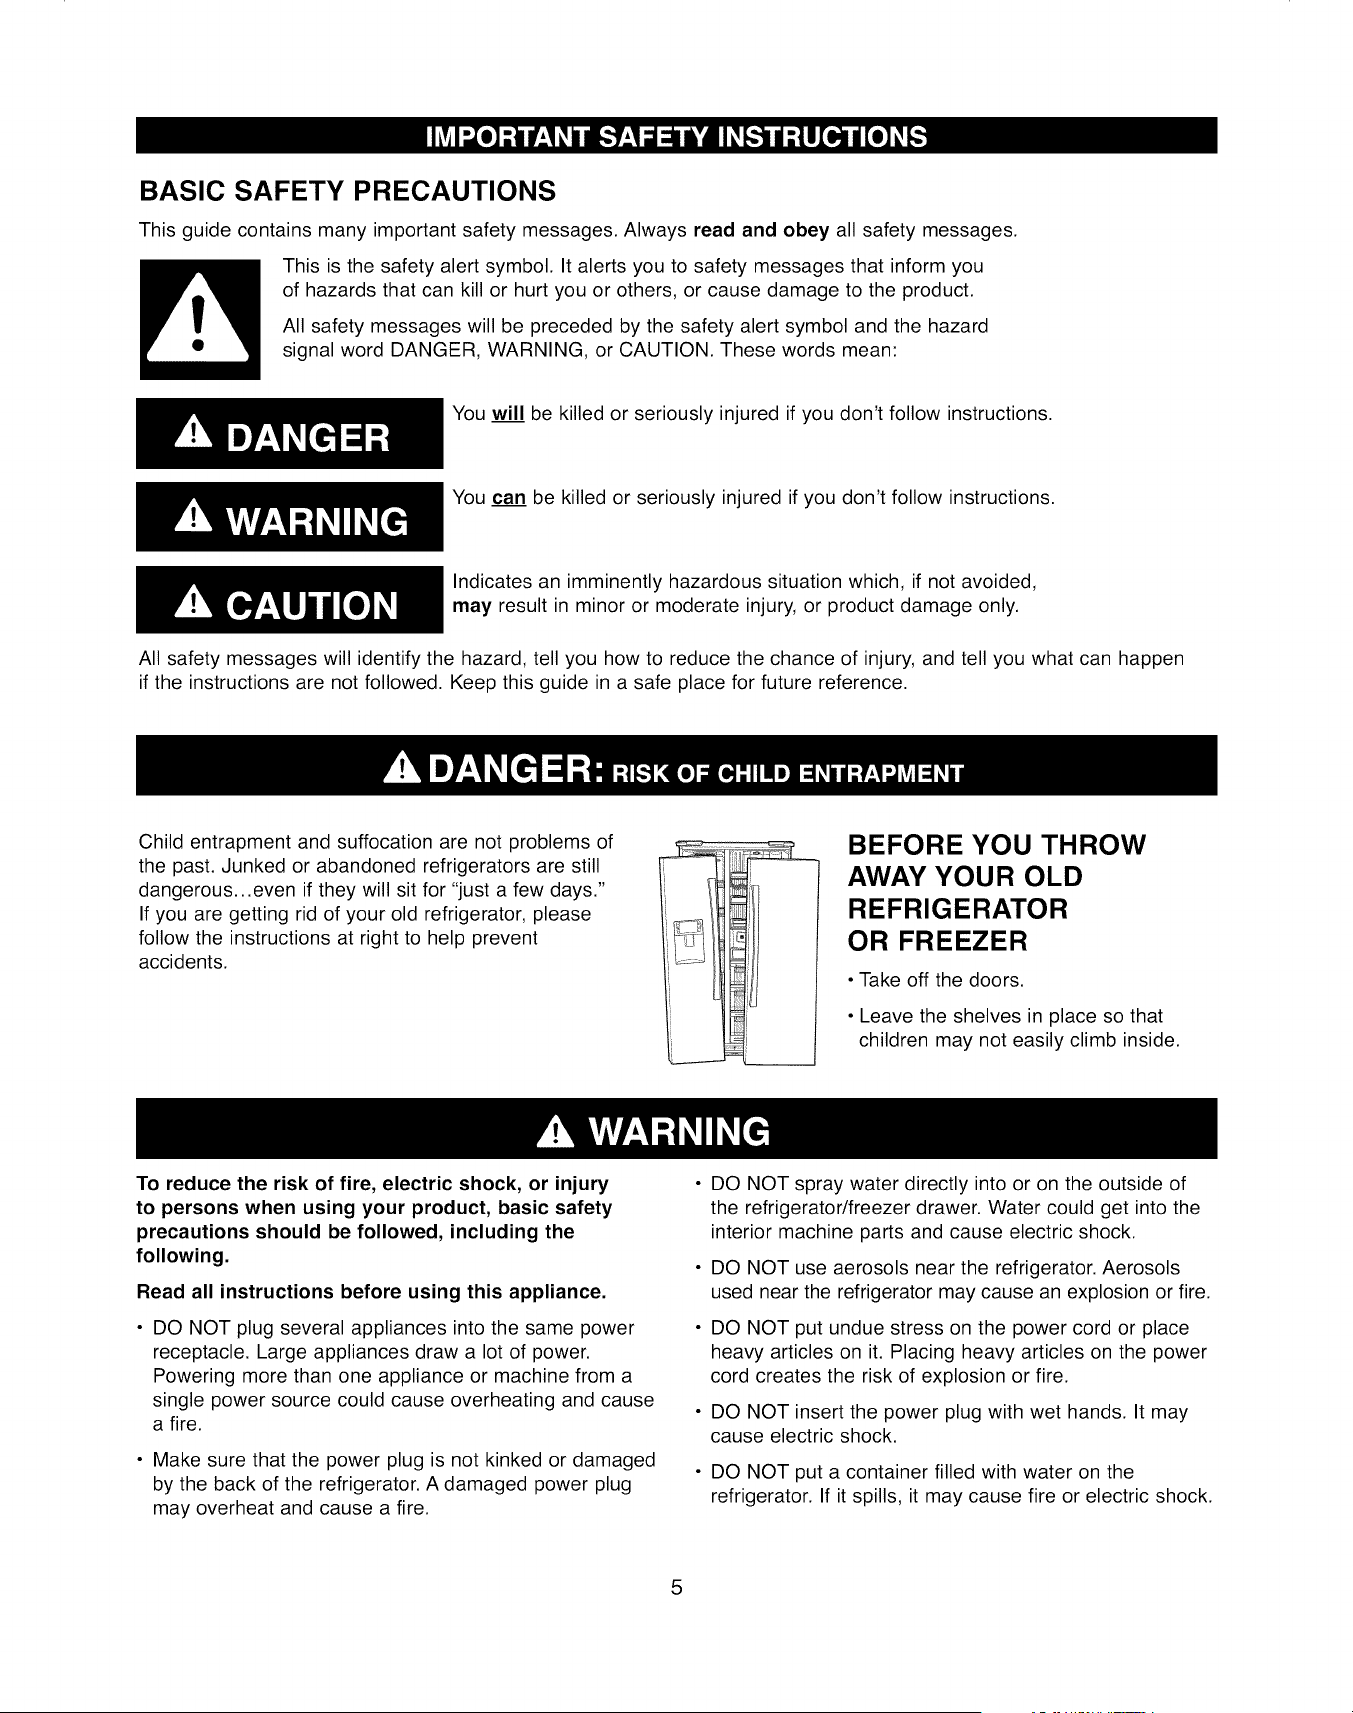
Child entrapment and suffocation are not problems of
the past. Junked or abandoned refrigerators are still
dangerous...even if they will sit for "just a few days."
If you are getting rid of your old refrigerator, please
follow the instructions at right to help prevent
accidents.
BEFORE YOU THROW
AWAY YOUR OLD
REFRIGERATOR
OR FREEZER
• Take off the doors.
• Leave the shelves in place so that
children may not easily climb inside.
To reduce the risk of fire, electric shock, or injury
to persons when using your product, basic safety
precautions should be followed, including the
following.
Read all instructions before using this appliance.
DO NOT plug several appliances into the same power
receptacle. Large appliances draw a lot of power.
Powering more than one appliance or machine from a
single power source could cause overheating and cause
a fire.
• Make sure that the power plug is not kinked or damaged
by the back of the refrigerator. A damaged power plug
may overheat and cause a fire.
DO NOT spray water directly into or on the outside of
the refrigerator/freezer drawer. Water could get into the
interior machine parts and cause electric shock.
DO NOT use aerosols near the refrigerator. Aerosols
used near the refrigerator may cause an explosion or fire.
DO NOT put undue stress on the power cord or place
heavy articles on it. Placing heavy articles on the power
cord creates the risk of explosion or fire.
DO NOT insert the power plug with wet hands. It may
cause electric shock.
DO NOT put a container filled with water on the
refrigerator. If it spills, it may cause fire or electric shock.
5
DO NOT install the refrigerator in a damp place or place
where it may come in contact with water. Wet and/or
deteriorated insulation of the internal electrical parts may
cause electric shock or fire.
oDO NOT store volatile or flammable substances in the
refrigerator. Storing benzene, thinner, alcohol, ether, LP
gas, and other such products may cause explosions.
DO NOT disassemble or repair the refrigerator by
yourself. You may run the risk of fire, appliance
malfunctions, and/or personal injury. Call your nearest
service center for help from a qualified service technician.
, Unplug the refrigerator before changing the interior light.
Changing the light while the refrigerator is plugged in
may cause electric shock.
• The refrigerator must be safely grounded. ALWAYS
make sure that you have grounded the refrigerator
before attempting to investigate or repair any part of the
appliance. Power leakages can cause severe electric
shock.
NEVER use gas pipes, telephone lines, or other potential
lightning attractors as an electrical ground.
Improper use of the grounding plug can result in a risk
of electric shock. If it is necessary to use an extension
cord to power the refrigerator, use only a 3-wire extension
cord that has a 3-blade ground plug and a 3-slot receptacle
that will accept the plug on the appliance. The marked
rating of the extension cord should be AC 115V/120V, 15A,
or more. Additionally, if a grounding adapter is used, make
sure the receptacle box is also fully grounded.
State of California Proposition 65 Warnings:
The California Safe Drinking Water and Toxic Enforcement
Act requires the Governor of California to publish a list of
substances known to the State of California to cause
cancer, birth defects, or other reproductive harm, and
requires businesses to warn of potential exposure to such
substances. This product contains a chemical known to
the State of California to cause cancer, birth defects, or
other reproductive harm. This appliance can cause low-
level exposure to some of the substances listed, including
benzene, formaldehyde, and carbon monoxide.
- Use good judgment when filling the refrigerator with food
and drinks. In an overfull refrigerator, heavy, fragile,
bulky, or breakable items may fall out and cause
personal injury and/or damage to surrounding objects.
- DO NOT put bottles or glass containers in the freezer.
When the contents freeze and then expand, the glass
may break and cause personal injury or leave
dangerous glass shards in the freezer.
- If the electrical wall socket is loose, do not insert the
power plug. There is a risk of electric shock or fire. Have
the plug looked at by a licensed electrician.
o NEVER unplug your refrigerator by pulling on the power
cord.
-Always grip the power plug firmly and pull straight out
from the outlet. Yanking or pulling on the power cord
may cause a short circuit, fire, and/or electric shock.
- A damaged power cord must be replaced by the
manufacturer, a certified service agent, or qualified
service personnel.
- DO NOT store articles on the top of the appliance.
When you open or close the door, the articles may
fall and cause personal injury and/or damage to
surrounding objects.
- DO NOT store pharmaceutical products, scientific
materials, and temperature=sensitive products in the
refrigerator. Products that require exact temperature
controls should not be stored in the refrigerator.
- DO NOT allow children to climb, stand, or hang on
shelves and handles of the refrigerator. DO NOT sit on
the freezer door. DO NOT allow children to climb into
o
o
the freezer. They could damage the refrigerator and/or
seriously injure themselves.
If you notice a chemical or burning plastic smell or see
smoke, unplug the refrigerator immediately and contact
your Sears Service Center.
After your refrigerator is in operation, do not touch the
cold surfaces in the freezer compartment. Particularly
when hands are damp or wet, skin may adhere to these
extremely cold surfaces. Skin may stick to the surface
and you may get frostbite.
DO NOT put your hands under the appliance. Any sharp
edges may cause personal injury.
NEVER put fingers or other objects into the water
dispenser hole or ice chute. It may cause personal injury
and/or material damage.
If the refrigerator will not be used for a long period of
time (for example, over several months), unplug the
power from the wall. Over time, deterioration in the
power cord insulation may cause fire.
DO NOT use a wet or damp cloth when cleaning plug.
Remove any dust or foreign matter from the power plug
pins. A dirty power plug can increase the risk of fire.
If the refrigerator is disconnected from the power supply,
you should wait for at least five minutes before plugging
it back in.
•DO NOT place the refrigerator directly in sunlight.
•The appliance must be positioned for easy access to the
power source.
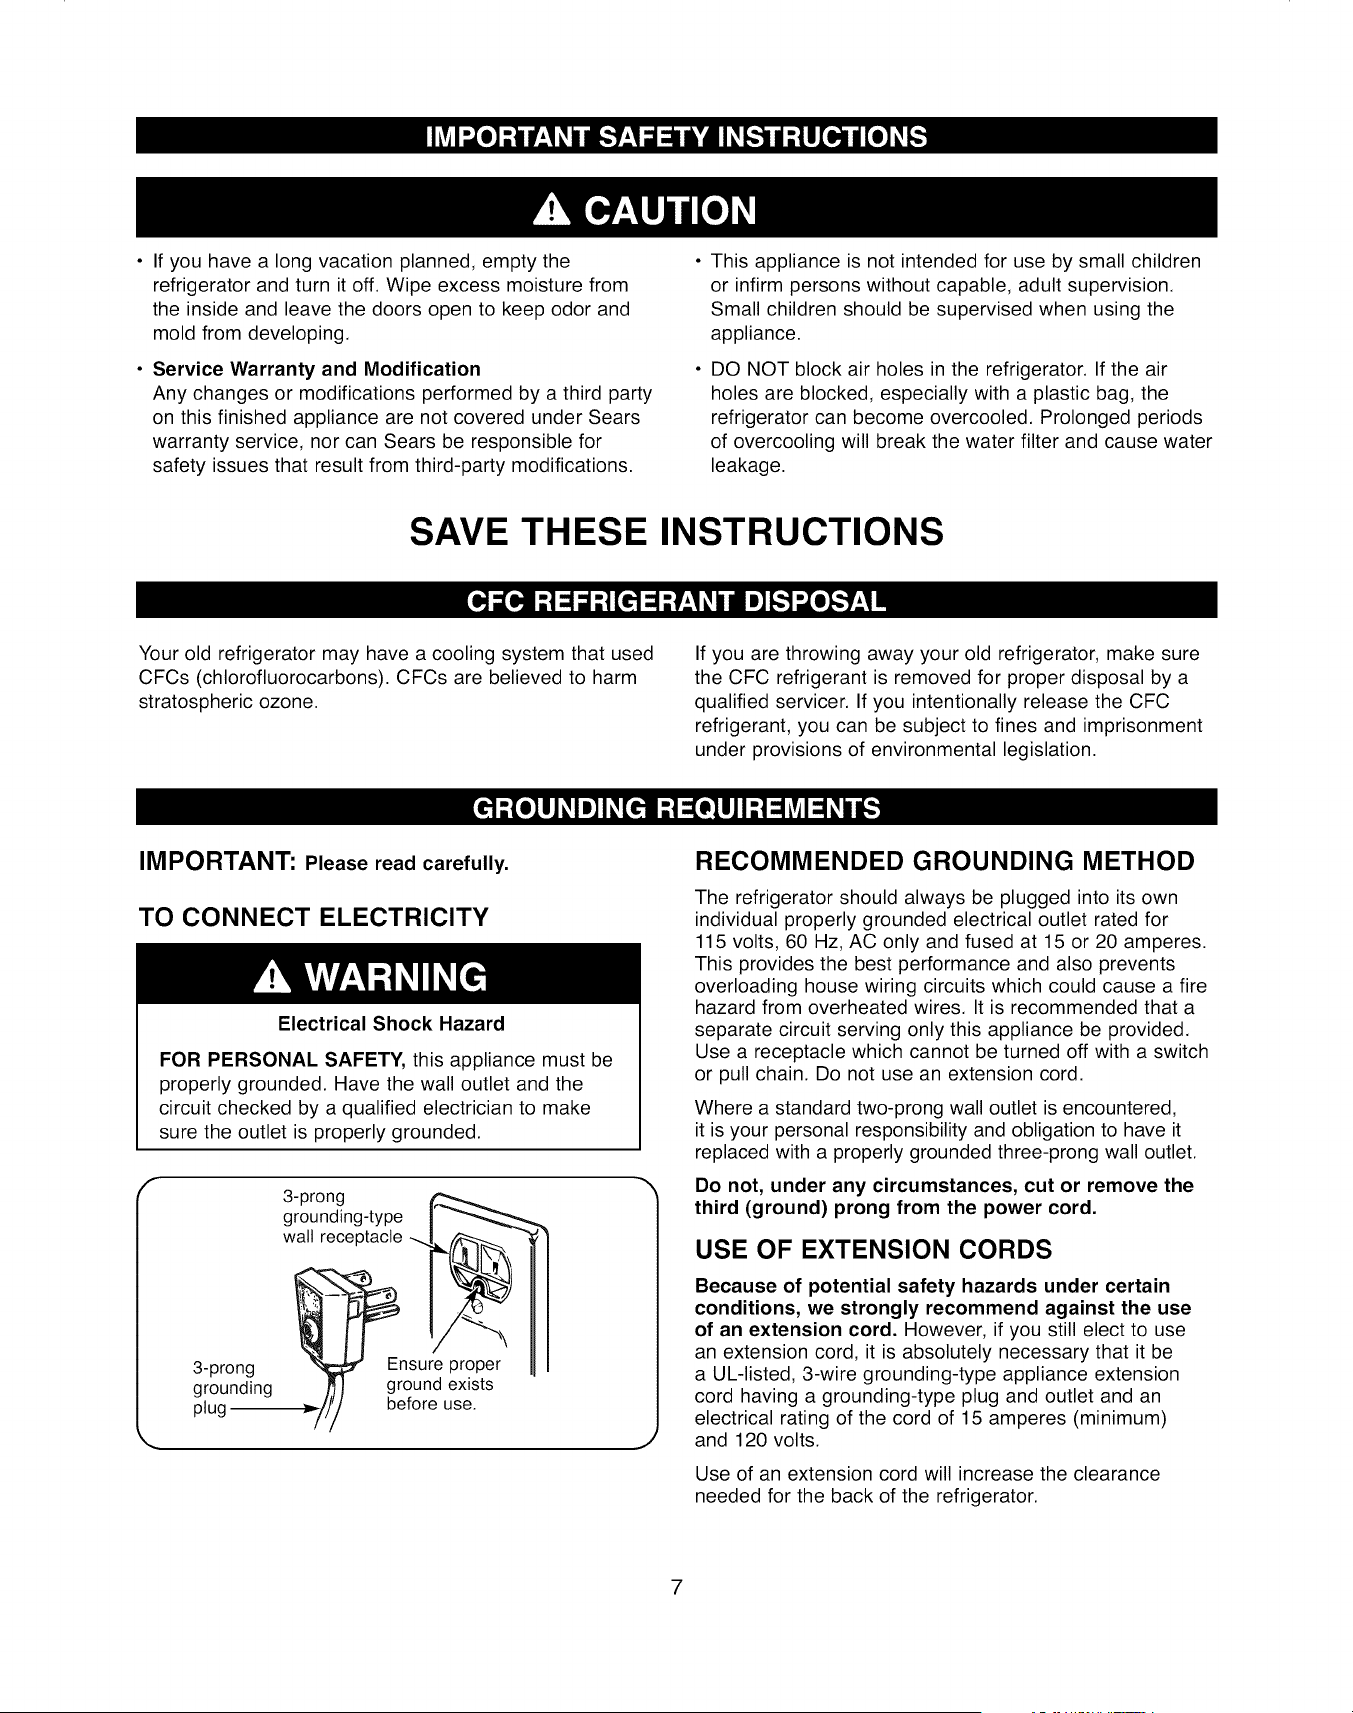
Ifyouhavealongvacationplanned,emptythe
refrigeratorandturnit off.Wipeexcessmoisturefrom
theinsideandleavethedoorsopento keepodorand
moldfromdeveloping.
• Service Warranty and Modification
Any changes or modifications performed by a third party
on this finished appliance are not covered under Sears
warranty service, nor can Sears be responsible for
safety issues that result from third-party modifications.
This appliance is not intended for use by small children
or infirm persons without capable, adult supervision.
Small children should be supervised when using the
appliance.
DO NOT block air holes in the refrigerator. If the air
holes are blocked, especially with a plastic bag, the
refrigerator can become overcooled. Prolonged periods
of overcooling will break the water filter and cause water
leakage.
SAVE THESE INSTRUCTIONS
Your old refrigerator may have a cooling system that used
CFCs (chlorofluorocarbons). CFCs are believed to harm
stratospheric ozone.
If you are throwing away your old refrigerator, make sure
the CFC refrigerant is removed for proper disposal by a
qualified servicer. If you intentionally release the CFC
refrigerant, you can be subject to fines and imprisonment
under provisions of environmental legislation.
IMPORTANT: Please read carefully.
TO CONNECT ELECTRICITY
Electrical Shock Hazard
FOR PERSONAL SAFETY, this appliance must be
properly grounded. Have the wall outlet and the
circuit checked by a qualified electrician to make
sure the outlet is properly grounded.
f3-prong
grounding-type
wall receptacle
3-prong_Ensure proper
grounding ground exists
plug be.__,_//_/fore use.
/7
RECOMMENDED GROUNDING METHOD
The refrigerator should always be plugged into its own
individual properly grounded electrical outlet rated for
115 volts, 60 Hz, AC only and fused at 15 or 20 amperes.
This provides the best performance and also prevents
overloading house wiring circuits which could cause a fire
hazard from overheated wires. It is recommended that a
separate circuit serving only this appliance be provided.
Use a receptacle which cannot be turned off with a switch
or pull chain. Do not use an extension cord.
Where a standard two-prong wall outlet is encountered,
it is your personal responsibility and obligation to have it
replaced with a properly grounded three-prong wall outlet.
Do not, under any circumstances, cut or remove the
third (ground) prong from the power cord.
USE OF EXTENSION CORDS
Because of potential safety hazards under certain
conditions, we strongly recommend against the use
of an extension cord. However, if you still elect to use
an extension cord, it is absolutely necessary that it be
a UL-listed, 3-wire grounding-type appliance extension
cord having a grounding-type plug and outlet and an
electrical rating of the cord of 15 amperes (minimum)
and 120 volts.
Use of an extension cord will increase the clearance
needed for the back of the refrigerator.
7

I®I
i
i
Use this section to become more familiar with the parts and features. Page references are included for your
convenience.
NOTE: The refrigerator you have purchased may have some or all of the items listed below.
OAuto Door Closer (p. 41)
OWater Filter (p. 45)
G Dairy Bin (p. 41)
GTilt Can Carry (p. 41)
_Optional Wine Rack (p. 41)
OGlass Shelves (p. 41,42)
Foldable Shelf (p. 41)
Refrigerator Door Bins (p. 41,42)
_I Egg Container (p. 41)
O Deli Drawer (p. 41, 42)
O Fruit and Vegetable Crispers (p. 41,42)
Freezer Drawers (p. 41,42)
O Freezer Door Bins (p. 41,42)
_1 Slide-Shelves (p. 41)
Icemaker and Ice Bucket (p. 41,43)
Freezer Light (p. 45)
Refrigerator Light (p. 45)
NOTES:
• The door handle may become loose over time. If this happens, tighten the bolts found on the inside of the door.
• If you close one door with a lot of force, the other door may open.
8

GETTING READY TO INSTALL
THE REFRIGERATOR
Congratulations on your purchase of the Kenmore Elite TM
Side-By-Side Refrigerator. We hope you enjoy the many
state-of-the-art features and efficiencies that this new
appliance offers.
Selecting the best location for the refrigerator.
• A location with easy access to the water supply.
• A location without direct exposure to sunlight.
• A location with level (or nearly level) flooring.
• A location with enough space for the refrigerator doors
to open easily.
• Allow sufficient space for air circulation of the internal
cooling system. If the refrigerator is not level or does not
have enough space, the internal cooling system may not
work properly.
H at least
160 ° '_door
swing
69 _"
-co
k,. j
First thing! Make sure that you can easily move your
refrigerator to its final location by measuring doorways
(both width and height), thresholds, ceilings, stairways, etc.
The following chart details the exact height and depth of
'our new Kenmore Elite TM Side-By-Side Refrigerator.
MODEL 41002, 41003, 41009
Capacity (Cu. Ft.) 24.1
Dimensions (inch)
Width, Overall 35W16
Cabinet Only 353A
Height, Overall 70
Cabinet Only 685/8
Depth, Overall 30
Cabinet Only 235/8
CLEARANCES
Allow clearance to the right, left, back, and top when
installing. (See drawing in column 1.) This will help
reduce power consumption and keep your energy bills
lower.
Do not install the refrigerator where the temperature will
go below 50°F (10°C).
Make sure to disconnect the water supply line BEFORE
removing the freezer door. See "Refrigerator and
Freezer Door Removal and Installation" on page 11 to
avoid damage.
To prevent damage to the floor while moving the
refrigerator, always make sure the front leveling legs
are in the up position (above the floor). Refer to
"Positioning and Leveling the Refrigerator" on page 15.
Leg
Flat-head screwdriver (-)
FLOORING
For proper installation, this refrigerator must be placed on
a level surface of hard material that is the same height as
the rest of the flooring. This surface should be strong
enough to support a fully loaded refrigerator or
approximately 309 Ibs (140 kg). To protect the finish of the
flooring, cut a large section of the cardboard carton and
place under the refrigerator where you are working. When
moving, be sure to pull the unit straight out and push the
unit straight in.
9

Excessive Weight Hazard
Use two or more people to move and install the
refrigerator. Failure to do so can result in back or
other injury.
UNPACKING YOUR REFRIGERATOR
Remove tape and any temporary labels from the
refrigerator before using. Do not remove any warning-type
labels, the model and serial number label, or the tech
sheet that is attached to the back wall of the refrigerator.
To remove any remaining tape or glue, rub the area
briskly with your thumb. Tape or glue residue can also be
easily removed by rubbing a small amount of liquid dish
soap over the adhesive with your fingers. Wipe with warm
water and dry.
Do not use sharp instruments, rubbing alcohol, flammable
fluids, or abrasive cleansers to remove tape or glue.
These products can damage the surface of the
refrigerator. For more information, see the 'Important
Safety Instructions" section.
Refrigerator shelves are installed in the shipping position.
Please reinstall the shelves according to your individual
storage needs.
When Moving Your Refrigerator:
Your refrigerator is heavy. When moving the
refrigerator for cleaning or service, be sure to protect
the floor. Always pull the refrigerator straight out
when moving it. Do not wiggle or walk the
refrigerator when trying to move it, as floor damage
could occur.
Explosion Hazard
Keep flammable materials and vapors, such as
gasoline, away from the refrigerator. Failure to do so
can result in death, explosion, or fire.
o To reduce the risk of electric shock, do not install the
refrigerator in a wet or damp area.
o Select a place where a water supply can be easily
connected for the automatic icemaker.
Avoid placing the refrigerator near a heat source,
direct sunlight, or moisture.
SUPPLIED PARTS
The following parts should be supplied with the
refrigerator. Please verify before installing.
Water filter Hex wrench Screw
(DA29-00003B) (DA80-00002C) (6001-000541)
REQUIRED TOOLS
The following tools are needed to install and adjust the
refrigerator.
Phillips-head Flat-head Wrench
screwdriver screwdriver
|
Pliers Allen wrench (3/!6")
10
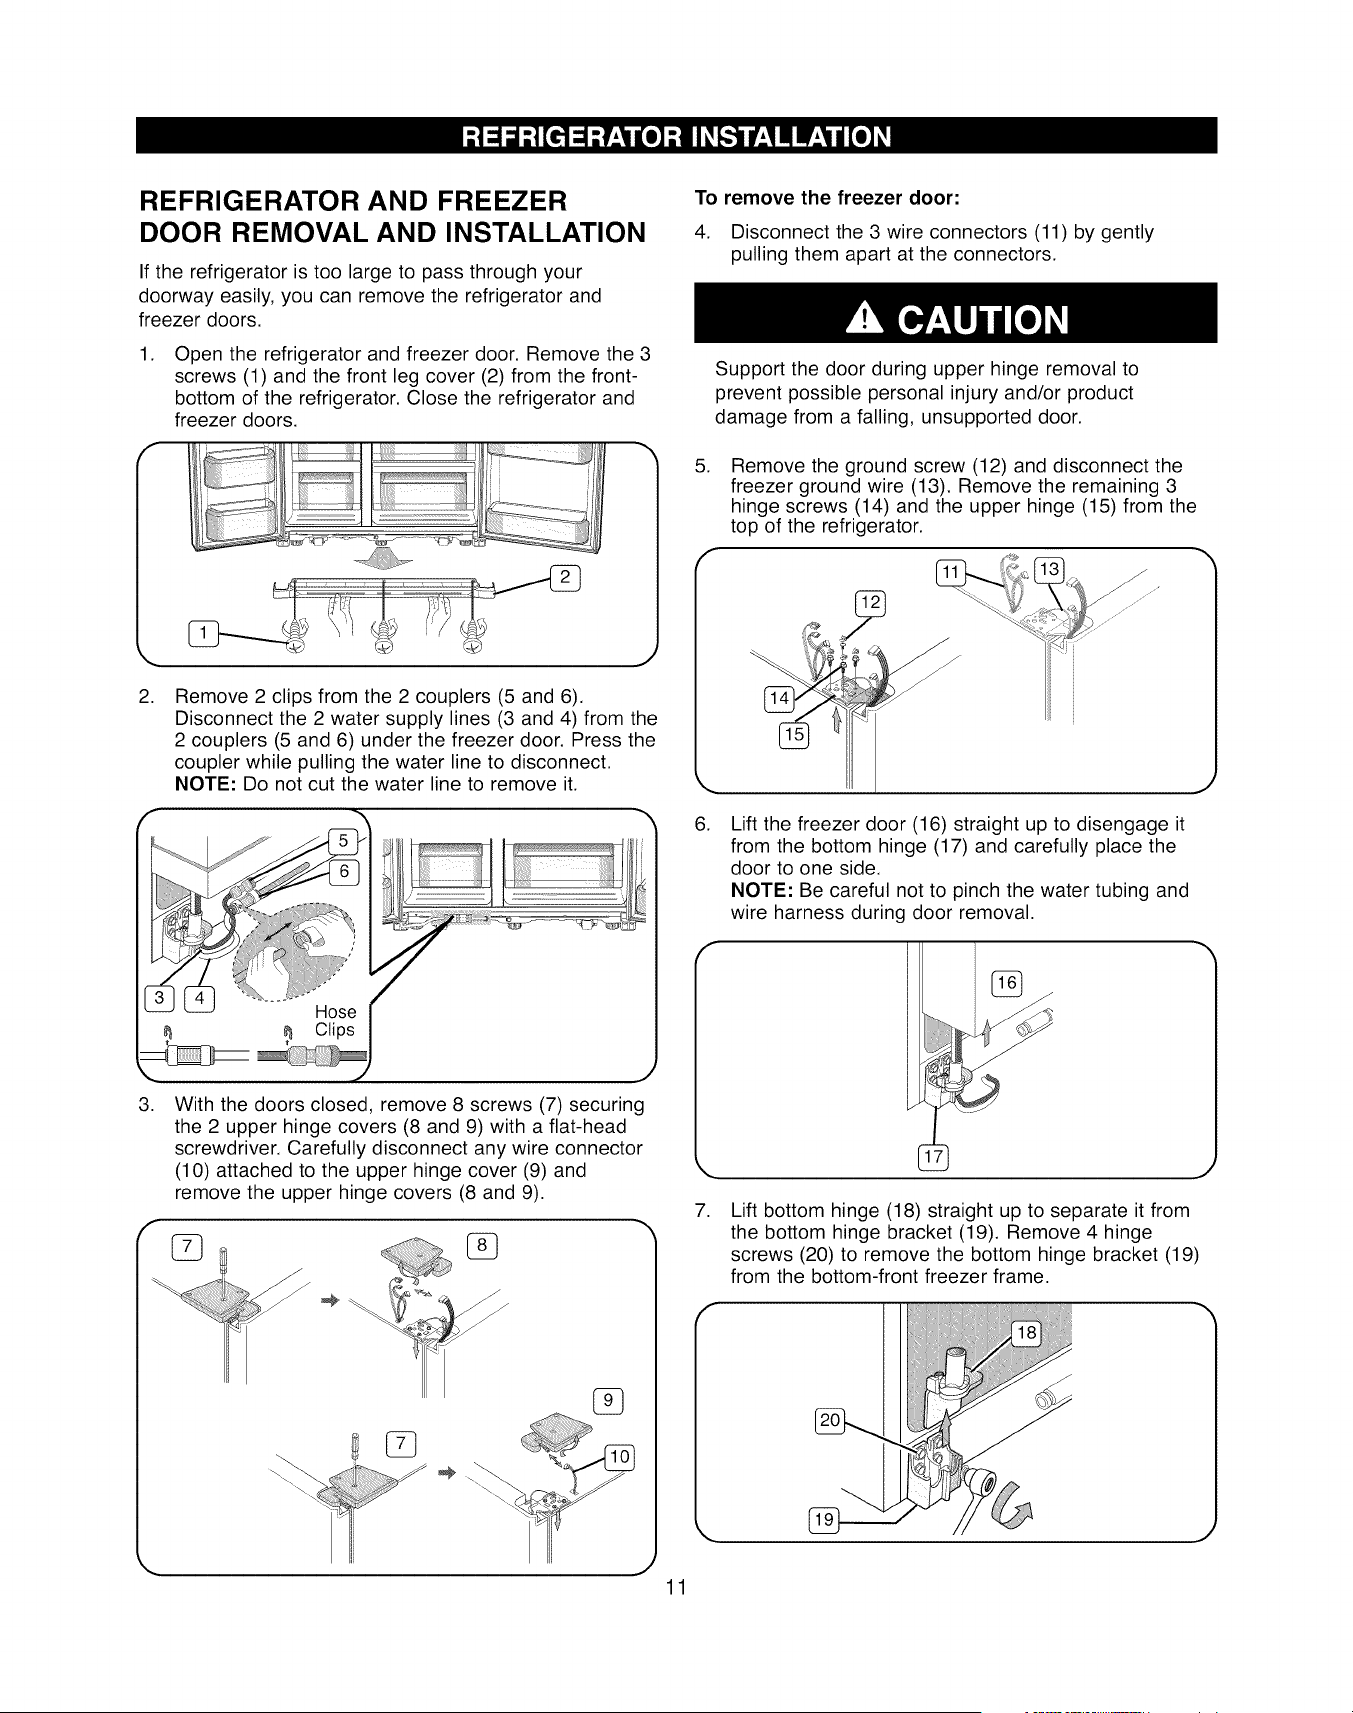
REFRIGERATOR AND FREEZER
DOOR REMOVAL AND INSTALLATION
If the refrigerator is too large to pass through your
doorway easily, you can remove the refrigerator and
freezer doors.
.
bottom of the refrigerator. Close the refrigerator and
freezer doors.
Open the refrigerator and freezer door. Remove the 3
screws (1) and the front leg cover (2) from the front-
il _iiiiiii!i iiiiiiili
J
.Remove 2 clips from the 2 couplers (5 and 6).
Disconnect the 2 water supply lines (3 and 4) from the
2 couplers (5 and 6) under the freezer door. Press the
coupler while pulling the water line to disconnect.
NOTE: Do not cut the water line to remove it.
Hose
_ Clips
,. .t'
.
J
With the doors closed, remove 8 screws (7) securing
the 2 upper hinge covers (8 and 9) with a flat-head
screwdriver. Carefully disconnect any wire connector
(10) attached to the upper hinge cover (9) and
remove the upper hinge covers (8 and 9).
,J
To remove the freezer door:
4. Disconnect the 3 wire connectors (11) by gently
pulling them apart at the connectors.
.
Support the door during upper hinge removal to
prevent possible personal injury and/or product
damage from a falling, unsupported door.
Remove the ground screw (12) and disconnect the
freezer ground wire (13). Remove the remaining 3
hinge screws (14) and the upper hinge (15) from the
top of the refrigerator.
6.
7.
Lift the freezer door (16) straight up to disengage it
from the bottom hinge (17) and carefully place the
door to one side.
NOTE: Be careful not to pinch the water tubing and
wire harness during door removal.
J
J
Lift bottom hinge (18) straight up to separate it from
the bottom hinge bracket (19). Remove 4 hinge
screws (20) to remove the bottom hinge bracket (19)
from the bottom-front freezer frame.
11
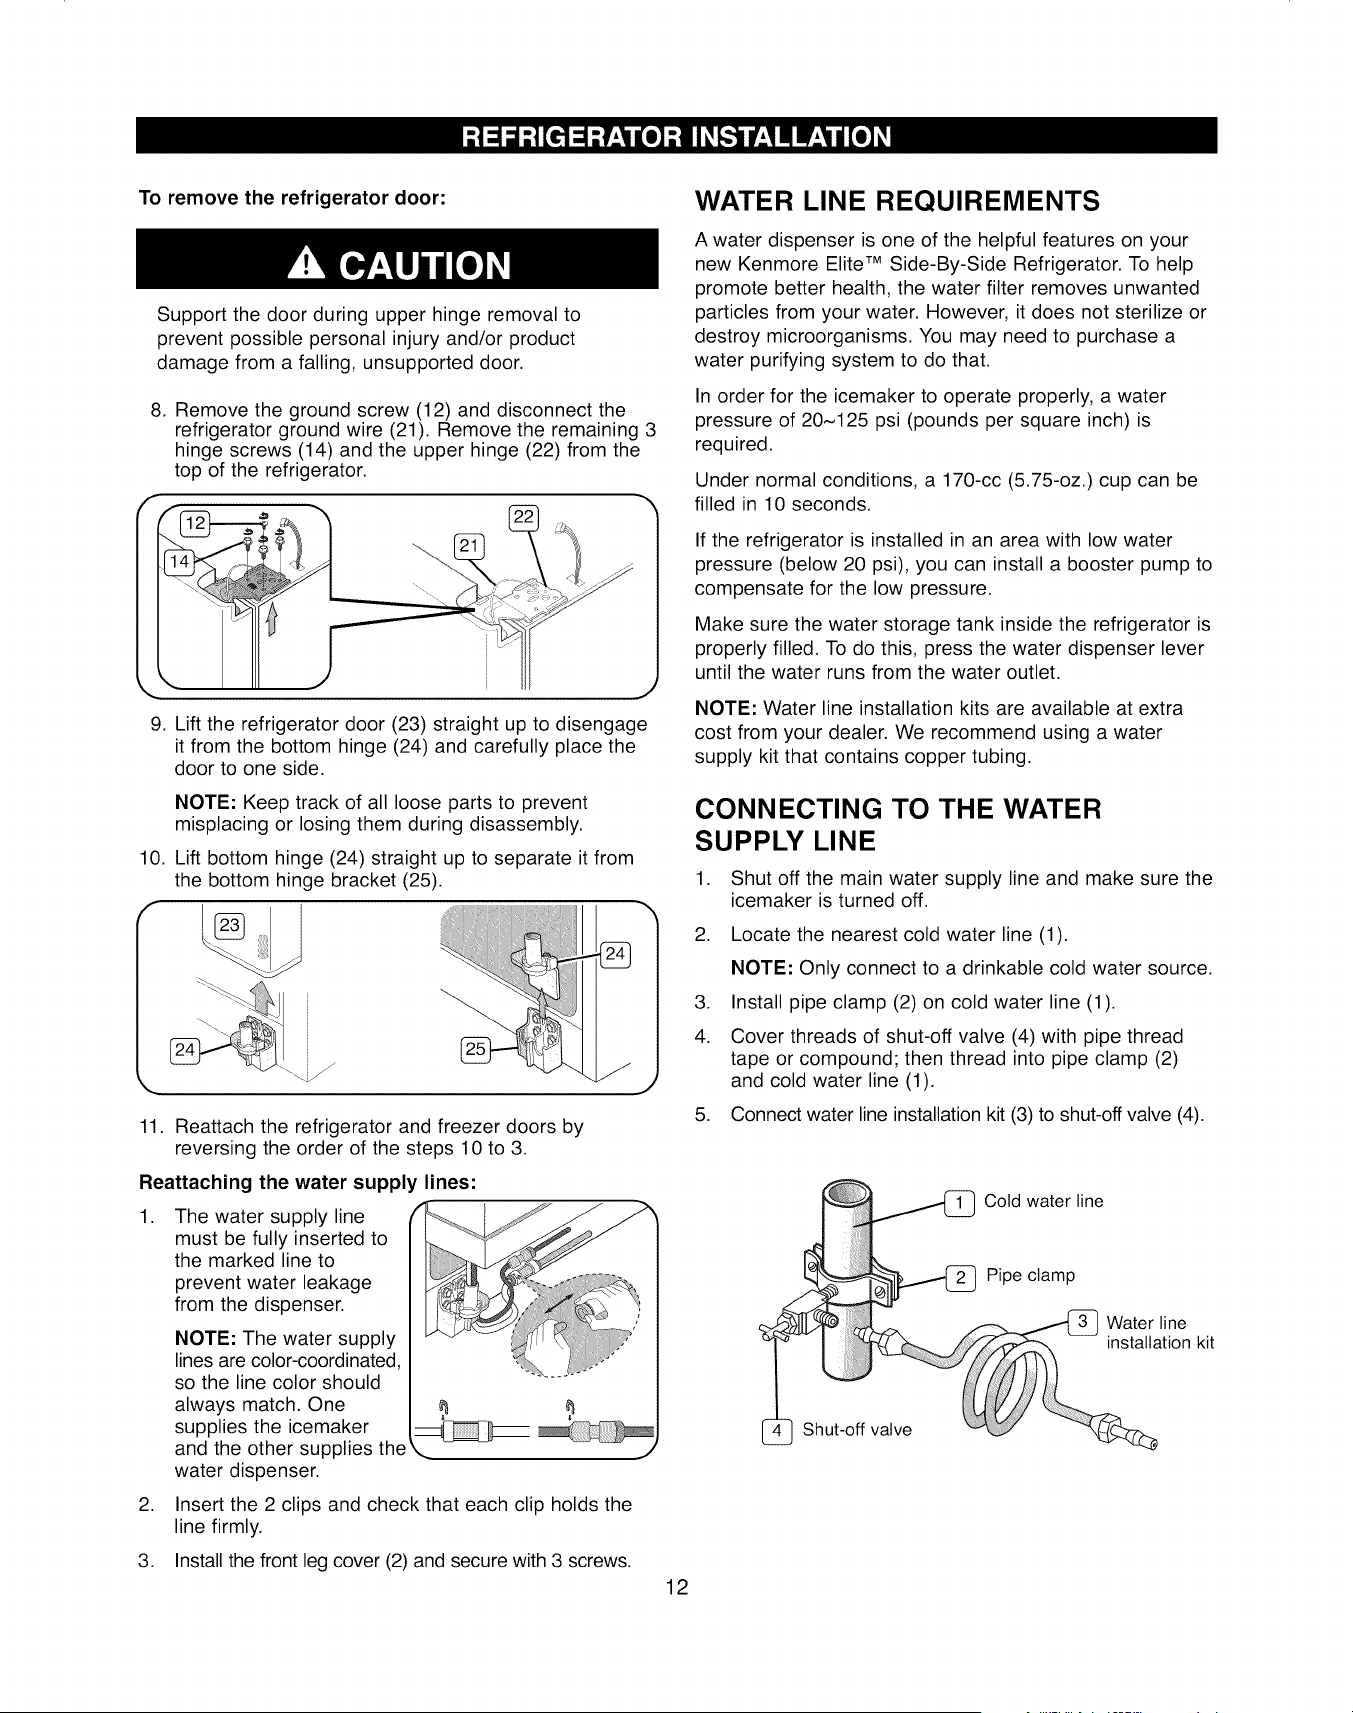
To remove the refrigerator door:
Support the door during upper hinge removal to
prevent possible personal injury and/or product
damage from a falling, unsupported door.
8. Remove the ground screw (12) and disconnect the
refrigerator ground wire (21). Remove the remaining 3
hinge screws (14) and the upper hinge (22) from the
top of the refrigerator.
9. Lift the refrigerator door (23) straight up to disengage
it from the bottom hinge (24) and carefully place the
door to one side.
NOTE: Keep track of all loose parts to prevent
misplacing or losing them during disassembly.
10. Lift bottom hinge (24) straight up to separate it from
the bottom hinge bracket (25).
f
J
11. Reattach the refrigerator and freezer doors by
reversing the order of the steps 10 to 3.
Reattaching the water supply lines:
.The water supply line
must be fully inserted to
the marked line to
prevent water leakage
from the dispenser.
NOTE: The water supply
lines are color-coordinated,
so the line color should
always match. One
supplies the icemaker
and the other supplies the
water dispenser.
,. J
2. Insert the 2 clips and check that each clip holds the
line firmly.
3. Install the front leg cover (2) and secure with 3 screws.
WATER LINE REQUIREMENTS
A water dispenser is one of the helpful features on your
new Kenmore Elite TM Side-By-Side Refrigerator. To help
promote better health, the water filter removes unwanted
particles from your water. However, it does not sterilize or
destroy microorganisms. You may need to purchase a
water purifying system to do that.
In order for the icemaker to operate properly, a water
pressure of 20~125 psi (pounds per square inch) is
required.
Under normal conditions, a 170-cc (5.75-oz.) cup can be
filled in 10 seconds.
If the refrigerator is installed in an area with low water
pressure (below 20 psi), you can install a booster pump to
compensate for the low pressure.
Make sure the water storage tank inside the refrigerator is
properly filled. To do this, press the water dispenser lever
until the water runs from the water outlet.
NOTE: Water line installation kits are available at extra
cost from your dealer. We recommend using a water
supply kit that contains copper tubing.
CONNECTING TO THE WATER
SUPPLY LINE
1. Shut off the main water supply line and make sure the
icemaker is turned off.
2. Locate the nearest cold water line (1).
NOTE: Only connect to a drinkable cold water source.
3. Install pipe clamp (2) on cold water line (1).
4. Cover threads of shut-off valve (4) with pipe thread
tape or compound; then thread into pipe clamp (2)
and cold water line (1).
5. Connect water line installation kit (3) to shut-off valve (4).
Shut-off valve
Cotd water line
Pipe clamp
Water line
installation kit
12
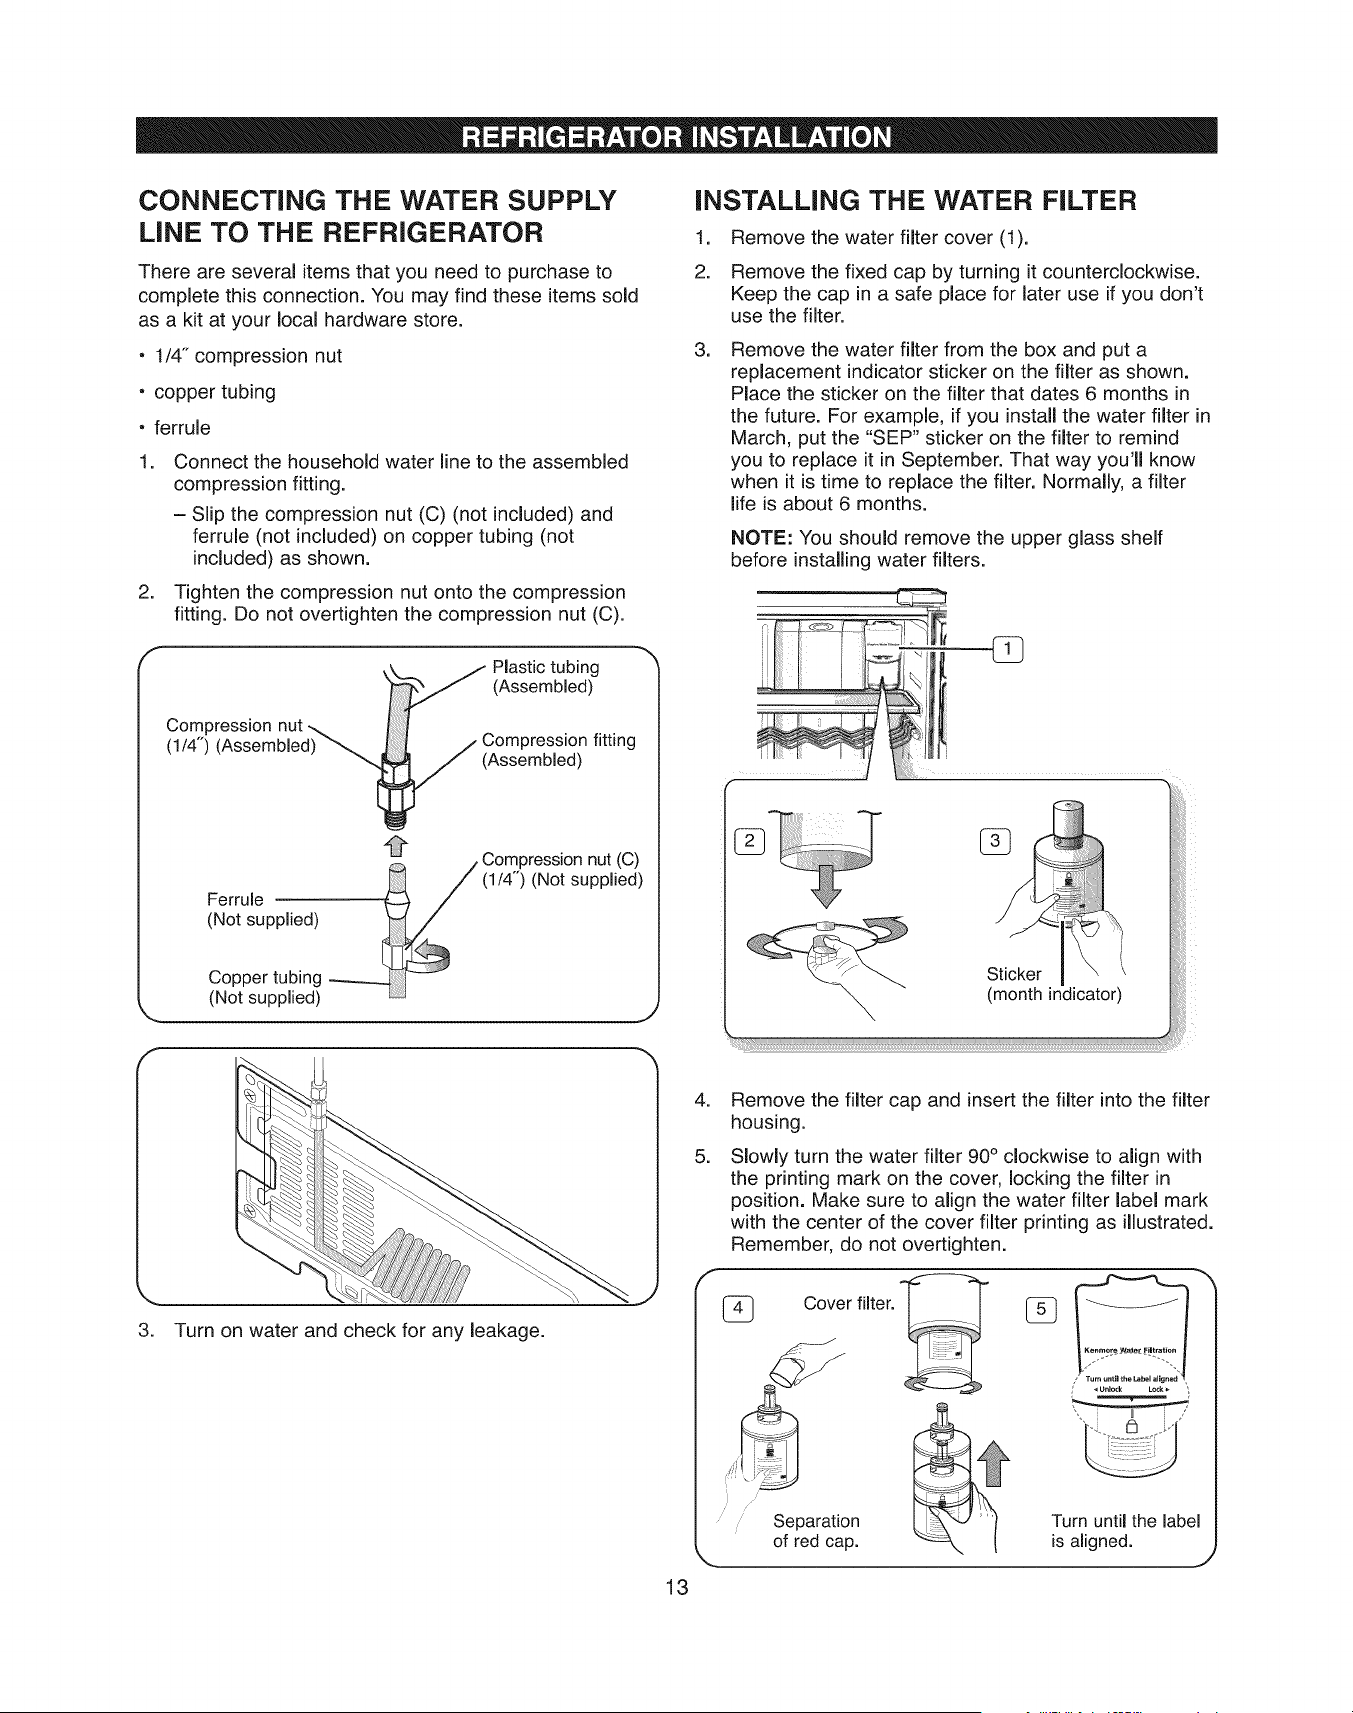
CONNECTING THE WATER SUPPLY
LiNE TO THE REFRIGERATOR
There are several items that you need to purchase to
complete this connection. You may find these items sold
as a kit at your local hardware store.
• 1/4" compression nut
• copper tubing
• ferrule
.
.
Connect the household water line to the assembled
compression fitting.
= Slip the compression nut (C) (not included) and
ferrule (not included) on copper tubing (not
included) as shown.
Tighten the compression nut onto the compression
fitting. Do not overtighten the compression nut (C).
Compression nut
(!/4") (Assembled)
/ Plastic tubing
(Assembled)
/7 (Os%prebslsi_fitting
/Compressionnut (C)
Ferrule _ (1/4") (Not supplied)
(Not supplied)
Copper tubing
(Not supplied)
J
INSTALLING THE WATER FILTER
.
2.
Remove the water filter cover (1).
Remove the fixed cap by turning it counterclockwise.
Keep the cap in a safe place for later use if you don't
use the filter.
.Remove the water filter from the box and put a
replacement indicator sticker on the filter as shown.
Place the sticker on the filter that dates 6 months in
the future. For example, if you instafl the water filter in
March, put the "SEP" sticker on the filter to remind
you to replace it in September. That way you'fl know
when it is time to replace the filter. Normally, a filter
life is about 6 months.
NOTE: You should remove the upper glass shelf
before installing water filters.
3. Turn on water and check for any leakage.
.
.
13
Remove the filter cap and insert the filter into the filter
housing.
Slowly turn the water filter 90 ° clockwise to align with
the printing mark on the cover, locking the filter in
position. Make sure to align the water filter label mark
with the center of the cover filter printing as illustrated.
Remember, do not overtighten.
Cover filter.
i
Separation
of red cap.
Turn until the label
is aligned. J
Remove any residual matter inside the water
supply line after installing the water filter.
1. Plug the refrigerator's power cord into a 3-prong
grounded outlet.
.
.
Turn ON the main water supply and turn ON the valve
to the water supply line.
Flush 3 gallons (11.4 liters) of water through the
dispenser (approximnately 6 minutes). This removes
any contaminants and purges any air in the water
lines.
4. Additional flushing may be required in some
households.
5. Open the refrigerator door and make sure there are
no water leaks coming from the water filter.
Water
iiiiiiiii!iiiililiiiiiiiii!i_ii
NOTE: Be sure to flush 3 gallons (11.4 liters) approximately
6 minutes). This purges any air in the water lines that
could cause the dispenser to drip.
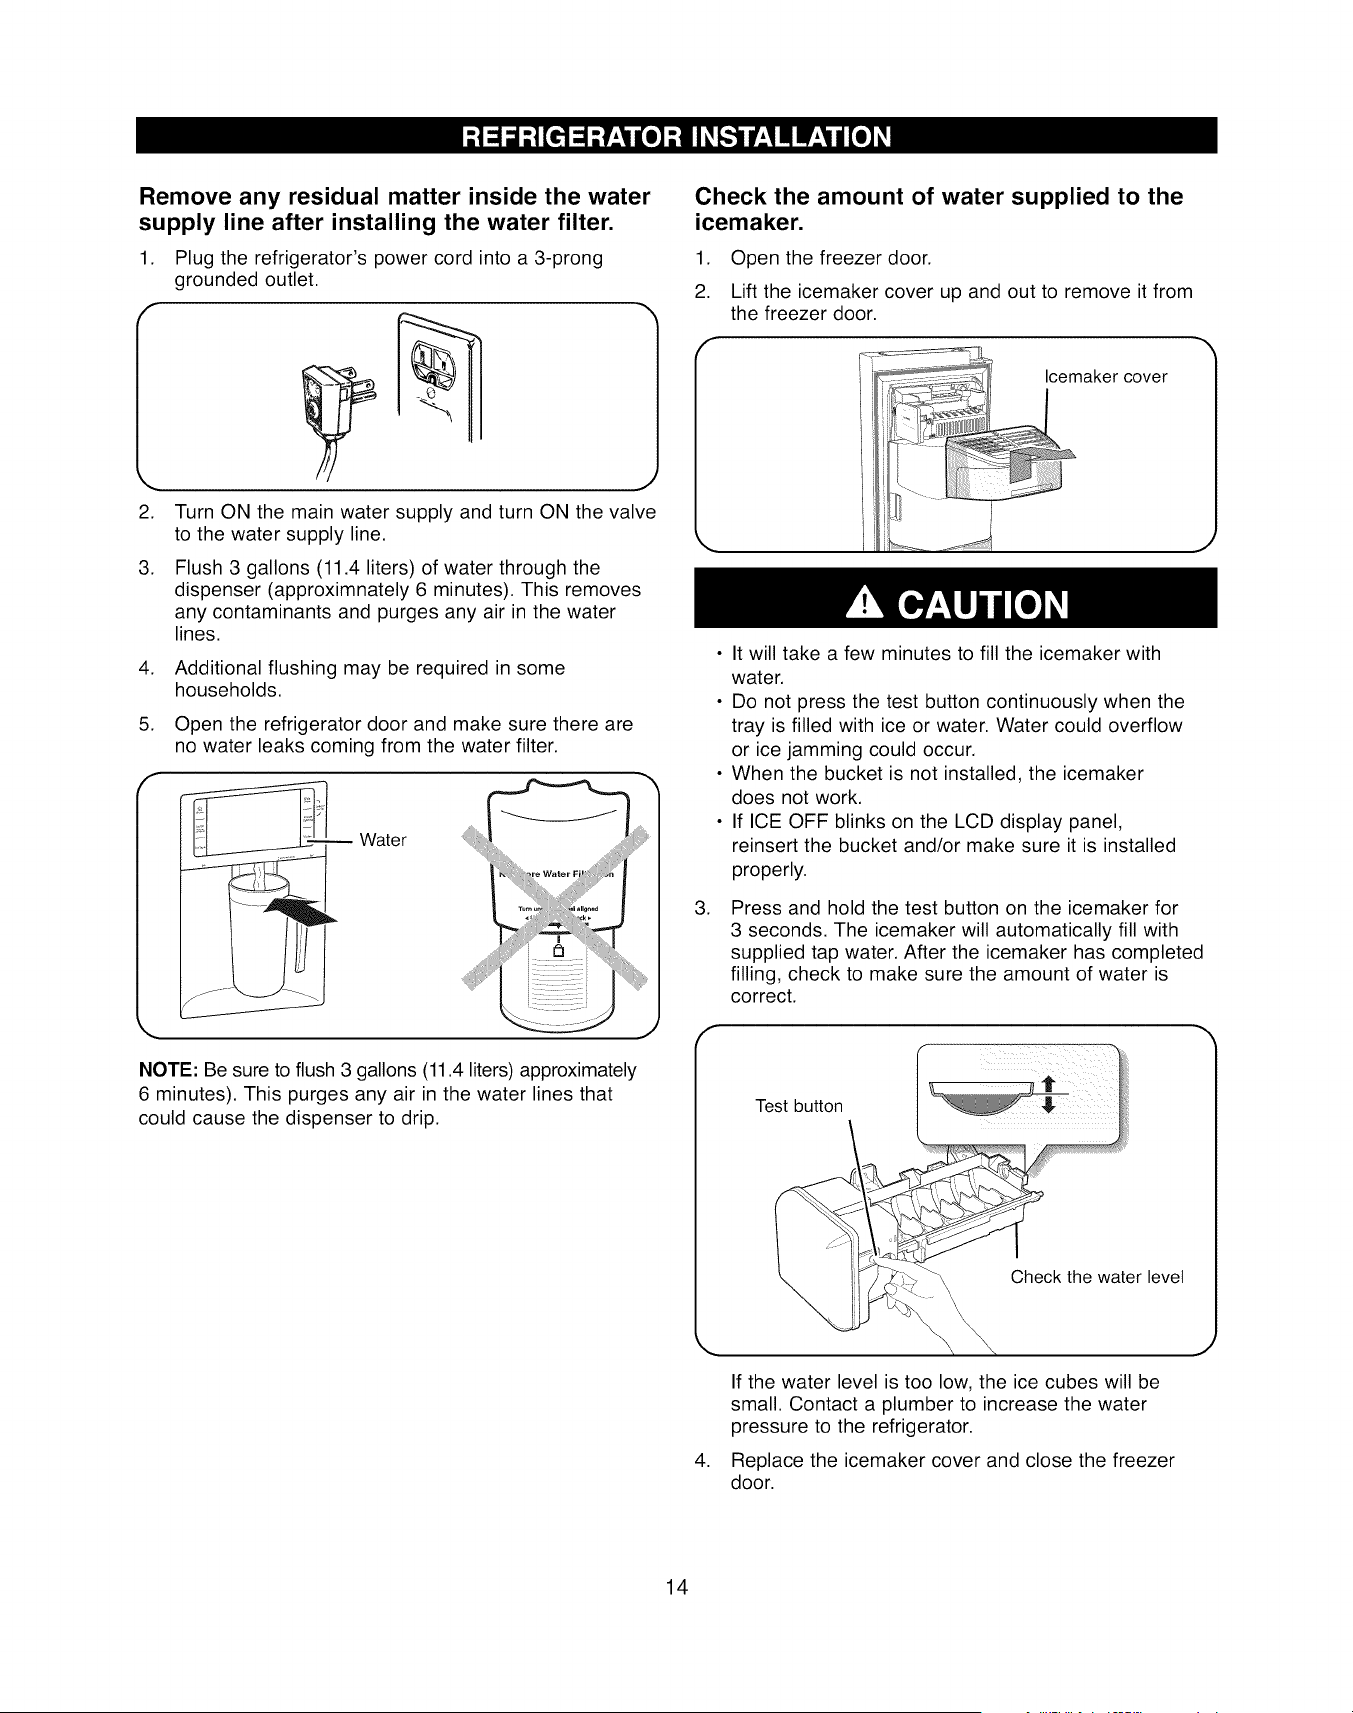
Check the amount of water supplied to the
icemaker.
.
2.
.
Open the freezer door.
Lift the icemaker cover up and out to remove it from
the freezer door.
Icemaker cover
• It will take a few minutes to fill the icemaker with
water.
• Do not press the test button continuously when the
tray is filled with ice or water. Water could overflow
or ice jamming could occur.
• When the bucket is not installed, the icemaker
does not work.
• If ICE OFF blinks on the LCD display panel,
reinsert the bucket and/or make sure it is installed
properly.
Press and hold the test button on the icemaker for
3 seconds. The icemaker will automatically fill with
supplied tap water. After the icemaker has completed
filling, check to make sure the amount of water is
correct.
Test button
.
If the water level is too low, the ice cubes will be
small. Contact a plumber to increase the water
pressure to the refrigerator.
Replace the icemaker cover and close the freezer
door.
14
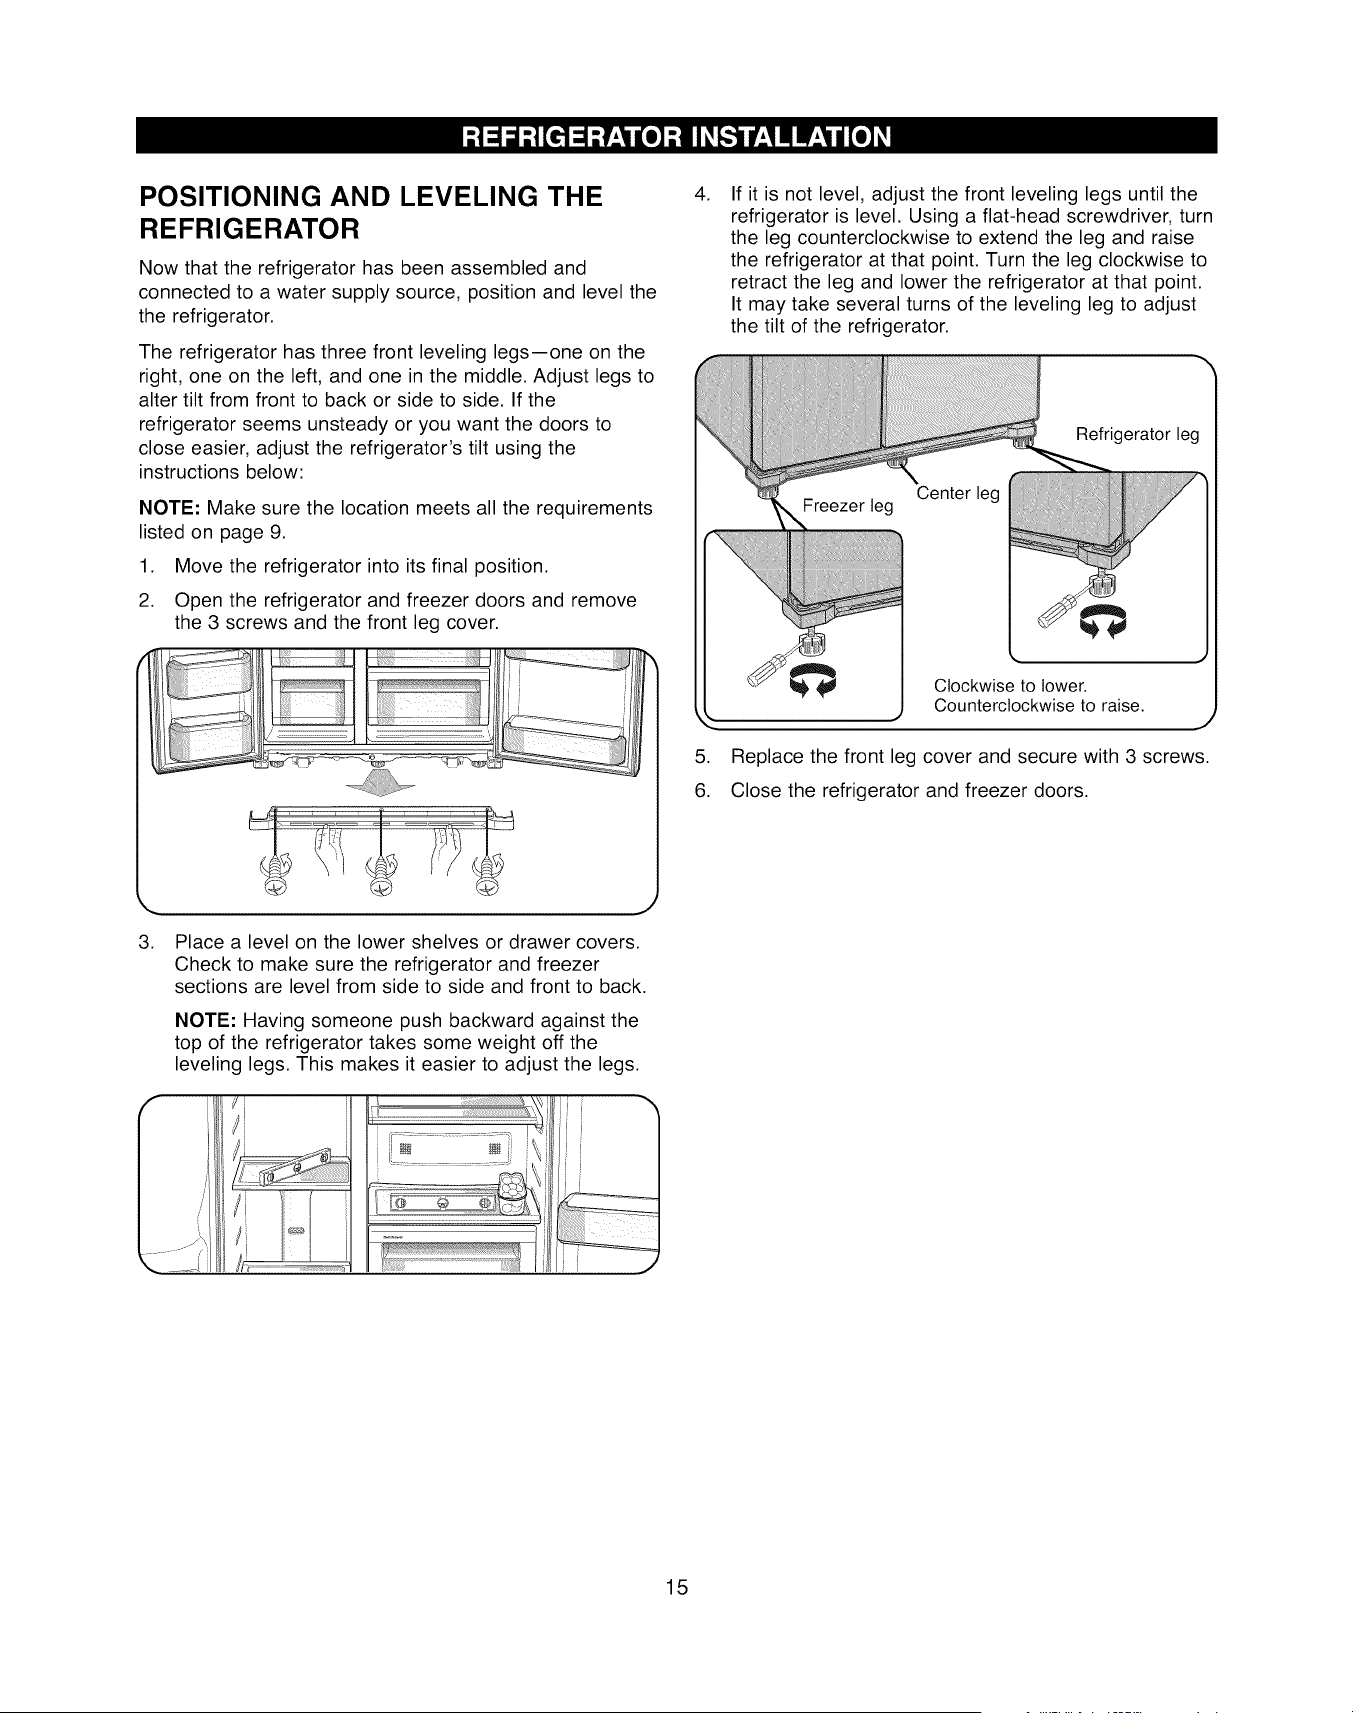
POSITIONING AND LEVELING THE
REFRIGERATOR
Now that the refrigerator has been assembled and
connected to a water supply source, position and level the
the refrigerator.
The refrigerator has three front leveling legs--one on the
right, one on the left, and one in the middle. Adjust legs to
alter tilt from front to back or side to side. If the
refrigerator seems unsteady or you want the doors to
close easier, adjust the refrigerator's tilt using the
instructions below:
NOTE: Make sure the location meets all the requirements
listed on page 9.
1. Move the refrigerator into its final position.
2. Open the refrigerator and freezer doors and remove
the 3 screws and the front leg cover.
3. Place a level on the lower shelves or drawer covers.
Check to make sure the refrigerator and freezer
sections are level from side to side and front to back.
NOTE: Having someone push backward against the
top of the refrigerator takes some weight off the
leveling legs. This makes it easier to adjust the legs.
/
/
i i
JJ
.
.
6.
If it is not level, adjust the front leveling legs until the
refrigerator is level. Using a flat-head screwdriver, turn
the leg counterclockwise to extend the leg and raise
the refrigerator at that point. Turn the leg clockwise to
retract the leg and lower the refrigerator at that point.
It may take several turns of the leveling leg to adjust
the tilt of the refrigerator.
Refrigerator leg
Counterclockwise to raise.
Replace the front leg cover and secure with 3 screws.
Close the refrigerator and freezer doors.
15
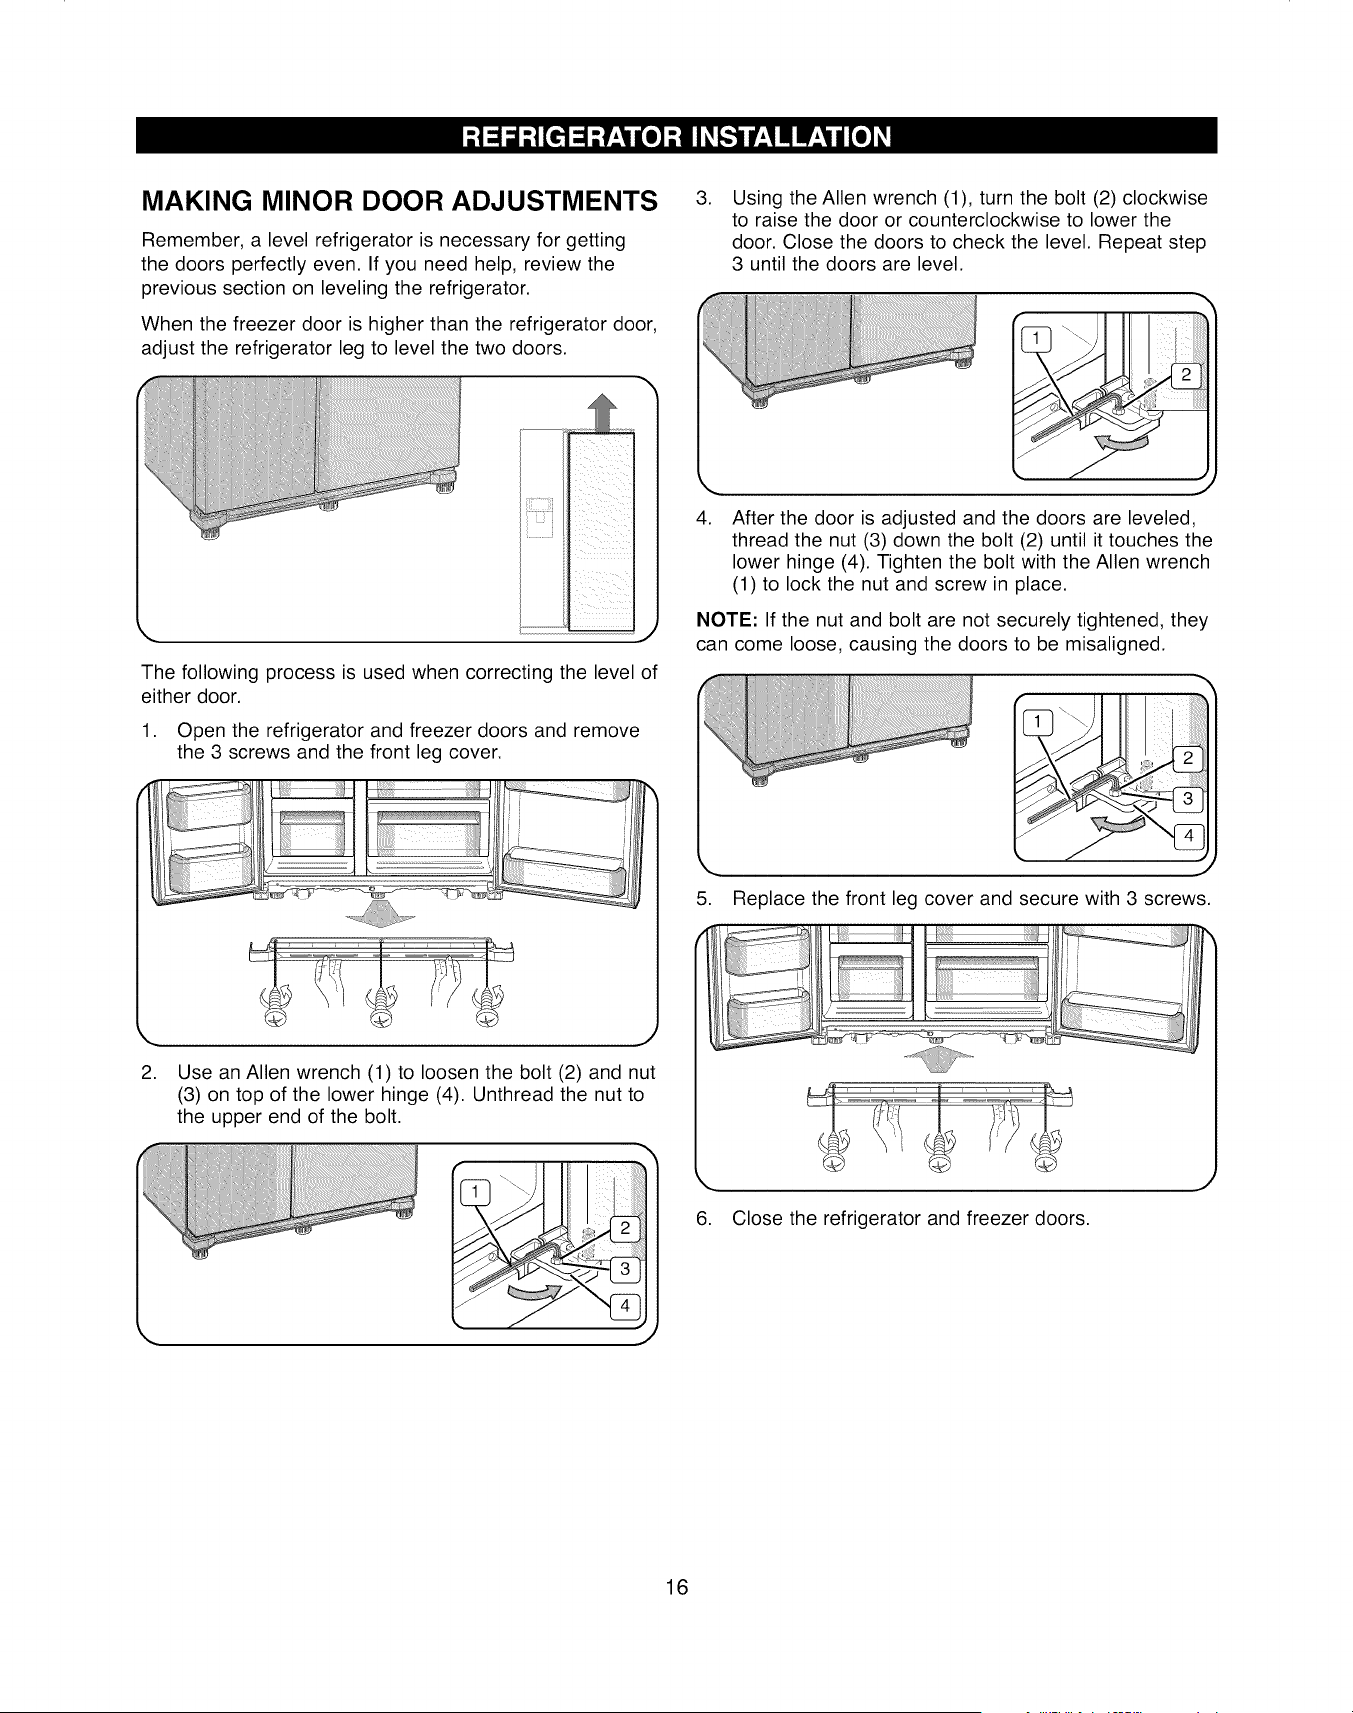
MAKING MINOR DOOR ADJUSTMENTS
Remember, a level refrigerator is necessary for getting
the doors perfectly even. If you need help, review the
previous section on leveling the refrigerator.
When the freezer door is higher than the refrigerator door,
adjust the refrigerator leg to level the two doors.
.Using the Allen wrench (1), turn the bolt (2) clockwise
to raise the door or counterclockwise to lower the
door. Close the doors to check the level. Repeat step
3 until the doors are level.
ii_iiiiiii!_iii
L,,,,,,,,I
The following process is used when correcting the level of
either door.
1. Open the refrigerator and freezer doors and remove
the 3 screws and the front leg cover.
k,,. j
2. Use an Allen wrench (1) to loosen the bolt (2) and nut
(3) on top of the lower hinge (4). Unthread the nut to
the upper end of the bolt.
.After the door is adjusted and the doors are leveled,
thread the nut (3) down the bolt (2) until it touches the
lower hinge (4). Tighten the bolt with the Allen wrench
(1) to lock the nut and screw in place.
NOTE: If the nut and bolt are not securely tightened, they
can come loose, causing the doors to be misaligned.
5. Replace the front leg cover and secure with 3 screws.
6. Close the refrigerator and freezer doors.
16
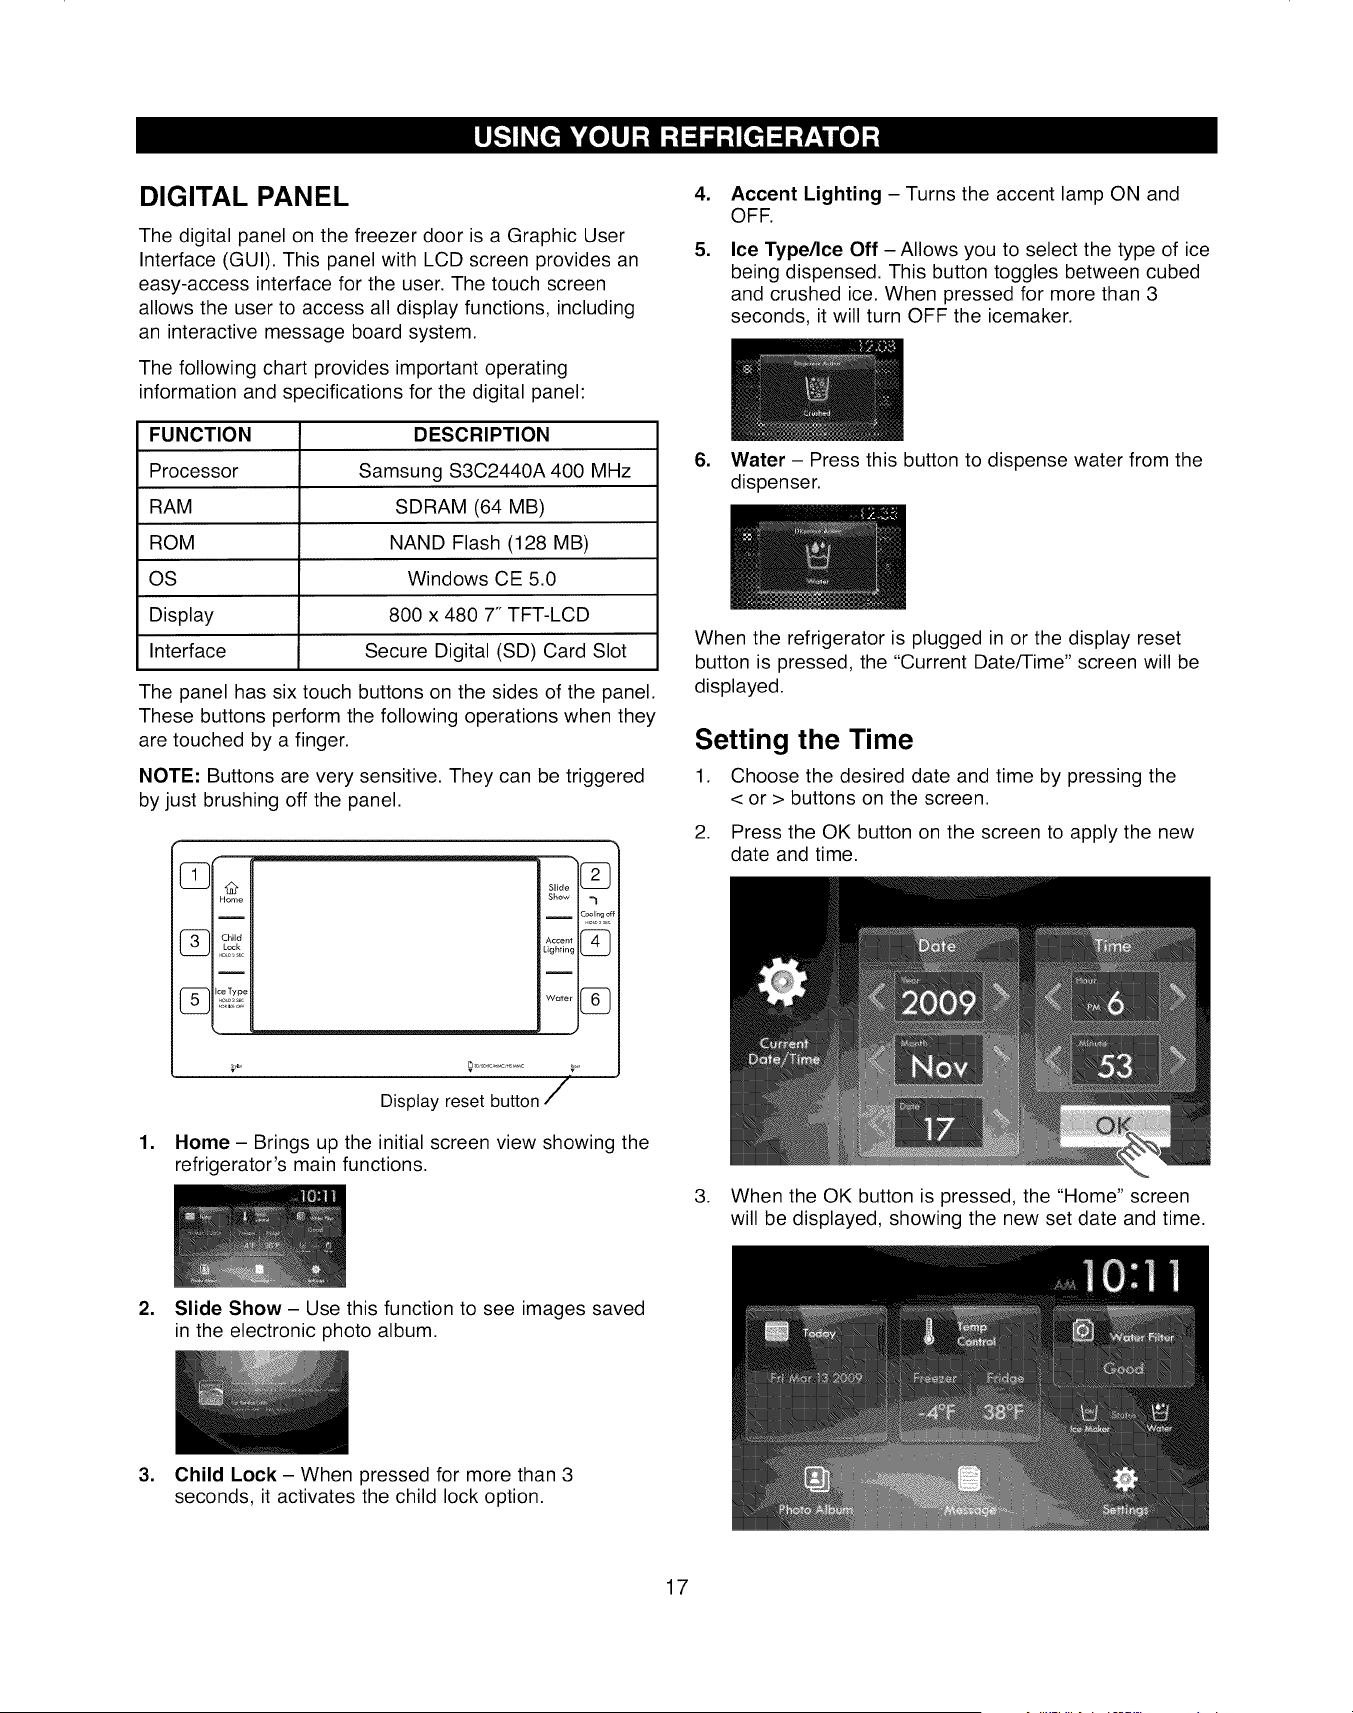
DIGITAL PANEL
The digital panel on the freezer door is a Graphic User
Interface (GUI). This panel with LCD screen provides an
easy-access interface for the user. The touch screen
allows the user to access all display functions, including
an interactive message board system.
The following chart provides important operating
information and specifications for the digital panel:
FUNCTION
Processor
RAM
ROM
OS
Display
Interface
DESCRIPTION
Samsung S3C2440A 400 MHz
SDRAM (64 MB)
NAND Flash (128 MB)
Windows CE 5.0
800 x 480 7" TFT-LCD
Secure Digital (SD) Card Slot
The panel has six touch buttons on the sides of the panel.
These buttons perform the following operations when they
are touched by a finger.
NOTE: Buttons are very sensitive. They can be triggered
by just brushing off the panel.
/
Display reset button /
1. Home - Brings up the initial screen view showing the
refrigerator's main functions.
,
,
Accent Lighting - Turns the accent lamp ON and
OFF.
Ice Type/Ice Off - Allows you to select the type of ice
being dispensed. This button toggles between cubed
and crushed ice. When pressed for more than 3
seconds, it will turn OFF the icemaker.
6. Water - Press this button to dispense water from the
dispenser.
When the refrigerator is plugged in or the display reset
button is pressed, the "Current Date/Time" screen will be
displayed.
Setting the Time
1. Choose the desired date and time by pressing the
< or > buttons on the screen.
2. Press the OK button on the screen to apply the new
date and time.
3. When the OK button is pressed, the "Home" screen
will be displayed, showing the new set date and time.
2. Slide Show- Use this function to see images saved
in the electronic photo album.
3. Child Lock - When pressed for more than 3
seconds, it activates the child lock option.
17
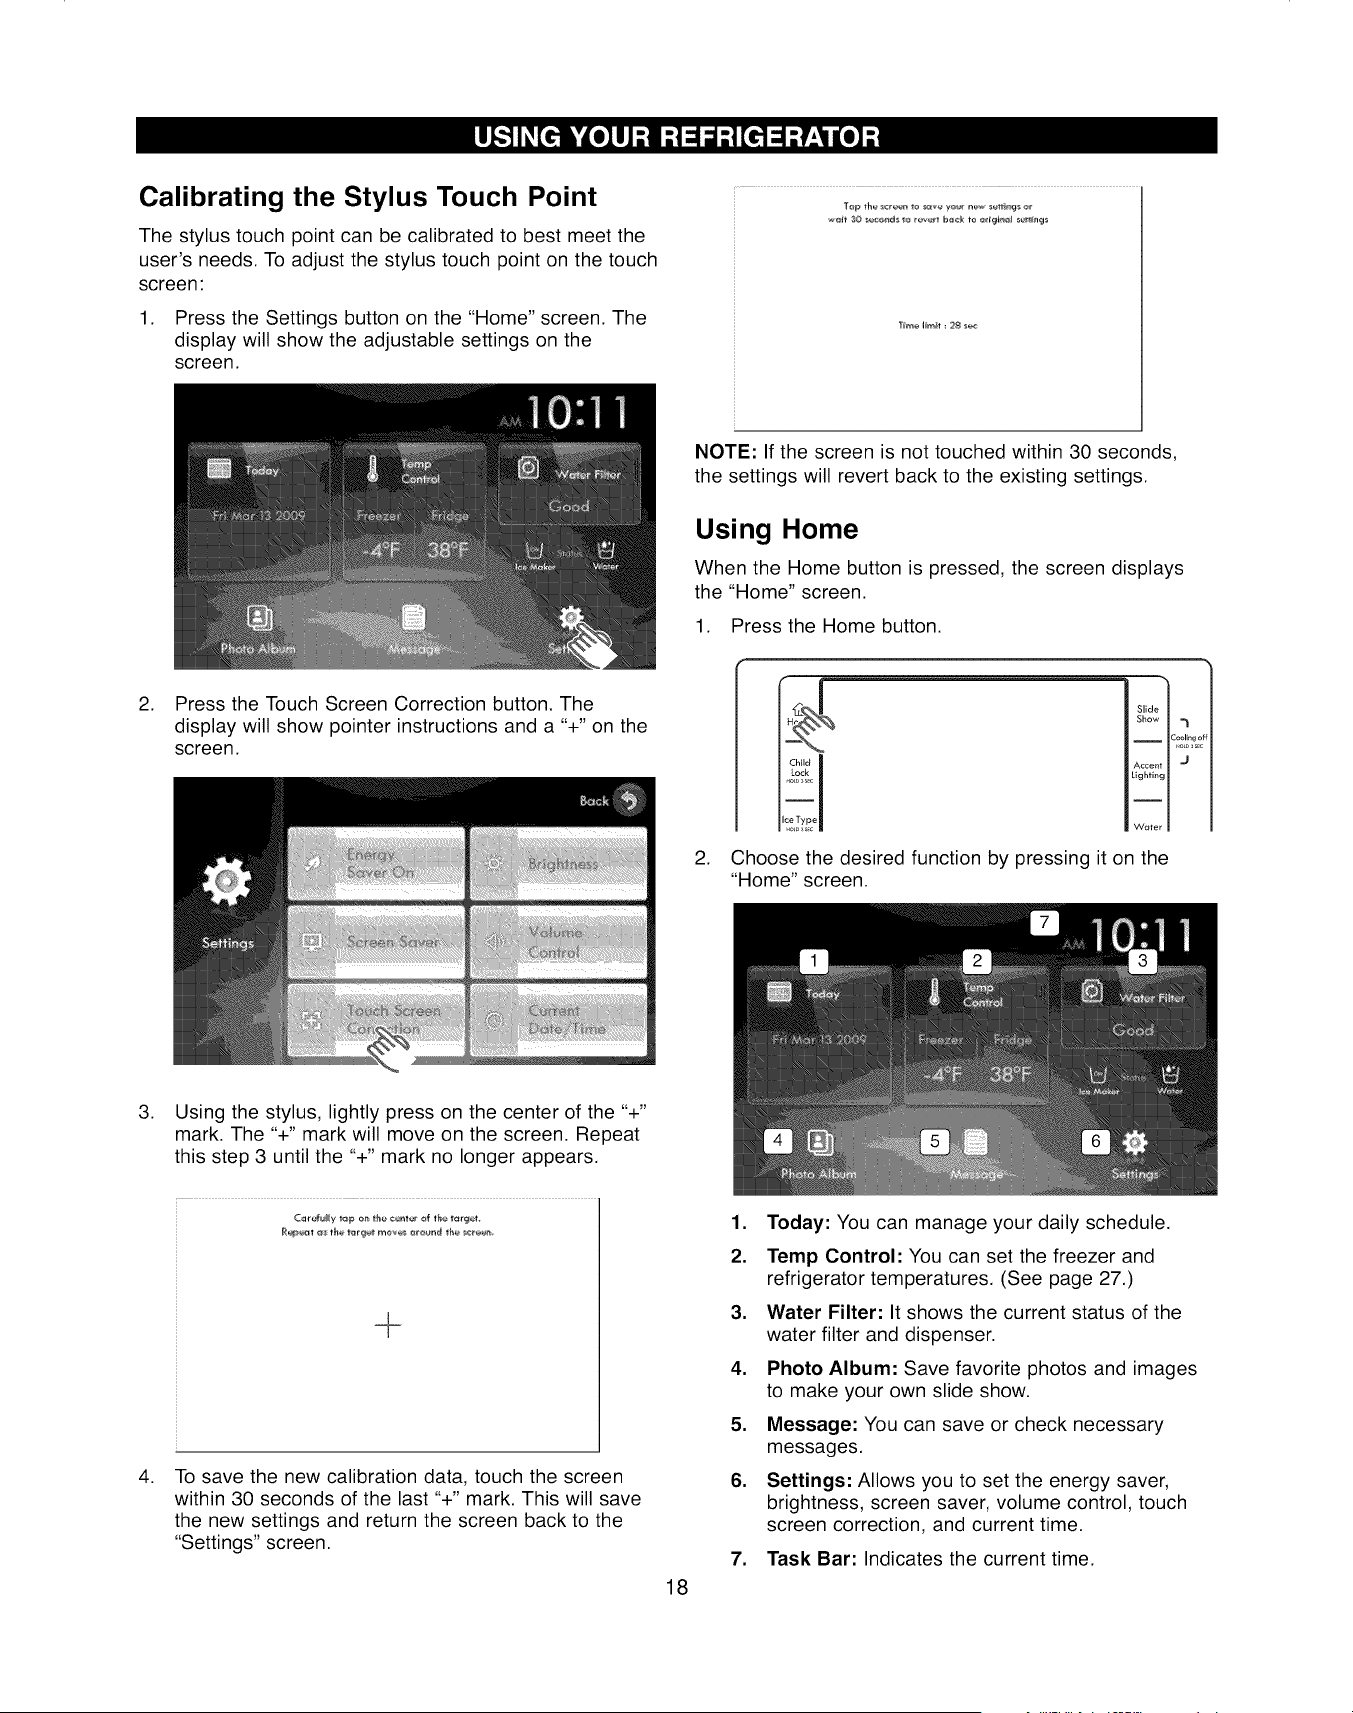
Calibrating the Stylus Touch Point
The stylus touch point can be calibrated to best meet the
user's needs. To adjust the stylus touch point on the touch
screen:
1. Press the Settings button on the "Home" screen. The
display will show the adjustable settings on the
screen.
•*aft 30 _,_e_d le rev¢#t _,ack t_ _dgi_el se_t_hgs
'lime l_r_t_ 28 se4z
.Press the Touch Screen Correction button. The
display will show pointer instructions and a "+" on the
screen.
NOTE: If the screen is not touched within 30 seconds,
the settings will revert back to the existing settings.
Using Home
When the Home button is pressed, the screen displays
the "Home" screen.
1. Press the Home button.
.
Child
Lock
Slide
Show
I C_ling off
Accent -J
,ighting
Water
Choose the desired function by pressing it on the
"Home" screen.
.
.
Using the stylus, lightly press on the center of the "+"
mark. The "+" mark will move on the screen. Repeat
this step 3 until the "+" mark no longer appears.
_@@_ a_ t_e terget me'_6 _reuad the _reet_
To save the new calibration data, touch the screen
within 30 seconds of the last "+" mark. This will save
the new settings and return the screen back to the
"Settings" screen.
18
1. Today: You can manage your daily schedule.
2. Temp Control: You can set the freezer and
refrigerator temperatures. (See page 27.)
3. Water Filter: It shows the current status of the
water filter and dispenser.
4. Photo Album: Save favorite photos and images
to make your own slide show.
5. Message: You can save or check necessary
messages.
6. Settings: Allows you to set the energy saver,
brightness, screen saver, volume control, touch
screen correction, and current time.
7. Task Bar: Indicates the current time.

Using Slide Show
When Slide Show is selected, it shows the slides that are
saved in an electronic photo album. See page 33 for
instructions on setting up a slide show. If slides are not
selected from the photo album, the screen will show a
Kenmore Elite TM default slide.
1. Press the Slide Show button.
,
12
Home
Child
Lock
Ice Type
blid_ I
Sh_
AccentY j ,s_
Lighting _
Water I
NOTE: The sliding photos option can be selected at
"Photo Album."
Press the Exit button to stop the slide show and
return to the "Home" screen.
Using the Child Lock Function
Activate the child lock function by pressing and holding
the Child Lock button for more than 3 seconds. All control
panel buttons, the touch-screen controls, and the
dispenser will be deactivated. To reactivate the control
buttons, the touch-screen controls, and the dispenser,
press and hold the Child Lock button for more than
3 seconds.
1. Press and hold the Child Lock button for more than
3 seconds.
Chef!
i
Slide
Show
I
Accent
Lighting
I
Water
7
coollngo
J
,
v v
The "child Lock Activated" message will be displayed
and the lock icon will show up in the upper-right
corner.
- Based on the photo size, there could be black
background around the photo.
-The photo is automatically optimized for a 16:9
wide-screen format.
NOTE: Saved images can be
stretched out or reversed. To
use a reversed image,
download it to your PC, flip
the image horizontally, and
then save it before uploading
it to the photo album.
,Press and hold the Child Lock button for more than
3 seconds to deactivate the child lock function and
reactivate all operating controls. The "Child Lock
Deactivated" message will be displayed and the lock
icon will disappear.
Slide
Show
I
Accent
Lighting
I
Water
7
Zool_ngo_
J
v v
19
DA9 c} 01746C(EN+ES).indd 19 2012.6.8 2:1'3:6 Pq[
Dispenser Controls
The last three buttons on the control panel control the
dispenser functions. These buttons include Accent
Lighting around the dispenser (1), Ice Type/Ice Off (2),
and Water dispensing (3).
I2
Home
I
Child
Lock
I
2_ Ice Type
Slide
Show -1
I Coolingof
Accent _Lighting
Water @
Using the Dispenser Lighting
Dispenser lighting turns ON whenever the dispenser is
operating. Five seconds after the dispenser stops
dispensing, the lighting turns OFF.
,. j
Using the Dispenser Accent Lighting
1. Press the Accent Lighting button to have the accent
lamp stay on.
Q
Home
Child
Lock
.oo_5c
I
Ice Type
.o4o sc
Slide I
Show -1
Water I
.
v v
NOTES:
• Light OFF is the default mode. The accent lamp
stays off.
• Light ON allows the accent lamp to stay on.
• The accent lamp turns off whenever the dispenser
is operating. Five seconds after the dispenser stops
dispensing, the accent lamp turns back on.
Press the Accent Lighting button a second time to
turn off the accent lamp.
Turning Off the Ice Dispenser
The Ice Type/Ice Off button controls two functions. The
length of time the control is held determines which
function it controls.
1. Press and hold the Ice Type/Ice Off button for more
than 3 seconds to turn OFF the icemaker. "Ice Maker
Off" will show on the display.
i
Slide
Show -1
I Cooling o
Accent "J
Lightklg
Water
J
.
NOTE: Pressing the Ice Type/Ice Off button for less
than 3 seconds will toggle the type of ice being
dispensed.
Press the Ice Type/Ice Off button for more than
3 seconds to restart ice production.
Selecting and Dispensing Ice
.Press the Ice Type/Ice Off button for less than 3
seconds. The screen will show "Dispenser Active
Cubed" or "Dispenser Active Crushed." Pressing the
Ice Type/Ice Off button for less than 3 seconds again
will toggle between the selections.
Ice Ty_,
Slide
Show
I
Accent
Lighting
I
Water
"1
=ool_ng ot
J
v
2. Place glass in dispenser to dispense selected ice.
NOTES:
• The dispenser always defaults to the last setting
that was used (Ice or Water).
• The selected dispenser function will be displayed as
the ice is being dispensed.
20
DA99 01746C(EN+ES).indd 20 2012.6.8 2:1',_;:7P_1
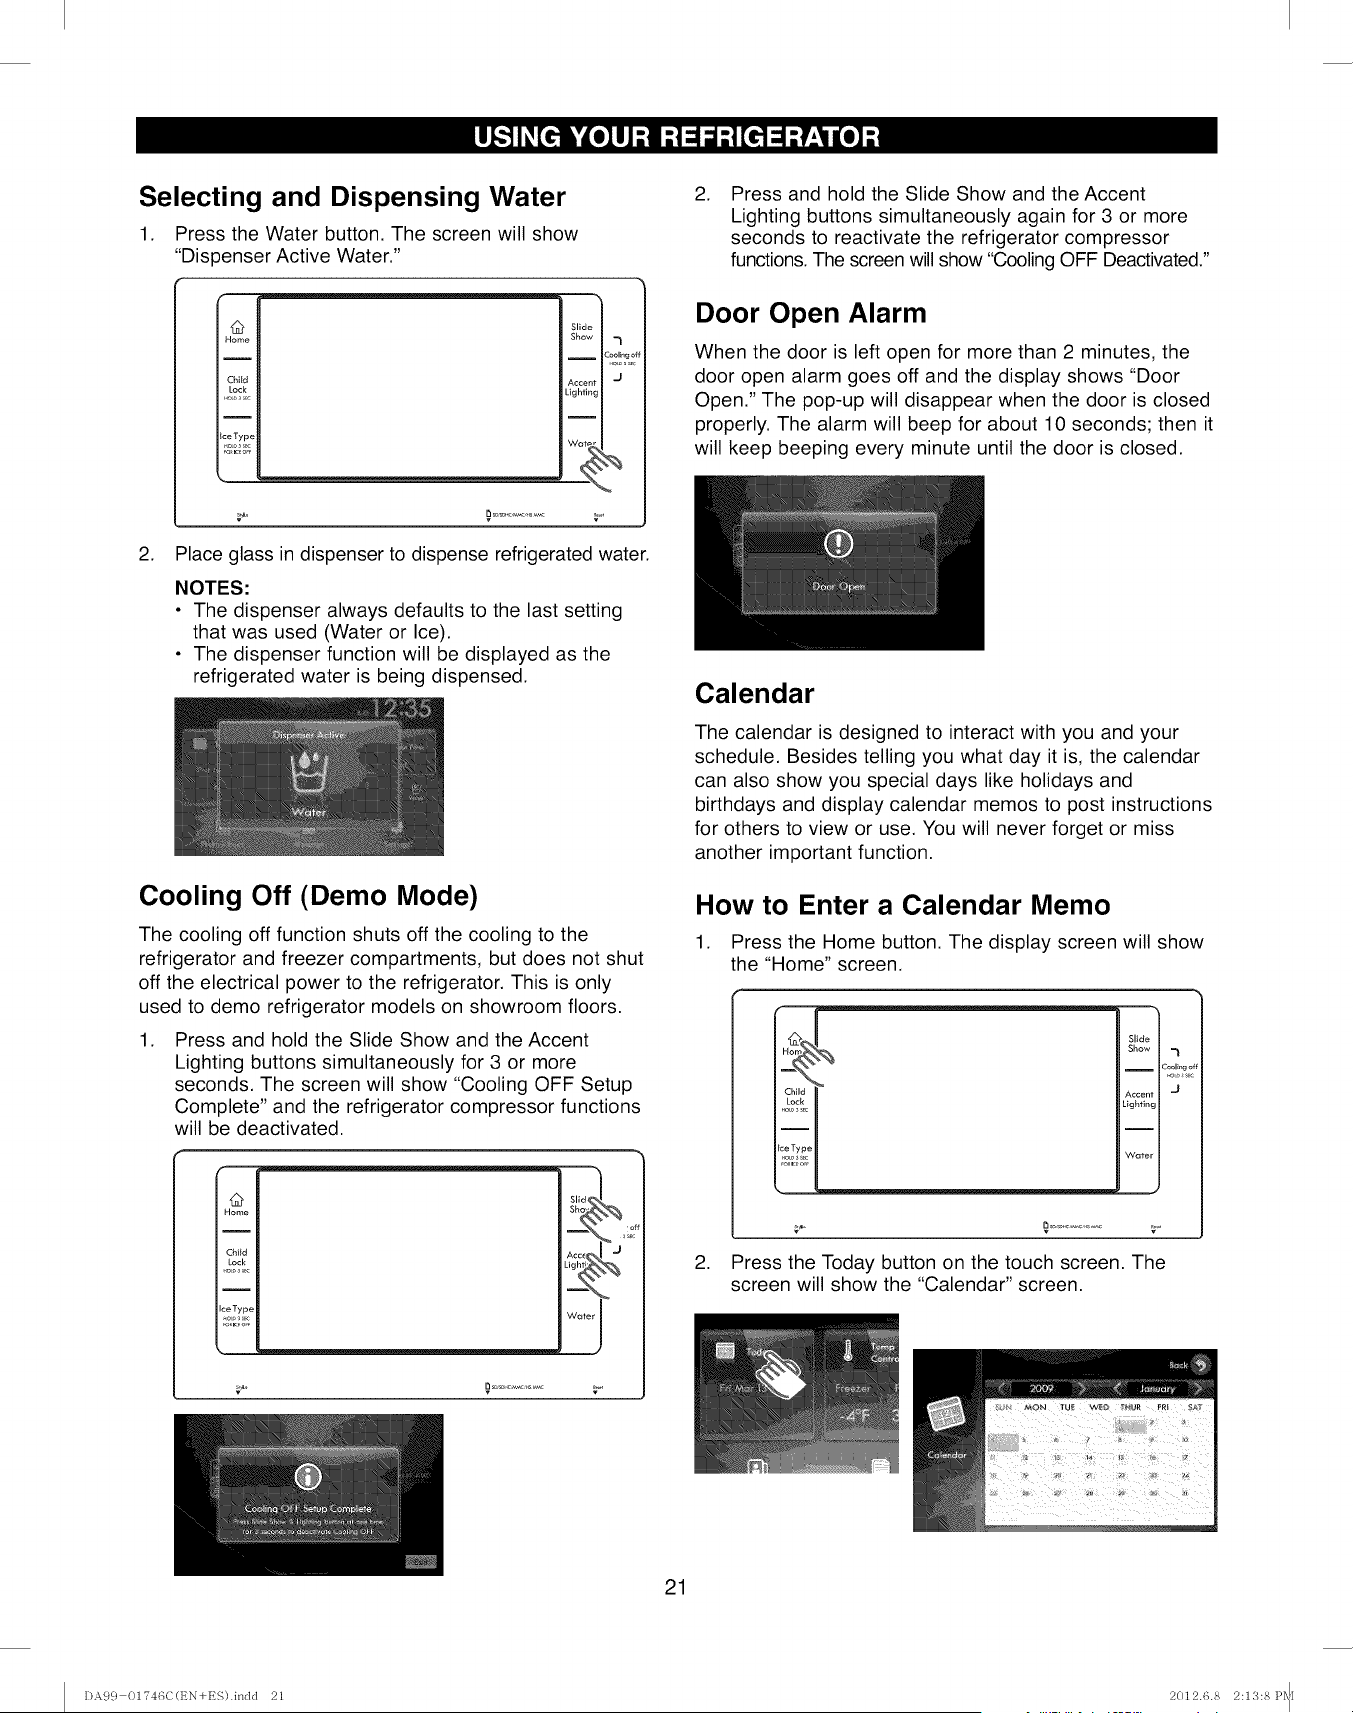
Selecting and Dispensing Water
1. Press the Water button. The screen will show
"Dispenser Active Water."
12
Home
I
Child
IceType
.o,_sc
i
Slid
Sho,
Acce
Lighti
Wab
2. Place glass in dispenser to dispense refrigerated water.
NOTES:
• The dispenser always defaults to the last setting
that was used (Water or Ice).
• The dispenser function will be displayed as the
refrigerated water is being dispensed.
Cooling Off (Demo Mode)
The cooling off function shuts off the cooling to the
refrigerator and freezer compartments, but does not shut
off the electrical power to the refrigerator. This is only
used to demo refrigerator models on showroom floors.
1. Press and hold the Slide Show and the Accent
Lighting buttons simultaneously for 3 or more
seconds. The screen will show "Cooling OFF Setup
Complete" and the refrigerator compressor functions
will be deactivated.
12
Home
Child
Lock
I
IceType
A¢CE M J
Water I
v
.Press and hold the Slide Show and the Accent
Lighting buttons simultaneously again for 3 or more
seconds to reactivate the refrigerator compressor
functions. The screen will show "Cooling OFF Deactivated."
Door Open Alarm
When the door is left open for more than 2 minutes, the
door open alarm goes off and the display shows "Door
Open." The pop-up will disappear when the door is closed
properly. The alarm will beep for about 10 seconds; then it
will keep beeping every minute until the door is closed.
Calendar
The calendar is designed to interact with you and your
schedule. Besides telling you what day it is, the calendar
can also show you special days like holidays and
birthdays and display calendar memos to post instructions
for others to view or use. You will never forget or miss
another important function.
How to Enter a Calendar Memo
1. Press the Home button. The display screen will show
the "Home" screen.
.
v
Press the Today button on the touch screen. The
screen will show the "Calendar" screen.
Slide
Show
ICaol_ng of
Accent
Lighting
I
Water
21
I)A9 c} 01?46C(EN+ES).indd 21 2012.6.8 2:1'3:8Pq[
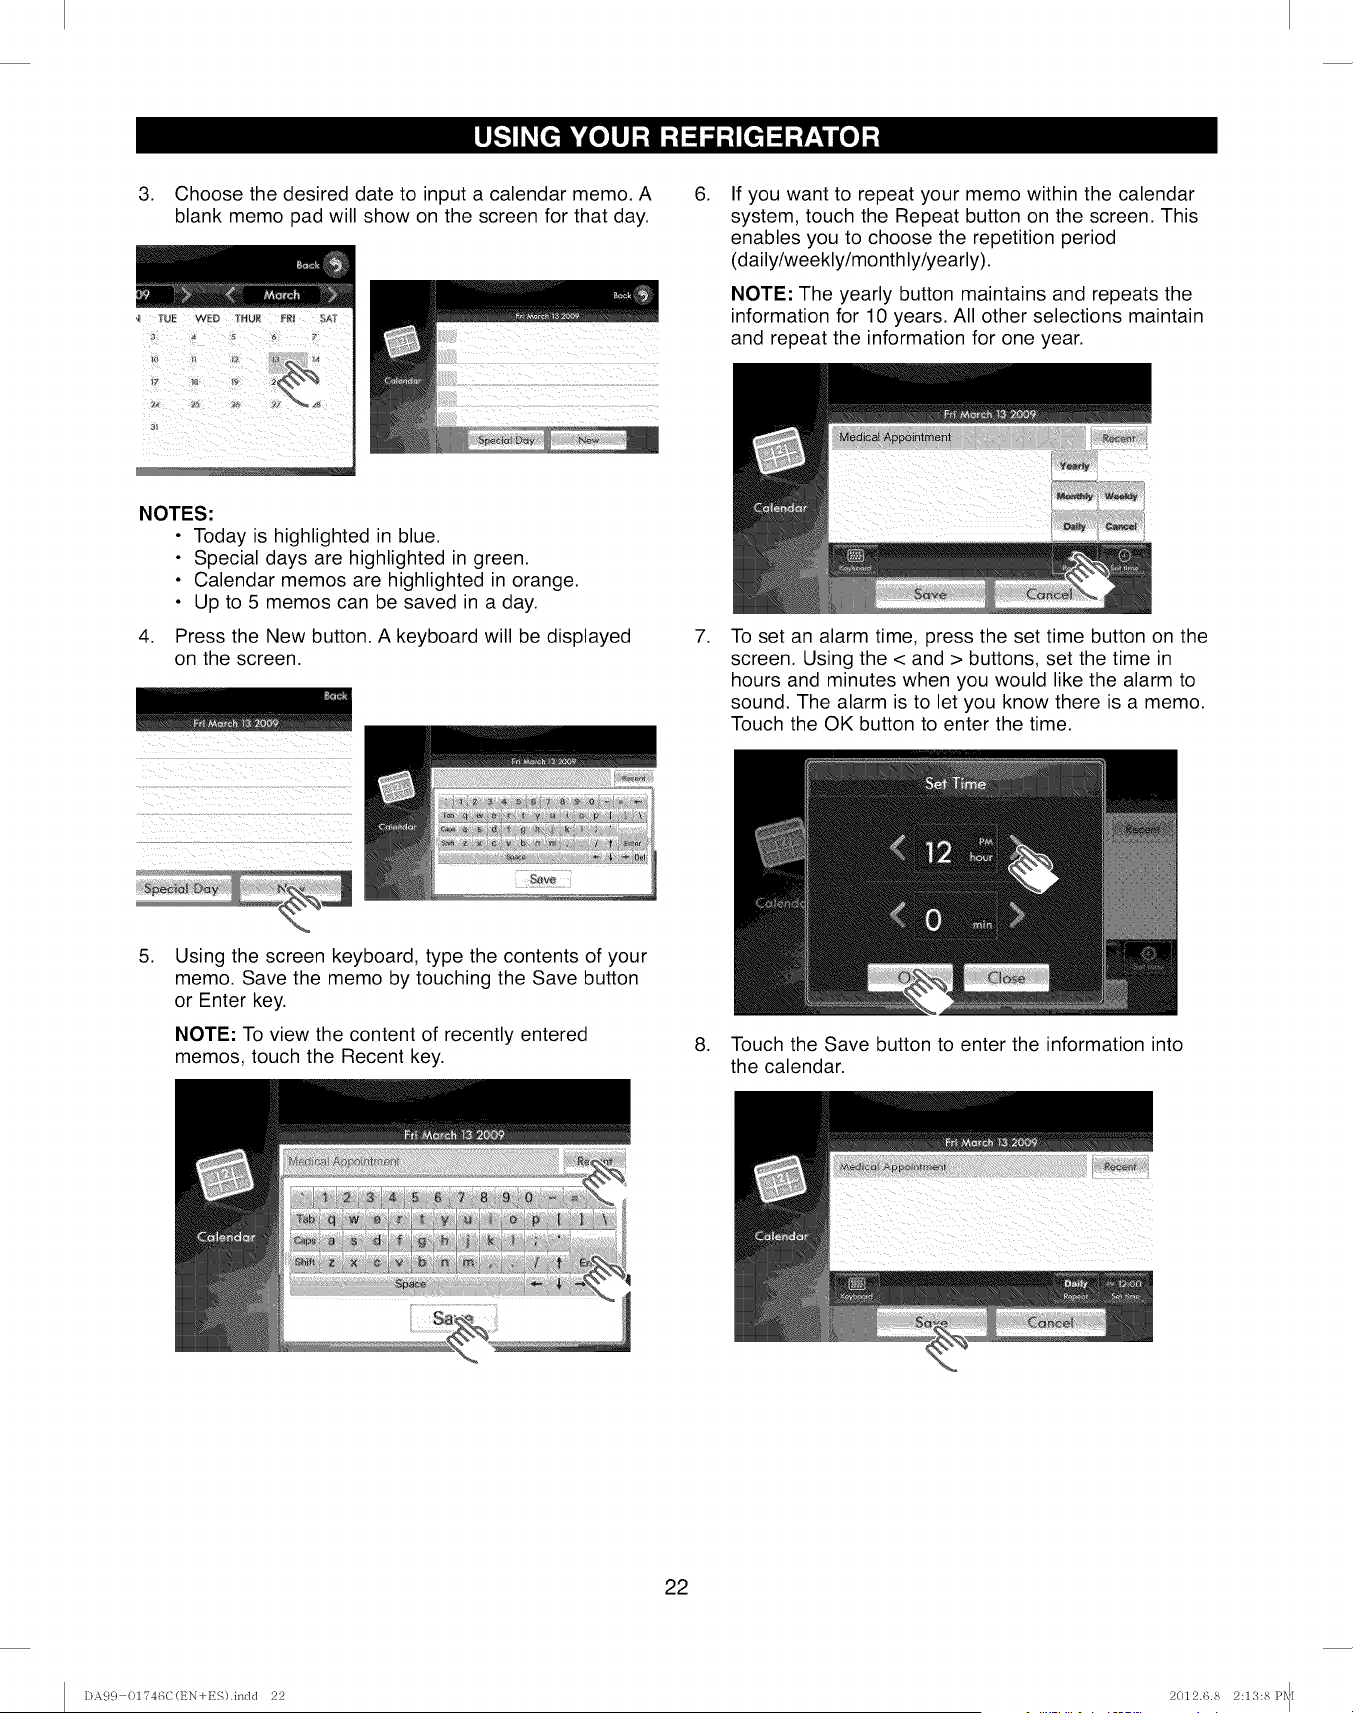
3. Choose the desired date to input a calendar memo. A
blank memo pad will show on the screen for that day.
NOTES:
• Today is highlighted in blue.
• Special days are highlighted in green.
• Calendar memos are highlighted in orange.
• Up to 5 memos can be saved in a day.
4. Press the New button. A keyboard will be displayed
on the screen.
.
.
If you want to repeat your memo within the calendar
system, touch the Repeat button on the screen. This
enables you to choose the repetition period
(daily/weekly/mo nthly/yearly).
NOTE: The yearly button maintains and repeats the
information for 10 years. All other selections maintain
and repeat the information for one year.
To set an alarm time, press the set time button on the
screen. Using the < and > buttons, set the time in
hours and minutes when you would like the alarm to
sound. The alarm is to let you know there is a memo.
Touch the OK button to enter the time.
.Using the screen keyboard, type the contents of your
memo. Save the memo by touching the Save button
or Enter key.
NOTE: To view the content of recently entered
memos, touch the Recent key. 8. Touch the Save button to enter the information into
the calendar.
i_i_!i_ii__iii_I_I__i_i_/>_i?>iiILIII_iii_ii_ii_ii!_i_Q_i_i_i__>i
22
DA9 c} 01746C(EN+ES).indd 22 2012.6.8 2:1'3:8Pql
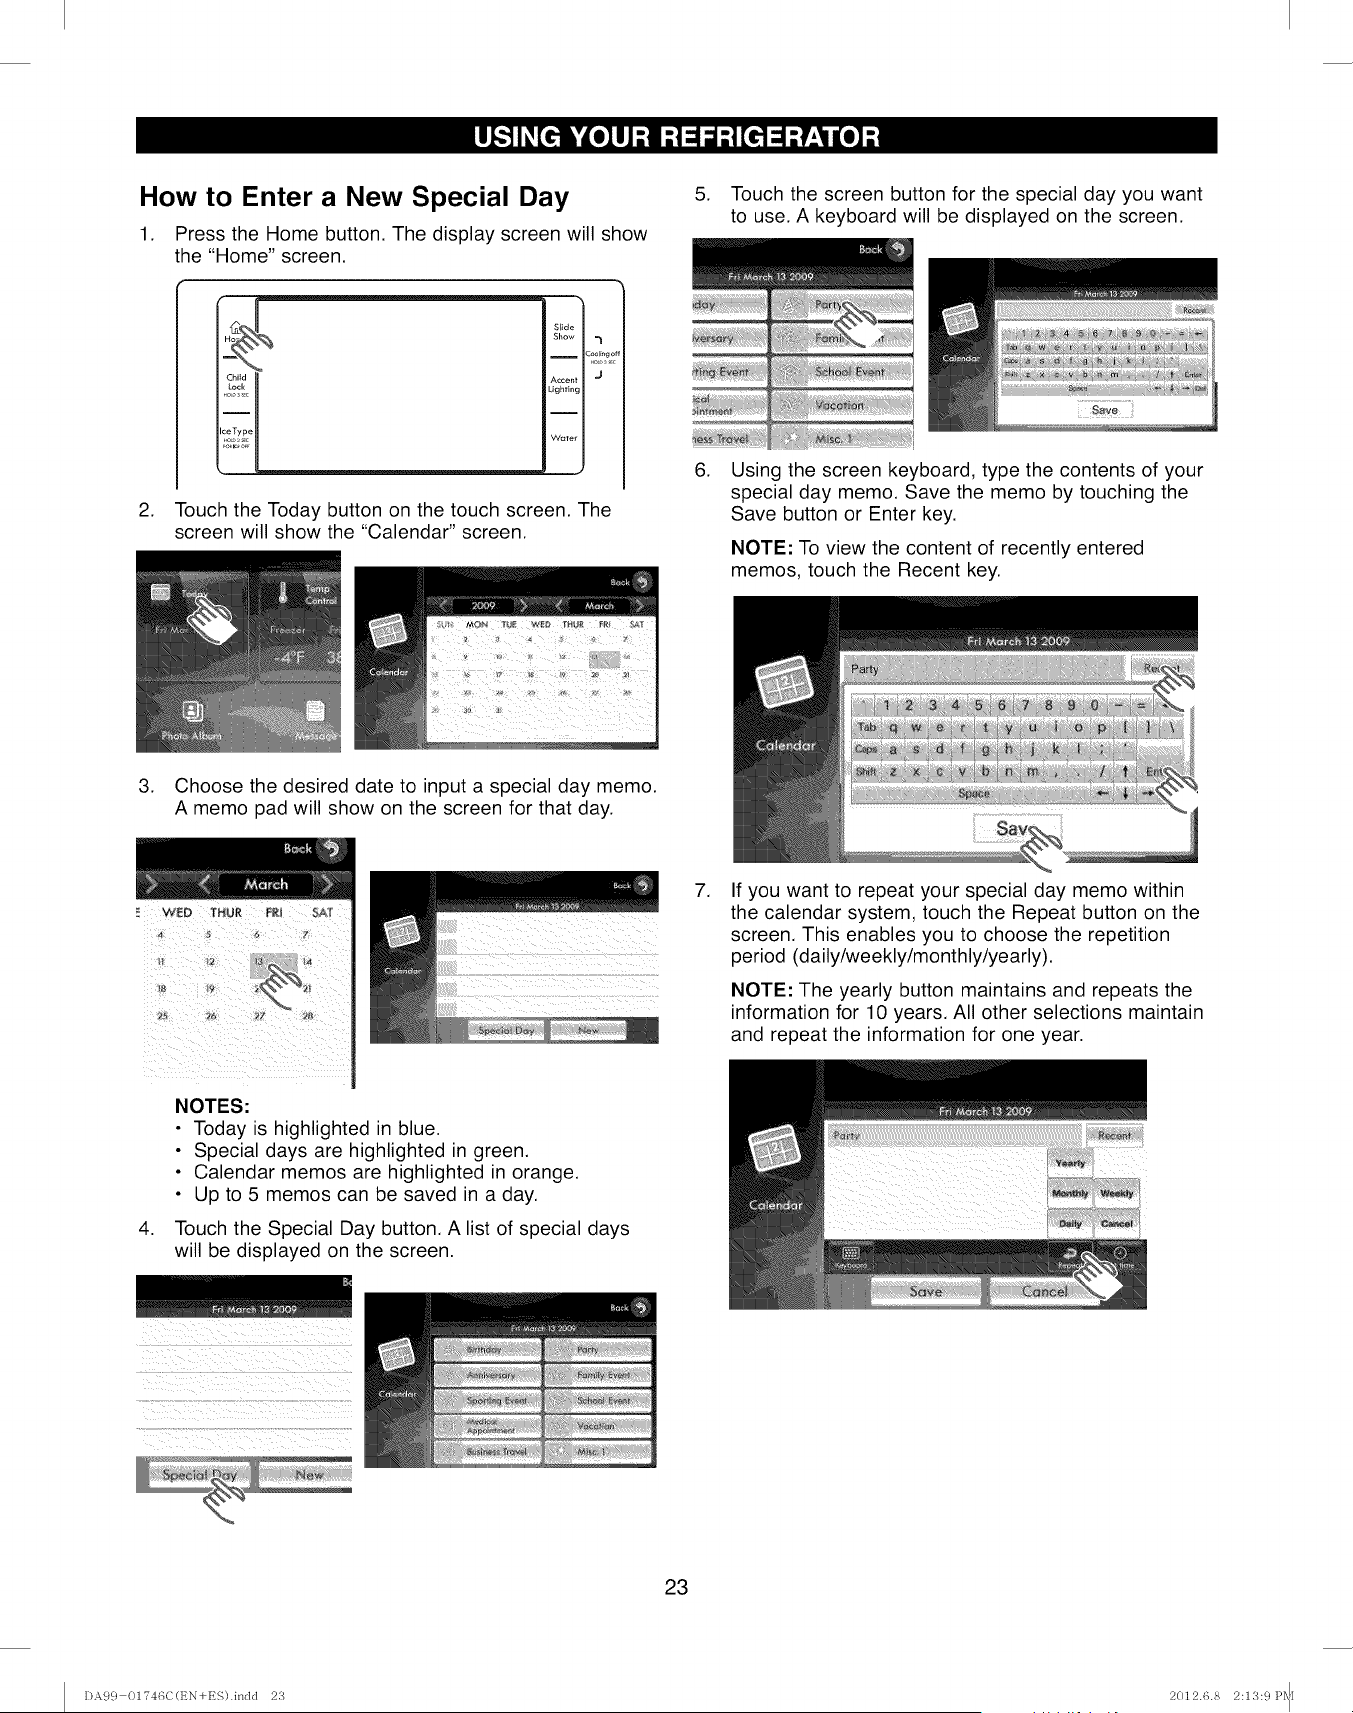
How to Enter a New Special Day
1. Press the Home button. The display screen will show
the "Home" screen.
H_ Slide
Show
ICooling o
Accent J
Lighting
Water
2. Touch the Today button on the touch screen. The
screen will show the "Calendar" screen.
.
.
Touch the screen button for the special day you want
to use. A keyboard will be displayed on the screen.
Using the screen keyboard, type the contents of your
special day memo. Save the memo by touching the
Save button or Enter key.
NOTE: To view the content of recently entered
memos, touch the Recent key.
3. Choose the desired date to input a special day memo.
A memo pad will show on the screen for that day.
.If you want to repeat your special day memo within
the calendar system, touch the Repeat button on the
screen. This enables you to choose the repetition
period (daily/weekly/monthly/yearly).
NOTE: The yearly button maintains and repeats the
information for 10 years. All other selections maintain
and repeat the information for one year.
.
NOTES:
•Today is highlighted in blue.
• Special days are highlighted in green.
• Calendar memos are highlighted in orange.
• Up to 5 memos can be saved in a day.
Touch the Special Day button. A list of special days
will be displayed on the screen.
_/_ _ii _ii_II :i_iii_i_ ii ii
7::::_!!¸:h'i;:':II?::':?Z:I!Z!7::(!_IZII:!:I7_i!!::_ii71:i!¸!¸!¸_!7
23
DA9 c} 01746C(EN+ES).indd 2'3 2012.6.8 2:13: c}Pq[
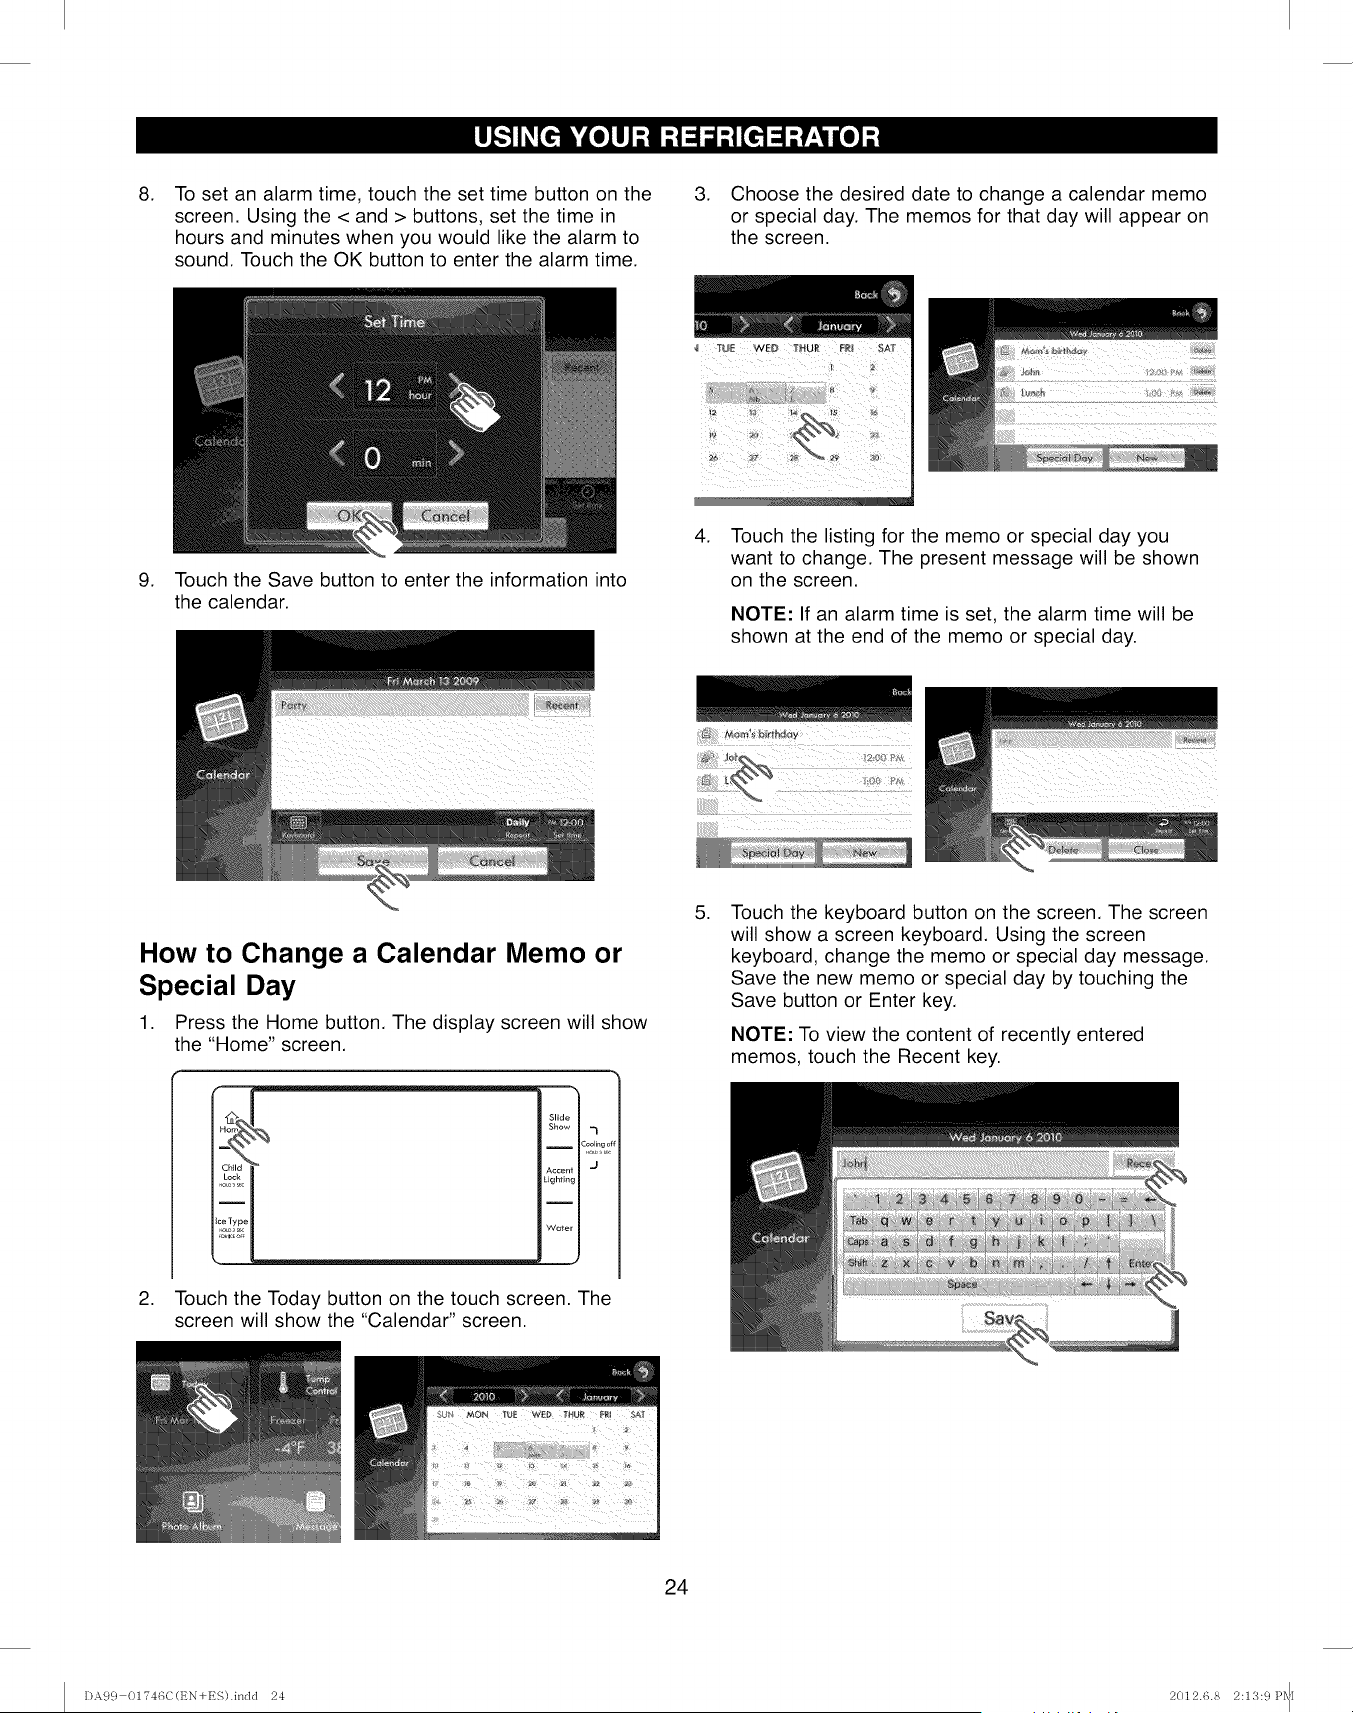
.To set an alarm time, touch the set time button on the
screen. Using the < and > buttons, set the time in
hours and minutes when you would like the alarm to
sound. Touch the OK button to enter the alarm time.
3. Choose the desired date to change a calendar memo
or special day. The memos for that day will appear on
the screen.
.Touch the Save button to enter the information into
the calendar.
.Touch the listing for the memo or special day you
want to change. The present message will be shown
on the screen.
NOTE: If an alarm time is set, the alarm time will be
shown at the end of the memo or special day.
How to Change a Calendar Memo or
Special Day
1. Press the Home button. The display screen will show
the "Home" screen.
.
Slide
Show "I
I Cooli,,g o
Lighting
I
Water
Touch the Today button on the touch screen. The
screen will show the "Calendar" screen.
.Touch the keyboard button on the screen. The screen
will show a screen keyboard. Using the screen
keyboard, change the memo or special day message.
Save the new memo or special day by touching the
Save button or Enter key.
NOTE: To view the content of recently entered
memos, touch the Recent key.
24
DA9 c} 01?46C(EN+ES).indd 24 2012.6.8 2:13: c}Pq[
,If you want to change or select a repeat for your
memo or special day, touch the Repeat button on the
screen. This enables you to choose the repetition
period (daily/weekly/monthly/yearly).
NOTE: The yearly button maintains and repeats the
information for 10 years. All other selections maintain
and repeat the information for one year.
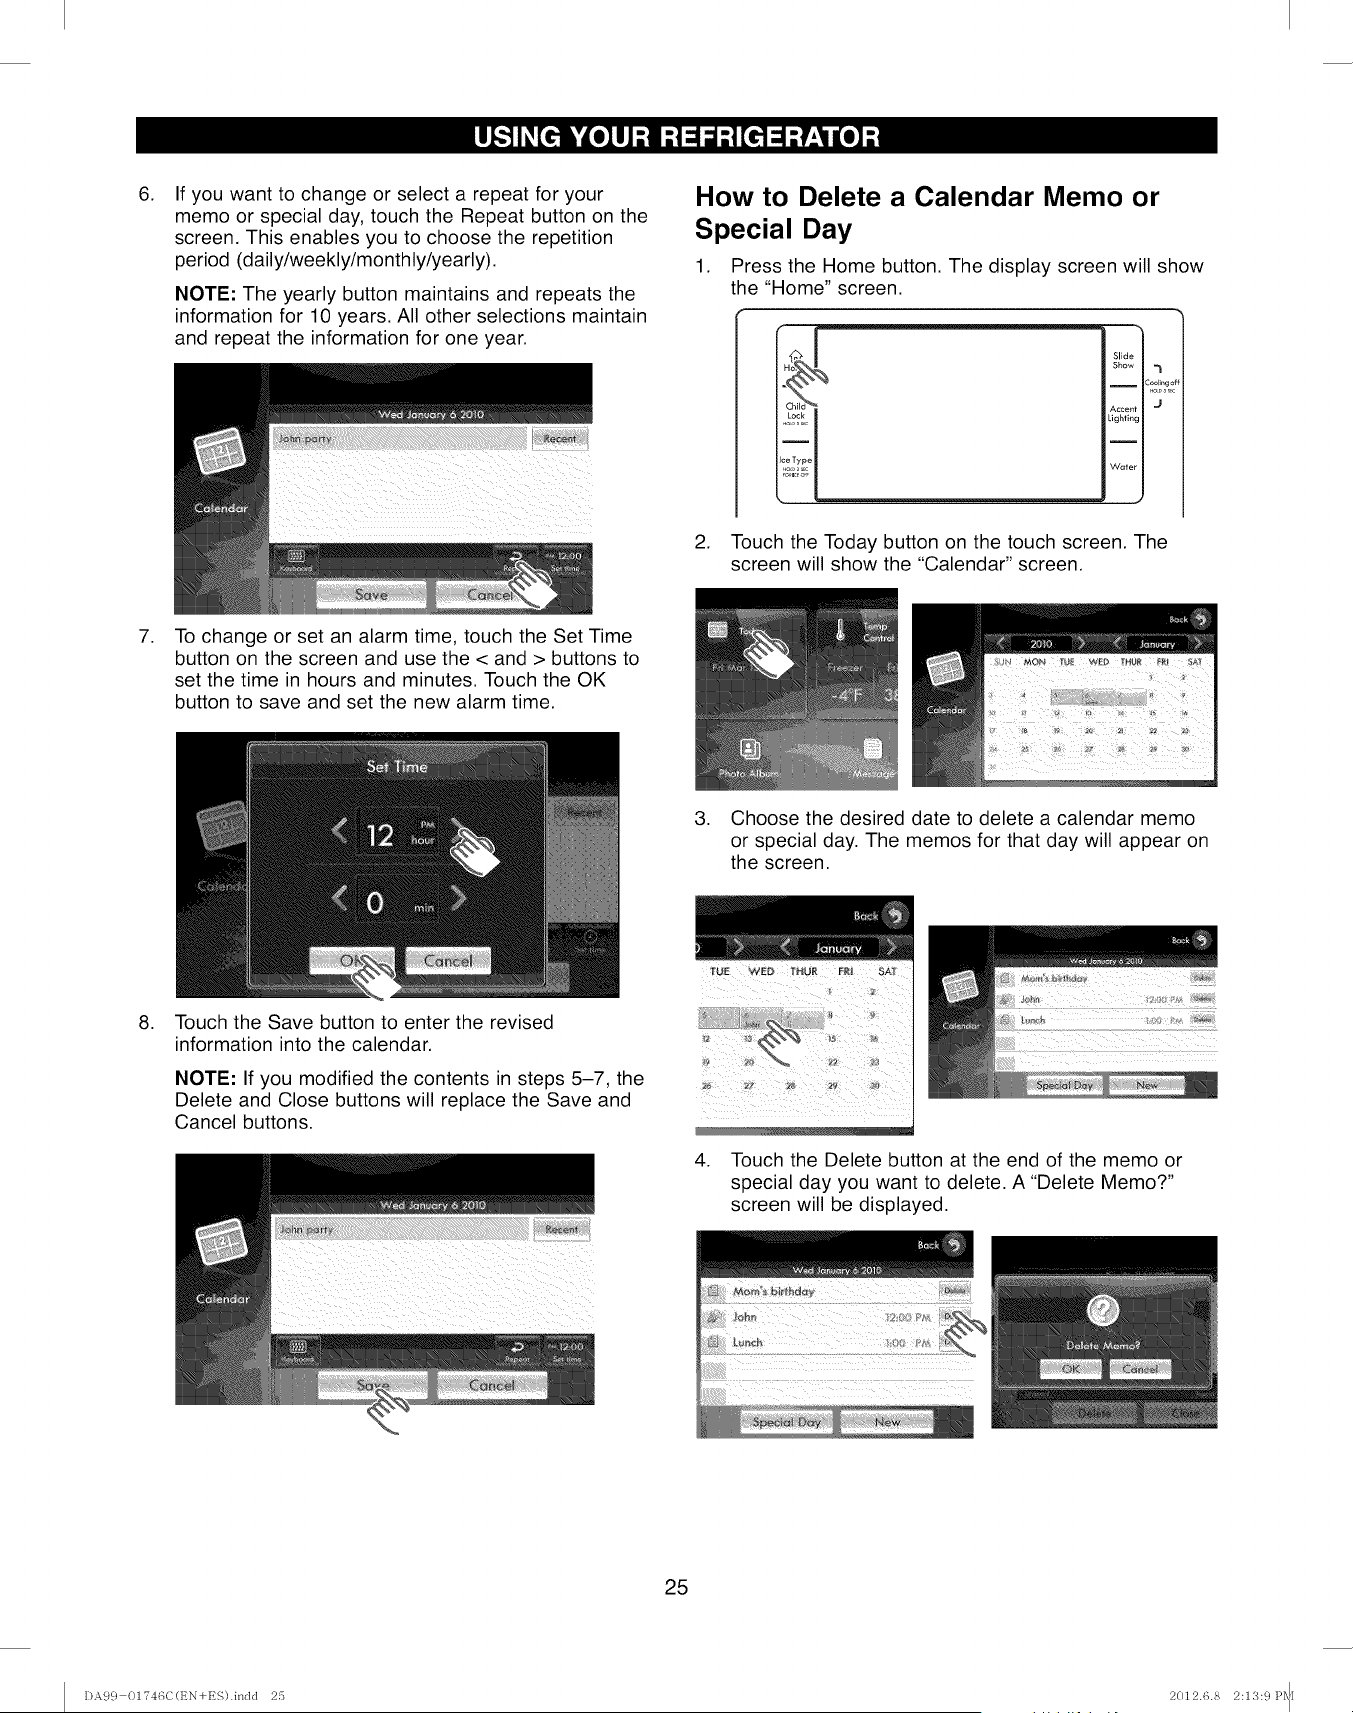
How to Delete a Calendar Memo or
Special Day
1. Press the Home button. The display screen will show
the "Home" screen.
Slide
Show ,_
Accent I J
Lighting I
Water I
2. Touch the Today button on the touch screen. The
screen will show the "Calendar" screen.
,To change or set an alarm time, touch the Set Time
button on the screen and use the < and > buttons to
set the time in hours and minutes. Touch the OK
button to save and set the new alarm time.
3. Choose the desired date to delete a calendar memo
or special day. The memos for that day will appear on
the screen.
,Touch the Save button to enter the revised
information into the calendar.
NOTE: If you modified the contents in steps 5-7, the
Delete and Close buttons will replace the Save and
Cancel buttons. _ii_!_I:_II_i_?!_L?I_III__!i:?_i_i!i/ii'!i/ii_ii_i
,Touch the Delete button at the end of the memo or
special day you want to delete. A "Delete Memo?"
screen will be displayed.
25
DA9 c} 01746C(EN+ES).indd 25 2012.6.8 2:13: c}Pq[
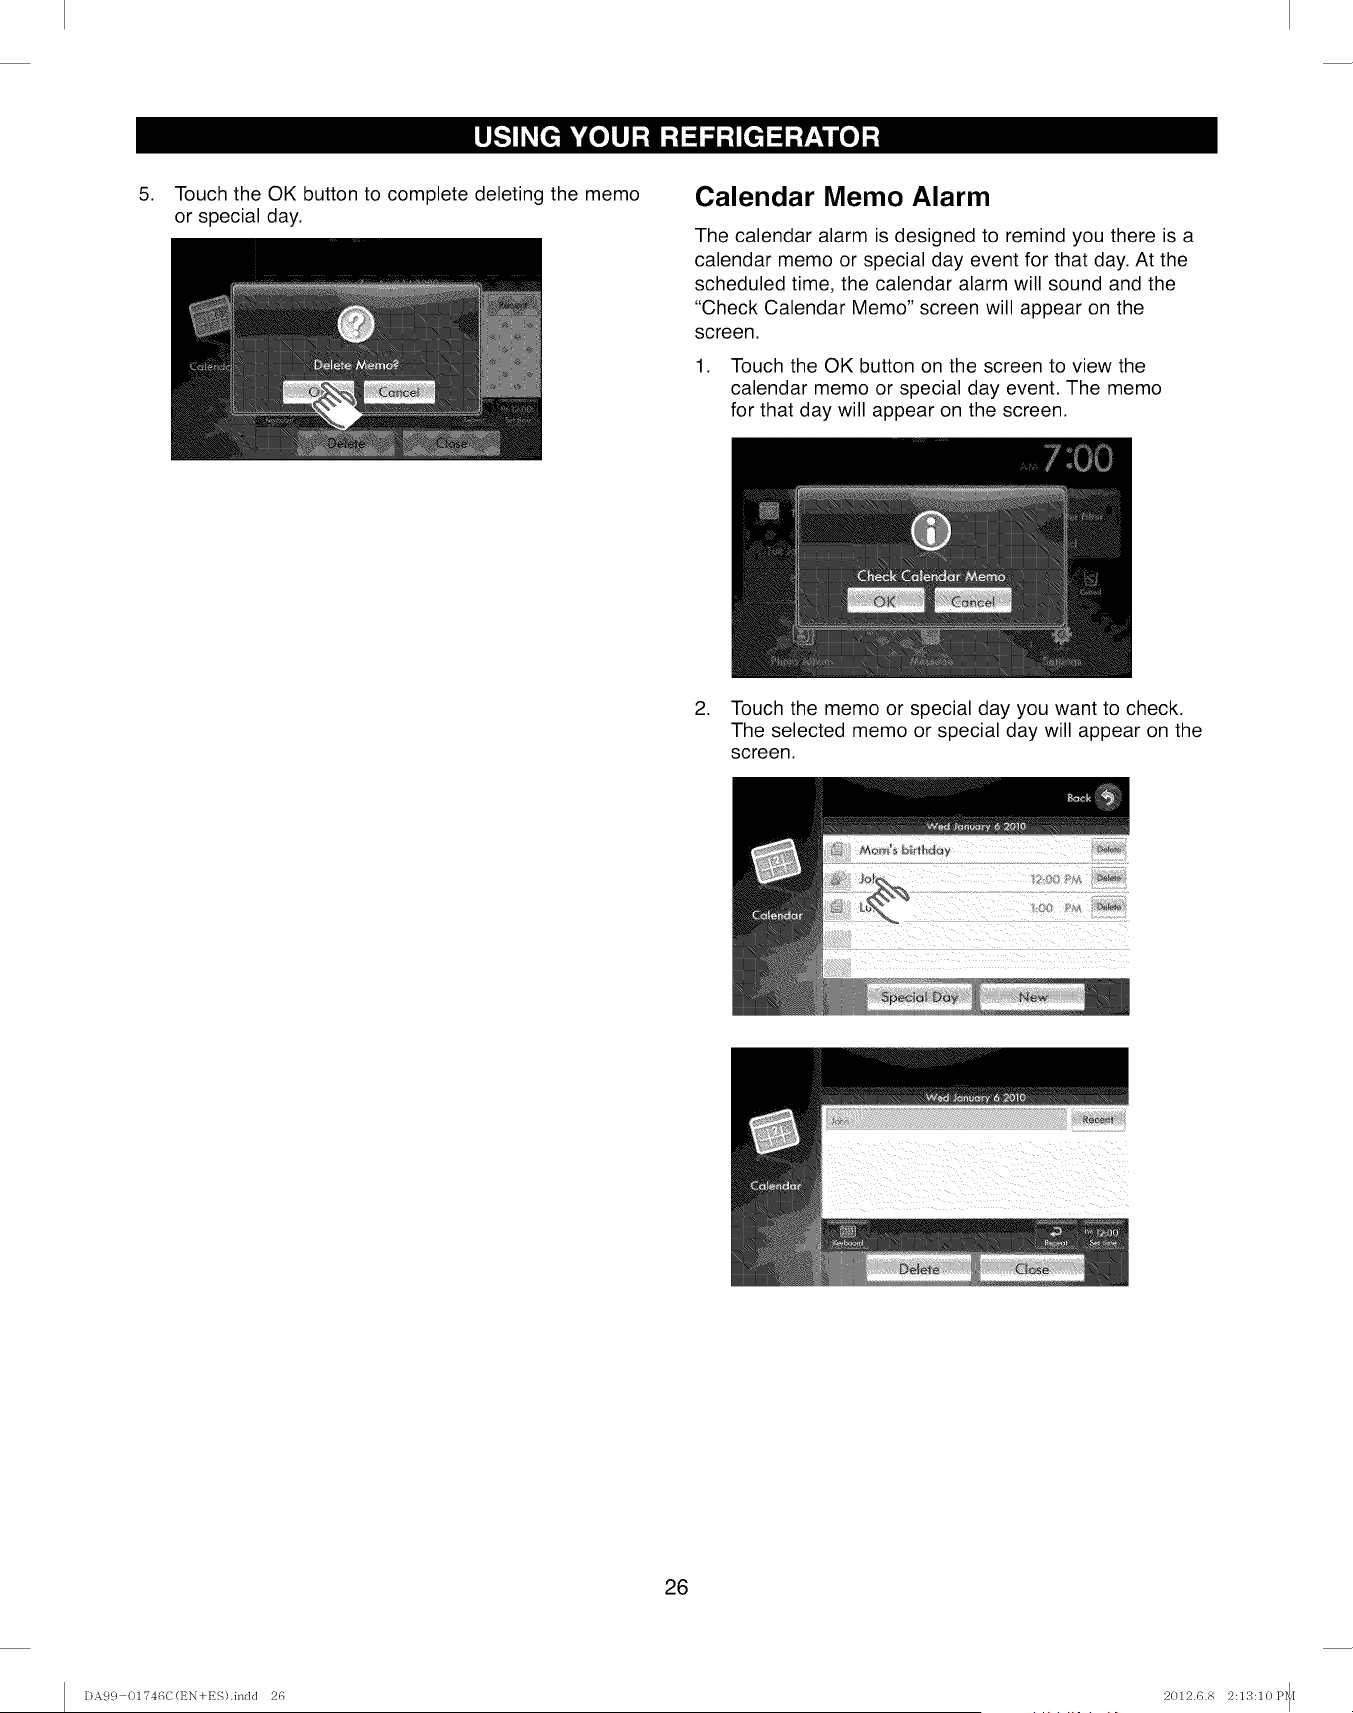
,Touch the OK button to complete deleting the memo
or special day.
Calendar Memo Alarm
The calendar alarm is designed to remind you there is a
calendar memo or special day event for that day. At the
scheduled time, the calendar alarm will sound and the
"Check Calendar Memo" screen will appear on the
screen.
1. Touch the OK button on the screen to view the
calendar memo or special day event. The memo
for that day will appear on the screen.
2. Touch the memo or special day you want to check.
The selected memo or special day will appear on the
screen.
26
DA99 01746C(t_N+ES).indd 26 2012.6.8 2:13:10 P_[
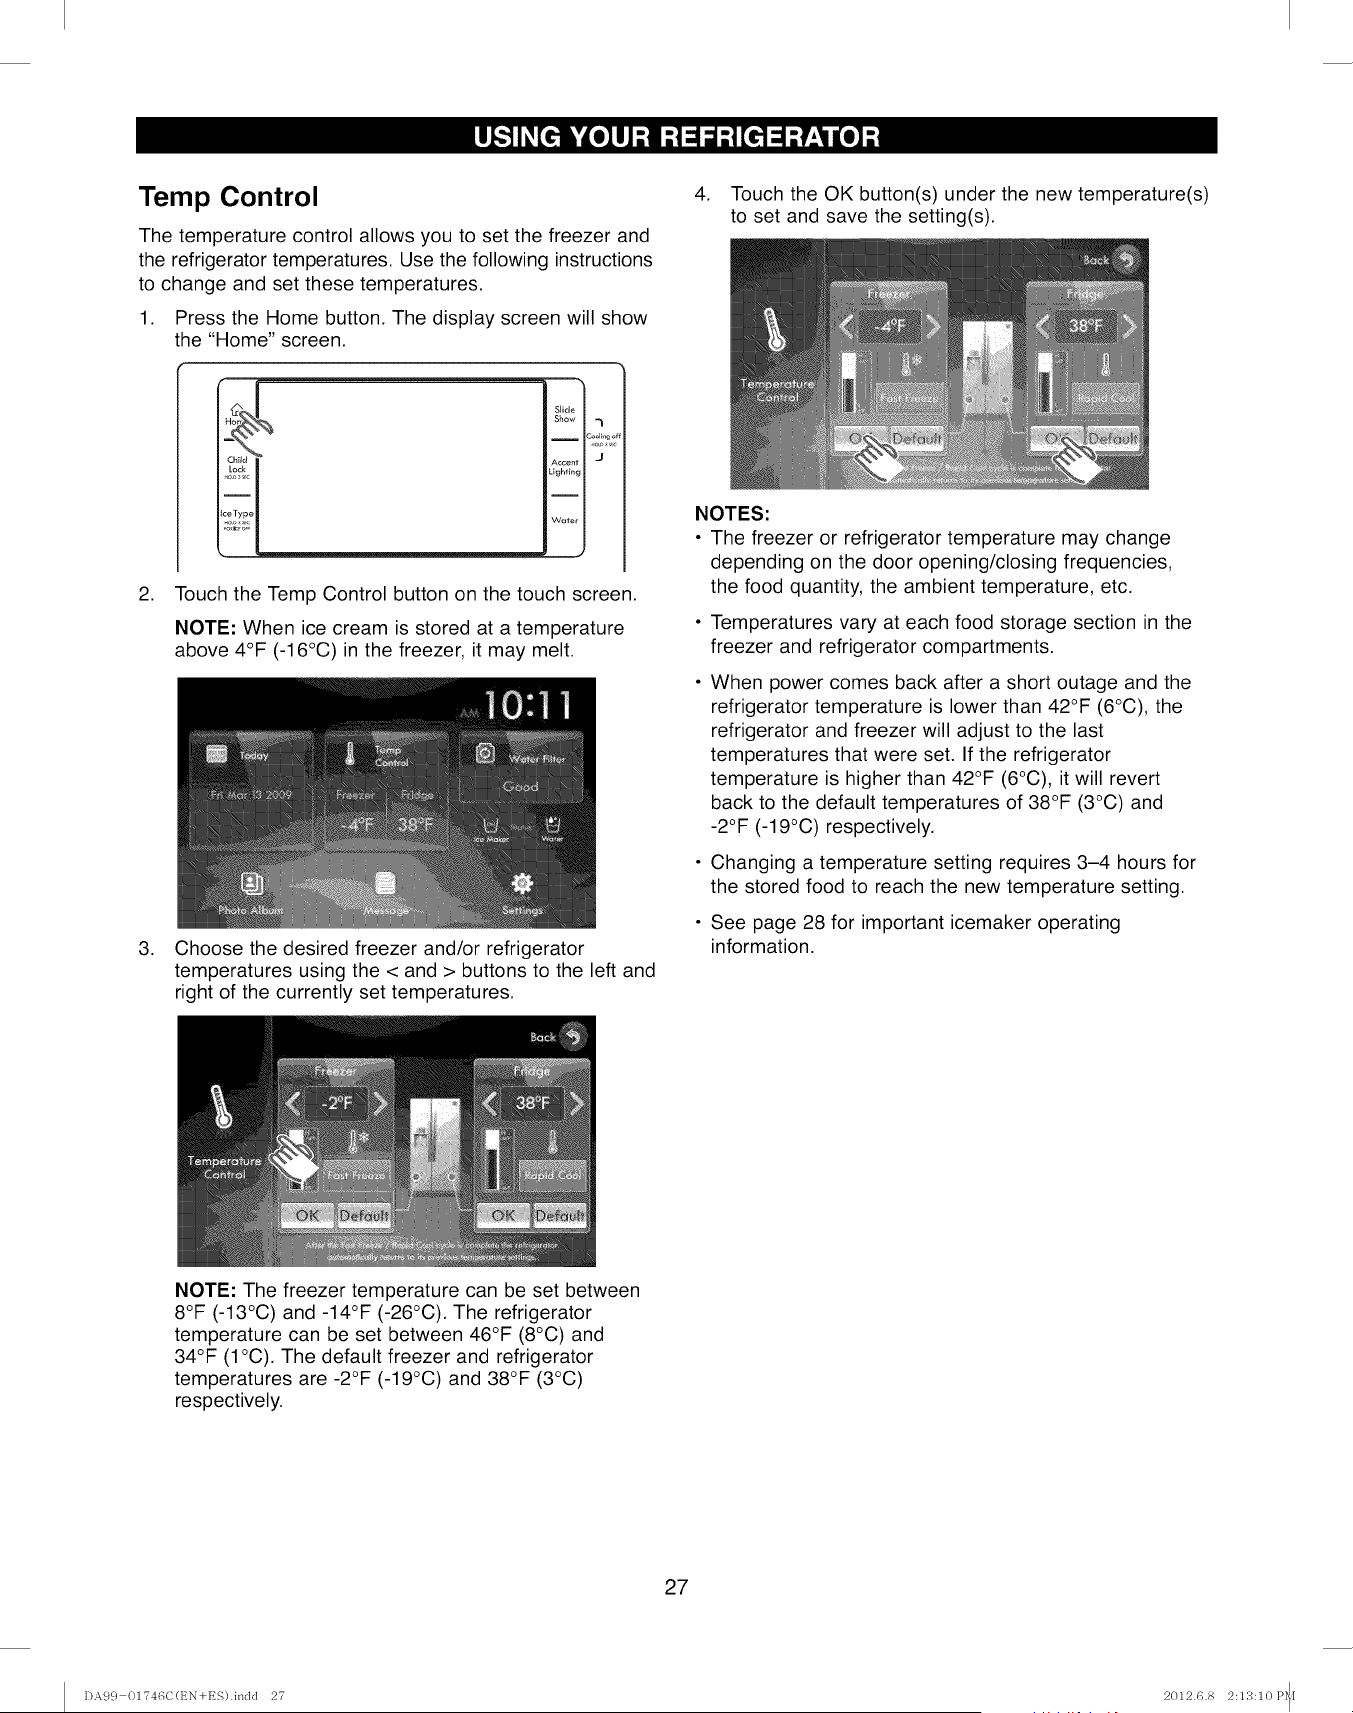
Temp Control
The temperature control allows you to set the freezer and
the refrigerator temperatures. Use the following instructions
to change and set these temperatures.
1. Press the Home button. The display screen will show
the "Home" screen.
Slide
Show -I
Accent I.,I
Lighting
Water
2. Touch the Temp Control button on the touch screen.
NOTE: When ice cream is stored at a temperature
above 4°F (-16°C) in the freezer, it may melt.
3. Choose the desired freezer and/or refrigerator
temperatures using the < and > buttons to the left and
right of the currently set temperatures.
,Touch the OK button(s) under the new temperature(s)
to set and save the setting(s).
NOTES:
• The freezer or refrigerator temperature may change
depending on the door opening/closing frequencies,
the food quantity, the ambient temperature, etc.
• Temperatures vary at each food storage section in the
freezer and refrigerator compartments.
When power comes back after a short outage and the
refrigerator temperature is lower than 42°F (6°C), the
refrigerator and freezer will adjust to the last
temperatures that were set. If the refrigerator
temperature is higher than 42°F (6°C), it will revert
back to the default temperatures of 38°F (3°C) and
-2°F (-19°C) respectively.
• Changing a temperature setting requires 3-4 hours for
the stored food to reach the new temperature setting.
• See page 28 for important icemaker operating
information.
NOTE: The freezer temperature can be set between
8°F (-13°C) and -14°F (-26°C). The refrigerator
temperature can be set between 46°F (8°C) and
34°F (1°C). The default freezer and refrigerator
temperatures are -2°F (-19°C) and 38°F (3°C)
respectively.
27
DA99 01746C(t_N+ES).indd 27 2012.6.8 2:13:10 P_[
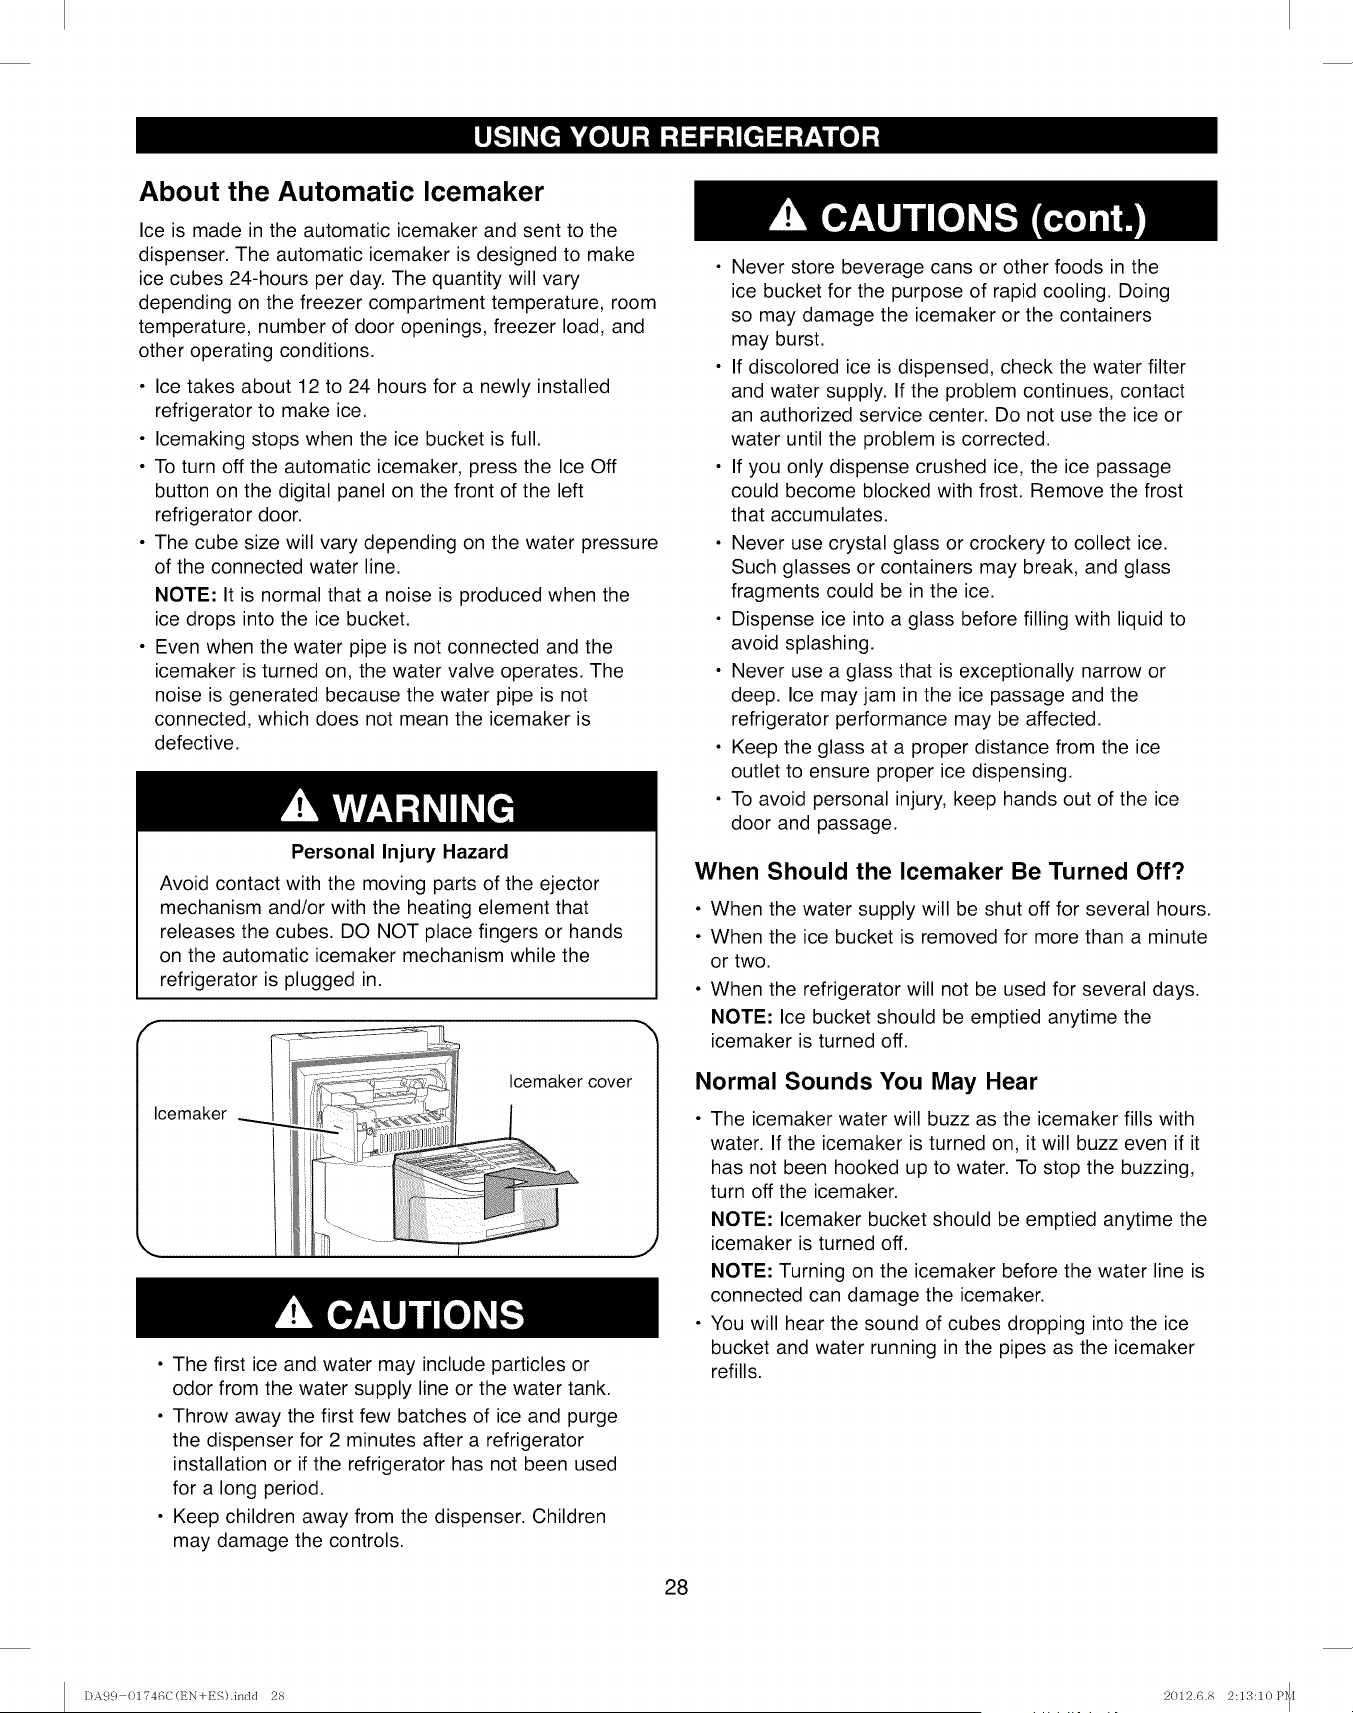
About the Automatic Icemaker
Ice is made in the automatic icemaker and sent to the
dispenser. The automatic icemaker is designed to make
ice cubes 24-hours per day. The quantity will vary
depending on the freezer compartment temperature, room
temperature, number of door openings, freezer load, and
other operating conditions.
• Ice takes about 12 to 24 hours for a newly installed
refrigerator to make ice.
• Icemaking stops when the ice bucket is full.
• To turn off the automatic icemaker, press the Ice Off
button on the digital panel on the front of the left
refrigerator door.
• The cube size will vary depending on the water pressure
of the connected water line.
NOTE: It is normal that a noise is produced when the
ice drops into the ice bucket.
• Even when the water pipe is not connected and the
icemaker is turned on, the water valve operates. The
noise is generated because the water pipe is not
connected, which does not mean the icemaker is
defective.
Personal Injury Hazard
Avoid contact with the moving parts of the ejector
mechanism and/or with the heating element that
releases the cubes. DO NOT place fingers or hands
on the automatic icemaker mechanism while the
refrigerator is plugged in.
Icemaker
Icemaker cover
• The first ice and water may include particles or
odor from the water supply line or the water tank.
• Throw away the first few batches of ice and purge
the dispenser for 2 minutes after a refrigerator
installation or if the refrigerator has not been used
for a long period.
• Keep children away from the dispenser. Children
may damage the controls.
• Never store beverage cans or other foods in the
ice bucket for the purpose of rapid cooling. Doing
so may damage the icemaker or the containers
may burst.
• If discolored ice is dispensed, check the water filter
and water supply. If the problem continues, contact
an authorized service center. Do not use the ice or
water until the problem is corrected.
• If you only dispense crushed ice, the ice passage
could become blocked with frost. Remove the frost
that accumulates.
• Never use crystal glass or crockery to collect ice.
Such glasses or containers may break, and glass
fragments could be in the ice.
• Dispense ice into a glass before filling with liquid to
avoid splashing.
• Never use a glass that is exceptionally narrow or
deep. Ice may jam in the ice passage and the
refrigerator performance may be affected.
• Keep the glass at a proper distance from the ice
outlet to ensure proper ice dispensing.
• To avoid personal injury, keep hands out of the ice
door and passage.
When Should the Icemaker Be Turned Off?
• When the water supply will be shut off for several hours.
• When the ice bucket is removed for more than a minute
or two.
• When the refrigerator will not be used for several days.
NOTE: Ice bucket should be emptied anytime the
icemaker is turned off.
Normal Sounds You May Hear
• The icemaker water will buzz as the icemaker fills with
water. If the icemaker is turned on, it will buzz even if it
has not been hooked up to water. To stop the buzzing,
turn off the icemaker.
NOTE: Icemaker bucket should be emptied anytime the
icemaker is turned off.
NOTE: Turning on the icemaker before the water line is
connected can damage the icemaker.
• You will hear the sound of cubes dropping into the ice
bucket and water running in the pipes as the icemaker
refills.
28
DA99 01746C(t_N+ES).inclcl 28 2012.6.8 2:13:10 P_[
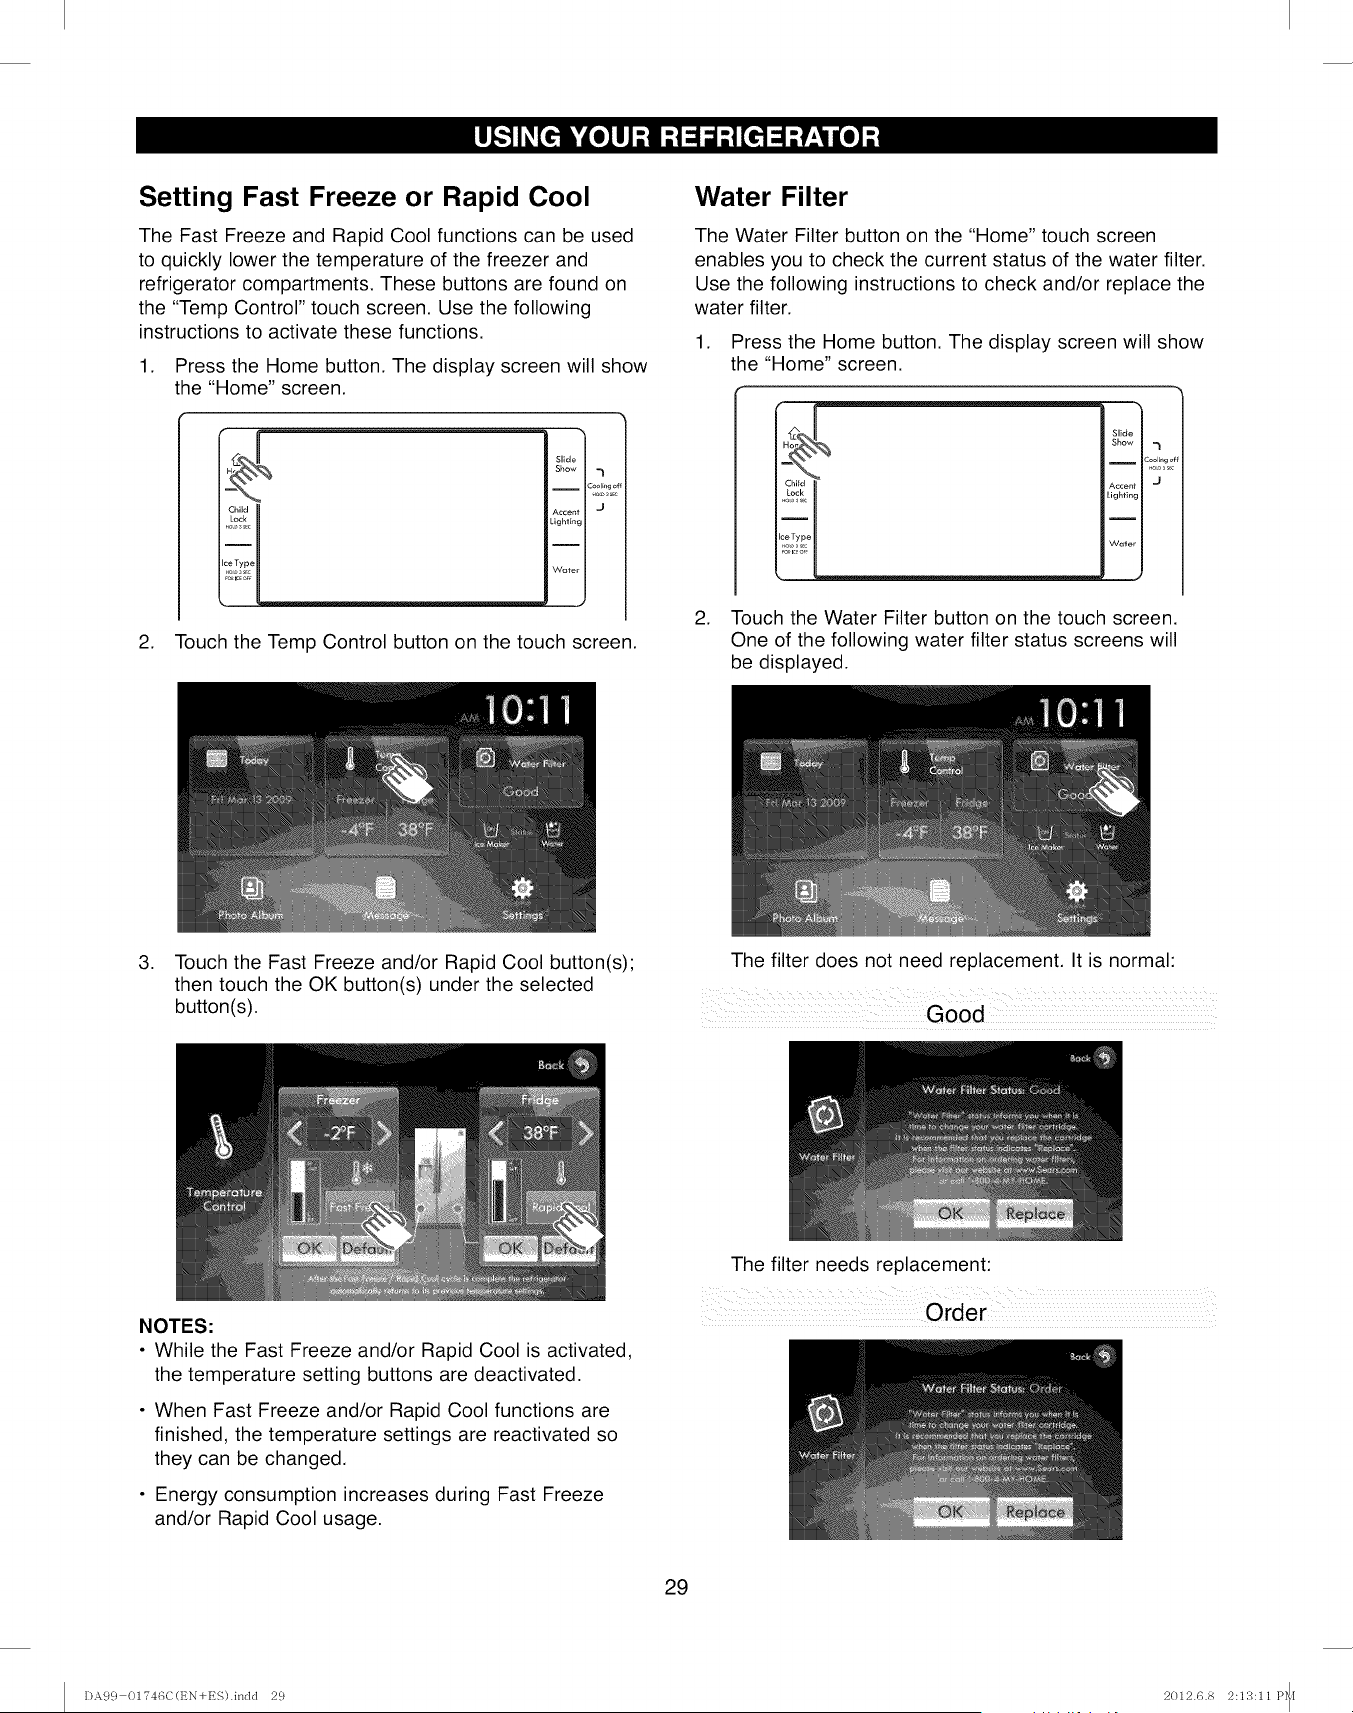
Setting Fast Freeze or Rapid Cool
The Fast Freeze and Rapid Cool functions can be used
to quickly lower the temperature of the freezer and
refrigerator compartments. These buttons are found on
the "Temp Control" touch screen. Use the following
instructions to activate these functions.
1. Press the Home button. The display screen will show
the "Home" screen.
Chiid
Slide
Show 7
__ c_,,L,_,
Accent I J
Lighting
'Water I
J
2. Touch the Temp Control button on the touch screen.
Water Filter
The Water Filter button on the "Home" touch screen
enables you to check the current status of the water filter.
Use the following instructions to check and/or replace the
water filter.
1. Press the Home button. The display screen will show
the "Home" screen.
i
Slide
Show _l
I2ool_ng c
Accent J
Lighting
I
Water
2. Touch the Water Filter button on the touch screen.
One of the following water filter status screens will
be displayed.
.Touch the Fast Freeze and/or Rapid Cool button(s);
then touch the OK button(s) under the selected
button(s).
The filter does not need replacement. It is normal:
Good
NOTES:
•While the Fast Freeze and/or Rapid Cool is activated,
the temperature setting buttons are deactivated.
• When Fast Freeze and/or Rapid Cool functions are
finished, the temperature settings are reactivated so
they can be changed.
• Energy consumption increases during Fast Freeze
and/or Rapid Cool usage.
The filter needs replacement:
Order
29
DA99 01746C(t_N+ES).indd 29 2012.6.8 2:13:11 P_[
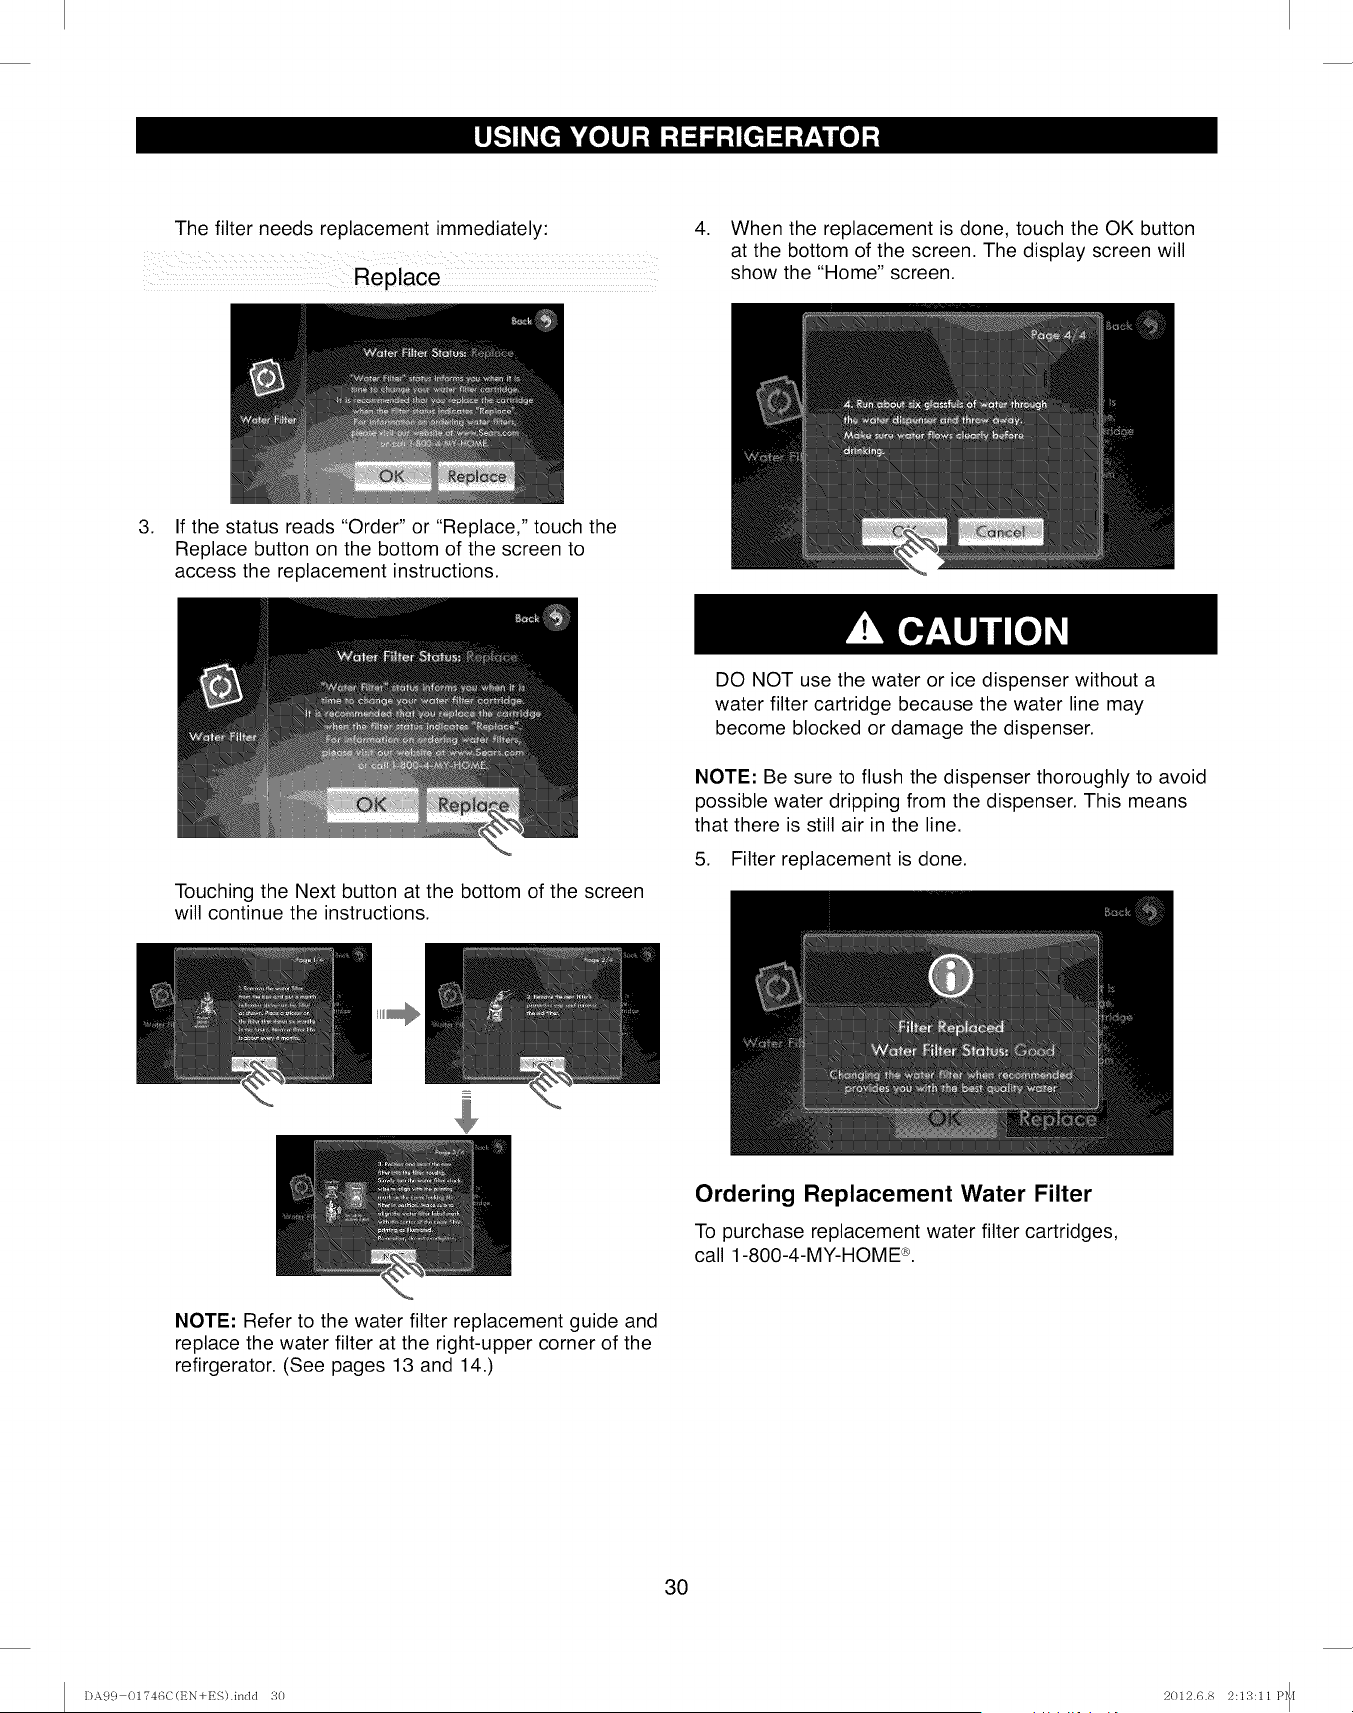
The filter needs replacement immediately: 4. When the replacement is done, touch the OK button
at the bottom of the screen. The display screen will
show the "Home" screen.
3. If the status reads "Order" or "Replace," touch the
Replace button on the bottom of the screen to
access the replacement instructions.
Touching the Next button at the bottom of the screen
will continue the instructions.
DO NOT use the water or ice dispenser without a
water filter cartridge because the water line may
become blocked or damage the dispenser.
NOTE: Be sure to flush the dispenser thoroughly to avoid
possible water dripping from the dispenser. This means
that there is still air in the line.
5. Filter replacement is done.
Ordering Replacement Water Filter
To purchase replacement water filter cartridges,
call 1-800-4-MY-HOME ®.
NOTE: Refer to the water filter replacement guide and
replace the water filter at the right-upper corner of the
refirgerator. (See pages 13 and 14.)
3O
DA99 01746C(t_N+ES).indd 30 2012.6.8 2:13:11 P_[
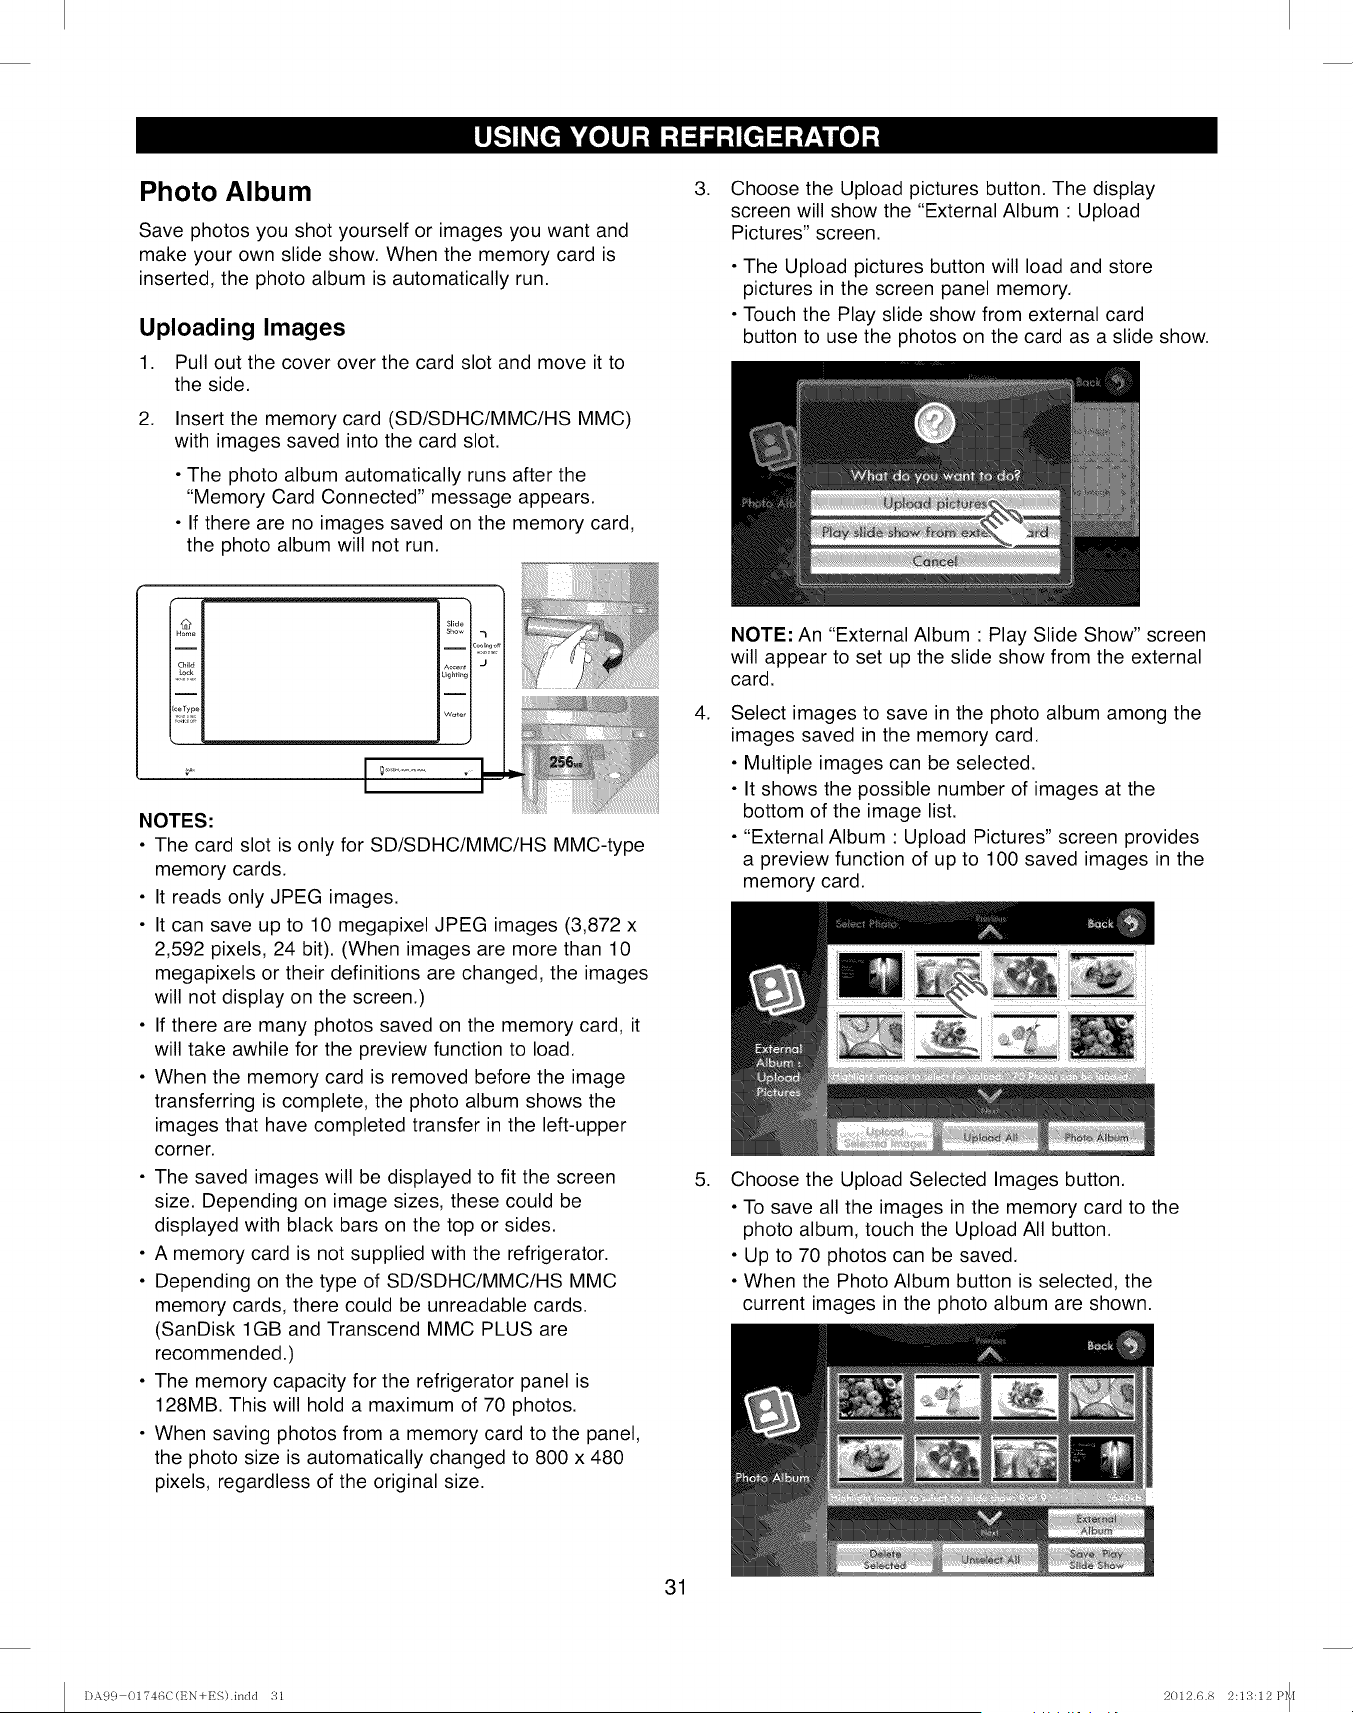
Photo Album
Save photos you shot yourself or images you want and
make your own slide show. When the memory card is
inserted, the photo album is automatically run.
Uploading Images
1. Pull out the cover over the card slot and move it to
the side.
.Insert the memory card (SD/SDHC/MMC/HS MMC)
with images saved into the card slot.
• The photo album automatically runs after the
"Memory Card Connected" message appears.
• If there are no images saved on the memory card,
the photo album will not run.
NOTES:
• The card slot is only for SD/SDHC/MMC/HS MMC-type
memory cards.
• It reads only JPEG images.
• It can save up to 10 megapixel JPEG images (3,872 x
2,592 pixels, 24 bit). (When images are more than 10
megapixels or their definitions are changed, the images
will not display on the screen.)
• If there are many photos saved on the memory card, it
will take awhile for the preview function to load.
• When the memory card is removed before the image
transferring is complete, the photo album shows the
images that have completed transfer in the left-upper
corner.
• The saved images will be displayed to fit the screen
size. Depending on image sizes, these could be
displayed with black bars on the top or sides.
• A memory card is not supplied with the refrigerator.
• Depending on the type of SD/SDHC/MMC/HS MMC
memory cards, there could be unreadable cards.
(SanDisk 1GB and Transcend MMC PLUS are
recommended.)
• The memory capacity for the refrigerator panel is
128MB. This will hold a maximum of 70 photos.
• When saving photos from a memory card to the panel,
the photo size is automatically changed to 800 x 480
pixels, regardless of the original size.
.Choose the Upload pictures button. The display
screen will show the "External Album : Upload
Pictures" screen.
• The Upload pictures button will load and store
pictures in the screen panel memory.
• Touch the Play slide show from external card
button to use the photos on the card as a slide show.
.
NOTE: An "External Album : Play Slide Show" screen
will appear to set up the slide show from the external
card.
Select images to save in the photo album among the
images saved in the memory card.
• Multiple images can be selected.
• It shows the possible number of images at the
bottom of the image list.
• "External Album : Upload Pictures" screen provides
a preview function of up to 100 saved images in the
memory card.
5. Choose the Upload Selected Images button.
• To save all the images in the memory card to the
photo album, touch the Upload All button.
• Up to 70 photos can be saved.
• When the Photo Album button is selected, the
current images in the photo album are shown.
31
I)A9 c} 01?46C(t_N+ES).indd 31 2012.6.8 2:13:12 P_I

.
• If the External Album button below the photo album
images is touched, the screen will go back to the
"What do you want to do?" screen.
NOTE: This product uses parts of the software from
the independent JPEG Group.
The screen displays "Uploading Selected Image(s)"
while the images are uploading from the memory card.
NOTES:
• Large photo file sizes will slow down the uploading
speed. Reformatting photos to their smallest file
sizes before they are uploaded will ensure the
fastest uploading speeds.
• High-definition or horizontal images (landscape)
could be distorted.
Deleting Images
1. Press the Home button. The display screen will show
the "Home" screen.
Slide
Show 7
ICool_ngo
Accent J
Lighting
I
Water
2. Touch the Photo Album button in the left bottom
corner of the touch screen. The images in the photo
album will appear on the screen.
.After the images have been uploaded, "Are you
finished uploading pictures, will be displayed on
the screen.
• Touch the OK button when there are no more
images to be uploaded.
• Touch the Cancel button to upload more images.
The display will go back to the "External Album :
Upload Pictures" screen. Repeat steps 4-7.
.Select the images you want to have deleted; then
touch the Delete Selected button. "Delete Selected
Image(s)?" will appear on the screen.
NOTES:
• Multiple images can be selected and deleted.
• The Kenmore EliteTM default slide cannot be deleted.
8. DO NOT remove the memory card from the slot under
the display until the screen shows "Please Remove
Memory Card."
9. Replace the cover over the card slot.
4. Touch the OK button to complete the deletion process.
32
DA9 c} 01"746C(t_N+ES).indd 32 2012.6.8 2:13:12 P_[
Setting Up a Slide Show From the Photo Album
1. Press the Home button. The display screen will show
the "Home" screen.
2. Touch the Photo Album button on the touch screen.
The images in the photo album will appear on the
screen.
.Select images to be used in the Slide Show; then
touch the Save Play Slide Show button. The slide
show will preview the selected slides.
• Multiple images can be selected.
• Depending on the photo size (width and height),
there could be black bars on the top/bottom and/or
sides of the image.
• The screen is optimized for 16:9 image size
(horizontal format).
• When only the original default image is in the
photo album, it will automatically show in the
slide show.
5. To view the slide show, press the Slide Show button
on the upper right.
I2
Home
I
Child
Lock
Ice Type
_ .__
Accent I J
Lighting I
Weter I
ADDITIONAL IMAGING NOTES:
• When stationary images, same-size images, or images
with black bars are displayed for extended periods of
time, they can cause screen burn. Selecting and using
different-sized images throughout the slide show will
prevent screen burn.
• The warranty does not cover damage from screen burn.
4. Touch the OK button to save the slide show as it is.
Touch the Cancel button and repeat Step 3 to add
more slides.
33
(Image with left and right
black bars)
(Image with top and bottom
black bars)
I)A99 01746C(EN+ES).indd 33 2012.6.8 2:13:13 P_[
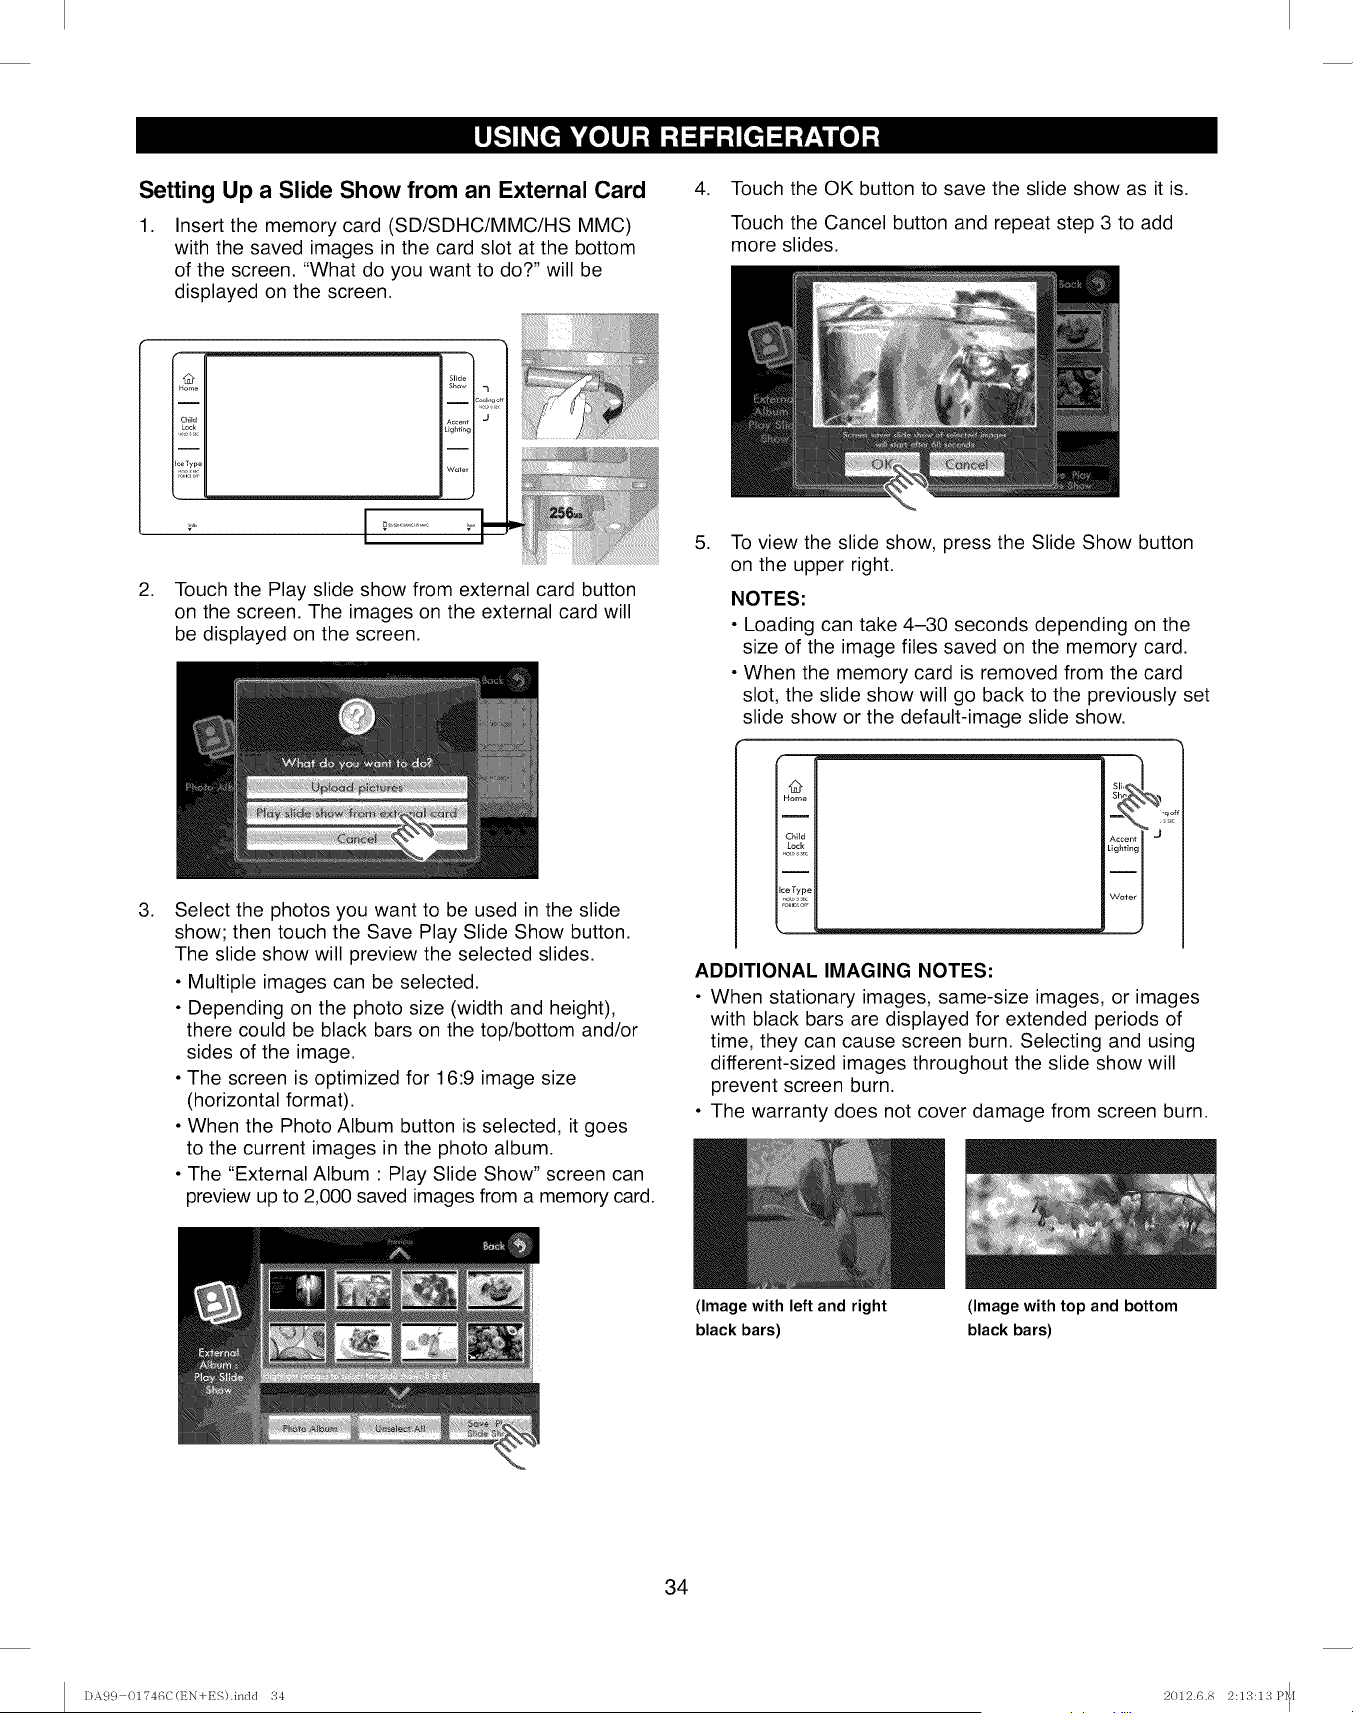
Setting Up a Slide Show from an External Card
1. Insert the memory card (SD/SDHC/MMC/HS MMC)
with the saved images in the card slot at the bottom
of the screen. "What do you want to do?" will be
displayed on the screen.
.Touch the OK button to save the slide show as it is.
Touch the Cancel button and repeat step 3 to add
more slides.
.
.
I Home II
I
I
II
g Child II
i i ii
l_eTypell
t
Touch the Play slide show from external card button
on the screen. The images on the external card will
be displayed on the screen.
Select the photos you want to be used in the slide
show; then touch the Save Play Slide Show button.
The slide show will preview the selected slides.
• Multiple images can be selected.
• Depending on the photo size (width and height),
there could be black bars on the top/bottom and/or
sides of the image.
• The screen is optimized for 16:9 image size
(horizontal format).
• When the Photo Album button is selected, it goes
to the current images in the photo album.
• The "External Album : Play Slide Show" screen can
preview up to 2,000 saved images from a memory card.
.To view the slide show, press the Slide Show button
on the upper right.
NOTES:
• Loading can take 4-30 seconds depending on the
size of the image files saved on the memory card.
• When the memory card is removed from the card
slot, the slide show will go back to the previously set
slide show or the default-image slide show.
t#
Home
I
Child
Lock
i
ceType
Accent I _ ,_1
Lighting I
ADDITIONAL IMAGING NOTES:
• When stationary images, same-size images, or images
with black bars are displayed for extended periods of
time, they can cause screen burn. Selecting and using
different-sized images throughout the slide show will
prevent screen burn.
• The warranty does not cover damage from screen burn.
34
(Image with left and right
black bars)
(Image with top and bottom
black bars)
DA99 01?46C(EN+ES).indd 34 2012.6.8 2:13:13 P_[
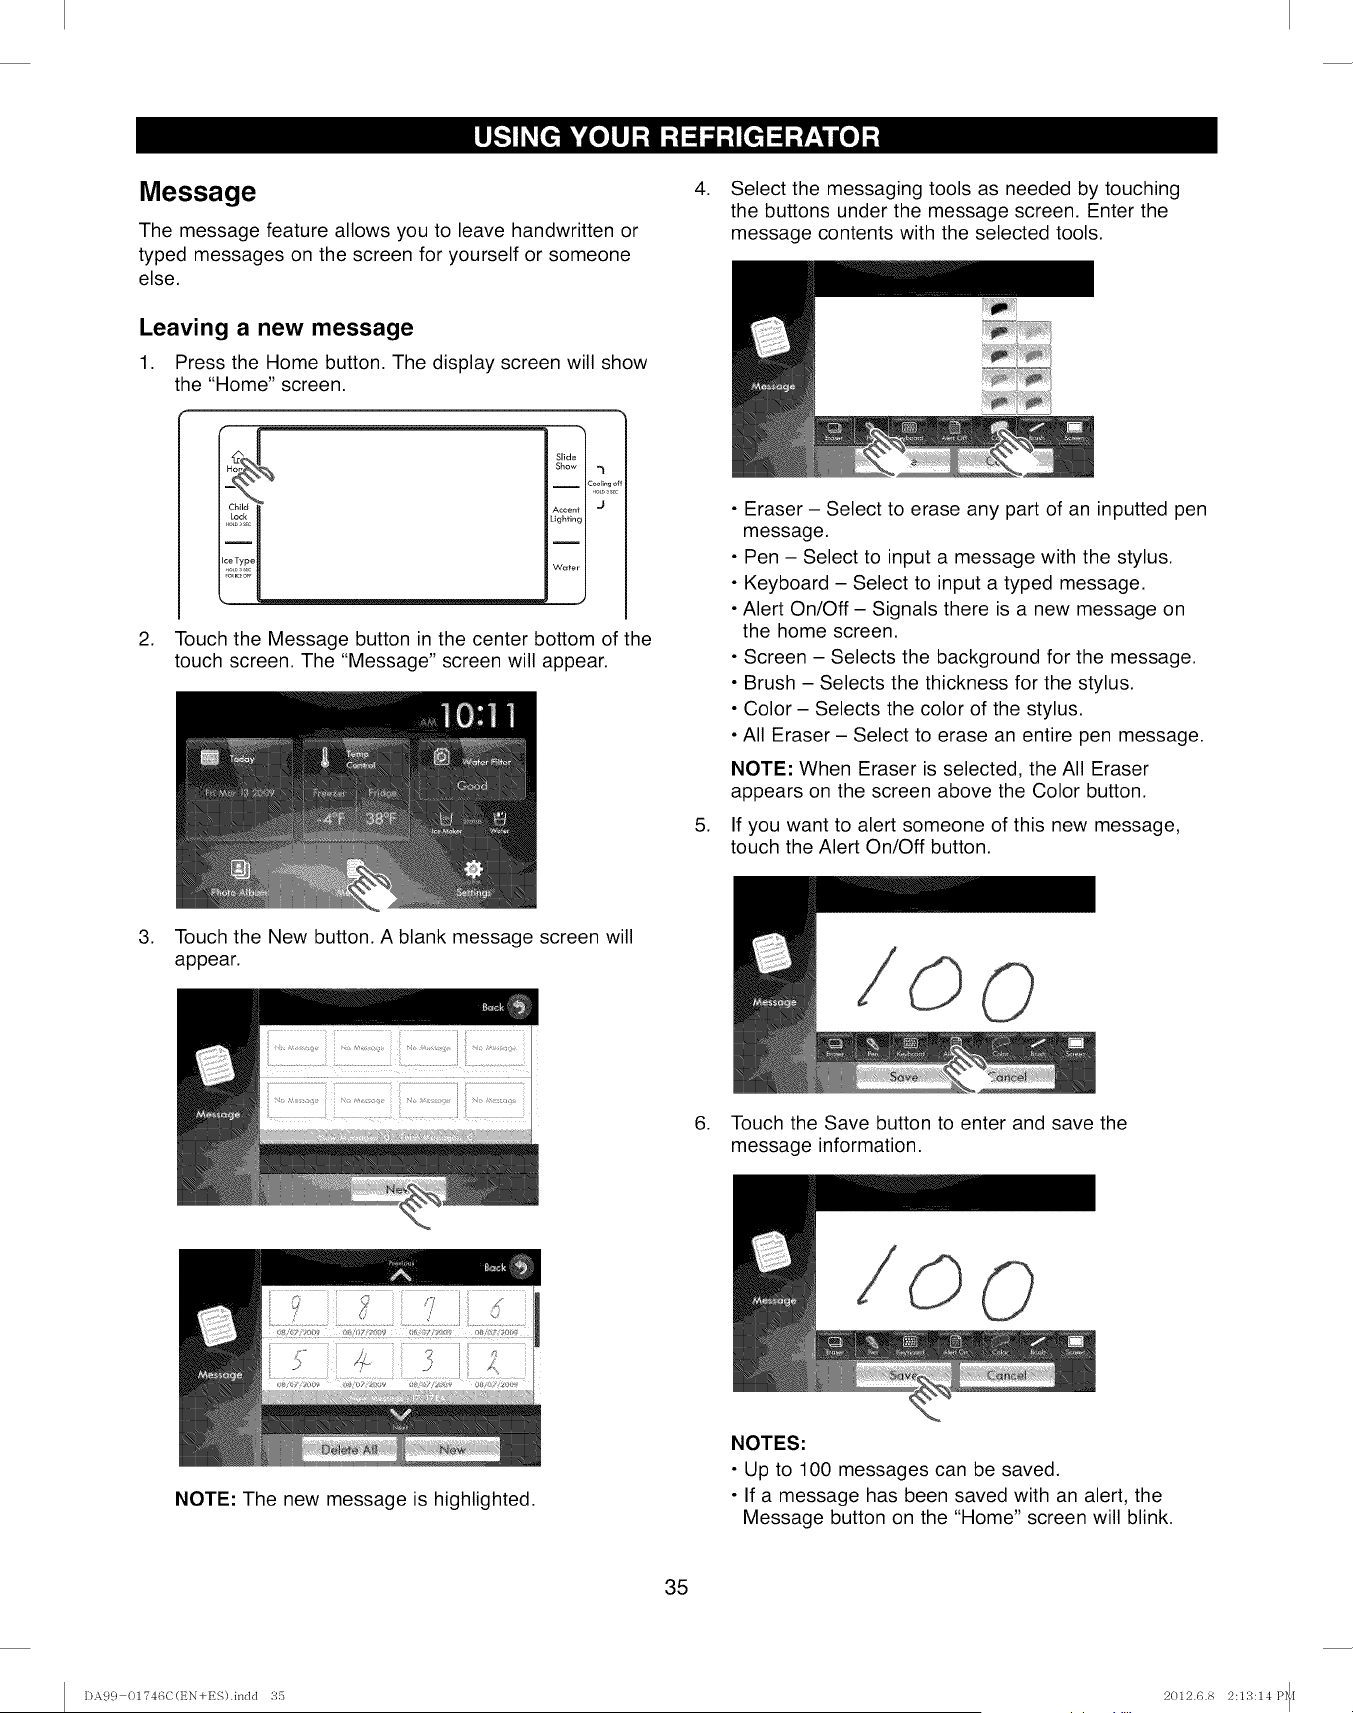
Message
The message feature allows you to leave handwritten or
typed messages on the screen for yourself or someone
else.
Leaving a new message
1. Press the Home button. The display screen will show
the "Home" screen.
"-x
Slide
Show "1
Cooli_go{
Accent [ "J
Lighting [
Ii
Wuter [
J
2. Touch the Message button in the center bottom of the
touch screen. The "Message" screen will appear.
4. Select the messaging tools as needed by touching
the buttons under the message screen. Enter the
message contents with the selected tools.
,
• Eraser - Select to erase any part of an inputted pen
message.
• Pen - Select to input a message with the stylus.
• Keyboard - Select to input a typed message.
• Alert On/Off - Signals there is a new message on
the home screen.
• Screen - Selects the background for the message.
• Brush - Selects the thickness for the stylus.
• Color - Selects the color of the stylus.
• All Eraser - Select to erase an entire pen message.
NOTE: When Eraser is selected, the All Eraser
appears on the screen above the Color button.
If you want to alert someone of this new message,
touch the Alert On/Off button.
3. Touch the New button. A blank message screen will
appear.
6. Touch the Save button to enter and save the
message information.
NOTE: The new message is highlighted.
NOTES:
• Up to 100 messages can be saved.
• If a message has been saved with an alert, the
Message button on the "Home" screen will blink.
35
DA9 c} 01"746C(EN+ES).indd 35 2012.6.8 2:13:14 P_[

Changing a message
1. Press the Home button. The display screen will show
the "Home" screen.
Slide
Show 'l
i
Coollng
o
Accent J
Lighting
I
Water
2. Touch the Message button in the center bottom of the
touch screen. The "Message" screen will appear.
3. Select the message you want to change by touching
it on the screen. The selected message will appear.
5. Touch the Save button to save and enter the changed
message.
Deleting a message
1. Press the Home button. The display screen will show
the "Home" screen.
Slide
Show -_
iC_olEng_
Ac¢enf J
Lighting
Water
2. Touch the Message button in the center bottom of the
touch screen. The "Message" screen will appear.
.Select the tools to make the desired changes to the
message. The message changes will appear on the
screen as they are entered.
NOTE: When you modify the message contents, the
Delete and Close buttons will replaced with Save and
Cancel buttons.
.Select the message you want to delete. The selected
message will appear on the screen.
36
DA9 c} 01?46C(t_N+ES).indd 36 2012.6.8 2:13:14 P_[
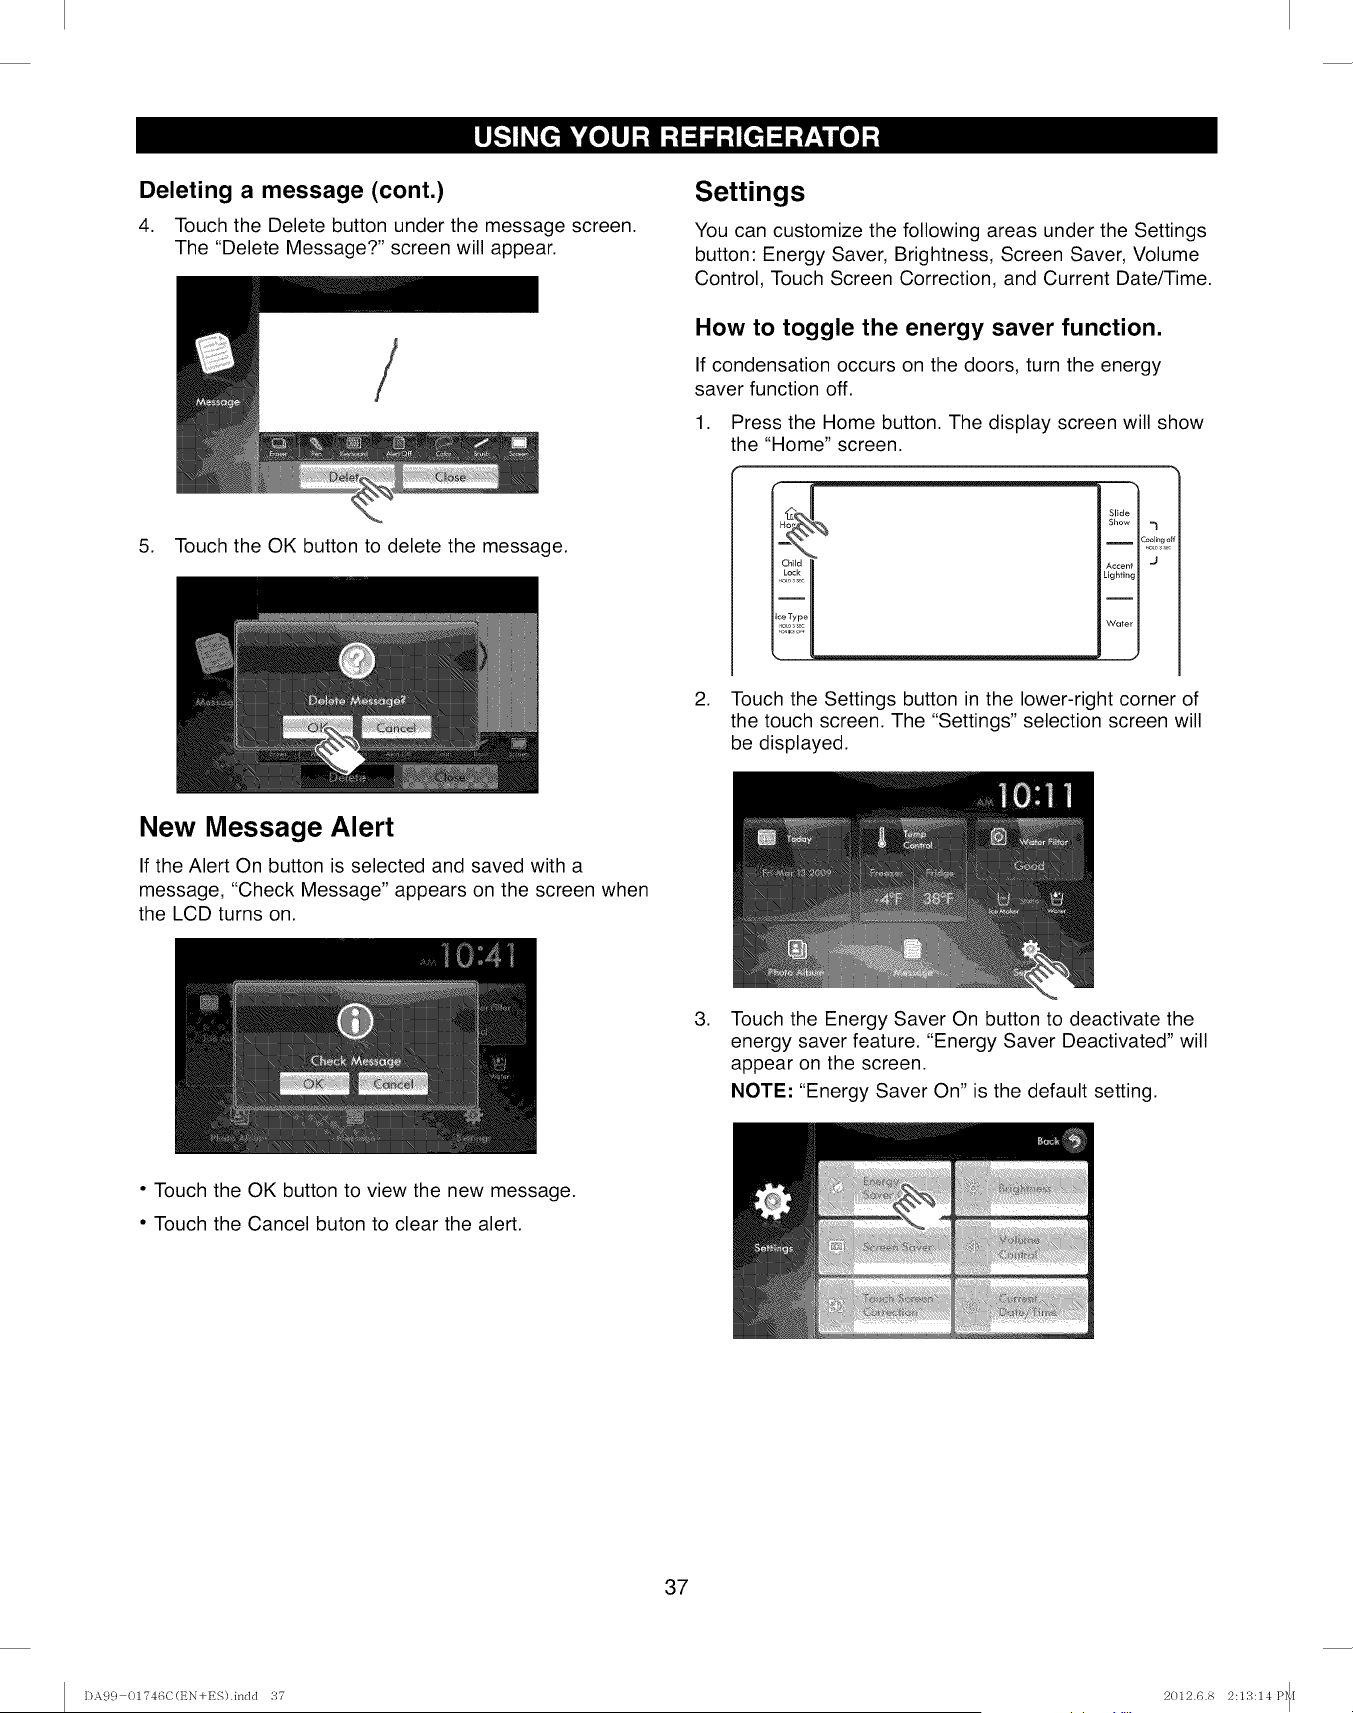
Deleting a message (cont.)
4. Touch the Delete button under the message screen.
The "Delete Message?" screen will appear.
5. Touch the OK button to delete the message.
Settings
You can customize the following areas under the Settings
button: Energy Saver, Brightness, Screen Saver, Volume
Control, Touch Screen Correction, and Current Date/Time.
How to toggle the energy saver function.
If condensation occurs on the doors, turn the energy
saver function off.
1. Press the Home button. The display screen will show
the "Home" screen.
Slide
Show =}
c_2=_?d_
A¢¢enl J
Lighting
Water
J
2. Touch the Settings button in the lower-right corner of
the touch screen. The "Settings" selection screen will
be displayed.
New Message Alert
If the Alert On button is selected and saved with a
message, "Check Message" appears on the screen when
the LCD turns on.
,Touch the Energy Saver On button to deactivate the
energy saver feature. "Energy Saver Deactivated" will
appear on the screen.
NOTE: "Energy Saver On" is the default setting.
• Touch the OK button to view the new message.
• Touch the Cancel buton to clear the alert.
37
DA9 c} 01T46C(t_N+ES).indd 37 2012.6.8 2:13:14 P_I
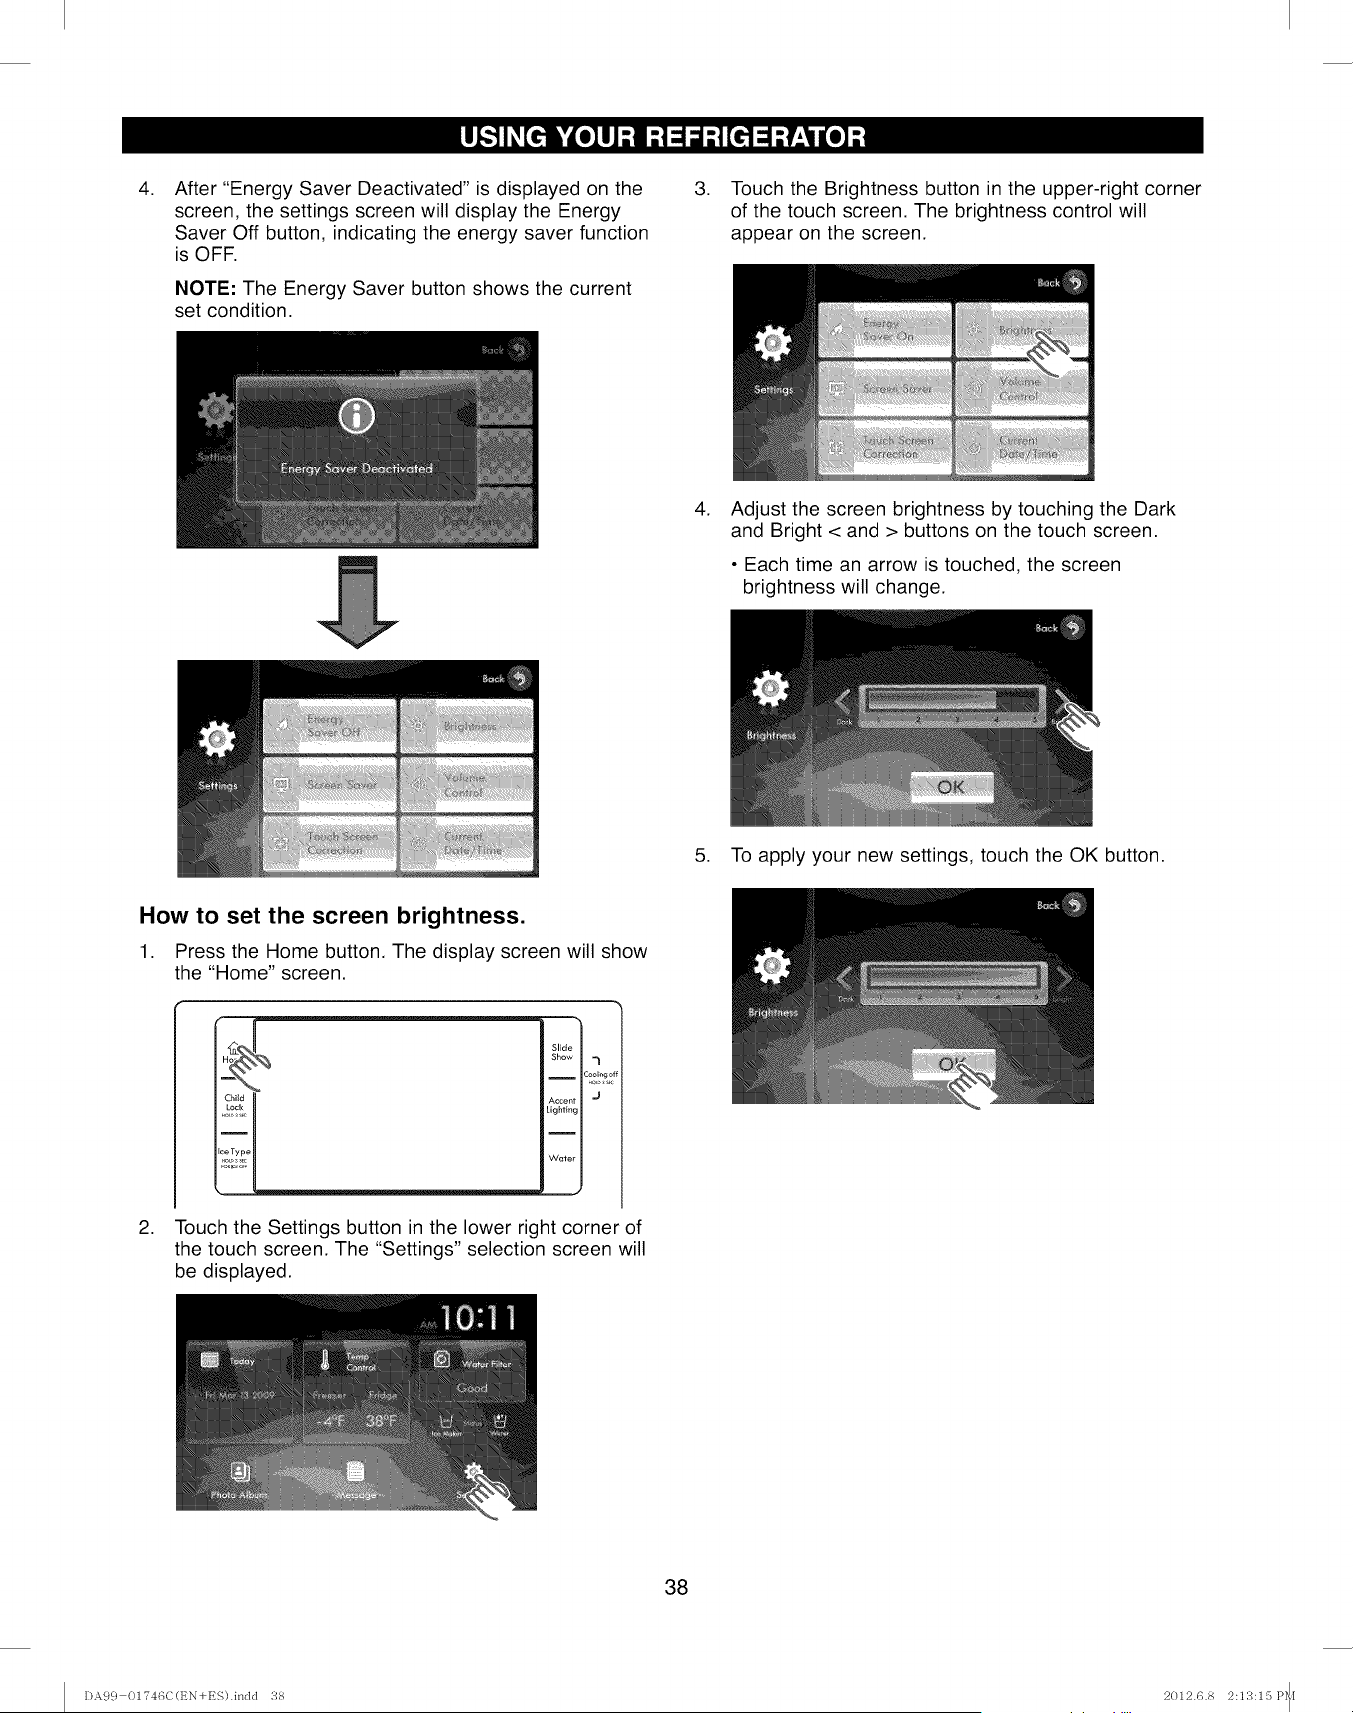
.After "Energy Saver Deactivated" is displayed on the
screen, the settings screen will display the Energy
Saver Off button, indicating the energy saver function
is OFF.
NOTE: The Energy Saver button shows the current
set condition.
.Touch the Brightness button in the upper-right corner
of the touch screen. The brightness control will
appear on the screen.
.Adjust the screen brightness by touching the Dark
and Bright < and > buttons on the touch screen.
• Each time an arrow is touched, the screen
brightness will change.
5. To apply your new settings, touch the OK button.
How to set the screen brightness.
1. Press the Home button. The display screen will show
the "Home" screen.
.
Slide
Show 7
Cool_r,gc
Accent J
Lighting
Water
J
Touch the Settings button in the lower right corner of
the touch screen. The "Settings" selection screen will
be displayed.
38
I)A99 OI'746C(EN+ES).indd 38 2012.6.8 2:113:15 P_[
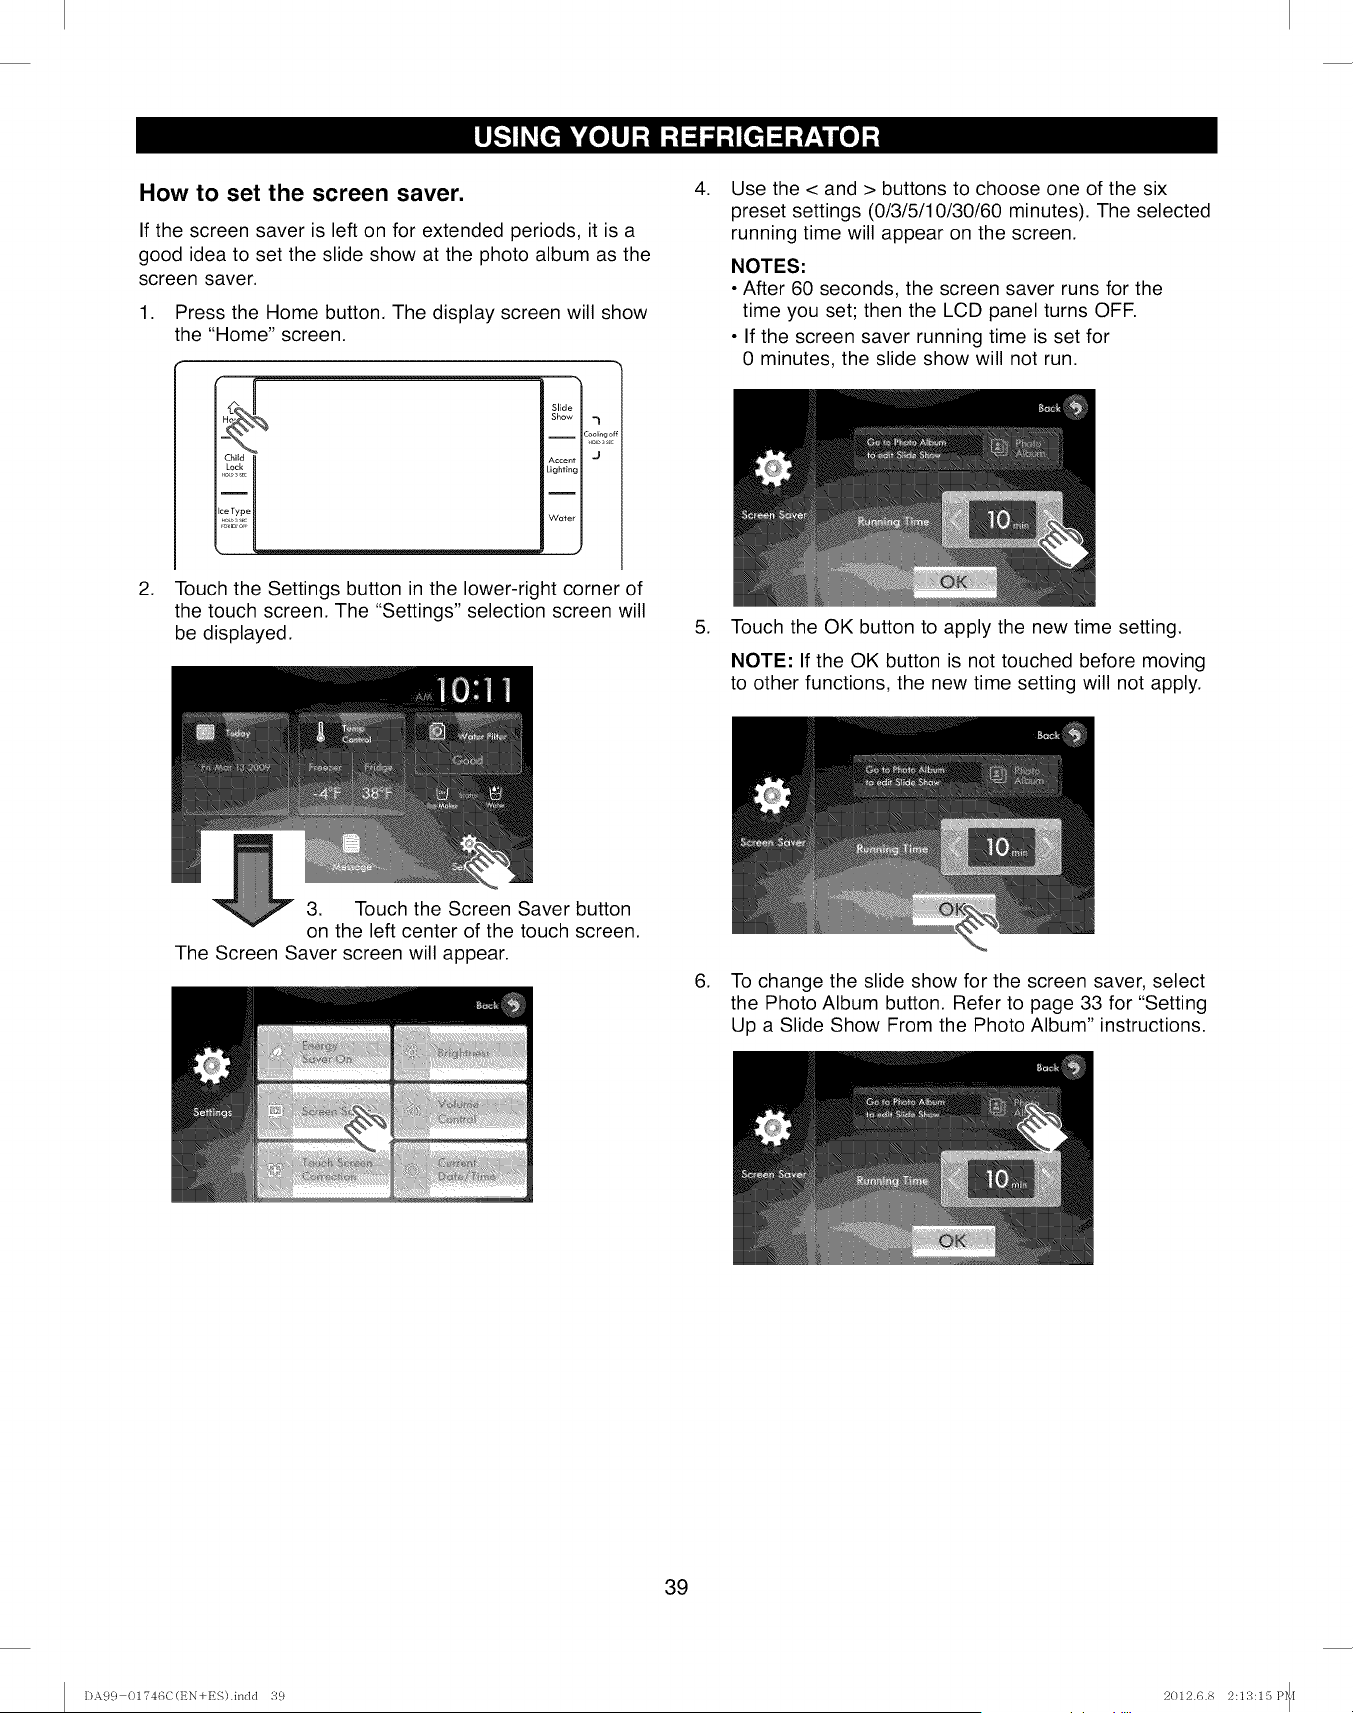
How to set the screen saver.
If the screen saver is left on for extended periods, it is a
good idea to set the slide show at the photo album as the
screen saver.
1. Press the Home button. The display screen will show
the "Home" screen.
.
[4 Slide
Show ,_
-- Coolrngc
Lighting
Water
J
Touch the Settings button in the lower-right corner of
the touch screen. The "Settings" selection screen will
be displayed.
.
.
Use the < and > buttons to choose one of the six
preset settings (0/3/5/10/30/60 minutes). The selected
running time will appear on the screen.
NOTES:
• After 60 seconds, the screen saver runs for the
time you set; then the LCD panel turns OFF.
• If the screen saver running time is set for
0 minutes, the slide show will not run.
Touch the OK button to apply the new time setting.
NOTE: If the OK button is not touched before moving
to other functions, the new time setting will not apply.
3. Touch the Screen Saver button
on the left center of the touch screen.
The Screen Saver screen will appear.
6. To change the slide show for the screen saver, select
the Photo Album button. Refer to page 33 for "Setting
Up a Slide Show From the Photo Album" instructions.
39
I)A99 01746C(EN+ES).indd 39 2012.6.8 2:13:15 P_[
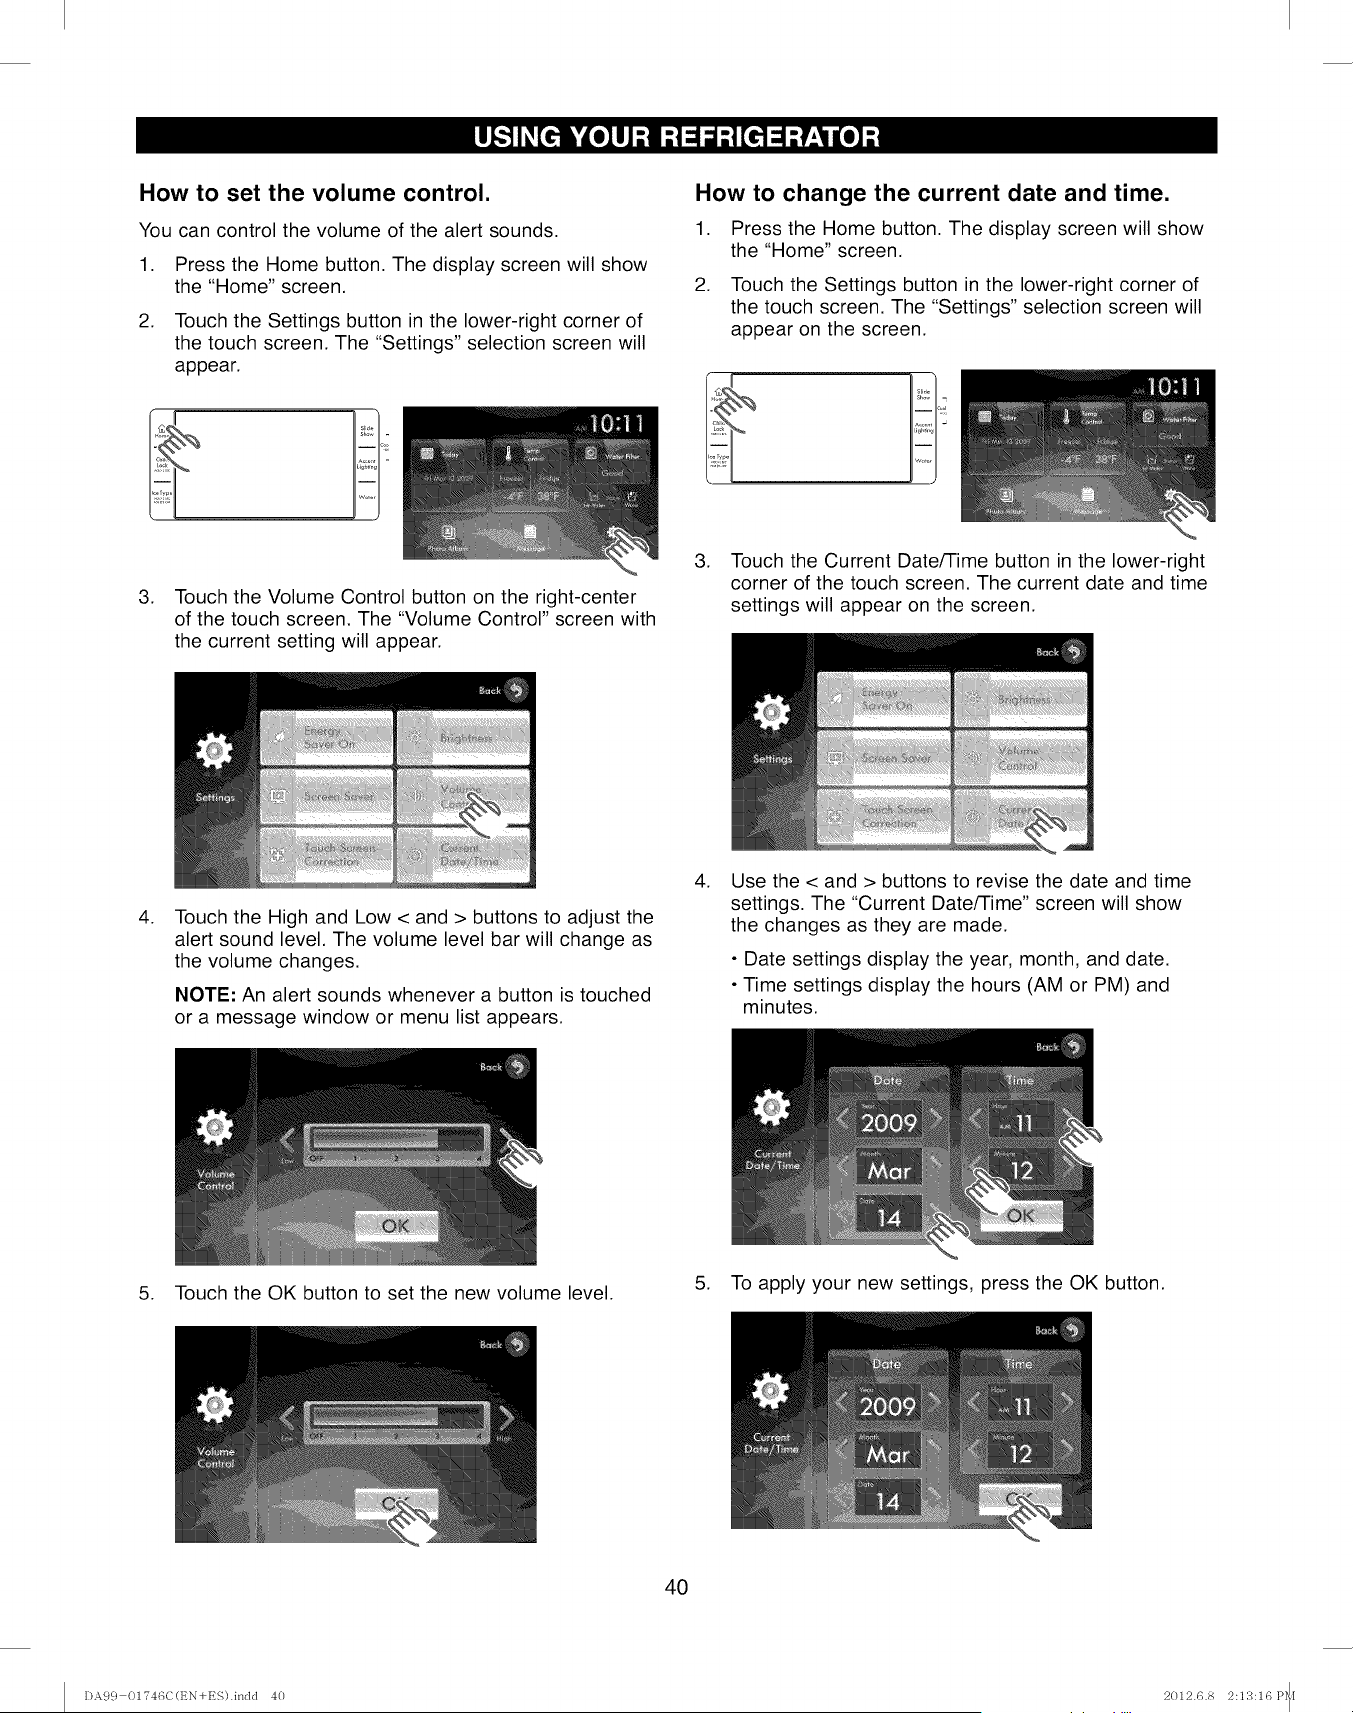
How to set the volume control.
You can control the volume of the alert sounds,
1. Press the Home button. The display screen will show
the "Home" screen.
2. Touch the Settings button in the lower-right corner of
the touch screen. The "Settings" selection screen will
appear.
3. Touch the Volume Control button on the right-center
of the touch screen. The "Volume Control" screen with
the current setting will appear.
How to change the current date and time.
1. Press the Home button. The display screen will show
the "Home" screen.
2. Touch the Settings button in the lower-right corner of
the touch screen. The "Settings" selection screen will
appear on the screen.
3. Touch the Current Date/Time button in the lower-right
corner of the touch screen. The current date and time
settings will appear on the screen.
.Touch the High and Low < and > buttons to adjust the
alert sound level. The volume level bar will change as
the volume changes.
NOTE: An alert sounds whenever a button is touched
or a message window or menu list appears.
.Use the < and > buttons to revise the date and time
settings. The "Current Date/Time" screen will show
the changes as they are made.
•Date settings display the year, month, and date.
• Time settings display the hours (AM or PM) and
minutes.
5. Touch the OK button to set the new volume level. 5. To apply your new settings, press the OK button.
4O
DA99 01?46C(EN+ES).indd 40 2012.6.8 2:13:16P_[
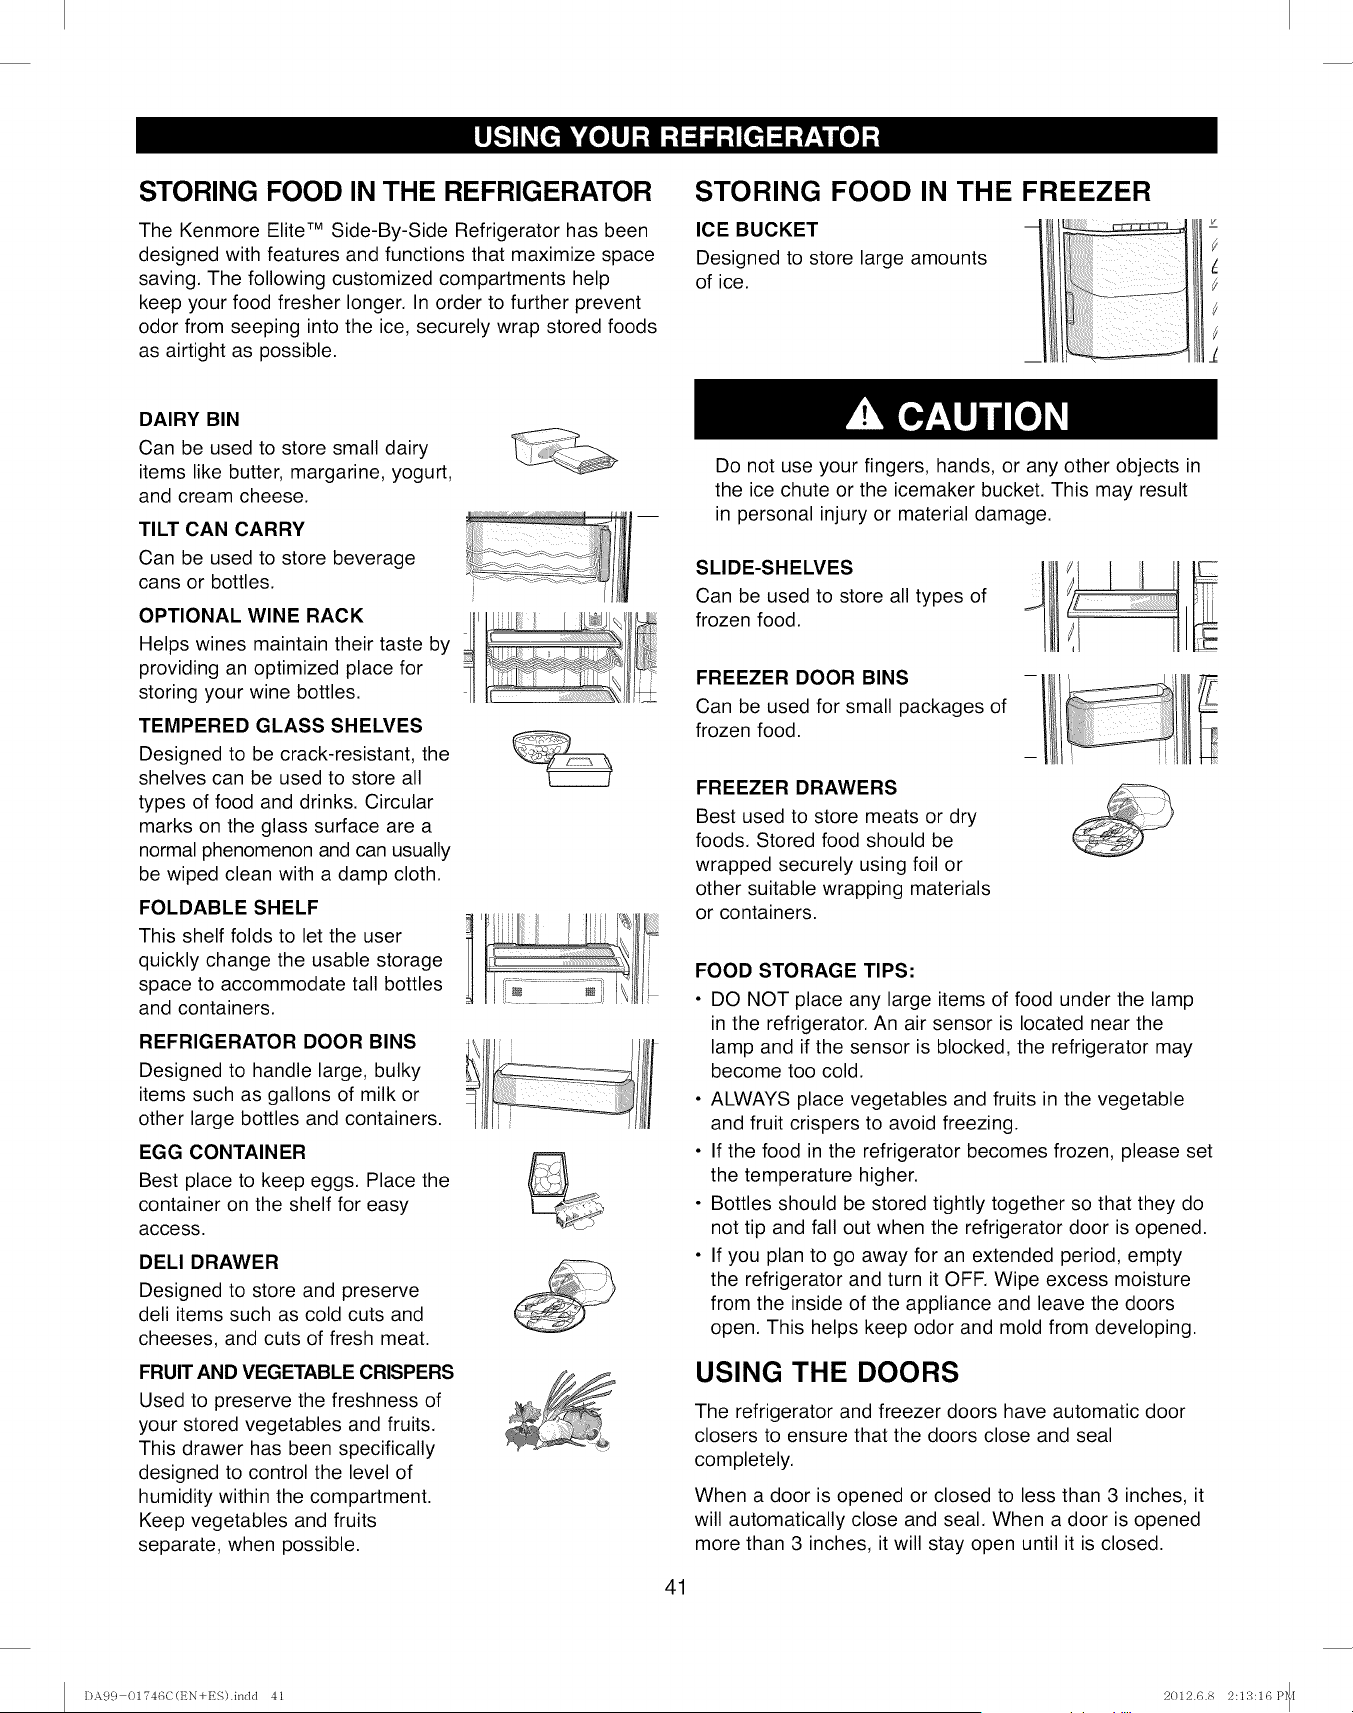
STORING FOOD IN THE REFRIGERATOR
The Kenmore Elite TM Side-By-Side Refrigerator has been
designed with features and functions that maximize space
saving. The following customized compartments help
keep your food fresher longer. In order to further prevent
odor from seeping into the ice, securely wrap stored foods
as airtight as possible.
STORING FOOD IN THE FREEZER
ICE BUCKET
Designed to store large amounts
of ice.
DAIRY BIN
Can be used to store small dairy
items like butter, margarine, yogurt,
and cream cheese.
TILT CAN CARRY
Can be used to store beverage
cans or bottles.
OPTIONAL WINE RACK
Helps wines maintain their taste by
providing an optimized place for
storing your wine bottles.
TEMPERED GLASS SHELVES
Designed to be crack-resistant, the
shelves can be used to store all
types of food and drinks. Circular
marks on the glass surface are a
normal phenomenon and can usually
be wiped clean with a damp cloth.
FOLDABLE SHELF
This shelf folds to let the user
quickly change the usable storage
space to accommodate tall bottles
and containers.
REFRIGERATOR DOOR BINS
Designed to handle large, bulky
items such as gallons of milk or
other large bottles and containers.
EGG CONTAINER
Best place to keep eggs. Place the
container on the shelf for easy
access.
DELl DRAWER
Designed to store and preserve
deli items such as cold cuts and
cheeses, and cuts of fresh meat.
FRUIT AND VEGETABLE CRISPERS
Used to preserve the freshness of
your stored vegetables and fruits.
This drawer has been specifically
designed to control the level of
humidity within the compartment.
Keep vegetables and fruits
separate, when possible.
tl illf
JrlJf_
Do not use your fingers, hands, or any other objects in
the ice chute or the icemaker bucket. This may result
in personal injury or material damage.
SLIDE-SHELVES
Can be used to store all types of
frozen food.
FREEZER DOOR BINS
Can be used for small packages of
frozen food.
FREEZER DRAWERS
Best used to store meats or dry
foods. Stored food should be
wrapped securely using foil or
other suitable wrapping materials
or containers.
41
FOOD STORAGE TIPS:
• DO NOT place any large items of food under the lamp
in the refrigerator. An air sensor is located near the
lamp and if the sensor is blocked, the refrigerator may
become too cold.
• ALWAYS place vegetables and fruits in the vegetable
and fruit crispers to avoid freezing.
• If the food in the refrigerator becomes frozen, please set
the temperature higher.
• Bottles should be stored tightly together so that they do
not tip and fall out when the refrigerator door is opened.
• If you plan to go away for an extended period, empty
the refrigerator and turn it OFF. Wipe excess moisture
from the inside of the appliance and leave the doors
open. This helps keep odor and mold from developing.
USING THE DOORS
The refrigerator and freezer doors have automatic door
closers to ensure that the doors close and seal
completely.
When a door is opened or closed to less than 3 inches, it
will automatically close and seal. When a door is opened
more than 3 inches, it will stay open until it is closed.
DA9 c} 01"746C(t_N+ES).indd 41 2012.6.8 2:13:16 P_[
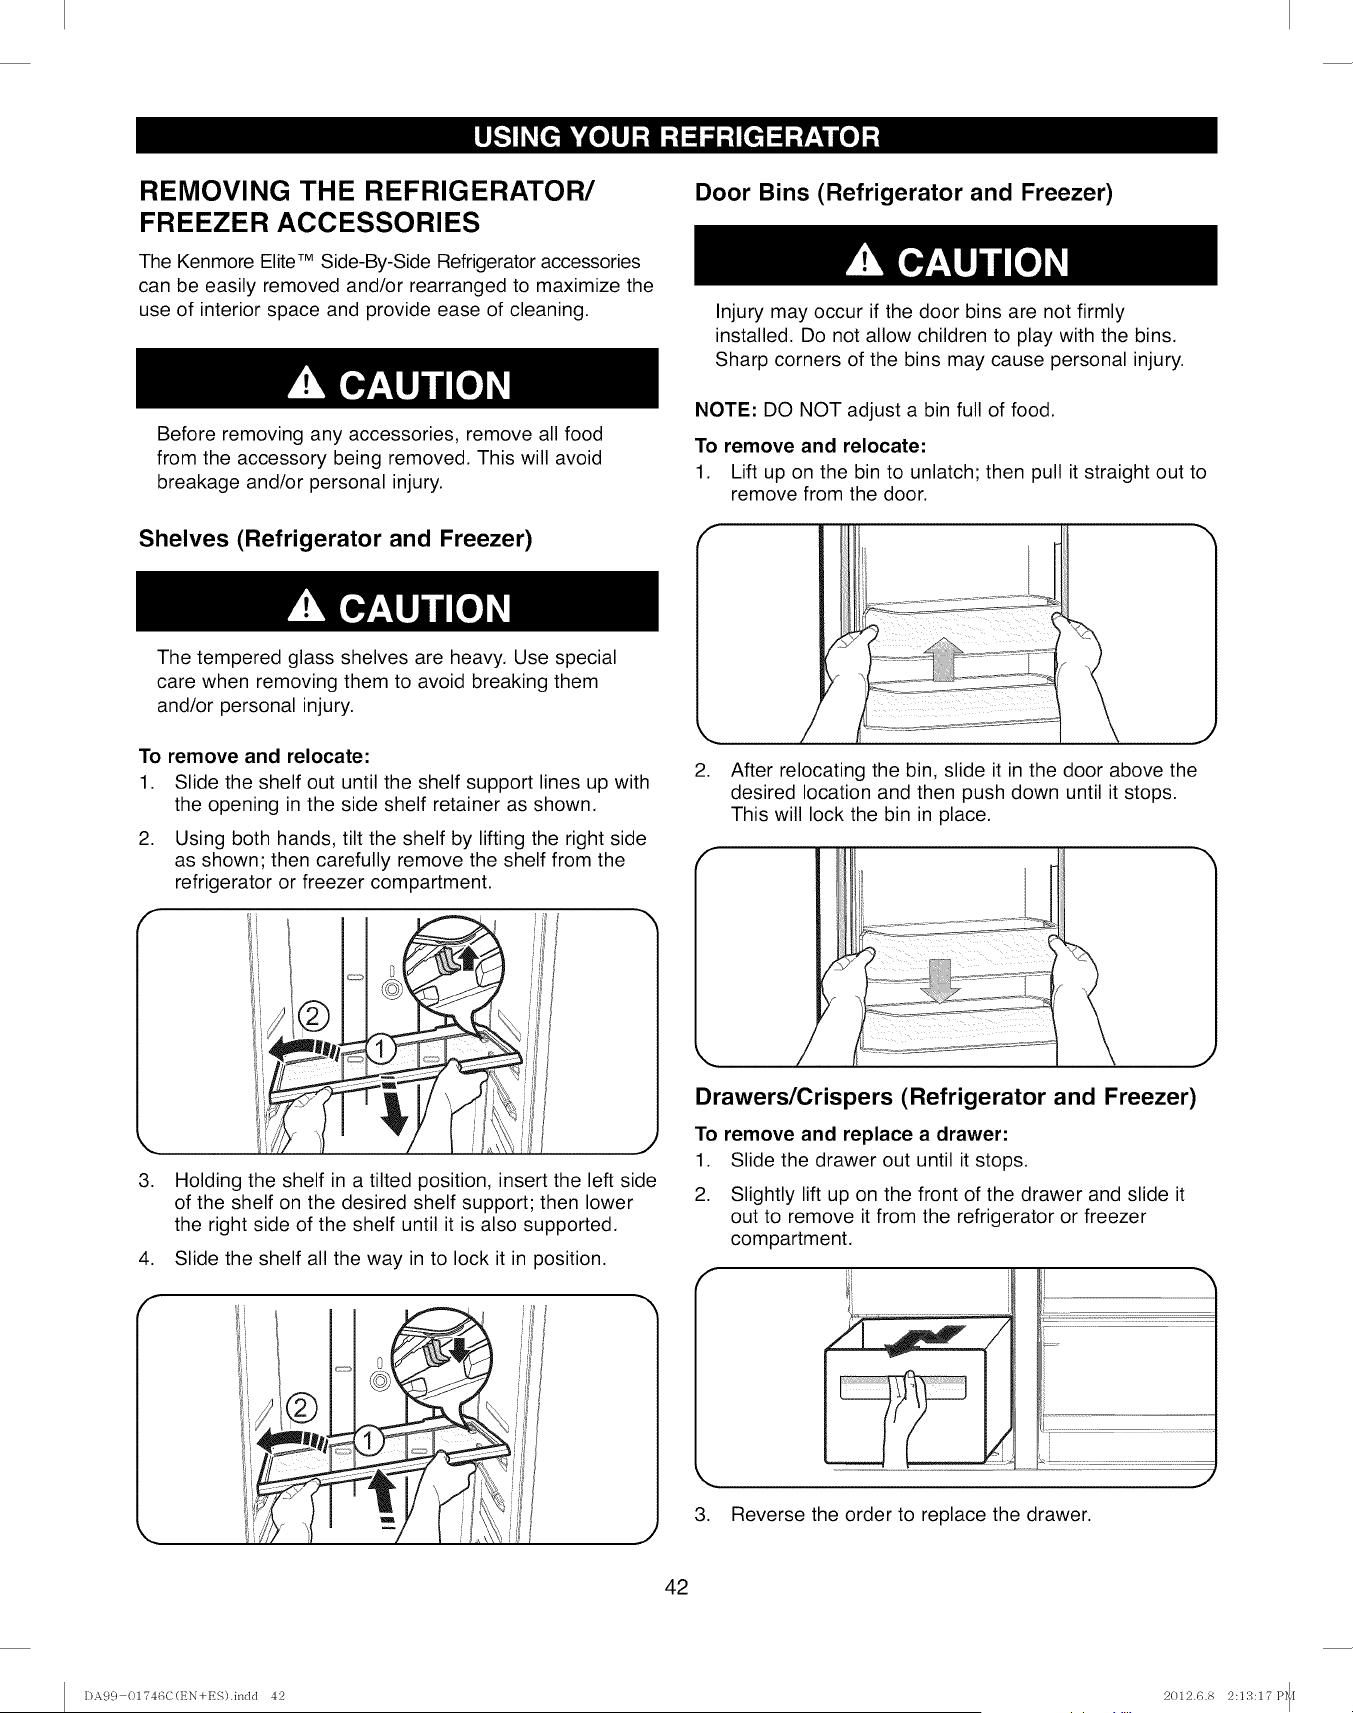
REMOVING THE REFRIGERATOR/
FREEZER ACCESSORIES
The Kenmore EliteTM Side-By-Side Refrigerator accessories
can be easily removed and/or rearranged to maximize the
use of interior space and provide ease of cleaning.
Before removing any accessories, remove all food
from the accessory being removed. This will avoid
breakage and/or personal injury.
Shelves (Refrigerator and Freezer)
Door Bins (Refrigerator and Freezer)
Injury may occur if the door bins are not firmly
installed. Do not allow children to play with the bins.
Sharp corners of the bins may cause personal injury.
NOTE: DO NOT adjust a bin full of food.
To remove and relocate:
1. Lift up on the bin to unlatch; then pull it straight out to
remove from the door.
The tempered glass shelves are heavy. Use special
care when removing them to avoid breaking them
and/or personal injury.
To remove and relocate:
1. Slide the shelf out until the shelf support lines up with
the opening in the side shelf retainer as shown.
2. Using both hands, tilt the shelf by lifting the right side
as shown; then carefully remove the shelf from the
refrigerator or freezer compartment.
3.
.
f
Holding the shelf in a tilted position, insert the left side
of the shelf on the desired shelf support; then lower
the right side of the shelf until it is also supported.
Slide the shelf all the way in to lock it in position.
2. After relocating the bin, slide it in the door above the
desired location and then push down until it stops.
This will lock the bin in place.
Drawers/Crispers (Refrigerator and Freezer)
To remove and replace a drawer:
1. Slide the drawer out until it stops.
2. Slightly lift up on the front of the drawer and slide it
out to remove it from the refrigerator or freezer
compartment.
3. Reverse the order to replace the drawer.
42
DA99 01746C(EN+ES).indd 42 2012.6.8 2:13:17 P_[

Drawers/Crispers (cont.)
To remove and replace a drawer cover:
Ice Bucket (Freezer)
To remove and replace:
Do not use excessive force when removing a drawer
cover. Forced drawer covers can break and/or cause
personal injury.
,
2.
Remove all the drawers as described on page 41.
Slide the drawer cover out until the cover supports
line up with the openings in the side supports as
shown; then carefully remove the drawer cover from
the refrigerator or freezer compartment.
,
,
f
Using both hands, tilt the cover with the right side
raised and position the left side on the desired shelf
support. Lower the right side so the right cover
support lines up with the opening in the side shelf
support.
Slide the cover all the way in to lock it in position.
,
Do not force the ice bucket during removal.
Unnecessary force could cause damage to the
icemaker.
Using both hands as shown, lift the ice bucket up
while slowly pulling it out. Do not force the ice bucket
during removal to prevent possible damage to the
icemaker.
2. Replace the ice bucket by slightly tilting in the top of
the ice bucket and sliding it into place.
43
DA9 c} 0174t3C(EN+ES).inclcl 4'3 2012.6.8 2:13:18 P_[
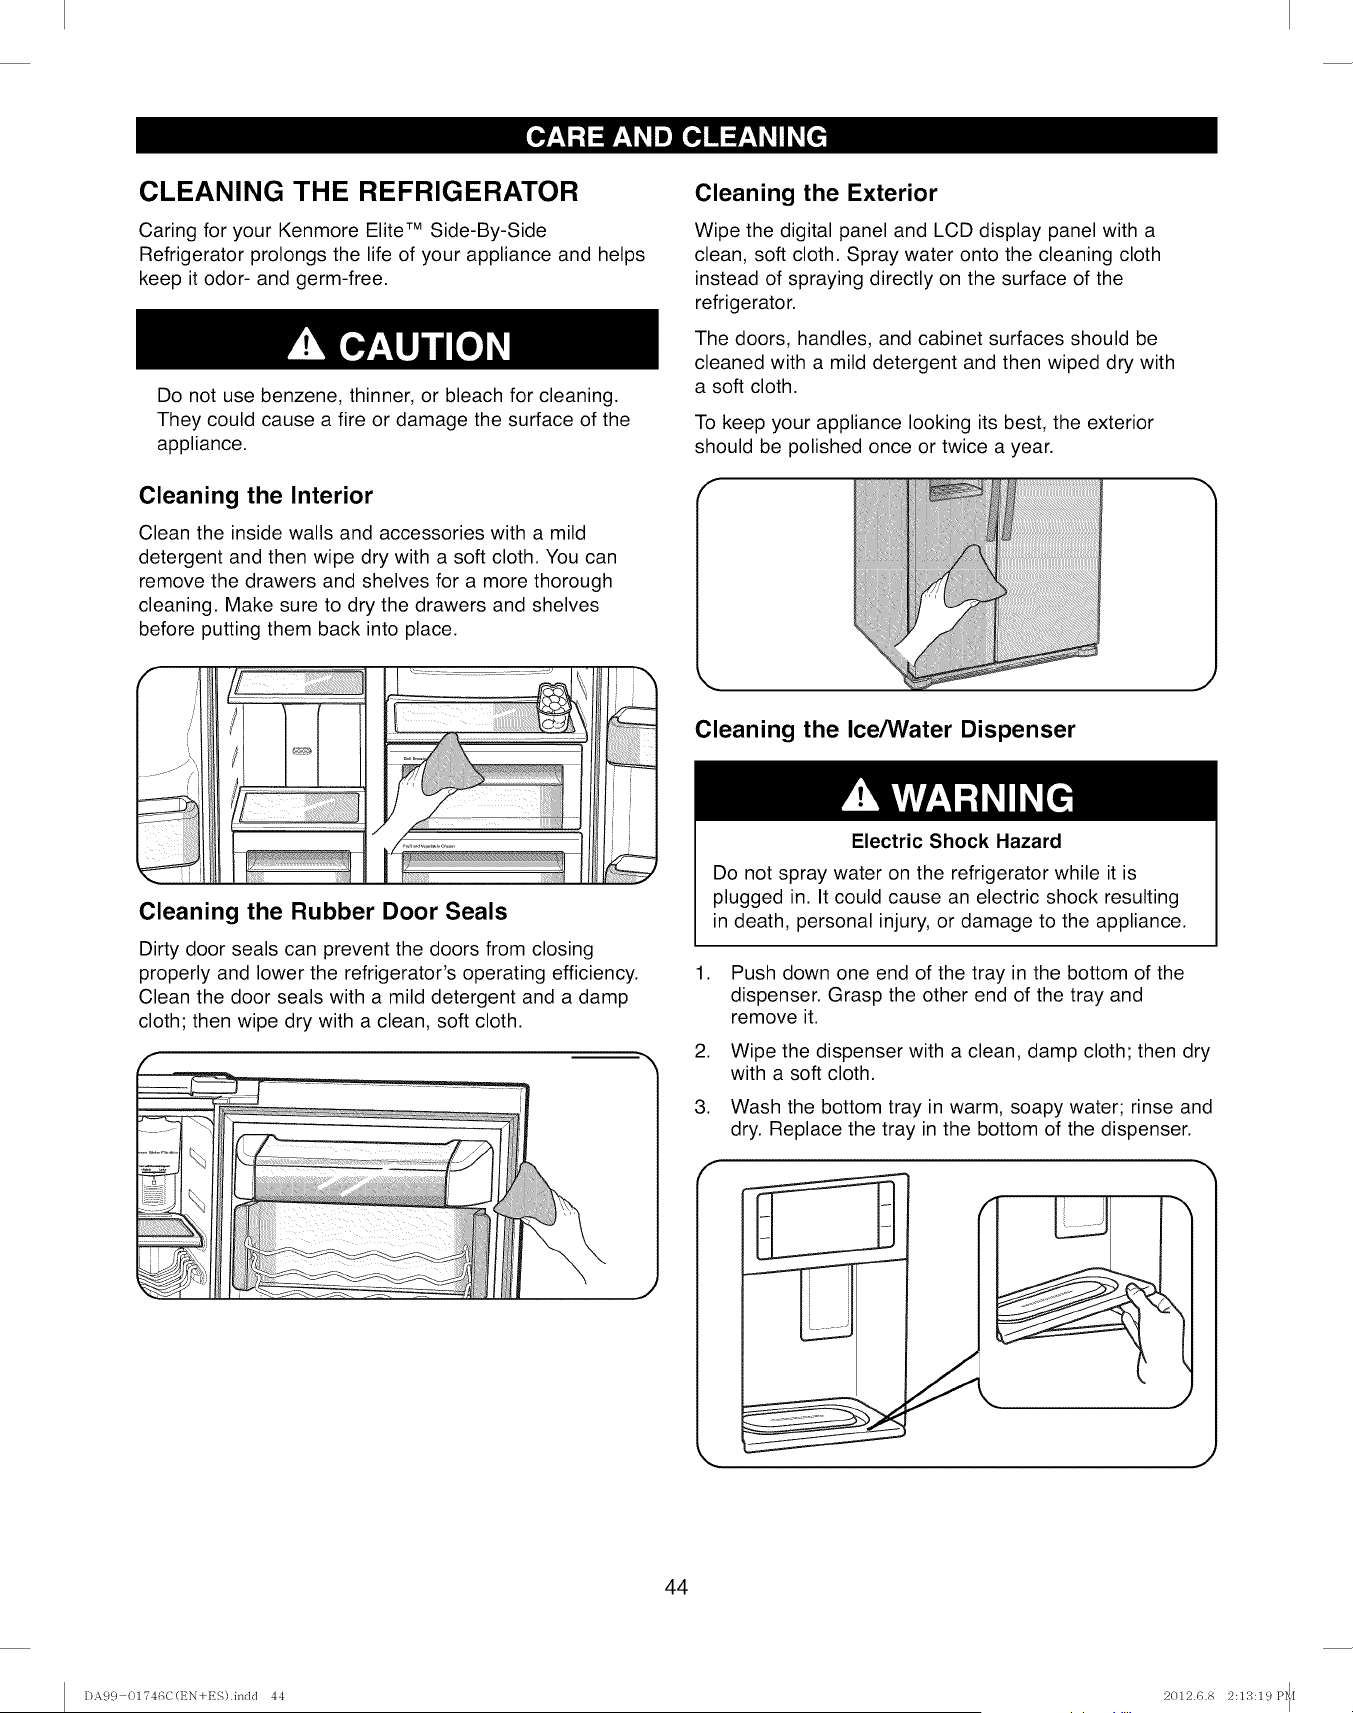
CLEANING THE REFRIGERATOR
Caring for your Kenmore Elite TM Side-By-Side
Refrigerator prolongs the life of your appliance and helps
keep it odor- and germ-free.
Do not use benzene, thinner, or bleach for cleaning.
They could cause a fire or damage the surface of the
appliance.
Cleaning the Interior
Clean the inside walls and accessories with a mild
detergent and then wipe dry with a soft cloth. You can
remove the drawers and shelves for a more thorough
cleaning. Make sure to dry the drawers and shelves
before putting them back into place.
Cleaning the Exterior
Wipe the digital panel and LCD display panel with a
clean, soft cloth. Spray water onto the cleaning cloth
instead of spraying directly on the surface of the
refrigerator.
The doors, handles, and cabinet surfaces should be
cleaned with a mild detergent and then wiped dry with
a soft cloth.
To keep your appliance looking its best, the exterior
should be polished once or twice a year.
f
Cleaning the Ice/Water Dispenser
J
Cleaning the Rubber Door Seals
Dirty door seals can prevent the doors from closing
properly and lower the refrigerator's operating efficiency.
Clean the door seals with a mild detergent and a damp
cloth; then wipe dry with a clean, soft cloth.
.
.
f
Electric Shock Hazard
Do not spray water on the refrigerator while it is
plugged in. It could cause an electric shock resulting
in death, personal injury, or damage to the appliance.
.
Push down one end of the tray in the bottom of the
dispenser. Grasp the other end of the tray and
remove it.
Wipe the dispenser with a clean, damp cloth; then dry
with a soft cloth.
Wash the bottom tray in warm, soapy water; rinse and
dry. Replace the tray in the bottom of the dispenser.
J
MJ
44
DA9 c} 01746C(t_N+ES).indd 44 2012.6.8 2:13:19 P_I
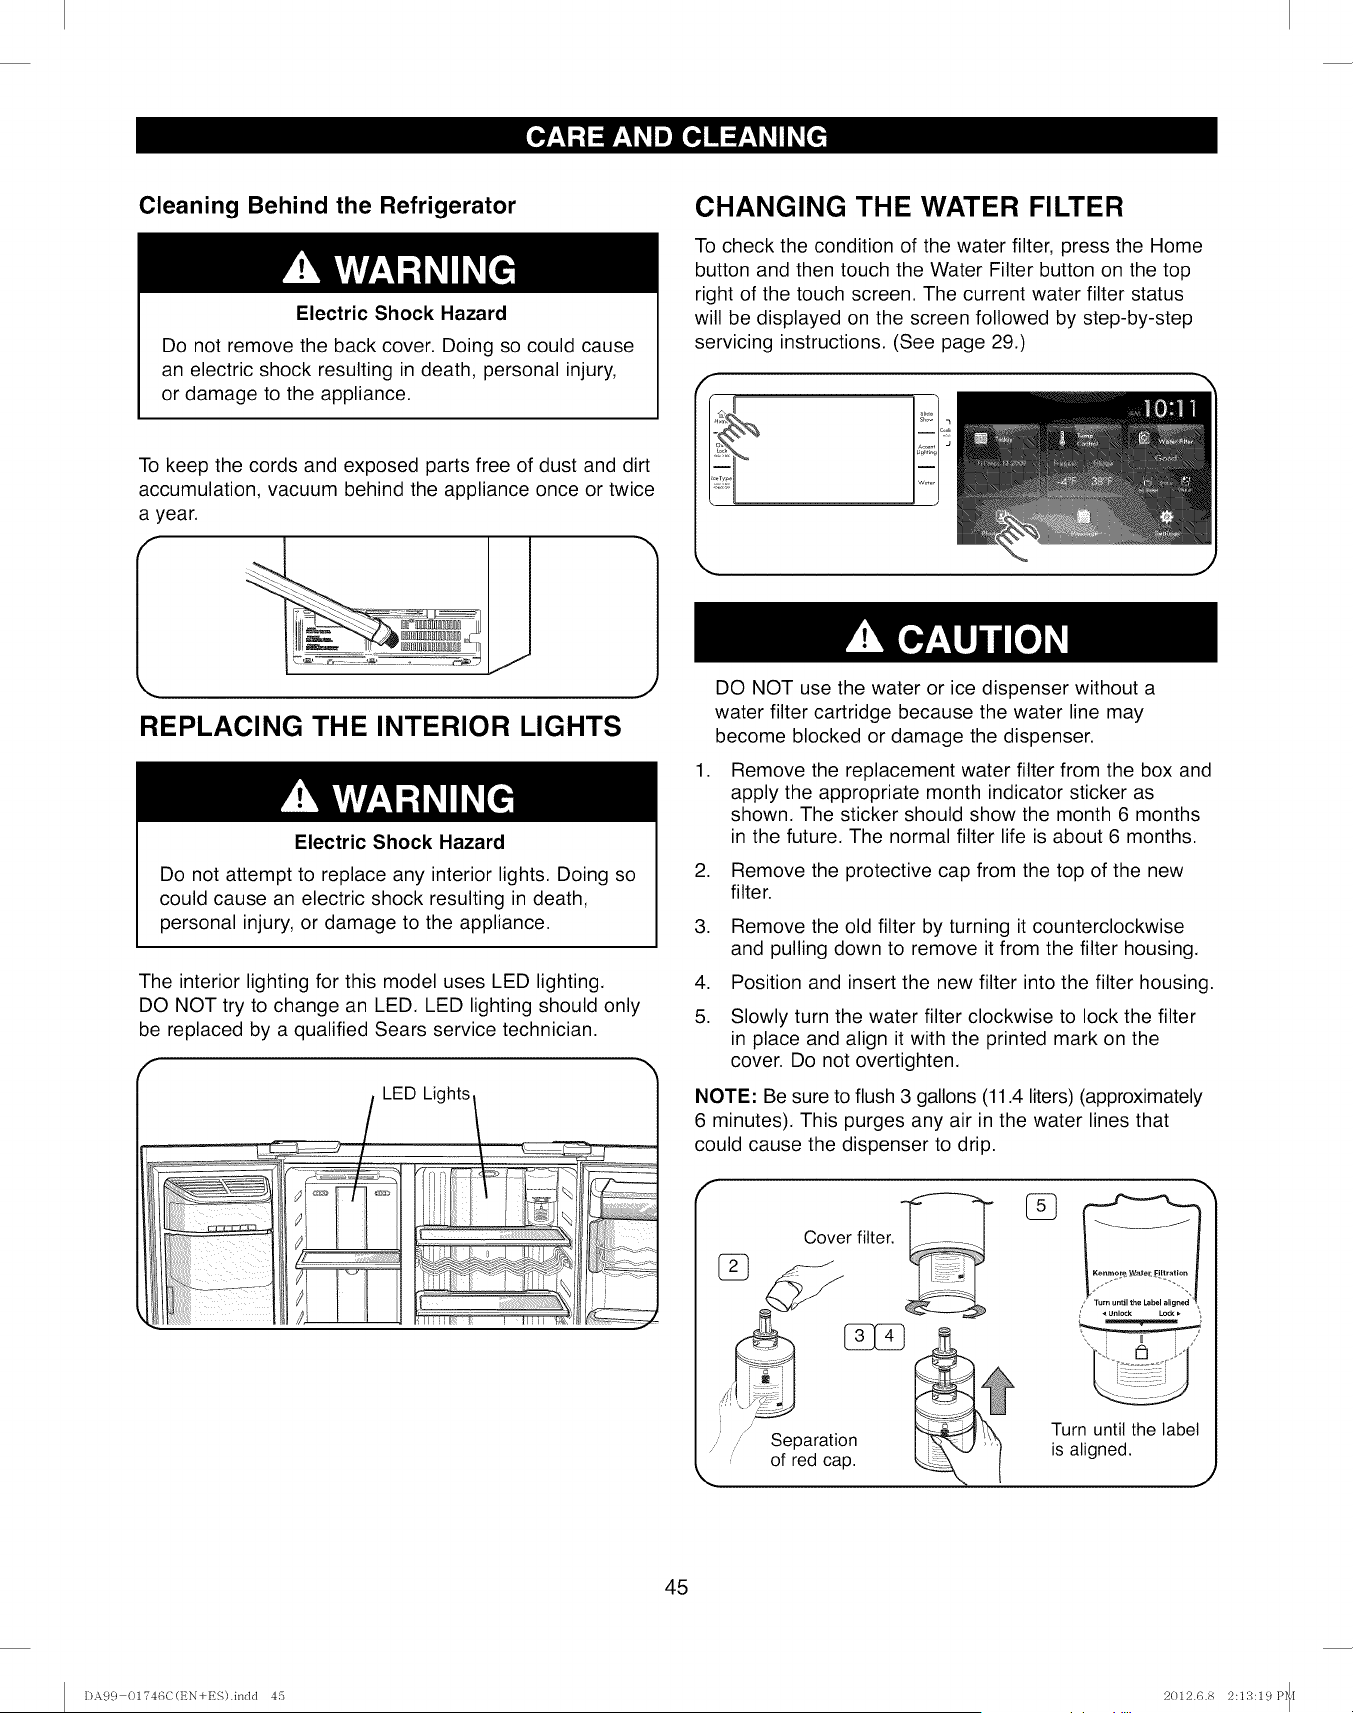
Cleaning Behind the Refrigerator
Electric Shock Hazard
Do not remove the back cover. Doing so could cause
an electric shock resulting in death, personal injury,
or damage to the appliance.
To keep the cords and exposed parts free of dust and dirt
accumulation, vacuum behind the appliance once or twice
a year.
REPLACING THE INTERIOR LIGHTS
Electric Shock Hazard
Do not attempt to replace any interior lights. Doing so
could cause an electric shock resulting in death,
personal injury, or damage to the appliance.
The interior lighting for this model uses LED lighting.
DO NOT try to change an LED. LED lighting should only
be replaced by a qualified Sears service technician.
I//P-J;II/I; ,............................
CHANGING THE WATER FILTER
To check the condition of the water filter, press the Home
button and then touch the Water Filter button on the top
right of the touch screen. The current water filter status
will be displayed on the screen followed by step-by-step
servicing instructions. (See page 29.)
.
.
.
.
5.
DO NOT use the water or ice dispenser without a
water filter cartridge because the water line may
become blocked or damage the dispenser.
Remove the replacement water filter from the box and
apply the appropriate month indicator sticker as
shown. The sticker should show the month 6 months
in the future. The normal filter life is about 6 months.
Remove the protective cap from the top of the new
filter.
Remove the old filter by turning it counterclockwise
and pulling down to remove it from the filter housing.
Position and insert the new filter into the filter housing.
Slowly turn the water filter clockwise to lock the filter
in place and align it with the printed mark on the
cover. Do not overtighten.
NOTE: Be sure to flush 3 gallons (11.4 liters) (approximately
6 minutes). This purges any air in the water lines that
could cause the dispenser to drip.
Separation
of red cap.
Turn until the label
is aligned.
45
DA9 c} 01746C(EN+ES).indd 45 2012.6.8 2:13:19P_[
POWER INTERRUPTIONS
1. If the power will be out for 24 hours or less, keep all
refrigerator doors closed to help foods stay cold and
frozen.
2. If the power will be out for more than 24 hours,
remove all frozen food and store it in a frozen food
locker.
WHEN YOU GO ON VACATION
If you choose to leave the refrigerator on while you
are away:
1. Use up any perishables and freeze other items.
2. Empty the ice bin.
3. Turn off the icemaker.
If you choose to turn the refrigerator off before you
leave:
1. Remove all food from the refrigerator.
2. Unplug the power cord or turn off the circuit breaker
or fuse box.
3. Clean the refrigerator interior. Make sure it has been
thoroughly cleaned and wiped dry.
4. Tape rubber or wood blocks to the top of each door to
prop them open far enough for air to get in. This stops
odor and mold from building up.
WHEN YOU MOVE
When you are moving your refrigerator to a new home,
follow these steps to prepare it for the move.
.
.
3.
.
.
Remove all food from the refrigerator and pack all
frozen food in dry ice.
Unplug the power cord.
Clean the refrigerator interior. Make sure it has been
thoroughly cleaned and wiped dry.
Take out all removable parts, wrap them well, and
tape them together so they don't shift and rattle
during the move. Refer to sections in "Using Your
Refrigerator" for removing instructions.
Raise the front leveling legs by turning them
clockwise as far as they will go. This will expose all
the rollers to make it easier to move.
6. Turn off the water supply line to the refrigerator.
Disconnect the water line behind the refrigerator.
7. Tape the doors shut and the power cord to the back
of the refrigerator.
When you get to your new home, put everything back and
refer to the "Refrigerator Installation" section for
installation instructions.
46
DA9 c} 01746C(EN+ES).indd 46 2012.6.8 2:13:21P_I
REFRIGERATOR DOES NOT OPERATE
Check if...
The power supply cord is unplugged.
A household fuse has blown or circuit
breaker tripped.
Refrigerator is in defrost cycle.
Then...
Firmly plug the cord into a live outlet with proper voltage.
Replace the fuse or reset the circuit breaker.
Wait about 30 minutes for defrost cycle to end.
REFRIGERATOR DOES NOT CHILL SUFFICIENTLY
Check if... Then...
The power supply cord is unplugged. Firmly plug the cord into a live outlet with proper voltage.
The temperature control on the display panel Reset the temperature control to a lower temperature.
is not set to the correct temperature.
Refrigerator is located in direct sunlight or Relocate away from heat source.
near a heat source.
The back of the refrigerator is located too close Make sure there is at least 3/8" of clearance between the
to the rear wall. back of refrigerator and rear wall.
FROZEN FOOD IN THE REFRIGERATOR
Check if... Then...
The temperature control on the display panel Reset the temperature control to a warmer temperature.
is not set to the correct temperature.
Room temperature is too low. Make sure refrigerator is installed in a temperature control
room.
Food is NOT stored properly in the refrigerator. Relocate food to warmer section in the refrigerator. Example:
Foods with high water content should not be stored in a Deli
Drawer or a Fruit and Vegetable Crisper.
UNUSUAL NOISE OR SOUNDS
Check if... Then...
The refrigerator is level and stable. Level and secure the refrigerator.
The back of the refrigerator is located too close Make sure there is at least 3/8" of clearance between the
to the rear wall. back of the refrigerator and the rear wall.
Anything was dropped behind or under the Remove the dropped object.
refrigerator.
A "ticking" sound is heard from inside the refrigerator. It is normal and occurs when various accessories contact
or expand due to temperature changes inside the
refrigerator.
"Clunking" and "hissing" sounds are heard from inside They are normal and occur when ice drops into the ice
the freezer, bucket and water refills the icemaker.
47
DA99 01746C(EN+ES).indd 47 2012.6.8 2:13:22P_f
FRONT CORNERS AND VERTICAL HINGED SURFACES ARE HOT OR HAVE CONDENSATION
Check if... Then...
Vertical hinged surfaces feel hot. Some heat is normal due to installed anti-condensators.
These prevent condensation buildup.
Refrigerator door is ajar. Condensation can occur when you leave a door open
for a long time.
ICEMAKER NOT PRODUCING ICE
Check if... Then...
The refrigerator was just installed. The refrigerator must run for at 12 to 24 hours before
making ice.
The water line is connected and water supply is Connect the water supply line and open the shut-off valve.
turned on.
The icemaker is turned off. Check the digital display panel to make sure the icemaker is
turned on.
The freezer temperature is too warm. Reset the temperature control to a lower temperature.
WATER BUBBLING SOUND
Check if... Then...
There is a bubbling water sound in the refrigerator. This is normal, The bubbling comes from the refrigerator
coolant liquid circulating through the refrigerator.
BAD SMELL IN REFRIGERATOR
Check if... Then...
There is food spoiled in the refrigerator. Throw away spoiled food.
Food is properly stored and wrapped. Foods with strong odors, like fish, should be stored in airtight
containers.
Old or spoiled food is in the freezer. Clean out freezer compartment periodically. Throw away
any spoiled or suspicious food.
FROST ON WALLS OF THE FREEZER
Check if... Then...
The air vent is blocked. Remove any obstructions so air can circulate freely.
There is sufficient space around the food. Allow sufficient space between foods stored for efficient air
circulation.
WATER DISPENSER IS NOT FUNCTIONING
Check if... Then...
The water line is connected and/or the shut-off Connect the water supply line and open the shut-off valve.
valve is open.
The water supply line has been crimped or crushed. Replace the water supply line.
The temperature in the freezer is too low. Reset the temperature control to a warmer temperature.
48
DA9 c} 01746C(EN+ES).indd 48 2012.6.8 2:13:22P_I
THE DISPLAY FUNCTIONS DO NOT WORK
Check if... Then...
The display lock function is set to Locked. Reset the display lock function to Unlocked.
The display lock function is set to Unlocked. Push the display reset button with a sharp tool. This
initializes the display. (Please note the user's information is
not removed.)
NOTHING ON THE "EXTERNAL ALBUM : UPLOAD PICTURES" OR "EXTERNAL ALBUM :
PLAY SLIDE SHOW" SCREEN AFTER INSERTING MEMORY CARD
Check if... Then...
The images are saved on your memory card Save the images on the memory card before inserting as an
(SD/SDHC/MMC/HS MMC). "External Album." If no images are saved on the memory card,
no images will appear on the screen.
The images are saved as JPEG files. Only JPEG files are compatible with this screen. Resave files
on memory card as JPEG files.
You waited long enough for the screen to read the Depending on the card type, it takes between 4-30 seconds
memory card. for images to load.
LCD SCREEN IS FREQUENTLY OFF
Check if...
The LCD Backlight Off function is not set properly.
The "External Album : Upload Pictures," "External
Album : Play Slide Show," or "What do you want to
do?" screen turns off automatically.
The LCD goes blank before you are done using it.
Then...
It is normal for the LCD screen to go blank after a period of
time. This reduces the refrigerator's power consumption.
The default time is 20 minutes for this screen use. This
screen will go blank after the set screen saver time or if
there is no user operation for 20 minutes.
The default time is 1 minute for all other screen uses. The
screen will go blank after the set screen saver time or if
there is no user operation for 1 minute.
AFTERIMAGE OR BORDER LINES OCCUR ON THE SCREEN
Check if... Then...
The image sizes are the same in Slide Show and
Screen Saver modes.
If all displayed images are the same size with blacked out
borders on top, bottom, left, or right of the screen, the image
can burn border lines and/or images into the screen. Always
use a variety of image sizes in Slide Show and Screen
Saver and change frequently to avoid this problem.
If photos are not placed and rotated properly, permanent
damage can occur to the LCD screen. This type of damage
is not covered by the warranty.
INPUT POINT IN THE TOUCH SCREEN IS NOT CORRECT
Check if... Then...
I The in the touch is set. I Do the touch correction from the
input point screen correctly "Settings"
screen screen.
II
49
DA9 c} 01746C(EN+ES).indd 49 2012.6.8 2:13:22P_[
NOTES
50
DA9 c} 01746C(t_N+ES).inclcl 50 2012.6.8 2:13:23 P_f
Garantia 52
Acuerdos de proteccion 53
Instrucciones importantes de seguridad 54
Eliminacion del refrigerante CFC 56
Requisitos de conexion a tierra 56
Partes y caracteristicas 57
Instalacion del refrigerador 58-65
Preparacion para la instalacion 58
Espacios de instalacion 58
Tipos de piso 58
Desembalaje de su refrigerador 59
Partes provistas 59
Herramientas requeridas 59
Retiro de la puerta
del refrigerador o congelador e instalacion 60
Requisitos del suministro de agua 61
Conexion a un suministro de agua 61,62
Instalacion del filtro de agua 62, 63
Posicionamiento y nivelacion del refrigerador 64
Realizacion de ajustes menores en la puerta 65
Como usar su refrigerador 66-94
Panel digital 66-91
Como configurar la hora 66
Como calibrar el puntero tfictil de la aguja 67
Como usar la funcion inicio 67
Como usar las diapositivas 68
Como usar la funcion de bloqueo para ni_os 68
Controles del dispensador 69
Como usar la iluminacion del dispensador 69
Como usar la iluminacion
acentuada del dispensador 69
Apagado del dispensador de hielo 69
Como seleccionar y expender hielo 69
Como seleccionar y expender agua 70
Enfriamiento (modo de prueba) 70
Alarma al abrir la puerta 70
Calendario 70
Como ingresar una nota en el calendario 70, 71
Como ingresar una fecha especial nueva 72
Como cambiar una nota
en el calendario o una fecha especial 73
Como borrar una nota
del calendario o una fecha especial 74, 75
Alarma de la nota del calendario 75
Control del temporizador 76
Acerca de la mfiquina de hacer hielo automfitica 77
Configuracion de congelamiento
rapido o enfriamiento inmediato 78
Filtro de agua 78, 79
Album de fotos 80-83
Mensaje 84-86
Configuraciones 86-89
Como guardar comida en el refrigerador 90
Como guardar comida en el congelador 90
Uso de las puertas 90
Retiro de accesorios
del refrigerador/congelador 91, 92
Cuidado y limpieza 93-95
Limpieza del refrigerador 93, 94
Reemplazo de las luces interiores 94
Cambio del filtro de agua 94
Cortes de corriente 95
Cuando sale de vacaciones 95
Cuando se muda 95
Guia de solucion de problemas 96-99
Servicio al cliente Pagina trasera
51
I)A99 01746C(EN+ES).indd 51 2012.6.8 2:13:23P_[
GARANTiADELREFRIGERADOR
fGarantia Limitada de Kenmore Elite TM
Sial realizar la instalacion, uso y mantenimiento de acuerdo con todas las instrucciones provistas con
este producto una parte imprescindible de este electrodomestico que no sea el sistema de refrigeracion
sellado falla debido a un defecto de material o fabricacion dentro del a_o desde su fecha de adquisicion, Ilame
al 1-800-4-MY-HOME _ para programar una reparacion gratuita. Si este electrodomestico alguna vez se usa con
propositos que exceden el uso familiar, esta cobertura solo tendra una validez de 90 dias desde la fecha de
adquisicion.
Si el sistema de refrigeracion sellado presenta defectos dentro de los cinco a_os desde la fecha de adquisicion,
Ilame al 1-800-4-MY-HOME _ para programar una reparacion gratuita. Si este electrodomestico alguna vez se usa
con propositos que exceden el uso familiar, esta cobertura solo tendra una validez de un a_o desde la fecha de
adquisicion.
Esta garantia cubre t_nicamente defectos de material y fabricacion. Sears NO cubrira:
1. items no renovables que se gasten fuera del uso normal, incluyendo pero no limitandose a filtros, cinturones,
bombillas de luz y bolsas.
2. Un tecnico del servicio de reparacion instruira al usuario sobre la instalacion correcta, funcionamiento
y mantenimiento del producto.
3. Un tecnico del servicio limpiar#, o mantendra este producto.
4. Da_os sobre o fallas del producto si no es instalado, usado o mantenido de acuerdo con todas las
instrucciones suministradas con el producto.
5. Da_os sobre o fallas del producto que sean por causa de accidentes, abuso, uso inadecuado o uso para
propositos fuera del uso correspondiente.
6. Dar_os sobre o fallas del producto causadas por el uso de detergentes, limpiadores, quimicos o utensilios que
no sean los recomendados en todas las instrucciones suministradas con el producto.
7. Da_os sobre o fallas de partes o sistemas que resulten de modificaciones no autorizadas realizadas sobre este
producto.
h
Descargo de responsabilidad de las garantias implicitas; limitacion de reparaciones
La t]nica y exclusiva reparacion a la cual acceder#, el cliente bajo esta garantia limitada sera la reparacion del
producto aqui provista. Las garantias implicitas, incluyendo garantias de comerciabilidad o conveniencia sobre
un proposito particular, se limitan a un a_o o al periodo mas corto permitido por la ley. Sears no ser#. responsable
por da_os accidentales o consecuentes. Algunos estados no permiten la exclusion o limitacion de da_os
accidentales o consecuentes, o la limitacion sobre la duracion de las garantias implicitas de comerciabilidad
o conveniencia, de modo que es posible que estas exclusiones o limitaciones no se apliquen en su caso.
Esta garantia tiene vigencia solo cuando el electrodomestico se use en Estados Unidos.
Esta garantia le da derechos legales especificos yes posible que tenga otros derechos legales que varian entre
un estado y otro.
Sears, Roebuck and Co., Hoffman Estates, IL 60179
J
52
DA99 01746C(EN+ES).indd 52 2012.6.8 2:13:24P_f
Acuerdos Maestros de Proteccion
Felicitaciones por realizar una compra inteligente. Su
nuevo producto Kenmore ® fue disefiado y fabricado para
argos de funcionamiento confiable. Pero al igual que todos
los productos, es posible que requiera un mantenimiento
preventivo o reparaciones cada cierto periodo de tiempo.
Es entonces cuando un Acuerdo Maestro de Proteccion
le puede ahorrar dinero y agravamiento.
El Acuerdo Maestro de Proteccion tambien ayuda a
extender la vida t]til de su producto nuevo. Esto es Io que
el Acuerdo incluye:
Partes y trabajo necesarios para ayudar a mantener
los productos funcionando en forma adecuada bajo un
uso normal, y no solo defectuoso. Nuestra cobertura
va mucho mas alia de la garantia del producto.
Sin deducibles, sin falla funcional excluida de la
cobertura--proteccion real.
Servicio de expertos conformado por una fuerza de
m_ts de 10,000 tecnicos autorizados del servicio de
reparacion de Sears, Io cual significa que alguien en
quien puede confiar trabajar& sobre su producto.
Llamadas ilimitadas al servicio y servicio de
reparacion en todo el pais, con la frecuencia que
desee, cuando nos necesite.
Garantia "contra defectos de fabricacion"--
reemplazo de su producto cubierto si se producen
cuatro o m&s fallas sobre el producto dentro de un
periodo de doce meses.
Reemplazo del producto si el producto cubierto no
puede ser reparado.
Control Anual de Mantenimiento Preventivo por
pedido suyo--sin costo adicional.
Ayuda rapida por telefono--lo Ilamamo Resolucion
Rapida--apoyo telef6nico de representantes de Sears
en todos los productos. Piense en nosotros como un
"manual del usuario con el cual puede hablar".
Proteccion ante golpes de corriente que evita dafios
electricos debido a fluctuaciones en la corriente.
Proteccion anual de $250 por p4rdida de comida
que se haya producido como resultado una falla
mec&nica de cualquier refrigerador o congelador
cubierto.
Reembolso de la renta si la reparacion de su
producto cubierto Ileva m&s tiempo del prometido.
10% de descuento sobre el precio regular de
cualquier servicio de reparaci6n no cubierto y partes
instaladas relacionadas.
Una vez adquirido el Acuerdo, una simple Ilamada
telefonica es Io Qnico que debe hacer para programar el
servicio. Puede Ilamar en cualquier momento del dia o la
noche, o programar una cita utilizando el servicio a traves
de Internet.
El Acuerdo Maestro de Proteccion es una adquisicion
libre de riesgos. Si Io cancela por cualquier motivo
durante el periodo de garantia del producto, le
brindaremos un reembolso completo o un reembolso
prorrateado en cualquier momento una vez que el
periodo de garantia del producto caduque, iAdquiera su
Acuerdo Maestro de Proteccion hoy!
Se aplican algunas limitaciones y exclusiones.
Para consultar sobre precios o hacer consultas
adicionales en EE.UU., Ilame al 1-800-827-6655.
Servicio de instalacion de Sears
Para una instalacion profesional de Sears de
electrodomesticos hogarer_os, abridores de puertas de
garaje, calentadores de agua, y otros articulos hogarer_os
importantes, en EE.UU. Ilame al 1-800-MY-HOME ®.
En el siguiente espacio, registre la fecha de adquisicion, modelo y nQmero de serie de su producto. Encontrar&
el modelo y el nemero de serie impresos en una etiqueta de identificacion ubicada sobre el costado derecho
del compartimiento del refrigerador. Tenga esta informacion a mano cuando se comunique con Sears con relacion
a su producto.
N° del modelo Fecha de adquisicion
N° de serie Vendedor
Guarde estas instrucciones y adjunte su recibo de venta para referencia futura.
53
DA99 01746C(EN+ES).indd 5'3 2012.6.8 2:13:24P_f
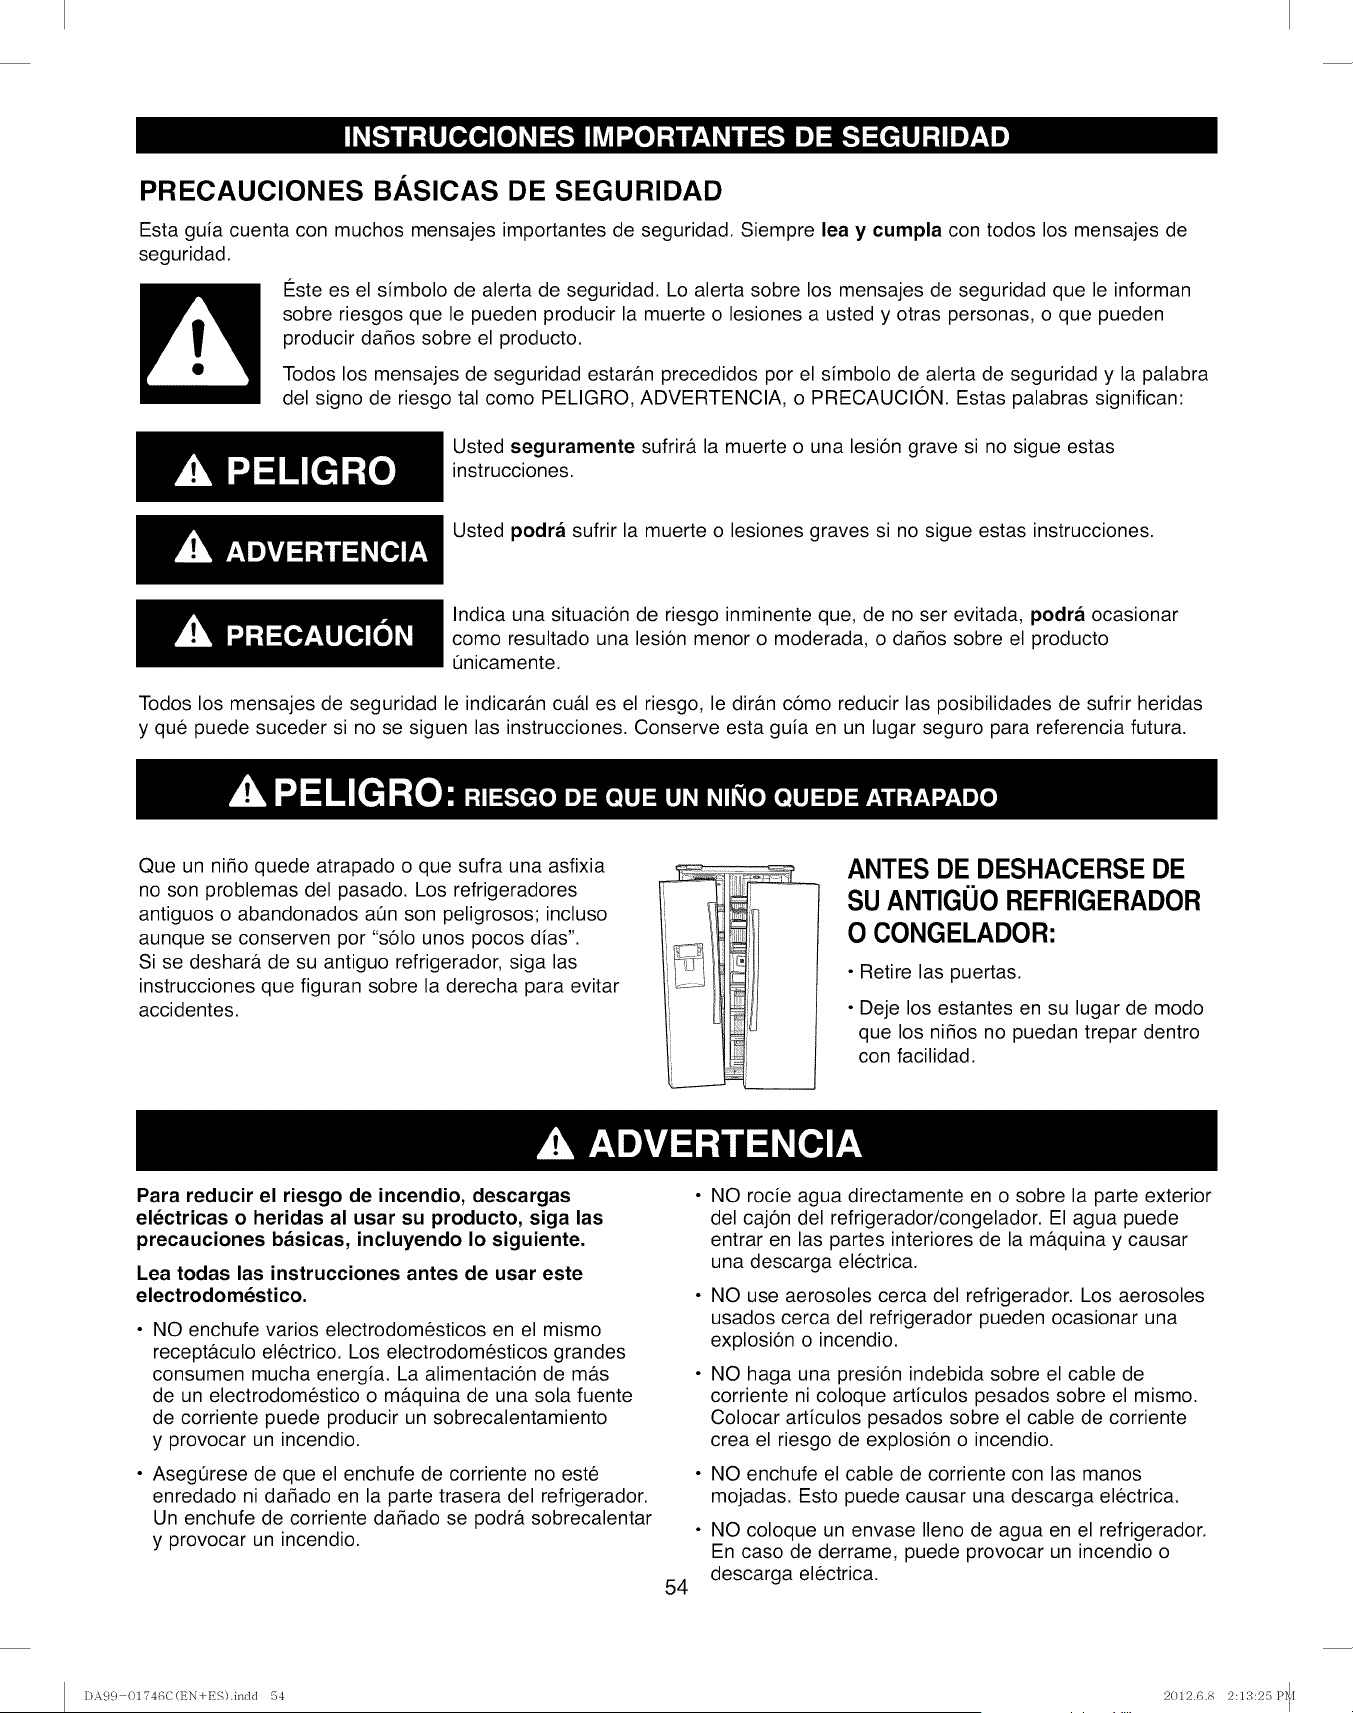
PRECAUCIONES B.&.SICAS DE SEGURIDAD
Esta guia cuenta con muchos mensajes importantes de seguridad. Siempre lea y cumpla con todos los mensajes de
seguridad.
€:ste es el simbolo de alerta de seguridad. Lo alerta sobre los mensajes de seguridad que le informan
sobre riesgos que le pueden producir la muerte o lesiones a usted y otras personas, o que pueden
producir dados sobre el producto.
Todos los mensajes de seguridad estar&n precedidos por el simbolo de alerta de seguridad y la palabra
del signo de riesgo tal como PELIGRO, ADVERTENCIA, o PRECAUCION. Estas palabras significan:
Usted seguramente sufrir& la muerte o una lesion grave si no sigue estas
instrucciones.
Usted podra sufrir la muerte o lesiones graves si no sigue estas instrucciones.
Indica una situacion de riesgo inminente que, de no ser evitada, podra ocasionar
como resultado una lesion menor o moderada, o dados sobre el producto
t]nicamente.
Todos los mensajes de seguridad le indicar&n cu#.l es el riesgo, le dir&n como reducir las posibilidades de sufrir heridas
y que puede suceder si no se siguen las instrucciones. Conserve esta guia en un lugar seguro para referencia futura.
Que un nido quede atrapado o que sufra una asfixia
no son problemas del pasado. Los refrigeradores
antiguos o abandonados at]n son peligrosos; incluso
aunque se conserven por %61o unos pocos dias".
Si se deshar& de su antiguo refrigerador, siga las
instrucciones que figuran sobre la derecha para evitar
accidentes.
ANTES DE DESHACERSE DE
SU ANTIGUO REFRIGERADOR
O CONGELADOR:
• Retire las puertas.
• Deje los estantes en su lugar de modo
que los nidos no puedan trepar dentro
con facilidad.
Para reducir el riesgo de incendio, descargas
electricas o heridas al usar su producto, siga las
precauciones basicas, incluyendo Io siguiente.
Lea todas las instrucciones antes de usar este
electrodomestico.
NO enchufe varios electrodomesticos en el mismo
recept&culo electrico. Los electrodomesticos grandes
consumen mucha energia. La alimentacion de m_ts
de un electrodomestico o m&quina de una sola fuente
de corriente puede producir un sobrecalentamiento
y provocar un incendio.
Asegerese de que el enchufe de corriente no este
enredado ni dadado en la parte trasera del refrigerador.
Un enchufe de corriente dadado se podr& sobrecalentar
y provocar un incendio.
54
NO rocie agua directamente en o sobre la parte exterior
del cajon del refrigerador/congelador. El agua puede
entrar en las partes interiores de la m&quina y causar
una descarga electrica.
NO use aerosoles cerca del refrigerador. Los aerosoles
usados cerca del refrigerador pueden ocasionar una
explosion o incendio.
NO haga una presion indebida sobre el cable de
corriente ni coloque articulos pesados sobre el mismo.
Colocar articulos pesados sobre el cable de corriente
crea el riesgo de explosion o incendio.
NO enchufe el cable de corriente con las manos
mojadas. Esto puede causar una descarga electrica.
NO coloque un envase Ileno de agua en el refrigerador.
En caso de derrame, puede provocar un incendio o
descarga electrica.
DA99 01T46C(t_N+ES).indd 54 2012.6.8 2:13:25 P_[
, NO instale el refdgerador en un lugar hQmedo ni en un •NUNCA use tubos de gas, lineas telef6nicas u otros elementos
lugar donde pueda entrar en contacto con agua. Si los
aislantes de las partes electdcas interiores se mojan y/o
detedoran existir& desgo de descarga electrica o incendio.
NO guarde sustancias vol&tiles o inflamables en el
refrigerador. Guardar benceno, diluyente, alcohol, eter, gas
LP y otros productos de este tipo puede provocar explosiones.
NO desarme ni repare el refrigerador. Podr& correr
el riesgo de sufrir un incendio, funcionamiento deficiente
del electrodomestico y/o lesiones personales. Llame a
su centro de servicio m_.s cercano para solicitar la ayuda
de un tecnico calificado del servicio.
Desenchufe el refrigerador antes de cambiar la luz del
interior. Cambiar la luz mientras el refrigerador se encuentra
enchufado podr& ocasionar una descarga el6ctrica.
El refrigerador deber& estar conectado a tierra de forma
segura. SIEMPRE asegQrese de haber conectado a tierra
el refrigerador antes de intentar investigar o reparar
cualquier parte del electrodomestico. Las p6rdidas de
corriente pueden ocasionar descargas electricas graves.
que atraigan la luz como conexi6n a tierra. El uso inadecuado
del enchufe de conexi6n a tierra puede provocar riesgos de
descargas el6ctricas. Si es necesario usar un prolongador
para alimentar el refrigerador, use s61oun prolongador de 3
cables que posea un enchufe de 3 patas y un receptaculo de
3 ranuras que acepte el enchufe en el electrodomestico. El
valor del prolongador deberia ser de AC 115V/120V, 15A, o
mas. En forma adicional, si se usa un adaptador de conexi6n
a tierra, asegarese de que la caja del recept&culo tambi6n
este totalmente conectada a tierra.
65 Advertencias propuestas por el Estado de California:
La Ley californiana sobre Agua Potable Segura y Aplicaciones
T6xicas requieren del Gobemador de California que publique
una lista de sustancias conocidas por el Estado de California
pot ser causa de c_.ncer,defectos de nacimiento, u otro dafio
reproductivo, y requiere de los negocios que avisen acerca
de la exposici6n potencial a dichas sustancias. Este producto
contiene una sustancia quimica conocida del Estado de
California por ser causa de c&ncer, defectos de nacimiento,
u otro dafio reproductivo. Este aparato puede generar una
exposici6n de bajo nivel a ciertas de las sustancias rubricadas,
incluyendo el benceno, y el mon6xido de carbono.
Use su buen criterio al Ilenar el refrigerador de alimentos y
bebidas. En un refdgerador sobrecargado, cualquier articulo
duro, fr_,gil,abultado o quebradizo podr& caer y ocasionar
lesiones personales y/o dafios sobre los objetos cercanos.
NO coloque botellas o envases de vidrio en el congelador.
Cuando los contenidos se congelan y luego de expanden,
el viddo se puede romper y ocasionar lesiones personales
o dejar peligrosos pedazos de vidrio roto en el congelador.
Si el tomacorriente de pared est& suelto, no inserteel cable
de corriente. Existe riesgo de descarga electrica o incendio.
Soliciteque el enchufe sea revisadopor un electricista matriculado.
NUNCA desenchufe el refrigerador tirando del cable de corriente.
- Siempre tome el enchufe de corriente de manera firme y
empuje en linea recta hacia afuera del tomacorriente. Jalar
bruscamente o tirar el cable de corriente puede ocasionar
un cortocircuito, incendio, y/o descarga electrica.
- Si un cable de corriente est#.dadado, deber& ser
reemplazado por el fabricante, un agente certificado
del servicio, o personal calificado del servicio.
NO guarde articulos en la parte superior de este
electrodomestico. AI abrir o cerrar la puerta, los articulos
podr&ncaer y ocasionar lesiones personales y/o dados sobre
los objetos cercanos.
NO guarde productos farmac6uticos, materiales cientificos,
y productos sensibles a la temperatura en el refrigerador.
Cualquier producto que requiera controles exactos de
temperatura no deber#,nser guardado en el refrigerador.
NO permita que los nifios se trepen, paten o cuelguen de los
estantes y manijas del refrigerador.NO se siente en la puerta
del congelador.NO permitaque los nifios se trepen al congelador.
Podrian dafiar el refrigerador y/o sufrir lesiones graves. 55
o
e
Si siente olor a un quimico o pl&stico quemado o ve humo,
desenchufe el refrigerador inmediatamente y comuniquese con
el Centro del Servicio de Sears.
Una vez que su refrigerador est6 en funcionamiento,
no toque las superficiesfrias del compartimiento del
congelador. Particularmente cuando las manos esten
hQmedaso mojadas, la piel se podr& adherir a estas
superficies extremadamente frias. La piel se podr&
adherir a la superficie y usted podr&sufrir una congelaci6n.
NO coloque las manos sobre el electrodom6stico. Cualquier
extremo puntiagudo puede ocasionar lesiones personales.
NUNCA coloque los dedos u otros objetos en el hoyo
dispensador de agua o en el vertedor de hielo. Puede
ocasionar lesiones personales y/o dados sobre el material.
Si el refrigerador no se usar&por un periodo de tiempo
prolongado (por ejemplo: durante varios meses), desenchufe
el cable de corriente. A Io largo del tiempo, el deterioro del
aislante del cable de corriente puede ocasionar un incendio.
NO use una tela mojada o hQmedaal limpiar el cable.
Retire cualquier polvo o materia extrada de las patas del cable
de corriente. Un cable de corriente sucio puede incrementar
el riesgo de incendio.
Si el refrigerador es desconectado del tomacorriente, deber&
esperar durante por Io menos cinco minutos antes de enchufar
el mismo nuevamente.
NO coloque el refrigerador donde pueda tener contacto directo
con la luz solar.
El electrodom6stico deber& estar colocado de modo que
cuente con un f&cilacceso al tomacorriente.
DA99 01746C(EN+ES).indd 55 2012.6.8 2:13:26P_[

• Si planifico sus vacaciones por un tiempo prolongado, vacie •
el refrigerador y apague el mismo. Retire el exceso de
humedad del interior y deje las puertas abiertas para evitar
que se produzcan olores y moho.
Garantia del servicio y modificacion
Cualquier cambio o modificacion realizada por un tercero
sobre este electrodomestico terminado no ser&n cubiertos
por el servicio de la garantia de Sears, ni podr& Sears ser
responsable por cuestiones de seguridad que resulten de
modificaciones realizadas por terceros.
Este electromestico no fue construido para ser usado por
nifios pequefios o personas enfermas que no cuenten con
la supervision de un adulto capaz. Los nifios pequefios
deberian ser supervisados cuando usen este
electrodomestico.
NO bloquee los hoyos de aire del refrigerador. Si se
bloquean los hoyos de aire, especialmente con una bolsa
de pl#.stico, el refrigerador se podr& enfriar en exceso.
Periodos prolongados de enfriamiento excesivo hara.nque
se rompa el filtro de agua y que se produzcan goteos de
agua.
CONSERVE ESTAS INSTRUCClONES
Es posibtequesu antiguorefrigeradortuvieraun sistemade
enfriamientoque usaraCFC (clorofluorocarbonos).Se cree que
los CFC dafian et ozonoestratosferico.
Si se deshara,de su antiguo refrigerador,aseguresede que et
refrigerantede CFC sea etiminadoenforma adecuadapor un
miembrocalificadodet servicio.Si en forma intencionallibera et
refrigeranteCFC, podraexponersea muttaso detencionbajolas
disposicionesde la legislacionmedioambiental.
IMPORTANTE" Solicitamos que lea
detenidamente.
PARA CONECTAR LA ELECTRICIDAD
Riesgo de descarga electrica
PARA SU SEGURIDAD PERSONAL, este
electrodomestico deber& estar adecuadamente
conectado a tierra. Contrate a un electricista
calificado para que controle el tomacorriente y el
circuito electrico para asegurar que el enchufe este
correctamente conectado a tierra.
Recepta.cuto de pared con
conexion a tierra de
Enchufe con
conexion a tierra
de 3 patas _-1
/
3 patas _ _.._\
_Asegurese de
contar con una
conexion a
tierra adecuada
antes de usar.
MC:TODO RECOMENDADO DE
CONEXION A TIERRA
El refrigerador siempre deberia ser conectado en su
tomacorriente individual con conexion a tierra de forma
adecuada de 115 volts, 60 Hz, AC 0nicamente y contar
con un fusible de entre 15 y 20 amperes. Esto garantiza
el mejor funcionamiento y adem&s previene la sobrecarga
de los circuitos del hogar, Io cual podria ocasionar riesgos
de incendio debido al recalentamiento de cables. Se
recomienda contar con un circuito separado que se
use t_nicamente con este electrodomestico. Use un
recept&culo que no se pueda apagar con un enchufe
o cadena para tirar. No use un prolongador.
En caso de contar con un tomacorriente de pared de dos
cables, es su responsabilidad y obligacion reemplazarlo
por un tomacorriente de pared de tres cables
correctamente conectado a tierra.
Nunca, bajo ninguna circunstancia, corte o elimine
el tercer cable (tierra) del cable de corriente.
USO DE PROLONGADORES
Debido a los posibles riesgos sobre la seguridad bajo
ciertas condiciones, recomendamos enfaticamente
no usar prolongadores. Sin embargo, si aOn decide
usar un prolongador, es absolutamente necesario que
sea un prolongador para electrodomestico de lista UL, de
cables con conexion a tierra, que cuente con un enchufe
con conexion a tierra y un tomacorriente con una
graduacion electrica del cable de 15 amperes (minimo)
y 120 volts.
El uso de un prolongador incrementar#, el espacio
necesario en la parte trasera del refrigerador.
56
DA99 01746C(t_N+ES).indd 56 2012.6.8 2:13:27 P_[
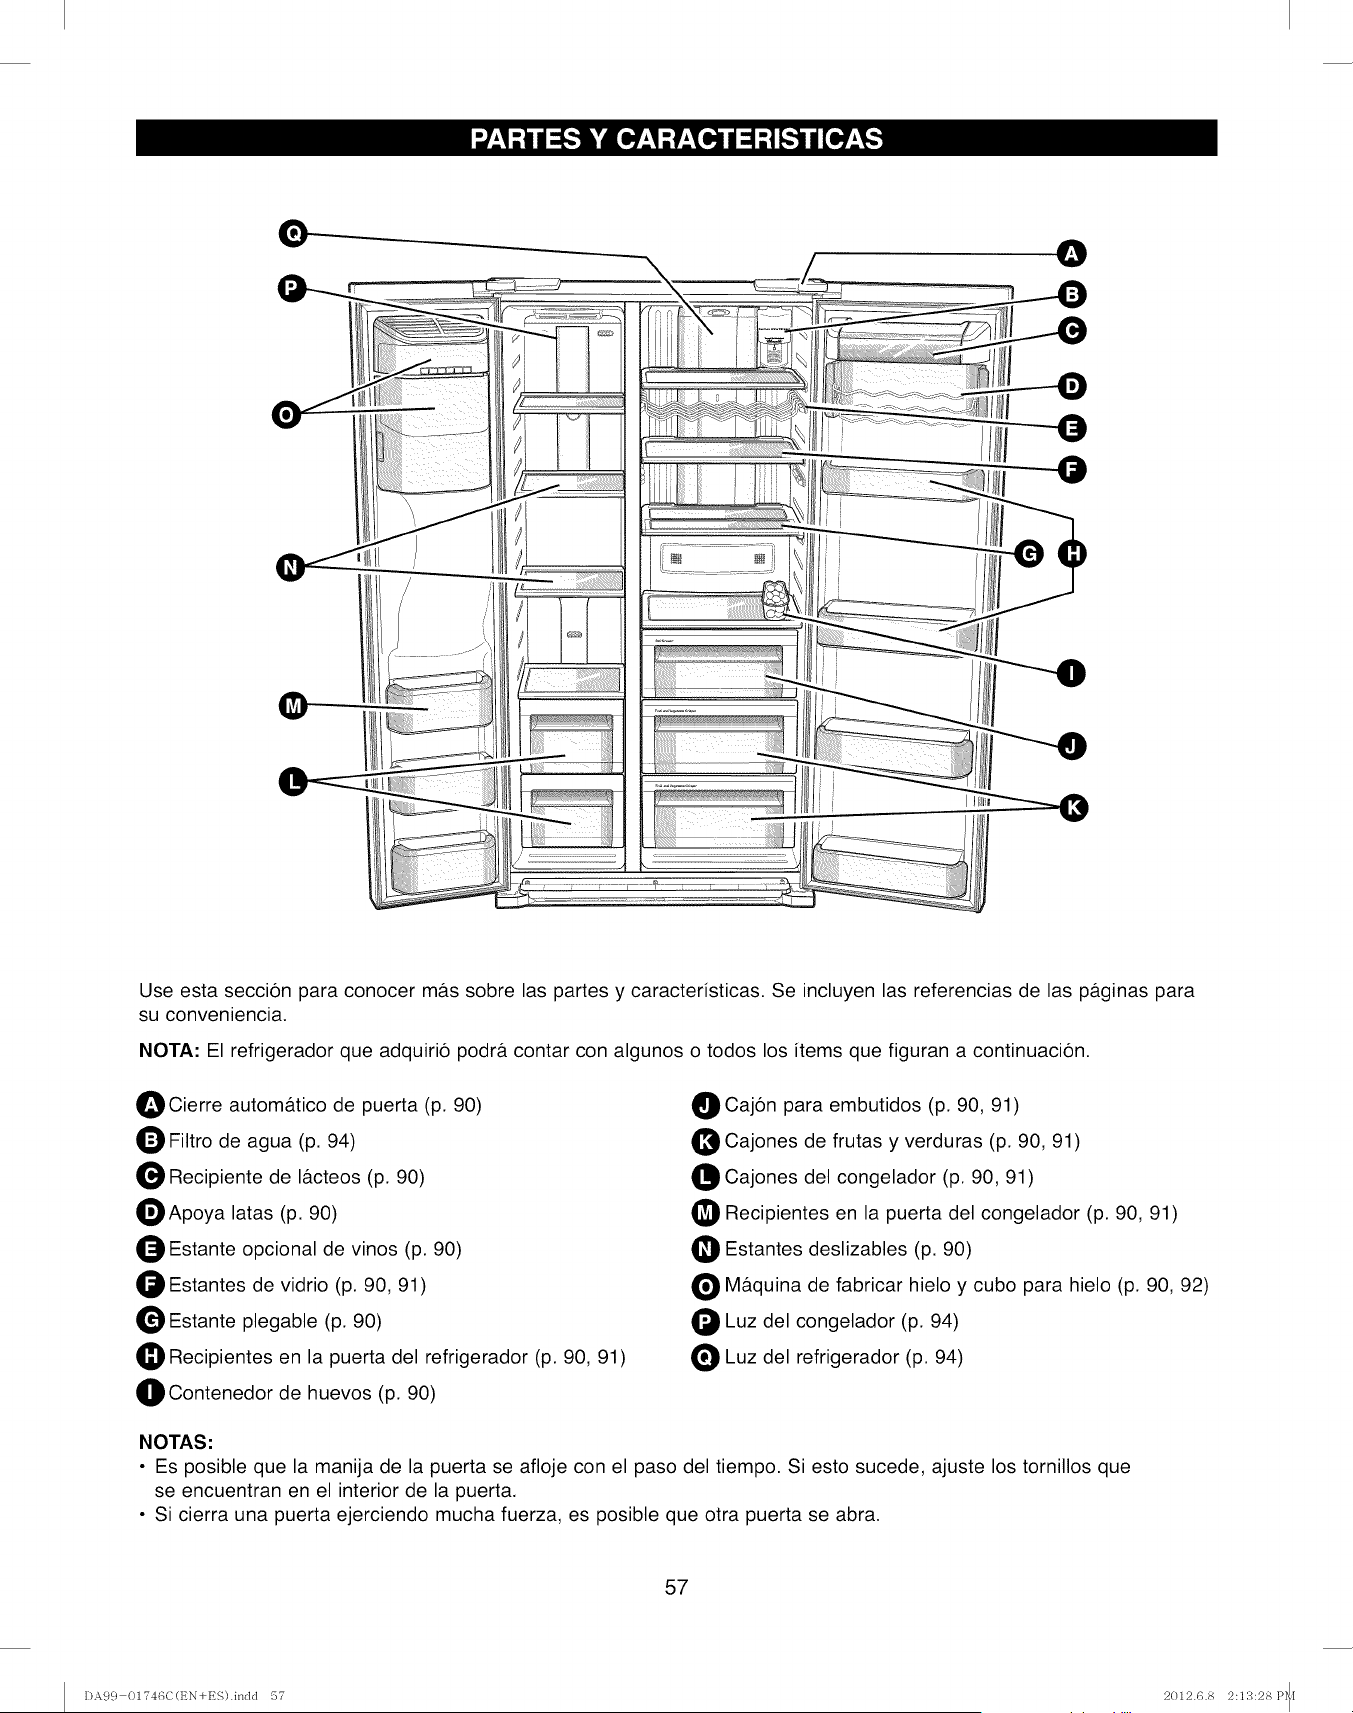
I®l
\
Use esta seccion para conocer m&s sobre las partes y caracteristicas. Se incluyen las referencias de las p&ginas para
su conveniencia.
NOTA." El refrigerador que adquirio podr& contar con algunos o todos los items que figuran a continuacion.
OCierre autom&tico de puerta (p. 90)
Filtro de agua (p. 94)
Recipiente de I&cteos (p. 90)
_Apoya latas (p. 90)
O Estante opcional de vinos (p. 90)
Estantes de vidrio (p. 90, 91)
Estante plegable (p. 90)
Recipientes en la puerta del refrigerador (p. 90, 91)
_IContenedor de huevos (p. 90)
O Cajon para embutidos (p. 90, 91)
Cajones de frutas y verduras (p. 90, 91)
Cajones del congelador (p. 90, 91)
Recipientes en la puerta del congelador (p. 90, 91)
_1Estantes deslizables (p. 90)
O M&quina de fabricar hielo y cubo para hielo (p. 90, 92)
Luz del congelador (p. 94)
Luz del refrigerador (p. 94)
NOTAS."
• Es posible que la manija de la puerta se afloje con el paso del tiempo. Si esto sucede, ajuste los tornillos que
se encuentran en el interior de la puerta.
• Si cierra una puerta ejerciendo mucha fuerza, es posible que otra puerta se abra.
57
DA9 c} 01?46C(t_N+ES).inc]c] 57 2012.6.8 2:13:28 P_[
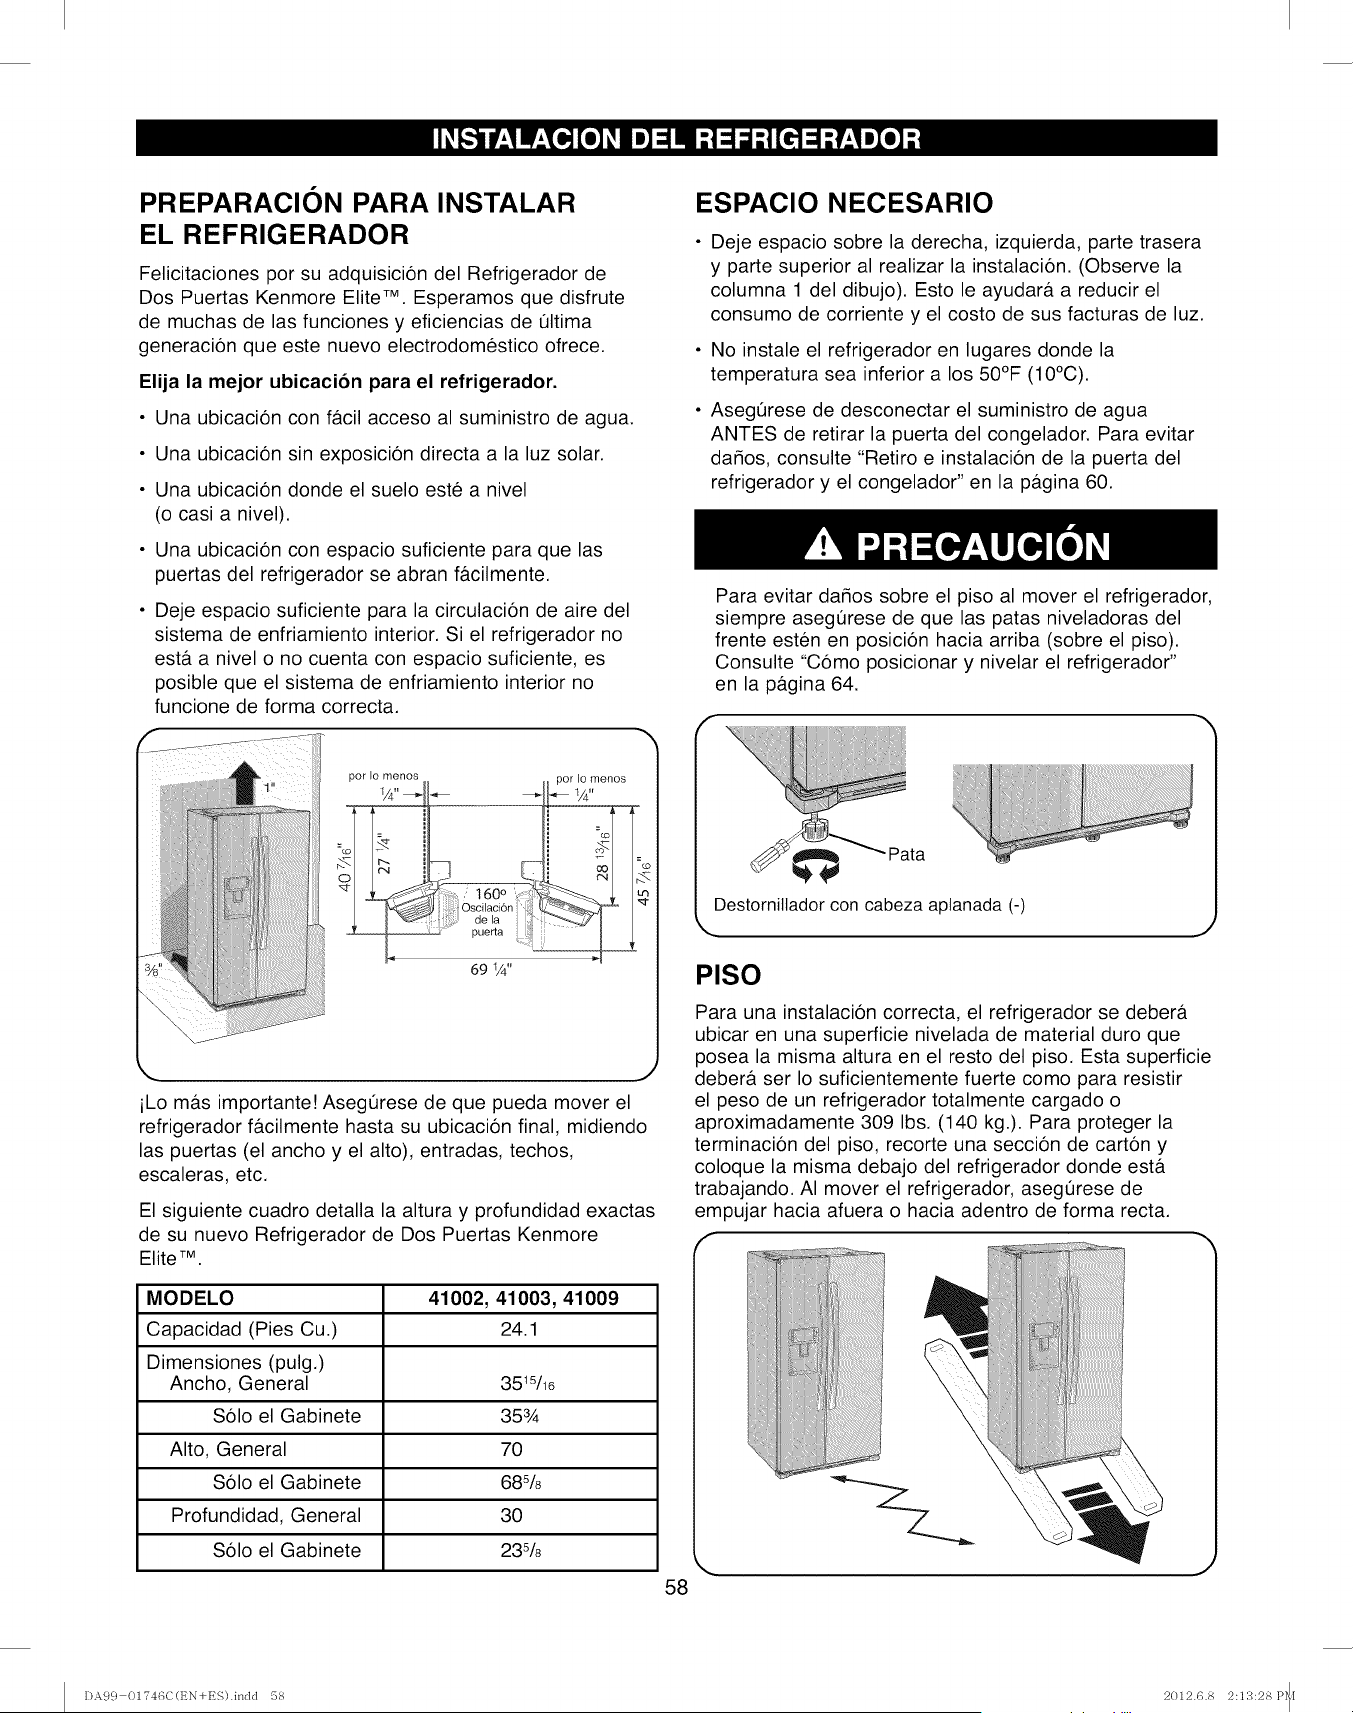
PREPARACION PARA INSTALAR
EL REFRIGERADOR
Felicitaciones por su adquisici6n del Refrigerador de
Dos Puertas Kenmore Elite TM. Esperamos que disfrute
de muchas de las funciones y eficiencias de t]ltima
generaci6n que este nuevo electrodomestico ofrece.
Elija la mejor ubicacion para el refrigerador.
•Una ubicaci6n con f&cil acceso al suministro de agua.
• Una ubicaci6n sin exposici6n directa a la luz solar.
• Una ubicaci6n donde el suelo este a nivel
(o casi a nivel).
• Una ubicaci6n con espacio suficiente para que las
puertas del refrigerador se abran f&cilmente.
Deje espacio suficiente para la circulaci6n de aire del
sistema de enfriamiento interior. Si el refrigerador no
est& a nivel o no cuenta con espacio suficiente, es
posible que el sistema de enfriamiento interior no
funcione de forma correcta.
por Io menos por Lomenos
O '
t60°
sc@ci6n _
de la "--_
,_ puerta ,
69 1/4"
,. J
iLo m&s importante! Asegerese de que pueda mover el
refrigerador f&cilmente hasta su ubicacion final, midiendo
las puertas (el ancho y el alto), entradas, techos,
escaleras, etc.
El siguiente cuadro detalla la altura y profundidad exactas
de su nuevo Refrigerador de Dos Puertas Kenmore
Elite 7M.
MODELO 41002, 41003, 41009
Capacidad (Pies Cu.) 24.1
Dimensiones (pulg.)
Ancho, General 351s/16
Solo el Gabinete 353/_
Alto, General 70
Solo el Gabinete 68%
Profundidad, General 30
Solo el Gabinete 23%
58
ESPACIO NECESARIO
Deje espacio sobre la derecha, izquierda, parte trasera
y parte superior al realizar la instalacion. (Observe la
columna 1 del dibujo). Esto le ayudar& a reducir el
consumo de corriente y el costo de sus facturas de luz.
No instale el refrigerador en lugares donde la
temperatura sea inferior a los 50°F (10°C).
Asegerese de desconectar el suministro de agua
ANTES de retirar la puerta del congelador. Para evitar
da_os, consulte "Retiro e instalacion de la puerta del
refrigerador y el congelador" en la p&gina 60.
Para evitar dados sobre el piso al mover el refrigerador,
siempre asegOrese de que las patas niveladoras del
frente esten en posicion hacia arriba (sobre el piso).
Consulte "Como posicionar y nivelar el refrigerador"
en la pagina 64.
Destornillador con cabeza aptanada (-)
PISO
Para una instalacion correcta, el refrigerador se deber&
ubicar en una superficie nivelada de material duro que
posea la misma altura en el resto del piso. Esta superficie
deber& ser Io suficientemente fuerte como para resistir
el peso de un refrigerador totalmente cargado o
aproximadamente 309 Ibs. (140 kg.). Para proteger la
terminacion del piso, recorte una seccion de carton y
coloque la misma debajo del refrigerador donde est&
trabajando. AI mover el refrigerador, asegQrese de
empujar hacia afuera o hacia adentro de forma recta.
I)A9 c} 01746C(EN+ES).indd 58 2012.6.8 2:13:28P_[
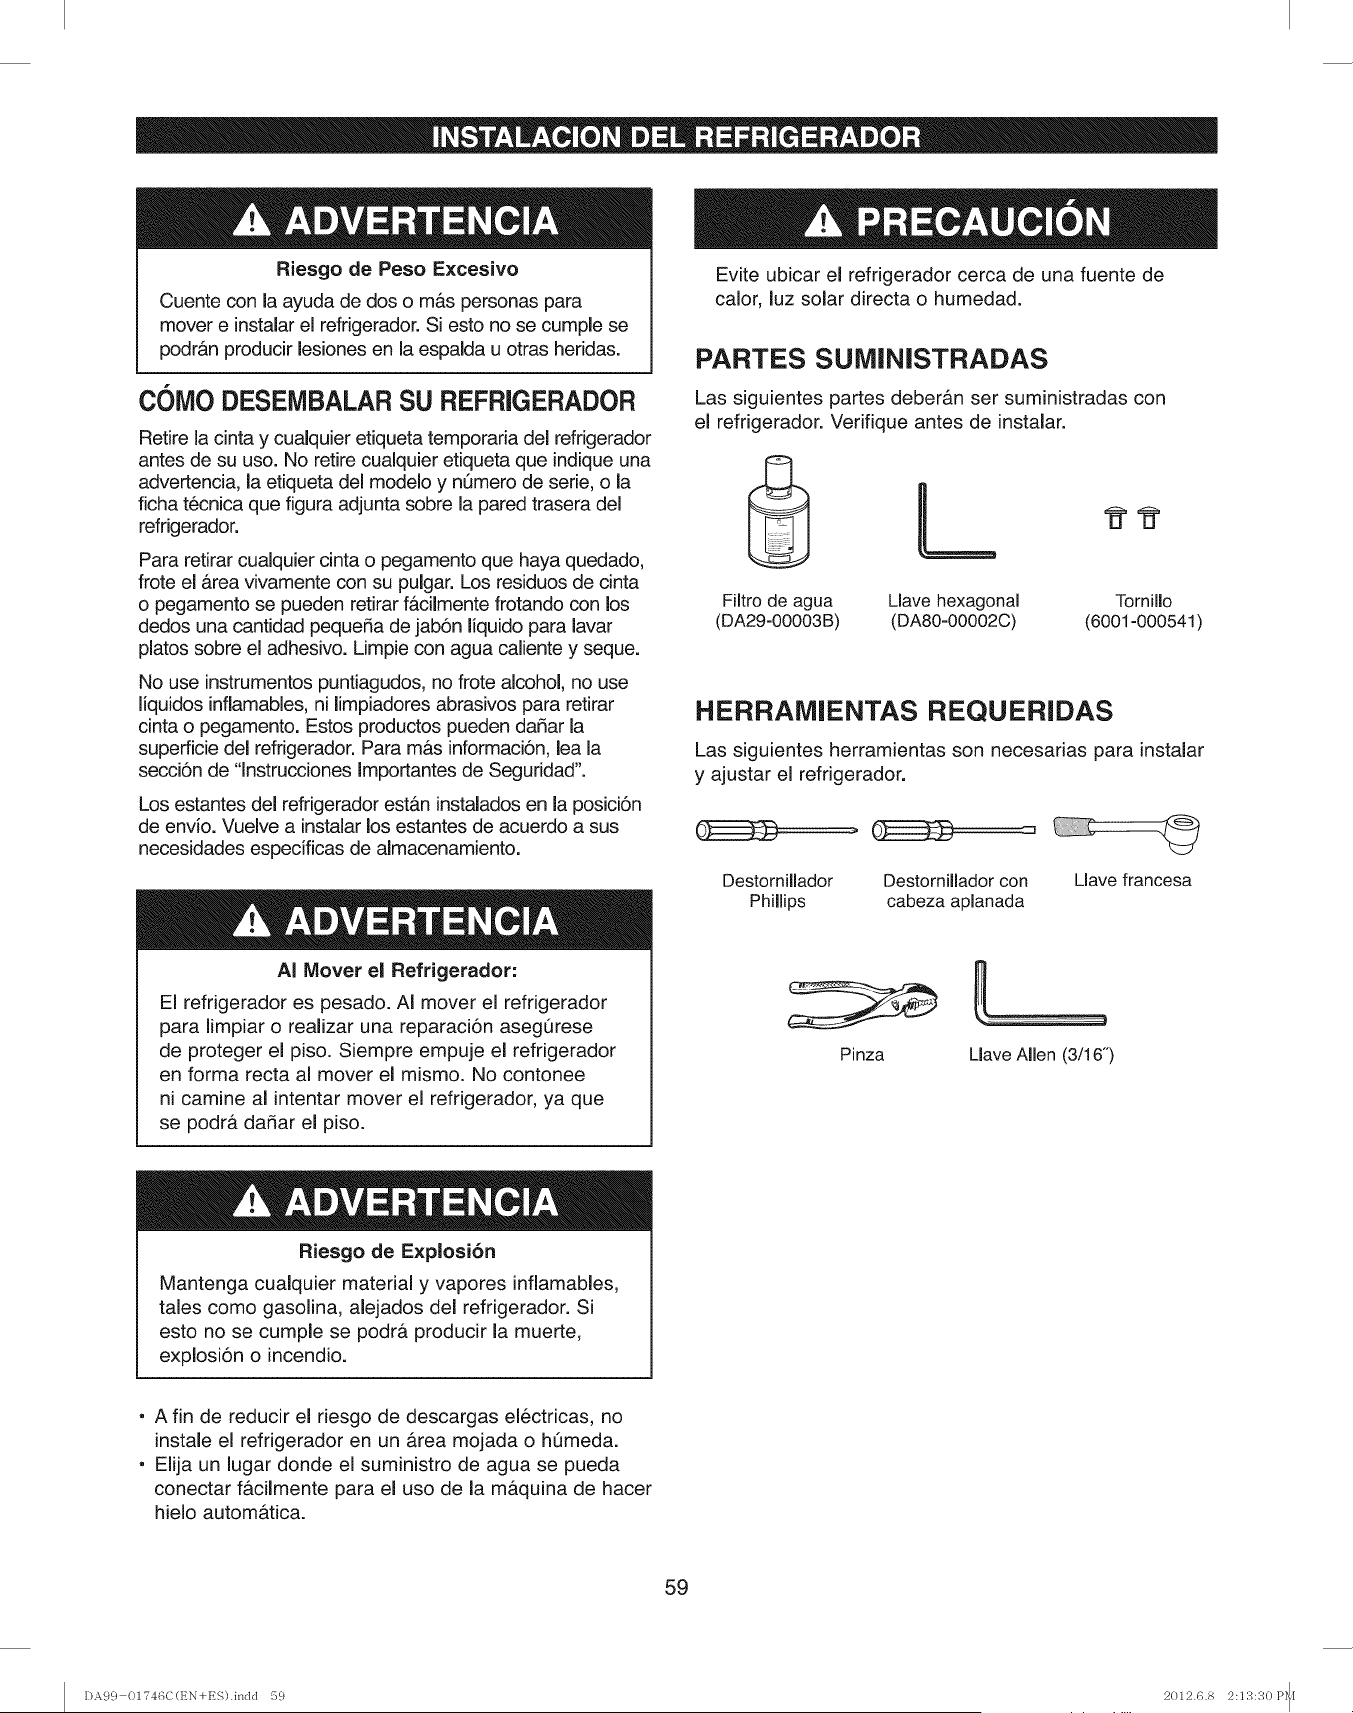
Riesgo de Peso Excesivo
Cuente con la ayuda de dos o m&s personas para
mover einstalarel refrigerador. Si esto no se cumple se
podr&n producir lesiones en la espalda u otras heridas.
COIVlODESEIVlBALARSU REFRIGERADOR
Retire la cinta y cualquier etiqueta temporaria del refrigerador
antes de su uso. No retire cualquier etiqueta que indiqueuna
advertencia, la etiqueta del modelo y nQmero de serie, o la
ficha tecnica que figura adjunta sobre la pared trasera del
refrigerador.
Para retirar cualquier cinta o pegamento que haya quedado,
frote el &tea vivamente con su pulgar. Los residuos de cinta
o pegamento se pueden retirar f&cilmente frotando con los
dedos una cantidad pequeda de jabSn liquido para lavar
platos sobre el adhesivo. Limpie con agua caliente y seque.
No use instrumentos puntiagudos, no frote alcohol, no use
liquidos inflamables,ni limpiadoresabrasivos para retirar
cinta o pegamento. Estos productos pueden dadar la
superficie del refrigerador. Para m&s informaci6n, lea la
secci6n de "lnstrucciones Importantes de Seguridad".
Los estantes del refrigerador est&n instalados en la posici6n
de envio. Vuelve a instalar los estantes de acuerdo a sus
necesidades especificas de almacenamiento.
AI Mover el Refrigerador:
El refrigerador es pesado. AI mover el refrigerador
para limpiar o realizar una reparaci6n asegQrese
de proteger el piso. Siempre empuje el refrigerador
en forma recta al mover el mismo. No contonee
ni camine al intentar mover el refrigerador, ya que
se podr& dadar el piso.
Evite ubicar el refrigerador cerca de una fuente de
calor, luz solar directa o humedad.
PARTES SUMINISTRADAS
Las siguientes partes deber&n ser suministradas con
el refrigerador. Verifique antes de instalar.
L.
Filtro de agua Llave hexagonal Tornillo
(DA29-00003B) (DA80-00002C) (6001-000541)
HERRAMIENTAS REQUERIDAS
Las siguientes herramientas son necesarias para instalar
y ajustar el refrigerador.
Destomillador Destomillador con Llave francesa
Phillips cabeza aplanada
Pinza Llave Allen (3/16")
Riesgo de Explosi6n
Mantenga cualquier material y vapores inflamables,
tales como gasolina, alejados del refrigerador. Si
esto no se cumple se podr& producir la muerte,
explosi6n o incendio.
A fin de reducir el riesgo de descargas el6ctricas, no
instale el refrigerador en un &rea mojada o hQmeda.
Elija un lugar donde el suministro de agua se pueda
conectar f&cilmente para el uso de la m&quina de hacer
hielo autom_ttica.
59
DA99 01746C(EN+ES).indd 59 2012.6.8 2:13:30 P_[
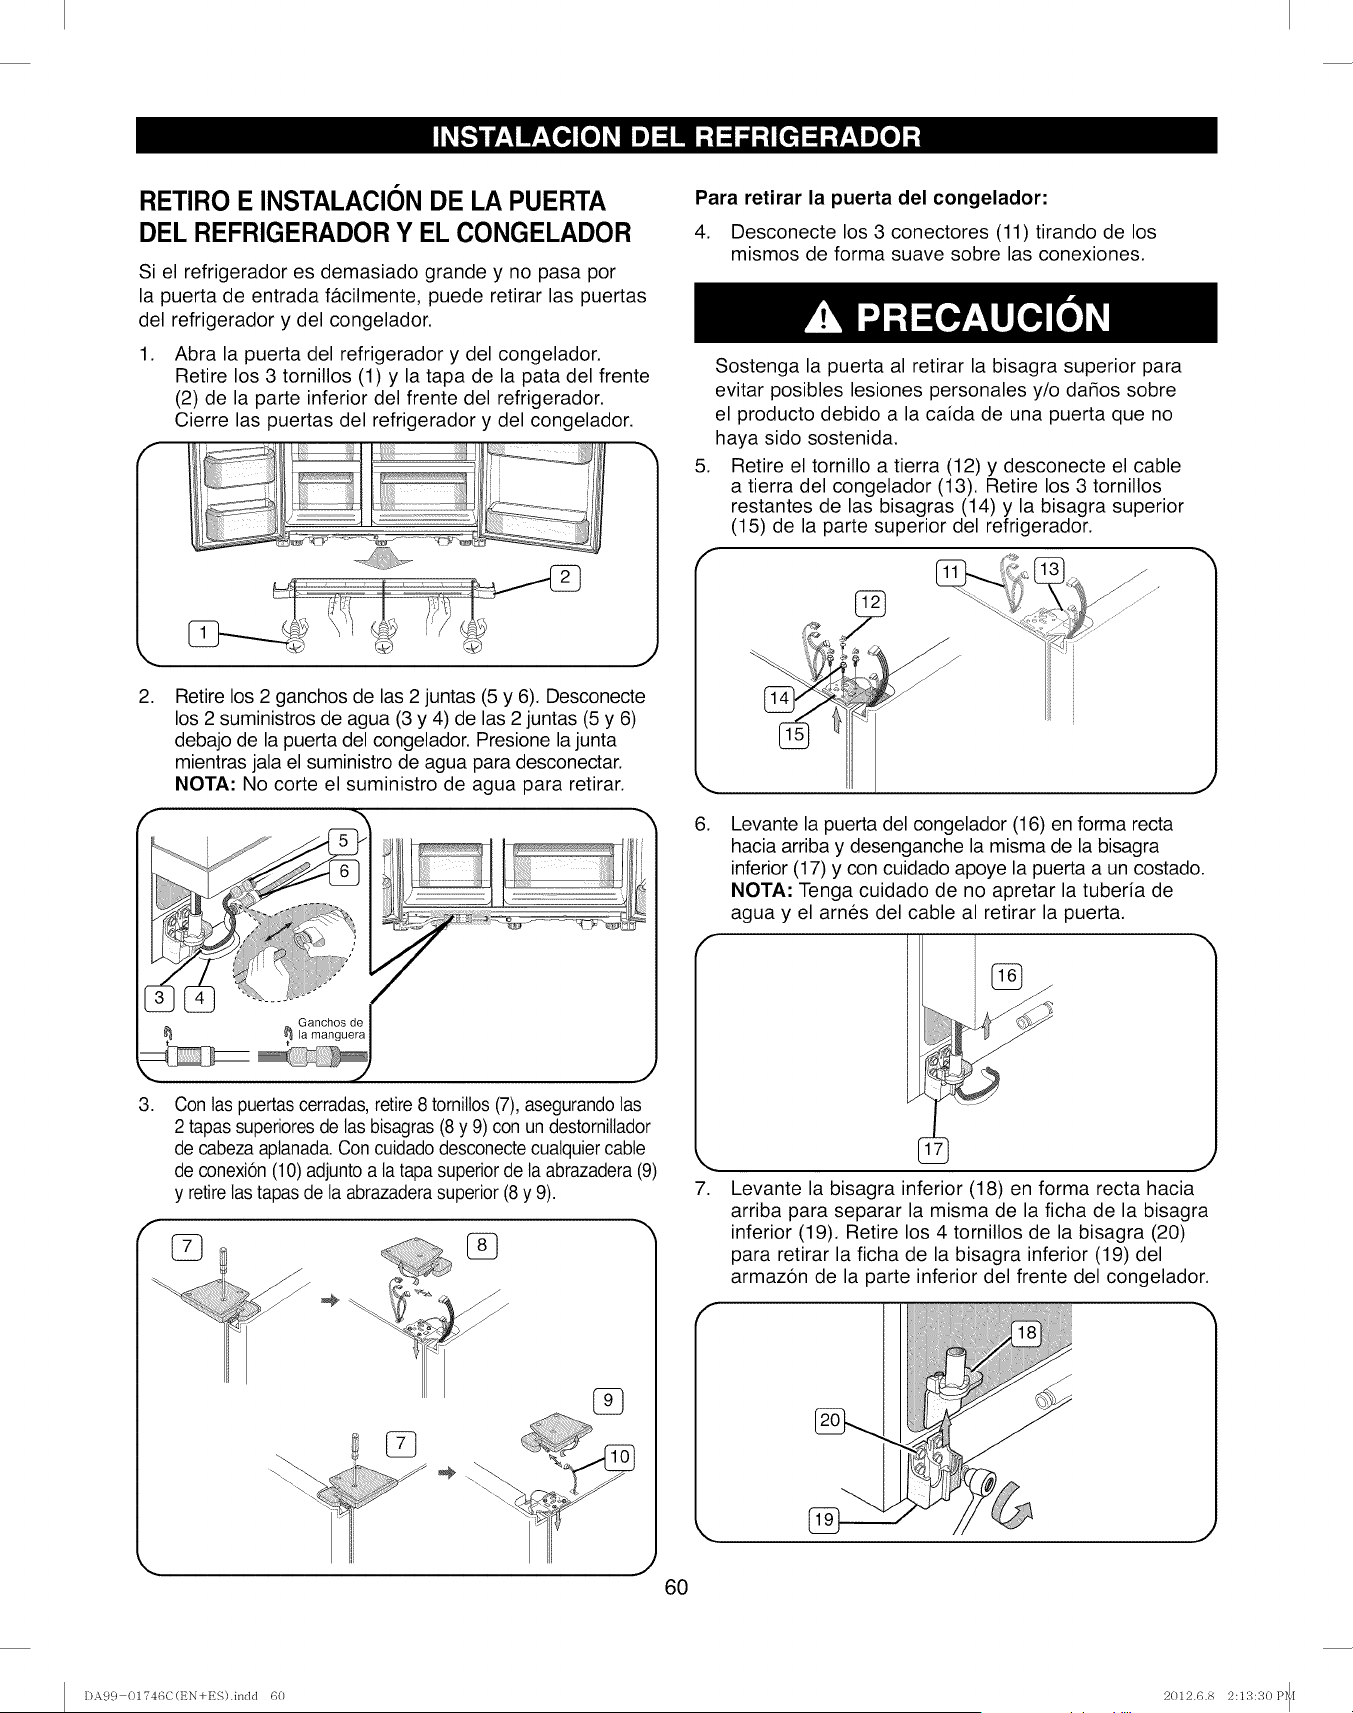
RETIRO E INSTALACION DE LA PUERTA
DEL REFRIGERADOR Y EL CONGELADOR
Si el refrigerador es demasiado grande y no pasa por
la puerta de entrada facilmente, puede retirar las puertas
del refrigerador y del congelador.
1. Abra la puerta del refrigerador y del congelador.
Retire los 3 tornillos (1) y la tapa de la pata del frente
(2) de la parte inferior del frente del refrigerador.
Cierre las puertas del refrigerador y del congelador.
il _ii]iiii!i iiiiiiili
2.
J
Retire los 2 ganchos de las 2 juntas (5 y 6). Desconecte
los 2 suministros de agua (3 y 4) de las 2 juntas (5 y 6)
debajo de la puerta del congelador. Presione la junta
mientras jala el suministro de agua para desconectar.
NOTA: No corte el suministro de agua para retirar.
IG_nChgSdr e
J
,Con las puertascerradas,retire8 tomittos(7), asegurandolas
2 tapassuperioresde las bisagras (8 y 9) con un destornillador
de cabezaaptanada.Con cuidadodesconectecualquiercable
de conexion(10)adjuntoa latapa superiorde laabrazadera(9)
y retirelas tapasde la abrazaderasuperior (8 y 9).
°7
,J
6O
Para retirar la puerta del congelador:
4. Desconecte los 3 conectores (11) tirando de los
mismos de forma suave sobre las conexiones.
,
Sostenga la puerta al retirar la bisagra superior para
evitar posibles lesiones personales y/o da_os sobre
el producto debido a la caida de una puerta que no
haya sido sostenida.
Retire el tornillo a tierra (12) y desconecte el cable
a tierra del congelador (13). Retire los 3 tornillos
restantes de las bisagras (14) y la bisagra superior
(15) de la parte superior del refrigerador.
6.
,
J
Levante la puerta del congelador (16) en forma recta
hacia arriba y desenganche la misma de la bisagra
inferior (17) y con cuidado apoye la puerta a un costado.
NOTA: Tenga cuidado de no apretar la tuberia de
agua y el arnes del cable al retirar la puerta.
J
Levante la bisagra inferior (18) en forma recta hacia
arriba para separar la misma de la ficha de la bisagra
inferior (19). Retire los 4 tornillos de la bisagra (20)
para retirar la ficha de la bisagra inferior (19) del
armazon de la parte inferior del frente del congelador.
I)A99 01746C(EN+ES).indd 60 2012.6.8 2:13:30 P_i
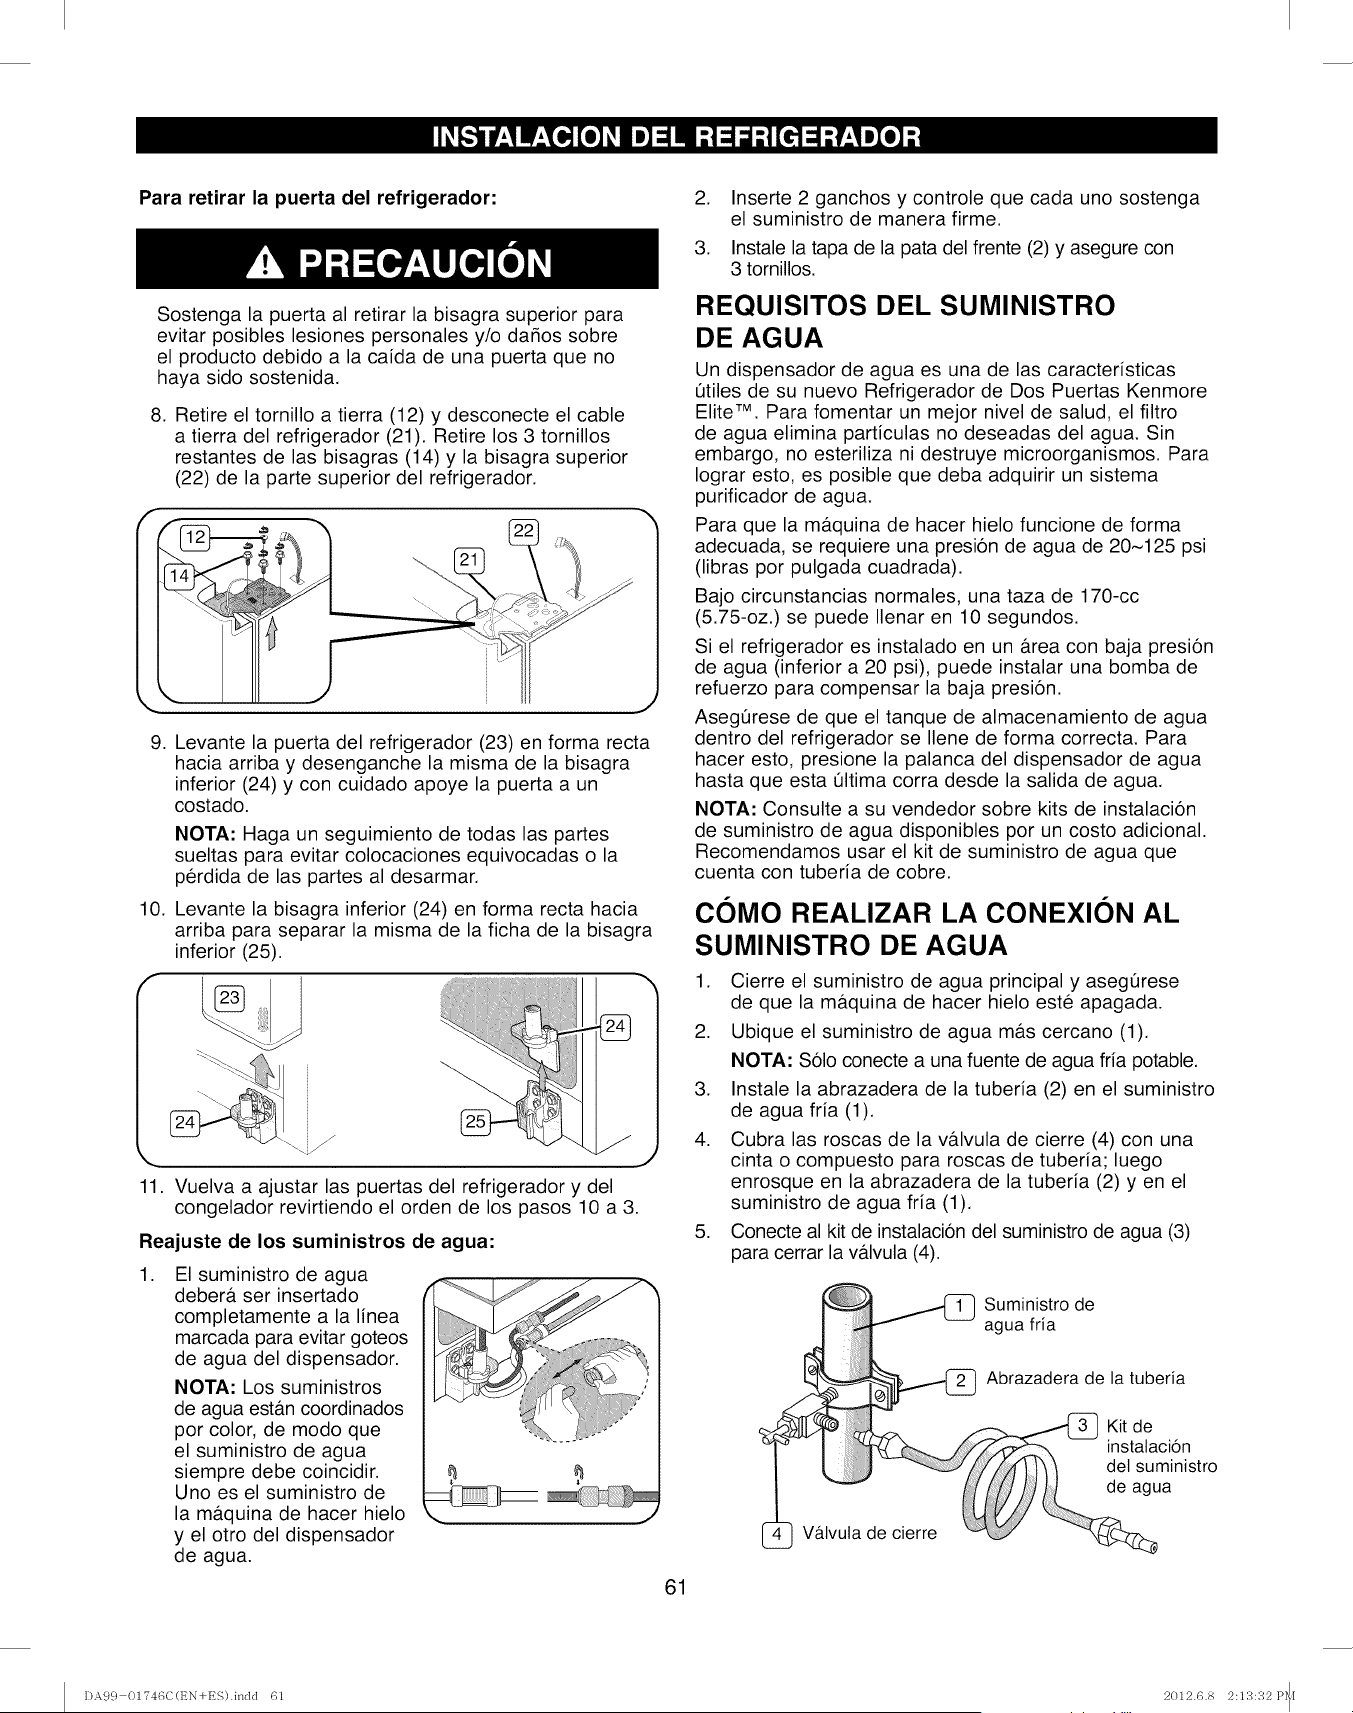
Para retirar la puerta del refrigerador:
Sostenga la puerta al retirar la bisagra superior para
evitar posibles lesiones personales y/o da_os sobre
el producto debido a la caida de una puerta que no
haya sido sostenida.
8. Retire el tornillo a tierra (12) y desconecte el cable
a tierra del refrigerador (21). Retire los 3 tornillos
restantes de las bisagras (14) y la bisagra superior
(22) de la parte superior del refrigerador.
,
10.
f
Levante la puerta del refrigerador (23) en forma recta
hacia arriba y desenganche la misma de la bisagra
inferior (24) y con cuidado apoye la puerta a un
costado.
NOTA: Haga un seguimiento de todas las partes
sueltas para evitar colocaciones equivocadas o la
perdida de las partes al desarmar.
Levante la bisagra inferior (24) en forma recta hacia
arriba para separar la misma de la ficha de la bisagra
inferior (25).
11. Vuelva a ajustar las puertas del refrigerador y del
congelador revirtiendo el orden de los pasos 10 a 3.
Reajuste de los suministros de agua:
,El suministro de agua
deber#, ser insertado
completamente a la linea
marcada para evitar goteos
de agua del dispensador.
NOTA: Los suministros
de agua estb.n coordinados
por color, de modo que
el suministro de agua
siempre debe coincidir.
Uno es el suministro de
la mb.quina de hacer hielo
y el otro del dispensador
de agua.
M
61
,
3.
Inserte 2 ganchos y controle que cada uno sostenga
el suministro de manera firme.
Instale la tapa de la pata del frente (2) y asegure con
3 tornillos.
REQUISITOS DEL SUMINISTRO
DE AGUA
Un dispensador de agua es una de las caracteristicas
Otiles de su nuevo Refrigerador de Dos Puertas Kenmore
Elite TM. Para fomentar un mejor nivel de salud, el filtro
de agua elimina particulas no deseadas del agua. Sin
embargo, no esteriliza ni destruye microorganismos. Para
Iograr esto, es posible que deba adquirir un sistema
purificador de agua.
Para que la m&quina de hacer hielo funcione de forma
adecuada, se requiere una presion de agua de 20~125 psi
(libras por pulgada cuadrada).
Bajo circunstancias normales, una taza de 170-cc
(5.75-oz.) se puede Ilenar en 10 segundos.
Si el refrigerador es instalado en un &rea con baja presion
de agua (inferior a 20 psi), puede instalar una bomba de
refuerzo para compensar la baja presion.
AsegQrese de que el tanque de almacenamiento de agua
dentro del refrigerador se Ilene de forma correcta. Para
hacer esto, presione la palanca del dispensador de agua
hasta que esta Qltima corra desde la salida de agua.
NOTA: Consulte a su vendedor sobre kits de instalacion
de suministro de agua disponibles por un costo adicional.
Recomendamos usar el kit de suministro de agua que
cuenta con tuberia de cobre.
COMO REALIZAR LA CONEXION AL
SUMINISTRO DE AGUA
1. Cierre el suministro de agua principal y asegQrese
de que la m&quina de hacer hielo este apagada.
2. Ubique el suministro de agua m&s cercano (1).
NOTA: Solo conecte a una fuente de agua fria potable.
3. Instale la abrazadera de la tuberia (2) en el suministro
de agua fria (1).
4. Cubra las roscas de la v&lvula de cierre (4) con una
cinta o compuesto para roscas de tuberia; luego
enrosque en la abrazadera de la tuberia (2) yen el
suministro de agua fria (1).
5. Conecte al kit de instalacion del suministro de agua (3)
para cerrar la v&lvula (4).
Suministro de
agua fria
Abrazadera de la tuberia
Vb.lvula de cierre
Kit de
instatacion
det suministro
de agua
DA99 01746C(EN+ES).indd 61 2012.6.8 2:13:32 P_f
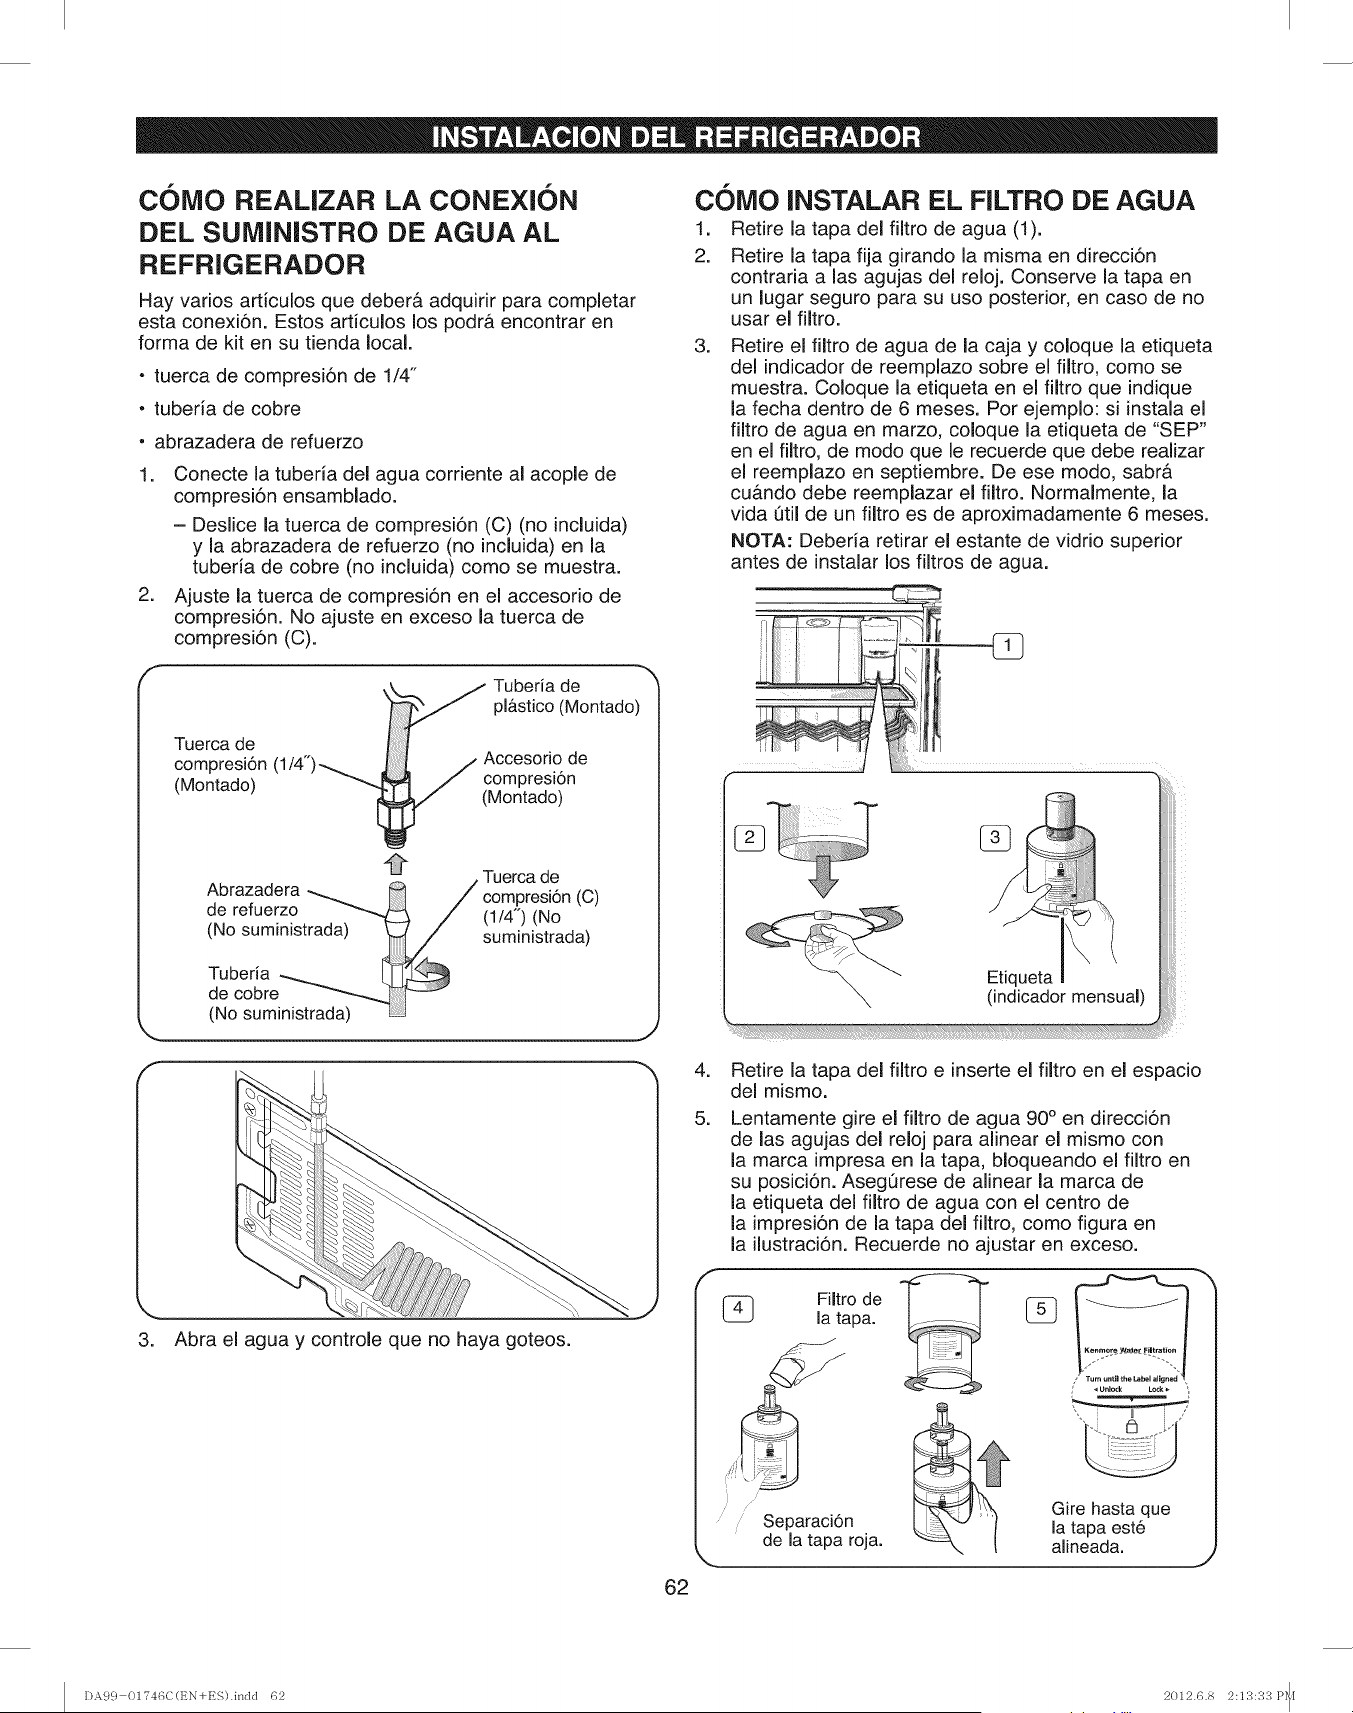
C()MO REALIZAR LA CONEXION
DEL SUMiNISTRO DE AGUA AL
REFRIGERADOR
Hay varios articulos que deber& adquirir para comp(etar
esta conexi6n. Estos articulos los podr& encontrar en
forma de kit en su tienda local.
-tuerca de compresi6n de 1/4"
- tuberia de cobre
• abrazadera de refuerzo
1. Conecte la tuberia de( agua corriente al acopie de
compresi6n ensamblado.
- Deslice (a tuerca de compresi6n (C) (no incluida)
y la abrazadera de refuerzo (no incluida) en la
tuberia de cobre (no incluida) como se muestra.
2. Ajuste (a tuerca de compresi6n en el accesorio de
compresi6n. No ajuste en exceso la tuerca de
compresi6n (C).
Tuerca de
compresi6n
(Montado)
_/ TiUbstec_(d_ontado)
(1/4") ( ( ,- Accesorio de
ompresiSn
[_ (Montado)
A_Tuercade
Abrazadera __ /compresi6n(C)
ae reTuerzo 1/4" N^
.. ( )(u
(No sumin_strada) suministrada)
Tuberia
de cobre
(No suministrada) LJ
3. Abra el agua y controle que no haya goteos.
62
COlViO (NSTALAR EL F(LTRO DE AGUA
t. Retire la tapa de( filtro de agua (1).
2. Retire la tapa fija girando la misma en direcci6n
contraria alas agujas del reloj. Conserve la tapa en
un lugar seguro para su uso posterior, en caso de no
usar el filtro.
=Retire el filtro de agua de la caja y coloque la etiqueta
del indicador de reemplazo sobre el filtro, como se
muestra. Coloque la etiqueta en el filtro que indique
la fecha dentro de 6 meses. Por ejemplo: si instala el
fi(tro de agua en marzo, co(oque la etiqueta de "SEP"
en el filtro, de modo que le recuerde que debe realizar
el reemplazo en septiembre. De ese modo, sabr&
cu&ndo debe reempiazar el filtro. Normalmente, la
vida Qti( de un filtro es de aproximadamente 6 meses.
NOTA: Deberia retirar el estante de vidrio superior
antes de instalar los filtros de agua.
Etiqueta
(indicador mensual)
=
5.
Retire la tapa del filtro e inserte el fiitro en el espacio
del mismo.
Lentamente gire el filtro de agua 90 °en direcci6n
de las agujas del reloj para alinear el mismo con
la marca impresa en la tapa, bloqueando el filtro en
su posici6n. AsegQrese de alinear la marca de
la etiqueta del fiitro de agua con el centro de
la impresi6n de la tapa del filtro, como figura en
la ilustraci6n. Recuerde no ajustar en exceso.
(_ Filtro de
la tapa.
i
Separaci6n
de la tapa roja.
_h
C;:EC:I!iI
U_lod_ L_k
, ==='="_="=_
, i m i
Gire hasta que
la tapa este
alineada. .,2
DA99 01746C(t_N+ES).indd 62 2012.6.8 2:13:33 P_I

Retire cualquier materia residual dentro del
suministro de agua luego de instalar el filtro
de agua.
1. Enchufe el cable de corriente del refrigerador en un
tomacorriente con conexion a tierra de 3 patas.
2. Encienda el suministro de agua principal y encienda
la valvula del suministro de agua.
3. Deje correr 3 galones (11.4 libros) de agua a traves
del dispensador (aproximadamente 6 minutos). Esto
elimina cualquier contaminante y purga cualquier
resto de aire que haya en el suministro de agua.
4. Es posible que se requiera volver a dejar correr agua
en algunos hogares.
5. Abra la puerta del refrigerador y asegQrese de que no
haya goteos de agua provenientes del filtro de agua.
--Agua
NOTA: AsegQrese de dejar correr 3 galones (11.4 litros)
durante aproximadamente 6 minutos. Esto purga cualquier
resto de aire que haya en el suministro de agua, el cual
pudiera hacer que el dispensador gotee.
Controle la cantidad de agua suministrada a
la maquina de hacer hielo.
,
2.
Abra la puerta de congelador.
Mueva la tapa de la ma.quina de hacer hielo hacia
arriba y afuera para retirar la misma de la puerta
del congelador.
,
• Le tomara algunos minutos Ilenar de agua la
maquina de hacer hielo.
• No presione el boton de prueba de forma continua
cuando la bandeja este Ilena de hielo o agua. Se
podra derramar agua o atascar el hielo.
• Cuando el cubo no est#. instalado, la maquina
de hacer hielo no funciona.
Si la funcion ICE OFF (sin hielo) parpadea en el
panel de LCD, reinserte el cubo y/o asegQrese
de que este instalado de forma adecuada.
Mantenga presionado el boton de prueba de la
maquina de hacer hielo por 3 segundos. La mb.quina
de hacer hielo Ilenara de forma automatica el grifo
de agua provisto. Una vez que la hielera se termino
de Ilenar, asegQrese de que la cantidad de agua sea
la correcta.
Boton de prueba
Controte el nivel
de ua
h
,
Si el nivel de agua es demasiado bajo, los cubos de
hielo seran pequehos. Comuniquese con un plomero
para incrementar la presion de agua del refrigerador.
Reemplace la tapa de la maquina de hacer hielo y
cierre la puerta del congelador.
63
DA99 01746C(EN+ES).indd 63 2012.6.8 2:13:34 P_f
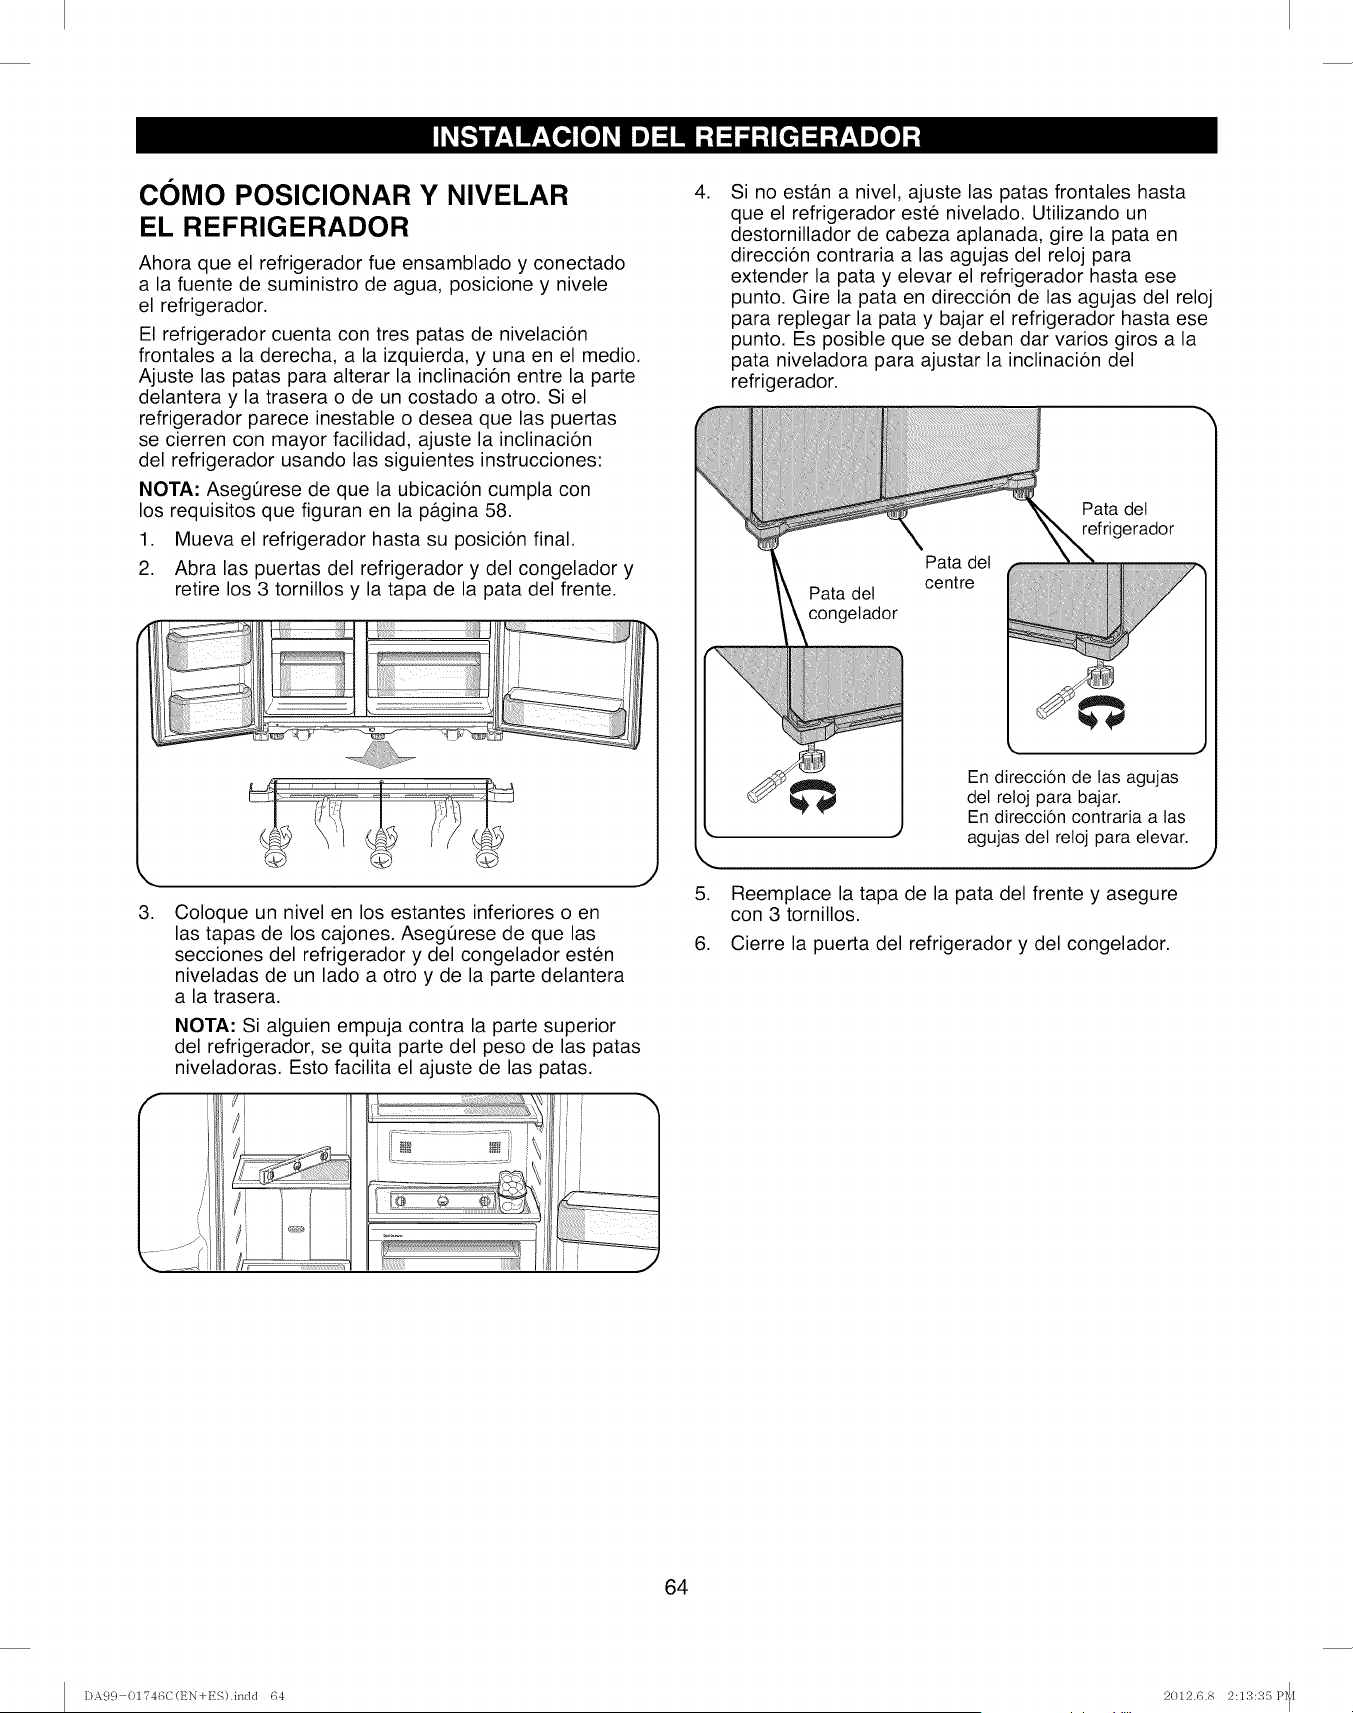
COMO POSIClONAR Y NIVELAR
EL REFRIGERADOR
Ahora que el refrigerador fue ensamblado y conectado
a la fuente de suministro de agua, posicione y nivele
el refrigerador.
El refrigerador cuenta con tres patas de nivelacion
frontales a la derecha, a la izquierda, y una en el medio.
Ajuste las patas para alterar la inclinacion entre la parte
delantera y la trasera o de un costado a otro. Si el
refrigerador parece inestable o desea que las puertas
se cierren con mayor facilidad, ajuste la inclinacion
del refrigerador usando las siguientes instrucciones:
NOTA: Asegt_rese de que la ubicacion cumpla con
los requisitos que figuran en la pagina 58.
1. Mueva el refrigerador hasta su posicion final.
2. Abra las puertas del refrigerador y del congelador y
retire los 3 tornillos y la tapa de la pata del frente.
k.
3.
J
Coloque un nivel en los estantes inferiores o en
las tapas de los cajones. AsegQrese de que las
secciones del refrigerador y del congelador esten
niveladas de un lado a otro y de la parte delantera
a la trasera.
NOTA: Si alguien empuja contra la parte superior
del refrigerador, se quita parte del peso de las patas
niveladoras. Esto facilita el ajuste de las patas.
/
i
7\
..... J_ /'i
if
i
,Si no estan a nivel, ajuste las patas frontales hasta
que el refrigerador este nivelado. Utilizando un
destornillador de cabeza aplanada, gire la pata en
direccion contraria alas agujas del reloj para
extender la pata y elevar el refrigerador hasta ese
punto. Gire la pata en direccion de las agujas del reloj
para replegar la pata y bajar el refrigerador hasta ese
punto. Es posible que se deban dar varios giros a la
pata niveladora para ajustar la inclinacion del
refrigerador.
Pata del
centre
Pata del
refrigerador
5.
En direccion de las agujas
det reloj para bajar.
En direccion contraria a tas
agujas del reloj para elevar.
Reemplace la tapa de la pata del frente y asegure
con 3 tornillos.
6. Cierre la puerta del refrigerador y del congelador.
J
64
DA99 01746C(EN+ES).indd 64 2012.6.8 2:13:35 P_f
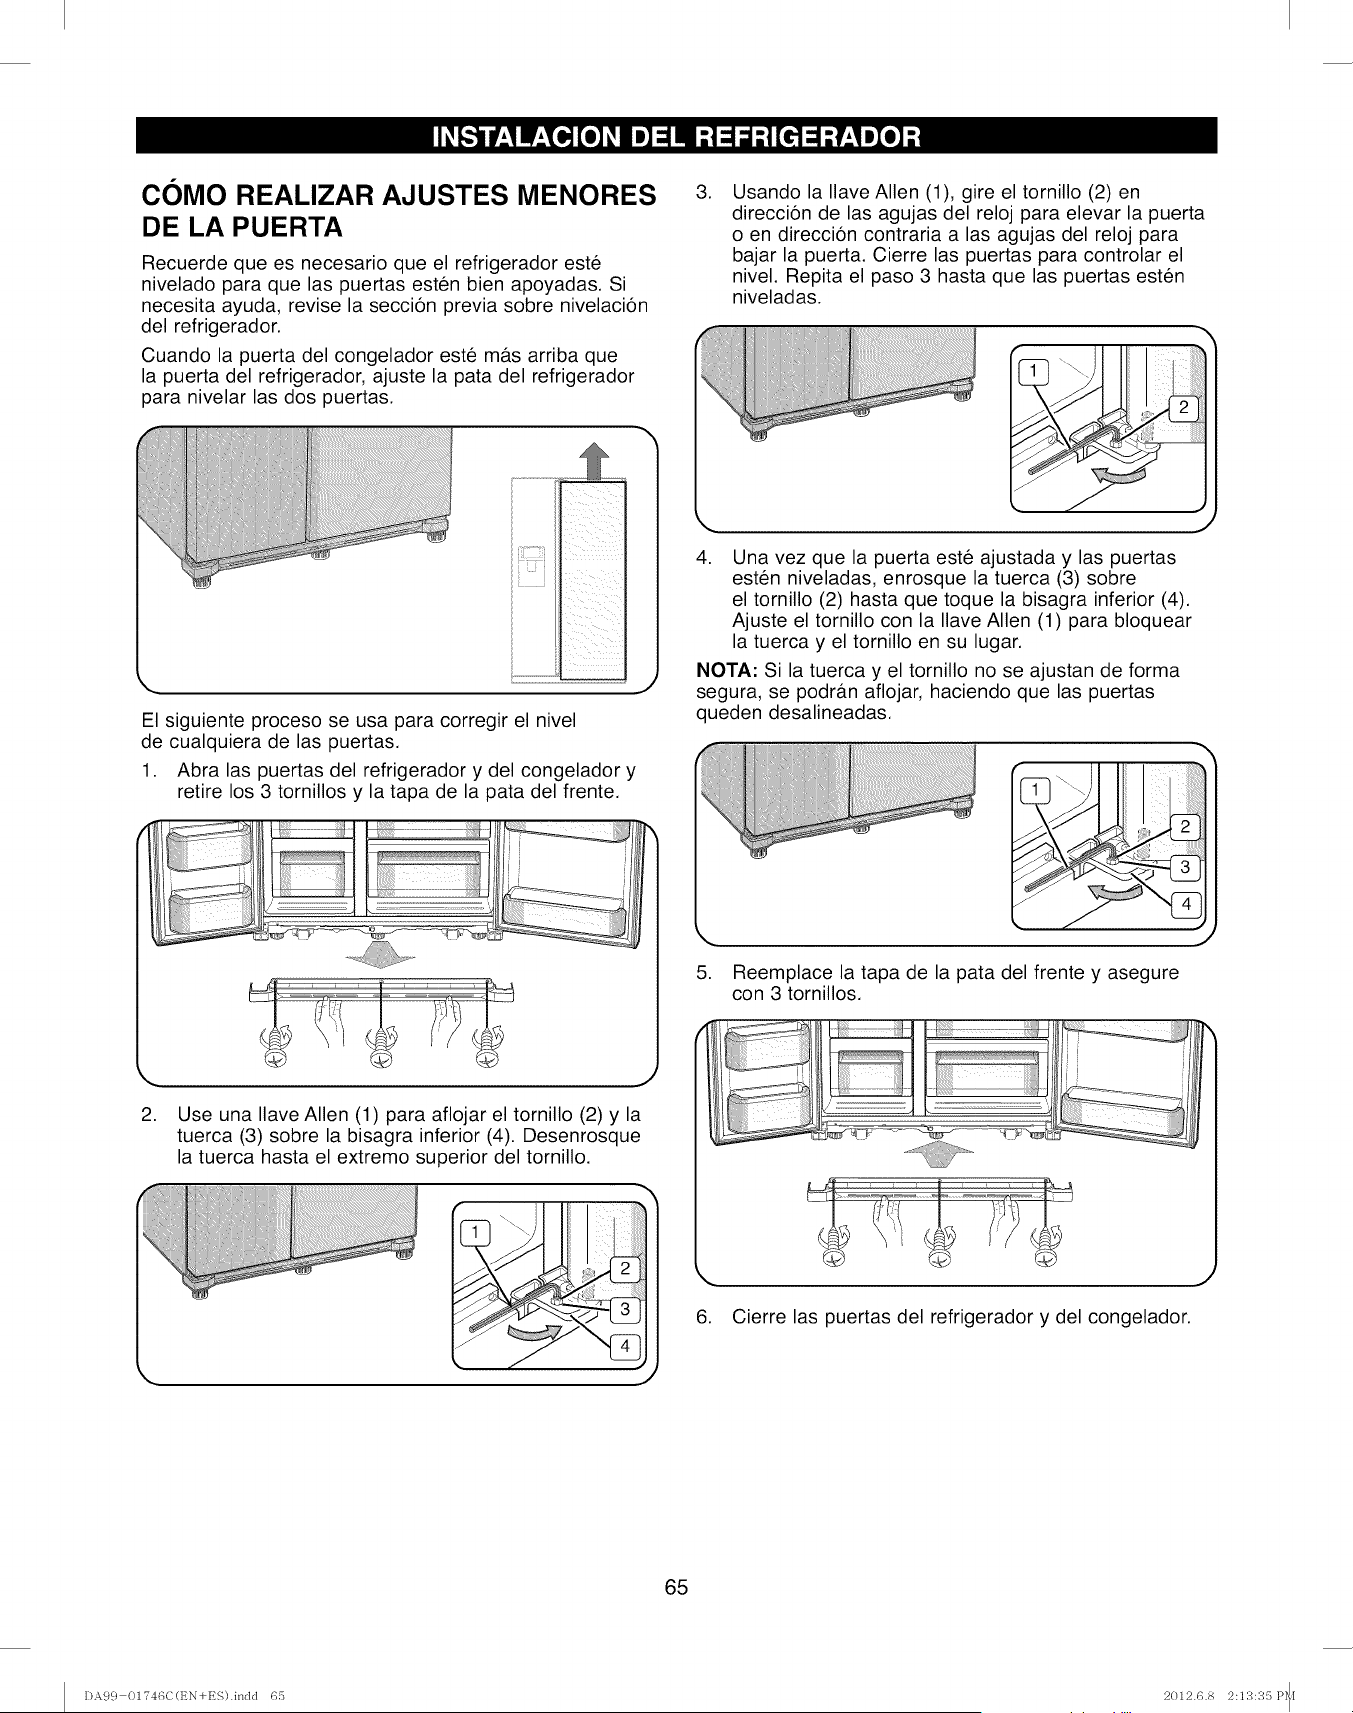
COMO REALIZAR AJUSTES MENORES
DE LA PUERTA
Recuerde que es necesario que el refrigerador est6
nivelado para que las puertas esten bien apoyadas. Si
necesita ayuda, revise la seccion previa sobre nivelacion
del refrigerador.
Cuando la puerta del congelador este mb.s arriba que
la puerta del refrigerador, ajuste la pata del refrigerador
para nivelar las dos puertas.
,Usando la Ilave Allen (1), gire el tornillo (2) en
direccion de las agujas del reloj para elevar la puerta
o en direccion contraria a las agujas del reloj para
bajar la puerta. Cierre las puertas para controlar el
nivel. Repita el paso 3 hasta que las puertas esten
niveladas.
El siguiente proceso se usa para corregir el nivel
de cualquiera de las puertas.
1. Abra las puertas del refrigerador y del congelador y
retire los 3 tornillos y la tapa de la pata del frente.
k,,. j
2. Use una Ilave Allen (1) para aflojar el tornillo (2) y la
tuerca (3) sobre la bisagra inferior (4). Desenrosque
la tuerca hasta el extremo superior del tornillo.
I
4. Una vez que la puerta este ajustada y las puertas
esten niveladas, enrosque la tuerca (3) sobre
el tornillo (2) hasta que toque la bisagra inferior (4).
Ajuste el tornillo con la Ilave Allen (1) para bloquear
la tuerca y el tornillo en su lugar.
NOTA: Si la tuerca y el tornillo no se ajustan de forma
segura, se podran aflojar, haciendo que las puertas
queden desalineadas.
5. Reemplace la tapa de la pata del frente y asegure
con 3 tornillos.
6. Cierre las puertas del refrigerador y del congelador.
J
J
65
DA99 01746C(EN+ES).indd 65 2012.6.8 2:13:35 P_f
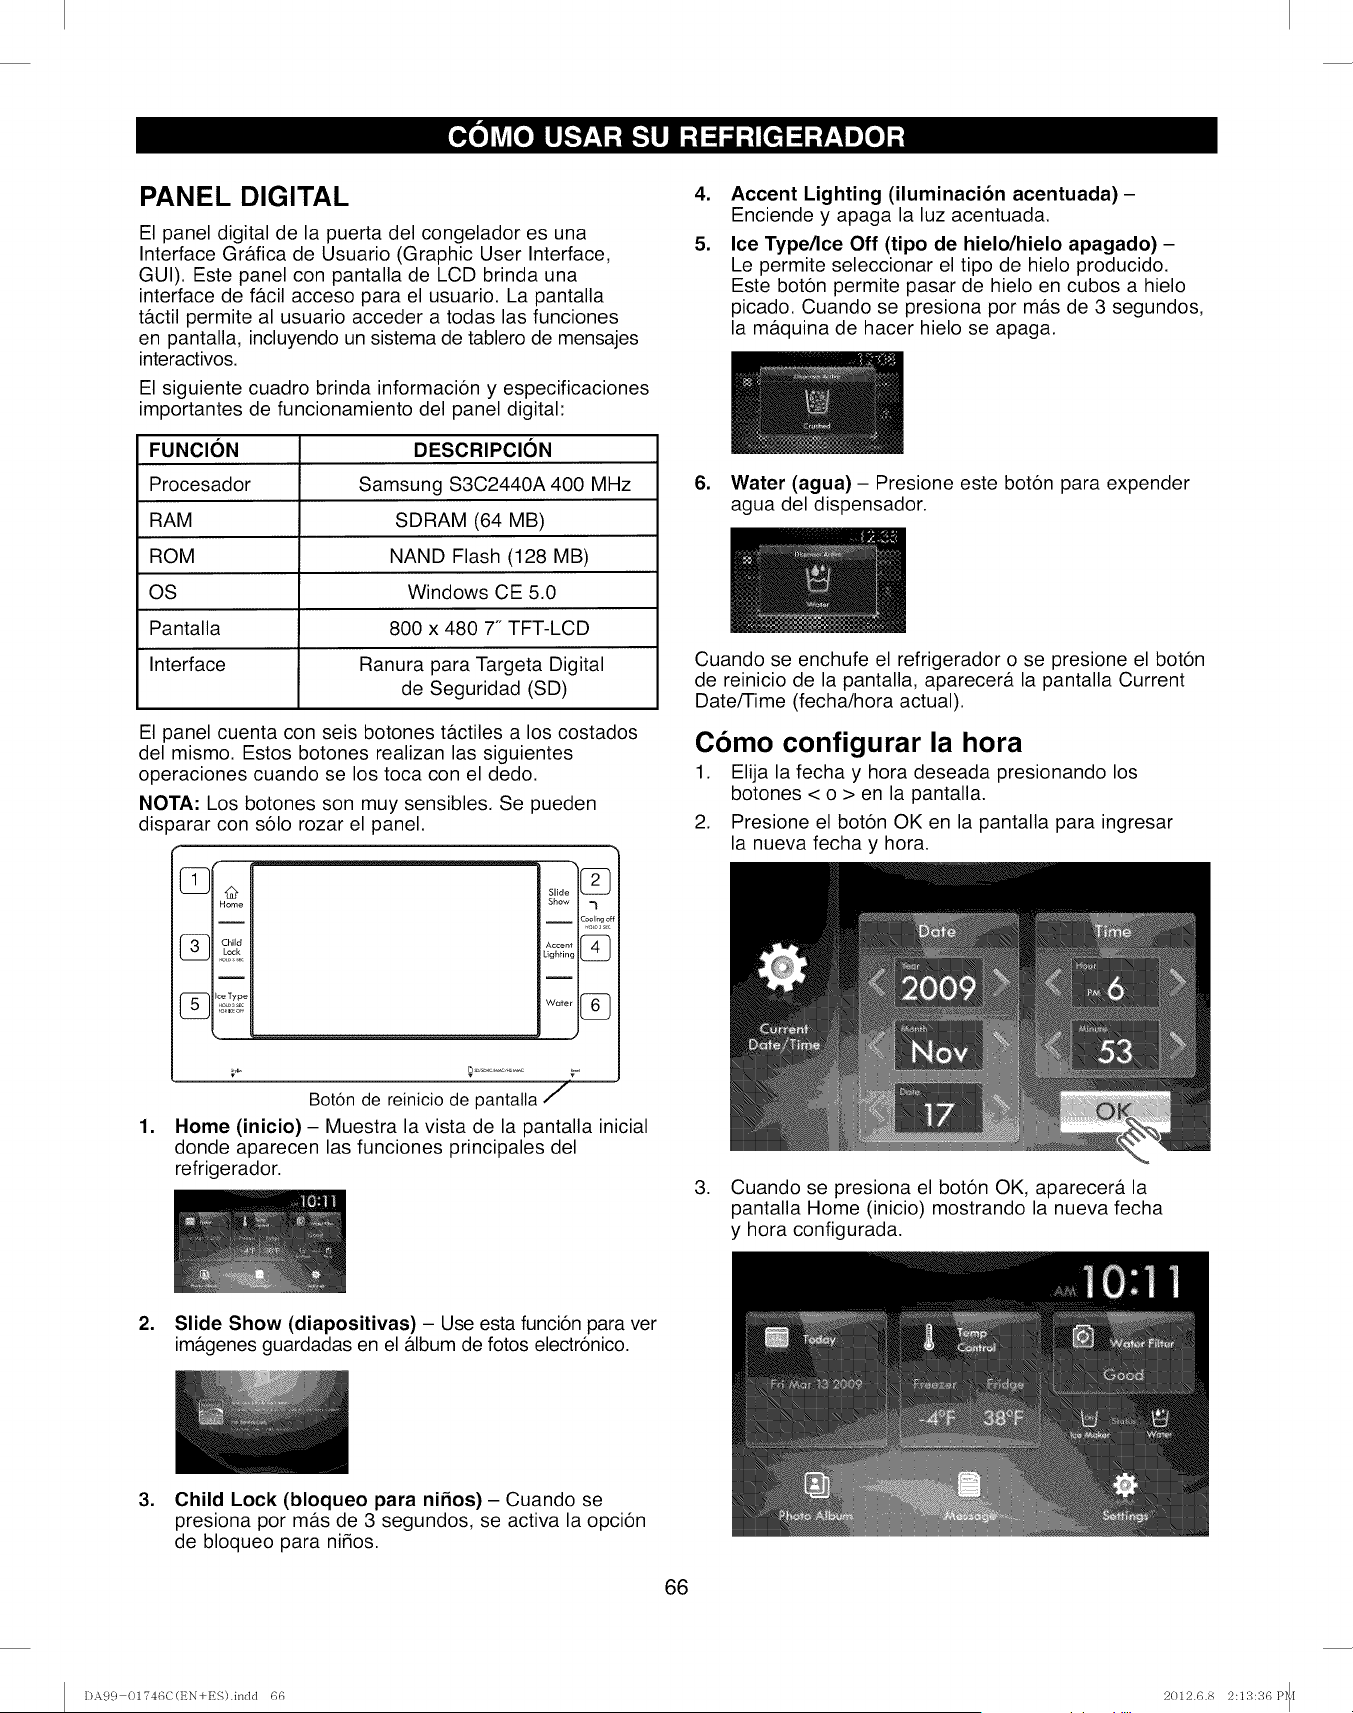
PANEL DIGITAL
El panel digital de la puerta del congelador es una
Interface Gr&fica de Usuario (Graphic User Interface,
GUI). Este panel con pantalla de LCD brinda una
interface de facil acceso para el usuario. La pantalla
tactil permite al usuario acceder a todas las funciones
en pantalla, incluyendo un sistema de tablero de mensajes
interactivos.
El siguiente cuadro brinda informacion y especificaciones
importantes de funcionamiento del panel digital:
FUNCION
Procesador
RAM
ROM
OS
Pantalla
Interface
DESCRIPClON
Samsung S3C2440A 400 MHz
SDRAM (64 MB)
NAND Flash (128 MB)
Windows CE 5.0
800 x 480 7" TFT-LCD
Ranura para Targeta Digital
de Seguridad (SD)
El panel cuenta con seis botones t&ctiles a los costados
del mismo. Estos botones realizan las siguientes
operaciones cuando se los toca con el dedo.
NOTA: Los botones son muy sensibles. Se pueden
dis)arar con solo rozar el panel.
Boton de reinicio de pantalta /
1. Home (inicio} - Muestra la vista de la pantalla inicial
donde aparecen las funciones principales del
refrigerador.
,
5.
Accent Lighting (iluminacion acentuada) -
Enciende y apaga la luz acentuada.
Ice Type/Ice Off (tipo de hielo/hielo apagado) -
Le permite seleccionar el tipo de hielo producido.
Este boton permite pasar de hielo en cubos a hielo
picado. Cuando se presiona por m&s de 3 segundos,
la maquina de hacer hielo se apaga.
6. Water (agua) - Presione este boton para expender
agua del dispensador.
Cuando se enchufe el refrigerador o se presione el boton
de reinicio de la pantalla, aparecer& la pantalla Current
Date/Time (fecha/hora actual).
Como configurar la hora
1. Elija la fecha y hora deseada presionando los
botones < o > en la pantalla.
2. Presione el boton OK en la pantalla para ingresar
la nueva fecha y hora.
3. Cuando se presiona el boton OK, aparecer& la
pantalla Home (inicio) mostrando la nueva fecha
y hora configurada.
2. Slide Show (diapositivas) - Use esta funcion para ver
im&genes guardadas en el &lbum de fotos electronico.
,Child Lock (bloqueo para nifios) - Cuando se
presiona por m&s de 3 segundos, se activa la opcion
de bloqueo para nidos.
66
DA99 01746C(t_N+ES).indd 66 2012.6.8 2:13:36 P_[
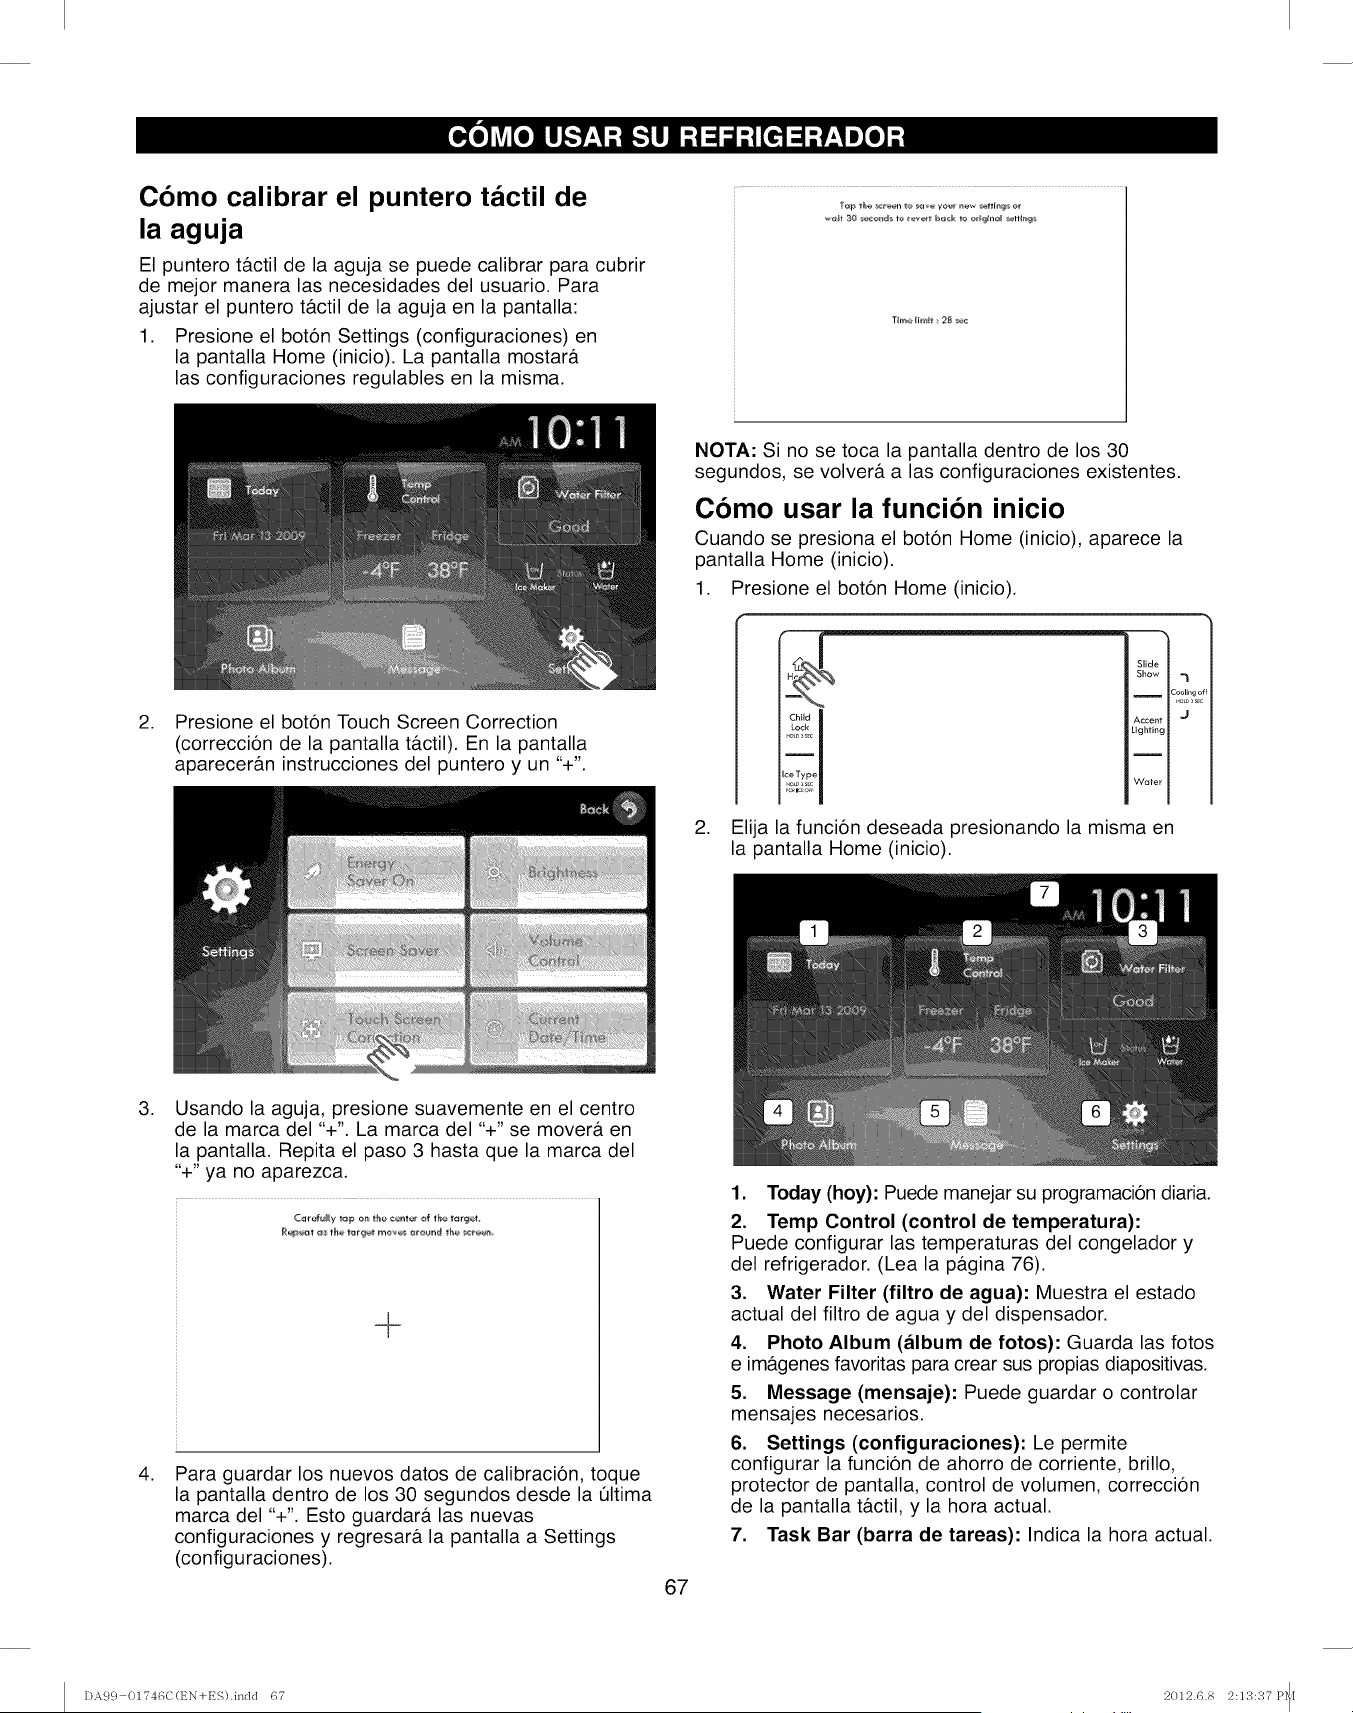
Como calibrar el puntero tactil de
la aguja
El puntero t&ctil de la aguja se puede calibrar para cubrir
de mejor manera las necesidades del usuario. Para
ajustar el puntero t&ctil de la aguja en la pantalla:
1. Presione el boton Settings (configuraciones) en
la pantalla Home (inicio). La pantalla mostar&
las configuraciones regulables en la misma.
T;me li_i_ 28 _ec
.Presione el boton Touch Screen Correction
(correccion de la pantalla t&ctil). En la pantalla
aparecer&n instrucciones del puntero y un "+".
NOTA: Si no se toca la pantalla dentro de los 30
segundos, se volver& alas configuraciones existentes.
Como usar la funcion inicio
Cuando se presiona el boton Home (inicio), aparece la
pantalla Home (inicio).
1. Presione el boton Home (inicio).
Child
Lock
_e I_oL_,s c
Slide
Show ,._
I 2_ling of_
Accent 'J
Lighting
Water
2. Elija la funcion deseada presionando la misma en
la pantalla Home (inicio).
.
.
Usando la aguja, presione suavemente en el centro
de la marca del "+". La marca del "+" se mover& en
la pantalla. Repita el paso 3 hasta que la marca del
"+" ya no aparezca.
_@@_ _ t_e t_g_t mev_ _reund the _reet_
Para guardar los nuevos datos de calibracion, toque
la pantalla dentro de los 30 segundos desde la Qltima
marca del "+". Esto guardar& las nuevas
configuraciones y regresar& la pantalla a Settings
(configuraciones).
67
1. Today (hoy): Puede manejar su programacion diaria.
2. Temp Control (control de temperatura):
Puede configurar las temperaturas del congelador y
del refrigerador. (Lea la p&gina 76).
3. Water Filter (filtro de agua): Muestra el estado
actual del filtro de agua y del dispensador.
4. Photo Album (album de fotos): Guarda las fotos
e im&genes favoritas para crear sus propias diapositivas.
5. Message (mensaje): Puede guardar o controlar
mensajes necesarios.
6. Settings (configuraciones): Le permite
configurar la funcion de ahorro de corriente, brillo,
protector de pantalla, control de volumen, correccion
de la pantalla t&ctil, y la hora actual.
7. Task Bar (barra de tareas): Indica la hora actual.
DA99 01746C(t_N+ES).indd 67 2012.6.8 2:13:37 P_I

Como usar las diapositivas
AI seleccionar Slide Show (diapositivas), se muestran
las im&genes que se guardaron en un &lbum de fotos
electr6nico. Para acceder a instrucciones sobre c6mo
configurar sus diapositivas, consulte la p&gina 82. Si
no se seleccionan diapositivas del &lbum de fotos, por
omisi6n la pantalla mostrar& una diapositiva de
Kenmore Elite TM.
1. Presione el boton Slide Show (diapositivas).
12
Home
Child
Lock
Ice Type
blJd" q
Accen_ j "_c
Lighting I
Water I
v v
,
NOTA: La opcion de muestra de fotos se puede
seleccionar en Photo Album (&lbum de fotos).
Presione el boton Exit (salir) para detener las
diapositivas y regresar a la pantalla Home (inicio).
- Dependiendo del tamado de las fotos, es posible
Como usar la funcion de bloqueo
para nlnos
Active la funcion de bloqueo para ni_os presionando y
sosteniendo el boton de Child Lock (bloqueo para ni_os)
por m&s de 3 segundos. Todos los botones del panel de
control, los controles de la pantalla t&ctil, y el dispensador
ser&n desactivados. Para reactivar los botones del
control, los controles de la pantalla tactil, y el
dispensador, mantenga presionado el boton Child Lock
(bloqueo para ni_os) por mas de 3 segundos.
1. Mantenga presionado el boton Child Lock (bloqueo
3ara ni_os) por m&s de 3 segundos.
Slide
Show -_
I2ool_ngoff
Accerff "_
Lighting
Water
2. Aparecera el mensaje de Child Lock Activado (control
para ni_os activado) y el icono de bloqueo tambien
aparecera en la esquina superior derecha.
que haya un fondo negro alrededor de las mismas.
- La foto es optimizada autom&ticamente en un
formato de pantalla grande de 16:9.
NOTA: Las imagenes
guardadas se pueden ampliar
o invertir. Para usar una
imagen en reverso,
descargue la misma en su
PC, gire en forma horizontal,
y luego guarde la misma
antes de cargarla en el &lbum
de fotos.
,Mantenga presionado el boton Child Lock (bloqueo
para ni_os) por mas de 3 segundos para desactivar la
funcion de bloqueo para ni_os y reactivar todos los
controles de funcionamiento. Aparecer& el mensaje
Child Lock Deactivated (control para ni_os
desactivado) y el icono de bloqueo desaparecera.
Ho_me
Chilli
Slide
Show =_
2oollng_
Accent "J
Lighting
Water
68
DA99 01746C(t_N+ES).indd 68 2012.6.8 2:13:37 P_[
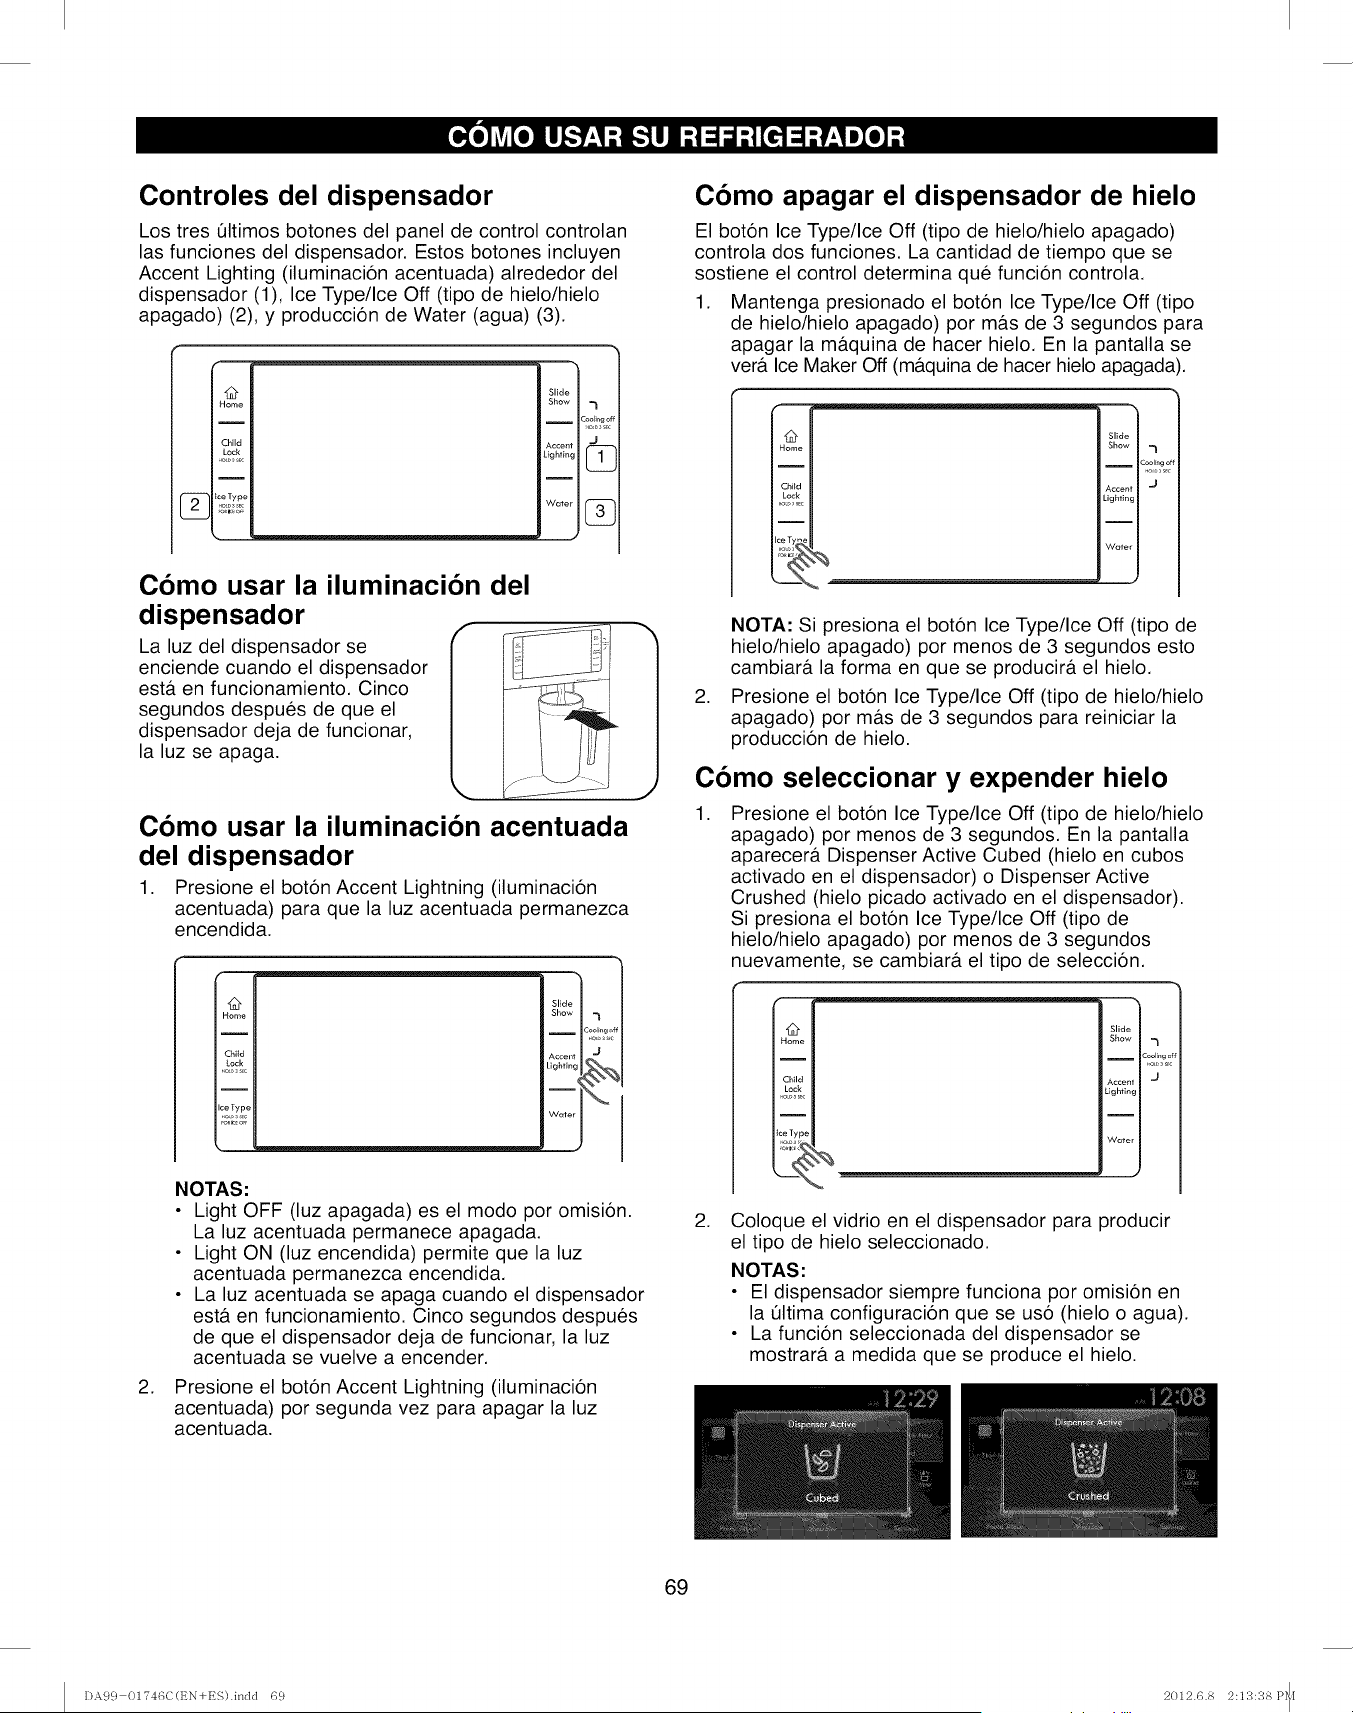
Controles del dispensador
Los tres Qltimos botones del panel de control controlan
las funciones del dispensador. Estos botones incluyen
Accent Lighting (iluminaci6n acentuada) alrededor del
dispensador (1), Ice Type/Ice Off (tipo de hielo/hielo
apagado) (2), y producci6n de Water (agua) (3).
@
Home
I
Child
Lock
Slide
Show -_
Accent J
Lighting _
Como usar la iluminacion del
dispensador r
La luz del dispensador se
enciende cuando el dispensador
esta. en funcionamiento. Cinco
segundos despues de que el
dispensador deja de funcionar,
la luz se apaga.
Como usar la iluminaci6n acentuada
del dispensador
1. Presione el boton Accent Lightning (iluminacion
acentuada) para que la luz acentuada permanezca
encendida.
@
Home
I
Child
Lock
i
ceType
.o_,,,c
Slide
Show
I
C
Accent
Lightingi
_
_
W{_ter
.
NOTAS:
• Light OFF (luz apagada) es el modo por omision.
La luz acentuada permanece apagada.
• Light ON (luz encendida) permite que la luz
acentuada permanezca encendida.
• La luz acentuada se apaga cuando el dispensador
estA en funcionamiento. Cinco segundos despues
de que el dispensador deja de funcionar, la luz
acentuada se vuelve a encender.
Presione el boton Accent Lightning (iluminacion
acentuada) por segunda vez para apagar la luz
acentuada.
J
Como apagar el dispensador de hielo
El boton Ice Type/Ice Off (tipo de hielo/hielo apagado)
controla dos funciones. La cantidad de tiempo que se
sostiene el control determina que funci6n controla.
1. Mantenga presionado el boton Ice Type/Ice Off (tipo
de hielo/hielo apagado) por m&s de 3 segundos para
apagar la mAquina de hacer hielo. En la pantalla se
verA Ice Maker Off (mAquina de hacer hielo apagada).
Slide
Show 7
ICooling c
Accent J
Lighting
Water
.
NOTA: Si presiona el boton Ice Type/Ice Off (tipo de
hielo/hielo apagado) por menos de 3 segundos esto
cambiarA la forma en que se producirA el hielo.
Presione el boton Ice Type/Ice Off (tipo de hielo/hielo
apagado) por m&s de 3 segundos para reiniciar la
produccion de hielo.
Como seleccionar y expender hielo
.Presione el boton Ice Type/Ice Off (tipo de hielo/hielo
apagado) por menos de 3 segundos. En la pantalla
aparecerA Dispenser Active Cubed (hielo en cubos
activado en el dispensador) o Dispenser Active
Crushed (hielo picado activado en el dispensador).
Si presiona el boton Ice Type/Ice Off (tipo de
hielo/hielo apagado) por menos de 3 segundos
nuevamente, se cambiarA el tipo de seleccion.
Child
L_k
_ce Ty 9
Slide I
Show I
Accent _ J
Lighting I
Ii
Water J
.Coloque el vidrio en el dispensador para producir
el tipo de hielo seleccionado.
NOTAS:
• El dispensador siempre funciona por omision en
la Qltima configuracion que se uso (hielo o agua).
• La funcion seleccionada del dispensador se
mostrarA a medida que se produce el hielo.
69
DA99 01746C(t_N+ES).incld 69 2012.6.8 2:13:38 P_I
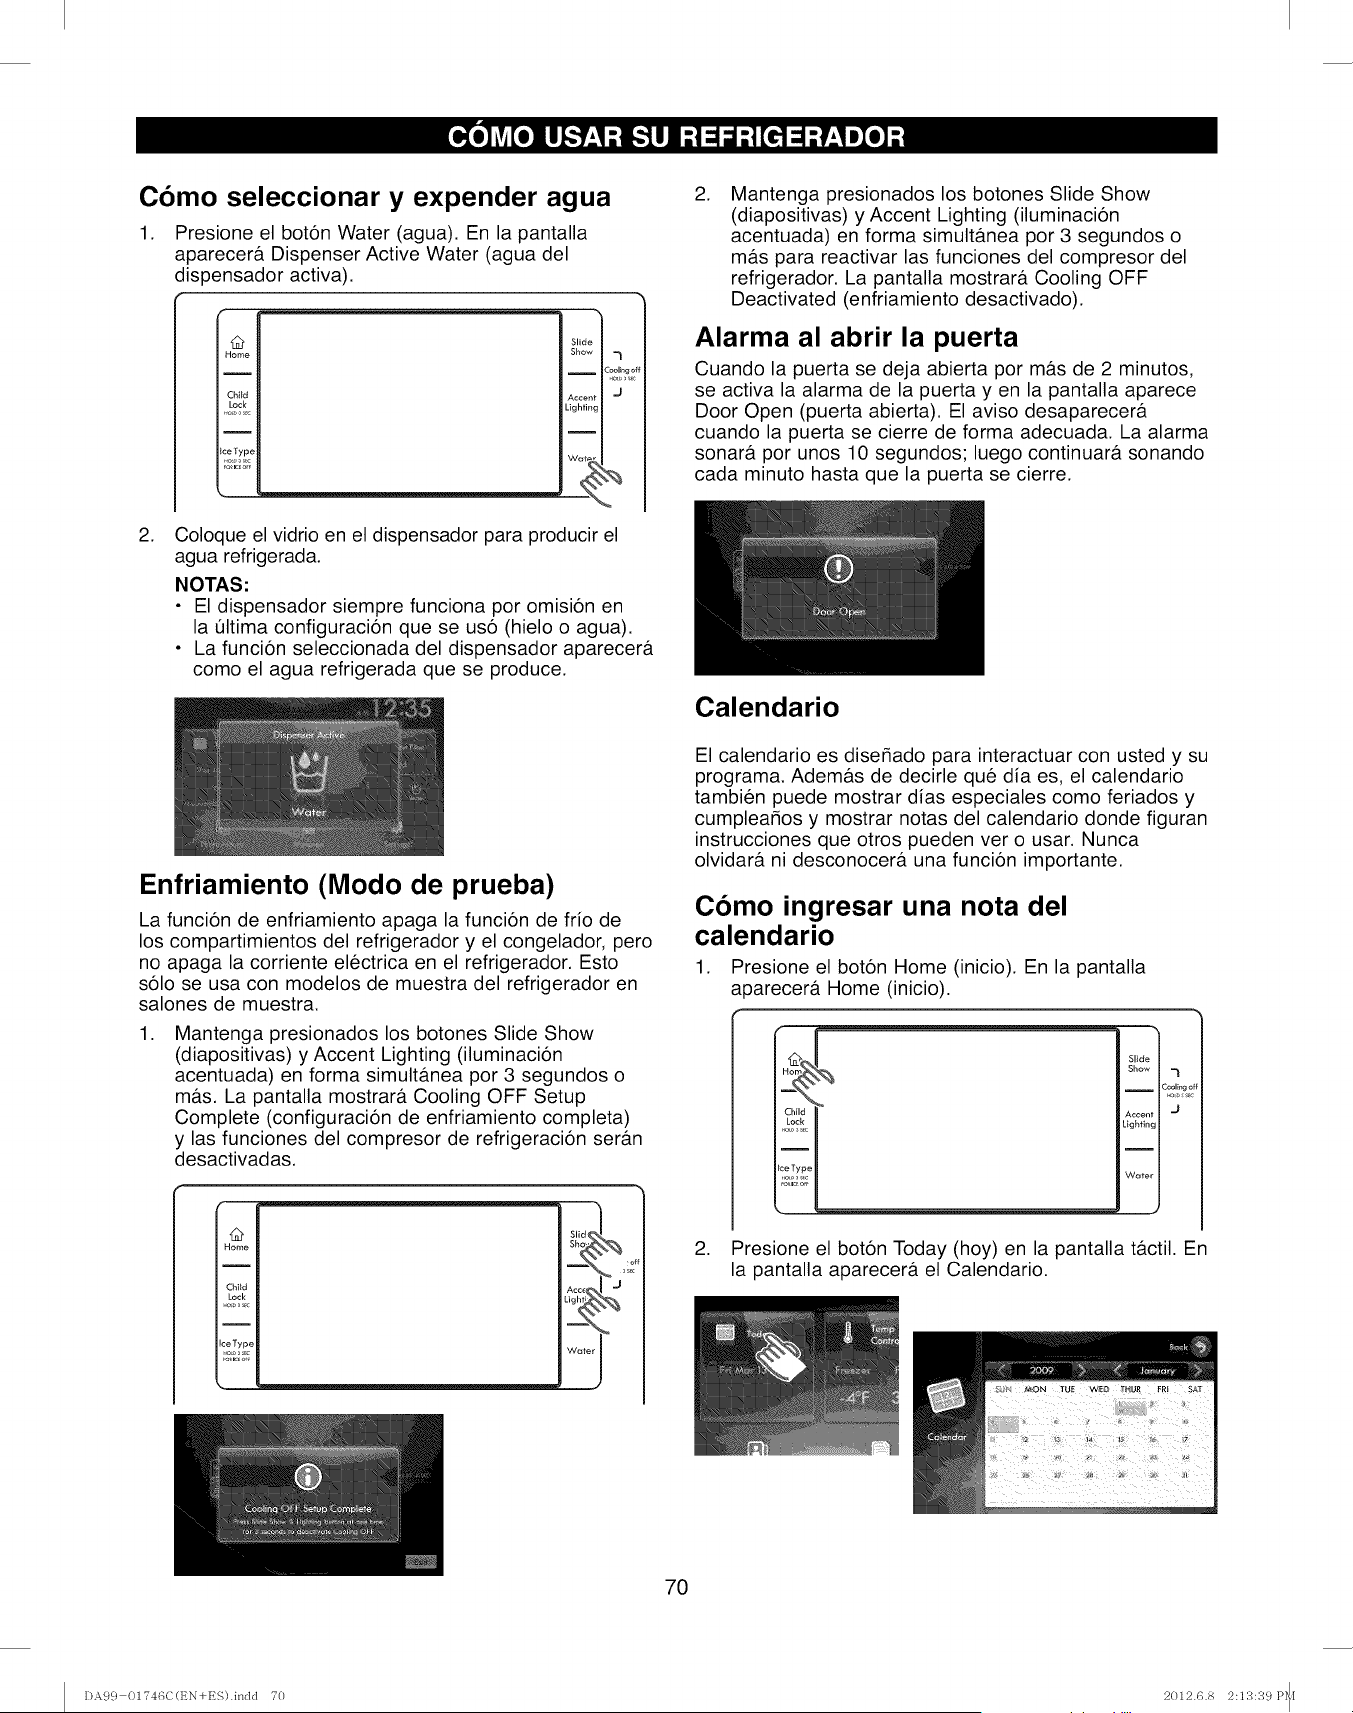
Como seleccionar y expender agua
1. Presione el boton Water (agua). En la pantalla
aparecera. Dispenser Active Water (agua del
dispensador activa).
.
@
Home
Child
Lock
I
IceTyp¢
Slide
Show
I
¢ccen
ightin
I
Wat_
"3
Cool_ngc
Coloque el vidrio en el dispensador para producir el
agua refrigerada.
NOTAS:
• El dispensador siempre funciona por omision en
la Oltima configuracion que se uso (hielo o agua).
• La funcion seleccionada del dispensador aparecera
como el agua refrigerada que se produce.
Enfriamiento (Modo de prueba)
La funcion de enfriamiento apaga la funcion de frio de
los compartimientos del refrigerador y el congelador, pero
no apaga la corriente electrica en el refrigerador. Esto
solo se usa con modelos de muestra del refrigerador en
salones de muestra.
.Mantenga presionados los botones Slide Show
(diapositivas) y Accent Lighting (iluminacion
acentuada) en forma simultanea por 3 segundos o
ma.s. La pantalla mostrara Cooling OFF Setup
Complete (configuracion de enfriamiento completa)
y las funciones del compresor de refrigeracion seran
desactivadas.
@
Home
Child
Lock
I
IceType
a_K,o
_ _ 3i_°
.Mantenga presionados los botones Slide Show
(diapositivas) y Accent Lighting (iluminacion
acentuada) en forma simulta.nea por 3 segundos o
mas para reactivar las funciones del compresor del
refrigerador. La pantalla mostrara Cooling OFF
Deactivated (enfriamiento desactivado).
Alarma al abrir la puerta
Cuando la puerta se deja abierta por mas de 2 minutos,
se activa la alarma de la puerta yen la pantalla aparece
Door Open (puerta abierta). El aviso desaparecera
cuando la puerta se cierre de forma adecuada. La alarma
sonara por unos 10 segundos; luego continuara sonando
cada minuto hasta que la puerta se cierre.
Calendario
El calendario es dise_ado para interactuar con usted y su
programa. Ademas de decirle que dia es, el calendario
tambien puede mostrar dias especiales como feriados y
cumplear_os y mostrar notas del calendario donde figuran
instrucciones que otros pueden ver o usar. Nunca
olvidara ni desconocera una funcion importante.
Como ingresar una nota del
calendario
1. Presione el boton Home (inicio). En la pantalla
a _arecera Home (inicio).
!
Slide
Show
ICooling c
_o.0 s,,
Accent J
Lighting
Water
2. Presione el boton Today (hoy) en la pantalla tactil. En
la pantalla aparecera el Calendario.
7O
DA99 01746C(t_N+ES).indd 70 2012.6.8 2:13:39 P_I
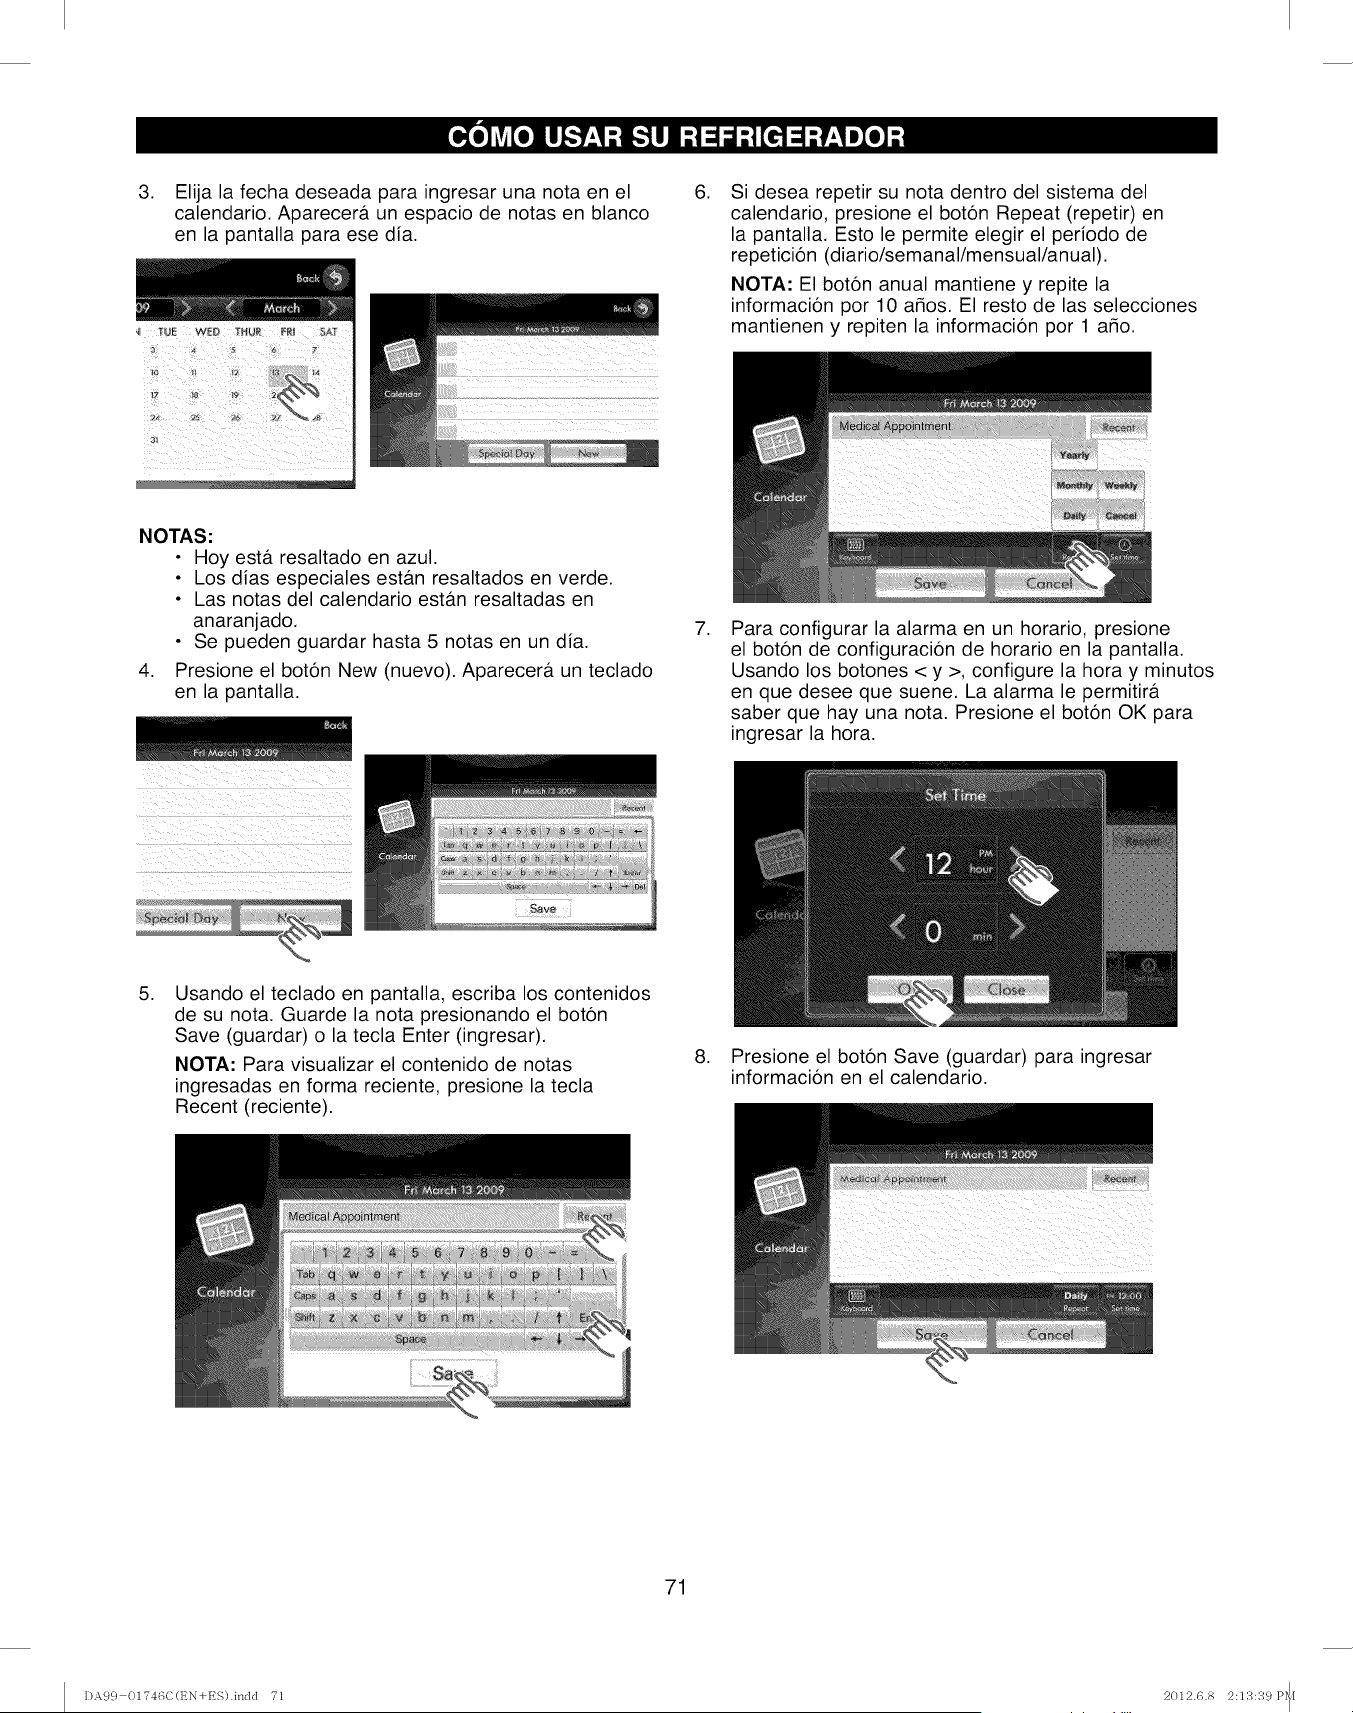
3. Elija la fecha deseada para ingresar una nota en el
calendario. Aparecera un espacio de notas en blanco
en la pantalla para ese dia.
.Si desea repetir su nota dentro del sistema del
calendario, presione el boton Repeat (repetir) en
la pantalla. Esto le permite elegir el periodo de
repeticion (diario/semanal/mensual/anual).
NOTA: El boton anual mantiene y repite la
informacion por 10 amos. El resto de las selecciones
mantienen y repiten la informacion por 1 a_o.
NOTAS"
• Hoy esta resaltado en azul.
• Los dias especiales estb.n resaltados en verde.
• Las notas del calendario estan resaltadas en
anaranjado.
• Se pueden guardar hasta 5 notas en un dia.
4. Presione el boton New (nuevo). Aparecera un teclado
en la pantalla.
(_iii _ _i!_iiii i i _ ii_ii_!iiii
iiii _i_ _ii__I _i_i i_ii_II_IILI
i i ii i i iii I
.Para configurar la alarma en un horario, presione
el boton de configuracion de horario en la pantalla.
Usando los botones < y >, configure la hora y minutos
en que desee que suene. La alarma le permitira
saber que hay una nota. Presione el boton OK para
ingresar la hora.
.Usando el teclado en pantalla, escriba los contenidos
de su nota. Guarde la nota presionando el boton
Save (guardar) o la tecla Enter (ingresar).
NOTA: Para visualizar el contenido de notas
ingresadas en forma reciente, presione la tecla
Recent (reciente).
.Presione el boton Save (guardar) para ingresar
informacion en el calendario.
71
DA99 01746C(t_N+ES).indd T1 2012.6.8 2:13:39 P_I
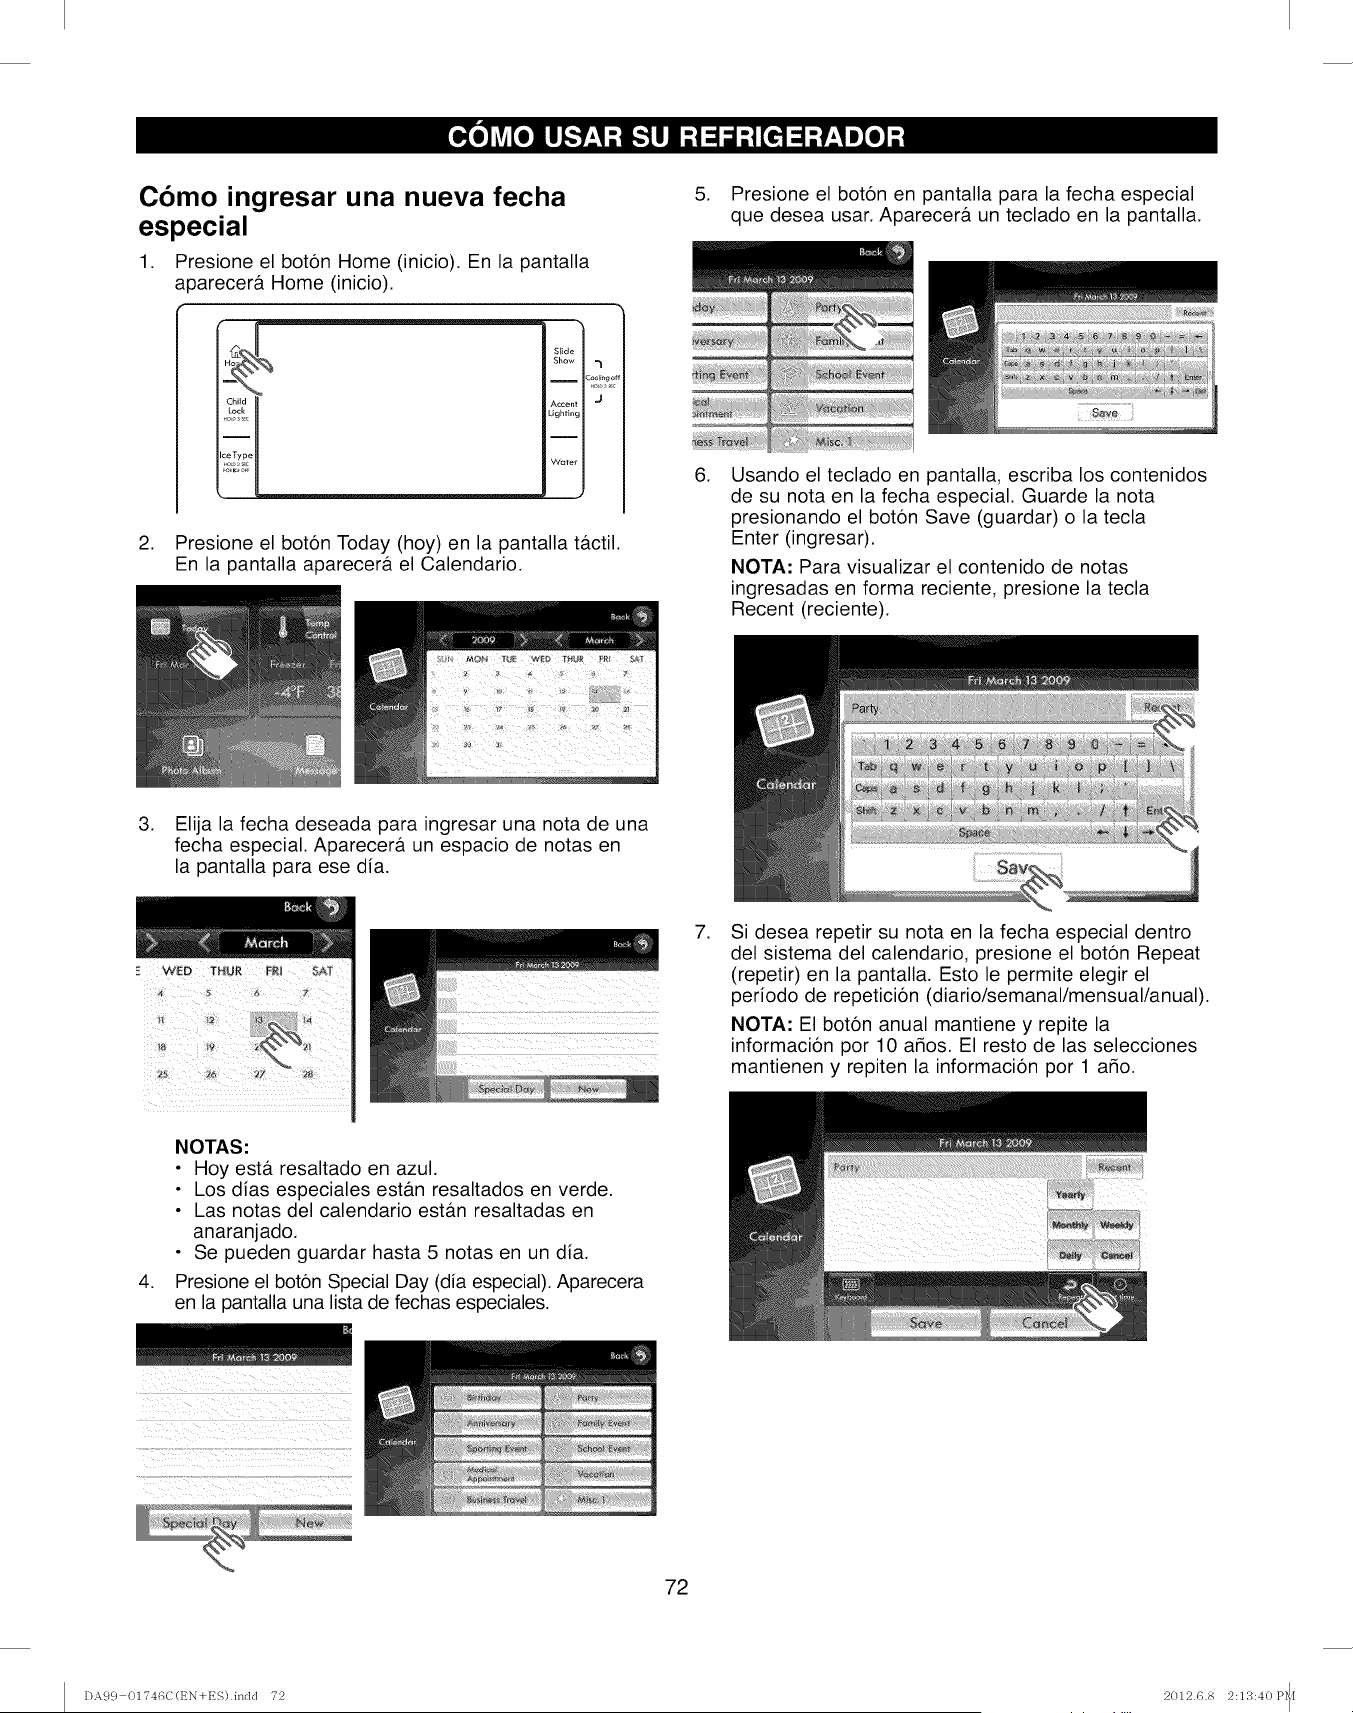
Como ingresar una nueva fecha
especial
1. Presione el boton Home (inicio). En la pantalla
a0arecera Home (inicio).
Slide
Show
ICooling o
Accent J
Lighting
Wmer
2. Presione el boton Today (hoy) en la pantalla tactil.
En la pantalla aparecera el Calendario.
.
.
Presione el boton en pantalla para la fecha especial
que desea usar. Aparecera un teclado en la pantalla.
Usando el teclado en pantalla, escriba los contenidos
de su nota en la fecha especial. Guarde la nota
presionando el boton Save (guardar) o la tecla
Enter (ingresar).
NOTA: Para visualizar el contenido de notas
ingresadas en forma reciente, presione la tecla
Recent (reciente).
3. Elija la fecha deseada para ingresar una nota de una
fecha especial. Aparecera un espacio de notas en
la pantalla para ese dia.
.Si desea repetir su nota en la fecha especial dentro
del sistema del calendario, presione el boton Repeat
(repetir) en la pantalla. Esto le permite elegir el
periodo de repeticion (diario/semanal/mensual/anual).
NOTA: El boton anual mantiene y repite la
informacion por 10 argos. El resto de las selecciones
mantienen y repiten la informacion por 1 a_o.
.
NOTAS:
• Hoy estA resaltado en azul.
• Los dias especiales estb.n resaltados en verde.
• Las notas del calendario estAn resaltadas en
anaranjado.
• Se pueden guardar hasta 5 notas en un dia.
Presione el boton Special Day (dia especial). Aparecera
en la pantalla una lista de fechas especiales.
72
I)A9 c} 01746C(t_N+ES).indd 72 2012.6.8 2:1;3:40 P_I
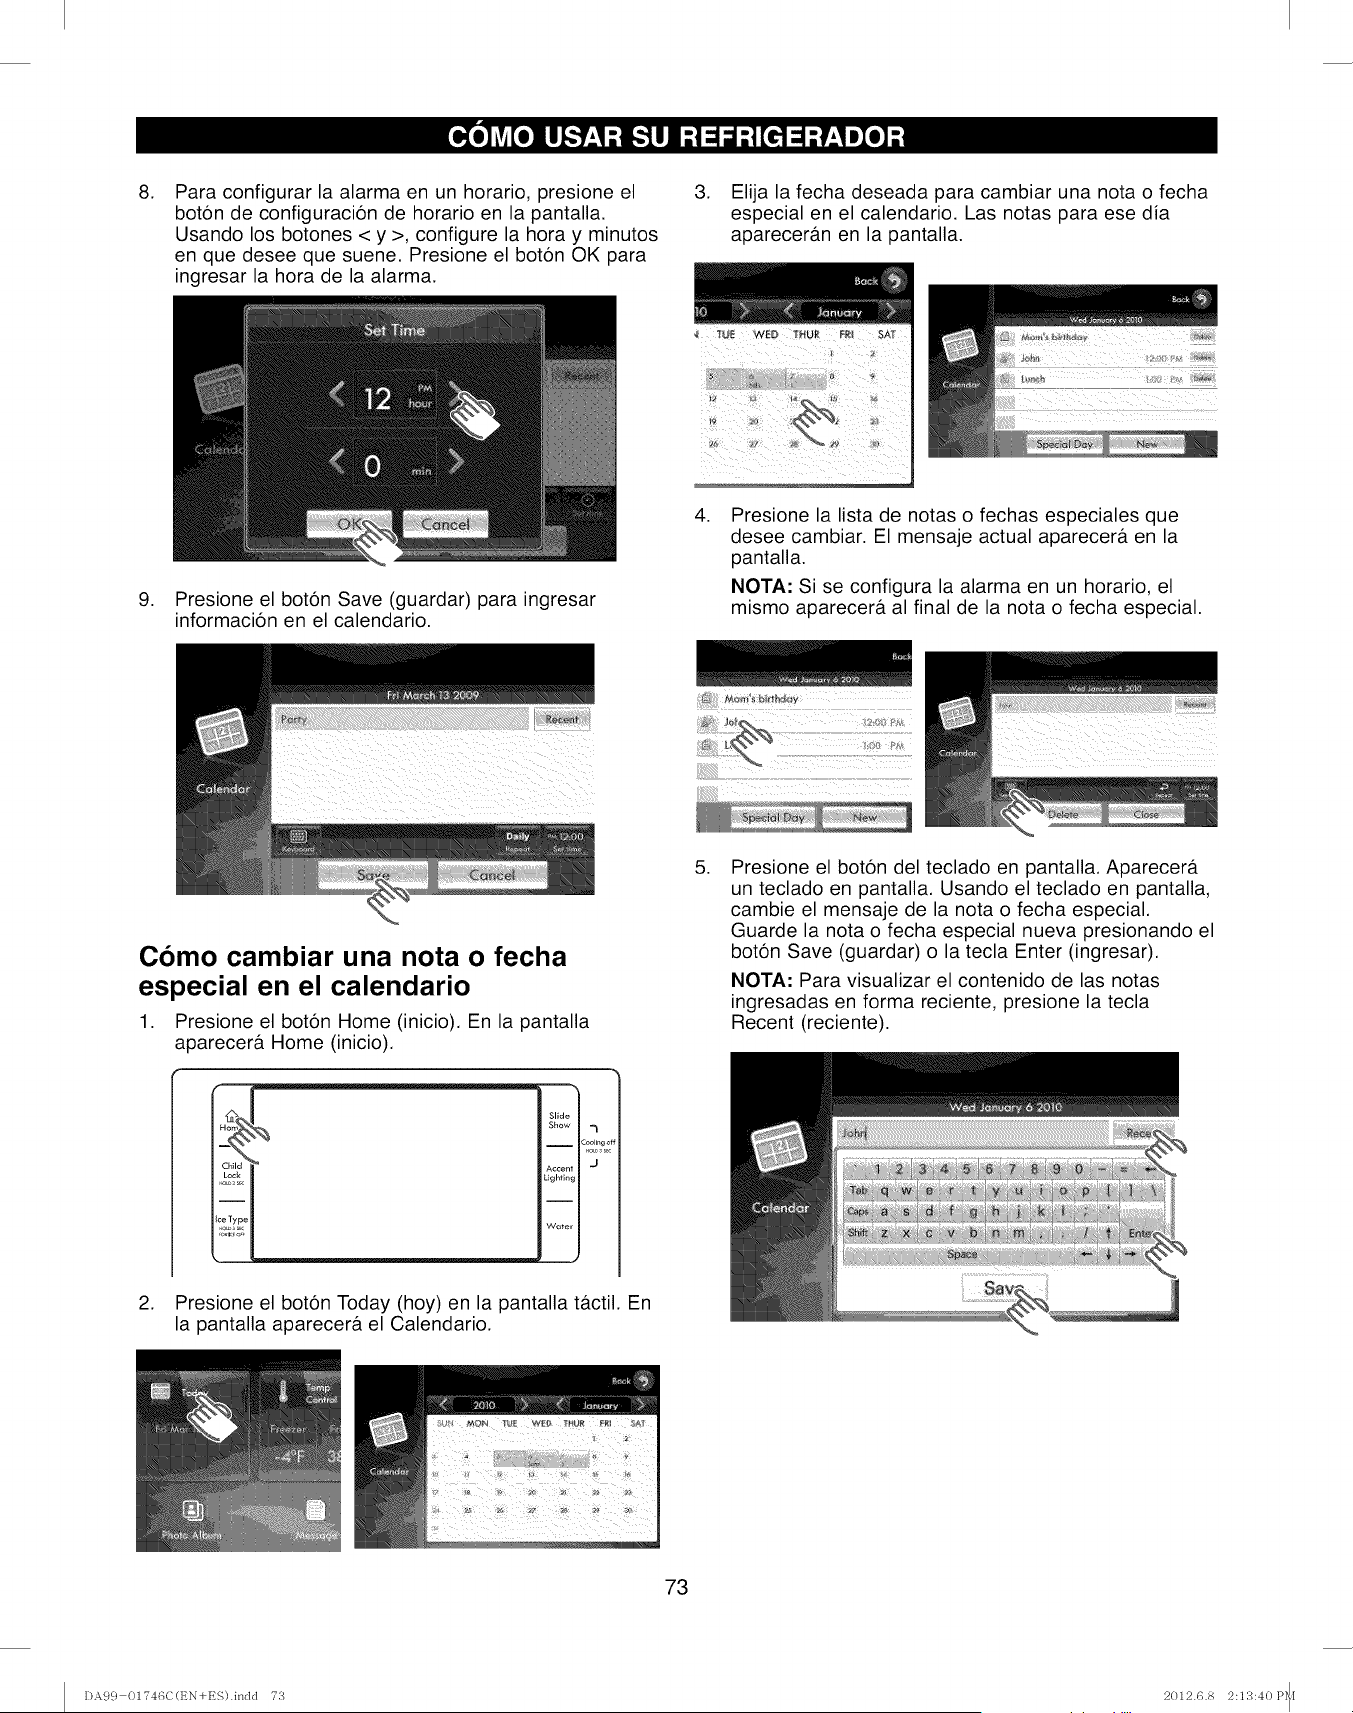
.
.
Para configurar la alarma en un horario, presione el
bot6n de configuraci6n de horario en la pantalla.
Usando los botones < y >, configure la hora y minutos
en que desee que suene. Presione el bot6n OK para
ingresar la hora de la alarma.
Presione el boton Save (guardar) para ingresar
informacion en el calendario.
3. Elija la fecha deseada para cambiar una nota o fecha
especial en el calendario. Las notas para ese dia
aparecer&n en la pantalla.
.Presione la lista de notas o fechas especiales que
desee cambiar. El mensaje actual aparecer& en la
pantalla.
NOTA: Si se configura la alarma en un horario, el
mismo aparecer& al final de la nota o fecha especial.
Como cambiar una nota o fecha
especial en el calendario
1. Presione el boton Home (inicio). En la pantalla
aparecerfi Home (inicio).
Slide
Show -_
i
Cooli_'g
O
Lighting
Water
2. Presione el bot6n Today (hoy) en la pantalla tfictil. En
la pantalla aparecerfi el Calendario.
.Presione el boton del teclado en pantalla. Aparecera.
un teclado en pantalla. Usando el teclado en pantalla,
cambie el mensaje de la nota o fecha especial.
Guarde la nota o fecha especial nueva presionando el
boton Save (guardar) o la tecla Enter (ingresar).
NOTA: Para visualizar el contenido de las notas
ingresadas en forma reciente, presione la tecla
Recent (reciente).
73
I)A99 OI'746C(EN+ES).indd 73 2012.6.8 2:13:40 P_I

,Si desea cambiar o seleccionar una repeticion de
su nota o fecha especial, presione el boton Repeat
(repetir) en la pantalla. Esto le permite elegir el
periodo de repeticion (diario/semanal/mensual/anual).
NOTA: El boton anual mantiene y repite la
informacion por 10 a_os. El resto de las selecciones
mantienen y repiten la informacion por 1 a_o.
Como borrar una nota o fecha
especial del calendario
1. Presione el boton Home (inicio). En la pantalla
aparecera Home (inicio).
Slide
Show
IC_lingot
Accent J
Lighting
I
Wuter
2. Presione el boton Today (hoy) en la pantalla tactil. En
la pantalla aparecera el Calendario.
,Para cambiar o configurar un horario para la alarma,
presione el boton Set Time (configuracion de horario)
en la pantalla y use los botones < y > para configurar
el horario en horas y minutos. Presione el boton OK
para guardar y configurar un nuevo horario de la alarma.
3. Elija la fecha deseada para borrar una nota o fecha
especial en el calendario. Las notas para ese dia
apareceran en la pantalla.
,Presione el boton Save (guardar) para ingresar
la informacion revisada en el calendario.
NOTA: Si modifico los contenidos en los pasos 5-7,
los botones Delete (borrar) y Close (cerrar)
reemplazaran los botones Save (guardar) y
Cancel (cancelar).
TU;I WII '_'HQI F;II £_]
,Presione el boton Delete (borrar) al final de la nota o
fecha especial que desee borrar. En la pantalla
aparecera el aviso Delete Memo? (L,borrar nota?).
74
DA9 c} 01T46C(t_N+ES).indd T4 2012.6.8 2:113:41 P_I
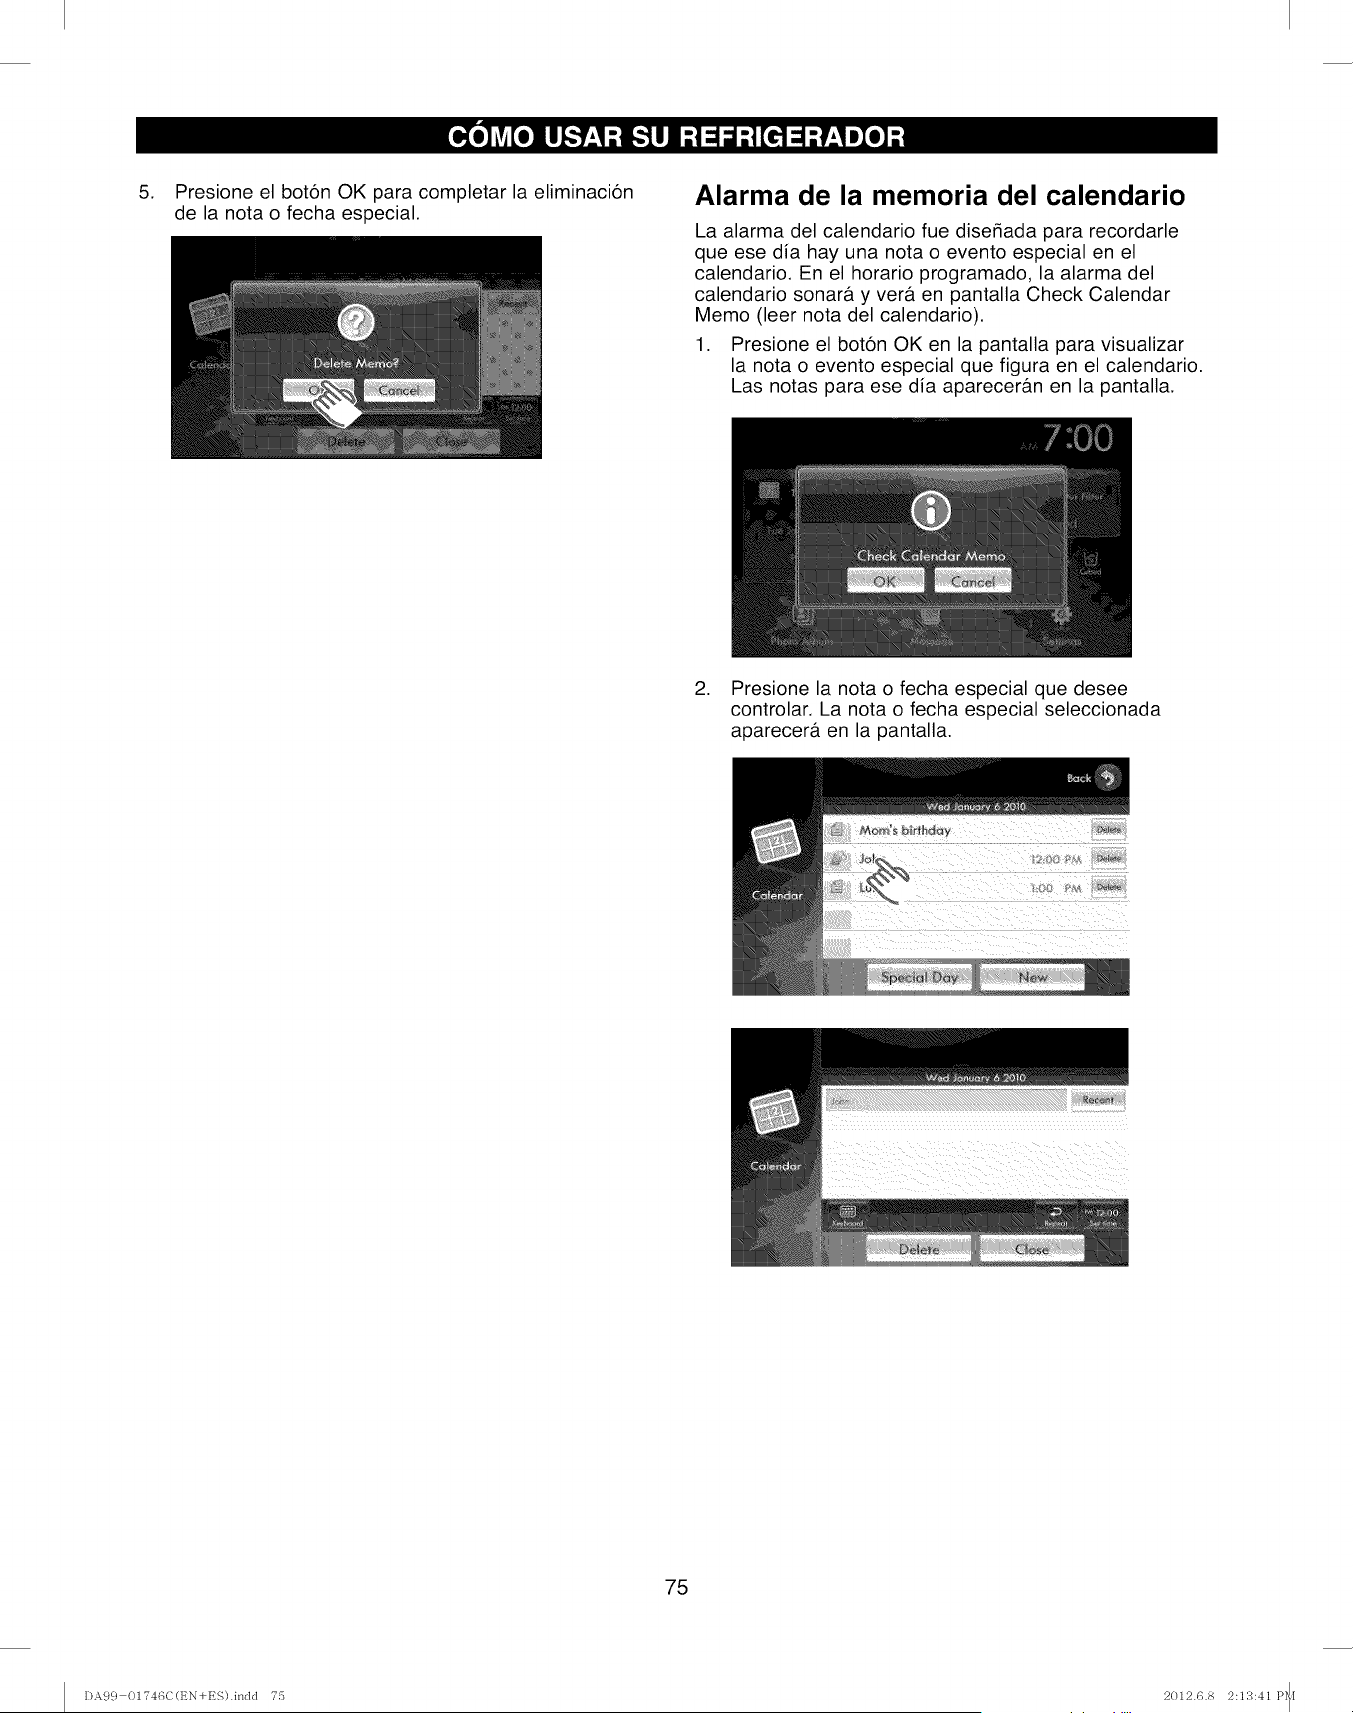
.Presione el boton OK para completar la eliminacion
de la nota o fecha especial.
Alarma de la memoria del calendario
La alarma del calendario fue diser_ada para recordarle
que ese dia hay una nota o evento especial en el
calendario. En el horario programado, la alarma del
calendario sonarb, y verb. en pantalla Check Calendar
Memo (leer nota del calendario).
1. Presione el boton OK en la pantalla para visualizar
la nota o evento especial que figura en el calendario.
Las notas para ese dia aparecerb.n en la pantalla.
2. Presione la nota o fecha especial que desee
controlar. La nota o fecha especial seleccionada
aparecerb, en la pantalla.
75
DA9 c} 01T46C(t_N+ES).indd T5 2012.6.8 2:13:41 P_I
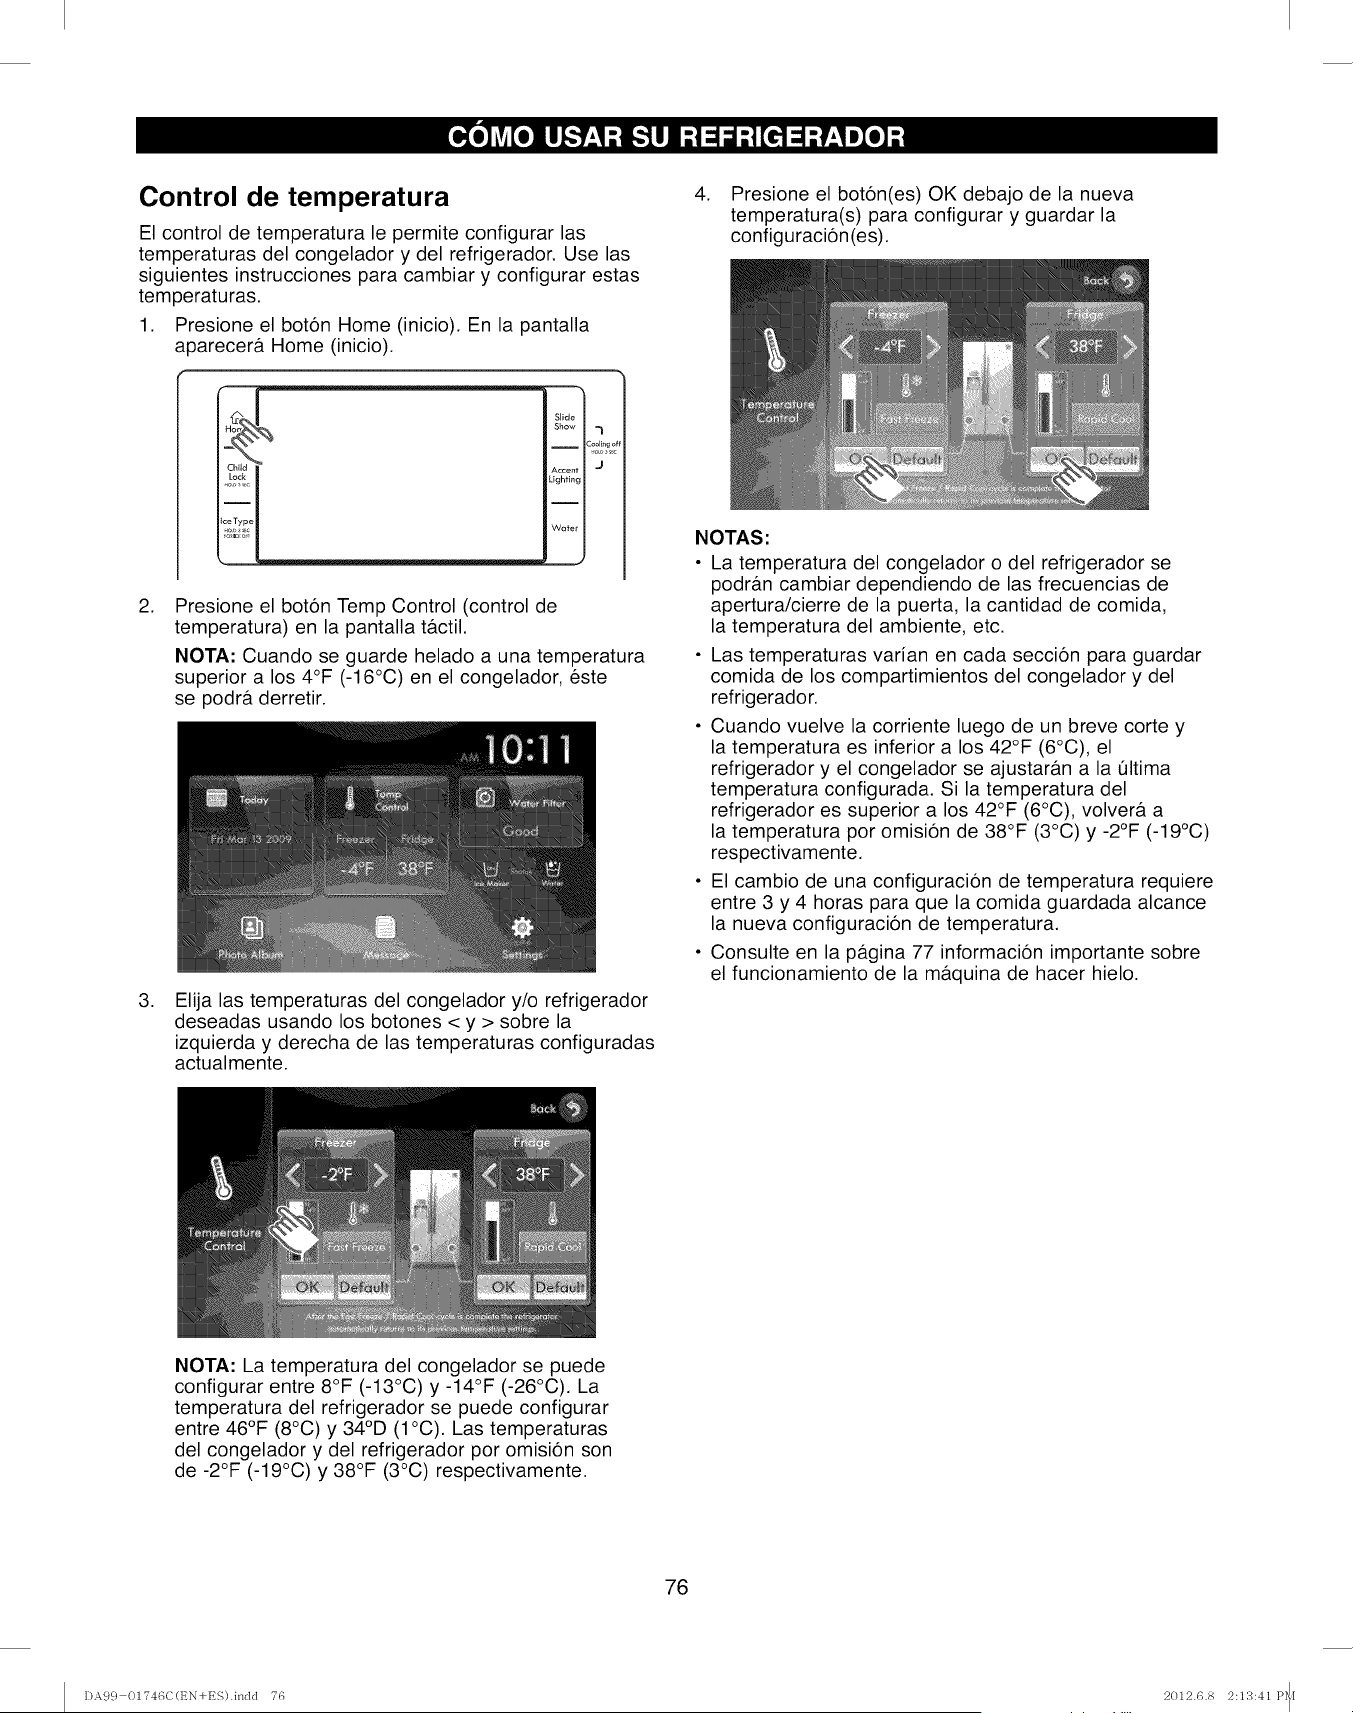
Control de temperatura
El control de temperatura le permite configurar las
temperaturas del congelador y del refrigerador. Use las
siguientes instrucciones para cambiar y configurar estas
temperaturas.
1. Presione el boton Home (inicio). En la pantalla
a0arecera Home (inicio).
Slide
Show -_
I :ool_,go
Accent J
Lighting
Wa_er
,Presione el boton Temp Control (control de
temperatura) en la pantalla tactil.
NOTA: Cuando se guarde helado a una temperatura
superior a los 4°F (-16°C) en el congelador, este
se podra derretir.
,Elija las temperaturas del congelador y/o refrigerador
deseadas usando los botones < y > sobre la
izquierda y derecha de las temperaturas configuradas
actualmente.
4. Presione el boton(es) OK debajo de la nueva
temperatura(s) para configurar y guardar la
configuracion(es).
NOTAS:
• La temperatura del congelador o del refrigerador se
podran cambiar dependiendo de las frecuencias de
apertura/cierre de la puerta, la cantidad de comida,
la temperatura del ambiente, etc.
• Las temperaturas varian en cada seccion para guardar
comida de los compartimientos del congelador y del
refrigerador.
• Cuando vuelve la corriente luego de un breve corte y
la temperatura es inferior a los 42°F (6°C), el
refrigerador y el congelador se ajustaran a la t]ltima
temperatura configurada. Si la temperatura del
refrigerador es superior a los 42°F (6°C), volvera, a
la temperatura por omision de 38°F (3°C) y -2°F (-19°C)
respectivamente.
• El cambio de una configuracion de temperatura requiere
entre 3 y 4 horas para que la comida guardada alcance
la nueva configuracion de temperatura.
• Consulte en la p_tgina 77 informacion importante sobre
el funcionamiento de la maquina de hacer hielo.
NOTA: La temperatura del congelador se puede
configurar entre 8°F (-13°C) y -14°F (-26°C). La
temperatura del refrigerador se puede configurar
entre 46°F (8°C) y 34°D (1°C). Las temperaturas
del congelador y del refrigerador por omision son
de -2°F (-19°C) y 38°F (3°C) respectivamente.
76
DA9 c} 01746C(t_N+ES).indd 76 2012.6.8 2:13:41 P_I
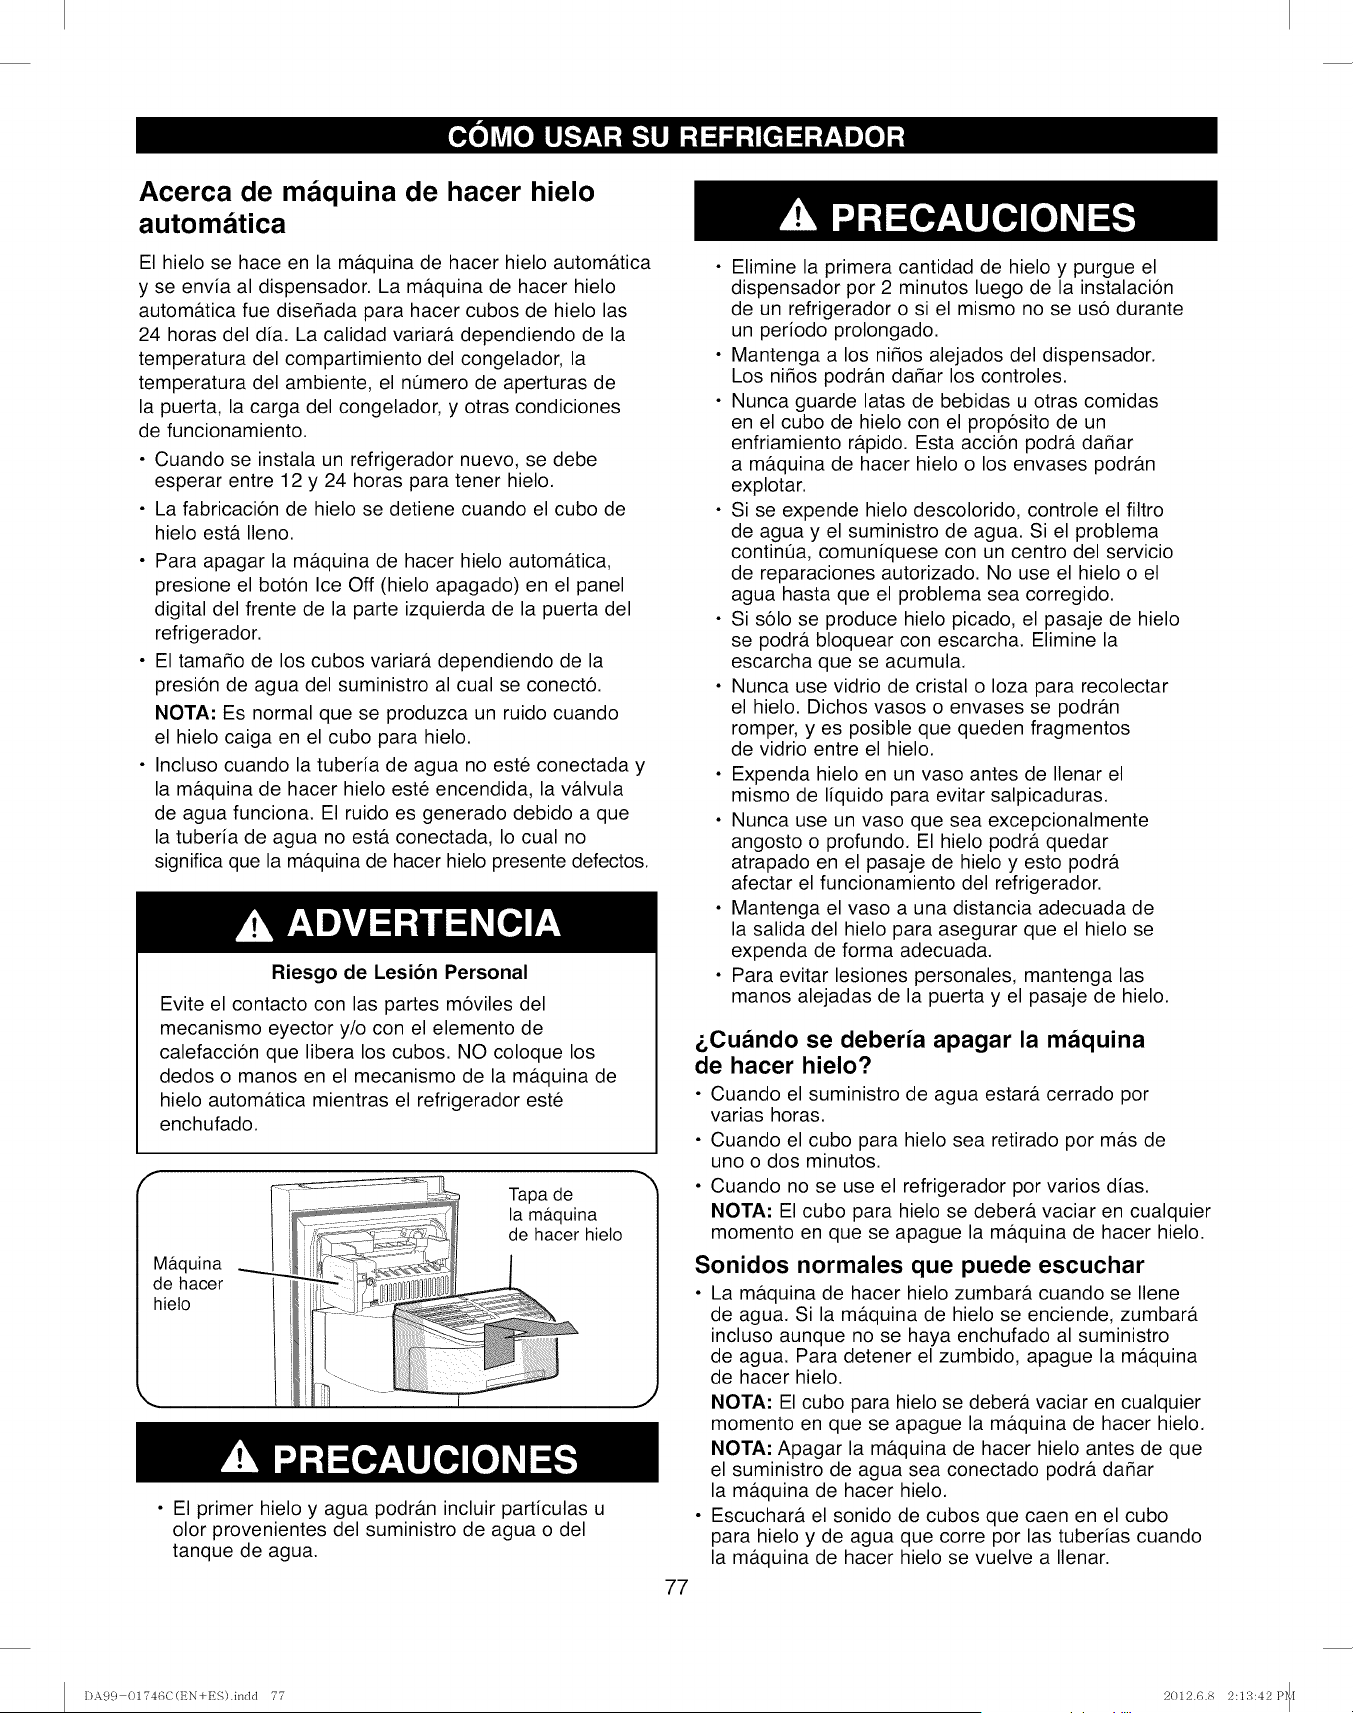
Acerca de maquina de hacer hielo
automatica
El hielo se hace en la m&quina de hacer hielo autom&tica
y se envia al dispensador. La m&quina de hacer hielo
autom&tica fue dise_ada para hacer cubos de hielo las
24 horas del dia. La calidad variar& dependiendo de la
temperatura del compartimiento del congelador, la
temperatura del ambiente, el nOmero de aperturas de
la puerta, la carga del congelador, y otras condiciones
de funcionamiento.
• Cuando se instala un refrigerador nuevo, se debe
esperar entre 12 y 24 horas para tener hielo.
• La fabricacion de hielo se detiene cuando el cubo de
hielo est& Ileno.
• Para apagar la m&quina de hacer hielo autom&tica,
presione el boton Ice Off (hielo apagado) en el panel
digital del frente de la parte izquierda de la puerta del
refrigerador.
• El tama_o de los cubos variara, dependiendo de la
presion de agua del suministro al cual se conecto.
NOTA: Es normal que se produzca un ruido cuando
el hielo caiga en el cubo para hielo.
• Incluso cuando la tuberia de agua no este conectada y
la m&quina de hacer hielo este encendida, la v&lvula
de agua funciona. El ruido es generado debido a que
la tuberia de agua no est& conectada, Io cual no
significa que la m&quina de hacer hielo presente defectos.
Riesgo de Lesion Personal
Evite el contacto con las partes moviles del
mecanismo eyector y/o con el elemento de
calefaccion que libera los cubos. NO coloque los
dedos o manos en el mecanismo de la m&quina de
hielo autom&tica mientras el refrigerador este
enchufado.
Maquina
de hacer
hielo
Tapa de
la maquina
de hacer hielo
• El primer hielo y agua podr#.n incluir particulas u
olor provenientes del suministro de agua o del
tanque de agua.
• Elimine la primera cantidad de hielo y purgue el
dispensador por 2 minutos luego de la instalacion
de un refrigerador o si el mismo no se uso durante
un periodo prolongado.
• Mantenga a los niMos alejados del dispensador.
Los niMos podr&n daMar los controles.
• Nunca guarde latas de bebidas u otras comidas
en el cubo de hielo con el proposito de un
enfriamiento r_tpido. Esta accion podr& daMar
a m&quina de hacer hielo o los envases podr&n
explotar.
• Si se expende hielo descolorido, controle el filtro
de agua y el suministro de agua. Si el problema
continQa, comuniquese con un centro del servicio
de reparaciones autorizado. No use el hielo o el
agua hasta que el problema sea corregido.
• Si solo se produce hielo picado, el pasaje de hielo
se podr_t bloquear con escarcha. Elimine la
escarcha que se acumula.
• Nunca use vidrio de cristal o Ioza para recolectar
el hielo. Dichos vasos o envases se podrb.n
romper, yes posible que queden fragmentos
de vidrio entre el hielo.
• Expenda hielo en un vaso antes de Ilenar el
mismo de liquido para evitar salpicaduras.
• Nunca use un vaso que sea excepcionalmente
angosto o profundo. El hielo podr& quedar
atrapado en el pasaje de hielo y esto podr&
afectar el funcionamiento del refrigerador.
• Mantenga el vaso a una distancia adecuada de
la salida del hielo para asegurar que el hielo se
expenda de forma adecuada.
• Para evitar lesiones personales, mantenga las
manos alejadas de la puerta y el pasaje de hielo.
&Cuando se deberia apagar la maquina
de hacer hielo?
• Cuando el suministro de agua estar& cerrado por
varias horas.
• Cuando el cubo para hielo sea retirado por m&s de
uno o dos minutos.
• Cuando no se use el refrigerador por varios dias.
NOTA: El cubo para hielo se debera, vaciar en cualquier
momento en que se apague la m&quina de hacer hielo.
Sonidos normales que puede escuchar
• La m&quina de hacer hielo zumbar& cuando se Ilene
de agua. Si la m_tquina de hielo se enciende, zumbar&
incluso aunque no se haya enchufado al suministro
de agua. Para detener el zumbido, apague la m&quina
de hacer hielo.
NOTA: El cubo para hielo se deber#, vaciar en cualquier
momento en que se apague la m&quina de hacer hielo.
NOTA: Apagar la mb.quina de hacer hielo antes de que
el suministro de agua sea conectado podr& daMar
la ma.quina de hacer hielo.
• Escuchar& el sonido de cubos que caen en el cubo
para hielo y de agua que corre por las tuberias cuando
la m&quina de hacer hielo se vuelve a Ilenar.
77
DA9 c} 0174GC(t_N+ES).inclcl 77 2012.6.8 2:1S:42 P_[
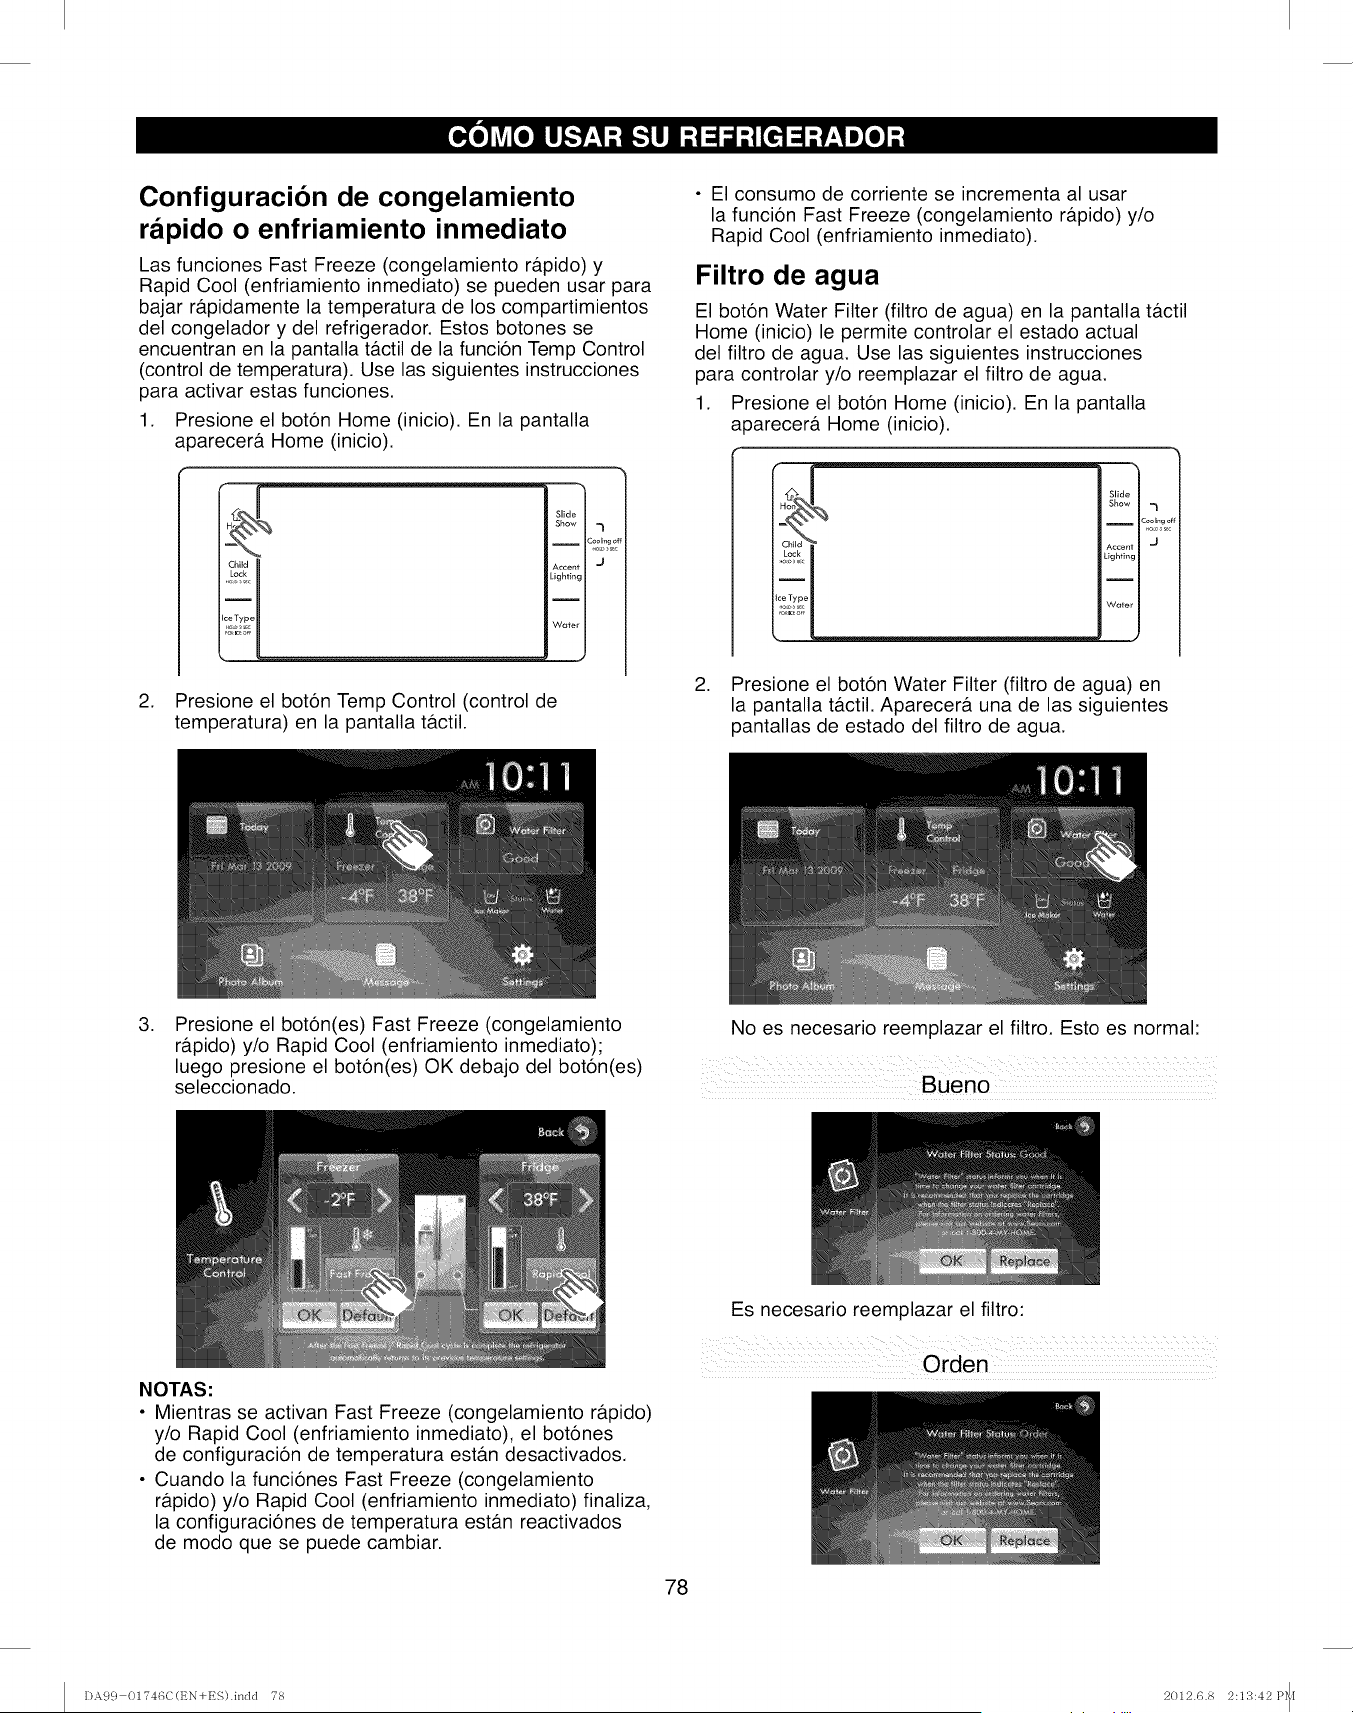
Configuracion de congelamiento
rapido o enfriamiento inmediato
Las funciones Fast Freeze (congelamiento ra.pido) y
Rapid Cool (enfriamiento inmediato) se pueden usar para
bajar ra.pidamente la temperatura de los compartimientos
del congelador y del refrigerador. Estos botones se
encuentran en la pantalla tactil de la funcion Temp Control
(control de temperatura). Use las siguientes instrucciones
para activar estas funciones.
1. Presione el boton Home (inicio). En la pantalla
aparecera Home (inicio).
Slide
Show 7
I Co_llng ¢
Accent J
Lighting
2. Presione el boton Temp Control (control de
temperatura) en la pantalla tactil.
• El consumo de corriente se incrementa al usar
la funcion Fast Freeze (congelamiento rapido) y/o
Rapid Cool (enfriamiento inmediato).
Filtro de agua
El boton Water Filter (filtro de agua) en la pantalla tactil
Home (inicio) le permite controlar el estado actual
del filtro de agua. Use las siguientes instrucciones
para controlar y/o reemplazar el filtro de agua.
1. Presione el boton Home (inicio). En la pantalla
a 3arecera Home (inicio).
Slide
Show -_
ICool_,-got
.o,, sec
Accent J
Lighting
Water
2. Presione el boton Water Filter (filtro de agua) en
la pantalla tactil. Aparecera una de las siguientes
pantallas de estado del filtro de agua.
,Presione el boton(es) Fast Freeze (congelamiento
rb.pido) y/o Rapid Cool (enfriamiento inmediato);
luego presione el boton(es) OK debajo del boton(es)
seleccionado.
No es necesario reemplazar el filtro. Esto es normal:
NOTAS:
• Mientras se activan Fast Freeze (congelamiento rapido)
y/o Rapid Cool (enfriamiento inmediato), el botones
de configuracion de temperatura est_m desactivados.
• Cuando la funciones Fast Freeze (congelamiento
rapido) y/o Rapid Cool (enfriamiento inmediato) finaliza,
la configuraciones de temperatura estan reactivados
de modo que se puede cambiar.
Es necesario reemplazar el filtro:
78
DA9 c} 01?46C(EN+ES).indd 78 2012.6.8 2:13:42P_I
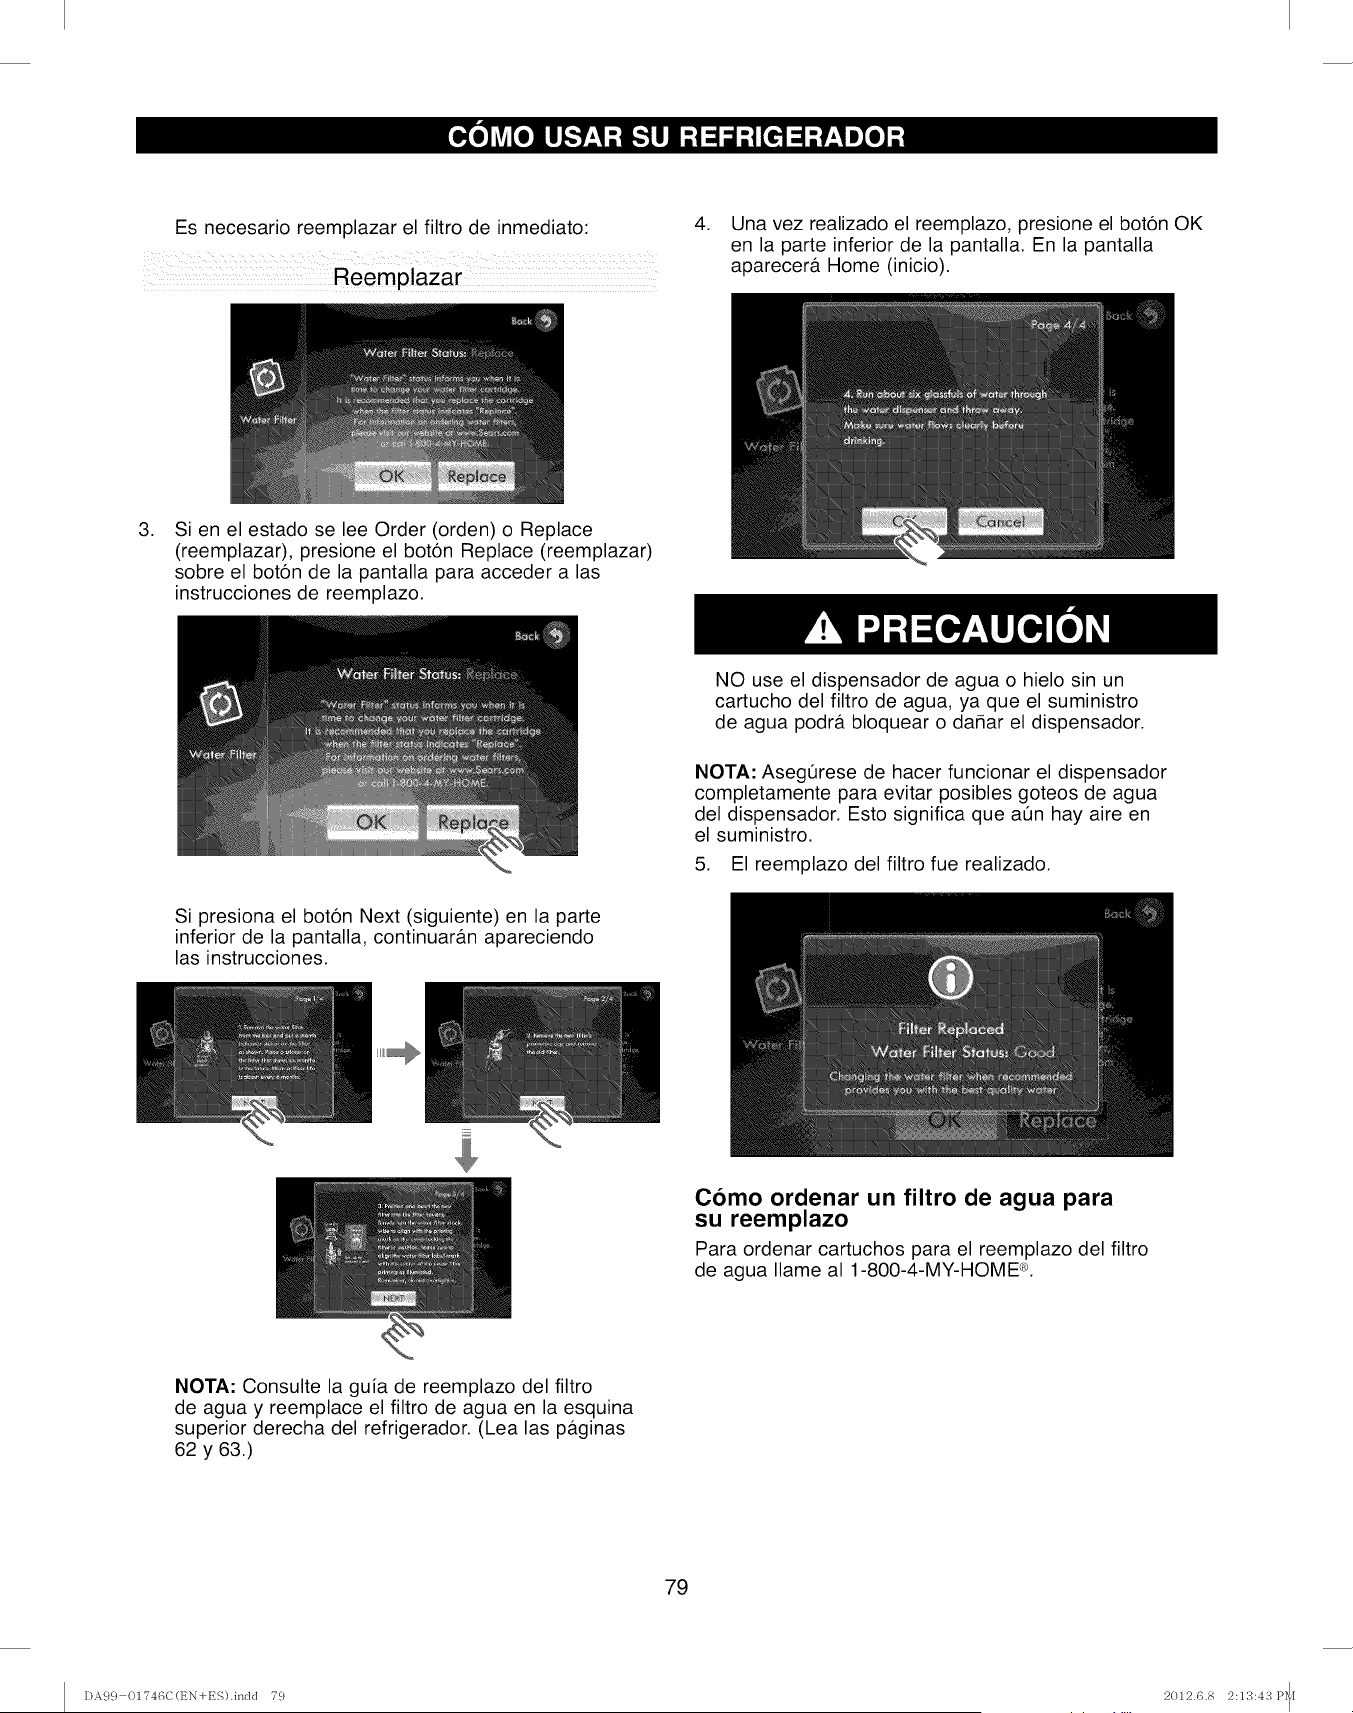
Es necesario reemplazar el filtro de inmediato: 4. Una vez realizado el reemplazo, presione el boton OK
en la parte inferior de la pantalla. En la pantalla
aparecera Home (inicio).
.Si en el estado se lee Order (orden) o Replace
(reemplazar), presione el boton Replace (reemplazar)
sobre el boton de la pantalla para acceder alas
instrucciones de reemplazo.
Si presiona el boton Next (siguiente) en la parte
inferior de la pantalla, continuaran apareciendo
las instrucciones.
NO use el dispensador de agua o hielo sin un
cartucho del filtro de agua, ya que el suministro
de agua podra bloquear o dahar el dispensador.
NOTA: AsegQrese de hacer funcionar el dispensador
completamente para evitar posibles goteos de agua
del dispensador. Esto significa que aQn hay aire en
el suministro.
5. El reemplazo del filtro fue realizado.
Como ordenar un filtro de agua para
su reemplazo
Para ordenar cartuchos para el reemplazo del filtro
de agua Ilame al 1-800-4-MY-HOME ®.
NOTA: Consulte la guia de reemplazo del filtro
de agua y reemplace el filtro de agua en la esquina
superior derecha del refrigerador. (Lea las paginas
62 y 63.)
79
DA99 01746C(t_N+ES).indd 79 2012.6.8 2:13:43 P_I
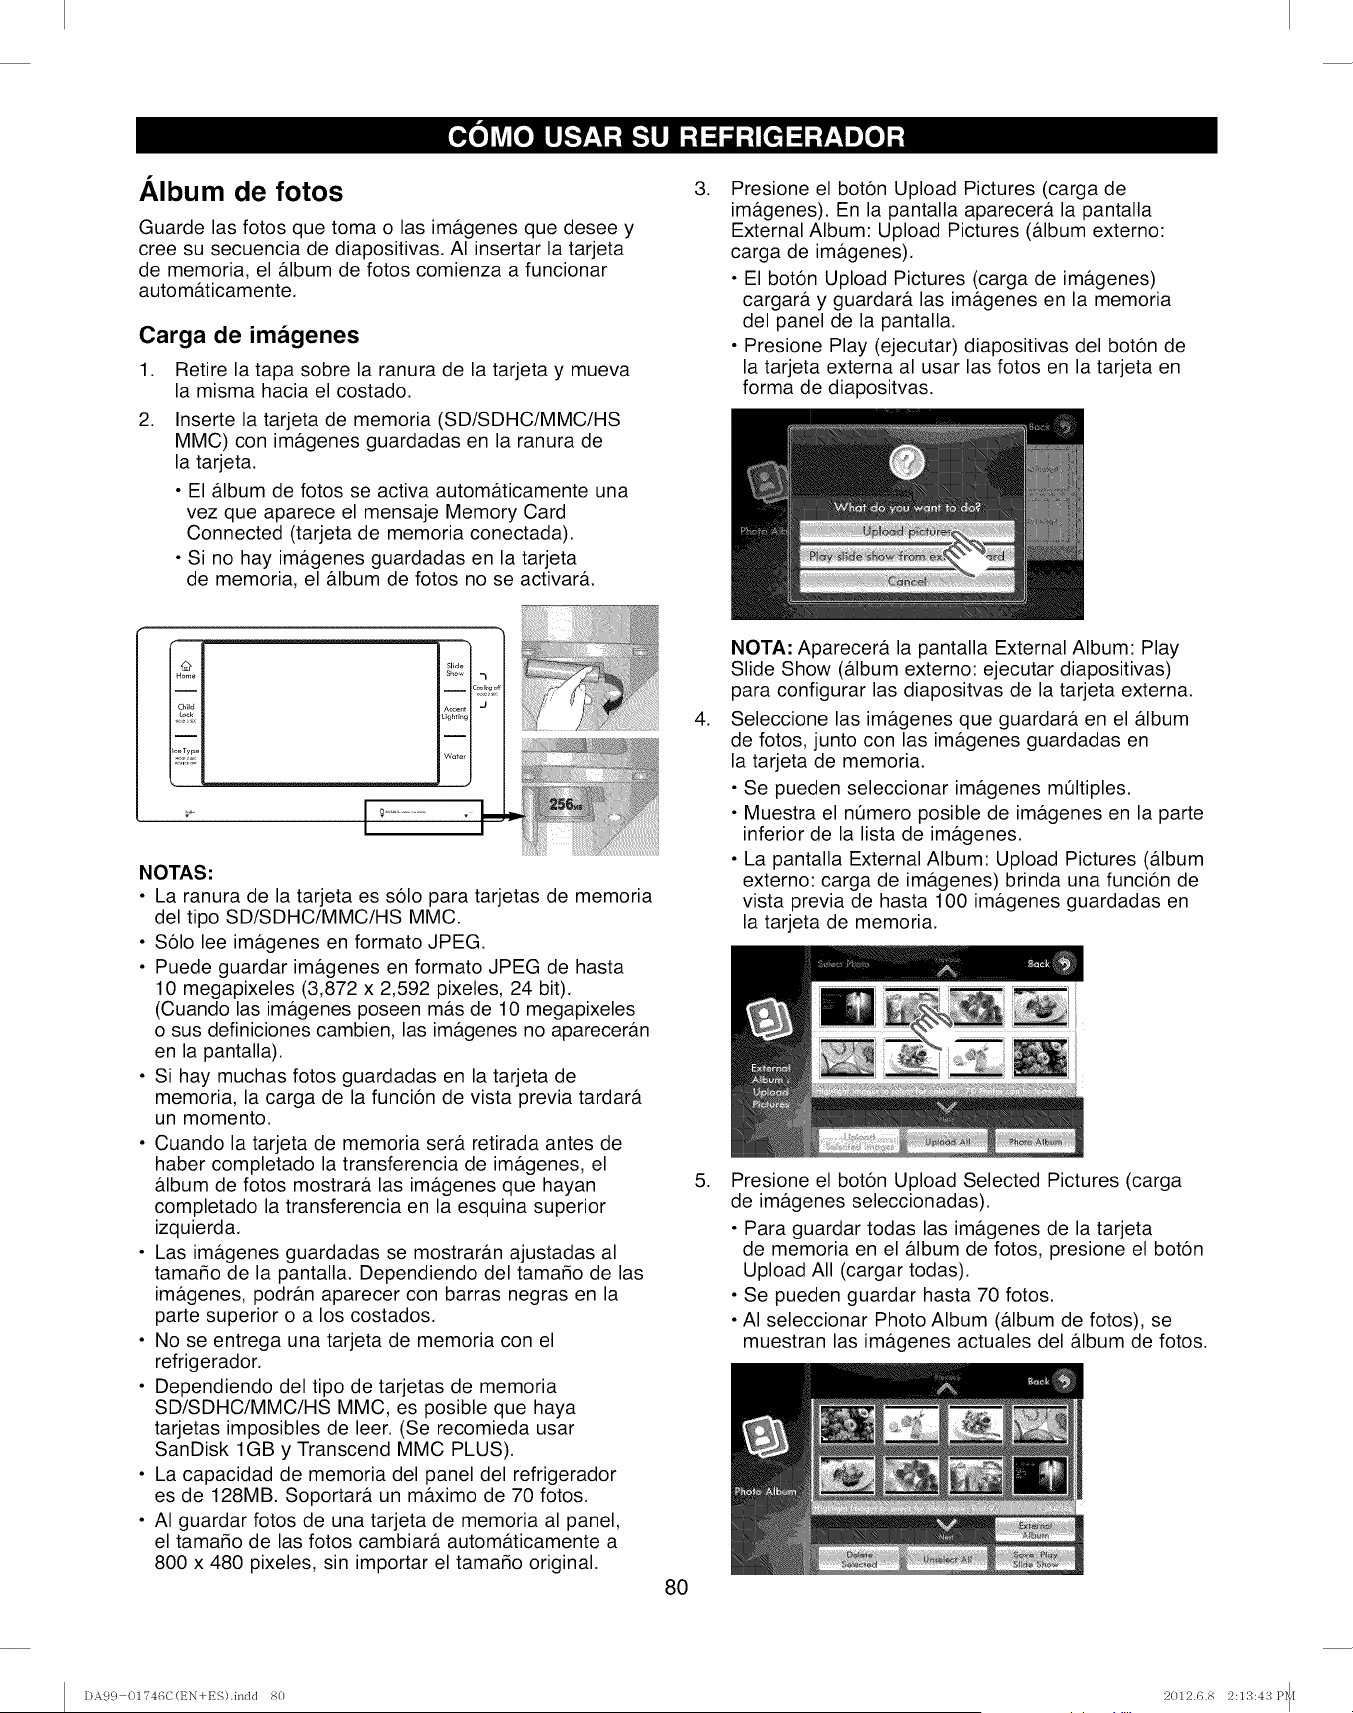
Album de fotos
Guarde las fotos que toma o las imb.genes que desee y
cree su secuencia de diapositivas. AI insertar la tarjeta
de memoria, el &bum de fotos comienza a funcionar
autom&ticamente.
Carga de imagenes
1. Retire la tapa sobre la ranura de la tarjeta y mueva
la misma hacia el costado.
.Inserte la tarjeta de memoria (SD/SDHC/MMC/HS
MMC) con ira&genes guardadas en la ranura de
la tarjeta.
• El &bum de fotos se activa automa.ticamente una
vez que aparece el mensaje Memory Card
Connected (tarjeta de memoria conectada).
• Si no hay ira&genes guardadas en la tarjeta
de memoria, el &bum de fotos no se activar&
.Presione el boton Upload Pictures (carga de
ira&genes). En la pantalla aparecer& la pantalla
External Album: Upload Pictures (&bum externo:
carga de ira&genes).
• El boton Upload Pictures (carga de ira&genes)
cargar& y guardar& las ira&genes en la memoria
del panel de la pantalla.
• Presione Play (ejecutar) diapositivas del boton de
la tarjeta externa al usar las fotos en la tarjeta en
forma de diapositvas.
i_n?
mHom_
I
I
iChild
mi
I=ceType
NOTAS."
• La ranura de la tarjeta es solo para tarjetas de memoria
del tipo SD/SDHC/MMC/HS MMC.
• Solo lee ira&genes en formato JPEG.
• Puede guardar ima.genes en formato JPEG de hasta
10 megapixeles (3,872 x 2,592 pixeles, 24 bit).
(Cuando las ira&genes poseen m&s de 10 megapixeles
o sus definiciones cambien, las ira&genes no aparecer&n
en la pantalla).
• Si hay muchas fotos guardadas en la tarjeta de
memoria, la carga de la funcion de vista previa tardar&
un momento.
• Cuando la tarjeta de memoria ser& retirada antes de
haber completado la transferencia de imagenes, el
&bum de fotos mostrar& las ima.genes que hayan
completado la transferencia en la esquina superior
izquierda.
• Las ima.genes guardadas se mostrar&n ajustadas al
tamado de la pantalla. Dependiendo del tamado de las
ira&genes, podrb.n aparecer con barras negras en la
parte superior o a los costados.
• No se entrega una tarjeta de memoria con el
refrigerador.
• Dependiendo del tipo de tarjetas de memoria
SD/SDHC/MMC/HS MMC, es posible que haya
tarjetas imposibles de leer. (Se recomieda usar
SanDisk 1GB y Transcend MMC PLUS).
• La capacidad de memoria del panel del refrigerador
es de 128MB. Soportar& un m&ximo de 70 fotos.
• AI guardar fotos de una tarjeta de memoria al panel,
el tamar_o de las fotos cambiar& autom&ticamente a
800 x 480 pixeles, sin importar el tamado original.
80
.
NOTA." Aparecer& la pantalla External Album: Play
Slide Show (&bum externo: ejecutar diapositivas)
para configurar las diapositvas de la tarjeta externa.
Seleccione las im_tgenes que guardar& en el &lbum
de fotos, junto con las ira&genes guardadas en
la tarjeta de memoria.
• Se pueden seleccionar ira&genes m01tiples.
• Muestra el nOmero posible de ira&genes en la parte
inferior de la lista de ira&genes.
• La pantalla External Album: Upload Pictures (#.lbum
externo: carga de ira&genes) brinda una funcion de
vista previa de hasta 100 ira&genes guardadas en
la tarjeta de memoria.
.Presione el boton Upload Selected Pictures (carga
de ira&genes seleccionadas).
• Para guardar todas las im#.genes de la tarjeta
de memoria en el &lbum de fotos, presione el boton
Upload All (cargar todas).
• Se pueden guardar hasta 70 fotos.
• AI seleccionar Photo Album (_tlbum de fotos), se
muestran las ira&genes actuales del &bum de fotos.
DA99 01746C(t_N+ES).inclcl 80 2012.6.8 2:13:43 P_I
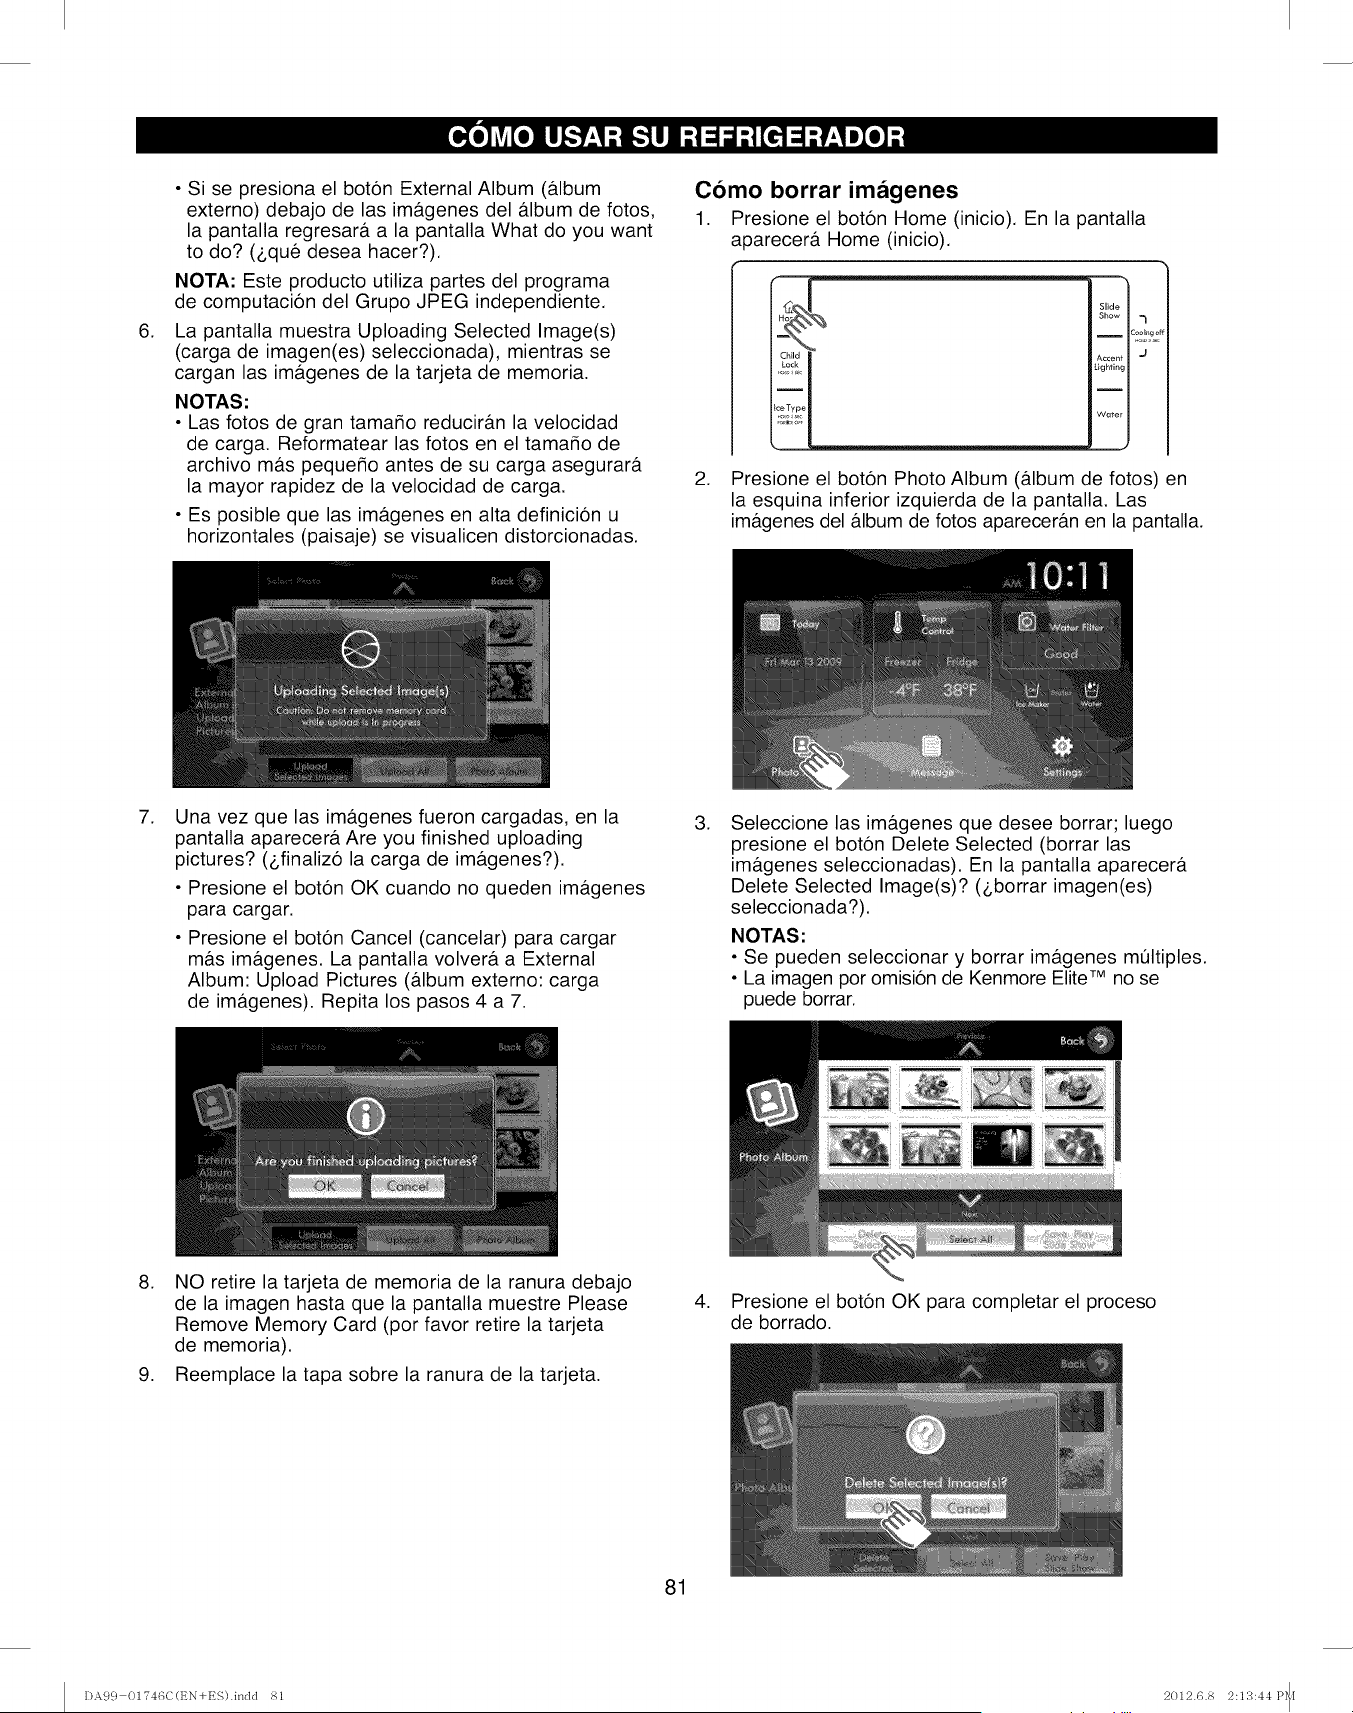
,
• Si se presiona el boton External Album (&lbum
externo) debajo de las im&genes del &lbum de fotos,
la pantalla regresar& a la pantalla What do you want
to do? (_,qu6 desea hacer?).
NOTA: Este producto utiliza partes del programa
de computacion del Grupo JPEG independiente.
La pantalla muestra Uploading Selected Image(s)
(carga de imagen(es) seleccionada), mientras se
cargan las im&genes de la tarjeta de memoria.
NOTAS:
• Las fotos de gran tama_o reducir&n la velocidad
de carga. Reformatear las fotos en el tamaMo de
archivo m&s pequeMo antes de su carga asegurar&
la mayor rapidez de la velocidad de carga.
• Es posible que las im&genes en alta definicion u
horizontales (paisaje) se visualicen distorcionadas.
Como borrar imagenes
1. Presione el boton Home (inicio). En la pantalla
a 3arecer& Home (inicio).
Slide
Show 1
ICool_,,g,
Accenf J
:ighting
Water
2. Presione el boton Photo Album (album de fotos) en
la esquina inferior izquierda de la pantalla. Las
imagenes del album de fotos apareceran en la pantalla.
,Una vez que las im&genes fueron cargadas, en la
pantalla aparecer& Are you finished uploading
pictures? (_,finaliz6 la carga de im&genes?).
• Presione el boton OK cuando no queden imagenes
para cargar.
• Presione el boton Cancel (cancelar) para cargar
mas im&genes. La pantalla volvera a External
Album: Upload Pictures (album externo: carga
de imagenes). Repita los pasos 4 a 7.
,Seleccione las imagenes que desee borrar; luego
presione el boton Delete Selected (borrar las
im&genes seleccionadas). En la pantalla aparecera
Delete Selected Image(s)? (_,borrar imagen(es)
seleccionada?).
NOTAS:
• Se pueden seleccionar y borrar im&genes m_ltiples.
• La imagen por omision de Kenmore Elite TM no se
puede borrar.
.... i
,NO retire la tarjeta de memoria de la ranura debajo
de la imagen hasta que la pantalla muestre Please
Remove Memory Card (por favor retire la tarjeta
de memoria).
9. Reemplace la tapa sobre la ranura de la tarjeta.
,Presione el boton OK para completar el proceso
de borrado.
81
DA9 c} 01?46C(EN+ES).indd 81 2012.6.8 2:13:44P_[
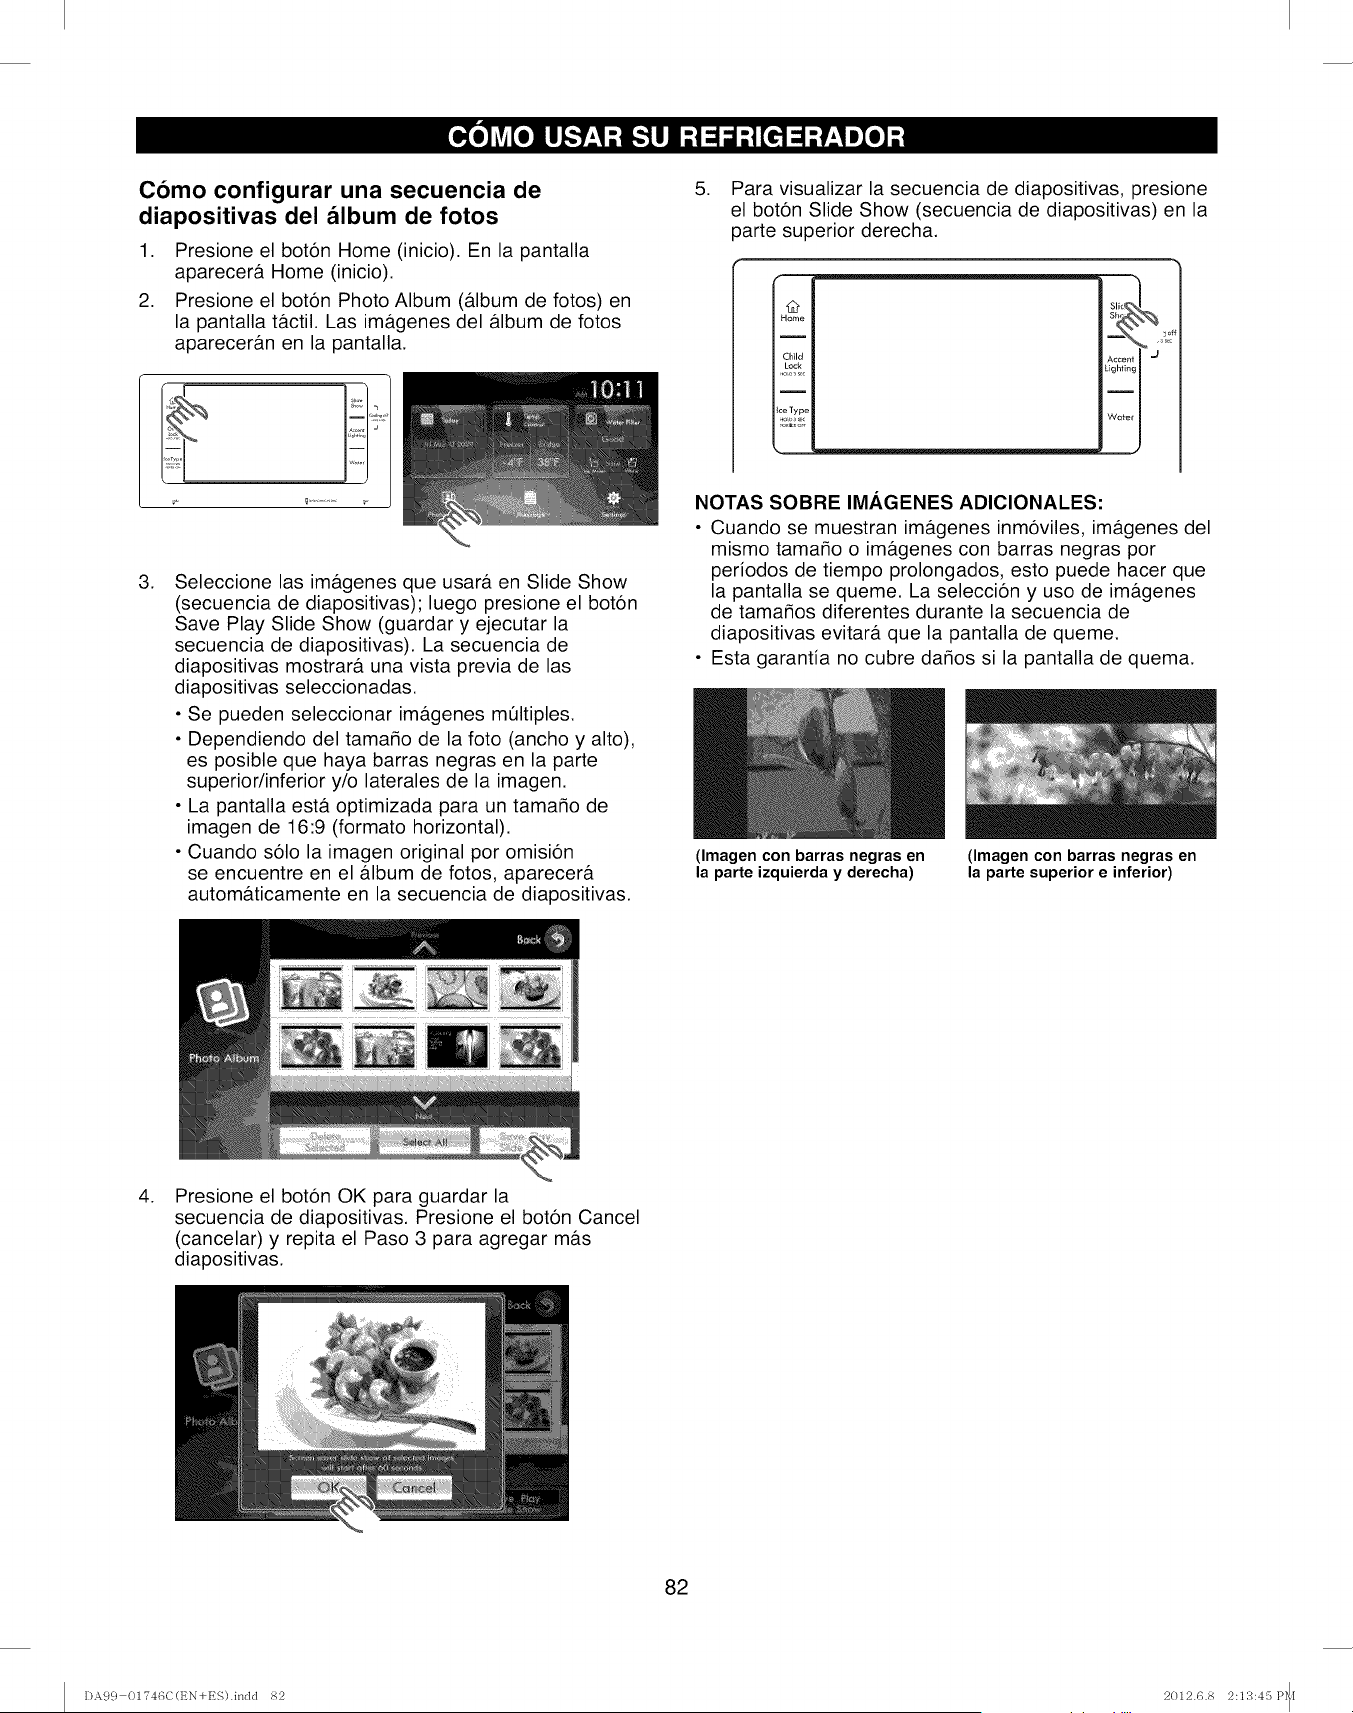
Como configurar una secuencia de
diapositivas del album de fotos
1. Presione el boton Home (inicio). En la pantalla
aparecera Home (inicio).
2. Presione el boton Photo Album (a.lbum de fotos) en
la pantalla tactil. Las imb.genes del album de fotos
apareceran en la pantalla.
,Seleccione las imagenes que usara en Slide Show
(secuencia de diapositivas); luego presione el boton
Save Play Slide Show (guardar y ejecutar la
secuencia de diapositivas). La secuencia de
diapositivas mostrar#, una vista previa de las
diapositivas seleccionadas.
• Se pueden seleccionar imagenes multiples.
• Dependiendo del tamaMo de la foto (ancho y alto),
es posible que haya barras negras en la parte
superior/inferior y/o laterales de la imagen.
• La pantalla esta. optimizada para un tama_o de
imagen de 16:9 (formato horizontal).
• Cuando solo la imagen original por omision
se encuentre en el album de fotos, aparecera
automaticamente en la secuencia de diapositivas.
,Para visualizar la secuencia de diapositivas, presione
el boton Slide Show (secuencia de diapositivas) en la
parte superior derecha.
Home'_ s_SIIc I
Child Accent I _1
Lock Lighting I
I
Ice Type
Water I
NOTAS SOBRE IMAGENES ADICIONALES:
• Cuando se muestran imagenes inmoviles, imagenes del
mismo tamaMo o imagenes con barras negras por
periodos de tiempo prolongados, esto puede hacer que
la pantalla se queme. La seleccion y uso de imagenes
de tamaMos diferentes durante la secuencia de
diapositivas evitara que la pantalla de queme.
• Esta garantia no cubre daMos si la pantalla de quema.
(Imagen con barras negras en
la parte izquierda y derecha)
(Imagen con barras negras en
la parte superior e inferior)
,Presione el boton OK para guardar la
secuencia de diapositivas. Presione el boton Cancel
(cancelar) y repita el Paso 3 para agregar mas
diapositivas.
82
DA99 01746C(t_N+ES).indd 82 2012.6.8 2:13:45 P_I
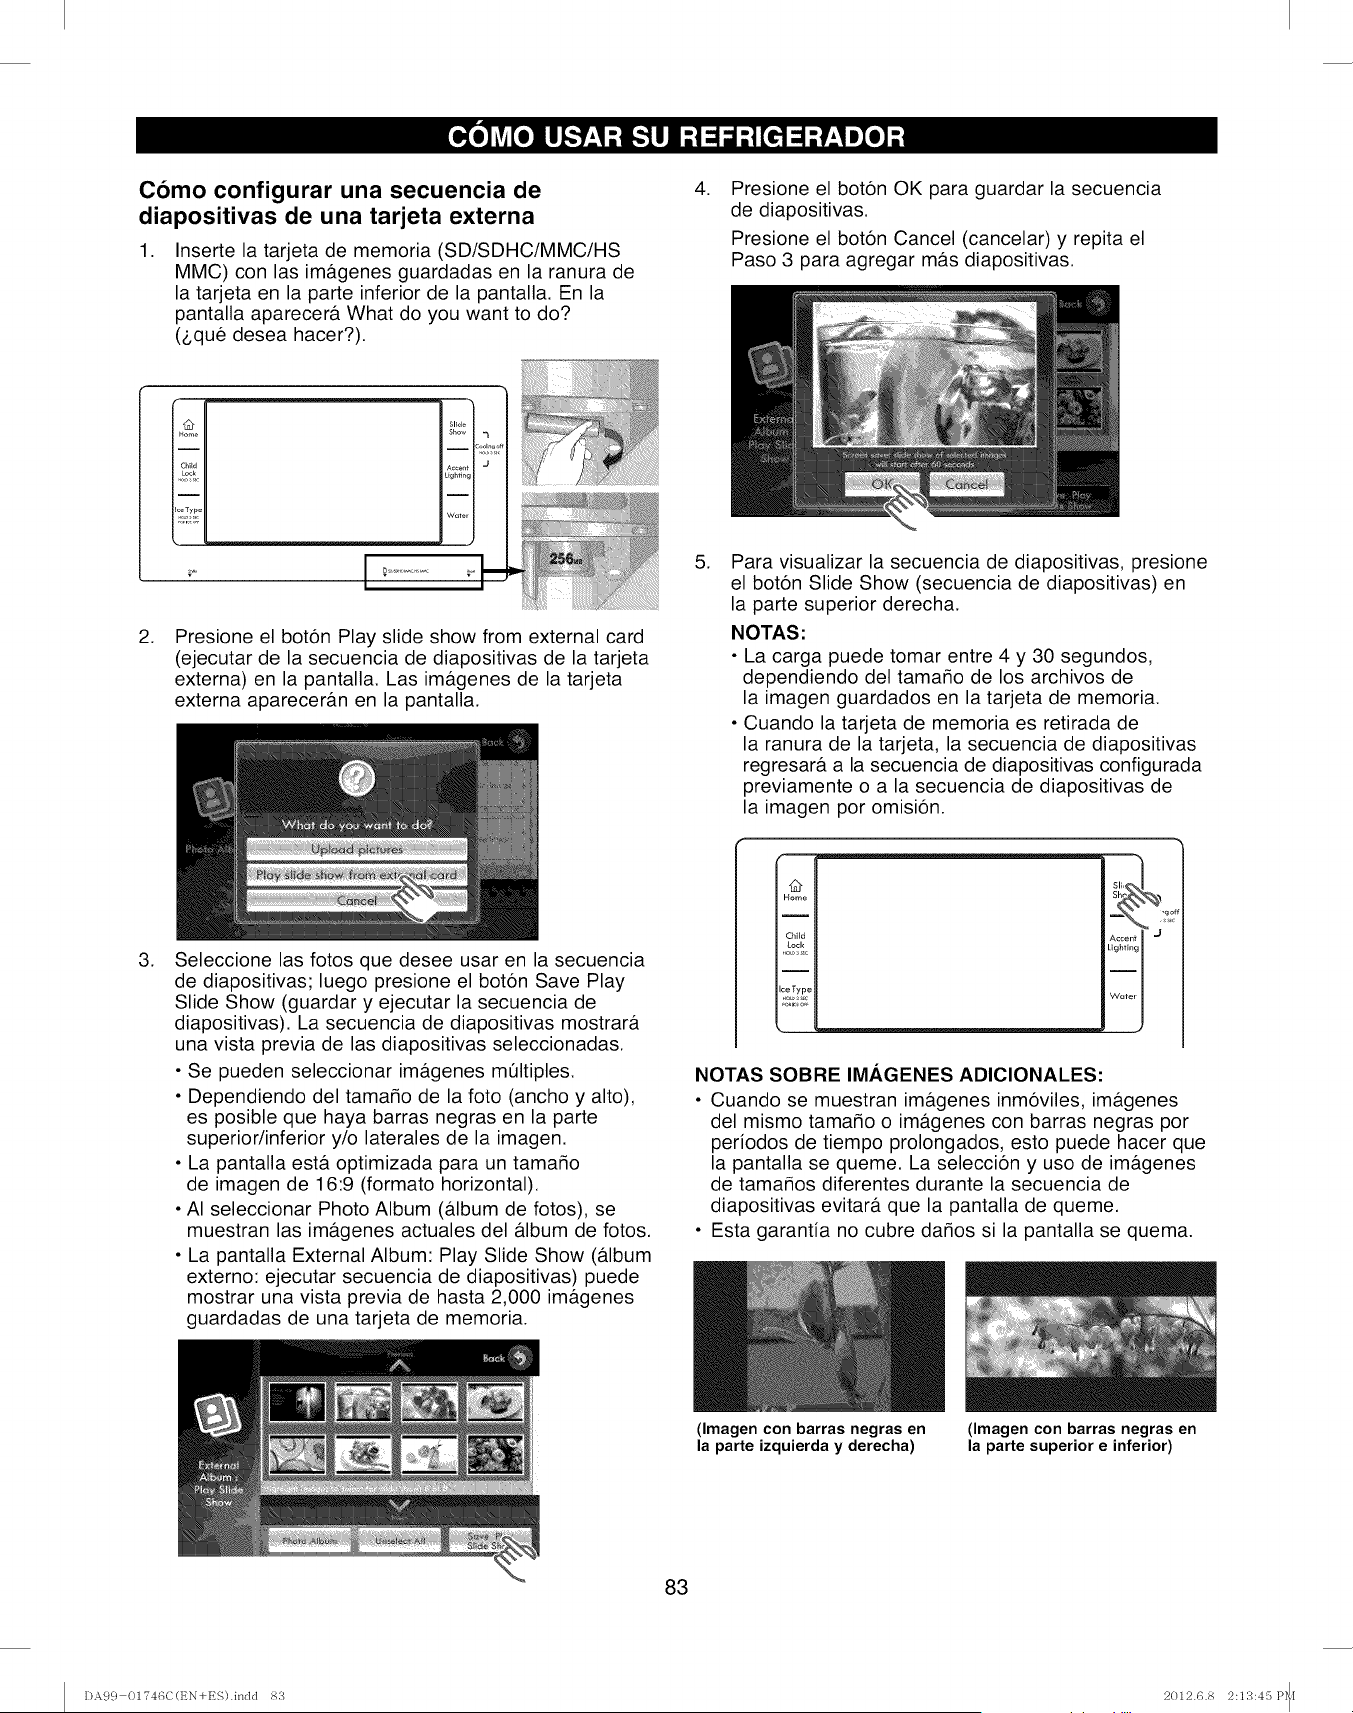
Como configurar una secuencia de
diapositivas de una tarjeta externa
,Inserte la tarjeta de memoria (SD/SDHC/MMC/HS
MMC) con las im&genes guardadas en la ranura de
la tarjeta en la parte inferior de la pantalla. En la
pantalla aparecer& What do you want to do?
(2,qu6 desea hacer?).
,Presione el boton OK para guardar la secuencia
de diapositivas.
Presione el boton Cancel (cancelar) y repita el
Paso 3 para agregar m&s diapositivas.
,
I "u# II SlideI
I Home II
IChild II Accent I J
I111 11
IiceTypell
I_;,_!_,II wo_ I
;_ I _............ _'
Presione el boton Play slide show from external card
(ejecutar de la secuencia de diapositivas de la tarjeta
externa) en la pantalla. Las im&genes de la tarjeta
externa aparecer&n en la pantalla.
,Para visualizar la secuencia de diapositivas, presione
el boton Slide Show (secuencia de diapositivas) en
la parte superior derecha.
NOTAS:
• La carga puede tomar entre 4 y 30 segundos,
dependiendo del tamaffo de los archivos de
la imagen guardados en la tarjeta de memoria.
• Cuando la tarjeta de memoria es retirada de
la ranura de la tarjeta, la secuencia de diapositivas
regresar& a la secuencia de diapositivas configurada
previamente o a la secuencia de diapositivas de
la imagen por omision.
,Seleccione las fotos que desee usar en la secuencia
de diapositivas; luego presione el boton Save Play
Slide Show (guardar y ejecutar la secuencia de
diapositivas). La secuencia de diapositivas mostrar&
una vista previa de las diapositivas seleccionadas.
• Se pueden seleccionar im&genes m01tiples.
• Dependiendo del tamaffo de la foto (ancho y alto),
es posible que haya barras negras en la parte
superior/inferior y/o laterales de la imagen.
• La pantalla est& optimizada para un tamaMo
de imagen de 16:9 (formato horizontal).
• AI seleccionar Photo Album (a.lbum de fotos), se
muestran las im&genes actuales del #.lbum de fotos.
• La pantalla External Album: Play Slide Show (a.lbum
externo: ejecutar secuencia de diapositivas) puede
mostrar una vista previa de hasta 2,000 im&genes
guardadas de una tarjeta de memoria.
O
Home
Child
Lock
I
ceType
_,j
Accent I
Lighting I
Water I
NOTAS SOBRE IMAGENES ADICIONALES:
• Cuando se muestran im&genes inm6viles, im&genes
del mismo tamaMo o im&genes con barras negras por
periodos de tiempo prolongados, esto puede hacer que
la pantalla se queme. La seleccion y uso de im&genes
de tamaMos diferentes durante la secuencia de
diapositivas evitar& que la pantalla de queme.
• Esta garantia no cubre daMos si la pantalla se quema.
(Imagen con barras negras en
la parte izquierda y derecha)
(Imagen con barras negras en
la parte superior e inferior)
83
DA99 01746C(t_N+ES).indd 8S 2012.6.8 2:13:45 P_I
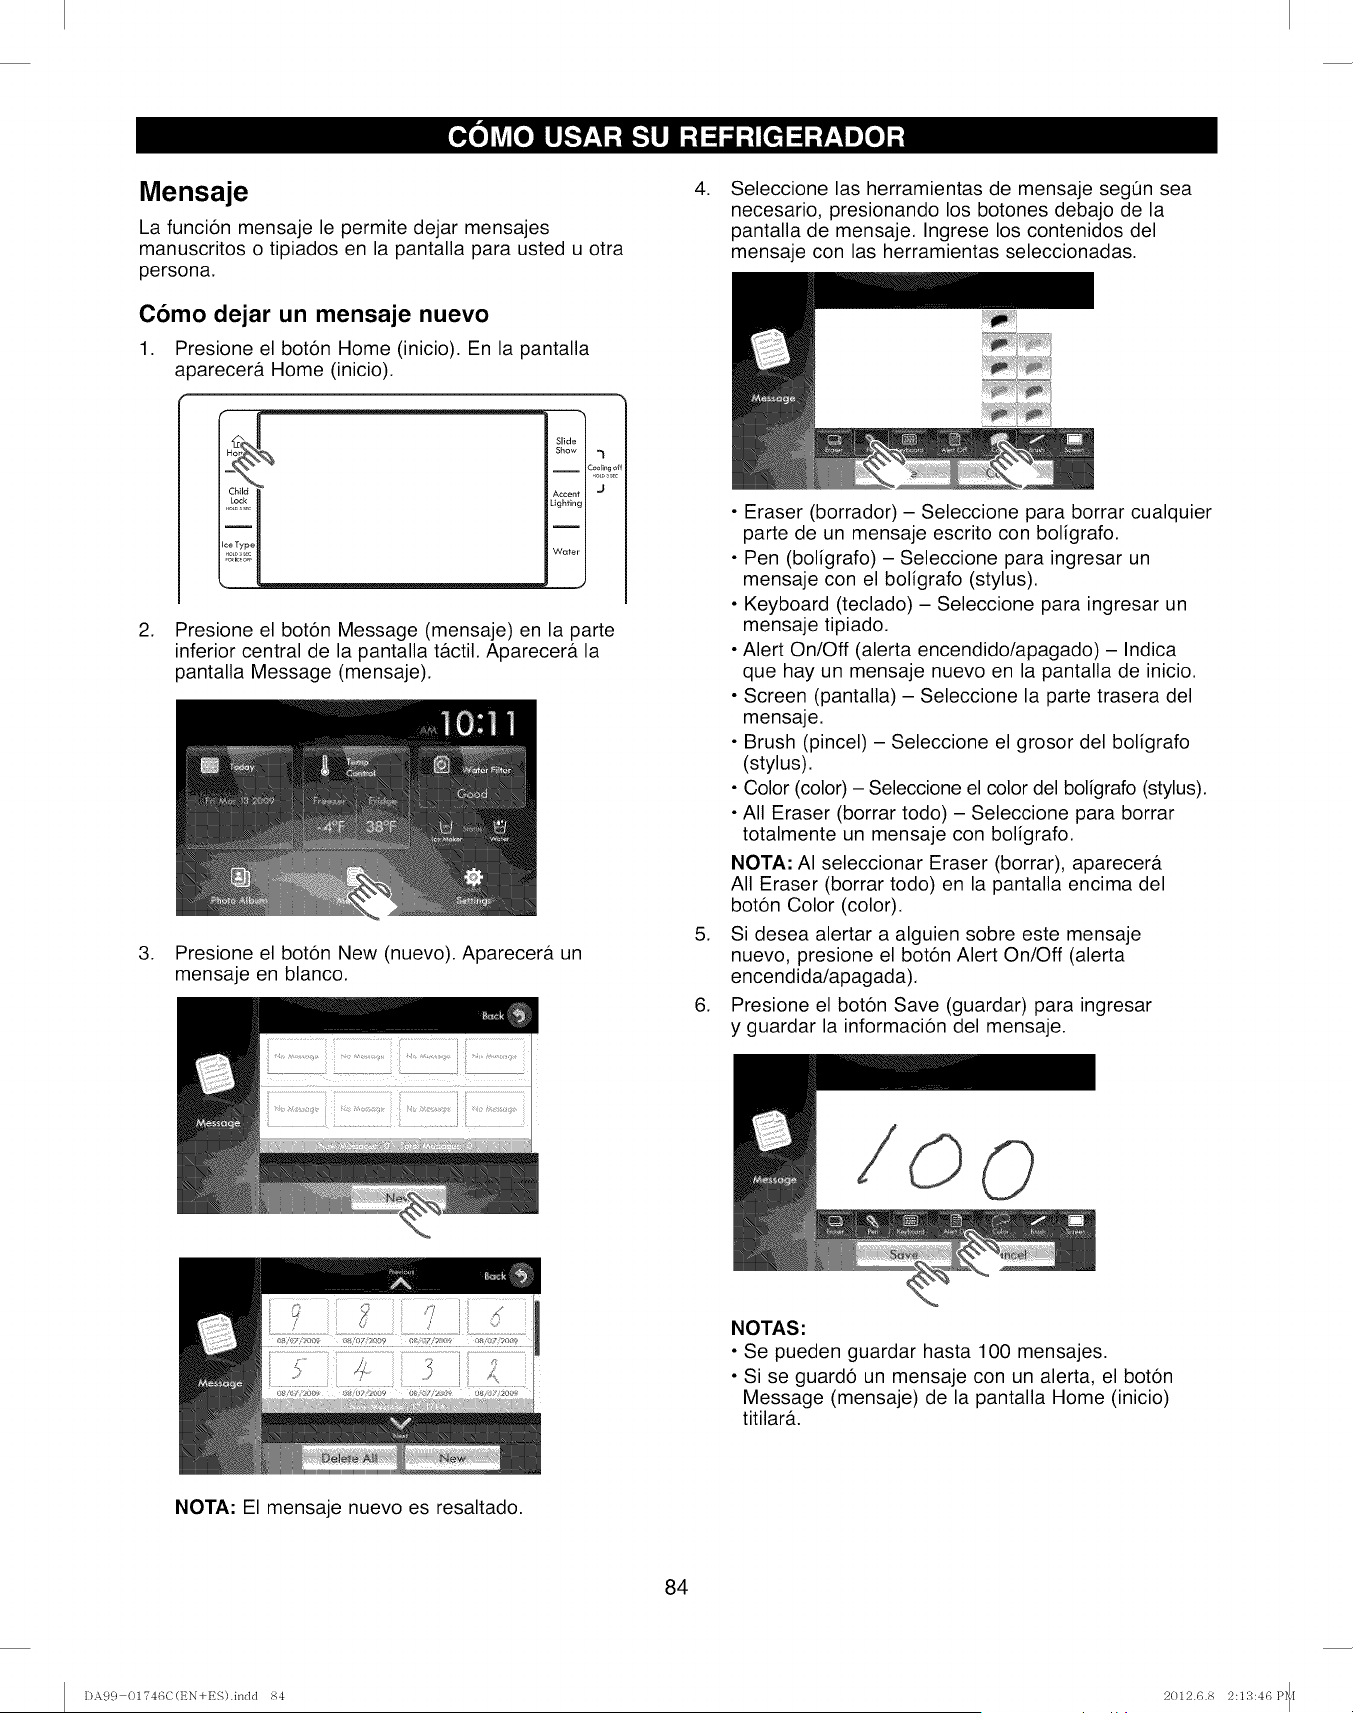
Mensaje
La funci6n mensaje le permite dejar mensajes
manuscritos o tipiados en la pantalla para usted u otra
persona.
Como dejar un mensaje nuevo
1. Presione el boton Home (inicio). En la pantalla
a3arecerf Home (inicio).
Slide
Show "l
iCool_,,go{
Lighting
I
Wuter
J
2. Presione el boton Message (mensaje) en la parte
inferior central de la pantalla t&ctil. Aparecera la
pantalla Message (mensaje).
3. Presione el boton New (nuevo). Aparecer& un
mensaje en blanco.
.
.
.
Seleccione las herramientas de mensaje segQn sea
necesario, presionando los botones debajo de la
pantalla de mensaje. Ingrese los contenidos del
mensaje con las herramientas seleccionadas.
• Eraser (borrador) - Seleccione para borrar cualquier
parte de un mensaje escrito con boligrafo.
• Pen (boligrafo) - Seleccione para ingresar un
mensaje con el boligrafo (stylus).
• Keyboard (teclado) - Seleccione para ingresar un
mensaje tipiado.
• Alert On/Off (alerta encendido/apagado) - Indica
que hay un mensaje nuevo en la pantalla de inicio.
• Screen (pantalla) - Seleccione la parte trasera del
mensaje.
• Brush (pincel) - Seleccione el grosor del boligrafo
(stylus).
• Color (color) - Seleccione el color del boligrafo (stylus).
• All Eraser (borrar todo) - Seleccione para borrar
totalmente un mensaje con boligrafo.
NOTA: AI seleccionar Eraser (borrar), aparecer&
All Eraser (borrar todo) en la pantalla encima del
boton Color (color).
Si desea alertar a alguien sobre este mensaje
nuevo, presione el boton Alert On/Off (alerta
encendida/apagada).
Presione el boton Save (guardar) para ingresar
y guardar la informacion del mensaje.
O
NOTAS:
• Se pueden guardar hasta 100 mensajes.
• Si se guardo un mensaje con un alerta, el boton
Message (mensaje) de la pantalla Home (inicio)
titilara.
NOTA: El mensaje nuevo es resaltado.
84
DA99 01746C(t_N+ES).indd 84 2012.6.8 2:13:46 P_[
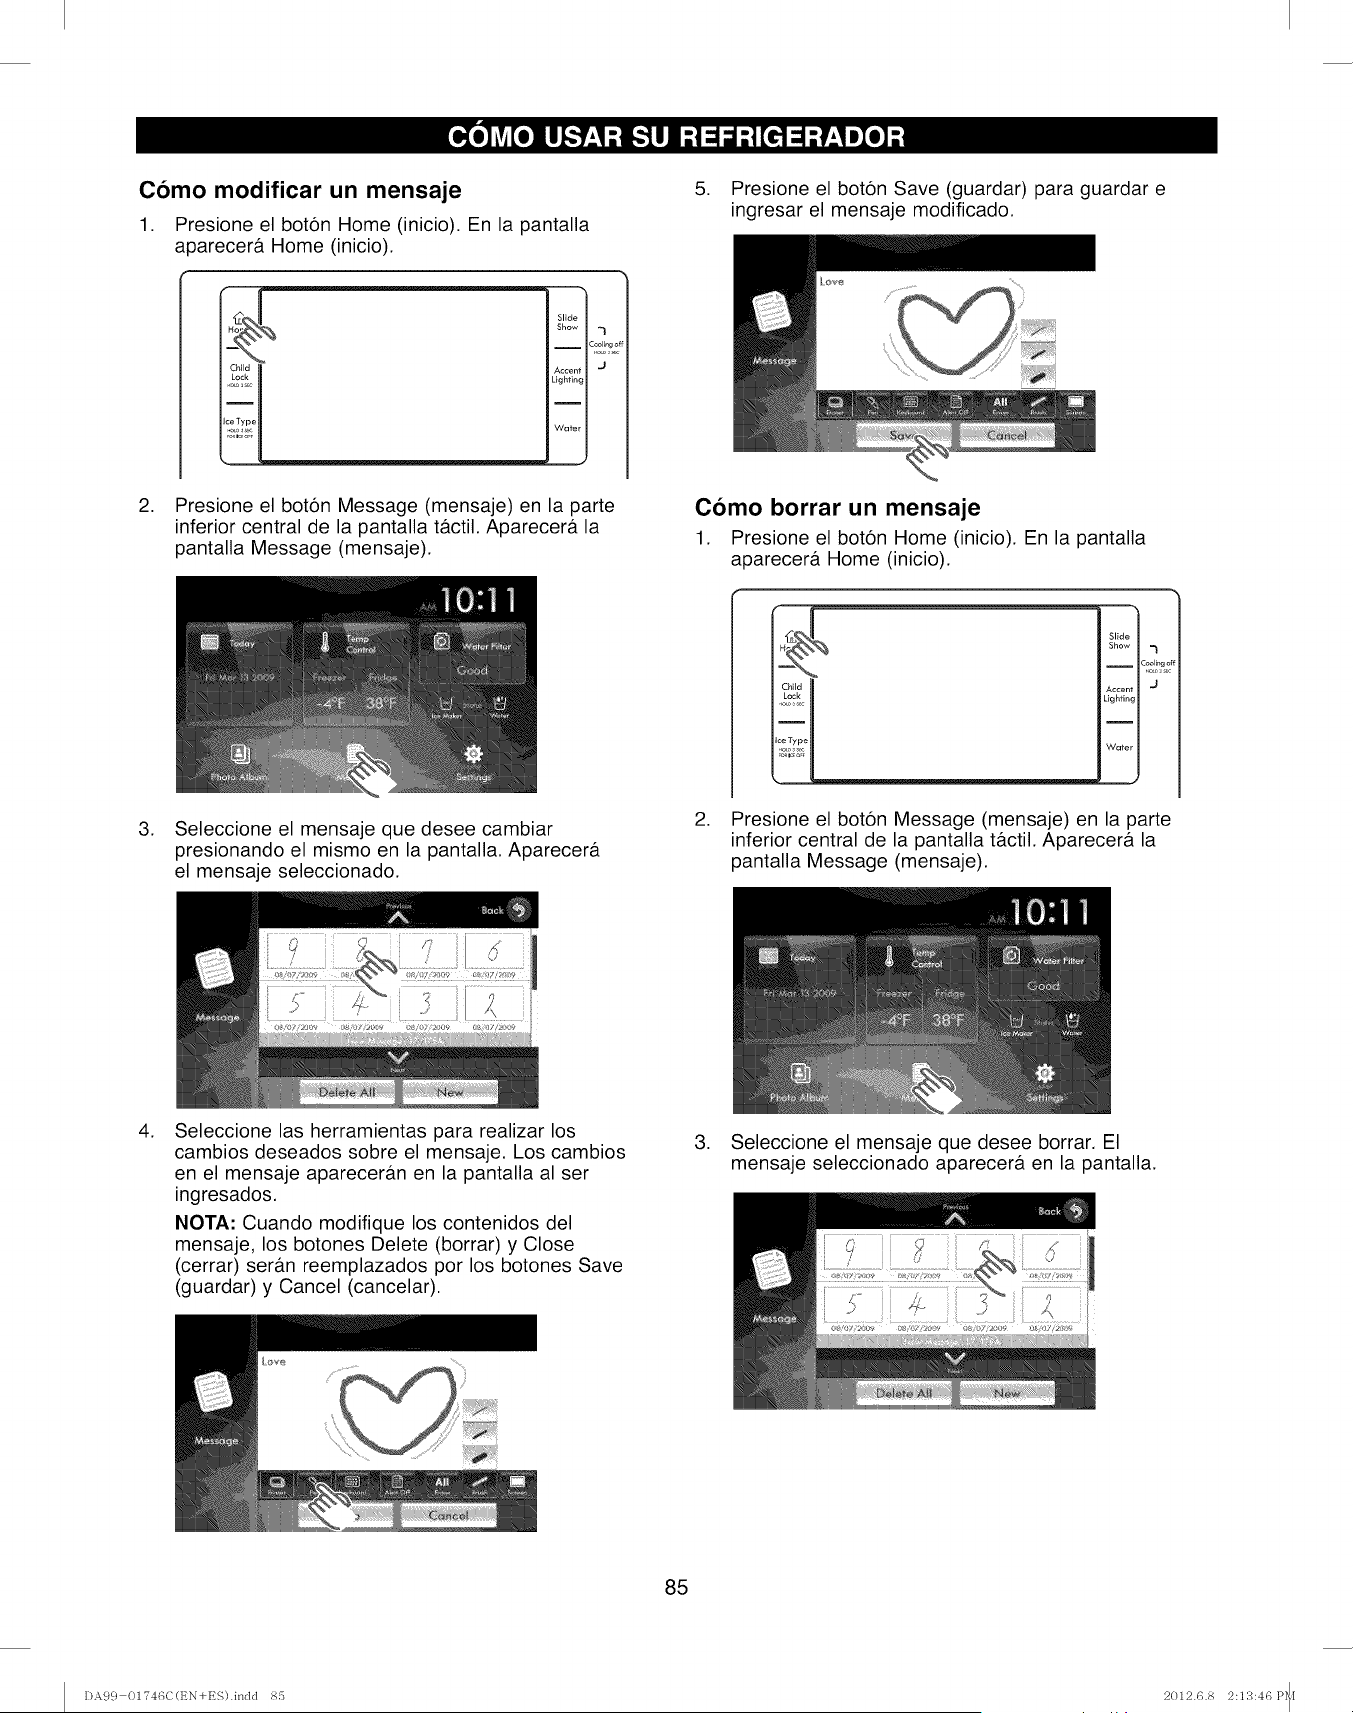
Como modificar un mensaje
1. Presione el boton Home (inicio). En la pantalla
aoarecerf Home (inicio).
Slide
Show _l
i
Coollng
o
......
Lighting
Water
2. Presione el boton Message (mensaje) en la parte
inferior central de la pantalla t&ctil. Aparecera la
pantalla Message (mensaje).
5. Presione el boton Save (guardar) para guardar e
ingresar el mensaje modificado.
Como borrar un mensaje
1. Presione el boton Home (inicio). En la pantalla
aparecera Home (inicio).
,Seleccione el mensaje que desee cambiar
presionando el mismo en la pantalla. Aparecera
el mensaje seleccionado.
Slide
Show
c_2%_/
Accent 'J
Lighting
I
Water
2. Presione el boton Message (mensaje) en la parte
inferior central de la pantalla tactil. Aparecera la
pantalla Message (mensaje).
,Seleccione las herramientas para realizar los
cambios deseados sobre el mensaje. Los cambios
en el mensaje apareceran en la pantalla al ser
ingresados.
NOTA: Cuando modifique los contenidos del
mensaje, los botones Delete (borrar) y Close
(cerrar) seran reemplazados por los botones Save
(guardar) y Cancel (cancelar).
,Seleccione el mensaje que desee borrar. El
mensaje seleccionado aparecera en la pantalla.
............
85
DA99 01746C(t_N+ES).indd 85 2012.6.8 2:13:46 P_[
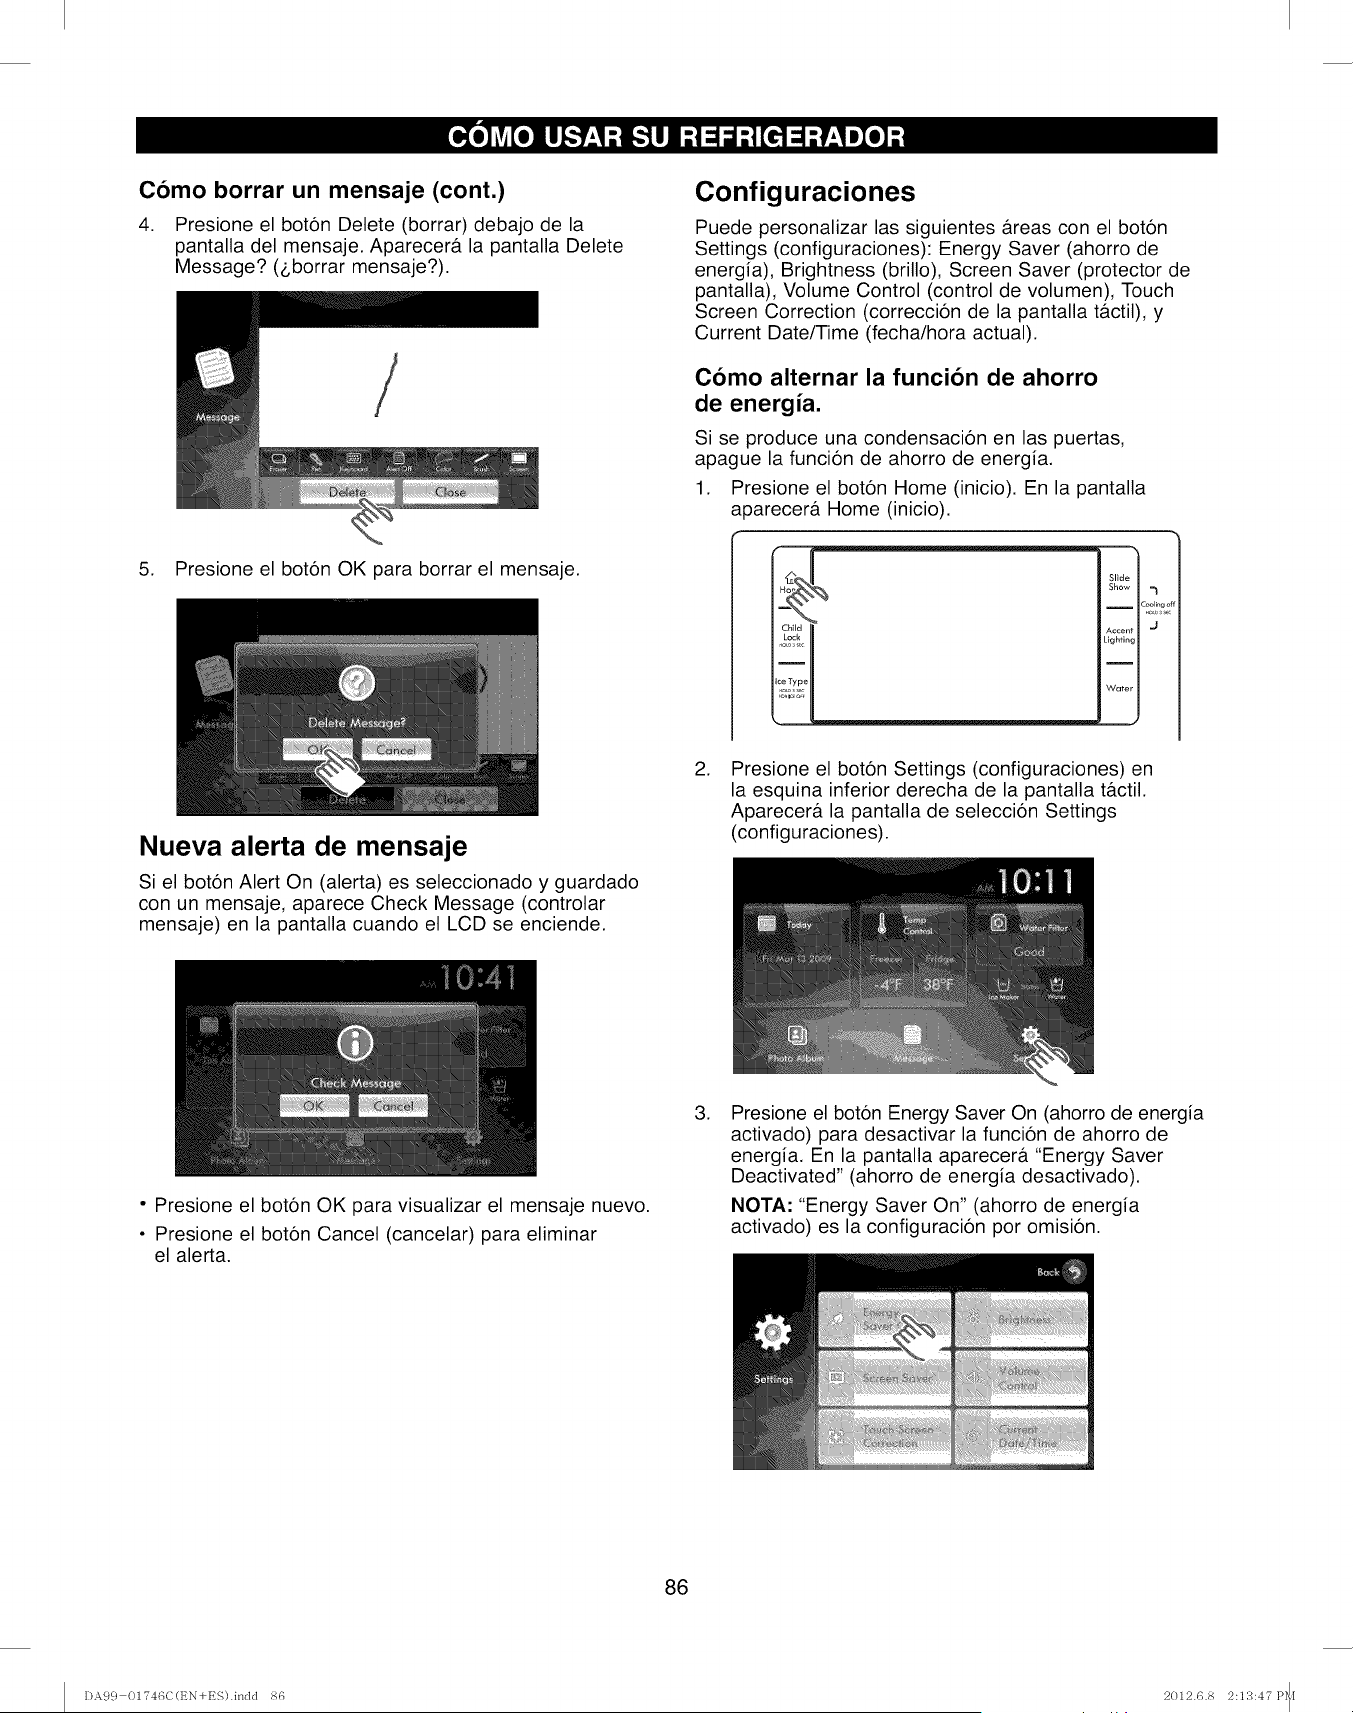
Como borrar un mensaje (cont.)
4. Presione el boton Delete (borrar) debajo de la
pantalla del mensaje. Aparecera la pantalla Delete
Message? (_,borrar mensaje?).
5. Presione el boton OK para borrar el mensaje.
Configuraciones
Puede personalizar las siguientes areas con el boton
Settings (configuraciones): Energy Saver (ahorro de
energia), Brightness (brillo), Screen Saver (protector de
pantalla), Volume Control (control de volumen), Touch
Screen Correction (correccion de la pantalla tactil), y
Current Date/Time (fecha/hora actual).
Como alternar la funcion de ahorro
de energia.
Si se produce una condensacion en las puertas,
apague la funcion de ahorro de energia.
1. Presione el boton Home (inicio). En la pantalla
a 3arecera Home (inicio).
Slide
Show -_
ICooRng _
.o0,
Accent "J
Lighting
Water
Nueva alerta de mensaje
Si el boton Alert On (alerta) es seleccionado y guardado
con un mensaje, aparece Check Message (controlar
mensaje) en la pantalla cuando el LCD se enciende.
.Presione el boton Settings (configuraciones) en
la esquina inferior derecha de la pantalla t_tctil.
Aparecera la pantalla de seleccion Settings
(configuraciones).
• Presione el boton OK para visualizar el mensaje nuevo.
• Presione el boton Cancel (cancelar) para eliminar
el alerta.
.Presione el boton Energy Saver On (ahorro de energia
activado) para desactivar la funcion de ahorro de
energia. En la pantalla aparecer& "Energy Saver
Deactivated" (ahorro de energia desactivado).
NOTA: "Energy Saver On" (ahorro de energia
activado) es la configuracion por omision.
86
DA99 01746C(t_N+ES).indd 86 2012.6.8 2:13:47 P_I

.Luego de aparecer Energy Saver Deactivated (ahorro
de energia desactivado) en la pantalla, la pantalla de
configuraciones mostrar& el boton Energy Saver Off
(ahorro de energia desactivado), indicando que la
funcion de ahorro de energia se encuentra en OFF
(apagada).
NOTA: El boton Energy Saver (ahorro de energia)
muestra la condici6n de la configuracion actual.
.Presione el boton Brightness (brillo) en la esquina
superior derecha de la pantalla t&ctil. El control de
brillo aparecer& en la pantalla.
.Ajuste el brillo de la pantalla presionando los botones
< y > para configurar Dark (oscuro) y Bright (claro)
en la pantalla.
• Cada vez que se presione una flecha, el brillo de
la pantalla cambiar&.
5. Para aplicar las nuevas configuraciones, presione
el boton OK.
Como configurar el brillo de la pantalla.
1. Presione el boton Home (inicio). En la pantalla
aoarecer& Home (inicio).
Slide
Show 7
IC_lE_gof
Accent 'J
Lighting
Wafer
J
.Presione el boton Settings (configuraciones) en
la esquina inferior derecha de la pantalla t&ctil.
Aparecer& la pantalla de seleccion Settings
(configuraciones).
87
DA99 01746C(t_N+ES).indd 87 2012.6.8 2:13:47 P_I
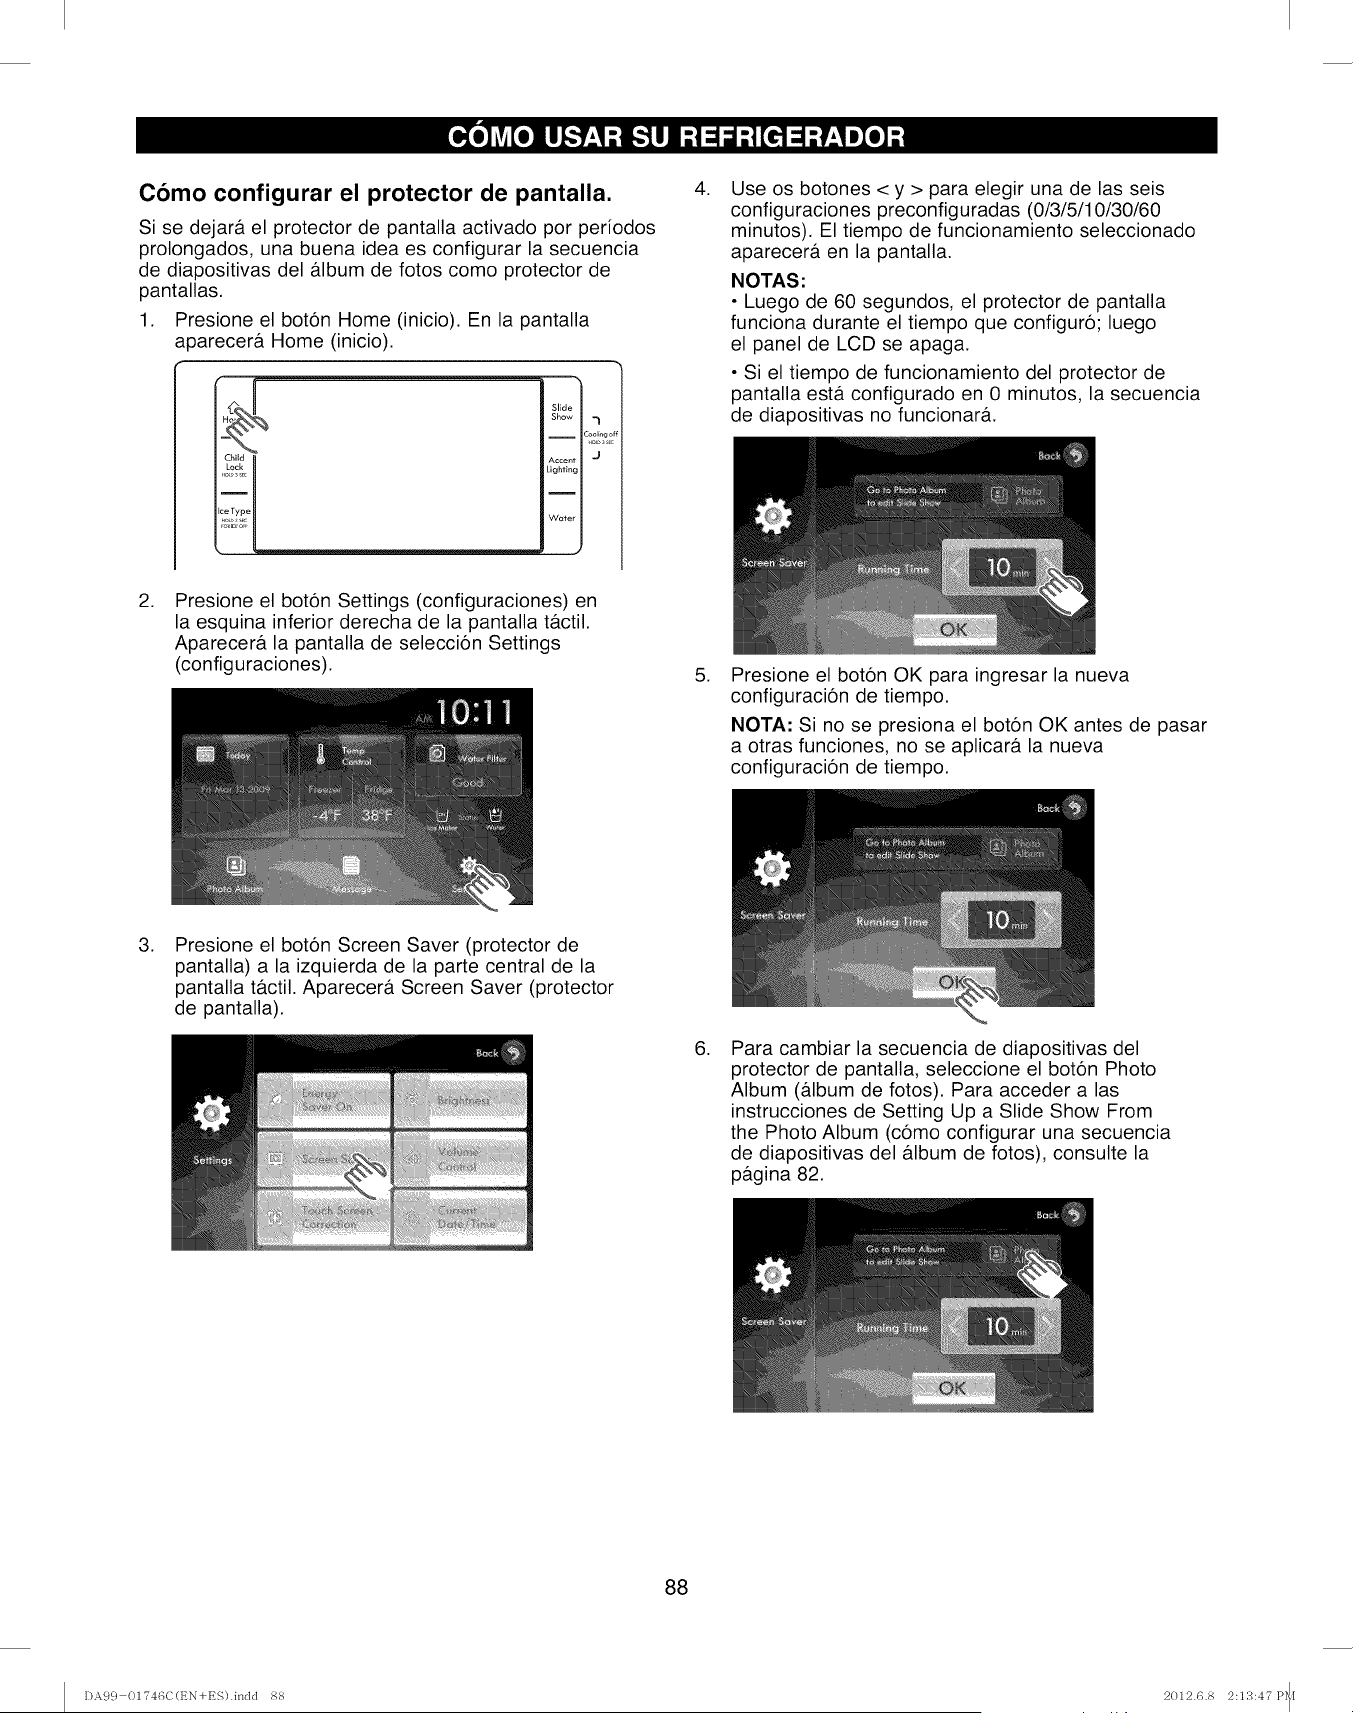
Como configurar el protector de pantalla.
Si se dejar#, el protector de pantalla activado por periodos
prolongados, una buena idea es configurar la secuencia
de diapositivas del album de fotos como protector de
pantallas.
1. Presione el boton Home (inicio). En la pantalla
a0arecera Home (inicio).
Slide
Show ,_
iCoolrngc
Accent J
Lighting
I
Writer
J
,Use os botones < y > para elegir una de las seis
configuraciones preconfiguradas (0/3/5/10/30/60
minutos). El tiempo de funcionamiento seleccionado
aparecera en la pantalla.
NOTAS:
• Luego de 60 segundos, el protector de pantalla
funciona durante el tiempo que configuro; luego
el panel de LCD se apaga.
• Si el tiempo de funcionamiento del protector de
pantalla esta configurado en 0 minutos, la secuencia
de diapositivas no funcionara.
,Presione el boton Settings (configuraciones) en
la esquina inferior derecha de la pantalla ta.ctil.
Aparecera la pantalla de seleccion Settings
(configuraciones). ,Presione el boton OK para ingresar la nueva
configuracion de tiempo.
NOTA: Si no se presiona el boton OK antes de pasar
a otras funciones, no se aplicara la nueva
configuracion de tiempo.
,Presione el boton Screen Saver (protector de
pantalla) a la izquierda de la parte central de la
pantalla tb.ctil. Aparecera Screen Saver (protector
de pantalla).
,Para cambiar la secuencia de diapositivas del
protector de pantalla, seleccione el boton Photo
Album (a.lbum de fotos). Para acceder alas
instrucciones de Setting Up a Slide Show From
the Photo Album (como configurar una secuencla
de diapositivas del album de fotos), consulte la
pagina 82.
88
DA99 01746C(t_N+ES).indd 88 2012.6.8 2:113:47 P_I
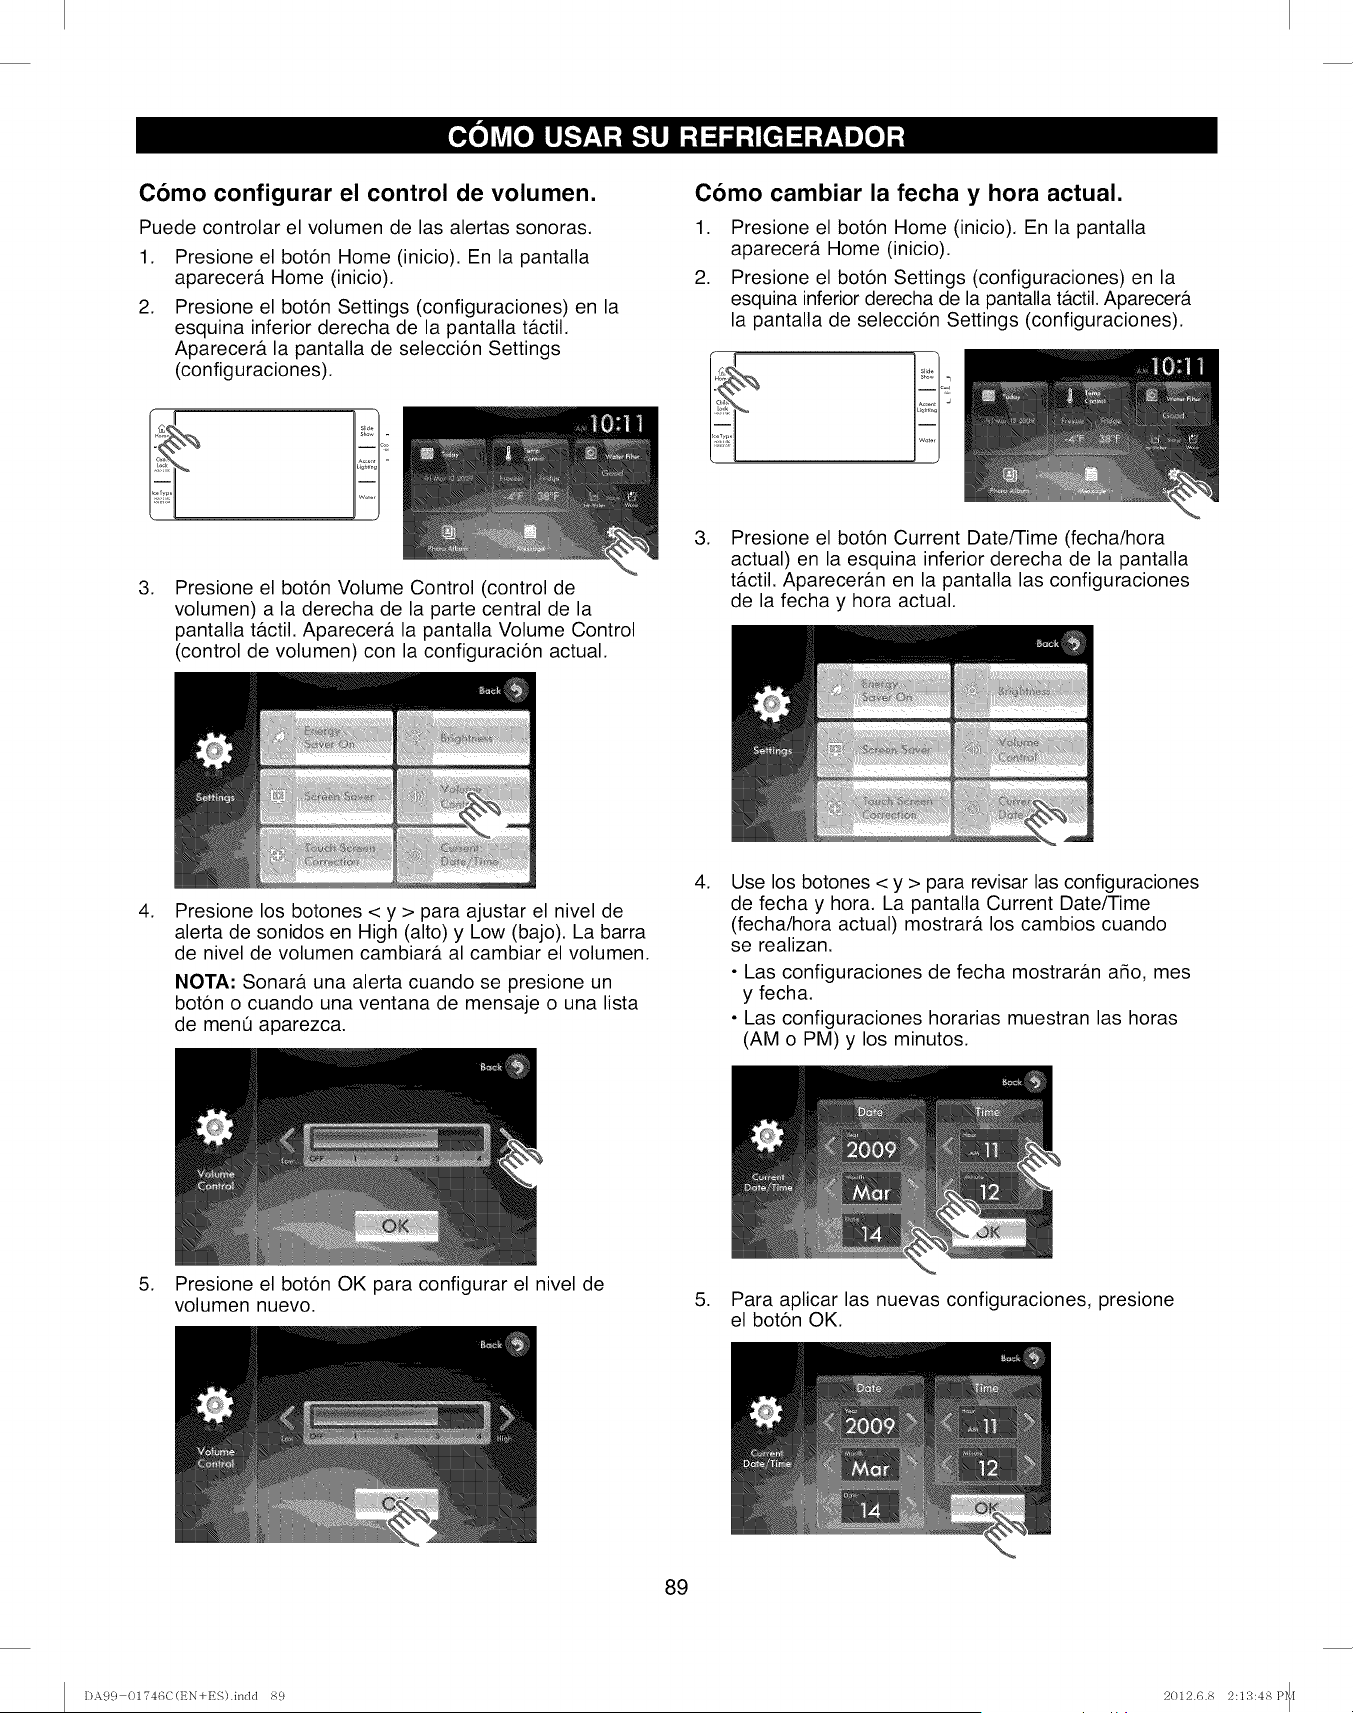
Como configurar el control de volumen.
Puede controlar el volumen de las alertas sonoras.
.
2.
Presione el bot6n Home (inicio). En la pantalla
aparecer& Home (inicio).
Presione el bot6n Settings (configuraciones) en la
esquina inferior derecha de la pantalla t&ctil.
Aparecer& la pantalla de selecci6n Settings
(configuraciones).
.Presione el bot6n Volume Control (control de
volumen) a la derecha de la parte central de la
pantalla t&ctil. Aparecer& la pantalla Volume Control
(control de volumen) con la configuraci6n actual.
Como cambiar la fecha y hora actual.
1. Presione el bot6n Home (inicio). En la pantalla
aparecer& Home (inicio).
2. Presione el bot6n Settings (configuraciones) en la
esquina inferior derecha de la pantalla t&ctil.Aparecer&
la pantalla de selecci6n Settings (configuraciones).
.Presione el bot6n Current Date/Time (fecha/hora
actual) en la esquina inferior derecha de la pantalla
t&ctil. Aparecer&n en la pantalla las configuraciones
de la fecha y hora actual.
.Presione los botones < y > para ajustar el nivel de
alerta de sonidos en High (alto) y Low (bajo). La barra
de nivel de volumen cambiar& al cambiar el volumen.
NOTA: Sonar& una alerta cuando se presione un
bot6n o cuando una ventana de mensaje o una lista
de mene aparezca.
.Use los botones < y > para revisar las configuraciones
de fecha y hora. La pantalla Current Date/Time
(fecha/hora actual) mostrar& los cambios cuando
se realizan.
•Las configuraciones de fecha mostrar&n afio, mes
y fecha.
• Las configuraciones horarias muestran las horas
(AM o PM) y los minutos.
5. Presione el bot6n OK para configurar el nivel de
volumen nuevo. 5. Para aplicar las nuevas configuraciones, presione
el bot6n OK.
89
DA99 01746C(EN+ES).indd 89 2012.6.8 2:13:48 P_[
COMO GUARDAR LA COMIDA EN
EL REFRIGERADOR
El Refrigerador de Dos Puertas Kenmore Elite TM fue
diser_ado con caracteristicas y funciones que maximizan
el ahorro de espacio. Los siguientes compartimientos
personalizados ayudan a mantener su comida m&s fresca
por m&s tiempo. A fin de evitar la filtracion de posibles
olores en el hielo, envuelva de forma segura las comidas
guardadas de la forma m&s hermetica posible.
RECIPIENTE DE LACTEOS
Se pueden usar para guardar
articulos I&cteos pequer_os tales
como manteca, margarina, yogur,
y queso crema.
APOYA LATAS
Se puede usar para guardar latas
de bebidas o botellas.
ESTANTE OPCIONAL PARA VINOS Ill
Ayuda a que los vinos conserven
su sabor, brindando un espacio
optimizado para guardar sus
botellas de vino.
ESTANTES DE VIDRIO TEMPLADO
Diser_ados con resistencia alas
fisuras, estos estantes se pueden
usar para guardar todo tipo de
comidas y bebidas. Las marcas
circulares en la superficie de vidrio
son un fen6meno normal y
comt]nmente se pueden limpiar
con una tela hQmeda.
ESTANTE PLEGABLE
Este estante se pliega para permitir
al usuario cambiar r&pidamente el
espacio de almacenamiento
disponible y ubicar botellas y
envases altos.
RECIPIENTES DE LA PUERTA
DEL REFRIGERADOR
Diser_ados para sostener articulos
grandes y abultados tales como
galones de leche u otras botellas
y envases grandes.
CONTENEDOR DE HUEVOS
Es el mejor lugar para colocar los
huevos. Coloque el contenedor
en el estante para un f&cil acceso.
CAJON PARA EMBUTIDOS
Diser_ado para guardar y conservar
articulos embutidos tales como
cortes frios y quesos, y cortes
de carne fresca.
CAJONES DE FRUTAS Y
VERDURAS
Se usan para conservar frescas las
verduras y frutas guardadas. Este
caj6n fue disefiado especificamente para controlar el nivel
de humedad dentro del compartimiento. Mantenga las
verduras y frutas separadas, siempre que sea posible.
COMO GUARDAR LA COMIDA EN
EL CONGELADOR
CUBO PARA HIELO
Diser_ado para guardar grandes
cantidades de hielo.
__
i I
i_ ! I
90
No use los dedos, manos, u otros objetos en el
vertedor de hielo o en el cubo de la m&quina de
hacer hielo. Esto podr& producir lesiones personales
o dafios de los materiales.
ESTANTES DESLIZABLES
Se pueden usar para guardar todo
tipo de comidas congeladas.
RECIPIENTES DE LA PUERTA
DEL CONGELADOR
Se pueden usar para guardar
paquetes pequer_os de comida
congelada.
CAJONES DEL CONGELADOR
Se usan especialmente para
guardar carnes o comidas secas.
envolver de forma segura, usando papel de aluminio u
otros materiales o envases adecuados para envolver.
CONSEJOS PARA GUARDAR COMIDA:
• NO coloque articulos grandes de comida debajo de
la I&mpara del refrigerador. Cerca de la I&mpara se
encuentra ubicado un sensor de aire y si dicho sensor
es bloqueado, el refrigerador se podr& enfriar en
exceso.
• SIEMPRE coloque las verduras y frutas en los cajones
para verduras y frutas a fin de evitar que se congelen.
• Si la comida del refrigerador se congela, ajuste la
temperatura en un grado m&s alto.
• Las botellas se deber&n guardar una junto a la otra,
de modo que no se vuelquen ni caigan cuando la
puerta del refrigerador es abierta.
• Si planea no estar por un periodo de tiempo
prolongado, vacie el refrigerador y apague el mismo.
Elimine la humedad excesiva del interior del
electrodomestico y deje las puertas abiertas. Esto
ayuda a evitar que se produzcan olores o moho.
COMO USAR LAS PUERTAS
Las puertas del refrigerador y del congelador cuentan
con cierres de puerta autom&ticos, para asegurar que
las mismas se cierren y sellen completamente.
Cuando se abre o cierre una puerta a menos de 3
pulgadas, la misma se cerrar_t y sellar& de forma
autom_ttica. Cuando se abra una puerta m_ts de 3
pulgadas, la misma permanecer& abierta hasta que
se cierre.
DA99 01746C(EN+ES).indd 90 2012.6.8 2:13:48 P_[
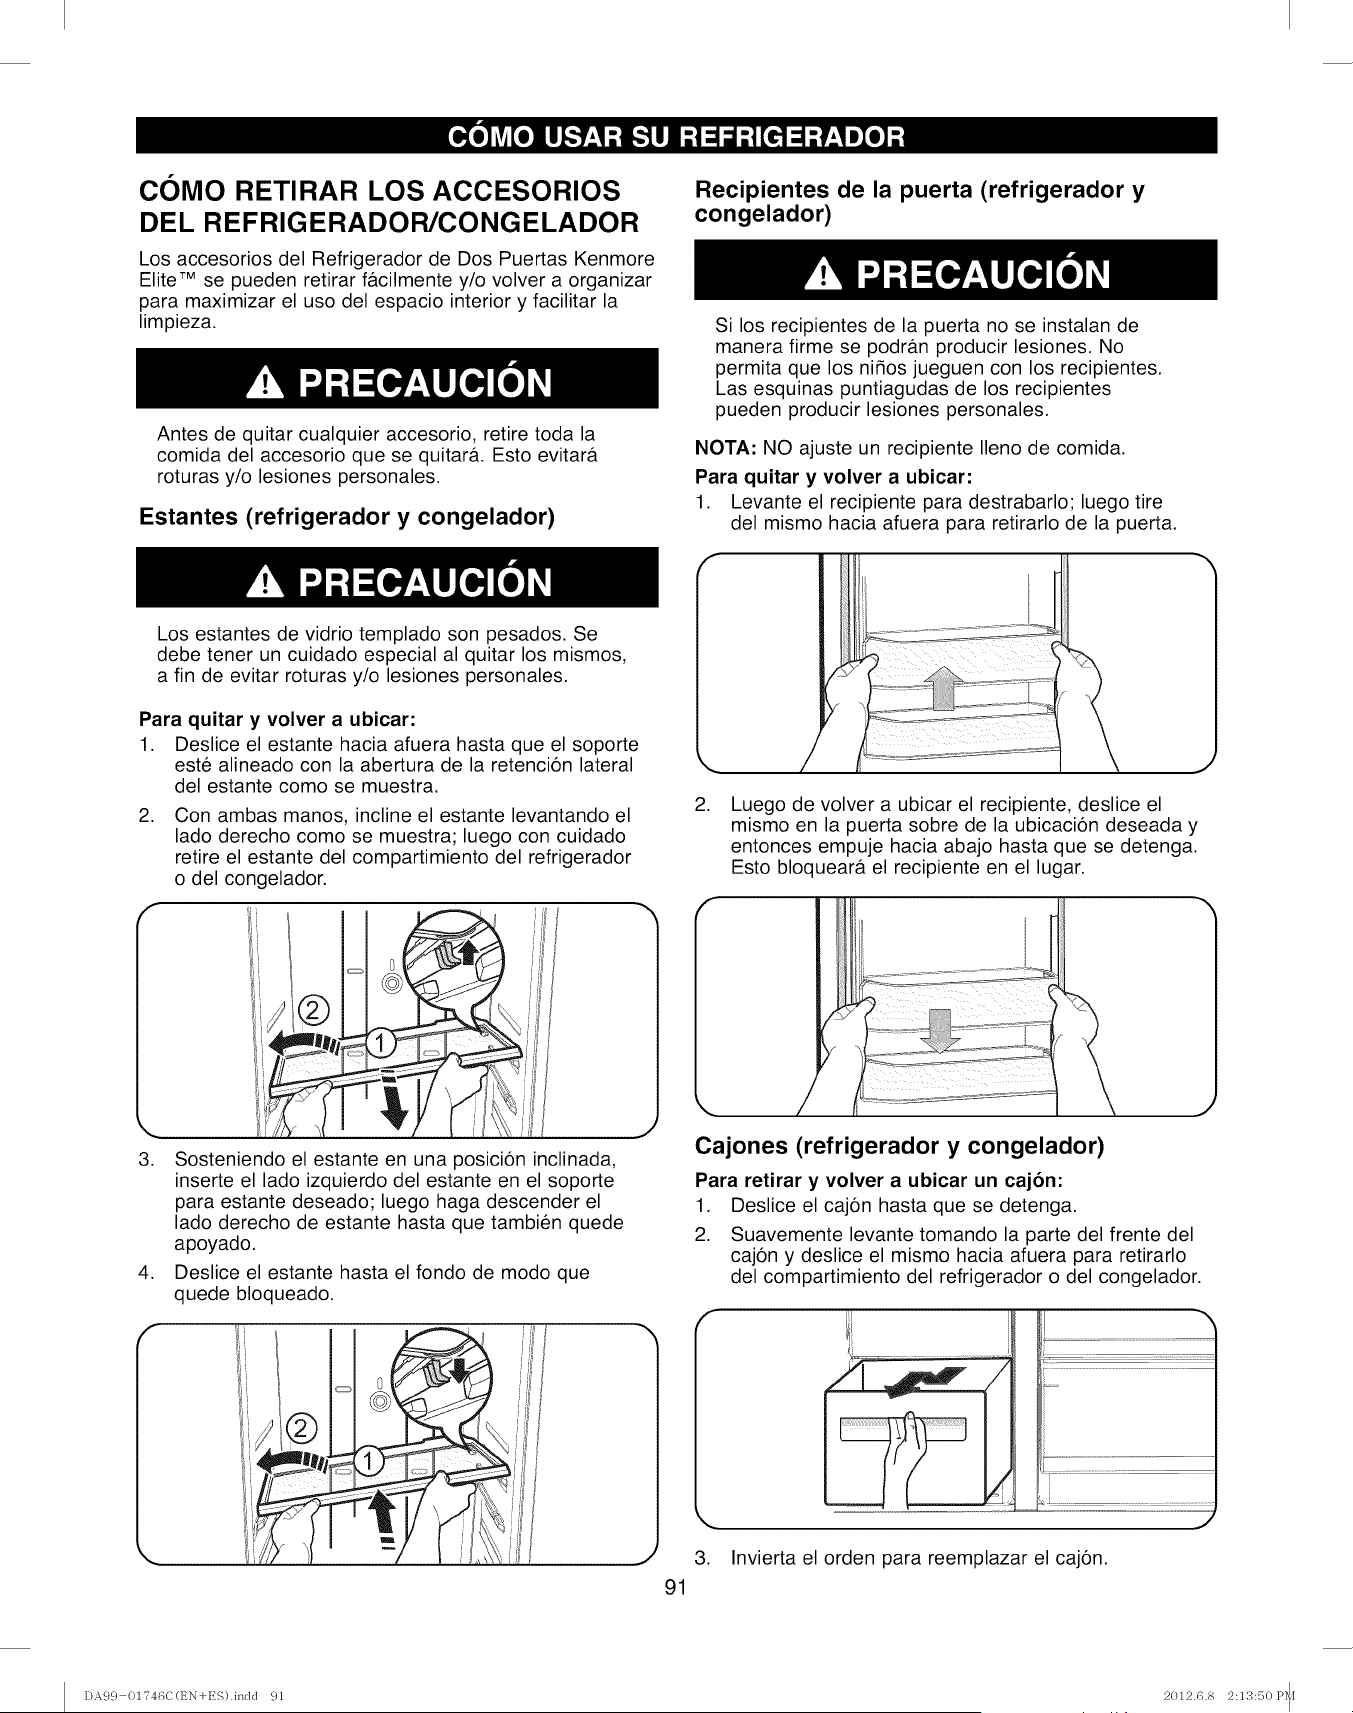
COMO RETIRAR LOS ACCESORIOS
DEL REFRIGERADOR/CONGELADOR
Los accesorios del Refrigerador de Dos Puertas Kenmore
Elite TM se pueden retirar f&cilmente y/o volver a organizar
para maximizar el uso del espacio interior y facilitar la
limpieza.
Antes de quitar cualquier accesorio, retire toda la
comida del accesorio que se quitar&. Esto evitar&
roturas y/o lesiones personales.
Estantes (refrigerador y congelador)
Recipientes de la puerta (refrigerador y
congelador)
Si los recipientes de la puerta no se instalan de
manera firme se podr&n producir lesiones. No
permita que los nifios jueguen con los recipientes.
Las esquinas puntiagudas de los recipientes
pueden producir lesiones personales.
NOTA: NO ajuste un recipiente Ileno de comida.
Para quitar y volver a ubicar:
1. Levante el recipiente para destrabarlo; luego tire
del mismo hacia afuera para retirarlo de la puerta.
Los estantes de vidrio templado son pesados. Se
debe tener un cuidado especial al quitar los mismos,
a fin de evitar roturas y/o lesiones personales.
Para quitar y volver a ubicar:
1. Deslice el estante hacia afuera hasta que el soporte
este alineado con la abertura de la retencion lateral
del estante como se muestra.
2. Con ambas manos, incline el estante levantando el
lado derecho como se muestra; luego con cuidado
retire el estante del compartimiento del refrigerador
o del congelador.
f
3.
,
Sosteniendo el estante en una posicion inclinada,
inserte el lado izquierdo del estante en el soporte
para estante deseado; luego haga descender el
lado derecho de estante hasta que tambien quede
apoyado.
Deslice el estante hasta el fondo de modo que
quede bloqueado.
,Luego de volver a ubicar el recipiente, deslice el
mismo en la puerta sobre de la ubicaci6n deseada y
entonces empuje hacia abajo hasta que se detenga.
Esto bloquear& el recipiente en el lugar.
Cajones (refrigerador y congelador)
Para retirar y volver a ubicar un cajon:
1. Deslice el caj6n hasta que se detenga.
2. Suavemente levante tomando la parte del frente del
caj6n y deslice el mismo hacia afuera para retirarlo
del compartimiento del refrigerador o del congelador.
3. Invierta el orden para reemplazar el caj6n.
91
DA99 01746C(EN+ES).indd 91 2012.6.8 2:13:50 P_[
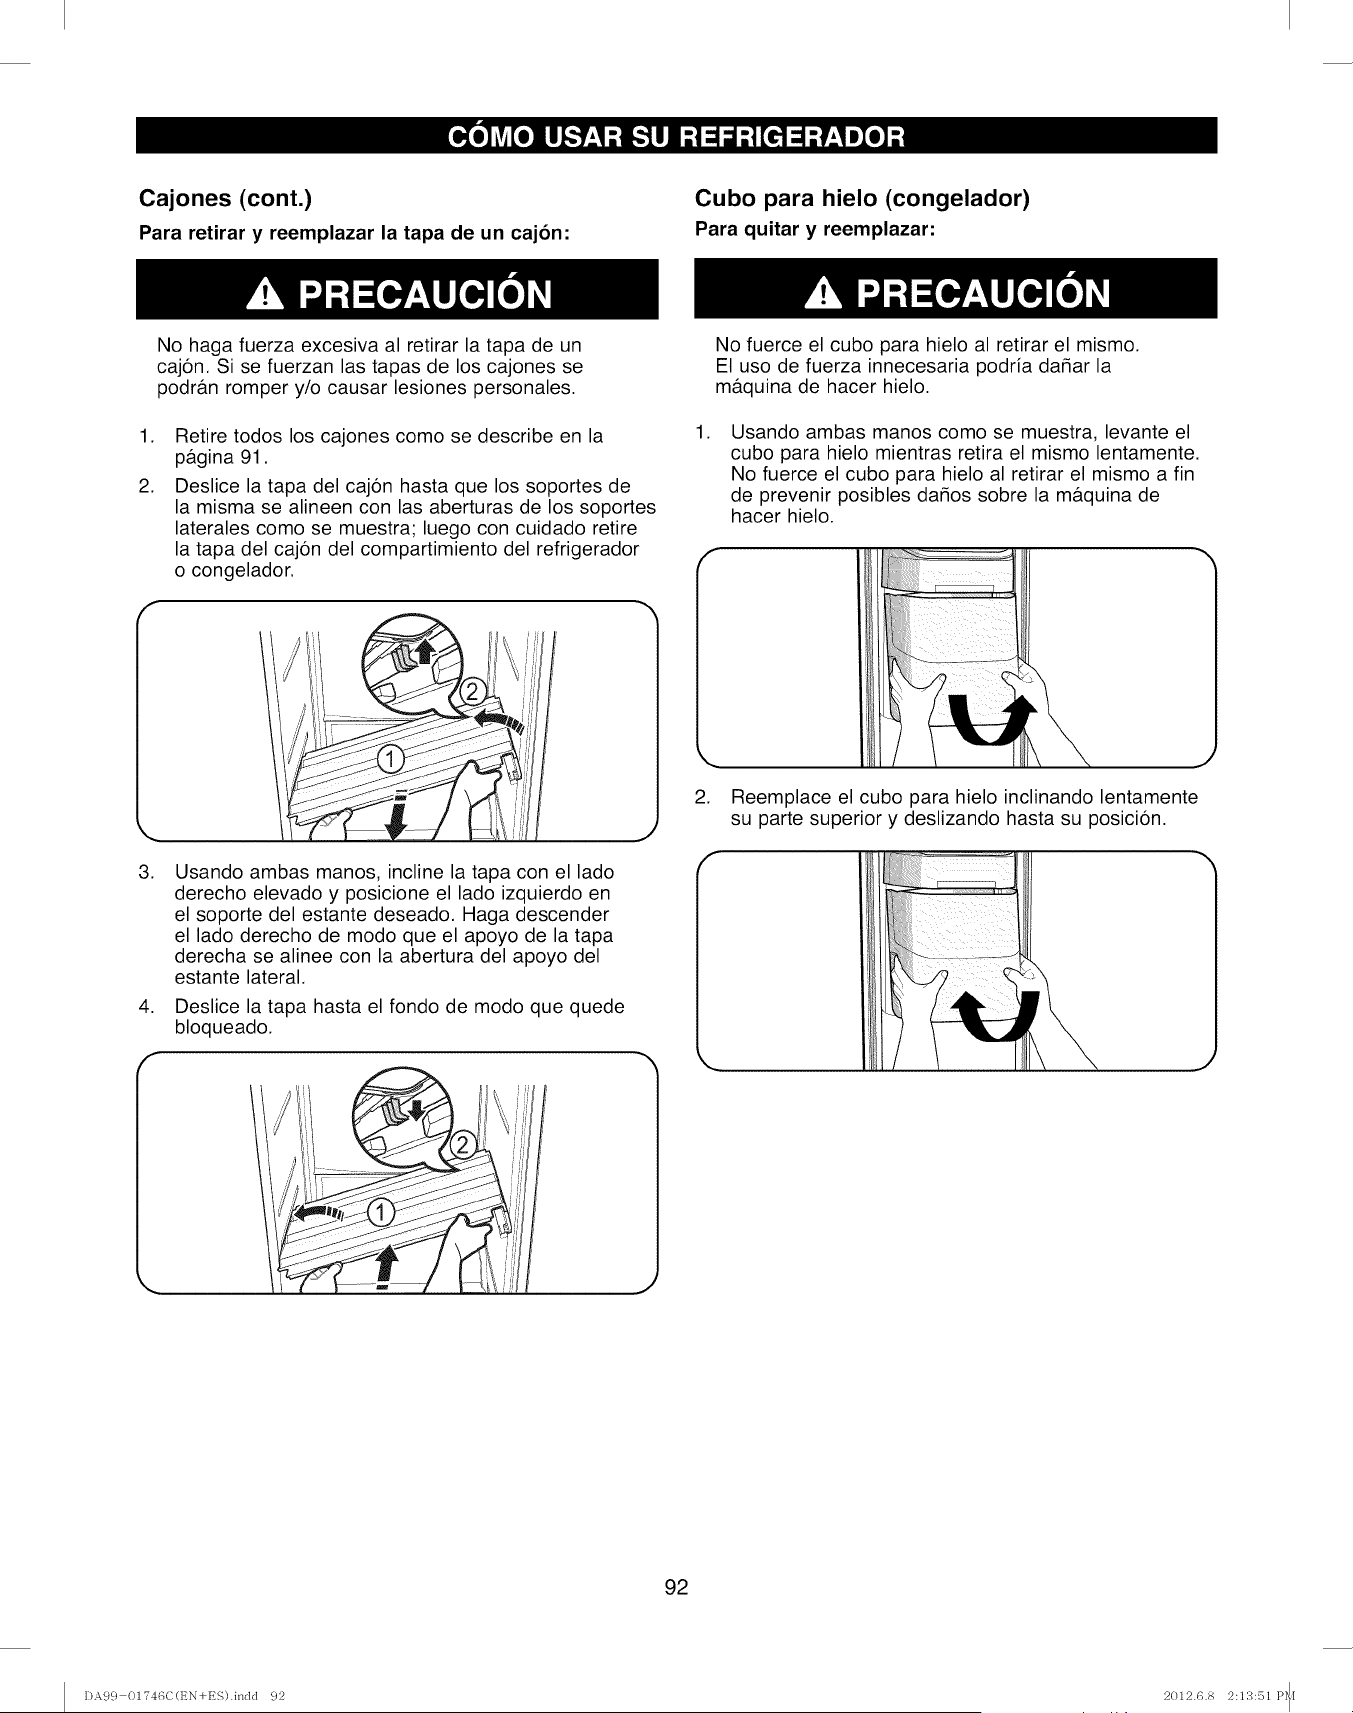
Cajones (cont.)
Para retirar y reemplazar la tapa de un cajon:
Cubo para hielo (congelador)
Para quitar y reemplazar:
No haga fuerza excesiva al retirar la tapa de un
cajon. Si se fuerzan las tapas de los cajones se
podr&n romper y/o causar lesiones personales.
,
2.
Retire todos los cajones como se describe en la
p&gina 91.
Deslice la tapa del cajon hasta que los soportes de
la misma se alineen con las aberturas de los soportes
laterales como se muestra; luego con cuidado retire
la tapa del cajon del compartimiento del refrigerador
o congelador.
No fuerce el cubo para hielo al retirar el mismo.
El uso de fuerza innecesaria podria dahar la
m&quina de hacer hielo.
,Usando ambas manos como se muestra, levante el
cubo para hielo mientras retira el mismo lentamente.
No fuerce el cubo para hielo al retirar el mismo a fin
de prevenir posibles dahos sobre la m&quina de
hacer hielo.
,Reemplace el cubo para hielo inclinando lentamente
su parte superior y deslizando hasta su posicion.
,
,
f
Usando ambas manos, incline la tapa con el lado
derecho elevado y posicione el lado izquierdo en
el soporte del estante deseado. Haga descender
el lado derecho de modo que el apoyo de la tapa
derecha se alinee con la abertura del apoyo del
estante lateral.
Deslice la tapa hasta el fondo de modo que quede
bloqueado.
92
I)A99 01?46C(EN+ES).indd 92 2012.6.8 2:13:51 P_[
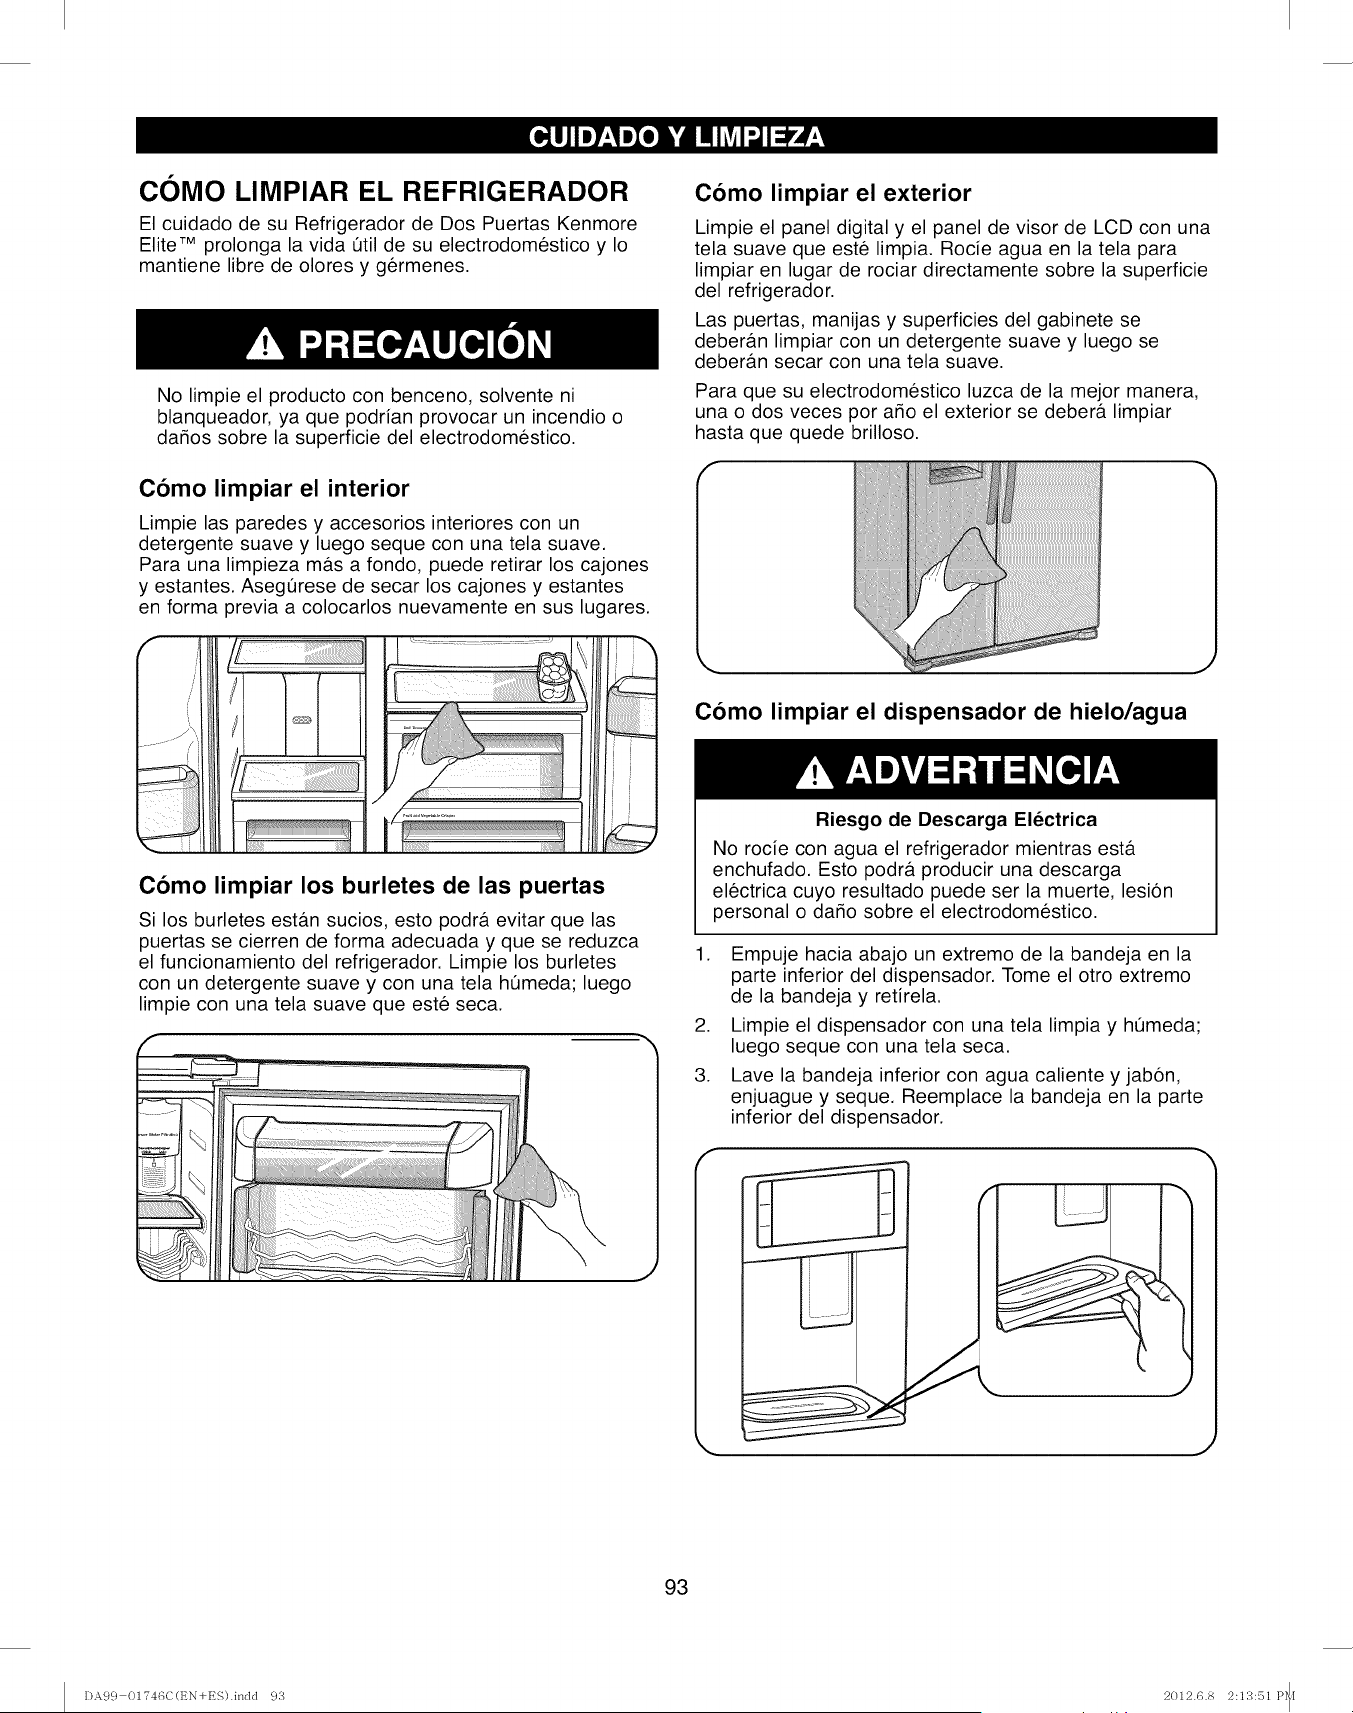
COMO LIMPIAR EL REFRIGERADOR
El cuidado de su Refrigerador de Dos Puertas Kenmore
Elite TM prolonga la vida Qtil de su electrodomestico y Io
mantiene libre de olores y germenes.
No limpie el producto con benceno, solvente ni
blanqueador, ya que podrian provocar un incendio o
da_os sobre la superficie del electrodomestico.
Como limpiar el interior
Limpie las paredes y accesorios interiores con un
detergente suave y luego seque con una tela suave.
Para una limpieza mas a fondo, puede retirar los cajones
y estantes. AsegQrese de secar los cajones y estantes
en forma previa a colocarlos nuevamente en sus lugares.
Como limpiar el exterior
Limpie el panel digital y el panel de visor de LCD con una
tela suave que este limpia. Rocie agua en la tela para
limpiar en lugar de rociar directamente sobre la superficie
del refrigerador.
Las puertas, manijas y superficies del gabinete se
deberb.n limpiar con un detergente suave y luego se
deberan secar con una tela suave.
Para que su electrodomestico luzca de la mejor manera,
una o dos veces por argo el exterior se debera limpiar
hasta que quede brilloso.
Como limpiar el dispensador de hielo/agua
Como limpiar los burletes de las puertas
Si los burletes esta.n sucios, esto podra evitar que las
puertas se cierren de forma adecuada y que se reduzca
el funcionamiento del refrigerador. Limpie los burletes
con un detergente suave y con una tela hQmeda; luego
limpie con una tela suave que este seca.
.
3.
Riesgo de Descarga Electrica
No rocie con agua el refrigerador mientras esta
enchufado. Esto podra, producir una descarga
electrica cuyo resultado puede ser la muerte, lesion
personal o da_o sobre el electrodomestico.
Empuje hacia abajo un extremo de la bandeja en la
parte inferior del dispensador. Tome el otro extremo
de la bandeja y retirela.
Limpie el dispensador con una tela limpia y hQmeda;
luego seque con una tela seca.
Lave la bandeja inferior con agua caliente y jabon,
enjuague y seque. Reemplace la bandeja en la parte
inferior del dispensador.
J
J
93
DA99 01746C(EN+ES).indd 93 2012.6.8 2:13:51 P_[
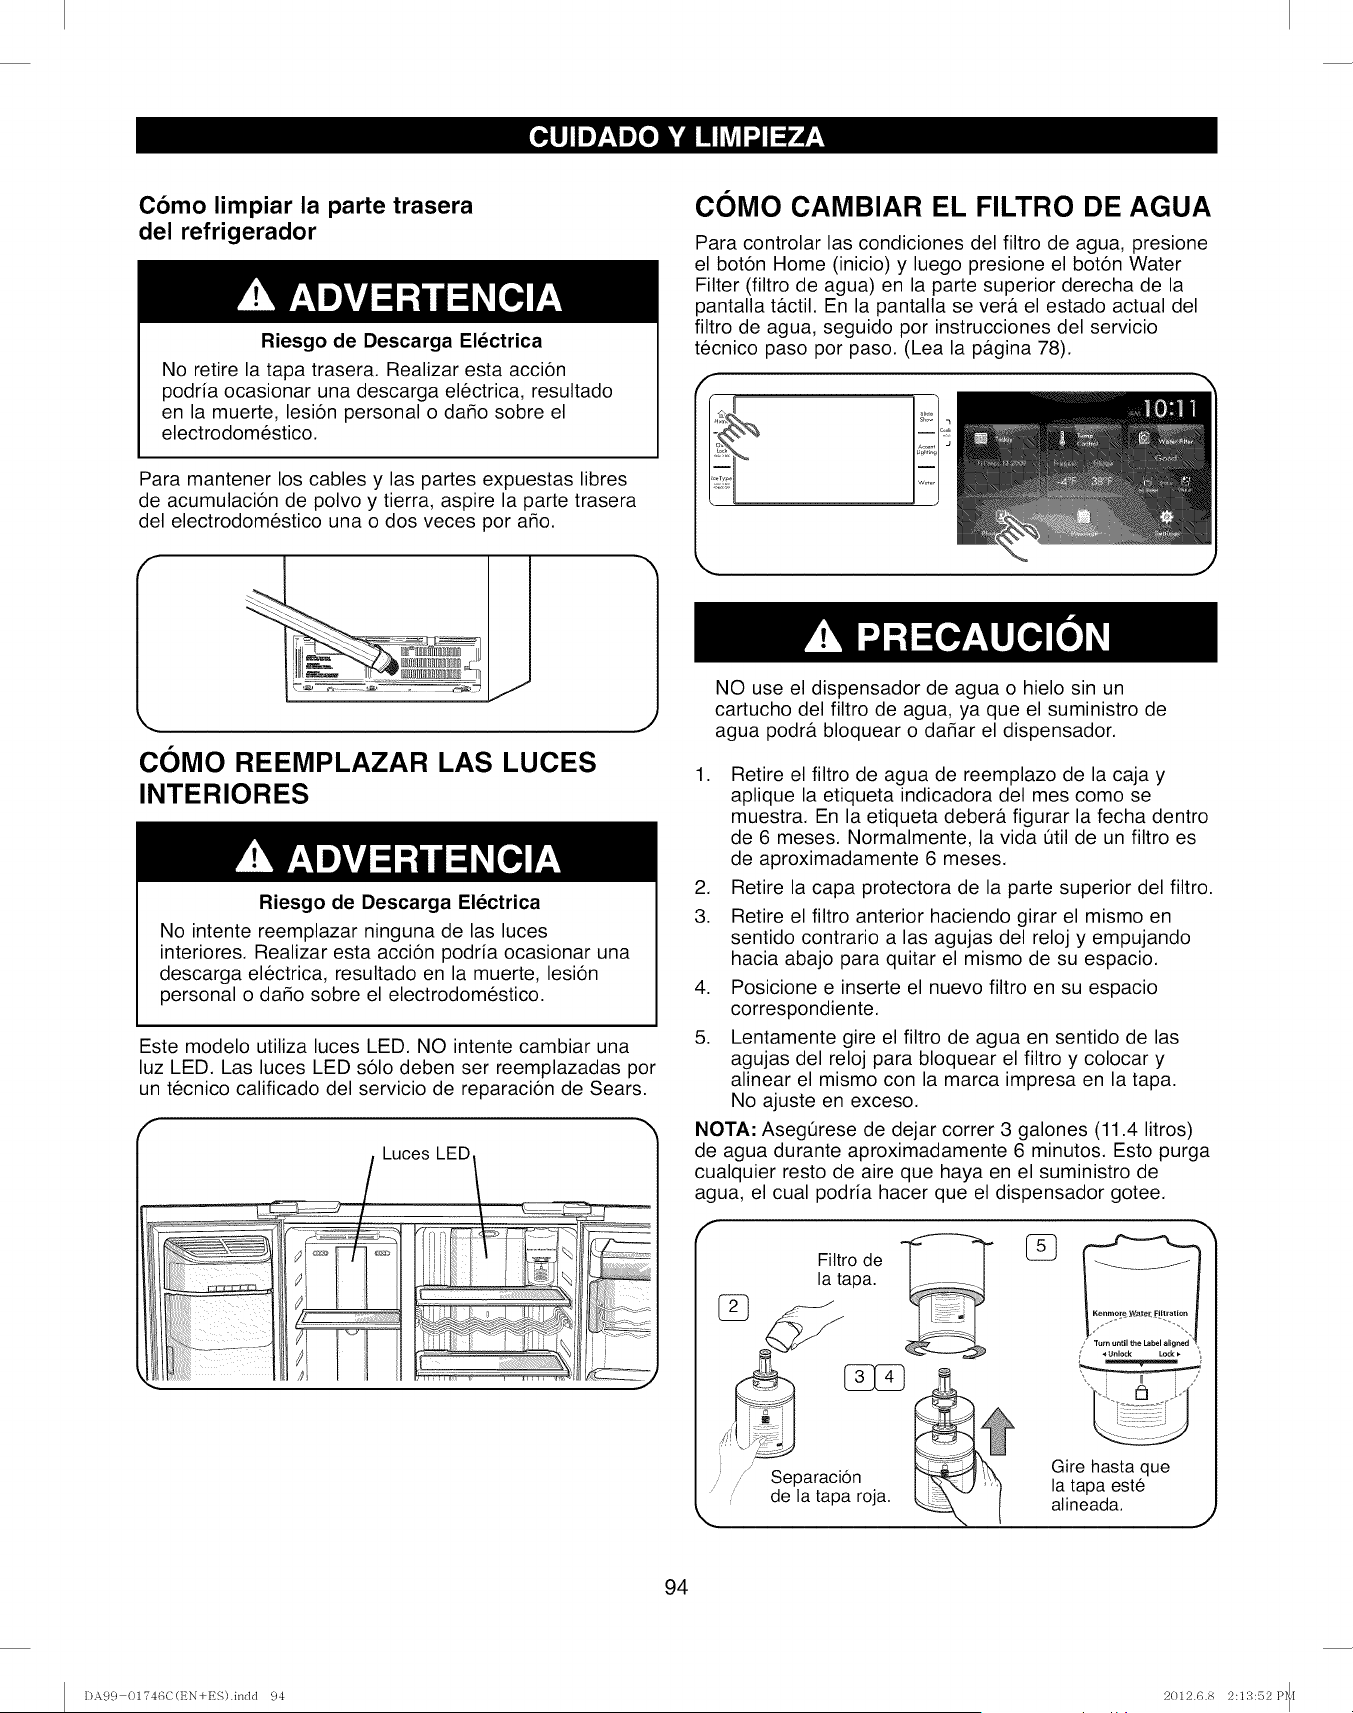
Como limpiar la parte trasera
del refrigerador
Riesgo de Descarga Electrica
No retire la tapa trasera. Realizar esta accion
podria ocasionar una descarga electrica, resultado
en la muerte, lesion personal o dado sobre el
electrodomestico.
Para mantener los cables y las partes expuestas libres
de acumulacion de polvo y tierra, aspire la parte trasera
del electrodomestico una o dos veces por ado.
COMO CAMBIAR EL FILTRO DE AGUA
Para controlar las condiciones del filtro de agua, presione
el boton Home (inicio) y luego presione el boton Water
Filter (filtro de agua) en la parte superior derecha de la
pantalla t&ctil. En la pantalla sever#, el estado actual del
filtro de agua, seguido por instrucciones del servicio
tecnico paso por paso. (Lea la p&gina 78).
COMO REEMPLAZAR LAS LUCES
INTERIORES
Riesgo de Descarga Electrica
No intente reemplazar ninguna de las luces
interiores. Realizar esta accion podria ocasionar una
descarga electrica, resultado en la muerte, lesion
personal o dado sobre el electrodomestico.
Este modelo utiliza luces LED. NO intente cambiar una
luz LED. Las luces LED solo deben ser reemplazadas por
un tecnico calificado del servicio de reparacion de Sears.
f
Luces LED/
NO use el dispensador de agua o hielo sin un
cartucho del filtro de agua, ya que el suministro de
agua podra bloquear o dadar el dispensador.
1. Retire el filtro de agua de reemplazo de la caja y
aplique la etiqueta indicadora del mes como se
muestra. En la etiqueta debera figurar la fecha dentro
de 6 meses. Normalmente, la vida Qtil de un filtro es
de aproximadamente 6 meses.
2. Retire la capa protectora de la parte superior del filtro.
3. Retire el filtro anterior haciendo girar el mismo en
sentido contrario alas agujas del reloj y empujando
hacia abajo para quitar el mismo de su espacio.
4. Posicione e inserte el nuevo filtro en su espacio
correspondiente.
5. Lentamente gire el filtro de agua en sentido de las
agujas del reloj para bloquear el filtro y colocar y
alinear el mismo con la marca impresa en la tapa.
No ajuste en exceso.
NOTA: Asegt_rese de dejar correr 3 galones (11.4 litros)
de agua durante aproximadamente 6 minutos. Esto purga
cualquier resto de aire que haya en el suministro de
agua, el cual podria hacer que el dispensador gotee.
de
la tapa. [
Separaci6n
de la tapa roja.
Gire hasta que
la tapa este
alineada. J
94
DA99 01746C(t_N+ES).indd 94 2012.6.8 2:13:52 P_[

INTERRUPCIONES SOBRE
LA CORRIENTE
1. Si no habr& corriente durante 24 horas o menos,
mantenga todas puertas del refrigerador cerradas
para mantener las comidas frias y congeladas.
2. Si no habr& corriente por m&s de 24 horas, retire
toda la comida congelada y guarde la misma en
un armario para comida congelada.
CUANDO SALE DE VACACIONES
Si decide dejar el refrigerador conectado mientras
esta de viaje:
1. Use cualquier alimento perecedero y congele
los dema.s productos.
2. Vacie el cubo para hielo.
3. Apague la m&quina de hacer hielo.
Si decide apagar el refrigerador antes de salir
de viaje:
1. Retire toda la comida del refrigerador.
2. Desenchufe el cable de corriente y apague el
disyuntor o la caja de fusibles.
3. Limpie el interior del refrigerador. AsegQrese de
que se haya limpiado y secado totalmente.
4. Coloque bloques de goma o madera en la parte
superior de cada puerta como sosten para que se
mantengan abiertas, de modo que entre suficiente
aire. Esto evita la acumulacion de olores y moho.
CUANDO SE MUDE
,
3.
Cuando sea necesario trasladar el refrigerador a su
nuevo hogar, siga estos pasos de modo que el mismo
este preparado para la mudanza.
1. Retire todas las comidas del refrigerador y embale
todas las comidas congeladas en hielo seco.
Desenchufe el cable de corriente.
Limpie el interior del refrigerador. AsegQrese de que
se haya limpiado y secado totalmente.
4. Retire todas las partes removibles, envuelva bien
las mismas y peguelas con cinta de modo que no
cambien de lugar ni se golpeen durante la mudanza.
Para m&s instrucciones sobre como quitar las partes,
consulte las secciones Using Your Refrigerator
(como usar su refrigerador).
5. Levante las patas niveladoras frontales, girando
las mismas en sentido de las agujas del reloj hasta
donde sea posible. Esto expondr& todas las ruedas
a fin de facilitar la mudanza.
6. Cierre el suministro de agua conectado al
refrigerador. Desconecte el suministro de agua
detr_ts del refrigerador.
7. Pegue las puertas cerradas y el cable de corriente
en la parte trasera del refrigerador.
AI Ilegar a su nuevo hogar, vuelva a colocar todo y
consulte la seccion Refrigerator Installation (instalacion
del refrigerador) para acceder alas instrucciones de
instalacion.
95
DA99 01746C(t_N+ES).indd 95 2012.6.8 2:13:55 P_[
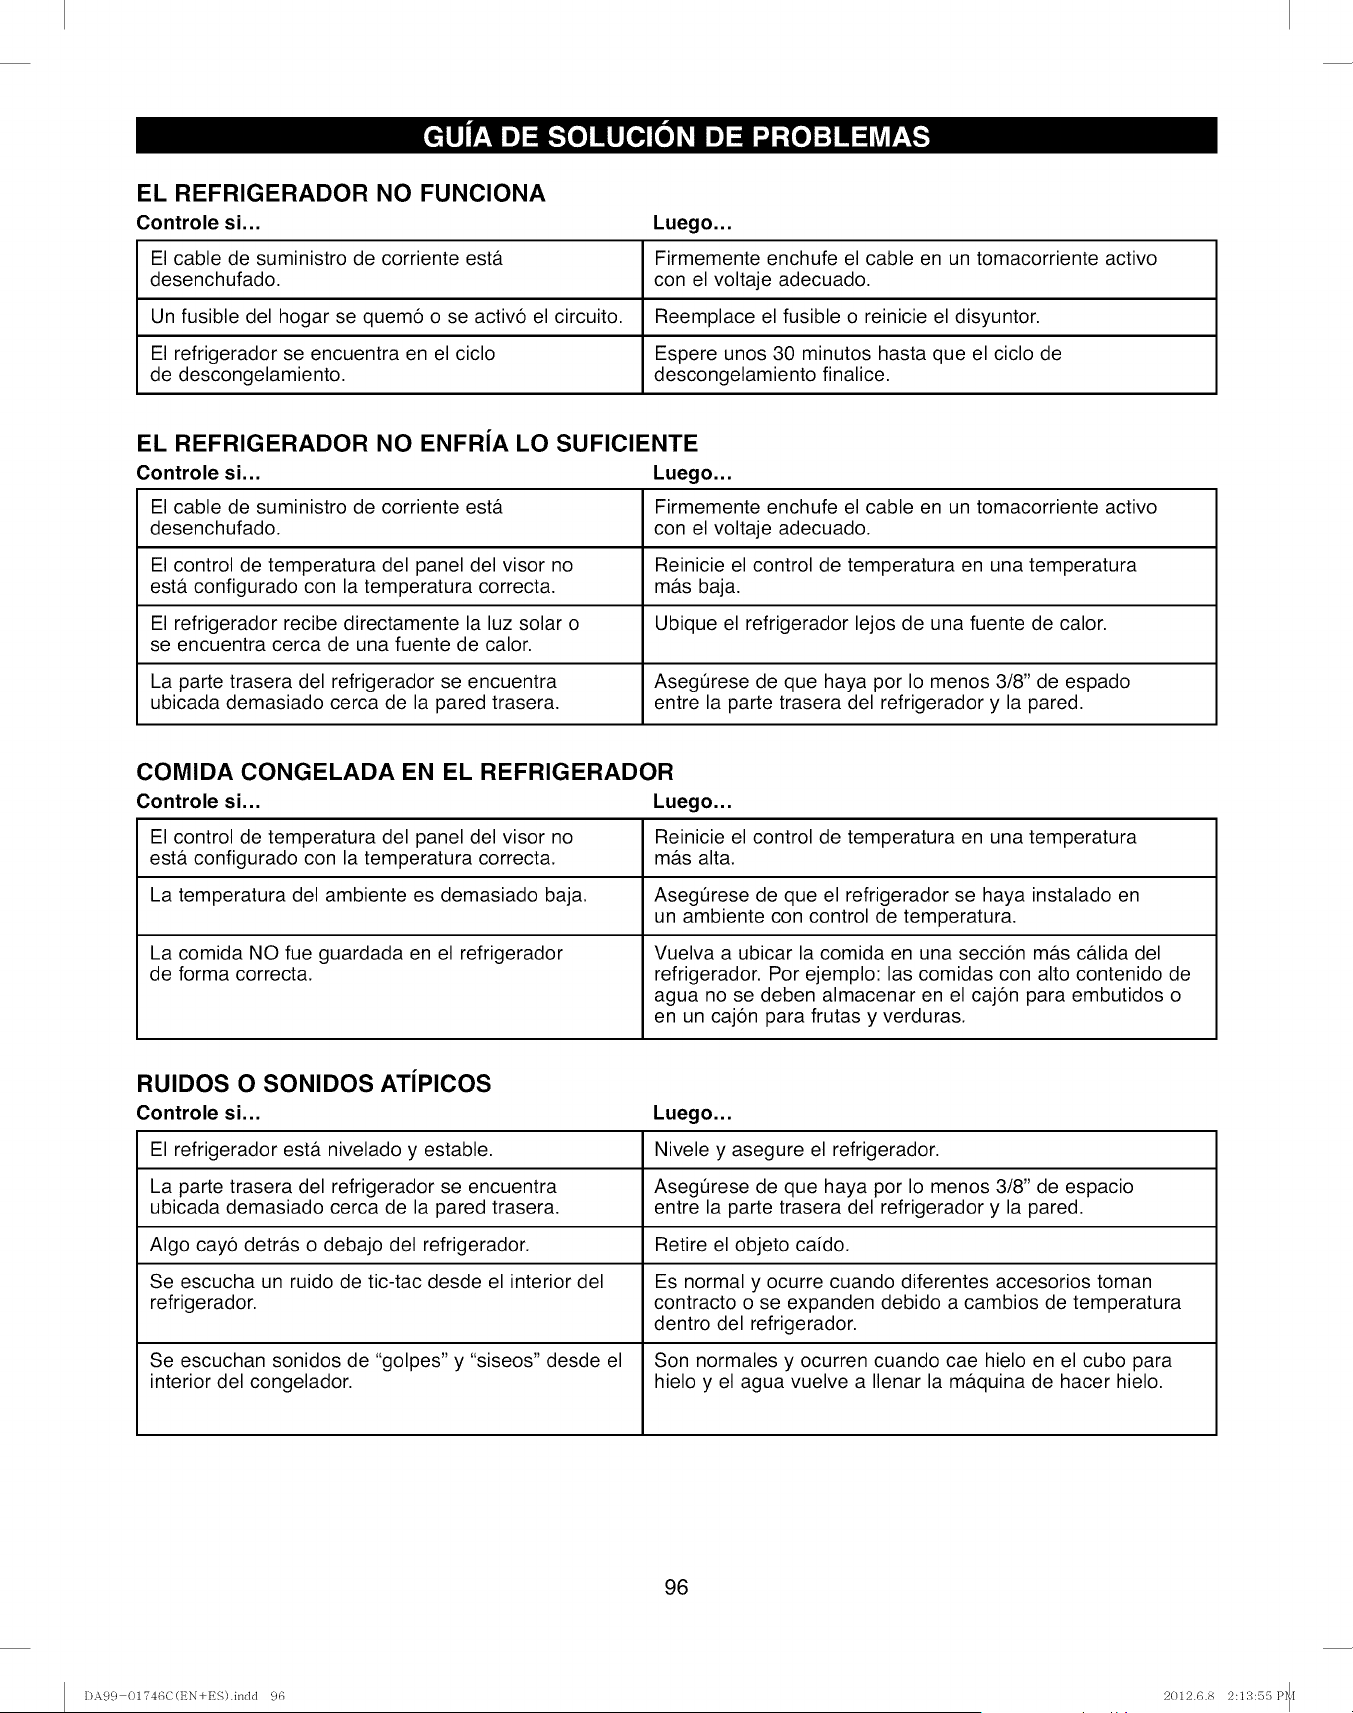
EL REFRIGERADOR NO FUNCIONA
Controle si...
El cable de suministro de corriente est&
desenchufado.
Un fusible del hogar se quem6 o se activ6 el circuito.
El refrigerador se encuentra en el ciclo
de descongelamiento.
Luego...
Firmemente enchufe el cable en un tomacorriente activo
con el voltaje adecuado.
Reemplace el fusible o reinicie el disyuntor.
Espere unos 30 minutos hasta que el ciclo de
descongelamiento finalice.
EL REFRIGERADOR NO ENFRiA LO SUFICIENTE
Controle si... Luego...
El cable de suministro de corriente est& Firmemente enchufe el cable en un tomacorriente activo
desenchufado, con el voltaje adecuado.
El control de temperatura del panel del visor no Reinicie el control de temperatura en una temperatura
est& configurado con la temperatura correcta, m&s baja.
El refrigerador recibe directamente la luz solar o Ubique el refrigerador lejos de una fuente de calor.
se encuentra cerca de una fuente de calor.
La parte trasera del refrigerador se encuentra Asegerese de que haya por Io menos 3/8" de espado
ubicada demasiado cerca de la pared trasera, entre la parte trasera del refrigerador y la pared.
COMIDA CONGELADA EN EL REFRIGERADOR
Controle si... Luego...
El control de temperatura del panel del visor no Reinicie el control de temperatura en una temperatura
est& configurado con la temperatura correcta, m&s alta.
La temperatura del ambiente es demasiado baja. Asegerese de que el refrigerador se haya instalado en
un ambiente con control de temperatura.
La comida NO fue guardada en el refrigerador Vuelva a ubicar la comida en una secci6n m&s c&lida del
de forma correcta, refrigerador. Por ejemplo: las comidas con alto contenido de
agua no se deben almacenar en el caj6n para embutidos o
en un caj6n para frutas y verduras.
RUlDOS O SONIDOS ATIPICOS
Controle si... Luego...
El refrigerador est& nivelado y estable. Nivele y asegure el refrigerador.
La parte trasera del refrigerador se encuentra Asegerese de que haya por Io menos 3/8" de espacio
ubicada demasiado cerca de la pared trasera, entre la parte trasera del refrigerador y la pared.
Algo cay6 detr&s o debajo del refrigerador. Retire el objeto caido.
Se escucha un ruido de tic-tac desde el interior del Es normal y ocurre cuando diferentes accesorios toman
refrigerador, contracto o se expanden debido a cambios de temperatura
dentro del refrigerador.
Se escuchan sonidos de "golpes" y "siseos" desde el Son normales y ocurren cuando cae hielo en el cubo para
interior del congelador, hielo y el agua vuelve a Ilenar la m&quina de hacer hielo.
96
DA99 01746C(t_N+ES).indd 96 2012.6.8 2:13:55 P_I
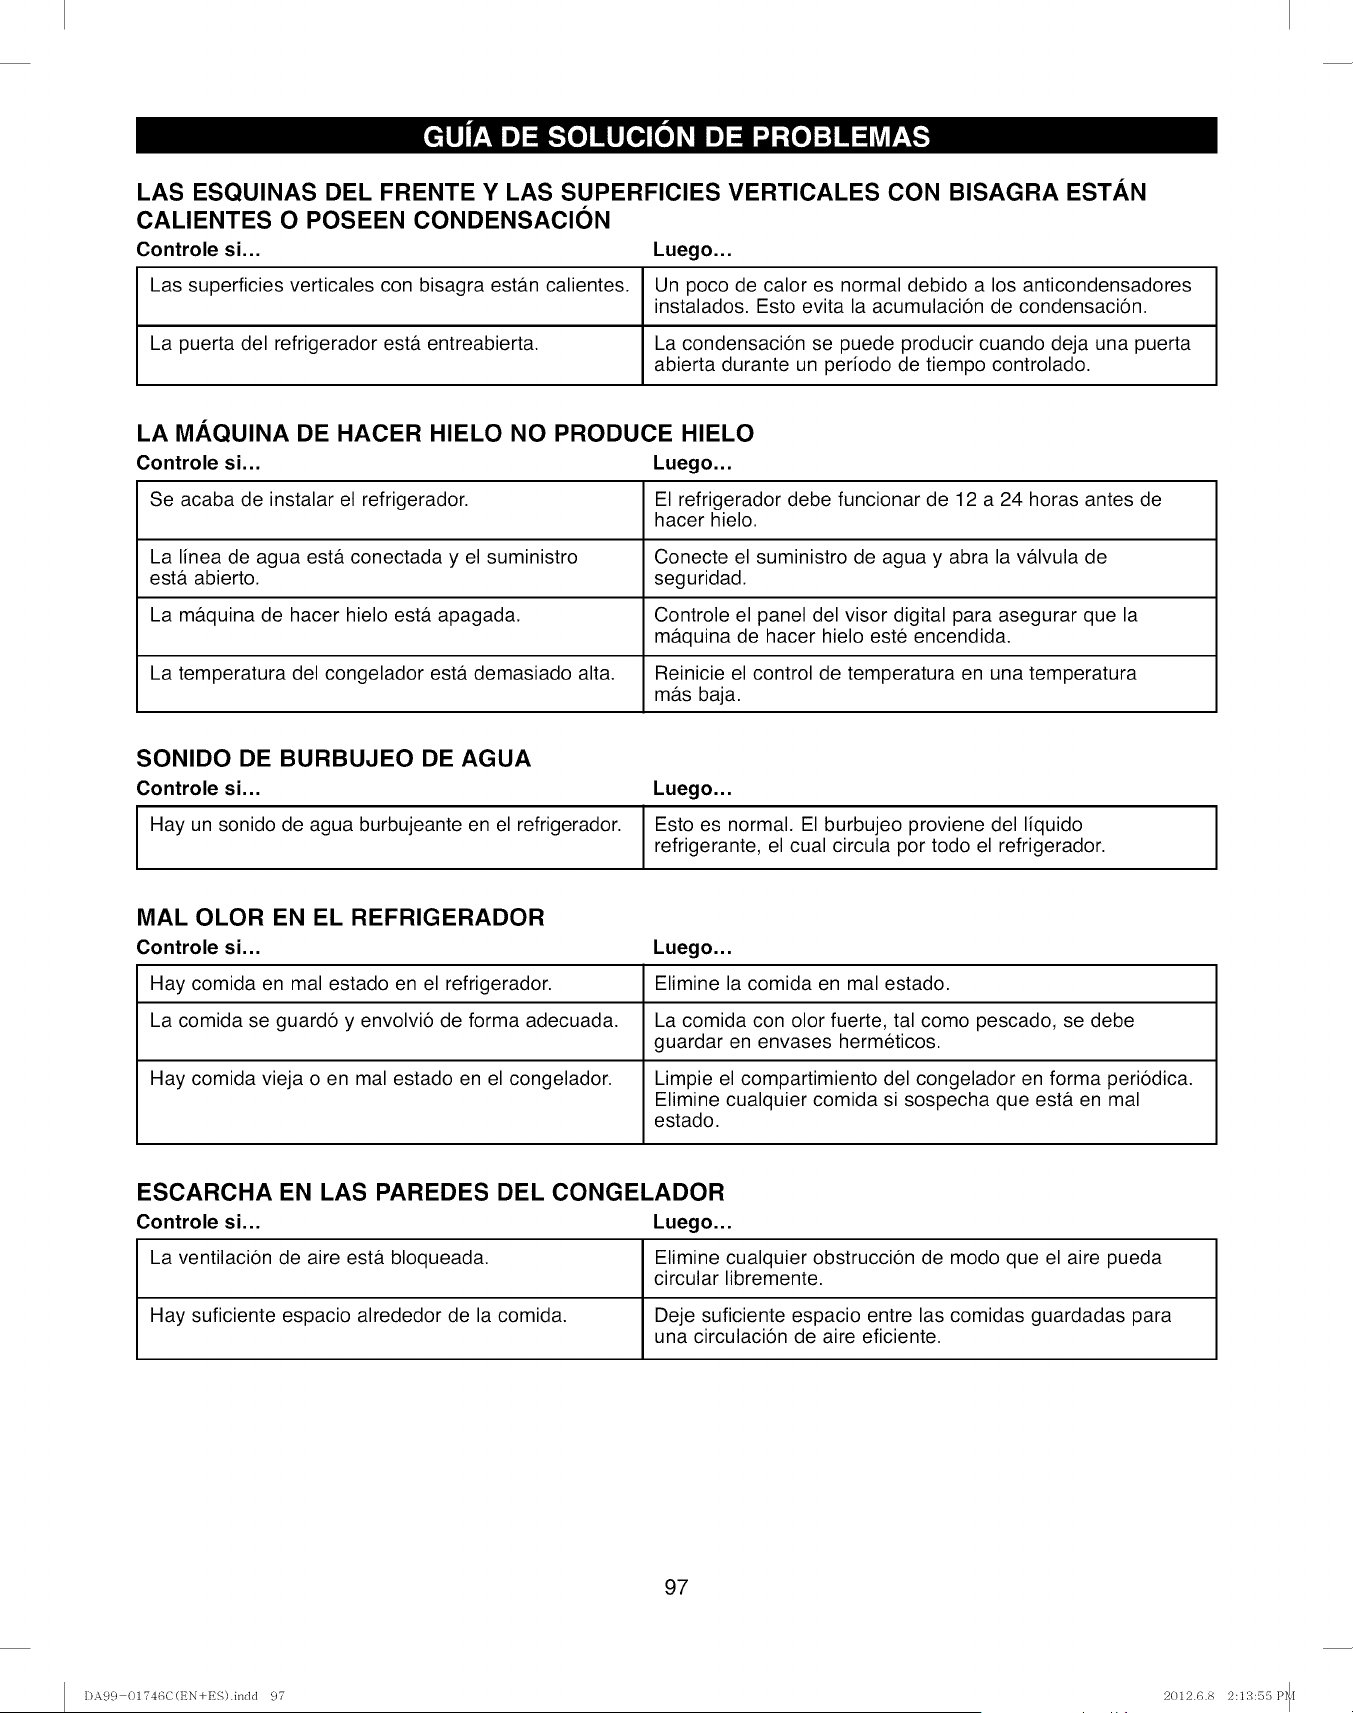
LAS ESQUINAS DEL FRENTE Y LAS SUPERFICIES VERTICALES CON BISAGRA ESTAN
CALIENTES O POSEEN CONDENSACION
Controle si... Luego...
Las superficies verticales con bisagra est&n calientes. Un poco de calor es normal debido a los anticondensadores
instalados. Esto evita la acumulaci6n de condensaci6n.
La puerta del refrigerador est& entreabierta. La condensaci6n se puede producir cuando deja una puerta
abierta durante un periodo de tiempo controlado.
LA MAQUlNA DE HACER HIELO NO PRODUCE HIELO
Controle si... Luego...
Se acaba de instalar el refrigerador. El refrigerador debe funcionar de 12 a 24 horas antes de
hacer hielo.
La linea de agua est& conectada y el suministro Conecte el suministro de agua y abra la v&lvula de
est& abierto, seguridad.
La m&quina de hacer hielo est& apagada. Controle el panel del visor digital para asegurar que la
m&quina de hacer hielo este encendida.
La temperatura del congelador est& demasiado alta. Reinicie el control de temperatura en una temperatura
m&s baja.
SONIDO DE BURBUJEO DE AGUA
Controle si... Luego...
Hay un sonido de agua burbujeante en el refrigerador. Esto es normal. El burbujeo proviene del liquido
refrigerante, el cual circula por todo el refrigerador.
MAL OLOR EN EL REFRIGERADOR
Controle si... Luego...
Hay comida en mal estado en el refrigerador. Elimine la comida en mal estado.
La comida se guard6 y envolvi6 de forma adecuada. La comida con olor fuerte, tal como pescado, se debe
guardar en envases hermeticos.
Hay comida vieja o en mal estado en el congelador. Limpie el compartimiento del congelador en forma peri6dica.
Elimine cualquier comida si sospecha que est& en mal
estado.
ESCARCHA EN LAS PAREDES DEL CONGELADOR
Controle si... Luego...
La ventilaci6n de aire est& bloqueada. Elimine cualquier obstrucci6n de modo que el aire pueda
circular libremente.
Hay suficiente espacio alrededor de la comida. Deje suficiente espacio entre las comidas guardadas para
una circulaci6n de aire eficiente.
97
DA99 01746C(t_N+ES).indd 97 2012.6.8 2:13:55 P_I

EL DISPENSADOR DE AGUA NO FUNCIONA
Controle si... Luego...
El suministro de agua est& conectado y/o la v&lvula Conecte el suministro de agua y abra la v&lvula de
de seguridad est& abierta, seguridad.
La linea de suministro de agua se pleg6 o aplast6. Reemplace la linea de suministro de agua.
La temperatura del freezer est& demasiado baja. Reinicie el control de temperatura en una temperatura
m&s alta.
LAS FUNCIONES DEL VISOR NO FUNCIONAN
Controle si... Luego...
La funci6n de bloqueo del visor est& configurada en Reinicie la funci6n de bloqueo del visor en Unlocked
Locked (bloqueado). (desbloqueado).
La funci6n de bloqueo del visor esta configurada en Presione el bot6n de reinicio de visor con una herramienta
Unlocked (desbloqueado). puntiaguda. Esto inicia el visor. (Observe que la informaci6n
del usuario no es eliminada).
NO HAY NADA EN LA PANTALLA "EXTERNAL ALBUM: UPLOAD PICTURES" (ALBUM
EXTERNO: CARGAR IMAGENES) O "EXTERNAL ALBUM: PLAY SLIDE SHOW" (ALBUM
EXTERNO: REPRODUCIR DIAPOSITIVAS) LUEGO DE INSERTAR LA TARJETA DE MEMORIA
Controle si... Luego...
Las im&genes se guardan en su tarjeta de memoria
(SD/SDHC/MMC/HS MMC).
Las im&genes se guardan como archivos JPEG.
Esper6 Io suficiente para que la pantalla lea la
tarjeta de memoria.
Guarde las im&genes en la tarjeta de memoria antes de
insertar la misma como External Album (&lbum externo). Si
no se guardan im&genes en la tarjeta de memoria, no
aparecer& ninguna imagen en la pantalla.
$61o los archivos JPEG son compatibles con esta pantalla.
Vuelva a guardar archivos en la tarjeta de memoria como
archivos JPEG.
Dependiendo del tipo de tarjeta, toma entre 4 y 30
segundos que las imagenes se carguen.
LA PANTALLA DE LCD CON FRECUENCIA EST.&, APAGADA
Controle si... Luego...
La funci6n LCD Backlight Off (luz de fondo del LCD)
est& configurada de forma correcta.
La pantalla External Album: Upload Pictures (&lbum
externo: cargar im&genes), External Album: Play
Slide Show (&lbum externo: reproducir secuencia de
diapositivas) o What do you want to do?
($qu6 desea hacer?) se apaga autom&ticamente.
La pantalla de LCD se pone en blanco antes de que
termine de usar la misma.
Es normal que la pantalla de LCD quede en blanco luego de
un periodo de tiempo. Esto reduce el consumo de energia
del refrigerador.
El tiempo de uso de esta pantalla es de 20 minutos por
omision. Esta pantalla se pondr& en blanco luego del
tiempo de configuracion del protector de pantalla o si el
usuario no la usa por 20 minutos.
El tiempo por omision es de 1 minuto para el resto de los
usos de la pantalla. Esta pantalla se pondr& en blanco luego
del tiempo de configuracion del protector de pantalla o si el
usuario no la usa por 1 minuto.
98
DA99 01746C(t_N+ES).indd 98 2012.6.8 2:13:56 P_I
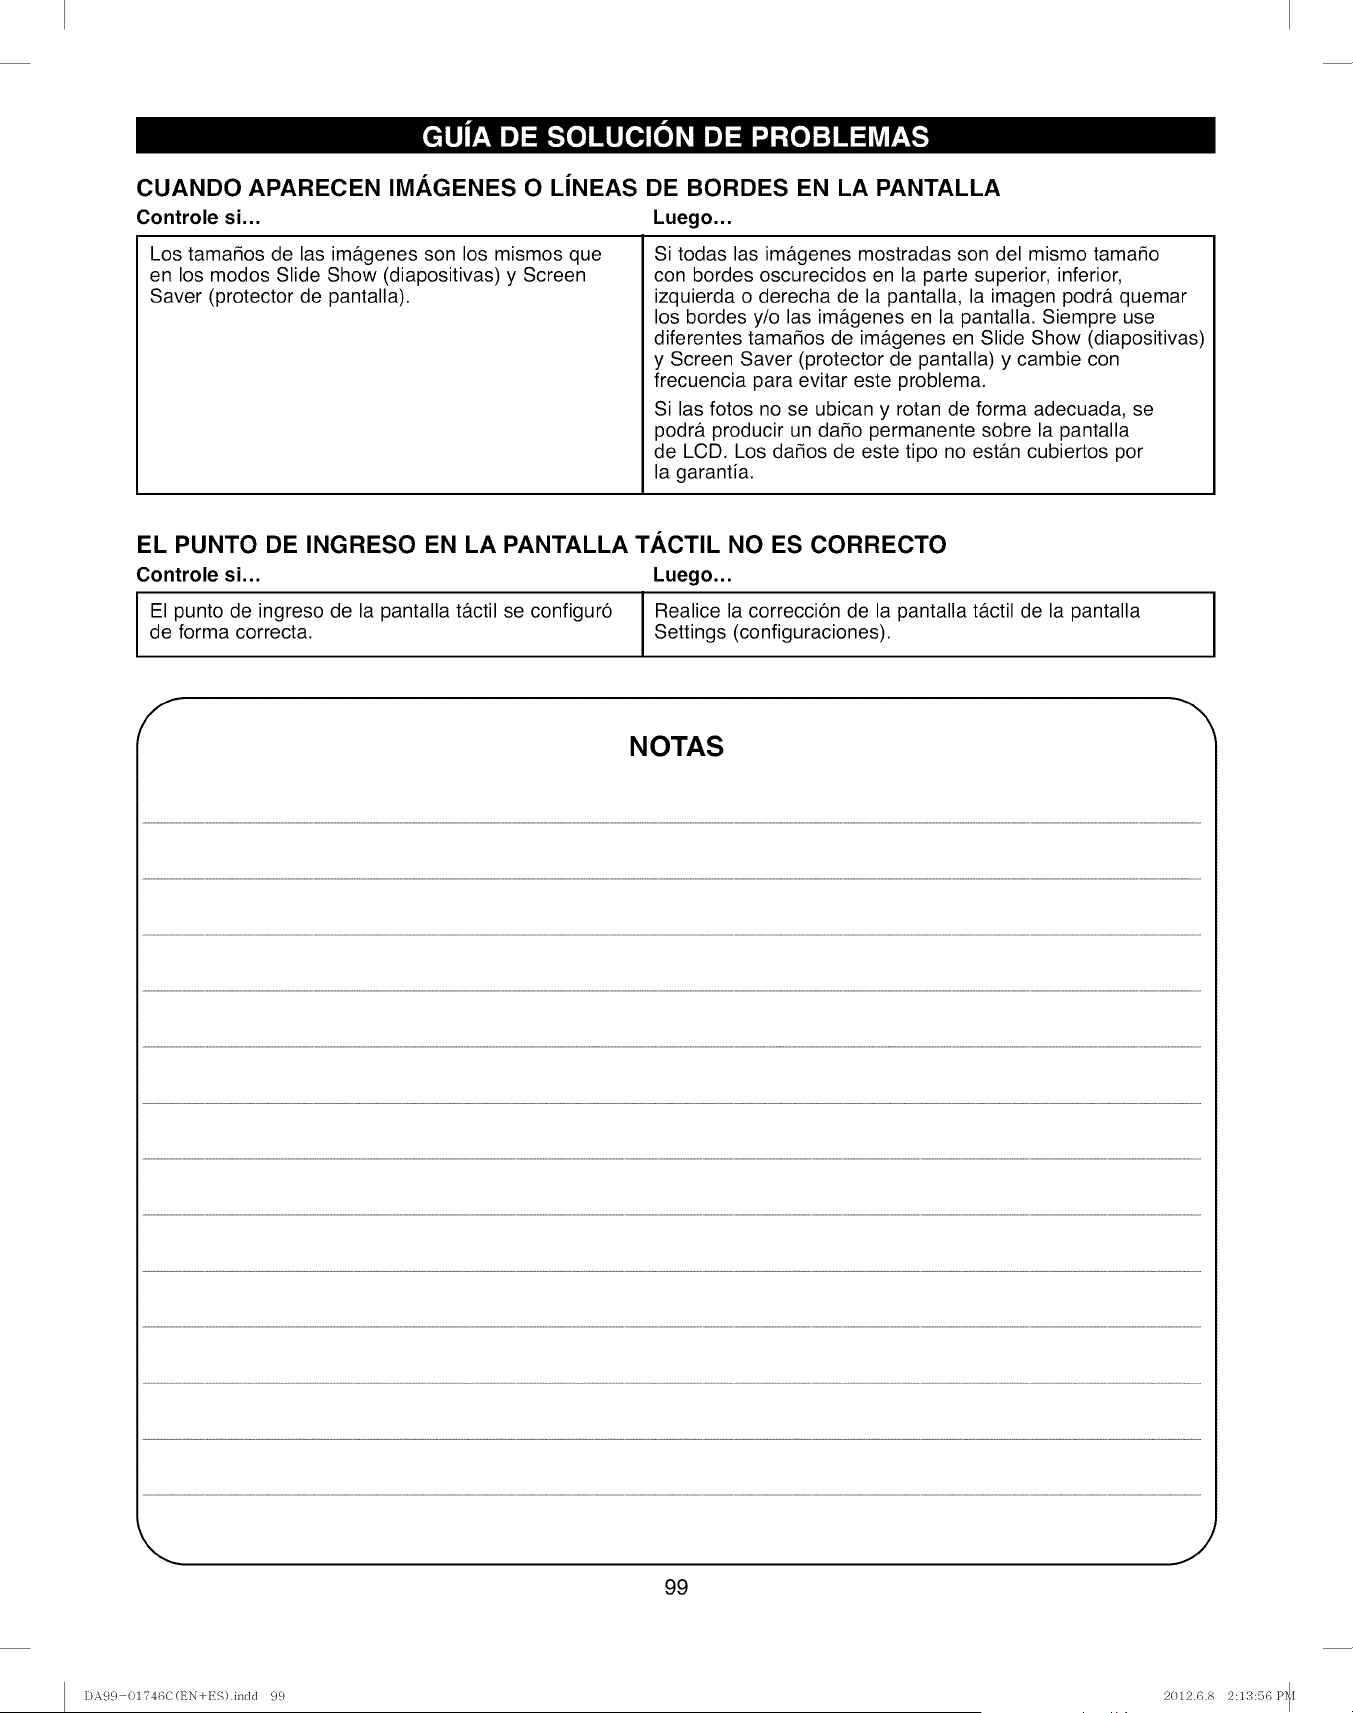
CUANDO APARECEN IMAGENES O LiNEAS DE BORDES EN LA PANTALLA
Controle si... Luego...
Los tamados de las im&genes son los mismos que
en los modos Slide Show (diapositivas) y Screen
Saver (protector de pantalla).
Si todas las im&genes mostradas son del mismo tama_o
con bordes oscurecidos en la parte superior, inferior,
izquierda o derecha de la pantalla, la imagen podr& quemar
los bordes y/o las im&genes en la pantalla, Siempre use
diferentes tama_os de im&genes en Slide Show (diapositivas)
y Screen Saver (protector de pantalla) y cambie con
frecuencia para evitar este problema.
Si las fotos no se ubican y rotan de forma adecuada, se
podr& producir un da_o permanente sobre la pantalla
de LCD. Los da_os de este tipo no est&n cubiertos por
la garantia.
EL PUNTO DE INGRESO EN LA PANTALLA TACTIL NO ES CORRECTO
Controle si... Luego...
El punto de ingreso de la pantalla t&ctil se configuro IRealice la correccion de la pantalla t&ctil de la pantalla
de forma correcta. I Settings (configuraciones).
YNOTAS
I
99
DA99 01746C(t_N+ES).indd 99 2012.6.8 2:13:56 P_I

Your Home
For expert troubleshooting and home solutions advice:
www.managemyhome.com
For repair - in your home - of all major brand appliances,
lawn and garden equipment, or heating and cooling systems,
no matter who made it, no matter who sold it!
For the replacement parts, accessories and
owner's manuals that you need to do-it-yourself.
For Sears professional installation of home appliances
and items like garage door openers and water heaters.
1-800-4-MY-HOME ®(1-800-469-4663)
Call anytime, day or night (U.S.A. and Canada)
www.sears.com www:sears:ca
Our Home
For repair of carry-in items like vacuums, lawn equipment,
and electronics, call anytime for the location of your nearest
Sears Parts & Repair Service Center
1-800-488-1222 (U.S.A.) 1-800-469-4663 (Canada)
www.sears.com www.sears.ca
To purchase a protection agreement on a product serviced by Sears:
1-800-827-6655 (U.S.A.) 1-800-361-6665 (Canada)
Para pedir servicio de reparaci6n
a domicilio, y para ordenar piezas:
1-888-SU-HOGAR ®
(1-888-784-6427)
Au Canada pour service en frangais:
1-800-LE-FOYER Mc
(1-800-533-6937)
www.sears.ca
TM SM
® Registered Trademark /Trademark /Service Mark of Sears Brands, LLC
TM
® Marca Registrada /Marca de Fabrica /SMMarca de Servicio de Sears Brands, LLC
MCMarque de commerce /MDMarque depos6e de Sears Brands, LLC ® Sears Brands, LLC
DA99 01746C(t_N+ES).indd 100 2012.6.8 2:13:57 P_[