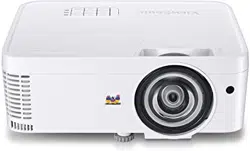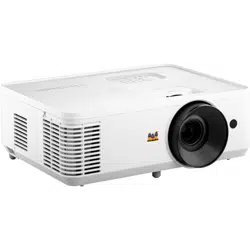
PA700S_PA700X_PA700W
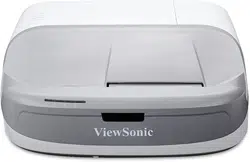
PS502X_PS502W
DLP Projector
User Guide
Model No. VS19341 | VS19343 | VS19342 | VS19344 | VS19345
P/N: PA700S | PA700X | PA700W | PS502X | PS502W
IMPORTANT: Please read this User Guide to obtain important information on installing and using your product in
a safe manner, as well as registering your product for future service. Warranty information contained in this User
Guide will describe your limited coverage from ViewSonic® Corporation, which is also found on our web site at
http://www.viewsonic.com in English, or in specific languages using the Regional selection box of our website.

2
Thank you for choosing ViewSonic®
As a world-leading provider of visual solutions, ViewSonic® is dedicated to
exceeding the world’s expectations for technological evolution, innovation, and
simplicity. At ViewSonic®, we believe that our products have the potential to make
a positive impact in the world, and we are confident that the ViewSonic® product
you have chosen will serve you well.
Once again, thank you for choosing ViewSonic®!

3
Please read the following before you start using the projector.
• Keep this user guide in a safe place for later reference.
• Read all warnings and follow all instrucons.
• Allow at least 20“ (50 cm) clearance around the projector to ensure proper
venlaon.
• Place the projector in a well-venlated area. Do not place anything on the
projector that prevents heat dissipaon.
• Do not place the projector on an uneven or unstable surface. The projector may
fall over, causing personal injury or projector malfuncon.
• Do not look straight at the projector lens during operaon. The intense light
beam may damage your eyes.
• Always open the lens shuer or remove the lens cap when the projector lamp is
on.
• Do not block the projecon lens with any objects when the projector is under
operaon as this could cause objects to become heated and deformed or even
cause a re.
• The lamp becomes extremely hot during operaon. Allow the projector to
cool for approximately 45 minutes prior to removing the lamp assembly for
replacement.
• Do not use lamps beyond the rated lamp life. Excessive use of lamps beyond the
rated life could cause them to break on rare occasions.
• Never replace the lamp assembly or any electronic component unless the
projector is unplugged.
• Do not aempt to disassemble the projector. There are dangerous high voltages
inside which may cause death if you should come into contact with live parts.
• When moving the projector, be careful not to drop or bump the projector on
anything.
• Do not place any heavy objects on the projector or connecon cables.
• Do not stand the projector on end vercally. Doing so may cause the projector to
fall over, causing personal injury or projector malfuncon.
• Avoid exposing the projector to direct sunlight or other sources of sustained
heat. Do not install near any heat sources such as radiators, heat registers,
stoves, or other devices (including ampliers) that may increase the temperature
of the projector to dangerous levels.
4
• Do not place liquids near or on the projector. Liquids spilled into the projector
may cause it to fail. If the projector does become wet, disconnect it from the
power supply and call your local service center to have the projector serviced.
• When the projector is under operaon, you may sense some heated air and odor
from its venlaon grill. It is a normal operaon and not a defect.
• Do not aempt to circumvent the safety provisions of the polarized or
grounding-type plug. A polarized plug has two blades with one wider than the
other. A grounding-type plug has two blades and a third grounding prong. The
wide and third blade are provided for your safety. If the plug does not t into
your outlet, obtain an adapter and do not aempt to force the plug into the
outlet.
• When connecng to a power outlet, DO NOT remove the grounding prong.
Please ensure grounding prongs are NEVER REMOVED.
• Protect the power cord from being treaded upon or pinched, parcularly at the
plug, and at the point where it emerges from the projector.
• In some countries, the voltage is NOT stable. This projector is designed to
operate safely within a voltage between 100 to 240 volts AC, but could fail if
power cuts or surges of ±10 volts occur. In areas where voltage may uctuate
or cut out, it is recommended that you connect your projector through a power
stabilizer, surge protector, or uninterruptable power supply (UPS).
• If smoke, an abnormal noise, or a strange odor is present, immediately switch
the projector o and call your dealer or ViewSonic®. It is dangerous to connue
using the projector.
• Use only aachments/accessories specied by the manufacturer.
• Disconnect the power cord from the AC outlet if the projector is not being used
for a long period of me.
• Refer all servicing to qualied service personnel.
CAUTION: Possibly hazardous opcal radiaon is emied from this product. As
with any bright light source, do not stare into the beam, RG2 IEC 62471-
5:2015.

5
Safety Precautions - Ceiling Mounting
Please read the following Safety Precautions before you start using the projector.
If you intend to mount the projector on the ceiling, it is strongly recommended
that you use a proper fitting projector ceiling mount kit and that you ensure it is
securely and safely installed.
If you use an inappropriate projector ceiling mount kit, there is a safety risk that the
projector may fall from the ceiling due to an improper attachment through the use
of the wrong gauge or length screws.

6
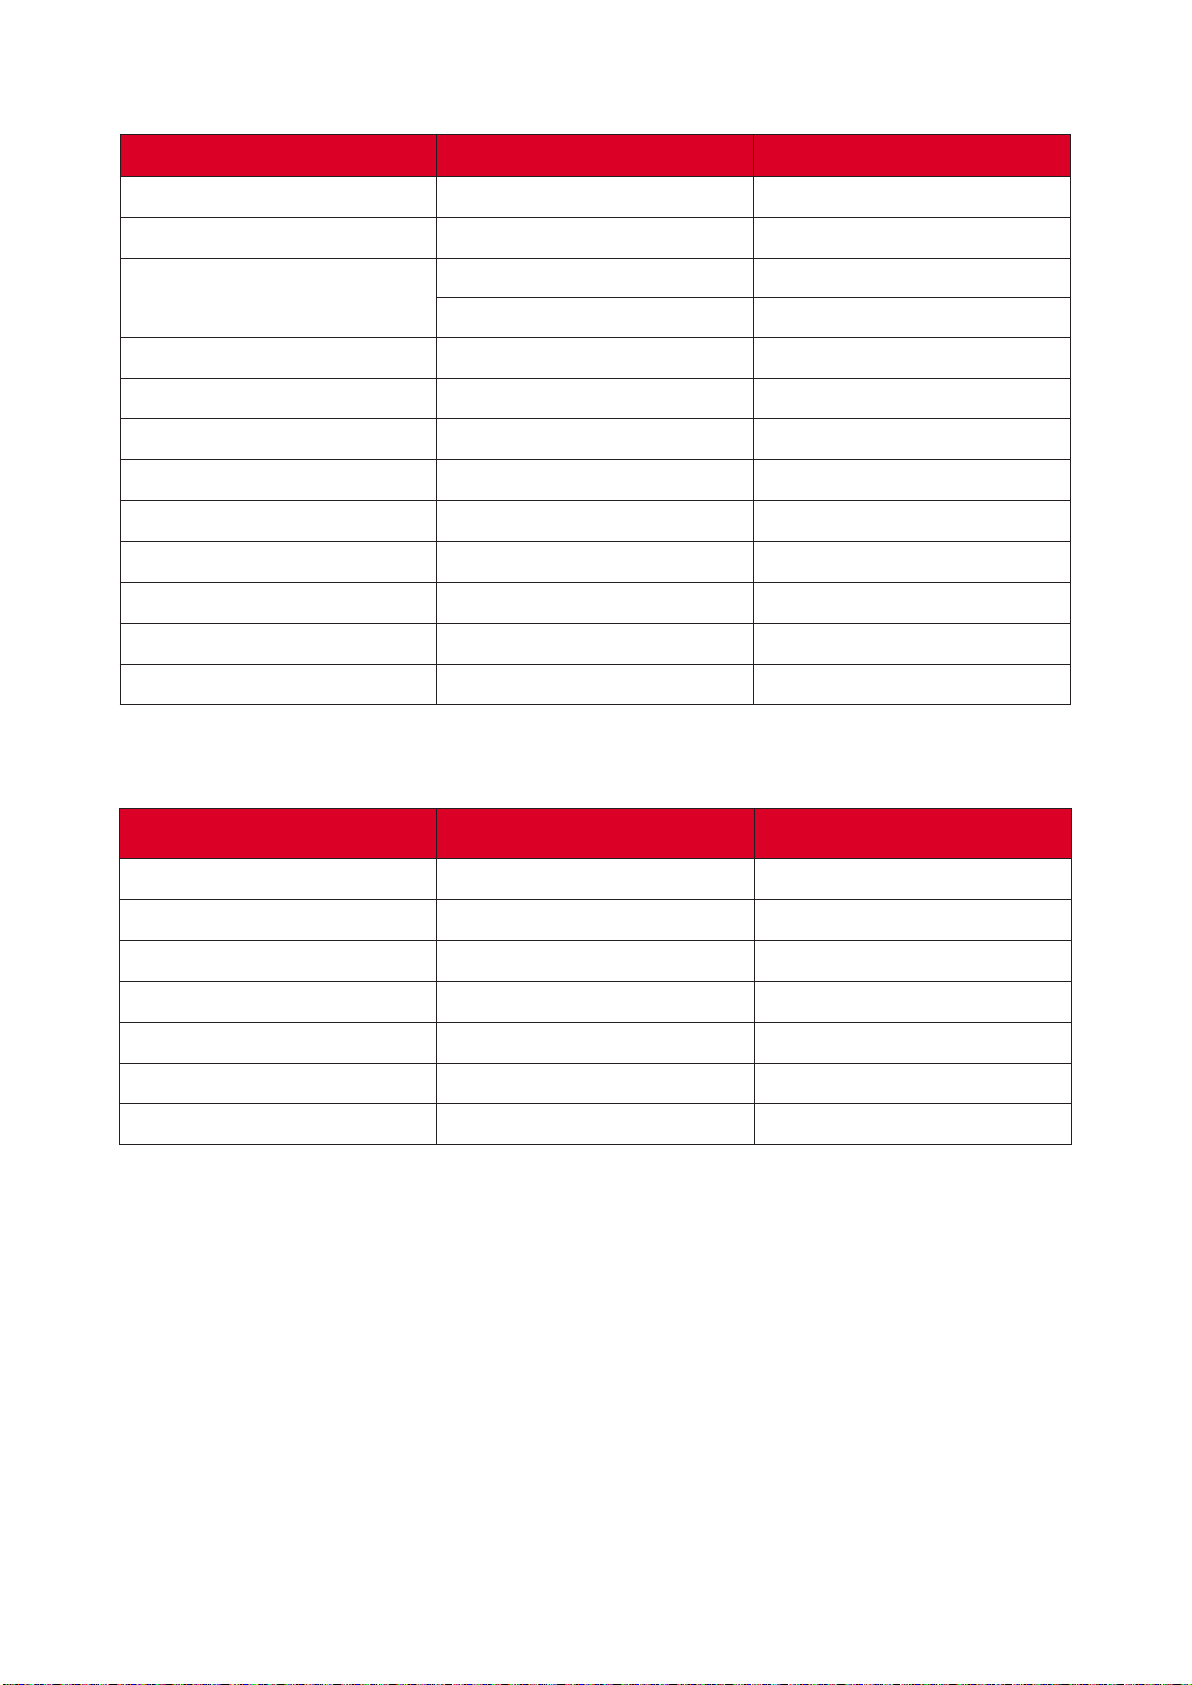
Contents
Safety Precautions ....................................................... 3
Introduction ................................................................ 9
Package Contents - PA700S | PA700X | PA700W ..................................................9
Package Contents - PS502X | PS502W .................................................................10
Product Overview .................................................................................................11
Projector ................................................................................................................ 11
Keypad ................................................................................................................... 12
Indicator Lights ...................................................................................................... 13
I/O Ports ................................................................................................................ 14
Remote Control ..................................................................................................... 15
Initial Setup ............................................................... 19
Choosing a Location - Projection Orientation ..... ..................................................19
Projection Dimensions - PA700S | PA700X ..........................................................20
Projection Dimensions - PA700W ......................................................................... 22
Projection Dimensions - PS502X .................................................................... ....... 24
Projection Dimensions - PS502W .........................................................................26
Mounting the Projector ........................................................................................28
Using the Security Bar ..........................................................................................28
Making Connections .................................................. 29
Connecting to Power ............................................................................................29
Connecting to External Devices ............................................................................30
HDMI Connection .................................................................................................. 30
Audio Connection .................................................................................................. 31
USB Type A Connection ......................................................................................... 32
RS-232 Connection ................................................................................................ 33
PC/Notebook and Monitor Connection ................................................................ 34
Using the Projector .................................................... 35
Starting Up the Projector .................................................................... ..................35
Selecting an Input Source .....................................................................................36
Help Menu ............................................................................................................. 37
Adjusting the Projected Image .............................................................................40
Adjusting the Projector’s Height and Projection Angle ......................................... 40
Adjusting the Focus, Keystone, and Zoom ............................................................ 41
Shutting Down the Projector ................................................................................42

7
Operating the Projector ............................................. 43
On-Screen Display (OSD) Menu ............................................................................43
Menu Navigation ..................................................................................................44
On-Screen Display (OSD) Menu Tree .................................................................... 45
Menu Operation ...................................................................................................50
Image Menu .......................................................................................................... 50
Display Menu......................................................................................................... 52
Setup Menu ........................................................................................................... 55
Options Menu ....................................................................................................... 57
Appendix ................................................................... 60
Specifications - PA700 ..........................................................................................60
Specifications - PS502 ........................................................................................... 61
Projector Dimensions ...........................................................................................62
Timing Chart .........................................................................................................63
Analog RGB ............................................................................................................ 63
HDMI 3D ................................................................................................................ 65
Troubleshooting ...................................................................................................66
LED Indicators ........................................................................................................ 68
Maintenance.................................................................... .....................................69
General Precautions .............................................................................................. 69
Cleaning the Lens .................................................................................................. 69
Cleaning the Case .................................................................................................. 69
Storing the Projector ............................................................................................. 69

8
Regulatory and Service Information .......................... 70
Compliance Information ....................................................................................... 70
FCC Compliance Statement ................................................................................... 70
Industry Canada Statement ................................................................................... 70
CE Conformity for European Countries ................................................................. 71
Declaration of RoHS2 Compliance......................................................................... 72
Indian Restriction of Hazardous Substances ......................................................... 73
Product Disposal at End of Product Life ................................................................ 73
Copyright Information ..........................................................................................74
Customer Service .................................................................................................. 75
Limited Warranty .................................................................................................. 76
Mexico Limited Warranty ...................................................................................... 79

9
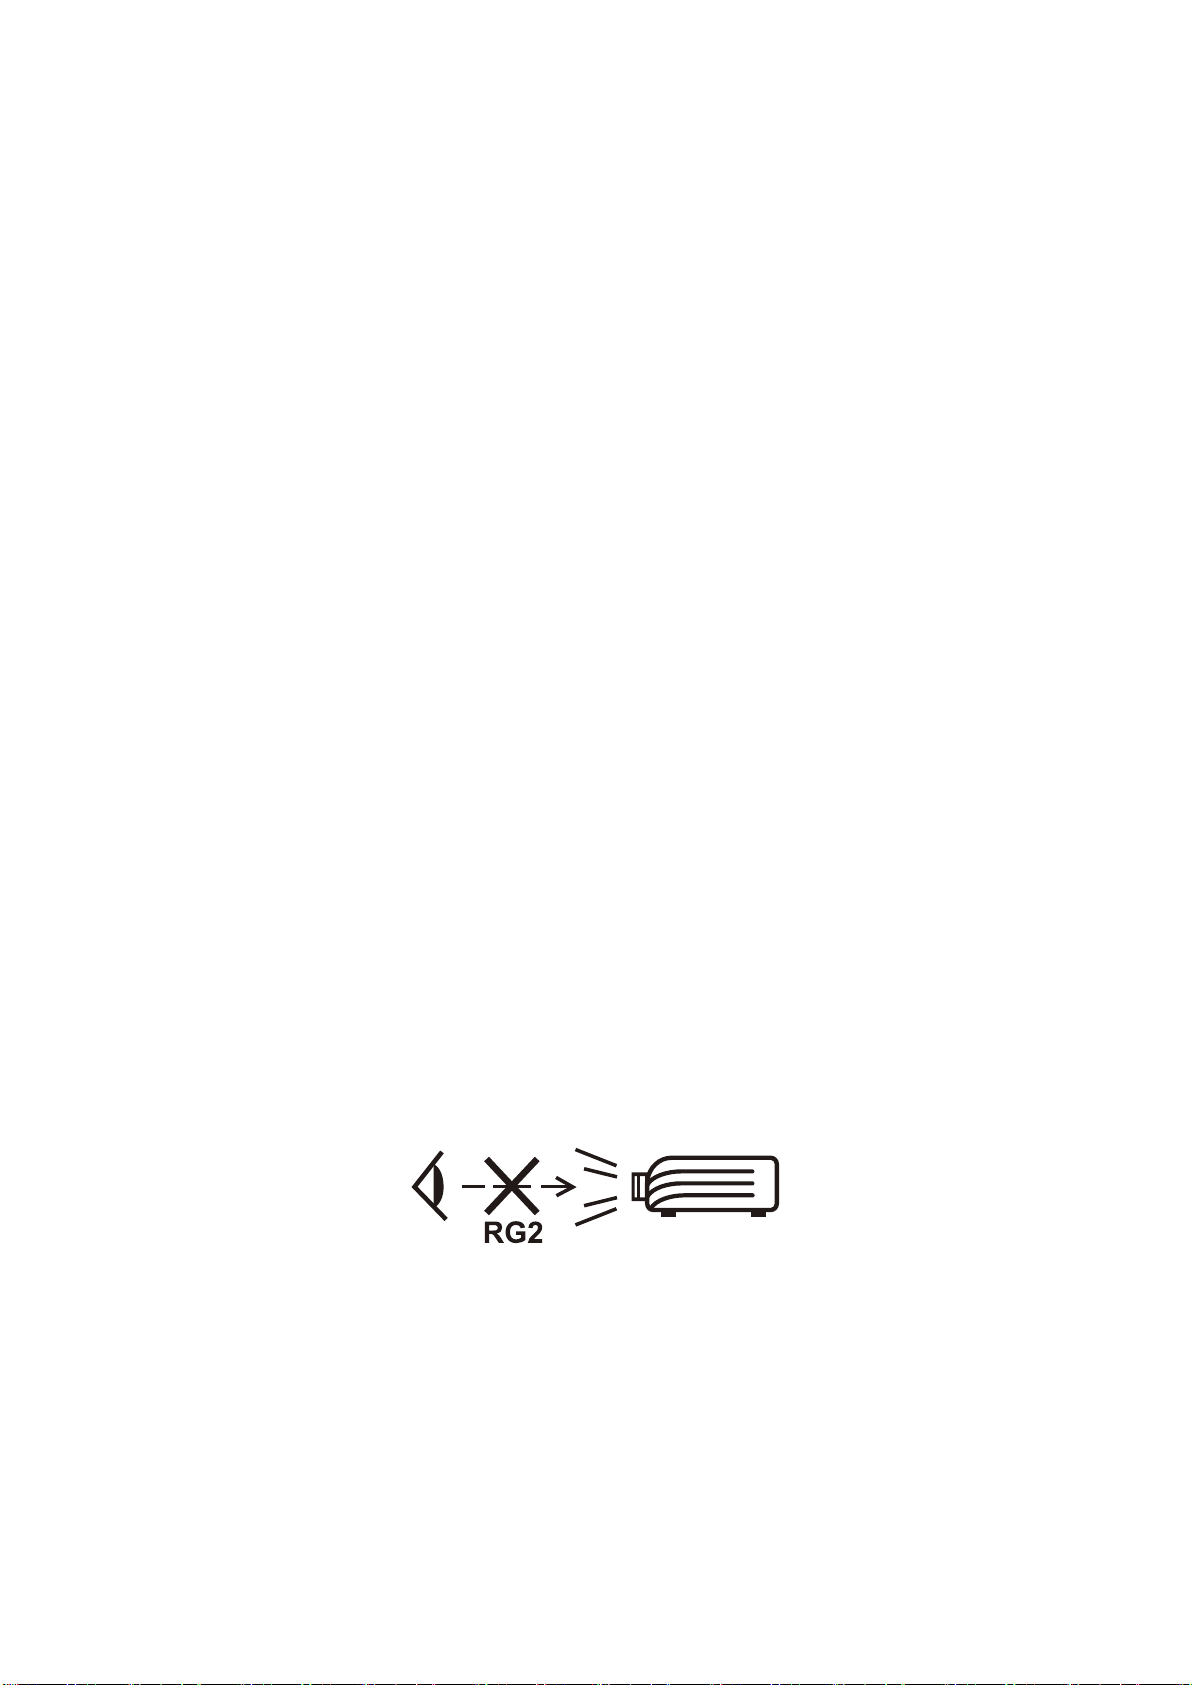
Introduction
Package Contents - PA700S | PA700X | PA700W
DLP Projector
PA700W Series
Quick Start Guide
クイックスタートガイド
http://vsweb.us/q/dn.php
http://vsweb.us
Download Link
ViewSonic Projector
1 2 3
4
5 6
Number
1
Projector
2
Remote Control
3
Baeries
4
Quick Start Guide
5
Power Cord
6
VGA Cable
The power cord and remote control included in your package may vary
depending on your country. Please contact your local reseller for more
informaon.
10
Package Contents - PS502X | PS502W
DLP Projector
PS502W Series
Quick Start Guide
クイックスタートガイド
http://vsweb.us/q/dn.php
http://vsweb.us
Download Link
ViewSonic Projector
1 2 3
4
5 6
Number
1
Projector
2
Remote Control
3
Baeries
4
Quick Start Guide
5
Power Cord
6
VGA Cable
The power cord and remote control included in your package may vary
depending on your country. Please contact your local reseller for more
informaon.
11
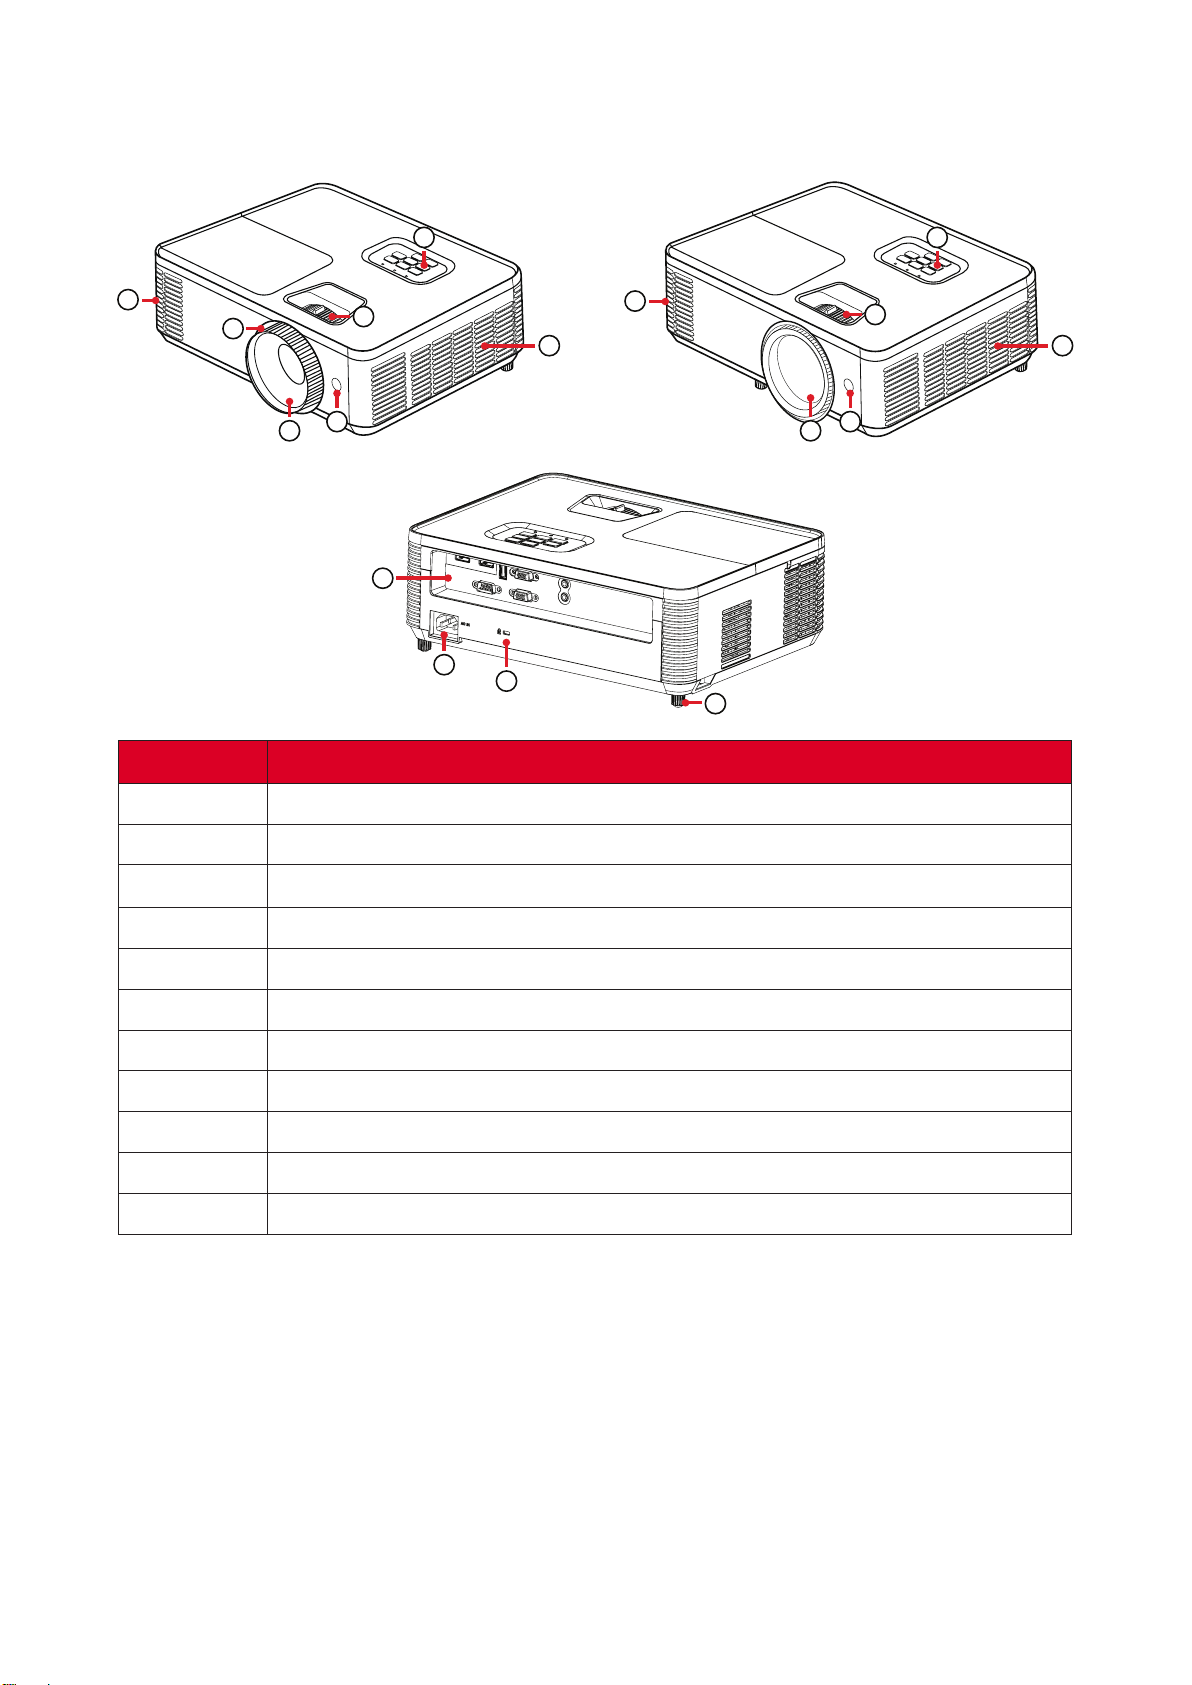
Product Overview
Projector
1
1
9
8
5 5
2 2
3 3
4
6 6
10
11
4
7
PA700 Series
PS502 Series
Number
1
Vent (outlet)
2
IR Receiver
3
Keypad
4
Focus Ring
5
Vent (inlet)
6
Projecon Lens
7
Adjuster Foot
8
Zoom Ring
9
I/O Ports
10
AC IN
11
Security Lock
Do not block projector intake and exhaust vents.
12
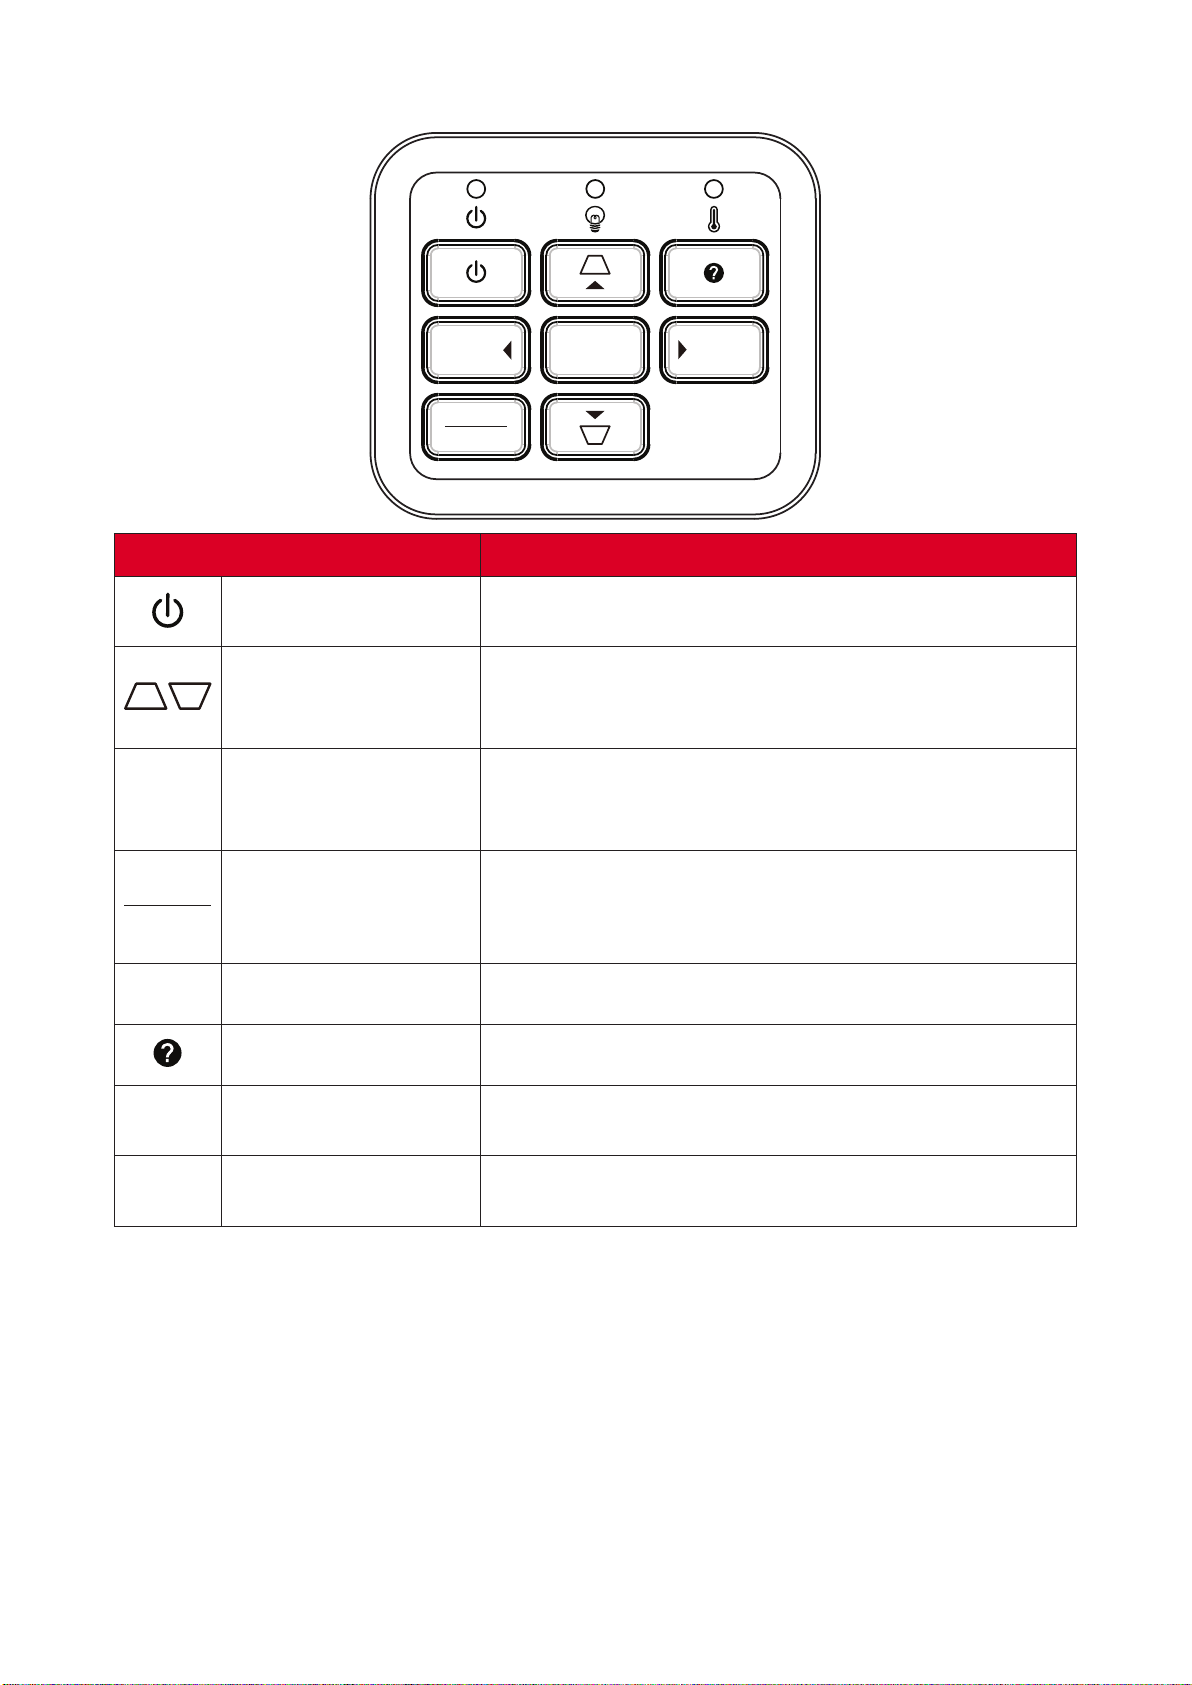
Keypad
MENU
EXIT
ENTER
SOURCE
AUTO
Key
Power
Toggles the projector between standby mode and
Power On.
Keystone
Manually corrects distorted images resulng from an
angled projecon when the On-Screen Display (OSD)
Menu is acvated.
tupq
Selects the desired menu items and makes
adjustments when the On-Screen Display (OSD) Menu
is acvated.
MENU
EXIT
Menu/Exit
• Acvate the On-Screen Display (OSD) Menu.
• Go back to previous level in the OSD Menu.
• Exit and save menu sengs.
SOURCE
Source
Toggle to the next input source.
Help
Displays the Help menu.
ENTER
Enter
Conrm the selecon when the On-Screen Display
(OSD) Menu is acvated.
AUTO
Auto
Automacally synchronize the projector to the input
source.

13
Indicator Lights
Indicator Light
Power indicator light
Light source indicator light
Temperature indicator light
14
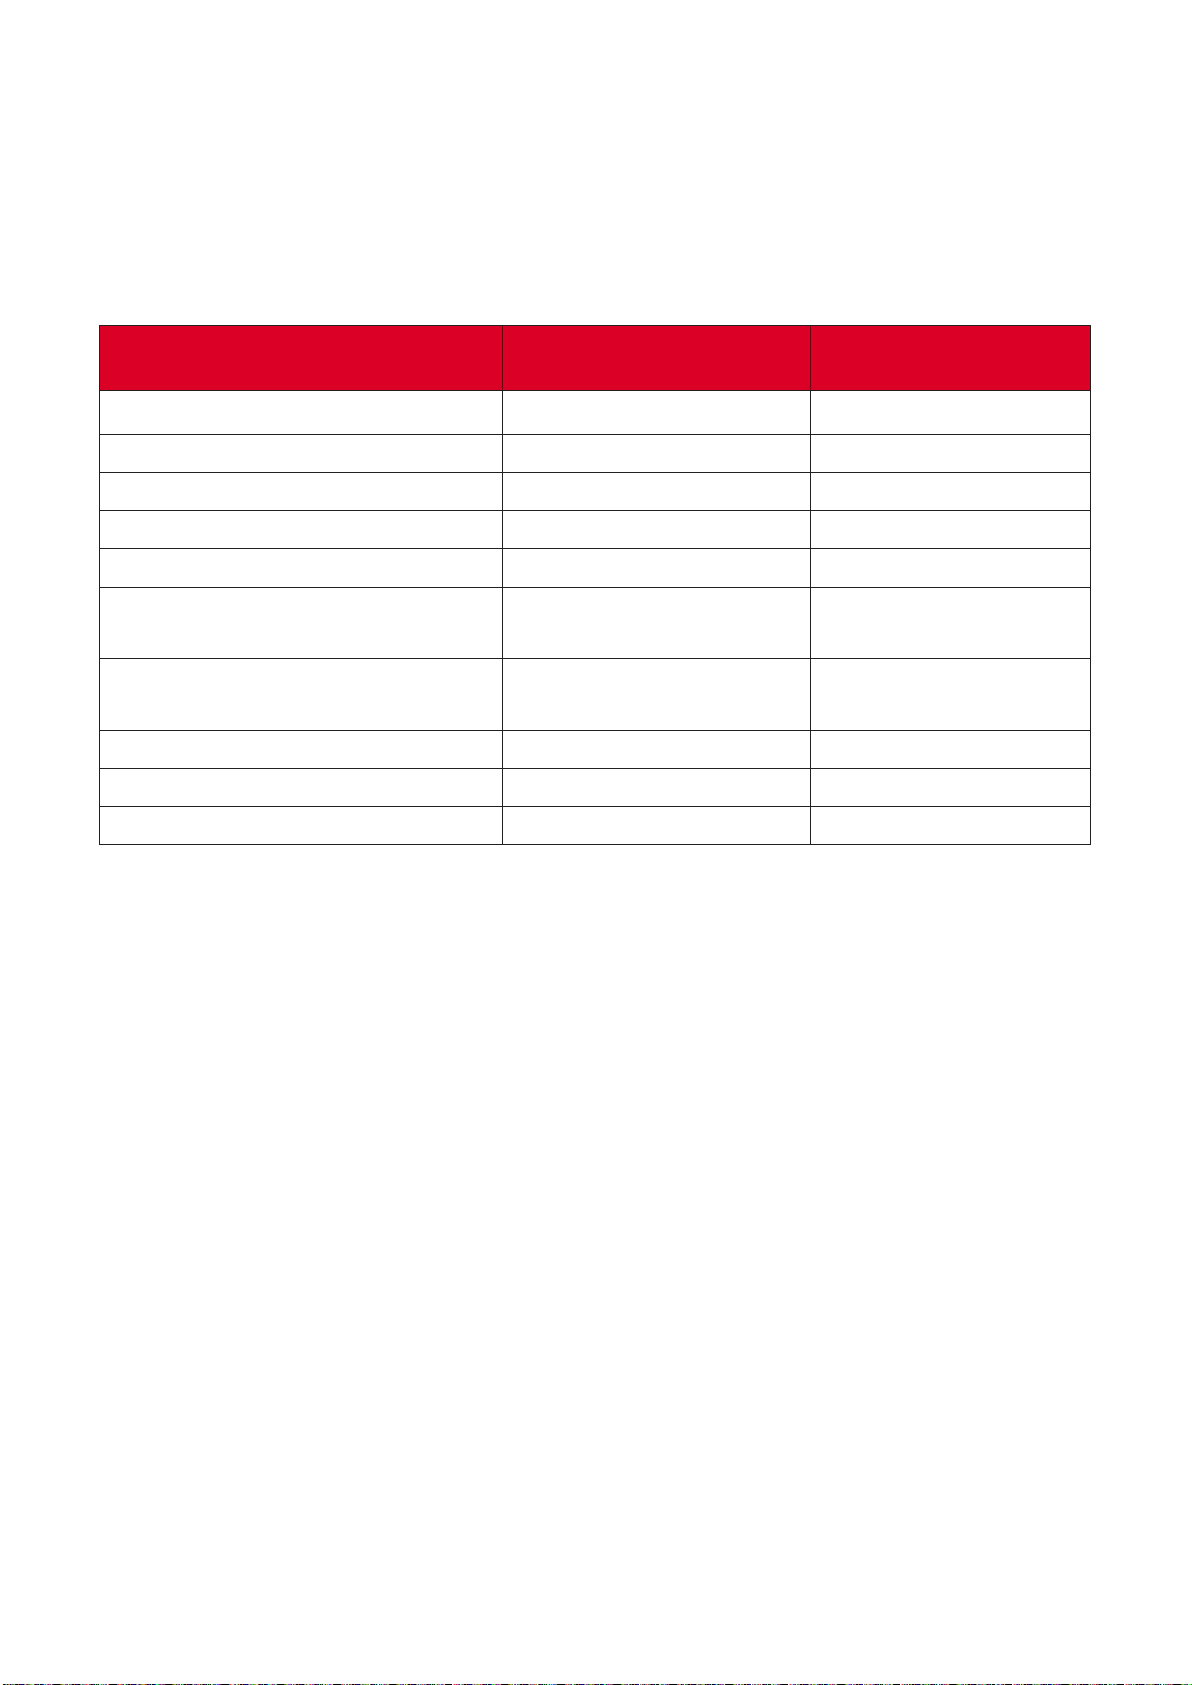
I/O Ports
HDMI 2
HDMI 1
USB 5V/1.5A
(SERVICE)
RS232
IN
COMPUTER
MONITOR OUT
OUT
AUDIO
1 2
3
4
5
6
7
8
9
Port
1 HDMI 1
HDMI port.
2 HDMI 2
HDMI port.
3 RS-232
RS-232 control port.
4
USB (5V/1.5A Out)
(Service)
USB Type A port for power and service.
5 COMPUTER
RGB (PC) signal input socket.
6 MONITOR OUT
RGB (PC) signal output socket.
7 AUDIO IN
Audio signal input socket.
8 AUDIO OUT
Audio signal output socket.
9 AC IN
AC IN socket.
15
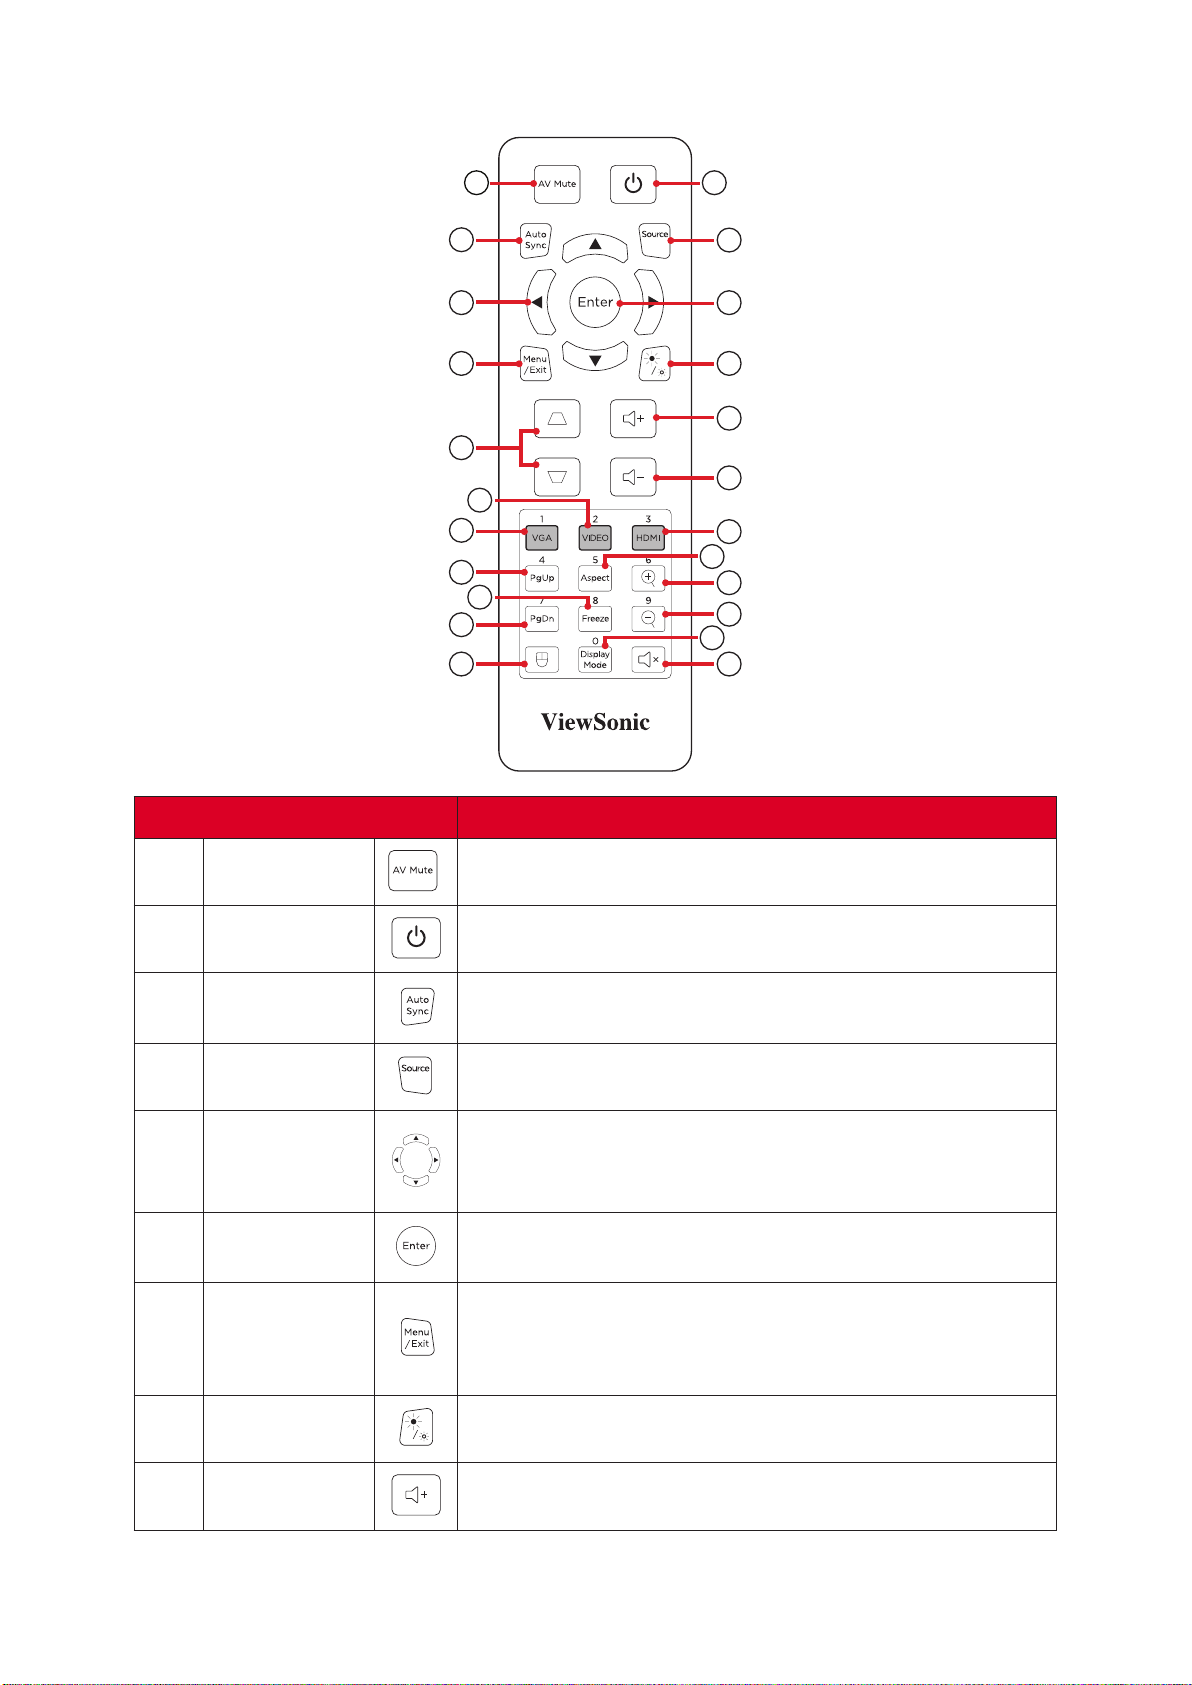
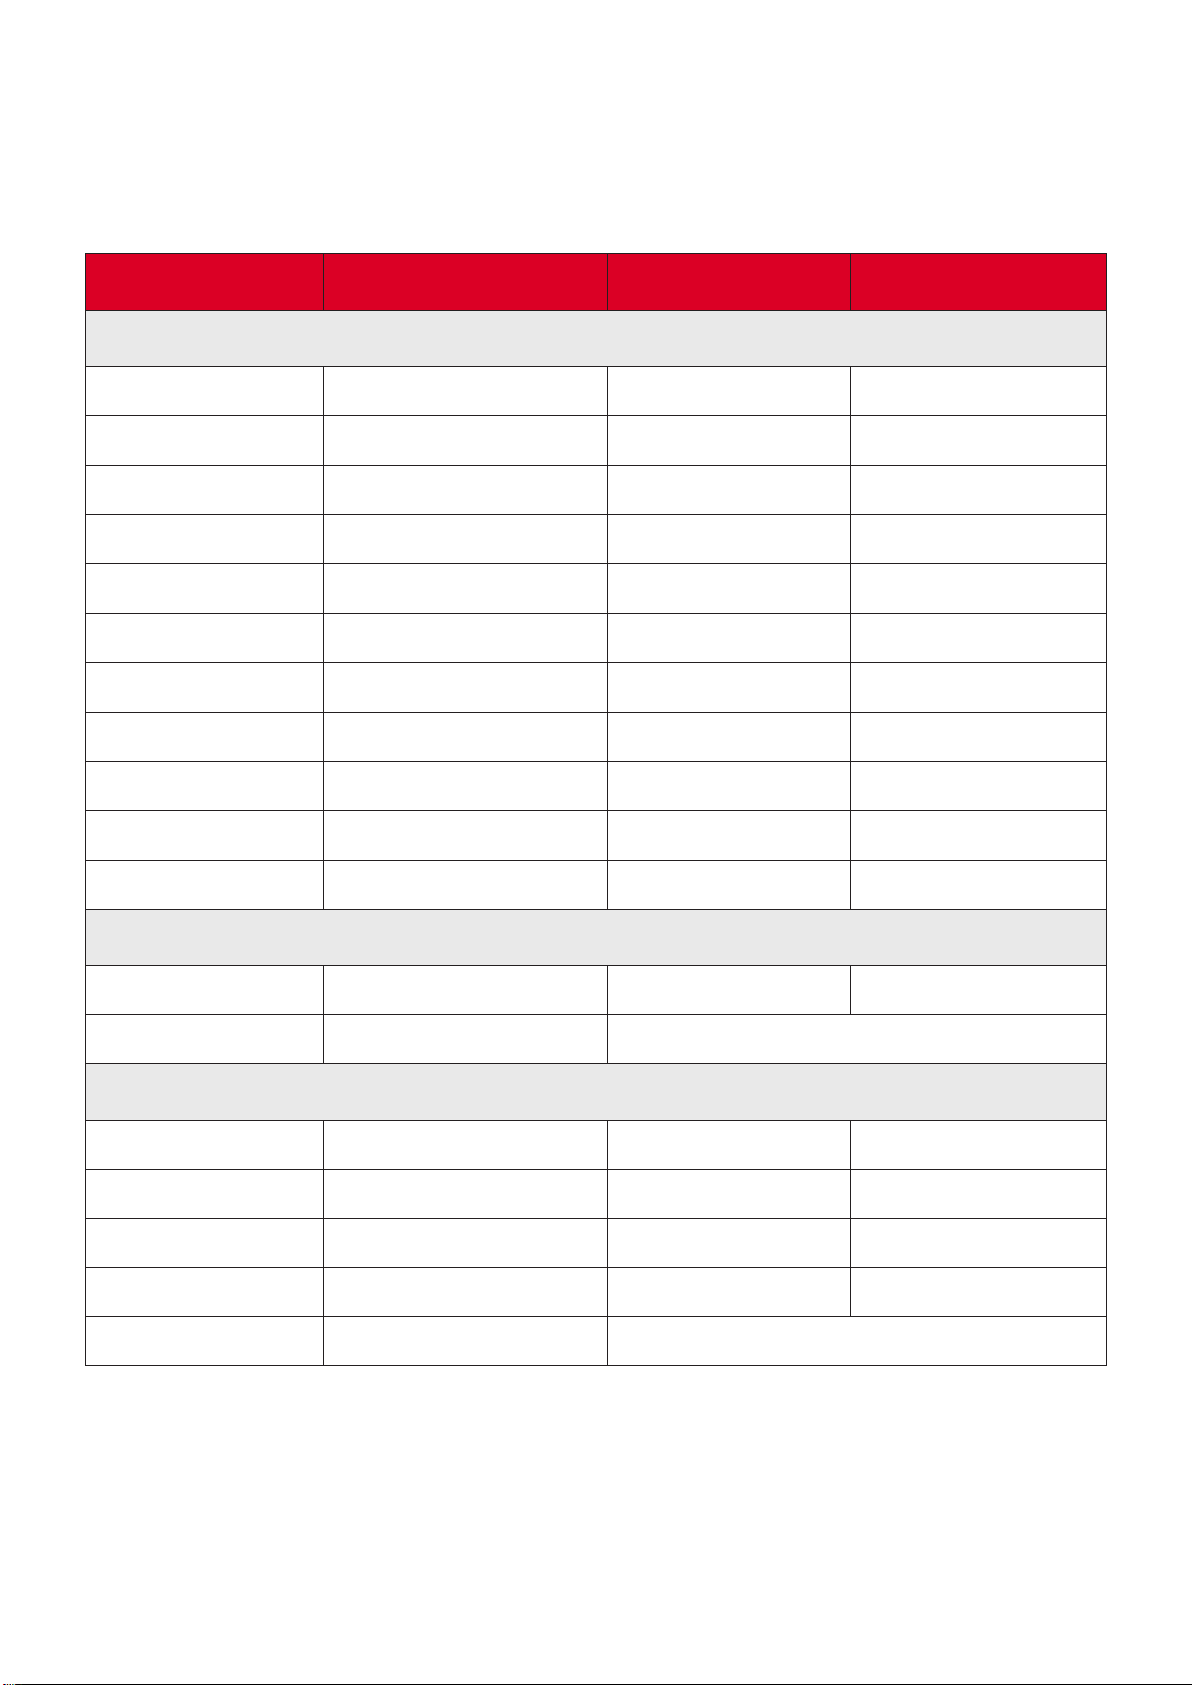
Remote Control
1 2
3
4
7
10
13
16
20
22
12
18
11
14
17
19
23
15
21
5
8
9
6
1
AV Mute Hide and recover the screen picture and volume mute.
2
Power
Turns the projector On or O
3
Auto Sync
Automacally synchronize the projector to the input
source.
4
Source
Toggle to the next input source.
5
Navigates and selects the desired menu items and
make adjustments when the On-Screen Display (OSD)
Menu is acvated.
6
Enter
Conrm the selecon when the On-Screen Display
(OSD) Menu is acvated.
7
Menu/Exit
• Turns the On-Screen Display (OSD) Menu On or O.
• Go back to a previous OSD Menu.
• Exit and Save menu sengs.
8
Brightness
Displays the brightness selecon bar.
9
Volume Up
Increase the volume level.
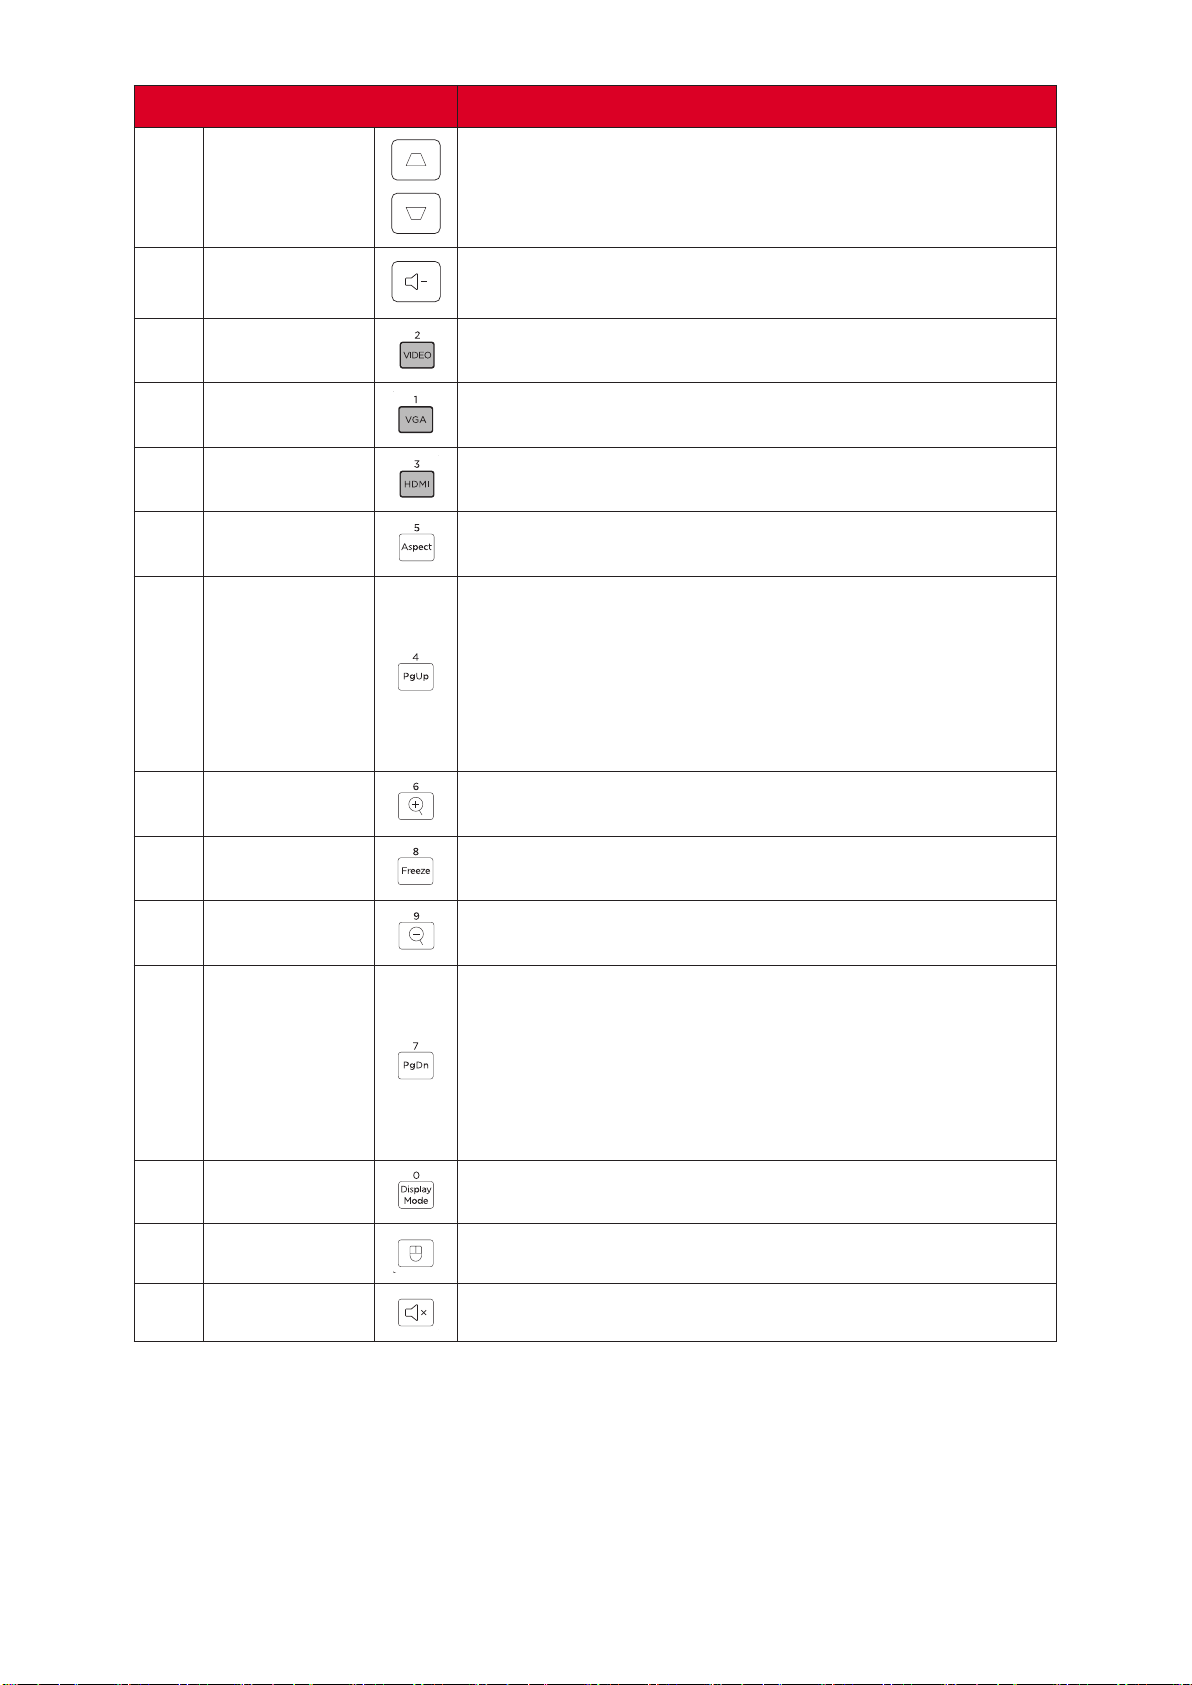
16
10
Keystone Manually correct distorted images.
11
Volume
Down
Decrease the volume level.
12
Video
Unsupported Buon
13
VGA Selects Computer IN port for display.
14
HDMI Selects the HDMI 1 or HDMI 2 input source.
15
Aspect Displays the format selecon bar.
16
Page Up
Operates your display soware program (on a
connected PC) which responds to page up commands
(like Microso PowerPoint).
NOTE: Only available when a PC input source is
selected and the PC and projector are connected
via USB.
17
Zoom In
Increase the projected image size.
18
Freeze Freeze/un-freeze the projected image.
19
Zoom Out Reduce the projected image size.
20
Page Down
Operates your display soware program (on a
connected PC) which responds to page down
commands (like Microso PowerPoint).
NOTE: Only available when a PC input source is
selected and the PC and projector are connected
via USB.
21
Display Mode
Displays the display mode selecon bar.
22
Mouse Mode
Enable/Disable the mouse funcon.
23
Mute
Mute/Unmute.
1. Connect the PC/Notebook to the projector via the COMPUTER and USB ports.
2. Set the input source to PC.
3. Now you can operate your display soware program which responds to page up/
down commands (like Microso PowerPoint).
17
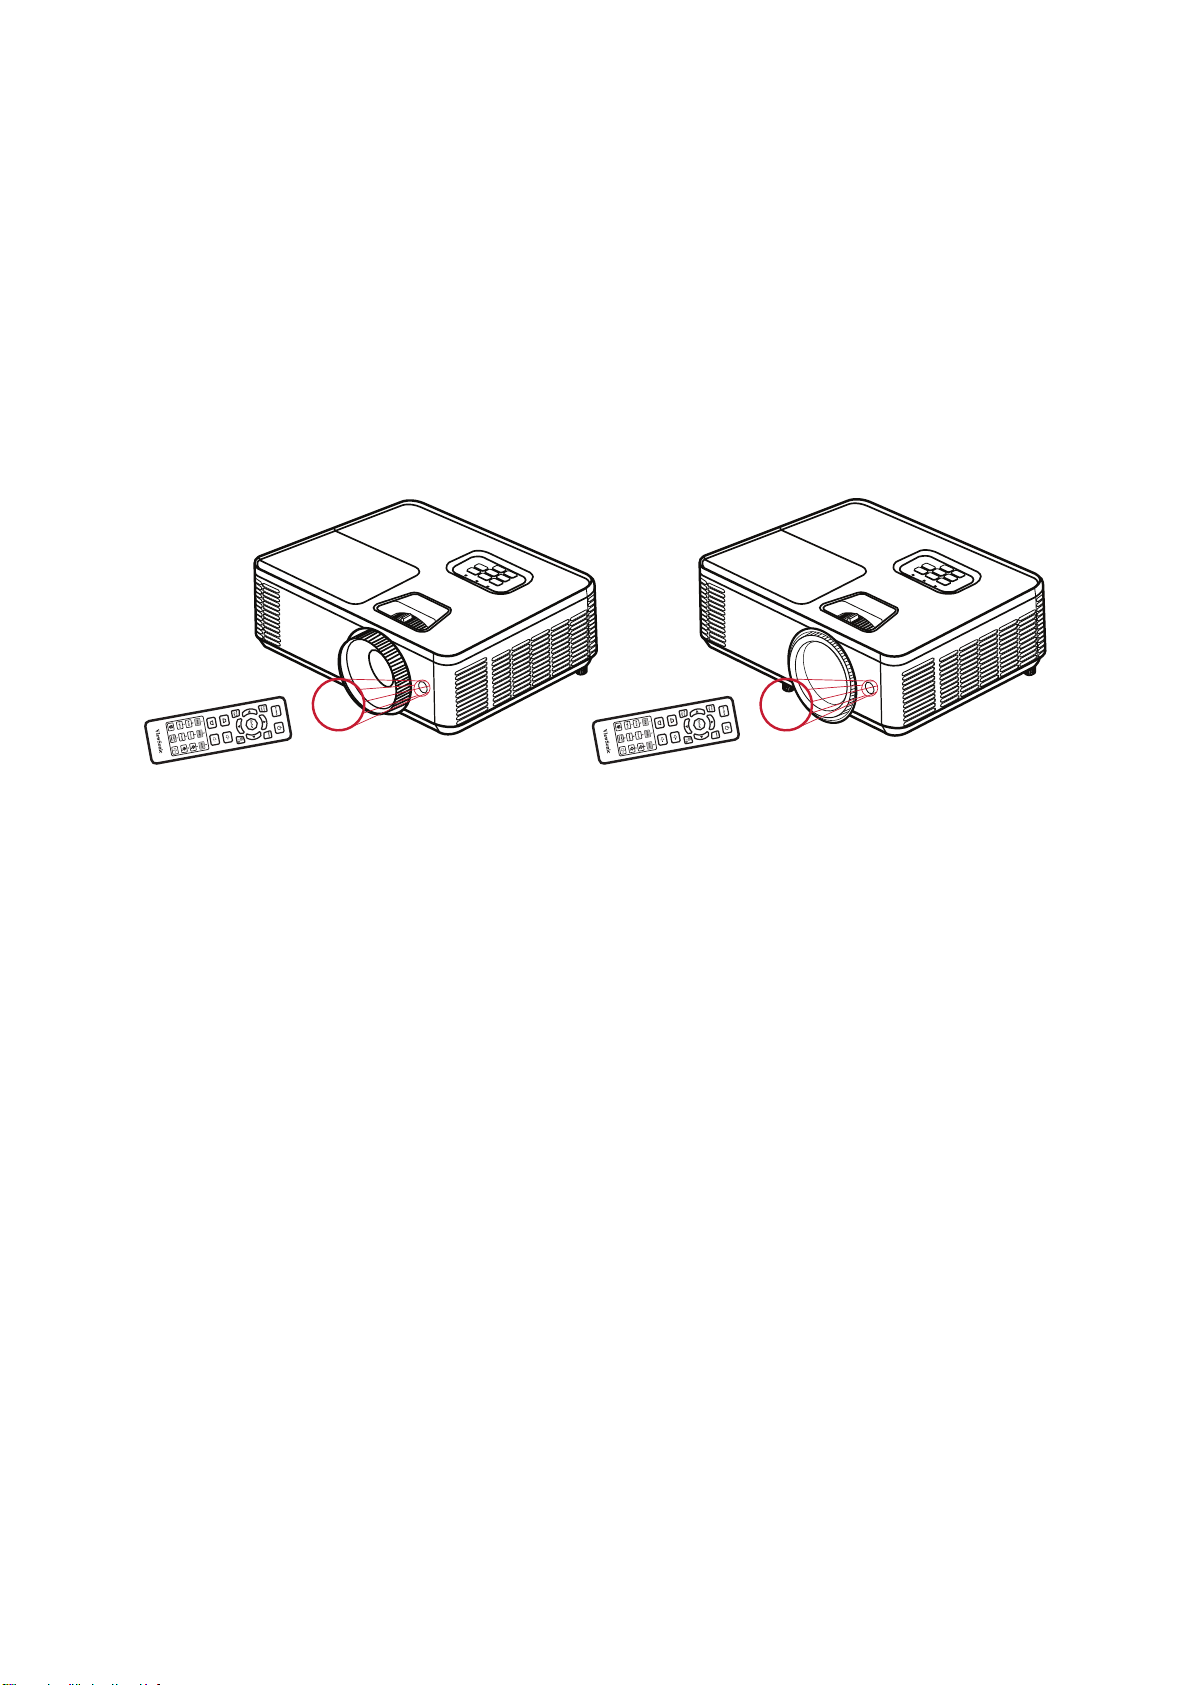
Remote Control - Receiver Range
To ensure proper funcon of the remote control follow the steps below:
1. The remote control must be held at an angle within 30° perpendicular to the
projector’s IR remote control sensor(s).
2. The distance between the remote control and the sensor(s) should not exceed 10
m (32.8 .).
Refer to the illustraon for the locaon of the infrared (IR) remote
control sensor(s).
Approx. 30° Approx. 30°
PS502 SeriesPA700 Series
18
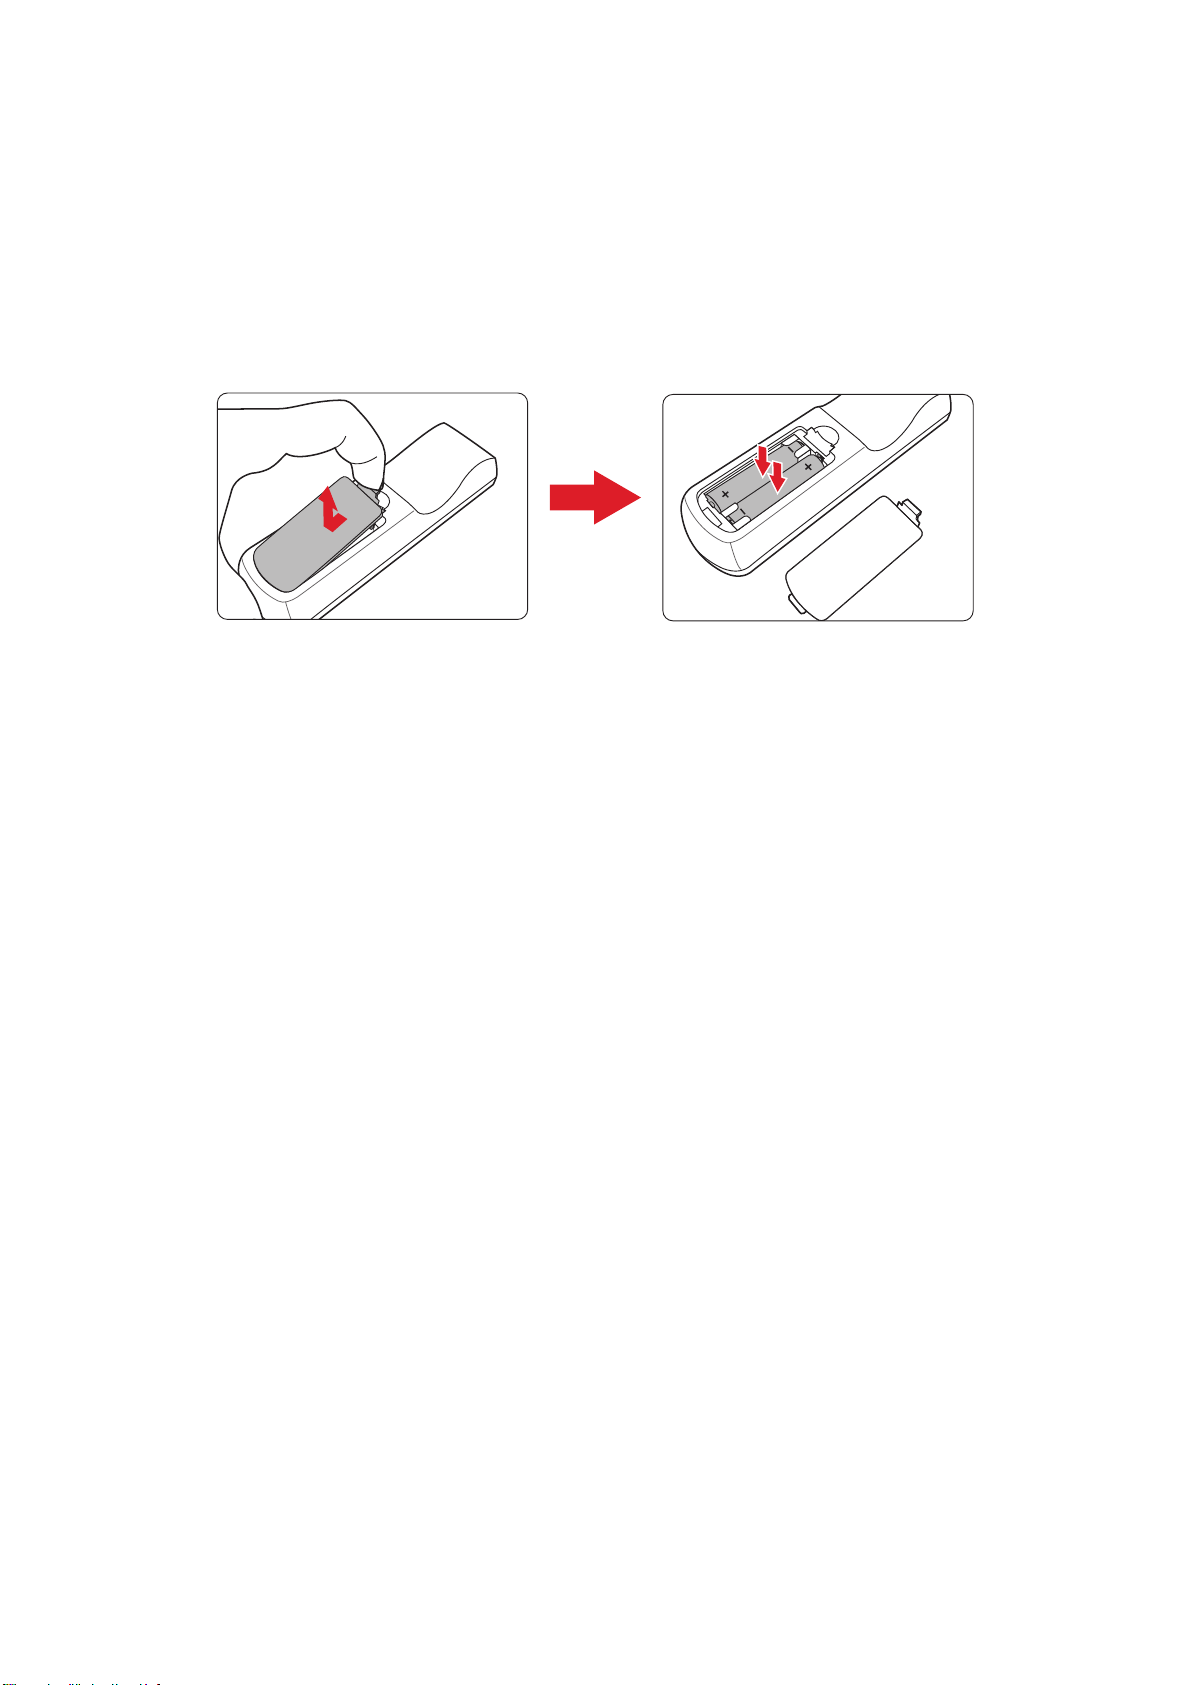
1. Remove the baery cover from the boom of the remote control by pressing the
nger grip and sliding it across.
2. Remove any exisng baeries (if necessary) and install two AAA baeries.
Observe the baery’s polaries as indicated.
3. Replace the baery cover by aligning it with the base and pushing it back into
posion.
• Avoid leaving the remote control and baeries in excessive heat or a humid
environment.
• Replace only with the same or equivalent type recommended by the
baery manufacturer.
• If the baeries are drained or if you will not be using the remote control for
an extended period of me, remove the baeries to avoid damage to the
remote control.
• Dispose of the used baeries according to the manufacturer’s instrucons
and local environment regulaons for your region.
19
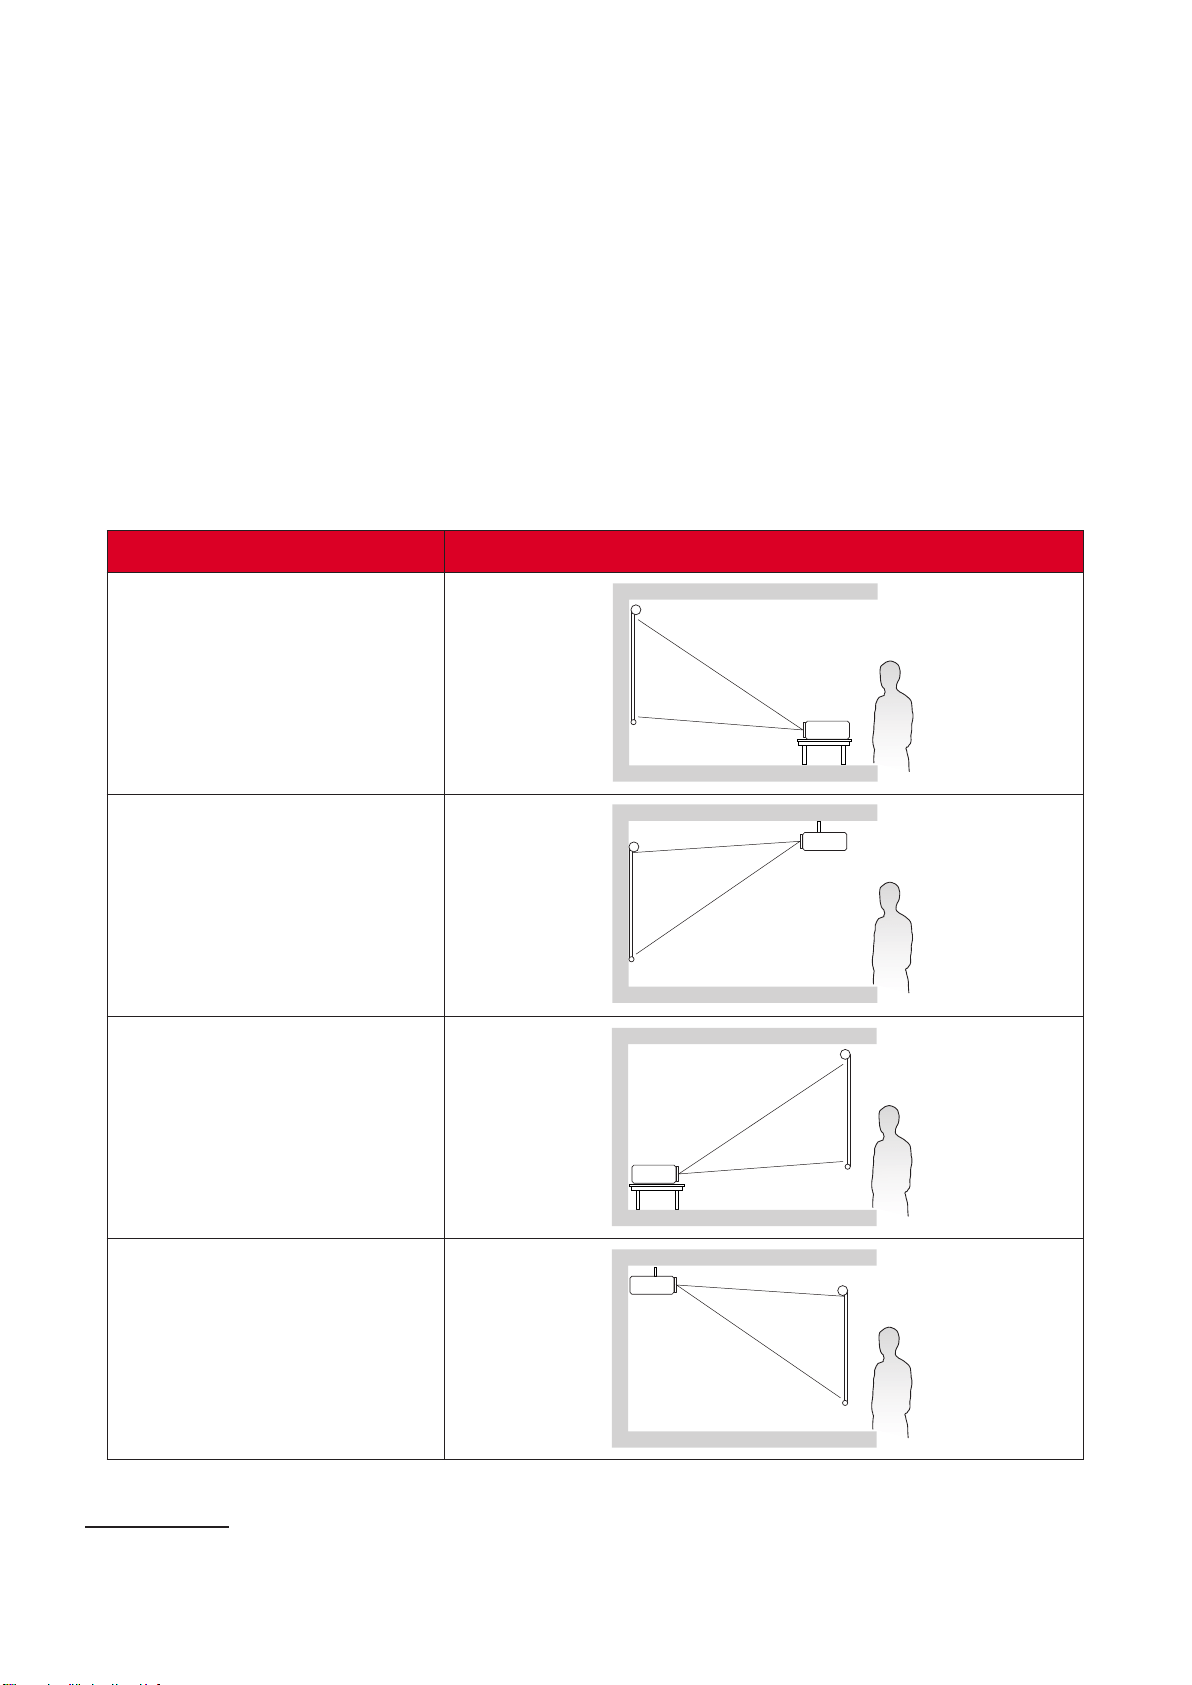
This secon provides detailed instrucons for the inial set up your projector.
Personal preference and room layout will decide the installaon locaon. Consider
the following:
•
Size and position of your screen.
• Location of a suitable power outlet.
• Location and distance between the projector and other equipment.
The projector is designed to be installed in one of the following locations:
The projector is placed near
the oor in front of the screen.
The projector is suspended
upside-down from the ceiling
in front of the screen.
¹
The projector is placed near
the oor behind the screen.
¹
The projector is suspended
upside-down from the ceiling
behind the screen.
A rear projecon screen is required.
20
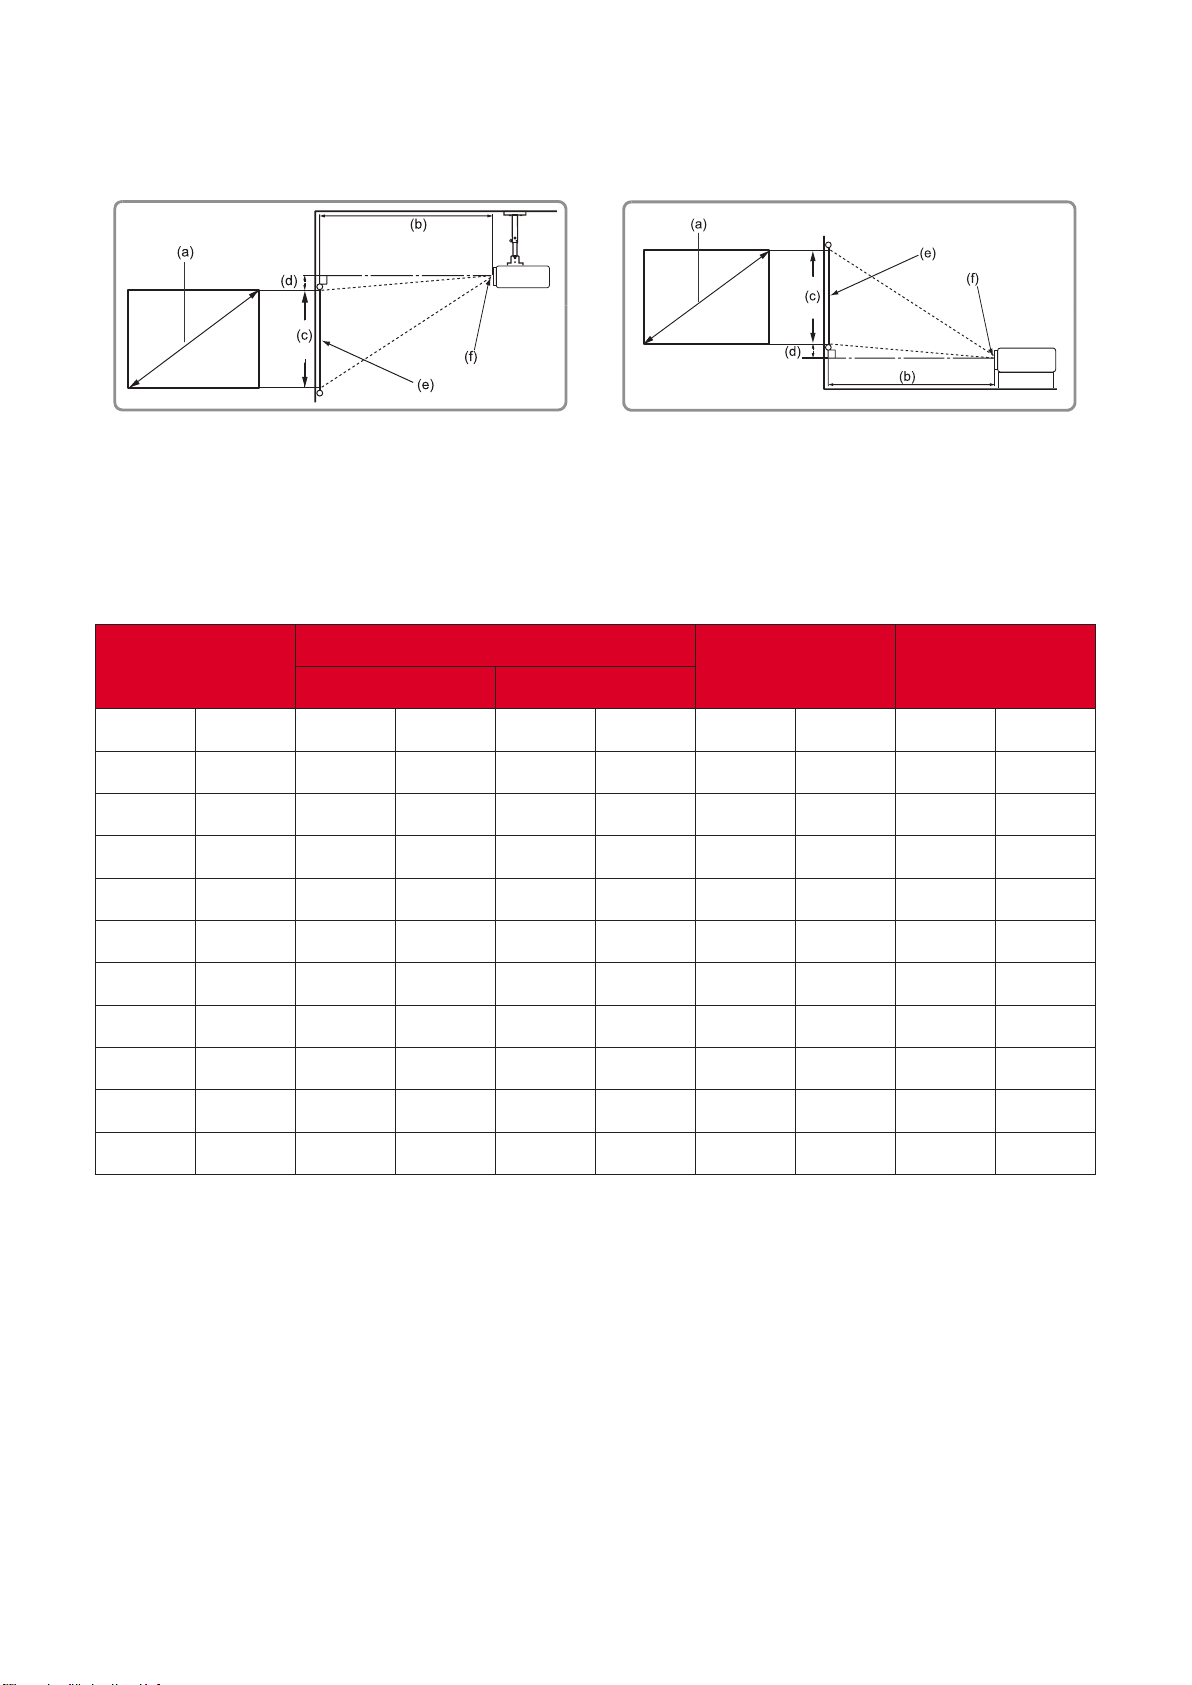
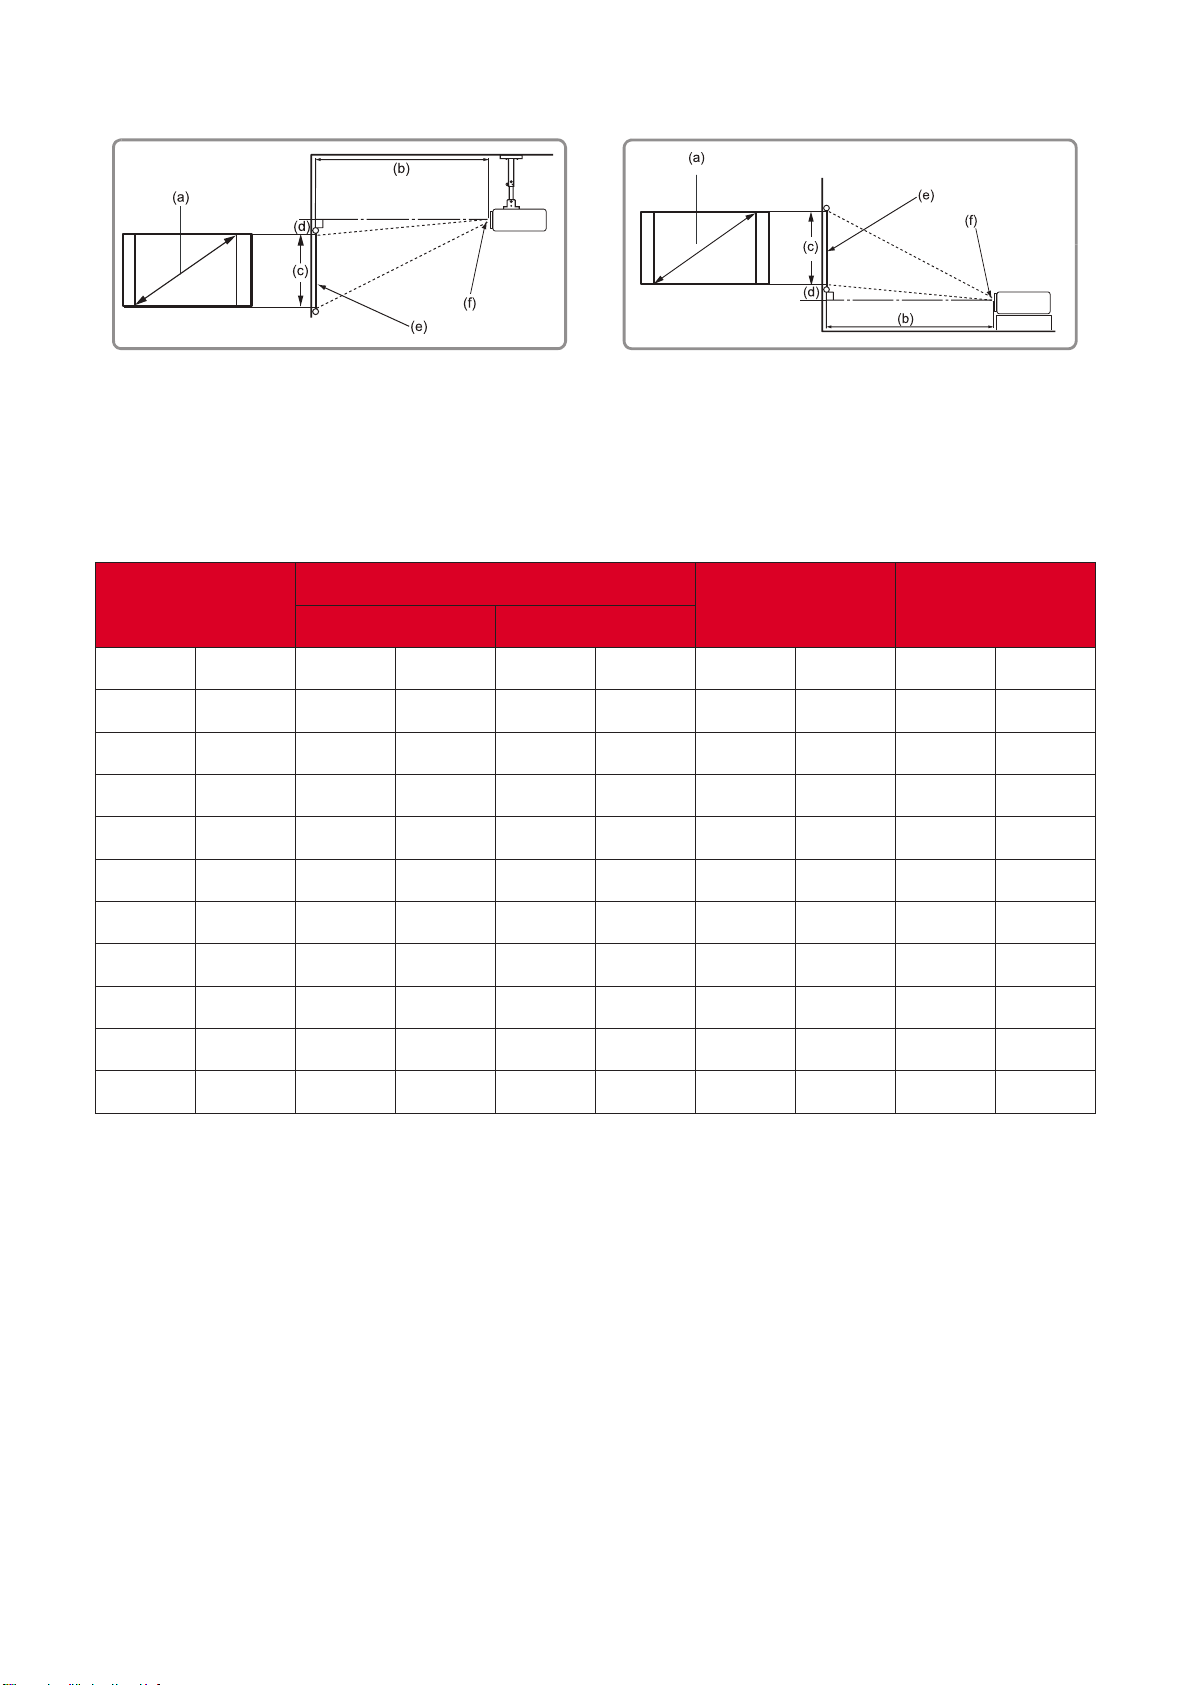
•
4:3 Image on a 4:3 Screen
•
(e) = Screen
(f) = Center of Lens
in.
in.
in.
in.
in.
30 762 46.56 1183 51.84 1317 18 457 2.70 69
60 1524 93.12 2365 103.68 2633 36 914 5.40 137
70 1778 108.64 2759 120.96 3072 42 1067 6.30 160
80 2032 124.16 3154 138.24 3511 48 1219 7.20 183
100 2540 155.20 3942 172.80 4389 60 1524 9 229
120 3048 186.24 4730 207.36 5267 72 1829 10.80 274
150 3810 232.80 5913 259.20 6584 90 2286 13.50 343
200 5080 310.40 7884 345.60 8778 120 3048 18 457
250 6350 388 9855 432 10973 150 3810 22.50 572
300 7620 465.60 11826 518.40 13167 180 4572 27 686
• These gures are for reference purposes only. Please refer to the actual
projector for the precise dimensions.
• It is recommended that if you intend to permanently install the projector
to physically test the projecon size and distance using the actual projector
before you permanently install it.
21
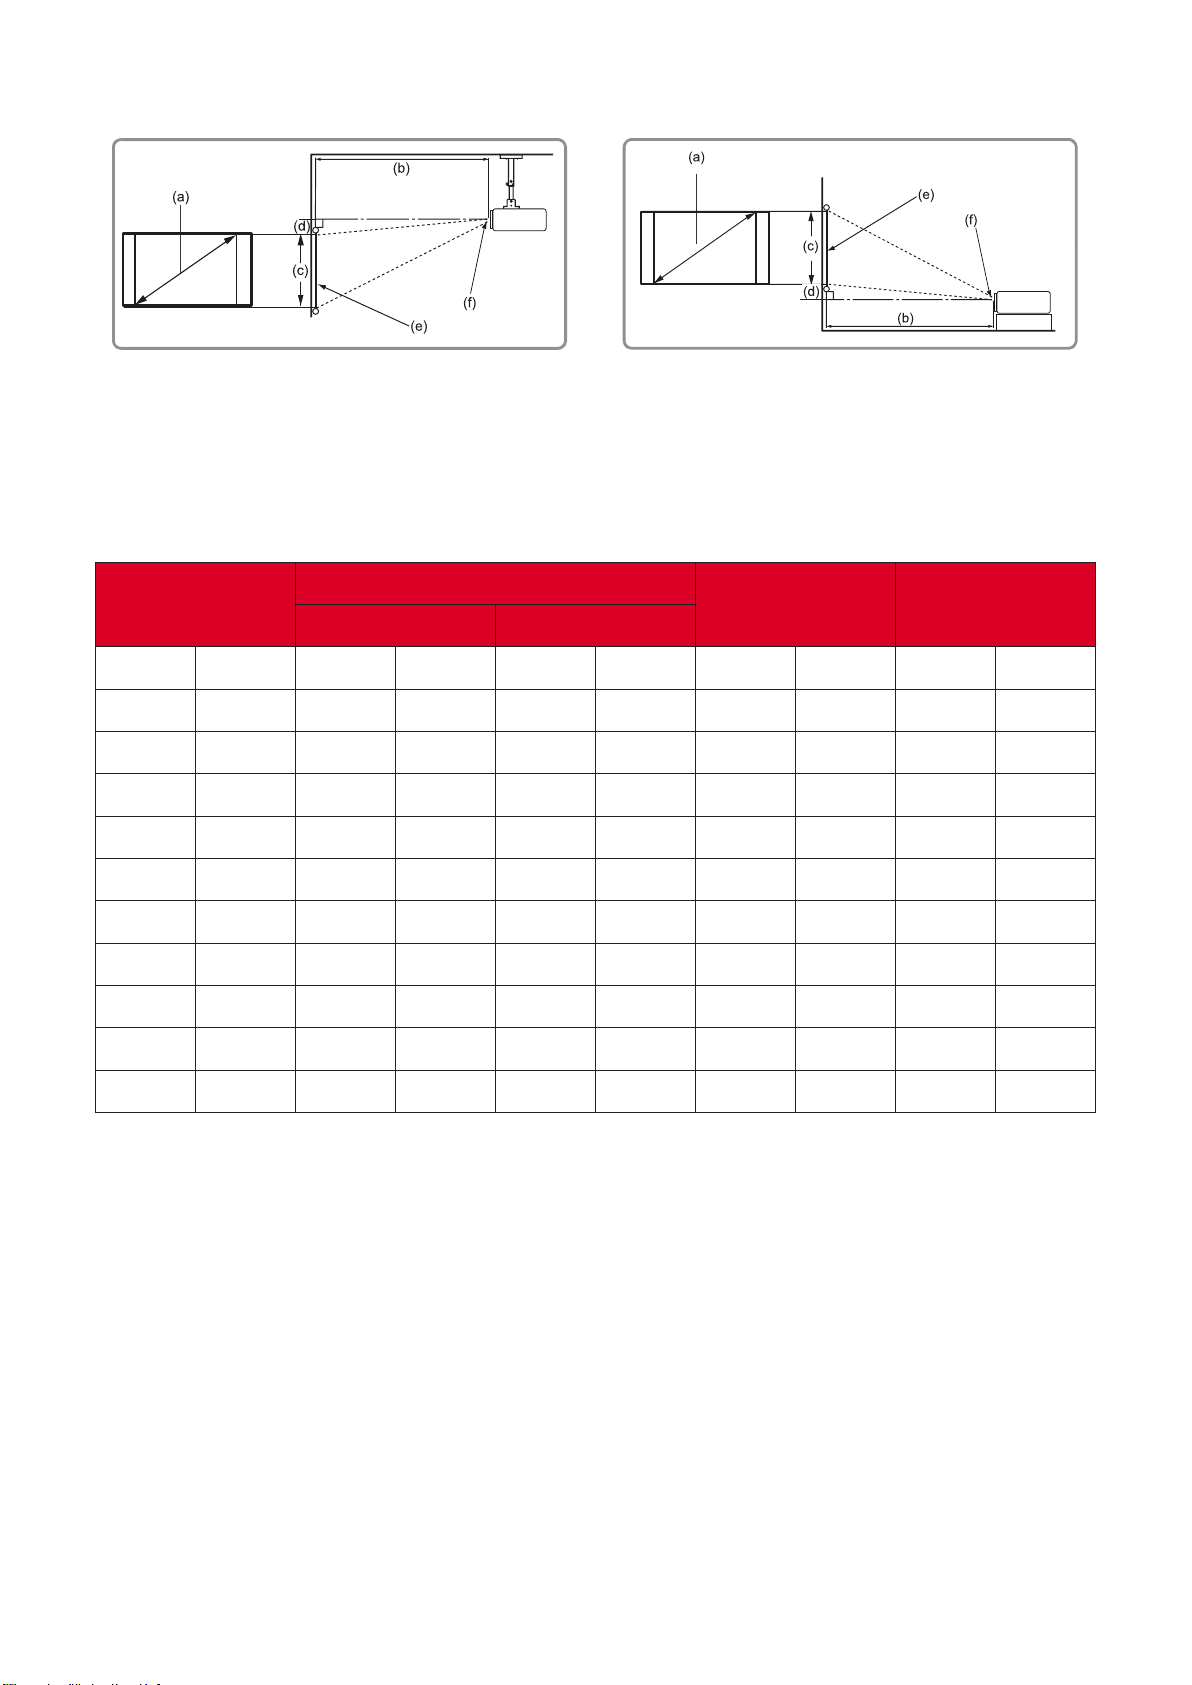
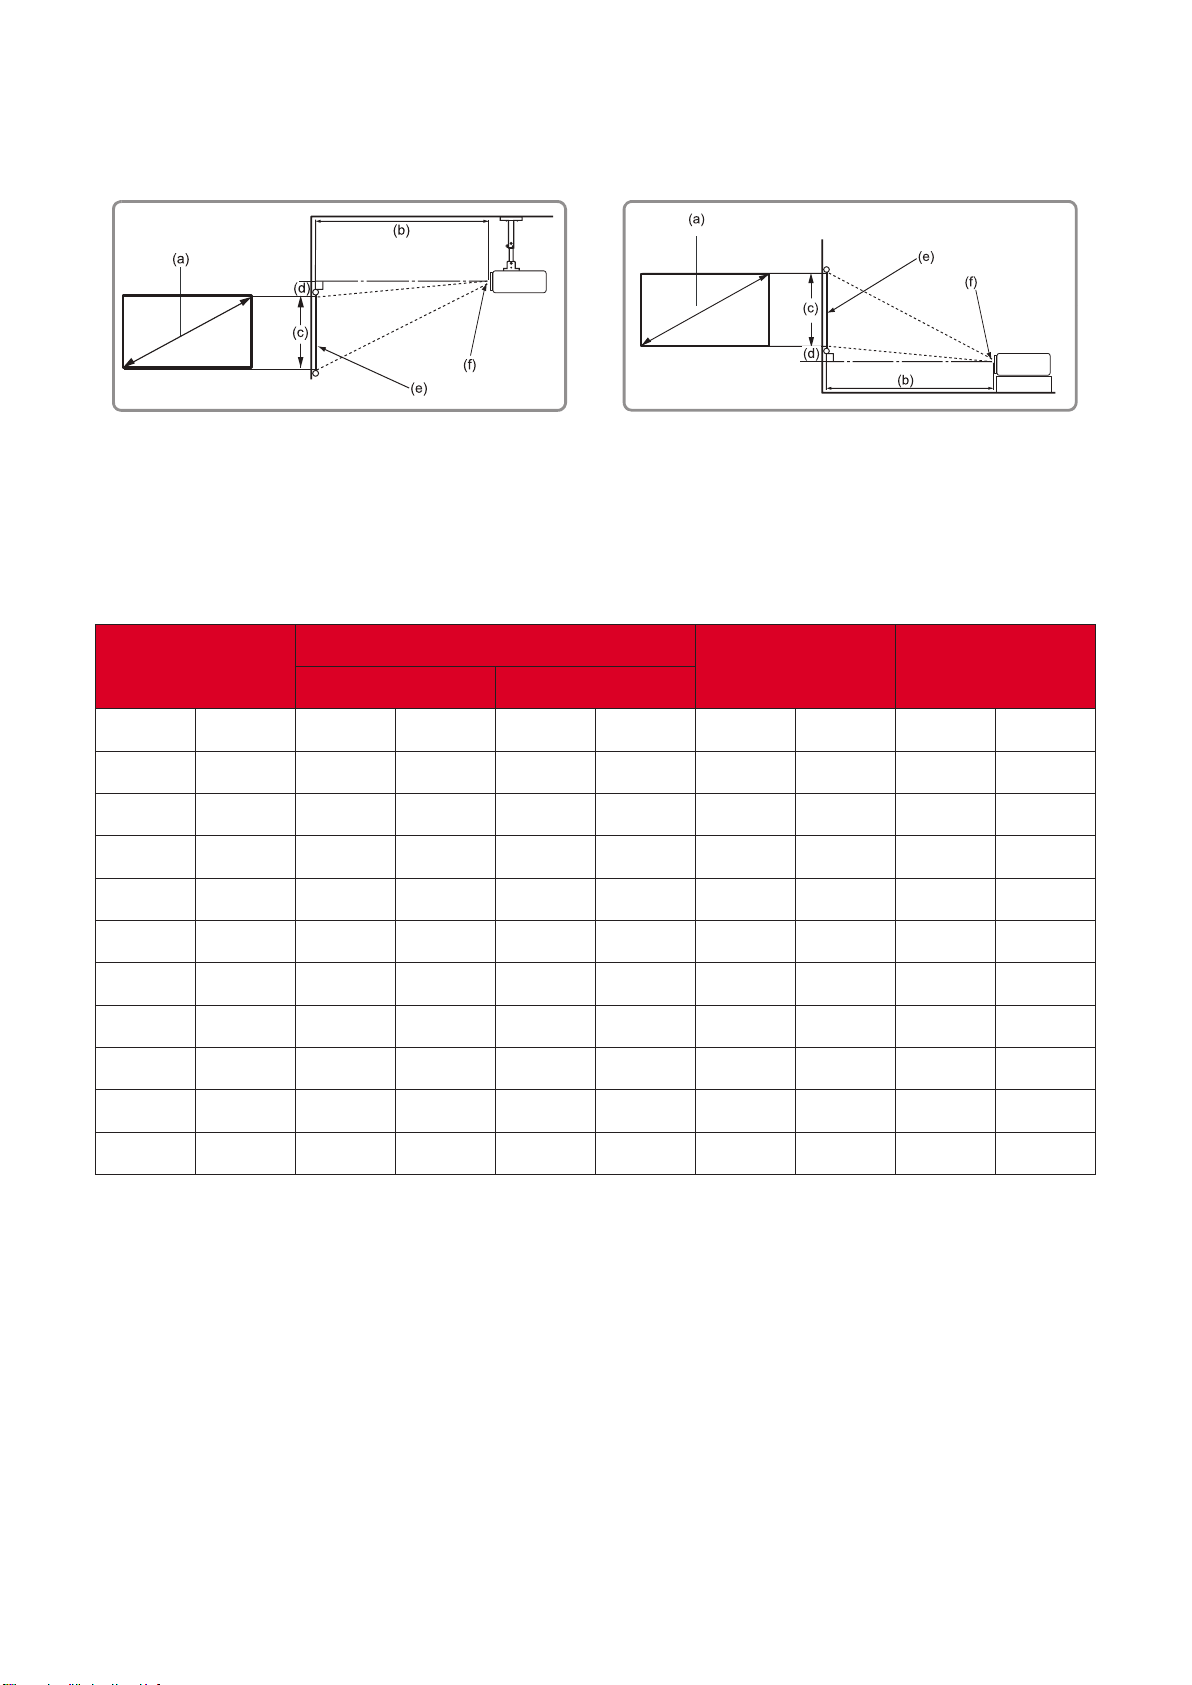
• 4:3 Image on a 16:10 Screen
•
(e) = Screen
(f) = Center of Lens
in.
in.
in.
in.
in.
30 762 41.13 1045 45.79 1163 15.90 404 2.38 61
60 1524 82.26 2089 91.58 2326 31.80 808 4.77 121
70 1778 95.97 2438 106.85 2714 37.10 942 5.56 141
80 2032 109.67 2786 122.11 3102 42.40 1077 6.36 162
100 2540 137.09 3482 152.64 3877 53 1346 7.95 202
120 3048 164.51 4179 183.17 4652 63.60 1615 9.54 242
150 3810 205.64 5223 228.96 5816 79.50 2019 11.92 303
200 5080 274.19 6964 305.28 7754 106 2692 15.90 404
250 6350 342.73 8705 381.60 9693 132.5 3365 19.87 505
300 7620 411.28 10446 457.92 11631 159 4039 23.85 606
• These gures are for reference purposes only. Please refer to the actual
projector for the precise dimensions.
• It is recommended that if you intend to permanently install the projector
to physically test the projecon size and distance using the actual projector
before you permanently install it.
22
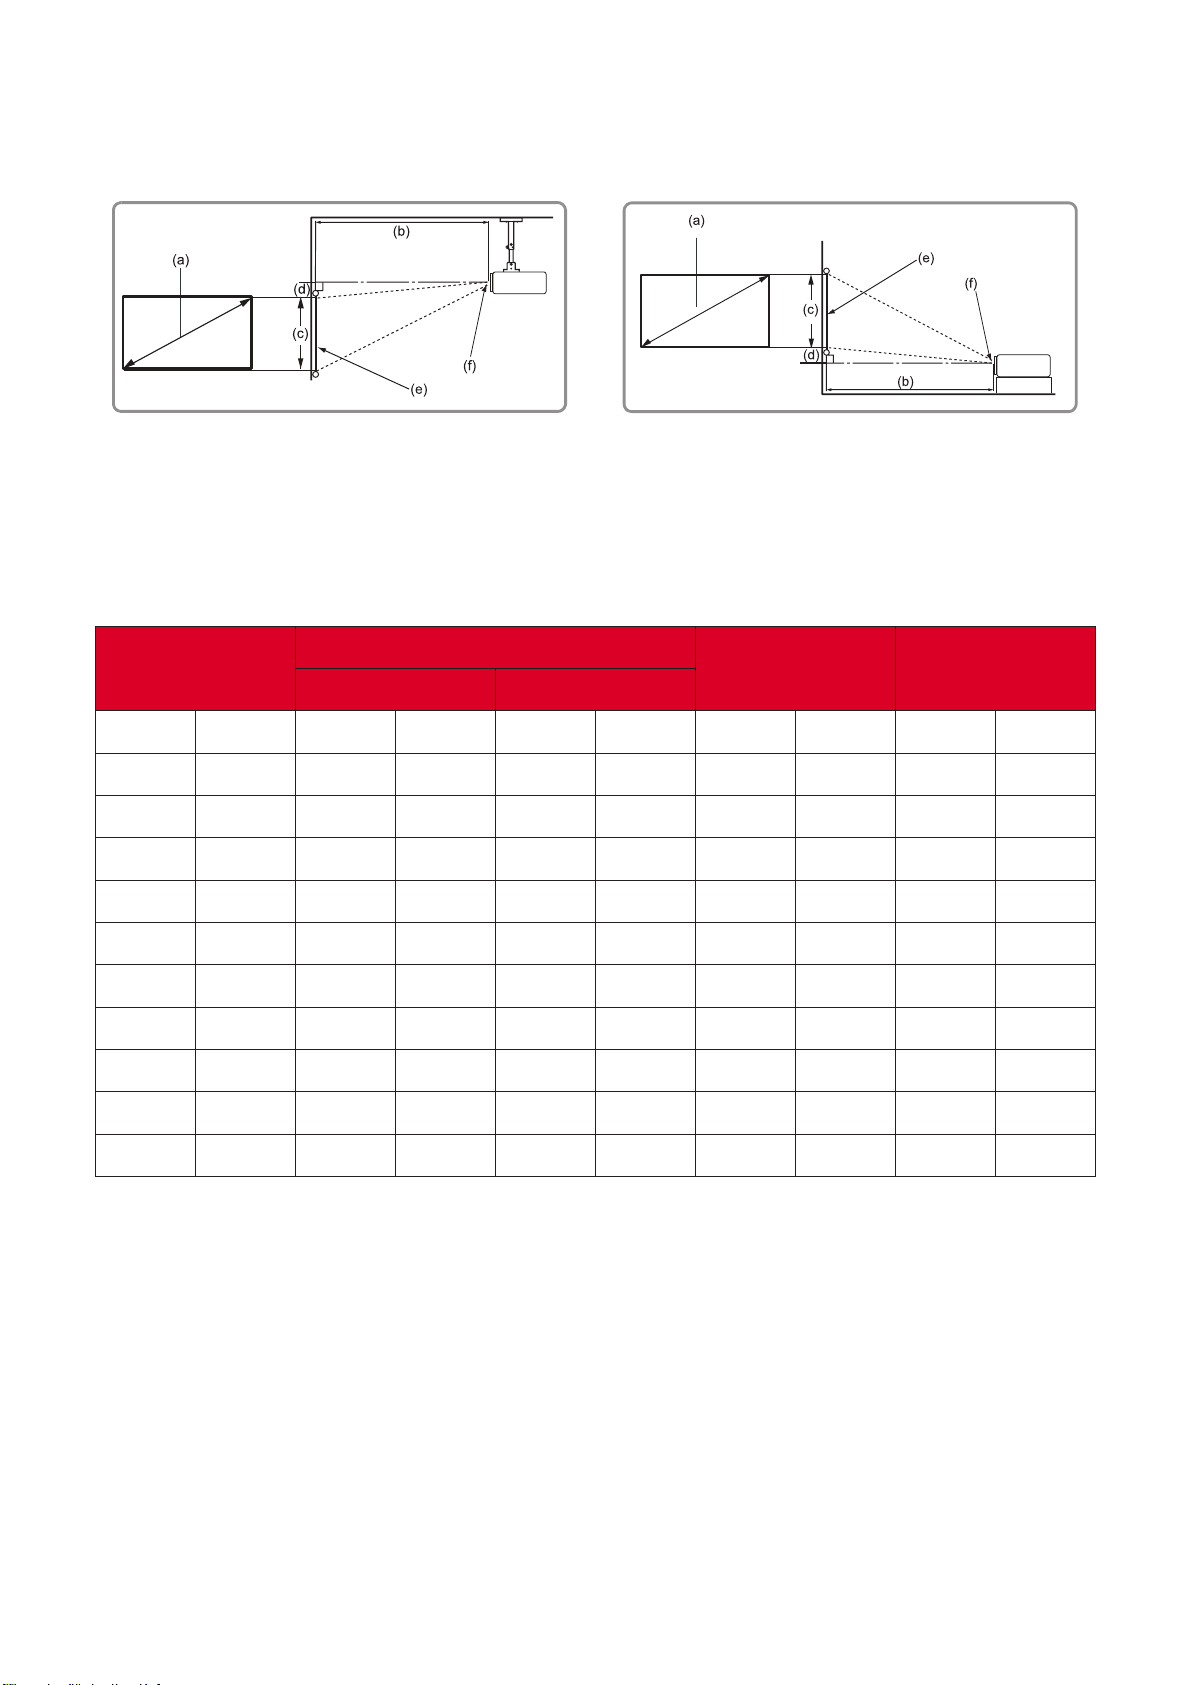
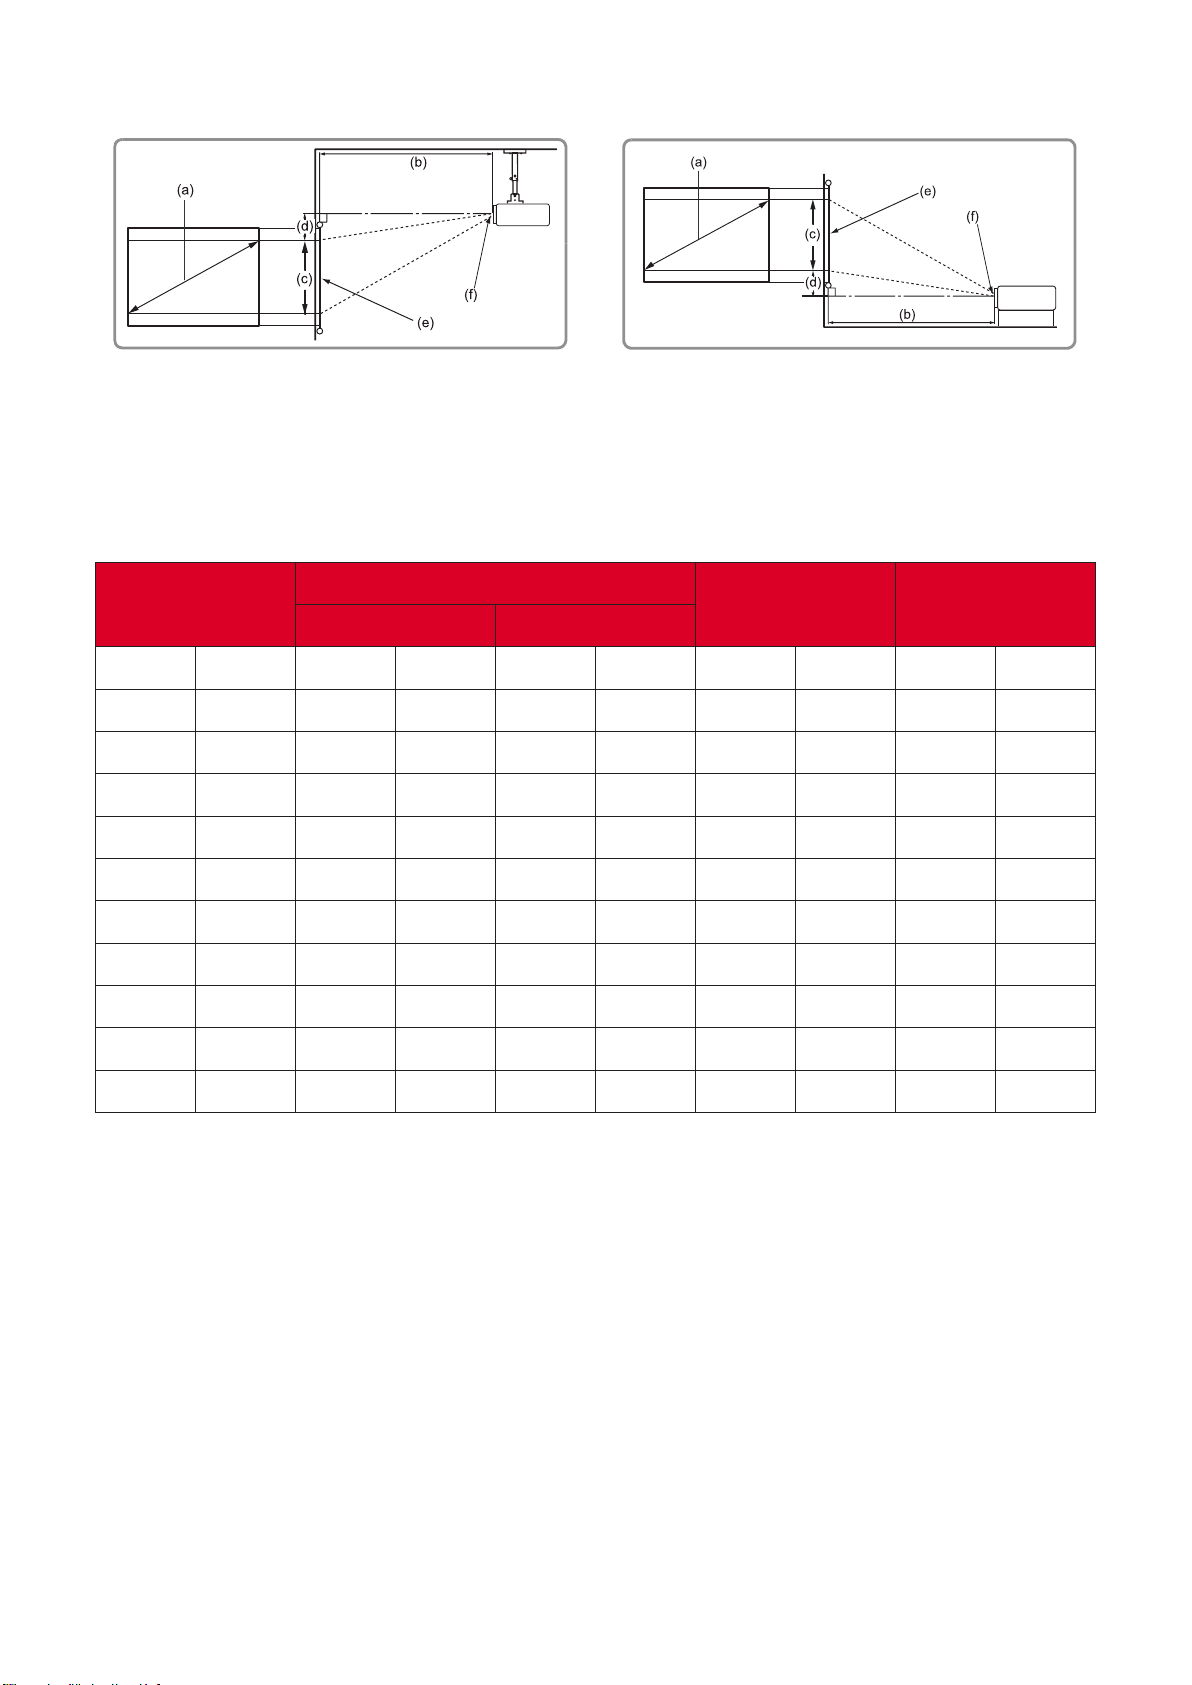
•
16:10 Image on a 16:10 Screen
•
(e) = Screen
(f) = Center of Lens
in.
in.
in.
in.
in.
30 762 39.20 995 43.80 1111 15.90 404 1.90 48
60 1524 78.36 1990 87.51 2223 31.80 808 3.94 100
80 2032 104.47 2654 116.68 2964 42.40 1077 5.26 134
90 2286 117.53 2985 131.27 3334 47.70 1212 5.91 150
100 2540 130.59 3317 145.86 3705 53 1346 6.57 167
120 3048 156.71 3980 175.03 4446 63.60 1615 7.89 200
150 3810 195.89 4976 218.78 5557 79.50 2019 9.86 250
200 5080 261.18 6634 291.71 7409 106 2692 13.14 334
250 6350 326.48 8293 364.64 9262 132.50 3365 16.43 417
300 7620 391.77 9951 437.57 11114 159 4039 19.70 500
• These gures are for reference purposes only. Please refer to the actual
projector for the precise dimensions.
• It is recommended that if you intend to permanently install the projector
to physically test the projecon size and distance using the actual projector
before you permanently install it.
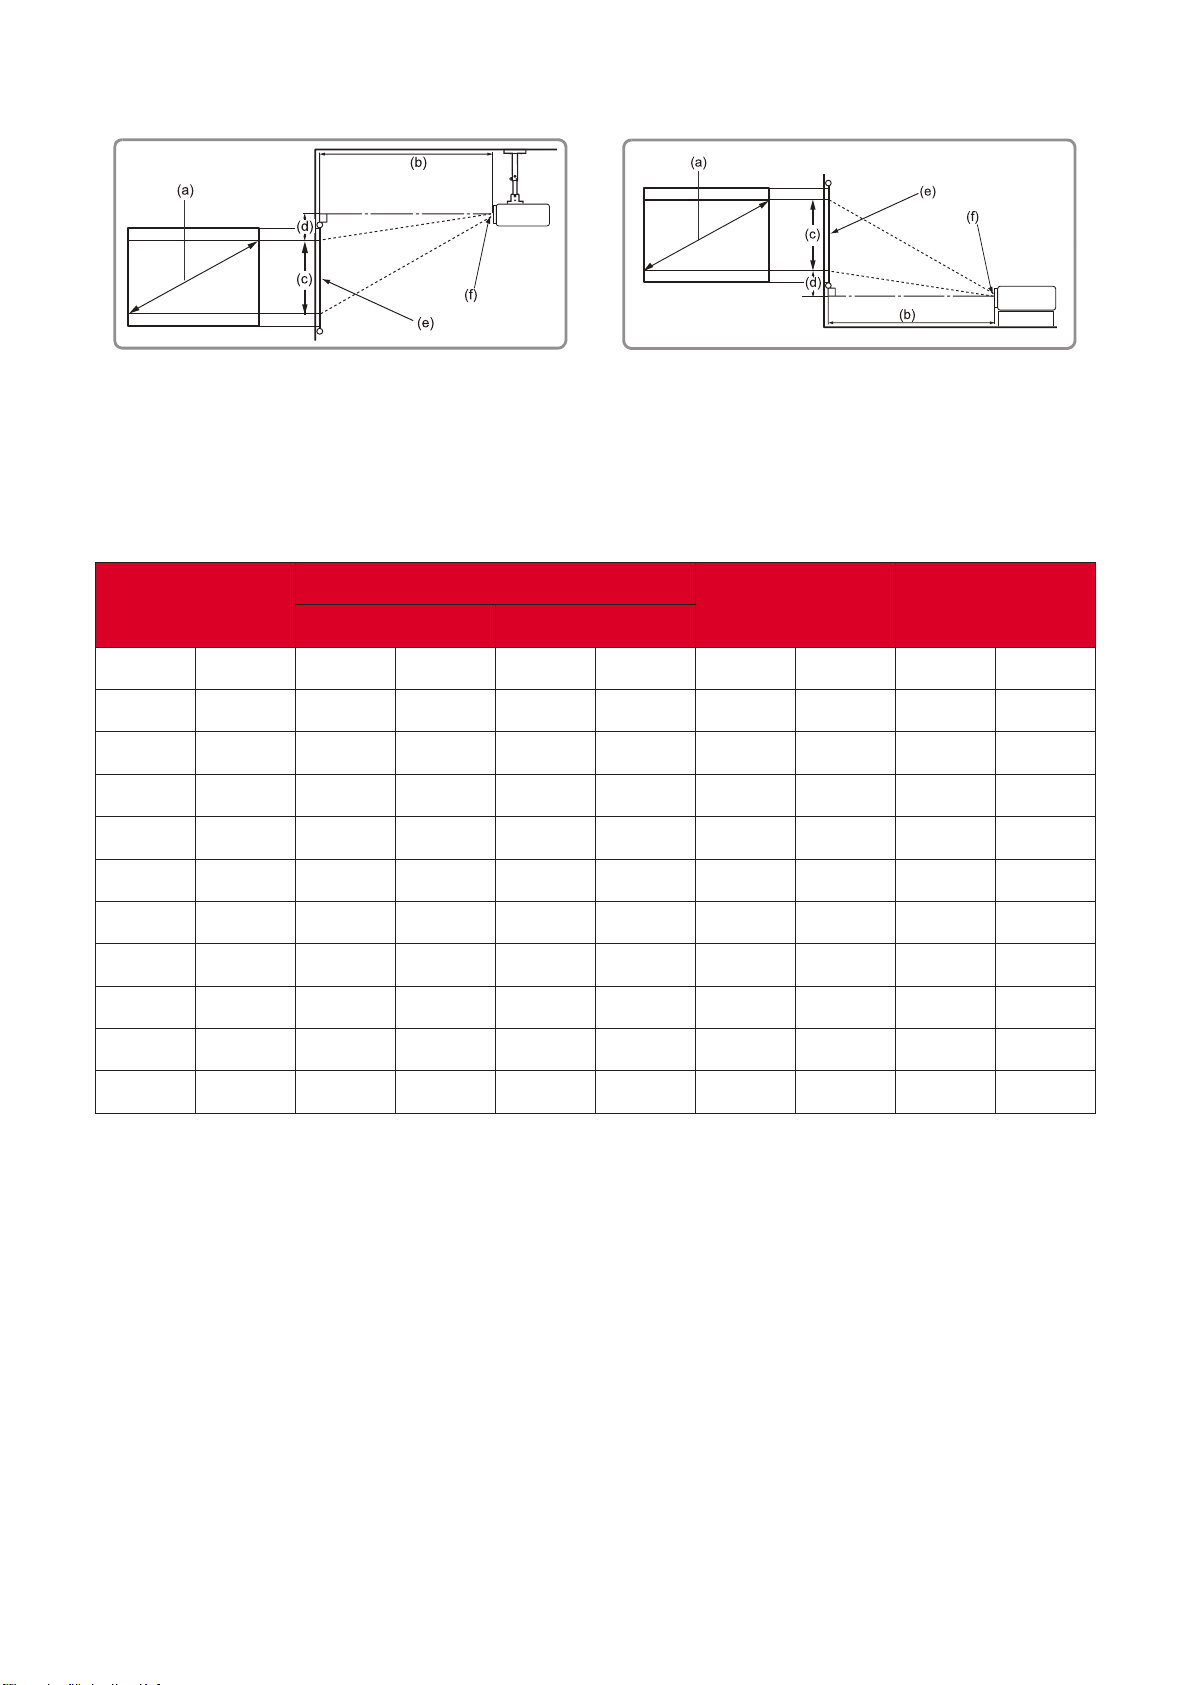
• 16:10 Image on a 4:3 Screen
•
(e) = Screen
(f) = Center of Lens
in.
in.
in.
in.
in.
30 762 36.90 937 41.30 1049 15 381 1.80 46
60 1524 73.92 1878 82.56 2097 30 762 3.72 94
80 2032 98.56 2503 110.08 2796 40 1016 4.96 126
90 2286 110.88 2816 123.84 3146 45 1143 5.58 142
100 2540 123.20 3129 137.60 3495 50 1270 6.20 157
120 3048 147.84 3755 165.12 4194 60 1524 7.44 189
150 3810 184.80 4694 206.40 5243 75 1905 9.30 236
200 5080 246.40 6259 275.20 6990 100 2540 12.40 315
250 6350 308 7823 344 8738 125 3175 15.50 394
300 7620 369.60 9388 412.80 10485 150 3810 18.60 472
• These gures are for reference purposes only. Please refer to the actual
projector for the precise dimensions.
• It is recommended that if you intend to permanently install the projector
to physically test the projecon size and distance using the actual projector
before you permanently install it.

24
•
4:3 Image on a 4:3 Screen
•
(e) = Screen
(f) = Center of Lens
in.
in.
in.
in.
in.
40 1016 19.74 501 19.74 501 24.02 610 3.60 91
60 1524 29.62 752 29.62 752 35.98 914 5.40 137
70 1778 34.55 878 34.55 878 42.01 1067 6.30 160
80 2032 39.49 1003 39.49 1003 47.99 1219 7.20 183
100 2540 49.36 1254 49.36 1254 60 1524 9 229
120 3048 59.23 1504 59.23 1504 72.01 1829 10.80 274
150 3810 74.04 1881 74.04 1881 90 2286 13.50 343
200 5080 98.72 2507 98.72 2507 120 3048 18
457
250 6350 123.40 3134 123.40 3134 150 3810 22.50 572
300 7620 148.08 3761 148.08 3761 180 4572 27 686
• These gures are for reference purposes only. Please refer to the actual
projector for the precise dimensions.
• It is recommended that if you intend to permanently install the projector
to physically test the projecon size and distance using the actual projector
before you permanently install it.
• 4:3 Image on a 16:10 Screen
•
(e) = Screen
(f) = Center of Lens
in.
in.
in.
in.
in.
40 1016 17.44 443 17.44 443 21.20 538 3.18 81
60 1524 26.16 664 26.16 664 31.80 808 4.77 121
70 1778 30.52 775 30.52 775 37.10 942 5.56 141
80 2032 34.88 886 34.88 886 42.40 1077 6.36 162
100 2540 43.60 1107 43.60 1107 53 1346 7.95 202
120 3048 52.32 1329 52.32 1329 63.60 1615 9.54 242
150 3810 65.40 1661 65.40 1661 79.50 2019 11.92 303
200 5080 87.20 2215 87.20 2215 106 2692 15.90 404
250 6350 109 2769 109 2769 132.50 3365 19.87 505
300 7620 130.80 3322 130.80 3322 159 4039 23.85 606
• These gures are for reference purposes only. Please refer to the actual
projector for the precise dimensions.
• It is recommended that if you intend to permanently install the projector
to physically test the projecon size and distance using the actual projector
before you permanently install it.
•
16:10 Image on a 16:10 Screen
•
(e) = Screen
(f) = Center of Lens
in.
in.
in.
in.
in.
40 1016 17.67 449 17.67 449 21.20 538 2.63 67
60 1524 26.51 673 26.51 673 31.80 808 3.94 100
80 2032 35.34 898 35.34 898 42.40 1077 5.26 134
90 2286 39.76 1010 39.76 1010 47.70 1212 5.91 150
100 2540 44.18 1122 44.18 1122 53 1346 6.57 167
120 3048 53.02 1347 53.02 1347 63.60 1615 7.89 200
150 3810 66.27 1683 66.27 1683 79.50 2019 9.86 250
200 5080 88.36 2244 88.36 2244 106 2692 13.14
334
250 6350 110.45 2805 110.45 2805 132.50 3365 16.43 417
300 7620 132.30 3360 132.30 3360 159 4039 19.70 500
• These gures are for reference purposes only. Please refer to the actual
projector for the precise dimensions.
• It is recommended that if you intend to permanently install the projector
to physically test the projecon size and distance using the actual projector
before you permanently install it.
• 16:10 Image on a 4:3 Screen
•
(e) = Screen
(f) = Center of Lens
in.
in.
in.
in.
in.
40 1016 16.67 423 16.67 423 20 508 2.48 63
60 1524 25.01 635 25.01 635 30 762 3.72 94
80 2032 33.34 847 33.34 847 40 1016 4.96 126
90 2286 37.51 953 37.51 953 45 1143 5.58 142
100 2540 41.68 1059 41.68 1059 50 1270 6.20 157
120 3048 50.02 1270 50.02 1270 60 1524 7.44 189
150 3810 62.52 1588 62.52 1588 75 1905 9.30 236
200 5080 83.36 2117 83.36 2117 100 2540 12.40 315
250 6350 104.20 2647 104.20 2647 125 3175 15.50 394
300 7620 125.04 3176 125.04 3176 150 3810 18.60 472
• These gures are for reference purposes only. Please refer to the actual
projector for the precise dimensions.
• It is recommended that if you intend to permanently install the projector
to physically test the projecon size and distance using the actual projector
before you permanently install it.
28
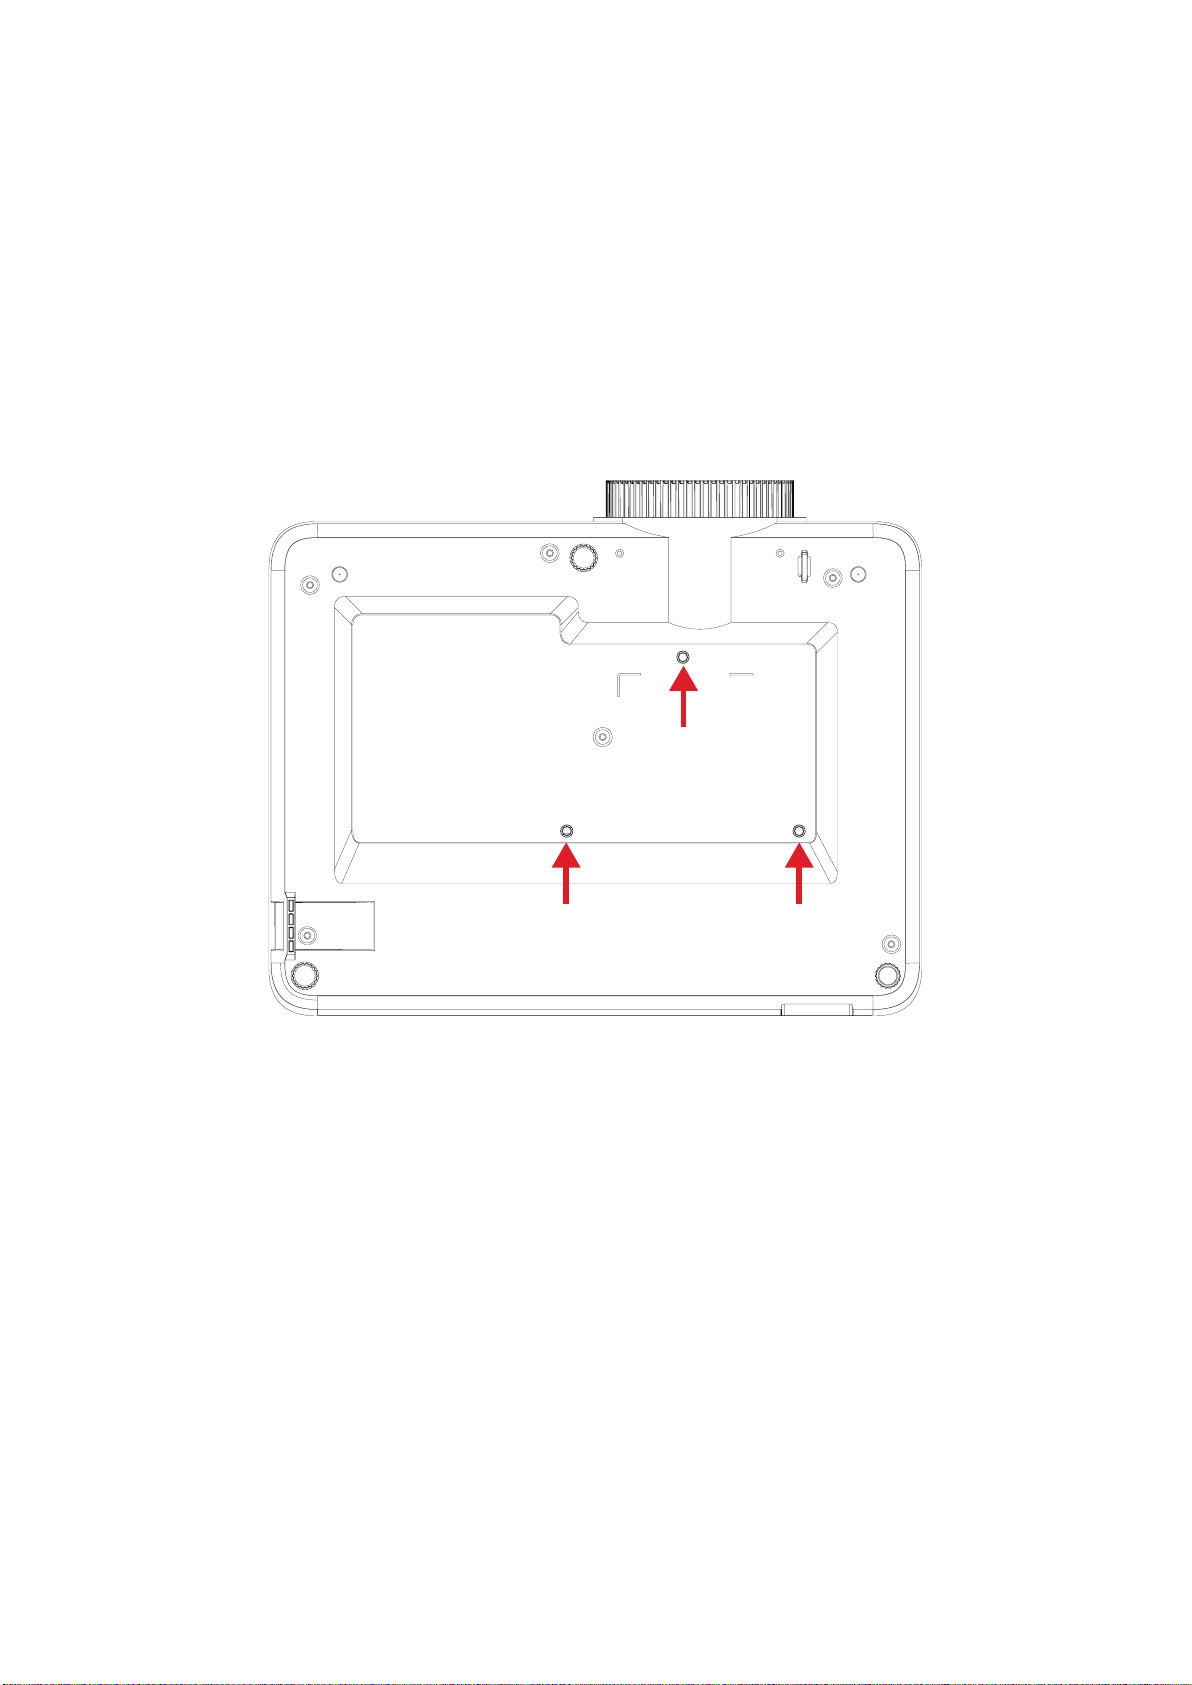
If you buy a third party mount, please use the correct screw size. Screw
size can vary depending on the thickness of the mounng plate.
To ensure the most secure installaon, please use a ViewSonic® wall or ceiling
mount.
Ensure the screws used to aach the mount to the projector meet the following
specicaons:
• Screw type: M4 x 7
• Maximum Screw Length: 7 mm
• Avoid installing the projector near a heat source or air condioner.
• Keep at least a 10 cm (3.9 in.) gap between the ceiling and the boom of
the projector.
To help prevent the projector from being stolen, use a security slot locking device to
secure the projector to a xed object.
29
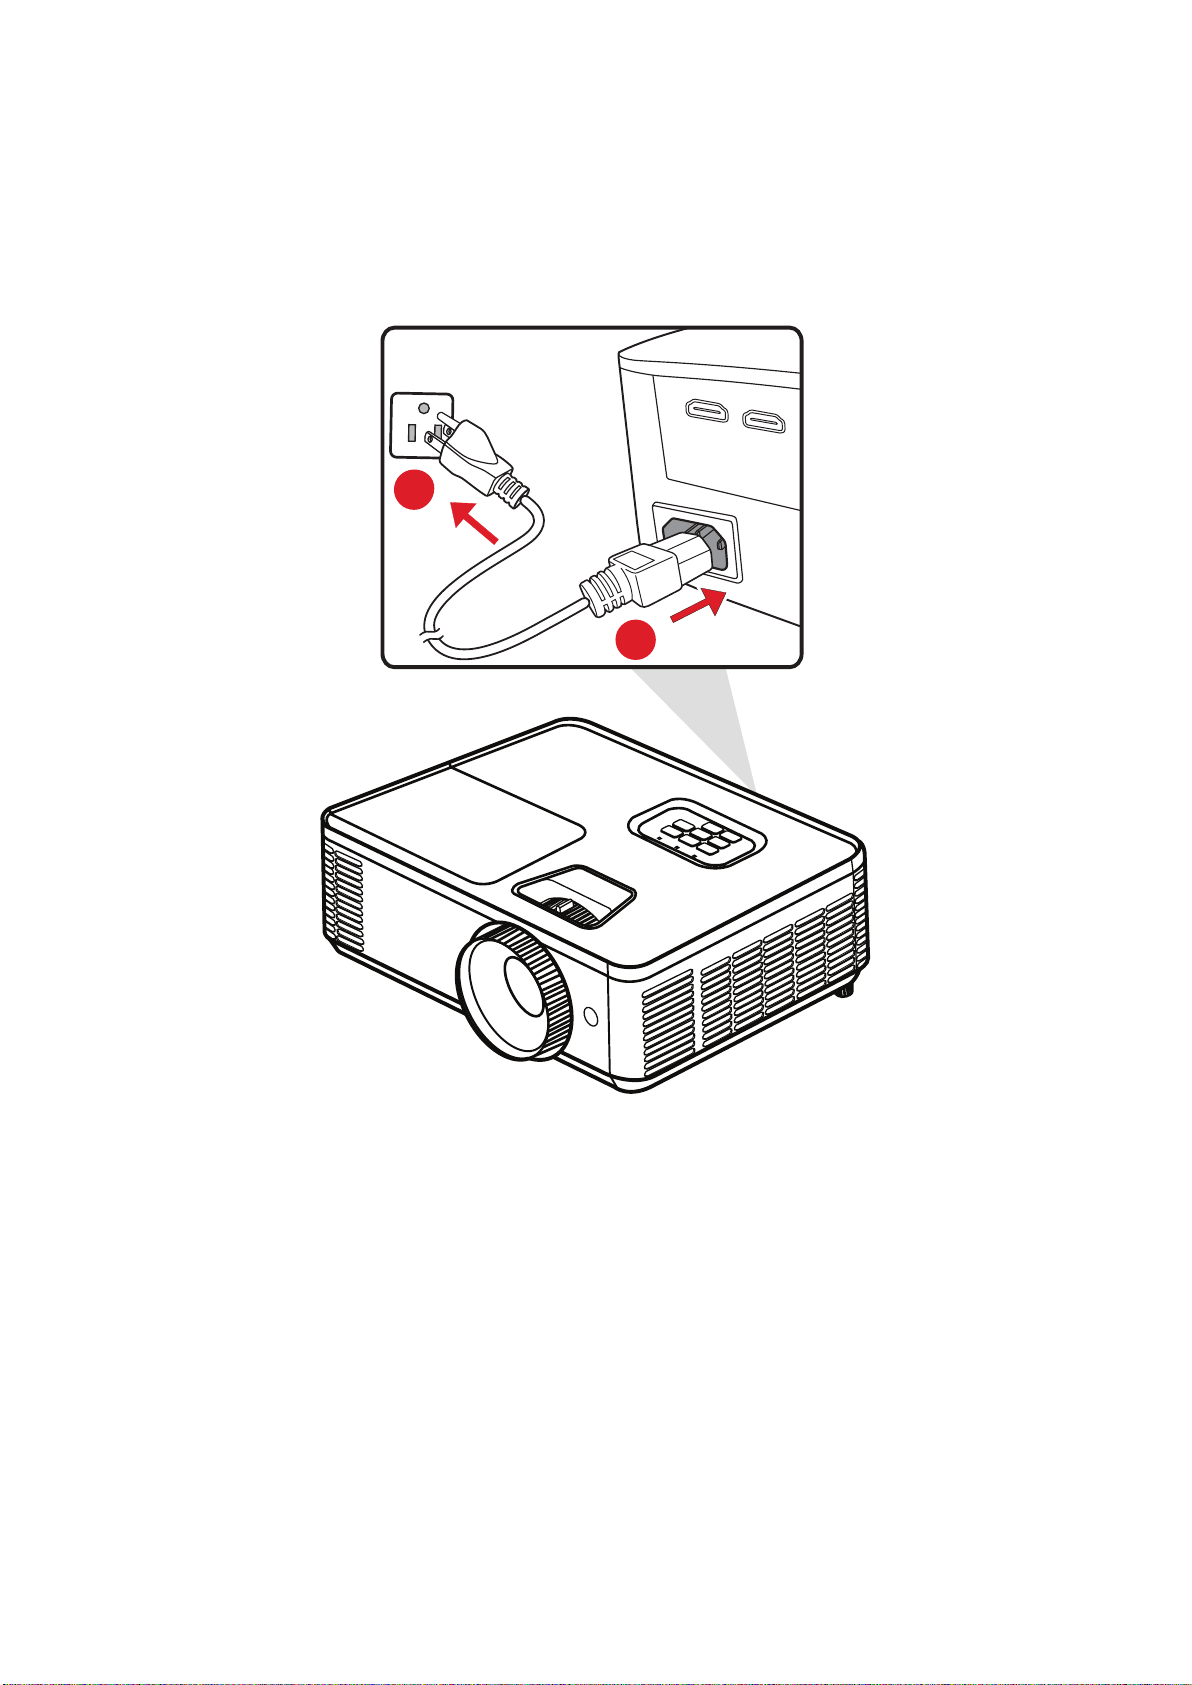
1. Connect the power cord to the AC IN jack at the rear of the projector.
2. Plug the power cord into a power outlet.
1
2
When installing the projector, incorporate a readily accessible disconnect
device in the xed wiring, or connect the power plug to an easily
accessible outlet near the unit. If a fault should occur during operaon of
the projector, use the disconnect device to switch o the power supply,
or disconnect the power plug.
30
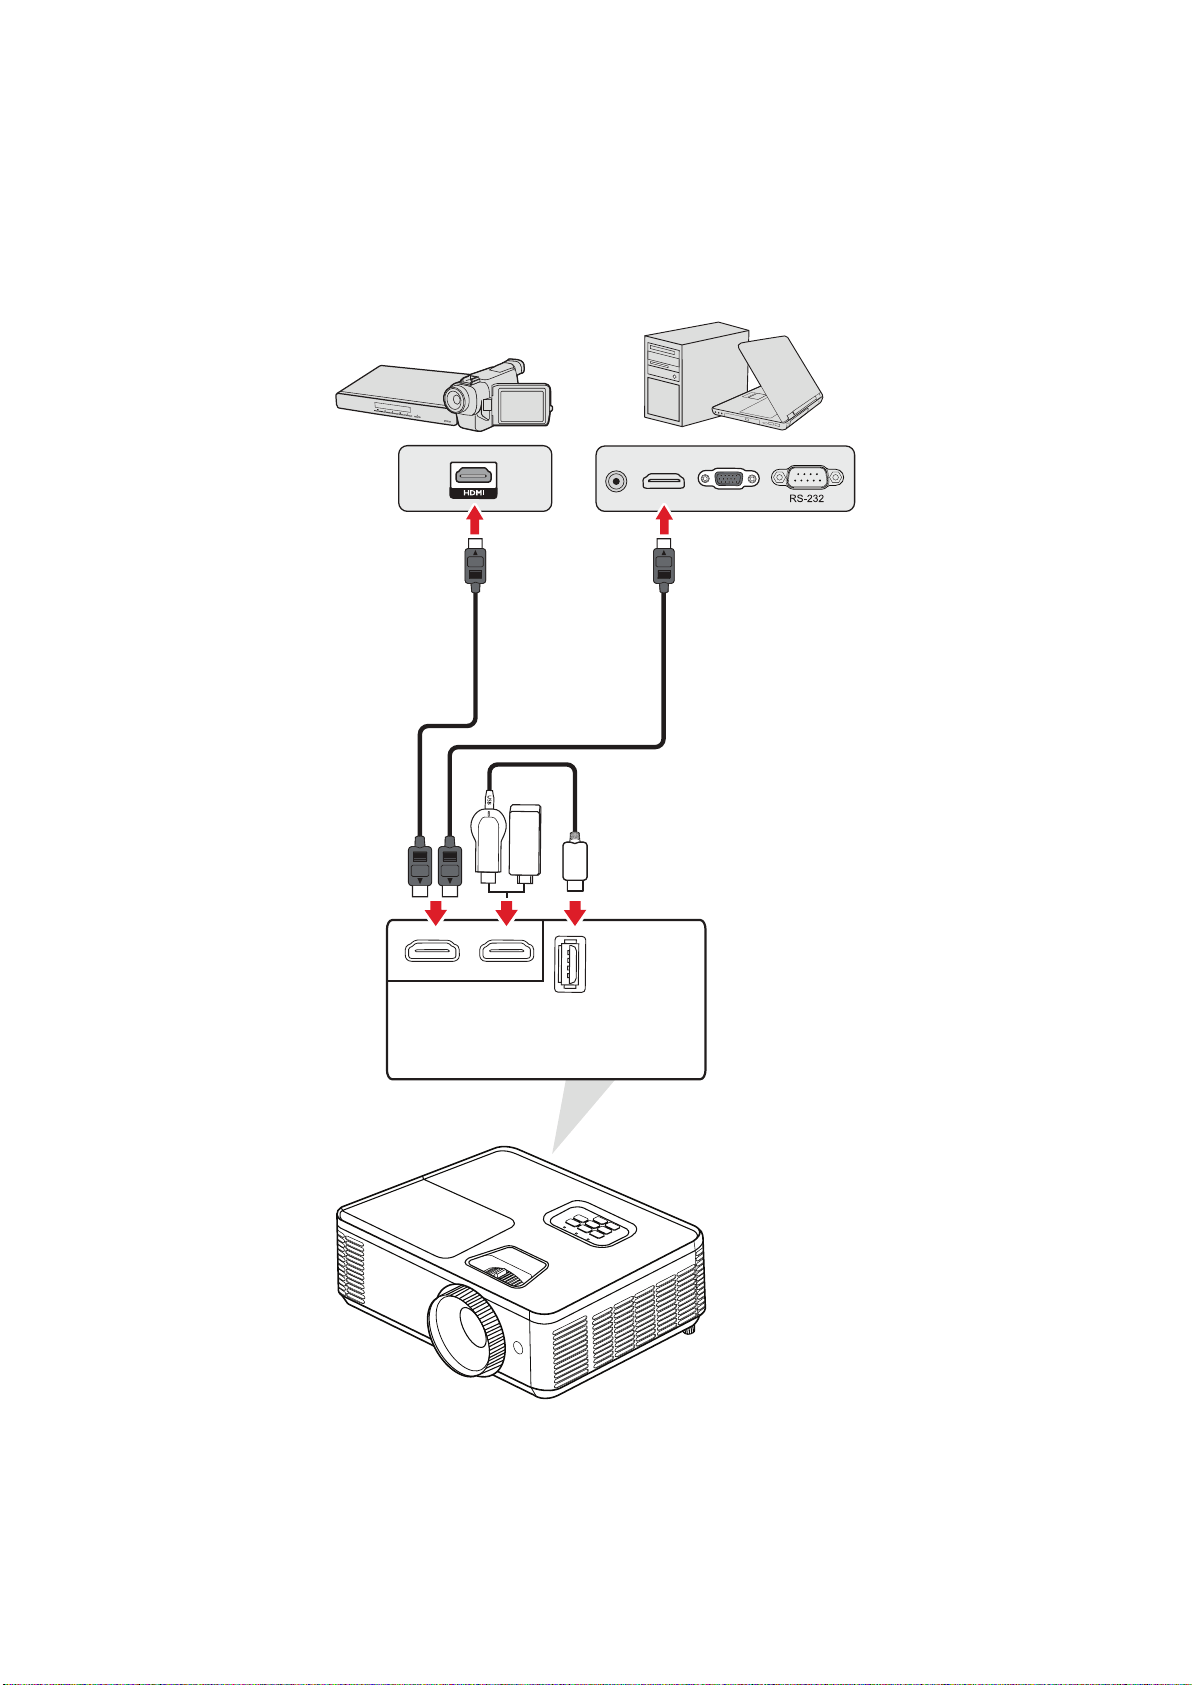
Connect one end of an HDMI cable to the HDMI port of your video device. Then
connect the other end of the cable to the port of your projector.
iPhone/iPad users will need to use an addional adapter.
USB 5V/1.5A
HDMI 1HDMI 2
31
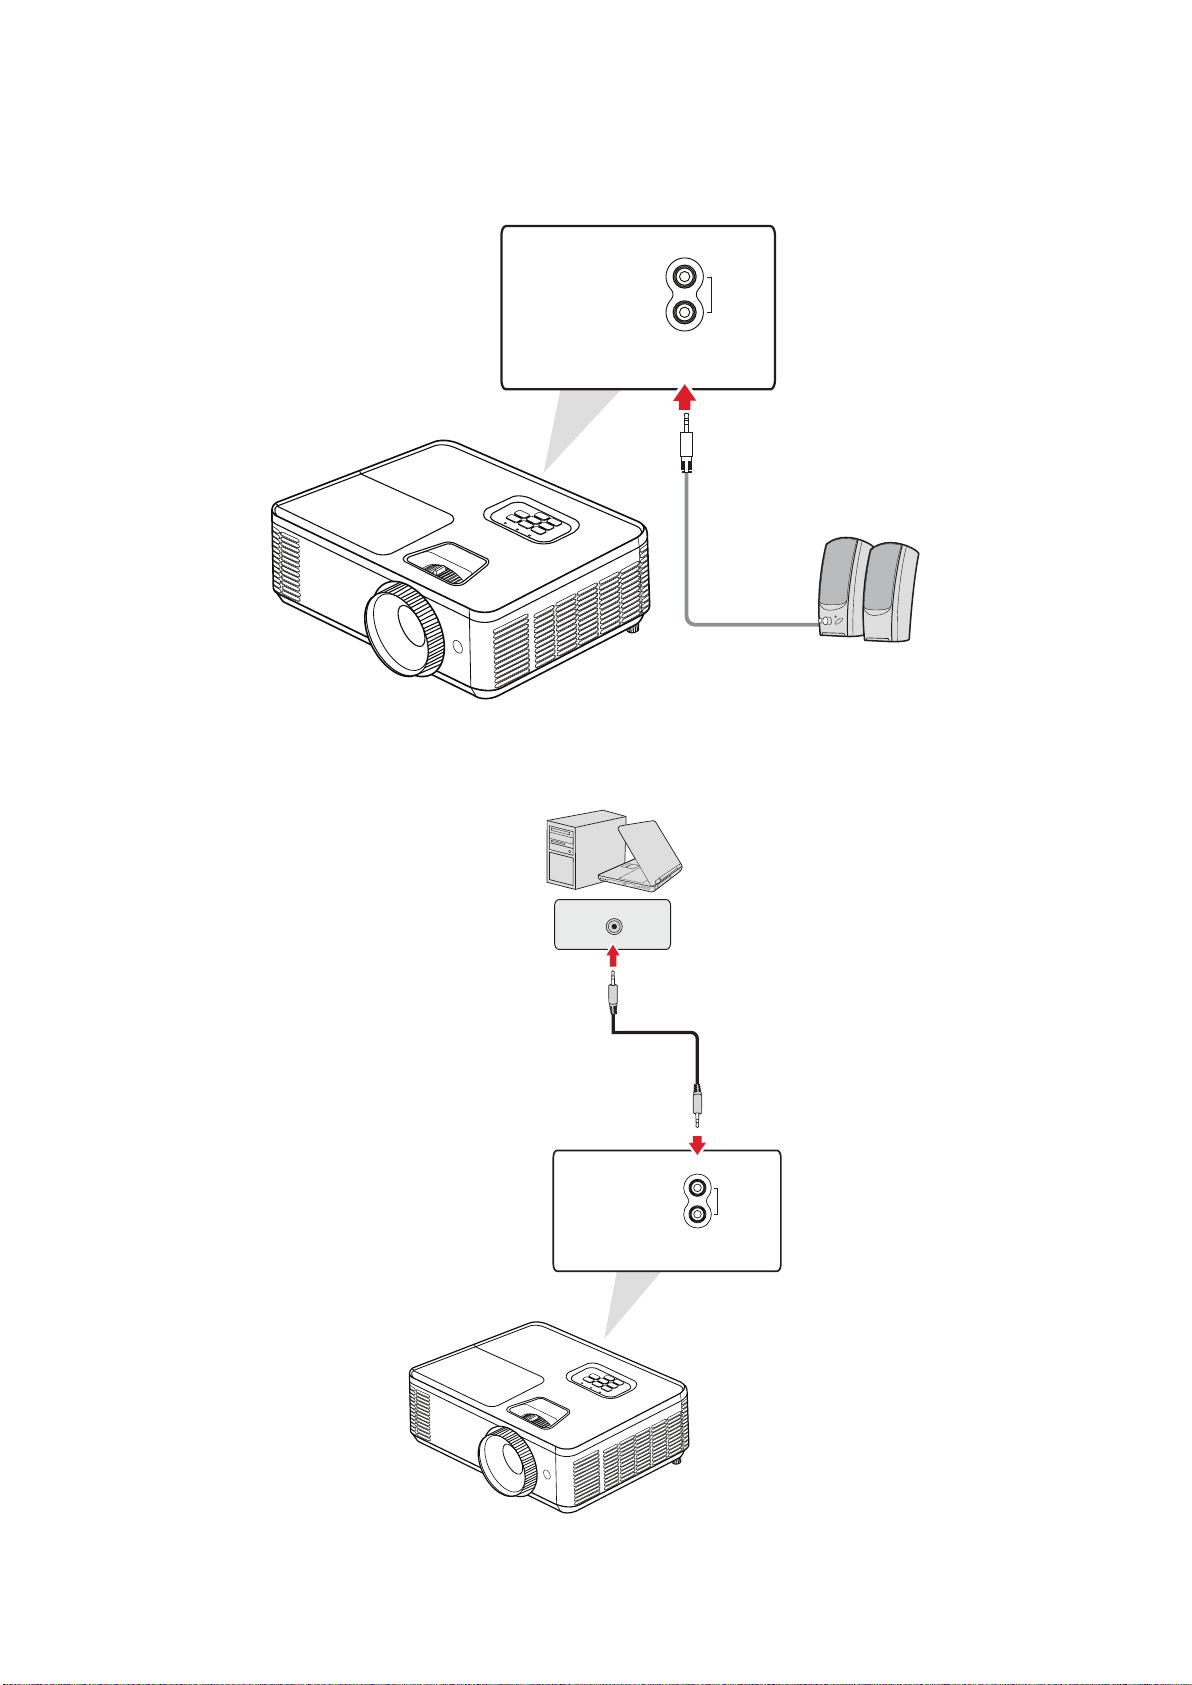
You can connect to various external sound delivery devices via the
port.
IN
OUT
AUDIO
Addionally, you can connect to the port with your device to use the
projector’s audio output.
IN
OUT
AUDIO
32
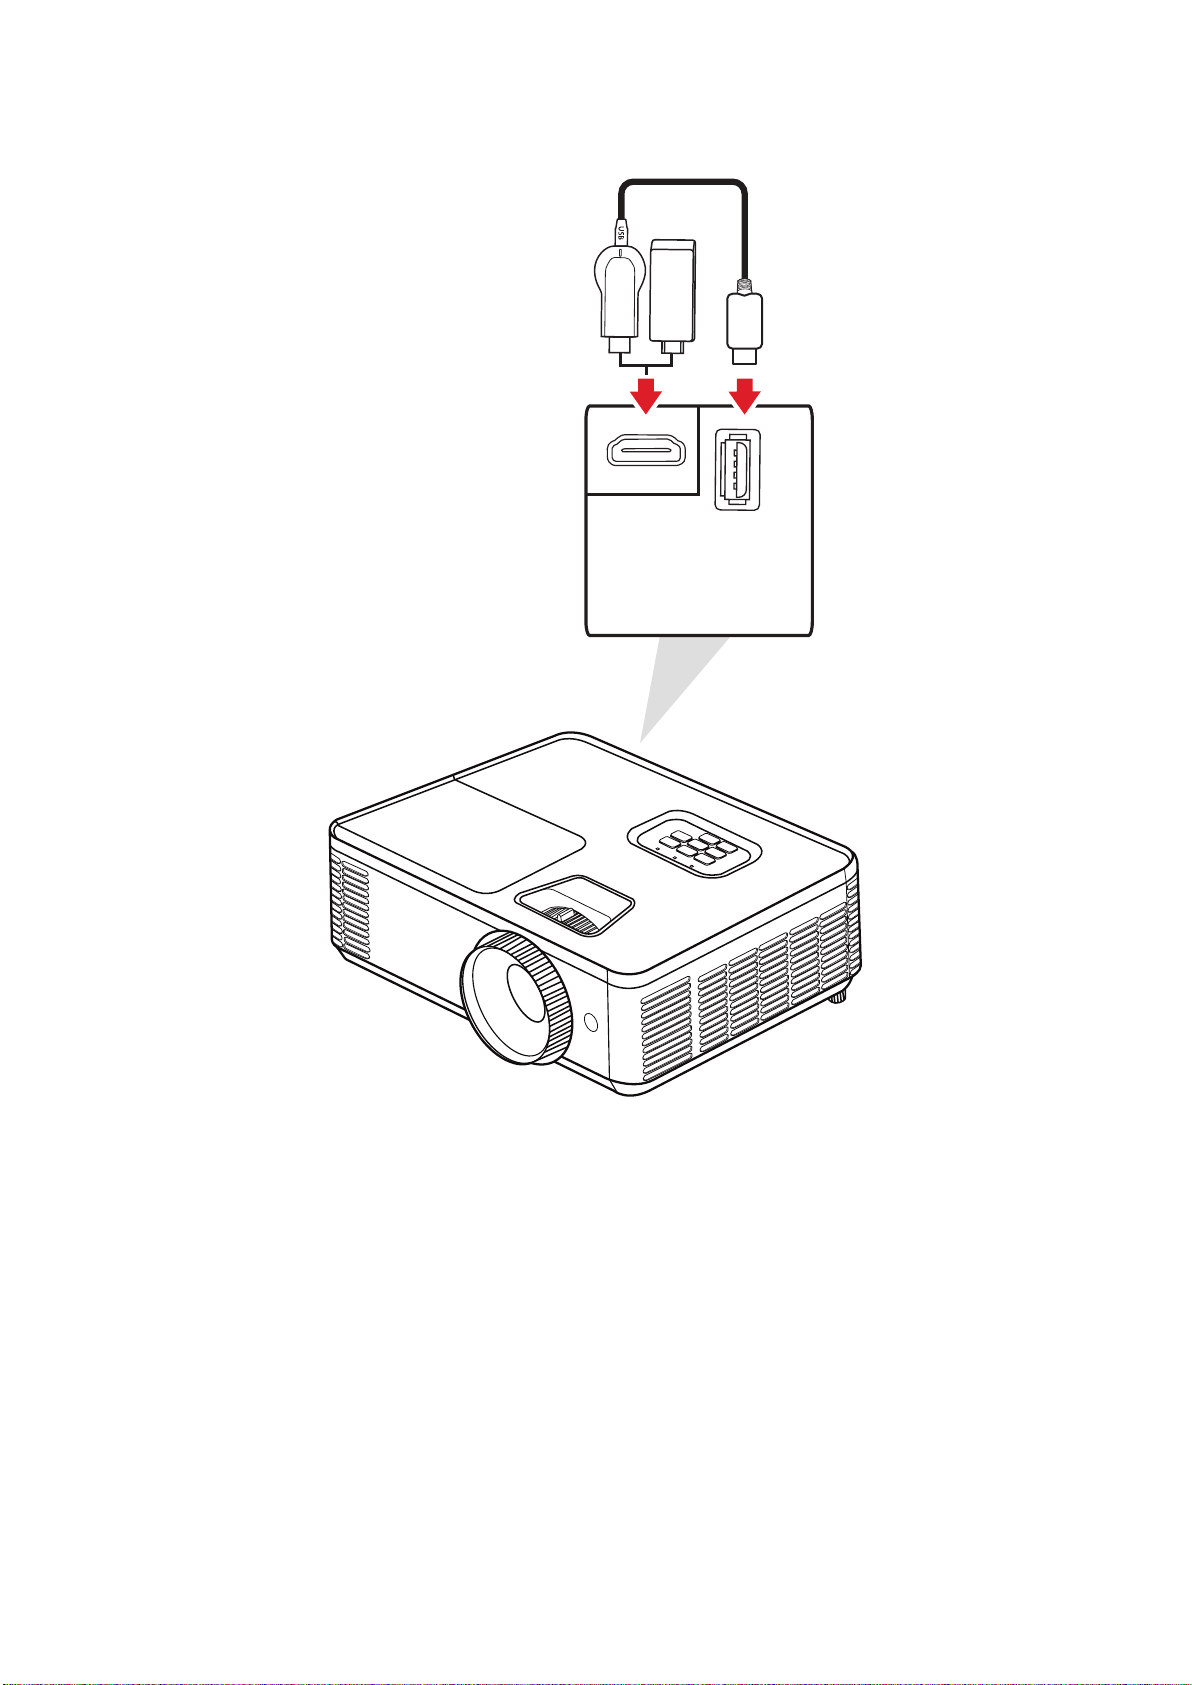
The USB port is for: Service and HDMI devices.
USB 5V/1.5A
HDMI 2
• PA700S/PA700X/PA700W/PS502X/PS502W USB Type A supports 5V/1.5A
power output for HDMI dongle charging.
33
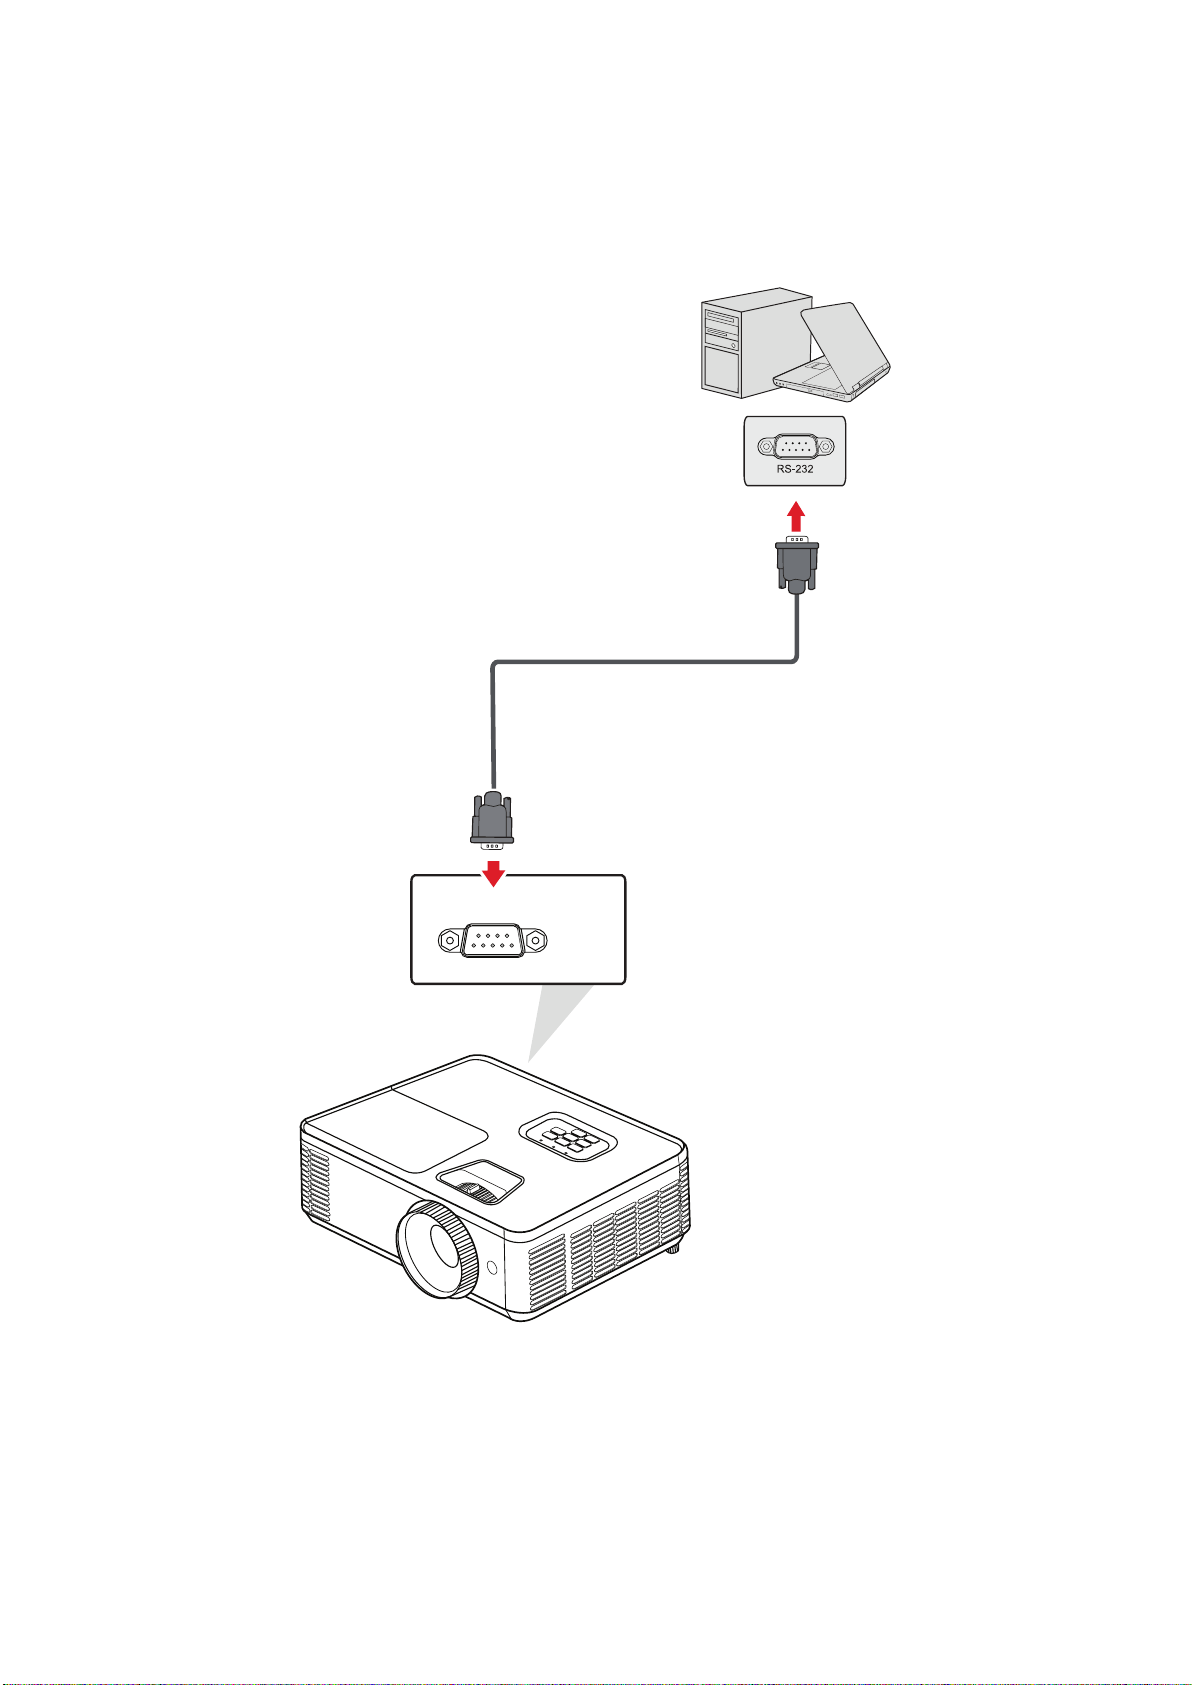
When you use a RS-232 serial port cable to connect the projector to an external
computer certain funcons can be controlled remotely by the PC, including Power
On/O, Volume adjustment, Input select, and more.
RS232
34
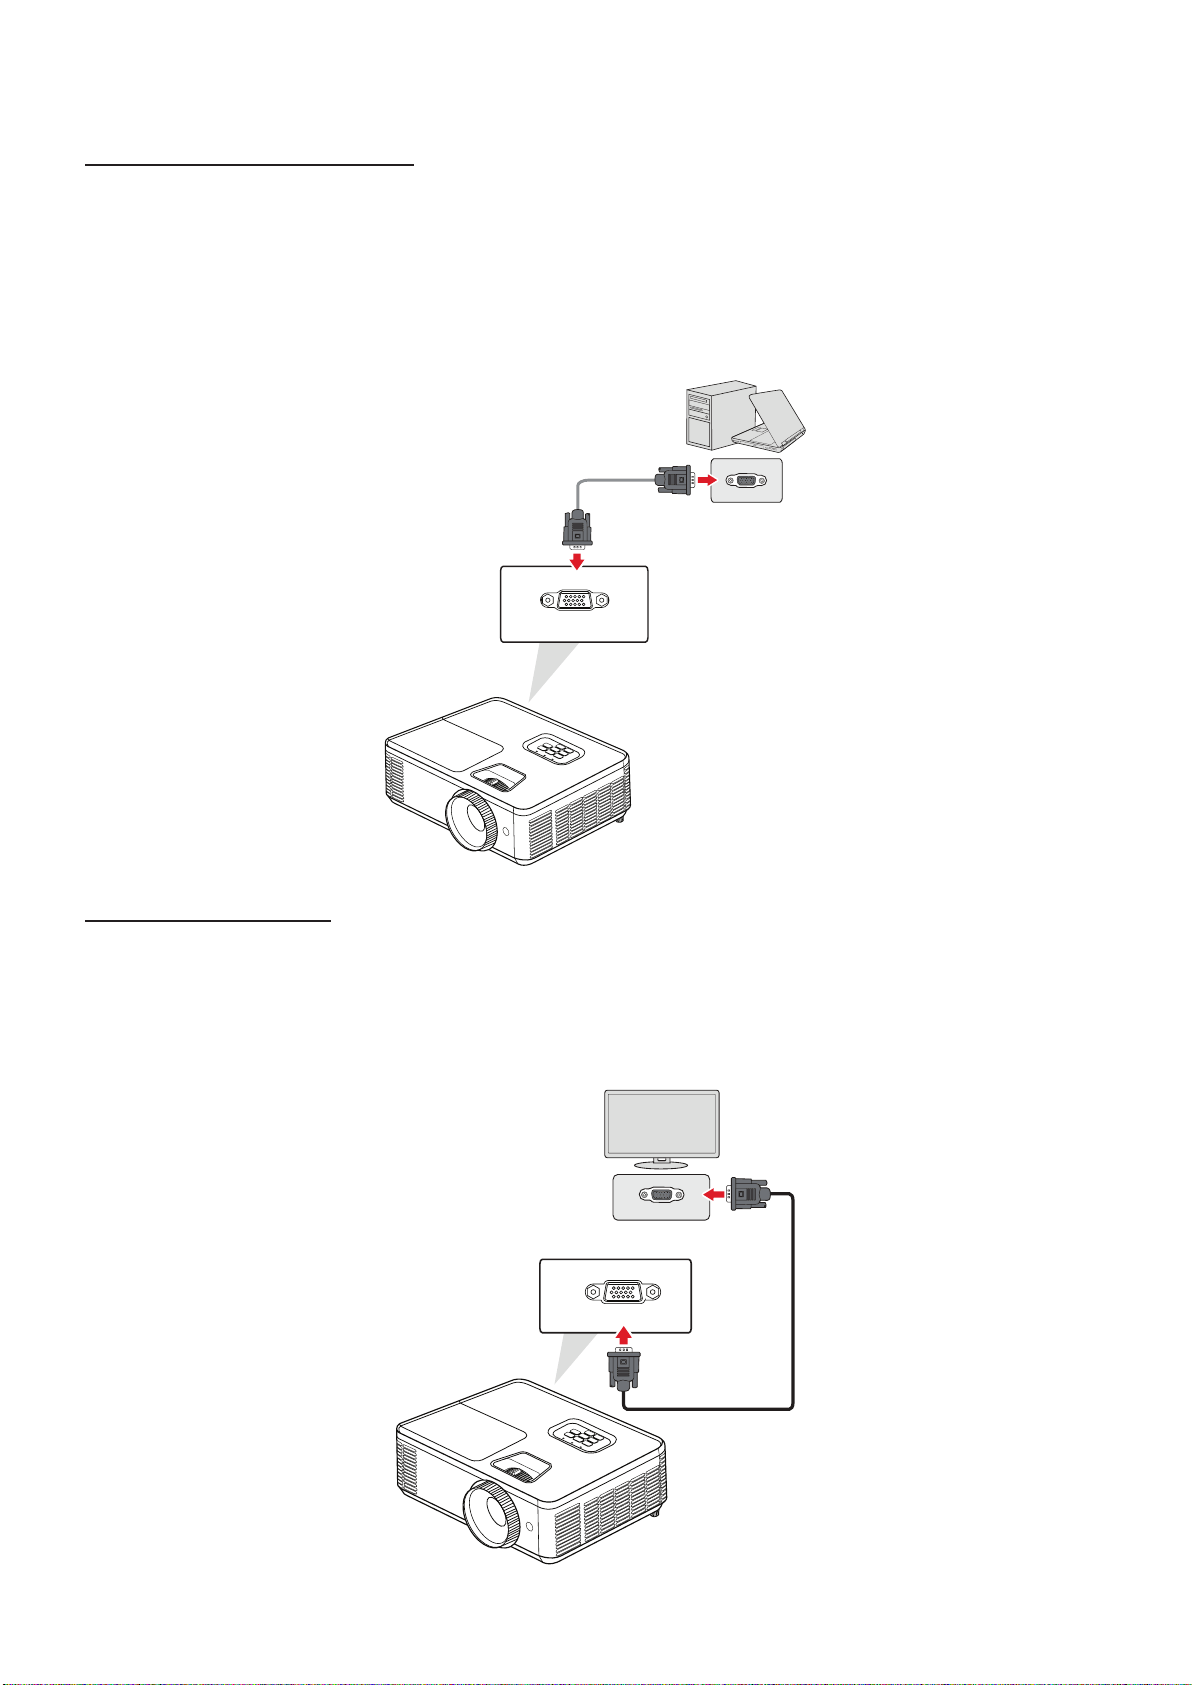
Connecng a PC/Notebook
Connect one end of a VGA cable to the VGA port of the PC/Notebook. Then connect
the other end of the cable to the port of the projector.
To use the remote mouse control funcon, take a USB cable and connect
one end to the USB port of the computer, and the other end to the USB
port on the projector.
COMPUTER
Monitor Connecon
To view the projected content up close on a monitor as well as project it, a monitor
can be connected to the port of the projector. Connect one end of a
VGA cable to the VGA port of the monitor. Then connect the other end of the cable
to the port of the projector.
MONITOR OUT
35
Using the Projector
ENU
EXIT
SO OTUAE
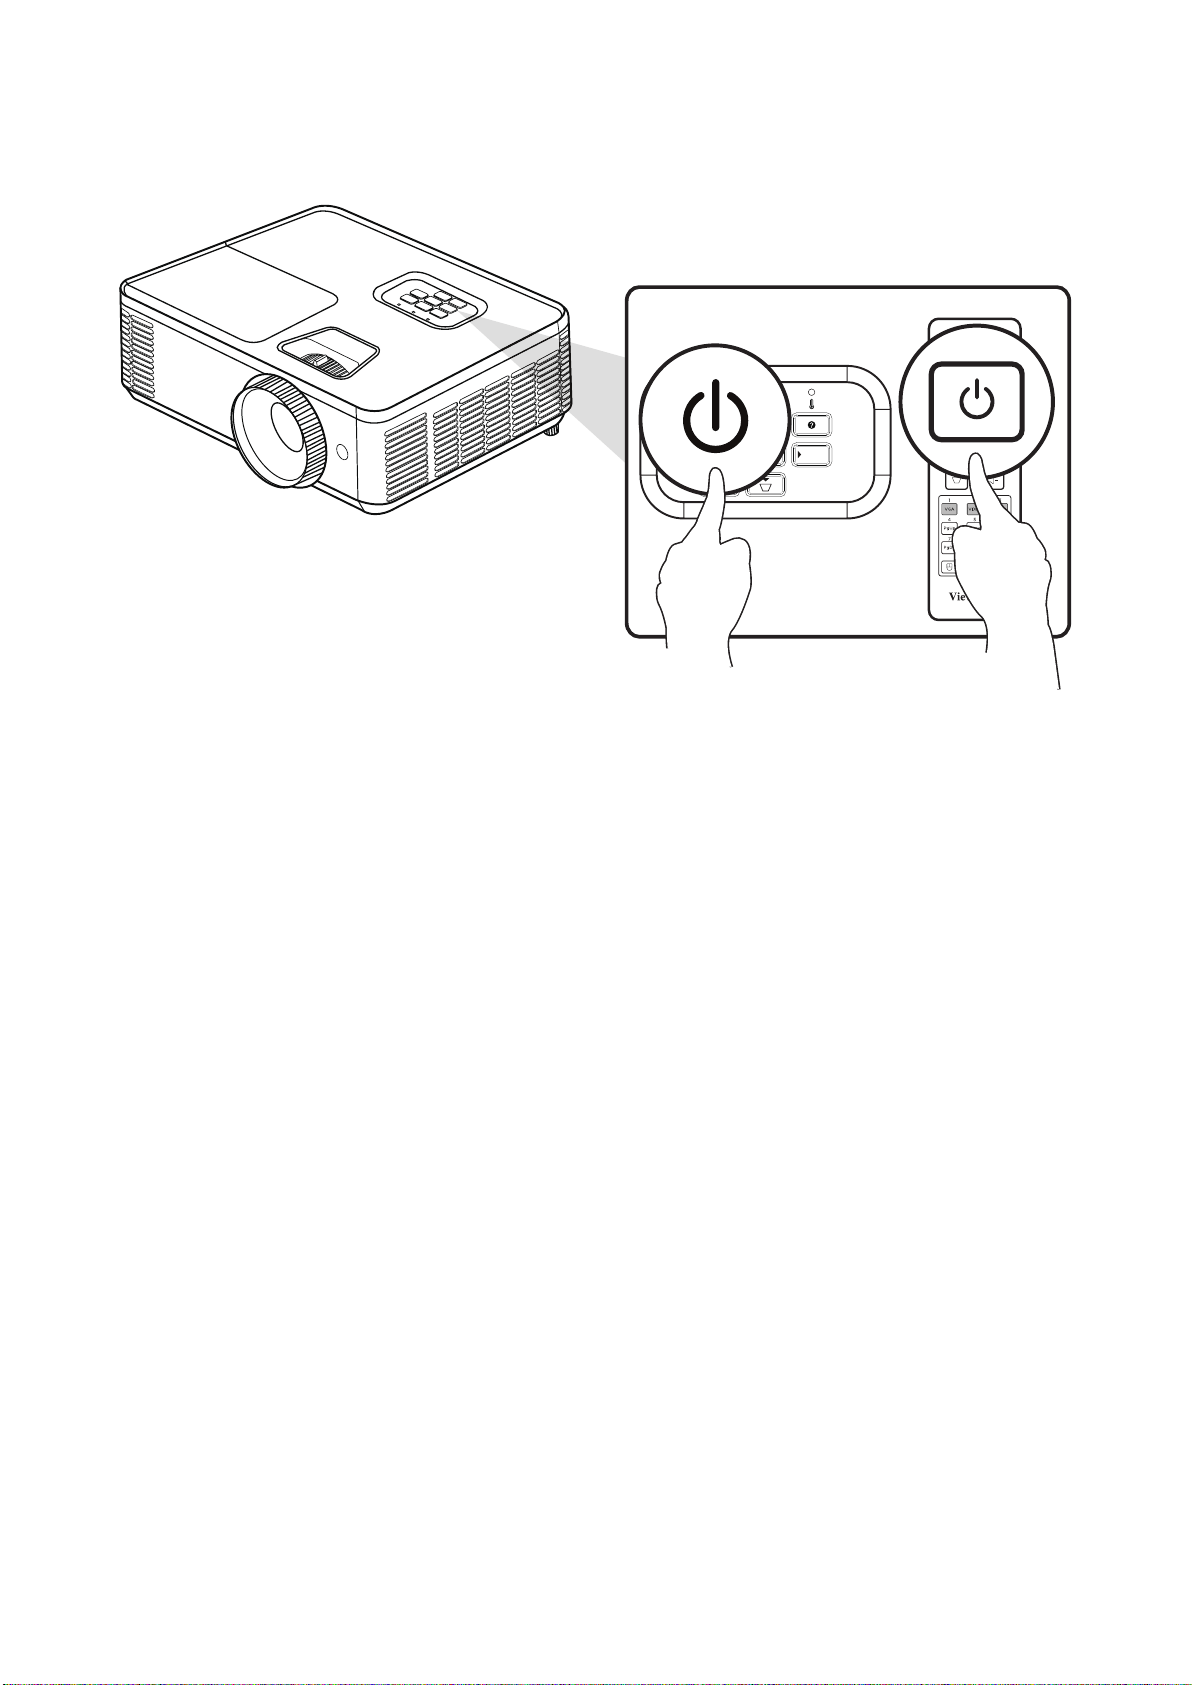
1. Ensure the projector’s power cord is properly connected to a power outlet.
2. Press the Power buon on the projector or remote control to turn on the
projector.
• The Power Indicator Light will be ashing blue during startup.
• The projector cannot be turned o within one minute aer starng.
36
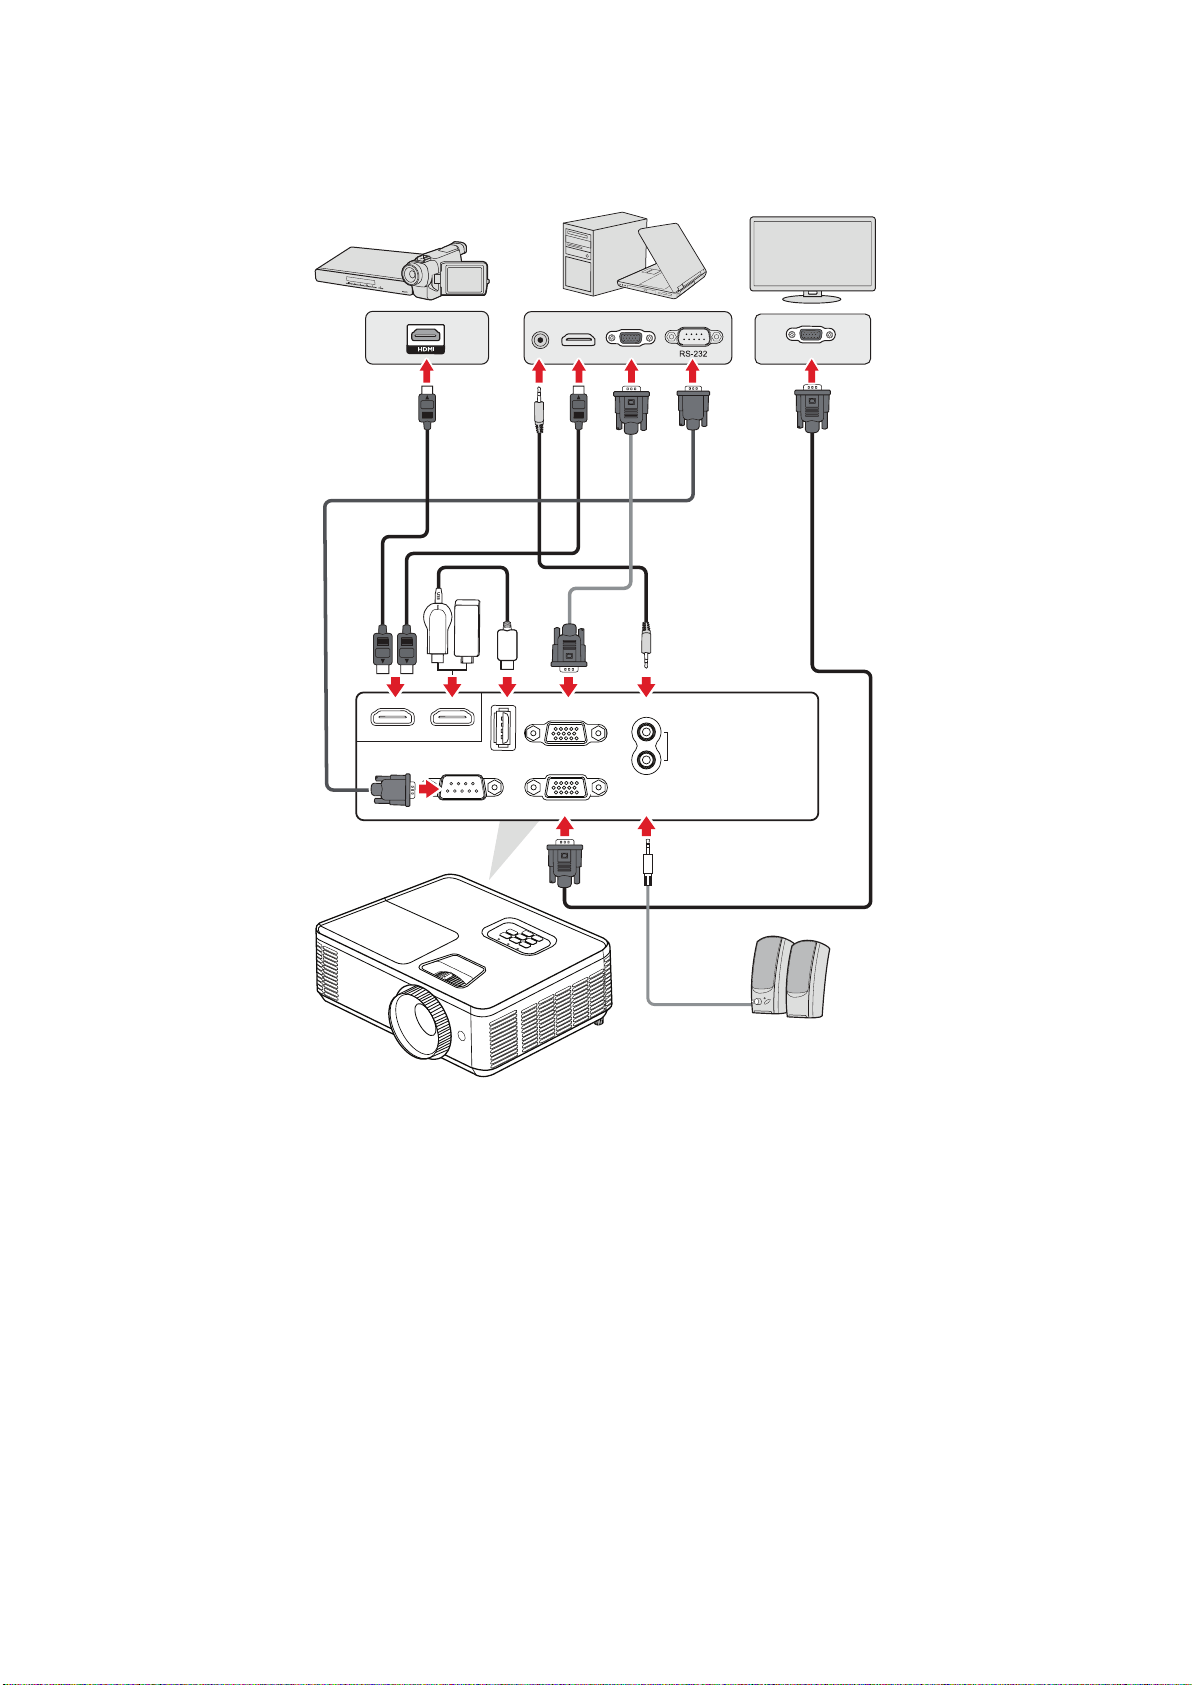
The projector can be connected to mulple devices at the same me. However, it
can only display one full screen at a me.
IN
OUT
AUDIO
RS232
MONITOR OUT
COMPUTER
USB 5V/1.5A
HDMI 1HDMI 2
(SERVICE)
The projector will automacally search for input sources. If mulple sources are
connected, press the buon on the projector or remote control to select the
desired input.
Ensure the connected sources are also turned on.

37
If no input source is detected, the below “Help Menu” will be displayed.
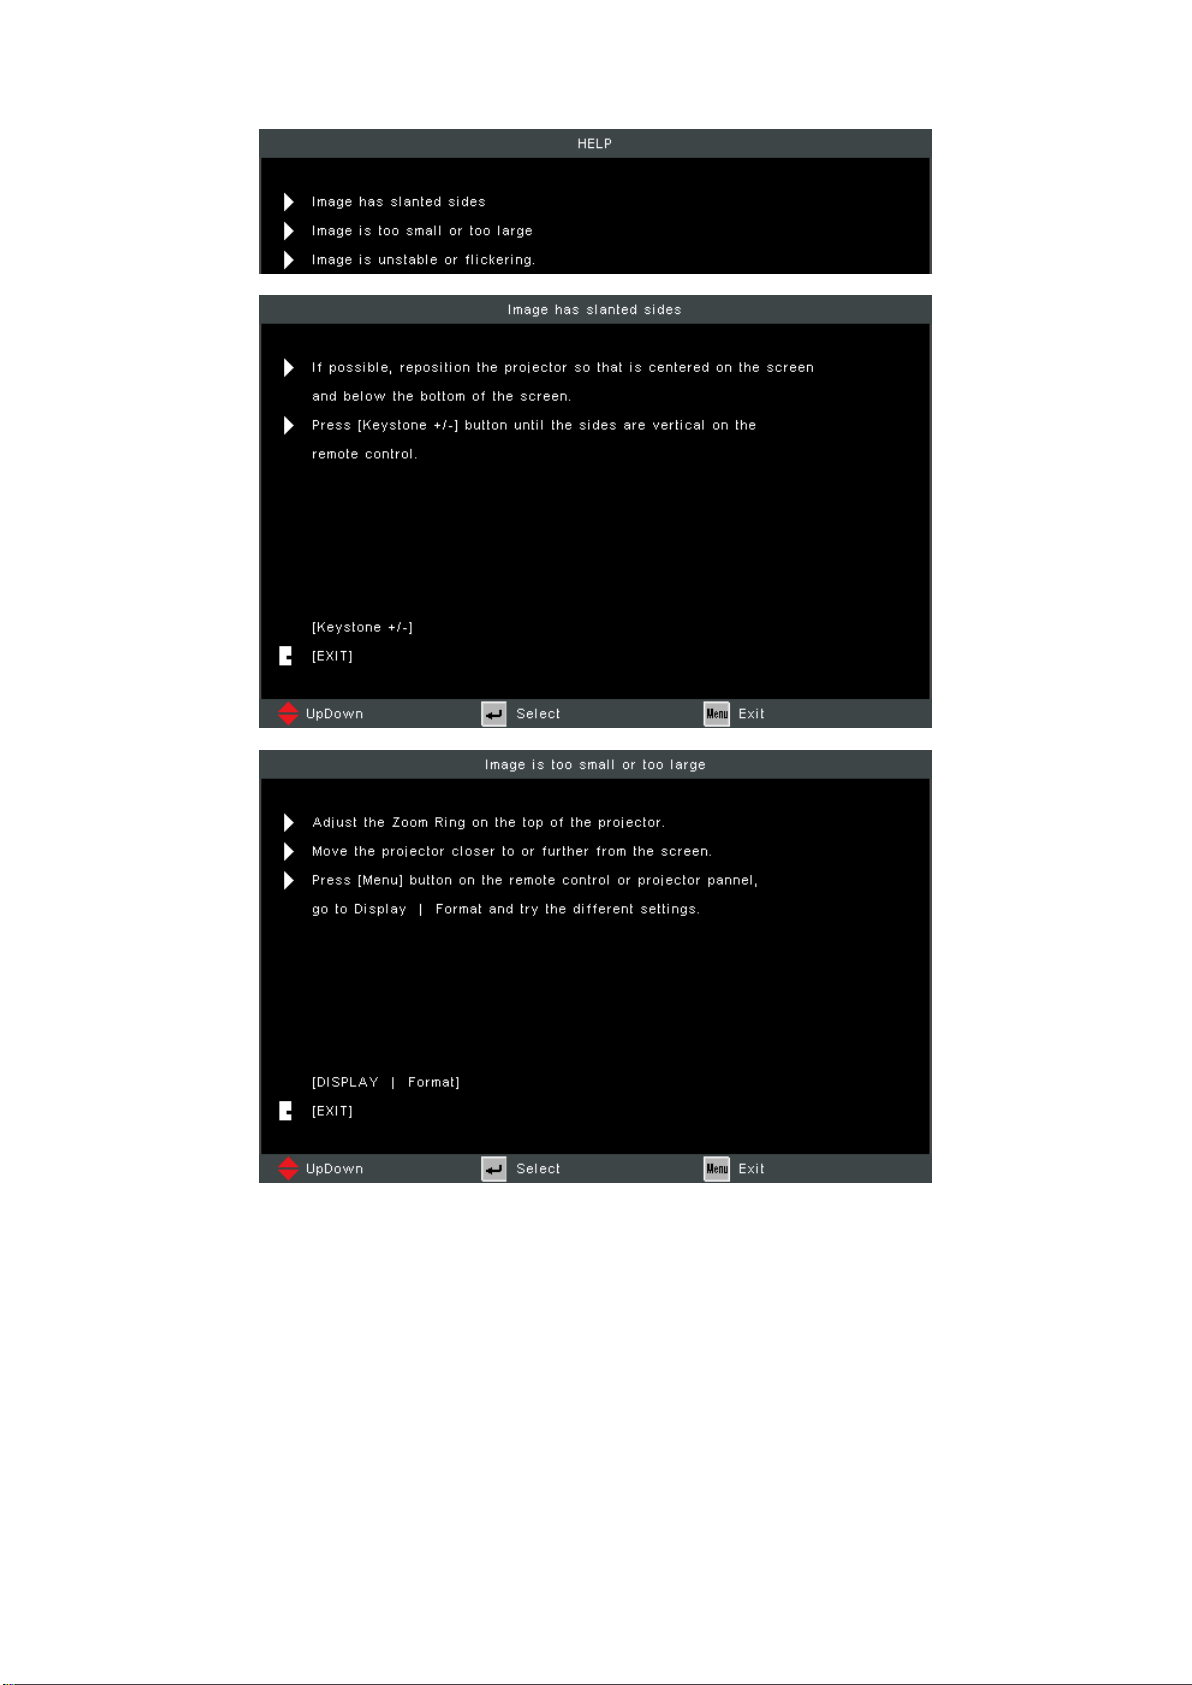
38
If an input source is detected, the below “Help Menu” will be displayed.
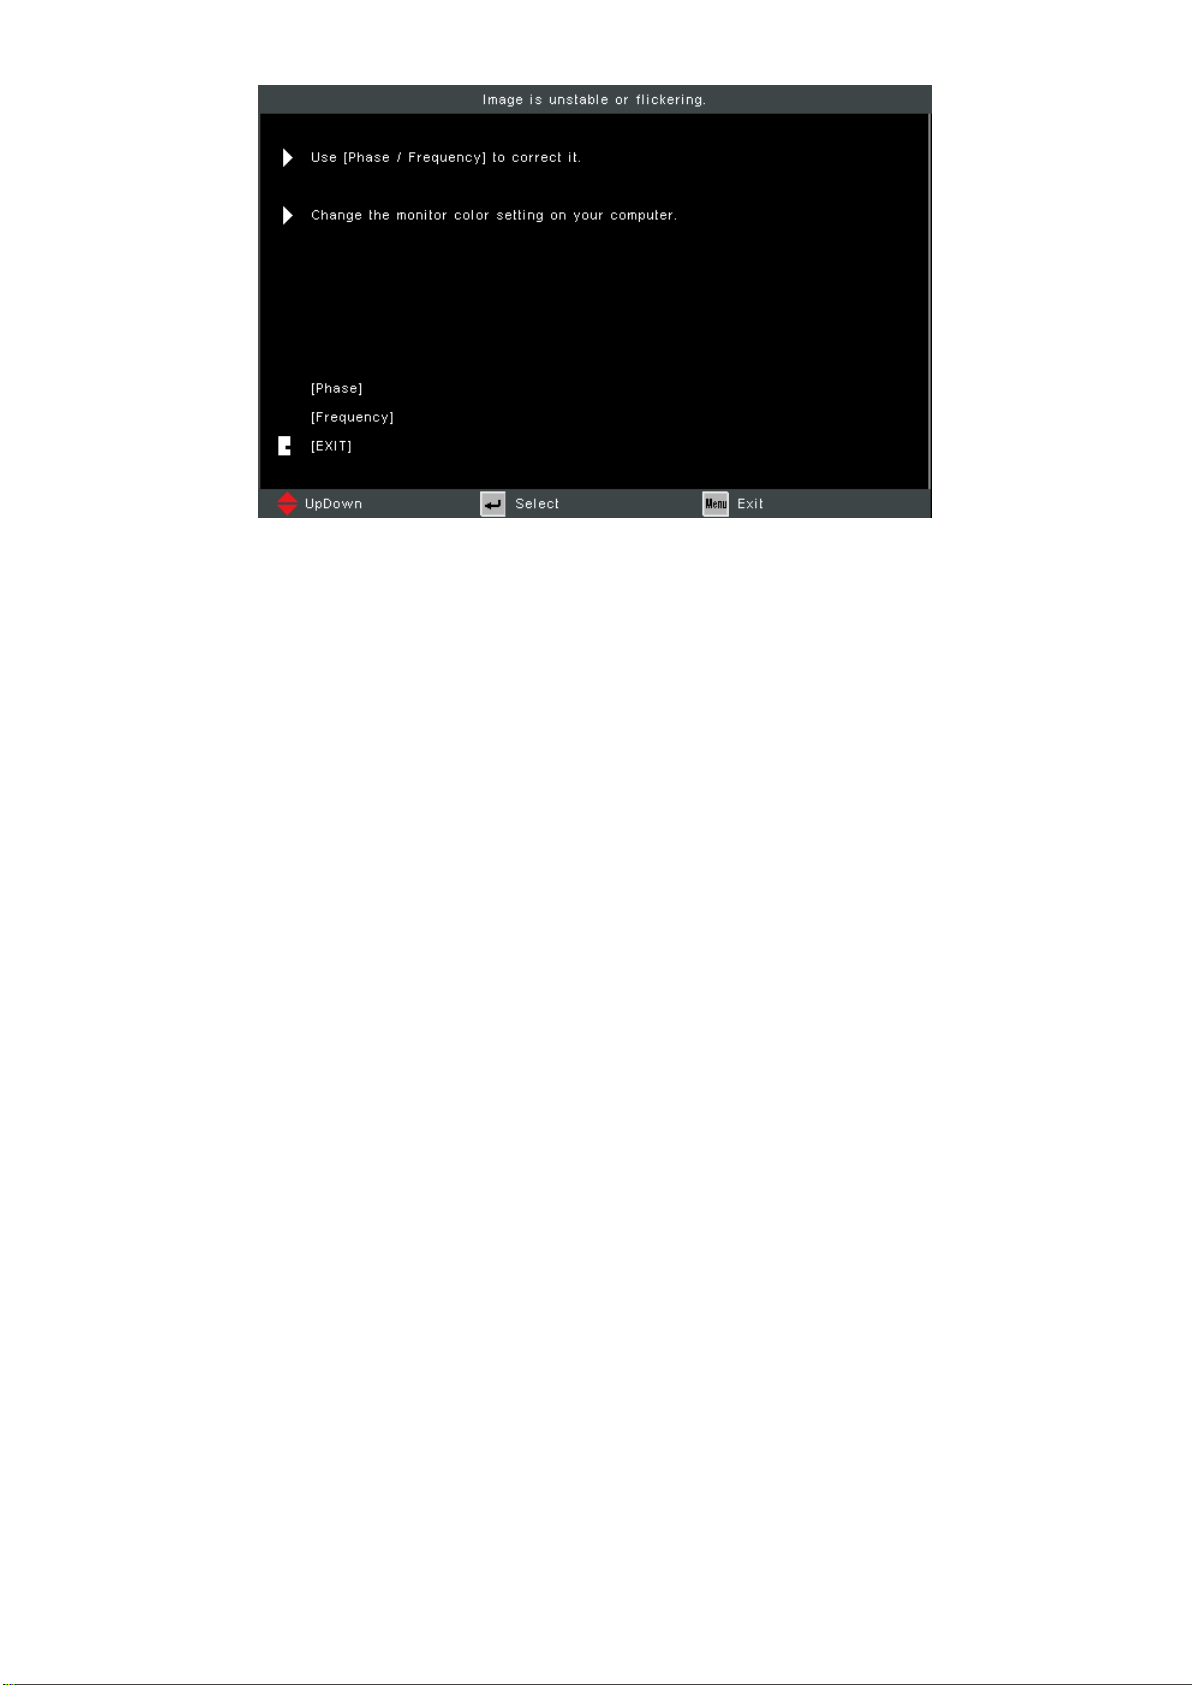
39

40
The projector is equipped with two (2) adjustment feet. Adjusng the feet will
change the projector’s height and the vercal projecon angle.
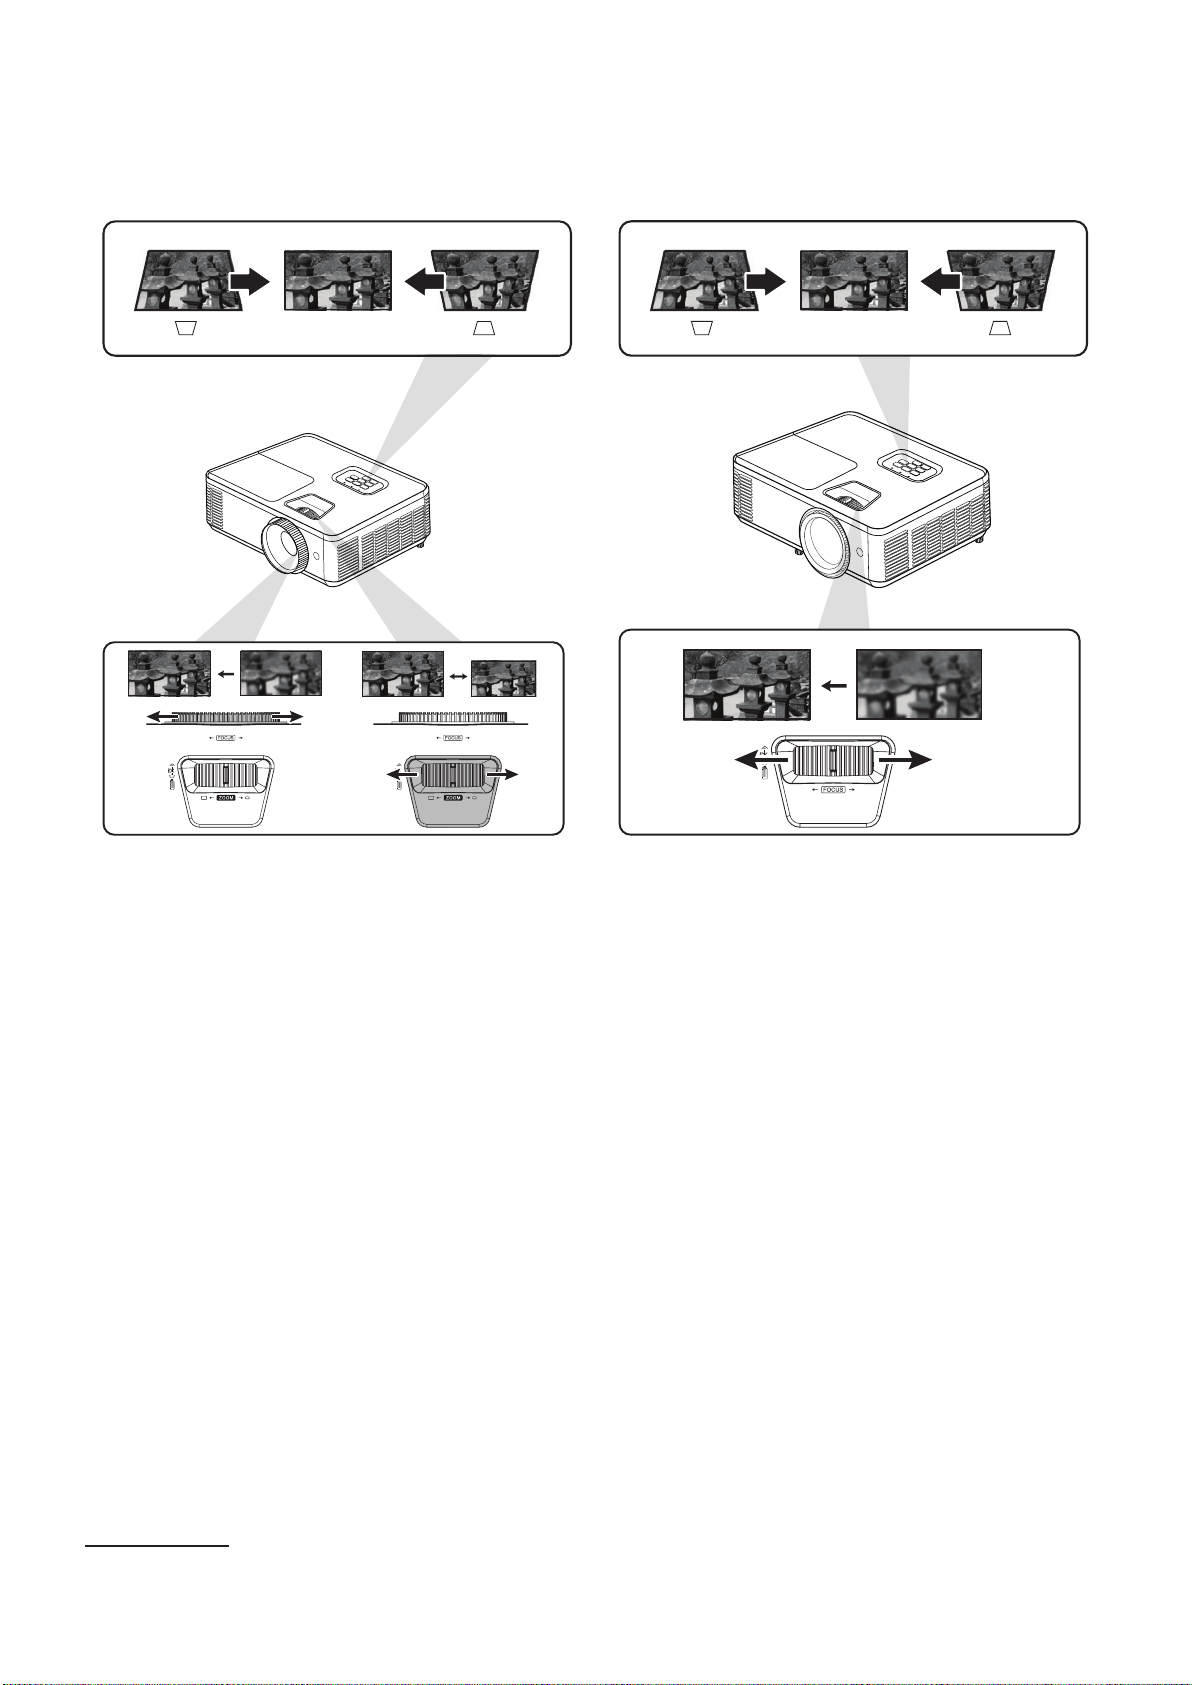
41
You can improve and adjust the clarity and posion of the image by adjusng the
, , or
1
.
PS502 SeriesPA700 Series
¹ PA700 series only

42
1. Press the Power buon on the projector or remote control and a “power o
message” will appear.
The projector cannot be turned o within one minute aer starng.
2. Press the Power buon again to conrm and shut down the projector.
The cooling fans will connue to operate for about 10 seconds for the
cooling cycle and the Power Indicator Light will ash blue.
3. The Power Indicator Light will turn solid red and enter standby mode.
If you wish to turn the projector back on, you must wait unl the cooling
cycle has nished and the projector has entered standby mode. When
the projector is in standby mode, simply press the Power buon again to
turn on the projector.
43
The projector has mullingual on-screen display menus that allow you to make
image adjustments and change a variety of sengs.
Adjust the Display Mode, Brightness, Contrast, and other
image related settings.
Adjust the aspect ratio, Zoom, Keystone, and 3D settings.
Adjust Language, Projection, Screen Type, Security, Audio
Settings, and HDMI CEC settings.
Select the Input Source and adjust several projector settings.

44
The projector has mullingual on-screen display menus that allow for image and
sengs adjustment.
To open the On-Screen Display (OSD) Menu, press the buon on the
projector or the remote control.
When the OSD is displayed, use the buons (pq) to select any item
in the main menu. While making a selecon on a parcular page, press the
buon on the projector or the remote control to enter a sub-menu.
Use the buons (tu) to select the desired item in the sub-menu
and then press to view further sengs. Adjust the sengs by using the
buons (tu).
Select the next item to be adjusted in the sub-menu and adjust as described
above.
Press to conrm, and the screen will return to the previous menu.
To exit, press the buon again. The OSD menu will close and the
projector will automacally save the new sengs.
45
Display Mode
Standard
Bright
Movie
Presentaon
Blackboard
User
3D
Brightness (-/+, -50~50)
Contrast (-/+, -50~50)
Sharpness (-/+, 1~15)
Color (-/+, -50~50)
Tint (-/+, -50~50)
Advanced
Gamma
Film
Video
Graphics
Standard
BrilliantColor™ (-/+, 1~10)
Color Temp
Warm
Medium
Cold
Color Sengs
Red/Green/Blue/Cyan/
Magenta/Yellow/White
Color Space
¹
Auto
RGB (0~255)
RGB (16~235)
YUV
Signal
Automac
Phase
Frequency
H. Posion
V. Posion
¹ For HDMI signal, select Auto, RGB (0~255), RGB (16~235), and YUV color space. For VGA signal, select Auto, RGB,
and YUV color space.
46
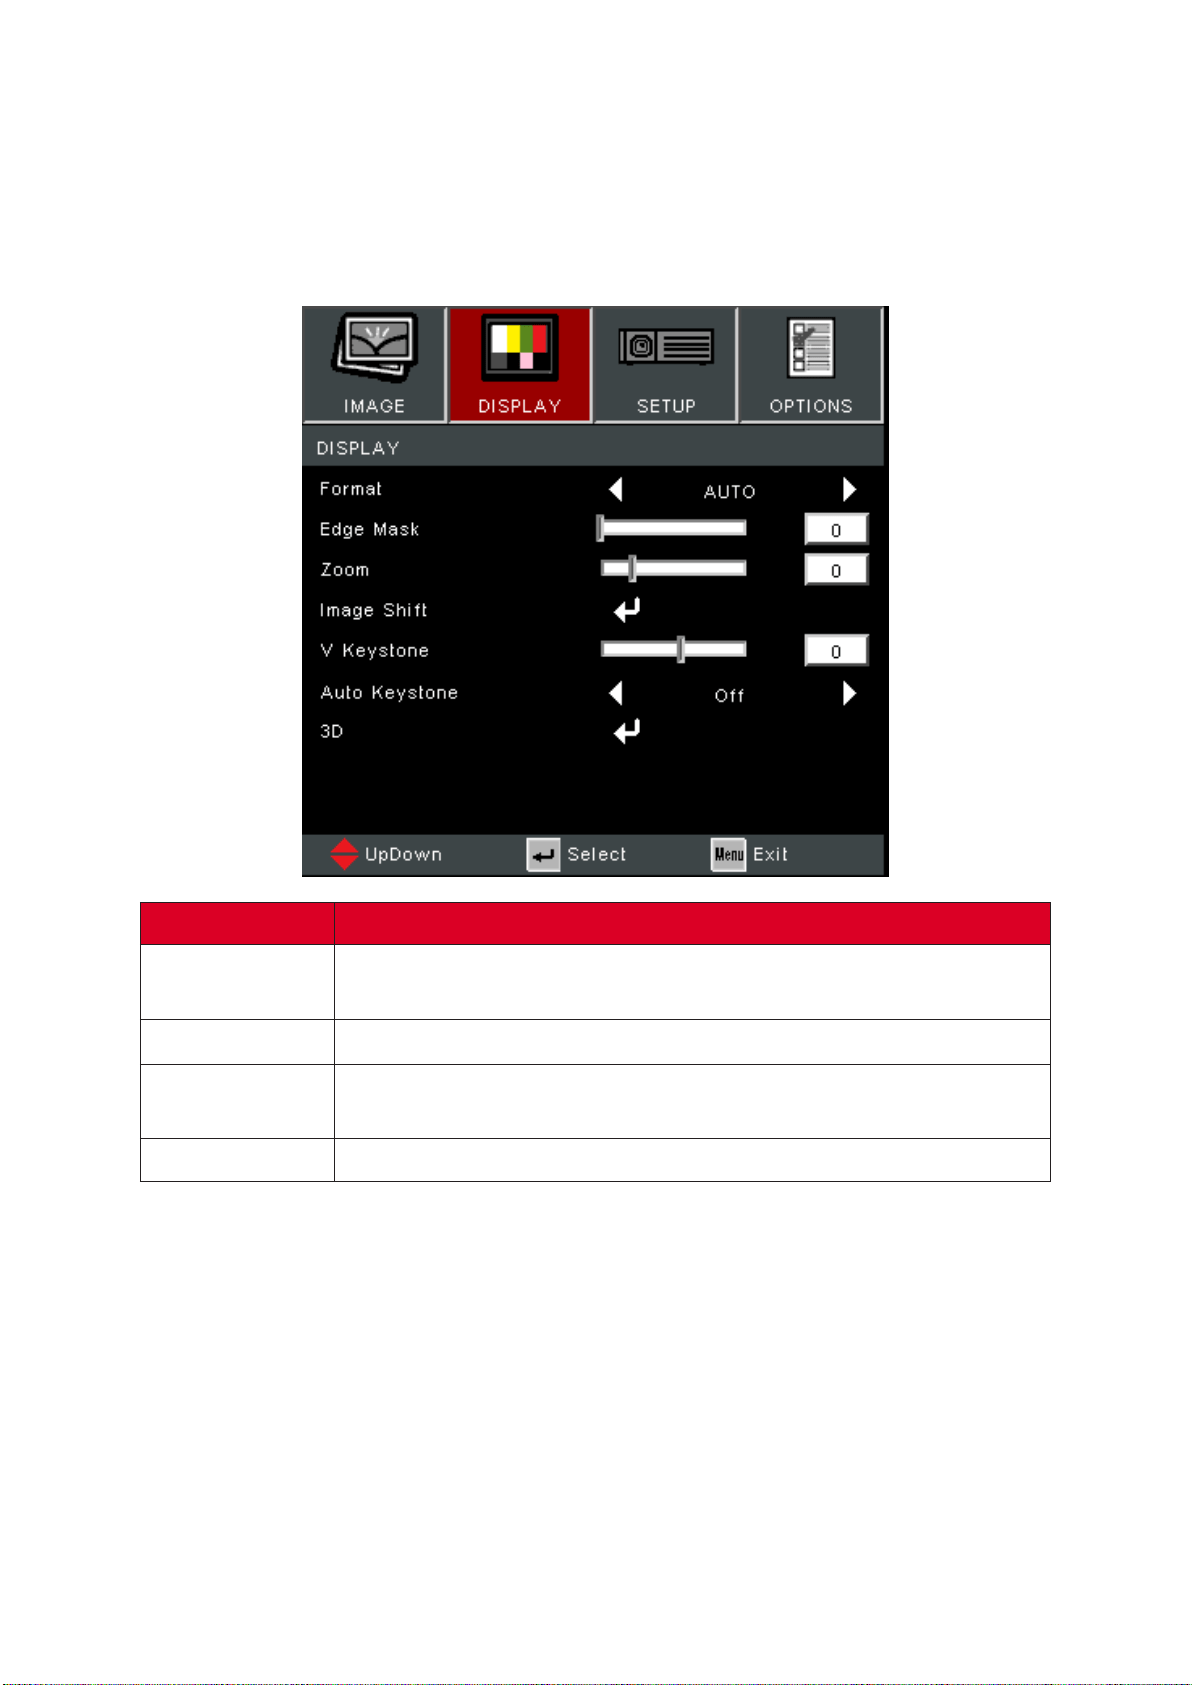
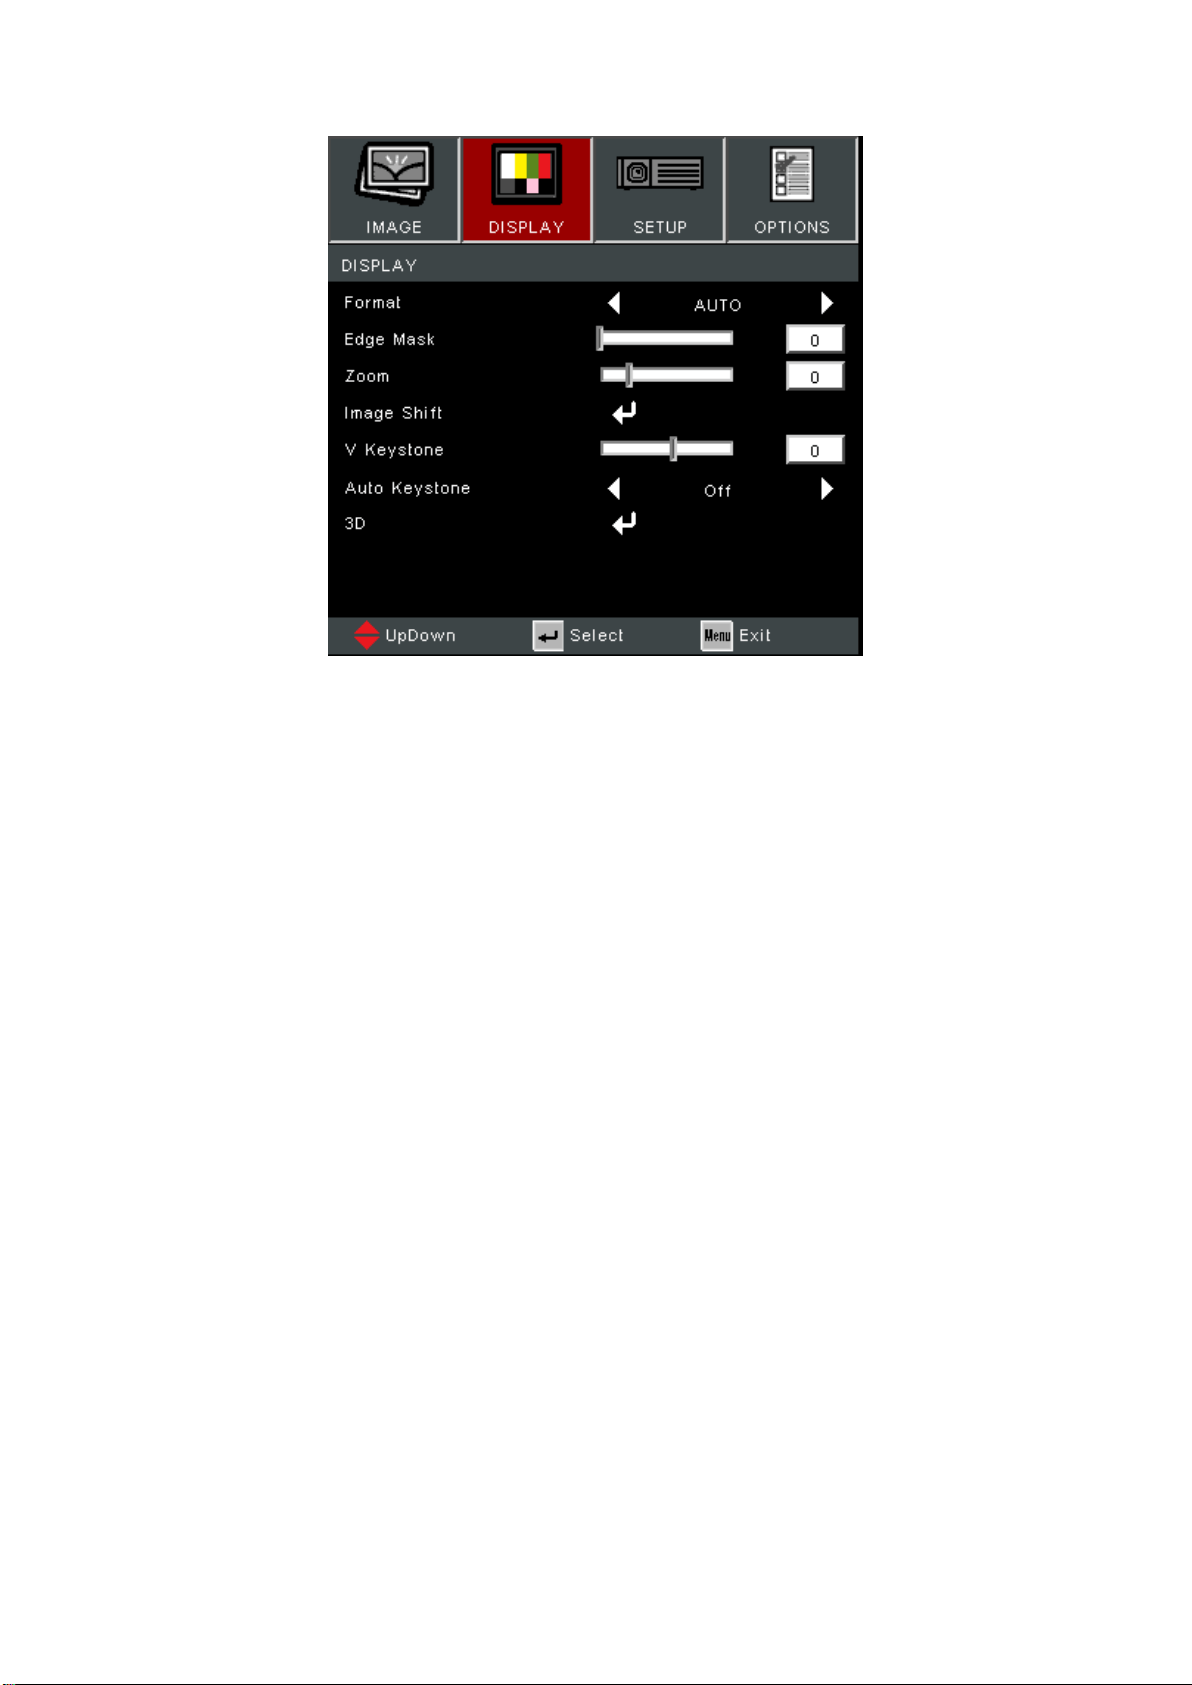
Format²
4:3
16:9 (or 16:10)
Nave
Auto
LBX
Edge Mask (-/+, 0~10)
Zoom (-/+, -5~25)
Image Shi
H (Horizontal) (-/+, -100~100)
V (Vercal) (-/+, -100~100)
V. Keystone
(-/+, -40~40)
³
(-/+, -20~20)
Auto Keystone
On
O
3D
3D Mode
O
DLP-Link
3D - 2D
3D
L
R
3D Format
Auto
Side by Side
Top and Boom
Frame Sequenal
3D Sync Invert
On
O
² For PA700S/PA700X/PS502X: 4:3, 16:9, Nave, Auto. For PA700W/PS502W: 4:3, 16:10, Nave, Auto, LBX
³ For PA700S/PA700X/PA700W
For PS502X/PS502W
47
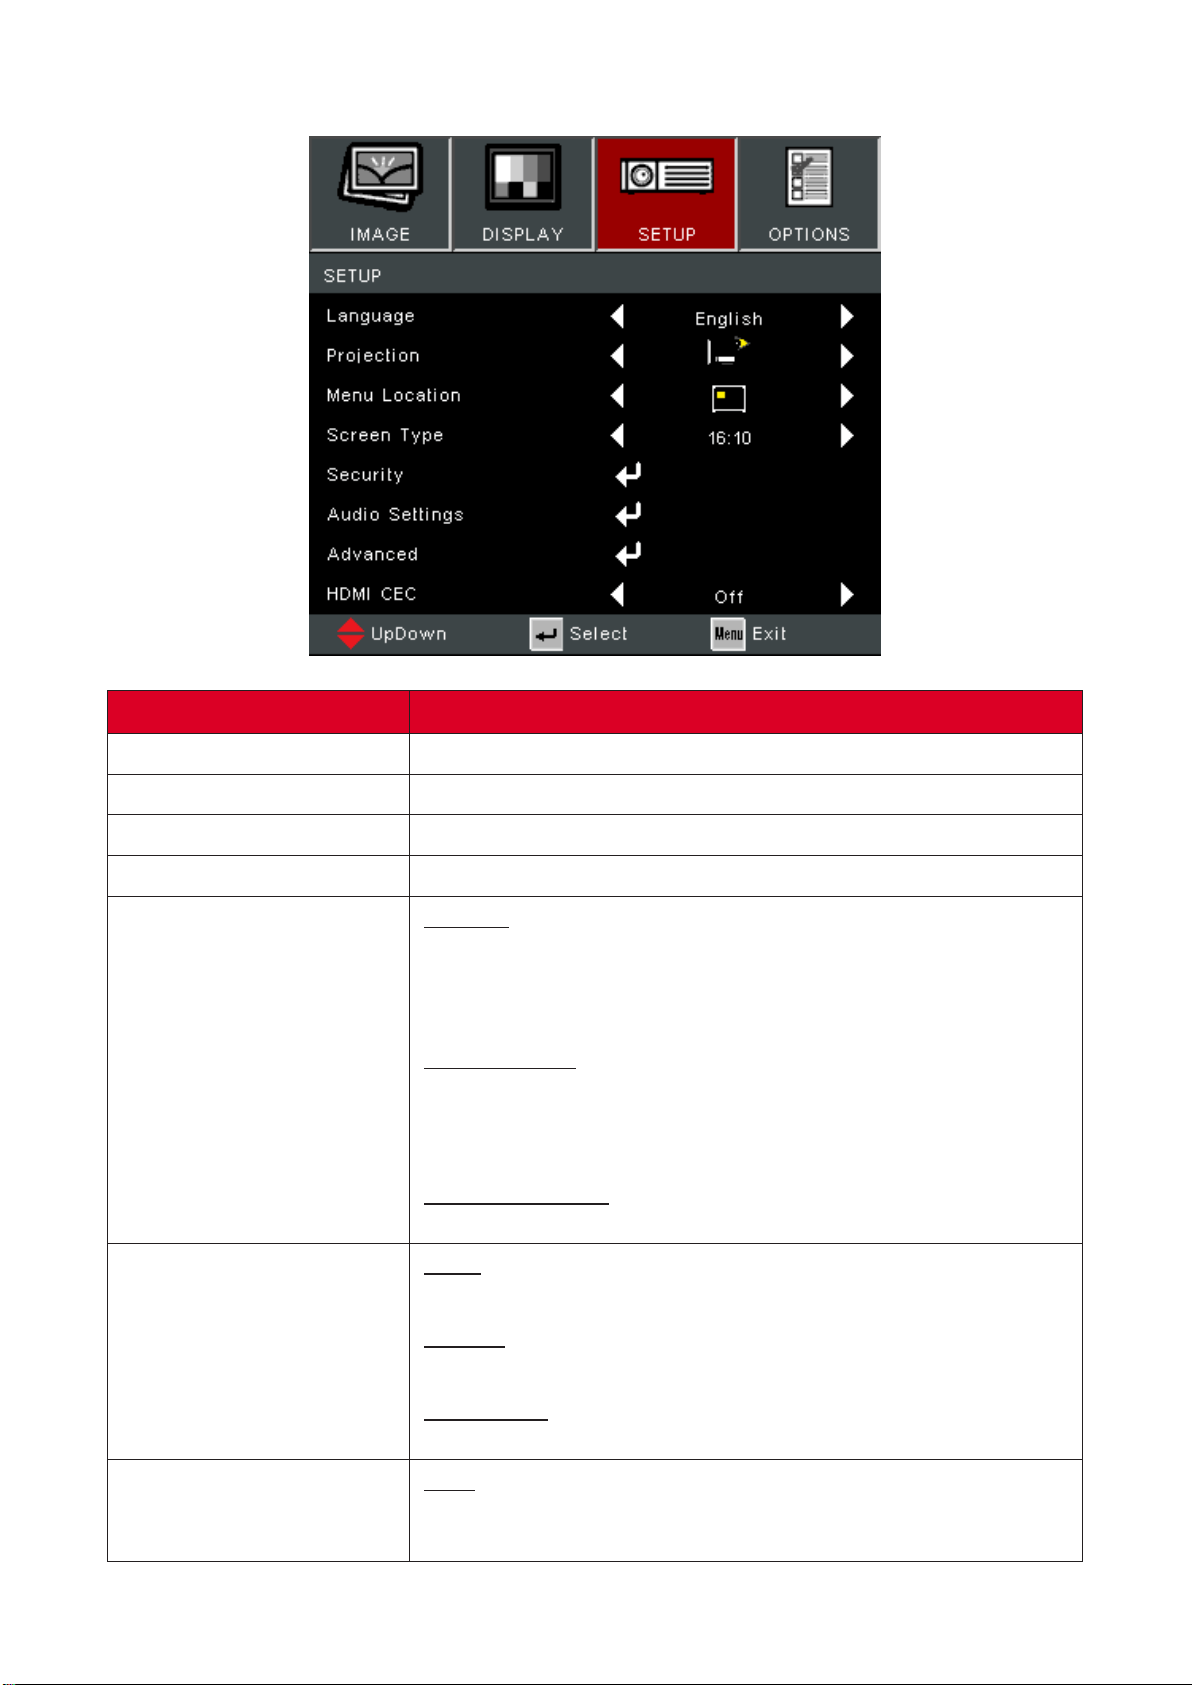
Language
English
Deutsch
Français
Italiano
Español
Português
Polski
Nederlands
Svenska
Suomi
ελληνικά
繁體中文
簡体中文
한국어
Русский
Magyar
Češna
يبرع
ไทย
Türkçe
Tiếng Việt
Indonesia
Projecon
Front Table
Front Ceiling
Rear Table
Rear Ceiling
Menu Locaon
Top-Le
Top-Right
Center
Boom-Le
Boom-Right
Screen Type
16:10
16:9
Screen Type selecon only for PA700W/PS502W
48
Security
On
O
Security Timer
Month
Day
Hour
Change Password
Audio Sengs
Mute
On
O
Volume (-/+, 0~10)
Audio Input
Default
AUDIO
Advanced Logo
Default
Neutral
HDMI CEC
On
O
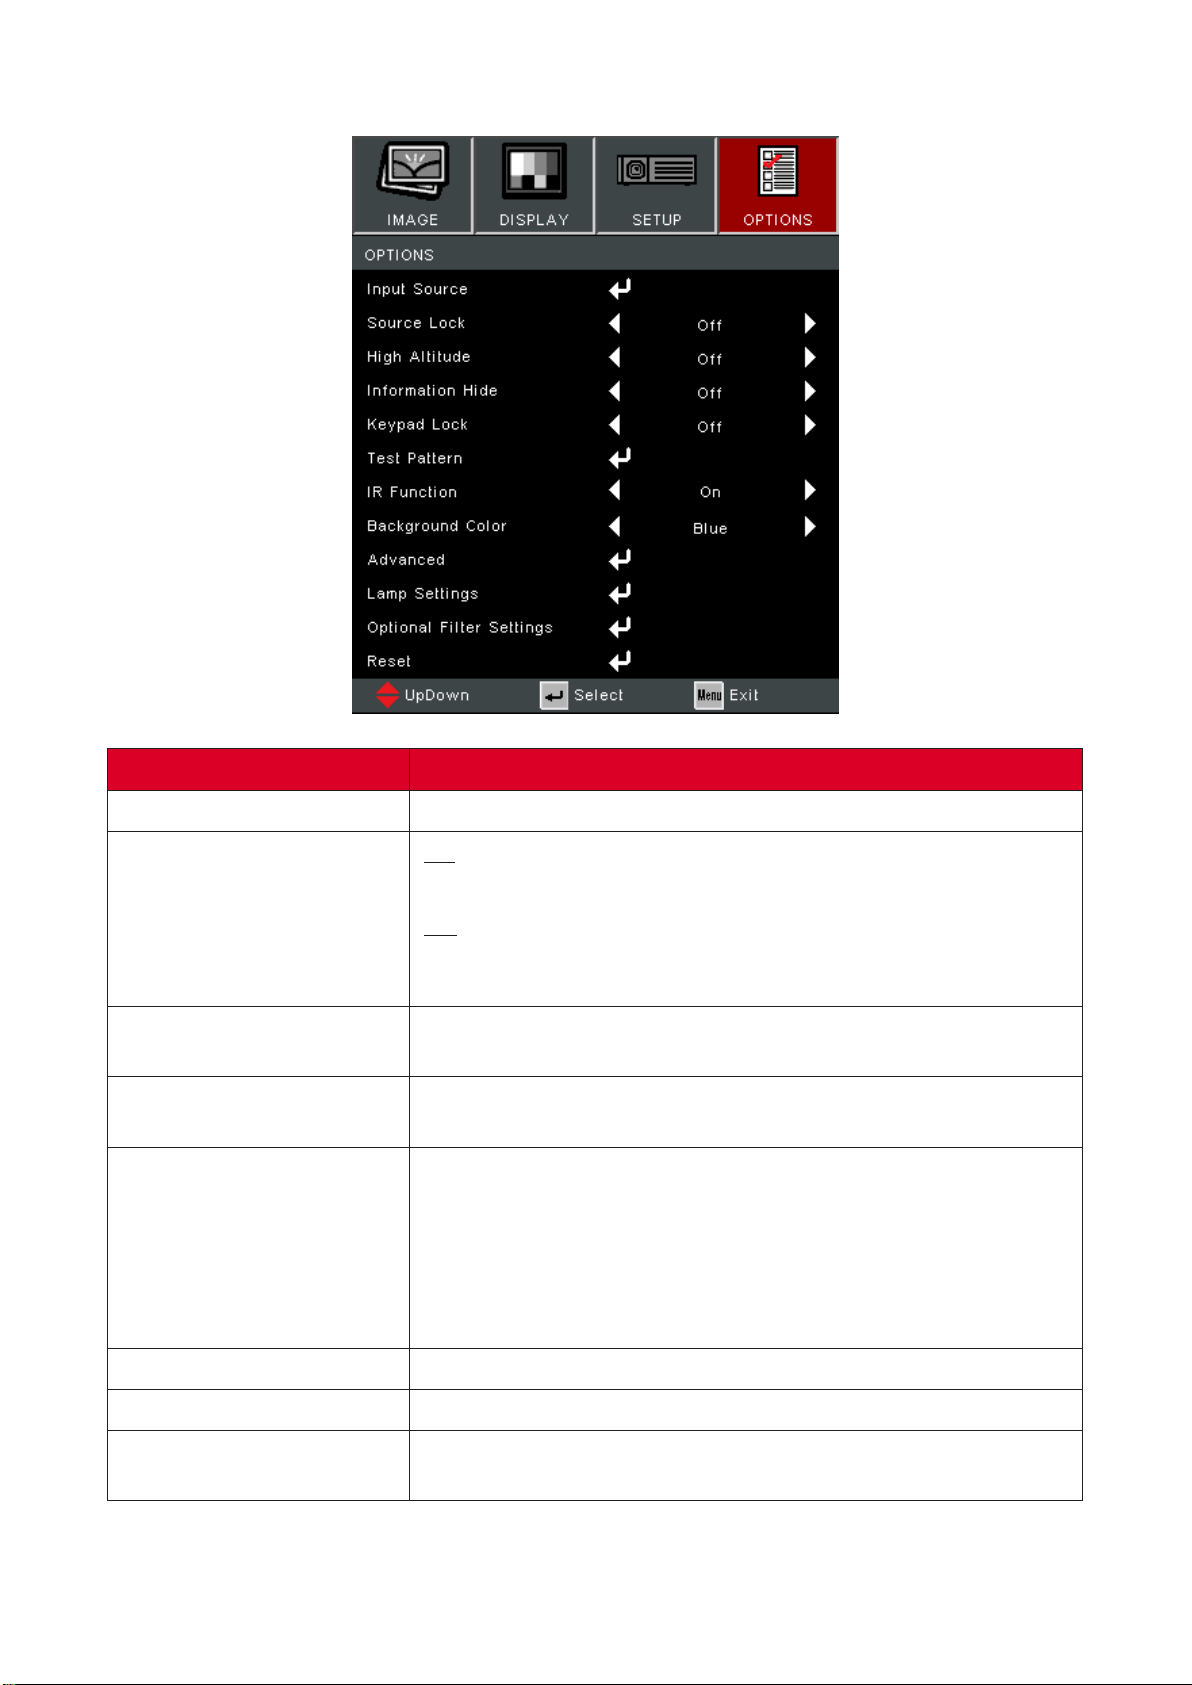
Input Source
VGA
HDMI 1
HDMI 2
Source Lock
On
O
High Altude
On
O
Informaon Hide
On
O
Keypad Lock
On
O
Test Paern
Grid
White
IR Funcon
On
O
49
Background Color
Black
Red
Blue
Green
White
Advanced
Direct Power On
On
O
Auto Power O (min) (-/+, 0~180) minutes
Power Mode (Standby)
Acve
Eco.
Signal Power On
On
O
Lamp Sengs
Lamp Hour
Lamp Reminder
On
O
Brightness Mode
Bright
Eco
Dynamic
Lamp Reset
Yes
No
Oponal Filter Sengs
Oponal Filter Installed
Yes
No
Filter Usage Hours 0~99999
Filter Reminder
O
300 Hr
500 Hr
800 Hr
1000 Hr
Filter Reset
Reset

50
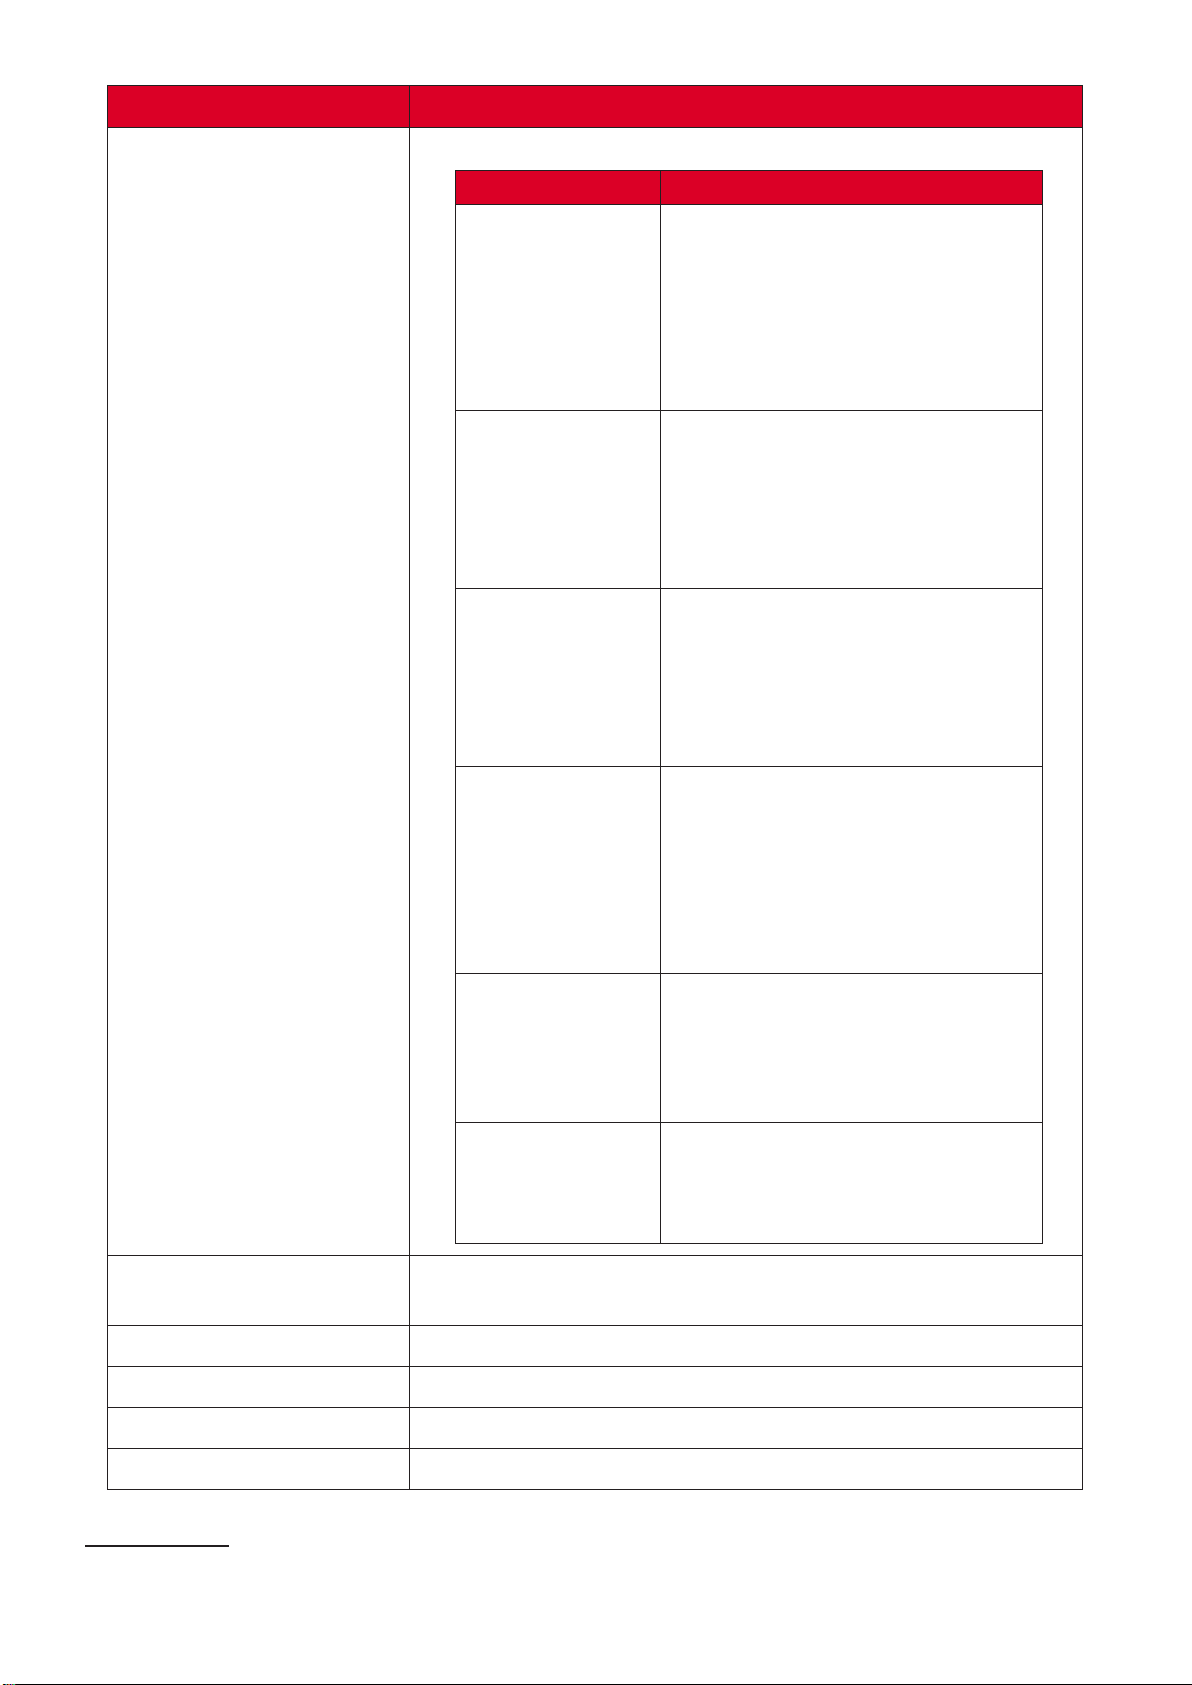
There are several predened display modes that you can
choose from to suit your viewing preference.
Suitable for daily circumstances in a
daylight environment.
Suitable for bright, well-lit environments.
Provides the best balance of detail and
colors for watching movies.
Suitable for most presenng needs for
business and educaon environments.
Achieve opmum color sengs when
projecng onto a blackboard.
User’s custom sengs.
Opmized for 3D content.
3D glasses are needed.
The higher the value, the brighter the image. Lower values
will result in a darker image.
Use this to set the peak white level aer you have previously
adjusted the seng to suit your selected input
and viewing environment.
A high value results in a sharper picture; a low value soens
the picture.
Adjust an image from black and white to fully saturated color.

51
The higher the value, the more greenish the picture becomes.
The lower the value, the more reddish the picture becomes.
Gamma
Reects the relaonship between input source and picture
brightness.
BrilliantColor™
A color-processing algorithm and enhancements to enable
higher brightness while providing true, more vibrant colors
in picture.
Color Temperature
Select from Warm, Medium, or Cold.
Color Seng
Only in permanent installaons with controlled lighng
levels such as boardrooms, lecture theaters, or home
theaters, should color management be considered. Color
management provides ne color control adjustment to allow
for more accurate color reproducon. Select Primary Color
rst and adjust its range/values in Hue, Saturaon and Gain.
Color Space
For HDMI signal, select Auto, RGB (0~255), RGB (16~235),
and YUV color space.
For VGA signal, select Auto, RGB, and YUV color space.
Signal
Adjust the Phase, Frequency, Horizontal and Vercal
posion values of the input source.
Exit
Exit the Advanced menu.
52
53
Select the aspect rao of the projected image.
Scales an image so that it is displayed
in the center of the screen with a 4:3
aspect rao. This is most suitable for
4:3 images like computer monitors,
standard denion TV, and 4:3
aspect DVD movies, as it displays
them without aspect alteraon.
Scales an image so that it is displayed
in the center of the screen with
a 16:9 aspect rao. This is most
suitable for images which are already
in a 16:9 aspect, like high denion
TV.
Projects the image as its original
resoluon and resizes it to t within
the display area. For input signals
with lower resoluons, the projected
image will be displayed in its original
size.
Scales an image proporonally to t
the projector’s nave resoluon in its
horizontal width. This is suitable for
the incoming image which is neither
4:3 nor 16:9 and you want to make
the most use of the screen without
altering the image’s aspect rao.
Scales an image so that it is displayed
in the center of the screen with
a 16:10 aspect rao. This is most
suitable for images which are already
in a 16:10 aspect.
LBX
For non-16:9 leerbox source and
if you use an external 16:9 lens to
display 2.35:1 aspect rao in full
resoluon.
Remove the video encoding noise on the edge of the video
source.
Reduce or magnify the projected image.
Adjust the projected image horizontally or vercally.
Adjust image distoron vercally.
Automacally correct the keystone.
WXGA models
54
3D Mode
Enable or disable the 3D funcon.
3D-2D
Select how the 3D content should appear on screen.
Display the 3D signal.
Display the le frame of the 3D
content.
Display the right frame of the 3D
content.
3D Format
Select the 3D content format.
A Blu-ray 3D source will be detected
automacally, and opons will not be selectable.
When a 3D idencaon signal is
detected, the 3D format is selected
automacally.
Display in Side-by-Side format.
Display in Top and Boom format.
Display in Frame Sequenal format.
3D Sync Invert
Enable or disable the 3D Sync Invert funcon.
This projector is a 3D ready projector with DLP-Link 3D soluon. Please
make sure your 3D glasses are for DLP-Link 3D. This projector supports
frame sequenal (page-ip) 3D via the / ports. For the
best performance, 1920 x 1080 resoluon is recommended. Please note
that 4K (3840 x 2160) resoluon is not supported in 3D mode.
55
Select the On-Screen Display (OSD) Menu language.
Select the preferred projecon posion.
Select the locaon for the On-Screen Display (OSD) Menu.
Select between a 16:10 or 16:9 aspect rao.
Security
Enable or disable a password prompt before using the
projector.
The default password is: 1234
Security Timer
Set the amount of me the projector can be used. Once
this me has elapsed you will be requested to enter your
password again.
Change Password
Set or modify the password.
Mute
Temporarily turn o the sound.
Volume
Adjust the volume level.
Audio Input
Select the audio input source.
Logo
Set the “startup screen”. If changes are made, they will take
eect the next me the projector is powered on.

56
When you connect HDMI CEC-compable devices to the
projector with HDMI cables, you can control them on the
same power on or power o status using the HDMI CEC
control feature in the projector’s OSD. This lets one device or
mulple devices in a group power on or power o via HDMI
CEC in a typical conguraon.
• In order for the CEC funcon to work properly,
make sure that the device is correctly
connected to the input of the projector
via an HDMI cable, and its CEC funcon is
turned on.
• Depending on the connected device, the CEC
funcon may not work.
• The CEC funcon supports the projector
powering o the device and the device
powering on the projector.
57
Use this opon to enable / disable input sources.
On
The projector will only search the current input selecon.
O
The projector will search for other signals if the current
input signal is lost.
When “On” is selected, the fans will spin faster. This feature is
useful in high altude areas where the air is thin.
Choose “On” to hide the info message. Choose “O” to show
source message.
When the keypad lock funcon is “On”, the control panel
will be locked however, the projector can be operated by the
remote control. By selecng “O”, you will be able to use the
control panel once more.
To turn o the keypad lock, press and hold
“Enter” key on top of the projector for 5 seconds.
Select the test paern from grid and white.
Enable/disable remote control operaon.
Display a black, red, blue, green, or white screen when no
input source is available.
58
Direct Power On
Automacally power on the projector when AC power
is supplied, without pressing the buon on the
projector or the remote control.
Auto Power O
A countdown mer will start when there is no signal being
sent to the projector. The projector will automacally power
o when the countdown has nished (in minutes).
Power Mode (Standby)
Normal standby (> 0.5W) with VGA
available.
Reduce power use (< 0.5W) with no
VGA available.
Signal Power On
Automacally power on the projector when a signal is
detected from the input source, without pressing the
buon on the projector or on the remote control.
The projector will not power on automacally by
HDMI if there is only one HDMI cable connected.
Exit
Exit the Advanced menu.
Lamp Hour
Displays the lamp hours of the current lamp.
Lamp Reminder
Show or to hide a warning message when the “change lamp
message” is displayed.
Brightness Mode
Highest brightness and power
consumpon.
Dim the light output, lowering
power consumpon.
Automacally adjust the picture
brightness in order to give opmum
contrast performance.
Lamp Reset
Resets the Lamp Hour counter. Should be used aer
replacing the lamp.
Exit
Exit Lamp Sengs.
59
Oponal Filter Installed
Select “Yes” to display warning message aer a specied
number of hours. Select “No” to turn o warning message.
The default seng is “No”. Aer installing a lter,
please turn on the projector then press , go
to > >
and select .
Filter Usage Hours
Displays the lter hours.
Filter Reminder
Select the number of hours unl the lter message is
displayed.
Factory default is 500 hours.
Filter Reset
Reset the dust lter counter aer replacing or cleaning the
dust lter.
Exit
Exit the Oponal Filter Sengs menu.
Return the sengs to default.
When reseng, the following sengs will sll
remain: Auto Keystone, Filter Usage Hours, High
Altude, Lamp hours, Language, Oponal Filter
installed, Password, Power Mode (Standby),
Projecon, Security, Security Timer, V Keystone.
• Acousc noise level of the projector may increase aer installing a dust
lter.
• For high temperature (> 35°C) or high atude (> 1524 m) operaon
condions, it is recommended to switch to “High Altude” cooling mode
when the dust lter is installed.
• It is recommended to clean the dust lter every 100 hours aer the dust
lter is installed.
• Turn o the projector and unplug it from its power source before installing
or detaching the lter.
60
Appendix
Item
Projector
Type Lamp (RLC-128)
Display Size
30”~300”
Throw Rao
1.94~2.16
(100”@ 3.94 m)
1.54~1.72
(100” @ 3.33 m)
Lens
F=2.42~2.53, f=21.85~24.01 mm
Display System
1-CHIP DMD
Resoluon
Nave 800 x 600 1024 x 768 1280 x 800
Input Signal
HDMI
f
h
: 15~102 kHz, f
v
:23~120 Hz, Pixel rate: 170 MHz
Power¹
Input Voltage
AC 100-240V, 50/60 Hz (auto switch)
Operang
Condions
Temperature
0°C to 40°C (32°F to 104°F)
Humidity
10% to 80% (non-condensing)
Altude
0 to 1,524 m (0 to 5,000 .) at 0°C to 35°C
1,525 to 3,657 m (5,000 to 12,000 .) at 0°C to 30°C
Storage Condions
Temperature
-30°C to 65°C (-22°F to 149°F)
Humidity
10% to 90% (non-condensing)
Altude
0 to 12,192 km (0 to 40,000 .)
Dimensions
Physical
(W x H x D)
309 x 115 x 234 mm
(12.2” x 4.5” x 9.21”)
Weight
Physical
2.70 kg (5.95 lbs)
Power
Consumpon
On²
295W (Typical)
O
< 0.5W (Standby)
¹ Please use the power adapter from ViewSonic® or an authorized source only.
² The test condion follows EEI standards.
61
Item
Projector
Type Lamp (RLC-128)
Display Size
60”~300”
Throw Rao
0.616
(77”@ 0.96 m)
0.52
(87” @ 0.97 m)
Lens
F=2.7, f=7.15 mm F=2.8, f=7.51 mm
Display System
1-CHIP DMD
Resoluon
Nave 1024 x 768 1280 x 800
Input Signal
HDMI
f
h
: 15~102 kHz, f
v
:23~120 Hz, Pixel rate: 170 MHz
Power³
Input Voltage
AC 100-240V, 50/60 Hz (auto switch)
Operang
Condions
Temperature
0°C to 40°C (32°F to 104°F)
Humidity
10% to 80% (non-condensing)
Altude
0 to 1,524 m (0 to 5,000 .) at 0°C to 35°C
1,525 to 3,657 m (5,000 to 12,000 .) at 0°C to 30°C
Storage Condions
Temperature
-30°C to 65°C (-22°F to 149°F)
Humidity
10% to 90% (non-condensing)
Altude
0 to 12.1 km (0 to 40,000 .)
Dimensions
Physical
(W x H x D)
309 x 115 x 234 mm
(12.2” x 4.5” x 9.21”)
Weight
Physical
2.87 kg (6.32 lbs)
Power
Consumpon
On
295W (Typical)
O
< 0.5W (Standby)
³ Please use the power adapter from ViewSonic® or an authorized source only.
⁴ The test condion follows EEI standards.
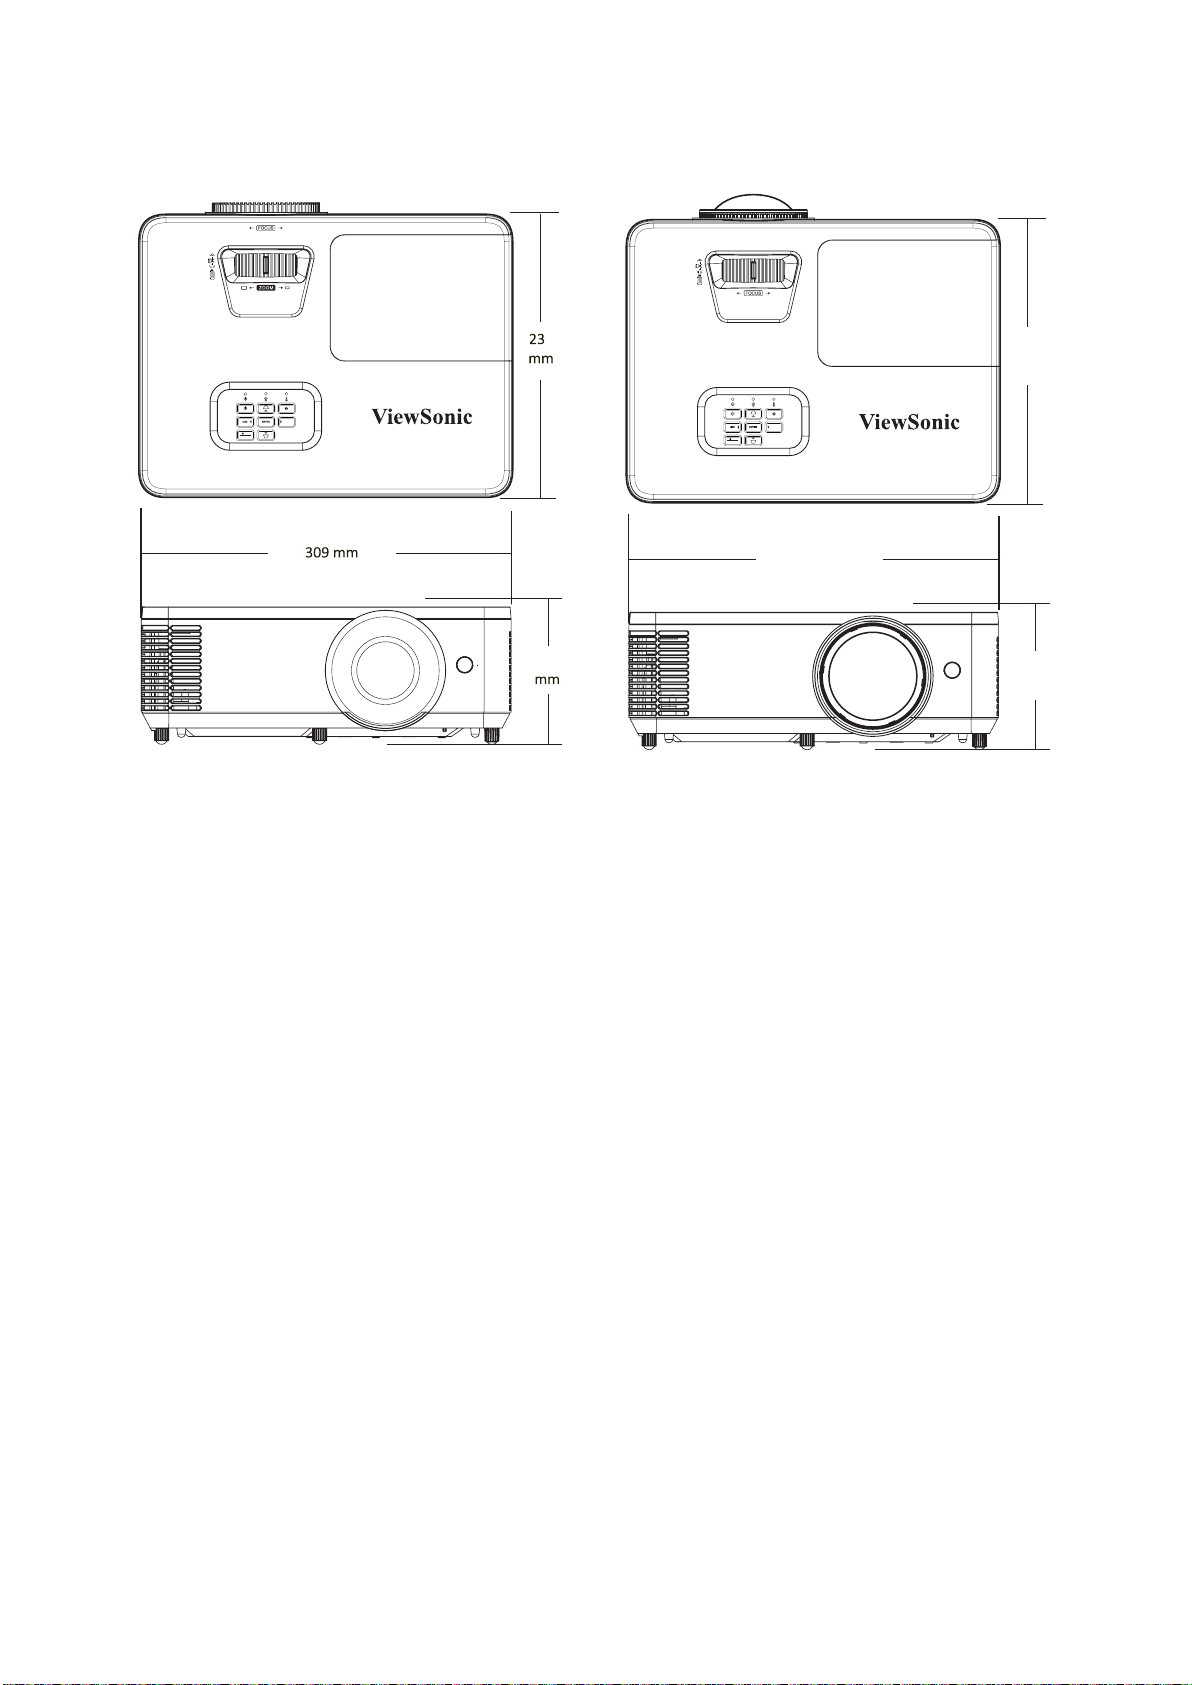
309 mm (W) x 115 mm (H) x 234 mm (D)
115
ENU
EXIT
SO OTUAE
PA700 Series
4
234
mm
309 mm
115
mm
ENU
EXIT
SO OTUAE
PS502 Series
63
640 x 480 60/67/72/75
800 x 600 56/60/72/75
1024 x 768 60/70/75
1152 x 864 75
1280 x 800 60
1280 x 960 60
1280 x 1024 60/75
1366 x 768 60
1440 x 900 60
1600 x 1200 60
1680 x 1050 60
1280 x 720 60/120
640 x 480 67
832 x 624 75
1024 x 768 75
1152 x 870 75
1920 X 1080 60
64
640 x 480 60/67/72/75
800 x 600 56/60/72/75
1024 x 768 60/70/75
1152 x 864 75
1280 x 800 60
1280 x 960 60
1280 x 1024 60/75
1440 x 900 60
1600 x 1200 60
1680 x 1050 60
832 x 624 75
1152 x 870 75
1920 x 1080 60
1920 x 1080 50/60
1920 x 1080 50/60
1280 x 720 50/60
720 X 480 60
720 x 576 50
720 X 480 60
720 x 576 50

1920 x 1080 24
1280 x 720 50/60
1920 x 1080 50/60
1920 x 1080 24
1280 x 720 50/60
• 1080i@25hz and 720p@50hz will run in 100 Hz; other 3D ming will run in
120 Hz.
• 1080P@24hz will run 144Hz (XGA, WXGA, 1080p)/96Hz (WUXGA).
• If the input frame rate is 48 Hz or greater, the output frame rate is set to
twice the input frame rate (FRC = 2X mode).
• If the 3D input frame rate is 25Hz or greater, the output frame rate is set to
four mes the input frame rate (FRC = 4X mode).
• If the 3D input frame rate is 24Hz (includes 23.9Hz), the output frame rate
is set to six mes the input frame rate (FRC = 6X mode).

66
This secon describes some common problems that you may experience when
using the projector.
The projector does not
turn on
• Ensure the power cord is properly aached to the
projector and to the power outlet.
• If the cooling process has not completed, please
wait unl it has nished then try to turn on the
projector again.
• If the above does not work, try another power
outlet or another electrical device with the same
power outlet.
There is no picture
• Ensure the video source cable is connected
properly, and that the video source is turned on.
• If the input source is not selected automacally,
select the correct source with the “Source Input”
on either the projector or the remote control.
The image is blurred
• Adjusng focus with the Focus Ring will help
correctly focus the projecon lens.
• Ensure the projector and screen are aligned
properly. If necessary, adjust the height of the
projector as well as the projecon angle and
direcon.
The image is reversed
• Open the OSD Menu and go to: >
and adjust the projecon opon.
The image is stretched
when projecng a 16:9
DVD
• When you play an anamorphic DVD or 16:9 DVD,
the projector will show the best image in 16:9.
• If you play a 4:3 format DVD tle, please change
the format as 4:3 in projector OSD Menu.
• Please setup the display format as 16:9 (wide)
aspect rao on the DVD player.

The remote control
does not work
• Ensure there are no obstacles between the remote
control and projector; and that they are within
range.
• The baeries may be out of power, please check
and replace if necessary.
The projector stops
responding to all
controls
• Turn o the projector and unplug the power cord.
Wait at least 20 seconds then reconnect and try
again.
When the warning indicators (see below) light up or ash, the projector will
automacally shutdown. Unplug the power cord from the projector, wait for 30
seconds and try again. If the warning indicators light up or ash, please contact
your nearest service center for assistance.
Steady Light
Flashing
(0.5 sec o/0.5
sec on)
Steady Light
Flashing
(0.5 sec o/0.5
sec on)
Back to red
steady light
when the
cooling fan
turns o.
Flashing Steady Light
Flashing Flashing
Flashing Steady Light

• Make sure the projector is turned o and the power cable is unplugged from the
power outlet.
• Never remove any parts from the projector. Contact ViewSonic® or a reseller
when any part of the projector needs replacing.
• Never spray or pour any liquid directly onto the case.
• Handle the projector with care, as a darker-colored projector, if scued, may
show marks more clearly than a lighter-colored projector.
• Use a canister of compressed air to remove dust.
• If the lens is sll not clean, use lens-cleaning paper or moisten a so cloth with
lens cleaner and gently wipe the surface.
Never rub the lens with abrasive materials.
• Use a so, lint-free, dry cloth to remove dirt or dust.
• If the case is sll not clean, apply a small amount of non-ammonia, non-alcohol
based, mild non-abrasive detergent onto a clean, so, lint-free cloth, then wipe
the surface.
Never use wax, alcohol, benzene, thinner, or other chemical
detergents.
If you intend to store the projector for an extended period of me:
• Ensure the temperature and humidity of the storage area are within the
recommend range.
• Retract the adjuster foot completely.
• Remove the baeries from the remote control.
• Pack the projector in its original packaging or equivalent.
• ViewSonic® does not recommend the use of any ammonia or alcohol-based
cleaners on the lens or case. Some chemical cleaners have been reported to
damage the lens and/or case of the projector.
• ViewSonic® will not be liable for damage resulng from use of any ammonia or
alcohol-based cleaners.

70
This secon addresses all connected requirements and statements regarding
regulaons. Conrmed corresponding applicaons shall refer to nameplate labels
and relevant markings on the unit.
FCC Compliance Statement
This device complies with part 15 of FCC Rules. Operaon is subject to the following
two condions: (1) this device may not cause harmful interference, and (2) this
device must accept any interference received, including interference that may
cause undesired operaon. This equipment has been tested and found to comply
with the limits for a Class B digital device, pursuant to part 15 of the FCC Rules.
These limits are designed to provide reasonable protecon against harmful
interference in a residenal installaon. This equipment generates, uses, and
can radiate radio frequency energy, and if not installed and used in accordance
with the instrucons, may cause harmful interference to radio communicaons.
However, there is no guarantee that interference will not occur in a parcular
installaon. If this equipment does cause harmful interference to radio or television
recepon, which can be determined by turning the equipment o and on, the user
is encouraged to try to correct the interference by one or more of the following
measures:
• Reorient or relocate the receiving antenna.
• Increase the separaon between the equipment and receiver.
• Connect the equipment into an outlet on a circuit dierent from that to which
the receiver is connected.
• Consult the dealer or an experienced radio/TV technician for help.
Warning: You are cauoned that changes or modicaons not expressly approved
by the party responsible for compliance could void your authority to operate the
equipment.
Industry Canada Statement
CAN ICES-003(B) / NMB-003(B)

71
CE Conformity for European Countries
The device complies with the EMC Direcve 2014/30/EU and Low Voltage
Direcve 2014/35/EU. Ecodesign Direcve 2009/125/EC.
The mark shown to the right is in compliance with the Waste Electrical
and Electronic Equipment Directive 2012/19/EU (WEEE). The mark
indicates the requirement NOT to dispose of the equipment as unsorted
municipal waste, but use the return and collection systems according to
local law.
72
This product has been designed and manufactured in compliance with Direcve
2011/65/EU of the European Parliament and the Council on restricon of the use
of certain hazardous substances in electrical and electronic equipment (RoHS2
Direcve) and is deemed to comply with the maximum concentraon values issued
by the European Technical Adaptaon Commiee (TAC) as shown below:
Proposed Maximum
Lead (Pb) 0.1% < 0.1%
Mercury (Hg) 0.1% < 0.1%
Cadmium (Cd) 0.01% < 0.01%
Hexavalent Chromium (Cr6⁺) 0.1% < 0.1%
Polybrominated biphenyls (PBB) 0.1% < 0.1%
Polybrominated diphenyl ethers
(PBDE)
0.1% < 0.1%
Bis (2-ethylhexyl) phthalate
(DEHP)
0.1% < 0.1%
Butyl benzyl phthalate (BBP) 0.1% < 0.1%
Dibutyl phthalate (DBP) 0.1% < 0.1%
Diisobutyl phthalate (DIBP) 0.1% < 0.1%
are:
• Mercury in cold cathode uorescent lamps and external electrode uorescent
lamps (CCFL and EEFL) for special purposes not exceeding (per lamp):
Short length (500 mm): maximum 3.5 mg per lamp.
Medium length (> 500 mm and 1,500 mm): maximum 5 mg per lamp.
Long length (> 1,500 mm): maximum 13 mg per lamp.
• Lead in glass of cathode ray tubes.
• Lead in glass of uorescent tubes not exceeding 0.2% by weight.
• Lead as an alloying element in aluminum containing up to 0.4% lead by weight.
• Copper alloy containing up to 4% lead by weight.
• Lead in high melng temperature type solders (i.e. lead-based alloys containing
85% by weight or more lead).
• Electrical and electronic components containing lead in a glass or ceramic other
than dielectric ceramic in capacitors, e.g. piezoelectronic devices, or in a glass or
ceramic matrix compound.

73
Restricon on Hazardous Substances statement (India). This product complies
with the “India E-waste Rule 2011” and prohibits use of lead, mercury, hexavalent
chromium, polybrominated biphenyls or polybrominated diphenyl ethers in
concentraons exceeding 0.1 weight % and 0.01 weight % for cadmium, except for
the exempons set in Schedule 2 of the Rule.
Product Disposal at End of Product Life
ViewSonic® respects the environment and is commied to working and living
green. Thank you for being part of Smarter, Greener Compung. Please visit the
ViewSonic® website to learn more.
hps://www.viewsonic.com/us/go-green-with-viewsonic
Europe:
hps://www.viewsonic.com/eu/go-green-with-viewsonic
Taiwan:
https://recycle.epa.gov.tw/

74
Copyright© ViewSonic® Corporaon, 2023. All rights reserved.
Macintosh and Power Macintosh are registered trademarks of Apple Inc.
Microso, Windows, and the Windows logo are registered trademarks of Microso
Corporaon in the United States and other countries.
ViewSonic®, the three birds logo, OnView, ViewMatch, and ViewMeter are
registered trademarks of ViewSonic® Corporaon.
VESA is a registered trademark of the Video Electronics Standards Associaon.
DPMS, DisplayPort, and DDC are trademarks of VESA.
ENERGY STAR® is a registered trademark of the U.S. Environmental Protecon
Agency (EPA).
As an ENERGY STAR® partner, ViewSonic® Corporaon has determined that this
product meets the ENERGY STAR® guidelines for energy eciency.
Disclaimer: ViewSonic® Corporaon shall not be liable for technical or editorial
errors or omissions contained herein; nor for incidental or consequenal damages
resulng from furnishing this material, or the performance or use of this product.
In the interest of connuing product improvement, ViewSonic® Corporaon
reserves the right to change product specicaons without noce. Informaon in
this document may change without noce.
No part of this document may be copied, reproduced, or transmied by any means,
for any purpose without prior wrien permission from ViewSonic® Corporaon.
PA700S_PA700X_PA700W_PS502X_PS502W_UG_ENG_1a_20230420
75
Customer Service
For technical support or product service, see the table below or contact your
reseller.
You will need the product’s serial number.
Country/ Region Country/ Region
Australia www.viewsonic.com/au/ Bangladesh www.viewsonic.com/bd/
中国 (China)
www.viewsonic.com.cn
香港 (繁體中文)
www.viewsonic.com/hk/
Hong Kong (English) www.viewsonic.com/hk-en/ India www.viewsonic.com/in/
Indonesia www.viewsonic.com/id/ Israel www.viewsonic.com/il/
日本 (Japan)
www.viewsonic.com/jp/ Korea www.viewsonic.com/kr/
Malaysia www.viewsonic.com/my/ Middle East www.viewsonic.com/me/
Myanmar www.viewsonic.com/mm/ Nepal www.viewsonic.com/np/
New Zealand www.viewsonic.com/nz/ Pakistan www.viewsonic.com/pk/
Philippines www.viewsonic.com/ph/ Singapore www.viewsonic.com/sg/
臺灣 (Taiwan)
www.viewsonic.com/tw/
ประเทศไทย
www.viewsonic.com/th/
Việt Nam
www.viewsonic.com/vn/ South Africa & Maurius www.viewsonic.com/za/
Americas
United States www.viewsonic.com/us Canada www.viewsonic.com/us
Lan America www.viewsonic.com/la
Europe
Europe www.viewsonic.com/eu/ France www.viewsonic.com/fr/
Deutschland www.viewsonic.com/de/ Қазақстан www.viewsonic.com/kz/
Россия www.viewsonic.com/ru/ España www.viewsonic.com/es/
Türkiye www.viewsonic.com/tr/ Україна www.viewsonic.com/ua/
United Kingdom www.viewsonic.com/uk/

76
Limited Warranty
ViewSonic® Projector
What the warranty covers:
ViewSonic® warrants its products to be free from defects in material and
workmanship, under normal use, during the warranty period. If a product
proves to be defecve in material or workmanship during the warranty period,
ViewSonic® will, at its sole opon, repair or replace the product with a like product.
Replacement product or parts may include remanufactured or refurbished parts or
components.
Limited Three (3) year General Warranty:
Subject to the more limited one (1) year warranty set out below, North and South
America: Three (3) years warranty for all parts excluding the lamp, three (3) years
for labor, and one (1) year for the original lamp from the date of the rst consumer
purchase.
Other regions or countries: Please check with your local dealer or local ViewSonic®
oce for the warranty informaon.
Under heavy usage sengs, where a projector’s use includes more than fourteen
(14) hours average daily usage, North and South America: One (1) year warranty
for all parts excluding the lamp, one (1) year for labor, and ninety (90) days for the
original lamp from the date of the rst consumer purchase; Europe: One (1) year
warranty for all parts excluding the lamp, one (1) year for labor, and ninety (90) days
for the original lamp from the date of the rst consumer purchase. Other regions
or countries: Please check with your local dealer or local ViewSonic® oce for the
warranty informaon. Lamp warranty subject to terms and condions, vericaon
and approval. Applies to manufacturer’s installed lamp only. All accessory lamps
purchased separately are warranted for 90 days.
Who the warranty protects:
This warranty is valid only for the rst consumer purchaser.
What the warranty does not cover:
Any product on which the serial number has been defaced, modied, or
removed.

77
Damage, deterioraon, or malfuncon resulng from:
Accident, misuse, neglect, re, water, lightning, or other acts of nature,
unauthorized product modicaon, or failure to follow instrucons supplied
with the product.
Operaon outside of product specicaons.
Operaon of the product for other than the normal intended use or not
under normal condions.
Repair or aempted repair by anyone not authorized by ViewSonic®.
Any damage of the product due to shipment.
Removal or installaon of the product.
Causes external to the product, such as electric power uctuaons or
failure.
Use of supplies or parts not meeng Viewsonic’s specicaons.
Normal wear and tear.
Any other cause which does not relate to a product defect.
Removal, installaon, and set-up service charges.
For informaon about receiving service under warranty, contact ViewSonic®
Customer Support (Please refer to the “Customer Support” page). You will need
to provide your product’s serial number.
To obtain warranted service, you will be required to provide: (a) the original
dated sales slip, (b) your name, (c) your address, (d) a descripon of the problem,
and (e) the serial number of the product.
Take or ship the product, freight prepaid, in the original container to an
authorized ViewSonic® service center or ViewSonic®.
For addional informaon or the name of the nearest ViewSonic® service center,
contact ViewSonic®.
There are no warranes, express or implied, which extend beyond the descripon
contained herein including the implied warranty of merchantability and tness for a
parcular purpose.

78
Exclusion of damages:
ViewSonic’s liability is limited to the cost of repair or replacement of the product.
ViewSonic® shall not be liable for:
Damage to other property caused by any defects in the product, damages based
upon inconvenience, loss of use of the product, loss of me, loss of prots, loss of
business opportunity, loss of goodwill, interference with business relaonships,
or other commercial loss, even if advised of the possibility of such damages.
Any other damages, whether incidental, consequenal or otherwise.
Any claim against the customer by any other party.
This warranty gives you specic legal rights, and you may also have other rights
which vary from local authority. Some local governments do not allow limitaons
on implied warranes and/or do not allow the exclusion of incidental or
consequenal damages, so the above limitaons and exclusions may not apply to
you.
For warranty informaon and service on ViewSonic® products sold outside of the
U.S.A. and Canada, contact ViewSonic® or your local ViewSonic® dealer.
The warranty period for this product in mainland China (Hong Kong, Macao,
and Taiwan Excluded) is subject to the terms and condions of the Maintenance
Guarantee Card.
For users in Europe and Russia, full details of warranty provided can be found at:
http://www.viewsonic.com/eu/ under “Support/Warranty Informaon”.
Projector Warranty Term Template In UG
VSC_TEMP_2005

79
Mexico Limited Warranty
ViewSonic® Projector
What the warranty covers:
ViewSonic® warrants its products to be free from defects in material and
workmanship, under normal use, during the warranty period. If a product
proves to be defecve in material or workmanship during the warranty period,
ViewSonic® will, at its sole opon, repair or replace the product with a like product.
Replacement product or parts may include remanufactured or refurbished parts or
components & accessories.
3 years for all parts excluding the lamp, 3 years for labor, 1 year for the original
lamp from the date of the rst consumer purchase.
Lamp warranty subject to terms and condions, vericaon and approval. Applies
to manufacturer’s installed lamp only.
All accessory lamps purchased separately are warranted for 90 days.
Who the warranty protects:
This warranty is valid only for the rst consumer purchaser.
What the warranty excludes and does not cover:
Any product on which the serial number has been defaced, modied or removed.
Damage, deterioraon, or malfuncon resulng from:
Accident, misuse, neglect, re, water, lightning, or other acts of nature,
unauthorized product modicaon, unauthorized aempted repair, or
failure to follow instrucons supplied with the product.
Any damage of the product due to shipment.
Causes external to the product, such as electrical power uctuaons or
failure.
Use of supplies or parts not meeng ViewSonic®’s specicaons.
Normal wear and tear.
Any other cause which does not relate to a product defect.
Any product exhibing a condion commonly known as “image burn-in” which
results when a stac image is displayed on the product for an extended period of
me.
Removal, installaon, insurance, and set-up service charges.

80
For informaon about receiving service under warranty, contact ViewSonic®
Customer Support (Please refer to the aached “Customer Service” page). You
will need to provide your product’s serial number, so please record the product
informaon in the space provided below on your purchase for your future use.
Please retain your receipt of proof of purchase to support your warranty claim.
For Your Records
Product Name: Model Number:
Document Number: Serial Number:
Purchase Date: Extended Warranty Purchase? (Y/N)
If so, what date does warranty expire?
To obtain warranty service, you will be required to provide (a) the original dated
sales slip, (b) your name, (c) your address, (d) a descripon of the problem, and
(e) the serial number of the product.
Take or ship the product, in the original container packaging, to an authorized
ViewSonic® service center.
Round trip transportaon costs for in-warranty products will be paid by
ViewSonic®.
There are no warranes, express or implied, which extend beyond the descripon
contained herein including the implied warranty of merchantability and tness for a
parcular purpose.
Exclusion of damages:
ViewSonic®’s liability is limited to the cost of repair or replacement of the product.
ViewSonic® shall not be liable for:
Damage to other property caused by any defects in the product, damages based
upon inconvenience, loss of use of the product, loss of me, loss of prots, loss of
business opportunity, loss of goodwill, interference with business relaonships,
or other commercial loss, even if advised of the possibility of such damages.
Any other damages, whether incidental, consequenal or otherwise.
Any claim against the customer by any other party.
Repair or aempted repair by anyone not authorized by ViewSonic®.

81
Contact Informaon for Sales & Authorized Service (Centro Autorizado de Servicio) within Mexico:
Name, address, of manufacturer and importers:
México, Av. de la Palma #8 Piso 2 Despacho 203, Corporavo Interpalmas,
Col. San Fernando Huixquilucan, Estado de México
Tel: (55) 3605-1099 hp://www.viewsonic.com/la/soporte/index.htm
NÚMERO GRATIS DE ASISTENCIA TÉCNICA PARA TODO MÉXICO: 001.866.823.2004
Hermosillo:
Distribuciones y Servicios Computacionales SA de CV.
Calle Juarez 284 local 2
Col. Bugambilias C.P: 83140
Tel: 01-66-22-14-9005
E-Mail: [email protected]ared.net.mx
Villahermosa:
Compumantenimietnos Garanzados, S.A. de C.V.
AV. GREGORIO MENDEZ #1504
COL, FLORIDA C.P. 86040
Tel: 01 (993) 3 52 00 47 / 3522074 / 3 52 20 09
E-Mail: compumantenimientos@prodigy.net.mx
Puebla, Pue. (Matriz):
RENTA Y DATOS, S.A. DE C.V. Domicilio:
29 SUR 721 COL. LA PAZ
72160 PUEBLA, PUE.
Tel: 01(52).222.891.55.77 CON 10 LINEAS
E-Mail: dat[email protected]x
Veracruz, Ver.:
CONEXION Y DESARROLLO, S.A DE C.V. Av.
Americas # 419
ENTRE PINZÓN Y ALVARADO
Fracc. Reforma C.P. 91919
Tel: 01-22-91-00-31-67
E-Mail: g[email protected]x
Chihuahua:
Soluciones Globales en Computación
C. Magisterio # 3321 Col. Magisterial
Chihuahua, Chih.
Tel: 4136954
E-Mail: Cef[email protected]
Cuernavaca:
Compusupport de Cuernavaca SA de CV
Francisco Leyva # 178 Col. Miguel Hidalgo
C.P. 62040, Cuernavaca Morelos
Tel: 01 777 3180579 / 01 777 3124014
E-Mail: aquev[email protected]
Distrito Federal:
QPLUS, S.A. de C.V.
Av. Coyoacán 931
Col. Del Valle 03100, México, D.F.
Tel: 01(52)55-50-00-27-35
E-Mail : g[email protected]x
Guadalajara, Jal.:
SERVICRECE, S.A. de C.V.
Av. Niños Héroes # 2281
Col. Arcos Sur, Sector Juárez
44170, Guadalajara, Jalisco
Tel: 01(52)33-36-15-15-43
E-Mail: mmir[email protected]
Guerrero Acapulco:
GS Computación (Grupo Sesicomp)
Progreso #6-A, Colo Centro
39300 Acapulco, Guerrero
Tel: 744-48-32627
Monterrey:
Global Product Services
Mar Caribe # 1987, Esquina con Golfo Pérsico
Fracc. Bernardo Reyes, CP 64280
Monterrey N.L. México
Tel: 8129-5103
E-Mail: a[email protected]
MERIDA:
ELECTROSER
Av Reforma No. 403Gx39 y 41
Mérida, Yucatán, México CP97000
Tel: (52) 999-925-1916
E-Mail: rrrb@sureste.com
Oaxaca, Oax.:
CENTRO DE DISTRIBUCION Y
SERVICIO, S.A. de C.V.
Murguía # 708 P.A., Col. Centro, 68000, Oaxaca
Tel: 01(52)95-15-15-22-22
Fax: 01(52)95-15-13-67-00
E-Mail. [email protected]om
Tijuana:
STD
Av Ferrocarril Sonora #3780 L-C
Col 20 de Noviembr
Tijuana, Mexico
FOR USA SUPPORT:
ViewSonic® Corporaon
381 Brea Canyon Road, Walnut, CA. 91789 USA
Tel: 800-688-6688
E-Mail: hp://www.viewsonic.com
Projector Mexico Warranty Term Template In UG
VSC_TEMP_2006
82