W
0-65857-18950-6
White
DOREL
Living
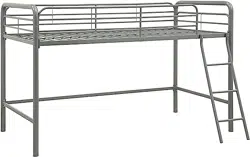
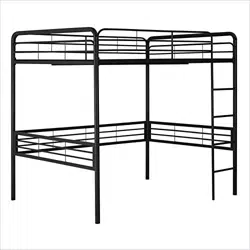
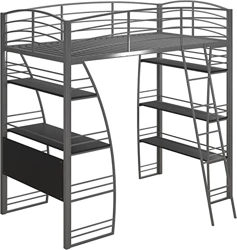
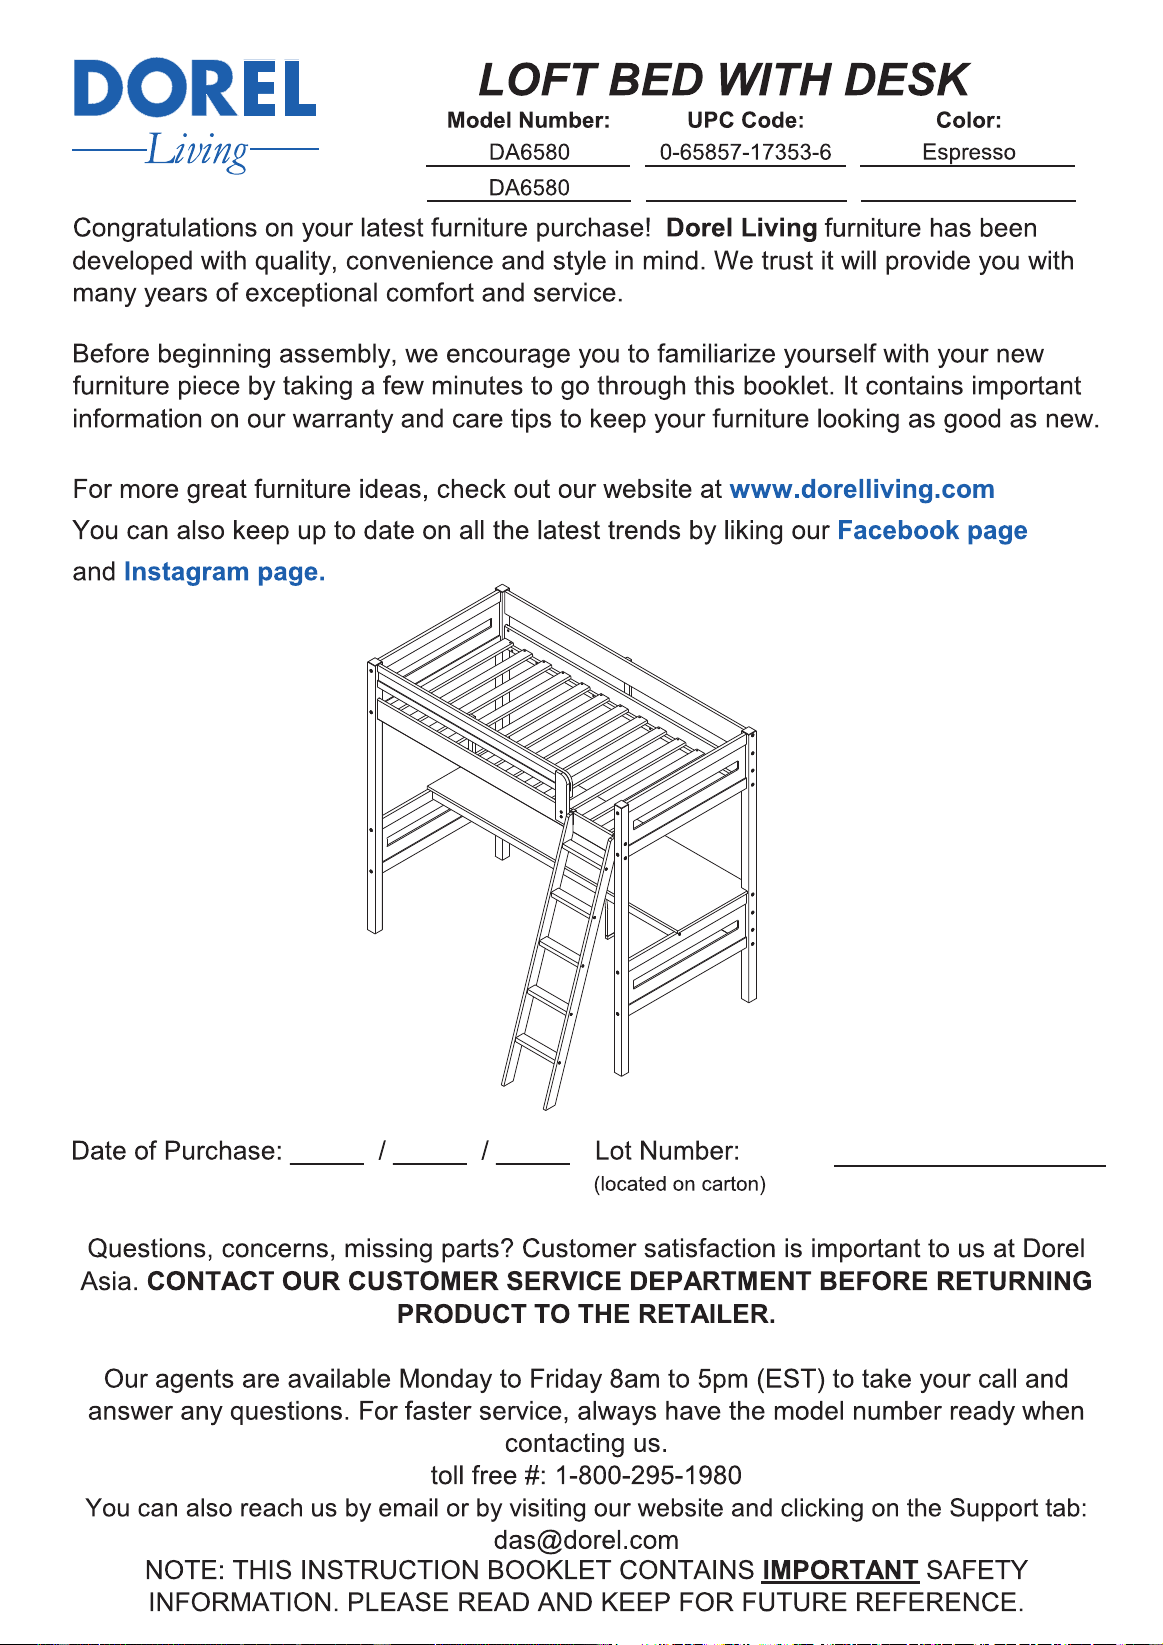
LOFT
BED
WITH
DESK
Model
Number
:
UPC
Code
:
Color
:
DA
6580
0
-
65857
-
17353
-
6
Espresso
DA
6580
Congratulations
on
your
latest
furniture
purchase
!
Dorel
Living
furniture
has
been
developed
with
quality
,
convenience
and
style
in
mind
.
We
trust
it
will
provide
you
with
many
years
of
exceptional
comfort
and
service
.
Before
beginning
assembly
,
we
encourage
you
to
familiarize
yourself
with
your
new
furniture
piece
by
taking
a
few
minutes
to
go
through
this
booklet
.
It
contains
important
information
on
our
warranty
and
care
tips
to
keep
your
furniture
looking
as
good
as
new
.
For
more
great
furniture
ideas
,
check
out
our
website
at
www
.
dorelliving
.
com
You
can
also
keep
up
to
date
on
all
the
latest
trends
by
liking
our
Facebook
page
and
Instagram
page
.
Date
of
Purchase
:
/ /
Lot
Number
:
(
located
on
carton
)
Questions
,
concerns
,
missing
parts
?
Customer
satisfaction
is
important
to
us
at
Dorel
Asia
.
CONTACT
OUR
CUSTOMER
SERVICE
DEPARTMENT
BEFORE
RETURNING
PRODUCT
TO
THE
RETAILER
.
Our
agents
are
available
Monday
to
Friday
8
am
to
5
pm
(
EST
)
to
take
your
call
and
answer
any
questions
.
For
faster
service
,
always
have
the
model
number
ready
when
contacting
us
.
toll
free
#
:
1
-
800
-
295
-
1980
You
can
also
reach
us
by
email
or
by
visiting
our
website
and
clicking
on
the
Support
tab
:
das
@
dorel
.
com
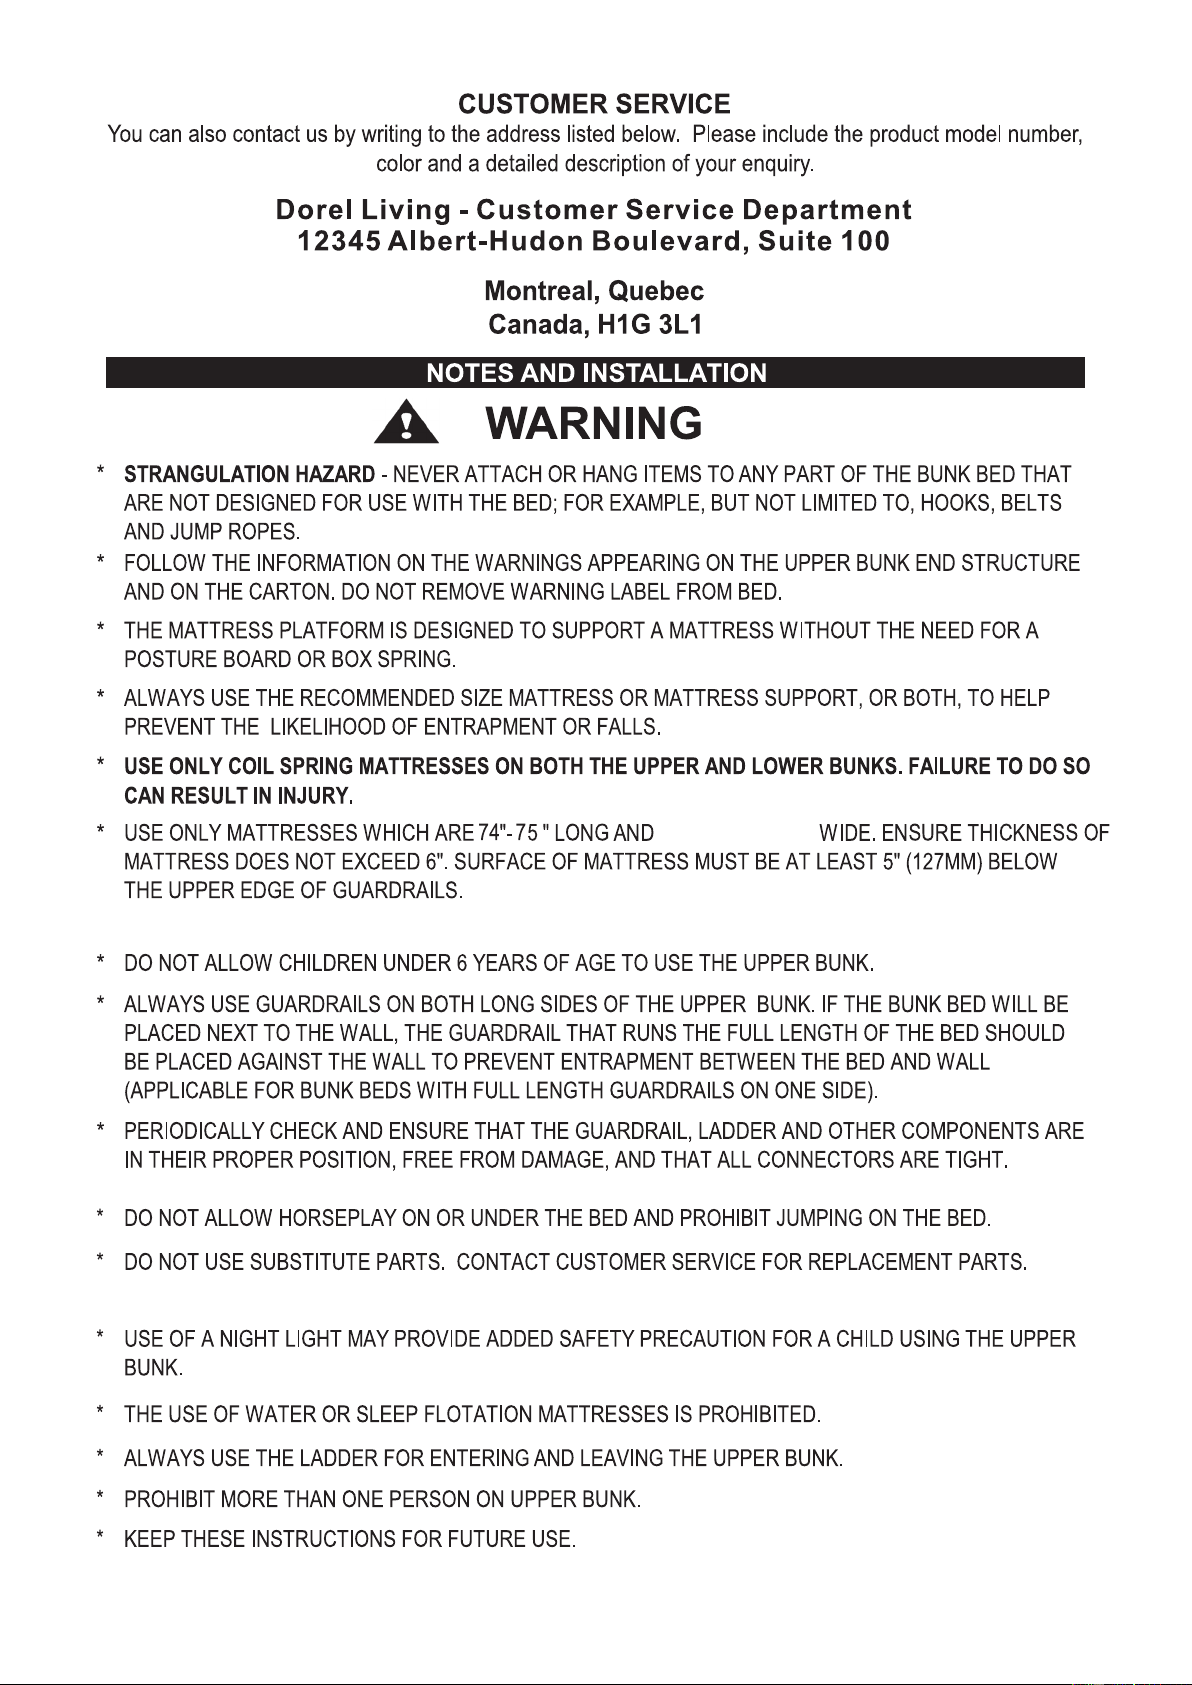
NOTE
:
THIS
INSTRUCTION
BOOKLET
CONTAINS
IMPORTANT
SAFETY
INFORMATION
.
PLEASE
READ
AND
KEEP
FOR
FUTURE
REFERENCE
.
-SIL
37 1/2" - 38 1/2"


DA6580-SIL/DA6580W
38 PCS
LOFT
BED
WITH
DESK
HARDWARE
LIST
1
0
<
£
1
/
4
"
x
100
mm
2
6
)
)
)
)
))))))
)
)
)
))))))
)
)
Tm
)
ymy
)
CD
1
/
4
"
x
48
mm
JOINT
CONNECTOR
(
4
mm
HEX
HEAD
)
JOINT
CONNECTOR
(
4
mm
HEX
HEAD
)
12
PCS
3
(
j
£
pymy
^
>
<
t
>
3.5
mm
x
19
mm
4
CD
4
mm
x
35
mm
FLAT
HEAD
SCREW
2
PCS
FLAT
HEAD
SCREW
26
PCS
5
0
11.8
mm
x
15
mm
6
CD
4
mm
x
30
mm
BARREL
NUT
12
PCS
FLAT
HEAD
SCREW
6
PCS
7
L
CD
10
mm
x
50
mm
WOOD
DOWEL
44
PCS
8
ALLEN
KEY
1
PC

LOFT
BED
WITH
DESK
HARDWARE
LIST
9
0
L
L
L L
<
f
1
/
4
"
x
64
mm
10
\
O
8
mm
x
30
mm
JOINT
CONNECTOR
(
4
mm
HEX
HEAD
)
7
PCS
WOOD
DOWEL
2
PCS
11
0
<
t
>
1
/
4
"
x
32
mm
12
<
t
>
9
mm
x
17
mm
JOINT
CONNECTOR
(
4
mm
HEX
HEAD
)
4
PCS
HEX
CAP
2
PCS
13
0
O
1
/
4
"
x
15
mm
14
30
mm
x
30
mm
x
18
mm
JOINT
CONNECTOR
(
4
mm
HEX
HEAD
)
12
PCS
L
SHAPED
METAL
PLATE
6
PCS
DA6580-SIL/DA6580W
LOFT
BED
WITH
DESK
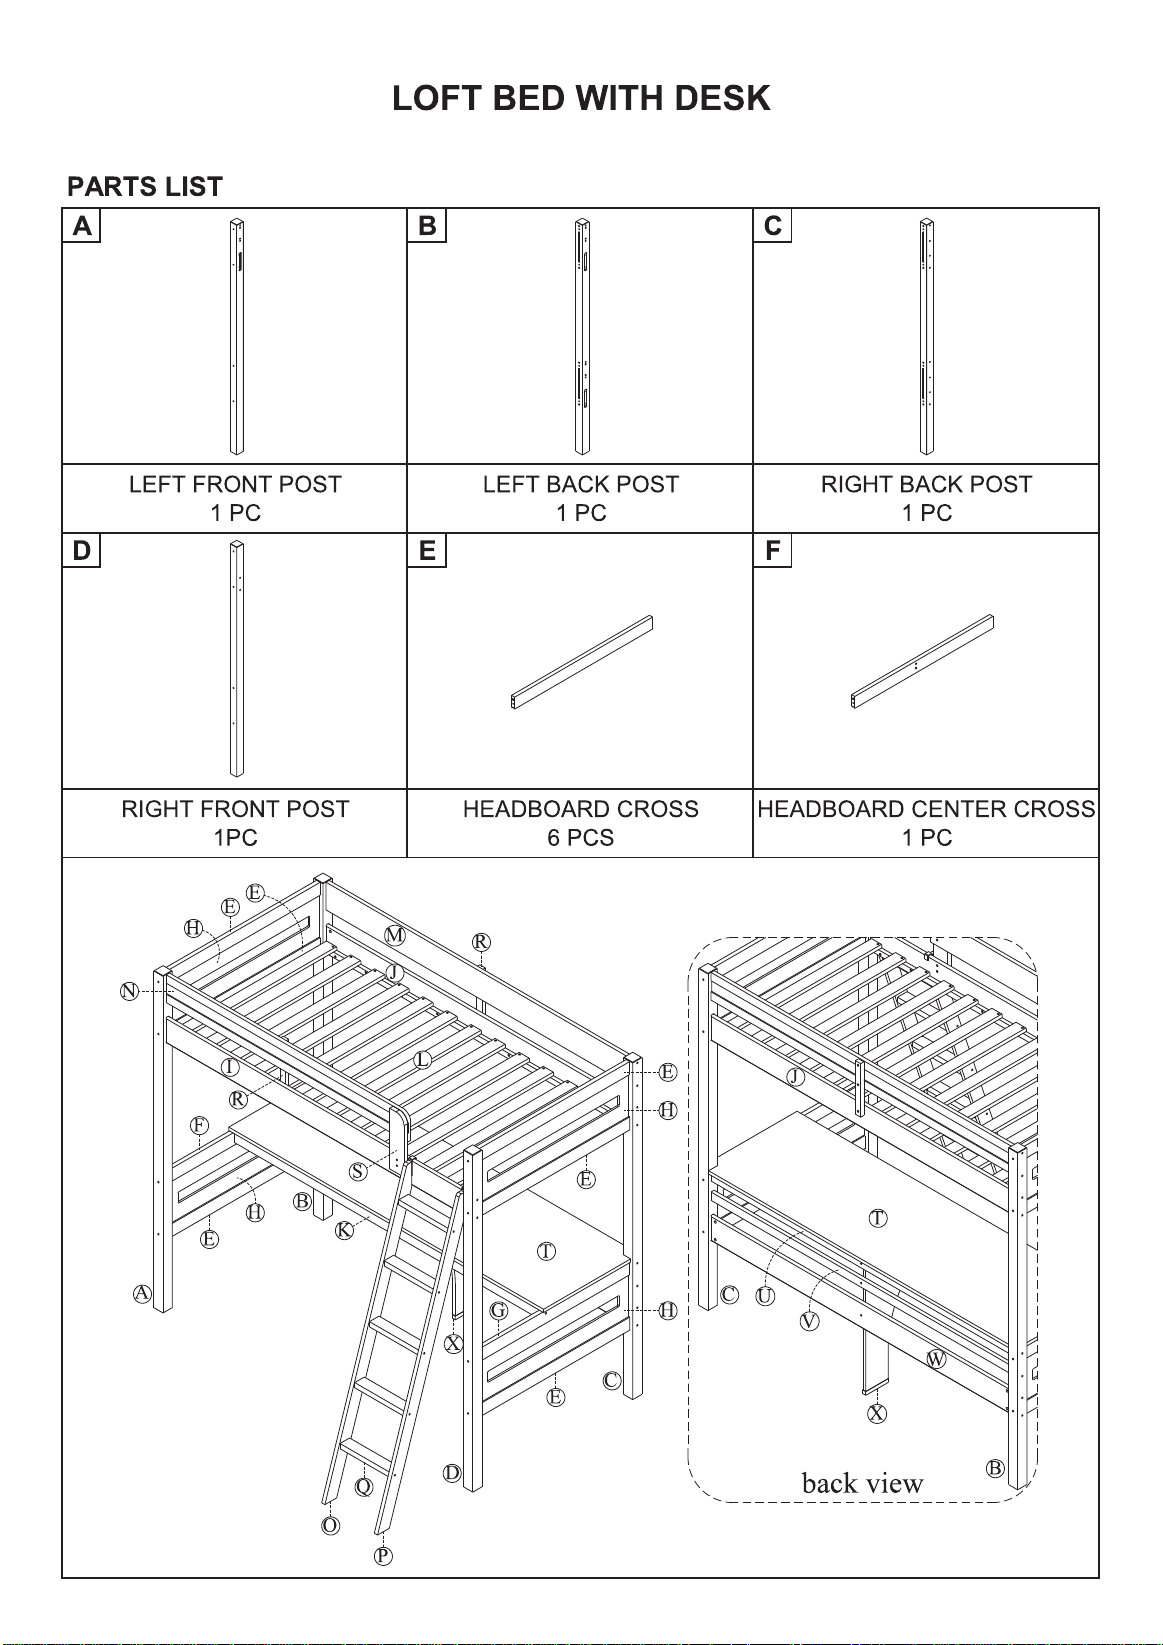
PARTS
LIST
A
fi
j
*
s
I
s
'
B
:
V
S
I
S
t
I
s
'
C
I
:
:
:
>
LEFT
FRONT
POST
1
PC
LEFT
BACK
POST
1
PC
RIGHT
BACK
POST
1
PC
D
fi
S
>
s
'
E
F
RIGHT
FRONT
POST
1
PC
HEADBOARD
CROSS
6
PCS
HEADBOARD
CENTER
CROSS
1
PC
©
©
©
©
©
©
©
©
©
©
©
©
©
©
&
©
©
©
Q
>
©
/
s
Vr
-
1
©
©
©
-
J
<
u
>
©
A
-
1
©
\
/
\
\
back
view
DA6580-SIL/DA6580W

LOFT
BED
WITH
DESK
PARTS
LIST
G
H
I
HEADBOARD
CENTER
CROSS
1
PC
HEADBOARD
PANEL
4
PCS
FRONT
SIDE
RAIL
1
PC
J
K
L
BACK
SIDE
RAIL
1
PC
DESK
FRONT
RAIL
1
PC
SLAT
13
PCS
M
N
O
LONG
GUARDRAIL
1
PC
SHORT
GUARDRAIL
1
PC
LEFT
LADDER
END
1
PC
P
Q
R
RIGHT
LADDER
END
1
PC
LADDER
STEP
5
PCS
GUARDRAIL
LEG
2
PCS
DA6580-SIL/DA6580W

LOFT
BED
WITH
DESK
PARTS
LIST
S
T
U
SHORT
GUARDRAIL
POST
1
PC
DESK
PANEL
1
PC
DESK
BACK
RAIL
1
PC
V
w
X
BOTTOM
BACK
GUARDRAIL
1
PC
BOTTOM
BACK
SIDE
RAIL
1
PC
SUPPORT
POST
1
PC
Y
SPACE
BLOCK
2
PCS
DA6580-SIL/DA6580W

LOFT
BED
WITH
DESK
0
©
A
©
©
.
©
r
0
©
r
®
groove
%
i
-
Qr
-
'
i
)
,
1
2
holes
F
®
®
r
©
®
Jb
&
JH
Jb
Jb
0
0
0
YY
o
o
0
0
YY
-
^
®
groove
0
0
The
2
holes
on
cross
(
F
)
face
the
same
direction
as
the
grooves
on
posts
(
A
&
B
)
.
\
/
8
PCS
0
0
8
PCS
1
One
of
the
headboard
crosses
(
E
)
has
a
warning
label
on
it
.
Do
not
use
it
in
this
step
.
Insert
wood
dowels
(
7
)
into
the
ends
of
headboard
cross
(
E
)
and
headboard
center
cross
(
F
)
.
Insert
headboard
panel
(
H
)
into
the
grooves
of
the
headboard
cross
(
E
)
and
headboard
center
cross
(
F
)
.
Attach
the
assembled
headboard
(
EHE
)
and
(
FHE
)
to
left
front
post
(
A
)
and
left
back
post
(
B
)
with
joint connectors (1) as shown. Use Allen key (8) to tighten the joint connectors (1).
DA6580-SIL/DA6580W
LOFT
BED
WITH
DESK
warning
label
©
=
7
<
7
©
©
A
0
0
0
0
groove
2
holes
o
<
ZL
©
0
/
0
©
©
r
©
'
©
x
>
A
-
s
>
A
-
0
J
&
^
t
groove
^
t
©
The
2
holes
on
cross
(
G
)
face
the
same
direction
as
the
grooves
on
posts
(
C
&
D
)
.
5
^
£
•
©
\
/
8
PCS
\
\
\
\
\
\ \
\
0
8
PCS
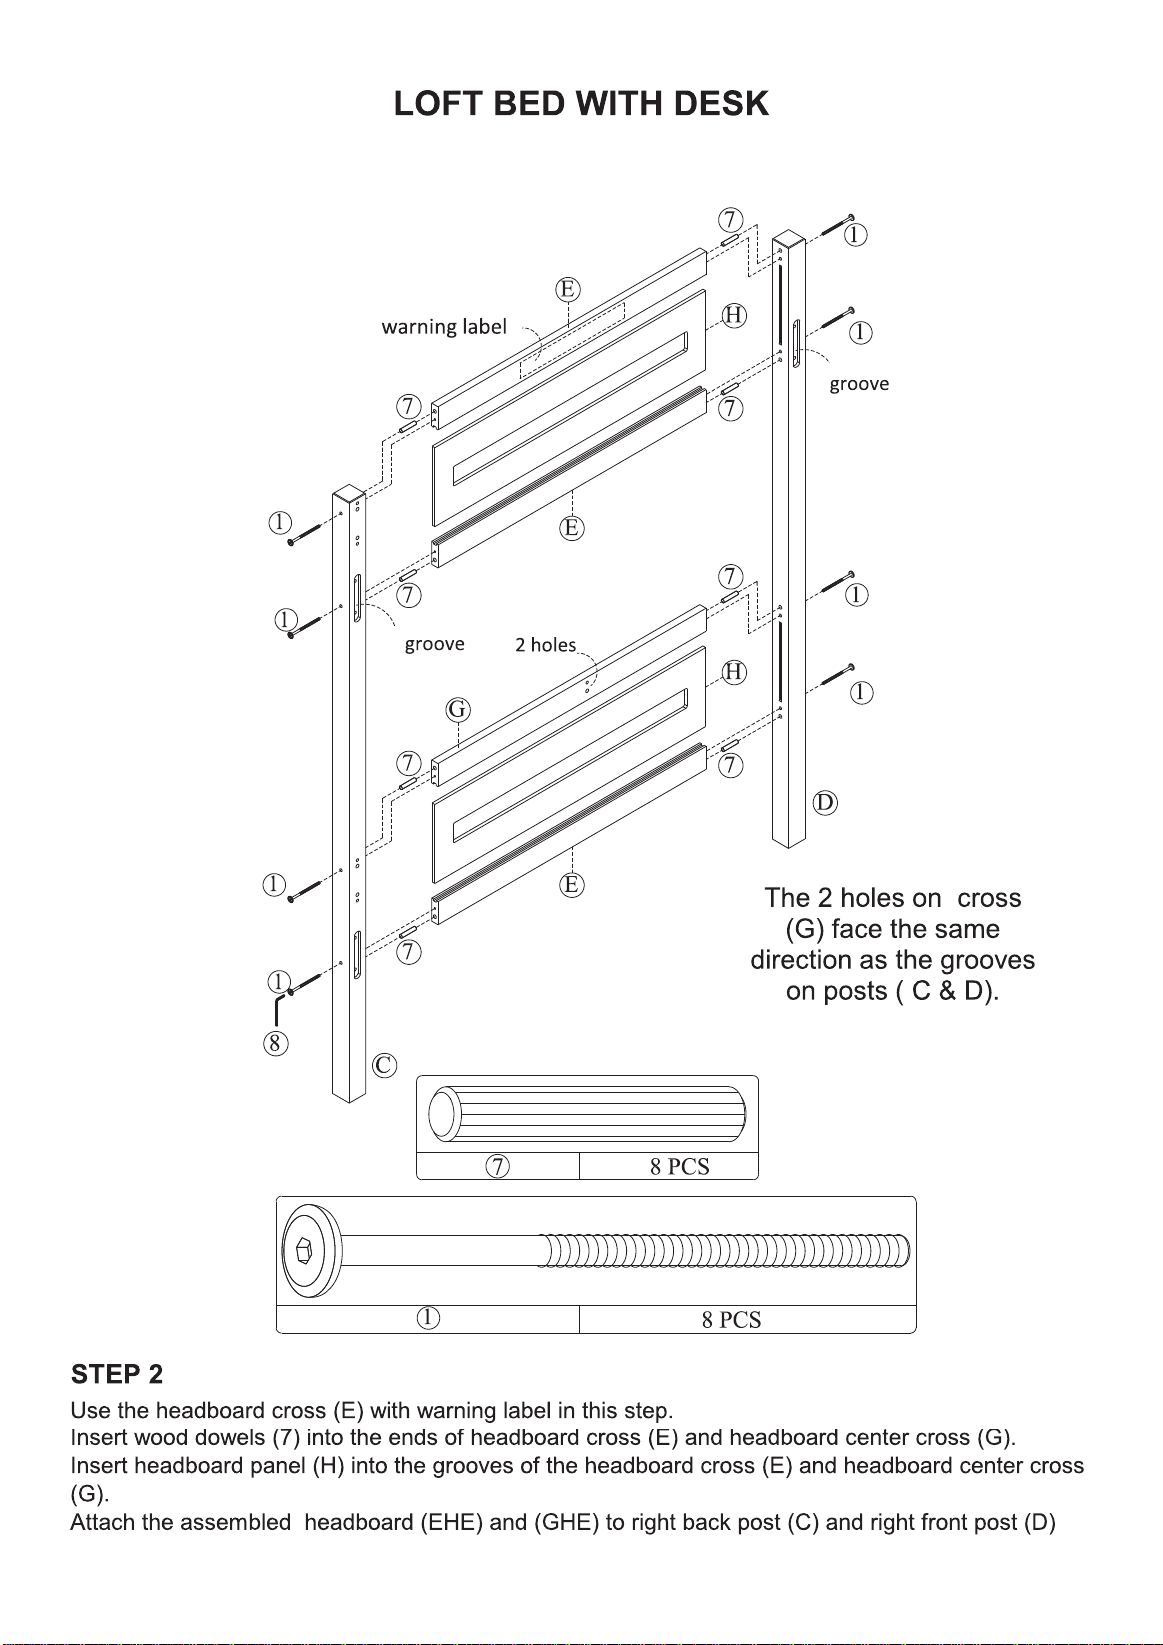
STEP
2
Use
the
headboard
cross
(
E
)
with
warning
label
in
this
step
.
Insert
wood
dowels
(
7
)
into
the
ends
of
headboard
cross
(
E
)
and
headboard
center
cross
(
G
)
.
Insert
headboard
panel
(
H
)
into
the
grooves
of
the
headboard
cross
(
E
)
and
headboard
center
cross
(
G
)
.
Attach
the
assembled
headboard
(
EHE
)
and
(
GHE
)
to
right
back
post
(
C
)
and
right
front
post
(
D
)
0
0
)
®
0
©
©
with joint connectors (1) as shown. Use Allen key (8) to tighten the joint connectors (1).
DA6580-SIL/DA6580W
LOFT
BED
WITH
DESK
S
:
5
:
M
)
©
N
©
Ho
es
on
this
side
:
>
©
5
:
©
©
0
"
s
7
©
i
N
'
-
S
G
o
.
x
2
\
\
\
0
/
/
/
©
©
2
PCS
\
©
©
10
PCS
\
0
/ / /
8
PCS
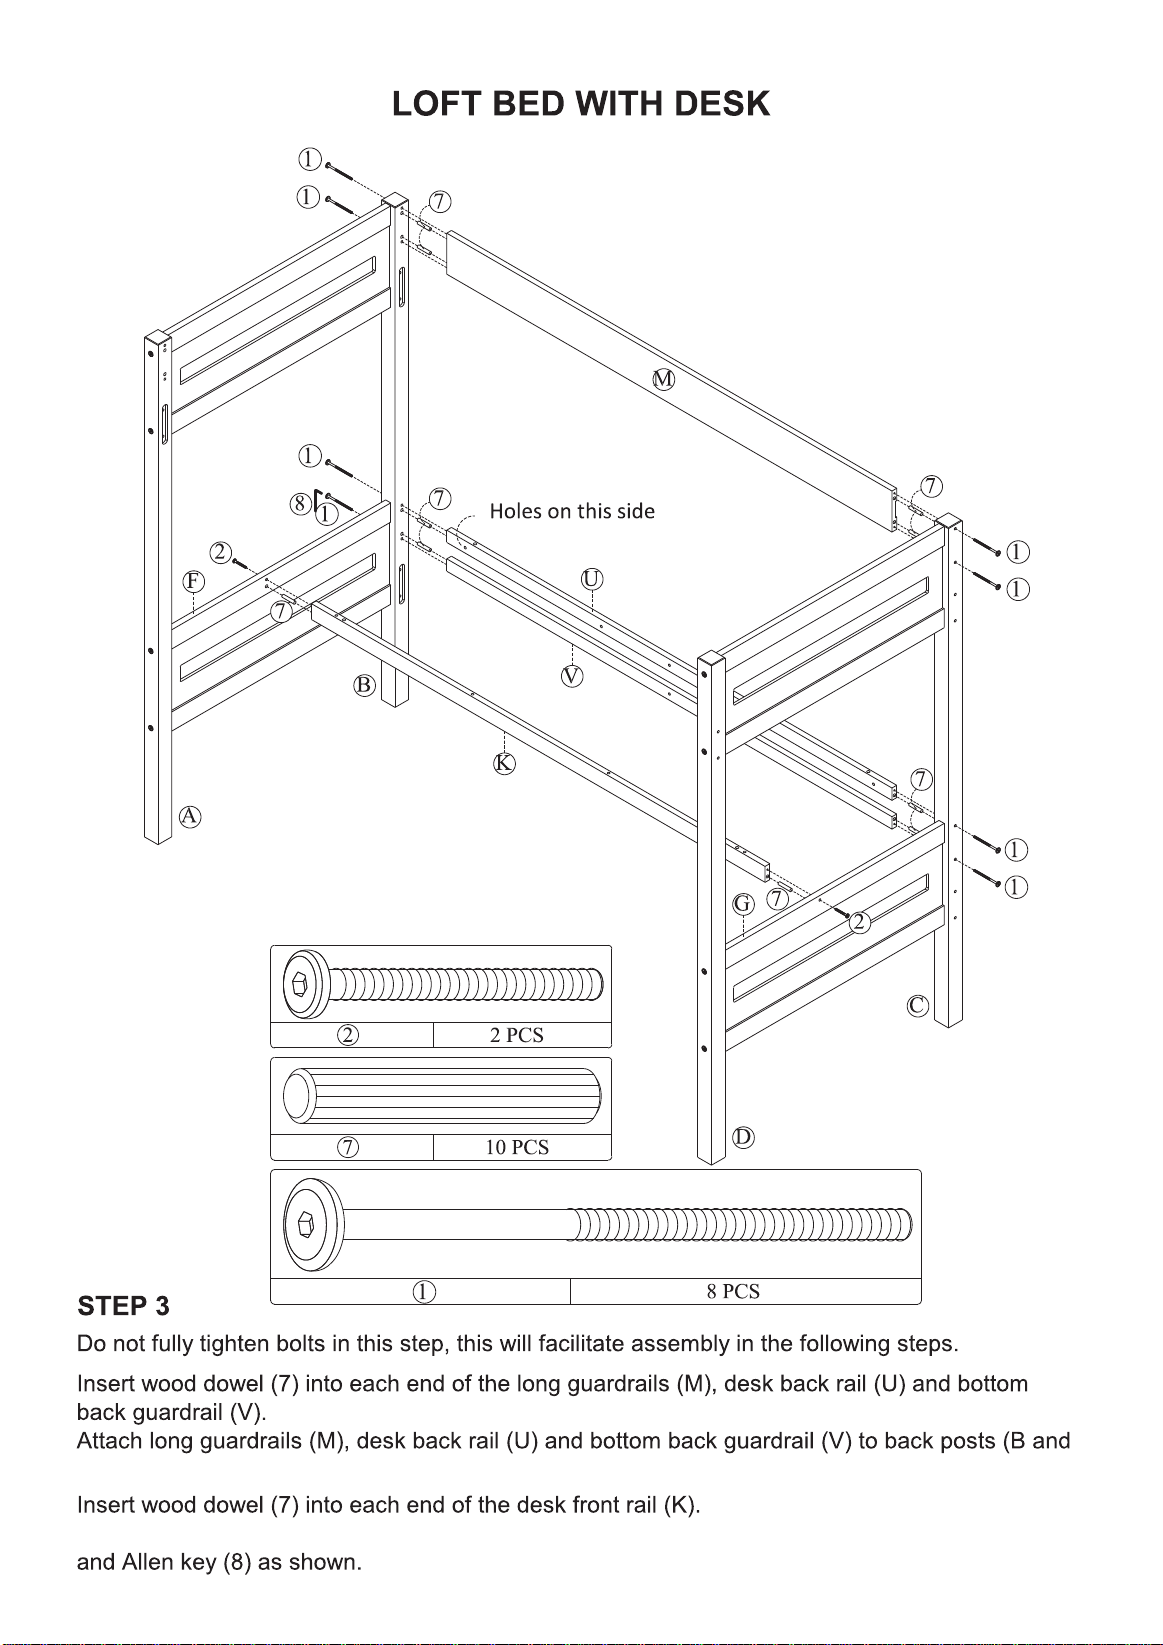
STEP
3
Do
not
fully
tighten
bolts
in
this
step
,
this
will
facilitate
assembly
in
the
following
steps
.
Insert
wood
dowel
(
7
)
into
each
end
of
the
long
guardrails
(
M
)
,
desk
back
rail
(
U
)
and
bottom
back
guardrail
(
V
)
.
Attach
long
guardrails
(
M
)
,
desk
back
rail
(
U
)
and
bottom
back
guardrail
(
V
)
to
back
posts
(
B
and
Insert
wood
dowel
(
7
)
into
each
end
of
the
desk
front
rail
(
K
)
.
Attach
desk
front
rail
(
K
)
to
headboard
center
crosses
(
F
and
G
)
with
joint
connectors
(
2
)
and
Allen
key
(
8
)
as
shown
.
)
)
)
)
)
)
)
)
)
C) with joint connectors (3) and Allen key (8) as shown.
Attach desk front rail (K) to headboard center crosses (F and G) with joint
connectors (2)
DA6580-SIL/DA6580W

LOFT
BED
WITH
DESK
5
0
©
J
r
\
5
&
©
&
©
©
<
S
>
©
&
©
6
*
V
.
©
9
m
©
/
-
«
s
>
©
'
s
$
>
s
®
r
\
$
©
5
/
©
/
/
/
/
/
/
©
/
/
/
/
/
/
\
/
<
B
>
Back
View
@
)
))))
))
)))
)))
)))
))
)))
))
))))
))
)))
))
))))
))
)))
))
))))
))
)
©
12
PCS
STEP
4
©
12
PCS
Insert
barrel
nuts
(
5
)
into
top
front
side
rail
(
I
)
.
Attach
top
front
side
rail
(
I
)
to
front
posts
(
A
&
D
)
with
joint
connectors
(
1
)
as
shown
.
Insert
barrel
nut
(
5
)
into
top
back
side
rail
(
J
)
and
bottom
back
side
rail
(
W
)
.
Attach
top
back
side
rail
(
J
)
and
bottom
back
side
rail
(
W
)
to
back
posts
(
B
&
C
)
with
joint
connectors
(
1
)
as
shown
.
Tighten
joint
connectors
(
1
)
with
the
Allen
key
(
8
)
.
DA6580-SIL/DA6580W
LOFT
BED
WITH
DESK
CD
,
EN
)
0
)
/
/
*
©
»
;
0
©
2
PCS
\ \
\
\
\
0
©
12
)
2
PCS
4
PCS
\
/
2
PCS
\ \ \
\
0
2
PCS
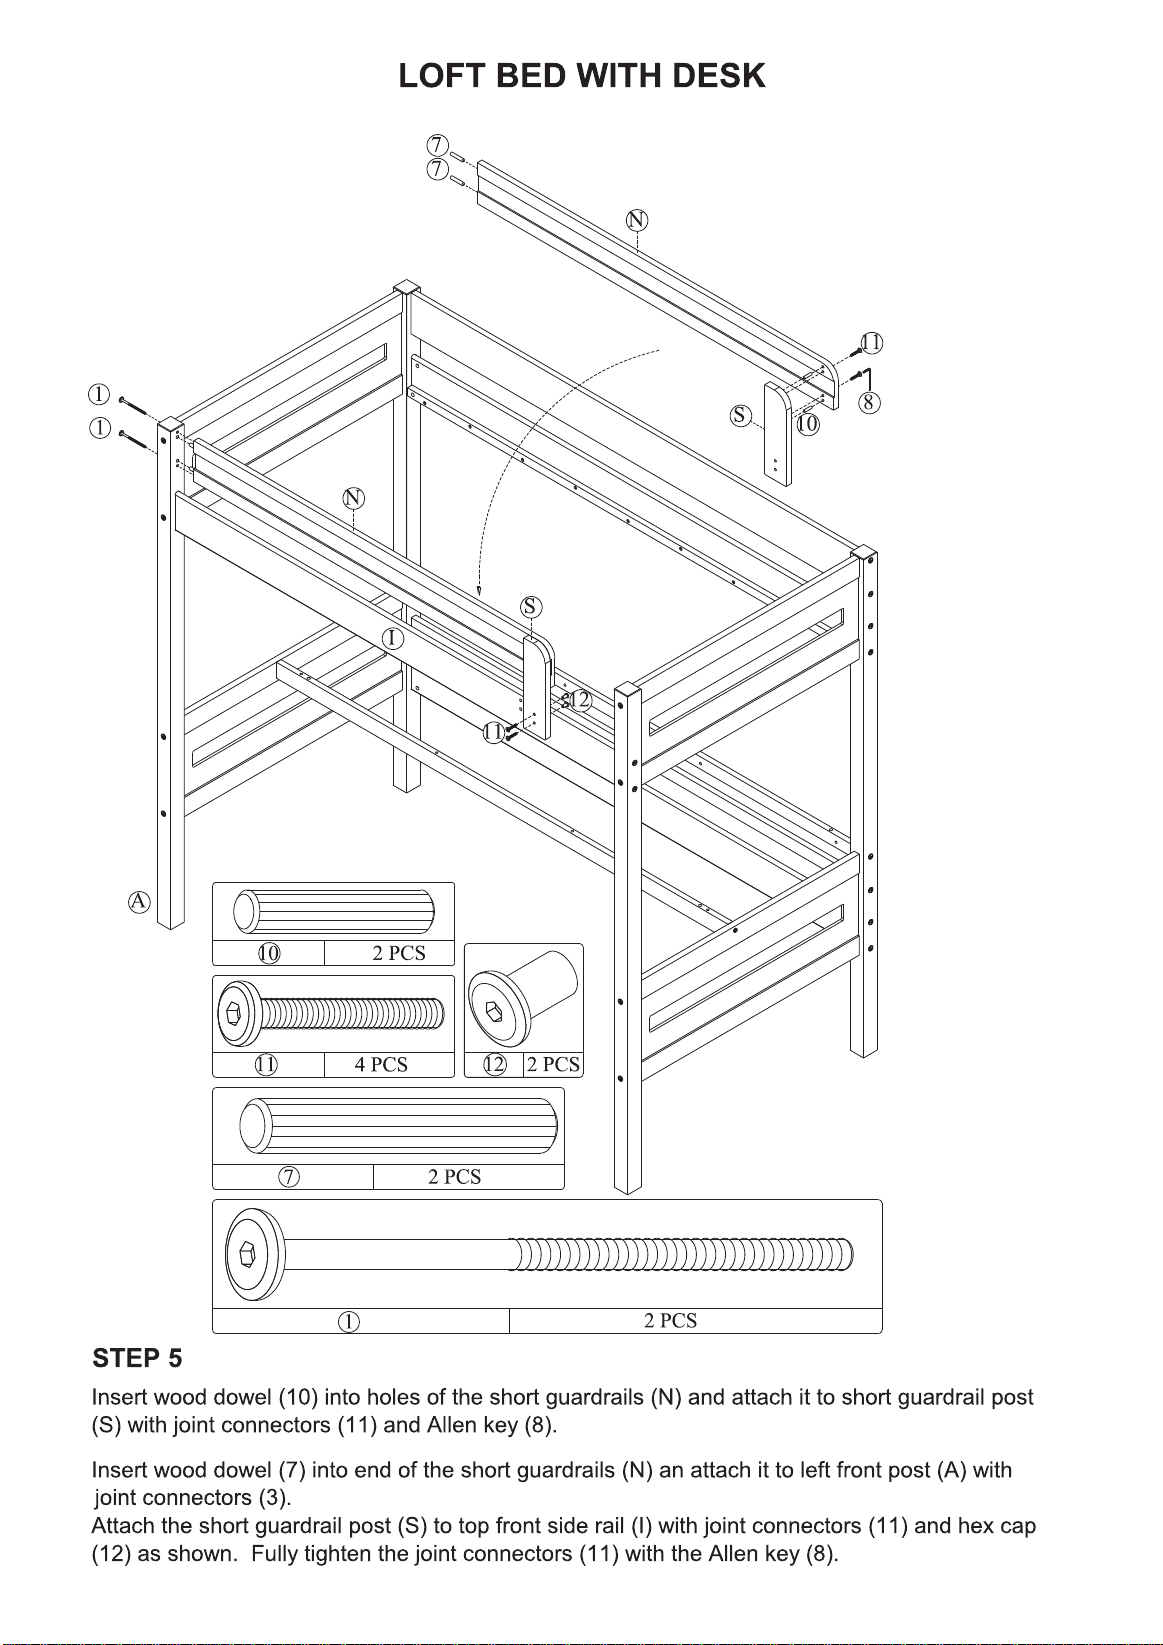
STEP
5
Insert
wood
dowel
(
10
)
into
holes
of
the
short
guardrails
(
N
)
and
attach
it
to
short
guardrail
post
(
S
)
with
joint
connectors
(
11
)
and
Allen
key
(
8
)
.
Insert
wood
dowel
(
7
)
into
end
of
the
short
guardrails
(
N
)
an
attach
it
to
left
front
post
(
A
)
with
joint
connectors
(
3
)
.
Attach
the
short
guardrail
post
(
S
)
to
top
front
side
rail
(
I
)
with
joint
connectors
(
11
)
and
hex
cap
(
12
)
as
shown
.
Fully
tighten
the
joint
connectors
(
11
)
with
the
Allen
key
(
8
)
.
©
©
©
DA6580-SIL/DA6580W

LOFT
BED
WITH
DESK
-
-
a
a
t
©
9
©
©
9
r
®
(
D
m
0
)
M
3
PCS
STEP
6
Attach
support
post
(
X
)
to
desk
back
rail
(
U
)
,
bottom
back
guardrail
(
V
)
and
bottom
back
side
rail
(
W
)
with
joint
connectors
(
9
)
as
shown
.
Tighten
joint
connectors
(
9
)
with
the
Allen
key
(
8
)
.
DA6580-SIL/DA6580W
LOFT
BED
WITH
DESK
a
7
7
A
7
0
0
)
0
A
©
P
13
)
0
-
0
©
©
<
Q
>
0
0
7
\
0
/
0
6
PCS
©
6
PCS
6
PCS
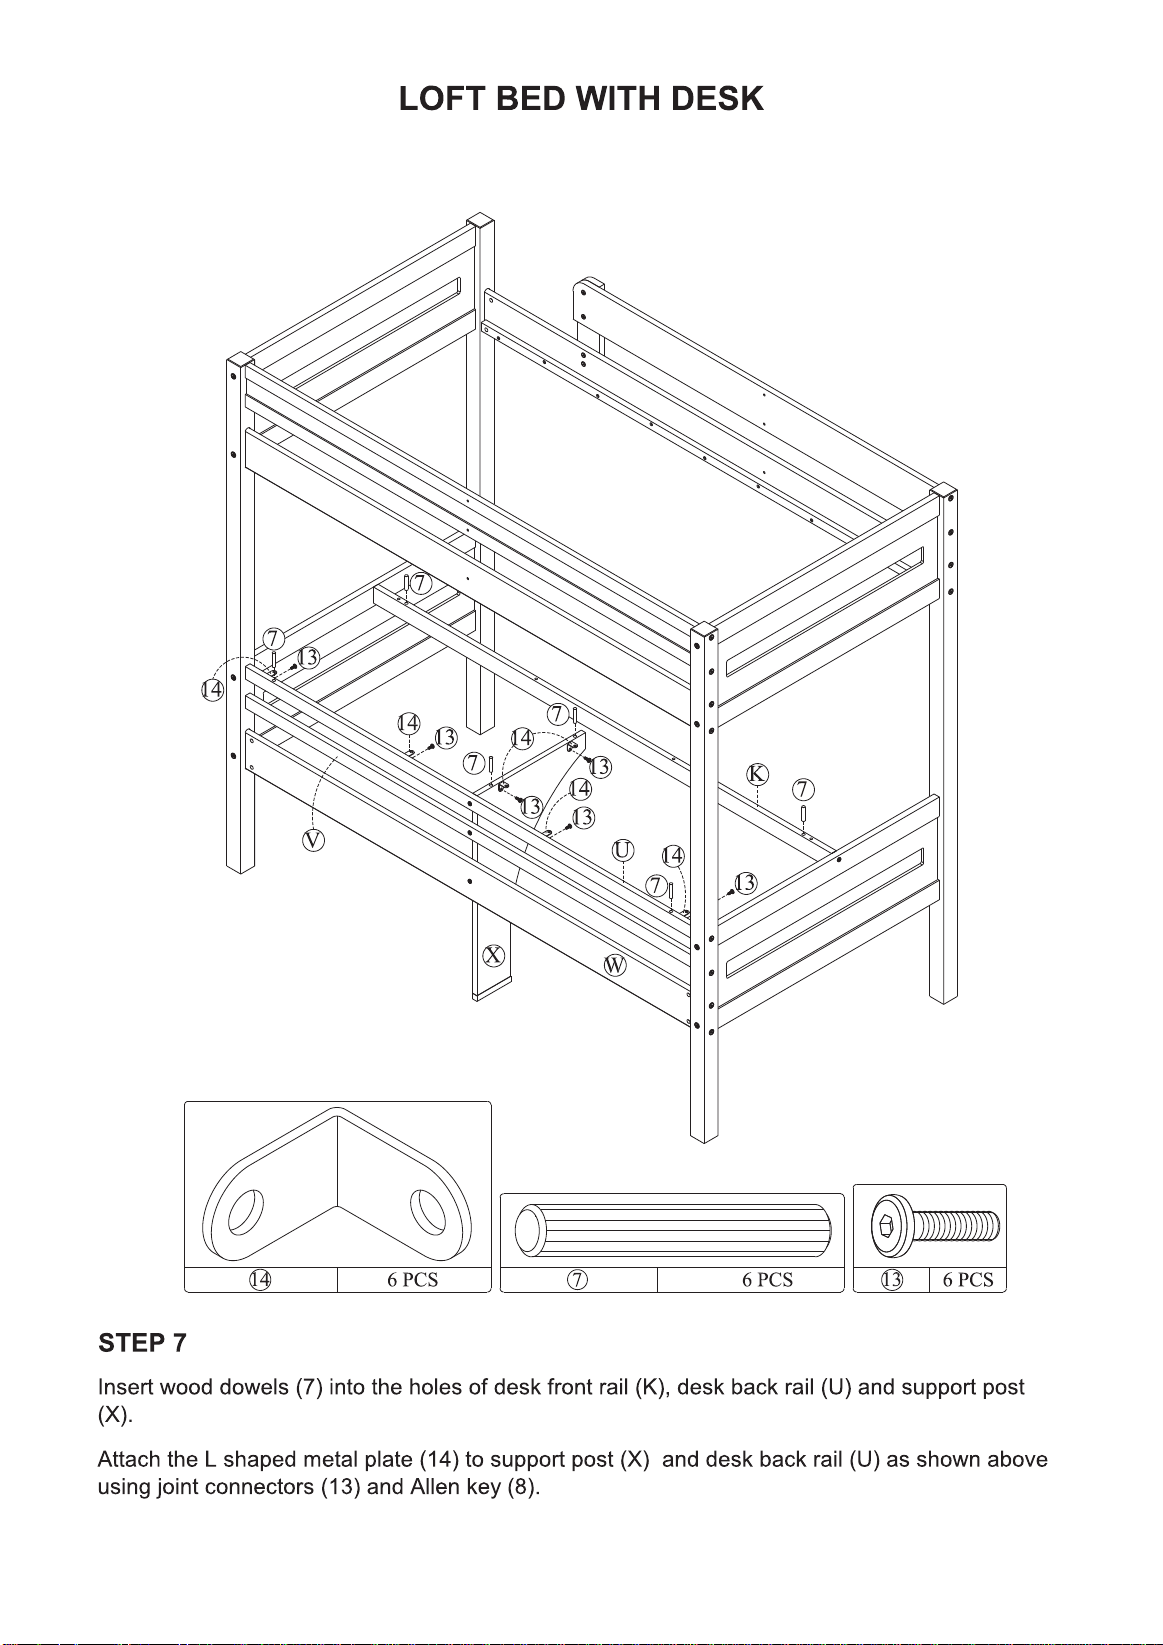
STEP
7
Insert
wood
dowels
(
7
)
into
the
holes
of
desk
front
rail
(
K
)
,
desk
back
rail
(
U
)
and
support
post
(
X
)
.
Attach
the
L
shaped
metal
plate
(
14
)
to
support
post
(
X
)
and
desk
back
rail
(
U
)
as
shown
above
using
joint
connectors
(
13
)
and
Allen
key
(
8
)
.
DA6580-SIL/DA6580W
LOFT
BED
WITH
DESK
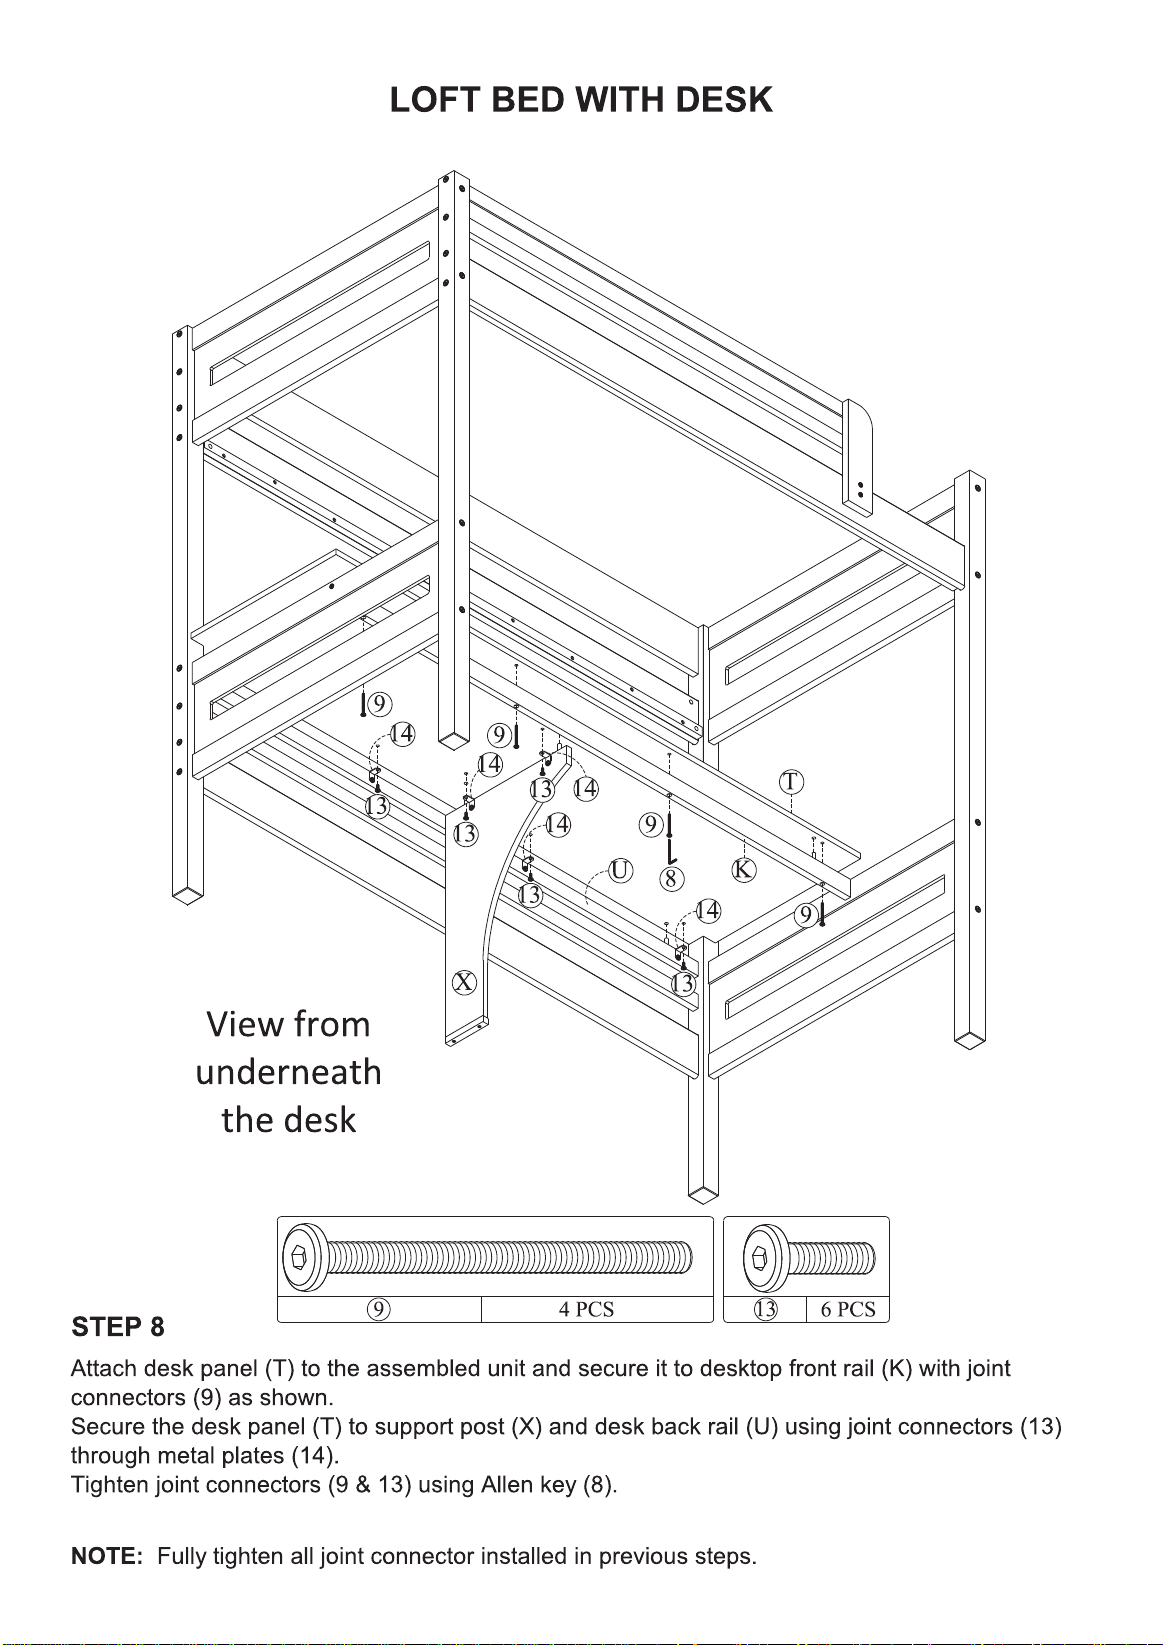
STEP
8
T
(
g
)
a
0
a
o
A
0
i
©
i
0
0
*
?
T
)
(
D
3
0
9
A
9
(
S
\
\\
>
\
\
0
J
u
©
6
PCS
View
from
underneath
the
desk
\
\\ \\
\\
\
\
0
J
n n n n n n
4
PCS
Attach
desk
panel
(
T
)
to
the
assembled
unit
and
secure
it
to
desktop
front
rail
(
K
)
with
joint
connectors
(
9
)
as
shown
.
Secure
the
desk
panel
(
T
)
to
support
post
(
X
)
and
desk
back
rail
(
U
)
using
joint
connectors
(
13
)
through
metal
plates
(
14
)
.
Tighten
joint
connectors
(
9
&
13
)
using
Allen
key
(
8
)
.
NOTE
:
Fully
tighten
all
joint
connector
installed
in
previous
steps
.
DA6580-SIL/DA6580W
LOFT
BED
WITH
DESK
®
SPACE
BLOCK
:
2
PCS
©
ONE
PER
SIDE
I
©
^
T
©
_
T
©
_
©
I
©
|
PHILLIPS
]
©
I
SCREWDRIVER
©
I
©
^
I
©
_
©
f
©
I
©
4
4
4
4
4
J
4
4
4
4
4
4
4
©
©
26
PCS
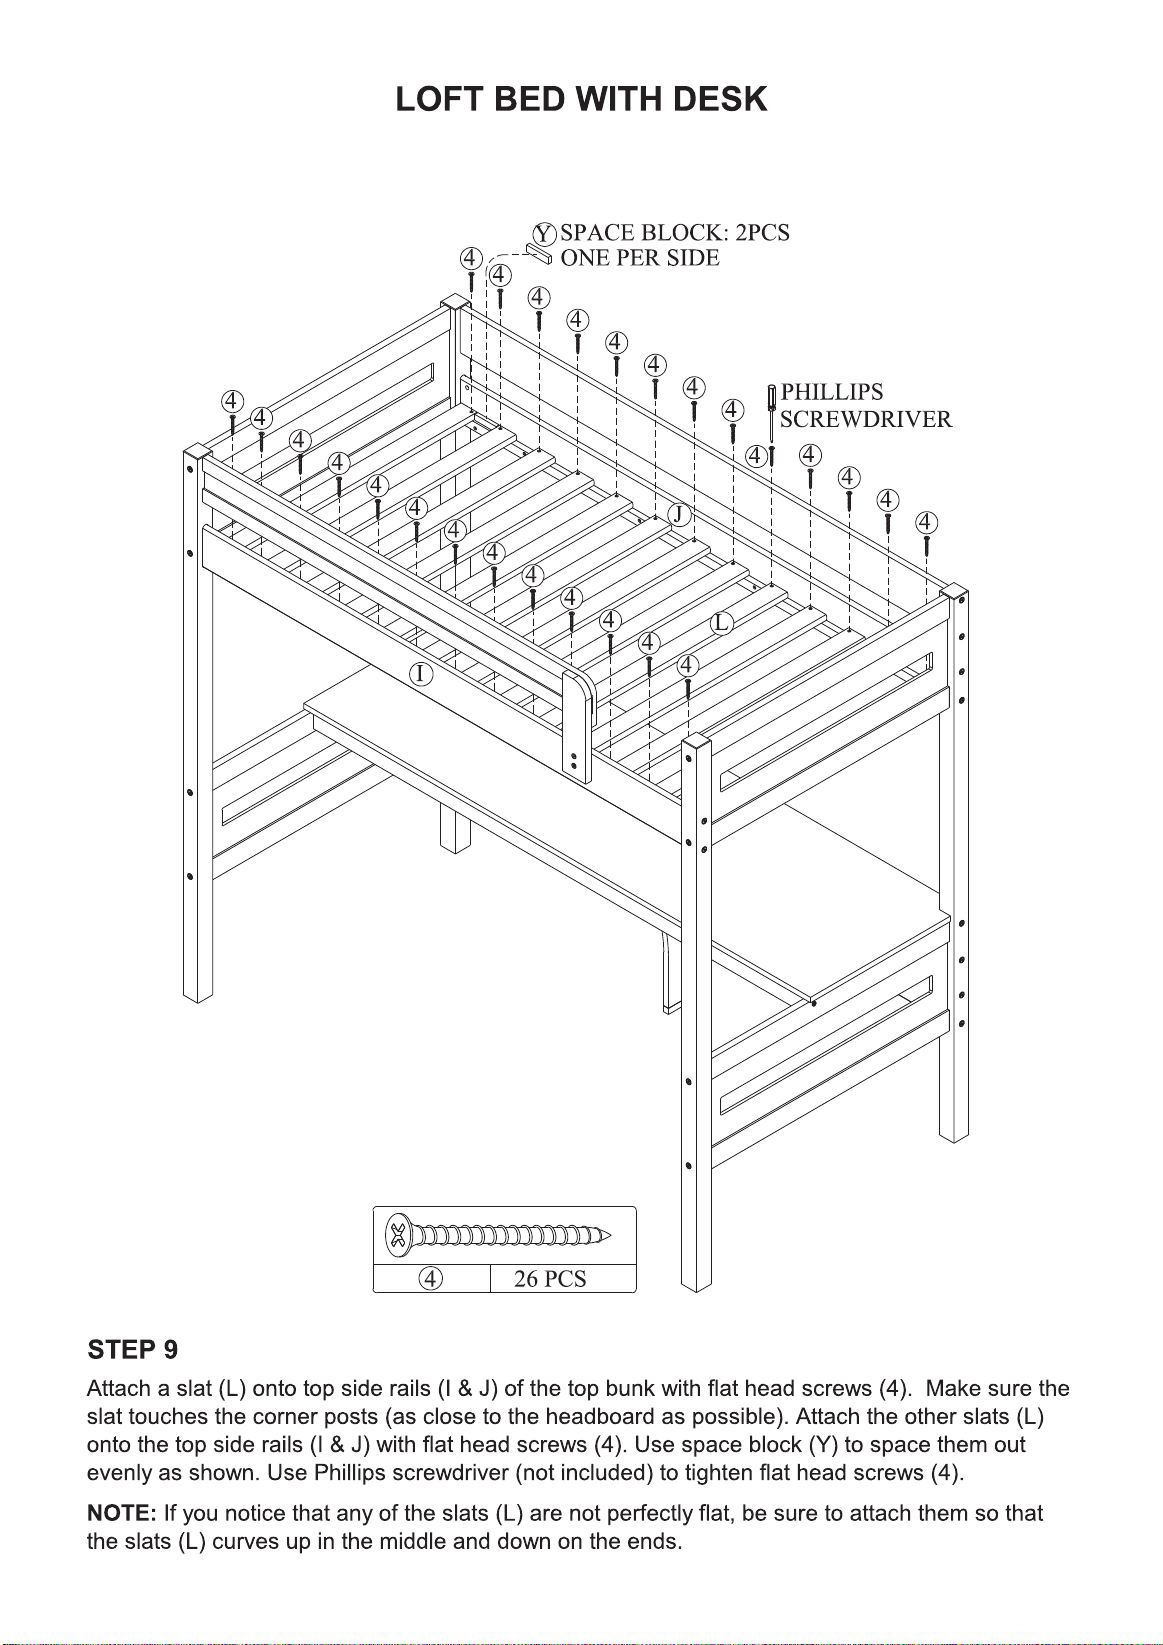
STEP
9
Attach
a
slat
(
L
)
onto
top
side
rails
(
I
&
J
)
of
the
top
bunk
with
flat
head
screws
(
4
)
.
Make
sure
the
slat
touches
the
corner
posts
(
as
close
to
the
headboard
as
possible
)
.
Attach
the
other
slats
(
L
)
onto
the
top
side
rails
(
I
&
J
)
with
flat
head
screws
(
4
)
.
Use
space
block
(
Y
)
to
space
them
out
evenly
as
shown
.
Use
Phillips
screwdriver
(
not
included
)
to
tighten
flat
head
screws
(
4
)
.
NOTE
:
If
you
notice
that
any
of
the
slats
(
L
)
are
not
perfectly
flat
,
be
sure
to
attach
them
so
that
the
slats
(
L
)
curves
up
in
the
middle
and
down
on
the
ends
.
DA6580-SIL/DA6580W
LOFT
BED
WITH
DESK
©
&
a
©
v
©
9
.
9
©
0
a
©
©
0
o
ft
©
5
$
a
©
®
X
®
8
0
5
ft
©
CJ
®
O
®
s
0
x
9
©
©
0
x
5
©
©
X
©
p
\
\
\
\ \
\
0
/
)
/
/
)
/
©
10
PCS
/
©
10
PCS
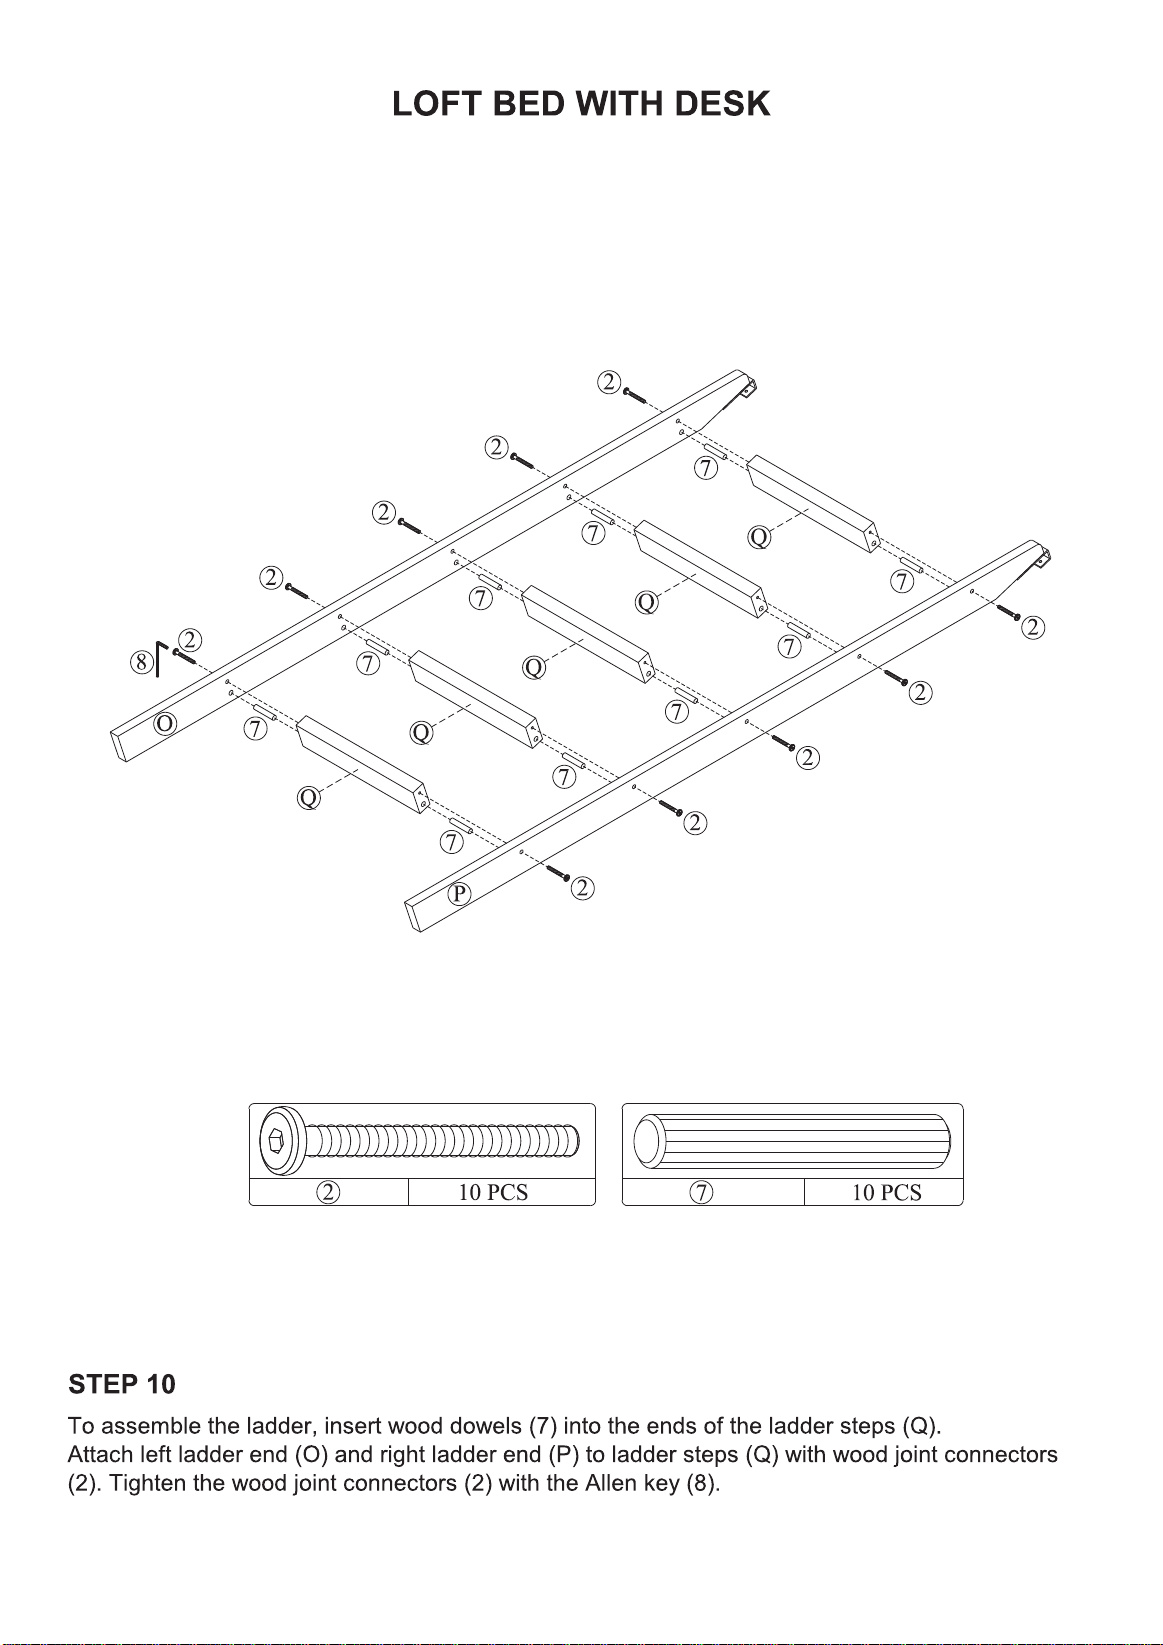
STEP
10
To
assemble
the
ladder
,
insert
wood
dowels
(
7
)
into
the
ends
of
the
ladder
steps
(
Q
)
.
Attach
left
ladder
end
(
O
)
and
right
ladder
end
(
P
)
to
ladder
steps
(
Q
)
with
wood
joint
connectors
(
2
)
.
Tighten
the
wood
joint
connectors
(
2
)
with
the
Allen
key
(
8
)
.
DA6580-SIL/DA6580W
LOFT
BED
WITH
DESK
i
i
6
6
6
AT
6
6
8
6
0
c
©
2
PCS
6
PCS
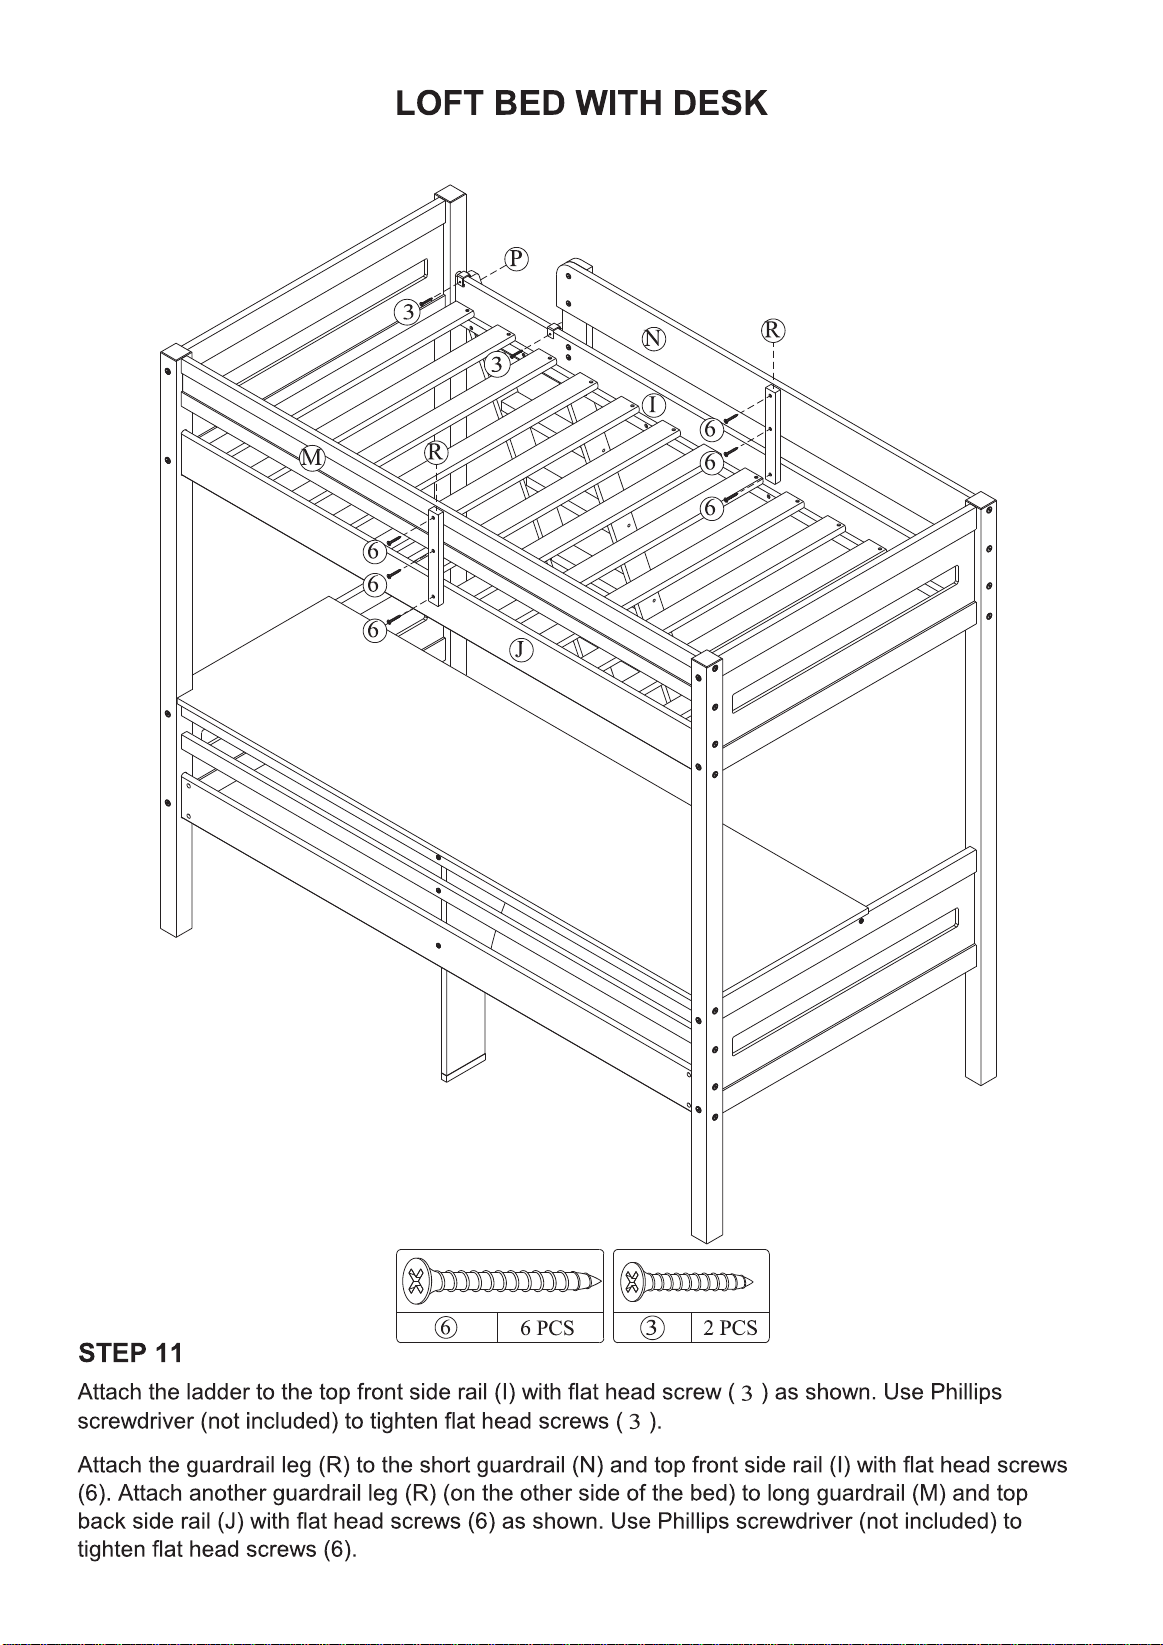
STEP
11
Attach
the
ladder
to
the
top
front
side
rail
(
I
)
with
flat
head
screw
(
)
as
shown
.
Use
Phillips
screwdriver
(
not
included
)
to
tighten
flat
head
screws
( )
.
Attach
the
guardrail
leg
(
R
)
to
the
short
guardrail
(
N
)
and
top
front
side
rail
(
I
)
with
flat
head
screws
(
6
)
.
Attach
another
guardrail
leg
(
R
)
(
on
the
other
side
of
the
bed
)
to
long
guardrail
(
M
)
and
top
back
side
rail
(
J
)
with
flat
head
screws
(
6
)
as
shown
.
Use
Phillips
screwdriver
(
not
included
)
to
tighten
flat
head
screws
(
6
)
.
DA6580-SIL/DA6580W

LOFT
BED
WITH
DESK
/
j
\
CAUTION
:
This
unit
is
intended
for
use
only
with
the
products
and
/
or
maximum
weights
indicated
.
Use
with
other
products
and
/
or
products
heavier
than
the
maximum
weights
indicated
may
result
in
instability
or
cause
possible
injury
.
DO
NOT
ALLOW
HORSEPLAY
ON
OR
UNDER
THE
BED
AND
PROHIBIT
JUMPING
ON
THE
BED
.
;
DO
NOT
ALLOW
CHILDREN
UNDER
6
YEARS
OF
AGE
TO
USE
THE
UPPER
BUNK
.
BED
IS
DESIGNED
FOR
CHILDREN
RANGING
FROM
6
YEARS
OF
AGE
TO
YOUNG
TEENAGERS
.
USE
ONLY
A
MATTRESS
WHICH
IS
74
"
-
75
"
LONG
AND
1
/
2
"
-
38
1
/
2
"
WIDE
ON
BUNK
.
ENSURE
THICKNESS
OF
MATTRESS
DOES
NOT
EXCEED
6
"
.
MAXIMUM
WEIGHT
CAPACITY
:
-
165
LBS
(
75
KGS
)
ON
UPPER
BUNK
-
100
LBS
ON
DESK
That
'
s
it
!
You
'
ve
finished
assembling
your
loft
bed
.
DO
NOT
RETURN
PRODUCT
TO
THE
STORE
.
If
a
part
is
missing
or
damaged
,
contact
our
customer
service
department
.
We
will
replace
the
part
FREE
of
charge
.
m
Tel
#
:
1
-
800
-
295
-
1980
E
-
Mail
:
das
@
dorel
.
com
DA6580-SIL/DA6580W