
Loading ...
Loading ...
Loading ...
10 PROPOSITION 65
WARNING
This product contains a chemical known to the
state of California to cause cancer, birth defects
or other reproductive harm. Some dust created by
power sanding, sawing, grinding, drilling, and other
construction activities contains chemicals known to
cause cancer, birth defects or other reproductive
harm. Some examples of these chemicals are:
• Lead from lead-based paints;
• Crystalline silica from bricks and cement and other
masonry products;
• Arsenic and chromium from chemically treated
lumber.
Your risk of exposure to these chemicals varies
depending on how often you do this type of work. To
reduce your exposure to these chemicals, work in a
well-ventilated area, and work with approved safety
equipment, such as dust masks that are specially
designed to filter out microscopic particles.
11 INSTALLATION
WARNING
Remove the battery pack from the machine before
installation.
WARNING
Do not use accessories that are not recommended
for this machine.
11.1 UNPACK THE MACHINE
WARNING
Make sure that you correctly assemble the machine
before use.
WARNING
• If parts of the machine are damaged, do not use
the machine.
• If parts are missing, do not operate the machine.
• If parts are damaged or missing, contact the
service center.
1. Open the package.
2. Read the documentation provided in the box.
3. Remove all the unassembled parts from the box.
4. Remove the machine from the box.
5. Discard the box and packing material in
compliance with local regulations.
WARNING
For your personal safety, do not insert battery before
the tool is assembled completely.
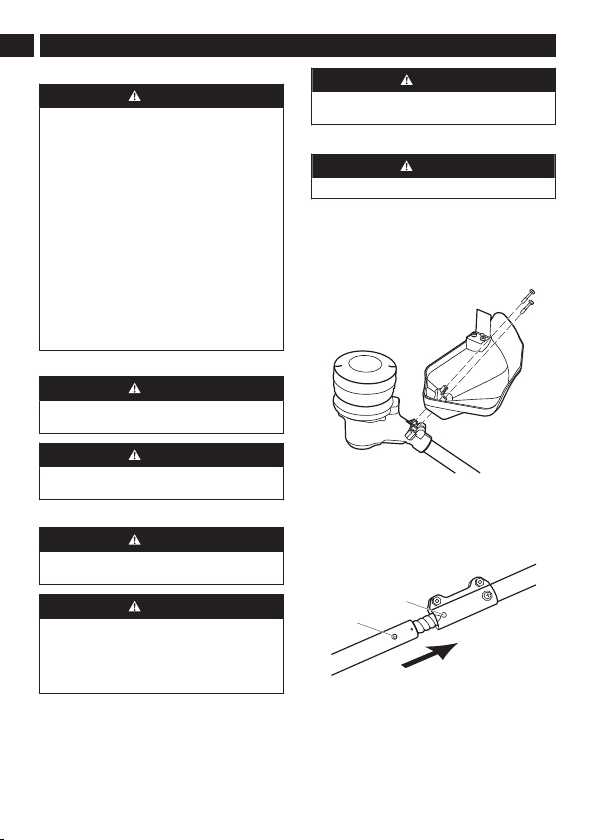
11.2 ATTACH THE GUARD
WARNING
Do not touch the cut-off blade.
1. Remove the screws from the trimmer head with a
Phillips head screwdriver (not included).
2. Put the guard onto the trimmer head.
3. Align the screw holes on the guard with the screw
holes on the trimmer head.
4. Tighten the screws.
11.3 ASSEMBLE THE SHAFT
1. Loosen the screw on the coupler.
2. Push in the release button (1) on the lower shaft.
3. Align the release button with the positioning hole
(2) and slide the two shafts together.
2
1
4. Turn the lower shaft until the button locks into the
positioning hole.
10
English
EN
Loading ...
Loading ...
Loading ...