Loading ...
• DO NOT USE THIS EXTRACTOR ON HARD FLOORS
UNLESS YOU HAVE THE PROPER HARD FLOOR
ATTACHMENT. USING THIS PRODUCT ON HARD
FLOORS MAY SCRATCH OR DAMAGE YOUR FLOOR.
• Water will drip from the tool after use and may
puddle. To avoid damage to wood and laminate
flooring and to avoid potential slip hazard, after
use (a) do not leave the product on wood and
laminate surfaces and remove to a hard surface
and (b) place unit on absorbent material (such
as a towel) to soak up drips.
BATTERY DISPOSAL
WARNING
- RISK OF EXPLOSION OR
EXPOSURE TO TOXIC MATERIAL
LITHIUM-ION BATTERIES
The battery must be collected, recycled or
disposed of in an environmentally sound
manner. The EPA certified RBRC Battery
Recycling Seal on the lithium-ion [Li-ion]
battery indicated Techtronic Industries, is
voluntarily participating in an industry program
to collect and recycle these batteries at the end
of their useful life, when taken out of service
in the United States or Canada. The RBRC
program provides a convenient alternative to
placing used Li-ion batteries into the trash or
the municipal waste stream, which may be
illegal in your area. Please visit www.rbrc.org/
call2recycle/ for information on Li-ion battery
recycling and disposal bans/restrictions in your
area. HOOVER’s involvement
in this program is part
of our commitment to
preserving our environment
and conserving our natural
resources.
GETTING STARTED
The charger included with your Clean Slate may
dier from what is shown in this user manual.
Please reference the Accessories section of this
manual or contact us at Hoover.com for more
information of your specific charger.
CAUTION: Not to be used for grooming
a pet.
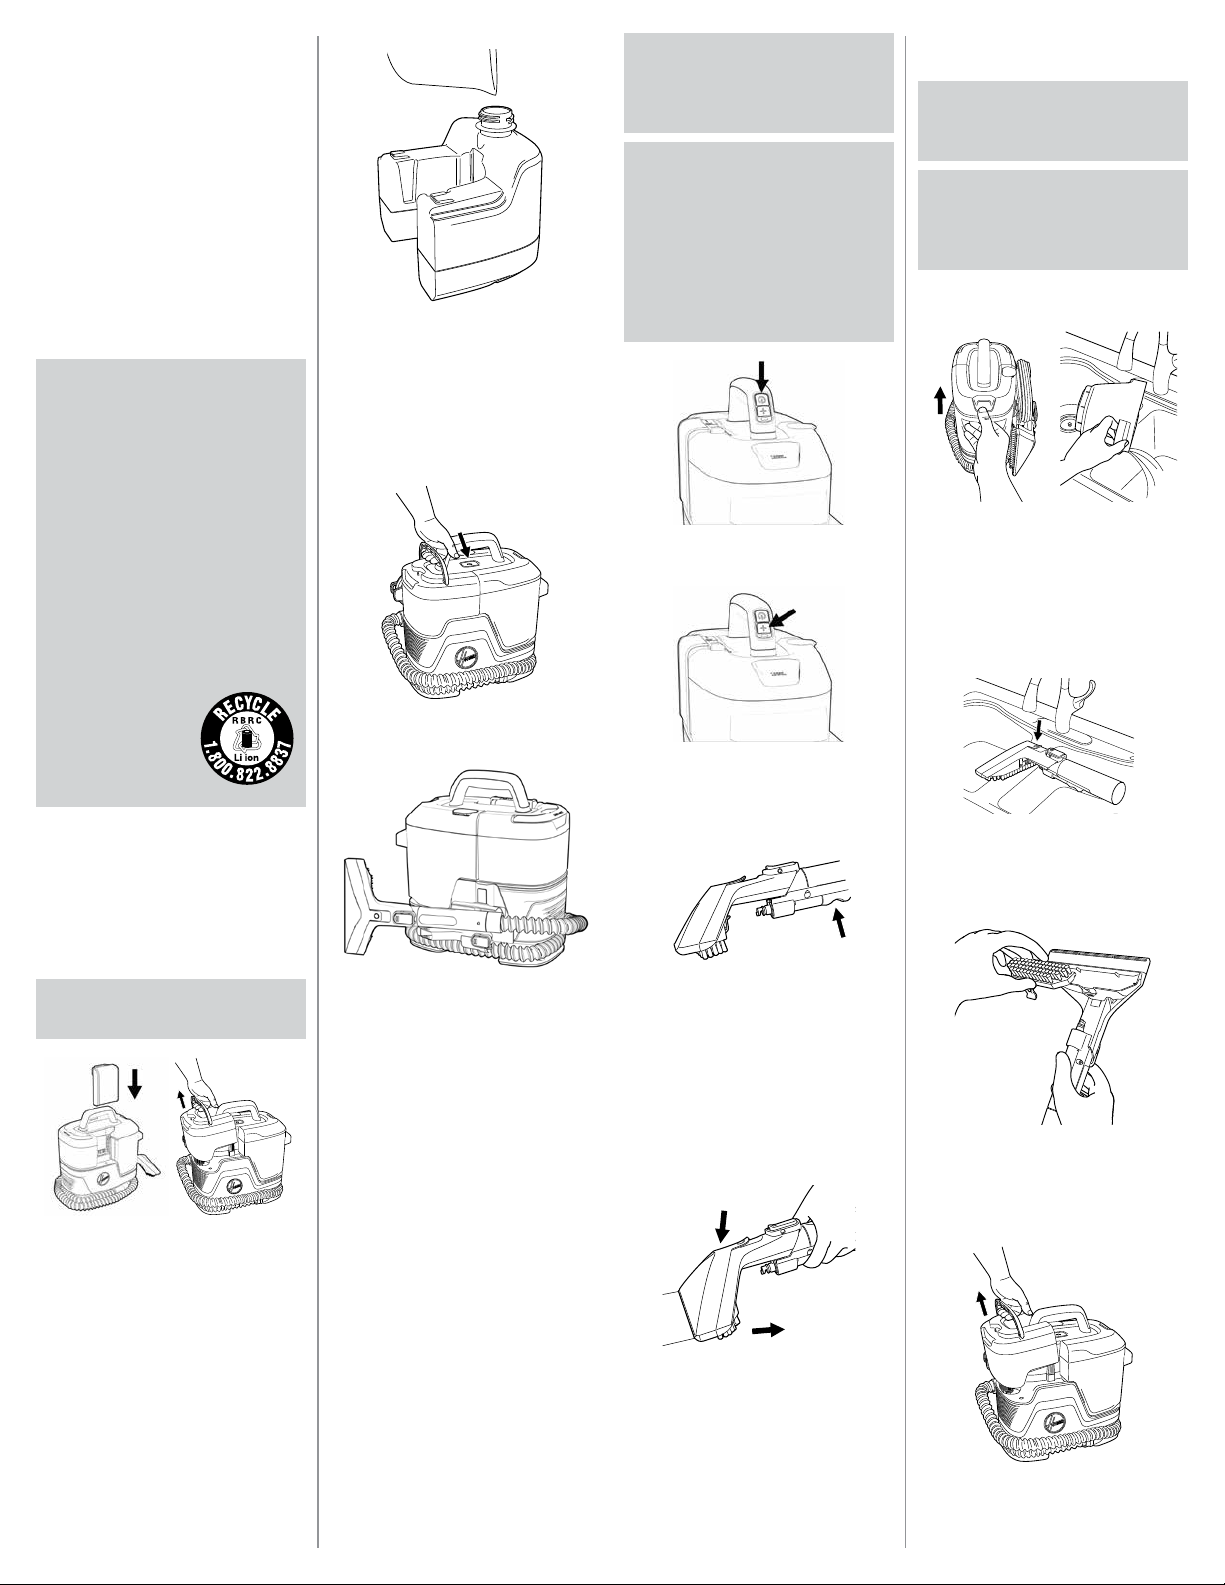
1
Place battery into unit, remove Solution Tank
from the side of the unit, then remove the cap.
2
Follow the formula ratio chart and use the
included measuring cup to add cleaning formula
in the Solution Tank.
CLEANING FLUID: SEE THE HOOVER SOLUTION
GUIDE insert or visit Hoover. com/cleaning-
solutions.
3
Replace and tighten cap. Slide the Solution Tank
back into the unit to secure the tank.
4
Unwrap hose from unit. Select preferred tool and
make sure it is attached securely.
OPERATION
BEFORE YOU BEGIN CLEANING
Use your Hoover upholstery and spot cleaner
only if upholstery fabric is marked with a “W” (for
“wet” clean) or “S/W” (for “solvent/dry” or “wet”
clean). Don’t clean fabric marked “S” (“solvent/
dry” clean only).
Test for colorfastness in a small, hidden area.
Gently rub surface with a dampened white cloth.
Wait ten minutes and check for color removal or
bleed with a white paper towel.
NOTE: To prevent staining, use plastic or
aluminum foil to protect wood or metal surfaces
from possible water spray.
NOTE: To avoid damage to wood floors
underneath area rugs or carpet, place waterproof
material (e.g. plastic) underneath them before
cleaning.
CAUTION: DO NOT USE THIS
EXTRACTOR ON HARD FLOORS. USING THIS
PRODUCT ON HARD FLOORS MAY SCRATCH OR
DAMAGE YOUR FLOOR.
CAUTION: Do not clean over floor
electrical outlets. Water will drip from the tool
after use and may puddle. To avoid damage
to wood and laminate flooring and to avoid
potential slip hazard, after use (a)do not leave
the product on wood and laminate surfaces and
move to a hard surface and (b) place unit on an
absorbent material (such as a towel) to soak
up drips.
1
Press Red Power button on the handle to turn ON.
2
When cleaning tough stains, use boost mode for
more power. Press the (+) sign located under the
power button. To turn o boost mode, press the
(+) sign again. Using boost mode reduces run
time to up to 15 min.
3
First, remove any large debris before using the
machine. Use preferred tool to suction up any
excess liquid from the stain.
Hold tool about 5 inches over the spot or stain.
Spray a generous amount of cleaning solution
over the soiled area by pressing the trigger
behind the tool and scrub the stain in a back-
and-forth motion.
4
To lift the stain, suction up the dirt and cleaning
solution by applying downward pressure on the
front of the cleaning tool and pulling towards
you. Repeat as needed.
IMPORTANT: Empty the Recovery Tank when it
reaches the MAX fill line. There will be an audible
change, lights will flash and the unit will turn o.
Ensure the tank is secured before cleaning.
MAINTENANCE
WARNING: To reduce the risk from
moving parts, remove the battery before
servicing.
WARNING: To reduce risk of fire
and electric shock due to internal component
damage, use only HOOVER® cleaning products
intended for use with the appliance as noted.
HOW TO CLEAN RECOVERY TANK
Leave the battery in machine. Press TANK
RELEASE button. Then lift lid o for emptying
and rinsing. Clean water will help remove
dirt & debris from the tank. Let air dry before
reinstalling.
HOW TO CLEAN TOOLS
1
Remove the tool from the hose. Rinse hand tool
under faucet. Remove nozzle cover by unlatching
from the top.
2
Pull the release tab to remove the insert and
rinse under faucet.
HOW TO CLEAN HOSE
1
Remove the solution tank and fill with warm water
(max 140˚F (60˚C)) to the small area fill line.
Loading ...
Loading ...
Loading ...