1
M 18 DIGITAL MIXER
owner’s manual

FCC & IC GRANT
FCC ID: 2AHDK-M18DIGI
IC: 21113-M18DIGI
INFORMATION TO THE USER:
NOTE: This equipment has been tested and found to comply with the limits for a Class A digital device, pursuant to part 15 of the FCC Rules. These
limits are designed to provide reasonable protection against harmful interference when the equipment is operated in a commercial environment.
This equipment generates, uses, and can radiate radio frequency energy and, if not installed and used in accordance with the instruction manual,
may cause harmful interference to radio communications. Operation of this equipment in a residential area is likely to cause harmful interference in
which case the user will be required to correct the interference at his own expense.
ENGLISH
FCC & IC DIRECTIVES
FCC ID: 2AHDK-M18DIGI
IC: 21113-M18DIGI
INFORMATIONS À L’UTILISATEUR:
REMARQUE: Cet appareil a fait l’objet de tests et a été déclaré conforme aux normes des appareils numériques de classe A, conformément à la partie
15 de la réglementation FCC. Ces limites sont conçues pour offrir une protection raisonnable contre les interférences néfastes dans une installation
résidentielle. Ce matériel génère, utilise et peut émettre de l’énergie sous forme de fréquences radio et, s’il n’est pas installé et utilisé conformément
aux instructions, il peut générer des interférences néfastes pour les communications radio. Il est cependant impossible de garantir qu’il n’y aura pas
d’interférences au sein d’une installation particulière. Si ce matériel interfère avec la réception radio ou télévisuelle, ce qui peut être déterminé en
mettant le matériel sous puis hors tension, l’utilisateur est invité à tenter de supprimer ces interférences.
FRANÇAIS

ITALIANO
DEUTSCH
ESPANOL
ENGLISH
FRANÇAIS
SAFETY PRECAUTIONS
1. Read all precautions, in particular those related to safety, very carefully as they provide important information. Keep these instructions in a safe
place.
WARNING: to prevent the risk of fire or electric shock, never expose this product to rain or humidity.
2. POWER SUPPLY FROM MAINS
a. The mains voltage is sufficiently high to cause electrocution; install and connect the device before plugging it in.
b. Before powering up, make sure that all the connections have been made correctly.
c. The metallic parts of the unit are earthed through the power cable. The device is a CLASS I apparatus and must be plugged into an earthed socket.
d. Protect the power cable from damage; make sure it is positioned in a way that it cannot be stepped on or crushed by objects.
e. To prevent the risk of electric shock, never open this product: there are no parts inside that the user needs to access.
3. Make sure that no objects or liquids get into the device, as this may cause a short circuit.
The device must not be exposed to drips or splashes. Do not place objects filled with liquid, such as vases, on the device. Do not place naked flames
(such as lighted candles) on the device.
4. Never attempt to carry out any operations, modifications or repairs that are not expressly described in this manual.
Contact your authorized service center or qualified personnel should any of the following occur:
- The device does not work (or works anomalously).
- The power cable has been damaged.
- Objects or liquids have got into the device.
- The device has been subject to a heavy shock.
5. Unplug the device if it will not be used for a long time.
6. Switch the device off immediately and unplug it if emission of strange odours or smoke is noticed.
7. Do not connect the device to any equipment or accessories other than those provided for the purpose.
Also check the suitability of the support surface on which the product is placed.
8. Supports and trolleys.
The equipment should be only used accessories of the type recommended by the manufacturer.
9. Hearing loss
Exposure to high sound levels can cause permanent hearing loss. The sound pressure level which causes hearing loss is different from person to
person and depends on the exposure time. Adequate protection devices must be used to prevent potentially dangerous exposure to high sound
pressure levels. Ear plugs or protective ear muffs must be worn when a transducer capable of producing high sound levels is used.
10. Correct disposal of this product. This symbol indicates that this product must not be disposed of with household waste, according to the WEEE
Directive (2012/19/EU) and your national law. This product should be taken to a collection center licensed for the recycling of waste electrical and
electronic equipment (EEE).
The mishandling of this type of waste could have a possible negative impact on the environment and human health due to potential hazardous
substances that are generally associated with EEE. At the same time, your cooperation in the correct disposal of this product will contribute to the
efficient use of natural resources. For more information about where you can take your waste equipment for recycling, please contact your local city
office, or your household waste collection service.
IMPORTANT NOTES
To prevent the occurrence of noise on line signal cables, use screened cables only and avoid putting them close to:
- Equipment generating high-intensity electromagnetic fields
- Power cables
- Speaker lines
- Place the device away from sources of heat and always ensure an adequate air circulation around it.
- Do not overload this product for a long time.
- Never force the controls (buttons, knobs etc.).
- Do not use solvents, alcohol, benzene or other volatile substances for cleaning the external parts of the device.
IMPORTANT NOTES
Please read this owner’s manual carefully and keep it on hand for future reference before connecting and using the device. The owner’s
manual is an integral part of the device and must accompany it when it changes ownership as a reference for correct installation and
use as well as for the safety precautions. RCF S.p.A. will not assume any responsibility for the incorrect installation and/or use of the
device.
LEGAL DISCLAIMER
RCF S.p.A. accepts no liability for any loss which may be suffered by any person who relies either wholly or in part upon any description,
photograph, or statement contained herein. Technical specifications, appearances, and other information are subject to change without
notice. All trademarks are the property of their respective owners.

ITALIANO
DEUTSCH
ESPANOL
ENGLISH
FRANÇAIS
WHAT’S IN THE BOX:
1. This manual
Read carefully this manual before start using you RCF M 18 Digital Mixer
2. Warranty Certificate
Read Carefully the Warranty Certificate. It allows you to extend the Warranty time to 3 years only registering your product
on the web site www.rcf.it/product-registration
3. Warning sheet
Read carefully the Warning Sheet to avoid any possible injury to the user or damage of the product during use.
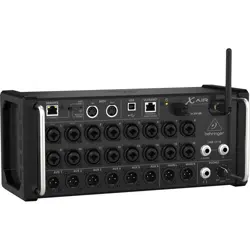
4. M 18 Digital Mixer
5. Power Cord
Each M 18 is provided with the power cord necessary in the region of delivery.
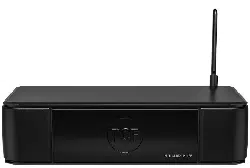
6. External antenna
Connect the external antenna for optimal communication over Wi-Fi, to complement the internal antenna.
Owner’s manual
This manual is intended to give the user the necessary information for the first use of RCF M 18 digital mixer. Follow
carefully this manual for a correct use of the device.
Visit the SUPPORT page on the M SERIES section of our website http://mixer.rcf.it to download the full owner’s manual.
M 18 DIGITAL MIXER
DESIGNED FOR MUSICIANS

ITALIANO
DEUTSCH
ESPANOL
ENGLISH
FRANÇAIS
1. MIC Input 1 to 6 – XLR Female
Connect your microphones to these remotely controlled 60 dB gain-range inputs. Red LEDs indicate the Phantom power
status ON or OFF for MIC input groups 1 to 4 and 5 to 8. To obtain best performances from your microphones use
balanced XLR cables.
2. MIC/LINE Input 7 and 8 – Combos
Input 7 & 8 provide Mic input on the XLR connection and Line input on the TRS jack connection.
3. MAIN OUTPUT L&R
Connect your active speaker or your amplifier to these +21dBu balanced Output. The green LEDs show the signal presence
on MAIN MIX channels.
2. MIC/LINE
INPUT
1. MIC
INPUT
15. LINE
INPUT
HiZ
3. MAIN
OUT
14. LINE
INPUT
12. MIDI
IN & OUT
13. HEADPHONES
STEREO
OUTPUT
8. LAN
CONNECTOR
4. EXTERNAL
WiFi
ANTENNA
5. POWER
SWITCH
7. AUX
OUTPUT
6. POWER
CABLE INLET
10. INTERNAL
ACCESS POINT
RESET
PUSHBUTTON
11. USB
PORT
9. DUAL
FOOTSWITCH
CONNECTOR
M 18 DIGITAL MIXER
REAR PANEL
ITALIANO
DEUTSCH
ESPANOL
ENGLISH
FRANÇAIS
You can modify these settings from the MixRemote app in the SETTINGS > NETWORK page.
11. USB Type A port
Insert here a USB stick to play high quality audio files. .WAV, .AIFF and MP3 file allowed for reproduction.
12. MIDI connectors
Connect here your MIDI controller. See the dedicated page on MixRemote (SETTINGS > MIDI) to view the available
function assignable to MIDI ports.
13. Headphones stereo output
Connect your headphones here either for PFL, Personal Monitoring or the Main Mix listening.
14. LINE Input 11-18
Connect here your line level sources like keyboard, external audio device or other small analog consoles used for submix.
Input level can be set to +4dBu or -10dBV.
15. LINE Input 9-10 with switchable HiZ input.
Connect to these inputs your line-level sources, at +4 dBu or -10 dBV, or high-impedance passive instruments, like electric
guitars, electric basses or piezo pickups.
WiFi AP
Frequency | 2,4 GHz
Channel | 3
Nation | Not assigned
Password | No password
Security | DIsabled
SSID | M 18-xxxxxx
Ext. Antenna | enabled
LAN PORT
DHCP Client | no
IP Address | 192.168.0.18
Gateway | 0.0.0.0
Mask | 255.255.255.0
DNS Server | 0.0.0.0
4. External Wi-Fi Antenna connector
M 18 includes an internal antenna and provisions for an external antenna. Attach the provided external antenna to this
connector for optimal performance of the MixRemote app.
5. Power switch
Turn On and Off your M 18 device.
6. Power cable inlet.
Connect here the provided power cord.
7. AUX Output 1-6 Balanced jacks
Connect to these +21dBu balanced output your stage monitors or external effects.
8. LAN connector
It is possible to connect here an external Wi-Fi Access Point for advanced communication configurations. This port is
intended also for future applications.
9. Dual footswitch connector
Connect here a single or dual footswitch. Assigned switching functions are completely programmable.
10. Internal access point reset pushbutton
Press this button during normal operation to restore the default settings for both the internal Wi-Fi Access Point and the
LAN port, as follows:

ITALIANO
DEUTSCH
ESPANOL
ENGLISH
FRANÇAIS
M 18 DIGITAL MIXER
FEATURES
18 input channel, 13 mix busses.
In detail:
Gate, Dynamic Compressor, three types of 4-band parametric EQ (Standard, Vintage, Smooth) present on every input
channel.
Standard 4-band parametric EQ for all AUX outputs.
Master Output Processor on Main Mix output, including Valve Warmer, Xciter, Maximizer.
Stereo Graphic EQ on the Main Mix output.
Four MultiFX processing sections on channels 5 to 10, including Overdrive, Modulation, Delay, Amp Simulation, and
others. Amp Simulations include Guitar and Bass Amplifier simulations developed by Overloud.
8 x MIC input
10 x Line input including 2 x switchable HiZ input
6 x AUX send
3 x Internal FX send
16 x FX insert points
1 x Stereo Main Mix
1 x Stereo Headphones

ITALIANO
DEUTSCH
ESPANOL
ENGLISH
FRANÇAIS
M 18 DIGITAL MIXER
TURN ON YOUR RCF M 18 DIGITAL MIXER
Switch on the M 18 through the Power Switch (n° 5. In the back panel view). A white light on the front panel, just under
the RCF logo will confirm that the M 18 is on.
2. A Wi-Fi network with SSID called M 18-xxxxxx will appear in the available network list (xxxxxx is an alphanumeric
string related to the internal MAC address).
3. Select the M 18 Wi-Fi network.
4. No password is requested by default.
5. Wait for the connection (typically five to ten seconds).
6. Now, launch the MixRemote application.
7. If MixRemote app. is already open in background, M 18 will be connected as soon as the application is moved to
foreground.
Connect your M 18 Digital Mixer to your iPad for the first time
1. On your iPad open the Configuration > Wi-Fi page.
Please notice that if you have modified the Wi-Fi settings (SSID name, password, etc..) the connection procedure may vary.
IMPORTANT: to obtain best connection performances avoid to place anything over the M 18’s top cover. Do this will
interfere with the internal antenna reducing Wi-Fi connection range and reliability. For best Wi-Fi connection performances
please always connect the provided external antenna and select your country on MixRemote App. SETTINGS > NETWORK
section.

ITALIANO
DEUTSCH
ESPANOL
ENGLISH
FRANÇAIS
AVVERTENZE PER LA SICUREZZA
1. Leggere con attenzione tutte le avvertenze, in particolare quelle relative alla sicurezza, dato che riportano informazioni molto importanti.
Conservate queste istruzioni in un luogo sicuro.
AVVERTENZA: al fine di evitare il rischio di incendio o di scossa elettrica, non esporre mai il prodotto a pioggia o umidità.
2. ALIMENTAZIONE ALLA RETE ELETTRICA
a. La tensione della rete elettrica è sufficientemente elevata da provocare folgorazione; installare e collegare il dispositivo prima di collegarlo alla
rete elettrica.
b. Prima di accendere il dispositivo verificare che tutti i collegamenti siano stati effettuati in modo corretto.
c. Le parti metalliche dell’unità sono collegate a terra attraverso il cavo di alimentazione. Questo è un dispositivo di CLASSE1 e deve essere
collegato a una presa dotata di messa a terra.
d. Proteggere il cavo di alimentazione da possibili danneggiamenti; assicurarsi che sia posizionato in modo da non essere calpestato o schiacciato
da altri oggetti.
e. Onde evitare il rischio di scosse elettriche, non aprire mai il prodotto: esso non contiene parti a cui l’utente possa avere necessità di accedere.
3. Evitare l’introduzione di corpi estranei o liquidi all’interno del dispositivo poiché potrebbero provocare cortocircuiti. Il dispositivo non deve essere
esposto a spruzzi o gocciolamenti. Non collocare sul dispositivo oggetti pieni di liquidi, per esempio vasi o bicchieri. Non collocare sul dispositivo
fiamme libere, per esempio candele.
4. Non tentare di eseguire operazioni, modifiche o riparazioni che non siano espressamente descritte in questo manuale. Rivolgersi a un centro di
assistenza autorizzato qualora dovesse verificarsi uno dei seguenti casi:
- Il dispositivo non funziona (o funziona in maniera anomala).
- Il cavo di alimentazione è stato danneggiato.
- Corpi estranei o liquidi sono penetrati nel dispositivo.
- Il dispositivo ha subito un impatto violento.
5. Scollegare il dispositivo in previsione di un periodo di inutilizzo prolungato.
6. Spegnere immediatamente il dispositivo e scollegarlo qualora si osservino emissioni di fumo o odori anomali.
7. Non collegare il dispositivo ad apparecchiature o ad accessori diversi da quelli appositamente previsti.
Verificare sempre l’idoneità della superficie dove si voglia appoggiare il prodotto.
8. Supporti e accessori.
L’apparecchiatura deve essere utilizzata esclusivamente su supporti e accessori di montaggio del tipo raccomandato dal fabbricante, ove necessario.
9. Perdita dell’udito.
L’esposizione a livelli sonori elevati può provocare una perdita permanente dell’udito. Il livello di pressione sonora pericolosa per l’udito varia
sensibilmente da persona a persona e dipende dalla durata dell’esposizione. Per evitare esposizioni potenzialmente pericolose a livelli elevati di
pressione sonora è necessario fare uso di protezioni adeguate.
10. Corretto smaltimento del prodotto.
Questo simbolo indica che il prodotto non può essere smaltito assieme ai normali rifiuti di casa in accordo con la Direttiva WEEE (2012/19/EU) e le
leggi nazionali. Questo prodotto deve essere portato in un centro di raccolta abilitato al riciclo di rifiuti elettrici ed elettronici (EEE).
La cattiva gestione di questo tipo di rifiuti può avere un possibile impatto negativo sull’ambiente e la salute a causa delle sostanze potenzialmente
pericolose generalmente associate a prodotti elettrici ed elettronici (EEE). Contemporaneamente, la collaborazione nel corretto smaltimento di
questo prodotto contribuirà ad un uso efficiente delle risorse naturali. Per maggiori informazioni su dove smaltire i rifiuti per il riciclo contatti i suoi
uffici locali o il servizio di raccolta rifiuti domestici.
NOTE IMPORTANTI
Al fine di prevenire la produzione di rumore sui cavi di segnale, utilizzare esclusivamente cavi schermati ed evitare di collocarli nelle
vicinanze di:
- Apparecchiature che producono campi elettromagnetici di alta intensità
- Cavi di alimentazione
- Linee di Potenza di altoparlanti
- Posizionare il dispositivo lontano da fonti di calore e assicurare sempre un’adeguata circolazione dell’aria attorno ad esso.
- Non sottoporre il prodotto a sovraccarichi prolungati.
- Non forzare mai i comandi come pulsanti o interruttori o manopole.
- Non utilizzare solventi, alcool, benzene o altre sostanze volatili per la pulizia delle parti esterne del dispositivo.
NOTE IMPORTANTI
Leggere con cura e attenzione questo manuale prima di connettere ed utilizzare il dispositivo e tenere il Manuale a portata di mano per
future consultazioni. Il manuale è parte integrante del prodotto e lo deve accompagnare sempre anche in caso di cambio di proprietà
come riferimento per una corretta installazione ed uso e per le norme di sicurezza. RCF S.p.A. non si assumerà nessuna responsabilità
per una non corretta installazione e/o non corretto utilizzo del dispositivo.
NOTE LEGALI
RCF S.p.A. non si assume alcuna responsabilità per eventuali perdite che potrebbero essere subite da persone che abbiano fatto
affidamento interamente o parzialmente a qualsivoglia descrizione, fotografia o dichiarazione contenuta nel presente. Le specifiche
tecniche, le immagini, e altre informazioni sono soggette a modifiche senza preavviso. Tutti i marchi eventualmente citati sono di
proprietà dei rispettivi titolari.

ITALIANO
DEUTSCH
ESPANOL
ENGLISH
FRANÇAIS
COSA È PRESENTE NELL’IMBALLO:
1. Questo manuale
Leggere con cura questo manuale prima di iniziare ad utilizzare il Mixer Digitale RCF M 18.
2. Certificato di Garanzia
Leggere accuratamente il Certificato di Garanzia. Consente di estendere di un anno la normale Garanzia del prodotto
registrando il prodotto al sito: www.rcf.it/product-registration
3. Foglio delle Avvertenze
Leggere con cura il foglio delle avvertenze per evitare qualsiasi danno a persone, cose o al prodotto stesso durante il suo
utilizzo.
4. Mixer Digitale RCF M 18
5. Cavo di alimentazione
Ogni M 18 è provvisto del cavo di alimentazione necessario nella regione di utilizzo.
6. Antenna Esterna
Installare sempre l’antenna esterna, complementare all’antenna interna, per ottenere una migliore comunicazione Wi-Fi .
MANUALE
Questo manuale è concepito per dare all’utilizzatore le informazioni necessarie al primo utilizzo del Mixer Digitale RCF M
18. Seguire accuratamente questo manuale per un corretto utilizzo del dispositivo RCF M 18.
Per scaricare la versione completa del Manuale Utente, visita la pagina SUPPORT nella sezione M SERIES del nostro sito
http://mixer.rcf.it
M 18 DIGITAL MIXER
PROGETTATO PER I MUSICISTI

ITALIANO
DEUTSCH
ESPANOL
ENGLISH
FRANÇAIS
1. Ingressi MIC da 1 a 6 – XLR Femmina
Ingressi dotati di preamplificatore microfonico con gain-range di 60dB controllato in remoto. LEDs di colore rosso
indicano l’attivazione della Phantom Power per i gruppi di ingressi microfonici da 1 a 4 e da 5 a 8. Per ottenere le migliori
prestazioni dal microfono in uso utilizzare cavi bilanciati XLR.
2. Ingressi MIC/LINE 7 and 8 – Combos
Gli ingressi 7 & 8 consentono ingressi microfonici sulla connessione XLR e ingressi di linea sulla connessione jack TRS.
3. USCITA MAIN L&R
Collegare a queste uscite bilanciate a +21dB degli altoparlanti attivi oppure l’amplificatore (in caso di altoparlanti
passivi). LEDs verdi indicano la presenza del segnale sui canali MAIN MIX.
4. Connettore per l’antenna Wi-Fi esterna
M 18 è provvisto di un’antenna Wi-Fi interna e include anche un’ antenna esterna. Installare sempre l’antenna esterna
in dotazione per ottenere le migliori prestazioni nel collegamento Wi-Fi della App. MixRemote.
2. MIC/LINE
INPUT
1. MIC
INPUT
15. LINE
INPUT
HiZ
3. MAIN
OUT
14. LINE
INPUT
12. MIDI
IN & OUT
13. HEADPHONES
STEREO
OUTPUT
8. LAN
CONNECTOR
4. EXTERNAL
WiFi
ANTENNA
5. POWER
SWITCH
7. AUX
OUTPUT
6. POWER
CABLE INLET
10. INTERNAL
ACCESS POINT
RESET
PUSHBUTTON
11. USB
PORT
9. DUAL
FOOTSWITCH
CONNECTOR
M 18 DIGITAL MIXER
PANNELLO POSTERIORE

ITALIANO
DEUTSCH
ESPANOL
ENGLISH
FRANÇAIS
Si possono modificare questi settaggi attraverso la pagina SETTINGS>NETWORK della App. MixRemote.
11. Porta USB Type A
Inserisci qui una “penna” USB per riprodurre files audio ad alta qualità. Sono supportati files nei formati .WAV, .AIFF e
.MP3.
12. Connettori MIDI
E’ possibile collegare qui il proprio MIDI controller. Visita la pagina dedicata sull’App. MixRemote (SETTINGS > MIDI) per
vedere le funzioni disponibili assegnabili alle porte MIDI.
13. Uscita Stereo per Cuffie
Collegare qui delle cuffie stereo per l’ascolto di PFL, Personal Monitoring o Main Mix.
14. Ingressi Linea 11-18
Collegare qui le sorgenti a livello linea come tastiere, altre apparecchiature audio oppure piccoli mixer analogici utilizzati
come sub-mix. Il livello di ingresso può essere regolato a +4dBu o -10dBV.
15. Ingressi di linea 9 e 10 con ingresso ad alta impedenza selezionabile (HiZ).
Collegare a questi ingressi sorgenti a livello di linea a +4dBu o -10dBV oppure anche strumenti passivi ad alta impedenza
come chitarre elettriche, bassi elettrici o pickups “piezo”.
WiFi AP
Frequency | 2,4 GHz
Channel | 3
Nation | Not assigned
Password | No password
Security | DIsabled
SSID | M 18-xxxxxx
Ext. Antenna | enabled
LAN PORT
DHCP Client | no
IP Address | 192.168.0.18
Gateway | 0.0.0.0
Mask | 255.255.255.0
DNS Server | 0.0.0.0
5. Interruttore di accensione
Accende e spegne il dispositivo M 18.
6. Presa di alimentazione.
Collegare qui il cavo di alimentazione in dotazione.
7. Uscite AUX 1-6 Jack Bilanciati
Collegare a queste uscite bilanciate a +21dB dei monitor da palco oppure delle unità effetti esterne.
8. Connessione LAN
E’ possibile collegare qui un Access Point Wi-Fi esterno per configurazioni di connessione avanzate. Questa porta è
dedicata anche ad applicazioni future.
9. Connettore per Footswitch doppio.
E’ possibile collegarvi un Footswitch singolo o doppio. Le funzioni assegnabili sono totalmente programmabili via
MixRemote app.
10. Pulsante di reset dell’Access Point interno
Premere questo pulsante durante le normali operazioni per portare allo stato di default sia l’access point Wi-Fi interno
che la porta LAN; i dati di default saranno i seguenti:

ITALIANO
DEUTSCH
ESPANOL
ENGLISH
FRANÇAIS
M 18 DIGITAL MIXER
CARATTERISTICHE
18 canali di ingresso, 13 mix busses di uscita.
Nel dettaglio:
In ognuno dei canali di ingresso sono presenti Gate, Compressore di dinamica, tre tipi di EQ parametrico a 4 bande
(Standard, Vintage, Smooth).
In ognuna delle uscite AUX è presente un EQ parametrico a 4 bande (Standard).
Sui canali di uscita Main Mix sono presenti tre Master Output Processors: Valve Warmer, Xciter, Maximizer.
Sempre sull’uscita Main Mix è presente anche un EQ Grafico Stereo a 31 bande .
Sono possibili varie soluzioni di MultiFx sui canali da 5 a 10, tra queste Overdrive, Modulation, Delay, Amp Simulation, e
altre. Le Amp Simulations includono simulazioni di amplificatori per Chitarra e Basso sviluppate da Overloud.
8 x Ingressi Microfonici
10 x ingressi linea, inclusi 2 x ingressi linea ad alta impedenza (HiZ)
6 x mandate AUX
3 x mandate ad FX interni
16 x punti di insert di FX
1 x Main Mix Stereo
1 x Headphones Stereo (cuffie)

ITALIANO
DEUTSCH
ESPANOL
ENGLISH
FRANÇAIS
M 18 DIGITAL MIXER
ACCENSIONE
Accendere l’M 18 utilizzando l’interruttore di accensione (n° 5 nella vista del pannello posteriore). Una luce bianca sul
pannello frontale, proprio sotto il logo RCF confermerà l’avvenuta accensione del dispositivo.
2. Un network WiFi con SSID chiamato M 18-xxxxxx apparirà nella lista dei network disponibili (xxxxxx è una stringa di
cifre alphanumeriche relative al MAC address interno).
3. Selezionare il network Wi-Fi M 18-xxxxxx.
4. Di default non viene richiesta una password.
5. Attendere l’avvenuta connessione (tipicamente da 5 a 10 secondi)).
6. Ora, lanciare l’applicazione MixRemote.
7. Se l’app. MixRemote è già aperta in background, M 18 si connetterà non appena l’applicazione verrà portata in
foreground.
Connettere il Mixer Digitale M 18 all’iPad per la prima volta
1. Sull’ iPad aprire il menu: Impostazioni > Wi-Fi .
Notare che se sono stati modificati i settaggi Wi-Fi (SSID name, password, etc..) la procedura di connessione potrebbe
variare.
IMPORTANTE: per ottenere le migliori prestazioni nella connessione Wi-Fi è necessario evitare di mettere alcun oggetto
sul pannello superiore dell’M 18. Farlo interferirebbe con l’antenna interna riducendo così la portata della connessione
Wi-Fi e la sua affidabilità. Per ottenere le migliori prestazioni della connessione Wi-Fi collegare sempre l’antenna esterna
fornita di serie e seleziona il paese (Country) nella sezione SETTINGS > NETWORK della App. MixRemote.

ITALIANO
DEUTSCH
ESPANOL
ENGLISH
FRANÇAIS
CONSIGNES DE SÉCURITÉ
1. Lisez très attentivement tous les avertissements car ils fournissent des informations importantes, tout spécialement en matière de sécurité.
Conservez ces instructions en lieu sûr.
AVERTISSEMENT: n’exposez jamais ce produit à la pluie ni à l’humidité pour éviter tout risque d’incendie et d’électrocution.
2. ALIMENTATION SECTEUR
a. La tension secteur est suffisamment élevée pour entraîner une électrocution. Installez et connectez l’appareil avant de le brancher.
b. Avant d’allumer l’appareil, vérifiez que toutes les connexions ont été effectuées correctement.
c. Les parties métalliques du produit sont reliées à la terre par l’intermédiaire du cordon secteur. L’appareil est un système de CLASSE I qui doit être
branché à une prise électrique mise à la terre.
d. Protégez le cordon secteur contre d’éventuels dommages. Vérifiez qu’il est disposé de sorte qu’il ne puisse pas être piétiné ni écrasé par des
objets.
e. N’ouvrez jamais le produit afin de prévenir tout risque d’électrocution: aucun composant à l’intérieur n’est destiné à l’utilisateur.
3. Vérifiez qu’aucun objet ou liquide ne peut pénétrer à l’intérieur de l’appareil pour éviter tout risque de court-circuit.
N’exposez pas l’appareil à des gouttes ou des éclaboussures. Ne posez aucun récipient contenant du liquide sur l’appareil– un vase ou des verres
par exemple. Ne placez aucun objet enflammé sur l’appareil– par exemple des bougies allumées.
4. Ne tentez jamais d’opération, de modification ou de réparation si elle n’est pas expressément décrite dans ce manuel.
Contactez le centre de SAV ou du personnel qualifié agréé dans chacun des cas suivants:
L’appareil ne fonctionne pas (ou ne fonctionne pas normalement).
Le cordon secteur est endommagé.
Des objets ou des liquides se sont introduits dans l’appareil.
L’appareil a subi un choc violent.
5. Débranchez l’appareil si vous ne comptez pas l’utiliser pendant une longue période.
6. Éteignez immédiatement l’appareil et débranchez-le si vous remarquez qu’une odeur bizarre ou de la fumée s’en dégage.
7. Connectez l’appareil uniquement à des équipements et accessoires fournis à cet effet. Vérifiez toujours que la surface sur laquelle est placé le
produit est stable et adaptée.
8. Supports et chariots: Utilisez uniquement les accessoires recommandés par le fabricant.
9. Surdité: L’exposition à des niveaux de pression acoustique élevés peut entraîner des dommages auditifs permanents. Le niveau de pression
acoustique qui engendre des troubles auditifs varie en fonction des individus et dépend de la durée d’exposition. Utilisez des dispositifs de protection
adaptés pour éviter de vous exposer à des niveaux de pression acoustique dangereux. Portez des bouchons d’oreille ou un casque antibruit quand
vous utilisez un transducteur produisant un volume sonore élevé.
10. Jeter correctement ce produit. Ce symbole indique que ce produit ne doit pas être jeté avec les ordures ménagères conformément à la directive
WEEE (2012/19/EU) et à la loi nationale de votre pays. Ce produit doit être éliminé dans un centre de collecte agréé pour le recyclage des déchets
électriques et électroniques.
L’élimination impropre de ce type de produit peut avoir un impact négatif sur l’environnement et la santé humaine en raison des substances
potentiellement dangereuses généralement contenues dans les équipements électriques et électroniques. Votre participation au traitement approprié
de ce produit contribuera à l’utilisation plus efficace des ressources naturelles. Pour savoir où apporter vos équipements en fin de vie afin de les
recycler, contactez les services de votre commune ou le centre de collecte de déchets proche de chez vous.
NOTES IMPORTANTES
Pour éviter l’apparition de bruit indésirable dans les câbles des signaux ligne, utilisez exclusivement des câbles blindés et évitez de les
faire passer à proximité:
- des équipements qui produisent de puissants champs électromagnétiques
- des câbles secteur
- des lignes d’enceintes
Éloignez l’appareil des sources de chaleur et vérifiez que l’espace autour de lui est suffisamment ventilé.
Ne faites pas fonctionner ce produit en surcharge pendant longtemps.
Ne forcez jamais les commandes (touches, boutons, etc.).
N’utilisez pas de solvant, d’alcool, de benzène ou d’autre produit volatile pour nettoyer les parties extérieures de ce produit.
AVERTISSEMENT À L’UTILISATEUR
Avant de connecter et d’utiliser l’appareil, lisez attentivement ce manuel et conservez-le à portée de main pour pouvoir le consulter
ultérieurement. Le manuel fait partie intégrante du produit et doit toujours l’accompagner, même en cas de revente de l’appareil, car il
décrit l’installation et l’utilisation du produit et donne d’importantes consignes de sécurité. La société RCF décline toute responsabilité
concernant l’installation et/ou l’utilisation incorrecte(s) de cet appareil.
MENTION LÉGALE
La société RCF décline toute responsabilité concernant l’exactitude et l’intégrité des descriptions, photos et informations contenues ici.
Spécifications techniques, apparence et informations complémentaires susceptibles d’être modifiées sans notification préalable. Toutes
les marques mentionnées appartiennent à leurs propriétaires respectifs.

ITALIANO
DEUTSCH
ESPANOL
ENGLISH
FRANÇAIS
CONTENU DE L’EMBALLAGE:
1. Ce manuel
Lisez attentivement ce manuel avant de commencer à utiliser votre mixeur numérique RCF M 18.
2. Certificat de garantie
Lisez attentivement le certificat de garantie. Il permet d’étendre la période de garantie à 3ans après vous être enregistré
sur www.rcf.it/product-registration
3. Page d’avertissements
Lisez attentivement la page d’avertissements pour éviter tout risque de blessure et tout dommage au produit pendant
son utilisation.
4. Mixeur numérique M 18
5. Cordon secteur
Chaque M 18 est fourni avec un cordon secteur répondant aux normes locales.
6. Antenne externe
Connectez l’antenne externe en plus de l’antenne interne pour une communication optimale en WiFi.
MANUEL
Ce manuel est destiné à fournir à l’utilisateur toutes les informations nécessaires à la première utilisation du mixeur
numérique RCF M 18. Suivez attentivement ce manuel pour utiliser l’appareil correctement.
Visitez la page de support sur la section de la série M de notre site Web http://mixer.rcf.it pour télécharger le Manuel du
Propriétaire complet.
M 18 DIGITAL MIXER
CONÇU POUR LES MUSICIENS

ITALIANO
DEUTSCH
ESPANOL
ENGLISH
FRANÇAIS
1. Entrées micro MIC 1 à 6 sur XLR femelle
Reliez vos microphones à ces entrées avec 60dB de gain et contrôle à distance. Une LED rouge indique l’état (ON/OFF)
de l’alimentation fantôme pour les groupes d’entrées MIC 1 à 4 et 5 à 8. Pour exploiter au mieux les performances de vos
micros, utilisez des câbles symétriques montés en XLR.
2. Entrées combo micro/ligne MIC/LINE 7 et 8
Les entrées 7 et 8 fournissent une connexion sur XLR pour les micros et sur jack trois points pour les signaux ligne.
3. SORTIE PRINCIPALE MAIN OUT L&R
Reliez vos enceintes actives ou votre amplificateur à cette sortie symétrique +21dBu. Les LED vertes indiquent la présence
d’un signal dans les canaux MAIN MIX.
2. MIC/LINE
INPUT
1. MIC
INPUT
15. LINE
INPUT
HiZ
3. MAIN
OUT
14. LINE
INPUT
12. MIDI
IN & OUT
13. HEADPHONES
STEREO
OUTPUT
8. LAN
CONNECTOR
4. EXTERNAL
WiFi
ANTENNA
5. POWER
SWITCH
7. AUX
OUTPUT
6. POWER
CABLE INLET
10. INTERNAL
ACCESS POINT
RESET
PUSHBUTTON
11. USB
PORT
9. DUAL
FOOTSWITCH
CONNECTOR
M 18 DIGITAL MIXER
PANNEAU ARRIÈRE

ITALIANO
DEUTSCH
ESPANOL
ENGLISH
FRANÇAIS
Vous pouvez modifier ces réglages à partir de l’application MixRemote à la page SETTINGS > NETWORK.
11. Port USB de type A
Insérez ici une clé USB pour lire des fichiers audio de haute qualité. Lecture de fichiers WAV, AIFF et MP3.
12. Connecteurs MIDI
Connectez ici votre contrôleur MIDI. Consultez la page dédiée de MixRemote (SETTINGS > MIDI) pour voir les fonctions
disponibles pour les ports MIDI.
13. Sortie casque stéréo
Connectez ici votre casque audio pour écouter le signal pré-fader (PFL), un signal de monitoring personnel ou le Main Mix.
14. Entrées ligne LINE 11 à 18
Connectez ici les sources de niveau ligne comme un clavier, un périphérique audio externe ou de petites consoles
analogiques pour les sous-mixs. Le niveau d’entrée est réglable sur +4dBu ou -10dBV.
15. Entrées ligne LINE 9 et 10 avec fonction HiZ commutable .
Reliez ces entrées à des sources de niveau ligne à +4dBu ou -10dBV, à des instruments passifs à haute impédance
comme des guitares et des basses électriques ou à des instruments avec capteur piézo.
WiFi AP
Frequency | 2,4 GHz
Channel | 3
Nation | Not assigned
Password | No password
Security | DIsabled
SSID | M 18-xxxxxx
Ext. Antenna | enabled
LAN PORT
DHCP Client | no
IP Address | 192.168.0.18
Gateway | 0.0.0.0
Mask | 255.255.255.0
DNS Server | 0.0.0.0
4. Connecteur de l’antenne Wi-Fi externe
Le M 18 possède une antenne interne et une antenne externe. Reliez l’antenne externe à ce connecteur pour que
l’application MixRemote fonctionne de façon optimale.
5. Commutateur marche/arrêt
Allume et éteint votre mixeur M 18.
6. Embase secteur.
Branchez ici le cordon secteur fourni.
7. Sorties AUX 1 à 6 sur jacks symétriques
Reliez vos retours de scène ou processeurs d’effets externes à ces sorties symétriques +21dBu.
8. Connecteur réseau LAN
On peut connecter ici un point d’accès externe pour les configurations de communication avancées. Ce port est aussi
destiné aux applications futures.
9. Connecteur pour double commutateur au pied
Reliez ici un commutateur au pied simple ou double. Les fonctions de commutation assignées sont entièrement
programmables.
10. Bouton poussoir de réinitialisation interne
Pendant le fonctionnement normal, appuyez sur ce bouton pour restaurer les réglages par défaut du point d’accès Wi-Fi
interne et du port réseau LAN comme suit:

ITALIANO
DEUTSCH
ESPANOL
ENGLISH
FRANÇAIS
M 18 DIGITAL MIXER
CARACTÉRISTIQUES
18 canaux d’entrée, 13 bus de mixage
En détail:
Gate, compresseur, trois types d’égaliseur paramétrique 4 bandes (Standard, Vintage, Smooth) dans chaque canal d’entrée.
Égaliseur paramétrique 4 bandes Standard dans toutes les sorties auxiliaires AUX.
Processeur Master dans la sortie Main Mix avec Valve Warmer, Xciter, Maximizer.
Égaliseur graphique stéréo dans la sortie Main Mix.
Quatre sections de traitement multi-effet dans les canaux 5 à 10 avec overdrive, modulation, delay, simulation d’ampli et
plus. Simulation d’ampli avec simulations d’amplis guitare et basse développées par Overloud.
8 entrées micro
10 entrées ligne dont 2 avec haute impédance commutable (HiZ)
6 départs auxiliaires
3 départs d’effets internes
16 points d’insertion
1 Main Mix stéréo
1 casque stéréo

ITALIANO
DEUTSCH
ESPANOL
ENGLISH
FRANÇAIS
M 18 DIGITAL MIXER
ALLUMEZ VOTRE MIXEUR NUMÉRIQUE RCF M18
Allumez le M18 à l’aide du commutateur marche/arrêt (n°5 sur le schéma du panneau arrière). Sur la face avant, une
lumière blanche juste sous le logo RCF confirme que le M18 est allumé.
2. Un réseau Wi-Fi avec SSID appelé M 18-xxxxxx apparaît dans la liste des réseaux disponibles (xxxxxx est une chaîne
alphanumérique relative à l’adresse MAC interne).
3. Sélectionnez le réseau Wi-Fi du M18.
4. Par défaut, aucun mot de passe n’est nécessaire.
5. Attendez que la connexion soit établie (généralement de 5 à 10 secondes).
6. Ensuite, lancez l’application MixRemote.
7. Si l’application MixRemote est déjà ouverte en arrière plan, le M18 sera connecté dès que l’application repassera en
premier plan.
Première connexion de votre mixeur numérique M18 à votre iPad
1. Dans votre iPad, ouvrez la page Configuration > Wi-Fi
Notez que la procédure de connexion peut être différente si vous avez modifié les réglages Wi-Fi (nom SSID, mot de passe,
etc.).
IMPORTANT: our obtenir la meilleure connexion possible, évitez de placer des objets au-dessus du capot du M 18. Les
objets sur le capot peuvent interférer avec l’antenne interne et amoindrir la portée et la fiabilité de la connexion Wi-Fi.
Pour obtenir les meilleures performances possibles en Wi-Fi, connectez toujours l’antenne externe fournie et sélectionnez
votre pays (Country) sur la section de MixRemote App. SETTINGS > NETWORK.
ITALIANO
DEUTSCH
ESPANOL
ENGLISH
FRANÇAIS
SICHERHEITSVORKEHRUNGEN
1. Lesen Sie sorgfältig alle Sicherheitshinweise, da sie wichtige Informationen bieten. Bewahren Sie diese Anweisungen an einem sicheren Ort auf.
WARNUNG: Setzen Sie dieses Produkt keinesfalls Feuchtigkeit oder Nässe aus, um das Risiko eines Brands oder Stromschlags
zu vermeiden.
2. STROMVERSORGUNG VOM NETZ
a. Die Netzspannung ist ausreichend hoch, um Tod durch Stromschlag zu verursachen. Installieren Sie das Gerät und schließen Sie ordnungsgemäß
es an, bevor Sie es einstecken.
b. Stellen Sie vor dem Einschalten sicher, dass die Anschlüsse korrekt verbunden wurden.
c. Die Metallteile des Gerätes werden über das Stromkabel geerdet. Das Gerät ist ein System der KLASSE I und muss in eine geerdete Steckdose
eingesteckt werden.
d. Schützen Sie das Stromkabel gegen Beschädigungen. Stellen Sie sicher, dass es so positioniert ist, dass man nicht darauf treten kann und dass
es nicht von Objekten geklemmt oder gequetscht wird.
e. Dieses Produkt darf keinesfalls geöffnet werden, da ansonsten das Risiko eines Stromschlags besteht. Es gibt keine Teile im Inneren, auf die der
Nutzer zugreifen muss.
3. Stellen Sie sicher, dass keine Objekte oder Flüssigkeiten in das Gerät gelangen, da dies zu einem Kurzschluss führen könnte.
Das Gerät darf keiner Feuchtigkeit oder Spritzern ausgesetzt sein. Stellen Sie keine Objekte, die mit einer Flüssigkeit gefüllt sind, wie Vasen oder
Gläser, auf das Gerät. Platzieren Sie keine offene Flamme (wie angezündete Kerzen) auf das Gerät.
4. Versuchen Sie keine Modifikationen, Änderungen oder Reparaturen durchzuführen, die nicht ausdrücklich in diesem Handbuch erwähnt sind.
Kontaktieren Sie Ihr autorisiertes Servicezentrum oder qualifiziertes Personal, falls einer der folgenden Fälle eintritt:
- Das Gerät funktioniert nicht (oder nicht normal).
- Das Stromkabel wurde beschädigt.
- Objekte oder Flüssigkeiten dringen in das Gerät ein.
- Auf das Gerät wirkte ein schwerer Schlag ein.
5. Ziehen Sie den Stecker des Geräts, wenn es für längere Zeit nicht benutzt wird.
6. Schalten Sie das Gerät sofort aus und ziehen Sie den Stecker, wenn ein ungewöhnlicher Geruch oder Rauch bemerkt wird.
7. Schließen Sie das Gerät nur an die Anlagen oder Zubehörteile an, die für den Zweck des Geräts bestimmt sind. Prüfen Sie immer die Stabilität und
Eignung der Oberfläche, auf die das Produkt gestellt wird.
8. Halterungen und Transport-Rollen. Es sollten nur Zubehörteile mit dem Gerät verwendet werden, die vom Hersteller empfohlen werden.
9. Hörverlust. Hohe Lautstärkepegel können zu dauerhaftem Hörverlust führen. Der Schalldruckpegel, der einen Hörverlust verursacht, unterscheidet
sich von Person zu Person und hängt von der Einwirkungszeit ab. Es müssen angemessene Schutzvorrichtungen verwendet werden, um eine potentiell
gefährliche Einwirkung von hohen Schalldruckpegeln zu verhindern. Es sind Ohrstöpsel und Ohrenschützer zu tragen, wenn ein Beschallungssystem
eingesetzt wird, das einen hohen Schallpegel verursacht.
10. Korrekte Entsorgung dieses Produkts. Dieses Symbol weist darauf hin, dass dieses Produkt nicht mit Haushaltsmüll gemäß der EEAG-Richtlinie
(2012/19/EU) und dem bei Ihnen national geltenden Gesetz entsorgt werden darf. Dieses Produkt sollte zu einer lizenzierten Sammelstelle für das
Recycling von Elektro- und Elektronik-Altgeräten (EEA) gebracht werden.
Eine falsche Handhabung dieser Art von Abfall könnte möglicherweise negative Auswirkungen auf die Umwelt und die menschliche Gesundheit
aufgrund potentiell gefährlicher Substanzen haben, die im Allgemeinen mit EEA verbunden sind. Ihre Kooperation bei der korrekten Entsorgung
dieses Produkts wird zu einer effizienten Nutzung der natürlichen Ressourcen beitragen. Um weitere Informationen darüber zu erhalten, wohin Sie
Ihre Altgeräte zum Recycling bringen können, wenden Sie sich an Ihre Stadtverwaltung oder Ihren Müllabfuhr für Haushaltsmüll.
WICHTIGE HINWEISE
Um das Auftreten von Geräuschen an den Signalkabeln zu vermeiden, verwenden Sie ausschließlich abgeschirmte Kabel und vermeiden
Sie deren Positionierung in der Nähe von:
- Geräten, die elektromagnetische Felder hoher Intensität erzeugen
- Stromkabel
- Lautsprecherleitungen
Positionieren Sie das Gerät entfernt von Wärmequellen und stellen Sie immer sicher, dass eine ausreichende Lüftung vorhanden ist.
Überlasten Sie dieses Produkt nicht für einen längeren Zeitraum.
Die Regelungen (Taster, Knöpfe) niemals mit Gewalt betätigen.
Verwenden Sie keine Lösungsmittel, Alkohol, Benzol oder andere flüchtige Substanzen zum Reinigen der externen Teile des Geräts.
HINWEIS FÜR DEN NUTZER
Bitte lesen Sie sorgfältig diese Handbuch und bewahren Sie sie zum späteren Nachschlagen auf, bevor Sie das Gerät anschließen
und verwenden. Die Handbuch gehört zum Gerät und muss mitgegeben werden, wann immer es den Besitzer wechselt, als Referenz
für die korrekte Installation und Nutzung sowie für die Sicherheitsvorkehrungen. Die Firma RCF übernimmt keine Verantwortung für die
nicht korrekte Installation und/oder Nutzung des Geräts.
HAFTUNGSAUSSCHLUSS
Die Firma RCF akzeptiert keine Haftung für einen Verlust, den eine Person erleidet, die sich ganz oder teilweise auf eine hierin enthaltene
Beschreibung, Abbildung oder Aussage verlässt. Technische Spezifikationen, Erscheinungsformen und andere Informationen können
sich ändern, ohne dass dies vorher angekündigt wird. Alle Handelszeichen sind das Eigentum der jeweiligen Besitzer.

ITALIANO
DEUTSCH
ESPANOL
ENGLISH
FRANÇAIS
INHALT DER PACKUNG:
1. Diese Handbuch
Lesen Sie diese Handbuch sorgfältig, bevor Sie Ihr Digitalmischpult RCF M 18 nutzen
2. Garantieschein
Füllen Sie die Garantieregistrierung aus (s. Garantieschein). Mit der Anmeldung können Sie die Garantiezeit (unter
www.rcf.it/product-registration) bis zu 3 Jahre erweitern.
3. Warnungen
Beachten Sie unbedingt die Sicherheitshinweise und Warnungen, um Verletzungen oder Produktschäden während
der Nutzung zu vermeiden.
4. Digitalmischpult M 18
5. Stromkabel
Jedes M 18 ist mit einem Stromkabel ausgestattet, welches den lokalen Vorschriften entspricht.
6. Externe Antenne
Schließen Sie die externe Antenne zur optimalen Kommunikation über WiFi zusätzlich zur internen Antenne an.
HANDBUCH
Diese Handbuch soll dem Nutzer die Informationen bieten, die zum Ersteinsatz des Digitalmischpults RCF M 18 notwendig
sind. Befolgen Sie diese Handbuch sorgfältig für eine korrekte Nutzung des Geräts.
Besuchen Sie die Support-Seite auf der M SERIES-Bereich unserer Website http://mixer.rcf.it die vollständige
Bedienungsanleitung herunterladen.
M 18 DIGITAL MIXER
KONZIPIERT FÜR MUSIKER

ITALIANO
DEUTSCH
ESPANOL
ENGLISH
FRANÇAIS
1. MIC-Eingang 1 bis 6 – XLR-Buchse
Schließen Sie Ihre Mikrofone an die fernsteuerbaren Eingänge mit 60 dB Gain-Range an. Für die Mic-Eingangsgruppen
1 bis 4 und 5 bis 8 zeigen die roten LEDs den Status der Phantomspeisung an. Um bestmögliche Ergebnisse zu erhalten,
verwenden Sie symmetrische XLR-Kabel.
2. MIC/LINE-Eingang 7 und 8 – Combos
Eingang 7 und 8 ermöglichen einen MIC-Eingang am XLR-Anschluss und einen Line-Eingang an der TRS-Anschlussbuchse.
3. HAUPTAUSGANG L&R
Schliessen Sie ihre aktiven Lautsprecher oder Ihren Verstärker an die symmetrischen Ausgänge mit +21 dBu an. Die
grünen LEDs zeigen an, ob ein Signal an den MAIN MIX Ausgängen anliegt.
2. MIC/LINE
INPUT
1. MIC
INPUT
15. LINE
INPUT
HiZ
3. MAIN
OUT
14. LINE
INPUT
12. MIDI
IN & OUT
13. HEADPHONES
STEREO
OUTPUT
8. LAN
CONNECTOR
4. EXTERNAL
WiFi
ANTENNA
5. POWER
SWITCH
7. AUX
OUTPUT
6. POWER
CABLE INLET
10. INTERNAL
ACCESS POINT
RESET
PUSHBUTTON
11. USB
PORT
9. DUAL
FOOTSWITCH
CONNECTOR
M 18 DIGITAL MIXER
ANSICHT M 18 RÜCKSEITE

ITALIANO
DEUTSCH
ESPANOL
ENGLISH
FRANÇAIS
Sie können diese Einstellungen vom MixRemote-App auf der Seite SETTINGS (EINSTELLUNGEN) > NETWORK (NETZWERK) ändern.
11. USB-Port, Typ A
USB-Port zum Abspielen von Audiodateien. (WAV, AIFF und MP3)
12. MIDI-Anschlüsse
Anschluss für MIDI-Controller. Im Bereich MixRemote (unter: SETTINGS (EINSTELLUNGEN) > MIDI), werden die
verfügbaren Funktionen für MIDI-Ports angezeigt.
13. Kopfhörer-Stereoausgang
Kopfhörer-Anschluss für Pre-Fader-Listening, Personal Monitoring oder Main -Mix-Listening.
14. LINE-Eingang 11-18
Anschlüsse für Geräte mit Line-Level, wie Keyboard, externe Audiogeräte oder andere analoge Konsolen, die für Submix
verwendet werden. Der Eingangspegel kann auf +4dBu oder -10dBV eingestellt werden.
15. LINE-Eingang 9-10 mit schaltbarem HiZ-Eingang.
Anschlüsse für Geräte mit +4 dBu oder -10 dBV , oder mit hoher Impedanz, wie E-Gitarren, E-Bass oder Piezo-
Tonabnehmer.
WiFi AP
Frequency | 2,4 GHz
Channel | 3
Nation | Not assigned
Password | No password
Security | DIsabled
SSID | M 18-xxxxxx
Ext. Antenna | enabled
LAN PORT
DHCP Client | no
IP Address | 192.168.0.18
Gateway | 0.0.0.0
Mask | 255.255.255.0
DNS Server | 0.0.0.0
4. Externer WiFi-Antennenanschluss
M 18 umfasst eine interne und eine externe Antenne. Befestigen Sie die externe Antenne an diesem Anschluss zur
optimalen Leistung der MixRemote-App.
5. Stromschalter
Schalten Sie Ihr M 18 Gerät ein und aus.
6. Stromkabeleingang.
Schließen Sie hier das beiliegende Stromkabel an.
7. AUX-Ausgang 1-6 symmetrische Buchsen
Schließen Sie ihre Bühnenmonitore oder externen Effekte an diese symmetrischen +21 dBu Ausgänge an.
8. LAN-Anschluss
Hier kann ein externer Access Point für erweiterte Kommunikationskonfigurationen angeschlossen werden. Dieser Port ist
auch für zukünftige Anwendungen gedacht.
9. Anschluss Zweifach-Fußschalter
Schließen Sie hier einen Einfach- oder Zweifach-Fußschalter an. Die zugewiesenen Schaltfunktionen sind vollständig
programmierbar.
10. Reset-Taster für internen Access Point.
Drücken Sie diesen Taster bei Normalbetrieb, um die Standardeinstellungen sowohl für den internen WiFi-Access-Point als
auch den LAN-Port wie folgt wieder herzustellen:

ITALIANO
DEUTSCH
ESPANOL
ENGLISH
FRANÇAIS
M 18 DIGITAL MIXER
MERKMALE VON M 18
18 Eingangskanäle, 13 Ausgangskanäle
Im Detail:
Gate, dynamischer Kompressor, drei Typen von parametrischen 4-Band-EQs (Standard, Vintage, Smooth), die an jedem
Eingangskanal vorhanden sind.
Standard Parametrische 4-Band-EQs für alle AUX-Ausgänge.
Master-Ausgangsprozessor am Main-Mix-Ausgang, einschließlich Valve Warmer, Xciter, Maximizer.
Stereo-Grafik-EQ am Main-Mix-Ausgang.
Vier MultiFX-Sektionen an den Kanälen 5 bis 10, einschließlich Overdrive, Modulation, Delay, Amp-Simulation etc.
Zu den Amp-Simulationen gehören Gitarren- und Bassverstärkersimulationen, entwickelt von Overloud.
8 x MIC-Eingang
10 x Line-Eingang einschließlich 2 x schaltbarer HiZ-Eingang
6 x AUX-Send
3 x FX-Send intern
16 x FX-Insert-Punkte
1 x Stereo Main Mix
1 x Stereokopfhörer

ITALIANO
DEUTSCH
ESPANOL
ENGLISH
FRANÇAIS
M 18 DIGITAL MIXER
SCHALTEN SIE IHR DIGITALMISCHPULT RCF M 18 EIN
Schalten Sie das M 18 über den Netzschalter ein (Nr. 5 in der Rückseitenansicht). Ein weißes Licht auf der
Vorderseite, unterhalb des RCF-Logos bestätigt, dass der M 18 eingeschaltet ist.
2. Ein WiFi-Netzwerk mit SSID, genannt M 18-xxxxxx, erscheint in der verfügbaren Netzwerkliste (xxxxxx ist ein
alphanumerischer String, der mit der internen MAC-Adresse zusammenhängt).
3. Wählen Sie das M 18 WiFi-Netzwerk.
4. Es wird standardmäßig kein Passwort angefordert.
5. Warten Sie auf die Verbindung (typischerweise fünf bis zehn Sekunden).
6. Nun starten Sie die MixRemote-Applikation.
7. Wenn die MixRemote-App im Hintergrund bereits geöffnet ist, dann wird mit dem M 18 verbunden, sobald die
Applikation im Vordergrund aktiv ist.
Schließen Sie Ihr M 18-Digitalmischpult zum ersten Mal in Ihr iPad an
1. Öffnen Sie die Seite Konfiguration > Wi-Fi auf Ihrem iPad
Bitte beachten Sie, dass die Vorgehensweise beim Anschließen variieren kann, wenn die WiFi-Einstellungen
geändert wurden (SSID-Bezeichnung, Passwort usw.).
WICHTIG: Um die beste Anschlussleistung zu erhalten, ist zu vermeiden, dass etwas auf die obere Abdeckung des M
18 gestellt wird. Objekte auf der oberen Abdeckung können zu Störungen der internen Antenne führen und den WiFi-
Anschlussbereich und die Zuverlässigkeit verringern. Um beste WiFi-Anschlussleistungen zu erzielen, schließen Sie immer
die beiliegende externe Antenne an und wählen Sie Ihr Land (Country) auf dem Abschnitt SETTINGS > NETWORK der
MixRemote App.

ITALIANO
DEUTSCH
ESPANOL
ENGLISH
FRANÇAIS
PRECAUCIONES DE SEGURIDAD
1. 1. Lea cuidadosamente todas las precauciones ya que proporcionan información importante, en particular las relacionadas con la seguridad.
Guarde estas instrucciones en un lugar seguro.
ADVERTENCIA:
Nunca exponga este producto a la lluvia o a la humedad para prevenir el riesgo de incendio o descarga eléctrica.
2. 2. ALIMENTACIÓN DE RED
a. La tensión de la red es lo suficientemente alta como para causar electrocución. Instale y conecte el equipo antes de enchufarlo.
b. Antes de encenderlo, asegúrese de que todas las conexiones se hayan realizado correctamente.
c. Las partes metálicas de la unidad están conectadas a tierra a través del cable de alimentación. El dispositivo es un sistema de Clase I y debe
estar conectado a una toma de tierra.
d. Proteja el cable de alimentación de posibles daños. Asegúrese de que se posicione de una manera que no pueda ser pisado o aplastado por
objetos.
e. Para evitar el riesgo de descarga eléctrica, nunca abra este equipo: no hay piezas en el interior a las que el usuario tenga que acceder.
3. Asegúrese de que no haya objetos o líquidos en el equipo ya que esto puede causar un cortocircuito.
El equipo no debe ser expuesto a goteos o salpicaduras. No coloque objetos que contengan líquidos sobre el dispositivo, como jarras o vasos. No
coloque llamas (por ejemplo, velas encendidas) sobre el dispositivo.
4. Nunca intente llevar a cabo cualquier operación, cambios o reparación que no se describa expresamente en este manual.
Póngase en contacto con su centro de servicio autorizado o personal calificado si ocurre cualquiera de los siguientes hechos:
El equipo no funciona (o funciona en forma anormal).
El cable de alimentación se ha dañado.
Han entrado objetos o líquidos en el equipo.
El equipo ha sufrido un fuerte golpe.
5. Desenchufe el equipo si no va a ser usado por un largo periodo de tiempo.
6. Apague y desenchufe de inmediato el equipo si nota que emite olores extraños o humo.
7. No conecte el equipo a cualquier dispositivo o accesorio distinto a los previstos para tal efecto. Compruebe siempre la estabilidad y la aptitud de
la superficie de apoyo sobre la que se coloca el equipo.
8. Soportes y carritos: sólo deben ser utilizados con el equipo los accesorios recomendados por el fabricante.
9. Pérdida de la audición: la exposición a altos niveles de ruido puede causar la pérdida permanente de la audición. El nivel de ruido que causa
la pérdida de audición es diferente de persona a persona y depende del tiempo de exposición al mismo. Deben usarse dispositivos de protección
adecuados para evitar los riesgos de la exposición a altos niveles de presión sonora; por ejemplo, tapones para los oídos u orejeras de protección
cuando se utiliza un transductor que produce altos niveles de sonido.
10. Eliminación correcta de este producto. Este símbolo indica que este producto no debe desecharse con la basura doméstica, de acuerdo con la
directiva WEEE (2012/19/UE) y su legislación nacional. Este producto debe ser llevado a un centro de recolección autorizado para el reciclado de los
residuos de aparatos eléctricos y electrónicos (EEE).
El mal manejo de este tipo de desechos podría tener un posible impacto negativo en el medio ambiente y en la salud humana debido a las sustancias
potencialmente peligrosas que normalmente se asocian con EEE. Su cooperación para la correcta eliminación de este producto contribuirá a la
utilización eficiente de los recursos naturales. Para obtener más información acerca de dónde se pueden llevar sus equipos para el reciclaje, póngase
en contacto con la oficina pertinente de su ciudad o con el servicio de recolección de residuos domésticos.
NOTAS IMPORTANTES
Para prevenir la aparición de ruido en los cables de señal de línea, use solamente cables blindados y evite ponerlos cerca de:
- Equipo de generación de campos electromagnéticos de alta intensidad
- Cables de alimentación
- Líneas de altavoces
Coloque el equipo lejos de fuentes de calor y siempre asegúrese que tenga una ventilación adecuada.
No sobrecargue este producto durante mucho tiempo.
Nunca fuerce los controles (botones, perillas, etc.).
No utilice disolventes, alcohol, bencina u otras sustancias volátiles para la limpieza de las partes externas del equipo.
CONSEJOS PARA EL USUARIO
Por favor, lea este manual con cuidado y téngala a mano para futuras consultas antes de conectar y utilizar el equipo. Este manual es
una parte integral del equipo y debe acompañarlo siempre que cambie de dueño como referencia para una correcta instalación y uso,
y para las medidas de seguridad. La firma RCF no asume ninguna responsabilidad por la instalación y/o uso incorrectos del equipo.
AVISO LEGAL
La firma RCF no asume ninguna responsabilidad por cualquier pérdida que pueda sufrir cualquier persona que se haya basado
completamente o en parte en las descripciones, fotografías o declaraciones contenidas en el presente documento. Las especificaciones
técnicas, las apariencias y toda otra información están sujetas a cambios sin previo aviso. Todas las marcas registradas son propiedad
de sus respectivos dueños.

ITALIANO
DEUTSCH
ESPANOL
ENGLISH
FRANÇAIS
CONTENIDO DE LA CAJA:
1. Este manual
Lea con cuidado este manual antes de comenzar a usar la mixer digital RCF M 18.
2. Certificado de Garantía
Lea con cuidado el certificado de garantía. Le permite extender el plazo de garantía hasta 3 años si se registra en www.
rcf.it/product-registration
3. Hoja de advertencias
Lea con cuidado la hoja de advertencies para evitar cualquier lesión al usuario o daños al producto durante su uso.
4. Mixer Digital M 18
5. Cable de alimentación
Cada M 18 está provista de un cable de alimentación compatible con las normas locales.
6. Antena externa
Conecte la antena externa para una óptima comunicación por Wi-Fi, que se suma a la antena interna.
MANUAL
Este manual está destinada a proporcionar al usuario la información necesaria para el primer uso de la mixer digital RCF
M 18. Siga cuidadosamente este manual para un uso correcto del equipo.
Visita la página de soporte en la sección de la serie M de nuestra página web http://mixer.rcf.it para descargar el Manual
de instrucciones completo.
M 18 DIGITAL MIXER
DISEÑADA POR MÚSICOS

ITALIANO
DEUTSCH
ESPANOL
ENGLISH
FRANÇAIS
1. Entradas de MIC 1 a 6 – XLR hembra
Conecte sus micrófonos a estas entradas con 60 dB de ganancia controladas por control remoto. En los grupos de
entradas MIC 1 a 4 y 5 a 8, LEDs rojos indican el estado de la alimentación phantom: ON u OFF. Para obtener el mejor
rendimiento de sus micrófonos, use cables XLR balanceados.
2. Entradas MIC/LINE 7 y 8 – Combos
Las entradas 7 y 8 combinan entradas de micrófono XLR y entradas de línea TRS.
3. SALIDA PRINCIPAL L&R
Conecte su caja de altavoces activa o su amplificador a esta salida balanceada de +21 dBu. Los LEDs verdes muestran la
presencia de la señal en los canales MAIN MIX.
2. MIC/LINE
INPUT
1. MIC
INPUT
15. LINE
INPUT
HiZ
3. MAIN
OUT
14. LINE
INPUT
12. MIDI
IN & OUT
13. HEADPHONES
STEREO
OUTPUT
8. LAN
CONNECTOR
4. EXTERNAL
WiFi
ANTENNA
5. POWER
SWITCH
7. AUX
OUTPUT
6. POWER
CABLE INLET
10. INTERNAL
ACCESS POINT
RESET
PUSHBUTTON
11. USB
PORT
9. DUAL
FOOTSWITCH
CONNECTOR
M 18 MIXER DIGITALE
PANEL TRASERO

ITALIANO
DEUTSCH
ESPANOL
ENGLISH
FRANÇAIS
Puede cambiar esta configuración desde la aplicación MixRemote en el menú SETTINGS > NETWORK.
11. Puerto USB tipo A
Inserte aquí una memoria USB para reproducir archivos de audio de alta calidad. Es compatible con los formatos WAV,
AIFF y MP3.
12. Conectores MIDI
Conecte aquí su controlador MIDI. Vea la página sobre el tema en la aplicación MixRemote (SETTINGS > MIDI) para ver
las funciones disponibles para los puertos MIDI.
13. Salida estéreo para audífonos
Conecte aquí sus audífonos para PFL (monitoreo pre fader), monitoreo personal o escuchar la mezcla principal (Main Mix).
14. Entradas LINE 11-18
Conecte aquí sus señales de nivel de línea; por ejemplo, teclados, dispositivos externos de audio u otras pequeñas mixers
análogas para submix. El nivel de entrada puede ser fijado en +4dBu o en -10dBV.
15. Entradas LINE 9-10 con entrada de alta impedancia (HiZ) conmutable.
Conecte estas entradas con sus señales de nivel de línea a +4 dBu o -10 dBV, o con instrumentos pasivos de alta
impedancia; por ejemplo, guitarras eléctricas, bajos eléctricos o pastillas piezo.
WiFi AP
Frequency | 2,4 GHz
Channel | 3
Nation | Not assigned
Password | No password
Security | DIsabled
SSID | M 18-xxxxxx
Ext. Antenna | enabled
LAN PORT
DHCP Client | no
IP Address | 192.168.0.18
Gateway | 0.0.0.0
Mask | 255.255.255.0
DNS Server | 0.0.0.0
4. Conector de antena Wi-Fi externa
La M 18 incluye dos antenas; una interna y una externa. Fije la antena externa a este conector para obtener un óptimo
rendimiento de la aplicación MixRemote.
5. Interruptor de encendido
Enciende y apaga la M 18.
6. Entrada del cable de alimentación
Conecte aquí el cable de alimentación del equipo.
7. Salidas AUX 1-6 balanceadas
Conecte sus monitores de escenario o efectos externos a estas salidas balanceadas de +21 dBu.
8. Conector LAN
Puede conectar aquí un punto de acceso externo para configuraciones avanzadas de comunicación. Este puerto está
destinado también a futuras aplicaciones.
9. Conector para doble pedal
Conecte aquí un conmutador de pedal simple o doble. Las funciones de conmutación asignadas son completamente
programables.
10. Botón de reinicio de acceso interno
Presione este botón durante el funcionamiento normal para restaurar la configuración por defecto, tanto para el punto
de acceso Wi-Fi interno y el puerto LAN, que es la siguiente:

ITALIANO
DEUTSCH
ESPANOL
ENGLISH
FRANÇAIS
M 18 DIGITAL MIXER
CARACTERÍSTICAS
18 canales de entrada y 13 buses de mezcla
En detalle:
Puerta de ruido, compresor de dinámica y 3 tipos de EQ paramétricos de 4 bandas (Standard, Vintage, Smooth) en cada
canal de entrada.
EQ paramétrico Standard de 4 bandas para todas las salidas AUX.
Procesador de salida principal (Master Output Processor) en la salida Main Mix, incluyendo Valve Warmer, Xciter y
Maximizer.
EQ gráfico estéreo en la salida Main Mix.
4 secciones de proceso MultiFX en canales 5 a 10, incluyendo Overdrive, Modulation, Delay, Amp Simulation y más. Amp
Simulation incluye simulaciones Guitar and Bass Amplifier desarrolladas por la firma Overloud.
8 entradas MIC
10 entradas LINE; 2 de ellas con entrada HiZ conmutable
6 envíos AUX
3 envíos FX internos
16 inserts FX
1 Main Mix estéreo
1 audífonos estéreo

ITALIANO
DEUTSCH
ESPANOL
ENGLISH
FRANÇAIS
M 18 DIGITAL MIXER
ENCENDIENDO SU MIXER DIGITAL RCF M 18
Encienda la M 18 con el interruptor de encendido (n° 5 en la vista del panel trasero). Una luz blanca en el panel frontal
debajo del logo de RCF confirmará que la M 18 está encendida.
2. Una red Wi-Fi con un SSID de nombre M 18-xxxxxx aparecerá en la lista de redes disponibles (xxxxxx es un número
alfanumérico relacionado con la dirección MAC interna).
3. Seleccione la red WiFi M 18 Wi-Fi.
4. No se solicita contraseña por defecto.
5. Espere que se conecte (normalmente, entre 5 y 10 segundos).
6. Abra la aplicación MixRemote.
7. Si la aplicación MixRemote ya está abierta en segundo plano, la M 18 se conectará tan pronto como la aplicación sea
movida al primer plano.
Conecte su mixer digital M 18 a su iPad por primera vez
1. 1. Abra la opción Configuration > Wi-Fi en su iPad.
Nota: si usted modificó la configuración Wi-Fi (nombre SSID, contraseña, etc.), el procedimiento de conexión puede variar.
IMPORTANTE: para obtener el mejor rendimiento de conexión, evite poner objetos sobre la M 18. Los objetos sobre
ella pueden interferir con la antena interna, reduciendo el rango y la seguridad de la conexión Wi-Fi. Para mejorar el
rendimiento de conexión Wi-Fi, conecte siempre la antena externa y seleccione su país (Country) en la sección
SETTINGS > NETWORK de MixRemote App.

33
* remote control from the app
** Stereo Chorus, Stereo Flanger, Stereo Tremolo,
Stereo Delay, or Stereo Pitch Shifter
34
18
9
2.2 Kg
18
8
60 dB
Ch 1-4, 5-8 ON/OFF
2
8
+4 dBu/-10 dBV
INPUTS
Mic preamp inputs
Mic pre inputs: gain range (*)
Mic pre inputs: +48V phantom
Hi-Z / Line inputs, unbalanced
Line inputs, unbalanced
All line inputs: sensitivity (*)
10
2
6
1
OUTPUTS
MAIN OUT (L,R), balanced +4 dBu
AUX OUT, balanced +4 dBu
PHONES OUT, stereo
3
Stereo Reverb
Stereo Delay
Assignable (**)
INTERNAL FX
FX1
FX2
FX3
16
2
4
4
2
4
INSERT FX
Amp Modeling
Chorus/Flanger/Tremolo
Delay
Overdrive
Pitch Shifter
2
MP3, WAV16, WAV24, AIFF
PLAYER
Number of playback tracks
Playback file format
Yes
Dual
1
IN, OUT
Yes
Yes
Yes
CONTROL
Internal Wi-Fi Access Point
Internal Wi-Fi antenna
External Wi-Fi antenna
MIDI ports
Dual Footswitch
USB 2.0 host port
LAN port
Self-contained digital mixer
with integrated effects
M 18 TECHNICAL DATA

34
M 18 SIGNAL FLOW DIAGRAM
M 18 INTERNAL BLOCK DIAGRAM


www.rcf.it
RCF S.p.A.
Via Raffaello Sanzio, 13
42124 Reggio Emilia - Italy
Tel +39 0522 274 411
Fax +39 0522 232 428
e-mail: info@rcf.it
10307704 RevA