

Edition notice
August 2017
The following paragraph does not apply to any country where such provisions are inconsistent with local law: LEXMARK
INTERNATIONAL, INC., PROVIDES THIS PUBLICATION “AS IS” WITHOUT WARRANTY OF ANY KIND, EITHER EXPRESS OR
IMPLIED, INCLUDING, BUT NOT LIMITED TO, THE IMPLIED WARRANTIES OF MERCHANTABILITY OR FITNESS FOR A PARTICULAR
PURPOSE. Some states do not allow disclaimer of express or implied warranties in certain transactions; therefore, this statement
may not apply to you.
This publication could include technical inaccuracies or typographical errors. Changes are periodically made to the information
herein; these changes will be incorporated in later editions. Improvements or changes in the products or the programs described
may be made at any time.
References in this publication to products, programs, or services do not imply that the manufacturer intends to make these available
in all countries in which it operates. Any reference to a product, program, or service is not intended to state or imply that only that
product, program, or service may be used. Any functionally equivalent product, program, or service that does not infringe any
existing intellectual property right may be used instead. Evaluation and
verification
of operation in conjunction with other products,
programs, or services, except those expressly designated by the manufacturer, are the user’s responsibility.
For Lexmark technical support, visit
http://support.lexmark.com.
For information on supplies and downloads, visit
www.lexmark.com.
© 2016 Lexmark International, Inc.
All rights reserved.
GOVERNMENT END USERS
The Software Program and any related documentation are "Commercial Items," as that term is defined in 48 C.F.R. 2.101, "Computer
Software" and "Commercial Computer Software Documentation," as such terms are used in 48 C.F.R. 12.212 or 48 C.F.R. 227.7202,
as applicable. Consistent with 48 C.F.R. 12.212 or 48 C.F.R. 227.7202-1 th rough 227.720 7-4, as applicable, the Commercial Computer
Software and Commercial Software Documentation are licensed to the U.S. Government end users (a) only as Commercial Items
and (b) with only those rights as are granted to all other end users pursuant to the terms and conditions herein.
Trademarks
Lexmark and the Lexmark logo are trademarks or registered trademarks of Lexmark International, Inc. in the United States and/or
other countries.
All other trademarks are the property of their respective owners.

Contents
Edition notice.................................................................................................2
Menu map...................................................................................................... 7
Menu map.............................................................................................................................................................. 7
Device.............................................................................................................9
Preferences........................................................................................................................................................... 9
Remote Operator Panel....................................................................................................................................10
Notifications.......................................................................................................................................................... 11
Power Management...........................................................................................................................................13
Information Sent to Lexmark........................................................................................................................... 14
Accessibility......................................................................................................................................................... 14
Restore Factory Defaults..................................................................................................................................15
Maintenance........................................................................................................................................................ 15
Visible Home Screen Icons............................................................................................................................ 20
About this Printer...............................................................................................................................................20
Print...............................................................................................................21
Layout....................................................................................................................................................................21
Finishing...............................................................................................................................................................22
Setup.....................................................................................................................................................................23
Quality.................................................................................................................................................................. 24
Job Accounting..................................................................................................................................................25
XPS........................................................................................................................................................................27
PDF........................................................................................................................................................................27
PostScript.............................................................................................................................................................27
PCL........................................................................................................................................................................28
HTML.................................................................................................................................................................... 30
Image....................................................................................................................................................................30
Paper............................................................................................................ 32
Tray Configuration.............................................................................................................................................32
Media Configuration......................................................................................................................................... 33
Bin Configuration...............................................................................................................................................34
Contents 3

Copy............................................................................................................. 35
Copy Defaults.....................................................................................................................................................35
Fax................................................................................................................ 39
Fax Mode.............................................................................................................................................................39
Analog Fax Setup..............................................................................................................................................39
Fax Server Setup............................................................................................................................................... 49
E-mail............................................................................................................52
E‑mail Setup........................................................................................................................................................52
E‑mail Defaults................................................................................................................................................... 53
Web Link Setup..................................................................................................................................................58
FTP................................................................................................................59
FTP Defaults....................................................................................................................................................... 59
USB Drive.................................................................................................... 64
Flash Drive Scan................................................................................................................................................64
Flash Drive Print.................................................................................................................................................68
Network/Ports.............................................................................................. 71
Network Overview..............................................................................................................................................71
Wireless.................................................................................................................................................................71
Ethernet................................................................................................................................................................74
TCP/IP................................................................................................................................................................... 74
IPv6........................................................................................................................................................................76
SNMP.....................................................................................................................................................................77
IPSec......................................................................................................................................................................77
802.1x....................................................................................................................................................................78
LPD Configuration............................................................................................................................................. 78
HTTP/FTP Settings............................................................................................................................................79
Parallel [x]............................................................................................................................................................ 80
ThinPrint................................................................................................................................................................81
USB........................................................................................................................................................................ 81
Google Cloud Print........................................................................................................................................... 82
Contents 4

Security........................................................................................................ 83
Login Methods....................................................................................................................................................83
Schedule USB Devices....................................................................................................................................85
Security Audit Log.............................................................................................................................................85
Login Restrictions.............................................................................................................................................. 88
Confidential Print Setup...................................................................................................................................88
Disk Encryption..................................................................................................................................................89
Erase Temporary Data Files............................................................................................................................89
Solutions LDAP Settings..................................................................................................................................90
Mobile Services Management....................................................................................................................... 90
Miscellaneous.................................................................................................................................................... 90
Reports..........................................................................................................91
Menu Settings Page...........................................................................................................................................91
Device................................................................................................................................................................... 91
Print........................................................................................................................................................................91
Shortcuts...............................................................................................................................................................91
Fax.........................................................................................................................................................................92
Network............................................................................................................................................................... 92
Help.............................................................................................................. 93
Help.......................................................................................................................................................................93
Troubleshooting..........................................................................................94
Troubleshooting.................................................................................................................................................94
Index.............................................................................................................95
Contents 5

Contents 6

Menu map
Menu map
Notes:
• The menus may vary depending on your printer model and printer firmware level.
• For more information on updating the printer firmware, go to http://support.lexmark.com/firmware or
contact your Lexmark representative.
Device
• Preferences
• Remote Operator Panel
• Notifications
• Power Management
• Information Sent to Lexmark
• Accessibility
• Restore Factory Defaults
• Maintenance
• Visible Home Screen Icons
• About This Printer
Print
• Layout
• Finishing
• Setup
• Quality
• Job Accounting
• XPS
• PDF
• PostScript
• PCL
• HTML
• Image
Paper
• Tray Configuration
• Media Configuration
• Bin Configuration
Copy
Copy Defaults
Fax
• Fax Mode
• Analog Fax Setup
• Fax Server Setup
E‑mail
• E‑mail Setup
• E‑mail Defaults
• Web Link Setup
FTP
FTP Defaults
USB Drive
• Flash Drive Scan • Flash Drive Print
Network/Ports
• Network Overview
• Wireless
• Ethernet
• TCP/IP
• IPv6
• SNMP
• IPSec
• 802.1x
• LPD Configuration
• HTTP/FTP Settings
• Parallel [x]
• ThinPrint
• USB
• Google Cloud Print
Menu map 7
Security
• Login Methods
• Schedule USB Devices
• Security Audit Log
• Login Restrictions
• Confidential Print Setup
• Disk Encryption
• Erase Temporary Data Files
• Solutions LDAP Settings
• Mobile Services Management
• Miscellaneous
Reports
• Menu Settings Page
• Device
• Print
• Shortcuts
• Fax
• Network
Help
• Print All Guides
• Color Quality Guide
• Connection Guide
• Copy Guide
• E‑mail Guide
• Fax Guide
• Information Guide
• Media Guide
• Moving Guide
• Print Quality Guide
• Scan Guide
• Supplies Guide
Troubleshooting Print Quality Test Pages
Menu map 8

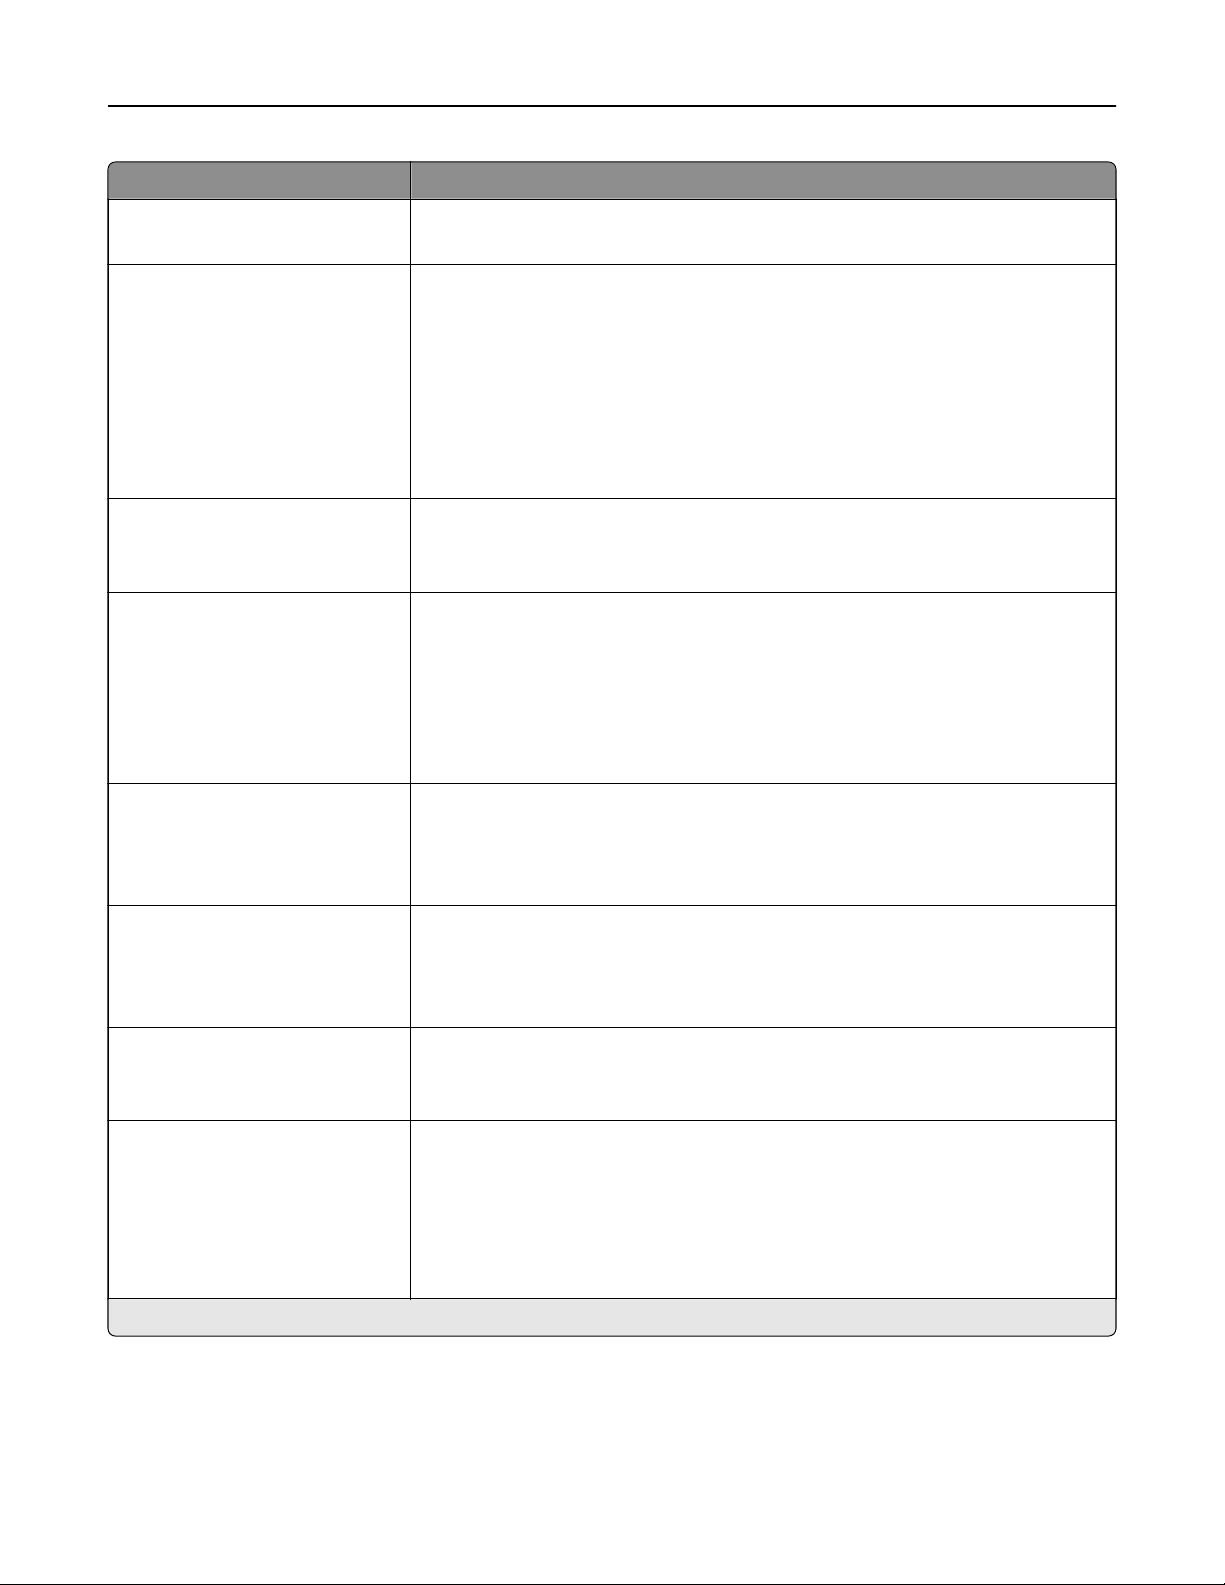
Device
Preferences
Menu item Description
Display Language
[List of languages]
Set the language of the text that appears on the display.
Note: Not all languages are available for all printer models.
You may need to install special hardware for some
languages.
Country/Region
[List of countries]
Identify the country that the printer is configured to operate.
Run Initial setup
On
O*
Run the setup wizard.
Keyboard
Keyboard Type
[List of languages]
Select a language as a keyboard type.
Displayed information
Display Text 1
Display Text 2
Custom Text 1
Custom Text 2
Specify the information to appear on the home screen.
Date and Time
Configure
Current Date and Time
Manually Set Date and Time
Date Format
Time Format
Time Zone
UTC (GMT) Oset
DST Start
DST End
DST Oset
Network Time Protocol
Enable NTP
NTP Server
Enable Authentication
Key ID
Password
Configure the printer date and time.
Notes:
• UTC (GMT) Oset, DST Start, End Start, and DST Oset
appear only in the Embedded Web Server for some
printer models.
• Key ID and Password appear only if Enable
Authentication is set to MD5 key.
Paper Sizes
U.S.*
Metric
Specify the unit of measurement for paper sizes.
Note: The country or region selected in the initial setup
wizard determines the initial paper size setting.
Note: An asterisk (*) next to a value indicates the factory default setting.
Device 9

Menu item Description
Screen Brightness
20–100% (100*)
Adjust the brightness of the display.
Flash Drive Access
Enabled*
Disabled
Enable access to the flash drive.
Allow Background Removal
O
On*
Allow image background removal in copy, fax, e-mail, FTP, or
scan-to-USB jobs.
Allow Custom Job scans
O
On*
Allow scanning from custom jobs.
One Page Flatbed Scanning
O*
On
Set copies from the scanner glass to only one page at a time.
Quiet Mode
O*
On
Set the amount of noise that the printer produces.
Note: Enabling this setting slows down the printer
performance.
Press Power Button
Do Nothing
Sleep*
Determine how the printer reacts when the user presses the
power button.
Output Lighting
O
On*
Enable the output light.
Screen Timeout
10–300 (60*)
Set the idle time in seconds before the display shows the home
screen, or before the printer logs o a user account
automatically.
Note: An asterisk (*) next to a value indicates the factory default setting.
Remote Operator Panel
Menu item Description
External VNC Connection
Don’t Allow*
Allow
Allow users to connect an external Virtual Network Computing
(VNC) client to run the remote control panel.
Authentication Type
None*
Standard Authentication
Set the authentication type when accessing the VNC client
server.
VNC Password Specify the password to connect to the VNC client server.
Note: This menu item appears only if Authentication Type is
set to Standard Authentication.
Note: An asterisk (*) next to a value indicates the factory default setting.
Device 10
Notifications
Menu item Description
ADF Loaded Beep
O
On*
Enable a sound when loading paper into the ADF.
Alarm Control
O
Single*
Continuous
Set the number of times that the alarm sounds when the printer
requires user intervention.
Error Lighting
O*
On
Set the indicator light to come on when a printer error occurs.
Note: This menu item appears only in some printer models.
Supplies
Show Supply Estimates
Show estimates*
Do not show estimates
Show the estimated status of the supplies.
Supplies
Cartridge Alarm
O*
Single
Continuous
Staple Alarm
O*
Single
Continuous
Hole Punch Alarm
O*
Single
Continuous
Set the number of times that the alarm sounds when the supply
status is low.
E‑mail Alerts Setup Configure the printer to send e‑mail alerts to a list of contacts
when the printer requires user intervention.
Error Prevention
Jam Assist
O
On*
Set the printer to flush automatically blank pages or pages with
partial prints after a jammed page is cleared.
Error Prevention
Auto Continue
O*
On
Let the printer continue processing or printing a job
automatically after clearing certain attendance conditions.
Note: An asterisk (*) next to a value indicates the factory default setting.
Device 11
Menu item Description
Error Prevention
Auto Reboot
Auto Reboot
Reboot when idle
Reboot always*
Reboot never
Set the printer to restart when an error occurs.
Error Prevention
Auto Reboot
Max Auto Reboots
1–20 (2*)
Set the number of automatic reboots that the printer can
perform.
Error Prevention
Auto Reboot
Auto Reboot Window
1–525600 (720*)
Set the number of seconds before the printer performs an
automatic reboot.
Error Prevention
Auto Reboot
Auto Reboot Counter
Show a read‑only information of the reboot counter.
Error Prevention
Auto Reboot
Reset Auto Reboot Counter
Cancel
Continue
Reset Auto Reboot Counter.
Error Prevention
Display Short Paper Error
On
Auto‑clear*
Set the printer to show a message when a short paper error
occurs.
Note: Short paper refers to the size of the paper loaded.
Error Prevention
Page Protect
O*
On
Set the printer to process the entire page into the memory
before printing it.
Jam Content Recovery
Jam Recovery
O
On
Auto*
Set the printer to reprint jammed pages.
Jam Content Recovery
Scanner Jam Recovery
Job level
Page level*
Specify how to restart a scan job after resolving a paper jam.
Note: An asterisk (*) next to a value indicates the factory default setting.
Device 12
Power Management
Menu item Description
Sleep Mode Profile
Print with Display o
Display on when printing
Allow printing with display o*
Print a job with the display turned o.
Note: This menu item appears only in some printer models.
Timeouts
Sleep Mode
Set the idle time before the printer begins operating in Sleep
mode.
Note: The default value may vary depending on your printer
model.
Timeouts
Hibernate Timeout
Disabled
1 hour
2 hours
3 hours
6 hours
1 day
2 days
3 days*
1 week
2 weeks
1 month
Set the time before the printer enters Hibernate mode.
Timeouts
Hibernate Timeout on Connection
Hibernate
Do Not Hibernate*
Set the printer to Hibernate mode even when an active
Ethernet connection exists.
Eco-Mode
O*
Energy
Energy/Paper
Paper
Minimize the use of energy, paper, or specialty media.
Note: Setting Eco‑Mode to Energy or Paper may
aect
printer performance, but not print quality.
Schedule Power Modes
Schedules
Schedule the printer to enter Sleep or Hibernate mode.
Note: This menu item appears only in some printer models.
Note: An asterisk (*) next to a value indicates the factory default setting.
Device 13

Information Sent to Lexmark
Menu item Description
Information Sent to Lexmark
Supplies and Page Usage (Anonymous)
Device Performance (Anonymous)
Device Interaction (Anonymous)
None of the Above
Send printer usage information to Lexmark anonymously.
Note: The default value is the value selected during the
initial setup.
Information Send Time
Start Time
Stop Time
User Information ‑ Level
Anonymous Session Information Only
Session Information with Generic User Information
Session Information with Actual User IDs
Accessibility
Menu item Description
Duplicate Key Strike Interval
0–5 (0*)
Set the interval in seconds during which the printer
ignores duplicate key presses on an attached keyboard.
Key Repeat Initial Delay
0.25–5 (1*)
Set the initial length of delay in seconds before a
repeating key starts repeating.
Note: This menu item appears only when a keyboard is
attached to the printer.
Key Repeat Rate
0.5–30 (30*)
Set the number of presses per second for a repeating
key.
Note: This menu item appears only when a keyboard is
attached to the printer.
Prolong Screen Timeout
O*
On
Let the user remain in the same location and reset the
Screen Timeout timer when it expires instead of
returning to the home screen.
Headphone Volume
1–10 (5*)
Adjust the headphone volume.
Note: This menu item appears only when headphones
are attached to the printer.
Enable Voice Guidance When Headphone Is Attached
O*
On
Enable Voice Guidance when headphones are attached
to the printer.
Speak Passwords/PINs
O*
On
Set the printer to read out loud passwords or personal
identification numbers.
Note: This menu item appears only when headphones
or speakers are attached to the printer.
Note: An asterisk (*) next to a value indicates the factory default setting.
Device 14

Menu item Description
Speech Rate
Very Slow
Slow
Normal*
Fast
Faster
Very Fast
Rapid
Very Rapid
Fastest
Set the Voice Guidance speech rate.
Note: This menu item appears only when headphones
or speakers are attached to the printer.
Note: An asterisk (*) next to a value indicates the factory default setting.
Restore Factory Defaults
Menu item Description
Restore Settings
Restore all settings
Restore printer settings
Restore network settings
Restore fax settings
Restore app settings
Restore the printer factory default settings.
Note: The default value is the value selected during the initial setup.
Maintenance
Configuration
Menu
Menu item Description
USB Configuration
USB PnP
1*
2
Change the USB driver mode of the printer to improve its
compatibility with a personal computer.
Note: This menu item appears only in some printer models.
USB Scan to Local
On*
O
Set whether the USB device driver enumerates as a USB
Simple device (single interface) or as a USB Composite device
(multiple interfaces).
USB Configuration
USB Speed
Full
Auto*
Set the USB port to run at full speed and disable its high‑speed
capabilities.
Note: This menu item appears only in some printer models.
Note: An asterisk (*) next to a value indicates the factory default setting.
Device 15

Menu item Description
Tray Configuration
Tray Linking
Automatic*
O
Set the printer to link the trays that have the same paper type
and paper size settings.
Tray Configuration
Show Tray Insert Message
O*
On
Show the Tray Insert message.
Tray Configuration
A5 Loading
Short Edge
Long Edge*
Specify the page orientation when loading A5‑size paper.
Note: This menu item appears only in some printer models.
Tray Configuration
Paper Prompts
Auto*
Multipurpose Feeder
Manual Paper
Envelope Prompts
Auto*
Multipurpose Feeder
Manual Envelope
Set the paper source that the user fills when a prompt to load
paper or envelope appears.
Note: For Multipurpose Feeder to appear, set
Configure
MP
to Cassette from the Paper menu.
Tray Configuration
Action for Prompts
Prompt user*
Continue
Use current
Set the printer to resolve paper- or envelope-related change
prompts.
Reports
Menu Settings Page
Event Log
Event Log Summary
HealthCheck Statistics
Print reports about printer menu settings, status, and event
logs.
Supply Usage And Counters
Clear Supply Usage History
Reset the supply usage history, such as number of pages and
days remaining, to the factory shipped level.
Supply Usage And Counters
Reset Maintenance Counter
Reset the counter after installing a new maintenance kit.
Supply Usage And Counters
Tiered Coverage Ranges
Adjust the range for the amount of color coverage on the
printed page.
Note: This menu item appears only in some printer models.
Note: An asterisk (*) next to a value indicates the factory default setting.
Device 16
Menu item Description
Printer Emulations
PPDS Emulation
O*
On
Set the printer to recognize and use the PPDS data stream.
Fax Configuration
Fax Low Power Support
Disable Sleep
Permit Sleep
Auto*
Set fax to enter Sleep mode whenever the printer determines
that it should.
Fax Configuration
Fax Storage Location
Disk
NAND*
Set the storage location for all faxes.
Note: This menu item appears only when a hard disk is
installed.
Print Configuration
Black Only Mode
O*
On
Print color content in grayscale.
Print Configuration
Color Trapping
O
1
2*
3
4
5
Enhance the printed output to compensate for misregistration
in the printer.
Print Configuration
Font Sharpening
0–150 (24*)
Set a text point-size value below which the high‑frequency
screens are used when printing font data.
For example, if the value is 24, then all fonts sized 24 points or
less use the high‑frequency screens.
Device Operations
Quiet Mode
O*
On
Set the printer to operate in Quiet mode.
Device Operations
Panel Menus
O
On*
Enable access to the control panel menus.
Device Operations
Custom Supply Levels
O*
On
Let printservice read and edit values from the Embedded Web
Server.
Note: An asterisk (*) next to a value indicates the factory default setting.
Device 17
Menu item Description
Device Operations
Safe Mode
O*
On
Set the printer to operate in a special mode, in which it attempts
to continue oering as much functionality as possible, despite
known issues.
For example, when set to On and the duplex motor is
nonfunctional, the printer performs one‑sided printing for a
two‑sided print job.
Device Operations
Minimum Copy Memory
80 MB*
100 MB
Set the minimum memory allocation for storing copy jobs.
Device Operations
Clear Custom Status
Erase user‑defined strings for the Default or Alternate custom
messages.
Device Operations
Clear all remotely‑installed messages
Erase messages that were remotely installed.
Device Operations
Automatically Display Error Screens
O
On*
Show existing error messages on the display after the printer
remains inactive on the home screen for a length of time equal
to the Screen Timeout setting.
Device Operations
Honor orientation on fast path copy
On
O*
Enable the printer to use the orientation setting under the Copy
menu when sending quick copy jobs.
Device Operations
Enable Optional Parallel Port
O*
On
Enable an optional parallel port.
Note: When set to On, the printer restarts.
Toner patch sensor setup
Calibration frequency preference
Disabled
Fewest color adjustment
Fewer color adjustment
Normal*
Better color accuracy
Best color accuracy
Set the printer to put down the correct amount of toner to
maintain color consistency.
Toner patch sensor setup
Full calibration
Run the full color calibration.
Toner patch sensor setup
Print TPS information page
Print a diagnostic page that contains information on toner patch
sensor calibration.
Note: An asterisk (*) next to a value indicates the factory default setting.
Device 18

Menu item Description
App Configuration
LES Applications
O
On*
Enable the Lexmark Embedded Solutions (LES) applications.
Notes:
• This menu item is available only in some printer models.
• When set to On, this setting does not aect built‑in
applications.
Scanner Configuration
Scanner Manual Registration
Print Quick Test
Print a Quick Test target page.
Note: Make sure that the margin spacing on the target page
is uniform all the way around the target. If it is not, then the
printer margins may need to be reset.
Scanner Configuration
Scanner Manual Registration
Front ADF Registration
Rear ADF Registration
Flatbed Registration
Manually register the flatbed and ADF after replacing the ADF,
scanner glass, or controller board.
Scanner Configuration
Edge Erase
Flatbed Edge Erase
0–6 (3*)
ADF Edge Erase
0–6 (3*)
Set the size, in millimeters, of the no‑print area around an ADF
or flatbed scan job.
Scanner Configuration
ADF Deskew
ADF Mechanical Deskew
O
On
Auto*
Set the printer to perform ADF mechanical skew adjustment.
Scanner Configuration
Disabled Scanner
Enabled*
Disabled
ADF Disabled
Disable the scanner when it is not working properly.
Scanner Configuration
Ti
Byte Order
CPU Endianness*
Little Endian
Big Endian
Set the byte order of a TIFF‑formatted scan output.
Scanner Configuration
Exact Ti Rows Per Strip
On*
O
Set the RowsPerStrip tag value of a TIFF‑formatted scan output.
Note: An asterisk (*) next to a value indicates the factory default setting.
Device 19

Out of Service Erase
Menu item Description
Memory Last Sanitized
Sanitize all information on nonvolatile memory
Erase all printer and network settings
Erase all apps and app settings
Erase all shortcuts and shortcut settings
Clear all settings and applications that are stored in
the printer hard disk.
Hard Disk Last Sanitized
Sanitize all information on hard disk
Erase downloads (Erase all macros, fonts, PFOs, etc.)
Erase buered jobs
Erase Held jobs
Clear all downloads and jobs that are stored in the
hard disk.
Visible Home Screen Icons
Menu Description
Visible Home Screen Icons
Copy
E‑mail
Fax
Status/Supplies
Job Queue
Change Language
Address Book
Bookmarks
Held Jobs
USB
FTP
Scan Profiles
App
Profiles
Specify which icons to show on the home screen.
Note: The icons may vary depending on your printer model.
About this Printer
Menu item Description
Asset Tag Specify the printer name, location, and contact information.
Printer’s Location
Contact
Export Configuration File to USB Export configuration files to a flash drive.
Export Compressed Logs to USB Export compressed log files to a flash drive.
Device 20

Print
Layout
Menu item Description
Sides
1‑sided*
2‑sided
Specify whether to print on one side or two sides of the paper.
Flip Style
Long Edge*
Short Edge
Determine which side of the paper (long edge or short edge) is bound when
performing two‑sided printing.
Note: Depending on the option selected, the printer automatically osets
each printed information of the page to bind the job correctly.
Blank Pages
Print
Do Not Print*
Print blank pages that are included in a print job.
Collate
O [1,1,1,2,2,2]*
On [1,2,1,2,1,2]
Keep the pages of a print job stacked in sequence, particularly when printing
multiple copies of the job.
Separator Sheets
None*
Between Copies
Between Jobs
Between Pages
Insert blank separator sheets when printing.
Separator Sheet Source
Tray [x] (1*)
Multipurpose Feeder
Specify the paper source for the separator sheet.
Note: For Multipurpose Feeder to appear, set Configure MP to Cassette from
the Paper menu.
Pages per Side
O*
2 pages per side
3 pages per side
4 pages per side
6 pages per side
9 pages per side
12 pages per side
16 pages per side
Print multiple page images on one side of a sheet of paper.
Pages per Side Ordering
Horizontal*
Reverse Horizontal
Vertical
Reverse Vertical
Specify the positioning of multiple page images when using Pages per Side.
Note: The positioning depends on the number of page images and their
page orientation.
Note: An asterisk (*) next to a value indicates the factory default setting.
Print 21

Menu item Description
Pages per Side Orientation
Auto*
Landscape
Portrait
Specify the orientation of a multiple‑page document when using Pages per
Side.
Pages per Side Border
None*
Solid
Print a border around each page image when using Pages per Side.
Copies
1–9999 (1*)
Specify the number of copies for each print job.
Print Area
Normal*
Fit to page
Whole Page
Set the printable area on a sheet of paper.
Note: An asterisk (*) next to a value indicates the factory default setting.
Finishing
Menu item Description
Staple Job
O*
1 staple, top left corner
2 staples, left
1 staple, top right corner
2 staples, top
1 staple, bottom left corner
2 staples, bottom
1 staple, bottom right corner
2 staples, right
Specify the staple position for all print jobs.
Note: This menu item appears only when a staple finisher is installed.
Staple Test
Start
Determine whether the staple finisher is functioning properly.
Note: This menu item appears only when a staple
finisher
is installed.
Hole Punch
O*
On
Punch holes along the edge of the printed output.
Note: This menu item appears only when a staple, hole punch finisher is
installed.
Hole Punch Mode
2 holes
3 holes
4 holes
Set the hole punch mode for the printed output.
Notes:
• 3 holes is the U.S. factory default setting. 4 holes is the international
factory default setting.
• This menu item appears only when a staple, hole punch finisher is
installed.
Note: An asterisk (*) next to a value indicates the factory default setting.
Print 22
Menu item Description
Oset Pages
None*
Between Copies
Between Jobs
Oset the output of each print job or each copy of a print job.
Notes:
• Between Copies osets each copy of a print job if Collate is set to On
[1,2,1,2,1,2]. If Collate is set to O [1,1,1,2,2,2], then each set of printed
pages are oset, such as all page 1s and all page 2s.
• Between Jobs sets the same oset position for the entire print job
regardless of the number of copies printed.
• This menu item appears only when a staple finisher is installed.
Note: An asterisk (*) next to a value indicates the factory default setting.
Setup
Menu item Description
Printer Language
PCL Emulation
PS Emulation*
Set the printer language.
Note: Setting a printer language default does not prevent a software
program from sending print jobs that use another printer language.
Job Waiting
O*
On
Preserve print jobs requiring supplies so that jobs not requiring the missing
supplies can print.
Note: This menu item appears only when a printer hard disk is installed.
Job Hold Timeout
0–255 (30*)
Set the time in seconds that the printer waits for user intervention before
it holds jobs that require unavailable resources and continues to print other
jobs in the print queue.
Note: This menu item appears only when a printer hard disk is installed.
Printer Usage
Max Speed
Max Yield*
Select between a faster print speed and a higher toner yield when printing.
Download Target
RAM*
Disk
Specify where to save all permanent resources, such as fonts and macros,
that have been downloaded to the printer.
Note: This menu item appears only when a printer hard disk is installed.
Resource Save
O*
On
Determine what the printer does with downloaded resources, such as
fonts and macros, when it receives a job that requires more than the
available memory.
Notes:
• When set to O, the printer retains downloaded resources only until
memory is needed. Resources associated with the inactive printer
language are deleted.
• When set to On, the printer preserves all the permanent
downloaded resources across all language switches. When
necessary, the printer shows memory full messages instead of
deleting permanent resources.
Note: An asterisk (*) next to a value indicates the factory default setting.
Print 23
Menu item Description
Print All Order
Alphabetical*
Newest First
Oldest First
Specify the order in which held and confidential jobs are printed when Print
All is selected.
Note: An asterisk (*) next to a value indicates the factory default setting.
Quality
Menu item Description
Print Mode
Black and White
Color*
Set the print mode.
Print Resolution
4800 CQ
2400 Image Q
1200 dpi
Set the resolution in dots print per inch (dpi), image quality (Image Q), or color
quality (CQ) for the printed output.
Note: The values may vary depending on your printer model.
Toner Darkness
1 to 5 (5*)
Determine the lightness or darkness of text images.
Halftone
Normal*
Detail
Enhance the printed output to have smoother lines with sharper edges.
Color Saver
O*
On
Reduce the amount of toner used to print graphics and images.
RGB Brightness
‑6 to 6 (0*)
Adjust the brightness, contrast, and saturation for color output.
Note: This setting does not
aect
files
where CMYK color
specifications
are
used.
RGB Contrast
0 to 5 (0*)
RGB Saturation
0 to 5 (0*)
Note: An asterisk (*) next to a value indicates the factory default setting.
Print 24
Advanced Imaging
Menu item Description
Color Balance
Cyan
‑5 to 5 (0*)
Magenta
‑5 to 5 (0*)
Ye l l o w
‑5 to 5 (0*)
Black
‑5 to 5 (0*)
Reset Defaults
Start
Adjust the amount of toner being used for each color.
Color Correction
O
Auto*
Manual
Modify the color settings used to print documents.
Notes:
• O sets the printer to receive the color correction from the software.
• Auto sets the printer to apply dierent color profiles to each object on the
printed page.
• Manual allows the customization of the RGB or CMYK color conversions
applied to each object on the printed page.
Color Samples
Print Color Samples
Print sample pages for each of the RGB and CMYK color conversion tables used
in the printer.
Color Adjust
Start
Calibrate the printer to adjust color variations in the printed output.
Spot Color Replacement
Set Custom CMYK
Assign specific CMYK values to twenty named spot colors.
RGB Replacement Match the colors of the printed output to the original document.
Notes:
• This menu item requires that you select the Display‑True‑Black color table.
• This menu item appears only in the Embedded Web Server.
Note: An asterisk (*) next to a value indicates the factory default setting.
Job Accounting
Note: This menu appears only when a printer hard disk is installed.
Menu item Description
Job Accounting
O*
On
Set the printer to create a log of the print jobs that it receives.
Note: An asterisk (*) next to a value indicates the factory default setting.
Print 25
Menu item Description
Accounting Log Frequency
Daily
Weekly
Monthly*
Specify how often the printer creates a log file.
Log Action at End of Frequency
None*
E‑mail Current Log
E‑mail & Delete Current Log
Post Current Log
Post & Delete Current Log
Specify how the printer responds when the frequency threshold expires.
Note: The value defined in Accounting Log Frequency determines when this
action is triggered.
Log Near Full Level
O
On*
Specify the maximum size of the log file before the printer executes the Log
Action at Near Full.
Log Action at Near Full
None*
E‑mail Current Log
E‑mail & Delete Current Log
E‑mail & Delete Oldest Log
Post Current Log
Post & Delete Current Log
Post & Delete Oldest Log
Delete Current Log
Delete Oldest Log
Delete All But Current
Delete All Logs
Specify how the printer responds when the hard disk is nearly full.
Note: The value
defined
in Log Near Full Level determines when this action
is triggered.
Log Action at Full
None*
E‑mail & Delete Current Log
E‑mail & Delete Oldest Log
Post & Delete Current Log
Post & Delete Oldest Log
Delete Current Log
Delete Oldest Log
Delete All But Current
Delete All Logs
Specify how the printer responds when disk usage reaches the maximum limit
(100MB).
URL to Post Log Specify where the printer posts job accounting logs.
E‑mail Address to Send Logs Specify the e‑mail address to which the printer sends job accounting logs.
Log File Prefix Specify the prefix for the log file name.
Note: The current host name
defined
in the TCP/IP menu is used as the
default log file prefix.
Note: An asterisk (*) next to a value indicates the factory default setting.
Print 26
XPS
Menu item Description
Print Error Pages
O*
On
Print a test page that contains information on errors, including XML markup
errors.
Minimum Line Width
1–30 (2*)
Set the minimum stroke width of any job printed in 1200 dpi.
Note: An asterisk (*) next to a value indicates the factory default setting.
PDF
Menu item Description
Scale to Fit
O*
On
Scale the page content to fit the selected paper size.
Annotations
Print
Do Not Print*
Specify whether to print annotations in the PDF.
Note: An asterisk (*) next to a value indicates the factory default setting.
PostScript
Menu item Description
Print PS Error
O*
On
Print a page that describes the PostScript® error.
Note: When an error occurs, processing of the job stops, the printer
prints an error message, and the rest of the print job is flushed.
Minimum Line Width
1–30 (2*)
Set the minimum stroke width.
Notes:
• Jobs printed in 1200 dpi use the value directly.
• Jobs printed in 4800 CQ use half the value.
Lock PS Startup Mode
O*
On
Disable the SysStart file.
Image Smoothing
O*
On
Enhance the contrast and sharpness of low‑resolution images.
Note: This setting has no
eect
on images with a resolution of 300 dpi or
higher.
Note: An asterisk (*) next to a value indicates the factory default setting.
Print 27
Menu item Description
Font Priority
Resident*
Flash/Disk
Establish the font search order.
Notes:
• Resident sets the printer to search its memory for the requested font
before searching the flash memory or printer hard disk.
• Flash/Disk sets the printer to search the flash memory or printer hard
disk for the requested font before searching the printer memory.
• This menu item appears only when a flash memory or printer hard
disk is installed.
Wait Timeout
O
On* (40 seconds)
Set the printer to wait for more data before canceling a print job.
Note: An asterisk (*) next to a value indicates the factory default setting.
PCL
Menu item Description
Font Source
Resident*
Disk
Download
Flash
All
Specify the source of the fonts that are displayed in the Font Name menu
item.
Note: Make sure that the hard disk and
flash
option are not
password‑protected.
Font Name
[List of available fonts]
Choose a font from the specified font source.
Notes:
• Courier is the factory default setting.
• The available fonts may vary depending on your printer model.
Symbol Set
[List of available symbol set]
Specify the symbol set for each font name.
Notes:
• 10U PC‑8 is the U.S. factory default setting. 12U PC‑850 is the
international factory default setting.
• A symbol set is a set of alphabetic and numeric characters,
punctuation, and special symbols. Symbol sets support the dierent
languages or specific programs such as math symbols for scientific
text.
• The available symbol sets may vary depending on your printer model.
Note: An asterisk (*) next to a value indicates the factory default setting.
Print 28

Menu item Description
Pitch
0.08–100 (10*)
Specify the font pitch for scalable monospaced fonts.
Notes:
• Pitch refers to the number of fixed‑space characters in a horizontal
inch of type.
• For nonscalable monospaced fonts, the pitch appears on the display
but it cannot be changed.
Orientation
Portrait*
Landscape
Specify the orientation of text and graphics on the page.
Lines per Page
1–255 (60*)
Specify the number of lines that print on each page.
Notes:
• The printer sets the amount of space between each line (vertical line
spacing) based on the Lines per Page, Paper Size, and Orientation
menu items.
• Specify the paper size and orientation before setting Lines per Page.
PCL5 Minimum Line Width
1–30 (2*)
Set the initial minimum stroke width of any job printed in 1200 dpi.
PCLXL Minimum Line Width
1–30 (2*)
A4 Width
198 mm*
203 mm
Set the width of the page when printing on A4‑size paper.
Note: 203 mm sets the width of the page to allow printing of eighty
10‑pitch characters.
Auto CR after LF
O*
On
Set the printer to perform a carriage return after a line feed control
command.
Note: Carriage return is a mechanism that commands the printer to move
the position of the cursor to the first position on the same line.
Auto LF after CR
O*
On
Set the printer to perform a line feed after a carriage return control
command.
Note: Carriage return is a mechanism that commands the printer to move
the position of the cursor to the first position on the same line.
Tray Renumber
Assign MP Feeder
0–201 (200*)
Assign Tray [x]
0–201 (200*)
Assign Manual Paper
0–201 (200*)
Assign Manual Envelope
0–201 (200*)
Configure the printer to work with print drivers or applications that use
dierent source assignments for the trays or feeders.
Note: An asterisk (*) next to a value indicates the factory default setting.
Print 29

Menu item Description
Tray Renumber
View Factory Defaults
Restore Defaults
Show or restore the factory default setting assigned to each tray or feeder.
Print Timeout
O
On*
Set the printer to end a print job after it has been idle for the specified
amount of time.
Note: When set to On, the factory default setting is 90 seconds.
Note: An asterisk (*) next to a value indicates the factory default setting.
HTML
Menu item Description
Font Name
[List of fonts] (Times*)
Set the font to use for HTML documents.
Font Size
1–255 (12*)
Set the font size to use for HTML documents.
Scale
1–400% (100*)
Scale HTML documents.
Orientation
Portrait*
Landscape
Set the page orientation for HTML documents.
Margin Size
8–255 mm (19*)
Set the page margin for HTML documents.
Backgrounds
Do Not Print
Print*
Print background information or graphics for HTML documents.
Note: An asterisk (*) next to a value indicates the factory default setting.
Image
Menu item Description
Auto Fit
O
On*
Select the best available paper size and orientation setting for an image.
Note: When set to On, this menu item overrides the scaling and orientation
settings for the image.
Invert
O*
On
Invert bitonal monochrome images.
Note: This menu item does not apply to GIF or JPEG image formats.
Note: An asterisk (*) next to a value indicates the factory default setting.
Print 30
Menu item Description
Scaling
Best Fit*
Anchor Top Left
Anchor Center
Fit Height/Width
Fit Height
Fit Width
Adjust the image to fit the printable area.
Note: When Auto Fit is set to On, Scaling is automatically set to Best Fit.
Orientation
Portrait*
Landscape
Reverse Portrait
Reverse Landscape
Specify the orientation of text and graphics on the page.
Note: An asterisk (*) next to a value indicates the factory default setting.
Print 31
Paper
Tray Configuration
Menu item Description
Default Source
Tray [x] (1*)
Multipurpose Feeder
Manual Paper
Manual Envelope
Set the paper source for all print jobs.
Note: Multipurpose Feeder only appears when Configure MP is set to
Cassette.
Paper Size/Type
Tray [x]
Multipurpose Feeder
Manual Paper
Manual Envelope
Specify the paper size or paper type loaded in each paper source.
Substitute Size
O
Statement/A5
Letter/A4
11 x 17/A3
All Listed*
Set the printer to substitute a specified paper size if the requested size is not
loaded in any paper source.
Notes:
• O prompts the user to load the required paper size.
• Statement/A5 prints A5‑size document on statement when loading
statement and statement‑size jobs on A5 paper size when loading A5.
• Letter/A4 prints A4‑size document on letter when loading letter and
letter‑size jobs on A4 paper size when loading letter.
• 11 x 17 prints A3‑size document on 11 x 17 when loading 11 x 17 and 11 x 17–
size jobs on A3 paper size when loading 11 x 17.
• All Listed substitutes Letter/A4.
Configure MP
Cassette*
Manual
First
Set the printer when to pick paper loaded in the multipurpose feeder.
Notes:
• When set to Cassette, the printer treats the multipurpose feeder like a
tray.
• When set to Manual, the printer treats the multipurpose feeder like a
manual feeder.
• When set to First, the printer picks paper from the multipurpose feeder
until it is empty, regardless of the required paper source or paper size.
Note: An asterisk (*) next to a value indicates the factory default setting.
Paper 32

Media Configuration
Universal Setup
Menu item Description
Units of Measure
Inches
Millimeters
Specify the unit of measurement for the universal paper.
Note: Inches is the U.S. factory default setting. Millimeters is the
international factory default setting.
Portrait Width
3–52 inches (8.50*)
76–1321 mm (216*)
Set the portrait width of the universal paper.
Portrait Height
3–52 inches (14*)
76–1321 mm (356*)
Set the portrait height of the universal paper.
Feed Direction
Short Edge*
Long Edge
Set the printer to pick paper from the short edge or long edge
direction.
Note: Long Edge appears only when the longest edge is shorter
than the maximum width supported.
Note: An asterisk (*) next to a value indicates the factory default setting.
Custom Scan Sizes
Menu item Description
Custom Scan Size [x]
Set Name and Type
Scan Size Name
Width
1–8.50 inches (8.50*)
25–216 mm (216*)
Height
1–25 inches (14*)
25–635 mm (356*)
Orientation
Portrait*
Landscape
2 scans per side
O*
On
Assign a scan size name and configure the scan settings.
Paper 33
Media Types
Menu item Description
Plain
Card Stock
Transparency
Recycled
Glossy
Heavy Glossy
Labels
Vinyl Labels
Bond
Envelope
Rough Envelope
Letterhead
Preprinted
Colored Paper
Light
Heavy
Rough/Cotton
Custom Type [x]
Specify the texture, weight, loading orientation, and output bin of the
paper loaded.
Select from the following options:
Tex tu re
Smooth
Normal*
Rough
Weight
Light
Normal*
Heavy
Loading Orientation
O
1 sided printing only
Duplex
Send to Bin
Disabled*
Standard Bin
Bin [x]
Note: An asterisk (*) next to a value indicates the factory default setting.
Bin Configuration
Menu item Description
Output Bin
Standard Bin*
Bin [x]
Specify the output bin.
Configure Bins
Mailbox*
Link
Link Optional
Type Assignment
Configure the mode of operation for the output bins.
Notes:
• Mailbox allows the standard bin and any optional bin to be selected
individually.
• Link allows all output bins to be linked together as though they were one
large bin.
• Link Optional treats all optional bins as one large output bin.
• Type Assignment assigns each paper type a bin or a linked bin set.
Custom Bin Names
Standard Bin
Bin [x]
Assign a name for the bin.
Note: An asterisk (*) next to a value indicates the factory default setting.
Paper 34
Copy
Copy Defaults
Menu item Description
Content Type
Te xt
Te xt/ P hot o*
Photo
Graphics
Improve the output result based on the content of the original document.
Content Source
Black and White Laser
Color Laser*
Inkjet
Photo/Film
Magazine
Newspaper
Press
Other
Improve the output result based on the source of the original document.
Sides
1 sided to 1 sided*
1 sided to 2 sided
2 sided to 1 sided
2 sided to 2 sided
Specify the scanning behavior based on the original document.
Separator Sheets
None*
Between Copies
Between Jobs
Between Pages
Specify whether to insert blank separator sheets when printing.
Separator Sheet Source
Tray [x] (1*)
Multipurpose Feeder
Specify the paper source for the separator sheet.
Color
O
On*
Auto
Specify whether to print copies in color.
Pages per Side
O*
2 Portrait pages
4 Portrait pages
2 Landscape pages
4 Landscape pages
Specify the number of page images to print on one side of a sheet of paper.
Note: An asterisk (*) next to a value indicates the factory default setting.
Copy 35

Menu item Description
Print Page Borders
O*
On
Place a border around each image when printing multiple pages on a single
page.
Collate
O
[1,1,1,2,2,2]
On [1,2,1,2,1,2]*
Print multiple copies in sequence.
“Copy from” Size
[List of paper sizes]
Set the paper size of the original document.
Notes:
• Letter is the U.S. factory default setting. A4 is the international factory
default setting.
• This menu item may vary depending on your printer model.
“Copy to” Source
Tray [x] (1*)
Multipurpose Feeder
Auto Size Match
Specify the paper source for the copy job.
Tempe ra ture
‑4 to 4 (0*)
Specify whether to generate a cooler or warmer output.
Darkness
‑4 to 4 (0*)
Adjust the darkness of the scanned image.
Number of Copies
1–9999 (1*)
Specify the number of copies.
Header/Footer
Top left
Top middle
Top right
Bottom left
Bottom middle
Bottom right
Apply a header or footer on the printed output.
Overlay
Confidential
Copy
Draft
Urgent
Custom
O*
Specify the overlay text printed on each page of the copy job.
Custom overlay Type a custom overlay text.
Note: An asterisk (*) next to a value indicates the factory default setting.
Copy 36
Advanced Imaging
Menu item Description
Color Balance
‑4 to 4 (0*)
Adjust the amount of toner being used in each color.
Color Dropout
None*
Red
Green
Blue
Default Red Threshold
0–255 (128*)
Default Green Threshold
0–255 (128*)
Default Blue Threshold
0–255 (128*)
Specify which color to drop during scanning, and adjust the dropout setting for
that color.
Auto Color Detect
Color Sensitivity
1–9 (5*)
Area Sensitivity
1–9 (5*)
Set the amount of color that the printer detects from the original document.
Contrast
Best for Content*
0
1
2
3
4
5
Specify the contrast of the output.
Background Removal
Background Detection
Content‑based*
Fixed
Level
‑4 to 4 (0*)
Adjust the amount of background visible on a scanned image.
Note: If you want to remove the background color from the original document,
then set Background Detection to Content-based. If you want to remove
image noise from a photo, then set Background Detection to Fixed.
Auto Center
O*
On
Align the content at the center of the page.
Mirror Image
O*
On
Create a mirror image of the original document.
Note: An asterisk (*) next to a value indicates the factory default setting.
Copy 37
Menu item Description
Negative Image
O*
On
Create a negative image of the original document.
Shadow Detail
‑4 to 4 (0*)
Adjust the amount of shadow detail visible on a scanned image.
Scan Edge to Edge
O*
On
Allow edge‑to‑edge scanning of the original document.
Sharpness
1–5 (3*)
Adjust the sharpness of a scanned image.
Note: An asterisk (*) next to a value indicates the factory default setting.
Admin Controls
Menu item Description
Allow Color Copies
O
On*
Print copies in color.
Allow Priority Copies
O
On*
Interrupt a print job to copy a page or document.
Custom Job Scanning
O*
On
Turn on scanning of custom jobs by default.
Allow Save as Shortcut
O
On*
Save custom copy settings as shortcuts.
Sample Copy Print a sample copy.
Note: An asterisk (*) next to a value indicates the factory default setting.
Copy 38

Fax
Fax Mode
Menu item Description
Fax Mode
Analog*
Fax Server
Disabled
Select a fax mode.
Note: An asterisk (*) next to a value indicates the factory default setting.
Analog Fax Setup
General Fax Settings
Menu item Description
Fax Name Identify your fax machine.
Fax Number Identify your fax number.
Fax ID
Fax Name
Fax Number*
Notify fax recipients of your fax name or fax number.
Enable Manual Fax
O*
On
Set the printer to fax manually.
Notes:
• This setting requires a line splitter and a telephone handset.
• Use a regular telephone line to answer an incoming fax job and to dial a
fax number.
• To go directly to the Manual Fax function, touch # and 0 on the keypad.
Memory Use
All receive
Mostly receive
Equal*
Mostly send
All send
Set the amount of internal printer memory allocated for faxing.
Note: This setting prevents memory buer conditions and failed faxes.
Cancel Faxes
Allow*
Don't Allow
Cancel outgoing faxes before they are transmitted, or cancel incoming faxes
before they finish printing.
Note: An asterisk (*) next to a value indicates the factory default setting.
Fax 39
Menu item Description
Caller ID
O
On*
Alternate
Show the telephone number of the person sending the fax.
Fax Number Masking
O*
From Left
From Right
Specify the format for masking an outgoing fax number.
Digits to Mask
0–58 (0*)
Specify the number of digits to mask in an outgoing fax number.
Enable Line Connected
Detection
O
On*
Determine whether a telephone line is connected to the printer.
Note: Detection takes place when turning on the printer and before each call.
Enable Line In Wrong Jack
Detection
O*
On
Determine whether a telephone line is connected to the correct port on the
printer.
Note: Detection takes place when turning on the printer and before each call.
Enable Extension in Use
Support
O
On*
Determine whether a telephone line is used by another device such as another
phone on the same line.
Note: This setting is monitored continuously after turning on the printer.
Optimize Fax Compatibility Configure the printer fax functionality for optimal compatibility with other fax
machines.
Note: An asterisk (*) next to a value indicates the factory default setting.
Fax Send Settings
Menu item Description
Resolution
Standard*
Fine
Super Fine
Ultra Fine
Set the resolution of the scanned image.
Note: A higher resolution increases fax transmission time and requires higher
memory.
Original Size
[List of paper sizes]
Specify the size of the original document.
Note: Mixed Sizes is the U.S. factory default setting. A4 is the international
factory default setting.
Orientation
Portrait
Landscape
Specify the page orientation of the original document.
Note: An asterisk (*) next to a value indicates the factory default setting.
Fax 40

Menu item Description
Sides (Duplex)
O*
Long Edge
Short Edge
Specify the page orientation of text and graphics when scanning a two‑sided
document.
Content Type
Te xt*
Te xt/ P hot o
Photo
Graphics
Improve the output result based on the content of the original document.
Content Source
Black and White Laser
Color Laser*
Inkjet
Photo/Film
Magazine
Newspaper
Press
Other
Improve the output result based on the source of the original document.
Darkness
1–9 (5*)
Adjust the darkness of the scanned image.
Behind a PABX
O*
On
Set the printer to dial a fax number without waiting to recognize the dial tone.
Note: Private Automated Branch Exchange (PABX) is a telephone network that
allows a single access number to oer multiple lines to outside callers.
Dial Mode
To ne*
Pulse
Specify the dial mode for incoming or outgoing faxes.
Note: An asterisk (*) next to a value indicates the factory default setting.
Advanced Imaging
Menu item Description
Color Balance
‑4 to 4 (0*)
Adjust the amount of toner used for each color.
Note: An asterisk (*) next to a value indicates the factory default setting.
Fax 41

Menu item Description
Color Dropout
None*
Red
Green
Blue
Default Red Threshold
0–255 (128*)
Default Green Threshold
0–255 (128*)
Default Blue Threshold
0–255 (128*)
Specify which color to drop during scanning, and adjust the dropout setting for
that color.
Contrast
Best for Content*
0
1
2
3
4
5
Set the contrast of the output.
Background Removal
‑4 to 4 (0*)
Adjust the amount of background visible on a scanned image.
Mirror Image
O*
On
Create a mirror image of the original document.
Negative Image
O*
On
Create a negative image of the original document.
Shadow Detail
‑4 to 4 (0*)
Adjust the amount of shadow detail visible on a scanned image.
Scan Edge to Edge
O*
On
Allow edge‑to‑edge scanning of the original document.
Sharpness
1–5 (3*)
Adjust the sharpness of the scanned image.
Tempe ra ture
‑4 to 4 (0*)
Specify whether to generate a bluer or redder output.
Note: An asterisk (*) next to a value indicates the factory default setting.
Fax 42
Admin Controls
Menu item Description
Automatic Redial
0–9 (5*)
Adjust the number of redial attempts based on the activity levels of recipient fax
machines.
Redial Frequency
1–200 minutes (3*)
Increase the time between redial attempts to increase the chance of sending
fax successfully.
Enable ECM
O
On*
Activate Error Correction Mode (ECM) for fax jobs.
Note: ECM detects and corrects errors in the fax transmission process that are
caused by telephone line noise and poor signal strength.
Enable Fax Scans
O
On*
Fax documents that are scanned at the printer.
Driver to Fax
O
On*
Allow the print driver to send fax.
Allow Save as Shortcut
O
On*
Save fax numbers as shortcuts in the printer.
Max Speed
33600*
14400
9600
4800
2400
Set the maximum speed for sending fax.
Adjust ADF Skew
O*
On
Fix skewed images that are scanned from the ADF.
Custom Job Scanning
O*
On
Enable Custom Job Scanning by default.
Scan Preview
O*
On
Enable previews for scanned documents.
Enable Color Fax Scans
O
by default*
On by default
Never use
Always use
Enable color scans for fax.
Note: An asterisk (*) next to a value indicates the factory default setting.
Fax 43
Menu item Description
Auto Convert Color Faxes to
Mono Faxes
O
On*
Convert all outgoing color faxes to black and white.
Confirm Fax Number
O*
On
Ask the user to confirm the fax number.
Dial Prefix Set a dialing prefix.
Dialing Prefix Rules
Prefix
Rule [x]
Establish a dialing prefix rule.
Note: An asterisk (*) next to a value indicates the factory default setting.
Fax Receive Settings
Menu item Description
Fax Job Waiting
None*
To ne r
Toner and Supplies
Remove fax jobs that request specific unavailable resources from the print
queue.
Rings to Answer
1–25 (3*)
Set the number of rings for incoming fax.
Auto Reduction
O
On*
Scale incoming fax to fit on the page.
Paper Source
Tray [x]
Multipurpose Feeder
Auto*
Set the paper source for printing incoming fax.
Sides (Duplex)
O*
On
Print on both sides of the paper.
Separator Sheets
O*
Before Job
After Job
Specify whether to insert blank separator sheets when printing.
Separator Sheet Source
Tray [x] (1*)
Multipurpose Feeder
Specify the paper source for the separator sheet.
Note: An asterisk (*) next to a value indicates the factory default setting.
Fax 44

Menu item Description
Output Bin
Standard Bin*
Bin [x]
Specify the output bin for received faxes.
Fax Footer
On
O*
Print the transmission information at the bottom of each page from a received
fax.
Fax Footer Time Stamp
Receive*
Print
Print the timestamp at the bottom of each page from a received fax.
Punch
O*
2 holes
3 holes
4 holes
Punch holes along the edge of the printed output.
Note: This menu item appears only when a staple, hole punch
finisher
is
installed.
Staple
O*
1 staple
2 staples
Set the stapling option for the printed output.
Note: This menu item appears only when a staple finisher is installed.
Holding Faxes
Held Fax Mode
O*
Always On
Manual
Scheduled
Hold received faxes from printing until they are released.
Note: An asterisk (*) next to a value indicates the factory default setting.
Admin Controls
Menu item Description
Enable Fax Receive
O
On*
Set the printer to receive fax.
Enable Color Fax Receive
O
On*
Set the printer to receive fax in color.
Enable Caller ID
O
On*
Show the number that is sending the incoming fax.
Block No Name Fax
O*
On
Block incoming faxes sent from devices with no station ID or fax ID specified.
Note: An asterisk (*) next to a value indicates the factory default setting.
Fax 45
Menu item Description
Banned Fax List
Add Banned Fax
Specify the phone numbers that you want to block.
Answer On
All Rings*
Single Ring Only
Double Ring Only
Triple Ring Only
Single or Double Rings Only
Single or Triple Rings Only
Double or Triple Rings Only
Set a distinctive ring pattern for incoming fax.
Auto Answer
O
On*
Set the printer to receive fax automatically.
Manual Answer Code
0–9 (9*)
Manually enter a code on the telephone number pad to begin receiving fax.
Notes:
• This menu item appears only when the printer shares a line with a
telephone.
• This menu item appears only when you set the printer to receive fax
manually.
Fax Forwarding
Print
Print and Forward
Forward*
Specify how to forward received fax.
Forward to
Destination [x]
Type
Shortcut Number
Specify where to forward received fax.
Confirmation E‑mail Send a confirmation e‑mail when fax forwarding is successful.
Note: The e‑mail is sent only when forwarding to FTP or Network Share
destinations.
Max Speed
33600*
14400
9600
4800
2400
Set the maximum speed for transmitting fax.
Note: An asterisk (*) next to a value indicates the factory default setting.
Fax 46
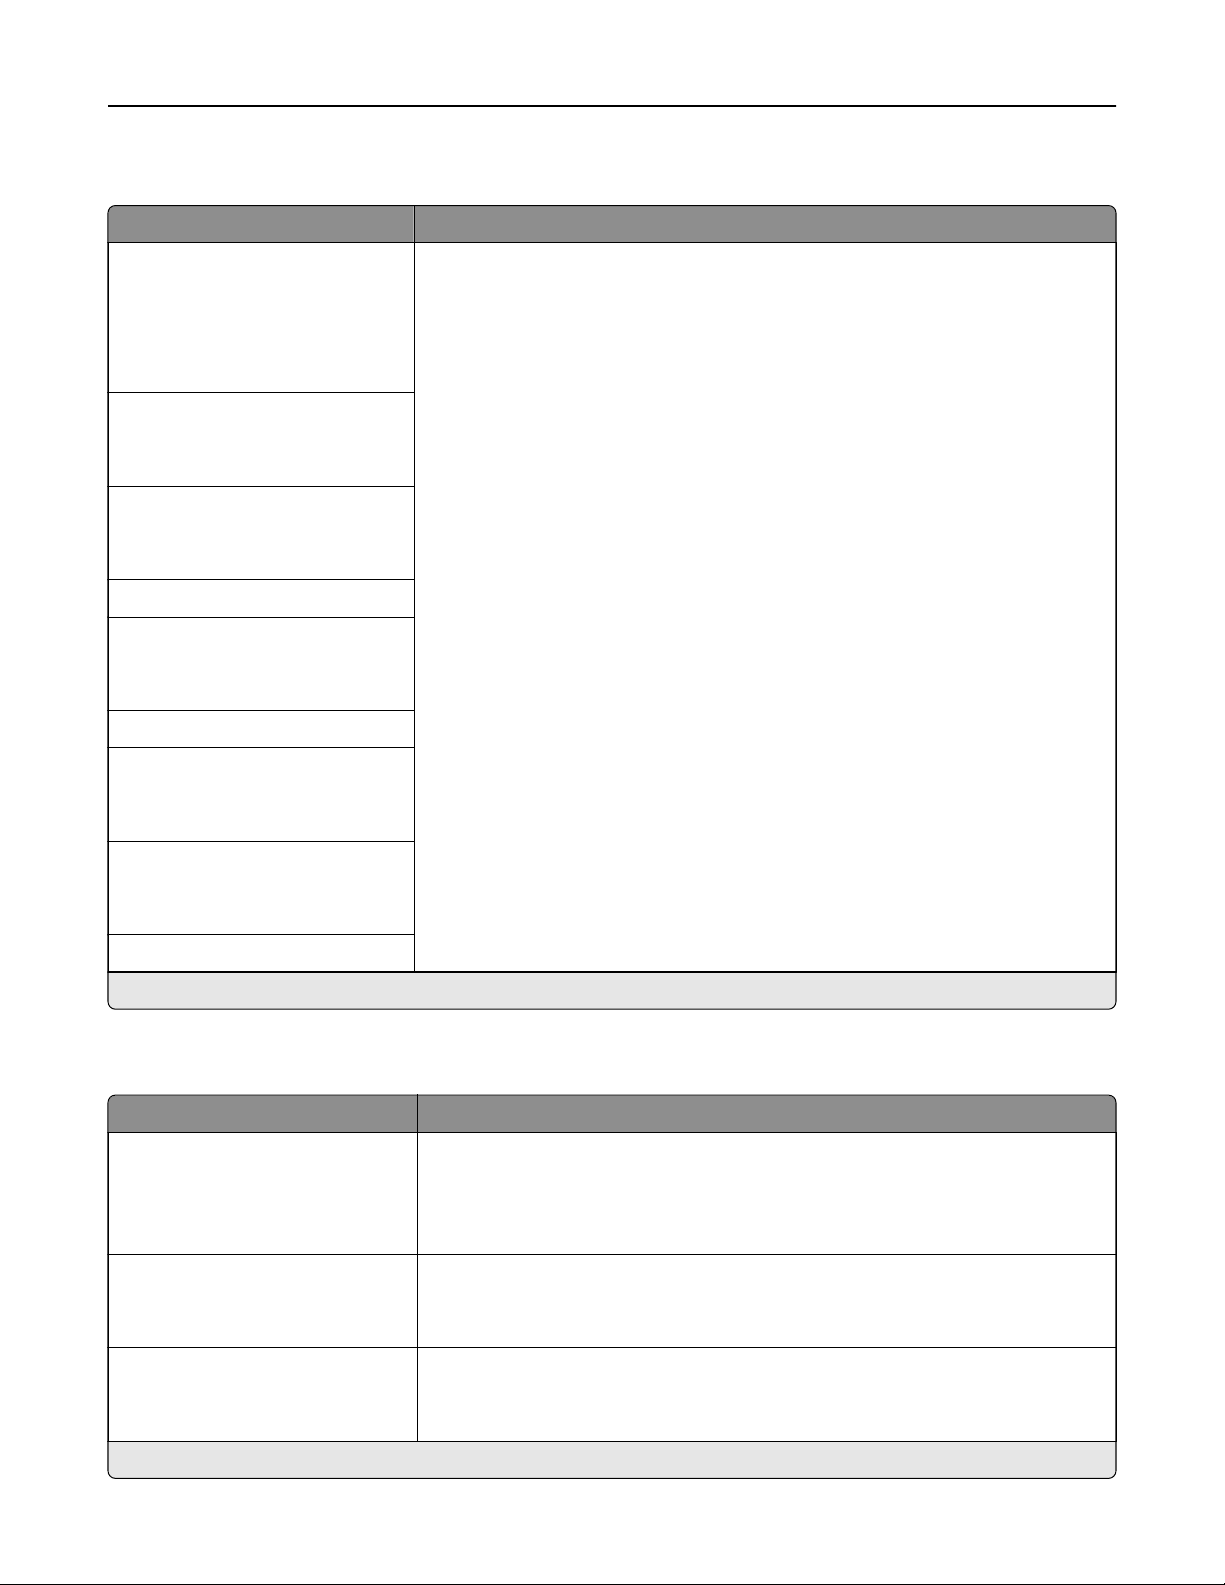
Fax Cover Page
Menu item Description
Fax Cover Page
O
by Default*
On by Default
Never Use
Always Use
Configure the settings for the fax cover page.
Include To field
O*
On
Include From field
O*
On
From
Include Message Field
O*
On
Message:
Include Logo
O*
On
Include Footer [x]
O*
On
Footer [x]
Note: An asterisk (*) next to a value indicates the factory default setting.
Fax Log Settings
Menu item Description
Transmission Log
Print log*
Do Not Print Log
Print Only For Error
Print a log for successful fax transmission or transmission error.
Receive Error Log
Print Never*
Print on Error
Print a log for fax‑receive failures.
Auto Print Logs
On*
O
Print all fax activity.
Note: An asterisk (*) next to a value indicates the factory default setting.
Fax 47
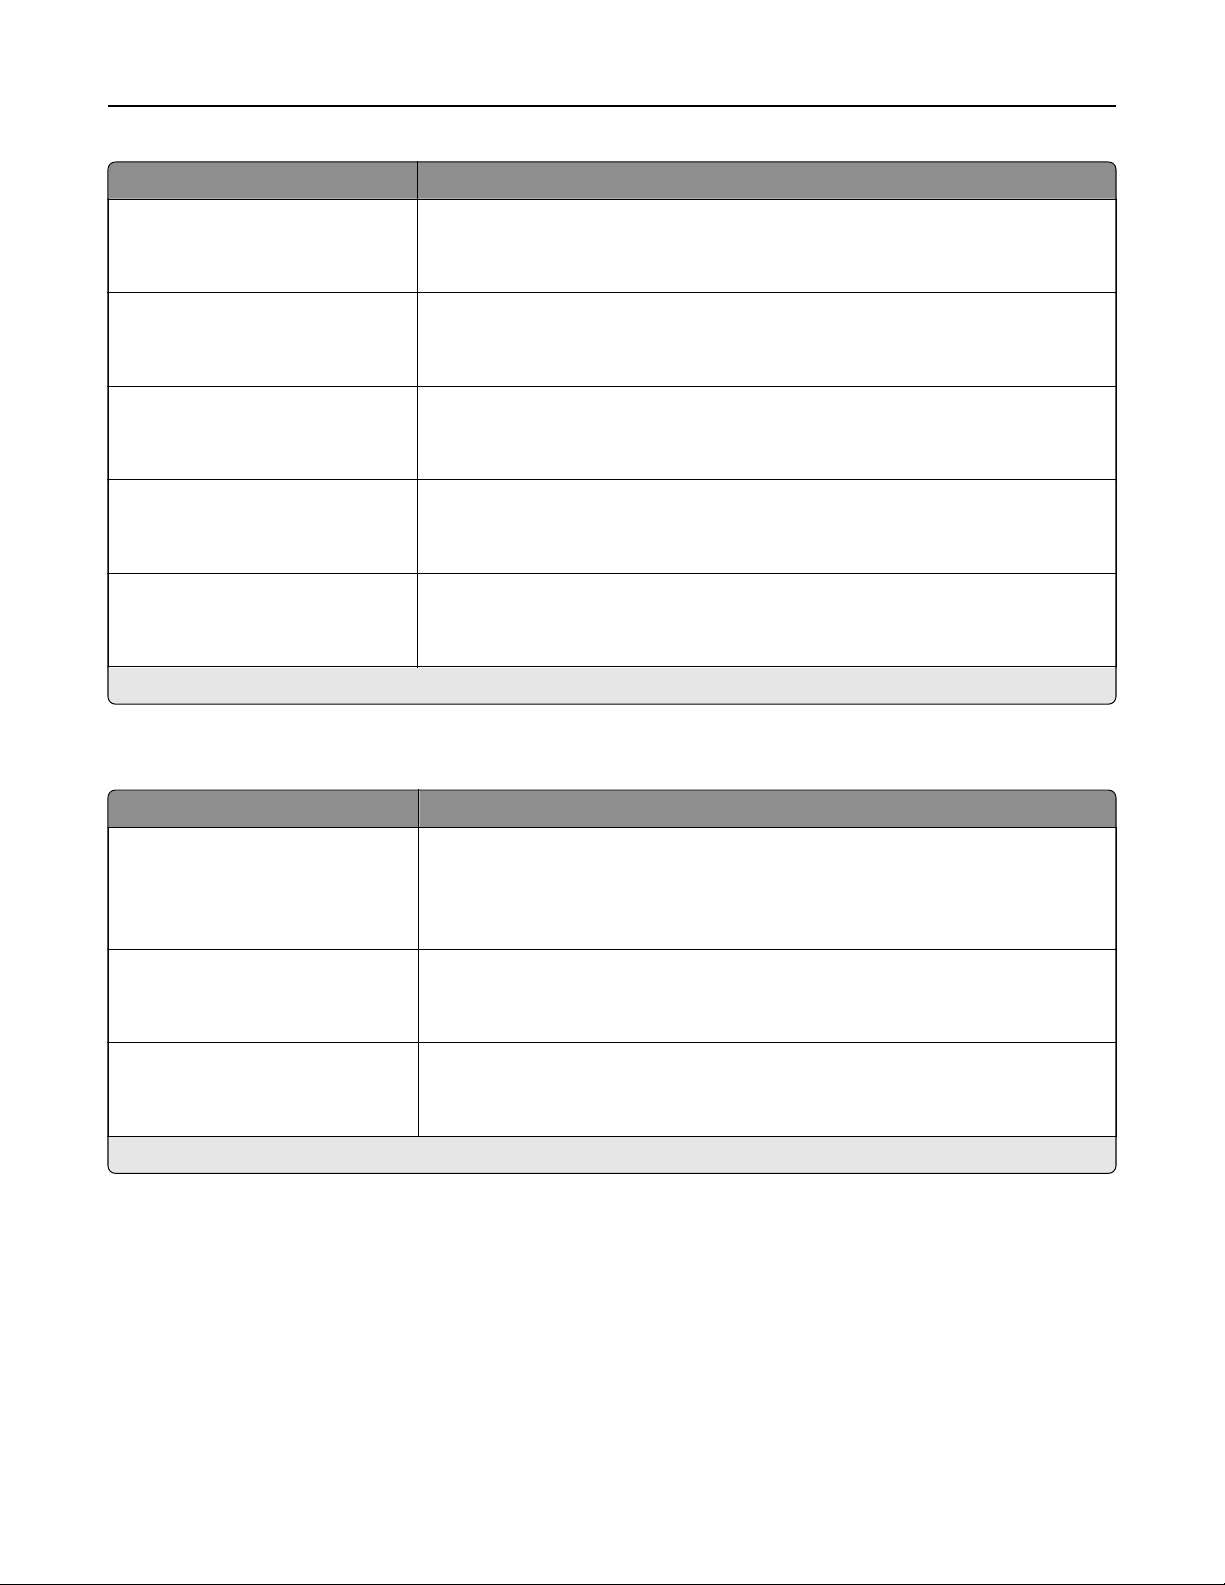
Menu item Description
Log Paper Source
Tray [x] (1*)
Multipurpose Feeder
Specify the paper source for printing logs.
Logs Display
Remote Fax Name*
Dialed Number
Identify the sender by remote fax name or fax number.
Enable Job Log
On*
O
View a summary of all fax jobs.
Enable Call Log
On*
O
View a summary of fax dialing history.
Log Output Bin
Standard Bin*
Bin [x]
Specify the output bin for printed logs.
Note: An asterisk (*) next to a value indicates the factory default setting.
Speaker Settings
Menu item Description
Speaker Mode
Always
O
Always On
On until Connected*
Set the fax speaker mode.
Speaker Volume
Low
High*
Adjust the fax speaker volume.
Ringer Volume
O
On*
Enable the ringer volume.
Note: An asterisk (*) next to a value indicates the factory default setting.
Fax 48
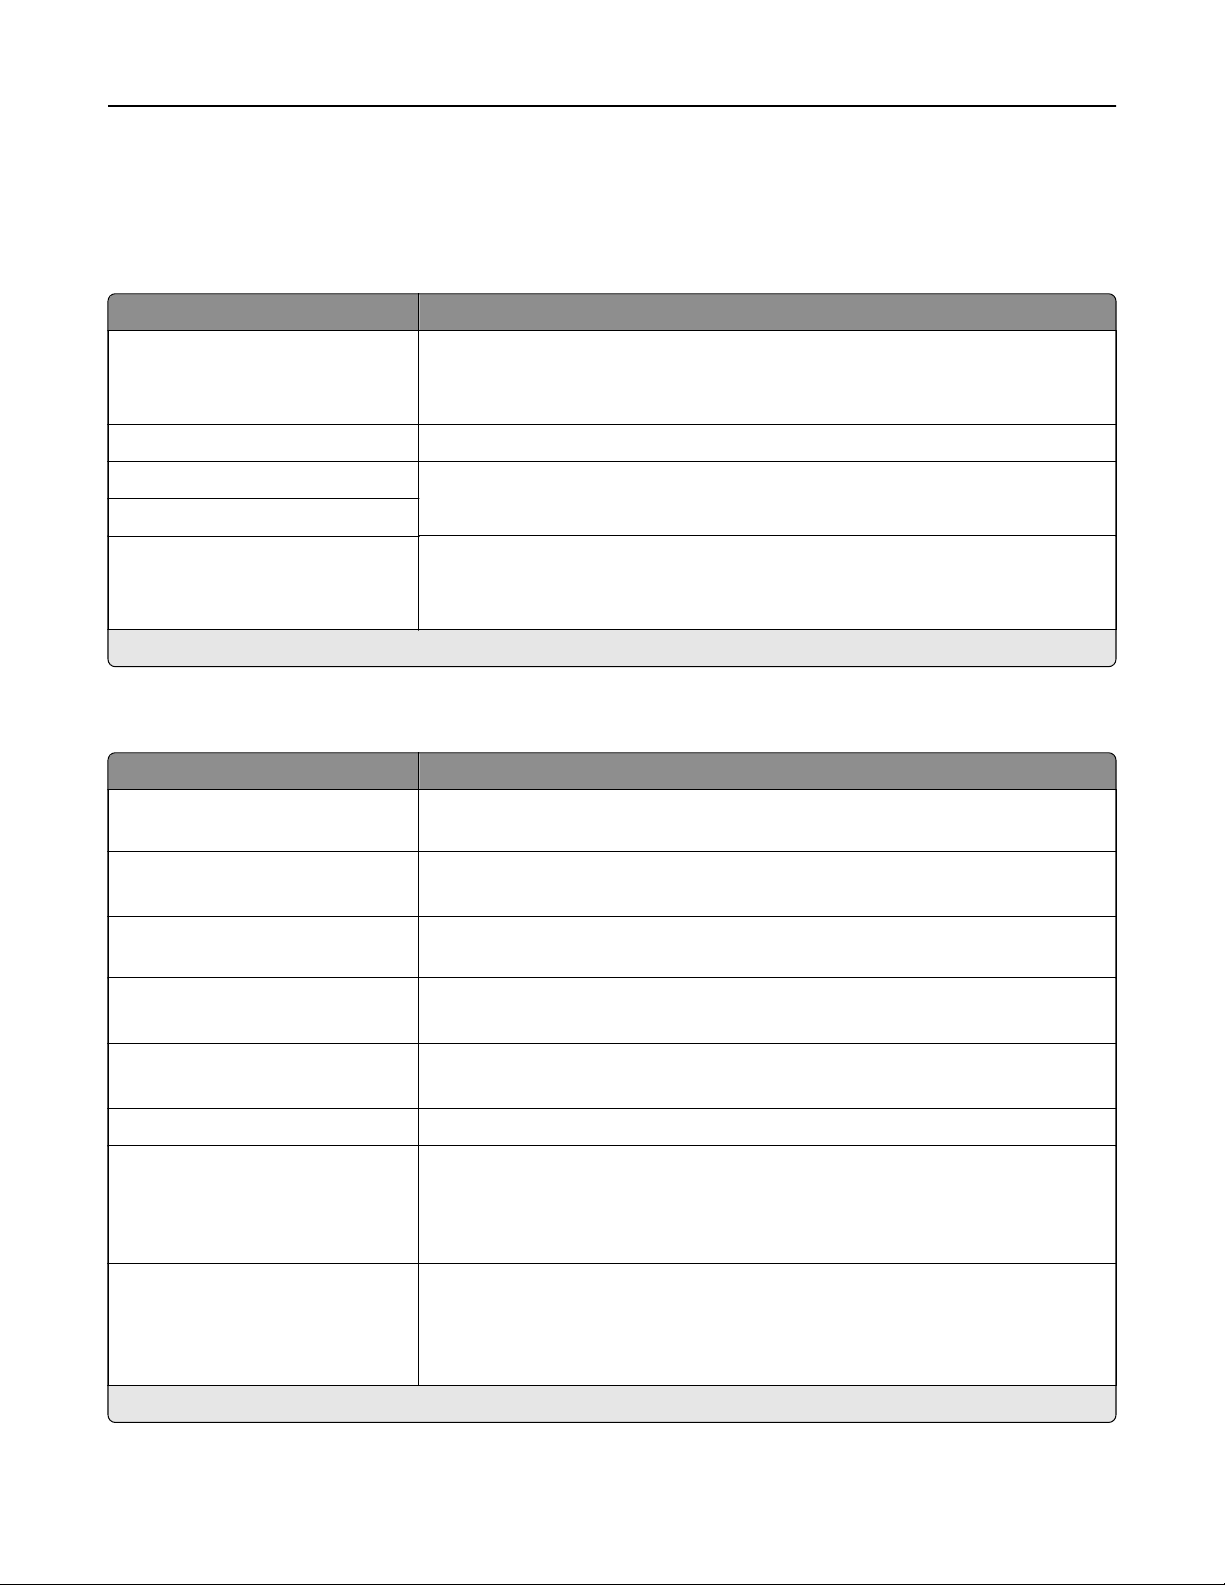
Fax Server Setup
General Fax Settings
Menu item Description
To Fo rm at Specify a fax recipient.
Note: If you want to use the fax number, then type the number sign (#) before
a number.
Reply Address Specify a reply address for sending fax.
Subject Specify the fax subject and message.
Message
Enable analog receive
O*
On
Set the printer to receive analog faxes.
Note: An asterisk (*) next to a value indicates the factory default setting.
Fax Server E‑mail Settings
Menu item Description
Primary SMTP Gateway Type the IP address or host name of the primary Simple Mail Transfer Protocol
(SMTP) server for sending e-mail.
Primary SMTP Gateway Port
1–65535 (25*)
Enter the port number of the primary SMTP server.
Secondary SMTP Gateway Type the server IP address or host name of your secondary or backup SMTP
server.
Secondary SMTP Gateway Port
1–65535 (25*)
Enter the server port number of your secondary or backup SMTP server.
SMTP Timeout
5–30 (30*)
Set the time before the printer times out if the SMTP server does not respond.
Reply Address Specify a reply address for sending fax.
Always use SMTP default Reply
Address
O
On*
Specify the SMTP reply address for sending fax.
Use SSL/TLS
Disabled*
Negotiate
Required
Specify whether to send fax using an encrypted link.
Note: An asterisk (*) next to a value indicates the factory default setting.
Fax 49

Menu item Description
Require Trusted Certificate
O
On*
Specify a trusted certificate when accessing the SMTP server.
SMTP Server Authentication
No authentication required*
Login / Plain
NTLM
CRAM‑MD5
Digest‑MD5
Kerberos 5
Set the authentication type for the SMTP server.
Device‑Initiated E‑mail
None*
Use Device SMTP Credentials
Specify whether credentials are required for device‑initiated e‑mail.
User‑Initiated E‑mail
None*
Use Device SMTP Credentials
Use Session User ID and
Password
Use Session E‑mail address
and Password
Prompt user
Specify whether credentials are required for user‑initiated e‑mail.
Use Active Directory Device
Credentials
O
On*
Enable user credentials and group destinations to connect to the SMTP server.
Device Userid Specify the user ID and password to connect to the SMTP server.
Device Password
Kerberos 5 REALM Specify the realm for the Kerberos 5 authentication protocol.
NTLM Domain Specify the domain name for the NTLM security protocol.
Disable "SMTP server not set
up" error
O*
On
Hide the “SMTP server not set up” error message.
Note: An asterisk (*) next to a value indicates the factory default setting.
Fax 50
Fax Server Scan Settings
Menu item Description
Image Format
TIFF (.tif)
PDF (.pdf)*
XPS (.xps)
TXT (.txt)
RTF (.rtf)
DOCX (.docx)
Specify the file format for the scanned image.
Content Type
Te xt
Te xt/ P hot o*
Photo
Graphics
Improve the output result based on the content of the original document.
Content Source
Black and White Laser
Color Laser*
Inkjet
Photo/Film
Magazine
Newspaper
Press
Other
Improve the output result based on the source of the original document.
Fax Resolution
Standard*
Fine
Super Fine
Ultra Fine
Set the fax resolution.
Darkness
1–9 (5*)
Set the darkness of the output.
Orientation
Portrait*
Landscape
Specify the orientation of text and graphics on the page.
Original Size
[List of paper sizes]
Set the paper size of the original document.
Notes:
• Mixed Sizes is the U.S. factory default setting. A4 is the international
factory default setting.
• This setting may vary depending on your printer model.
Use Multi‑Page TIFF
O
On*
Choose between single‑ and multiple‑page TIFF files.
Note: An asterisk (*) next to a value indicates the factory default setting.
Fax 51

E-mail
E‑mail Setup
Menu item Description
Primary SMTP Gateway Type the IP address or host name of the primary SMTP server for sending e-
mail.
Primary SMTP Gateway Port
1–65535 (25*)
Enter the port number of the primary SMTP server.
Secondary SMTP Gateway Type the server IP address or host name of your secondary or backup SMTP
server.
Secondary SMTP Gateway Port
1–65535 (25*)
Enter the server port number of your secondary or backup SMTP server.
SMTP Timeout
5–30 seconds (30*)
Set the time before the printer times out if the SMTP server does not respond.
Reply Address Specify a reply address in the e‑mail.
Always use SMTP default Reply
Address
On*
O
Always use the default reply address in the SMTP server.
Use SSL/TLS
Disabled*
Negotiate
Required
Specify whether to send e‑mail using an encrypted link.
Require Trusted Certificate
O
On*
Require a trusted certificate when accessing the SMTP server.
SMTP Server Authentication
No authentication required*
Login / Plain
NTLM
CRAM‑MD5
Digest‑MD5
Kerberos 5
Set the authentication type for the SMTP server.
Device‑Initiated E‑mail
None*
Use Device SMTP Credentials
Specify whether credentials are required for device‑initiated e‑mail.
Note: An asterisk (*) next to a value indicates the factory default setting.
E-mail 52
Menu item Description
User‑Initiated E‑mail
None*
Use Device SMTP Credentials
Use Session User ID and
Password
Use Session E‑mail address
and Password
Prompt user
Specify whether credentials are required for user‑initiated e‑mail.
Use Active Directory Device
Credentials
O
On*
Enable user credentials and group designations to connect to the SMTP server.
Device Userid Specify the user ID and password to connect to the SMTP server.
Device Password
Kerberos 5 REALM Specify the realm for the Kerberos 5 authentication protocol.
NTLM Domain Specify the domain name for the NTLM security protocol.
Disable "SMTP server not set
up" error
O*
On
Hide the “SMTP server not set up” error message.
Note: An asterisk (*) next to a value indicates the factory default setting.
E‑mail Defaults
Menu item Description
Subject Specify the e‑mail subject and message.
Message
File Name Specify the file name for the scanned image.
Format
PDF (.pdf)*
TIFF (.tif)
JPEG (.jpg)
XPS (.xps)
TXT (.txt)
RTF (.rtf)
DOC (.docx)
Specify the file format for the scanned image.
Note: An asterisk (*) next to a value indicates the factory default setting.
E-mail 53
Menu item Description
Global OCR Settings
Recognized Languages
Auto Rotate
Despeckle
Auto Contrast Enhance
Configure the settings for optical character recognition (OCR).
Note: This menu item appears only if you have purchased and installed an
OCR solution.
PDF Settings
PDF Version
1.3
1.4
1.5*
1.6
1.7
Archival Version
A‑1a*
A‑1b
Highly Compressed
O*
On
Secure
O*
On
Searchable
O*
On
Archival (PDF/A)
O*
On
Set the PDF format of the scanned image.
Content Type
Te xt
Te xt/ P hot o*
Photo
Graphics
Improve the output result based on the content of the original document.
Content Source
Black and White Laser*
Color Laser
Inkjet
Photo/Film
Magazine
Newspaper
Press
Other
Improve the output result based on the original document.
Note: An asterisk (*) next to a value indicates the factory default setting.
E-mail 54
Menu item Description
Color
Black and White
Gray
Color*
Auto
Specify the color when scanning an image.
Resolution
75 dpi
150 dpi*
200 dpi
300 dpi
400 dpi
600 dpi
Set the resolution of the scanned image.
Darkness
-4 to 4 (0*)
Adjust the darkness of the scanned image.
Orientation
Portrait*
Landscape
Specify the orientation of text and graphics on the page.
Original Size
[List of paper sizes]
Set the paper size of the original document.
Note: Mixed Sizes is the factory default setting.
Sides
O*
Long Edge
Short Edge
Specify the page orientation of text and graphics when scanning a two‑sided
document.
Note: An asterisk (*) next to a value indicates the factory default setting.
Advanced Imaging
Menu item Description
Color Balance
-4 to 4 (0*)
Adjust the amount of toner being used for each color.
Color Dropout
Color Dropout
None*
Red
Green
Blue
Default Red Threshold
0–255 (128*)
Default Green Threshold
0–255 (128*)
Default Blue Threshold
0–255 (128*)
Specify which color to drop during scanning, and adjust the dropout setting for
that color.
Note: An asterisk (*) next to a value indicates the factory default setting.
E-mail 55
Menu item Description
Auto Color Detect
Color Sensitivity
1–9 (5*)
Area Sensitivity
1–9 (5*)
Set the amount of color that the printer detects from the original document.
Note: This menu item appears only when Color is set to Auto.
JPEG Quality
Best for content*
5–95
Set the quality of a JPEG‑format scanned image.
Notes:
• 5 reduces the file size, but lessens the image quality.
• 95 provides the best image quality, but produces a large
file
size.
Contrast
Best for content*
0
1
2
3
4
5
Specify the contrast of the output.
Background Removal
Background Detection
Content‑based*
Fixed
Level
‑4 to 4 (0*)
Adjust the amount of background visible on a scanned image.
Note: If you want to remove the background color from the original
document, then set Background Detection to Content-based. If you want to
remove image noise from a photo, then set Background Detection to Fixed.
Mirror Image
O*
On
Create a mirror image of the original document.
Negative Image
O*
On
Create a negative image of the original document.
Shadow Detail
‑4 to 4 (0*)
Adjust the amount of shadow detail visible on a scanned image.
Scan Edge to Edge
O*
On
Allow edge‑to‑edge scanning of the original document.
Sharpness
1–5 (3*)
Adjust the sharpness of a scanned image.
Tempe ra ture
‑4 to 4 (0*)
Specify whether to generate a cooler or warmer output.
Note: An asterisk (*) next to a value indicates the factory default setting.
E-mail 56
Menu item Description
Blank Pages
Blank Page Removal
Blank Page Sensitivity
Specify whether to include blank pages.
Note: An asterisk (*) next to a value indicates the factory default setting.
Admin Controls
Menu item Description
Max E‑mail Size
0–65535 (0*)
Set the allowable file size for each e‑mail.
Size Error Message Specify an error message that the printer sends when an e‑mail exceeds its
allowable file size.
Note: You can type up to 1024 characters.
Limit Destinations Limit sending of e‑mail only to the specified list of domain names.
Note: Use a comma to separate each domain.
Send Me a Copy
Never appears*
On by Default
O by Default
Always On
Send a copy of the e‑mail to yourself.
Limit E‑mail Recipients
O*
On
Limit the number of e‑mail recipients.
Use cc:/bcc:
O*
On
Enable carbon copy and blind carbon copy in e‑mail.
Use Multi‑Page TIFF
On*
O
Choose between single- and multiple‑page TIFF files.
TIFF Compression
LZW*
JPEG
Set a compression option for TIFF files.
Text D ef au lt
5–95 (75*)
Set the quality of text on a scanned image.
Text/ Ph oto De fa ult
5–95 (75*)
Set the quality of text or photo on a scanned image.
Photo Default
5–95 (50*)
Set the quality of a photo on a scanned image.
Note: An asterisk (*) next to a value indicates the factory default setting.
E-mail 57

Menu item Description
E‑mail Bit Depth
1 bit
8 bit*
Enable the Text/Photo mode to produce smaller file sizes by using 1‑bit image.
Note: This menu item appears only when Color is set to Gray.
Transmission Log
Print log*
Do Not Print Log
Print Only For Error
Print a log for successful e‑mail transmission.
Log Paper Source
Tray [x] (1*)
Multipurpose Feeder
Specify the paper source for printing logs.
Custom Job Scanning
O*
On
Turn on scanning of custom jobs by default.
Note: This menu item appears only when a hard disk is installed.
Scan Preview
O
On*
Show the scan preview on the display.
Note: This menu item appears only when a printer hard disk is installed.
Allow Save as Shortcut
O
On*
Save e-mail addresses as shortcuts.
Note: When set to O, the Save As Shortcut button does not appear on the
e-mail Destination screen.
E‑mail Images Sent As
Attachment*
Web Link
Specify how to send the images in e‑mail.
Reset E-mail Information After
Sending
O
On*
Restore the default e-mail information after sending an e-mail.
Note: An asterisk (*) next to a value indicates the factory default setting.
Web Link Setup
Menu item Description
Server Set the printer to send e‑mail as a web link.
Login
Password
Path
File Name
Web Link
E-mail 58

FTP
FTP Defaults
Menu item Description
Format
PDF (.pdf)*
TIFF (.tif)
JPEG (.jpg)
XPS (.xps)
TXT (.txt)
RTF (.rtf)
DOCX (.docx)
Specify the file format for the scanned image.
Note: The menu items may vary depending on your printer model.
Global OCR Settings
Recognized Languages
Auto Rotate
Despeckle
Auto Contrast Enhance
Configure the settings for optical character recognition (OCR).
Note: This menu appears only if you have purchased and installed an OCR
solution.
PDF Settings
PDF Version
1.3
1.4
1.5*
1.6
1.7
Archival Version
A‑1a*
A‑1b
Secure
O*
On
Archival (PDF/A)
O*
On
Set the PDF format for the scanned image.
Content Type
Te xt
Te xt/ P hot o*
Graphics
Photo
Improve the output result based on the content of the original document.
Note: An asterisk (*) next to a value indicates the factory default setting.
FTP 59

Menu item Description
Content Source
Black and White Laser
Color Laser*
Inkjet
Photo/Film
Magazine
Newspaper
Press
Other
Improve the output result based on the source of the original document.
Color
Black and White
Gray
Color*
Auto
Specify the color when scanning an image.
Resolution
75 dpi
150 dpi*
200 dpi
300 dpi
400 dpi
600 dpi
Set the resolution of the scanned image.
Darkness
-4 to 4 (0*)
Adjust the darkness of the scanned image.
Orientation
Portrait*
Landscape
Specify the orientation of text and graphics on the page.
Original Size
[List of paper sizes]
Set the paper size of the original document.
Notes:
• Letter is the U.S. factory default setting. A4 is the international factory
default setting.
• The menu items may vary depending on your printer model.
Sides
O*
Long Edge
Short Edge
Specify the page orientation of text and graphics when scanning a two‑sided
document.
File Name Specify the file name of the scanned image.
Note: An asterisk (*) next to a value indicates the factory default setting.
FTP 60
Advanced Imaging
Menu item Description
Color Balance
-4 to 4 (0*)
Adjust the amount of toner used for each color in scan output.
Color Dropout
Color Dropout
None*
Red
Green
Blue
Default Red Threshold
0–255 (128*)
Default Green Threshold
0–255 (128*)
Default Blue Threshold
0–255 (128*)
Specify which color to drop during scanning, and adjust the dropout setting for
that color.
Auto Color Detect
Color Sensitivity
1–9 (5*)
Area Sensitivity
1–9 (5*)
Set the amount of color that the printer detects from the original document.
Note: This menu item appears only when Color is set to Auto.
JPEG Quality
Best for content*
5–95
Set the quality of a JPEG‑format image.
Notes:
• 5 reduces the file size, but lessens the image quality.
• 90 provides the best image quality, but produces a large
file
size.
Contrast
Best for content*
0
1
2
3
4
5
Specify the contrast of the output.
Background Removal
Background Detection
Content‑based*
Fixed
Level
‑4 to 4 (0*)
Adjust the amount of background visible on a scanned image.
Note: If you want to remove the background color from the original
document, then set Background Detection to Content-based. If you want to
remove image noise from a photo, then set Background Detection to Fixed.
Mirror Image
O*
On
Create a mirror image of the original document.
Note: An asterisk (*) next to a value indicates the factory default setting.
FTP 61

Menu item Description
Negative Image
O*
On
Create a negative image of the original document.
Shadow Detail
‑4 to 4 (0*)
Adjust the amount of shadow detail visible on a scanned image.
Scan Edge to Edge
O*
On
Allow edge‑to‑edge scanning of the original document.
Sharpness
1–5 (3*)
Adjust the sharpness of a scanned image.
Tempe ra ture
‑4 to 4 (0*)
Specify whether to generate a cooler or warmer output.
Blank Pages
Blank Page Removal
Blank Page Sensitivity
Specify whether to include blank pages.
Note: An asterisk (*) next to a value indicates the factory default setting.
Admin Controls
Menu item Description
Text D ef au lt
5–95 (75*)
Set the quality of text on a scanned image.
Text/ Ph oto De fa ult
5–95 (75*)
Set the quality of text or photo image on a scanned image.
Photo Default
5–95 (50*)
Set the quality of a photo image on a scanned image.
Use Multi‑Page TIFF
On*
O
Choose between single- and multiple‑page TIFF files.
TIFF Compression
LZW*
JPEG
Set a compression option for TIFF files.
Transmission Log
Print Log*
Do Not Print Log
Print Only For Error
Print a log for successful FTP scan transmission.
Log Paper Source
Tray [x] (1*)
Multipurpose Feeder
Specify the paper source for printing FTP logs.
Note: An asterisk (*) next to a value indicates the factory default setting.
FTP 62
Menu item Description
FTP Bit Depth
1 bit
8 bit*
Enable the Text/Photo mode to have smaller file sizes by using 1‑bit image.
Note: This menu item appears only when Color is set to Gray.
Custom Job Scanning
O*
On
Turn on scanning of custom jobs by default.
Note: This menu item appears only when a hard disk is installed.
Scan Preview
O
On*
Show a preview of the scan on the display.
Note: This menu item appears only when a hard disk is installed.
Allow Save as Shortcut
O
On*
Save custom FTP settings as shortcuts.
Note: An asterisk (*) next to a value indicates the factory default setting.
FTP 63

USB Drive
Flash Drive Scan
Menu item Description
Format
PDF (.pdf)*
TIFF (.tif)
JPEG (.jpg)
XPS (.xps)
Specify the file format for the scanned image.
Note: The settings may vary depending on your printer model.
Global OCR Settings
Recognized Languages
Auto Rotate
Despeckle
Auto Contrast Enhance
Configure the settings for optical character recognition (OCR).
Note: This menu appears only if you have purchased and installed an OCR
solution.
PDF Settings
PDF Version
1.3
1.4
1.5*
1.6
1.7
Archival Version
A‑1a*
A‑1b
Secure
O*
On
Archival (PDF/A)
O*
On
Set the PDF format for the scanned image.
Content Type
Te xt
Te xt/ P hot o*
Graphics
Photo
Improve the output result based on the content of the original document.
Note: An asterisk (*) next to a value indicates the factory default setting.
USB Drive 64
Menu item Description
Content Source
Black and White Laser
Color Laser*
Inkjet
Photo/Film
Magazine
Newspaper
Press
Other
Improve the output result based on the source of the original document.
Color
Black and White
Gray
Color*
Auto
Specify the color when scanning an image.
Resolution
75 dpi
150 dpi*
200 dpi
300 dpi
400 dpi
600 dpi
Set the resolution of the scanned image.
Darkness
1–9 (5*)
Adjust the darkness of the scanned image.
Orientation
Portrait*
Landscape
Specify the orientation of text and graphics on the page.
Original Size
[List of paper sizes]
Set the paper size of the original document.
Notes:
• Letter is the U.S. factory default setting. A4 is the international factory
default setting.
• This menu item may vary depending on your printer model.
Sides
O*
Long edge
Short edge
Specify the page orientation of text and graphics when scanning a two‑sided
document.
File Name Specify the file name of the scanned image.
Note: An asterisk (*) next to a value indicates the factory default setting.
USB Drive 65
Advanced Imaging
Menu item Description
Color Balance Adjust the amount of toner used for each color.
Color Dropout
Color Dropout
None*
Red
Green
Blue
Default Red Threshold
0–255 (128*)
Default Green Threshold
0–255 (128*)
Default Blue Threshold
0–255 (128*)
Specify which color to drop during scanning, and adjust the dropout setting for
that color.
Auto Color Detect
Color Sensitivity
1–9 (5*)
Area Sensitivity
1–9 (5*)
Set the amount of color that the printer detects from the original document.
Note: This menu item appears only when Color is set to Auto.
JPEG Quality
Best for content*
5–95
Set the quality of a JPEG‑format image.
Notes:
• 5 reduces the file size, but lessens the image quality.
• 90 provides the best image quality, but produces a large
file
size.
Contrast
Best for content*
0
1
2
3
4
5
Specify the contrast of the output.
Background Removal
Background Detection
Content‑based*
Fixed
Level
‑4 to 4 (0*)
Adjust the amount of background visible on a scanned image.
Note: If you want to remove the background color from the original
document, then set Background Detection to Content-based. If you want to
remove image noise from a photo, then set Background Detection to Fixed.
Mirror Image
O*
On
Create a mirror image of the original document.
Note: An asterisk (*) next to a value indicates the factory default setting.
USB Drive 66
Menu item Description
Negative Image
O*
On
Create a negative image of the original document.
Shadow Detail
‑4 to 4 (0*)
Adjust the amount of shadow detail visible on a scanned image.
Scan Edge to Edge
O*
On
Allow edge‑to‑edge scanning of the original document.
Sharpness
1–5 (3*)
Adjust the sharpness of a scanned image.
Tempe ra ture
‑4 to 4 (0*)
Specify whether to generate a cooler or warmer output.
Blank Pages
Blank Page Removal
Blank Page Sensitivity
Specify whether to include blank pages.
Note: An asterisk (*) next to a value indicates the factory default setting.
Admin Controls
Menu item Description
Text D ef au lt
5–95 (75*)
Set the quality of text on a scanned image.
Text/ Ph oto De fa ult
5–95 (75*)
Set the quality of text or photo on a scanned image.
Photo Default
5–95 (75*)
Set the quality of a photo on a scanned image.
Use Multi‑Page TIFF
On*
O
Choose between single- and multiple‑page TIFF files.
TIFF Compression
LZW*
JPEG
Set the compression for TIFF files.
Scan Bit Depth
1 bit
8 bit*
Enable the Text/Photo mode to have smaller file sizes by using 1‑bit image.
Note: This menu item appears only when Color is set to Gray.
Custom Job Scanning
O*
On
Turn on scanning of custom jobs by default.
Note: This menu item appears only when a hard disk is installed.
Note: An asterisk (*) next to a value indicates the factory default setting.
USB Drive 67
Menu item Description
Scan Preview
O
On*
Show a preview of the scan on the display.
Note: This menu item appears only when a hard disk is installed.
Note: An asterisk (*) next to a value indicates the factory default setting.
Flash Drive Print
Menu item Description
Number of Copies
1–9999 (1*)
Set the number of copies.
Paper Source
Tray [x] (1*)
Multipurpose Feeder
Manual Paper
Manual Envelope
Specify the paper source for the print job.
Color
O
On*
Specify whether to print in color.
Collate
(1,1,1) (2,2,2)*
(1,2,3) (1,2,3)
Print multiple copies in sequence.
Sides (Duplex)
1‑Sided*
2‑Sided
Specify which side of the paper to print on.
Staple
O*
1 staple, top left corner
2 staples, left
1 staple, top right corner
2 staples, top
1 staple, bottom left corner
2 staples, bottom
1 staple, bottom right corner
2 staples, right
Specify the staple position for all print jobs.
Note: This menu item appears only when a staple
finisher
is installed.
Hole Punch
O*
On
Punch holes along the edge of the printed output.
Note: This menu item appears only when a multiposition staple, hole punch
finisher is installed.
Note: An asterisk (*) next to a value indicates the factory default setting.
USB Drive 68
Menu item Description
Hole Punch Mode
2 holes
3 holes
4 holes
Set the hole punch mode for the printed output.
Notes:
• 3 holes is the U.S. factory default setting. 4 holes is the international factory
default setting.
• This menu item appears only when a multiposition staple, hole punch
finisher is installed.
Oset Pages
None*
Between Copies
Between Jobs
Oset the output of each print job or each copy of a print job.
Duplex Binding
Long Edge*
Short Edge
Define binding for two-sided pages, and how the printing on the back of the sheet
is oriented in relation to the printing on the front.
Notes:
• Long Edge assumes binding along the long edge of the page (left edge for
portrait and top edge for landscape).
• Short Edge assumes binding along the short edge of the page (top edge for
portrait and left edge for landscape).
Pages per Side
O*
2‑Up
3‑Up
4‑Up
6‑Up
9‑Up
12‑Up
16‑Up
Print multiple page images on one side of a sheet of paper.
Pages per Side Ordering
Horizontal*
Reverse Horizontal
Reverse Vertical
Vertical
Specify the positioning of multiple page images when using Pages per Side.
Note: The positioning depends on the number of page images and their page
orientation.
Pages per Side Orientation
Auto*
Landscape
Portrait
Specify the orientation of a multiple‑page document when using Pages per Side.
Pages per Side Border
None*
Solid
Print a border around each page image when using Pages per Side.
Note: An asterisk (*) next to a value indicates the factory default setting.
USB Drive 69
Menu item Description
Separator Sheets
O*
Between Copies
Between Jobs
Between Pages
Specify whether to insert blank separator sheets when printing.
Separator Sheet Source
Tray [x] (1*)
Multipurpose Feeder
Specify the paper source for the separator sheet.
Note: For Multipurpose Feeder to appear, set Configure MP to Cassette from
the Paper menu.
Blank Pages
Do Not Print*
Print
Specify whether to include blank pages in a print job.
Note: An asterisk (*) next to a value indicates the factory default setting.
USB Drive 70

Network/Ports
Network Overview
Menu item Description
Active Adapter
Auto*
[List of network cards]
Specify how a network is connected.
Network Status Show the connection status of the printer network.
Display Network Status on
Printer
O
On*
Show the network status on the display.
Speed, Duplex Show the speed of the currently active network card.
IPv4 Show the IPv4 address.
All IPv6 Addresses Show all IPv6 addresses.
Reset Print Server
Start
Reset all active network connections to the printer.
Note: This setting removes all network configuration settings.
Network Job Timeout
O
On* (90 seconds)
Set the time before the printer cancels a network print job.
Banner Page
O
On*
Print a banner page.
Note: An asterisk (*) next to a value indicates the factory default setting.
Wireless
Note: This menu is available only in printers connected to a wireless network or printers that have a wireless
network adapter.
Network/Ports 71

Menu item Description
Wireless Connection Setup
Network Name
Network Mode
Infrastructure*
Ad hoc
Wireless Security Mode
Disabled*
WEP
WPA2/WPA - Personal
WPA2 - Personal
802.1x - Radius
Determine the wireless network the printer connects to.
Wi‑Fi Protected Setup
WPS Auto Detect
O
On*
Start Push Button Method
Start PIN Method
Establish a wireless network and enable network security.
Notes:
• Start Push-Button Method connects the printer to a wireless
network when buttons on both the printer and the access point
(wireless router) are pressed within a given period of time.
• Start PIN Method connects the printer to a wireless network
when a PIN on the printer is entered into the wireless settings
of the access point.
Network Mode
BSS Type
Infrastructure*
Ad hoc
Preferred Channel Number
Auto*
1–11
Specify the network mode.
Note: Preferred Channel Number only appears if BSS Type is set to
Ad hoc.
Enable Wi‑Fi Direct
On
O*
Set the printer to connect directly to Wi-Fi devices.
Compatibility
802.11b/g
802.11b/g/n*
802.11a/b/g/n
802.11a/n
802.11a/b/g/n/ac
Specify the wireless standard for the wireless network.
Note: 802.11a/b/g/n and 802.11a/n are selectable only if the Enable
Wi‑Fi Direct setting is disabled.
Wireless Security Mode
Disabled*
WEP
WPA2/WPA-Personal
WPA2-Personal
Set the type of security for connecting the printer to wireless devices.
Network/Ports 72
Menu item Description
WEP Authentication Mode
Auto*
Open
Shared
Set the type of Wireless Encryption Protocol (WEP) used by the
printer.
Note: This menu item appears only if Wireless Security Mode is set
to WEP.
Set WEP Key Specify a WEP password for secure wireless connection.
WPA-PSK Encryption Mode
AES
Enable wireless security through Wi-Fi Protected Access (WPA).
Note: This menu item appears only if the Wireless Security Mode is
set to WPA2/WPA-Personal or WPA2-Personal.
Set Pre‑Shared Key Set the password for secure wireless connection.
WPA2-PSK Encryption Mode
AES
Enable wireless security through WPA2.
Note: This menu item appears only if the Wireless Security Mode is
set to WPA2/WPA-Personal or WPA2-Personal.
802.1x Encryption Mode
WPA+
WPA2*
Enable wireless security through 802.1x standard.
Note: This menu item appears only if the Wireless Security Mode is
set to 802.1x - Radius.
Network Address
UAA
LAA
View the network addresses.
PCL Smartswitch
On*
O*
Set the printer to switch automatically to PCL emulation when a print
job requires it, regardless of the default printer language.
Note: If PCL SmartSwitch is
o,
then the printer does not examine
incoming data and uses the default printer language specified in
the Setup menu.
PS Smartswitch
On*
O*
Set the printer to switch automatically to PS emulation when a print
job requires it, regardless of the default printer language.
Note: If PS SmartSwitch is o, then the printer does not examine
incoming data and uses the default printer language specified in
the Setup menu.
NPA Mode
Auto*
O
Set the printer to perform the special processing required for
bidirectional communication, following the conventions defined by
the NPA protocol.
Note: The printer restarts after changing the setting.
Job Buering
On
O*
Temporarily store print jobs in the printer hard disk before printing.
Note: This menu item appears only when a hard disk is installed.
Mac Binary PS
Auto*
On
O
Set the printer to process Macintosh binary PostScript print jobs.
Notes:
• On processes raw binary PostScript print jobs.
• O filters print jobs using the standard protocol.
Network/Ports 73
Ethernet
Menu item Description
Network Speed Show the speed of an active network adapter.
IPv4
Enable DHCP
On*
O
Enable Dynamic Host Configuration Protocol (DHCP).
Note: DHCP is a standard protocol that allows a server to dynamically
distribute IP addressing and
configuration
information to clients.
IPv4
Set Static IP Address
IP Address
Netmask
Gateway
Set the static IP address of your printer.
Network Address
UAA
LAA
Show the printer Media Access Control (MAC) addresses: Locally Administered
Address (LAA) and Universally Administered Address (UAA).
Note: You can change the printer LAA manually.
PCL SmartSwitch
O
On*
Set the printer to switch automatically to PCL emulation when a print job
requires it, regardless of the default printer language.
Note: If PCL SmartSwitch is
o,
then the printer does not examine incoming
data and uses the default printer language specified in the Setup menu.
PS SmartSwitch
O
On*
Set the printer to switch automatically to PS emulation when a print job requires
it, regardless of the default printer language.
Note: If PS SmartSwitch is
o,
then the printer does not examine incoming
data and uses the default printer language specified in the Setup menu.
Job Buering
O
On*
Temporarily store jobs on the printer hard disk before printing.
Notes:
• This menu item appears only when a hard disk is installed.
• This menu item appears only in some printer models.
Mac Binary PS
Auto*
On
O
Set the printer to process Macintosh binary PostScript print jobs.
Notes:
• On processes raw binary PostScript print jobs.
•
O
filters
print jobs using the standard protocol.
Energy Ecient Ethernet
O
On*
Reduce power consumption when the printer does not receive data from the
Ethernet network.
Note: An asterisk (*) next to a value indicates the factory default setting.
TCP/IP
Note: This menu appears only in network printers or printers attached to print servers.
Network/Ports 74
Menu item Description
Set Hostname Set the current TCP/IP host name.
Domain Name Set the domain name.
Note: This menu item appears only in some printer models.
Allow DHCP/BOOTP to update
NTP server
O
On*
Allow the DHCP and BOOTP clients to update the NTP settings of the printer.
Zero Configuration Name Specify a service name for the zero configuration network.
Note: This menu item appears only in some printer models.
Enable Auto IP
O
On*
Assign an IP address automatically.
DNS Server Address Specify the current Domain Name System (DNS) server address.
Backup DNS Server Address Specify the backup DNS server addresses.
Backup DNS Server Address 2
Backup DNS Server Address 3
Domain Search Order Specify a list of domain names to locate the printer and its resources that reside
in dierent domains on the network.
Note: This menu item appears only in some printer models.
Enable DDNS
O
On*
Update the Dynamic DNS settings.
DDNS TTL Specify the current DDNS settings.
Default TTL
DDNS Refresh Time
Enable mDNS
O
On*
Update multicast DNS settings.
WINS Server Address Specify a server address for Windows Internet Name Service (WINS).
Enable BOOTP
O*
On
Allow the BOOTP to assign a printer IP address.
Restricted Server List Specify an IP address for the TCP connections.
Notes:
• Use a comma to separate each IP address.
• You can add up to 50 IP addresses.
Note: An asterisk (*) next to a value indicates the factory default setting.
Network/Ports 75
Menu item Description
Restricted Server List Options
Block All Ports*
Block Printing Only
Block Printing and HTTP Only
Specify how the IP addresses in the list can access the printer functionality.
MTU Specify a maximum transmission unit (MTU) parameter for the TCP connections.
Raw Print Port
1–65535 (9100*)
Specify a raw port number for printers connected on a network.
Outbound Trac Maximum
Speed
O*
On
Enable the printer maximum transfer rate.
Enhanced TLS Security
O*
On
Enhance printer privacy and data integrity.
Note: An asterisk (*) next to a value indicates the factory default setting.
IPv6
Note: This menu appears only in network printers or printers that are attached to print servers.
Menu item Description
Enable IPv6
O
On*
Enable IPv6 in the printer.
Enable DHCPv6
O*
On
Enable DHCPv6 in the printer.
Stateless Address Autoconfiguration
O
On*
Set the network adapter to accept the automatic IPv6 address
configuration entries provided by a router.
DNS Server Address Specify the DNS server address.
Manually Assigned IPv6 Address Assign the IPv6 address.
Manually Assigned IPv6 Router Assign the IPv6 router.
Address Prefix
0–128 (64*)
Specify the address prefix.
All IPv6 Addresses Show all IPv6 addresses.
All IPv6 Router Addresses Show all IPv6 router addresses.
Note: An asterisk (*) next to a value indicates the factory default setting.
Network/Ports 76

SNMP
Note: This menu appears only in network printers or printers that are attached to print servers.
Menu item Description
SNMP Versions 1 and 2c
Enabled
O
On*
Allow SNMP Set
O
On*
Enable PPM MIB
O
On*
SNMP Community
Configure Simple Network Management Protocol (SNMP) versions 1
and 2c to install print drivers and applications.
SNMP Version 3
Enabled
O
On*
Set Read/Write Credentials
User Name
Password
Set Read‑only Credentials
User Name
Password
Authentication Hash
MD5
SHA1*
Minimum Authentication Level
No Authentication, No Privacy
Authentication, No Privacy
Authentication, Privacy*
Privacy Algorithm
DES
AES‑128*
Configure SNMP version 3 to install and update the printer security.
Note: An asterisk (*) next to a value indicates the factory default setting.
IPSec
Note: This menu appears only in network printers or printers that are attached to print servers.
Network/Ports 77

Menu item Description
Enable IPSec
O*
On
Enable Internet Protocol Security (IPSec).
Base Configuration
Default*
Compatibility
Secure
Set the IPSec base configuration.
Note: This menu item appears only when Enable IPSec is set to
On.
IPSec Device Certificate Specify an IPSec certificate.
Note: This menu item appears only when Base
Configuration
is set
to Compatibility.
Pre‑Shared Key Authenticated
Connections
Host [x]
Address
Key
Configure the authenticated connections of the printer.
Note: These menu items appear only when Enable IPSec is set to
On.
Certificate Authenticated Connections
Host [x] Address[/subnet]
Address[/subnet]
Note: An asterisk (*) next to a value indicates the factory default setting.
802.1x
Note: This menu appears only in network printers or printers that are attached to print servers.
Menu item Description
Active
O*
On
Let the printer join networks that require authentication before
allowing access.
Note: To
configure
the settings of this menu item, access the
Embedded Web Server.
Note: An asterisk (*) next to a value indicates the factory default setting.
LPD Configuration
Note: This menu appears only in network printers or printers that are attached to print servers.
Menu item Description
LPD Timeout
0–65535 seconds (90*)
Set the time‑out value to stop the Line Printer Daemon (LPD) server
from waiting indefinitely for hung or invalid print jobs.
Note: An asterisk (*) next to a value indicates the factory default setting.
Network/Ports 78
Menu item Description
LPD Banner Page
O*
On
Print a banner page for all LPD print jobs.
Note: A banner page is the
first
page of a print job used as a
separator of print jobs and to identify the originator of the print job
request.
LPD Trailer Page
O*
On
Print a trailer page for all LPD print jobs.
Note: A trailer page is the last page of a print job.
LPD Carriage Return Conversion
O*
On
Enable carriage return conversion.
Note: Carriage return is a mechanism that commands the printer to
move the position of the cursor to the
first
position on the same
line.
Note: An asterisk (*) next to a value indicates the factory default setting.
HTTP/FTP Settings
Note: This menu appears only in network printers or printers attached to print servers.
Menu item Description
Enable HTTP Server
O
On*
Access the Embedded Web Server to monitor and manage the printer.
Enable HTTPS
O
On*
Configure the HyperText Transfer Protocol Secure (HTTPS) settings.
Enable FTP/TFTP
O
On*
Send files using FTP.
Local Domains Specify domain names for HTTP and FTP servers.
HTTP Proxy IP Address Configure the HTTP and FTP server settings.
Notes:
• 80 is the factory default port for HTTP.
• 21 is the factory default port for FTP.
FTP Proxy IP Address
HTTP Default IP Port
HTTPS Device Certificate
FTP Default IP Port
Timeout for HTTP/FTP
Requests
1–299 seconds (30*)
Specify the time before the server connection stops.
Retries for HTTP/FTP Requests
1–299 (3*)
Set the number of retries to connect to the HTTP/FTP server.
Note: An asterisk (*) next to a value indicates the factory default setting.
Network/Ports 79
Parallel [x]
Note: This menu appears only when an optional parallel card is installed.
Use To
PCL SmartSwitch
On*
O
Set the printer to switch automatically to PCL emulation when a print job
received through a serial port requires it, regardless of the default printer
language.
Note: If PCL SmartSwitch is o, then the printer does not examine incoming
data and uses the default printer language specified in the Setup menu.
PS SmartSwitch
On*
O
Set the printer to switch automatically to PS emulation when a print job received
through a serial port requires it, regardless of the default printer language.
Note: If PS SmartSwitch is o, then the printer does not examine incoming
data and uses the default printer language specified in the Setup menu.
NPA Mode
On
O
Auto*
Set the printer to perform the special processing required for bidirectional
communication, following the conventions defined by the NPA protocol.
Note: The printer restarts after changing the setting.
Advanced Status
On*
O
Enable bidirectional communication through the parallel port.
Protocol
Standard
Fastbytes*
Specify the parallel port protocol.
Honor Init
On
O*
Set the printer to honor printer hardware initialization requests from the
computer.
Note: The computer requests initialization by activating the Init signal from
the parallel port. Many personal computers activate the Init signal each time
the computer is turned on.
Parallel Mode 2
On
O*
Determine whether the parallel port data is sampled on the leading or trailing
edge of a strobe.
Mac Binary PS
On
O
Auto*
Set the printer to process Macintosh binary PostScript print jobs.
Notes:
• On processes raw binary PostScript print jobs.
• O filters print jobs using the standard protocol.
ENA Address Set the network address information for an external print server.
Note: This menu item is available only if the printer is attached to an external
print server through the USB port.
ENA Netmask Set the netmask information for an external print server.
Note: This menu item is available only if the printer is attached to an external
print server through the USB port.
Note: An asterisk (*) next to a value indicates the factory default setting.
Network/Ports 80

Use To
ENA Gateway Set the gateway information for an external print server.
Note: This menu item is available only if the printer is attached to an external
print server through the USB port.
Note: An asterisk (*) next to a value indicates the factory default setting.
ThinPrint
Menu item Description
Enable ThinPrint
O
On*
Print using ThinPrint.
Port Number
4000–4999 (4000*)
Set the port number for the ThinPrint server.
Bandwidth (bits/sec)
100–1000000 (0*)
Set the speed to transmit data in a ThinPrint environment.
Packet Size (kbytes)
0–64000 (0*)
Set the packet size for data transmission.
Note: An asterisk (*) next to a value indicates the factory default setting.
USB
Note: This menu appears only in some printer models.
Menu item Description
PCL SmartSwitch
O
On*
Set the printer to switch to PCL emulation when a print job received through a
USB port requires it, regardless of the default printer language.
Note: If PCL SmartSwitch is
o,
then the printer does not examine incoming
data and uses the default printer language specified in the Setup menu.
PS SmartSwitch
O
On*
Set the printer to switch to PS emulation when a print job received through a
USB port requires it, regardless of the default printer language.
Note: If PS SmartSwitch is
o,
then the printer does not examine incoming
data and uses the default printer language specified in the Setup menu.
Job Buering
O*
On
Temporarily store jobs on the printer hard disk before printing.
Note: This menu item appears only when a hard disk installed.
Note: An asterisk (*) next to a value indicates the factory default setting.
Network/Ports 81
Menu item Description
Mac Binary PS
On
Auto*
O
Set the printer to process Macintosh binary PostScript print jobs.
Notes:
• When set to On, the printer processes raw binary PostScript print jobs
from computers using the Macintosh operating system.
• When set to Auto, the printer processes print jobs from computers using
either Windows or Macintosh operating systems
• When set to O, the printer filters PostScript print jobs using the standard
protocol.
Enable USB Port
O
On*
Enable the standard USB port.
Note: An asterisk (*) next to a value indicates the factory default setting.
Google Cloud Print
Menu item Description
Registration
Register
Register the printer to the Google Cloud server.
Options
Enable Google Cloud Print
O
On*
Print directly from your Google account.
Options
Enable Local Discovery
O
On*
Allow higher bandwidth for data transmission.
Options
Enable SSL Peer Verification
O
On*
Verify authenticity of the peer certificate to connect to your Google
account.
Options
Always Print As Image
O*
On
Save the scanned output into image files.
Note: An asterisk (*) next to a value indicates the factory default setting.
Network/Ports 82

Security
Login Methods
Manage Permissions
Menu item Description
Function Access
Modify Address Book
Create
Profiles
Manage Bookmarks
Flash Drive Print
Flash Drive Color Printing
Held Jobs Access
User
Profiles
Cancel Jobs at the Device
Change Language
Internet Printing Protocol (IPP)
B/W Print
Color Print
Control access to the printer functions.
Administrative Menus
Security Menu
Network/Ports Menu
Paper Menu
Reports Menu
Function
Configuration
Menus
Supplies Menu
Option Card Menu
SE Menu
Device Menu
Control access to the printer menus.
Device Management
Remote Management
Firmware Updates
Apps Configuration
Operator Panel Lock
Import / Export All Settings
Out of Service Erase
Control access to the printer management options.
Security 83
Menu item Description
Apps
New Apps
Slideshow
Change Wallpaper
Screen Saver
Forms and Favorites
Eco-Settings
Control access to the printer applications.
Note: The list may vary depending on the applications that are enabled from
the Embedded Web Server.
Local Accounts
Menu item Description
Manage Groups/Permissions
Add Group
Import Access Controls
Function Access
Administrative Menus
Device Management
Apps
All Users
Import Access Controls
Function Access
Administrative Menus
Device Management
Apps
Admin
Control group or user access to the printer functions, applications, and security
settings.
Add User
User Name/Password
User Name
Password
PIN
Create local accounts to manage access to the printer functions.
User Name/Password Accounts
Add User
User Name Accounts
Add User
Password Accounts
Add User
PIN Accounts
Add User
Security 84
Schedule USB Devices
Menu item Description
Schedules
Add New Schedule
Schedule access to the USB ports.
Security Audit Log
Menu item Description
Enable Audit
O*
On
Record the events in the secure audit log and remote syslog.
Enable Remote Syslog
O*
On
Send audit logs to a remote server.
Remote Syslog Server Specify the remote syslog server and port.
Remote Syslog Port
1–65535 (514*)
Remote Syslog Method
Normal UDP*
Stunnel
Specify a syslog method to transmit logged events to a remote server.
Note: An asterisk (*) next to a value indicates the factory default setting.
Security 85

Menu item Description
Remote Syslog Facility
0 ‑ Kernel Messages
1 ‑ User‑Level Messages
2 ‑ Mail System
3 ‑ System Daemons
4 ‑ Security/Authorization
Messages*
5 ‑ Messages Generated
Internally by Syslogs
6 ‑ Line Printer Subsystem
7 ‑ Network News Subsystem
8 ‑ UUCP Subsystem
9 ‑ Clock Daemon
10 ‑ Security/Authorization
Messages
11 ‑ FTP Daemon
12 ‑ NTP Subsystem
13 ‑ Log Audit
14 ‑ Log Alert
15 ‑ Clock Daemon
16 ‑ Local Use 0 (local0)
17‑ Local Use 1 (local1)
18 ‑ Local Use 2 (local2)
19 ‑ Local Use 3 (local3)
20 ‑ Local Use 4 (local4)
21 ‑ Local Use 5 (local5)
22 ‑ Local Use 6 (local6)
23 ‑ Local Use 7 (local7)
Specify a facility code that the printer uses when sending log events to a remote
server.
Severity of Events to Log
0 ‑ Emergency
1 ‑ Alert
2 ‑ Critical
3 ‑ Error
4 ‑ Warning*
5 ‑ Notice
6 ‑ Informational
7 ‑ Debug
Specify the priority level cuto for logging messages and events.
Notes:
• 0 ‑ Emergency is the highest severity. 7 ‑ Debug is the lowest.
• The selected severity level and anything higher are logged. For example,
selecting 4 ‑ Warning logs the severity levels from 0 to 4.
Remote Syslog Non‑Logged
Events
O*
On
Send all events, regardless of severity level, to the remote server.
Admin’s E‑mail Address Send e‑mail notification of logged events to the administrator.
Note: An asterisk (*) next to a value indicates the factory default setting.
Security 86

Menu item Description
E‑maiL Log Cleared Alert
O*
On
Send e‑mail notification to the administrator when a log entry is deleted.
E‑maiL Log Wrapped Alert
O*
On
Send e‑mail notification to the administrator when the log becomes full and
begins to overwrite the oldest entries.
Log Full Behavior
Wrap Over Older Entries*
E‑mail Log Then Delete All
Entries
Resolve log storage issues when the log fills its allotted memory.
E‑maiL % Full Alert
O*
On
Send e‑mail notification to the administrator when the log fills its allotted
memory.
% Full Alert Level
1–99 (90%*)
E‑maiL Log Exported Alert
O*
On
Send e‑mail notification to the administrator when a log is exported.
E‑maiL Log Settings Changed
Alert
O*
On
Send e‑mail notification to the administrator when Enable Audit is set.
Log Line Endings
LF (\n)*
CR (\r)
CRLF (\r\n)
Specify how the log file terminates the end of each line.
Digitally Sign Exports
O*
On
Add a digital signature to each exported log file.
Clear Log
Start
Delete all audit logs.
Export Log
Syslog (RFC 5424)
Syslog (RFC 3164)
CSV
Export a security log to a flash drive.
Note: An asterisk (*) next to a value indicates the factory default setting.
Security 87

Login Restrictions
Menu item Description
Login failures
1–10 (3*)
Specify the number of failed login attempts before the user gets locked out.
Failure time frame
1–60 minutes (5*)
Specify the time frame between failed login attempts before the user gets locked out.
Lockout time
1–60 minutes (5*)
Specify the lockout duration.
Web Login Timeout
1–120 minutes (10*)
Specify the delay for a remote login before the user is logged o automatically.
Note: An asterisk (*) next to a value indicates the factory default setting.
Confidential Print Setup
Menu item Description
Max Invalid PIN
2–10
Set the number of times an invalid PIN can be entered.
Notes:
• A value of zero turns o this setting.
• When the limit is reached, the print jobs for that user name and PIN are
deleted.
• This menu item appears only when a hard disk is installed.
Confidential Job Expiration
O*
1 Hour
4 Hours
24 Hours
1 Week
Set the expiration time for confidential print jobs.
Notes:
• If this menu item is changed while confidential print jobs reside in the printer
memory or hard disk, then the expiration time for those print jobs does not
change to the new default value.
• If the printer is turned o, then all confidential jobs held in the printer memory
are deleted.
Repeat Job Expiration
O*
1 Hour
4 Hours
24 Hours
1 Week
Set the expiration time for a print job that you want to repeat.
Verify Job Expiration
O*
1 Hour
4 Hours
24 Hours
1 Week
Set the expiration time that the printer prints a copy for the user to examine its quality,
before printing the remaining copies.
Note: An asterisk (*) next to a value indicates the factory default setting.
Security 88
Menu item Description
Reserve Job Expiration
O*
1 Hour
4 Hours
24 Hours
1 Week
Set the expiration time that the printer stores print jobs for printing at a later time.
Require All Jobs to be Held
O*
On
Set the printer to hold all print jobs.
Note: An asterisk (*) next to a value indicates the factory default setting.
Disk Encryption
Note: This menu appears only when a printer hard disk is installed.
Menu item Description
Status
Enabled
Disabled
Determine whether Disk Encryption is enabled.
Start encryption Prevent the loss of sensitive data in case the printer or its hard disk is stolen.
Note: Enabling disk encryption erases all contents in the hard disk. If necessary, back up
important data from the printer before starting the encryption.
Erase Temporary Data Files
Menu item Description
Stored in onboard memory
O*
On
Delete all files stored on the printer memory.
Stored on hard disk
1 Pass Erase*
3 Pass Erase
7 Pass Erase
Delete all files stored on the printer hard disk.
Note: An asterisk (*) next to a value indicates the factory default setting.
Security 89
Solutions LDAP Settings
Use To
Follow LDAP Referrals
O*
On
Search the dierent servers in the domain for the logged-in user account.
LDAP Certificate Verification
No*
Ye s
Enable verification of LDAP certificates.
Mobile Services Management
Use To
AirPrint
Print
Scan
Fax
Enable functions in the AirPrint software feature.
Miscellaneous
Menu item Description
Protected Features
Show*
Hide
Show all the features that Function Access Control (FAC) protects regardless
of the security permission that the user has.
Note: FAC manages access to
specific
menus and functions or disables them
entirely.
Print Permission
O*
On
Let the user log in before printing.
Default Print Permission Login Set the default login for Print Permission.
Security Reset Jumper
Enable “Guest” access*
No Eect
Specify the eect of using the security reset jumper.
Notes:
• The jumper is located beside a lock icon on the controller board.
• Enable “Guest” access provides full access control to users who are not
logged in.
• No Eect means that the reset has no eect on the printer security
configuration.
Minimum Password Length
0–32 (0*)
Specify the minimum characters that are allowed for a password.
Note: An asterisk (*) next to a value indicates the factory default setting.
Security 90

Reports
Menu Settings Page
Menu item Description
Menu Settings Page Print a report that contains the printer menus.
Device
Menu item Description
Device Information Print a report that contains information about the printer.
Device Statistics Print a report about printer usage and supply status.
Profile List Print a list of profiles that are stored in the printer.
Asset Report Print a report that contains the printer serial number and model name.
Print
Menu item Description
Print Fonts
PCL Fonts
PS Fonts
Print samples and information about the fonts that are available in each printer
language.
Print Directory Print the resources that are stored in the flash drive or printer hard disk.
Note: This menu item appears only when a flash drive or printer hard disk is
installed.
Shortcuts
Menu item Description
All Shortcuts Print a report that lists the shortcuts that are stored in the printer.
Fax Shortcuts
Copy Shortcuts
E‑mail Shortcuts
FTP Shortcuts
Network Folder Shortcuts
Reports 91
Fax
Menu item Description
Fax Job Log Print a report about the last 200 completed fax jobs.
Note: This menu item appears only when Enable Job Log is set to On.
Fax Call Log Print a report about the last 100 attempted, received, and blocked calls.
Note: This menu item appears only when Enable Job Log is set to On.
Network
Menu item Description
Network Setup Page Print a page that shows the configured network and wireless settings on the
printer.
Note: This menu item appears only in network printers or printers connected
to print servers.
Reports 92

Help
Help
Menu item Description
Print All Guides Prints all the guides
Color Quality Guide Provides information about solving color quality issues
Connection Guide Provides information about connecting the printer locally (USB) or to a network
Copy Guide Provides information about making a copy and configuring the settings
E‑mail Guide Provides information about sending an e‑mail and configuring the settings
Fax Guide Provides information about sending a fax and configuring the settings
Scan Guide Provides information about scanning a document and configuring the settings
Information Guide Provides information about the printer
Media Guide Provides information about loading paper and specialty media
Moving Guide Provides information about moving, locating, or shipping the printer
Print Quality Guide Provides information about solving print quality issues
Supplies Guide Provides information about ordering supplies
Help 93

Troubleshooting
Troubleshooting
Menu item Description
Print Quality Test Pages Print sample pages to identify and correct print quality defects.
Troubleshooting 94

Index
M
menu
802.1x 78
Accessibility 14
Bin Configuration 34
Confidential Print Setup 88
Configuration
Menu 15
Copy Defaults 35
Custom Scan Sizes 33
Device 91
Erase Temporary Data Files 89
Ethernet 74
E‑mail Defaults 53
E‑mail Setup 52
Fax 92
Fax Cover Page 47
Fax Log Settings 47
Fax Mode 39
Fax Receive Settings 44
Fax Send Settings 40
Fax Server E‑mail Settings 49
Fax Server Scan Settings 51
Finishing 22
Flash Drive Print 68
Flash Drive Scan 64
FTP Defaults 59
General Fax Settings 39, 49
Google Cloud Print 82
Help 93
HTML 30
HTTP/FTP Settings 79
Image 30
IPSec 77
IPv6 76
Job Accounting 25
Layout 21
Local Accounts 84
Login Restrictions 88
LPD Configuration 78
Manage Permissions 83
Media Types 34
Menu Settings Page 91
Miscellaneous 90
Mobile Services
Management 90
Network 92
Network Overview 71
Notifications
11
Out of Service Erase 20
Parallel [x] 80
PCL 28
PDF 27
PostScript 27
Power Management 13
Preferences 9
Print 91
Quality 24
Remote Operator Panel 10
Security Audit Log 85
Setup 23
Shortcuts 91
SNMP 77
Solutions LDAP Settings 90
Speaker Settings 48
TCP/IP 74
ThinPrint 81
Tray Configuration 32
Troubleshooting 94
Universal Setup 33
USB 81
Web Link Setup 58
XPS 27
menu map 7
menus
About this Printer 20
Disk Encryption 89
Information Sent to Lexmark 14
Restore Factory Defaults 15
Schedule USB Devices 85
Visible Home Screen Icons 20
Wireless 71
N
Network Overview menu 71
P
Parallel [x] menu 80
Print Quality Test Pages 94
printer menus 7
T
TCP/IP menu 74
W
Wireless menu 71
Index 95