
CONTENTS
SAFETY
........................................................................... 1-5
USE AND CARE
Removal of Packaging Tape ...................................... 5
Your Range and Its Features ..................................... 6
Cooktop Cooking .................................................... 7, 8
Cooktop Controls ....................................................... 7
Range Control ............................................................. 9
Clock & Timer ............................................................ 10
Burner Ignition ...................................................... 7, 12
Oven Cooking Tips .............................................. 11.13
Broiling ...................................................................... 14
CLEANING
The Self-Clean Cycle .......................................... 15,16
Cleaning Tips ...................................................... 17,18
Removable Range Parts ..................................... 15-20
SERVICE
What to 0o Before Calling for Service .............. 21, 22
Thermostat Adjustments ......................................... 23
WARRANTY
MODELS 36745, 36749
Kenmore
Recyd_ paper
MAR29200O
USE • CARE • SAFETY
MANUAL
229C402OPO22-1 SR10232
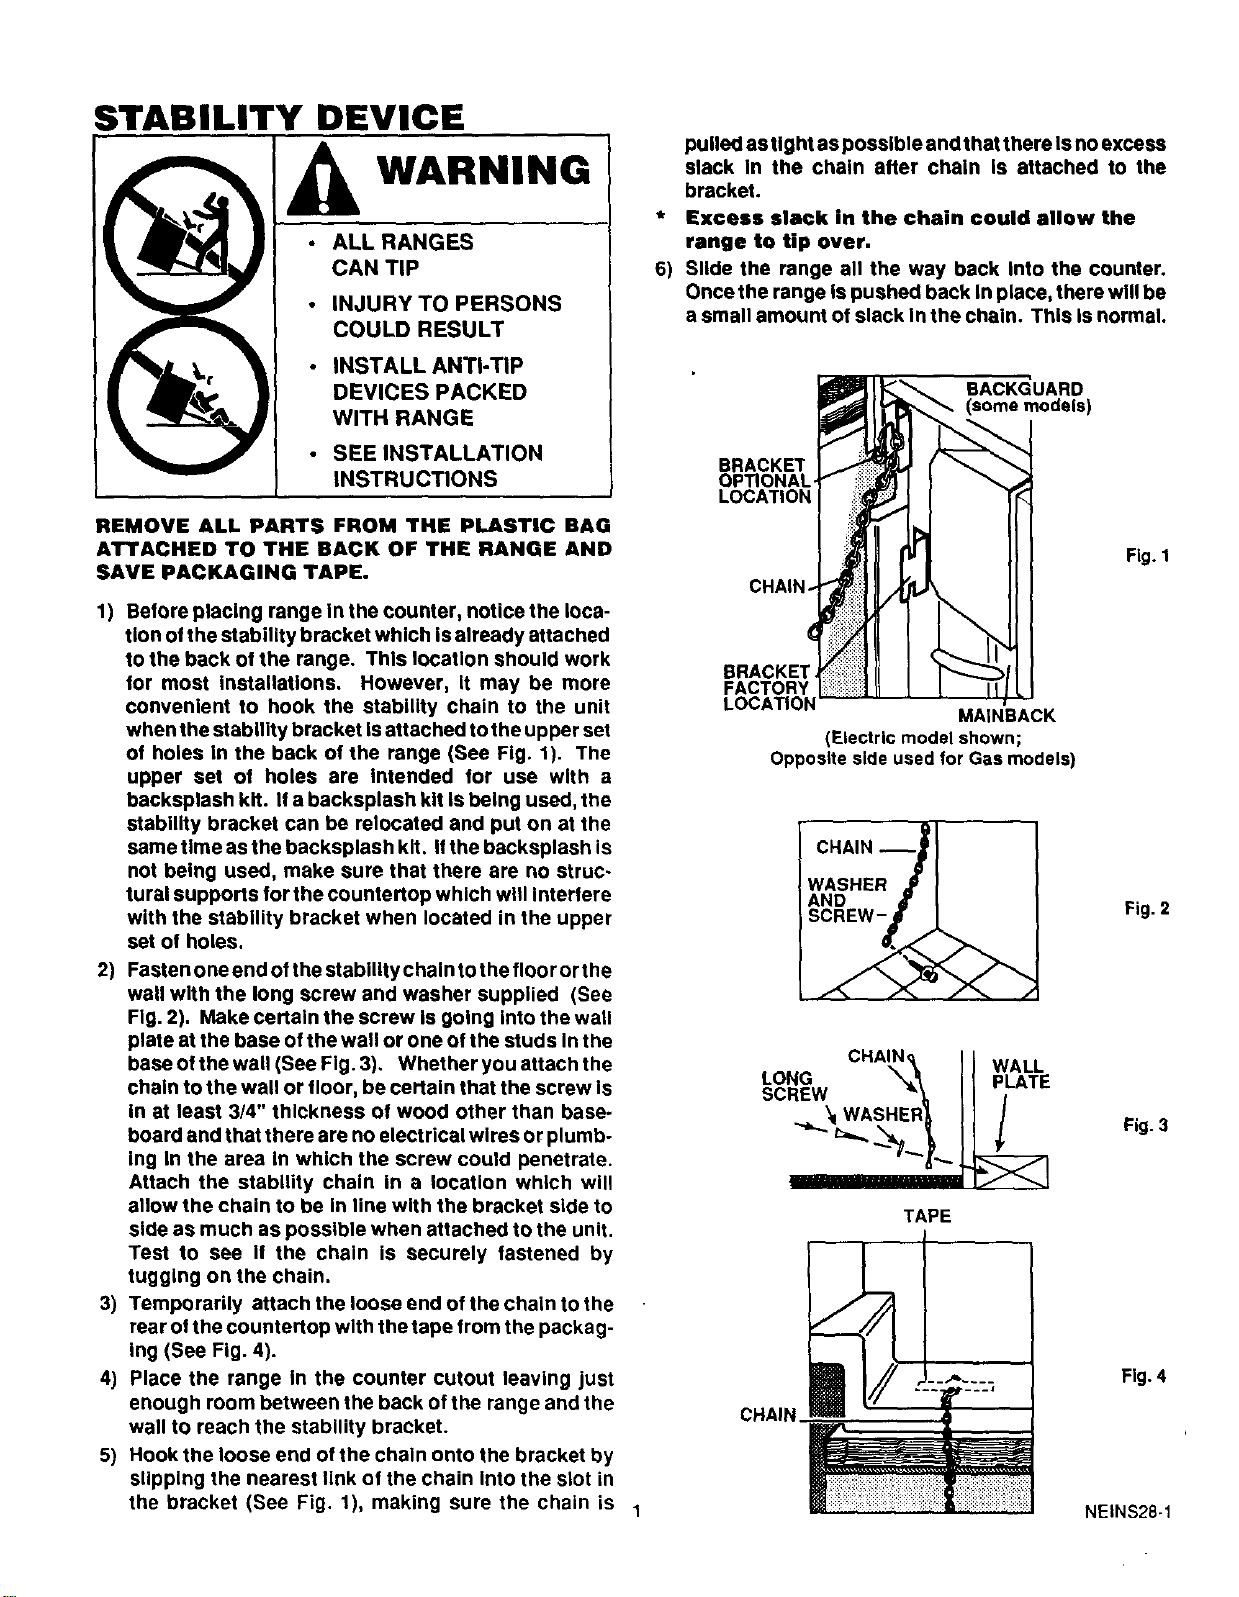
STABILITY DEVICE
• ALL RANGES
CAN TIP
• INJURY TO PERSONS
COULD RESULT
• INSTALL ANTI-TIP
DEVICES PACKED
WITH RANGE
• SEE INSTALLATION
INSTRUCTIONS
pulled as tlg htas possible and that there Is no excess
slack In the chain after chain is attached to the
bracket.
Excess slack in the chain could allow the
range to tip over.
6) Slide the range all the way back Into the counter.
Once the range is pushed back in place, there will be
a small amount of slack in the chain. This is normal.
BACKGUARD
BRACKET
OP_ONAL
LOCATION
REMOVE ALL PARTS FROM THE PLASTIC BAG
ATTACHED TO THE BACK OF THE RANGE AND
SAVE PACKAGING TAPE.
Fig. 1
1) Before placing range In the counter, notice the loca-
tion of the stability bracket which is already attached
to the back ot the range. This location should work
for most installations. However, it may be more
convenient to hook the stability chain to the unit
when the stability bracket isattached to the upper set
of holes in the back of the range (See Fig. 1). The
upper set of holes are Intended for use with a
backsplash kit. If a backsplash kit is being used, the
stability bracket can be relocated and put on at the
same time as the backsplash kit. Ifthe backsplash is
not being used, make sure that there are no struc-
tural supports for the countertop which will Interlere
with the stability bracket when located in the upper
set of holes.
2) Fasten one end of the stability chain to the floor or the
wall with the long screw and washer supplied (See
Fig. 2). Make certain the screw is going into the wall
plate at the base of the wall or one of the studs In the
base of the wall (See Fig. 3). Whether you attach the
chain to the wall or floor, be certain that the screw Is
in at least 3/4" thickness of wood other than base-
board and that there are no electrical wires or plumb-
ing in the area In which the screw could penetrate.
Attach the stability chain in a location which will
allow the chain to be in line with the bracket side to
side as much as possible when attached to the unit.
Test to see If the chain is securely fastened by
tugging on the chain.
3) Temporarily attach the loose end of the chain to the
rear ol the countertop with the tape from the packag-
ing (See Fig. 4).
4) Place the range In the counter cutout leaving just
enough room between the back of the range and the
wall to reach the stability bracket.
5) Hook the loose end of the chain onto the bracket by
slipping the nearest link of the chain into the slot in
the bracket (See Fig. 1), making sure the chain is 1
FACTORY
LOCA_ON
MAINBACK
(Ele_ric modelshown;
OpposltesideusedforGas models)
CHAIN--
WASHER
AND
SCREW-
CHAIN
CHAIN_ I [ WALL
\\ IIP ATE
_x I WASHER_ J] /
TAPE
Fig. 2
Fig. 3
Fig. 4
NEINS28-1
IMPORTANT INSTRUCTIONS
FOR YOUR SAFETY
SAVE THESE INSTRUCTIONS
Read all instructions before using this appliance. When using electrical
appliances, basic safety precautions should be followed, including the following:
WARNING: If the Information In this manual is
not followed exactly, a fire or explosion may result
causing property damage, personal injury or death.
-- Do not store or use gasoline or other flam-
mable vapors and liquids in the vicinity of this or
any other appliance.
-- WHAT TO DO IF YOU SMELL GAS
• Do not try to light any appliance!
• Do not touch any electrical switch; Do not use
any phone In your building!
• Immediately call your gas supplier from a
neighbor's phone. Follow the gas supplier's
instructions!
• If you cannot reach your gas supplier, call the
fire department.
-- Installation and service must be performed by
a qualified installer, service agency or the gas
supplier.
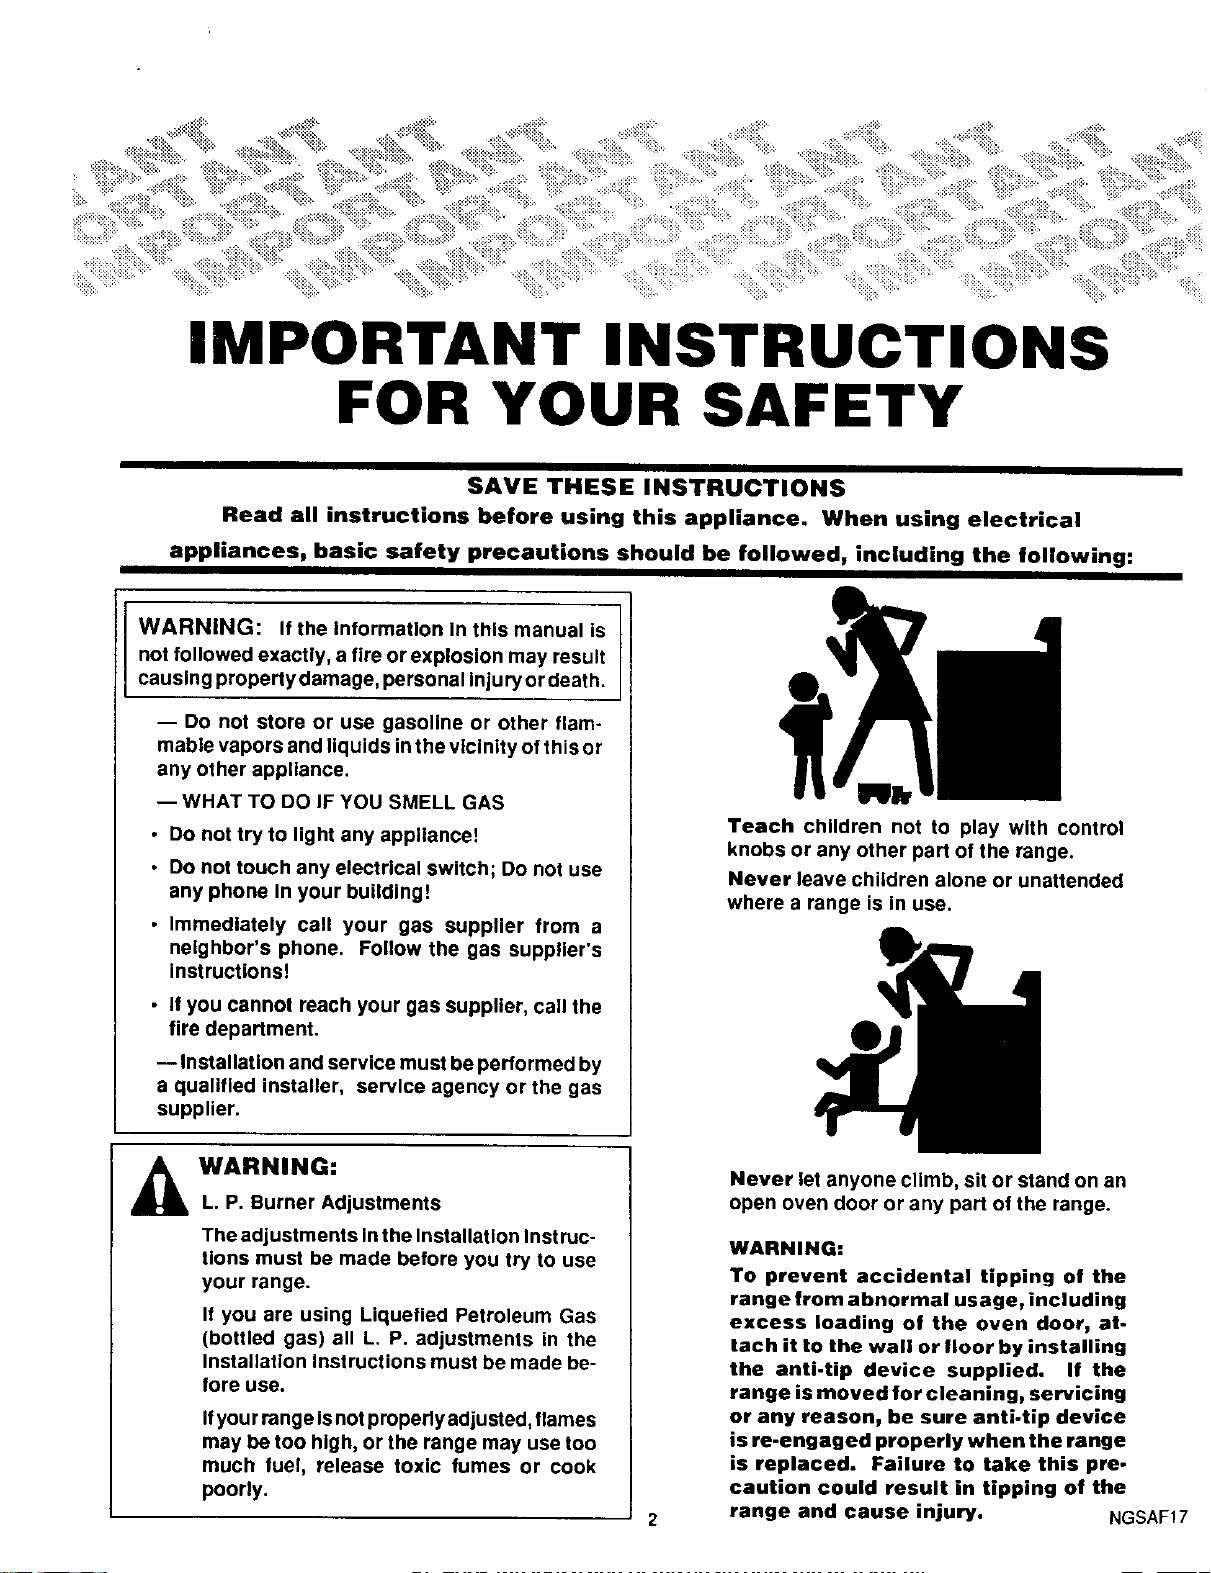
Teach children not to play with control
knobs or any other part of the range.
Never leave children alone or unattended
where a range is in use.
WARNING:
L. P. Burner Adjustments
The adjustments Inthe Installation Instruc-
tions must be made before you try to use
your range.
It you are using Liquefied Petroleum Gas
(bottled gas) all L. P. adjustments in the
Installation Instructions must be made be-
tore use.
Ifyou rrange Isnot properly adjusted, llames
may be too high, or the range may use too
much fuel, release toxic fumes or cook
poorly.
Never let anyone climb, sit or stand on an
open oven door or any part of the range.
WARNING:
To prevent accidental tipping of the
range from abnormal usage, including
excess loading of the oven door, at-
tach it to the wall or floor by installing
the anti-tip device supplied. If the
range is moved for cleaning, servicing
or any reason, be sure anti-tip device
is re-engaged properly when the range
is replaced. Failure to take this pre-
caution could result in tipping of the
range and cause injury. NGSAF17
To insure safety for yourself and your home, please read your Owner's Manual
carefully. Keep it handy for quick easy reference. Pay close attention to the
_lk y°ur
safety sections of manual. You can recognize the safety sections by
looking for the symbol or the word "Safety".
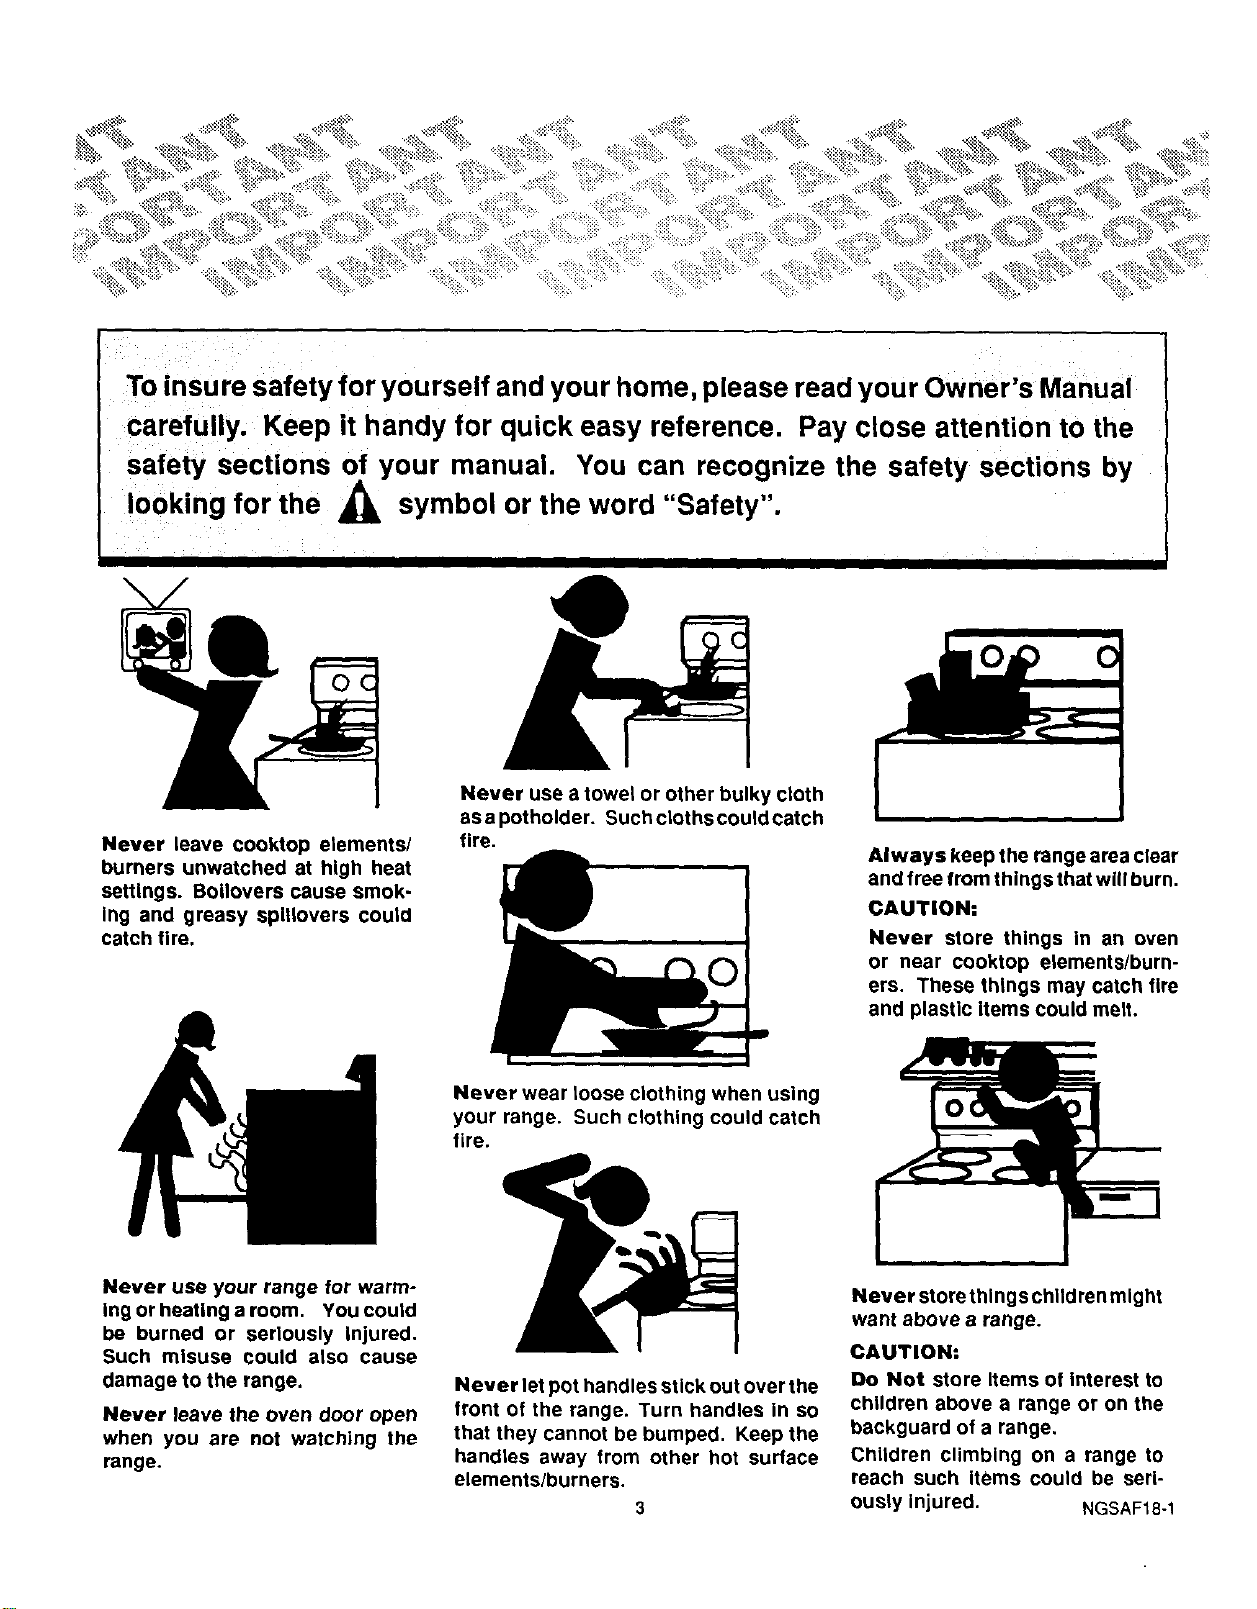
Never leave cooktop elements/
burners unwatched at high heat
settings. Bollovers cause smok-
Ing and greasy spltlovers could
catch tire.
Never use a towel or other bulky cloth
asa potholdero Such clothscouldcatch
fire,
Always keep the range area clear
and free from things that will burn,
CAUTION:
Never store things in an oven
or near cooktop elements/burn-
ers. These things may catch fire
and plastic items could melt.
Never wear loose clothing when using
your range. Such clothing could catch
fire.
Never use your range for warm-
Ing or heating aroom. You could
be burned or seriously Injured,
Such misuse could also cause
damage to the range.
Never leave the oven door open
when you are not watching the
range.
Never let pot handles stick out over the
front of the range. Turn handles in so
that they cannot be bumped, Keep the
handles away from other hot surface
elements/burners.
Never storethlngs children might
want above a range.
CAUTION:
Do Not store Items of interest to
children above a range or on the
backguard of a range,
Children climbing on a range to
reach such items could be seri-
ously Injured. NGSAF18-1
IMPORTANT SAFETY INSTRUCTIONS
BASIC SAFETY PRECAUTIONS
Keep this book for later use.
Be sure your range Is Installed and grounded properly
by a qualified technician.
Always use dry potholders when removing pans from
the oven or cooktop. Moist or damp potholders can
cause steam burns.
Always follow cleaning instructions In this book.
Always keep the range and oven clean. Food and
grease are easy to ignite. Clean the range, oven and
vents regularly.
Clean Only Parts Listed In Manual,
CAUTION: Do not store items of interest to
children in cabinets above a range or on the
backguard of a range. Children climbing on a
range to reach items could be seriously injured.
Always keep combustible wall coverings, curtains, or
drapes a safe distance away from your range and oven.
Always keep dish towels, dish cloths, potholders and
other linens a safe distance away from your range.
Never store such items on your range.
Always keep the appliance area clear and free from
things that will burn (gasoline and other flammable
vapors and liquids).
Never try to repair or replace any part of the range
unless instructions are given In this book. All other
work should be done by a skilled technician.
Never heat unopened food containers. Pressure
buildup may make container burst and cause injury.
Never leave jars or cans of fat or drippings on or near
therange. Neverletgreasebuilduponyourrange. You
can keep grease fires from starting if you clean up
grease and spills after each range use.
Never try to move a pan of hot fat, especially a deep fat
fryer. Wait until the fat has cooled.
Never touch burner grates or interior surfaces of the
oven. They may be hot even though there are no flames
present.
Always keep wooden utensils, plastic utensils or can ned
food a safe distance away from your range.
Some cleaners produce nox-
ious fumes and wet cloths or
sponges could cause steam
burns if used on a hot surface.
If they have been turned off. The glass surface of the
cooktop will retain heat after the controls are turned off.
Only some kinds of glass or ceramic pans can be used
for cooktop cooking. Be sure that the pan you use will
not break when heated on the cooktop burners.
Never block free airflow through the oven vent.
Do not cook on broken cooktop. If cooktop should
break, cleaning solutions and spillovers may penetrate
the broken cooktop and create a risk of electrical shock.
Contact a qualified technician immediately.
_=:=:=_____ Choose pots and pans
with flat bottoms, large
enough to cover the en-
tire cooktop burner. This will cut down the risk of
setting pot holders or clothing on fire with an uncovered
burner and waste less energy.
OVEN SAFETY
Place oven racks in desired position while oven is cool.
If rack must be moved while oven Is hot, do not let
potholder contact hot oven burners.
After broiling, always take the broiler pan out of the
range and clean It. Leftover grease in the broiler pan
can catch on fire next time you use the pan.
Always use care when opening oven door. Let hot air
and steam escape before moving food.
Never use aluminum foil to line oven bottoms. Improper
use of foil could starta fire.
SELF-CLEAN SAFETY
If the self-cleaning mode malfunctions, turn off
and disconnect the power supply. Have serviced by a
qualified technician.
Always remove broiler pan and other utensils from the
oven before a self-clean cycle.
Never rub, move, or damage the door gasket on self-
cleaning ranges. The gasket is essential for a good seal.
Never try to clean utensils, cookware or removable
parts of your range during a self-clean cycle.
Do Not Use Oven Cleaners -- No commercial oven
cleaner or oven liner protective coating of any kind
should be used in or around any part of the oven.
COOKTOP SAFETY
Always use care when touching the cooktop burners.
Cooktop burners could be hot enough to burn you even 4
NGSAF32
SAFETY INSTRUCTIONS (continued)
READ AND UNDERSTAND
THIS INFORMATION NOW!
Should you ever need it, you will
not have time for reading.
Be sure everyone in your home
knows what to do in case of fire.
Never use water on a grease fire.
it will only spread the flames.
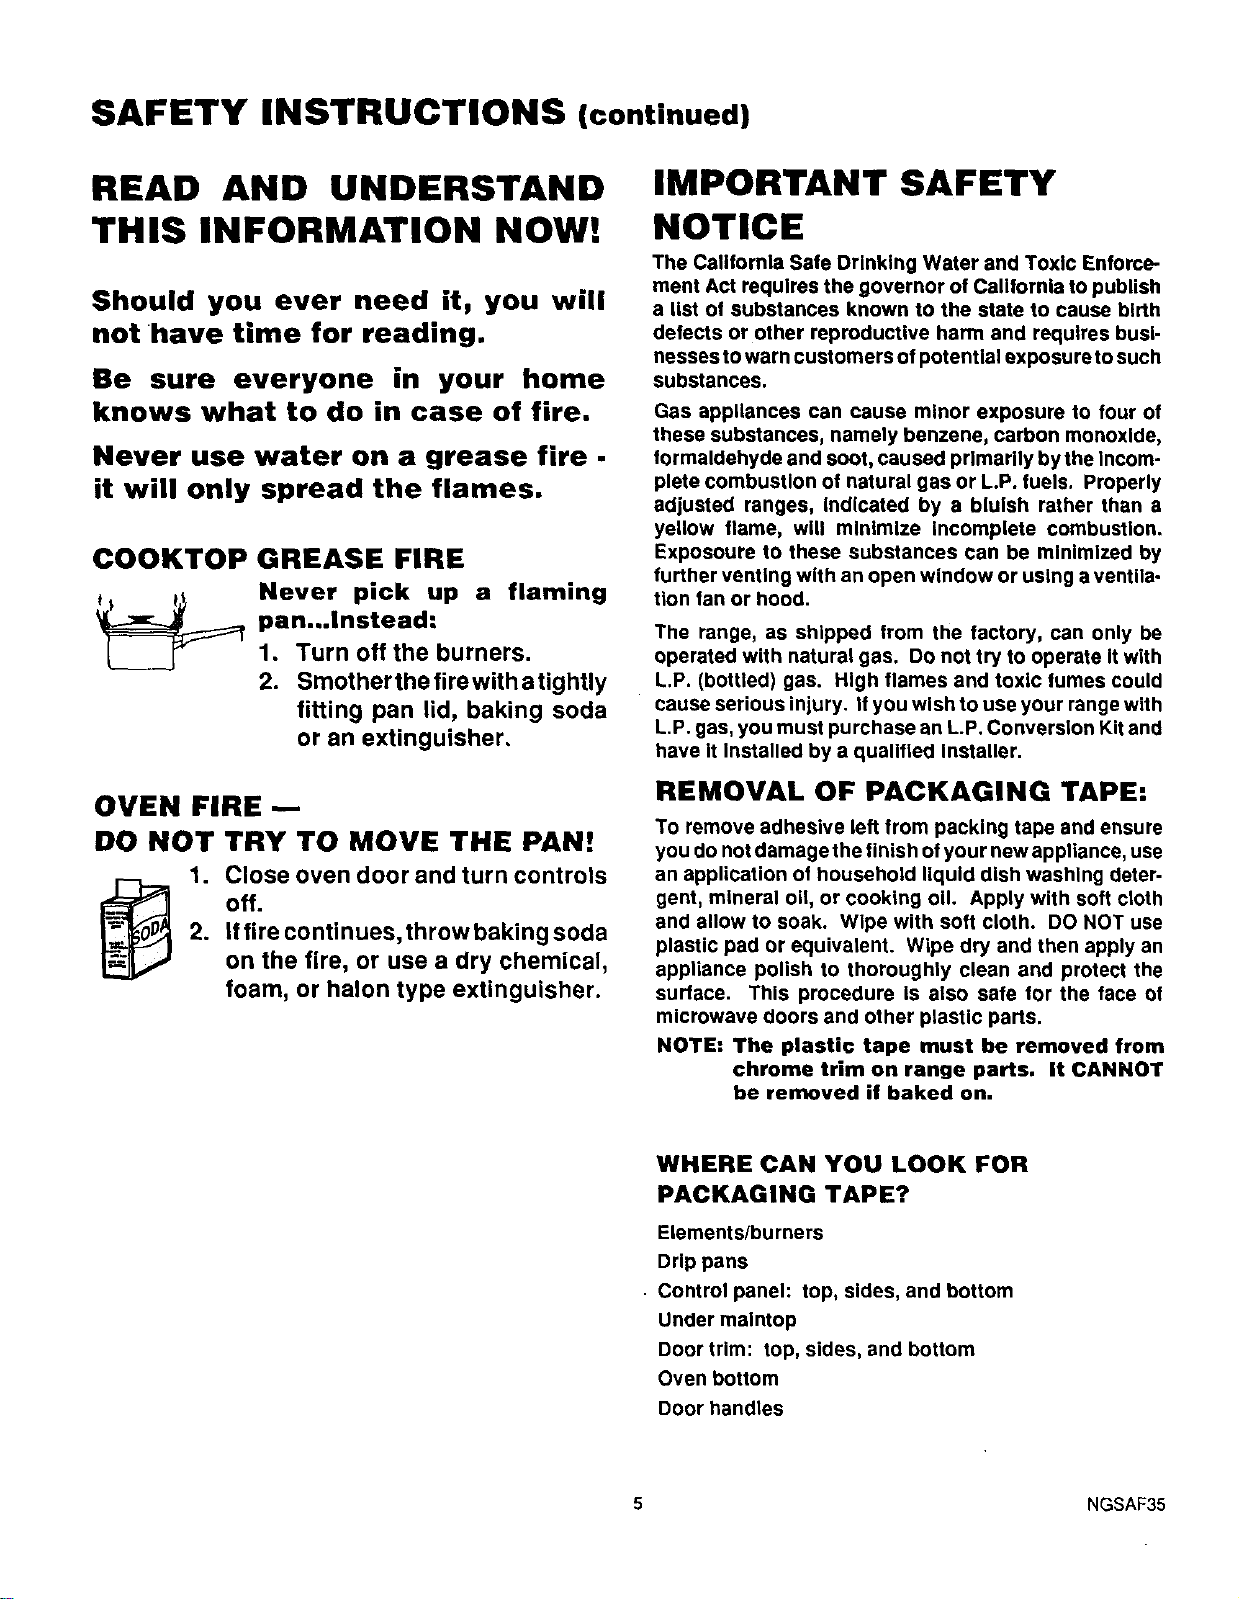
COOKTOP GREASE FIRE
Never pick up a flaming
pan...Instead:
1. Turn off the burners.
2. Smother the firewith atighUy
fitting pan lid, baking soda
or an extinguisher,
OVEN FIRE--
DO NOT TRY TO MOVE THE PAN!
1. Close oven door and turn controls
off.
2. Iffire continues, throw baking soda
on the fire, or use a dry chemical,
foam, or halon type extinguisher.
IMPORTANT SAFETY
NOTICE
The California Safe Drinking Water and Toxic Enforce-
ment Act requires the governor of California to publish
a list of substances known to the state to cause birth
defects or other reproductive harm and requires busi-
nesses to warn customers of potential exposure to such
substances.
Gas appliances can cause minor exposure to four of
these substances, namely benzene, carbon monoxide,
formaldehyde and soot, caused primarily by the incom-
plete combustion of natural gas or L.P. fuels. Properly
adjusted ranges, Indicated by a bluish rather than a
yellow flame, will minimize Incomplete combustion.
Exposoure to these substances can be minimized by
further venting with an open window or using a ventila-
tion fan or hood.
The range, as shipped from the factory, can only be
operated with natural gas. DOnot try to operate Itwith
L.P. (bottled) gas. High flames and toxic fumes could
cause serious injury. If you wish to use your range with
L.P. gas, you must purchase an L.P. Conversion Kit and
have it Installed by a qualified Installer.
REMOVAL OF PACKAGING TAPE:
To remove adhesive left from packing tape and ensure
you do not damage the finish ofyour new appliance, use
an application of household liquid dish washing deter-
gent, mineral oil, or cooking oil. Apply with soft cloth
and allow to soak. Wipe with soft cloth. DO NOT use
plastic pad or equivalent. Wipe dry and then apply an
appliance polish to thoroughly clean and protect the
surface. This procedure is also safe for the face of
microwave doors and other plastic parts.
NOTE: The plastic tape must be removed from
chrome trim on range parts, It CANNOT
be removed if baked on.
WHERE CAN YOU LOOK FOR
PACKAGING TAPE?
Elements/burners
Drip pans
Control panel: top, sides, and bottom
Under maintop
Door trim: top, sides, and bottom
Oven bottom
Door handles
5 NGSAF35
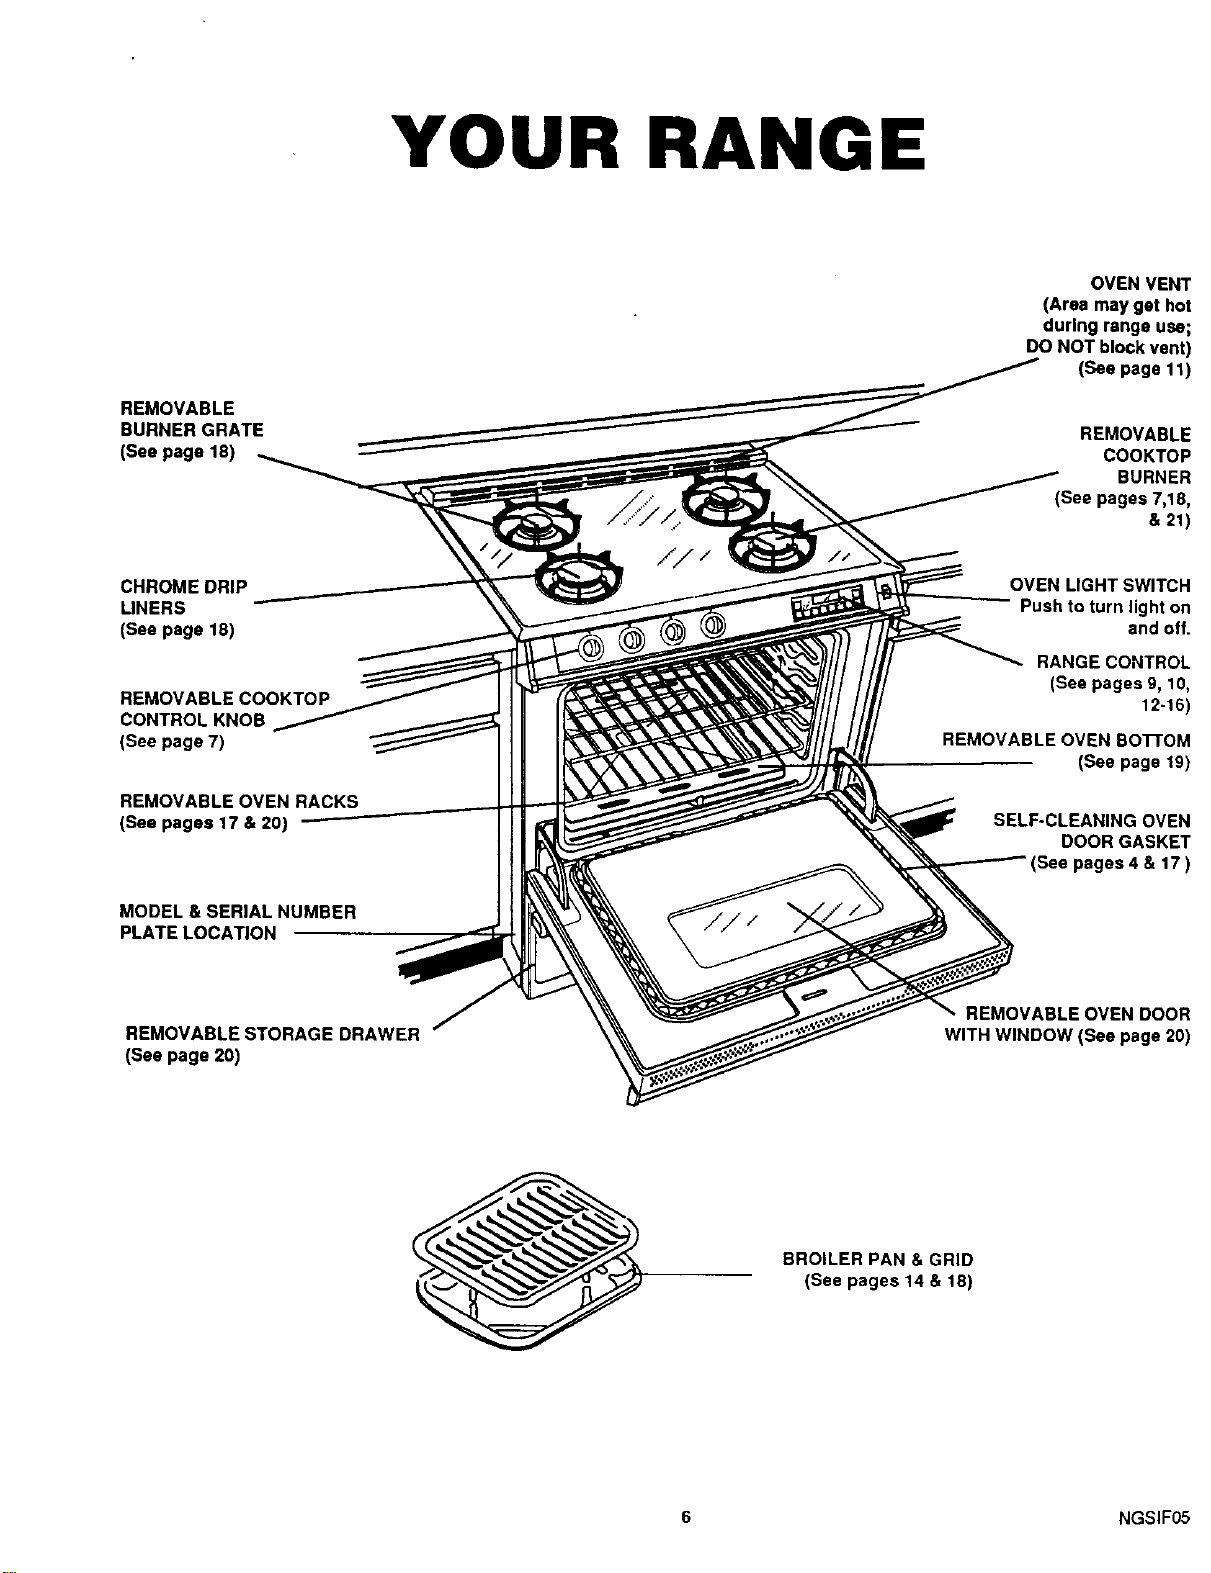
YOUR RANGE
REMOVABLE
BURNER GRATE
(See page 18)
OVEN VENT
(Area may get hot
during range use;
DO NOT block vent)
(See page 11)
REMOVABLE
COOKTOP
BURNER
(Seepages7,18,
&21)
CHROME DRIP
LINERS
(See page 18)
REMOVABLE COOKTOP
CONTROL KNOB
(Seepage7)
REMOVABLE OVEN RACKS
(See pages 17 & 20)
MODEL & SERIAL NUMBER
PLATELOCATION
OVEN LIGHT SWITCH
Push to turn light on
and off.
RANGE CONTROL
(See pages 9, 10,
12-16)
REMOVABLE OVEN BO'I-rOM
(See page 19)
SELF-CLEANING OVEN
DOOR GASKET
(Seepages4&17)
REMOVABLESTORAGE DRAWER
(See page 20)
REMOVABLE OVENDOOR
WITH WINDOW(Seepage20)
BROILER PAN & GRID
(See pages 14 & 18)
6 NGSIF05
TO START THINGS COOKING
COOKTOP COOKING
Before you use the cooktop for the first time, take a few
moments to familiarize yourself with the burners and the
knob used to turn on each burner.
COOKTDPBURNERS
BURNER IGNITION
COOKTOP SPARK IGNITION - When you turn the
cooktop knob to LITE, the spark Igniter makes a series
ofelectric sparks (ticking sound)whlchllghtsthe burner.
During a power failure the burners will not light
automatically. In an emergency, a cooktop burner may
be lit with a match by following the steps below. The
oven cannot be used during a power failure.
Lighting gas burners with a match I
is dangerous. You should match
light the cooktop burners only in
emergency.
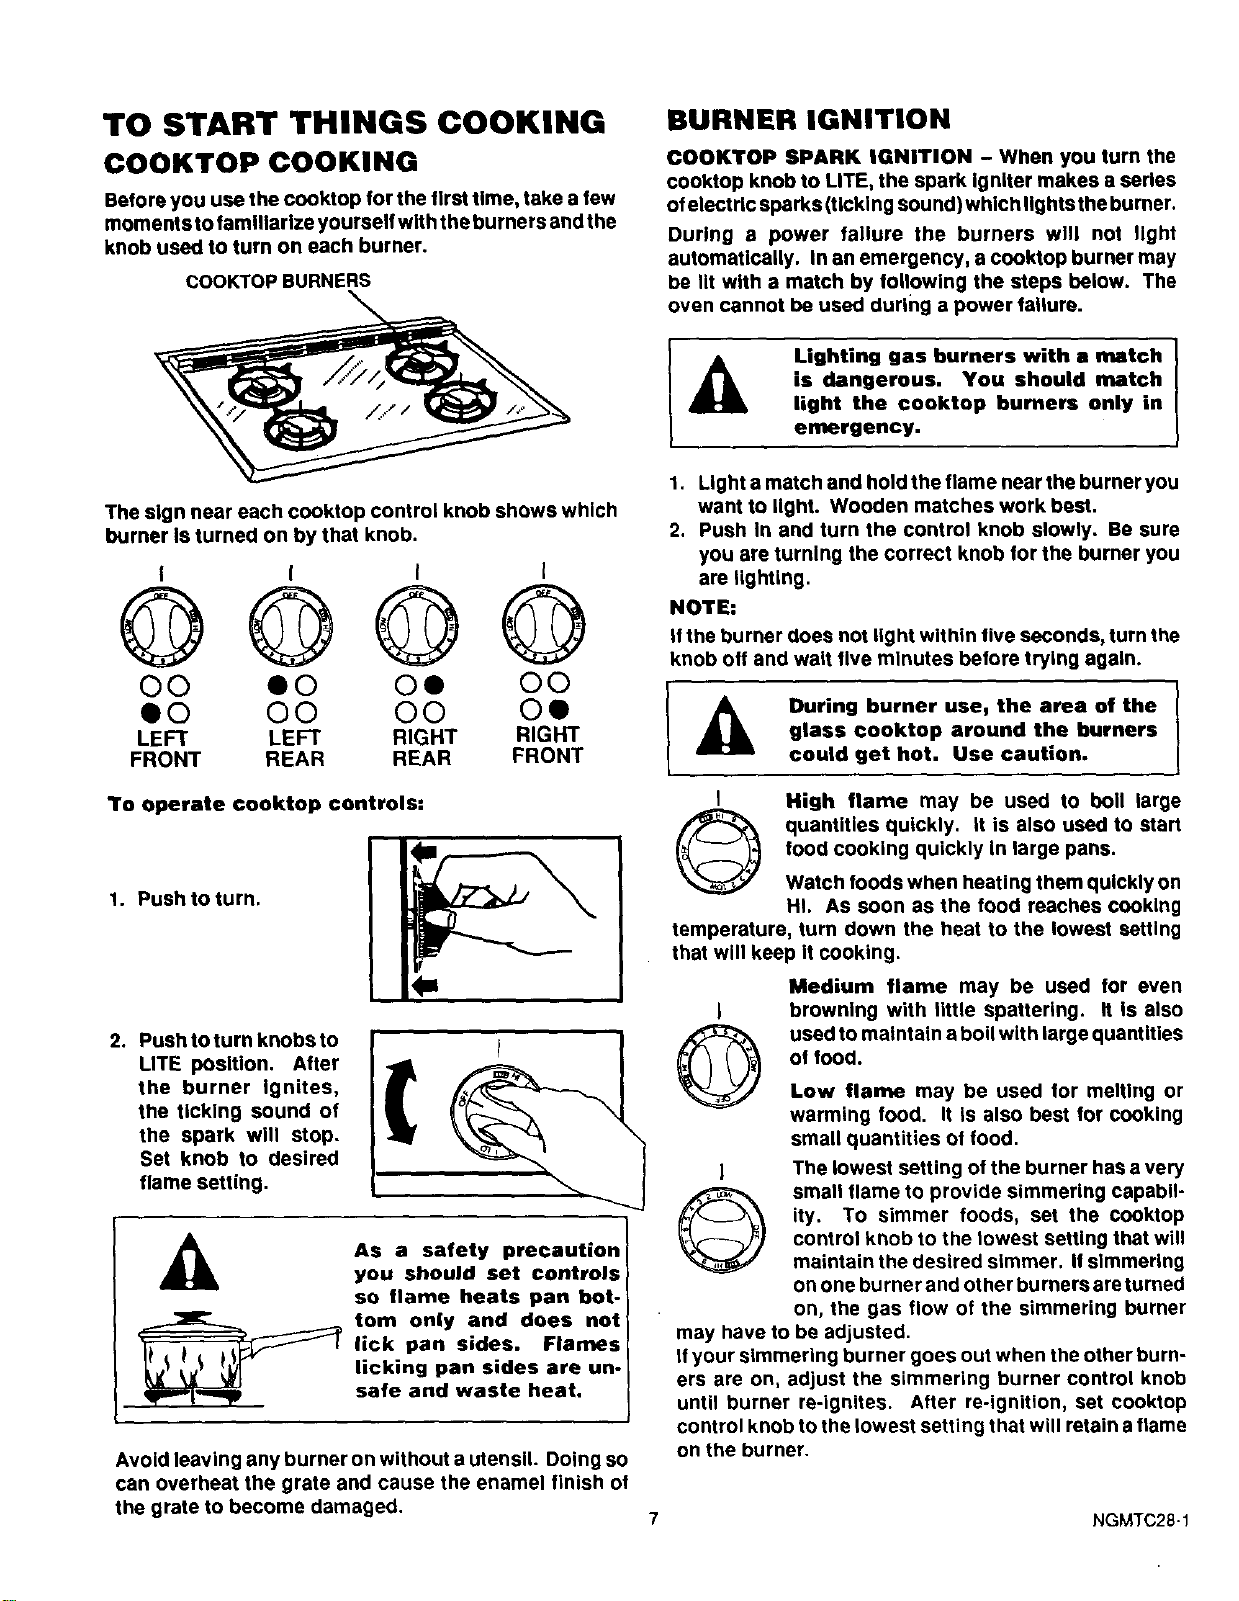
The sign near each cooktop control knob shows which
burner Is turned on by that knob.
I I I I
@Q©@
OO eO Oe OO
eo oo oo oe
LEFT LEFT RIGHT RIGHT
FRONT REAR REAR FRONT
1, Light a match and hold the flame near the burner you
want to light. Wooden matches work best.
2. Push In and turn the control knob slowly. Be sure
you are turning the correct knob for the burner you
are lighting.
NOTE:
If the burner does not light within five seconds, turn the
knob off and wait five minutes before trying again.
I A During burner use, the area of the
JL
glass cooktop around the burners
could get hot. Use caution.
I High flame may be used to boll large
quantities quickly. It is also used to start
food cooking quickly in large pans.
To operate ¢ooktop controls:
1. Push to turn.
2. Push toturn knobs to
UTE position. After
the burner ignites,
the ticking sound of
the spark will stop.
Set knob to desired
flame setting.
_k AS a safety precaution
you should set controls
so flame heats pan bet-
©
__::_ tom only and does not
lick pan sides. Flames
licking pan sides are un-
safe and waste heat.
Avoid leaving any burner on without autensil. Doing so
can overheat the grate and cause the enamel finish of
the grate to become damaged.
Watch foods when heating them quickly on
HI. As soon as the food reaches cooking
temperature, turn down the heat to the lowest setting
that will keep it cooking.
Medium flame may be used for even
browning with little spattering. It is also
used to maintain a boil with large quantities
ol food.
Low flame may be used lor melting or
warming food. It Is also best for cooking
small quantities of food.
The lowest setting of the burner has a very
small flame to provide simmering capabil-
ity. To simmer foods, set the cooktop
control knob to the lowest setting that will
maintain the desired simmer. Ifsimmering
on one burner and other burners are turned
on, the gas flow of the simmering burner
may have to be adjusted.
Ifyour simmering burner goes out when the other burn-
ers are on, adjust the simmering burner control knob
until burner re-ignites. After re-ignition, set cooktop
control knob to the lowest setting that will retain a flame
on the burner.
7
NGMTC28-1
To Start Things Cooking (cont.)
For best cooking results and energy efficient operation,
you should use pans that are flat on the bottom. Match
the size of the pan to the size of the flame. The pan
should not extend over the edge of the drip bowl more
than 1".
#
Note." A slight odor Is normal when a new cooktop Is
used for the first time. It Is caused by the heating of new
parts and insulating materials and will disappear in a
short time.
HOME CANNING TIPS
In surface cooking of foods other than canning, the use
of large-diameter pots (extending more than 1" beyond
edge o! drip pan) Is not recommended. However, when
canning with water-bath or pressure canner, large-di-
ameter pots may be used. This Is because boiling water
temperatures (even under pressure) are not harmful to
cooktop surfaces surrounding burner.
HOWEVER, DO NOT USE LARGE DIAMETER CAN-
NERS OR OTHER LARGE DIAMETER POTS FOR
FRYING OR BOILING FOODS OTHER THAN WATER.
Most syrup or sauce mixtures -- and all types of frying
-- cook at temperatures much hlgherthan boiling water,
Such temperatures could eventually harm cooktop sur-
faces surrounding burners.
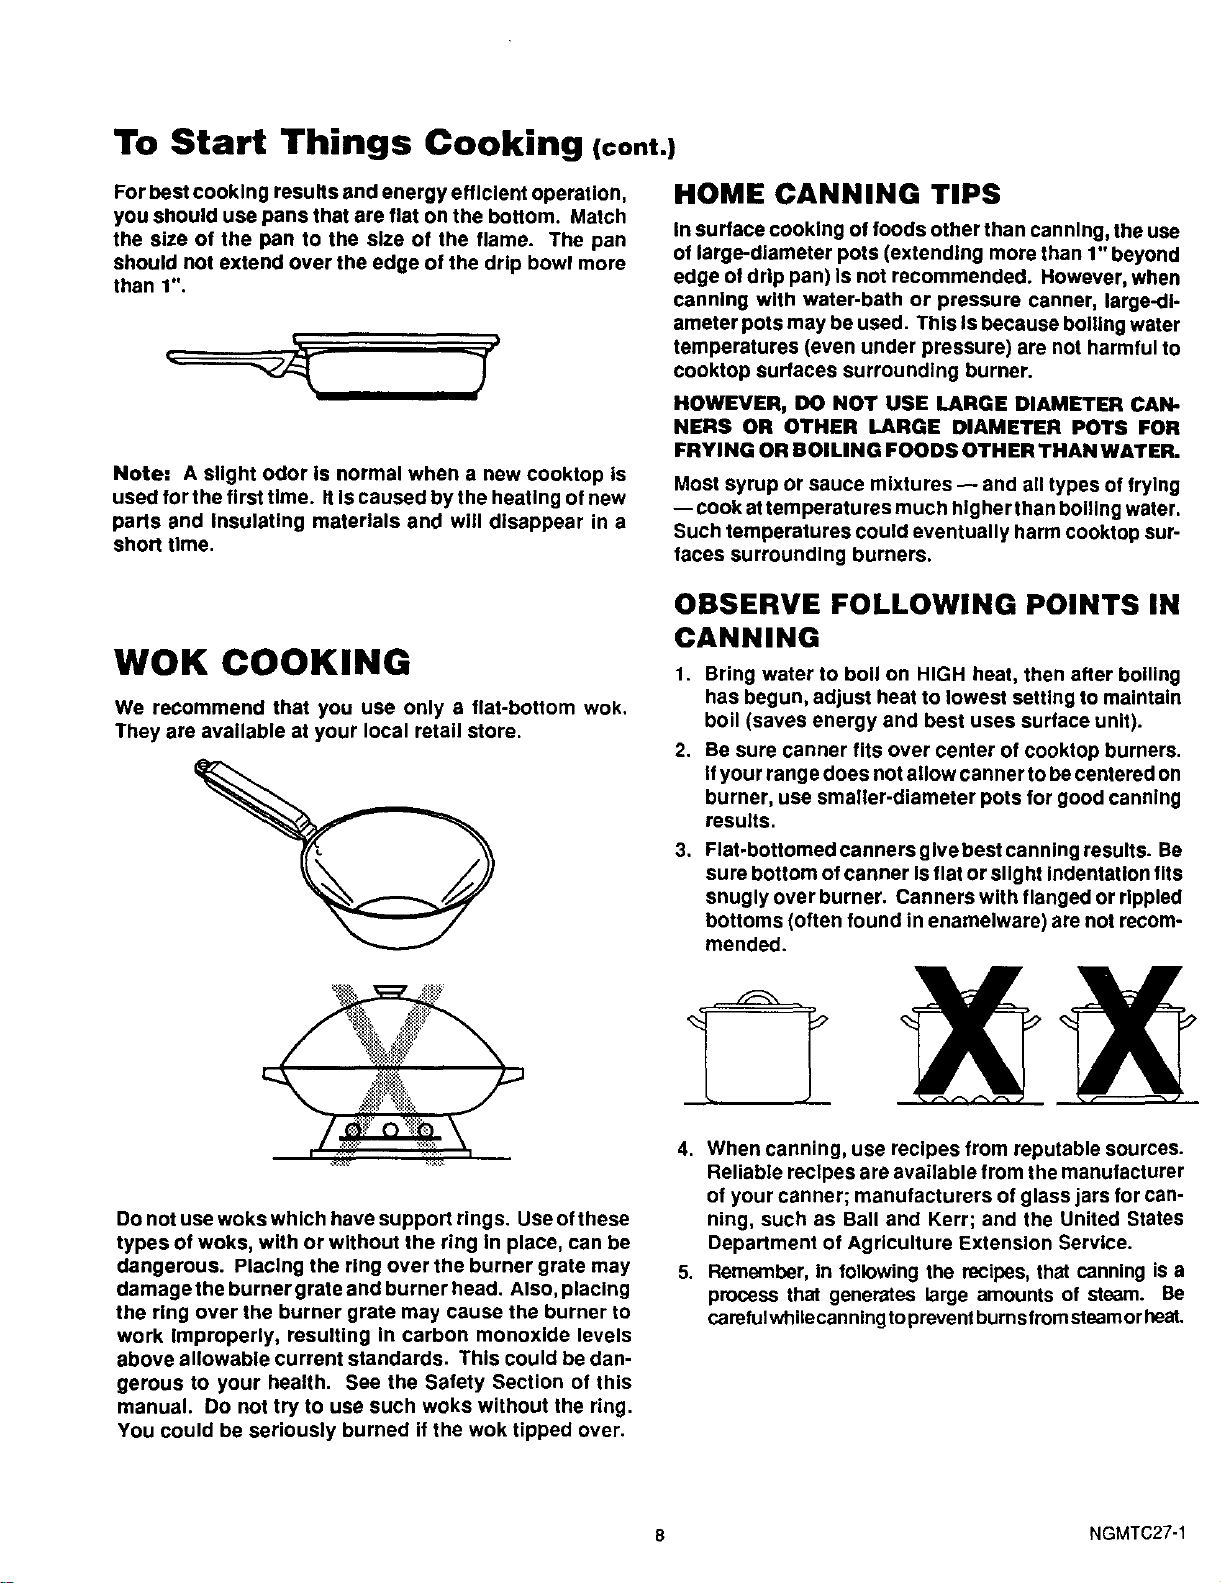
WOK COOKING
We recommend that you use only a flat-bottom wok,
They are available at your local retail store.
OBSERVE FOLLOWING POINTS IN
CANNING
1. Bring water to boil on HIGH heat, then after boiling
has begun, adjust heat to lowest setting to maintain
boil (saves energy and best uses surface unit).
2. Be sure canner fits over center of cooktop burners.
If your range does not allow canner to becentered on
burner, use smaller-diameter pots for good canning
results.
Flat-bottomed canners give best canning results. Be
sure bottom of canner Isflat or slight indentation fits
snugly over burner. Canners with flanged or rippled
bottoms (often found in enamelware) are not recom-
mended.
3,
Do not use woks which have support ring s. Use of these
types of woks, with or without the ring In place, can be
dangerous. Placing the ring over the burner grate may
damage the burner grate and burner head. Also, placing
the ring over the burner grate may cause the burner to
work Improperly, resulting In carbon monoxide levels
above allowable current standards. This could be dan-
gerous to your health. See the Safety Section of this
manual. Do not try to use such woks without the ring.
You could be seriously burned if the wok tipped over.
4. When canning, use recipes from reputable sources.
Reliable recipes are available from the manufacturer
of your canner; manufacturers of glass jars for can-
ning, such as Ball and Kerr; and the United States
Department of Agriculture Extension Service.
5. Remember, in following the recipes, that canning is a
process that generates large amounts of steam. Be
camfulwhilecanning topreventburnsfromsteamor beat.
8 NGMTC27-1
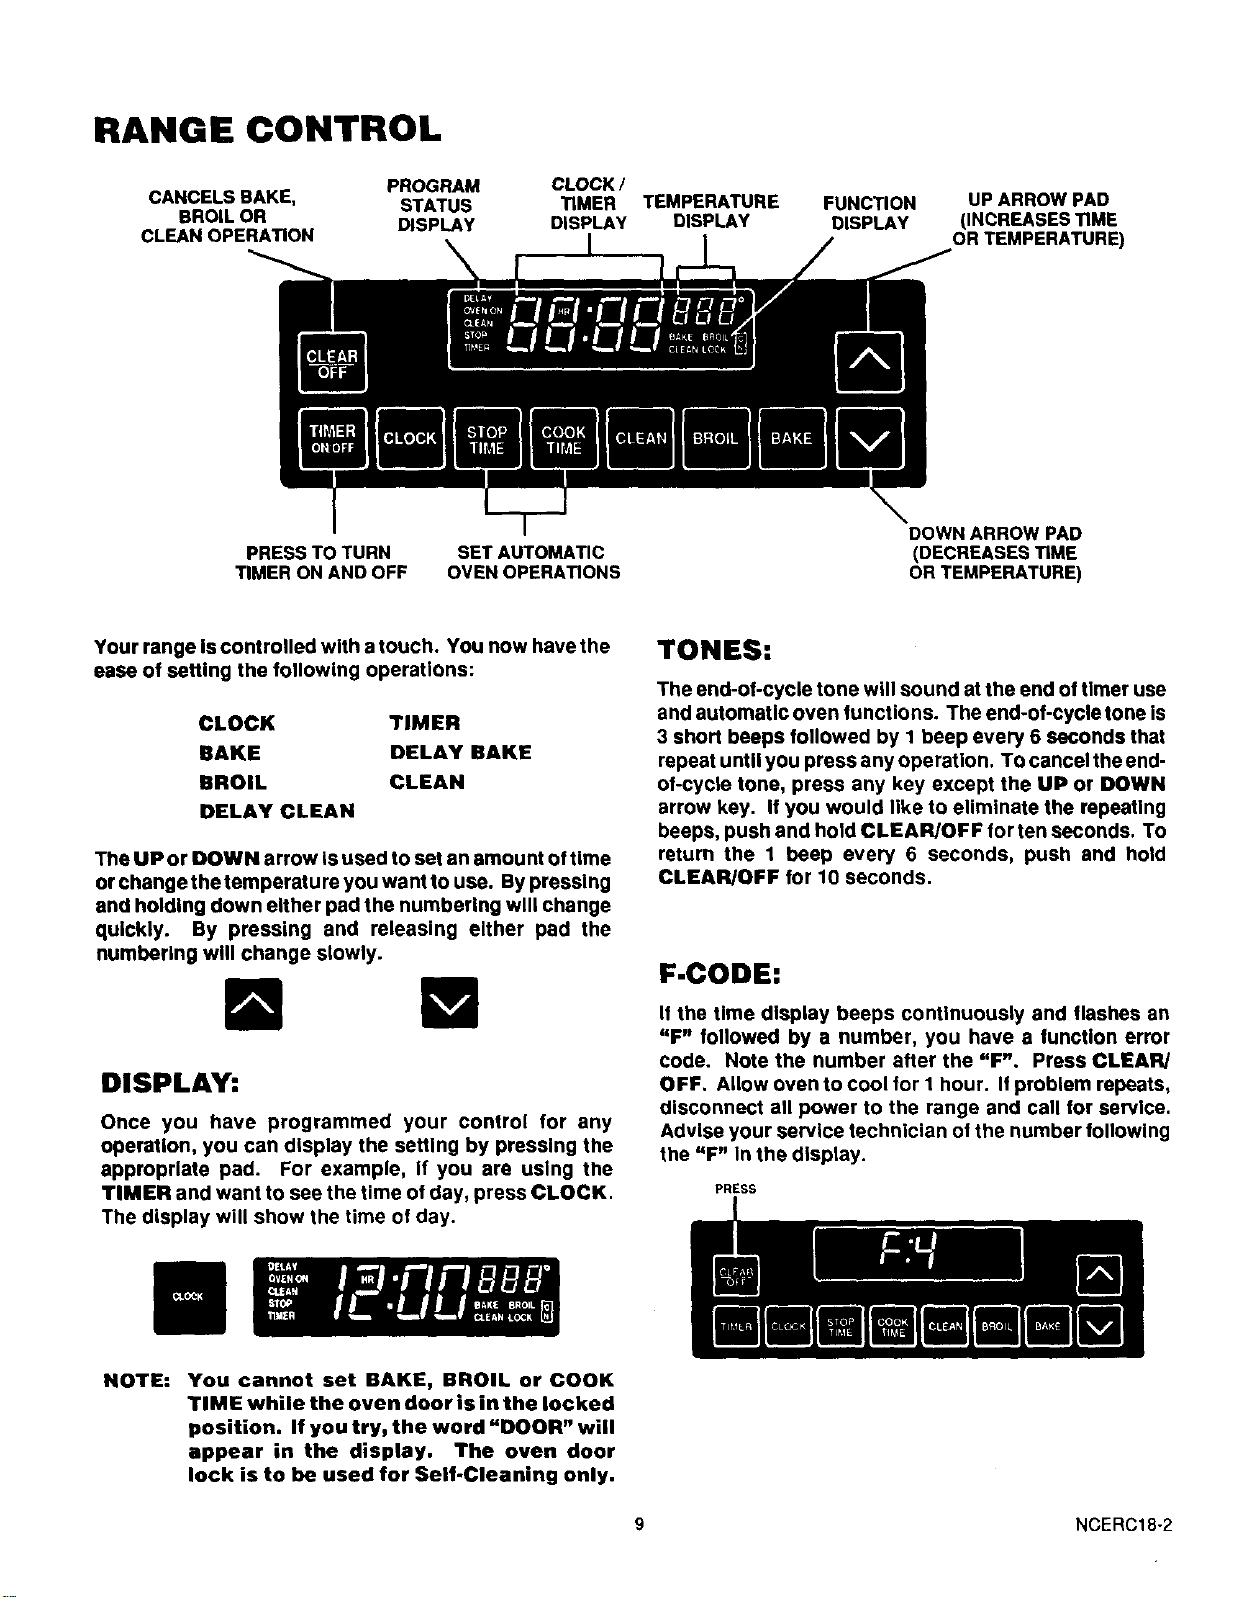
RANGECONTROL
PROGRAM
CANCELS BAKE, STATUS
BROIL OR DISPLAY
CLEAN OPERATION
\
CLOCK /
TIMER TEMPERATURE FUNCTION
DISPLAY DISPLAY DISPLAY
UP ARROW PAD
{INCREASES TIME
OR TEMPERATURE)
PRESS TO TURN
TIMER ON AND OFF
SET AUTOMATIC
OVEN OPERATIONS
DOWN ARROW PAD
(OECREASES TIME
OR TEMPERATURE)
Your range Is controlled with a touch. You now have the
ease of setting the following operations:
CLOCK TIMER
BAKE DELAY BAKE
BROIL CLEAN
DELAY CLEAN
The UP or DOWN arrow Is used to set an amount of time
or change thetemperature you want to use. By pressing
and holding down either pad the numbering will change
quickly. By pressing and releasing either pad the
numbering will change slowly.
DISPLAY:
Once you have programmed your control for any
operation, you can display the setting by pressing the
appropriate pad. For example, if you are using the
TIMER and want to see the time of day, press CLOCK.
The display will show the time of day.
TONES:
The end-of-cycle tone will sound at the end of timer use
and automatic oven functions. The end-of-cycle tone is
3 short beeps followed by 1 beep every 6 seconds that
repeat unUl you press any operation. TOcancel the end-
of-cycle tone, press any key except the UP or DOWN
arrow key. If you would like to eliminate the repeating
beeps, push and hold CLEAR/OFF for ten seconds. To
return the 1 beep every 6 seconds, push and hold
CLEAR/OFF for 10 seconds.
F.CODE:
I1the time display beeps continuously and flashes an
"F" followed by a number, you have a function error
code. Note the number after the "P', Press CLEAR/
OFF. Allow oven to cool for I hour. If problem repeats,
disconnect all power to the range and call for se_lce.
Advise your service technician of the number following
the "F" in the display.
PRESS
NOTE: You cannot set BAKE, BROIL or COOK
TIME while the oven door is in the locked
position. If you try, the word "DOOR" will
appear in the display. The oven door
lock is to be used for Sell-Cleaning only.
9 NCERC18-2
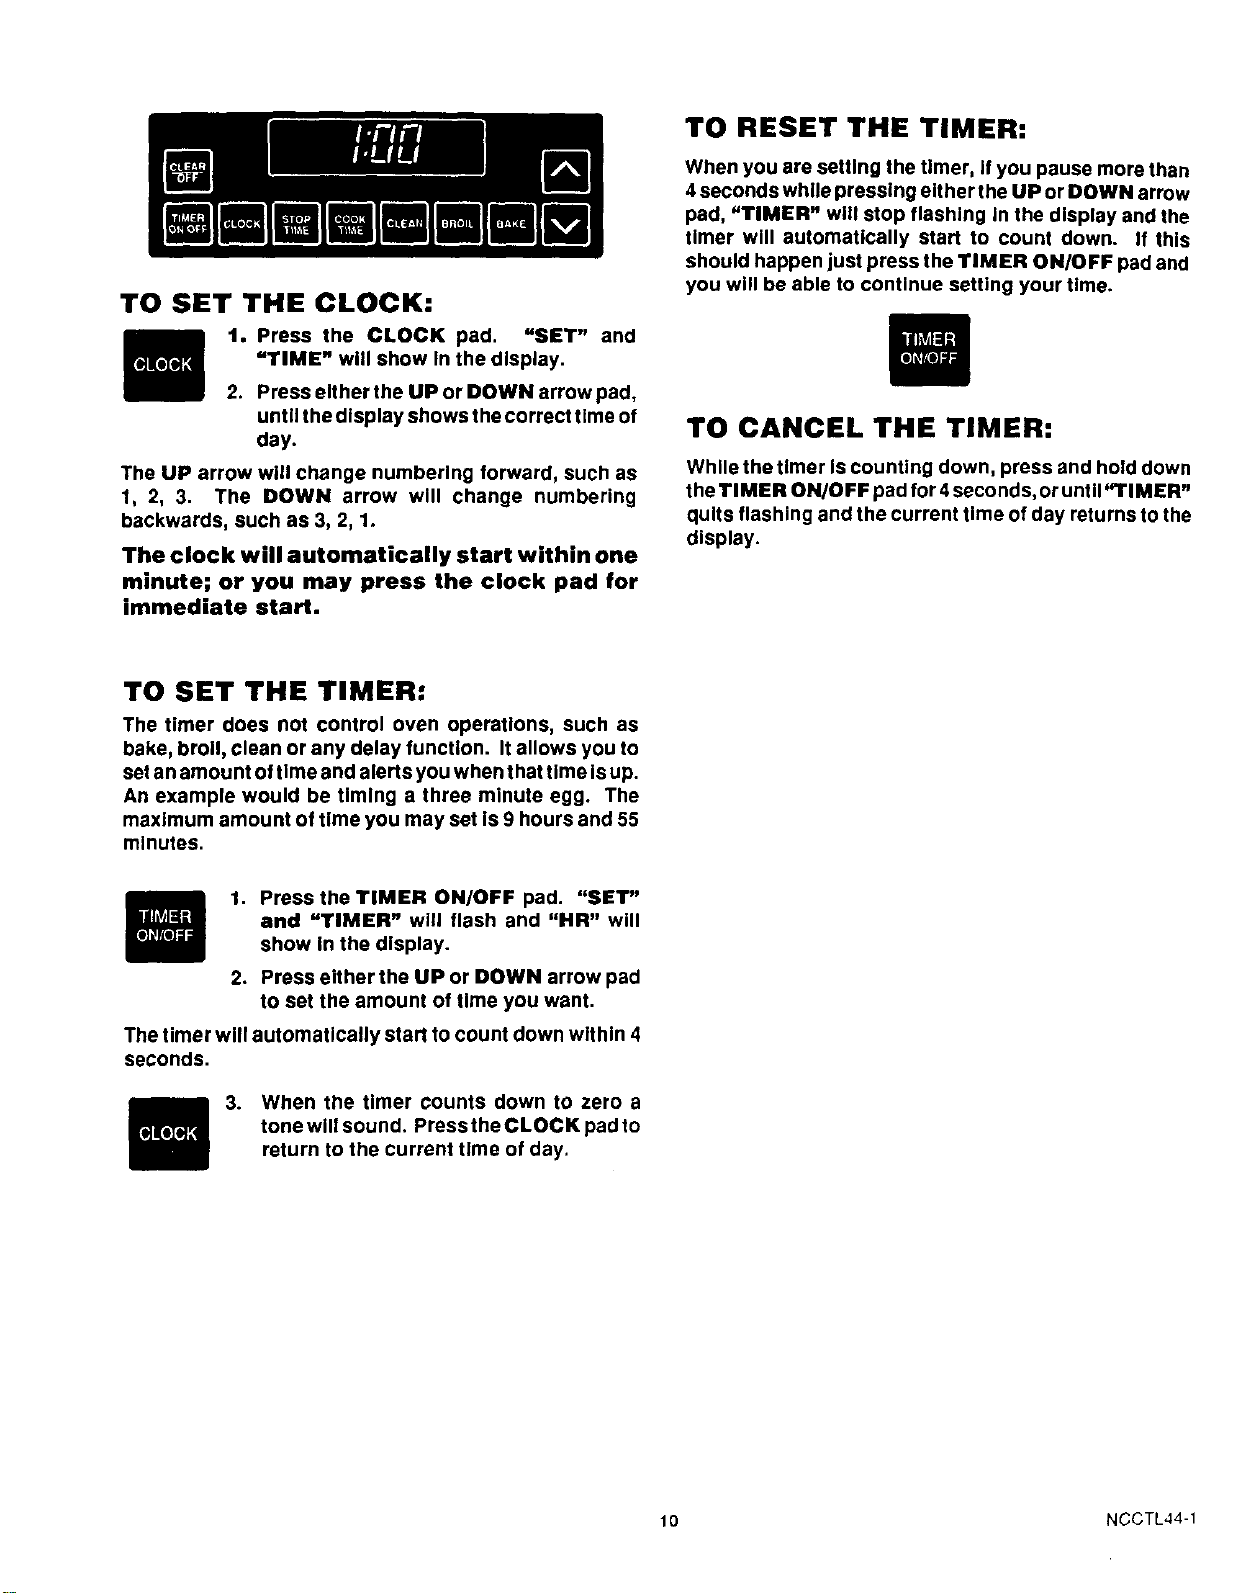
TO SET THE CLOCK:
1. Press the CLOCK pad. "SET" and
"TIME" will show Inthe display.
2. Press either the UP or DOWN arrow pad,
until the display shows the correct time of
day.
The UP arrow will change numbering forward, such as
1, 2, 3. The DOWN arrow will change numbering
backwards, such as 3, 2, 1.
The clock will automatically start within one
minute; or you may press the clock pad for
immediate start.
TO RESET THE TIMER:
When you are setting the timer, If you pause more than
4 seconds while pressing either the UP or DOWN arrow
pad, "TIMER" will stop flashing In the display and the
timer will automatically start to count down. If this
should happen just press the TIMER ON/OFF pad and
you will be able to continue setting your time.
TO CANCEL THE TIMER:
While the timer Is counting down, press and hold down
the TIMER ON/OFF pad for 4 seconds, or until "I"IMER-
quits flashing and the current time of day returns to the
display.
TO SET THE TIMER:
The timer does not control oven operations, such as
bake, broil, clean or any delay function. It allows you to
set an amount of time and alerts you when that time isup.
An example would be timing a three minute egg. The
maximum amount of time you may set Is 9 hours and 55
minutes.
1. Press the TIMER ON/OFF pad. "SET"
and "TIMER" will flash and "HR" will
show in the display.
2. Press either the UP or DOWN arrow pad
to set the amount of time you want.
The timer will automatically start to count down within 4
seconds.
3. When the timer counts down to zero a
tone will sound. Press the CLOCK pad to
return to the current time of day,
10 NCCTL44-1
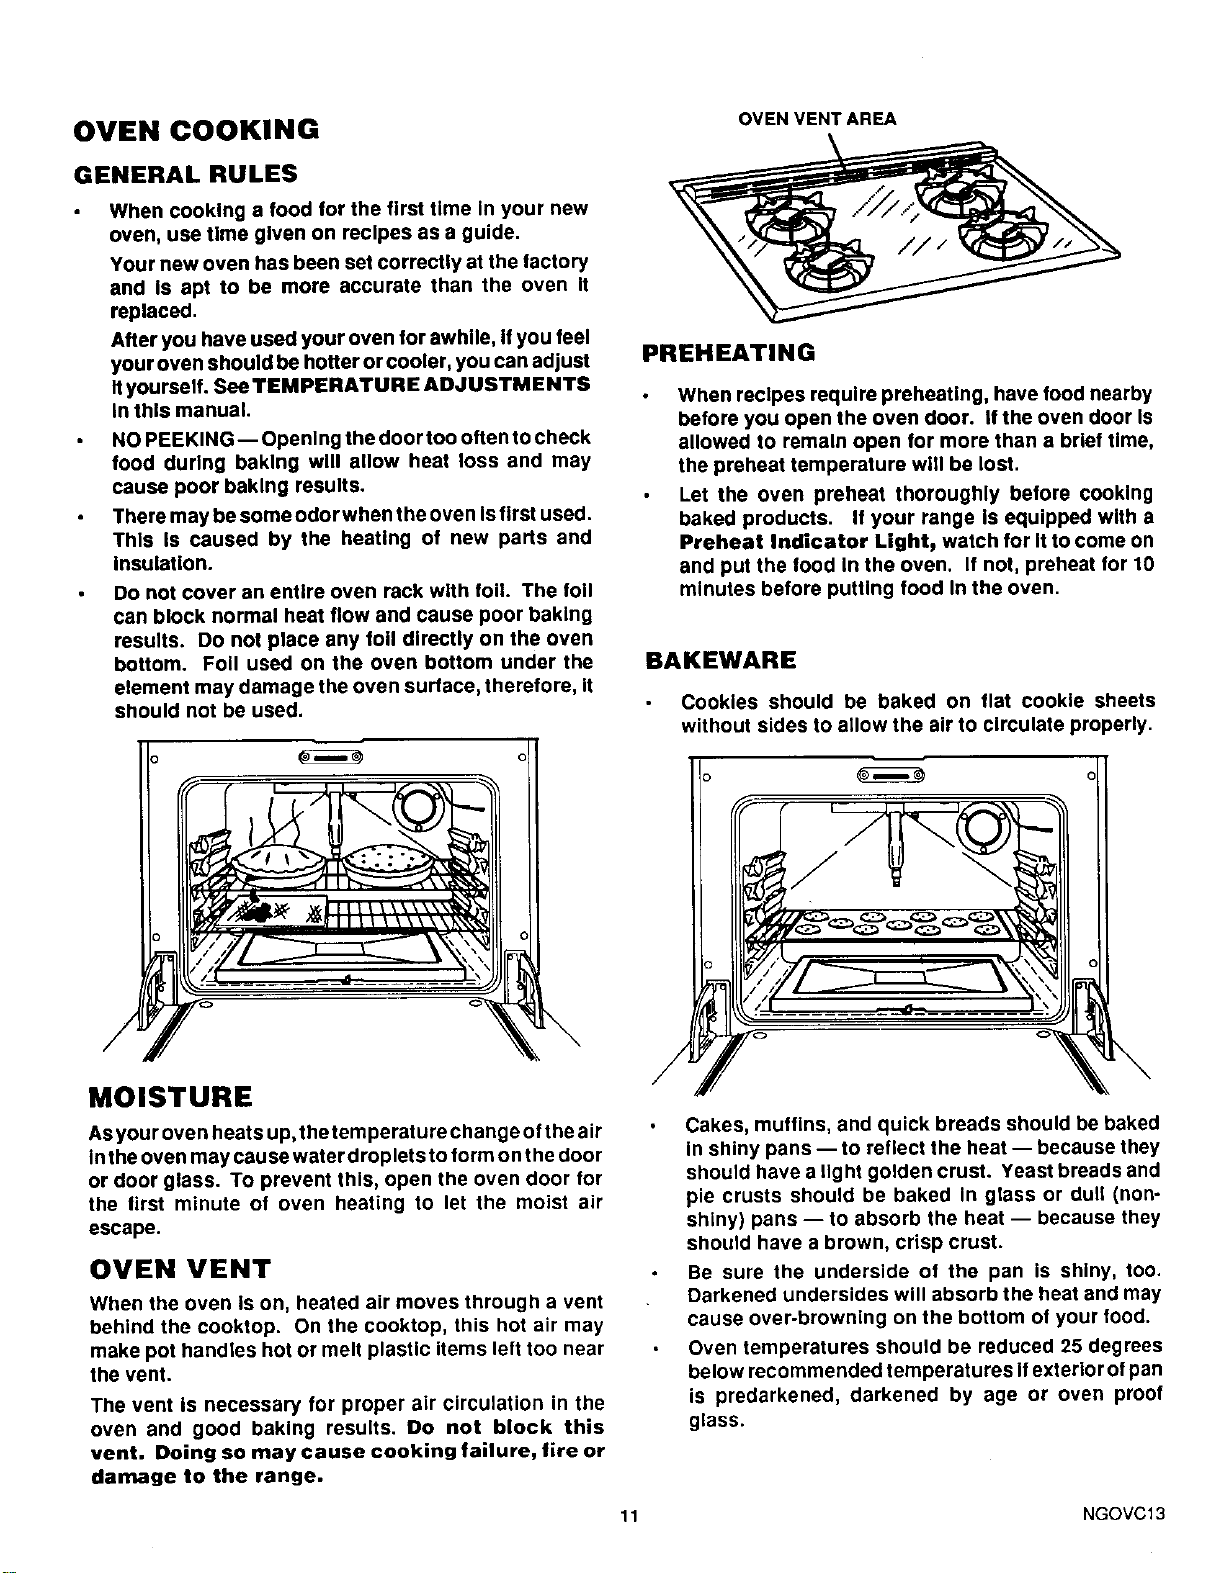
OVEN COOKING OVENVENTAREA
GENERAL RULES
When cooking a food for the first time in your new
oven, use time given on recipes as a guide.
Your new oven has been set correctly at the factory
and Is apt to be more accurate than the oven It
replaced.
After you have used your oven for awhile, If you feel
your oven should be hotter or cooler, you can adjust
tt yourself. See TEMPERATURE ADJUSTMENTS
in this manual.
NO PEEKING--Opening the door too often to check
food during baking will allow heat loss and may
cause poor baking results.
There may be some odor when the oven Isfirst used.
This Is caused by the heating of new parts and
Insulation.
Do not cover an entire oven rack with foil. The foil
can block normal heat flow and cause poor baking
results. Do not place any foil directly on the oven
bottom. Foil used on the oven bottom under the
element may damage the oven surface, therefore, it
should not be used.
/
)
PREHEATING
When recipes require preheating, have food nearby
before you open the oven door. If the oven door Is
allowed to remain open for more than a brief time,
the preheat temperature will be lost.
Let the oven preheat thoroughly before cooking
baked products. If your range is equipped with a
Preheat Indicator Light, watch for It to come on
and put the food In the oven. If not, preheat for 10
minutes before putting food In the oven.
BAKEWARE
Cookies should be baked on flat cookie sheets
without sides to allow the air to circulate properly.
MOISTURE
Asyour oven heats up, the temperature change of the air
in the oven may cause water droplets to form on the door
or door glass. To prevent this, open the oven door for
the first minute of oven heating to let the moist air
escape.
OVEN VENT
When the oven Is on, heated air moves through a vent
behind the cooktop. On the cooktop, this hot air may
make pot handles hot or melt plastic items left too near
the vent.
The vent is necessary for proper air circulation in the
oven and good baking results. Do not block this
vent. Doing so may cause cooking failure, fire or
damage to the range.
Cakes, muffins, and quick breads should be baked
in shiny pans -- to reflect the heat -- because they
should have a light golden crust. Yeast breads and
pie crusts should be baked In glass or dull (non-
shiny) pans -- to absorb the heat -- because they
should have a brown, crisp crust.
Be sure the underside of the pan is shiny, too.
Darkened undersides will absorb the heat and may
cause over-browning on the bottom of your food.
Oven temperatures should be reduced 25 degrees
below recommended temperatures ifexterior of pan
is predarkened, darkened by age or oven proof
glass.
11 NGOVC13
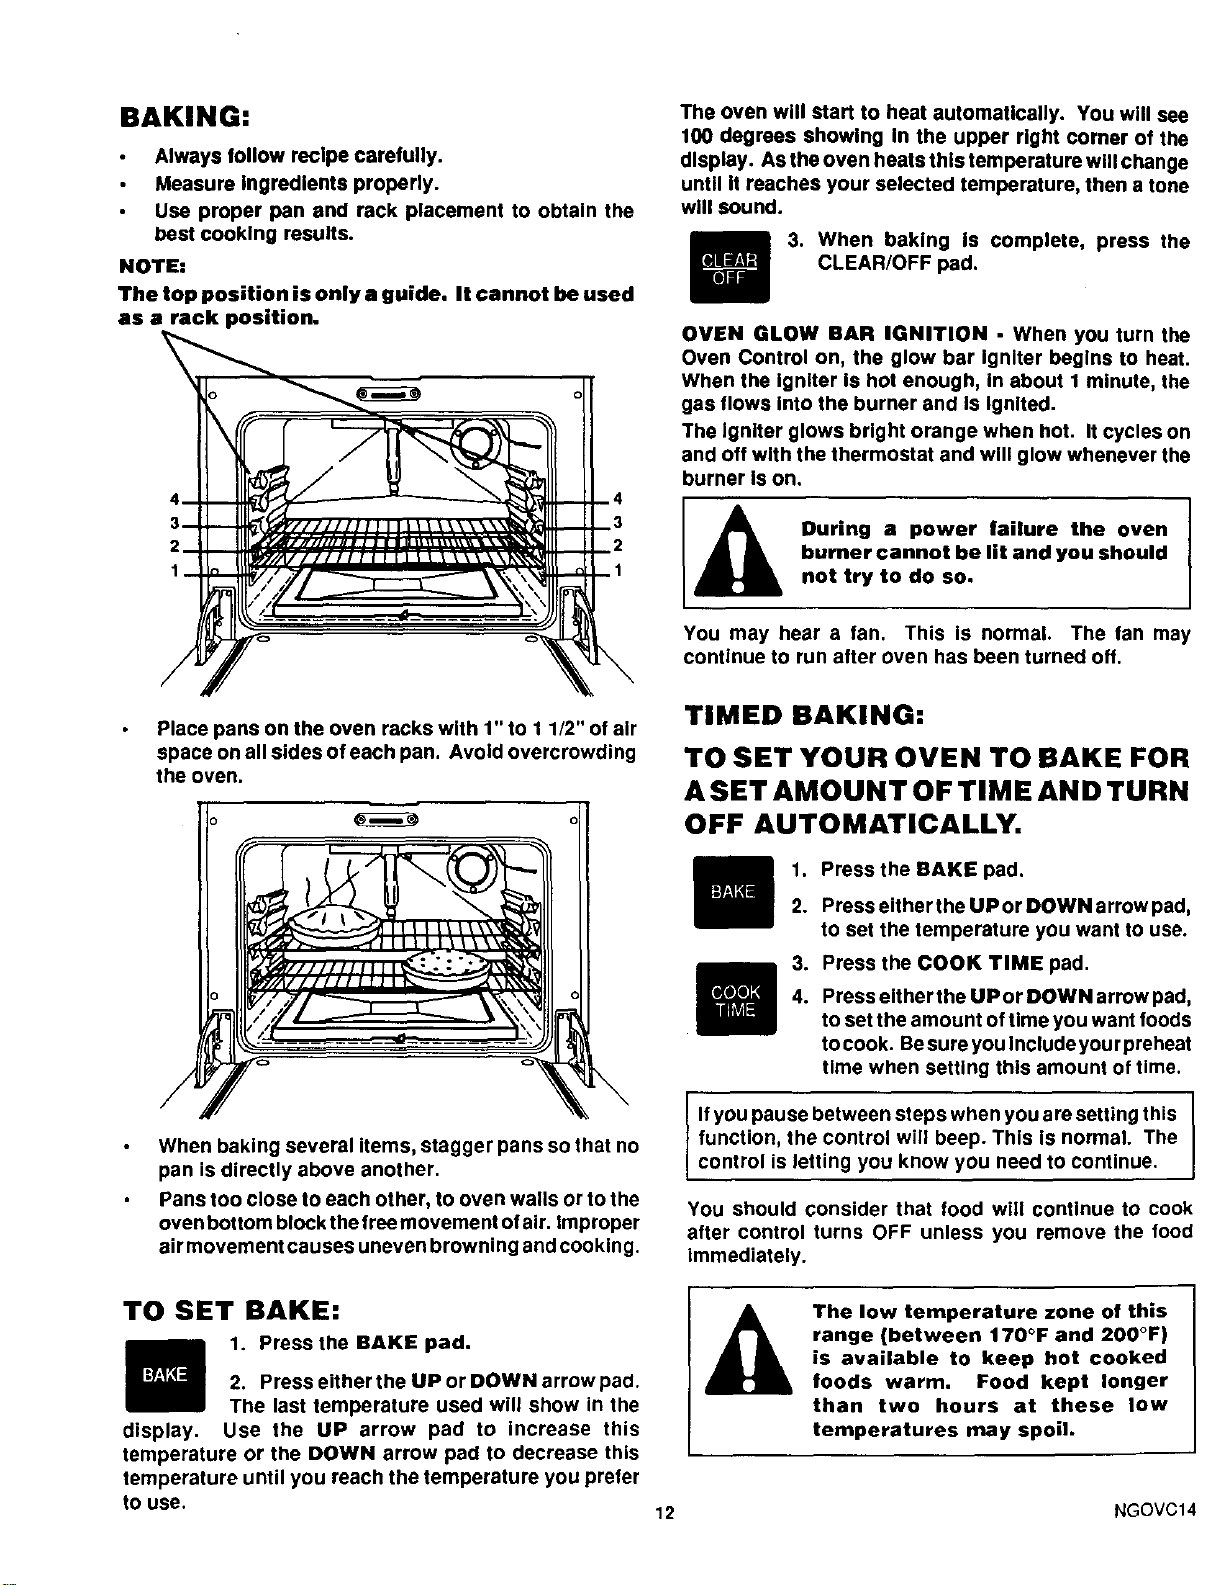
BAKING:
Always follow recipe carefully.
Measure Ingredients properly.
Use proper pen and rack placement to obtain the
best cooking results.
NOTE:
The top position is only a guide, It cannot be used
as a rack position.
The oven will start to heat automatically. You will see
100 degrees showing In the upper right corner of the
display. As the oven heats this temperature will change
until It reaches your selected temperature, then a tone
will sound.
3. When baking Is complete, press the
CLEAR/OFF pad.
OVEN GLOW BAR IGNITION - When you turn the
Oven Control on, the glow bar Igniter begins to heat.
When the igniter is hot enough, in about 1 minute, the
gas flows into the burner and Is Ignited.
The Igniter glows bright orange when hot. It cycles on
and off with the thermostat and will glow whenever the
burner Is on.
During a power failure the oven
burner cannot be lit and you should
not try to do so.
You may hear a fan. This is normal. The fan may
continue to run after oven has been turned off.
Place pans on the oven racks with 1" to 1 1/2" of air
space on all sides of each pan. Avoid overcrowding
the oven.
When baking several items, stagger pans so that no
pan is directly above another.
Pans too close to each other, to oven walls or to the
oven bottom block the free movement of air. Improper
airmovement causes uneven browning and cooking.
TIMED BAKING:
TO SET YOUR OVEN TO BAKE FOR
A SET AMOUNT OF TIME AND TURN
OFF AUTOMATICALLY.
1. Press the BAKE pad.
2. Press either the UP or DOWN arrow pad,
to set the temperature you want to use.
3. Press the COOK TIME pad.
4. Press either the UP or DOWN arrow pad,
to set the amount of time you want foods
tocook. Besure you Includeyour preheat
time when setting this amount of time.
If you pause between steps when you are setting this
function, the control will beep. This Is normal. The
control is letting you know you need to continue.
You should consider that food will continue to cook
after control turns OFF unless you remove the food
immediately.
TO SET BAKE:
1. Press the BAKE pad.
2. Press either the UP or DOWN arrow pad.
The last temperature used will show in the
Use the UP arrow pad to increase this
temperature or the DOWN arrow pad to decrease this
temperature until you reach the temperature you prefer
to use.
display.
The low temperature zone of this
range (between 170°F and 200°F)
is available to keep hot cooked
foods warm. Food kept longer
than two hours at these low
temperatures may spoil.
12 NGOVC14
TO SET YOUR OVEN FOR A DELAYED
START AND AUTOMATIC STOP
I
While setting this operation you will not need to I
I calculate when the oven will turn on; the control will
I do this tor you. You will need to set the following:
I 1, Temperature 2. Cooking Time 3. Stop Time
1. Press the BAKE pad.
2. Press the UP or DOWN arrow pad to
select the temperature you want.
3. Press the COOK TIME pad,
4, Press the UP arrow to select how long
you want food to cook. Be sure to
include your preheat time.
5. Press the STOP TIME pad.
6. Press the UP arrow pad to enter the time
of day you want the oven to turn olf. The
oven will shut off automatically when the
preset STOP TIME is reached.
7. Press the CLOCK pad to return the dis-
play to the current time of day.
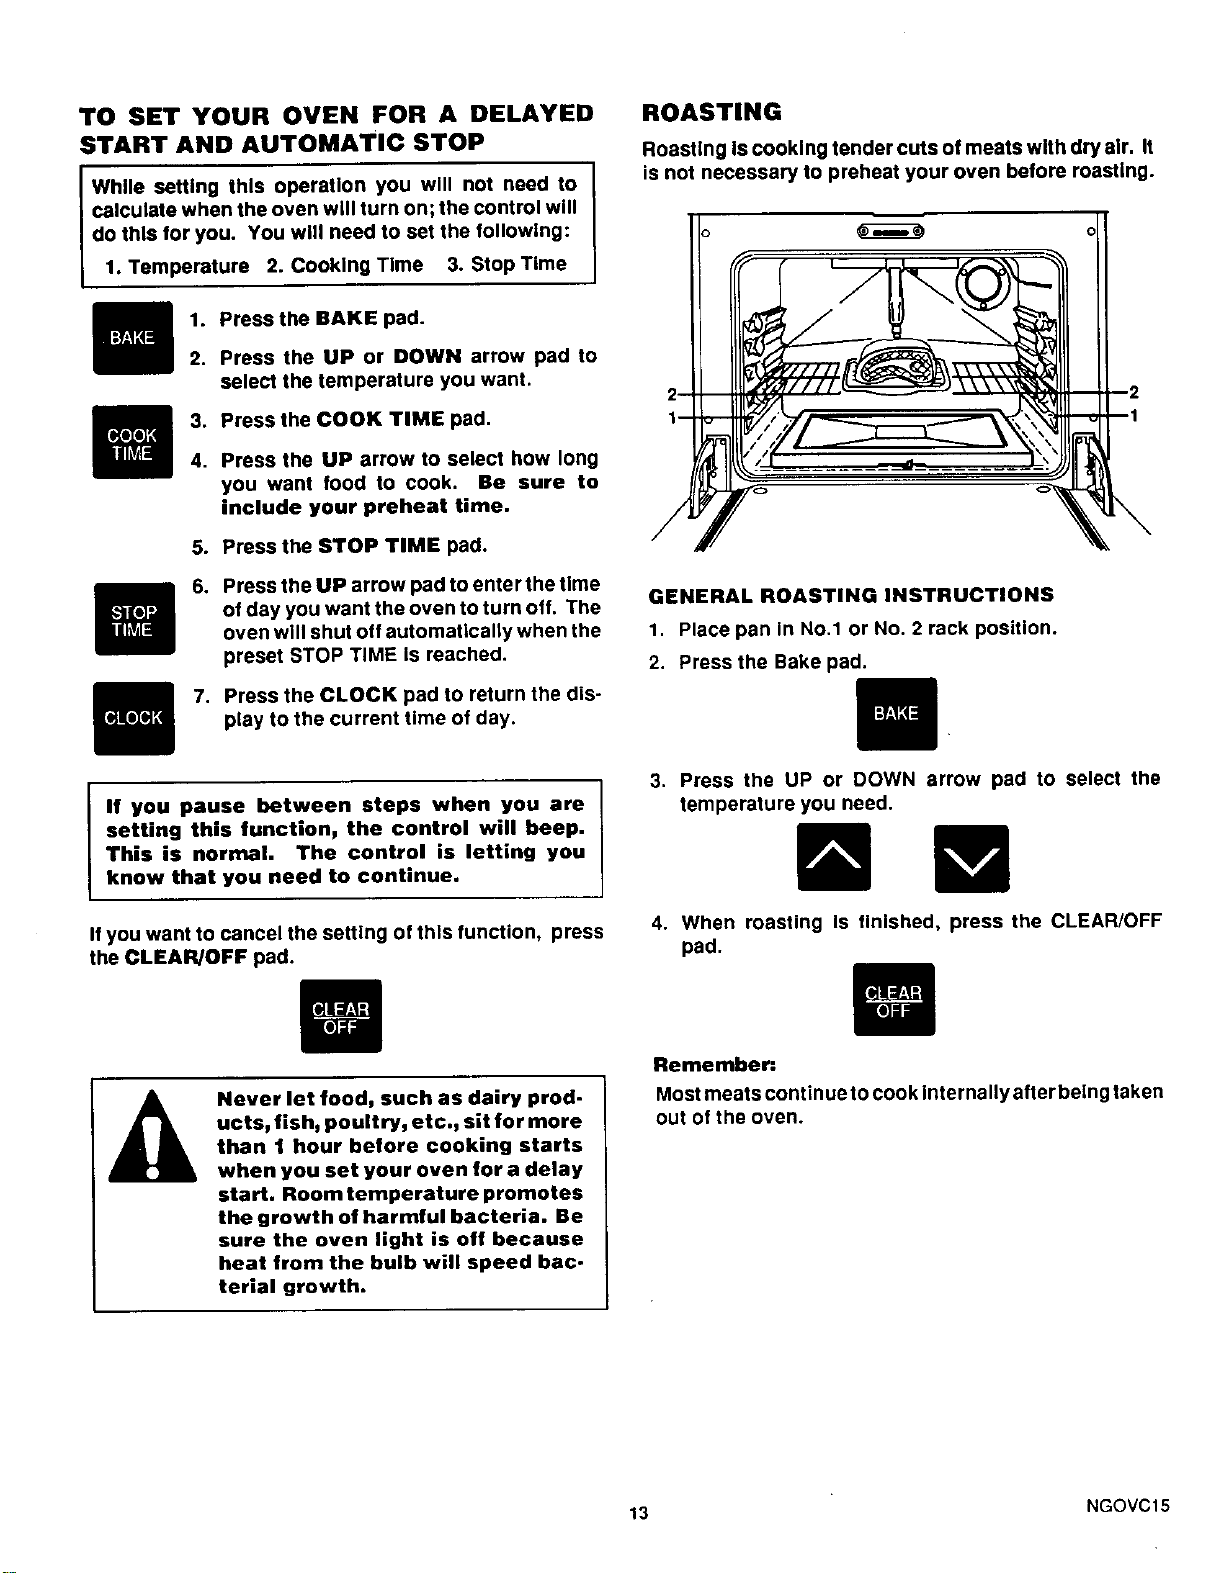
ROASTING
Roasting Is cooking tender cuts of meats with dry air. It
is not necessary to preheat your oven before roasting.
GENERAL ROASTING INSTRUCTIONS
1. Place pan in No.1 or No. 2 rack position.
2. Press the Bake pad.
If you pause between steps when you are
setting this function, the control will beep.
This is normal. The control is letting you
know that you need to continue.
Ifyou want to cancel the setting of this function, press
the CLEAR/OFF pad.
3. Press the UP or DOWN arrow pad to select the
temperature you need.
4. When roasting Is finished, press the CLEAR/OFF
pad.
Never let food, such as dairy prod-
ucts, fish, poultry, etc.j sit for more
than 1 hour before cooking starts
when you set your oven for a delay
start. Room temperature promotes
the growth of harmful bacteria. Be
sure the oven light is off because
heat from the bulb will speed bac.
terial growth.
Remember:
Most meats continue to cook Internally after being taken
out of the oven.
13 NGOVC15
BROILING
BROILING TIPS:
Please note:
Your oven door should
be completely closed
while broiling.
Use only the broiler pan and grid that came with your
range for broiling. They are designed for proper
drainage of fat and liquids and help prevent spatter,
smoke or fire.
Do not preheat when broiling. For even broiling
on both sides, start the food on a cold pan.
Trim the outer layer of fat from steaks and chops. Slit
the fatty edges to keep the meat from curling.
For maximum juiciness, salt the first side just before
turning the meat. Salt the second side just before
serving.
Brush chlcken and fish with butter several tlmes as
they broll. When brolling fish, grease the grid to
prevent stlcklng. Broil with skin side down. It Is not
necessary to turn fish.
Never leave e soiled broiler pan in the range.
Grease in the pan may smoke or burn the next time
the oven Is used.
Be sure you know the correct procedure for putting
out a grease tire. See the section on safety.
POSITIONING BROILER PAN
Broiling Is cooking by direct heat from the broil burner.
Tender cuts of meat or marinated meat should be se-
lected for broiling. For best results, steaks and chops
should be at least 3/4" thick.
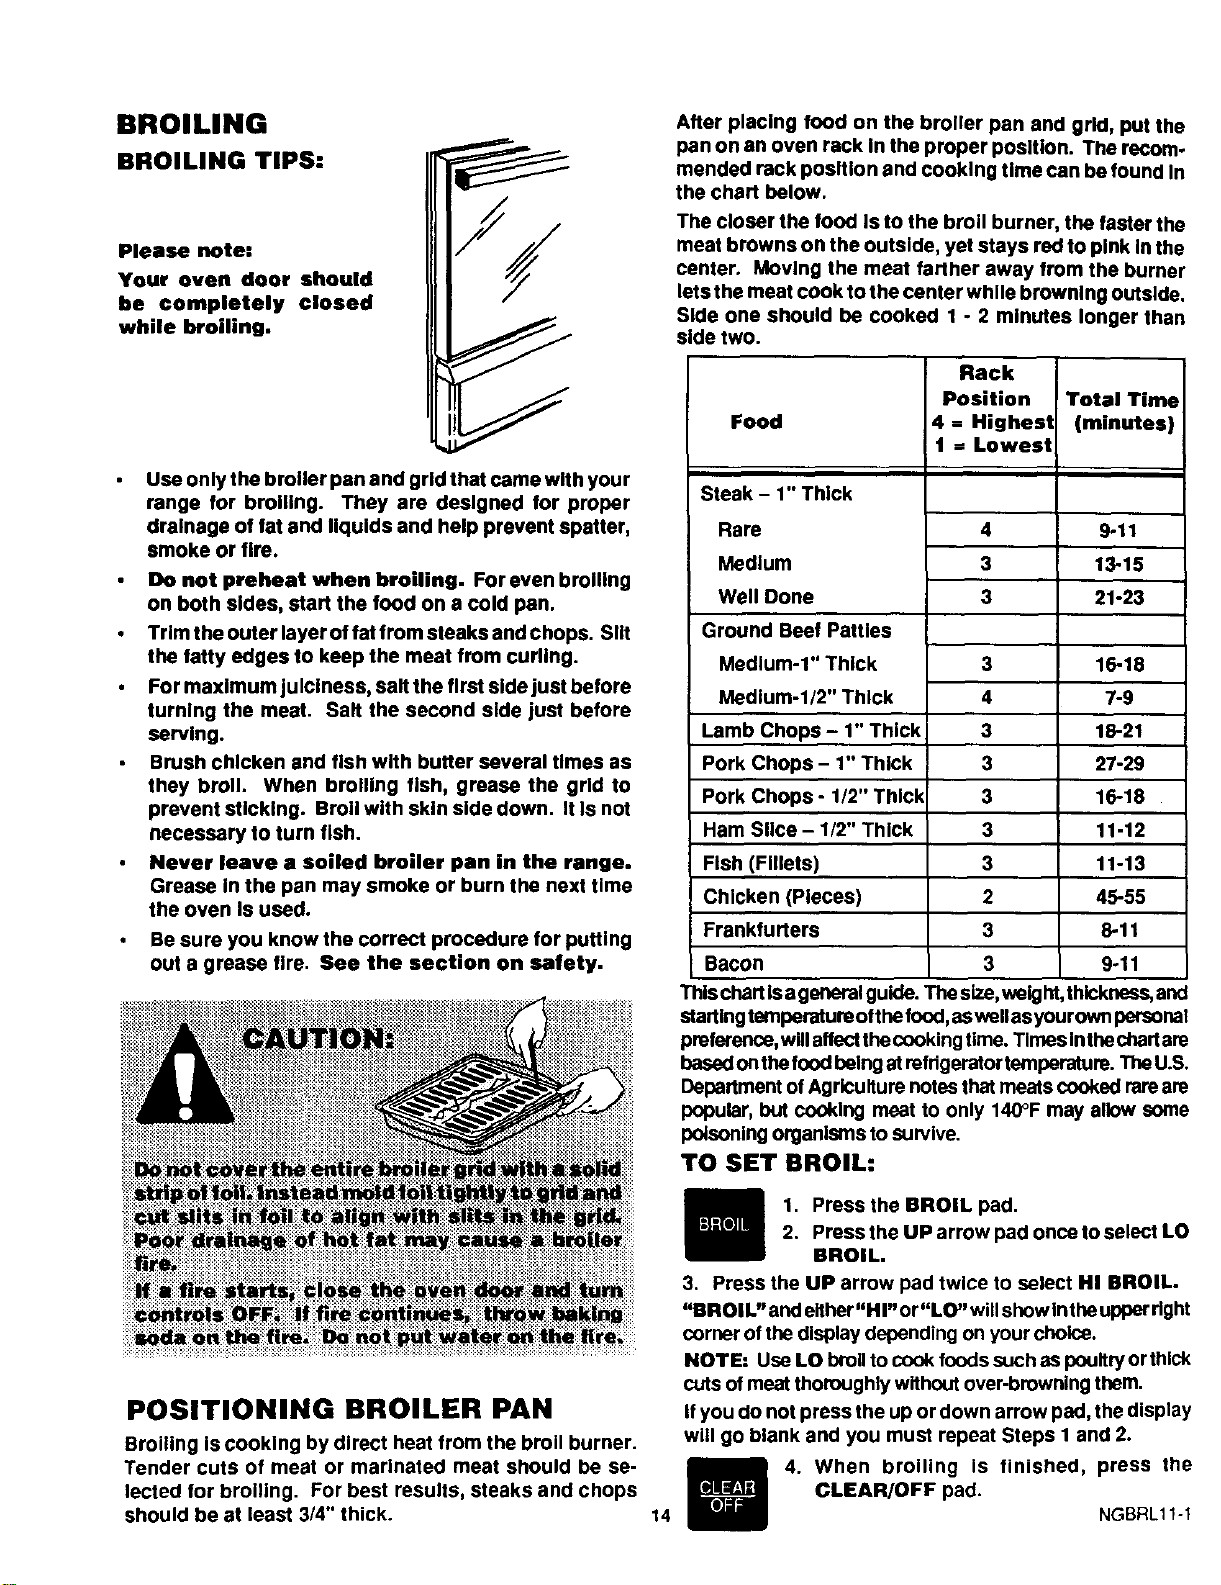
After placing food on the broiler pan and grid, put the
pan on an oven rack In the proper position. The recom.
mended rack position and cooking time can be found In
the chart below.
The closer the food Is to the broil burner, the faster the
meat browns on the outside, yet stays red to pink In the
center. Moving the meat farther away from the burner
lets the meat cook to the center while browning outside.
Side one should be cooked 1 - 2 minutes longer than
side two.
Food
Steak - 1" Thick
Rare
Medium
Well Done
Ground Beef Patties
Medium-1" Thick
Medium-I/2" Thick
Lamb Chops - 1" Thick
Pork Chops - 1" Thick
Pork Chops - 1/2" Thick
Ham Slice - 1/2" Thick
Fish (Fillets)
Chicken (Pieces)
Frankfurters
Bacon
Rack
Position Total Time
4 = Highest (minutes)
t = Lowest
4 9-11
3 13-15
3 21-23
3 16-18
4 7-9
3 18-21
3 27-29
3 16-18
3 11-12
3 11-13
2 45-55
3 8-11
3 9-11
Thischart Isa general guide. The size,weight, thickness,and
startingtemperature ofthefood, aswellas yourown personal
preference,willaffectthecooking time. Times Inthechartare
based onthe foodbeing at refrigerator temperature. TheU.S.
Department of Agriculture notes that meats cooked ramam
popular, but cooking meat to only 140°F may allow some
poisoning organisms to survive.
TO SET BROIL:
14
1. Press the BROIL pad.
2. Press the UP arrow pad once to select LO
BROIL.
3. Press the UP arrow pad twice to select HI BROIL.
"BROI I." and either"H I" or"LO" willshow Inthe upperright
corner of the display depending on your choice.
NOTE: Use LO broilto cook foods such as poultryor thick
cuts of meat thoroughly without over-browning them.
If you do not press the up or down arrow pad, the display
will go blank and you must repeat Steps I and 2.
4. When broiling is finished, press the
CLEAR/OFF pad.
NGBRL11-I
THE SELF.CLEAN CYCLE (3 HOURS- NORMAL CLEAN TIME)
BEFORE A CLEAN CYCLE
1. Remove the broiler pan and grid, oven racks, all
utensils and any foil that may be In the oven. Do not
try to clean utensils or any other objects in the oven
during a self-clean cycle. If oven racks are left in
the range during a clean cycle, they will darken,
lose their luster and become hard to slide. If
you choose to leave the racks in the oven, you
can polish the edges of the racks with steel
wool and apply a small amount of vegetable oil
to the rack edges after the self-clean cycle.
This will make the racks easier to slide.
2. Soil on the oven lront frame, under the front edge of
the cooktop, the door liner outside the door gasket
and the front edge ofthe oven cavity (about 1" Into the
oven) will not be cleaned during a clean cycle (see
Illustration below). Clean these areas by hand before
starting a clean cycle.
Use hot water with a soap-filled steel wool pad. We
recommend a cleanser such as 'Soft Scrub®' brand
or a similar cleaning product to keep white surfaces
looking clean and new. After cleaning, rinse well to
help prevent a brown residue from forming when the
oven is heated. Buff these areas dry with a dry cloth,
OVEN LIGHT
To prolong the life of the bulb, be sure the
oven light is OFF during Self-Clean.
FRONT FRAME
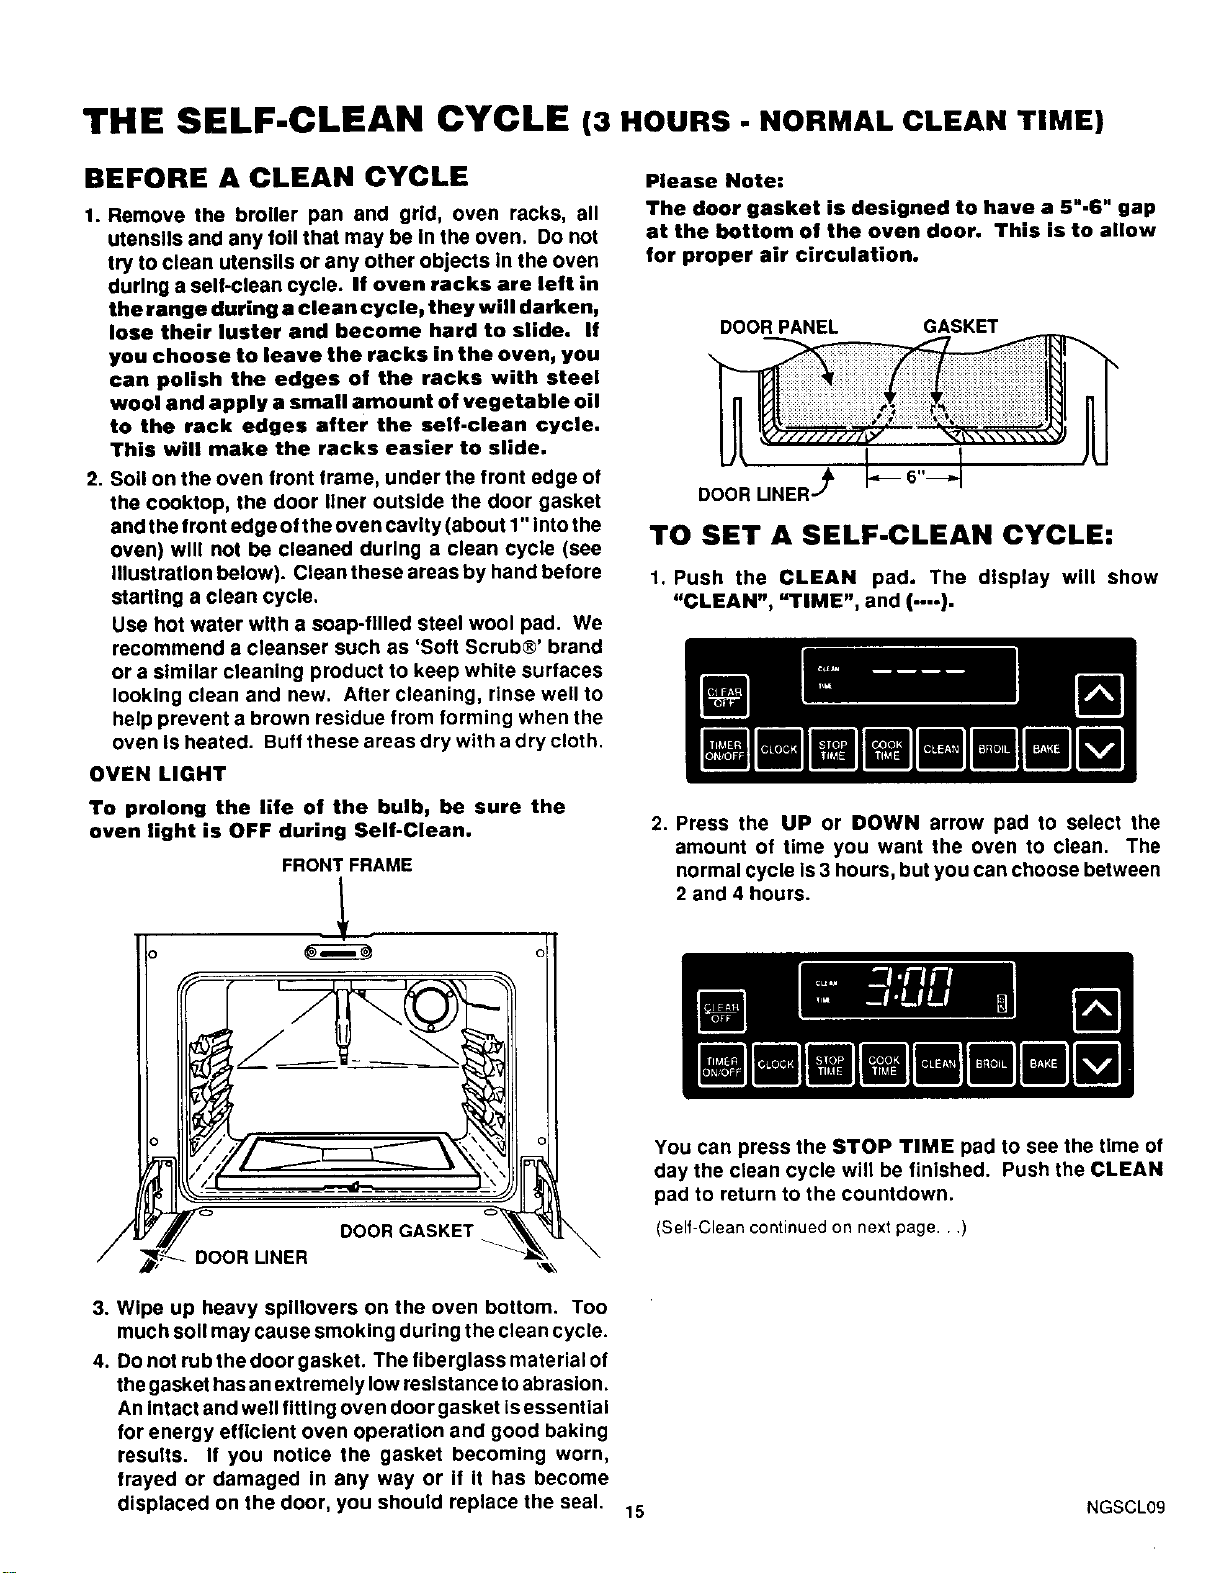
Please Note:
The door gasket is designed to have a 5".6" gap
at the bottom of the oven door. This is to allow
for proper air circulation.
DOOR PANEL GASKET
DOOR UNER-._
TO SET A SELF-CLEAN CYCLE:
1. Push the CLEAN pad. The display will show
"CLEAN", "TIME", and (--.-).
2. Press the UP or DOWN arrow pad to select the
amount of time you want the oven to clean. The
normal cycle is 3 hours, but you can choose between
2 and 4 hours.
DOOR GASKET
DOOR LINER
3. Wipe up heavy spillovers on the oven bottom. Too
much soil may cause smoking during the clean cycle.
4. Do not rub the door gasket. The fiberglass material of
the gasket has an extremely low resistance to abrasion.
An intact and well fitUng oven door gasket isessential
for energy efficient oven operation and good baking
results. If you notice the gasket becoming worn,
frayed or damaged In any way or if it has become
displaced on the door, you should replace the seal.
You can press the STOP TIME pad to see the tlme of
day the clean cycle will be finished. Push the CLEAN
pad to return to the countdown.
Self-Clean continued on next page...)
15
NGSCL09
(Serf-Cleancontinued...)
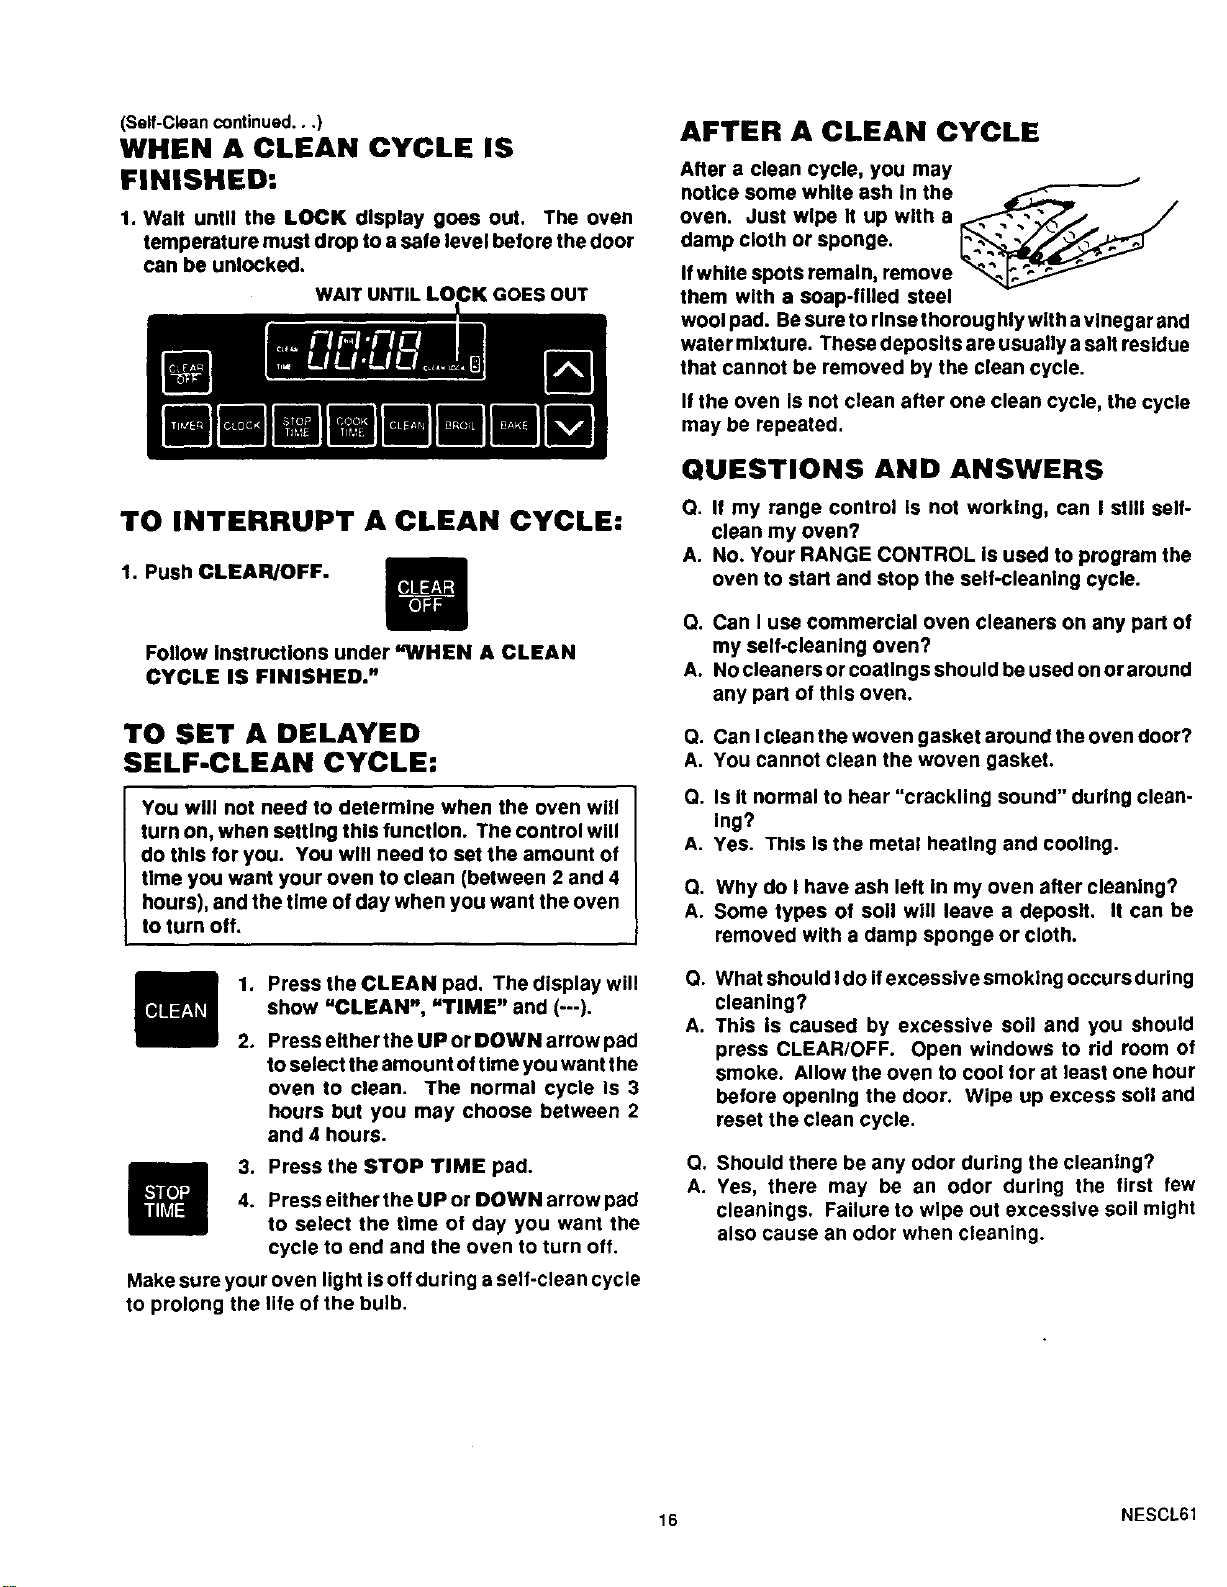
WHEN A CLEAN CYCLE IS
FINISHED:
1. Wall until the LOCK display goes out. The oven
temperature must drop to a safe level before the door
can be unlocked.
WAIT UNTIL LOCK GOES OUT
TO INTERRUPT A CLEAN CYCLE:
1. Push CLEAR/OFF.
Follow Instructions under "WHEN A CLEAN
CYCLE IS FINISHED."
TO SET A DELAYED
SELF-CLEAN CYCLE:
You will not need to determine when the oven will
turn on, when setting this function. The control will
do this for you. You will need to set the amount of
time you want your oven to clean (between 2 and 4
hours), and the time of day when you want the oven
to turn off.
1. Press the CLEAN pad. The display will
show "CLEAN", "TIME" and (---).
,
Press either the UP or DOWN arrow pad
to select the amount of time you want the
oven to clean. The normal cycle Is 3
hours but you may choose between 2
and 4 hours.
3. Press the STOP TIME pad.
4. Press either the UP or DOWN arrow pad
to select the time of day you want the
cycle to end and the oven to turn off.
Make sure your oven light is off during a self-clean cycle
to prolong the life of the bulb.
AFTER A CLEAN CYCLE
After a clean cycle, you may
notice some white ash In the
oven. Just wipe It up with a _j J
damp cloth or sponge. _Z>._.._
If white spots remain, remove
them with a soap-filled steel
wool pad. Be sure to rinse thoroug hly with a vinegar and
water mixture. These deposits are usually a salt residue
that cannot be removed by the clean cycle.
If the oven Is not clean after one clean cycle, the cycle
may be repeated.
QUESTIONS AND ANSWERS
Q. If my range control is not working, can I still self-
clean my oven?
A. No. Your RANGE CONTROL Is used to program the
oven to start and stop the self-cleaning cycle.
Q. Can I usa commercial oven cleaners on any part of
my self-cleaning oven?
A. No cleaners or coatings should be used on or around
any part of this oven.
Q. Can Iclean the woven gasket around the oven door?
A. You cannot clean the woven gasket.
Q. Is It normal to hear "crackling sound" during clean-
Ing?
A. Yes. This Is the metal heating and cooling.
Q. Why do I have ash left in my oven after cleaning?
A. Some types of soil will leave a deposit. It can be
removed with a damp sponge or cloth.
O.
A.
What should Ido if excessive smoking occurs during
cleaning?
This Is caused by excessive soil and you should
press CLEAR/OFF. Open windows to rid room of
smoke. Allow the oven to cool for at least one hour
before opening the door. Wipe up excess soil and
reset the clean cycle.
O.
A.
Should there be any odor during the cleaning?
Yes, there may be an odor during the first few
cleanings. Failure to wipe out excessive soil might
also cause an odor when cleaning.
16 NESCL61
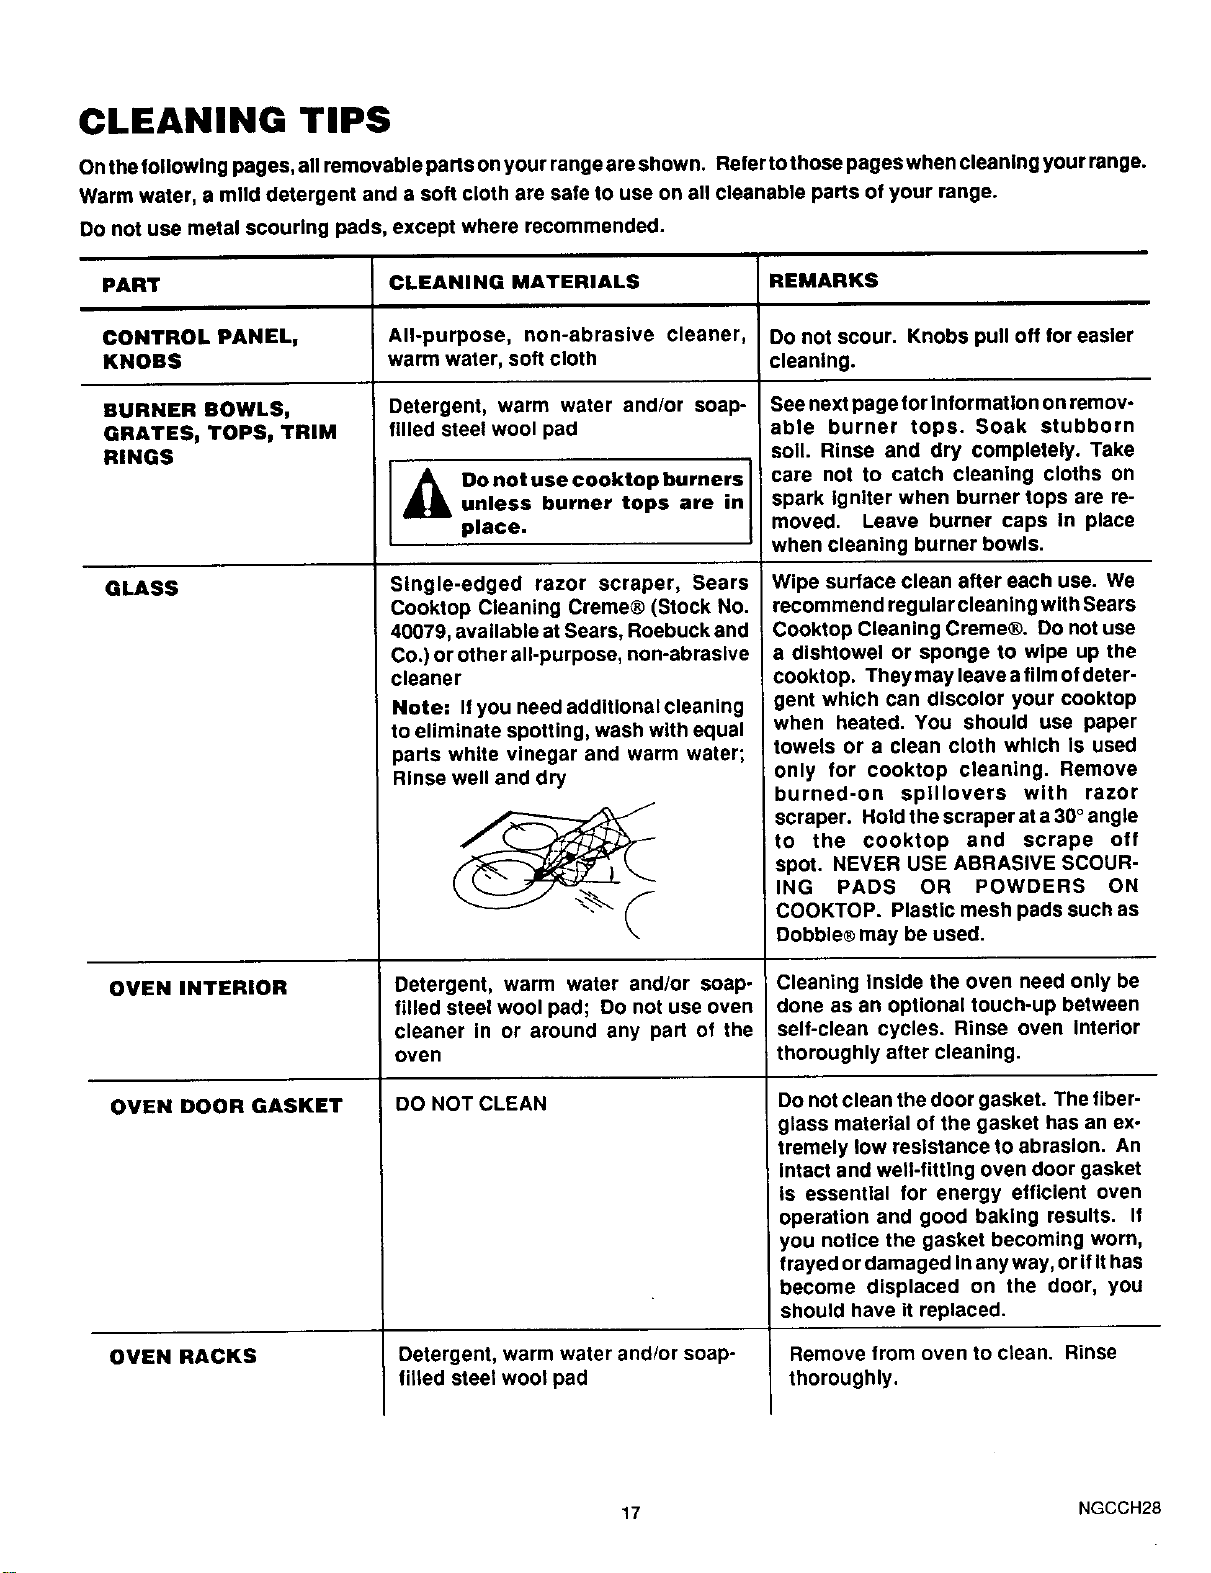
CLEANING TIPS
Onthefollowlng pages, all removablepartsonyour rangeareshown. Refertothosepageswhencleanlngyourrange.
Warm water, a mild detergent and a soft cloth are safe to use on all cleanable parts of your range.
Do not use metal scouring pads, except where recommended.
PART
CONTROLPANEL,
KNOBS
CLEANING MATERIALS
All-purpose, non-abrasive cleaner,
warm water, soft cloth
BURNER BOWLS,
GRATES, TOPS, TRIM
RINGS
GLASS
OVEN INTERIOR
OVEN DOOR GASKET
OVEN RACKS
Detergent, warm water and/or soap-
filled steel wool pad
_ Do not use cooktop burners
unless burner tops are in
place.
Single-edged razor scraper, Sears
Cooktop Cleaning Creme® (Stock No.
40079, available at Sears, Roebuck and
Co.) or other all-purpose, non-abrasive
cleaner
Note: Ifyou need additionalcleaning
to eliminate spotting, wash with equal
)arts white vinegar and warm water;
Rinse well and dry
Detergent, warm water and/or soap-
filled steel wool pad; Do not use oven
cleaner in or around any part of the
oven
DO NOT CLEAN
Detergent, warm water and/or soap-
tilled steel wool pad
REMARKS
Do not scour. Knobs pull off for easier
cleaning.
See next page for Information on remov-
able burner tops. Soak stubborn
soil. Rinse and dry completely. Take
care not to catch cleaning cloths on
spark igniter when burner tops are re-
moved. Leave burner caps In place
when cleaning burner bowls.
Wipe surface clean after each use. We
recommend regularcleanlng with Sears
Cooktop Cleaning Creme®. Do not use
a dishtowel or sponge to wipe up the
cooktop. They may leave a film of deter-
gent which can discolor your cooktop
when heated. You should use paper
towels or a clean cloth which is used
only for cooktop cleaning. Remove
burned-on splllovers with razor
scraper. Hold the scraper at a 30° angle
to the cooktop and scrape off
spot. NEVER USE ABRASIVE SCOUR-
ING PADS OR POWDERS ON
COOKTOP. Plastic mesh pads such as
Dobble® may be used.
Cleaning Inside the oven need only be
done as an optional touch-up between
self-clean cycles. Rinse oven Interior
thoroughly after cleaning.
Do not clean the door gasket. The fiber-
glass material of the gasket has an ex-
tremely low resistance to abrasion. An
intact and well-fitting oven door gasket
Is essential for energy elflcient oven
operation and good baking results. If
you notice the gasket becoming worn,
frayed or damaged In any way, or ifIthas
become displaced on the door, you
should have it replaced.
Remove from oven to clean. Rinse
thoroughly.
17 NGCCH28
CLEANING TIPS
PART
BRUSHED CHROME
COOKTOP
CLEANING MATERIALS
Detergent, warm water, plastic
or nylon scouring pad or bell In
Dip-it@ solution to remove stub-
bern soil
REMARKS
Do not scour chrome tops. Stubborn
stains may be removed by using Esprse
Magwheel Cleaner® or Turtle Wax Pol-
Ishing Compound®. To remove finger
prints on brushed chrome, apply a little
baby oll with a paper towel. Rub In the
direction of the brush marks. Armor All
Protectant®can also beused (afterclean-
Ing). Be sure to clean spills of acidic
foods quickly. Vinegar spills can perma-
nently stain chrome.
GLASS OVEN DOOR/WIN- Glass cleaner and paper towels Remove stubborn soil with paste of bak-
DOW (SOME MODELS) Ing soda and water. Do not use abrasive
cleaners. Rinse thoroughly.
BROILER PAN AND GRID Detergent,warm water, soft cloth
or a chrome cleaner or special
cooktop cleaning creme
Remove soiled pan from oven to cool.
Drain fat or drippings. FIll panwlth warm
water. Sprinkle grid with detergent and
cover with damp cloth or paper towels.
Let pan and grid soak for a few minutes.
Rinse or scour as needed. Dry well. Grid
and pan may be washed Ina dishwasher.
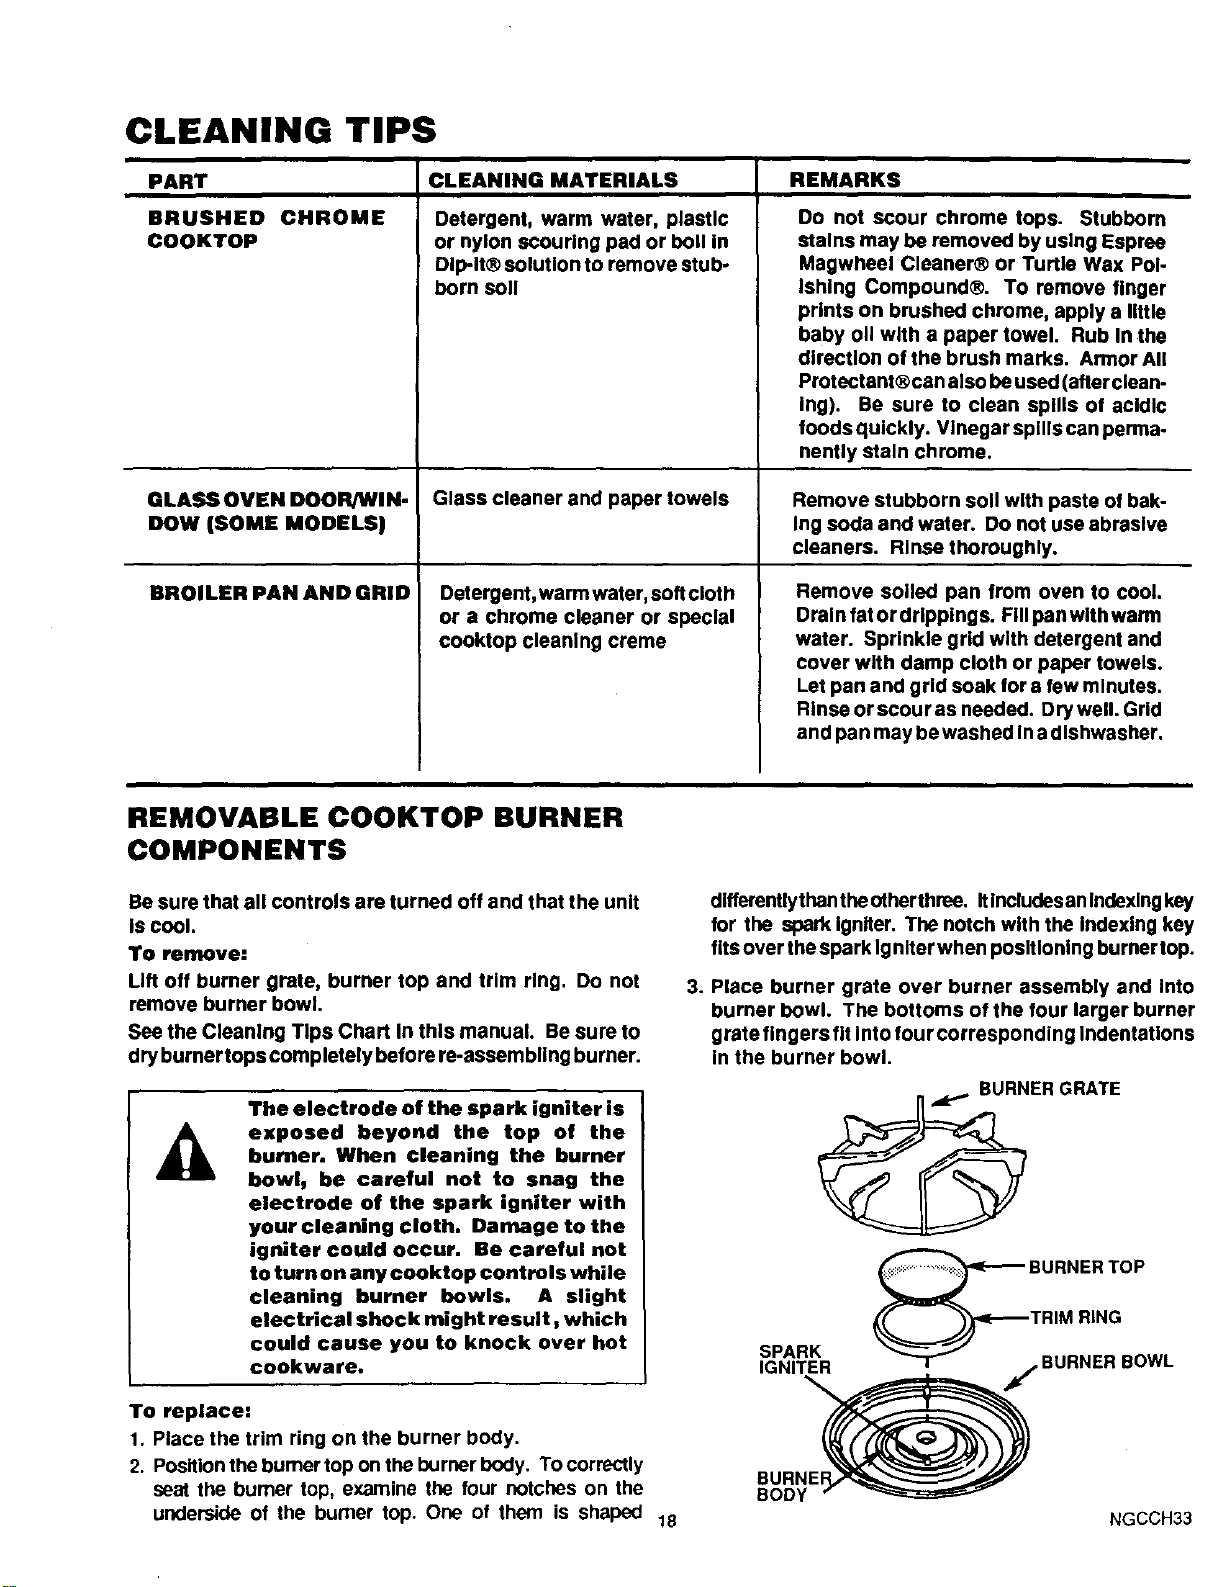
REMOVABLE COOKTOP BURNER
COMPONENTS
Be sure that all controls are turned off and that the unit
IS cool.
To remove:
Lift off burner grate, burner top and trim ring. Do not
remove burner bowl.
See the Cleaning Tips Chart In this manual. Be sure to
dry burnertope completely before re-assembling burner.
The electrode of the spark igniter is
exposed beyond the top of the
burner. When cleaning the burner
bowl, be careful not to snag the
electrode of the spark igniter with
your cleaning cloth. Damage to the
igniter could occur. Be careful not
to turn on any cooktop controls while
cleaning burner bowls. A slight
electrical shock might result, which
could cause you to knock over hot
cookware.
To replace:
1. Place the trim ring on the burner body.
2. Positionthe burner top on the burner body. To correctly
seat the burner top, examine the four notches on the
underside of the burner top. One of them is shaped 18
dlfferentlythan theotherthrse. Itincludesan Indexingkey
for the spark ignner. The notch with the Indexing key
fits over the spark Igniter when positioning burnertop.
3. Place burner grate over burner assembly and Into
burner bowl. The bottoms ofthe four larger burner
grate fingers fit Into four corresponding Indentations
in the burner bowl.
SPARK
IGNITER
ER GRATE
BURNER TOP
TRIM RiNG
BURNER BOWL
BURNER
BODY
NGCCH33
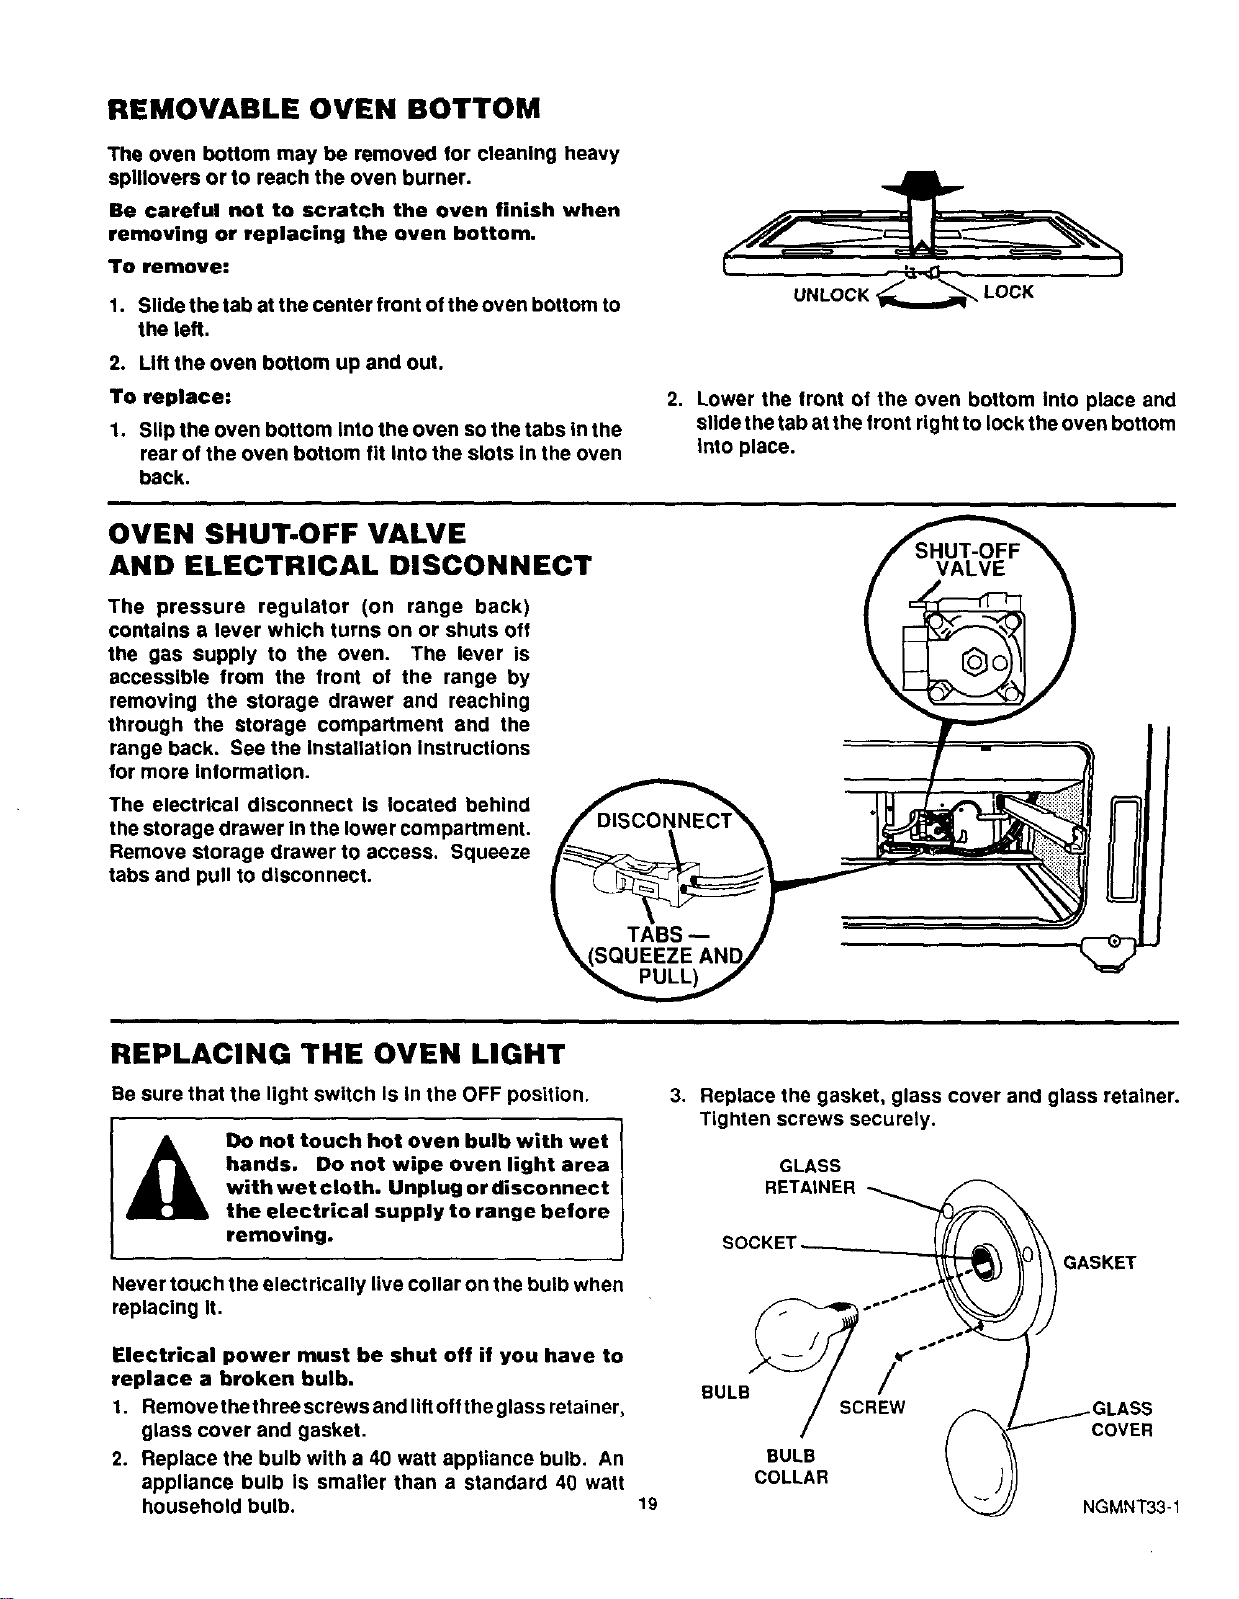
REMOVABLE OVEN BOTTOM
The oven bottom may be removed for cleaning heavy
splllovers or to reach the oven burner.
Be careful not to scratch the oven finish when
removing or replacing the oven bottom.
To remove:
1. Slide the tab at the center front of the oven bottom to
the left.
2. Lift the oven bottom up and out.
UNLOCK_,_lq_ LOCK
To replace:
1. Slip the oven bottom into the oven so the tabs In the
rear of the oven bottom fit into the slots In the oven
back.
2. Lower the front of the oven bottom into place and
slide the tab at the front right to lock the oven bottom
into place.
OVEN SHUT-OFF VALVE
AND ELECTRICAL DISCONNECT
The pressure regulator (on range back)
contains a lever which turns on or shuts off
the gas supply to the oven. The lever is
accessible from the front of the range by
removing the storage drawer and reaching
through the storage compartment and the
range back. See the installation Instructions
for more Inlormatlon.
The electrical disconnect Is located behind
the storage drawer in the lower compartment.
Remove storage drawer to access. Squeeze
tabs and pull to disconnect.
REPLACING THE OVEN LIGHT
Be sure that the light switch Is in the OFF position.
Do not touch hot oven bulb with wet
hands. Do not wipe oven light area
with wet cloth. Unplug or disconnect
the electrical supply to range before
removing.
Never touch the electrically live collar on the bulb when
replacing It.
Electrical power must be shut off il you have to
replace a broken bulb.
1. Removethethree screws and lift offthe glass retainer,
glass cover and gasket.
2. Replace the bulb with a 40 watt appliance bulb. An
appliance bulb is smaller than a standard 40 watt
household bulb.
3. Replace the gasket, glass cover and glass retainer.
Tighten screws securely.
19
GLASS
RETAINER -_._ _
/ SCREW /_.! _GLASS
BULB / _
COLL.. \ jj)
NGMNT33-1
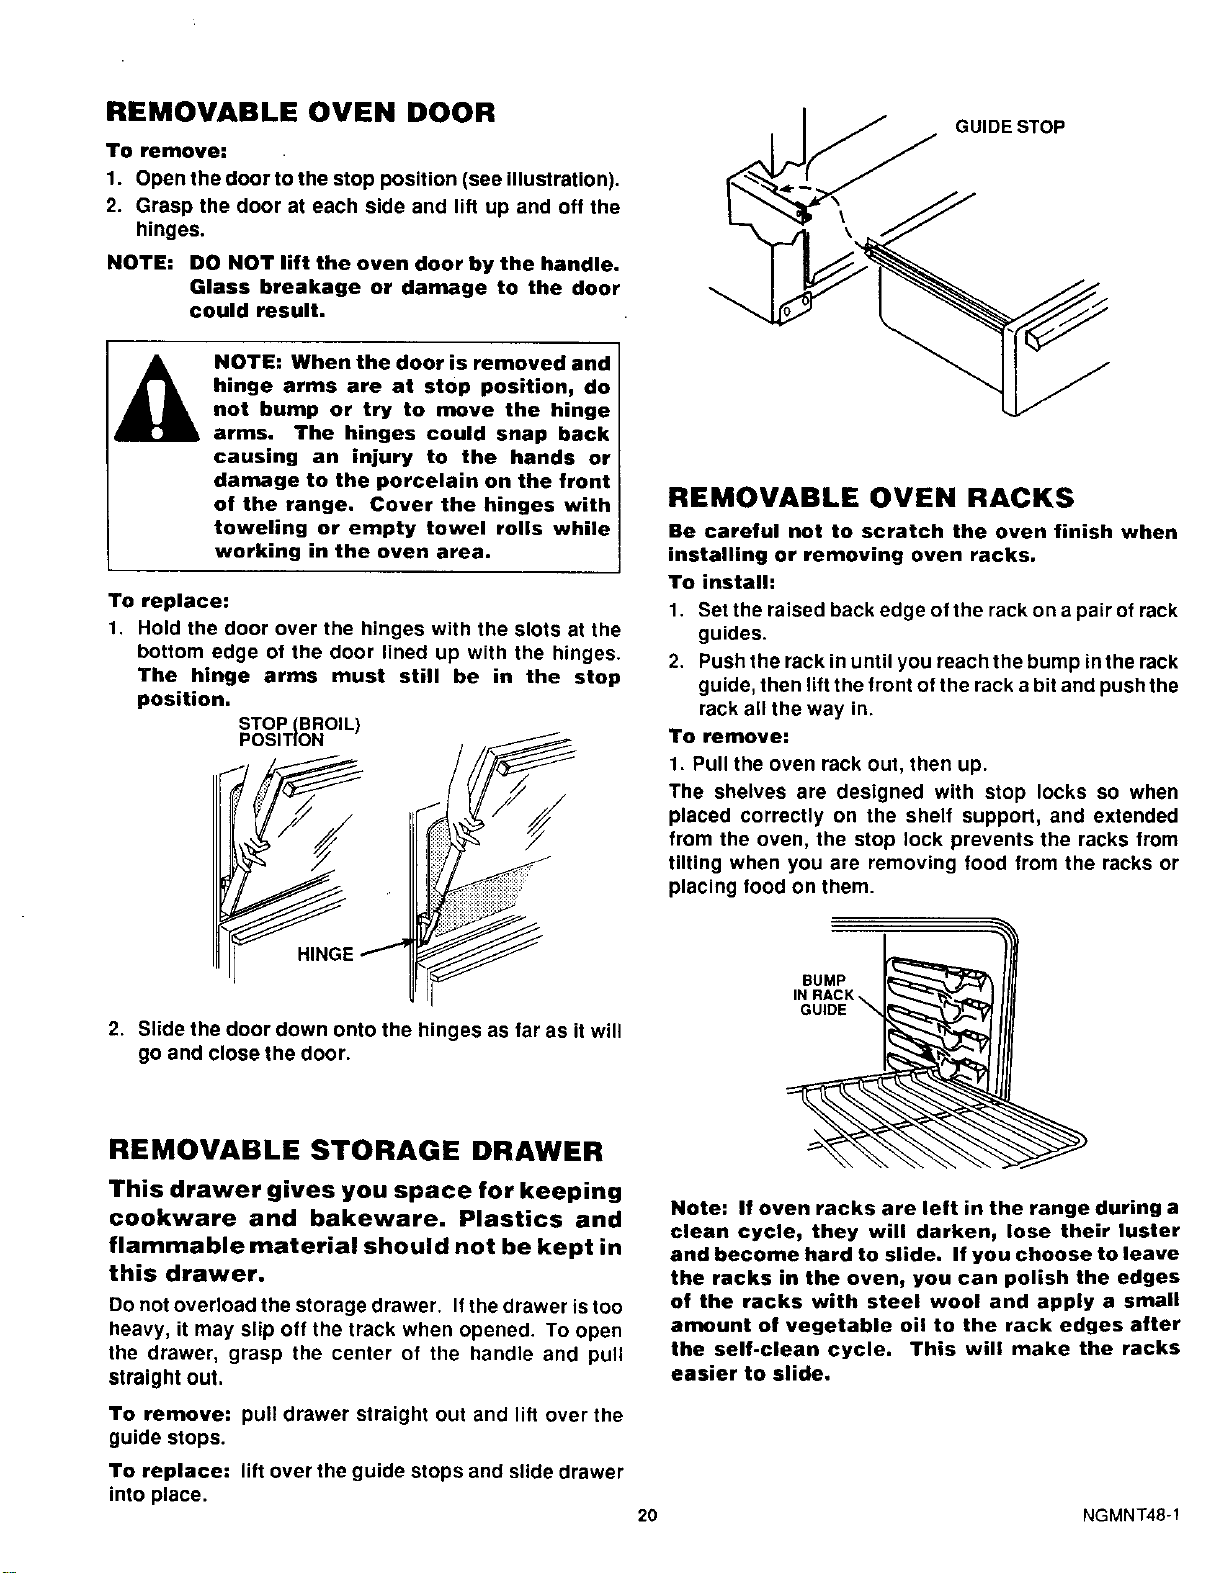
REMOVABLE OVEN DOOR
To remove:
1. Open the door to the stop position (see illustration).
2. Grasp the door at each side and lift up and off the
hinges.
NOTE: DO NOT lift the oven door by the handle.
Glass breakage or damage to the door
could result.
NOTE: When the door is removed and
hinge arms are at stop position, do
not bump or try to move the hinge
arms. The hinges could snap back
causing an injury to the hands or
damage to the porcelain on the front
of the range. Cover the hinges with
toweling or empty towel rolls while
working in the oven area.
To replace:
1. Hold the door over the hinges with the slots at the
bottom edge of the door lined up with the hinges.
The hinge arms must still be in the stop
position.
STOP (BROIL)
POSITION
2. Slide the door down onto the hinges as far as it will
go and close the door.
REMOVABLE STORAGE DRAWER
This drawer gives you space for keeping
cookware and bakeware. Plastics and
flammable material should not be kept in
this drawer.
Do not overload the storage drawer. If the drawer is too
heavy, it may slip off the track when opened. To open
the drawer, grasp the center of the handle and pull
straight out,
To remove: pull drawer straight out and lift over the
guide stops.
GUIDE STOP
REMOVABLE OVEN RACKS
Be careful not to scratch the oven finish when
installing or removing oven racks.
To install:
1. Set the raised back edge of the rack on a pair of rack
guides.
2. Push the rack in until you reach the bump in the rack
guide, then lift the front of the rack a bit and push the
rack all the way in.
To remove:
1. Pull the oven rack out, then up.
The shelves are designed with stop locks so when
placed correctly on the shelf support, and extended
from the oven, the stop lock prevents the racks from
tilting when you are removing food from the racks or
placing toed on them.
Note: If oven racks are left in the range during a
clean cycle, they will darken, lose their luster
and become hard to slide. If you choose to leave
the racks in the oven, you can polish the edges
of the racks with steel wool and apply a small
amount of vegetable oil to the rack edges after
the self-clean cycle. This will make the racks
easier to slide.
To replace: lift over the guide stops and slide drawer
into place.
20 NGMNT48-1
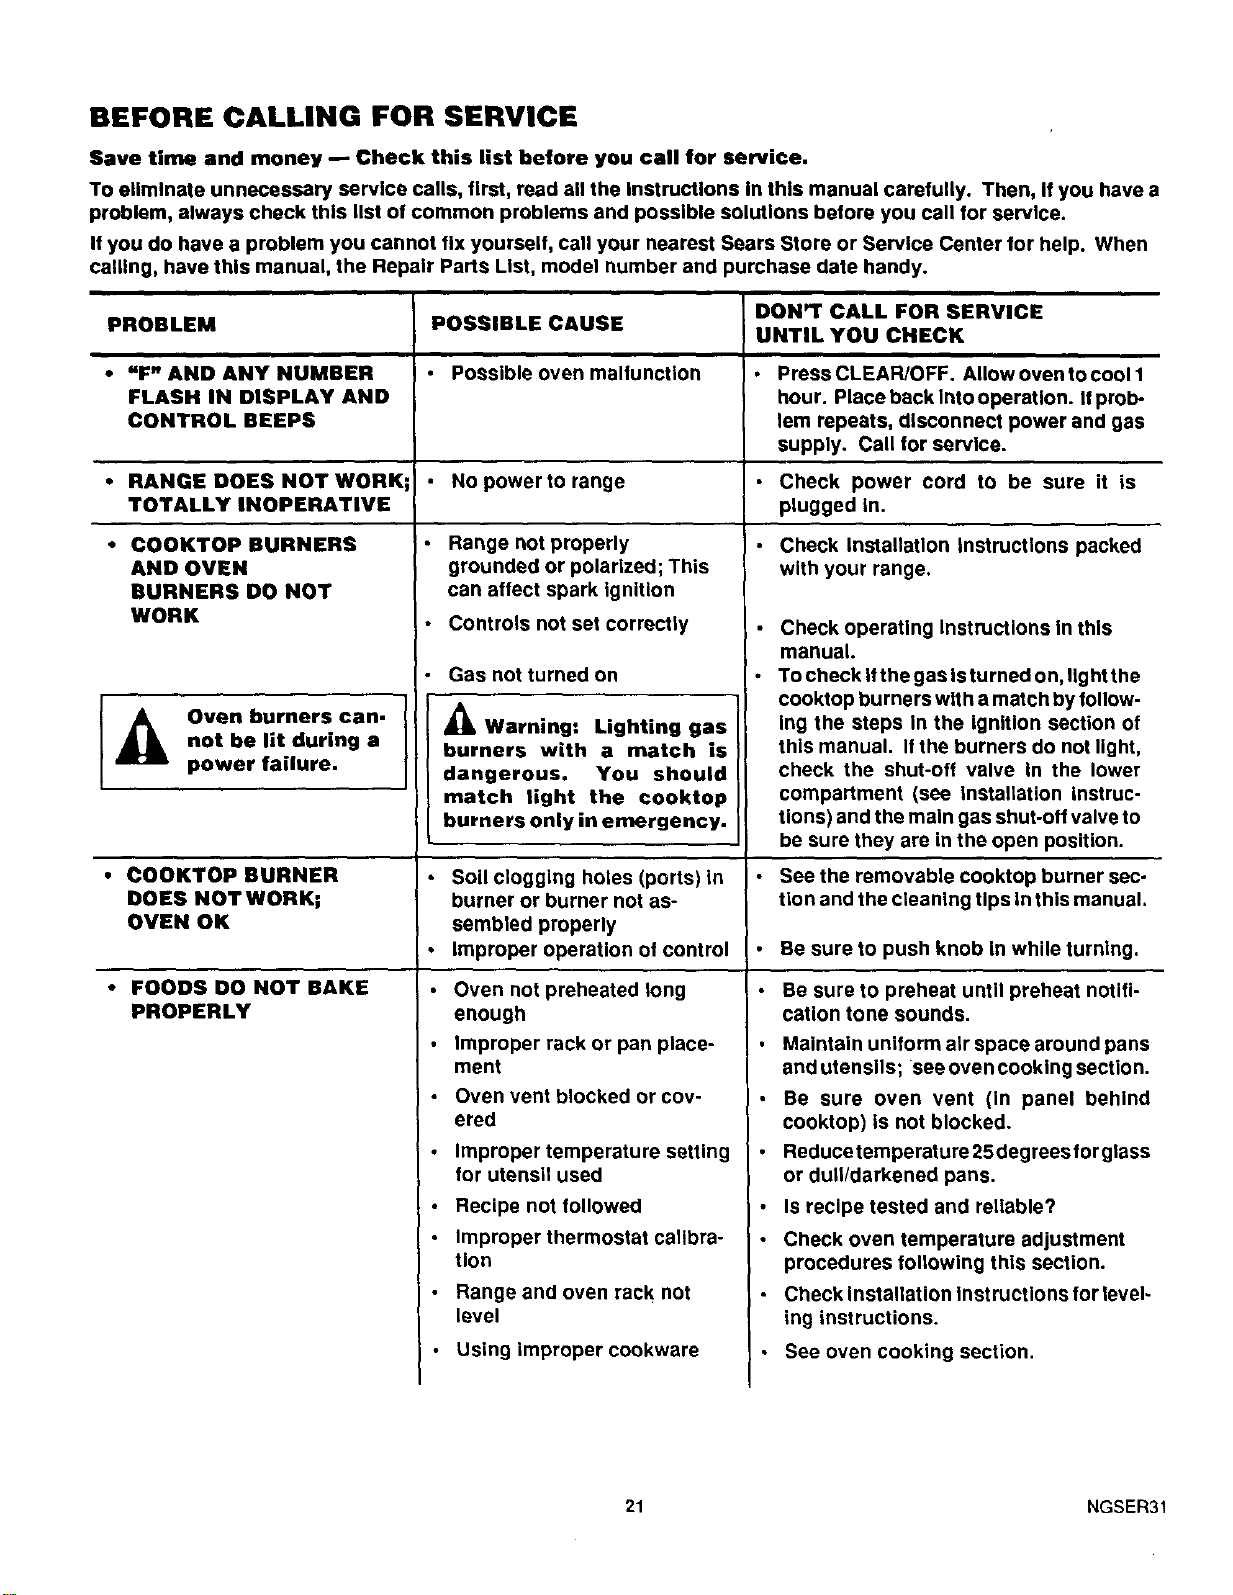
BEFORE CALLING FOR SERVICE
Save time and money _ Check this list before you call for service.
To eliminate unnecessary service calls, first, read all the instructions in this manual carefully. Then, If you have a
problem, always check this list of common problems and possible solutions before you call for service.
If you do have a problem you cannot fix yourself, call your nearest Sears Store or Service Center for help. When
calling, have this manual, the Repair Parts List, model number and purchase date handy.
PROBLEM
• UF" AND ANY NUMBER
FLASH IN DISPLAY AND
CONTROL BEEPS
POSSIBLE CAUSE
• Possible oven malfunction
• RANGE DOES NOT WORK • No power to range
TOTALLY INOPERATIVE
DON'T CALL FOR SERVICE
UNTIL YOU CHECK
Press CLEAR/OFF. Allow oven to cool 1
hour. Place back Into operation. Ifprob-
lem repeats, disconnect power and gas
supply. Call for service.
• Check power cord to be sure it is
plugged in.
• COOKTOP BURNERS
AND OVEN
BURNERS DO NOT
WORK
Oven burners can.
not be lit during a
power failure.
• COOKTOP BURNER
DOES NOT WORK;
OVEN OK
• FOODS DO NOT BAKE
PROPERLY
Range not properly
grounded or polarized; This
can affect spark ignition
Controls not set correctly
Gas not turned on
_ Warning: Lighting gas
burners with a match is
dangerous. You should l
match light the eooktop
burners only in emergency.
Soil clogging holes (ports) in
burner or burner not as-
sembled properly
Improper operation of control
Oven not preheated long
enough
Improper rack or pan place-
ment
Oven vent blocked or cov-
ered
Improper temperature setting
for utensil used
Recipe not followed
Improper thermostat calibra-
tion
Range and oven rack not
level
Using improper cookware
Check Installation Instructions packed
with your range.
Check operating Instructions In this
manual.
To check ifthe gas isturned on, light the
cooktop burners with a match by follow-
ing the steps in the ignition section of
this manual. If the burners do not light,
check the shut-off valve in the lower
compartment (see installation instruc-
tions) and the main gas shut-off valve to
be sure they are in the open position.
See the removable cooktop burner sec-
tion and the cleaning tips In this manual.
Be sure to push knob in while turning.
Be sure to preheat until preheat notifi-
cation tone sounds.
Maintain uniform air space around pans
and utensils; see oven cooking section.
Be sure oven vent (in panel behind
cooktop) is not blocked.
Reducetemperature 25degrees for glass
or dull/darkened pans.
Is recipe tested and reliable?
Check oven temperature adjustment
procedures following this section.
Check installation Instructions for level-
ing instructions.
See oven cooking section.
21 NGSER31
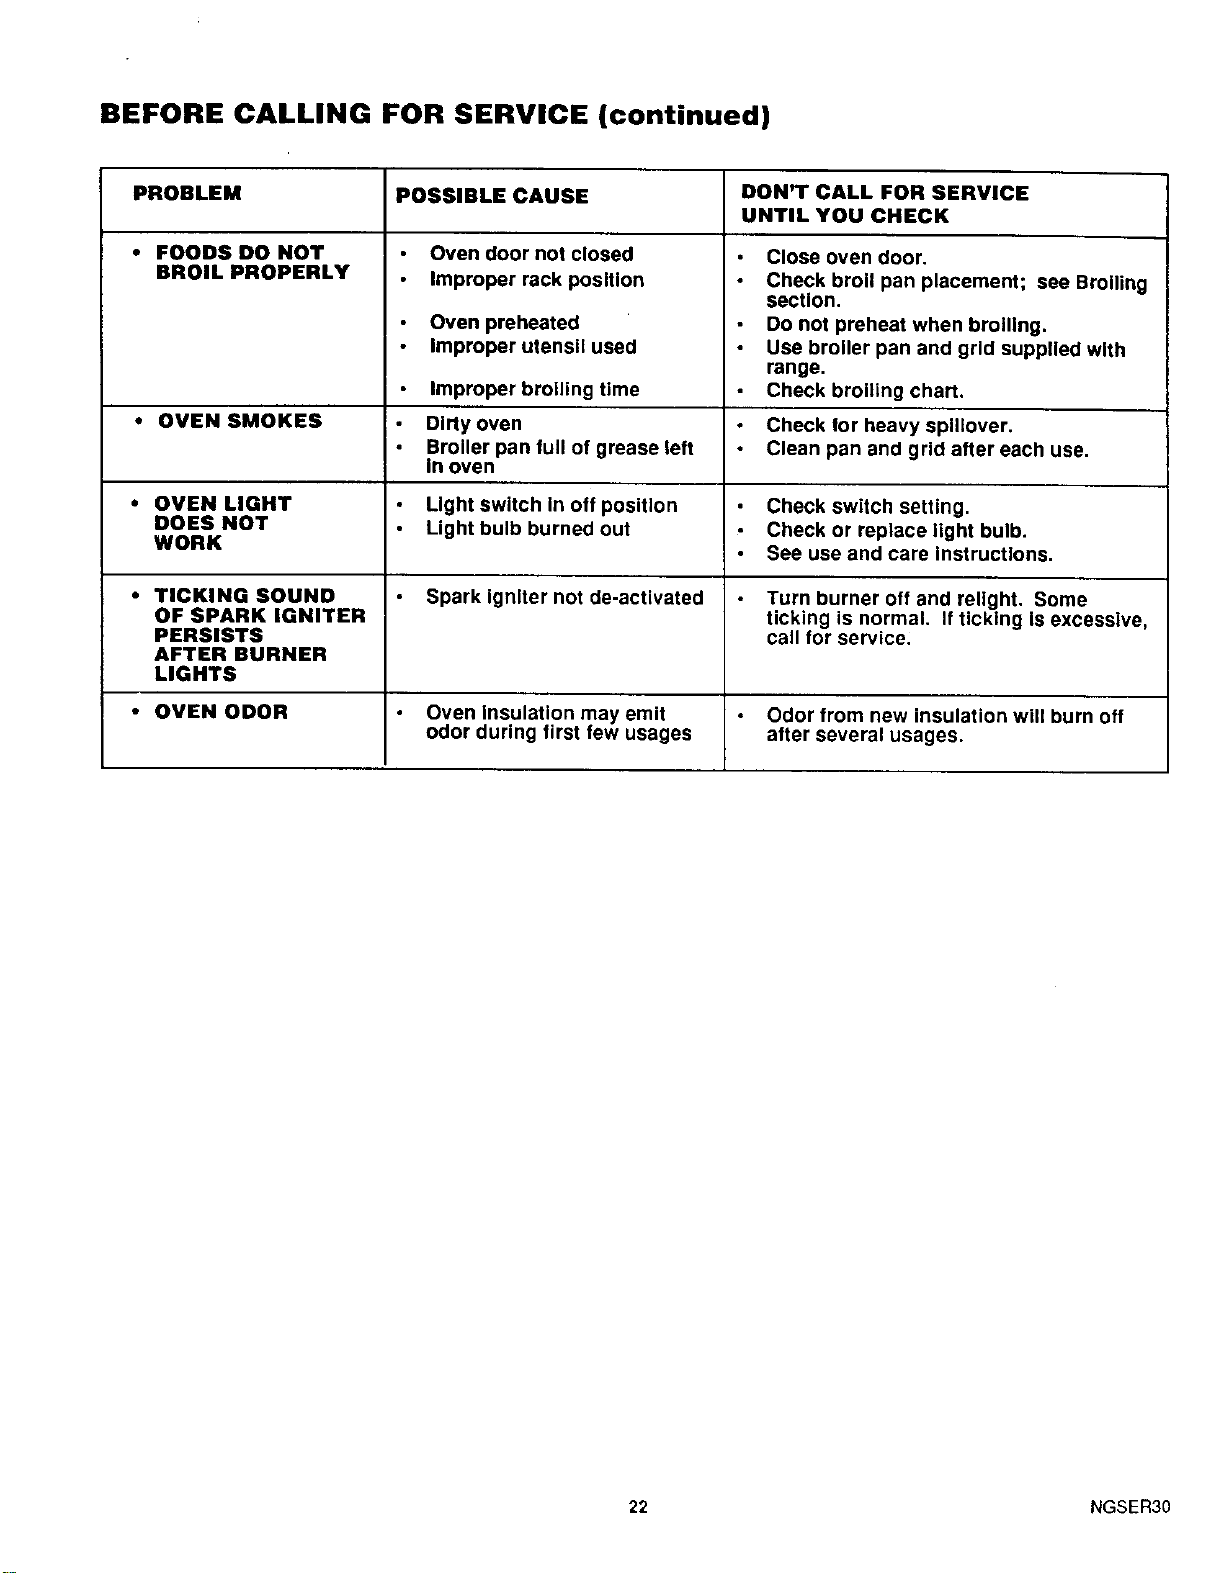
BEFORE CALLING FOR SERVICE (continued)
PROBLEM POSSIBLE CAUSE DON'T CALL FOR SERVICE
UNTIL YOU CHECK
• FOODS DO NOT
BROIL PROPERLY
Oven door not closed
Improper rack position
Oven preheated
Improper utensil used
Close oven door.
Check broil pan placement; see Broiling
section.
Do not preheat when broiling.
Use broiler pan and grid supplied with
range.
Check broiling chart.Improper broiling time
• OVEN SMOKES Dirty oven Check for heavy spillover.
Broiler pan full of grease left Clean pan and grid after each use.
In oven
• OVEN LIGHT Light switch in off position Check switch setting.
DOES NOT Light bulb burned out Check or replace light bulb.
WORK See use and care Instructions.
• TICKING SOUND Spark igniter not de-activated Turn burner off and rellght. Some
OF SPARK IGNITER ticking is normal. If ticking is excessive,
PERSISTS call for service.
AFTER BURNER
LIGHTS
• OVEN ODOR Oven Insulation may emit Odor from new insulation will burn off
odor during first few usages after several usages.
22 NGSER30
"DO-IT-YOURSELF" OVEN TEMPERATURE ADJUSTMENT
You may feel that your new oven cooks differently than
the oven It replaced. We recommend that you use your
new oven s few weeks to become more familiar with it,
following the times given In your recipes as a guide.
Your oven has been preset to maximize cooking
efficiency. If you think your new oven is too hot
(burning foods), or not hot enough (foods are under-
cooked) you can adjust the temperature yourself. The
appearance and texture of foods Is a better Indicator of
oven accuracy than an inexpensive oven thermometer.
We do not recommend the use of inexpensive
thermometers, such as those found in the grocery
store, to readjust the temperature setting of your
new oven. These thermometers can vary by 20°-40°F.
Also, you must open the oven door to read the
thermometer and this changes the temperature of the
oven.
To decide how much to change the temperature, set the
oven temperature 25°F higher (if foods are under-
cooked) or 25°F lower (if foods are burning) than the
temperature In your recipe, then bake. The results of
this "test" should give you an idea of how much the
temperature should be changed.
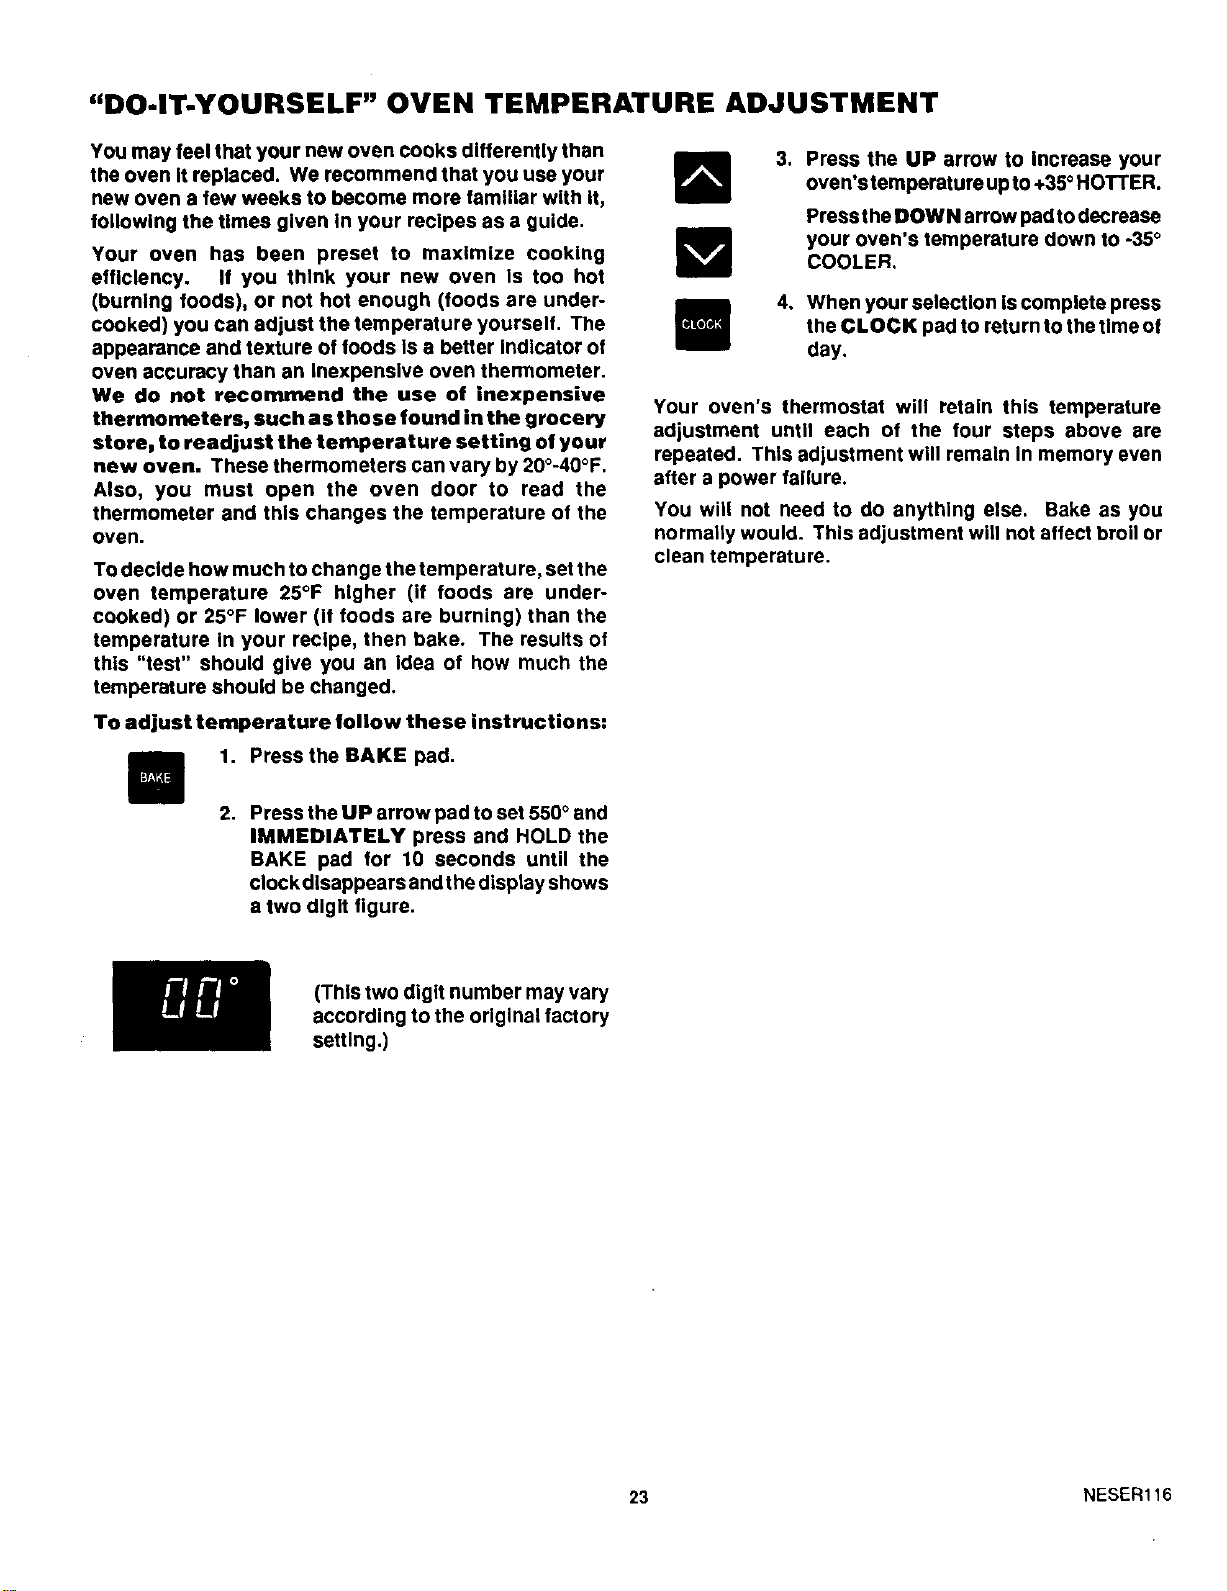
To adjust temperature follow these instructions:
1. P_sstheBAKE pad.
3. Press the UP arrow to Increase your
oven'stemperature up to +35°HOTTER.
Press the DOWN arrow pad to decrease
your oven's temperature down to -35°
COOLER.
4. When your selection Iscomplete press
the CLOCK pad to return to the time of
day.
Your oven's thermostat will retain this temperature
adjustment until each of the four steps above are
repeated. This adjustment will remain In memory even
after a power failure.
You will not need to do anything else. Bake as you
normally would. This adjustment will not affect broil or
clean temperature.
2. Press the UP arrow pad to set 550° and
IMMEDIATELY press and HOLD the
BAKE pad for 10 seconds until the
clock disappears and the display shows
a two digit figure.
(This two digit number may vary
according to the odglnal factory
setting.)
23 NESER116
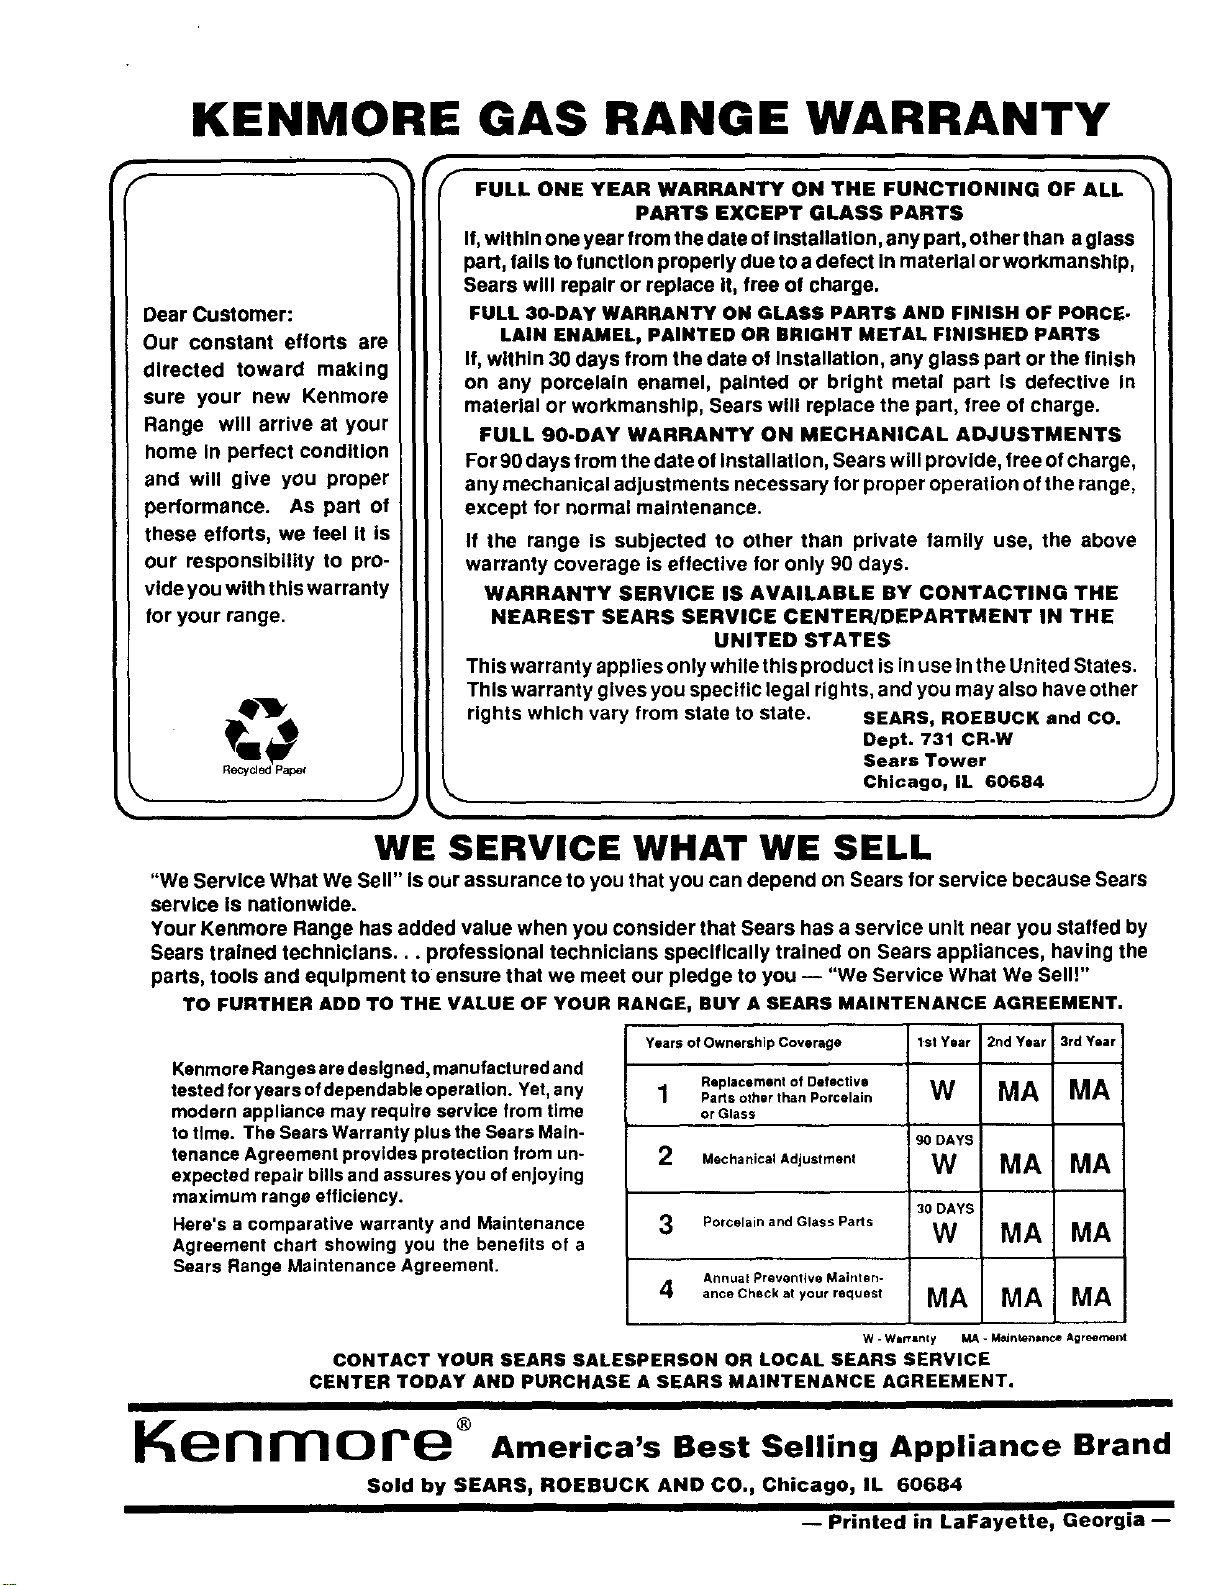
KENMORE GAS RANGE WARRANTY
f
Dear Customer:
Our constant efforts are
directed toward making
sure your new Kenmore
Range will arrive at your
home in perfect condition
and will give you proper
performance. As part of
these efforts, we feel it is
our responsibility to pro-
vide you with this warranty
for your range.
Re_yd_ Paper
J
f FULL ONE YEAR WARRANTY ON THE FUNCTIONING OF ALL '_
PARTS EXCEPT GLASS PARTS
If, within one year from the date of Installation, any part, other than a glass
part, falls to function properly due to a detect In material or workmanship,
Sears will repair or replace it, free of charge.
FULL 30-DAY WARRANTY ON GLASS PARTS AND FINISH OF PORCE-
LAIN ENAMEL, PAINTED OR BRIGHT METAL FINISHED PARTS
If, within 30 days from the date of Installation, any glass part or the finish
on any porcelain enamel, painted or bright metal part Is defective In
material or workmanship, Sears will replace the part, free of charge.
FULL 90-DAY WARRANTY ON MECHANICAL ADJUSTMENTS
For 90 days from the date of installation, Sears will provide, free ofcharge,
any mechanical adjustments necessary for proper operation of the range,
except for normal maintenance.
If the range is subjected to other than private family use, the above
warranty coverage is effective for only 90 days.
WARRANTY SERVICE IS AVAILABLE BY CONTACTING THE
NEAREST SEARS SERVICE CENTER/DEPARTMENT IN THE
UNITED STATES
This warranty applies only while this product is in use in the United States.
This warranty gives you specific legal rights, and you may also have other
rights which vary from state to state. SEARS, ROEBUCK and CO.
Dept. 731 CR-W
Sears Tower
Chicago, IL 60684
WE SERVICE WHAT WE SELL
"We Service What We Sell" Is our assurance to you that you can depend on Sears for service because Sears
service is nationwide.
Your Kenmore Range has added value when you consider that Sears has a service unit near you staffed by
Sears trained technicians.., professional technicians specifically trained on Sears appliances, having the
parts, tools and equipment to ensure that we meet our pledge to you -- "We Service What We SelIY'
TO FURTHER ADD TO THE VALUE OF YOUR RANGE, BUY A SEARS MAINTENANCE AGREEMENT.
Kenmore Ranges are designed, manufactured and
tested for years of dependable operation. Yet, any
modern appliance may require service from time
to time. The Sears Warranty plus the Sears Main-
tenance Agreement provides protection from un-
expected repair bills and assures you of enjoying
maximum range efficiency.
Here's s comparative warranty and Maintenance
Agreement chart showing you the benefits of a
Sears Range Maintenance Agreement.
Years of Ownership Coverage 1st Year 2nd Year ;3rd Year
Replacement of Defective
1 Parts oth,r than Porcelain W MA MA
or Glass
90 DAYS
2 Mechanical Adjustment W MA MA
30 DAYS
3 Porcelain and Glass Parts W MA MA
Annual Preventive Maint en-
4 ance Check at your request MA MA MA
W - Wmrrsnty MA - M_Jntellance Agreemeld
CONTACT YOUR SEARS SALESPERSON OR LOCAL SEARS SERVICE
CENTER TODAY AND PURCHASE A SEARS MAINTENANCE AGREEMENT.
Kenmore America's Best Selling Appliance Brand
Sold by SEARS, ROEBUCK AND CO., Chicago, IL 60684
-- Printed in LaFayette, Georgia --

