*1
The technology marking data is based
on a unit attached to the passenger
seat seatback and a car air conditioning
air outlet speed of 4-meters per second
(equivalent to the “low” setting) with
the product operating at the “standard”
setting in the center of the space (0.5m
above the oor) to maintain 25000 high
dencity plasmacluster ions per cm³.
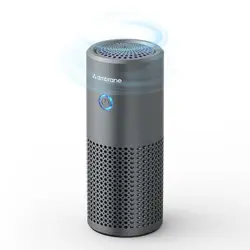
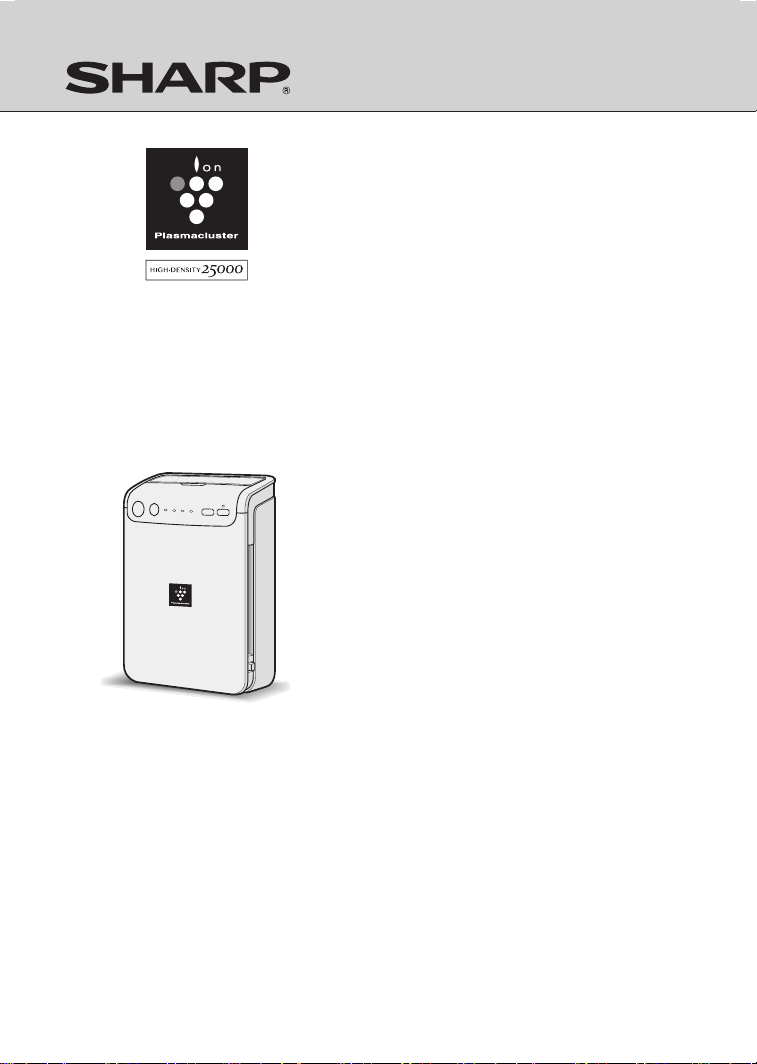
CAR AIR PURIFIER
OPERATION MANUAL
FP-JC2
The unit is designed for ordinary passenger
cars with DC 12V batteries.It cannot be used in
vehicles with DC 24V batteries
(buses, trucks, etc.)
*1
"Plasmacluster" and "Device of a cluster
of grapes" are trademarks of Sharp
Corporation.
FP-JC2.indd 1 2018/06/28 11:35:09
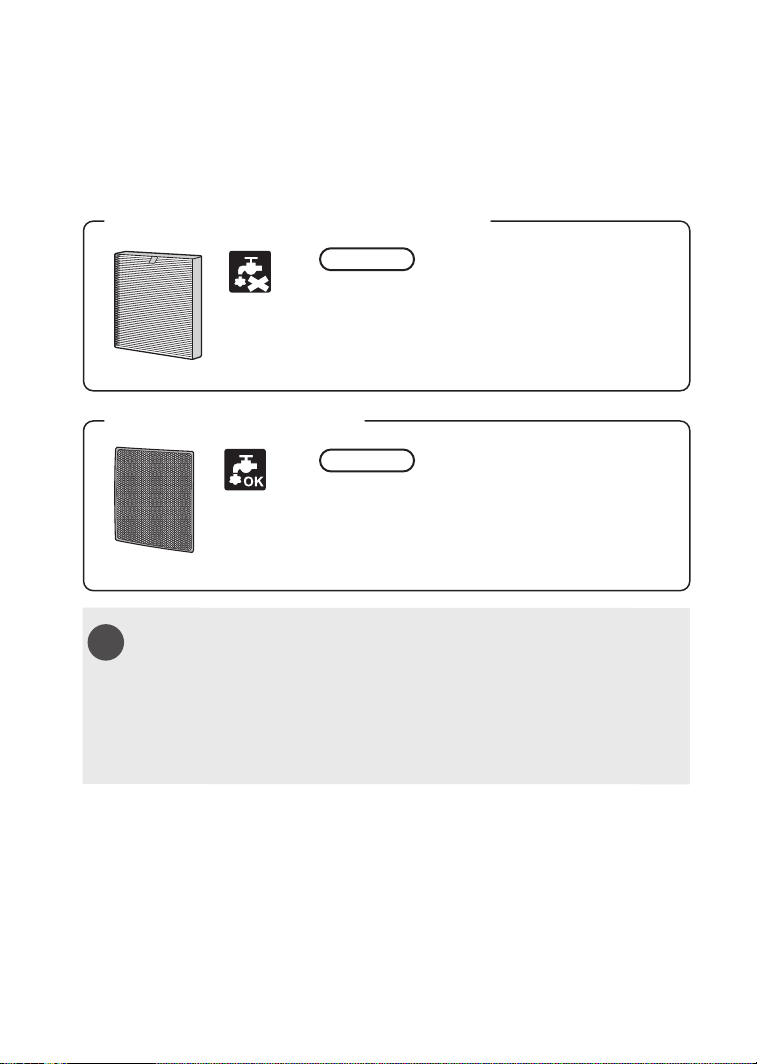
All-in-one dust collection/deodorizing lter
Washable Deodorizing Filter
• Tobacco smoke (particles)
• Ammonia odor
• Acetaldehyde
• Acetic acid type odor
NOTE
• The air purier is designed to remove air-suspended dust and the odors.
The air purier is not designed to remove harmful gases such as carbon monoxide
contained in cigarette smoke.
The air purier may not completely remove an odor if the source of the odor is still
present.
• Some odors absorbed by the lters will break down over time, causing additional
odors. Depending on usage conditions, and especially if the unit is used in
environments signicantly more severe than a normal household, these odors may
become noticeable sooner than expected. Replace the lter in those cases or if dust
is unable to be removed after maintenance.
• Pollen, Allergens (Dust mite feces and remains)
• Mold
• Dust
• Tobacco smoke (particles)
• Pet odor
• Mold odor
• Ammonia odor
• Food smell
Can catch
Can catch
Do not wash
FP-JC2.indd 2 2018/06/28 11:35:11

E-1
Thank you for purchasing this SHARP Plasmacluster Ion Generator.
Please read this manual carefully before using Plasmacluster Ion Generator.
After reading, keep the manual in a convenient location for future reference.
CONTENTS
• IMPORTANT SAFETY INSTRUCTIONS ...................................E-2
• PART NAMES ...................................................................... E-5
• PREPARATION .................................................................... E-7
• OPERATION ........................................................................ E-14
• CARE AND MAINTENANCE ............................................... E-16
• FILTER REPLACEMENT GUIDELINES .............................. E-18
• REPLACING THE FUSE...................................................... E-19
• SPECIFICATIONS ................................................................ E-19
• TROUBLESHOOTING ......................................................... E-20
FP-JC2.indd 1 2018/06/28 11:35:11
E-2
IMPORTANT SAFETY INSTRUCTIONS
WARNING
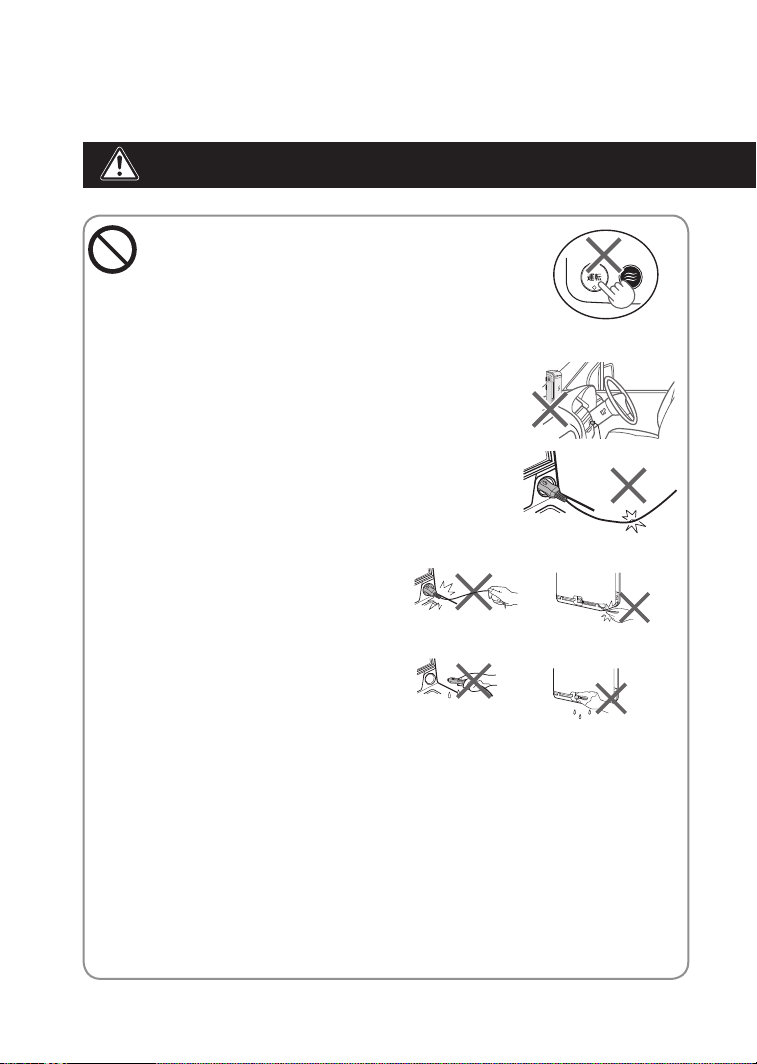
To reduce the risk of electrical shock, fire, or injury :
• Do not operate switches while driving.
(Doing so could lead to accidents.)
• Do not put in places exposed to direct
sunlight.(Doing so could cause warping or
malfunction.)
• Attach only to the driver’s seat or passenger
seat headrest shaft or the backseat center
arm rest.Do not place on the dashboard.
(as doing so can cause accident, injury, or
malfunction. )
• This unit is designed exclusively for use in vehicles
with 12V batteries. Do not use it in other vehicles.
Do not use the unit in large trucks, buses or other
vehicles with 24V batteries.
(Doing so could lead to re or electric shock.)
• Do not damage or modify the cord.Also, do not
use the cord if it is damaged.
(The damaged section could cause short-circuiting
and the cord could melt,leading to re.)
If the cord is damaged,contact
your store of purchase or SHARP
authorized service center.
• Do not pull on the cord when
unplugging the car adapter or the
Micro USB plug.(Doing so could
damage the cord,leading to re or
electric shock.)
• Do not plug in or unplug the car
adapter or the Micro USB
plug with
wet hands.(Doing so could cause
electric shock.)
• When transporting, be careful not to drop the unit or subject it to shocks.
(Doing so could cause injury or damage.)
If the unit should drop or be damaged, contact your store of purchase or
SHARP authorized service center.Continued usage of damaged unit could
lead to re or electric shock.
• Do not install in the place that hinders driving.
(Tangled around the shift lever,cause ofaccident,injury,failure)
Plug for main unit
Car Adapter
Car Adapter
Plug for main unit
FP-JC2.indd 2 2018/06/28 11:35:15

E-3
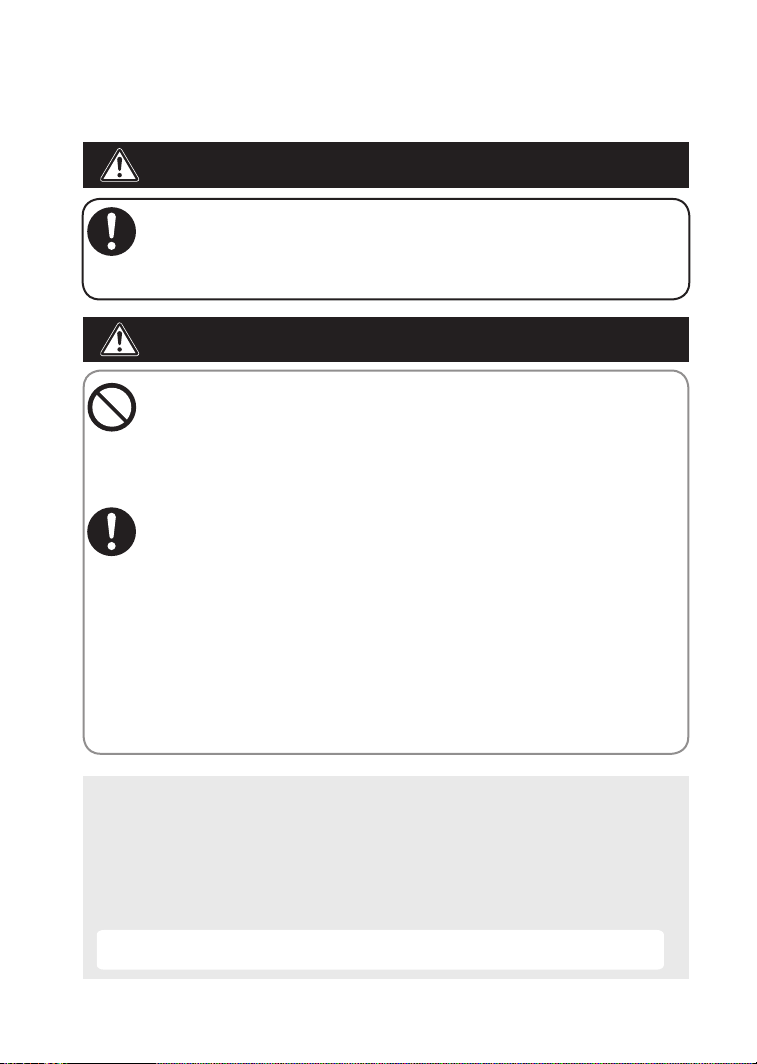
• Do not modify the unit. Also, no one other than an authorized repairman
should take apart or repair the unit. (Doing so could lead to re, electric
shock or injury.) Contact your store of purchase or SHARP authorized
service center for repairs.
• Do not spill beverages or drop cigarette ashes, metal objects,easily
burnable objects, etc., into the unit through the air outlet or air intake.
Be particularly careful if there are small children in your family.
If water or foreign substances should get inside the unit,unplug the car
adapter from the accessory socket.
(Continued usage could lead to re or electric shock.) Contact your store
of purchase or SHARP authorized service center.
• Do not wipe the unit with oils, alcohol, benzene or thinners, or spray
hairspray or insecticides on the unit. If such substances should get on
the unit, wipe them off immediately.(Such substances could lead to
cracking or electric shock or could catch re.)
• Do not place the unit in a place where it is exposed to oil smoke or
moisture such as kitchen counter or humidifying device.
(Doing so could lead to electric shock.)
Do not place the unit near heating equipment such as the utlet of hot-air
type heater. (Doing so could cause warping or malfunction.)
• Use the car adapter designed exclusively for this unit, and insert the car
adapter securely all the way in until it stops.
(If the car adapter is not inserted securely until it stops, it could heat up,
deforming the accessory socket, and this could lead to re.)
• If the fuse should blow, be sure to replace it with a 2.5A glass tube fuse
(commercially available). Never use a piece of wire, etc., in place of the
fuse.(Using anything other than the specified type of fuse could cause
heating, leading to fire.)
• Wire in such a way that the cord does not get in the way of the driver.
Correctly attached wires according to the instructions in the Operation Manual.
(Incorrect wiring can cause injury or malfunction.)
• If you notice abnormal operation (mold odor, unusual noise, etc.) during operation,
stop operation and remove the car adapter from the socket,
(as a precaution against re, electric shock, or injury.)
• Be sure to unplug the car adapter from the accessory socket whencleaning.
(Failure to do so could cause electric shock or injury.)
• Be sure to unplug the car adapter from the accessory socket when not in
use for long periods of time.
(Failure to do so could lead to electric shock or re caused by short-
circuiting.)
FP-JC2.indd 3 2018/06/28 11:35:16
E-4
• If the accessory socket is integrated into the ashtray, be sure that cigarettes
are completely extinguished before using the unit.
• When leaving the vehicle, unplug the car adapter and close the ashtray’s lid.
(Failure to do so could lead to re caused by the smoldering cigarettes.)
IMPORTANT SAFETY INSTRUCTIONS
WARNING
To reduce the risk of electric shock, re or injury :
Caution
To reduce the risk of electric shock, re or
injury :
• Do not attach or wire in a place that may interfere with the operation of the
car's air bags,(as doing so can cause a traffic accident or injury.)Air bag
activation can cause the unit and other objects to fly about the cabin.
• Do not touch the metal parts of the car adapter’s car adapter (or of the
accessory socket).(The metal parts of the car adapter could be hot directly
after the car is stopped, and could cause burns if touched.)
• Make sure that accessory attachment belt is not loose and secured tightly
in place.(A loose belt can become detached or fall off during operation and
cause injury or accident. )
• Do not operate the air purier without the lter attached.
(Without the lter, the air purier will not lter air and may also malfunction.)
• Move the unit out of the car when using room fumigating type insecticides
or deodorizers. If not, the chemicals could get inside the unit and later be
ejected from the air outlet, possibly harming your health.
• If the unit risks falling out (when driving on rough roads,over bumps, etc.),
either slow down or remove the unit
beforehand. (Failure to do so could
cause injury or damage to the unit.)
• When attaching the unit, only use the accessory attachment belt,(as failing
to do so can cause accident or injury.)Before operating the unit, make
sure that the unit is properly secure and that the attachment belt is not
loose,(otherwise the unit may come loose or fall off and cause a trafc
accident or injury.)
• Do not use items of silicone-based products* near the unit.
The uororesin or silicone could get stuck inside the unit, preventing it from
producing Plasmacluster ions.
If this happens, remove the dust from the electrode section of the
Plasmacluster Ion Generating Unit.
* Hair care products (split end coatings, hair mousses, hair treatments, etc.),
cosmetics, antiperspirants, antistatic agents, waterproong sprays, polishes,
glass cleaners, chemicalimpregnated clothes, wax, etc.
The inside of the unit has insulation with fluoresin, silicon, and similar
materials that can cause the air purier to not emit Plasmacluster ions.
FP-JC2.indd 4 2018/06/28 11:35:16
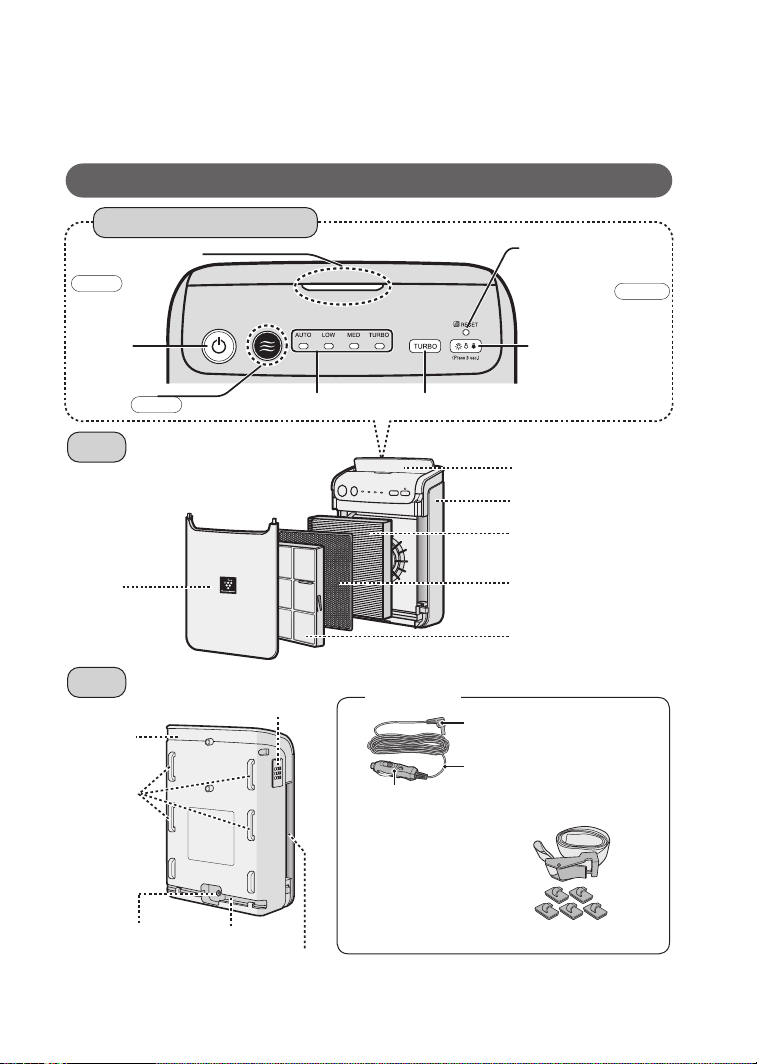
E-5
Main Unit
・
Operation Panel
/
Display
PART NAMES
Operation Panel/Display
Front
Back
Cleanliness Monitor
(
Green
・
Yellow
)
Odor Monitor
(Yellow)
Operation
Button
Filter Reset
Indicator Light(Yellow)
Unit Replacing (green)
Light Control Button
<Press 3 sec.>
FILTER RESET Button
Mode Indicator
Light
(
Blue
・
Purple
)
Front
Panel
Air Outlet
Main Unit
All-in-one
dustcollection/
deodorizing lter
Washable
Deodorizing Filter
Pre-Filter
Main Unit
Belt Guide
Power Input
Terminal
Cable Rail
Sensor Cover
Air Inlet
Plug for main unit
Cord(3m)
Car Adapter (With 2.5A glass tube fuse)
Connect to the cigar lighter socket in the vehicle.
・
Mounting belt
・
Cable Clip(5 pieces)
To x cable on wiring.
・
Operation Manual
Turbo operation
button
Accessories
See E-17
See E- 6
See E- 6
FP-JC2.indd 5 2018/06/28 11:35:22
E-6
PART NAMES
Clean
Impure
Turn OFF
Yellow
Clean
Impure
Geeen
Yellow
Odor Monitor
Cleanliness Monitor
Indicates the odor level in 2 steps. Indicates the air purify level in 2 steps.
Odor Monitor / Cleanliness Monitor
FP-JC2.indd 6 2018/06/28 11:35:22
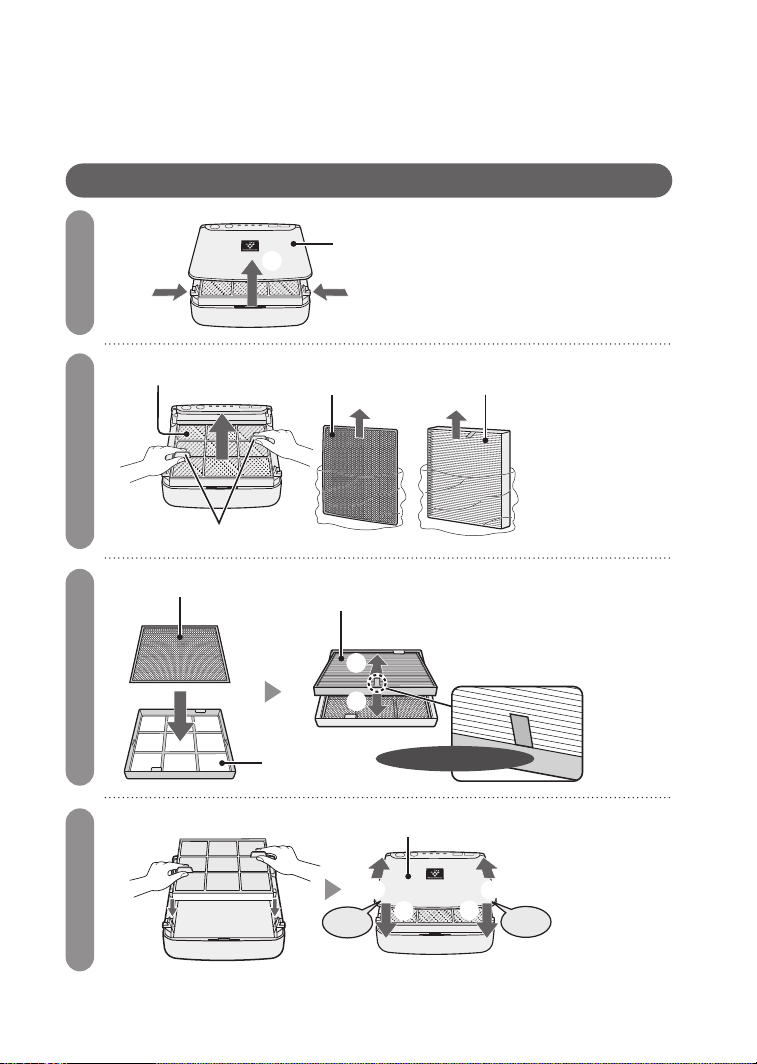
E-7
1
2
3
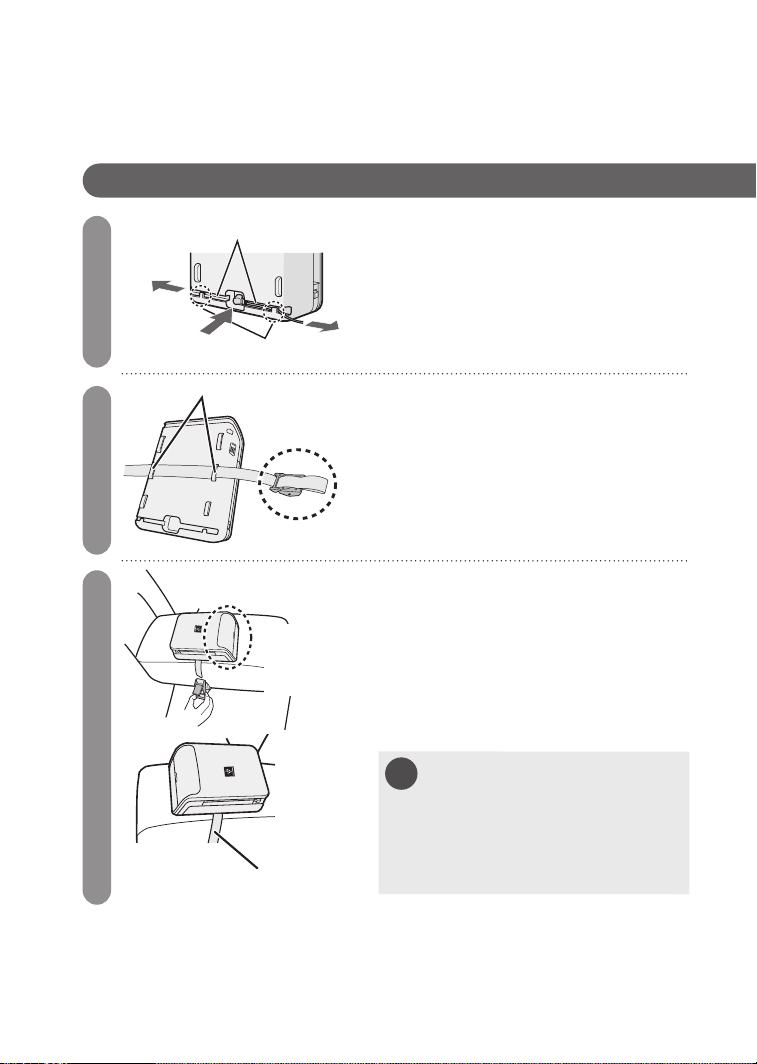
Filter Installation
INSTLLATION
①①
②
Front Panel
Pre-Filter
Washable
Deodorizing Filter
All-in-one dust collection/
deodorizing lter
Grab two lever
①
②
Washable
Deodorizing Filter
Pre-Filter
put
Upside the tagged surface
4
①
①
②
②
Close
Close
Front Panel
Open
Push
Push
All-in-one dust collection/
deodorizing lter
FP-JC2.indd 7 2018/06/28 11:35:26
E-8
1
2
3
①
Securely insert the car adapter
connection plug into the unit's
power source input terminal.
②
Conforming to the attaching
location, place the power cord
along the cable rail.(The cable rail
has two directions.)
※
Do not wrap the power cord
downward.
Attachment belt precautions.
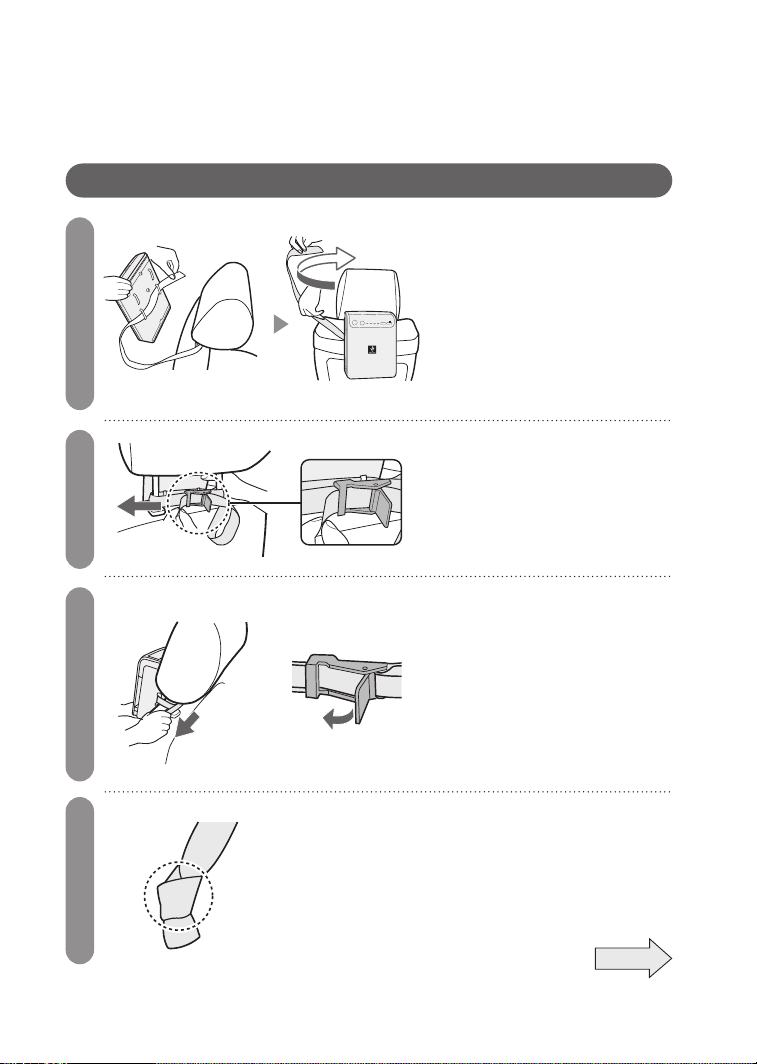
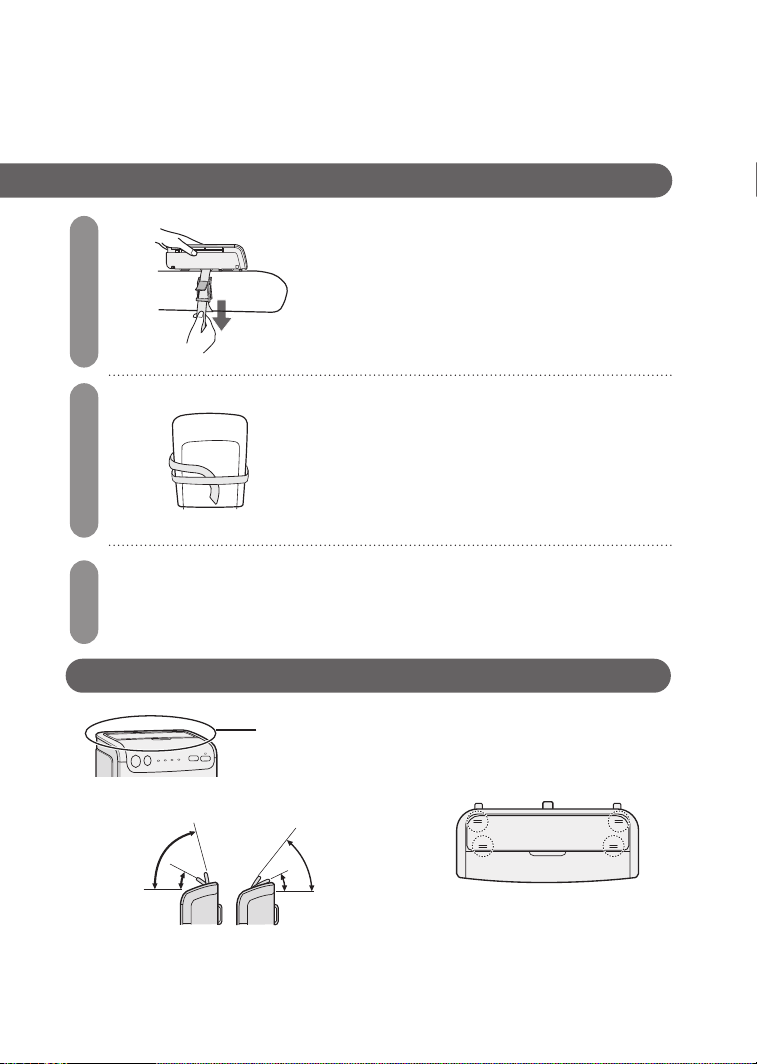
PREPARATION
Attaching to the seatback
Buckle
guide
Push
• To prevent accident or injury, do not install in a car model
without a headrest.
(as doing so can cause accident or injury.)
• When attaching the unit with the belt, make sure that the
unit cannot fall off once attached.
• To open the buckle, press the back surface with the
fingers,
(
as shown in the drawing on the right.
)
Detach the headrest.
To secure the belt, run the headrest
shaft through the belt hole*1, and
then attach the headrest.(The buckle
should be positioned as shown in *2 in
the drawing on the left.)
①
②
②
Cable Rail
Hook the cable
※1
※2
Front
Headrest
Shaft
Wrap the belt around
the shaft.
FP-JC2.indd 8 2018/06/28 11:35:31
E-9
6
5
4
Attaching to the seatback(cont)
7
Insert the belt through the
belt guide and then pull and
wrap the belt around the
shaft.
※
The back of the unit has
belt guides in two places.
(Wrap the belt around the shaft
horizontally.)
Pull the belt through the
buckle guide, as shown on
the left.
①
②
①
While supporting the unit
with a hand, pull the belt
in the direction indicated
by the arrow.
②
When rmly locked in
place, make sure that the
buckle closes.
To keep the unit from falling, tie the tip of
the belt into a knot.
Place the tip of the belt between the unit
and headrest.
After storing the belt, adjust the height of
the headrest.
cont
FP-JC2.indd 9 2018/06/28 11:35:34
E-10
8
9
NOTE
Attaching to the seatback
(cont)
PREPARATION
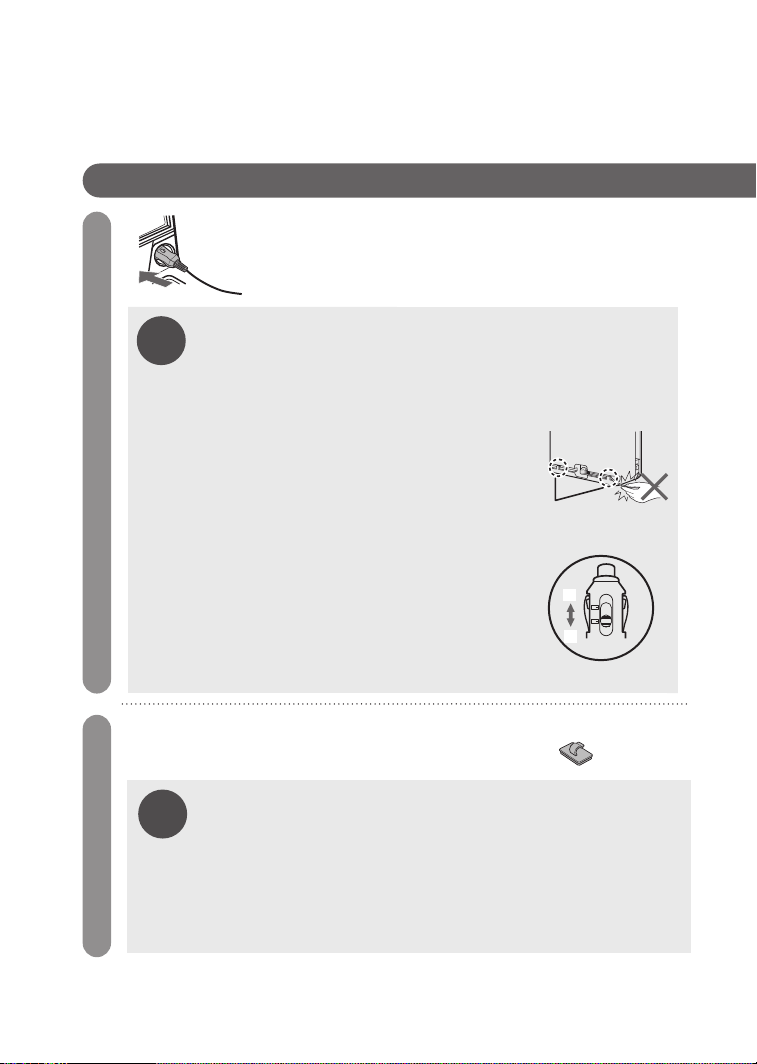
Insert the car adapter into the
accessory socket.
• Be sure to remove any dirt, from the accessory socket
• Use the car adapter designed exclusively for this unit,and insert
the car adapter securely all the way in until it stops. (If the car
adapter is not inserted securely until it stops, it could heat up,
deforming the accessory socket, and this could lead to re.)
• Do not pull on the cord when unplugging the car adapter
(Doing so could damagethe cord,
Leading to re or electric shock.)
• When using, connect with the selector
switch set to “N”, and if the plug is loose,
connect with the switch set to “W”.
(The width between electrodes (the metal parts)
differs at the N and W positions.)
• Do not use the unit in large trucks, buses
or other vehicles with 24V batteries.
(Doing so could lead to re or electric shock.)
W
N
N
W
Hook
Wiring of the adapter cable
Use cable clip to x the cable if needed.
Cable Clip
• Clean the place where you want to the clips beforehand.
• Do not touch or reinstall the joining surface of the clip.
• Clips will peel off if installed on a corrugated surface.
• Do not install on movable parts such as seat rails or shift lever.
• Do not install in places which may inuence safety sach as air
bags, consider an appropriate place for installation.
• Consider the front/back movement of seats and reclining.
• Do not fold the cable or put pressure on it.
NOTE
FP-JC2.indd 10 2018/06/28 11:35:36
E-11
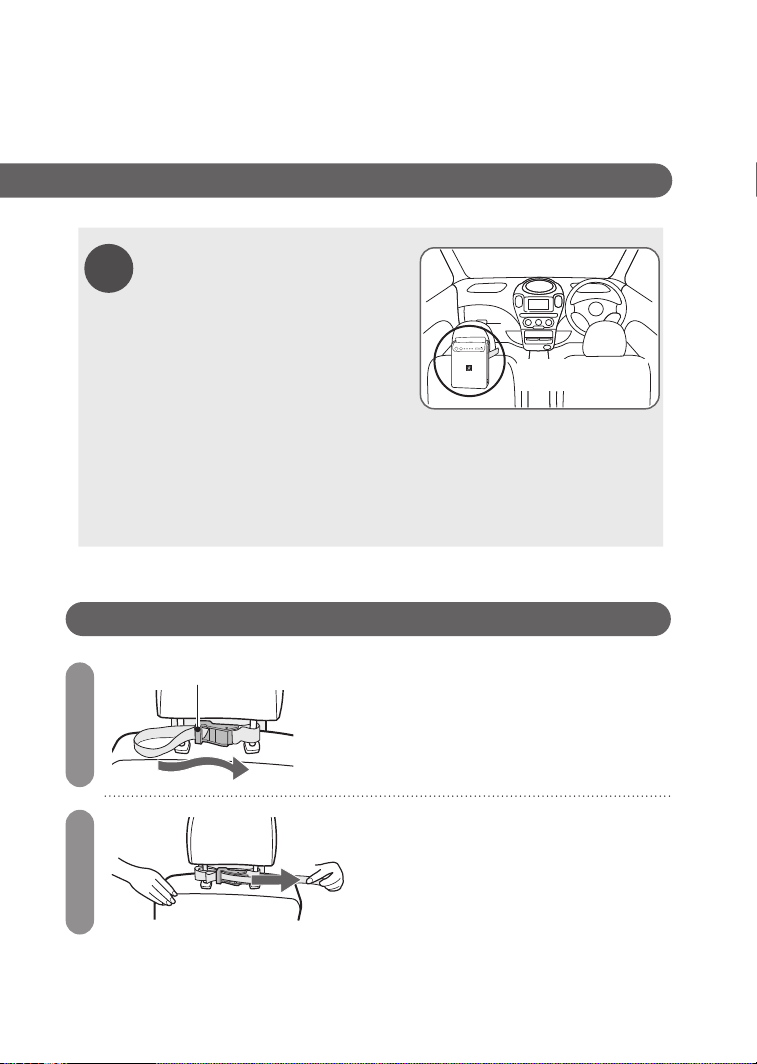
1
2
• Do not obstruct the air inlet or outlet.
• Keep the unit away from the vehicle’s in-glass antenna. Failure to do so
could cause interference on the radio.
• If there should be interference on a TV or radio located in the same
car, or if an atomic clock in the car should not display the time properly,
move the unit away from the TV, radio, atomic clock, etc.
• The unit could get scratched by the vibrations of the vehicle, etc.
NOTE
Separate the main unit from electronic
key of vehicle by 30cm or more.
Otherwise, it may interfere with
electronic wave of main unit and the
electronic key may not be recognized.
Cautions on installation
Separate the main unit
from electronic key of
vehicle by 30cm or more.
Unfastening the belt
Buckle Guide
Pull the tip of the belt through the
buckle guide in the reverse of the
fastening direction.
After passing the belt through the
buckle guide, pull on the belt to
unfasten it from the buckle.
FP-JC2.indd 11 2018/06/28 11:35:38
E-12
アームレストへの取り付け
PREPARATION
1
2
3
①
Securely insert the car adapter
connection plug into the unit's power
source input terminal.
②
Conforming to the attaching location,
place the power cord along the cable
rail.
(The cable rail has two directions.)
※
Do not wrap the power cord downward.
Run the belt through one of the belt
guides on the back of the unit.
①
②
②
Cable Gail
Hook the cable
Set the unit on the back seat armrest
and then wrap the belt around the
armrest.
Pull the belt until it is tight and
securely in place.
NOTE
• If the armrest has a storage
compartment or similar
feature and it is not possible
to completely store the
armrest due to the thickness
of the belt, do not attach the
unit to the armrest.
Belt Guide
Check the
direction.
Not Loose
Attaching to the armrest
Place the unit
so that the air
outlet faces
forward.
FP-JC2.indd 12 2018/06/28 11:35:40
E-13
4
5
Fasten the buckle while pulling the
belt so that it is tight and securely in
place.
If there is left over belt length, place
it under the armrest.
To unfasten the belt, refer to E-11
"Unfastening the belt".
approx 42°
approx 84°
approx 26°
approx 52°
6
To attach the car adapter, refer to steps 8 and 9 of E-10
Attaching to the seat back.
Adjusting the airow direction
Air outlet louver
Adjust the angle of louver
by pressing corner
FP-JC2.indd 13 2018/06/28 11:35:45
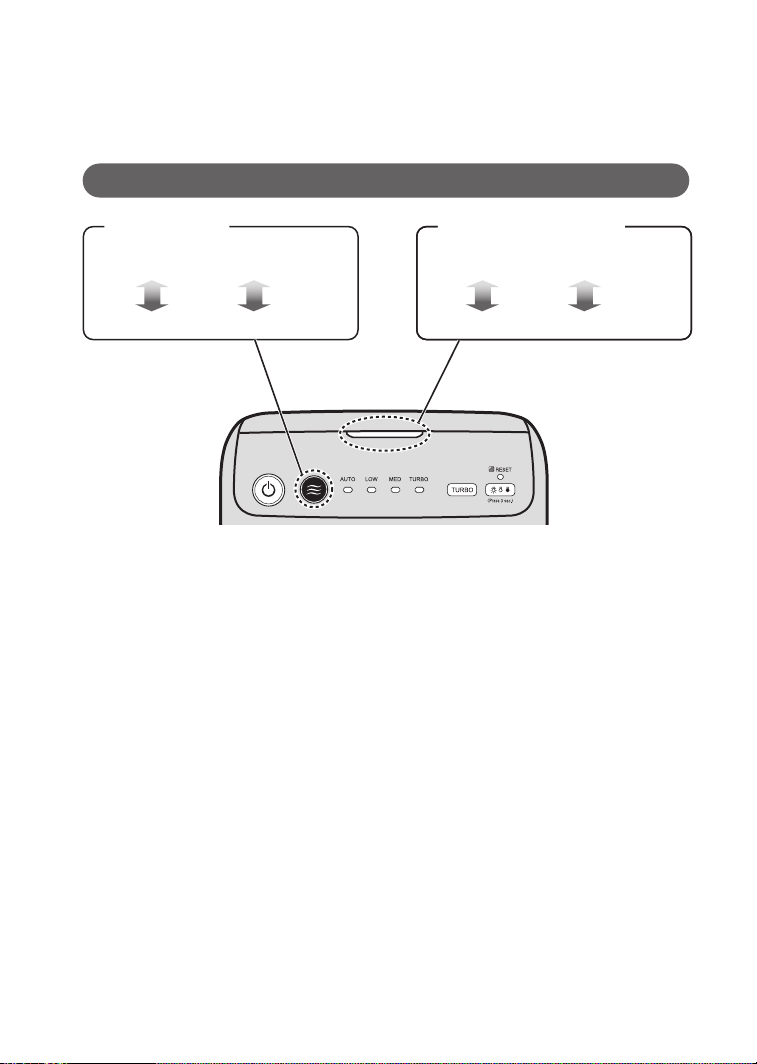
E-14
Selecting Mode
OPERATION
Light Control
Engine synchronizing function
AUTO
MED OFF
LOW
AUTO
……
The fan speed is automatically
controlled depending on air
condition.
「
TURBO
」 運転
When you want to reduce the odor quickly
While the operation is stopped
• The “TURBO” is enabled by just pressing the
Turbo Button. When the “TURBO” is executed
by pressing the button, the operation is
stopped by pressing the Turbo Button or
Operation Button and returns to "AUTO".
In operation
• If you press the Turbo Button
or Button during the “TURBO”
operation, the mode returns to
the operation mode immediately
before the “TURBO”.
Select the desired brightness.
Even when the power is OFF, the airow lamp is lit on the "dark" setting and
does not turn off.
(With the unit ON)
If the vehicle's engine is turned off and the vehicle is stopped while the unit
is operating, the unit resumes operating in the same mode when the vehicle's
engine is started back up.
• For preventing you from forgetting to turn OFF the product, it automatically stops after 4
hours from the operation is started, however, if the main unit is operated even if the key
of the vehicle is pulled out or the engine switch is turned OFF, pull out the cigar plug for
preventing the dead battery.
• It is not a failure should the fan operate with a delay of about 3 to 10 seconds after starting.
About twice Plasmacluster ion of "MED" fan speed is
discharge with stronger air volume for 30 minutes.
Brighter
Turn OFF
Darker
FP-JC2.indd 14 2018/06/28 11:35:49
E-15
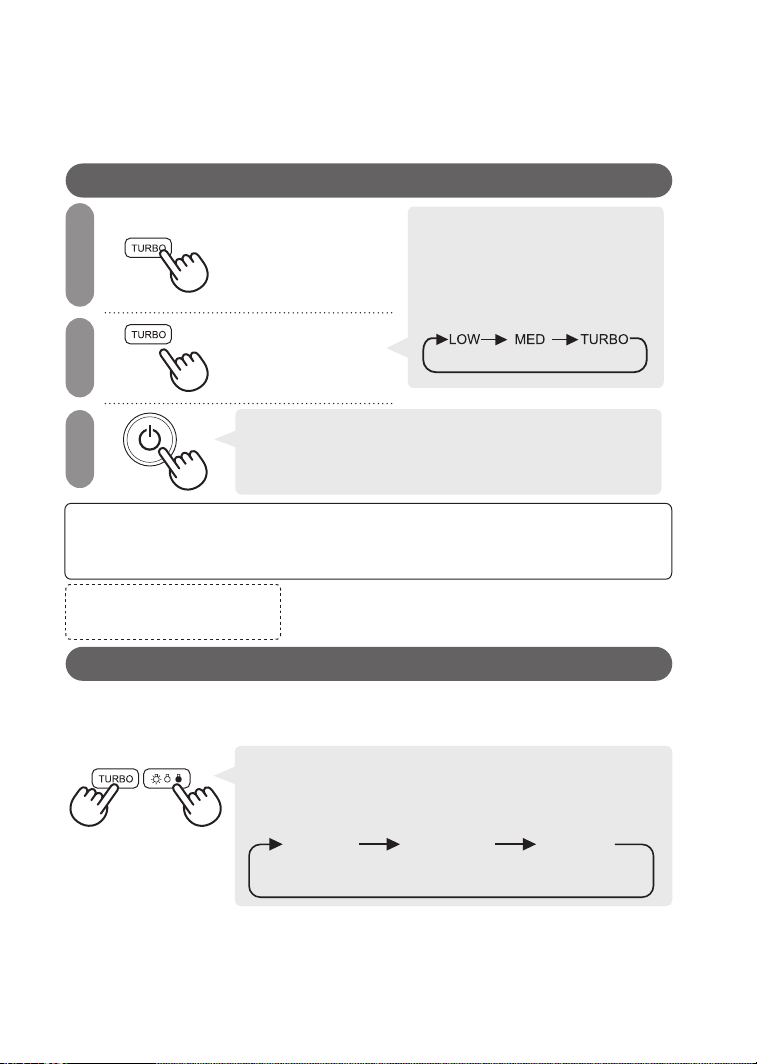
1
2
3
Adjusting Sensor Sensitivity(Dust / Odor Sensor)
Press more
3 seconds
(Less than 8
seconds) Set the
desired sensor
sensitivity.
• The airow lamp displays
the current sensor setting.(At
time of shipment, the lamp
displays the standard setting.)
• Pressing the button, changes
the display as shown below.
「LOW」
「STANDARD」
「HIGH」
• If the power OFF Button is not pushed within 8 seconds
of adjusting
sensor
sensitivity,the setting will be saved
automatically.
• The sensor sensitivity setting will be saved even if the
unit is unplugged.
Items detected by the sensor
• House dust (dirt, mite feces and remains, mold spores, pollen), cigarette
smoke, etc.
• Cigarette and incense stick odor, cosmetic, alcohol, spray, and other odors.
Cleanliness Monitor
「
Yellow
」
…SET to “LOW”
「
Green
」
…SET to “HIGH”
Setting the lter maintenance notication lamp time
You can change the amount of time that accumulates until the lter
maintenance notication lamp lights up to the amount that you prefer.
※
At time of shipment, the time is set to the standard time of 40 hours.
• With the unit idol, pressing the Turbo operation
button and Light control button at the same time for 3
seconds switches the unit to the Filter maintenance
lamp setting mode.
• Press the Turbo button to specify the time.
Weak
lamp lit
(20 hours)
Turbo
lamp lit
(80 hours)
Standard
lamp lit
(40 hours)
Benchmarks for setting the lter maintenance lamp light up time.
Example:
When set to 40 hours and driving 2 hours a day 5 days a week, the lamp
will light up in about one month.
(With the unit OFF)
FP-JC2.indd 15 2018/06/28 11:35:51
E-16
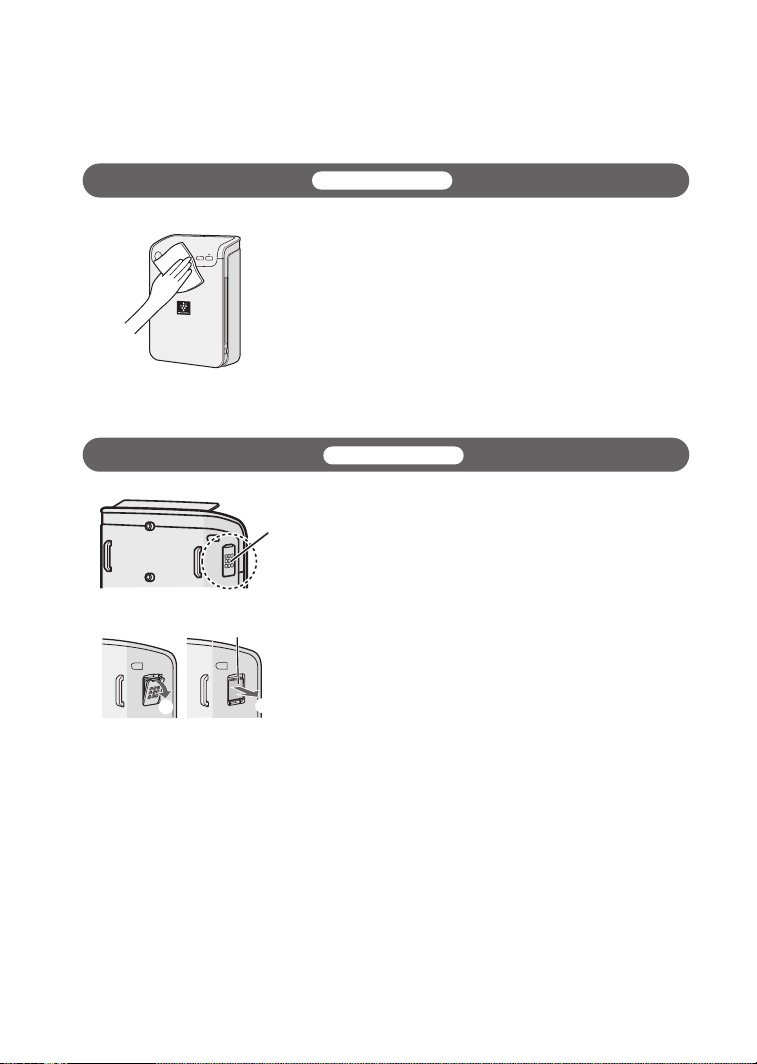
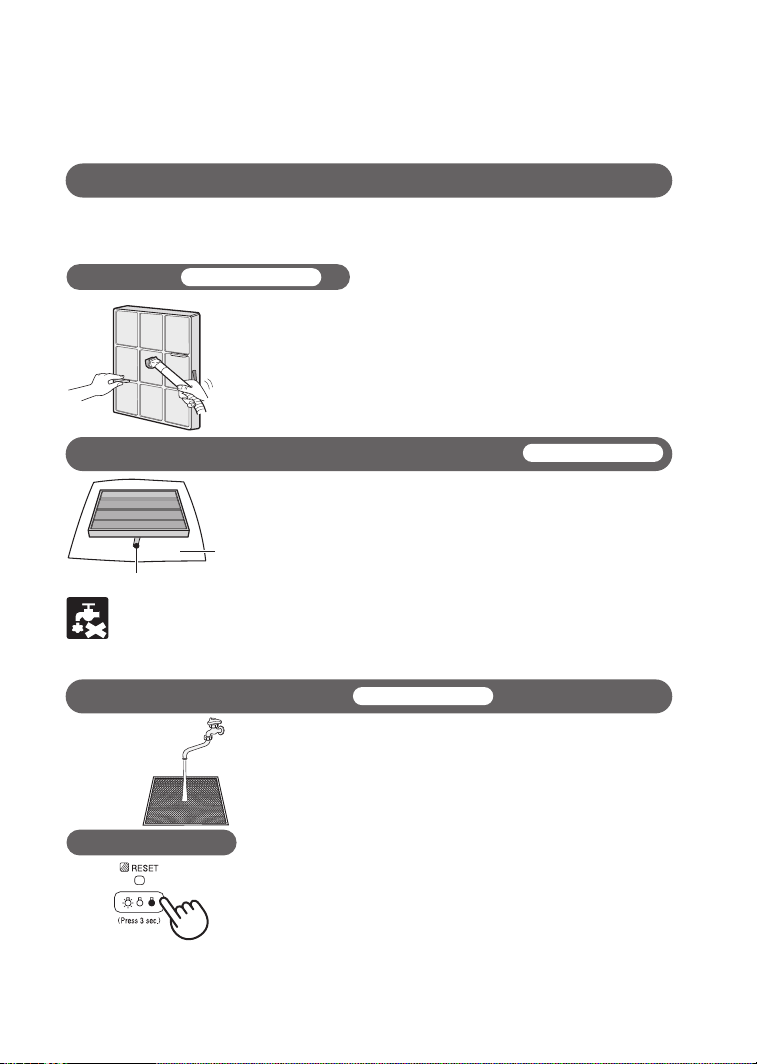
CARE AND
MAINTENANCE
①
②
Main Unit/Front
Panel
One time per month.
<For Stubborn Dirt>
Use a soft cloth dampened with water or
warm water.
Wipe with a dry, soft cloth
Dust/Odor Sensor
Sensor
Cover
Filter
Gently remove dust from sensor
cover with vacuume cleaner
When washing the lter
①
Remove the sensor lter.
②
If the sensor lter is very dirty, wash it with
water and dry it thoroughly.
One time per month.
FP-JC2.indd 16 2018/06/28 11:35:53
E-17
When the lter maintenance lamp lights up
(Yellow)
If you are concerned about an odor even if the lter maintenance lamp has
not lit up, do lter maintenance when the following odors are particularly
strong, and also refer to the Troubleshooting section on page E-20.
All-in-one dust collection/deodorizing F lter
Pre-Filter
Washable Deodorizing Filter
Never wash with water.
Vacuum dust with a vacuum cleaner
• When vacuuming, use the low setting.
When the lter is extremely dirty.
In a kitchen detergent dissolved
in liquid, soak wash for about 10
seconds.
※
After thoroughly rinsing off
the detergent, dry the lter in shade.
• Clean only the side without the tag.
Never clean the opposite side. Cleaning
the back degrades lter performance.
• To prevent damaging the lter, do not
use excessive force when cleaning.
How to clean when there is a very
strong odor.
• Dry the lter for about 6 hours in direct
sunlight.Make sure that the lter is not
exposed rain or snow.
Vacuum dust with a vacuum cleaner
How to clean when there is a very
strong odor.
Rinse the lter with water for about 2
or 3 minutes and then dry in a well-
ventilated place.
Insert the car adapter into the power input terminal,
start operation, and then press the Light control button
(also the Filter maintenance reset button) for more
than 3 seconds.
(The Filter maintenance lamp lights off)
Press more 3
seconds
(
Washing with water degrades
lter performance.
)
Lay the lter on
newspaper or a
similar material to
avoid dirtying the
area around it.
Tag
One time per month.
One time per month.
One time per month.
After cleaning
FP-JC2.indd 17 2018/06/28 11:35:56
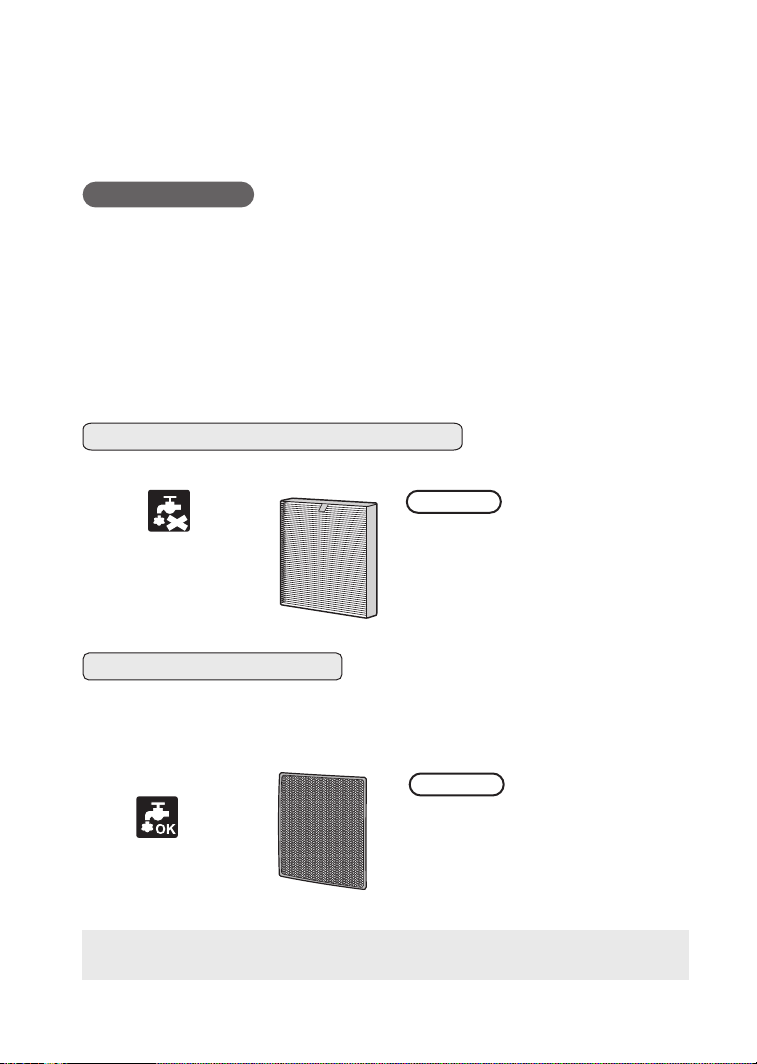
E-18
FILTER REPLACEMENT
GUIDELINES
Sold separately
Model
:
FZ-JC2SFE
(
Replacement timing
※
:
About 6 months to 1 year)
Set items
:
All-in-one dust collection/deodorizing lter(1)
Washable deodorizing lter(1)
※
Calculated based on the JEM1467 standard of the Japan Electrical Manufacture'
sassociation.At a smoking rate of 2cigarettes per day (6month) or 1sigarettes per
day (1year).
All-in-one dust collection/deodorizing lter
Replace periodically.
Water washable
Replace periodically.If you are concerned about odor, washing the lter with water
can lessen the odor.
Depending on the usage environment, the lter may need to be replaced
from every several weeks to every several months.
Washable Deodorizing Filter
• Tobacco smoke (particles)
• Ammonia odor
• Acetaldehyde
• Acetic acid type odor
• Pollen, Allergens (Dust mite feces and remains)
• Mold
• Dust
• Tobacco smoke
(particles)
• Pet odor
• Mold odor
• Ammonia odor
• Food smell
Can catch
Can catch
Do not wash
FP-JC2.indd 18 2018/06/28 11:35:58
E-19
1
Turn the tip of the car adapter and remove it.
How to replace the fuse
Fuse replacement
2
• Be sure to replace with a 2.5A glass tube fuse
(commercially available).
• Before use, make sure that the car adapter tip is
not loose after reattaching it. Using the unit while
the car adapter tip is loose can damage the unit.
Insert the new fuse,
then reassemble as before.
2.5 A glass
tube fuse
New Fuse
• Pollen, Allergens (Dust mite feces and remains)
• Pet odor
• Mold odor
• Ammonia odor
• Food smell
FP-JC2.indd 19 2018/06/28 11:36:00

E-20
TROUBLESHOOTING
Problem WHAT TO DO
The Plasmacluster Ion
Generator does not work.
• Is the Car Adapter connected properly?
Ensure it isconnected correctly.
• Does not a fuse blow?
Replace with a new fuse.
• Does the car use a 24V battery?
The air purier is not compatible with 24V batteries.
How often should I do cleaning
and maintenance?
• To maintain ion concentration and air purifying
performance, clean the pre-lter about once
a month.Regular and careful cleaning helps
maintain ion release and dust collection performance.
Cleanliness Monitor color
does not change. Odor Monitor
does not light up.
• When the unit has been running it for some time,
sensor sensitivity sometimes becomes unstable
and Cleanliness Monitor color does not change as a result.
• When the Cleanliness Monitor color remains
green (the Odor Monitor is not lit), the air
is being kept clean.When blowing cigarette
smoke and the like on the sensor cover causes
the Cleanliness Monitor to change color, the
Cleanliness Monitor is working properly.
• Inserting the car adapter into the accessory
socket and starting to drive when there is a very
strong odor in the car can lower dust and odor
sensor sensitivity.In this case, remove the car
adapter from the power input terminal, ventilate
the car, and then reinsert the car adapter into the
power input terminal and begin driving.
• Is the air purier installed in a place where it
is difcult to detect dirt? Is the dust and odor
sensor cover and lter dirty?Install the air purier
in a different place and clean the sensor.
• Adjust sensor sensitivity.
The Cleanliness Monitor stays
yellow and does not turn
green. The Odor Monitor stays
yellow and does not turn off.
• Is a car window or door open?
When outdoor air is entering the vehicle it may
take time until the Cleanliness Monitor turns green.
• Dirty or clogged dust(sensitive) sensor openings
interfere with sensor operation. Gently clean the
sensor lter or the sensor cover.
The Cleanliness Monitor
display switches frequently.
• This could be a response to wind due to opening
and closing doors.
• Adjust sensor sensitivity.
The unit display is too bright.
• The Cleanliness Monitor, Odor Monitor, and Filter
maintenance lamp can be turned off.Press the
lamp Brighter, Darker, Turn Off button to switch
the brightness level. (See E-00)
The Cleanliness Monitor does
not light up.
• Is the lamp set to the Turn Off setting?
• Press the lamp Brighter, Darker, Turn Off button
to switch the brightness. (See E-00)
FP-JC2.indd 20 2018/06/28 11:36:01

E-21
Problem WHAT TO DO
The Filter maintenance lamp
has turned green.
• When total running time passes 19,000 hours
(equivalent to 8 hours a day for 6 years and 6
months), the unit stops emitting Plasmacluster
ions and the Filter maintenance lamp light turns
green. The unit no longer emits Plasmacluster
ions but continues to air purify. To replace the
Plasmacluster ion unit, contact your nearest
sales dealer or repair service center.
T
he wind flow lamp is fully lit. • Please remove the car adapter and re-insert it,
then press the operation button again.
• If this happens repeatedly, contact the store of
purchase or SHARP authorized service center.
A discontinuous noise is heard. A
clicking or ticking sound comes
from the unit.
• Clicking or ticking sound may be audible when
the unit is generating ions. You may feel the
sound becomes louder or softer depending on
use environment or operation mode, however,
the effect of Plasmacluster Ion is not changed.
The unit has difculty
detecting odors and cigarette
smoke
.
• Is the lter still in the plastic bag?
Remove the lter from the plastic bag.
• Is the air ow from the air outlet weak?
Clean the sensor cover and pre-lter and the
washable deodorizing lter or all-in-one dust
collection/deodorizing lter.
Air coming out of the air outlet
has an odor.
• Is the unit in use inside a car with a strong odor?
タバコや香水・芳香剤など、強いニオイがあるときにお
使いになると、数週間から数カ月でフィルターからニオ
イが発生し、フィルターの交換が必要な場合があります。
車内の換気と併用してお使いいただくことをおすすめし
ます。
• Is the lter extremely dirty?
Clean the lter. If the odor persists after
cleaning, replace the lter. Plasmacluster ion
generation generates a very small amount of
ozone that may cause an odor from the air outlet,
but it is a minute amount and has no adverse
health affects
.
The lter has an odor. • Dry the lter in sunlight for about 6 hours.(Make
sure that the lter is not exposed rain or snow.)
The operation does not stop
al-though the engine of vehicle
is switched OFF.
• If the main unit is operating even though the key
of the vehicle is pulled out or the engine switch
is turned OFF, pull out the car adapter out to
prevent having a dead battery.
The product does not operate
in conjunction with engine.
• In a vehicle where the power is supplied to the
accessory socket even if the engine of vehicle is
switched OFF, the engine interlocking function
cannot be used.
FP-JC2.indd 21 2018/06/28 11:36:01
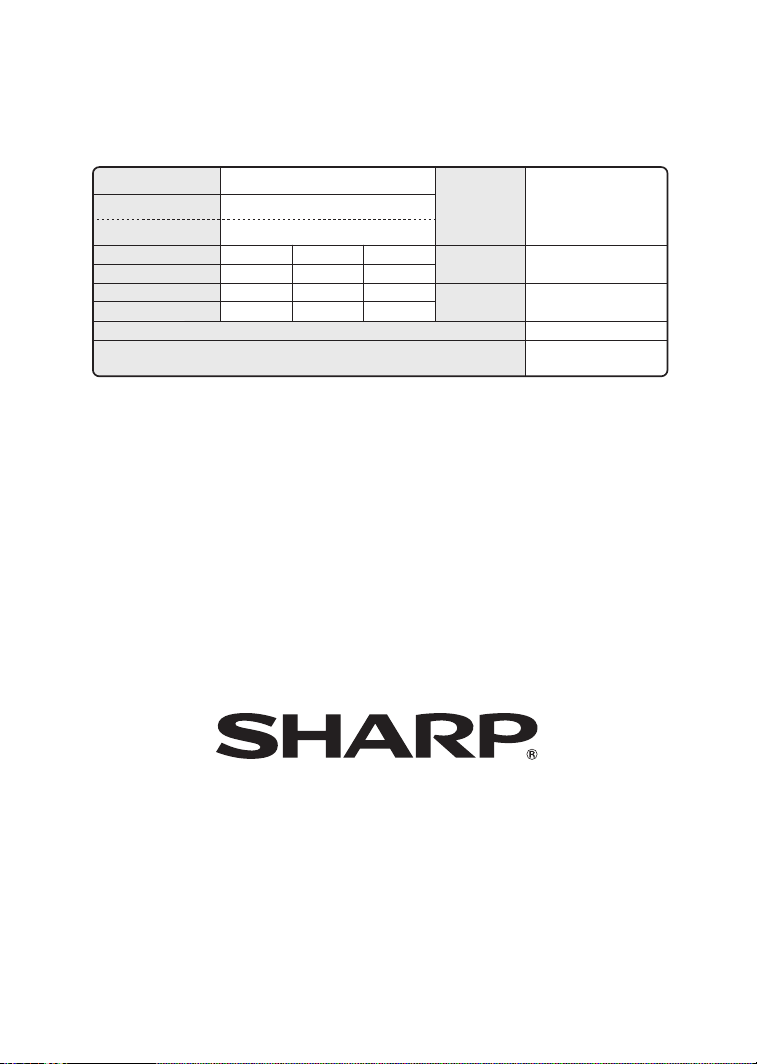
Printed in China TINSEA005KKRZ 18G- ①
OSAKA, JAPAN
SHARP CORPORATION
Power cord
length
Outer
dimensions
(mm)
Weight
Approx.13min(3.6m
3
)
Approx.20min(6.0m
3
)
3.6m
3
Approx.3m
Approx. 1.1kg
(Excluding accessories)
FP-JC2M-B
Car adapter
DC12V
「
TURBO」
0.54m
3
/
min
4.6W
42dB
「
MED」
0.35m
3
/
min
2.4W
32dB
「
LOW」
0.24m
3
/
min
1.8W
26dB
184(W)
77(D)
243(H)
(Excluding accessories)
Operation mode
Air flow
Power consumption
Operating noise level
Model
Power supply
Rated voltage
Capacity applicable for high-density Plasmacluster 25000
※1
Cleaning time
※2
※
1Based on a unit attached to the passenger seat seatback and a car air
conditioning air outlet speed of 4-meters per second (equivalent to the “low”
setting) with the unit operating under the “standard” setting in the center of the
space (0.5m above the oor) to maintain 25000 ions per cm³.
※
2 <Criteria for calculating air purier time>
Company standards based on JEM1467 of the Japan Electrical Manufacturers'
Association. The time required to reduce dust concentration from 1.25mg/m³ to
0.15mg/m³ (equivalent to reducing concentration to 12% of its initial amount) in a
space with the volume of a typical car (3.6m³) or minivan (6.0m³).
SPECIFICATIONS
FP-JC2.indd 24 2018/06/28 11:36:02