*9001334149*
Ú ,QVWDOODWLRQLQVWUXFWLRQV Ù
PLQ
PLQ
PLQ
PLQ
PLQ
PLQ
&

D
E
F
PLQ
GH

en
Ú
,QVWDOODWLRQLQVWUXFWLRQV
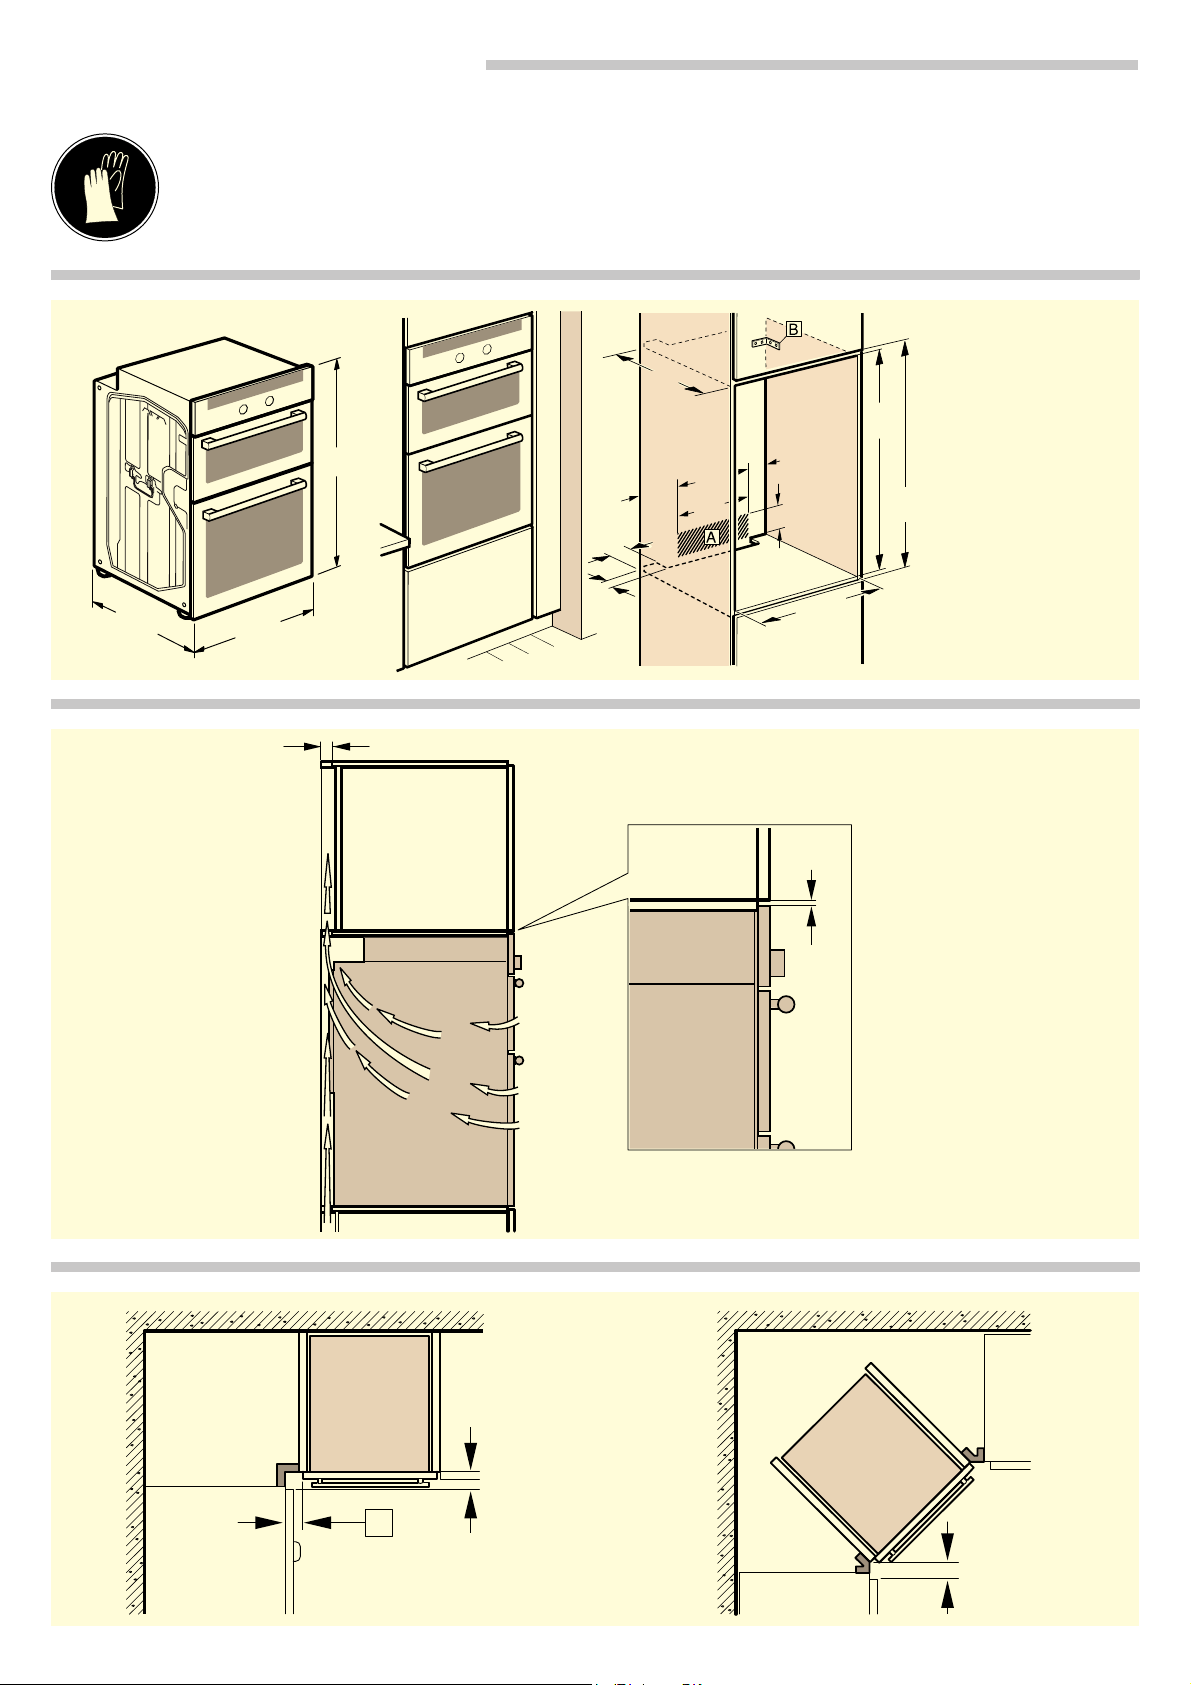
,PSRUWDQWLQIRUPDWLRQ²)LJ
■ 7KH VDIH RSHUDWLRQ RI WKLV DSSOLDQFH FDQ RQO\ EH JXDUDQWHHG LI LW
KDV EHHQ LQVWDOOHG WR D SURIHVVLRQDO VWDQGDUG LQ DFFRUGDQFH ZLWK
WKHVH LQVWDOODWLRQ LQVWUXFWLRQV 7KH LQVWDOOHU VKDOO EH OLDEOH IRU DQ\
GDPDJHUHVXOWLQJIURPLQFRUUHFWLQVWDOODWLRQ
■ 'RQRWXVHWKHGRRUKDQGOHWRWUDQVSRUWRULQVWDOOWKHDSSOLDQFH
■ 7KHDSSOLDQFHPXVWEHWUDQVSRUWHGE\WZRSHRSOHXVLQJWKH
FDUU\KDQGOHVRQHLWKHUVLGH²ILJXUH E
■ &KHFNWKHDSSOLDQFHIRUGDPDJHDIWHUXQSDFNLQJLW'RQRW
FRQQHFWWKHDSSOLDQFHLILWKDVEHHQGDPDJHGLQWUDQVLW
■ 3URFHHGLQDFFRUGDQFHZLWKWKHLQVWDOODWLRQVKHHWVIRULQVWDOOLQJ
DFFHVVRULHV
■ %HIRUH VWDUWLQJ XS WKH DSSOLDQFH UHPRYH DQ\ SDFNDJLQJ PDWHULDO
DQGDGKHVLYHILOPIURPWKHFRRNLQJFRPSDUWPHQWDQGWKHGRRU
■ )LWWHGXQLWVPXVWEHKHDWUHVLVWDQWXSWR &DQGDGMDFHQW
XQLWIURQWVXSWR &
■ 'R QRW LQVWDOO WKH DSSOLDQFH EHKLQG D GHFRUDWLYH GRRU RU WKH GRRU
RIDNLWFKHQXQLWDVWKLVPD\FDXVHWKHDSSOLDQFHWRRYHUKHDW
■ $Q\FXWRXWVWKDWQHHGWREHPDGHLQWKHXQLWVVKRXOGEHPDGH
EHIRUH WKH DSSOLDQFH LV LQVWDOOHG 5HPRYH DQ\ VKDYLQJV DV WKH\
PD\SUHYHQWWKHHOHFWULFDOFRPSRQHQWVIURPZRUNLQJSURSHUO\
■ :HDU SURWHFWLYH JORYHV VR WKDW \RX GR QRW FXW \RXUVHOI3DUWV WKDW
DUHDFFHVVLEOHGXULQJLQVWDOODWLRQPD\KDYHVKDUSHGJHV
■ 7KH PDLQV VRFNHW IRU WKH DSSOLDQFH PXVW HLWKHU EH ORFDWHG LQ WKH
KDWFKHGDUHD $RURXWVLGHRIWKHDUHDZKHUHWKHDSSOLDQFHLV
LQVWDOOHG
■ 6HFXUH DQ\ XQVHFXUHG XQLWV WR WKH ZDOO XVLQJ D VWDQGDUG EUDFNHW
%
■ 7KHGLPHQVLRQVLQWKHILJXUHVDUHLQPP
$SSOLDQFHLQDWDOOXQLW²ILJ
7R YHQWLODWH WKH DSSOLDQFH WKHUH PXVW EH D JDS RI PP EHWZHHQ
DOOLQWHUPHGLDWHIORRUVDQGWKHZDOO
,IWKHWDOOXQLWKDVDQRWKHUEDFNSDQHOLQDGGLWLRQWRWKHHOHPHQW
EDFNSDQHOVWKLVPXVWEHUHPRYHG
'RQRWILWWKHDSSOLDQFHWRRKLJKXSLWPXVWEHSRVVLEOHIRU
DFFHVVRULHVWREHUHPRYHGHDVLO\
&RUQHULQVWDOODWLRQ²ILJ
7RHQVXUHWKDWWKHDSSOLDQFHGRRUFDQEHRSHQHGLQDFRUQHU
LQVWDOODWLRQWDNHDFFRXQWRIWKHGLPHQVLRQV'LPHQVLRQ &LV
GHSHQGHQWRQWKHWKLFNQHVVRIWKHXQLWIURQWXQGHUWKHKDQGOH
&RQQHFWLQJWKHDSSOLDQFHWRWKHHOHFWULFLW\VXSSO\
7KHDSSOLDQFHFRUUHVSRQGVWRSURWHFWLRQFODVV,DQGPXVWRQO\EH
RSHUDWHGZLWKDSURWHFWLYHHDUWKFRQQHFWLRQ
7KH IXVH SURWHFWLRQ PXVW FRUUHVSRQG WR WKH SRZHU UDWLQJ VSHFLILHG
RQWKHDSSOLDQFHVUDWLQJSODWHDQGWRORFDOUHJXODWLRQV
7KHDSSOLDQFHPXVWEHGLVFRQQHFWHGIURPWKHSRZHUVXSSO\
ZKHQHYHULQVWDOODWLRQZRUNLVEHLQJFDUULHGRXW
:KHQWKHDSSOLDQFHLVLQVWDOOHGSURWHFWLRQPXVWEHSURYLGHG
DJDLQVWDFFLGHQWDOFRQWDFWLQWKHIXWXUH
2QO\DOLFHQVHGSURIHVVLRQDOPD\FRQQHFWWKHDSSOLDQFH
,Q WKH SHUPDQHQW HOHFWULFDO ZLULQJ DQ HQHUJ\LVRODWLQJ GHYLFH PXVW
EHSURYLGHGLQWKHSKDVHVLQDFFRUGDQFHZLWKWKHLQVWDOODWLRQ
UHTXLUHPHQWV ,GHQWLI\ WKH OLYH DQG QHXWUDO FRQGXFWRUV LQ WKH PDLQV
VRFNHW7KHDSSOLDQFHPD\EHGDPDJHGLILWLVQRWFRQQHFWHG
FRUUHFWO\
2QO\FRQQHFWWKHDSSOLDQFHDVVKRZQLQWKHFRQQHFWLRQGLDJUDP
6HHWKHUDWLQJSODWHIRUWKHYROWDJH
)L[LQJWKHDSSOLDQFHLQSODFH)LJ
■ 'RQRWXVHWKHGRRUKDQGOHWRWUDQVSRUWRULQVWDOOWKHDSSOLDQFH
■ 7KHDSSOLDQFHPXVWEHWUDQVSRUWHGE\WZRSHRSOHXVLQJWKH
FDUU\KDQGOHVRQHLWKHUVLGH²ILJXUH E
5HPRYH WKH WUDQVSRUW ORFNV RQ HDFK VLGH DQG WKURZ WKHP DZD\ ²
ILJXUH D
&DUU\WKHDSSOLDQFHE\WKHFDUU\KDQGOHVRQHDFKVLGH6XSSRUW
WKHIURQWRIWKHDSSOLDQFHZLWK\RXUKDQGZKHQGRLQJVR²
ILJXUH E
3ODFHWKHDSSOLDQFHLQWKHXQLWDQGIROGWKHFDUU\KDQGOHVEDFN
GRZQEHIRUHSXVKLQJLWLQ²ILJXUH F
3XVKWKHDSSOLDQFHLQIXOO\'RQRWNLQNRUWUDSWKHFRQQHFWLRQ
FDEOHZKHQGRLQJVRRUURXWHLWRYHUVKDUSHGJHV
&HQWUHWKHDSSOLDQFH²ILJXUH G
7KHUH PXVW EH DQ DLU JDS RI PP EHWZHHQ WKH DSSOLDQFH DQG WKH
IURQWRIDGMDFHQWXQLWV
8VHDVSLULWOHYHOWRSRVLWLRQWKHDSSOLDQFHVRWKDWLWLVSHUIHFWO\
OHYHO
6FUHZWKHDSSOLDQFHLQWRSODFH²ILJXUH H
5HPRYDO
'LVFRQQHFWWKHDSSOLDQFHIURPWKHSRZHUVXSSO\
8QGRWKHVHFXULQJVFUHZV
/LIWWKHDSSOLDQFHVOLJKWO\DQGSXOOLWRXWFRPSOHWHO\

el
Ù
■ ·
■
■
E
■
■
■
■
&
&
■
■
■
■
$
■
%
■ ¨PP
PP
&
,
■
■
E
D
E
F
G
PP
H