
Table of Contents
SpectraView Contents ............................................................................................................ 3
SpectraView Hardware Setup .............................................................................................. 4
SpectraView Software Setup ................................................................................................ 5
PC ....................................................................................................................................... 5
Macintosh ......................................................................................................................... 5
Macintosh Version
Calibrating Your Monitor ................................................................................................. 6
Creating a Custom Preset ..............................................................................................12
Adjusting Monitor Controls........................................................................................... 14
Calibration Graphing ...................................................................................................... 15
PC Version
Calibrating Your Monitor ................................................................................................16
Creating a Custom Preset ............................................................................................. 22
Adjusting Monitor Controls........................................................................................... 25
Calibration Logging ....................................................................................................... 26
Troubleshooting .................................................................................................................... 28
Calibrator Specifications ..................................................................................................... 29
Limited Warranty for SpectraView Hardware .................................................................. 30
SpectraView End-User Software License Agreement ...................................................... 32
References .............................................................................................................................. 33
3
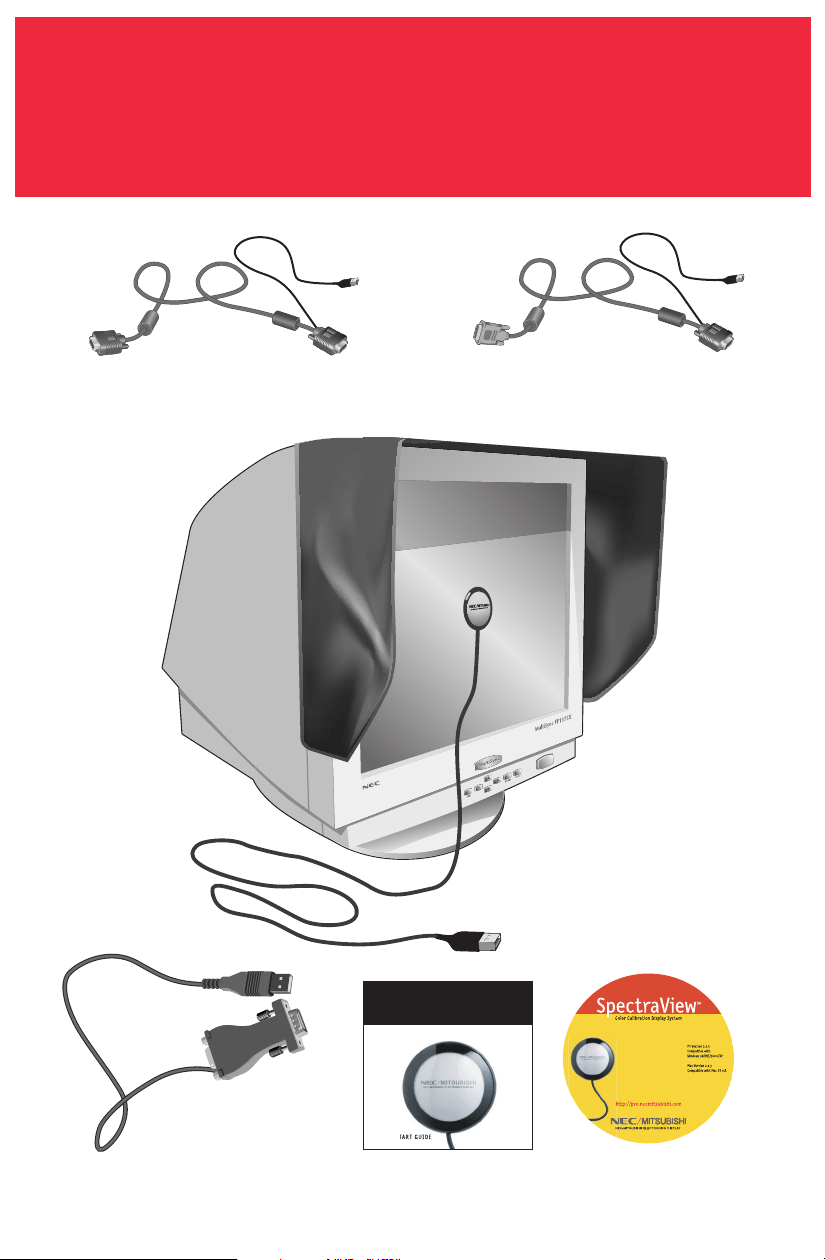
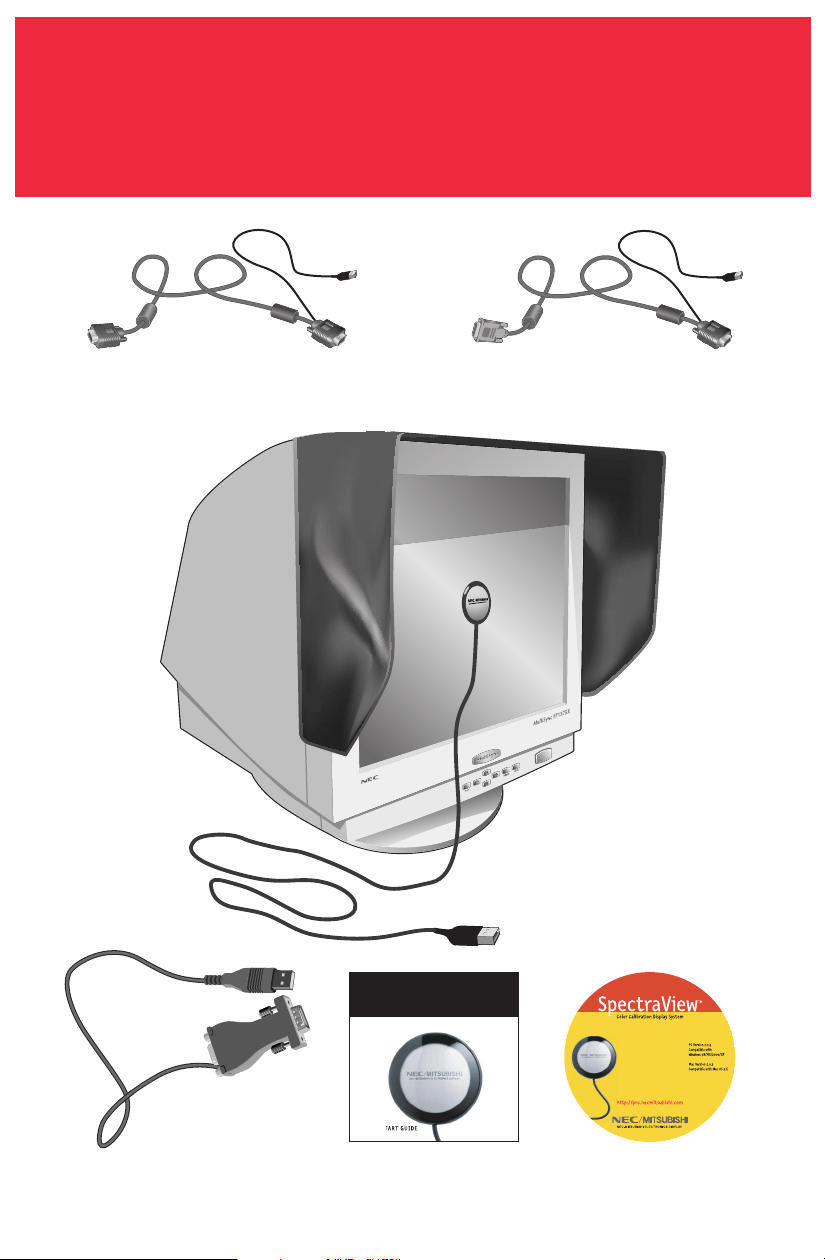
SpectraView Contents
VGA to VGA Video Cable
VGA to DVI Video Cable
Quick Start Guide
Sp
p
ectraView
TM
Color Calibration Dis
p
lay Syste
m
Q
UICK S
T
Hood
SpectraView
Color Calibrator
VGA to VGA Video
SpectraView Adapter
CD-ROM

4
1. Connect the SpectraView video cable to input connector on monitor.
•For the MultiSync FP955 / FP1375X connect the DVI-A connector of the
SpectraView video cable to the DVI input connector on the monitor.
•For the DiamondPro 930SB-BK, DiamondPro 2070SB-BK and MultiSync
FP2141SB-BK connect the captive cable or the VGA cable on the monitor to the
female end of the 15-pin adapter and the male end to the computer system. Skip to
Step #3.
•For the DiamondPro 2060u connect the VGA connector (without the USB pig-tail
connector) of the SpectraView video cable to Signal B on the monitor.
2. Connect the VGA connector (with the USB pig-tail connector) of the SpectraView video
cable to the output connector of the computer system.
3. Connect the USB pig-tail connector of the SpectraView video cable to an available USB
connector on the computer system. For DiamondPro 930SB-BK, DiamondPro 2070SB-
BK and MultiSync FP2141SB-BK use the USB pig-tail of the adaptor to connect to the
computer.
4. Connect the USB connector of the SpectraView Color Calibrator to an available USB
connector on the computer system.
5. Remove adhesive covering on the Velcro tabs of the SpectraView hood and attach the
hood to the front top and sides of the monitor bezel (Figure 1).
SpectraView
Hardware Setup
Figure 1

5
Windows (98SE, Me, 2000, XP)
1. Insert the SpectraView CD-ROM in the CD-ROM drive.
2.
Add/New Hardware Wizard will appear on the screen upon initial startup.
Now select “Search for a suitable driver for my device” and click “Next”. In the
next menu check the box in the search location for “CD-ROM Drives” or “Remov-
able Media” and click “Next”.
3.
After driver installation is complete, Run “Spectraview\spectraview.exe” from the
CD-ROM.
4. Follow screen prompts for software installation.
5. Restart the computer and monitor.
Macintosh (OS 9.x or higher)
1. Insert the SpectraView CD-ROM in the CD-ROM drive.
2. Double click on the Macintosh Folder.
3. Double click on the SpectraView Installer icon.
4. Follow screen prompts for software installation.
5. Restart the computer and monitor.
Now you are ready to launch the SpectraView Software.
Please see the online documentation in this manual for the SpectraView Hardware
limited warranty.
SpectraView
Software Setup
6
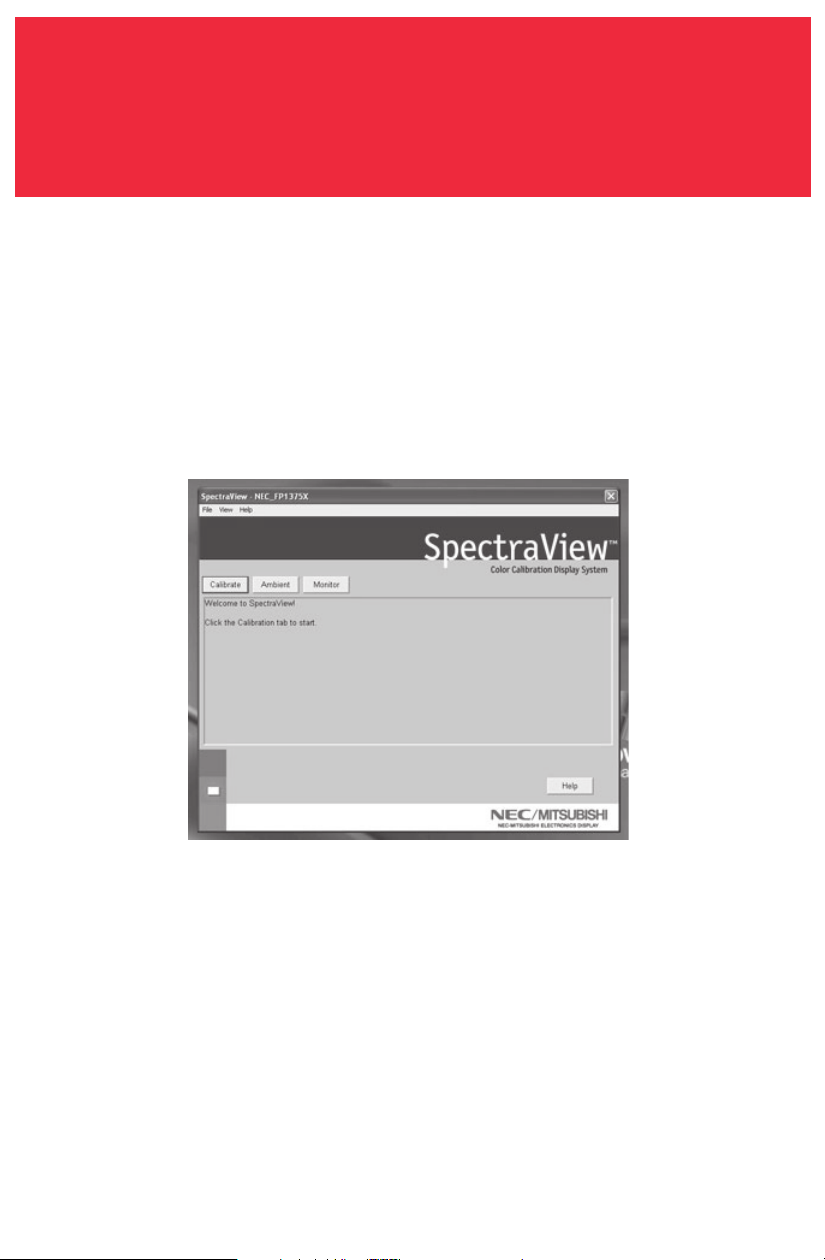
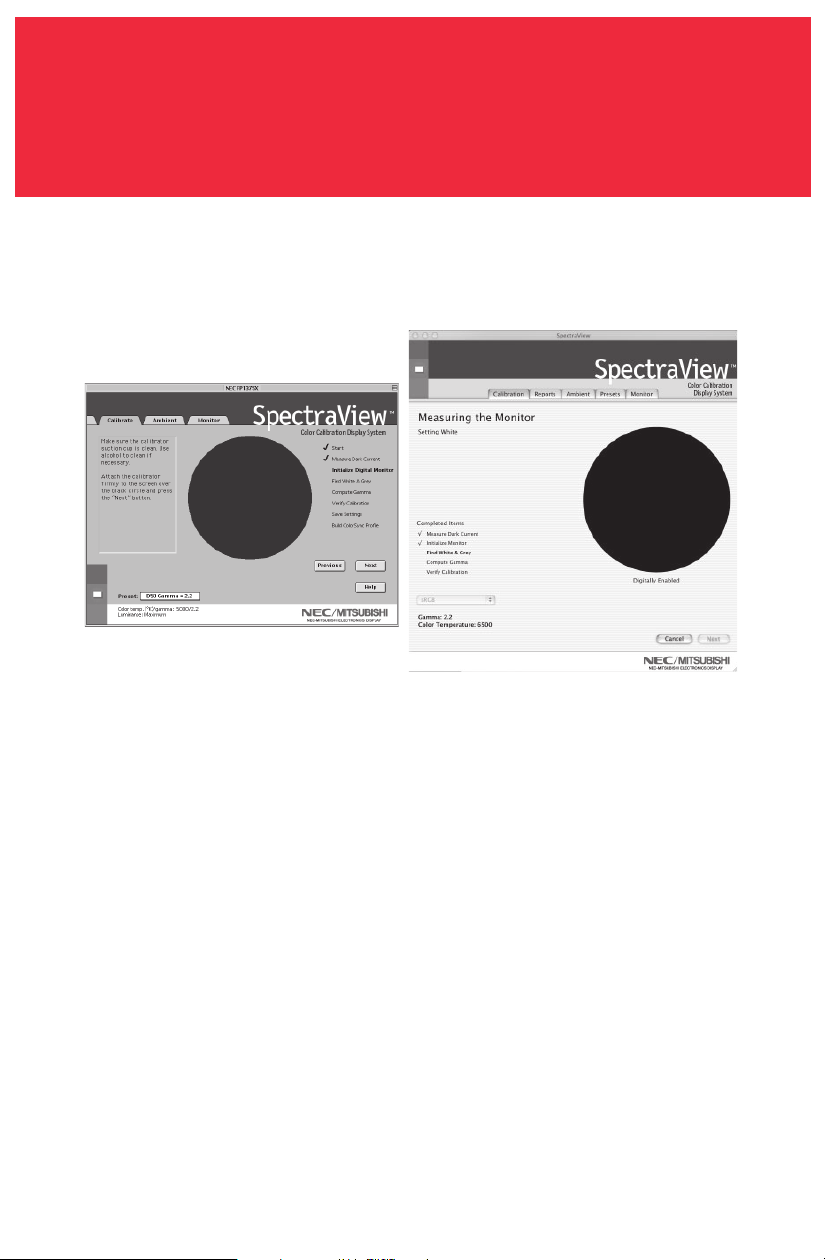
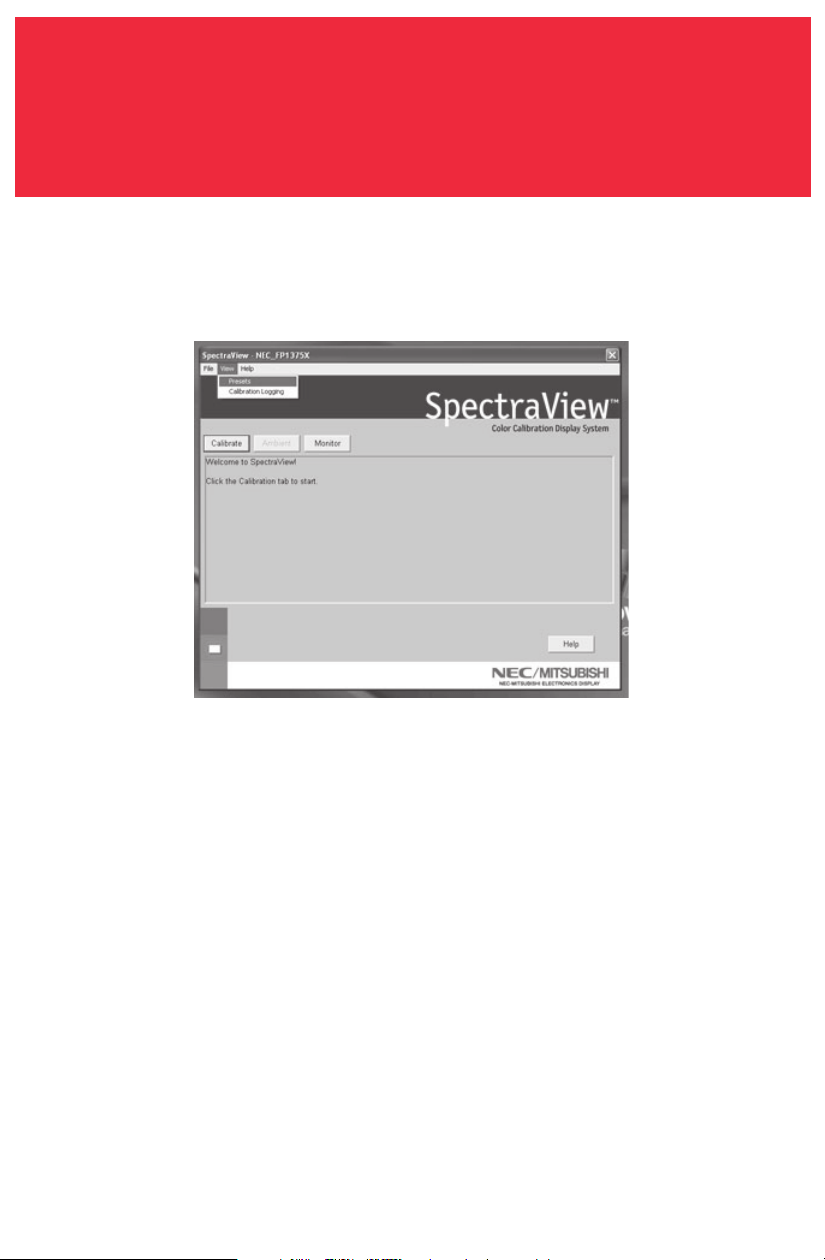
Launch the SpectraView program.
While the SpectraView software is loading, it will initialize the monitor and the
color calibrator for adjustment. This process takes approximately 30 seconds to
complete but may vary based on system performance.
Note: If one of these two devices aren’t detected an error screen will appear asking
you to check the connection.
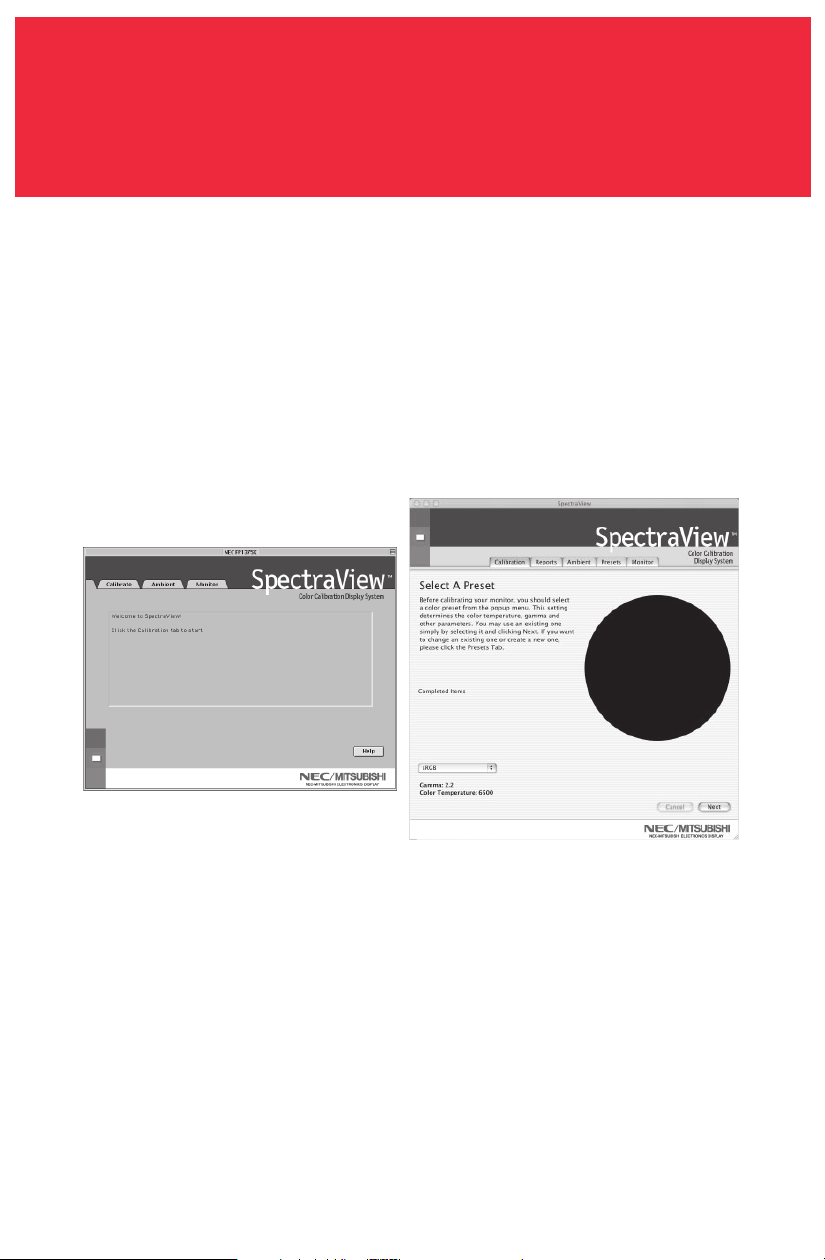
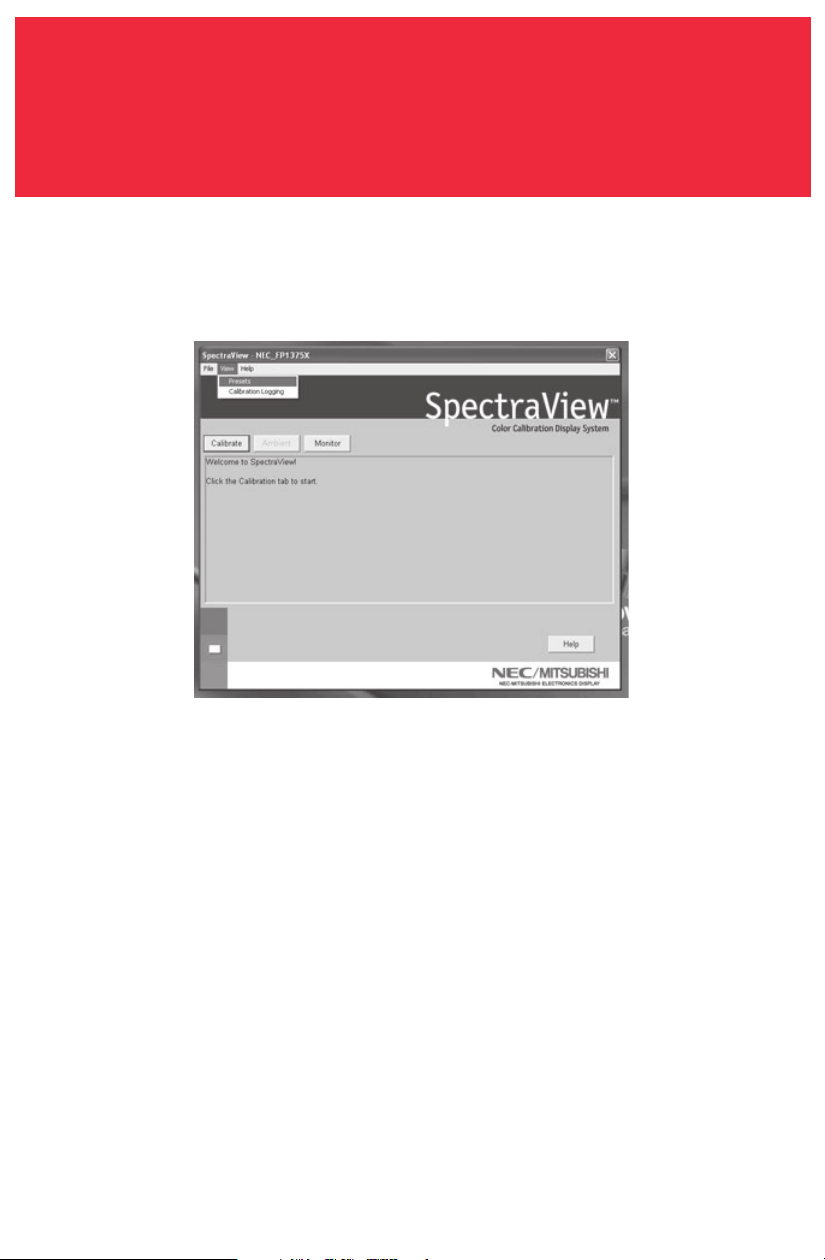
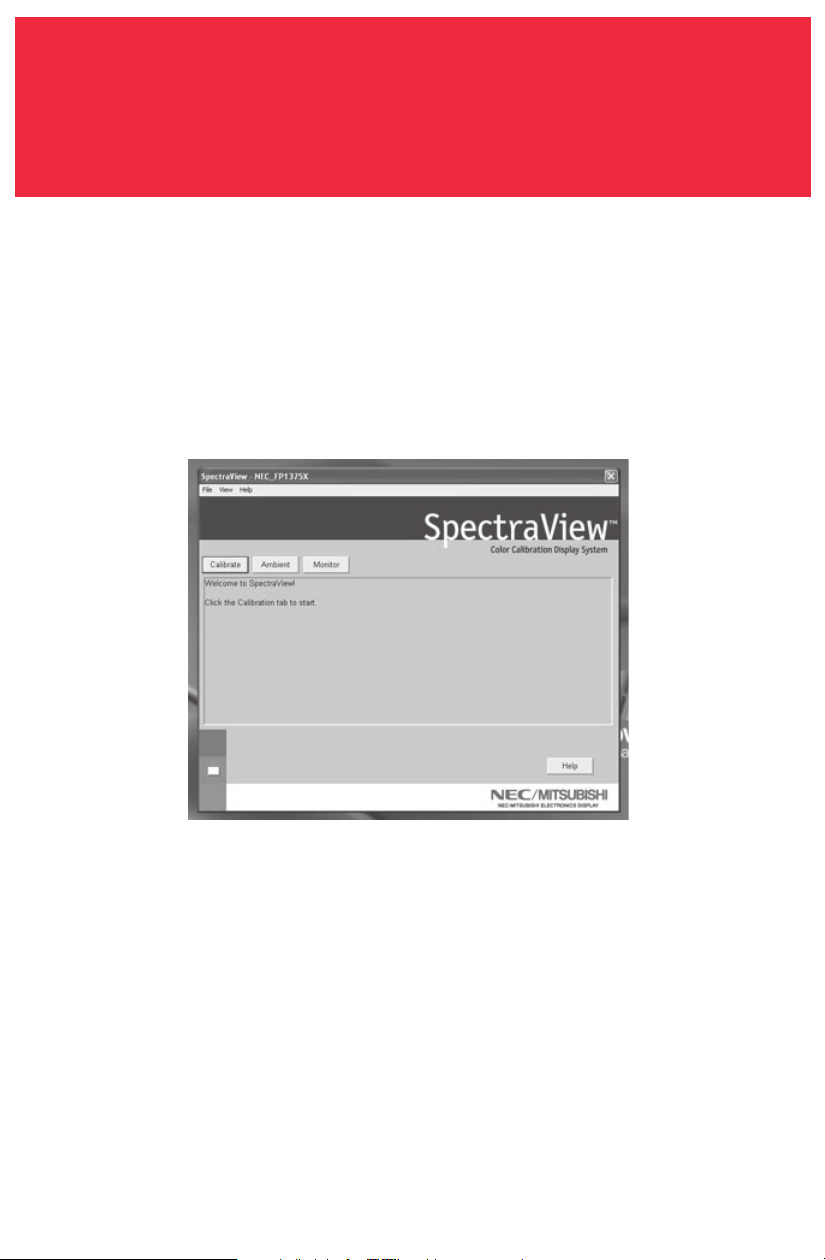
If this is the first time that SpectraView has run, the monitor will be uncalibrated.
To perform a calibration, click “Calibration” in the software menu (Figure 3a).
SpectraView allows you to specify the parameters you prefer to use for calibra-
tion. These parameters (color temperature, gamma, and white luminance) are
contained in “Presets”, which are small files containing these values. SpectraView
ships with two Presets already installed, sRGB and D50. You may select a Preset
for calibration by clicking on the “Preset” pulldown in the lower-left corner of the
CALIBRATE panel. You may also create your own Presets through the process
described in Section 4: Creating a Custom Preset.
Calibrating Your Monitor
MAC VERSION
Figure 3a
OSX
OS9

7
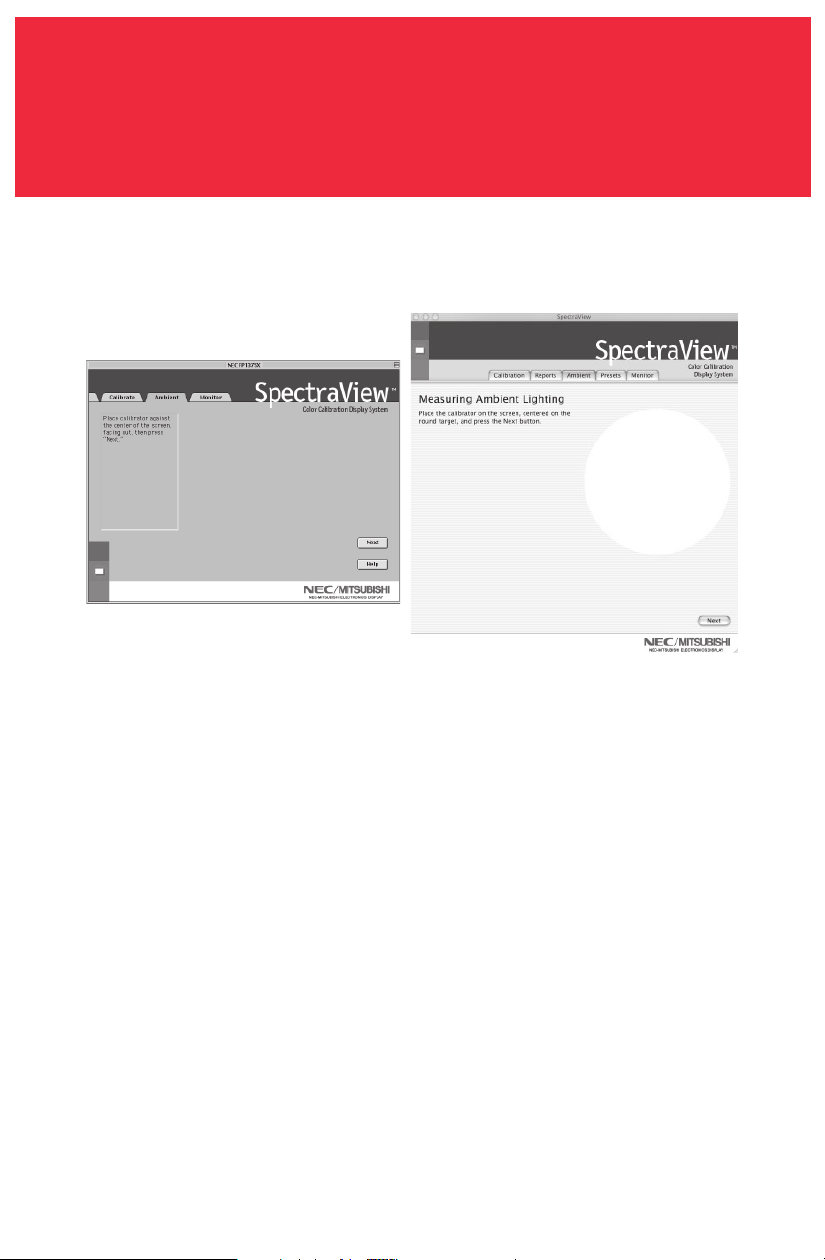
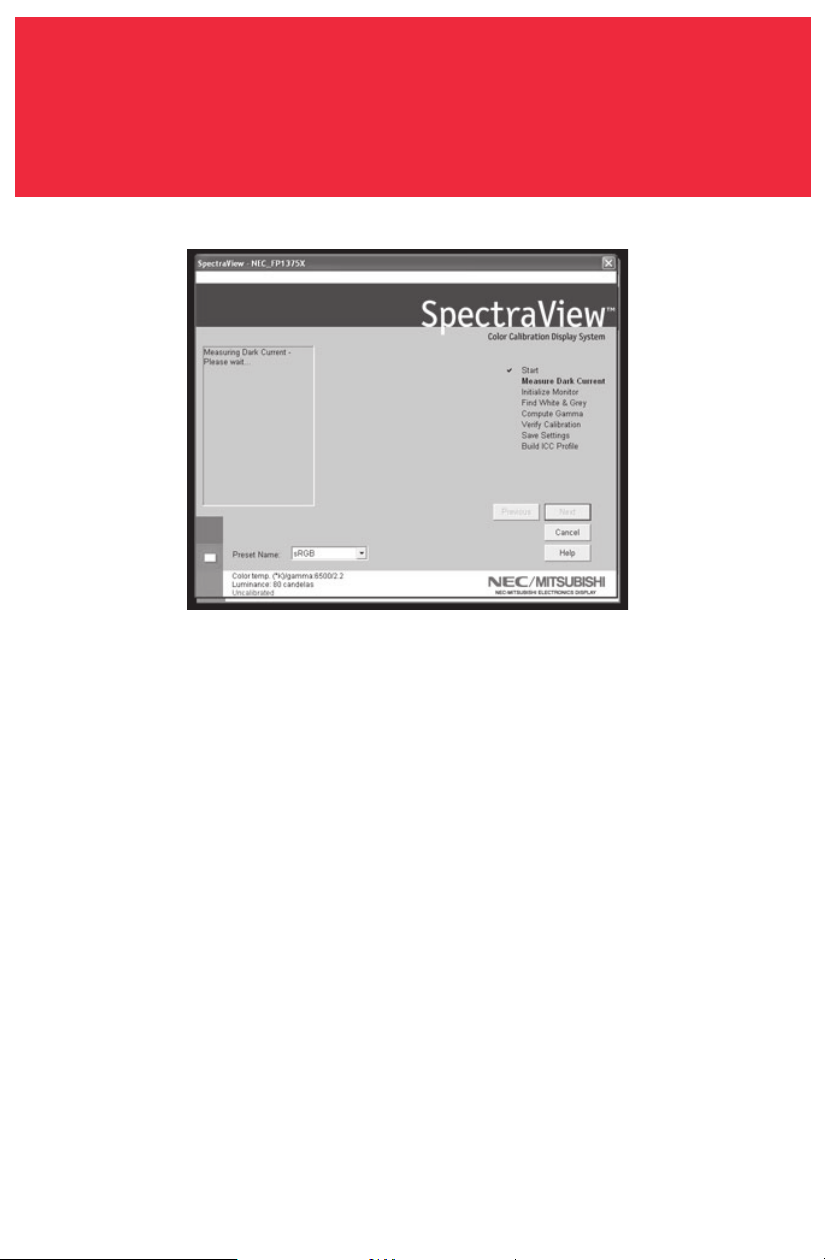
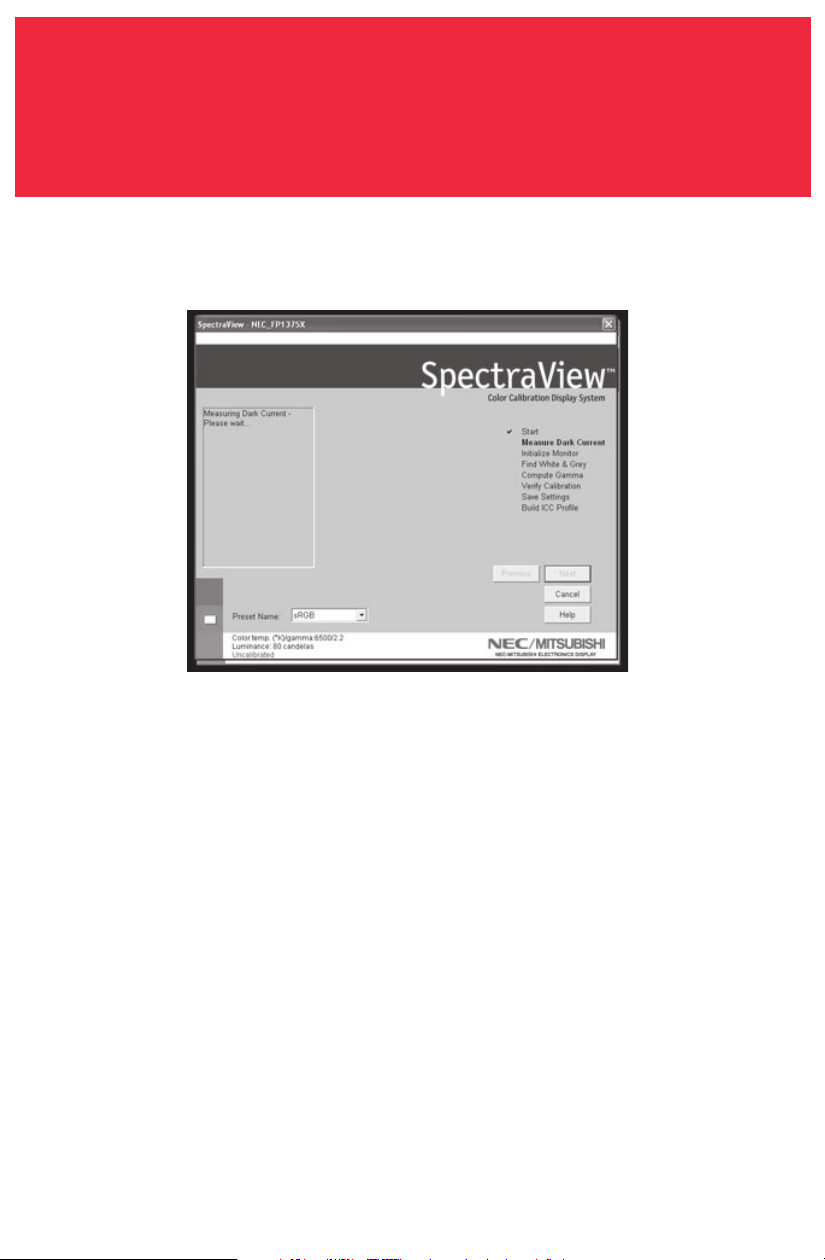
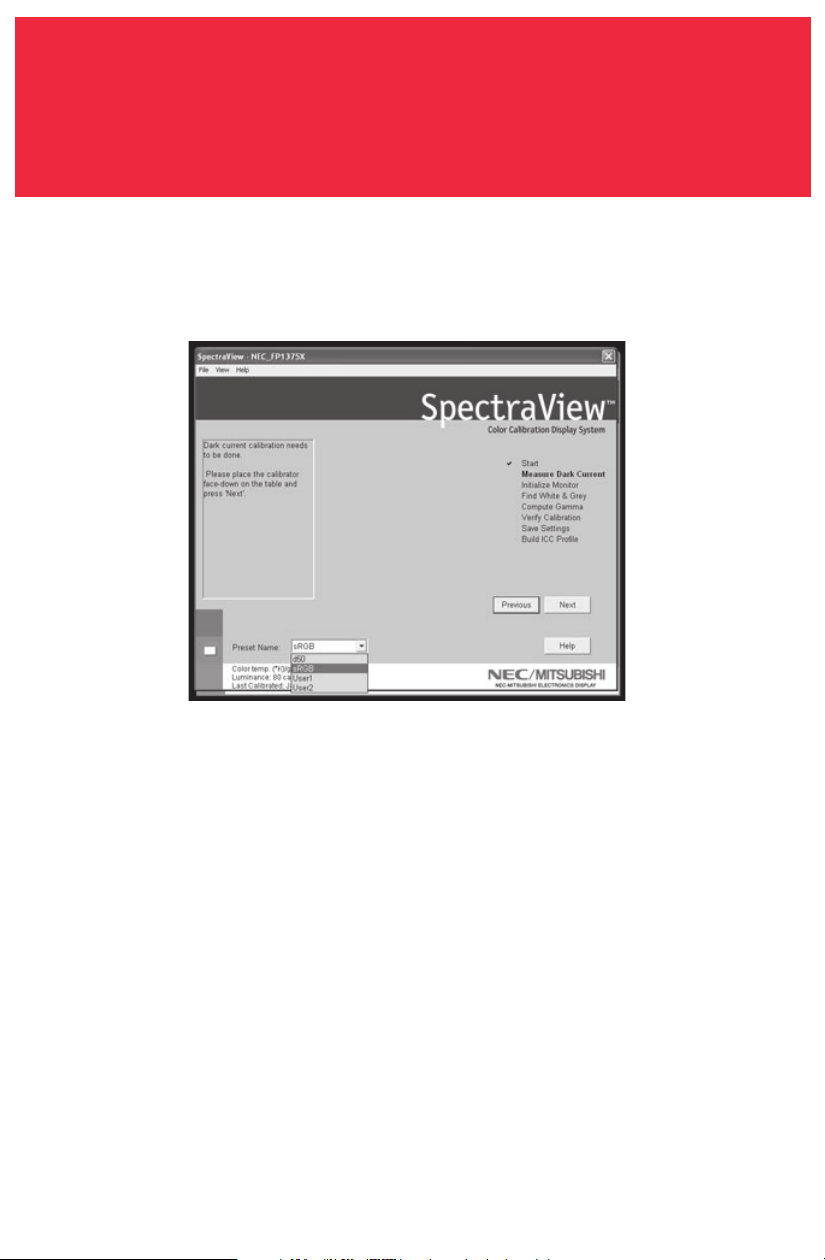
The SpectraView Color Sensor is extremely sensitive to light. At first it must set
its internal values for black before measuring colors. This initial measurement of
black is called a “Dark Current Calibration.” This step must be performed prior to
every calibration of the monitor (Figure 3b).
Place the suction cup side of the color calibrator on a non-reflective, opaque
surface (desk, mousepad, etc.) and click “Next” to continue. DO NOT PLACE THE
SENSOR ON THE MONITOR SCREEN.
Calibrating Your Monitor –continued
Figure 3b
MAC VERSION
OSX
OS9

8
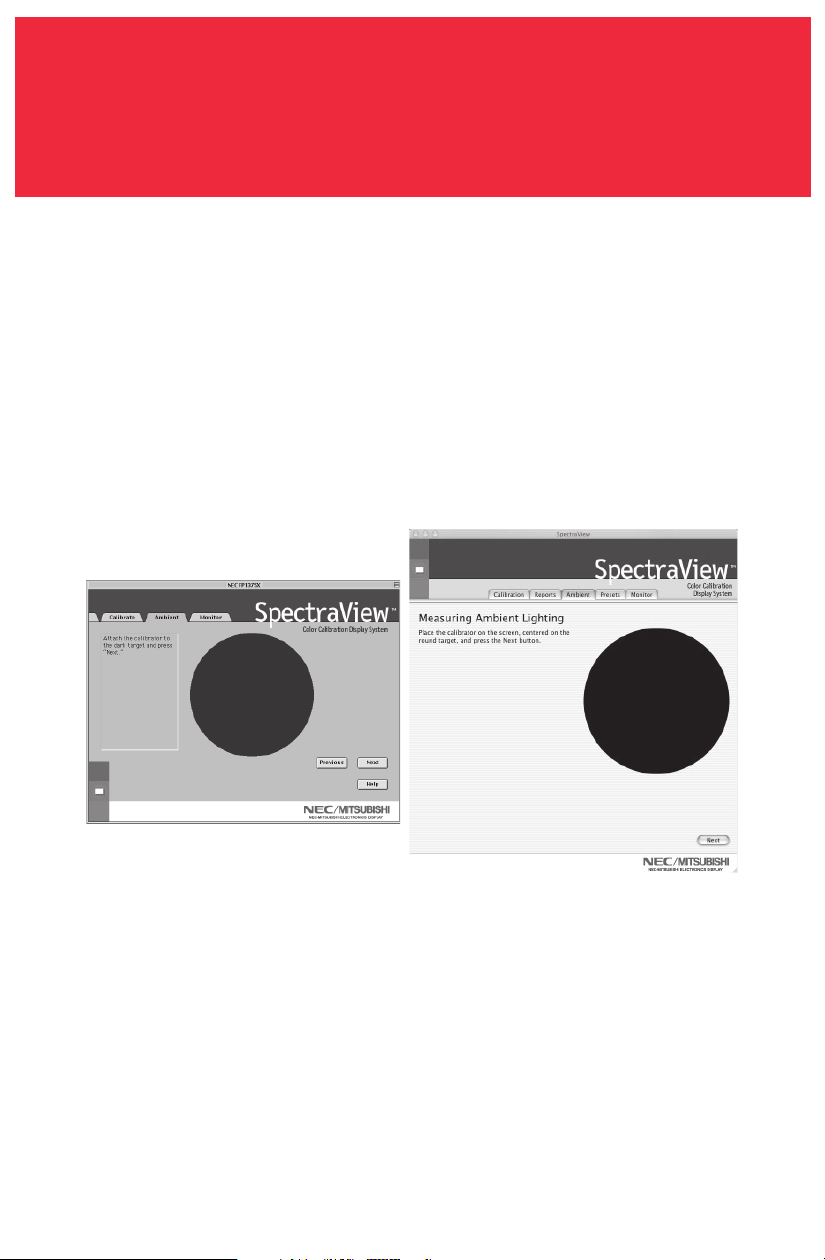
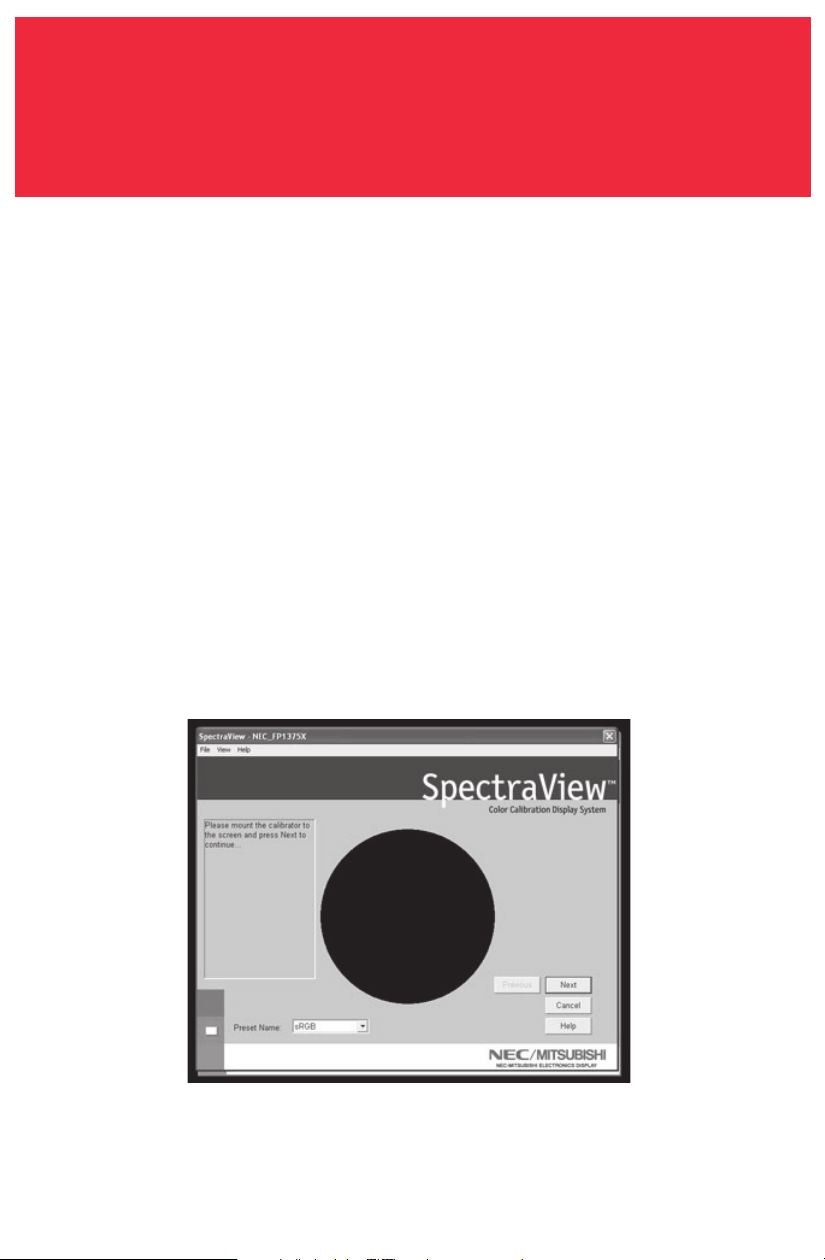
The next step will start the color calibration of the monitor.
Attach the suction cup side of the calibrator to the face of the CRT directly over
the black circle located in the software menu (Figure 3c).
Once the calibrator is attached to the monitor’s face click “Next” to continue.
Throughout the calibration process you will see many changes to the colors and
brightness of the screen (OSX calibration menu is full screen). The process indica-
tor within the menu will indicate which adjustments are currently being made.
Calibrating Your Monitor –continued
Figure 3c
MAC VERSION
OSX
OS9
9
Calibrating Your Monitor –continued
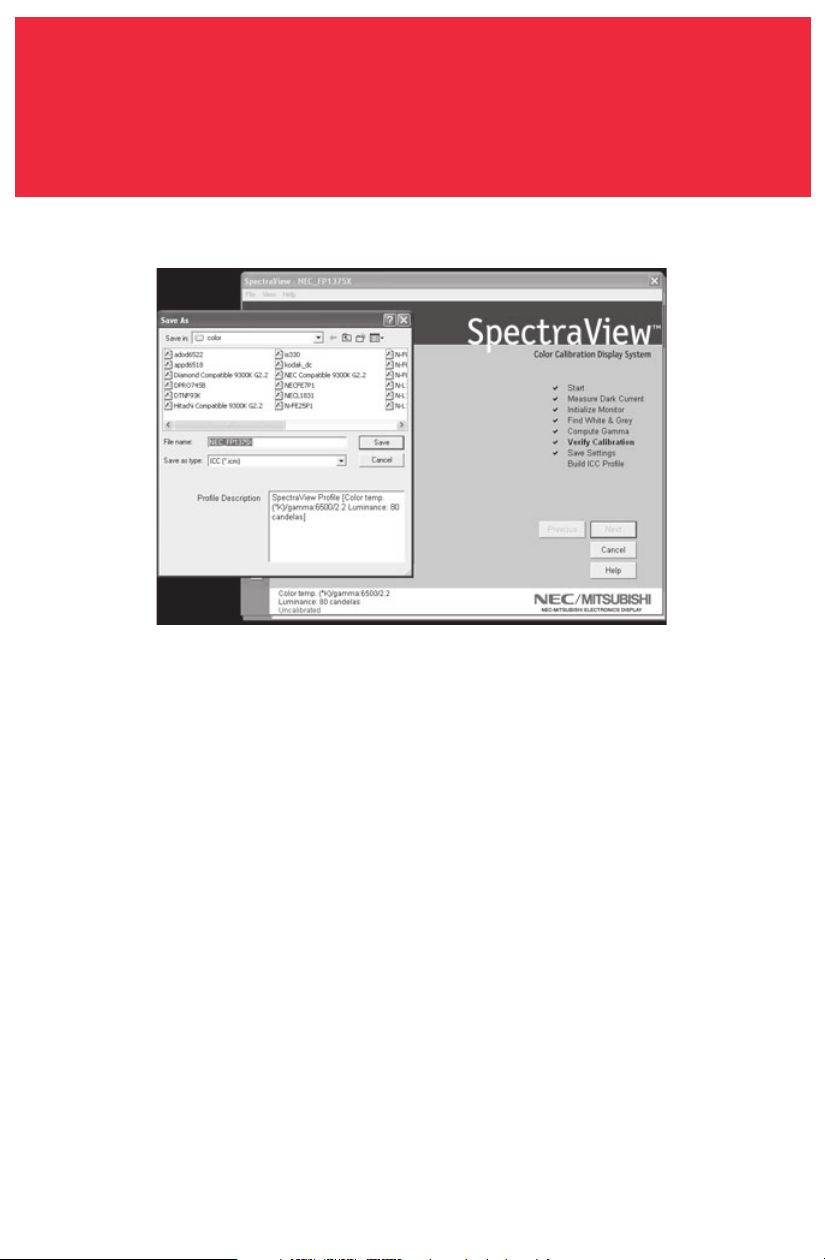
When the calibration process is complete, you will be prompted for the file name
of the ICC profile created from the data measured from the monitor.
When the file name is selected, click “Save” to finish the installation.
Once the initial calibration is complete the option to adjust the monitor to the
ambient lighting conditions is available. The Ambient function is used to adjust
the brightness control to maximize visibility of shadow detail in images. Since
room light washes out this detail, an increase in brightness is necessary to make
the detail visible. However, since increasing the brightness control decreases
gamma, use this function carefully.
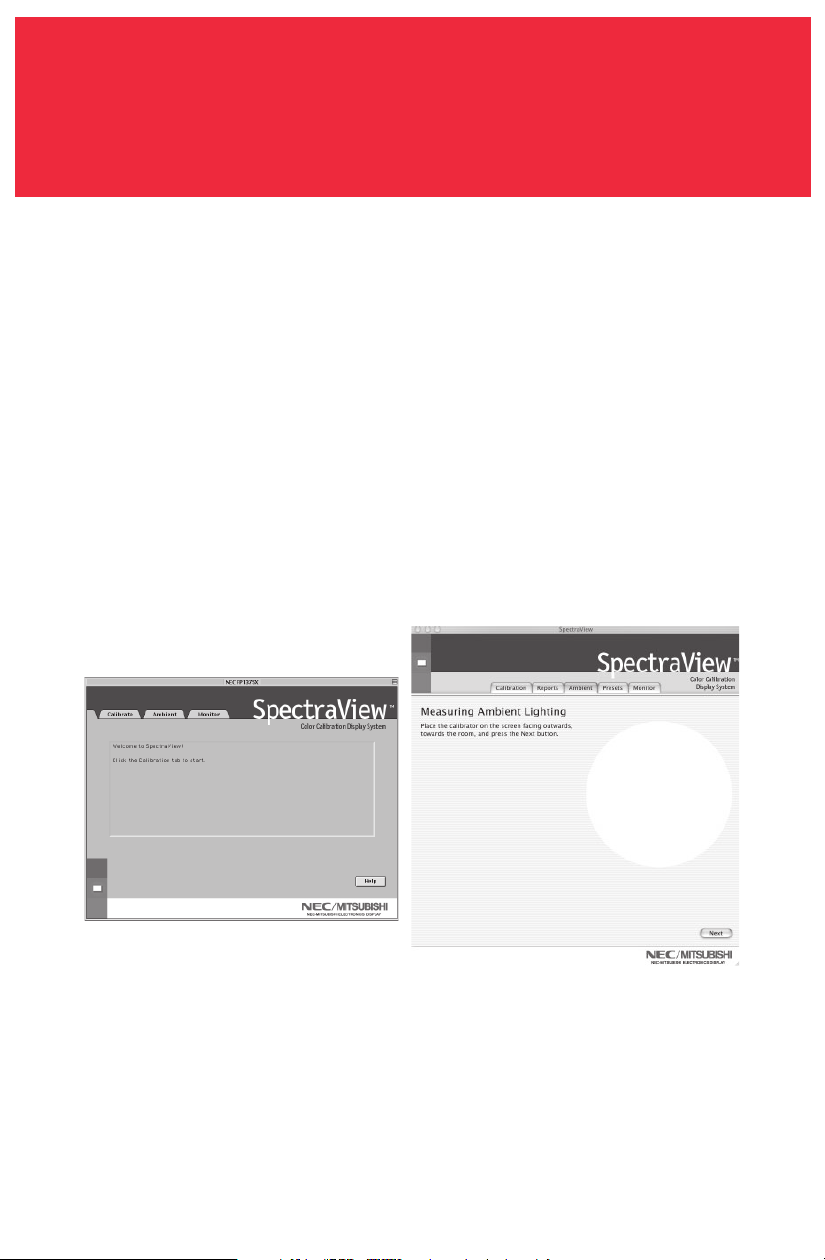
To start this process click “Ambient” in the software menu (Figure 3d).
MAC VERSION
Figure 3d
OSX
OS9
10
The calibrator needs to make an ambient light measurement (Figure 3e).
Hold the color calibrator near the face of the monitor with the suction cup side
facing away from the monitor.
Note: Make sure that nothing is blocking the sensors on the suction cup side of the
color calibrator during this adjustment. The calibrator should be held with nothing
between the sensors and the light source located in the area.
Click “Next” to start this measurement.
Calibrating Your Monitor –continued
MAC VERSION
Figure 3e
OSX
OS9
11
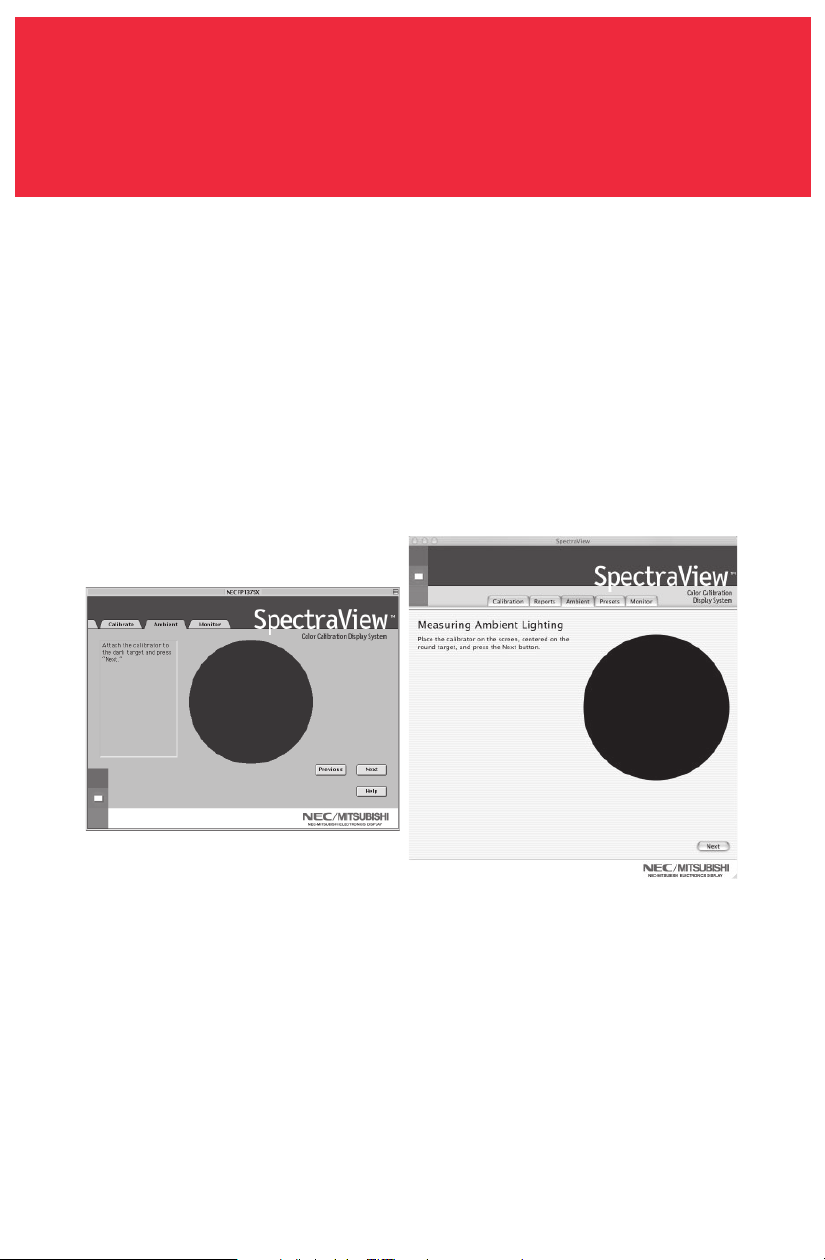
Calibrating Your Monitor –continued
Attach the suction cup side of the calibrator to the face of the CRT directly over
the black circle located in the software menu (Figure 3f).
Once the calibrator is attached to the monitor’s face click “Next” to complete the
ambient adjustment.
Note: This process should be repeated if the ambient lighting conditions in the
environment change.
Figure 3f
MAC VERSION
OSX
OS9
12
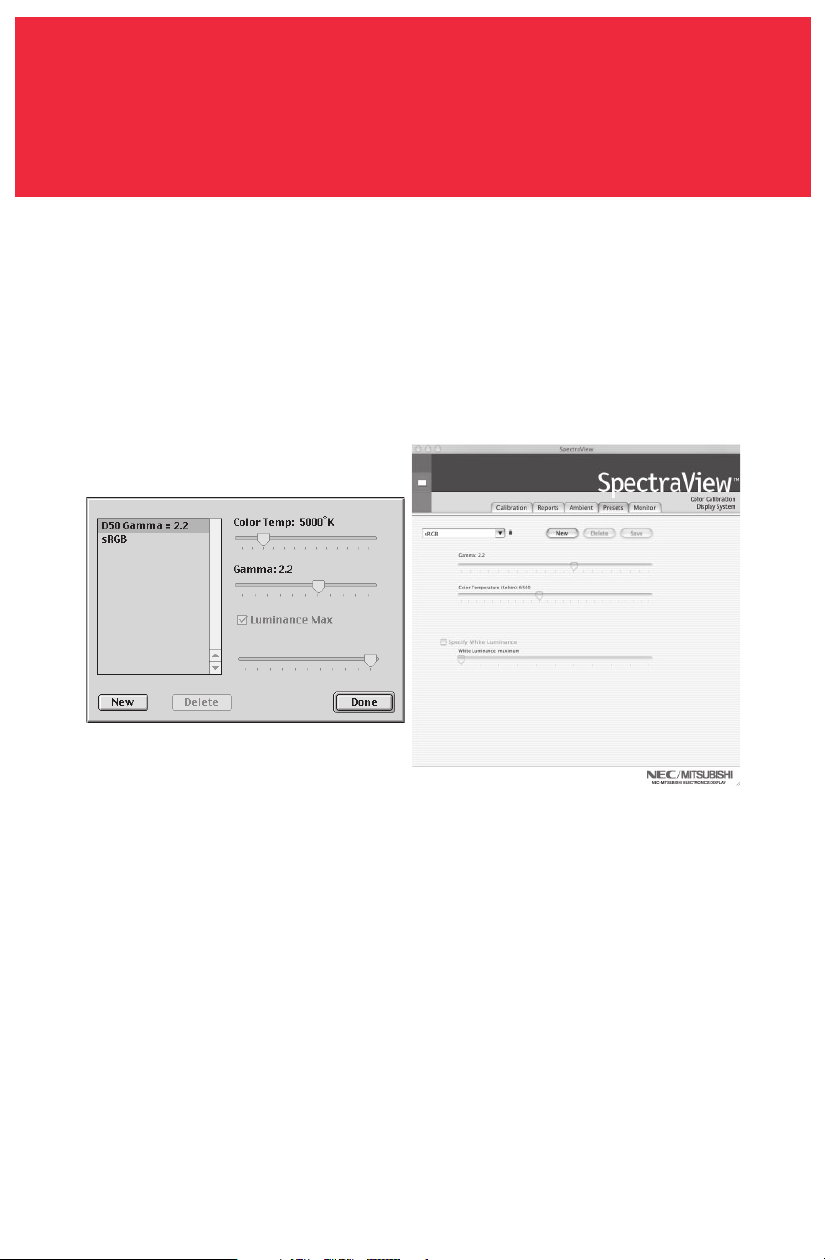
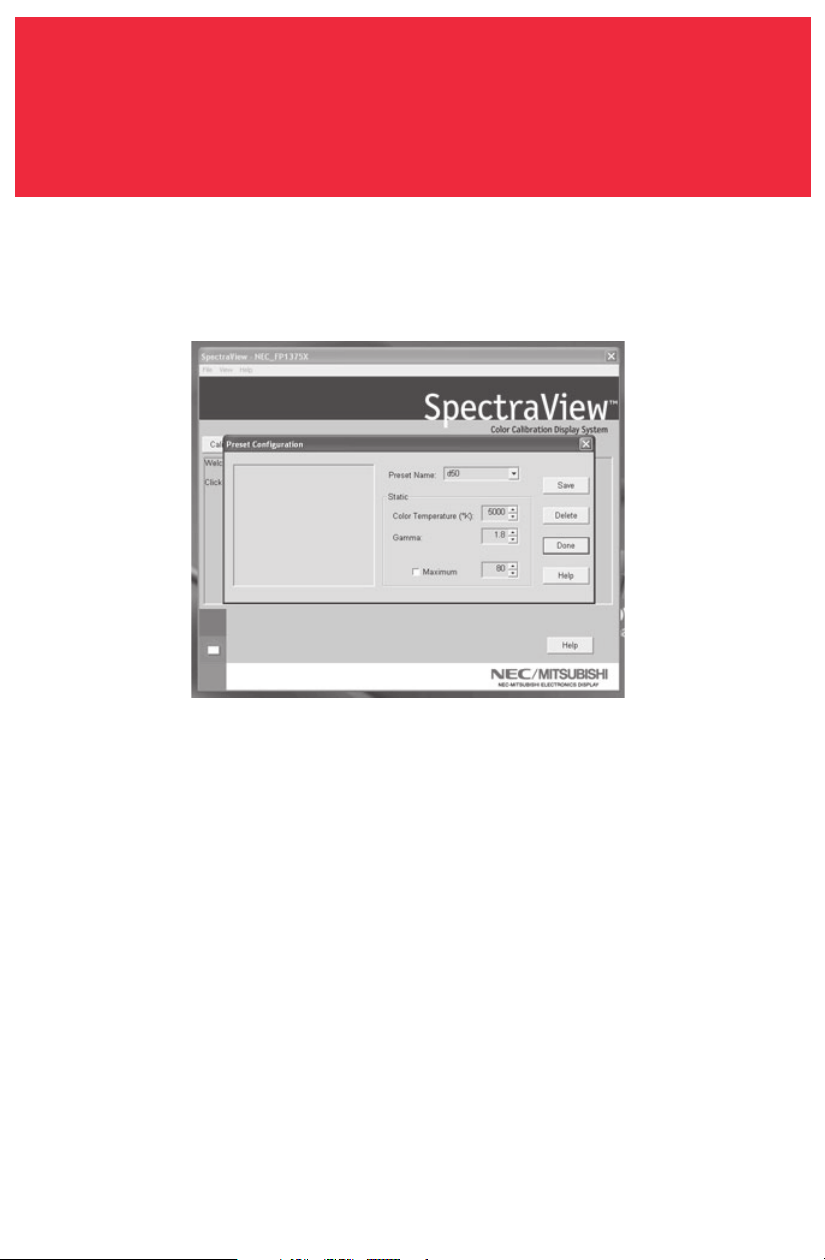
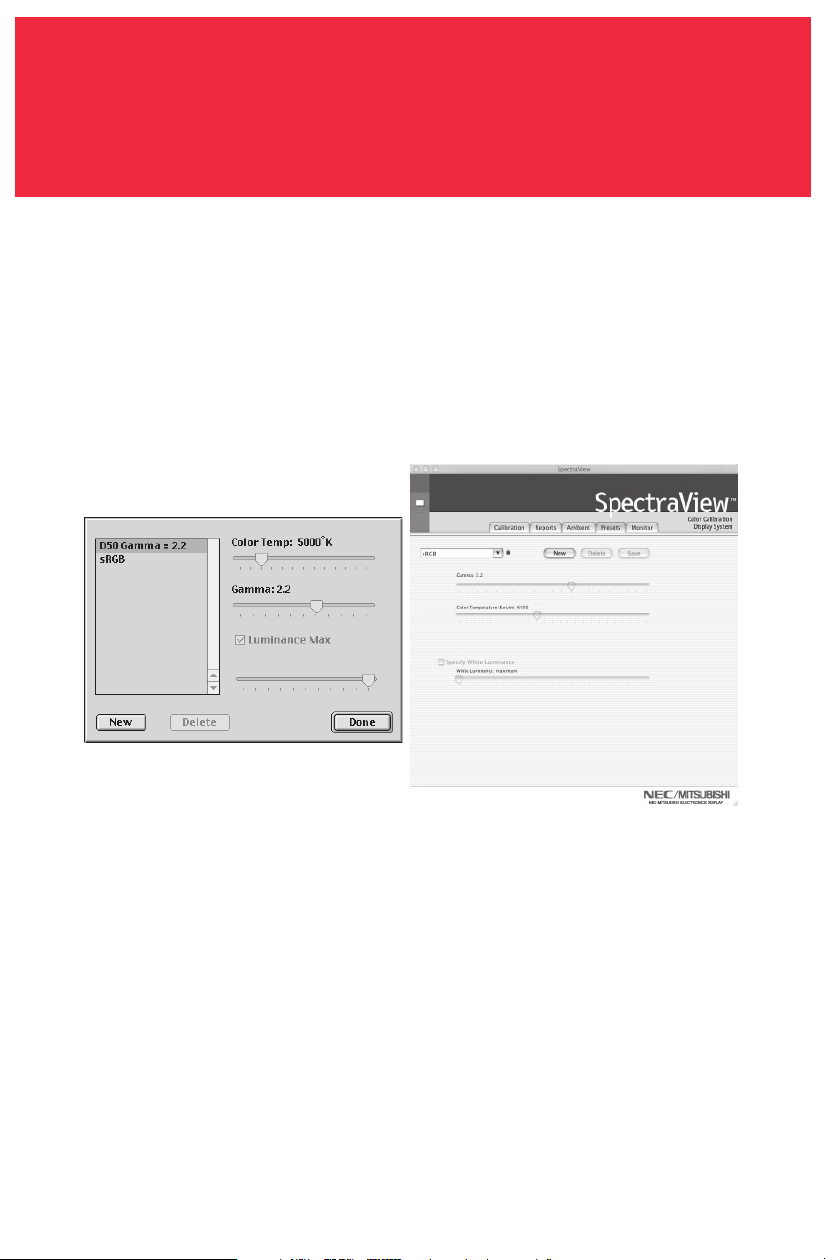
Presets contain the values to be used during the calibration process. Presets
store values of color temperature, gamma, and luminance. If a color setting other
than sRGB or D50 is desired, a custom calibration preset needs to be created.
To open the presets menu click on “View” in the software menu and select
“Presets”.
To create a new preset, click “New” and when prompted create a Preset Name.
Adjust the “Color Temperature” control to the desired setting.
Adjust the “Gamma” control to the desired setting.
Luminance is the value of the brightness of full white and may have a value
specified in candelas/meter-squared (cd/m
2
) or may be set to “Max”. The Max
value is the brightest that the monitor can be adjusted using factory-specified
limits for the red, green, and blue controls. To request the maximum brightness
for a calibration click the “Luminance Max” check box.
Creating a Custom Preset
Figure 4
MAC VERSION
OSX
OS9

13
Creating a Custom Preset –continued
Once the desired changes have been made to these controls click “Done” to save
this setting as a calibration option.
To delete a preset, select the setting in the “Preset” menu box and click “Delete”.
Once a custom preset has been created it may be selected at any time from the
pulldown on the Calibrate panel prior to calibration. It is not necessary to use
the newly created preset.
Enter the calibration menu and select the custom preset in the “Preset” menu
box.
Follow the instructions in Section 3 to recalibrate your monitor.
MAC VERSION
14
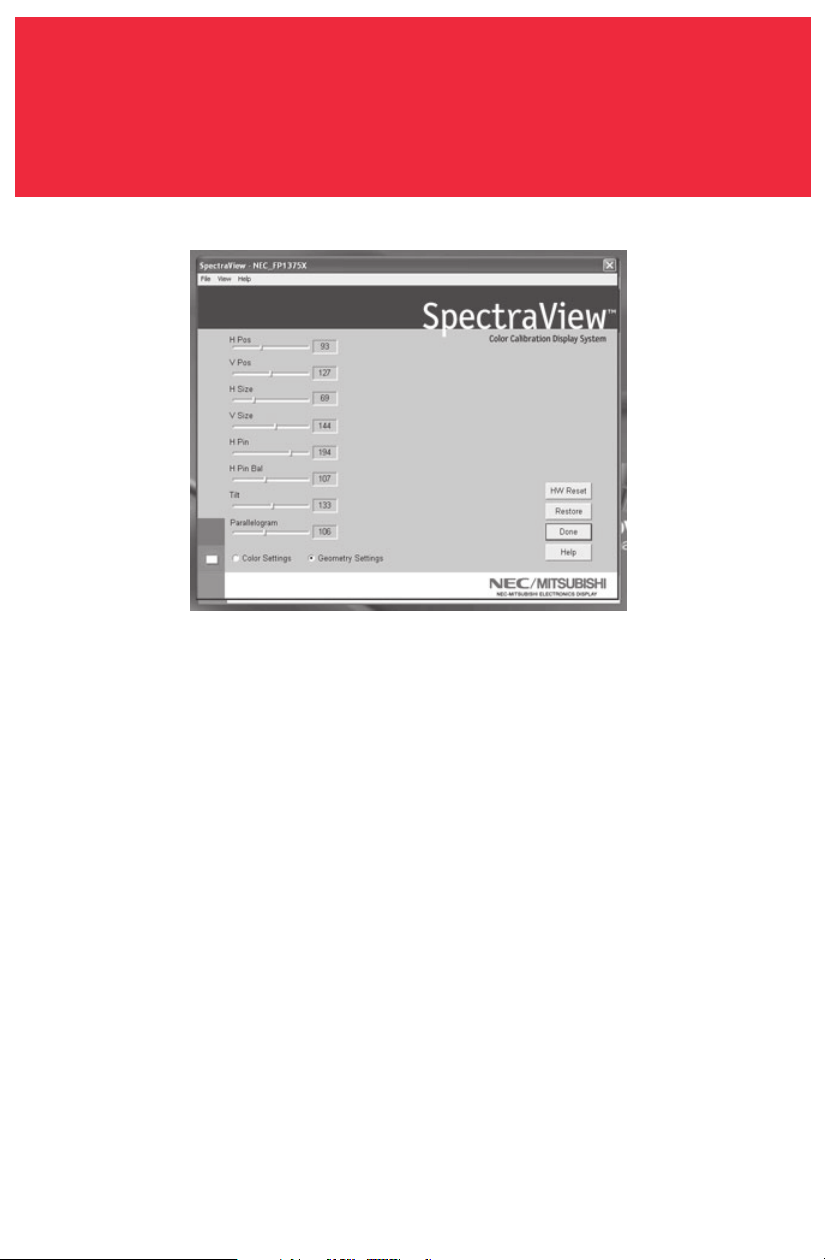
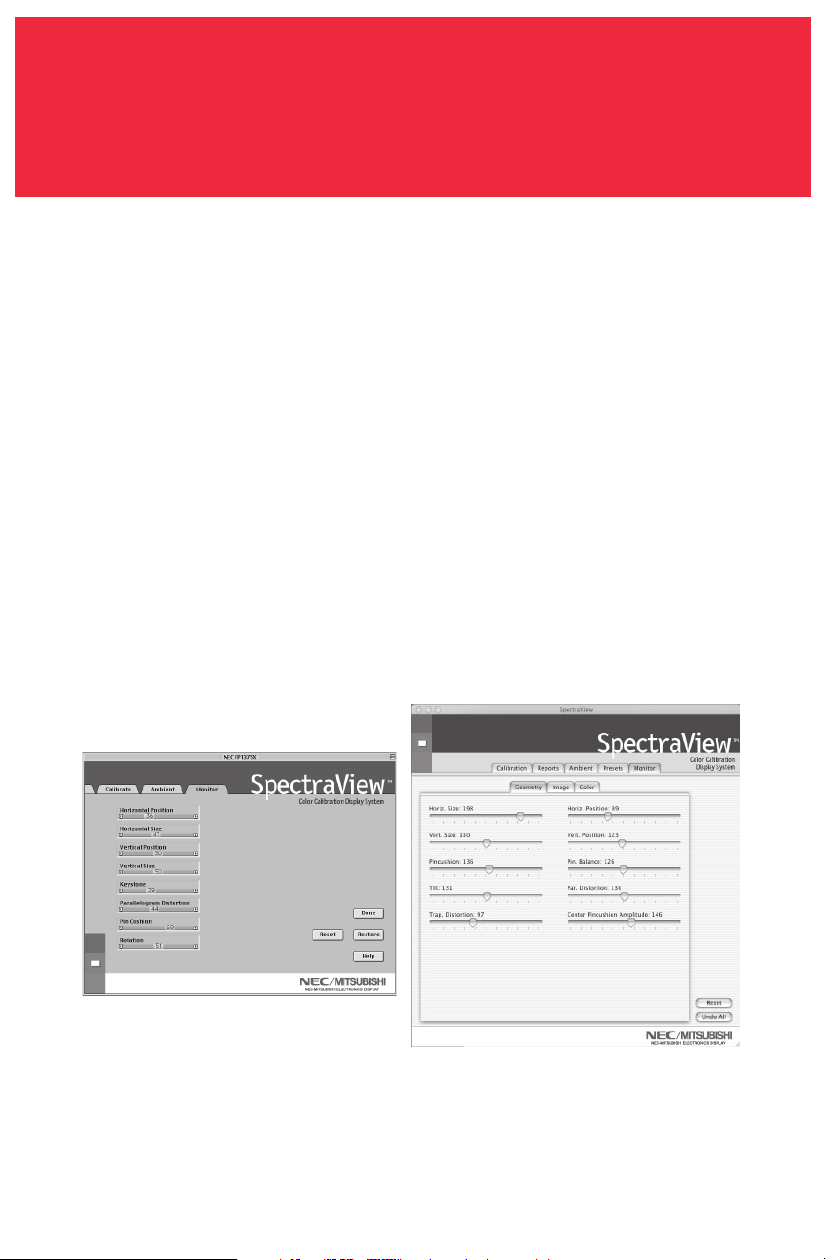
Adjusting Monitor Controls
Once a monitor is calibrated the On Screen Manager (OSM) is disabled from the
monitor’s front panel controls. The reason for this is that any adjustments made
manually to the monitor’s color controls can compromise the calibration that has
been done to the monitor.
If the monitor’s image, geometry, or color needs to be adjusted these controls
are available in the “Monitor” menu.
Enter the “Monitor” menu from the main software menu.
Move the slider bars to the desired setting.
To reset the menu to the settings before any of the adjustments, click “Restore”,
“Undo all” or “Reset” to set these controls to their factory default.
Click “Done” when finished to return to the main menu.
MAC VERSION
OSX
OS9

15
Graphs of the calibration can be shown on screen and printed out for reference
monitoring.
To view the graphs menu, click “View” in the software menu and select “Graph”.
Now choose “Gamma Accuracy” or “DeltaE Tracking”.
Gamma Accuracy – This graph plots the accuracy of the CIE values for color versus
the target values.
Delta E Tracking – This graph plots the accuracy of calibration in terms of DeltaE’s
where a DeltaE is a mathematical measure of visible differences in colors. The
calculation of a DeltaE takes into account both luminance and chromaticity
deviation from a reference value. A DeltaE value of two to three would identify a
difference in color that is just noticeable. The DeltaE graph shows both DeltaC
measurement which is the error due to just color differences and DeltaE which is
the error due to color and luminance differences.
The graph can be printed for future reference.
Calibration Graphing
MAC VERSION (OS9 version only)
16
Launch the SpectraView program.
While the SpectraView software is loading, it will initialize the monitor and the
color calibrator for adjustment. This process takes approximately 30 seconds to
complete but may vary based on system performance.
Note: If one of these two devices aren’t detected an error screen will appear asking
you to check the connection.
If this is the first time that SpectraView has run, the monitor will be uncalibrated.
To perform a calibration, click “Calibration” in the software menu (Figure 3a).
SpectraView allows you to specify the parameters you would prefer to use for
calibration. These parameters (color temperature, gamma, and white luminance)
are contained in “Presets” which are small files containing these values.
SpectraView ships with two Presets already installed, sRGB and D50. You may
select a Preset for calibration by clicking on the “Preset” pulldown in the lower-
left corner of the CALIBRATE panel. You may also create your own Presets through
the process described in Section 4: Creating a Custom Preset.
Calibrating Your Monitor
PC VERSION
Figure 3a
17
The SpectraView Color Sensor is extremely sensitive to light. At first it must set
its internal values for black before measuring colors. This initial measurement of
black is called a “Dark Current Calibration.” This step must be performed prior to
every calibration of the monitor (Figure 3b).
Place the suction cup side of the color calibrator on a non-reflective, opaque
surface (desk, mousepad, etc.) and click “Next” to continue. DO NOT PLACE THE
SENSOR ON THE MONITOR SCREEN.
Calibrating Your Monitor –continued
Figure 3b
PC VERSION
18
The next step will start the color calibration of the monitor.
Attach the suction cup side of the calibrator to the face of the CRT directly over
the black circle located in the software menu (Figure 3c).
Once the calibrator is attached to the monitor’s face click “Next” to continue.
Throughout the calibration process you will see many changes to the colors and
brightness of the screen. The process indicator within the menu will indicate
which adjustments are currently being made.
Calibrating Your Monitor –continued
Figure 3c
PC VERSION
19
Calibrating Your Monitor –continued
Once the calibration process is finished you will be prompted for the file name of
the ICC profile created from the data measured from the monitor (Figure 3d).
The default file name will use the monitor’s model number (for example, FP1375X ,
FP955, or DP2060u).
Once the file name is selected click “Save” to finish the installation.
Once the initial calibration is complete the option to adjust the monitor to the
ambient lighting conditions is available. The Ambient function is used to adjust
the brightness control to maximize visibility of shadow detail in images. Since
room light washes out this detail, an increase in brightness is necessary to make
the detail visible. However, since increasing the brightness control decreases
gamma, use this function carefully.
Figure 3d
PC VERSION
20
To start this process click “Ambient” in the software menu (Figure 3e).
The calibrator needs to make an ambient light measurement (Figure 3f).
Calibrating Your Monitor –continued
Figure 3e
Figure 3f
PC VERSION
21
Calibrating Your Monitor –continued
Hold the color calibrator near the face of the monitor with the suction cup side
facing away from the monitor.
Note: Make sure that nothing is blocking the sensors on the suction cup side of the
color calibrator during this adjustment. The calibrator should be held with nothing
between the sensors and the light source located in the area.
Click “Next” to start this measurement.
Attach the suction cup side of the calibrator to the face of the CRT directly over
the black circle located in the software menu (Figure 3g).
Once the calibrator is attached to the monitor’s face click “Next” to complete the
ambient adjustment.
Note: This process should be repeated if the ambient lighting conditions in the
environment change.
Figure 3g
PC VERSION
22
Creating a Custom Preset
Presets contain the values to be used during the calibration process. Presets
store values of color temperature, gamma, and luminance. If a color setting other
than sRGB or D50 is desired, a custom calibration preset needs to be created.
To open the presets menu click on “View” in the software menu and select
“Presets” (Figure 4a).
Figure 4a
PC VERSION
23
Creating a Custom Preset –continued
Enter a name for the new preset in the “Preset Name” menu box (Figure 4b).
Adjust the “Color Temperature” control to the desired setting.
Adjust the “Gamma” control to the desired setting.
Luminance is the value of the brightness of full white and may have a value
specified in candelas/meter-squared (cd/m
2
) or may be set to “Max”. The Max
value is the brightest that the monitor can be adjusted using factory-specified
limits for the red, green, and blue controls. To request the maximum brightness
for a calibration click the “Maximum” check box.
Once the desired changes have been made to these controls click “Save” to create
this setting as a calibration option.
To delete a preset, select the setting in the “Preset Name” menu box and click
“Delete”.
Figure 4b
PC VERSION

24
Creating a Custom Preset –continued
Once a custom preset has been created it may be selected at any time from the
pulldown on the Calibrate panel prior to calibration. It is not necessary to use
the newly created preset.
Enter the calibration menu and select the custom preset in the “Preset Name”
menu box (Figure 4c).
Follow the instructions in Section 3 to recalibrate your monitor.
Figure 4c
PC VERSION
25
Adjusting Monitor Controls
Once a monitor is calibrated the On Screen Manager (OSM) is disabled from the
monitor’s front panel controls. The reason for this is that any adjustments made
manually to the monitor’s color controls can compromise the calibration that has
been done to the monitor.
If the monitor’s image geometry needs to be adjusted these controls are
available in the “Monitor” menu.
Enter the “Monitor” menu from the main software menu.
Move the slider bars to the desired setting.
To reset the menu to the settings before any of the adjustments were made click
“Restore” or “HW Reset” to set these controls to their factory default.
Click “Done” when finished to return to the main menu.
Figure 5
PC VERSION
26
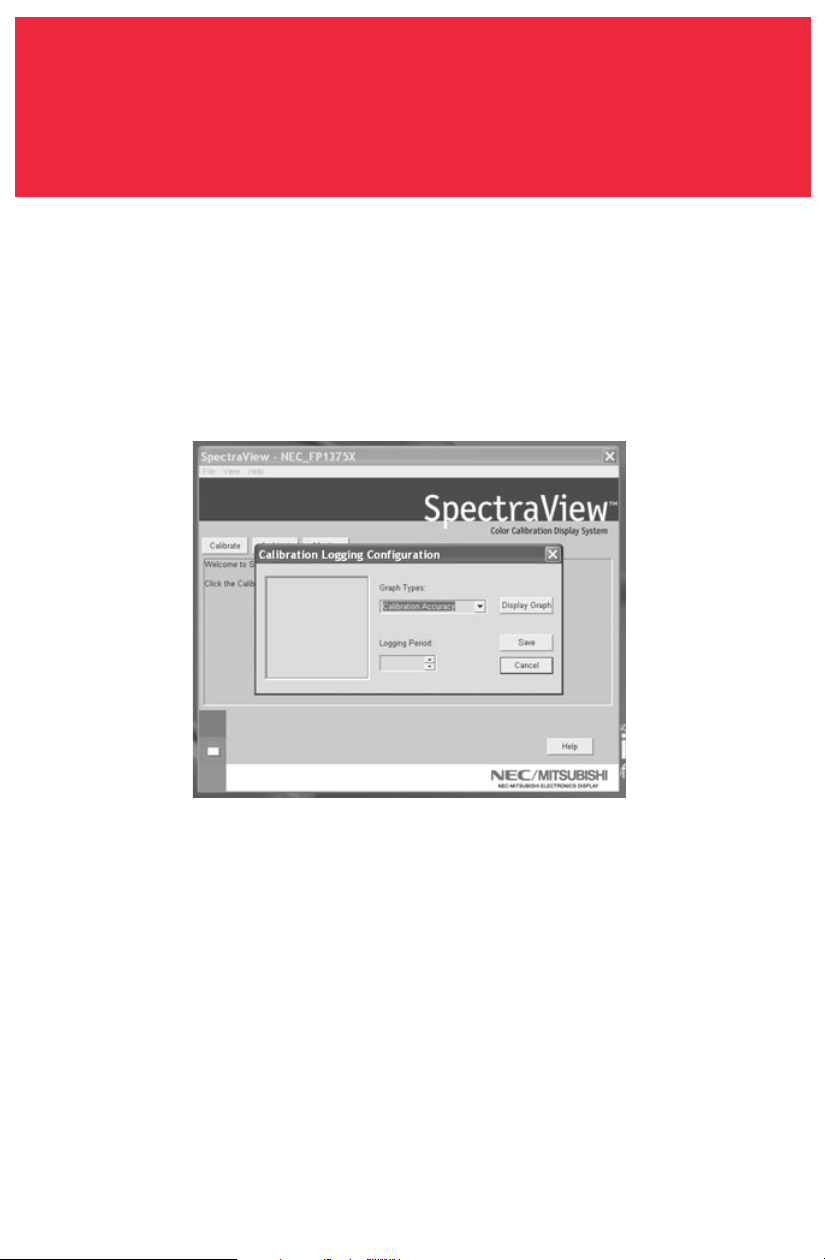
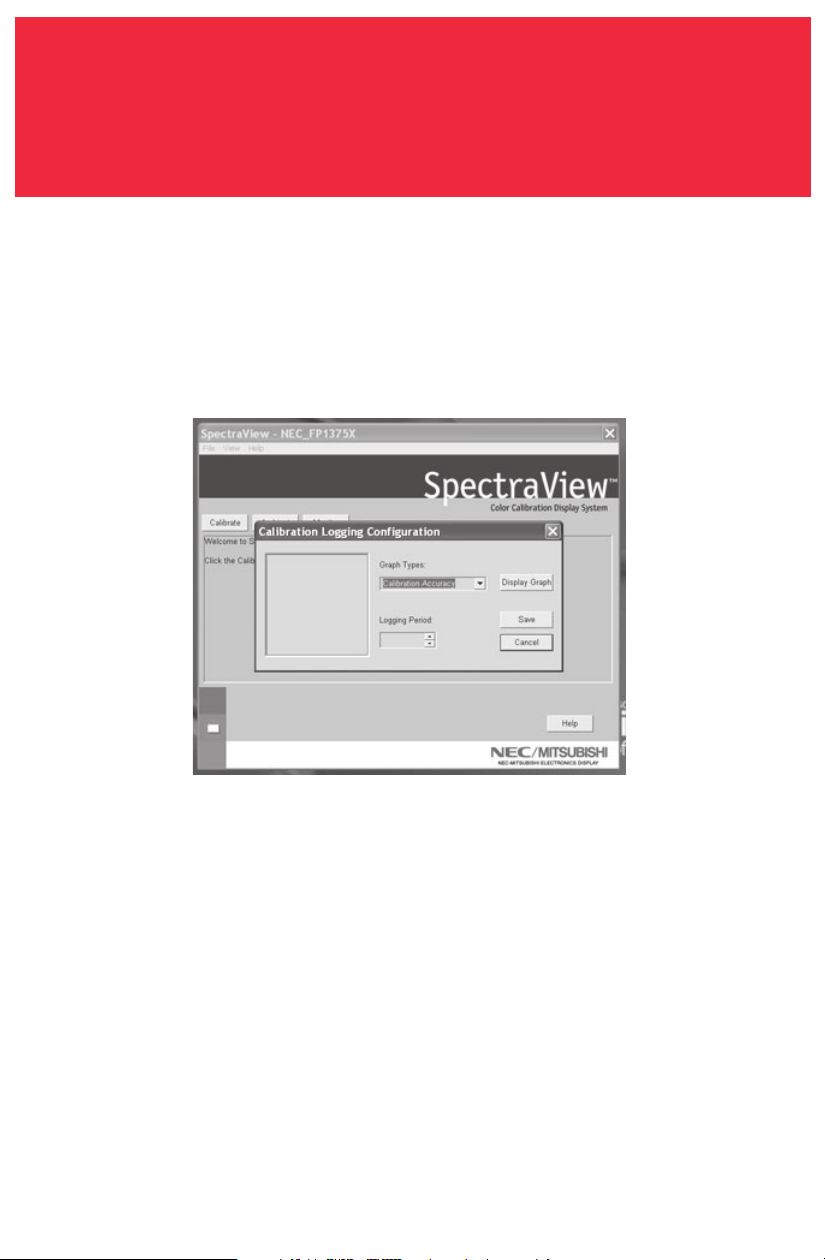
A history of the monitor’s performance is stored in a database after each
calibration. Graphs of the performance can be shown on screen and printed out
for reference monitoring.
To open the Calibration Logging menu click on “View” in the software menu and
select “Calibration Logging”.
Once the Calibration Logging Configuration menu is open, select which
information to graph and the length of a logging period (Figure 6).
To change the graph type click on the “Graph Types” menu box and select from
the following:
Calibration Accuracy – This graph plots the accuracy of the CIE values for color
versus the target values.
Delta E Tracking – This graph plots the accuracy of calibration in terms of DeltaE’s
where a DeltaE is a mathematical measure of visible differences in colors. The
calculation of a DeltaE takes into account both luminance and chromaticity
Calibration Logging
Figure 6
PC VERSION

27
Calibration Logging –continued
deviation from a reference value. A DeltaE value of two to three would identify a
difference in color that is just noticeable. The DeltaE graph shows both DeltaC
measurement which is the error due to just color differences and DeltaE which is
the error due to color and luminance differences.
Display Aging (For Windows Only) – The maximum luminance of the display is
recorded after every calibration. This graph shows the aging trend of the display
over time.
Click “Display Graph” to view the log of the monitor or “Save” to create a text
version of the data.
Once in the graph view, the file can be printed or saved for future reference.
PC VERSION

28
Troubleshooting
1. “Digital Monitor Not Found”
SpectraView either could not find the monitor ID in the registry of device names
or the monitor did not respond to the test digital command sent to it.
a. Check the connection at the monitor. For Mitsubishi DP2060U monitors, the
Digital Cable should be connected to Signal B, not Signal A. Signal A does not
provide DC communication lines, or;
b. You have connected the Digital Cable in reverse; the VGA connector at the USB
end should always connect to the graphics card and never to the monitor, or;
c. Since three microprocessors are involved in the SpectraView configuration
(DDC controller in the monitor, microprocessor in the Digital Cable, and the
host CPU), it is not unusual for these devices to get “out of sync” on power-
down/power-up sequences. To resync the microprocessors, unplug the USB
cable from the Digital Cable and restart the computer. Replug the digital
Cable USB connector and relaunch SpectraView.
2. Bad Calibrations
If the DeltaE Tracking graph shows a bad calibration (DeltaE value of four or
greater any place in the graph), it is probably from a bad dark current calibration.
Repeat calibration with the sensor in the darkest possible location (covered with
an opaque cloth or material, if possible) during the Measure Dark Current step.
29
Calibrator Specifications
The following specifications refer to measurement of a CRT display with EBU or
P22 phosphor set at D6500 and a luminance of 90 candela/m
2
when compared to
measurement by a PhotoResearch-650 spectrophotometer:
ycaruccA
ecnanimorhC
ecnanimuL
200.-/+:y,x
%2-/+:Y
ytilibataepeR
emas,tnemurtsniemas(
)hctap
100.-/+:y,x
%5.-/+:Y
ytilibataepeR
)tnemurtsni-retni(
200.-/+:y,x
%2-/+:Y
hserfeRneercS
zh021-zh03
deepstnemerusaeM
slennahceerht{
})B,G,R(
sm002

30
IMPORTANT NOTICE TO USER: READ THIS AGREEMENT CAREFULLY. BY OPENING THE ENCLOSED PACK-
AGE OR OTHERWISE USING OR INSTALLING THE SOFTWARE, YOU ACCEPT ALL TERMS AND CONDITIONS
OF THIS AGREEMENT. IF YOU DO NOT AGREE WITH THE TERMS AND CONDITIONS OF THIS AGREEMENT,
YOU WILL NOT BE ABLE TO USE THIS SOFTWARE AND MUST RETURN ALL SOFTWARE ITEMS (DISKS, CDs,
WRITTEN MATERIALS, AND PACKAGING) TO THE PLACE OF PURCHASE FOR A REFUND.
This license agreement (“License”) is a legal agreement between you and NEC-Mitsubishi Electronics Display
of America, Inc. (hereinafter “NMD-A”) granting you certain rights to access and use the software contained
in this envelope. YOU HEREBY AGREE, BOTH ON YOUR OWN BEHALF AND AS AN AUTHORIZED REPRESENTATIVE
OF ANY ORGANIZATION FOR WHICH YOU ARE USING THE SOFTWARE (“EMPLOYER”), THAT YOU AND YOUR EM-
PLOYER WILL USE THE SOFTWARE ONLY IN ACCORDANCE WITH THE FOLLOWING TERMS:
1. Disclaimer of Warranty on Software. You expressly acknowledge and agree that use of the Software
is at your sole risk. THE SOFTWARE IS PROVIDED “AS IS”, WITH ALL FAULTS AND WITHOUT WARRANTY OF ANY
KIND. NMDA does not warrant that the functions contained in the Software will meet your require-
ments, or that the operation of the Software will be uninterrupted or error-free, or that defects in the
Software will be corrected. Furthermore, NMDA does not warrant or make any representation regarding
the use or the results of the use of the Software or related documentation in terms of their correctness,
accuracy, reliability or otherwise. Should the Software prove defective, you (and not NMDA or a NMDA
authorized representative) assume the entire cost of all necessary servicing, repair or correction. Some
states do not allow the exclusion or limitation of implied warranties, so the above exclusion may not
apply to you. The terms of this disclaimer do not affect or prejudice the statutory rights of a consumer
acquiring NMDA products otherwise than in the course of a business; neither do they limit or exclude
any liability for death or personal injury caused by NMDA’s negligence.
If you have purchased the Software for business or commercial use, you also agree that NMDA EXPRESSLY
DISCLAIMS ANY WARRANTY OF MERCHANTABILITY, FITNESS FOR A PARTICULAR PURPOSE, TITLE OR NON-IN-
FRINGEMENT WITH RESPECT TO THE SOFTWARE.
2. Limitation of Liability. UNDER NO CIRCUMSTANCES, INCLUDING NEGLIGENCE, SHALL NMDA BE LIABLE
FOR ANY INCIDENTAL, SPECIAL, INDIRECT, PUNITIVE OR CONSEQUENTIAL DAMAGES ARISING OUT OF OR
RELATING TO THIS LICENSE OR THE SOFTWARE.
3. License Grant, Permitted Uses and Restrictions. NMDA grants to you, and you accept, a personal,
install and use the Software in object code format on a single computer at one time. This License does
not allow the Software to exist on more than one computer at a time. If you wish to use the Software on
a network, please contact NMDA. You may make one copy of the Software in machine-readable form for
backup purposes only. The backup copy must include all copyright information contained on the original.
This License is effective until terminated as provided herein. You may terminate this License by destroy-
ing the Software and any copies of the Software in your possession. This License will terminate auto-
matically upon any violation of the terms of this License. You acknowledge that this License does not
entitle you to any support, maintenance or upgrade from NMDA.
4. License Restrictions. You may not do any of the following yourself, or through any other person and
you may not permit any third party with whom you have a business relationship to do any of the follow-
ing: (A) copy, modify or create derivative works based upon the Software; (B) decompile, disassemble, or
reverse engineer the Software in whole or in part; (C) defeat, disable or circumvent any protection mecha-
nism related to the Software; (D) sell, license, sublicense, lease, rent, distribute, disclose, permit access
to, or transfer to any third party, whether for profit or without charge, any portion of the Software or
any product (as a separate product or bundled with any other products other than the Software) cre-
ated with the Software (including, without limitation, profiles in .ICM or .ICC format), or, in particular,
without limiting the
generality
of the foregoing, distribute the Software or any such product on any
media, over networks, electronic bulletin boards, or websites, or allow any third party to use the Soft-
ware; (E) publish or otherwise communicate any review of or information about Software performance
to any third party without the prior written consent of NMDA; (F) export, use or download the Software
in violation of any laws or regulations, including U.S. Department of Commerce Export Administration
SpectraView End-User
Software License Agreement

31
regulations and other applicable laws or (G) use the Software in connection with life support systems,
human implantation, medical devices, nuclear facilities, nuclear systems or weapons, aviation, mass transit
or any applications where failure or malfunction could lead to possible loss of life or catastrophic prop-
erty damage.
5. Title and Ownership. Except for the rights expressly granted above, this License transfers to you no
right, title, or interest in the Software, any product (including, without limitation, profiles in .ICM or .ICC
format) created with the Software or any copyright, patent, trademark, trade secret or other intellec-
tual property or proprietary right in the Software or any such product. NMDA retains sole and exclusive
title to all portions of the Software and any copies thereof, and you hereby assign to NMDA all right, title,
and interest in and to any modifications you make to the Software and any product you make with the
Software, whether or not such modifications are permitted. You agree not to disclose the Software to
anyone.
6. Export Law Assurances. You may not use or otherwise export or re-export the Software except as
authorized by United States law and the laws of the jurisdiction in which the Software was obtained. In
particular, but without limitation, the software may not be exported or re-exported (I) into (or to a na-
tional or resident of) any U.S. embargo country or (ii) to anyone on the U.S. Treasury Department’s list of
Specially Designated Nationals or the U.S. Department of Commerce’s Table of Denial Orders. By using the
SpectraView Software, you represent and warrant that you are not located in, under control of, or a na-
tional or resident of any such country or on any such list.
7. Government End Users. If the Software is supplied to the United States Government, the Software is
classified as “restricted computer software” as defined in clause 52.227-19 of the FAR. The United States
Government’s rights to the Software are as provided in clause 52.227-19 of the FAR.
8. Controlling Law and Severability. This License shall be governed by the laws of the United States and
the State of Illinois. You irrevocably submit to the jurisdiction of any state or federal court sitting in the
State of Illinois, and any action or proceeding arising out of this License will be heard and determined in
such court. If for any reason a court of competent jurisdiction finds any provision, or portion thereof, to
be unenforceable, the remainder of this License shall continue in full force and effect.
9. Complete Agreement. This License constitutes the entire agreement between the parties with
respect to the use of the Software and supersedes all prior or contemporaneous understandings re-
garding such subject matter. No amendment to or modification of this License will be binding unless in
writing and signed by NMDA.
SpectraView End-User
Software License Agreement
–continued

32
Limited Warranty for
SpectraView Hardware
LIMITED WARRANTY. LIMITED WARRANTY.
LIMITED WARRANTY. LIMITED WARRANTY.
LIMITED WARRANTY. NMDA warrants the SpectraView Hardware (hereinafter “Product” or
“Products”) to be free from defects in material and workmanship and, subject to the condi-
tions set forth below, agrees to repair or replace (at NMD-A’s sole option) any part of the
enclosed unit which proves defective for a period of three (3) years from the date of first
consumer purchase. Spare parts are warranted for ninety (90) days. Replacement parts or
unit may be new or refurbished and will meet specifications of the original parts or unit.
This warranty gives you specific legal rights and you may also have other rights, which vary
from state to state. This warranty is limited to the original purchaser of the Product and is
not transferable. This warranty covers only NMD-A-supplied components. Service required
as a result of third party components is not covered under this warranty. Service required as
a result of abuse or improper usage is also not covered under this warranty. In order to be
covered under this warranty, the Product must have been purchased in the U.S.A. or Canada
by the original purchaser. This warranty only covers Product distribution in the U.S.A. or
Canada by NMD-A No warranty service is provided outside of the U.S.A. or Canada. Proof of
Purchase will be required by NMD-A to substantiate date of purchase. Such proof of purchase
must be an original bill of sale or receipt containing name and address of seller, purchaser,
and the serial number of the product.
NMD-A SHALL NOT BE LIABLE FOR DIRECT, INDIRECT, INCIDENTAL, CONSEQUENTIAL, OR OTHER
TYPES OF DAMAGES RESULTING FROM THE USE OF ANY NMD-A PRODUCT OTHER THAN THE LI-
ABILITY STATED ABOVE. THESE WARRANTIES ARE IN LIEU OF ALL OTHER WARRANTIES EXPRESS
OR IMPLIED, INCLUDING, BUT NOT LIMITED TO, THE IMPLIED WARRANTIES OF MERCHANTABIL-
ITY OR FITNESS FOR A PARTICULAR PURPOSE. SOME STATES DO NOT ALLOW THE EXCLUSION OF
IMPLIED WARRANTIES OR THE LIMITATION OR EXCLUSION OF LIABILITY FOR INCIDENTAL OR
CONSEQUENTIAL DAMAGES SO THE ABOVE EXCLUSIONS OR LIMITATIONS MAY NOT APPLY TO
YOU.
This Product is warranted in accordance with the terms of this limited warranty. Consumers
are cautioned that Product performance is affected by system configuration, software, the
application, customer data, and operator control of the system, among other factors. While
NMD-A Products are considered to be compatible with many systems, specific functional imple-
mentation by the customers of the Product may vary. Therefore, suitability of a Product for a
specific purpose or application must be determined by consumer and is not warranted by
NMD-A.

33
References
NEC-Mitsubishi Monitor Customer Service & Support
Customer Service and Technical Support:
(800) 632-4662
Fax: (800) 695-3044
Online Technical Support
Knowledge Base: http://www.necmitsubishi.com/
css/knowledgebase.cfm
Customer Service & Technical
Support Email: http://www.necmitsubishi.com/
css/techform.htm
Electronic Channels
SpectraView Assistance: http://pro.necmitsubishi.com
Internet (e-mail): tech-suppor t@necmitsubishi.com
World Wide Web: http://www.necmitsubishi.com
Product Registration: http://www.necmitsubishi.com/
productregistration


Contenu de SpectraView
Contenu de SpectraView ........................................................................................................ 3
Installation du matériel SpectraView ................................................................................. 4
Installation du logiciel SpectraView .................................................................................... 5
PC ........................................................................................................................................ 5
Macintosh ......................................................................................................................... 5
Version Macintosh
Étalonner votre moniteur ..................................................................................................... 6
Créer un préréglage personnalisé........................................................................................ 12
Ajuster les commandes du moniteur ..................................................................................14
Étalonner les graphiques ......................................................................................................15
Version PC
Étalonner votre moniteur .....................................................................................................16
Créer un préréglage personnalisé....................................................................................... 22
Ajuster les commandes du moniteur ................................................................................. 25
Enregistrement chronologique des étalonnages ............................................................. 26
Dépannage ............................................................................................................................. 28
Caractéristiques de l’étalonneur......................................................................................... 29
Contrat de licence d’utilisation du logiciel SpectraView ................................................ 30
Garantie restreinte pour le matériel SpectraView........................................................... 32
Références .............................................................................................................................. 33
3
Contenu de SpectraView
Câble vidéo VGA à DVI
(for MultiSync FP955/FP1375X)
Câble vidéo VGA à VGA
(for MultiSync FP2141SB-BK, DiamondPro 2070SB-BK,
DiamondPro 2060U)
( for DiamondPro 930SB-BK)
Câble vidéo VGA à VGA
Adaptateur SpectraView
Guide de démarrage
rapide
Sp
p
ectraView
TM
Color Calibration Dis
p
lay Syste
m
Q
UICK S
T
CD-ROM
Capot
Calibrateur de
couleurs SpectraView
4
1. Raccordement du câble vidéo SpectraView au moniteur :
• MultiSync FP955 / FP1375X : Branchez la prise DVI-A du câble vidéo SpectraView
sur le port d’entrée DVI du moniteur.
•Pour les DiamondPro 930SB-BK, DiamondPro 2070SB-BK et MultiSync FP2141SB-BK
connecter le câble volant ou le câble VGA sur le moniteur à l’extrémité femelle de
l’adaptateur à 15 broches et l’extrémité male à l‘ordinateur. Saute pour Marcher #3.
• DiamondPro 2060u : Branchez la prise VGA du câble vidéo SpectraView
(sans raccord USB en tire-bouchon) sur Signal B du moniteur.
2. Branchez la prise VGA du câble vidéo SpectraView (avec raccord USB en tire bouchon)
sur le port de sortie de l’ordinateur.
3. Branchez le raccord USB en tire-bouchon du câble vidéo SpectraView sur un connecteur
USB libre de l’ordinateur. Pour le DiamondPro 930SB-BK, DiamondPro 2070SB-BK et
MultiSync FP2141SB-BK utilise pour relier à l’ordinateur le USB tire-bouchon de
l’adaptateur.
4. Branchez le raccord USB du Calibrateur Couleurs SpectraView sur un connecteur USB
libre de l’ordinateur.
5. Enlevez l’adhésif des pattes velcro du capot SpectraView ; fixez celui-ci au-dessus du
moniteur (à l’avant) et sur les côtés (Figure 1).
Installation du
matériel SpectraView
Figure 1

5
Windows (98SE, Me, 2000, XP)
1. Insérez le disque compact SpectraView dans votre lecteur de CD-ROM.
2. L’assistant Ajouter/Nouveau matériel apparaît à l’écran lors de la mise en route initiale.
Sélectionnez “Chercher le pilote approprié pour mon unité”, puis cliquez sur “Suivant”.
Sur le menu qui s’affiche, cochez la case “Lecteurs CD-ROM” ou “Support amovible
”
dans la section de recherche, puis cliquez sur “Suivant”.
3. Lorsque l’installation du pilote est achevée, exécutez le programme
Spectraview\spectraview.exe du CD-ROM.
4. Suivez les invites à l’écran pour installer le logiciel.
5. Redémarrez l’ordinateur et le moniteur.
Macintosh (OS 9.2 ou plus récent)
1. Insérez le disque compact SpectraView dans votre lecteur de CD-ROM.
2. Double-cliquez sur le dossier Macintosh.
3. Double-cliquez sur l’icône “Installation SpectraView
”
.
4. Suivez les invites à l’écran pour installer le logiciel.
5. Redémarrez l’ordinateur et le moniteur.
Le logiciel est maintenant prêt à être lancé. Pour des directives plus complètes, consultez le Guide
d’utilisation qui se trouve sur le disque compact SpectraView.
Vous pourrez aussi y prendre connaissance de la garantie restreinte du matériel SpectraView.
Installation du
logiciel SpectraView

6
Lancer le programme SpectraView
Pendant le chargement du logiciel SpectraView, ce dernier initialisera le moniteur
et le calibrateur de couleurs pour ajustement. Ce processus prend
approximativement 30 secondes, mais cela peut varier selon les performances du
système.
Remarque : Si l’un de ces deux périphériques n’est pas détecté, un écran d’erreur
apparaîtra vous demandant de vérifier le branchement.
Si c’est la première fois que SpectraView fonctionne, le moniteur sera non
étalonné. Pour effectuer un étalonnage, cliquez sur « Étalonner » (Calibrate) dans
le menu du logiciel (Figure 3a).
SpectraView vous permet de spécifier les paramètres que vous préférez utiliser
pour l’étalonnage. Ces paramètres (température de couleur, gamma et luminance
blanche) sont contenus dans le dossier « Préréglages » (Preset) sous la forme de
petits fichiers contenant ces valeurs. SpectraView expédie le produit avec deux
préréglages déjà installés, RGB et D50. Vous pouvez sélectionner un préréglage
pour l’étalonnage, en cliquant sur le menu déroulant « Préréglage » (Preset) dans
Ét lonner votre moniteur
VERSION MACINTOSH
Figure 3a
OSX
OS9

7
Ét lonner votre moniteur (suite)
VERSION MACINTOSH
Le capteur de couleurs SpectraView est extrêmement sensible à la lumière. Il doit
d’abord régler ses valeurs internes pour le noir avant de mesurer les couleurs.
Cette mesure initiale du noir est appelée un « Étalonnage du noir actuel ». Cette
étape doit être effectuée préalablement à chaque étalonnage du moniteur
(Figure 3b).
Placez le côté de la ventouse de l’étalonneur de couleurs sur une surface anti-
réfléchissante, opaque (bureau, tapis de souris) et cliquez sur « Suivant » (Next)
pour continuer. NE PLACEZ PAS LE CAPTEUR SUR L’ÉCRAN DU MONITEUR.
le coin gauche inférieur de l’affichage ÉTALONNAGE. Vous pouvez également créer
vos propres préréglages en procédant comme il est expliqué à la section 4 : Créer
un préréglage personnalisé.
Figure 3b
OSX
OS9
8
Ét lonner votre moniteur (suite)
VERSION MACINTOSH
La prochaine étape va permettre de commencer l’étalonnage du moniteur.
Fixez le côté de la ventouse de l’étalonneur sur la face de l’écran cathodique
directement sur le cercle noir situé dans le menu du logiciel (Figure 3c).
Une fois que l’étalonneur est fixé sur la face du moniteur, cliquez sur « Suivant »
(Next) pour continuer.
Pendant le processus d’étalonnage, les couleurs et la luminosité de l’écran vont
subir de nombreux changements (Le menu de calibrage OSX est plein écran).
L’ indicateur du processus dans le menu montrera les réglages en cours.
Figure 3c
OSX
OS9
9
Lorsque le processus d’étalonnage est terminé, vous serez invité à donner un nom
au fichier du profil ICC créé à partir des données mesurées à partir du moniteur.
Lorsque le nom du fichier est sélectionné, cliquez sur « Sauvegarder » (Save) pour
terminer l’installation.
Une fois que l’étalonnage initial est terminé, l’option permettant d’ajuster le
moniteur aux conditions de lumière ambiante est disponible. La fonction Ambi-
ance est utilisée pour ajuster la commande de luminosité permettant de
maximiser la visibilité des détails sombres dans les images. Étant donné que la
lumière de la pièce supprime ces détails, il est nécessaire d’augmenter la
luminosité pour rendre chaque détail visible. Toutefois, puisque le fait
d’augmenter la commande de luminosité diminue le rayonnement Gamma, utilisez
cette fonction avec prudence.
Pour commencer ce processus, cliquez sur « Ambiance » (Ambient) dans le menu
du logiciel (Figure 3d).
Ét lonner votre moniteur (suite)
VERSION MACINTOSH
Figure 3d
OSX
OS9

10
Ét lonner votre moniteur (suite)
VERSION MACINTOSH
L’étalonneur doit mesurer la lumière ambiante (Figure 3e).
Tenez l’étalonneur de couleurs à proximité de la face du moniteur avec le côté de
la ventouse en direction opposée du moniteur.
Remarque : Assurez-vous que rien ne bloque les capteurs situés sur le côté de la
ventouse de l’étalonneur de couleurs pendant cet ajustement. L’étalonneur
devrait être tenu sans qu’aucun objet ne se trouve entre les capteurs et la source
de lumière de la pièce.
Cliquez sur « Suivant » (Next) pour commencer cette mesure.
Figure 3e
OSX
OS9
11
Ét lonner votre moniteur (suite)
VERSION MACINTOSH
Fixez le côté de la ventouse de l’étalonneur sur la face de l’écran cathodique
directement sur le cercle noir situé dans le menu du logiciel (Figure 3f).
Une fois que l’étalonneur est fixé sur la face du moniteur, cliquez sur « Suivant »
(Next) pour terminer le réglage ambiant.
Remarque : Il sera nécessaire de recommencer ce processus, si les conditions
d’éclairage ambiant sont modifiées.
Figure 3f
OSX
OS9
12
Les préréglages contiennent les valeurs à utiliser pendant le processus
d’étalonnage. Les préréglages emmagasinent les valeurs de la température des
couleurs, du rayonnement gamma et de la luminance. Si vous souhaitez un réglage
de couleur autre que RGB et D50, vous devez créer un préréglage d’étalonnage
personnalisé.
Pour ouvrir le menu des préréglages, cliquez sur « Voir » (View) dans le menu du
logiciel et sélectionnez « Préréglages » (Presets).
Pour créer un nouveau préréglage, cliquez sur « Nouveau » (New) et lorsque vous y
êtes invité, créez un nom de préréglage.
Ajustez la commande « Température de couleur » (Color Temperature) comme vous
le souhaitez.
Ajustez la commande « Gamma » (Gamma) comme vous le souhaitez.
La luminance est la valeur de luminosité du blanc parfait et elle peut être
spécifiée en candelas/mètres carrés (cd/m2), ou bien elle peut être réglée au «
Maximum ». La valeur Maximum est la luminosité maximale sur laquelle le
moniteur peut être réglé à l’aide des limites spécifiées à l’usine pour les
commandes rouges, vertes et bleues. Pour obtenir une luminosité maximale pour
un étalonnage, cliquez sur la case à cocher « Luminance Max ».
Créer un préréglage personnalisé
VERSION MACINTOSH
Figure 4
OSX
OS9

13
Créer un préréglage personnalisé (suite)
VERSION MACINTOSH
Une fois que les changements souhaités ont été effectués pour ces commandes,
cliquez sur « Terminé » (Done) pour les sauvegarder en option d’étalonnage.
Pour supprimer un préréglage, sélectionnez-le dans la case du menu « Préréglage
» (Preset) et cliquez sur « Supprimer » (Delete).
Une fois qu’un préréglage personnalisé a été créé, vous pouvez le sélectionner à
tout moment à partir du menu déroulant sur l’affichage Étalonner avant
l’étalonnage. Il n’est pas nécessaire d’utiliser le préréglage nouvellement créé.
Entrez dans le menu d’étalonnage et sélectionnez le préréglage personnalisé dans
la case du menu « Préréglage » (Preset).
Suivez les instructions indiquées à la section 3 pour ré-étalonner votre moniteur.
14
Ajuster les commandes du moniteur
VERSION MACINTOSH
Une fois qu’un moniteur est étalonné, le Gestionnaire à l’écran (On Screen
Manager - OSM) est désactivé du panneau de commandes du moniteur. Pour la
bonne raison que tout ajustement effectué manuellement aux commandes de
couleur du moniteur risque de compromettre l’étalonnage du moniteur.
S’il est nécessaire de régler la géométrie de l’image du moniteur, vous pouvez
accéder à ces commandes dans le menu « Moniteur » (Monitor).
Entrez dans le menu « Moniteur » (Monitor) à partir du menu de logiciel principal.
Déplacez les barres coulissantes comme vous le souhaitez.
Pour réinitialiser le menu aux préréglages antérieurs, cliquez sur « Restaurer »
(Restaure), « Défaites » tous (Undo All) ou « Réinitialiser » (Reset) pour installer
ces commandes par défaut comme à l’origine.
Cliquez sur « Terminé » (Done) lorsque vous avez fini pour retourner au menu
principal.
OSX
OS9

15
Étalonner les graphiques
VERSION MACINTOSH (Version OS9 seulement)
Les graphiques de l’étalonnage peuvent être affichés à l’écran et imprimés pour
référence ultérieure.
Pour voir le menu des graphes, cliquez sur « Voir » (View) dans le menu du logiciel
et sélectionnez « Graphique » (Graph). Ensuite, choisissez entre « Précision
Gamma » (Gamma Accuracy) ou « Suivi Delta E » (Delta E Tracking).
Précision Gamma - Ce graphe représente la précision des valeurs CIE pour les
couleurs par rapport aux valeurs ciblées.
Suivi Delta E - Ce graphe représente la précision de l’étalonnage en termes de
DeltaE, DeltaE étant une mesure mathématique des différences visibles dans les
couleurs. Le calcul d’un DeltaE prend en compte à la fois la déviation de la
luminance et de la chromaticité à partir d’une valeur de référence. Une valeur
DeltaE de deux ou trois identifierait une différence dans la couleur à peine
perceptible. Le graphe DeltaE montre la mesure DeltaC qui est une erreur due aux
différences justes de couleur et DeltaE qui est une erreur due aux différences de
couleur et de luminance.
Le graphe peut être imprimé pour référence ultérieure.
16
Étalonner votre moniteur
VERSION PC
Figure 2a
Lancer le programme SpectraView.
Pendant le chargement du logiciel SpectraView, ce dernier initialisera le moniteur et
le calibrateur de couleurs pour ajustement. Ce processus prend approximativement
30 secondes, mais cela peut varier selon les performances du système.
Remarque : Si l’un de ces deux périphériques n’est pas détecté, un écran d’erreur
apparaîtra vous demandant de vérifier le branchement.
Si c’est la première fois que SpectraView fonctionne, le moniteur sera non
étalonné. Pour effectuer un étalonnage, cliquez sur le bouton « Étalonner »
(Calibrate) (Figure 2a).
SpectraView vous permet de spécifier les paramètres que vous préférez utiliser
pour l’étalonnage. Ces paramètres (température de couleur, gamma et luminance
blanche) sont contenus dans le dossier « Préréglages » (Preset) sous la forme de
petits fichiers contenant ces valeurs. SpectraView expédie le produit avec deux
préréglages déjà installés, RGB et D50. Vous pouvez sélectionner un préréglage
pour l’étalonnage, en cliquant sur le menu déroulant « Préréglage » (Preset) dans
dans le coin gauche inférieur de l’affichage ÉTALONNAGE. Vous pouvez également
créer vos propres préréglages en procédant comme il est expliqué à la section 3 :
Créer un préréglage personnalisé
17
Étalonner votre moniteur (suite)
Figure 2b
VERSION PC
Le capteur de couleurs SpectraView est extrêmement sensible à la lumière. Il doit
d’abord régler ses valeurs internes pour le noir avant de mesurer les couleurs.
Cette mesure initiale du noir est appelée un « Étalonnage du noir actuel ». Cette
étape doit être effectuée préalablement à chaque étalonnage du moniteur (Figure
2b).
Placez le côté de la ventouse de l’étalonneur de couleurs sur une surface anti-
réfléchissante, opaque (bureau, tapis de souris) et cliquez sur « Suivant » (Next)
pour continuer. NE PLACEZ PAS LE CAPTEUR SUR L’ÉCRAN DU MONITEUR.

18
Étalonner votre moniteur (suite)
Figure 2c
VERSION PC
La prochaine étape va permettre de commencer l’étalonnage du moniteur.
Fixez le côté de la ventouse de l’étalonneur sur la face de l’écran cathodique
directement sur le cercle noir situé dans le menu du logiciel (Figure 2c).
Une fois que l’étalonneur est fixé sur la face du moniteur, cliquez sur « Suivant »
(Next) pour continuer.
Pendant le processus d’étalonnage, les couleurs et la luminosité de l’écran vont
subir de nombreux changements. L’indicateur du processus dans le menu
montrera les réglages en cours.
19
Étalonner votre moniteur (suite)
Figure 2d
VERSION PC
Lorsque le processus d’étalonnage est terminé, vous serez invité à donner un nom
au fichier du profil ICC créé à partir des données mesurées à partir du moniteur.
Le nom du fichier par défaut utilisera le numéro de modèle du moniteur (par
exemple, FP1375X, FP955 ou DP2060u).
Lorsque le nom du fichier est sélectionné, cliquez sur « Sauvegarder » (Save) pour
terminer l’installation.
Une fois que l’étalonnage initial est terminé, l’option permettant d’ajuster le
moniteur aux conditions de lumière ambiante est disponible. La fonction Ambi-
ance est utilisée pour ajuster la commande de luminosité permettant de
maximiser la visibilité des détails sombres dans les images. Étant donné que la
lumière de la pièce supprime ces détails, il est nécessaire d’augmenter la
luminosité pour rendre chaque détail visible. Toutefois, puisque le fait
d’augmenter la commande de luminosité diminue le rayonnement Gamma, utilisez
cette fonction avec prudence.

20
Étalonner votre moniteur (suite)
Figure 2e
Figure 2f
VERSION PC
Pour commencer ce processus, cliquez sur « Ambiance » (Ambient) dans le menu
du logiciel (Figure 2e).
L’étalonneur doit mesurer la lumière ambiante (Figure 2f).
21
Étalonner votre moniteur (suite)
Figure 2g
VERSION PC
Tenez l’étalonneur de couleurs à proximité de la face du moniteur avec le côté de
la ventouse en direction opposée du moniteur.
Remarque : Assurez-vous que rien ne bloque les capteurs situés sur le côté de la
ventouse de l’étalonneur de couleurs pendant cet ajustement. L’étalonneur
devrait être tenu sans qu’aucun objet ne se trouve entre les capteurs et la source
de lumière de la pièce.
Cliquez sur « Suivant » (Next) pour commencer cette mesure.
Fixez le côté de la ventouse de l’étalonneur sur la face de l’écran cathodique
directement sur le cercle noir situé dans le menu du logiciel (Figure 2g).
Une fois que l’étalonneur est fixé sur la face du moniteur, cliquez sur « Suivant »
(Next) pour terminer le réglage ambiant.
Remarque : Il sera nécessaire de recommencer ce processus, si les conditions
d’éclairage ambiant sont modifiées.
22
Créer un préréglage personnalisé
Figure 3a
VERSION PC
Les préréglages contiennent les valeurs à utiliser pendant le processus
d’étalonnage. Les préréglages emmagasinent les valeurs de la température des
couleurs, du rayonnement gamma et de la luminance. Si vous souhaitez un réglage
de couleur autre que RGB et D50, vous devez créer un préréglage d’étalonnage
personnalisé.
Pour ouvrir le menu des préréglages, cliquez sur « Voir » (View) dans le menu du
logiciel et sélectionnez « Préréglages » (Presets) (Figure 3a).
23
Créer un préréglage personnalisé (suite)
VERSION PC
Entrez un nom pour le nouveau préréglage dans la case du menu « Nom de
préréglage » (Preset Name) (Figure 3b).
Ajustez la commande « Température de couleur » (Color Temperature) comme vous
le souhaitez.
Ajustez la commande « Gamma » (Gamma) comme vous le souhaitez.
La luminance est la valeur de luminosité du blanc parfait et elle peut être
spécifiée en candelas/mètres carrés (cd/m2), ou bien elle peut être réglée au «
Max ». La valeur Max est la luminosité maximale sur laquelle le moniteur peut
être réglé à l’aide des limites spécifiées à l’usine pour les commandes rouges,
vertes et bleues. Pour obtenir une luminosité maximale pour un étalonnage,
cliquez sur la case à cocher « Max ».
Une fois que les changements souhaités ont été effectués pour ces commandes,
cliquez sur « Sauvegarder » (Save) pour créer ce réglage en option d’étalonnage.
Pour supprimer un préréglage, sélectionnez-le dans la case du menu « Nom de
préréglage » (Preset Name) et cliquez sur « Supprimer » (Delete).
Figure 3b
24
Créer un préréglage personnalisé (suite)
Figure 3c
VERSION PC
Une fois qu’un préréglage personnalisé a été créé, vous pouvez le sélectionner à
tout moment à partir du menu déroulant sur l’affichage Étalonner avant
l’étalonnage. Il n’est pas nécessaire d’utiliser le préréglage nouvellement créé.
Entrez dans le menu d’étalonnage et sélectionnez le préréglage personnalisé dans
la case du menu « Nom de préréglage » (Preset Name) (Figure 3c).
Suivez les instructions indiquées à la section 2 pour ré-étalonner votre moniteur
Ajuster les commandes du moniteur.

25
Adjuster les commandes du moniteur
Figure 4
VERSION PC
Une fois qu’un moniteur est étalonné, le Gestionnaire à l’écran (On Screen
Manager - OSM) est désactivé du panneau de commandes du moniteur. Pour la
bonne raison que tout ajustement effectué manuellement aux commandes de
couleur du moniteur risque de compromettre l’étalonnage du moniteur.
S’il est nécessaire de régler la géométrie de l’image du moniteur, vous pouvez
accéder à ces commandes dans le menu « Moniteur » (Monitor).
Entrez dans le menu « Moniteur » (Monitor) à partir du menu de logiciel principal.
Déplacez les barres coulissantes comme vous le souhaitez.
Pour réinitialiser le menu aux préréglages précédents, cliquez sur « Restaurer »
(Restaure) ou « Réinitialiser HW » (HW Reset).
Cliquez sur « Terminé » (Done) lorsque vous avez fini pour retourner au menu
principal.
26
Enregistrement chronologique
des étalonnages
Figure 5
VERSION PC
Un historique des performances du moniteur est sauvegardé dans une base de
données après chaque étalonnage.
Pour ouvrir le menu d’enregistrement chronologique des étalonnages, cliquez sur
« Voir » (View) dans le menu du logiciel et sélectionnez « Enregistrement
chronologique des étalonnages » (Calibration Logging).
Une fois que le menu d’enregistrement chronologique des étalonnages est ouvert,
sélectionnez l’information à enregistrer dans le graphe et la longueur d’une
période d’enregistrement chronologique des étalonnages (Figure 5).
Pour modifier le type de graphe, cliquez sur la case de menu « Types de graphe »
(Graph Types) et sélectionnez à partir des éléments suivants :
Précision de l’étalonnage - Ce graphe représente la précision des valeurs CIE pour
les couleurs par rapport aux valeurs ciblées.
Suivi Delta E - Ce graphe représente la précision de l’étalonnage en termes de
DeltaE, DeltaE étant une mesure mathématique des différences visibles dans les
couleurs. Le calcul d’un DeltaE prend en compte à la fois la déviation de la
luminance et de la chromaticité à partir d’une valeur de référence. Une valeur
DeltaE de deux ou trois identifierait une différence dans la couleur à peine

27
Étalonner les graphiques (suite)
VERSION PC
perceptible. Le graphe DeltaE montre la mesure DeltaC qui est une erreur due aux
différences justes de couleur et DeltaE qui est une erreur due aux différences de
couleur et de luminance.
Chronologie de l’affichage (pour Windows seulement) - La luminosité maximale de
l’affichage est enregistrée après chaque étalonnage. Ce graphe indique la
chronologie de l’affichage au fil du temps.
Cliquez sur « Graphe d’affichage » (Display Graph) pour voir le registre du
moniteur ou sur « Sauvegarder » (Save) pour créer une version texte des données.
Une fois dans le graphe affiché, le fichier peut être imprimé ou sauvegardé pour
référence ultérieure.

28
Dépannage
1. « Moniteur numérique non trouvé » (Digital Monitor Not Found)
SpectraView n’a pu trouver l’ID du moniteur dans l’index des noms de
périphériques ou le moniteur n’a pas répondu à la commande test numérique qui
lui a été envoyée.
a. Vérifier la connexion du moniteur. Pour les moniteurs Mitsubishi DP2060U, le
câble numérique doit être branché au signal B et non au signal A. Le signal A ne
fournit pas de lignes de communication AC, ou
b. Vous avez branché le câble numérique à l’envers; le connecteur VGA à
l’extrémité USB devrait toujours se connecter à la carte graphique et jamais
au moniteur, ou
c. Vu que trois microprocesseurs sont impliqués dans la configuration
SpectraView (contrôleur DDC dans le moniteur, microprocesseur dans le câble
numérique et l’ordinateur principal), il n’est pas inhabituel que ces
périphériques deviennent « désynchronisés » pendant les mises sous/hors
tension. Pour re-synchroniser les microprocesseurs, débranchez le câble USB
du câble numérique et redémarrez l’ordinateur. Rebranchez le connecteur USB
du câble numérique et relancez SpectraView.
2. Mauvais étalonnages
Si le graphe de suivi DeltaE indique un mauvais étalonnage (valeur DeltaE de
quatre ou plus n’importe où dans le graphique), cela vient probablement d’un
mauvais étalonnage du noir actuel. Ré-exécutez l’étalonnage avec le capteur
dans une pièce la plus noire possible (couvert d’un chiffon ou d’un matériel
opaque, si possible) pendant l’étape de mesure du noir actuel.
29
Caractéristiques de l’étalonneur
Les caractéristiques suivantes se rapportent à la mesure d’un écran cathodique
avec un ensemble luminescent EBU ou D6500 et une luminance de 90 candelas/m2
comparée à une mesure effectuée par spectrophotomètre aPhotoResearch-650.
noisicérP
ecnanimorhC
ecnanimuL
200.-/+:y,x
%2-/+:Y
étilibitcudorpeR
,tnemurtsniemêm(
emmargorp-suosemêm
)snoitacifidomed
100.-/+:y,x
%5.-/+:Y
étilibitcudorpeR
,tnemurtsniemêm
-suosemêm
edemmargorp
)snoitacifidom
200.-/+:y,x
%2-/+:Y
narcé'dnoitarénégéR
zh021-zh03
erusemedessetiV
})B,V,R(xuanacsiort{
sm002

30
AVIS IMPORTANT : VEUILLEZ LIRE ATTENTIVEMENT CE CONTRAT. EN OUVRANT LE PAQUET CI-JOINT, EN UTILISANT,
OU ENCORE EN INSTALLANT LE LOGICIEL, VOUS RECONNAISSEZ AVOIR PRIS CONNAISSANCE DES TERMES DE CE CONTRAT
ET LES AVOIR ACCEPTÉS. SI VOUS N’ACCEPTEZ PAS LES TERMES DE CE CONTRAT, VOUS NE POUVEZ UTILISER CE LOGICIEL.
VOUS DEVEZ ALORS RETOURNER LE LOGICIEL ET TOUS LES ARTICLES S’Y RAPPORTANT (LES DISQUETTES, LES CD, LES
DOCUMENTS ÉCRITS, LE CONDITIONNEMENT) À L’ENDROIT OÙ VOUS L’AVEZ ACHETÉ POUR OBTENIR UN REMBOURSEMENT.
Le présent contrat de licence (« licence ») est un accord juridique entre vous et la société NEC-Mitsubishi Electronics
Display of America, Inc. (ci-dessous dénommée « NMDA »). Il vous concède certains droits d’accès et d’utilisation du
logiciel se trouvant dans l’enveloppe. VOUS CONSENTEZ PAR LES PRÉSENTES, VOUS ET TOUTE ORGANISATION («EMPLOYEUR
») POUR LAQUELLE VOUS ÊTES LE REPRÉSENTANT AUTORISÉ À UTILISER LE LOGICIEL, À ÊTRE LIÉ AUX TERMES SUIVANTS DE
CE CONTRAT CONCERNANT SON UTILISATION :
1. Exonération de garantie sur le logiciel. Vous convenez et acceptez formellement d’utiliser le logiciel à vos propres
risques. CE LOGICIEL EST FOURNI « TEL QUEL », AVEC SES IMPERFECTIONS ET SANS GARANTIE D’AUCUNE SORTE. NMDA ne
garantit pas que les fonctions contenues dans le logiciel répondront à vos exigences, ni que le fonctionnement du
logiciel sera ininterrompu ou exempt d’erreur, ni que les défauts dans le logiciel seront corrigés. En outre, NMDA décline
toute responsabilité, et ne formule aucune observation quant à l’utilisation du logiciel ou des conséquences pouvant
en résulter, et quant à l’exactitude, la pertinence, la justesse, etc. des documents qui accompagnent le logiciel. Si le
logiciel s’avérait défectueux, vous (et non NMDA ni un représentant autorisé de NMDA) devrez prendre à votre charge
tous les frais de maintenance, réparation ou correction.
Certaines provinces et certains états ne permettant pas
l’exclusion ou la restriction des garanties tacites, les exclusions/restrictions exprimées ci-dessus peuvent ne pas
s’appliquer.
Les consommateurs qui achètent des produits NMDA pour une utilisation autre que commerciale ont des
droits prévus par la loi : ces droits ne sont pas lésés par les termes de cette exonération qui, par ailleurs, ne limite ni
n’exclut la responsabilité de NMDA en cas de décès ou de blessures corporelles causés par sa propre négligence.
Si vous avez acheté ce logiciel pour un usage professionnel ou commercial, vous acceptez aussi la déclaration suivante :
EN CE QUI A TRAIT AU LOGICIEL, NMDA REJETTE FORMELLEMENT TOUTE GARANTIE DE : VALEUR MARCHANDE, CONVENANCE À
UNE FIN PARTICULIÈRE, TITRE DE PROPRIÉTÉ, ABSENCE DE CONTRE-FAÇON.
2. Limitation de la responsabilité. EN AUCUN CAS, Y COMPRIS CELUI DE NÉGLIGENCE, NMDA NE POURRA ÊTRE TENUE
RESPONSABLE DE TOUT DOMMAGE ACCIDENTEL, PUNITIF, SPÉCIAL, DIRECT OU INDIRECT RÉSULTANT DE CETTE LICENCE OU
DE CE LOGICIEL, OU BIEN LIÉ À CEUX-CI.
3. Octroi de la licence - Utilisations autorisées - Restrictions.3. Octroi de la licence - Utilisations autorisées - Restrictions.
3. Octroi de la licence - Utilisations autorisées - Restrictions.3. Octroi de la licence - Utilisations autorisées - Restrictions.
3. Octroi de la licence - Utilisations autorisées - Restrictions. NMDA vous octroie la licence sous réserve des
conditions suivantes que vous acceptez : la licence est intransférable, non exclusive et personnelle ; elle vous autorise
à installer et à utiliser le logiciel, en format code objet, sur un seul ordinateur ; vous ne pouvez utiliser le logiciel sur
plusieurs ordinateurs à la fois. Veuillez contacter NMDA si vous désirez une installation-réseau. En vue uniquement de la
sauvegarde des données, vous pouvez faire une copie du logiciel sur un support lisible par une machine ; cette copie de
secours doit donner toute l’information de copyright de l’original. Cette licence reste en vigueur jusqu’à sa résiliation,
déterminée par ce qui suit : a) Vous résiliez vous-même cette licence en détruisant le logiciel et toutes les copies que
vous possédez ; b) La licence est résiliée automatiquement lorsqu’un des termes du contrat n’est pas respecté. Vous
reconnaissez que cette licence ne vous donne droit à aucun soutien technique, aucune maintenance, ni version améliorée
de la part de NMDA.
4. Restrictions de la licence .4. Restrictions de la licence .
4. Restrictions de la licence .4. Restrictions de la licence .
4. Restrictions de la licence . Vous n’êtes pas autorisé à faire ce qui suit — directement, par personne interposée, ou
par l’intermédiaire d’un tiers avec qui vous avez des relations d’affaires: (A) copier, modifier, ou réaliser un produit
dérivé de ce logiciel ; (B) décompiler, désassembler, ou faire de l’ingénierie inverse sur le logiciel en tout ou en partie ;
(C) rendre inopérant, mettre hors service ou contourner un dispositif de protection du logiciel ; (D) vendre, accorder
une licence ou une sous-licence, donner à bail, louer, distribuer, divulguer, transférer à un tiers — soit gratuitement,
soit à but lucratif — ou autoriser l’accès à : une partie du logiciel ou de tout produit créé avec le logiciel (soit distinct,
soit fourni avec des articles autres que le logiciel, y compris, sans limitation, les profils en format .ICM et .ICC). En
particulier, mais sans restreindre la portée générale de ce qui précède, vous ne pouvez distribuer le logiciel ou tout
produit similaire sur un support, sur des réseaux, sur des services de messagerie électronique ou sur Internet, ou
permettre à un tiers d’utiliser le logiciel ; (E) publier ni communiquer de quelque façon que ce soit à un tiers une étude
ou des renseignements sur l’efficacité du logiciel, sans avoir reçu au préalable une autorisation écrite de NMDA ; (F)
exporter, utiliser, ou télécharcher le logiciel lorsque cela contrevient à des lois ou des réglementations, y compris celles
de l’U.S. Department of Commerce Export Administration, et autres lois applicables ou (G) utiliser le logiciel en corrélation
avec des systèmes de support vital, des implantations cutanées, des instruments médicaux, des établissements
nucléaires, des systèmes ou des armes nucléaires, l’aviation, les transports publics, et toute autre utilisation où une
panne ou un mauvais fonctionnement
Contrat de licence d’utilisation
du logiciel SpectraView

31
Contrat de licence d’utilisation
du logiciel SpectraView
(suite)
pourraient causer des pertes de vie, ou des dégâts matériels catastrophiques.
5. Titre de propriété. Exception faite des droits qui vous sont formellement octroyés ci-dessus, la présente licence ne
vous concède aucun droit, titre, ni participation visant : a) le logiciel et les produits réalisés avec le logiciel (y compris,
sans limitation, les profils en format .ICM or .ICC) ; b) les copyrights, brevets, droits de propriété, propriétés intellectuelles,
secrets industriels ou marques de commerce relatifs au logiciel et à ses produits. NMDA reste le seul et exclusif
propriétaire du logiciel, des parties qui le constituent et de ses copies ; vous cédez par les présentes à NMDA les droits,
titres et participations issus de toute modification que vous apporterez au logiciel, de tout produit que vous réaliserez
avec celui-ci, que ces modifications soient autorisées ou non. Vous consentez en outre à ne pas divulguer le logiciel.
6. Contrôle des exportations. Vous ne pouvez utiliser le logiciel, ni l’exporter ou le réexporter, à l’encontre des lois
américaines où de celles sous lesquelles il a été acheté. En particulier, mais sans limitation, le logiciel ne peut pas être
exporté ni réexporté : a) vers un pays (ou vers un citoyen ou un résident de celui-ci) frappé d’embargo par les États-
Unis d’Amérique ; et b) vers tout individu figurant sur la liste des Specially Designated Nationals dressée par l’U.S.
Treasury Department ou sur le tableau des Denial Orders de l’U.S. Department of Commerce. En utilisant le logiciel
SpectraView, vous acceptez ce qui précède et vous déclarez et garantissez que vous ne vous trouvez pas dans un tel
pays, que vous n’êtes pas sous le contrôle d’un tel pays, que vous n’en êtes pas citoyen ou résident ou que vous ne vous
trouvez pas sur une des listes mentionnées ci-dessus.
7. Utilisation au sein du gouvernement. Le logiciel est classé « diffusion restreinte » lorsqu’il est fourni au gouvernement
des États-Unis, au sens de la clause 52.227-19 du FAR. Par ailleurs, la clause 52.227-19 du FAR définit les droits du
gouvernement américain touchant au logiciel.
8. Compétences et Divisibilité. La présente licence relève des compétences des tribunaux des États-Unis et de de
l’Illinois. Vous vous engagez donc, de manière définitive, à soumettre tout argument aux compétences de ces tribunaux
d’état ou fédéraux : toute poursuite judiciaire fondée sur cette licence devra être engagée devant, et arrêtée par un
tel tribunal. Advenant qu’un tribunal compétent juge qu’une clause ou une partie des présentes soit non exécutoire, le
reste de ce contrat de licence continuera d’être en vigueur et à avoir force de loi.
9. Contrat entier. Cette licence est le contrat intégral entre les parties en ce qui concerne l’utilisation du logiciel ; elle
remplace toute entente précédente ou contemporaine sur le sujet. Aucun amendement ni modification de cette li-
cence, à moins d’être écrit et signé par MDA, n’aura force obligatoire.

32
Garantie restreinte pour
le matériel SpectraView
GARANTIE RESTREINTE. GARANTIE RESTREINTE.
GARANTIE RESTREINTE. GARANTIE RESTREINTE.
GARANTIE RESTREINTE. NMDA garantit le matériel SpectraView (ci-après dénommé « produit » ou « produits ») contre
tous vices de matières premières et de fabrication ; sous réserve des conditions stipulées ci-dessous, NMDA consent à
réparer ou à remplacer (à la seule discrétion de NMDA) les pièces de l’appareil ci-inclus s’avérant défectueuses dans un
délai de trois (3) ans à compter de la date d’achat originale. Les pièces de rechange sont garanties pendant quatre-
vingt-dix (90) jours. Les pièces ou l’appareil de rechange pourront être neufs ou remis à neuf, leur spécifications
équivalentes à celles des pièces/de l’appareil d’origine homologues.
Cette garantie vous donne des droits spécifiques ; vous pouvez par ailleurs en avoir d’autres qui varient selon la
province ou l’état. Cette garantie n’est pas transférable et est destinée uniquement au premier acheteur du produit ;
elle ne couvre que les composants fournis par NMDA. Toute réparation causée par un composant non fourni par NMDA
n’est donc pas couverte par cette garantie, qui ne couvre pas non plus les réparations causées par une utilisation
abusive ou inappropriée. Le premier acheteur doit avoir acheté le produit aux États-Unis ou au Canada pour qu’il soit
sous garantie, car celle-ci ne couvre la distribution du produit par NMDA que dans ces deux pays : aucun service au
titre de la garantie n’est offert ailleurs. Une preuve d’achat doit être présentée à NMDA pour valider la date de l’achat
: reçu de vente ou facture d’origine portant le nom et l’adresse du vendeur, de l’acheteur, ainsi que le numéro de série
du produit.
À L’EXCEPTION DES RESPONSABILITÉS ÉTABLIES CI-DESSUS, NMDA NE POURRA ÊTRE TENUE RESPONSABLE DE TOUT DOMMAGE
ACCIDENTEL, DIRECT OU INDIRECT, NI DE TOUT AUTRE GENRE DE DOMMAGES PROVENANT DE L’UTILISATION D’UN PRODUIT
NMDA. CETTE GARANTIE REMPLACE TOUTES LES AUTRES GARANTIES EXPRESSES OU TACITES, Y COMPRIS, MAIS SANS S’Y
LIMITER, TOUTE GARANTIE TACITE DE VALEUR MARCHANDE ET DE CONVENANCE À UN USAGE PARTICULIER. CERTAINES PROV-
INCES ET CERTAINS ÉTATS NE PERMETTANT PAS L’EXCLUSION DES GARANTIES TACITES, OU L’EXCLUSION ET LA RESTRICTION
DES DOMMAGES ACCIDENTELS OU INDIRECTS, LES EXCLUSIONS/RESTRICTIONS EXPRIMÉES CI-DESSUS PEUVENT NE PAS
S’APPLIQUER.
Ce produit est garanti en conformité avec les termes de cette garantie restreinte. Avis aux consommateurs : La
performance du produit dépend, entre autres, de la configuration du système, des logiciels, de l’application, des données
du clients et de l’implémentation. Les produits NMDA sont reconnus pour être compatibles avec plusieurs systèmes.
Mais la mise à exécution étant particulière à chaque client, la compatibilité du produit pour toute utilisation ou tout
objet spécifiques doit être établie par ce dernier ; elle ne peut être garantie par NMDA.

33
Références
Service à la clientèle et assistance technique du moniteur NEC-Mitsubishi
Service à la clientèle et assistance technique:
(800) 632-4662
Télécopieur: (800) 695-3044
Base de connaissance de l’assistance
technique en lign: http://www.necmitsubishi.com/
css/knowledgebase.cfm
Adresse électronique du service à la
clientèle et de l’assistance technique: http://www.necmitsubishi.com/
css/techform.htm
Courrier électronique
SpectraView Assistance: http://pro.necmitsubishi.com
Internet (e-mail): tech-suppor t@necmitsubishi.com
World Wide Web: http://www.necmitsubishi.com
Produit enregistré: http://www.necmitsubishi.com/
productregistration