
NEXT 8365/8375 INSTALLATION AND OPERATION MANUAL

2
EN Installation and operation manual .................................................................... 3
NL Handleiding voor installatie en bediening ........................................................11
DE Installations- und Betriebshandbuch ...............................................................20
FR Manuel d’installation et mode d’emploi ...........................................................29
ES Manual de instalación y uso .............................................................................38
IT Manuale d’installazione e utilizzo .......................................................................47

3
EN CONTENTS
1 IDENTIFYING THE PARTS ........................................................................................................................................... 4
1.1 Soundbar ...............................................................................................................................................................................4
1.2 Wirele subwoofer ................................................................................................................................................................5
1.3 Remote Control .....................................................................................................................................................................5
2 PREPARATIONS ....................................................................................................................................................... 6
2.1 Preparing the Remote Control ............................................................................................................................................6
2.2 Using the Remote Control for the fir time ..........................................................................................................................6
2.3 Replacing the Remote Control baery ..............................................................................................................................6
3 CONNECTIONS ....................................................................................................................................................... 7
3.1 Standard HDMI (ARC) conneion ......................................................................................................................................7
3.2 MP3 Link conneion .............................................................................................................................................................7
3.3 Power conneion .................................................................................................................................................................7
3.4 Pairing the Wirele subwoofer with the Soundbar .............................................................................................................8
Automatic pairing .................................................................................................................................................................8
Manual pairing ......................................................................................................................................................................8
4 GENERAL OPERATION .............................................................................................................................................. 8
4.1 Using the remote control of the TV ......................................................................................................................................8
4.2 Using the supplied (Soundbar) remote control .................................................................................................................. 8
Standby / ON ........................................................................................................................................................................8
Seleing modes .................................................................................................................................................................... 9
Adjuing Super Ba Boo ....................................................................................................................................................9
Adjuing the treble level ......................................................................................................................................................9
Adjuing the volume ............................................................................................................................................................9
Seleing the equalizer .........................................................................................................................................................9
Adjuing the brightne of the display ................................................................................................................................9
Seing the Sleep Timer .........................................................................................................................................................9
5 AUX / MP3 LINK / OPTICAL / HDMI OPERATION ...................................................................................................... 9
6 PLAY WITH YOUR BLUETOOTH DEVICE ..................................................................................................................... 9
6.1 Pair Bluetooth enabled devices manually .........................................................................................................................9
6.2 Conne your device to the Soundbar via Bluetooth ........................................................................................................9
6.3 Lien to music from your Bluetooth device ...................................................................................................................... 10
7 WARNINGS AND DISCLAIMERS...............................................................................................................................10
7.1 Precautions concerning baeries .....................................................................................................................................10
8 SPECIFICATIONS ....................................................................................................................................................10
9 SUPPLIED ACCESSORIES .........................................................................................................................................10
4
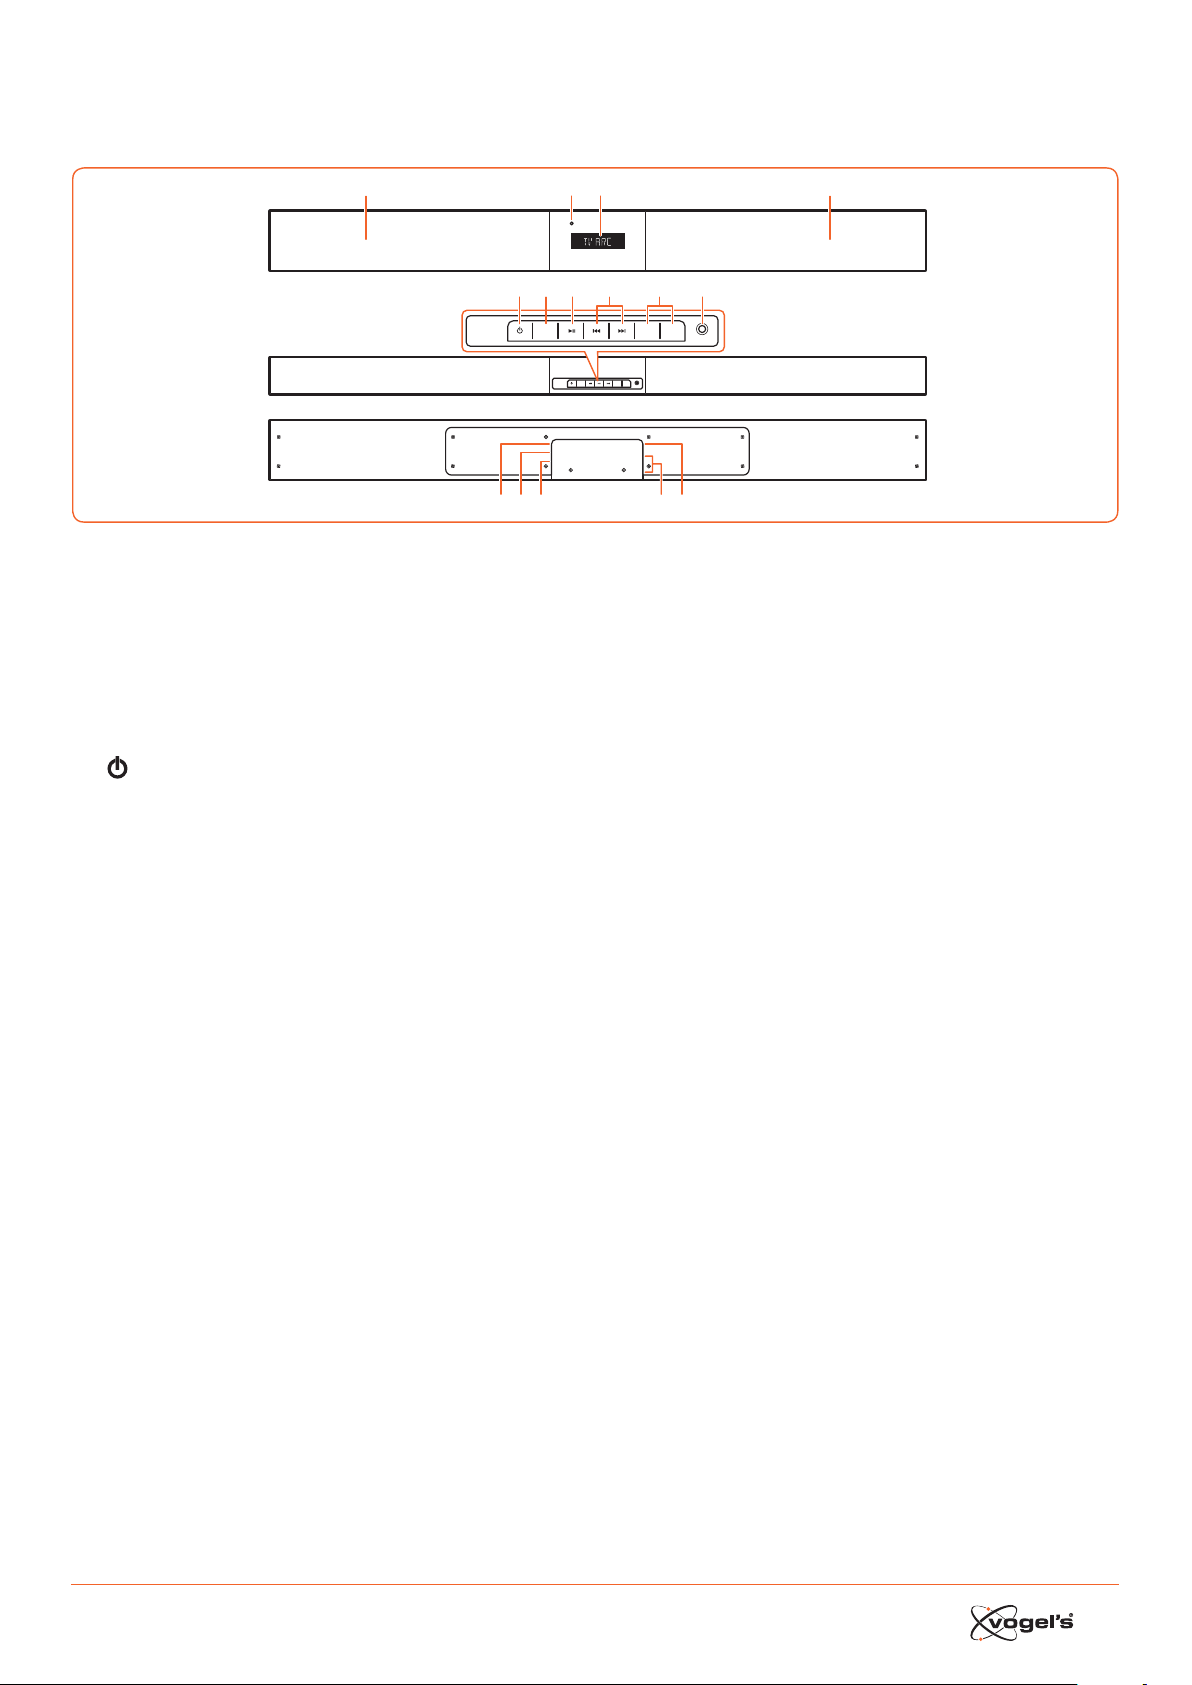
1. IDENTIFYING THE PARTS
1.1 Soundbar
1 Speakers
2 Display / Remote Control Sensor
- Shows the current atus.
- Receives the signal from the remote control.
3 Standby Indicator
Lights up red when the Soundbar is in ANDBY mode.
4
Switches the Soundbar between ON and ANDBY
mode.
5 SOURCE
Switches between BT (Bluetooth), OPT (OPTICAL), AUX,
HDMI 1, HDMI 2, HDMI ARC and MP3 LINK modes.
6 B;
Play/pause/resume playback in Bluetooth mode.
7 S / T
Skip to previous track/skip to next track in Bluetooth
mode.
8 VOL+ / VOL-
Increase/decrease the volume level.
9 MP3 LINK socket
Connes to an external audio device.
10 AC ~ socket
For conneing the power cord.
11 OPTICAL socket
12 AUX socket
13 HDMI 1/HDMI 2 sockets
14 HDMI OUT TV ARC socket
HDMI output (ARC).
SOURCE
MP3 LINK
VOL– VOL+
AC
OPTICAL
AUX
HDMI IN 2
HDMI IN 1
HDMI OUT
TV(ARC)
SOURCE
MP3 LINK
VOL– VOL+
123
4
10 12 13 1411
5 67 9
1
8

5
1.2 Wireless subwoofer
1
Wireles s pairing
2 3
1 AC ~ inlet
Connes to the power cord.
2 Indicator
Lights up when pairing is succeful.
3 Wireless pairing button
Connes to the Soundbar.
1.3 Remote Control
VOL+
VOL–
BASS+ TREB+ EQ DIM+
HDMI 1HDMI 2 ARC BT
OPT AUXMP3 PAIR
MUTE
BASS– TREB– SLEEP DIM–
1
2
3
4
5
6
7
8
9
11
10
12
1
Switches the Soundbar between ON and ANDBY
mode.
2 SOURCE
Sele the desired play mode.
3 VOL+ / VOL-
Increase/decrease the volume level.
4 BASS+ / BASS-
Adju the ba level.
5 TREB+ / TREB-
Adju the treble level.
6 MUTE
Mutes or resumes the sound.
7 PAIR
- Aivates the pairing funion in Bluetooth mode.
- Disconnes the exiing paired Bluetooth device.
8 B ;
Play/pause/resume playback in Bluetooth mode.
9 S / T
Skip to previous track/skip to next track in Bluetooth
mode.
10 EQ
Seles the preset equalizer.
11 DIM+ / DIM-
Adjus display brightne.
12 SLEEP
Sets the sleep timer.
6
2. PREPARATIONS
2.1 Preparing the Remote Control
The provided Remote Control allows the Soundbar to be
operated from a diance.
• Even if the Remote Control is operated within the
eeive range (6m), remote control operation may
be impoible if there are any obacles between the
Soundbar and the remote control.
• If the Remote Control is operated near other produs
which generate infrared rays, or if other remote control
devices using infra-red rays are used near the
Soundbar, it may operate incorrely. Conversely, the
other produs may operate incorrely.
2.2 Using the Remote Control for the first time
The Soundbar has a pre-inalled lithium CR2025 baery.
• Remove the proteive tab to aivate the Remote
Control baery.
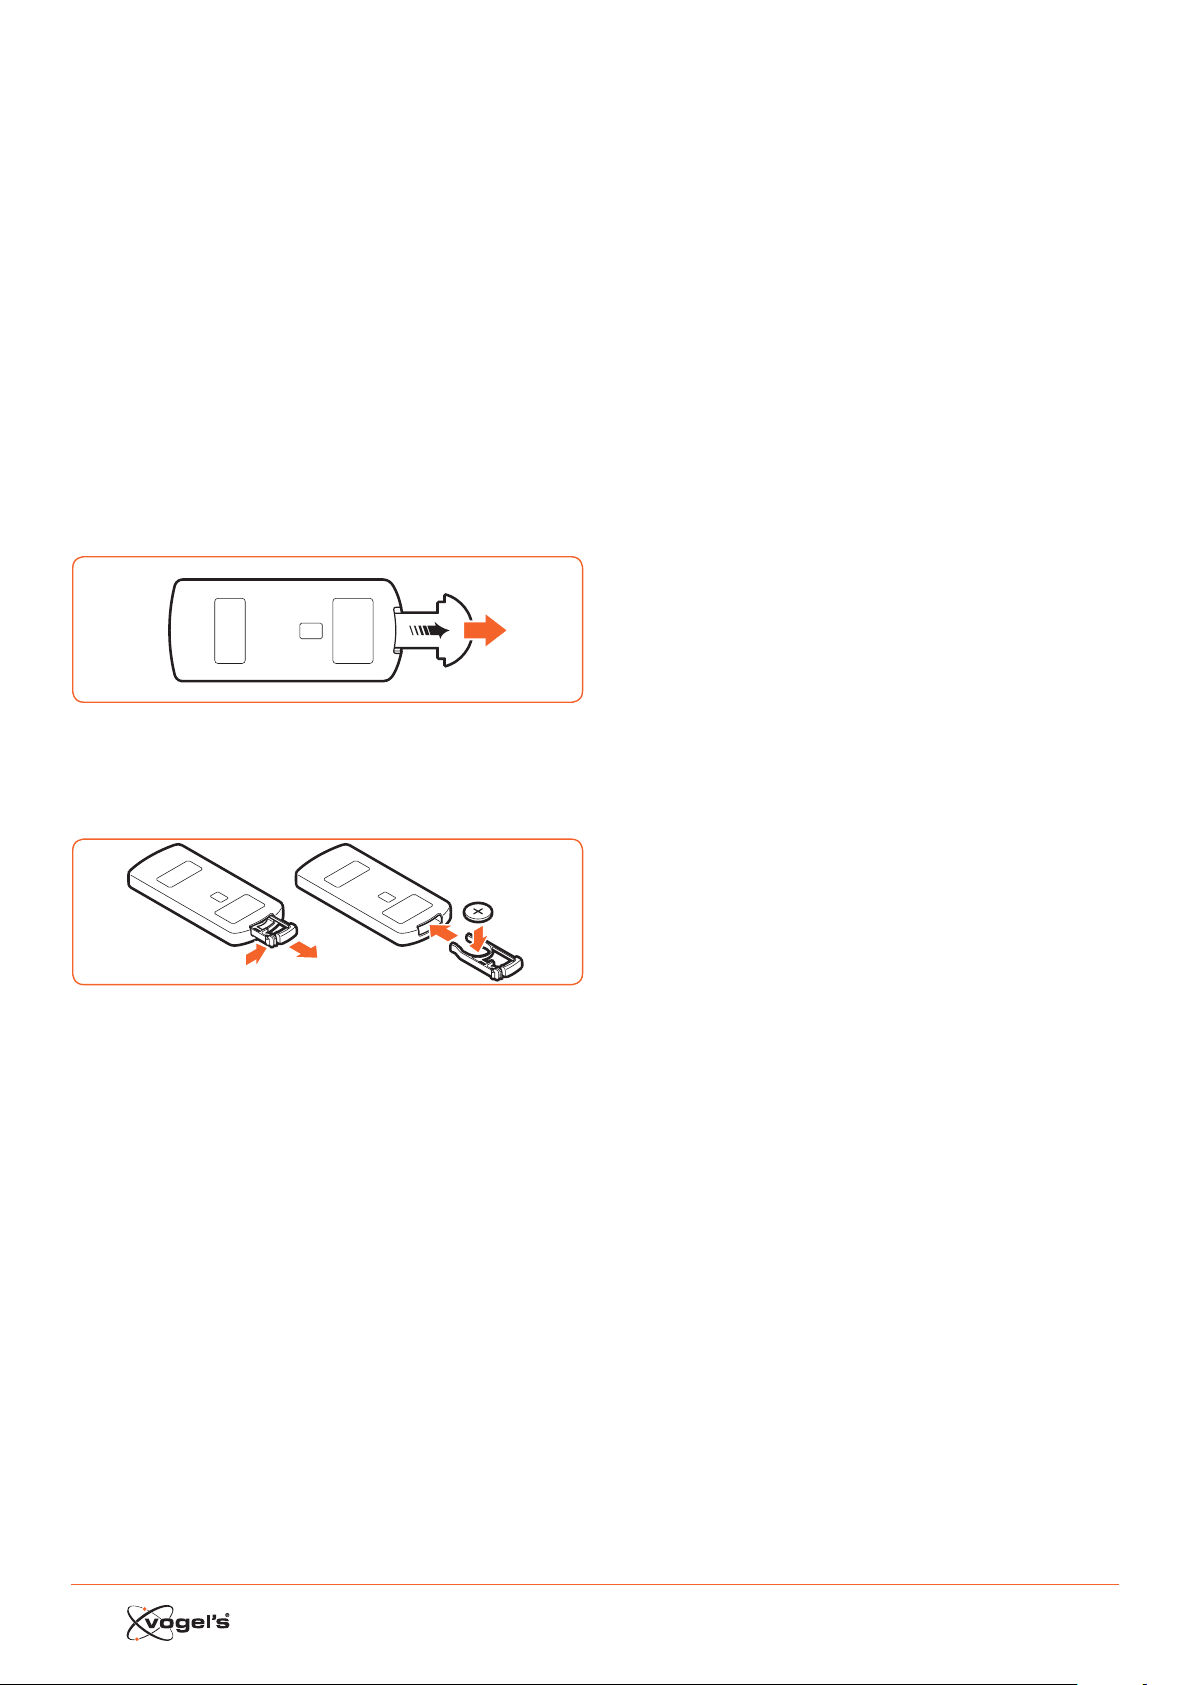
2.3 Replacing the Remote Control battery
1 Pull out the baery tray and remove the old baery.
2 Place a new CR2025 baery into the baery tray with
corre polarity (+/-) as indicated.
3 Insert the baery tray back into the slot.

7
3. CONNECTIONS
3.1 Standard HDMI (ARC) connection
AC
OPTICAL
AUX
HDMI IN 2
HDMI IN 1
HDMI OUT
TV(ARC)
TV
• The SoundMount configuration is based on a HDMI conneion between the HDMI ARC socket of the Soundbar and
the HDMI ARC socket of the TV.
Note!
ARC = Audio Return Channel.
• In case the TV is not equipped with an HDMI ARC socket, you can conne Soundbar and TV with an optical cable
(not included).
3.2 MP3 Link connection
SOURCE
MP3 LINK
VOL– VOL+
MP3
Player
• Conne a 3.5mm to 3.5mm audio cable (not included) to the MP3 LINK socket (9) on the Soundbar and the audio
output socket on an external audio device. For example an MP3 player, iPhone, etc.
3.3 Power connection
CAUTION!
• Risk of produ damage! Make sure that the power supply voltage corresponds to the voltage printed on the back of
the Soundbar and the subwoofer.
• Before conneing the AC power cord, make sure that you have completed all other conneions.

8
3.4 Pairing the Wireless subwoofer with the Soundbar
Ex faory the Wirele subwoofer and Soundbar are paired.
Automatic pairing
1 Plug the dedicated SoundMount power cable into the
Soundbar.
2 Plug the subwoofer into the mains sockets.
3 Pre the
buon on the Soundbar or on the remote
control to switch the Soundbar ON.
> The subwoofer and soundbar will automatically pair
within 30 seconds.
> When the subwoofer is pairing with the soundbar, the
Indicator will flash rapidly.
> When the subwoofer is paired with the soundbar, the
Indicator will light up conantly.
> During ANDBY mode, the subwoofer Indicator will
go o and flash slowly.
Manual pairing
1 Plug the dedicated SoundMount power cable into the
Soundbar.
2 Plug the subwoofer into the mains sockets.
3 Make sure that the Soundbar is in ANDBY mode.
4 Pre and hold the Wirele pairing buon on the
boom of the subwoofer for a few seconds.
> The subwoofer will enter the pairing mode and the
Indicator will blink quickly.
5 Pre the
buon on the Soundbar or on the remote
control to switch the Soundbar ON.
> Aer the wirele conneion succeeds, the Indicator
will light up conantly.
> If the Indicator ill blinks or does not blink at all, the
wirele conneion has failed.
• Unplug the cable of the subwoofer.
• Reconne the main cable aer 3 minutes.
• Repeat eps 1 - 5.
Notes!
• If the wirele conneion fails again, check if there is a
confli or rong interference (for example, interference
from an eleronic device) around your location.
Remove these conflis or rong interferences and
repeat the above procedures.
• The subwoofer mu be within 6m of the Soundbar in an
open area.
• If the Soundbar is not conneed with the subwoofer
and it is in On mode, then the meage
‘CHECK SUBWOOFER’ will show on the display and the
Indicator on the boom of the subwoofer will blink.
Repeat eps 1 - 5 above to pair the subwoofer to the
Soundbar.
4. GENERAL OPERATION
4.1 Using the remote control of the TV
When the HDMI ARC socket of the Soundbar is conneed
to the HDMI ARC socket of the TV via the HDMI cable and
the CEC funion on the TV is aivated in the setup menu of
the TV, you can use the remote control of the TV to
control the SoundMount (Soundbar and subwoofer).
• When the TV is switched ON, the SoundMount (Sound-
bar and subwoofer) will automatically switch ON.
• When the TV is switched to OFF / ANDBY, the Sound-
Mount will automatically switch OFF (to ANDBY).
• When the SoundMount is ON, the sound volume can be
controlled with the VOLUME - / VOLUME + and MUTE
buons on the remote control of the TV.
Note!
• To make it poible to control the SoundMount with the
remote control of the TV, it is important that the HDMI
CEC (Consumer Eleronics Control) funion is aivated
in the setup menu of the TV.
This funion has a dierent name for each TV brand:
Anynet (Samsung), Aquos Link (Sharp), Bravia Sync
(Sony), Regza Link (Toshiba), Simplink (LG),
Viera Link Panasonic), EZ-Sync (JVC), Easylink (Philips),
Netcommand (Mitsubishi).
The internal TV speakers will automatically be disabled
the moment the TV is switched ON and the Soundbar is
switched on automatically.
4.2 Using the supplied (Soundbar) remote control
When the HDMI ARC socket of the Soundbar is conneed
to the HDMI ARC socket of the TV via the HDMI cable and
the CEC funion on the TV is aivated in the setup menu of
the TV, you can use the remote control of the TV to
control the SoundMount (Soundbar and subwoofer).
In this case, you only need the supplid (Soundbar) remote
control for initial seings of personal preferences (TREBLE,
BASS, brightne level of Soundbar display) and for
controlling special funions like Bluetooth audio reaming.
In case the Soundbar and the TV are conneed via an
optical link, the supplied (Soundbar) remote control also
mu be used to control the SoundMount TV volume, source
seleion, etc..
It is not poible to control the sound volume with the
remote control of the TV. Internal TV speakers mu be
switched o manually. See the setup menu of the TV.
Standby / ON
When you fir conne the Soundbar to the mains socket,
the Soundbar will be in ANDBY mode and the ANDBY
Indicator lights red.
• Pre the
buon on the Soundbar or on the remote
control of the TV to switch the Soundbar ON.
• Pre the
buon again to switch the Soundbar back
to ANDBY mode.
> The Standby Indicator will light up red.
• Disconne the mains plug from the mains socket if you
want to switch the Soundbar o completely.
Note!
• When the Soundbar is idle for approximately 15 minutes,
it will automatically switch to ANDBY mode.

9
Selecting modes
• Pre the SOURCE buon on the Soundbar repeatedly
or pre the HDMI 1 / HDMI 2 / ARC / BT (Bluetooth) / OPT
(Optical) / AUX / MP3 buons on the remote control
to sele the desired mode. The seleed mode will be
shown on the display.
Note!
• When the HDMI ARC socket of the Soundbar is
conneed to the HDMI ARC socket of the TV via the
HDMI cable and the CEC funion on the TV is
aivated in the setup menu of the TV, SOURCE seleion
will automatically switch to ‘TV ARC’ (SoundMount).
Adjusting Super Bass Boost
• Pre the BASS + / BASS– buons on the remote control
to adju the ba boo level from –3 to +3.
> The seleed BASS level will automatically ored per
source.
Adjusting the treble level
• Pre the TREB + / TREB – buons on the remote control
to adju the treble level from –3 to +3.
> The seleed TREBLE level will automatically ored per
source.
Adjusting the volume
• Pre the VOL + / VOL – buons on the Soundbar to
adju the volume.
• Pre the MUTE buon on the remote control of the TV to
turn the sound o.
• Pre the MUTE buon on the remote control of the TV
again or pre the VOL+ buon on the Soundbar to
resume normal volume.
Selecting the equaliser
• Pre the EQ buon on the remote control to sele
equalizer seing MOVIE or SPEECH.
> Aer switching OFF and ON, the equalizer seing will
automatically return to MOVIE mode.
Adjusting the brightness of the display
• Pre the DIM+ / DIM- buon on the remote control to
sele brightne level.
> The seleed BRIGHTNESS level will automatically
ored.
Setting the Sleep Timer
Use the SLEEP TIMER to turn the syem o aer a certain
number of minutes in PLAY mode. By seing the SLEEP
TIMER, you can fall asleep to music and know that your
syem will turn o by itself rather than play all night.
1 In ON mode, pre the SLEEP buon on the remote
control repeatedly to sele your desired number of
minutes. The number of minutes will be displayed in the
following sequence:
SLEEP 120 - SLEEP 90 - SLEEP 60 - SLEEP 30 - SLEEP 15 -
SLEEP 00.
2 Stop preing the SLEEP buon when your desired
number of minutes is displayed.
> The Sleep Timer is now set.
3 To cancel the SLEEP TIMER, pre the SLEEP buon
repeatedly until ‘SLEEP 00’ is displayed.
5. AUX/MP3 LINK/OPTICAL/
HDMI OPERATION
1 Make sure that the audio device is conneed to the
Soundbar.
2 Pre the SOURCE buon on the Soundbar repeatedly
or pre the HDMI 1 / HDMI 2 / ARC / OPT (OPTICAL) /
AUX / MP3 buons on the remote control of the Sound-
bar to sele the desired mode.
3 Operate your audio device direly for playback
features.
4 Pre the VOL + / VOL – buons on the Soundbar to
adju the volume to your desired level.
Note!
• You may need to switch to lineair PCM (Pulse Code
Modulation) output on your source device (for example
TV, DVD or Blu-ray player) while the Soundbar is swit-
ched to OPTICAL or HDMI mode.
• A/V peripherals mu be conneed to the TV.
6. PLAY WITH BLUETOOTH DEVICE
You can lien to tracks from a media device if conneed to
the Soundbar via Bluetooth.
6.1 Pair Bluetooth enabled devices manually
The fir time you conne your Bluetooth device to the
Soundbar, you need to pair your device to the Soundbar.
CAUTION!
• The operational range between the Soundbar and the
device is approximately 8 metres (without any obje
between the Bluetooth device and the Soundbar).
• Before conneing a Bluetooth device to the Soundbar,
ensure you know the device’s capabilities.
• Compatibility with all Bluetooth devices is not
guaranteed.
• Obacles between the device and the Soundbar can
reduce operational range.
• If the signal rength is weak, your Bluetooth receiver
may disconne, but it will re-enter pairing mode
automatically.
6.2 Connect your device to the Soundbar via Bluetooth
1 Switch the Soundbar ON.
2 Pre the SOURCE buon on the Soundbar repeatedly
or the BT buon on the remote control to sele BT
(Bluetooth) mode.
> The Display shows ‘BT’, then ‘NO BT’ (if there’s no
Bluetooth device conneed).
3 Pre the PAIR buon on the remote control for a few
seconds to aivate Bluetooth pairing.
> The Display shows ‘PAIR’.
4 Aivate your Bluetooth device and sele the SEARCH
mode.
> ‘Vogel’s SoundMount’ will appear on your Bluetooth
device li.
5 Sele ‘Vogel’s SoundMount’ and enter ‘0000 for the
paword, if neceary.
> The display shows ‘BLUEPORT’ when the conneion is
succeful.
• To disconne the Bluetooth funion, switch to another
funion on the Soundbar or disable the funion from
your Bluetooth device.

10
6.3 Listen to music from your Bluetooth device
• If the conneed Bluetooth device supports
Advanced Audio Diribution Profile (A2DP), you can
lien to the music ored on the device through the
player.
• If the device also supports Audio Video Remote
Control Profile (AVRCP), you can use the Soundbar’s
remote control to play music ored on the device.
1 Pair your device with the Soundbar.
2 Play music via your device (if it supports A2DP).
3 Use the remote control to control play (if it supports
AVRCP).
• Pre the B; buon to to pause/resume play.
• Pre the S / T buons to jump to a track.
7. WARNINGS AND DISCLAIMERS
To keep the warranty valid, never try to repair the
Soundbar and/or the Wirele subwoofer yourself.
If you encounter problems when using the SoundMount,
please conta your Vogel’s dealer.
Bluetooth and HDMI are regiered trademarks and are the
property of their respeive owners.
The Bluetooth word mark and logos are regiered
trademarks owned by Bluetooth SIG, Inc. and any use of
such marks by Vogel’s is under license. Other trademarks
and trade names are those of their respeive owners.
The term HDMI and the HDMI logo are trademarks or
regiered trademarks of HDMI Licensing LLC in the United
States and other countries.
7.1 Precautions concerning Batteries
• When the Remote Control is not going to be used for
a long time (more than a month), remove the baery
from the Remote Control to prevent it from leaking.
• If the baery leaks, wipe away the leakage inside the
baery compartment and replace the baery with a
new one.
• Do not use any baeries other than those specified.
• Do not heat or disaemble baeries.
• Never throw them in fire or water.
• Do not carry or ore baeries with other metallic objes
as this may cause the baeries to short-circuit, leak or
explode.
• Never recharge a baery unle it is confirmed to be a
rechargeable type.
WEEE disposal instructions
Do not dispose of this device, the remote
control or its baery with unsorted
household wae. Improper disposal may
be harmful to the environment and human
health. Please refer to your local wae
authority for information on return and
colleion syems in your area.
CE compliance
This produ is in compliance with the eential requirements
and other relevant provisions of Direives 2006/95/EC
(Low Voltage), 2004/108/EC (EMC) and 2011/65/EU (ROHS,
Reriion of the use of certain hazardous subances in
elerical and eleronic equipment).
8. SPECIFICATIONS
Soundbar
Power requirements..............................AC 220-240 V 50/60 Hz
Average power consumption during operation .............60 W
Standby power consumption le than ...........................0.5 W
Output power RMS ....................................................... 75 W x 2
Total harmonic diortion ....................................1%(1 kHz, 1 W)
Audio input sensitivity .....................................................700 mV
Frequency response ...........................................180 Hz - 20 kHz
Total Impedance .................................................................. 6 Ω
Dimension (W x H x D) .................................... 950 x 86 x 52 mm
Subwoofer
Power requirements ........................... AC 220 - 240 V 50/60 Hz
Average power consumption during operation .............60 W
Standby power consumption le than ...........................0.5 W
Output power ..................................................................150 W
Frequency response ............................................40 Hz - 150 Hz
Impedance .......................................................................... 3 Ω
Dimension (W x H x D) .................................. 419 X 312 x 150 mm
Remote Control
Diance .................................................................................6 m
Angle ..................................................................................... 30°
9. SUPPLIED ACCESSORIES
AC Power Cord ...................................................................... 2 x
HDMI Cable ........................................................................... 1 x
Remote Control .................................................................... 1 x

11
NL INHOUD
1 ONDERDELEN ..........................................................................................................................................................12
1.1 Soundbar ............................................................................................................................................................................. 12
1.2 Draadloze subwoofer ......................................................................................................................................................... 13
1.3 Afandsbediening .............................................................................................................................................................. 13
2 VOORBEREIDING ....................................................................................................................................................14
2.1 De afandsbediening voorbereiden ............................................................................................................................... 14
2.2 De afandsbediening voor de eere keer gebruiken .................................................................................................... 14
2.3 De baerij van de afandsbediening vervangen .......................................................................................................... 14
3 AANSLUITINGEN .....................................................................................................................................................15
3.1 Standaard HDMI-aansluiting (ARC) .................................................................................................................................. 15
3.2 MP3 Link-aansluiting ........................................................................................................................................................... 15
3.3 Aansluiting op netvoeding ................................................................................................................................................ 15
3.4 De draadloze subwoofer koppelen met de soundbar ................................................................................................... 16
Automatisch koppelen ...................................................................................................................................................... 16
Handmatig koppelen ......................................................................................................................................................... 16
4 ALGEMENE BEDIENING ...........................................................................................................................................16
4.1 De afandsbediening van de tv gebruiken .................................................................................................................... 16
4.2 De meegeleverde afandsbediening (soundbar) gebruiken ....................................................................................... 16
Stand-by / AAN ................................................................................................................................................................... 17
Modi seleeren ................................................................................................................................................................... 17
Super Ba Boo aanpaen .............................................................................................................................................. 17
Hogetonenniveau aanpaen........................................................................................................................................... 17
Volume regelen................................................................................................................................................................... 17
Equalizer seleeren ............................................................................................................................................................ 17
Helderheid van het display aanpaen ............................................................................................................................ 17
Sleep timer inellen ............................................................................................................................................................ 17
5 AUX / MP3 LINK / OPTICAL / HDMI SELECTEREN ....................................................................................................17
6 AFSPELEN VIA BLUETOOTH-APPARAAT ...................................................................................................................18
6.1 Handmatig apparaten met Bluetooth koppelen ............................................................................................................ 18
6.2 Apparaat met soundbar verbinden via Bluetooth .......................................................................................................... 18
6.3 Muziek luieren vanaf uw Bluetooth-apparaat met Bluetooth ...................................................................................... 18
7 WAARSCHUWINGEN EN AFWIJZING VAN AANSPRAKELIJKHEID ............................................................................. 18
7.1 Voorzorgsmaatregelen betreende baerijen ................................................................................................................ 18
8 SPECIFICATIES ........................................................................................................................................................ 19
9 MEEGELEVERDE ACCESSOIRES ...............................................................................................................................19
12
1. ONDERDELEN
1.1 Soundbar
1 Luidsprekers
2 Display / Sensor van afstandsbediening
- Gee de huidige atus weer.
- Ontvangt het signaal van de afandsbediening.
3 Standby lampje
Licht rood op wanneer de unit in de AND-BY modus
aat.
4
Schakelt de soundbar tuen AAN en AND-BY.
5 SOURCE
Schakelt tuen BT (Bluetooth), OPT (OPTICAL), AUX,
HDMI 1, HDMI 2, HDMI ARC en MP3 LINK.
6 B;
Afspelen/pauzeren/afspelen hervaen in Bluetooth-
modus
7 S / T
Overslaan naar vorige nummer/overslaan naar
volgende nummer in Bluetooth-modus.
8 VOL+ / VOL-
Volume harder/zachter.
9 MP3 LINK-ingang
Ingang voor extern audioapparaat.
10 Ingang voor voeding
Voor aansluiting van het netsnoer.
11 OPTICAL-ingang
12 AUX-ingang
13 HDMI 1/HDMI 2-ingang
14 HDMI UIT TV ARC-uitgang
HDMI uitgang (ARC).
SOURCE
MP3 LINK
VOL– VOL+
AC
OPTICAL
AUX
HDMI IN 2
HDMI IN 1
HDMI OUT
TV(ARC)
SOURCE
MP3 LINK
VOL– VOL+
123
4
10 12 13 1411
5 67 9
1
8

13
1.2 Draadloze subwoofer
1
Wireles s pairing
2 3
1 Ingang voor voeding
Voor aansluiting van het netsnoer.
2 Indicatielampje
Licht op wanneer de koppeling is geslaagd.
3 Knop voor draadloze koppeling
Maakt verbinding met de Soundbar.
1.3 Afstandsbediening
VOL+
VOL–
BASS+ TREB+ EQ DIM+
HDMI 1HDMI 2 ARC BT
OPT AUXMP3 PAIR
MUTE
BASS– TREB– SLEEP DIM–
1
2
3
4
5
6
7
8
9
11
10
12
1
Schakelt de Soundbar tuen AAN en AND-BY.
2 SOURCE
Gewene afspeelmodus seleeren.
3 VOL+ / VOL-
Volume harder/zachter.
4 BASS+ / BASS-
Basniveau aanpaen.
5 TREB+ / TREB-
Hogetonenniveau aanpaen.
6 MUTE
Geluid dempen of hervaen.
7 PAIR
- Aiveert de koppelfunie in Bluetooth-modus
- Verbreekt de beaande koppeling met Bluetooth-
apparaat.
8 B ;
Afspelen/pauze/afspelen hervaen in Bluetooth-
modus
9 S / T
Overslaan naar vorige nummer/overslaan naar
volgende nummer in Bluetooth-modus.
10 EQ
Vooraf ingeelde equalizer seleeren.
11 DIM+ / DIM-
Helderheid display aanpaen.
12 SLEEP
Sleep timer inellen.
14
2. VOORBEREIDING
2.1 De afstandsbediening voorbereiden
Met de meegeleverde afandsbediening kan de
Soundbar op afand worden bediend.
• Als de afandsbediening binnen het juie bereik (6 m)
wordt gebruikt, maar er bevinden zich obakels tuen
de Soundbar en de afandsbediening, is het mogelijk
dat deze niet naar behoren werkt.
• Ook als de afandsbediening wordt gebruikt in de
buurt van andere produen die infraroodralen
genereren, of als er andere afandsbedieningen met
infraroodralen in de buurt van de Soundbar worden
gebruikt, is het mogelijk dat de afandsbediening niet
naar behoren werkt. De werking van de andere pro-
duen kan in een dergelijk geval ook worden veroord.
2.2 De afstandsbediening voor de eerste keer
gebruiken
De soundbar bevat al een lithium CR2025-baerij.
• Verwijder het beschermlipje om de baerij van de
afandsbediening te aiveren.
2.3 De batterij van de afstandsbediening vervangen
1
2
3
1 Trek het baerijcompartiment uit de afandsbediening
en verwijder de oude baerij.
2 Plaats een nieuwe CR2025-baerij in het baerij-
compartiment met de polen (+/-) in de aangegeven
positie.
3 Plaats het baerijcompartiment terug in de sleuf.

15
3. AANSLUITINGEN
3.1 Standaard HDMI-aansluiting
AC
OPTICAL
AUX
HDMI IN 2
HDMI IN 1
HDMI OUT
TV(ARC)
TV
• De SoundMount-configuratie is gebaseerd op een HDMI-verbinding tuen de HDMI ARC-aansluiting van de
Soundbar en de HDMI ARC-aansluiting op de tv.
Let op!
ARC = Audio Return Channel.
• Als de tv niet is voorzien van een HDMI ARC-aansluiting, dan kunt u de soundbar en de tv met een optische kabel (niet
meegeleverd) met elkaar verbinden.
3.2 MP3 Link-aansluiting
SOURCE
MP3 LINK
VOL– VOL+
MP3
Player
• Sluit een audiokabel met aan beide zijden een 3,5 mm ekker (niet meegeleverd) aan op de MP3 LINK-ingang op de
soundbar en op de audio-uitgang op een extern audioapparaat. Bijvoorbeeld een MP3-speler, iPhone, enzovoorts.
3.3 Aansluiting op de netvoeding
PAS OP!
• Gevaar voor beschadiging van het produ! Controleer of het voltage van de netvoeding overeenkomt met het
voltage dat op de achterkant van de Soundbar en de subwoofer is afgedrukt.
• Zorg ervoor dat alle andere verbindingen zijn voltooid voordat u het netsnoer aansluit.
.

16
3.4 De draadloze subwoofer koppelen met de Soundbar
De draadloze subwoofer en de Soundbar zijn af fabriek
gekoppeld.
Automatisch koppelen
1 Sluit de speciale SoundMount-voedingskabel aan op
de Soundbar.
2 Sluit de subwoofer aan op de netvoeding.
3 Druk op de
knop op de Soundbar of op de
afandsbediening om de Soundbar AAN te zeen.
> Binnen 30 seconden worden subwoofer en Soundbar
automatisch gekoppeld.
> Wanneer de subwoofer aan de Soundbar wordt
gekoppeld, knippert het indicatorlampje snel.
> Wanneer de subwoofer aan de Soundbar is
gekoppeld, brandt het indicatorlampje conant.
> In de andby modus knippert het lampje van de
subwoofer langzaam.
Handmatig koppelen
1 Sluit de speciale SoundMount-voedingskabel aan op
de Soundbar.
2 Sluit de subwoofer aan op de netvoeding.
3 Zorg ervoor dat de Soundbar in de ANDBY modus
aat.
4 Houd de knop voor draadloos koppelen op de onder-
kant van de subwoofer enkele seconden ingedrukt.
> De subwoofer gaat in de koppelingsmodus en het
indicatorlampje knippert snel.
5 Druk op de knop op de Soundbar of op de afands-
bediening om de soundbar AAN te zeen.
> Nadat de draadloze verbinding tot and is gebracht,
brandt het indicatorlampje conant.
> Als het lampje blij knipperen of helemaal niet brandt,
is de koppeling mislukt.
• Haal de ekker van de subwoofer uit het opconta.
• Steek de ekker na 3 minuten opnieuw in het op-
conta.
• Herhaal ap 1 - 5.
Let op!
• Als de draadloze verbinding opnieuw mislukt,
controleer dan of er in de omgeving een ander
apparaat is dat kan conflieren of oren.
Verwijder eventuele orende apparaten en herhaal de
bovenaande procedure.
• De subwoofer moet zich binnen 6 meter van de Sound-
bar bevinden, zonder obakels ertuen.
• Als de Soundbar niet met de subwoofer is verbonden
en wel is ingeschakeld, wordt de melding
‘CHECK SUBWOOFER’ op het display weergegeven
en knippert het indicatorlampje op onderkant van de
subwoofer.
Herhaal bovenaande appen 1 - 5 om de subwoofer
aan de soundbar te koppelen.
4. ALGEMENE BEDIENING
4.1 De afstandsbediening van de tv gebruiken
Wanneer de HDMI ARC-aansluiting op de Soundbar via
de HDMI-kabel is verbonden met de HDMI ARC-aansluiting
van de tv, en de CEC-funie op de tv wordt geaiveerd in
het inallatiemenu van de tv, dan kunt u de afands-
bediening van de tv gebruiken om de SoundMount
(Soundbar en subwoofer) te bedienen.
• Wanneer de tv wordt ingeschakeld (ON), wordt de
SoundMount (Soundbar en subwoofer) automatisch
ook ingeschakeld.
• Wanneer de tv wordt uitgeschakeld (OFF / ANDBY),
wordt de SoundMount automatisch ook uitgeschakeld
(naar ANDBY).
• Wanneer de SoundMount is ingeschakeld, kan het
volume van het geluid worden aangepa met de
knoppen VOLUME - / VOLUME + en MUTE op de
afandsbediening van de tv.
Let op!
• Om de SoundMount te kunnen bedienen met de
afandsbediening van de tv, is het belangrijk dat de
HDMI CEC-funie (Consumer Eleronics Control) in het
inallatiemenu van de tv wordt geaiveerd.
Deze funie hee bij elk merk tv een andere naam:
Anynet (Samsung), Aquos Link (Sharp), Bravia Sync
(Sony), Regza Link (Toshiba), Simplink (LG), Viera Link
(Panasonic), EZ-Sync (JVC), Easylink (Philips), Netcom-
mand (Mitsubishi).
De interne tv-luidsprekers worden automatisch uitge-
schakeld op het moment dat de tv wordt ingeschakeld
en ook de Soundbar automatisch wordt ingeschakeld.
4.2 De meegeleverde afstandsbediening (Soundbar)
gebruiken
Wanneer de HDMI ARC-aansluiting op de Soundbar via
de HDMI-kabel is verbonden met de HDMI ARC-aansluiting
van de tv, en de CEC-funie op de tv wordt geaiveerd in
het inallatiemenu van de tv, dan kunt u de afands-
bediening van de tv gebruiken om de SoundMount
(Soundbar en subwoofer) te bedienen.
In dit geval hebt u de meegeleverde afandsbediening
(Soundbar) alleen nodig voor de eere inellingen of
persoonlijke voorkeuren (TREBLE, BASS, helderheid van het
Soundbar display) en voor speciale funies als audio-
reaming via Bluetooth.
Als de Soundbar en de tv via een optische koppeling zijn
verbonden, moet de meegeleverde afands-
bediening (Soundbar) ook worden gebruikt om het
volume, de bronseleie, enzovoorts, van de SoundMount
en de tv te regelen. Het is niet mogelijk om het geluidsvo-
lume met de afandsbediening van de tv te regelen. De
interne tv-luidsprekers moeten handmatig worden uitge-
schakeld. Zie het inallatiemenu van de tv.

17
Standby / AAN
Wanneer u de Soundbar voor het eer op netvoeding
aansluit, wordt de ANDBY modus geaiveerd en licht het
ANDBY lampje rood op.
• Druk op de
knop op de Soundbar of op de
afandsbediening van de tv om de Soundbar AAN te
zeen.
• Druk opnieuw op de
knop om de Soundbar weer in
de ANDBY modus te zeen.
> Het and-by lampje licht rood op.
• Haal de ekker uit het opconta als u de Soundbar
volledig wilt uitschakelen.
Let op!
• Wanneer de Soundbar ongeveer 15 minuten inaief
is, schakelt het apparaat automatisch over naar de
ANDBY modus
Modi selecteren
• Druk herhaaldelijk op de knop SOURCE op de Sound-
bar of druk op de knop HDMI 1 / HDMI 2 / ARC / BT
(Bluetooth) / OPT (Optical) / AUX / MP3 op de afands-
bediening om de gewene modus te seleeren. De
gekozen modus wordt op het display weergegeven.
Let op!
• Wanneer de HDMI ARC-aansluiting op de Soundbar
via de HDMI-kabel is verbonden met de HDMI ARC-
aansluiting van de tv, en de CEC-funie op de tv wordt
geaiveerd in het inallatiemenu van de tv, dan wordt
de SOURCE automatisch ingeeld op ‘TV ARC’ (Sound-
Mount).
Super Bass Boost aanpassen
• Druk op BASS + / BASS – op de afandsbediening om
het ba boo-niveau aan te paen van –3 to +3.
> Het gekozen BASS-niveau wordt automatisch per
bron opgeslagen.
Hogetonenniveau aanpassen
• Druk op TREB + / TREB – op de afandsbediening om
het hogetonenniveau aan te paen van –3 to +3.
> Het gekozen TREBLE-niveau wordt automatisch per
bron opgeslagen.
Volume regelen
• Druk op VOL + / VOL – op de Soundbar om het volume
te regelen.
• Druk op MUTE op de afandsbediening van de tv om
het geluid uit te zeen.
• Druk nogmaals op MUTE op de afandsbediening van
de tv of druk op de knop VOL+ op de Soundbar om
terug te keren naar het normale volume.
Equalizer selecteren
• Druk op EQ op de afandsbediening om de equalizer-
inelling MOVIE of SPEECH te kiezen.
> Na in- en uitschakelen wordt de equalizer
automatisch ingeeld op de MOVIE modus.
Helderheid van het display aanpassen
• Druk op DIM+ / DIM- op de afandsbediening om het
helderheidsniveau te seleeren.
> Het gekozen BRIGHTNESS-niveau wordt automatisch
opgeslagen.
Sleep timer instellen
Met de SLEEP TIMER kunt u het syeem na een bepaald
aantal minuten in de PLAY-modus uitschakelen.
Wanneer u de SLEEP TIMER inelt, kunt u met muziek in
slaap vallen zonder dat het syeem de hele nacht blij
spelen. Na het ingeelde aantal minuten schakelt het
syeem zichzelf uit.
1 Druk, terwijl het syeem is ingeschakeld, herhaaldelijk
op SLEEP op de afandsbediening om het gewene
aantal minuten te seleeren. Het aantal minuten wordt
in de volgende volgorde weergegeven:
SLEEP 120 - SLEEP 90 - SLEEP 60 - SLEEP 30 - SLEEP 15 -
SLEEP 00.
2 Druk niet meer op SLEEP als het gewene aantal
minuten wordt weergegeven.
> De sleep timer is nu ingeeld.
3 U schakelt de SLEEP TIMER uit door herhaaldelijk op
SLEEP te drukken, totdat ‘SLEEP 00’ wordt weergegeven.
5. AUX / MP3 LINK / OPTICAL /
HDMI SELECTEREN
1 Controleer of het audioapparaat is verbonden met de
soundbar.
2 Druk herhaaldelijk op de knop SOURCE op de Sound-
bar of druk op de knop HDMI 1 / HDMI 2 / ARC / OPT
(OPTICAL) / AUX / MP3 op de afandsbediening van
de Soundbar om de gewene modus te seleeren.
3 De afspeelfunies regelt u op het audioapparaat.
4 Druk op VOL + / VOL – op de soundbar om het volume
te regelen.
Let op!
• Het is mogelijk dat u naar de lineair PCM-uitgang (Pulse
Code Modulation) moet overschakelen op het bron-
apparaat (bijvoorbeeld tv, dvd of Blu-ray-speler)
wanneer de Soundbar in de modus OPTICAL of HDMI
aat.
• A/V-randapparatuur moet op de tv worden
aangesloten.

18
6. AFSPELEN VIA APPARAAT MET
BLUETOOTH
U kunt naar muziek van een media-apparaat luieren als
dit via Bluetooth met de Soundbar is verbonden.
6.1 Handmatig apparaten met Bluetooth koppelen
De eere keer dat u een apparaat via Bluetooth met de
soundbar verbindt, moet het apparaat aan de Soundbar
worden gekoppeld.
PAS OP!
• De maximale afand tuen de Soundbar en het
apparaat is ongeveer 8 meter (zonder obakels tuen
het apparaat met Bluetooth en de Soundbar).
• Zorg ervoor dat u de mogelijkheden van het Bluetooth-
apparaat kent, voordat u dit verbindt met de Sound-
bar.
• Compatibiliteit met alle Bluetooth-apparatuur wordt
niet gegarandeerd.
• Obakels tuen het apparaat en de Soundbar kunnen
het bereik verminderen.
• Als de signaalerkte zwak is, kan uw Bluetooth-
ontvanger de verbinding verbreken, maar het
apparaat keert automatisch terug naar de koppelings-
modus.
6.2 Apparaat met soundbar verbinden via Bluetooth
1 Schakel de Soundbar in.
2 Druk herhaaldelijk op SOURCE op de Soundbar of op BT
op de afandsbediening om de BT-modus (Bluetooth)
te seleeren.
> Op het display wordt ‘BT’ weergegeven en
vervolgens ‘NO BT” (als er geen Bluetooth-apparaat is
verbonden).
3 Druk enkele seconden op PAIR op de afands-
bediening om de Bluetooth-koppeling te aiveren.
> Op het display wordt ‘PAIR’ weergegeven.
4 Aiveer uw Bluetooth-apparaat en seleeer de modus
SEARCH.
> ‘Vogel’s SoundMount’ wordt op uw lij met Bluetooth-
apparaten weergegeven.
5 Seleeer ‘Vogel’s SoundMount’ en geef zo nodig
‘0000’ als wachtwoord op.
> Op het display wordt ‘BLUEPORT’ weergegeven
wanneer de verbinding tot and is gebracht.
• Om de Bluetooth-funie uit te schakelen, kie u een
andere funie op de Soundbar of schakelt u de funie
uit vanaf uw Bluetooth-apparaat.
6.3 Muziek luisteren vanaf uw apparaat met Bluetooth
• Als het verbonden Bluetooth-apparaat Advanced
Audio Diribution Profile (A2DP) ondereunt, kunt u via
de speler naar muziek luieren die op het apparaat
aat.
• Als het apparaat ook Audio Video Remote Control
Profile (AVRCP) ondereunt, kunt u de afands-
bediening van de Soundbar gebruiken om muziek te
luieren die op het apparaat is opgeslagen.
1 Koppel het apparaat met de Soundbar.
2 Speel muziek af via het apparaat (als het A2DP onder-
eunt).
3 Gebruik de afandsbediening voor de bediening (als
het apparaat AVRCP ondereunt).
• Druk op B; om het afspelen te pauzeren en te
hervaen.
• Druk op S / T om naar een bepaald nummer te
gaan.
7. WAARSCHUWINGEN EN
AFWIJZING VAN
AANSPRAKELIJKHEID
Probeer nooit de Soundbar en/of de subwoofer zelf te
repareren, want dan vervalt de garantie.
Neem conta op met uw Vogel’s dealer als zich
problemen voordoen bij het gebruik van de SoundMount.
Bluetooth en HDMI zijn gedeponeerde handelsmerken en
het eigendom van hun respeieve eigenaren.
Het woordmerk en de logo’s van Bluetooth zijn gedepo-
neerde handelsmerken van Bluetooth SIG, Inc. en het
gebruik van dergelijke merktekens door Vogel’s gebeurt
onder licentie. Andere handelsmerken en handelsnamen
zijn eigendom van hun respeieve eigenaars.
De term HDMI en het HDMI-logo zijn handelsmerken of ge-
regireerde handelsmerken van HDMI Licensing LLC in de
Verenigde Staten en andere landen.
7.1 Voorzorgsmaatregelen betreffende batterijen
• Verwijder de baerij wanneer u de afandsbediening
gedurende langere tijd niet gebruikt (langer dan een
maand). Dit voorkomt dat de baerij gaat lekken.
• Mocht de baerij lekken, veeg dan het baerij-
compartiment schoon en vervang de baerij door een
nieuwe.
• Gebruik geen andere baerijen dan het opgegeven
type.
• Verhit of demonteer baerijen nooit.
• Gooi baerijen nooit in open vuur of in water.
• Bewaar baerijen niet in de buurt van andere metalen
objeen; de baerijen kunnen dan kortsluiten, lekken of
exploderen.
• Laad een baerij nooit opnieuw op, tenzij u zeker weet
dat het een oplaadbare baerij betre.
Instructies voor verwijdering (WEEE)
Gooi dit apparaat, de afandsbediening
of de baerij nooit bij huishoudelijke
reafval. Onjuie verwijdering kan
schadelijk zijn voor mens en milieu.
Raadpleeg de plaatselijke voorschrien
voor inzameling en verwijdering van afval
in uw regio.

19
CE-conform
Dit produ voldoet aan de eentiële vereien en overige
relevante bepalingen van de richtlijnen 2006/95/EC (laag
-
spanning), 2004/108/EC (EMC) en 2011/65/EU (ROHS, beper-
king van het gebruik van bepaalde gevaarlijke
oen in elektrische en elektronische apparatuur).
8. SPECIFICATIES
Soundbar
Voedingsvereien ................................AC 220-240 V 50/60 Hz
Gemiddeld energieverbruik tijdens werking ....................60 W
Energieverbruik in and-by minder dan ..........................0,5 W
Uitgangsvermogen RMS .............................................. 75 W x 2
Totale harmonische vervorming.......................1% (1 kHz, 1 W)
Audio-ingangsgevoeligheid .........................................700 mV
Frequentierespons .............................................. 180 Hz - 20 kHz
Totale impedantie ................................................................ 6 Ω
Afmetingen (B x H x D) ................................... 950 x 86 x 52 mm
Subwoofer
Voedingsvereien .............................. AC 220 - 240 V 50/60 Hz
Gemiddeld energieverbruik tijdens werking ....................60 W
Energieverbruik in and-by minder dan ..........................0,5 W
Uitgangsvermogen ..........................................................150 W
Frequentierespons ................................................40 Hz - 150 Hz
Impedantie .......................................................................... 3 Ω
Afmetingen (B x H x D) ..................................419 x 312 x 150 mm
Afstandsbediening
Afand...................................................................................6 m
Hoek ....................................................................................... 30°
9. MEEGELEVERDE ACCESSOIRES
Netsnoer ................................................................................. 2 x
HDMI-kabel ............................................................................ 1 x
Afandsbediening ............................................................... 1 x

20
DE INHALT
1 TEILE BESTIMMEN ....................................................................................................................................................21
1.1 Soundbar ............................................................................................................................................................................. 21
1.2 Kabelloser Subwoofer .........................................................................................................................................................22
1.3 Fernbedienung ...................................................................................................................................................................22
2 VORBEREITUNG ..................................................................................................................................................... 23
2.1 Vorbereiten der Fernbedienung........................................................................................................................................23
2.2 Fernbedienung zum eren Mal verwenden ....................................................................................................................23
2.3 Auauschen der Baerie der Fernbedienung .................................................................................................................23
3 ANSCHLÜSSE ......................................................................................................................................................... 24
3.1 Standard-HDMI(ARC)-Anschlu ........................................................................................................................................24
3.2 MP3-Link-Anschlu ..............................................................................................................................................................24
3.3 Netzanschlu ......................................................................................................................................................................24
3.4 Kabelloser Subwoofer mit der Soundbar koppeln ...........................................................................................................25
Automatische Kopplung ....................................................................................................................................................25
Manuelle Kopplung ............................................................................................................................................................25
4 ALLGEMEINER BETRIEB ........................................................................................................................................... 25
4.1 Fernbedienung des Fernsehers verwenden .....................................................................................................................25
4.2 Mitgelieferte (Soundbar-)Fernbedienung verwenden ...................................................................................................25
Standby/EIN .........................................................................................................................................................................26
Modi auswählen .................................................................................................................................................................26
Super Ba Boo einellen .................................................................................................................................................. 26
Höhenpegel einellen .......................................................................................................................................................26
Lautärke einellen ............................................................................................................................................................26
Equalizer auswählen ........................................................................................................................................................... 26
Helligkeit der Anzeige einellen ........................................................................................................................................26
Einschlaunktion einellen.................................................................................................................................................26
5 AUX/MP3-LINK/OPTISCH/HDMI-BETRIEB ............................................................................................................ 26
6 MIT IHREM BLUETOOTH-GERÄT ABSPIELEN ............................................................................................................. 27
6.1 Bluetoothfähige Geräte manuell aktivieren.....................................................................................................................27
6.2 Ihr Gerät über Bluetooth mit der Soundbar verbinden ...................................................................................................27
6.3 Musik mit ihrem Bluetoothgerät abspielen .......................................................................................................................27
7 WARNHINWEISE UND HAFTUNGSAUSSCHLUSS ...................................................................................................... 27
7.1 Hinweise zur Baerienutzung .............................................................................................................................................27
8 SPEZIFIKATIONEN .................................................................................................................................................. 28
9 IM LIEFERUMFANG ENTHALTENES ZUBEHÖR ........................................................................................................... 28
21
1. TEILE ZUORDNEN
1.1 Soundbar
1 Lautsprecher
2 Anzeige-/Fernsteuerungssensor
- Zeigt den aktuellen Status an.
- Empfängt das Signal von der Ferneuerung.
3 Standby -Anzeige
Leuchtet rot, wenn sich die Einheit im ANDBY-Modus
befindet.
4
Umschalten der Soundbar zwischen EIN und ANDBY.
5 SOURCE (QUELLE)
Umschalten zwischen BT (Bluetooth), OPT (OPTISCH),
AUX, HDMI 1, HDMI 2, HDMI ARC und MP3 LINK.
6 B;
Abspielen/Pause/Wiedergabe fortsetzen im Bluetooth-
Modus.
7 S / T
Zum vorherigen/nächen Titel springen im Bluetooth-
Modus.
8 VOL+ / VOL-
Erhöhen/Verringern der Lautärke
9 MP3-LINK-Buchse
Connes to an external audio device.
10 AC~-Buchse
Für den Anschlu eines Netzkabels.
11 OPTICAL (OPTISCH) -Buchse
12 AUX-Buchse
13 HDMI-1-/HDMI-2-Buchse
14 HDMI OUT TV ARC-Buchse
HDMI-Output (ARC).
SOURCE
MP3 LINK
VOL– VOL+
AC
OPTICAL
AUX
HDMI IN 2
HDMI IN 1
HDMI OUT
TV(ARC)
SOURCE
MP3 LINK
VOL– VOL+
123
4
10 12 13 1411
5 67 9
1
8
22
1.2 Kabelloser Subwoofer
1
Wireles s pairing
2 3
1 AC ~-Einlass
Verbindung mit dem Netzkabel
2 Anzeige
Leuchtet, wenn die Kopplung erfolgreich war.
3 Kabellose Kopplungsschaltfläche
Verbindung mit der Soundbar.
1.3 Fernbedienung
VOL+
VOL–
BASS+ TREB+ EQ DIM+
HDMI 1HDMI 2 ARC BT
OPT AUXMP3 PAIR
MUTE
BASS– TREB– SLEEP DIM–
1
2
3
4
5
6
7
8
9
11
10
12
1
Umschalten der Soundbar zwischen EIN und ANDBY.
2 SOURCE (QUELLE)
Auswahl des gewünschten Kopplungsmodus.
3 VOL+ / VOL-
Erhöhen/Verringern der Lautärke
4 BASS+ / BASS-
Einellen des Bapegels.
5 TREB+ / TREB-
Höhenpegel einellen.
6 MUTE (STUMM)
Stummschalten oder Ton wieder aktivieren.
7 PAIR (KOPPLUNG)
- Aktiviert die Kopplungsfunktion im Bluetooth-Modus.
- Trennen der gekoppelten Bluetoothgeräte.
8 B ;
Abspielen/Pause/Widergabe fortsetzen im Bluetooth-
Modus.
9 S / T
Zum vorherigen/nächen Titel springen im Bluetooth-
Modus.
10 EQ
Standard-Equalizer auswählen.
11 DIM+ / DIM-
Anzeigehelligkeit einellen.
12 SLEEP (EINSCHLAFFUNKTION)
Einschlaunktion einellen.

23
2. VORBEREITUNGEN
2.1 Vorbereiten der Fernbedienung
Die mitgelieferte Ferneuerung ermöglicht die Bedienung
der Einheit aus Entfernung.
• Auch wenn die Ferneuerung innerhalb der Funktions-
reichweite von 6 m bedient wird, kann die Bedienung
nicht funktionieren, wenn sich zwischen der Soundbar
und der Ferneuerung Hindernie befinden.
• Wenn die Ferneuerung neben anderen Geräten be-
dient wird, die Infrarotrahlung auenden oder wenn
eine andere Ferneuerung mit Infrarotrahlen nahe der
Soundbar verwendet wird, kann es zu Funktiontörun-
gen kommen. Ebenso kann es zu Funktiontörungen
bei den anderen Geräten kommen.
2.2 Fernbedienung zum ersten Mal verwenden
Die Soundbar i mit einer bereits eingelegten Lithium-
CR2015-Baerie ausgeaet.
• Entfernen Sie die Schutzabdeckung, um die Fernbe-
dienung zu aktivieren Baerie prüfen.
2.3 Austauschen der Batterie der Fernsteuerung
1
2
3
1 Schieben Sie das Baeriefach heraus und entnehmen
Sie die alte Baerie.
2 Legen Sie eine neue CR2025-Baerie mit der korrekten
Ausrichtung der Pole (+/-) wie angezeigt in das Bae-
riefach.
3 Schieben Sie das Baeriefach wieder zurück.

24
3. ANSCHLÜSSE
3.1 Standard-HDMI-Anschluss
AC
OPTICAL
AUX
HDMI IN 2
HDMI IN 1
HDMI OUT
TV(ARC)
TV
• Die SoundMount-Konfiguration basiert auf einem HDMI-Anschlu zwischen der HDMI-ARC-Buchse der Soundbar und
der HDMI-ARC-Buchse des Fernsehers.
Hinweis!
ARC = Audio Return Channel.
• Wenn der Fernseher nicht mit einer HDMI-ARC-Buchse ausgeaet i, können Sie die Soundbar und den Fernseher mit
einem optischen Kabel miteinander verbinden (nicht enthalten).
3.2 MP3-Link-Anschluss
SOURCE
MP3 LINK
VOL– VOL+
MP3
Player
• Verbinden Sie ein 3,5-mm- mit einem 3,5-mm-Audiokabel (nicht enthalten) mit der MP3-Link-Buchse (9) an der Sound-
bar und die Audioausgangsbuchse mit einem externen Audiogerät. Beispielsweise mit einem MP3-Player, iPhone usw.
3.3 Netzanschluss
ACHTUNG!
• Gefahr von Produktschäden! Achten Sie darauf, da die Versorgungpannung mit der auf der Rückseite der Sound-
bar aufgedruckten Spannung des Subwoofer übereinimmt.
• Achten Sie vor dem Anschlu des Netzkabels darauf, da alle anderen Verbindung hergeellt wurden.

25
3.4 Koppeln des kabellosen Subwoofers
Ab Fabrik sind der kabellose Subwoofer und die Soundbar
gekoppelt.
Automatische Kopplung
1 Stecken Sie das entsprechende SoundMount-
Netzkabel
2 Stecken Sie den Subwoofer in die Netzeckdose.
3 Drücken Sie auf die
Tae auf der Soundbar oder
auf der Ferneuerung, um die Soundbar einzuschalten
(EIN).
> Der Subwoofer und die Soundbar werden automa-
tisch innerhalb von 30 Sekunden gekoppelt.
> Wenn der Subwoofer mit der Soundbar gekoppelt
wird, blinkt die Anzeige schnell.
> Wenn der Subwoofer mit der Soundbar gekoppelt i,
leuchtet die Anzeige konant.
> Im Standby-Modus erlischt die Anzeige und blinkt
langsam.
Manuelles Koppeln
1 Stecken Sie das entsprechende SoundMount-
Netzkabel
2 Stecken Sie den Subwoofer in die Netzeckdose.
3 Achten Sie darauf, da sich die Soundbar im ANDBY-
Modus befindet.
4 Halten Sie die Tae kabellose Kopplung auf der Ober-
seite des Subwoofer einige Sekunden lang gedrückt.
> Der Subwoofer önet den Kopplungsmodus und die
Anzeige blinkt schnell.
5 Drücken Sie auf die
Tae auf der Soundbar oder
auf der Ferneuerung, um die Soundbar einzuschalten
(EIN).
> Wenn der kabellose Anschlu erfolgreich war,
leuchtet die Anzeige dauerha.
> Wenn die Anzeige immer noch blinkt oder gar nicht
mehr blinkt, funktioniert der kabellose Anschlu nicht.
• Ziehen Sie das Kabel aus dem Subwoofer.
• Schließen Sie das Hauptkabel nach drei Minuten
erneut an.
• Wiederholen Sie die Schrie 1 - 5.
Hinweise!
• Wenn der kabellose Anschlu erneut nicht funktioniert,
überprüfen Sie, ob es es sich um einen Konflikt oder
eine arke Interferenz (zum Beispiel eine Interferenz von
einem elektronischen Gerät) im Bereich der
Verbindung handelt.
Beheben Sie den Konflikt oder die arke Interferenz und
wiederholen Sie den oben genannten Ablauf.
• Der Subwoofer mu sich in einem oenen Bereich
innerhalb von 6 m um die Soundbar herum befinden.
• Wenn die Soundbar nicht mit dem Subwoofer
verbunden i und sich im Ein-Modus befindet, wird
die Mieilung ‘CHECK SUBWOOFER’ auf der Anzeige
angezeigt und die Leuchte unten am Subwoofer blinkt.
Wiederholen Sie die Schrie 1 - 5 oben, um den
Subwoofer mit der Soundbar zu koppeln.
4. ALLGEMEINER BETRIEB
4.1 Fernsteuerung des Fernsehers verwenden
Wenn die HDMI-ARC-Buchse der Soundbar über das HDMI-
Kabel mit der HDMI-ARC-Buchse des Fernsehers verbunden
i und die CEC-Funktion des Fernsehers im Einellungsmenü
aktiviert i, können Sie die Ferneuerung des Fernsehers
verwenden, um die SoundMount (Soundbar und Subwoo-
fer) zu euern.
• Wenn der Fernseher eingeschaltet i (EIN), wird die
SoundMount (Soundbar und Subwoofer) automatisch
ebenfalls eingeschaltet (EIN).
• Wenn der Fernseher ausgeschaltet i (AUS) oder auf
ANDBY eht, wird die SoundMount (Soundbar und
Subwoofer) automatisch ebenfalls ausgeschaltet (AUS)
oder auf ANDBY geschaltet.
• Wenn die SoundMount eingeschaltet i (EIN), kann die
Lautärke mit VOLUME -/VOLUME + und ILL geeuert
werden. Diese Taen befinden sich auf der Ferneu-
erung des Fernsehers.
Hinweis!
• Damit die SoundMount mit der Ferneuerung des
Fernsehers geeuert werden kann, i es wichtig, da
die HDMI-CEC-Funktion (Consumer Eleronics Control)
im Einellungsmenü des Fernsehers aktiviert i.
Diese Funktion hat bei jedem Hereller einen anderen
Namen: Anynet (Samsung), Aquos Link (Sharp), Bravia
Sync (Sony), Regza Link (Toshiba), Simplink (LG), Viera
Link Panasonic), EZ-Sync (JVC), Easylink (Philips),
Netcommand (Mitsubishi).
Die internen Fernseherlautsprecher werden automa-
tisch deaktiviert, wenn der Fernseher eingeschaltet
(EIN) und die Soundbar automatisch eingeschaltet
wird.
4.2 Mitgelieferte (Soundbar-)Fernsteuerung verwenden
Wenn die HDMI-ARC-Buchse der Soundbar über das HDMI-
Kabel mit der HDMI-ARC-Buchse des Fernsehers verbunden
i und die CEC-Funktion des Fernsehers im Einellungsmenü
aktiviert i, können Sie die Ferneuerung des Fernsehers
verwenden, um die SoundMount (Soundbar und
Subwoofer) zu euern.
In diesem Fall benötigen Sie nur die mitgelieferte (Sound-
bar-)Ferneuerung für die ermaligen Einellungen Ihrer
persönlichen Vorlieben (HÖHE, BASS, Helligkeitseinellung
der Soundbaranzeige) und zur Steuerung spezieller Funkti-
onen wie Bluetooth-Audioreaming.
Wenn die Soundbar und der Fernseher über einem opti-
schen Link miteinander verbunden sind, mu die mitge-
lieferte (Soundbar-)Ferneuerung auch zur Steuerung der
SoundMount-Fernseherlautärke, der -Eingabequelle usw.
verwendet werden.
Die Lautärke kann mit der Ferneuerung des Fernsehers
nicht eingeellt werden. Interne Fernseherlautsprecher
müen manuell ausgeschaltet werden. Beachten Sie das
Einellungsmenü für den Fernseher.

26
Standby/EIN
Wenn Sie die Soundbar zum eren Mal anschließen,
befindet sie sich im ANDBY-Modus und die ANDBY-
Leuchte leuchtet rot.
• Drücken Sie auf die
auf der Soundbar oder auf der
Ferneuerung des Fernsehers, um die Soundbar
einzuschalten (EIN).
• Drücken Sie erneut auf die
Tae, um die Soundbar
wieder in den ANDBY-Modus zu schalten.
> Die Standby-Leuchte leuchtet rot auf.
• Ziehen Sie den Hauptecker aus der Haupteckdose,
wenn Sie die Soundbar volländig auchalten
möchten.
Hinweis!
• Wenn sich die Soundbar etwa 15 Minuten lang im
Ruhezuand befindet, wird sie automatisch in den
ANDBY-Modus geschaltet.
Auswahlmodi
• Drücken Sie auf der Soundbar wiederholt auf die Tae
SOURCE (QUELLE) oder drücken Sie auf die Taen
HDMI 1/HDMI 2/ARC/BT (Bluetooth)/OPT (Optisch)/
AUX/MP3 auf der Ferneuerung, um den gewünschten
Modus auszuwählen. Der ausgewählte Modus wird auf
der Anzeige wiedergegeben.
Hinweis!
• Wenn die HDMI-ARC-Buchse der Soundbar über das
HDMI-Kabel mit der HDMI-ARC-Buchse des Fernsehers
verbunden i und die CEC-Funktion des Fernsehers im
Einellungsmenü aktiviert i, wird die Auswahl SOURCE
(QUELLE) automatisch auf ‘TV ARC’ (SoundMount)
eingeellt.
Super Bass Boost einstellen
• Drücken Sie auf der Ferneuerung auf die Taen BASS
+/BASS– um den Ba-Boo-Pegel zwischen –3 und +3
einzuellen.
> Der ausgewählte BASS-Pegel wird für jede Quelle
automatisch gespeichert.
Höhenpegel einstellen
• Drücken Sie auf der Ferneuerung auf die Taen
TREB +/TREB – um den Höhenpegel zwischen –3 und +3
einzuellen.
> Der ausgewählte HÖHEN-Pegel wird jede Quelle
automatisch gespeichert.
Lautstärke einstellen
• Drücken Sie auf der Soundbar auf die Taen VOL +/
VOL – um die Lautärke einzuellen.
• Drücken Sie auf der Ferneuerung des Fernsehers auf
die Tae MUTE (ILL), um den Ton abzuschalten.
• Drücken Sie auf der Ferneuerung des Fernsehers er-
neut auf die Tae MUTE (ILL) oder drücken Sie auf die
Tae VOL+ auf der Soundbar, um die zuvor eingeellte
Lautärke wiederherzuellen.
Equalizer auswählen
• Drücken Sie auf die EQ-Tae auf der Ferneuerung, um
die Equalizier-Einellung MOVIE oder SPEECH
auszuwählen.
> Nach dem Aus- oder Einschalten (AUS/EIN), wird die
Equalizier-Einellung automatisch in den MOVIE-
Modus eingeellt.
Einstellung der Anzeigehelligkeit
• Drücken Sie auf die Tae DIM-/DIM- auf der
Ferneuerung, um die Helligkeit einzuellen.
> Die ausgewählte BRIGHTNESS (HELLIGKEIT) wird
automatisch gespeichert.
Einschlaffunktion einstellen
Verwenden Sie die SLEEP TIMER (EINSCHLAFFUNKTION), um
das Syem nach einer voreingeellten Anzahl Minuten im
PLAY (Abspiel)-Modus auszuschalten. Mit der EINSCHLAF-
FUNKTION können mit Musik einschlafen und sich sicher
sein, da Ihr Syem abgeschaltet wird und nicht die ganze
Nacht hindurch läu.
1 Drücken Sie im ON (EIN)-Modus wiederholt auf die Tae
SLEEP (EINSCHLAFFUNKTION) auf der Ferneuerung, um
die gewünschten Anzahl Minuten einzuellen. Die An-
zahl Minuten wird in folgender Reihenfolge angezeigt:
SLEEP 120 - SLEEP 90 - SLEEP 60 - SLEEP 30 - SLEEP 15 -
SLEEP 00.
2 Laen Sie die Tae SLEEP los, wenn die von Ihnen ge-
wünschte Anzahl Minuten angezeigt wird.
> Die Sleep Timer (Einschlaunktion) i nun eingeellt.
3 TUm die EINSCHLAFFUNKTION abzubrechen, drücken
Sie wiederholt auf die Tae SLEEP, bis ‘SLEEP 00’ ange-
zeigt wird.
5. AUX/MP3 LINK/OPTISCH/
HDMI
1 Achten Sie darauf, da das Audiogerät mit der Sound-
bar verbunden i.
2 Drücken Sie wiederholt auf der Soundbar auf die Tae
SOURCE (QUELLE) oder drücken Sie auf der Fernbe-
dienung der Soundbar auf HDMI 1/HDMI 2/ARC/OPT
(OPTISCH)/AUX/MP3, um den gewünschten Modus
auszuwählen.
3 Wählen Sie direkt auf Ihrem Audiogerät die Abspielfunk-
tionen.
4 Drücken Sie die Taen VOL +/VOL – auf der Soundbar,
um die Lautärke auf den gewünschten Pegel einzus-
tellen
Hinweis!
• Sie müen den linearen PCM-Ausgang (Pulse Code
Modulation) an ihren Quellgerät (zum Beispiel
Fernseher, DVD- oder Blue-Ray-Player) einschalten,
während die Soundbar auf OPTICAL (OPTISCH) oder
HDMI-Modus geschaltet i.
• A/V-Peripheriegeräte müen mit dem Fernseher ver-
bunden sein.

27
6. MIT IHREM BLUETOOTH-GERÄT
ABSPIELEN
Sie können sich Titel auf einem Mediengerät anhören,
wenn es mit der Soundbar über Bluetooth verbunden i.
6.1 Bluetoothfähige Geräte manuell aktivieren
TWenn Sie Ihre Bluetoothgerät zum eren Mal mit der
Soundbar verbinden, müen Sie das Gerät mit der
Soundbar koppeln.
ACHTUNG!
• Die Reichweite zwischen der Soundbar und dem Gerät
beträgt höchens 8 Meter (ohne Objekte zwischen
dem Bluetoothgerät und der Soundbar).
• Bevor Sie ein Bluetoothgerät mit der Soundbar koppeln,
lernen Sie die Leiungsangaben des Geräts kennen.
• Eine Kompatibilität mit allen Bluetoothgeräte kann nicht
garantiert werden.
• Hindernie zwischen dem Gerät und der Soundbar
können die Reichweite verkürzen.
• Wenn die Signalärke schwach i, kann sich Ihr Blu-
etooth-Empfänger verbinden, aber es wird den Kop-
plungsmodus automatisch wieder herellen.
automatically.
6.2 Ihr Gerät über Bluetooth mit der Soundbar
verbinden
1 Soundbar einschalten (EIN).
2 Drücken Sie auf der Soundbar wiederholt auf die Tae
SOURCE (QUELLE) oder auf die BT-Tae auf der
Ferneuerung, um BT auszuwählen (Bluetooth-)Modus.
> Auf der Anzeigt wird er ‘BT’, dann ‘NO BT’ (wenn
kein Bluetoothgerät verbunden) angezeigt.
3 Drücken Sie ein paar Sekunden lang auf die Tae PAIR
(KOPPELN) auf der Ferneuerung, um die Bluetooth-
Kopplung zu aktivieren.
> Auf der Anzeige wird ‘PAIR’ (‘KOPPLUNG’) angezeigt.
4 Aktivieren Sie Ihr Bluetoothgerät und wählen Sie den
Modus SEARCH (SUCHE) aus.
> ‘Vogel’s SoundMount’ wird auf Ihrer Bluetoothgerät-
lie angezeigt.
5 Wählen Sie ‘Vogel’s SoundMount’ aus und geben Sie
‘0000 als Kennwort ein, falls erforderlich.
> Auf der Anzeige erscheint ‘BLUEPORT, wenn die
Verbindung erfolgreich i.
• Um die Bluetoothfunktion zu deaktivieren, schalten Sie
zu einer anderen Funktion auf der Soundbar um oder
deaktivieren Sie die Funktion auf Ihrem Bluetoothgerät.
6.3 Musik mit ihrem Bluetoothgerät abspielen
• Wenn das verbundene Bluetoothgerät Advanced
Audio Diribution Profile (A2DP) unterützt, können
Sie die auf Ihrem Gerät gespeicherte Musik über den
Player abspielen.
• Wenn das Gerät auch Audio Video Remote Control
Profile (AVRCP) unterützt, können Sie die Ferneu-
erung der Soundbar verwenden um die auf dem Gerät
gespeicherte Musik abzuspielen.
1 Ihr Gerät mit der Soundbar koppeln.
2 Musik über Ihr Gerät abspielen (wenn es A2DP
unterütz).
3 Ferneuerung zur Abspieleuerung verwenden (wenn
AVRCP unterützt wird).
• Drücken auf die Tae B;, um die Pausenfunktion zu
aktivieren oder das Abspielen fortzusetzen.
• Drücken Sie die Taens S / T , um zu einem Titel
zu springen.
7. WARNHINWEISE UND
HAFTUNGSAUSSCHLUSS
Damit die Garantie Ihre Gültigkeit behält, versuchen Sie
niemals, die Soundbar und/oder den kabellosen
Subwoofer selb zu reparieren.
Wenn Sie Probleme mit der SoundMount haben, wenden
Sie sich bie an den Vogel´s-Händler.
Bluetooth und HDMI sind regirierte Handelsmarken und
sind im Besitz ihrer jeweiligen Eigentümer.
Die Wortmarke Bluetooth und die entsprechenden Logos
sind regirierte Handelsmarken im Besitz der Bluetooth SIG,
Inc. Jede Verwendung dieser Marken durch Vogel´s erfolgt
unter Lizenz. Andere Handelsmarken und Handelsnamen
gehören den entsprechenden Besitzern.
Der Ausdruck HDMI und das HDMI-Logo sind Handelsmar-
ken oder regirierte Handelsmarken der DMI Licensing LLC
in den Vereinigten Staaten und in anderen Ländern.
7.1 Hinweise zur Batterienutzung
• Wenn eine Ferneuerung längere Zeit nicht verwendet
wird (mehr als einen Monat), entfernen Sie die Baerie
aus der Ferneuerung, damit sie nicht ausläu.
• Wenn die Baerie ausläu, wischen Sie die Flüigkeit
im Baeriefach ab und tauschen Sie die Baerie durch
eine neue aus.
• Verwenden Sie keine anderen Baerien als die
angegebenen.
• Erhitzen Sie Baerien nicht und nehmen Sie sich nicht
auseinander.
• Werfen Sie sie niemals in Feuer oder Waser.
• Transportieren oder lagern Sie Baerien nicht
zusammen mit anderen Metallobjekten, da dies zu
Kurzschlüen, Leckage oder zu Explosionen führen
kann.
• Laden Sie Baerien nicht auf, es sei denn, es handelt
sich um aufladbare Baerien.
Entsorgungshinweise (WEEE)
Entsorgen Sie dieses Gerät,
die Ferneuerung oder die Baerien nicht
unsortiert im Haushaltsmüll. Eine falschen
Entsorgung i umweltschädlich und kann
eine Gefahr für die menschliche
Gesundheit darellen. Bien fragen Sie
Ihren örtlichen Abfallbetrieb nach
weiteren Informationen zur Rückgabe
und nach Sammelsyemen in Ihrer
Gegend.
CE Beachtung
Dieses Produkt entspricht den wesentlichen Anforderungen
und anderen relevanten Bedingungen der Richtlinien
2006/95/EC (Niederspannung), 2004/108/EC (EMC) und
2011/65/EU (‘RoHS’, Beschränkung einzelner gefährlicher
Stoe in elektrischen und elektrotechnischen Erzeugnien).

28
8. SPEZIFIKATIONEN
Soundbar
Netzanforderungen..............................AC 220-240 V 50/60 Hz
Durchschnilicher Stromverbrauch im Betrieb ................60 W
Standby-Stromverbrauch unter ........................................0.5 W
Ausgangsleiung RMS ................................................. 75 W x 2
Klirrfaktor (THD) ....................................................1%(1 kHz, 1 W)
Eingangsempfindlichkeit ...............................................700 mV
Frequenzreaktion ................................................180 Hz - 20 kHz
Impedanz gesamt ................................................................ 6 Ω
Maße (B x H x T) .............................................. 950 x 86 x 52 mm
Subwoofer
Netzanforderungen ........................... AC 220 - 240 V 50/60 Hz
Durchschnilicher Stromverbrauch im Betrieb ................60 W
Standby-Stromverbrauch unter ........................................0.5 W
Ausgangsleiung .............................................................150 W
Frequenzreaktion .................................................40 Hz - 150 Hz
Impedanz ............................................................................. 3 Ω
Maße (B x H x T) ............................................ 419 X 312 x 150 mm
Fernsteuerung
Aband .................................................................................6 m
Winkel .................................................................................... 30°
9. IM LIEFERUMFANG
ENTHALTENES ZUBEHÖR
Stromkabel (Wechselrom) .................................................. 2 x
HDMI-Kabel ............................................................................ 1 x
Ferneuerung ....................................................................... 1 x

29
FR TABLE DES MATIERES
1 IDENTIFYING THE PARTS ......................................................................................................................................... 30
1.1 Barre de son ........................................................................................................................................................................30
1.2 Subwoofer sans fil ................................................................................................................................................................ 31
1.3 Télécommande .................................................................................................................................................................. 31
2 PREPARATIONS ..................................................................................................................................................... 32
2.1 Préparation de la télécommande....................................................................................................................................32
2.2 Utilisation de la télécommande pour la première fois ....................................................................................................32
2.3 Remplacement de la pile de la télécommande ............................................................................................................ 32
3 CONNEXIONS ....................................................................................................................................................... 33
3.1 Connexion HDMI Standard (ARC) ..................................................................................................................................... 33
3.2 Connexion MP3 Link ...........................................................................................................................................................33
3.3 Connexion d’alimentation ................................................................................................................................................. 33
3.4 Aociation du subwoofer sans fil avec la barre de son ..................................................................................................34
Aociation automatique ................................................................................................................................................... 34
Aociation manuelle .........................................................................................................................................................34
4 UTILISATION .......................................................................................................................................................... 34
4.1 Utilisation de la télécommande de la TV .........................................................................................................................34
4.2 Utilisation de la télécommande (barre de son) fournie ..................................................................................................34
Veille / MARCHE ..................................................................................................................................................................35
Séleion des modes ........................................................................................................................................................... 35
Réglage du Super Ba Boo .............................................................................................................................................35
Réglage du niveau des aigus ............................................................................................................................................ 35
Réglage du volume ............................................................................................................................................................ 35
Séleion de l’égaliseur ....................................................................................................................................................... 35
Réglage de la luminosité de l’écran .................................................................................................................................35
Réglage du minuteur de mise en veille ............................................................................................................................35
5 FONCTIONNEMENT AUX / MP3 LINK / OPTIQUE / HDMI ........................................................................................ 35
6 LECTURE AVEC VOTRE APPAREIL BLUETOOTH ......................................................................................................... 36
6.1 Aociation manuelle des appareils Bluetooth ................................................................................................................36
6.2 Connexion de votre appareil à la barre de son via Bluetooth .......................................................................................36
6.3 Ecoute de la musique depuis votre appareil Bluetooth .................................................................................................. 36
7 AVERTISSEMENTS ................................................................................................................................................... 36
7.1 Précautions concernant les piles ......................................................................................................................................36
8 SPECIFICATIONS ................................................................................................................................................... 37
9 ACCESSOIRES FOURNIS......................................................................................................................................... 37
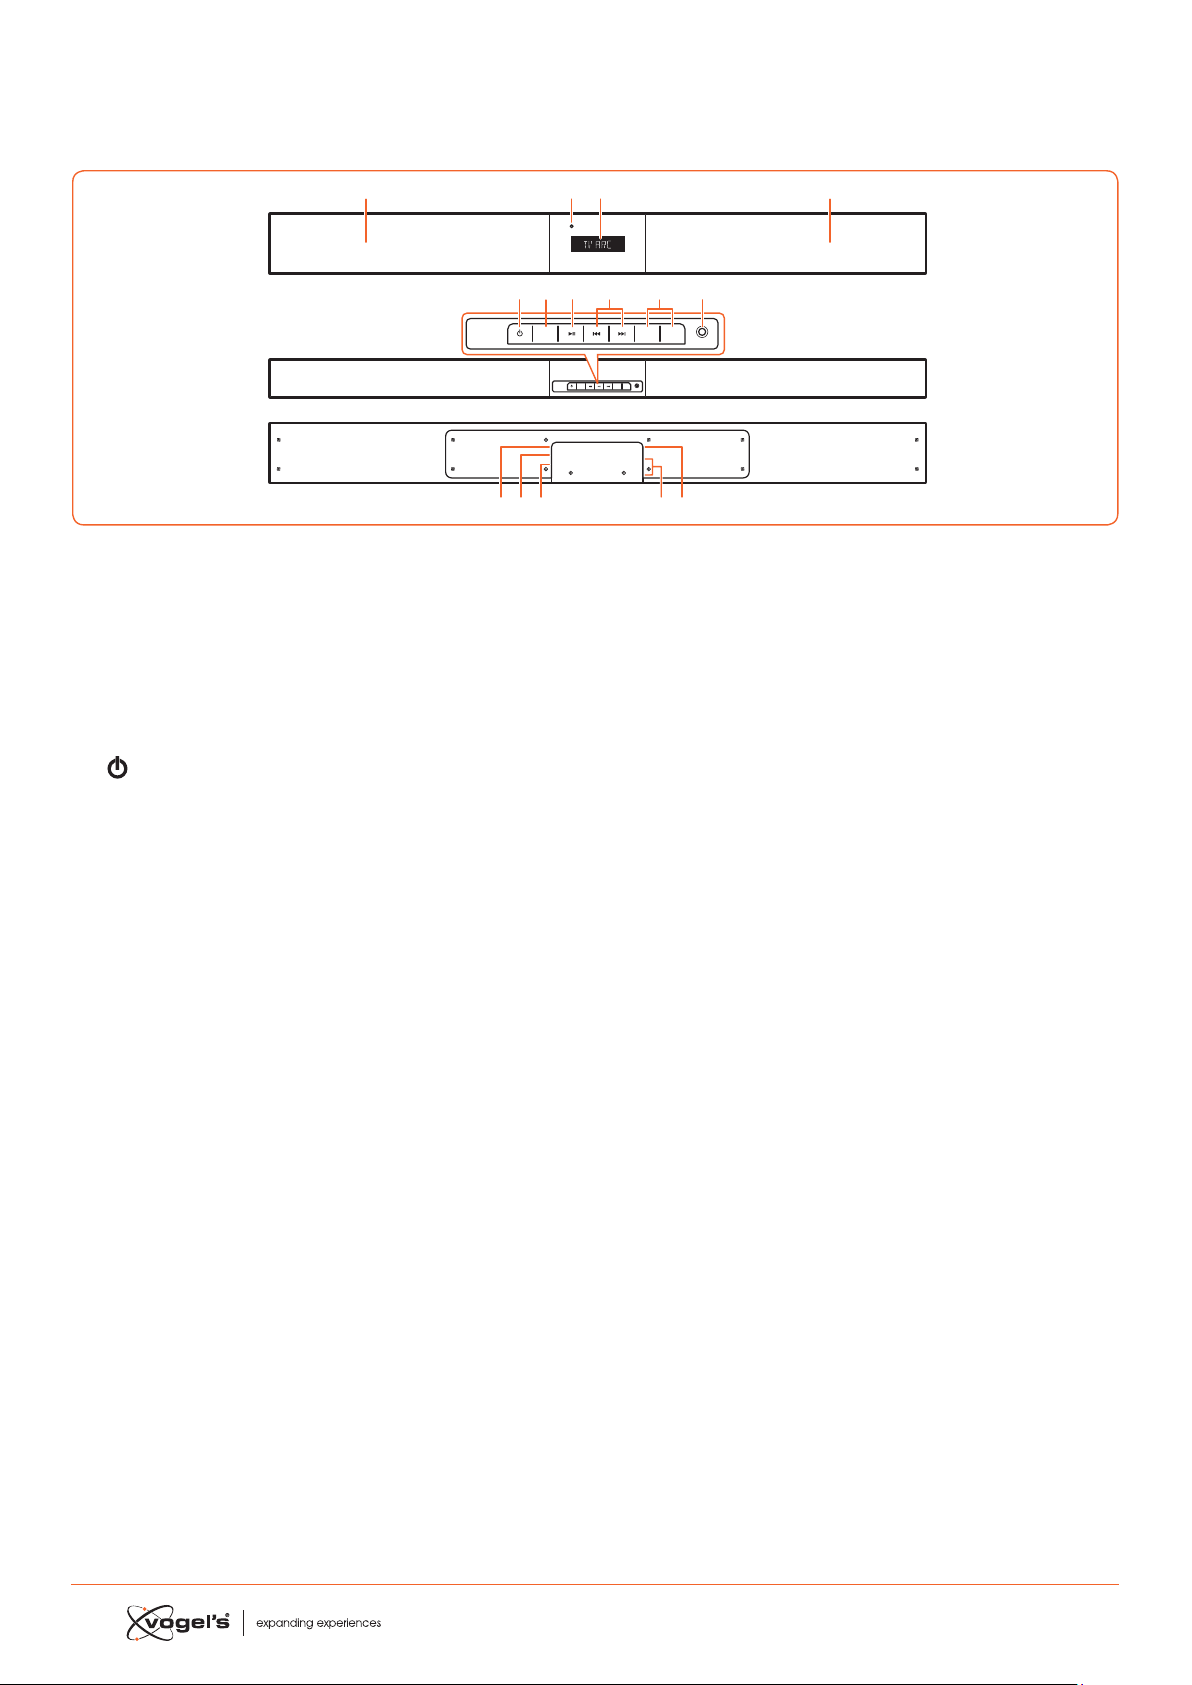
1. IDENTIFICATION DES PIECES
1.1 Barre de son
1 Haut-parleurs
2 Ecran/Capteur de télécommande
- Ache le atut auel.
- Reçoit le signal de la télécommande.
3 Témoin de veille
S’allume en rouge lorsque l’appareil e en mode
ANDBY (VEILLE).
4
Commute la barre de son entre les modes ON
(MARCHE) et ANDBY (VEILLE.)
5 SOURCE
Commutre entre les modes BT (Bluetooth),
OPT (OPTIQUE), AUX, HDMI 1. HDMI 1. HDMI ARC et MP1.
LINK.
6 B;
Leure/Pause/Reprise leure en mode Bluetooth.
7 S / T
Paer à la pie précédente/Paer à la pie suivante
en mode Bluetooth.
8 VOL+ / VOL-
Augmenter/Diminuer le volume.
9 Prise MP3 LINK
Se connee à un appareil audio externe.
10 CA ~ prise
Pour conneer le cordon d’alimentation.
11 Prise OPTIQUE
12 Prise AUX
13 Prises HDMI 1/HDMI 2
14 Prise SORTIE HDMI TV ARC
Sortie HDMI (ARC).
SOURCE
MP3 LINK
VOL– VOL+
AC
OPTICAL
AUX
HDMI IN 2
HDMI IN 1
HDMI OUT
TV(ARC)
SOURCE
MP3 LINK
VOL– VOL+
123
4
10 12 13 1411
5 67 9
1
8
30

31
1.2 Subwoofer sans fil
1
Wireles s pairing
2 3
1 CA ~ alimentation
Se connee au cordon d’alimentation.
2 Témoin
S’allume lorsque l’aociation e réuie.
3 Bouton d’association sans fil
Se connee à la barre de son.
1.3 Télécommande
VOL+
VOL–
BASS+ TREB+ EQ DIM+
HDMI 1HDMI 2 ARC BT
OPT AUXMP3 PAIR
MUTE
BASS– TREB– SLEEP DIM–
1
2
3
4
5
6
7
8
9
11
10
12
1
Commute la barre de son entre les modes ON (MAR-
CHE) et ANDBY (VEILLE).
2 SOURCE
Séleionner le mode de leure souhaité.
3 VOL+ / VOL-
Augmenter/Diminuer le volume.
4 BASS+ / BASS-
Réglez le niveau des baes.
5 TREB+ / TREB-
Réglez le niveau des aigus.
6 MUTE (SILENCIEUX)
Coupe ou remet le son.
7 PAIR (ASSOCIER)
- Aive la fonion d’aociation en mode Bluetooth.
- Déconnee l’appareil Bluetooth aocié exiant.
8 B ;
Leure/Pause/Reprise de la leure en mode Bluetooth.
9 S / T
Paer à la pie précédente/Paer à la pie suivante
en mode Bluetooth.
10 EQ
Séleionne la préséleion de l’égaliseur.
11 DIM+ / DIM-
Règle la luminosité de l’écran.
12 SLEEP (VEILLE)
Règle le minuteur de mise en veille.
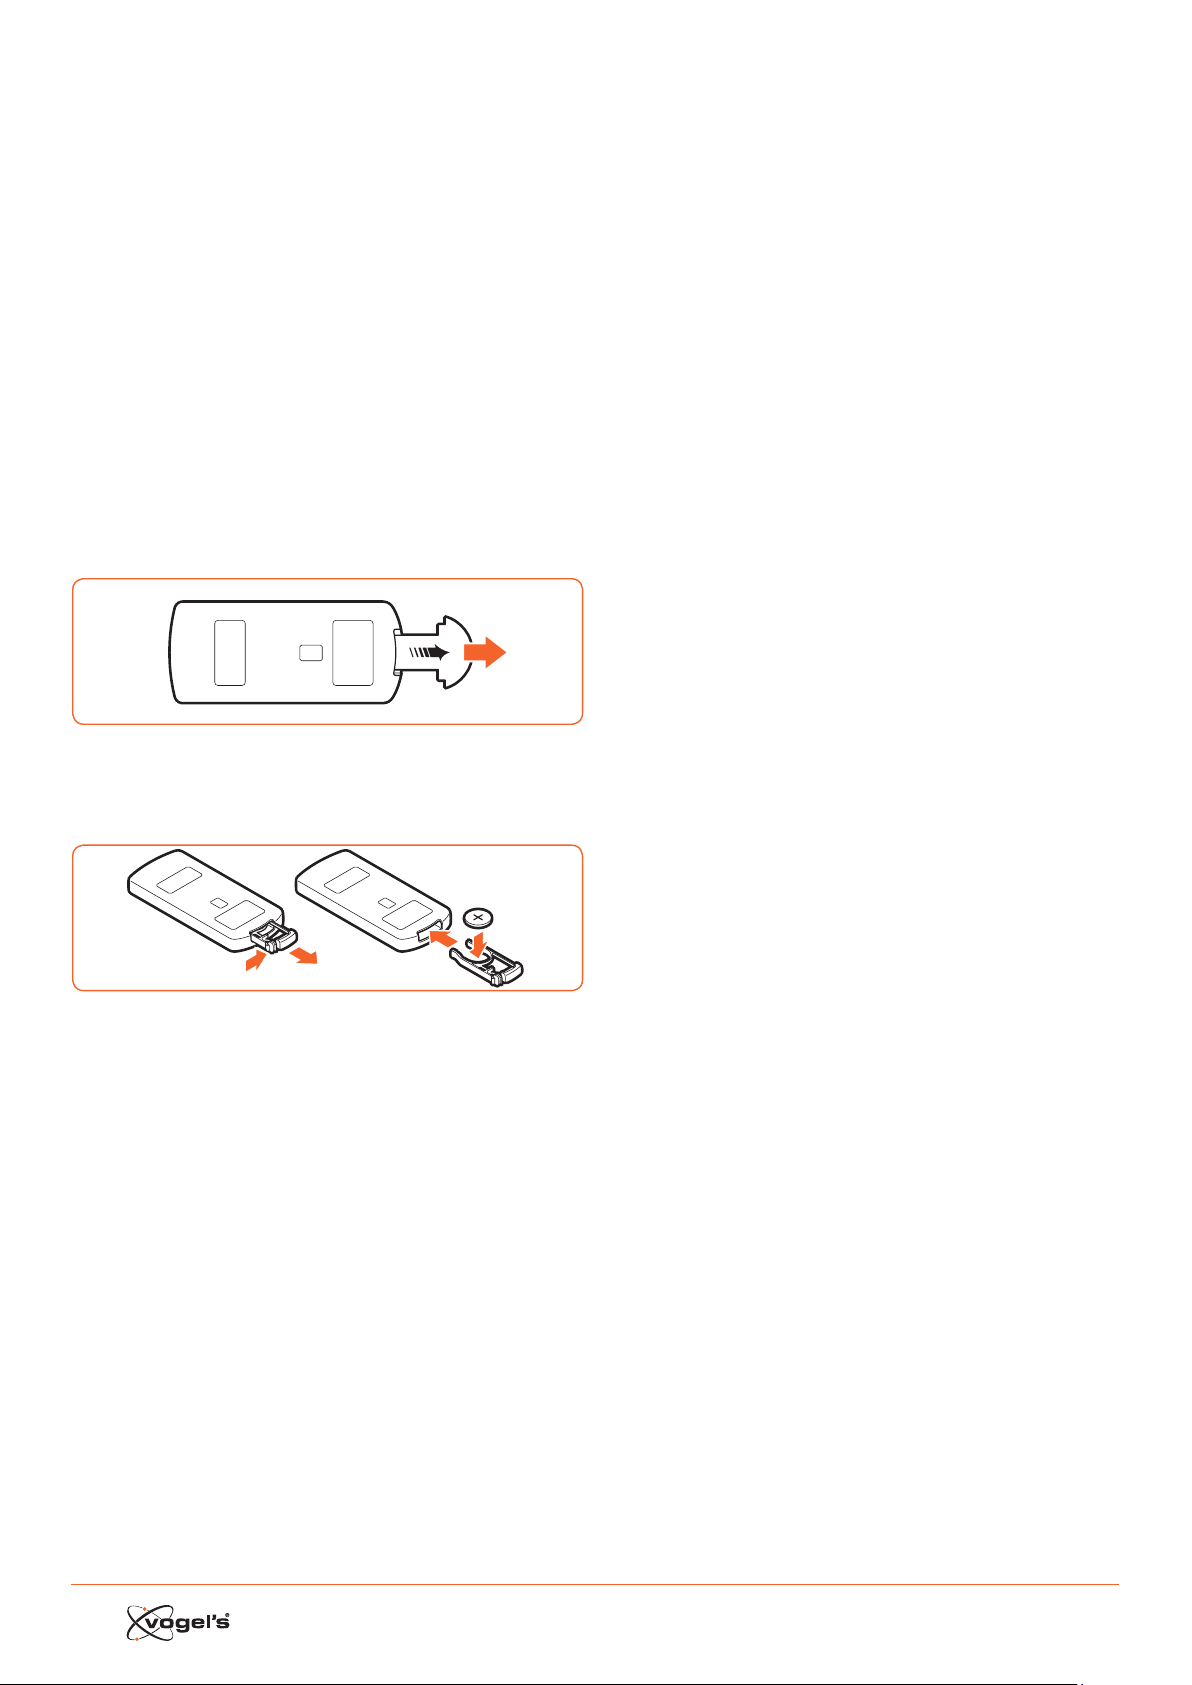
32
2. PREPARATIONS
2.1 Préparation de la télécommande
La télécommande fournie permet d’utiliser l’appareil à
diance.
• Même si la télécommande e aionnée dans la
portée eeive (6 m), l’utilisation de la télécommande
peut être impoible s’il y a des obacles entre la barre
de son et la télécommande.
• Si la télécommande e aionnée à proximité d’autres
produits qui génèrent des rayons infrarouges ou si
d’autres appareils avec télécommande utilisant des
rayons infrarouges sont utilisés à proximité de la barre
de sons, la télécommande peut ne pas fonionner
correement. De même, les autres produits peuvent ne
pas fonionner correement.
2.2 Utilisation de la télécommande pour la première
fois
La barre de son poède une pile au lithium CR2025
pré-inallée.
• Enlevez la languee de proteion pour aiver la pile de
la télécommande.
2.3 Remplacement de la pile de la télécommande
1
2
3
1 Tirez le compartiment des piles et enlevez l’ancienne
pile.
2 Placez une nouvelle pile CR2025 dans le compartiment
des piles en respeant la polarité (+/-) indiquée.
3 Réinsérez le compartiment des piles dans le logement.

33
3. CONNEXIONS
3.1 Connexion HDMI standard
AC
OPTICAL
AUX
HDMI IN 2
HDMI IN 1
HDMI OUT
TV(ARC)
TV
• La configuration SoundMount e basée sur une connexion HDMI entre la prise HDMI ARC de la barre de son et la prise
HDMI ARC de la télévision.
Remarque !
ARC = Audio Return Channel.
• Si la télévision n’e pas équipée d’une prise HDMI ARC, vous pouvez conneer la barre de son et la télévision avec un
câble optique (non fourni).
3.2 Connexion MP3 Link
SOURCE
MP3 LINK
VOL– VOL+
MP3
Player
• Branchez un câble audio 3,5 mm à 3,5 mm (non fourni) à la prise MP3 LINK (9) sur la barre de son et la prise de sortie
audio sur un périphérique audio externe. Par exemple, un leeur MP3, un iPhone, etc.
3.3 Connexion d’alimentation
DANGER !
• Risque d’endommagement du produit ! Veillez à ce que la tension d’alimentation corresponde à la tension indiquée
au dos de la barre de son et du subwoofer.
• Avant de brancher le cordon d’alimentation CA, veillez à avoir eeué toutes les autres connexions.

34
3.4 Association du subwoofer sans fil avec la barre de
son
Le subwoofer sans fil et la barre de son sont aociés en
usine.
Association automatique
1 Branchez le câble d’alimentation dédié SoundMount
dans la barre de son.
2 Branchez le subwoofer dans la prise seeur.
3 Appuyez sur le bouton
de la barre de son ou sur la
télécommande pour mere la barre de son en position
ON (MARCHE).
> Le subwoofer et la barre de son s’aocient automati-
quement dans les 30 secondes.
> Lorsque le subwoofer s’aocie avec la barre de son,
le témoin clignote rapidement.
> Lorsque le subwoofer e aocié à la barre de son, le
témoin s’allume en continu.
> En mode veille, le témoin du subwoofer s’éteint et
clignote lentement.
Association manuelle
1 Branchez le câble d’alimentation dédié SoundMount
dans la barre de son.
2 Branchez le subwoofer dans la prise seeur.
3 Veillez à ce que la barre de son se trouve en mode
veille.
4 Appuyez et maintenez enfoncé le bouton d’aociation
sans fil au bas du subwoofer pendant quelques secon-
des.
> Le subwoofer pae en mode aociation et le témoin
clignote rapidement.
5 Appuyez sur le bouton
de la barre de son ou sur la
télécommande pour mere la barre de son en position
ON (MARCHE).
> Une fois la connexion sans fil établie, le témoin
s’allume en continu.
> Si le témoin clignote toujours ou ne clignote pas du
tout, la connexion sans fil a échoué.
• Débranchez le câble du subwoofer.
• Rebranchez le câble d’alimentation après 3
minutes.
• Répétez les étapes 1 - 5.
Remarque !
• Si la connexion sans fil échoue à nouveau , vérifiez s’il y
a un conflit ou une forte interférence (par exemple, des
interférences d’un appareil éleronique) aux alentours
de votre position.
Eliminez ces conflits ou ces fortes interférences et répé-
tez les procédures ci-deus.
• Le subwoofer doit se situer à moins de 6 m de la barre
de son dans un espace ouvert.
• Si la barre de son n’e pas conneée avec le subwoo-
fer et si elle se trouve en mode Marche, le meage
‘CHECK SUBWOOFER’ (‘VERIFIER LE SUBWOOFER’)
apparait à l’écran et le témoin au bas du subwoofer
clignote. Répétez les étapes 1 - 5 ci-deus pour aocier
le subwoofer à la barre de son.
4. UTILISATION
4.1 Utilisation de la télécommande de la TV
Lorsque la prise HDMI ARC de la barre de son e conneée
à la prise HDMI ARC ou à la télévision via le câble HDMI
et que la fonion CEC de la télévision e aivée dans le
menu configuration de la télévision, vous pouvez utiliser la
télécommande de la télévision pour contrôler le Sound-
Mount (barre de son et subwoofer).
• Lorsque la TV e allumée, le SoundMount (barre de son
et subwoofer) e automatiquement allumé..
• Lorsque la TV e mise en position OFF / ANDBY (ARRET/
VEILLE), le SoundMount se met automatiquement en
position ARRET (puis VEILLE).
• Lorsque le SoundMount e en position MARCHE, le
volume du son peut être contrôlé via les boutons VO-
LUME - / VOLUME + et MUTE sur la télécommande de la
télévision.
Remarque !
• Pour pouvoir contrôler le SoundMount avec la télécom-
mande de la télévision, il e important que la fonion
HDMI CEC (Consumer Eleronics Control) soit aivée
dans le menu configuration de la TV.
Cee fonion porte un nom diérent pour chaque
marque de télévision : Anynet (Samsung), Aquos Link
(Sharp), Bravia Sync (Sony), Regza Link (Toshiba), Sim-
plink (LG), Viera Link Panasonic), EZ-Sync (JVC), Easylink
(Philips), Netcommand (Mitsubishi).
Les haut-parleurs internes de la télévision sont automa-
tiquement désaivés dès que la télévision e allumée
et la barre de son e allumée automatiquement.
4.2 Utilisation de la télécommande (barre de son)
fournie
Lorsque la prise HDMI ARC de la barre de son e conneée
à la prise HDMI ARC ou à la télévision via le câble HDMI
et que la fonion CEC de la télévision e aivée dans le
menu configuration de la télévision, vous pouvez utiliser la
télécommande de la télévision pour contrôler le Sound-
Mount (barre de son et subwoofer).
Dans ce cas, vous avez seulement besoin de la
télécommande fournie (barre de son) pour les paramètres
initiaux des préférences personnelles (TREBLE, BASS (AIGUS,
BASSES), niveau de luminosité de l’écran de la barre de
son) et pour le contrôle des fonions spéciales comme le
reaming audio Bluetooth.
Lorsque la barre de son et la télévision sont conneées via
un lien optique, la télécommande (barre de son) fournie
doit également être utilisée pour contrôler le volume de la
télévision SoundMount, la séleion de la source, etc..
Il n’e pas poible de contrôler le volume avec la télé-
commande de la télévision. Les haut-parleurs internes de
la télévision doivent être coupés manuellement. Voyez le
menu de configuration de la télévision.

35
Veille/Marche
Lorsque vous conneez la première fois la barre de son à
la prise de courant, la barre de son e en mode veille et le
témoin veille s’allume en rouge.
• Appuyez sur le bouton
la barre de son ou sur la
télécommande de la télévision pour mere la barre de
son en position ON (MARCHE).
• Appuyez à nouveau sur le bouton
pour remere la
barre de son en mode veille.
> Le témoin de veille s’allume en rouge.
• Débranchez la fiche de la prise seeur si vous souhaitez
déconneer complètement la barre de son.
Remarque !
• Lorsque la barre de son e inaive pendant environ 15
minutes, elle pae automatiquement en mode veille.
Sélection des modes
• Appuyez sur le bouton SOURCE de la barre de son à
plusieurs reprises ou appuyez sur les boutons HDMI 1/
HDMI 2 / ARC / BT (Bluetooth) / OPT (Optique) / AUX /
MP3 de la télécommande pour séleionner le mode
souhaité. Le mode séleionné apparaît à l’écran.
Remarque !
• Lorsque la prise HDMI ARC de la barre de son e con-
neée à la prise HDMI ARC de la télévision via le câble
HDMI et que la fonion CEC de la télévision e aivée
dans le menu configuration de la télévision, la séleion
de la SOURCE se positionnera automatiquement sur ‘TV
ARC’ (SoundMount).
Réglage du Super Bass Boost
• Appuyez sur les boutons BASS + / BASS– de la télécom-
mande pour régler le niveau de baes de –3 à +3.
> Le niveau de BASS (BASSES) séleionné sera automa-
tiquement ocké par source.
Réglage du niveau des aigus.
• Appuyez sur les boutons TREB + / TREB – de la télécom-
mande pour régler le niveau des aigus de -3 à +3.
> Le niveau des TREBLE (AIGUS) séleionné sera auto-
matiquement ocké par source.
Réglage du volume
• Appuyez sur le boutons VOL + / VOL – de la barre de
son pour régler le volume.
• Appuyez sur le bouton MUTE (SILENCIEUX) de la télé-
commande de la télévision pour couper le son.
• Appuyez à nouveau sur le bouton MUTE (SILENCIEUX)
de la télécommande de la télévision ou appuyez sur
le bouton VOL+ de la barre de son pour reprendre le
volume normal.
Sélection de l’égaliseur
• Appuyez sur le bouton EQ de la télécommande pour
séleionner le paramètre d’égaliseur MOVIE (FILM) ou
SPEECH (PAROLE).
> Après avoir commuté entre les position OFF (ARRET)
et ON (MARCHE), le paramètre de l’égaliseur revient
automatiquement en mode MOVIE (FILM).
Adjusting the brightness of the display
• Appuyez sur le bouton DIM+ / DIM- de la télécomman-
de pour séleionner le niveau de luminosité.
> Le niveau de BRIGHTNESS (LUMINOSITE) séleionné e
automatiquement enregiré.
Réglage du minuteur de mise en veille
Utilisez le SLEEP TIMER (MINUTEUR DE MISE EN VEILLE) pour
couper le syème après plusieurs minutes en mode PLAY
(LECTURE). En réglant le SLEEP TIMER, vous pouvez vous
endormir sur la musique et votre syème s’éteindra auto-
matiquement.
1 En mode ON (MARCHE), appuyez sur le bouton SLEEP
(VEILLE) de la télécommande à plusieurs reprises pour
séleionner le nombre de minutes souhaité. Le nombre
de minutes sera aché dans la séquence suivante :
VEILLE 120 - VEILLE 90 - VEILLE 60 - VEILLE 30 - VEILLE 15 -
VEILLE 00.
2 Arrêtez d’appuyer sur le bouton SLEEP lorsque le nom-
bre de minutes souhaité apparaît.
> Le minuteur de mode veille e maintenant réglé.
3 Pour annuler le SLEEP TIMER, appuyez sur le bouton
SLEEP à plusieurs reprises jusqu’à ce que ‘SLEEP 00’
(‘VEILLE 00’) apparaie.
5. FONCTIONNEMENT AUX /
MP3 LINK / OPTIQUE / HDMI
1 Veillez à ce que le périphérique audio soit conneé à
la barre de son.
2 Appuyez sur le bouton SOURCE sur la barre de son
à plusieurs reprises ou appuyez sur les boutons HDMI
1 / HDMI 2 / ARC / OPT (OPTIQUE) / AUX / MP3 sur la
télécommande de la barre de son pour séleionner le
mode souhaité.
3 Utilisez votre périphérique audio direement pour la
leure.
4 Appuyez sur les boutons VOL + / VOL – de la barre de
son pour régler le volume au niveau souhaité.
Remarque !
• Vous devrez peut-être paer à la sortie PCM (Pulse
Code Modulation) linéaire sur votre appareil source
(ex. TV, DVD ou leeur Blu-ray) lorsque la barre de son
e mise en mode OPTIQUE ou HDMI.
• Les périphériques A/V doivent être conneés à la
télévision.

36
6. LECTURE AVEC VOTRE
APPAREIL BLUETOOTH
Vous pouvez écouter les pies d’un appareil s’il e
conneé à la barre de son via Bluetooth.
6.1 Association manuelle des appareils Bluetooth
La première fois que vous conneez votre appareil
Bluetooth à la barre de son, vous devez aocier votre
appareil à la barre de son.
DANGER !
• La plage opérationnelle entre la barre de son et
l’appareil e d’environ 8 mètres (sans obacle entre
l’appareil Bluetooth et la barre de son).
• Avant de conneer un appareil Bluetooth à la barre
de son, veillez à connaître les capacités de l’appareil.
• La compatibilité avec les appareils Bluetooth n’e pas
garantie.
• Les obacles entre l’appareil et la barre de son
peuvent réduire la portée opérationnelle.
• Si la force du signal e faible, votre récepteur Bluetooth
peut se déconneer, mais il repaera en mode
aociation automatiquement.
6.2 Connexion de votre appareil à la barre de son via
Bluetooth
1 Meez labarre de son en mode ON (MARCHE).
2 Appuyez sur le bouton SOURCE de la barre de son à
plusieurs reprises ou sur le bouton BT de la télécom-
mande pour séleionner le mode BT (Bluetooth).
> L’écran ache ‘BT’ et ensuite ‘NO BT’ (‘PAS DE BT’, si
aucun appareil Bluetooth n’e conneé).
3 Appuyez sur le bouton PAIR (ASSOCIER) sur la
télécommande pendant quelques secondes pour
aiver l’aociation Bluetooth.
> L’écran ache ‘PAIR’ (‘ASSOCIER’).
4 Aivez votre appareil Bluetooth et séleionnez le mode
SEARCH (RECHERCHER).
> ‘Vogel’s SoundMount’ apparaît sur votre appareil
Bluetooth
5 Séleionnez ‘Vogel’s SoundMount’ et entrez ‘0000’
comme mot de pae, le cas échéant.
> L’écran ache ‘BLUEPORT’ lorsque la connexion e
établie.
• Pour déconneer la fonion Bluetooth, paez à une
autre fonion sur la barre de son ou désaivez la
fonion depuis votre appareil Bluetooth.
6.3 Ecoute de la musique depuis votre appareil
Bluetooth
• Si l’appareil Bluetooth conneé supporte la fonion
Advanced Audio Diribution Profile (A2DP), vous
pouvez écouter la musique ockée sur l’appareil via le
leeur.
• Si l’appareil supporte également la fonion Audio
Video Remote Control Profile (AVRCP), vous pouvez
utiliser la télécommande de la barre de son pour lire la
musique ockée sur l’appareil.
1 Aociés votre appareil avec la barre de son.
2 Lisez la musique via votre appareil (s’il prend en charge
A2DP).
3 Utilisez la télécommande pour contrôler la leure (s’il
prend en charge AVRCP).
• Appuyez sur le bouton B; pour interrompre/reprendre
la leure.
• Appuyez sur les boutons S / T pour sauter une
pie.
7. AVERTISSEMENTS
Pour maintenir la validité de la garantie, n’eayez jamais
de réparer la barre de son et/ou le subwoofer sans fil
vous-même. Si vous rencontrez des problèmes lors de
l’utilisation de SoundMount, veuillez contaer votre diribu-
teur Vogel’s.
Bluetooth et HDMI sont des marques commerciales
déposées et sont la propriété de leurs propriétaires
respeifs.
La marque et les logos Bluetooth sont des marques
commerciales déposées de Bluetooth SIG, Inc. et toute
utilisation de ces marques par Vogel’s fait l’objet d’une
licence. Les autres marques et marques commerciales sont
celles de leurs propriétaires respeifs.
Le terme et le logo HDMI sont des marques commerciales
ou des marques commerciales déposées de HDMI
Licensing LLC aux Etats-Unis et dans d’autres pays.
7.1 Précautions relatives aux piles
• Lorsque la télécommande n’e pas utilisée pendant
une longue période (plus d’un mois), enlevez la pile de
la télécommande pour éviter qu’elle ne fuite.
• Si la pile fuite, euyez la fuite dans le compartiment des
piles et remplacez la pile par une nouvelle.
• N’utilisez pas d’autres piles que celles indiquées.
• Ne chauez pas ou ne démontez pas les piles.
• Ne les jetez jamais dans le feu ou dans l’eau.
• Ne transportez pas ou ne ockez pas de piles avec
d’autres objets métalliques car cela pourrait entraîner
un court-circuit, une fuite ou une explosion des piles.
• Ne chargez jamais une pile tant qu’il n’a pas été con-
firmé qu’il s’agit d’une pile rechargeable.
Instructions de mise au rebut WEEE
Ne meez pas au rebut cet appareil,
la télécommnde ou sa pile avec les
déchets ménagers non triés. Une mise au
rebut inadéquate peut être nocive pour
l’environnement et la santé humaine.
Veuillez vous renseigner auprès de l’agence
locale responsable des déchets
concernant les syèmes de retour et de
collee dans votre région.
Conformité CE
Ce produit e conforme aux exigences eentielles et à
d’autres dispositions pertinentes des Direives 2006/95/CE
(Voltage bas), 2004/108/EC (EMC) et 2011/65/UE (la direive
ROHS, direive relative à la limitation de l’utilisation de cer
-
taines subances dangereuses au niveau de l’équipement
élerique et éleronique).

37
8. SPECIFICATIONS
Barre de son
Alimentation .........................................CA 220-240 V 50/60 Hz
Consommation d’alimentation moyenne pendant
l’utilisation ............................................................................60 W
Consommation d’alimentation en veille inférieure à ...0,5 W
Puiance de sortie RMS ............................................... 75 W x 2
Diorsion harmonique totale .............................1%(1 kHz, 1 W)
Sensibilité d’entrée audio ..............................................700 mV
Réponse de fréquence .....................................180 Hz - 20 kHz
Impédance totale ................................................................ 6 Ω
Dimension (l x H x P) ....................................... 950 x 86 x 52 mm
Subwoofer
Alimentation ....................................... CA 220 - 240 V 50/60 Hz
Consommation d’alimentation moyenne pendant
l’utilisation ............................................................................60 W
Consommation d’alimentation en veille inférieure à ...0,5 W
Puiance de sortie ..........................................................150 W
Réponse de fréquence .....................................40 Hz - 150 kHz
Impédance .......................................................................... 3 Ω
Dimension (l x H x P) ..................................... 419 X 312 x 150 mm
Télécommande
Diance .................................................................................6 m
Angle ..................................................................................... 30°
9. ACCESSOIRES FOURNIS
Cordon d’alimentation CA ................................................... 2 x
Câble HDMI ........................................................................... 1 x
Télécommande ..................................................................... 1 x

38
ES CONTENIDO
1 IDENTIFICACIÓN DE PIEZAS ................................................................................................................................... 39
1.1 Barra de sonido ...................................................................................................................................................................39
1.2 Subwoofer inalámbrico ...................................................................................................................................................... 40
1.3 Mando a diancia .............................................................................................................................................................40
2 PREPARATIVOS ...................................................................................................................................................... 41
2.1 Preparación del mando a diancia ................................................................................................................................. 41
2.2 Uso del mando a diancia por primera vez .................................................................................................................... 41
2.3 Suitución de la batería del mando a diancia ............................................................................................................. 41
3 CONEXIONES ........................................................................................................................................................ 42
3.1 Conexión HDMI (ARC) eándar ........................................................................................................................................ 42
3.2 Conexión MP3 Link ..............................................................................................................................................................42
3.3 Conexión de alimentación ................................................................................................................................................ 42
3.4 Emparejamiento del subwoofer inalámbrico con la barra de sonido ..........................................................................43
Emparejamiento automático............................................................................................................................................43
Emparejamiento manual ................................................................................................................................................... 43
4 FUNCIONAMIENTO GENERAL ................................................................................................................................ 43
4.1 Uso del mando a diancia del TV .....................................................................................................................................43
4.2 Uso del mando a diancia incluido (barra de sonido) ..................................................................................................43
Espera (Standby) / Encendido ..........................................................................................................................................44
Selección de modos ..........................................................................................................................................................44
Ajue de refuerzo de graves Super Ba Boo ................................................................................................................. 44
Ajue de nivel de agudos..................................................................................................................................................44
Ajue del volumen .............................................................................................................................................................44
Selección del ecualizador ................................................................................................................................................. 44
Ajue del brillo de la pantalla ...........................................................................................................................................44
Ajue del temporizador de apagado .............................................................................................................................44
5 FUNCIONAMIENTO AUX / MP3 LINK / OPTICAL / HDMI ........................................................................................ 44
6 REPRODUCCIÓN CON UN DISPOSITIVO BLUETOOTH ............................................................................................. 45
6.1 Emparejamiento manual de dispositivos Bluetooth ........................................................................................................45
6.2 Conexión del dispositivo a la barra de sonido mediante Bluetooth .............................................................................45
6.3 Escuchar música desde el dispositivo Bluetooth .............................................................................................................45
7 ADVERTENCIAS Y EXENCIÓN DE RESPONSABILIDAD ............................................................................................. 45
7.1 Precautions concerning baeries .....................................................................................................................................45
8 ESPECIFICACIONES ............................................................................................................................................... 46
9 ACCESORIOS SUMINISTRADOS ............................................................................................................................. 46

39
1. IDENTIFICACIÓN DE LAS
PIEZAS
1.1 Barra de sonido
1 Altavoces
2 Display / Sensor del mando a distancia
- Muera el eado aual.
- Recibe la señal del mando a diancia.
3 Indicador de espera (Standby)
Se enciende en rojo cuando la unidad se encuentra
en modo de espera (ANDBY).
4
Cambia el modo de la barra de sonido entre encen-
dido y espera.
5 SOURCE (FUENTE)
Cambia entre los modos BT (Bluetooth), OPT (ÓPTICO),
AUX, HDMI 1, HDMI 2, HDMI ARC y MP3 LINK.
6 B;
Reproduce/pone en pausa/reanuda la reproducción
en modo Bluetooth.
7 S / T
Salta a la pia anterior/salta a la pia siguiente en
modo Bluetooth.
8 VOL+ / VOL-
Sube/baja el nivel de volumen.
9 Toma de conexión de MP3 LINK
Permite conear un dispositivo de audio externo.
10 Toma de conexión ~ AC
Para conear el cable de alimentación.
11 Toma de conexión OPTICAL
12 Toma de conexión AUX
13 Tomas de conexión HDMI 1/HDMI 2
14 Toma de conexión HDMI OUT TV ARC
Salida HDMI (ARC).
SOURCE
MP3 LINK
VOL– VOL+
AC
OPTICAL
AUX
HDMI IN 2
HDMI IN 1
HDMI OUT
TV(ARC)
SOURCE
MP3 LINK
VOL– VOL+
123
4
10 12 13 1411
5 67 9
1
8

40
1.2 Subwoofer inalámbrico
1
Wireles s pairing
2 3
1 Toma ~ AC
Toma de conexión del cable de alimentación.
2 Indicador
Se enciende cuando el emparejamiento es correo.
3 Botón de emparejamiento inalámbrico
Conexión a la barra de sonido.
1.3 Mando a distancia
VOL+
VOL–
BASS+ TREB+ EQ DIM+
HDMI 1HDMI 2 ARC BT
OPT AUXMP3 PAIR
MUTE
BASS– TREB– SLEEP DIM–
1
2
3
4
5
6
7
8
9
11
10
12
1
Cambia el modo de la barra de sonido entre
encendido y espera.
2 SOURCE (FUENTE)
Permite seleccionar el modo de reproducción
deseado.
3 BASS+ / BASS- (GRAVES)
Sube/baja el nivel de volumen.
4 BASS+ / BASS-
Permite ajuar el nivel de graves.
5 TREB+ / TREB- (AGUDOS)
Permite ajuar el nivel de agudos.
6 MUTE (SILENCIO)
Silencia o vuelva a aivar el sonido.
7 PAIR (EMPAREJAR)
- Aiva la función de emparejado en modo Bluetooth.
- Desconea el dispositivo Bluetooth emparejado
exiente.
8 B ;
Reproduce/pone en pausa/reanuda la reproducción
en modo Bluetooth.
9 S / T
Salta a la pia anterior/salta a la pia siguiente en
modo Bluetooth.
10 EQ
Selecciona el ecualizador preajuado.
11 DIM+ / DIM-
Permite ajuar el brillo de la pantalla.
12 SLEEP
Permite ajuar el temporizador de apagado.
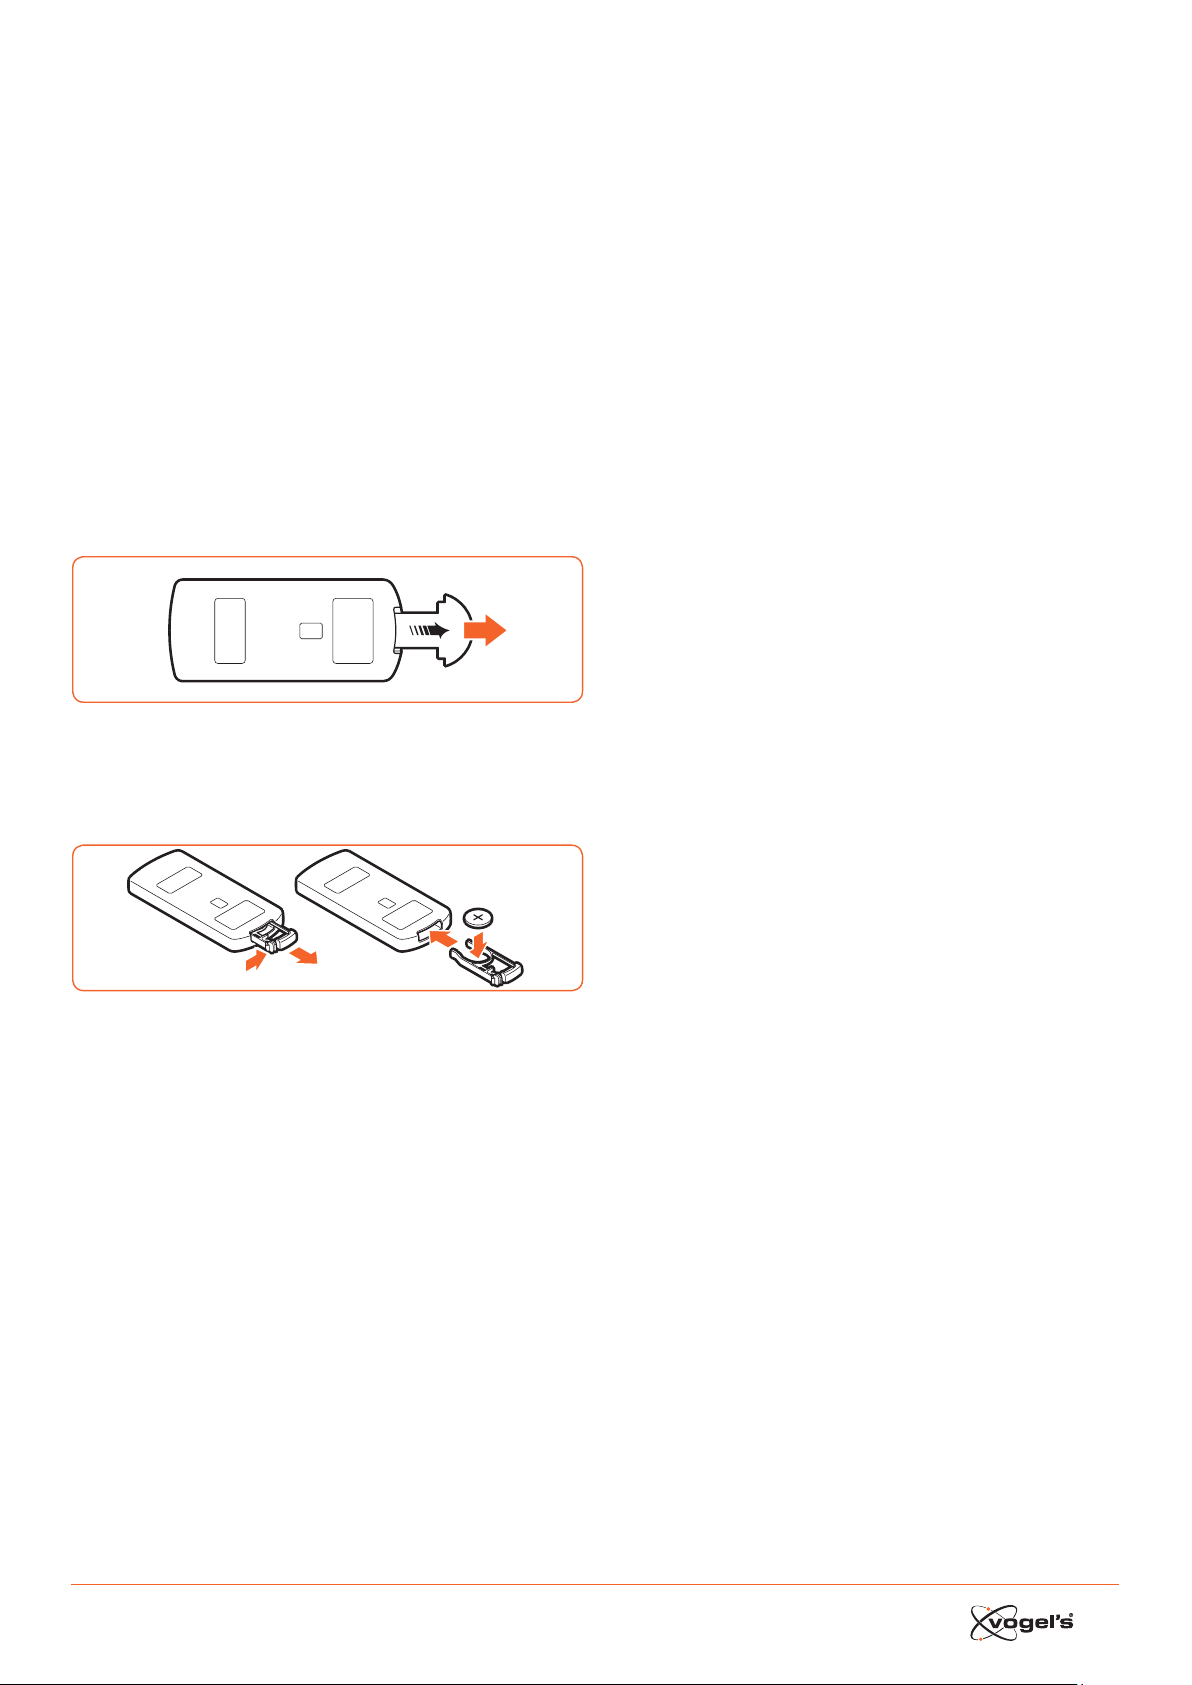
41
2. PREPARATIVOS
2.1 Preparación del mando a distancia
El mando a diancia incluido permite utilizar la unidad
desde la diancia.
• Aunque se utilice el mando a diancia dentro del
alcance efeivo (6 m), la exiencia de obáculos
entre la barra de sonido y el mando a diancia podría
imposibilitar su funcionamiento.
• Si el mando a diancia se utiliza cerca de otros
produos que generan rayos infrarrojos o si se utiliza
otro mando a diancia que emplea rayos infrarrojos
cerca de la barra de sonido, el mando a diancia
podría funcionar incorreamente. De la misma
manera, los otros produos podrían funcionar
incorreamente.
2.2 Uso del mando a distancia por primera vez
La barra de sonido cuenta con una batería de litio CR2025
preinalada.
• Retire la lengüeta proteora para aivar la batería del
mando a diancia.
2.3 Sustitución de la batería del mando a distancia
1
2
3
1 Extraiga la bandeja de la batería y saque la batería
antigua.
2 Coloque una nueva batería CR2025 en la bandeja con
la polaridad correa (+/-) como se indica.
3 Introduzca la bandeja de la batería de nuevo en la
ranura.
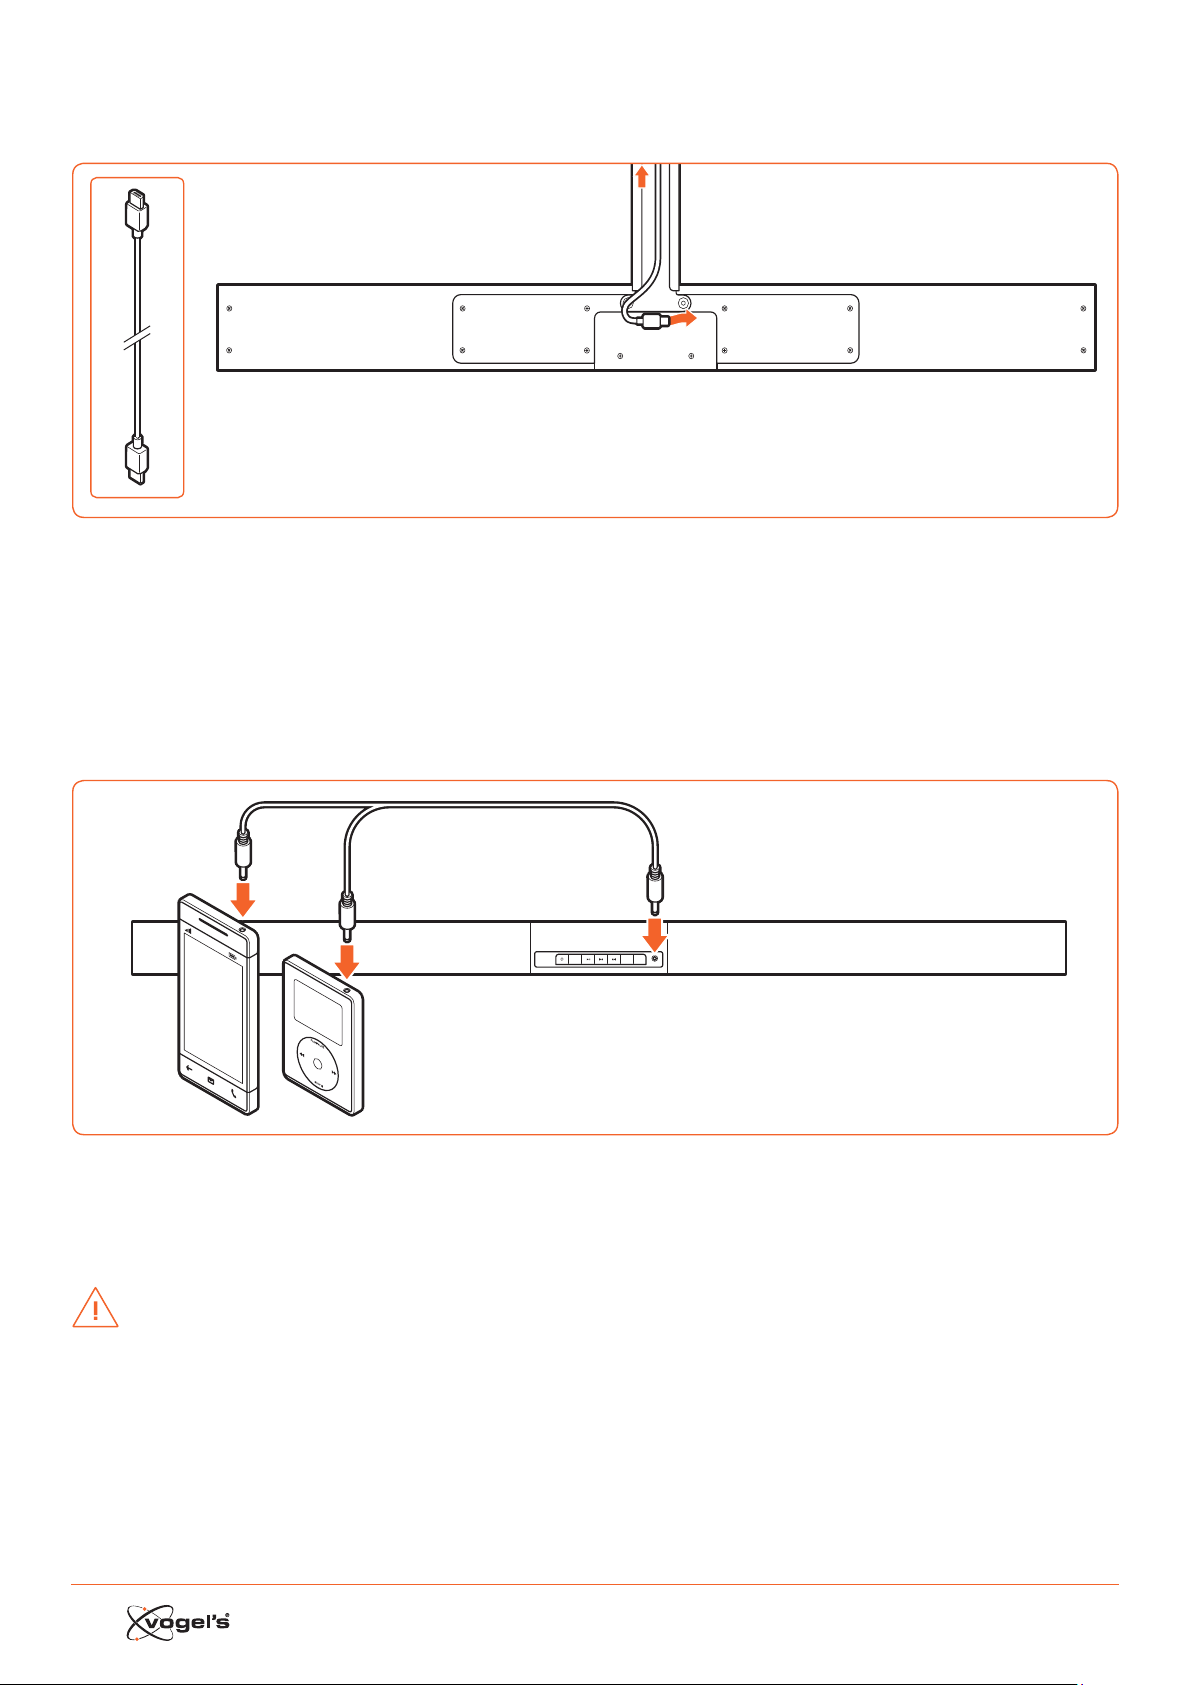
42
3. CONEXIONES
3.1 Conexión HDMI estándar
AC
OPTICAL
AUX
HDMI IN 2
HDMI IN 1
HDMI OUT
TV(ARC)
TV
• La configuración de SoundMount se basa en una conexión HDMI entre la toma de conexión HDMI ARC de la barra
de sonido y la toma de conexión HDMI ARC del televisor.
¡Nota!
ARC = Audio Return Channel (Canal de retorno de audio).
• Si el televisor no eá equipado con una toma de conexión HDMI ARC, puede conear la barra de sonido y el televi-
sor con un cable óptico (no incluido).
3.2 Conexión MP3 Link
SOURCE
MP3 LINK
VOL– VOL+
MP3
Player
• Conee un cable de sonido de 3,5 mm a 3,5 mm (no incluido) a la toma de conexión MP3 LINK (9) de la barra de
sonido y la toma de conexión de salida de sonido a un dispositivo de audio externo. Por ejemplo, un reproduor de
MP3, iPhone, etc.
3.3 Conexión de alimentación
¡PRECAUCIÓN!
• ¡Riesgo de dañar el produo! Asegúrese de que la tensión de la fuente de alimentación se corresponda con la ten-
sión impresa en la parte poerior de la barra de sonido y el subwoofer.
• Antes de conear el cable de alimentación CA, asegúrese de haber completado todas las demás conexiones.

43
3.4 Emparejamiento del subwoofer inalámbrico con la
barra de sonido
El subwoofer inalámbrico y la barra de sonido se
emparejan fuera de fábrica.
Emparejamiento automático
1 Conee el cable de conexión de SoundMount dedi-
cado a la barra de sonido.
2 Conee el subwoofer a la toma de corriente.
3 Pulse el botón
en la barra de sonido o en el mando
a diancia para encender la barra de sonido.
> Cuando el subwoofer eá en proceso de
emparejado con la barra de sonido, el indicador
parpadea rápidamente.
> Cuando el subwoofer eá emparejado con la barra
de sonido, el indicador permanece encendido de
manera conante.
> Durante el modo de espera (ANDBY), el indicador
del subwoofer se apaga y parpadea lentamente.
Emparejamiento manual
1 Conee el cable de conexión de SoundMount dedi-
cado a la barra de sonido.
2 Conee el subwoofer a la toma de corriente.
3 Compruebe que la barra de sonido se encuentra en
modo de espera (ANDBY).
4 Mantenga pulsado el botón de emparejamiento
inalámbrico de la parte inferior del subwoofer durante
unos segundos.
> El subwoofer entrará en modo de emparejamiento y
el indicador parpadeará rápidamente.
5 Pulse el botón
en la barra de sonido o en el mando
a diancia para encender la barra de sonido.
> Una vez eablecida la conexión inalámbrica, el
indicador permanecerá encendido de manera
conante.
> Si el indicador continúa parpadeando o no
parpadea en absoluto, significa que la conexión
inalámbrica ha fallado.
• Desconee el cable del subwoofer.
• Vuelva a conear el cable principal tras 3 minutos.
• Repita los pasos 1 - 5.
¡Notas!
• Si la conexión inalámbrica vuelve a fallar, compruebe
si exie algún conflio o interferencia potente (por
ejemplo, interferencia procedente de un dispositivo
elerónico) en su entorno.
• El subwoofer debe encontrarse a menos de 6 m de la
barra de sonido en una zona abierta.
• Si la barra de sonido no eá coneada al subwoofer
y se encuentra en modo de conexión, se morará el
mensaje ‘CHECK SUBWOOFER’ (‘Comprobar
subwoofer’) en el display y el indicador de la parte
inferior del subwoofer parpadeará.
Repita los pasos 1 - 5 anteriores para emparejar el
subwoofer con la barra de sonido.
4. FUNCIONAMIENTO GENERAL
4.1 Uso del mando a distancia del TV
Cuando la toma de conexión HDMI ARC de la barra de
sonido se conea a la toma de conexión HDMI ARC del
televisor a través del cable HDMI y se aiva la función CEC
en el menú de configuración del televisor, puede utilizar el
mando a diancia del televisor para
controlar SoundMount (barra de sonido y subwoofer).
• Al encender el televisor, SoundMount (barra de sonido y
subwoofer) se encenderá automáticamente.
• Al apagar o poner en espera (ANDBY) el televisor,
SoundMount se apagará (modo de espera)
automáticamente.
• Cuando eá encendido SoundMount, el volumen del
sonido se puede controlar con los botones VOLUME - /
VOLUME + y MUTE del mando a diancia del televisor.
¡Nota!
• Para poder controlar SoundMount con el mando a
diancia del televisor, es importante aivar la función
HDMI CEC (control de elerónica de consumo) en el
menú de configuración del televisor.
Ea función tiene un nombre diferente para cada
marca de TV: Anynet (Samsung), Aquos Link (Sharp),
Bravia Sync (Sony), Regza Link (Toshiba), Simplink (LG),
Viera Link Panasonic), EZ-Sync (JVC), Easylink (Philips),
Netcommand (Mitsubishi).
Los altavoces internos del televisor se desaivarán
automáticamente cuando se encienda el televisor y se
conee automáticamente la barra de sonido.
4.2 Uso del mando a distancia incluido (barra de so-
nido)
Cuando la toma de conexión HDMI ARC de la barra de
sonido se conea a la toma de conexión HDMI ARC del
televisor a través del cable HDMI y se aiva la función CEC
en el menú de configuración del televisor, puede utilizar
el mando a diancia del televisor para controlar Sound-
Mount (barra de sonido y subwoofer).
En ee caso, solo necesita el mando a diancia incluido
(barra de sonido) para realizar la configuración inicial de
las preferencias personales (agudos, graves, nivel de brillo
del display de la barra de sonido) y para controlar funcio-
nes especiales como transmisión de audio Bluetooth.
Si la barra de sonido y el televisor se conean a través de
una conexión óptica, el mando a diancia incluido (barra
de sonido) debe utilizarse también para controlar el
volumen del televisor de SoundMount, seleccionar la
fuente, etc. No se puede controlar el volumen de sonido
con el mando a diancia del televisor. Los altavoces
internos del televisor deben apagarse manualmente.
Consulte el menú de configuración del televisor.

44
Standby / ON
Al conear por primera vez la barra de sonido a la toma
de conexión de red, la barra de sonido se encontrará en
modo de espera (ANDBY) y el indicador de espera se
enciende en rojo.
• Pulse el botón
en la barra de sonido o el mando
a diancia del televisor para encender la barra de
sonido.
• Vuelva a pulsar el botón
para poner la barra de
sonido en modo de espera (ANDBY) de nuevo.
> El indicador de modo de espera se enciende en
color rojo.
• Si desea apagar la barra de sonido completamente,
desconee el enchufe de alimentación de la toma.
¡Nota!
• Cuando la barra de sonido eá inaiva durante
aproximadamente 15 minutos, pasará
automáticamente a modo en espera (ANDBY.
Selección de modos
• Pulse el botón SOURCE (Fuente) en la barra de sonido
varias veces o pulse los botones HDMI 1 / HDMI 2 /
ARC / BT (Bluetooth) / OPT (Óptico) / AUX / MP3 en el
mando a diancia para seleccionar el modo dese-
ado. El modo seleccionado aparecerá en el display.
¡Nota!
• Al conear la toma de conexión HDMI ARC de la barra
de sonido a la toma de conexión HDMI ARC del televi-
sor a través de un cable HDMI y aivar la función CEC
en el menú de configuración del televisor, si selecciona
SOURCE (Fuente) cambiará automáticamente a ‘TV
ARC’ (SoundMount).
Ajuste de refuerzo de graves Super Bass Boost
• Pulse los botones BASS + / BASS– del mando a diancia
para ajuar el nivel de refuerzo de graves de –3 a +3.
> Se guardará automáticamente el nivel de GRAVES
seleccionado por fuente.
Ajuste del nivel de agudos
• Pulse los botones TREB + / TREB – del mando a diancia
para ajuar el nivel de agudos de –3 a +3.
> Se guardará automáticamente el nivel de AGUDOS
seleccionado por fuente.
Ajuste del volumen
• Pulse los botones VOL + / VOL – de la barra de sonido
para ajuar el volumen.
• Pulse el botón MUTE (Sileciar) en el mando a diancia
del televisor para apagar el sonido.
• Vuelva a pulsar el botón MUTE (Silenciar) en el mando
a diancia o pulse el botón VOL+ en la barra de sonido
para reaurar el volumen normal.
Selección del ecualizador
• Pulse el botón EQ en el mando a diancia para selec-
cionar el ajue de ecualizador MOVIE (Película) o
SPEECH (Discurso).
> Después de apagar y encender, el ajue del ecu-
alizador volverá automáticamente al modo MOVIE
(Película).
Ajuste del brillo de la pantalla
• Pulse el botón DIM+ / DIM- en el mando a diancia
para seleccionar el nivel de brillo.
> Se guardará automáticamente el nivel de
BRIGHTNESS (BRILLO) seleccionado.
Ajuste del temporizador de apagado
Utilice el temporizador de apagado (SLEEP TIMER) para
apagar el siema tras un determinado número de minutos
en modo de reproducción. El ajue del temporizador de
apagado permite dormirse tranquilamente escuchando
música sabiendo que el siema se apagará solo en lugar
de permanecer encendido toda la noche.
1 En modo encendido, pulse el botón SLEEP del mando
a diancia varias veces para seleccionar el número de
minutos deseado. El número de minutos aparecerá en
el orden siguiente:
SLEEP 120 - SLEEP 90 - SLEEP 60 - SLEEP 30 - SLEEP 15 -
SLEEP 00.
2 Cuando se mueren los minutos deseados, deje de
pulsar el botón SLEEP.
> El temporizador de apagado eá configurado.
3 Para cancelar el temporizador de apagado (SLEEP
TIMER), pulse el botón SLEEP varias veces haa que se
muere ‘SLEEP 00’.
5. FUNCIONAMIENTO AUX /
MP3 LINK / OPTICAL / HDMI
1 Compruebe que el dispositivo de sonido eá conec-
tado a la barra de sonido.
2 Pulse el botón SOURCE (Fuente) en la barra de sonido
varias veces o pulse los botones HDMI 1 / HDMI 2 / ARC
/ OPT (ÓPTICA) / AUX / MP3 en el mando a diancia de
la barra de sonido para seleccionar el modo deseado.
3 Utilice direamente las funciones de reproducción del
dispositivo de sonido.
4 Pulse los botones VOL + / VOL – en la barra de sonido
para ajuar el volumen al nivel deseado.
¡Nota!
• Mientras se cambia la barra de sonido a modo
OPTICAL o HDMI es posible que deba cambiar a la
salida PCM (modulación de código de impulso) lineal
del dispositivo fuente (por ejemplo, TV, reproduor de
DVD o Blu-ray).
• Los periféricos de audio y vídeo deben conearse al
televisor.

45
6. REPRODUCCIÓN CON UN
DISPOSITIVO BLUETOOTH
Puede escuchar pias de un dispositivo multimedia si eá
coneado a la barra de sonido a través de Bluetooth.
6.1 Emparejamiento manual de dispositivos Bluetooth
La primera vez que conee un dispositivo Bluetooth a la
barra de sonido, será necesario emparejar el dispositivo
con la barra de sonido.
¡PRECAUCIÓN!
• El alcance operativo entre la barra de sonido y el
dispositivo es de aproximadamente 8 metros (sin
ningún objeto entre el dispositivo Bluetooth y la barra
de sonido).
• Antes de conear un dispositivo Bluetooth a la barra
de sonido, asegúrese de conocer las capacidades del
dispositivo.
• No se garantiza la compatibilidad con todos los
dispositivos Bluetooth.
• Los obáculos entre el dispositivo y la barra de sonido
pueden reducir el alcance operativo.
• Si la intensidad de la señal es débil, el receptor
Bluetooth podría desconearse, pero volverá al modo
de emparejamiento automáticamente.
6.2 Conexión del dispositivo a la barra de sonido
mediante Bluetooth
1 Encienda la barra de sonido.
2 Pulse el botón SOURCE (Fuente) en la barra de sonido
varias veces o el botón BT del mando a diancia para
seleccionar el modo BT (Bluetooth).
> El display muera ‘BT’, a continuación, ‘NO BT’ (si no
hay ningún dispositivo Bluetooth coneado).
3 Pulse el botón PAIR (Emparejar) en el mando a
diancia durante unos segundos para aivar el
emparejado Bluetooth.
> El display muera ‘PAIR’.
4 Aive el dispositivo Bluetooth y seleccione el modo de
SEARCH (búsqueda).
> ‘Vogel’s SoundMount’ (SoundMount de Vogel’s)
aparecerá en la lia de dispositivos Bluetooth.
5 Seleccione ‘Vogel’s SoundMount’ e introduzca la
contraseña ‘0000’ si es necesario.
> El display muera ‘BLUEPORT’ cuando la conexión se
ha efeuado correamente.
• Para desconear la función Bluetooth, cambie a otra
función en la barra de sonido o desaive la función del
dispositivo Bluetooth.
6.3 Escuchar música desde el dispositivo Bluetooth
• Si el dispositivo Bluetooth coneado admite perfil de
diribución de audio avanzado (A2DP), puede
escuchar música almacenada en el dispositivo a
través del reproduor.
• Si el dispositivo admite también perfil de control remoto
de audio y vídeo (AVRCP), puede usar el mando a
diancia de la barra de sonido para reproducir música
almacenada en el dispositivo.
1 Empareje el dispositivo con la barra de sonido.
2 Reproduzca música a través del dispositivo (si admite
A2DP).
3 Utilice el mando a diancia para controlar la
reproducción (si admite AVRCP).
• Pulse el botón B; para poner en pausa/reanudar la
reproducción.
• Pulse los botones S / T para saltar a una pia.
7. ADVERTENCIAS Y EXENCIÓN
DE RESPONSABILIDAD
Para mantener la validez de la garantía, no intente reparar
nunca la barra de sonido o el subwoofer inalámbrico por
sí mismo. Si encuentra algún problema al utilizar Sound-
Mount, póngase en contao con su diribuidor Vogel’s.
Bluetooth y HDMI son marcas comerciales regiradas y son
propiedad de sus respeivos propietarios.
La palabra Bluetooth y los logotipos son marcas
comerciales regiradas propiedad de Bluetooth SIG, Inc.
y cualquier uso de dichas marcas por parte de Vogel’s se
realiza con licencia. Otras marcas comerciales y nombres
de marcas son propiedad de sus respeivos propietarios.
El término HDMI y el logotipo de HDMI son marcas
comerciales o marcas comerciales regiradas de HDMI
Licensing LLC en los Eados Unidos y otros países.
7.1 Precauciones relativas a las baterías
• Cuando no se vaya a utilizar el mando a diancia
durante un periodo prolongado (más de un mes),
extraiga la batería del mando a diancia para evitar
fugas.
• Si la batería genera fugas, limpie las fugas del interior
del compartimento de la batería y suituya la batería
por otra nueva.
• No utilice baterías diintas a las especificadas.
• No caliente ni desmonte las baterías.
• No tire nunca las baterías al fuego o agua.
• No transporte ni guarde las baterías con otros objetos
metálicos pueo que podrían ocasionarse
cortocircuitos, fugas o explosiones.
• Nunca recargue una batería a menos que haya
confirmado que es de tipo recargable.
Instrucciones de eliminación WEEE
No elimine ee dispositivo, el mando
a diancia o su batería con los
residuos doméicos sin clasificar.
Una eliminación incorrea podría
dañar el medio ambiente y ser perjudicial
para la salud. Consulte a la autoridad local
para obtener más información sobre los
siemas de recogida y devolución de
su zona.
Conformidad CE
Ee produo cumple los requisitos esenciales y otras dispo
-
siciones aplicables recogidos en las Direivas 2006/95/EC
(Baja tensión), 2004/108/CE (Compatibilidad
Eleromagnética) y 2011/65/EU (Rericciones a la utilización
de determinadas suancias peligrosas en aparatos
eléricos y elerónicos).

46
8. ESPECIFICACIONES
Barra de sonido
Requisitos de alimentación .................CA 220-240 V 50/60 Hz
Consumo de energía medio durante
el funcionamiento ..............................................................60 W
Consumo de energía en espera (Standby) inferior a ....0,5 W
Potencia de salida RMS ............................................... 75 W x 2
Diorsión total de armónicos ............................1%(1 kHz, 1 W)
Sensibilidad de entrada de audio ................................700 mV
Respuea de frecuencia ..................................180 Hz - 20 kHz
Impedancia total ................................................................. 6 Ω
Dimensiones (Anch. x Alt. x Prof.) ................. 950 x 86 x 52 mm
Subwoofer
Requisitos de alimentación .................CA 220-240 V 50/60 Hz
Consumo de alimentación medio durante
el funcionamiento ..............................................................60 W
Consumo de alimentación Standby power consumption
le than ..............................................................................0.5 W
Potencia de salida ..........................................................150 W
Respuea de frecuencia ..................................40 Hz - 150 kHz
Impedancia .......................................................................... 3 Ω
Dimensiones (Anch. x Alt. x Prof.) ................ 419 x 312 x 150 mm
Mando a distancia
Diancia ................................................................................6 m
Ángulo ................................................................................... 30°
9. ACCESORIOS SUMINISTRADOS
Cable de alimentación CA .................................................. 2 x
Cable HDMI ........................................................................... 1 x
Mando a diancia ............................................................... 1 x

47
IT SOMMARIO
1 IDENTIFICAZIONE DEI COMPONENTI ...................................................................................................................... 48
1.1 Barra audio .......................................................................................................................................................................... 48
1.2 Subwoofer senza fili ............................................................................................................................................................. 49
1.3 Telecomando ......................................................................................................................................................................49
2 PREPARAZIONI ...................................................................................................................................................... 50
2.1 Preparazione del telecomando ........................................................................................................................................50
2.2 Utilizzo del telecomando per la prima volta ....................................................................................................................50
2.3 Soituzione della baeria del telecomando ...................................................................................................................50
3 CONNESSIONI ........................................................................................................................................................51
3.1 Conneione HDMI (ARC) andard .................................................................................................................................. 51
3.2 Conneione MP3 Link ........................................................................................................................................................ 51
3.3 Conneione di alimentazione .......................................................................................................................................... 51
3.4 Accoppiamento del subwoofer senza fili alla barra audio ............................................................................................52
Accoppiamento automatico ...........................................................................................................................................52
Accoppiamento manuale ................................................................................................................................................52
4 FUNZIONAMENTO GENERALE ................................................................................................................................. 52
4.1 Utilizzo del telecomando della TV .....................................................................................................................................52
4.2 Utilizzo del telecomando fornito (Barra audio) ................................................................................................................52
Standby / ON ......................................................................................................................................................................52
Selezionare la modalità .....................................................................................................................................................53
Regolazione del Super Ba Boo .....................................................................................................................................53
Regolazione del livello degli alti ........................................................................................................................................53
Regolazione del volume ....................................................................................................................................................53
Selezione dell’equalizzatore ..............................................................................................................................................53
Regolazione della luminosità dello schermo ...................................................................................................................53
Impoazione del timer di spegnimento automatico ......................................................................................................53
5 GIOCARE CON IL DISPOSITIVO BLUETOOTH .......................................................................................................... 53
6 GIOCARE CON IL DISPOSITIVO BLUETOOTH .......................................................................................................... 53
6.1 Accoppiamento manuale dei dispositivi abilitati Bluetooth ..........................................................................................53
6.2 Conneione del dispositivo alla barra audio tramite Bluetooth ....................................................................................53
6.3 Ascoltare la musica dal dispositivo Bluetooth ..................................................................................................................54
7 AVVERTENZE E LIBERATORIE ................................................................................................................................... 54
7.1 Precauzioni sulle baerie ...................................................................................................................................................54
8 SPECIFICHE ........................................................................................................................................................... 54
9 ACCESSORI FORNITI ............................................................................................................................................. 54
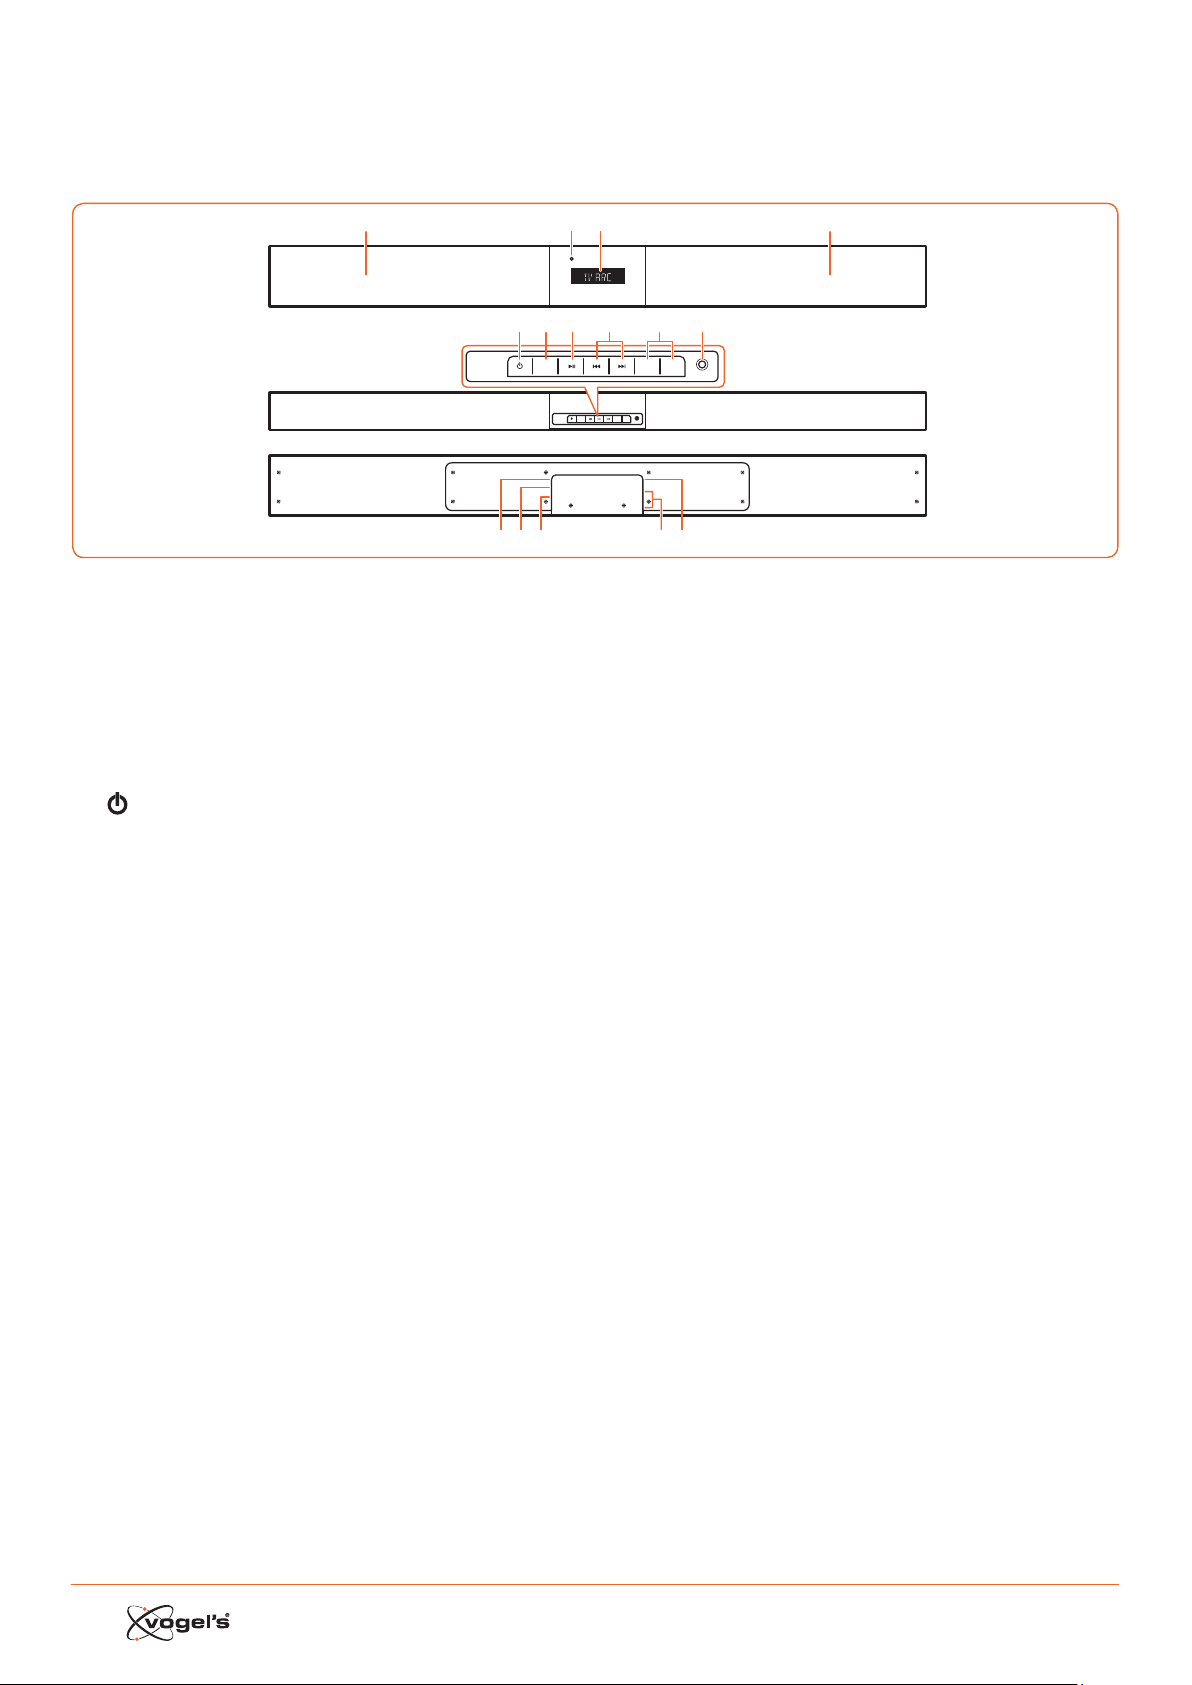
48
1. IDENTIFICAZIONE DEI
COMPONENTI
1.1 Barra audio
1 Altoparlanti
2 Schermo/ Sensore telecomando
- Mora lo ato corrente.
- Riceve il segnale dal telecomando.
3 Indicatore standby
Si accende di roo quando l’unità si trova in modalità
ANDBY.
4
Alterna la barra audio fra la modalità ON e ANDBY.
5 SOURCE (FONTE)
Alterna fra le modalità BT (Bluetooth), OPT (OPTICAL),
AUX, HDMI 1, HDMI 2, HDMI ARC e MP3 LINK.
6 B;
Play/pausa/riprendi playback in modalità Bluetooth.
7 S / T
Paa alla traccia precedente/paa alla traccia suc-
ceiva in modalità Bluetooth.
8 VOL+ / VOL-
Aumenta/diminuisce il livello del volume.
9 Presa MP3 LINK
Per collegarsi a un dispositivo audio eerno.
10 Presa AC ~
Per collegare il cavo di alimentazione.
11 Presa OPTICAL [OTTICA]
12 Presa AUX
13 Prese HDMI 1/HDMI 2
14 Presa HDMI OUT TV ARC
Uscita HDMI (ARC).
SOURCE
MP3 LINK
VOL– VOL+
AC
OPTICAL
AUX
HDMI IN 2
HDMI IN 1
HDMI OUT
TV(ARC)
SOURCE
MP3 LINK
VOL– VOL+
123
4
10 12 13 1411
5 67 9
1
8
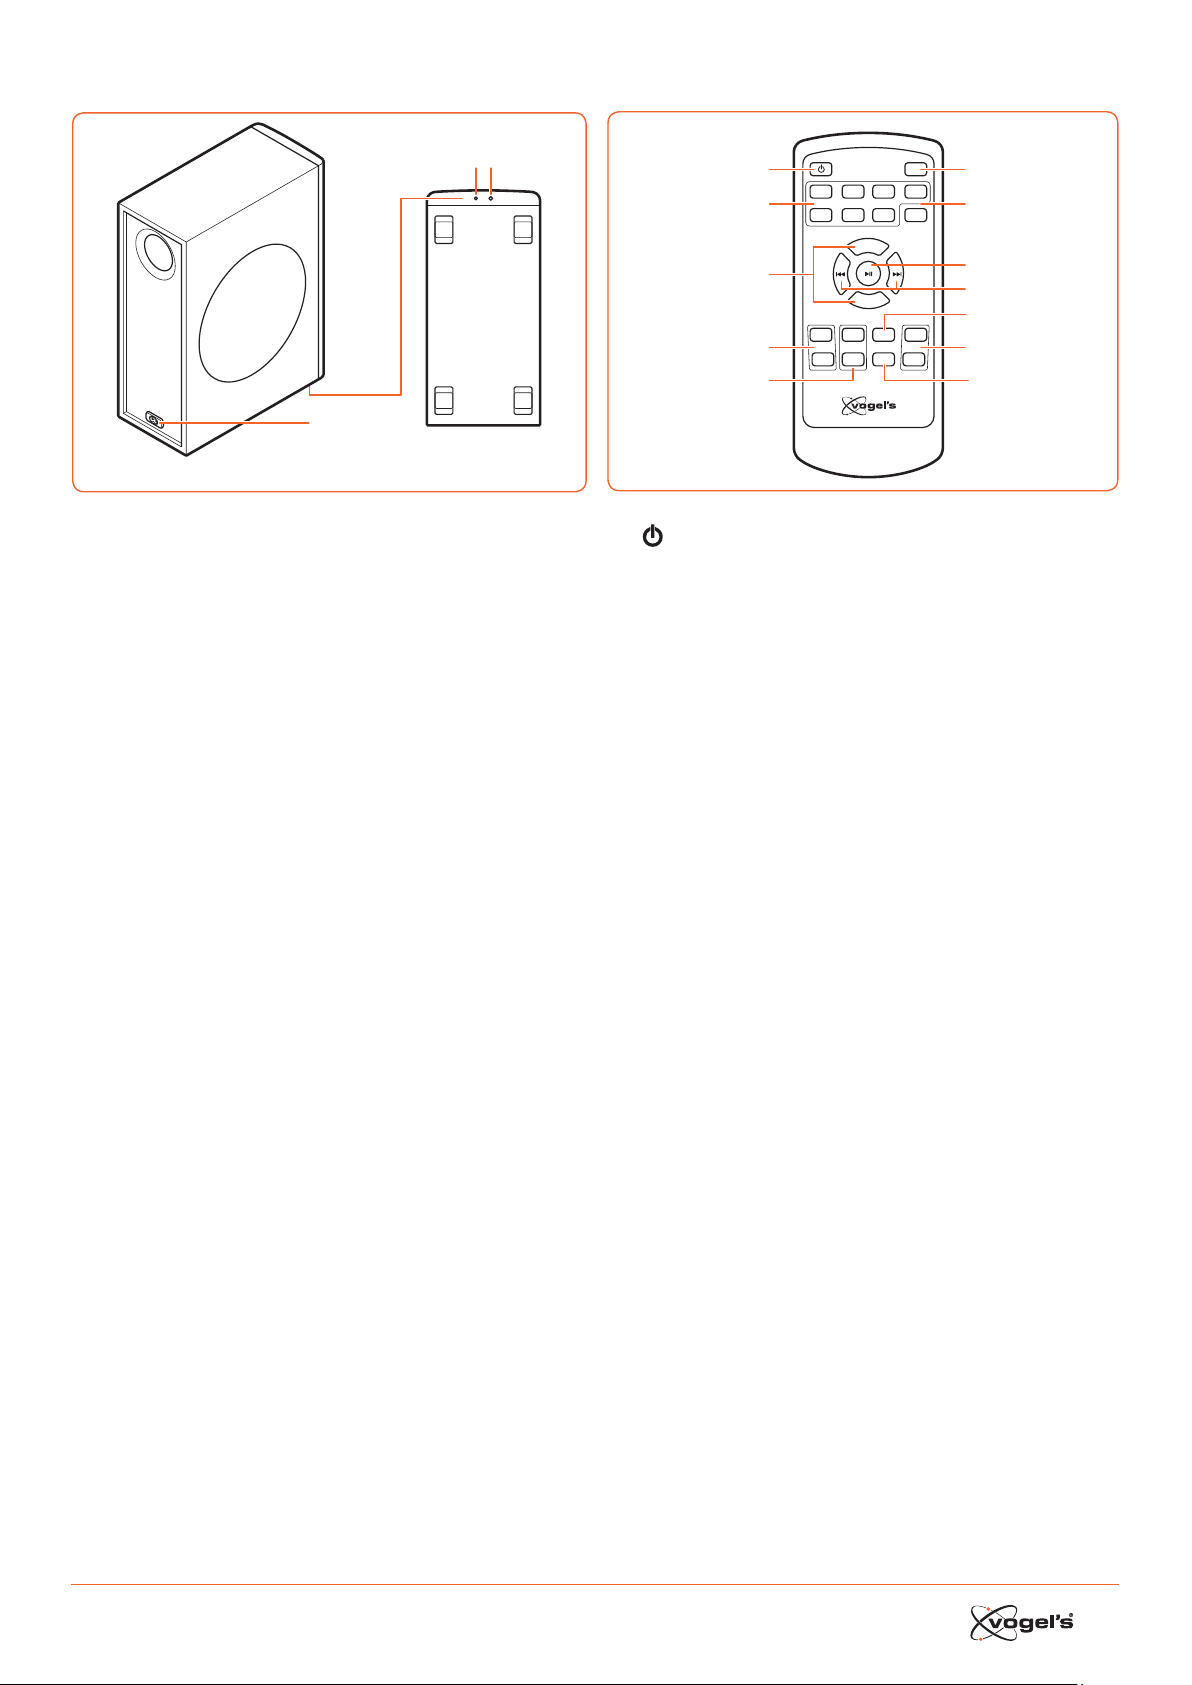
49
1.2 Subwoofer senza fili
1
Wireles s pairing
2 3
1 Ingresso AC ~
Si collega al cavo di alimentazione.
2 Indicatore
Si accende quando l’accoppiamento avviene
correamente.
3 Pulsante di accoppiamento wireless
Si collega alla barra audio.
1.3 Telecomando
VOL+
VOL–
BASS+ TREB+ EQ DIM+
HDMI 1HDMI 2 ARC BT
OPT AUXMP3 PAIR
MUTE
BASS– TREB– SLEEP DIM–
1
2
3
4
5
6
7
8
9
11
10
12
1
Alterna la barra audio fra la modalità ON e ANDBY.
2 SOURCE (FONTE)
Selezionare la modalità di riproduzione desiderata.
3 VOL+ / VOL-
Aumenta/diminuisce il livello del volume.
4 BASS+ / BASS-
Regola il livello dei bai.
5 TREB+ / TREB-
Regolazione del livello degli alti.
6 MUTE
Toglie il suono o riprende il suono.
7 PAIR
- Aiva la funzione di accoppiamento in modalità
Bluetooth.
- Scollega il dispositivo Bluetooth accoppiato esiente.
8 B ;
Play/pausa/riprende playback in modalità Bluetooth.
9 S / T
Paa alla traccia precedente/paa alla traccia
succeiva in modalità Bluetooth.
10 EQ
Seleziona l’equalizzatore preimpoato.
11 DIM+ / DIM-
Regola la luminosità dello schermo.
12 SLEEP
Impoa la modalità timer di spegnimento.
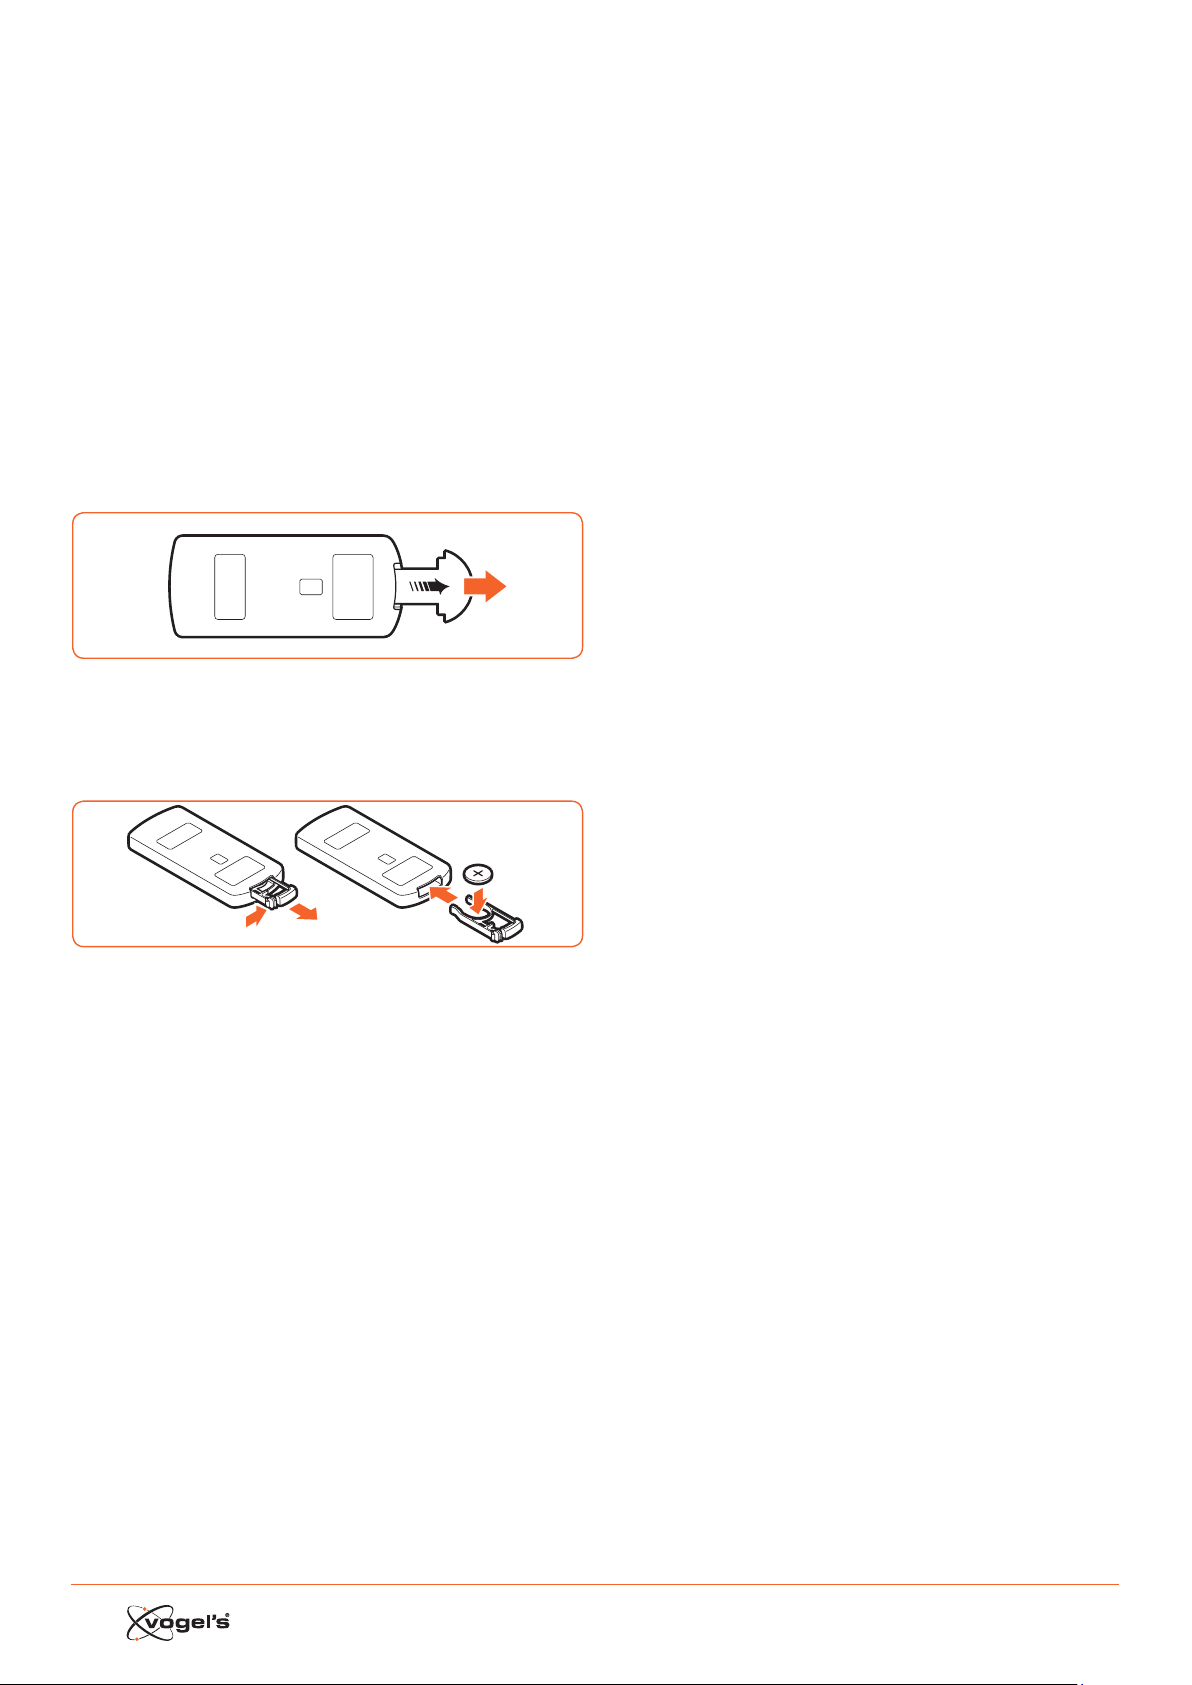
50
2. PREPARAZIONI
2.1 Preparazione del telecomando
Il telecomando fornito consente di operare l’unità a
dianza.
• Anche se il telecomando viene utilizzato entro la
dianza eeiva (6 m), l’utilizzo del telecomando
potrebbe non eere poibile in presenza di oacoli fra
la barra audio e il telecomando.
• Se il telecomando viene utilizzato vicino ad altri prodoi
che generano dei raggi infraroi, o se altri dispositivi
di comando a dianza che utilizzano raggi infraroi
vengono usati vicino alla barra audio, eo potrebbe
non funzionare correamente. Di conseguenza, gli altri
prodoi potrebbero non funzionare correamente.
2.2 Utilizzo del telecomando per la prima volta
La barra audio ha una baeria al litio CR2025 pre-inallata.
• Rimuovere la linguea proteiva per aivare la baeria
del telecomando
2.3 Sostituzione della batteria del telecomando
1
2
3
1 Erarre il vano baeria e rimuovere la vecchia baeria.
2 Inserire una nuova baeria CR2025 nel vano baeria
con la polarità correa (+/-) come indicato.
3 Rimeere il vano baeria nell’apposita cavità.
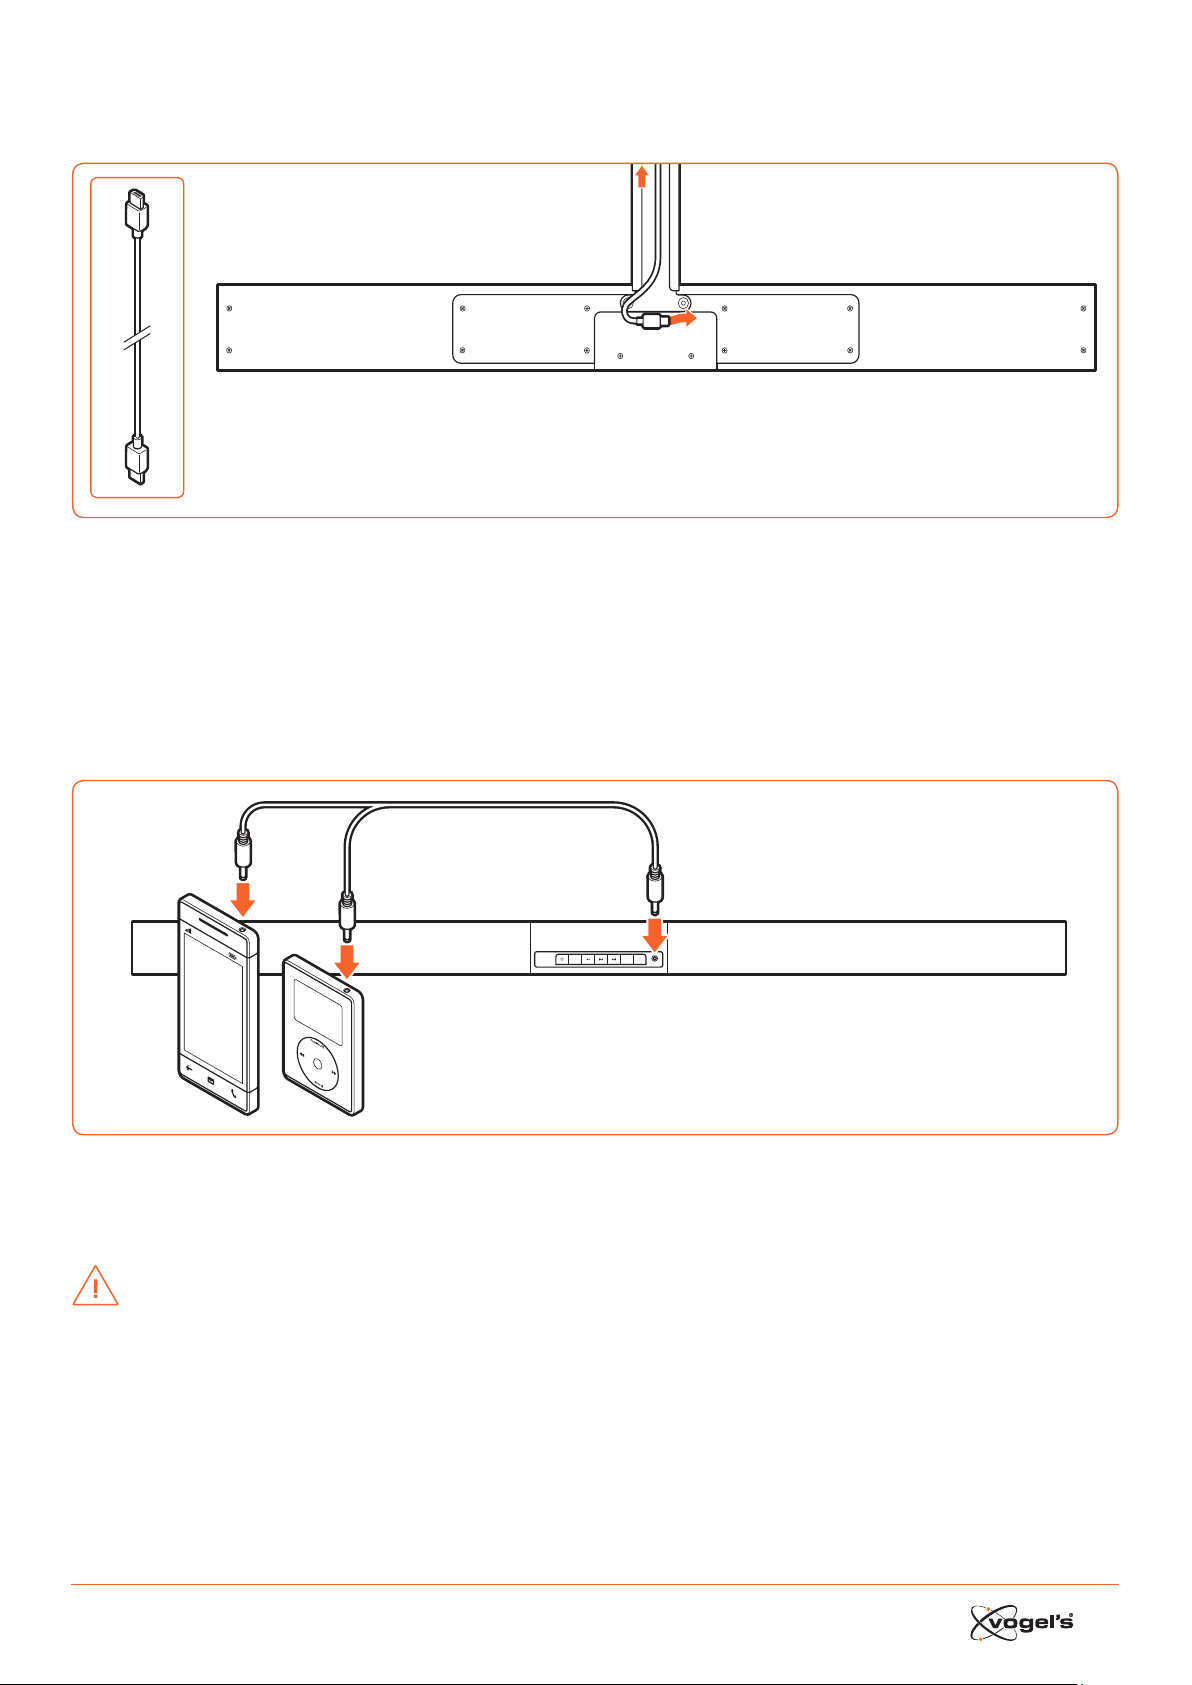
51
3. CONNESSIONI
3.1 Connessione HDMI standard
AC
OPTICAL
AUX
HDMI IN 2
HDMI IN 1
HDMI OUT
TV(ARC)
TV
• La configurazione del SoundMount si basa su una conneione HDMI fra la presa HDMI ARC della barra audio e la
presa HDMI ARC della TV.
Nota!
ARC = Audio Return Channel.
• Nel caso in cui la TV non sia dotata di una presa HDMI ARC, si può collegare la barra audio e la TV con un cavo oico
(non incluso).
3.2 Connessione MP3 Link
SOURCE
MP3 LINK
VOL– VOL+
MP3
Player
• Collegare una cavo audio 3,5mm a 3,5mm (non incluso) alla presa MP3 LINK (9) sulla barra audio e la presa di uscita
audio su un dispositivo audio eerno. Ad esempio un leore MP3, iPhone, ecc.
3.3 Connessione di alimentazione
ATTENZIONE!
• Rischio di danneggiare il prodoo! Controllare che la tensione di alimentazione corrisponda al voltaggio ampato sul
retro della barra audio e del subwoofer.
• Prima di collegare il cavo di alimentazione AC, accertarsi di aver completato tue le altre conneioni.

52
3.4 Accoppiamento del subwoofer senza fili alla barra
audio
Il subwoofer senza fili e la barra audio vengono accoppiati
in fabbrica.
Accoppiamento automatico
1 Collegare alla barra audio il cavo di alimentazione
SoundMount dedicato.
2 Collegare il subwoofer nelle prese di corrente.
3 Premere il pulsante
sulla barra audio o sul
telecomando per accendere la barra audio.
> Il subwoofer e la barra audio si accoppieranno auto-
maticamente entro 30 secondi.
> Quando il subwoofer si a accoppiando con la barra
audio, la spia lampeggerà velocemente.
> Quando il subwoofer è accoppiato con la barra
audio, la spia rimarrà accesa fia.
> Durante la modalità ANDBY, la spia del subwoofer si
spegnerà e lampeggerà lentamente.
Accoppiamento manuale
1 Collegare alla barra audio il cavo di alimentazione
SoundMount dedicato.
2 Collegare il subwoofer nelle prese di corrente.
3 Controllare che la barra audio si trovi in modalità
ANDBY.
4 Tenere premuto il tao di accoppiamento Wirele nella
parte inferiore del subwoofer per alcuni secondi.
> Il subwoofer entrerà in modalità di accoppiamento e
la spia lampeggerà velocemente.
5 Premere il pulsante
sulla barra audio o sul teleco-
mando per accendere la barra audio.
> Una volta che la conneione wirele è riuscita, la
spia rimarrà accesa fia.
> ISe la spia continua a lampeggiare o non lampeggia
del tuo, significa che la conneione wirele non è
riuscita.
• Staccare il cavo del subwoofer.
• Ricollegare il cavo di alimentazione dopo 3 minuti.
• Ripetere i paaggi da 1 a 5.
Note!
• Se la conneione wirele continua a fallire, controllare
se è presente un conflio o una forte interferenza (ad
esempio, interferenza da un dispositivo eleronico) nei
paraggi.
Eliminare quei conflii o forti interferenze e ripetere le
procedure sopraccitate.
• Il subwoofer deve trovare a 6 mt dalla barra audio in
un’area aperta.
• Se la barra audio non è connea al subwoofer e si
trova in modalità On, allora sul display verrà visualizzato
il meaggio ‘CONTROLLA SUBWOOFER’ e la spia nella
parte inferiore del subwoofer lampeggerà. Ripetere i
paaggi da 1 a 5 sopraccitati per accoppiare il sub-
woofer alla barra audio.
4. FUNZIONAMENTO GENERALE
4.1 Utilizzo del telecomando della TV
Quando la presa HDMI ARC della barra audio è connea
alla presa HDMI ARC della TV tramite il cavo HDMI e la
funzione CEC sulla TV è aivata nel menu di setup della
TV, si può usare il telecomando della TV per controllare il
SoundMount (barra audio e subwoofer).
• Quando la TV è accesa, il SoundMount (barra audio e
subwoofer) si accenderà automaticamente.
• Quando la TV si trova su OFF / ANDBY, il SoundMount si
spegnerà automaticamente (in ANDBY).
• Quando il SoundMount è acceso, il volume del suono
si può controllare con i pulsanti VOLUME - / VOLUME + e
MUTE sul telecomando della TV.
Nota!
• Per poter controllare il SoundMount con il telecomando
della TV, è importante che la funzione HDMI CEC (Con-
sumer Eleronics Control) sia aivata nel menu di setup
della TV.
Quea funzione ha un nome dierente per ogni marca
di TV: Anynet (Samsung), Aquos Link (Sharp), Bravia
Sync (Sony), Regza Link (Toshiba), Simplink (LG), Viera
Link Panasonic), EZ-Sync (JVC), Easylink (Philips),
Netcommand (Mitsubishi).
Gli altoparlanti interni della TV verranno automatica-
mente disaivati quando la TV viene accesa e la barra
audio si accende automaticamente.
4.2 Utilizzo del telecomando fornito (Barra audio)
Quando la presa HDMI ARC della barra audio è connea
alla presa HDMI ARC della TV tramite il cavo HDMI e la
funzione CEC sulla TV è aivata nel menu di setup della
TV, si può usare il telecomando della TV per controllare il
SoundMount (barra audio e subwoofer).
In queo caso, vi servirà solo il telecomando fornito (barra
audio) per le impoazioni iniziali delle preferenze personali
(ALTI, BASSI, livello di luminosità dello schermo della barra
audio) e per controllare le funzioni speciali come lo
reaming audio in Bluetooth.
Nel caso in cui la barra audio e la TV siano connee
tramite un collegamento oico, il telecomando fornito
(barra audio) si dovrà usare anche per controllare il volume
della TV. la selezione della fonte, ecc. per il SoundMount.
Non è poibile controllare il volume del suono con il
telecomando della TV. Gli altoparlanti interni devono eere
spenti manualmente. Vedere il menu di setup della TV.
Standby / ON
Alla prima conneione della barra audio alla presa di
corrente, la barra audio sarà in modalità ANDBY e la spia
ANDBY si accenderà di roo.
• Premere il pulsante
sulla barra audio o sul
telecomando della TV per accendere la barra audio.
• Premere nuovamente il pulsante
per riportare la
barra audio in modalità ANDBY.
> La spia di Standby si accenderà di roo.
• Se si vuole spegnere la barra audio completamente,
scollegare la spina di alimentazione dalla presa di cor-
rente.
Nota!
• Quando la barra audio è inutilizzata per circa 15 minuti,
entrerà automaticamente in modalità ANDBY.

53
Selezionare la modalità
• Premere ripetutamente il pulsante SOURCE sulla barra
audio o i pulsanti HDMI 1 / HDMI 2 / ARC / BT (Bluetooth)
/ OPT (Optical) / AUX / MP3 sul telecomando per
selezionare la modalità desiderata. La modalità
selezionata verrà visualizzata sul display.
Nota!
• Quando la presa HDMI ARC della barra audio è conne-
a alla presa HDMI ARC della TV tramite il cavo HDMI
e la funzione CEC sulla TV è aivata nel menu di setup
della TV, la selezione SOURCE paerà automaticamen-
te a ‘TV ARC’ (SoundMount).
Regolazione del Super Bass Boost
• Premere i pulsante BASS + / BASS - sul telecomando per
regolare il livello ba boo da -3 a +3.
> Il livello di BASSI selezionato verrà memorizzato
automaticamente come fonte.
Regolazione del livello degli alti
• Premere i pulsanti TREB + / TREB – sul telecomando per
regolare il livello degli alti da -3 a +3.
> Il livello di ALTI selezionato verrà memorizzato automa-
ticamente come fonte.
Regolazione del volume
• Premere i pulsanti VOL + / VOL – sulla barra audio per
regolare il volume.
• Premere il pulsante MUTE sul telecomando della TV per
spegnere il suono.
• Premere nuovamente il pulsante MUTE sul
telecomando della TV o premere il pulsante VOL+ sulla
barra audio per riaivare il volume normale.
Selezione dell’equalizzatore
• Premere il pulsante EQ sul telecomando per selezionare
l’impoazione dell’equalizzatore MOVIE o SPEECH.
> Dopo un accensione/spegnimento, l’impoazione
dell’equalizzatore ritornerà automaticamente in
modalità MOVIE.
Regolazione della luminosità dello schermo
• Premere il pulsante DIM+ / DIM- sul telecomando per
selezionare il livello di luminosità.
> Il livello di LUMINOSITA’ selezionato verrà memorizzato
automaticamente.
Impostazione del timer di spegnimento automatico
Usare il timer di spegnimento automatico per spegnere il
siema dopo un certo numero di minuti in modalità PLAY.
Se si impoa il timer di spegnimento automatico, ci si può
addormentare con la musica sapendo che il siema si
spegnerà da solo piuoo che rimanere acceso tua la
noe.
1 In modalità ON, premere ripetutamente il pulsante
SLEEP sul telecomando per selezionare il numero di
minuti desiderato. Il numero di minuti verrà visualizzato
nella seguente sequenza:
SLEEP 120 - SLEEP 90 - SLEEP 60 - SLEEP 30 - SLEEP 15 -
SLEEP 00.
2 Non premere più il pulsante SLEEP quando viene visua-
lizzato il numero di minuti desiderato.
> Il timer di spegnimento automatico è impoato.
3 Per cancellare il timer di spegnimento automatico,
premere ripetutamente il pulsante SLEEP fino a quando
non verrà visualizzato ‘SLEEP 00’.
5. FUNZIONAMENTO AUX/MP3
LINK/OPTICAL/HDMI
1 Controllare che il dispositivo audio sia collegato alla
barra audio.
2 Premere ripetutamente il pulsante SOURCE sulla barra
audio o i pulsanti HDMI 1 / HDMI 2 / ARC / OPT
(OPTICAL) / AUX / MP3 sul telecomando della barra
audio per selezionare la modalità desiderata.
3 Utilizzare il dispositivo audio direamente per le opzioni
di playback.
4 Premere i pulsanti VOL + / VOL – sulla barra audio per
regolare il volumento al livello desiderato.
Nota!
• Potrebbe eere neceario paare all’uscita lineare
PCM (Pulse Code Modulation) sul voro dispositivo
source (ad esempio TV, leore DVD o Blu-Ray) mentre la
barra audio paa in modalità OPTICAL o HDMI.
• Le periferiche A/V devono eere connee alla TV.
6. RIPRODURRE CON IL
DISPOSITIVO BLUETOOTH
Si poono ascoltare delle tracce da un dispositivo se
conneo alla barra audio tramite Bluetooth.
6.1 Accoppiamento manuale dei dispositivi abilitati
Bluetooth
La prima volta che si connee il dispositivo Bluetooth alla
barra audio, il dispositivo deve eere accoppiato alla
barra audio.
ATTENZIONE!
• La dianza operativa fra la barra audio e il dispositivo
è di circa 8 metri (senza neun oggeo fra il dispositivo
Bluetooth e la barra audio).
• Prima di conneere un dispositivo Bluetooth alla barra
audio, accertarsi di conoscere le capacità del
dispositivo.
• La compatibilità con tui i dispositivi Bluetooth non è
garantita.
• Gli oacoli fra il dispositivo e la barra audio poono
ridurre la dianza operativa.
• Se la forza del segnale è debole, il voro ricevitore
Bluetooth potrebbe scollegarsi, ma rientrerà
automaticamente in modalità di accoppiamento.
6.2 Connessione del dispositivo alla barra audio
tramite Bluetooth
1 Accensione della barra audio.
2 Premere ripetutamente il pulsante SOURCE sulla barra
audio o il pulsante BT sul telecomando per selezionare
la modalità BT (Bluetooth).
> Il Display visualizza ‘BT’, quindi ‘NO BT’ (se non è
conneo neun dispositivo Bluetooth).
3 Premere per alcuni secondi il pulsante PAIR sul
telecomando per aivare l’accoppiamento Bluetooth.
> Il display visualizza ‘PAIR’.
4 Aivare il dispositivo Bluetooth e selezonare la modalità
SEARCH [RICERCA].
> ‘Vogel’s SoundMount’ apparirà sull’elenco dispositivi
Bluetooth.

54
5 Selezionare ‘Vogel’s SoundMount’ e digitare ‘0000’
come paword, se neceario.
> Il display visualizza ‘BLUEPORT’ quando la
conneione è avvenuta con succeo.
• Per scollegare la funzione Bluetooth, paare a un’altra
funzione sulla barra audio o disaivare la funzione dal
dispositivo Bluetooth.
6.3 Ascoltare la musica dal dispositivo Bluetooth
• Se il dispositivo Bluetooth conneo supporta Advanced
Audio Diribution Profile (A2DP), si può ascoltare la
musica memorizzata nel dispositivo usando il leore.
• Se il dispositivo supporta anche Audio Video Remote
Control Profile (AVRCP), si può usare il telecomando
della barra audio per riprodurre la muscia memorizzata
nel dispositivo.
1 Accoppiamento del dispositivo con la barra audio.
2 Riprodurre la musica con il voro dispositivo (se sup-
porta A2DP).
3 Usare il telecomando per controllare la riproduzione (se
supporta AVRCP).
• Premere il pulsante B; per meere in pausa/riavviare la
riproduzione.
• Premere i pulsanti S / T per paare a una
determinata traccia.
7. AVVERTENZE E LIBERATORIE
Per mantenere valida la garanzia, non cercare mai di
riparare da soli la barra audio e/o il subwoofer senza fili.
In caso di problemi durante l’uso del SoundMount, si prega
di contaare il proprio rivenditore Vogel’s.
Bluetooth e HDMI sono dei marchi commerciali regirati e
sono di proprietà dei rispeivi proprietari.
Il marchio e i logo Bluetooth sono dei marchi regirati di
proprietà di Bluetooth SIG, INc. e qualsiasi utilizzo di tali
marchi da parte di Vogel’s è soo licenza. Altri marchi
commerciali e nomi commerciali sono quelli dei rispeivi
proprietari.
Il termine HDMI e il logo HDMI sono marchi commerciali o
marchi commerciali regirati di HDMI Licensing LLC negli
Stati Uniti e in altri paesi.
7.1 Precauzioni sulle batterie
• Quando il telecomando non verrà usato per un lungo
periodo di tempo (più di un mese), togliere la baeria
dal telecomando per evitare che vi siano delle perdite.
• Se la baeria perde, pulire la perdita dal vano baeria
e soituire la baeria con una nuova.
• Non usare baerie diverse da quelle specificate.
• Non riscaldare o smontare le baerie.
• Non gearle mai nel fuoco o nell’acqua.
• Non portare o conservare le baerie con altri oggei
metallici, perché queo potrebbe causare un corto
circuito, una perdita o un’esplosione delle baerie.
• Non ricaricare mai una baeria a meno che non vi sia
la certezza che si trai di una baeria di tipo
ricaricabile.
Istruzioni di smaltimento WEEE
Non smaltire queo dispositivo,
telecomando o la sua baeria insieme ai
rifiuti domeici indierenziati.
Uno smaltimento non correo potrebbe
eere dannoso all’ambiente e alla salute
umana. Si faccia riferimento alle proprie
autorità locali per i rifiuti per avere
informazioni sui siemi di reituzione e
raccolta nella vora zona.
Conformità CE
Queo prodoo è conforme ai requisiti eenziali e alle altre
disposizioni rilevanti delle Direive 2006/95/CE (bao voltag
-
gio), CEM2004/108/CE e 2011/65/UE (RoHS, rerizione all’uso
di soanze pericolose nelle apparecchiature eleriche ed
eleroniche).
8. SPECIFICHE
Barra audio
Requisiti di alimentazione .................... AC 220-240 V 50/60 Hz
Consumo medio di elericità durante
il funzionamento .................................................................60 W
Consumo di elericità in andby meno di......................0.5 W
Potenza in uscita RMS ................................................... 75 W x 2
Diorsione armonica totale ...............................1%(1 kHz, 1 W)
Sensibilità ingreo audio ................................................700 mV
Rispoa di frequenza .........................................180 Hz - 20 kHz
Impedenza totale ................................................................. 6 Ω
Dimensioni (L x A x P) ..................................... 950 x 86 x 52 mm
Subwoofer
Requisiti di alimentazione .................... AC 220-240 V 50/60 Hz
Consumo medio di elericità durante
il funzionamento .................................................................60 W
Consumo di elericità in andby meno di......................0.5 W
Potenza in uscita .............................................................. 150 W
Rispoa di frequenza .........................................40 Hz - 150 kHz
Impedenza ........................................................................... 3 Ω
Dimensioni (L x A x P) ....................................419 x 312 x 150 mm
Telecomando
Dianza ............................................................................... 6 mt
Angolo ................................................................................... 30°
9. ACCESSORI FORNITI
Cavo di alimentazione AC ................................................... 2 x
Cavo HDMI ............................................................................. 1 x
Telecomando ....................................................................... 1 x

www.vogels.com Vogel’s Holding BV 2017
©
All rights reserved
USERMA_NEXT8365_8375_V02