Countertop Dishwasher
User's Manual
PLEASE READ THIS MANUAL CAREFULLY BEFORE USING YOUR
DISHWASHER AND KEEP IT FOR FUTURE REFERENCE.
Models: MCSDRY1S / MCSDRY35W1
Model: MCSCD3W

PRODUCT REGISTRATION
Thank you for purchasing a Magic Chef® product. The first step to protect your new product is to complete the product registration on our website:
www.mcappliance.com/register. The benefits of registering your product include the following:
1. Registering your product will allow us to contact you regarding a safety notification or product update.
2. Registering your product will allow for more efficient warranty service processing if warranty service is required.
3. Registering your product could act as your proof of purchase in the event of insurance loss.
Once again, thank you for purchasing a Magic Chef product.
2

CONTENTS
PRODUCT REGISTRATION . . . . . . . . . . . . . . . . . . . . . . . . . . . . . . . . . . . . . . . . . . . . . . . . . . . . . .2
IMPORTANT SAFETY INSTRUCTIONS . . . . . . . . . . . . . . . . . . . . . . . . . . . . . . . . . . . . . . . . . . . . .4
SPECIFICATIONS. . . . . . . . . . . . . . . . . . . . . . . . . . . . . . . . . . . . . . . . . . . . . . . . . . . . . . . . . . . . . . 6
PARTS AND FEATURES . . . . . . . . . . . . . . . . . . . . . . . . . . . . . . . . . . . . . . . . . . . . . . . . . . . . . . . . 6
BEFORE USE . . . . . . . . . . . . . . . . . . . . . . . . . . . . . . . . . . . . . . . . . . . . . . . . . . . . . . . . . . . . . . . . 7
OPERATING INSTRUCTIONS . . . . . . . . . . . . . . . . . . . . . . . . . . . . . . . . . . . . . . . . . . . . . . . . . . . . 8
CARE AND MAINTENANCE . . . . . . . . . . . . . . . . . . . . . . . . . . . . . . . . . . . . . . . . . . . . . . . . . . . . . 10
TROUBLESHOOTING. . . . . . . . . . . . . . . . . . . . . . . . . . . . . . . . . . . . . . . . . . . . . . . . . . . . . . . . . . .10
LIMITED WARRANTY . . . . . . . . . . . . . . . . . . . . . . . . . . . . . . . . . . . . . . . . . . . . . . . . . . . . . . . . . . 11
3

4
IMPORTANT SAFETY INSTRUCTIONS
This manual contains Safety Instructions, Installation and Operating Instructions, and Troubleshooting Tips. Please carefully read this manual before using your
Dishwasher for instructions on how to use and maintain the product properly. Be sure to follow the safety instructions to avoid injury or damage to the product.
Keep this manual. When passing on/selling the device to a third party, the manual must be handed over along with the device.
Before calling for service, please make sure unit is installed and being used correctly, and read the troubleshooting section.
WARNING: When using your appliance, follow the precautions listed below:
NOTE: Specifications may change at any time without notice.
1. Read all instructions.
2. This appliance is for household use only. It is not intended for commercial applications.
3. The appliance is intended for indoor use only. DO NOT use outdoors.
4. Use only for intended purpose.
5. DO NOT operate your dishwasher unless all enclosure panels are properly in place.
6. DO NOT tamper with the control panel or display.
7. Remove the door to the washing compartment when removing an old dishwasher from service or discarding it.
8. The appliance must be plugged into a properly installed and grounded outlet that meets the voltage requirements listed on the ratings label.
9. ALWAYS place unit on a level, stable, heat resistant surface that can properly support the weight of the appliance. DO NOT use on carpet, vinyl, cloth, etc. and DO NOT move
during operation.
10. The unit must be placed in a space with good ventilation. This product is intended to be used freestanding, DO NOT place it in a cabinet. DO NOT cover or block the steam
exhaust vent to avoid overheating.
11. Under certain conditions, hydrogen gas may be produced in a hot-water system that has not been used for two weeks or more. HYDROGEN GAS IS EXPLOSIVE. If the hot-water
system has not been used for such a period, before using the dishwasher turn on all hot-water faucets and let the water flow from each for several minutes. This will release any
accumulated hydrogen gas. As the gas is flammable, do not smoke or use an open flame during this time.
12. GROUNDING INSTRUCTIONS--This appliance must be grounded. In the event of a malfunction or breakdown, grounding will reduce the risk of electric shock by providing a path
of least resistance for electric current. This appliance is equipped with a cord having an equipment-grounding conductor and a grounding plug. The plug must be plugged into an
appropriate outlet that is installed and grounded in accordance with all local codes and ordinances.
13. DO NOT put any object on top of the appliance and do not insert any objects (such as pins or wire) into the steam exhaust vent or any openings of the appliance.
14. Place the appliance in a well-ventilated and dry place, away from any kind of corrosive gas, fire sources, high temperatures, strong electromagnetic fields, steam, or humidity.
15. Only fill the water tank with 50°F - 68°F (10°C - 20°C) water (slightly below room temperature).
16. Use only detergents made for use in dishwashers.
17. Keep children away from detergents. Detergents may cause chemical burns in mouth, throat or eyes or and result in suffocation. If detergent accidentally gets into eyes, rinse
immediately with water and seek medical treatment promptly.
18. DO NOT touch the heating element during or immediately after operation.
19. DO NOT operate the dishwasher unless the door is properly in place.
20. DO NOT abuse, sit or stand on the door, body, or racks of the appliance. DO NOT apply pressure to the door of the unit to avoid tipping it.
21. DO NOT allow children to operate, play with, or crawl inside the appliance.
22. The appliance can be used by children aged from 8 years and above and persons with reduced physical, sensory or mental capabilities, or lack of experience and knowledge, if
they have given supervision or instruction concerning use of the appliance in a safe way and understand the hazards involved.
23. DO NOT add any type of solvent to the dishwasher.
24. DO NOT open the door while the program is still running. There is a risk of hot water spraying out of the appliance.
25. Use caution and keep children away from dishwasher when opening the door, as remaining water in the washing chamber may contain detergent residue.
26. Avoid damaging the door gasket of the dishwasher. Doing so can lead to leaks and potential shock hazard.
27. If the door cannot be properly closed or is damaged in any way, DO NOT use the appliance. Contact customer service for assistance.
28. ALWAYS turn off and remove the plug from the outlet when not in use and before cleaning. Allow unit to cool down before cleaning, moving or servicing.
29. It is not recommended to put sharp knives and objects in the dishwasher. If necessary, knives and other utensils with sharp points must be placed in the cutlery rack pointing
downwards to avoid cut-type injuries or damage to the unit. DO NOT allow sharp points or tips to extend far beyond the bottom of the cutlery rack.
30. Only wash items that are designated as ‘Dishwasher Safe’.
31. To prevent injury or damage to the unit caused by it tipping over, DO NOT overload the unit.
32. DO NOT use the dishwasher to clean or dry items other than dishes, unless rinsing fruits/vegetables using that cycle.
4

READ AND FOLLOW THIS
SAFETY INFORMATION CAREFULLY
SAVE THESE INSTRUCTIONS
33. DO NOT store flammable materials in, on, or near the appliance.
34. The appliance is not intended to be operated by means of an external timer or separate remote-control system.
35. CAUTION: Appliance can be very hot during or after operation. DO NOT touch until the unit has cooled down to avoid injury.
36. DO NOT immerse the appliance or power cord into water or any other liquids. DO NOT plug in unit if power cord is wet or with wet hands to avoid electric shock injury and/
or damage to the unit.
37. DO NOT modify or cut the power cord and DO NOT operate any appliance that has a damaged cord or plug; or if the unit is damaged or malfunctions in any way. Contact
customer service or a service technician.
38. DO NOT let the cord hang over edge of table or counter. ALWAYS keep cord away from hot surfaces or items.
39. DO NOT unplug your appliance by pulling on the power cord. ALWAYS grasp the plug firmly and pull it straight out from the outlet.
40. DO NOT run cord under carpeting, throw rugs, runners, or similar coverings. DO NOT route cord under furniture, appliances, or any heavy object. Place the cord where it will
not be tripped over.
41. ALWAYS unplug the appliance when it is not in use.
5
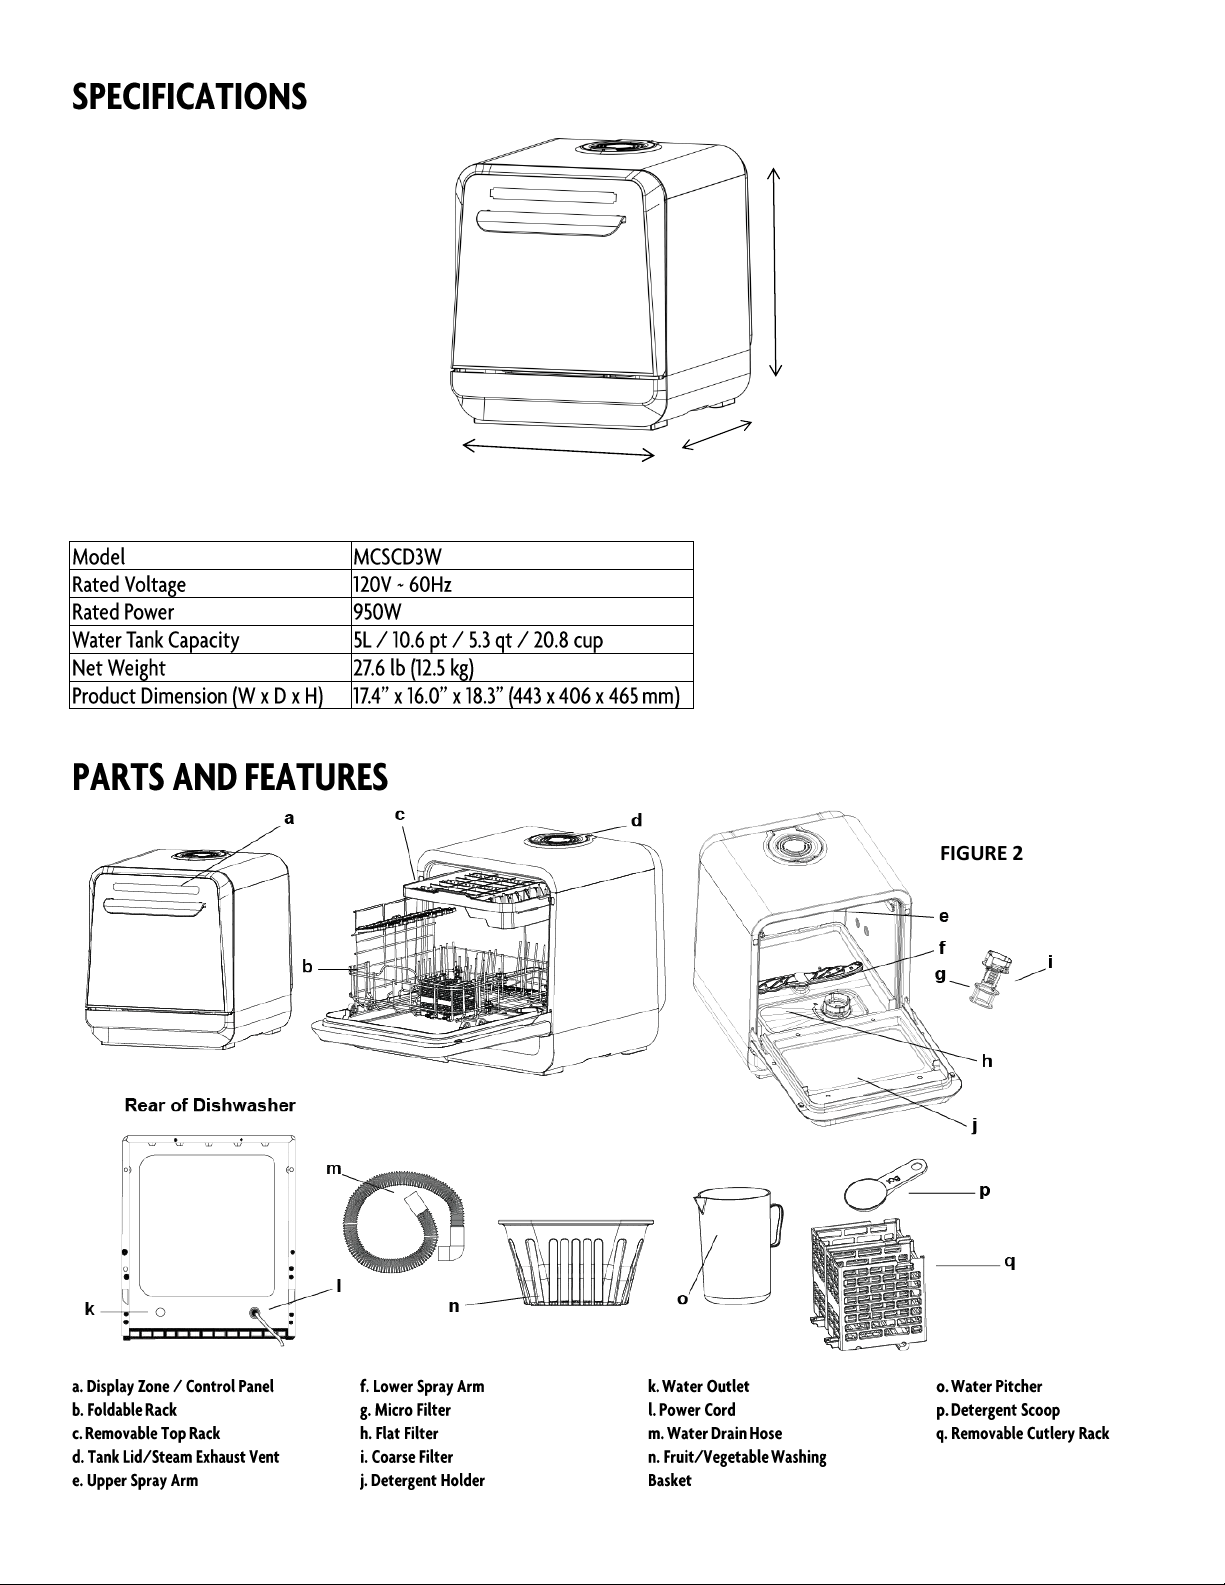
FIGURE 2
FIGURE 1
443 mm
406 mm
465 mm
6
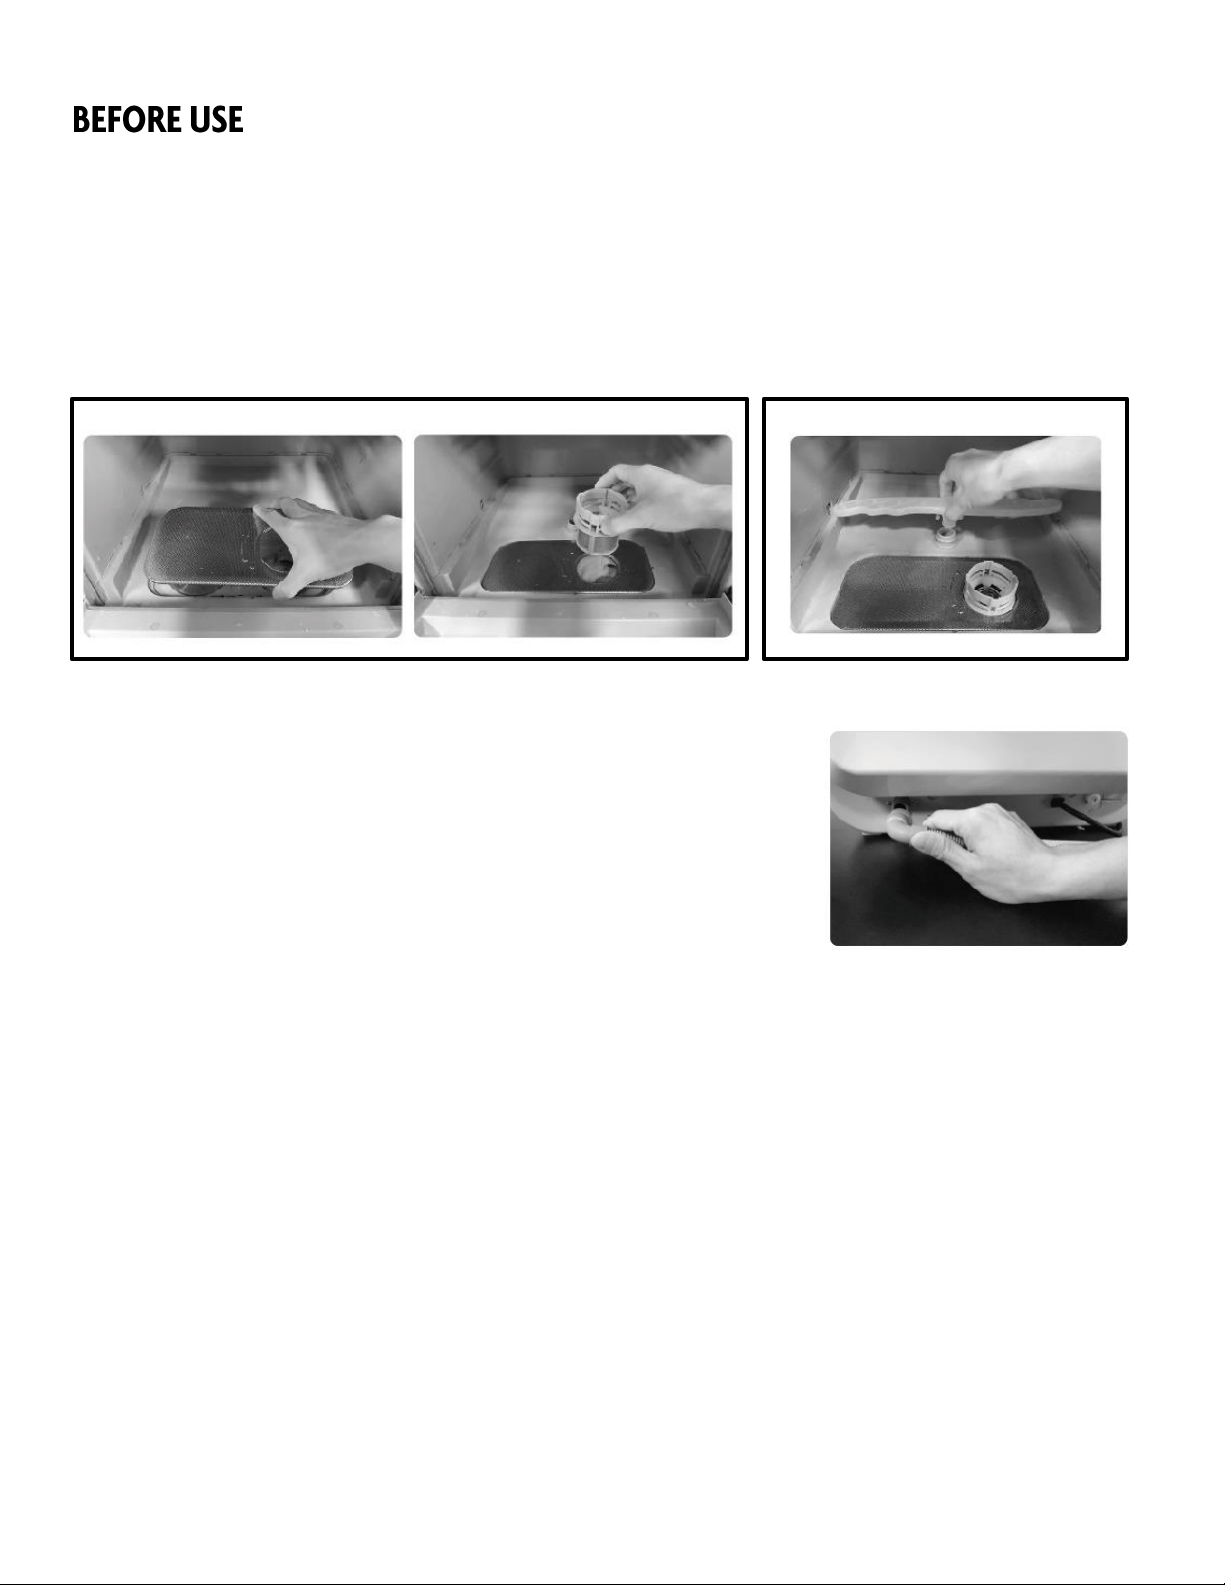
FIGURE 3 FIGURE 4
FIGURE 5
Remove all packing materials from the appliance. If there is a protective plastic film on the door or control panel, be sure to remove that. Examine the entire unit for any
damage and verify that all parts and accessories are present. Rinse the spray arm, the baskets, and the filters (fine, coarse and micro) with water and wipe off the unit with a
soft dry cloth. Place the dishwasher on a flat, level surface sturdy enough to support the unit and close enough to the sink and an electrical outlet for the power cord and
drain hose to reach.
Install the flat fine filter and cylinder filter in the bottom of the inside of the dishwasher (The cylinder filter is comprised of coarse filter and micro filter, which can be
separated by turning counter-clockwise). Turn the cylinder filter clockwise to lock in place. (Fig. 3) Attach the spray arm to the dishwasher by pushing firmly into place until
you hear a click. Make sure it is secure and can still rotate freely. (Fig. 4)
Place the folding rack and the top rack, or the fruit/vegetable washing basket, into the dishwasher, and connect the
supplied drainage hose to the water outlet hole at the back of the appliance. ALWAYS be sure push the drain hose in
place correctly and the connection is secure (Fig. 5). Place the drainage hose in the sink and attach with the suction
cup. The drainage hose should be kept facing downward. If the hose is a pointing upward, the maximum acceptable
height is 6” (15cm) from the bottom of dishwasher.
Be sure to keep the sink clean and do not immerse the drainage hose in water to prevent sewage flowing back.
NOTE: There may be some residual moisture in the unit due to factory testing to ensure proper functioning. If this is
the case, wipe the interior dry with a soft cloth.
7
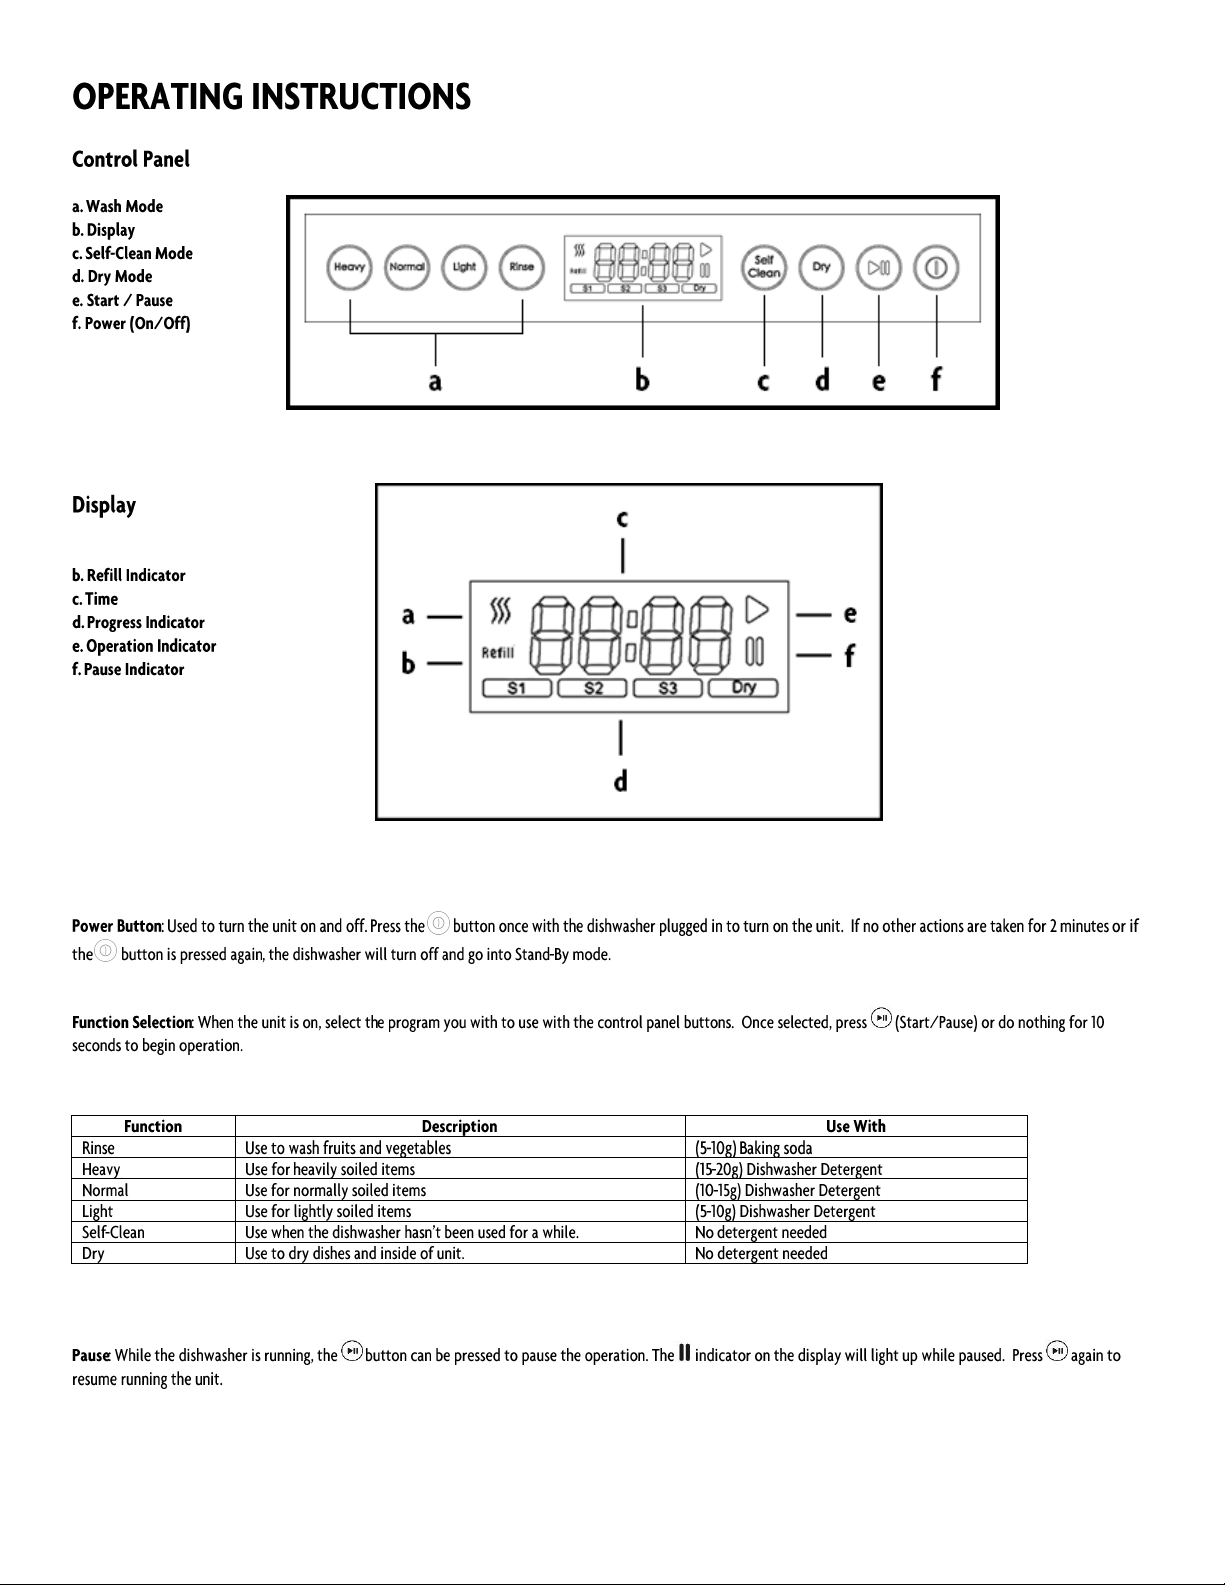
FIGURE 6
FIGURE 7
88
a. Dry Indicator
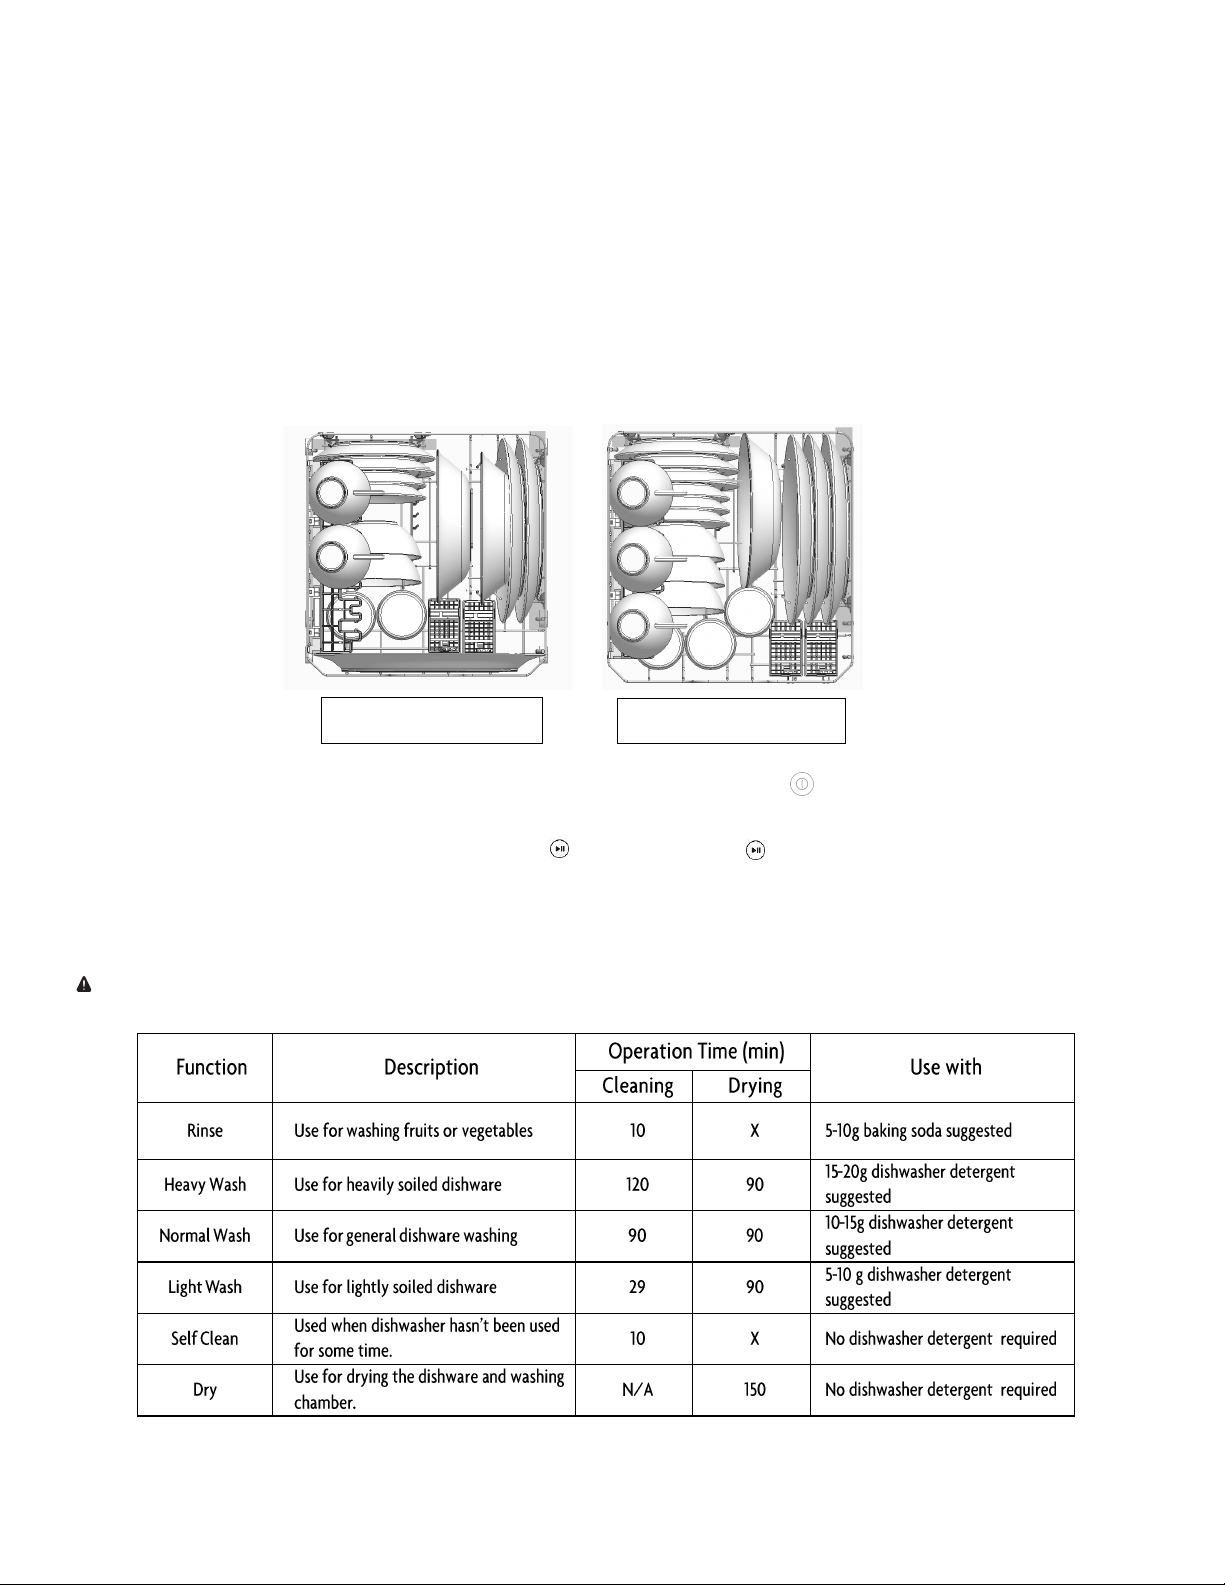
FIGURE 9
9
WASHING DISHES
Before shutting the door, add detergent to the Detergent Holder. You can use powder, liquid, gel or pods. Press the (Power) button and the unit will come on in
Operation Mode. Open the tank lid on the top of the dishwasher and pour in 5000 ml (5 liters) of water into the water tank. The included pitcher is 2000 ml, so it will take
2-1/2 pitchers to fill the reservoir. The refill light will shut off when full.
Select the desired function using the Wash Mode buttons, and then push the (Start/Pause) button. If the is not pressed, the unit will start the wash cycle
automatically after 10 seconds.
NOTE: If no buttons are pressed after the power is turned on, the unit will automatically go back to Standby mode after 2 minutes.
For faster and more efficient drying, open door slightly after washing dishes.
CAUTION: Be careful to avoid steam when door is opened.
LOADING THE DISHWASHER
Be sure that the dishwasher is sitting on a surface that will not be affected by the weight of it, close to the sink with the drain hose properly connected and set to drain. The
power cord should be able to reach an outlet. Plug in the dishwasher and it will beep and come on in Standby mode with just the Power button lit.
Rinse the dishes to be washed to get rid of any leftover food still on them. Open the door and pull out the racks. Load dishes so the soiled side is angled towards the spray
arm at the bottom of the unit, and avoid having items touching each other to prevent noises and possible damage during the washing cycle. If necessary, the top rack can be
removed to accommodate larger items in the dishwasher by gently lifting the front while pulling it straight out.
Cutlery should be placed in the cutlery rack that slides out near the top of the cavity. Be sure that any sharp edges and points are facing down to prevent being injured.
NOTE: ALWAYS make sure items are dishwasher safe before putting in the unit. Items washed in it that are not dishwasher safe could become damaged, as well as the
dishwasher itself.
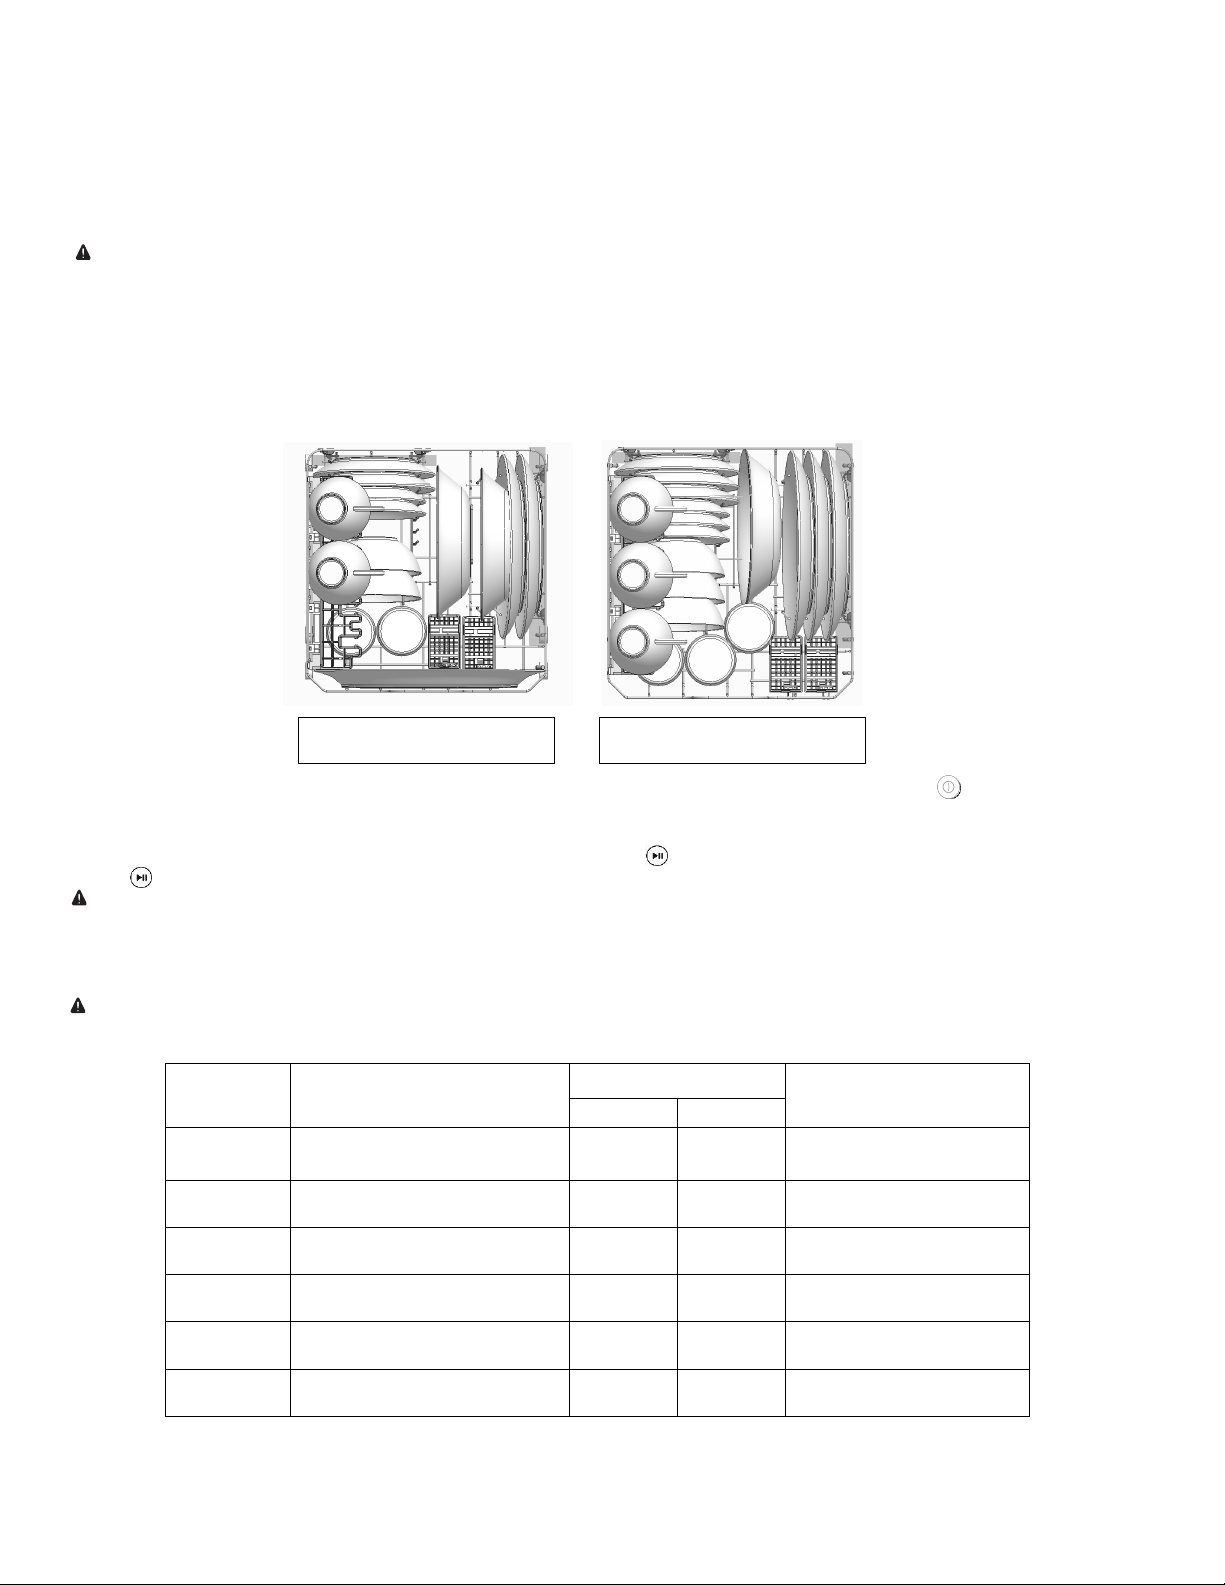
The official capacity certified by the regulatory body(DOE) is 2 full Place Settings and a full assortment of Serving Pieces with the sliding Top Rack removed and all cutlery
and utensils loaded in the Utensil Baskets in the Main Rack.
Alternatively, depending on the size of the dishes, 3 Place Settings without the full assortment of Serving Pieces can be loaded, also by removing the Top Rack and loading
all pieces into the Main Rack.
9
FIGURE 8
2 Ful
l Place Settings and Full
Assortment of Serving Pieces
3
Place Settings without Full
Assortment of Serving Pieces

CARE AND MAINTENANCE
Regular inspection and maintenance will help to prevent malfunction. It is recommended to check and maintain the following items.
DOOR AND DOOR SEAL
Clean door gasket with a damp cloth regularly. Never use a steam cleaner to clean the dishwasher. We are not liable for any consequential damage if steam cleaner is used. Regularly wipe the
door and control panel with a damp cloth. Do no t use sponges or materials with a rough surfaces or abrasive detergents, as these could scratch the surfaces.
FILTER ASSEMBLY
Remove any larger food particles trapped in the filters after each wash cycle by rinsing the filters under running water. Remove the coarse and fine filter from the flat filter by turning the
assembly counter-clockwise, and separate them by also turning counter-clockwise. Rinse under running water until any food particles are removed, then reassemble and let dry. There is also a
screen filter on the water fill hole under the tank lid that can be twisted counter-clockwise to remove for periodic cleaning under running water.
NOTE:
The entire filter assembly should be
cleaned at least once a week.
NOTE: The entire filter assembly should be cleaned at least once.
WARNING:
Never run the dishwasher without the filters in place.
SPRAY ARM
Check if the spray arm has deposits of grease and lime scale. Lime scale, grease and dirt in the rinsing water can block the nozzles or prevent the bearing assemblies of the spray arm from
working properly. Check the outlet nozzles on the spray arm regularly. To clean, lift the spray arm upwards to detach from the dishwasher and clean it under running water. Replace in the
dishwasher after cleaning and lock the spray arm into position.
If needed, add dishwasher detergent and start the [Heavy wash] mode in an empty chamber.
WASTE WATER PUMP
Larger food remnants which are not filtered out by the filtration system may block the waste water pump. Rinsing water will not be pumped out and result in a blockage. If this happens, turn off
the unit and disconnect the appliance from the power supply. Remove all the filters and remnants. Remove any water from inside the dishwasher and check and clean the filters.
CLEANING PRECAUTIONS
1. NEVER use chlorinated household detergents. Doing so can pose a health hazard.
2. ALWAYS unplug the appliance and let it cool down completely before cleaning.
3. Keep the body and door window clean. Do not use harsh abrasive cleaners or sharp metal scrapers to clean the door window as they can scratch the surface, which may
result in shattering of the glass.
CAUTION: DO NOT allow water to penetrate any gaps in the body of the unit or the steam exhaust vent when cleaning the appliance.
4. If the control panel gets wet, wipe it dry with a soft and dry cloth. DO NOT use coarse materials or abrasive cleaners to clean the control panel. When cleaning the
control panel, open the door to prevent the appliance from accidentally turning on.
5. DO NOT use poisonous or corrosive detergents to clean the appliance.
6. Dry all parts thoroughly before connecting the dishwasher to an electrical outlet.
7. Allow the appliance to cool down completely and clean it before storing. Place the unit in a box and store in a cool, dry location.
8. DO NOT wrap the power cord tightly around the appliance or put any pressure on the power cord when storage to avoid damaging the power cord.
TROUBLESHOOTING
The door is open
Water level is too low
Water level is too high, risking
overflow
Make sure door is firmly closed
Turn the unit off and disconnect from the power
supply. Contact customer service for assistance.
Turn the unit off and disconnect from the power
supply. Contact customer service for assistance.
Temperature sensor circuit is open
Turn the unit off and disconnect from the power
supply. Contact customer service for assistance.
Temperature sensor circuit is
shorted
Failure of water inlet pump or
problem with water intake
Turn the unit off and disconnect from the power
supply. Contact customer service for assistance.
Turn the unit off and disconnect from the power
supply. Contact customer service for assistance.
10

LIMITED WARRANTY
MC Appliance Corporation warrants each new dishwasher to be free from defects in material and workmanship, and agrees to remedy any such defect or to furnish
a new part(s), at the company’s option, for any part(s) of the unit that have failed during the warranty period. Parts and labor expenses are covered on this unit for a
period of one year from the date of purchase. A copy of the dated sales receipt or invoice is required to receive warranty service by an authorized service agent.
This warranty covers appliances in use within the continental United States, Alaska, Hawaii, and Puerto Rico. This warranty does not cover the following:
• Damages due to shipping damage or improper installation or electrical connections.
• Damages due to misuse or abuse.
• Content losses due to failure of the unit.
• Inside components such as door panels, shelves, racks, etc.
• Repairs performed by unauthorized service agents.
• Service calls that do not involve defects in material and workmanship such as instructions on proper use of the product and door reversal or improper
installation.
• Replacement or resetting of house fuses or circuit breakers.
• Failure of this product if used for other purposes than its intended purpose.
• Disposal costs for failed unit not returned to our factory.
• Any delivery/installation costs incurred as the result of a unit that fails to perform as specified.
• Expenses for travel and transportation for product service if your appliance is located in a remote area where service by an authorized service technician
is not available.
• The removal and reinstallation of your appliance if it is installed in an inaccessible location or is not installed in accordance with published installation
instructions.
• Refunds for non-repairable products are limited to the price paid for the unit per the sales receipt.
Limitations of Remedies and Exclusions:
Product repair in accordance with the terms herein, is your sole and exclusive remedy under this limited warranty. Any and all implied warranties including
merchantability and fitness for a particular purpose are hereby limited to one year or the shortest period allowed by law. MC Appliance Corporation is not liable
for incidental or consequential damages and no representative or person is authorized to assume for us any other liability in connection with the sale of this
product. Under no circumstances is the consumer permitted to return this unit to the factory without the prior written consent of MC Appliance Corporation.
Some states prohibit the exclusion or limitation of incidental or consequential damages, or limitations on implied warranties. This warranty gives you specific legal
rights, and you may also have other rights which vary from state to state.
Model Parts & Labor Type of Service
MCSCD3W One Year
Carry-In
For Service or Assistance please call 888-775-0202 or visit us on the web at www.mcappliance.com to request warranty service or order parts.
11

12
Lavavajillas sobre encimera
Manual de usuario
Modelo: MCSCD3W
POR FAVOR LEA ESTE MANUAL CUIDADOSAMENTE ANTES DE USAR
SU LAVAVAJILLAS Y CONSERVELO PARA FUTURAS REFERENCIAS.

REGISTRO DEL PRODUCTO
Gracias por comprar un producto Magic Chef®. El primer paso para proteger su nuevo producto es completar el registro del producto en
nuestro sitio web: www.mcappliance.com/register. Beneficios de registrar este producto:
1.
El registro del producto nos permitirá contactarlo en caso de una notificación de seguridad o actualización del producto.
2.
El registro del producto permitirá procesar el servicio de garantía de modo más eficiente si se requiere servicio de garantía.
3.
El registro del producto puede servir como comprobante de compra en caso de pérdida del seguro.
Una vez más, gracias por comprar un producto Magic Chef.
14

ÍNDICE
REGISTRO DEL PRODUCTO. . . . . . . . . . . . . . . . . . . . . . . . . . . . . . . . . . . . . . . . . . . . . . . . . . . . . . . . . . . . . 14
INSTRUCCIONES DE SEGURIDAD IMPORTANTES. . . . . . . . . . . . . . . . . . . . . . . . . . . . . . . . . . . . . . . . . . . 16
ESPECIFICACIONES . . . . . . . . . . . . . . . . . . . . . . . . . . . . . . . . . . . . . . . . . . . . . . . . . . . . . . . . . . . . . . . . . . . . 18
PIEZAS Y CARACTERÍSTICAS. . . . . . . . . . . . . . . . . . . . . . . . . . . . . . . . . . . . . . . . . . . . . . . . . . . . . . . . . . . . . 18
ANTES DE USAR. . . . . . . . . . . . . . . . . . . . . . . . . . . . . . . . . . . . . . . . . . . . . . . . . . . . . . . . . . . . . . . . . . . . . . . . 19
INSTRUCCIONES DE FUNCIONAMIENTO. . . . . . . . . . . . . . . . . . . . . . . . . . . . . . . . . . . . . . . . . . . . . . . . . . . 20
CUIDADO Y MANTENIMIENTO. . . . . . . . . . . . . . . . . . . . . . . . . . . . . . . . . . . . . . . . . . . . . . . . . . . . . . . . . . . . 22
SOLUCIÓN DE PROBLEMAS. . . . . . . . . . . . . . . . . . . . . . . . . . . . . . . . . . . . . . . . . . . . . . . . . . . . . . . . . . . . . . 22
GARANTÍA LIMITADA. . . . . . . . . . . . . . . . . . . . . . . . . . . . . . . . . . . . . . . . . . . . . . . . . . . . . . . . . . . . . . . . . . . . 23
15

INSTRUCCIONES DE SEGURIDAD IMPORTANTES
Este manual contiene instrucciones de seguridad, instrucciones de instalación y funcionamiento, y consejos para la resolución de problemas. Lea atentamente este manual antes de usar el
lavavajillas para obtener instrucciones sobre cómo usar y mantener el producto correctamente. Asegúrese de seguir las instrucciones de seguridad para evitar lesiones personales o dañar el
producto.
Guarde este manual. Al transferir o vender el aparato a un tercero, el manual debe entregarse junto con el aparato.
Antes de contactar a servicio técnico, cerciórese de que el equipo haya sido instalado y se esté usando de manera correcta, y lea la sección de solución de problemas.
ADVERTENCIA: Cuando use su aparato, siga las precauciones que se indican a continuación:
NOTA: Las especificaciones pueden cambiar en cualquier momento sin previo aviso.
1.
Lea todas las instrucciones.
2.
Este aparato es solo para uso doméstico. No está diseñado para usos comerciales.
3.
Este aparato está diseñado solamente para uso en interiores. NO lo use al aire libre.
4.
Usar solo para el fin previsto.
5.
NO opere su lavavajillas a menos que todos los paneles de la carcasa estén colocados correctamente.
6.
NO manipule el panel de control ni la pantalla.
7.
Retire la puerta del compartimiento de lavado cuando ponga fuera de servicio un lavavajillas viejo o lo deseche.
8.
El electrodoméstico debe enchufarse a un tomacorriente con conexión a tierra debidamente instalado, con toma a tierra y que cumpla con los requisitos de tensión indicados en la
etiqueta de especificaciones.9.
9.
SIEMPRE coloque el equipo sobre una superficie nivelada, estable y resistente al calor que pueda soportar adecuadamente el peso del aparato. NO lo utilice sobre alfombras, vinilos,
telas, etc. y NO lo mueva mientras se encuentre funcionando.
10.
El equipo debe colocarse en un espacio con buena ventilación. Este producto está diseñado para usarse de forma independiente, NO lo coloque dentro de un
° °
gabinete. NO cubra ni bloquee la ventilación de escape de vapor para evitar el sobrecalentamiento.
11.
Bajo ciertas condiciones, se puede producir hidrógeno gaseoso en un sistema de agua caliente que no se ha utilizado durante dos semanas o más. EL GAS DE HIDRÓGENO ES
EXPLOSIVO. Si el sistema de agua caliente no se ha utilizado durante ese período, antes de usar el lavavajillas, abra todos los grifos de agua caliente y deje correr el agua por varios
minutos. Esto liberará el gas de hidrógeno acumulado. Como el gas es inflamable, no fume ni use una llama abierta durante este tiempo.
12.
INSTRUCCIONES DE CONEXIÓN A TIERRA: este electrodoméstico debe estar conectado a tierra. En caso de mal funcionamiento o averí a, la conexión a tierra reducirá el riesgo de
descarga eléctrica al proporcionar una ruta de menor resistencia para la corriente eléctrica. Este electrodoméstico viene con un cable que tiene un conductor de conexión a tierra
del equipo y un enchufe con conexión a tierra. El enchufe se debe conectar a un tomacorriente apropiado instalado y ser puesto a tierra de acuerdo con todos los códigos y
ordenanzas locales.
13.
NO coloque ningún objeto encima del aparato y no inserte ningún objeto (como pasadores o cables) en la salida de vapor ni en cualquier abertura del aparato.
14.
Coloque el aparato en un lugar bien ventilado y seco, lejos de cualquier tipo de gas corrosivo, fuentes de fuego, altas temperaturas, fuertes campos electromagnéticos, vapor o
humedad.
15.
Solo llene el tanque de agua con 50°F - 68°F (10°C - 20°C) de aqua (ligeramente por debajo de la temperatura ambiente).
16.
Use solo detergentes para lavavajillas.
17.
Mantenga a los niños alejados de los detergentes. Los detergentes pueden causar quemaduras químicas en la boca, la garganta o los ojos, así como provocar asfixia. Si el detergente
entra accidentalmente en los ojos, enjuague de inmediato con agua y busque tratamiento médico de inmediato.
18.
NO toque el elemento calentador durante o inmediatamente después de la operación.
19.
NO opere el lavavajillas a menos que la puerta esté bien cerrada.
20.
NO maltratar, sentarse ni pararse en la puerta, el cuerpo ni las cestas del electrodoméstico. NO haga fuerza sobre la puerta del equipo, pues ello podría hacerlo volcar.
21.
NO permita que los niños operen, jueguen ni gateen dentro del aparato.
22.
El aparato puede ser utilizado por niños a partir de 8 años y personas con capacidades físicas, sensoriales o mentales reducidas, o falta de experiencia y conocimiento, si están bajo
supervisión o han recibido instrucciones sobre el uso de forma segura y entienden los peligros que se corren.
23.
NO agregue ningún tipo de solvente al lavavajillas.
24.
NO abra la puerta mientras el programa aún esté funcionado. Existe el riesgo de que salga agua caliente del aparato.
25.
Tenga cuidado y mantenga a los niños alejados del lavavajillas al abrir la puerta, ya que el agua restante en la cámara de lavado puede contener residuos de detergente.
26.
Evite dañar la junta de la puerta del lavavajillas. Hacerlo puede provocar fugas y un posible peligro de descarga.
27.
Si la puerta no cierra bien o tiene algún tipo de daño, NO use el aparato. Comuníquese con atención al cliente para obtener asistencia.
28.
SIEMPRE apague y desenchufe del tomacorriente cuando no esté en uso y antes de limpiarlo. Deje que el equipo se enfríe antes de limpiarlo, moverlo o darle servicio de
mantenimiento.
29.
No se recomienda poner cuchillos y objetos afilados en el lavavajillas. Si es necesario, los cuchillos y otros utensilios con puntas afiladas deben colocarse en el cesto de cubiertos
apuntando hacia abajo para evitar lesiones cortantes o daños al equipo. NO permita que las puntas o puntas afiladas se extiendan mucho más allá del fondo del cesto para cubiertos.
30.
Solo lave los artículos designados como "aptos para lavavajillas».
16

LEA Y SIGA CUIDADOSAMENTE
ESTA INFORMACIÓN DE
SEGURIDAD
GUARDE ESTAS INSTRUCCIONES
31.
Para evitar lesiones o da
ñ
os al equipo causados por su vuelco, NO sobrecargue el equipo.
32.
NO use el lavavajillas para limpiar o secar art
í
culos que no sean platos, a menos que sea para enjuague las frutas/verduras usando ese ciclo.
33.
NO almacene materiales inflamables dentro, sobre ni cerca del aparato.
34.
E
l aparato no est
á
dise
ñ
ado para funcionar mediante un temporizador externo ni un sistema de control remoto independiente.
35.
PR
E
CAUCI
Ó
N:
E
l aparato puede estar muy caliente durante o despu
é
s de la operaci
ó
n.NO toque hasta que el equipo se haya enfriado para
evitar lesiones.
36.
NO sumerja el aparato ni el cable de alimentaci
ó
n en agua u otros l
í
quidos. NO enchufe el equipo si el cable de alimentaci
ó
n est
á
mojado o si usted tiene las manos
mojadas para
evitar lesiones por descargas el
é
ctricas y/o da
ñ
os al equipo.
37.
NO modifique ni corte el cable de alimentaci
ó
n y NO opere ning
ú
n aparato que tenga un cable o enchufe da
ñ
ado; o si el equipo est
á
da
ñ
ado o funciona mal de alguna
manera.
P
ó
ngase en contacto con el servicio al cliente o un t
é
cnico de servicio.
38.
NO deje que el cable cuelgue del borde de la mesa o encimera. SI
EM
PR
E
mantenga el cable alejado de superficies u objetos calientes.
39.
NO desenchufe el electrodom
é
stico tirando del cable de alimentaci
ó
n. SI
EM
PR
E
agarre el enchufe con firmeza y extr
á
igalo del tomacorriente.
40.
NO pase el cable debajo de alfombras, tapetes, alfombras de pasillo ni similares. NO coloque el cable debajo de muebles, aparatos o cualquier objeto pesado. Coloque el
cable en un lugar donde no pueda causar tropiezos.
41.
SI
EM
PR
E
desenchufe el aparato cuando no est
é
en uso.
17
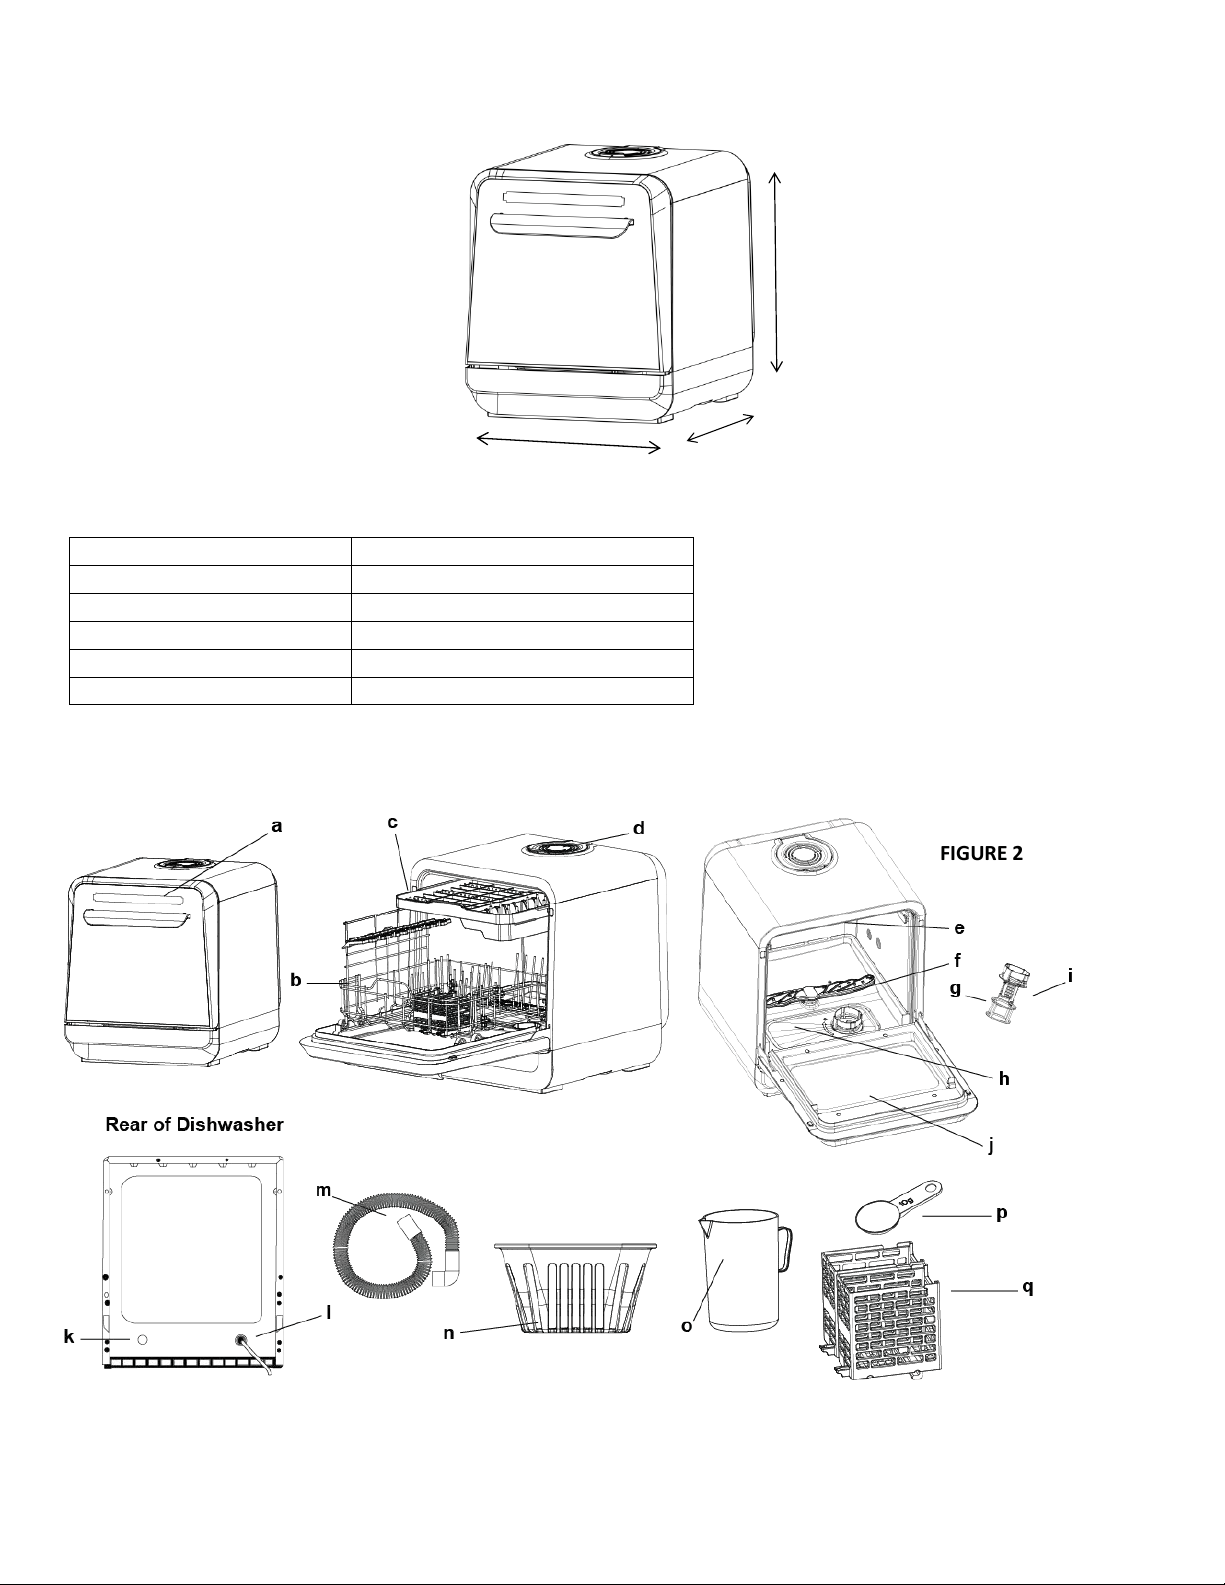
FIGURE 1
FIGURE 2
Modelo
MCSCD3W
Tensión nominal
120 V ~ 60 Hz
Potencia nominal 950 W
Capacidad del tanque de agua 5 l/10.6 pt/5.3 qt/20.8 tazas
Peso neto
27.6 lb. (12.5 kg)
Dimensión del producto
17.4 " × 16.0" × 18.3» (443 × 406 × 465 mm)
ESPECIFICACIONES
a. Zona de pantalla/Panel de control
b. Cesto plegable
c. Cesto superior extraíble
d. Tapa del tanque/ventilación de escape de vapor
e. Brazo aspersor superior
f. Brazo aspersor inferior
g. Microfiltro
h. Filtro plano
i. Filtro grueso
j. Receptáculo de detergente
k. Salida de agua
l. Cable de alimentación
m. Manguera de drenaje de agua
n. Cesta de lavado de frutas/verduras
o. Jarra de agua
p. Cucharada de detergente
q. Cesto para cubiertos extraíble
P
IE
Z
AS
Y
CARACTER
Í
STICAS
443 mm
406 mm
465 mm
18
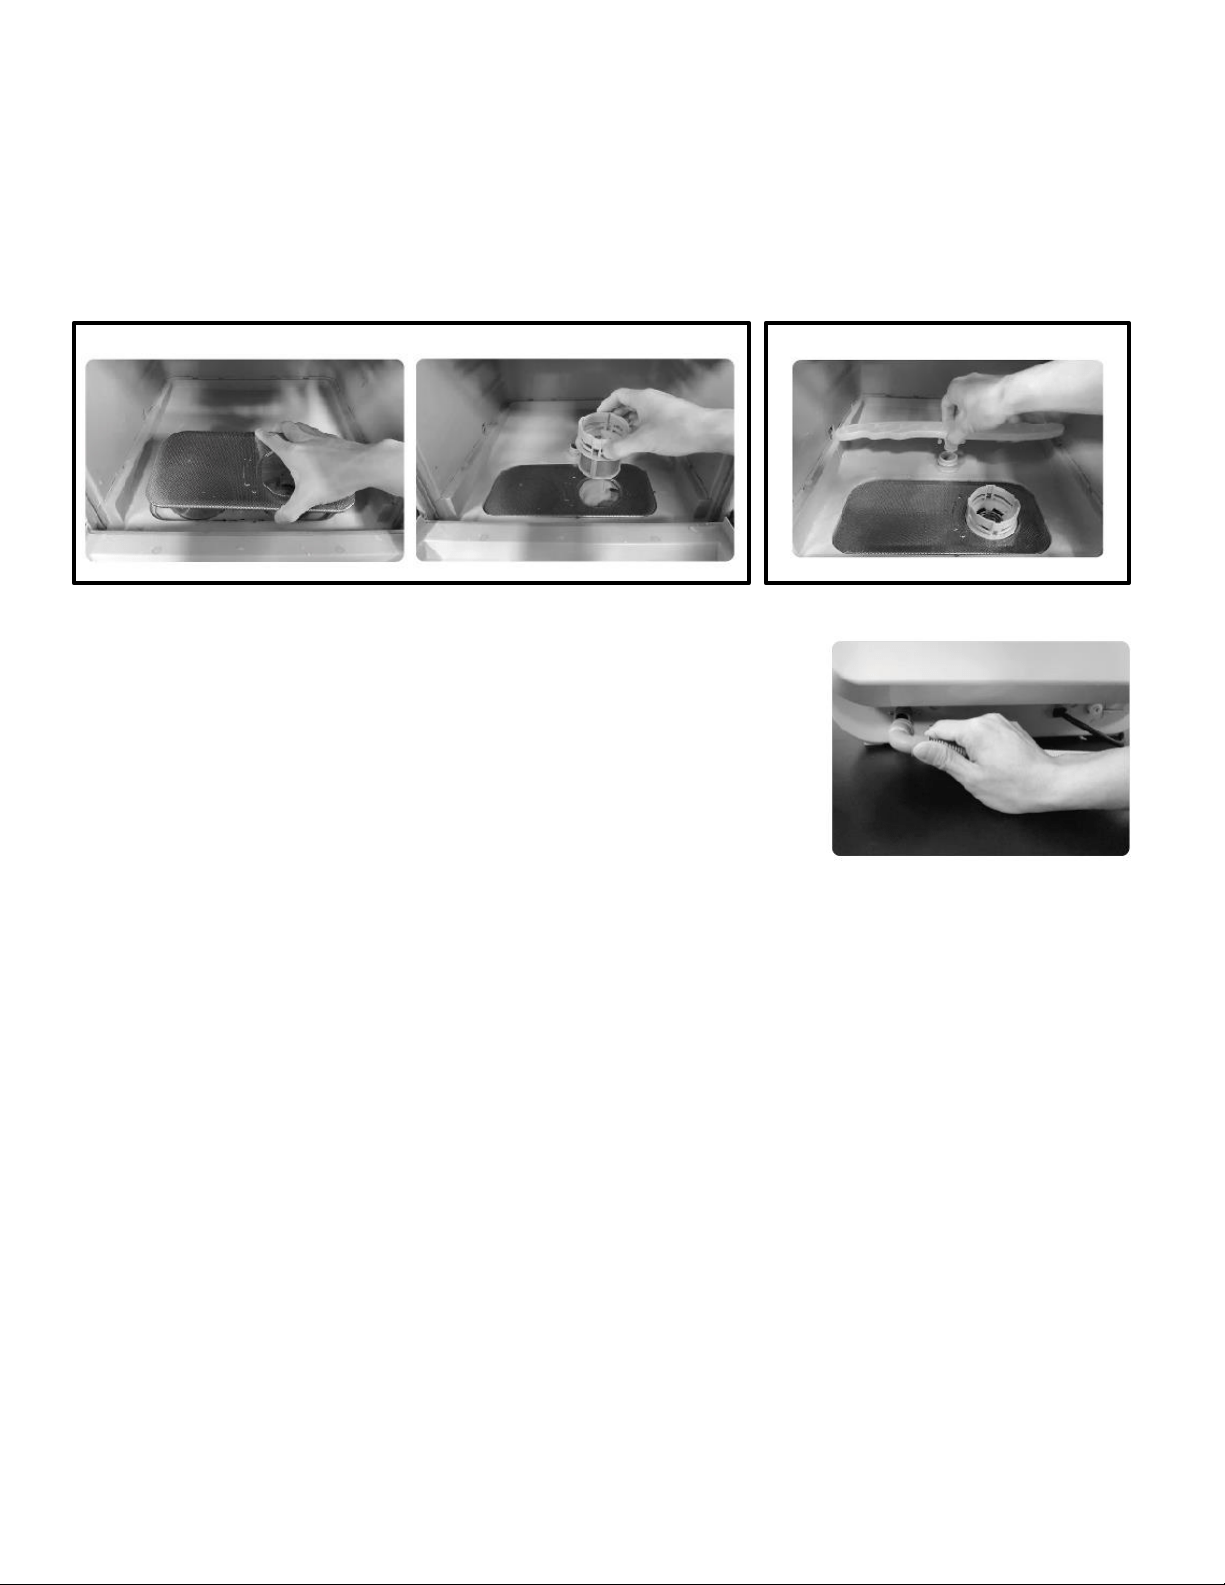
FIGURE 3
FIGURE 4
FIGURE 5
ANTES DE USAR
Retire todos los materiales de embalaje del aparato. Si hay una pel
í
cula protectora de pl
á
stico en la puerta o en el panel de control, aseg
ú
rese de quitarla.
E
xamine todo el equipo en busca de da
ñ
os y
verifique que todas las piezas y accesorios est
é
n presentes.
E
njuague el brazo aspersor, las cestas y los filtros (fino, grueso y micro) con agua y limpie el equipo con un pa
ñ
o suave y seco. Coloque el
lavavajillas sobre una superficie plana y nivelada, lo suficientemente resistente como para soportar el equipo y lo suficientemente cerca del fregadero y de un tomacorriente para hacer llegar el cable de
alimentaci
ó
n y la manguera de drenaje.
Instale el filtro plano fino y el filtro cil
í
ndrico en la parte inferior dentro del lavavajillas (el filtro cil
í
ndrico est
á
compuesto por un filtro grueso y un microfiltro, que se pueden separar girando en sentido
antihorario).
G
ire el filtro del cilindro en sentido horario para fijarlo en su sitio. (Fig. 3) Fije el brazo aspersor al lavavajillas empuj
á
ndolo con firmeza hasta que escuche un clic.
V
erifique que est
é
fijo y
pueda girar libremente. (Fig. 4)
Coloque el cesto plegable y el cesto superior, o el cesto de lavado de frutas/verduras, en el lavavajillas, y conecte la manguera de drenaje
suministrada a la conexi
ó
n de salida de agua en la parte posterior del aparato. SI
EM
PR
E
aseg
ú
rese de empujar la manguera de drenaje en su
lugar correctamente y que la conexi
ó
n est
é
fija (Fig. 5). Coloque la manguera de drenaje en el fregadero y suj
é
telo con la ventosa. La
manguera de drenaje debe mantenerse hacia abajo. Si la manguera apunta hacia arriba, la altura m
á
xima aceptable es de 6
”
(15 cm) desde la
parte inferior del lavavajillas.
Aseg
ú
rese de mantener limpio el fregadero y no sumerja la manguera de drenaje en agua para evitar el retorno de las aguas residuales.
NOTA: Puede haber algo de humedad residual en el equipo debido a las pruebas de f
á
brica para garantizar su correcto funcionamiento. Si
este es el caso, seque el interior con un pa
ñ
o suave.
19
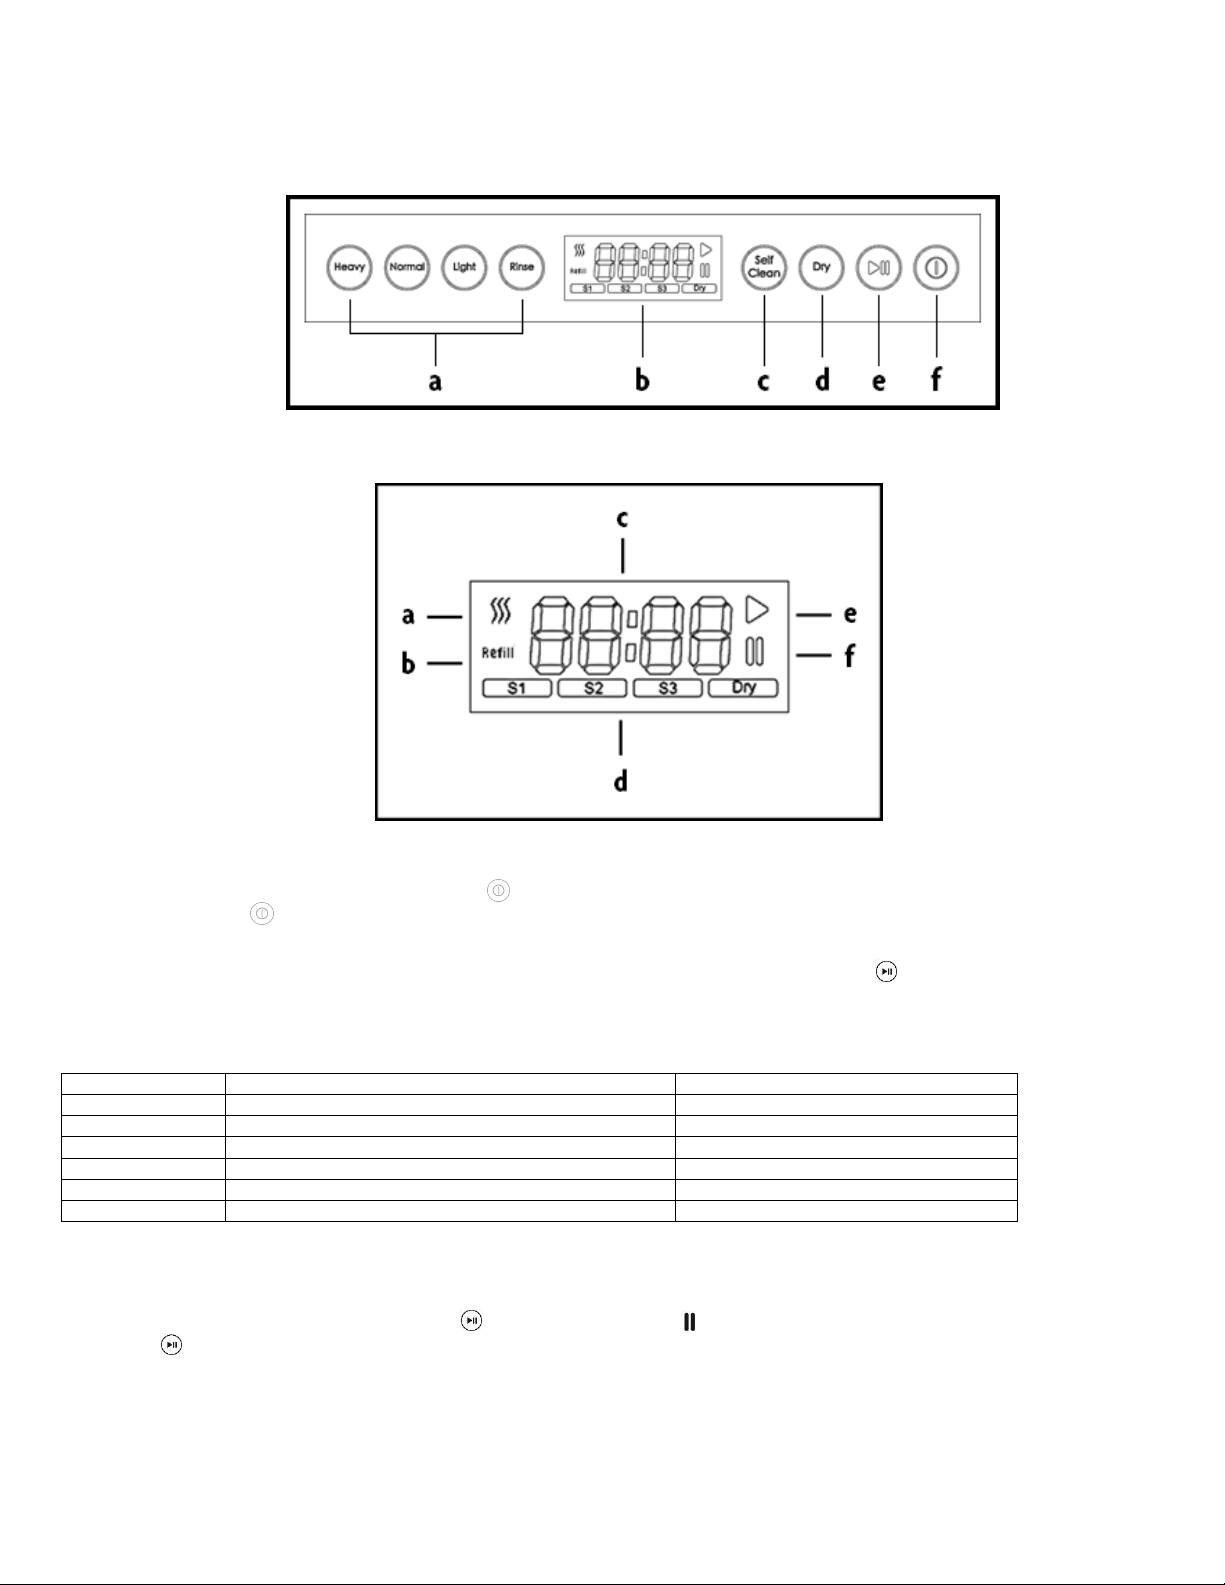
FIGURE 6
FIGURE 7
INSTRUCCION
E
S D
E
FUNCIONA
M
I
E
NTO
Panel de control
a.
M
odo de lavado
b. Pantalla
c.
M
odo de autolimpieza
d.
M
odo secado
e. Iniciar/pausa
f.
E
ncendido/Apagado
Pantalla
a.
Indicador de secado
b.
Indicador de recarga
c.
Tiempo
d.
Indicador de progreso
e.
Indicador de
operaci
ó
n
f.
Indicador de pausa
Funci
ó
n
Descripci
ó
n
Usar con
Enjuague
Use para lavar frutas y verduras
Bicarbonato de sodio (5-10 g)
Intensivo
Para artículos muy sucios
Detergente para lavavajillas (15-20 g)
Normal
Para art
í
culos con suciedad normal
Detergente para lavavajillas (10-15 g)
Ligero
Para art
í
culos ligeramente sucios
Detergente para lavavajillas (5-10 g)
Autolimpieza
Se aplica cuando el lavavajillas no se ha utilizado durante un tiempo.
No se necesita detergente
Secado
Para secar los platos y el interior del equipo.
No se necesita detergente
Pausa: Mientras el lavavajillas está funcionando, se puede presionar el botón para pausar la operación. El indicador en la pantalla se iluminará mientras está en
pausa. Presione nuevamente para reanudar el funcionamiento del equipo.
BOTÓN POWER (ENCENDIDO): Se utiliza para encender y apagar el equipo. Presione el botón una vez con el lavavajillas enchufado para encender el equipo. Si no se hace nada más durante
2 minutos o si se vuelve a presionar el botón, el lavavajillas se apagará y pasará al modo de espera.
Selección de funciones: Cuando el equipo está encendido, seleccione el programa que desea usar con los botones del panel de control. Una vez seleccionado, presione (Inicio/Pausa) o no haga
nada durante 10 segundos para comenzar la operación.
20
CARGA DEL LAVAVAJILLAS
Asegúrese de que el lavavajillas se encuentre sobre una superficie que no se verá afectada por su peso, cerca del fregadero con la manguera de drenaje conectada
correctamente y configurada para drenar. El cable de alimentación debe poder alcanzar un tomacorriente. Enchufe el lavavajillas y emitirá un pitido, luego se encenderá en
modo de espera con el botón Encendido iluminado.
Enjuague los platos a lavar para deshacerse de los restos de comida que aún les quedan.Abra la puerta y saque los cestos. Cargue los platos de manera que el lado sucio esté
en ángulo hacia el brazo aspersor en la parte inferior de el equipo, y evite que los artículos se toquen entre sí para evitar ruidos y posibles daños durante el ciclo de lavado.
Si es necesario, el cesto superior se puede quitar para acomodar artículos más grandes en el lavavajillas.
Los cubiertos deben colocarse en la bandeja de cubiertos que se desliza hacia afuera cerca de la parte superior de la cavidad. Asegúrese de que los bordes afilados y las
puntas estén hacia abajo para evitar lesiones por levante suavemente el frente mientras lo jala hacia afuera.
NOTA: SIEMPRE asegúrese de que los artículos sean aptos para lavavajillas antes de colocarlos en el equipo. Los artículos lavados que no son aptos para lavavajillas
podrían dañarse y también podría dañarse el propio lavavajillas.
La capacidad oficial certificada por el regulador (DOE) es 2 ajustes de lugar completo y una variedad completa de piezas de servicio con el bastidor superior deslizante
eliminado y todos los cubiertos y utensilios cargados en las cestas de utensilios en el bastidor principal.
Alternativamente, dependiendo del tamaño de los platos, se pueden cargar 3 Ajustes de Lugar sin la variedad completa de Piezas de Servicio, también quitando el Bastidor
Superior y cargando todas las piezas en el Bastidor Principal.
LAVADO DE PLATOS
Antes de cerrar la puerta, agregue detergente en el receptáculo para detergente. Puede usar polvo, líquido, gel o cápsulas. Presione el botón (Encendido) y el equipo
se encenderá en modo de operación. Abra la tapa del tanque en la parte superior del lavavajillas y vierta 5000 ml (5 litros) de agua en el tanque. La jarra incluida tiene
capacidad para 2000 ml, por lo que se necesitarán 2 1/2 jarras para llenar el depósito. La luz de recarga se apagará cuando esté llena.
Seleccione la función deseada con los botones del Modo de lavado y luego presione el botón (Inicio/Pausa). Si no
presiona , el equipo comenzará el ciclo de lavado automáticamente después de 10 segundos.
NOTA: Si no se presiona ningún botón después del encendido, el equipo volverá automáticamente al modo de espera después de 2 minutos.
Para un secado más rápido y eficiente, abra la puerta ligeramente después de lavar los platos.
PRECAUCIÓN: Tenga cuidado de evitar el vapor cuando se abre la puerta.
F
unci
ó
n
Descripci
ó
n
U
sar con
Tiempo de operaci
ó
n (min)
Limpieza
Secado
Enjuague Para lavar frutas o verduras
10 X
Se recomienda 5-10 g de bicarbonato de sodio
Lavado intensivo Para vajilla muy sucia
120 90
Lavado normal
Para lavado general de vajilla 90 90
Lavado ligero
Para vajilla ligeramente sucia 29 90
Autolimpieza 10 X
No se requiere detergente para lavavajillas
Secado
Para secar la vajilla y la cámara de lavado. N/A 150
No se requiere detergente para lavavajillas
Se recomiendan 15-20 g de detergente para
lavavajillas
Se recomiendan 10-15 g de detergente para
lavavajillas
Se recomiendan 5-10 g de detergente para
lavavajillas
Se aplica cuando el lavavajillas no se
ha utilizado durante algún tiempo.
21
FIGURE 9
FIGURE 8
3 c
onfiguraciones de lugar sin una
variedad completa de piezas para servir
2 configuraciones completas de lugar y
surtido completo de piezas para servir
CUIDADO Y MANTENIMIENTO
La inspección y el mantenimiento regulares ayudarán a prevenir el mal funcionamiento. Se recomienda revisar y dar mantenimiento a lo siguiente:
PUERTA Y SELLO DE LA PUERTA
Limpie con regularidad la junta de la puerta con un paño húmedo. Nunca use un limpiador a vapor para limpiar el lavavajillas. No somos responsables de ningún daño resultante del uso de un
limpiador a vapor. Limpie con regularidad la puerta y el panel de control con un paño húmedo. No use esponjas o materiales con superficies ásperas ni detergentes abrasivos, ya que podrían
rayar las superficies.
CONJUNTO DE FILTRO
Elimine las partículas de comida más grandes atrapadas en los filtros después de cada ciclo de lavado enjuagando los filtros con agua corriente. Retire los filtros grueso y fino del filtro plano
girando el conjunto en sentido antihorario, y sepárelos también girando en sentido antihorario. Enjuague con agua corriente hasta que se eliminen las partículas de alimentos, luego vuelva a
armar y deje secar. También hay un filtro de pantalla en el orificio de llenado de agua debajo de la tapa del tanque que se puede girar en sentido antihorario para quitarlo y limpiarlo
periódicamente con agua corriente.
NOTA: Todo el conjunto del filtro debe limpiarse al menos una vez por semana.
ADVERTENCIA: Nunca haga funcionar el lavavajillas si los filtros no están en su lugar.
BRAZO ASPERSOR
Verifique si el brazo aspersor tiene depósitos de grasa o incrustaciones calcáreas. Las incrustaciones calcáreas, la grasa y la suciedad en el agua de enjuague pueden bloquear las boquillas o
impedir el buen funcionamiento de los conjuntos de cojinetes del brazo aspersor. Revise con regularidad las boquillas de salida en el brazo aspersor. Para limpiar, levante el brazo aspersor para
separarlo del lavavajillas y límpielo con agua corriente. Vuelva a colocar en el lavavajillas después de limpiar y encaje el brazo aspersor en su posición.
Si es necesario, agregue detergente para lavavajillas y comience el modo [Lavado fuerte] en una cámara vacía.
BOMBA DE AGUA RESIDUAL
Los restos de alimentos más grandes que no son filtrados por el sistema de filtración pueden bloquear la bomba de agua residual. La bomba no enviará el agua de enjuague y provocará un
bloqueo. Si esto sucede, apague el equipo y desconecte el aparato de la fuente de alimentación. Quite todos los filtros y restos. Quite el agua del interior del lavavajillas, luego verifique y
limpie los filtros.
PRECAUCIONES DE LIMPIEZA
1.
NUNCA use detergentes domésticos clorados. Hacerlo puede presentar un peligro para la salud.
2.
SIEMPRE desenchufe el aparato y déjelo enfriar por completo antes de limpiarlo.
3.
Mantenga limpios el cuerpo y la ventana de la puerta. No use limpiadores abrasivos fuertes ni raspadores metálicos afilados para limpiar la ventana de la puerta, ya que
pueden rayar la superficie y quebrar el vidrio.
PRECAUCIÓN: NO permita que el agua penetre en los espacios en el cuerpo de el equipo ni en la ventilación de escape de vapor cuando limpie el aparato.
4.
Si el panel de control se moja, séquelo con un pañ o suave y seco. NO use materiales ni limpiadores abrasivos para limpiar el panel de control. Al limpiar el panel de
control, abra la puerta para evitar que el aparato se encienda accidentalmente.
5. NO use detergentes venenosos ni corrosivos para limpiar el aparato.
6.
Seque bien todas las piezas antes de conectar el lavavajillas al tomacorriente.
7.
Deje que el aparato se enfríe por completo y límpielo antes de guardarlo. Coloque el equipo en una caja y guárdelo en un lugar fresco y seco.
8.
NO enrolle con firmeza el cable de alimentación alrededor del aparato ni lo presione durante el almacenamiento para evitar dañarlo.
SOLUCIÓN DE PROBLEMAS
Código de error
El
E3
E4
Solución
Ciérrela bien
Apague el equipo y desconéctelo de la fuente de alimentación.
Comuníquese con atención al cliente para obtener asistencia.
Apague el equipo y desconéctelo de la fuente de alimentación.
Comuníquese con atención al cliente para obtener asistencia.
E7
ES
E9
Apague el equipo y desconéctelo de la fuente de alimentación.
Comuníquese con atención al cliente para obtener asistencia.
Apague el equipo y descon
é
ctelo de la fuente de alimentaci
ó
n.
Comun
í
quese con atenci
ó
n al cliente para obtener asistencia
.
Apague el equipo y desconéctelo de la fuente de alimentación.
Comuníquese con atención al cliente para obtener asistencia.
Causa
La puerta está abierta
Nivel de agua demasiado bajo
Nivel del agua demasiado alto, con riesgo de
desbordamiento
Circuito del sensor de temperatura abierto
Circuito del sensor de temperatura
en cortocircuito
Fallo de la bomba de entrada de agua o
problema con la admisi
ó
n de agua
22

M
C Appliance Corporation garantiza que cada lavavajilla nuevo carece de defectos en los materiales y mano de obra, y acuerda remediar dichos defectos o proporcionar
una o m
á
s partes nuevas, a opci
ó
n de la compa
ñí
a, para cualquier parte del equipo que falle durante el per
í
odo de garant
í
a. Los gastos de piezas y mano de obra est
á
n
cubiertos en este equipo por un per
í
odo de un a
ñ
o a partir de la fecha de compra. Para recibir el servicio de garant
í
a por parte de un agente de servicio autorizado, es
necesario presentar una copia del recibo o de la factura de venta con fecha.
E
sta garant
í
a cubre los electrodom
é
sticos en uso dentro de los
E
stados Unidos continental, Alaska,
H
awai y Puerto Rico.
E
sta garant
í
a no cubre lo siguiente:
•
Da
ñ
os causados durante el env
í
o o instalaci
ó
n o conexiones el
é
ctricas inadecuadas.
•
Da
ñ
os por mal uso o abuso.
•
P
é
rdidas de contenido por fallas del equipo.
•
Componentes internos como paneles de puertas, estantes, cestos, etc.
•
Reparaciones realizadas por agentes de servicio no autorizados.
•
Llamadas al servicio t
é
cnico que no impliquen defectos de materiales ni mano de obra, tales como instrucciones sobre el uso adecuado
del producto o la inversi
ó
n de la puerta o la instalaci
ó
n incorrecta.
•
Reemplazo o reinicio de fusibles o interruptores de la vivienda.
•
Fallo de este producto si se usa para otros fines que no sean los previstos.
•
Costos de eliminaci
ó
n de equipo averiado no devuelto a nuestra f
á
brica.
•
Cualquier costo de entrega/instalaci
ó
n incurrido como resultado de un equipo que no funciona como se especifica.
•
G
astos de viaje y transporte para el servicio del producto si su electrodom
é
stico se encuentra en un lugar remota donde el servicio de
un t
é
cnico de servicio autorizado no est
á
disponible.
•
La extracci
ó
n y reinstalaci
ó
n del electrodom
é
stico si est
á
instalado en una ubicaci
ó
n inaccesible o no est
á
instalado de acuerdo con las
instrucciones publicadas.
•
Los reembolsos por productos no reparables se limitan al precio pagado por el equipo seg
ú
n el recibo de compra.
Limitaciones a remedios y exclusiones:
La reparaci
ó
n del producto de acuerdo con los t
é
rminos aqu
í
indicados es el
ú
nico y exclusivo remedio bajo esta garant
í
a limitada. Cualquiera y todas las garant
í
as
impl
í
citas, incluyendo la comerciabilidad y la idoneidad para un prop
ó
sito particular se limitan por la presente a un a
ñ
o o al per
í
odo m
á
s corto permitido por la ley.
M
C
Appliance Corporation no es responsable por da
ñ
os incidentales o consecuentes y ning
ú
n representante o persona est
á
autorizada para asumir por nuestra parte, ninguna
otra responsabilidad con relaci
ó
n a la venta de este producto. Bajo ninguna circunstancia se le permite al consumidor devolver este equipo a la f
á
brica sin la autorizaci
ó
n
previa por escrito suministrada por
M
C Appliance Corporation.
Algunos estados proh
í
ben la exclusi
ó
n o limitaci
ó
n de los da
ñ
os incidentales o consecuentes, o limitaciones en las garant
í
as impl
í
citas.
E
sta garant
í
a le otorga derechos
legales espec
í
ficos, y usted podr
í
a tener otros derechos que var
í
an seg
ú
n el estado.
Modelo
Tipo de servicio
MCSCD3W
Piezas y mano de obra
Un a
ñ
o
Llevar
Para Servicio o Asistencia por favor llame al 888-775-0202 o vis
í
tenos en el sitio web en www.mcappliance.com para solicitar
servicio de garant
í
a u ordenar partes.
G
ARANT
Í
A LI
M
ITADA
23

CNA International, Inc., opera bajo el nombre comercial de MC Appliance Corporation. Todos los
derechos reservados.
El logotipo de Magic Chef® es una marca registrada de CNA International, Inc.
www .mcappliance.com
Impreso China
24